Safety 1st 3202008000 Gebruikershandleiding
- Type
- Gebruikershandleiding

EN Thank you for purchasing this Multi-Use Lock. We’re proud to be your choice for safeguar-
ding your child’s environment.
FR Merci d’avoir acheté le Bloque-placard Multifonctions. Nous sommes ravis d’avoir été
choisis pour sécuriser l’environnement de votre enfant.
DE Vielen Dank, dass Sie sich für die Allzwecksicherung entschieden haben. Es freut uns, dass
wir Ihre erste Wahl sind, um die Welt Ihres Kindes ein Stück sicherer zu machen.
NL Bedankt voor de aankoop van dit schuifslot met geheime knop. We zijn trots dat u ons
gekozen heeft om de omgeving van uw kind veilig te maken.
ES Gracias por adquirir este bloqueador de puertas deslizante con Multi-Use Lock. Nos com-
place que nos haya elegido para ayudarle a que el entorno de su hijo sea más seguro.
IT Grazie per aver acquistato il blocca-maniglie scorrevole Multi-Use Lock. Siamo orgogliosi di
essere stati scelti per aiutarti a creare un ambiente sicuro per il tuo bambino.
PT Obrigado por ter adquirido este Bloqueador de porta de armário de correr Multi-Use Lock.
Estamos orgulhosos por ser a sua escolha para proteger o ambiente do seu filho.
• ADVERTENCIA: No utilizar este accesorio para prevenir el uso de sustancias
tóxicas o peligrosas, ni de objetos cortantes o punzantes. Dichos materiales
deben siempre colocarse en lugares apartados del alcance de los niños o inac-
cesibles para ellos. LA INSTALACIÓN DEBE REALIZARLA UN ADULTO.
• PRECAUCIÓN: Este sistema de bloqueo limita el acceso de los niños al
interior del armario o cajón, aunque no garantiza la completa seguridad del
menor. No se puede sustituir por la correcta supervisión de un adulto. Sustituir
el dispositivo si le faltase alguna pieza o esta estuviese rota o doblada. No es
adecuado para su uso en cocinas u hornos, como bloqueo de ventanas, ni para
su uso en puertas interiores o exteriores. Si es posible, instalar el dispositivo
lejos del alcance de los niños. Este producto no es ningún juguete. NO SE
DEBE PERMITIR QUE LOS NIÑOS JUEGUEN CON ÉL.
• ÚNICAMENTE PARA SU USO EN INTERIORES.
Información importante sobre seguridad Comprobar la seguridad del dispositivo
después de su instalación. No se debe seguir utilizando el dispositivo cuando el
niño ya sea lo suficientemente mayor como para abrirlo. Con el tiempo, el niño
será capaz de abrirlo. Para mantener la seguridad de este dispositivo durante el
mayor tiempo posible, no se debe permitir que los niños vean cómo funcionan
estos dispositivos de seguridad. Si observan cómo se abre o suelta, tarde o
temprano serán capaces de hacerlo ellos también.
• ANTES DE EMPEZAR
Leer detenidamente las instrucciones antes del montaje y uso del accesorio.
La función de protección de este accesorio para los niños puede verse afectada
si no se siguen correctamente las instrucciones. Conservar estas instrucciones
para futuras consultas. Sacar todo el contenido del embalaje y desecharlo de
acuerdo con las consignas municipales de reciclaje.
Comprobar que todas las piezas estén presentes. Si falta alguna pieza, habrá
que ponerse en contacto con nosotros o visitar nuestro sitio web www.
safety1st.com.
• ATTENTION : NE PAS utiliser ce produit pour empêcher l’accès à des subs-
tances toxiques et dangereuses ou des objets tranchants ou pointus. Ce type de
produits doit toujours être placé en hauteur ou rangé tout à fait hors de portée
des enfants. INSTALLATION PAR UN ADULTE REQUISE.
• MISE EN GARDE : Ce dispositif de verrouillage restreint l’accès aux contenus
d’un placard ou d’un tiroir par les enfants mais ne peut pas garantir à lui seul
la sécurité complète de l’enfant. Il ne peut pas se substituer à la vigilance d’un
adulte. Remplacer le dispositif en cas de pièce cassée, déchirée ou manquante.
Ne convient pas sur les cuisinières ou fours, pour la fermeture de fenêtres ou
pour un usage sur portes intérieures ou extérieures. Si possible, installer hors
de portée des enfants. Ces produits ne sont pas des jouets. NE PAS laisser les
enfants jouer avec. POUR USAGE EN INTÉRIEUR EXCLUSIVEMENT.
• INFORMATIONS IMPORTANTES DE SÉCURITÉ
Vérifier la sécurité après installation. Arrêter d’utiliser le produit lorsque l’enfant
a atteint un âge où il peut le retirer seul. Votre enfant pourra, avec le temps,
retirer ce produit. Pour que ce produit reste efficace aussi longtemps que
possible, évitez de laisser votre enfant vous regarder lorsque vous mettez en
œuvre le dispositif de sécurité. S’il (si elle) vous regarde défaire un dispositif de
sécurité, l’enfant peut apprendre plus tôt à s’en défaire à son tour.
•AVANT DE COMMENCER
Merci de lire attentivement les instructions avant le montage et l’utilisation
du produit. La fonction du produit assurant la protection de l’enfant peut être
altérée si vous ne suivez pas ces instructions. Conservez cette notice afin de
vous y référer ultérieurement si besoin. Sortez tous les éléments de l’emballage
et débarrassez-vous de la boîte en suivant les instructions de tri de votre région.
Étalez et identifiez tous les éléments. S’il manque un ou des éléments, merci de
nous contacter sur notre site Internet www.safety1st.com
• ATTENZIONE: NON utilizzare il prodotto come prevenzione contro sostanze
tossiche e pericolose o oggetti taglienti o appuntiti. Tali materiali devono essere
sempre collocati «in alto» o tenuti in altro modo completamente al di fuori
della portata dei bambini. E’ RICHIESTA L’INSTALLAZIONE DA PARTE DI UN
ADULTO.
• AVVERTENZA: Questo dispositivo di blocco limita l’accesso da parte dei bam-
bini piccoli al contenuto di una credenza o di un cassetto, ma non è in grado di
garantire la sicurezza assoluta del bambino. Non sostituisce l’adeguata super-
visione da parte di un adulto. Sostituire il dispositivo se qualche componente
è rotto, lacerato o mancante. Non indicato per stufe e forni, come sistema di
blocco per la finestra o per l’utilizzo su porte interne o esterne. Se possibile,
installare fuori dalla portata dei bambini.
Questi prodotti non sono giocattoli. NON permettere ai bambini di utilizzarli per
giocare. USO ESCLUSIVAMENTE DOMESTICO.
• IMPORTANTI INFORMAZIONI DI SICUREZZA
Verificare la sicurezza dopo l’installazione. Smettere di utilizzare il prodotto
quando il bambino diventa abbastanza grande da eluderlo. Il bambino potreb-
be essere in grado di eludere il prodotto. Per rendere il prodotto efficace il più a
lungo possibile, evitare che il bambino veda come vengono attivati i dispositivi
di sicurezza. Infatti, vederti aprire un sistema di blocco, un meccanismo di
chiusura o un coperchio, lo renderebbe in grado di capire in fretta come fare
lo stesso.
• PRIMA DI INIZIARE
Leggere le istruzioni prima di montare e utilizzare il prodotto. La funzione di
protezione dei bambini da parte del dispositivo può essere compromessa se non
seguite le istruzioni. Conservare le istruzioni come futuro riferimento. Rimuo-
vere tutto il contenuto dall’imballaggio e smaltire la scatola secondo le locali
normative di raccolta differenziata. Estrarre e individuare tutte le componenti.
Se mancano delle componenti, contattaci attraverso il nostro sito internet
www.safety1st.com.
• WARNHINWEIS: Verwenden Sie dieses Produkt nicht, um Ihr Kind am
Zugang zu Gift- oder Gefahrenstoffe oder scharfen bzw. spitzen Objekten
zu hindern. Solche gefährlichen Gegenstände müssen für Kinder stets völlig
unerreichbar, zum Beispiel sehr weit oben, aufbewahrt werden. INSTALLATION
NUR DURCH ERWACHSENE.
• VORSICHT: Dieses Schloss verhindert den Zugriff auf die Inhalte eines
Schranks oder einer Kommode durch Kinder, kann allerdings keine hundertpro-
zentige Sicherheit garantieren. Es ersetzt nicht die Aufsichtspflicht durch einen
Erwachsenen. Tauschen Sie das Schloss aus, wenn Teile davon fehlen oder
beschädigt sind. Nicht geeignet für Heizkörper und Öfen, als Fenstersicherung
oder an Wohnungs- und Haustüren. Soweit möglich außerhalb der Reichweite
von Kindern installieren. Dieses Produkt ist kein Spielzeug; verhindern Sie es,
dass Kinder damit spielen. AUSSCHLIEßLICH FÜR DIE VERWENDUNG IM
INNENRAUM GEEIGNET.
• WICHTIGE SICHERHEITSINFORMATIONEN
Überprüfen Sie die Sicherheit regelmäßig nach der Installation. Dieses Produkt
darf nicht mehr verwendet werden, wenn Ihr Kind alt genug ist, um seinen
Mechanismus zu verstehen bzw. zu überwinden. Ab einem bestimmten Zeitpu-
nkt wird Ihr Kind in der Lage sein, die Sicherung zu öffnen . Damit das Schoss
so lange wie möglich seinen Zweck erfüllt, vermeiden Sie, dass Ihr Kind Ihnen
dabei zusieht, wie Sie es bedienen. Wenn Ihr Kind Sie dabei beobachtet, wie
Sie es öffnen, lernt es schneller den Mechanismus zu überwinden.
• VOR DER VERWENDUNG
Lesen Sie sich diese Anweisungen gut durch, bevor Sie das Produkt montieren
und verwenden. Ansonsten könnte die Sicherheitsfunktion und der Schutz
des Kindes durch diesen Artikel auf Grund fehlerhafter Anwendung beein-
trächtigt werden. Bewahren Sie die Anleitung für späteres Nachschlagen auf.
Entnehmen Sie alle Inhalte aus der Verpackung und entsorgen Sie diese gemäß
den örtlichen Vorschriften zur Abfalltrennung. Vor der Montage sollten Sie sich
alle Teile gründlich ansehen und anhand der Anleitung identifizieren. Falls Teile
fehlen, kontaktieren Sie uns über unsere Webseite www.safety1st.com.
• ADVERTÊNCIA: Não utilizar este produto para proteger contra substâncias
tóxicas e perigosas, ou objetos afiados ou pontiagudos. Estes materiais devem
ser sempre colocados em locais “em altura” ou então estarem completamente
inacessíveis às crianças. É NECESSÁRIA A INSTALAÇÃO POR UM ADULTO.
• CUIDADO: Este dispositivo de bloqueio restringe o acesso por jovens crianças
aos conteúdos de um armário ou gaveta mas não pode assegurar a segurança
absoluta da criança. Não é um substituto de uma supervisão adequada por um
adulto. Substituir o dispositivo se alguma peça estiver partida, rachada ou em
falta. Não é adequado para fogões e fornos, como bloqueio para janelas ou
para utilizar em portas interiores ou exteriores. Quando possível, instalar fora
do alcance das crianças. Estes produtos não são brinquedos. NÃO deixar as
crianças brincar com os mesmos. APENAS PARA UTILIZAÇÃO EM INTE-
RIORES DOMÉSTICOS.
• INFORMAÇÕES DE SEGURANÇA IMPORTANTES
Verificar a segurança depois da instalação. Deixar de utilizar quando a criança
for suficientemente crescida para abrir o dispositivo. A criança acabará por
eventualmente conseguir abrir este produto. Para manter este produto eficaz
durante o maior tempo possível, evite que as crianças vejam como opera o dis-
positivo de segurança. Ver como desengata um bloqueio, o fecha ou o protege
pode permitir-lhes aprender mais cedo como o abrir.
• ANTES DE COMEÇAR
Ler estas instruções com atenção antes de montar e utilizar o dispositivo.
A função de proteção da criança do dispositivo pode ser afetada se não cum-
prir as instruções. Guardar as instruções para consultas futuras. Retirar todos
os conteúdos da embalagem e eliminar a caixa cumprindo as indicações de
eliminação de resíduos locais. Expor e identificar todas as peças.
Se faltarem peças, contacte-nos (consultar website) www.safety1st.com.
• WAARSCHUWING: Dit product NIET gebruiken om te beschermen tegen
giftige en gevaarlijke stoffen of scherpe en puntige voorwerpen. Dergelijke ma-
terialen dienen steeds op hoge hoogte geplaatst te worden of op een andere
manier volledig ontoegankelijk voor kinderen gemaakt te worden. INSTALLA-
TIE DOOR EEN VOLWASSENE VEREIST.
• OPGELET: dit vergrendelingsslot beperkt de toegang door jonge kinderen
tot de inhoud van een kast of lade, maar kan de absolute veiligheid van het
kind niet garanderen. Het is geen vervangmiddel voor degelijke supervisie door
een volwassene. Vervang de voorziening wanneer enig onderdeel kapot of
gescheurd is of ontbreekt. Niet geschikt voor kachels en fornuizen, ook niet
als vensterslot of voor gebruik op binnen- of buitendeuren. Indien mogelijk
buiten het bereik van kinderen installeren. Deze producten zijn geen speelgoed.
Laat kinderen er NIET mee spelen. ENKEL VOOR BINNENGEBRUIK IN EEN
HUISELIJKE OMGEVING.
• BELANGRIJKE VEILIGHEIDSINFORMATIE
Controleer de veiligheid na de installatie. Stop het gebruik wanneer uw kind
oud genoeg is om de werking door te hebben. Uw kind zal uiteindelijk in staat
zijn dit product open te krijgen. Om dit product zo lang mogelijk doeltreffend
te houden, dient u te voorkomen dat kinderen zien hoe u de veiligheidsvoorzie-
ningen gebruikt. Doordat ze zien hoe u een slot, klink of afdekking losmaakt,
zullen ze sneller leren hoe ze het zelf moeten doen.
• VOOR U VAN START GAAT
Lees deze instructie nauwkeurig alvorens te monteren en het toestel te
gebruiken. De functie van de voorziening om kinderen te beschermen kan ver-
loren gaan wanneer u de instructies niet naleeft. Bewaar de instructies om deze
later te raadplegen. Verwijder alle inhoud uit de verpakking en gooi de doos
weg volgens de lokale sorteerinstructies. Leg alle onderdelen open en herken
ze. Gelieve ons te contacteren via onze website www.safety1st.com wanneer
bepaalde onderdelen ontbreken.
EN Features FR Caractéristiques DE Eigenschaften NL Kenmerken ES Características IT Caratteristiche PT Características
ES
FR
IT
DE
PT
NL
1
•WARNING: Do not use this product to guard against toxic and dangerous
substances, or sharp-edged or pointed objects. Such materials should always
be placed “high up” or otherwise made completely inaccessible to children.
ADULT INSTALLATION REQUIRED.
•CAUTION: This locking device restricts access by young children to the
contents of a cupboard or drawer but cannot ensure absolute child safety. It
is not a substitute for proper adult supervision. Replace the device if any part
is broken, torn or missing. Not suitable for stoves and ovens, as a window
lock or for use on interior or exterior doors. When possible install out of reach
of children. These products are not toys. DO NOT allow children to play with
them. FOR INDOOR HOME USE ONLY.
•IMPORTANT SAFETY INFORMATION
Check for security after installation. Discontinue use when your child becomes
old enough to defeat it. Your child will eventually be able to defeat this
product. To keep this product effective for as long as possible, avoid letting
children see how you operate child safety devices. Watching you disengage a
lock, latch or cover could enable them to learn sooner how to defeat it.
•BEFORE YOU BEGIN
Read this instruction carefully before mounting and using the device.
The child protective function of the device may be affected if you do not follow
the instructions. Keep the instructions for future reference. Remove all contents
from packaging and discard box following the local sorting instructions. Lay out
and identify all parts. If any parts are missing, please contact us on our website
www.safety1st.com.
EN
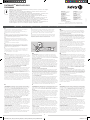
NOTE: This product has a two unique features that help to redirect and distract
your child’s attention. A - The functional buttons are hidden
underneath a flexible over mold. B -The decoy button is non-functioning. C -
Mounting Plate. D - Lock Housing. E - Pivot Housing.
FR
REMARQUE : Ce produit offre deux caractéristiques uniques qui permettent de
détourner l’attention de votre enfant. A - Les boutons fonctionnels sont cachés
sous une surface flexible. B - Le bouton-leurre est non-fonctionnel. C - Plaque de
fixation. D - Boîtier de verrouillage. E - Boîtier de pivot.
DE
ANMERKUNG: Dieses Produkt hat zwei besondere Eigenschaften, um die
Aufmerksamkeit Ihres Kindes abzulenken. A - Die funktionsfähigen Elemente
sind unter einer flexiblen Oberfläche verborgen. B - Der «Lockvogel»-Knopf hat
keine Funktion.
C - Montageplatte. D - Verschluss. E - Drehgelenk.
NL
OPMERKING: Dit product heeft twee unieke functies die u helpen de aandacht
van het kind af te leiden. A - De werkende knoppen zitten verborgen onder een
flexibel mal/oppervlak. B - De afleidingsknop werkt niet. C - Montageplaat. D -
Behuizing van het slot. E - Behuizing van de spil.
ES
NOTA: Este accesorio dispone de dos características únicas que ayudan a distraer
la atención del menor. A - Los botones funcionales están ocultos debajo de un
sobremoldeado flexible. B - El botón trampa no funciona. C - Placa de fijación.
D - Carcasa del bloqueo. E - Carcasa del pivote.
IT
NOTA: Il presente prodotto ha due caratteristiche uniche che aiutano ad attirare
e distrarre l’attenzione del tuo bambino. A - I pulsanti funzionali sono nascosti
sotto una superficie flessibile. B - Il pulsante in vista non ha funzioni specifiche. C
- Piastra di montaggio. D - Dispositivo di blocco. E - Elemento orientabile.
PT
NOTA: Este produto possui duas funcionalidades únicas que ajudam a redirecionar
e distrair a atenção da criança. A - Os botões funcionais estão escondidos debaixo
de um molde superior flexível. B - O botão contra intrusão é fictício. C - Placa de
montagem. D - Alojamento do bloqueio. E - Alojamento do pino.
EN
A
C
D
E
B
014 3640 01
Made in China - Fabriqué en Chine - Hergestellt in China -
Vervaardigd in China - Fabricado en China - Prodotto in Cina - Fabricado na China
DOREL U.K. LTD
Imperial Place, Maxwell Road, Borehamwood,
Hertfordshire, WD6 1JN UNITED KINGDOM
DOREL FRANCE S.A.S
Z.I. - 9 bd du Poitou BP 905
49309 Cholet Cedex FRANCE
DOREL GERMANY
Augustinusstraße 9 c
D - 50226 Frechen-Königsdorf DEUTSCHLAND
DOREL ITALIA S.P.A.
a Socio Unico - Via Verdi, 14
24060 Telgate (Bergamo) ITALIA
DOREL HISPANIA, S.A.U.
Edificio Barcelona Moda Centre
Ronda Maiols, 1 Planta 4ª, puerta 401 - 403 - 405
08192 Sant Quirze del Vallès - Barcelona ESPAÑA
DOREL NETHERLANDS
Postbus 6071 - 5700 ET HELMOND NEDERLAND
DOREL PORTUGAL
Rua Pedro Dias, 25 Parque Industrial da Gândara
4480 - 614 Rio Mau - Vila do Conde PORTUGAL
DOREL BRASIL
Av. Nilo Peçanha 1516/1582 - 28030-035
Campos dos Goytacazes - RJ
CNPJ: 10.659.948/0001 - 07 BRASIL
DOREL BELGIUM
BITM Brussels International Trade Mart
Atomiumsquare 1, BP 177 - 1020 Brussels
BELGIQUE / BELGIE
DOREL JUVENILE SWITZERLAND S.A.
Chemin de la Colice 4
1023 CRISSIER SWITZERLAND / SUISSE
DOREL POLSKA
Ul. Legnicka 84/86 - 41-503 CHORZOW POLAND
OUTSMART TM MULTI-USE LOCK
3202008000
12m +
3202008000_2019_safety1st_homesafety_safetyitem_outsmart_multisuelock_manual_014364001.indd 1 13/04/2018 11:43

2
EN To install FR Installation DE Montage NL Om te installeren ES Proceder a la instalación IT Come installarlo PT Para instalar
EN To use FR Utilisation DE Verwendung NL Om te gebruiken ES Uso IT Come utilizzarlo PT Para utilizar
EN To clean FR Nettoyage DE Reinigung NL Om te reinigen ES Limpieza IT Come pulirlo PT Para limpar
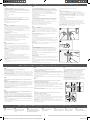
1 - BEFORE YOU BEGIN: Clean and dry the contact surfaces.
Determine the location where you will install the Secret Button Multi-Use Lock: With
paper still on adhesive, position the LOCK HOUSING to the front surface of the
appliance or cabinetry being secured and determine where the PIVOT HOUSING will be
positioned on the side surface (Figure A).
2 - Remove the adhesive paper from the PIVOT HOUSING and adhere to side surface
(Figure B).
A: Pivot Housing + Lock Housing
B: Pivot Housing
C: Less than 1”
3 - Holding the LOCK HOUSING in position on the front surface, test to ensure the
item you are securing cannot open more than 1” (Figure C).
4 - With LOCK HOUSING attached to the MOUNTING PLATE, remove adhesive paper
from the MOUNTING PLATE and install in the predetermined position on the front
surface.
NOTE: Allow adhesive to cure for 24 hours before use.
5 - Tug firmly to check for a secure fit.
1 - AVANT DE COMMENCER : Nettoyer et sécher les surfaces de contact.
Choisir l’emplacement d’installation de votre Bloque-placard Multifonctions Secret
Button: le papier de protection de l’adhésif toujours en place, positionner le BOÎTIER DE
VERROUILLAGE sur la partie avant du meuble ou placard à sécuriser et choisir l’empla-
cement du BOÎTIER DE PIVOT sur l’autre partie du meuble (Figure A).
2 - Ôter le papier de protection de l’adhésif du BOÎTIER DE PIVOT et faire adhérer sur la
surface concernée (Figure B).
A : Boîtier de pivot + Boîtier de verrouillage
B : Boîtier de pivot
C : Inférieur à 2,5 cm
3 - En maintenant le BOÎTIER DE VERROUILLAGE en position sur la partie avant, vérifier
que l’élément à sécuriser ne peut pas s’ouvrir de plus de 2,5 cm (Figure C).
4 - Le BOÎTIER DE VERROUILLAGE étant fixé sur la PLAQUE DE FIXATION, retirer le
papier de protection de l’adhésif de la PLAQUE DE FIXATION et installer l’élément à
l’emplacement choisi sur la partie avant.
REMARQUE : Laisser l’adhésif prendre pendant 24 heure avant utilisation.
5 - Tirer fermement pour vérifier la bonne fixation.
1 – ANTES DE COMEÇAR: Limpar e secar as superfícies de contacto.
Escolher o local onde vai instalar o Bloqueador Multifunções Secret Button: com a
película ainda no autocolante, posicionar o ALOJAMENTO DO BLOQUEIO na superfície
da frente do aparelho ou armário a proteger e determinar onde o ALOJAMENTO DO
PINO será posicionado na superfície lateral (Figura A).
2 – Retirar a película do autocolante do ALOJAMENTO DO PINO e colar na superfície
lateral (Figura B).
A: Alojamento do pino + Alojamento do bloqueio
B: Alojamento do pino
C: Menos de 2,5 cm
3 – Segurar o ALOJAMENTO DE BLOQUEIO na posição na superfície da frente, teste
para garantir que o objeto que está a proteger não abre mais de 2,5 cm (Figura C).
4 – Com o ALOJAMENTO DO BLOQUEIO preso à PLACA DE MONTAGEM, retire a
película do autocolante da PLACA DE MONTAGEM e instale na posição pré-determina-
da na superfície da frente.
NOTA: Deixar o autocolante colocado durante 24 horas antes de utilizar.
5 – Puxar com força para verificar que está bem fixo.
1 - VOR DER MONTAGE: Reinigen und trocknen Sie die Kontaktflächen
gründlich.
Legen Sie fest, wo Sie die «Secret Button“ Allzwecksicherung anbringen möchten:
Platzieren Sie den Verschluss OHNE das Papier von der Klebefläche zu entfernen auf der
Vorderseite des Schrankes bzw Geräts, welches Sie sichern möchten. Anhand dieser
Position legen Sie fest, wo das Drehgelenk auf der Seitenfläche platziert werden muss.
(Abbildung A).
2 - Entfernen Sie das Schutzpapier von der Klebefläche des Drehgelenks und kleben Sie
es auf die Seitenfläche (Abbildung B).
A: Montageplatte & Verschluss
B: Drehgelenk
C: Weniger als 2,5 Zentimeter
3 - Platzieren Sie den Verschluss auf der Vorderseite und vergewissern Sie sich, dass
sich die Tür nicht mehr als 2,50 cm weit öffnen lässt. (Abbildung C).
4 - Befestigen Sie den Verschluss auf der Montageplatte. Entfernen Sie das Schutzpa-
pier von der Klebefläche der Montageplatte und kleben Sie sie an die gewünschte
Position auf der Front.
ANMERKUNG: Lassen Sie den Kleber 24 Stunden lang trocknen, bevor Sie das Produkt
verwenden.
5 - Ziehen Sie kräftig an der Allzwecksicherung, um sicherzustellen, dass die Sicherung
sicher und fest haftet.
Check regularly that the device is functioning properly.
To Remove Permanently:
NOTE: Lock is unusable after permanent removal. Disengage Lock per Step 1 in TO USE. Carefully
slide dental floss between adhesive and contact surface to release. Wipe off adhesive with a soft cloth
and warm soapy water or roll adhesive off of surface with fingers and clean the surface according to
manufacturer’s recommendations.
D: Open lock by pressing top and bottom buttons to release LOCK HOUSING (Figures D and D1).
E: To secure your appliance or cabinetry, snap LOCK HOUSING back onto MOUNTING PLATE (Figure E).
Verificar regularmente que o dispositivo está a funcionar
corretamente. Para remover de forma permanente:
NOTA: O bloqueio fica inutilizado depois de ser removido de forma
permanente.
Desengate o bloqueio seguindo o passo 1 em PARA UTILIZAR.
Deslizar com cuidado fio dentário entre o autocolante e a superfície de
contacto para soltar. Remover o autocolante com um pano suave e água
com sabão quente ou retire o autocolante da superfície com os dedos e
limpe a superfície seguindo as recomendações do fabricante.
D: Abra o bloqueio premindo os botões de cima e de baixo para soltar o
ALOJAMENTO DO BLOQUEIO (Figuras D e D1).
E: Para proteger o aparelho ou armário, engatar novamente o ALOJAMEN-
TO DO BLOQUEIO na PLACA DE MONTAGEM (Figura E).
Controleer regelmatig of de voorziening correct werkt.
Om permanent te verwijderen:
OPMERKING: het slot kan na permanente verwijdering niet meer gebruikt worden. Maak het slot los volgens
Stap 1 ‘Om te gebruiken’. Schuif voorzichtig flosdraad/of ander stevig dun garen tussen het kleefgedeelte en het
contactoppervlak om het slot los te maken. Verwijder het middel van het oppervlak met uw vingers en reinig het
oppervlak volgens de aanbevelingen van de fabrikant.
D: Open het slot door op de knop onderaan en bovenaan te drukken om de BEHUIZING VAN HET
SLOT los te
maken (Afbeeldingen C en D1).
E: Om uw toestel of uw kast te beveiligen, zet u de SLOTBEHUIZEING terug op de MONTAGEPLAAT
(Afbeelding E)
.
Vérifier régulièrement que le dispositif fonctionne correctement. Retrait
définitif :
REMARQUE : le verrou est définitivement inutilisable après un retrait définitif. Désengager le verrou en
suivant l’étape 1 de la rubrique UTILISATION.
Passer délicatement du fil dentaire entre l’adhésif et la surface de contact à libérer. Retirer l’adhésif
par frottement à l’aide d’un chiffon doux et d’un peu d’eau chaude savonneuse ou rouler du doigt
l’adhésif sur la surface puis nettoyer la surface selon les recommandations du fabricant du meuble.
D : Ouvrir le verrou en appuyant sur les boutons du haut et du bas pour libérer le
BOÎTIER DE VERROUILLAGE (Figures D et D1).
E : Pour sécuriser le meuble ou placard, repositionner le BOÎTIER DE VERROUILLAGE sur la PLAQUE DE
FIXATION (Figure E).
Comprobar periódicamente que el dispositivo funcione correctamente.
Para retirarlo de manera permanente:
NOTA: El bloqueo ya no se podrá volver a utilizar una vez que se haya desprendido.
Soltar el bloqueo según el Paso 1 de la sección USO.
Introducir con cuidado hilo dental entre el adhesivo y la superficie de contacto para soltarlo. Eliminar
los restos de adhesivo con un paño suave y agua tibia con jabón o retirar el adhesivo con los dedos y
limpiar la superficie conforme a las recomendaciones del fabricante.
D: Abrir el cierre pulsando los botones superior e inferior de la CARCASA DEL BLOQUEO (imágenes
D y D1).
E: Para garantizar la seguridad del aparato o del mueble, volver a ajustar la CARCASA DEL BLOQUEO
en la PLACA DE FIJACIÓN (imagen E).
Überprüfen Sie regelmäßig, ob der Artikel ordnungsgemäß funktioniert.
Endgültiges Entfernen des Artikels:
ANMERKUNG: Das Schloss kann nach dem endgültigen Entfernen nicht mehr verwendet werden.
Öffnen Sie das Schloss, wie in Schritt 1 des Abschnitts VERWENDUNG erklärt wird. Schieben Sie
vorsichtig etwas Zahnseide zwischen die Klebe- und die Kontaktfläche, um die Haftung zu lösen.
Wischen Sie den Klebstoff mit einem weichen Tuch und warmem Seifenwasser ab oder rubbeln Sie
den Klebstoff mit den Fingern von der Oberfläche und reinigen diese gemäß den Anweisungen des
Herstellers.
D: Öffnen Sie den Verschluss, indem Sie die (verdeckten) oberen und unteren Entriegelungstasten
zusammendrücken. (Abbildungen D und D1).
E: Um den Schrank oder das Gerät zu sichern, drücken Sie den Verschluss auf die Montageplatte, bis
es einrastet (Abbildung E).
Controllare regolarmente che il dispositivo funzioni in modo corretto.
Per rimuovere in modo definitivo:
NOTA: Il blocco è inutilizzabile dopo la rimozione definitiva.
Disinserire il blocco come da Passaggio 1 in PER L’UTILIZZO.
Passare con attenzione del filo interdentale tra l’adesivo e la superficie di contatto per separarli. Pulire
le tracce dell’adesivo con un panno morbido e acqua tiepida o rimuovere l’adesivo dalla superficie con
le dita e pulire la superficie secondo i suggerimenti del produttore.
D: Aprire premendo i pulsanti di sblocco superiore e inferiore per sbloccare il DISPOSITIVO DI BLOCCO
(Figure D e D1).
E: Per rendere sicuro l’apparecchio o mobiletto, chiudere di nuovo il DISPOSITIVO DI BLOCCO sulla
PIASTRA DI MONTAGGIO (Figura E).
Wipe clean and keep lock
dry.
Passer un coup de chiffon
et maintenir le dispositif
au sec.
Wischen Sie das Schloss mit einem
feuchten Tuch ab und sorgen Sie dafür,
dass es möglichst trocken bleibt.
Schoon vegen en het slot
droog houden.
Limpiarlo con un paño y
mantener el bloqueo seco.
Pulire con un panno e
mantenere asciutto.
Limpe com um pano e
mantenha o bloqueio seco.
EN
FR
PT
DE
EN PTNL
FR ES
DE IT
EN FR DE NL ES IT PT
NL
ES
IT
5 - Tirare con forza per verificare che sia ben posizionato.
1 - ANTES DE EMPEZAR: Limpiar y secar las superficies de contacto.
Elegir la ubicación donde se vaya a instalar el bloqueapuertas multifuncional con
Secret Button: Con el protector del adhesivo todavía puesto, colocar la CARCASA DEL
BLOQUEO en la superficie frontal del dispositivo o mueble que se quiere asegurar y
determinar en qué lugar se posicionará la CARCASA DEL PIVOTE en la superficie lateral
(imagen A).
2 - Retirar el protector del adhesivo de la CARCASA DEL PIVOTE y adherirlo a la
superficie lateral (imagen B).
A: Carcasa del pivote + Carcasa del bloqueo
B: Carcasa del pivote
C: Menos de 2,5 cm
3 - Mantener la CARCASA DEL BLOQUEO en posición en la superficie frontal y asegu-
rarse de que el dispositivo no podrá abrirse más de 2,5 cm (imagen C).
4 - Con la CARCASA DEL BLOQUEO unida a la PLACA DE FIJACIÓN, retirar el protector
del adhesivo de la PLACA DE FIJACIÓN e instalar en la posición predeterminada de la
superficie frontal.
NOTA: Dejar que el adhesivo se adhiera perfectamente durante 24 horas antes de usar
el dispositivo.
5 - Tirar con firmeza para garantizar el bloqueo perfecto.
1 - PRIMA DI INIZIARE: Pulire ed asciugare le superfici di contatto.
Determinare la posizione in cui si desidera installare il blocca-ante multifunzione
Secret Button: senza rimuovere la carta dalla parte adesiva, applicare il DISPOSITIVO
DI BLOCCO sulla superficie anteriore dell’apparecchio o del mobiletto da chiudere
e stabilire dove dovrà essere posizionato l’ELEMENTO ORIENTABILE sulla superficie
laterale (Figura A).
2 - Rimuovere la carta adesiva dall’ELEMENTO ORIENTABILE e incollarlo alla superficie
laterale (Figura B).
A: Elemento orientabile + Dispositivo di blocco
B: Elemento orientabile
C: Inferiore a 2,5 cm
3 - Tenendo il DISPOSITIVO DI BLOCCO in posizione sulla superficie anteriore, verificare
che l’elemento che si desidera bloccare non possa essere aperto per più di 2,5 cm
(Figure C).
4 - Con il DISPOSITIVO DI BLOCCO fissato alla PIASTRA DI MONTAGGIO, rimuovere la
carta adesiva dalla PIASTRA DI MONTAGGIO e installarla nella posizione predeterminata
sulla superficie anteriore.
NOTA: Lasciar riposare l’adesivo per 24 ore prima di utilizzarlo.
1 - VOOR U VAN START GAAT: Reinig en droog de contactoppervlakken.
Bepaal de plaats waar u het Secret Button multislot zult installeren: met het papier nog
op de sticker, plaatst u DE BEHUIZING VAN HET SLOT op het vooroppervlak van het
toestel of de kast die u gaat beveiligen. Vervolgens bepaal je zo ook waar DE BEHUI-
ZING VAN DE SPIL moet komen aan het zij-oppervlak (Afbeelding A).
2 - Verwijder het laagje van de sticker alleen van DE BEHUIZING VAN DE SPIL (nog
niet van de behuizig van het slot), zodat hij gaat plakken en plak deze tegen het
zij-oppervlak (Afbeelding B).
A: Behuizing van de spil + behuizing van het slot
B: Behuizing van de spil
C: minder dan 2,5 cm
3 - Houd de andere zijde, de BEHUIZING VAN HET SLOT vast tegen het oppervlak
vooraan aan het oppervlak waar u het slot wil bevestigen en test om te verzekeren dat
het item dat u beveiligt niet verder dan 2 cm geopend kan worden (Afbeelding C).
4 - Met de SLOTBEHUIZING vast tegen de
MONTAGEPLAAT, verwijdert u het kleefpapier van de MONTAGEPLAAT en installeert u
deze in de vooraf bepaalde positie op het oppervlak vooraan.
OPMERKING: Laat het kleefmiddel 24 uur drogen voor het gebruik.
5 - Trek stevig om de vaste hechting te controleren.
A
B
C
D D1
E
3202008000_2019_safety1st_homesafety_safetyitem_outsmart_multisuelock_manual_014364001.indd 2 13/04/2018 11:43
-
 1
1
-
 2
2


Safety 1st 3202008000 Gebruikershandleiding
- Type
- Gebruikershandleiding
in andere talen
- italiano: Safety 1st 3202008000 Guida utente
- français: Safety 1st 3202008000 Mode d'emploi
- español: Safety 1st 3202008000 Guía del usuario
- Deutsch: Safety 1st 3202008000 Benutzerhandbuch
- português: Safety 1st 3202008000 Guia de usuario


