Aeg-Electrolux S60170TK38 Handleiding
- Categorie
- Accessoires voor het maken van koffie
- Type
- Handleiding

S 60170 TK 38
Koelkast
Refrigerator
Gebruiksaanwijzing
Instruction booklet
PERFEKT IN FORM UND FUNKTION
N/AE/55. (08.)
200381725

2
Geachte klant,
Voordat u uw nieuwe apparaat in gebruik neemt, dient u deze
gebruiksaanwijzing aandachtig te lezen. U vindt hierin belangrijke informatie
m.b.t. veilig gebruik, opstelling en onderhoud van het apparaat.
Bewaar de gebruiksaanwijzing zodat u nog eens iets kunt nalezen. Geef het
boekje door aan een eventuele volgende eigenaar van het apparaat.
Deze gebruiksaanwijzing is bestemd voor meerdere, technisch vergelijkbare
modellen in verschillende uitvoeringen. Let dus op de aanwijzingen die op uw
apparaat betrekking hebben.
Met de waarschuwingsdriehoek en/of door signaalwoorden (Waarschuwing!,
Voorzichtig!, Attentie!) geven wij aanwijzingen die belangrijk zijn voor uw
veiligheid of voor het functioneren van het apparaat. Let goed op deze
aanwijzingen.
1. Dit symbool en de cijfers voeren u stap voor stap door de bediening van het
apparaat.
2.…
Bij dit symbool vindt u aanvullende informatie m.b.t. bediening en praktisch
gebruik van het apparaat.
Het klaverblad staat voor tips en aanwijzingen m.b.t. economisch en
milieuvriendelijk gebruik van het apparaat.
Mocht er een storing optreden, dan vindt u in dit boekje aanwijzingen om
kleine storingen zelf op te heffen, zie hoofdstuk "Wat te doen als"....
Bij technische problemen kunt u altijd contact opnemen met onze
service-afdeling.
U bent nu in het bezit van een AEG product. Vanzelfsprekend kunt u ook
tijdens het gebruik van uw product op AEG rekenen. Daarom nodigen wij u
van harte uit u te registreren op onze internetsite www.mijnapparaten.nl. Wij
kunnen u dan nog beter van dienst zijn met informatie over producten,
gebruiksaanwijzingen, tips, innovaties, oplossingen voor storingen etc.
Gedrukt op milieuvriendelijk gefabriceerd papier.
Wie milieubewust denkt, handelt ook zo …

3
Inhoud
Veiligheid . . . . . . . . . . . . . . . . . . . . . . . . . . . . . . . . . . . . . . . . . . . . . . . .55
Afvalverwerking . . . . . . . . . . . . . . . . . . . . . . . . . . . . . . . . . . . . . . . . . . .57
Informatie over het verpakkingsmateriaal . . . . . . . . . . . . . . . . . . . . . . . . . .57
Oud apparaat verwijderen . . . . . . . . . . . . . . . . . . . . . . . . . . . . . . . . . . . . . . .57
Apparaat vervoeren . . . . . . . . . . . . . . . . . . . . . . . . . . . . . . . . . . . . . . . . . . . .57
Transportbeveiliging verwijderen . . . . . . . . . . . . . . . . . . . . . . . . . . . . . . . . .58
Opstellen . . . . . . . . . . . . . . . . . . . . . . . . . . . . . . . . . . . . . . . . . . . . . . . . . . . .58
Plaats van opstelling . . . . . . . . . . . . . . . . . . . . . . . . . . . . . . . . . . . . . . . . . . .58
Het apparaat heeft lucht nodig . . . . . . . . . . . . . . . . . . . . . . . . . . . . . . . . . .59
Apparaat richten . . . . . . . . . . . . . . . . . . . . . . . . . . . . . . . . . . . . . . . . . . . . . .59
Inbouw van het toestel . . . . . . . . . . . . . . . . . . . . . . . . . . . . . . . . . . . . . . . . .59
Werkplaat verwijderen . . . . . . . . . . . . . . . . . . . . . . . . . . . . . . . . . . . . . . . . . .60
Installatie en bevestiging onder een werkplaat . . . . . . . . . . . . . . . . . . . . .60
Deurscharnier omzetten . . . . . . . . . . . . . . . . . . . . . . . . . . . . . . . . . . . . . . . . .61
Beschrijving van het apparaat . . . . . . . . . . . . . . . . . . . . . . . . . . . . . . . . . .62
Frontaanzicht . . . . . . . . . . . . . . . . . . . . . . . . . . . . . . . . . . . . . . . . . . . . . . . . .62
Vóór het in gebruik nemen . . . . . . . . . . . . . . . . . . . . . . . . . . . . . . . . . . . . .63
In gebruik nemen en temperatuurregeling . . . . . . . . . . . . . . . . . . . . . . .63
Apparaat uitschakelen . . . . . . . . . . . . . . . . . . . . . . . . . . . . . . . . . . . . . . . . .64
Interieur . . . . . . . . . . . . . . . . . . . . . . . . . . . . . . . . . . . . . . . . . . . . . . . . . . . . .65
Legplateaus . . . . . . . . . . . . . . . . . . . . . . . . . . . . . . . . . . . . . . . . . . . . . . . . . . .65
Op de juiste wijze indelen . . . . . . . . . . . . . . . . . . . . . . . . . . . . . . . . . . . . . .66
Ontdooien . . . . . . . . . . . . . . . . . . . . . . . . . . . . . . . . . . . . . . . . . . . . . . . . . . .67
De koelruimte wordt automatisch ontdooid . . . . . . . . . . . . . . . . . . . . . . . .67
Reiniging en onderhoud . . . . . . . . . . . . . . . . . . . . . . . . . . . . . . . . . . . . . . .67
Tips voor het besparen van energie . . . . . . . . . . . . . . . . . . . . . . . . . . . . . .68
Wat te doen als ... . . . . . . . . . . . . . . . . . . . . . . . . . . . . . . . . . . . . . . . . . . . . .69
Hulp bij storingen . . . . . . . . . . . . . . . . . . . . . . . . . . . . . . . . . . . . . . . . . . . . .69
Lamp vervangen . . . . . . . . . . . . . . . . . . . . . . . . . . . . . . . . . . . . . . . . . . . . . . .71
Bepalingen, normen, richtlijnen . . . . . . . . . . . . . . . . . . . . . . . . . . . . . . . . .71
Bedrijfsgeluiden . . . . . . . . . . . . . . . . . . . . . . . . . . . . . . . . . . . . . . . . . . . . . .72

Vaktermen . . . . . . . . . . . . . . . . . . . . . . . . . . . . . . . . . . . . . . . . . . . . . . . . . . .72
Service . . . . . . . . . . . . . . . . . . . . . . . . . . . . . . . . . . . . . . . . . . . . . . . . . . . . . .73
Garantievoorwaarden . . . . . . . . . . . . . . . . . . . . . . . . . . . . . . . . . . . . . . . . . .74
Repartievoorwaarden . . . . . . . . . . . . . . . . . . . . . . . . . . . . . . . . . . . . . . . . . .76
4

5
Veiligheid
De veiligheid van onze koelapparaten voldoet aan de Europese en
Nederlandse normen. Toch zien wij ons genoodzaakt, u op het volgende te
wijzen:
Gebruik volgens de voorschriften
Het apparaat is bedoeld voor gebruik in het huishouden. Het is geschikt
om levensmiddelen te koelen. Als het apparaat voor verkeerde doeleinden
wordt gebruikt of foutief wordt bediend, wordt eventuele schade niet door
de garantiebepalingen gedekt.
Constructieve wijzigingen of veranderingen aan het apparaat zijn uit
veiligheidsoverwegingen niet toegestaan.
Als u dit apparaat gebruikt voor industriële doeleinden of voor andere
doeleinden dan het koelen van levensmiddelen, dient u de daarvoor
geldende wettelijke bepalingen in acht te nemen.
Voor het in gebruik nemen
Controleer of het apparaat geen transportschade heeft. Een beschadigd
apparaat in geen geval aansluiten! Wend u in geval van schade tot uw
leverancier.
Zorg ervoor dat het apparaat niet op het aansluitsnoer staat.
Koelmiddel
Het apparaat bevat in de koelmiddelkringloop het koelmiddel isobutaan
(R600a), een natuurlijk gas dat milieuvriendelijk, maar brandbaar is.
Waarschuwing - Let er bij vervoeren en opstellen van het apparaat op, dat
er geen onderdelen van de koelmiddelkringloop beschadigd raken.
Bij beschadiging van de koelmiddelkringloop:
- open vuur en ontstekingsbronnen beslist vermijden;
- de ruimte waarin het apparaat staat goed ventileren.
Veiligheid van kinderen
Delen van de verpakking (bijv. folie, styropor) kunnen gevaarlijk zijn voor
kinderen. Verstikkingsgevaar! Verpakkingsmateriaal uit de buurt van
kinderen houden.
Afgedankte apparaten onbruikbaar maken voordat u ze wegdoet. Stekker
uit het stopcontact trekken, aansluitsnoer afsnijden, eventuele snap- of
grendelsloten verwijderen of onbruikbaar maken. Daardoor voorkomt u,
dat spelende kinderen elkaar of zichzelf in het apparaat opsluiten
(verstikkingsgevaar) of in andere levensgevaarlijke situaties terechtkomen.
Kinderen zien vaak de gevaren niet die de omgang met elektrische
apparaten met zich meebrengt. Zorg daarom voor het nodige toezicht en
laat kinderen niet met het apparaat spelen.
Dit apparaat is niet bedoeld voor gebruik door kinderen, personen met
verminderde lichamelijke, zintuigelijke of geestelijke capaciteiten of een
gebrek aan kennis en ervaring, tenzij er toezicht is ingesteld door de
persoon die verantwoordelijk is voor hun veiligheid of tenzij zij van deze
persoon instructies hebben gekregen over het gebruik.

6
In het dagelijks gebruik
Bussen of flessen met brandbaar gas of vloeistof kunnen door koude-
inwerking ondicht worden. Explosiegevaar! Bewaar geen bussen of flessen
met brandbare stoffen, zoals spuitbussen, navullingen voor aanstekers enz.
in het apparaat.
Waarschuwing - Geen elektrische apparaten (bijv. elektrische ijsmachine,
mixer enz.) in het apparaat gebruiken.
Waarschuwing - Om het functioneren van het apparaat niet nadelig te
beïnvloeden, mogen de ventilatie-openingen van het apparaat of het
inbouwmeubel niet worden afgedekt of versperd.
Waarschuwing - Gebruik m.u.v. de in deze gebruiksaanwijzing aanbevolen
hulpmiddelen geen mechanische of kunstmatige hulpmiddelen om het
ontdooiproces te bespoedigen.
Vóór het schoonmaken altijd het apparaat uitschakelen en de stekker uit
het stopcontact trekken of de zekering in de huisinstallatie uitschakelen.
Meerwegstekkers, koppelingen en verlengsnoeren mogen niet worden
gebruikt.
Controleer of het aansluitsnoer niet door de achterkant van het
apparaat wordt afgekneld en beschadigd. Een beschadigd aansluitsnoer
kan oververhit raken en brand veroorzaken.
Geen zware voorwerpen of het apparaat zelf op het aansluitsnoer zetten.
Kans op kortsluiting en brand!
In geval van storing
Mocht er een storing aan het apparaat optreden, kijk dan eerst in deze
gebruiksaanwijzing onder "Wat te doen als...". Als de aanwijzingen daar u
niet verder helpen, voer dan verder zelf geen werkzaamheden uit.
Reparaties aan het apparaat mogen alleen door vakmensen worden
uitgevoerd. Onvakkundige reparaties kunnen tot aanzienlijke risico's voor
de gebruiker leiden. Wend u bij reparaties tot uw vakhandelaar of onze
service-afdeling.
De stekker nooit aan het snoer uit het stopcontact trekken, maar altijd
aan de stekker zelf. Let vooral op als het apparaat uit de nis wordt
getrokken. Beschadiging van het aansluitsnoer kan kortsluiting, brand
en/of elektrische schokken veroorzaken.
Als het aansluitsnoer van dit apparaat beschadigd is, moet het door
onze service-afdeling worden vervangen.
De stekker nooit in een loszittend of beschadigd stopcontact steken. Kans
op elektrische schokken en brand!

7
Afvalverwerking
Informatie over het verpakkingsmateriaal
Gooi het verpakkingsmateriaal van uw apparaat op de juiste wijze weg. Alle
gebruikte materialen zijn niet schadelijk voor het milieu en kunnen
hergebruikt worden.
Over de materialen: De kunststoffen kunnen ook hergebruikt worden en
hebben de volgende aanduidingen:
>PE< voor polyethyleen, bijv. de buitenste verpakking en de zakjes binnenin.
>PS< voor geschuimd polystyreen, bijv. de hoekbeschermers, volkomen cfk-
vrij.
Oud apparaat verwijderen
Om milieuredenen moeten koelapparaten op deskundige wijze worden
verwerkt. Dat geldt voor uw oude apparaat en ook voor uw nieuwe apparaat
als dat aan vervanging toe is.
Waarschuwing! Afgedankte apparaten onbruikbaar maken voordat u ze
wegdoet. Stekker uit het stopcontact trekken, aansluitsnoer afsnijden,
eventuele snap- of grendelsloten verwijderen of onbruikbaar maken.
Daardoor voorkomt u, dat spelende kinderen elkaar of zichzelf in het
apparaat opsluiten (verstikkingsgevaar) of in andere levensgevaarlijke
situaties terechtkomen.
Aanwijzingen voor het weggooien:
Het apparaat mag niet bij het huisvuil worden gezet.
De koelmiddelkringloop, vooral de warmtewisselaar aan de achterkant van
het apparaat, mag niet beschadigd raken.
Het symbool op het product of op de verpakking wijst erop dat dit
product niet als huishoudafval mag worden behandeld, maar moet worden
afgegeven bij een verzamelpunt waar elektrische en elektronische
apparatuur wordt gerecycled. Als u ervoor zorgt dat dit product op de
juiste manier wordt verwijderd, voorkomt u mogelijke negatieve gevolgen
voor mens en milieu die zich zouden kunnen voordoen in geval van
verkeerde afvalverwerking. Voor gedetailleerdere informatie over het
recyclen van dit product, kunt u contact opnemen met de gemeente, de
gemeentereiniging of de winkel waar u het product hebt gekocht.
Apparaat vervoeren
Om het apparaat te vervoeren zijn twee personen nodig.
Het apparaat rechtop en liefst in de originele verpakking vervoeren.

8
Transportbeveiliging verwijderen
Het apparaat en delen van het interieur zijn voor het transport beveiligd.
1.Alle plakband en kunststof delen uit de binnenruimte van het apparaat
nemen.
Eventuele resten van plakband kunt u met wasbenzine verwijderen.
Opstellen
Plaats van opstelling
Zet het apparaat in een goed geventileerde en droge ruimte.
De omgevingstemperatuur heeft invloed op het stroomverbruik en het
functioneren van het apparaat.
Daarom moet het apparaat
-
niet direct in de zon staan;
- niet naast een fornuis, kachel of andere warmtebron staan;
- alleen op een plaats staan waarvan de omgevingstemperatuur
overeenkomt met de klimaatklasse waarvoor het apparaat is uitgevoerd.
De klimaatklasse vindt u op het typeplaatje, dat zich links binnenin het
apparaat bevindt.
In onderstaande tabel ziet u, welke omgevingstemperatuur bij welke
klimaatklasse hoort.
klimaatklasse voor omgevingstemperatuur van
SN +10 tot +32°C
N +16 tot +32°C
ST +18 tot +38°C
T +18 tot +43°C
Als opstelling naast een warmtebron niet te vermijden is, moet aan de zijkant
van het apparaat de volgende minimale afstand worden aangehouden:
- tot een elektrisch fornuis 3 cm;
- tot een olie- of kolenfornuis 30 cm.
Anders is opstelling van een warmte-isolerende plaat tussen fornuis en
koelapparaat noodzakelijk.
Als het koelapparaat naast een ander koel- of vriesapparaat staat, is een
afstand van 5 cm aan weerszijden aan te bevelen, zodat zich geen condens
vormt aan de buitenkant van de apparaten.
Directe inbouw onder een kookplaat is niet toegestaan. De voor een deel
hoge stralingstemperaturen van de kookplaat kunnen het apparaat
beschadigen.
Als in de buurt van het apparaat een kookplaat wordt ingebouwd, moeten de
betreffende inbouw- en veiligheidsvoorschriften worden opgevolgd. Door het

grote aantal mogelijke inbouwsituaties kunnen we hier geen gedetailleerde
aanwijzingen geven.
Door voldoende afstand en aanbrengen van een geschikte warmte-isolerende
plaat moet worden voorkomen dat het koelapparaat wordt verwarmd.
Ventilatie van het koelapparaat volgens de voorschriften moet gewaarborgd
zijn.
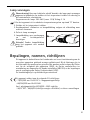
Het apparaat heeft lucht nodig
De luchttoevoer vindt plaats
onder de deur via de
ventilatiesleuf tussen apparaat
en vloer, de luchtafvoer via het
bovenste ventilatierooster. Let
erop dat deze openingen niet
door sokkelpanelen e.d.
worden afgedekt.
Attentie! Als het apparaat bijv.
onder een bovenkast wordt
opgesteld, moet een afstand
van minimaal 10 cm tussen de
bovenkant van het apparaat en
het daarboven aangebrachte
meubel worden aangehouden (A).
Apparaat richten
1. Het apparaat moet waterpas en stabiel staan. Eventuele oneffenheden in de
vloer compenseren door in- of uitdraaien van de stelvoeten voor.
Inbouw van het toestel
Het koelapparaat kan ook onder een
werkplaat worden geïnstalleerd. In dit
geval moet de werkplaat van het
apparaat worden verwijderd (zie
Werkplaat verwijderen).
De minimale hoogte onder de werkplaat
moet 820 mm bedragen.
Voor een probleemloze ventilatie moet
een opening achteraan voor de
uitstromende lucht met een oppervlakte
van ten minste 200 cm2 worden gezorgd.
De oppervlakte van de werkplaat moet
met geschikte middelen worden behandeld (bijv. lak), om het opzwellen bij optreden
van natte te voorkomen.
9

De afstand tussen het apparaat en de muur moet tenminste 30 mm bedragen. Om
het lawaai van de onderdelen van het apparaat, zoals de compressor en de
condensator te voorkomen, mogen deze de muur niet aanraken.
Werkplaat verwijderen
Bij het verwijderen van de werkplaat gaat
u als volgt voor:
1. Draai de schroeven vooraan, links en
rechts uit.
2. Draai de schroeven achteraan, links en
rechts uit.
3. Hef de werkplaat vooraan licht op,
druk ze ca 20 mm naar achteren en
hef tenslotte de plaat op.
4. Schroef de plaathouder achteraan
links en rechts af.
5. Behoud de plaathouder en de
schroeven samen met de werkplaat
Installatie en bevestiging onder een werkplaat
Wissel de deurbuffer voor de inbouw, indien
nodig (zie Deurbuffer wisselen)
Schuif het apparaat in naar zijn definitieve
plaats.
Let op dat het netkabel niet ergens inhaakt.
Controleer de afstand naar de muur.
Stel het apparaat in met hulp van de
instelbare voeten vooraan, zodat het vast
staat.
Bevestig het apparaat door het scharnier
van de deur bovenaan onder de werkplaat met hulp van een geschikte schroef (de keuze
hangt vanaf de aard van de werkplaat, en de afstand tussen het apparaat en de werkplaat
af, niet geleverd). Indien nodig, de ruimte tussen de werkplaat en het scharnier kan door
een geschikte tussenlaag (plastic of hout, niet geleverd) op peil worden gebracht.
Daardoor kunnen een verbuiging van het scharnier en ook eventuele functiestoringen
worden verhinderd.
10

11
Deurscharnier omzetten
Het deurscharnier kan van rechts (leveringstoestand) naar links worden
omgezet, als plaats van opstelling of bedieningsgemak dat vereisen.
U kunt het deurscharnier ook tegen betaling door een vakman laten
omzetten. Neem dan contact op met onze service-afdeling.
Waarschuwing! Bij het omzetten
van het deurscharnier mag het
apparaat niet aan het stroomnet
aangesloten zijn. Eerst de stekker
uit het stopcontact trekken.
1. Apparaat voorzichtig naar
achteren kantelen en op een
deken op de vloer leggen.
2. Let erop dat de compressor en de
condensor niet in aanraking
komen met de vloer.
3. De twee voorste stelvoeten
losschroeven.
Deurscharnier rechts onder
losschroeven door de twee
schroeven los te draaien en het
deurscharnier met de
scharnierbout naar beneden
losnemen.
Schroef op de linker kant
uitdraaien en op de rechter kant
weer indraaien.
4. De deur in licht geopende
toestand naar onderen
losnemen.
5. Bovenste scharnierbout
uitdraaien en op de
tegenoverliggende kant weer
indraaien.
6. De deur weer inzetten.
7. Scharnierbout volgens de
afbeelding in het deurscharnier
omzetten.
8. Scharnierbout links onder in de
apparaatdeur inzetten en deurscharnier met de drie schroeven vastschroeven.
9. De twee voorste stelvoeten aanbrengen en apparaat rechtop zetten.
10. Deurgreep van links naar rechts omzetten en gaten met de afdekstiften
afsluiten.

12
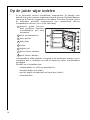
Beschrijving van het apparaat
Frontaanzicht
(verschillende modellen)
1 glazen legplateau
2 dooiwateruitloop
3 groente-/fruitbak
4 typeplaatje
5 verstelbare voeten
6 boter-/kaasvak met klepje
7 temperatuurregelaar en
binnenverlichting
8 deurvak
9 deurafdichting
10 flessenrek
11 eierrek
12 luchtafvoer
13 ventilatierooster
14 condensor
15 dooiwateropvangbak
16 compressor

13
Vóór het in gebruik nemen
Laat het apparaat voordat u het aansluit en in gebruik neemt 2 uur staan,
zodat de olie naar de compressor terug kan stromen. Anders zou de
compressor beschadigd kunnen raken.
1. Reinig vóór het in gebruik nemen de binnenkant en alle accessoires (zie
hoofdstuk "Reiniging en onderhoud").
In gebruik nemen en temperatuurregeling
De temperatuurregelaar bevindt zich rechts boven in de koelruimte en is
tegelijk AAN/UIT-schakelaar.
Stand "0" = koeling uit
Stand "1" = warmste
binnentemperatuur
Stand "5" = koudste
binnentemperatuur
1. Stekker in het stopcontact
steken.
2. Gewenste temperatuur instellen door de temperatuurregelaar te draaien.
De binnenverlichting gaat aan. De compressor start en loopt dan
automatisch.
3. Als u een hogere of een lagere temperatuur wilt, draait u de
temperatuurregelaar op een warmere resp. koudere stand.
Aanwijzing: Bij wijziging van de instelling start de compressor niet direct, als
er op dat moment juist automatisch wordt ontdooid.
Omdat de bewaartemperatuur in de koelruimte snel wordt bereikt, kunt u
direct na het inschakelen de koelruimte vullen.
Uit voedingswetenschappelijk standpunt is +5°C voor de koelruimte koud
genoeg als bewaartemperatuur.

14
De volgende factoren hebben invloed op de binnentemperatuur:
- omgevingstemperatuur;
- hoeveelheid en temperatuur van de opgeslagen levensmiddelen;
- vaak of lang openen van de deur;
- een storing aan het apparaat.
Daarom moet de instelling van de temperatuurregelaar eventueel aan de
omstandigheden worden aangepast.
Belangrijk!
Hoge omgevingstemperatuur (bijv. op hete zomerdagen) en koude instelling
van de temperatuurregelaar (stand "5") kunnen ertoe leiden dat de
compressor continu werkt.
Reden: de compressor moet ononderbroken lopen om bij hoge
omgevingstemperatuur de lage temperatuur in het apparaat te handhaven.
Het apparaat wordt dan niet meer ontdooid - want automatisch ontdooien
is alleen mogelijk als de compressor stilstaat (zie ook hoofdstuk "Ontdooien").
Sterke rijpvorming op de achterwand van de koelruimte is het gevolg.
Zet in dit geval de temperatuurregelaar op een warmere stand (stand "3" tot
"4"). Bij deze instelling wordt de compressor geregeld en het ontdooiproces
begint weer automatisch.
Apparaat uitschakelen
1. Om het apparaat uit te schakelen de temperatuurregelaar op stand "0"
draaien.
Als het apparaat voor langere tijd buiten bedrijf moet worden gesteld:
1. Apparaat uitschakelen door de temperatuurregelaar op stand "0" te draaien.
2. Stekker uit het stopcontact trekken of zekering in de huisinstallatie
uitschakelen.
3. Apparaat grondig reinigen (zie hoofdstuk "Reiniging en onderhoud").
4. Deur open laten staan om reukvorming te voorkomen.

15
Interieur
Legplateaus
Het glazen legplateau moet in de onderste geleiders boven de groente-
/fruitbak liggen, opdat groente en fruit langer vers blijven.
De overige legplateaus zijn in
hoogte verstelbaar:
1. Legplateau naar voren trekken, tot
het kan worden losgenomen.
2. Legplateau op een andere hoogte
plaatsen.

16
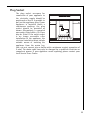
Op de juiste wijze indelen
In de koelruimte heersen verschillende temperaturen. De koudste zone
bevindt zich op het onderste legplateau boven de groente-/fruitbak. Warmere
zones zijn de bovenste legplateaus en de vakken in de deur. Op welke plek in
de koelruimte geschikte temperaturen voor verschillende soorten
levensmiddelen heersen, ziet u in de afbeelding.
1 desserts, gebak, kant-en-
klare gerechten, afgesloten
levensmiddelen, vers vlees,
vleeswaren
2 melk, zuivelproducten
3 fruit, groente
4 boter, kaas
5 eieren
6 yoghurt e.d.
7 kleine flessen, dranken
8 grote flessen, dranken
Levensmiddelen altijd afgedekt of verpakt in de koelruimte bewaren, om te
voorkomen dat ze uitdrogen en reuk of smaak op andere levensmiddelen
overdragen.
Geschikt om te verpakken zijn:
- vershoudzakjes en -folie van polyethyleen;
- kunststof bakjes met deksel;
- speciale kapjes van kunststof met band van elastiek;
- aluminiumfolie.

17
Ontdooien
De koelruimte wordt automatisch ontdooid
De achterwand van de koelruimte wordt met rijp bedekt als de compressor
loopt en wordt ontdooid als de compressor stilstaat.
Het dooiwater wordt in het afvoergootje aan de achterwand van de
koelruimte opgevangen, door de afvoeropening naar de opvangbak bij de
compressor gevoerd en daar
verdampt.
De dooiwateruitloop regelmatig
controleren en schoonmaken,
anders zou in geval van een
verstopping het verzamelde water in
de isolatie terechtkomen en zo tot
storingen kunnen leiden.
Gebruik bij het reinigen van de
dooiwateruitloop het meegeleverde
reinigingsstaafje (zie afbeelding).
Bewaar het bij de dooiwateruitloop.
Reiniging en onderhoud
Om hygiënische redenen moet de binnenkant van het apparaat, inclusief de
accessoires, regelmatig worden schoongemaakt.
Waarschuwing!
Het apparaat moet vóór het reinigen beslist spanningloos worden
gemaakt. Kans op elektrische schok! Voordat u gaat reinigen apparaat
uitschakelen en stekker uit het stopcontact trekken of zekering in de
huisinstallatie uitschakelen.
Het apparaat nooit met stoomreinigingsapparaten schoonmaken. Er zou
vocht in elektrische delen terecht kunnen komen, kans op elektrische
schok! Hete stoom kan tot beschadiging aan kunststof onderdelen leiden.
Het apparaat moet goed droog zijn voordat u het weer in gebruik neemt.
Attentie!
Etherische oliën en organische oplosmiddelen kunnen de kunststof
onderdelen aantasten, bijv.

18
- sap van citroen- of sinaasappelschillen;
- boterzuur;
- reinigingsmiddelen die azijnzuur bevatten.
Zulke stoffen niet met onderdelen van het apparaat in aanraking laten
komen.
Geen schurende reinigingsmiddelen gebruiken.
1. Apparaat uitschakelen en stekker uit het stopcontact trekken of zekering in
de huisinstallatie uitschakelen.
2. Binnenruimte en accessoires met een doekje en lauw water schoonmaken.
Eventueel wat handafwasmiddel toevoegen.
3. Daarna met schoon water afnemen en goed droog wrijven.
4. De dooiwateruitloop in de achterwand van de koelruimte regelmatig
controleren. Een verstopte afvoeropening m.b.v. het reinigingsstaafje of een
stukje ijzerdraad schoonmaken.
Stof op de condensor vermindert het koelvermogen en verhoogt het
energieverbruik. Daarom één maal per jaar de condensor, het metalen rooster
op de achterzijde van het apparaat, met een zachte borstel of met de
stofzuiger voorzichtig schoonmaken.
5. Als alles goed droog is, het apparaat weer in gebruik nemen.
Tips voor het besparen van energie
Zet het apparaat niet in de buurt van een fornuis, kachel of andere
warmtebron. Bij hoge omgevingstemperaturen loopt de compressor vaker
en langer.
Zorg voor een goede ventilatie bij de sokkel en aan de achterkant van het
apparaat. Ventilatie-openingen nooit afdekken.
Geen warme levensmiddelen in het apparaat zetten. Warme
levensmiddelen eerst laten afkoelen.
Deur niet langer dan nodig open laten.
De temperatuur niet kouder dan nodig instellen.
De condensor aan de achterkant van het apparaat altijd schoon houden.

19
Wat te doen als...
Hulp bij storingen
Misschien gaat het bij een storing om een klein defect dat u m.b.v.
onderstaande aanwijzingen zelf kunt opheffen. Voer zelf geen verdere
werkzaamheden uit als onderstaande informatie u niet verder helpt.
Als u toch voor één van de in deze gebruiksaanwijzing vermelde storingen of
vanwege foutieve bediening onze service-afdeling inschakelt, wordt dit
bezoek ook tijdens de garantietermijn niet door onze garantiebepalingen
gedekt.
Waarschuwing! Reparaties aan het apparaat mogen alleen door vakmensen
worden uitgevoerd. Onvakkundige reparaties kunnen tot aanzienlijke risico's
voor de gebruiker leiden. Wend u bij reparaties tot uw vakhandelaar of onze
service-afdeling.
Storing
Apparaat werkt niet.
.
De temperatuur in de
koelruimte niet laag genoeg.
Apparaat koelt te sterk.
Mogelijke oorzaak
Apparaat is niet ingeschakeld
Stekker zit niet of niet goed in
het stopcontact.
Zekering in de huisinstallatie is
niet in orde.
Stopcontact is defect.
Temperatuur is niet goed
ingesteld.
Deur is lange tijd open geweest.
U hebt in de afgelopen 24 uur
grote hoeveelheden warme
levensmiddelen in het apparaat
gelegd.
Apparaat staat naast een
warmtebron.
Temperatuur is te koud
ingesteld.
Oplossing
Apparaat inschakelen.
Stekker in het stopcontact
steken.
Zekering controleren, evt.
vervangen.
Storingen aan het stroomnet
kan uw elektro-installateur
verhelpen.
Zie hoofdstuk "In gebruik
nemen en
temperatuurregeling".
Deur niet langer open laten dan
nodig is.
Koudere temperatuurinstelling
kiezen.
Zie hoofdstuk "Plaats van
opstelling".
Temperatuurregelaar op
warmere stand draaien.

20
Binnenverlichting werkt niet.
Sterke rijpvorming in het
apparaat, evt. ook aan de
deurafdichting.
Water op de bodem van de
koelruimte of op de
legplateaus.
Ongewone geluiden.
Na wijziging van de
temperatuurinstelling begint
de compressor niet direct.
Zie hoofdstuk "Lamp
vervangen".
De ondichte plekken
voorzichtig met een föhn
verwarmen (niet warmer dan
ca. 50°C). Tegelijkertijd de
verwarmde deurafdichting
met de hand zo in vorm
trekken dat hij weer goed
aansluit.
Dooiwateruitloop m.b.v. het
reinigingsstaafj schoonmaken
(zie hoofdstuk "Reiniging en
onderhoud").
Voorste stelvoeten bijstellen.
Apparaat iets wegtrekken.
Dit onderdeel evt. voorzichtig
iets wegbuigen.
De compressor begint na
enige tijd automatisch weer.
Lamp is defect.
Deurafdichting is ondicht (evt.
na omzetten van het
deurscharnier).
Dooiwateruitloop is verstopt
Apparaat staat niet waterpas.
Apparaat heeft contact met
de wand of andere
voorwerpen.
Een onderdeel, bijv. een buis,
aan de achterzijde van het
apparaat komt in aanraking
met een ander onderdeel van
het apparaat of de wand.
Dat is normaal, er is geen
sprake van een storing.
Storing Mogelijke oorzaak
Oplossing

21
Lamp vervangen
Waarschuwing! Kans op elektrische schok! Voordat u de lamp gaat vervangen
apparaat uitschakelen en stekker uit het stopcontact trekken of zekering in
de huisinstallatie uitschakelen.
Gegevens van de lamp: 220-240 V, max. 15 W, fitting: E 14
1.Om het apparaat uit te schakelen temperatuurregelaar op stand "0" draaien.
2. Stekker uit het stopcontact trekken.
3. Kruiskopschroef uitdraaien en lampafdekking volgens de afbeelding naar
achteren losnemen.
4. Defecte lamp vervangen.
5. Lampafdekking weer aanbrengen
en met kruiskopschroef
bevestigen.
Attentie! Zonder lampafdekking
mag het apparaat niet worden
gebruikt.
Bepalingen, normen, richtlijnen
Dit apparaat is bedoeld voor het huishouden en is met inachtneming van de
voor deze apparaten geldende normen gefabriceerd. Bij de fabricage zijn in
het bijzonder die maatregelen getroffen die worden vereist volgens de Duitse
wet op de veiligheid van apparaten (GSG), de Duitse voorschriften ter
voorkoming van ongevallen bij koude-installaties (VBG 20) en de bepalingen
van de vereniging van Duitse elektrotechnici (VDE).
De koudekringloop is op dichtheid gecontroleerd.
Dit apparaat voldoet aan de volgende EU-richtlijnen:
- 73/23/EEG van 19.02.1973 - laagspanningsrichtlijn
- 89/336/EEG van 03.05.1989
(incl. wijzigingsrichtlijn 92/31/EEG - EMC-richtlijn
- 96/57 EEC - 96/09/03 (richtlijn energie-efficiëntie) en latere aanvullingen

22
Bedrijfsgeluiden
De volgende geluiden zijn karakteristiek voor koelapparaten:
Klikken
Altijd als de compressor in- of uitschakelt, is een klikken te horen.
Zoemen
Zodra de compressor werkt, kunt u hem horen zoemen.
Borrelen/klotsen
Als koelmiddel in dunne buizen stroomt, kunt u een borrelend of klotsend
geluid horen. Ook na het uitschakelen van de compressor is dit geluid nog
korte tijd hoorbaar.
Vaktermen
Koelmiddel
Vloeistoffen die voor het produceren van koude kunnen worden gebruikt,
noemt men koelmiddelen. Ze hebben een relatief laag kookpunt, zo laag
dat de warmte van de in het koelapparaat opgeslagen levensmiddelen het
koelmiddel tot koken resp. verdampen kan brengen.
Koelmiddelkringloop
Gesloten kringloopsysteem waarin zich het koelmiddel bevindt. De
koelmiddelkringloop bestaat in hoofdzaak uit verdamper, compressor,
condensor en buizen.
Verdamper
In de verdamper verdampt het koelmiddel. Zoals alle vloeistoffen heeft
koelmiddel om te verdampen warmte nodig. Deze warmte wordt
onttrokken aan de binnenruimte van het apparaat, die daardoor afkoelt.
Daarom is de verdamper in de binnenruimte aangebracht of direct achter
de binnenwand ingeschuimd en daardoor niet zichtbaar.
Compressor
De compressor ziet eruit als een tonnetje. Hij wordt door een ingebouwde
elektromotor aangedreven en is achter in de sokkel van het apparaat
ondergebracht. Taak van de compressor is het om dampvormig koelmiddel
uit de verdamper te halen, samen te persen en naar de condensor verder
te leiden.
Condensor
De condensor heeft meestal de vorm van een rooster. In de condensor
wordt het door de compressor samengeperste koelmiddel gecondenseerd.
Daarbij komt warmte vrij die via de oppervlakte van de condensor aan de
omgevingslucht wordt afgegeven. De condensor is daarom buiten
aangebracht, meestal aan de achterkant van het apparaat.

23
Dear customer,
Before switching on your new appliance please read these operating
instructions carefully. They contain important information for safe use, for
installation and for care of the appliance. Please keep these operating
instructions for future reference. Pass them on to possible new owners of the
appliance.
These operating instructions are for use with several technically comparable
models with varying accessories. Please observe the notes which apply to
your model.
Notes which are important for your safety or for the proper functioning of
the appliance are stressed with a warning triangle and/or with signal words
(Warning!, Caution!, Important!). Please observe the following carefully.
1. This symbol guides you step by step in the operation of the appliance.
2. .....
Supplementary information regarding operation and practical applications of
the appliance appear after this symbol.
Tips and notes concerning economical and environmentally sound use of the
appliance are marked with the cloverleaf.
Explanations of the technical terminology used in the operating instructions
can be found at the end in the section "Technical Terminology". The operating
instructions contain instructions for the correction of possible malfunctions
by the user in the section "What to do if ...". If these instructions should not
be sufficient, contact your local Service Force Centre.
The symbol on the product or on its packaging indicates that this product
may not be treated as household waste. Instead it should be taken over to the
appropriate collection point for the recycling of electrical and electronic
equipment. By ensuring this product is disposed of correctly, you will help
prevent potential negative consequences for the environment and human
health, which could otherwise be caused by inappropriate waste handling of
this product. For more detailed information about recycling of this product,
please contact your local council, your household waste disposal service or
the shop where you purchased the product.
Printed on paper manufactured with environmentally sound processes he who
thinks ecologically acts accordingly...

24
Contents
Important Safety Instruction............................................................................................26
Disposal .....................................................................................................................................28
Appliance Packaging Information......................................................................................28
Disposal of Old Appliances...................................................................................................28
Remove Transport Packaging.............................................................................................28
Installation...............................................................................................................................29
Installation Location .............................................................................................................29
Your Refrigerator Needs Air .................................................................................................30
Detaching the Worktop.........................................................................................................30
Levelling......................................................................................................................................31
Reversing the Door..................................................................................................................31
Plug Socket...............................................................................................................................33
Description of the Appliance ............................................................................................34
View of the Appliance............................................................................................................34
Using the Appliance.............................................................................................................35
Before Use .................................................................................................................................35
To Start the Appliance...........................................................................................................35
Thermostat Control ................................................................................................................35
Switching Off the Appliance.............................................................................................36
Interior Accessories...............................................................................................................36
Storage Shelves........................................................................................................................36
Hints for storage....................................................................................................................37
Cleaning and Care.................................................................................................................38
Internal Cleaning...................................................................................................................38
Energy Saving Tips.................................................................................................................39
What to do if .........................................................................................................................40
Correcting Malfunctions.......................................................................................................40
Changing the Light Bulb ......................................................................................................42

25
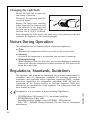
Noises During Operation ....................................................................................................42
Regulations, Standards, Guidelines................................................................................42
Technical Terminology..........................................................................................................43

26
Important Safety Instructions
These warnings are provided in the interests of your safety. Ensure you fully
understand them before installing or using the appliance. Your safety is of
paramount importance. If you are unsure about the meaning of these
warnings contact the Customer Care Department for assistance.
Intended use
The refrigerator is intended for use in the home. It is suitable for the cooling,
freezing and storing of frozen food, as well as for making ice. If the
appliance is used for purposes other than those intended or used incorrectly,
no liability can be accepted by the manufacturer for any damage that may
be caused.
Alterations or changes to the refrigerator are not permitted for reasons of
safety.
If you use the refrigerator in a commercial application or for purposes other
than the cooling, freezing or frozen storage of foods, the manufacturer
accepts no liability for any damages which may occur.
Prior to initial start–up
Check the appliance for transport damage. Under no circumstance should
a damaged appliance be plugged in. In the event of damage, please
contact your supplier.
Ensure that the appliance does not stand on the electrical supply cable.
Important: if the supply cable is damaged, it must be replaced by
authorised service or qualified personnel using a special cable of the same
type.
Refrigerant
The refrigerant isobutane (R600a) is contained with in the refrigerant circuit
of the appliance, a natural gas with a high level of environmental
compatibility, which is nevertheless flammable.
Warning- During transportation and installation of the appliance, be
certain that none of the components of the refrigerant circuit become
damaged.
If the refrigerant circuit should become damaged:
- avoid open flames and sources of ignition;
- thoroughly ventilate the room in which the appliance is situated.
Safety of children
Packaging (e.g. wraps, polystyrene) can be dangerous for children. There is
a risk of suffocation! Keep packaging material away from children!
Please make old appliances unusable prior to disposal. Pull out the mains
plug, cut off the mains cable, break or remove spring or bolt catches, if
fitted. By doing this you ensure that children cannot lock themselves in
the appliance when playing (there is risk of suffocation!) or get themselves
into other dangerous situations.

27
Often children cannot recognise the hazards present in household
appliances. It is therefore important that you ensure adequate supervision
and never let children play with the appliance!
This appliance is not intended for use by persons (including children) with
reduced physical sensory or mental capabilities, or lack of experience and
knowledge, unless they have been given supervision or instruction
concerning use of the appliance by a person responsible for their safety.
Daily Operation
Containers with flammable gases or liquids can leak at low temperatures.
There is a risk of an explosion! Do not store any containers with flammable
materials such as spray cans, fire extinguisher refill cartridges etc. in the
refrigerator/freezer.
Bottles and cans must not be placed in the freezer compartment. They can
burst when the contents freeze, high carbonate content drinks can even
explode! Never store lemonade, juices, beer, wine, sparkling wine etc. in the
freezer compartment.
Do not place ice cream or ice cubes in the mouth immediately after
removal from the freezer compartment. Very cold ice can freeze to the lips
or tongue and cause injury.
Do not touch frozen food with wet hands. Your hands could freeze to the
food.
Warning- Do not operate any electrical appliances in the refrigerator
and/or freezer (e.g. electric ice cream makers, mixers etc.).
Warning- In order not to impair the function of the appliance, never cover
or obstruct the ventilation openings.
Warning- Do not damage the cooling circuit.
Warning- Do not use any mechanical devices or other artificial means to
speed up defrosting unless they are recommended by the manufacturer.
Before cleaning the appliance, always switch off the appliance and unplug
it, or disconnect from the electricity supply.
When unplugging always pull the plug from the mains socket, do not pull
on the cable.
In case of malfunction
If a malfunction occurs on the appliance, please look first in the "What to do if
..." section of these instructions. If the information given there does not help,
please do not perform any further repairs yourself.
This product should be serviced by an authorised engineer and only
genuine spare parts should be used.
Under no circumstances should you attempt to repair the appliance
yourself. Repairs carried out by inexperienced persons may cause injury or
serious malfunctioning. Contact your local Service Force centre.

28
Disposal
Appliance Packaging Information
All materials are environmentally sound! They can be disposed of or burned
at an incinerating plant without danger. About the materials: The plastics can
be recycled and are identified as follows:
>PE< for polyethylene, e.g. the outer covering and the bags in the interior.
>PS< for polystyrene foam, e.g. the pads, which are all free of chloro-
fluorocarbon.
The carton parts are made from recycled paper and should be disposed of at
a wastepaper recycling collection location.
Disposal of Old Appliances
For environmental reasons, refrigeration appliances must be disposed of
properly. This applies to your old appliance, and - at the end of its service life
- for your new appliance as well.
Warning! Before disposing of old appliances make them inoperable. Remove
plug from mains, sever the power cable, remove or destroy any snap or latch
closures. This ensures that children do not lock themselves inside the
appliance (danger of suffocation!) or place themselves into other life-
endangering situations.
Disposal:
The appliance may not be disposed of with domestic waste or bulky refuse.
The refrigerant circuit, especially the heat exchanger at the back of the
appliance, must not be damaged.
The symbol on the product or on its packaging indicates that this
product may not be treated as household waste. Instead it should be taken
to the appropriate collection point for the recycling of electrical and
electronic equipment. By ensuring this product is disposed of correctly,
you will help prevent potential negative consequences for the
environment and human health, which could otherwise be caused by
inappropriate waste handling of this product. For more detailed
information about recycling of this product, please contact your local
council, your household waste disposal service or the shop where you
purchased the product.
Remove Transport Packaging
The appliance and the interior fittings are protected for transport.
1. Pull off the adhesive tape on the left and right side of the door.
2. Remove all adhesive tape and packing pieces from the interior of the
appliance.

29
Installation
Installation Location
The appliance should be set up in a well ventilated, dry room.
Energy use and efficient performance of the appliance is affected by the
ambient temperature. The appliance should therefore
- not be exposed to direct sunlight;
- not be installed next to radiators, cookers or other sources of heat;
- only be installed at a location whose ambient temperature corresponds to
the climate classification, for which the appliance is designed.
The climate classification can be found on the serial plate, which is located
at the left on the inside of the appliance.
The following table shows which ambient temperature is correct for each
climate classification:
Climate classification for an ambient temperature of
SN +10 to +32 °C
N +16 to +32 °C
ST +18 to +38 °C
T +18 to +43 °C
If the refrigeration appliance is installed next to another refrigerator or
freezer a clearance of 5 cm at the sides is required, in order to prevent the
formation of condensation on the outside of the appliance.

30
Your Refrigerator Needs Air
For correct operation this
appliance must be located in a
dry atmosphere, away from
heat sources, e.g. cookers,
radiators, boilers and direct
sunlight.
You should also ensure that air
can circulate freely around the
back and the top of the
cabinet. There should be
100mm (4”) between the top of
the cabinet and any
overhanging kitchen furniture.
Alternatively allow 50mm (2”) between the top of the cabinet and any
overhanging kitchen furniture and a gap of 25mm (1”) on either side of the
appliance.
If your refrigerator is installed
under a continuous worktop, an
air outlet opening of at least
200 cm
2
and a ventilation grille
(A/B) matching the worktop
design should be installed at
the rear of the worktop. The cut
surfaces of the worktop (C)
should be varnished to avoid
swelling due to penetration of
moisture. The appliance wall
distance must beat least 30 mm
and should be checked before
the ventilation grille is inserted.
Detaching the Worktop
After the worktop has been
removed the appliance can be
installed underneath a
continuous worktop. The
procedure is as follows:
1.Unscrew the screws (1) on the
right and the left.
2. Lift the worktop slightly, push it
about 20 mm towards the rear,
and lift it off upwards (2). To
remove the top of the
refrigerator unfasten the screws
on the front-right- and front-
left-hand side (3) and keep it in
a safe place (4).

31
Levelling
The appliance must be level. Level the
appliance by adjusting the two
adjustable feet (1) at the front of the
appliance.
If required the washer (2) can be
removed.
Reversing the Door
The side at which the door opens can be changed from the right side (as
supplied) to the left side, if the installation site requires.
Warning! When changing the side at which the door opens, the appliance
must not be connected to the mains. Remove plug from the mains
beforehand.
Carefully tilt the appliance to
the back and place an adequate
object under it.
Take care to avoid the
compressor or the condenser
touching the ground.
Unscrew the adjustable feet
situated on both sides (2
pieces), in addition the screws
fixing the lower door holders (2
pieces) respectively the screw
on the other side.
Take off the freezer door by
pulling it slightly downwards.
Unscrew the top door hinge pin
of the refrigerator then screw it
back on the other side.
Fit the freezer door on the
upper door hinge pin.
Put over the pin in the lower
door holding plate in the
direction of the arrow.
Fix the plate on the other side
leaving the position of the door
unchanged.

Then screw in the one screw in
the place set free on the other
side as well as the adjustable
feet (2 pieces) and stand
upright again.
Put the handles on the other
side and put the plastic
covering pins supplied in the
plastic bag of this instruction
book into the vacant holes.
Put the appliance into it’s
place, set it level and plug it
into the mains socket.
32

33
Plug Socket
The plug socket necessary for
connection of your appliance to
the electricity supply should be
positioned so that it is possible to
pull out the appliance plug. If your
appliance is installed under a
continuous worktop, the plug
socket should be provided as
shown. Alternatively a concealed
spur socket fitted with a 13 A fuse
may be fitted. If the outlet socket
is no longer accessible after
installation of the appliance, the
electrical installation must include
suitable means of isolating the
appliance from the mains (e.g.
fuse, cut-out, current trip or similar with a minimum contact separation of
3 mm). The mains cable may only be changed by a qualified electrician or
competent person. If your appliance needs repairing, please contact your
local Service Force Centre.

34
1. Glass shelf
2. Defrost water drain
3. Salad drawer
4. Rating Plate
5. Adjustable feet
6. Butter compartment
7. Interior Light/Thermostat control
8. Door shelf
9. Door gasket
10. Bottle shelf
11. Egg tray
12. Air circulation
13. Air vent
14. Condenser
15. Evaporator tray
16. Compressor
Description of the Appliance
View of the Appliance

35
Using the Appliance
Before Use
Remove all securing tapes.
Wash the inside of the appliance
with lukewarm water with a little
bicarbonate of soda added (5 ml
to 0,5 litre of water). Do not use
soap or detergent as the smell
may linger. Dry the appliance
thoroughly.
Do not use detergents, abrasive
powders, highly perfumed cleaning products, wax polishes or products
containing alcohol.
To Start the Appliance
1. Allow the appliance to stand for 2 hrs after installation.
2. Plug in the appliance and switch on at the mains supply.
3. Turn the thermostat control to the required setting. A setting of 3 is usually
suitable for normal operation (see thermostat control).
4. Leave the appliance for approximately 4 hours for the correct temperature to
be reached before placing food inside.
Thermostat Control
The thermostat control situated inside the refrigerator regulates the
temperature of the larder compartment. Thermostat control is marked from
1-5 the higher the number, the colder the setting.
Position 0 - Off
Position 1 - minimum coldness
Position 5 - maximum coldness

36
Switching Off the Appliance
To switch off the appliance, turn the temperature regulator to position"0".
If the appliance is not going to be used for an extended period:
1. Remove all refrigerated packages.
2. Switch off the appliance by turning the thermostat knob to position"0".
3. Remove the mains plug or switch off or disconnect from the electricity
supply.
4. Clean thoroughly (see section: “Cleaning and Care”).
5. Leave the door open to avoid the build up of odours.
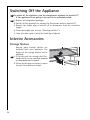
Interior Accessories
Storage Shelves
Various glass storage shelves are
included with your appliance. The
height of the storage shelves can be
adjusted:
1. To do this pull the storage shelf for-
ward until it can be swivelled upwards
or downwards and removed.
2. Please do the same in reverse to insert
the shelf at a different height.

37
Hints for storage
Below is the recommended storage positions for various food types:
1 Frozen food storage & ice
making
2 Ready-cooked foods
3 Foods in dishes
4 Opened cans
5 Milk, dairy products
6 Fresh meat, cold cuts,
sausages, etc.
7 Fruits, vegetables, salads
8 Cheese, butter
9 Eggs
10 Yoghurt, Cream
11 Small bottles, soft drinks
12 Large bottles, drinks

38
Cleaning and Care
For hygienic reasons the appliance interior, including interior accessories,
should be cleaned regularly.
Warning!
The appliance must not be connected to the mains during cleaning.
Danger of electrical shock. Before cleaning switch the appliance off and
remove the plug from the mains, or switch off or disconnect from the
electricity supply.
Never clean the appliance with a steam cleaner. Moisture could
accumulate in electrical components and there is a danger of an electrical
shock. Hot vapours can lead to the damage of plastic parts.
The appliance must be dry before it is switched back on.
Important!
Ethereal oils and organic solvents can attack plastic parts, e.g.
- lemon juice or the juice from orange peals;
- butyric acid;
- cleansers which contain acetic acid.
Do not allow such substances to come into contact with appliance parts.
Do not use any abrasive cleansers.
Before any maintenance of cleaning work is carried out DISCONNECT the
appliance from the ELECTRICITY SUPPLY.
Internal Cleaning
Clean the inside and accessories with
warm water and bicarbonate of soda (5
ml to 0.5 litre of water). Rinse and dry
thoroughly.
Do not use detergents, abrasive
powders, highly perfumed cleaning
products, wax polishes or cleaning
products containing bleach or alcohol.
Clean the drain hole of the water
trough at regular intervals and ensure
that the drain hole is clear at all times.
If blocked carefully clear using a piece
of flexible curtain wire inserted into
the drain outlet to remove the blockage.
Regularly check the door seals and wipe clean to ensure they are clean and
free from debris.
Accumulation of dust at the condenser increases energy consumption. For
this reason carefully clean the condenser at the back of the appliance once
a year with a soft brush or a vacuum cleaner.

39
Energy Saving Tips
Do not install the appliance near cookers, radiators or other sources of
warmth. High ambient temperatures cause longer, more frequent
operation of the compressor.
Ensure sufficient air circulation and exhaust at the appliance base and at
the back wall of the appliance. Never cover air vent openings.
Do not place warm foods into the appliance. Allow warm foods to cool
first.
Only leave door open as long as necessary.
Do not set temperature any colder than necessary.
Put frozen food in the fridge to defrost. The cold in the frozen food will
then be used to cool the fridge.
Always keep the heat emitting condenser, the metal grille on the rear wall
of your appliance clean.

40
What to do if ...
Correcting Malfunctions
A malfunction may be caused by only a minor fault that you can rectify
yourself using the following instructions. Do not perform any other work on
the appliance if the following information does not provide assistance in your
specific case.
Important! Repairs to refrigerators/freezers may only be performed by
competent service engineers. Improper repairs can give rise to significant
hazards for the user. If your appliance needs repairing, please contact your
specialist dealer or your local Service Force Centre.
Symptom
Appliance does not work.
The compressor runs con-
tinuously.
The food is too warm.
Possible Cause
Appliance is not switched
on.
Mains plug is not plugged
in or is loose.
Fuse has blown or is
defective
Socket is defective.
Temperature is set too
cold.
Temperature is not
properly adjusted.
Door was open for an
extended period.
A large quantity of warm
food was placed in the
appliance within the last
24 hours.
The appliance is near a
heat source.
Remedy
Switch on the appliance.
Insert mains plug.
Check fuse, replace if nec-
essary.
Mains malfunctions are to
be corrected by an
electrician.
Turn the thermostat knob
to a warmer setting
temporarily.
Please look in the “Starting
Up and Temperature
Regulation” section.
Do not leave the door
open any longer than
necessary.
Turn the thermostat knob
to a colder setting tem-
porarily.
Please look in
the“Installation location”
section.

41
Symptom
Interior lighting does not
work.
Heavy build up of frost,
possibly also on the door
seal.
Unusual noises.
The compressor does not
start immediately after
changing the temperature
setting.
Water in the bottom of
the cabinet.
Possible Cause
Light bulb is defective.
Door seal is not airtight
(possibly after reversing
the door).
Appliance is not level.
The appliance is touching
the wall or other objects.
This is normal, no error
has occurred.
Water drain hole is
blocked.
Remedy
Please look in the
“Changing the Light Bulb”
section.
Carefully warm the
leaking sections of the
door seal with a hair dryer
(on a cool setting). At the
sametime shape the
warmed door seal by hand
such that it sits correctly.
Readjust the feet.
Move the appliances
lightly.
The compressor starts
after a period of time.
See the “Cleaning and
Care” section.

42
Changing the Light Bulb
Should the light fail to work you
can change it as below:
Disconnect the appliance from the
electricity supply.
Remove the lamp cover retaining
screws, then take the lamp cover off
in the direction of the arrow and
the bulb can be changed. (Type of
the bulb: 230 V, 15 W, E 14 thread)
After changing the bulb replace the lamp cover, and retaining screws and
reconnect the appliance to the electricity supply.
Noises During Operation
The following noises are characteristic of refrigeration appliances:
Clicks
Whenever the compressor switches on or off, a click can be heard.
Humming
As soon as the compressor is in operation, you can hear it humming.
Bubbling/Splashing
When refrigerant flows into thin tubes, you can hear bubbling or splashing
noises. Even after the compressor has been switched off, this noise can be
heard for a short time.
Regulations, Standards, Guidelines
This appliance was designed for household use and was manufactured in
accordance with the appropriate standards. The necessary measures in
accordance with appliance safety legislation regulations (GSG), accident
prevention regulations for refrigeration appliances (VBG 20) and the
regulations of the German Society of Electrical Engineers (VDE) were
observed in the manufacture of this appliance. The refrigerant circuit has
been checked for leaks.
This appliance is in accordance with the following EUguidelines:
– 73/23/EWG dated 19 February 1973 - low voltage guidelines.
– 89/336/EWG dated 3 May 1989
(including guideline change notice 92/31/EWG) - EMV guideline
- 96/57 EEC - 96/09/03 (Energy Efficiency Directive) and its subsequent
amendments
N/AE/55. (08)

43
Technical Terminology
Refrigerant
Liquids that can be used to a generate a cooling effect are known as
refrigerants. They have a relatively low boiling-point, indeed so low, that
the warmth from the food stored in the fridge or freezer can cause the
refrigerant to boil and vaporise.
Refrigerant Circuit
Closed circulation system that contains the refrigerant. The refrigerant
circuit comprises primarily of an evaporator, a compressor, a condenser
and pipe work.
Evaporator
The refrigerant is evaporated in the evaporator. Similar to all other liquids,
refrigerant requires heat to evaporate. This heat is removed from the
interior of the appliance, as a result the interior is cooled. The evaporator
is therefore located inside the appliance or placed in foam immediately
behind the inner wall and thus not visible.
Compressor
The compressor looks like a small drum. It is driven by a built-in electric
motor and is mounted on the base of the appliance at the rear. The task
of the compressor is to draw in vaporised refrigerant from the evaporator,
to compress it, and to pass it on to the condenser.
Condenser
The condenser normally has the form of a grid. The refrigerant com-
pressed in the compressor is liquefied in the condenser. During this
process, heat is released to the surrounding air at the surface of the
condenser. The condenser is mounted on the base of the appliance.

AEG Hausgeräte GmbH
Postfach 1036
D-90327 Nürnberg
Sie können Ersatzteile, Zubehör und Pflegemittel on-line bestellen bei
http://www.aeg-electrolux.de
© Copyright by AEG
Technische Änderungen vorbehalten
200381725- 00 - 0408
2008. 01. 25.
From the Electrolux Group. The world’s No.1 choice.
The Electrolux Group is the world's largest producer of powered appliances for kitchen, cleaning and
outdoor use. More than 55 million Electrolux Group products (such as refrigerators, cookers, washing
machines, vacuum cleaners, chain saws and lawn mowers) are sold each year to a value of approx. USD
14 billion in more than 150 countries around the world.
Het symbool op het product of op de verpakking wijst erop dat dit product niet als huishoudafval mag worden
behandeld. Het moet echter naar een plaats worden gebracht waar elektrische en elektronische apparatuur
wordt gerecycled. Als u ervoor zorgt dat dit product op de correcte manier wordt verwijderd, voorkomt u
mogelijk voor mens en milieu negatieve gevolgen die zich zouden kunnen voordoen in geval van verkeerde
afvalbehandeling. Voor meer details in verband met het recyclen van dit product, neemt u het best contact op
met de gemeentelijke instanties, het bedrijf of de dienst belast met de verwijdering van huishoudafval of de
winkel waar u het product hebt gekocht.
The symbol on the product or on its packaging indicates that this product may not be treated as household
waste. Instead it should be taken over to the appropriate collection point for the recycling of electrical and
electronic equipment. By ensuring this product is disposed of correctly, you will help prevent potential
negative consequences for the environment and human health, which could otherwise be caused by
inappropriate waste handling of this product. For more detailed information about recycling of this product,
please contact your local council, your household waste disposal service or the shop where you purchased the
product.
-
 1
1
-
 2
2
-
 3
3
-
 4
4
-
 5
5
-
 6
6
-
 7
7
-
 8
8
-
 9
9
-
 10
10
-
 11
11
-
 12
12
-
 13
13
-
 14
14
-
 15
15
-
 16
16
-
 17
17
-
 18
18
-
 19
19
-
 20
20
-
 21
21
-
 22
22
-
 23
23
-
 24
24
-
 25
25
-
 26
26
-
 27
27
-
 28
28
-
 29
29
-
 30
30
-
 31
31
-
 32
32
-
 33
33
-
 34
34
-
 35
35
-
 36
36
-
 37
37
-
 38
38
-
 39
39
-
 40
40
-
 41
41
-
 42
42
-
 43
43
-
 44
44


Aeg-Electrolux S60170TK38 Handleiding
- Categorie
- Accessoires voor het maken van koffie
- Type
- Handleiding
in andere talen
Gerelateerde papieren
-
Aeg-Electrolux S60150TK8 Handleiding
-
-
-
-
-
-
-
-
-