Aeg-Electrolux HE634070XB Handleiding
- Categorie
- Kookplaten
- Type
- Handleiding

HE634070XB NL Gebruiksaanwijzing 2
EN User manual 15
FR Notice d'utilisation 27
DE Benutzerinformation 41

INHOUD
1. VEILIGHEIDSINFORMATIE . . . . . . . . . . . . . . . . . . . . . . . . . . . . . . . . . . . . . . . . . . . . . . . . . . . . 3
2. VEILIGHEIDSVOORSCHRIFTEN . . . . . . . . . . . . . . . . . . . . . . . . . . . . . . . . . . . . . . . . . . . . . . . . 4
3. BESCHRIJVING VAN HET PRODUCT . . . . . . . . . . . . . . . . . . . . . . . . . . . . . . . . . . . . . . . . . . . 6
4. DAGELIJKS GEBRUIK . . . . . . . . . . . . . . . . . . . . . . . . . . . . . . . . . . . . . . . . . . . . . . . . . . . . . . . . 7
5. NUTTIGE AANWIJZINGEN EN TIPS . . . . . . . . . . . . . . . . . . . . . . . . . . . . . . . . . . . . . . . . . . . 10
6. ONDERHOUD EN REINIGING . . . . . . . . . . . . . . . . . . . . . . . . . . . . . . . . . . . . . . . . . . . . . . . . 11
7. PROBLEEMOPLOSSING . . . . . . . . . . . . . . . . . . . . . . . . . . . . . . . . . . . . . . . . . . . . . . . . . . . . . 11
8. MONTAGE-INSTRUCTIES . . . . . . . . . . . . . . . . . . . . . . . . . . . . . . . . . . . . . . . . . . . . . . . . . . . 13
9. TECHNISCHE INFORMATIE . . . . . . . . . . . . . . . . . . . . . . . . . . . . . . . . . . . . . . . . . . . . . . . . . . 13
10. MILIEUBESCHERMING . . . . . . . . . . . . . . . . . . . . . . . . . . . . . . . . . . . . . . . . . . . . . . . . . . . . . . 14
VOOR PERFECTE RESULTATEN
Bedankt dat u voor dit AEG product heeft gekozen. Dit apparaat is ontworpen om vele jaren
uitstekend te presteren, met innovatieve technologieën die het leven gemakkelijker helpen
maken – functies die gewone apparaten wellicht niet hebben. Neem een paar minuten de tijd
om het door te lezen zodat u er optimaal van kunt profiteren.
Ga naar onze website voor:
Advies over gebruik, brochures, het oplossen van problemen en
onderhoudsinformatie:
www.aeg.com
Registreer uw product voor een betere service:
www.aeg.com/productregistration
Koop accessoires, verbruiksartikelen en originele reserveonderdelen voor uw
apparaat:
www.aeg.com/shop
KLANTENSERVICE
Wij raden altijd het gebruik van originele onderdelen aan.
Zorg er als u contact opneemt met de klantenservice voor dat u de volgende gegevens bij de
hand hebt.
De informatie staat op het typeplaatje. model, productnummer, serienummer.
Waarschuwing - Belangrijke veiligheidsinformatie.
Algemene informatie en tips
Milieu-informatie
Wijzigingen voorbehouden.
2
www.aeg.com

1. VEILIGHEIDSINFORMATIE
Lees zorgvuldig de meegeleverde instructies voor in-
stallatie en gebruik van het apparaat. De fabrikant is
niet verantwoordelijk voor letsel en schade veroorzaakt
door een foutieve installatie. Bewaar de instructies van
het apparaat voor toekomstig gebruik.
1.1 Veiligheid van kinderen en kwetsbare mensen
WAARSCHUWING!
Gevaar voor verstikking, letsel of permanente inva-
liditeit.
• Dit apparaat kan worden gebruikt door kinderen van
8 jaar en ouder en door mensen met beperkte licha-
melijke, zintuiglijke of verstandelijke vermogens of
een gebrek aan ervaring en kennis, indien zij onder
toezicht staan van een volwassene of van iemand die
verantwoordelijk is voor hun veiligheid.
• Laat kinderen niet met het apparaat spelen.
• Houd alle verpakkingsmaterialen uit de buurt van kin-
deren.
• Houd kinderen en huisdieren uit de buurt van het ap-
paraat als het in werking is of afkoelt. Het apparaat is
heet.
• Als het apparaat is uitgerust met een kinderbeveili-
ging, raden wij aan dit te activeren.
• Reiniging en onderhoud mag niet worden uitgevoerd
door kinderen zonder toezicht.
1.2 Algemene veiligheid
• Het apparaat en de toegankelijke onderdelen ervan
worden heet tijdens gebruik. De verwarmingselemen-
ten niet aanraken.
• Bedien het apparaat niet met een externe timer of
een apart afstandbedieningssysteem.
NEDERLANDS 3

• Zonder toezicht koken op een kookplaat met vet of
olie kan gevaarlijk zijn en brandgevaar opleveren.
• Probeer brand nooit met water te blussen, maar scha-
kel in plaats daarvan het apparaat uit en bedek de
vlam, d.w.z. met een deksel of blusdeken.
• Bewaar geen voorwerpen op de kookplaten.
• Gebruik geen stoomreiniger om het apparaat schoon
te maken.
• Metalen voorwerpen, zoals messen, vorken, lepels en
deksels mogen niet op de kookplaat worden ge-
plaatst, aangezien ze heet kunnen worden.
• Als de glaskeramische oppervlakte gebarsten is,
schakel het apparaat dan uit om het risico op elektri-
sche schokken te voorkomen.
2.
VEILIGHEIDSVOORSCHRIFTEN
2.1 Montage
WAARSCHUWING!
Alleen een erkende installatie-
technicus mag het apparaat in-
stalleren.
• Verwijder alle verpakkingsmaterialen.
• Installeer en gebruik geen beschadigd
apparaat.
• Volg de installatie-instructies op die
zijn meegeleverd met het apparaat.
• Houd de minimumafstand naar andere
apparaten en units in acht.
• Wees voorzichtig met het verplaatsen
van het apparaat, het is zwaar. Draag
altijd veiligheidshandschoenen.
• Dicht de oppervlakken af met kit om
te voorkomen dat ze gaan opzetten
door vocht.
• Bescherm de bodem van het apparaat
tegen stoom en vocht.
• Installeer het apparaat niet naast een
deur of onder een raam. Dit voorkomt
dat hete pennen van het apparaat val-
len als de deur of het raam wordt geo-
pend.
• Als het apparaat geïnstalleerd is bo-
ven lades zorg er dan voor dat de
ruimte tussen de onderkant van het
apparaat en de bovenste lade vol-
doende is voor luchtcirculatie.
• De onderkant van het apparaat kan
heet worden. Wij raden aan om een
onbrandbaar scheidingspaneel te
plaatsen onder het apparaat om te
voorkomen dat de onderkant kan wor-
den aangeraakt.
Aansluiting aan het
elektriciteitsnet
WAARSCHUWING!
Gevaar voor brand en elektrische
schokken.
• Alle elektrische aansluitingen moeten
door een gediplomeerd elektromon-
teur worden gemaakt.
• Dit apparaat moet worden aangeslo-
ten op een geaard stopcontact.
• Verzeker u ervan dat de stekker uit het
stopcontact is getrokken, voordat u
4
www.aeg.com

welke werkzaamheden dan ook uit-
voert.
• Gebruik de juiste stroomkabel.
• Voorkom dat de stroomkabels verstrikt
raken.
• Zorg ervoor dat de stroomkabel of
stekker (indien van toepassing) het he-
te apparaat of heet kookgerei niet
aanraakt als u het apparaat op de na-
bijgelegen contactdozen aansluit
• Zorg ervoor dat het apparaat correct
is geïnstalleerd. Losse en onjuiste
stroomkabels of stekkers (indien van
toepassing) kunnen ervoor zorgen dat
de contactklem te heet wordt.
• Zorg ervoor dat er een schokbescher-
ming wordt geïnstalleerd.
• Zorg ervoor dat het snoer niet wordt
belast door trekken.
• Zorg dat u de hoofdstekker (indien
van toepassing) of kabel niet bescha-
digt. Neem contact op met de service-
afdeling of een elektromonteur om
een beschadigde hoofdkabel te ver-
vangen.
• De elektrische installatie moet een iso-
latieapparaat bevatten waardoor het
apparaat volledig van het lichtnet af-
gesloten kan worden. Het isolatieap-
paraat moet een contactopening heb-
ben met een minimale breedte van 3
mm.
• Gebruik alleen de juiste isolatie-appa-
raten: stroomonderbrekers, zekerin-
gen (schroefzekeringen moeten uit de
houder worden verwijderd), aardlek-
schakelaars en contactgevers.
2.2 Gebruik
WAARSCHUWING!
Gevaar op letsel, brandwonden
of elektrische schokken
• Gebruik dit apparaat in een huishou-
delijke omgeving.
• De specificatie van het apparaat mag
niet worden veranderd.
• Bedien het apparaat niet met een ex-
terne timer of een apart afstandbedie-
ningssysteem.
• Laat het apparaat tijdens het gebruik
niet onbeheerd achter.
• Bedien het apparaat niet met natte
handen of als het contact maakt met
water.
• Leg geen bestek of deksels van steel-
pannen op de kookzones. Ze zijn heet.
• Zet de kookzone op "uit" na elk ge-
bruik.
• Het apparaat mag niet worden ge-
bruikt als werkblad of aanrecht.
• Sluit het apparaat direct af van de
stroomtoevoer als het oppervlak van
het apparaat gebroken is. Dit om elek-
trische schokken te voorkomen.
WAARSCHUWING!
Brand- of explosiegevaar.
• Verhitte vetten en olie kunnen ont-
vlambare damp afgeven. Houd vlam-
men of verwarmde voorwerpen uit de
buurt van vet en olie als u er mee
kookt.
• De dampen die hete olie afgeeft kun-
nen spontane ontbranding veroorza-
ken.
• Gebruikte olie die voedselresten be-
vat kan brand veroorzaken bij een la-
gere temperatuur dan olie die voor de
eerste keer wordt gebruikt.
• Plaats geen ontvlambare producten of
items die vochtig zijn door ontvlamba-
re producten in, bij of op het appa-
raat.
• Probeer niet om een brand te blussen
met water. Haal het apparaat uit het
stopcontact en dek de vlammen af
met een deksel of blusdeken.
WAARSCHUWING!
Risico op schade aan het appa-
raat.
• Zet geen hete pannen op het bedie-
ningspaneel.
• Laat kookgerei niet droogkoken.
• Laat geen voorwerpen of kookgerei
op het apparaat vallen. Het oppervlak
kan beschadigen.
• Activeer de kookzones niet met lege
pannen of zonder pannen erop.
• Geen aluminiumfolie op het apparaat
leggen.
• Pannen van gietijzer, aluminium of
met beschadigde bodems kunnen
krassen veroorzaken in het glaskera-
NEDERLANDS 5

miek. Til deze voorwerpen altijd op als
u ze moet verplaatsen op het kookop-
pervlak.
2.3 Onderhoud en reiniging
WAARSCHUWING!
Risico op schade aan het appa-
raat.
• Reinig het apparaat regelmatig om te
voorkomen dat het materiaal van het
oppervlak achteruitgaat.
• Gebruik geen waterstralen of stoom
om het apparaat te reinigen.
• Maak het apparaat schoon met een
vochtige, zachte doek. Gebruik alleen
neutrale schoonmaakmiddelen. Ge-
bruik geen schuurmiddelen, schuur-
sponsjes, oplosmiddelen of metalen
voorwerpen.
2.4 Verwijdering
WAARSCHUWING!
Gevaar voor letsel of verstikking.
• Neem contact met uw plaatselijke
overheid voor informatie m.b.t. correc-
te afvalverwerking van het apparaat.
• Haal de stekker uit het stopcontact.
• Snijd het netsnoer van het apparaat af
en gooi dit weg.
3. BESCHRIJVING VAN HET PRODUCT
120/175/210 mm
145 mm
145 mm
265 mm
170 mm
1 2
4 35
1
Kookzone
2
Kookzone
3
Kookzone
4
Bedieningspaneel
5
Kookzone
3.1 Indeling bedieningspaneel
1
678
2
4
3
5
6
www.aeg.com

Gebruik de tiptoetsen om het apparaat te bedienen, De displays, lampjes
en geluiden vertellen welke functie actief is.
Tiptoets Functie
1
Het timerdisplay De tijd in minuten weergeven.
2
Kookzone instellen.
3
/
De tijd verlengen of verkorten.
4
Het in- en uitschakelen van de buitenste
ring.
5
Het bedieningspaneel vergrendelen/
ontgrendelen.
6
Een kookstanddisplay De kookstand weergeven.
7
De functie STOP+GO in- en uitschake-
len.
8
Het in- en uitschakelen van de buitenste
ringen.
3.2 Kookstanddisplays
Display Beschrijving
De kookzone is uitgeschakeld.
-
De kookzone wordt gebruikt.
De STOP+GO-functie is in werking.
De automatische verwarmingsfunctie is in werking.
+ cijfer
Er is een storing.
/ /
OptiHeat Control (3 staps restwarmte-indicatie): door
gaan met koken / warmhouden / restwarmte.
Slot/kinderbeveiliging is in werking.
De functie Automatische uitschakelen is in werking ge-
treden.
3.3 OptiHeat Control (3 staps
restwarmte-indicatie)
WAARSCHUWING!
/ / Verbrandingsgevaar
door restwarmte!
OptiHeat Control geeft het niveau van
de restwarmte aan.
4. DAGELIJKS GEBRUIK
U bedient de kookplaat met de knop-
pen van de oven. Het hoofdstuk Da-
gelijks gebruik van de oven vertelt u
hoe u de kookplaat moet bedienen.
NEDERLANDS 7

Wanneer een kookzone is inge-
schakeld, maakt deze kort een
brommend geluid. Dit is kenmer-
kend voor alle glaskeramische
kookplaten en duidt niet op een
storing.
4.1 Automatische
uitschakeling
De functie schakelt het apparaat
automatisch uit als:
•
Alle kookzones uitgeschakeld zijn (
).
• U de kookstand niet instelt nadat u het
apparaat hebt ingeschakeld.
• U iets hebt gemorst of iets langer dan
10 seconden op het bedieningspaneel
hebt gelegd (een pan, doek, etc.). Er
klinkt een geluidssignaal en het appa-
raat wordt uitgeschakeld. Verwijder
het voorwerp of reinig het bedienings-
paneel.
• U een kookzone niet uitschakelt of de
kookstand verandert. Na enige tijd
gaat
branden en wordt het appa-
raat uitgeschakeld. Zie hieronder.
• De verhouding tussen warmte-instel-
ling en tijden van de automatische uit-
schakelingsfunctie:
•
, - — 6 uur
•
- — 5 uur
•
— 4 uur
•
- — 1,5 uur
4.2 In- en uitschakelen van de
buitenste ringen
Het verwarmingsvlak kan worden aange-
past aan de grootte van het kookgerei.
Raak sensorveld
/ aan om de bui-
tenste ring in te schakelen. Het controle-
lampje gaat branden Voor meer buiten-
ste verwarmingskringen hetzelfde sen-
sorveld opnieuw aanraken. Het bijbeho-
rende controlelampje gaat branden.
Voer de procedure opnieuw uit om de
buitenste ring uit te schakelen. Het con-
trolelampje gaat uit.
4.3 De automatische
opwarmfunctie
De automatische opwarmfunctie scha-
kelt even de hoogste kookstand in en
verlaagt dan naar de gewenste kook-
stand. Draai om deze functie in te scha-
kelen de knop van de kookzone naar
rechts tot
in het display verschijnt.
Stel hierna meteen de kookstand in.
1
2
3
4
5
6
7
8
9
10
11
0
123456789
4.4 Timer
Timer met aftelfunctie
Gebruik de timer met aftelfunctie om in
te stellen hoe lang de kookzone op dat
moment moet werken.
Stel de timer met aftelfunctie in nadat
de kookzone is geselecteerd.
U kunt de kookstand voor of na het in-
stellen van de timer selecteren.
•
Kookzone instellen:raak
meerdere
malen aan tot het lampje van de ge-
wenste kookzone brandt.
• De timer met aftelfunctie activeren:
raak
van de timer aan om de tijd in
te stellen (
00
-
99
minuten). Als het
lampje van de kookzone langzaam
knippert, wordt de tijd afgeteld.
• Resterende tijd weergeven: selec-
teer de kookzone met
. Het indica-
tielampje van de kookzone gaat snel-
ler knipperen. Op het display wordt
de resterende tijd weergegeven.
• De timer met aftelfunctie wijzin-
gen:selecteer de kookzone met
.
Raak
of aan.
8
www.aeg.com

• De timer uitschakelen: selecteer de
kookzone met
. Raak aan. De
resterende tijd telt af tot
00
. Het in-
dicatielampje van de kookzone gaat
uit. Om de kookzone uit te schakelen
kunt u ook
en gelijktijdig aanra-
ken.
Als de afteltijd verstreken is, klinkt er
een geluidssignaal en knippert
00
.
De kookzone wordt uitgeschakeld.
• Het geluidssignaal stopzetten: aan-
raken van
CountUp Timer (De timer met
optelfunctie)
Gebruik CountUp Timer om in de gaten
te houden hoelang de kookzone werkt.
• De kookzone instellen (indien er
meer dan 1 kookzone actief is):raak
meerdere malen aan tot het lampje
van de gewenste kookzone brandt.
• Voor het inschakelen vanCountUp
Timer:
door van de timer aan te
raken gaat branden. Als het lampje
van de kookzone langzaam knippert,
wordt de tijd opgeteld. De display
schakelt tussen
en getelde tijd (mi-
nuten).
• Om in de gaten te houden hoelang
de kookzone werkt:selecteer de
kookzone met
. Het indicatielampje
van de kookzone gaat sneller knippe-
ren. Het display geeft de tijd aan die
de kookzone werkt.
• Voor het uitschakelen van de Coun-
tUp Timer: stel de kookzone in met
en raak of aan om de timer
uit te schakelen. Het indicatielampje
van de kookzone gaat uit.
Kookwekker
U kunt de timer gebruiken als een kook-
wekker terwijl het apparaat is ingescha-
keld en de kookzone niet werken (het
display van de kookstand toont
).
• Om de kookwekker in te schakelen:
Raak
aan. Raak of van de ti-
mer aan om de tijd in te stellen. Het
display van de kookzones schakelt zich
na 10 seconden automatisch uit. Als
de tijd verstreken is, klinkt er een ge-
luidssignaal en knippert
00
.
• Het geluidssignaal stopzetten: raak
aan.
• Om de kookwekker uit te schakelen:
Schakel de linkerkookzone voor even
aan en uit.
De functie kookwekker heeft geen in-
vloed op de werking van de kookzones.
4.5 STOP+GO
De -functie stelt alle kookzones in
voor de warmhoudstand (
).
stopt de timerfunctie niet.
• Voor het inschakelen van deze func-
tie, raakt u
aan. Het symbool
gaat branden.
• Raak voor het uitschakelen van deze
functie
aan. De kookstand die u
eerder hebt ingesteld, wordt weerge-
geven.
Als u de kookstanden wijzigt,
stopt de functie en de displays
tonen de nieuwe kookstanden.
4.6 Slot
U kunt de sensors op de kookplaat ver-
grendelen als de kookzones werken.
Stel eerst de kookstand in.
Voor het inschakelen van deze functie
raakt u
aan. Het symbool ver-
schijnt gedurende vier seconden.
De timer blijft aan.
Voor het uitschakelen van deze functie
raakt u
aan. De kookstand die u eer-
der hebt ingesteld, wordt weergegeven.
Als u de kookstand wijzigt, wordt deze
functie uitgeschakeld.
Als u het apparaat stopt, stopt deze
functie ook.
4.7 De kinderbeveiliging
Deze functie voorkomt dat het kooktoe-
stel onbedoeld wordt gebruikt.
De kinderbeveiliging inschakelen
• Het apparaat is uitgeschakeld.
•
Raak
4 seconden tot het symbool
knippert.
NEDERLANDS 9

•
Raak
aan in de periode waarin het
symbool
knippert, het symbool
gaat 4 seconden branden.
De kinderbeveiliging uitschakelen
• Het apparaat is uitgeschakeld.
•
Raak
aan tot het symbool knip-
pert.
•
Raak
aan in de periode waarin het
symbool
knippert, het symbool
gaat 4 seconden branden.
De kinderbeveiliging uitschakelen
voor een enkele kooksessie
• Schakel de kookzone in. Het symbool
gaat branden. Raak aan tot het
symbool
aan gaat.
•
Stel de kookstand vanuit stand
bin-
nen 4 seconden in. U kunt het kook-
toestel bedienen.
• De kinderbeveiliging werkt nadat u
het apparaat heeft uitgeschakeld.
4.8 OffSound Control (In- en
uitschakelen van de geluiden)
Uitschakelen van de geluiden
Schakel het apparaat uit.
Raak
3 seconden aan, het geluid
klinkt. Raak
aan, het geluid klinkt.
Raak
3 seconden aan. gaat aan,
het geluid is aan. Raak
aan, gaat
aan, het geluid is uit.
Als deze functie is ingeschakeld, kunt u
alleen geluiden horen als:
• de kookwekker af gaat
• De timer af gaat
• als u iets op het bedieningspaneel
plaatst.
Inschakelen van de geluiden
Schakel het apparaat uit.
Raak
3 seconden aan. Raak aan.
Raak
3 seconden aan. . gaat aan,
omdat het geluid uit is. Raak
aan,
gaat aan. Het geluid is aan.
5. NUTTIGE AANWIJZINGEN EN TIPS
5.1 Kookgerei
Informatie over het kookgerei
• De bodem van het kookgerei moet zo
dik en vlak mogelijk zijn.
• Kookgerei gemaakt van geëmailleerd
staal of met aluminium of kopperen
bodems, kunnen tot verkleuringen lei-
den van de glazen keramische kook-
plaat.
5.2 Energie besparen
Energie besparen
• Doe indien mogelijk altijd een deksel
op de pan.
• Zet het kookgerei op de kookzone
voordat u deze inschakelt.
• Schakel voor het einde van de berei-
dingstijd de kookzones uit, om ge-
bruik te maken van de restwarmte.
• De bodems van de pannen en kook-
zones dienen dezelfde afmeting te
hebben.
5.3 Öko Timer (Eco-timer)
Om energie te besparen schakelt
het verwarmingselement van de
kookzone eerder uit dan het sig-
naal van de timer met aftelfunc-
tie klinkt. Het verschil in wer-
kingstijd hangt af van het niveau
van de kookstand en de lengte
van de bereiding.
10
www.aeg.com

Informatie over acrylamides
Belangrijk! Volgens recente
wetenschappelijke informatie kan het
intensief bruinen van levensmiddelen
(met name in producten die zetmeel
bevatten), een gezondheidsrisico
vormen tengevolge van acrylamides.
Om die reden adviseren wij
levensmiddelen zoveel mogelijk bij lage
temperaturen gaar te laten worden en
de gerechten niet te veel te bruinen.
6. ONDERHOUD EN REINIGING
Reinig het apparaat telkens na gebruik
Gebruik altijd kookgerei met een schone
bodem.
Krassen of donkere vlekken in de
glaskeramiek hebben geen in-
vloed op de werking van het ap-
paraat.
Vuil verwijderen:
1.
– Verwijder direct:gesmolten plas-
tic, gesmolten folie en suikerhou-
dende gerechten. Anders kan het
vuil het apparaat beschadigen.
Gebruik een speciale schraper
voor de glazen plaat. Plaats de
schraper schuin op de glazen
plaat en verwijder resten door het
blad over het oppervlak te schui-
ven.
– Verwijder nadat het apparaat
voldoende is afgekoeld:kalkvlek-
ken, waterkringen, vetvlekken,
glimmende metaalachtige ver-
kleuringen. Gebruik een speciaal
schoonmaakmiddel voor glaskera-
miek of roestvrij staal.
2.
Reinig het apparaat met een vochti-
ge doek en een beetje afwasmiddel.
3.
Wrijf het apparaat ten slotte droog
met een schone doek.
7. PROBLEEMOPLOSSING
Probleem Mogelijke oorzaak Oplossing
U kunt het apparaat niet
inschakelen of bedie-
nen.
Het apparaat is niet aan-
gesloten op een stop-
contact of is niet goed
geïnstalleerd.
Controleer of het appa-
raat goed is aangesloten
op het stopcontact (zie
aansluitdiagram).
Schakel het apparaat op-
nieuw in en stel de kook-
stand binnen 10 secon-
den in.
U hebt twee of meer tip-
toetsen tegelijk aange-
raakt.
Raak slechts één tiptoets
tegelijk aan.
De STOP+GO-functie is
in werking.
Raadpleeg het hoofdstuk
"Dagelijks gebruik".
Er bevindt zich water of
vetspatten op het bedie-
ningspaneel.
Reinig het bedieningspa-
neel.
NEDERLANDS 11

Probleem Mogelijke oorzaak Oplossing
Er klinkt een geluidssig-
naal en het apparaat
wordt uitgeschakeld.
Er weerklinkt een ge-
luidssignaal als het ap-
paraat uit is.
U hebt een of meer tip-
toetsen afgedekt.
Verwijder het voorwerp
van de tiptoetsen.
De restwarmte-indicatie
gaat niet aan.
De kookzone is niet
heet, omdat hij slechts
kortstondig is gebruikt.
Als het lang duurt alvo-
rens de kookzone vol-
doende heet is, neem
dan contact op met de
klantenservice.
De automatische op-
warmfunctie start niet.
De hoogste kookstand is
ingesteld.
De hoogste kookstand
heeft hetzelfde vermogen
als de automatische op-
warmfunctie.
U kunt de buitenste ring
niet inschakelen.
Schakel eerst de binnen-
ring in.
De sensorvelden wor-
den warm.
Het kookgerei is te
groot of staat te dicht bij
het bedieningspaneel.
Plaats groter kookgerei
op de achterste kookzo-
nes indien nodig.
Er klinkt geen signaal
wanneer u de sensorvel-
den van het bedienings-
paneel aanraakt.
De signalen zijn uitge-
schakeld.
Activeer de signalen (zie
In- en uitschakelen van de
geluiden).
gaat branden.
De automatische uit-
schakeling is in werking
getreden.
Schakel het apparaat uit
en weer in.
gaat branden.
De kinderbeveiliging of
toetsblokkering is actief.
Raadpleeg het hoofdstuk
"Dagelijks gebruik".
en een getal gaat
branden.
Er heeft zich een fout in
het apparaat voorge-
daan.
Ontkoppel het apparaat
enige tijd van de stroom-
toevoer. Ontkoppel de
zekering uit het elektri-
sche systeem van het
huis. Sluit het apparaat
opnieuw aan. Als
weer
gaat branden, neem dan
contact op met de klan-
tenservice.
Als u door het volgen van de boven-
staande suggesties het probleem niet
kunt oplossen, dient u contact op te ne-
men met uw vakhandelaar of de klanten-
service. Geef de gegevens door van het
typeplaatje, een driecijferige code voor
de glaskeramiek (bevindt zich op de
hoek van het glazen oppervlak) en de
foutmelding die wordt weergegeven.
Controleer of u het apparaat op de juis-
te manier gebruikt hebt. Bij onjuist ge-
bruik van het apparaat wordt het bezoek
van de technicus van de klantenservice
of de vakhandelaar in rekening gebracht,
zelfs tijdens de garantieperiode. De in-
structies over de klantenservice en de
garantiebepalingen vindt u in het garan-
tieboekje.
12
www.aeg.com

8. MONTAGE-INSTRUCTIES
WAARSCHUWING!
Zie het hoofdstuk 'Veiligheidsin-
formatie'.
Voor montage
Noteer voor montage van het apparaat
de onderstaande informatie van het ty-
peplaatje. Het typeplaatje bevindt zich
aan de onderkant van de behuizing van
het apparaat.
• Model ...........................
•Productnummer
(PNC) ........................................
• Serienummer (S.N.)..............
8.1 Inbouwapparatuur
• Inbouwapparaten mogen alleen wor-
den gebruikt nadat zij ingebouwd zijn
in geschikte inbouwunits of werkbla-
den die aan de normen voldoen.
8.2 Montage
min.
50mm
min.
500mm
490
+1
mm
560
+1
mm
R 5mm
55mm
min.
28 mm
9. TECHNISCHE INFORMATIE
Modell HE634070XB Prod.Nr. 949 595 055 01
Typ 58 HAD C6 AO 220-240 V 50-60 Hz
Made in Germany
Ser.Nr. .......... 7.1 kW
AEG
NEDERLANDS 13

Vermogen van kookzones
Kookzone Nominaal vermogen (max warmte-
instelling) [W]
Rechtsachter —170 / 265 mm 1500 / 2400 W
Rechtsvoor — 145 mm 1200 W
Linksachter — 145 mm 1200 W
Linksvoor — 120 / 175 / 210 mm 800 / 1600 / 2300 W
10. MILIEUBESCHERMING
Recycle de materialen met het
symbool
. Gooi de verpakking in
een geschikte verzamelcontainer om
het te recyclen.
Help om het milieu en de
volksgezondheid te beschermen en
recycle het afval van elektrische en
elektronische apparaten. Gooi
apparaten gemarkeerd met het
symbool
niet weg met het
huishoudelijk afval. Breng het
product naar het milieustation bij u
in de buurt of neem contact op met
de gemeente.
14
www.aeg.com

CONTENTS
1. SAFETY INFORMATION . . . . . . . . . . . . . . . . . . . . . . . . . . . . . . . . . . . . . . . . . . . . . . . . . . . . . 16
2. SAFETY INSTRUCTIONS . . . . . . . . . . . . . . . . . . . . . . . . . . . . . . . . . . . . . . . . . . . . . . . . . . . . . 17
3. PRODUCT DESCRIPTION . . . . . . . . . . . . . . . . . . . . . . . . . . . . . . . . . . . . . . . . . . . . . . . . . . . . 19
4. DAILY USE . . . . . . . . . . . . . . . . . . . . . . . . . . . . . . . . . . . . . . . . . . . . . . . . . . . . . . . . . . . . . . . . 20
5. HELPFUL HINTS AND TIPS . . . . . . . . . . . . . . . . . . . . . . . . . . . . . . . . . . . . . . . . . . . . . . . . . . . 23
6. CARE AND CLEANING . . . . . . . . . . . . . . . . . . . . . . . . . . . . . . . . . . . . . . . . . . . . . . . . . . . . . . 23
7. TROUBLESHOOTING . . . . . . . . . . . . . . . . . . . . . . . . . . . . . . . . . . . . . . . . . . . . . . . . . . . . . . . 24
8. INSTALLATION INSTRUCTIONS . . . . . . . . . . . . . . . . . . . . . . . . . . . . . . . . . . . . . . . . . . . . . . 25
9. TECHNICAL INFORMATION . . . . . . . . . . . . . . . . . . . . . . . . . . . . . . . . . . . . . . . . . . . . . . . . . 26
10. ENVIRONMENT CONCERNS . . . . . . . . . . . . . . . . . . . . . . . . . . . . . . . . . . . . . . . . . . . . . . . . . 26
FOR PERFECT RESULTS
Thank you for choosing this AEG product. We have created it to give you impeccable
performance for many years, with innovative technologies that help make life simpler –
features you might not find on ordinary appliances. Please spend a few minutes reading to get
the very best from it.
Visit our website for:
Get usage advice, brochures, trouble shooter, service information:
www.aeg.com
Register your product for better service:
www.aeg.com/productregistration
Buy Accessories, Consumables and Original spare parts for your appliance:
www.aeg.com/shop
CUSTOMER CARE AND SERVICE
We recommend the use of original spare parts.
When contacting Service, ensure that you have the following data available.
The information can be found on the rating plate. Model, PNC, Serial Number.
Warning / Caution-Safety information
General information and tips
Environmental information
Subject to change without notice.
ENGLISH 15

1. SAFETY INFORMATION
Before the installation and use of the appliance, careful-
ly read the supplied instructions. The manufacturer is
not responsible if an incorrect installation and use cau-
ses injuries and damages. Always keep the instructions
with the appliance for future reference.
1.1 Children and vulnerable people safety
WARNING!
Risk of suffocation, injury or permanent disability.
• This appliance can be used by children aged from 8
years and above and persons with reduced physical,
sensory or mental capabilities or lack of experience
and knowledge if they are supervised by an adult or a
person who is responsible for their safety.
• Do not let children play with the appliance.
• Keep all packaging away from children.
• Keep children and pets away from the appliance
when it operates or when it cools down. Accessible
parts are hot.
• If the appliance has a child safety device, we recom-
mend that you activate it.
• Cleaning and user maintenance shall not be made by
children without supervision.
1.2 General Safety
• The appliance and its accessible parts become hot
during use. Do not touch the heating elements.
• Do not operate the appliance by means of an exter-
nal timer or separate remote-control system.
• Unattended cooking on a hob with fat or oil can be
dangerous and may result in fire.
16
www.aeg.com

• Never try to extinguish a fire with water, but switch off
the appliance and then cover flame e.g. with a lid or a
fire blanket.
• Do not store items on the cooking surfaces.
• Do not use a steam cleaner to clean the appliance.
• Metallic objects such as knives, forks, spoons and lids
should not be placed on the hob surface since they
can get hot.
• If the glass ceramic surface is cracked, switch off the
appliance to avoid the possibility of electric shock.
2.
SAFETY INSTRUCTIONS
2.1 Installation
WARNING!
Only a qualified person must in-
stall this appliance.
• Remove all the packaging.
• Do not install or use a damaged appli-
ance.
• Obey the installation instruction sup-
plied with the appliance.
• Keep the minimum distance from the
other appliances and units.
• Always be careful when you move the
appliance because it is heavy. Always
wear safety gloves.
• Seal the cut surfaces with a sealant to
prevent moisture to cause swelling.
• Protect the bottom of the appliance
from steam and moisture.
• Do not install the appliance adjacent
to a door or under a window. This pre-
vents hot cookware to fall from the ap-
pliance when the door or the window
is opened.
• If the appliance is installed above
drawers make sure that the space, be-
tween the bottom of the appliance
and the upper drawer, is sufficient for
air circulation.
• The bottom of the appliance can get
hot. We recommend to install a non-
combustile separation panel under the
appliance to prevent access to the
bottom.
Electrical connection
WARNING!
Risk of fire and electrical shock.
• All electrical connections must be
made by a qualified electrician.
• The appliance must be earthed.
• Before carrying out any operation
make sure that the appliance is dis-
connected from the power supply.
• Use the correct electricity mains cable.
• Do not let the electricity mains cable
tangle.
• Make sure the mains cable or plug (if
applicable) does not touch the hot ap-
pliance or hot cookware, when you
connect the appliance to the near
sockets
• Make sure the appliance is installed
correctly. Loose and incorrect electrici-
ty mains cable or plug (if applicable)
can make the terminal become too
hot.
• Make sure that a shock protection is
installed.
• Use the strain relief clamp on cable.
• Make sure not to cause damage to the
mains plug (if applicable) or to the
ENGLISH 17

mains cable. Contact the Service or an
electrician to change a damaged
mains cable.
• The electrical installation must have an
isolation device which lets you discon-
nect the appliance from the mains at
all poles. The isolation device must
have a contact opening width of mini-
mum 3 mm.
• Use only correct isolation devices: line
protecting cut-outs, fuses (screw type
fuses removed from the holder), earth
leakage trips and contactors.
2.2 Use
WARNING!
Risk of injury, burns or electric
shock.
• Use this appliance in a household en-
vironment.
• Do not change the specification of this
appliance.
• Do not use an external timer or a sep-
arate remote-control system to oper-
ate the appliance.
• Do not let the appliance stay unatten-
ded during operation.
• Do not operate the appliance with wet
hands or when it has contact with wa-
ter.
• Do not put cutlery or saucepan lids on
the cooking zones. They become hot.
• Set the cooking zone to “off” after
use.
• Do not use the appliance as a work
surface or as a storage surface.
• If the surface of the appliance is
cracked, disconnect immediately the
appliance from the power supply. This
to prevent an electrical shock.
WARNING!
Risk of fire or explosion.
• Fats and oil when heated can release
flammable vapours. Keep flames or
heated objects away from fats and oils
when you cook with them.
• The vapours that very hot oil releases
can cause spontaneous combustion.
• Used oil, that can contain food rem-
nants, can cause fire at a lower tem-
perature than oil used for the first
time.
• Do not put flammable products or
items that are wet with flammable
products in, near or on the appliance.
• Do not try to extinguish a fire with wa-
ter. Disconnect the appliance and cov-
er the flame with a lid or a fire blanket.
WARNING!
Risk of damage to the appliance.
• Do not keep hot cookware on the con-
trol panel.
• Do not let cookware to boil dry.
• Be careful not to let objects or cook-
ware fall on the appliance. The surface
can be damaged.
• Do not activate the cooking zones
with empty cookware or without cook-
ware.
• Do not put aluminium foil on the ap-
pliance.
• Cookware made of cast iron, alumini-
um or with a damaged bottom can
cause scratches on the glass ceramic.
Always lift these objects up when you
have to move them on the cooking
surface.
2.3 Care and Cleaning
WARNING!
Risk of damage to the appliance.
• Clean regularly the appliance to pre-
vent the deterioration of the surface
material.
• Do not use water spray and steam to
clean the appliance.
• Clean the appliance with a moist soft
cloth. Only use neutral detergents. Do
not use abrasive products, abrasive
cleaning pads, solvents or metal ob-
jects.
2.4 Disposal
WARNING!
Risk of injury or suffocation.
• Contact your municipal authority for
information on how to discard the ap-
pliance correctly.
• Disconnect the appliance from the
mains supply.
18
www.aeg.com

• Cut off the mains cable and discard it.
3. PRODUCT DESCRIPTION
120/175/210 mm
145 mm
145 mm
265 mm
170 mm
1 2
4 35
1
Cooking zone
2
Cooking zone
3
Cooking zone
4
Control panel
5
Cooking zone
3.1 Control panel layout
1
678
2
4
3
5
Use the sensor fields to operate the appliance The displays, indicators and
sounds tell which function operate.
Sensor field Function
1
The timer display To show the time in minutes.
2
To select a cooking zone.
3
/
To increase or decrease the time.
4
To activate and deactivate the outer
ring.
5
To lock / unlock the control panel.
6
A heat setting display To show the heat setting.
ENGLISH 19

Sensor field Function
7
To activate and deactivate the STOP
+GO function.
8
To activate and deactivate the outer
rings.
3.2 Heat setting displays
Display Description
The cooking zone is deactivated.
-
The cooking zone operates.
The STOP+GO function operates.
The Automatic Heat Up function operates.
+ digit
There is a malfunction.
/ /
OptiHeat Control (3 step Residual heat indicator): con-
tinue cook / stay warm / residual heat.
Lock / The Child Safety Device operates.
The Automatic Switch Off function operates.
3.3 OptiHeat Control (3 step
Residual heat indicator)
WARNING!
/ / The risk of burns
from residual heat!
OptiHeat Control shows the level of the
residual heat.
4. DAILY USE
You operate the hob with the knobs
of the oven. The Daily Use chapter for
the oven tells how to operate the hob.
When a cooking zone operates,
it hums for a short time. This is
typical of all ceramic glass cook-
ing zones and does not show
that the appliance operates in-
correctly.
4.1 Automatic Switch Off
The function deactivates the appliance
automatically if:
•
All cooking zones are deactivated (
).
• You do not set the heat setting after
you activate the appliance.
• You spill something or put something
on the control panel for more than 10
seconds, (a pan, a cloth, etc.). An
acoustic signal sound some time and
the appliance deactivates. Remove the
object or clean the control panel.
• You do not deactivate a cooking zone
or change the heat setting. After some
time
comes on and the appliance
deactivates. See below.
• The relation between heat setting and
times of the Automatic Switch Off
function:
•
, - — 6 hours
•
- — 5 hours
•
— 4 hours
•
- — 1.5 hours
20
www.aeg.com

4.2 Activation and
deactivation of the outer rings
You can adjust the surface you cook to
the dimension of the cookware.
To activate the outer ring touch the sen-
sor field
/ . The indicator comes
on. For more outer rings touch the same
sensor field again. The subsequent indi-
cator comes on.
Do the procedure again to deactivate
the outer ring. The indicator goes out.
4.3 The automatic heat up
Automatic heat up function sets the
highest heat setting for some time, and
then decreases to the necessary level.
To switch it on turn the cooking zone
knob to the right until you see
in the
display. After that set the heat setting
immediately.
1
2
3
4
5
6
7
8
9
10
11
0
123456789
4.4 Timer
Count Down Timer
Use the Count Down Timer to set how
long the cooking zone operates for only
this one time.
Set the Count Down Timer after the
selection of the cooking zone.
You can set the heat setting before or af-
ter you set the timer.
•
To set the cooking zone: touch
again and again until the indicator of a
necessary cooking zone comes on.
• To activate the Count Down Timer:
touch
of the timer to set the time (
00
-
99
minutes). When the indicator
of the cooking zone start to flash slow,
the time counts down.
• To see the remaining time: set the
cooking zone with
. The indicator
of the cooking zone starts to flash
quickly. The display shows the remain-
ing time.
• To change the Count Down Timer:
set the cooking zone with
. Touch
or .
• To deactivate the timer: set the
cooking zone with
. Touch . The
remaining time counts back to
00
.
The indicator of the cooking zone
goes out. To deactivate you can also
touch
and at the same time.
When the countdown comes to an
end, the sound operates and
00
flash-
es. The cooking zone deactivates.
•
To stop the sound: touch
CountUp Timer ( The count up
timer)
Use the CountUp Timer to monitor how
long the cooking zone operates.
• To set the cooking zone (if more
than 1 cooking zone operate ) :
touch
again and again until the in-
dicator of a necessary cooking zone
comes on.
• To activate the CountUp Timer:
touch
of the timer comes on.
When the indicator of the cooking
zone starts to flash slow, the time
counts up. The display switches be-
tween
and counted time (minutes).
• To see how long the cooking zone
operates: set the cooking zone with
. The indicator of the cooking zone
starts to flash quickly. The display
shows the time that the cooking zone
operates.
• To deactivate the CountUp Timer:
set the cooking zone with
and
touch
or to deactivate the timer.
The indicator of the cooking zone
goes out.
ENGLISH 21

Minute Minder
You can use the timer as a Minute Mind-
er while the appliance is activated and
the cooking zones do not operate (the
heat setting display shows
).
• To activate the Minute Minder:
Touch
. Touch or of the timer
to set the time. The display of the
cooking zones deactivates automati-
cally after 10 seconds. When the time
comes to an end, the sound operates
and
00
flashes.
•
To stop the sound: touch .
• To deactivate the Minute Minder:
Activate and deactivate the left front
cooking zone for a short time.
The Minute Minder function has no ef-
fect on the operation of the cooking
zones.
4.5 STOP+GO
The function sets all cooking zones
that operate to the Keep Warm setting (
).
The
function does not stop the timer
function.
•
To activate this function touch
.
The symbol
comes on.
•
To deactivate this function touch
.
The heat setting that you set before
comes on.
When you change the heat set-
tings, the function stops and the
displays show the new heat set-
tings.
4.6 Lock
You can lock the sensors on the hob
when the cooking zones operate.
First set the heat setting.
To activate this function touch
. The
symbol
comes on for 4 seconds.
The Timer stays on.
To deactivate this function touch
.
The heat setting that you set before
comes on.
When you change the heat setting, you
deactivate this function.
When you deactivate the appliance, you
also deactivate this function.
4.7 The Child Safety Device
This function prevents an accidental op-
eration of the hob.
To activate The Child Safety Device
• The appliance is deactivated.
•
Touch
for 4 seconds until the sym-
bol
flashes.
•
Touch in the time when symbol
flashes, the symbol comes on for 4
seconds.
To deactivate The Child Safety Device
• The appliance is deactivated.
•
Touch
until the symbol flashes.
•
Touch in the time when symbol
flashes, the symbol comes on for 4
seconds.
Overriding The Child Safety Device for
one cooking session
• Activate the cooking zone. The sym-
bol
comes on. Touch until the
symbol
comes on.
•
Set the heat setting from position
in less than 4 seconds. You can oper-
ate the hob.
• The Child Safety Device operates after
you deactivate the appliance.
4.8 OffSound Control
(Deactivation and activation of
the sounds)
Deactivation of the sounds
Deactivate the appliance.
Touch
for 3 seconds, sound operates.
Touch
, sound operates. Touch for
3 seconds.
comes on, the sound is
on. Touch
, comes on, the sound
is off.
When this function operates, you can
hear sounds only when:
• the Minute Minder comes down
• The Count Down Timer comes down
• you put something on the control pan-
el.
Activation of the sounds
Deactivate the appliance.
22
www.aeg.com

Touch for 3 seconds. Touch .
Touch
for 3 seconds. . comes on,
because the sound is off. Touch
,
comes on. The sound is on.
5. HELPFUL HINTS AND TIPS
5.1 Cookware
Information about the cookware
• The bottom of the cookware must be
as thick and flat as possible.
• Cookware made of enamelled steel
and with aluminium or copper bot-
toms can cause the colour change on
the glass-ceramic surface.
5.2 Energy saving
How to save energy
• If it is possible, always put the lids on
the cookware.
• Put cookware on a cooking zone be-
fore you start it.
• Stop the cooking zones before the
end of the cooking time to use residu-
al heat.
• The bottom of pans and cooking
zones must have the same dimension.
5.3 Öko Timer (Eco Timer)
To save energy, the heater of the
cooking zone deactivates before
the count down timer sounds.
The difference in the operation
time depends on the heat setting
level and the length of the cook-
ing operation.
Information on acrylamides
Important! According to the newest
scientific knowledge, if you brown food
(specially the one which contains starch),
acrylamides can pose a health risk. Thus,
we recommend that you cook at the
lowest temperatures and do not brown
food too much.
6. CARE AND CLEANING
Clean the appliance after each use.
Always use cookware with clean bottom.
Scratches or dark stains on the
glass-ceramic cause no effect on
how the appliance operates.
To remove the dirt:
1.
– Remove immediately: melted
plastic, plastic foil, and food with
sugar. If not, the dirt can cause
damage to the appliance. Use a
special scraper for the glass . Put
the scraper on the glass surface at
an acute angle and move the
blade on the surface .
– Remove after the appliance is
sufficiently cool: limescale rings ,
water rings, fat stains, shiny metal-
lic discolorations. Use a special
cleaning agent for glass ceramic
or stainless steel.
2.
Clean the appliance with a moist
cloth and some detergent.
3.
At the end rub the appliance dry
with a clean cloth.
ENGLISH 23

7. TROUBLESHOOTING
Problem Possible cause Remedy
You cannot activate the
appliance or operate it.
The appliance is not
connected to an electri-
cal supply or it is con-
nected incorrectly.
Check if the appliance is
correctly connected to
the electrical supply (refer
to connection diagram).
Activate the appliance
again and set the heat
setting in less than 10
seconds.
You touched 2 or more
sensor fields at the same
time.
Touch only one sensor
field.
The STOP+GO function
operates.
Refer to the chapter “Dai-
ly Use”.
There is water or fat
stains on the control
panel.
Clean the control panel.
An acoustic signal
sounds and the appli-
ance deactivates.
An acoustic signal
sounds when the appli-
ance is deactivated.
You put something on
one or more sensor
fields.
Remove the object from
the sensor fields.
The residual heat indica-
tor does not come on.
The cooking zone is not
hot because it operated
only for a short time.
If the cooking zone oper-
ated sufficiently long to
be hot, speak to the serv-
ice centre.
The Automatic Heat Up
function does not oper-
ate.
The highest heat setting
is set.
The highest heat setting
has the same power as
the Automatic Heat Up
function.
You cannot activate the
outer ring.
Activate the inner ring
first.
The sensor fields be-
come hot.
The cookware is too
large or you put it too
near to the controls.
Put large cookware on
the rear cooking zones if
necessary.
There is no signal when
you touch the panel sen-
sor fields
The signals are deactiva-
ted.
Activate the signals (see
OffSound Control).
comes on.
The Automatic Switch
Off operates.
Deactivate the appliance
and activate it again.
comes on.
The Child Safety Device
or the Lock function op-
erates.
Refer to the chapter “Dai-
ly Use”.
24
www.aeg.com

Problem Possible cause Remedy
and a number come
on.
There is an error in the
appliance.
Disconnect the appliance
from the electrical supply
for some time. Discon-
nect the fuse from the
electrical system of the
house. Connect it again.
If
comes on again,
speak to the service cen-
tre.
If you tried the above solutions and can-
not repair the problem, speak to your
dealer or the customer service. Give the
data from the rating plate, three digit
letter code for the glass ceramic (it is in
the corner of the glass surface) and an
error message that comes on.
Make sure, you operated the appliance
correctly. If not the servicing by a cus-
tomer service technician or dealer will
not be free of charge, also during the
warranty period. The instructions about
the customer service and conditions of
guarantee are in the guarantee booklet.
8. INSTALLATION INSTRUCTIONS
WARNING!
Refer to "Safety information"
chapter.
Before the installation
Before the installation of the appliance,
record the information below from the
rating plate. The rating plate is on the
bottom of the appliance casing.
• Model ...........................
• PNC .............................
• Serial number ....................
8.1 Built-in appliances
• Only use the built-in appliances after
you assemble the appliance into cor-
rect built-in units and work surfaces
that align to the standards.
8.2 Assembly
min.
50mm
min.
500mm
490
+1
mm
560
+1
mm
R 5mm
55mm
ENGLISH 25

min.
28 mm
9. TECHNICAL INFORMATION
Modell HE634070XB Prod.Nr. 949 595 055 01
Typ 58 HAD C6 AO 220-240 V 50-60 Hz
Made in Germany
Ser.Nr. .......... 7.1 kW
AEG
Cooking zones power
Cooking zone Nominal Power (Max heat setting)
[W]
Right rear —170 / 265 mm 1500 / 2400 W
Right front — 145 mm 1200 W
Left rear — 145 mm 1200 W
Left front — 120 / 175 / 210 mm 800 / 1600 / 2300 W
10. ENVIRONMENT CONCERNS
Recycle the materials with the
symbol
. Put the packaging in
applicable containers to recycle it.
Help protect the environment and
human health and to recycle waste
of electrical and electronic
appliances. Do not dispose
appliances marked with the symbol
with the household waste. Return the
product to your local recycling
facility or contact your municipal
office.
26
www.aeg.com

SOMMAIRE
1. CONSIGNES DE SÉCURITÉ . . . . . . . . . . . . . . . . . . . . . . . . . . . . . . . . . . . . . . . . . . . . . . . . . . 28
2. INSTRUCTIONS DE SÉCURITÉ . . . . . . . . . . . . . . . . . . . . . . . . . . . . . . . . . . . . . . . . . . . . . . . . 29
3. DESCRIPTION DE L'APPAREIL . . . . . . . . . . . . . . . . . . . . . . . . . . . . . . . . . . . . . . . . . . . . . . . . 31
4. UTILISATION QUOTIDIENNE . . . . . . . . . . . . . . . . . . . . . . . . . . . . . . . . . . . . . . . . . . . . . . . . 33
5. CONSEILS UTILES . . . . . . . . . . . . . . . . . . . . . . . . . . . . . . . . . . . . . . . . . . . . . . . . . . . . . . . . . . 36
6. ENTRETIEN ET NETTOYAGE . . . . . . . . . . . . . . . . . . . . . . . . . . . . . . . . . . . . . . . . . . . . . . . . . 36
7. EN CAS D'ANOMALIE DE FONCTIONNEMENT . . . . . . . . . . . . . . . . . . . . . . . . . . . . . . . . . 37
8. INSTRUCTIONS D'INSTALLATION . . . . . . . . . . . . . . . . . . . . . . . . . . . . . . . . . . . . . . . . . . . . 38
9. CARACTERISTIQUES TECHNIQUES . . . . . . . . . . . . . . . . . . . . . . . . . . . . . . . . . . . . . . . . . . . 39
10. EN MATIÈRE DE PROTECTION DE L'ENVIRONNEMENT . . . . . . . . . . . . . . . . . . . . . . . . . 40
POUR DES RÉSULTATS PARFAITS
Merci d'avoir choisi ce produit AEG. Nous l'avons conçu pour qu'il vous offre des
performances irréprochables pour longtemps, en intégrant des technologies innovantes qui
vous simplifient la vie grâce à des caractéristiques que vous ne trouverez pas forcément sur
des appareils ordinaires. Veuillez prendre quelques instants pour lire cette notice afin d'utiliser
au mieux votre appareil.
Visitez notre site Internet pour :
Obtenir des conseils d'utilisation, des brochures, de l'aide, des informations :
www.aeg.com
Enregistrer votre produit pour obtenir un meilleur service :
www.aeg.com/productregistration
Acheter des accessoires, consommables et pièces de rechange d'origine pour votre
appareil :
www.aeg.com/shop
SERVICE APRÈS-VENTE
N'utilisez que des pièces de rechange d'origine.
Avant de contacter le service, assurez-vous de disposer des informations suivantes :
Vous trouverez ces informations sur la plaque signalétique. Modèle, PNC, numéro de série.
Avertissement/Attention : consignes de sécurité.
Informations générales et conseils
Informations écologiques
Sous réserve de modifications.
FRANÇAIS 27

1. CONSIGNES DE SÉCURITÉ
Avant d'installer et d'utiliser cet appareil, lisez soigneu-
sement les instructions fournies. Le fabricant ne peut
être tenu pour responsable des dommages et blessures
liés à une mauvaise installation ou utilisation. Conservez
toujours cette notice avec votre appareil pour vous y ré-
férer ultérieurement.
1.1 Sécurité des enfants et des personnes
vulnérables
AVERTISSEMENT
Risque d'asphyxie, de blessure ou d'invalidité per-
manente.
• Cet appareil peut être utilisé par des enfants de plus
de 8 ans, ainsi que des personnes dont les capacités
physiques, sensorielles et mentales sont réduites ou
dont les connaissances et l'expérience sont insuffi-
santes, à condition d'être surveillés par une personne
responsable de leur sécurité.
• Ne laissez pas les enfants jouer avec l'appareil.
• Ne laissez pas les emballages à la portée des enfants.
• Tenez les enfants et les animaux éloignés de l'appa-
reil lorsqu'il est en cours de fonctionnement ou lors-
qu'il refroidit. Les parties accessibles sont chaudes.
• Si l'appareil est équipé d'un dispositif de sécurité en-
fants, nous vous recommandons de l'activer.
• Les enfants ne doivent pas nettoyer ni entreprendre
une opération de maintenance sur l'appareil sans sur-
veillance.
1.2 Sécurité générale
• L'appareil et ses parties accessibles deviennent
chauds pendant son fonctionnement. Ne touchez pas
les éléments chauffants.
28
www.aeg.com

• Ne faites pas fonctionner l'appareil avec un minuteur
externe ou un système de commande à distance.
• Il peut être dangereux de laisser chauffer de la grais-
se ou de l'huile sans surveillance sur une table de
cuisson car cela pourrait provoquer un incendie.
• N'essayez jamais d'éteindre un feu avec de l'eau.
Mettez à l'arrêt l'appareil puis couvrez les flammes,
par exemple avec un couvercle ou une couverture
ignifuge.
• N'entreposez rien sur les surfaces de cuisson.
• N’utilisez pas de nettoyeur vapeur pour nettoyer l'ap-
pareil.
• Ne posez pas d'objets métalliques tels que couteaux,
fourchettes, cuillères ou couvercles sur la table de
cuisson car ils pourraient chauffer.
• Si la surface vitrocéramique est fissurée, mettez à l'ar-
rêt l'appareil pour éviter tout risque d'électrocution.
2.
INSTRUCTIONS DE SÉCURITÉ
2.1 Installation
AVERTISSEMENT
L'appareil doit être installé uni-
quement par un professionnel
qualifié.
• Retirez l'intégralité de l'emballage.
• N'installez pas et ne branchez pas un
appareil endommagé.
• Suivez scrupuleusement les instruc-
tions d'installation fournies avec l'ap-
pareil.
• Respectez l'espacement minimal re-
quis par rapport aux autres appareils.
• L'appareil est lourd, prenez toujours
des précautions lorsque vous le dépla-
cez. Portez toujours des gants de sé-
curité.
• Isolez les surfaces découpées à l'aide
d'un matériau d'étanchéité pour éviter
que la moisissure ne provoque de
gonflements.
• Protégez la partie inférieure de l'appa-
reil de la vapeur et de l'humidité.
• N'installez pas l'appareil près d'une
porte ou sous une fenêtre. Les réci-
pients chauds risqueraient de tomber
de l'appareil lors de l'ouverture de cel-
les-ci.
• Si l'appareil est installé au-dessus de
tiroirs, assurez-vous qu'il y a suffisam-
ment d'espace entre le fond de l'ap-
pareil et le tiroir supérieur pour que
l'air puisse circuler.
• Le dessous de l'appareil peut devenir
très chaud. Nous vous recommandons
d'installer un panneau de séparation
ignifuge sous l'appareil pour en blo-
quer l'accès.
FRANÇAIS 29

Branchement électrique
AVERTISSEMENT
Risque d'incendie ou d'électro-
cution.
• L'ensemble des branchements électri-
ques doit être effectué par un techni-
cien qualifié.
• L'appareil doit être relié à la terre.
• Avant toute intervention, assurez-vous
que l'appareil est débranché.
• Utilisez le câble d'alimentation électri-
que approprié.
• Ne laissez pas le câble d'alimentation
s'emmêler.
• Assurez-vous que le câble d'alimenta-
tion ou la fiche (si présente) n'entrent
pas en contact avec les surfaces brû-
lantes de l'appareil ou les récipients
brûlants lorsque vous branchez l'appa-
reil à des prises électriques situées à
proximité.
• Assurez-vous que l'appareil est bien
installé. Un câble d'alimentation lâche
et inapproprié ou une fiche (si présen-
te) non serrée peuvent être à l'origine
d'une surchauffe des bornes.
• Assurez-vous qu'une protection anti-
électrocution est installée.
• Utilisez un collier anti-traction sur le
câble.
• Veillez à ne pas endommager la fiche
secteur (si présente) ni le câble d'ali-
mentation. Contactez le service après-
vente ou un électricien pour remplacer
le câble d'alimentation s'il est endom-
magé.
• L'installation électrique doit être équi-
pée d'un dispositif d'isolement à cou-
pure omnipolaire. Le dispositif d'isole-
ment doit présenter une distance
d'ouverture des contacts d'au moins
3 mm.
• N'utilisez que des systèmes d'isolation
appropriés : des coupe-circuits, des
fusibles (les fusibles à visser doivent
être retirés du support), un disjoncteur
différentiel et des contacteurs.
2.2 Utilisation
AVERTISSEMENT
Risque de blessures, de brûlures
ou d'électrocution.
• Utilisez cet appareil dans un environ-
nement domestique.
• Ne modifiez pas les caractéristiques
de cet appareil.
• Ne faites pas fonctionner l'appareil
avec un minuteur externe ou un systè-
me de commande à distance.
• Ne laissez jamais l'appareil sans sur-
veillance pendant son fonctionne-
ment.
• N'utilisez jamais cet appareil avec les
mains mouillées ou lorsqu'il est en
contact avec de l'eau.
• Ne posez pas de couverts ou de cou-
vercles sur les zones de cuisson. Elles
sont chaudes.
• Éteignez les zones de cuisson après
chaque utilisation.
• N'utilisez jamais l'appareil comme
plan de travail ou comme plan de
stockage.
• Si la surface de l'appareil présente des
fêlures, débranchez immédiatement
l'appareil pour éviter tout risque
d'électrocution.
AVERTISSEMENT
Risque d'explosion ou d'incen-
die.
• Les graisses et l'huile chaude peuvent
dégager des vapeurs inflammables.
Tenez les flammes ou les objets
chauds éloignés des graisses et de
l'huile lorsque vous vous en servez
pour cuisiner.
• Les vapeurs dégagées par l'huile très
chaude peuvent provoquer une com-
bustion spontanée.
• L'huile qui a servi contient des restes
d'aliments qui peuvent provoquer un
incendie à température plus faible que
l'huile n'ayant jamais servi.
• Ne placez pas de produits inflamma-
bles ou d'éléments imbibés de pro-
duits inflammables à l'intérieur, à
proximité ou sur l'appareil.
• Ne tentez pas d'éteindre un incendie
avec de l'eau. Débranchez l'appareil
et couvrez les flammes à l'aide d'un
couvercle ou d'une couverture à in-
cendie.
AVERTISSEMENT
Risque de dommage de l'appa-
reil.
30
www.aeg.com

• Ne laissez pas de récipients chauds
sur le bandeau de commande.
• Ne laissez pas le contenu des réci-
pients de cuisson s'évaporer.
• Prenez soin de ne pas laisser tomber
d'objets ou de récipients sur l'appa-
reil. Sa surface risque d'être endom-
magée.
• Ne faites jamais fonctionner les zones
de cuisson avec des récipients de cuis-
son vides ou sans aucun récipient de
cuisson.
• Ne placez jamais de papier aluminium
sur l'appareil.
• N'utilisez pas de récipients en fonte
ou en aluminium, ni de récipients dont
le fond est endommagé et rugueux. Ils
risqueraient de rayer la surface vitro-
céramique. Soulevez toujours ces ob-
jets lorsque vous devez les déplacer
sur la surface de cuisson.
2.3 Entretien et nettoyage
AVERTISSEMENT
Risque de dommage de l'appa-
reil.
• Nettoyez régulièrement l'appareil afin
de maintenir le revêtement en bon
état.
• Ne pulvérisez pas d'eau ni de vapeur
pour nettoyer l'appareil.
• Nettoyez l'appareil avec un chiffon
doux humide. Utilisez uniquement des
produits de lavage neutres. N'utilisez
pas de produits abrasifs, de tampons
à récurer, de solvants ou d'objets mé-
talliques.
2.4 Mise au rebut
AVERTISSEMENT
Risque de blessure ou d'asphy-
xie.
• Contactez votre service municipal
pour obtenir des informations sur la
marche à suivre pour mettre l'appareil
au rebut.
• Débranchez l'appareil de l'alimenta-
tion secteur.
• Coupez le câble d'alimentation et
mettez-le au rebut.
3. DESCRIPTION DE L'APPAREIL
120/175/210 mm
145 mm
145 mm
265 mm
170 mm
1 2
4 35
1
Zone de cuisson
2
Zone de cuisson
3
Zone de cuisson
4
Bandeau de commande
5
Zone de cuisson
3.1 Description du bandeau de commande
FRANÇAIS 31

1
678
2
4
3
5
Appuyez sur les touches sensitives pour faire fonctionner l'appareil. Les
affichages, les voyants et les signaux sonores indiquent quelles fonctions
sont activées.
Touche sensitive Fonction
1
Affichage du minuteur Pour indiquer la durée, en minutes.
2
Pour sélectionner une zone de cuisson.
3
/
Pour augmenter ou diminuer la durée.
4
Pour activer ou désactiver le circuit exté-
rieur de la zone de cuisson.
5
Pour verrouiller ou déverrouiller le ban-
deau de commande.
6
Affichage du niveau de cuis-
son
Pour indiquer le niveau de cuisson.
7
Pour activer et désactiver la fonction
STOP+GO.
8
Pour activer et désactiver les circuits ex-
térieurs.
3.2 Indicateurs du niveau de cuisson
Affichage Description
La zone de cuisson est désactivée.
-
La zone de cuisson est activée.
La fonction STOP+GO est activée.
La fonction de démarrage automatique de la cuisson
est activée.
+ chiffre
Une anomalie de fonctionnement s'est produite.
/ /
OptiHeat Control (Voyant de chaleur résiduelle à trois
niveaux) : continuer la cuisson / maintien au chaud /
chaleur résiduelle.
Le dispositif de verrouillage/sécurité enfants est activé.
32
www.aeg.com

Affichage Description
La fonction d'arrêt automatique est activée.
3.3 OptiHeat Control (3
niveaux de chaleur résiduelle)
AVERTISSEMENT
\ \ La chaleur résiduelle
peut être source de brûlures !
OptiHeat Control indique le niveau de
chaleur résiduelle.
4. UTILISATION QUOTIDIENNE
La table de cuisson fonctionne à l'aide
des manettes du four. Le chapitre trai-
tant de l'utilisation quotidienne du
four vous indique comment faire fonc-
tionner la table de cuisson.
Lorsqu'une zone de cuisson est
en fonctionnement, elle bour-
donne pendant un court instant.
Ce bruit n'est pas signe de dys-
fonctionnement de l'appareil et
n'a aucune incidence sur son bon
fonctionnement.
4.1 Arrêt automatique
Cette fonction arrête l'appareil
automatiquement si :
• Toutes les zones de cuisson sont dés-
activées (
).
• Vous ne réglez pas le niveau de cuis-
son après avoir allumé l'appareil.
• Vous avez renversé quelque chose ou
placé un objet sur le bandeau de com-
mande pendant plus de 10 secondes
(une casserole, un torchon, etc.). Un si-
gnal sonore retentit pendant quelques
instants et l'appareil s'éteint. Retirez
l'objet du bandeau de commande ou
nettoyez celui-ci.
• Vous ne désactivez pas la zone de
cuisson ou ne modifiez pas le niveau
de cuisson. Au bout de quelques ins-
tants,
s'allume et l'appareil s'éteint.
Voir ci-dessous.
• La relation entre le niveau de cuisson
et les durées de la fonction d'arrêt au-
tomatique :
•
, - : 6 heures
•
- : 5 heures
•
: 4 heures
•
- : 1 heure 30 minutes
4.2 Activation et désactivation
des circuits de cuisson
extérieurs
Vous pouvez adapter la surface de cuis-
son à la dimension du récipient.
Pour activer le circuit de cuisson exté-
rieur, appuyez sur la touche sensitive
/ . Le voyant s'allume. Pour activer
plusieurs circuits de cuisson extérieurs,
appuyez de nouveau sur la même tou-
che sensitive. Le voyant correspondant
s'allume.
Répétez la procédure ci-dessus pour
désactiver le circuit de cuisson extérieur.
Le voyant de contrôle s’éteint.
4.3 La fonction de démarrage
automatique de la cuisson
La fonction de démarrage automatique
de la cuisson est tout d'abord réglée au
maximum, puis diminue pour atteindre
le niveau souhaité. Pour activer la fonc-
tion Booster, tournez la manette de la
zone de cuisson vers la droite jusqu'à ce
que
s'affiche. Après cela, réglez le ni-
veau de cuisson immédiatement.
FRANÇAIS 33

1
2
3
4
5
6
7
8
9
10
11
0
123456789
4.4 Minuteur
Minuteur
Utilisez le minuteur pour régler la durée
de fonctionnement de la zone de cuis-
son pendant une session.
Réglez le minuteur après avoir sélec-
tionné la zone de cuisson.
Vous pouvez régler le niveau de cuisson
avant ou après avoir réglé le minuteur.
• Pour choisir la zone de cuisson : ap-
puyez sur
à plusieurs reprises jus-
qu'à ce que l'indicateur de la zone de
cuisson correspondante s'affiche.
• Pour activer le minuteur : appuyez
sur la touche
du minuteur pour ré-
gler la durée (de
00
à
99
minutes).
Lorsque le voyant de la zone de cuis-
son clignote lentement, le minuteur
démarre.
• Vérification du temps restant : choi-
sissez la zone de cuisson à l'aide de
. Le voyant de la zone de cuisson
clignote rapidement. L'écran indique
le temps restant.
• Pour modifier le minuteur : choisis-
sez la zone de cuisson à l'aide de
.
Appuyez sur
ou .
• Pour désactiver le minuteur : choisis-
sez la zone de cuisson à l'aide de
.
Appuyez sur
. Le temps restant est
décompté jusqu'à
00
. Le voyant de
la zone de cuisson s'éteint. Pour le
désactiver, vous pouvez également
appuyer sur
et simultanément.
Lorsque le minuteur touche à sa fin, un
signal sonore se fait entendre et
00
clignote. La zone de cuisson se désac-
tive.
• Pour arrêter le signal sonore : ap-
puyez sur
CountUp Timer (Minuteur
progressif)
Utilisez le CountUp Timer pour contrôler
la durée de fonctionnement de la zone
de cuisson sélectionnée.
• Pour sélectionner la zone de cuisson
(si plusieurs zones sont en cours
d'utilisation) : appuyez sur
à plu-
sieurs reprises jusqu'à ce que l'indica-
teur de la zone de cuisson correspon-
dante s'affiche.
• Pour activer la fonction CountUp Ti-
mer : appuyez sur
jusqu'à ce que
s'allume. Lorsque le voyant de la
zone de cuisson clignote lentement, le
minuteur démarre. L'écran affiche, en
alternance,
et le nombre de minu-
tes écoulées.
• Pour contrôler la durée de fonction-
nement de la zone de cuisson sélec-
tionnée : choisissez la zone de cuisson
à l'aide de
. Le voyant de la zone
de cuisson clignote rapidement. L'affi-
chage indique la durée de fonctionne-
ment de la zone de cuisson.
• Pour dés activer le CountUp Timer :
choisissez la zone de cuisson à l'aide
de
et appuyez sur ou pour
désactiver le minuteur.
Minuterie indépendante
Vous pouvez utiliser le minuteur comme
Minuterie indépendante lorsque l'appa-
reil est allumé mais que vous n'utilisez
pas les zones de cuisson (le niveau de
cuisson indiqué est
).
• Pour activer la minuterie : Appuyez
sur
. Appuyez sur la touche ou
du minuteur pour régler la durée.
L'affichage de la zone de cuisson se
désactive automatiquement au bout
de 10 secondes. Lorsque le minuteur
touche à sa fin, un signal sonore se fait
entendre et
00
clignote.
34
www.aeg.com

• Pour arrêter le signal sonore : ap-
puyez sur
.
• Pour désactiver la minuterie : Acti-
vez la zone de cuisson avant gauche
pendant un court instant puis désacti-
vez-la.
La fonction Minuterie est sans effet sur
le fonctionnement des zones de cuisson.
4.5 STOP+GO
La fonction permet de mettre simul-
tanément tous les foyers de cuisson allu-
més en position de maintien au chaud (
).
La fonction
n’interrompt pas le minu-
teur.
• Pour activer cette fonction, appuyez
sur
. Le symbole s'allume.
• Pour désactiver cette fonction, ap-
puyez sur
. Le niveau de cuisson
précédent s'allume.
Lorsque vous modifiez les ni-
veaux de cuisson, la fonction
s'arrête et l'affichage montre les
nouveaux réglages.
4.6 Verrouillage
Vous pouvez verrouiller les capteurs sur
la table de cuisson quand les zones de
cuisson fonctionnent.
Réglez tout d'abord le niveau de cuis-
son.
Pour activer cette fonction, appuyez sur
. Le symbole s'allume pendant 4
secondes.
Le minuteur reste allumé.
Pour désactiver cette fonction, appuyez
sur
. Le niveau de cuisson précédent
s'allume.
Lorsque vous changez de niveau de cuis-
son, vous désactivez cette fonction.
Lorsque vous mettez l'appareil à l'arrêt,
vous désactivez également cette fonc-
tion.
4.7 Dispositif de sécurité
enfants
Cette fonction permet d'éviter une utili-
sation involontaire de la table de cuis-
son.
Pour activer le dispositif de sécurité
enfants
• L'appareil est éteint.
•
Appuyez sur la touche
pendant
4 secondes jusqu'à ce que le symbole
clignote.
•
Appuyez sur pendant que le sym-
bole
clignote ; le symbole s'allu-
me pendant 4 secondes.
Pour désactiver le dispositif de
sécurité enfants
• L'appareil est éteint.
•
Appuyez sur la touche
jusqu'à ce
que le symbole
clignote.
•
Appuyez sur
pendant que le sym-
bole
clignote ; le symbole s'allu-
me pendant 4 secondes.
Désactivation du dispositif de sécurité
enfants le temps d'une cuisson
• Activez la zone de cuisson. Le symbole
s'allume. Appuyez sur la touche
jusqu'à ce que le symbole s'allume.
• Réglez le niveau de cuisson à partir de
la position
dans les 4 secondes qui
suivent. Vous pouvez utiliser la table
de cuisson.
• Le dispositif de sécurité enfants est ré-
activé dès que vous éteignez l'appa-
reil.
4.8 OffSound Control
(Désactivation et activation
des signaux sonores)
Désactivation des signaux
sonores
Mettez à l'arrêt l'appareil.
Appuyez sur
pendant 3 secondes, le
son se met en fonctionnement. Appuyez
sur la touche
, le son se met en fonc-
tionnement. Appuyez sur
pendant 3
secondes.
s'allume, le signal sonore
est activé. Appuyez sur
, s'allume,
le signal sonore est désactivé.
Lorsque cette fonction est en fonction-
nement, vous ne pouvez entendre des
signaux sonores que lorsque :
• le minuteur arrive en fin de course
FRANÇAIS 35

• le décompte de la minuterie commen-
ce
• vous posez un objet sur le bandeau de
commande.
Activation des signaux sonores
Mettez à l'arrêt l'appareil.
Appuyez sur
pendant 3 secondes.
Appuyez sur
. Appuyez sur pen-
dant 3 secondes. .
s'affiche, car le si-
gnal sonore est arrêté. Appuyez sur
,
s'allume. Les signaux sonores sont
activés.
5. CONSEILS UTILES
5.1 Ustensiles de cuisson
Informations concernant les us-
tensiles de cuisson
• Le fond de l'ustensile de cuisson doit
être aussi plat et épais que possible.
• Les récipients de cuisson avec un fond
en émail, en aluminium ou en cuivre
peuvent laisser des traces sur la surfa-
ce vitrocéramique.
5.2 Économies d'énergie
Comment réaliser des écono-
mies d'énergie
• Si possible, couvrez toujours les réci-
pients de cuisson avec un couvercle
pendant la cuisson.
• Déposez toujours le récipient sur la
zone de cuisson avant de mettre celle-
ci en fonctionnement.
• Désactivez les zones de cuisson avant
la fin du temps de cuisson pour utiliser
la chaleur résiduelle.
• Veillez à ce que le fond du plat de
cuisson corresponde à la dimension
de la zone de cuisson.
5.3 Öko Timer (Minuteur Eco)
Pour réaliser des économies
d'énergie, la zone de cuisson se
désactive automatiquement
avant le signal du minuteur. La
différence de temps de fonction-
nement dépend du niveau et de
la durée de cuisson.
6. ENTRETIEN ET NETTOYAGE
Nettoyez l'appareil après chaque utilisa-
tion.
Utilisez toujours des récipients de cuis-
son dont le fond est propre.
Les égratignures ou les taches
sombres sur la vitrocéramique
n'ont aucune influence sur le
fonctionnement de l'appareil.
Pour enlever les salissures :
1.
– Enlevez immédiatement : plasti-
que fondu, films plastiques et ali-
ments contenant du sucre. Sinon,
la saleté pourrait endommager
l'appareil. Utilisez un racloir spé-
cial pour la vitre. Tenez le racloir
incliné sur la surface vitrée et fai-
tes glisser la lame du racloir pour
enlever les salissures.
– Une fois que l'appareil a suffi-
samment refroidi, enlevez : tra-
ces de calcaire et d'eau, projec-
tions de graisse, décolorations
métalliques luisantes. Utilisez un
agent de nettoyage pour vitrocé-
ramique ou acier inoxydable.
2.
Nettoyez l'appareil à l'aide d'un chif-
fon humide et d'un peu de déter-
gent.
3.
Et enfin, essuyez l'appareil à l'aide
d'un chiffon propre.
36
www.aeg.com

7. EN CAS D'ANOMALIE DE FONCTIONNEMENT
Problème Cause probable Solution
Vous ne pouvez pas allu-
mer l'appareil ou le faire
fonctionner.
L'appareil n'est pas con-
necté à une source d'ali-
mentation électrique ou
le branchement est in-
correct.
Vérifiez que l'appareil est
correctement branché à
une source d'alimenta-
tion électrique (reportez-
vous au schéma de bran-
chement).
Allumez de nouveau l'ap-
pareil et réglez le niveau
de cuisson en moins de
10 secondes.
Vous avez appuyé sur
plusieurs touches sensi-
tives en même temps.
N'appuyez que sur une
seule touche sensitive à
la fois.
La fonction STOP+GO
est activée.
Reportez-vous au chapi-
tre « Utilisation quoti-
dienne ».
Il y a de l'eau ou des ta-
ches de graisse sur le
bandeau de commande.
Nettoyez le bandeau de
commande.
Un signal sonore retentit
et l'appareil s'éteint.
Un signal sonore retentit
lorsque l'appareil est
éteint.
Vous avez posé quelque
chose sur une ou plu-
sieurs touches sensiti-
ves.
Retirez l'objet des tou-
ches sensitives.
Le voyant de chaleur ré-
siduelle ne s'allume pas.
La zone de cuisson n'est
pas chaude parce qu'el-
le n'a fonctionné que
peu de temps.
Si la zone de cuisson a eu
assez de temps pour
chauffer, faites appel à
votre service après-vente.
La fonction de démarra-
ge automatique de la
cuisson ne fonctionne
pas.
Le niveau de cuisson le
plus élevé est réglé.
Le niveau de cuisson le
plus élevé est identique à
la fonction de démarrage
automatique de la cuis-
son.
Impossible d'activer le
circuit extérieur.
Activez d'abord le circuit
intérieur.
Les touches sensitives
sont chaudes.
Le récipient est trop
grand ou vous l'avez pla-
cé trop près des com-
mandes.
Placez les récipients de
grande taille sur les zones
de cuisson arrière, si né-
cessaire.
Aucun signal sonore ne
se fait entendre lorsque
vous appuyez sur les
touches sensitives du
bandeau
Les signaux sonores
sont désactivés.
Activez les signaux sono-
res (reportez-vous au cha-
pitre « Commande son »).
FRANÇAIS 37

Problème Cause probable Solution
s'allume.
La fonction d'arrêt auto-
matique est activée.
Éteignez l'appareil puis
allumez-le de nouveau.
s'allume.
Le dispositif de sécurité
enfants ou de verrouilla-
ge est activé.
Reportez-vous au chapi-
tre « Utilisation quoti-
dienne ».
et un chiffre s'affi-
chent.
Une erreur s'est produi-
te dans l'appareil.
Débranchez l'appareil de
l'alimentation électrique
pendant quelques minu-
tes. Déconnectez le fu-
sible de l'installation do-
mestique. Rebranchez
l'appareil. Si
s'allume à
nouveau, contactez votre
service après-vente.
Si les indications ci-dessus ne vous per-
mettent pas de remédier au problème,
veuillez vous adresser à votre revendeur
ou au service après-vente. Veuillez lui
fournir les informations figurant sur la
plaque signalétique, la combinaison à 3
lettres et chiffres pour la vitrocéramique
(située dans un des coins de la table de
cuisson) et le type de message d'erreur
qui s'affiche.
Veillez à faire fonctionner l'appareil cor-
rectement. En cas d'erreur de manipula-
tion de la part de l'utilisateur, le dépla-
cement du technicien du service après-
vente ou du magasin vendeur peut être
facturé même en cours de garantie. Les
instructions relatives au service après-
vente et aux conditions de garantie figu-
rent dans le livret de garantie.
8. INSTRUCTIONS D'INSTALLATION
AVERTISSEMENT
Reportez-vous au chapitre « Con-
signes de sécurité ».
Avant l'installation
Avant l'installation de l'appareil, notez
ci-dessous les informations figurant sur
la plaque signalétique. La plaque signa-
létique se trouve au bas de l'enveloppe
extérieure de l'appareil.
• Modèle ...........................
• PNC .............................
• Numéro de série ....................
8.1 Appareils encastrables
• Les appareils encastrables ne peuvent
être mis en fonctionnement qu'après
avoir été installés dans des meubles et
sur des plans de travail homologués et
adaptés.
38
www.aeg.com

8.2 Montage
min.
50mm
min.
500mm
490
+1
mm
560
+1
mm
R 5mm
55mm
min.
28 mm
9. CARACTERISTIQUES TECHNIQUES
Modell HE634070XB Prod.Nr. 949 595 055 01
Typ 58 HAD C6 AO 220-240 V 50-60 Hz
Made in Germany
Ser.Nr. .......... 7.1 kW
AEG
Puissance des zones de cuisson
Zone de cuisson Puissance nominale (niveau de cuis-
son max.) [W]
Arrière droite — 170 / 265 mm 1500 / 2400 W
Avant droite — 145 mm 1200 W
Arrière gauche — 145 mm 1200 W
Avant gauche — 120 / 175 / 210 mm 800 / 1600 / 2300 W
FRANÇAIS 39

10. EN MATIÈRE DE PROTECTION DE L'ENVIRONNEMENT
Recyclez les matériaux portant le
symbole
. Déposez les emballages
dans les conteneurs prévus à cet
effet.
Contribuez à la protection de
l'environnement et à votre sécurité,
recyclez vos produits électriques et
électroniques. Ne jetez pas les
appareils portant le symbole
avec
les ordures ménagères. Emmenez un
tel produit dans votre centre local de
recyclage ou contactez vos services
municipaux.
40
www.aeg.com

INHALT
1. SICHERHEITSINFORMATIONEN . . . . . . . . . . . . . . . . . . . . . . . . . . . . . . . . . . . . . . . . . . . . . . 42
2. SICHERHEITSHINWEISE . . . . . . . . . . . . . . . . . . . . . . . . . . . . . . . . . . . . . . . . . . . . . . . . . . . . . 43
3. GERÄTEBESCHREIBUNG . . . . . . . . . . . . . . . . . . . . . . . . . . . . . . . . . . . . . . . . . . . . . . . . . . . . 45
4. TÄGLICHER GEBRAUCH . . . . . . . . . . . . . . . . . . . . . . . . . . . . . . . . . . . . . . . . . . . . . . . . . . . . . 47
5. PRAKTISCHE TIPPS UND HINWEISE . . . . . . . . . . . . . . . . . . . . . . . . . . . . . . . . . . . . . . . . . . . 49
6. REINIGUNG UND PFLEGE . . . . . . . . . . . . . . . . . . . . . . . . . . . . . . . . . . . . . . . . . . . . . . . . . . . 50
7. FEHLERSUCHE . . . . . . . . . . . . . . . . . . . . . . . . . . . . . . . . . . . . . . . . . . . . . . . . . . . . . . . . . . . . . 51
8. MONTAGEANLEITUNG . . . . . . . . . . . . . . . . . . . . . . . . . . . . . . . . . . . . . . . . . . . . . . . . . . . . . 52
9. TECHNISCHE DATEN . . . . . . . . . . . . . . . . . . . . . . . . . . . . . . . . . . . . . . . . . . . . . . . . . . . . . . . 53
10. UMWELTTIPPS . . . . . . . . . . . . . . . . . . . . . . . . . . . . . . . . . . . . . . . . . . . . . . . . . . . . . . . . . . . . . 54
FÜR PERFEKTE ERGEBNISSE
Danke, dass Sie sich für dieses AEG Produkt entschieden haben. Wir haben es geschaffen,
damit Sie viele Jahre von seiner ausgezeichneten Leistung und den innovativen Technologien,
die Ihnen das Leben erleichtern, profitieren können. Es ist mit Funktionen ausgestattet, die in
gewöhnlichen Geräten nicht vorhanden sind. Nehmen Sie sich ein paar Minuten Zeit zum
Lesen, um seine Vorzüge kennen zu lernen.
Besuchen Sie uns auf unserer Website, um:
Anwendungshinweise, Prospekte, Fehlerbehebungs- und Service-Informationen zu
erhalten:
www.aeg.com
Ihr erworbenes Produkt zu registrieren, um den besten Service dafür zu
gewährleisten:
www.aeg.com/productregistration
Zubehör, Verbrauchsmaterial und Original-Ersatzteile für Ihr Gerät zu erwerben:
www.aeg.com/shop
KUNDENDIENST UND -BETREUUNG
Bitte verwenden Sie ausschließlich Original-Ersatzteile für Ihre Produkte.
Halten Sie folgende Angaben bereit, wenn Sie sich an den Kundendienst wenden
(diese Informationen finden Sie auf dem Typenschild): Modell, Produktnummer (PNC),
Seriennummer.
Warnungs-/ Sicherheitshinweise.
Allgemeine Hinweise und Ratschläge
Hinweise zum Umweltschutz
Änderungen vorbehalten.
DEUTSCH 41

1. SICHERHEITSINFORMATIONEN
Lesen Sie vor der Montage und Verwendung des Ge-
räts sorgfältig die mitgelieferte Anleitung. Der Herstel-
ler haftet nicht für Verletzungen oder Schäden, die
durch eine fehlerhafte Montage entstehen. Bewahren
Sie die Anleitung zum Nachschlagen auf.
1.1 Sicherheit von Kindern und schutzbedürftigen
Personen
WARNUNG!
Es besteht Erstickungsgefahr, das Risiko von Ver-
letzungen oder permanenten Behinderungen.
• Dieses Gerät kann dann von Kindern ab 8 Jahren, von
Personen mit eingeschränkten körperlichen, sensori-
schen oder geistigen Fähigkeiten sowie von Personen
ohne bisherige Erfahrung im Umgang mit solchen
Geräten bedient werden, wenn sie dabei von einer
Person, die für ihre Sicherheit verantwortlich ist, be-
aufsichtigt werden.
• Kinder dürfen nicht mit dem Gerät spielen.
• Halten Sie das Verpackungsmaterial von Kindern fern.
• Halten Sie Kinder und Haustiere vom Gerät fern,
wenn es in Betrieb oder in der Abkühlphase ist. Be-
rührbare Teile sind heiss.
• Falls Ihr Gerät mit einer Kindersicherung ausgestattet
ist, empfehlen wir, diese einzuschalten.
• Reinigung und Wartung des Geräts darf nicht von
Kindern ohne Aufsicht erfolgen.
1.2 Allgemeine Sicherheit
• Das Gerät und die zugänglichen Geräteteile werden
während des Betriebs heiß. Berühren Sie nicht die
Heizelemente.
• Schalten Sie das Gerät nicht über eine externe Zeit-
schaltuhr oder eine separate Fernsteuerung ein.
42
www.aeg.com

• Kochen mit Fett oder Öl auf einem unbeaufsichtigten
Kochfeld ist gefährlich und kann zu einem Brand füh-
ren.
• Versuchen Sie nicht einen Brand mit Wasser zu lö-
schen, sondern schalten Sie das Gerät aus und bede-
cken Sie die Flamme mit einem Deckel oder einer
Feuerlöschdecke.
• Legen Sie keine Gegenstände auf dem Kochfeld ab.
• Benutzen Sie zum Reinigen des Gerätes keinen
Dampfreiniger.
• Legen Sie keine Metallgegenstände wie Messer, Ga-
beln, Löffel oder Topfdeckel auf die Oberfläche des
Kochfelds, da diese heiß werden können.
• Schalten Sie das Gerät sofort ab, wenn Sie Risse auf
der Glaskeramikfläche feststellen. Stromschlagge-
fahr!
2.
SICHERHEITSHINWEISE
2.1 Montage
WARNUNG!
Nur eine qualifizierte Fachkraft
darf den Elektroanschluss des
Geräts vornehmen.
• Entfernen Sie das Verpackungsmateri-
al.
• Stellen Sie ein beschädigtes Gerät
nicht auf und benutzen Sie es nicht.
• Halten Sie sich an die mitgelieferte
Montageanleitung.
• Die Mindestabstände zu anderen Ge-
räten und Küchenmöbeln sind einzu-
halten.
• Seien Sie beim Umsetzen des Geräts
vorsichtig, denn es ist schwer. Tragen
Sie stets Sicherheitshandschuhe.
• Dichten Sie die Ausschnittskanten mit
einem Dichtungsmittel ab, um ein Auf-
quellen durch Feuchtigkeit zu verhin-
dern.
• Schützen Sie die Geräteunterseite vor
Dampf und Feuchtigkeit.
• Installieren Sie das Gerät nicht direkt
neben einer Tür oder unter einem
Fenster. So kann heißes Kochgeschirr
nicht herunterfallen, wenn die Tür
oder das Fenster geöffnet wird.
• Wird das Gerät über Schubladen ein-
gebaut, achten Sie darauf, dass zwi-
schen dem Geräteboden und der
oberen Schublade ein ausreichender
Abstand für die Luftzirkulation vorhan-
den ist.
• Der Boden des Geräts kann heiß wer-
den. Wir empfehlen eine feuerfeste
Trennplatte unter dem Gerät anzu-
bringen, damit der Boden nicht zu-
gänglich ist.
Elektrischer Anschluss
WARNUNG!
Brand- und Stromschlaggefahr.
DEUTSCH 43

• Die elektrischen Anschlüsse müssen
von einem qualifizierten Elektriker aus-
geführt werden.
• Das Gerät muss geerdet sein.
• Vor der Durchführung jeglicher Arbei-
ten muss das Gerät von der elektri-
schen Stromversorgung getrennt wer-
den.
• Stellen Sie sicher, dass Sie das richtige
Kabel für den elektrischen Netzan-
schluss verwenden.
• Achten Sie darauf, dass das Netzkabel
nicht lose hängt oder sich verheddert.
• Stellen Sie beim elektrischen An-
schluss des Gerätes sicher, dass das
Netzkabel oder ggf. der Netzstecker
nicht mit dem heißen Gerät oder heiß-
em Kochgeschirr in Berührung kommt.
• Achten Sie darauf, dass das Gerät ord-
nungsgemäß montiert wird. Wenn
freiliegende oder ungeeignete Netz-
kabel oder Netzstecker verwendet
werden, kann der Anschluss überhit-
zen.
• Sorgen Sie dafür, dass ein Berüh-
rungsschutz installiert wird.
• Kabel zugentlasten.
• Achten Sie darauf, Netzstecker und
Netzkabel nicht zu beschädigen. Wen-
den Sie sich zum Austausch des be-
schädigten Netzkabels an den Kun-
dendienst oder einen Elektriker.
• Die elektrische Installation muss eine
Trenneinrichtung aufweisen, mit der
Sie das Gerät allpolig von der Strom-
versorgung trennen können. Die
Trenneinrichtung muss mit einer Kon-
taktöffnungsbreite von mindestens 3
mm ausgeführt sein.
• Verwenden Sie nur geeignete Trenn-
vorrichtungen: Überlastschalter, Siche-
rungen (Schraubsicherungen müssen
aus dem Halter entfernt werden kön-
nen), Fehlerstromschutzschalter und
Schütze.
2.2 Gebrauch
WARNUNG!
Es besteht Verletzungs-, Verbren-
nungs- und Stromschlaggefahr.
• Das Gerät ist für die Verwendung im
Haushalt vorgesehen.
• Nehmen Sie keine technischen Ände-
rungen am Gerät vor.
• Schalten Sie das Gerät nicht über eine
externe Zeitschaltuhr oder eine sepa-
rate Fernsteuerung ein.
• Lassen Sie das Gerät bei Betrieb nicht
unbeaufsichtigt.
• Bedienen Sie das Gerät nicht mit
feuchten oder nassen Händen oder
wenn es mit Wasser in Kontakt ge-
kommen ist.
• Legen Sie kein Besteck und keine
Topfdeckel auf die Kochzonen. Sie
werden heiß.
• Schalten Sie die Kochzonen nach je-
dem Gebrauch aus.
• Benutzen Sie das Gerät nicht als Ar-
beits- oder Abstellfläche.
• Hat die Geräteoberfläche einen
Sprung, trennen Sie das Gerät umge-
hend von der Spannungsversorgung.
Dies dient zur Vermeidung eines
Stromschlags.
WARNUNG!
Es besteht Explosions- und
Brandgefahr.
• Erhitzte Öle und Fette können brenn-
bare Dämpfe freisetzen. Halten Sie
Flammen oder erhitzte Gegenstände
beim Kochen mit Fetten und Ölen von
diesen fern.
• Die von sehr heißem Öl freigesetzten
Dämpfe können eine Selbstzündung
verursachen.
• Bereits verwendetes Öl kann Lebens-
mittelreste enthalten und einen Brand
bei niedrigeren Temperaturen als fri-
sches Öl verursachen.
• Platzieren Sie keine entflammbaren
Produkte oder Gegenstände, die mit
entflammbaren Produkten benetzt
sind, im Gerät, auf dem Gerät oder in
der Nähe des Geräts.
• Löschen Sie eine Flamme nicht mit
Wasser. Schalten Sie das Gerät aus
und bedecken Sie die Flamme mit ei-
nem Deckel oder einer Feuerlöschde-
cke.
WARNUNG!
Das Gerät könnte beschädigt
werden.
44
www.aeg.com

• Stellen Sie kein heißes Kochgeschirr
auf das Bedienfeld.
• Lassen Sie das Kochgeschirr nicht leer-
kochen.
• Lassen Sie keine Gegenstände oder
Kochgeschirr auf das Bedienfeld fal-
len. Die Oberfläche könnte beschä-
digt werden.
• Schalten Sie die Kochzonen nicht mit
leerem oder ohne Kochgeschirr ein.
• Legen Sie keine Alufolie auf das Ge-
rät.
• Kochgeschirr aus Gusseisen oder Alu-
miniumguss oder mit beschädigten
Böden kann die Glaskeramikoberflä-
che verkratzen. Heben Sie das Koch-
geschirr stets an, wenn Sie es auf dem
Kochfeld umsetzen möchten.
2.3 Reinigung und Pflege
WARNUNG!
Das Gerät könnte beschädigt
werden.
• Reinigen Sie das Gerät regelmäßig,
um eine Abnutzung des Oberflächen-
materials zu verhindern.
• Reinigen Sie das Gerät nicht mit ei-
nem Wasser- oder Dampfstrahl.
• Reinigen Sie das Geräts mit einem
weichen, feuchten Tuch. Verwenden
Sie ausschließlich Neutralreiniger. Be-
nutzen Sie keine Scheuermittel, scheu-
ernde Reinigungsschwämmchen, Lö-
sungsmittel oder Metallgegenstände.
2.4 Entsorgung
WARNUNG!
Verletzungs- oder Erstickungsge-
fahr.
• Für Informationen zur ordnungsgemä-
ßen Entsorgung des Gerätes wenden
Sie sich an die zuständige kommunale
Behörde vor Ort.
• Trennen Sie das Gerät von der Strom-
versorgung.
• Schneiden Sie das Netzkabel ab und
entsorgen Sie es.
3. GERÄTEBESCHREIBUNG
120/175/210 mm
145 mm
145 mm
265 mm
170 mm
1 2
4 35
1
Kochzone
2
Kochzone
3
Kochzone
4
Bedienfeld
5
Kochzone
3.1 Bedienfeldanordnung
DEUTSCH 45

1
678
2
4
3
5
Bedienen Sie das Gerät über die Sensorfelder. Anzeigen, Kontrolllampen
und akustische Signale informieren Sie über die aktiven Funktionen.
Sensorfeld Funktion
1
Timer-Anzeige Zeigt die Zeit in Minuten an.
2
Auswählen der Kochzone.
3
/
Erhöhen oder Verringern der Zeit.
4
Ein- und Ausschalten des äußeren Krei-
ses.
5
Verriegeln/Entriegeln des Bedienfelds.
6
Anzeige der Kochstufe Zeigt die Kochstufe an.
7
Ein- und Ausschalten der Funktion STOP
+GO.
8
Ein- und Ausschalten der äußeren Krei-
se.
3.2 Anzeige der Kochstufen
Display Beschreibung
Die Kochzone ist ausgeschaltet.
-
Die Kochzone ist eingeschaltet.
Die Funktion STOP+GO ist eingeschaltet.
Die Ankochautomatik ist in Betrieb.
+ Zahl
Eine Störung ist aufgetreten.
/ /
OptiHeat Control (3-stufige Restwärmeanzeige): Weiter-
garen/Warmhalten/Restwärme.
Die Tastensperre oder die Kindersicherung ist aktiv.
Die Abschaltautomatik ist in Betrieb.
46
www.aeg.com

3.3 OptiHeat Control
(Restwärmeanzeige, 3-stufig)
WARNUNG!
/ / Es besteht Verbren-
nungsgefahr durch Restwärme!
OptiHeat Control zeigt die Restwärme-
stufe an.
4. TÄGLICHER GEBRAUCH
Das Kochfeld wird mit den Schaltern
des Backofens bedient. Im Kapitel
„Täglicher Gebrauch“ für den Back-
ofen können Sie nachlesen, wie das
Kochfeld bedient wird.
Wenn sich eine Kochzone ein-
schaltet, ist für kurze Zeit ein
Brummen zu hören. Dieses Ver-
halten ist typisch für alle Kochzo-
nen eines Glaskeramik-Kochfelds
und bedeutet nicht, dass das Ge-
rät nicht ordnungsgemäß arbei-
tet.
4.1 Abschaltautomatik
Mit dieser Funktion wird das Gerät in
folgenden Fällen automatisch
ausgeschaltet:
• Alle Kochzonen sind ausgeschaltet (
).
• Nach dem Einschalten des Geräts wird
keine Kochstufe gewählt.
• Das Bedienfeld ist mehr als 10 Sekun-
den mit verschütteten Lebensmitteln
oder einem Gegenstand bedeckt
(Topf, Tuch usw.). Ein akustisches Sig-
nal ertönt einige Male und das Gerät
schaltet ab. Entfernen Sie den Gegen-
stand oder reinigen Sie das Bedien-
feld.
• Eine Kochzone wurde nicht ausge-
schaltet bzw. die Kochstufe wurde
nicht geändert. Nach einer gewissen
Zeit leuchtet das Symbol
auf und
das Gerät wird ausgeschaltet. Siehe
unten.
• Verhältnis zwischen der Kochstufe und
den Zeiten der Abschaltautomatik:
•
, - — 6 Stunden
•
- — 5 Stunden
•
— 4 Stunden
•
- — 1,5 Stunden
4.2 Ein- und Ausschalten der
äußeren Heizkreise
Die Kochflächen können an die Größe
des Kochgeschirrs angepasst werden.
Berühren Sie das Sensorfeld
/ ,
um den äußeren Heizkreis einzuschalten.
Die Anzeige leuchtet auf. Wenn Sie wei-
tere äußere Heizkreise einschalten
möchten, berühren Sie das Sensorfeld
nochmals. Die entsprechende Kontroll-
lampe leuchtet auf.
Wiederholen Sie den Vorgang, um den
äußeren Heizkreis auszuschalten. Die
Kontrolllampe erlischt.
4.3 Ankochautomatik
Bei Verwendung der Ankochautomatik
wird eine gewisse Zeit lang die höchste
Kochstufe eingestellt und anschließend
auf die erforderliche Stufe zurückge-
schaltet. Drehen Sie zum Einschalten der
Kochzone den Einstellknopf nach rechts,
bis Sie
im Display sehen können.
Stellen Sie anschließend die Kochstufe
sofort ein.
1
2
3
4
5
6
7
8
9
10
11
0
123456789
DEUTSCH 47

4.4 Uhr
Kurzzeitmesser
Mit dem Kurzzeitmesser stellen Sie ein,
wie lange eine Kochzone für einen ein-
zelnen Kochvorgang eingeschaltet blei-
ben soll.
Wählen Sie erst die Kochzone aus und
stellen Sie dann den Kurzzeitmesser
ein.
Sie können die Kochstufe einstellen, be-
vor Sie den Kurzzeitmesser einstellen
oder umgekehrt.
• Auswählen der Kochzone: Berühren
Sie
so oft, bis die Anzeige der ge-
wünschten Kochzone aufleuchtet.
• Einschalten des Kurzzeitmessers: Be-
rühren Sie
am Timer, um die Zeit
einzustellen (
00
-
99
Minuten).
Wenn die Anzeige der Kochzone lang-
samer blinkt, wird die Zeit herunterge-
zählt.
• So wird die Restzeit angezeigt:
Wählen Sie die Kochzone mit
aus.
Die Anzeige der Kochzone blinkt
schneller. Das Display zeigt die Rest-
zeit an.
• Ändern des Kurzzeitmessers: Wäh-
len Sie die Kochzone mit
aus. Be-
rühren Sie
oder .
• So schalten Sie den Kurzzeitmesser
aus: Wählen Sie die Kochzone mit
aus. Berühren Sie . Die Restzeit wird
auf
00
heruntergezählt. Die Anzeige
der Kochzone erlischt. Zum Ausschal-
ten können Sie auch
und gleich-
zeitig berühren.
Nach Ablauf der eingestellten Zeit er-
tönt ein Signalton und
00
blinkt. Die
Kochzone wird ausgeschaltet.
• Ausschalten des Signaltons: Berüh-
ren Sie
CountUp Timer
(Garzeitmesser)
Benutzen Sie die Funktion CountUp Ti-
mer, um festzustellen wie lange die
Kochzone bereits in Betrieb ist.
• Auswählen der Kochzone (wenn
mehr als 1 Kochzone in Betrieb ist):
Berühren Sie
so oft, bis die Anzei-
ge der gewünschten Kochzone auf-
leuchtet.
• So schalten Sie den CountUp Timer
ein: Berühren Sie
des Timers,
leuchtet auf. Wenn die Anzeige der
Kochzone langsamer blinkt, wird die
Zeit hochgezählt. Das Display schaltet
um zwischen
und der abgelaufe-
nen Zeit (Minuten).
• So können Sie feststellen, wie lange
die Kochzone bereits in Betrieb ist:
Wählen Sie die Kochzone mit
aus.
Die Anzeige der Kochzone blinkt
schneller. Das Display zeigt die Ein-
schaltdauer der Kochzone an.
• So schalten Sie den CountUp Timer
aus: Wählen Sie die Kochzone mit
aus und berühren Sie oder , um
den Garzeitmesser auszuschalten. Die
Anzeige der Kochzone erlischt.
Kurzzeitwecker
Sie können die Uhr als Kurzzeitwecker
benutzen, wenn das Gerät eingeschaltet
ist und die Kochzonen nicht in Betrieb
sind (die Kochstufenanzeige
anzeigt).
• Einschalten des Kurzzeitweckers:
Berühren Sie
. Berühren Sie
oder des Timers, um die Zeit einzu-
stellen. Die Anzeige der Kochzonen
wird automatisch nach 10 Sekunden
ausgeschaltet. Wenn die eingestellte
Zeit abgelaufen ist, ertönt ein Signal
und
00
blinkt.
• Ausschalten des Signaltons: Berüh-
ren Sie
.
• Ausschalten des Kurzzeitweckers:
Schalten Sie die vordere linke Kochzo-
ne kurz ein und wieder aus.
Der Kurzzeitwecker hat keine Auswir-
kung auf den Kochzonenbetrieb.
4.5 STOP+GO
Mit der Funktion werden alle einge-
schalteten Kochzonen auf Warmhalten (
) geschaltet.
Die Funktion
unterbricht nicht die Ti-
mer-Funktion.
48
www.aeg.com

• Berühren Sie zur Aktivierung dieser
Funktion
. Das Symbol leuchtet
auf.
• Berühren Sie zur Deaktivierung die-
ser Funktion
. Die zuvor ausgewähl-
te Kochstufe wird eingestellt.
Wenn Sie die Kochstufe ändern,
wird die Funktion deaktiviert und
das Display zeigt die neu einge-
stellte Kochstufe an.
4.6 Sperre
Sie können die Sensorfelder des Koch-
felds sperren, wenn die Kochzone ein-
geschaltet ist.
Stellen Sie zuerst die Kochstufe ein.
Berühren Sie zur Aktivierung dieser
Funktion
. Das Symbol wird 4 Se-
kunden lang angezeigt.
Der Timer bleibt eingeschaltet.
Berühren Sie zur Deaktivierung dieser
Funktion
. Die zuvor ausgewählte
Kochstufe wird eingestellt.
Diese Funktion wird deaktiviert, wenn
Sie die Kochstufe ändern.
Diese Funktion wird auch deaktiviert, so-
bald das Gerät ausgeschaltet wird.
4.7 Kindersicherung
Diese Funktion verhindert ein versehent-
liches Einschalten des Kochfelds.
Einschalten der Kindersicherung
• Das Gerät ist ausgeschaltet.
•
Berühren Sie
4 Sekunden lang, bis
das Symbol
blinkt.
•
Berühren Sie
während das Symbol
blinkt, das Symbol wird 4 Se-
kunden lang angezeigt.
Ausschalten der Kindersicherung
• Das Gerät ist ausgeschaltet.
•
Berühren Sie
, bis das Symbol
blinkt.
•
Berühren Sie
während das Symbol
blinkt, das Symbol wird 4 Se-
kunden lang angezeigt.
Kindersicherung für einen einzelnen
Kochvorgang außer Kraft setzen
• Schalten Sie die Kochzone ein. Das
Symbol
leuchtet auf. Berühren Sie
, bis das Symbol erscheint.
• Stellen Sie die Kochstufe ausgehend
von der Position
innerhalb von
4 Sekunden ein. Das Kochfeld kann
jetzt benutzt werden.
• Die Kindersicherung wird eingeschal-
tet, sobald Sie das Gerät ausschalten.
4.8 OffSound Control
(Aktivierung und
Deaktivierung des Signaltons)
Deaktivieren des Signaltons
Schalten Sie das Gerät aus.
Berühren Sie
3 Sekunden lang, der
Signalton ertönt. Berühren Sie
, der
Signalton ertönt. Berühren Sie
3 Se-
kunden lang.
leuchtet und der Signal-
ton ist aktiviert. Berühren Sie
,
leuchtet auf, der Signalton ist deaktiviert.
Haben Sie den Signalton deaktiviert, er-
tönt er nur in folgenden Fällen:
• Bei Ablauf des Kurzzeitweckers
• Bei Ablauf des Kurzzeitmessers
• Wenn das Bedienfeld bedeckt ist.
Aktivieren des Signaltons
Schalten Sie das Gerät aus.
Berühren Sie 3 Sekunden lang
. Be-
rühren Sie
. Berühren Sie 3 Sekunden
lang
. . leuchtet auf, da der Signal-
ton deaktiviert ist. Berühren Sie
,
leuchtet. Der Signalton ist aktiviert.
5. PRAKTISCHE TIPPS UND HINWEISE
5.1 Kochgeschirr
Informationen zum Kochgeschirr
• Der Boden des Kochgeschirrs sollte so
dick und flach wie möglich sein.
DEUTSCH 49

• Kochgeschirr aus Stahlemaille oder
mit Aluminium- oder Kupferböden
kann Verfärbungen der Glaskeramik-
oberfläche verursachen.
5.2 Energiesparen
So sparen Sie Energie
• Decken Sie Kochgeschirr, wenn mög-
lich, mit einem Deckel ab.
• Setzen Sie das Kochgeschirr vor dem
Einschalten der Kochzone auf.
• Schalten Sie die Kochzonen bereits
vor dem Ende des Garvorgangs aus
und nutzen Sie die Restwärme.
• Der Boden des Kochgeschirrs und die
verwendete Kochzone sollten gleich
groß sein.
5.3 Öko Timer (Öko-Timer)
Um Energie zu sparen, schaltet
sich die Kochzonenheizung vor
dem Signal des Kurzzeitmessers
ab. Die Abschaltzeit hängt von
der eingestellten Kochstufe und
der Gardauer ab.
Informationen zu
Acrylamiden
Wichtig! Nach neuesten
wissenschaftlichen Erkenntnissen kann
die Bräunung von Lebensmitteln,
speziell bei stärkehaltigen Produkten,
eine gesundheitliche Gefährdung durch
Acrylamid verursachen. Daher
empfehlen wir, bei möglichst niedrigen
Temperaturen zu garen und die Speisen
nicht zu stark zu bräunen.
6. REINIGUNG UND PFLEGE
Reinigen Sie das Gerät nach jedem Ge-
brauch.
Achten Sie immer darauf, dass der Bo-
den des Kochgeschirrs sauber ist.
Kratzer oder dunkle Flecken in
der Glaskeramik beeinträchtigen
die Funktionsfähigkeit des Ge-
räts nicht.
So entfernen Sie Verschmutzungen:
1.
– Folgendes muss sofort entfernt
werden: geschmolzener Kunst-
stoff, Plastikfolie, zuckerhaltige Le-
bensmittel. Andernfalls können
die Verschmutzungen das Gerät
beschädigen. Verwenden Sie ei-
nen speziellen Reinigungsschaber
für Glas. Den Reinigungsschaber
schräg zur Glasfläche ansetzen
und über die Oberfläche bewe-
gen.
– Folgendes kann nach ausreich-
ender Abkühlphase entfernt
werden: Kalk- und Wasserränder,
Fettspritzer und metallisch schim-
mernde Verfärbungen. Verwenden
Sie hierfür einen speziellen Reini-
ger für Glaskeramik oder Edel-
stahl.
2.
Reinigen Sie das Gerät mit einem
feuchten Tuch und etwas Spülmittel.
3.
Am Ende das Gerät mit einem tro-
ckenen Tuch abreiben.
50
www.aeg.com

7. FEHLERSUCHE
Problem Mögliche Ursache Abhilfe
Das Gerät kann nicht
eingeschaltet oder be-
dient werden.
Das Gerät ist nicht oder
nicht ordnungsgemäß
an die Spannungsversor-
gung angeschlossen.
Prüfen Sie, ob das Gerät
ordnungsgemäß an die
Spannungsversorgung
angeschlossen ist (siehe
Anschlussplan).
Schalten Sie das Gerät er-
neut ein und stellen Sie
innerhalb von 10 Sekun-
den die Kochstufe ein.
Zwei oder mehr Sensor-
felder wurden gleichzei-
tig berührt.
Berühren Sie nur ein Sen-
sorfeld.
Die Funktion STOP+GO
ist eingeschaltet.
Siehe hierzu Kapitel
„Täglicher Gebrauch“.
Wasser- oder Fettsprit-
zer befinden sich auf
dem Bedienfeld.
Wischen Sie das Bedien-
feld ab.
Ein akustisches Signal
ertönt und das Gerät
schaltet ab.
Wenn das Gerät ausge-
schaltet wird, ertönt ein
akustisches Signal.
Mindestens ein Sensor-
feld wurde bedeckt.
Entfernen Sie den Ge-
genstand von den Sen-
sorfeldern.
Die Restwärmeanzeige
funktioniert nicht.
Die Kochzone ist nicht
heiß, da sie nur kurze
Zeit in Betrieb war.
War die Kochzone lange
genug eingeschaltet, um
heiß zu sein, wenden Sie
sich bitte an den Kunden-
dienst.
Die Ankochautomatik
startet nicht.
Die höchste Kochstufe
ist eingestellt.
Die höchste Kochstufe
hat die gleiche Leistung
wie die Ankochautomatik.
Der äußere Heizkreis
lässt sich nicht einschal-
ten.
Schalten Sie zuerst den
inneren Heizkreis ein.
Die Sensorfelder werden
heiß.
Das Kochgeschirr ist zu
groß, oder Sie haben es
zu nahe an die Bediene-
lemente gestellt.
Stellen Sie großes Koch-
geschirr nötigenfalls auf
die hinteren Kochzonen.
Es ertönt kein Signalton,
wenn Sie die Sensorfel-
der des Bedienfelds be-
rühren.
Der Signalton ist ausge-
schaltet.
Schalten Sie den Signal-
ton ein (siehe „Einschal-
ten des Signaltons“).
leuchtet auf.
Die Abschaltautomatik
hat ausgelöst.
Schalten Sie das Gerät
aus und wieder ein.
DEUTSCH 51

Problem Mögliche Ursache Abhilfe
leuchtet auf.
Die Kindersicherung
oder die Tastensperre
ist eingeschaltet.
Siehe hierzu Kapitel
„Täglicher Gebrauch“.
und eine Zahl werden
angezeigt.
Im Gerät ist ein Fehler
aufgetreten.
Trennen Sie das Gerät ei-
ne Zeit lang vom Strom-
netz. Schalten Sie die Si-
cherung im Sicherungs-
kasten der Hausinstallati-
on aus. Schalten Sie die
Sicherung wieder ein.
Wenn
erneut aufleuch-
tet, benachrichtigen Sie
den Kundendienst.
Wenn Sie das Problem mit der oben an-
gegebenen Abhilfemaßnahme nicht be-
heben können, wenden Sie sich bitte an
Ihren Fachhändler oder den Kunden-
dienst. Geben Sie dabei die Daten auf
dem Typenschild, den dreistelligen
Buchstaben-Code für die Glaskeramik
(befindet sich in der Ecke der Glasfläche)
und die angezeigte Fehlermeldung an.
Vergewissern Sie sich, dass Sie das Gerät
korrekt bedient haben. Wenn Sie das
Gerät falsch bedient haben, fällt auch
während der Garantiezeit für den Besuch
eines Kundendiensttechnikers oder
Händlers eine Gebühr an. Die Anweisun-
gen zum Kundendienst und die Garan-
tiebedingungen finden Sie im Garantie-
heft.
8. MONTAGEANLEITUNG
WARNUNG!
Siehe Kapitel „Sicherheitshinwei-
se“.
Vor der Montage
Notieren Sie vor der Montage des Ge-
räts alle Daten, die Sie unten auf dem
Typenschild finden. Das Typenschild be-
findet sich unten am Gerätegehäuse.
• Modell ...........................
•Produktnummer
(PNC) ........................................
• Seriennummer ............
8.1 Einbaugeräte
• Einbaugeräte dürfen nur nach dem
Einbau in bzw. unter normgerechte,
passende Einbauschränke und Ar-
beitsplatten betrieben werden.
52
www.aeg.com

8.2 Montage
min.
50mm
min.
500mm
490
+1
mm
560
+1
mm
R 5mm
55mm
min.
28 mm
9. TECHNISCHE DATEN
Modell HE634070XB Prod.Nr. 949 595 055 01
Typ 58 HAD C6 AO 220-240 V 50-60 Hz
Made in Germany
Ser.Nr. .......... 7.1 kW
AEG
Kochzonenleistung
Kochzone Nennleistung (höchste Kochstufe)
[W]
Hinten rechts —170 / 265 mm 1500 / 2400 W
Vorne rechts — 145 mm 1200 W
Hinten links — 145 mm 1200 W
Vorne links —120 / 175 / 210 mm 800 / 1600 / 2300 W
DEUTSCH 53

10. UMWELTTIPPS
Recyceln Sie Materialien mit dem
Symbol
. Entsorgen Sie die
Verpackung in den entsprechenden
Recyclingbehältern.
Recyceln Sie zum Umwelt- und
Gesundheitsschutz elektrische und
elektronische Geräte. Entsorgen Sie
Geräte mit diesem Symbol
nicht
mit dem Hausmüll. Bringen Sie das
Gerät zu Ihrer örtlichen Sammelstelle
oder wenden Sie sich an Ihr
Gemeindeamt.
54
www.aeg.com

DEUTSCH 55

www.aeg.com/shop
892952670-A-282012
-
 1
1
-
 2
2
-
 3
3
-
 4
4
-
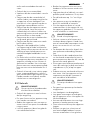 5
5
-
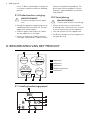 6
6
-
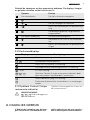 7
7
-
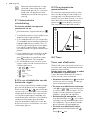 8
8
-
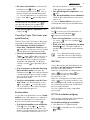 9
9
-
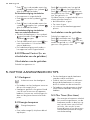 10
10
-
 11
11
-
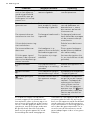 12
12
-
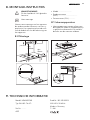 13
13
-
 14
14
-
 15
15
-
 16
16
-
 17
17
-
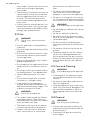 18
18
-
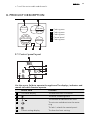 19
19
-
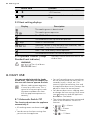 20
20
-
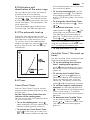 21
21
-
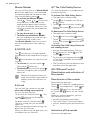 22
22
-
 23
23
-
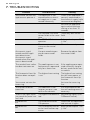 24
24
-
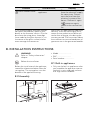 25
25
-
 26
26
-
 27
27
-
 28
28
-
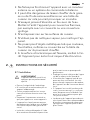 29
29
-
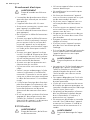 30
30
-
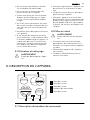 31
31
-
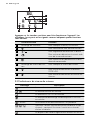 32
32
-
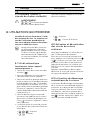 33
33
-
 34
34
-
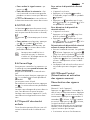 35
35
-
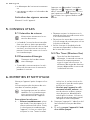 36
36
-
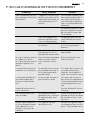 37
37
-
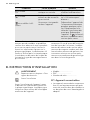 38
38
-
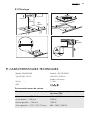 39
39
-
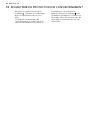 40
40
-
 41
41
-
 42
42
-
 43
43
-
 44
44
-
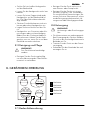 45
45
-
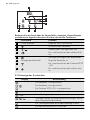 46
46
-
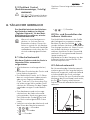 47
47
-
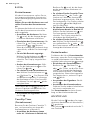 48
48
-
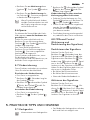 49
49
-
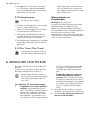 50
50
-
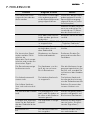 51
51
-
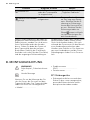 52
52
-
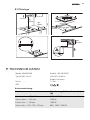 53
53
-
 54
54
-
 55
55
-
 56
56


Aeg-Electrolux HE634070XB Handleiding
- Categorie
- Kookplaten
- Type
- Handleiding
in andere talen
Gerelateerde papieren
-
Aeg-Electrolux HE634070XB Handleiding
-
Aeg-Electrolux HM634070MB Handleiding
-
-
-
-
-
-
-
-