Belling DB4 90DFT de handleiding
- Categorie
- Fornuizen
- Type
- de handleiding
Deze handleiding is ook geschikt voor


IMPORTANT NOTICE
Please note the cooling fan fitted to this appliance is an integral part of its safety
and functionality.
When the appliance is installed care must be taken that the cooling fans perform-
ance is not impeded by any objects coming into contact with it. (Installation pipes,
leads etc)
Care must also be taken that there is sufficient air flow at the rear of the appliance
for the cooling fan to run at its optimum efficiency. (Particularly Built In appliances)
See clearance dimensions in the installation section of the booklet.
During use the Appliance must never be disconnected from the Mains supply as
this will seriously affect the safety and performance of the appliance, particularly
in relation to surface temperatures becoming hot and gas operated parts not work-
ing efficiently.
The cooling fan is designed to run on after the control knob has been switched off
to keep the front of the appliance and the controls cool until the appliance has nat-
urally cooled itself.

Our Warranty
Should you need it . . . .
Inside the paperwork which has come with this appliance,
there is a leaflet and card explaining the terms of our
extended warranty and guarantee.
In order to apply for a one year guarantee, simply fill in the
details on the card and post it off, this will register your
appliance.
Should you wish to take out extended warranty, please fill
in the details on the leaflet and post this off.
Alternatively, you can register, and apply for extended war-
ranty on line at:
www.belling.co.uk
If your appliance is covered by the warranty and guaran-
tee, you will not be billed for work undertaken should your
appliance be faulty, terms and conditions do apply, so
please read through the literature carefully.
Our Customer Care Centre can be called on:
0844 815 3746
We aim to answer calls as quickly as possible, and in strict
rotation as soon as one of our Customer Care team
becomes free.
Please ensure that you have available your appliances
model number and serial number, there is a space at the
back of this book for recording that information.
Alternatively visit the web site.
Outside the UK and Northern Ireland, please contact your
local supplier.

User’s Section . . . . . . . . . . . . . . . . . . . . . . . . . . . . . . . . . . . . . . . . . . . . . . . . . . . . . .
Before Using Your Cooker . . . . . . . . . . . . . . . . . . . . . . . . . . . . . . . . . . . . . . . . . . . . . .
About Your Cooker . . . . . . . . . . . . . . . . . . . . . . . . . . . . . . . . . . . . . . . . . . . . . . . . . . .
Hob & Cooker Safety . . . . . . . . . . . . . . . . . . . . . . . . . . . . . . . . . . . . . . . . . . . . . . . . . .
Chip Pan Fires . . . . . . . . . . . . . . . . . . . . . . . . . . . . . . . . . . . . . . . . . . . . . . . . . . . . . . .
Using The Clock / Programmer . . . . . . . . . . . . . . . . . . . . . . . . . . . . . . . . . . . . . . . . . . .
Using Your Gas Hob. . . . . . . . . . . . . . . . . . . . . . . . . . . . . . . . . . . . . . . . . . . . . . . . . . .
Using Your Griddle. . . . . . . . . . . . . . . . . . . . . . . . . . . . . . . . . . . . . . . . . . . . . . . . . . . .
Using Your Grill . . . . . . . . . . . . . . . . . . . . . . . . . . . . . . . . . . . . . . . . . . . . . . . . . . . . . .
Grilling Guide . . . . . . . . . . . . . . . . . . . . . . . . . . . . . . . . . . . . . . . . . . . . . . . . . . . . . . .
Using Your Main Oven(s) . . . . . . . . . . . . . . . . . . . . . . . . . . . . . . . . . . . . . . . . . . . . . . .
Oven & Grill Functions . . . . . . . . . . . . . . . . . . . . . . . . . . . . . . . . . . . . . . . . . . . . . . . . .
Fanned Oven Guide . . . . . . . . . . . . . . . . . . . . . . . . . . . . . . . . . . . . . . . . . . . . . . . . . . .
Cooking Guide. . . . . . . . . . . . . . . . . . . . . . . . . . . . . . . . . . . . . . . . . . . . . . . . . . . . . . .
Roasting Guide . . . . . . . . . . . . . . . . . . . . . . . . . . . . . . . . . . . . . . . . . . . . . . . . . . . . . .
General Baking Guide . . . . . . . . . . . . . . . . . . . . . . . . . . . . . . . . . . . . . . . . . . . . . . . . .
Using Your Slow Cook Oven . . . . . . . . . . . . . . . . . . . . . . . . . . . . . . . . . . . . . . . . . . . . .
Cleaning Your Gas Hob . . . . . . . . . . . . . . . . . . . . . . . . . . . . . . . . . . . . . . . . . . . . . . . .
Cleaning Your Cavities . . . . . . . . . . . . . . . . . . . . . . . . . . . . . . . . . . . . . . . . . . . . . . . . .
Cleaning Your Appliance. . . . . . . . . . . . . . . . . . . . . . . . . . . . . . . . . . . . . . . . . . . . . . . .
Cook Shop . . . . . . . . . . . . . . . . . . . . . . . . . . . . . . . . . . . . . . . . . . . . . . . . . . . . . . . . .
Trouble Shooting . . . . . . . . . . . . . . . . . . . . . . . . . . . . . . . . . . . . . . . . . . . . . . . . . . . .
Before You Call . . . . . . . . . . . . . . . . . . . . . . . . . . . . . . . . . . . . . . . . . . . . . . . . . . . . . .
Changing Light Bulbs . . . . . . . . . . . . . . . . . . . . . . . . . . . . . . . . . . . . . . . . . . . . . . . . . .
Installation Instructions . . . . . . . . . . . . . . . . . . . . . . . . . . . . . . . . . . . . . . . . . . . . . .
Installing Your Cooker . . . . . . . . . . . . . . . . . . . . . . . . . . . . . . . . . . . . . . . . . . . . . . . . .
Technical Data . . . . . . . . . . . . . . . . . . . . . . . . . . . . . . . . . . . . . . . . . . . . . . . . . . . . . .
Customer Care . . . . . . . . . . . . . . . . . . . . . . . . . . . . . . . . . . . . . . . . . . . . Back Cover
Contents
If you smell gas:
Do not
try to light any appliance. Do not touch any electrical switch.
Call
the Gas Emergency Helpline at TRANSCO on: 0800 111999

Before Using Your Cooker
Before using this appliance please make sure that
you have removed all packaging and wrapping.
Some of the furniture inside this
appliance may have additional wrapping.
It is also advised that you turn the ovens and/or
grill on for a short while, this will burn off any
residues left from manufacturing. There may be a
smell which accompanies this process - but this is
nothing to worry about and is harmless.
We also recommend that you wash the oven
shelves, the baking tray, the grill pan, and the grill
pan trivet before their first use in hot soapy water,
this will remove the protective oil coating.
Although every care has been taken to ensure this
appliance has no burrs, or sharp edges, we
recommend that you wear protective gloves when
installing and moving this appliance.
This will prevent any injury.
Our policy is one of constant development and
improvement. Strict accuracy of illustrations and
specifications cannot be guaranteed. Modification
to design and material may be necessary
subsequent to publication.
Please bear in mind that not all the sections inside
this handbook are relevant to your appliance, but
you should read carefully the sections which are
relevant before installation and use. This will save
you time.
Always use a registered installer for this appliance.
Environmental protection:
Glen Dimplex Home Appliance brands are
committed to protecting the environment and
operates and Environmental Management System
which complies with BS EN ISO 14001.
All packaging with this appliance is recyclable and
environmentally friendly.
Please recycle whenever possible - contact your
local authority for your nearest recycling centre.
!!!
i
i
!!!
i
i
!!!

Hob & Cooker Safety
Always ensure that pan bases are dry, and flat before
using them on the hob.
Always position pans over the centre of the burner,
and turn the handles to a safe position so they cannot
be knocked or grabbed.
Always use pans which are no smaller than 100mm
(4”), or larger than 250mm (10”).
Always take care when removing food from the oven
as the area around the cavity may be hot.
Always use oven gloves when handling any utensils
which have been in the oven as they will be hot.
Always make sure that the oven shelves are resting in
the correct position in between two runners. Do not
place the oven shelves on top of the highest runner,
this will lead to spillage and injury if the baking tray, or
dish falls.
Never use double pans, rimbased pans, old or
misshapen pans, or any pan which is not stable on a
flat surface.
Never leave cooking fat, or oil, unattended.
Never use commercial simmering aids, or heat
diffusers, as they create excessive heat and can
damage the surface of the hob.
Never use the hob for any other purpose than cooking
food.
Plastic cooking utensils can melt if they come into
contact with a warm hob. Never leave them close to,
or on top of, the hob.
Never leave the burner alight without a pan covering it.
This causes a fire hazard.
Do not place items on the door while it is open.
Do not wrap foil around the oven shelves, or allow it to
block the flue.
Do not drape tea towels near the oven while it is on,
this will cause a fire hazard.
Do not pull heavy items, such as turkeys, or large
joints of meat, out from the oven on the shelf, as they
may overbalance and fall.
Do not use this appliance to heat anything other than
food items, and do not use it for heating the room.
Always make sure that the
burner caps, rings and
pansupports are correctly
placed. This will prevent pans
becoming unstable while in
use, and ensure an
uninterrupted gas flow.
Call Customer Care for
a service engineers visit
if:
You find over a period of
time that the gas oven
becomes hotter at a
particular temperature - the
thermostat may need
replacing.
The cooling fan fails to
work.
i
WARNING: Parts of
the appliance may
become hot while in
use, always make sure
that children are
supervised when they
are near to the
appliance.
!!!

Chip Pan Fires
What causes a chip pan fire?
Chip pan fires start when oil of fat overheats and catches fire,
or when oil or fat spills on to the cooker because the pan has
been filled too high.
They can also start when wet chips are put into hot oil,
making it bubble up and overflow.
Preventing a chip pan fire
Never fill the pan more than a third full with oil or fat.
Never leave the pan alone with the heat on - even for a few
seconds.
Dry chips before putting them in the pan.
Never put chips in the pan if the oil has started smoking.
Turn off the heat and leave the oil to cool down, or else it
could catch fire.
In the event of a chip pan fire
If your chip pan does catch fire - don’t panic, and don’t move
the pan. Serious burns are often caused by picking up the
pan and running outside with it.
If it is safe to do so, and you don’t have to reach across the
pan, turn off the heat.
Never throw water, or use a fire extinguisher.
If you can, drape a damp cloth or towel over the pan to
smother the flames.
Leave the pan to cool down for at least half an hour.
If you can’t control the fire yourself, close the door, get out
and tell everybody else to get out.
Call the fire brigade. Don’t go back inside whatever the
reason.

Through your programmer you will be able to set the time
of day, set the minute minder, and use the semi and fully
automatic cooking functions. The programmer is vital to
the working of your appliance, and reading this section will
make sure that you get the most out of your ovens.
The programmer buttons (push button timer)
There are three buttons on this type of timer. The table
below shows you what their symbols look like, depending on
the model type, and what they do.
Setting the time of day (push button timer)
Press the Plus and Minus buttons together for a few
seconds, and release.
The ‘’ in between the numbers on the LED Display will
begin to flash.
While the ‘’ is flashing it is possible to adjust the time
using the Plus and Minus buttons.
Important - Once the time has been set, allow
approximately 30 seconds before using any of
the other timer functions. This ensures that the time
will remain correct.
Wait until the clock has finished flashing before attempt-
ing to use other functions of the clock
Symbol Symbol What is it?
-
Down / Minus
Used to decrease cook / end time, remove
minutes from the minute minder and adjust
the time of day.
Also for listening to and setting the alarm
tone. There are 3 tones to choose from.
+
Up / Plus
Used to increase cook / end time, add minutes
to the minute minder and adjust the time of
day.
Function button
Used to select the functions available on this
timer.
Press once for: Minute Minder.
Press twice for: Cook time
Press three times for: End time.
How to use these functions is explained later
on in this section.
Using The Programmer/Clock
Automatic
symbol
Cook Pot
Minute Minder
symbol
This is a 24 hour clock.
Before you do anything
with your appliance -
you must set the cor-
rect time of day.
i
What your timer symbols
mean.

Using The Programmer/Clock
Setting an alarm tone (Push button timer)
Press and hold the minus button.
Once the minus button is released, the tone is selected.
You can change tone by repeatedly pressing the minus
button (3 tones)
Setting the minute minder (push button timer)
To set the Minute Minder, press the centre button once.
The bell symbol will appear and start flashing.
The flashing will last for approx. 5 seconds so the
time must be set within this time frame.
Use the Plus and Minus button to set the length of time
required. Once this has been done, the Minute Minder
is set.
When the desired length of time has counted down the
alarm will sound. To cancel the tone, press any of the
buttons.
To cancel the Minute Minder at any time, press the Plus
and Minus buttons together.
Semi Automatic Cooking (Push button timer)
Duration method (switch off after set time period)
Press the Function (centre) button twice (This will skip
past the Minute Minder function).
The display will flash the word ‘dur’, and the ‘A’ will flash
on the left hand side of the display.
Use the Plus and Minus buttons to set the length of time
you want to cook for. The flashing will last for
approx. 5 seconds, so the setting must be done
within this time frame or the time of day will
show again.
Once the duration has been set, the oven will automati-
cally switch off.When the set time has elapsed the alarm
will sound. To switch off the alarm, press any button.
To view any remaining time press the function (centre)
button twice.
To cancel the semi automatic programme at any time,
press the plus and minus buttons together.
The End Time method (Switch off at a set end time)
Press the Function button three times (This will skip past
the Minute Minder and the Duration function)
The display will flash the word ‘End’ and the ‘A’ will flash
on the left hand side of the display.

Use the Plus and Minus buttons to select the time the
oven is required to turn off.
Once this is done the oven will turn itself off at the pre-
selected time. To turn off the alarm press any button.
To cancel the Semi Automatic programme at any time,
press the plus and minus buttons together.
Fully Automatic Cooking (push button timer)
This function allows the cooker to switch on and off
automatically
It requires both the duration and the end time to be
entered. The timer will work out the start time and begin
cooking.
Press the Function (centre) button twice, (This will skip
past the Minute Minder).
The display will flash the word ‘dur’, and the ‘A’ will flash
on the left hand side of the display.
Use the Plus and Minus buttons to set the length of time
you want to cook for. The flashing will last for
approx. 5 seconds so the setting must be set
within this time frame or the time of day will
show again.
Press the Function button three times (skips past the
Minute Minder and the Duration functions)
The display will flash ‘End’ and the ‘A’ will flash on the
left hand side of the display.
Use the Plus and Minus buttons to select the time the
oven is required to turn off.
Set the temperature of the oven and place the food
inside. The timer will calculate the start time.
When this is done, the oven will turn itself off at the time
you have selected. To switch off the alarm, press any
button.
To cancel the automatic programme at any time, press
the plus and minus buttons together.
Using The Programmer/Clock
The automatic cooking
symbol will appear to
show that the oven is
no longer in manual
mode but in automatic
mode.
i
Important: Once the
oven has switched itself
off please make sure
you turn to oven con-
trols to the ‘off’ position
and set the oven to
manual by pressing the
Cook Time and Ready
Time buttons / icons
together.
i
Important: Remove
food as soon as it is
cooked.
i

Using The Programmer/Clock
The programmer Icons (touch control timer)
There are three icons on this type of timer. The table below
shows you what the symbols look like, depending on the
model type, and their functions.
Note - some functions require you to ‘touch and hold’
an icon for a few seconds, whilst others require you
just to ‘touch’ the icon without holding it.
Setting the time of day (touch control timer)
Touch and hold the centre icon for a few seconds and
release.
The ‘’ in between the numbers on the LED Display will
begin to flash.
While the ‘’ is flashing you can adjust the time using the
Plus and Minus icons.
Please note: the hours and minutes adjust quickly
Important - Once the time has been set, allow
approximately 30 seconds before using any of
the other timer functions. This ensures that the
time will remain correct.
Setting an alarm tone (touch control timer)
Touch and hold the Plus and Minus icons simultaneous-
ly until the ‘
’ flashes and you hear a beep.Then press
the centre icon.
Touch the minus icon to select the tone.
You can change the tone by repeatedly touching the
minus icon (3 tones)
Symbol Symbol What is it?
-
Down / Minus
Used to decrease cook / end time, remove
minutes from the minute minder and adjust
the time of day.
Also for listening to and setting the alarm
tone. There are 3 tones to choose from.
+
Up / Plus
Used to increase cook / end time, add minutes
to the minute minder and adjust the time of
day.
Function icon
Used to select the functions available on this
timer.
Press once for: Minute Minder and to set
the time of day.
Press twice for: Cook time
Press three times for: End time.
How to use these functions is explained later
on in this section.
What your timer symbols
mean.
Automatic
symbol
Cook Pot
Minute Minder
symbol

Setting the Programmer
Setting the minute minder (touch control timer)
To set the Minute Minder, touch and hold the centre
icon. The bell symbol will appear and start flashing.
Important - The flashing will last for approx. 5
seconds so any setting must be set within this
time frame.
Use the Plus and Minus icons to set the length of time
required. Once this has been done, the Minute Minder
is set.
When the desired length of time has counted down the
alarm will sound. To cancel the tone, touch and hold
any of the icons.
To cancel the Minute Minder at any time, press and hold
the Plus and Minus icons together.
Semi Automatic Cooking (Touch control timer)
Duration method (switch off after set time period)
Touch and hold the Function (centre) icon. The bell will
flash and beep. Touch the function icon again (This will
skip past the Minute Minder function).
The display will flash the word ‘dur’, and the ‘A’ will flash
on the left hand side of the display.
Use the Plus and Minus icons to set the length of time
you want to cook for. The flashing will last for
approx. 5 seconds, so the setting must be done
within this time frame or the time of day will
show again.
Once the duration has been set, the oven will automati-
cally switch off.When the set time has elapsed the alarm
will sound. To switch off the alarm, press any icon.
To view any remaining time touch and hold the function
(centre) icon and touch again.
To cancel the semi automatic programme at any time,
press the plus and minus icons together.
The End Time method (Switch off at a set end time)
Touch and hold the Function icon. The bell will flash and
beep. Touch the function icon again - twice (This will
skip past the Minute Minder and the Duration function)
The display will flash the word ‘End’ and the ‘A’ will flash
on the left hand side of the display.
Use the Plus and Minus icons to select the time the oven
is required to turn off.
Once this is done the oven will turn itself off at the pre-
selected time. To turn off the alarm press any icon.
To cancel the Semi Automatic programme at any time,
press the plus and minus icons together.

Setting the Programmer
Fully Automatic Cooking (Touch Control timer)
This function allows the cooker to switch on and off
automatically
It requires both the duration and the end time to be
entered. The timer will work out the start time and begin
cooking.
Touch and hold the Function (centre) icon. The bell will
flash and beep. Touch the function (centre) icon again.
(This will skip past the Minute Minder).
The display will flash the word ‘dur’, and the ‘A’ will flash
on the left hand side of the display.
Use the Plus and Minus icons to set the length of time
you want to cook for. The flashing will last for
approx. 5 seconds so any setting must be set
within this time frame or the time of day will
show again.
Touch the Function icon again (skips past the Minute
Minder and the Duration functions)
The display will flash ‘End’ and the ‘A’ will flash on the
left hand side of the display.
Use the Plus and Minus icons to select the time the oven
is required to turn off.
Set the temperature of the oven and place the food
inside. The timer will calculate the start time.
When this is done the oven will turn itself off at the time
you have selected. To switch off the alarm, press any
icon.
To cancel the automatic programme at any time, press
the plus and minus buttons together.
The automatic cooking
symbol will appear to
show that the oven is
no longer in manual
mode but in automatic
mode.
i
Important: Once the
oven has switched itself
off please make sure
you turn to oven con-
trols to the ‘off’ position
and set the oven to
manual by pressing the
Cook Time and Ready
Time buttons / icons
together.
i
Important: Remove
food as soon as it is
cooked.
i

Using Your Gas Hob
Hob Ignition
Models without thermocouples:
To turn on, place your pan onto the pansupports above
the burner you wish to use.
Push in and turn the selected control knob
anticlockwise, to the full on symbol.
If your hob has an ignition button or switch on the
fascia, press it in until your burner lights.
If your hob has automatic ignition it will spark next to
the burner when you push in the control knob.
To simmer, turn the control knob to the small flame
symbol. This will ensure that the flame is just large
enough to gently heat the contents of the pan.
To turn off, turn the control knob clockwise to the ‘off’
position.
Always make sure that your pans are place correctly on
the burners as shown, and do not allow the flame to
extend over the base of the pan.
Models with thermocouples:
ignition as above, but:
Hold the control knob in for 15 seconds. Do not hold
the control knob in for any longer than 15 seconds. If
the burner fails to light within this time, release the
control knob and wait one minute before attempting to
re-ignite.
Energy Saving
Position pans centrally over the elements.
Only heat the amount of liquid you need.
Once liquids have been brought to the boil, reduce the
heat setting to a simmer.
Consider using a pressure cooker if possible.
Vegetables in small pieces will cook quicker.
Use a pan which is a close match to your element size.
Smaller elements are ideal for simmering and stewing
in smaller pans, while the larger elements are ideal for
frying and boiling
Front
of the appliance.
Burner cap
Burner ring
Burner skirt
Electrode
Electrode
Viewed from the side
of the burner
Front
of the appliance.
Burner cap
Burner ring
Burner skirt
Thermocouple and electrode
Thermocouple
Electrode
Viewed from the side
of the burner
How can I tell if my hob
has thermocouples?
Picture A below:
shows a burner without
thermocouples.
Picture B below:
shows a burner with
thermocouples.
i
A
B
In the event of a power
failure, or the ignition
not working:
Push in and turn the
control knob to start the
gas, then hold a lighted
match or taper to the
burner until it lights.
i
Use flat based pans
which are the correct
size for your burners
and suitable for your
hob type.
We recommend the
following sizes:
100mm or 4” min.
250mm or 10” max.
Smaller or larger pan
sizes may lead to slower
cooking times.
i

Using Your Griddle (if supplied)
● Only use the griddle which has been approved for use on
this appliance. Do not use any other griddle, as this may
be hazardous.
●
Please read these instructions thoroughly
before using the
griddle for the first time.
Before using the griddle for the first time
● Wash the griddle thoroughly in hot soapy water. (see
“Cleaning” section).
● Season sparingly with a minimum amount of cooking oil.
● Heat the griddle on full rate for 3 minutes. The griddle
plate is now ready for use.
Using the griddle
● The griddle should only be positioned front-to-back
over the burners indicated by the griddle symbol on the
fascia panel.
●
Do not
use the griddle over the large burners.
● Place the griddle carefully on the pan support over the
burners, using the locating feet on the underside of the
griddle. Take care to avoid damage to the surface of the
pan supports.
● Before cooking, preheat the griddle for 3 minutes on full
rate, which is indicated on the control knobs by a large
flame symbol.
● After preheating, turn the control knobs to the small
flame symbol.
● The griddle is now ready for cooking.
● Do not use metal implements, as they may damage the
non-stick surface.
Note:
Using a gas appliance results in the production of heat
and moisture in the room in which it is installed. Always
ensure that the room is well ventilated: keep natural
ventilation holes open, or install a mechanical ventilation
device (i.e. an extractor hood). Prolonged use of the
appliance may call for additional ventilation, for example
opening a window, or more effective ventilation such as
increasing the level of mechanical ventilation where
present.
Always make sure that
children are super-
vised when they are
near to the appliance
when it is in use.
!!!
Seasoning the
griddle: see the
‘Cleaning’ section of this
handbook.
i
Always allow the griddle
to cool completely before
moving or cleaning.
!!!
About your griddle:
The griddle is made of
quality cast iron, and
has a non-stick cooking
surface.
Regular seasoning will
prolong the life of the
griddle and prevent
rusting. If the griddle
shows signs of rust,
wash and re-season.
i

Using Your Grill
Before you start grilling. . . .
Before you use the grill, make sure you have placed the
grill shelf in the position you need as once the grill is on
you may injure yourself if you try to move the shelf.
Do not close the door while the grill is in use.
Turn the selector control knob to the heat setting you
require.
To switch off, return the control knob to the ‘off’
position.
The cooling fan will come on during use, and may
continue to run for some time afterwards.
To adjust your results, you can turn the grid over, or
remove it altogether.
If your grill is a dual grill:
The dual grill uses all of the top element and is ideal for
grilling large quantities of food.
The single grill uses part of the element only, and is
better suited to grill smaller amounts of food.
The grill pan
This appliance comes with a grill pan, grill pan handle and
a grid.
The handle of the grill pan is detachable to allow you to
remove it while the pan is in use, this stops it from
getting hot.
To attach the handle:
Place the handle over the narrow edge of the grill pan
and slide to the centre as shown in the diagrams.
Shelf & Grid adjustments
Speed of grilling can be adjusted by changing the shelf
position or the turning the grill pan grid.
High: For thin foods and toasting.
Low: For thicker meat pieces.
Aluminium Foil
Never cover the grill pan or grill grid with foil, or allow fat
to build up in the grill pan, as this creates a fire hazard.
Warning: Accessible
parts may become hot
when the grill is in use.
children should be kept
away.
Please note: the grill
pan handle is designed
for sliding the grill pan
into and out of the grill
cavity. It is not to be
used for lifting the pan.
Types of grill
Fixed rate
grill: has a
full ‘on’ setting and ‘off’.
Variable rate grill: has
adjustable heat settings
1 (low) to 8 (high) or 5
(high) - depending on
the model.
Single grill
: has one grill
element.
Dual grill: has two grill
elements which can be
used together, or as a
single grill.
i
i
i
For best results:
Pre-heat the grill for
about 3 minutes.
i

Using Your Main Oven
The main oven may be controlled by the programmer (see
The Programmer/Clock for details).
The programmer, if fitted, must be set to manual before it
can be used, or programmed.
Switching on the fanned / conventional oven
Use the main oven control to turn your oven on, and
select your temperature.
Your appliance may be fitted with a thermostat indicator
light. If it is, then this will come on to show that the oven
is heating, and once the temperature is achieved, it will
go out.
To switch off the main oven, simply turn the control knob
back to the ‘ ‘ position.
The cooling fan will come on during use, and may con-
tinue to run for some time afterwards.
Switching on the multifunction oven (if applicable)
Use the function control knob to select the function you
wish to use - see the functions table for details.
Note: You can change function during cooking if you
wish, as long as the oven is in manual mode.
Turn the temperature control knob to the temperature
you wish to use.
Your appliance may be fitted with a thermostat indicator
light. If it is, then this will come on to show that the oven
is heating, and once the temperature is achieved, it will
go out.
To switch off the main oven, simply turn the control knob
back to the ‘ ‘ position.
The cooling fan will come on during use, and may contin-
ue to run for some time afterwards.
Important: Never
place food, or dishes on
the base of the main
oven, the element is
here and it will cause
over heating.
i

Oven & Grill Functions
Main Oven Function Recommended Uses
Base Heat Only Used to finish off the bases of food following cooking using the conventional
or fanned modes. The base heat can be used to provide additional
browning for pizzas, pies and quiche. Use this function towards the end of
cooking.
Top Heat Only The heat is ideal from browning off the tops of food as it is not as fierce as
the grill following conventional or fanned cooking. Provides additional
browning for dishes like Lasagna or Cauliflower cheese. Use this function
towards the end of
cooking.
Conventional Oven This function is ideal for traditional roasting. The meat is placed in the
middle of the oven, roast potatoes towards the top.
Intensive Bake Suitable for food with a high moisture content, such as quiche, bread and
cheesecake. It also eliminates the need for baking pastry blind.
Fanned Grill The fan allows the heat to circulate around the food. Ideal for thinner foods
such as bacon, fish and gammon steaks. Foods do not require turning. Use
with the oven door closed.
Fanned Oven The even temperature in the oven makes this function suitable for batch
baking, or batch cooking foods.
Defrost To defrost foods, such as cream cakes/gateaux, use with the oven door
closed. For cooling dishes prior to refrigeration, leave the door open.
Dual Grill This function cooks food from the top and is ideal for a range of food from
toast to steaks. As the whole grill is working, you can cook larger quantities
of food.
Single Grill For smaller quantities of food, but is still ideal for
anything from toast to steaks.
Base Heat with Fan Used to cook open pies (such as mince pies) the base element ensures that
the base is cooked while the fan allows the air to circulate around the filling
- without being too intensive.
Lights only Use when the oven is switched off and cold to aid cleaning the oven cavity.
The chart below details all of the functions which are available. Your oven may
not have all of the functions shown here.

Fanned Oven Guide
Conventional
temp (˚C)
‘A’ Efficiency oven
(˚C)
Gas mark
100
110
130
140
150
160
180 - 190
200
220
230
250
100
110
120
130
140
150
160
170
180
190
200
1/4
1/4
1/2
1
2
3
4 - 5
6
7
8
9
Some adjustment will have to be made to conventional
cooking temperatures.
The table below shows conventional cooking
temperatures, fanned temperatures and gas marks.
For optimum results using the fanned oven setting,
conventional temperatures need to be converted to the
fanned oven temperatures.
For example and item which would cook at 180˚C will
now cook at the fanned oven temperature of 160˚C.
This is a high efficiency oven, you may notice an
emission of steam when the door is opened.
When cooking chilled or frozen foods, use the
recommended cooking times and temperature on the
packaging. Always make sure the food is piping hot
throughout before serving.
There are no zones of heat, and no flavour transfer
when using a fanned oven - allowing you to cook a
greater variety of foods together.
If you are cooking on more than one shelf, you may
need to slightly increase the cooking time.
Always make sure that there is enough space between
dishes, to allow food to rise, and to air to circulate.

Pre-heating
To get the best results from your oven, we recommend
pre-heating for around 5 to 15 minutes before placing
your dishes in. This is especially important for items
which are chilled, frozen, batter based, yeast based or
whisked sponges.
If you are using a fanned function, you should still pre-
heat but for a shorter time.
The items in the cooking guide below are based on a
pre-heated oven, but can be adjusted to take into account
personal taste.
Oven and bakeware
Always use high quality trays and tins for cooking. Poor
quality tins and trays can warp in the oven producing
uneven results.
Never use dishes which are cracked, damaged or not
oven proof as heating may lead to shattering inside the
oven.
Food Type Temp.
Setting ˙C
Time
Approx.
Shelf
Position
Cakes
Small cakes
Victoria sandwich
Semi rich fruit cake
Christmas cake
Conv
190
180
150
150
Fanned
160
160
125
125
Intensive
-
-
-
-
15 - 25
20 - 30
2
1/2
- 3hrs
2
1/2
- 3hrs
7 & 13
7
5
3
Puddings
Bread & butter
pudding
Fruit crumble
170
200
150
175
-
-
45 - 1hr
40 - 1hr
9
9
Miscellaneous
Yorkshire pudding:
large
small
Shortcrust pastry
220
220
200
200
200
180
200
200
180
40 - 45
15 - 20
depends on
filling
11
12
top - middle
Cooking Guide

Roasting Guide
Roasting times depend on the weight, shape and texture
of the meat and personal preference. In order to
calculate the roasting time, weigh the meat or poultry,
including the stuffing, and follow the times given
below.
Frozen meat must be thoroughly thawed before
cooking. For large joints, it is advisable to thaw
overnight.
Frozen poultry must be thoroughly thawed before
cooking. The time required depends on the size of the
bird - eg: a large turkey may take up to 48 hours to
thaw.
When cooking stuffed meat or poultry, calculate the
cooking time from the total weight of the meat plus the
stuffing.
Cooking joints in foil, covered roasters, lidded
casseroles, or roasting bags will help to reduce meat
shrinkage, give a more moist result and may reduce fat
splashing. However, a slightly longer cooking time will be
required, add 5 - 10 minutes per 450g (1lb) to the
calculated cooking time. When using roasting bags do
not exceed the temperatures recommended by the
manufacturer, and do not allow the roasting bag to
touch the sides or top of the oven.
Use of a trivet with the roasting tin will reduce fat
splashing during open roasting, and will help to keep the
oven interior clean.
The use of a roasting tin larger then that supplied is not
advised, as this may impair performance and lead to
extended cooking times.
Meat joints (including chicken) should be roasted at
180 - 200˚C Conventional/ 160 - 180˚C Fanned for
20 - 30 mins per 450g/1lb, plus 20 minutes on shelf
position 2.

Roasting Guide
Roast turkey
Roasting turkey perfectly involves cooking two different
types of meat - the delicate light breast meat, which
must not be allowed to dry out, and the darker leg meat,
which takes longer to cook.
The turkey must be roasted long enough for the legs to
cook, so frequent basting is necessary. The breast meat
can be covered once browned.
The turkey can be open roasted, breast side down, for
half of the cook time, and then turned over for the
remainder of the cooking time.
If the turkey is stuffed, add 5 minutes per 1lb to the
cooking time.
If roasting turkey covered with foil, add 5 minutes per
1lb to the cooking time.
To test if the turkey is cooked, push a fine skewer into
the thickest part of the thigh. If the juices run clear, the
turkey is cooked. If the juices are still pink, the turkey
will need longer cooking. Always make sure that the
turkey is cooked properly before serving.
The maximum size Turkey for this appliance is: 20lbs
approximately 9kgs.
Please do not attempt to roast a Turkey larger than this, as
the results cannot be guaranteed.
Turkey Roasting times.
Most Turkeys are measured by the kilogram. Timing should
be calculated in either of these ways:
40 minutes per 1kg plus 10 minutes per 1/4 kg.
or
20 minutes per 1lb, plus 20 minutes.
Turkey should be roasted at 180 - 200˚C
Conventional/ 160 - 180˚C Fanned for 20 - 30 mins
per 450g/1lb, plus 20 minutes.

General Baking Guide
Trouble-shooting - Fruit Cakes
Trouble-shooting - Sponge Cakes
PROBLEM POSSIBLE CAUSE
Fruit sinking to the bottom Low oven temperature which may cause the cake to
take longer to set, allowing the fruit to sink. Or, too
much liquid, or raising agent. The fruit may not have
been properly washed and dried.
Cake sinking / dipping in the centre Too much raising agent in the mixture. Too hot, or too
cool an oven. Or, not enough liquid or insufficient
creaming.
Surface cracks Too small a tin, or too much mixture in the tin. Too
much raising agent in the mix, plus not enough liquid
or insufficient creaming. The oven may be too hot.
Hard outer crust with a damp patch inside Oven too hot, therefore the cake baked too quickly.
Too much sugar, or insufficient liquid.
Burnt outside Oven temperature too high. Oven too small for the
size of cake. Insufficient protection around the tin.
Cake baked on too high a shelf.
Texture with pronounced holes. Too much raising agent. Flour unevenly mixed.
Texture too close and cake insufficiently risen. Not enough raising agent. Not enough liquid. Too
cool an oven. Insufficient creaming.
Cake crumbles when cut Not enough liquid. Baked for too long. Not enough
sugar. Too much baking agent.
Too dry Over baking. Insufficient egg or liquid. Too much rais-
ing agent.
Domed top Insufficient creaming of mixture. Cake baked on too
high a shelf position, or at too high a temperature.
Paper liners can cause the outer edge not to rise and
the centre to peak.
Hollowed / sunken top Too much raising agent. Oven temperature too low, or
incorrect shelf position. Cake removed from oven
before it’s cooked. Use of soft tub margarine.
Very pale, but cooked Oven temperature too low. Baked too low in the oven
Overflowing tin Tin too small for the amount of mixture

Cleaning your Gas Hob
Sometimes when a hob is not working well, it is because
it needs cleaning.
Enamel parts
Use a mild cream cleaner for example ‘Cif’. Stubborn
marks can be removed with a soap filled pad.
Stainless steel surfaces
Only use a clean cloth wrung out with warm, soapy
water and dried off with a soft cloth. For stubborn
marks use a specialist stainless steel cleaner.
Do not use steam cleaners.
Sharp implements and objects can mark the surface of
stainless steel, however they do become less noticeable
in time.
Cast iron parts
Ensure the parts have fully cooled and scrape off any
stubborn marks, and bits of food with a plastic, or
wooden cooking implement. Rinse in warm soapy
water and dry with a tea towel.
Do not clean in a dishwasher.
If you notice any rusting on your griddle, or
pansupports, simply clean in warm soapy water, then
re-season.
Burner caps and skirts
The slots in the burner skirts where the flames burn
should be cleared of deposits.
Clean with a nylon brush, rinse and then dry
thoroughly. There may be brownish coloured markings
on your burners, these are carbon deposits or fat stains
and can be removed using a soap filled pad.
Do not put burners in the dishwasher or soak them.
Using dishwasher powders, washing up liquids and
caustic pastes can damage the burners.
Burner caps and heads must be repositioned correctly
so that they sit squarely on to the hob as shown on the
left.
This is particularly important with stainless steel models
as failure to reposition the caps correctly may result in
discolouration of the stainless steel around the burners.
Painted & Plastic parts
Only use a clean cloth wrung out in hot soapy water.
Baby oil can be used to
restore stainless steel
finishes - but only use a
few drops. Don’t use
cooking oils as they can
contain salts which will
damage the metal.
Always allow your
appliance to cool
down, and switch off
the electricity before
you clean any part of
it.
!!!
i
Don’t use:
undiluted bleaches,
products containing
chlorides, wire wool or
abrasive cleaners on
aluminium, stainless
steel, or plastic/painted
parts they can damage
the appliance. Nylon
pads can also be
unsuitable
i
g g g
g
g
Seasoning the
griddle:
Pour a drop of unsalted
cooking oil onto the
cooking side of the
griddle, use kitchen roll
to cover the griddle
evenly. Olive oil is not
suitable for seasoning.
Regular seasoning
prevents rust.
i

Cleaning your Cavities
Cleaning the oven cavities
Some foods can cause fat to spit, especially if you have
open roasted, this leaves the inside of the cavity
greasy.
It is important to clean the oven cavity as a build up of
fat can damage the appliance and may invalidate your
guarantee.
Chrome plated parts.
Use a moist soap filled pad, or place in a dishwasher.
Shelf runners can be removed to enable you to clean
then thoroughly. Make sure they are cool to touch and
then grasp the runners and slide out of their hanging
holes.
Pristine enamel surfaces
The enamel can be cleaned by wiping the surfaces
with a clean cloth which has been wrung out in hot,
soapy water.
If larger splashes of fat do not readily disappear, you
can use a mild cream cleaner to remove them. More
stubborn marks can be removed using a soap filled
pad.
Rinse well, and allow to dry before use.
Vitreous enamel surfaces
The enamel can be cleaned by wiping the surfaces
with a clean cloth which has been wrung out in hot,
soapy water.
Stubborn marks can be cleaned using a moistened
soap filled pad, or a mild cream cleaner.
Rinse well, and allow to dry before use.
Pull out to clean
Always allow your
appliance to cool
down, and switch off
the electricity before
you clean any part of
it.
!!!
Don’t use:
Caustic or abrasive
cleaners, bleaches,
coarse wire wool or
hard implements,
these will damage
your appliance.
i
Using a trivet while
roasting meat may help
to reduce fat splashes.
i

Baby oil can be used to
restore stainless steel
finishes - but only use a
few drops. Don’t use
cooking oils as they can
contain salts which will
damage the metal.
Take extra care when
cleaning over symbols
on fascia panels,
excessive cleaning can
lead to the symbols
fading.
Always allow your
appliance to cool
down, and switch off
the electricity before
you clean any part of
it.
Cleaning your Appliance
Painted & Plastic parts
Only use a clean cloth wrung out in hot soapy water.
Do not use abrasive cleaners, such as “Cif”, wire or nylon
cleaning pads on these parts.
Stainless steel & Aluminium surfaces
Only use a clean cloth wrung out in hot soapy water, and
dry with a soft cloth.
Stubborn marks can be removed using a stainless steel
cleaner. Supplies can be purchased from the Customer
Care Centre.
Sharp objects can mark the surface of stainless steel, but
will become less noticeable with time.
Wipe any spillage immediately, taking care to avoid burn-
ing your hands.
Some foods are corrosive eg; vinegar, fruit juices and
especially salt - they can mark or damage the metal if
they are left on the surface.
Enamel surfaces & parts
Clean with warm, soapy water and a clean cloth.
Dry with a soft clean towel or cloth.
Do not use steam cleaners.
Glass parts
Only use a clean cloth wrung out in hot soapy water, or
a specialist glass cleaner.
Rinse away any excess cleaner and dry with a soft cloth.
Do not use abrasives or polishes as they will scratch and
damage the glass.
The inner door glass panel can be removed for cleaning
but it must be replaced the right way up. If there is any
writing on the glass, you must be able to read it clearly
when the cavity doors are open.
Always make sure that the glass is pushed fully into the
Stop position.
To remove the glass panel, open the door wide, hold the
top and bottom edges and slide out.
Warning: Do not operate the appliance without the glass
panel correctly fitted.
!!!
i
i
Don’t use:
undiluted bleaches,
products containing
chlorides or abrasive
cleaners on aluminium
or stainless steel, they
can damage the
appliance.
i
Glass door panels
For your safety, glass door
panels are made of toughened
glass. This ensures that, in
the unlikely event that a panel
breaks, it does so into small
fragments to minimise the risk
of injury.
Please take care when
handling, using or cleaning all
glass panels, as any damage
to the surfaces or edges may
result in the glass breaking
without warning or apparent
cause at a later date.
Should any glass panel be
damaged, we strongly
recommend that it is replaced
immediately
.

Cook Shop
Product
description
Product
code
Quantity Where used
Rectangular
carbon filters
082612620 2 Hoods
Round carbon
filters
082611571 1 Hoods
Ceramic hob
scraper kit
082606781 1 All ceramic glass
hobs including
induction.
Ceramic hob
cleaner and
conditioner
082606780 1 All ceramic glass
hobs including
induction
Sealed hotplate
conditioner
082606783 1 All sealed / solid
plate hobs.
Stainless steel
cleaner
082606764 1 All stainless steel
parts
Oven cleaner
spray
082606786 1 All cookers, inside
cavities and on
glass.
Multi-purpose
kitchen
cleaner
082606782 1 General kitchen
cleaner.
E-cloth 082813300 1 All cookers, for
cleaning glass and
stainless steel
To order or enquire about any
of these products, please call
the Spares Sales team on:
0870 458 9961.

Before you call. .
Problem? Advice
The ignition won’t work.
(Gas and dual fuel models)
Check there is a spark when the
ignition button is depressed. If
there is no spark, check the
electricity supply is switched on at
the socket.
Check that the gas supply is
switched on.
There’s condensation on the
doors.
Condensation is caused by hot,
moist air meeting a cooler surface
(i.e. the oven door). You cannot
always prevent it, but you can
minimise it when it happens by
doing the following:
Pre-heat the oven at a high
temperature before putting food in
the oven, and cover the food you
are cooking wherever possible.
Whenever you can, cook wet
foods at higher temperatures.
Don’t leave food in the oven to
cool down.
Automatic cooking will normally
produce condensation when the
oven is cooling down with food
inside.
There’s been a power failure
and the oven won’t work.
(models with clocks and
automatic programmers)
Switch off the electricity supply.
When the power returns - re-set
the programmer/Clock to the
correct time of day.
This will allow you to use your
appliance.

No. of
lamps
Bulb
Location
Oven
type
Instruction for
changing the bulb
2
(@25W)
side All Wait until the oven is cool,
then remove the oven
shelves.
Grasp the lens cover on the
light fitting and pull it away
from the side of the oven.
Unscrew the bulb.
1
(@25W)
rear Fanned /
Multifunction
Wait until the oven is cool,
then remove the shelves.
The oven light is at the rear
of the oven cavity.
Remove the loose oven back
- unscrew the 4 securing
screws (one at each corner).
Unscrew the lens cover (turn
anticlockwise). Unscrew the
bulb and replace. Replace
lens cover and replace oven
back.
1
(@25W)
rear Conventional Wait until the oven is cool,
then remove the oven
shelves.
The oven light is at the rear
of the oven cavity.
Unscrew the lens cover (turn
anticlockwise). Unscrew the
bulb and replace. Replace
lens cover.
Changing Light Bulbs
Warning: There is a risk of electric shock, so always
make sure you have turned off and unplugged your
appliance.
Not all appliances have the same number and type of
bulbs. Before replacing your bulb, open the top/main
oven door and see which type you have. Then use the
table to help you change your bulb correctly.
Please remember that bulbs are not covered by
your warranty.
Bulbs can be purchased from hardware stores (always
take the old bulb with you).
There is no need to remove
the oven back on the 90DF
model.

Installing Your Cooker
Clearances
This cooker may be fitted flush to the base units of your
kitchen.
No shelf, overhang, cupboard, or cooker hood should
be less than 650mm above the hob top, but please
check this with the hood manufacturers instructions.
If your appliance has a side opening door, we
recommend a side clearance of 60mm to allow the
oven door to fully open.
The cooker must have a side clearance above hob level
of 90mm up to a height of 400mm.
The important dimensions are those around the
appliance.
650mm
minimum
400mm
clearance
Flush fit to
base units
Flush fit to
base units
90
mm
90
mm
For all appliance sizes:
700mm
800mm
900mm
1000mm
1100mm
1200mm

Installing Your Cooker
The information below is crucial to installing this appliance
correctly and safely.
Where standards have been revised - always use the most
recent edition.
Failure to install appliances correctly is dangerous
and could lead to prosecution.
Ventilation Requirements
The room containing the appliance should have an air
supply in accordance with BS 5440:Part 2.
● All rooms require an openable window, or equivalent,
and some will require a permanent vent as well.
● For room volumes up to 5m
3
an air vent of 100cm
3
is
required.
● If the room has a door which opens directly to the
outside, or exceeds 10m
3
- no air vent is required.
● For room volumes between 5m
3
and 10m
3
and air vent
of 50cm
2
is required.
● If there are other fuel burning appliances in the same
room, BS 5440:Part 2 should be consulted to determine
the air vent requirements.
● This appliance must not be fitted into a bed sitting room
of less than 20m
3
or into a bath or shower room.
Windows and vents should not be blocked or removed
without first consulting a competent engineer.
LPG only - do not install this appliance below ground
level. This does not preclude installation into rooms which
are basements with respect to one side of the building, but
open to ground level on the opposite side
.

Installing Your Cooker
The information below is crucial to installing this appliance
correctly and safely.
Failure to install appliances correctly is dangerous
and could lead to prosecution.
UK Regulations & Standards
always refer to the most recent issue of the standards
Gas Safety Regulations.
Building Regulations - issued by the DEFRA.
Building Standards (Scotland) (Consolidated) - issued by
the Scottish Development Department.
I.E.E. Wiring Regulations.
Electricity at Work Regulations.
BS 6172 Installation of Domestic Gas Cooking. For LP
Gas, refer to BS 5482 Part 1, Part 2 or Part 3 as
relevant.
Installation and Servicing Instructions for this appliance.
For installation in countries other than the UK, the appliance
must be connected in accordance with all local gas and
electrical regulations.
In the Republic of Ireland installers should refer to IS 813
Domestic Gas Appliances.

Fitting the plinth (if applicable)
Make sure the appliance is raised to a height of 915mm
or above before beginning. If the appliance is below
915mm - you can only fit the plinth cover labelled X.
You can adjust the height using the feet (1) of the
appliance.
If your appliance has a storage drawer at the bottom,
you access the required holes through the base of the
drawer after lifting the mat.
Open the appliance doors, and loosen screw A located
on bracket (2). Do not remove this screw entirely.
Insert screw B, through slot (3) and screw into the small
hole at the bottom of bracket (2).
Make sure that the plinth cover is flush to the appliance,
but not over tightened.
Fitting the splashback (if applicable)
Remove the screws from the rear of the hotplate vent.
Locate the splashback in position so that all the fixing
holes are in line with the holes in the rear of the hot-
plate vent.
Re-fit screws into the holes to secure the splashback in
place.
Installing Your Cooker
B
A
(1)
(2)
(3)
X
Y
Door
Plinth cover
Oven cavity

Stabilising and Securing
Your cooker may come with a stability chain, if it does not
we recommend that you buy a stability bracket from your
local supplier, this will keep the cooker from moving and
will prevent damage to the flexible hosing at the back of
the cooker.
Your stability chain
Your cooker must be secured to a wall or a solid partition
behind the cooker.
Your stability bracket
You can buy a stability bracket from your supplier and it
can fitted as follows:
Place the cooker in position and draw a pencil line level
with the front edge.
Remove the cooker and mark off 450mm from the
pencil line to locate the front edge of the lower
bracket.
Fix the bracket to the floor. Measure from floor level
to engagement edge in the back of the cooker and add
3mm.
Assemble the underside of the top part of the bracket
to this height.
See the drawings for the location of the bracket and
the recommended positioning.
Levelling
Once your cooker is secure:
Place a spirit level onto a baking tray, on an oven shelf.
These cookers are fitted with adjustable feet which will
allow you to adjust the height of the appliance until it is
level. The adjustable feet are at the rear of the cooker.
Installing Your Cooker
Stability Hook
(not supplied)
Rear of cooker
Firmly fix chain
to cooker rear
Stability chain to
be as short as
possible
Cooker stability chain not designed
with bracket engagement slot
g
Model viewed from rear
Locate stability bracket here
X
Rear
plinths

Installing Your Cooker
Connecting the electricity supply
Warning: This appliance must be earthed!
This appliance must be fitted using a double pole unit
of 30 ampere minimum capacity with 3mm minimum
contact at all poles.
Access to the mains terminal is gained by opening the
terminal block cover at the rear of the appliance - use
a flat bladed screw driver for this.
Connection should be made with a 6.0mm
2
twin and
earth cable.
First strip the wires. Then push the cable through the
cable clamping the terminal block cover.
Connect the cable to the terminal block and tighten the
cable clamp screw - see diagram.
Close the terminal box, ensuring that the cover is
engaged on the locking tabs.
Sufficient cable should be used to allow the cooker to
be pulled out, but must hang clear of the floor so it
does not become twisted or trapped when the cooker
is pushed back.
Please ensure that the user has this copy of the
handbook, and the appliance is in place. Thank you.
ë

Installing Your Cooker
Connecting to the gas supply
The inlet to the appliance is ISO 7 - Rp
1
⁄2
” internal thread
situated towards the top right corner of the rear.
Fit the bayonet connection. This should be located so as
to ensure that the flexible hose does not kink.
Use a 900mm - 1125mm length of flexible hose.
Ensure that all pipe work is of the correct rating.
Natural Gas - Flexible connections should comply with
BS 669. Parts of the appliance likely to come into contact
with a flexible connector have a temperature of less than
70˙C.
LP Gas - For flexible connections use a bayonet type
hose, suitable for use on LP Gas up to 50mbar pressure
rise and 70˙C temperature rise. The flexible hose should
be coloured black with a red stripe, band or label. If in
doubt, contact your supplier.
After installation make sure all connections are gas
sound.
Commissioning
Pressure settings:
G20 Natural Gas @ 20mbar
G30 Butane @ 28-30mbar / 50mbar
G25 Natural Gas @ 20mbar
G31 Propane @ 37mbar
Hob
Turn on gas supply and check for soundness at the hot-
plate injector. Light two burners and check that the pres-
sure is correct.
Grill
Turn the control knob to the full on position and ignite,
allow the grill to operate for a few minutes.
Oven
Turn the control knob to the full on position and ignite,
allow the oven to operate for a few minutes
.

Technical Data - Notes
Type of gas:
Natural Gas I2H
Natural Gas II2H3+*
Natural Gas II2ELL3B/P*
LP Gas I3+
Please see your data badge for specified gas
type.
* Can be converted from Natural gas to LP Gas
Never attempt to convert an appliance -
unless the data badge states that you can.
Burner Aeration:
Fixed
Pressure setting:
G20 Natural Gas @ 20mbar
G30 Butane @ 28-30mbar / 50mbar
G25 Natural Gas @ 20mbar
G31 Propane @ 37mbar
Electrical supply:
220 - 240V ~ 50Hz
Countries of destination:
GB
IE
DE
!!!

Technical Data - Notes
Fuel Type Hotplate Burner /
Element
Nominal Rate
Qn
Butane
g/h
Propane
g/h
Injectors
used
Natural Gas
G20
&
G25
Hob - small
Hob - medium
Hob - Large
Hob - wok
Total heat input
5 burners
7 burners
1.0kW
2.0kW
3.0kW
3.5kW
11.5kW
14.5kW
-
-
-
-
-
-
-
-
-
-
77
104
129
121 & 63
LP Gas
Hob - small
Hob - medium
Hob - Large
Hob - wok
Total heat input
5 burners
7 burners
1.0kW
2.0kW
3.0kW
3.5kW
11.5kW
14.5kW
73
145
218
254
72
143
215
250
50
70
87
87 & 35
Fuel Type Conventional
oven
Fanned oven Dual variable
grill
(90/100 size)
Dual variable
grill
(110 size)
Electric
@ 230V
2.1kW 2.0kW
2.5kW
(900 tall oven)
1.8 - 2.7kW 1.8 - 2.8kW
Oven lamps
25W each
Appliance size
90DFT 100DFT 110DFT 90DFT DB4
220 - 240V
6150 - 7320W
220 - 240V
5775 - 6870W
220 - 240V
5860 - 6970W
6150 - 7320W

Service Record
Date of purchase Installer stamp / Printed name Date of installation
Place of purchase:
Date Part(s) replaced Engineers Stamp/
Printed Name
Model Number
Serial Number
Please record your model number and serial number in the space below.
Where are my model and serial numbers?
Freestanding HL appliances: base of storage drawer
Freestanding appliances: front frame near oven cavity
Built in oven: front frame near oven cavity
Hobs: base plate of the hob
Having these numbers to hand will help us to help you, quickly and more efficiently.
When contacting us, please use the Customer Care number on the back cover of this
handbook.

Inhoud
Gebruiksaanwijzing
Over uw fornuis . . . . . . . . . . . . . . . . . . . . . . . . . . . . . . . . . . . . . . . . . . . . . . . . . . . . 63
Veiligheidsvoorschriften voor kookplaat en fornuis . . . . . . . . . . . . . . . . . . . . . . . . . . . 64
Frituurpan branden . . . . . . . . . . . . . . . . . . . . . . . . . . . . . . . . . . . . . . . . . . . . . . . . . 65
Gebruik van de timer / klok . . . . . . . . . . . . . . . . . . . . . . . . . . . . . . . . . . . . . . . . . . . 66
Gebruik van de gaskookplaat
Gebruik van de gaskookplaat . . . . . . . . . . . . . . . . . . . . . . . . . . . . . . . . . . . . . . . . . . 69
Gebruik van de bakplaat . . . . . . . . . . . . . . . . . . . . . . . . . . . . . . . . . . . . . . . . . . . . . 70
Gebruik van de ovens / grill
Gebruik van de bovengrill . . . . . . . . . . . . . . . . . . . . . . . . . . . . . . . . . . . . . . . . . . . . . 72
Kooktabel grill . . . . . . . . . . . . . . . . . . . . . . . . . . . . . . . . . . . . . . . . . . . . . . . . . . . . . 73
Het gebruik van de conventionele bovenoven. . . . . . . . . . . . . . . . . . . . . . . . . . . . . . . 74
Kooktabel voor de conventionele bovenoven . . . . . . . . . . . . . . . . . . . . . . . . . . . . . . . 75
Het gebruik van de multifunctionele oven . . . . . . . . . . . . . . . . . . . . . . . . . . . . . . . . . 76
Het gebruik van uw heteluchtoven (indien aanwezig) . . . . . . . . . . . . . . . . . . . . . . . . . 77
Oven- en grillfuncties . . . . . . . . . . . . . . . . . . . . . . . . . . . . . . . . . . . . . . . . . . . . . . . . 78
Het gebruik van de multifunctionele ovengrill . . . . . . . . . . . . . . . . . . . . . . . . . . . . . . . 79
Kooktabellen . . . . . . . . . . . . . . . . . . . . . . . . . . . . . . . . . . . . . . . . . . . . . . . . . . . . . . 81
Koel- en ontdooifunctie. . . . . . . . . . . . . . . . . . . . . . . . . . . . . . . . . . . . . . . . . . . . . . . 86
Het gebruik van uw sudderoven (indien voorzien). . . . . . . . . . . . . . . . . . . . . . . . . . . . 87
Bordenrek (indien voorzien) . . . . . . . . . . . . . . . . . . . . . . . . . . . . . . . . . . . . . . . . . . . 89
Reiniging en onderhoud van apparaat
Reiniging van gaskookplaat. . . . . . . . . . . . . . . . . . . . . . . . . . . . . . . . . . . . . . . . . . . . 90
Ovenruimten reinigen. . . . . . . . . . . . . . . . . . . . . . . . . . . . . . . . . . . . . . . . . . . . . . . . 91
Uitschuifbaar reksysteem . . . . . . . . . . . . . . . . . . . . . . . . . . . . . . . . . . . . . . . . . . . . . 92
Apparaat reinigen . . . . . . . . . . . . . . . . . . . . . . . . . . . . . . . . . . . . . . . . . . . . . . . . . . 93
Voordat u belt . . . . . . . . . . . . . . . . . . . . . . . . . . . . . . . . . . . . . . . . . . . . . . . . . . . . . 94
Lampen verwisselen . . . . . . . . . . . . . . . . . . . . . . . . . . . . . . . . . . . . . . . . . . . . . . . . . 95
Installatievoorschriften . . . . . . . . . . . . . . . . . . . . . . . . . . . . . . . . . . . . . . . . . . . . 96
Technische gegevens . . . . . . . . . . . . . . . . . . . . . . . . . . . . . . . . . . . . . . . . . . . . . 103
Klantenservice . . . . . . . . . . . . . . . . . . . . . . . . . . . . . . . . . . . . . . . . . . Achteromslag

BELANGRIJKE OPMERKING
Wij wijzen erop dat de koelventilator waarmee dit apparaat is uitgerust een
integraal deel vormt van de veiligheid en de functionaliteit.
Bij het installeren van het apparaat moet u ervoor zorgen dat de werking van
de koelventilator niet wordt gerhinderd door voorwerpen die hiermee in contact
komen. (installatieleidingen, netsnoeren etc.)
U moet er ook op letten dat er voldoende luchtstroming is aan de achterkant
van het apparaat om de koelventilator optimaal te laten werken. (Vooral
inbouwapparaten) Zie de afmetingen van de vrije ruimte in de sectie Installatie
van deze handleiding.
Tijdens gebruik van het apparaat mag de stekker nooit uit het stopcontact
worden verwijderd omdat dit een ernstig nadelig effect kan hebben op de
veiligheid en de werking van het apparaat, in het bijzonder met betrekking tot
de temperatuur van oppervlakken die heet worden en op gas werkende
onderdelen die niet doeltreffend genoeg werken.
De koelventilator is ontworpen om te blijven werken na het uitzetten van de
bedieningsknop om het frontpaneel van het apparaat en de bedieningsknoppen
koel te houden totdat het apparaat vanzelf helemaal is afgekoeld.
Garantie
Gedurende een periode van twee jaar, na aankoopdatum van uw
Belling keukenapparatuur, geeft Faber International BV volledige
garantie op de keukenapparatuur. Volledige garantie houdt in dat
Faber International BV defecte onderdelen zal repareren of vervan-
gen zonder de wederpartij daartoe materiaalkosten, voorrijdkosten
en arbeidsloon in rekening te brengen.
Voor de uitgebreide garantievoorwaarden of wanneer deze komen
te vervallen verwijzen wij u naar onze website www.belling.nl of
telefonisch op te vragen onder nummer +31 (0) 513 656500.
Voor vragen omtrent onderdelen en service, voor Nederland en
België, kunt u ons bereiken onder nummer +31 (0) 513 656500.
International BV
Saturnus 8
8448 CC Heerenveen
Wij verzoeken u vriendelijk het model- en serienummer, welke zijn
te vinden op uw handleiding en op de keukenmachine gereed te
houden of te vermelden wanneer u ons gaat contacten.

Voordat u het fornuis gebruikt
Voordat u dit apparaat gebruikt dient u alle
verpakkingsmateriaal te verwijderen. Sommige
onderdelen in dit apparaat zijn afzonderlijk verpakt.
Wij raden u ook aan om de ovens en/of grill korte
tijd aan te zetten om de fabricageresten te
verbranden. Dit proces kan gepaard gaan met een
geur – maar hier hoeft u zich geen zorgen over te
maken omdat deze ongevaarlijk is.
We raden u ook aan om de ovenrekken, de
bakplaat, de grillpan en de grillpan onderzetter te
wassen met heet zeepwater voor het eerste gebruik
omdat dit de beschermende olielaag verwijdert.
Hoewel wij er alle zorg aan hebben besteed om dit
apparaat te leveren zonder oneffenheden of scherpe
randen, raden wij u aan om beschermende
handschoenen te dragen bij het installeren en
verplaatsen van dit apparaat.
Dit voorkomt letsel.
Dit apparaat is niet geschikt voor gebruik door
personen (waaronder kinderen) met een verminderd
fysiek, zintuiglijk of mentaal vermogen, of gebrek
aan ervaring en kennis, zonder aanwijzingen voor
het gebruik van het apparaat of toezicht door een
persoon die op hun veiligheid let.
Ons beleid is gericht op voortdurende ontwikkeling
en verbetering. Wij staan niet in voor de strikte
nauwkeurigheid van de afbeeldingen en technische
gegevens. Wijzigingen van het ontwerp en het
materiaal kunnen nodig zijn na publicatie.
Wij wijzen erop dat niet alle hoofdstukken in deze
handleiding van toepassing zijn op uw apparaat,
maar u dient de hoofdstukken die betrekking op uw
apparaat hebben voor installatie en gebruik te lezen.
Dit zal tijd besparen.
Maak altijd gebruik van een erkende installateur
voor dit apparaat.
Milieubescherming:
Al ons verpakkingsmateriaal is recycleerbaar en
milieuvriendelijk.
Probeer waar mogelijk te recyclen – Neem contact
op met de plaatselijke autoriteiten voor het
dichtstbijzijnde recyclingcentrum.
!!!
i
i
!!!
i
i
!!!
Dit apparaat is uitslui-
tend bedoeld voor
gebruik in een
huishoudelijke keuken
en is niet ontworpen
of bestemd voor com-
mercieel gebruik.
!!!

Over uw fornuis
A
De afbeeldingen hieronder tonen de ver-
schillende ruimten en kookplaat indelingen
die beschikbaar zijn in de gas/elektra serie.
Heteluchtoven
Multifunctionele
oven en grill
Sudderoven
Bedieningspaneel
Conventionele
oven & aparte
grill functie met
open deur
Groot
Brander
Medium
Brander
Wokbrander
Klein
Brander
Groot
Brander
Wokbrander
Klein
Brander
Medium
Brander
Medium
Brander
Medium
Brander
Klein
Brander
= Programmeerbare oven (zie
sectie Timer)
Heteluchtoven
Bedieningspaneel
Multifunctionele
oven en grill
Conventionele
oven & aparte
grill functie met
open deur

Veiligheidsvoorschriften voor kookplaat en fornuis
Zorg er altijd voor dat de onderkant van de pannen
droog en plat is voordat u ze gebruikt op de kookplaat.
Plaats de pan altijd op het midden van de brander en
draai de handvaten naar een veilige stand zodat hier niet
tegen gestoten of aan getrokken kan worden.
Gebruik altijd pannen die niet kleiner zijn dan 100 mm,
of groter dan 250 mm.
Wees altijd voorzichtig als u voedsel uit de oven haalt
want de zone rondom de ruimte kan heet worden.
Gebruik altijd ovenhandschoenen bij het gebruik van
keukengerei in de oven omdat dit heet zal zijn.
Zorg er altijd voor dat de ovenrekken in de juiste stand
staan tussen twee steunen. Plaats de ovenrekken niet op
de bovenste steun dit leidt tot morsen en letsel als de
bakplaat of de schotel valt.
Gebruik nooit dubbele pannen, pannen met een
onderrand, oude of misvormde pannen of een pan die
niet stabiel is op een vlak oppervlak.
Laat kookvet of slaolie nooit onbewaakt achter.
Gebruik geen commerciële sudderplaten of warmtever-
spreiders omdat ze overmatige hitte kunnen veroorzaken
en het oppervlak van de kookplaat kunnen beschadigen.
Gebruik de kookplaat nooit voor een ander doel dan
voor het bereiden van voedsel.
Plastic kookgerei kan smelten als dit in aanraking komt
met een warme kookplaat. Leg het kookgerei nooit in de
buurt van of bovenop de kookplaat.
Laat de brander niet aanstaan als er geen pan op staat.
Dit kan brandgevaar veroorzaken.
Plaats geen voedsel op de deur als deze open staat.
Wikkel geen folie rond de ovenrekken en zorg ervoor dat
dit het rookafvoerkanaal niet kan blokkeren.
Leg geen theedoeken in de buurt van de oven als deze
aan staat omdat dit brandgevaar veroorzaakt.
Trek geen zware voedingsmiddelen zoals kalkoenen of
grote stukken vlees uit de oven op het rek omdat deze
kunnen kantelen en vallen.
Gebruik het apparaat niet om iets anders dan voedsel
te verwarmen en gebruik het niet om de ruimte te
verwarmen.
Zorg er altijd voor dat de bran-
derdeksels, branderringen en
pandragers goed zijn geplaatst.
Dit voorkomt het instabiel wor-
den van de pannen als ze wor-
den gebruikt en zorgt voor een
ononderbroken gasstroom.
Bel klantenservice voor een
bezoek van een onder-
houdsmonteur indien:
u vindt dat de gasoven na
verloop van tijd heter wordt
op een bepaalde temperatuur
– misschien moet de ther-
mostaat worden vervangen.
de koelventilator niet werkt.
i
WAARSCHUWING:
Onderdelen van het
apparaat kunnen heet
worden tijdens het
gebruik, houd toezicht
op kinderen als ze zich
in de buurt van het
apparaat bevinden.
!!!

Frituurpan branden
Wat veroorzaakt een frituurpan brand?
Frituurpan branden beginnen als olie of vet te heet
wordt en vlam vat of als olie of vet op de kookplaat
wordt gemorst omdat de pan te vol is gevuld.
Het kan ook gebeuren als u natte frieten in hete olie
doet waardoor het gaat spetteren en overstroomt.
Een frituurpan brand voorkomen
Vul de pan nooit met meer dan eenderde vet of olie.
Laat de pan nooit onbewaakt achter op het vuur – zelfs
niet een paar seconden.
Droog frieten af voordat u ze in de pan doet.
Doe de frieten nooit in de pan als de olie walmt. Draai
het vuur uit en laat de olie afkoelen anders kan de olie
vlam vatten.
In het geval van een frituurpan brand
Als uw frituurpan vlam vat – raak dan niet in paniek en
verplaats de pan niet. Ernstige brandwonden worden
vaak veroorzaakt door de pan op te pakken en ermee
naar buiten te rennen.
Als het veilig is om te doen en u niet over de pan heen
hoeft te reiken, zet dan het vuur onder de pan uit.
Gooi er nooit water overheen en gebruik geen
brandblusser.
Leg, indien mogelijk een vochtige doek of handdoek
over de pan om de vlammen te smoren.
Laat de pan minstens een half uur afkoelen.
Indien u de vlam in de pan niet onder controle krijgt,
sluit dan de deur, ga naar buiten en waarschuw iedereen
om het huis te verlaten.
Bel de brandweer. Ga om geen enkele reden terug naar
binnen.

Gebruik van de timer / klok
De timer is een 24-uurs
klok. Voordat u iets met
het apparaat doet –
moet u de juiste tijd
instellen.
i
Verklaring van timer symbol-
en.
Met uw timer kunt u de tijd instellen, de minutenteller
instellen en de half- en volautomatische kookfuncties
gebruiken. De timer is essentieel voor de werking van uw
apparaat en het lezen van deze sectie zorgt ervoor dat u
optimaal van uw oven profiteert.
De programmeerknoppen
Dit type timer is voorzien van drie knoppen.De tabel
hieronder toont u hoe hun symbolen eruit zien, afhankelijk
van het modeltype en waarvoor ze gebruikt kunnen worden.
Instellen van tijd
Druk tegelijkertijd een paar seconden op de plus-
en minknoppen en laat los.
Stel de tijd in door gebruik van de plus- en
minknoppen. Druk één keer voor het stap voor stap
instellen en houd ingedrukt voor het snel verhogen
van de tijd...
Wacht ongeveer 10 seconden totdat de ‘’ stopt
met knipperen na het instellen van de tijd.
Gebruik het apparaat zoals u normaal doet.
Instellen van alarmtoon
U kunt kiezen uit drie tonen.
Druk op de minknop en laat weer los.
Als u de minknop loslaat wordt de toon geselecteerd.
Symbool Symbool Wat is dit?
-
Omlaag / Min
Wordt gebruikt om de kook-/eindtijd te ver-
minderen, minuten van de minutenteller te
verwijderen of de tijd te wijzigen.
Ook voor het luisteren naar en instellen van de
alarmtoon.
+
Omhoog / plus
Wordt gebruikt om de kook-/eindtijd te verhogen,
minuten aan de minutenteller toe te voegen of de
tijd aan te passen.
Functieknop
Wordt gebruikt om de beschikbare functies van
deze timer te selecteren.
Druk een keer voor: Minutenteller.
Druk twee keer voor: Kooktijd
Druk drie keer voor: Eindtijd.
Hoe u deze functies kunt gebruiken wordt later
in dit hoofdstuk uitgelegd.

Timer instellen
Volautomatisch koken
Schakelt automatisch aan en uit
Dit vereist dat zowel de duur als de eindtijd worden inge-
voerd. De timer berekent de starttijd en begint met koken.
Druk twee keer op de functieknop om de minutenteller over
te slaan.
Op het scherm ziet u het woord ‘duur’, en de ‘A’ knipperen
aan de linkerkant van het scherm.
Gebruik de plus- en minknoppen om de benodigde
tijdsduur die u voor het koken nodig heeft, in te stellen. Dit
moet u binnen 5 seconden doen anders verschijnt de tijd
opnieuw.
Druk drie keer op de functieknop om de minutenteller en
de kookduur timer over te slaan.
Op het scherm ziet u het woord ‘End’, en de ‘A’ knipperen
aan de linkerkant van het scherm.
Gebruik de plus- en minknoppen om de tijd te selecteren
waarop de oven moet worden uitgeschakeld.
Hierna zal de oven automatisch uitschakelen op de door u
geselecteerde tijd. Om het alarm uit te schakelen, drukt u
op een willekeurige knop.
Stel de temperatuur van de oven in en zet het
voedsel erin.
De timer berekent de juiste starttijd.
Bij gebruik van de timer:
Doe het volgende:
Maak uzelf vertrouwd met het gebruik van de timer.
Gebruik zo koud en vers mogelijke voedingsmiddelen
rechtstreeks uit de koelkast.
Kies voedingsmiddelen die geschikt zijn voor koken vanaf
een koude start, sommige gerechten worden beïn-vloed
door ongekookt te laten op kamertemperatuur.
Zorg ervoor dat vlees, gevogelte en rauwe voedings-
middelen goed zijn ontdooid voordat u ze in de oven zet.
Bedek de schotels met deksels of folie.
Probeer de eindtijd zo dicht mogelijk in de buurt van uw
terugkeer te plannen.
Doe niet het volgende:
Plaats geen warme voedingsmiddelen in de sudderoven.
Het voedsel moet volledig zijn afgekoeld voordat u het in
de oven plaatst en de oven moet ook afgekoeld zijn
voordat u start.
Gerechten klaarmaken van restjes overgebleven vlees of
gevogelte of pasteitjes met een natte vulling!
Schotels met teveel vloeistof vullen.
Het automatische kook-
symbool verschijnt om aan
te geven dat de oven niet
langer in de handmatige
stand staat maar in de
automatische stand.
i
Belangrijk: Na het
automatisch uitschakelen
van de oven dient u de
bedieningsknop in de ‘uit’
stand te zetten en de
oven in de hand-matige
stand door tegelijkertijd
te drukken op de toetsen
Cook Time (Kooktijd) en
Ready Time (Klaar).
i
Belangrijk: Haal het
voedsel eruit zodra het
gaar is.
i

Gebruik van uw gaskookplaat
Ontsteking van kookplaat
Modellen met thermokoppels:
Om de kookplaat aan te zetten plaatst u de pan op de
pandragers boven de brander die u wilt gebruiken.
Druk in en draai de bedieningsknop naar links, naar het
volledig aan symbool.
Indien uw kookplaat is uitgerust met een ontstekings-
knop of -schakelaar op het bedieningspaneel, drukt u
deze in totdat uw brander brandt.
Indien uw kookplaat is uitgerust met een automatische
ontsteking dan zal deze een vonk geven naast de
brander wanneer u de bedieningsknop indrukt.
Om te sudderen, draait u de bedieningsknop naar het
kleine vlamsymbool.Dit zorgt ervoor dat de vlam groot
genoeg is om de inhoud van de pan zachtjes te
verwarmen.
Om uit te schakelen, zet u de bedieningsknop weer in de
stand “uit”.
Zorg er altijd voor dat uw pannen juist op de branders
zijn geplaatst zoals afgebeeld en laat de vlam niet buiten
de bodem van de pan uitkomen.
Modellen met thermokoppels:
Ontsteking zoals hierboven, maar:
Houd de bedieningsknop 15 seconden lang ingedrukt.
Houd de bedieningsknop niet langer dan 15 seconden
ingedrukt. Als de brander niet binnen deze tijd
aangaat, laat dan de bedieningsknop los en wacht een
minuut voordat u deze opnieuw probeert te ontsteken.
Energiebesparing
Plaats de pannen in het midden van de elementen.
Verhit alleen de benodigde hoeveelheid vloeistof.
Als de vloeistof aan de kook is gebracht, vermindert u
de warmte om zachtjes te laten koken.
Overweeg het gebruik van een snelkookpan indien
mogelijk.
Groenten in kleine stukjes zijn eerder gaar.
Gebruik een pan met een doorsnede die bijna gelijk is
aan de grootte van het element.
Kleinere elementen zijn ideaal voor het sudderen en
stoven in kleinere pannen terwijl de grotere elementen
ideaal zijn voor koken en bakken.
Hoe weet ik of mijn
kookplaat is uitgerust met
thermokoppels?
Afbeelding A hieronder:
toont een brander zonder
thermokoppels.
Afbeelding B hieronder:
toont een brander met
thermokoppels.
i
In het geval van een
stroomonderbreking of als
de ontsteking niet werkt:
houd de bedieningsknop
ingedrukt om het gas te
starten en houd dan een
lucifer of gasaansteker bij
de brander totdat deze aan
gaat.
i
Gebruik pannen met een
vlakke onderkant die de
juiste afmetingen hebben
voor de branders en die
geschikt zijn voor uw type
kookplaat.
We raden de volgende
afmetingen aan:
100 mm of 4” min.
250 mm of 10” min.
Kleinere of grotere afmetin-
gen van pannen kunnen lei-
den tot langzamere kooktij-
den.
i

Gebruik van de bakplaat
Gebruik alleen de bakplaat die is goedgekeurd voor
gebruik op dit apparaat. Gebruik geen andere bakplaat
omdat dit gevaarlijk kan zijn.
Lees de instructies aandachtig door voordat u de
bakplaat voor de eerste keer gebruikt.
Voordat u de bakplaat voor de eerste keer gebruikt
Was de bakplaat grondig in heet zeepwater. (zie de
sectie “Reiniging”).
Vet lichtjes in met een klein beetje slaolie.
Verwarm de bakplaat op volledig vermogen gedurende
3 minuten. De bakplaat is nu klaar voor gebruik.
Gebruik van de bakplaat
De bakplaat moet alleen van voren naar
achteren over de branders worden
geplaatst zoals staat aangegeven door het
bakplaat symbool op het bedieningspaneel.
Gebruik
de bakplaat niet met de grote branders.
Plaats de bakplaat voorzichtig op de pandrager over de
branders en gebruik daarbij de stelvoetjes op de
onderkant van de bakplaat. Zorg ervoor dat u het
oppervlak van de pandragers niet beschadigt.
Warm de bakplaat 3 minuten voor in de hoogste stand
voordat u gaat bakken. De hoogste stand is aangegeven
op de bedieningsknoppen door een groot vlamsymbool.
Na het voorverwarmen, draait u de bedieningsknop
naar het kleine vlamsymbool.
De bakplaat is nu klaar voor gebruik.
Gebruik geen metalen keukengerei omdat dit de anti-
aanbaklaag kan beschadigen.
Houd toezicht op
kinderen als ze zich in
de buurt van het appa-
raat bevinden wanneer
dit in gebruik is.
!!!
Invetten van de bak-
plaat: zie de sectie
‘Reiniging’ van deze
handleiding.
i
Na het bakken dient u de
bakplaat volledig te laten
afkoelen voordat u deze
verplaatst of reinigt.
!!!
Over uw bakplaat:
De bakplaat is ver-
vaardigd van hoogwaardig
gietijzer, en is voorzien
van een anti-aanbaklaag.
Het regelmatig invetten
verlengt de levensduur
van de bakplaat en
voorkomt roestvorming.
Als de bakplaat tekenen
van roestvorming ver-
toont, dient u de bakplaat
te wassen en opnieuw in
te vetten.
i

Het gebruik van de bovengrill
voordat u met grillen begint. . . .
Voordat u de grill gebruikt, moet u ervoor zorgen dat u het
grillrooster op de juiste stand heeft gezet, want als de grill
eenmaal aan staat, kunt u letsel oplopen als u probeert het
rooster te verplaatsen.
- Sluit niet de deur wanneer u de grill in gebruik heeft.
- Draai de bedieningsknop naar de door u gewenste stand.
- Om uit te zetten draai de bedieningsknop in de “off”
stand.
- Het powercool systeem start automatisch en kan nog
enkele minuten doordraaien nadat u de grill heeft
uitgezet.
- Voor uw eigen resultaat kunt u de grillstanden aanpassen
naar eigen inzicht.
Plaats de functieschakelaar op de juist stand (grill)
Om uit te schakelen zet u de functieschakelaar weer terug.
De grill funtie van de sterling modellen heeft een vast
vermogen.
De koelventilator zal tijdens en na gebruik zijn werk doen.
Nadat u het fornuis heeft uitgeschakeld kan de ventilator
nog even nadraaien. Stopt automatisch.
De grillpan
Dit apparaat wordt geleverd met een grillpan, grillpan
handvat en een rooster.
Het handvat van de grillpan is afneembaar om het eraf te
kunnen halen wanneer de pan wordt gebruikt, hierdoor
wordt het handvat niet heet.
Handvat bevestigen:
Plaats het handvat over de smalle rand van de grillpan en
schuif dit naar het midden zoals getoond in de schema-
tische voorstellingen.
Plaat- en roosterafstellingen
De snelheid van het grillen kan worden aangepast door het
veranderen van de roosterstand of door het grillpan rooster
te draaien.
Hoog: Voor dun voedsel en het roosteren van brood.
Laag: Voor dikkere stukken vlees.
Aluminiumfolie
Bedek de grillpan of de grillpan onderzetter nooit met folie en
laat geen vet ophopen in de grillpan omdat dit brandgevaar
veroorzaakt.
Waarschuwing:
Toegankelijke onderdelen
kunnen heet worden bij
gebruik van de grill.
Kinderen moeten uit de
buurt worden gehouden.
Opmerking: het hand-
vat van de grillpan is
ontworpen om de grill-
pan in en uit de grill-
ruimte te schuiven. Het
is niet bedoeld om de
pan mee op te tillen.
Type grill
Vast vermogen
grill: heeft
een ‘aan’’ en ‘uit’
instelling.
Variabel vermogen
grill:
heeft instelbare warmte-
instellingen 1 (laag) tot
8 (hoog) of 5 (hoog) –
afhankelijk van het model.
Enkele grill
: heeft één
grillelement.
Dubbele grill
l: heeft twee
grillelementen die samen
kunnen worden gebruikt
of gebruikt kunnen
worden als een enkele
grill.
Voor de beste resultaten:
Verwarm de grill
ongeveer 3 minuten voor.

Grill kooktabel
Voedsel
Type
Circa tijd
(minuten)
Bacon 8 – 15
Worstjes 12 – 15
Karbonaadjes
Lamsvlees
Varkensvlees
10 – 15
15 – 25
Roosteren
2 stuks
4 stuks
1 – 2 (per kant)
1 – 2 (per kant)
Broodproducten
Kadetjes
Krentenbrood/koekjes
1 – 2 (per kant)
1 – 2 (per kant)
Kaas op toast
2 stuks
4 stuks
4 –5
4 –5
Vis:
filets 10 – 15
Kip:
filets 20 – 30
Biefstuk:
halfrauw
medium
goed doorbakken
Hamsteaks
7 – 10
10 – 15
15 – 20
12 – 15
Net als bij elke kooktabel
zijn de tijden circa en
kunnen worden
aangepast aan uw per-
soonlijke smaak.
i

Gebruik van uw oven
Uw oven kan ingeschakeld staan incombinatie met de timer ( zie timer / klok voor
verdere informatie )
De timer dient op “handbediening” te staan voordat de oven gebruikt of geprogrammeerd
kan worden.
Gebruik van de conventionele / hetelucht oven
- Draai de bedieningsknop van de oven op de gewenste temperatuur. Het
thermostaatlampje gaat branden.
- Zodra het lampje van de thermostaat wordt uitgeschakeld is de temperatuur bereikt
welke u heeft ingesteld.
- Om de oven uit te zetten draai de bedieningsknop in de “off ” stand.
- Het powercool systeem start automatisch en kan nog enkele minuten doordraaien nadat
u de oven heeft uitgezet
Gebruik van de multifunctionele oven ( indien aanwezig )
- Draai de bedieningsknop van de standenschakelaar naar de gewenste ovenstand
( zie de functietabel multifunctionele oven )
Opmerking: U kan tijdens het gebruik een andere functie kiezen. De oven dient dan wel
op “handbediening”’te staan.
- Draai de temperatuur bedieningsknop van de oven op de gewenste temperatuur. Het
thermostaatlampje gaat branden.
- Zodra het lampje van de thermostaat wordt uitgeschakeld is de temperatuur bereikt
welke u heeft ingesteld.
- Om de oven uit te zetten draai de bedieningsknop in de “off ” stand.
- Het powercool systeem start automatisch en kan nog enkele minuten doordraaien nadat
u de oven heeft uitgezet
_ Belangrijk: Plaats nooit voedsel of keukenservies
direct op de bodem van de oven. Dit kan oververhitting
veroorzaken met als gevolg schade aan uw toestel.

Kooktabel voor conventionele bovenoven
Voedsel
Temp. °C
Circa
Kooktijd
Kleine cakes
Biscuitdeeg
(2x 180mm / 7”)
Koninginnenbrood
Gevulde fruitcake
(2x 180mm / 7”)
Scones
Schuimgebak
180
160
naast elkaar
200
140
naast elkaar
215
90 – 100
15 – 20 min
20 – 25 min
8 – 12 min
2
1/2
– 3 uur
10 – 15 min
2 – 3 uur
Kruimeldeeg
Bladerdeeg
Soesjesdeeg
200 – 210
200 – 210
200 – 210
Afhankelijk van de
afmetingen en het
soort gerecht plus
de vulling.
Koekjes
Lichte cake
Melkpudding
160 – 200
150
140
10 – 20 min
30 – 45 min
2 –2
1/2
uur
Net als in elke kooktabel
zijn de tijden circa en
kunnen worden
aangepast aan uw
persoonlijke smaak.
i
Omdat de bovenoven
kleiner is – moet u
wellicht de tijden/ tem-
peraturen van de
recepten verminderen.
i
Alle opgegeven tijden in
de kooktabel zijn
gebaseerd op een
voorverwarmde oven.
i

Oven- en grillfuncties
Functie van hoofdoven Aanbevolen gebruik
Uitsluitend onderwarmte Wordt gebruikt om de onderkant van voedsel te bereiden na gebruik van de
conventionele of heteluchtoven. De onderwarmte kan worden gebruikt voor
het aanvullend bruineren van pizza’s, taarten en quiches. Gebruik deze func-
tie aan het eind van de kooktijd.
Uitsluitend bovenwarmte De warmte is ideaal voor het bruineren van de bovenkant van gerechten
omdat ze niet zo krachtig is als de grill na het koken in de conventionele of
heteluchtoven. Zorgt voor het aanvullend bruineren van gerechten zoals
lasagne en bloemkool met kaassaus. Gebruik deze functie aan het einde van
de kooktijd.
Conventionele oven Deze functie is ideaal voor traditioneel braden.Het vlees wordt in
het midden van de oven geplaatst, en de aardappeltjes worden boven in de
oven geroosterd.
Intensief bakken Geschikt voor voedsel met een hoog vochtgehalte zoals quiches, brood en
cheesecakes. Hierdoor is het voorbakken van pasteitjes niet langer nodig.
Heteluchtgrill De ventilator circuleert de warmte rond het voedsel. Ideaal voor dunner
voedsel zoals bacon, vis en hamsteaks. Het voedsel hoeft niet te worden
omgedraaid. Gebruik deze functie met een gesloten ovendeur.
Heteluchtoven De gelijkmatige temperatuur in de oven maakt deze functie geschikt voor
het bakken of koken van grote hoeveelheden voedsel.
Ontdooien Om voedsel zoals slagroomgebak/taarten te ontdooien, moet u de oven
gebruiken met een gesloten deur. Voor het afkoelen van gerechten voor het
invriezen, moet u de deur open laten.
Dubbele grill Deze functie kookt het voedsel van bovenaf en is ideaal voor verschillende
soorten voedsel van toast tot biefstuk. Omdat de hele grill werkt, kunt u
grotere hoeveelheden voedsel bereiden.
Enkele grill Voor kleinere hoeveelheden voedsel, maar nog steeds ideaal voor alles van
toast tot biefstuk.
Onderwarmte met ventilator Wordt gebruikt om pasteien en taartbodems te bakken (zoals vleespasteitjes).
Het onderverwarmingselement zorgt ervoor dat de pastei-/taartbodem wordt
gebakken terwijl de ventilator ervoor zorgt dat de lucht rond de vulling
circuleert – zonder dat deze te intensief is.
Alleen lampen Gebruik deze functie als de oven uitgeschakeld en koud is als hulp bij het
reinigen van de ovenruimte.
Het overzicht hieronder verschaft informatie over alle beschikbare functies.Het kan
zijn dat uw oven niet voorzien is van alle hier afgebeelde functies.

Heteluchtoven kooktabel
Conventioneel
temp (°C)
Heteluchtoven
(°C)
Gasstand
100
110
130
140
150
160
180 – 190
200
220
230
250
100
110
120
130
140
150
160
170
180
190
200
1/4
1/4
1/2
1
2
3
4 –5
6
7
8
9
De conventionele kooktemperaturen moeten worden
aangepast.
De tabel hieronder geeft conventionele kooktempera-
turen, heteluchttemperaturen en gasstanden weer.
Voor optimale resultaten met de heteluchtoven instelling,
moeten conventionele temperaturen worden omgezet in
heteluchttemperaturen.
Voesel dat bijvoorbeeld op 180 °C moet worden bereid,
moet nu bereid worden op een heteluchttemperatuur
van 160 °C.
Omdat het een hoog rendement oven is, kunt u een
uitstoot van stoom zien wanneer de deur wordt
geopend.
Bij de bereiding van gekoeld of bevroren voedsel, wordt
aanbevolen om de kooktijden en temperaturen te
gebruiken die op de verpakking staan aangegeven. Zorg
er altijd voor dat het eten kokend heet is voordat u het
serveert.
In een heteluchtoven zijn geen warmtezones en geen
smaakoverdracht – waardoor u een grotere verschei-
denheid aan voedsel tegelijkertijd kan bereiden.
Indien u op meer dan één rek kookt, moet u wellicht de
kooktijd iets verhogen.
Zorg dat er altijd genoeg ruimte is tussen de gerechten
zodat het voedsel kan rijzen en de lucht kan circuleren.

Voorverwarmen
Voor de beste resultaten van uw oven, raden we aan om
de oven 5 tot 15 minuten voor te verwarmen voordat u de
gerechten erin plaatst. Dit is vooral belangrijk voor voedsel
dat gekoeld of bevroren is en voedsel met een deegbasis,
gist of stijf geslagen Moscovisch gebak.
Als u gebruik maakt van de heteluchtfunctie dient u ook
voor te verwarmen, maar gedurende een kortere periode.
De gerechten in de kooktabel hieronder zijn gebaseerd op
een voorverwarmde oven, maar kunnen worden aangepast
aan uw persoonlijke smaak.
Oven- en bakgerei
Gebruik altijd hoog kwalitatieve schalen en vormen voor het
bakken. Schalen en vormen van een slechte kwaliteit
kunnen in de oven vervormen en onregelmatige resultaten
produceren.
Gebruik nooit gescheurde of beschadigde schalen of
schalen die niet ovenbestendig zijn omdat de warmte het
barsten van de schaal in de oven tot gevolg kan hebben.
Soort voedsel Temp.
Instelling °C
Tijd
circa
Taarten
Kleine cakes
Biscuitdeeg
Gevulde fruitcake
Kerstcake
Conventioneel
190
180
150
150
Hetelucht
160
160
125
125
Intensief
-
-
-
-
15 – 25
20 – 30
2
1/2
– 3 uur
2
1/2
– 3 uur
Pudding
Brood en boterpudding
Vruchtenkruimeltaart
170
200
150
175
-
-
45 – 1 uur
40 – 1 uur
Overige
Yorkshire pudding:
Groot
Klein
Kruimeldeeg
220
220
200
200
200
180
200
200
180
40 – 45
15 – 20
afhankelijk
van Vulling
Kooktabel

Braadtabel
De braadtijden hangen af van het gewicht, de vorm
en de structuur van het vlees en natuurlijk van de
persoonlijke voorkeur. Om de braadtijd te berekenen,
dient u het vlees of gevogelte, inclusief de vulling, te
wegen en de opgegeven tijden hieronder te volgen.
Bevroren vlees moet volledig zijn ontdooid voordat u
dit gaat bereiden. Het is aangeraden grote braadstukken
een hele nacht te laten ontdooien
Bevroren gevogelte moet volledig zijn ontdooid voordat
u dit gaat bereiden.De benodigde tijd hangt af van de
grootte van het gevogelte – b.v.: een grote kalkoen kan
wel 48 uur nodig hebben om te ontdooien.
Bij het braden van gevuld vlees of gevogelte dient u de
braadtijd te berekenen van het totaal gewicht van het
vlees plus de vulling.
Het bereiden van braadstukken in folie, afgedekte
braadsleden, braadpannen met deksels of braadzakken
reduceert het slinken van het vlees, zorgt dat het vlees
mals blijft en reduceert opspattend vet. De braadtijden
dienen echter wel iets verlengd te worden, voeg 5 – 10
minuten per 450g toe aan de berekende braadtijd. Bij
het gebruik van braadzakken mag de aanbevolen
temperatuur van de fabrikant niet worden overschreden
en mag de braadzak de zijkanten of bovenkant van de
oven niet aanraken.
Het gebruik van een onderzetter met de braadvorm zal
het opspatten van vet verminderen bij het onafgedekt
braden en helpt de binnenkant van de oven schoon te
houden.
Het gebruik van een grotere braadvorm dan de
meegeleverde vorm wordt niet aangeraden omdat dit de
prestatie kan verslechteren en kan leiden tot langere
braadtijden.
Stukken vlees (inclusief kip) moeten worden gebraden
op 180 – 200 °C Conventioneel / 160 – 180 °C
Hetelucht gedurende 20 – 30 minuten per 450g, plus
20 minuten op rekstand 2.

Braden
Gebraden kalkoen
Het perfect braden van een kalkoen vereist het braden
van twee verschillende soorten vlees – het delicate
borstvlees dat niet mag uitdrogen en het meer donkere
vlees van de poten dat meer tijd nodig heeft om te garen.
De kalkoen moet lang genoeg worden gebraden om de
poten te laten garen dus is het nodig om de kalkoen
regelmatig met vet te bedruipen. U kunt het borstvlees
bedekken zodra dit bruin is.
Kalkoen moet op 180–190 °C – Conventioneel / 160°C –
hetelucht worden gebraden gedurende 20 minuten per
450 gram, plus 20 minuten.
De kalkoen kan onafgedekt worden gebraden, met de
borst naar beneden gedurende de helft van de braadtijd
en dan omgekeerd voor de resterende braadtijd.
Voor een gevulde kalkoen voegt u 5 minuten per
450 gram toe aan de braadtijd.
Indien de gebraden kalkoen afgedekt is met folie voegt
u 5 minuten per 450 gram toe aan de braadtijd.
Om te testen of de kalkoen gaar is, duwt u een dunne
vleespen in het dikste gedeelte van de dij. Als er helder
vocht uit komt, is de kalkoen gaar. Als het vocht nog
roze is dan moet de kalkoen nog langer garen. Zorg er
altijd voor dat de kalkoen goed gaar is voordat u deze
serveert.
De maximale kalkoengrootte voor dit apparaat is: ongeveer 9 kg.
Probeer geen grotere kalkoenen te braden omdat het resultaat
dan niet kan worden gegarandeerd.
Kalkoen braadtijden.
De meeste kalkoenen worden in kilogrammen gewogen. De
tijd moet worden berekend op een van de volgende manieren:
40 minuten per 1kg plus 10 minuten per ¼ kg.
of
20 minuten per 450 gram, plus 20 minuten.

Algemene baktabel
Problemen oplossen – Vruchtencakes
PROBLEEM MOGELIJKE OORZAAK
De vruchten zinken naar de bodem. Lage oventemperatuur waardoor het langer duurt voordat de cake
gaar wordt en de vruchten naar de bodem zinken. Of te veel vloeistof
of rijsmiddel. De vruchten zijn mogelijk niet goed gewassen en
gedroogd.
De cake zakt in het midden inéén Te veel rijsmiddel in het beslag. De oven is te warm of te koud. Of er
is niet genoeg vloeistof of onvoldoende geklopt.
Scheur in de bovenkant van de cake. Te kleine vorm of te veel beslag in de vorm.Te veel rijsmiddel in het
beslag en niet genoeg vloeistof of onvoldoende geklopt. De oven kan
te heet zijn.
Harde buitenste korst met een vochtige
plakkerige binnenkant.
De oventemperatuur is te hoog waardoor de cake te snel is gebakken.
Te veel suiker of onvoldoende vloeistof.
Verbrand aan de buitenkant Oventemperatuur te hoog.Oven te klein voor het formaat cake.
Onvoldoende bescherming rond de vorm. Cake op een te hoge plaat-
stand gebakken.
Gaten in de structuur. Te veel rijsmiddel. Bloem niet gelijkmatig door het deeg gemengd.
Structuur te dik en cake niet voldoende
gerezen.
Niet genoeg rijsmiddel.Onvoldoende vloeistof toegevoegd. Oven te
koud. Onvoldoende geklopt.
De cake kruimelt bij het aansnijden. Onvoldoende vloeistof toegevoegd.Te lang gebakken. Onvoldoende
suiker. Te veel bakpoeder.
Te droog Te lang gebakken. Onvoldoende ei of vloeistof.Te veel rijsmiddel.
Bolle bovenkant Onvoldoende geklopt. Cake op een te hoge plaatstand gebakken of op
een te hoge temperatuur. Het bekleden van de vorm met bakpapier
kan tot gevolg hebben dat de buitenste rand niet rijst en het midden
omhoog komt.
Gat / middenstuk ingezakt Te veel rijsmiddel.Te lage oventemperatuur of onjuiste plaatstand.
Cake uit de oven gehaald voordat deze gaar was. Gebruik van zachte
margarine.
Heel licht, maar wel gaar Oventemperatuur te laag. Op een te lage stand in de oven gebakken.
Cake over de vorm gegaan. Vorm te klein voor de hoeveelheid beslag.
Problemen oplossen – Moskovisch gebak

“Koel- en ontdooifunctie”
Om voedsel af te laten koelen na het bakken voordat u
het in de koelkast zet of invriest, zet u de ovenknop in de
ontdooistand en opent u de deur.
Om bevroren voedsel te ontdooien zet u de ovenknop in
de ontdooistand, plaatst u het voedsel in het midden van
de oven en sluit u de deur.
Ontdooitijden
Kleine of dunne stukjes bevroren vis of vlees, b.v. visfilets,
garnalen en gehakt, ontdooien in ongeveer 1 – 2 uur. Door
het voedsel in een enkele laag te verspreiden, wordt de
ontdooitijd verkort.
Een middelgrote ovenschotel of stoofschotel ontdooit in
ongeveer 3 – 4 uur.
Een 1
1
¼2 kg kip ontdooit in ongeveer 5 uur, verwijder de
ingewanden zo snel mogelijk.
Controleer altijd of voedsel volledig is ontdooid voordat u
het gaat bereiden.
Wees voorzichtig
Ontdooi geen gevuld gevogelte met deze methode.
Ontdooi geen grote stukken vlees of gevogelte van meer
dan 2kg met deze methode.
Plaats nooit rauw voedsel om te ontdooien naast gekookt
eten dat moet afkoelen omdat dit kan leiden tot
kruisbesmetting.
Het ontdooien van vlees, gevogelte en vis kan worden
versneld met deze methode, maar zorg ervoor dat het
eten volledig is ontdooid voordat u het gaar kookt.
Plaats vlees en gevogelte op een onderzetter in een
vleesschaal om het vocht op te vangen van het
ontdooiproces.

Gebruik van uw sudderoven (indien aanwezig)
Inleiding
Een van uw ovenruimten is een elektrische oven die matige
warmte levert voor het sudderen of warmhouden van
voedsel. Het sudderelement bevindt zich op de bodem van de
onderste ovenruimte – zorg er altijd voor dat de kookschaal
in het midden op de bodem van deze ruimte is geplaatst.
Gebruik de ruimte niet om voedsel of conserven in op te
slaan.
Kooktijden
De kooktijden verschillen afhankelijk van het te bereiden
soort voedsel en de ervaring leert hoe lang voedsel moet
koken naar persoonlijke voorkeur en smaak.
Over het algemeen dient voedsel tenminste 5 uur te koken
en kan het zelfs 8 – 10 uur blijven sudderen als het is
afgedekt zonder te bederven. Voedsel dat in de sudderoven
wordt bereid, moet ongeveer 3 uur langer koken dan in een
conventionele oven.
Keukengerei
U kunt alle ovenvaste kookschotels voor sudderen gebruiken,
op voorwaarde dat ze van een goed sluitend deksel zijn
voorzien.
Om een slecht sluitend deksel nauwsluitend te maken, kunt
u een stuk bakfolie gebruiken en dit over de schotel plaatsen
onder het deksel.
De meest geschikte ovenschotels voor sudderen zijn
vuurvaste schotels die over directe warmte kunnen worden
gebruikt en voor bakken in de oven, en deze schotels zijn
tevens voldoende aantrekkelijk om als serveerschalen te
gebruiken.
Voordelen van sudderen
Sudderen is altijd een van de beste manieren geweest om
warme maaltijden te bereiden met een minimale voorbe-
reidingstijd en weinig tijd in de keuken.
De voordelen van sudderen zijn:
U kunt het voedsel vele uren onbewaakt achter laten en
het blijft vele uren warm als u het afdekt.
Goedkope stukken vlees worden heerlijk mals als u ze
langzaam laat sudderen.Het vlees slinkt ook minder.
Gerechten zoals soep, groenten, pudding, hartige
gerechten en conserven zijn ook geschikt voor bereiding
in de sudderoven.
U hoeft geen stoomkokers bij te vullen, u heeft geen met
stoomgevulde keuken en hoeft het voedsel niet constant
te controleren.

Gebruik van uw sudderoven (indien aanwezig)
Voedsel warmhouden
Zet de bedieningsknop van de oven aan en plaats het
voedsel in de oven. As het voedsel vochtig moet blijven, dan
is het belangrijk om de schotel of plaat af te dekken zodat
het voedsel niet uitdroogt. Dit kunt u doen door
aluminiumfolie te gebruiken als de schotel geen deksel heeft.
Gebruik geen huishoudfolie om het voedsel af te
dekken.
Sommige gerechten kunt u het beste onafgedekt laten als
u wilt dat het voedsel droog en krokant wordt.
Voeg geen jus toe aan de gerechten totdat u ze opdient.
Voorgesneden vlees moet u op een bord plaatsen en
afdekken en slechts één eetlepel jus toevoegen om het
mals te houden.
l
Voor het warmhouden van maaltijden op borden raden
wij aan om het voedsel op hete en niet op koude borden
te plaatsen.
Sudderen
Zet de sudderoven aan en plaats de kookpot in het midden
op de bodem van de oven. Volg de richtlijnen voor de beste
resultaten.
De maximale capaciteit voor ovenvaste schotels is niet
meer dan 2,5 liter. Opmerking: Hoe meer u de schotel/pot
vult, hoe langer het duurt voordat het voedsel gaar is.
Alle vlees- en gevogelterecepten hebben minimaal 5 uur
kooktijd nodig.
Zorg er voor dat alle bevroren ingrediënten goed ontdooid
zijn.
Snij wortelgroenten in kleinere stukken omdat deze meer
tijd nodig hebben dan vlees om te garen. Indien mogelijk
moeten ze 2 – 3 minuten worden gebruind voordat u ze
laat sudderen.
Zorg dat de wortelgroenten altijd op de bodem van de pan
liggen en in het kookvocht zijn ondergedompeld.
U moet een vleesthermometer gebruiken als u stukken
varkensvlees of gevogelte bereidt. De binnentemperatuur
van het vlees moet 88 °C bereiken,
Gevuld vlees of gevuld gevogelte mag niet worden
gesudderd. Bereid de vulling apart.
Bedek schotels met een deksel of folie om te voorkomen
dat het vocht verdampt.
Voeg aan het einde van de bereidingstijd peper en zout en
verdikkingsmiddelen toe.
Het openen van de deur tijdens het koken leidt tot
warmteverlies en verlengt de kooktijden.

Bordenrek (indien aanwezig)
Bordenrek installeren:
Trek het rek uit de ruimte.
Kantel de bordenverwarmer naar u toe en zorg dat deze
vasthaakt aan de onderkant van de reksteunen aan de
voorkant.
Laat de bordenverwarmer voorzichtig in de juiste stand
zakken.
De bordenverwarmer zit nu stevig op zijn plaats en u kunt
er nu borden op leggen.
Zorg er altijd voor dat u ovenhandschoenen gebruikt als u
de bordenverwarmer in een hete of recent gebruikte oven
plaatst om brandwonden te voorkomen.
Zorg er altijd voor dat uw borden geschikt zijn voor
opwarmen – sommige borden kunnen barsten of scheuren
als ze aan warmte worden blootgesteld.
We raden u aan om de oven te verwarmen tot 70 °C, of
lager als u borden opwarmt.
63

Uw gaskookplaat reinigen
Soms werkt een kookplaat niet goed omdat deze gereinigd
moet worden.
Emaille onderdelen
Gebruik een milde crèmereiniger. Hardnekkige vlekken
kunnen worden verwijderd door gebruik van een met zeep
gevulde spons.
Roestvrijstalen oppervlakken
Gebruik alleen een schone uitgewrongen doek met warm
zeepwater en droog af met een zachte doek. Voor hard-
nekkige vlekken kunt u speciaal reinigingsmiddel voor
roestvrijstaal gebruiken.
Gebruik geen stoomreinigers.
Scherpe onderdelen en voorwerpen kunnen krassen
achterlaten op het roestvrijstalen oppervlak, maar zullen
in de loop van de tijd minder opvallen.
Gietijzeren onderdelen
Zorg ervoor dat de onderdelen volledig zijn afgekoeld en
schraap hardnekkige vlekken en etensresten af met plas-
tic of houten kookgerei. Spoel goed af met warm zeepwa-
ter en droog af met een theedoek.
Reinig niet in de vaatwasmachine.
Indien u roest ziet op uw bakplaat of op de pandragers
kunt u dit verwijderen met warm zeepwater en de
onderdelen daarna opnieuw invetten.
Branderdeksels en -koppen
De sleuven in de branderkop waar de vlammen branden
moet worden ontdaan van afzettingen.
Reinig met een nylonborstel, spoel en droog grondig. Er
kunnen bruinachtige vlekken ontstaan op uw branders.
Dit is koolafzetting of zijn vetvlekken en deze kunnen wor-
den verwijderd met een met zeep gevuld sponsje.
Plaats branders niet in de vaatwasmachine en dompel ze
niet onder. Het gebruik van vaatwasmachine poeder,
afwasmiddel en bijtende stoffen kan de branders
beschadigen.
De branderdeksels en -koppen moeten juist worden
teruggeplaatst zodat ze recht op de kookplaat zitten zoals
links afgebeeld.
Dit is vooral belangrijk bij roestvrijstalen modellen omdat
het niet goed terugplaatsen van de deksels kan leiden tot
verkleuring van het roestvrijstaal rond de branders.
Plastic en geverfde onderdelen
Gebruik alleen een schone uitgewrongen doek met heet
zeepwater.
Babyolie kan worden
gebruikt om de roestvri-
jstalen afwerking te her-
stellen – maar gebruik
slechts enkele druppels.
Gebruik geen slaolie
omdat deze zout bevat dat
het metaal beschadigt.
Laat uw apparaat altijd
volledig afkoelen en
schakel de stroom uit
voordat u gaat reini-
gen.
!!!
i
Gebruik geen:
onverdund bleekmiddel,
chloride bevattende
middelen, draadwol of
abrasieve reinigingsmid-
delen op aluminium,
roestvrij staal of plastic/
geverfde onderdelen. Dit
kan het apparaat bescha-
digen. Nylonsponzen kun-
nen ook ongeschikt zijn.
i
Invetten van de bak-
plaat:
Giet een druppel onge-
zouten slaolie op de
kookkant van de bakplaat
en gebruik keukenpapier
om de bakplaat gelijk-
matig in te wrijven.
Olijfolie is niet geschikt
voor invetten. Regelmatig
smeren voorkomt
roestvorming.
i

Ovenruimten reinigen
Reinigen van ovenruimten
Bepaald voedsel kan vetspatten achterlaten, vooral bij
het braden met een onafgedekte braadslede. Hierdoor
wordt de binnenkant van de ruimte vettig.
Het is belangrijk om de ovenruimte te reinigen omdat
een ophoping van vet de oven kan beschadigen en de
garantie ongeldig kan maken.
Verchroomde onderdelen.
Gebruik een met zeep gevulde spons, de rekken kunnen
in de vaatwasmachine worden geplaatst.
De reksteunen kunnen worden verwijderd om ze
gemakkelijk en grondig te reinigen. Controleer of ze
afgekoeld zijn, grijp de steunen en schuif ze uit hun
ophanggaten.
Pristine emaille oppervlakken
Het emaille kan worden gereinigd door de oppervlakken
af te vegen met een schone doek die is uitgewrongen in
heet zeepwater.
Indien grote vetspatten niet meteen verdwijnen, kunt u
een milde crèmereiniger gebruiken om ze te verwijderen.
Hardnekkige vlekken kunnen worden verwijderd door
gebruik van een met zeep gevulde spons.
Spoel goed en laat voor het gebruik drogen.
Glasemaille oppervlakken
Het emaille kan worden gereinigd door de oppervlakken
af te vegen met een schone doek die is uitgewrongen in
heet zeepwater.
Hardnekkige vlekken kunt u reinigen met een met zeep
gevulde spons of een milde crèmereiniger.
Spoel goed en laat voor het gebruik drogen.
Laat uw oven altijd
volledig afkoelen en
schakel de stroom uit
voordat u gaat reinigen.
!!!
Gebruik geen:
Bijtende of abrasieve
reinigingsmiddelen,
bleekmiddelen, ruwe
draadwol of harde hulp-
middelen, hierdoor
wordt uw apparaat
beschadigd.
i
Gebruik een onderzetter
tijdens het braden van
het vlees om vetspatten
te verminderen.
i

Uitschuifbaar reksysteem (indien aanwezig)
In aanvulling op de traditionele rekken waarmee uw
apparaat is uitgerust, is het uitschuifbare reksysteem
op de meest gebruikte plaats in de ovenruimte
geïnstalleerd.
De rekken van het uitschuifsysteem zijn gemakkelijker
uit te trekken dan de traditionele rekken zodat de
ovendeur korter open blijft. De soepele werking
vermindert ook de kans op vet of voedsel, morserij en
verleent extra bescherming.
U hoeft de uitschuifbare rekken niet altijd te gebruiken,
u kunt de rekken in de traditionele standen plaatsen als
u meer keuze wenst.
U kunt de uitschuifbare rekken gemakkelijk uit de
steunen halen voor het terugplaatsen of reinigen, maar
we raden u aan de rekken voor het bakken terug te
plaatsen en de rekken voor het reinigen pas te
verwijderen na het afkoelen om brandwonden te
voorkomen.
De uitschuifbare rekken eruit halen
Zorg dat het rek voldoende is afgekoeld om aan te raken.
Duw het ovenrek terug in de ruimte totdat deze tegen
de aanslag rust.
Pak de reksteunen in het midden vast en til de achterkant
van het rek omhoog uit de aanslag.
U kunt dan de voorkant van het rek uit de borglipjes
tillen.
De uitschuifbare rekken terugplaatsen
Zorg dat de ovensteunen volledig naar achteren in de
ruimte worden geduwd.
Kantel het rek en zorg dat de voorkant van het rek
tegen de aanslag rust.
Plaats het rek voorzichtig terug op de steun en klik
deze stevig op z’n plaats.
Zorg dat de achterkant van het rek in de borglipjes zit
en schuif het rek in en uit de oven om te controleren of
dit naar behoren werkt.
Standaard rekken
U kunt standaard rekken eruit halen door ze recht naar
u toe uit te trekken, en u plaatst ze weer terug door ze
recht naar achteren in de ovenruimte te schuiven.
Deze rekken kunnen worden gereinigd in de
vaatwasmachine.

Babyolie kan worden
gebruikt om de roestvri-
jstalen afwerking te
herstellen – maar gebruik
slechts enkele druppels.
Gebruik geen slaolie
omdat deze zout bevat
dat het roestvrijstalen
oppervlak beschadigt.
Pas vooral op tijdens het
reinigen van symbolen
op het bedieningspaneel,
overmatig reinigen kan
het vervagen van de
symbolen tot gevolg
hebben.
Laat uw oven altijd
volledig afkoelen en
schakel de stroom uit
voordat u de onderde-
len reinigt.
Uw oven reinigen
Plastic en geverfde onderdelen
Gebruik alleen een schone uitgewrongen doek met heet
zeepwater.
Gebruik geen abrasieve reinigingsmiddelen, draad of
nylon sponzen op deze onderdelen.
Roestvrijstalen & aluminium oppervlakken
Gebruik alleen een schone uitgewrongen doek met heet
zeepwater en droog met een zachte doek.
Hardnekkige vlekken kunnen worden verwijderd door
gebruik van een reinigingsmiddel voor roestvrij staal.
U kunt de verbruiksartikelen kopen bij het
Klantenservicecentrum.
Scherpe voorwerpen kunnen krassen achterlaten op het
roestvrijstalen oppervlak maar zullen in de loop van de tijd
minder opvallen.
Veeg gemorst voedsel onmiddellijk af en zorg ervoor dat u
uw handen daarbij niet verbrandt.
Bepaald voedsel is corrosief, b.v. azijn, vruchtensappen
en vooral zout
– deze kunnen vlekken achterlaten of
roestvrij staal beschadigen als ze op het oppervlak blijven
zitten.
Emaille oppervlakken en onderdelen
Gebruik warm zeepwater en een schone doek.
Droog af met een zachte schone handdoek of doek.
Gebruik geen stoomreinigers.
Glazen onderdelen
Gebruik alleen een schone uitgewrongen doek met heet
zeepwater of een speciale glasreiniger.
Veeg overmatig reinigingsmiddel af en droog met een
zachte doek.
Gebruik geen schuurmiddelen of polijstmiddelen omdat
dezehet glas zullen beschadigen en krassen.
Het binnenste glazen deurpaneel kan voor reiniging
worden verwijderd, maar moet met de goede kant
omhoog worden teruggeplaatst. Als er is geschreven op
het glas moet u het duidelijk kunnen lezen als de deuren
van de ruimte open zijn.
Zorg er altijd voor dat het glas volledig tegen de aanslag
is geduwd.
Om het glazen paneel eruit te halen, zet u de deur wijd
open, en houdt u de boven- en onderranden vast als u het
eruit laat glijden.
Waarschuwing:
Gebruik
de oven niet als het glazen paneel
niet goed is geplaatst.
!!!
i
i
Gebruik geen:
onverdund bleekmiddel,
chloride bevattende
middelen of abrasieve
reinigingsmiddelen op
aluminium of roestvrij
staal, ze kunnen de oven
beschadigen.
i
Glazen deurpanelen
Met het oog op uw veiligheid
zijn de glazen deurpanelen
vervaardigd van gehard glas.In
het onwaarschijnlijke geval dat
een paneel breekt, zorgt dit
ervoor dat het niet in kleine
stukken uiteen spat om de kans
op letsel tot een minimum te
beperken.
Wees voorzichtig bij het
hanteren, gebruiken of reinigen
van alle glazen panelen omdat
schade aan de oppervlakken of
randen kan resulteren in
brekend glas zonder waarschu-
wing of duidelijke oorzaak op
een later tijdstip.
Indien een glazen paneel is
beschadigd, raden we ten
sterkste aan om dit meteen te
vervangen
.

Voordat u belt. .
Probleem? Advies
De ontsteking werkt niet.
(Gas en gas/elektra modellen)
Controleer of er een vonk is als de
ontstekingknop wordt ingedrukt. Indien
er geen vonk is, controleer dan of de
stekker in het stopcontact zit.
Controleer of de gasvoorziening is
ingeschakeld.
Steek de stekker van een ander appa-
raat in het stopcontact, als dat werkt,
vervang dan de 3 amp zekering van
het fornuis.
Er is condensatie op de
deuren.
Condensatie wordt veroorzaakt door
warme, vochtige lucht die in aanraking
komt met een koeler oppervlak (d.w.z.
de ovendeur). U kunt het niet altijd
voorkomen, maar u kunt het tot een
minimum beperken door het volgende
te doen:
Verwarm de oven voor op een hoge
temperatuur voordat u het voedsel in
de oven zet en bedek het voedsel dat
u kookt zoveel mogelijk.
Kook nat voedsel zoveel mogelijk op
hogere temperaturen.
Laat voedsel niet in de oven afkoelen.
Automatisch koken veroorzaakt in het
algemeen condensatie als de oven
afkoelt als er voedsel in de oven zit.
Er is een stroomstoring
opgetreden en de oven
werkt niet.
(modellen met klokken en
automatische timers)
Schakel de stroom uit.
Als de stroom weer is hersteld – kunt u
de timer/klok resetten Op de juiste tijd.
Hierdoor kunt u de oven gebruiken.

Aantal
lampen
Lamplocatie Oventype Instructies voor het
verwisselen van de lamp
1
(@25W)
of
1
(@40W)
Achterwand Hetelucht/
Multifunctie
Wacht totdat de oven is
afgekoeld en verwijder hierna
de ovenrekken.
Het ovenlampje bevindt zich op
de achterwand van de oven-
ruimte.
Haal de losse achterwand van
de oven eruit – draai de 4
bevestigingschroeven los (één
in elke hoek).
Schroef de lenskap los (draai
naar links). Schroef het lampje
los en vervang dit. Plaats de
lenskap terug en plaats de
achterwand van de oven terug.
De lampen verwisselen
Waarschuwing: Er bestaat kans op een elektrische schok dus
u dient er altijd voor te zorgen dat u het apparaat uitschakelt
en de stekker uit het stopcontact verwijdert.
Niet alle ovens hebben hetzelfde aantal en type lampen.
Voordat u een lamp verwisselt, dient u de deur van de boven-/
hoofdoven te openen en te kijken welk type lamp in de oven
zit. U kunt daarna de tabel gebruiken om uw lamp op de juiste
wijze te verwisselen.
Vergeet niet dat gloeilampen niet door de garantie
worden gedekt.
U kunt een gloeilamp bij een ijzerwinkel kopen (neem altijd de
oude gloeilamp mee).
Bij het 900DF model hoeft u
de achterwand van de oven
niet te verwijderen.

Uw fornuis installeren
Dit toestel dient door een deskundig installateur te worden
geïnstalleerd. De installatie dient te voldoen aan de
betreffende voorschriften en regelgeving van de plaatselijke
gas- en elektrische maatschappij Voordat dit toestel
geïnstalleerd en gebruikt wordt dienen de instructies te
worden gelezen. Alle garanties en eventuele claims welke
voort komen uit het foutief installeren en aansluiten komen
te vervallen. Een bewijs van aansluiting door een erkend
installateur kan worden opgevraagd indien de installatie
voorschriften niet zijn nageleefd.
Voordat u begint
Wees voorzichtig bij het verplaatsen van dit apparaat,
het is zwaarder dan dat het eruit ziet! Als u het apparaat
moet optillen, zorg dan dat u de juiste hefmethode
gebruikt.
Een zachte of ongelijkmatige vloer kan beschadigd raken
tenzij het apparaat zorgvuldig wordt verplaatst.
Probeer het fornuis niet te verplaatsen door aan de
handgrepen of deuren te trekken. Wij adviseren u om de
deur te openen en het frame van het fornuis vast te
houden om het te verplaatsen. Draag hiervoor
beschermende handschoenen en zorg dat uw vingers
niet tussen de deur bekneld raken.
Ventilatie
Dit toestel is niet aangesloten op een afzuiginstallatie voor
verbrandingsproducten. Het dient geïnstalleerd en
aangesloten te worden volgens de plaatselijke voorschriften
met betrekking tot ventilatie. De ruimte waar het fornuis
wordt geplaatst dient een openbaar raam te hebben of een
open deur naar een ander vertrek met een inhoud groter
dan 11 m2. Indien het apparaat in kleinere ruimtes wordt
geplaatst dan 10 m2 is een ventilatieopening met een
doeltreffend oppervlak van 100cm2 noodzakelijk. Als de
ruimte waar het fornuis in staat ook nog andere apparaten
staan welke brandstof verbranden kan extra ventilatie
noodzakelijk zijn.
LET OP!!
Dit apparaat is uitsluitend ontworpen voor huishoudelijk
koken. Het voor andere doeleinden of professioneel gebruik
kan alle garantie en aansprakelijkheid ongeldig maken.

Uw fornuis installeren
Vrije ruimten
Dit fornuis kan gelijk met de onderkant van de andere
apparatuur in uw keuken worden geplaatst.
Geen enkele plank, overstek, kast of afzuigkap van de
kookplaat mag minder dan 650 mm boven de bovenkant
van de kookplaat zijn geplaatst, controleer dit aan de
hand van de instructies van de fabrikant van de kap.
Indien uw apparaat is uitgerust met een zijwaarts
openende deur dan raden wij een vrije ruimte aan de
zijkant aan van 60 mm zodat de deur volledig kan
worden geopend.
Het fornuis moet boven de kookplaat een vrije ruimte
aan de zijkant hebben van 90 mm tot een hoogte van
400 mm.
De belangrijkste afmetingen zijn de afmetingen rond het
fornuis.
650mm
minimum
400mm
clearance
Flush fit to
base units
Flush fit to
base units
90
mm
90
mm
For all appliance sizes:
700mm
800mm
900mm
1000mm
1100mm
1200mm

De plint plaatsen (indien aanwezig)
Zorg dat het fornuis tot een hoogte is getakeld van
915 mm of hoger voordat u begint. Als het fornuis lager
staat dan 915mm – dan kunt u alleen de plintafdekking
aangeduid door Y plaatsen.
U kunt de hoogte van het fornuis instellen met behulp
van de poten (1).
Als uw fornuis een opberglade heeft aan de onderkant,
dan kunt u de benodigde gaten bereiken via de
onderkant van de lade als u de mat optilt.
Open de deuren van het apparaat en draai schroef A op
de beugel (2) los. Verwijder de schroef niet volledig.
Monteer schroef B, via sleuf (3) en schroef deze in het
kleine gat aan de onderkant van de beugel (2).
Zorg dat de plintafdekking volledig gelijk staat met het
apparaat, maar niet te strak vastzit.
Handdoekrailing installeren (indien aanwezig)
Er zitten twee gaten in de handdoekrailing, bovenkant
(A) en onderkant (B), deze gaten hebben corresponde-
rende gaten aan beide kanten van het bedieningspaneel.
De schroef voor het bovenste gat (A), moet worden
geschroefd in de meegeleverde adapter, en de
resterende schroef gaat door het onderste gat (B). Beide
schroeven zijn M6 schroeven. Met de meegeleverde
inbussleutel kunt u de schroeven vastdraaien en ervoor
zorgen dat de handdoekrailing gelijk is met het
bedieningspaneel, maar niet te strak vast wordt gezet.
Monteren van de spatstrook ( indien aanwezig )
- Verwijder de schroeven aan de achterkant van de
ventilatierooster.
- Houd de spatstrook met de hand in de juiste positie om
te controleren of alle schroefgaten overeenkomen met
de spatstrook.
- Monteer de schroeven terug zodat de spatstrook
vastgezet kan worden.
Uw fornuis installeren
B
A
(1)
(2)
(3)
X
Y
Deur
Plintafdekking
Ovenruimte
A
B

Uw fornuis installeren
Stabiliseren en verankeren van het fornuis
Bij het installeren en aansluiten van het fornuis met een
flexibele gasvoorziening dient u het fornuis te borgen met
een beugel of ketting. (deze onderdelen worden niet
meegeleverd door stoves). Dit voorkomt het schuiven en of
kantelen van het fornuis en beschadiging aan de gasslang
en netsnoer op de achterzijde van het fornuis. (zie
afbeelding).
Waterpas stellen
Zodra uw het fornuis heeft vast gezet plaatst u een
waterpas op een vlakke ondergrond op het fornuis. Het
fornuis is uitgerust met verstelbare poten waarmee u de
hoogte van het apparaat kunt instellen en aanpassen totdat
het fornuis waterpas staat
g

Uw fornuis installeren
Aansluiten op netvoeding
Wij adviseren u om dit fornuis te laten aansluiten door een
erkend installateur welke op de hoogte is van de plaatselijke
wetgeving en voorschriften. Een bewijs van aansluiting door
een erkend installateur kan worden opgevraagd indien
installatie voorschriften niet zijn nageleefd.
De dikte van het snoer moet geschikt zijn voor de maximale
belasting van het fornuis en in overeenstemming met de
plaatselijke regelgeving. Controleer de aansluitwaarde op het
type plaatje achter op het fornuis of zie pagina 103 in deze
handleiding voor de maximale belasting.
Toegang tot de netstroomklem is mogelijk door de
beschermingskap op het achterpaneel te verwijderen. Sluit het
netsnoer aan op de correcte klemmen bestaande uit 3 x fase,
2 x neutraal en 1 x aarde (zie afbeelding) Het is mogelijk dat
u de meer tandige verbindingen moet verplaatsen in verband
met uw type aansluiting of model. Controleer of de meer
tandige verbindingen correct zijn gemonteerd en de
schroefklemmen strak zijn aangedraaid. Zet het stroomsnoer
nu vast in de kabelklem (zie afbeelding) en sluit de
beschermingskap.
U dient voldoende kabel te gebruiken zodat het fornuis naar
voren kan worden getrokken.
Let er wel op dat de kabel niet geknikt of bekneld raakt tijdens
het verplaatsten van het fornuis.
Zorg ervoor dat u alle netsnoeren van alle naburige
warmtebronnen zoals een oven of grill vandaan leidt.
Na aansluiting op het netstroom dient u te controleren of alle
elektronische onderdelen werken.
Geaard zijn van het fornuis
Dit apparaat moet worden aangesloten op een aardingscircuit.
Indien het elektriciteitsnetwerk niet is voorzien van een
aardverbinding dient het dan afzonderlijk ge
ï
nstalleerd te
worden via de plaatselijke wetgeving. Aarding is een
veiligheidsmaatregel die wettelijk is voorgeschreven.

Uw fornuis installeren
Aansluiten op de gasvoorziening
De ingang van het apparaat is ISO 7 – Rp
1
¼2” inwendige
bedrading die zich in de rechter bovenhoek van de
achterkant bevindt. De gasslang (niet meegeleverd) moet
volden aan de wettelijke en plaatselijk regelgeving.
Zorg ervoor dat de gasslang niet bekneld of geknikt
gemonteerd is wat schade of las raken van de gasslang kan
veroorzaken.
Controleer dit te alle tijde bij het verplaatsen van het fornuis.
Aardgas – Flexibele aansluitingen moeten voldoen aan de
wettelijke en plaatselijke regelgeving.
Onderdelen van het fornuis, welke in contact kunnen
komen met een flexibele aansluiting, hebben een tempera-
tuurstijging van minder dan 70 °C.
LP Gas – Voor flexibele aansluitingen dient de gasslang te
voldoen aan de plaatselijke en wettelijke regelgeving. In
ieder geval geschikt is voor gebruik bij LP Gas tot 50 mbar
drukstijging en 70 °C temperatuurstijging. Neem bij twijfel
contact op met uw leverancier.
Na installatie dient u te controleren dat alle
aansluitingen gasdicht zijn.
In bedrijf stellen
Dit fornuis is geschikt voor de volgende gasdrukken:
G20 aardgas G 20mbar
G30 Butaan G 28-30mbar
G31 Propaan G 37mbar
G25 aardgas G 25mbar
Kookplaat
Zet de gasvoorziening aan en controleer of de branderin-
jector van de kookplaat goed werkt.

Technische gegevens – Opmerkingen
Europa
Type gas:
Aardgas I
2H
Aardgas II2H3+*
LP Gas I3+
Kijk op het typeplaatje voor het specifieke
type gas.
* Kan worden omgebouwd van natuurlijk gas naar LP Gas
Probeer nooit een apparaat om te bouwen –
tenzij het typeplaatje aangeeft dat dit kan.
Branderbeluchting:
Vast
Dit fornuis is geschikt voot de volgende
gasdrukken:
:
G20 aardgas @ 20mbar
G30 Butaan @ 28-30mbar
G31 Propaan @ 37mbar
G25 aardgas @ 25mbar
Stroomtoevoer:
230V / 400V 3N ~ 50Hz
Alle elementen hebben een spanning van 230V
Bestemmingslanden:
Groot-Brittannië
Ierland
Frankrijk
Nederland

Technische gegevens – Opmerkingen
Brandstoftype Kookplaat brander /
element
Nominaal
vermogen Qn
Butaan
g/u
Propaan
g/u
Aardgas
Kookplaat – klein
Kookplaat – medium
Kookplaat – groot
Kookplaat – wok
Totale warmte-invoer
5 branders
7 branders
1,0kW
2,0kW
3,0kW
3,5kW
11,5kW
13,5kW
-
-
-
-
-
-
-
-
-
-
LP gas
Kookplaat – klein
Kookplaat – medium
Kookplaat – groot
Kookplaat – wok
Totale warmte-invoer
5 branders
7 branders
1,0kW
2,0kW
3,0kW
3,5kW
11,5kW
13,5kW
73
145
218
254
72
143
215
250
Brandstoftype Multifunctionele
oven
Conventioneel
Bovenste oven
Heteluchtoven Sudderoven
(indien voorzien)
Elektrisch
@ 230V
2,2kW 1,4kW 2,0kW (Main)
2.5kW (Tall)
0,17kW
Brandstoftype Dubbel
variabel Grill
Ovenlampen
Elektrisch
@ 230V
2,7kW – 2,9kW 25W elk of halogeen
40W elk
Het voltage van
het toestel
240v 220v
Maximale
belasting
90 DB4
Classic 900
Classic 1000
Classic 1100
7320W
7320W
6870W
6970W
6150W
6150W
5775W
5860W
kookplaat / warmhoudplaat – Technische gegevens

Conversievoorschriften
Deze conversiekit is bestemd voor gebruik bij de volgende apparaten:
Gas/elektra – alle afmetingen.
Deze conversiekit is bestemd voor gebruik bij het ombouwen van de bovenstaande
apparaten van:
VK-apparaat aardgas naar LP – Aardgas G20 @ 20mbar naar LPG G30/31 @
29/37mbar
VK apparaat LP naar aardgas – LPG G30/31 @ 29/37mbar naar aardgas G20 @
20mbar
VK naar Australisch aardgas @ 1,0kPa
VK naar Australische ULPG @ 2,75kPa
Voordat u met het ombouwen begint moet u er zeker van zijn dat de gas- en stroomvoorzie-
ningen zijn uitgeschakeld. De volledige conversie moet worden uitgevoerd – d.w.z. u moet
de branderinjectoren en de by-pass pennen vervangen.
Belangrijk: De conversieprocedure moet worden uitgevoerd door een bevoegde persoon,
d.w.z. met Corgi-registratie.Na de conversie moeten alle betrokken onderdelen op
gasbestendigheid worden gecontroleerd.
Injectoren en bypassschroeven
VK / Europa NG
Kookplaat brander Hulpbrander
(Klein)
Semi-snel
(Medium)
Snel
(Groot)
Wok
Binnenste Buitenste
Injector 77 104 129 63 121
VK / Europa LP
Kookplaat brander Hulpbrander
(Klein)
Semi-snel
(Medium)
Snel
(Groot)
Wok
Binnenste Buitenste
Injector 50 70 87 35 87
Australisch aardgas
Kookplaat brander Hulpbrander
(Klein)
Semi-snel
(Medium)
Snel
(Groot)
Wok
Binnenste Buitenste
Injector 82 118 142 72 138
Bypass 63 63 77
Australische ULPG
Kookplaat brander Hulpbrander
(Klein)
Semi-snel
(Medium)
Snel
(Groot)
Wok
Binnenste Buitenste
Injector 50 70 87 38 87
Bypass 32 39 45 80

Nous contacter
Service number: 01 69 11 11 85
GLEN DIMPLEX France
ZI petite Montagne Sud
12 rue des Cévennes - Lisses
91017 EVRY cedex
FRANCE
Tél. : 00 33 (0)1 69 11 11 91
Fax : 00 33 (0)1 60 86 28 37
www.glendimplex-france.fr
Faber International BV
Saturnus 8
NL-8448 CC Heerenveen
Tel.: +31 (0) 513-656500
Fax.: +31 (0) 513-656501
www.belling.nl
Nederland en Belgie

08 31201 00 © 10.2010
Dual Fuel Range (Europe)
Model Names: Belling classic 90DFT, 100DFT & 110DFT. Belling DB4 90DF
Contact Us
Should you need to get in touch with us (UK and Northern Ireland only), please call
Belling Customer Care Centre Helpline on:
0844 815 3746
For customers outside the UK and Northern Ireland, please contact your local supplier.
Glen Dimplex Home Appliances Limited is the owner of the Belling brand and is part of
the Glen Dimplex group of companies.
Stoney Lane, Prescot, Merseyside, L35 2XW
-
 1
1
-
 2
2
-
 3
3
-
 4
4
-
 5
5
-
 6
6
-
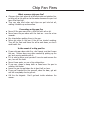 7
7
-
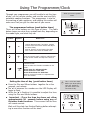 8
8
-
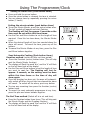 9
9
-
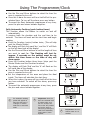 10
10
-
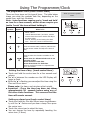 11
11
-
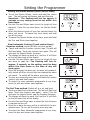 12
12
-
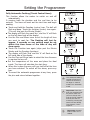 13
13
-
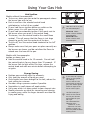 14
14
-
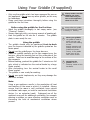 15
15
-
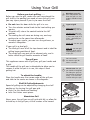 16
16
-
 17
17
-
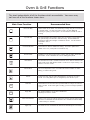 18
18
-
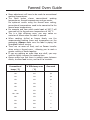 19
19
-
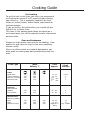 20
20
-
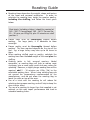 21
21
-
 22
22
-
 23
23
-
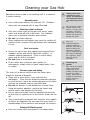 24
24
-
 25
25
-
 26
26
-
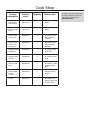 27
27
-
 28
28
-
 29
29
-
 30
30
-
 31
31
-
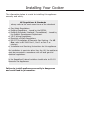 32
32
-
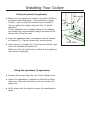 33
33
-
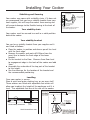 34
34
-
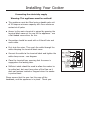 35
35
-
 36
36
-
 37
37
-
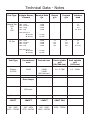 38
38
-
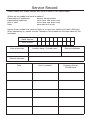 39
39
-
 40
40
-
 41
41
-
 42
42
-
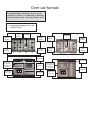 43
43
-
 44
44
-
 45
45
-
 46
46
-
 47
47
-
 48
48
-
 49
49
-
 50
50
-
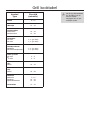 51
51
-
 52
52
-
 53
53
-
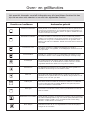 54
54
-
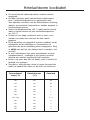 55
55
-
 56
56
-
 57
57
-
 58
58
-
 59
59
-
 60
60
-
 61
61
-
 62
62
-
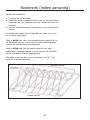 63
63
-
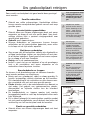 64
64
-
 65
65
-
 66
66
-
 67
67
-
 68
68
-
 69
69
-
 70
70
-
 71
71
-
 72
72
-
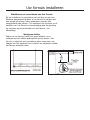 73
73
-
 74
74
-
 75
75
-
 76
76
-
 77
77
-
 78
78
-
 79
79
-
 80
80


Belling DB4 90DFT de handleiding
- Categorie
- Fornuizen
- Type
- de handleiding
- Deze handleiding is ook geschikt voor
in andere talen
- English: Belling DB4 90DFT Owner's manual
Gerelateerde papieren
Andere documenten
-
Beko CSG 52000 DW Handleiding
-
Beko CS90F320X de handleiding
-
Electrolux EKK510102W Handleiding
-
-
Blomberg BDFP34550SS Handleiding
-
BORETTI VP946IXBE LINEA PRINCIPALE de handleiding
-
bora CC B1 Instructions For Fitting And Use
-
-
Falcon 90 Professional Instructions for Use and Installation
-
Falcon 110 Induction Instructions for Use and Installation