Indesit PAA 642 IX/I Gebruikershandleiding
- Categorie
- Kookplaten
- Type
- Gebruikershandleiding
Deze handleiding is ook geschikt voor

English
Operating Instructions
HOB
Contents
Operating Instructions,1
Warnings,2
Assistance,3
Description of the appliance,4
Installation,5
Start-up and use,9
Precautions and tips,9
Maintenance and care,10
Troubleshooting,10
PAA 642 IX/I
PAA 642 IX/I NL
Nederlands
Gebruiksaanwijzing
KOOKPLAAT
Inhoud
Gebruiksaanwijzing,1
Belangrijk,2
Service,3
Beschrijving van het apparaat,4
Het installeren,11
Starten en gebruik,15
Voorzorgsmaatregelen en advies,15
Onderhoud en verzorging,16
Storingen en oplossingen,16

2
Warnings
WARNING: The appliance and its accessible parts
become hot during use. Care should be taken to
avoid touching heating elements. Children less than 8
years of age shall be kept away unless continuously
supervised. This appliance can be used by children
aged from 8 years and above and persons with
reduced physical, sensory or mental capabilities or
lack of experience and knowledge if they have been
given supervision or instruction concerning use of the
appliance in a safe way and understand the hazards
involved. Children shall not play with the appliance.
Cleaning and user maintenance shall not be made
by children without supervision.
WARNING: Unattended cooking on a hob with fat or
oil can be dangerous and may result in re. NEVER
try to extinguish a re with water, but switch off the
appliance and then cover ame e.g. with a lid or a
re blanket.
WARNING: Danger of re: do not store items on the
cooking surfaces.
Never use steam cleaners or pressure cleaners on
the appliance.
Remove any liquid from the lid before opening it. Do
not close the glass cover (if present) when the gas
burners or electric hotplates are still hot.
The appliance is not intended to be operated by
means of an external timer or separate remote
control system.
CAUTION: the use of inappropriate hob guards can
cause accidents.
Belangrijk
PAS OP: Dit apparaat en zijn bereikbare onderdelen
worden tijdens gebruik zeer heet. Zorg ervoor de
verwarmende elementen niet aan te raken. Zorg
ervoor dat kinderen die kleiner dan 8 jaar oud zijn
niet dichtbij het apparaat kunnen komen, tenzij onder
constant toezicht. Het huidige apparaat mag alleen
door kinderen van 8 jaar en ouder en door personen
met een beperkt lichamelijk, sensorieel of geestelijk
vermogen, of zonder ervaring en kennis worden
gebruikt, mits ze onder adequaat toezicht zijn, of
mits ze zijn onderricht m.b.t. het veilige gebruik van
het apparaat en zich bewust zijn van de betreffende
gevaren. Voorkom dat kinderen met het apparaat
spelen. De reinigings- en onderhoudshandelingen
mogen niet door kinderen worden uitgevoerd, tenzij
onder toezicht.
PAS OP: Het kan gevaarlijk zijn een fornuis met vet
of olie onbewaakt te laten. Er kan brand ontstaan.
U moet NOOIT proberen een vlam/brand te blussen
met water. U dient daarentegen het apparaat uit te
schakelen en de vlam te bedekken met bijvoorbeeld
een (blus)deken.
PAS OP: Brandgevaar: laat nooit voorwerpen op het
kookoppervlak liggen.
Gebruik nooit huishoudapparaten met stoom of hoge
druk voor het reinigen van de kookplaat.
Verwijder eventuele geknoeide vloeistoffen van de
dekplaat voordat u hem opent. Doe het glazen deksel
(waar aanwezig) niet omlaag als de gasbranders of
de elektrische plaat nog warm zijn.
Het apparaat is niet geschikt om te worden
ingeschakeld m.b.v. een externe timer of door een
gescheiden afstandsbedieningssysteem.
PAS OP: het gebruik van ongeschikte
kookplaatbeschermingen kan ongelukken
veroorzaken.

3
Assistance
Please have the following information to hand:
• the type of problem encountered.
• the appliance model (Mod.).
• the serial number (S/N).
The latter two pieces of information can be found on the data plate located
on the appliance.
The following information are applicable only for the UK and Republic of
Ireland.
Repairs and After Sales
For product help and advice, repairs, spare parts or accessories, we’re here
to help.
For local repair engineers - 03448 111 606
ROI - 0818 313 413
For Parts and Accessories visit: parts.hotpoint.co.uk/shop
Please remember to register your appliance at www.hotpointservice.co.uk
to activate your 10 year parts guarantee.
Service
U moet doorgeven:
• het type storing
• het model apparaat (Mod.)
• het serienummer (S/N)
Deze informatie bevindt zich op het typeplaatje links onderin het koelgedeelte.

4
Description of the appliance
Overall view
1. Support Grid for COOKWARE
2. GAS BURNERS
3. Control Knobs for GAS BURNERS
4. GAS BURNERS button
5. Ignition for GAS BURNERS
6. SAFETY DEVICES
• GAS BURNERS differ in size and power. Use the diameter of the cookware
to choose the most appropriate burner to cook with.
• Control Knobs for GAS BURNERS adjust the size of the ame.
• GAS BURNER IGNITION enables a specic burner to be lit automatically.
• SAFETY DEVICE stops the gas flow if the flame is accidentally
extinguished.
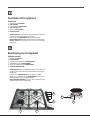
Beschrijving van het apparaat
Algemeen aanzicht
1. Roosters voor PANNEN
2. GASBRANDERS
3. Knoppen voor het regelen van de GASBRANDERS
4. Ontstekingsknop voor de GASBRANDERS
5. Bougie voor ontsteking van de GASBRANDERS
6. VEILIGHEIDSMECHANISME
• GASBRANDERS hebben verschillende afmetingen en vermogen. Kies
de brander die het best overeenkomt met de diameter van de pan die u
wilt gebruiken.
• Knoppen van de GASBRANDERS voor het regelen van de vlam.
• Bougie voor het ontsteken van de GASBRANDERS: zorgt voor een
automatische ontsteking van de gekozen brander.
• VEILIGHEIDSMECHANISME zorgt ervoor dat de gastoevoer wordt
onderbroken als de vlam per ongeluk uitgaat.
1
2
3
4
6
5

GB
5
Installation
! Before operating your new appliance please read this instruction booklet
carefully. It contains important information for safe use, installation and care
of the appliance.
! Please keep these operating instructions for future reference. Pass them on
to possible new owners of the appliance.
Positioning
! Keep packaging material out of the reach of children. It can become a choking
or suffocation hazard (see Precautions and tips).
! The appliance must be installed by a qualied professional according to the
instructions provided. Incorrect installation may cause harm to people and
animals or may damage property.
! This unit may be installed and used only in permanently ventilated rooms
in accordance with current national regulations. The following requirements
must be observed:
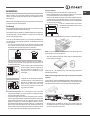
• The room must be equipped with an air extraction system that expels
any combustion fumes. This may consist of a hood or an electric fan that
automatically starts each time the appliance is switched on.
In a chimney stack or branched flue.
(exclusively for cooking appliances)
Directly to
the Outside
• The room must also allow proper air circulation, as air is needed for
combustion to occur normally. The ow of air must not be less than 2 m
3
/h
per kW of installed power.
The air circulation system may take air directly
from the outside by means of a pipe with an
inner cross section of at least 100 cm
2
; the
opening must not be vulnerable to any type
of blockages.
The system can also provide the air needed for
combustion indirectly, i.e. from adjacent rooms
tted with air circulation tubes as described
above. However, these rooms must not be
communal rooms, bedrooms or rooms that
may present a re hazard.
• Intensive and prolonged use of the appliance may necessitate
supplemental ventilation, e.g. opening a window or increasing the power
of the air intake system (if present).
• Liquid petroleum gas sinks to the oor as it is heavier than air. Therefore,
rooms containing LPG cylinders must also be equipped with vents to allow
gas to escape in the event of a leak. As a result LPG cylinders, whether
partially or completely full, must not be installed or stored in rooms or
storage areas that are below ground level (cellars, etc.). It is advisable to
keep only the cylinder being used in the room, positioned so that it is not
subject to heat produced by external sources (ovens, replaces, stoves,
etc. ) which could raise the temperature of the cylinder above 50°C.
A
Examples of
ventilation holes
for comburant air.
Enlarging the ventilation slot
between window and floor.
Adjacent
Room
Room to be
Vented
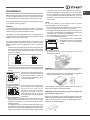
Fitting the appliance
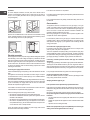
The following precautions must be taken when installing the hob:
• Kitchen cabinets adjacent to the appliance and taller than the top of the
hob must be at least 200 mm from the edge of the hob.
• Hoods must be installed according to their relative installation instruction
manuals and at a minimum distance of 650 mm from the hob (see gure).
• Place the wall cabinets adjacent to the hood at a minimum height of 420
mm from the hob (see gure).
If the hob is installed beneath a wall cabinet,
the latter must be situated at a minimum of 700
mm above the hob.
• The installation cavity should have the dimensions indicated in the gure.
NOTE: In case of installation of a hood above the hob, please refer to the
hood instructions for the correct distance.
• After having cleaned the perimeter surface, apply the supplied gasket to
the hob as shown in the gure.
Position the hob in the worktop opening made respecting the dimensions
indicated in the Instruction.
NOTE: the power supply cable must be long enough to permit its upward
extraction.
To secure the hob, use the brackets (A) provided with it. Fit the brackets into the
relevant bores shown by the arrow and fasten them by means of their screws
in accordance with the thickness of the worktop (see the following gures).
Top 20 mm
Top 30-50 mm
• Where the hob is not installed over a built-in oven, a wooden panel must
be installed as insulation. This must be placed at a minimum distance of
20 mm from the lower part of the hob.
600mm min.
420mm min.
650mm min.

6
GB
Ventilation
To ensure adequate ventilation, the back panel of the cabinet must be
removed. It is advisable to install the oven so that it rests on two strips of
wood, or on a completely at surface with an opening of at least 45 x 560
mm (see diagrams).
560 mm.
45 mm.
Where a hob is installed above an oven without a forced ventilation cooling
system, adequate ventilation must be provided inside the cabinet by means
of air holes through which air can pass (see gure).
Electrical connection
Hobs equipped with a three-pole power supply cable are designed to operate
with alternating current at the voltage and frequency indicated on the data
plate (this is located on the lower part of the appliance). The earth wire in the
cable has a green and yellow cover. If the appliance is to be installed above
a built-in electric oven, the electrical connection of the hob and the oven must
be carried out separately, both for electrical safety purposes and to make
extracting the oven easier.
Connecting the supply cable to the mains
Install a standardised plug corresponding to the load indicated on the data
plate.
The appliance must be directly connected to the mains using an omnipolar
circuit-breaker with a minimum contact opening of 3 mm installed between
the appliance and the mains.
The circuit-breaker must be suitable for the charge indicated and must comply
with current electrical regulations (the earthing wire must not be interrupted
by the circuit-breaker). The supply cable must not come into contact with
surfaces with temperatures higher than 50°C.
! The installer must ensure that the correct electrical connection has been
made and that it is compliant with safety regulations.
Before connecting to the power supply, make sure that:
• the appliance is earthed and the plug is compliant with the law.
• the socket can withstand the maximum power of the appliance, which is
indicated on the data plate.
• the voltage is in the range between the values indicated on the data plate.
• the socket is compatible with the plug of the appliance. If the socket is
incompatible with the plug, ask an authorised technician to replace it. Do
not use extension cords or multiple sockets.
! Once the appliance has been installed, the power supply cable and the
electrical socket must be easily accessible.
! The cable must not be bent or compressed.
! The cable must be checked regularly and replaced by authorised technicians
only (see Assistance).
! The manufacturer declines any liability should these safety measures not
be observed.
Gas connection
The appliance should be connected to the main gas supply or to a gas
cylinder in compliance with current national regulations. Before carrying out
the connection, make sure the cooker is compatible with the gas supply you
wish to use. If this is not the case, follow the instructions indicated in the
paragraph “Adapting to different types of gas.”
When using liquid gas from a cylinder, install a pressure regulator which
complies with current national regulations.
! Check that the pressure of the gas supply is consistent with the values
indicated in Table 1 (“Burner and nozzle specications”). This will ensure the
safe operation and longevity of your appliance while maintaining efcient
energy consumption.
Connection with a rigid pipe (copper or steel)
! Connection to the gas system must be carried out in such a way as not to
place any strain of any kind on the appliance.
There is an adjustable L-shaped pipe tting on the appliance supply ramp
and this is tted with a seal in order to prevent leaks. The seal must always
be replaced after rotating the pipe tting (seal provided with appliance). The
gas supply pipe tting is a threaded 1/2 gas cylindrical male attachment.
Connecting a flexible jointless stainless steel pipe to a threaded
attachment
The gas supply pipe tting is a threaded 1/2 gas cylindrical male attachment.
These pipes must be installed so that they are never longer than 2000 mm
when fully extended. Once connection has been carried out, make sure that
the exible metal pipe does not touch any moving parts and is not compressed.
! Only use pipes and seals that comply with current national regulations.
Checking the tightness of the connection
! When the installation process is complete, check the pipe ttings for leaks
using a soapy solution. Never use a ame.
Adapting to different types of gas
! This operation must be performed by a qualied technician.
If the appliance is intended to operate with a different gas from the gas type
stated on the rating plate and information label on the top of the hob, change
the injectors.
Remove the information label and keep it with the instructions booklet.
Use pressure regulators suitable for the gas pressure indicated in the
Instruction.
• The gas nozzles must be changed by After Sales Service or a qualied
technician.
• Nozzles not supplied with the appliance must be ordered from After Sales
Service.
• Adjust the minimum setting of the taps.
NOTE: when liquid petroleum gas is used (G30/G31), the minimum gas
setting screw must be tightened as far as it will go.

GB
7
IMPORTANT: should you experience difculty in turning the burners
knobs, please contact the After Sales Service for the replacement of
the burner tap if found to be faulty.
• Adjusting the burners’ primary air
Does not require adjusting.
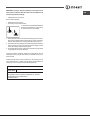
• Setting the burners to minimum
1. Turn the tap to the low ame position;
2. Remove the knob and adjust the adjustment
screw, which is positioned in or next to the tap
pin, until the ame is small but steady.
3. Having adjusted the ame to the required low setting, while the burner is
alight, quickly change the position of the knob from minimum to maximum
and vice versa several times, checking that the ame does not go out.
4. Some appliances have a safety device (thermocouple) tted. If the device
fails to work when the burners are set to the low ame setting, increase
this low ame setting using the adjusting screw.
5. Once the adjustment has been made, replace the seals on the by-passes
using sealing wax or a similar substance.
! Once this procedure is nished, replace the old rating sticker with one
indicating the new type of gas used. Stickers are available from any of our
Service Centres.
! Should the gas pressure used be different (or vary slightly) from the
recommended pressure, a suitable pressure regulator must be tted to the
inlet pipe (in order to comply with current national regulations).
Electrical
connections
DATA PLATE
ECODESIGN
see data plate
This appliance conforms to the EU Regulation no. 66/2014
implementing Directive 2009/125/EC.
standard EN 30-2-1

8
GB
NATURAL GAS
(Methane)
LIQUEFIED
PETROLEUM GAS
(Butane)
G30
Model configuration
4 BURNERS
Rated thermal
owrate (kW)
Total rated
consumption
Air required (m³) for
burning1m³ of gas
Rapid
Semi-Rapid
Auxiliary
Rapid
Semi-Rapid
Auxiliary
G25
85
63
50
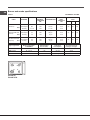
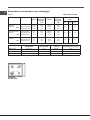
Burner and nozzle specifications
Table 1
TYPE OF GAS
USED
TYPE OF
BURNER
NOZZLE RATED
THERMAL
FLOW RATE
kW
RATED
CONSUMPTION
REDUCED
HEAT
CAPACITY
kW
GAS PRESSURE
mbar
min. rat. max.
3.00
1.65
1.00
218 g/h
120 g/h
73 g/h
0.75
0.40
0.40
0.75
0.40
0.40
G25 25 mbar 1R - 2S -1A 7.30 808 l/h 8.187
G30 30 mbar
1R - 2S -1A
7.30 531 g/h 30.94
Type of gas used
ELEC
TRIC SUPPLY: 220-240V~ 50/60Hz 0,6W
CATEGORY II2L3B/P
LIQUEFIED
PETROLEUM GAS
(Propane)
G31
Rapid
Semi-Rapid
Auxiliary
214 g/h
118 g/h
71 g/h
0.75
0.40
0.40
G31 30 mbar
1R - 2S -1A
7.30 521 g/h 30.94
85
63
50
3.00
1.65
1.00
3.00
1.65
1.00
F2 121
94Y
F1 72
332 l/h
183 l/h
111 l/h
20 25 30
25 30 35
25 30 35
SS
AR
PAA 642 IX/I
PAA 642 IX/I NL

GB
9
Start-up and use
! The position of the corresponding gas burner is shown on every knob.
Gas burners
Each burner can be adjusted to one of the following settings using the
corresponding control knob:
● Off
Maximum
Minimum
To light one of the burners, hold a lit match or lighter near the burner and, at
the same time, press down and turn the corresponding knob anti-clockwise
to the maximum setting.
Since the burner is tted with a safety device, the knob should be pressed
for approximately 2-3 seconds to allow the automatic device keeping the
ame alight to heat up.
When using models with an ignition button, light the desired burner by rst
pressing the gas burners button (identiable by the symbol), then pressing
down the corresponding knob as far as possible and turning it anticlockwise
towards the maximum setting.
! If a ame is accidentally extinguished, turn off the control knob and wait for
at least 1 minute before trying to relight it.
To switch off the burner, turn the knob in a clockwise direction until it stops
(when reaches the “●” position).
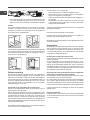
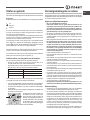
Practical advice on using the burners
To ensure the burners operate efciently:
• Use appropriate cookware for each burner (see table) so that the ames
do not extend beyond the bottom of the cookware.
• Always use cookware with a at base and a cover.
• When the contents of the pan reach boiling point, turn the knob to minimum.
Rapid (R)
Semi Rapid (S)
Auxiliary (A)
Ø Cookware Diameter (cm)
24 - 26
16 - 22
8 - 14
Burner
To identify the type of burner, refer to the designs in the section entitled, “Burner
and Nozzle Specications”.
• For maximum stability, always make sure that the pan supports are
correctly tted and that each pan is placed centrally over the burner.
• Pan handles should be positioned in line with one of the support bars on
the pan support grid.
• Pan handle should be positioned so not to protrude beyond the front edge
of the hob.
The more variable aspect in terms of pan
stability can often be the pan itself, (or
the positioning of that pan during use).
Well balanced pans, with at bases that
are placed centrally over the burner,
with the pan handles aligned with one
of the support ngers obviously offer the
greatest stability.
Precautions and tips
! This appliance has been designed and manufactured in compliance with
international safety standards. The following warnings are provided for safety
reasons and must be read carefully.
General safety
• This is a class 3 built-in appliance.
• Gas appliances require regular air exchange to maintain efcient
operation. When installing the hob, follow the instructions provided
in the paragraph on “Positioning” the appliance.
• These instructions are only valid for the countries whose symbols
appear in the manual and on the serial number plate.
• The appliance was designed for domestic use inside the home and is not
intended for commercial or industrial use.
• The appliance must not be installed outdoors, even in covered areas. It is
extremely dangerous to leave the appliance exposed to rain and storms.
• Do not touch the appliance with bare feet or with wet or damp hands and
feet.
• The appliance must be used by adults only for the preparation of food,
in accordance with the instructions outlined in this booklet. Any other
use of the appliance (e.g. for heating the room) constitutes improper
use and is dangerous. The manufacturer may not be held liable for
any damage resulting from improper, incorrect and unreasonable
use of the appliance.
• The openings used for ventilation and dispersion of heat must never be
covered.
• Always make sure the knobs are in the “●”/“○” position when the appliance
is not in use.
• When unplugging the appliance always pull the plug from the mains socket,
do not pull on the cable.
• Never carry out any cleaning or maintenance work without having detached
the plug from the mains.
• In case of malfunction, under no circumstances should you attempt to repair
the appliance yourself. Repairs carried out by inexperienced persons may
cause injury or further malfunctioning of the appliance. Contact a Service
Centre (see Assistance).
• Do not close the glass cover (if present) when the gas burners or electric
hotplates are still hot.
• The appliance should not be operated by people (including children)
with reduced physical, sensory or mental capacities, by inexperienced
individuals or by anyone who is not familiar with the product. These
individuals should, at the very least, be supervised by someone who
assumes responsibility for their safety or receive preliminary instructions
relating to the operation of the appliance.
• Do not let children play with the appliance.
• The appliance is not intended to be operated by means of an external
timer or separate remote-control system.
Disposal
• When disposing of packaging material: observe local legislation so that
the packaging may be reused.
• The European Directive 2012/19/EU on Waste Electrical and Electronic
Equipment (WEEE), requires that old household electrical appliances must
not be disposed of in the normal unsorted municipal waste stream. Old
appliances must be collected separately in order to optimise the recovery
and recycling of the materials they contain and reduce the impact on
human health and the environment.The crossed out “wheeled bin” symbol
on the product reminds you of your obligation, that when you dispose of
the appliance it must be separately collected.
Consumers should contact their local authority or retailer for information
concerning the correct disposal of their old appliance.

10
GB
Respecting and conserving the environment
• Cook your food in closed pots or pans with well-tting lids and use as little
water as possible. Cooking with the lid off will greatly increase energy
consumption.
• Use purely at pots and pans.
• If you are cooking something that takes a long time, it’s worth using a
pressure cooker, which is twice as fast and saves a third of the energy.
Maintenance and care
Switching the appliance off
Disconnect your appliance from the electricity supply before carrying out
any work on it.
Cleaning the hob surface
• All the enamelled and glass parts should be cleaned with warm water and
neutral solution.
• Stainless steel surfaces may be stained by calcareous water or aggressive
detergents if left in contact for too long. Any food spills (water, sauce, coffee,
etc.) should be wiped away before they dry.
• Clean with warm water and neutral detergent, and then dry with a soft
cloth or chamois. Remove baked-on dirt with specic cleaners for stainless
steel surfaces.
• Clean stainless steel only with soft cloth or sponge.
• Do not use abrasive or corrosive products, chlorine-based cleaners or pan
scourers.
• Do not use steam cleaning appliances.
• Do not use ammable products.
• Do not leave acid or alkaline substances, such as vinegar, mustard, salt,
sugar or lemon juice on the hob.
Cleaning the hob parts
• Clean the enamelled and glass parts only with soft cloth or sponge.
• Grids, burner caps and burners can be removed to be cleaned.
• Clean them by hand with warm water and non-abrasive detergent,
removing any food residues and checking that none of the burner openings
is clogged.
• Rinse and dry.
• Ret burners and burner caps correctly in the respective housings.
• When replacing the grids, make sure that the panstand area is aligned
with the burner.
• Models equipped with electrical ignition plugs and safety device require
thorough cleaning of the plug end in order to ensure correct operation.
Check these items frequently, and if necessary, clean them with a damp
cloth. Any baked-on food should be removed with a toothpick or needle.
! To avoid damaging the electric ignition device, do not use it when the
burners are not in their housing.
Gas tap maintenance
Over time, the taps may become jammed or difcult to turn. If this happens,
the tap must be replaced.
! This procedure must be performed by a qualied technician authorised
by the manufacturer.
Troubleshooting
It may happen that the appliance does not function properly or at all. Before
calling the service centre for assistance, check if anything can be done. First,
check to see that there are no interruptions in the gas and electrical supplies,
and, in particular, that the gas valves for the mains are open.
The burner does not light or the ame is not even around the burner.
Check whether:
• The gas holes on the burner are clogged.
• All the movable parts that make up the burner are mounted correctly.
• There are draughts near the appliance.
The ame dies in models with a safety device.
Check to make sure that:
• You pressed the knob all the way in.
• You keep the knob pressed in long enough to activate the safety device.
• The gas holes are not blocked in the area corresponding to the safety
device.
The burner does not remain lit when set to minimum.
Check to make sure that:
• The gas holes are not blocked.
• There are no draughts near the appliance.
• The minimum setting has been adjusted properly.
The cookware is unstable.
Check to make sure that:
• The bottom of the cookware is perfectly at.
• The cookware is positioned correctly at the centre of the burner.
• The pan support grids have been positioned correctly.

NL
11
Het installeren
! Bewaar dit boekje zorgvuldig voor eventuele verdere raadpleging. Wanneer
u het product weggeeft, verkoopt, of wanneer u verhuist, dient u dit boekje
bij het apparaat te bewaren zodat alle nodige informatie voorhanden blijft.
! Lees de gebruiksaanwijzingen zorgvuldig door: er staat belangrijke informatie
in over installatie, gebruik en veiligheid.
Plaatsing
! Het verpakkingsmateriaal is niet bestemd voor kinderen en dient daarom
te worden weggegooid volgens de geldende normen voor gescheiden
afvalverzameling ( zie Voorzorgsmaatregelen en advies).
! De installatie moet worden uitgevoerd door een bevoegde installateur en
volgens de instructies van de fabrikant. Een verkeerde installatie kan schade
berokkenen aan personen, dieren of dingen.
! Dit apparaat mag alleen geïnstalleerd worden en funktioneren in goed
geventileerde vertrekken volgens de voorschriften van de van kracht zijnde
Nationaal geldende normen. De volgende eisen moeten in acht genomen
worden:
• Het vertrek moet voor de verbrandingsrook over een afvoersysteem naar
buiten toe beschikken. Dit kan gebeuren door middel van een afzuigkap
of een elektrische ventilator die automatisch aangaan elke keer als het
apparaat wordt aangezet.
In het gevaal van een schoorsteen of vertakte
rookleiding (gereserveerd voor fornuizen)
Rechtstreeks
naar buiten
• Het vertrek moet een luchttoevoersysteem hebben dat dient voor de
normale verbranding van het gas. De luchttoevoer die nodig is voor een
normale verbranding moet niet minder dan 2 m
3
/h zijn per kW geïnstalleerd
vermogen.
Dit systeem kan worden uitgevoerd door lucht
direct van buiten te onttrekken door middel van
een buis met een doorsnede van minstens 100
cm
2
en die zodanig is geplaatst dat hij niet per
ongeluk verstopt kan raken.
Een andere manier is door op indirecte wijze
lucht te onttrekken aan de aangrenzende
vertrekken die door middel van een
ventilatiebuis, zoals boven beschreven,
met buiten zijn verbonden en die geen
gemeenschappelijke delen zijn van het huis
en ook geen ruimtes met hoog brandgevaar
of slaapkamers.
• Bij een intensief en langdurig gebruikvan het apparaat kan een extra
ventilatie nodig zijn, bijvoorbeeld door een raam te openen of betere
ventilatie door de het vermogen van de reeds aanwezige mechanische
afzuiging te verhogen.
• (voor België) De gassen van vloeibaar gemaakte gasmengsels (LPG)
zijn zwaarder dan lucht en blijven laag hangen. Om deze reden moeten
vertrekken waar LPG-essen staan laag geplaatste ontluchtingsopeningen
hebben voor het afvoeren van eventueel ontsnapt gas. Lege of halfvolle
A
Voorbeelden
ventilatie-opening
voor verbrandingslucht
Verhoging van de spleet
tussen deur en vloer
Aangrenzend
vertrek
Te ventileren
vertrek
LPG-flessen mogen dus niet worden geïnstalleerd of bewaard in
vertrekken die lager liggen dan de vloer (kelders, enz.). Het is beter alleen
de in gebruik zijnde es in het vertrek te bewaren, zodanig geplaatst dat
hij niet in rechtstreeks contact staat met warmtebronnen (oven, open
haard, kachel, enz.) die hem tot temperaturen van meer dan 50°C zouden
kunnen brengen.
Inbouw
Voor een juiste installatie van de kookplaat moeten de volgende
voorzorgsmaatregelen in acht worden genomen:
• De meubels die direct naast de kookplaat staan en hierboven uitsteken,
moeten op minstens 200 mm van de rand van de plaat staan.
• Een afzuigkap moet worden geïnstalleerd volgens de voorschriften die u
kunt vinden in het instructieboekje van de afzuigkap zelf en in ieder geval
op een afstand van minstens 650 mm (zie afbeelding).
• Hang de keukenkastjes naast de kap op een minimum hoogte van 420
mm van het keukenblad (zie afbeelding).
Als de kookplaat onder een keukenkastje
wordt geplaatst, moet deze zich op een afstand
van minstens 700 mm van het keukenblad
bevinden.
• De opening van het meubel moet de afmetingen hebben die in de
afbeelding zijn aangegeven.
OPMERKING: Als er een afzuigkap boven de kookplaat wordt geïnstalleerd,
zie dan de bij de afzuigkap geleverde instructies voor de juiste afstand.
• Maak het omtrekoppervlak schoon en breng vervolgens de meegeleverde
afdichting op de kookplaat aan, zoals op de afbeelding.
Plaats de kookplaat in de opening in het werkblad, die gemaakt is volgens de
maten die zijn aangegeven in de Gebruiksaanwijzing.
OPMERKING: het netsnoer moet lang genoeg zijn om de kookplaat naar
boven naar buiten te kunnen halen.
Gebruik voor het vastzetten van de kookplaat de bijgeleverde beugels (A).
Plaats de beugels in de desbetreffende boringen (aangegeven met de pijl), en
zet hen vast met behulp van hun schroeven, al naargelang de dikte van het
werkblad (zie de volgende afbeeldingen).
600mm min.
420mm min.
650mm min.

12
NL
Top 20 mm
Top 30-50 mm
• Als de kookplaat niet boven een inbouwoven wordt geïnstalleerd, moet
u een houten isolatieplank aanbrengen. Deze moet op een minimum
afstand van 20 mm van de onderkant van de kookplaat worden geplaatst.
Ventilatie
Om een goede ventilatie te bereiken moet u de achterkant van het meubel
verwijderen. Het verdient de voorkeur de oven op twee houten balken
te plaatsen, of eventueel op een enkele plank die een opening heeft van
tenminste 45 x 560 mm (zie afbeeldingen).
560 mm.
45 mm.
Als de kookplaat wordt geïnstalleerd boven een inbouwoven die niet beschikt
over een afkoelmechanisme met ventilator, moet de nodige ventilatie binnen
het meubel worden bereikt door het creëren van openingen voor de toe- en
afvoer van de lucht. (zie afbeeldingen).
Elektrische aansluiting
De kookplaten met driepolige voedingskabel werken met de wisselstroom,
spanning en frequentie die aangegeven zijn op het typeplaatje (aan de
onderkant van de kookplaat). De aarding van de kabel wordt aangegeven
door de kleuren geel-groen. Als het fornuis wordt geïnstalleerd boven een
inbouwoven moeten de elektrische aansluitingen van fornuis en oven apart
worden uitgevoerd, zowel voor veiligheidsredenen als voor het eventueel
makkelijker verwijderen van de oven.
Het aansluiten van de voedingskabel aan het elektrische net
Gebruik voor de voedingskabel een stekker die genormaliseerd is voor de
lading aangegeven op het typeplaatje.
Wanneer het apparaat rechtstreeks op het net wordt aangesloten moet u
tussen het apparaat en het net een meerpolige schakelaar aanbrengen met
een afstand tussen de contacten van minstens 3mm, aangepast aan het
elektrische vermogen en voldoend aan de geldende normen (de aarding
mag niet worden onderbroken door de schakelaar). De voedingskabel moet
zodanig worden geplaatst dat hij nergens een temperatuur bereikt van 50°C
hoger dan de kamertemperatuur.
! De installateur is verantwoordelijk voor een correcte elektrische aansluiting
en het in acht nemen van de veiligheidsnormen.
Voor het aansluiten moet u controleren dat:
• het stopcontact geaard is en voldoet aan de geldende normen;
• het stopcontact in staat is het maximale vermogen van het apparaat te
dragen, zoals aangegeven op het typeplaatje;
• de spanning zich bevindt tussen de waarden die staan aangegeven op
het typeplaatje;
• het stopcontact en de stekker overeenkomen. Als dat niet zo is, dient
u ofwel de stekker ofwel het stopcontact te vervangen; gebruik geen
verlengsnoeren of dubbelstekkers.
! Wanneer het apparaat geïnstalleerd is moeten het snoer en het stopcontact
gemakkelijk te bereiken zijn.
! De kabel mag niet worden gebogen of samengedrukt.
! De kabel moet van tijd tot tijd worden gecontroleerd en mag alleen door
erkende monteurs worden vervangen (zie Service).
! De fabrikant kan nergens aansprakelijk voor worden gesteld als deze normen
niet worden nageleefd.
Gasaansluiting
De aansluiting van het apparaat aan de gasbuizen moet worden uitgevoerd
zoals voorgeschreven door de geldende normen, en nadat men er zeker
van is dat het fornuis is ingesteld voor het type gas dat men gaat gebruiken.
In het omgekeerde geval gaat u te werk zoals beschreven in de paragraaf
“Aanpassing aan verschillende types gas”.
Aansluiting met onbuigzame buis (koper of staal)
! De aansluiting aan de gasleiding moet zodanig worden uitgevoerd dat het
apparaat niet beweegt.
Op de voedingsstructuur van het apparaat bevindt zich een “L”-vormig,
richtbaar verbindingsstuk waarvan de afdichting is verzekerd door een
pakking. Als het verbindingsstuk gedraaid moet worden is het absoluut
noodzakelijk de pakking te vervangen (bij het apparaat geleverd). Het
verbindingsstuk waardoor het gas toegang krijgt tot het fornuis is voorzien
van schroefdraad: 1/2 gas cilindrische schroefbout.
Aansluiting met een roestvrije stalen exibele buis aan een onafgebroken
wand voorzien van aanhechtingen met schroefdraad.
Het verbindingsstuk waardoor het gas toegang krijgt tot het fornuis is voorzien
van schroefdraad: 1/2 gas cilindrische schroefbout.
De in werking stelling van deze buizen moet zodanig worden bewerkstelligd
dat hun lengte in uitgerolde toestand niet meer dan 2000 mm is. Nadat de
aansluiting heeft plaatsgevonden moet u controleren dat de exibele metalen
buis niet in contact komt met de beweegbare delen of dat hij vastgekneld raakt.
! Gebruik uitsluitend buizen en afdichtingen die voldoen aan de geldende
landelijke normen.
Controleren gasdichtheid
! Nadat het installeren heeft plaats gevonden moet de perfecte gasdichtheid
van alle verbindingsstukken worden gecontroleerd met een zeepoplossing
en nooit met een vlam.

NL
13
Aanpassen aan de verschillende soorten gas
! Deze ingreep moet worden uitgevoerd door een gekwalificeerd
technicus.
Als het apparaat bedoeld is om te werken met ander gas dan de soort die op
het typeplaatje en het informatielabel bovenop de kookplaat wordt vermeld,
dan moeten de sproeiers worden vervangen.
Verwijder het informatielabel en bewaar het bij het instructieboekje.
Gebruik drukregelaars die geschikt zijn voor de gasdruk die in de
Gebruiksaanwijzing staat aangegeven.
• De sproeiers moeten worden vervangen door de Klantenservice of door
een gekwaliceerd monteur.
• Sproeiers die niet bij het apparaat geleverd zijn, moeten worden besteld
bij de Klantenservice.
• Stel de laagste stand van de kranen bij.
OPMERKING: als er vloeibaar gas (G30/G31) wordt gebruikt, moet de
schroef voor de laagste stand zo ver mogelijk worden aangehaald.
BELANGRIJK: als de branderknoppen moeilijk draaien, neem dan
contact op met de Klantenservice voor vervanging van de branderkraan,
als blijkt dat deze defect is.
• Het regelen van de minimumstand
1. Zet het kraantje op de minimumstand;
2. Verwijder de knop en draai aan het
regelschroefje in of naast de spil van het
kraantje totdat u een kleine, regelmatige vlam
bereikt.
3. Controleer of de brander aanblijft als u de knop snel van hoog naar laag
draait.
4. Als bij de apparaten met een veiligheidsmechanisme (thermo-element)
dit systeem niet werkt als de branders op de minimum stand staan, moet
u het minimum verhogen door aan de stelschroef te draaien.
5. Als de regeling voltooid is moet u de zegels op de bypass schroefjes weer
op hun plaats brengen met zegellak of dergelijk materiaal.
! Aan het einde van deze handelingen moet u het oude etiket van de
gasinstelling vervangen met het etiket dat correspondeert met het nieuwe
gas, verkrijgbaar bij onze Technische Service Centers.
! Als de gasdruk van het gebruikte gas verschillend (of variabel) is dan hetgeen
is voorzien, moet op de toevoerbuis een drukteregela
Elektrische
aansluitingen
TYPEPLAATJE
Dit apparaat voldoet aan de EU reglement nr. 66/2014 met
integratie van richtlijn 2009/125/EC.
EN 30-2-1 reglement
ECODESIGN
zie typeplaatje

14
NL
AARDGAS
(Methaan)
VLOEIBAAR GAS
(Butaan)
G30
Configuratie model
4 BRANDERS
Totaal nominaal
verbruik
Benodigde lucht (m³) voor
verbranding van 1 m³ gas
Snelle brander
Halfsnelle brander
Sudderbrander
G25
85
63
50
Tabel 1
Gebruikt type gasType branderType
sproeier
Normaal
thermisch
vermogen
kW
Nominaal
verbruik
Verminderd
thermisch
vermogen
kW
Gasdruk
mbar
min. nom. max.
3.00
1.65
1.00
332 l/h
183 l/h
111 l/h
218 g/h
120 g/h
73 g/h
0.75
0.40
0.40
0.75
0.40
0.40
G25 25 mbar 1R - 2S -1A 7.30 808 l/h 8.187
G30 30 mbar
1R - 2S -1A
7.30 531 g/h 30.94
ELEKTRISCHE VOEDING: 220-240V~ 50/60Hz 0,6W
CATEGORIE II2L3B/P
VLOEIBAAR GAS
(Propaan)
G31
214 g/h
118 g/h
71 g/h
0.75
0.40
0.40
G31 30 mbar
1R - 2S -1A
7.30 521 g/h 30.94
85
63
50
3.00
1.65
1.00
3.00
1.65
1.00
Kenmerken van de branders en de straalpijpjes
25 30 35
25 30 35
20 25 30
F2 121
94Y
F1 72
Snelle brander
Halfsnelle brander
Sudderbrander
Snelle brander
Halfsnelle brander
Sudderbrander
Gebruikt type gas Normaal thermisch
vermogen kW
SS
AR
PAA 642 IX/I
PAA 642 IX/I NL

NL
15
Starten en gebruik
! Op iedere knop staat aangegeven waar de gasbrander zich precies bevindt.
Gasbranders
De gekozen brander kan met de betreffende knop als volgt worden geregeld:
● Uit
Maximum
Minimum
Om een van de branders aan te steken dient u er een vlam of aansteker bij
te houden, de knop stevig in te drukken en tegen de klok in te draaien tot u
het maximum vermogen heeft bereikt.
In de uitvoeringen die zijn voorzien van een veiligheidsmechanisme moet u
de knop circa 2-3 seconden lang ingedrukt houden totdat het element dat
automatisch de vlam ontstoken houdt, warm wordt.
In de uitvoeringen voorzien van een bougie moet u om de gekozen brander
aan te steken om te beginnen de ontstekingsknop (aangegeven door het
symbool , ) indrukken, dan de betreffende knop stevig indrukken en tegen
de klok indraaien tot u het maximum vermogen heeft bereikt.
! Mocht een gasbrander per ongeluk uitgaan, draai dan de knop uit en wacht
minstens 1 minuut voordat u hem weer probeert aan te steken.
Om de brander uit te doen moet u de knop geheel met de klok meedraaien
totdat hij niet meer verder kan (tot aan het symbool “●”).
Praktisch advies voor het gebruik van de branders
Voor een optimaal rendement dient u het volgende te onthouden:
• Gebruik voor iedere brander de pan die erop past (zie tabel) om te
vermijden dat de vlammen er onderuit vandaan komen.
• Gebruik alleen pannen met een platte bodem en met een deksel erop.
• Draai de knop op het minimum zodra het kookpunt is bereikt..
Ø Diameter pan (cm)
24 - 26
16 - 24
8 - 14
Brander
Snelle brander (R)
Halfsnelle brander (S)
Sudderbrander (A)
Voor het herkennen van het soort brander verwijzen wij u naar de afbeeldingen
in paragraaf “Kenmerken van de branders en straalpijpen”.
• Voor de maximale stabiliteit, controlleer dat de steunen voor de bakblikken
goed zijn geplaatst en dat ieder blik zich recht boven de brander staat.
• Controleer dat de bakblikken op lijn staan met ééN van de steunbalken
van de blikken.
• Plaats de handvaten van de bakblikken zodanig dat ze niet uitsteken aan
de voorkant van de kookplaat.
Het aspect dat het verschil uitmaakt voor
de stabiliteit van de pan is vaak de pan
zelf (of de positie van de pan tijdens het
gebruik). Goed uitgebalanceerd pannen,
met platte onderkanten, die in het midden
van de branders staan, met de handvaten
die op lijn zijn gezett met de dwarsliggers
van het rooster bieden uiteraard de maximale stabiliteit.
Voorzorgsmaatregelen en advies
! Dit apparaat is ontworpen en vervaardigd volgens de geldende internationale
veiligheidsvoorschriften. Deze aanwijzingen zijn geschreven voor uw veiligheid
en u dient ze derhalve goed door te nemen.
Algemene veiligheidsmaatregelen
• Dit is een inbouwapparaat van klasse 3.
• Gasfornuizen hebben voor een goede werking behoefte aan een
regelmatige luchtverversing. Controleer dat bij het installeren aan
de vereisten wordt voldaan beschreven in de paragraaf “Plaatsing”.
• Deze instructies gelden alleen voor de landen wiens symbolen in de
gebruiksaanwijzing en op het typeplaatje staan.
• Dit apparaat is vervaardigd voor niet-professioneel gebruik binnenshuis.
• Het apparaat dient niet buitenshuis te worden geplaatst, ook niet in
overdekte toestand. Het is erg gevaarlijk als het in aanraking komt met
regen of onweer.
• Raak het apparaat niet blootsvoets aan of met natte handen of voeten.
• Het apparaat dient gebruikt te worden om voedsel te bereiden.
Het mag uitsluitend door volwassenen worden gebruikt en alleen
volgens de instructies die in deze handleiding beschreven staan.
Elk ander gebruik (bv.: verwarming van ruimten) is als oneigenlijk te
beschouwen en dus gevaarlijk. De fabrikant kan niet aansprakelijk
worden gesteld voor eventuele schade die te wijten is aan onjuist,
verkeerd of onredelijk gebruik.
• Laat de ventilatieopeningen en warmteafvoer vrij.
• Controleer altijd dat de knoppen in de stand “●”/“○” staan als de oven niet
wordt gebruikt.
• Haal de stekker nooit uit het stopcontact door aan het snoer te trekken
maar door de stekker zelf beet te pakken.
• Maak de oven niet schoon of voer geen onderhoud uit als de stekker nog
in het stopcontact zit.
• Als de oven defect is, mag u nooit aan het interne systeem sleutelen om
een reparatie proberen uit te voeren. Neem contact op met de Technische
Dienst (zie Service).
• Doe het glazen deksel (waar aanwezig) niet omlaag als de gasbranders
of de elektrische platen nog warm zijn.
• Dit apparaat mag niet worden gebruikt door personen (kinderen
inbegrepen) met een beperkt lichamelijk, sensorieel of geestelijk vermogen
of personen die niet de nodige ervaring of kennis hebben met het apparaat,
tenzij onder toezicht van een persoon die verantwoordelijk is voor hun
veiligheid of nadat hun is uitgelegd hoe het apparaat werkt.
• Voorkom dat kinderen met het apparaat spelen.
• Het apparaat is niet geschikt om te worden ingeschakeld m.b.v. een
externe timer ofwel door een gescheiden afstandsbedieningssysteem.
Afvalverwijdering
• Verwijdering van het verpakkingsmateriaal: houd u aan de plaatselijke
normen, zodat het verpakkingsmateriaal hergebruikt kan worden.
• De Europese Richtlijn 2012/19/EU over Vernietiging van Electrische
en Electronische Apparatuur (WEEE), vereist dat oude huishoudelijke
electrische apparaten niet mogen vernietigd via de normale ongesorteerde
afvalstroom. Oude apparaten moeten apart worden ingezameld om zo
het hergebruik van de gebruikte materialen te optimaliseren en de
negatieve invloed op de gezondheid en het milieu te reduceren. Het
symbool op het product van de “afvalcontainer met een kruis erdoor”
herinnert u aan uw verplichting, dat wanneer u het apparaat vernietigt,
het apparaat apart moet worden ingezameld.
Consumenten moeten contact opnemen met de locale autoriteiten voor
informatie over de juiste wijze van vernietiging van hun oude apparaat.

16
NL
Energiebesparing en milieubehoud
• Bereid uw etenswaren in afgesloten potten of pannen met goed passende
deksels en gebruik zo weinig mogelijk water. Koken zonder deksel zal het
energieverbruik enorm verhogen.
• Gebruik enkel vlakke potten en pannen.
• Als u iets bereidt dat lang duurt, kunt u eventueel een snelkookpan
gebruiken die twee maal sneller werkt en een derde van de energie
bespaart.
Onderhoud en verzorging
De elektrische stroom afsluiten
Sluit altijd eerst de stroom af voordat u tot enige handeling overgaat.
Het oppervlak van de kookplaat reinigen
• Alle geëmailleerde en glazen onderdelen moeten met warm water en een
neutrale oplossing gereinigd worden.
• Er kunnen vlekken op roestvrijstalen oppervlakken ontstaan indien
deze te lang worden blootgesteld aan kalkrijk water of aggressieve
reinigingsmiddelen. Eventueel gemorste eten (water, saus, kofe, etc.)
dient verwijderd te worden voordat dit opdroogt.
• Reinig met warm water en een neutraal reinigingsmiddel en droog
vervolgens met een zachte doek of zeemleer. Verwijder ingebakken vuil
met specieke reinigingsmiddelen voor roestvrijstalen oppervlakken.
• Reinig roestvrijstaal alleen met een zachte doek of spons.
• Gebruik geen schurende of bijtende products, reinigingsmiddelen op
chloorbasis of schuursponsjes.
• Gebruik geen stoomreinigers.
• Gebruik geen brandbare producten.
• Laat geen zure of basische stoffen, zoals azijn, mosterd, zout, suiker of
citroensap op de kookplaat achter.
De onderdelen van de kookplaat reinigen
• Reinig geëmailleerde en glazen alleen met een zachte doek of spons.
• Roosters, branderkappen en branders kunnen voor reiniging verwijderd
worden.
• Reinig ze handmatig met warm water en een niet-bijtend reinigingsmiddel,
verwijder eventuele voedselresten en controleer dat er geen
branderopeningen verstopt zijn.
• Afspoelen en drogen.
• Breng de branders en branderkappen weer correct in de betreffende
behuizingen aan.
• Zorg bij het terugplaatsen van de roosters dat het pannensteungedeelte
in lijn is met de brander.
• Bij modellen die zijn uitgerust met elektrische ontstekingspluggen
en een veiligheidsvoorziening moet het uiteinde van de plug grondig
schoongemaakt worden voor een correcte werking. Controleer deze items
regelmatig en reinig ze indien nodig met een vochtige doek. Eventueel
ingebakken voedsel moet met een tandenstoker of naald verwijderd
worden.
! Om beschadiging van de elektrische ontstekingsinstallatie te
voorkomen, dienen deze niet gebruikt te worden wanneer de branders
zich niet in hun behuizing bevinden.
Onderhoud gaskranen
Met verloop van tijd kan een kraan stroef worden of vast blijven zitten; in dat
geval is het noodzakelijk hem te vervangen.
! Dit moet worden uitgevoerd door een door de fabrikant bevoegde
installateur.
Storingen en oplossingen
Het kan gebeuren dat het kookvlak niet (afdoende) functioneert. Voordat u
de servicedienst belt dient u te controleren of u het euvel zelf kunt oplossen.
Verieer om te beginnen of er een correcte stroom- en gastoevoer is, en in
het bijzonder of de hoofdgasleiding open staat.
De brander gaat niet aan of de vlam is niet gelijkmatig.
Heeft u gecontroleerd of:
• De openingen van de vlamverspreiders niet verstopt zijn.
• Alle onderdelen van de brander goed in elkaar zitten.
• Het niet tocht dichtbij het kookvlak.
De vlam blijft niet aan in de uitvoeringen met veiligheidsmechanisme.
Heeft u gecontroleerd of:
• U de knop goed heeft ingedrukt.
• U de knop lang genoeg heeft ingedrukt voor het activeren van het
veiligheidsmechanisme.
• De gaten van de vlamverspreiders dichtbij het veiligheidsmechanisme
niet verstopt zijn.
De brander blijft niet aan als hij op minimum staat.
Heeft u gecontroleerd of:
• De gaten van de vlamverspreiders niet verstopt zijn.
• Het niet tocht dichtbij het kookvlak.
• De minimum stand niet goed is ingesteld.
De pannen zijn wankel.
Heeft u gecontroleerd of:
• De bodem van de pan helemaal plat is.
• De pan in het midden van de brander of de kookplaat staat.
• De roosters niet zijn verwisseld.
195146097.00
06/2016 - XEROX FABRIANO
Indesit Company S.p.A.
V
iale Aristide Merloni,47
60044 Fabriano (AN)
www.indesit.com
-
 1
1
-
 2
2
-
 3
3
-
 4
4
-
 5
5
-
 6
6
-
 7
7
-
 8
8
-
 9
9
-
 10
10
-
 11
11
-
 12
12
-
 13
13
-
 14
14
-
 15
15
-
 16
16


Indesit PAA 642 IX/I Gebruikershandleiding
- Categorie
- Kookplaten
- Type
- Gebruikershandleiding
- Deze handleiding is ook geschikt voor
in andere talen
- English: Indesit PAA 642 IX/I User guide
Gerelateerde artikelen
-
Indesit PAA 642 IX/I NL Gebruikershandleiding
-
Indesit PAA 641 de handleiding
-
-
-
-
-
Hotpoint PKL 642 IX/HA de handleiding
-
HOTPOINT/ARISTON TQG 751 W/HA(WH) Gebruikershandleiding
-
Scholtes TG 751 (IX) GH (EU) Gebruikershandleiding
-
Indesit THP 641 de handleiding