Domo DO 926 BFK de handleiding
- Categorie
- Koelkast-diepvriezers
- Type
- de handleiding

HANDLEIDING
MODE D’EMPLOI
GEBRAUCHSANLEITUNG
INSTRUCTION BOOKLET
MANUAL DE INSTRUCCIONES
NÁVOD K POUŽITÍ
NÁVOD NA POUŽITIE
PRODUCT OF
KOELKAST, DIEPVRIEZER
RÉFRIDGÉRATEUR, CONGÉLATEUR
KÜHLSCHRANK, GEFRIERSCHRANK
REFRIGERATOR, FREEZER
FRIGORÍFICO, CONGELADOR
LEDNICE, KOMPAKTNÍ MRAZÁK
CHLADNIČKA, MRAZNIČKA
DO926BFK

DO926BFK
LINEA 2000 - Dompel 9 - 2200 Herentals Belgium - Tel 014/21.71.91 - Fax : 014/21.54.63
GARANTIEVOORWAARDEN
Dit apparaat heeft een garantietermijn van 2 jaar vanaf de datum van aankoop.
Gedurende de garantieperiode zal de distributeur volledige verantwoording op zich nemen
voor gebreken, welke aanwijsbaar berusten op materiaal- of constructiefouten. Wanneer
dergelijke gebreken voorkomen, zal het apparaat, indien nodig vervangen of gerepareerd
worden. Het recht op garantie vervalt wanneer de gebreken zijn ontstaan door hardhandig
gebruik, het niet in acht nemen van de gebruiksaanwijzing of ingreep door derden. De
garantie is alleen van toepassing als het garantiebewijs is afgestempeld en ondertekend
is door de winkelier op het moment van aankoop. Alle onderdelen, welke aan slijtage
onderhevig zijn, vallen buiten de garantie.
CONDITIONS DE GARANTIE
Nous accordons une garantie de 2 ans sur ce produit à partir de la date d’achat.
Pendant la durée de la garantie, le distributeur prendra à sa charge la réparation des vices
de fabrication ou de matières, en se réservant le droit de décider si certaines pièces doivent
être réparées ou échangées, ou si l’appareil lui-même doit être échangé. Les dommages
occasionnés par une utilisation inadéquate (branchement continu, erreur de voltage, prise
inappropriée, choc, etc...), l’usure normale ne portant préjudice ni au bon fonctionnement ni
à la valeur de l’appareil, excluent toute prétention à la garantie.
La garantie devient caduque si des réparations ont été effectuées par des personnes non
agréées. La garantie ne sera valable que si la date d’achat ainsi que le cachet et la signature
du magasin gurent sur la carte de garantie. Toutes les pièces détachées non résistantes et
par conséquent sujettes à l‘usure, ne sont pas sous garantie.
GARANTIE
Die Garantie für dieses Gerät beträgt 2 Jahr ab dem Kaufdatum. Während dieser zweijärigen
Garantie trägt der Verteiler die Verantwortung für Mangel, die eindeutig auf Material- oder
Konstuktionsfehler zurück-zuführen sind. Wenn es solche mangel gibt, wird das Gerät,
wenn notwendig, ersetzt oder repariert. Das Recht auf Garantie erlischt, wenn die Mängel
auf eine unangemessene Anwendung, die Nichtbefolgung der Gebrauchsanleitungen oder
eine Raparatur von einer dritten Partei zurückzuführen
sind. Die Garantie gilt nur, wen der Garantieschein beim Kauf vom Einzelhändler
abgestempelt und unterschrieben worden ist. Alle Teile, dem Verschleiß ausgesetzt sein,
sind nicht in der Garantie eingeschlossen.
WARRANTY
This appliance has a two year warranty period. During this period the manufacturer is
responsible for any failures which are the direct result of construction failure. When these
failures occur the appliance will be repaired or replaced if necessary. The warranty will
not be valid when the damage to the appliance is caused by wrong use, not following the
instructions or repairs executed by a third party. The warranty will only be valid if the
warranty application has been completed by the dealer at the time of purchase. All parts,
which are subject to wear, are excluded from the warranty.

DO926BFK
LINEA 2000 - Dompel 9 - 2200 Herentals Belgium - Tel 014/21.71.91 - Fax : 014/21.54.63
www.domo-elektro.be
If your device breaks down within the 2-year warranty period, you can return the device
together with your receipt to the shop where you purchased it.
CONDICIONES DE GARANTÍA
Este aparato tiene un término de garantía de 2 años, desde la fecha de la compra.
Durante el período de garantía, el suministrador asumirá la entera responsabilidad en
cuanto a defectos debidos a errores de material o de fabricación.
En caso de tales defectos, el aparato será reemplazado o reparado, cuando sea necesario. La
garantía perderá su vigencia en caso de defectos causados por mal uso, no cumplimiento
del manual de instrucciones o intervención por una tercera persona. La garantía se concede
sobre la base del recibo de caja. La garantía no cubre piezas expuestas al desgaste.
Si el producto está defectuoso dentro del período de garantía de 2 años, puede traer su
recibo de caja junto con el teléfono a la tienda donde adquirió la unidad.
ZÁRUKA
Pro záruku začínající dnem prodeje spotřebiče platí na území ČR tyto podmínky:
1. trvání záruky: 2 roky
2. poskytování záruky:
a) záruční opravu provedeme podle našeho zvážení opravou nebo výměnou vadných dílů,
jestliže tyto závady vznikly prokazatelně vadou materiálu nebo chybou při výrobě
b) záruční oprava bude provedena jen při předložení tohoto záručního listu a dokladu o
zaplacení
c) jestliže dojde k opravě nebo výměně spotřebiče v záruční době, záruční doba se
prodlužuje
3. záruka se nevztahuje
a) na mechanické poškození
b) nesprávné používání v rozporu s návodem k použití
1. záruka zaniká:
- při použití spotřebiče jinak než v domácnosti
- při provádění opravy nebo změny na spotřebiči osobou jinou než pověřenou
naším servisem
Na tento spotřebič poskytujeme záruku na nedostatky, které jsou označeny jako výrobní
chyby nebo chyby materiálu. Záruční doba začíná dnem prodeje a je uznána po předložení
potvrzeného tohoto záručního listu nebo orig.dokladu o zaplacení + tento nepotvrzený,
ale vyplněný ZL pro záznam opravy. Případné reklamace můžete uplatnit v místě nákupu
tohoto přístroje nebo v servisním středisku rmy:
Domo-elektro s.r.o. Hluboká 147, 34506 Kdyně viz www.domo-elektro.cz
tel. 379 789 684 nebo na [email protected] , tel. 379 422 550

DO926BFK
LINEA 2000 - Dompel 9 - 2200 Herentals Belgium - Tel 014/21.71.91 - Fax : 014/21.54.63
ZÁRUKA
Pre záruku začínajúcich dňom predaja spotrebiča platí na území SR tieto podmienky:
1. trvania záruky: 2 roky
2. poskytovanie záruky:
a) záručnú opravu vykonáme podľa nášho zvážení opravou alebo výmenou
chybných dielov, ak tieto závady vznikli preukázateľne chybou materiálu alebo
chybou pri výrobe
b) záručná oprava bude vykonaná len pri predložení tohto záručného listu a
dokladu o zaplatenie
c) ak dôjde k oprave alebo výmene spotrebiča v záručnej dobe, záručná doba sa
predlžuje.
3. záruka sa nevzťahuje
a) na mechanické poškodenie
b) nesprávne používanie v rozpore s návodom na použitie
1. záruka zaniká:
- Pri použití spotrebiča inak ako v domácnosti
- Pri vykonávaní opravy alebo zmeny na spotrebiči osobou inou ako poverenou naším
servisom
Na tento spotrebič poskytujeme záruku na nedostatky, ktoré sú označené ako výrobné
chyby alebo chyby materiálu. Záručná doba začína dňom predaja a je uznaná po
predložení potvrdeného tohoto záručného listu alebo orig.dokladu o zaplatení +
tento nepotvrdený, ale vyplnený ZL pre záznam opravy. Prípadné reklamácie môžete
uplatniť v mieste nákupu tohto prístroja alebo v servisnom stredisku rmy:
Domo-elektro s.r.o. Hluboká 147, 34506 Kdyně pozri www.domo-elektro.cz
tel. 379 789 684 alebo na [email protected], tel. 379 422 550

DO926BFK
LINEA 2000 - Dompel 9 - 2200 Herentals Belgium - Tel 014/21.71.91 - Fax : 014/21.54.63
www.domo-elektro.be
Type nr. Apparaat
N° de modèle de l’appareil DO926BFK
Type nr des Gerätes
Type nr. of appliance
Naam
Nom ..............................................................................................................................................
Name
Name
Adres
Adresse ...........................................................................................................................................
Adresse
Address
Aankoopdatum
Date d’achat ...................................................................................................................................
Kaufdatum
Date of purchase

DO926BFK
LINEA 2000 - Dompel 9 - 2200 Herentals Belgium - Tel 014/21.71.91 - Fax : 014/21.54.63
REKLAMACE/REKLAMÁCIE : (VYPLNÍ ZÁKAZNÍK NEBO
OBCHOD)
Popis vady 1. reklamace (reklamácie) / Datum uplatnění reklamace (Dátum uplatnenia
reklamácie):
Popis vady 2. reklamace (reklamácie) / Datum uplatnění reklamace (Dátum uplatnenia
reklamácie):
Popis vady 3. reklamace (reklamácie) / Datum uplatnění reklamace (Dátum uplatnenia
reklamácie):
Záznamy servisu :
1.reklamace (datum přijetí/odeslání/ číslo reklamačního dokladu)
(dátum prijatia / odoslania / číslo reklamačného dokladu)
2.reklamace (datum přijetí/odeslání/ číslo reklamačního dokladu)
(dátum prijatia / odoslania / číslo reklamačného dokladu)
3.reklamace (datum přijetí/odeslání/ číslo reklamačního dokladu)
(dátum prijatia / odoslania / číslo reklamačného dokladu)
* Jméno kupujícího, adresu a tel.spojení je nutno vyplnit pokud si zákazník přeje
zaslání opraveného přístroje domů.
Bez úplného vyplnění všech ostatních údajů v záručním listu nebude možno Vaši
reklamaci včas vyřídit.
* Meno kupujúceho, adresu a tel.spojení je nutné vyplniť ak si zákazník praje zaslanie
opraveného prístroja domov.
Bez vyplnenia všetkých ostatných údajov v záručnom liste nebude možné Vašu
reklamáciu včas vybaviť.

DO926BFK
LINEA 2000 - Dompel 9 - 2200 Herentals Belgium - Tel 014/21.71.91 - Fax : 014/21.54.63
www.domo-elektro.be
RECYCLAGE INFORMATIE
Dit symbool op het product of op de verpakking wijst erop dat dit product niet als
huishoudafval mag worden behandeld. Het moet echter naar een plaats worden ge-
bracht waar elektrische en elektronische apparatuur wordt gerecycleerd. Als u ervoor
zorgt dat dit product op de correcte manier wordt verwijderd, voorkomt u mogelijk
voor mens en milieu negatieve gevolgen die zich zouden kunnen voordoen in geval
van verkeerde afvalbehandeling. voor meer details in verband met het recycleren van
dit product, neemt u het best contact op met de gemeentelijke instanties, het bedrijf
of de dienst belast met de verwijdering van huishoudafval of de winkel waar u het
product hebt gekocht.
Het verpakkingsmateriaal is recycleerbaar. Behandel de verpakking milieu bewust.
INFORMATION DE RECYCLAGE
Ce symbole sur le produit ou son emballage indique que ce produit ne peut être traité
comme déchet ménager. Il doit plutôt être remis au point de ramassage concerné, se
chargeant du recyclage du matériel électrique et électronique.
En vous assurant que ce produit est éliminé correctement,
vous favorisez la prévention des conséquences négatives pour
l’environnement et la santé humaine qui, sinon, seraient le résu-
lat d’un traitement inapproprié des déchets de ce produit. Pour
obetenie plus de détails sur le récyclage de ce produit, veuillez
prendre contact avec le bureau municipal de votre région, votre
service d’éliminiation des déchets ménagers ou le magasin où
vous avez acheté le produit.
L’emballage est recyclable. Traiter l’emballage écologiquement.
RECYCLING INFORMATIONEN
Dieses Symbol auf dem Produkt oder seiner Verpackung weist
darauf hin, dass dieses Produkt nicht als normaler Haushalt-
sabfall zu behandeln ist, sondern an einem Sammelpunkt für
des Recyling von elektrischen und elektronischen Geräten
abgegeben werden muss. Durch Ihren Beitrag zum korrekten
Entsorgen dieses Produkts schützen Sie die Umwelt und die Ge-
sundheit Ihrer Mitmenschen. Umwelt und Gesundheit werden
durch falsches Entsorgen gehährdet. Weitere Informationen über das Recycling dieses
Produkts erhalten Sie von Ihren Rathaus, Ihrer Müllabfurh oder dem Geschäft, in dem
Sie das Produkt gekauft haben.
Das Verpackungsmaterial ist wiederverwertbar. Entsorgen Sie die Verpackung
umweltgerecht und führen Sie sie der Wertstoffsammlung zu.

DO926BFK
LINEA 2000 - Dompel 9 - 2200 Herentals Belgium - Tel 014/21.71.91 - Fax : 014/21.54.63
RECYCLING INFORMATION
This symbol on the product or on its packaging indicates that this product may not
be treated as household waste. Instead it shall be brought to the applicable collection
point for recycling of electrical and electronic equipment. By ensuring this product is
disposed of correctly, you will help prevent potential negative consequences for the en-
vironment and human health, which could otherwise be caused by inappropriate waste
handling of this product. For more detailed information about recycling of this product,
please contact your local city ofce, your household waste disposal service or the shop
where you purchased the product.
The packaging is recyclable. Please treat package ecologically
INFORMACIÓN DE RECICLAJE
El símbolo en el producto o el embalaje indica que este producto
no puede ser tratado como residuo doméstico. Los residuos de
aparatos tienen que ser depositados en un punto de recogida
destinado al reciclaje de aparatos eléctricos y electrónicos.
Eliminando este producto de manera correcta, se puede evitar
las consecuencias negativas posibles para el hombre y el medio
ambiente en caso de un tratamiento de residuos incorrecto. Si
desea obtener más información sobre el reciclaje de este producto,
pónganse en contacto con la ocina municipal, la empresa o el
servicio de recogida de residuos domésticos correspondiente o con
el establecimiento dónde ha adquirido el producto. El material de
embalaje es reciclable. Trate el embalaje de manera ecológica.
INFORMACE O RECYKLACI ODPADU
Symbol na přístroji či na jeho obalu znamená, že s tímto výrobkem není možno
nakládat jako s běžným domovním odpadem, nýbrž musí být odevzdán na místech
určených ke sběru a likvidaci elektrických a elektronických zařízení. Dodržením
tohoto doporučení chráníte životní prostředí a zdraví spoluobčanů. Více informací o
možnostech likvidace nebezpečného odpadu obdržíte na obecních nebo městských
úřadech, sběrných dvorech nebo v prodejně, kde jste přístroj zakoupili. Obalové
materiály jsou recyklovatelné, nakládejte s nimi podle předpisů pro životní prostředí.
INFORMÁCIE O RECYKLÁCIU ODPADU
Symbol na prístroji alebo na jeho obale znamená, že s týmto výrobkom nie je možné
nakladať ako s domovým odpadom, ale musí byť odovzdaný na miestach určených
na zber a likvidáciu elektrických a elektronických zariadení. Dodržaním tohto
odporúčania chránite životné prostredie a zdravie spoluobčanov. Viac informácií o
možnostiach likvidácie nebezpečného odpadu obdržíte na obecných alebo mestských
úradoch, zberných dvoroch alebo v predajni, kde ste prístroj zakúpili. Obalové
materiály sú recyklovateľné, nakladajte s nimi podľa predpisov pre životné prostredie.
WEBSHOP
Accessoires en onderdelen van Domo-toestellen kunnen vanaf nu ook online besteld worden
via de webshop van Domo*:
http://webshop.domo-elektro.be
De webshop is ook te bereiken via de Domo-website: www.domo-elektro.be.
Hiernaast zijn de accessoires en onderdelen ook nog altijd te verkrijgen in de winkel waar u het
toestel heeft aangekocht.
Les accessoires et pièces détachées de Domo sont à présent disponibles en ligne sur le
webshop*:
http://webshop.domo-elektro.be
Le webshop est aussi accessible via le site internet de Domo: www.domo-elektro.be.
Vous pouvez toujours vous procurer les accessoires et pièces détachées au point de vente dont
provient votre appareil.
Zubehör und Ersatzteile von Domo-Geräten können ab jetzt auch online im Domo-Webshop
bestellt werden*:
http://webshop.domo-elektro.be
Zum Domo-Webshop gelangen Sie auch über die Domo-Internetseite: www.domo-elektro.be.
Außerdem können Sie nach wie vor Domo-Zubehör und -Ersatzteile in Geschäften bekommen,
wo Domo-Gerät verkauft werden.
From now on, accessories and parts of Domo appliances can also be ordered online from the
Domo webshop*:
http://webshop.domo-elektro.be
You can reach the webshop through the Domo website as well: www.domo-elektro.be. The
accessories and parts can also still be obtained at the store where you bought the appliance.
Nyní je možné nakupovat originální příslušenství i náhradní díly online přes internetový
obchod:
www.domo-elektro.cz
(platí pouze pro Českou a Slovenskou republiku)
Příslušenství i náhradní díly je možné objednat i přes obchod, kde jste zakoupili vás spotřebič.
* Enkel in België, Nederland, Luxemburg, Frankrijk en Duitsland.
* Seulement dans la Belgique, le Pays-Bas, le Luxembourg, la France et l’Allemagne.
* Nur in Belgien, die Niederlande, Luxemburg, Frankreich und Deutschland.
* Only in Belgium, the Netherlands, Luxemburg, France and Germany.
NL
FR
DE
EN
CZ

DO926BFK
LINEA 2000 - Dompel 9 - 2200 Herentals Belgium - Tel 014/21.71.91 - Fax : 014/21.54.63
www.domo-elektro.be
WEBSHOP
Accessoires en onderdelen van Domo-toestellen kunnen vanaf nu ook online besteld worden
via de webshop van Domo*:
http://webshop.domo-elektro.be
De webshop is ook te bereiken via de Domo-website: www.domo-elektro.be.
Hiernaast zijn de accessoires en onderdelen ook nog altijd te verkrijgen in de winkel waar u het
toestel heeft aangekocht.
Les accessoires et pièces détachées de Domo sont à présent disponibles en ligne sur le
webshop*:
http://webshop.domo-elektro.be
Le webshop est aussi accessible via le site internet de Domo: www.domo-elektro.be.
Vous pouvez toujours vous procurer les accessoires et pièces détachées au point de vente dont
provient votre appareil.
Zubehör und Ersatzteile von Domo-Geräten können ab jetzt auch online im Domo-Webshop
bestellt werden*:
http://webshop.domo-elektro.be
Zum Domo-Webshop gelangen Sie auch über die Domo-Internetseite: www.domo-elektro.be.
Außerdem können Sie nach wie vor Domo-Zubehör und -Ersatzteile in Geschäften bekommen,
wo Domo-Gerät verkauft werden.
From now on, accessories and parts of Domo appliances can also be ordered online from the
Domo webshop*:
http://webshop.domo-elektro.be
You can reach the webshop through the Domo website as well: www.domo-elektro.be. The
accessories and parts can also still be obtained at the store where you bought the appliance.
Nyní je možné nakupovat originální příslušenství i náhradní díly online přes internetový
obchod:
www.domo-elektro.cz
(platí pouze pro Českou a Slovenskou republiku)
Příslušenství i náhradní díly je možné objednat i přes obchod, kde jste zakoupili vás spotřebič.
* Enkel in België, Nederland, Luxemburg, Frankrijk en Duitsland.
* Seulement dans la Belgique, le Pays-Bas, le Luxembourg, la France et l’Allemagne.
* Nur in Belgien, die Niederlande, Luxemburg, Frankreich und Deutschland.
* Only in Belgium, the Netherlands, Luxemburg, France and Germany.
NL
FR
DE
EN
CZ

DO926BFK
LINEA 2000 - Dompel 9 - 2200 Herentals Belgium - Tel 014/21.71.91 - Fax : 014/21.54.63
Als de voedingskabel beschadigd is, moet hij vervangen
worden door de fabrikant, zijn dienst na verkoop of een
gelijkaardig gekwaliceerd persoon, om ongelukken te
voorkomen.
Si le cordon d’alimentation est endommagé, il doit être
remplacé par le fabricant, son service après-vente ou toute
autre personne qualiée, pour éviter tout accident.
Wenn das Stromzuführungskabel beschädigt ist, muss es
vom Hersteller, dessen Kundendienst oder einer gleichartig
geschulten Person ersetzt werden, um Unfälle zu verhindern.
If the power supply cord is damaged, it must be replaced by
the manufacturer, its service agent or a similarly qualied
person in order to avoid a hazard.
Cuando el cable de alimentación está dañado, tiene que ser
reemplazado por el fabricante, el servicio posventa o una
persona similarmente calicada, para evitar accidentes.
Jestliže je poškozený přívodní kabel, musí být neprodleně
vyměněn v odborném servisu nebo oprávněnou osobou. Jinak
hrozí nebezpečí úrazu!
Ak je poškodený prívodný kábel, musí byť bezodkladne
vymenený v odbornom servise alebo oprávnenou osobou.
Inak hrozí nebezpečenstvo úrazu!

DO926BFK
11
www.domo-elektro.be
VEILIGHEIDSMAATREGELEN
• Dit toestel moet aangesloten worden op een geaard
stopcontact. In geval van kortsluiting zorgt de aarding er
voor dat de stroom kan afgeleid worden, zo voorkomt u
elektrocutie.
• Gebruik geen verlengsnoer om uw toestel aan te sluiten.
Sluit de ijskast ook niet aan op een stopcontact waar nog
een ander toestel op aangesloten is. Verbindt het snoer ook
niet met een ander snoer. Sluit de ijskast uitsluitend aan op
een muurstopcontact.
• Een lege ijskast kan erg gevaarlijk zijn voor kinderen.
Verwijder de deur van de ijskast wanneer u ze niet meer
gebruik. Of neem andere maatregelen waardoor het toestel
ongevaarlijk wordt. Zorg ervoor dat u het koelsysteem niet
beschadigd.
• Wanneer het elektrisch snoer beschadigd is, moet u het
laten vervangen door een gekwaliceerd persoon of de
dienst na verkoop van de fabrikant, om ongelukken te
voorkomen.
Dit toestel mag gebruik worden door kinderen vanaf 8 jaar
en ouder. En door personen met een fysieke of sensoriële
beperking of mensen met een beperkte mentale capaciteit
of gebrek aan ervaring of kennis. Op voorwaade dat deze
personen toezicht krijgen of instructies hebben gekregen over
het gebruik van het toestel op een veilige manier en dat ze
ook de gevaren kennen bij het gebruik van het toestel.
Kinderen mogen niet met het toestel spelen.
Onderhoud en reiniging van het toestel mag niet gebeuren
door kinderen, tenzij ze ouder zijn dan 8 jaar en toezicht
krijgen.

DO926BFK
12
Houd het toestel en het snoer buiten het bereiken van
kinderen, jonger dan 8 jaar.
Dit toestel is geschikt om te gebruiken in de huishoudelijke
omgeving en in gelijkaardige omgevingen zoals :
• Keukenhoek voor personeel van winkels, kantoren en
andere gelijkaardige professionele omgevingen.
• Boerderijen
• Hotel- en motelkamers en andere omgevingen met een
residentieel karakter.
• Gastenkamers, of gelijkaardige
Opgelet : het toestel mag niet gebruikt worden met een
externe timer of een aparte afstandsbediening.
ONDERDELEN
1. Temperatuurregelaar
2. Leggers
3. Deksel voor groentebak
4. Groentebak
5. Diepvriesladen
6. Stelvoetjes
7. Deurrek
8. Deurrek voor essen
INSTALLATIE
• Verwijder alle verpakkingsmateriaal, zowel
binnenin als aan de buitenkant. Maak de
buitenkant van het toestel schoon met een
droge doek. De binnenkant kan u reinigen
met een zachte vochtige doek.
• Plaats het toestel niet in een nauwe doorgang, direct zonlicht of vocht.
• Zorg er voor dat de lucht vrij rond de koelkast kan circuleren. De achterkant van
de ijskast moet minstens 13 cm verwijderd zijn van de muur.
• Zet de ijskast op een stevige, vlakke ondergrond.
• Vermijd direct zonlicht en warmte. Zonlicht kan de buitenkant van de ijskast
aantasten. Warmte zal voor een hoger verbruik zorgen.
• Vermijd een te hoge vochtigheidsgraad. Te veel vocht in de lucht zal er voor
zorgen dat er te snel vorst gevormd wordt in uw ijskast.
1
2
3
4
5
6
7
8

DO926BFK
13
www.domo-elektro.be
• Controleer voordat u uw koelkast op de netvoeding aansluit of de spanning op het
typeplaatje van uw apparaat overeenstemt met de spanning bij u thuis. Een andere
spanning kan het apparaat beschadigen.
• De stekker is de enige manier om het apparaat van de voeding te ontkoppelen,
zorg dat deze altijd makkelijk bereikbaar is. Om de voeding naar het apparaat
te ontkoppelen, schakel het apparaat uit en haal vervolgens de stekker uit het
stopcontact.
• Het apparaat moet geaard zijn. De fabrikant is niet verantwoordelijk voor schade
die ontstaat door het niet gebruiken van een aarding.
• Voor oneffen oppervlakken kunnen de voorste stelvoetjes op één lijn worden
gebracht.
• Laat het toestel na installatie 3 uur staan vooraleer het aan te zetten. Zo kan het
koelmiddel zich zetten.
ONDERHOUD EN REINIGING
Reiniging
Gebruik geen agressieve schoonmaakmiddelen of oplosmiddelen.
1. Stel de temperatuurregelaar in op de positie 0FF en haal de stekker uit het
stopcontact.
2. Haal de levensmiddelen uit en berg deze in een koele ruimte op.
3. Maak het apparaat schoon met een zachte doek, warm water en een mild
schoonmaakmiddel.
4. Reinig de deurdichting alleen met schoon water en veeg vervolgens grondig af.
5. Na reiniging, steek de stekker in het stopcontact en stel de temperatuurregelaar op
de gewenste positie in.
6. Plaats de levensmiddelen opnieuw in het apparaat.
Vervanging gloeilamp
Haal de stekker uit het stopcontact voordat u de gloeilamp vervangt.
1. Verwijder de lampenkap door deze omhoog te duwen.
2. Schroef de oude gloeilamp uit en schroef vervolgens een nieuwe 15W (E14
tting) gloeilamp in.
3. Plaats de lampenkap terug.
Ontdooien koelkast
De koelkast ontdooit volledig automatisch.
Tijdens de werking van de koeling worden er condensatiedruppels of rijm achteraan
het apparaat gevormd. Dit is normaal. Het is niet nodig om de condensatie of het ijs
weg te vegen. Het achterpaneel ontdooit automatisch. De condensatie stroomt in het
condensatiekanaal en wordt naar de koeling geleid waar het verdampt.
Opmerking: Houd het condensatiekanaal en afvoergat schoon zodat de condensatie
kan wegstromen.

DO926BFK
14
Ontdooien diepvries
Een ijslaag in de diepvries heeft een negatieve impact op de koeling van de ingevroren
levensmiddelen en leidt tot een hoger stroomverbruik. Verwijder de ijslaag regelmatig.
Schraap het ijs niet af met een mes of puntig voorwerp. De koelbuizen kunnen schade
oplopen.
1. Haal de ingevroren levensmiddelen uit de diepvries en plaats ze tijdelijk in een
koele ruimte.
2. Haal de stekker uit het stopcontact.
3. Om het ontdooiproces te versnellen, plaats een pan met warm water op een
stander in de diepvries.
4. Veeg de condensatie weg met een doek of spons.
5. Veeg het vriesvak droog.
6. Steek de stekker in het stopcontact en stel de temperatuurregelaar op de gewenste
positie in.
7. Plaats de ingevroren levensmiddelen opnieuw in de diepvries.
OMGEVINGSTEMPERATUUR
Dit apparaat is ontworpen om te werken in een omgevingstemperatuur tussen 16°C en
38°C. In een ruimte met een lagere of hogere temperatuur zal het apparaat niet juist
werken.
ALVORENS LEVENSMIDDELEN TE BEWAREN
• Verwijder alle verpakking.
• Laat het apparaat gedurende 2 – 3 uur werken zonder levensmiddelen zodat de
kast tot de gepaste temperatuur afkoelt.
Maak de binnenkant van het apparaat schoon met warm water en een beetje afwas-
middel om eventuele fabricageresten en stof te verwijderen.
TEMPERATUURREGELING
De koelkast wordt geregeld door een temperatuurregelaar die zich binnenin het appa-
raat bevindt. Stel de regelaar op uw gewenste positie in.
• OFF is de ‘uit’ stand
• MIN is de warmste stand
• MED is de normale stand
• MAX is de koudste stand
• Het apparaat werkt niet in de positie OFF (het koelsysteem is uitgeschakeld),
maar de voeding is niet onderbroken.
• De werkingstijd en –temperatuur worden beïnvloed door de plaats waar de
koelkast wordt gebruikt, het aantal keer de deur wordt geopend en de
temperatuur van de kamer waar de koelkast zich in bevindt.
• Wanneer u het apparaat in gebruik neemt of na het ontdooien van het apparaat,
stel de regelaar gedurende minstens 2 uur op de koudste stand in voordat u

DO926BFK
15
www.domo-elektro.be
levensmiddelen inbrengt en stel vervolgens op de medium stand in.
UW APPARAAT VERPLAATSEN
Als het apparaat voor welke reden dan ook wordt uitgeschakeld, wacht 10 minuten
voordat u het opnieuw inschakelt. De druk in het koelsysteem dient eerst te worden
gestabiliseerd voordat u het apparaat opnieuw inschakelt.
• Schakel het apparaat uit en haal de stekker uit het stopcontact. Verwijder alle
levensmiddelen. Verwijder tevens alle mobiele onderdelen (schappen, acces-
soires, etc.) of maak ze vast in de koelkast om schokken te vermijden.
• Verplaats het apparaat en installeer. Als het apparaat tijdens het verplaatsen op
zijn zijde werd gehouden, zelfs al was dit zeer kort, laat het apparaat minstens 10
minuten in de rechtopstaande positie staan voordat u het apparaat inschakelt.
Uw apparaat gebruikt isobutaan (R600a) als koelmiddel. Niettegenstaande dat R600a
een milieuvriendelijk en natuurlijk gas is, is het explosief. Wees dus zeer voorzichtig
tijdens het verplaatsen of installeren van uw apparaat om schade aan de koelelement-
en te vermijden. In geval van een lek dat werd veroorzaakt door schade aan de koele-
lementen, haal uw koelkast weg van open vlammen of warmtebronnen en verlucht de
kamer waar het apparaat zich in bevindt enkele minuten.
LEVENSMIDDELEN IN DE KOELKAST BEWAREN
De koelkast zorgt voor een langere bewaartijd van verse, beperkt houdbare levens-
middelen. Bewaren van vers voedsel voor het beste resultaat:
• Bewaar alleen zeer verse levensmiddelen van een goede kwaliteit.
• Zorg dat de levensmiddelen goed zijn verpakt of afgedekt voordat u ze bewaart.
Dit vermijdt dat de levensmiddelen uitdrogen, bleker worden of aan smaak ver-
liezen en zorgt voor een langere versheid. Dit vermijdt tevens overdracht van
geuren.
• Zorg dat levensmiddelen met een sterke geur goed verpakt en afgedekt zijn en
bewaar deze uit de buurt van boter, melk en room en andere levensmiddelen die
door een sterke geur aangetast kunnen worden.
• Laat warme levensmiddelen afkoelen voordat u ze in de koelkast plaatst.
LEVENMIDDELEN IN DE DIEPVRIES INVRIEZEN EN BEWAREN
Gebruik de diepvries
• Om diepgevroren levensmiddelen te bewaren
• Om ijsblokjes te maken.
• Om levensmiddelen in te vriezen.
Opmerking: Zorg dat de deur van de diepvries altijd juist gesloten is.
Bewaar op -18°C of kouder. Open de deur van de diepvries alleen indien nodig.
Diepvriesproducten kopen
• De verpakking mag niet beschadigd zijn.

DO926BFK
16
• Gebruik binnen de minimale houdbaarheidsdatum.
• Indien mogelijk, transporteer diepgevroren levensmiddelen in een thermische tas
en plaats de levensmiddelen snel in de diepvries.
Vers voedsel invriezen
Vries alleen vers en onbeschadigd voedsel in. Om de best mogelijke voedingswaarde,
smaak en kleur te behouden, blancheer groente voordat u ze invriest.
Aubergines, paprika’s, courgettes en asperges moeten niet worden geblancheerd.
Opmerking: Houd de in te vriezen levensmiddelen uit de buurt van levensmiddelen
die reeds ingevroren zijn.
• De volgende levensmiddelen zijn geschikt om in te vriezen: Cakes en gebak, vis
en schaal- en schelpdieren, vlees, wild, pluimvee, groente, fruit, specerijen, eieren
zonder schaal, zuivelproducten zoals kaas en boter, kant-en-klaar gerechten en
etensrestjes zoals soep, stoofschotels, gekookt vlees en vis, aardappelgerechten,
soufés en desserts.
• De volgende levensmiddelen zijn niet geschikt om in te vriezen: Groente die over
het algemeen rauw wordt gegeten zoals sla, radijzen, eieren in de schaal, druiven,
appels, peren en perziken, hardgekookte eieren, yoghurt, zure melk, zure room en
mayonaise.
Diepvriesproducten bewaren
Om te vermijden dat levensmiddelen hun smaak verliezen of uitdrogen, steek ze in een
luchtdichte verpakking.
1. Plaats de levensmiddelen in de verpakking.
2. Verwijder alle lucht.
3. Dicht de verpakking af.
4. Label de verpakking met de inhoud en datum van invriezen.
Gepaste verpakking:
Plastic folie, buisfolie van polyethyleen, aluminiumfolie of houders geschikt voor in
de diepvries. Deze producten zijn te verkrijgen bij uw speciaalzaak.
Aanbevolen bewaartijden van diepvriesproducten in de diepvries
Deze tijden kunnen verschillen naar gelang het soort voedsel. De ingevroren
levensmiddelen kunnen tussen 1 en 12 maanden worden bewaard (minimum op
-18°C).
Levensmiddel Bewaartijd
Spek, stoofschotels, melk 1 maand
Brood, roomijs, worst, erwten, bereide schelpdieren, vette vis 2 maanden
Niet-vette vis, schelpdieren, pizza, scones en mufns 3 maanden
Ham, cakes, koeken, rundvlees en lamskoteletjes, stukken pluimvee 4maanden

DO926BFK
17
www.domo-elektro.be
Boter, groente (geblancheerd), volledig ei en dooiers, gekookte riv-
ierkreeften, gehakt (rauw), varkensvlees (rauw)
6 maanden
Fruit (droog of in siroop), eiwit, rundvlees (rauw), volledige kip,
lamsvlees (rauw), fruitcakes
12 maanden
Nooit vergeten:
• Als u verse levensmiddelen met een minimale houdbaarheidsdatum invriest, moet
u deze voor het verstrijken van deze datum invriezen.
• Controleer of de levensmiddelen vroeger reeds niet werden ingevroren.
Ingevroren levensmiddelen die volledig ontdooid zijn mogen niet opnieuw
worden ingevroren.
• Eenmaal ontdooid, eet de levensmiddelen snel op.
VAKANTIE
Wanneer u voor een korte periode op vakantie gaat, kan u het toestel ingeschakeld
laten. Wanneer u voor een langere periode op vakantie gaat, doet u best het volgende :
• Haal al het voedsel uit uw ijskast
• Verwijder de stekker uit het stopcontact
• Reinig de ijskast grondig.
• Laat de deur van de ijskast open om schimmelvorming en slechte geuren te
vermijden.
STROOMPANNE
De meeste stroompannes worden hersteld in 1 of 2 uur en zullen de temperatuur
van uw ijskast niet veranderen. U moet wel het openen van de ijskastdeur tot een
minimum beperken tijdens een stroompanne.
Tijdens een langere stroompanne moet u maatregelen nemen om het voedsel te
beschermen, bv door droog ijs op uw voedsel te leggen.
Bevroren levensmiddelen blijven goed als de stroomuitval niet langer dan 15 uur
duurt. Vries bevroren levensmiddelen die volledig ontdooid zijn niet opnieuw in. De
levensmiddelen kunnen uw gezondheid schaden.
BELANGRIJKE REGELS
• Plaats nooit warm eten in de ijskast.
• Drank moet bewaard worden in een afgesloten container.
• Voedsel dat langere tijd bewaard wordt in de ijskast moet afgedekt worden of
bewaard worden in glazen containers.
• Plaats nooit bedorven eten in de ijskast.
• Zorg er steeds voor dat de ijskast niet overladen is, zodat het voedsel voldoende
kan gekoeld worden.
• Open de deur van de ijskast alleen wanneer het nodig is.
• Toestel mag niet gebruikt worden voor buitenkamperen bv. tent.

DO926BFK
18
• Mag alleen binnen gebruikt worden.
• Het toestel mag niet gebruikt worden in openbaar vervoer.
• Vries voedsel niet terug in wanneer het reeds ontdooid is geweest.
• Zet geen dranken met prik in de diepvriezer.
• Wees voorzichtig bij het consumeren van ijslolly’s die net uit de diepvriezer
komen om vrieswonden te voorkomen.
• Neem niets uit de diepvriezer met natte handen.
• De diepvriezer maakt geluid wanneer de compressor het koelmiddel rond pompt.
Dit is normaal.
• Zet geen warme voedingsmiddelen in de diepvriezer.
• Zorg ervoor dat het voedsel is afgedekt.
• Duw het voedsel niet teveel samen, er moet nog lucht rond kunnen circuleren.
• Laat de deur niet te lang open staan. Zorg er ook voor dat de deur altijd weer goed
gesloten wordt.
• Label het voedsel met de datum om de houdbaarheid in de diepvriezer te kunnen
controleren.
DRAAIRICHTING VAN DEUR WIJZIGEN
Als u de scharnieren van de deur naar de andere kant wilt brengen is het aanbevolen
om contact op te nemen met een erkende reparateur om hem het werk te laten
uitvoeren. Voordat u de draairichting wijzigt, controleer of de stekker uit het
stopcontact is gehaald en dat het apparaat leeg is. Het is aanbevolen om een
kruiskopschroevendraaier en een moersleutel te gebruiken (beide niet meegeleverd).
1. Verwijder het afdekplaatje van de schroeven. Verwijder de drie schroeven en
vervolgens de bovenscharnier die de deur op zijn plaats houdt. Til de deur op en
plaats deze op een zacht oppervlak om krassen te vermijden.
SHOPPING FOR FROZEN FOOD
The appliance is rated as a 4 star freezer and can freeze fresh food and store pre-frozen food� When
you are buying frozen food, look at the Storage Guidelines on the packaging� You will be able to store
each item of frozen food for the period shown against the 4 star rating�
FREEZING FRESH FOOD
Ensure that your freezing operations are carried out under the most hygienic conditions as freezing
alone does not improve the food�
Never put hot or even warm foodstus into the freezer�
Prior to freezing the food, food should always be covered tightly with foil, plastic lm, placed in
plastic bags or stored in airtight containers� This will prevent food from dehydrating and to prevent
any strong odors of some foods transferring to milder ones�
To freeze raw meat, wrap in plastic bags or in airtight containers and place on the lowest shelf to
avoid cross contamination�
Do not allow raw meat to come into contact with cooked foods� For safety, only store raw meat for
two or three days� Fruit and vegetables should be thoroughly cleaned and placed in the crisper�
Milk and other liquids should be sealed with lids and placed in the bottle shelf in the door�
NOTE: The ambient temperature of the freshly stored food and how often the door is opened aect
the temperature in the refrigerator� If required, change the thermostat temperature settings�
Reverse door
STORING FROZEN FOOD
All frozen food you purchase should be placed in the freezer as soon as possible to avoid them from
defrosting and spoiling�
All storage recommendations printed on the packaging of frozen food by the manufacturer should
always be followed�
When using the freezer for the rst time or after defrosting, set the thermostat knob to the maximum
position for at least 2 hours before introducing food to be stored, and then readjust it to the normal
position�
The technical data mentioned in the ‘Specications’ are obtained in the case that the freezing drawers
are removed�
MAKING ICE CUBES
1� Fill the ice tray with ¾ full of clean water�
2� Place the tray in the top freezing drawer�
3� Close the door�
To remove the ice cubes from the tray, put the tray under running water for a while and then twist
the tray slightly to loosen the ice cubes�
Follow the following stages to reverse the door from its initial position�
1� Remove the hinge cover�
Remove the hinge cover
98
GB GB
2. Verwijder de middelste afdekplaatjes, schroeven en scharnier. Plaats deze aan de
andere zijde. Til de deur op en plaats deze op een zacht oppervlak om krassen te
vermijden.
2� Remove three screws with suitable tools� Remove the upper hinge then take o carefully the
fridge compartment door�
3� Remove middle hinge, screws, screw caps and plastic inserting nails� Install them on the other
side� Take o the lower door and put it away�
Remove three screws
4� The disassembly and installation of bottom parts :
A� Disassemble lower hinge and screws� Then install them on the other side and consolidate the
lower hinge�
Note: the refrigerator-freezer incline angle less 45°�
B� Swap over the position of the adjustable foot to the other side of the cabinet�
8� Move the hinge to another side of the box after removing the screws on the hinge;
Usescrewstofasten�
9� Install the hinge cover after fastening the hinge�
C� Swap over the position of the lower door block to the other side� Install the screws and
consolidate them�
5� Install the lower door and take care of its alignment with the appliance body�
6� Tighten the screws of the middle hinge on the reversible side�
7� Install the top door and remove the existing top door block� Install a new top door block
(notthesame one) on the reversible side� Screw it down�
1110
GB GB

DO926BFK
19
www.domo-elektro.be
3. Verwijder de onderste schroeven, scharnier en het stelvoetje onderaan het
apparaat.
2� Remove three screws with suitable tools� Remove the upper hinge then take o carefully the
fridge compartment door�
3� Remove middle hinge, screws, screw caps and plastic inserting nails� Install them on the other
side� Take o the lower door and put it away�
Remove three screws
4� The disassembly and installation of bottom parts :
A� Disassemble lower hinge and screws� Then install them on the other side and consolidate the
lower hinge�
Note: the refrigerator-freezer incline angle less 45°�
B� Swap over the position of the adjustable foot to the other side of the cabinet�
8� Move the hinge to another side of the box after removing the screws on the hinge;
Usescrewstofasten�
9� Install the hinge cover after fastening the hinge�
C� Swap over the position of the lower door block to the other side� Install the screws and
consolidate them�
5� Install the lower door and take care of its alignment with the appliance body�
6� Tighten the screws of the middle hinge on the reversible side�
7� Install the top door and remove the existing top door block� Install a new top door block
(notthesame one) on the reversible side� Screw it down�
1110
GB GB
4. Verwijder het stelvoetje van de andere kant van de bodem en breng het naar de
overeenkomstige positie aan de tegenovergestelde kant van de bodem.
2� Remove three screws with suitable tools� Remove the upper hinge then take o carefully the
fridge compartment door�
3� Remove middle hinge, screws, screw caps and plastic inserting nails� Install them on the other
side� Take o the lower door and put it away�
Remove three screws
4� The disassembly and installation of bottom parts :
A� Disassemble lower hinge and screws� Then install them on the other side and consolidate the
lower hinge�
Note: the refrigerator-freezer incline angle less 45°�
B� Swap over the position of the adjustable foot to the other side of the cabinet�
8� Move the hinge to another side of the box after removing the screws on the hinge;
Usescrewstofasten�
9� Install the hinge cover after fastening the hinge�
C� Swap over the position of the lower door block to the other side� Install the screws and
consolidate them�
5� Install the lower door and take care of its alignment with the appliance body�
6� Tighten the screws of the middle hinge on the reversible side�
7� Install the top door and remove the existing top door block� Install a new top door block
(notthesame one) on the reversible side� Screw it down�
1110
GB GB
5. Maak de schroeven, scharnierbeugel en het stelvoetje aan de andere kant van de
bodem vast.
6. Zet de onderste deur voorzichtig op zijn plaats. Zorg dat de deur zowel
horizontaal als verticaal is uitgelijnd zodat de afdichtingen op alle zijden gesloten
zijn voordat u het middelste scharnier volledig vastmaakt. Breng de scharnier
terug en schroef vast.
7. Plaats de bovenste deur. Verwijder de deurstop. Plaats een nieuwe deurstop en
schroef deze vast.
2� Remove three screws with suitable tools� Remove the upper hinge then take o carefully the
fridge compartment door�
3� Remove middle hinge, screws, screw caps and plastic inserting nails� Install them on the other
side� Take o the lower door and put it away�
Remove three screws
4� The disassembly and installation of bottom parts :
A� Disassemble lower hinge and screws� Then install them on the other side and consolidate the
lower hinge�
Note: the refrigerator-freezer incline angle less 45°�
B� Swap over the position of the adjustable foot to the other side of the cabinet�
8� Move the hinge to another side of the box after removing the screws on the hinge;
Usescrewstofasten�
9� Install the hinge cover after fastening the hinge�
C� Swap over the position of the lower door block to the other side� Install the screws and
consolidate them�
5� Install the lower door and take care of its alignment with the appliance body�
6� Tighten the screws of the middle hinge on the reversible side�
7� Install the top door and remove the existing top door block� Install a new top door block
(notthesame one) on the reversible side� Screw it down�
1110
GB GB
8. Plaats de scharnieren van de bovenste deur, schroef deze vast en plaats het
afdekplaatje terug.
2� Remove three screws with suitable tools� Remove the upper hinge then take o carefully the
fridge compartment door�
3� Remove middle hinge, screws, screw caps and plastic inserting nails� Install them on the other
side� Take o the lower door and put it away�
Remove three screws
4� The disassembly and installation of bottom parts :
A� Disassemble lower hinge and screws� Then install them on the other side and consolidate the
lower hinge�
Note: the refrigerator-freezer incline angle less 45°�
B� Swap over the position of the adjustable foot to the other side of the cabinet�
8� Move the hinge to another side of the box after removing the screws on the hinge;
Usescrewstofasten�
9� Install the hinge cover after fastening the hinge�
C� Swap over the position of the lower door block to the other side� Install the screws and
consolidate them�
5� Install the lower door and take care of its alignment with the appliance body�
6� Tighten the screws of the middle hinge on the reversible side�
7� Install the top door and remove the existing top door block� Install a new top door block
(notthesame one) on the reversible side� Screw it down�
1110
GB GB

DO926BFK
20
9. Met de deur gesloten, controleer of de deur zowel horizontaal als verticaal is
uitgelijnd en de afdichtingen op alle zijden gesloten zijn voordat u het bovenste
scharnier volledig vastmaakt. Indien nodig, stel de stelvoetjes af.
PROBLEMEN EN HUN OPLOSSINGEN
Wanneer er zich een probleem voor doet met uw ijskast, controleer dan even
onderstaande vragen alvorens contact op te nemen met onze na verkoop dienst.
1. Toestel werkt niet.
Het toestel krijgt geen stroom, controleer of de stroomtoevoer in orde is.
Controleer of de stekker in het stopcontact steekt.
Controleer of de juiste voltage is gebruikt.
2. De ijskast springt te vaak aan.
Is de deur goed gesloten.
Hebt u warm eten in de ijskast gezet, waardoor het toestel harder moet werken om
te koelen.
De deur is te vaak of te lang open geweest
Het toestel krijgt de verkeerde voltage
Het toestel staat te kort in de buurt van een warmte bron of direct zonlicht.
3. De binnen temperatuur is te warm.
Controleer of de ijskast stroom heeft.
Controleer of de stekker in het stopcontact steekt.
De temperatuurinstelling is te laag.
De deur heeft te lang of te vaak opengestaan.
De lucht toevoer is geblokkeerd
Controleer of het toestel de juiste voltage krijgt
Het toestel staat te kort in de buurt van een warmte bron of de zon

DO926BFK
21
www.domo-elektro.be
MESURES DE SÉCURITÉ
- Cet appareil doit être raccordé à une prise de courant mise
à la terre. En cas de court-circuit, la prise de terre assure la
dérivation du courant, vous évitant ainsi toute électrocution.
- N’utilisez pas de rallonge pour raccorder votre appareil. Ne
raccordez pas non plus le réfrigérateur à une prise de courant
sur laquelle un autre appareil est déjà raccordé. Ne reliez pas
non plus le câble électrique à un un autre câble. Raccordez le
réfrigérateur uniquement à une prise murale.
- Un réfrigérateur vide peut être très dangereux pour les
enfants. Retirez la porte du réfrigérateur lorsque vous ne
l’utilisez plus. Ou prenez d’autres mesures rendant l’appareil
inoffensif. Veillez à ne pas endommager le dispositif
réfrigérant.
- Si le câble électrique est endommagé, vous devez le faire
remplacer par une personne qualiée ou par le service après-
vente du fabricant, an d’éviter tout accident.
- Les enfants courent le risque de s’enfermer dans le
réfrigérateur. Avant de vous séparer de l’appareil, vous devez
retirer la porte. Ne laissez pas les étagères à l’intérieur de
l’appareil an que les enfants ne puissent grimper à l’intérieur
du réfrigérateur.
Cet appareil peut être utilisé par des enfants âgés d’au moins
8 ans et par des personnes ayant des capacités physiques,
sensorielles ou mentales réduites ou dénuées d’expérience ou
de connaissance, s’ils (si elles) sont correctement surveillé(e)
s ou si des instructions relatives à l’utilisation de l’appareil en
toute sécurité leur ont été données et si les risques encourus
ont été appréhendés.
Veillez à ce que les enfants ne puissent pas jouer avec
l’appareil.

DO926BFK
22
L’entretien et le nettoyage de l’appareil ne peuvent pas
s’effectuer par des enfants, à moins qu’ils aient plus de 8 ans
et qu’ils soient sous surveillance.
Gardez l’appareil et le cordon électrique hors de la portée
d’enfants de moins de 8 ans.
Cet appareil est destiné à un usage domestique ou à d’autres
usages comme :
• Dans la cuisine du personnel dans des magasins,
des bureaux ou d’autres lieux mis en rapport avec
l’environnement de travail.
• Dans les fermes.
• Dans les chambres d’hôtels, de motels et d’autres lieux
avec un caractère résidentiel.
• Dans les chambres d’hôtes ou similaires.
Attention: l’appareil ne peut pas être utilisé avec une
minuterie externe ou une commande à distance séparée.
ÉLÉMENTS
1. Bouton de contrôle de la température
2. Clayettes
3. Couvercle du bac à légumes
4. Bac à légumes
5. Tiroirs de congélation
6. Pieds de mise à niveau
7. Balconnets de porte
8. Compartiment à bouteilles
INSTALLATION
• Ôtez tout le matériel d’emballage, tant
à l’intérieur qu’à l’extérieur. Nettoyez
l’extérieur de l’appareil à l’aide d’un chiffon
sec. Vous pouvez nettoyer l’intérieur de
l’appareil à l’aide d’un chiffon doux et
humide.
1
2
3
4
5
6
7
8

DO926BFK
23
www.domo-elektro.be
• Ne placez pas l’appareil dans un passage étroit, sous la lumière directe du soleil
ou dans l’humidité.
• Veillez à ce que l’air puisse circuler librement autour du réfrigérateur. L’arrière du
réfrigérateur doit s’écarter d’au moins 13 cm du mur.
• Placez le réfrigérateur sur un sol ferme et plat.
• Évitez la lumière directe du soleil et la chaleur. La lumière du soleil risque de
dégrader l’extérieur du réfrigérateur. La chaleur augmentera la consommation
d’énergie.
• Évitez un taux d’humidité trop élevé. Trop d’humidité dans l’air accélérera la
formation de glace dans votre réfrigérateur.
• Avant de brancher le réfrigérateur pour la première fois, vériez que la tension
du courant fourni par le réseau électrique de votre habitation correspond à la
tension de fonctionnement du réfrigérateur indiquée sur la plaque signalétique de
l’appareil. Une tension différente pourrait endommager l’appareil.
• L’appareil doit être relié à la terre. Le fabricant n’est pas responsable pour les
dommages se produisant à cause de l’utilisation de l’appareil sans mise à la terre.
• Si l’appareil est installé sur une surface irrégulière, il pourra être ajusté au moyen
des pieds réglables.
• Après installation, laissez l’appareil reposer pendant 3 heures avant de le mettre
sous tension. Le gaz réfrigérant pourra ainsi se stabiliser.
ENTRETIEN ET NETTOYAGE
Nettoyage
N’utilisez pas de produits nettoyants abrasifs ou des solvants.
1. Réglez le bouton de contrôle de la température en position OFF (ARRÊT) et
débranchez le câble d’alimentation de la prise murale.
2. Sortez les aliments et conservez-les dans un endroit frais.
3. Nettoyez l’appareil avec un chiffon doux imprégné d’eau chaude et de détergent.
4. Nettoyez le joint de porte avec de l’eau claire uniquement, puis essuyez-le
soigneusement.
5. Après le nettoyage, reconnectez l’appareil et réglez la température désirée.
6. Replacez les aliments dans l’appareil.
Remplacement de l’ampoule
Attention: débranchez le câble d’alimentation de la prise murale avant de remplacer
l’ampoule de la lampe.
1. Enlevez le couvercle de la lampe en le poussant vers le haut.
2. Dévissez l’ampoule hors d’usage, puis vissez une ampoule neuve de type 15W
(culot E14).
3. Replacez le couvercle de la lampe.
Dégivrage du réfrigérateur
Le dégivrage du réfrigérateur est entièrement automatique.

DO926BFK
24
Lorsque l’élément frigorique fonctionne, des perles de condensation ou du givre se
forment à l’arrière du réfrigérateur. Ce phénomène est normal. Il n’est pas nécessaire
d’essuyer la condensation ou le givre. Le panneau arrière se dégivre automatiquement.
La condensation s’écoule dans le canal de condensation et est amené vers l’unité de
réfrigération, d’où elle s’évapore.
Remarque: Gardez le canal de condensation et l’orice d’évacuation propres, de sorte
que la condensation puisse s’écouler.
Dégivrage du congélateur
Une couche de givre dans le congélateur nuira à la réfrigération des aliments congelés
et augmentera la consommation d’énergie. Retirez régulièrement la couche de givre.
Ne retirez pas le givre ou la glace avec un couteau ou un objet pointu. Cela pourrait
endommager les tubes réfrigérants.
1. Sortez les aliments congelés et conservez-les temporairement dans un endroit
frais.
2. Débranchez l’appareil de la prise secteur.
3. An d’accélérer le processus de dégivrage, placez une casserole d’eau chaude sur
un support dans le congélateur.
4. Essuyez la condensation avec un chiffon ou une éponge.
5. Essuyez le compartiment de congélation.
6. Branchez l’appareil et ajustez le bouton de contrôle de température sur le réglage
désiré.
7. Replacez les aliments dans le congélateur.
TEMPÉRATURE AMBIANTE
Cet appareil est conçu pour fonctionner sous une température ambiante entre 16 et
38°C. Si la température est inférieure ou supérieure, l’appareil ne fonctionnera pas
correctement.
AVANT DE PLACER DES ALIMENTS DANS LE RÉFRIGÉRATEUR
• Enlevez tous les matériaux d’emballage.
• Laissez l’appareil fonctionner à vide pendant 2 à 3 heures de sorte que les
compartiments puissent refroidir à la température appropriée.
• Nettoyez l’intérieur de l’appareil avec de l’eau tiède et un peu de détergent liquide
pour éliminer les résidus de fabrication et du transport.
CONTRÔLE DE LA TEMPÉRATURE
La température du réfrigérateur se règle au moyen du bouton de contrôle situé à
l’intérieur du réfrigérateur. Ajustez le bouton de contrôle sur le réglage désiré.
• OFF = Arrêt
• MIN = Niveau minimum de refroidissement
• MED = Niveau moyen de refroidissement

DO926BFK
25
www.domo-elektro.be
• MAX = Niveau maximum de refroidissement
• En position OFF (ARRÊT), l’appareil ne fonctionne pas (le système de
refroidissement est désactivé), mais l’alimentation n’est pas coupée.
• La durée de fonctionnement et la température sont affectées par l’emplacement
du réfrigérateur, par la fréquence d’ouverture de la porte et par la température
ambiante de la pièce où est installé l’appareil.
• Lorsque vous utilisez le réfrigérateur pour la première fois ou après un dégivrage,
réglez le bouton de contrôle de la température jusqu’à la position maximale
pendant au moins 2 heures avant d’insérer des aliments, puis réglez de nouveau le
bouton sur la position moyenne.
DÉPLACEMENT DE VOTRE RÉFRIGÉRATEUR
Si l’appareil est éteint pour une raison quelconque, attendez 10 minutes avant de
le remettre en marche. Cela permettra à la pression du système de réfrigération de
s’égaliser avant le redémarrage.
• Éteignez l’appareil et débranchez le câble d’alimentation de la prise secteur
Enlevez tous les aliments. Enlevez également toutes les pièces mobiles (clayettes,
accessoires, etc.) ou attachez-les dans le réfrigérateur an d’éviter tout risque de
choc.
• Déplacez l’appareil jusqu’à son nouvel emplacement. Si l’appareil a été placé
sur un des ses côtés durant un certain temps, remettez-le en position verticale et
attendez au moins 10 minutes avant de le mettre en marche.
Votre réfrigérateur utilise de l’isobutane (R600a) comme réfrigérant. Bien que le
R600a soit un gaz écologique et naturel, il est explosif. Vous devez donc faire attention
pendant le transport et l’installation pour éviter que les éléments de réfrigération de
l’appareil ne soient endommagés. En cas de fuite due à la détérioration des éléments
de réfrigération, éloignez votre réfrigérateur des ammes nues et des sources de
chaleur, et ventilez la pièce où il se trouve durant quelques minutes.
CONSERVATION DES ALIMENTS DANS LE RÉFRIGÉRATEUR
Le réfrigérateur permet de prolonger la durée de conservation des denrées périssables.
Conservation des aliments frais pour des résultats optimaux :
• Ne conservez que des aliments qui sont très frais et de bonne qualité.
• Veiller à ce que les aliments soient bien emballés ou couverts avant d’être stockés.
Cela permettra d’éviter que les aliments se déshydratent, que leur couleur se
détériore ou qu’ils perdent leur goût et aidera à maintenir leur fraîcheur. Cela
permettra également d’empêcher le transfert d’odeurs.
• Assurez-vous que les aliments à forte odeur sont emballés ou couverts et
entreposés à l’écart des aliments tels que le beurre, le lait et la crème qui sont
susceptibles de se gâter du fait des odeurs fortes.
• Faites refroidir les aliments chauds avant de les mettre au réfrigérateur.

DO926BFK
26
CONGÉLATION ET CONSERVATION DES ALIMENTS DANS LE
CONGÉLATEUR
Utilisation du congélateur
• Pour conserver les aliments surgelés.
• Pour fabriquer des glaçons.
• Pour congeler les aliments.
Remarque : Assurez-vous que la porte du congélateur a été fermée correctement.
Stockez-les à une température de -18 ° C ou moins. Évitez d’ouvrir la porte du
compartiment du congélateur inutilement.
Achat d’aliments congelés
• L’emballage ne doit pas être endommagé.
• Consommez-les avant la date de péremption / limite d’utilisation / date de
consommation.
• Si possible, transportez les aliments surgelés dans un sac isotherme et placez-les
rapidement dans le compartiment du congélateur.
Congélation des aliments frais
Ne congelez que des aliments frais et en bon état. Pour conserver le mieux possible la
valeur nutritive, la saveur et la couleur, les légumes doivent être blanchis avant d’être
congelés. Il n’est pas nécessaire de blanchir les aubergines, les poivrons, les courgettes
et les asperges. Remarque : Les aliments à congeler ne doivent pas entrer en contact
avec les aliments déjà congelés.
• Les aliments suivants peuvent être congelés: Les gâteaux et les pâtisseries, les
poissons et les fruits de mer, la viande, le gibier, la volaille, les légumes, les fruits,
les herbes, les oeufs sans coquilles, les produits laitiers comme le fromage et le
beurre, les plats cuisinés et les restes tels que les soupes, les ragoûts, la viande
cuite et le poisson, les plats de pommes de terre, les soufés et les desserts.
• Les aliments suivants ne sont pas adaptés à la congélation: Les types de légumes
qui sont généralement consommés crus, comme la laitue ou les radis, les oeufs en
coquilles, les raisins, les pommes entières, les poires et les pêches, les oeufs durs,
les yaourts, le lait caillé, la crème sure et la mayonnaise.
Emballage des aliments surgelés
Utilisez des emballages hermétiques pour conserver les aliments : cela permet d’éviter
qu’ils ne se déshydratent ou ne perdent leur saveur.
1. Placez les aliments dans des emballages.
2. Retirez l’air.
3. Scellez l’emballage.
4. Étiquetez l’emballage avec le contenu et la date de congélation.
Emballage approprié :
Film plastique, lm tubulaire de polyéthylène, papier d’aluminium, récipients de
congélation. Ces produits sont disponibles dans les points de vente spécialisés.

DO926BFK
27
www.domo-elektro.be
Durée de stockage des aliments surgelés recommandée dans le congélateur
Ces durées varient en fonction du type d’aliment. Les aliments que vous congelez
peuvent être conservés de 1 à 12 mois (minimum à -18 ° C).
Aliment Durée de congélation
Bacon, ragoût, lait 1 mois
Pain, glace, saucisses, tartes, fruits de mer préparés, pois-
sons gras
2 mois
Poissons non gras, crustacés, pizzas, scones et mufns 3 mois
Jambon, gâteaux, biscuits, boeuf, côtelettes d’agneau,
morceaux de volaille
4 mois
Beurre, légumes (blanchis), oeufs entiers et jaunes
d’oeufs, écrevisses cuites, viande hachée (crue), porc (cru)
6 mois
Fruits (secs ou au sirop), blancs d’oeufs, boeuf (cru), pou-
let entier, agneau (cru), gâteaux aux fruits
12 mois
N’oubliez jamais :
• Lorsque vous congelez des aliments frais comportant une « date de péremption
/ limite d’utilisation /date de consommation «, vous devez les congeler avant
l’expiration de cette date.
• Vériez que les aliments n’ont pas déjà été congelés. En effet, les aliments
congelés qui ont complètement décongelé ne doivent pas être recongelés.
• Une fois décongelés, les aliments doivent être consommés rapidement.
VACANCES
Lorsque vous partez en vacances pour une courte période, vous pouvez laisser
l’appareil branché.
Lorsque vous partez en vacances pour une longue période, il est préférable de
procéder comme suit :
• retirez toute la nourriture de votre réfrigérateur,
• enlevez la che de la prise de courant,
• nettoyez à fond le réfrigérateur,
• laissez la porte du réfrigérateur ouverte pour éviter la formation de moisissure et
les mauvaises odeurs.
PANNE DE COURANT
La plupart des pannes de courant sont rétablies endéans 1 ou 2 heures et ne
modieront pas la température de votre réfrigérateur. Vous devez toutefois réduire au
minimum l’ouverture de la porte du réfrigérateur au cours d’une panne de courant.
Au cours d’une panne de courant prolongée, vous devez prendre des mesures pour
protéger la nourriture, p.ex. en la couvrant de glace sèche.

DO926BFK
28
Les aliments congelés ne seront pas affectés si la panne dure moins de 15 heures.
Ne recongelez pas les aliments une fois complètement dégelés. Leur consommation
serait alors potentiellement dangereuse.
RÈGLES IMPORTANTES
• Ne placez jamais de nourriture chaude dans le réfrigérateur.
• Les boissons doivent être conservées dans des récipients fermés.
• La nourriture à conserver plus longtemps dans le réfrigérateur doit être couverte
ou conservée dans des récipients en verre.
• Ne placez jamais de nourriture avariée dans le réfrigérateur.
• Veillez à ce que le réfrigérateur ne soit jamais surchargé pour que la nourriture
puisse être sufsamment rafraîchie.
• N’ouvrez la porte du réfrigérateur que lorsque c’est nécessaire.
• Il n’est pas destiné à une utilisation extérieur (p.ex la tente) en camping.
• Il ne peut être utilisé qu’à l’intérieur.
• L’appareil ne peut être utilisé dans les transports publics.
• Ne recongelez jamais des aliments décongelés.
• Ne placez pas de boissons gazeuses au congélateur.
• Soyez prudent lorsque vous consommez des glaçons aromatisés sortant du
congélateur, an d’éviter des gelures au niveau de la bouche.
• Ne retirez rien du congélateur si vous avez les mains mouillées.
• Le congélateur ronronne un peu quand le compresseur fait circuler le gaz
réfrigérant. Ceci est tout à fait normal.
• Ne placez pas d’aliments encore chauds dans le congélateur.
• Assurez-vous que les aliments sont emballés ou recouverts.
• N’entassez pas trop les aliments, l’air froid doit encore pouvoir circuler autour
d’eux.
• Ne laissez pas la porte ouverte trop longtemps. Assurez-vous également d’avoir
bien refermé la porte à chaque fois.
• Apposez sur les aliments une étiquette comportant une date pour pouvoir
contrôler leur durée de conservation au congélateur.
CHANGEMENT DU SENS D’OUVERTURE DE LA PORTE
Si vous avez besoin de monter la porte du réfrigérateur dans l’autre sens, il est
recommandé d’appeler votre agent d’entretien agréé pour effectuer cette inversion, ou
de demander à un technicien.
Avant d’inverser le sens d’ouverture de la porte, vous devez vous assurer que
l’appareil est débranché et vide. Il est recommandé d’utiliser un tournevis cruciforme
et une clé (ces deux outils ne sont pas fournis).
1. Enlevez la cache de protection des vis. Enlevez les trois vis ainsi que la charnière
supérieure qui maintient la porte en place. Soulevez la porte et posez-la sur une
surface douce, an d’éviter de la griffer.

DO926BFK
29
www.domo-elektro.be
SHOPPING FOR FROZEN FOOD
The appliance is rated as a 4 star freezer and can freeze fresh food and store pre-frozen food� When
you are buying frozen food, look at the Storage Guidelines on the packaging� You will be able to store
each item of frozen food for the period shown against the 4 star rating�
FREEZING FRESH FOOD
Ensure that your freezing operations are carried out under the most hygienic conditions as freezing
alone does not improve the food�
Never put hot or even warm foodstus into the freezer�
Prior to freezing the food, food should always be covered tightly with foil, plastic lm, placed in
plastic bags or stored in airtight containers� This will prevent food from dehydrating and to prevent
any strong odors of some foods transferring to milder ones�
To freeze raw meat, wrap in plastic bags or in airtight containers and place on the lowest shelf to
avoid cross contamination�
Do not allow raw meat to come into contact with cooked foods� For safety, only store raw meat for
two or three days� Fruit and vegetables should be thoroughly cleaned and placed in the crisper�
Milk and other liquids should be sealed with lids and placed in the bottle shelf in the door�
NOTE: The ambient temperature of the freshly stored food and how often the door is opened aect
the temperature in the refrigerator� If required, change the thermostat temperature settings�
Reverse door
STORING FROZEN FOOD
All frozen food you purchase should be placed in the freezer as soon as possible to avoid them from
defrosting and spoiling�
All storage recommendations printed on the packaging of frozen food by the manufacturer should
always be followed�
When using the freezer for the rst time or after defrosting, set the thermostat knob to the maximum
position for at least 2 hours before introducing food to be stored, and then readjust it to the normal
position�
The technical data mentioned in the ‘Specications’ are obtained in the case that the freezing drawers
are removed�
MAKING ICE CUBES
1� Fill the ice tray with ¾ full of clean water�
2� Place the tray in the top freezing drawer�
3� Close the door�
To remove the ice cubes from the tray, put the tray under running water for a while and then twist
the tray slightly to loosen the ice cubes�
Follow the following stages to reverse the door from its initial position�
1� Remove the hinge cover�
Remove the hinge cover
98
GB GB
2� Remove three screws with suitable tools� Remove the upper hinge then take o carefully the
fridge compartment door�
3� Remove middle hinge, screws, screw caps and plastic inserting nails� Install them on the other
side� Take o the lower door and put it away�
Remove three screws
4� The disassembly and installation of bottom parts :
A� Disassemble lower hinge and screws� Then install them on the other side and consolidate the
lower hinge�
Note: the refrigerator-freezer incline angle less 45°�
B� Swap over the position of the adjustable foot to the other side of the cabinet�
8� Move the hinge to another side of the box after removing the screws on the hinge;
Usescrewstofasten�
9� Install the hinge cover after fastening the hinge�
C� Swap over the position of the lower door block to the other side� Install the screws and
consolidate them�
5� Install the lower door and take care of its alignment with the appliance body�
6� Tighten the screws of the middle hinge on the reversible side�
7� Install the top door and remove the existing top door block� Install a new top door block
(notthesame one) on the reversible side� Screw it down�
1110
GB GB
2. Enlevez les vis et la charnière inférieures, ainsi que le pied réglable situé sous
l’appareil.
2� Remove three screws with suitable tools� Remove the upper hinge then take o carefully the
fridge compartment door�
3� Remove middle hinge, screws, screw caps and plastic inserting nails� Install them on the other
side� Take o the lower door and put it away�
Remove three screws
4� The disassembly and installation of bottom parts :
A� Disassemble lower hinge and screws� Then install them on the other side and consolidate the
lower hinge�
Note: the refrigerator-freezer incline angle less 45°�
B� Swap over the position of the adjustable foot to the other side of the cabinet�
8� Move the hinge to another side of the box after removing the screws on the hinge;
Usescrewstofasten�
9� Install the hinge cover after fastening the hinge�
C� Swap over the position of the lower door block to the other side� Install the screws and
consolidate them�
5� Install the lower door and take care of its alignment with the appliance body�
6� Tighten the screws of the middle hinge on the reversible side�
7� Install the top door and remove the existing top door block� Install a new top door block
(notthesame one) on the reversible side� Screw it down�
1110
GB GB
3. Enlevez le pied réglable situé de l’autre côté sous l’appareil et déplacez-le vers la
position correspondante sur le côté opposé sous l’appareil.
2� Remove three screws with suitable tools� Remove the upper hinge then take o carefully the
fridge compartment door�
3� Remove middle hinge, screws, screw caps and plastic inserting nails� Install them on the other
side� Take o the lower door and put it away�
Remove three screws
4� The disassembly and installation of bottom parts :
A� Disassemble lower hinge and screws� Then install them on the other side and consolidate the
lower hinge�
Note: the refrigerator-freezer incline angle less 45°�
B� Swap over the position of the adjustable foot to the other side of the cabinet�
8� Move the hinge to another side of the box after removing the screws on the hinge;
Usescrewstofasten�
9� Install the hinge cover after fastening the hinge�
C� Swap over the position of the lower door block to the other side� Install the screws and
consolidate them�
5� Install the lower door and take care of its alignment with the appliance body�
6� Tighten the screws of the middle hinge on the reversible side�
7� Install the top door and remove the existing top door block� Install a new top door block
(notthesame one) on the reversible side� Screw it down�
1110
GB GB
4. Fixez les vis, la charnière-étrier et le pied réglable de l’autre côté sous l’appareil.
5. Replacez prudemment la porte inférieure. Veillez à ce que la porte soit bien
ajustée, tant horizontalement que verticalement, de manière à ce que les joints
d’étanchéité se referment sur tous les côtés, avant de revisser dénitivement la
charnière centrale. Replacez la charnière et vissez-la.
6. Placez la porte supérieure. Enlevez l’arrêt de porte. Placez un nouvel arrêt de
porte et vissez-le.

DO926BFK
30
2� Remove three screws with suitable tools� Remove the upper hinge then take o carefully the
fridge compartment door�
3� Remove middle hinge, screws, screw caps and plastic inserting nails� Install them on the other
side� Take o the lower door and put it away�
Remove three screws
4� The disassembly and installation of bottom parts :
A� Disassemble lower hinge and screws� Then install them on the other side and consolidate the
lower hinge�
Note: the refrigerator-freezer incline angle less 45°�
B� Swap over the position of the adjustable foot to the other side of the cabinet�
8� Move the hinge to another side of the box after removing the screws on the hinge;
Usescrewstofasten�
9� Install the hinge cover after fastening the hinge�
C� Swap over the position of the lower door block to the other side� Install the screws and
consolidate them�
5� Install the lower door and take care of its alignment with the appliance body�
6� Tighten the screws of the middle hinge on the reversible side�
7� Install the top door and remove the existing top door block� Install a new top door block
(notthesame one) on the reversible side� Screw it down�
1110
GB GB
7. Placez les charnières de la porte supérieure, vissez-les et replacez la cache de
protection.
2� Remove three screws with suitable tools� Remove the upper hinge then take o carefully the
fridge compartment door�
3� Remove middle hinge, screws, screw caps and plastic inserting nails� Install them on the other
side� Take o the lower door and put it away�
Remove three screws
4� The disassembly and installation of bottom parts :
A� Disassemble lower hinge and screws� Then install them on the other side and consolidate the
lower hinge�
Note: the refrigerator-freezer incline angle less 45°�
B� Swap over the position of the adjustable foot to the other side of the cabinet�
8� Move the hinge to another side of the box after removing the screws on the hinge;
Usescrewstofasten�
9� Install the hinge cover after fastening the hinge�
C� Swap over the position of the lower door block to the other side� Install the screws and
consolidate them�
5� Install the lower door and take care of its alignment with the appliance body�
6� Tighten the screws of the middle hinge on the reversible side�
7� Install the top door and remove the existing top door block� Install a new top door block
(notthesame one) on the reversible side� Screw it down�
1110
GB GB
8. La porte fermée, vériez si celle-ci est bien ajustée, tant horizontalement que
verticalement, et si les joints d’étanchéité se referment sur tous les côtés, avant
de revisser dénitivement la charnière supérieure. Si nécessaire, ajustez les pieds
réglables.
PROBLÈMES ET LEURS SOLUTIONS
Lorsqu’un problème survient à votre réfrigérateur, contrôlez aussi les questions ci-
dessous avant de prendre contact avec nôtre service après-vente.
1. L’appareil ne fonctionne pas.
L’appareil ne reçoit pas de courant, contrôlez si l’alimentation de courant est en ordre.
Contrôlez si la che est bien enfoncée dans la prise de courant.
Contrôlez si la tension utilisée est correcte.
2. Le réfrigérateur se réenclenche trop souvent.
La porte est-elle bien fermée ?
Avez-vous placé de la nourriture chaude dans le réfrigérateur obligeant ainsi l’appareil
à fonctionner plus fort pour la réfrigérer.
La porte a été ouverte trop souvent ou trop longtemps.
L’appareil reçoit une tension erronée.
L’appareil se trouve trop près d’une source de chaleur ou sous la lumière directe du
soleil.
3. La température à l’intérieur est trop chaude.
Contrôlez si le réfrigérateur est alimenté en courant.

DO926BFK
31
www.domo-elektro.be
Contrôlez si la che est bien enfoncée dans la prise de courant.
Le réglage de la température est trop faible.
La porte a été ouverte trop souvent ou trop longtemps.
L’amenée d’air est bloquée.
Contrôlez si l’appareil est alimenté à la tension correcte.
L’appareil se trouve trop près d’une source de chaleur ou sous la lumière directe du
soleil.

DO926BFK
32
SICHERHEITSVORKEHRUNGEN
• Dieses Gerät muss an eine geerdete Steckdose
angeschlossen werden. Bei Kurzschluss sorgt die Erdung
dafür, dass der Strom abgeleitet werden kann und
verhindert somit Stromschlag.
• Zum Anschluss des Geräts keine Verlängerungsschnur
verwenden. Den Kühlschrank auch nicht an eine
Steckdose anschließen, worauf noch ein anderes Gerät
angeschlossen ist. Das Kabel auch nicht mit einem
anderen Kabel verbinden. Den Kühlschrank ausschließlich
an eine Wandsteckdose anschließen.
• Eine leerer Kühlschrank kann für Kinder sehr gefährlich
sein. Die Türe des Kühlschranks entfernen, falls dieser
nicht mehr benutzt wird. Oder andere Maßnahmen
ergreifen, wodurch das Gerät ungefährlich wird. Sorgen
Sie dafür, dass das Kühlsystem nicht beschädigt wird.
• Falls das elektrische Kabel beschädigt ist, sollte es, zur
Vermeidung von Unfällen, von einem qualizierten
Fachmann oder dem Kundendienst des Fabrikanten
ausgetauscht werden.
• Kinder könnten sich im Kühlschrank einschließen. Bevor
Sie das Gerät entsorgen, sollten Sie die Türe entfernen.
Die Regale im Gerät lassen, sodass Kinder nicht in den
Kühlschrank klettern können.
Dieses Gerät darf von Kindern ab 8 Jahren oder älter
gebraucht werden. Ebenso dürfen Personen mit körperlicher
bzw. leichter geistiger Behinderung sowie Personen mit
eingeschränkter Erfahrung das Gerät betätigen. Dies unter
der Voraussetzung, dass diese Personen ausreichende
Anweisungen sowohl zum Gebrauch des Gerätes, als auch
zu den hiermit verbundenen Gefahren erhalten haben. Kinder

DO926BFK
33
www.domo-elektro.be
dürfen nicht mit dem Gerät spielen.
Die Pege und Wartung des Gerätes darf nicht von Kindern
ausgeführt werden, es sei denn, dass dies unter Aufsicht
passiert und es sich um Kinder handelt, die älter als 8 Jahre
sind und im Voraus ausreichend über den Gebrauch/die
Wartung informiert worden sind.
Sorgen Sie dafür, dass sich das Gerät nicht in Anwesenheit
von Kindern unter 8 Jahren bendet.
Dieses Gerät eignet sich zum Gebrauch im Haushalt oder
ähnlichen Umgebungen, wie z.B.:
• Küchenzeile für Personal in Geschäften,
• Büros oder anderen professionellen Umgebungen
• Bauernhöfe
• Hotel-/Motel-/Gästezimmer u.ä.
Achtung: das Gerät darf nicht mit einer externen
Zeitschaltuhr oder Fernbedienung
gebraucht werden.
ZUBEHÖRTEILE
1. Temperaturregler
2. Regale
3. Deckel für Gemüsefach
4. Gemüsefach
5. Gefrierschubladen
6. Stellfüße
7. Türregal
8. Türregal für Flaschen
ANSCHLUSS
• Das Verpackungsmaterial sowohl innen
als auch außen entfernen. Die Außenseite
des Apparats mit einem sauberen, feuchten
Tuch reinigen. Die Innenseite kann mit einem weichen, feuchten Tuch gereinigt
werden.
• Das Gerät nicht in einen schmalen Gang, direktes Sonnenlicht oder Feuchtigkeit
stellen.
• Die Luft rund um den Kühlschrank sollte frei zirkulieren können. Die Rückseite
1
2
3
4
5
6
7
8

DO926BFK
34
des Kühlschranks muss mindestens 13 cm von der Wand entfernt sein.
• Den Kühlschrank auf einen stabilen, achen Untergrund stellen.
• Direktes Sonnenlicht und Wärme vermeiden. Sonnenlicht kann die Außenseite
des Kühlschranks angreifen. Wärme verursacht einen höheren Stromverbrauch
• Einen zu hohen Feuchtigkeitsgrad vermeiden. Zuviel Luftfeuchtigkeit sorgt für
schnellere Eisbildung im Kühlschrank.
• Bevor Sie den Kühlschrank an das Stromnetz anschließen, kontrollieren Sie,
ob die Spannung auf dem Typenschild Ihres Geräts mit der Spannung in Ihrer
Wohnung übereinstimmt. Eine andere Spannung kann das Gerät beschädigen.
• Sie können das Gerät nur über den Stecker vom Stromnetz trennen. Sorgen Sie
dafür, dass er immer einfach zugänglich ist. Um das Gerät vom Stromnetz zu
trennen, schalten Sie das Gerät aus und ziehen Sie den Stecker anschließend aus
der Steckdose.
• Das Gerät muss geerdet sein. Der Hersteller ist nicht für Schäden verantwortlich,
die aus dem Fehlen einer Erdung resultieren.
• Bei unebenen Oberächen können die vorderen Stellfüße zur Ausrichtung
verwendet werden.
• Das Gerät nach dem Aufstellen vor dem Einschalten 12 Stunden stehen lassen. So
kann das Kühlmittel sich verteilen.
PFLEGE UND REINIGUNG
Reinigung
Verwenden Sie keine aggressiven Reinigungs- oder Lösungsmittel.
1. Stellen Sie die Temperatur auf die Position OFF ein und ziehen Sie den Stecker
aus der Steckdose.
2. Entnehmen Sie die Lebensmittel und bewahren Sie diese an einem kühlen Ort auf.
3. Reinigen Sie das Gerät mit einem weichen Tuch mit warmem Wasser und einem
milden Reinigungsmittel.
4. Reinigen Sie die Türdichtung nur mit warmem Wasser und reiben Sie diese
anschließend gründlich ab.
5. Stecken Sie den Stecker nach der Reinigung in die Steckdose und stellen Sie den
Temperaturregler erneut in der gewünschten Temperatur ein.
6. Legen Sie die Lebensmittel wieder in das Gerät.
Austausch der Glühbirne
Ziehen Sie den Netzstecker aus der Steckdose, bevor Sie die Glühbirne austauschen.
1. Entfernen Sie den Lampenabdeckung, indem Sie ihn nach oben schieben.
2. Schauben Sie die alte Glühbirne aus und setzen Sie anschließend eine neue 15W
(E14-Fassung) Glühbirne ein.
3. Setzen Sie die Lampenabdeckung wieder auf.
ABTAUEN
Der Kühlschrank taut sich vollständig automatisch ab.

DO926BFK
35
www.domo-elektro.be
Während des Betriebs des Kühlers bildet sich Kondensationstropfen oder Reif
an der Rückwand des Geräts. Dies ist normal. Es ist nicht erforderlich, die
Kondensationsüssigkeit oder das Eis zu entfernen. Die Rückwand taut sich
automatisch ab. Die Kondensationsüssigkeit läuft über den Kondensationskanal und
wird zum Kühler geführt, wo sie verdampft.
Hinweis: Halten Sie den Kondensationskanal und das Abussloch sauber, sodass die
Kondensationsüssigkeit ablaufen kann.
Eine Eisschicht im Gefrierschrank hat negative Auswirkungen auf die Kühlung der
eingefrorenen Lebensmittel und führt zu einem höheren Stromverbrauch. Entfernen
Sie die Eisschicht regelmäßig. Schaben Sie das Eis nicht mit einem Messer oder einem
spitzen Gegenstand ab. Die Kühlleitungen könnten beschädigt werden.
1. Entnehmen Sie die gefrorenen Lebensmittel aus dem Gefrierschrank und lagern
Sie diese temporär in einem kühlen Raum.
2. Ziehen Sie den Netzstecker aus der Steckdose.
3. Zur Beschleunigung des Abtauprozesses stellen Sie einen Topf mit warmem
Wasser auf eine Ablage im Tiefkühlschrank.
4. Wischen Sie Kondensüssigkeit mit einem Tuch oder Schwamm ab.
5. Wischen Sie das Tiefkühlfach trocken.
6. Stecken Sie den Stecker in die Steckdose und stellen Sie den Temperaturregler in
der gewünschten Temperatur ein.
7. Legen Sie die eingefrorenen Lebensmittel wieder in das den Tiefkühlschrank.
UMGEBUNGSTEMPERATUR
Dieses Gerät wurde so entworfen, dass es bei einer Umgebungstemperatur zwischen
16°C und 38°C funktioniert. In einem Raum mit einer geringeren oder höheren
Temperatur funktioniert das Gerät nicht ordnungsgemäß.
BEVOR SIE LEBENSMITTEL IM KÜHLSCHRANK AUFBEWAHREN
• Sämtliches Verpackungsmaterial entfernen.
• Lassen Sie das Gerät 2 – 3 Stunden ohne Lebensmittel in Betrieb, sodass der
Kühlschrank auf eine angemessene Temperatur abkühlt.
• Reinigen Sie die Innenseite des Geräts mit warmem Wasser und etwas
Spülmittel, um eventuelle Produktionsrückstände und Staub zu entfernen.
TEMPERATURREGELUNG
Der Kühlschrank wird durch einen Temperaturregler geregelt, der sich im Gerät
befindet. Stellen Sie diesen Regler auf die gewünschte Position ein.
• OFF ist die Einstellung „Aus“.
• MIN ist die wärmste Einstellung.
• MED ist die normale Einstellung.
• MAX ist die kälteste Einstellung.

DO926BFK
36
• Das Gerät funktioniert in der Position OFF nicht (das Kühlsystem ist ausgeschal-
tet), doch die Stromversorgung ist nicht unterbrochen.
• Die Betriebszeit und die -temperatur werden durch den Ort, an dem der
Kühlschrank verwendet wird, durch die Häufigkeit der Türöffnung und durch die
Temperatur des Raums beeinflusst, in dem sich der Kühlschrank befindet.
• Wenn Sie das Gerät erstmals verwenden oder nachdem es abgetaut wurde, stellen
Sie den Regler für 2 Stunden auf die kälteste Einstellung, ohne dass Lebensmittel
hineingelegt werden. Stellen Sie den Regler anschließend auf die Einstellung
„Medium“.
VERSETZEN DES GERÄTS
Wen Sie das Gerät, unabhängig aus welchem Grund, ausschalten, warten Sie 10
Minuten, bis Sie es erneut einschalten. Der Druck im Kühlsystem muss zunächst sta-
bilisiert werden, bevor Sie das Gerät erneut einschalten.
• Schalten Sie das Gerät aus und ziehen Sie den Netzstecker aus der Steckdose.
Sämtliche Lebensmittel entnehmen. Entfernen Sie außerdem alle abnehmbaren
Teile (Regale, Zubehör, usw.) oder befestigen Sie diese im Kühlschrank, um
Erschütterungen zu vermeiden.
• Versetzen Sie das Gerät und installieren Sie es. Wenn Sie das Gerät während des
Transports auf die Seite gelegt haben, auch wenn dies nur sehr kurz der Fall war,
lassen Sie das Gerät mindestens 10 Minuten gerade stehen, bevor Sie es erneut
einschalten.
Ihr Gerät verwendet das Kühlmittel Isobutan (R600a). Obwohl R600a ein umwelt-
freundliches und natürliches Gas ist, ist es explosiv. Seien Sie deshalb während des
Transports oder bei der Installation des Geräts sehr vorsichtig, um Schäden an den
Kühlelementen zu vermeiden. Im Falle eines Lecks durch eine Beschädigung der
Kühlelemente halten Sie den Kühlschrank von offenem Feuer oder Wärmequellen
fern und lüften Sie den Raum, in dem sich das Gerät befindet, für einige Minuten.
LEBENSMITTEL IM KÜHLSCHRANK AUFBEWAHREN
Der Kühlschrank sorgt für eine längere Aufbewahrungszeit von frischen
Lebensmitteln mit begrenzter Haltbarkeit. Für eine Aufbewahrung von frischen
Lebensmitteln mit den besten Ergebnissen:
• Verwenden Sie nur sehr frische Lebensmittel einer sehr guten Qualität.
• Sorgen Sie dafür, dass die Lebensmittel gut verpackt oder abgedeckt sind, bevor
Sie diese aufbewahren. Dies vermeidet, dass die Lebensmittel austrocknen, aus-
bleichen oder ihren Geschmack verlieren. Dadurch bleiben sie länger frisch. Es
vermeidet außerdem die Übertragung von Gerüchen.
• Sorgen Sie dafür, dass Lebensmittel mit einem starken Geruch gut verpackt und
abgedeckt sind und bewahren Sie diese fern von Butter, Milch und Sahne sowie
anderen Lebensmitteln auf, die durch einen starken Geruch beeinträchtigt werden
können.

DO926BFK
37
www.domo-elektro.be
• Lassen Sie warme Lebensmittel abkühlen, bevor Sie diese in den Kühlschrank
stellen.
LEBENSMITTEL IM GEFRIERSCHRANK EINFRIEREN UND
AUFBEWAHREN
Verwendung des Gefrierschranks
• Zur Aufbewahrung von Tiefkühlware
• Zur Herstellung von Eiswürfeln
• Zum Einfrieren von Lebensmitteln
Hinweis: Achten Sie darauf, dass die Tür des Gefrierschranks immer ordnungsgemäß
geschlossen ist.
Bei -18°C oder kälter aufbewahren. Öffnen Sie die Türen des Gefrierschranks nur
wenn nötig.
Tiefkühlwaren kaufen
• Die Verpackung darf nicht beschädigt sein.
• Innerhalb des Mindesthaltbarkeitsdatums verbrauchen.
• Transportieren Sie Tiefkühlware nach Möglichkeit in einer Kühltasche und legen
Sie diese schnell in den Gefrierschrank.
Einfrieren von frischen Lebensmitteln
Frieren Sie nur frische und unbeschädigte Lebensmittel ein. Zur Erhaltung des
bestmöglichen Nährwertes, des Geschmacks und der Farbe blanchieren Sie Gemüse,
bevor Sie es einfrieren.
Auberginen, Paprika, Zucchini und Spargel müssen nicht blanchiert werden.
Hinweis: Halten Sie die einzufrierenden Lebensmittel fern von Lebensmitteln, die
bereits eingefroren sind.
• Die folgenden Lebensmittel eignen sich zum Einfrieren: Kuchen und Gebäck,
Fisch und Schalen- und Krustentiere, Fleisch, Wild, Geügel, Gemüse, Obst,
Gewürze, Eier ohne Schale, Milchprodukte wie Käse und Butter, Fertiggerichte
und Reste von Gerichten, wie Suppe, Schmorgerichte, gekochtes Fleisch und
Fisch, Kartoffelgerichte, Soufés und Desserts.
• Die folgenden Lebensmittel eignen sich nicht zum Einfrieren: Gemüse, die
allgemein roh verzehrt werden, wie Salat, Radieschen, Eier mit Schale, Trauben,
Äpfel, Birnen und Prsiche, hart gekochte Eier, Joghurt, Sauermilch, Sauerrahm
und Mayonnaise.
Aufbewahrung von Tiefkühlware
Zur Vermeidung des Geschmacksverlusts und von Austrocknung geben Sie die
Lebensmittel in eine luftdichte Verpackung.
1. Geben Sie die Lebensmittel in die Verpackung.
2. Entfernen Sie sämtliche Luft.
3. Dichten Sie die Verpackung ab.

DO926BFK
38
4. Etikettieren Sie die Verpackung mit dem Datum des Einfrierens.
Geeignete Verpackung:
Plastikfolie, Schlauchfolie aus Polyethylen, Aluminiumfolie oder Behälter für
Tiefkühlware. Diese Produkte sind in Ihrem Fachgeschäft erhältlich.
Empfohlene Aufbewahrungszeiten für Tiefkühlware im Gefrierschrank
Diese Zeiten können je nach Art der Speisen abweichen. Die eingefrorenen
Lebensmittel können zwischen 1 und 12 Monaten aufbewahrt werden (mindestens bei
-18°C).
Lebensmittel Aufbewah-
rungszeit
Speck, Schmorgerichte, Milch 1 Monat
Brot, Sahneeis, Wurst, Erbsen, zubereitete Schalentiere, fetter Fisch 2 Monate
Nicht-fetter Fisch, Schalentiere, Pizza, Scones und Mufns 3 Monate
Schinken, Kuchen, Rindeisch und Lammkoteletts, Geügelteile 4 Monate
Butter, Gemüse (blanchiert), komplettes Ei und Dotter, gekochter
Flusskrebs, Gehacktes (roh), Schweineeisch (roh)
6 Monate
Obst (trocken oder in Sirup), Eiweiß, Rindeisch (roh), ganzes Huhn,
Lammeisch (roh), Obstkuchen
12 Monate
Niemals vergessen:
• Wenn Sie frische Lebensmittel mit einem Mindesthaltbarkeitsdatum einfrieren,
müssen Sie diese vor Ablauf des Mindesthaltbarkeitsdatums einfrieren.
• Kontrollieren Sie, ob die Lebensmittel nicht bereits einmal eingefroren wurden.
Eingefrorene Lebensmittel, die komplett aufgetaut sind, dürfen nicht erneut
eingefroren werden.
• Verzehren Sie einmal aufgetaute Lebensmittel schnell.
URLAUB
Falls Sie für eine kurze Zeit in Urlaub gehen, kann das Gerät eingeschaltet bleiben.
Falls Sie für längere Zeit in Urlaub gehen, kann wie folgt verfahren werden :
• alle Lebensmittel aus dem Kühlschrank entfernen
• den Stecker aus der Steckdose ziehen
• Den Kühlschrank gründlich reinigen.
• Die Türe des Kühlschranks offen lassen, um Schimmel und schlechten Geruch zu
vermeiden.
STROMAUSFALL
Die meisten Stromausfälle werden innerhalb von 1 bis 2 Stunden behoben und
ändern die Temperatur des Kühlschranks nicht. Die Kühlschranktüre, während eines

DO926BFK
39
www.domo-elektro.be
Stromausfalls, so wenig wie möglich öffnen.
Während eines längeren Stromausfalls, Maßnahmen ergreifen, um die Lebensmittel zu
schützen, zum Beispiel mit Hilfe von Trockeneis.
Gefrorene Lebensmittel halten sich, wenn der Stromausfall nicht länger als 15 Stunden
dauert.
Frieren Sie gefrorene Lebensmittel, die vollständig aufgetaut sind, nicht erneut ein.
Die Lebensmittel können Ihrer Gesundheit schaden.
WICHTIGE REGELN
• Niemals warmes Essen in den Kühlschrank stellen.
• Getränke sollten in geschlossenen Gefäßen aufbewahrt werden.
• Lebensmittel die längere Zeit im Kühlschrank aufbewahrt werden, sollten
abgedeckt oder in Glasschalen aufbewahrt werden.
• Niemals verdorbene Lebensmittel in den Kühlschrank stellen.
• Stets dafür sorgen, dass der Kühlschrank nicht zu voll ist, sodass die Lebensmittel
ausreichend gekühlt werden können.
• Die Türe des Kühlschranks nur öffnen, wenn es nötig ist.
• Nicht für draussen Campingzwecke (bzw. Tent).
• Darf nur in Räumen verwendet werden.
• Das Gerät darf nicht in öffentlichen Verkehrsmitteln benutzt werden.
• Aufgetaute Lebensmittel nicht wieder einfrieren.
• Keine kohlensäurehaltigen Getränke in die Gefrierbox stellen.
• Vorsicht beim Essen von gerade aus der Gefrierbox genommenen Eislollies, um
Erfrierungen zu vermeiden.
• Mit nassen Händen nichts aus der Gefrierbox entnehmen.
• Die Gefrierbox macht Geräusche, wenn der Kompressor das Kühlmittel bewegt.
Dies ist normal.
• Keine warmen Speisen in die Gefrierbox stellen.
• Dafür sorgen, dass die Lebensmittel abgedeckt sind.
• Nicht zu viele Lebensmittel in die Gefrierbox stopfen, damit noch Luft zirkulieren
kann.
• Tür nicht zu lange offen stehen lassen. Dafür sorgen, dass die Tür stets richtig
verschlossen wird.
• Die Lebensmittel mit Datum versehen, um die Haltbarkeit kontrollieren zu
können.
ÖFFNUNGSRICHTUNG DER TÜR ÄNDERN
Wenn Sie die Scharniere der Tür auf die andere Seite versetzen möchten, empfehlen
wir, einen anerkannten Fachmann zu kontaktieren und ihn diese Arbeiten durchführen
zu lassen. Bevor Sie die Öffnungsrichtung ändern, kontrollieren Sie, ob der Stecker
aus der Steckdose gezogen wurde und dass das Gerät leer ist. Es empehlt sich, einen
Kreuzschlitzschraubendreher und einen Maulschlüssel zu verwenden (beide nicht im
Lieferumfang enthalten).

DO926BFK
40
1. Entfernen Sie die Abdeckung der Schrauben. Entfernen Sie die drei Schrauben
und anschließend das obere Scharnier, dass die Tür in ihrer Position hält. Heben
Sie die Tür hoch und legen Sie diese zur Vermeidung von Kratzern auf einen
weichen Untergrund.
SHOPPING FOR FROZEN FOOD
The appliance is rated as a 4 star freezer and can freeze fresh food and store pre-frozen food� When
you are buying frozen food, look at the Storage Guidelines on the packaging� You will be able to store
each item of frozen food for the period shown against the 4 star rating�
FREEZING FRESH FOOD
Ensure that your freezing operations are carried out under the most hygienic conditions as freezing
alone does not improve the food�
Never put hot or even warm foodstus into the freezer�
Prior to freezing the food, food should always be covered tightly with foil, plastic lm, placed in
plastic bags or stored in airtight containers� This will prevent food from dehydrating and to prevent
any strong odors of some foods transferring to milder ones�
To freeze raw meat, wrap in plastic bags or in airtight containers and place on the lowest shelf to
avoid cross contamination�
Do not allow raw meat to come into contact with cooked foods� For safety, only store raw meat for
two or three days� Fruit and vegetables should be thoroughly cleaned and placed in the crisper�
Milk and other liquids should be sealed with lids and placed in the bottle shelf in the door�
NOTE: The ambient temperature of the freshly stored food and how often the door is opened aect
the temperature in the refrigerator� If required, change the thermostat temperature settings�
Reverse door
STORING FROZEN FOOD
All frozen food you purchase should be placed in the freezer as soon as possible to avoid them from
defrosting and spoiling�
All storage recommendations printed on the packaging of frozen food by the manufacturer should
always be followed�
When using the freezer for the rst time or after defrosting, set the thermostat knob to the maximum
position for at least 2 hours before introducing food to be stored, and then readjust it to the normal
position�
The technical data mentioned in the ‘Specications’ are obtained in the case that the freezing drawers
are removed�
MAKING ICE CUBES
1� Fill the ice tray with ¾ full of clean water�
2� Place the tray in the top freezing drawer�
3� Close the door�
To remove the ice cubes from the tray, put the tray under running water for a while and then twist
the tray slightly to loosen the ice cubes�
Follow the following stages to reverse the door from its initial position�
1� Remove the hinge cover�
Remove the hinge cover
98
GB GB
2. Entfernen Sie die mittleren Abdeckungen, Schrauben und das Scharnier. Setzen
Sie diese an der anderen Seite ein. Heben Sie die Tür hoch und legen Sie diese zur
Vermeidung von Kratzern auf einen weichen Untergrund.
2� Remove three screws with suitable tools� Remove the upper hinge then take o carefully the
fridge compartment door�
3� Remove middle hinge, screws, screw caps and plastic inserting nails� Install them on the other
side� Take o the lower door and put it away�
Remove three screws
4� The disassembly and installation of bottom parts :
A� Disassemble lower hinge and screws� Then install them on the other side and consolidate the
lower hinge�
Note: the refrigerator-freezer incline angle less 45°�
B� Swap over the position of the adjustable foot to the other side of the cabinet�
8� Move the hinge to another side of the box after removing the screws on the hinge;
Usescrewstofasten�
9� Install the hinge cover after fastening the hinge�
C� Swap over the position of the lower door block to the other side� Install the screws and
consolidate them�
5� Install the lower door and take care of its alignment with the appliance body�
6� Tighten the screws of the middle hinge on the reversible side�
7� Install the top door and remove the existing top door block� Install a new top door block
(notthesame one) on the reversible side� Screw it down�
1110
GB GB
3. Entfernen Sie die untersten Schrauben, das Scharnier und den Stellfuß unten am
Gerät.
2� Remove three screws with suitable tools� Remove the upper hinge then take o carefully the
fridge compartment door�
3� Remove middle hinge, screws, screw caps and plastic inserting nails� Install them on the other
side� Take o the lower door and put it away�
Remove three screws
4� The disassembly and installation of bottom parts :
A� Disassemble lower hinge and screws� Then install them on the other side and consolidate the
lower hinge�
Note: the refrigerator-freezer incline angle less 45°�
B� Swap over the position of the adjustable foot to the other side of the cabinet�
8� Move the hinge to another side of the box after removing the screws on the hinge;
Usescrewstofasten�
9� Install the hinge cover after fastening the hinge�
C� Swap over the position of the lower door block to the other side� Install the screws and
consolidate them�
5� Install the lower door and take care of its alignment with the appliance body�
6� Tighten the screws of the middle hinge on the reversible side�
7� Install the top door and remove the existing top door block� Install a new top door block
(notthesame one) on the reversible side� Screw it down�
1110
GB GB
4. Entfernen Sie den Stellfuß der anderen Seite vom Boden und setzen Sie ihn an der
entsprechenden Position an der gegenüberliegenden Seite am Boden wieder ein.
2� Remove three screws with suitable tools� Remove the upper hinge then take o carefully the
fridge compartment door�
3� Remove middle hinge, screws, screw caps and plastic inserting nails� Install them on the other
side� Take o the lower door and put it away�
Remove three screws
4� The disassembly and installation of bottom parts :
A� Disassemble lower hinge and screws� Then install them on the other side and consolidate the
lower hinge�
Note: the refrigerator-freezer incline angle less 45°�
B� Swap over the position of the adjustable foot to the other side of the cabinet�
8� Move the hinge to another side of the box after removing the screws on the hinge;
Usescrewstofasten�
9� Install the hinge cover after fastening the hinge�
C� Swap over the position of the lower door block to the other side� Install the screws and
consolidate them�
5� Install the lower door and take care of its alignment with the appliance body�
6� Tighten the screws of the middle hinge on the reversible side�
7� Install the top door and remove the existing top door block� Install a new top door block
(notthesame one) on the reversible side� Screw it down�
1110
GB GB
5. Befestigen Sie die Schrauben, den Scharnierbügel und den Stellfuß an der
gegenüberliegenden Seite des Bodens.
6. Setzen Sie die untere Tür vorsichtig ein. Achten Sie darauf, dass die Tür sowohl
senkrecht als auch waagerecht ausgerichtet ist, sodass die Dichtungen an allen

DO926BFK
41
www.domo-elektro.be
Seiten anliegen, bevor Sie das mittlere Scharnier vollständig festziehen. Setzen
Sie das Scharnier wieder ein und schrauben Sie es fest.
7. Setzen Sie die oberste Tür ein. Entfernen Sie den Türstopper. Setzen Sie einen
neuen Türstopper ein und schrauben Sie diesen fest.
2� Remove three screws with suitable tools� Remove the upper hinge then take o carefully the
fridge compartment door�
3� Remove middle hinge, screws, screw caps and plastic inserting nails� Install them on the other
side� Take o the lower door and put it away�
Remove three screws
4� The disassembly and installation of bottom parts :
A� Disassemble lower hinge and screws� Then install them on the other side and consolidate the
lower hinge�
Note: the refrigerator-freezer incline angle less 45°�
B� Swap over the position of the adjustable foot to the other side of the cabinet�
8� Move the hinge to another side of the box after removing the screws on the hinge;
Usescrewstofasten�
9� Install the hinge cover after fastening the hinge�
C� Swap over the position of the lower door block to the other side� Install the screws and
consolidate them�
5� Install the lower door and take care of its alignment with the appliance body�
6� Tighten the screws of the middle hinge on the reversible side�
7� Install the top door and remove the existing top door block� Install a new top door block
(notthesame one) on the reversible side� Screw it down�
1110
GB GB
8. Setzen Sie die Scharniere der obersten Tür ein, schrauben Sie diese fest und
befestigen Sie die Abdeckung erneut.
2� Remove three screws with suitable tools� Remove the upper hinge then take o carefully the
fridge compartment door�
3� Remove middle hinge, screws, screw caps and plastic inserting nails� Install them on the other
side� Take o the lower door and put it away�
Remove three screws
4� The disassembly and installation of bottom parts :
A� Disassemble lower hinge and screws� Then install them on the other side and consolidate the
lower hinge�
Note: the refrigerator-freezer incline angle less 45°�
B� Swap over the position of the adjustable foot to the other side of the cabinet�
8� Move the hinge to another side of the box after removing the screws on the hinge;
Usescrewstofasten�
9� Install the hinge cover after fastening the hinge�
C� Swap over the position of the lower door block to the other side� Install the screws and
consolidate them�
5� Install the lower door and take care of its alignment with the appliance body�
6� Tighten the screws of the middle hinge on the reversible side�
7� Install the top door and remove the existing top door block� Install a new top door block
(notthesame one) on the reversible side� Screw it down�
1110
GB GB
9. Kontrollieren Sie bei geschlossener Tür, dass die Tür sowohl senkrecht als auch
waagerecht ausgerichtet und die Dichtungen an allen Seiten anliegen, bevor Sie
das obere Scharnier vollständig festziehen. Stellen Sie falls nötig die Stellfüße
ein.
PROBLEME UND DEREN LÖSUNG
Falls Sie ein Problem mit Ihrem Kühlschrank haben, kontrollieren Sie bitte die
folgende Frageliste, bevor Sie mit unserem Kundendienst Kontakt aufnehmen.
1. Gerät funktioniert nicht.
Das Gerät bekommt keinen Strom, kontrollieren, ob die Stromzufuhr in Ordnung ist.
Kontrollieren, ob sich der Stecker in der Steckdose bendet.
Kontrollieren, ob die richtige Spannung zur Verfügung steht.
2. Der Kühlschrank springt zu oft an.
Ist die Türe gut geschlossen?
Wurde warmes Essen in den Kühlschrank gestellt, wodurch das Gerät stärker kühlen
muss?
Ist die Türe zu oft oder zu lange geöffnet worden?
Das Gerät bekommt die falsche Spannung

DO926BFK
42
Das Gerät steht in der Nähe einer Wärmequelle oder in direktem Sonnenlicht.
4. Die Innentemperatur ist zu warm.
Kontrollieren, ob der Kühlschrank Strom hat.
Kontrollieren, ob sich der Stecker in der Steckdose bendet.
Die Temperatureinstellung ist zu niedrig.
Die Türe hat zu lange oder zu oft offen gestanden.
Die Luftzufuhr ist blockiert.
Kontrollieren, ob dem Gerät die richtige Spannung zur Verfügung steht.
Das Gerät steht in der Nähe einer Wärmequelle oder in direktem Sonnenlicht.

DO926BFK
43
www.domo-elektro.be
SAFETY INSTRUCTIONS
• - This appliance must be grounded. In the event of an
electrical short circuit, grounding reduces the risk of
electrical shock by providing an escape wire for the
electrical current
• - Do not use an extension cord
• - Use an exclusive wall outlet. Do not connect your
refrigerator to extension cords or together with any other
appliance in the same wall outlet. Do not splice the cord.
• - An empty refrigerator is a very dangerous attraction to
children. Remove either the gasket, latches, lids or doors
from unused appliances, or take some other action that
will guarantee it harmless.
• - Do not damage the refrigerant circuit.
• - If the supply cord is damaged, it must be replaced by the
manufacturer or its service agent or a similarly qualied
person in order to avoid a hazard.
• - Risk of child entrapment. Before you throw away your
old refrigerator or freezer.
• Take off the doors
• Leave the shelves in place so that children may not easily
climb inside.
This appliance can be used by children, starting from the
age of 8 and up. And by persons with a physical or sensorly
limitation as well as, mentally limited persons or persons
with a lack of experience and knowledge. On the condition
that these persons have received the necessary instruction on
how to use this appliance in a safe way and they must also
know the dangers that can occur in using this appliance.
Children cannot be allowed to play with the appliance.

DO926BFK
44
Maintenance and cleaning of the appliance, cannot be done
by children younger than 8 year old.
This appliance is suitable to be in an household environment
and in similar surroundings such as :
• Kitchen for personnel of shops, ofces or other similar
professional surrounding.
• Farms
• Hotel or motel rooms and other surroundings with a
residential character
• Guest rooms or similar
Attention : This appliance can not be used with external timer
or separate remote control.
PARTS
1. Temperature control knob
2. Shelves
3. Cover for vegetable container
4. Vegetable container
5. Freezer drawers
6. Levelling feet
7. Door shelves
8. Door bottle shelf
INSTALLATION
Remove the exterior and interior packing, wipe
the outside thoroughly with a soft dry cloth and
the inside with a wet, lukewarm cloth. Avoid
placing the cabinet in a narrow recess or near any
leave source, direct sunlight, or moisture. Let air circulate freely around the cabinet.
Keep the rear of the refrigerator 127mm away from the wall.
Location
1. Select a place with a strong, level oor.
2. Allow 13 cm of space between the back of the refrigerator and any adjacent wall.
3. Avoid direct sunlight and heat. Direct sunlight may affect the acrylic coating.
Heat sources nearby will cause higher electricity consumption.
4. Avoid very moist places. Too much moisture in the air will cause frost to from
1
2
3
4
5
6
7
8

DO926BFK
45
www.domo-elektro.be
very quickly on the evaporator, and your refrigerator.
• Before connecting your refrigerator to the power supply, check that the voltage
stated on the rating label of your appliance corresponds to the voltage in your
home. A different voltage could damage the appliance.
• The appliance must be grounded. The manufacturer is not responsible for
damages that may occur as a result of usage without grounding.
• For uneven surfaces, front feet can be aligned.
• After installation, leave the freezer for 3 hours before turning it on. This way the
refrigerant can settle.
CARE AND MAINTENANCE
Cleaning
Do not use abrasive cleaning agents or solvents.
1. Set the temperature control knob to the OFF position and disconnect the mains
plug from the mains socket.
2. Take out the food and store in a cool location.
3. Clean the appliance with a soft cloth, warm water and detergent.
4. Wipe the door seal with clear water only and then wipe dry thoroughly.
5. After cleaning reconnect and adjust the temperature control knob as desired.
6. Put the food back into the appliance.
Bulb replacement
Beware: Unplug the appliance from the power supply before replacing the light bulb.
1. Remove the bulb cover by pushing it upwards.
2. Unscrew the old bulb and then screw a new 15W (E14 base) bulb.
3. Replace the bulb cover.
DEFROSTING
The refrigerator defrosts fully automatically.
While the cooling is running, beads of condensation or hoarfrost form at the back
of the refrigerator. This is normal. It is not necessary to wipe off the condensation
or frost. The rear panel defrosts automatically. The condensation runs into the
condensation channel and is conveyed to the cooling from where it evaporates.
Note: Keep the condensation channel and drainage hole clean, so that the condensation
can run out.
A layer of frost in the freezer will impair refrigeration of the frozen food and increases
power consumption. Remove the layer of frost regularly. Do not scrape off frost or ice
with a knife or pointed object. Doing this may damage the refrigerant tubes.
1. Remove the frozen food and place temporarily in a cool location.
2. Disconnect the appliance from the mains socket.
3. To accelerate the defrosting process, place a pan of hot water on a stand in the
freezer.

DO926BFK
46
4. Wipe up condensation with a cloth or sponge.
5. Wipe dry the freezer compartment.
6. Plug in the appliance and adjust the temperature control knob as desired.
7. Put the frozen food back in the freezer.
AMBIENT TEMPERATURE
This appliance is designed to operate in ambient temperature between 16°C and
38°C. If these temperatures are exceeded, i.e. colder or warmer, the appliance will not
operate correctly.
BEFORE PLACING FOOD IN THE FRIDGE
• Remove all packaging.
• Allow the appliance to run empty for 2 – 3 hours so the compartment can cool to
the appropriate temperature.
• Clean the inside of the appliance with warm water and a little liquid detergent to
remove manufacturing and transportation dust.
TEMPERATURE CONTROL
The fridge is controlled with a temperature control knob located inside the appliance.
Adjust the control knob as desired to suit your individual preference.
• OFF is off setting
• MIN is warmest setting
• MED is normal setting
• MAX is coldest setting
• In the OFF position the appliance does not operate (the cooling system is
switched off), but power supply is not interrupted.
• The running time and temperature are affected by where the fridge is located, how
often the door is opened and the temperature of the room the fridge is located in.
• When you use the appliance for the rst time or after defrosting, adjust the control
knob to the coldest setting for at least 2 hours before introducing food to be
stored, and then readjust to the middle setting.
MOVING YOUR APPLIANCE
If the appliance is turned off for any reason, wait for 10 minutes before turning it back
on. This will allow the refrigeration system pressures to equalise before restarting.
• Turn off the appliance and unplug it from the mains socket. Remove all food.
Also remove all mobile parts (shelves, accessories, etc.) or x them into the fridge
to avoid any shock.
• Relocate and install. If the appliance has been left on its side for any length of
time, leave it standing upright for at least 10 minutes before turning on.

DO926BFK
47
www.domo-elektro.be
Your appliance uses isobutane (R600a) as a refrigerant. Although R600a is an
environmentally friendly and natural gas, it is explosive. Therefore you should be
careful during shipment and installation to prevent your appliance’s cooler elements
from being damaged. In the event of a leak caused by damage to the cooler elements,
move your fridge from open ame or heat sources and ventilate the room where the
appliance is located for a few minutes.
STORING FOOD IN THE FRIDGE
The fridge helps to extend the storage times of fresh perishable foods.
Fresh food care for best results:
• Store foods that are very fresh and of good quality.
• Ensure that food is well wrapped or covered before it is stored. This will prevent
food from dehydrating, deteriorating in colour or losing taste and will help
maintain freshness. It will also prevent odour transfer.
• Make sure that strong smelling foods are wrapped or covered and stored away
from foods such as butter, milk and cream which can be tainted by strong odours.
• Cool hot foods down before placing them in the fridge.
FREEZING AND STORING FOOD IN THE FREEZER
Use the freezer
• To store deep-frozen food.
• To make ice cubes.
• To freeze food.
Note: Ensure that the freezer door has been closed properly.
Store at -18°C or colder. Avoid opening the freezer drawers unnecessarily.
Purchasing frozen food
• Packaging must not be damaged.
• Use by the ‘use by /best before/best by/’ date.
• If possible, transport deep-frozen food in an insulated bag and place quickly in the
freezer.
Freezing fresh food
Freeze fresh and undamaged food only. To retain the best possible nutritional value,
avour and colour, vegetables should be blanched before freezing.
Aubergines, peppers, zucchini and asparagus do not require blanching.
Note: Keep food to be frozen away from food which is already frozen.
• The following foods are suitable for freezing: Cakes and pastries, sh and
seafood, meat, game, poultry, vegetables, fruit, herbs, eggs without shells, dairy
products such as cheese and butter, ready meals and leftovers such as soups,
stews, cooked meat and sh, potato dishes, soufés and desserts.
• The following foods are not suitable for freezing:Types of vegetables, which are
usually consumed raw, such as lettuce or radishes, eggs in shells, grapes, whole

DO926BFK
48
apples, pears and peaches, hard-boiled eggs, yoghurt, soured milk, sour cream,
and mayonnaise.
Packing frozen food
To prevent food from losing its avour or drying out, place food in airtight packaging.
1. Place food in packaging.
2. Remove air.
3. Seal the wrapping.
4. Label packaging with contents and dates of freezing.
Suitable packaging:
Plastic lm, tubular lm made of polyethylene, aluminium foil, freezer containers.
These products are available from specialist outlets.
Recommended storage times of frozen food in the freezer
These times vary depending on the type of food. The food that you freeze can be
preserved from 1 to 12 months (minimum at -18°C).
Food Storage time
Bacon, casseroles, milk 1 month
Bread, ice cream, sausages, pies, prepared shellsh, oily sh 2 months
Non-oily sh, shellsh, pizza, scones and mufns 3 months
Ham, cakes, biscuits, beef and lamb chops, poultry pieces 4 months
Butter, vegetables (blanched), eggs whole and yolks, cooked cray-
sh, minced meat (raw), pork (raw)
6 months
Fruit (dry or in syrup), egg whites, beef (raw), whole chicken, lamb
(raw), fruit cakes
12 months
Never forget:
• When you freeze fresh foods whit a ‘use by /best before/best by/’ date, you must
freeze them before the expiry of this date.
• Check that the food was not already frozen. Indeed, frozen food that has thawed
completely must not be refrozen.
• Once defrosted, food should be consumed quickly.
VACATION TIME
For short vacation periods, leave the control knobs at their usual settings. During
longer absences;
• remove all foods,
• disconnect from electrical outlet,
• clean the refrigerator thoroughly, including defrost pan,
• leave door open to avoid possible formations of condensate, mold or odors.

DO926BFK
49
www.domo-elektro.be
POWER FAILURE
Most power failures are corrected within an hour or two and will not affect your
refrigerator temperatures. However, you should minimize the number of door
openings while the power is off. During power failures of longer duration, take steps
to protect your food by blacking dry ice on top of packages.
Frozen food should not be affected if the power failure lasts for less than 15 hours.
Do not refreeze frozen foods that have thawed completely. The food may be
dangerous to eat.
SOME IMPORTANT RULES FOR THE CORRECT USE OF THE
REFRIGERATOR
• Never place hot foods in the refrigerator,
• Beverages should be stored in sealed containers.
• Foods to be stored for a long time should be wrapped in cellophance or
polyethylence, or kept in glass containers.
• Never place spoiled foods in the cabinet.
• Don’t overload the cabinet.
• Don’t open the door unless necessary.
• Caution: please keep the products away from the re or similar glowing substance
before you dispose the refrigerator.
• Caution : Not for outer camping use (ex. Tent)
• Caution: For indoor use only.
• Caution: The appliance can not be used in public transportation.
• Do not freeze food again after it has been defrosted already.
• Do not place carbonated liquids such as zzy drinks into the freezer.
• Be careful when consuming ice lollies straight from the freezer to avoid freeze
burns.
• Do not take anything out of the freezer with wet hands.
• The freezer produces sounds when the compressor pumps the refrigerant around.
This is normal.
• Do not place any hot foods into the freezer.
• Make sure that all food in the freezer is covered.
• Do not press together the food. The air should be able to circulate around the
food.
• Do not leave the door open for too long. Also make sure that the door is always
properly closed.
• Label the food with the date to be able to check the expiration in the freezer.
DOOR CONVERSION
If you need to hinge your door on the opposite side it is recommended that you call
your local authorised service agent to make this conversion or ask a technician.
Before you reverse the door, you should ensure the appliance is unplugged and empty.
It is recommended to use a crosshead screwdriver and a spanner (both not supplied).

DO926BFK
50
1. Remove the cover plate of the screws. Remove the three screws and then the
upper hinge that holds the door in place. Lift the door off and place it on a soft
surface to prevent scratching.
SHOPPING FOR FROZEN FOOD
The appliance is rated as a 4 star freezer and can freeze fresh food and store pre-frozen food� When
you are buying frozen food, look at the Storage Guidelines on the packaging� You will be able to store
each item of frozen food for the period shown against the 4 star rating�
FREEZING FRESH FOOD
Ensure that your freezing operations are carried out under the most hygienic conditions as freezing
alone does not improve the food�
Never put hot or even warm foodstus into the freezer�
Prior to freezing the food, food should always be covered tightly with foil, plastic lm, placed in
plastic bags or stored in airtight containers� This will prevent food from dehydrating and to prevent
any strong odors of some foods transferring to milder ones�
To freeze raw meat, wrap in plastic bags or in airtight containers and place on the lowest shelf to
avoid cross contamination�
Do not allow raw meat to come into contact with cooked foods� For safety, only store raw meat for
two or three days� Fruit and vegetables should be thoroughly cleaned and placed in the crisper�
Milk and other liquids should be sealed with lids and placed in the bottle shelf in the door�
NOTE: The ambient temperature of the freshly stored food and how often the door is opened aect
the temperature in the refrigerator� If required, change the thermostat temperature settings�
Reverse door
STORING FROZEN FOOD
All frozen food you purchase should be placed in the freezer as soon as possible to avoid them from
defrosting and spoiling�
All storage recommendations printed on the packaging of frozen food by the manufacturer should
always be followed�
When using the freezer for the rst time or after defrosting, set the thermostat knob to the maximum
position for at least 2 hours before introducing food to be stored, and then readjust it to the normal
position�
The technical data mentioned in the ‘Specications’ are obtained in the case that the freezing drawers
are removed�
MAKING ICE CUBES
1� Fill the ice tray with ¾ full of clean water�
2� Place the tray in the top freezing drawer�
3� Close the door�
To remove the ice cubes from the tray, put the tray under running water for a while and then twist
the tray slightly to loosen the ice cubes�
Follow the following stages to reverse the door from its initial position�
1� Remove the hinge cover�
Remove the hinge cover
98
GB GB
2. Remove the centre cover plates, screws and hinge. Place them on the other side.
Lift the door off and place it on a soft surface to prevent scratching.
2� Remove three screws with suitable tools� Remove the upper hinge then take o carefully the
fridge compartment door�
3� Remove middle hinge, screws, screw caps and plastic inserting nails� Install them on the other
side� Take o the lower door and put it away�
Remove three screws
4� The disassembly and installation of bottom parts :
A� Disassemble lower hinge and screws� Then install them on the other side and consolidate the
lower hinge�
Note: the refrigerator-freezer incline angle less 45°�
B� Swap over the position of the adjustable foot to the other side of the cabinet�
8� Move the hinge to another side of the box after removing the screws on the hinge;
Usescrewstofasten�
9� Install the hinge cover after fastening the hinge�
C� Swap over the position of the lower door block to the other side� Install the screws and
consolidate them�
5� Install the lower door and take care of its alignment with the appliance body�
6� Tighten the screws of the middle hinge on the reversible side�
7� Install the top door and remove the existing top door block� Install a new top door block
(notthesame one) on the reversible side� Screw it down�
1110
GB GB
3. Remove the lower screws, hinge and the adjustable foot from the base of the
appliance.
2� Remove three screws with suitable tools� Remove the upper hinge then take o carefully the
fridge compartment door�
3� Remove middle hinge, screws, screw caps and plastic inserting nails� Install them on the other
side� Take o the lower door and put it away�
Remove three screws
4� The disassembly and installation of bottom parts :
A� Disassemble lower hinge and screws� Then install them on the other side and consolidate the
lower hinge�
Note: the refrigerator-freezer incline angle less 45°�
B� Swap over the position of the adjustable foot to the other side of the cabinet�
8� Move the hinge to another side of the box after removing the screws on the hinge;
Usescrewstofasten�
9� Install the hinge cover after fastening the hinge�
C� Swap over the position of the lower door block to the other side� Install the screws and
consolidate them�
5� Install the lower door and take care of its alignment with the appliance body�
6� Tighten the screws of the middle hinge on the reversible side�
7� Install the top door and remove the existing top door block� Install a new top door block
(notthesame one) on the reversible side� Screw it down�
1110
GB GB
4. Remove the adjustable foot from the other side of the base and move it to the
same position on the opposite side of the base.
2� Remove three screws with suitable tools� Remove the upper hinge then take o carefully the
fridge compartment door�
3� Remove middle hinge, screws, screw caps and plastic inserting nails� Install them on the other
side� Take o the lower door and put it away�
Remove three screws
4� The disassembly and installation of bottom parts :
A� Disassemble lower hinge and screws� Then install them on the other side and consolidate the
lower hinge�
Note: the refrigerator-freezer incline angle less 45°�
B� Swap over the position of the adjustable foot to the other side of the cabinet�
8� Move the hinge to another side of the box after removing the screws on the hinge;
Usescrewstofasten�
9� Install the hinge cover after fastening the hinge�
C� Swap over the position of the lower door block to the other side� Install the screws and
consolidate them�
5� Install the lower door and take care of its alignment with the appliance body�
6� Tighten the screws of the middle hinge on the reversible side�
7� Install the top door and remove the existing top door block� Install a new top door block
(notthesame one) on the reversible side� Screw it down�
1110
GB GB
5. Fasten the screws, hinge bracket and the adjustable foot to the other side of the
base.
6. Carefully replace the bottom part of the door into position. Make sure that the
door is aligned horizontally as well as vertically so that the seal is closed on
all sides before you tighten the centre hinge completely. Return the hinge to its
positions and fasten it.

DO926BFK
51
www.domo-elektro.be
7. Position the upper door. Remove the door stop. Place a new doorstop and fasten it
with the screw.
2� Remove three screws with suitable tools� Remove the upper hinge then take o carefully the
fridge compartment door�
3� Remove middle hinge, screws, screw caps and plastic inserting nails� Install them on the other
side� Take o the lower door and put it away�
Remove three screws
4� The disassembly and installation of bottom parts :
A� Disassemble lower hinge and screws� Then install them on the other side and consolidate the
lower hinge�
Note: the refrigerator-freezer incline angle less 45°�
B� Swap over the position of the adjustable foot to the other side of the cabinet�
8� Move the hinge to another side of the box after removing the screws on the hinge;
Usescrewstofasten�
9� Install the hinge cover after fastening the hinge�
C� Swap over the position of the lower door block to the other side� Install the screws and
consolidate them�
5� Install the lower door and take care of its alignment with the appliance body�
6� Tighten the screws of the middle hinge on the reversible side�
7� Install the top door and remove the existing top door block� Install a new top door block
(notthesame one) on the reversible side� Screw it down�
1110
GB GB
8. Position the hinge of the upper door, fasten it with the screw and replace the cover
plate.
2� Remove three screws with suitable tools� Remove the upper hinge then take o carefully the
fridge compartment door�
3� Remove middle hinge, screws, screw caps and plastic inserting nails� Install them on the other
side� Take o the lower door and put it away�
Remove three screws
4� The disassembly and installation of bottom parts :
A� Disassemble lower hinge and screws� Then install them on the other side and consolidate the
lower hinge�
Note: the refrigerator-freezer incline angle less 45°�
B� Swap over the position of the adjustable foot to the other side of the cabinet�
8� Move the hinge to another side of the box after removing the screws on the hinge;
Usescrewstofasten�
9� Install the hinge cover after fastening the hinge�
C� Swap over the position of the lower door block to the other side� Install the screws and
consolidate them�
5� Install the lower door and take care of its alignment with the appliance body�
6� Tighten the screws of the middle hinge on the reversible side�
7� Install the top door and remove the existing top door block� Install a new top door block
(notthesame one) on the reversible side� Screw it down�
1110
GB GB
9. With the door closed, check whether the door is aligned horizontally as well as
vertically and that the seal closes on all sides before you tighten the upper hinge
completely. If necessary, adjust the adjustable feet.
TROUBLE SHOOTING
Frequently, a problem is minor and a service call may not be necessary, use this
trouble shooting guide for a possible solution.
1. Does not work
Check connection of power cord to power source.
Plug in unit
Use proper voltage.
2. Cools too frequently
Check temperature setting and adjust as needed.
Close door securely.
Be sure that food is cool before inserting.
Do not keep door open for too long and MINIMIZE door openings.
Do not place unit close to heat sources Or direct sunlight.
3. Intemal temperature not cold enough
Check connection of power cord to Power source.
Plug in unit

DO926BFK
52
Check setting and adjust as needed.
Close door securely.
Be sure that food is cool before inserting.
Do not keep door open for too long and MINMIZE, door openings.
Allow room for airto circulate around unit..
Use proper voltage.
Do not place unit close to heat sources or direct sunlight.
5. Freezer is not cold enough
Check setting and adjust as needed
Close door securely.
Be sure that food is cool before inserting.
Do not keep door open for too long.
Use proper voltage.

DO926BFK
53
www.domo-elektro.be
PRECAUCIONES IMPORTANTES
Este aparato está diseñado para ser utilizado
por niños a partir de 16 años de edad y por
personas con discapacidades físicas, sensoriales
o mentales, o por personas que no dispongan de
suciente experiencia y conocimientos, a no ser
que sean supervisados o instruidos inicialmente
en la utilización segura del aparato y los
posibles peligros.
Los niños deben estar siempre bajo supervisión,
para asegurar que no juegan con el aparato.
El mantenimiento y la limpieza del aparato
no pueden efectuarse por niños, a no ser
que tengan más de 16 años de edad y sean
supervisados. Mantenga el aparato y el cordón
eléctrico fuera del alcance de niños menores de
16 años.
Este aparato está diseñado para ser utilizado en
un entorno doméstico y en entornos similares
como:
• En la cocina para el personal de tiendas,
ocinas y otros entornos profesionales
similares.
• En las ncas.

DO926BFK
54
• En las habitaciones de hoteles y moteles y
otros entornos con un carácter residencial.
• En los cuartos de huéspedes o similares.
Atención: el aparato no puede ser utilizado con
un temporizador externo o un mando a distancia
separado.
• Lea todas las instrucciones antes del uso.
• Antes de utilizarlo, compruebe si
el voltaje indicado en el aparato
corresponde al voltaje de la electricidad
de su casa.
• No permita que el cable cuelgue sobre
una supercie o el borde de una mesa o
encimera.
• No utilice nunca el aparato si el cable
o el enchufe están dañados, después de
un mal funcionamiento de la unidad
o si están dañados. Lleve el aparato al
distribuidor autorizado más cercano
centro para la inspección y reparación.
• Se requiere supervisión cuando el aparato
es usado por o cerca de niños.
• El uso de accesorios no recomendados o

DO926BFK
55
www.domo-elektro.be
vendidos por el fabricante puede causar
incendios, descargas eléctricas o lesiones.
• Desenchufe la toma de corriente cuando
no se usa, para montar o desmontar
piezas y antes de limpiarlo. Ponga todos
los botones en posición desconectado
(“off”) y desconecte el enchufe de la
toma de corriente. Nunca tire del cable
para desenchufarlo.
• No deje que el aparato funcione sin
supervisión.
• No encienda nunca el aparato cerca de
una estufa de gas o eléctrica, ni en un
lugar donde pueda entrar en contacto
con un horno eléctrico o con otro aparato
caliente.
• No utilice el aparato en el exterior.
• Utilice el aparato sólo para el n para el
que se ha fabricado.
• Coloque siempre el aparato sobre una
supercie rme, horizontal y seca.
• Utilice el aparato sólo para uso doméstico.
El fabricante no es responsable de los
accidentes que resulten del uso incorrecto del

DO926BFK
56
aparato, ni del incumplimiento de las normas
establecidas en este manual.
• Todas las reparaciones aparte del
mantenimiento ordinario de la unidad deben
ser efectuadas por el fabricante o por su
servicio post-venta.
• No sumerja nunca el aparato, el cable o el
enchufe en agua o cualquier otro líquido.
• Asegúrese de que los niños no puedan tocar
el cable eléctrico o el aparato.
• Mantenga el cable alejado de bordes alados
y piezas calientes u otras fuentes de calor.
• Antes del primer uso retire todos los
materiales de embalaje y etiquetas de
promoción.
PIEZAS
1. Regulador de temperatura con sección de
bombilla
2. Estantes
3. Tapa para la bandeja de verduras
4. Compartimento de verduras
5. Cajón del congelador
6. Patas ajustables
7. Estantes de la puerta
8. Estante de la puerta para botellas
INSTALACIÓN
• Retire todo el material de embalaje, tanto del
interior como del exterior. Limpie el exterior
del aparato con un paño seco. El interior
puede limpiarlo con un paño suave y húmedo.
1
2
3
4
5
6
7
8

DO926BFK
57
www.domo-elektro.be
• No coloque el aparato en un paso estrecho o en un lugar húmedo o que reciba la
luz directa del sol.
• Asegúrese de que pueda circular el aire alrededor del frigoríco. La parte
posterior del frigoríco debe estar separada de la pared al menos 13 cm.
• Coloque el frigoríco sobre una supercie rme y nivelada.
• Evite la luz directa del sol y el calor. La luz solar puede deteriorar el exterior del
frigoríco. El calor aumentará el consumo.
• Evite un grado de humedad demasiado elevado. Demasiada humedad ambiental
causará que se forme hielo demasiado rápido en el frigoríco.
• Antes de conectar el frigoríco a la red eléctrica se debe comprobar que la tensión
de la placa de especicaciones del aparato se corresponde con el voltaje de su
hogar. Otra tensión puede dañar el aparato.
• El enchufe es la única forma de desconectar el aparato de la alimentación,
asegúrese de que es fácil acceder al mismo. Para desconectar la alimentación al
aparato, apague el aparato y retire el enchufe de la toma de corriente.
• El aparato debe estar conectado a tierra. El fabricante no se hace responsable de
los daños causados por no utilizar una conexión a tierra.
• Para supercies irregulares, las patas delanteras se pueden alinear.
• Deje el aparato después de la instalación 3 horas antes de encenderlo. Así se
puede asentar el refrigerante.
MANTENIMIENTO Y LIMPIEZA
Limpieza
No utilice productos de limpieza agresivos o disolventes.
1. Ajuste el regulador de temperatura en la posición OFF (apagado) y retire el
enchufe de la toma de corriente.
2. Retire los alimentos y almacénelos en un lugar fresco.
3. Limpie el aparato con un paño suave, agua tibia y un detergente suave.
4. Limpie la junta de la puerta solo con agua limpia y frote a fondo.
5. Después de la limpieza, introduzca el enchufe en la toma de corriente y ajuste el
regulador de temperatura en la posición deseada.
6. Vuelva a colocar los alimentos en el aparato.
Cambiar la bombilla
Retire el enchufe de la toma de corriente antes de cambiar la bombilla.
1. Retire la pantalla de la lámpara al empujarla hacia arriba.
2. Desenrosque la bombilla usada y enrosque una nueva bombilla de 15W (casquillo
E14).
3. Vuelva a colocar la pantalla.
DESCONGELACIÓN
El frigoríco se descongela automáticamente.
Durante el funcionamiento del congelador se forman gotas de condensación o

DO926BFK
58
escarcha en la parte posterior del aparato. Esto es normal. No es necesario limpiar
la condensación o el hielo. El panel posterior se descongela automáticamente. La
condensación uye en el canal de condensación y se guía al grupo frigoríco, donde
se evapora.
Nota: Mantenga limpio el canal de condensación y el oricio de drenaje, de manera
que la condensación se pueda eliminar.
Una capa de hielo en el congelador inuye de manera negativa en la refrigeración
de los alimentos congelados y genera un mayor consumo energético. Elimine con
regularidad la capa de hielo. No raspe el hielo con un cuchillo u otro objeto con punta.
El serpentín refrigerador podría resultar dañado.
1. Saque los alimentos congelados del congelador y guárdelos provisionalmente en
un lugar frío.
2. Retire el enchufe de la toma de corriente.
3. Para acelerar el proceso de congelación, coloque un recipiente con agua caliente
sobre un estante del congelador.
4. Elimine la condensación con un paño o esponja.
5. Seque el interior del congelador.
6. Conecte el enchufe a la toma de corriente y sitúe el control de temperatura en la
Posición deseada.
7. Introduzca de nuevo los alimentos congelados en el congelador.
TEMPERATURA AMBIENTE
Este aparato se ha diseñado para funcionar a una temperaturas ambiente de entre
16°C y 38°C. En una habitación con una temperatura inferior o superior, el aparato
no funcionará correctamente.
ANTES DE GUARDAR ALIMENTOS EN EL FRIGORÍFICO
• Retire el embalaje.
• Deje que el aparato funcione durante 2-3 horas sin alimentos hasta que este se
enfríe y alcance la temperatura adecuada.
• Limpie el interior del aparato con agua tibia y un detergente suave para eliminar
cualquier residuo de fabricación y polvo.
REGULACIÓN DE TEMPERATURA
El frigoríco se regula con un regulador de temperatura que se encuentra en el interior
del aparato. Ajuste el regulador hasta la posición deseada.
• OFF es la posición de apagado
• MIN es la posición más caliente
• MED es la posición normal y
• MAX es la posición más fría

DO926BFK
59
www.domo-elektro.be
• El aparato no funciona en la posición OFF (el sistema de refrigeración está
apagado), pero la alimentación no se interrumpe.
• El tiempo de funcionamiento y la temperatura se ven afectados por la ubicación
en la que se utiliza el frigoríco, el número de veces que se abre la puerta y la
temperatura de la habitación en la que se encuentra el frigoríco.
• Cuando el aparato se ponga en funcionamiento o después de descongelar el
aparato, ajuste el regulador durante al menos 2 horas en la temperatura más fría
antes de introducir los alimentos. A continuación, ajuste la posición media.
DESPLAZAR SU APARATO
Si el aparato se apaga por cualquier motivo, espere 10 minutos antes de volver a
encenderlo. La presión en el sistema de refrigeración se debe estabilizar antes de
volver a encenderlo.
• Apague el aparato y retire el enchufe de la toma de corriente. Retire todos los
• alimentos. También debe retirar todas las partes móviles (estantes, accesorios,
etc.) o jarlos en el frigoríco para evitar choques.
• Desplace el aparato e instálelo. Si el dispositivo se mantuvo posicionado sobre
un lado mientras se trasladaba, aunque fuera durante un tiempo muy corto, el
aparato deberá ponerse en posición vertical durante al menos 10 minutos antes de
encender el aparato.
Su aparato utiliza isobutano (R600a) como refrigerante. A pesar de que el R600a es un
gas respetuoso con el medio ambiente y natural, es explosivo. Por lo tanto, debe tener
mucho cuidado al mover o instalar el aparato para evitar daños en los elementos de
refrigeración. En el caso de que se produzca una fuga por un daño en los elementos de
refrigeración, mantenga el frigoríco alejado de llamas o fuentes de calor y ventile la
habitación donde se encuentra el aparato durante algunos minutos.
CONSERVAR ALIMENTOS EN EL FRIGORÍFICO
El frigoríco asegura una vida útil más prolongada de los alimentos frescos y
perecederos. Conservación de alimentos frescos para obtener los mejores resultados:
• Conserve solo alimentos muy frescos y de buena calidad.
• Asegúrese de que los alimentos están bien envasados o cúbralos antes de
almacenarlos. Esto evita que los alimentos se sequen, pierdan color o sabor y hará
que se conserven frescos durante más tiempo. Esto también evita la transferencia
de olores.
• Asegúrese de que los alimentos con un olor fuerte se envasan bien y se cubren.
Manténgalos alejados de mantequilla, leche y nata, así como otros alimentos que
pueden verse afectados por un fuerte olor.
• Deje que los alimentos calientes se enfríen antes de introducirlos en el frigoríco.
CONGELACIÓN Y CONSERVACIÓN DE ALIMENTOS EN EL
CONGELADOR

DO926BFK
60
Utilice el congelador
• Para conservar alimentos congelados.
• Para fabricar cubitos de hielo.
• Para congelar alimentos.
Nota: asegúrese de que la puerta del congelador esté siempre bien cerrada.
Compra de productos congelados
• El envase no puede encontrarse dañado.
• Consuma antes de la fecha de caducidad.
• Si es posible, transporte los alimentos congelados en una bolsa térmica e
introdúzcalos rápidamente en el congelador.
Conservación de productos congelados
Mantenga a una temperatura no superior a -18°C. Abra la puerta del congelador
únicamente cuando sea necesario.
Congelación de alimentos frescos
Congele únicamente alimentos frescos en buen estado. Para preservar lo mejor posible
los valores nutritivos, el sabor y el color, escalde las verduras antes de congelarlas.
No es necesario escaldar las berenjenas, pimientos, calabacines o espárragos.
Nota: mantenga los alimentos que va a congelar alejados de los alimentos ya
congelados.
• Son adecuados para congelar los siguientes alimentos: bizcochos y repostería,
pescado y marisco, carne, caza, aves, verdura, fruta, especias, huevos sin cáscara,
productos lácteos como queso o mantequilla, platos preparados y restos de
comidas como sopas, guisos, carne y pescado cocinados, platos a base de patatas,
sués y postres.
• No son adecuados para congelar los siguientes alimentos: verduras que se
toman generalmente crudas, como lechuga, rábanos, huevos con cáscara, uvas,
manzanas, peras y melocotones, huevos duros, yogur, leche agria, nata agria y
mayonesa.
Conservación de productos congelados
Para evitar que los alimentos pierdan su sabor o se sequen, guárdelos en un envase
hermético.
1. Introduzca los alimentos en el envase.
2. Extraiga todo el aire.
3. Cierre el envase.
4. Añada al envase una etiqueta con su contenido y la fecha de congelación.
Envases adecuados:
película de plástico, rollo de película de polietileno, papel de aluminio o recipientes
aptos para el congelador. Estos productos se pueden adquirir en un establecimiento
especializado.

DO926BFK
61
www.domo-elektro.be
Tiempo de conservación en el congelador recomendado para los productos
congelados
Este tiempo puede variar según el tipo de alimento. Los alimentos congelados se
pueden conservar entre 1 y 12 meses (a un mínimo de -18°C).
Alimento Tiempo de
conservación
Tocino, guisos, leche 1 mes
Pan, helados, salchichas, guisantes, marisco cocido, pescado azul 2 meses
Pescado blanco, marisco, pizza, bollos y magdalenas 3 meses
Jamón, bizcochos, galletas, carne de ternera y chuletas de cordero,
aves troceadas
4 meses
Mantequilla, verdura (escaldada), huevo entero y yemas, cangrejos
de río cocidos, carne picada (cruda), carne de cerdo (cruda)
6 meses
Fruta (seca o en almíbar), clara de huevo, carne de ternera (cruda),
pollo entero, carne de cordero (cruda), bizcochos de frutas
12 meses
No olvidar:
• Si congela alimentos frescos que tengan una fecha de caducidad, deberá
congelarlos antes de que se alcance esa fecha de caducidad.
• Asegúrese de que los alimentos no se hayan congelado anteriormente. Los
alimentos congelados que se han descongelado por completo no pueden volver a
congelarse.
• Una vez descongelados, consuma rápidamente los alimentos.
VACACIONES
Si se va de vacaciones durante un periodo corto, el aparato puede permanecer
enchufado. Si se va de vacaciones durante un periodo largo, lo mejor es hacer lo
siguiente:
• Saque todos los alimentos del frigoríco.
• Retire el enchufe de la toma de corriente.
• Limpie bien el frigoríco.
• Deje la puerta abierta del frigoríco para evitar la aparición de moho y malos
olores.
APAGÓN
La mayoría de los apagones duran entre 1 y 2 horas y no suelen alterar la temperatura
del frigoríco. Limite la apertura de la puerta del frigoríco en la mayor medida
posible durante un apagón.
Durante un apagón más largo, debe adoptar otras medidas para conservar los
alimentos, por ejemplo, colocar hielo seco sobre los alimentos.
Los alimentos congelados se mantienen en buenas condiciones si el fallo de

DO926BFK
62
alimentación no dura más de 15 horas.
No vuelva a congelar los alimentos que se hayan descongelado por completo. Esos
alimentos pueden perjudicar su salud.
NORMAS IMPORTANTES
• No introduzca nunca alimentos calientes en el frigoríco.
• Las bebidas deben almacenarse en recipientes cerrados.
• Los alimentos que deban conservarse durante mucho tiempo en el frigoríco
deberán taparse o conservarse en recipientes de cristal.
• Nunca introduzca alimentos en mal estado en el frigoríco.
• Asegúrese en todo momento de que el frigoríco no está sobrecargado de forma
que los alimentos puedan refrigerarse lo suciente.
• Abra la puerta del frigoríco únicamente cuando sea necesario.
• El aparato no puede utilizarse para realizar acampadas, p. ej. tiendas de campaña.
• Solo se puede utilizar en interiores.
• El aparato no puede utilizarse en el transporte público.
• No vuelva a congelar alimentos que hayan sido descongelados.
• No ponga bebidas gaseosas en el congelador.
• Tenga cuidado al consumir helados recién sacados del congelador para evitar
heridas de congelación.
• No saque nada del congelador con las manos mojadas.
• El congelador hace ruido cuando el compresor bombea el refrigerante. Esto es
normal.
• No ponga alimentos calientes en el congelador.
• Asegúrese de que la comida está cubierta.
• No paga la comida demasiado apretada, pues debe poder circular el aire alrededor.
• No deje la puerta abierta demasiado tiempo. Asegúrese también de que la puerta
esté siempre cerrada correctamente.
• Etiquete los alimentos con la fecha para poder comprobar la caducidad en el
congelador
CAMBIO DE DIRECCIÓN DE LA PUERTA
Si quiere trasladar las bisagras de la puerta hacia el otro lado, le recomendamos que se
ponga en contacto con un taller de reparación autorizado para llevar a cabo el trabajo.
Antes de cambiar la dirección de giro, compruebe que el enchufe se ha desconectado
de la toma de corriente y que el aparato está vacío. Se recomienda el uso de un
destornillador Phillips y una llave (ambos no incluidos).
1. Retire la chapita de los tornillos. Retire los tres tornillos y, a continuación,
retire la bisagra superior que mantiene la puerta en su lugar. Levante la puerta y
colóquela sobre una supercie suave para evitar arañazos.

DO926BFK
63
www.domo-elektro.be
SHOPPING FOR FROZEN FOOD
The appliance is rated as a 4 star freezer and can freeze fresh food and store pre-frozen food� When
you are buying frozen food, look at the Storage Guidelines on the packaging� You will be able to store
each item of frozen food for the period shown against the 4 star rating�
FREEZING FRESH FOOD
Ensure that your freezing operations are carried out under the most hygienic conditions as freezing
alone does not improve the food�
Never put hot or even warm foodstus into the freezer�
Prior to freezing the food, food should always be covered tightly with foil, plastic lm, placed in
plastic bags or stored in airtight containers� This will prevent food from dehydrating and to prevent
any strong odors of some foods transferring to milder ones�
To freeze raw meat, wrap in plastic bags or in airtight containers and place on the lowest shelf to
avoid cross contamination�
Do not allow raw meat to come into contact with cooked foods� For safety, only store raw meat for
two or three days� Fruit and vegetables should be thoroughly cleaned and placed in the crisper�
Milk and other liquids should be sealed with lids and placed in the bottle shelf in the door�
NOTE: The ambient temperature of the freshly stored food and how often the door is opened aect
the temperature in the refrigerator� If required, change the thermostat temperature settings�
Reverse door
STORING FROZEN FOOD
All frozen food you purchase should be placed in the freezer as soon as possible to avoid them from
defrosting and spoiling�
All storage recommendations printed on the packaging of frozen food by the manufacturer should
always be followed�
When using the freezer for the rst time or after defrosting, set the thermostat knob to the maximum
position for at least 2 hours before introducing food to be stored, and then readjust it to the normal
position�
The technical data mentioned in the ‘Specications’ are obtained in the case that the freezing drawers
are removed�
MAKING ICE CUBES
1� Fill the ice tray with ¾ full of clean water�
2� Place the tray in the top freezing drawer�
3� Close the door�
To remove the ice cubes from the tray, put the tray under running water for a while and then twist
the tray slightly to loosen the ice cubes�
Follow the following stages to reverse the door from its initial position�
1� Remove the hinge cover�
Remove the hinge cover
98
GB GB
2. Retire las chapitas centrales, los tornillos y la bisagra. Colóquela en el otro lado.
Levante la puerta y colóquela sobre una supercie suave para evitar arañazos.
2� Remove three screws with suitable tools� Remove the upper hinge then take o carefully the
fridge compartment door�
3� Remove middle hinge, screws, screw caps and plastic inserting nails� Install them on the other
side� Take o the lower door and put it away�
Remove three screws
4� The disassembly and installation of bottom parts :
A� Disassemble lower hinge and screws� Then install them on the other side and consolidate the
lower hinge�
Note: the refrigerator-freezer incline angle less 45°�
B� Swap over the position of the adjustable foot to the other side of the cabinet�
8� Move the hinge to another side of the box after removing the screws on the hinge;
Usescrewstofasten�
9� Install the hinge cover after fastening the hinge�
C� Swap over the position of the lower door block to the other side� Install the screws and
consolidate them�
5� Install the lower door and take care of its alignment with the appliance body�
6� Tighten the screws of the middle hinge on the reversible side�
7� Install the top door and remove the existing top door block� Install a new top door block
(notthesame one) on the reversible side� Screw it down�
1110
GB GB
3. Retire los tornillos inferiores, la bisagra y la pata de ajuste en la parte inferior del
aparato.
2� Remove three screws with suitable tools� Remove the upper hinge then take o carefully the
fridge compartment door�
3� Remove middle hinge, screws, screw caps and plastic inserting nails� Install them on the other
side� Take o the lower door and put it away�
Remove three screws
4� The disassembly and installation of bottom parts :
A� Disassemble lower hinge and screws� Then install them on the other side and consolidate the
lower hinge�
Note: the refrigerator-freezer incline angle less 45°�
B� Swap over the position of the adjustable foot to the other side of the cabinet�
8� Move the hinge to another side of the box after removing the screws on the hinge;
Usescrewstofasten�
9� Install the hinge cover after fastening the hinge�
C� Swap over the position of the lower door block to the other side� Install the screws and
consolidate them�
5� Install the lower door and take care of its alignment with the appliance body�
6� Tighten the screws of the middle hinge on the reversible side�
7� Install the top door and remove the existing top door block� Install a new top door block
(notthesame one) on the reversible side� Screw it down�
1110
GB GB
4. Retire la pata de ajuste del otro lado de la parte inferior y llévela hasta la posición
correspondiente en el lado opuesto de la parte inferior.
2� Remove three screws with suitable tools� Remove the upper hinge then take o carefully the
fridge compartment door�
3� Remove middle hinge, screws, screw caps and plastic inserting nails� Install them on the other
side� Take o the lower door and put it away�
Remove three screws
4� The disassembly and installation of bottom parts :
A� Disassemble lower hinge and screws� Then install them on the other side and consolidate the
lower hinge�
Note: the refrigerator-freezer incline angle less 45°�
B� Swap over the position of the adjustable foot to the other side of the cabinet�
8� Move the hinge to another side of the box after removing the screws on the hinge;
Usescrewstofasten�
9� Install the hinge cover after fastening the hinge�
C� Swap over the position of the lower door block to the other side� Install the screws and
consolidate them�
5� Install the lower door and take care of its alignment with the appliance body�
6� Tighten the screws of the middle hinge on the reversible side�
7� Install the top door and remove the existing top door block� Install a new top door block
(notthesame one) on the reversible side� Screw it down�
1110
GB GB
5. Fije los tornillos, el soporte de la bisagra y la pata de ajuste en el otro lado de la
parte inferior.
6. Coloque la puerta inferior en su lugar con cuidado. Asegúrese de que la puerta
está alineada tanto horizontal como verticalmente, de manera que las juntas
estén cerradas por todos los lados antes de unir completamente la bisagra central.
Vuelva a colocar la bisagra y atornille.
7. Coloque la puerta superior. Retire el tope de puerta. Coloque un tope de puerta
nuevo y atornille.

DO926BFK
64
2� Remove three screws with suitable tools� Remove the upper hinge then take o carefully the
fridge compartment door�
3� Remove middle hinge, screws, screw caps and plastic inserting nails� Install them on the other
side� Take o the lower door and put it away�
Remove three screws
4� The disassembly and installation of bottom parts :
A� Disassemble lower hinge and screws� Then install them on the other side and consolidate the
lower hinge�
Note: the refrigerator-freezer incline angle less 45°�
B� Swap over the position of the adjustable foot to the other side of the cabinet�
8� Move the hinge to another side of the box after removing the screws on the hinge;
Usescrewstofasten�
9� Install the hinge cover after fastening the hinge�
C� Swap over the position of the lower door block to the other side� Install the screws and
consolidate them�
5� Install the lower door and take care of its alignment with the appliance body�
6� Tighten the screws of the middle hinge on the reversible side�
7� Install the top door and remove the existing top door block� Install a new top door block
(notthesame one) on the reversible side� Screw it down�
1110
GB GB
8. Coloque las bisagras de la puerta superior, atornille y vuelva a colocar la chapita.
2� Remove three screws with suitable tools� Remove the upper hinge then take o carefully the
fridge compartment door�
3� Remove middle hinge, screws, screw caps and plastic inserting nails� Install them on the other
side� Take o the lower door and put it away�
Remove three screws
4� The disassembly and installation of bottom parts :
A� Disassemble lower hinge and screws� Then install them on the other side and consolidate the
lower hinge�
Note: the refrigerator-freezer incline angle less 45°�
B� Swap over the position of the adjustable foot to the other side of the cabinet�
8� Move the hinge to another side of the box after removing the screws on the hinge;
Usescrewstofasten�
9� Install the hinge cover after fastening the hinge�
C� Swap over the position of the lower door block to the other side� Install the screws and
consolidate them�
5� Install the lower door and take care of its alignment with the appliance body�
6� Tighten the screws of the middle hinge on the reversible side�
7� Install the top door and remove the existing top door block� Install a new top door block
(notthesame one) on the reversible side� Screw it down�
1110
GB GB
9. Con la puerta cerrada, compruebe que la puerta está alineada tanto horizontal
como verticalmente y que las juntas están cerradas por todos los lados antes de
jar completamente la bisagra superior. Si es necesario, ajuste las patas de ajuste.
PROBLEMAS Y SUS SOLUCIONES
Cuando tenga un problema con su frigoríco, compruebe las siguientes cuestiones
antes de ponerse en contacto con nuestro servicio de posventa.
1. El aparato no funciona.
El aparato no recibe electricidad, compruebe si el suministro eléctrico es correcto.
Asegúrese de insertar el enchufe en la toma de corriente.
Compruebe que se está utilizando el voltaje adecuado.
2. El frigoríco rebota frecuentemente.
Compruebe que la puerta está bien cerrada.
Ha introducido comida caliente en el frigoríco, por lo que el aparato debe trabajar
con más intensidad para enfriarla.
La puerta ha estado abierta demasiadas veces o durante demasiado tiempo.
El aparato se ha conectado al voltaje incorrecto.
El aparato está demasiado cerca de una fuente de calor o está expuesto directamente a
la luz solar.
3. La temperatura interior del frigoríco es demasiado alta.
Compruebe que el frigoríco tiene corriente.
Asegúrese de insertar el enchufe en la toma de corriente.
El ajuste de temperatura es demasiado bajo.

DO926BFK
65
www.domo-elektro.be
La puerta ha estado demasiado tiempo abierta o con mucha frecuencia.
El suministro de aire está bloqueado
Compruebe que el aparato se conecta a la tensión correcta
El aparato está demasiado cerca de una fuente de calor o está expuesto directamente a
la luz solar.
4. El congelador no está lo sucientemente frío
La puerta del congelador no se ha cerrado bien.
La puerta del congelador ha estado abierta demasiadas veces o durante demasiado
tiempo.
Compruebe que el aparato está conectado a la tensión correcta.

DO926BFK
66
BEZPEČNOSTNÍ POKYNY
• Přístroj musí být zapojen do uzemněné
zásuvky. V případě el. zkratu uzemnění
snižuje riziko úrazu el. proudem
• Nepoužívejte prodlužovací přívodní kabel.
• Do zásuvky zapojujte pouze tento přístroj.
Nikdy do stejné zásuvky nezapojujte
další spotřebiče. Nezapojujte přístroj
přes prodlužovací kabel ani nepoužívejte
rozdvojky zásuvky.
• Prázdná lednice může být pro děti velmi
nebezpečné lákadlo. Pokud lednici
nepoužíváte, tak zabezpečte dveře i různá
víka, tak aby přístroj nebyl pro nikoho
nebezpečný.
• Nenarušujte chladící okruh, aby neunikalo
chladivo.
• Pokud je přívodní kabel poškozen, musí být
vždy okamžitě opraven v odborném servise
nebo proškolenou osobou.
• Dejte pozor, ať se do lednice nikdo nezavírá.
• Pokud lednici nevyužíváte, nechte v ní
všechny police, aby to děti nelákalo vlézt

DO926BFK
67
www.domo-elektro.be
dovnitř.
• Před vyhozením staré nepoužívané lednice,
důkladně zabezpečte nebo odmontujte dveře.
• Přístroj smí používat pouze děti starší 8 let.
Osoby se sníženou psychickou, motorickou
nebo mentální schopností smí používat
přístroj pouze za neustálého dohledu
odpovědné osoby, která je seznámena s
pravidly používání a případným rizikem.
• Děti si s přístrojem nesmí hrát.
• Čistění a běžnou údržbu smí provádět pouze
osoby starší 8 let a při tom být pod dohledem.
• Přístroj je určen pro používání v
domácnostech a podobných prostředích, tak
jako je:
• kuchyňky v obchodech, kancelářích atd.
• chaty, chalupy
• hotely, penziony a jiné dočasné ubytování
POZOR: Aby se předešlo rizikům úrazu
(poškození), nesmí být přístroj používán se
žádnou externí součástí (např. časovač, vypínač,
přepínač …)

DO926BFK
68
ČÁSTI
1. Nastavení teploty se žárovkou
2. Poličky
3. Víko poličky na zeleninu
4. Přihrádka na zeleninu
5. Šuplíky / přihrádky
6. Nastavitelné nožičky
7. Poličky ve dveřích
8. Polička na láhve
Uvedení do provozu
• Lednici rozbalte, vyjměte veškeré
příslušenství zevnitř přístroje. Z vnější
strany odlepte ochranné a reklamní polepy.
Vnější povrch důkladně otřete jemným
suchým hadrem a vnitřek můžete otřít
jemným navlhčeným hadříkem. Neumisťujte
lednici do těsné blízkosti tepelných zdrojů ani na přímé sluneční záření. Zadní
část ledničky musí být minimálně 127 mm ode zdi, tak aby mohla být zaručená
optimální cirkulace vzduchu.
Umístění:
• Vyberte rovnou podlahu, s vysokou nosností.
• Nechte alespoň 13 cm mezeru mezi zadní stranou a zdí.
• Vyvarujte se umístění na přímý sluneční svit. Přímé slunce způsobuje změnu
barvy povrchu. Zvýšené teplo v okolí zvyšuje spotřebu přístroje a může zkracovat
jeho životnost.
• Vyvarujte se velmi vlhkému prostředí. Velká vlhkost má za následek zvýšené
namražování vnitřního prostoru a výparníku.
• Před zapojením si důkladně zkontrolujte, zda parametry vaší zástrčky
korespondují s požadavky na přístroji. Rozdílné parametry el. sítě mohou přístroj
poškodit.
• Lednici můžete odpojit od elektrické energie pouze vypojením z el. sítě, proto by
měla být zástrčka stále přístupná. Chcete-li lednici odpojit, nastavte ovladač do
polohy OFF a poté odpojte z el. sítě.
• Lednice musí být uzemněna. Výrobce ani prodejce není schopen krýt rizika,
pokud tomu tak není.
• Pokud nemáte zcela rovnou podlahu, můžete nastavit výšku předních nožiček a
nerovnosti vyrovnat.
• Po umístění nechte přístroj alespoň 3 hodin stát v klidu a až potom ho zapněte. Při
stěhování se rozvířilo chladivo a je potřeba, aby se znovu usadilo.
ÚDRŽBA
Čištění
1
2
3
4
5
6
7
8

DO926BFK
69
www.domo-elektro.be
Nepoužívejte žádná drsná čistidla, která mohou poškodit povrch přístroje.
1. Nastavení teploty otočte do polohy OFF a vypojte zástrčku z el. sítě.
2. Všechno jídlo z lednice vyjměte a nechte někde v chladu.
3. Lednici vytřete jemným vlhkým hadříkem. Můžete použít i čistící prostředek.
4. Důkladně otřete i těsnění na dveřích. Těsnění potom důkladně vysušte.
5. Po vyčištění lednici opět zapojte do el. sítě a nastavte na požadovanou chladící
teplotu.
6. Po chvíli vložte všechno jídlo zpět do lednice.
Výměna žárovky osvětlení
POZOR: Před výměnou nejdříve vypojte lednici z el. sítě.
1. Zatlačením směrem nahoru odejměte kryt světla.
2. Vyšroubujte starou žárovku a poté našroubujte novou 15 W žárovku (závit E14).
3. Opět zakryjte krytem.
ODMRAŽOVÁNÍ
Lednice se odmražuje plně automaticky.
Pokud je lednice spuštěna a chladí, tak se na zadní straně agregátu objevuje jinovatka
nebo krůpěje vody, to je normální a není potřeba vlhkost nijak utírat. Zadní panel se
odmražuje automaticky a zkondenzovaná voda stéká přímo do výparníku, odkud se
odpařuje.
Jakákoli vrstva namrzlého ledu zhoršuje účinnost mrazáku a zvyšuje spotřebu energie.
Pravidelně odstraňujte namrzlou vrstvu a váš mrazák bude optimálně pracovat. Na
odstraňování nepoužívejte žádné ostré předměty, abyste nepoškodili chladící okruh
1. Vyndejte všechny zmražené potraviny a na chvíli vložte do studené místnosti.
2. Odpojte přístroj z el. sítě
3. Pro urychlení, můžete dovnitř do mrazáku vložit nádobu s horkou vodou a nechat
ji stát na dně mrazáku. Velké kusy ledu odstraňte ručně.
4. Vnitřní stěny setřete vlhkým hadříkem.
5. Celý vnitřek mrazáku vytřete do sucha.
6. Po vyčištění mrazák opět zapojte do zásuvky a nastavte si požadovanou teplotu.
TEPLOTA OKOLÍ
Lednice je zkonstruována a navrhnuta na používání v místech s průměrnou teplotou
16 – 38 °C. Pokud je tato teplota v okolí překročena (nižší nebo vyšší), tak nemusí
lednice chladit správně.
PŘED VLOŽENÍM JÍDLA DO LEDNICE
• Odlepte veškeré reklamní a ochranné polepy.
• Vnitřek lednice vytřete vlhkým hadříkem, abyste vytřeli možné nečistoty a prach
z dopravy.
• Lednici nechte alespoň 2-3 hodiny v klidu odstát a běžet naprázdno. Takto

DO926BFK
70
necháte nachladit vnitřní prostor.
NASTAVENÍ TEPLOTY
Uvnitř v lednici je nastavitelný termostat, jeho otáčením si navolte požadovanou
teplotu. Termostat si nastavte na Vámi požadovanou teplotu.
• OFF – vypnuto
• MIN – nejteplejší nastavení (málo chladí)
• MED – střední teplota
• MAX – maximální chlazení
• Při nastavení do pozice OFF lednice vůbec nechladí (chladící systém je vypnutý),
ale přívod elektřiny není přerušen.
• Teplota a doba nachlazení je ovlivňována okolní teplotou i tím, jak často se
otvírají dveře.
• Pokud používáte lednici poprvé po odmražování, nastavte termostat na 2
hodiny na maximální chlazení, poté vložte potraviny a termostat si upravte na
požadovanou hodnotu.
HÝBÁNÍ S LEDNICÍ
Pokud se přístroj z jakéhokoli důvodu vypnul, tak počkejte alespoň 10 min před jeho
opětovným zapnutím. Chladící systém potřebuje vyrovnat tlaky uvnitř chladícího
okruhu.
• Přístroj vypněte a vypojte z el. sítě. Z lednice vyndejte všechno jídlo. Vyndejte
nebo zajistěte všechny volné poličky a regály proti pohybu.
• Přemístěte na nové místo a uveďte znovu do provozu. Po stěhování lednice ji
nechte alespoň 10 min v klidu stát, a až potom ji zapojte.
Lednice používá chladivo R600a. Chladivo R600a je isobutan, který je šetrný k
životnímu prostředí, ale zároveň náchylný ke vznícení. Proto byste měli být velmi
opatrní a dbát na to, aby se chladící systém nepoškodil. V případě poškození a
nechtěného úniku chladiva, zamezte styku s otevřeným ohněm či se zdrojem tepla a
místnost rychle vyvětrejte.
JÍDLO V LEDNICI
Lednice prodlužuje trvanlivost jídla (zejména jídla podléhající rychlé zkáze).
Pokud vložíte čerstvé potraviny, tak ty vydrží v lednici nejdéle.
Skladujte pouze jídlo čerstvé.
• Před vložením do lednice jídlo zabalte nebo zakryjte, jinak by jídlo vysychalo a
měnilo barvu a samozřejmě ztrácelo na čerstvosti i chuti.
• Potraviny se silným aroma důkladně zabalte, aby se vůně/zápach nepřenesla na
ostatní potraviny.

DO926BFK
71
www.domo-elektro.be
• Před vložením do lednice, nechte všechny potraviny vychladnout.
ZAMRAZOVÁNÍ A SKLADOVÁNÍ V MRAZÁKU
Přístroj můžete využít:
• uchovávat hluboce zamražené potraviny
• výroba kostek ledu
• zamražovat potraviny
UPOZORNĚNÍ: vždy se přesvědčte, že jste důkladně zavřeli dveře.
Uchování mražených potravin
• Obal ani krabička potravin nesmí být poškozen
• Popisujte si balíčky s informacemi o datem trvanlivosti / vložení atd …
• Pokud možno, všechny zmražené potraviny přenášejte z obchodu v chladící tašce
a co nejrychleji je vložte do mrazáku.
• Uchovávejte v chladu nižším než -18 °C. Zbytečně neotvírejte dveře mrazáku
Zamrazování čerstvých potravin
Zamražujte pouze čerstvé ovoce ve 100% kvalitě. Aby se zachovala co nejlepší chuť,
barva i výživová hodnota, doporučujeme všechnu zeleninu před zmrazením lehce z
blanšírovat.
Lilek, papriky, cukety ani chřest blanšírování nepotřebují.
POZNÁMKA: Potraviny, které se chystáte mrazit, držte mimo již zamražené suroviny.
• Následující potraviny jsou vhodné ke zmražení: cukrářské výrobky, ryby, maso,
drůbež, ovoce, zelenina, sýry, máslo, zbytky vařených jídel, polévky, dušená masa
atd …
• Následující potraviny nejsou vhodné ke zmražení: Druhy zeleniny, které se
konzumují syrové (jako např. ledový salát, ředkev, hroznové víno, celá jablka,
hrušky, broskve), vařená vejce natvrdo, jogurt, majonéza, smetana, atd...
Balení potravin ke zmražení
Aby potraviny v mrazáku neztrácely chuť a nevysychaly, musí být zabaleny.
1. Potraviny vložte do obalu.
2. Vytlačte co nejvíce přebytečného vzduchu.
3. Obal uzavřete.
4. Balíček popište datem spotřeby / vložení.
Do čeho nejlépe balit:
Plastová potravinová fólie, sáčky do mrazáku, alobal, nádoby vhodné do mrazáku.
Všechny výše popsané jsou k dostání v běžných obchodech s domácími potřebami.
Doporučená doba uchování v mrazáku
Níže zmíněné časy jsou orientační a závisí na typu potraviny. Jídlo obecně může být v
mrazáku 1-12 měsíců (při teplotě pod -18 °C)

DO926BFK
72
Druh potraviny Doba
Slanina, dušené maso se zeleninou, mléko 1 měsíc
Chleba, zmrzlina, párky, koláče, předvařené měkkýši, tučné ryby 2 měsíce
Málo tučné ryby, hluboce zamražené měkkýši, pizza, mufny 3 měsíce
Šunka, sušenky, hovězí/skopové kotlety, naporcovaná drůběž 4 měsíce
Máslo, zelenina (blanšírovaná), vejce a žloutky, vařený rak, mleté
masi (syrové), vepřové (syrové)
6 měsíce
Ovoce (sušené, syrup), vaječné bílky, hovězí (syrové), celé kuře,
skopové (syrové), ovocné koláče
12 měsíce
POZOR: Pokud zamražujete čerstvé potraviny s označením datem spotřeby, musí je
zamrazit před tímto datem. Zkontrolujte, zda potraviny už nebyly jednou zamražené,
neboť každé jídlo se smí zamražovat pouze jednou.
Zabezpečení při odjezdu na delší dovolenou
Při krátkodobém odjezdu nechte vše tak jak je. Pokud plánuje odjet na delší čas, tak
nezapomeňte:
• vyndat z lednice všechno jídlo
• odpojit přístroj z el. sítě
• vytřít vnitřek lednice
• nechat otevřené dveře, aby se vyvětrala vlhkost
VÝPADEK PROUDU
Výpadek proudu je převážně kratší než 1-2 hodiny, na takto krátký čas se neděje
nic špatného, nižší teplota se v uzavřené lednici udrží. Nesmí se však otevírat dveře
lednice a zbytečně větrat. Během delšího výpadku proudu můžete do lednice vkládat
větší množství ledu, které vnitřní prostor částečně ochladí.
Pokud je výpadek kratší než 15 hodin, tak by mělo všechno zamražené jídlo vydržet a
udržet si svoji kvalitu.
Pokud již nějaké potraviny kompletně rozmrzly, nikdy je nezamražujte zpět.
NĚKOLIK RAD PRO SPRÁVNÉ ZAPOJENÍ A POUŽÍVÁNÍ LEDNICE
• Do lednice nevkládejte teplé jídlo
• Nápoje skladujte v uzavřených nádobách
• Jídlo pro delší uskladnění v lednici musí být překryto a zabaleno ve fólii nebo
alobalu.
• Do lednice nikdy neukládejte zkažené potraviny
• Nikdy lednici nepřeplňujte, nesnažte se do ní nacpat co nejvíce jídla.
• Zbytečně neotvírejte dveře, aby se nevětral vnitřní prostor.
• UPOZORNĚNÍ: Lednici držte v dostatečné vzdálenosti od ohně i hořlavin
• UPOZORNĚNÍ: Není určeno pro venkovní použití (kromě velkých stanů)

DO926BFK
73
www.domo-elektro.be
• UPOZORNĚNÍ: Lednice není určena pro použití v dopravních prostředcích.
• Jednou zmražené a rozmražené potraviny už znovu nemažte.
• Do mrazáku nevkládejte žádné perlivé tekutiny.
• Při konzumaci zmrzlých potravin (lízatka, nanuky, ovoce) buďte opatrní, abyste si
nezpůsobili omrzliny.
• Do mrazáku nesahejte mokrýma rukama.
• Mrazák je vybaven kompresorem, který při sepnutí hučí. Tento hluk je běžný.
• Do mrazáku nevkládejte žádné teplé potraviny.
• V mrazáku by všechny potraviny měly být zabalené nebo přikryté.
• Balíčky s jídlem nemačkejte k sobě, mrazák nepřeplňujte, aby mohl cirkulovat
vzduch.
• Nenechávejte otevřené dveře příliš dlouho. Vždy se ujistěte, že jsou dveře
důkladně zavřené.
• Doporučujeme: balíčky jídel popisovat i datum doporučené spotřeby.
PŘEHOZENÍ PANTŮ DVEŘÍ
Pokud potřebujete přehodit otevírání dveří na opačnou stranu, musí se přemontovat
panty. Doporučujeme, pozvat si servisního mechanika nebo proškolenou osobu
z okolí. Ještě dříve než začněte panty přemontovávat, lednici vypněte a vše z ní
vyndejte pryč. Budete potřebovat křížový šroubovák a klíč (ani jedno není dodáno v
balení).
1. Odkryjte horní kryt na pantu, tak aby se mohly povolit šrouby. Šrouby
odšroubujte a poté sundejte i horní pant, který drží dveře na svém místě. Dveře
lehce nadzvedněte, vyndejte a postavte stranou na měkké místo, tak aby se
nepoškrábaly.
SHOPPING FOR FROZEN FOOD
The appliance is rated as a 4 star freezer and can freeze fresh food and store pre-frozen food� When
you are buying frozen food, look at the Storage Guidelines on the packaging� You will be able to store
each item of frozen food for the period shown against the 4 star rating�
FREEZING FRESH FOOD
Ensure that your freezing operations are carried out under the most hygienic conditions as freezing
alone does not improve the food�
Never put hot or even warm foodstus into the freezer�
Prior to freezing the food, food should always be covered tightly with foil, plastic lm, placed in
plastic bags or stored in airtight containers� This will prevent food from dehydrating and to prevent
any strong odors of some foods transferring to milder ones�
To freeze raw meat, wrap in plastic bags or in airtight containers and place on the lowest shelf to
avoid cross contamination�
Do not allow raw meat to come into contact with cooked foods� For safety, only store raw meat for
two or three days� Fruit and vegetables should be thoroughly cleaned and placed in the crisper�
Milk and other liquids should be sealed with lids and placed in the bottle shelf in the door�
NOTE: The ambient temperature of the freshly stored food and how often the door is opened aect
the temperature in the refrigerator� If required, change the thermostat temperature settings�
Reverse door
STORING FROZEN FOOD
All frozen food you purchase should be placed in the freezer as soon as possible to avoid them from
defrosting and spoiling�
All storage recommendations printed on the packaging of frozen food by the manufacturer should
always be followed�
When using the freezer for the rst time or after defrosting, set the thermostat knob to the maximum
position for at least 2 hours before introducing food to be stored, and then readjust it to the normal
position�
The technical data mentioned in the ‘Specications’ are obtained in the case that the freezing drawers
are removed�
MAKING ICE CUBES
1� Fill the ice tray with ¾ full of clean water�
2� Place the tray in the top freezing drawer�
3� Close the door�
To remove the ice cubes from the tray, put the tray under running water for a while and then twist
the tray slightly to loosen the ice cubes�
Follow the following stages to reverse the door from its initial position�
1� Remove the hinge cover�
Remove the hinge cover
98
GB GB
2. Odšroubujte prostřední držák/pant a přemístěte jej na druhou stranu spotřebiče.
Spodní dveře mrazáku lehce nadzvedněte, vyndejte a postavte stranou na měkké
místo, tak aby se nepoškrábaly.
2� Remove three screws with suitable tools� Remove the upper hinge then take o carefully the
fridge compartment door�
3� Remove middle hinge, screws, screw caps and plastic inserting nails� Install them on the other
side� Take o the lower door and put it away�
Remove three screws
4� The disassembly and installation of bottom parts :
A� Disassemble lower hinge and screws� Then install them on the other side and consolidate the
lower hinge�
Note: the refrigerator-freezer incline angle less 45°�
B� Swap over the position of the adjustable foot to the other side of the cabinet�
8� Move the hinge to another side of the box after removing the screws on the hinge;
Usescrewstofasten�
9� Install the hinge cover after fastening the hinge�
C� Swap over the position of the lower door block to the other side� Install the screws and
consolidate them�
5� Install the lower door and take care of its alignment with the appliance body�
6� Tighten the screws of the middle hinge on the reversible side�
7� Install the top door and remove the existing top door block� Install a new top door block
(notthesame one) on the reversible side� Screw it down�
1110
GB GB
3. Odšroubujte spodní pant dveří i přední (výškově nastavitelnou) nožičku.

DO926BFK
74
2� Remove three screws with suitable tools� Remove the upper hinge then take o carefully the
fridge compartment door�
3� Remove middle hinge, screws, screw caps and plastic inserting nails� Install them on the other
side� Take o the lower door and put it away�
Remove three screws
4� The disassembly and installation of bottom parts :
A� Disassemble lower hinge and screws� Then install them on the other side and consolidate the
lower hinge�
Note: the refrigerator-freezer incline angle less 45°�
B� Swap over the position of the adjustable foot to the other side of the cabinet�
8� Move the hinge to another side of the box after removing the screws on the hinge;
Usescrewstofasten�
9� Install the hinge cover after fastening the hinge�
C� Swap over the position of the lower door block to the other side� Install the screws and
consolidate them�
5� Install the lower door and take care of its alignment with the appliance body�
6� Tighten the screws of the middle hinge on the reversible side�
7� Install the top door and remove the existing top door block� Install a new top door block
(notthesame one) on the reversible side� Screw it down�
1110
GB GB
4. Z podstavce vyšroubujte i druhou přední nožičku a přendejte na druhou stranu.
2� Remove three screws with suitable tools� Remove the upper hinge then take o carefully the
fridge compartment door�
3� Remove middle hinge, screws, screw caps and plastic inserting nails� Install them on the other
side� Take o the lower door and put it away�
Remove three screws
4� The disassembly and installation of bottom parts :
A� Disassemble lower hinge and screws� Then install them on the other side and consolidate the
lower hinge�
Note: the refrigerator-freezer incline angle less 45°�
B� Swap over the position of the adjustable foot to the other side of the cabinet�
8� Move the hinge to another side of the box after removing the screws on the hinge;
Usescrewstofasten�
9� Install the hinge cover after fastening the hinge�
C� Swap over the position of the lower door block to the other side� Install the screws and
consolidate them�
5� Install the lower door and take care of its alignment with the appliance body�
6� Tighten the screws of the middle hinge on the reversible side�
7� Install the top door and remove the existing top door block� Install a new top door block
(notthesame one) on the reversible side� Screw it down�
1110
GB GB
5. Spodní pant obraťte a společně s přední nožkou našroubujte na opačnou stranu
lednice než byla původně. Vše důkladně dotáhněte.
6. Na spodní pant nasaďte dveře. Zkontrolujte zda zavřené dveře těsní po celém
svém obvodu. Pokud ano, tak je upevněte pomocí středového pantu a vše
důkladně dotáhněte.
7. Nasaďte i horní dveře. Zarážku dveří přehoďte na druhou stranu a vše důkladně
dotáhněte.
2� Remove three screws with suitable tools� Remove the upper hinge then take o carefully the
fridge compartment door�
3� Remove middle hinge, screws, screw caps and plastic inserting nails� Install them on the other
side� Take o the lower door and put it away�
Remove three screws
4� The disassembly and installation of bottom parts :
A� Disassemble lower hinge and screws� Then install them on the other side and consolidate the
lower hinge�
Note: the refrigerator-freezer incline angle less 45°�
B� Swap over the position of the adjustable foot to the other side of the cabinet�
8� Move the hinge to another side of the box after removing the screws on the hinge;
Usescrewstofasten�
9� Install the hinge cover after fastening the hinge�
C� Swap over the position of the lower door block to the other side� Install the screws and
consolidate them�
5� Install the lower door and take care of its alignment with the appliance body�
6� Tighten the screws of the middle hinge on the reversible side�
7� Install the top door and remove the existing top door block� Install a new top door block
(notthesame one) on the reversible side� Screw it down�
1110
GB GB
8. Horní dveře upevněte horním pantem a ten důkladně přišroubujte. Pant překryjte
horním krytem, tak jak bylo z počátku.
2� Remove three screws with suitable tools� Remove the upper hinge then take o carefully the
fridge compartment door�
3� Remove middle hinge, screws, screw caps and plastic inserting nails� Install them on the other
side� Take o the lower door and put it away�
Remove three screws
4� The disassembly and installation of bottom parts :
A� Disassemble lower hinge and screws� Then install them on the other side and consolidate the
lower hinge�
Note: the refrigerator-freezer incline angle less 45°�
B� Swap over the position of the adjustable foot to the other side of the cabinet�
8� Move the hinge to another side of the box after removing the screws on the hinge;
Usescrewstofasten�
9� Install the hinge cover after fastening the hinge�
C� Swap over the position of the lower door block to the other side� Install the screws and
consolidate them�
5� Install the lower door and take care of its alignment with the appliance body�
6� Tighten the screws of the middle hinge on the reversible side�
7� Install the top door and remove the existing top door block� Install a new top door block
(notthesame one) on the reversible side� Screw it down�
1110
GB GB
9. Takto nasazené a zavřené dveře zkontrolujte, zda těsní po celém svém obvodu.
Pokud je potřeba, můžete usazení dveří

DO926BFK
75
www.domo-elektro.be
ŘEŠENÍ MOŽNÝCH PROBLÉMŮ
Stává se, že nastane problém, který lze snadno vyřešit i bez odborné pomoci.
Nejdříve zkontrolujte níže, zda se nejedná právě o tento typ problému.
1. Přístroj nefunguje
• zkontrolujte přívod energie a zda nevypadl el. proud
• zapojte do zásuvky se správným napětím
2. Chladící systém spíná velmi často
• zkontrolujte nastavení vnitřní teploty, pokud je potřeba tak přenastavte
• důkladně zavřete dveře a zkontrolujte zda všude těsní
• nevkládejte dovnitř lednice teplé jídlo
• nenechávejte příliš dlouho otevřené dveře, omezte jejich otevírání
• nechávejte lednici blízko tepla. Zamezte aby na ni nesvítilo přímé slunce.
3. Teplota uvnitř přístroje je velmi nízká
• překontrolujte a nastavte správnou teplotu uvnitř lednice
4. Uvnitř lednice není dostatečně chladno
• zkontrolujte přívod energie a zda nevypadl el. proud
• zapojte / zapněte lednici
• překontrolujte a nastavte správnou teplotu uvnitř lednice
• důkladně zavřete dveře
• nenechávejte příliš dlouho otevřené dveře, omezte jejich otevírání
• zajistěte, aby bylo kolem lednice dostatek místa na cirkulaci vzduchu
• zapojte do zásuvky se správným napětím
• nevkládejte dovnitř lednice teplé jídlo
5. Mrazák nemrazí
• překontrolujte a nastavte správnou teplotu uvnitř
• důkladně zavřete dveře
• zajistěte, aby byly potraviny před vložením dostatečně chladné
• nenechávejte příliš dlouho otevřené dveře
• zapojte do zásuvky se správným napětím

DO926BFK
76
BEZPEČNOSTNÉ POKYNY
• Prístroj musí byť zapojený do uzemnenej zásuvky. V
prípade el. skratu uzemnenie znižuje riziko úrazu el.
prúdom.
• Nepoužívajte predlžovací prívodný kábel.
• Do zásuvky zapájajte len tento prístroj. Nikdy do rovnakej
zásuvky nezapájajte ďalšie spotrebiče. Pripojenie práčky
cez predlžovací kábel ani nepoužívajte rozdvojky zásuvky.
• Prázdna chladnička môže byť pre deti veľmi nebezpečné
lákadlo. Ak chladničku nepoužívate, tak zabezpečte
dvere aj rôzne veka, tak aby prístroj nebol pre nikoho
nebezpečný.
• Nezasahujte chladiaci okruh, aby neunikalo chladivo.
• Pokiaľ je prívodný kábel poškodený, musí byť vždy
okamžite opravený v odbornom servise alebo preškolenou
osobou.
• Dajte pozor, nech sa do chladničky nikto nezatvára.
• Ak chladničku nevyužívate, nechajte v nej všetky police,
aby to deti nelákalo vliezť dovnútra.
• Pred vyhodením staré nepoužívané chladničky, dôkladne
zabezpečte alebo odmontujte dvere.
• Prístroj smie používať iba deti staršie ako 8 rokov. Osoby
so zníženou psychickou, motorickú alebo mentálnou
schopnosťou smie používať prístroj iba za neustáleho
dohľadu zodpovednej osoby, ktorá je oboznámená s
pravidlami používania a prípadným rizikom.
• Deti si s prístrojom nesmie hrať.
• Čistenie a bežnú údržbu môžu vykonávať len osoby
staršie ako 8 rokov a pri tom byť pod dohľadom.
• Prístroj je určený pre používanie v domácnostiach a
podobných prostrediach, tak ako je:

DO926BFK
77
www.domo-elektro.be
- kuchynky v obchodoch, kanceláriách atď.
- chaty, chalupy
- hotely, penzióny a iné dočasné ubytovanie
• POZOR: Aby sa predišlo riziku úrazu (poškodenie),
nesmie byť prístroj používaný sa žiadnu externú súčasťou
(napr. Časovač, vypínač,
prepínač ...)
ČASTI
1. Nastavenie teploty sa žiarovkou
2. Poličky
3. Veko poličky na zeleninu
4. Priehradka na zeleninu
5. Šuplíky / priehradky
6. Nastaviteľné nožičky
7. Poličky vo dverách
8. Polička na fľaše
UVEDENIE DO PREVÁDZKY
Chladničku rozbaľte, vyberte všetko príslušenstvo
zvnútra prístroja. Z vonkajšej strany odlepte
ochranné a reklamné polepy. Vonkajší povrch
dôkladne utrite suchou handrou a vnútro môžete utrieť jemnou navlhčenou
handričkou. Neumiestňujte chladničku do tesnej blízkosti tepelných zdrojov ani na
priame slnečné žiarenie. Zadná časť chladničky musí byť minimálne 127 mm od
steny, tak aby mohla byť zaručená optimálna cirkulácia vzduchu.
• Umiestnenie:
• Vyberte rovnú podlahu, s vysokou nosnosťou.
• Nechajte aspoň 13 cm medzeru medzi zadnou stranou a stenou.
• Vyvarujte sa umiestnenia na priamy slnečný svit. Priame slnko spôsobuje zmenu
farby povrchu. Zvýšené teplo v okolí zvyšuje spotrebu prístroja a môže skracovať
jeho životnosť.
• Vyvarujte sa veľmi vlhkému prostrediu. Veľká vlhkosť má za následok zvýšené
namrazovanie vnútorného priestoru a výparníka.
• Pred zapojením si dôkladne skontrolujte, či parametre vašej zástrčky
korešpondujú s požiadavkami na prístroji. Rozdielne parametre el. siete môžu
prístroj poškodiť.
• Lednici môžete odpojiť od elektrickej energie iba vypojením z el. siete, preto by
mala byť zástrčka stále prístupná. Ak chcete chladničku odpojiť, nastavte ovládač
1
2
3
4
5
6
7
8

DO926BFK
78
do polohy OFF a odpojte z el. siete.
• Chladnička musí byť uzemnená. Výrobca ani predajca nie je schopný kryť riziká,
ak to tak nie je.
• Ak nemáte úplne rovnú podlahu, môžete nastaviť výšku predných nožičiek a
nerovnosti vyrovnať.
• Po umiestnení nechajte prístroj aspoň 3 hodín stáť v pokoji a až potom ho zapnite.
Pri sťahovaní sa rozvírilo chladivo a je potrebné, aby sa znovu usadilo.
ÚDRŽBA
Čistenie
• Nepoužívajte žiadna drsná čistidlá, ktoré môžu poškodiť povrch prístroja.
• Nastavenie teploty otočte do polohy OFF a odpojte zástrčku z el. siete.
• Všetko jedlo z chladničky vyberte a nechajte niekde v chlade.
• Lednici vytrite jemnou vlhkou handričkou. Môžete použiť aj čistiaci prostriedok.
• Dôkladne utrite aj tesnenia na dverách. Tesnenie potom dôkladne vysušte.
• Po vyčistení chladničku opäť zapojte do el. siete a nastavte na požadovanú
chladiacu teplotu.
• Po chvíli vložte všetko jedlo späť do chladničky.
Výmena žiarovky osvetlenia
POZOR: Pred výmenou najskôr vypojte chladničku z el. siete.
1. Zatlačením smerom nahor odstráňte kryt svetla.
2. Vyskrutkujte starú žiarovku a potom naskrutkujte novú 15 W žiarovku (závit
E14).
3. Opäť zakryte krytom.
ODMRAZOVANIE
Chladnička sa odmrazuje plne automaticky.
Ak je chladnička spustená a chladí, tak sa na zadnej strane agregátu objavuje inovať
alebo kropaje vody, to je normálne a nie je potreba vlhkosť nijako utierať. Zadný
panel sa odmrazuje automaticky a roztopená voda steká priamo do výparníka, odkiaľ
sa odparuje.
Akákoľvek vrstva namrznutého ľadu zhoršuje účinnosť mrazničky a zvyšuje spotrebu
energie. Pravidelne odstraňujte zamrznutú vrstvu a vaša mraznička bude optimálne
pracovať. Na odstraňovanie nepoužívajte žiadne ostré predmety, aby ste nepoškodili
chladiaci okruh.
1. Vyberte všetky zmrazené potraviny a na chvíľu vložte do studenej miestnosti.
2. Odpojte prístroj z el. siete
3. Pre urýchlenie, môžete dovnútra do mrazničky vložiť nádobu s horúcou vodou a
nechať ju stáť na dne mrazničky. Veľké kusy ľadu odstráňte ručne.
4. Vnútorné steny zotrite vlhkou handričkou.
5. Celý vnútro mrazničky vytrite dosucha.

DO926BFK
79
www.domo-elektro.be
6. Po vyčistení mrazničku opäť zapojte do zásuvky a nastavte si požadovanú teplotu.
TEPLOTA OKOLIE
Chladnička je skonštruovaná a navrhnutá na používanie v miestach s priemernou
teplotou 16 - 38 °C. Ak je táto teplota v okolí prekročená (nižšie alebo vyššie), tak
nemusí chladnička chladiť správne.
PRED VLOŽENÍM JEDLÁ DO CHLADNIČKY
Odlepte všetky reklamné a ochranné polepy. Vnútro chladničky vytrite vlhkou
handričkou, aby ste vytreli možné nečistoty a prach z dopravy. Lednici nechajte
aspoň 2-3 hodiny v pokoji odstáť a bežať naprázdno. Takto necháte nachladit vnú-
torný priestor.
NASTAVENIE TEPLOTY
Vnútri v chladničke je nastaviteľný termostat, jeho otáčaním si navoľte požadovanú
teplotu. Termostat si nastavte na Vami požadovanú teplotu.
• OFF - vypnuté
• MIN - najteplejšie nastavenie (málo chladí)
• MED - stredná teplota
• MAX - maximálne chladenie
• Pri nastavení do pozície OFF chladnička vôbec nechladí (chladiaci systém je
vypnutý), ale prívod elektriny nie je prerušený.
• Teplota a doba nachladnutí je ovplyvňovaná okolitou teplotou aj tým, ako často sa
otvárajú dvere.
• Pokiaľ používate chladničku prvýkrát po odmrazovanie, nastavte termostat na 2
hodiny na maximálne chladenie, potom vložte potraviny a termostat si upravte na
požadovanú hodnotu.
HÝBANIE S CHLADNIČKOU
Ak sa prístroj z akéhokoľvek dôvodu vypol, tak počkajte aspoň 10 min pred
jeho opätovným zapnutím. Chladiaci systém potrebuje vyrovnať tlaky vo vnútri
chladiaceho okruhu.
• Prístroj vypnite a vypojte z el. siete. Z chladničky vyberte všetko jedlo. Vyberte
alebo zabezpečte všetky voľné poličky a regály proti pohybu.
• Premiestnite na nové miesto a uveďte znovu do prevádzky. Po sťahovaní
chladničky ju nechajte aspoň 10 min v kľude stáť, a až potom ju zapojte.
Chladnička používa chladivo R600a. Chladivo R600a je izobután, ktorý je šetrný k
životnému prostrediu, ale zároveň náchylný k vznieteniu. Preto by ste mali byť veľmi
opatrní a dbať na to, aby sa chladiaci systém nepoškodil. V prípade poškodenia a
nechceného úniku chladiva, zamedzte styku s otvoreným ohňom či so zdrojom tepla a
miestnosť rýchlo vyvetrajte.

DO926BFK
80
JEDLO V CHLADNIČKE
Chladnička predlžuje trvanlivosť jedla (najmä jedlá podliehajúce skaze).
Ak vložíte čerstvé potraviny, tak tie vydržia v chladničke najdlhšie.
Skladujte len jedlo čerstvé.
• Pred vložením do chladničky jedlo zabaľte alebo zakryte, inak by jedlo vysýchalo
a menilo farbu a samozrejme strácalo na čerstvosti i chuti.
• Potraviny sa silnou arómou dôkladne zabaľte, aby sa vôňa / zápach nepreniesla na
ostatné potraviny.
• Pred vložením do chladničky, nechajte všetky potraviny vychladnúť.
ZAMRAZOVANIE A SKLADOVANIE V MRAZNIČKE
Prístroj môžete využiť:
• uchovávať hlboko zamrazené potraviny
• výroba kociek ľadu
• zamrazovať potraviny
UPOZORNENIE: vždy sa presvedčte, že ste dôkladne zavreli dvere.
Uchovanie zmrazených potravín
• Obal ani krabička potravín nesmie byť poškodený
• Popisujte si balíčky s informáciami o dátumom trvanlivosti / vloženie atd ...
• Pokiaľ možno, všetky zmrazené potraviny prenášajte z obchodu v chladiacej
taške a čo najrýchlejšie ich vložte do mrazničky.
• Uchovávajte v chlade nižším ako -18 ° C. Zbytočne neotvárajte dvere mrazničky.
Zamrazovanie čerstvých potravin
Zamrazujte iba čerstvé ovocie v 100% kvalite. Aby sa zachovala čo najlepšiu chuť,
farba i výživová hodnota, odporúčame všetku zeleninu pred zmrazením ľahko z
blanšírovať.
Baklažán, papriky, cukety ani špargľa blanšírovanie nepotrebujú.
POZNÁMKA: Potraviny, ktoré sa chystáte mraziť, držte mimo už zamrazené
suroviny.
• Nasledujúce potraviny sú vhodné na zmrazenie: cukrárske výrobky, ryby, mäso,
hydina, ovocie, zelenina, syry, maslo, zvyšky varených jedál, polievky, dusená
mäsa atď ...
• Nasledujúce potraviny nie sú vhodné na zmrazenie: Druhy zeleniny, ktoré sa
konzumujú surové (ako napr. Ľadový šalát, reďkev, hrozno, celé jablká, hrušky,
broskyne), varené vajcia natvrdo, jogurt, majonéza, smotana, atď ...
Balenie potravín na zmrazenie
Aby potraviny v mrazničke nestrácali chuť a nevysychali, musia byť zabalené.
1. Potraviny vložte do obalu.

DO926BFK
81
www.domo-elektro.be
2. Vytlačte čo najviac prebytočného vzduchu.
3. Obal uzavrite.
4. Balíček popíšte dátumom spotreby / vloženie.
Do čoho najlepšie baliť:
Plastová potravinová fólia, vrecká do mrazničky, alobal, nádoby vhodnej do
mrazničky.
Všetky vyššie opísané sú k dostaniu v bežných obchodoch s domácimi potrebami.
Odporúčaná doba uchovanie v mrazničke
Nižšie spomínané časy sú orientačné a závisia od typu potraviny. Jedlo všeobecne
môže byť v mrazničke 1-12 mesiacov (pri teplote pod -18 ° C)
Druh potraviny Doba
Slanina, dusené mäso so zeleninou, mlieko 1 mesiac
Chlieb, zmrzlina, párky, koláče, predvarené mäkkýše, tučné ryby 2 mesiaca
Málo tučné ryby, hlboko zmrazené mäkkýše, pizza, mufny 3 mesiaca
Šunka, sušienky, hovädzie / baranie kotlety, naporciované hydinu 4 mesiaca
Maslo, zelenina (blanšírovaná), vajcia a žĺtky, varený rak, mleté
mäso (surové), bravčové (surové)
6 mesiaca
Ovocie (sušené, syrup), vaječné bielky, hovädzie (surové), celé
kurča, baranie (surové), ovocné koláče
12 mesiaca
POZOR: Ak zmrazujú čerstvé potraviny s označením dátumom spotreby, musí ich
zamraziť pred týmto dátumom. Skontrolujte, či potraviny už neboli raz zamrazené,
lebo každé jedlo sa smie zamrazovať iba raz.
ZABEZPEČENIE PRI ODCHODE NA DLHŠIU DOVOLENKU
Pri krátkodobom odchode nechajte všetko tak ako je.
Pokiaľ plánuje odísť na dlhší čas, tak nezabudnite:
• vybrať z chladničky všetko jedlo
• odpojiť prístroj z el. siete
• vytrieť vnútro chladničky
• nechať otvorené dvere, aby sa prevzdušnil vlhkosť
VÝPADOK PRÚDU
Výpadok prúdu je prevažne kratšia ako 1-2 hodiny, na takto krátky čas sa nedeje
nič zlé, nižšia teplota sa v uzavretej chladničke udrží. Nesmie sa však otvárať dvere
chladničky a zbytočne vetrať. Počas dlhšieho výpadku prúdu môžete do chladničky
vkladať väčšie množstvo ľadu, ktoré vnútorný priestor čiastočne ochladí.
Ak je výpadok kratší ako 15 hodín, tak by malo všetko zamrazené jedlo vydržať a
udržať si svoju kvalitu.
Ak už nejaké potraviny kompletne sa rozpustili, nikdy ich nezmrazujte späť.

DO926BFK
82
NIEKOĽKO RÁD PRE SPRÁVNE ZAPOJENIE A POUŽÍVANIE
CHLADNIČKY
• Do chladničky nevkladajte teplé jedlo
• Nápoje skladujte v uzavretých nádobách
• Jedlo pre dlhšie uskladnenie v chladničke musia byť prekryté a zabalené vo fólii
alebo alobalu.
• Do chladničky nikdy neukladajte pokazené potraviny
• Nikdy chladničku neprepĺňajte, nesnažte sa do nej napchať čo najviac jedla.
• Zbytočne neotvárajte dvere, aby sa nevetrali vnútorný priestor.
• UPOZORNENIE: Lednici držte v dostatočnej vzdialenosti od ohňa aj horľavín
• UPOZORNENIE: Nie je určené pre vonkajšie použitie (okrem veľkých stanov)
• UPOZORNENIE: Chladnička nie je určená na použitie v dopravných
prostriedkoch.
• Raz zmrazené a rozmrazené potraviny už znovu nemažte.
• Do mrazničky nevkladajte žiadne perlivé tekutiny.
• Pri konzumácii zmrznutých potravín (lízanky, nanuky, ovocie) buďte opatrní, aby
ste si nespôsobili omrzliny.
• Do mrazničky nesiahajte mokrými rukami.
• Mraznička je vybavena kompresorom, ktorý pri zopnutí hučí. Tento hluk je bežný.
• Do mrazničky nevkladajte žiadne teplé potraviny.
• V mrazničke by všetky potraviny mali byť zabalené alebo prikryté.
• Balíčky s jedlom nestláčajte k sebe, mrazničku nepreplňujte, aby mohol
cirkulovať vzduch.
• Nenechávajte otvorené dvere príliš dlho. Vždy sa uistite, že sú dvere dôkladne
zatvorené.
• Odporúčame: balíčky jedál popisovať aj dátum odporúčanej spotreby.
PREHODENIE PÁNTOV DVERÍ
Ak potrebujete prehodiť otváranie dverí na opačnú stranu, musí sa premontovať pánty.
Odporúčame, pozvať si servisného mechanika alebo vyškolenú osobu z okolia.
Ešte skôr ako začnete pánty přemontovávat, chladničku vypnite a všetko z nej vyberte
preč. Budete potrebovať krížový skrutkovač a kľúč (ani jedno nie je dodaný v balení).
1. Odkryte horný kryt na pánte, tak aby sa mohli povoliť skrutky. Skrutky
odskrutkujte a potom zložte aj horný pánt, ktorý drží dvere na svojom mieste.
Dvere mierne nadvihnite, vyberte a postavte stranou na mäkké miesto, tak aby sa
predišlo poškriabaniu.

DO926BFK
83
www.domo-elektro.be
SHOPPING FOR FROZEN FOOD
The appliance is rated as a 4 star freezer and can freeze fresh food and store pre-frozen food� When
you are buying frozen food, look at the Storage Guidelines on the packaging� You will be able to store
each item of frozen food for the period shown against the 4 star rating�
FREEZING FRESH FOOD
Ensure that your freezing operations are carried out under the most hygienic conditions as freezing
alone does not improve the food�
Never put hot or even warm foodstus into the freezer�
Prior to freezing the food, food should always be covered tightly with foil, plastic lm, placed in
plastic bags or stored in airtight containers� This will prevent food from dehydrating and to prevent
any strong odors of some foods transferring to milder ones�
To freeze raw meat, wrap in plastic bags or in airtight containers and place on the lowest shelf to
avoid cross contamination�
Do not allow raw meat to come into contact with cooked foods� For safety, only store raw meat for
two or three days� Fruit and vegetables should be thoroughly cleaned and placed in the crisper�
Milk and other liquids should be sealed with lids and placed in the bottle shelf in the door�
NOTE: The ambient temperature of the freshly stored food and how often the door is opened aect
the temperature in the refrigerator� If required, change the thermostat temperature settings�
Reverse door
STORING FROZEN FOOD
All frozen food you purchase should be placed in the freezer as soon as possible to avoid them from
defrosting and spoiling�
All storage recommendations printed on the packaging of frozen food by the manufacturer should
always be followed�
When using the freezer for the rst time or after defrosting, set the thermostat knob to the maximum
position for at least 2 hours before introducing food to be stored, and then readjust it to the normal
position�
The technical data mentioned in the ‘Specications’ are obtained in the case that the freezing drawers
are removed�
MAKING ICE CUBES
1� Fill the ice tray with ¾ full of clean water�
2� Place the tray in the top freezing drawer�
3� Close the door�
To remove the ice cubes from the tray, put the tray under running water for a while and then twist
the tray slightly to loosen the ice cubes�
Follow the following stages to reverse the door from its initial position�
1� Remove the hinge cover�
Remove the hinge cover
98
GB GB
2. Odskrutkujte prostredný držiak / pánt a premiestnite ho na druhú stranu
spotrebiča. Spodná dvere mrazničky mierne nadvihnite, vyberte a postavte
stranou na mäkké miesto, tak aby sa predišlo poškriabaniu.
2� Remove three screws with suitable tools� Remove the upper hinge then take o carefully the
fridge compartment door�
3� Remove middle hinge, screws, screw caps and plastic inserting nails� Install them on the other
side� Take o the lower door and put it away�
Remove three screws
4� The disassembly and installation of bottom parts :
A� Disassemble lower hinge and screws� Then install them on the other side and consolidate the
lower hinge�
Note: the refrigerator-freezer incline angle less 45°�
B� Swap over the position of the adjustable foot to the other side of the cabinet�
8� Move the hinge to another side of the box after removing the screws on the hinge;
Usescrewstofasten�
9� Install the hinge cover after fastening the hinge�
C� Swap over the position of the lower door block to the other side� Install the screws and
consolidate them�
5� Install the lower door and take care of its alignment with the appliance body�
6� Tighten the screws of the middle hinge on the reversible side�
7� Install the top door and remove the existing top door block� Install a new top door block
(notthesame one) on the reversible side� Screw it down�
1110
GB GB
3. Odskrutkujte spodný pánt dverí aj predné (výškovo nastaviteľnú) nožičku.
2� Remove three screws with suitable tools� Remove the upper hinge then take o carefully the
fridge compartment door�
3� Remove middle hinge, screws, screw caps and plastic inserting nails� Install them on the other
side� Take o the lower door and put it away�
Remove three screws
4� The disassembly and installation of bottom parts :
A� Disassemble lower hinge and screws� Then install them on the other side and consolidate the
lower hinge�
Note: the refrigerator-freezer incline angle less 45°�
B� Swap over the position of the adjustable foot to the other side of the cabinet�
8� Move the hinge to another side of the box after removing the screws on the hinge;
Usescrewstofasten�
9� Install the hinge cover after fastening the hinge�
C� Swap over the position of the lower door block to the other side� Install the screws and
consolidate them�
5� Install the lower door and take care of its alignment with the appliance body�
6� Tighten the screws of the middle hinge on the reversible side�
7� Install the top door and remove the existing top door block� Install a new top door block
(notthesame one) on the reversible side� Screw it down�
1110
GB GB
4. Z podstavca vyskrutkujte aj druhú prednú nožičku a preložte na druhú stranu.
2� Remove three screws with suitable tools� Remove the upper hinge then take o carefully the
fridge compartment door�
3� Remove middle hinge, screws, screw caps and plastic inserting nails� Install them on the other
side� Take o the lower door and put it away�
Remove three screws
4� The disassembly and installation of bottom parts :
A� Disassemble lower hinge and screws� Then install them on the other side and consolidate the
lower hinge�
Note: the refrigerator-freezer incline angle less 45°�
B� Swap over the position of the adjustable foot to the other side of the cabinet�
8� Move the hinge to another side of the box after removing the screws on the hinge;
Usescrewstofasten�
9� Install the hinge cover after fastening the hinge�
C� Swap over the position of the lower door block to the other side� Install the screws and
consolidate them�
5� Install the lower door and take care of its alignment with the appliance body�
6� Tighten the screws of the middle hinge on the reversible side�
7� Install the top door and remove the existing top door block� Install a new top door block
(notthesame one) on the reversible side� Screw it down�
1110
GB GB
5. Spodná pánt obráťte a spoločne s prednou nôžkou naskrutkujte na opačnú stranu
chladničky než bola pôvodne. Všetko dôkladne dotiahnite.
6. Na spodnej pánt nasaďte dvere. Skontrolujte či zavreté dvere tesnia po celom
svojom obvode. Ak áno, tak je upevnite pomocou stredového pántu a všetko
dôkladne dotiahnite.
7. Nasaďte aj horné dvere. Zarážku dverí prehoďte na druhú stranu a všetko
dôkladne dotiahnite.

DO926BFK
84
2� Remove three screws with suitable tools� Remove the upper hinge then take o carefully the
fridge compartment door�
3� Remove middle hinge, screws, screw caps and plastic inserting nails� Install them on the other
side� Take o the lower door and put it away�
Remove three screws
4� The disassembly and installation of bottom parts :
A� Disassemble lower hinge and screws� Then install them on the other side and consolidate the
lower hinge�
Note: the refrigerator-freezer incline angle less 45°�
B� Swap over the position of the adjustable foot to the other side of the cabinet�
8� Move the hinge to another side of the box after removing the screws on the hinge;
Usescrewstofasten�
9� Install the hinge cover after fastening the hinge�
C� Swap over the position of the lower door block to the other side� Install the screws and
consolidate them�
5� Install the lower door and take care of its alignment with the appliance body�
6� Tighten the screws of the middle hinge on the reversible side�
7� Install the top door and remove the existing top door block� Install a new top door block
(notthesame one) on the reversible side� Screw it down�
1110
GB GB
8. Horné dvere upevnite horným pántom a ten dôkladne priskrutkujte. Pánt prekryte
horným krytom, tak ako bolo zo začiatku.
2� Remove three screws with suitable tools� Remove the upper hinge then take o carefully the
fridge compartment door�
3� Remove middle hinge, screws, screw caps and plastic inserting nails� Install them on the other
side� Take o the lower door and put it away�
Remove three screws
4� The disassembly and installation of bottom parts :
A� Disassemble lower hinge and screws� Then install them on the other side and consolidate the
lower hinge�
Note: the refrigerator-freezer incline angle less 45°�
B� Swap over the position of the adjustable foot to the other side of the cabinet�
8� Move the hinge to another side of the box after removing the screws on the hinge;
Usescrewstofasten�
9� Install the hinge cover after fastening the hinge�
C� Swap over the position of the lower door block to the other side� Install the screws and
consolidate them�
5� Install the lower door and take care of its alignment with the appliance body�
6� Tighten the screws of the middle hinge on the reversible side�
7� Install the top door and remove the existing top door block� Install a new top door block
(notthesame one) on the reversible side� Screw it down�
1110
GB GB
9. Takto nasadené a zatvorené dvere skontrolujte, či tesnia po celom svojom obvode.
Ak je potreba, môžete usadenie dverí
RIEŠENIE MOŽNÝCH PROBLÉMOV
Stáva sa, že nastane problém, ktorý sa dá ľahko vyriešiť aj bez odbornej pomoci.
Najskôr skontrolujte nižšie, či sa nejedná práve o tento typ problému.
1. Prístroj nefunguje
• skontrolujte prívod energie a či nevypadol el. prúd
• zapojte do zásuvky so správnym napätím
2. Chladiaci systém spína veľmi často
• skontrolujte nastavenie vnútornej teploty, ak je potreba tak prenastavte
• dôkladne zatvorte dvere a skontrolujte či všade tesnia
• nevkladajte dovnútra chladničky teplé jedlo
• nenechávajte príliš dlho otvorené dvere, obmedzte ich otváranie
• nechávajte chladničku blízko tepla. Zabráňte aby na ňu nesvietilo priame slnko.
3. Teplota vo vnútri prístroja je veľmi nízka
prekontrolujte a nastavte správnu teplotu vo vnútri chladničky
4. Vnútri chladničky nie je dostatočne chladno
• skontrolujte prívod energie a či nevypadol el. prúd
• zapojte / zapnite chladničku
• prekontrolujte a nastavte správnu teplotu vo vnútri chladničky

DO926BFK
85
www.domo-elektro.be
• dôkladne zatvorte dvere
• nenechávajte príliš dlho otvorené dvere, obmedzte ich otváranie
• zaistite, aby bolo okolo chladničky dostatok miesta na cirkuláciu vzduchu
• zapojte do zásuvky so správnym napätím
• nevkladajte dovnútra chladničky teplé jedlo
5. Mraznička nemrazí
• prekontrolujte a nastavte správnu teplotu vo vnútri
• dôkladne zatvorte dvere
• zaistite, aby boli potraviny pred vložením dostatočne chladné
• nenechávajte príliš dlho otvorené dvere
• zapojte do zásuvky so správnym napätím

LINEA 2000 - Dompel 9 - 2200 Herentals - Belgium - Tel: +32 14 21 71 91 - Fax: +32 14 21 54 63
BESTEL
de originele
Domo-accessoires
en -onderdelen
online via:
of scan hier:
COMMANDEZ
d’authentiques
accessoires et
pièces Domo en
ligne sur:
ou scannez ici:
BESTELLEN SIE
die Domo
Original-Zubehör
und -Ersatzteile
online über:
oder hier scannen:
ORDER
the original
Domo
accessories and
parts online at:
or scan here:
webshop.domo-elektro.be
Webshop
-
 1
1
-
 2
2
-
 3
3
-
 4
4
-
 5
5
-
 6
6
-
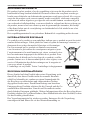 7
7
-
 8
8
-
 9
9
-
 10
10
-
 11
11
-
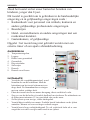 12
12
-
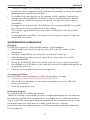 13
13
-
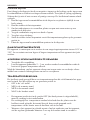 14
14
-
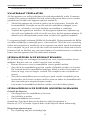 15
15
-
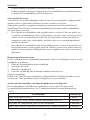 16
16
-
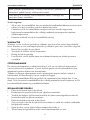 17
17
-
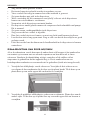 18
18
-
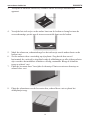 19
19
-
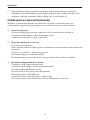 20
20
-
 21
21
-
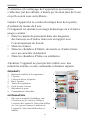 22
22
-
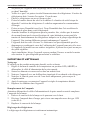 23
23
-
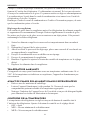 24
24
-
 25
25
-
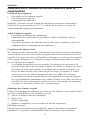 26
26
-
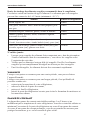 27
27
-
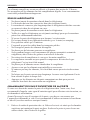 28
28
-
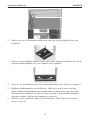 29
29
-
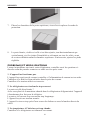 30
30
-
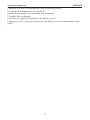 31
31
-
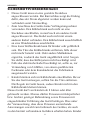 32
32
-
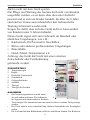 33
33
-
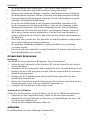 34
34
-
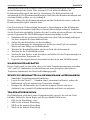 35
35
-
 36
36
-
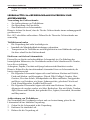 37
37
-
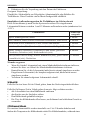 38
38
-
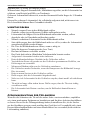 39
39
-
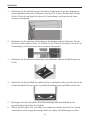 40
40
-
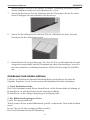 41
41
-
 42
42
-
 43
43
-
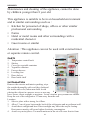 44
44
-
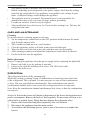 45
45
-
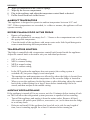 46
46
-
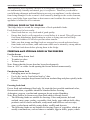 47
47
-
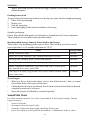 48
48
-
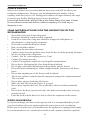 49
49
-
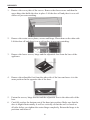 50
50
-
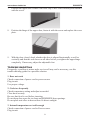 51
51
-
 52
52
-
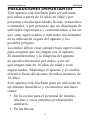 53
53
-
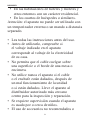 54
54
-
 55
55
-
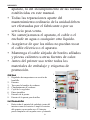 56
56
-
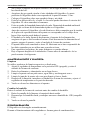 57
57
-
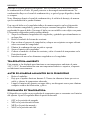 58
58
-
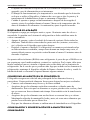 59
59
-
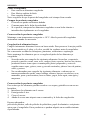 60
60
-
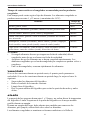 61
61
-
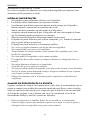 62
62
-
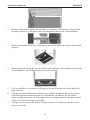 63
63
-
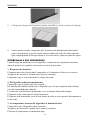 64
64
-
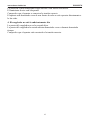 65
65
-
 66
66
-
 67
67
-
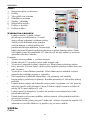 68
68
-
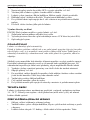 69
69
-
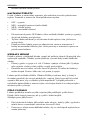 70
70
-
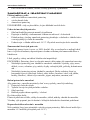 71
71
-
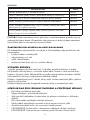 72
72
-
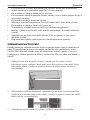 73
73
-
 74
74
-
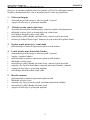 75
75
-
 76
76
-
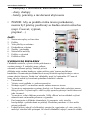 77
77
-
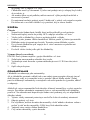 78
78
-
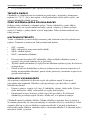 79
79
-
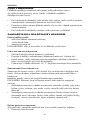 80
80
-
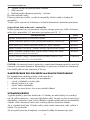 81
81
-
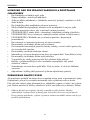 82
82
-
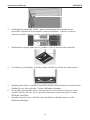 83
83
-
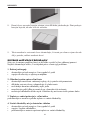 84
84
-
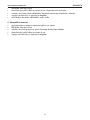 85
85
-
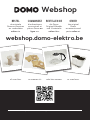 86
86


Domo DO 926 BFK de handleiding
- Categorie
- Koelkast-diepvriezers
- Type
- de handleiding
in andere talen
- English: Domo DO 926 BFK Owner's manual
- français: Domo DO 926 BFK Le manuel du propriétaire
- español: Domo DO 926 BFK El manual del propietario
- Deutsch: Domo DO 926 BFK Bedienungsanleitung
- slovenčina: Domo DO 926 BFK Návod na obsluhu
Gerelateerde artikelen
-
Domo DO912K DO913DV de handleiding
-
Domo DO910K de handleiding
-
-
-
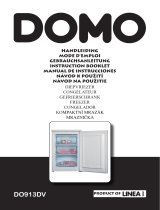 Linea 2000 DO913DV DO912K de handleiding
-
-
Domo DO9144M DO9143M DO703BL DO9175KR de handleiding
-
Domo DO9173J de handleiding
-
Domo DO8138 DO8139 de handleiding
-
Domo DO8139 DO8138 de handleiding
