

nl
2
Inhoudsopgave
[nl] Gebr ui ks aanwi j zi ng
8 Gebruik volgens de voorschriften . . . . . . . . . . . 3
( Belangrijke veiligheidsvoorschriften . . . . . . . . . 3
Algemeen. . . . . . . . . . . . . . . . . . . . . . . . . . . . . . . . . . . 3
Halogeenlamp . . . . . . . . . . . . . . . . . . . . . . . . . . . . . . . 4
] Oorzaken van schade . . . . . . . . . . . . . . . . . . . . . 5
Algemeen. . . . . . . . . . . . . . . . . . . . . . . . . . . . . . . . . . . 5
7 Milieubescherming. . . . . . . . . . . . . . . . . . . . . . . . 5
Energiebesparing . . . . . . . . . . . . . . . . . . . . . . . . . . . . . 5
Milieuvriendelijk afvoeren . . . . . . . . . . . . . . . . . . . . . . . 6
* Het apparaat leren kennen . . . . . . . . . . . . . . . . . 7
Bedieningspaneel. . . . . . . . . . . . . . . . . . . . . . . . . . . . . 7
Toetsen en display . . . . . . . . . . . . . . . . . . . . . . . . . . . . 7
Verwarmingsmethoden en functies . . . . . . . . . . . . . . . 8
Temperatuur. . . . . . . . . . . . . . . . . . . . . . . . . . . . . . . . . 8
Binnenruimte . . . . . . . . . . . . . . . . . . . . . . . . . . . . . . . . 9
_ Toebehoren. . . . . . . . . . . . . . . . . . . . . . . . . . . . . . 9
Accessoires . . . . . . . . . . . . . . . . . . . . . . . . . . . . . . . . . 9
Accessoires plaatsen . . . . . . . . . . . . . . . . . . . . . . . . . . 9
Extra toebehoren . . . . . . . . . . . . . . . . . . . . . . . . . . . . 10
K Voor het eerste gebruik. . . . . . . . . . . . . . . . . . . 11
Eerste gebruik . . . . . . . . . . . . . . . . . . . . . . . . . . . . . . 11
Binnenruimte en accessoires reinigen . . . . . . . . . . . . 11
1 Apparaat bedienen. . . . . . . . . . . . . . . . . . . . . . . 11
Apparaat in- en uitschakelen . . . . . . . . . . . . . . . . . . . 11
Verwarmingsmethode en temperatuur instellen . . . . .11
Snel voorverwarmen. . . . . . . . . . . . . . . . . . . . . . . . . . 12
O Tijdfuncties. . . . . . . . . . . . . . . . . . . . . . . . . . . . . 12
Bereidingstijd instellen . . . . . . . . . . . . . . . . . . . . . . . .12
Einde instellen . . . . . . . . . . . . . . . . . . . . . . . . . . . . . . 13
Kookwerker instellen . . . . . . . . . . . . . . . . . . . . . . . . . 14
Tijd instellen . . . . . . . . . . . . . . . . . . . . . . . . . . . . . . . . 14
A Kinderslot . . . . . . . . . . . . . . . . . . . . . . . . . . . . . . 14
Activeren en deactiveren . . . . . . . . . . . . . . . . . . . . . . 14
D Reinigen . . . . . . . . . . . . . . . . . . . . . . . . . . . . . . . 15
Geschikte schoonmaakmiddelen . . . . . . . . . . . . . . . .15
Apparaat schoon houden. . . . . . . . . . . . . . . . . . . . . . 16
p Rekjes . . . . . . . . . . . . . . . . . . . . . . . . . . . . . . . . . 16
Rekjes verwijderen en bevestigen . . . . . . . . . . . . . . . 16
q Apparaatdeur . . . . . . . . . . . . . . . . . . . . . . . . . . . 17
Deurruiten verwijderen en inbrengen . . . . . . . . . . . . .17
3 Wat te doen bij storingen? . . . . . . . . . . . . . . . . 19
Storingen zelf verhelpen . . . . . . . . . . . . . . . . . . . . . . .19
Lamp voor de binnenruimte aan het plafond
vervangen . . . . . . . . . . . . . . . . . . . . . . . . . . . . . . . . . .20
4 Servicedienst . . . . . . . . . . . . . . . . . . . . . . . . . . . 20
E-nummer en FD-nummer. . . . . . . . . . . . . . . . . . . . . .20
J Voor u in onze kookstudio uitgetest. . . . . . . . . 21
Algemene aanwijzingen . . . . . . . . . . . . . . . . . . . . . . .21
Taart, cake en gebak . . . . . . . . . . . . . . . . . . . . . . . . .21
Ovenschotels en gegratineerde gerechten . . . . . . . . .25
Gevogelte, vlees en vis. . . . . . . . . . . . . . . . . . . . . . . .25
Groente en bijgerechten . . . . . . . . . . . . . . . . . . . . . . .28
Desserts . . . . . . . . . . . . . . . . . . . . . . . . . . . . . . . . . . .28
Acrylamide in levensmiddelen . . . . . . . . . . . . . . . . . .28
Drogen . . . . . . . . . . . . . . . . . . . . . . . . . . . . . . . . . . . .28
Inmaken . . . . . . . . . . . . . . . . . . . . . . . . . . . . . . . . . . .29
Deeg laten rijzen. . . . . . . . . . . . . . . . . . . . . . . . . . . . .30
Ontdooien. . . . . . . . . . . . . . . . . . . . . . . . . . . . . . . . . .30
Warmhouden . . . . . . . . . . . . . . . . . . . . . . . . . . . . . . .31
Testgerechten. . . . . . . . . . . . . . . . . . . . . . . . . . . . . . .31

Gebruik volgens de voorschriften nl
3
8Gebruik volgens de
voorschriften
Gebr ui k vol gens de voor schr i f t en
Lees deze gebruiksaanwijzing zorgvuldig
door. Alleen dan kunt u uw apparaat goed en
veilig bedienen. Bewaar de
gebruiksaanwijzing voor later gebruik of om
door te geven aan een volgende eigenaar.
Dit apparaat is alleen bestemd voor inbouw.
Neem het speciale installatievoorschrift in
acht.
Controleer het apparaat na het uitpakken. Niet
aansluiten in geval van transportschade.
Alleen een daartoe bevoegd vakman mag
apparaten zonder stekker aansluiten. Bij
schade door een verkeerde aansluiting maakt
u geen aanspraak op garantie.
Dit apparaat is alleen bestemd voor
huishoudelijk gebruik en de huiselijke
omgeving. Gebruik het uitsluitend voor het
bereiden van gerechten en drank. Zorg ervoor
dat het apparaat onder toezicht gebruikt
wordt. Het toestel alleen gebruiken in gesloten
ruimtes.
Dit apparaat is bestemd voor gebruik tot op
hoogten van maximaal 4.000 meter boven
zeeniveau.
Dit toestel kan worden gebruikt door kinderen
vanaf 8 jaar en door personen met beperkte
fysieke, sensorische of geestelijke vermogens
of personen die gebrek aan kennis of ervaring
hebben, wanneer zij onder toezicht staan van
een persoon die verantwoordelijk is voor hun
veiligheid of geleerd hebben het op een
veilige manier te gebruiken en zich bewust zijn
van de risico's die het gebruik van het toestel
met zich meebrengt.
Kinderen mogen niet met het apparaat spelen.
Reiniging en onderhoud van het toestel
mogen niet worden uitgevoerd door kinderen,
tenzij zij 15 aar of ouder zijn en onder toezicht
staan.
Zorg ervoor dat kinderen die jonger zijn dan
8 jaar uit de buurt blijven van het toestel of de
aansluitkabel.
Toebehoren altijd op de juiste manier in de
binnenruimte leggen. ~ "Toebehoren"
op pagina 9
(Belangrijke
veiligheidsvoorschriften
Be l an g r i j k e vei l i ghei ds v oor s chr i f t en
Algemeen
:Waarschuwing – Risico van brand!
■ Brandbare voorwerpen die in de
binnenruimte worden bewaard kunnen vlam
vatten. Bewaar geen brandbare voorwerpen
in de binnenruimte. Open nooit de deur
wanneer er sprake is van rookontwikkeling
in het apparaat. Het toestel uitschakelen en
de stekker uit het stopcontact halen of de
zekering in de meterkast uitschakelen.
Risico van brand!
■ Losse voedselresten, vet en vleessap
kunnen in brand vliegen. Voor gebruik dient
u de binnenruimte, de
verwarmingselementen en de accessoires
vrij te maken van grove verontreiniging.
Risico van brand!
■ Wanneer de apparaatdeur geopend wordt,
ontstaat er een luchtstroom. Het bakpapier
kan dan de verwarmingselementen raken
en vlam vatten. Tijdens het voorverwarmen
mag er nooit bakpapier los op de
toebehoren liggen. Verzwaar het bakpapier
altijd met een vorm. Bakpapier alleen op
het benodigde oppervlak leggen. Het
bakpapier mag niet uitsteken over de
toebehoren.
:Waarschuwing – Risico van verbranding!
■ Het toestel wordt zeer heet. Nooit de hete
vlakken in de binnenruimte of
verwarmingselementen aanraken. Het
apparaat altijd laten afkoelen. Zorg ervoor
dat er geen kinderen in de buurt zijn.
Risico van verbranding!
■ Toebehoren of vormen worden zeer heet.
Neem hete toebehoren en vormen altijd met
behulp van een pannenlap uit de
binnenruimte.
Risico van verbranding!
■ Alcoholdampen kunnen in de binnenruimte
vlam vatten. Nooit gerechten klaarmaken
die een hoog percentage alcohol bevatten.
Alleen kleine hoeveelheden drank met een
hoog alcoholpercentage gebruiken. De
deur van het toestel voorzichtig openen.

nl Belangrijke veiligheidsvoorschriften
4
:Waarschuwing – Kans op verbranding!
■ Tijdens het gebruik worden de
toegankelijke onderdelen heet. De hete
onderdelen nooit aanraken. Zorg ervoor dat
er geen kinderen in de buurt zijn.
Kans op verbrandingen!
■ Bij het openen van de deur van het
apparaat kan hete stoom vrijkomen.
Afhankelijk van de temperatuur is er geen
stoom te zien. Tijdens het openen niet te
dicht bij het apparaat staan. De deur van
het apparaat voorzichtig openen. Zorg
ervoor dat kinderen uit de buurt blijven.
Kans op verbrandingen!
■ Door water in de hete binnnruimte kan hete
waterdamp ontstaan. Nooit water in de hete
binnenruimte gieten.
:Waarschuwing – Risico van letsel!
■ Wanneer er krassen op het glas van de
apparaatdeur zitten, kan dit springen. Geen
schraper, scherpe of schurende
schoonmaakmiddelen gebruiken.
Risico van letsel!
■ Bij het openen en sluiten van de
apparaatdeur bewegen de scharnieren zich
en kunnen ze klem komen te zitten. Kom
niet met uw handen bij de scharnieren.
:Waarschuwing – Kans op een elektrische
schok!
■ Ondeskundige reparaties zijn gevaarlijk.
Reparaties en de vervanging van
beschadigde aansluitleidingen mogen
uitsluitend worden uitgevoerd door technici
die zijn geïnstrueerd door de
klantenservice. Is het apparaat defect, haal
dan de stekker uit het stopcontact of
schakel de zekering in de meterkast uit.
Contact opnemen met de klantenservice.
Kans op een elektrische schok!
■ De kabelisolatie van hete toestelonderdelen
kan smelten. Zorg ervoor dat er nooit
aansluitkabels van elektrische toestellen in
contact komen met hete onderdelen van
het apparaat.
Kans op een elektrische schok!
■ Binnendringend vocht kan een schok
veroorzaken. Geen hogedrukreiniger of
stoomreiniger gebruiken.
Kans op een elektrische schok!
■ Een defect toestel kan een schok
veroorzaken. Een defect toestel nooit
inschakelen. De netstekker uit het
stopcontact halen of de zekering in de
meterkast uitschakelen. Contact opnemen
met de klantenservice.
:Waarschuwing – Gevaar door
magnetisme!
In het bedieningspaneel of de
bedieningselementen bevinden zich
permanente magneten. Deze kunnen
elektronische implantaten, zoals pacemakers,
of insulinepompen beïnvloeden. Dragers van
elektronische implantaten dienen een afstand
van minstens 10 cm tot het bedieningspaneel
aan te houden.
Halogeenlamp
:Waarschuwing – Gevaar voor
verbranding!
De lampen in de binnenruimte worden heel
heet. Ook enige tijd na het uitschakelen
bestaat er nog een risico van verbranding.
Glazen afscherming niet aanraken. Tijdens het
schoonmaken contact met de huid vermijden.
:Waarschuwing – Kans op een elektrische
schok!
Bij vervanging van de lamp in de binnenruimte
staan de contacten van de lampfitting onder
stroom. Trek voordat u tot vervanging
overgaat de netstekker uit het stopcontact
trekken of schakel de zekering in de
meterkast uit.

Oorzaken van schade nl
5
]Oorzaken van schade
Oor zaken van schade
Algemeen
Attentie!
■ Toebehoren, folie, bakpapier of vormen op de
bodem van de binnenruimte: Geen toebehoren op
de bodem van de binnenruimte leggen. Geen
bakpapier of folie, van welk type dan ook, op de
bodem van de binnenruimte leggen. Geen vorm op
de bodem van de binnenruimte plaatsen wanneer
een temperatuur van meer dan 50 °C ingesteld is.
Er ontstaat dan een opeenhoping van warmte. De
bak- en braadtijden kloppen niet meer en het email
wordt beschadigd.
■ Aluminiumfolie: aluminiumfolie in de binnenruimte
mag niet in contact komen met de deurruit. Hierdoor
kunnen permanente verkleuringen van de ruit
optreden.
■ Water in de hete binnenruimte: Nooit water in de
hete binnenruimte gieten. Er ontstaat dan
waterdamp. Door de verandering van temperatuur
kan schade aan het email ontstaan.
■ Blijft er gedurende langere tijd vocht in de
binnenruimte, dan kan dit leiden tot corrosie. De
binnenruimte na gebruik laten drogen. Bewaar
gedurende langere tijd geen levensmiddelen in de
gesloten binnenruimte. Bewaar geen gerechten in
de binnenruimte.
■ Koelen met de apparaatdeur open: na een bereiding
met hoge temperaturen de binnenruimte laten
afkoelen met de deur gesloten. Zorg ervoor dat er
niets tussen de apparaatdeur beklemd raakt. Ook
wanneer de deur slechts op een kier staat, kunnen
naburige voorzijden van meubels in de loop van de
tijd beschadigd raken.
Alleen na gebruik met veel vocht de binnenruimte
laten drogen met de deur open.
■ Vruchtensap: De bakplaat bij zeer vochtig
vruchtengebak niet te overvloedig bedekken.
Vruchtensap dat van de bakplaat druppelt, laat
vlekken achter die niet meer kunnen worden
verwijderd. Gebruik zo mogelijk de diepere
braadslede.
■ Sterk vervuilde dichting: wanneer de dichting sterk
vervuild is, sluit de apparaatdeur niet goed meer. De
aangrenzende voorzijden van meubels kunnen dan
beschadigd raken. Zorg ervoor dat de dichting altijd
schoon is. ~ "Reinigen" op pagina 15
■ Apparaatdeur als vlak om op iets op te leggen of te
plaatsen: niets op de apparaatdeur leggen of
plaatsen en er niets aan hangen. Geen vormen of
toebehoren op de apparaatdeur plaatsen.
■ Toebehoren inschuiven: afhankelijk van het type
toestel kunnen de toebehoren krassen geven op de
deur. Toebehoren altijd tot de aanslag in de
binnenruimte schuiven.
■ Apparaat transporteren: Het apparaat niet aan de
deurgreep vasthouden of dragen. De deurgreep
houdt op den duur het gewicht van het apparaat niet
en kan afbreken.
7Milieubescherming
Milieubescherming
Uw nieuwe apparaat is bijzonder energie-efficiënt. Hier
krijgt u tips over de manier waarop u bij het gebruik van
uw apparaat nog meer kunt besparen op energie en het
apparaat op de juiste manier afvoert.
Energiebesparing
■ Het apparaat alleen voorverwarmen als dit in het
recept of in de tabellen van de gebruiksaanwijzing is
opgegeven.
■ Laat diepvrieslevensmiddelen eerst ontdooien
voordat u ze in de binnenruimte plaatst.
■ Gebruik donkere, zwart gelakte of geëmailleerde
bakvormen. Deze nemen de hitte bijzonder goed op.
■ Verwijder de accessoires die u niet nodig heeft uit
de binnenruimte.

nl Milieubescherming
6
■ Open de apparaatdeur tijdens de bereiding zo
weinig mogelijk.
■ Meerdere taarten of cakes kunt u het beste na
elkaar bakken. De binnenruimte is dan nog warm.
Hierdoor is de baktijd voor het tweede gerecht
korter. U kunt ook twee rechthoekige vormen naast
elkaar in de binnenruimte plaatsen.
■ Bij langere bereidingstijden kunt u het apparaat
10 minuten voor het einde van de bereidingstijd
uitzetten en de restwarmte gebruiken voor het
afbakken.
Milieuvriendelijk afvoeren
Voer de verpakking op een milieuvriendelijke manier af.
Dit apparaat is gekenmerkt in
overeenstemming met de Europese richtlijn
2012/19/EU betreffende afgedankte
elektrische en elektronische apparatuur (waste
electrical and electronic equipment - WEEE).
De richtlijn geeft het kader aan voor de in de
EU geldige terugneming en verwerking van
oude apparaten.

Het apparaat leren kennen nl
7
*Het apparaat leren kennen
He t appar aat leren kennen
In dit hoofdstuk geven we u uitleg over de indicaties en
bedieningselementen. Daarnaast leert u verschillende
functies van uw apparaat kennen.
Aanwijzing: Afhankelijk van het apparaattype zijn kleur-
en detailafwijkingen mogelijk.
Bedieningspaneel
Via het bedieningspaneel stelt u de verschillende
functies van uw apparaat in. Hier ziet u een overzicht
van het bedieningspaneel en de indeling van de
bedieningselementen.
Aanwijzing: Bij veel apparaten kunnen de schakelaars
worden ingedrukt. Om te ver- en ontgrendelen in de
nulstand op de schakelaar drukken.
Toetsen en display
Met de toetsen kunt u verschillende extra functies van
uw apparaat instellen. Op het display ziet u de
bijbehorende waarden.
--------
Display
De functie die kan worden ingesteld of op dit moment
afloopt, verschijnt op het display.
Om de verschillende tijdfuncties te kiezen meerdere
keren het sensorgebied e aanraken. Het symbool van
de functie die op dit moment wordt gekozen is verlicht.
( Toetsen en display
De Toetsen zijn touch-velden waar sensoren
onder liggen. Tip alleen op het betreffende
symbool om de functie te kiezen.
Op het display zijn symbolen van actieve functies
en de tijdfuncties te zien.
0 Functiekeuzeknop
Met de functiekeuzeknop stelt u de
verwarmingsmethode of andere functies in.
U kunt de functiekeuzeknop naar rechts of links
draaien.
8 Temperatuurknop
Met de temperatuurknop stelt u de temperatuur in
of kiest u de instelling voor andere functies.
De temperatuurknop kunt u vanuit de nulstand
alleen naar rechts draaien, tot de aanslag. Niet
daaraan voorbij.
Sensorgebied Betekenis
M Kookwekker Kookwekker instellen.
e Tijdfuncties Bereidingstijd x, Einde y en Tijd
kiezen door het betreffende symbool
meerdere keren aan te raken.
Kinderslot Om de ovenfuncties via het bedie-
ningspaneel te blokkeren en deblok-
keren het sensorgebied ca.
4 seconden lang aanraken.
A
@
Min
Plus
Instelwaarden verlagen.
Instelwaarden verhogen.

nl Het apparaat leren kennen
8
Verwarmingsmethoden en functies
Met de functiekeuzeknop stelt u de
verwarmingsmethoden en meer functies in.
Om altijd de juiste verwarmingsmethode voor uw
gerecht te kunnen bepalen, geven wij hier uitleg over de
verschillen en toepassingen.
--------
Meer functies
Uw nieuwe oven biedt u nog meer functies, waarop wij
hier een korte toelichting geven.
--------
Temperatuur
Met de temperatuurknop stelt u de temperatuur in de
binnenruimte in. Daarnaast worden hiermee de standen
voor andere functies gekozen.
Bij zeer hoge temperaturen wordt de temperatuur van
het apparaat na langere tijd wat lager.
--------
Temperatuurindicatie
Bij het opwarmen van de oven verschijnt het symbool p
op het display. In de verwarmingspauzes verdwijnt het.
Wanneer u voorverwarmt, is het optimale tijdstip voor
het inschuiven van de gerechten bereikt zodra het
symbool voor het eerst verdwijnt.
Verwarmingsmethode Gebruik
›
3D-hetelucht Voor het bakken en braden op één of meerdere niveaus.
De ventilator verdeelt de warmte van het ronde verwarmingselement aan de achterkant
gelijkmatig in de binnenruimte.
"
Hetelucht Eco Voor het efficiënt bereiden van geselecteerde gerechten op één niveau, zonder voorver-
warmen.
De ventilator verdeelt de warmte van het ronde verwarmingselement aan de achterkant in
de binnenruimte.
Deze verwarmingsmethode wordt gebruikt voor het bepalen van het energieverbruik in de
luchtcirculatiemodus en de energie-efficiëntieklasse.
0
Pizzastand Voor het bereiden van pizza's en gerechten die veel warmte van onderen nodig hebben.
Het onderste verwarmingselement en het ronde verwarmingselement aan de achterwand
zijn ingeschakeld.
$
Onderwarmte Voor de bereiding au bain-marie en om na te bakken.
De warmte komt van onderen.
$
Grill, groot Voor het grillen van platte stukken, zoals steaks, worstjes of toast, en voor het gratineren.
Het hele oppervlak onder het grillelement wordt heet.
#
Circulatiegrillen Voor het braden van gevogelte, hele vis en grotere vleesstukken.
Het grillelement en de ventilator schakelen afwisselend in en uit. De ventilator wervelt de
hete lucht rond de gerechten.
%
Boven- en onderwarmte Voor traditioneel bakken en braden op één niveau. Bijzonder geschikt voor gebak met
vochtige bedekking.
De warmte komt gelijkmatig van onderen en van boven.
Deze verwarmingsmethode wordt gebruikt voor het bepalen van het energieverbruik in de
conventionele modus.
Functie Gebruik
J
Snel voorverwarmen Binnenruimte zonder accessoires snel opwarmen.
^
Verlichting van de binnenruimte Verlichting van de binnenruimte inschakelen, zonder functie.
Hierdoor wordt bijv. het reinigen van de binnenruimte vergemakkelijkt.
Stand Betekenis
Ú Stand nul De oven warmt niet op.
50-275 Temperatuurbereik De temperatuur die in de binnen-
ruimte kan worden ingesteld op
°C.
1, 2, 3 Grillstanden De grillstanden voor Grill, groot
$ en Grill, klein % (afhankelijk
van het type apparaat).
1 = stand 1, zwak
2 = stand 2, gemiddeld
3 = stand 3, sterk

Toebehoren nl
9
Aanwijzing: Door thermische traagheid kan de
weergegeven temperatuur een beetje afwijken van de
werkelijke temperatuur in de binnenruimte.
Binnenruimte
Verschillende functies voor de binnenruimte
vergemakkelijken het gebruik van uw apparaat. Zo
wordt bijv. de binnenruimte volledig verlicht en een
koelventilator beschermt het apparaat tegen
oververhitting.
Apparaatdeur openen
Opent u de apparaatdeur wanneer er een programma
loopt, dan wordt de werking voortgezet.
Verlichting van de binnenruimte
Bij de meeste verwarmingsmethoden en functies is de
verlichting van de binnenruimte aan als het programma
loopt. Wordt de werking met de functieschakelaar
beëindigd, dan gaat de verlichting uit.
Met de stand Verlichting van de binnenruimte, kunt u de
lamp met de functiekeuzeknop, inschakelen zonder dat
de oven opwarmt. Dit helpt u bijv. bij de reiniging van
het apparaat.
Koelventilator
De koelventilator wordt zo nodig in- en uitgeschakeld.
De warme lucht ontsnapt via de deur.
Attentie!
De ventilatiesleuven niet afdekken. Dan raakt het
apparaat oververhit.
De koelventilator loopt een bepaalde tijd na, zodat de
binnenruimte na gebruik sneller afkoelt.
_Toebehoren
Toe be hor en
Bij uw apparaat horen verschillende toebehoren. Hier is
krijgt u een overzicht over de meegeleverde toebehoren
en de manier waarop ze worden gebruikt.
Accessoires
De meegeleverde accessoires kunnen variëren,
afhankelijk van het type apparaat.
--------
Gebruik alleen originele toebehoren. Deze zijn speciaal
op uw apparaat afgestemd.
Toebehoren kunt u nabestellen bij de servicedienst, in
de vakhandel of via het internet.
Aanwijzing: Wanneer de toebehoren heet worden,
kunnen ze vervormen. Dit heeft geen invloed op de
werking. De vervorming verdwijnt weer nadat ze zijn
afgekoeld.
Accessoires plaatsen
De binnenruimte heeft 3 inschuifhoogtes. De
inschuifhoogtes worden van beneden naar boven
geteld.
De accessoires altijd tussen de beide geleidestangen
van een inschuifhoogte plaatsen.
De accessoires kunnen tot ongeveer halverwege naar
buiten worden getrokken zonder dat ze kantelen.
Aanwijzingen
■ Let erop dat u de accessoires altijd op de juiste
manier in de binnenruimte plaatst.
■ Plaats de accessoires altijd volledig in de
binnenruimte, zodat ze de apparaatdeur niet raken.
■ Neem de accessoires die u niet nodig hebt uit de
binnenruimte.
■ Om de rekjes te reinigen kunt u ze uit de
binnenruimte nemen. ~ Blz. 16
Rooster
Voor servies, gebak- en ovenschalen.
Voor braad- en grillstukken en diepvries-
gerechten.
Braadslede
Voor vochtig gebak, taarten, diepvries-
gerechten en grote braadstukken.
Hij kan ook worden gebruikt om het vet
op te vangen, als u direct op het rooster
grilt.

nl Toebehoren
10
Vergrendelingsfunctie
De toebehoren kunnen tot ongeveer halverwege naar
buiten worden getrokken, tot ze inklikken. De
vergrendelingsfunctie voorkomt dat de toebehoren
kantelen wanneer ze worden verwijderd. De toebehoren
dienen op de juiste wijze in de binnenruimte te worden
geschoven, zodat de kantelbeveiliging goed werkt.
Let er bij het inschuiven van het rooster op dat de
ontgrendelnok ‚ zich aan de achterkant bevindt en naar
beneden wijst. De open kant moet naar de
apparaatdeur en de kromming naar beneden ¾
wijzen.
Let er bij het inschuiven van platen op dat de
ontgrendelnok ‚ zich aan de achterkant bevindt en naar
beneden wijst. De schuine kant van de toebehoren ƒ
moet van voren naar de apparaatdeur wijzen.
Voorbeeld in de afbeelding: braadslede
Toebehoren combineren
U kunt het rooster gelijktijdig met de braadslede
inschuiven, om afdruipende vloeistof op te vangen.
Let er bij het plaatsen vanhet rooster op dat beide
afstandhouders ‚ op de achterste rand staan. Bij het
inschuiven van de braadslede bevindt het rooster zich
boven de bovenste geleidestang van de inschuifhoogte.
Voorbeeld in de afbeelding: braadslede
Extra toebehoren
Extra toebehoren kunt u kopen bij de servicedienst, in
speciaalzaken of via het internet. Een uitgebreid
aanbod voor uw apparaat vindt u in onze folders of op
internet.
De beschikbaarheid en de mogelijkheid om online te
bestellen is per land verschillend. U kunt dit nakijken in
uw verkoopdocumenten.
Aanwijzing: Niet alle extra toebehoren passen bij elk
apparaat. Geef bij de aankoop altijd de precieze
aanduiding (E-nr.) van uw apparaat op.
~ "Servicedienst" op pagina 20
--------
D
D
D
D
E
D
D
D
Toebehoren
Bak- en braadrooster
Bakplaat
Braadslede
Bakplaat, met antiaanbaklaag
Braadslede, met antiaanbaklaag
Ovenpan
Stoomset voor de oven
Grote braadpan
Deksel voor grote braadpan
Pizzaplaat
Grillplaat
Baksteen van keramiek
Glazen braadpan, 5,1 liter
Glazen braadslede
ComfortFlex uittrekbaar deel (1 niveau)*
3-voudig uittrekbaar deel*
* Toebehoren passen niet in elk apparaat, bij de bestelling het E-nr.
opgeven

Voor het eerste gebruik nl
11
KVoor het eerste gebruik
Vo o r het eer s t e gebr ui k
Voordat u uw nieuwe apparaat kunt gebruiken moet u
enkele instellingen uitvoeren: Reinig daarnaast de
binnenruimte en de toebehoren.
Eerste gebruik
Na het apparaat op de stroom is aangesloten verschijnt
de tijd op het display. Stel de actuele tijd in.
Tijd instellen
De functiekeuzeknop moet op nul staan.
De klok is standaard ingesteld op 12:00.
1. Met de velden A of @ de tijd instellen.
2. Om te bevestigen op het veld e tippen.
De ingestelde tijd wordt weergegeven op het display.
Binnenruimte en accessoires reinigen
Voordat u voor het eerst gerechten klaarmaakt met het
apparaat dient u de binnenruimte en de accessoires te
reinigen.
Binnenruimte reinigen
Om het "nieuwe" luchtje van de oven te verwijderen,
warmt u de lege, gesloten binnenruimte op.
Let erop dat zich geen verpakkingsresten, zoals
piepschuimkorreltjes, in de binnenruimte bevinden.
Neem voor het opwarmen de gladde oppervlakken in
de binnenruimte af met een zachte, vochtige doek.
Tijdens het opwarmen van de oven dient de keuken
geventileerd te worden.
Voer de opgegeven instellingen uit. In het volgende
hoofdstuk kunt u lezen hoe u een verwarmingsmethode
en temperatuur instelt. ~ "Apparaat bedienen"
op pagina 11
Na afloop van de weergegeven tijd de oven
uitschakelen.
Wanneer de binnenruimte afgekoeld is, reinigt u de
gladde oppervlakken met zeepsop en een
schoonmaakdoekje.
Accessoires reinigen
Reinig de accessoires grondig met zeepsop en een
schoonmaakdoekje of een zachte borstel.
1Apparaat bedienen
Appar aat bedi enen
U heeft de bedieningselementen en hun werking al
leren kennen. Nu leggen we uit hoe u het apparaat
instelt.
Apparaat in- en uitschakelen
De functiekeuzeknop schakelt het apparaat in en uit.
Zodra u hem in een positie buiten de nulstand draait, is
het apparaat ingeschakeld. Om het apparaat uit te
schakelen de functiekeuzeknop altijd in de nulstand
draaien.
Verwarmingsmethode en temperatuur
instellen
Met de functiekeuze- en temperatuurknop stelt u het
apparaat heel eenvoudig in. In der tabel met de
verwarmingsmethoden vindt u voor elk gerecht de
methode die het meest geschikt is.
Voorbeeld in de afbeelding: boven- en onderwarmte %
bij 190°C.
1. Met de functiekeuzeknop de verwarmingsmethode
instellen.
2. Met de temperatuurknop de temperatuur of
grillstand instellen.
Na enkele seconden begint de oven op te warmen.
Om de oven uit te schakelen de functiekeuzeknop op
nul zetten.
Aanwijzing: Op het apparaat kan ook de bereidingstijd
en de eindtijd worden ingesteld.~ "Tijdfuncties"
op pagina 12
Instellingen
Verwarmingsme-
thode
3D-hetelucht ›
Temperatuur maximaal
Tijdsduur 1 uur
&

nl Tijdfuncties
12
Wijzigen
U kunt de verwarmingsmethode en de temperatuur op
elk moment met de daarvoor bestemde knop
veranderen.
Snel voorverwarmen
Met de functie Snel voorverwarmen kunt u de
opwarmtijd verkorten.
Gebruik Snel voorverwarmen alleen bij ingestelde
temperaturen van boven de 100 °C.
Om een gelijkmatig resultaat te krijgen, plaatst u het
gerecht pas in de binnenruimte wanneer het snel
voorverwarmen beëindigd is.
1. De functiekeuzeknop op J zetten.
2. Met de temperatuurknop de temperatuur instellen.
Na enkele seconden begint de oven op te warmen.
Wanneer het snel voorverwarmen is beëindigd, klinkt er
een signaal. Plaats het gerecht in de binnenruimte.
Gebruik hierna het best:
■ › 3D-hetelucht
OTijdfuncties
Ti j d f unc t i e s
Uw apparaat beschikt over verschillende tijdfuncties.
Om bij de bereidingstijd te komen een
verwarmingsmethode kiezen en het sensorgebied e
aanraken. Zodra de bereidingstijd is ingesteld kunt u
een eindtijd instellen.
Aan het einde van de bereidingstijd of de
kookwekkertijd klinkt een signaal. U kunt het signaal
voortijdig beëindigen door het sensorgebied e aan te
raken.
Bereidingstijd instellen
U kunt op de oven de bereidingstijd voor uw gerecht
instellen. Zo wordt de bereidingsduur niet per ongeluk
overschreden en hoeft u andere werkzaamheden niet te
onderbreken om de werking te beëindigen.
U kunt maximaal 23 uur en 59 minuten instellen. De
bereidingstijd kan tot een uur in stappen van een
minuut worden ingesteld en daarna in stappen van 5
minuten.
Afhankelijk van het sensorgebied dat u het eerst
aanraakt, begint de bereidingstijd bij een andere
voorgestelde waarde:
10 minuten met het sensorgebied A en 30 minuten met
het sensorgebied @.
Voorbeeld in de afbeelding: bereidingstijd 45 minuten.
1. Verwarmingsmethode en temperatuur of grillstand
instellen.
2. Het sensorgebied e aanraken.
Op het display verschijnen A A : A A en het
symbool x.
Tijdfunctie Gebruik
x Bereidingstijd Wanneer de ingestelde bereidingstijd afgelo-
pen is, wordt de oven automatisch uitgescha-
keld.
y Eindtijd De bereidingstijd en de gewenste eindtijd kie-
zen. De oven start automatisch, zodat het pro-
gramma op het gewenste tijdstip beëindigd is.
Q Kookwekker De kookwekker functioneert als een eierwek-
ker. Hij loopt onafhankelijk van het gebruik en
de oven wordt er niet door beïnvloed.
Tijd Als er geen andere functie is gekozen, ver-
schijnt de tijd op het display van de oven.

Tijdfuncties nl
13
3. De bereidingstijd instellen met A of @.
Na enkele seconden begint de oven op te warmen. Op
het display kunt u het verloop van de bereidingstijd
aflezen.
De tijd is afgelopen
Er klinkt een signaal. De oven warmt niet meer op. Op
het display verschijnt ‹‹‹‹.
Zodra het signaal beëindigd is, kunt u het
sensorgebied @ aanraken en opnieuw een tijdsduur
instellen.
Schakel de oven uit zodra het gerecht klaar is. Hiervoor
de functiekeuzeknop op de nulstand draaien.
Wijzigen en afbreken
Met het sensorgebied A of @ kunt u de tijdsduur op elk
moment wijzigen. Na enkele seconden wordt de
wijziging overgenomen.
Om af te breken stelt u met het sensorgebied A de
bereidingstijd in op ‹‹:‹‹. De oven warmt zonder
tijdsduur verder op.
Einde instellen
U kunt het tijdstip waarop de bereidingstijd afloopt op
een later tijdstip zetten. U kunt het gerecht bijv. 's
morgens in de oven zetten en zo instellen dat het 's
middags klaar is.
Aanwijzingen
■ Let erop dat levensmiddelen niet te lang in de oven
staan en bederven.
■ Stel het einde in als de oven nog onverwarmd is.
■ Stel geen einde meer in wanneer hij al gestart is.
Hierdoor kan het bereidingsresultaat worden
beïnvloed.
Het einde van de bereidingstijd kan maximaal 23 uur en
59 minuten worden uitgesteld.
Voorbeeld in de afbeelding: het is 10:30 uur, de
ingestelde tijdsduur is 45 minuten en het gerecht moet
om 12:30 uur klaar zijn.
1. Verwarmingsmethode en temperatuur of grillstand
instellen.
2. Het sensorgebied e aanraken en de bereidingstijd
instellen met A of @.
3. Het sensorgebied e aanraken.
Op het display verschijnen A A : A A en het
symbool y.
4. De eindtijd instellen met het sensorgebied A of @.
Na enkele seconden neemt de oven de instellingen
over. Op het display verschijnt de eindtijd. Zodra de
oven start, loopt de bereidingstijd af.
De tijd is afgelopen
Er klinkt een signaal. De oven warmt niet meer op. Op
het display verschijnt ‹‹‹‹.
Zodra het signaal beëindigd is, kunt u het
sensorgebied @ aanraken en opnieuw een tijdsduur
instellen.
Schakel de oven uit zodra het gerecht klaar is. Hiervoor
de functiekeuzeknop op de nulstand draaien.
Wijzigen en afbreken
Met de toets A of @ kunt u de eindtijd wijzigen. Na
enkele seconden wordt de verandering overgenomen.
De eindtijd kan niet meer worden gewijzigd wanneer de
tijdsduur afloopt. Het bereidingsresultaat zou dan niet
meer kloppen.
Om het programma af te breken zet u met de toets A
de eindtijd helemaal terug naar de actuele tijd plus
tijdsduur. Het apparaat begint op te warmen en de
tijdsduur loopt af.

nl Kinderslot
14
Kookwerker instellen
U kunt de kookwekker gebruiken wanneer de oven in-
of uitgeschakeld is. Er mag echter geen bereidingsduur
of eindtijd zijn ingesteld.
U kunt maximaal 23 uur en 59 minuten instellen. Tot 10
minuten kan de wekkertijd worden ingesteld in stappen
van 30 seconden. Hierna worden de tijdstappen groter,
naarmate de waarde hoger is.
Afhankelijk van het sensorgebied dat u het eerst
aanraakt, begint de wekkertijd bij een andere
voorgestelde waarde:
5 minuten met het sensorgebied A en 10 minuten met
het sensorgebied @.
1. Het sensorgebied M aanraken.
Op het display is het symbool Q verlicht.
2. Met A of @ de kookwekkertijd instellen.
Na enkele seconden begint de wekkertijd af te lopen.
Tip: Geldt de ingestelde kookwekkertijd voor het
gebruik van de oven, gebruik dan de bereidingsduur.
Zo schakelt de oven automatisch uit.
De kookwekker is afgelopen
Er klinkt een signaal. Op het display verschijnt ‹‹‹‹.
Met een willekeurig sensorgebied de kookwekker
uitschakelen.
Wijzigen en afbreken
Met A of @ kunt u de wekkertijd op elk moment
veranderen. Na enkele seconden wordt de wijziging
overgenomen.
Om af te breken stelt u met het sensorgebied A de
kookwekker in op ‹‹:‹‹. De kookwekker is
uitgeschakeld.
Tijd instellen
Na de aansluiting of na een stroomonderbreking
knippert de tijd op het display. Stel de tijd in.
De functiekeuzeknop dient in de nulstand te staan.
1. Met het sensorgebied A of @ de tijd instellen.
2. Om te bevestigen op het veld e tippen.
Tijd wijzigen
U kunt de tijd zo nodig weer veranderen, bijv. van
zomer- in wintertijd.
Raak hiervoor, terwijl het apparaat uitgeschakeld is, het
sensorgebied e aan tot de tijd knippert en wijzig hem
met A of @.
AKinderslot
Ki nder s l ot
Om te voorkomen dat kinderen het apparaat per
ongeluk inschakelen of instellingen wijzigen, is het
voorzien van een kinderslot.
Aanwijzingen
■ Een eventueel aangesloten kookplaat wordt niet
beïnvloed doordat de oven is voorzien van een
kinderslot.
■ Na een stroomonderbreking is het kinderslot niet
meer actief.
Activeren en deactiveren
Om het kinderslot te activeren moet de
functiekeuzeknop op nul staan.
Veld e ca. 4 seconden lang aanraken.
Op het display wordt †‘”“ weergegeven. Het
kinderslot is geactiveerd.
Aanwijzing: Wanneer er een wekkertijd Q is ingesteld,
loopt deze verder. Zolang het kinderslot geactiveerd is,
kan de wekkertijd niet worden veranderd.
Om te deactiveren het veld e opnieuw 4 seconden
lang aanraken tot †‘”“ verdwijnen van het display.

Reinigen nl
15
DReinigen
Re i n i g e n
Wanneer uw apparaat goed wordt onderhouden en
schoongemaakt blijft het er lang mooi uitzien en goed
functioneren. Hier leggen we uit hoe u het apparaat
goed onderhoudt en schoonmaakt.
Geschikte schoonmaakmiddelen
Let op de opgaven in de tabellen om te voorkomen dat
de verschillende oppervlakken door verkeerde
schoonmaakmiddelen worden beschadigd. Afhankelijk
van het apparaattype zijn bij uw apparaat niet alle
voorzieningen beschikbaar.
Attentie!
Oppervlakteschade
Gebruik geen
■ scherpe of schurende schoonmaakmiddelen,
■ sterk alcoholhoudende schoonmaakmiddelen,
■ harde schuur- of schoonmaaksponsjes,
■ hogedrukreiniger of stoomreiniger of
■ speciale schoonmaakmiddelen voor de
warmtereiniging.
Was nieuwe vaatdoekjes voor gebruik grondig uit.
Tip: Bijzonder aanbevelenswaardige schoonmaak- en
verzorgingsmiddelen kunt u kopen bij de servicedienst.
Houd u aan de betreffende aanwijzingen van de
fabrikant.
:Waarschuwing – Risico van verbranding!
Het toestel wordt zeer heet. Nooit de hete vlakken in de
binnenruimte of verwarmingselementen aanraken. Het
apparaat altijd laten afkoelen. Zorg ervoor dat er geen
kinderen in de buurt zijn.
Bereik Schoonmaken
Buitenzijde apparaat
Voorzijde van
roestvrij staal
Warm zeepsop:
Met een schoonmaakdoekje reinigen en met een
zachte doek nadrogen.
Kalk, vet, zetmeel en eiwitvlekken onmiddellijk
verwijderen. Onder zulke vlekken kan corrosie
ontstaan.
Bij de servicedienst of in de vakhandel zijn speci-
ale schoonmaakmiddelen voor roestvrij staal ver-
krijgbaar die geschikt zijn voor warme
oppervlakken. Het schoonmaakmiddel heel dun
opbrengen met een zachte doek.
Knststof Warm zeepsop:
Met een schoonmaakdoekje reinigen en met een
zachte doek nadrogen.
Geen glasreiniger of schraper gebruiken.
Gelakte opper-
vlakken
Warm zeepsop:
Met een schoonmaakdoekje reinigen en met een
zachte doek nadrogen.
Bedieningspaneel Warm zeepsop:
Met een schoonmaakdoekje reinigen en met een
zachte doek nadrogen.
Geen glasreiniger of schraper gebruiken.
Ruiten van de
deur
Warm zeepsop:
Met een schoonmaakdoekje reinigen en met een
zachte doek nadrogen.
Geen schraper of schuursponsjes van roestvrij
staal gebruiken.
Deurgreep Warm zeepsop:
Met een schoonmaakdoekje reinigen en met een
zachte doek nadrogen.
Als er ontkalkingsmiddel op de deurgreep komt,
direct afnemen. Anders ontstaan er mogelijk vlek-
ken die niet meer verwijderd kunnen worden.
Binnenzijde apparaat
Emaillen vlakken Warm zeepsop of water met azijn:
Met een schoonmaakdoekje reinigen en met een
zachte doek nadrogen.
Ingebrande voedselresten met een vochtige doek
en zeepsop losweken. Bij sterke vervuiling een
schuursponsje van roestvrij staal of ovenreiniger
gebruiken.
Attentie!
Nooit ovenreiniger in de warme binnenruimte ge-
bruiken. Er kan schade aan het email ontstaan.
Vóór het volgende opwarmen resten uit de binnen-
ruimte en van de toesteldeur volledig verwijderen.
De binnenruimte na het schoonmaken open laten
om te drogen.
Aanwijzing: Door levensmiddelresten kan witte
aanslag ontstaan. Deze zijn ongevaarlijk en heb-
ben geen invloed op de werking.
Zo nodig verwijderen met citroenzuur.
Glazen kapje van
de binnenruimte-
verlichting
Warm zeepsop:
Met een schoonmaakdoekje reinigen en met een
zachte doek nadrogen.
Bij sterke vervuiling ovenspray gebruiken.
Deurdichting
Niet afnemen!
Warm zeepsop:
Met een schoonmaakdoekje reinigen.
Niet schuren.
Deurafscherming van roestvrijstaal:
Reinigingsmiddelen voor roestvrij staal gebruiken.
Neem de aanwijzingen van de fabrikant in acht.
Geen schoonmaakmiddelen voor roestvrij staal
gebruiken.
van kunststof:
Met warm zeepsop en een schoonmaakdoekje
reinigen. Met een zachte doek nadrogen. Geen
glasreiniger of schraper gebruiken.
Deurafscherming afnemen om hem schoon te
maken.
Rekjes Warm zeepsop:
Laten weken en reinigen met een schoonmaak-
doekje of borstel.
Uittreksysteem Warm zeepsop:
Met een schoonmaakdoekje of borstel schoonma-
ken.
Verwijder het smeervet niet van de uitschuifrails.
U kunt ze het beste reinigen wanneer ze inge-
schoven zijn. Niet afwassen in de vaatwasma-
chine.

nl Rekjes
16
--------
Aanwijzingen
■ Geringe kleurverschillen op de voorzijde van het
apparaat ontstaan door gebruik van verschillende
materialen, zoals glas, kunststof en metaal.
■ Donkere plekken bij de ruiten van de deur, lijkend op
vegen, zijn lichtreflexen van de verlichting van de
binnenuimte.
■ Het email wordt ingebrand op zeer hoge
temperaturen.Hierdoor kunnen er kleine
kleurverschillen ontstaan. Dit is normaal en heeft
geen nadelige invloed op de werking.
De smalle randen van de bakplaten kunnen niet
volledig worden geëmailleerd. Ze kunnen daarom
ruw zijn. De bescherming tegen corrosie blijft hierbij
intact.
Apparaat schoon houden
Om te voorkomen dat er hardnekkig vuil ontstaat, dient
u het apparaat altijd schoon te houden en vuil direct te
verwijderen.
:Waarschuwing – Risico van brand!
Losse voedselresten, vet en vleessap kunnen in brand
vliegen. Voor gebruik dient u de binnenruimte, de
verwarmingselementen en de accessoires vrij te maken
van grove verontreiniging.
Tips
■ De binnenruimte na gebruik altijd schoonmaken. Zo
kan er geen vuil inbranden.
■ Verwijder kalk-, vet-, zetmeel- en eiwitvlekken altijd
onmiddellijk.
■ Voor het bereiden van zeer vochtig gebak de
braadslede gebruiken.
■ Gebruik geschikt gerei om te braden, bijv. een
braadpan.
pRekjes
Re k j e s
Wanneer uw apparaat goed wordt onderhouden en
schoongemaakt blijft het er lang mooi uitzien en goed
functioneren. Hier leggen wij u uit hoe u de rekjes kunt
verwijderen en schoonmaken.
Rekjes verwijderen en bevestigen
:Waarschuwing – Risico van verbranding!
De rekjes worden heel heet. Nooit de hete rekjes
aanraken. Het apparaat altijd laten afkoelen. Zorg
ervoor dat er geen kinderen in de buurt zijn.
Rekjes verwijderen
1. Het rekje aan de voorkant een beetje optillen ‚ en
verwijderen ƒ (Afb. !).
2. Vervolgens het hele rekje naar voren trekken en
uitnemen (Afb. ").
Maak de rekjes schoon met zeepsop en een
schoonmaaksponsje. Gebruik bij hardnekkig vuil een
borstel.
Toebehoren Warm zeepsop:
Laten weken en reinigen met een schoonmaak-
doekje of borstel.
Bij sterke vervuiling een schuursponsje van roest-
vrij staal gebruiken.
2
D
E
1

Apparaatdeur nl
17
Rekjes ophangen
De rekjes passen alleen links of rechts. Let er bij beide
rekjes op dat de gebogen stangen zich aan de voorkant
bevinden.
1. Het rekje eerst in het midden van de achterste bus
steken ‚, tot het aansluit op de wand van de
binnenruimte, en naar achteren drukken ƒ (Afb. !).
2. Het rekje vervolgens in de voorste bus steken „, tot
het ook hier aansluit op de wand van de
binnenruimte, en naar beneden drukken … (Afb. ").
qApparaatdeur
Appar aat deur
Wanneer uw apparaat goed wordt onderhouden en
schoongemaakt blijft het er lang mooi uitzien en goed
functioneren. Hier leggen wij u uit hoe u de
apparaatdeur kunt verwijderen en schoonmaken.
Deurruiten verwijderen en inbrengen
Om ze gemakkelijker schoon te maken kunt u de ruiten
van de apparaatdeur afnemen.
Apparaatdeur vastzetten
1. Apparaatdeur helemaal openen.
2. Beide blokkeerhendels links en rechts openklappen
(Afb. !).
3. Apparaatdeur sluiten tot de aanslag (Afb. ").
Ruiten verwijderen
1. Apparaatdeur een beetje openen.
2. Links en rechts op de afscherming drukken (Afb. !).
3. Afscherming afnemen (Afb. ").
4. De buitenste ruit eruit trekken (Afb. #) en voorzichtig
op een egaal oppervlak leggen.
F
G
2
D
E
1
2
1
2
1

nl Apparaatdeur
18
5. Deurdichting afnemen (Afb. $).
6. De binnenste ruit eruit trekken (Afb. %) en
voorzichtig op een egaal oppervlak leggen.
7. Zo nodig kunt u de condensstrip voor het reinigen
verwijderen. Hiervoor de apparaatdeur volledig
openen (Afb. &).
8. De condensstrip naar boven klappen en uitnemen
(Afb. ').
Reinig de ruiten met glasreiniger en een zachte doek.
Neem de condensstrip af met een doek en warm
zeepsop.
:Waarschuwing
Risico van letsel!
■ Wanneer er krassen op het glas van de
apparaatdeur zitten, kan dit springen. Geen
schraper, scherpe of schurende
schoonmaakmiddelen gebruiken.
Risico van letsel!
■ Bij het openen en sluiten van de apparaatdeur
bewegen de scharnieren zich en kunnen ze klem
komen te zitten. Kom niet met uw handen bij de
scharnieren.
Ruiten inbrengen
1. De apparaatdeur volledig openen en de
condensstrip weer aanbrengen. Hiervoor de strip
verticaal inbrengen en naar beneden draaien
(Afb. !).
2. Binnenste ruit inschuiven en erop letten dat hij van
onderen goed in de houder zit (Afb. ").
3. Binnenste ruit aan de bovenkant aandrukken
(Afb. #).
4. Deurdichting inbrengen (Afb. $).
5. Buitenste ruit inschuiven en erop letten dat hij van
onderen goed in de houder zitten (Afb. %).
1
2

Wat te doen bij storingen? nl
19
6. Buitenste ruit aan de bovenkant aandrukken
(Afb. &).
7. De afscherming plaatsen en aandrukken tot hij
hoorbaar vergrendelt (Afb. ').
8. Apparaatdeur weer volledig openen.
9. Beide blokkeerhendels links en rechts dichtklappen
(Afb. ()
10. Toesteldeur sluiten.
Attentie!
Gebruik de binnenruimte pas weer wanneer de ruiten
naar behoren zijn ingezet.
3Wat te doen bij storingen?
Wat te doen bi j st or i ngen?
Storingen worden vaak veroorzaakt door een
kleinigheid. Probeer voordat u contact opneemt met de
servicedienst de storing zelf op te lossen met behulp
van de tabel.
Storingen zelf verhelpen
Technische storingen aan het apparaat kunt u vaak
heel gemakkelijk zelf verhelpen.
Lukt een gerecht niet optimaal, dan vindt u aan het
einde van de gebruiksaanwijzing vele tips en
aanwijzingen voor de bereiding. ~ "Voor u in onze
kookstudio uitgetest." op pagina 21
--------
:Waarschuwing – Gevaar voor letsel!
Ondeskundige reparaties zijn gevaarlijk.Nooit proberen
het apparaat zelf te repareren. Reparaties mogen
uitsluitend worden uitgevoerd door technici die zijn
geïnstrueerd door de klantenservice. Bij defect van het
apparat met de servicedienst contact opnemen;
:Waarschuwing – Kans op een elektrische schok!
Ondeskundige reparaties zijn gevaarlijk. Reparaties en
de vervanging van beschadigde aansluitleidingen
mogen uitsluitend worden uitgevoerd door technici die
zijn geïnstrueerd door de klantenservice. Is het
apparaat defect, haal dan de stekker uit het stopcontact
of schakel de zekering in de meterkast uit. Contact
opnemen met de klantenservice.
Foutmeldingen op het display
Wanneer op het display een foutmelding met „“”
verschijnt, bijv. “‹†‹ƒ, het veld e aanraken. De
foutmelding wordt dan teruggezet. Stel eventueel de tijd
opnieuw in.
Was het een eenmalige storing, dan kunt u het
apparaat weer gebruiken zoals altijd. Verschijnt de
foutmelding opnieuw, neem dan contact op met de
servicedienst en geef hierbij de exacte foutmelding en
het E-nr. van uw apparaat op. ~ "Servicedienst"
op pagina 20
Storing Mogelijke
oorzaak
Oplossing / aanwijzing
Apparaat werkt
niet.
Zekering
defect.
Controleer de zekering in de
meterkast.
Stroomonder-
breking
Controleer of het keukenlicht of
andere keukenapparaten functio-
neren.
Op het display
knippert de tijd.
Stroomonder-
breking.
Stel de tijd opnieuw in.
Apparaat kan niet
worden inge-
steld. Op het dis-
play is een
sleutelsymbool
verlicht of
†‘”“.
Kinderslot is
geactiveerd.
Deactiveer het kinderslot door ca.
4 seconden lang de toets met het
sleutelsymbool in te drukken.

nl Servicedienst
20
Lamp voor de binnenruimte aan het plafond
vervangen
Als de lamp voor de binnenruimte is uitgevallen, moet
deze worden vervangen. Temperatuurbestendige 230V-
halogeenlampen, 25 watt, kunt u krijgen bij de
servicedienst of uw speciaalzaak.
Houd de halogeenlamp vast met een droge doek.
Hierdoor wordt de levensduur van de lamp verlengd.
Gebruik uitsluitend originele lampen.
:Waarschuwing – Kans op een elektrische schok!
Bij vervanging van de lamp in de binnenruimte staan de
contacten van de lampfitting onder stroom. Trek
voordat u tot vervanging overgaat de netstekker uit het
stopcontact trekken of schakel de zekering in de
meterkast uit.
:Waarschuwing – Risico van verbranding!
Het toestel wordt zeer heet. Nooit de hete vlakken in de
binnenruimte of verwarmingselementen aanraken. Het
apparaat altijd laten afkoelen. Zorg ervoor dat er geen
kinderen in de buurt zijn.
1. Leg een theedoek in de onverwarmde binnenruimte,
om schade te voorkomen.
2. Glazen afscherming er naar links uitdraaien (Afb. !).
3. Lamp eruit trekken - niet draaien (Afb. ").
Nieuwe lamp inbrengen, hierbij op de stand van de
pinnen letten. De lamp stevig aandrukken.
4. Glazen afscherming er weer inschroeven.
Afhankelijk van het type apparaat is de glazen
afscherming voorzien van een afdichtring.
Afdichtring weer aanbrengen voor het inschroeven.
5. Theedoek eruit nemen en de zekering inschakelen.
4Servicedienst
Se r v i c e d i e n s t
Wanneer uw apparaat gerepareerd moet worden, staat
onze servicedienst voor u klaar. Wij vinden altijd een
passende oplossing, ook om een onnodig bezoek van
medewerkers van de servicedienst te voorkomen.
E-nummer en FD-nummer
Geef aan de servicedienst altijd het volledige
productnummer (E-nr.) en het fabricagenummer (FD-nr.)
van uw apparaat op, zodat wij u goed van dienst
kunnen zijn. Het typeplaatje met de nummers vindt u
wanneer u de apparaatdeur opendoet.
Bij enkele apparaten die werken met stoom vindt u het
typeplaatje achter de afdekking.
Om niet te lang te hoeven zoeken kunt u hier direct de
gegevens van uw apparaat en het telefoonnummer van
de servicedienst invullen.
Houd er rekening mee dat een bezoek van
medewerkers van de servicedienst in het geval van een
verkeerde bediening ook tijdens de garantieperiode
kosten met zich meebrengt.
De contactgegevens in alle landen vindt u in de
bijgesloten lijst met Servicedienstadressen.
Verzoek om reparatie en advies bij storingen
Vertrouw op de competentie van de fabrikant. Dan bent
u ervan verzekerd dat de reparatie wordt uitgevoerd
door ervaren technici die gebruikmaken van de
originele reserveonderdelen voor uw apparaat.
2
1
E-nr.
FD-nr.
Servicedienst O
NL 088 424 4080
B 070 222 145
=1U)'(1U
7\SH

Voor u in onze kookstudio uitgetest. nl
21
JVoor u in onze kookstudio
uitgetest.
Vo o r u in onz e kookst udi o ui t get es t .
U vindt hier een keur aan gerechten en de daarbij
behorende optimale instellingen. Wij laten u zien welke
verwarmingsmethode en temperatuur het meest
geschikt zijn voor uw gerecht. U krijgt informatie over de
juiste toebehoren en de hoogte waarop ze ingeschoven
dienen te worden. U krijgt tips over vormen en de
bereiding.
Aanwijzing: Bij het bereiden van levensmiddelen kan
veel waterdamp in de binnenruimte ontstaan.
Uw apparaat is heel energie-efficiënt en geeft tijdens de
werking slechts weinig warmte naar buiten af. Op grond
van de hoge temperatuurverschillen tussen de
binnenruimte en de buitenste delen van het apparaat
kan er condenswater op de deur, het bedieningspaneel
of nabijgelegen meubelfronten neerslaan. Dit is een
normaal natuurkundig verschijnsel. Door
voorverwarmen of de deur voorzichtig te openen, kan
het condensaat worden gereduceerd.
Algemene aanwijzingen
Aanbevolen instelwaarden
In de tabel vindt u voor diverse gerechten de optimale
verwarmingsmethode. Temperatuur en tijdsduur zijn
afhankelijk van de hoeveelheid en het recept. Daarom
zijn er instelbereiken aangegeven. Probeer het eerst
met de lagere waarden. Bij een lage temperatuur wordt
het gerecht gelijkmatiger bruin. Stel de oven indien
nodig de volgende keer hoger in.
Aanwijzing: De bereidingstijden kunnen niet door
hogere temperaturen worden ingekort. De gerechten
zouden dan alleen van buiten gaar, maar van binnen
niet goed doorbakken zijn.
De instelwaarden gelden voor producten die in de
onverwarmde binnenruimte worden geplaatst. Zo kunt u
tot 20 procent energie besparen. Wanneer u
voorverwarmt worden de aangegeven baktijden enkele
minuten korter.
Voor bepaalden gerechten is voorverwarmen nodig, dit
staat in de tabel aangegeven. Plaats uw gerecht en de
accessoires pas na het voorverwarmen in de
binnenruimte.
Maakt u iets klaar volgens eigen recept, neem dan
soortgelijke gerechten als basis. Bijkomende informatie
vindt u onder de tips na de insteltabel.
Niet gebruikte accessoires verwijderen uit de
binnenruimte. Zo krijgt u een optimaal bakresultaat en
bespaart u tot 20 procent energie.
Verwarmingsmethode milde hetelucht
Milde hetelucht is een intelligente verwarmingsmethode
voor een gezonde bereiding van vlees, vis en gebak.
Het apparaat regelt de energietoevoer in de
binnenruimte optimaal. Het product wordt in fases
bereid met behulp van restwarmte. Zo blijft het sappiger
en wordt het minder bruin. Afhankelijk van de bereiding
en het gerecht kan energie worden bespaard. Als u
tijdens het bereiden vroegtijdig de ovendeur opent of
door het voorverwarmen verdwijnt dit effect.
Gebruik alleen de originele accessoires die bij uw
apparaat horen. Deze zijn optimaal op de binnenruimte
en de verwarmingsmethoden afgestemd. Niet gebruikte
accessoires verwijderen uit de binnenruimte.
Plaats de gerechten in de onverwarmde, lege
binnenruimte. Kies een temperatuur tussen 120 °C en
230 °C.Houd de deur van het apparaat tijdens de
bereiding gesloten. Gebruik slechts één niveau.
De verwarmingsmethode milde hetelucht wordt voor het
bepalen van het energieverbruik in de
circulatieluchtmodus en de energie-efficiëntieklasse
gebruikt.
Bakken op één niveau
Gebruik de volgende inschuifhoogtes voor het bakken
op één niveau:
■ hoog gebak of hoge vormen op het rooster: hoogte
1
■ plat gebak of op de bakplaat: hoogte 1 of 2
Bakken op meerdere niveaus
Gebruik hete lucht. Taarten op bakplaten of in vormen
die gelijktijdig in de oven worden geplaatst, hoeven niet
op hetzelfde moment klaar te zijn.
Bakken op twee niveaus:
■ Braadslede: hoogte 3
Bakplaat: hoogte 1
Accessoires
Gebruik alleen de originele accessoires die bij uw
apparaat horen. Deze zijn optimaal op de binnenruimte
en de functies afgestemd.
Let erop dat u altijd geschikte accessoires gebruikt en
deze er goed om inschuift. ~ "Toebehoren"
op pagina 9
Bakpapier
Gebruik alleen bakpapier dat geschikt is voor de
gekozen temperatuur. Knip het bakpapier altijd zodanig
af dat het goed past.
Taart, cake en gebak
Uw apparaat biedt talrijke verwarmingsmethoden voor
het bakken van gebak en klein gebak. In de
insteltabellen vindt u optimale instellingen voor vele
gerechten.
Neem ook de aanwijzingen in de paragraaf over het
rijzen van het deeg in acht.
Bakvormen
Voor een optimaal kookresultaat raden wij u aan
donkere bakvormen van metaal te gebruiken.
Lichte vormen, keramische vormen en vormen van glas
verlengen de baktijd en het gebak bruint niet
gelijkmatig.
Wilt u vormen van silicone gebruiken, raadpleeg dan de
informatie en de recepten van de fabrikant. Vormen van

nl Voor u in onze kookstudio uitgetest.
22
silicone zijn vaak kleiner dan normale vormen. De
hoeveelheid- en receptgegevens kunnen afwijken.
Diepvriesproducten
Gebruik geen sterk met ijs bedekte diepvriesproducten.
Verwijder het ijs van het gerecht.
Diepvriesproducten zijn ten dele ongelijkmatig
voorgebakken. De ongelijkmatige bruine kleur blijft ook
na het bakken bestaan.
Brood en broodjes
Attentie!
Nooit water in de hete binnenruimte gieten of vormen
met water op de bodem van de oven plaatsen. Door de
verandering van temperatuur kan schade aan het email
ontstaan.
Sommige gerechten lukken het best wanneer ze in
meerdere stappen worden gebakken. Deze zijn in de
tabel aangegeven.
De instelwaarden voor brooddeeg gelden zowel voor
deeg op de bakplaat als voor deeg in een rechthoekige
vorm.
Gebak in vormen
Gebak op de plaat
Gerecht Accessoires/vormen Inschuif-
hoogte
Verwar-
mings-
methode
Tempera-
tuur in °C
Tijdsduur
in min.
Cake, eenvoudig Krans-/rechthoekige vorm 1 " 150-160 70-85
Cake, fijn Krans-/rechthoekige vorm 1 % 150-160 70-80
Taartbodem van roerdeeg Springvorm Ø 26 cm 1 % 160-180 20-30
Vruchten- of kwarktaart met bodem van zand-
taartdeeg
Springvorm Ø 26 cm 1 % 170-190 70-90
Taart Taartvorm 1 % 220-240 30-45
Tulband cake Tulbandvorm 1 % 160-170 50-70
Gistgebak Springvorm Ø 28 cm 1 % 160-170 25-35
Biscuittaart, 3 eieren Springvorm Ø 26 cm 1 % 160-170* 25-35
Biscuittaart, 6 eieren Springvorm Ø 28 cm 1 % 150-160* 35-45
* voorverwarmen
Gerecht Accessoires/vormen Inschuif-
hoogte
Verwar-
mings-
methode
Tempera-
tuur in °C
Tijdsduur
in min.
Cake met bedekking Bakplaat 1 % 160-170 25-45
Cake, 2 niveaus Universele braadslede + bakplaat 3+1 › 140-160 30-50
Zandtaartdeeggebak met droge bedekking Bakplaat 1 % 160-180 30-40
Zandtaartdeeggebak met droge bedekking,
2 niveaus
Universele braadslede + bakplaat 3+1 › 150-160 35-45
Zandtaartdeeggebak met vochtige bedekking braadslede 1 % 160-180 60-80
Gistdeeggebak met droge bedekking braadslede 1 % 160-180 20-30
Gistdeeggebak met droge bedekking,
2 niveaus
Universele braadslede + bakplaat 3+1 › 140-150 25-35
Gistdeeggebak met vochtige bedekking braadslede 2 % 170-190 35-50
Broodvlecht, gistdeegkrans Bakplaat 1 % 160-170 30-40
Biscuitrol Bakplaat 1 % 180-200* 10-15
Strudel, zoet braadslede 1 % 190-200 50-60
Strudel, diepvries braadslede 1 › 200-220 30-45
* voorverwarmen

Voor u in onze kookstudio uitgetest. nl
23
Klein gebak
Koekjes
Brood en broodjes
Pizza, quiche en hartig gebak
Gerecht Accessoires/vormen Inschuif-
hoogte
Verwar-
mings-
methode
Tempera-
tuur in °C
Tijdsduur
in min.
Muffins Muffinplaat 1 " 170-190 20-30
Muffins, 2 niveaus Muffinplaat 3+1 › 160-170 25-35
Klein gebak van gistdeeg Bakplaat 1 % 150-170 25-35
Klein gistdeeggebak, 2 niveaus Universele braadslede + bakplaat 3+1 › 150-170 25-35
Bladerdeeggebak Bakplaat 1 › 180-200* 15-30
Bladerdeeggebak, 2 niveaus Universele braadslede + bakplaat 3+1 › 180-200* 20-35
Deeg van bijv. soesjes Bakplaat 1 % 200-220 30-45
* voorverwarmen
Gerecht Accessoires/vormen Inschuif-
hoogte
Verwar-
mings-
methode
Tempera-
tuur in °C
Tijdsduur
in min.
Sprits Bakplaat 1 › 140-150* 20-35
Sprits, 2 niveaus Universele braadslede + bakplaat 3+1 › 140-150* 25-40
Koekjes Bakplaat 2 % 140-160 12-25
Koekjes, 2 niveaus Universele braadslede + bakplaat 3+1 › 140-160 20-30
Schuimgebak Bakplaat 1 › 90-100 100-130
Schuimgebak, 2 niveaus Universele braadslede + bakplaat 3+1 › 90-100 120-150
Macarons Bakplaat 1 › 100-110 30-45
Macarons, 2 niveaus Universele braadslede + bakplaat 3+1 › 100-110 35-50
* 5 min voorverwarmen
Gerecht Accessoires/vormen Inschuif-
hoogte
Verwar-
mings-
methode
Tempera-
tuur in °C
Tijdsduur
in min.
Brood, 750 g (in rechthoekige vorm en op de
plaat)
Braadslede of rechthoekige vorm 1 › 220 - 230
190 - 200*
10 - 15 25
- 35
Brood, 1000 g (in rechthoekige vorm en op de
plaat)
Braadslede of rechthoekige vorm 1 › 220 - 230
190 - 200*
10 - 15 30
- 45
Brood, 1500 g (in rechthoekige vorm en op de
plaat)
Braadslede of rechthoekige vorm 1 › 210 - 220
180 - 190*
10 - 15 45
- 55
Plat rond brood braadslede 1 % 240- 250* 15 - 20
Broodjes, zoet, vers Bakplaat 1 % 180 - 200* 10 - 20
Broodjes, zoet, vers, 2 niveaus Universele braadslede + bakplaat 3+1 › 160 - 170* 20 - 30
Broodjes, vers Bakplaat 1 % 180 - 200 25 - 35
Toast grillen Rooster 2 † 220 - 240 7 - 10
* voorverwarmen
Gerecht Accessoires/vormen Inschuif-
hoogte
Verwar-
mings-
methode
Tempera-
tuur in °C
Tijdsduur
in min.
Pizza, vers - op de bakplaat Bakplaat 1 0 180 - 190 20 - 25
Pizza, vers - op de bakplaat, 2 niveaus Universele braadslede + bakplaat 3+1 › 170 - 190 35 - 50
Pizza, vers, dunne bodem, in pizzavorm Pizzaplaat 1 0 250 - 260* 8 - 13
* voorverwarmen

nl Voor u in onze kookstudio uitgetest.
24
Tips voor het bakken
Pizza, gekoeld Rooster 1 0 190 - 200 10 - 15
Pizza, diepvries, dunne bodem, 1 stuk Rooster 1 0 190 - 210 10 - 20
Pizza, diepvries, dunne bodem, 2 stuks Braadslede + rooster 3+1 › 190 - 200 20 - 25
Pizza, diepvries, dikke bodem, 1 stuk Rooster 1 0 180 - 200 20 - 25
Pizza, diepvries, dikke bodem, 2 stuks Universele braadslede + rooster 3+1 › 190 - 210 20 - 30
Minipizza's, diepvries braadslede 1 0 180 - 200 15 - 20
Hartig gebak in vormen Springvorm Ø 28 cm 1 % 170 - 190 65 - 80
Quiche Taartvorm, zwart metaal 1 % 200 - 210 35 - 45
Pasteigebak Ovenschaal 1 › 170 - 190 50 - 70
Empanada braadslede 1 % 190 - 200 40 - 50
Börek braadslede 1 % 190 - 200 40 - 50
Gerecht Accessoires/vormen Inschuif-
hoogte
Verwar-
mings-
methode
Tempera-
tuur in °C
Tijdsduur
in min.
* voorverwarmen
U wilt vaststellen of het gebak door-
bakken is.
Steek met een houten prikker op de hoogste plaats in het gebak. Zit er geen deeg meer aan de prikker, dan is
het gebak klaar.
Het gebak stort in. Gebruik de volgende keer minder vloeistof. Of stel de temperatuur 10 °C lager in en verleng de baktijd. Houd
u aan de opgegeven ingrediënten en bereidingsaanwijzingen in het recept.
Het gebak is in het midden hoog gere-
zen en lager bij de randen.
Vet alleen de bodem van de springvorm in. Na het bakken maakt u het gebak voorzichtig los met een mes.
Het sap van de vruchten stroomt over. Gebruik de volgende keer de braadslede.
Klein gebak plakt bij het bakken aan
elkaar.
Tussen de gebakstukken dient een afstand van ca. 2 cm te zijn. Zo is er voldoende plaats om het gebak goed
te laten rijzen en helemaal bruin te laten worden.
Het gebak is te droog. Stel de temperatuur 10 °C hoger in en houd een kortere baktijd aan.
Het gebak is over het geheel te licht. Zijn de inschuifhoogte en de accessoires juist, verhoog dan evt. de temperatuur of houd een langere baktijd
aan.
Het gebak is aan de bovenkant te
licht, maar van onderen te donker.
Plaats het gebak de volgende keer één niveau hoger.
Het gebak is aan de bovenkant te
donker, maar van onderen te licht.
Plaats het gebak de volgende keer één niveau lager. Kies een lagere temperatuur en houd een langere baktijd
aan.
Het gebak in een (langwerpige) vorm
wordt te donker aan de achterkant.
Zet de bakvorm niet direct tegen de achterwand maar midden op het accessoire.
Het gebak is in zijn geheel te donker. Kies de volgende keer een lagere temperatuur en houd evt. een langere baktijd aan.
Het gebak is ongelijkmatig bruin
geworden.
Kies een wat lagere temperatuur.
Ook bakpapier dat uitsteekt kan de luchtcirculatie beïnvloeden. Knip het bakpapier altijd zo af dat het goed
past.
Let erop dat de bakvorm niet direct voor de openingen in de achterwand van de binnenruimte staat.
Bij het bakken van klein gebak moet u indien mogelijk gelijke groottes en diktes aanhouden.
U hebt op meerdere niveaus gebak-
ken. Op de bovenste plaat is het
gebak donkerder dan op de onderste.
Kies voor het bakken op meerdere niveaus altijd hete lucht. Bakplaten of vormen die gelijktijdig in de oven
worden geplaatst, hoeven niet op hetzelfde moment klaar te zijn.
Het gebak ziet er goed uit, maar is van
binnen niet goed doorbakken.
Bak iets langer bij een wat lagere temperatuur en voeg evt. minder vloeistof toe. Bij gebak met een vochtige
bovenkant bakt u eerst de bodem voor. Bestrooi hem met amandelen of paneermeel en doe dan de boven-
laag erop.
Het gebak laat niet los wanneer u het
uit de vorm wilt storten.
Laat het gebak na het bakken nog 5 tot 10 minuten afkoelen. Komt het er nog steeds niet uit, maak de rand
dan voorzichtig los met een mes. Stort het gebak opnieuw en bedek de vorm meerdere keren met een natte,
koude doek. Vet de vorm de volgende keer in en bestrooi hem met paneermeel.

Voor u in onze kookstudio uitgetest. nl
25
Ovenschotels en gegratineerde gerechten
Uw apparaat biedt talrijke verwarmingsmethoden voor
het bereiden van vlees. In de insteltabellen vindt u
optimale instellingen voor vele gerechten.
De bereidingstoestand van een ovenschotel is
afhankelijk van de grootte van de vorm en de hoogte
van het gerecht.
Gebruik voor ovenschotels en gegratineerde gerechten
een platte, brede vorm. In een smalle, hoge vorm
hebben de gerechten meer tijd nodig en worden
donkerder aan de bovenkant.
Gebruik altijd de aangegeven inschuifhoogtes.
Op één niveau kunt u bakken in vormen of met de
braadslede.
■ Vormen op het rooster: hoogte 1
■ Braadslede: hoogte 1
Door de gerechten gelijktijdig te bereiden, kunt u tot 45
procent energie besparen. Plaats de vormen naast
elkaar in de binnenruimte.
Gevogelte, vlees en vis
Uw apparaat biedt talrijke verwarmingsmethoden voor
het klaarmaken van gevogelte, vlees en vis. In de
insteltabellen vindt u voor enkele gerechten optimale
instellingen.
Braden op het rooster
Het braden op het rooster is bijzonder geschikt voor
groot gevogelte of meerdere stukken tegelijk.
Plaats de braadslede met het rooster op de
aangegeven inschuifhoogte. Let erop dat het rooster
goed op de braadslede ligt. ~ "Toebehoren"
op pagina 9
Giet afhankelijk van de grootte en het soort vlees tot ^
liter water in de braadslede. Vrijkomende vloeistof wordt
opgevangen. Van dit braadvocht kunt u een saus
maken. Bovendien ontstaat er zo minder rook en blijft
de binnenruimte schoner.
Braden in vormen
:Waarschuwing – Risico van letsel door barstend
glas!
Zet hete vormen van glas op een droge onderzetter. Is
de ondergrond nat of koud, dan kan het glas knappen.
:Waarschuwing – Risico van verbranding!
Wanneer het deksel na de bereiding wordt afgenomen
kan er zeer hete stoom vrijkomen. Til het deksel aan de
achterkant op, zodat de hete stoom van het lichaam af
naar buiten gaat.
Gebruik alleen vormen die geschikt zijn voor de oven.
Vormen van glas zijn het meest geschikt. Controleer of
de vorm in de binnenruimte past.
Glanzende braadsledes van edelstaal of aluminium
reflecteren de warmte als een spiegel en zijn daardoor
niet zo geschikt. Gevogelte, vlees en vis wordt
langzamer gaar en minder bruin. Houd een hogere
temperatuur en/of langere bereidingstijd aan.
Houd u aan de aanwijzingen van de fabrikant van de
braadvorm.
Open vorm
Voor het klaarmaken van gevogelte, vlees en vis kunt u
het beste een hoge vorm gebruiken. Plaats de vorm op
het rooster. Wanneer u geen geschikte vorm heeft, kunt
u de braadslede gebruiken.
Gesloten vorm
De binnenruimte blijft bij de bereiding in een gesloten
vorm veel schoner. Let erop dat het deksel past en
goed sluit. Plaats de vorm op het rooster.
Gevogelte, vlees en vis kunnen ook in een gesloten
braadslede knapperig worden. Gebruik hiervoor een
braadslede met glazen deksel en stel een hogere
temperatuur in.
Grillen
Laat de deur van het apparaat tijdens het grillen
gesloten. Nooit grillen terwijl de apparaatdeur geopend
is.
Leg het te grillen stuk op het rooster. Plaats bovendien
de braadslede, met de schuine kant naar de
apparaatdeur, ten minste één inschuifhoogte eronder.
Zo wordt afdruipend vet opgevangen.
Neem indien mogelijk grillstukken van ongeveer
dezelfde dikte en hetzelfde gewicht. Dan worden ze
gelijkmatig bruin en blijven lekker mals. Leg de te
grillen stukken rechtstreeks op het rooster.
Keer ze met een grilltang. Wanneer u met een vork in
het vlees prikt, verliest het sap en wordt het droog.
Bestrooi vlees pas na het grillen. Zout onttrekt water
aan het vlees.
Aanwijzingen
■ Het grillelement wordt steeds weer in- en
uitgeschakeld, dat is normaal. Hoe vaak dit gebeurt,
is afhankelijk van de ingestelde grillstand.
■ Bij het grillen kan rook ontstaan.
Gerecht Accessoires/vormen Inschuif-
hoogte
Verwar-
mings-
methode
Tempera-
tuur in °C
Tijdsduur
in min.
Ovenschotel, hartig, gegaarde ingrediënten Ovenschaal 1 % 200 - 220 40 - 60
Ovenschotel, zoet Ovenschaal 1 % 170 - 190 40 - 60
Aardappelgratin, rauwe ingrediënten, 4 cm
hoog
Ovenschaal 1 0 170 - 180 50 - 60

nl Voor u in onze kookstudio uitgetest.
26
Aanbevolen instelwaarden
De instelwaarden gelden voor ongevuld vlees,
braadklaar gevogelte en vlees en vis op
koelkasttemperatuur, die in de onverwarmde
binnenruimte worden geplaatst.
In de tabel vindt u gegevens voor gevogelte, vlees en
vis en voorgestelde gewichten. Wilt u zwaarder
gevogelte, vlees of vis bereiden, gebruik dan in elk
geval de lagere temperatuur. Om bij meerdere stukken
de bereidingsduur te bepalen dient u uit te gaan van het
gewicht van het zwaarste stuk. De stukken dienen
ongeveer even groot te zijn.
Hoe groter het gevogelte, het vlees of de vis, des te
lager de temperatuur en des te langer de bereidingstijd.
Gevogelte, vlees en vis na ca. ^ tot Z van de
opgegeven tijd keren.
Gevogelte
Prik bij eend of gans het vel onder de vleugels in. Zo
kan het vet weglopen.
Snijd bij eendenborst het vel in.Keer de eendenborst
niet.
Voeg wat vloeistof toe aan het gevogelte in de pan. De
bodem van de vorm dient ca. 0,5-1 cm bedekt te zijn.
Let er bij het keren van gevogelte op dat eerst de
borstzijde resp. de kant van het vel onder ligt.
Gevogelte wordt bijzonder knapperig bruin als u het
tegen het einde van de bereidingstijd bestrijkt met
boter, zout water of sinaasappelsap.
Vlees
Bestrijk mager vlees naar wens met vet of leg er
reepjes spek op.
Voeg aan braadstukken van mager vlees een beetje
vloeistof toe. In glazen vormen moet de bodem van de
vorm ca. ^ cm hoog bedekt zijn.
Snij een zwoerd kruisgewijs in. Let er bij het keren van
braadvlees op dat eerst het zwoerd onder ligt.
Als het braadvlees klaar is, moet het nog 10 minuten in
de uitgeschakelde, gesloten binnenruimte blijven
liggen. Zo kan het vleessap zich beter verdelen. Wikkel
het braadvlees evt. in aluminiumfolie. Bij de opgegeven
bereidingstijd is de aanbevolen rusttijd niet inbegrepen.
Braden en stoven in een vorm is comfortabeler. U kunt
het braadvlees met de vorm eenvoudiger uit de
binnenruimte nemen en de saus direct in de vorm
bereiden.
De hoeveelheid vloeistof is afhankelijk van het soort
vlees en het materiaal van de vormen en of u een
deksel gebruikt. Wanneer u vlees in geëmailleerde of
donkere braadvormen klaarmaakt, is er wat meer
vloeistof nodig dan in glazen vormen.
Tijdens het braden verdampt de vloeistof in de vorm.
Voeg zo nodig voorzichtig wat vloeistof toe.
De afstand tussen het vlees en het deksel moet
minstens 3 cm bedragen. Het vlees kan tijdens de
bereiding uitzetten.
Voor het stoven braadt u het vlees naar wens eerst aan.
Voeg er voor het braadsap water, wijn, azijn of iets
soortgelijks aan toe. De bodem van de vorm dient ca 1-
2 cm bedekt te zijn.
Vis
Hele vis hoeft niet gekeerd te worden. Plaats de hele vis
in de zwemstand in de binnenruimte, met de rugvin
naar boven. Een ingesneden aardappel of kleine
ovenvaste vorm in de buik van de vis zorgt voor
stabiliteit.
De vis is gaar wanneer de rugvin gemakkelijk loslaat.
Doe bij het stomen twee tot drie eetlepels vloeistof en
wat citroensap of azijn in de vorm.
Gevogelte
Gerecht Accessoires/vormen Inschuif-
hoogte
Verwar-
mings-
methode
Tempera-
tuur in °C
Tijdsduur
in min.
Kip, 1,3 kg Open vorm 1 † 200 - 210 60 - 70
Kleine kipdelen, à 250 g Rooster 1 † 210 - 220 35 - 40
Kipsticks, nuggets, diepvries braadslede 1 % 190 - 210 20 - 25
Eend, 2 kg Open vorm 1 † 180 - 200 90 - 110
Gans, 3 kg Rooster 1 † 160 - 170 110 - 130
Ganzenbouten, à 350 g Open vorm 1 † 150 - 160 110 - 130
Kalkoen, 2,5 kg Open vorm 1 † 170 - 190 80 - 100
Kalkoenfilet, zonder been, 1 kg, in gesloten
pan
Gesloten vorm 1 % 220 - 240 80 - 100
Kalkoendij, met been, 1 kg Open vorm 1 † 180 - 190 80 - 100

Voor u in onze kookstudio uitgetest. nl
27
Vlees
Vis
Tips voor het braden, stoven en grillen
Gerecht Accessoires/vormen Inschuif-
hoogte
Verwar-
mings-
methode
Temperatur
in °C /
grillstand
Tijdsduur
in min.
Gebraden varkensvlees zonder zwoerd, bijv.
halsstuk, 1,5 kg
Open vorm 1 † 180 - 200 100 - 120
Gebraden varkensvlees met zwoerd, bijv.
schouderstuk, 2 kg
Open vorm 1 † 180 - 200 120 - 140
Gebraden varkenslende, 1,5 kg Open vorm 1 † 210 - 220 60 - 70
Varkenssteaks, 2 cm dik Rooster 3 ( 3 18 - 22
Runderfilet, medium, 1 kg Open vorm 1 † 210 - 220 40 - 50
Gestoofd rundvlees, 1,5 kg Gesloten vorm 1 " 200 - 220 140 - 160
Rosbief, medium, 1,5 kg Open vorm 1 † 200 - 210 60 - 70
Burger, 3-4 cm hoog Rooster 2 ( 3 25 - 30
Gebraden kalfsvlees, 1,5 kg Open vorm 1 † 160 - 180 100 - 120
Kalfsschenkel, 1,5 kg Open vorm 1 % 200 - 210 110 - 120
Lamsbout zonder been, medium, 1,0 kg inge-
bonden
Open vorm 1 † 180 - 190 70 - 80
Lamszadel met been, 1,5 kg, medium Open vorm 1 † 180 - 190* 35 - 40
Grillworsten Rooster 3 ( 3 12 - 18
Gehaktbrood, 1 kg Open vorm 1 † 180 - 190 70 - 80
* zonder keren
Gerecht Accessoires/vormen Inschuif-
hoogte
Verwar-
mings-
methode
Tempera-
tuur in °C /
grillstand
Tijdsduur
in min.
Vis, gegrild, heel 300 g, bijv. forel Rooster 2 † 170 - 180 20 - 25
Vis, gegrild, heel 1,5 kg, bijv. zalm Rooster 1 † 160 - 170 35 - 50
Visfilet, viskotelet, gegrild, 2-3 cm dik, gegrild Rooster 2 ( 3 15 - 20
Vis, gestoofd, heel 300 g, bijv. forel Gesloten vorm 1 " 170 -180 40 - 45
Vis, gestoofd, heel 1,5 kg, bijv. zalm Gesloten vorm 1 " 170 - 180 50 - 60
Visfilet, ongepaneerd, 2-3 cm dik, gestoofd Gesloten vorm 1 " 170 - 180 30 - 40
De binnenruimte wordt erg vuil. Bereid het product in een gesloten braadslede of gebruik het grillrooster. Wanner u het grillrooster gebruikt,
behaalt u een optimaal braadresultaat. U kunt het grillrooster als speciaal toebehoren kopen.
Het braadvlees is te donker en de
korst is op enkele plaatsen verbrand
en/of het braadvlees is te droog.
Controleer de inschuifhoogte en de temperatuur. Kies de volgende keer een lagere temperatuur en verkort
evt. de braadtijd.
De korst is te dun. Verhoog de temperatuur of schakel na afloop van de braadtijd de grill even in.
Het braadvlees ziet er goed uit, maar
de jus is aangebrand.
Neem de volgende keer kleiner braadgerei en voeg evt. meer vloeistof toe.
Het braadvlees ziet er goed uit, maar
de jus is te licht en te waterig.
Neem de volgende keer groter braadgerei en voeg evt. minder vloeistof toe.
Bij het stoven brandt het vlees aan. Het deksel moet goed op de braadvorm passen en goed sluiten.
Reduceer de temperatuur en voeg indien gewenst tijdens het stoven nog vloeistof toe.
Het grillproduct wordt te droog. Het vlees pas na het grillen zouten. Zout onttrekt water aan het vlees. Steek tijdens het keren niet in het grill-
product. Gebruik een grilltang.

nl Voor u in onze kookstudio uitgetest.
28
Groente en bijgerechten
Hier vindt u gegevens voor het bereiden van gegrilde
groente, aardappels en diepvries-aardappelproducten.
Houd u aan de opgaven in de tabel.
Desserts
Met uw apparaat kunt u ook zelf soufflés en yoghurt
maken.
Soufflés
Soufflés kunt u ook in een waterbad in de braadslede
klaarmaken. Plaats hiertoe de braadslede op hoogte 2.
Yoghurt
Neem de rekjes en accessoires uit de binnenruimte. De
binnenruimte moet leeg zijn.
1. 1 liter melk (3,5 % vet) op de kookplaat tot 90 °C
verwarmen en tot 40 °C afkoelen.
Bij houdbare melk is het verwarmen op 40 °C
voldoende.
2. 150g yoghurt (koelkasttemperatuur) erdoor roeren.
3. Koppen of kleine potjes hiermee vullen en afdekken
met vershoudfolie.
4. De koppen of potjes vervolgens op de bodem van
de binnenruimte zetten en instellen zoals
aangegeven in de tabel.
5. Na de bereiding de yoghurt in de koelkast laten
afkoelen.
Acrylamide in levensmiddelen
Acrylamide ontstaat vooral bij met hoge verhitting
klaargemaakte graan- en aardappelproducten, zoals
bijv. patates frites, aardappelchips, toast, broodjes,
brood of fijne bakwaren (koekjes, taaitaai, speculaas).
Drogen
Met hete lucht kunt u uitstekend drogen.Bij deze soort
conservering worden aromastoffen door het onttrekken
van water geconcentreerd.
Gebruik uitsluitend fruit, groente en kruiden zonder
gebreken en was deze grondig. Bedek de braadslede
en het rooster met bak- of perkamentpapier. Laat de
vruchten goed afdruipen en maak ze droog.
Snijd ze eventueel in even grote stukken of even dunne
plakjes. Leg ongeschild fruit op de schaal met de
snijvlakken naar boven. Let erop dat zowel fruit als
paddestoelen niet op elkaar liggen.
Gerecht Accessoires/vormen Inschuif-
hoogte
Verwar-
mings-
methode
Tempera-
tuur in °C /
grillstand
Tijdsduur
in min.
Gegrilde groente braadslede 3 ( 3 10 - 20
Gebakken aardappelen, gehalveerd braadslede 1 › 170 - 190 45 - 60
Aardappelproducten, diepvries, bijv. frites, kro-
ketten, aardappelflappen, Rösti
braadslede 1 % 200 - 220 25 - 35
Aardappelproducten, diepvries, frites, 2
niveaus
Universele braadslede + bakplaat 3+1 › 200 - 220** 30 - 40
* 5 min. voorverwarmen, gebruik niet de functie Snel voorverwarmen
Gerecht Accessoires/vormen Inschuif-
hoogte
Verwar-
mings-
methode
Tempera-
tuur in °C
Duur in
uren/min.
Yoghurt Portievormen - › 50 6 - 7h
Soufflé in portievormen Portievormen 1 % 160 -170 30 - 40min
Tips voor een acrylamidearme bereiding van gerechten
Algemeen ■ Zo kort mogelijke bereidingstijden aanhouden.
■ Gerechten goudgeel en niet te donker laten worden.
■ Grote, dikke gerechten bevatten minder acrylamide.
Bakken Met boven- en onderwarmte, max. 200 °C.
Met hete lucht max. 180 °C.
Koekjes Met boven- en onderwarmte, max. 190 °C.
Met hete lucht max. 170 °C.
Ei of eigeel vermindert de vorming van acrylamide.
Oven-frites Gelijkmatig en in één laag over de plaat verdelen. Ca. 400-600 g per plaat bakken, zodat de aardappels
niet uitdrogen en knapperig worden.

Voor u in onze kookstudio uitgetest. nl
29
Rasp de groenten en blancheer ze vervolgens.Laat de
geblancheerde groenten afdruipen en verdeel ze
gelijkmatig over het rooster.
Droog kruiden samen met de steel. Leg de kruiden
gelijkmatig in kleine hoopjes op het rooster.
Gebruik de volgende inschuifhoogtes voor het drogen:
■ 1 rooster: hoogte 2
■ 2 roosters: hoogte 3+1
Fruit en groente met veel vocht enkele malen keren. Het
gedroogde gerecht direct na het drogen losmaken van
het papier.
In de tabel vindt u de instellingen voor het drogen van
verschillende levensmiddelen. Temperatuur en tijdsduur
zijn afhankelijk van de soort, vochtigheid, rijpheid en
dikte van de te drogen levensmiddelen.Hoe langer u de
te drogen levensmiddelen laat drogen, des te beter ze
geconserveerd zijn.Hoe dunner er gesneden wordt, des
te sneller het einde van de droogtijd bereikt wordt en
des te meer aroma het gedroogde product behoudt.
Daarom zijn er instelbereiken aangegeven.
Wilt u nog meer levensmiddelen drogen, neem dan
soortgelijke levensmiddelen in de tabel als
uitgangspunt.
Inmaken
In uw apparaat kunt u fruit en groente inmaken.
:Waarschuwing – Risico van letsel!
Wanneer de levensmiddelen niet goed zijn ingekookt,
kunnen de inmaakpotten barsten. Volg de aanwijzingen
voor het inkoken.
Potten
Gebruik uitsluitend schone en onbeschadigde
weckpotten. Gebruik uitsluitend hittebestendige, schone
en onbeschadigde rubber afdichtringen. Klemmen en
veren van tevoren controleren.
Gebruik bij een inmaakproces alleen weckpotten van
gelijke grootte die gevuld zijn met dezelfde
levensmiddelen. In de binnenruimte kunt u de inhoud
van maximaal zes weckpotten met ^, 1 of 1^ liter
tegelijkertijd inmaken. Gebruik geen grotere of hogere
potten. Dan zouden de deksels kunnen springen.
De weckpotten mogen tijdens het inkoken niet met
elkaar in contact komen in de binnenruimte.
Fruit en groente voorbereiden
Gebruik uitsluitend fruit en groenten die geen gebreken
vertonen. Was ze grondig.
Fruit resp. groente, afhankelijk van de soort, schillen,
ontpitten, kleinmaken en in weckpotten doen. Vullen tot
ca. 2 cm onder de rand.
Fruit: de vruchten in de weckpotten doen, met een hete,
afgeschuimde suikeroplossing (ca. 400 ml voor 1-
literfles). Op één liter water:
■ ca. 250 g suiker bij zoet fruit
■ ca. 500 g suiker bij zuur fruit
Groente: de groente in de weckpotten doen met heet,
gekookt water.
De glazen randen schoonmaken. Leg op elke pot een
natte rubberen ring en een deksel. Sluit de potten af
met klemmen. Plaats de potten zó in de braadslede dat
ze elkaar niet raken. 500 ml heet water (ca. 80 °C) in
de braadslede doen. Instellen zoals aangegeven in de
tabel.
Inmaken beëindigen
Fruit: Na enige tijd stijgen er met korte tussenpozen
belletjes op. Zodra in alle weckpotten belletjes te zien
zijn het apparaat uitschakelen. Haal de weckpotten na
de aangegeven nawarmtijd uit de binnenruimte.
Groente: Na enige tijd stijgen er met korte tussenpozen
belletjes op. Zodra alle weckpotten borrelen, de
temperatuur tot 120 °C reduceren en ze zoals
aangegeven in de tabel in de gesloten binnenruimte
verder laten borrelen. Schakel na afloop van deze tijd
het apparaat uit en maak zoals in de tabel aangegeven
nog enkele minuten gebruik van de nawarmte.
Haal de potten na het inmaken uit de binnenruimte en
plaats ze op een schone doek. Zet de hete potten niet
op een koude of natte ondergrond, dan zouden ze
kunnen knappen. Dek de weckpotten af om ze te
beschermen tegen tocht. Klemmen pas verwijderen
wanneer de potten koud zijn.
De aangegeven tijden in de insteltabel zijn richtwaarden
voor het inmaken van fruit en groente. Deze kunnen
worden beïnvloed door de omgevingstemperatuur, het
aantal potten en de hoeveelheid, temperatuur en
kwaliteit van de inhoud. De opgaven hebben betrekking
op ronde potten van 1 liter. Controleer voordat u om- of
uitschakelt of de potten werkelijk borrelen. Het borrelen
begint na ca. 30-60 minuten.
Gerecht Accessoires/vormen Inschuif-
hoogte
Verwar-
mings-
methode
Tempera-
tuur in °C
Tijdsduur
in min.
Pitvruchten (appelringen, 3 mm dik, per roos-
ter 200 g)
1-2 roosters 2 / 1+3 › 80 4 - 8 h
Wortelgewassen (wortelen), geraspt, geblan-
cheerd
1-2 roosters 2 / 1+3 › 80 4 - 7 h
Paddestoelen in plakjes 1-2 roosters 2 / 1+3 › 80 5 - 8 h
Kruiden, schoongemaakt 1-2 roosters 2 / 1+3 › 60 2 - 5 h

nl Voor u in onze kookstudio uitgetest.
30
Deeg laten rijzen
Het deeg rijst duidelijk sneller dan bij kamertemperatuur
en droogt niet uit. Start de werking alleen wanneer de
binnenruimte geheel is afgekoeld.
Laat gistdeeg altijd twee maal rijzen. Houd u wanneer
het deeg voor de eerste en tweede keer rijst aan de
opgaven in de insteltabellen (gaarheid van het deeg en
afzonderlijke gaarheid).
Gaarheid van deeg
Doe het deeg in een hittebestendige schaal en plaats
deze op het rooster. Instellen zoals aangegeven in de
tabel.
Open tijdens het gisten de apparaatdeur niet omdat er
anders vocht ontwijkt. Het deeg niet afdekken.
Tijdens het gebruik ontstaat er condenswater en beslaat
de deurruit. Na het gisten de binnenruimte afnemen.
Kalkresten met wat azijn oplossen en afnemen met
helder water.
Afzonderlijke gaarheid
Plaats het gebak op de inschuifhoogte die in de tabel is
aangegeven.
Wanner u wilt voorverwarmen vindt de afzonderlijke
gaarheid buiten het apparaat op een warme plek plaats.
Temperatuur en duur van het gisten zijn afhankelijk van
de soort en hoeveelheid van de ingrediënten. Daarom
zijn de opgaven in de insteltabel richtwaarden.
Ontdooien
Geschikt voor het ontdooien van diepvries fruit, groente
en gebak. Gevogelte, vlees en vis kunt u het beste in de
koelkast ontdooien. Niet geschikt voor room- of
slagroomtaarten.
Gebruik de volgende inschuifhoogtes voor het
ontdooien:
■ 1 rooster: hoogte 1
De tijdsopgaven in de tabel zijn richtwaarden.Ze zijn
afhankelijk van de kwaliteit, vriestemperatuur (-18°C) en
de aard van de levensmiddelen. Er zijn tijdsintervallen
aangegeven.Stel eerst de kortste tijd in en verleng deze
zo nodig.
Tip: Vlak of in porties ingevroren producten ontdooien
sneller dan wanneer ze als blok zijn bevroren.
Diepvrieslevensmiddelen uit de verpakking halen en in
een geschikte vorm op het rooster plaatsen.
De voedingsproducten tussentijds één tot twee keer
omroeren of keren. Grote stukken moet u herhaaldelijk
keren.Haal de voedingsproducten zo nodig tussentijds
uit elkaar of neem reeds ontdooide stukken uit de
binnenruimte.
Laat de ontdooide voedingsproducten nog 10 tot 30
minuten in het uitgeschakelde apparaat rusten, zodat
de temperatuur gelijkmatig verdeeld wordt.
Gerecht Accessoires/vormen Inschuif-
hoogte
Verwar-
mings-
methode
Stap Tempera-
tuur in °C
Tijdsduur in minuten
Groente, bijv. wortelen Inmaakpotten, 1 liter 1 › 1. 160-170 Tot aan het borrelen: 30-40
2. 120 Vanaf het borrelen: 30-40
3. - Nawarmen: 30
Groente, bijv. komkommer Inmaakpotten, 1 liter 1 › 1. 160-170 Tot aan het borrelen: 30-40
2. - Nawarmen: 30
Steenvruchten, bijv. kersen, prui-
men
Inmaakpotten, 1 liter 1 › 1. 160-170 Tot aan het borrelen: 30-40
2. - Nawarmen: 35
Pitvruchten, bijv. appels, aardbeien Inmaakpotten, 1 liter 1 › 1. 160-170 Tot aan het borrelen: 30-40
2. - Nawarmen: 25
Gerecht Accessoires/vormen Inschuif-
hoogte
Verwar-
mings-
methode
Stap Tempera-
tuur in °C
Tijdsduur in minuten
Gistdeeg, licht Schotel, bakplaat 1 % 1. 50 25-30
2. 50 10-20
Gistdeeg, zwaar en vetrijk Schotel, bakplaat 1 % 1. 50 20-40
2. 50 15-25

Voor u in onze kookstudio uitgetest. nl
31
Warmhouden
U kunt gegaarde gerechten met de
verwarmingsmethode boven- en onderwarmte bij 70 °C
warm houden. Zo voorkomt u condensvorming en hoeft
u de binnenruimte niet af te nemen.
Houd de gegaarde gerechten nooit langer dan twee uur
warm. Let erop dat sommige gerechten tijdens het
warm houden verder garen. Dek de gerechten evt. af.
Testgerechten
Deze tabellen zijn gemaakt voor onderzoeksinstituten
om het controleren en testen van het apparaat te
vergemakkelijken.
Volgens EN 60350-1.
Bakken
Bakplaten of vormen die gelijktijdig in de oven worden
geplaatst, hoeven niet op hetzelfde moment klaar te
zijn.
Inschuifhoogtes bij het bakken op twee niveaus:
■ Braadslede: hoogte 3
Bakplaat: hoogte 1
Bakken met twee springvormen:
■ Op één niveau
Aanwijzingen
■ De instelwaarden gelden voor producten die in de
onverwarmde binnenruimte worden geplaatst.
■ Neem de aanwijzingen voor het voorverwarmen in
de tabellen in acht. De instelwaarden gelden zonder
snel voorverwarmen.
■ Gebruik bij het bakken eerst de laagste opgegeven
temperatuur.
Grillen
Plaats ook de braadslede. De vloeistof wordt
opgevangen en de binnenruimte blijft schoner.
Bakken
Gerecht Accessoires/vormen Inschuif-
hoogte
Verwar-
mings-
methode
Tempera-
tuur in °C
Tijdsduur
in min.
Brood, algemeen Bakplaat 1 › 50 40-70
Taart, vochtig Bakplaat 1 › 50 70-90
Gebak, droog Bakplaat 1 › 60 60-75
Gerecht Accessoires/vormen Inschuif-
hoogte
Verwar-
mings-
methode
Tempera-
tuur in °C
Tijdsduur
in min.
Sprits Bakplaat 1 % 140 - 150** 20 - 25
Sprits Bakplaat 1 › 140 - 150** 20 - 35
Sprits, 2 niveaus Universele braadslede + bakplaat 3+1 › 140 - 150** 25 - 40
Small cakes Bakplaat 1 " 150-160 30 - 35
Small cakes Bakplaat 1 › 150 - 160** 23 - 30
Small cakes, 2 niveaus Universele braadslede + bakplaat 3+1 › 150 - 160** 25 - 35
Waterbiscuit Springvorm Ø 26 cm 1 % 160 - 170* 25 - 35
Waterbiscuit Springvorm Ø 26 cm 1 › 160 - 170* 25 - 35
Bedekte appeltaart 2 x zwarte bakvormen Ø 20 cm 1 0 160 - 170 65 - 75
Bedekte appeltaart 2 x zwarte bakvormen Ø 20 cm 1 % 180 - 190 60 - 80
* voorverwarmen, niet de snelverwarmingsfunctie gebruiken
** 5 min. voorverwarmen, niet de snelverwarmingsfunctie gebruiken.

nl Voor u in onze kookstudio uitgetest.
32
Grillen
Gerecht Accessoires/vormen Inschuif-
hoogte
Verwar-
mings-
methode
Grillstand Tijdsduur
in min.
Toast roosteren Rooster 3 ( 3** 0,5 - 1,0
Beefburger, 12 stuks Rooster 2 ( 3*** 25 - 30
** 5 min. voorverwarmen, niet de snelverwarmingsfunctie gebruiken.
*** Na 2/3 van de totale tijd keren

en
33
Table of contents
[en]Inst ructi on manual
8 Intended use . . . . . . . . . . . . . . . . . . . . . . . . . . . . 34
( Important safety information . . . . . . . . . . . . . . 34
General information . . . . . . . . . . . . . . . . . . . . . . . . . . 34
Halogen lamp. . . . . . . . . . . . . . . . . . . . . . . . . . . . . . . 35
] Causes of damage . . . . . . . . . . . . . . . . . . . . . . . 36
General information . . . . . . . . . . . . . . . . . . . . . . . . . . 36
7 Environmental protection . . . . . . . . . . . . . . . . . 36
Saving energy . . . . . . . . . . . . . . . . . . . . . . . . . . . . . . 36
Environmentally-friendly disposal . . . . . . . . . . . . . . . . 37
* Getting to know your appliance . . . . . . . . . . . . 38
Control panel . . . . . . . . . . . . . . . . . . . . . . . . . . . . . . . 38
Buttons and display . . . . . . . . . . . . . . . . . . . . . . . . . . 38
Types of heating and functions . . . . . . . . . . . . . . . . . 39
Temperature. . . . . . . . . . . . . . . . . . . . . . . . . . . . . . . . 39
Cooking compartment . . . . . . . . . . . . . . . . . . . . . . . . 40
_ Accessories . . . . . . . . . . . . . . . . . . . . . . . . . . . . 40
Control accessories . . . . . . . . . . . . . . . . . . . . . . . . . . 40
Inserting accessories . . . . . . . . . . . . . . . . . . . . . . . . . 40
Optional accessories . . . . . . . . . . . . . . . . . . . . . . . . . 41
K Before using for the first time. . . . . . . . . . . . . . 42
Initial use . . . . . . . . . . . . . . . . . . . . . . . . . . . . . . . . . . 42
Cleaning the cooking compartment and accessories 42
1 Operating the appliance . . . . . . . . . . . . . . . . . . 42
Switching the appliance on and off . . . . . . . . . . . . . . 42
Setting the heating function and temperature . . . . . . 42
Rapid heating. . . . . . . . . . . . . . . . . . . . . . . . . . . . . . . 43
O Time-setting options . . . . . . . . . . . . . . . . . . . . . 43
Setting the cooking time . . . . . . . . . . . . . . . . . . . . . . 43
Setting the end time . . . . . . . . . . . . . . . . . . . . . . . . . . 44
Setting the short-term timer . . . . . . . . . . . . . . . . . . . . 44
Setting the time on the clock . . . . . . . . . . . . . . . . . . . 45
A Childproof lock. . . . . . . . . . . . . . . . . . . . . . . . . . 45
Activating and deactivating . . . . . . . . . . . . . . . . . . . . 45
D Cleaning . . . . . . . . . . . . . . . . . . . . . . . . . . . . . . . 46
Suitable cleaning agents . . . . . . . . . . . . . . . . . . . . . . 46
Keeping the appliance clean . . . . . . . . . . . . . . . . . . . 47
p Rails. . . . . . . . . . . . . . . . . . . . . . . . . . . . . . . . . . . 47
Detaching and refitting the rails . . . . . . . . . . . . . . . . . 47
q Appliance door . . . . . . . . . . . . . . . . . . . . . . . . . . 48
Removing and installing the door panels . . . . . . . . . . 48
3 Trouble shooting . . . . . . . . . . . . . . . . . . . . . . . . 50
Rectifying faults yourself . . . . . . . . . . . . . . . . . . . . . . .50
Replacing the bulb in the top of the cooking
compartment . . . . . . . . . . . . . . . . . . . . . . . . . . . . . . .51
4 Customer service . . . . . . . . . . . . . . . . . . . . . . . . 51
E number and FD number . . . . . . . . . . . . . . . . . . . . .51
J Tested for you in our cooking studio. . . . . . . . 52
General information . . . . . . . . . . . . . . . . . . . . . . . . . .52
Cakes and pastries. . . . . . . . . . . . . . . . . . . . . . . . . . .52
Bakes and gratins . . . . . . . . . . . . . . . . . . . . . . . . . . .56
Poultry, meat and fish . . . . . . . . . . . . . . . . . . . . . . . . .56
Vegetables and side dishes . . . . . . . . . . . . . . . . . . . .58
Desserts . . . . . . . . . . . . . . . . . . . . . . . . . . . . . . . . . . .59
Acrylamide in foodstuffs . . . . . . . . . . . . . . . . . . . . . . .59
Drying . . . . . . . . . . . . . . . . . . . . . . . . . . . . . . . . . . . . .59
Preserving . . . . . . . . . . . . . . . . . . . . . . . . . . . . . . . . .60
Prove dough . . . . . . . . . . . . . . . . . . . . . . . . . . . . . . . .61
Defrosting . . . . . . . . . . . . . . . . . . . . . . . . . . . . . . . . . .61
Keeping warm . . . . . . . . . . . . . . . . . . . . . . . . . . . . . .62
Test dishes . . . . . . . . . . . . . . . . . . . . . . . . . . . . . . . . .62

en Intended use
34
8Intended use
Intended use
Read these instructions carefully. Only then
will you be able to operate your appliance
safely and correctly. Retain the instruction
manual and installation instructions for future
use or for subsequent owners.
This appliance is only intended to be fully fitted
in a kitchen. Observe the special installation
instructions.
Check the appliance for damage after
unpacking it. Do not connect the appliance if it
has been damaged in transport.
Only a licensed professional may connect
appliances without plugs. Damage caused by
incorrect connection is not covered under
warranty.
This appliance is intended for domestic use
only. The appliance must only be used for the
preparation of food and drink. The appliance
must be supervised during operation. Only
use this appliance indoors.
This appliance is intended for use up to a
maximum height of 4000 metres above sea
level.
This appliance may be used by children over
the age of 8 years old and by persons with
reduced physical, sensory or mental
capabilities or by persons with a lack of
experience or knowledge if they are
supervised or are instructed by a person
responsible for their safety how to use the
appliance safely and have understood the
associated hazards.
Children must not play with, on, or around the
appliance. Children must not clean the
appliance or carry out general maintenance
unless they are at least 15 years old and are
being supervised.
Keep children below the age of 8 years old at
a safe distance from the appliance and power
cable.
Always slide accessories into the cooking
compartment the right way round.
~ "Accessories" on page 40
(Important safety
information
Impor t ant saf et y informat i on
General information
:Warning – Risk of fire!
■ Combustible items stored in the cooking
compartment may catch fire. Never store
combustible items in the cooking
compartment. Never open the appliance
door if there is smoke inside. Switch off the
appliance and unplug it from the mains or
switch off the circuit breaker in the fuse box.
Risk of fire!
■ Loose food remnants, fat and meat juices
may catch fire. Before using the appliance,
remove the worst of the food remnants from
the cooking compartment, heating elements
and accessories.
Risk of fire!
■ A draught is created when the appliance
door is opened. Greaseproof paper may
come into contact with the heating element
and catch fire. Do not place greaseproof
paper loosely over accessories during
preheating. Always weight down the
greaseproof paper with a dish or a baking
tin. Only cover the surface required with
greaseproof paper. Greaseproof paper
must not protrude over the accessories.
:Warning – Risk of burns!
■ The appliance becomes very hot. Never
touch the interior surfaces of the cooking
compartment or the heating elements.
Always allow the appliance to cool down.
Keep children at a safe distance.
Risk of serious burns!
■ Accessories and ovenware become very
hot. Always use oven gloves to remove
accessories or ovenware from the cooking
compartment.
Risk of burns!
■ Alcoholic vapours may catch fire in the hot
cooking compartment. Never prepare food
containing large quantities of drinks with a
high alcohol content. Only use small
quantities of drinks with a high alcohol
content. Open the appliance door with care.

Important safety information en
35
:Warning – Risk of scalding!
■ The accessible parts become hot during
operation. Never touch the hot parts. Keep
children at a safe distance.
Risk of scalding!
■ When you open the appliance door, hot
steam can escape. Steam may not be
visible, depending on its temperature. When
opening, do not stand too close to the
appliance. Open the appliance door
carefully. Keep children away.
Risk of scalding!
■ Water in a hot cooking compartment may
create hot steam. Never pour water into the
hot cooking compartment.
:Warning – Risk of injury!
■ Scratched glass in the appliance door may
develop into a crack. Do not use a glass
scraper, sharp or abrasive cleaning aids or
detergents.
Risk of injury!
■ The hinges on the appliance door move
when opening and closing the door, and
you may be trapped. Keep your hands away
from the hinges.
:Warning – Risk of electric shock!
■ Incorrect repairs are dangerous. Repairs
may only be carried out and damaged
power cables replaced by one of our
trained after-sales technicians. If the
appliance is defective, unplug the appliance
from the mains or switch off the circuit
breaker in the fuse box. Contact the after-
sales service.
Risk of electric shock and serious injury!
■ The cable insulation on electrical
appliances may melt when touching hot
parts of the appliance. Never bring
electrical appliance cables into contact with
hot parts of the appliance.
Risk of electric shock!
■ Do not use any high-pressure cleaners or
steam cleaners, which can result in an
electric shock.
Risk of electric shock!
■ A defective appliance may cause electric
shock. Never switch on a defective
appliance. Unplug the appliance from the
mains or switch off the circuit breaker in the
fuse box. Contact the after-sales service.
:Warning – Hazard due to magnetism!
Permanent magnets are used in the control
panel or in the control elements. They may
affect electronic implants, e.g. heart
pacemakers or insulin pumps. Wearers of
electronic implants must stay at least 10 cm
away from the control panel.
Halogen lamp
:Warning – Risk of burns!
The bulbs in the cooking compartment
become very hot. There is still a risk of burning
your skin for some time after they have been
switched off. Do not touch the glass cover.
Avoid contact with your skin when cleaning.
:Warning – Risk of electric shock!
When replacing the cooking compartment
bulb, the bulb socket contacts are live. Before
replacing the bulb, unplug the appliance from
the mains or switch off the circuit breaker in
the fuse box.

en Causes of damage
36
]Causes of damage
Ca u s e s of damage
General information
Caution!
■ Accessories, foil, greaseproof paper or ovenware on
the cooking compartment floor: do not place
accessories on the cooking compartment floor. Do
not cover the cooking compartment floor with any
sort of foil or greaseproof paper. Do not place
ovenware on the cooking compartment floor if a
temperature of over 50 ºC has been set. This will
cause heat to accumulate. The baking and roasting
times will no longer be correct and the enamel will
be damaged.
■ Aluminium foil: Aluminium foil in the cooking
compartment must not come into contact with the
door glass. This could cause permanent
discolouration of the door glass.
■ Water in a hot cooking compartment: do not pour
water into the cooking compartment when it is hot.
This will cause steam. The temperature change can
cause damage to the enamel.
■ Moisture in the cooking compartment: Over an
extended period of time, moisture in the cooking
compartment may lead to corrosion. Allow the
cooking compartment to dry after use. Do not keep
moist food in the closed cooking compartment for
extended periods of time. Do not store food in the
cooking compartment.
■ Cooling with the appliance door open: Following
operation at high temperatures, only allow the
cooking compartment to cool down with the door
closed. Do not trap anything in the appliance door.
Even if the door is only left open a crack, the front of
nearby furniture may become damaged over time.
Only leave the cooking compartment to dry with the
door open if a lot of moisture was produced whilst
the oven was operating.
■ Fruit juice: when baking particularly juicy fruit pies,
do not pack the baking tray too generously. Fruit
juice dripping from the baking tray leaves stains that
cannot be removed. If possible, use the deeper
universal pan.
■ Extremely dirty seal: If the seal is very dirty, the
appliance door will no longer close properly during
operation. The fronts of adjacent units could be
damaged. Always keep the seal clean.
~ "Cleaning" on page 46
■ Appliance door as a seat, shelf or worktop: Do not
sit on the appliance door, or place or hang anything
on it. Do not place any cookware or accessories on
the appliance door.
■ Inserting accessories: depending on the appliance
model, accessories can scratch the door panel
when closing the appliance door. Always insert the
accessories into the cooking compartment as far as
they will go.
■ Carrying the appliance: do not carry or hold the
appliance by the door handle. The door handle
cannot support the weight of the appliance and
could break.
7Environmental protection
En v i r o n ment al pr ot ec t i on
Your new appliance is particularly energy-efficient.
Here you can find tips on how to save even more
energy when using the appliance, and how to dispose
of your appliance properly.
Saving energy
■ Only preheat the appliance if this is specified in the
recipe or in the tables in the operating instructions.
■ Leave frozen food to defrost before placing it in the
cooking compartment.
■ Use baking tins that are dark-coloured, painted black
or have an enamel coating. These absorb the heat
particularly well.
■ Remove any unnecessary accessories from the
cooking compartment.

Environmental protection en
37
■ Open the appliance door as infrequently as possible
when the appliance is in use.
■ It is best to bake several cakes one after the other.
The cooking compartment stays warm. This reduces
the baking time for the second cake. You can place
two cake tins next to each other in the cooking
compartment.
■ For longer cooking times, you can switch the
appliance off 10 minutes before the end of the
cooking time and use the residual heat to finish
cooking.
Environmentally-friendly disposal
Dispose of packaging in an environmentally-friendly
manner.
This appliance is labelled in accordance with
European Directive 2012/19/EU concerning
used electrical and electronic appliances
(waste electrical and electronic equipment -
WEEE). The guideline determines the
framework for the return and recycling of used
appliances as applicable throughout the EU.

en Getting to know your appliance
38
*Getting to know your
appliance
Get t i ng to know your appl i ance
In this chapter, we will explain the indicators and
controls. You will also find out about the various
functions of your appliance.
Note: Depending on the appliance model, individual
details and colours may differ.
Control panel
You can set your appliance's various functions on the
control panel. Below, you will see an overview of the
control panel and the layout of the controls.
Note: On some appliances, the control knobs can be
pushed in. To push the control knob in and engage it or
to release it again, turn it to the "Off" position.
Buttons and display
You can use the buttons to set various additional
functions on your appliance. You will be able to see the
values for these on the display.
--------
Display panel
On the display panel, you will be able to see the
function that you can set or that is currently in progress.
Touch the e button repeatedly to select the various
time-setting options. The symbol for the function that is
currently selected will be lit.
( Buttons and display
The buttons are touch keys with sensors
underneath. Simply touch a symbol to select the
function.
The display shows symbols for active functions
and the time-setting options.
0 Function selector
Use the function selector to set the heating
function or other functions.
You can turn the function selector clockwise or
anti-clockwise from the "Off" position.
8 Temperature selector
Use the temperature selector to set the
temperature for the heating function or select the
setting for other functions.
You can only turn the temperature selector
clockwise from the "Off" position, until it offers
resistance. Do not turn the selector beyond this
point.
Button Meaning
M Timer Set the timer.
e Time-setting options Touch the corresponding symbol
repeatedly to select the cooking
time x, end time y and time of day.
Childproof lock You can lock and unlock the oven
functions on the control panel by
pressing and holding the button for
approx. 4 seconds.
A
@
Minus
Plus
Reduce setting values.
Increase setting values.

Getting to know your appliance en
39
Types of heating and functions
Use the function selector to set the types of heating and
other functions.
To make sure you always use the right type of heating
to cook your food, we have explained the differences
and applications below.
--------
Other functions
Your new oven has yet more functions; see below for a
brief description of these.
--------
Temperature
Use the temperature selector to set the temperature in
the cooking compartment. You can also use it to select
the settings for other functions.
When cooking at very high temperatures, the appliance
lowers the temperature slightly after an extended
period.
--------
Temperature indicator
When the oven is heating up, the p symbol will appear
on the display panel. It goes out during pauses in
heating.
When you are preheating the appliance, the optimal
time to place your food in the oven is when the symbol
first goes out.
Type of heating Use
›
3D hot air For baking and roasting on one or more levels.
The fan distributes the heat from the ring heating element in the back panel evenly around
the cooking compartment.
"
Hot air gentle For gently cooking selected types of food on one level without preheating.
The fan distributes the heat from the ring-shaped heating element in the back panel
around the cooking compartment.
This type of heating is used to measure both the energy consumption in air recirculation
mode and the energy-efficiency class.
0
Pizza setting For cooking pizza and dishes that require a lot of heat from underneath.
The bottom heating element and the ring-shaped heating element in the back panel heat
the cooking compartment.
$
Bottom heating For cooking in a bain marie and for baking food for extra time.
Heat is emitted from below.
$
Grill, large area For grilling flat items, such as steaks or sausages, for making toast, and for browning
food.
The whole area below the grill element becomes hot.
#
Circulated air grilling For roasting poultry, whole fish and larger pieces of meat.
The grill element and the fan switch on and off alternately. The fan circulates the hot air
around the food.
%
Top/bottom heating For traditional baking and roasting on one level. Especially suitable for cakes with moist
toppings.
Heat is emitted evenly from above and below.
This type of heating is used to measure the energy consumption in the conventional
mode.
Function Use
J
Rapid heat-up Heats up the cooking compartment quickly without accessories inside it.
^
Interior lighting Switches on the interior lighting; all other functions remain off.
This makes it easier to clean the cooking compartment, for example.
Position Meaning
Ú "Off" position In this position, the oven does not
heat.
50-275 Temperature range The temperature that can be set
in the cooking compartment in °C.
1, 2, 3 Grill settings Grill settings for the full-surface
grill $ and centre-area grill %
(depending on the appliance
model).
1 = setting 1, low
2 = setting 2, medium
3 = setting 3, high

en Accessories
40
Note: Due to thermal inertia, the actual temperature
inside the cooking compartment may differ slightly from
the temperature that is displayed.
Cooking compartment
Various functions in the cooking compartment make
your appliance easier to use. For example, the cooking
compartment is well lit and a cooling fan prevents the
appliance from overheating.
Opening the appliance door
If you open the appliance door when the appliance is in
operation, the appliance will continue to operate as
before.
Interior lighting
With most heating functions and other functions, the
interior lighting in the cooking compartment will remain
lit while the oven is in operation. When the function
selector is turned to bring operation to an end, the
lighting will go out.
By turning the function selector to the interior lighting
setting, you can switch on the lighting without heating
the oven. This makes it easier to clean your appliance,
for example.
Cooling fan
The cooling fan switches on and off as required. The
hot air escapes above the door.
Caution!
Do not cover the ventilation slots. Otherwise, the
appliance may overheat.
So that the cooking compartment cools down more
quickly after operation, the cooling fan continues to run
for a certain period afterwards.
_Accessories
Ac c e s s o r i e s
Your appliance is accompanied by a range of
accessories. Here, you can find an overview of the
accessories included and information on how to use
them correctly.
Control accessories
The accessories supplied may differ depending on the
appliance model.
--------
Only use original accessories. They are specially
adapted for your appliance.
You can buy accessories from the after-sales service,
from specialist retailers or online.
Note: The accessories may deform when they become
hot. This does not affect their function. Once they have
cooled down again, they regain their original shape.
Inserting accessories
The cooking compartment has three shelf positions.
The shelf positions are counted from the bottom up.
Always insert accessories between the two guide rods
for the shelf position.
Accessories can be pulled out approximately halfway
without tipping.
Notes
■ Make sure that you always insert the accessories
into the cooking compartment the right way round.
■ Always insert the accessories fully into the cooking
compartment so that they do not touch the appliance
door.
■ Take any accessories that you will not be using out
of the cooking compartment.
■ The shelves can be taken out of the cooking
compartment for cleaning. ~ Page 47
Wire rack
For ovenware, cake tins and ovenproof
dishes.
For roasts, grilled items and frozen
meals.
Universal pan
For moist cakes, pastries, frozen meals
and large roasts.
It can be used to catch dripping fat when
you are grilling directly on the wire rack.

Accessories en
41
Locking function
The accessories can be pulled out approximately
halfway until they lock in place. The locking function
prevents the accessories from tilting when they are
pulled out. The accessories must be inserted into the
cooking compartment correctly for the tilt protection to
work properly.
When inserting the wire rack, ensure that lug ‚ is at the
rear and is facing downwards. The open side must be
facing the appliance door and the outer rail must be
facing downwards ¾.
When inserting baking trays, ensure that lug ‚ is at the
rear and is facing downwards. The sloping edge of the
accessory ƒ must be facing towards the appliance
door.
Example in the picture: Universal pan
Combining accessories
You can insert the wire rack and the universal pan at
the same time to catch drops of liquid.
When inserting the wire rack, ensure that both spacers
‚ are at the rear edge. When inserting the universal
pan, the wire rack is on top of the upper guide rod of
the shelf position.
Example in the picture: Universal pan
Optional accessories
You can purchase optional accessories from the after-
sales service and specialist retailers, or on the Internet.
You will find a comprehensive range of products for
your appliance in our brochures and on the Internet.
Both availability and whether it is possible to order
online differ between countries. Please see your sales
documents for more details.
Note: Not all optional accessories are suitable for every
appliance. When purchasing, please always quote the
exact designation (E no.) of your appliance.
~ "Customer service" on page 51
--------
D
D
D
D
E
D
D
D
Accessories
Baking and roasting shelf
Baking tray
Universal pan
Baking tray, non-stick
Universal pan, non-stick
Extra-deep pan
Steaming set for ovens
Profi pan
Lid for the Profi pan
Pizza tray
Grill tray
Ceramic brick
Glass roasting dish, 5.1 litres
Glass pan
ComfortFlex rail (1 level)*
3 x fully extendable pull-out rack*
*Accessory does not fit in every appliance, quote the E no. when order-
ing

en Before using for the first time
42
KBefore using for the first
time
Be f o r e us i ng for the fi rst ti me
Before you can use your new appliance, you must
make some settings. You must also clean the cooking
compartment and accessories.
Initial use
The time will appear on the display once the appliance
is connected to the power supply. Set the current time.
Setting the time on the clock
The function selector must be set to "Off".
The time is set to 12:00 by default.
1. Use the A or @ button to set the time.
2. Touch the e button to confirm.
Once you have set the time, it will be shown on the
display panel.
Cleaning the cooking compartment and
accessories
Before using the appliance to prepare food for the first
time, you must clean the cooking compartment and
accessories.
Cleaning the cooking compartment
To eliminate the new-appliance smell, heat up the
cooking compartment without anything in it and with the
oven door closed.
Make sure that there is no packaging (e.g. polystyrene
pellets) left in the cooking compartment. Before heating
up the appliance, wipe the smooth surfaces in the
cooking compartment with a soft, damp cloth. Make
sure that the kitchen is well ventilated while the oven is
heating up.
Apply the settings indicated. You can find out how to
set the heating function and the temperature in the next
section. ~ "Operating the appliance" on page 42
Turn off the oven once the specified time has elapsed.
Once the cooking compartment has cooled down,
clean the smooth surfaces with soapy water and a dish
cloth.
Cleaning the accessories
Clean the accessories thoroughly using soapy water
and a dish cloth or soft brush.
1Operating the appliance
Oper at i ng the appl i anc e
You have already learnt about the controls and how
they work. Now we will explain how to apply settings on
your appliance.
Switching the appliance on and off
Use the function selector to switch the appliance on or
off. Turning the function selector to any position other
than the "Off" position switches on the appliance. To
switch off the appliance, always turn the function
selector to the "Off" position.
Setting the heating function and temperature
It is very easy to apply the settings you require to your
appliance using the function and temperature selector.
In the heating function table, you will find the optimal
heating functions for all kinds of food.
Example in the picture: Top/bottom heating % at
190 °C.
1. Use the function selector to set the heating function.
2. Use the temperature selector to set the temperature
or grill setting.
The oven will start heating after a few seconds.
To switch off the oven, turn the function selector to the
"Off" position (zero).
Note: The cooking time and the end time can also be
set on the appliance.~ "Time-setting options"
on page 43
Changing
The heating function and temperature can be changed
at any time using the relevant selector.
Settings
Heating function 3D hot air ›
Temperature Maximum
Cooking time 1 hour
&

Time-setting options en
43
Rapid heating
With Rapid heating, you can shorten the heat-up time.
Only use rapid heat-up when a temperature of over
100 °C has been selected.
To achieve an even cooking result, do not place your
food into the cooking compartment until rapid heat-up is
complete.
1. Set the function selector to J.
2. Use the temperature selector to set the temperature.
The oven will start heating after a few seconds.
Once rapid heat-up is complete, an audible signal will
sound. Place your food in the cooking compartment.
Then, for best results, use:
■ › 3D hot air
OTime-setting options
Ti me- set t i ng opt i ons
Your appliance has different time-setting options.
To navigate to the cooking time, select a heating
function and touch the e button. Once you have set the
cooking time, you can set the end time.
An audible signal will sound once the cooking time or
timer duration has elapsed. To end the audible signal
early, touch the e button.
Setting the cooking time
You can set the cooking time for your food on the oven.
This prevents the food from accidentally being cooked
for too long, and means that you do not have to stop
what you are doing to switch off the oven.
The maximum time that can be set is 23 hours 59
minutes. The cooking time can be set in 1-minute
increments up to 1 hour, and in 5-minute increments
thereafter.
The cooking time will start at a different default value
depending on which button you touch first:
10 minutes with the A button and 30 minutes with the
@ button.
Example in the diagram: Cooking time of 45 minutes.
1. Set the heating function and temperature or grill
setting.
2. Touch the e button.
A A : A A and the x symbol will appear on the
display panel.
Time-setting option Use
x Cooking time Once the cooking time you set has elapsed,
the oven will automatically switch off.
y End time Select a cooking time and the end time you
require. The oven will start up automatically
so that it finishes cooking at the required time.
Q Short-term
timer
The short-term timer functions like an egg
timer. It runs independently of the oven when
it is heating and does not affect the oven.
Clock If no other function has been selected, the
time of day will appear on the oven's display
panel.

en Time-setting options
44
3. Touch A or @ to set the cooking time.
The oven will start heating after a few seconds. The
cooking time will count down on the display panel.
The time has elapsed
An audible signal will sound. The oven will stop heating.
‹‹‹‹ will appear on the display panel.
Once the audible signal has stopped, you can touch the
@ button and set a new cooking time.
When your food is ready, switch off the oven. To do this,
turn the function selector to the "Off" position.
Changing and cancelling
You can use the A or @ button to change the cooking
time at any time. After a few seconds, the change will
be applied.
To cancel, use the A button to set the cooking time to
‹‹:‹‹. The oven will continue to heat without a set
cooking time.
Setting the end time
You can delay the time at which cooking is due to
finish. You can, for example, put your food in the oven
in the morning and set the cooking time so that it is
ready at lunchtime.
Notes
■ Make sure that food is not left in the oven for too
long as it may spoil.
■ Set the end time while the oven is still cold.
■ Do not adjust the end time once the appliance is
already in operation, as this may affect the cooking
result.
The end of the cooking time can be delayed by up to
23 hours 59 minutes.
Example in the picture: The time is 10.30 a.m., a
cooking time of 45 minutes has been set and you want
the food to be ready at 12.30 p.m.
1. Set the heating function and temperature or grill
setting.
2. Touch the e button and use the A or @ button to set
the cooking time.
3. Touch the e button.
A A : A A and the y symbol will appear on the
display panel.
4. Use the A or @ button to set the end time.
After a few seconds, the oven will apply the settings.
The end time will appear on the display panel. Once the
oven starts, the cooking time will begin to count down.
The time has elapsed
An audible signal will sound. The oven will stop heating.
‹‹‹‹ will appear on the display panel.
Once the audible signal has stopped, you can touch the
@ button and set a new cooking time.
When your food is ready, switch off the oven. To do this,
turn the function selector to the "Off" position.
Changing and cancelling
You can use the A or @ button to change the end time.
After a few seconds, the change will be applied. The
end time cannot be changed once the cooking time has
already started to count down. Otherwise the cooking
result would no longer be satisfactory.
To cancel, use the A button to set the end time all the
way back to the current time plus the cooking time. The
appliance will start to heat and the cooking time will
start to count down.
Setting the short-term timer
You can use the short-term timer whether the oven is
switched on or off. However, it is not possible to set a
cooking time or end time.
The maximum time that can be set is 23 hours 59
minutes. Up to 10 minutes, the timer duration can be
set in 30-second increments. Above 10 minutes, the
time increments become larger the longer the time you
wish to set.
The timer duration will start at a different default value
depending on which button you touch first:

Childproof lock en
45
5 minutes with the A button and 10 minutes with the
@ button.
1. Touch the M button.
The Q symbol will be lit on the display panel.
2. Use the A or @ button to set the timer duration.
After a few seconds, the duration on the timer will start
to elapse.
Tip: To use the timer for the oven, enter the required
cooking time. The oven will switch off automatically at
the end of this cooking time.
The short-term timer duration has elapsed
An audible signal will sound. ‹‹‹‹ will appear on the
display panel.
Touch any button to switch off the short-term timer.
Changing and cancelling
You can use the A or @ button to change the timer
duration at any time. After a few seconds, the change
will be applied.
To cancel, use the A button to set the short-term timer
to ‹‹:‹‹. The short-term timer is now switched off.
Setting the time on the clock
Once the appliance has been connected to the mains
or following a power failure, the clock will flash on the
display panel. Set the clock.
The function selector must be set to the "Off" position.
1. Use the A or @ button to set the time on the clock.
2. Touch the e button to confirm.
Changing the time on the clock
You can change the time again when you need to, e.g.
from summer to winter time.
To do this, with the appliance switched off, touch and
hold the e button until the clock flashes, and then use
the A or @ button to change the time.
AChildproof lock
Ch i l d p r o o f lock
Your appliance is equipped with a childproof lock so
that children cannot switch it on accidentally or change
any settings.
Notes
■ If a hob is connected, it will not be affected by the
childproof lock on the oven.
■ After a power cut, the childproof lock will no longer
be active.
Activating and deactivating
To activate the childproof lock, the function selector
must be set to "Off".
Touch and hold the e button for approx. 4 seconds.
†‘”“ will be shown on the display panel. The
childproof lock is now active.
Note: If a timer duration Q has been set, this will
continue to count down. While the childproof lock is
active, the timer duration cannot be changed.
To deactivate, touch and hold the e button again for
4 seconds until †‘”“ goes out on the display panel.

en Cleaning
46
DCleaning
Cl eani ng
With good care and cleaning, your appliance will retain
its appearance and remain fully functioning for a long
time to come. We will explain here how you should
correctly care for and clean your appliance.
Suitable cleaning agents
To ensure that the different surfaces are not damaged
by using the wrong cleaning agent, observe the
information in the table. Depending on the appliance
model, not all of the areas listed may be on/in your
appliance.
Caution!
Risk of surface damage
Do not use:
■ Harsh or abrasive cleaning agents,
■ Cleaning agents with a high alcohol content,
■ Hard scouring pads or cleaning sponges,
■ High-pressure cleaners or steam cleaners,
■ Special cleaners for cleaning the appliance while it is
hot.
Wash new sponge cloths thoroughly before use.
Tip: Highly recommended cleaning and care products
can be purchased through the after-sales service.
Observe the respective manufacturer's instructions.
:Warning – Risk of burns!
The appliance becomes very hot. Never touch the
interior surfaces of the cooking compartment or the
heating elements. Always allow the appliance to cool
down. Keep children at a safe distance.
--------
Area Cleaning
Appliance exterior
Stainless steel
front
Hot soapy water:
Clean with a dish cloth and then dry with a soft
cloth.
Remove flecks of limescale, grease, starch and
albumin (e.g. egg white) immediately. Corrosion
can form under such flecks.
Special stainless steel cleaning products suitable
for hot surfaces are available from our after-sales
service or from specialist retailers. Apply a very
thin layer of the cleaning product with a soft cloth.
Plastic Hot soapy water:
Clean with a dish cloth and then dry with a soft
cloth.
Do not use glass cleaner or a glass scraper.
Painted surfaces Hot soapy water:
Clean with a dish cloth and then dry with a soft
cloth.
Control panel Hot soapy water:
Clean with a dish cloth and then dry with a soft
cloth.
Do not use glass cleaner or a glass scraper.
Door panels Hot soapy water:
Clean with a dish cloth and then dry with a soft
cloth.
Do not use a glass scraper or a stainless steel
scouring pad.
Door handle Hot soapy water:
Clean with a dish cloth and then dry with a soft
cloth.
If descaler comes into contact with the door han-
dle, wipe it off immediately. Otherwise, any stains
will not be able to be removed.
Appliance interior
Enamelled sur-
faces
Hot soapy water or a vinegar solution:
Clean with a dish cloth and then dry with a soft
cloth.
Soften baked-on food remnants with a damp cloth
and soapy water. Use stainless steel wire wool or
oven cleaner to remove stubborn dirt.
Caution!
Never use oven cleaner in the cooking compart-
ment when it is still warm. This may damage the
enamel. Remove all food remnants from the cook-
ing compartment and the appliance door before
you next heat up the appliance.
Leave the cooking compartment open to dry after
cleaning it.
Note: Food residues can cause white deposits to
form. These are harmless and do not affect how
the appliance works.
Remove using lemon juice if required.
Glass cover for
the interior light-
ing
Hot soapy water:
Clean with a dish cloth and then dry with a soft
cloth.
If the cooking compartment is heavily soiled, use
oven cleaner.
Door seal
Do not remove.
Hot soapy water:
Clean with a dish cloth.
Do not scour.
Door cover made from stainless steel:
Use stainless steel cleaner. Follow the manufac-
turers' instructions. Do not use stainless steel
care products.
made from plastic:
Clean using hot soapy water and a dish cloth. Dry
with a soft cloth. Do not use glass cleaner or a
glass scraper.
Remove the door cover for cleaning.
Rails Hot soapy water:
Soak and clean with a dish cloth or brush.
Pull-out system Hot soapy water:
Clean with a dish cloth or a brush.
Do not remove the lubricant while the pull-out rails
are pulled out – it is best to clean them when they
are pushed in. Do not clean in the dishwasher.
Accessories Hot soapy water:
Soak and clean with a dish cloth or brush.
If there are heavy deposits of dirt, use a stainless
steel scouring pad.

Rails en
47
Notes
■ Slight differences in colour on the front of the
appliance are caused by the use of different
materials, such as glass, plastic and metal.
■ Shadows on the door panels, which look like
streaks, are caused by reflections made by the
interior lighting.
■ Enamel is baked on at very high temperatures.This
can cause some slight colour variation. This is
normal and does not affect operation.
The edges of thin trays cannot be completely
enamelled. As a result, these edges can be rough.
This does not impair the anti-corrosion protection.
Keeping the appliance clean
Always keep the appliance clean and remove dirt
immediately so that stubborn deposits of dirt do not
build up.
:Warning – Risk of fire!
Loose food remnants, fat and meat juices may catch
fire. Before using the appliance, remove the worst of the
food remnants from the cooking compartment, heating
elements and accessories.
Tips
■ Clean the cooking compartment after each use. This
will ensure that dirt cannot be baked on.
■ Always remove flecks of limescale, grease, starch
and albumin (e.g. egg white) immediately.
■ Use the universal pan for baking very moist cakes.
■ Use suitable ovenware for roasting, e.g. a roasting
dish.
pRails
Ra i l s
With good care and cleaning, your appliance will retain
its appearance and remain fully functional for a long
time to come. This will tell you how to remove the
shelves and clean them.
Detaching and refitting the rails
:Warning – Risk of burns!
The rails become very hot. Never touch the hot rails.
Always allow the appliance to cool down. Keep children
away from the appliance.
Detaching the rails
1. Lift the rail slightly at the front ‚ and detach it ƒ
(figure !).
2. Then pull the whole rail towards you and take it out
(figure ").
Clean the rails with cleaning agent and a sponge. For
stubborn deposits of dirt, use a brush.
2
D
E
1

en Appliance door
48
Attaching the rails
The rails only fit on the right or the left side. For both
rails, ensure that the curved rods are at the front.
1. First, insert the rail in the middle of the rear socket ‚,
until the rail rests against the cooking compartment
wall, and push it back ƒ (figure !).
2. Then insert the rail into the front socket „, until the
rail also rests against the cooking compartment wall
here, and press it downwards … (figure ").
qAppliance door
Ap p l i a n c e door
With good care and cleaning, your appliance will retain
its appearance and remain fully functional for a long
time to come. This will tell you how to clean the
appliance door.
Removing and installing the door panels
To facilitate cleaning, you can remove the glass panels
from the appliance door.
Locking the appliance door
1. Open the appliance door fully.
2. Open the two locking levers on the left and right
(fig. !).
3. Close the appliance door as far as it goes (fig. ").
Removing panels
1. Open the appliance door slightly.
2. Press the left- and right-hand sides of the cover
(fig.°!).
3. Remove the cover (fig. ").
4. Lift out the outer panel (fig. #) and set it down
carefully on a flat surface.
F
G
2
D
E
1
2
1
2
1

Appliance door en
49
5. Remove the door seal (fig. $).
6. Lift out the inner panel (fig. %) and set it down
carefully on a flat surface.
7. If necessary, you can remove the condensate trough
for cleaning. To do this, open the appliance door
fully (fig. &).
8. Tilt the condensate trough up and remove it (fig. ').
Clean the panels with glass cleaner and a soft cloth.
Wipe the condensate trough with a cloth and some hot
soapy water.
:Warning
Risk of injury!
■ Scratched glass in the appliance door may develop
into a crack. Do not use a glass scraper, sharp or
abrasive cleaning aids or detergents.
Risk of injury!
■ The hinges on the appliance door move when
opening and closing the door, and you may be
trapped. Keep your hands away from the hinges.
Fitting panels
1. Open the appliance door fully and refit the
condensate trough. To do this, insert the trough from
above and rotate it at the bottom (fig. !).
2. Slide each inner panel back in and make sure that it
is sitting correctly at the bottom in the retainer
(fig. ").
3. Push the inner panel in at the top (fig. #).
4. Hooking in the door seal (fig. $).
5. Slide the outer panel back in and make sure that it is
sitting correctly at the bottom in the retainer (fig. %).
1
2

en Trouble shooting
50
6. Push the outer panel in at the top (fig. &).
7. Put the cover back in place and press on it until you
hear it click into place (fig. ').
8. Open the appliance door again fully.
9. Close the two locking levers on the left and right
(fig. ()
10. Close the appliance door.
Caution!
Do not use the cooking compartment again until the
panels have been correctly fitted.
3Trouble shooting
Tr ou bl e shoot i ng
If a fault occurs, there is often a simple explanation.
Before calling the after-sales service, please refer to the
fault table and attempt to correct the fault yourself.
Rectifying faults yourself
You can often easily rectify technical faults with the
appliance yourself.
If a dish does not turn out exactly as you wanted, you
can find useful cooking tips and instructions at the end
of this instruction manual. ~ "Tested for you in our
cooking studio" on page 52
--------
:Warning – Risk of injury!
Incorrect repairs are dangerous. Do not attempt to
repair the appliance yourself. Repairs must only be
carried out by one of our trained after-sales engineers. If
the appliance is defective, call the after-sales service.
:Warning – Risk of electric shock!
Incorrect repairs are dangerous. Repairs may only be
carried out and damaged power cables replaced by
one of our trained after-sales technicians. If the
appliance is defective, unplug the appliance from the
mains or switch off the circuit breaker in the fuse box.
Contact the after-sales service.
Error messages on the display
If an error message (begins with "“") appears on the
display panel, e.g. “‹†‹ƒ, touch the e button. This will
reset the error message. If necessary, reset the time on
the clock.
If the error was a one-off, you can continue to use the
appliance as normal. If the error message appears
again, call our after-sales service and quote the exact
error message and the E no. of your appliance.
~ "Customer service" on page 51
Fault Possible
cause
Notes/remedy
The appliance is
not working.
Defective cir-
cuit breaker.
Check the circuit breaker in the
fuse box.
Power failure Check whether the kitchen light
or other kitchen appliances are
working.
The time is flash-
ing on the display.
Power failure. Reset the time.
The settings on
the appliance
cannot be config-
ured. A key sym-
bol has lit up on
the display or
†‘”“.
The child-
proof lock is
activated.
Deactivate the childproof lock by
pressing and holding the button
with the key symbol for approx. 4
seconds.

Customer service en
51
Replacing the bulb in the top of the cooking
compartment
If the cooking compartment light bulb fails, it must be
replaced. Heat-resistant, 25 watt, 230 V halogen bulbs
are available from the after-sales service or specialist
retailers.
When handling the halogen bulb, use a dry cloth. This
will increase the service life of the bulb. Only use these
bulbs.
:Warning – Risk of electric shock!
When replacing the cooking compartment bulb, the
bulb socket contacts are live. Before replacing the bulb,
unplug the appliance from the mains or switch off the
circuit breaker in the fuse box.
:Warning – Risk of burns!
The appliance becomes very hot. Never touch the
interior surfaces of the cooking compartment or the
heating elements. Always allow the appliance to cool
down. Keep children at a safe distance.
1. Place a tea towel in the cold cooking compartment
to prevent damage.
2. Turn the glass cover anti-clockwise to remove it
(figure !).
3. Pull out the bulb – do not turn it (figure ").
Insert the new bulb, making sure that the pins are in
the correct position. Push the bulb in firmly.
4. Screw the glass cover back on.
Depending on the appliance model, the glass cover
may have a sealing ring. If the glass cover has a
sealing ring, put it back in place before screwing the
cover back on.
5. Remove the tea towel and switch on the circuit
breaker.
4Customer service
Cu s t o mer ser vi ce
Our after-sales service is there for you if your appliance
needs to be repaired. We will always find an
appropriate solution, also in order to avoid after-sales
personnel having to make unnecessary visits.
E number and FD number
When calling us, please quote the full product number
(E no.) and the production number (FD no.) so that we
can provide you with the correct advice. The rating plate
bearing these numbers can be found when you open
the appliance door.
On some appliances with a steam-assisted cooking
function, you will find the rating plate behind the control
panel.
To save time, you can make a note of the numbers for
your appliance and the telephone number of the after-
sales service in the space below in case you need
them.
Please note that a visit from an after-sales service
engineer is not free of charge in the event that the
appliance has been misused, even during the warranty
period.
Please find the contact data of all countries in the
enclosed customer service list.
Rely on the professionalism of the manufacturer. You
can therefore be sure that the repair is carried out by
trained service technicians who carry original spare
parts for your appliances.
2
1
E no.
FD no.
After-sales service O
=1U)'(1U
7\SH

en Tested for you in our cooking studio
52
JTested for you in our
cooking studio
Tes t ed for you in our cooki ng st udi o
Here, you can find a selection of dishes and the ideal
settings for them. We will show you which type of
heating and temperature are best suited to your dish.
You will get information on suitable cooking
accessories and the height at which they should be
placed in the oven. You will also get tips about
cookware and preparation methods.
Note: A lot of steam can build up in the cooking
compartment when cooking food.
Your appliance is very energy-efficient and radiates very
little heat to its surroundings during operation. Due to
the high difference in temperature between the
appliance interior and the external parts of the
appliance, condensation may build up on the door,
control panel or adjacent kitchen cabinet panels. This is
a normal physical phenomenon. Condensation can be
reduced by preheating the oven or opening the door
carefully.
General information
Recommended setting values
The table lists the optimal heating type for various types
of food. The temperature and cooking time are
dependent on the quantity of food and the recipe.
Settings ranges are indicated for this reason. Try using
the lower values to start with. A lower temperature will
result in more even browning. You can use a higher
setting next time if necessary.
Note: Cooking times cannot be reduced by using
higher temperatures. The food would only be cooked
on the outside, but would not be fully baked in the
middle.
The setting values apply to food that is placed into a
cold cooking compartment. By doing so, you can make
energy savings of up to 20 per cent. If you preheat the
oven, you can reduce the indicated baking times by
several minutes.
Preheating is necessary for selected food, and this is
indicated in the table. Do not place your food or
accessories into the cooking compartment until it has
finished preheating.
If you wish to follow one of your own recipes when
baking, you should use the setting values listed for
similar food in the table as reference. Additional
information can be found in the baking tips listed after
the settings tables.
Remove unused accessories from the cooking
compartment. This will ensure that you achieve the best
possible cooking results and energy savings of up to
20 per cent.
Gentle hot air heating function
Gentle hot air is an intelligent heating function that
allows you to gently cook meat, fish and baked items.
The appliance optimally controls the supply of energy to
the cooking compartment. The food is cooked in
phases using residual heat. This means that it remains
more succulent and browns less. Depending on the
method of preparation and the type of food, it is
possible to save energy. If you open the appliance door
before the food has finished cooking or if you preheat
the appliance, you may not be able to achieve this
result.
Only use genuine accessories for your appliance.
These have been tailored to the cooking compartment
and the heating functions of your appliance. Remove
any accessories that are not being used from the
cooking compartment.
Place the food into the empty cooking compartment
before the oven is heated up. Select a temperature of
between 120 °C and 230 °C.Always keep the
appliance door closed when cooking. Only cook on one
level when using this function.
The Gentle hot air heating function is used to measure
both the energy consumption in air recirculation mode
and the energy efficiency class.
Baking on one level
When baking on one level, use the following shelf
positions:
■ Tall baked goods or tin on wire rack: Level 1
■ Flat baked goods or goods in a baking tray: Level 1
or 2
Baking on two or more levels
Use hot air. Items that are placed in the oven on baking
trays or in baking tins/dishes at the same time will not
necessarily be ready at the same time.
Baking on two levels:
■ Universal pan: Position 3
Baking tray: Position 1
Accessories
Only use original accessories supplied with your
appliance. These have been tailored to the cooking
compartment and the operating modes of your
appliance.
Ensure that you always use suitable accessories and
that they are placed in the oven the right way around.
~ "Accessories" on page 40
Greaseproof paper
Only use greaseproof paper that is suitable for the
selected temperature. Always cut greaseproof paper to
size.
Cakes and pastries
Your appliance offers you a range of heating types for
the preparation of cakes and small baked items. You
can find the ideal settings for many dishes in the
settings tables.
Also refer to the notes in the section on allowing dough
to rise.
Baking tins
For optimal cooking results, we recommend using dark-
coloured metal baking tins.

Tested for you in our cooking studio en
53
Tinplate baking tins, ceramic dishes and glass dishes
extend baking time and mean that the baked item will
not brown evenly.
If you are using silicone moulds, follow the
manufacturer's instructions and recipes. Silicone
moulds are often smaller than normal baking tins.
Quantity and recipe specifications may vary.
Frozen products
Do not use frozen products that are heavily frosted.
Remove any ice on the food.
Some frozen products may be unevenly pre-baked.
Uneven browning may remain even after baking.
Bread and rolls
Caution!
Never pour water into the hot cooking compartment or
place cookware containing water onto the bottom of the
cooking compartment. The change in temperature can
cause damage to the enamel.
Some food turns out better if it is baked in several
stages. These dishes are indicated in the table.
The setting values for bread dough apply to both dough
placed on a baking tray and dough placed in a loaf tin.
Cakes in tins
Cakes on trays
Dish Accessories/cookware Shelf posi-
tion
Type of
heating
Tempera-
ture in °C
Cooking
time in
mins
Sponge cake, simple Vienna ring tin/loaf tin 1 " 150-160 70-85
Sponge cake, delicate Vienna ring tin/loaf tin 1 % 150-160 70-80
Sponge flan base 26 cm springform cake tin 1 % 160-180 20-30
Fruit tart or cheesecake with shortcrust pastry
base
26 cm springform cake tin 1 % 170-190 70-90
Tart Tart dish or tin 1 % 220-240 30-45
Bundt cake Bundt cake tin 1 % 160-170 50-70
Yeast cake 28 cm springform cake tin 1 % 160-170 25-35
3-egg fatless sponge cake 26 cm springform cake tin 1 % 160-170* 25-35
6-egg fatless sponge cake 28 cm springform cake tin 1 % 150-160* 35-45
* Preheat
Dish Accessories/cookware Shelf posi-
tion
Type of
heating
Tempera-
ture in °C
Cooking
time in
mins
Sponge cake with topping Baking tray 1 % 160-170 25-45
Sponge cake, 2 levels Universal pan + baking tray 3+1 › 140-160 30-50
Shortcrust pastry with dry topping Baking tray 1 % 160-180 30-40
Shortcrust pastry with dry topping, 2 levels Universal pan + baking tray 3+1 › 150-160 35-45
Shortcrust pastry with moist topping Universal pan 1 % 160-180 60-80
Yeast cake with dry topping Universal pan 1 % 160-180 20-30
Yeast cake with dry topping, 2 levels Universal pan + baking tray 3+1 › 140-150 25-35
Yeast cake with moist topping Universal pan 2 % 170-190 35-50
Plaited loaf, savarin Baking tray 1 % 160-170 30-40
Swiss roll Baking tray 1 % 180-200* 10-15
Strudel, sweet Universal pan 1 % 190-200 50-60
Strudel, frozen Universal pan 1 › 200-220 30-45
* Preheat

en Tested for you in our cooking studio
54
Small baked items
Biscuits
Bread and rolls
Pizza, quiche and savoury cakes
Dish Accessories/cookware Shelf posi-
tion
Type of
heating
Tempera-
ture in °C
Cooking
time in
mins
Muffins Muffin tray 1 " 170-190 20-30
Muffins, 2 levels Muffin tray 3+1 › 160-170 25-35
Small yeast cakes Baking tray 1 % 150-170 25-35
Small yeast cakes, 2 levels Universal pan + baking tray 3+1 › 150-170 25-35
Puff pastry Baking tray 1 › 180-200* 15-30
Puff pastry, 2 levels Universal pan + baking tray 3+1 › 180-200* 20-35
Choux pastry Baking tray 1 % 200-220 30-45
* Preheat
Dish Accessories/cookware Shelf posi-
tion
Type of
heating
Tempera-
ture in °C
Cooking
time in
mins
Viennese whirls Baking tray 1 › 140-150* 20-35
Viennese whirls, 2 levels Universal pan + baking tray 3+1 › 140-150* 25-40
Biscuits Baking tray 2 % 140-160 12-25
Biscuits, 2 levels Universal pan + baking tray 3+1 › 140-160 20-30
Meringue Baking tray 1 › 90-100 100-130
Meringue, 2 levels Universal pan + baking tray 3+1 › 90-100 120-150
Macaroons Baking tray 1 › 100-110 30-45
Macaroons, 2 levels Universal pan + baking tray 3+1 › 100-110 35-50
* Preheat for 5 mins
Dish Accessories/cookware Shelf posi-
tion
Heating
function
Tempera-
ture in °C
Cooking
time in
min
Bread, 750 g (in a loaf tin or free-form) Universal pan or loaf tin 1 › 220 - 230
190 - 200*
10 - 15 25
- 35
Bread, 1000 g (in a loaf tin or free-form) Universal pan or loaf tin 1 › 220 - 230
190 - 200*
10 - 15 30
- 45
Bread, 1500 g (in a loaf tin or free-form) Universal pan or loaf tin 1 › 210 - 220
180 - 190*
10 - 15 45
- 55
Flatbread Universal pan 1 % 240- 250* 15 - 20
Bread rolls, sweet, fresh Baking tray 1 % 180 - 200* 10 - 20
Bread rolls, sweet, fresh, 2 levels Universal pan + baking tray 3+1 › 160 - 170* 20 - 30
Bread rolls, fresh Baking tray 1 % 180 - 200 25 - 35
Toast with topping Wire wrack 2 † 220 - 240 7 - 10
* Preheat
Dish Accessories/cookware Shelf posi-
tion
Heating
function
Tempera-
ture in °C
Cooking
time in
min
Pizza, fresh – on a baking tray Baking tray 1 0 180 - 190 20 - 25
Pizza, fresh – on a baking tray, 2 levels Universal pan + baking tray 3+1 › 170 - 190 35 - 50
Pizza, fresh, thin-crust, on a pizza tray Pizza tray 1 0 250 - 260* 8 - 13
* Preheat

Tested for you in our cooking studio en
55
Baking tips
Pizza, chilled Wire rack 1 0 190 - 200 10 - 15
Pizza, frozen, thin-crust, x 1 Wire rack 1 0 190 - 210 10 - 20
Pizza, frozen, thin-crust, x 2 Universal pan + wire rack 3+1 › 190 - 200 20 - 25
Pizza, frozen, deep-pan, x 1 Wire rack 1 0 180 - 200 20 - 25
Pizza, frozen, deep-pan, x 2 Universal pan + wire rack 3+1 › 190 - 210 20 - 30
Mini pizzas, frozen Universal pan 1 0 180 - 200 15 - 20
Savoury cakes in a tin 28 cm springform cake tin 1 % 170 - 190 65 - 80
Quiche Flan tin, black 1 % 200 - 210 35 - 45
Pierogi Ovenproof dish 1 › 170 - 190 50 - 70
Empanadas Universal pan 1 % 190 - 200 40 - 50
Börek Universal pan 1 % 190 - 200 40 - 50
Dish Accessories/cookware Shelf posi-
tion
Heating
function
Tempera-
ture in °C
Cooking
time in
min
* Preheat
You want to find out whether the
baked item is completely cooked in
the middle.
Push a cocktail stick into the highest point on the baked item. If the cocktail stick comes out clean with no
dough residue, the baked item is ready.
The baked item collapses. Next time, use less liquid. Alternatively, set the temperature 10 °C lower and extend the baking time. Adhere
to the specified ingredients and preparation instructions in the recipe.
The baked item has risen in the mid-
dle but is lower around the edge.
Only grease the base of the springform cake tin. After baking, loosen the baked item carefully with a knife.
The fruit juice overflows. Next time, use the universal pan.
Small baked items stick to one
another during baking.
There should be a gap of approx. 2 cm around each item. This gives enough space for the baked items to
expand well and brown on all sides.
The baked item is too dry. Set the temperature 10 °C higher and shorten the baking time.
The baked item is too light in colour
overall.
If the shelf position and the accessories are correct, then you should increase the temperature if necessary or
extend the baking time.
The baked item is too light on top, and
too dark underneath.
Bake the cake one level higher in the oven the next time.
The baked item is too dark on top,
and too light underneath.
Bake the cake one level lower in the oven the next time. Select a lower temperature and extend the baking
time.
The baked item is too dark in a tin or
loaf tin.
Place the baking tray in the middle of the accessory, not directly against the back wall.
The baked item is too dark in colour
overall.
Select a lower temperature next time and extend the baking time if necessary.
The baked item is unevenly browned. Select a slightly lower temperature.
Protruding greaseproof paper can affect the air circulation. Always cut greaseproof paper to size.
Ensure that the baking tin does not stand directly in front of the openings in the cooking compartment back
wall.
When baking small items, you should use similar sizes and thicknesses wherever possible.
You were baking on several levels.
The items on the top baking tray are
darker than those on the lower baking
tray.
Always select hot air when baking on several levels. Baked items that are placed into the oven on trays or in
baking tins at the same time will not necessarily be ready at the same time.
The baked item looks good, but is not
cooked properly in the middle.
Use a lower temperature and bake slightly longer; if necessary, add slightly less liquid. For baked items with a
moist topping, bake the base first. Sprinkle it with almonds or breadcrumbs and then place the topping on top.
The baked item cannot be turned out
of the dish when it is turned upside
down.
Allow the baked item to cool down for 5 to 10 minutes after baking. If it still sticks, carefully loosen it around
the edges again using a knife. Turn the baked item upside down again and cover it several times with a cold,
wet cloth. Next time, grease the baking tin and sprinkle with breadcrumbs.

en Tested for you in our cooking studio
56
Bakes and gratins
Your appliance offers a range of heating types for
preparing bakes. You can find the ideal settings for
many dishes in the settings tables.
How well cooked a bake is depends on the size of the
cookware and the depth of the bake.
Use wide, shallow cookware for bakes and gratins.
Food takes longer to cook in deep, narrow cookware
and it browns more on top.
Always use the indicated shelf positions.
You can prepare dishes on one level using a baking tin/
dish or the universal pan.
■ Baking tins/dishes on the wire rack: Level 1
■ Universal pan: Level 1
By preparing several dishes at the same time, you can
make energy savings of up to 45 per cent. Position
baking tins/dishes next to one another in the cooking
compartment.
Poultry, meat and fish
Your appliance offers you a range of heating types for
preparing poultry, meat and fish. You can find the ideal
settings for certain dishes in the settings tables.
Roasting on the wire rack
Roasting on the wire rack is particularly well suited for
larger poultry or for multiple pieces at the same time.
Slide the universal pan into the oven at the indicated
shelf position with the wire rack attached. Ensure that
the wire rack is correctly positioned on the universal
pan. ~ "Accessories" on page 40
Pour up to ^ litres of water into the universal pan,
depending on the size and type of the roast. Any
dripping liquid is caught. You can make a sauce from
these juices. In addition, less smoke is generated, and
the cooking compartment stays cleaner.
Roasting in cookware
:Warning – Risk of injury caused by shattering
glass!
Place hot glass cookware on a dry mat after cooking. If
the surface is damp or cold, the glass may crack.
:Warning – Risk of scalding!
Very hot steam may escape when opening the lid after
cooking. Lift the lid at the rear, so that the hot steam
can escape away from you.
Only use cookware which is suitable for use in an oven.
Glass cookware is best. Check whether the cookware
fits in the cooking compartment.
Shiny roasting dishes made from stainless steel or
aluminium reflect heat like a mirror and are therefore
not particularly suitable. The poultry, meat and fish
cooks slower and does not brown so well. Use a higher
temperature and/or a longer cooking time.
Observe the manufacturer's instructions for your
roasting cookware.
Uncovered cookware
To cook poultry, meat and fish, it is best to use a deep
roasting tin. Place the tin onto the wire rack. If you do
not have any suitable cookware, use the universal pan.
Covered cookware
When cooking with covered cookware, the cooking
compartment remains considerably cleaner. Ensure that
the lid fits well and closes properly. Place the cookware
onto the wire rack.
Poultry, meat and fish can also become crispy in a
covered roasting dish. Simply use a roasting dish with a
glass lid and set a higher temperature.
Grilling
Keep the appliance door closed when using the grill.
Never grill with the appliance door open.
Place the food to be grilled on the wire rack. In addition,
slide the universal pan in at least one shelf position
lower, with the slanted edge facing the appliance door.
Any dripping fat will be caught.
When grilling, try wherever possible to use pieces of
food which are of a similar thickness and weight. This
will allow them to brown evenly and remain succulent
and juicy. Place the food to be grilled directly onto the
wire rack.
Use tongs to turn the pieces of food you are grilling. If
you pierce the meat with a fork, the juices will run out
and it will become dry.
Do not add salt to the meat until it has been grilled. Salt
draws water from the meat.
Notes
■ The grill element switches itself continuously on and
off; this is normal. The grill setting determines how
frequently this occurs.
■ Smoke may be produced when grilling.
Recommended setting values
The setting values are based on the assumption that
unstuffed, chilled, ready-to-roast poultry, meat or fish is
placed into a cold cooking compartment.
Dish Accessories/cookware Shelf posi-
tion
Type of
heating
Tempera-
ture in °C
Cooking
time in
mins
Bake, savoury, cooked ingredients Ovenproof dish 1 % 200 - 220 40 - 60
Bake, sweet Ovenproof dish 1 % 170 - 190 40 - 60
Potato gratin, raw ingredients, 4 cm deep Ovenproof dish 1 0 170 - 180 50 - 60

Tested for you in our cooking studio en
57
In the table, you can find specifications for poultry, meat
and fish with default values for the weight. If you wish to
prepare heavier poultry, meat or fish, always use the
lower temperature. If roasting several joints, use the
weight of the heaviest piece as a basis for determining
the cooking time. The individual pieces should be
approximately equal in size.
The larger the poultry, meat or fish is, the lower the
cooking temperature and the longer the cooking time.
Turn the poultry, meat and fish after approx. ^ to Z of
the indicated time.
Poultry
When cooking duck or goose, pierce the skin on the
underside of the wings. This allows the fat to drain out.
If using duck breast, score the skin. Do not turn duck
breasts.
Add a little liquid to the poultry in the cookware. Cover
the bottom of the cookware with approx. 0,5-1 cm of
liquid.
When you turn poultry, ensure that the breast side or
skin side is underneath to begin with.
Poultry will turn out particularly crispy and brown if you
baste it towards the end of the roasting time with butter,
salted water or orange juice.
Meat
Baste lean meat with fat as required or cover it with
strips of bacon.
When roasting, add a little liquid if the meat is lean. A
covering of approx. ^ cm depth should be applied to
the base of any glass cookware.
Score the rind crosswise. If you turn the joint when
cooking, ensure that the rind is underneath at first.
When the joint is ready, turn off the oven and allow it to
rest for another 10 minutes in the cooking
compartment. This allows the meat juices to be better
distributed. Wrap the joint in aluminium foil if necessary.
The recommended resting time is not included in the
cooking time indicated.
It is more convenient to roast and braise meat in
cookware. You can take the joint out of the cooking
compartment more easily in the cookware, and prepare
the sauce in the cookware itself.
The quantity of liquid is dependent on the type of meat,
the cookware material and also on whether or not a lid
is used. If preparing meat in an enamelled or dark metal
roasting dish, it will need a little more liquid than if
cooked in glass cookware.
The steam evaporates in the cookware when roasting.
Carefully pour in more liquid if required.
The distance between the meat and the lid should be at
least 3 cm. The meat may rise.
If necessary, braise the meat first by searing it. Add
water, wine, vinegar or a similar liquid to the braising
liquid. A covering approx. 1-2 cm deep should be
applied to the base of the cookware.
Fish
Fish cooked whole does not have to be turned. Place
the whole fish into the cooking compartment in
swimming position with the dorsal fin facing upwards.
Placing half a potato or a small oven-proof container in
the stomach cavity of the fish will provide stability.
You can tell when the fish is cooked because the dorsal
fin can be removed easily.
When stewing, add two to three tablespoons of liquid
and a little lemon juice or vinegar into the cookware.
Poultry
Meat
Dish Accessories/cookware Shelf posi-
tion
Heating
function
Tempera-
ture in °C
Cooking
time in
min
Chicken, 1.3 kg Cookware, uncovered 1 † 200 - 210 60 - 70
Small chicken portions, 250 g each Wire rack 1 † 210 - 220 35 - 40
Chicken goujons, nuggets, frozen Universal pan 1 % 190 - 210 20 - 25
Duck, 2 kg Cookware, uncovered 1 † 180 - 200 90 - 110
Goose, 3 kg Wire rack 1 † 160 - 170 110 - 130
Goose legs, 350 g each Cookware, uncovered 1 † 150 - 160 110 - 130
Small turkey, 2.5 kg Cookware, uncovered 1 † 170 - 190 80 - 100
Turkey breast, boned, 1 kg, in cookware with
lid
Cookware, covered 1 % 220 - 240 80 - 100
Turkey thigh, bone in, 1 kg Cookware, uncovered 1 † 180 - 190 80 - 100
Dish Accessories/cookware Shelf posi-
tion
Heating
function
Tempera-
ture in °C/
grill setting
Cooking
time in
min
Joint of pork without rind, e.g. neck, 1.5 kg Cookware, uncovered 1 † 180 - 200 100 - 120
Joint of pork with rind, e.g. shoulder, 2 kg Cookware, uncovered 1 † 180 - 200 120 - 140
* Do not turn

en Tested for you in our cooking studio
58
Fish
Tips on roasting and braising
Vegetables and side dishes
Here, you can find information for preparing grilled
vegetables, potatoes and frozen potato products.
Adhere to the specifications in the table.
Pork tenderloin steak, 1.5 kg Cookware, uncovered 1 † 210 - 220 60 - 70
Pork steaks, 2 cm thick Wire rack 3 ( 3 18 - 22
Fillet of beef, medium, 1 kg Cookware, uncovered 1 † 210 - 220 40 - 50
Pot-roasted beef, 1.5 kg Cookware, covered 1 " 200 - 220 140 - 160
Sirloin, medium, 1.5 kg Cookware, uncovered 1 † 200 - 210 60 - 70
Burger, 3-4 cm thick Wire rack 2 ( 3 25 - 30
Joint of veal, 1.5 kg Cookware, uncovered 1 † 160 - 180 100 - 120
Knuckle of veal, 1.5 kg Cookware, uncovered 1 % 200 - 210 110 - 120
Leg of lamb, boned, medium, 1.0 kg, tied Cookware, uncovered 1 † 180 - 190 70 - 80
Saddle of lamb on the bone, 1.5 kg, medium Cookware, uncovered 1 † 180 - 190* 35 - 40
Grilled sausages Wire rack 3 ( 3 12 - 18
Meat loaf, 1 kg Cookware, uncovered 1 † 180 - 190 70 - 80
Dish Accessories/cookware Shelf posi-
tion
Type of
heating
Tempera-
ture in °C/
grill setting
Cooking
time in
mins
Fish, grilled, whole, 300 g, e.g. trout Wire rack 2 † 170 - 180 20 - 25
Fish, grilled, whole, 1.5 kg, e.g. salmon Wire rack 1 † 160 - 170 35 - 50
Fish fillet/cutlet, 2-3 cm thick, grilled Wire rack 2 ( 3 15 - 20
Fish, braised, whole, 300 g, e.g. trout Cookware, covered 1 " 170 -180 40 - 45
Fish, braised, whole, 1.5 kg, e.g. salmon Cookware, covered 1 " 170 - 180 50 - 60
Fish fillet, plain, 2-3 cm thick, braised Cookware, covered 1 " 170 - 180 30 - 40
Dish Accessories/cookware Shelf posi-
tion
Heating
function
Tempera-
ture in °C/
grill setting
Cooking
time in
min
* Do not turn
The cooking compartment becomes
very dirty.
Prepare your food in an enclosed roasting dish with higher temperature or use the grill tray. You will achieve
the best roasting results if you use the grill tray. The grill tray can be bought later as a special accessory.
The roast is too dark and the crack-
ling is burned in places, and/or the
roast is too dry.
Check the shelf position and temperature. Select a lower temperature the next time and reduce the roasting
time if necessary.
The crackling is too thin. Increase the temperature or switch on the grill briefly at the end of the roasting time.
The roast looks good but the juices
are burnt.
Next time, use a smaller roasting dish and add more liquid if necessary.
The roast looks good but the juices
are too clear and watery.
Next time, use a larger roasting dish and add less liquid if necessary.
The meat gets burned during brais-
ing.
The roasting dish and lid must fit together well and close properly.
Reduce the temperature and add more liquid when braising if necessary.

Tested for you in our cooking studio en
59
Desserts
You can make your own soufflés and yogurt using your
appliance.
Soufflés
You can also prepare soufflés in a water bath in the
universal pan. To do so, slide the universal pan in at
level 2.
Yogurt
Remove accessories and shelves from the cooking
compartment. The cooking compartment must be
empty.
1. Heat 1 litre of milk (3.5 % fat) to 90 °C on the hob
and then cool down to 40 °C.
It is sufficient to heat UHT milk to 40 °C.
2. Stir in 150 g (chilled) yogurt.
3. Pour into cups or small jars and cover with cling film.
4. Place the cups or jars onto the cooking
compartment floor and set as indicated in the table.
5. After preparation, leave the yogurt to cool in the
refrigerator.
Acrylamide in foodstuffs
Acrylamide is mainly produced in grain and potato
products prepared at high temperatures, such as potato
crisps, chips, sliced bread, bread rolls, bread or fine
baked goods (biscuits, gingerbread, spiced biscuit).
Drying
You can achieve outstanding drying results with hot air.
With this type of preserving, flavours are concentrated
as a result of the dehydration.
Only use unblemished, fresh fruit, vegetables and herbs
and wash them thoroughly. Line the wire rack with
greaseproof paper or parchment paper. Drain the
excess water from the fruit and then dry it.
If necessary, cut it into equal chunks or thin slices.
Place unpeeled fruit onto the dish with the sliced
surfaces facing upwards. Ensure that neither fruit nor
mushrooms overlap on the wire rack.
Grate vegetables and then blanch them. Drain the
blanched vegetables thoroughly and spread them
evenly on the wire rack.
Dry herbs on the stem. Position the herbs evenly and
slightly heaped on the wire rack.
Use the following shelf positions for drying:
■ 1 wire rack: Position 2
■ 2 wire racks: Positions 3 + 1
Turn very juicy fruit and vegetables several times. After
drying, remove the dried fruit and vegetables from the
paper immediately.
Dish Accessories/cookware Shelf posi-
tion
Heating
function
Tempera-
ture in °C/
grill setting
Cooking
time in
min
Grilled vegetables Universal pan 3 ( 3 10 - 20
Baked potatoes, halved Universal pan 1 › 170 - 190 45 - 60
Potato products, frozen, e.g. chips, croquettes,
potato pockets, rösti
Universal pan 1 % 200 - 220 25 - 35
Potato products, frozen, chips, 2 levels Universal pan + baking tray 3+1 › 200 - 220** 30 - 40
* Preheat for 5 min; do not use rapid heat-up function
Dish Accessories/cookware Shelf posi-
tion
Type of
heating
Tempera-
ture in °C
Duration:
mins/hrs
Yoghurt Individual moulds - › 50 6 - 7h
Soufflé in individual moulds Individual moulds 1 % 160 -170 30 - 40min
Tips for keeping acrylamide to a minimum
General ■ Keep cooking times as short as possible.
■ Cook food until it is golden brown, but not too dark.
■ Large, thick pieces of food contain less acrylamide.
Baking With top/bottom heating at max. 200 °C.
With hot air at max. 180 °C.
Biscuits With top/bottom heating at max. 190 °C.
With hot air at max. 170 °C.
Egg or egg yolk reduces the production of acrylamide.
Oven chips Spread out a single layer evenly on the baking tray. Cook approx. 400-600 g at once on a baking tray so
that the chips do not dry out and become crunchy.

en Tested for you in our cooking studio
60
The table contains settings for drying various foodstuffs.
The temperature and drying time are dependent on the
type, moisture, ripeness and thickness of the food to be
dried. The longer you leave the food to be dried, the
better it will be preserved. The thinner the slices are, the
quicker the drying process will be and the more flavour
the dried food will retain. For this reason, the table
specifies setting ranges.
If you want to dry food that is not listed in the table, you
should use similar foodstuffs in the table as a reference.
Preserving
You can preserve fruit and vegetables using your
appliance.
:Warning – Risk of injury!
If the food is preserved incorrectly, the preserving jars
may burst. Follow the instructions for preserving.
Jars
Only use clean and undamaged preserving jars. Only
use heat-resistant, clean and undamaged rubber rings.
Check clips and clamps in advance.
For each preserving process, only use preserving jars
that are the same size and contain the same food. In
the cooking compartment, you can preserve the
contents of a maximum of six ^, 1 or 1^-litre
preserving jars at the same time. Do not use jars that
are larger or taller than this. The lids could rupture.
Preserving jars must not touch one another in the
cooking compartment during the preserving process.
Preparing fruit and vegetables
Only use fruit and vegetables that are in good condition.
Wash them thoroughly.
Peel, core and chop fruit and vegetables appropriate to
their type and fill the preserving jars with them up to
approx. 2 cm below the rim.
Fruit: Fill the preserving jars with the fruit along with a
hot, skimmed sugar solution (approx. 400 ml for a 1-
litre jar). For one litre of water:
■ Approx. 250 g sugar for sweet fruit
■ Approx. 500 g sugar for sour fruit
Vegetables: Fill the jars with the vegetables along with
hot, boiled water.
Wipe the rims of the jars, as they must be clean. Place
a damp rubber ring and a lid on each jar. Seal the jars
with the clips. Place the jars into the universal pan so
that they do not touch each other. Pour 500 ml hot
water (approx. 80 °C) into the universal pan. Use the
settings indicated in the table.
Ending the preserving process
Fruit: After a short while, small bubbles will form at short
intervals. Switch off the appliance once all preserving
jars are bubbling. Remove the jars from the cooking
compartment after the indicated residual heating time.
Vegetables: After a short while, small bubbles will form
at short intervals. As soon as all preserving jars are
bubbling, reduce the temperature to 120 °C and allow
the jars to continue to bubble in the closed cooking
compartment as indicated in the table. After this time
has elapsed, switch off the appliance and make use of
the residual heat for several minutes as indicated in the
table.
After preserving, remove the jars from the cooking
compartment and place them onto a clean cloth. Do not
place these hot jars onto a cold or damp surface, as
they may crack. Cover the preserving jars to protect
them from draughts. Only remove the clamps once the
jars are cold.
The indicated times in the settings table are average
values for preserving fruit and vegetables. They may be
influenced by room temperature, the number of jars,
quantity, heat and quality of the jar contents. The
specifications are based on 1-litre round jars. Before
you switch off the appliance or change the cooking
mode, check whether the contents of the jars are
bubbling as they should. The bubbling process starts
after approx. 30-60 minutes.
Dish Accessories/cookware Shelf posi-
tion
Type of
heating
Tempera-
ture in °C
Cooking
time in
mins
Pomes (apple rings, 3 mm thick, 200 g per
wire rack)
1-2 wire racks 2 / 1+3 › 80 4 - 8 h
Root vegetables (carrots), grated, blanched 1-2 wire racks 2 / 1+3 › 80 4 - 7 h
Sliced mushrooms 1-2 wire racks 2 / 1+3 › 80 5 - 8 h
Herbs, washed 1-2 wire racks 2 / 1+3 › 60 2 - 5 h
Dish Accessories/cookware Shelf posi-
tion
Type of
heating
Step Tempera-
ture in °C
Cooking time in minutes
Vegetables, e.g. carrots Preserving jars, 1 litre 1 › 1. 160-170 Until it starts bubbling: 30-40
2. 120 Once it starts bubbling: 30-
40
3. - Residual heat: 30
Vegetables, e.g. cucumbers Preserving jars, 1 litre 1 › 1. 160-170 Until it starts bubbling: 30-40
2. - Residual heat: 30

Tested for you in our cooking studio en
61
Prove dough
Your yeast dough will prove considerably more quickly
using this heating function than at room temperature
and will not dry out. Do not start the appliance if the
cooking compartment is not completely cool.
Always allow yeast dough to prove twice.Use the
settings indicated in the settings tables for the first and
second proving stages (dough fermentation stage and
final fermentation stage).
Dough fermentation
Place the dough into a heat-resistant bowl and place
this onto the wire rack. Use the settings indicated in the
table.
Do not open the appliance door while the dough is
proving, otherwise moisture will escape. Do not cover
the dough.
Condensation builds up during the proving process,
which steams up the door panel. Wipe out the cooking
compartment after dough proving.Remove any
limescale with a little vinegar and wipe with clean water.
Final fermentation
Place your dough into the oven at the shelf position
indicated in the table.
If you want to preheat the oven, the final fermentation
stage takes place outside the appliance in a warm
place.
The temperature and proving time are dependent on
the type and quantity of the ingredients. For this reason,
the values indicated in the settings table are intended
as a guide only.
Defrosting
For defrosting frozen fruit, vegetables and baked items.
Poultry, meat and fish should ideally be defrosted in the
refrigerator. Not suitable for cream cakes or cream
gateaux.
Use the following shelf positions when defrosting:
■ 1 wire rack: Position 1
The times indicated in the table are intended as a guide
only. They are dependent on the quality, freezing
temperature (-18 °C) and composition of the food. Time
ranges are indicated. Set the shortest time first and then
extend the time if necessary.
Tip: Food that has been frozen flat or in portions
defrosts more quickly than food items frozen in a block.
Remove frozen food from its packaging and place it
onto the wire rack in suitable cookware.
Redistribute the food or turn it once or twice as it
defrosts. Large pieces of food should be turned
frequently. As the food defrosts, break up any clumps
and remove items which have already defrosted from
the cooking compartment.
To allow the temperature to equalise, leave the
defrosted food to rest for another 10 to 30 minutes in
the appliance after switching it off.
Stone fruit, e.g. cherries, damsons Preserving jars, 1 litre 1 › 1. 160-170 Until it starts bubbling: 30-40
2. - Residual heat: 35
Pomes, e.g. apples, strawberries Preserving jars, 1 litre 1 › 1. 160-170 Until it starts bubbling: 30-40
2. - Residual heat: 25
Dish Accessories/cookware Shelf posi-
tion
Type of
heating
Step Tempera-
ture in °C
Cooking time in minutes
Dish Accessories/cookware Shelf posi-
tion
Type of
heating
Step Tempera-
ture in °C
Cooking time in minutes
Yeast dough, light Bowl, baking tray 1 % 1. 50 25-30
2. 50 10-20
Yeast dough, heavy and rich Bowl, baking tray 1 % 1. 50 20-40
2. 50 15-25
Dish Accessories/cookware Shelf posi-
tion
Type of
heating
Tempera-
ture in °C
Cooking
time in
mins
Bread, general Baking tray 1 › 50 40-70
Cake, moist Baking tray 1 › 50 70-90
Cake, dry Baking tray 1 › 60 60-75

en Tested for you in our cooking studio
62
Keeping warm
You can keep cooked dishes warm using the top/
bottom heating type at 70 °C. This will avoid
condensation developing, and means you will not have
to wipe out the cooking compartment.
Do not keep cooked dishes warm for longer than two
hours. Be aware that some dishes may continue
cooking whilst being kept warm. Cover the dishes if
necessary.
Test dishes
These tables have been produced for test institutes to
facilitate appliance testing.
As per EN 60350-1.
Baking
Items that are placed in the oven on baking trays or in
baking tins/dishes at the same time will not necessarily
be ready at the same time.
Shelf positions for baking on two levels:
■ Universal pan: Position 3
Baking tray: Position 1
Baking with two springform cake tins:
■ On a single level:
Notes
■ The setting values apply to dishes placed into a cold
cooking compartment.
■ Please note the information in the tables about
preheating. The setting values are valid without rapid
heating-up.
■ For baking, use the lower of the indicated
temperatures first.
Grilling
Also slide in the universal pan. The liquid will be caught
and the cooking compartment stays cleaner.
Baking
Grilling
Dish Accessories/cookware Shelf posi-
tions
Type of
heating
Tempera-
ture in °C
Cooking
time in
mins
Viennese whirls Baking tray 1 % 140 - 150** 20 - 25
Viennese whirls Baking tray 1 › 140 - 150** 20 - 35
Viennese whirls, 2 levels Universal pan + baking tray 3+1 › 140 - 150** 25 - 40
Small cakes Baking tray 1 " 150-160 30 - 35
Small cakes Baking tray 1 › 150 - 160** 23 - 30
Small cakes, 2 levels Universal pan + baking tray 3+1 › 150 - 160** 25 - 35
Hot water sponge cake 26 cm springform cake tin 1 % 160 - 170* 25 - 35
Hot water sponge cake 26 cm springform cake tin 1 › 160 - 170* 25 - 35
Double-crusted apple pie 2 x 20 cm black cake tins 1 0 160 - 170 65 - 75
Double-crusted apple pie 2 x 20 cm black cake tins 1 % 180 - 190 60 - 80
* Preheat; do not use rapid heat-up function.
** Preheat for 5 mins., do not use quick heat function.
Dish Accessories/cookware Shelf posi-
tion
Heating
function
Grill setting Cooking
time in
min
Toasting bread Wire rack 3 ( 3** 0,5 - 1,0
Beefburgers, x 12 Wire rack 2 ( 3*** 25 - 30
** Preheat for 5 min; do not use rapid heat-up function.
*** Turn after 2/3 of the total time

6

&RQVWUXFWD1HII9HUWULHEV*PE+
&DUO:HU\6WUDH
0QFKHQ
*(50$1<
*9001389393*
9001389393
980613
-
 1
1
-
 2
2
-
 3
3
-
 4
4
-
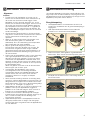 5
5
-
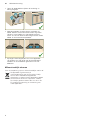 6
6
-
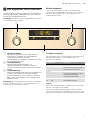 7
7
-
 8
8
-
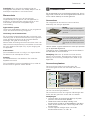 9
9
-
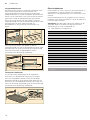 10
10
-
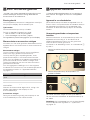 11
11
-
 12
12
-
 13
13
-
 14
14
-
 15
15
-
 16
16
-
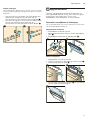 17
17
-
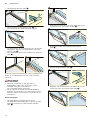 18
18
-
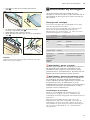 19
19
-
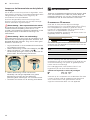 20
20
-
 21
21
-
 22
22
-
 23
23
-
 24
24
-
 25
25
-
 26
26
-
 27
27
-
 28
28
-
 29
29
-
 30
30
-
 31
31
-
 32
32
-
 33
33
-
 34
34
-
 35
35
-
 36
36
-
 37
37
-
 38
38
-
 39
39
-
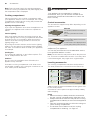 40
40
-
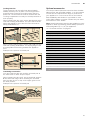 41
41
-
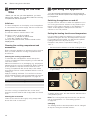 42
42
-
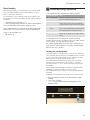 43
43
-
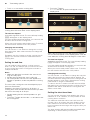 44
44
-
 45
45
-
 46
46
-
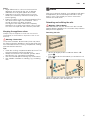 47
47
-
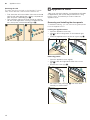 48
48
-
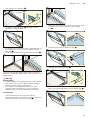 49
49
-
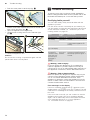 50
50
-
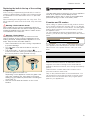 51
51
-
 52
52
-
 53
53
-
 54
54
-
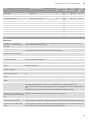 55
55
-
 56
56
-
 57
57
-
 58
58
-
 59
59
-
 60
60
-
 61
61
-
 62
62
-
 63
63
-
 64
64


in andere talen
- English: CONSTRUCTA CC4M600.0 User manual
Andere documenten
-
Siemens IQ500 HB537ABS0 de handleiding
-
Bosch SERIE 4 HBA334BS0 de handleiding
-
-
-
-
-
-
-
-