
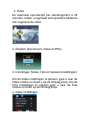
User Manual
Action Camera

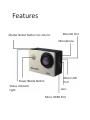
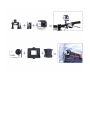
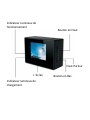
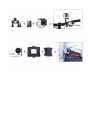
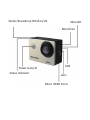
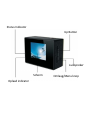
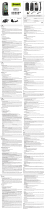
Shuer/Select Buon
WiFi ON/OFF
Features
MicroSD Slot
Microphone
Micro USB
Port
Lens
Micro HDMI Port
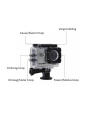
Power/Mode Buon
Status Indicator
Light

Status
Indicator Light
Charging Status
Light
Screen
Down Button
Menu
Up Button
Speaker

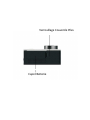
Battery Door Latch
Battery Door

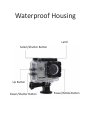
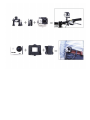
Waterproof Housing
Power/Mode Buon
Down/Shuer Buon
Select/Shuer Buon
Up Buon
Latch

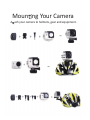
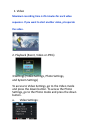
Moun ng Your Camera
A ach your camera to helmets, gear and equipment.


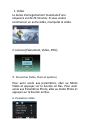
1. Video
Maximum recording time is 29 minutes for each video
sequence. If you want to start another video, pls operate
the video.
2. Playback (Event, Video or JPEG)
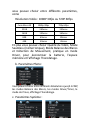
3.Settings (Video Settings, Photo Settings,
and System Settings)
To access to Video Settings, go to the Video mode
and press the down button. To access the Photo
Settings, go to the Photo mode and press the down
button.
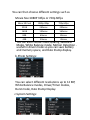
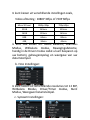
a. Video Settings:

You can then choose different settings such as
Movie Size:1080P 30fps or 720p 60fps
Micro SD Card
1080p 30fps
720p 60fps
32GB
240mins
320mins
16GB
120mins
160mins
8GB
60mins
80mins
4GB
30mins
40mins
You can also choose Video Quality, Seamless
Mode, White Balance mode, Motion Detection -
usefull in driver mode so you can save battery
and memory space, and Date Stamp display.
b.Photo Settings:
You can select different resolutions up to 12 MP,
White Balance modes, Driver/Timer modes,
Burst mode, Date Stamp Display.
c.System Settings:

1)Sounds: On/Off, Start-up 1/2/3/None, Beep
On/Off, Volume 0/1/2/3
2)Power Frequency:50Hz/60Hz/Auto
3)Panel Protect(Screen Saver):Off/1 mins/3
mins/5 mins
4)Power Save: Off/1 mins/3mins/5mins
5)Date&Time: YY/MM/DD
6)Language: English/Simplified Chinese/
Traditional Chinese/France/Spanish/Italian/
Portuguese/Dutch/Polish/Russian/Japanese
7)Format: No/Yes
8)IR mode
9)Reset All: No/Yes
10)Version
Capturing Video +Photos
To capture the photos and videos, click on the button
OK/Shutter modes.

Storage/MicroSD Cards
This camera is compatible with 4GB,16GB, and
32GB capacity microSD, microSDHC, and
microSDXC memory cards. You must use a
microSD card with a Class 10 speed rating. We
recommend using brand name memory cards for
maximum reliability in high-vibration activities
.
Charging the Battery
If recording is occurring when battery reaches 0%,
the camera will save the file and power OFF.
To charge the battery:
1.Connect the camera to a computer or USB
power supply.
2.The Charging Status Light remains ON while the
battery is charging.
3.The Charging Status Light will turn OFF when
the battery is fully charged.

Connecting to the iSmart DV App
The iSmart DV App lets you control you camera
remotely using a smartphone or tablet. Features
include full camera control, live preview, photo
playback and sharing of select content and
more.
1.Download the iSmart DV App to your
smartphone or tablet at the Apple App Store or
Google Play.
2.Press the Power/Mode Button to power
camera ON.
3.Press the OK/Shutter button for 3 seconds
until you see “waiting for WIFI connection”
4.In your smartphone or tablet’s Wi-Fi settings,
connect to the network called “Action Cam”
followed by a series of numbers.
5.Enter the password“1234567890”
6.Open the iSmart DV App on your smartphone
or tablet.


Obturateur/Sélecon WiFi marche/arrêt
Fente MicroSD
Microphon
USB
Objecf
Port Micro HDMI
Marche/Arrêt
Indicateur de Fonconnement

Indicateur Lumineux de
fonctionnement
Indicateur Iumineux de
chargement
L ’écran
Bouton en Bas
Bouton en Haut
Haut-Parleur

Verrouillage Couvercle Piles
Capot Batterie

Bouton Power/Mode
Bouton en Bas/I’Obturateur
Sélec on/Obturateur
Bouton en Haut
Ouverture

Fixa on de votre caméra
Fixez votre caméra sur casques véhicules et équipement.


1. Vidéo
La durée d’enregistrement maximale d’une
séquence est de 29 minutes. Si vous voulez
commencer un autre vidéo, manipulez le vidéo.
2. Lecture (Événement, Vidéo, JPEG)
3. Paramètres (Vidéo, Photo et Système)
Pour avoir accès aux paramètres, allez au Mode
Vidéo et appuyez sur le bouton en Bas. Pour avoir
accès aux Paramètres Photo, allez au mode Photo et
appuyez sur le bouton en Bas.
a. Paramètres Vidéo :

vous pouvez choisir entre différents paramètres,
come
Résolution Vidéo : 1080P 30fps ou 720P 60fps
Carte Micro SD
1080p 30fps
720p 60fps
32GB
240mins
320mins
16GB
120mins
160mins
8GB
60mins
80mins
4GB
30mins
40mins
En plus vous pouvez choisir Qualité du Vidéo, Mode
Seamless (ininterrompue), Mode Balance des Blancs
et Détection de Mouvement, pratique en mode
Driver, pour économiser la batterie, l’espace
mémoire et l’affichage l’horodatage.
b. Paramètres Photo:
Vous pouvez choisir entre différents Résolutions jusq’à 12 MP,
les modes Balance des Blancs, les modes Driver/Timer, le
mode de Prises, affichage l’horodatage.
c. Paramètres Système :

1) Sons : activer/désactiver, démarrage
1/2/3/aucun, Beep activer/désactiver,
Volume 0/1/2/3
2) Fréquence de Puissance :
50Hz/60Hz/Auto
3) Economiseur d’écran (Screen Saver) :
Désactiver/1min./3min./5min.
4) Économie d’énergie :
Désactiver/1min./3min./5min.
5) Date&Temps : AA/MM/JJ
6) Langue : Anglais/Chinois
Simplifié/Chinois
Traditionnel/Français/Espagnol/Italien/P
ortugais/Hollandais/Polonais/Russe/Jap
onais
7) Formatage :Non/Oui
8) Mode Infrarouge
9) Réinitialiser tout : Non/Oui
10) Version
Enregistrer les vidéos et prendre les photos
Pour enregistrer les vidéos et prendre les photos
appuyez sur le bouton OK/Modes Obturateur.
.

Cet appareil photo est compatible avec les cartes
mémoire microSD, microSDHC et microSDXC avec
une capacité de 4GB, 16GB et 32GB. Utilisez
uniquement des cartes de classe 10. Veuillez
n’utiliser que des cartes de marque afin d’obtenir
une fiabilité maximale pendant les activités de
vibration élevés.
.
Rechargement de la batterie
Si vous êtes en train d’enregistrer et la batterie arrive
à 0%, la caméra sauvegardera le fichier et s’éteindra.
Pour charger la batterie :
1. Reliez la caméra à un ordinateur ou
chargeur USB.
2. L’indicateur lumineux de chargement
est allumé pendant que la batterie se
recharge.
3. Quand la batterie est complètement
chargée l’indicateur lumineux de
chargement s’éteindra.

Relier à l’App iSmart DV
L’App iSmart DV vous permet de contrôler à distance
votre caméra en utilisant un Smartphone ou tablette.
Les caractéristiques incluent Contrôle total de la
caméra, Prévisualisation en directe, Lecture Photo,
Partage de contenues sélectionnés et plus.
1. Téléchargez l’App iSmart Dv sur votre
Smartphone ou tablette à partir
d’Appstore Apple ou Google Play.
2. Appuyez sur le bouton Power/Mode
pour mettre en marche la caméra.
3. Appuyez sur le bouton Ok/Obturateur
pendant 3 secondes lors que vous
voyez « En attente de connexion WiFi »
4. Dans les paramètres WiFi de votre
Smartphone ou tablette, connectez au
réseau appelé « Action Cam » suivi par
u n e s é r i e d e n u m é r o s .
5. Entrez le mot de passe « 1234567890 »
6. Ouvrez l’application iSmart DV sur
votre Smartphone ou tablette.

Handleiding
Action Camera

Sluiter/Keuzeknop WiFiAan/Uit
MicroSD
Microfoon
USB
Lens
Micro HDMI Poort
Power Aan/Uit
Status Indicator

Status Indicator
Oplaad indicator
Scherm
Omlaag/Menu knop
Up Button
Luidspreker

Klepje Batterijvakje
Batterijvakje

Power/Modus knop
Omlaag/Sluter knop
Keuze/Sluiter Knop
Omhoog knop
Vergrendeling

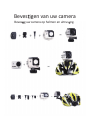
Beves gen van uw camera
Beves g uw camera op helmen en uitrus ng.


1. Video
De maximale opnametijd per videofragment is 29
minuten. Indien u nogmaals wilt opnemen bedientu
dan nogmaals de video.
2. Afspelen (Evenement, Video of JPEG)
3. Instellingen (Video, Foto en Systeem instellingen)
Om de Video instellingen te openen, gaat u naar de
Video modus en drukt u op de Omlaag knop. Om de
Foto instellingen te openen gaat u naar de Foto
modus en drukt op de Omlaag knop.
a. Video Instellingen

U kunt kiezen uit verschillende instellingen zoals,
Video afmeting : 1080P 30fps of 720P 60fps
Micro SD kaart
1080p 30fps
720p 60fps
32GB
240min
320min
16GB
120min
160min
8GB
60min
80min
4GB
30min
40min
U kunt ook kiezen uit: Beeld Kwaliteit, Seamless
Modus, Witbalans modus, Bewegingsdetectie,
handig in de Driver modus zodat u kunt besparen op
uw batterij, geheugenopslag en weergave van uw
datumstempel.
b. Foto Instellingen:
U kunt kiezen uit verschillende resoluties tot 12 MP,
Witbalans Modus, Driver/Timer modus, Burst
Modus, Weergave Datumstempel.
c. Systeem Instellingen:

1) Geluiden: Aan/Uit, Sart-up 1/2/3,Geen,
Piep Aan/Uit, Volume 0/1/2/3
2) Frequentie Vermogen: 50Hz/60Hz/Auto
3) Schermbeveiliging (ScreenSaver):
Uit/1min/3min/5min
4) Energiebesparing: Uit/1min/3min/5min
5) Datum&Tijd: JJ/MM/DD
6) Taal: Engels/Gesimplificeerd
Chinees/Traditioneel
Chinees/Frans/Spaans/Italiaans/Portuge
es/Nederlands/Pools/Russisch/Japans
7) Formatteren:Nee/Ja
8) Infrarood Modus
9) Alles Resetten:Nee/Ja
10) Versie
Opnemen van Video + Foto’s
Voor het opnemen van foto’s en video’s, klikt u op de
knop OK/Sluiter Modus.
.

Opslag MicroSD kaarten
Deze camera is compatible met microSD, microSDHC
en microSDXC geheugenkaarten van 4GB, 16GB en
32GB. U dient geheugenkaarten te gebruiken met
een Class 10 speed rating. Wij adviseren u
geheugenkaarten te gebruiken van een goed merk
voor een maximale betrouwbaarheid tijdens
activiteiten met veel trillingen.
.
Opladen van de Batterij
Indien tijdens het gebruik van de camera de batterij
op 0% staat, zal de camera het bestand opslaan en
uitgaan.
Om de batterij op te laden:
1) Sluit de camera aan op een computer of een
USB oplader.
2) De indicator van de batterij zal blijven
branden tijdens het opladen van de batterij.
3) De indicator van de batterij zal uitgaan zodra
de batterij volledig is opgeladen.

Aansluiten op de iSmart DV App
Met de iSmart Dv App kunt u uw camera op afstand
bedienen door middel van uw smartphone of tablet.
Onder andere de volgende functies kunt u gebruiken,
volledig besturing van uw camera, live bekijken, foto
afspelen en het delen of selecteren van content en
meer.
1. Download de iSmart Dv App op uw smartphone
of tablet in de Apple App Store of Google Play.
2. Druk op de Power/Modus knop om de camera
aan te zetten.
3. Druk, gedurende 3 seconden op de OK/Sluiter
knop tot u “wachten op WiFI verbinding” ziet.
4. In de WiFi instellingen van uw smartphone of
tablet maakt u verbinding met het netwerk
“Action Cam” gevolgd door een serie getallen.
5. Voer het wachtwoord in, dit is “1234567890”
6. Open de iSmart Dv App op uw smartphone of
tablet.
Documenttranscriptie
User Manual Action Camera Features Shutter/Select Button WiFi ON/OFF MicroSD Slot Microphone Power/Mode Button Status Indicator Light Micro USB Port Lens Micro HDMI Port Status Indicator Light Up Button Speaker Screen Charging Status Light Down Button Menu Battery Door Latch Battery Door Waterproof Housing Latch Select/Shutter Button Up Button Down/Shutter Button Power/Mode Button Moun ng Your Camera A ach your camera to helmets, gear and equipment. 1. Video Maximum recording time is 29 minutes for each video sequence. If you want to start another video, pls operate the video. 2. Playback (Event, Video or JPEG) 3.Settings (Video Settings, Photo Settings, and System Settings) To access to Video Settings, go to the Video mode and press the down button. To access the Photo Settings, go to the Photo mode and press the down button. a. Video Settings: You can then choose different settings such as Movie Size:1080P 30fps or 720p 60fps Micro SD Card 1080p 30fps 720p 60fps 32GB 240mins 320mins 16GB 120mins 160mins 8GB 60mins 80mins 4GB 30mins 40mins You can also choose Video Quality, Seamless Mode, White Balance mode, Motion Detection usefull in driver mode so you can save battery and memory space, and Date Stamp display. b.Photo Settings: You can select different resolutions up to 12 MP, White Balance modes, Driver/Timer modes, Burst mode, Date Stamp Display. c.System Settings: 1)Sounds: On/Off, Start-up 1/2/3/None, Beep On/Off, Volume 0/1/2/3 2)Power Frequency:50Hz/60Hz/Auto 3)Panel Protect(Screen Saver):Off/1 mins/3 mins/5 mins 4)Power Save: Off/1 mins/3mins/5mins 5)Date&Time: YY/MM/DD 6)Language: English/Simplified Chinese/ Traditional Chinese/France/Spanish/Italian/ Portuguese/Dutch/Polish/Russian/Japanese 7)Format: No/Yes 8)IR mode 9)Reset All: No/Yes 10)Version Capturing Video +Photos To capture the photos and videos, click on the button OK/Shutter modes. Storage/MicroSD Cards This camera is compatible with 4GB,16GB, and 32GB capacity microSD, microSDHC, and microSDXC memory cards. You must use a microSD card with a Class 10 speed rating. We recommend using brand name memory cards for maximum reliability in high-vibration activities . Charging the Battery If recording is occurring when battery reaches 0%, the camera will save the file and power OFF. To charge the battery: 1.Connect the camera to a computer or USB power supply. 2.The Charging Status Light remains ON while the battery is charging. 3.The Charging Status Light will turn OFF when the battery is fully charged. Connecting to the iSmart DV App The iSmart DV App lets you control you camera remotely using a smartphone or tablet. Features include full camera control, live preview, photo playback and sharing of select content and more. 1.Download the iSmart DV App to your smartphone or tablet at the Apple App Store or Google Play. 2.Press the Power/Mode Button to power camera ON. 3.Press the OK/Shutter button for 3 seconds until you see “waiting for WIFI connection” 4.In your smartphone or tablet’s Wi-Fi settings, connect to the network called “Action Cam” followed by a series of numbers. 5.Enter the password“1234567890” 6.Open the iSmart DV App on your smartphone or tablet. Obturateur/Sélection WiFi marche/arrêt Fente MicroSD Microphon Marche/Arrêt Indicateur de Fonctionnement USB Objectif Port Micro HDMI Indicateur Lumineux de fonctionnement Bouton en Haut Haut-Parleur L ’écran Indicateur Iumineux de chargement Bouton en Bas Verrouillage Couvercle Piles Capot Batterie Caisson Etanche Ouverture Sélec on/Obturateur Bouton en Haut Bouton en Bas/I’Obturateur Bouton Power/Mode Fixa on de votre caméra Fixez votre caméra sur casques véhicules et équipement. 1. Vidéo La durée d’enregistrement maximale d’une séquence est de 29 minutes. Si vous voulez commencer un autre vidéo, manipulez le vidéo. 2. Lecture (Événement, Vidéo, JPEG) 3. Paramètres (Vidéo, Photo et Système) Pour avoir accès aux paramètres, allez au Mode Vidéo et appuyez sur le bouton en Bas. Pour avoir accès aux Paramètres Photo, allez au mode Photo et appuyez sur le bouton en Bas. a. Paramètres Vidéo : vous pouvez choisir entre différents paramètres, come Résolution Vidéo : 1080P 30fps ou 720P 60fps Carte Micro SD 1080p 30fps 720p 60fps 32GB 240mins 320mins 16GB 120mins 160mins 8GB 60mins 80mins 4GB 30mins 40mins En plus vous pouvez choisir Qualité du Vidéo, Mode Seamless (ininterrompue), Mode Balance des Blancs et Détection de Mouvement, pratique en mode Driver, pour économiser la batterie, l’espace mémoire et l’affichage l’horodatage. b. Paramètres Photo: Vous pouvez choisir entre différents Résolutions jusq’à 12 MP, les modes Balance des Blancs, les modes Driver/Timer, le mode de Prises, affichage l’horodatage. c. Paramètres Système : 1) 2) 3) 4) 5) 6) 7) 8) 9) 10) Sons : activer/désactiver, démarrage 1/2/3/aucun, Beep activer/désactiver, Volume 0/1/2/3 Fréquence de Puissance : 50Hz/60Hz/Auto Economiseur d’écran (Screen Saver) : Désactiver/1min./3min./5min. Économie d’énergie : Désactiver/1min./3min./5min. Date&Temps : AA/MM/JJ Langue : Anglais/Chinois Simplifié/Chinois Traditionnel/Français/Espagnol/Italien/P ortugais/Hollandais/Polonais/Russe/Jap onais Formatage :Non/Oui Mode Infrarouge Réinitialiser tout : Non/Oui Version Enregistrer les vidéos et prendre les photos Pour enregistrer les vidéos et prendre les photos appuyez sur le bouton OK/Modes Obturateur. . Cet appareil photo est compatible avec les cartes mémoire microSD, microSDHC et microSDXC avec une capacité de 4GB, 16GB et 32GB. Utilisez uniquement des cartes de classe 10. Veuillez n’utiliser que des cartes de marque afin d’obtenir une fiabilité maximale pendant les activités de vibration élevés. . Rechargement de la batterie Si vous êtes en train d’enregistrer et la batterie arrive à 0%, la caméra sauvegardera le fichier et s’éteindra. Pour charger la batterie : 1. 2. 3. Reliez la caméra à un ordinateur ou chargeur USB. L’indicateur lumineux de chargement est allumé pendant que la batterie se recharge. Quand la batterie est complètement chargée l’indicateur lumineux de chargement s’éteindra. Relier à l’App iSmart DV L’App iSmart DV vous permet de contrôler à distance votre caméra en utilisant un Smartphone ou tablette. Les caractéristiques incluent Contrôle total de la caméra, Prévisualisation en directe, Lecture Photo, Partage de contenues sélectionnés et plus. 1. Téléchargez l’App iSmart Dv sur votre Smartphone ou tablette à partir d’Appstore Apple ou Google Play. 2. Appuyez sur le bouton Power/Mode pour mettre en marche la caméra. 3. Appuyez sur le bouton Ok/Obturateur pendant 3 secondes lors que vous voyez « En attente de connexion WiFi » 4. Dans les paramètres WiFi de votre Smartphone ou tablette, connectez au réseau appelé « Action Cam » suivi par une série de numéros. 5. Entrez le mot de passe « 1234567890 » 6. Ouvrez l’application iSmart DV sur vo t re S m a rt p ho n e o u ta b l ette . Handleiding Action Camera Sluiter/Keuzeknop WiFiAan/Uit MicroSD Microfoon Power Aan/Uit Status Indicator USB Lens Micro HDMI Poort Status Indicator Up Button Luidspreker Scherm Oplaad indicator Omlaag/Menu knop Klepje Batterijvakje Batterijvakje Vergrendeling Keuze/Sluiter Knop Omhoog knop Omlaag/Sluter knop Power/Modus knop Beves gen van uw camera Beves g uw camera op helmen en uitrus ng. 1. Video De maximale opnametijd per videofragment is 29 minuten. Indien u nogmaals wilt opnemen bedientu dan nogmaals de video. 2. Afspelen (Evenement, Video of JPEG) 3. Instellingen (Video, Foto en Systeem instellingen) Om de Video instellingen te openen, gaat u naar de Video modus en drukt u op de Omlaag knop. Om de Foto instellingen te openen gaat u naar de Foto modus en drukt op de Omlaag knop. a. Video Instellingen U kunt kiezen uit verschillende instellingen zoals, Video afmeting : 1080P 30fps of 720P 60fps Micro SD kaart 1080p 30fps 720p 60fps 32GB 240min 320min 16GB 120min 160min 8GB 60min 80min 4GB 30min 40min U kunt ook kiezen uit: Beeld Kwaliteit, Seamless Modus, Witbalans modus, Bewegingsdetectie, handig in de Driver modus zodat u kunt besparen op uw batterij, geheugenopslag en weergave van uw datumstempel. b. Foto Instellingen: U kunt kiezen uit verschillende resoluties tot 12 MP, Witbalans Modus, Driver/Timer modus, Burst Modus, Weergave Datumstempel. c. Systeem Instellingen: 1) 2) 3) 4) 5) 6) 7) 8) 9) 10) Geluiden: Aan/Uit, Sart-up 1/2/3,Geen, Piep Aan/Uit, Volume 0/1/2/3 Frequentie Vermogen: 50Hz/60Hz/Auto Schermbeveiliging (ScreenSaver): Uit/1min/3min/5min Energiebesparing: Uit/1min/3min/5min Datum&Tijd: JJ/MM/DD Taal: Engels/Gesimplificeerd Chinees/Traditioneel Chinees/Frans/Spaans/Italiaans/Portuge es/Nederlands/Pools/Russisch/Japans Formatteren:Nee/Ja Infrarood Modus Alles Resetten:Nee/Ja Versie Opnemen van Video + Foto’s Voor het opnemen van foto’s en video’s, klikt u op de knop OK/Sluiter Modus. . Opslag MicroSD kaarten Deze camera is compatible met microSD, microSDHC en microSDXC geheugenkaarten van 4GB, 16GB en 32GB. U dient geheugenkaarten te gebruiken met een Class 10 speed rating. Wij adviseren u geheugenkaarten te gebruiken van een goed merk voor een maximale betrouwbaarheid tijdens activiteiten met veel trillingen. . Opladen van de Batterij Indien tijdens het gebruik van de camera de batterij op 0% staat, zal de camera het bestand opslaan en uitgaan. Om de batterij op te laden: 1) Sluit de camera aan op een computer of een USB oplader. 2) De indicator van de batterij zal blijven branden tijdens het opladen van de batterij. 3) De indicator van de batterij zal uitgaan zodra de batterij volledig is opgeladen. Aansluiten op de iSmart DV App Met de iSmart Dv App kunt u uw camera op afstand bedienen door middel van uw smartphone of tablet. Onder andere de volgende functies kunt u gebruiken, volledig besturing van uw camera, live bekijken, foto afspelen en het delen of selecteren van content en meer. 1. Download de iSmart Dv App op uw smartphone of tablet in de Apple App Store of Google Play. 2. Druk op de Power/Modus knop om de camera aan te zetten. 3. Druk, gedurende 3 seconden op de OK/Sluiter knop tot u “wachten op WiFI verbinding” ziet. 4. In de WiFi instellingen van uw smartphone of tablet maakt u verbinding met het netwerk “Action Cam” gevolgd door een serie getallen. 5. Voer het wachtwoord in, dit is “1234567890” 6. Open de iSmart Dv App op uw smartphone of tablet.-
 1
1
-
 2
2
-
 3
3
-
 4
4
-
 5
5
-
 6
6
-
 7
7
-
 8
8
-
 9
9
-
 10
10
-
 11
11
-
 12
12
-
 13
13
-
 14
14
-
 15
15
-
 16
16
-
 17
17
-
 18
18
-
 19
19
-
 20
20
-
 21
21
-
 22
22
-
 23
23
-
 24
24
-
 25
25
-
 26
26
-
 27
27
-
 28
28
-
 29
29
-
 30
30
-
 31
31
-
 32
32
-
 33
33
-
 34
34
-
 35
35
-
 36
36


Salora PSC5335FWD Handleiding
- Type
- Handleiding
- Deze handleiding is ook geschikt voor
in andere talen
- English: Salora PSC5335FWD User manual
- français: Salora PSC5335FWD Manuel utilisateur
Gerelateerde artikelen
Andere documenten
-
Gembird ACAM-W-01 Handleiding
-
 Mr Handsfree iSmart de handleiding
-
 Mr Handsfree iSmart de handleiding
-
 Mr Handsfree iSmart de handleiding
-
 Mr Handsfree iSmart de handleiding
-
 Mr Handsfree iSmart de handleiding
-
 Mr Handsfree iSmart de handleiding
-
Rollei AC415 Snelstartgids
-
Denver ACT-5020TWC Handleiding
-
Rollei Actioncam 540 Handleiding


