
1
2
3
4
5
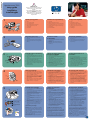
unpack your hp printer
a. Printer
b. Power module and cord
c. Print cartridge protector
d. Print cartridges (HP #57 and HP #58)
e. Software and Printer Help on CD
f. Documentation
g. Setup Guide
plug in the power cord
1. Plug the power module into the back of the
printer (a).
2. Plug the power cord into the power module (b).
3. Plug the power module into a working electrical
outlet (c).
load plain paper in the IN tray
1. Lift the OUT tray (a).
2. Pull out the paper length guide (b) on the IN tray.
3. Slide the paper width guide (c) as far to the left as
it will go.
4. Move the photo tray slider (d) toward you until it
stops. This disengages the photo tray.
5. Place a stack of plain paper into the IN tray (e).
6. Adjust the paper width guide and paper length
guide to fit close to the edges of the paper without
bending the paper.
7. Lower the OUT tray.
select your language
1. Press the Power button (a) to turn the printer on.
2. When prompted, press the right side of the Tools
button (b) until Select Language appears on the
LCD (c). Press OK/Yes to continue.
3. When prompted, press the right side of the Tools
button to highlight your language. Press OK/Yes
(d) to select your language, then press OK/Yes
again to confirm.
4. When prompted, press the right side of the Tools
button to highlight your country/region. Press
OK/Yes to select your country/region.
install the print cartridges
1. If the printer is not on, press the Power button (a)
to turn the printer on.
2. Open the top cover (b). The print cartridge cradle
moves to the center of the printer.
3. Pop open both of the print cartridge cradle latches
(c) by pulling the bottom of the latch out.
4. Remove the plastic tape from each print
cartridge (d).
5. Insert the HP #57 tri-color print cartridge in the
left stall (e).
Insert the HP #58 photo print cartridge in the
right stall.
6. Close both print cartridge cradle latches by pulling
the bottom of the latch out, pressing down, then
releasing the latch (f).
7. Close the top cover. Press the OK/Yes button. A
calibration page (g) prints automatically. This
verifies that the print cartridges are installed
correctly.
install a black print cartridge
Be sure to purchase an HP #56 black print cartridge
separately.
To print text documents faster and better, replace the
photo print cartridge in the right stall with an HP #56
black print cartridge.
To go back to printing beautiful photos, remove the
black print cartridge and reinstall the HP #58 photo
print cartridge in the right stall.
Store the unused print cartridge in the protector that
came with your printer.
Do not touch the ink nozzles
or the copper contacts!
(a)
(b)
57
56
58
*Q1603-90188* Q1603-90188
(a)
(d)
(b)
(e)
(c)
hp photosmart 7350
setup guide
installation
installatiegids
(c)
(a)
(c)
(b)
(d)
(b)
(f)
(c)
(e)
(d)
(g)
(a)
(b)
(c)
(g)
(f)
(e)
(d)
(a)
Copper contacts
Ne touchez ni les buses
d’encre ni les contacts en
cuivre !
Raak de inktsproeiers en
de koperen contactpunten
niet aan!
Koperen contactpunten
Contacts en cuivre
Windows PC:
Be sure to insert the HP Photosmart CD before you
connect the printer to your computer with the
USB cable.
Insérez le CD hp photosmart avant de connecter
l’imprimante à votre ordinateur au moyen du
câble USB.
Plaats de HP Photosmart-cd in het cd-rom-station
voordat u de printer met de USB-kabel op de
computer aansluit.
!
uw hp-printer uitpakken
a. Printer
b. Voedingsblok en netsnoer
c. Beschermende inktpatroonhouder
d. Inktpatronen (HP #57 en HP #58)
e. Software en Help bij printer op cd-rom
f. Documentatie
g. Installatiegids
het netsnoer aansluiten
1. Sluit het voedingsblok aan op de achterzijde van
de printer (a).
2. Sluit het netsnoer aan op het voedingsblok (b).
3. Sluit het voedingsblok aan op een werkend
stopcontact (c).
normaal papier laden in de
invoerlade
1. Til de uitvoerlade (a) omhoog.
2. Trek de papierlengtegeleider (b) op de invoerlade uit.
3. Schuif de papierbreedtegeleider (c) zo ver mogelijk
naar links.
4. Trek de schuifknop (d) van de fotolade helemaal naar
u toe. Hiermee schakelt u de fotolade uit.
5. Plaats een stapel normaal papier in de invoerlade (e).
6. Schuif de papierbreedtegeleider en de
papierlengtegeleider zo dicht mogelijk tegen het
papier aan, zonder het papier te buigen.
7. Laat de uitvoerlade zakken.
de gewenste taal selecteren
1. Druk op de aan/uit-knop (a) om de printer aan te zetten.
2. Wanneer hierom wordt gevraagd, drukt u net zolang op
de rechterkant van de knop Extra (b) totdat Taal
selecteren verschijnt op het LCD-scherm (c). Druk op
OK/Ja om door te gaan.
3. Wanneer hierom wordt gevraagd, drukt u net zolang op
de rechterkant van de knop Extra totdat de gewenste
taal wordt gemarkeerd. Druk op OK/Ja (d) om de
desbetreffende taal te selecteren en druk vervolgens
nogmaals op OK/Ja om uw keuze te bevestigen.
4. Wanneer hierom wordt gevraagd, drukt u net zolang op
de rechterkant van de knop Extra totdat uw land/regio
wordt gemarkeerd. Druk op OK/Ja om uw land/regio
te selecteren.
de inktpatronen installeren
1. Wanneer de printer niet aanstaat, zet u deze alsnog
aan door op de aan/uit-knop (a) te drukken.
2. Open de bovenklep (b). De inktpatroonhouder
beweegt naar het midden van de printer.
3. Ontgrendel beide inktpatroonhouders op de wagen
door het onderste gedeelte van de klemmetjes (c)
naar buiten te trekken.
4. Verwijder de plastic tape (d) van beide inktpatronen.
5. Plaats de driekleurenpatroon HP #57 in de
linkerhouder (e).
Plaats de fotopatroon HP #58 in de rechterhouder.
6. Vergrendel de klemmetjes op de houders van beide
inktpatronen door het onderste gedeelte van de
klemmetjes (f) naar buiten te trekken, naar beneden
te drukken en vervolgens los te laten.
7. Sluit de bovenklep. Druk op de knop OK/Ja.
Er wordt automatisch een kalibratiepagina (g)
afgedrukt. Hiermee kunt u controleren of de
inktpatronen goed zijn geïnstalleerd.
een zwarte inktpatroon installeren
U moet de zwarte inktpatroon HP #56 zelf aanschaffen.
Om tekstdocumenten sneller en beter af te kunnen
drukken, is het raadzaam de fotopatroon, die zich in de
rechterhouder van de printer bevindt, te vervangen door
de zwarte inktpatroon HP #56.
Als u daarna weer afdrukken van fotokwaliteit wilt
maken, verwijdert u de zwarte inktpatroon en plaatst u
de fotopatroon HP #58 weer in de rechterhouder van
de printer.
Bewaar de ongebruikte inktpatroon in de houder
die bij de printer wordt geleverd.
déballez votre imprimante hp
a. Imprimante
b. Module d’alimentation et cordon
c. Boîte de protection de la cartouche d’impression
d. Cartouches d’impression (HP n° 57 et HP n° 58)
e. CD-ROM contenant le logiciel et l’aide en ligne
f. Documentation
g. Guide d’installation
branchez le cordon
d’alimentation
1. Connectez le module d’alimentation à l’arrière de
l’imprimante (a).
2. Branchez le cordon d’alimentation dans le
module (b).
3. Branchez le module sur une prise de courant
alimentée (c).
chargez du papier ordinaire
dans le bac d’ENTREE
1. Soulevez le bac de SORTIE (a).
2. Tirez le guide de longueur du papier (b) situé sur
le bac d’ENTREE.
3. Faites glisser le guide de largeur du papier (c)
vers la gauche en le tirant au maximum.
4. Tirez vers vous au maximum le levier du bac
photo (d). Vous dégagez ainsi le bac photo.
5. Placez une pile de papier dans le bac
d’ENTREE (e).
6. Réglez les guides de largeur et de longueur contre
les bords du papier, sans faire plier ce dernier.
7. Abaissez le bac de SORTIE.
sélectionnez votre langue
1. Appuyez sur le bouton Alimentation (a) pour
mettre l’imprimante sous tension.
2. A l’invite, appuyez sur l’extrémité droite du bouton
Outils (b) jusqu’à ce que le menu Sélection de la
langue apparaisse sur l’écran LCD (c). Appuyez
sur OK/Oui pour continuer.
3. A l’invite, appuyez sur l’extrémité droite du bouton
Outils jusqu’à ce que votre langue apparaisse en
surbrillance. Appuyez une première fois sur
OK/Oui (d) pour sélectionner votre langue, puis
une deuxième fois pour confirmer votre choix.
4. A l’invite, appuyez sur l’extrémité droite du bouton
Outils jusqu’à ce que votre pays/région
apparaisse en surbrillance. Appuyez sur OK/Oui
pour valider votre choix.
installez les cartouches
d’impression
1. Si l’imprimante n’est pas sous tension, appuyez
sur le bouton Alimentation (a) pour la mettre en
marche.
2. Ouvrez le capot supérieur (b). Le berceau de la
cartouche vient se placer au centre de l’imprimante.
3. Ouvrez les deux loquets du berceau de la cartouche
d’impression (c) en tirant sur la partie inférieure.
4. Sur chaque cartouche, retirez la bande
adhésive (d).
5. Insérez la cartouche trichromique HP n° 57 dans le
magasin de gauche (e).
Insérez la cartouche photo HP n° 58 dans le
magasin de droite.
6. Fermez les deux loquets du berceau : tirez pour
cela sur la partie inférieure des loquets, appuyez
vers le bas, puis relâchez les loquets (f).
7. Fermez le capot supérieur. Appuyez sur OK/Oui.
Une page d’étalonnage (g) s’imprime
automatiquement afin de vérifier que les cartouches
d’impression sont bien en place.
installez une cartouche d’encre noire
Achetez une cartouche d’encre noire HP n° 56.
Pour une impression plus rapide et de meilleure qualité
de vos documents texte, remplacez la cartouche photo
dans le magasin de droite par une cartouche d’encre
noire HP n° 56.
Si vous souhaitez ensuite imprimer de superbes photos,
retirez la cartouche d’encre noire et réinstallez la
cartouche photo HP n° 58 dans le magasin de droite.
Stockez la cartouche d’impression non utilisée dans la
boîte de protection livrée avec votre imprimante.

7
getting assistance
• HP Photosmart 7350 Basics Guide
• HP Photosmart Printer Help
• See the HP Photosmart Software Setup & Product
Support booklet for a list of Web sites and phone
numbers
• www.hp.com/cposupport/loc/regional.html
Printed in Germany 08/02 v3 • Printed on recycled paper
© 2002 Hewlett-Packard Company
Windows is a registered trademark of Microsoft Corporation
Macintosh is a registered trademark of Apple Computer, Inc.
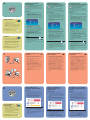
Windows PC
Macintosh
(b)
(a)
(b)
(a)
6
install the hp photosmart
printer software
Important: You must insert the HP Photosmart
CD to install the printer software.
Note: For more detailed instructions or troubleshooting
information, see the HP Photosmart Software Setup &
Product Support booklet.
Windows PC
1. Be sure you have completed steps 1 through 5. If
your computer is off, turn it on.
Important: Do not connect the printer to your
computer until prompted. Disable virus-checking
software before you install the printer software.
2. Insert the HP Photosmart CD into your computer’s
CD-ROM drive. The following dialog box appears.
3. Click Install hp photosmart printers software.
Follow the onscreen instructions to install the
printer software.
Note: If the dialog box does not appear, use
Windows Explorer or My Computer to locate your
CD-ROM drive, then double-click setup.exe. The
HP Photosmart printer dialog box appears. Click
Install hp photosmart printers software.
Important: Do not connect the printer to your
computer until prompted.
4.
Continue with step 7 to connect the printer to your
computer.
Macintosh
1. Be sure you have completed steps 1
through 5. If your computer is off, turn it on.
Important: Disable virus-checking software before
you install the printer software.
2. Continue with step 7 to connect the printer to your
computer.
!
connect the printer to your
computer
1. Purchase a USB-compliant interface cable
separately. The cable must be less than 3 meters
long.
2. Plug one end of the USB cable into your
computer’s USB port (a).
3. Plug the other end of the USB cable into the USB
port on the back of your printer (b).
Note: Do not plug the USB cable into the camera
port on the front of your printer. That port is for
your HP direct-printing digital camera.
Important: Be sure the printer is connected directly
to your computer. Installing the printer software
when the printer is connected to the computer
through a USB hub can cause errors and prevent
a successful installation.
4. Continue with step 8 to finish the software
installation.
8
finish installing the hp
photosmart printer software
Windows PC
1. After connecting the printer to your computer,
continue following the onscreen instructions to
finish installing the HP Photosmart Printer Software
and the HP Photo & Imaging Software.
2. At the end of the installation, the computer
restarts. A welcome window appears. Click where
it says Click here to print a test page.
Macintosh
1. After connecting the printer to your computer,
insert the HP Photosmart CD into your computer’s
CD-ROM drive. Double-click the HP Photosmart
CD icon.
2. Double-click the HP Photosmart install icon. Follow
the onscreen instructions to install the
printer software.
de software voor de
hp photosmart-printer installeren
Belangrijk: U moet de HP Photosmart-cd in
het cd-rom-station plaatsen als u de
printersoftware wilt installeren.
Opmerking: Raadpleeg het boekje Software-installatie
& productondersteuning voor de HP Photosmart-printer
als u gedetailleerde instructies wenst of wilt weten hoe u
problemen kunt verhelpen.
Windows PC
1. Controleer of u de stappen 1 t/m 5 volledig hebt
uitgevoerd. Als de computer uitstaat, zet u deze nu
aan.
Belangrijk: Sluit de printer pas aan op de computer
wanneer hierom wordt gevraagd. Voordat u de
printersoftware installeert, moet u eventuele actieve
antivirusprogramma's uitschakelen.
2. Plaats de HP Photosmart-cd in het cd-rom-station van
de computer. Het volgende dialoogvenster verschijnt.
3. Klik op De software voor de HP Photosmart
installeren. Volg de instructies op het scherm om de
printersoftware te installeren.
Opmerking: Als het dialoogvenster niet verschijnt,
zoekt u via Windows Verkenner of Deze computer
het cd-rom-station op en dubbelklikt u op het
bestand setup.exe. Het dialoogvenster van de
HP PhotoSmart-printer verschijnt. Klik op De software
voor de HP Photosmart installeren.
Belangrijk: Sluit de printer pas aan op de computer
wanneer hierom wordt gevraagd.
4.
Ga door naar stap 7 om de printer op de computer
aan te sluiten.
Macintosh
1. Controleer of u de stappen 1 t/m 5
volledig hebt uitgevoerd. Als de computer
uitstaat, zet u deze nu aan.
Belangrijk: Voordat u de printersoftware installeert,
moet u eventuele actieve antivirusprogramma's
uitschakelen.
2. Ga door naar stap 7 om de printer op de computer
aan te sluiten.
!
de printer aansluiten op
de computer
1. U moet zelf een USB-interfacekabel aanschaffen.
De kabel mag niet langer zijn dan 3 meter.
2. Sluit het ene uiteinde van de USB-kabel aan op de
USB-poort van de computer (a).
3. Sluit het andere uiteinde van de USB-kabel aan op
de USB-poort op de achterzijde van de printer (b).
Opmerking: Sluit de USB-kabel niet aan op de
camerapoort op de voorzijde van de printer. De
camerapoort is bedoeld voor de HP direct-printing
digitale camera.
Belangrijk: Zorg ervoor dat de printer direct op
de computer is aangesloten. Wanneer u de
printersoftware installeert terwijl de printer op de
computer is aangesloten via een USB-hub, kan dit
leiden tot fouten waardoor de installatie niet met
succes kan worden voltooid.
4. Ga door naar stap 8 om de installatie van de
software te voltooien.
de installatie van de software
voor de hp photosmart-printer
voltooien
Windows PC
1. Nadat u de printer op de computer hebt
aangesloten, voltooit u de installatie van de
software voor de HP Photosmart-printer en HP-
software voor foto- en beeldbewerking aan de
hand van de instructies op het scherm.
2. Zodra de installatie voltooid is, wordt het systeem
opnieuw gestart. Er verschijnt een welkomst-
scherm. Klik op Klik hier om een testpagina af te
drukken.
Macintosh
1. Nadat u de printer op de computer hebt
aangesloten, plaatst u de HP Photosmart-cd in het
cd-rom-station van de computer. Dubbelklik op het
pictogram voor de HP Photosmart-cd.
2. Dubbelklik op het installatiepictogram voor HP
Photosmart. Volg de instructies op het scherm om
de printersoftware te installeren.
meer informatie en
ondersteuning
• Beknopte handleiding HP Photosmart 7350
• Help bij HP Photosmart-printer
• Raadpleeg het boekje Software-installatie en
productondersteuning dat bij de HP Photosmart-
printer wordt geleverd voor een overzicht van
websites en telefoonnummers
• www.hp.com/cposupport/loc/regional.html
Gedrukt in Duitsland 08/02 v3 • Gedrukt op gerecycled papier
© 2002 Hewlett-Packard Company
Windows is een geregistreerd handelsmerk van Microsoft Corporation
Macintosh is een geregistreerd handelsmerk van Apple Computer, Inc.
installez le logiciel de
l’imprimante hp photosmart
Important : Insérez le CD hp photosmart afin
de procéder à l’installation du logiciel de
l’imprimante.
Remarque : Pour des instructions plus détaillées ou
pour toute information relative au dépannage,
reportez-vous à la brochure Configuration du logiciel
et assistance produit de l’imprimante hp photosmart.
PC sous Windows
1. Assurez-vous d’avoir réalisé les étapes 1 à 5.
Si votre ordinateur est éteint, allumez-le.
Important : Ne connectez pas l’imprimante à votre
ordinateur avant d’y être autorisé. Désactivez le
programme anti-virus avant d’installer le logiciel
de l’imprimante.
2. Insérez le CD hp photosmart dans le lecteur de
CD-ROM de votre ordinateur. La boîte de dialogue
suivante s’affiche.
3. Cliquez sur Installer le pilote d’imprimante
hp photosmart. Suivez les instructions à l’écran
pour installer le pilote de l’imprimante.
Remarque : Si la boîte de dialogue ne s’affiche
pas, utilisez l’Explorateur Windows ou le Poste de
travail pour localiser votre lecteur de CD-ROM,
puis double-cliquez sur setup.exe. La boîte de
dialogue de l’imprimante hp photosmart s’affiche.
Cliquez sur Installer le pilote d’imprimante
hp photosmart.
Important : Ne connectez pas l’imprimante à votre
ordinateur avant d’y être autorisé.
4.
Passez à l’étape 7 pour connecter l’imprimante à
votre ordinateur.
Macintosh
1. Assurez-vous d’avoir réalisé les étapes
1 à 5. Si votre ordinateur est éteint, allumez-le.
Important : Désactivez le programme anti-virus
avant d’installer le logiciel de l’imprimante.
2. Passez à l’étape 7 pour connecter l’imprimante à
votre ordinateur.
connectez l’imprimante à
votre ordinateur
1. Achetez un câble d’interface compatible USB.
Ce câble doit mesurer moins de 3 mètres.
2. Branchez l’une des extrémités du câble USB dans
le port USB de votre ordinateur (a).
3. Branchez l’autre extrémité du câble USB dans le
port USB situé à l’arrière de l’imprimante (b).
Remarque : Ne branchez pas le câble USB dans
le port situé à l’avant de l’imprimante. Ce port est
dédié à votre appareil photo numérique à
impression directe hp.
Important : Assurez-vous que l’imprimante est
directement connectée à votre ordinateur. Si vous
installez le logiciel de l’imprimante alors que
l’imprimante est connectée à l’ordinateur via un
concentrateur USB, vous vous exposez à des
erreurs et à une installation défectueuse.
4. Passez à l’étape 8 pour terminer l’installation du
logiciel.
terminez l’installation du
logiciel de l’imprimante
hp photosmart
PC sous Windows
1. Une fois l’imprimante connectée à votre
ordinateur, continuez à suivre les instructions à
l’écran pour terminer l’installation du logiciel de
l’imprimante hp photosmart et du logiciel photo et
imagerie hp.
2. Une fois l’installation terminée, l’ordinateur
redémarre. Une fenêtre de bienvenue s’ouvre.
Cliquez sur le texte Cliquez ici pour imprimer une
page de test.
Macintosh
1. Une fois l’imprimante connectée à votre
ordinateur, insérez le CD hp photosmart dans le
lecteur de CD-ROM de celui-ci. Double-cliquez sur
l’icône du CD HP Photosmart.
2. Double-cliquez sur l’icône d’installation de
HP Photosmart, puis suivez les instructions à
l’écran pour installer le logiciel de l’imprimante.
!
assistance
• Guide des fonctions de base hp photosmart 7350
• Aide en ligne de l’imprimante hp photosmart
• Reportez-vous à la brochure Configuration du
logiciel et assistance produit hp photosmart pour
une liste des sites Web et des numéros de
téléphone.
• www.hp.com/cposupport/loc/regional.html
Imprimé en Allemagne 08/02 v3 • Imprimé sur papier recyclé
© 2002 Hewlett-Packard Company
Windows est une marque déposée de Microsoft Corporation
Macintosh est une marque déposée d’Apple Computer, Inc.
Documenttranscriptie
*Q1603-90188* Q1603-90188 ! hp photosmart 7350 Windows PC: setup guide installation installatiegids Be sure to insert the HP Photosmart CD before you connect the printer to your computer with the USB cable. Insérez le CD hp photosmart avant de connecter l’imprimante à votre ordinateur au moyen du câble USB. Plaats de HP Photosmart-cd in het cd-rom-station voordat u de printer met de USB-kabel op de computer aansluit. 1 (a) (g) (b) unpack your hp printer déballez votre imprimante hp uw hp-printer uitpakken a. Printer a. Imprimante a. Printer b. Power module and cord b. Module d’alimentation et cordon b. Voedingsblok en netsnoer c. Print cartridge protector c. Boîte de protection de la cartouche d’impression c. Beschermende inktpatroonhouder d. Print cartridges (HP #57 and HP #58) d. Cartouches d’impression (HP n° 57 et HP n° 58) d. Inktpatronen (HP #57 en HP #58) e. Software and Printer Help on CD e. CD-ROM contenant le logiciel et l’aide en ligne e. Software en Help bij printer op cd-rom f. f. f. Documentation Documentation Documentatie g. Setup Guide g. Guide d’installation g. Installatiegids plug in the power cord branchez le cordon d’alimentation het netsnoer aansluiten (c) (d) (e) (f) 2 1. Plug the power module into the back of the printer (a). (c) 2. Plug the power cord into the power module (b). 3. Plug the power module into a working electrical outlet (c). 1. Connectez le module d’alimentation à l’arrière de l’imprimante (a). 2. Branchez le cordon d’alimentation dans le module (b). 1. Sluit het voedingsblok aan op de achterzijde van de printer (a). 2. Sluit het netsnoer aan op het voedingsblok (b). 3. Sluit het voedingsblok aan op een werkend stopcontact (c). 3. Branchez le module sur une prise de courant alimentée (c). (b) (a) 3 load plain paper in the IN tray 1. Lift the OUT tray (a). (a) 2. Pull out the paper length guide (b) on the IN tray. 3. Slide the paper width guide (c) as far to the left as it will go. 4. Move the photo tray slider (d) toward you until it stops. This disengages the photo tray. 5. Place a stack of plain paper into the IN tray (e). (c) (e) (d) (b) 6. Adjust the paper width guide and paper length guide to fit close to the edges of the paper without bending the paper. 7. Lower the OUT tray. 4 select your language 1. Press the Power button (a) to turn the printer on. 2. When prompted, press the right side of the Tools button (b) until Select Language appears on the LCD (c). Press OK/Yes to continue. 3. When prompted, press the right side of the Tools button to highlight your language. Press OK/Yes (d) to select your language, then press OK/Yes again to confirm. (c) (a) (b) 5 (d) 4. When prompted, press the right side of the Tools button to highlight your country/region. Press OK/Yes to select your country/region. install the print cartridges (b) (a) 56 1. If the printer is not on, press the Power button (a) to turn the printer on. 2. Open the top cover (b). The print cartridge cradle moves to the center of the printer. 3. Pop open both of the print cartridge cradle latches (c) by pulling the bottom of the latch out. 58 57 4. Remove the plastic tape from each print cartridge (d). 5. Insert the HP #57 tri-color print cartridge in the left stall (e). (c) (d) Insert the HP #58 photo print cartridge in the right stall. Do not touch the ink nozzles or the copper contacts! Ne touchez ni les buses d’encre ni les contacts en cuivre ! Raak de inktsproeiers en de koperen contactpunten niet aan! (f) 7. Close the top cover. Press the OK/Yes button. A calibration page (g) prints automatically. This verifies that the print cartridges are installed correctly. install a black print cartridge Be sure to purchase an HP #56 black print cartridge separately. (g) (e) Copper contacts Contacts en cuivre Koperen contactpunten 6. Close both print cartridge cradle latches by pulling the bottom of the latch out, pressing down, then releasing the latch (f). To print text documents faster and better, replace the photo print cartridge in the right stall with an HP #56 black print cartridge. To go back to printing beautiful photos, remove the black print cartridge and reinstall the HP #58 photo print cartridge in the right stall. Store the unused print cartridge in the protector that came with your printer. chargez du papier ordinaire dans le bac d’ENTREE normaal papier laden in de invoerlade 1. Soulevez le bac de SORTIE (a). 2. Tirez le guide de longueur du papier (b) situé sur le bac d’ENTREE. 3. Faites glisser le guide de largeur du papier (c) vers la gauche en le tirant au maximum. 4. Tirez vers vous au maximum le levier du bac photo (d). Vous dégagez ainsi le bac photo. 5. Placez une pile de papier dans le bac d’ENTREE (e). 6. Réglez les guides de largeur et de longueur contre les bords du papier, sans faire plier ce dernier. 7. Abaissez le bac de SORTIE. 1. Til de uitvoerlade (a) omhoog. sélectionnez votre langue de gewenste taal selecteren 1. Appuyez sur le bouton Alimentation (a) pour mettre l’imprimante sous tension. 2. A l’invite, appuyez sur l’extrémité droite du bouton Outils (b) jusqu’à ce que le menu Sélection de la langue apparaisse sur l’écran LCD (c). Appuyez sur OK/Oui pour continuer. 3. A l’invite, appuyez sur l’extrémité droite du bouton Outils jusqu’à ce que votre langue apparaisse en surbrillance. Appuyez une première fois sur OK/Oui (d) pour sélectionner votre langue, puis une deuxième fois pour confirmer votre choix. 4. A l’invite, appuyez sur l’extrémité droite du bouton Outils jusqu’à ce que votre pays/région apparaisse en surbrillance. Appuyez sur OK/Oui pour valider votre choix. 1. Druk op de aan/uit-knop (a) om de printer aan te zetten. 2. Wanneer hierom wordt gevraagd, drukt u net zolang op de rechterkant van de knop Extra (b) totdat Taal selecteren verschijnt op het LCD-scherm (c). Druk op OK/Ja om door te gaan. 3. Wanneer hierom wordt gevraagd, drukt u net zolang op de rechterkant van de knop Extra totdat de gewenste taal wordt gemarkeerd. Druk op OK/Ja (d) om de desbetreffende taal te selecteren en druk vervolgens nogmaals op OK/Ja om uw keuze te bevestigen. 4. Wanneer hierom wordt gevraagd, drukt u net zolang op de rechterkant van de knop Extra totdat uw land/regio wordt gemarkeerd. Druk op OK/Ja om uw land/regio te selecteren. installez les cartouches d’impression de inktpatronen installeren 1. Si l’imprimante n’est pas sous tension, appuyez sur le bouton Alimentation (a) pour la mettre en marche. 2. Ouvrez le capot supérieur (b). Le berceau de la cartouche vient se placer au centre de l’imprimante. 3. Ouvrez les deux loquets du berceau de la cartouche d’impression (c) en tirant sur la partie inférieure. 4. Sur chaque cartouche, retirez la bande adhésive (d). 5. Insérez la cartouche trichromique HP n° 57 dans le magasin de gauche (e). Insérez la cartouche photo HP n° 58 dans le magasin de droite. 6. Fermez les deux loquets du berceau : tirez pour cela sur la partie inférieure des loquets, appuyez vers le bas, puis relâchez les loquets (f). 7. Fermez le capot supérieur. Appuyez sur OK/Oui. Une page d’étalonnage (g) s’imprime automatiquement afin de vérifier que les cartouches d’impression sont bien en place. 2. Trek de papierlengtegeleider (b) op de invoerlade uit. 3. Schuif de papierbreedtegeleider (c) zo ver mogelijk naar links. 4. Trek de schuifknop (d) van de fotolade helemaal naar u toe. Hiermee schakelt u de fotolade uit. 5. Plaats een stapel normaal papier in de invoerlade (e). 6. Schuif de papierbreedtegeleider en de papierlengtegeleider zo dicht mogelijk tegen het papier aan, zonder het papier te buigen. 7. Laat de uitvoerlade zakken. 1. Wanneer de printer niet aanstaat, zet u deze alsnog aan door op de aan/uit-knop (a) te drukken. 2. Open de bovenklep (b). De inktpatroonhouder beweegt naar het midden van de printer. 3. Ontgrendel beide inktpatroonhouders op de wagen door het onderste gedeelte van de klemmetjes (c) naar buiten te trekken. 4. Verwijder de plastic tape (d) van beide inktpatronen. 5. Plaats de driekleurenpatroon HP #57 in de linkerhouder (e). Plaats de fotopatroon HP #58 in de rechterhouder. 6. Vergrendel de klemmetjes op de houders van beide inktpatronen door het onderste gedeelte van de klemmetjes (f) naar buiten te trekken, naar beneden te drukken en vervolgens los te laten. 7. Sluit de bovenklep. Druk op de knop OK/Ja. Er wordt automatisch een kalibratiepagina (g) afgedrukt. Hiermee kunt u controleren of de inktpatronen goed zijn geïnstalleerd. een zwarte inktpatroon installeren installez une cartouche d’encre noire U moet de zwarte inktpatroon HP #56 zelf aanschaffen. Achetez une cartouche d’encre noire HP n° 56. Pour une impression plus rapide et de meilleure qualité de vos documents texte, remplacez la cartouche photo dans le magasin de droite par une cartouche d’encre noire HP n° 56. Si vous souhaitez ensuite imprimer de superbes photos, retirez la cartouche d’encre noire et réinstallez la cartouche photo HP n° 58 dans le magasin de droite. Stockez la cartouche d’impression non utilisée dans la boîte de protection livrée avec votre imprimante. Om tekstdocumenten sneller en beter af te kunnen drukken, is het raadzaam de fotopatroon, die zich in de rechterhouder van de printer bevindt, te vervangen door de zwarte inktpatroon HP #56. Als u daarna weer afdrukken van fotokwaliteit wilt maken, verwijdert u de zwarte inktpatroon en plaatst u de fotopatroon HP #58 weer in de rechterhouder van de printer. Bewaar de ongebruikte inktpatroon in de houder die bij de printer wordt geleverd. 6 install the hp photosmart printer software ! Important: You must insert the HP Photosmart CD to install the printer software. Note: For more detailed instructions or troubleshooting information, see the HP Photosmart Software Setup & Product Support booklet. Windows PC 1. Be sure you have completed steps 1 through 5. If your computer is off, turn it on. Important: Do not connect the printer to your computer until prompted. Disable virus-checking software before you install the printer software. 2. Insert the HP Photosmart CD into your computer’s CD-ROM drive. The following dialog box appears. • HP Photosmart 7350 Basics Guide • HP Photosmart Printer Help • See the HP Photosmart Software Setup & Product Support booklet for a list of Web sites and phone numbers www.hp.com/cposupport/loc/regional.html Important : Insérez le CD hp photosmart afin de procéder à l’installation du logiciel de l’imprimante. Important: Do not connect the printer to your computer until prompted. 4. Continue with step 7 to connect the printer to your computer. assistance Macintosh • Guide des fonctions de base hp photosmart 7350 1. Be sure you have completed steps 1 through 5. If your computer is off, turn it on. • Aide en ligne de l’imprimante hp photosmart • Reportez-vous à la brochure Configuration du logiciel et assistance produit hp photosmart pour une liste des sites Web et des numéros de téléphone. Important: Disable virus-checking software before you install the printer software. 2. Continue with step 7 to connect the printer to your computer. www.hp.com/cposupport/loc/regional.html (b) PC sous Windows Windows PC 1. Assurez-vous d’avoir réalisé les étapes 1 à 5. Si votre ordinateur est éteint, allumez-le. 1. Controleer of u de stappen 1 t/m 5 volledig hebt uitgevoerd. Als de computer uitstaat, zet u deze nu aan. Important : Ne connectez pas l’imprimante à votre ordinateur avant d’y être autorisé. Désactivez le programme anti-virus avant d’installer le logiciel de l’imprimante. Belangrijk: Sluit de printer pas aan op de computer wanneer hierom wordt gevraagd. Voordat u de printersoftware installeert, moet u eventuele actieve antivirusprogramma's uitschakelen. 2. Plaats de HP Photosmart-cd in het cd-rom-station van de computer. Het volgende dialoogvenster verschijnt. 3. Cliquez sur Installer le pilote d’imprimante hp photosmart. Suivez les instructions à l’écran pour installer le pilote de l’imprimante. Remarque : Si la boîte de dialogue ne s’affiche pas, utilisez l’Explorateur Windows ou le Poste de travail pour localiser votre lecteur de CD-ROM, puis double-cliquez sur setup.exe. La boîte de dialogue de l’imprimante hp photosmart s’affiche. Cliquez sur Installer le pilote d’imprimante hp photosmart. Important : Ne connectez pas l’imprimante à votre ordinateur avant d’y être autorisé. 4. Passez à l’étape 7 pour connecter l’imprimante à votre ordinateur. Macintosh 1. Assurez-vous d’avoir réalisé les étapes 1 à 5. Si votre ordinateur est éteint, allumez-le. 3. Klik op De software voor de HP Photosmart installeren. Volg de instructies op het scherm om de printersoftware te installeren. Opmerking: Als het dialoogvenster niet verschijnt, zoekt u via Windows Verkenner of Deze computer het cd-rom-station op en dubbelklikt u op het bestand setup.exe. Het dialoogvenster van de HP PhotoSmart-printer verschijnt. Klik op De software voor de HP Photosmart installeren. Belangrijk: Sluit de printer pas aan op de computer wanneer hierom wordt gevraagd. 4. Ga door naar stap 7 om de printer op de computer aan te sluiten. Macintosh 1. Controleer of u de stappen 1 t/m 5 volledig hebt uitgevoerd. Als de computer uitstaat, zet u deze nu aan. Belangrijk: Voordat u de printersoftware installeert, moet u eventuele actieve antivirusprogramma's uitschakelen. 2. Ga door naar stap 7 om de printer op de computer aan te sluiten. connect the printer to your computer connectez l’imprimante à votre ordinateur de printer aansluiten op de computer 1. Purchase a USB-compliant interface cable separately. The cable must be less than 3 meters long. 1. Achetez un câble d’interface compatible USB. Ce câble doit mesurer moins de 3 mètres. 1. U moet zelf een USB-interfacekabel aanschaffen. De kabel mag niet langer zijn dan 3 meter. 2. Branchez l’une des extrémités du câble USB dans le port USB de votre ordinateur (a). 2. Sluit het ene uiteinde van de USB-kabel aan op de USB-poort van de computer (a). 3. Branchez l’autre extrémité du câble USB dans le port USB situé à l’arrière de l’imprimante (b). 3. Sluit het andere uiteinde van de USB-kabel aan op de USB-poort op de achterzijde van de printer (b). 2. Plug one end of the USB cable into your computer’s USB port (a). 3. Plug the other end of the USB cable into the USB port on the back of your printer (b). Windows PC Belangrijk: U moet de HP Photosmart-cd in het cd-rom-station plaatsen als u de printersoftware wilt installeren. Opmerking: Raadpleeg het boekje Software-installatie & productondersteuning voor de HP Photosmart-printer als u gedetailleerde instructies wenst of wilt weten hoe u problemen kunt verhelpen. 2. Passez à l’étape 7 pour connecter l’imprimante à votre ordinateur. (a) ! Remarque : Pour des instructions plus détaillées ou pour toute information relative au dépannage, reportez-vous à la brochure Configuration du logiciel et assistance produit de l’imprimante hp photosmart. Important : Désactivez le programme anti-virus avant d’installer le logiciel de l’imprimante. Imprimé en Allemagne 08/02 v3 • Imprimé sur papier recyclé © 2002 Hewlett-Packard Company Windows est une marque déposée de Microsoft Corporation Macintosh est une marque déposée d’Apple Computer, Inc. 7 de software voor de hp photosmart-printer installeren 3. Click Install hp photosmart printers software. Follow the onscreen instructions to install the printer software. Note: If the dialog box does not appear, use Windows Explorer or My Computer to locate your CD-ROM drive, then double-click setup.exe. The HP Photosmart printer dialog box appears. Click Install hp photosmart printers software. Printed in Germany 08/02 v3 • Printed on recycled paper © 2002 Hewlett-Packard Company Windows is a registered trademark of Microsoft Corporation Macintosh is a registered trademark of Apple Computer, Inc. • ! 2. Insérez le CD hp photosmart dans le lecteur de CD-ROM de votre ordinateur. La boîte de dialogue suivante s’affiche. getting assistance • installez le logiciel de l’imprimante hp photosmart Note: Do not plug the USB cable into the camera port on the front of your printer. That port is for your HP direct-printing digital camera. Important: Be sure the printer is connected directly to your computer. Installing the printer software when the printer is connected to the computer through a USB hub can cause errors and prevent a successful installation. 4. Continue with step 8 to finish the software installation. Remarque : Ne branchez pas le câble USB dans le port situé à l’avant de l’imprimante. Ce port est dédié à votre appareil photo numérique à impression directe hp. Opmerking: Sluit de USB-kabel niet aan op de camerapoort op de voorzijde van de printer. De camerapoort is bedoeld voor de HP direct-printing digitale camera. Important : Assurez-vous que l’imprimante est directement connectée à votre ordinateur. Si vous installez le logiciel de l’imprimante alors que l’imprimante est connectée à l’ordinateur via un concentrateur USB, vous vous exposez à des erreurs et à une installation défectueuse. Belangrijk: Zorg ervoor dat de printer direct op de computer is aangesloten. Wanneer u de printersoftware installeert terwijl de printer op de computer is aangesloten via een USB-hub, kan dit leiden tot fouten waardoor de installatie niet met succes kan worden voltooid. 4. Passez à l’étape 8 pour terminer l’installation du logiciel. 4. Ga door naar stap 8 om de installatie van de software te voltooien. terminez l’installation du logiciel de l’imprimante hp photosmart de installatie van de software voor de hp photosmart-printer voltooien PC sous Windows Windows PC 1. Une fois l’imprimante connectée à votre ordinateur, continuez à suivre les instructions à l’écran pour terminer l’installation du logiciel de l’imprimante hp photosmart et du logiciel photo et imagerie hp. 1. Nadat u de printer op de computer hebt aangesloten, voltooit u de installatie van de software voor de HP Photosmart-printer en HPsoftware voor foto- en beeldbewerking aan de hand van de instructies op het scherm. 2. Une fois l’installation terminée, l’ordinateur redémarre. Une fenêtre de bienvenue s’ouvre. Cliquez sur le texte Cliquez ici pour imprimer une page de test. 2. Zodra de installatie voltooid is, wordt het systeem opnieuw gestart. Er verschijnt een welkomstscherm. Klik op Klik hier om een testpagina af te drukken. Macintosh Macintosh 1. Une fois l’imprimante connectée à votre ordinateur, insérez le CD hp photosmart dans le lecteur de CD-ROM de celui-ci. Double-cliquez sur l’icône du CD HP Photosmart. 1. Nadat u de printer op de computer hebt aangesloten, plaatst u de HP Photosmart-cd in het cd-rom-station van de computer. Dubbelklik op het pictogram voor de HP Photosmart-cd. 2. Double-cliquez sur l’icône d’installation de HP Photosmart, puis suivez les instructions à l’écran pour installer le logiciel de l’imprimante. 2. Dubbelklik op het installatiepictogram voor HP Photosmart. Volg de instructies op het scherm om de printersoftware te installeren. (b) (a) Macintosh 8 finish installing the hp photosmart printer software Windows PC 1. After connecting the printer to your computer, continue following the onscreen instructions to finish installing the HP Photosmart Printer Software and the HP Photo & Imaging Software. 2. At the end of the installation, the computer restarts. A welcome window appears. Click where it says Click here to print a test page. meer informatie en ondersteuning • Beknopte handleiding HP Photosmart 7350 Macintosh • Help bij HP Photosmart-printer • Raadpleeg het boekje Software-installatie en productondersteuning dat bij de HP Photosmartprinter wordt geleverd voor een overzicht van websites en telefoonnummers 1. After connecting the printer to your computer, insert the HP Photosmart CD into your computer’s CD-ROM drive. Double-click the HP Photosmart CD icon. • www.hp.com/cposupport/loc/regional.html Gedrukt in Duitsland 08/02 v3 • Gedrukt op gerecycled papier © 2002 Hewlett-Packard Company Windows is een geregistreerd handelsmerk van Microsoft Corporation Macintosh is een geregistreerd handelsmerk van Apple Computer, Inc. 2. Double-click the HP Photosmart install icon. Follow the onscreen instructions to install the printer software.-
 1
1
-
 2
2


HP PHOTOSMART 7345 de handleiding
- Type
- de handleiding
- Deze handleiding is ook geschikt voor
in andere talen
- English: HP PHOTOSMART 7345 Owner's manual
- français: HP PHOTOSMART 7345 Le manuel du propriétaire
Gerelateerde artikelen
-
Compaq PHOTOSMART 7150 de handleiding
-
-
HP PHOTOSMART 5510 Serie de handleiding
-
-
-
HP Photosmart All-in-One Printer series - B010 de handleiding
-
-
-
HP Photosmart Wireless e-All-in-One Printer series - B110 de handleiding
-