Sony WS-X10W de handleiding
- Categorie
- Accessoires voor het maken van koffie
- Type
- de handleiding

Precautions
This product is for DAV-X10 only. Use
with other products or for other
purposes than those specified may
cause damage or injury.
To customers
Sufficient expertise is required for
installing this product. Be sure to
subcontract the installation to qualified
service personnel and pay adequate
attention to safety during the
installation.
For qualified service personnel
Sufficient expertise is required for
installing this product. Be sure to read
this instruction manual thoroughly to
do the installation work safely. We are
not liable for any damage or injury
caused by mishandling or improper
installation. After installation, please
hand this installation manual to the
customers.
On safety
Be sure to attach the mounting plate
to a wall that is sufficiently thick and
strong.
Do not lean or hang on the speaker,
as the speaker may fall down.
On cleaning
Clean the mounting plate and the plate
cover with a soft cloth slightly moistened
with a mild detergent solution. Do not
use any type of abrasive pad, scouring
powder or solvent such as thinner,
benzine or alcohol.
If you have any questions or problems
concerning your system, please consult
your nearest Sony dealer.
Précautions
Ce produit est destiné uniquement au
DAV-X10. L’utilisation avec d’autres
produits ou à des fins autres que celles
spécifiées peut provoquer des dégâts ou
des blessures.
Avis aux clients
Vous devez disposer d’un certain
savoir-faire pour installer ce produit.
Confiez l’installation à du personnel
qualifié et prenez toutes les mesures de
sécurité requises pendant l’installation.
Avis au personnel qualifié
Vous devez disposer d’un certain
savoir-faire pour installer ce produit.
Lisez intégralement le mode d’emploi
pour réaliser le travail en toute sécurité.
Notre garantie ne couvre pas les dégâts
ni les blessures qui seraient provoqués
par une fausse manipulation ou une
installation incorrecte. Après
l’installation, transmettez le présent
mode d’emploi à votre client.
Sécurité
Veillez à fixer la plaque de fixation
sur un mur suffisamment épais et
solide.
Evitez de vous appuyer ou de vous
suspendre à l’enceinte car vous
risquez de la faire tomber.
Nettoyage
Nettoyez la plaque de fixation et son
cache avec un linge doux légèrement
humidifié à l’aide d’une solution
détergente douce. N’utilisez aucun type
de tampon abrasif, de poudre à récurer
ou de solvant comme du dissolvent, du
benzène ou de l’alcool.
Supplied Items
Éléments fournis
Elementos suministrados
Mitgelieferte Teile
Articoli in dotazione
Bijgeleverde items
Medföljande delar
Zawartość opakowania
3-210-549-11(2)
Wall Mounting Brackets
Operating Instructions (For the speaker)
Mode d’emploi (Système de haut-parleurs)
Manual de instrucciones (para el altavoz)
Bedienungsanleitung (für Lautsprecher)
Istruzioni per l’uso (per il diffusore)
Gebruiksaanwijzing (voor de luidspreker)
Bruksanvisning (för högtalaren)
Instrukcja obsługi głośnika
WS-X10W
Sony Corporation © 2007 Printed in Malaysia
Si vous avez des questions ou si vous
rencontrez des problèmes avec votre
système, consultez votre revendeur
Sony le plus proche.
Precauciones
Este producto es sólo para DAV-X10. El
uso con otros productos o para otros
fines distintos de los especificados
puede producir lesiones o daños.
A los clientes
La instalación de este producto requiere
una experiencia suficiente. Asegúrese
de subcontratar la instalación a
personal técnico cualificado y preste la
atención adecuada a la seguridad
durante la instalación.
Para el personal técnico cualificado
La instalación de este producto requiere
una experiencia suficiente. Lea
detenidamente este manual de
instrucciones para realizar la
instalación con seguridad. El fabricante
del producto no se responsabiliza de las
lesiones o daños causados por la
manipulación incorrecta o la
instalación inadecuada. Después de la
instalación, devuelva este manual a los
clientes.
Seguridad
Asegúrese de colocar la placa de
montaje en una pared que sea lo
suficientemente gruesa y resistente.
No se apoye ni se cuelgue en el
altavoz, ya que éste podría caerse.
Limpeza
Limpie la placa de montaje y la cubierta
de la placa con un paño suave
ligeramente humedecido con una
solución detergente poco concentrada.
No utilice estropajos abrasivos,
detergente en polvo ni disolventes,
como bencina, alcohol o diluyente.
Si tiene alguna pregunta o problam
relacionado con el sistema, póngase en
contacto con el distribuidor de Sony
más cercano.
Sicherheitsmaßnahmen
Dieses Produkt ist ausschließlich für die
DAV-X10 konzipiert. Bei Verwendung
mit anderen Produkten oder zu einem
anderen als dem vorgesehenen Zweck
besteht die Gefahr von Verletzungen
bzw. Sachschäden.
Hinweis an Kunden
Zur Installation dieses Produkts sind
Fachkenntnisse erforderlich. Lassen Sie
die Installationsarbeiten unbedingt von
qualifizierten Fachleuten ausführen
und beachten Sie bei der Installation
die nötigen Sicherheitsvorkehrungen.
Für qualifiziertes Fachpersonal
Zur Installation dieses Produkts sind
Fachkenntnisse erforderlich. Lesen Sie
diese Gebrauchsanweisung unbedingt
sorgfältig durch, damit eine sichere
Ausführung der Arbeiten gewährleistet
ist. Der Hersteller übernimmt keine
Haftung für Verletzungen bzw.
Sachschäden, die durch
unsachgemäßen Umgang mit dem
Produkt oder eine fehlerhafte
Installation verursacht werden.
Händigen Sie diese
Installationsanleitung nach der
Installation dem Kunden aus.
Sicherheit
Achten Sie darauf, dass die Wand, an
der Sie die Montageplatte befestigen,
ausreichend stark und tragfähig ist.
Lehnen Sie sich nicht an die
Lautsprecher und hängen Sie sich
nicht daran. Andernfalls können die
Lautsprecher umkippen.
Reinigung
Reinigen Sie die Montageplatte und die
Plattenabdeckung mit einem weichen
Tuch, das Sie leicht mit einer milden
Reinigungslösung angefeuchtet haben.
Verwenden Sie keine Scheuermittel,
Scheuerschwämme oder Lösungsmittel
wie Verdünnung, Benzin oder Alkohol.
Sollten am System Probleme auftreten
oder sollten Sie Fragen haben, wenden
Sie sich bitte an Ihren Sony-Händler.
Precauzioni
Il prodotto è utilizzabile esclusivamente
con DAV-X10. L’uso con altri prodotti
o per scopi diversi da quelli specificati
può provocare danni e lesioni.
Ai clienti
Per l’installazione del presente prodotto
è necessario disporre di sufficiente
competenza. Assicurarsi che
l’installazione venga eseguita da
personale di assistenza qualificato e di
prestare la dovuta attenzione durante
l’installazione.
Al personale di assistenza
qualificato
Per l’installazione del presente prodotto
è necessario disporre di sufficiente
competenza. Leggere con attenzione il
presente manuale delle istruzioni per
garantire la sicurezza durante
l’installazione. Si declina qualsiasi
responsabilità per eventuali danni o
lesioni derivanti da un uso errato o da
un’installazione non adeguata. Dopo
aver eseguito l’installazione, consegnare
il presente manuale ai clienti.
Sicurezza
Assicurarsi di fissare le piastre di
montaggio su una parete che abbia
uno spessore e una resistenza
adeguata.
Evitare di appoggiarsi o appendersi al
diffusore, poiché potrebbe cadere.
Pulizia
Pulire la piastra di montaggio e il
copripiastra con un panno morbido
leggermente inumidito con una
soluzione detergente delicata. Non
utilizzare alcun tipo di spugna o polvere
abrasiva né solventi, quali diluente,
benzina smacchiante o alcol.
Per qualsiasi domanda o problema
riguardante il sistema, rivolgersi al
rivenditore Sony più vicino.
Voorzorgsmaatregelen
Dit product mag alleen samen met de
DAV-X10 worden gebruikt. Gebruik
met andere producten of voor andere
doeleinden dan deze vermeld, kunnen
tot schade of verwondingen leiden.
Aan klanten
U moet voldoende ervaring hebben om
dit product te installeren. Besteed de
installatie uit aan vakbekwaam
personeel en let goed op de
veiligheidsmaatregelen tijdens de
installatie.
Aan vakbekwaam personeel
U moet voldoende ervaring hebben om
dit product te installeren. Lees deze
gebruiksaanwijzing aandachtig door
zodat u de installatie veilig kunt
voltooien. We zijn niet aansprakelijk
voor schade of verwondingen die
veroorzaakt zijn door ruwe behandeling
of een slechte installatie. Geef deze
gebruiksaanwijzing na installatie aan de
klant.
Veiligheid
Monteer de wandplaat aan een muur
die voldoende dik en sterk is.
Leun niet tegen de luidspreker en ga
er ook niet aan hangen omdat hij dan
kan vallen.
Reiniging
Maak de wandplaat en de plaatdeksel
schoon met een zachte doek die licht
bevochtigd is met een zacht zeepsopje.
Gebruik geen schuursponsje,
schuurpoeder of oplosmiddelen zoals
thinner, benzine of alcohol.
Met alle vragen of eventuele problemen
met uw systeem kunt u steeds terecht
bij uw dichtstbijzijnde Sony-handelaar.
Säkerhetsåtgärder
Denna produkt är endast avsedd för
DAV-X10. Användning med andra
produkter eller för andra syften än de
som anges kan orsaka materiella skador
eller personskador.
Till kunder
Det krävs tillräcklig expertis för att
installera denna produkt. Kontrollera
att de som du anlitar för att installera
produkten är kvalificerad personal och
var uppmärksam på säkerhetsaspekter
under installationen.
För kvalificerad servicepersonal
Det krävs tillräcklig expertis för att
installera denna produkt. Läs dessa
instruktioner noga så att du kan göra
installationsarbetet på ett säkert sätt. Vi
är inte ansvarsskyldiga för materiella
skador eller personskador som orsakats
av felaktig hantering eller felaktig
installation. Efter installationen ska du
ge denna installationsanvisning till
kunden.
Om säkerhet
Kontrollera att väggen som du fäster
monteringsplattan på är tillräckligt
tjock och stark.
Luta dig inte mot högtalaren, och
häng inte på den eftersom den kan
falla.
Rengöring
Rengör monteringsplattan, och plattans
skydd med en mjuk trasa lätt fuktad
med milt rengöringsmedel. Använd
inte någon typ av skurduk, skurmedel
eller lösningar som thinner, alkohol
eller bensen.
Om du har några frågor eller får
problem med systemet kontaktar du
närmaste Sony-återförsäljare.
Środki ostrożności
Ten produkt jest przeznaczony tylko do
współpracy z urządzeniem DAV-X10.
Używanie go z innymi produktami lub
do innych celów niż opisane w tej
instrukcji może spowodować
uszkodzenie produktu lub obrażenia
użytkownika.
Informacja dla klientów
Instalacja tego produktu wymaga
odpowiedniej wiedzy. Dlatego należy
zlecić ją wykwalifikowanym
instalatorom i przestrzegać zaleceń
dotyczących bezpieczeństwa.
Informacje dla wykwalifikowanych
instalatorów
Instalacja tego produktu wymaga
odpowiedniej wiedzy. Aby bezpiecznie
zainstalować produkt, należy zapoznać
się z tą instrukcją. Firma Sony nie
odpowiada za szkody ani obrażenia
wynikające z nieodpowiedniego
obchodzenia się z produktem lub
nieprawidłowej instalacji. Po
zainstalowaniu produktu należy
przekazać instrukcję instalacji
klientom.
Bezpieczeństwo
Płytę montażową należy montować
na ścianie, która jest odpowiednio
wytrzymała i gruba.
Nie należy opierać się o głośnik ani
wieszać się na głośniku, ponieważ
może on upaść.
Czyszczenie
Płytę montażową i osłonę płyty należy
czyścić miękką ściereczką lekko
zwilżoną łagodnym roztworem
detergentu. Nie należy używać ostrych
myjek, proszku do szorowania ani
środków, takich jak rozcieńczalniki,
benzyna lub alkohol.
Jeżeli masz jakiekolwiek pytania lub
problemy dotyczące systemu,
skontaktuj się z najbliższym sprzedawcą
produktów firmy Sony.
Specifications
Dimensions
Approx. 119 × 75 × 164 mm
(4
3
/4
× 3 × 6
1
/2
in.) (w/h/d)
170 × 129 × 189 mm
(6
3
/4
× 5
1
/8
× 7
1
/2
in.) (w/h/d) incl.
speaker (per 1 piece)
Mass
Approx. 0.3 kg (11 oz) (per 1 piece)
Design and specifications are subject to
change without notice.
Spécifications
Dimensions
Environ 119 × 75 × 164 mm
(4
3
/4
× 3 × 6
1
/2
po.) (l/h/p)
170 × 129 × 189 mm
(6
3
/4
× 5
1
/8
× 7
1
/2
po.) (l/h/p) enceinte
comprise (pour 1 pièce)
Poids
Environ 0,3 kg (11 livres) (pour 1 pièce)
La conception et les spécifications sont
sujettes à modification sans préavis.
Especificaciones
Dimensiones
Aprox. 119 × 75 × 164 mm (an/al/prf)
170 × 129 × 189 mm (an/al/prf)
incluido el altavoz (por cada pieza)
Peso
Aprox. 0,3 kg (por cada pieza)
Diseño y especificaciones sujetos a
cambios sin previo aviso.
Technische Daten
Abmessungen
ca. 119 × 75 × 164 mm (B/H/T)
bzw. 170 × 129 × 189 mm (B/H/T)
einschl. Lautsprecher (pro 1 Stück)
Gewicht
ca. 0,3 kg (pro 1 Stück)
Änderungen, die dem technischen
Fortschritt dienen, bleiben vorbehalten.
Caratteristiche tecniche
Dimensioni
Circa 119 × 75 × 164 mm (l/a/p)
170 × 129 × 189 mm (l/a/p)
comp. diffusore (per 1 pezzo)
Peso
Circa 0,3 kg (per 1 pezzo)
Il design e le caratteristiche tecniche
sono soggetti a modifiche senza
preavviso.
Technische gegevens
Afmetingen
Ca. 119 × 75 × 164 mm (b/h/d)
170 × 129 × 189 mm (b/h/d) incl.
luidspreker (per stuk)
Gewicht
Ca. 0,3 kg (per stuk)
Ontwerp en specificaties kunnen
zonder voorafgaande kennisgeving
worden gewijzigd.
Tekniska specifikationer
Dimensioner
Cirka 119 × 75 × 164 mm (b/h/d)
170 × 129 × 189 mm (b/h/d)
inklusive högtalare (per 1 del)
Vikt
Cirka 0,3 kg (per 1 del)
Utförande och specifikationer kan
komma att ändras utan föregående
meddelande.
Dane techniczne
Wymiary
Ok. 119 × 75 × 164 mm (s/w/g)
170 × 129 × 189 mm (s/w/g)
w tym głośnik (1 sztuka)
Waga
Ok. 0,3 kg (1 sztuka)
Konstrukcja i dane techniczne mogą
ulec zmianie bez uprzedzenia.
(2)

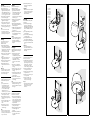
Assembly
Refer to the illustrations on the right
during the assembly process.
Tightly attach the mounting plate
() to the wall (making sure the
wall is sufficiently thick) using 2 or
more sufficient length screws (M4 or
No. 8) (not supplied) so it is stable.
Pass the speaker cord through the
hole in the mounting plate.
Push down and slide the plate cover
() on the mounting plate.
Connect the speaker cord (passed
through the hole) to the speaker.
Secure the speaker to the mounting
plate using a supplied screw ().
Note
Do not loosen the screws of the
mounting plate or the screws to
secure the speaker to the mounting
plate during the assembly process.
Montage
Tout au long de la procédure de
montage, reportez-vous aux
illustrations de droite.
Fixez solidement la plaque de
fixation () au mur (en vérifiant
que celui-ci est suffisamment épais)
à l’aide d’au moins 2 vis de longueur
suffisante (M4 ou No. 8) (non
fournies) afin qu’elle soit stable.
Faites passer le cordon de l’enceinte à
travers l’orifice de la plaque de
fixation.
Abaissez et faites glisser le cache
() sur la plaque de fixation.
Raccordez le cordon de l’enceinte (à
travers l’orifice) à l’enceinte.
Fixez l’enceinte à la plaque de
fixation à l’aide de la vis fournie
().
Remarque
Ne desserrez pas les vis de la plaque
de fixation ou celles qui servent à
fixer l’enceinte sur la plaque de
fixation lors du montage.
Montaje
Consulte las ilustraciones que aparecen
a la derecha durante el proceso de
montaje.
Coloque la placa de montaje
correctamente () en la pared
(asegúrese de que la pared es lo
suficientemente gruesa) mediante
dos o más tornillos de longitud
suficiente (M4 o No. 8) (no
suministrados) para que sea estable.
Pase el cable del altavoz a través del
orificio de la placa de montaje.
Presione hacia abajo y deslice la
cubierta de la placa () en la placa
de montaje.
Conecte el cable del altavoz (que ha
pasado a través del orificio) al
altavoz.
Sujete el altavoz a la placa de
montaje mediante el tornillo
suministrado ().
Nota
No afloje los tornillos de la placa de
montaje ni los tornillos que fijan el
altavoz a la placa de montaje durante
el proceso de montaje.
Montage
Ziehen Sie bei der Montage die
Abbildungen rechts heran.
Befestigen Sie die Montageplatte
() mithilfe von mindestens 2
ausreichend langen Schrauben (M4
oder Nr. 8) (nicht mitgeliefert)
sicher und fest an der Wand.
Vergewissern Sie sich, dass die Wand
dafür stark genug ist.
Führen Sie das Lautsprecherkabel
durch die Bohrung in der
Montageplatte.
Drücken Sie die Plattenabdeckung
() nach unten und schieben Sie sie
auf die Montageplatte.
Schließen Sie das durch die Bohrung
geführte Lautsprecherkabel an den
Lautsprecher an.
Befestigen Sie den Lautsprecher mit
einer mitgelieferten Schraube ()
an der Montageplatte.
Hinweis
Lösen Sie beim Montieren nicht die
Schrauben der Montageplatte oder
die Schrauben, mit denen der
Lautsprecher an der Montageplatte
befestigt ist.
Montaggio
Durante l’operazione di montaggio fare
riferimento alle illustrazioni riportate
sulla destra.
Fissare saldamente la piastra di
montaggio () alla parete
(accertandosi che la parete abbia
uno spessore sufficiente) utilizzando
2 o più viti della lunghezza
sufficiente (M4 o n. 8) (non in
dotazione), in modo tale che sia
stabile.
Far passare il cavo del diffusore
attraverso la cavità nella piastra di
montaggio.
Spingere verso il passo e far scorrere
il copripiastra () sulla piastra di
montaggio.
Collegare il cavo del diffusore (fatto
passare in precedenza attraverso la
cavità) al diffusore.
Fissare il diffusore alla piastra di
montaggio utilizzando una vite in
dotazione ().
Nota
Durante il montaggio non allentare le
viti della piastra di montaggio o le
viti che fissano il diffusore alla piastra
di montaggio.
Installatie
Raadpleeg tijdens de installatie de
illustraties aan de rechterkant.
Bevestig de wandplaat () stevig
aan de muur (zorg dat de muur dik
genoeg is) met 2 of meer schroeven
die voldoende lang zijn (M4 of Nr.
8) (niet bijgeleverd). Zorg dat de
wandplaat stabiel is.
Trek de luidsprekerkabel door de
opening in de wandplaat.
Druk de plaatdeksel naar beneden
en schuif hem () over de
wandplaat.
Verbind de luidsprekerkabel (door
de opening getrokken) met de
luidspreker.
Maak de luidspreker vast op de
wandplaat met een bijgeleverde
schroef ().
Opmerking
Maak de schroeven van de wandplaat
of de schroeven die de luidspreker op
de wandplaat bevestigen niet los
tijdens de installatie.
Montering
Referera till bilderna till höger under
monteringen.
Fäst monteringsplattan () på
väggen (och se till att väggen är
tillräckligt tjock) med hjälp av 2 eller
flera tillräckligt långa skruvar (M4
eller nr 8) (medföljer ej) så den är
stabil.
Led högtalarsladden genom hålet i
monteringsplattan.
För ner och skjut plattskyddet ()
på monteringsplattan.
Anslut högtalarsladden (som du
drar genom hålet) till högtalaren.
Fäst högtalaren på monteringsplattan
med hjälp av en medföljande skruv
().
Observera!
Lossa inte monteringsplattans
skruvar eller skruvarna för att fästa
högtalarna på fästplattan under
monteringen.
Montaż
Podczas montażu należy korzystać z
ilustracji po prawej stronie.
Dokładnie dokręć płytę montażową
() do ściany (ściana musi mieć
odpowiednią grubość) za pomocą co
najmniej 2 śrub o odpowiedniej
długości (M4 lub nr 8) (brak w
zestawie), tak aby płyta była stabilna.
Przełóż przewód głośnika przez
otwór w płycie montażowej.
Wciśnij i przesuń osłonę płyty ()
na płycie montażowej.
Podłącz przewód (przełożony przez
otwór) do głośnika.
Przymocuj głośnik do płyty
montażowej za pomocą śruby
dołączonej do zestawu ().
Uwaga
Podczas montażu nie należy odkręcać
śrub płyty montażowej ani śrub
mocujących głośnik do płyty
montażowej.
Not supplied
Non fournies
No suministrados
Nicht mitgeliefert
Non in dotazione
Niet bijgeleverd
Medföljer ej
Brak w zestawie
Documenttranscriptie
3-210-549-11(2) Precautions This product is for DAV-X10 only. Use with other products or for other purposes than those specified may cause damage or injury. Wall Mounting Brackets Operating Instructions (For the speaker) Mode d’emploi (Système de haut-parleurs) Manual de instrucciones (para el altavoz) Bedienungsanleitung (für Lautsprecher) Istruzioni per l’uso (per il diffusore) Gebruiksaanwijzing (voor de luidspreker) Bruksanvisning (för högtalaren) Instrukcja obsługi głośnika WS-X10W Sony Corporation © 2007 Printed in Malaysia For qualified service personnel Sufficient expertise is required for installing this product. Be sure to read this instruction manual thoroughly to do the installation work safely. We are not liable for any damage or injury caused by mishandling or improper installation. After installation, please hand this installation manual to the customers. On safety Be sure to attach the mounting plate to a wall that is sufficiently thick and strong. Do not lean or hang on the speaker, as the speaker may fall down. On cleaning Clean the mounting plate and the plate cover with a soft cloth slightly moistened with a mild detergent solution. Do not use any type of abrasive pad, scouring powder or solvent such as thinner, benzine or alcohol. (2) Supplied Items Éléments fournis Elementos suministrados Mitgelieferte Teile Articoli in dotazione Bijgeleverde items Medföljande delar Zawartość opakowania To customers Sufficient expertise is required for installing this product. Be sure to subcontract the installation to qualified service personnel and pay adequate attention to safety during the installation. If you have any questions or problems concerning your system, please consult your nearest Sony dealer. Précautions Ce produit est destiné uniquement au DAV-X10. L’utilisation avec d’autres produits ou à des fins autres que celles spécifiées peut provoquer des dégâts ou des blessures. Avis aux clients Vous devez disposer d’un certain savoir-faire pour installer ce produit. Confiez l’installation à du personnel qualifié et prenez toutes les mesures de sécurité requises pendant l’installation. Avis au personnel qualifié Vous devez disposer d’un certain savoir-faire pour installer ce produit. Lisez intégralement le mode d’emploi pour réaliser le travail en toute sécurité. Notre garantie ne couvre pas les dégâts ni les blessures qui seraient provoqués par une fausse manipulation ou une installation incorrecte. Après l’installation, transmettez le présent mode d’emploi à votre client. Sécurité Veillez à fixer la plaque de fixation sur un mur suffisamment épais et solide. Evitez de vous appuyer ou de vous suspendre à l’enceinte car vous risquez de la faire tomber. Nettoyage Nettoyez la plaque de fixation et son cache avec un linge doux légèrement humidifié à l’aide d’une solution détergente douce. N’utilisez aucun type de tampon abrasif, de poudre à récurer ou de solvant comme du dissolvent, du benzène ou de l’alcool. Si vous avez des questions ou si vous rencontrez des problèmes avec votre système, consultez votre revendeur Sony le plus proche. Precauciones Este producto es sólo para DAV-X10. El uso con otros productos o para otros fines distintos de los especificados puede producir lesiones o daños. A los clientes La instalación de este producto requiere una experiencia suficiente. Asegúrese de subcontratar la instalación a personal técnico cualificado y preste la atención adecuada a la seguridad durante la instalación. Para el personal técnico cualificado La instalación de este producto requiere una experiencia suficiente. Lea detenidamente este manual de instrucciones para realizar la instalación con seguridad. El fabricante del producto no se responsabiliza de las lesiones o daños causados por la manipulación incorrecta o la instalación inadecuada. Después de la instalación, devuelva este manual a los clientes. Seguridad Asegúrese de colocar la placa de montaje en una pared que sea lo suficientemente gruesa y resistente. No se apoye ni se cuelgue en el altavoz, ya que éste podría caerse. Limpeza Limpie la placa de montaje y la cubierta de la placa con un paño suave ligeramente humedecido con una solución detergente poco concentrada. No utilice estropajos abrasivos, detergente en polvo ni disolventes, como bencina, alcohol o diluyente. Si tiene alguna pregunta o problam relacionado con el sistema, póngase en contacto con el distribuidor de Sony más cercano. Sicherheitsmaßnahmen Dieses Produkt ist ausschließlich für die DAV-X10 konzipiert. Bei Verwendung mit anderen Produkten oder zu einem anderen als dem vorgesehenen Zweck besteht die Gefahr von Verletzungen bzw. Sachschäden. Hinweis an Kunden Zur Installation dieses Produkts sind Fachkenntnisse erforderlich. Lassen Sie die Installationsarbeiten unbedingt von qualifizierten Fachleuten ausführen und beachten Sie bei der Installation die nötigen Sicherheitsvorkehrungen. Für qualifiziertes Fachpersonal Zur Installation dieses Produkts sind Fachkenntnisse erforderlich. Lesen Sie diese Gebrauchsanweisung unbedingt sorgfältig durch, damit eine sichere Ausführung der Arbeiten gewährleistet ist. Der Hersteller übernimmt keine Haftung für Verletzungen bzw. Sachschäden, die durch unsachgemäßen Umgang mit dem Produkt oder eine fehlerhafte Installation verursacht werden. Händigen Sie diese Installationsanleitung nach der Installation dem Kunden aus. Sicherheit Achten Sie darauf, dass die Wand, an der Sie die Montageplatte befestigen, ausreichend stark und tragfähig ist. Lehnen Sie sich nicht an die Lautsprecher und hängen Sie sich nicht daran. Andernfalls können die Lautsprecher umkippen. Reinigung Reinigen Sie die Montageplatte und die Plattenabdeckung mit einem weichen Tuch, das Sie leicht mit einer milden Reinigungslösung angefeuchtet haben. Verwenden Sie keine Scheuermittel, Scheuerschwämme oder Lösungsmittel wie Verdünnung, Benzin oder Alkohol. Sollten am System Probleme auftreten oder sollten Sie Fragen haben, wenden Sie sich bitte an Ihren Sony-Händler. Precauzioni Il prodotto è utilizzabile esclusivamente con DAV-X10. L’uso con altri prodotti o per scopi diversi da quelli specificati può provocare danni e lesioni. Ai clienti Per l’installazione del presente prodotto è necessario disporre di sufficiente competenza. Assicurarsi che l’installazione venga eseguita da personale di assistenza qualificato e di prestare la dovuta attenzione durante l’installazione. Al personale di assistenza qualificato Per l’installazione del presente prodotto è necessario disporre di sufficiente competenza. Leggere con attenzione il presente manuale delle istruzioni per garantire la sicurezza durante l’installazione. Si declina qualsiasi responsabilità per eventuali danni o lesioni derivanti da un uso errato o da un’installazione non adeguata. Dopo aver eseguito l’installazione, consegnare il presente manuale ai clienti. Sicurezza Assicurarsi di fissare le piastre di montaggio su una parete che abbia uno spessore e una resistenza adeguata. Evitare di appoggiarsi o appendersi al diffusore, poiché potrebbe cadere. Pulizia Pulire la piastra di montaggio e il copripiastra con un panno morbido leggermente inumidito con una soluzione detergente delicata. Non utilizzare alcun tipo di spugna o polvere abrasiva né solventi, quali diluente, benzina smacchiante o alcol. Per qualsiasi domanda o problema riguardante il sistema, rivolgersi al rivenditore Sony più vicino. Voorzorgsmaatregelen Dit product mag alleen samen met de DAV-X10 worden gebruikt. Gebruik met andere producten of voor andere doeleinden dan deze vermeld, kunnen tot schade of verwondingen leiden. Aan klanten U moet voldoende ervaring hebben om dit product te installeren. Besteed de installatie uit aan vakbekwaam personeel en let goed op de veiligheidsmaatregelen tijdens de installatie. Aan vakbekwaam personeel U moet voldoende ervaring hebben om dit product te installeren. Lees deze gebruiksaanwijzing aandachtig door zodat u de installatie veilig kunt voltooien. We zijn niet aansprakelijk voor schade of verwondingen die veroorzaakt zijn door ruwe behandeling of een slechte installatie. Geef deze gebruiksaanwijzing na installatie aan de klant. Veiligheid Monteer de wandplaat aan een muur die voldoende dik en sterk is. Leun niet tegen de luidspreker en ga er ook niet aan hangen omdat hij dan kan vallen. Reiniging Maak de wandplaat en de plaatdeksel schoon met een zachte doek die licht bevochtigd is met een zacht zeepsopje. Gebruik geen schuursponsje, schuurpoeder of oplosmiddelen zoals thinner, benzine of alcohol. Met alle vragen of eventuele problemen met uw systeem kunt u steeds terecht bij uw dichtstbijzijnde Sony-handelaar. Säkerhetsåtgärder Denna produkt är endast avsedd för DAV-X10. Användning med andra produkter eller för andra syften än de som anges kan orsaka materiella skador eller personskador. Till kunder Det krävs tillräcklig expertis för att installera denna produkt. Kontrollera att de som du anlitar för att installera produkten är kvalificerad personal och var uppmärksam på säkerhetsaspekter under installationen. För kvalificerad servicepersonal Det krävs tillräcklig expertis för att installera denna produkt. Läs dessa instruktioner noga så att du kan göra installationsarbetet på ett säkert sätt. Vi är inte ansvarsskyldiga för materiella skador eller personskador som orsakats av felaktig hantering eller felaktig installation. Efter installationen ska du ge denna installationsanvisning till kunden. Om säkerhet Kontrollera att väggen som du fäster monteringsplattan på är tillräckligt tjock och stark. Luta dig inte mot högtalaren, och häng inte på den eftersom den kan falla. Rengöring Rengör monteringsplattan, och plattans skydd med en mjuk trasa lätt fuktad med milt rengöringsmedel. Använd inte någon typ av skurduk, skurmedel eller lösningar som thinner, alkohol eller bensen. Om du har några frågor eller får problem med systemet kontaktar du närmaste Sony-återförsäljare. Informacja dla klientów Instalacja tego produktu wymaga odpowiedniej wiedzy. Dlatego należy zlecić ją wykwalifikowanym instalatorom i przestrzegać zaleceń dotyczących bezpieczeństwa. Informacje dla wykwalifikowanych instalatorów Instalacja tego produktu wymaga odpowiedniej wiedzy. Aby bezpiecznie zainstalować produkt, należy zapoznać się z tą instrukcją. Firma Sony nie odpowiada za szkody ani obrażenia wynikające z nieodpowiedniego obchodzenia się z produktem lub nieprawidłowej instalacji. Po zainstalowaniu produktu należy przekazać instrukcję instalacji klientom. Bezpieczeństwo Płytę montażową należy montować na ścianie, która jest odpowiednio wytrzymała i gruba. Nie należy opierać się o głośnik ani wieszać się na głośniku, ponieważ może on upaść. Czyszczenie Płytę montażową i osłonę płyty należy czyścić miękką ściereczką lekko zwilżoną łagodnym roztworem detergentu. Nie należy używać ostrych myjek, proszku do szorowania ani środków, takich jak rozcieńczalniki, benzyna lub alkohol. Jeżeli masz jakiekolwiek pytania lub problemy dotyczące systemu, skontaktuj się z najbliższym sprzedawcą produktów firmy Sony. Ten produkt jest przeznaczony tylko do współpracy z urządzeniem DAV-X10. Używanie go z innymi produktami lub do innych celów niż opisane w tej instrukcji może spowodować uszkodzenie produktu lub obrażenia użytkownika. Abmessungen ca. 119 × 75 × 164 mm (B/H/T) bzw. 170 × 129 × 189 mm (B/H/T) einschl. Lautsprecher (pro 1 Stück) Gewicht ca. 0,3 kg (pro 1 Stück) Änderungen, die dem technischen Fortschritt dienen, bleiben vorbehalten. Caratteristiche tecniche Dimensioni Circa 119 × 75 × 164 mm (l/a/p) 170 × 129 × 189 mm (l/a/p) comp. diffusore (per 1 pezzo) Peso Circa 0,3 kg (per 1 pezzo) Il design e le caratteristiche tecniche sono soggetti a modifiche senza preavviso. Technische gegevens Afmetingen Ca. 119 × 75 × 164 mm (b/h/d) 170 × 129 × 189 mm (b/h/d) incl. luidspreker (per stuk) Gewicht Ca. 0,3 kg (per stuk) Ontwerp en specificaties kunnen zonder voorafgaande kennisgeving worden gewijzigd. Specifications Dimensions Approx. 119 × 75 × 164 mm (4 3/4 × 3 × 6 1/2 in.) (w/h/d) 170 × 129 × 189 mm (6 3/4 × 5 1/8 × 7 1/2 in.) (w/h/d) incl. speaker (per 1 piece) Mass Approx. 0.3 kg (11 oz) (per 1 piece) Design and specifications are subject to change without notice. Tekniska specifikationer Dimensioner Cirka 119 × 75 × 164 mm (b/h/d) 170 × 129 × 189 mm (b/h/d) inklusive högtalare (per 1 del) Vikt Cirka 0,3 kg (per 1 del) Utförande och specifikationer kan komma att ändras utan föregående meddelande. Spécifications Dimensions Environ 119 × 75 × 164 mm (4 3/4 × 3 × 6 1/2 po.) (l/h/p) 170 × 129 × 189 mm (6 3/4 × 5 1/8 × 7 1/2 po.) (l/h/p) enceinte comprise (pour 1 pièce) Poids Environ 0,3 kg (11 livres) (pour 1 pièce) La conception et les spécifications sont sujettes à modification sans préavis. Especificaciones Środki ostrożności Technische Daten Dimensiones Aprox. 119 × 75 × 164 mm (an/al/prf) 170 × 129 × 189 mm (an/al/prf) incluido el altavoz (por cada pieza) Peso Aprox. 0,3 kg (por cada pieza) Diseño y especificaciones sujetos a cambios sin previo aviso. Dane techniczne Wymiary Ok. 119 × 75 × 164 mm (s/w/g) 170 × 129 × 189 mm (s/w/g) w tym głośnik (1 sztuka) Waga Ok. 0,3 kg (1 sztuka) Konstrukcja i dane techniczne mogą ulec zmianie bez uprzedzenia. Assembly Montage Refer to the illustrations on the right during the assembly process. Tightly attach the mounting plate () to the wall (making sure the wall is sufficiently thick) using 2 or more sufficient length screws (M4 or No. 8) (not supplied) so it is stable. Pass the speaker cord through the hole in the mounting plate. Push down and slide the plate cover () on the mounting plate. Connect the speaker cord (passed through the hole) to the speaker. Secure the speaker to the mounting plate using a supplied screw (). Ziehen Sie bei der Montage die Abbildungen rechts heran. Befestigen Sie die Montageplatte () mithilfe von mindestens 2 ausreichend langen Schrauben (M4 oder Nr. 8) (nicht mitgeliefert) sicher und fest an der Wand. Vergewissern Sie sich, dass die Wand dafür stark genug ist. Führen Sie das Lautsprecherkabel durch die Bohrung in der Montageplatte. Drücken Sie die Plattenabdeckung () nach unten und schieben Sie sie auf die Montageplatte. Schließen Sie das durch die Bohrung geführte Lautsprecherkabel an den Lautsprecher an. Befestigen Sie den Lautsprecher mit einer mitgelieferten Schraube () an der Montageplatte. Note Do not loosen the screws of the mounting plate or the screws to secure the speaker to the mounting plate during the assembly process. Montage Tout au long de la procédure de montage, reportez-vous aux illustrations de droite. Fixez solidement la plaque de fixation () au mur (en vérifiant que celui-ci est suffisamment épais) à l’aide d’au moins 2 vis de longueur suffisante (M4 ou No. 8) (non fournies) afin qu’elle soit stable. Faites passer le cordon de l’enceinte à travers l’orifice de la plaque de fixation. Abaissez et faites glisser le cache () sur la plaque de fixation. Raccordez le cordon de l’enceinte (à travers l’orifice) à l’enceinte. Fixez l’enceinte à la plaque de fixation à l’aide de la vis fournie (). Remarque Ne desserrez pas les vis de la plaque de fixation ou celles qui servent à fixer l’enceinte sur la plaque de fixation lors du montage. Montaje Consulte las ilustraciones que aparecen a la derecha durante el proceso de montaje. Coloque la placa de montaje correctamente () en la pared (asegúrese de que la pared es lo suficientemente gruesa) mediante dos o más tornillos de longitud suficiente (M4 o No. 8) (no suministrados) para que sea estable. Pase el cable del altavoz a través del orificio de la placa de montaje. Presione hacia abajo y deslice la cubierta de la placa () en la placa de montaje. Conecte el cable del altavoz (que ha pasado a través del orificio) al altavoz. Sujete el altavoz a la placa de montaje mediante el tornillo suministrado (). Nota No afloje los tornillos de la placa de montaje ni los tornillos que fijan el altavoz a la placa de montaje durante el proceso de montaje. Hinweis Lösen Sie beim Montieren nicht die Schrauben der Montageplatte oder die Schrauben, mit denen der Lautsprecher an der Montageplatte befestigt ist. Montaggio Durante l’operazione di montaggio fare riferimento alle illustrazioni riportate sulla destra. Fissare saldamente la piastra di montaggio () alla parete (accertandosi che la parete abbia uno spessore sufficiente) utilizzando 2 o più viti della lunghezza sufficiente (M4 o n. 8) (non in dotazione), in modo tale che sia stabile. Far passare il cavo del diffusore attraverso la cavità nella piastra di montaggio. Spingere verso il passo e far scorrere il copripiastra () sulla piastra di montaggio. Collegare il cavo del diffusore (fatto passare in precedenza attraverso la cavità) al diffusore. Fissare il diffusore alla piastra di montaggio utilizzando una vite in dotazione (). Nota Durante il montaggio non allentare le viti della piastra di montaggio o le viti che fissano il diffusore alla piastra di montaggio. Installatie Raadpleeg tijdens de installatie de illustraties aan de rechterkant. Bevestig de wandplaat () stevig aan de muur (zorg dat de muur dik genoeg is) met 2 of meer schroeven die voldoende lang zijn (M4 of Nr. 8) (niet bijgeleverd). Zorg dat de wandplaat stabiel is. Trek de luidsprekerkabel door de opening in de wandplaat. Druk de plaatdeksel naar beneden en schuif hem () over de wandplaat. Verbind de luidsprekerkabel (door de opening getrokken) met de luidspreker. Maak de luidspreker vast op de wandplaat met een bijgeleverde schroef (). Opmerking Maak de schroeven van de wandplaat of de schroeven die de luidspreker op de wandplaat bevestigen niet los tijdens de installatie. Not supplied Non fournies No suministrados Nicht mitgeliefert Non in dotazione Niet bijgeleverd Medföljer ej Brak w zestawie Montering Referera till bilderna till höger under monteringen. Fäst monteringsplattan () på väggen (och se till att väggen är tillräckligt tjock) med hjälp av 2 eller flera tillräckligt långa skruvar (M4 eller nr 8) (medföljer ej) så den är stabil. Led högtalarsladden genom hålet i monteringsplattan. För ner och skjut plattskyddet () på monteringsplattan. Anslut högtalarsladden (som du drar genom hålet) till högtalaren. Fäst högtalaren på monteringsplattan med hjälp av en medföljande skruv (). Observera! Lossa inte monteringsplattans skruvar eller skruvarna för att fästa högtalarna på fästplattan under monteringen. Montaż Podczas montażu należy korzystać z ilustracji po prawej stronie. Dokładnie dokręć płytę montażową () do ściany (ściana musi mieć odpowiednią grubość) za pomocą co najmniej 2 śrub o odpowiedniej długości (M4 lub nr 8) (brak w zestawie), tak aby płyta była stabilna. Przełóż przewód głośnika przez otwór w płycie montażowej. Wciśnij i przesuń osłonę płyty () na płycie montażowej. Podłącz przewód (przełożony przez otwór) do głośnika. Przymocuj głośnik do płyty montażowej za pomocą śruby dołączonej do zestawu (). Uwaga Podczas montażu nie należy odkręcać śrub płyty montażowej ani śrub mocujących głośnik do płyty montażowej. -
 1
1
-
 2
2


Sony WS-X10W de handleiding
- Categorie
- Accessoires voor het maken van koffie
- Type
- de handleiding
in andere talen
- English: Sony WS-X10W Owner's manual
- italiano: Sony WS-X10W Manuale del proprietario
- français: Sony WS-X10W Le manuel du propriétaire
- español: Sony WS-X10W El manual del propietario
- Deutsch: Sony WS-X10W Bedienungsanleitung
- svenska: Sony WS-X10W Bruksanvisning
- polski: Sony WS-X10W Instrukcja obsługi