

INHOUDSOPGAVE
1. VEILIGHEIDSINFORMATIE.......................................................................................3
2. VEILIGHEIDSVOORSCHRIFTEN.............................................................................. 4
3. BESCHRIJVING VAN HET PRODUCT..................................................................... 6
4. BEDIENING .............................................................................................................. 7
5. DAGELIJKS GEBRUIK............................................................................................... 7
6. AANWIJZINGEN EN TIPS...................................................................................... 10
7. ONDERHOUD EN REINIGING.............................................................................. 11
8. PROBLEEMOPLOSSING........................................................................................ 12
9. MONTAGE ..............................................................................................................15
10. TECHNISCHE INFORMATIE................................................................................18
VOOR PERFECTE RESULTATEN
Bedankt dat u voor dit AEG-product heeft gekozen. Dit apparaat is ontworpen
om vele jaren uitstekend te presteren, met innovatieve technologieën die het
leven gemakkelijker helpen maken met functies die gewone apparaten wellicht
niet hebben. Neem een paar minuten de tijd om het door te lezen zodat u er
optimaal van kunt profiteren.
Ga naar onze website voor:
Advies over gebruik, brochures, het oplossen van problemen en
onderhoudsinformatie:
www.aeg.com
Registreer uw product voor een betere service:
www.registeraeg.com
Koop accessoires, verbruiksartikelen en originele reserveonderdelen voor uw
apparaat:
www.aeg.com/shop
KLANTENSERVICE
Gebruik altijd originele onderdelen.
Als u contact opneemt met de klantenservice zorg dat u de volgende gegevens
bij de hand hebt: model, productnummer, serienummer.
Deze informatie wordt vermeld op het typeplaatje.
Waarschuwing / Belangrijke veiligheidsinformatie
Algemene informatie en tips
Milieu-informatie
Wijzigingen voorbehouden.
www.aeg.com2

1. VEILIGHEIDSINFORMATIE
Lees zorgvuldig de meegeleverde instructies voor
installatie en gebruik van het apparaat. De fabrikant is
niet verantwoordelijk voor letsel en schade veroorzaakt
door een foutieve installatie. Bewaar de instructies van
het apparaat voor toekomstig gebruik.
1.1 Veiligheid van kinderen en kwetsbare mensen
• Dit apparaat kan worden gebruikt door kinderen van 8
jaar en ouder en door mensen met beperkte
lichamelijke, zintuiglijke of verstandelijke vermogens
of een gebrek aan ervaring en kennis, indien zij onder
toezicht staan of instructies hebben gekregen over het
veilig gebruiken van het apparaat en indien zij de
eventuele gevaren begrijpen.
• Laat kinderen niet met het apparaat spelen.
• Reiniging en onderhoud mag niet worden uitgevoerd
door kinderen zonder toezicht.
• Houd alle verpakkingsmaterialen uit de buurt van
kinderen.
1.2
Algemene veiligheid
•
Dit apparaat is bedoeld voor huishoudelijk gebruik of
gelijksoortige toepassingen zoals:
– boerderijen, personeelskeukens in winkels,
kantoren of andere werkomgevingen
– Door gasten in hotels, motels, bed&breakfasts en
andere woonomgevingen
• Houd de ventilatieopeningen altijd vrij van
obstructies; dit geldt zowel voor losstaande als
ingebouwde modellen.
• Gebruik geen mechanische of andere middelen om
het ontdooiproces te versnellen, behalve die
middelen die door de fabrikant zijn aanbevolen.
• Let op dat u het koelcircuit niet beschadigt.
• Gebruik geen elektrische apparaten in de koelkast,
tenzij deze door de fabrikant worden aanbevolen.
NEDERLANDS
3

• Gebruik geen waterstralen of stoom om het apparaat
te reinigen.
• Maak het apparaat schoon met een vochtige, zachte
doek. Gebruik alleen neutrale schoonmaakmiddelen.
Gebruik geen schuurmiddelen, schuursponsjes,
oplosmiddelen of metalen voorwerpen.
• Bewaar geen explosieve substanties zoals spuitbussen
met drijfgas in dit apparaat.
• Als de voedingskabel beschadigd is, moet de
fabrikant of diens technische dienst of een
gekwalificeerd persoon deze vervangen teneinde
gevaarlijke situaties te voorkomen.
2. VEILIGHEIDSVOORSCHRIFTEN
2.1 Montage
WAARSCHUWING!
Alleen een erkende
installatietechnicus mag het
apparaat installeren.
• Verwijder alle verpakkingsmaterialen.
• Installeer en gebruik geen
beschadigd apparaat.
• Volg de installatie-instructies op die
zijn meegeleverd met het apparaat.
• Wees voorzichtig met het verplaatsen
van het apparaat, het is zwaar. Draag
altijd veiligheidshandschoenen.
• Zorg ervoor dat rond het apparaat
lucht kan circuleren.
• Wacht ten minste 4 uur alvorens het
apparaat aan de netstroom aan te
sluiten. Hierdoor kan de olie terug in
de compressor stromen.
• Installeer het apparaat niet in de
nabijheid van radiators, fornuizen,
ovens of kookplaten.
• De achterzijde van het apparaat moet
tegen de muur worden geplaatst.
• Installeer het apparaat niet op een
plaats met direct zonlicht.
• Gebruik dit apparaat niet in gebieden
die te vochtig of te koud zijn, zoals
bijgebouwen, garages of kelders.
• Til de voorkant van het apparaat op
als u hem wilt verplaatsen, om krassen
op de vloer te voorkomen.
2.2 Aansluiting op het
elektriciteitsnet
WAARSCHUWING!
Gevaar voor brand en
elektrische schokken.
• Dit apparaat moet worden
aangesloten op een geaard
stopcontact.
• Controleer of de elektrische
informatie op het typeplaatje
overeenkomt met de
stroomvoorziening. Zo niet, neem dan
contact op met een elektromonteur.
• Gebruik altijd een correct ge?
stalleerd, schokbestendig
stopcontact.
• Gebruik geen meerwegstekkers en
verlengsnoeren.
• Zorg dat u de elektrische onderdelen
(hoofdstekker, kabel, compressor) niet
beschadigt. Neem contact met de
Servicedienst of een elektrotechnicus
om de elektrische onderdelen te
wijzigen.
• De stroomkabel moet lager blijven
dan het niveau van de stopcontact.
• Steek de stekker pas in het
stopcontact als de installatie is
voltooid. Zorg ervoor dat het
netsnoer na installatie bereikbaar is.
• Trek niet aan het netsnoer om het
apparaat los te koppelen. Trek altijd
aan de stekker.
www.aeg.com4

2.3 Gebruik
WAARSCHUWING!
Gevaar op letsel,
brandwonden of elektrische
schokken.
• De specificatie van het apparaat mag
niet worden veranderd.
• Plaats geen elektrische apparaten
(bijv. ijsmachines) in het apparaat
tenzij uitdrukkelijk geschikt verklaard
door de fabrikant.
• Zorg ervoor dat u het koelcircuit niet
beschadigt. Het bevat isobutaan
(R600a), aardgas met een hoge
ecologische compatibiliteit. Dit gas is
ontvlambaar.
• Als er schade aan het koelcircuit
optreedt, zorg er dan voor dat er zich
geen vlammen en andere
ontstekingsbronnen in de kamer
bevinden. Ventileer de kamer goed.
• Zet geen hete items op de
kunststofonderdelen van het
apparaat.
• Plaats geen koolzuurhoudende
dranken in het vriesvak. Dit zal extra
druk in de drankfles veroorzaken.
• Bewaar geen ontvlambare gassen en
vloeistoffen in het apparaat.
• Plaats geen ontvlambare producten
of items die vochtig zijn door
ontvlambare producten in, bij of op
het apparaat.
• Raak de compressor of condensator
niet aan. Ze zijn heet.
• Zorg ervoor dat u nooit met natte of
vochtige handen items uit het vriesvak
verwijderd of aanraakt.
• Vries ontdooide voedingswaren nooit
opnieuw in.
• Bewaar de voedingswaren volgens de
instructies op de verpakking.
2.4 Onderhoud en reiniging
WAARSCHUWING!
Gevaar voor letsel of schade
aan het apparaat.
• Schakel het apparaat uit en trek de
stekker uit het stopcontact voordat u
onderhoudshandelingen verricht.
• Het koelcircuit van dit apparaat bevat
koolwaterstoffen. Enkel bevoegde
personen mogen de eenheid
onderhouden en herladen.
• Controleer regelmatig de afvoer van
het apparaat en reinig het indien
nodig. Indien de afvoer verstopt is, zal
er water op de bodem van het
apparaat liggen.
2.5 Verwijdering
WAARSCHUWING!
Gevaar voor letsel of
verstikking.
• Haal de stekker uit het stopcontact.
• Snij het netsnoer van het apparaat af
en gooi dit weg.
• Verwijder de deur om te voorkomen
dat kinderen en huisdieren
opgesloten raken in het apparaat.
• Het koelcircuit en de
isolatiematerialen van dit apparaat
zijn ozonvriendelijk.
• Het isolatieschuim bevat ontvlambare
gassen. Neem contact met uw
plaatselijke overheid voor informatie
m.b.t. correcte afvalverwerking van
het apparaat.
• Veroorzaak geen schade aan het deel
van de koeleenheid dat zich naast de
warmtewisselaar bevindt.
NEDERLANDS
5

3. BESCHRIJVING VAN HET PRODUCT
3.1 Productoverzicht
753 41 2
9 8
6
1
Groentelades
2
Kastplateaus
3
DYNAMICAIR-functie
4
Flessenrek
5
Bedieningspaneel
6
Deurplateaus
7
Flessenrek
8
Vrieslades
9
Typeplaatje
www.aeg.com6

4. BEDIENING
4.1 Bedieningspaneel
1
3 2
1
Temperatuurweergave LED
2
FROSTMATIC
3
Temperatuurknop
4.2 Inschakelen
Steek dan de stekker in het stopcontact.
4.3 FROSTMATIC-functie
U kunt de FROSTMATIC-functie
inschakelen door te drukken op de
FROSTMATIC-knop.
De LED die bij het symbool
FROSTMATIC hoort gaat branden.
U kunt de FROSTMATIC-functie
inschakelen door te drukken op de
FROSTMATIC-knop.
Het FROSTMATIC-indicatielampje gaat
branden.
Deze functie stopt
automatisch na 52 uur.
4.4 Temperatuurregeling
Houd om het apparaat te bedienen de
thermostaatknop ingedrukt tot de LED
van de gewenste temperatuur brandt.
De selectie loopt van 2°C tot 8°C
Áls de knop één keer wordt aangeraakt,
blijft de huidige instelling LED
knipperen.
Elke keer dat de knop wordt aangeraakt,
verplaatst de ingestelde temperatuur 1
positie. De bijbehorende LED knippert
even.
Druk de instelknop in tot de vereiste
temperatuur is geselecteerd. De
instelling wordt vastgezet
Koudste instelling: +2°C.
Warmste instelling: +8°C.
Een gemiddelde instelling is
over het algemeen het
meest geschikt.
De exacte instelling moet echter worden
gekozen rekening houdend met het feit
dat de temperatuur in het apparaat
afhankelijk is van:
• de kamertemperatuur
• hoe vaak de deur wordt geopend
• de hoeveelheid voedsel die wordt
bewaard
• de plek van het apparaat
5. DAGELIJKS GEBRUIK
5.1 Invriezen van vers voedsel
Het vriesvak is geschikt voor het
invriezen van vers voedsel en om
diepvriesvoedsel langere tijd te bewaren.
Om vers voedsel in te vriezen, activeer
de FROSTMATIC-functie ten minste 24
uur voordat u het in te vriezen voedsel in
het vriesvak legt.
NEDERLANDS
7

Plaats het verse in te vriezen voedsel het
onderste vak.
De maximale hoeveelheid voedsel die in
24 uur ingevroren kan worden, staat
vermeld op het typeplaatje, een etiket
dat zich aan de binnenkant van het
apparaat bevindt.
Het invriesproces duurt 24 uur. voeg
tijdens deze periode geen ander voedsel
toe om in te vriezen.
Wanneer het invriesproces is voltooid, de
vereiste temperatuur weer instellen (zie
"FROSTMATIC-functie").
In deze conditie komt de
temperatuur in het
koelkastgedeelte mogelijk
onder de 0°C. Als dit het
geval is, stelt u de
thermostaatknop weer in op
een warmere instelling.
5.2 Het bewaren van
ingevroren voedsel
Als u het apparaat voor het eerst of na
een periode dat het niet gebruikt is
inschakelt, dient u het apparaat minstens
2 uur te laten werken met de
FROSTMATIC functie ingeschakeld.
Als er grote hoeveelheden voedsel
bewaard moeten worden, dient u alle
laden en korven uit het apparaat te
verwijderen en het voedsel op het glazen
schap te zetten, hiermee verkrijgt u het
beste resultaat.
In het geval van onbedoelde
ontdooiing, bijvoorbeeld als
de stroom langer is
uitgevallen dan de duur die
op de kaart met technische
kenmerken onder
"tijdsduur" is vermeld, moet
het ontdooide voedsel snel
geconsumeerd worden of
onmiddellijk bereid worden
en dan weer worden
ingevroren (nadat het
afgekoeld is)
5.3 Ontdooien
Diepgevroren of ingevroren voedsel kunt
u, voordat het gebruikt wordt, in het
koelvak of op kamertemperatuur laten
ontdooien, afhankelijk van de
hoeveelheid tijd die hiervoor nodig is.
Kleine stukken kunnen zelfs rechtstreeks
vanuit de vriezer gekookt worden als ze
nog bevroren zijn: in dat geval zal de
bereiding iets langer duren.
5.4 DYNAMICAIR
Met de DYNAMICAIR-functie wordt
voedsel snel gekoeld en wordt de
temperatuur in de koelkast gelijkmatiger.
Druk om DYNAMICAIR in te schakelen
op de schakelaar (A).
Het groene lampje (B) gaat aan.
A
B
Activeer de voorziening als
de omgevingstemperatuur
hoger is dan 25°C.
5.5 Het plaatsen van de
deurplateaus
Om het bewaren van voedselpakketten
van verschillende afmetingen mogelijk te
maken, kunnen de schappen op
verschillende hoogtes worden geplaatst.
Om deze aanpassingen uit te voeren,
gaat u als volgt te werk:
1. Trek het schap geleidelijk in de
richting van de pijlen totdat het los
komt
www.aeg.com8

2. Opnieuw plaatsen zoals gewenst.
Om een goede
luchtcirculatie te
garanderen moet het
onderste deurschap niet
worden verwijderd
5.6 Verplaatsbare legrekken
De wanden van de koelkast zijn voorzien
van een aantal geleiders zodat de
legplateaus op de gewenste plaats gezet
kunnen worden.
Sommige schappen moeten aan de
achterkant worden opgetild om ze te
kunnen verwijderen.
Verwijder de glasplaat
boven de groentelade niet
om een goede
luchtcirculatie te
garanderen.
5.7 Flessenrek
Plaats de flessen (met de openingen naar
voren gericht) in het voorgeplaatste
schap.
Plaats alleen dichte flessen.
5.8 Vriesmandjes uit de vriezer
verwijderen
De vriesmandjes hebben een limietstop
om te voorkomen dat ze per ongeluk
verschuiven of vallen. Trek de korf naar u
toe om het uit de vriezer te halen, tot het
niet verder kan, verwijder de korf door
de voorkant naar boven te kantelen.
2
1
Bij het terugzetten tilt u de voorkant van
de korf een beetje op en schuift u hem
gekanteld in de vriezer. Zodra het
mandje over de eindpunten heen is, kunt
u hem terug op zijn plaats schuiven.
NEDERLANDS
9

6. AANWIJZINGEN EN TIPS
6.1 Normale bedrijfsgeluiden:
De volgende geluiden zijn normaal
tijdens de werking:
• Een zacht gorgelend en borrelend
geluid als het koelmiddel door
leidingen wordt gepompt.
• Een zoemend en kloppend geluid van
de compressor als het koelmiddel
wordt rondgepompt.
• Een plotseling krakend geluid uit de
binnenkant van het apparaat
veroorzaakt door thermische
uitzetting (een natuurlijk en
ongevaarlijk natuurkundig fenomeen).
• Een zacht klikkend geluid van de
thermostaat als de compressor aan of
uit gaat.
6.2 Tips voor
energiebesparing
• De deur niet vaker openen of open
laten staan dan strikt noodzakelijk.
6.3 Tips voor het koelen van
vers voedsel
Om de beste prestatie te verkrijgen:
• zet geen warm voedsel of
verdampende vloeistoffen in de
koelkast
• dek het voedsel af of verpak het, in
het bijzonder als het een sterke geur
heeft
• plaats het voedsel zodanig dat de
lucht er vrijelijk omheen kan circuleren
6.4 Tips voor het koelen
Nuttige tips:
• Vlees (alle soorten): in plastic zakken
verpakken en op het glazen schap
leggen, boven de groentelade.
• Bewaar het, voor de veiligheid,
slechts een of maximaal twee dagen
op deze manier.
• Gekookt voedsel, koude schotels,
enz: deze moeten afgedekt worden
en mogen op willekeurig welk schap
gezet worden.
• Fruit en groente: deze moeten
zorgvuldig schoongemaakt worden
en in de speciaal daarvoor bedoelde
lade(n) geplaatst worden.
• Boter en kaas: dit moet in speciale
luchtdichte bakjes gelegd of in
aluminiumfolie of plastic zakjes
gewikkeld worden om zoveel mogelijk
lucht in te sluiten.
• Flessen: deze moeten een dop
hebben en opgeslagen worden
oftewel in het flessenrek of het
deurflessenrek (indien voorzien).
• Bananen, aardappelen, uien en
knoflook, indien niet verpakt, mogen
niet in de koelkast bewaard worden.
6.5 Tips voor het invriezen
Om u te helpen het voedsel zo goed
mogelijk in te vriezen, volgen hier een
paar belangrijke tips:
• De maximale hoeveelheid voedsel die
in 24 uur ingevroren kan worden,
wordt vermeld op het typeplaatje.
• Het invriesproces duurt 24 uur. Voeg
gedurende deze periode niet meer in
te vriezen voedsel toe
• vries alleen vers en grondig
schoongemaakte levensmiddelen van
uitstekende kwaliteit in
• bereid het voedsel in kleine porties
voor, zo kan het snel en volledig
worden ingevroren en zo kunt u later
alleen die hoeveelheid laten
ontdooien die u nodig heeft
• Wikkel het voedsel in aluminiumfolie
of plastic en zorg ervoor dat de pakjes
luchtdicht zijn
• leg vers, nog niet ingevroren voedsel
niet tegen het al ingevroren voedsel,
om te voorkomen dat dit laatste warm
wordt
• Mager voedsel kan beter worden
ingevroren dan vet voedsel. Zout
zorgt dat het voedsel minder lang in
de vriezer goed blijft
• Water bevriest, als dit rechtstreeks uit
het vriesvak geconsumeerd wordt,
kan het aan de huid vastvriezen
• Het is aan te bevelen de invriesdatum
op elk pakje te vermelden, dan kunt u
zien hoe lang het al bewaard is.
www.aeg.com10

6.6 Tips voor het bewaren van
ingevroren voedsel
Om de beste resultaten van dit apparaat
te verkrijgen, dient u
• verzeker u ervan dat de commercieel
ingevroren levensmiddelen op
geschikte wijze door de
detailhandelaar werden opgeslagen;
• zorg ervoor dat de ingevroren
levensmiddelen zo snel mogelijk van
de winkel naar uw vriezer gebracht
worden;
• de deur niet vaker te openen of open
te laten staan dan strikt noodzakelijk;
• als voedsel eenmaal ontdooid is,
bederft het snel en kan het niet
opnieuw worden ingevroren;
• bewaar het voedsel niet langer dan
de door de fabrikant aangegeven
bewaarperiode.
7. ONDERHOUD EN REINIGING
WAARSCHUWING!
Raadpleeg de hoofdstukken
Veiligheid.
7.1 Algemene waarschuwingen
LET OP!
Voordat u welke
onderhoudshandeling dan
ook verricht, de stekker uit
het stopcontact trekken.
Dit apparaat bevat
koolwaterstoffen in de
koeleenheid. Onderhoud en
hervullen mag alleen
uitgevoerd worden door
bevoegde technici.
De toebehoren en
onderdelen van het
apparaat zijn niet geschikt
om in een afwasmachine
gewassen te worden.
7.2 Eerste inschakeling
LET OP!
Laat, voordat u de stekker in
het stopcontact steekt en de
koelkast voor de eerste keer
aanzer, het apparaat eerst
minimaal 4 uur rechtop
staan. De olie heeft dan
genoeg tijd om terug te
keren naar de compressor.
Anders kunnen de
compressor of de
elektronische onderdelen
beschadigd raken.
7.3 De binnenkant
schoonmaken
Voordat u het apparaat voor de eerste
keer gebruikt, wast u de binnenkant en
de interne accessoires met lauwwarm
water en een beetje neutrale zeep om de
typische geur van een nieuw product
weg te nemen. Droog daarna grondig af.
LET OP!
Gebruik geen
oplosmiddelen of
schuurmiddelen. Deze
beschadigen de lak.
7.4 Periodieke reiniging
LET OP!
Trek niet aan leidingen en/of
kabels aan de binnenkant
van de kast en verplaats of
beschadig ze niet.
LET OP!
Zorg ervoor dat u het
koelsysteem niet
beschadigt.
LET OP!
Til de voorkant van de
koelkast op als u hem wilt
verplaatsen, om krassen op
de vloer te voorkomen.
NEDERLANDS
11

Het apparaat moet regelmatig worden
schoongemaakt:
1. Maak de binnenkant en de
accessoires schoon met lauw water
en wat neutrale zeep.
2. Controleer de afdichtingen
regelmatig en wrijf ze schoon om u
ervan te verzekeren dat ze schoon en
vrij van restjes zijn.
3. Spoel ze af en maak ze grondig
droog.
4. Maak indien toegankelijk de
condensor en de compressor aan de
achterkant van het apparaat schoon
met een borstel.
Deze handeling zal de prestatie van
het apparaat verbeteren en het
elektriciteitsverbruik besparen.
7.5 Periodes dat het apparaat
niet gebruikt wordt
Neem de volgende
voorzorgsmaatregelen als het apparaat
gedurende lange tijd niet gebruikt
wordt:
1. Trek de stekker uit het stopcontact.
2. verwijder al het voedsel
3. Maak het apparaat en alle
toebehoren schoon.
4. Laat de deur/deuren open staan om
onaangename luchtjes te
voorkomen.
WAARSCHUWING!
Als uw apparaat aan blijft
staan, vraag dan iemand om
het zo nu en dan te
controleren, om te
voorkomen dat het
bewaarde voedsel bederft
als de stroom uitvalt.
7.6 Het ontdooien van de
koelkast
Rijp wordt elke keer als de
compressormotor tijdens normale
werking stopt, automatisch van de
verdamper van het koelvak verwijderd.
Het dooiwater loopt via een gootje in
een speciale opvangbak aan de
achterkant van het apparaat, boven de
compressormotor, waar het verdampt.
Het is belangrijk om het afvoergaatje van
het dooiwater in het midden van het
koelvak regelmatig schoon te maken om
te voorkomen dat het water overloopt en
op het voedsel in de koelkast gaat
druppelen.
7.7 De vriezer ontdooien
Het vriesvak is vorstvrij. Dit betekent dat
er geen rijp gevormd wordt als het
vriesvak werkt, noch op de
binnenwanden, noch op het voedsel
Dit komt door de continue circulatie van
koude lucht binnen het vak door een
automatisch aangedreven ventilator
8.
PROBLEEMOPLOSSING
WAARSCHUWING!
Raadpleeg de hoofdstukken
Veiligheid.
www.aeg.com12

8.1 Wat moet u doen als…
Probleem Mogelijke oorzaak Oplossing
Het apparaat werkt niet. Het apparaat is uitgescha-
keld.
Zet het apparaat aan.
De stekker zit niet goed in
het stopcontact.
Steek de stekker goed in het
stopcontact.
Er staat geen spanning op
het stopcontact.
Sluit een ander elektrisch ap-
paraat op het stopcontact aan.
Neem contact op met een
gekwalificeerd elektricien.
Het apparaat maakt lawaai. Het apparaat is niet stevig
en stabiel geplaatst.
Controleer of het apparaat
stabiel staat.
Het lampje werkt niet. Het lampje staat in de
stand-by stand.
Sluit en open de deur.
Het lampje werkt niet. Het lampje is stuk. Neem contact op met de
dichtstbijzijnde klantenservice.
De compressor werkt con-
tinu.
De temperatuur is goed in-
gesteld.
Raadpleeg het hoofdstuk 'Be-
diening'.
Er worden veel producten
tegelijk geplaatst.
Wacht een paar uur en con-
troleer dan nogmaals de tem-
peratuur.
De omgevingstemperatuur
is te hoog.
Zie het typeplaatje voor de kli-
maatklasse.
Het voedsel dat in het ap-
paraat werd geplaatst, was
te warm.
Laat voedsel afkoelen tot ka-
mertemperatuur voordat u het
opslaat
De deur is niet goed
gesloten.
Zie 'De deur sluiten'.
De functie FROSTMATIC is
ingeschakeld.
Raadpleeg " FROSTMATIC
functie".
De compressor start niet on-
middellijk na het drukken op
FROSTMATIC of na het ve-
randeren van de tempera-
tuur.
Dit is normaal, er is geen
storing.
De compressor start na enige
tijd.
Er loopt water in de koel-
kast.
De waterafvoer is verstopt. Reinig de waterafvoer.
Producten verhinderen dat
het water in de waterop-
vangbak loopt.
Zorg ervoor dat de producten
de achterwand niet raken.
NEDERLANDS
13

Probleem Mogelijke oorzaak Oplossing
Er ligt water op de vloer. De dooiwaterafvoer is niet
aangesloten op de ver-
damperbak boven de
compressor.
Maak de dooiwaterafvoer vast
op de verdamperbak.
De temperatuur kan niet
worden ingesteld.
De functie FROSTMATIC
of COOLMATIC is inge-
schakeld.
Schakel FROSTMATIC of
COOLMATIC handmatig uit,
of wacht tot de functie autom-
atisch reset om de tempera-
tuur in te stellen. Zie "FROST-
MATIC of COOLMATIC func-
tie".
De deur is verkeerd uitge-
lijnd of komt tegen het ven-
tilatierooster aan.
Het apparaat staat niet wa-
terpas.
Zie 'Waterpas zetten'.
De temperatuur in het appa-
raat is te laag/hoog.
De temperatuurknop is
niet goed ingesteld.
Stel een hogere/lagere tem-
peratuur in.
De deur is niet goed
gesloten.
Zie 'De deur sluiten'.
De temperatuur van het
voedsel is te hoog.
Laat het voedsel afkoelen tot
kamertemperatuur voordat u
het conserveert.
Er worden veel producten
tegelijk bewaard.
Conserveer minder producten
tegelijk.
De deur is te vaak geo-
pend.
Open de deur alleen als het
nodig is.
De functie FROSTMATIC is
ingeschakeld.
Raadpleeg "FROSTMATIC
functie".
Er is geen koude luchtcir-
culatie in het apparaat
aanwezig.
Zorg ervoor dat er koude
luchtcirculatie in het apparaat
aanwezig is.
Bel, wanneer het advies niet
tot resultaten leidt, de
dichtstbijzijnde
klantenservice voor dit merk.
8.2 De deur sluiten
1. Maak de afdichtingen van de deur
schoon.
2. Stel de deur, indien nodig, af.
Raadpleeg "Montage".
3. Vervang, indien nodig, de defecte
deurafdichtingen. Neem contact op
met de klantenservice.
8.3 Het lampje vervangen
Het apparaat is uitgerust met een LED-
binnenlampje dat een lange levensduur
heeft.
Alleen een onderhoudsmonteur mag de
verlichting vervangen. Neem contact op
met de klantenservice.
www.aeg.com14

9. MONTAGE
WAARSCHUWING!
Raadpleeg de hoofdstukken
Veiligheid.
9.1 Opstelling
Het apparaat moet geïnstalleerd worden
op een droge, goed geventileerde plaats
binnen waar de omgevingstemperatuur
overeenkomt met de klimaatklasse die
vermeld is op het typeplaatje van het
apparaat:
Klimaat-
klasse
Omgevingstemperatuur
SN +10°C tot + 32°C
N +16°C tot + 32°C
ST +16°C tot + 38°C
T +16°C tot + 43°C
Bij bepaalde modeltypes
kunnen er functionele
problemen ontstaan als deze
temperaturen niet worden
gerespecteerd. De juiste
werking van het apparaat
kan enkel gegarandeerd
worden als het opgegeven
temperatuurbereik wordt
gerespecteerd. Als u vragen
hebt m.b.t. de
montagelocatie van het
apparaat, raadpleeg dan de
dealer, uw klantenservice of
de dichtstbijzijnde
technische dienst
9.2 Locatie
De stroomtoevoer aan het
apparaat moet verbroken
kunnen worden; de stekker
moet daarom na de
installatie gemakkelijk
toegankelijk zijn.
Het apparaat moet ver van hittebronnen,
zoals radiatoren, boilers, direct zonlicht
enz., vandaan worden geïnstalleerd. Zorg
er voor dat lucht vrij kan circuleren aan
de achterkant van het keukenkastje. Als
het apparaat onder een wandkast wordt
geplaatst, moet de minimale afstand
tussen de bovenkant van de kast en de
wandkast ten minste 100 mm bedragen
om optimale prestaties te garanderen.
Voor de beste prestaties kunt u het
apparaat echter beter niet onder een
wandkast zetten. De afstelbare voetjes
aan de onderkant van het apparaat
garanderen een nauwkeurig horizontale
uitlijning.
A
B
100 mm
min
20 mm
LET OP!
Om een goede werking te
garanderen bij
omgevingstemperaturen van
meer dan 38°C raden we aan
om een afstand van 30 mm
rond de zijkanten van het
apparaat te handhaven.
9.3 Aansluiting op het
elektriciteitsnet
• Zorg er vóór het aansluiten voor dat
het voltage en de frequentie op het
typeplaatje overeenkomen met de
stroomtoevoer in uw huis.
• Dit apparaat moet worden
aangesloten op een geaard
stopcontact. De netsnoerstekker is
voorzien van een contact voor dit
doel Als het stopcontact niet geaard
is, sluit het apparaat dan aan op een
afzonderlijk aardepunt, in
NEDERLANDS
15

overeenstemming met de geldende
regels, raadpleeg hiervoor een
gekwalificeerd elektricien
• De fabrikant kan niet aansprakelijk
gesteld worden als bovenstaande
veiligheidsvoorschriften niet
opgevolgd worden.
• Dit apparaat voldoet aan de EU-
richtlijnen.
9.4 Nivellering
Zorg ervoor dat het apparaat waterpas
staat wanneer u het plaatst. Deze stand
kan bereikt worden met de twee
afstelbare voetjes die aan de voorkant en
onderkant van het apparaat bevestigd
zijn.
9.5 Omkeerbaarheid van de
deur
WAARSCHUWING!
Voordat werkzaamheden
worden uitgevoerd, moet u
zich ervan verzekeren dat de
stekker uit het stopcontact is
getrokken.
LET OP!
Om de volgende
handelingen uit te voeren,
raden we aan dit te doen
met de hulp van iemand
anders die de deuren van
het apparaat tijdens de
werkzaamheden stevig
vasthoudt.
1. Open de deur en verwijder de
legplanken.
2. Draai de schroeven van het bovenste
scharnier (1) los.
2
1
3. Verwijder de deur van de draaipen
van het middelste scharnier (2).
4. Plaats de deksel van het bovenste
scharnier in de gaten aan de
tegenoverliggende zijde.
5. Draai de schroeven van het
middelste scharnier los (3).
6. Verwijder de pluggen aan de
bovenzijde van beide deuren en
verplaats deze naar de andere kant.
7. Verwijder de onderkant van de deur
van de draaipen van het onderste
scharnier (4).
4
3
8. Schroef de draaipen van het
onderste scharnier (5) los en schroef
de draaipen van het onderste
scharnier (6) in het linker gat van het
onderste scharnier.
www.aeg.com16

5
6
9. Schroef de schroeven van het
onderste scharnier los en verwijder
het scharnier (8).
10. Schroef de onderste afdekpluggen
los en schroef ze in het gat aan de
andere zijde (7).
11. Plaats het onderste scharnier aan de
andere zijde en maak het vast d.m.v.
de schroeven (8).
7
8
12. Plaats de onderkant van de deur op
de draaipen van het onderste
scharnier (9).
13. Schroef de middelste afdekpluggen
los en schroef ze in het gat aan de
andere zijde (10).
14. Plaats het middelste scharnier aan de
andere zijde en maak het vast d.m.v.
de schroeven (11).
10
9
180
o
11
15. Plaats de bovenkant van de deur op
de draaipen van het middelste
scharnier (12).
16. Bevestig de deur aan het bovenste
scharnier en maak vast d.m.v. de
schroeven (13).
12
13
17. Bevestig de deurgrepen en pluggen
aan de tegenovergestelde zijde.
A
A
C
C
B
B
NEDERLANDS
17

Voer een eindcontrole uit en
verzeker u ervan dat:
• Alle schroeven zijn
aangedraaid.
• De magnetische
afdichtstrip vast zit aan
de kast.
• De deur goed open en
dicht gaat.
Als de
omgevingstemperatuur laag
is (bijv. in de winter), kan het
zijn dat het deurrubber niet
precies op de kast past.
Wacht in dat geval tot de
deurrubber zich op een
natuurlijke wijze zet.
Als u bovenstaande
handelingen liever niet zelf
uitvoert, neem dan contact
op met de dichtstbijzijnde
klantenservice. Een vakman
van de klantenservice zal de
draairichting van de deuren
op uw kosten veranderen.
10. TECHNISCHE INFORMATIE
10.1 Technische gegevens
Hoogte mm 2005
Breedte mm 595
Diepte mm 642
Maximale bewaartijd bij stroomuitval uur 18
Spanning Volt 230 - 240
Frequentie Hz 50
De technische gegevens staan op het
typeplaatje aan de bonne- of buitenkant
van het apparaat en op het energielabel.
11. MILIEUBESCHERMING
Recycle de materialen met het symbool
. Gooi de verpakking in een geschikte
verzamelcontainer om het te recyclen.
Help om het milieu en de
volksgezondheid te beschermen en
recycle het afval van elektrische en
elektronische apparaten. Gooi apparaten
gemarkeerd met het symbool niet weg
met het huishoudelijk afval. Breng het
www.aeg.com18

product naar het milieustation bij u in de
buurt of neem contact op met de
gemeente.
NEDERLANDS
19

CONTENTS
1. SAFETY INFORMATION.........................................................................................21
2. SAFETY INSTRUCTIONS........................................................................................ 22
3. PRODUCT DESCRIPTION...................................................................................... 24
4. OPERATION............................................................................................................ 25
5. DAILY USE................................................................................................................25
6. HINTS AND TIPS..................................................................................................... 28
7. CARE AND CLEANING.......................................................................................... 29
8. TROUBLESHOOTING.............................................................................................30
9. INSTALLATION....................................................................................................... 32
10. TECHNICAL INFORMATION...............................................................................36
FOR PERFECT RESULTS
Thank you for choosing this AEG product. We have created it to give you
impeccable performance for many years, with innovative technologies that help
make life simpler features you might not find on ordinary appliances. Please
spend a few minutes reading to get the very best from it.
Visit our website for:
Get usage advice, brochures, trouble shooter, service information:
www.aeg.com
Register your product for better service:
www.registeraeg.com
Buy Accessories, Consumables and Original spare parts for your appliance:
www.aeg.com/shop
CUSTOMER CARE AND SERVICE
Always use original spare parts.
When contacting our Authorised Service Centre, ensure that you have the
following data available: Model, PNC, Serial Number.
The information can be found on the rating plate.
Warning / Caution-Safety information
General information and tips
Environmental information
Subject to change without notice.
www.aeg.com20

1. SAFETY INFORMATION
Before the installation and use of the appliance,
carefully read the supplied instructions. The
manufacturer is not responsible if an incorrect
installation and use causes injuries and damages. Always
keep the instructions with the appliance for future
reference.
1.1 Children and vulnerable people safety
• This appliance can be used by children aged from 8
years and above and persons with reduced physical,
sensory or mental capabilities or lack of experience
and knowledge if they have been given supervision or
instruction concerning use of the appliance in a safe
way and understand the hazards involved.
• Do not let children play with the appliance.
• Cleaning and user maintenance shall not be made by
children without supervision.
• Keep all packaging away from children.
1.2
General Safety
•
This appliance is intended to be used in household
and similar applications such as:
– Farm houses; staff kitchen areas in shops, offices
and other working environments
– By clients in hotels, motels, bed and breakfast and
other residential type environments
• Keep ventilation openings, in the appliance enclosure
or in the built-in structure, clear of obstruction.
• Do not use mechanical devices or other means to
accelerate the defrosting process, other than those
recommended by the manufacturer.
• Do not damage the refrigerant circuit.
• Do not use electrical appliances inside the food
storage compartments of the appliance, unless they
are of the type recommended by the manufacturer.
ENGLISH
21

• Do not use water spray and steam to clean the
appliance.
• Clean the appliance with a moist soft cloth. Only use
neutral detergents. Do not use abrasive products,
abrasive cleaning pads, solvents or metal objects.
• Do not store explosive substances such as aerosol
cans with a flammable propellant in this appliance.
• If the supply cord is damaged, it must be replaced by
the manufacturer, its service agent or similarly
qualified persons in order to avoid a hazard.
2. SAFETY INSTRUCTIONS
2.1 Installation
WARNING!
Only a qualified person must
install this appliance.
• Remove all the packaging.
• Do not install or use a damaged
appliance.
• Obey the installation instruction
supplied with the appliance.
• Always be careful when you move the
appliance because it is heavy. Always
wear safety gloves.
• Make sure the air can circulate around
the appliance.
• Wait at least 4 hours before
connecting the appliance to the
power supply. This is to allow the oil
to flow back in the compressor.
• Do not install the appliance close to
radiators or cookers, oven or hobs.
• The rear of the appliance must stand
against the wall.
• Do not install the appliance where
there is direct sunlight.
• Do not install this appliance in areas
that are too humid or too colds, such
as the construction appendices,
garages or wine cellars.
• When you move the appliance, lift it
by the front edge to avoid scratching
the floor.
2.2 Electrical connection
WARNING!
Risk of fire and electrical
shock.
• The appliance must be earthed.
• Make sure that the electrical
information on the rating plate agrees
with the power supply. If not, contact
an electrician.
• Always use a correctly installed
shockproof socket.
• Do not use multi-plug adapters and
extension cables.
• Make sure not to cause damage to
the electrical components (e.g. mains
plug, mains cable, compressor).
Contact the Service or an electrician
to change the electrical components.
• The mains cable must stay below the
level of the mains plug.
• Connect the mains plug to the mains
socket only at the end of the
installation. Make sure that there is
access to the mains plug after the
installation.
• Do not pull the mains cable to
disconnect the appliance. Always pull
the mains plug.
2.3 Use
WARNING!
Risk of injury, burns,
electrical shock or fire.
www.aeg.com22

• Do not change the specification of
this appliance.
• Do not put electrical appliances (e.g.
ice cream makers) in the appliance
unless they are stated applicable by
the manufacturer.
• Be careful not to cause damage to
the refrigerant circuit. It contains
isobutane (R600a), a natural gas with a
high level of environmental
compatibility. This gas is flammable.
• If damage occurs to the refrigerant
circuit, make sure that there are no
flames and sources of ignition in the
room. Ventilate the room.
• Do not let hot items to touch the
plastic parts of the appliance.
• Do not put soft drinks in the freezer
compartment. This will create
pressure on the drink container.
• Do not store flammable gas and
liquid in the appliance.
• Do not put flammable products or
items that are wet with flammable
products in, near or on the appliance.
• Do not touch the compressor or the
condenser. They are hot.
• Do not remove or touch items from
the freezer compartment if your hands
are wet or damp.
• Do not freeze again food that has
been thawed.
• Obey the storage instructions on the
packaging of frozen food.
2.4 Care and cleaning
WARNING!
Risk of injury or damage to
the appliance.
• Before maintenance, deactivate the
appliance and disconnect the mains
plug from the mains socket.
• This appliance contains hydrocarbons
in the cooling unit. Only a qualified
person must do the maintenance and
the recharging of the unit.
• Regularly examine the drain of the
appliance and if necessary, clean it. If
the drain is blocked, defrosted water
collects in the bottom of the
appliance.
2.5 Disposal
WARNING!
Risk of injury or suffocation.
• Disconnect the appliance from the
mains supply.
• Cut off the mains cable and discard it.
• Remove the door to prevent children
and pets to be closed inside of the
appliance.
• The refrigerant circuit and the
insulation materials of this appliance
are ozone-friendly.
• The insulation foam contains
flammable gas. Contact your
municipal authority for information on
how to discard the appliance
correctly.
• Do not cause damage to the part of
the cooling unit that is near the heat
exchanger.
ENGLISH
23

3. PRODUCT DESCRIPTION
3.1 Product overview
753 41 2
9 8
6
1
Vegetable drawers
2
Cabinet shelves
3
DYNAMICAIR function
4
Bottle rack
5
Control panel
6
Door shelves
7
Bottle shelf
8
Freezer drawers
9
Rating plate
www.aeg.com24

4. OPERATION
4.1 Control panel
1
3 2
1
Temperature indicators LED
2
FROSTMATIC
3
Temperature regulator
4.2 Switching on
Insert the plug into the wall socket.
4.3 FROSTMATIC function
You can activate FROSTMATIC function
by pressing the FROSTMATIC button.
The LED corresponding to the symbol
FROSTMATIC indicator lights up.
You can deactivate FROSTMATIC
function by pressing the FROSTMATIC
button again.
The FROSTMATIC indicator will light off.
This function stops
automatically after 52 hours.
4.4 Temperature regulation
To operate the appliance, touch the
temperature regulator button until the
LED corresponding to the required
temperature lights up. Selection is
progressive, varying from 2 to 8°C.
At first button touch actual setting LED
keeps blinking.
Any time the button is touch the set
temperature is moved to 1 position .
Corresponding LED will blink for a while.
Touch the setting button until the
required temperature is selected. The set
will be fixed
Coldest setting: +2°C.
Warmest setting: +8°C.
A medium setting is
generally the most suitable.
However, the exact setting should be
chosen keeping in mind that the
temperature inside the appliance
depends on:
• room temperature
• how often the door is opened
• quantity of food stored
• appliance location.
5. DAILY USE
5.1 Freezing fresh food
The freezer compartment is suitable for
freezing fresh food and storing frozen
and deep-frozen food for a long time.
To freeze fresh food activate the
FROSTMATIC function at least 24 hours
before placing the food to be frozen in
the freezer compartment.
Place the fresh food to be frozen in the
bottom compartment.
The maximum amount of food that can
be frozen in 24 hours is specified on the
rating plate, a label located on the
inside of the appliance.
ENGLISH
25

The freezing process lasts 24 hours:
during this period do not add other food
to be frozen.
When the freezing process is completed,
return to the required temperature (see
"FROSTMATIC Function").
In this condition, the
refrigerator compartment
temperature might drop
below 0°C. If this occurs
reset the temperature
regulator to a warmer
setting.
5.2 Storage of frozen food
When first starting-up or after a period
out of use, before putting the products
in the compartment let the appliance run
at least 2 hours with the FROSTMATIC
function turned on.
If large quantities of food are to be
stored, remove all drawers from
appliance and place food on glass shelf
to obtain the best performance.
In the event of accidental
defrosting, for example due
to a power failure, if the
power has been off for
longer that the value shown
in the technical data chart
under "Rising time", the
defrosted food must be
consumed quickly or cooked
immediately and then re-
frozen (after cooling).
5.3 Thawing
Deep-frozen or frozen food, prior to
being used, can be thawed in the
refrigerator compartment or at room
temperature, depending on the time
available for this operation.
Small pieces may even be cooked still
frozen, directly from the freezer: in this
case, cooking will take longer.
5.4 DYNAMICAIR
The DYNAMICAIR function let food cool
quickly and a more constant temperature
in the refrigerator.
To activate the DYNAMICAIR device
push the switch (A).
The green indicator (B) comes on.
A
B
Activate the device when the
ambient temperature more
than 25°C.
5.5 Positioning the door
shelves
To permit storage of food packages of
various sizes, the door shelves can be
placed at different heights.
To make these adjustments proceed as
follows:
1. Gradually pull the shelf in the
direction of the arrows until it comes
free
2. Reposition the shelf as required.
Do not move the lower
door shelf to ensure
correct air circulation
www.aeg.com26

5.6 Movable shelves
The walls of the refrigerator are
equipped with a series of shelves
support so that the shelves can be
positioned as desired.
Some shelves must be lifted up by the
rear edge to enable them to be
removed.
Do not move the glass shelf
above the vegetable drawer
to ensure correct air
circulation.
5.7 Bottle rack
Place the bottles (with the opening
facing front) in the pre-positioned shelf.
Place only closed bottles.
5.8 Removal of freezing
baskets from the freezer
The freezing baskets have a limit stop to
prevent their accidental removal or
falling out. At the time of its removal
from the freezer, pull the basket towards
yourself and, upon reaching the end
point, remove the basket by tilting its
front upwards.
2
1
At the time of putting it back, slightly lift
the front of the basket to insert it into the
freezer. Once you are over the end
points, push the baskets back in their
position.
ENGLISH
27

6. HINTS AND TIPS
6.1 Normal operating sounds
The following sounds are normal during
operation:
• A faint gurgling and bubbling sound
from coils sound when refrigerant is
pumped.
• A whirring and pulsating sound from
the compressor when refrigerant is
pumped.
• A sudden cracking noise from inside
appliance caused by thermic
dilatation (a natural and not
dangerous physical phenomenon).
• A faint click noise from the
temperature regulator when the
compressor switches on or off.
6.2 Hints for energy saving
• Do not open the door frequently or
leave it open longer than absolutely
necessary.
6.3 Hints for fresh food
refrigeration
To obtain the best performance:
• do not store warm food or
evaporating liquids in the refrigerator
• do cover or wrap the food, particularly
if it has a strong flavour
• position food so that air can circulate
freely around it
6.4 Hints for refrigeration
Useful hints:
• Meat (all types) : wrap in polythene
bags and place on the glass shelf
above the vegetable drawer.
• For safety, store in this way only one
or two days at the most.
• Cooked foods, cold dishes, etc..:
these should be covered and may be
placed on any shelf.
• Fruit and vegetables: these should be
thoroughly cleaned and placed in the
special drawer(s) provided.
• Butter and cheese: these should be
placed in special airtight containers or
wrapped in aluminium foil or
polythene bags to exclude as much
air as possible.
• Bottles: these need a cap and should
be stored on the door bottle shelf, or
(if equipped) on the bottle rack.
• Bananas, potatoes, onions and garlic,
if not packed, must not be kept in the
refrigerator.
6.5 Hints for freezing
To help you make the most of the
freezing process, here are some
important hints:
• the maximum quantity of food which
can be frozen in 24 hrs. is shown on
the rating plate;
• the freezing process takes 24 hours.
No further food to be frozen should
be added during this period;
• freeze only top quality, fresh and
thoroughly cleaned, foodstuffs;
• prepare food in small portions to
enable it to be rapidly and completely
frozen and to make it possible
subsequently to thaw only the
quantity required;
• wrap up the food in aluminium foil or
polythene and make sure that the
packages are airtight;
• do not allow fresh, unfrozen food to
touch food which is already frozen,
thus avoiding a rise in temperature of
the latter;
• lean foods store better and longer
than fatty ones; salt reduces the
storage life of food;
• water ices, if consumed immediately
after removal from the freezer
compartment, can possibly cause the
skin to be freeze burnt;
• it is advisable to show the freezing in
date on each individual pack to
enable you to keep tab of the storage
time.
6.6 Hints for storage of frozen
food
To obtain the best performance from this
appliance, you should:
www.aeg.com28

• make sure that the commercially
frozen foodstuffs were adequately
stored by the retailer;
• be sure that frozen foodstuffs are
transferred from the foodstore to the
freezer in the shortest possible time;
• not open the door frequently or leave
it open longer than absolutely
necessary;
• once defrosted, food deteriorates
rapidly and cannot be refrozen;
• do not exceed the storage period
indicated by the food manufacturer.
7. CARE AND CLEANING
WARNING!
Refer to Safety chapters.
7.1 General warnings
CAUTION!
Unplug the appliance before
carrying out any
maintenance operation.
This appliance contains
hydrocarbons in its cooling
unit; maintenance and
recharging must therefore
only be carried out by
authorized technicians.
The accessories and parts of
the appliance are not
suitable for washing in a
dishwasher.
7.2 Initial power on
CAUTION!
Before inserting the power
plug in to the outlet and
switching on the cabinet for
the first time, leave the
appliance standing upright
for at least 4 hours. This will
assure a sufficient amount of
time for the oil to return to
the compressor. Otherwise
the compressor or electronic
components may sustain
damage.
7.3 Cleaning the interior
Before using the appliance for the first
time, the interior and all internal
accessories should be washed with
lukewarm water and some neutral soap
to remove the typical smell of a brand-
new product, then dried thoroughly.
CAUTION!
Do not use detergents or
abrasive powders, as these
will damage the finish.
7.4 Periodic cleaning
CAUTION!
Do not pull, move or
damage any pipes and/or
cables inside the cabinet.
CAUTION!
Take care of not to damage
the cooling system.
CAUTION!
When moving the cabinet,
lift it by the front edge to
avoid scratching the floor.
The equipment has to be cleaned
regularly:
1. Clean the inside and accessories with
lukewarm water and some neutral
soap.
2. Regularly check the door seals and
wipe clean to ensure they are clean
and free from debris.
3. Rinse and dry thoroughly.
4. If accessible, clean the condenser
and the compressor at the back of
the appliance with a brush.
This operation will improve the
performance of the appliance and
save electricity consumption.
ENGLISH
29

7.5 Periods of non-operation
When the appliance is not in use for long
periods, take the following precautions:
1. Disconnect the appliance from
electricity supply.
2. Remove all food.
3. Clean the appliance and all
accessories.
4. Leave the door/doors open to
prevent unpleasant smells.
WARNING!
If the cabinet will be kept on,
ask somebody to check it
once in a while to prevent
the food inside from spoiling
in case of a power failure.
7.6 Defrosting of the
refrigerator
Frost is automatically eliminated from the
evaporator of the refrigerator
compartment every time the motor
compressor stops, during normal use.
The defrost water drains out through a
trough into a special container at the
back of the appliance, over the motor
compressor, where it evaporates.
It is important to periodically clean the
defrost water drain hole in the middle of
the refrigerator compartment channel to
prevent the water overflowing and
dripping onto the food inside.
7.7 Defrosting the freezer
The freezer compartment is frost free.
This means that there is no build up of
frost when it is in operation, neither on
the internal walls nor on the foods.
The absence of frost is due to the
continuous circulation of cold air inside
the compartment, driven by an
automatically controlled fan.
8. TROUBLESHOOTING
WARNING!
Refer to Safety chapters.
8.1 What to do if...
Problem Possible cause Solution
The appliance does not op-
erate.
The appliance is switched
off.
Switch on the appliance.
The mains plug is not con-
nected to the mains socket
correctly.
Connect the mains plug to the
mains socket correctly.
There is no voltage in the
mains socket.
Connect a different electrical
appliance to the mains socket.
Contact a qualified electrician.
The appliance is noisy. The appliance is not sup-
ported properly.
Check if the appliance stands
stable.
www.aeg.com30

Problem Possible cause Solution
The lamp does not work. The lamp is in stand-by. Close and open the door.
The lamp does not work. The lamp is defective. Contact the nearest Author-
ised Service Centre.
The compressor operates
continually.
Temperature is set incor-
rectly.
Refer to "Operation" chapter.
Many food products were
put in at the same time.
Wait some hours and then
check the temperature again.
The room temperature is
too high.
Refer to climate class chart on
the rating plate.
Food products placed in
the appliance were too
warm.
Allow food products to cool to
room temperature before stor-
ing.
The door is not closed cor-
rectly.
Refer to "Closing the door".
The FROSTMATIC function
is switched on.
Refer to "FROSTMATIC func-
tion".
The compressor does not
start immediately after
pressing the FROSTMATIC,
or after changing the tem-
perature.
This is normal, no error has
occurred.
The compressor starts after a
period of time.
Water flows inside the refrig-
erator.
The water outlet is clog-
ged.
Clean the water outlet.
Food products prevent
that water flows into the
water collector.
Make sure that food products
do not touch the rear plate.
Water flows on the floor. The melting water outlet is
not connected to the
evaporative tray above the
compressor.
Attach the melting water out-
let to the evaporative tray.
Temperature cannot be set. The FROSTMATIC or
COOLMATIC function is
switched on.
Switch off FROSTMATIC or
COOLMATIC manually, or wait
until the function resets auto-
matically to set the tempera-
ture. Refer to "FROSTMATIC
or COOLMATIC function".
Door is misaligned or inter-
feres with ventilation grill.
The appliance is not level-
led.
Refer to "Levelling".
The temperature in the ap-
pliance is too low/too high.
The temperature regulator
is not set correctly.
Set a higher/lower tempera-
ture.
ENGLISH
31

Problem Possible cause Solution
The door is not closed cor-
rectly.
Refer to "Closing the door".
The food products' tem-
perature is too high.
Let the food products temper-
ature decrease to room tem-
perature before storage.
Many food products are
stored at the same time.
Store less food products at the
same time.
The door has been
opened often.
Open the door only if necessa-
ry.
The FROSTMATIC function
is switched on.
Refer to "FROSTMATIC func-
tion".
There is no cold air circula-
tion in the appliance.
Make sure that there is cold air
circulation in the appliance.
If the advice does not lead
to the desired result, contact
the nearest Authorised
Service Centre.
8.2 Closing the door
1. Clean the door gaskets.
2. If necessary, adjust the door. Refer to
"Installation".
3. If necessary, replace the defective
door gaskets. Contact the Authorised
Service Centre.
8.3 Replacing the lamp
The appliance is equipped with a longlife
LED interior light.
Only service is allowed to replace the
lighting device. Contact your Authorised
Service Centre.
9. INSTALLATION
WARNING!
Refer to Safety chapters.
9.1 Positioning
This appliance can be installed in a dry,
well ventilated indoor where the ambient
temperature corresponds to the climate
class indicated on the rating plate of the
appliance:
Climate
class
Ambient temperature
SN +10°C to + 32°C
N +16°C to + 32°C
Climate
class
Ambient temperature
ST +16°C to + 38°C
T +16°C to + 43°C
www.aeg.com32

Some functional problems
might occur for some types
of models when operating
outside of that range. The
correct operation can only
be guaranteed within the
specified temperature
range. If you have any
doubts regarding where to
install the appliance, please
turn to the vendor, to our
customer service or to the
nearest Service Centre
9.2 Location
It must be possible to
disconnect the appliance
from the mains power
supply; the plug must
therefore be easily
accessible after installation.
The appliance should be installed well
away from sources of heat such as
radiators, boilers, direct sunlight etc.
Ensure that air can circulate freely around
the back of the cabinet. To ensure best
performance, if the appliance is
positioned below an overhanging wall
unit, the minimum distance between the
top of the cabinet and the wall unit must
be at least 100 mm . Ideally, however, the
appliance should not be positioned
below overhanging wall units. Accurate
levelling is ensured by one or more
adjustable feet at the base of the
cabinet.
A
B
100 mm
min
20 mm
CAUTION!
In order to guarantee proper
functioning in ambient
temperature above 38°C, it
is advised to have a 30mm
separation between the
sides of the appliance and
surrounding furniture.
9.3 Electrical connection
• Before plugging in, ensure that the
voltage and frequency shown on the
rating plate correspond to your
domestic power supply.
• The appliance must be earthed. The
power supply cable plug is provided
with a contact for this purpose. If the
domestic power supply socket is not
earthed, connect the appliance to a
separate earth in compliance with
current regulations, consulting a
qualified electrician.
• The manufacturer declines all
responsibility if the above safety
precautions are not observed.
• This appliance complies with the
E.E.C. Directives.
9.4 Levelling
When placing the appliance ensure that
it stands level. This can be achieved by
two adjustable feet at the bottom in
front.
9.5 Door reversibility
WARNING!
Before carrying out any
operations, remove the plug
from the power socket.
ENGLISH
33

CAUTION!
To carry out the following
operations, we suggest that
this be made with another
person that will keep a firm
hold on the doors of the
appliance during the
operations.
1. Open the door and empty the
shelves.
2. Unscrew the screws of the upper
hinge (1).
2
1
3. Remove the door from the middle
hinge pivot (2).
4. Place the cover of the upper hinge
into the holes on the opposite side.
5. Screw off the screws of the middle
hinge (3).
6. Remove the plugs on the upper side
of both doors and move them to the
other side.
7. Remove the lower door from the
lower hinge pivot (4).
4
3
8. Screw off the pivot of the lower hinge
(5) and screw the lower hinge pivot
(6) into the left drill of the lower
hinge.
5
6
9. Screw off the screws of the lower
hinge and remove the hinge (8).
10. Screw off the lower cover plugs and
screw them into the hole on the
opposite side (7).
11. Put the lower hinge on the opposite
side and fix it with the screws (8).
www.aeg.com34

7
8
12. Place the lower door on the lower
hinge pivot (9).
13. Screw off the middle cover plugs and
screw them into the hole on the
opposite side (10).
14. Put the middle hinge on the
opposite side and fix it with the
screws (11).
10
9
180
o
11
15. Place the upper door on the middle
hinge pivot (12).
16. Fix the door with upper hinge and fix
it with screws of it (13).
12
13
17. Attach the door handles and plugs
on the opposite side.
A
A
C
C
B
B
Do a final check to make
sure that:
• All screws are tightened.
• The magnetic seal
adheres to the cabinet.
• The door opens and
closes correctly.
If the ambient temperature
is cold (i.e. in Winter), the
gasket may not fit perfectly
to the cabinet. In that case,
wait for the natural fitting of
the gasket.
In case you do not want to
carry out the above
mentioned operations,
contact the nearest
Authorised Service Centre.
The Authorised Service
specialist will carry out the
reversibility of the doors at
your cost.
ENGLISH
35

10. TECHNICAL INFORMATION
10.1 Technical data
Height mm 2005
Width mm 595
Depth mm 642
Rising time Hours 18
Voltage Volts 230 - 240
Frequency Hz 50
The technical information are situated in
the rating plate, on the external or
internal side of the appliance and in the
energy label.
11. ENVIRONMENT CONCERNS
Recycle the materials with the symbol .
Put the packaging in applicable
containers to recycle it. Help protect the
environment and human health and to
recycle waste of electrical and electronic
appliances. Do not dispose appliances
marked with the symbol with the
household waste. Return the product to
your local recycling facility or contact
your municipal office.
www.aeg.com36

ΠΕΡΙΕΧΌΜΕΝΑ
1. ΠΛΗΡΟΦΟΡΊΕΣ ΓΙΑ ΤΗΝ ΑΣΦΆΛΕΙΑ............................................................. 38
2. ΟΔΗΓΊΕΣ ΓΙΑ ΤΗΝ ΑΣΦΆΛΕΙΑ........................................................................ 39
3. ΠΕΡΙΓΡΑΦΉ ΠΡΟΪΌΝΤΟΣ...............................................................................41
4. ΛΕΙΤΟΥΡΓΊΑ.....................................................................................................42
5. ΚΑΘΗΜΕΡΙΝΉ ΧΡΉΣΗ.................................................................................... 43
6. ΥΠΟΔΕΊΞΕΙΣ ΚΑΙ ΣΥΜΒΟΥΛΈΣ...................................................................... 45
7. ΦΡΟΝΤΊΔΑ ΚΑΙ ΚΑΘΆΡΙΣΜΑ.......................................................................... 46
8. ΑΝΤΙΜΕΤΩΠΙΣΗ ΠΡΟΒΛΗΜΑΤΩΝ..................................................................48
9. ΕΓΚΑΤΆΣΤΑΣΗ.................................................................................................51
10. ΤΕΧΝΙΚΆ ΣΤΟΙΧΕΊΑ.......................................................................................55
ΓΙΑ ΑΡΙΣΤΑ ΑΠΟΤΕΛΕΣΜΑΤΑ
Σας ευχαριστούμε που επιλέξατε αυτό το προϊόν της AEG. Το σχεδιάσαμε για να
σας παρέχει άψογη απόδοση για πολλά χρόνια, με πρωτοποριακές τεχνολογίες
που θα κάνουν τη ζωή σας πιο απλή και με χαρακτηριστικά που ενδεχομένως δεν
θα βρείτε σε κοινές συσκευές. Σας παρακαλούμε να αφιερώσετε λίγα λεπτά και να
διαβάσετε τις οδηγίες, ώστε να διασφαλίσετε την καλύτερη δυνατή χρήση της
συσκευής σας.
Επισκεφθείτε την ιστοσελίδα μας για να:
Βρείτε υποδείξεις χρήσης, φυλλάδια, συμβουλές για την επίλυση
προβλημάτων, πληροφορίες συντήρησης:
www.aeg.com
Καταχωρήσετε το προϊόν σας, ώστε να έχετε καλύτερο σέρβις:
www.registeraeg.com
Αγοράσετε εξαρτήματα, αναλώσιμα και γνήσια ανταλλακτικά για τη συσκευή
σας:
www.aeg.com/shop
ΥΠΟΣΤΗΡΙΞΗ ΠΕΛΑΤΩΝ ΚΑΙ ΣΕΡΒΙΣ
Συνιστάται η χρήση γνήσιων ανταλλακτικών.
Όταν επικοινωνείτε με το σέρβις, βεβαιωθείτε ότι έχετε διαθέσιμα τα ακόλουθα
στοιχεία: Μοντέλο, Κωδ. προϊόντος (PNC), Αριθμός σειράς.
Τα στοιχεία αυτά θα τα βρείτε στην πινακίδα τεχνικών χαρακτηριστικών.
Προειδοποίηση / Προσοχή - Πληροφορίες για την ασφάλεια
Γενικές πληροφορίες και συμβουλές
Πληροφορίες σχετικά με το περιβάλλον
Υπόκειται αε αλλαγές χωρίς προειδποίηση.
ΕΛΛΗΝΙΚΑ
37

1. ΠΛΗΡΟΦΟΡΊΕΣ ΓΙΑ ΤΗΝ ΑΣΦΆΛΕΙΑ
Πριν από την εγκατάσταση και τη χρήση της συσκευής,
διαβάστε προσεκτικά τις παρεχόμενες οδηγίες. Ο
κατασκευαστής δεν ευθύνεται αν προκληθεί
τραυματισμός ή ζημιά από λανθασμένη εγκατάσταση και
χρήση. Να φυλάσσετε πάντα αυτές τις οδηγίες μαζί με τη
συσκευή για μελλοντική αναφορά.
1.1 Ασφάλεια παιδιών και ευπαθών ατόμων
• Η συσκευή αυτή μπορεί να χρησιμοποιηθεί από παιδιά
ηλικίας 8 ετών και άνω και από άτομα με μειωμένες
σωματικές, αισθητηριακές ή πνευματικές δυνατότητες
ή έλλειψη εμπειρίας και γνώσης, εάν επιβλέπονται ή
έχουν λάβει οδηγίες σχετικά με τη χρήση της συσκευής
με ασφαλή τρόπο και κατανοούν τους κινδύνους που
ενέχονται.
• Μην αφήνετε τα παιδιά να παίζουν με τη συσκευή.
• Ο καθαρισμός και η συντήρηση από τον χρήστη δεν
πρέπει να πραγματοποιούνται από παιδιά χωρίς
επίβλεψη.
• Φυλάσσετε όλα τα υλικά συσκευασίας μακριά από τα
παιδιά.
1.2 Γενικές πληροφορίες για την ασφάλεια
• Αυτή η συσκευή προορίζεται για οικιακή χρήση και
παρόμοιες εφαρμογές, όπως:
– Αγροικίες, χώροι κουζίνας προσωπικού σε
καταστήματα, γραφεία και άλλα εργασιακά
περιβάλλοντα
– Από πελάτες σε ξενοδοχεία, μοτέλ, πανσιόν και
άλλα περιβάλλοντα στέγασης
• Διατηρείτε ελεύθερα από εμπόδια όλα τα ανοίγματα
αερισμού στο περίβλημα της συσκευής ή την
εντοιχισμένη κατασκευή.
• Μη χρησιμοποιείτε μηχανικές συσκευές ή διαφορετικά
τεχνητά μέσα για την επιτάχυνση της διαδικασίας
απόψυξης από εκείνα που συνιστά ο κατασκευαστής.
www.aeg.com38

• Μην προκαλείτε ζημιά στο κύκλωμα ψυκτικού υγρού.
• Μη χρησιμοποιείτε ηλεκτρικές συσκευές στο εσωτερικό
του θαλάμου αποθήκευσης τροφίμων της συσκευής,
εκτός αν είναι συσκευές οι οποίες προτείνονται για
αυτή τη χρήση από τον κατασκευαστή.
• Μη χρησιμοποιείτε ψεκασμό με νερό ή ατμό για το
καθάρισμα της συσκευής.
• Καθαρίστε τη συσκευή με ένα υγρό μαλακό πανί.
Χρησιμοποιείτε μόνο ουδέτερα απορρυπαντικά. Μη
χρησιμοποιείτε λειαντικά προϊόντα, σφουγγαράκια που
χαράσσουν, διαλύτες ή μεταλλικά αντικείμενα.
• Μην αποθηκεύετε εκρηκτικές ουσίες όπως φιάλες
αεροζόλ με εύφλεκτο προωθητικό σε αυτή τη συσκευή.
• Εάν το καλώδιο τροφοδοσίας έχει υποστεί φθορές, θα
πρέπει να αντικατασταθεί από τον κατασκευαστή, τον
αντιπρόσωπο του σέρβις ή ένα κατάλληλα
εξουσιοδοτημένο άτομο, ώστε να αποφευχθούν οι
κίνδυνοι.
2. ΟΔΗΓΊΕΣ ΓΙΑ ΤΗΝ ΑΣΦΆΛΕΙΑ
2.1 Εγκατάσταση
ΠΡΟΕΙΔΟΠΟΙΗΣΗ!
Η εγκατάσταση αυτής της
συσκευής πρέπει να
εκτελείται μόνο από
κατάλληλα καταρτισμένο
άτομο.
• Αφαιρέστε όλα τα υλικά της
συσκευασίας.
• Εάν η συσκευή έχει υποστεί ζημιά,
μην προβείτε σε εγκατάσταση ή
χρήση της.
• Ακολουθείτε τις οδηγίες εγκατάστασης
που παρέχονται με τη συσκευή.
• Να είστε πάντα προσεκτικοί κατά τη
μετακίνηση της συσκευής, καθότι είναι
βαριά. Φοράτε πάντα γάντια
ασφαλείας.
• Διασφαλίστε την κυκλοφορία του αέρα
γύρω από τη συσκευή.
• Περιμένετε τουλάχιστον 4 ώρες πριν
συνδέσετε τη συσκευή στην παροχή
ρεύματος. Αυτό είναι απαραίτητο για
να μπορέσει το λάδι να επιστρέψει στο
συμπιεστή.
• Μην εγκαθιστάτε τη συσκευή κοντά σε
σώματα θέρμανσης, κουζίνες,
φούρνους ή εστίες μαγειρέματος.
• Η συσκευή πρέπει να βρίσκεται με την
πλάτη στον τοίχο.
• Μην εγκαθιστάτε τη συσκευή σε θέση
όπου εκτίθεται σε άμεσο ηλιακό φως.
• Μην εγκαθιστάτε αυτή τη συσκευή σε
μέρη με πολύ υγρασία ή κρύο, όπως
αποθήκες, γκαράζ ή κελάρια κρασιού.
• Όταν μετακινείτε τη συσκευή, να την
ανασηκώνετε από το μπροστινό μέρος
για να μη χαράξετε το δάπεδο.
2.2 Ηλεκτρική σύνδεση
ΠΡΟΕΙΔΟΠΟΙΗΣΗ!
Κίνδυνος πυρκαγιάς και
ηλεκτροπληξίας.
• Η συσκευή πρέπει να είναι γειωμένη.
• Βεβαιωθείτε ότι οι πληροφορίες
σχετικά με το ηλεκτρικό ρεύμα στην
πινακίδα τεχνικών χαρακτηριστικών
ΕΛΛΗΝΙΚΑ 39

συμφωνούν με την παροχή ρεύματος.
Αν δεν συμφωνούν, επικοινωνήστε με
ηλεκτρολόγο.
• Χρησιμοποιείτε πάντα σωστά
εγκατεστημένη πρίζα με προστασία
κατά της ηλεκτροπληξίας.
• Μη χρησιμοποιείτε πολύπριζα και
μπαλαντέζες.
• Προσέχετε να μην προκληθεί ζημιά
στα ηλεκτρικά εξαρτήματα (π.χ. φις
τροφοδοσίας, καλώδιο τροφοδοσίας,
συμπιεστής). Επικοινωνήστε με το
Σέρβις ή με ηλεκτρολόγο για την
αλλαγή των ηλεκτρικών εξαρτημάτων.
• Το καλώδιο τροφοδοσίας πρέπει να
παραμένει χαμηλότερα από το ύψος
του φις τροφοδοσίας.
• Συνδέστε το φις τροφοδοσίας στην
πρίζα μόνον αφού έχει ολοκληρωθεί η
εγκατάσταση. Μετά την εγκατάσταση,
βεβαιωθείτε ότι είναι δυνατή η
πρόσβαση στο φις τροφοδοσίας.
• Μην τραβάτε το καλώδιο ρεύματος για
να αποσυνδέσετε τη συσκευή.
Τραβάτε πάντα το φις τροφοδοσίας.
2.3 Χρήση
ΠΡΟΕΙΔΟΠΟΙΗΣΗ!
Κίνδυνος τραυματισμού,
εγκαυμάτων, ηλεκτροπληξίας
ή πυρκαγιάς.
• Μην αλλάζετε τις προδιαγραφές αυτής
της συσκευής.
• Μην τοποθετείτε ηλεκτρικές συσκευές
(π.χ. παγωτομηχανές) μέσα στη
συσκευή, εκτός αν αναφέρονται ως
κατάλληλες για τον σκοπό αυτό από
τον κατασκευαστή.
• Προσέχετε να μην προκληθεί ζημιά
στο κύκλωμα ψυκτικού υγρού. Το
κύκλωμα ψυκτικού υγρού περιέχει
ισοβουτάνιο (R600a), ένα φυσικό
αέριο με υψηλό επίπεδο
περιβαλλοντικής συμβατότητας. Αυτό
το αέριο είναι εύφλεκτο.
• Αν προκληθεί ζημιά στο κύκλωμα
ψυκτικού υγρού, βεβαιωθείτε ότι δεν
υπάρχει παρουσία φλόγας και πηγών
ανάφλεξης στο χώρο. Αερίστε τον
χώρο.
• Μην αφήνετε ζεστά αντικείμενα να
έρθουν σε επαφή με τα πλαστικά μέρη
της συσκευής.
• Μην τοποθετείτε αναψυκτικά ποτά στο
θάλαμο του καταψύκτη. Στο θάλαμο
καταψύκτη αναπτύσσεται πίεση στα
δοχεία αυτών των ποτών.
• Μη φυλάσσετε εύφλεκτα αέρια και
υγρά στη συσκευή.
• Μην τοποθετείτε μέσα, κοντά ή επάνω
στη συσκευή εύφλεκτα αντικείμενα ή
αντικείμενα εμποτισμένα με εύφλεκτα
προϊόντα.
• Μην αγγίζετε τον συμπιεστή ή τον
συμπυκνωτή. Αυτά τα εξαρτήματα
είναι ζεστά.
• Εάν τα χέρια σας είναι βρεγμένα ή
νωπά, μην αφαιρείτε ή μην αγγίζετε
προϊόντα από τον θάλαμο του
καταψύκτη.
• Μην καταψύχετε εκ νέου τρόφιμα που
έχετε αποψύξει.
• Ακολουθείτε τις οδηγίες αποθήκευσης
στη συσκευασία των κατεψυγμένων
τροφίμων.
2.4 Φροντίδα και καθάρισμα
ΠΡΟΕΙΔΟΠΟΙΗΣΗ!
Κίνδυνος τραυματισμού ή
βλάβης της συσκευής.
• Πριν από την πραγματοποίηση
συντήρησης, απενεργοποιήστε τη
συσκευή και αποσυνδέστε το φις
τροφοδοσίας από την πρίζα.
• Η συσκευή αυτή περιέχει
υδρογονάνθρακες στην ψυκτική
μονάδα. Η συντήρηση και η
αναπλήρωση του ψυκτικού υγρού της
μονάδας πρέπει να
πραγματοποιούνται μόνο από
εξειδικευμένο άτομο.
• Επιθεωρείτε τακτικά την
αποστράγγιση της συσκευής και, αν
απαιτείται, καθαρίζετέ την. Εάν η
αποστράγγιση είναι φραγμένη, το
νερό απόψυξης συσσωρεύεται στο
κάτω μέρος της συσκευής.
2.5 Απόρριψη
ΠΡΟΕΙΔΟΠΟΙΗΣΗ!
Κίνδυνος τραυματισμού ή
ασφυξίας.
• Αποσυνδέστε τη συσκευή από την
τροφοδοσία ρεύματος.
www.aeg.com40

• Κόψτε το καλώδιο τροφοδοσίας και
απορρίψτε το.
• Αφαιρέστε την πόρτα για να
αποτραπεί ο εγκλεισμός παιδιών ή
ζώων μέσα στη συσκευή.
• Το κύκλωμα ψυκτικού υγρού και τα
μονωτικά υλικά αυτής της συσκευής
είναι φιλικά προς το όζον.
• Ο αφρός μόνωσης περιέχει εύφλεκτο
αέριο. Επικοινωνήστε με τις δημοτικές
αρχές για πληροφορίες σχετικά με τη
σωστή απόρριψη της συσκευής.
• Μην προκαλείτε ζημιά στο τμήμα της
ψυκτικής μονάδας που βρίσκεται
κοντά στον εναλλάκτη θερμότητας.
3. ΠΕΡΙΓΡΑΦΉ ΠΡΟΪΌΝΤΟΣ
3.1 Επισκόπηση προϊόντος
753 41 2
9 8
6
1
Συρτάρια λαχανικών
2
Ράφια θαλάμου
3
Λειτουργία DYNAMICAIR
4
Σχάρα μπουκαλιών
5
Πίνακας χειριστηρίων
6
Ράφια πόρτας
7
Ράφι μπουκαλιών
8
Συρτάρια καταψύκτη
9
Πινακίδα τεχνικών χαρακτηριστικών
ΕΛΛΗΝΙΚΑ 41

4. ΛΕΙΤΟΥΡΓΊΑ
4.1 Πίνακας χειριστηρίων
1
3 2
1
Ενδείξεις θερμοκρασίας LED
2
FROSTMATIC
3
Κουμπί ρυθμιστή
4.2 Ενεργοποίηση της
συσκευής
Συνδέστε το φις ρεύματος στην πρίζα.
4.3 Λειτουργία FROSTMATIC
Μπορείτε να ενεργοποιήσετε τη
λειτουργία FROSTMATIC, πατώντας το
κουμπί FROSTMATIC.
Ανάβει η λυχνία LED που αντιστοιχεί στο
σύμβολο της ένδειξης FROSTMATIC.
Μπορείτε να απενεργοποιήσετε τη
λειτουργία FROSTMATIC, πατώντας
ξανά το κουμπί FROSTMATIC.
Θα σβήσει η ένδειξη FROSTMATIC.
Αυτή η λειτουργία
διακόπτεται αυτόματα μετά
από 52 ώρες.
4.4 Ρύθμισης θερμοκρασίας
Για τη λειτουργία της συσκευής, αγγίξτε
το κουμπί του ρυθμιστή θερμοκρασίας,
μέχρι να ανάψει η λυχνία LED που
αντιστοιχεί στην απαιτούμενη
θερμοκρασία. Η επιλογή είναι
προοδευτική και κυμαίνεται από 2 έως
8°C.
Κατά την πρώτη επαφή του κουμπιού, η
λυχνία LED της πραγματικής ρύθμισης
αναβοσβήνει συνεχώς.
Με κάθε άγγιγμα του πλήκτρου, η
ρύθμιση της θερμοκρασίας μεταβάλλεται
κατά 1 θέση. Η αντίστοιχη λυχνία LED
αναβοσβήνει για λίγο.
Αγγίξτε το κουμπί ρύθμισης, μέχρι να
επιλεγεί η απαιτούμενη θερμοκρασία. Η
ρύθμιση έχει καθοριστεί
Ψυχρότερη ρύθμιση: +2°C.
Θερμότερη ρύθμιση: +8°C.
Η πλέον κατάλληλη είναι
συνήθως μια ενδιάμεση
ρύθμιση.
Ωστόσο, η ακριβής ρύθμιση πρέπει να
επιλεγεί λαμβάνοντας υπόψη ότι η
θερμοκρασία στο εσωτερικό της
συσκευής εξαρτάται από:
• τη θερμοκρασία δωματίου
• πόσο συχνά ανοίγει η πόρτα
• την ποσότητα των
αποθηκευμένων τροφίμων
• τη θέση της συσκευής.
www.aeg.com42

5. ΚΑΘΗΜΕΡΙΝΉ ΧΡΉΣΗ
5.1 Κατάψυξη φρέσκων
τροφίμων
Ο θάλαμος του καταψύκτη είναι
κατάλληλος για την κατάψυξη φρέσκων
τροφίμων και τη μακροχρόνια
αποθήκευση κατεψυγμένων και βαθιά
κατεψυγμένων τροφίμων.
Για να καταψύξετε φρέσκα τρόφιμα,
ενεργοποιήστε τη λειτουργία
FROSTMATIC τουλάχιστον 24 ώρες
προτού τοποθετήσετε τα τρόφιμα στο
θάλαμο του καταψύκτη.
Τοποθετήστε τα φρέσκα τρόφιμα προς
κατάψυξη σετον κάτω θάλαμο.
Η μέγιστη ποσότητα τροφίμων που
μπορεί να καταψυχθεί σε 24 ώρες
καθορίζεται στην πινακίδα τεχνικών
χαρακτηριστικών, μια ετικέτα που
βρίσκεται στο εσωτερικό της συσκευής.
Η διαδικασία κατάψυξης διαρκεί 24 ώρες:
κατά τη διάρκεια αυτής της περιόδου, μην
προσθέτετε άλλα τρόφιμα στον
καταψύκτη.
Όταν ολοκληρωθεί η διαδικασία
κατάψυξης, επιστρέψτε στην
απαιτούμενη θερμοκρασία (βλ.
«Λειτουργία FROSTMATIC»).
Σε αυτή την περίπτωση, η
θερμοκρασία στο θάλαμο
του ψυγείου ενδέχεται να
μειωθεί κάτω από τους 0 °C.
Αν συμβεί αυτό, θέστε και
πάλι το ρυθμιστή
θερμοκρασίας σε μια πιο
θερμή ρύθμιση.
5.2 Αποθήκευση
κατεψυγμένων τροφίμων
Κατά την αρχική ενεργοποίηση ή μετά
από μια περίοδο μη λειτουργίας, προτού
τοποθετήσετε τα προϊόντα στο θάλαμο, η
συσκευή πρέπει να λειτουργήσει για
τουλάχιστον 2 ώρες με ενεργοποιημένη
τη λειτουργία FROSTMATIC.
Εάν πρόκειται να αποθηκευτούν μεγάλες
ποσότητες τροφίμων, αφαιρέστε όλα τα
συρτάρια από τη συσκευή και
τοποθετήστε τα τρόφιμα επάνω σε
γυάλινα ράφια για επίτευξη της βέλτιστης
απόδοσης.
Σε περίπτωση κατά λάθος
απόψυξης, για παράδειγμα
λόγω διακοπής ρεύματος,
εάν το ρεύμα ήταν κομμένο
για περισσότερο χρόνο από
την τιμή που αναγράφεται
στον πίνακα τεχνικών
χαρακτηριστικών στην
ενότητα «Χρόνος ανόδου»,
τα αποψυγμένα τρόφιμα
πρέπει να καταναλωθούν
σύντομα ή να μαγειρευτούν
αμέσως και στη συνέχεια να
καταψυχθούν εκ νέου (αφού
έχουν κρυώσει).
5.3 Απόψυξη
Τα τρόφιμα βαθιάς κατάψυξης ή της
κατάψυξης, πριν τη χρήση τους,
μπορούν να αποψύχονται στο θάλαμο
ψυγείου ή σε θερμοκρασία δωματίου,
ανάλογα με το διαθέσιμο χρόνο για
απόψυξη.
Τα μικρά κομμάτια μπορούν να
μαγειρεύονται ακόμη και κατεψυγμένα,
απευθείας από τον καταψύκτη: σε αυτήν
την περίπτωση, το μαγείρεμα διαρκεί
περισσότερο.
5.4 DYNAMICAIR
Η λειτουργία DYNAMICAIR επιτυγχάνει
ταχεία ψύξη των τροφίμων και πιο
σταθερή θερμοκρασία μέσα στο ψυγείο.
Για να ενεργοποιήσετε τη διάταξη
DYNAMICAIR, πιέστε τον διακόπτη (A).
Ανάβει η πράσινη ενδεικτική λυχνία (B).
ΕΛΛΗΝΙΚΑ 43

A
B
Ενεργοποιήστε τη διάταξη
όταν η θερμοκρασία
περιβάλλοντος είναι
υψηλότερη από 25°C.
5.5 Τοποθέτηση των ραφιών
της πόρτας
Για να είναι δυνατή η αποθήκευση
συσκευασιών τροφίμων διαφόρων
μεγεθών, τα ράφια της πόρτας μπορούν
να τοποθετούνται σε διαφορετικά ύψη.
Για να πραγματοποιήσετε αυτές τις
προσαρμογές, κάντε τα εξής:
1. Τραβήξτε σταδιακά το ράφι προς την
κατεύθυνση των βελών μέχρι να
απελευθερωθεί
2. Επανατοποθετήστε το ράφι όπως
απαιτείται.
Για τη διασφάλιση της
σωστής κυκλοφορίας του
αέρα, μη μετακινείτε το
κάτω ράφι της πόρτας
5.6 Μετακινούμενα ράφια
Τα τοιχώματα του ψυγείου είναι
εφοδιασμένα με μια σειρά από
στηρίγματα ραφιών, ώστε να είναι δυνατή
η κατ’ επιλογή τοποθέτηση των ραφιών.
Ορισμένα ράφια πρέπει να ανασηκωθούν
από το πίσω άκρο για να αφαιρεθούν.
Για να εξασφαλίσετε τη
σωστή κυκλοφορία του
αέρα, μη μετακινήσετε το
γυάλινο ράφι πάνω από το
συρτάρι λαχανικών.
5.7 Σχάρα μπουκαλιών
Τοποθετήστε τα μπουκάλια (με το στόμιο
προς τα εμπρός) στο ήδη τοποθετημένο
ράφι.
Τοποθετήστε μόνο κλειστά
μπουκάλια.
www.aeg.com44

5.8 Αφαίρεση των καλαθιών
κατάψυξης από τον
καταψύκτη
Τα καλάθια κατάψυξης διαθέτουν
αναστολέα, ώστε να αποτρέπεται η
τυχαία αφαίρεση ή πτώση τους. Εάν
θέλετε να αφαιρέσετε ένα καλάθι από τον
καταψύκτη, τραβήξτε το προς το μέρος
σας και μόλις φτάσετε στο τελικό σημείο
της διαδρομής του, σηκώστε το
μπροστινό του μέρος προς τα πάνω για
να το αφαιρέσετε.
2
1
Για να τοποθετήσετε το καλάθι ξανά
πίσω, σηκώστε ελαφρά το μπροστινό του
μέρος και εισαγάγετέ το στον καταψύκτη.
Όταν ξεπεράσετε τα τελικά σημεία της
διαδρομής τους, σπρώξτε τα καλάθια να
επιστρέψουν στη θέση τους.
6. ΥΠΟΔΕΊΞΕΙΣ ΚΑΙ ΣΥΜΒΟΥΛΈΣ
6.1 Κανονικοί ήχοι
λειτουργίας
Οι παρακάτω ήχοι είναι φυσιολογικοί
κατά τη διάρκεια της λειτουργίας:
• Ένας αμυδρός ήχος γουργουρίσματος
ακούγεται από τις σερπαντίνες όταν το
ψυκτικό αντλείται.
• Ένα βουητό και ένας παλλόμενος
ήχος ακούγεται από τον συμπιεστή
όταν το ψυκτικό αντλείται.
• Ένας ξαφνικός ήχος σπασίματος από
το εσωτερικό της συσκευής ο οποίος
προκαλείται από τη θερμική διαστολή
(ένα φυσικό και ακίνδυνο φυσικό
φαινόμενο).
• Ένας αμυδρός ήχος κλικ από το
ρυθμιστή θερμοκρασίας όταν ο
συμπιεστής ενεργοποιείται ή
απενεργοποιείται.
6.2 Συμβουλές
εξοικονόμησης ενέργειας
• Μην ανοίγετε την πόρτα συχνά και
μην την αφήνετε ανοιχτή για
περισσότερο από ό,τι είναι απολύτως
απαραίτητο.
6.3 Συμβουλές ψύξης
φρέσκων τροφίμων
Για να έχετε τα καλύτερα αποτελέσματα:
• μην αποθηκεύετε στο ψυγείο ζεστά
τρόφιμα ή υγρά που εξατμίζονται
• καλύπτετε ή τυλίγετε τα τρόφιμα,
ιδιαίτερα εάν μυρίζουν έντονα
• τοποθετείτε τα τρόφιμα με τέτοιο
τρόπο ώστε ο αέρας να κυκλοφορεί
ελεύθερα γύρω τους
6.4 Συμβουλές ψύξης
Χρήσιμες συμβουλές:
• Κρέας (όλοι οι τύποι): τυλίξτε σε
πλαστικές σακούλες και τοποθετήστε
το στο γυάλινο ράφι επάνω από το
συρτάρι των λαχανικών.
• Για λόγους ασφαλείας, αποθηκεύστε
με αυτό τον τρόπο μόνο για μία ή δύο
ημέρες το πολύ.
ΕΛΛΗΝΙΚΑ 45

• Μαγειρεμένα τρόφιμα, κρύα πιάτα,
κ.λπ.: αυτά θα πρέπει να καλύπτονται
και μπορούν να τοποθετούνται σε
οποιοδήποτε ράφι.
• Φρούτα και λαχανικά: αυτά θα πρέπει
να πλένονται καλά και να
τοποθετούνται στο(α) ειδικό(ά)
συρτάρι(α) που παρέχεται(ονται).
• Βούτυρο και τυρί: αυτά θα πρέπει να
τοποθετούνται σε ειδικά αεροστεγή
δοχεία ή να τυλίγονται με
αλουμινόχαρτο ή σε πλαστικές
σακούλες αφαιρώντας όσο το δυνατόν
περισσότερο αέρα.
• Μπουκάλια: αυτά θα πρέπει να είναι
ταπωμένα και θα πρέπει να
αποθηκεύονται στο ράφι μπουκαλιών
στην πόρτα ή (αν διατίθεται) στη
σχάρα μπουκαλιών.
• Οι μπανάνες, οι πατάτες, τα
κρεμμύδια και το σκόρδο, εάν δεν
είναι συσκευασμένα, δεν πρέπει να
διατηρούνται στο ψυγείο.
6.5 Συμβουλές κατάψυξης
Για να σας βοηθήσουμε να
εκμεταλλεύεστε στο έπακρο τη διαδικασία
κατάψυξης, ακολουθούν ορισμένες
σημαντικές συμβουλές:
• η μέγιστη ποσότητα των τροφίμων
που μπορεί να καταψυχθεί μέσα σε 24
ώρες αναφέρεται στην πινακίδα
τεχνικών χαρακτηριστικών,
• η διαδικασία κατάψυξης διαρκεί 24
ώρες. Κατά τη διάρκεια αυτής της
περιόδου δεν θα πρέπει να
προστίθενται άλλα τρόφιμα για
κατάψυξη
• καταψύχετε μόνο πρώτης ποιότητας,
φρέσκα και καλά καθαρισμένα
τρόφιμα
• αποθηκεύετε τα τρόφιμα σε μικρές
μερίδες ώστε να είναι δυνατή η
γρήγορη και πλήρης κατάψυξή τους
και η μεταγενέστερη απόψυξη μόνο
της απαιτούμενης ποσότητας
• τυλίγετε τα τρόφιμα σε αλουμινόχαρτο
ή πλαστικές σακούλες και
εξασφαλίζετε ότι οι συσκευασίες είναι
αεροστεγείς
• μην αφήνετε φρέσκα, μη κατεψυγμένα
τρόφιμα να έρχονται σε επαφή με ήδη
κατεψυγμένα τρόφιμα, ώστε να
αποτρέπεται η αύξηση της
θερμοκρασίας των δεύτερων
• τα άπαχα τρόφιμα αποθηκεύονται
καλύτερα και για μεγαλύτερο διάστημα
από τα λιπαρά, το αλάτι μειώνει τη
διάρκεια αποθήκευσης των τροφίμων
• οι γρανίτες, εάν καταναλωθούν
αμέσως μετά την έξοδό τους από την
κατάψυξη, μπορούν να προκαλέσουν
στο δέρμα εγκαύματα από πάγο
• είναι σκόπιμο να γράφετε την
ημερομηνία κατάψυξης σε κάθε
συσκευασία ώστε να μπορείτε να
υπολογίζετε το χρόνο αποθήκευσης.
6.6 Συμβουλές για την
αποθήκευση κατεψυγμένων
τροφίμων
Για να έχετε την καλύτερη δυνατή
απόδοση της συσκευής αυτής:
• ελέγχετε ότι οι συνθήκες διατήρησης
των κατεψυγμένων τροφίμων του
εμπορίου ήταν κατάλληλες στο
κατάστημα αγοράς τους,
• εξασφαλίζετε την ταχύτερη δυνατή
μεταφορά των κατεψυγμένων
τροφίμων από το κατάστημα αγοράς
τους στον καταψύκτη,
• μην ανοίγετε την πόρτα συχνά και μην
την αφήνετε ανοιχτή για περισσότερο
από ό,τι είναι απολύτως απαραίτητο,
• μετά την απόψυξη, τα τρόφιμα
αλλοιώνονται γρήγορα και δεν
μπορούν να καταψυχθούν ξανά,
• μην υπερβαίνετε το χρόνο
αποθήκευσης που υποδεικνύεται από
τους παρασκευαστές των τροφίμων.
7. ΦΡΟΝΤΊΔΑ ΚΑΙ ΚΑΘΆΡΙΣΜΑ
ΠΡΟΕΙΔΟΠΟΙΗΣΗ!
Ανατρέξτε στα κεφάλαια
σχετικά με την Ασφάλεια.
www.aeg.com46

7.1 Γενικές προειδοποιήσεις
ΠΡΟΣΟΧΗ!
Πριν από οποιαδήποτε
εργασία συντήρησης
αποσυνδέετε τη συσκευή
από την πρίζα.
Η συσκευή αυτή περιέχει
υδρογονάνθρακες στη
μονάδα ψύξης της, και για το
λόγο αυτό οι εργασίες
συντήρησης και
επαναφόρτισης θα πρέπει να
πραγματοποιούνται μόνο
από εξουσιοδοτημένους
τεχνικούς.
Τα αξεσουάρ και μέρη της
συσκευής δεν είναι
κατάλληλα για πλύσιμο στο
πλυντήριο πιάτων.
7.2 Πρώτη ενεργοποίηση
ΠΡΟΣΟΧΗ!
Πριν από την τοποθέτηση
του φις τροφοδοσίας στην
πρίζα και την ενεργοποίηση
του θαλάμου για πρώτη
φορά, αφήστε τη συσκευή σε
όρθια θέση για τουλάχιστον
4 ώρες. Με αυτόν τον τρόπο
θα εξασφαλιστεί επαρκής
χρόνος για την επιστροφή
του λαδιού στο συμπιεστή.
Διαφορετικά, ο συμπιεστής ή
τα ηλεκτρονικά εξαρτήματα
μπορεί να υποστούν βλάβη.
7.3 Καθάρισμα του
εσωτερικού
Πριν από την πρώτη χρήση της
συσκευής, το εσωτερικό και όλα τα
εξαρτήματα πρέπει να πλυθούν με
χλιαρό νερό και ουδέτερο σαπούνι για
την αφαίρεση της τυπικής μυρωδιάς ενός
ολοκαίνουριου προϊόντος και, στη
συνέχεια, να σκουπιστούν καλά για να
στεγνώσουν.
ΠΡΟΣΟΧΗ!
Μη χρησιμοποιείτε
απορρυπαντικά ή σκόνες
που χαράσσουν, καθότι
καταστρέφουν το φινίρισμα.
7.4 Τακτικός καθαρισμός
ΠΡΟΣΟΧΗ!
Μην τραβάτε, μετακινείτε ή
προκαλείτε ζημιά σε
σωληνώσεις ή/και καλώδια
που βρίσκονται στο
εσωτερικό του θαλάμου.
ΠΡΟΣΟΧΗ!
Προσέξτε να μην προκληθεί
ζημιά στο σύστημα ψύξης.
ΠΡΟΣΟΧΗ!
Όταν μετακινείτε τη συσκευή,
να την ανασηκώνετε από το
μπροστινό μέρος για να μη
χαράξετε το δάπεδο.
Η συσκευή πρέπει να καθαρίζεται
τακτικά:
1. Καθαρίζετε το εσωτερικό και τα
εξαρτήματα με χλιαρό νερό και λίγο
ουδέτερο σαπούνι.
2. Ελέγχετε και σκουπίζετε τακτικά τα
λάστιχα της πόρτας, ώστε να
παραμένουν καθαρά και χωρίς
υπολείμματα.
3. Ξεπλύνετε και σκουπίστε καλά.
4. Αν έχετε πρόσβαση, καθαρίστε το
συμπυκνωτή και το συμπιεστή στο
πίσω μέρος της συσκευής με μια
βούρτσα.
Η διαδικασία αυτή βελτιώνει την
απόδοση της συσκευής και
εξοικονομεί κατανάλωση ρεύματος.
ΕΛΛΗΝΙΚΑ 47

7.5 Περίοδοι εκτός
λειτουργίας
Όταν η συσκευή δεν χρησιμοποιείται για
μεγάλα χρονικά διαστήματα, λαμβάνετε
τις ακόλουθες προφυλάξεις:
1. Αποσυνδέστε τη συσκευή από την
ηλεκτρική τροφοδοσία.
2. Αφαιρέστε όλα τα τρόφιμα.
3. Καθαρίστε τη συσκευή και όλα τα
εξαρτήματα.
4. Αφήστε την πόρτα ή τις πόρτες
ανοικτές για να αποτρέψετε τις
δυσάρεστες οσμές.
ΠΡΟΕΙΔΟΠΟΙΗΣΗ!
Εάν ο θάλαμος πρόκειται να
παραμείνει ενεργοποιημένος,
ζητήστε από κάποιο άτομο
να ελέγχει το θάλαμο κατά
διαστήματα, ώστε να μη
χαλάσουν τα τρόφιμα στο
εσωτερικό σε περίπτωση
διακοπής ρεύματος.
7.6 Απόψυξη του ψυγείου
Ο πάγος εξαλείφεται αυτόματα από τον
εξατμιστήρα του θαλάμου του ψυγείου
κάθε φορά που σταματά ο συμπιεστής
κινητήρα κατά τη διάρκεια της κανονικής
χρήσης. Το νερό της απόψυξης
αποστραγγίζεται μέσω μιας σκάφης σε
ένα ειδικό δοχείο στο πίσω μέρος της
συσκευής, επάνω από το συμπιεστή,
όπου και εξατμίζεται.
Είναι σημαντικό να καθαρίζεται τακτικά η
οπή αποστράγγισης του νερού της
απόψυξης στη μέση του αγωγού του
θαλάμου του ψυγείου, προκειμένου να
αποτρέπεται η υπερχείλιση και το στάξιμο
νερού στα τρόφιμα στο εσωτερικό του
θαλάμου.
7.7 Απόψυξη του καταψύκτη
Ο θάλαμος του καταψύκτη είναι frost
free. Αυτό σημαίνει ότι δεν υπάρχει
συσσώρευση πάγου όταν λειτουργεί,
ούτε στα εσωτερικά τοιχώματα ούτε στα
τρόφιμα.
Η απουσία του πάγου οφείλεται στη
συνεχή κυκλοφορία κρύου αέρα στο
εσωτερικό του θαλάμου, η οποία
παράγεται από έναν αυτόματα
ελεγχόμενο ανεμιστήρα.
8. ΑΝΤΙΜΕΤΩΠΙΣΗ ΠΡΟΒΛΗΜΑΤΩΝ
ΠΡΟΕΙΔΟΠΟΙΗΣΗ!
Ανατρέξτε στα κεφάλαια
σχετικά με την Ασφάλεια.
8.1 Τι να κάνετε αν...
Πρόβλημα Πιθανή αιτία Αντιμετώπιση
Η συσκευή δεν λειτουργεί. Η συσκευή είναι
απενεργοποιημένη.
Ενεργοποιήστε τη συσκευή.
Δεν έχει συνδεθεί σωστά
το φις τροφοδοσίας στην
πρίζα.
Συνδέστε σωστά το φις
τροφοδοσίας στην πρίζα.
www.aeg.com48

Πρόβλημα Πιθανή αιτία Αντιμετώπιση
Δεν υπάρχει τάση
ρεύματος στην πρίζα.
Συνδέστε μια άλλη ηλεκτρική
συσκευή στην πρίζα.
Επικοινωνήστε με
πιστοποιημένο ηλεκτρολόγο.
Η συσκευή κάνει θόρυβο. Η συσκευή δεν στηρίζεται
σωστά.
Βεβαιωθείτε ότι η συσκευή
είναι σταθερή.
Ο λαμπτήρας δεν λειτουργεί. Ο λαμπτήρας βρίσκεται σε
κατάσταση αναμονής.
Κλείστε και ανοίξτε την πόρτα.
Ο λαμπτήρας δεν λειτουργεί. Ο λαμπτήρας είναι
ελαττωματικός.
Επικοινωνήστε με το
πλησιέστερο Εξουσιοδοτημένο
Κέντρο Σέρβις.
Ο συμπιεστής λειτουργεί
συνεχώς.
Δεν έχει ρυθμιστεί σωστά η
θερμοκρασία.
Ανατρέξτε στο κεφάλαιο
«Λειτουργία».
Τοποθετήσατε ταυτόχρονα
μεγάλες ποσότητες
τροφίμων.
Περιμένετε μερικές ώρες και
ελέγξτε ξανά τη θερμοκρασία.
Η θερμοκρασία
περιβάλλοντος είναι πολύ
υψηλή.
Ανατρέξτε στον πίνακα
κλιματικής κατηγορίας στην
πινακίδα τεχνικών
χαρακτηριστικών.
Τα τρόφιμα που
τοποθετήσατε στη συσκευή
ήταν πολύ ζεστά.
Περιμένετε μέχρι τα τρόφιμα να
αποκτήσουν θερμοκρασία
δωματίου πριν τα
αποθηκεύσετε.
Δεν έχει κλείσει σωστά η
πόρτα.
Ανατρέξτε στην ενότητα
«Κλείσιμο της πόρτας».
Η λειτουργία FROSTMAT‐
IC είναι ενεργοποιημένη.
Ανατρέξτε στην ενότητα
«Λειτουργία FROSTMATIC».
Ο συμπιεστής δεν ξεκινά
αμέσως μετά το πάτημα του
FROSTMATIC, ή μετά από
την αλλαγή της
θερμοκρασίας.
Αυτό είναι φυσιολογικό,
δεν υπάρχει
δυσλειτουργία.
Ο συμπιεστής ξεκινά μετά από
ένα χρονικό διάστημα.
Υπάρχει ροή νερού στο
εσωτερικό του ψυγείου.
Η έξοδος νερού είναι
φραγμένη.
Καθαρίστε την έξοδο νερού.
Υπάρχουν τρόφιμα που
εμποδίζουν τη ροή του
νερού στο συλλέκτη νερού.
Βεβαιωθείτε ότι τα τρόφιμα δεν
έρχονται σε επαφή με την
πίσω πλάκα.
ΕΛΛΗΝΙΚΑ 49

Πρόβλημα Πιθανή αιτία Αντιμετώπιση
Υπάρχει ροή νερού στο
δάπεδο.
Η έξοδος του νερού
απόψυξης δεν είναι
συνδεδεμένη στον δίσκο
εξάτμισης που βρίσκεται
επάνω από το συμπιεστή.
Προσαρμόστε την έξοδο του
νερού απόψυξης ώστε να ρέει
μέσα στον δίσκο εξάτμισης.
Δεν είναι δυνατή η ρύθμιση
της θερμοκρασίας.
Η λειτουργία FROSTMAT‐
IC ή COOLMATIC είναι
ενεργοποιημένη.
Απενεργοποιήστε τη
λειτουργία FROSTMATIC ή
COOLMATIC χειροκίνητα, ή
περιμένετε μέχρι η λειτουργία
να επαναρυθμιστεί αυτόματα
για να ρυθμίσετε τη
θερμοκρασία. Ανατρέξτε στην
ενότητα «Λειτουργία FROST‐
MATIC ή COOLMATIC».
Η πόρτα δεν είναι σωστά
ευθυγραμμισμένη ή
παρεμβάλλεται στη γρίλια
εξαερισμού.
Η συσκευή δεν είναι
σωστά οριζοντιωμένη.
Ανατρέξτε στην ενότητα
«Οριζοντίωση της συσκευής».
Η θερμοκρασία στη συσκευή
είναι πολύ χαμηλή/πολύ
υψηλή.
Δεν έχει ρυθμιστεί σωστά ο
ρυθμιστής θερμοκρασίας.
Ρυθμίστε υψηλότερη/
χαμηλότερη θερμοκρασία.
Δεν έχει κλείσει σωστά η
πόρτα.
Ανατρέξτε στην ενότητα
«Κλείσιμο της πόρτας».
Η θερμοκρασία των
τροφίμων είναι πολύ
υψηλή.
Αφήστε τη θερμοκρασία των
τροφίμων να μειωθεί στη
θερμοκρασία δωματίου πριν
από την αποθήκευση.
Αποθηκεύσατε ταυτόχρονα
μεγάλες ποσότητες
τροφίμων.
Αποθηκεύστε λιγότερα
τρόφιμα ταυτόχρονα.
Ανοίγετε πολύ συχνά την
πόρτα.
Ανοίγετε την πόρτα μόνο όταν
είναι απαραίτητο.
Η λειτουργία FROSTMAT‐
IC είναι ενεργοποιημένη.
Ανατρέξτε στην ενότητα
«Λειτουργία FROSTMATIC».
Δεν υπάρχει κυκλοφορία
κρύου αέρα στη συσκευή.
Βεβαιωθείτε ότι υπάρχει
κυκλοφορία κρύου αέρα στη
συσκευή.
Εάν το πρόβλημα δεν
αποκατασταθεί,
επικοινωνήστε με το
πλησιέστερο
Εξουσιοδοτημένο Κέντρο
Σέρβις.
8.2 Κλείσιμο της πόρτας
1. Καθαρίστε τα λάστιχα της πόρτας.
2. Εάν χρειαστεί, προσαρμόστε την
πόρτα. Ανατρέξτε στην ενότητα
«Εγκατάσταση».
www.aeg.com50

3. Εάν χρειαστεί, αντικαταστήστε τα
ελαττωματικά λάστιχα της πόρτας.
Επικοινωνήστε με το
Εξουσιοδοτημένο Κέντρο Σέρβις.
8.3 Αντικατάσταση του
λαμπτήρα
Η συσκευή διαθέτει εσωτερικό φωτισμό
LED μακράς διάρκειας.
Μόνο κάποιος αντιπρόσωπος σέρβις
επιτρέπεται να αντικαταστήσει τη διάταξη
φωτισμού. Επικοινωνήστε με το
Εξουσιοδοτημένο Κέντρο Σέρβις.
9. ΕΓΚΑΤΆΣΤΑΣΗ
ΠΡΟΕΙΔΟΠΟΙΗΣΗ!
Ανατρέξτε στα κεφάλαια
σχετικά με την Ασφάλεια.
9.1 Τοποθέτηση
Η συσκευή αυτή μπορεί να εγκατασταθεί
σε στεγνό, καλά αεριζόμενο εσωτερικό
χώρο όπου η θερμοκρασία
περιβάλλοντος αντιστοιχεί στην κλιματική
κατηγορία που αναγράφεται στην
πινακίδα τεχνικών χαρακτηριστικών της
συσκευής:
Κλιματικ
ή
κατηγορ
ία
Θερμοκρασία περιβάλλοντος
SN +10°C έως + 32°C
N +16°C έως +32°C
ST +16°C έως + 38°C
T +16°C έως + 43°C
Μπορεί να παρουσιαστούν
λειτουργικά προβλήματα σε
ορισμένους τύπους
μοντέλων όταν λειτουργούν
εκτός αυτού του εύρους. Η
σωστή λειτουργία μπορεί να
διασφαλιστεί μόνο εντός του
καθορισμένου εύρους
θερμοκρασίας. Εάν έχετε
αμφιβολίες σχετικά με το
μέρος τοποθέτησης της
συσκευής, απευθυνθείτε
στον πωλητή, την
εξυπηρέτηση πελατών μας ή
στο πλησιέστερο Κέντρο
Σέρβις
9.2 Θέση
Πρέπει να είναι δυνατή η
αποσύνδεση της συσκευής
από την ηλεκτρική παροχή,
επομένως, η πρόσβαση στο
φις πρέπει να είναι εύκολη
μετά την εγκατάσταση.
Η συσκευή πρέπει να εγκαθίσταται
μακριά από πηγές θερμότητας, όπως
σώματα καλοριφέρ, λέβητες, άμεσο
ηλιακό φως, κ.λπ. Βεβαιωθείτε ότι ο
αέρας μπορεί να κυκλοφορεί ελεύθερα
πίσω από τον θάλαμο. Για να
εξασφαλίσετε τη βέλτιστη απόδοση, εάν η
συσκευή έχει τοποθετηθεί κάτω από
κρεμαστό ντουλάπι, η ελάχιστη
απόσταση μεταξύ του επάνω μέρους του
θαλάμου και του ντουλαπιού πρέπει να
είναι τουλάχιστον 100 mm. Ιδανικά,
ωστόσο, η συσκευή δεν πρέπει να
τοποθετείται κάτω από κρεμαστά
ντουλάπια. Η ακριβής οριζοντίωση
εξασφαλίζεται από ένα ή περισσότερα
ρυθμιζόμενα πόδια στη βάση του
θαλάμου.
ΕΛΛΗΝΙΚΑ 51

A
B
100 mm
min
20 mm
ΠΡΟΣΟΧΗ!
Για τη διασφάλιση της
σωστής λειτουργίας σε
θερμοκρασίες περιβάλλοντος
άνω των 38ºC, συνιστάται να
υπάρχει απόσταση 30mm
ανάμεσα στις πλευρές της
συσκευής και των γύρω
επίπλων.
9.3 Ηλεκτρική σύνδεση
• Πριν από τη σύνδεση, επαληθεύστε
ότι η τάση και η συχνότητα που
αναγράφονται στην πινακίδα τεχνικών
χαρακτηριστικών αντιστοιχούν στα
χαρακτηριστικά της παροχής σας.
• Η συσκευή πρέπει να είναι γειωμένη.
Το φις του καλωδίου τροφοδοσίας
διαθέτει μια επαφή για το σκοπό αυτό.
Εάν η πρίζα δεν είναι γειωμένη,
συνδέστε τη συσκευή σε μια
μεμονωμένη γείωση σύμφωνα με τους
τρέχοντες κανονισμούς, αφού
συμβουλευθείτε έναν επαγγελματία
ηλεκτρολόγο.
• Σε περίπτωση μη τήρησης των
παραπάνω προφυλάξεων ασφαλείας,
ο κατασκευαστής δεν φέρει καμία
ευθύνη.
• Η συσκευή αυτή συμμορφώνεται με
τις Οδηγίες της ΕΟΚ.
9.4 Οριζοντίωση της
συσκευής
Κατά την τοποθέτηση της συσκευής,
βεβαιωθείτε ότι είναι επίπεδη. Αυτό
μπορεί να επιτευχθεί με δύο ρυθμιζόμενα
πόδια που βρίσκονται μπροστά στο κάτω
μέρος.
9.5 Δυνατότητα αντιστροφής
της πόρτας
ΠΡΟΕΙΔΟΠΟΙΗΣΗ!
Πριν πραγματοποιήσετε
οποιαδήποτε ενέργεια,
αποσυνδέστε το φις από την
πρίζα.
ΠΡΟΣΟΧΗ!
Για να πραγματοποιήσετε τις
ακόλουθες ενέργειες,
συνιστάται να έχετε τη
βοήθεια ενός ακόμα ατόμου,
το οποίο θα συγκρατεί καλά
τις πόρτες της συσκευής
κατά τη διάρκεια των
εργασιών.
1. Ανοίξτε την πόρτα και αδειάστε τα
ράφια.
2. Ξεβιδώστε τις βίδες του πάνω
μεντεσέ (1).
www.aeg.com52

2
1
3. Αφαιρέστε την πόρτα από τον πείρο
του μεσαίου μεντεσέ (2).
4. Τοποθετήστε το κάλυμμα του επάνω
μεντεσέ στις οπές στην αντίθετη
πλευρά.
5. Ξεβιδώστε τις βίδες του μεσαίου
μεντεσέ (3).
6. Αφαιρέστε τις τάπες στην άνω
πλευρά και των δύο πορτών και
τοποθετήστε τις στην άλλη πλευρά.
7. Αφαιρέστε την κάτω πόρτα από τον
πείρο του κάτω μεντεσέ (4).
4
3
8. Ξεβιδώστε τον πείρο του κάτω
μεντεσέ (5) και βιδώστε τον πείρο του
κάτω μεντεσέ (6) στην αριστερή οπή
του κάτω μεντεσέ.
5
6
9.
Ξεβιδώστε τις βίδες του κάτω μεντεσέ
και αφαιρέστε τον μεντεσέ (8).
10. Ξεβιδώστε τις κάτω τάπες
καλύμματος και βιδώστε τις στην οπή
στην αντίθετη πλευρά (7).
11. Τοποθετήστε τον κάτω μεντεσέ στην
αντίθετη πλευρά και στερεώστε τον
με τις βίδες (8).
7
8
12. Τοποθετήστε την κάτω πόρτα πάνω
στον πείρο του κάτω μεντεσέ (9).
13. Ξεβιδώστε τις μεσαίες τάπες
καλύμματος και βιδώστε τις στην οπή
στην αντίθετη πλευρά (10).
14. Τοποθετήστε τον μεσαίο μεντεσέ
στην αντίθετη πλευρά και στερεώστε
τον με τις βίδες (11).
ΕΛΛΗΝΙΚΑ 53

10
9
180
o
11
15. Τοποθετήστε την επάνω πόρτα στον
πείρο του μεσαίου μεντεσέ (12).
16. Στερεώστε την πόρτα με τον επάνω
μεντεσέ και στερεώστε τον με τις
βίδες του (13).
12
13
17. Στερεώστε τις λαβές της πόρτας και
τα φις στην αντίθετη πλευρά.
A
A
C
C
B
B
Κάντε έναν τελικό έλεγχο για
να βεβαιωθείτε ότι:
• Όλες οι βίδες είναι
σφιγμένες.
• Το μαγνητικό λάστιχο
είναι προσκολλημένο στο
θάλαμο.
• Η πόρτα ανοίγει και
κλείνει σωστά.
Εάν η θερμοκρασία
περιβάλλοντος είναι χαμηλή
(δηλ. το χειμώνα), το λάστιχο
μπορεί να μην εφαρμόζει
απόλυτα στο θάλαμο. Στην
περίπτωση αυτή, περιμένετε
μέχρι το λάστιχο να
εφαρμόσει με φυσικό τρόπο.
Εάν δεν θέλετε να εκτελέσετε
εσείς οι ίδιοι τις διαδικασίες
που περιγράφονται
παραπάνω, επικοινωνήστε
με το πλησιέστερο
Εξουσιοδοτημένο Κέντρο
Σέρβις. Ο τεχνικός του
Εξουσιοδοτημένου Κέντρου
Σέρβις θα αντιστρέψει τις
πόρτες με δική σας χρέωση.
www.aeg.com54

10. ΤΕΧΝΙΚΆ ΣΤΟΙΧΕΊΑ
10.1 Τεχνικά χαρακτηριστικά
Ύψος mm 2005
Πλάτος mm 595
Βάθος mm 642
Χρόνος ανόδου Ώρες 18
Τάση Volt 230 - 240
Συχνότητα Hz 50
Τα τεχνικά δεδομένα αναγράφονται στην
πινακίδα τεχνικών χαρακτηριστικών στην
εξωτερική ή εσωτερική πλευρά της
συσκευής και στην ετικέτα ενεργειακής
κατανάλωσης.
11. ΠΕΡΙΒΑΛΛΟΝΤΙΚΑ ΘΕΜΑΤΑ
Ανακυκλώστε τα υλικά που φέρουν το
σύμβολο . Τοποθετήστε τα υλικά
συσκευασίας σε κατάλληλα δοχεία για
ανακύκλωση. Συμβάλετε στην προστασία
του περιβάλλοντος και της ανθρώπινης
υγείας ανακυκλώνοντας τις άχρηστες
ηλεκτρικές και ηλεκτρονικές συσκευές.
Μην απορρίπτετε με τα οικιακά
απορρίμματα συσκευές που φέρουν το
σύμβολο . Επιστρέψτε το προϊόν στην
τοπική σας μονάδα ανακύκλωσης ή
επικοινωνήστε με τη δημοτική αρχή.
*
ΕΛΛΗΝΙΚΑ 55

www.aeg.com/shop
280154247-A-342014
-
 1
1
-
 2
2
-
 3
3
-
 4
4
-
 5
5
-
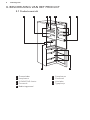 6
6
-
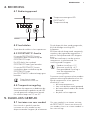 7
7
-
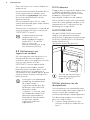 8
8
-
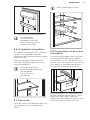 9
9
-
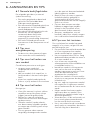 10
10
-
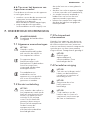 11
11
-
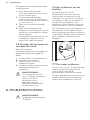 12
12
-
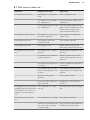 13
13
-
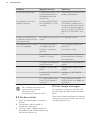 14
14
-
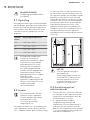 15
15
-
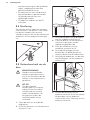 16
16
-
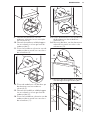 17
17
-
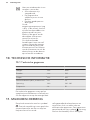 18
18
-
 19
19
-
 20
20
-
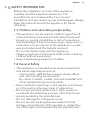 21
21
-
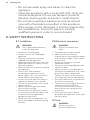 22
22
-
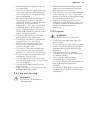 23
23
-
 24
24
-
 25
25
-
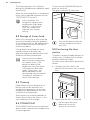 26
26
-
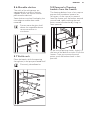 27
27
-
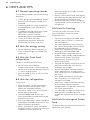 28
28
-
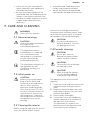 29
29
-
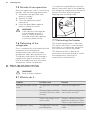 30
30
-
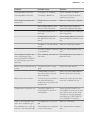 31
31
-
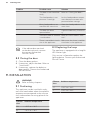 32
32
-
 33
33
-
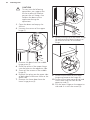 34
34
-
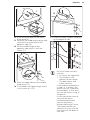 35
35
-
 36
36
-
 37
37
-
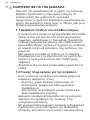 38
38
-
 39
39
-
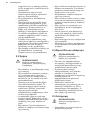 40
40
-
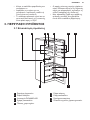 41
41
-
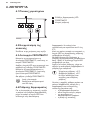 42
42
-
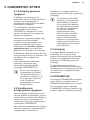 43
43
-
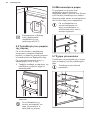 44
44
-
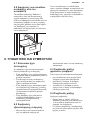 45
45
-
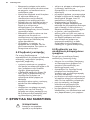 46
46
-
 47
47
-
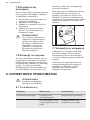 48
48
-
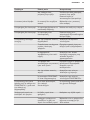 49
49
-
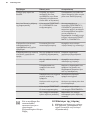 50
50
-
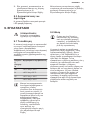 51
51
-
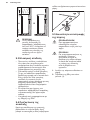 52
52
-
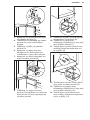 53
53
-
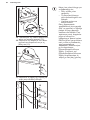 54
54
-
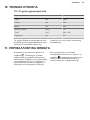 55
55
-
 56
56


