Salora CR624DAB de handleiding

Categorie
Radio's
Type
de handleiding
Instruction Manual
IMPORTANT: Please read all instructions carefully before use and keep for future reference
Ver 1.0
DAB/FM Radio
CR624DAB
2
1.
SAFETY
For household and indoor use only.
Place the appliance on a flat, stable surface with adequate ventilation and
away from other sources of heat. Minimum distances around the appliance
for adequate ventilation is 10cm. Do not cover or restrict ventilation
openings.
Keep the appliance and its cord out of reach of children less than 8 years.
Do not allow children to use the appliance without supervision.
This appliance can be used by children aged from 8
years and above and
persons with reduced physical, sensory or mental capabilities or lack of
experience and knowledge if they have been given supervision or instruction
concerning use of the appliance in a safe way and understand the hazards
involved. Children shall not play with the appliance. Cleaning and user
maintenance shall not be made by children unless they are aged from 8
years and above and supervised.
Fully unwind the cable before plugging in and ensure the cable is positioned
away from areas where it is likely to get damaged or cause a trip hazard.
The output cord of this mains adaptor cannot be replaced. In the event of
damage to the cable, jack plug or adaptor, the entire adaptor unit should be
replaced.
Connections must only be made via the mains adaptor supplied, never
connect the appliance directly to the 240v mains supply.
Never use the adaptor supplied with any other appliance.
The mains adaptor will become warm in use; do not cover or place on or
near surfaces that could be affected by heat such as table tops and carpets.
Remove mains adaptor from supply if appliance is unused for a long period
of time, and during thunderstorms.
Do not pull on the cable to disconnect from mains supply.
Keep appliance, cable, mains adaptor plug dry and away
from areas where it
is likely to get splashed. Avoid using in hot, humid environments.
Do not place items with naked flames or containers with liquids on this
appliance.
Switch off and unplug when not in use and before cleaning or servicing the
appliance. Servicing of this appliance must only be carried out by a qualified
electrician.
Always ensure the mains adaptor plug is readily unpluggable
do not use
with „lockable‟ sockets or permanently wire to mains.
3
1.
SAFETY (continued)
The exclamation point within an equilateral
triangle is intended to alert the user to
presence of important operating and
maintenance (servicing) instructions in the
literature accompanying the appliance
Warning: to reduce the risk of electric shock, do not remove cover (or back). No user serviceable
parts inside, refer servicing to qualified service personnel.
The lightning flash with arrow-head symbol,
within an equilateral triangle, is intended to alert
the user to the presence of un-insulated
"dangerous voltage" within the product's
enclosure that may be of sufficient magnitude to
constitute a risk of electric shock.
4
PARTS
1. Mode button
2. Standby ( ) button
3. Menu / Info button
4. Alarm 1 button
5. Enter button
6. Alarm 2 button
7. Snooze / Sleep button
8. Preset button
9. Scan button
10. Backward () button
11. Volume - button
12. Forward () button
13. Volume + button
14. Display (on front face)
15. Speaker
16. Antenna
17. On / Off switch
18. DC in jack
19. Headphone jack
20. Battery compartment cover (on
underside)
Rear view
Top view
20
5
3. BATTERY INSTALLATION AND USE
To use the appliance with batteries
ensure that the power cord is NOT
connected to the mains and install the
batteries into the battery
compartment.
3.1 Lift off the battery compartment cover
from the underside of the radio.
3.2 Insert 4 x AA 1.5V alkaline batteries
(not included) in accordance with the
diagram in the battery compartment.
Take care to observe the correct
polarity (+/ -).
3.3 Refit the battery compartment cover.
3.4 Do not expose the batteries or the installed batteries to excessive heat (e.g.
fire, sunshine or position close to radiators etc.).
Notes:
All DAB radio‟s use more power during use than „traditional‟ radios and so
will run batteries down within a few hours. Therefore use of mains power
(or rechargeable batteries) is recommended for extended listening.
Always switch off using the ON/OFF switch at rear when not in use.
Standby mode continues to use power and (if in battery mode) will
flatten the batteries within a couple of days.
BATTERY SAFETY AND DISPOSAL
CAUTION Danger of explosion if batteries are incorrectly fitted / replaced.
Only use „AA‟ 1.5V batteries in this appliance.
Be sure to insert batteries correctly taking care to observe the correct
polarity (+ and -).
Use only batteries of the same or equivalent type as recommended.
Batteries should be replaced by an adult.
Do not recharge non-rechargeable batteries.
Remove rechargeable batteries from appliance before recharging.
Never mix old and new batteries (replace all batteries at the same time).
Never try to dismantle batteries.
Do not short-circuit the supply terminals.
Always remove exhausted or dead batteries from the product.
Remove batteries from the product before extended storage.
Dispose of batteries responsibly at local authority household waste recycling
facility.
DO NOT dispose of batteries in a fire as the batteries may explode.
6
4. GETTING STARTED
4.1 If using mains power, insert the adaptor cord into the power socket at the
rear of the radio. Plug the adaptor into the mains supply socket.
4.2 If using the radio with batteries ensure that the power cord is NOT inserted
into the back of the appliance and install the batteries into the battery
compartment.
4.3 Fully extend the telescopic antenna.
4.4 Move the ON / OFF switch at the rear of
the radio to the ‘on’ position the display will
illuminate.
4.5 P
ress the STANDBY ( ) button to turn the radio on and a welcome message
will be displayed briefly (Fig. 1) and start to tune in.
4.6 DAB mode will automatically be selected and the radio will perform an
autotune full scan (Fig. 2). The display will then show ‘searching’, together
with a slide bar (Fig. 3) that indicates the progress of the scan and the
number of stations found so far.
Fig. 2 Fig. 3
4.7 When the scan is finished the radio will play the first alphanumerically found
station. The display will show the station being listened to.
4.8 If the radio does not find any stations, ‘No signal DAB’ will be displayed.
Ensure the antenna is fully extended or try moving the radio to another
location (near a window may be better) and repeat the above steps.
4.9 Adjust the volume to the desired level using VOL + or VOL buttons.
4.10 To search the stations that have been found, press the FORWARD () or
BACKWA
RD () buttons to scroll through the available stations.
4.11 To switch to FM radio, press the MODE button. The display will show
switching to FM. Press the button again to return the radio to DAB mode.
4.12 Press the STANDBY (
) button to place the unit in standby mode.
4.13 To turn the clock radio completely off, move the ON / OFF switch at the
rear of the radio to the ‘off’ position (note: clock display and alarm will not
function in OFF mode).
Note: The clock in this radio is equipped to receive a DAB radio frequency time
signal or FM time signal with RDS and after turned on, it will automatically
tune into a DAB radio station and update the clock. It may be necessary to
wait for 1-2 minutes to allow
the unit to receive the time signal.
Fig. 1
show the progress of the scan.
Press the SCAN button and 'Autotune full scan' is displayed (Fig.2).
7
5. USING THE RADIO DAB MODE
DAB differs from analogue radio; the separate signals from a number of
stations are grouped together and transmitted as a single frequency.
These groups are referred to as multiplexes and ensembles. Each time a
group has been found the name of the group will be shown on the lower
half of the display.
5.1 DAB mode - auto scan
This function allows the radio to search automatically for DAB Band III
channels.
5.1.1
The scan will be initiated and a slide bar will be shown in the display to
5.1.2 When the scan is finished the radio will play the first alphanumerically
found station.
5.1.3 If the radio does not find any stations, „No signal DAB‟ will be displayed.
Try moving the radio to another location (near a window may be better) and
repeating the above steps. Ensure the antenna is fully extended.
5.1.4 To scroll through the stations that have been found, press the FORWARD
( ) or BACKWARD ( ) buttons. Then press the ENTER button listen to
the station of choice or wait a few seconds and the radio will automatically
retune.
5.2 DAB mode Manual scan
This function allows a specific or new ensemble to be manually added to
the stations already available on the radio.
5.2.1 Press and hold the ENTER button until the
display shows „manual tune‟ (Fig. 4).
5.2.2 Press the FORWARD ( ) OR
BACKWARD ( ) buttons to move through
the DAB channels and the associated
frequencies. When the desired ensemble /
frequency appears in the display
(e.g. Fig. 5), press the ENTER button to
add the ensemble and display the name.
5.2.3 Press the FORWARD ( ) OR BACKWARD ( ) buttons to move through
the stations included in the ensemble and press the ENTER button to listen
to the station of choice and exit the manual tune mode.
5.3 DAB MODE SECONDARY SERVICES
Some stations include secondary services and when these are available a
„>‟ symbol appears after the station name. To access this service press the
ENTER button.
Fig. 4
Fig. 5
8
6. USING THE RADIO - FM MODE
6.1 Turn the radio on, press the MODE button and select the FM mode. The
display will show „switching to FM‟ and the radio will tune to 87.50 MHz.
6.2 To activate auto search, briefly press the SCAN button and the radio will
start scanning up the frequency and stop automatically once the next
station up has been found. To scan downwards, press and hold the SCAN
button for at least 1 second.
6.3 To search manually, press the FORWARD ( ) or BACKWARD ( ) button
to increment the frequency by 0.05MHz.
6.4 To change the audio mode (auto or mono) press the ENTER button on the
unit, this will switch from auto to mono, press and again to switch back. If
auto is selected the radio will automatically switch between stereo and
mono mode. (Note: as this unit only has a single speaker, these modes will
not affect the speaker output)
6.5 If an FM RDS (Radio Data Signal) is present, the display will automatically
show the station name and radio text (where available).
7. RADIO DISPLAY MODES
If the MENU button is pressed repeatedly when a radio station is playing,
the second line of the station display will scroll through the following modes
with each press of the button.
In DAB mode
In FM mode
Ensemble / Multiplex (Group name) - The ensemble / multiplex is a group of
station that are bundled and transmitted together in a single frequency.
There are national and local multiplexes, local ones contain stations that are
specific to the local area.
Signal strength the display will show a slide bar to indicate the strength of
the signal. The stronger the signal, the longer the bar.
DLS (dynamic label segment) / Radio text - The broadcaster may include a
scrolling message about the current programme.
Programme type this describes the style of the programme. If the
information is not available the display will show „<Programme type>‟.
Time and date - the time and date will be automatically updated by the radio
time signal.
Audio mode the display will show if the station being received is stereo or
mono.
Frequency display will show the frequency of the station being broadcast.
Audio bit rate the display will show the digital audio bit rate being received.
9
8. PROGRAMMED STATION FUNCTION
This function allows up to 10 stations to be programmed into the memory
and stored in the DAB and FM modes.
8.1 Follow the directions above to select a radio station.
8.2 Press and hold the PRESET button until the display shows the flashing
PRESET number (Fig. 8).
8.3 Press the FORWARD ( ) or BACKWARD ( ) buttons to select the preset
storage location of choice and then press the ENTER button to confirm. The
station now broadcasting has now been stored in the selected location (Fig.
9).
8.4 To store further stations, press and hold the PRESET button, and then
press the FORWARD ( ) or BACKWARD ( ) buttons repeatedly until an
empty storage location is found. Press the ENTER button to save the
station.
Fig. 8 Fig. 9 Fig. 10
8.5 To listen to a preset station, press the PRESET button once and then press
the FORWARD ( ) or BACKWARD ( ) button to select the desired preset
location. When the storage location of choice is displayed, press the
ENTER button to listen to the stored station. If the preset has not been
allocated „Preset empty‟ will be shown in the display (Fig. 10).
9. ALARM FUNCTION
This radio has a dual alarm function and it is possible to set two individual
alarm times. This alarm and may be set to wake as a buzzer tone or to a
favourite radio (DAB/FM) station. The alarm can be set in standby or during
operation.
9.1 To set the first alarm, press the ALARM 1 button to display the alarm 1
status, use the FORWARD ( ) or BACKWARD ( ) button until Alarm
status ON‟ is displayed and press the ENTER button to enter the set up
mode.
9.2 The display will now show the current time, the wake up time and the hour
digits for the wake up time will flash. Press the FORWARD ( ) or
BACKWARD ( ) buttons until the correct alarm hour is displayed.
9.3 Press the ENTER button to accept and the minute digits will now flash in
the display. Use the FORWARD ( ) or BACKWARD ( ) buttons until the
correct alarm minute is displayed.
9.4 Press the ENTER button to accept and the alarm frequency (e.g. daily,
weekdays, weekends, once) will now be displayed. Use the FORWARD
( ) or BACKWARD ( ) buttons to set the alarm frequency.
9.5 Press the ENTER button to accept and the wake up mode (e.g. BEEPER,
DAB or FM) will be displayed. Use the FORWARD ( ) or BACKWARD
( ) buttons to select the wake up mode of choice.
10
9.6 Press the ENTER button to accept and the alarm volume will now be
displayed. Use the FORWARD ( ) or BACKWARD ( ) buttons to set the
wake up volume of choice.
9.7 Press the ENTER button once more to accept and exit the set up mode.
The alarm indicator
( 1)
will now be shown in the display.under standby mode.
9.8 The alarm is now set and will remain in memory when the unit is switched
to standby mode.
9.9 When the time on the clock is the same as the alarm time that has been
set, the alarm will sound and the display will flash.
9.10 The alarm will continue to sound and stop automatically after one hour. To
silence the alarm , press the STANDBY ( ) buttons . If a daily
has been set , the alarm indicator will remain illuminated and the
alarm
alarm will sound again at the same time the following day until the alarm is
switched off.
9.11 To activate the snooze function, press the SNOOZE / SLEEP button when
the alarm sounds. The snooze indicator (Zz) will be shown in the display;
the alarm will silence and then sound again after approximately nine
minutes.
9.12 To turn off the alarm permanently, press the ALARM 1 button to display the
alarm status. Use the FORWARD ( ) or BACKWARD ( ) button until
„Alarm status OFF‟ is displayed, then press the ENTER button to accept
and exit the mode. The alarm has now been deactivated and the alarm
indicator will no longer be shown in the display.
Notes
If the power is interrupted (or the unit is switched OFF using the rear
switch) and batteries are not fitted in the battery compartment, the alarm
settings will be lost.
To set the second alarm, use the ALARM 2 button and then follow the
steps above to set this alarm.
If the DAB or FM radio wake up option is selected the alarm will play the
last station listened to in DAB or FM.
The clock display size / brightness is fixed and cannot be adjusted.
11
10. SETTING AND USING THE SLEEP FUNCTION
This function will switch off the radio automatically after a preset time
interval.
10.1 With the radio of choice playing, press the SNOOZE / SLEEP button and the
sleep status is shown in the display.
10.2 Press the FORWARD ( ) or BACKWARD ( ) buttons repeatedly until the
desired sleep interval (see sequence below) is shown in the display.
10.3 Press the ENTER button to accept. The sleep timer is now activated and
the display will show the sleep indicator (S) and the time interval remaining
before the radio switches off (e.g. 10).
10.4 The sleep function will count down and the unit will switch off automatically
after the time interval selected has lapsed.
10.5 To cancel the sleep timer, press the SNOOZE / SLEEP button and then
press the FORWARD ( ) or BACKWARD ( ) button repeatedly until „OFF‟
is shown in the display. Press the ENTER button to accept.
11. USING HEADPHONES (not included)
A stereo headphone jack has been provided so that the unit can be used
without disturbing others. Plug in the headphones at the point marked
at the rear of the radio and adjust the listening volume to your chosen level.
Excessive sound pressure from earphones and headphones can cause
hearing loss. The speaker will not operate when earphones are fitted.
12. RESET
Moving the radio to another location in the country the pre-tuned and stored
stations may no longer be available and it will be necessary to reset the
radio back to the factory settings.
12.1 With the unit switched on, press and hold the MENU / INFO button until the
display shows the „system reset‟.
12.2 Press the ENTER button to confirm reset and „press enter key to reset‟ will
be displayed.
12.3 Press the ENTER button once again to confirm. The radio will display
„system reset‟ and the reset will begin.
12.4 A „full scan‟ will then start and the display will show a slow progressing slide
bar.
12.5 When the scan is finished the radio will play the first alphanumerically
found station. All stored programmed stations will be lost during reset.
Note
If the MENU / INFO ENTER button is pressed again quickly in step 12.1 the
„software number‟ will be displayed.
12
13. CARE AND MAINTENANCE
Wipe external surfaces with a soft cloth. If the cabinet is very dirty, unplug
from the mains supply and use a damp cloth soaked in a weak solution of
washing up liquid and water. Allow to dry thoroughly before reusing.
14. TROUBLESHOOTING GUIDE
Observation Potential cause / solution
The unit does not
work.
Has the adaptor lead been correctly plugged into the
mains and the DC input jack at the rear of the unit?
Does the socket that is being used have power?
Has the power lead been removed from the back of the
unit without the batteries being installed?
Has the ON/OFF button at the rear of the unit been moved
to the „on‟ position?
The unit does not
work on batteries
Has the adaptor lead been removed from the back of the
unit?
Are the batteries inserted correctly?
Are the batteries exhausted?
Has the ON/OFF button at the rear of the unit been moved
to the „on‟ position?
No sound Is the volume control set at minimum?
Are headphones fitted in the phones jack?
Radio reception
noisy (FM)
Extend the antenna or adjust the position of the radio.
FM stereo if weak switch to MONO as this requires less
signal strength.
Radio reception
stutters / bubbling
sounds (DAB)
Signal is weak. Extend the antenna or adjust the location
of the radio. Positions higher up or nearer windows may
improve reception. Note sometimes retracting the aerial
slightly (less than full length) may improve reception.
DAB
„No signal DAB
This normally means the signal is very weak, not that there
is no signal. Try moving the radio to a different location and
re-scanning. Check that your local area has DAB coverage
on www.ukdigitalradio.com/coverage/postcodesearch/
Alarm function
does not work
Has the alarm been activated see section 9.1?
Has the correct alarm been activated?
Sleep function
does not work
Has the sleep function been activated see section 10?
13
15. TECHNICAL SPECIFICATION
Rated voltage (transformer) 100 240V~ 50/60Hz, 0.15A
Transformer output 5V 0.5A
Rated voltage (radio) DC 6V (1.5V x 4 AA)
Power consumption 3W
Power consumption (standby) 0.3W
Class rating (transformer) 2
Audio output 1.5W RMS
Radio DAB 174-240MHz
FM 87.5-108MHz
Operating conditions Temperature: 5°C to 35°C
Humidity 5% to 90%
Operating position Horizontal
14
1. VEILIGHEID
Uitsluitend voor huishoudelijk gebruik binnenshuis.
Plaats het apparaat op een vlakke, stabiele ondergrond met voldoende venlae en uit de
buurt van hie bronnen. De minimale afstand rondom het apparaat voor voldoende
venlae is 10 cm. Bedek of blokkeer de venlaeopeningen niet.
Houd dit apparaat en de elektriciteitskabel buiten bereik van kinderen, jonger dan 8 jaar.
Laat kinderen dit apparaat niet gebruiken zonder toezicht.
Dit apparaat kan worden gebruikt door kinderen vanaf 8 jaar en personen met een
lichamelijke, motorische of geestelijke beperking en personen zonder kennis of ervaring
m.b.t. de bediening van dit apparaat, tenzij deze personen onder toezicht staan of instruces
hebben gekregen om dit apparaat veilig te bedienen en zich bewust zijn van de eventuele
gevaren. Kinderen dienen niet met dit apparaat te spelen. Reiniging en onderhoud dienen
niet door kinderen te worden gedaan zonder toezicht.
Rol de kabel volledig uit voordat u deze in het stopcontact doet en verzeker u ervan dat de
kabel op een plek ligt waar deze niet zal beschadigen of waar men er niet over kan vallen.
De kabel van de voedingsadapter kan niet worden vervangen. Indien de kabel, de plug of
voedingsadapter
is beschadigd, dient de gehele unit te worden vervangen.
Verbindingen dienen uitsluitend tot stand te komen door middel van de meegeleverde
voedingsadapter, sluit het apparaat nooit direct op een 240V aansluiting aan.
De voedingsadapter zal warm worden jdens gebruik, bedek deze niet of plaats deze nooit
op een ondergrond die gevoelig is voor hie, zoals een aanrecht of een tapijt.
Verwijder de voedingsadapter uit het stopcontact indien u het apparaat voor langere jd niet
gebruikt of gedurende onweer.
Trek nooit aan de kabel om de voedingsadapter uit het stopcontact te halen.
Houd het apparaat, de kabel, en de voedingsadapter stekker droog en vermijd plaatsen waar
deze nat kunnen worden. Vermijd gebruik in een warme, vochge omgeving.
Plaats geen open vlammen of containers gevuld met vloeistoffen op dit apparaat.
Schakel het apparaat uit indien u deze niet gebruikt of indien het apparaat wordt
schoongemaakt of onderhouden. Onderhoud dient uitsluitend te worden uitgevoerd door
gekwaliceerd personeel.
Verzeker u ervan dat de voedingsadapter aljd gemakkelijk uit het stopcontact is te
verwijderen en makkelijk toegankelijk is- gebruik geen vergrend
elbare stopcontacten of
permanente bekabeling.
2.
VEILIGHEID
Het bliksemschicht met een pijl symbool in een driehoek waarschuwt de
gebruiker op de aanwezigheid van niet-geïsoleerde “gevaarlijke voltage”in de
behuizing van het apparaat die voldoende sterk kunnen zijn dat er een kans
bestaat op een elektrische schok.
Het uitroepteken symbool in een driehoek waarschuwt de gebruiker op de
aanwezigheid van belangrijke instruces, bijgesloten bij dit apparaat, met
betrekking tot de bediening en onderhoud van dit apparaat.
Waarschuwing: om het risico op een elektrische schok te
reduceren, open de behuizing (v
oor -en achter) niet. Er
bevinden zich geen onderdelen in het apparaat die de
gebruiker kan vervangen, wendt u zich tot gekwaliceerd
personeel voor onderhoud.
ATTENTIE
RISICO OP EEN ELEKTRISCHE
SCHOK
NIET OPENEN
15
20
ONDERDELEN
Boven aanzicht
Achter aanzicht
1. Modus knop 11. Volume - knop
2.
Stand-by (q) knop
12.
Vooruit (6) knop
3. Menu/Info knop 13. Volume + knop
4. Alarm 1 knop 14. Display (Vooraanzicht)
5. Enter knop 15. Luidspreker
6. Alarm 2 knop 16. Antenne
7. Snooze/Sleep knop 17. Aan/Uit schakelaar
8. Preset knop 18. DC in aansluing
9. Scan knop 19. Hoofdtelefoon aansluing
10
Terug (5) knop
20. Baerij comparment deksel (onderzijde)
16
3. INSTALLATIE EN GEBRUIK VAN DE BATTERIJEN
Indien u dit apparaat met baerijen wilt gebruiken let
u dan op dat de elektriciteitsdraad niet is aangesloten
op het stopcontact en plaats de baerij in het
comparment.
3.1 Til het deksel van het comparment aan de onderzijde
van de radio op.
3.2 Plaats de 4 x AA 1.5V alkaline baerijen (niet
inbegrepen) in het comparment zoals afgebeeld. Let
op de juiste polariteit (+/-)van de baerijen.
3.3 Sluit het deksel van het comparment.
3.4 Stel de baerijen en de geïnstalleerde baerijen niet bloot aan overmage hie (bijv. vuur,
zonlicht of na
ast radiatoren).
N.B.:
Alle DAB Radio’s verbruiken meer elektriciteit dan de tradionele radio’s, dus de baerijen
zullen binnen enkele uren leeg zijn. Wij adviseren u daarom gebruik te maken van de
elektriciteitsaansluing of van oplaadbare baerijen jdens langdurig gebruik.
Zet het apparaat, indien deze niet gebruikt wordt, aljd uit door middel van de Aan/Uit
schakelaar aan de achterzijde van het apparaat. In de Stand-by stand wordt nog aljd
elektriciteit verbruikt en (bij baerijgebruik) zullen de baerijen binnen enkele dagen leeg
zijn.
VEILIGHEID EN VERWIJDERING VAN BATTERIJEN
LET OP: gevaar v
oor explosie indien de baerijen niet correct geplaatst zijn.
Gebruik uitsluitend “AA”1.5V baerijen in dit apparaat.
Let bij het plaatsen van de baerijen op de juiste polariteit (+/-).
Gebruik uitsluitend de genoemde baerijen of gelijkwaardige baerijen zoals hierboven
genoemd.
Baerijen dienen te worden vervangen door een volwassene.
Laad geen baerijen op die niet oplaadbaar zijn.
Voordat u oplaadbare baerijen gaat opladen, dient u deze te verwijderen uit het apparaat.
Plaats geen lege en volle baerijen samen in het apparaat (alle baerijen tegelijk vervangen).
Probeer nooit baerijen uit elkaar te halen.
Vero
orzaak geen kortsluing in de stroomaansluing.
Verwijder aljd slecht werkende of lege baerijen uit het apparaat.
Indien u het apparaat gedurende lange jd niet gebruikt, aljd de baerijen verwijderen.
Gooi baerijen aljd op een verantwoorde manier weg, infomeer hiervoor bij uw lokale
milieupark.
Gooi baerijen nooit in een vuur omdat deze kunnen exploderen.
17
4. AAN DE SLAG
4.1 Indien u gebruik maakt van de elektriciteit, sluit u de voedingsadapter plug aan op de
achterkant van de radio. Doe de stekker van de voedingsadapter in het stopcontact.
Indien u gebruik maakt van erijen let u er dan op dat de elektriciteitskabel niet is
aangesloten op de stroomvoorziening. En plaats de ba erijen in het compar ment.
4.3 Trek de antenne volledig uit.
4.4 Zet de Aan/Uit schakelaar aan de achterzijde van de radio opon”. De display zal oplichten.
4.5 Druk op de Stand-by (q) knop om de radio aan te ze en en er zal kort een
w
elkomstboodschap op het scherm verschijnen (Fig.1) en de radio zal gaan afstemmen.
Fig.1
4.6 De DAB modus zal automa h worden geselecteerd en de radio zal een volledige autotune
scan uitvoeren (Fig.2). Op de display verschijnt”searching samen met een voortgangsbalk
(Fig.3) die de voortgang aangee
en het tot dan toe aantal gevonden sta ons.
Fig.2 Fig.3
4.7 Zodra de scan is beëindigd zal de radio het eerste alfanumeriek gevonden sta on laten
horen. Op de display verschijnt het st on waarnaar op dit moment wordt geluisterd.
4.8 Indien de radio geen sta ons kan vinden, v
erschijnt er op het scherm “No Signal DAB”.
Controleer of de antenne volledig is uitgetrokken of probeer de radio op een andere plaats te
ze
en (dichter bij een raam kan een beter resultaat opleveren) en volg de bovenstaande
stappen.
4.9 Pas het volume aan naar eigen inzicht door gebruik te maken van de VOL+ en VOL – knoppen.
4.10 U kunt, door gebruik te maken van de Vooruit (6)en Terug (5) knoppen zoeken naar een
sta on tussen de beschikbare sta ons.
4.11 Om te schakelen naar FM radio, kunt u gebruik maken van de MODUS knop. Op de display
verschijnt
“switching to FM). Door nogmaals op de MODUS knop te drukken keert u weer
terug naar de DAB modus.
4.12 Druk op de STAND-BY (q) knop om het apparaat in stand-by modus te ze
en.
4.13 Om de radio volledig uit te schakelen, zet u de Aan/Uit schakelaar aan de achterzijde van de
radio op “o” (de klok en alarm display zullen niet werken in de OFF modus).
N.B.: De klok in deze radio is uitgerust om een DAB radio frequ gnaal te ontvangen of
een FM d signaal met RDS en nadat u de radio hee aangezet, zal de radio autom h
afstemmen op een DAB radio sta
on en de
klok updaten. Het kan voorkomen dat u 1-2
minuten moet wachten voordat het apparaat het signaal ontvangt.
18
5. GEBRUIK VAN DE RADIO DAB MODUS
DAB wijkt af van de analoge radio; de aparte signalen van verschillende staons worden
gegroepeerd en uitgezonden via één frequene. Deze groepen worden ook wel mulplexen
of ensembles genoemd. Iedere keer als er een groep is gevonden zal de naam van die groep
verschijnen op de onderste hel van de display.
5.1 DAB Modus – auto scan
Door middel van deze funce zal de radio automasch zoeken naar de DAB Band III kanalen
zoeken.
5.1.1 Druk op de SCAN knop en op de display verschijnt “Autotune full scan”(Fig.2).
De scan
zal beginnen en de voortgangsbalk zal op de display verschijnen om de voortgang
van de scan te tonen.
5.1.2 Zodra de scan is voltooid zal de radio afstemmen op het eerste alfanumerieke staon dat
gevonden is.
5.1.3 Indien de radio geen staons kan vinden, verschijnt er op het scherm “No Signal DAB”.
Probeer de radio op een andere plaats te zeen (dichter bij een raam kan een beter resultaat
opleveren) en volg de bovenstaande stappen. Controleer of de antenne volledig is
uitgetrokken.
5.1.4 U kunt, door gebruik te maken van de Vooruit (6)en Terug (5) knoppen zoeken naar een
staon tussen de
beschikbare staons. Druk daarna op de ENTER knop om het staon van uw
keuze te beluisteren of wacht enkele seconden zodat de radio automasch opnieuw zal
afstemmen.
5.2 DAB mode – Handmag scannen
Door middel van deze funce kunt u een speciek of nieuw ensemble handmag toevoegen
aan de reeds beschikbare staons.
5.2.1 Druk op de ENTER knop en houd deze ingedrukt tot op de display”manual tune” (Fig.4)
verschijnt.
Fig.4
5.2.2 Druk op de Vooruit (6)of Terug (5) knoppen om zoeken tussen de DAB kanalen en
frequenes. Zodra de gewenste ensemble/frequene op de display verschijnt (bijv. Fig.5),
drukt u op de ENTER knop om dit ensemble toe te voegen en de naam op de display weer te
geven.
Fig.5
5.2.3 Druk op de Vooruit (6)of Terug (5) knoppen om te zoeken tussen de staons die behoren tot
het ensemble en druk op de ENTER knop om het door u gewenst staon te beluisteren en om
de Handmag afstemmen modus te verlaten.
5.3 DAB Modus – secundaire services
Sommige staons bieden secondaire services en indien deze beschikbaar zijn zal het symbool
“>”achter de naam van het staon verschijnen. Om deze serv
ice te openen drukt u op de
ENTER knop.
19
6 GEBRUIK VAN DE RADIO – FM MODUS
6.1 Zet de radio aan, druk op de MODUS knop en selecteer de FM modus. Op de display
verschijnt “switching to FM”en de radio zal afstemmen op 87.50MHz.
6.2 Om het automasch zoeken te starten, drukt u kort op de SCAN knop en de radio zal
doorgaan met zoeken tot het eerstvolgende staon is gevonden. Om terug te zoeken houdt u
de SCAN knop minimaal één seconde ingedrukt.
6.3 Om handmag te zoeken, drukt u op de Vooruit (6)of Terug (5) knop zodat het zoeken per
0.05MHz zal oplopen of
afnemen.
6.4 Om de audio modus te wijzigen (auto of mono) drukt u op de ENTER knop op het apparaat,
hierdoor zal de audio modus van auto naar mono wijzigen, druk nogmaals om weer te
veranderen. Indien u auto hee geselecteerd zal de radio automasch schakelen tussen
stereo en mono (N.B.: Daar dit apparaat één luidspreker hee zullen de verschillende modi
niet beïnvloed worden op de luidspreker output).
6.5 Indien een FM RDS (Radio Data Signal) aanwezig is, zal op de display automasch de naam en
de tekst van het staon verschijnen (indien beschikbaar).
7. RA
DIO DISPLAY MODI
Indien u herhaaldelijk op de MENU knop drukt terwijl een radiostaon aan staat, zullen er op
de tweede regel van de display verschillende weergaveopes verschijnen, iedere keer als u
drukt
In DAB Modus
In FM Modus
Ensemble/Mulplex (groep Naam) – een ensemble of Mulplexe is een groep van staon die
gebundeld zijn en uitgezonden worden via één frequene. Er zijn naonale en lokale
mulplexen, de lokale omvaen staons die gebonden zijn aan een bepaalde regio.
Signaal sterkte – op de display wordt een balk weergegeven die de sterkte van h
et signaal
aangee. Hoe sterker het signaal, hoe langer de balk.
DLS (dynamic label segment) /Radio Tekst- het uitzendstaon kan een rolboodschap
meezenden betreffende het huidige programma.
Programma type – dit omschrij de sjl van een programma. Indien dit niet beschikbaar is zal
op de display “Programme type” verschijnen.
Tijd en datum – de jd en de datum zal automasch worden geüpdatet door middel van het
radio signaal.
Audio modus – op de display wordt weergegeven of het staon dat u ontvangt in stereo of
mono wordt uitgezonden.
Frequene – op de display verschijnt de frequene van het huidige staon.
Audio bit rate (Bitsnelheid)– op de display verschijnt de digitale audio bit rate dat wordt
ontvangen.
20
8. VOORKEURZENDERS FUNCTIE
Door middel van deze funce kunnen 10 radiostaons worden opgeslagen in het geheugen
voor zowel de DAB als de FM modi.
8.1 Volg de instruces zoals hierboven weergegeven.
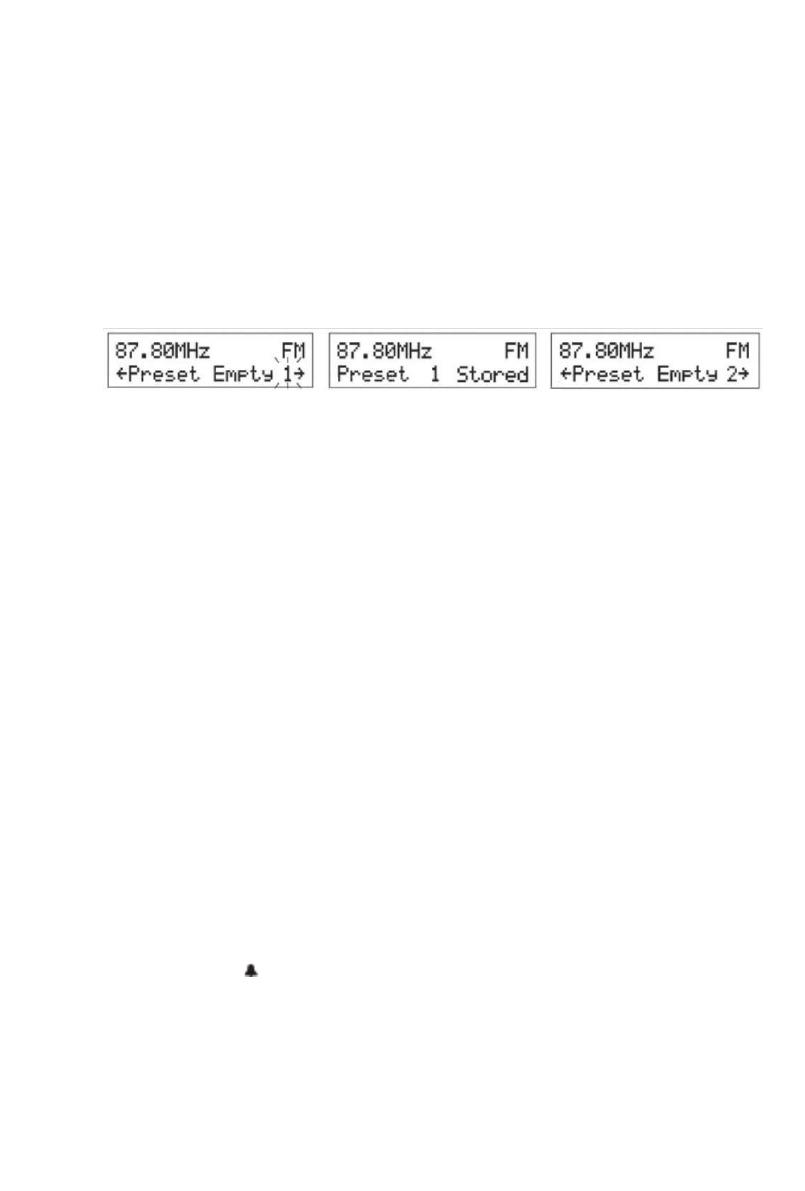
8.2 Druk op de PRESET knop en houd deze ingedrukt tot op de display een knipperend PRESET
nummer verschijnt (Fig.8).
8.3 Druk op de Vooruit (6)of Terug (5) knop om een locae voor uw voorkeurzender te
selecteren. Druk vervolgens op de ENTER knop om te bevesgen. Het radio staon dat u nu
beluistert zal op de gekozen locae worden opgeslagen (Fig.9
).
8.4 Om meerder staons op te slaan, drukt u op de ENTER knop en houd deze ingedrukt, druk
daarna op de Vooruit (6)of Terug (5) knop om een beschikbare locae te vinden. Druk op de
ENTER knop om het staon op te slaan.
Fig.8
Fig.9
Fig.10
8.5 Om een voorkeurzender te beluisteren, drukt u één keer op de PREST knop en daarna op de
Vooruit (6)of Terug (5) knop om de gewenste voorkeurzender te selecteren. Zodra de locae
van uw voorkeurzender op de display verschijnt, drukt u op de ENTER knop om dit radio
staon te beluisteren. Indien de voorkeurzender niet is toegewezen aan een locae,
verschijnt er op de display “Preset Empty” (Fig.10).
9. ALARM FUNCTIE
Deze radio beschikt over een dubbele alarmfunce waarmee het mogelijk is twee
verschillende alarmjden in te stellen. U kunt wakker worden door de zoemer of door de
muziek van uw favoriete radio staon (DAB/FM). U kunt het alarm instellen in de stand-by
modus of als de radio in werking is.
9.1 Om het eerste alarm in het stellen, drukt u op ALARM 1 om de status van het alarm 1 weer te
geven, gebruik de Vooruit (6)of Terug (5)
knoppen tot er “Alarm status On”verschijnt en druk
op de ENTER knop om het instelmenu te openen.
9.2 Op de display verschijnt nu de huidige jd, de wekjd en de uren van de wekjden zullen
knipperen. Druk op de Vooruit (6)of Terug (5) knop tot het gewenste uur wordt weergeven.
9.3 Druk op de enter knop om te bevesgen, nu zullen de minuten knipperen. Druk op de
Vooruit (6)of Terug (5) knop tot de gewenste minuten worden weergeven.
9.4 Druk op de ENTER knop om te bevesgen, vervolgens zal nu de frequene waarin het alarm
wilt instellen worden weergeven (bijv. dagelijks, weekdagen, weekends, eenmalig). Druk op
de Vooruit (6)of Terug (5) knop om de gewenste frequene in te stellen.
9.5 Druk op de ENTER knop om te bevesgen en de wekmodus (zoemer, DAB of FM) zal worden
weergeven. Druk op de Vooruit (6)of Terug (5) knop om de gewenste wekmodus in te stellen.
9.6 Druk op de ENTER knop om te bevesgen, nu zal het alarm volume worden weergeven. Druk
op de Vooruit (6)of Terug (5) knop om het gewenste volume in te stellen.
9.7 Druk nog één keer op de ENTER knop om te bevesgen en het instel menu te verlaten.
De alarm indicator ( 1) zal nu verschijnen op de display in de stand-by modus.
9.8 Het alarm is nu ingesteld en zal worden opgeslagen in het geheugen in de stand-by modus.
9.9 Zodra de jd van het alarm gelijk is aan de huidige jd zal het alarm afgaan en zal de display
knipperen.
9.10 Het alarm zal blijven afgaan en na een uur automasch stoppen. Om het alarm uit te zeen,
drukt u op de stand-by (q) knop. Indien u de frequene van het alarm op dagelijks hee
ingesteld zal de alarm indicator op de display aan blijven en de v
olgende dag op dezelfde jd
weer afgaan tot u deze weer uitzet.
21
9.11 Om de Snooze funce te acveren, drukt op de SNOOZE/SLEEP knop zodra het alarm afgaat.
De SNOOZE indicator (Zz) zal op de display verschijnen; het alarm zal uitgaan en na ongeveer
9 minuten weer afgaan.
9.12 Om het alarm helemaal uit te schakelen, drukt u op de ALARM 1 knop om de status van het
alarm weer te geven. Druk op de Vooruit (6)of Terug (5) knop tot op de display “Alarm status
OFF” verschijnt, druk daarna op de ENTER knop om te bevesgen en het menu te verlaten.
Het alarm is nu helemaal uitgeschakeld en de alarm
indicator zal niet meer zichtbaar zijn op
de display.
N.B.
Indien de stroomvoorziening is onderbroken of het apparaat is door middel van de
schakelaar aan de achterzijde van de radio op OFF gezet of indien de baerijen niet correct
zijn geplaatst, zullen de instellingen van het alarm verloren gaan.
Om het tweede alarm in te stellen, drukt u op de ALARM 2 knop en volgt u bovengenoemde
instruces.
Indien u als wekmodus DAB of FM radio hee ingesteld, zal de zender waarnaar u als laatste
hee geluisterd te horen zijn.
De afmeng en helderheid van de display is standaard en kan
niet worden gewijzigd.
10. INSTELLEN EN GEBRUIK VAN DE SLEEP (automasch uitschakelen) FUNCTIE
Door middel van deze funce kunt u na een vooringestelde intervaljd de radio automasch
laten uitschakelen.
10.1 Terwijl de radio aan het spelen is, drukt u op de SNOOZE/SLEEP knop en de SLEEP status zal
op de display verschijnen.
10.2 Druk herhaaldelijk op de Vooruit (6)of Terug (5) knop tot de gewenste intervaljd verschijnt
(zie onderstaande volgorde).
10.3 Druk op de ENTER knop om te bevesgen. De SLEEP mer is nu geacv
eerd en op de display
verschijnt de sleep indicator (S) met daarbij de resterende jd tot de radio automasch zal
uitschakelen (bijv.10).
10.4 De SLEEP funce zal aellen en daarna automasch uitschakelen nadat de ingestelde
intervaljd is verstreken.
10.5 Om de SLEEP mer uit te schakelen, drukt u op de SNOOZE/SLEEP knop en daarna drukt u
herhaaldelijk op de Vooruit (6)of Terug (5) knoppen tot “OFF”verschijnt op de display. Druk
op de ENTER knop om te bevesgen.
11. GEBRUIK VAN DE HOOFDTELEFOON (niet inbegrepen)
De radio is voorzien van een stereo hoofdtelefoon aansluing zod
at u het apparaat kunt
gebruiken zonder andere mensen te storen. Doe de hoofdtelefoon in de aansluing die
aangegeven wordt met aan de achterzijde van de radio en pas het volume naar uw keuze
aan.
Excessief geluid van een hoofdtelefoon of oordopjes kan leiden tot gehoorverlies. De
luidspreker werkt niet indien een hoofdtelefoon is aangesloten.
12 RESET
Indien u de radio verplaatst naar een andere regio in het land kan het voorkomen dat de
voorkeurzenders niet mee beschikbaar zijn en is het noodzakelijk om de radio weer te
reseen naar de fabrieksinstelling
en.
12.1 Terwijl het apparaat aan staat, drukt u op de MENU/INFO knop en houd deze ingedrukt tot
op de display “system reset”verschijnt.
22
12.2 Druk op de ENTER knop om te bevesgen tot op de display “press enter key to reset”
verschijnt.
12.3 Druk nogmaals op de ENTER knop om te bevesgen. Op de display verschijnt “system reset”
en de radio zal beginnen met de reset.
12.4 De radio zal een volledige scan uitvoeren, op de display verschijnt de voortgangsbalk.
12.5 Zodra de scan is voltooid zal de radio de eerste alfanumerieke radio zender spelen. Alle
voorgaande opgeslagen radio zenders zullen verloren gaan.
N.B.
Indien u jdens stap 12.1 nogmaals snel op de MENU/INFO knop drukt zal het “soware
nummer” word
en weergegeven.
13. REINIGING EN ONDERHOUD
Reinig de buitenkant van het apparaat met een zachte doek. Indien de behuizing erg vuil is,
trekt u de stekker uit het stopcontact en reinigt u het apparaat met een vochge doek met
een lichte oplossing van water en afwasmiddel. Let op dat het apparaat volledig droog is
voordat u de stekker weer in het stopcontact doet.
14. PROBLEEM OPLOSSEN
Probleem Mogelijke oorzaak/Oplossing
Het apparaat doet
het niet
Zit de plug van de voedingsadapter goed in de DC aansluing aan de
achterzijde van de radio en zit de stekker goed in het stopcontact?
Staat er stroom op het stopcontact waarin de stekker zit?
Is de stroomtoevoer verwijderd zonder dat er baerijen in het apparaat zijn
gedaan?
Staat de Aan/Uit schakelaar aan de achterzijde van het apparaat in de ON
posie?
Het apparaat doet
het niet met
baerijen
Hee u de voedingsadapter verwijderd aan de achterzijde van het apparaat?
Zijn de baerijen correct geplaatst?
Zijn de baerijen leeg?
Staat de Aan/Uit schakelaar aan de achterzijde van het apparaat in de ON
posie?
Geen geluid Staat het volume ingesteld op minimum?
Is er een hoofdtelefoon of oordopjes aangesloten op het apparaat?
Radio ontvangst
gee herrie (FM)
Trek de antenne volledig uit of zet de radio op een andere locae.
FM Stereo – Indien dit signaal zwak is kunt u de radio overzeen naar MONO
ontvangst, dit signaal hoe niet zo sterk te zijn.
Radio ontvangst
hapert en gee
bubbelend geluid
(DAB)
Het signaal is zwak. Trek de antenne volledig uit of zet de radio op een andere
locae. Plaats de radio wat hoger of dichter bij een raam, dit kan de ontvangst
iets verbeteren. N.B.: Soms kan het ontvangst iets beter zijn indien u de
antenne niet helemaal uirekt ( iets korter dan de volledige lengte).
DAB “No signal
DAB”
Dit betekent over het algemeen dat het signaal te zwak is, niet dat er geen
signaal is. Probeer de radio te verplaatsen of voer een nieuwe scan uit.
Controleer of er in uw regio een DAB signaal ontvangst is.
Alarm funce doet
het niet
Hee u het alarm geacveerd – zie sece 9.1?
Hee u het juiste alarm geacveerd?
Sleep funce doet
het niet
Hee u de Sleep funce geacveerd – zie sece 10?
23
15 TECHNISCHE SPECIFICATIES
Nominale spanning (voedingsadapter) 100 – 240V ~50/60Hz, 0,15°
Voedingsadapter Spanning uit 5V 0,5A
Nominale spanning (radio) DC 6V (1.5V x 4 AA)
Stroomverbruik 3W
Stroomverbruik (Stand-by) 0.3W
Veiligheidsklasse (Voedingsadapter) 2
Audio output 1.5W RMS
Radio DAB 174 – 240MHz
FM 87.5 – 108MHz
Gebruiksomstandigheden Temperatuur 5°C tot 35°C
Vochgheid 5% tot 90%
Gebruiksposie Horizontaal
24
1. SÉCURITÉ
Pour une u isa on domes que et à l’intérieur uniquement.
Placez l’appareil sur une surface plan et stable en laissant beaucoup d’espace pour la
v a on et loin des sources de chaleur. Laissez un minimum d’espace de 10 cm autour de
l’appareil pour une v a on correcte. Ne pas couvrir ni bloquer les ouvertures de
v a on.
Tenez l’appareil et le cordon hors de la portée des enfants de moins de 8 ans.
Ne laissez pas les enfants u liser l’appareil sans surveillance.
Cet appareil peut être isé par les enfants de 8 ans et plus et des personnes aux capacités
physiques, sensorielles ou mentales réduites ou des personnes dénuées d’expérience ou de
connaissance sauf si celles-ci sont sous la surveillance ou ont reçu les instruc ons
d’u i on appropriées et si on comprend les dangers inhérents. Le ne oyage et l’entre n
par l’usager ne doivent pas être eectué par les enfants, sauf s’ils ont plus de 8 ans et s’ils
sont surveillés.
Déroulez le câble rement avant de brancher-le et assurez-vous de posi onnez-le en
prévenant l’endommager ou les chutes éventuelles.
Le cordon d’alimenta on de so de l’adaptateur secteur ne peut pas être remplacé. En cas
de dommage du cordon, la prise jack ou l’ad
aptateur, l’unité toute re doit être
remplacée.
Les branchements doivent être établis par l’adaptateur secteur fourni, ne branchez jamais
l’appareil directement à l’alimenta on 240V.
N’u isez jamais l’adaptateur fourni avec un autre appareil.
L’adaptateur secteur deviendra chaud pendant l’usage ; ne couvrez pas ou ne le posez pas
sur des surfaces susc bles de réagir à la chaleur, comme des plateaux de table et des
tapis.
Si ne vou isez pas l’appareil pendant une période prolongée ou en cas d’orage
débranchez l’appareil.
Ne pas le câble si vous voulez débrancher l’appareil de la prise secteur.
Gar
dez cet appareil, le câble et l’adaptateur au sec et loin des endroits ou il risques d’être
éclaboussé par de l’eau. Evitez des environnements chauds et humides.
Ne placez pas des objets avec des flammes nues ou un récipient rempli de liquide sur
l’appareil.
Eteindrez et débranchez l’appareil si vous ne
lisez pas par une période prolongée et avant
le ne oyage ou entre en. Le service et l’entre en ne doivent être réalisé que par un
personnel qualifié.
Assurez-vous que le cordon d’alimenta on puisse être facilement débranché de la prise
secteur, n’u isez pas une prise verrouillable ou un cordon d’alimenta
on permanent dans la
prise de courant.
25
Ce symbole placé dans un triangle équilatéral a pour but d’aver u isateur de
la présence d’un voltage dangereux non isolé, dans le bo
de l’appareil, qui peut s’avérer d’une amplitude susante pour provoquer un
risque d’électro on.
Ce point d’exclama on dans un triangle équilatéral a pour but d’av r
l’u isateur de la présence de direc ves de fonc onnement ou d’entre
importantes dans le manuel d’in on qui accompagne l’appareil
An de minimiser les risques de choc électrique ne pas re rer
le couvercle (ou les pièces). Il n'y a pas de pièces pouvant être
réparées par l’u isateur dans de ce e unité confier à un
agent qualifié
ATTENTION
RISQUE DE CHOC ÉLECTRIQUE
NE PAS OUVRIR
26
20
2. COMMANDES
Vue de dessus
Vue d’arrière
1. Bouton Mode 11. Bouton Volume -
2. Bouton Veille 12.
Bouton en avant ( 6)
3. Bouton Menu/Info 13. Bouton Volume +
4. Bouton Alarme 1 14. Écran (vue frontale)
5. Bouton Entrée 15. Haut Parleur
6. Bouton Alarme 2 16. Antenne
7. Bouton Répéon/Réveil 17. Interrupteur Marche/Arrêt
8. Bouton Préréglage (Mémorisaon) 18. Prise Jack DC in
9. Bouton Balayage 19. Prise Écouteurs/Casque
10.
Bouton en Arrière (5)
20. Couvercle comparment piles (en dessous)
27
3. INSTALLATION DES PILES ET UTILISATION
Pour uliser l’appareil avec les piles assurez-vous que
le cordon d’alimentaon n’est pas branché et installez
les piles dans le comparment.
3.1 Enlevez le couvercle du comparment des piles en
dessous la radio.
3.2 Placez 4 x AA 1.5V piles alcalines (pas inclues) selon la
diagramme dans le comparment à piles, en
respectant la polarité correcte (+/-).
3.3 Remeez le couvercle du comparment à piles.
3.4 N’exposez pas le piles ou les piles installées à une source de chaleur telles quun feu, le soleil
ou radiateur, etc.
Notes :
Tout
es les radios DAB consomment plus d’énergie que les radios tradionnelles, donc les
piles seront déchargées au bout de quelques heures. Nous vous conseillons d’uliser le
cordon d’alimentaon (ou les piles rechargeables) pour une écoute prolongée.
Ulisez toujours l’interrupteur ON/OFF à l’arrière de l’appareil quand vous ne l’ulisez pas.
Le mode Veille connue à uliser d’énergie et (en mode piles) déchargera les piles dans
quelques jours.
PILES SECURITE ET TRAITEMENT
ATTENTION- Danger dexplosion si les piles ne sont pas placé correctement.
Ulisez exclusivement les piles
AA 1.5V dans cet appareil.
Assurez-vous que les piles sont placées correctement en suivant les polarités indiquées (+ et -).
Ulisez exclusivement les mêmes piles ou un type équivalent recommandé.
Les piles ne peuvent pas être remplacées que par une adulte.
Ne recharger pas des piles non rechargeables.
Rerez les piles rechargeables de l’appareil avant de les recharger.
Jamais ulisez les piles nouvelles et vieilles (remplacez-les toutes en même temps).
N’essayez jamais de démonter les piles.
Ne court-circuitez pas les bornes d’alimentaon.
Rerez toujours les piles déchargées de l’appareil.
En cas de
non ulisaon prolongée rerez les piles.
Traitez les piles de manière responsable et consultez les autorités locales compétentes pour
les opons de recyclage et/ou éliminaon.
Ne jetez jamais les piles dans un feu car elles pourraient exploser.
28
4 UTILISATION
4.1 En cas d’ulisaon sur secteur, insérez le cordon de l’adaptateur dans la prise à l’arrière de la
radio. Insérez l’adaptateur secteur dans une prise de courant.
4.2 En cas d’ulisaon des piles, assurez-vous que le cordon d’alimentaon N’EST PAS connecté
à l’arrière de la radio et installez les piles dans le comparment à piles.
4.3 Étendez comptement l’antenne télescopique.
4.4 Meez l’interrupteur ON/OFF à l’arrière de la radio en posion « ON ». L’écran s’allumera.
4.5 Appuyez sur le bouton STANDBY (q) pour mere en marche la radio et un message de
bienv
enue sera aché brièvement (Fig. 1) et commencera la syntonisaon.
Fig.1
4.6 Le mode DAB sera séleconné automaquement et la radio effectuera une recherche
automaque (Fig.2). L’écran affichera « searching » et une barre de progression indique la
progression de la recherche et le numéro des staons déjà trouvées.
Fig.2 Fig.3
4.7 Quand la recherche est terminée la radio ouvrera la première staon alphanumérique
trouvée. L’écran affichera le nom de la staon.
4.8 Si la radio ne trouve aucune de staon, « No Signal DAB »s’achera.
Assurez-vous que l’antenne est complètement déplo
yée ou déplacez la radio à un endroit de
meilleur récepon (près d’une fenêtre pourrait être mieux) et répétez la procédure ci-dessus.
4.9 Vous pouvez régler le volume au niveau désiré en ulisant les boutons VOL+ et VOL-.
4.10 Pour chercher la staon désirée, appuyez sur le bouton FORWARD (6) ou BACKWARD (5)
pour basculer entre les staons disponibles.
4.11 Pour passer en mode FM, appuyez sur le bouton MODE. L’écran affichera le mode FM.
Appuyez un autre fois sur le bouton pour retourner en mode DAB.
4.12 Appuyez sur le bouton STANDBY (q) pour passer en mode veille.
4.13 Pour arrêt
er comptement le radio-réveil, meez l’interrupteur ON/OFF à l’arrière de la
radio en posion « OFF » (remarque : l’écran d’achage et l’alarme ne fonconnent pas en
mode OFF).
Remarque : L’horloge dans cee radio est équipée de recevoir le signal de l’heure d’une
fréquence DAB radio ou le signal de l’heure FM avec RDS et après mise en marche, la
staon radio DAB mera à jour l’horloge. C’est possible que vous devez aendre 1 -2
minutes pour recevoir le signal de l’heure.
29
5 UTILISATION DE LA RADIO – MODE DAB
DAB diffère de la radio analogue ; les signaux séparés de certaines staons radio sont
regroupé en bouquets et diusé comme une seule fréquence. Cee groupes s’appellent
mulplexes et ensembles. Chaque fois que la radio trouve un groupe, le nom de ce groupe
sera affiché sur la moié inférieure de l’écran.
5.1 Mode DAB – auto scan
Cee foncon permet la radio de chercher automaquement les canaux DAB Band III.
5.1.1 Appuyez sur le bouton SCAN et « Autotune full scan »sera affiché (Fig.2).
La recherche commencera et la barre de progression
sera affiché sur l’écran pour montrer la
progression de la recherche.
5.1.2 Quand la recherche est terminée la radio ouvrera la première staon alphanumérique
trouvée.
5.1.3 Si la radio ne trouve aucune de staon, « No Signal DAB »s’achera.
Assurez-vous que l’antenne est complètement déployée ou déplacez la radio à un endroit de
meilleur récepon (près d’une fenêtre pourrait être mieux) et répétez la procédure ci-dessus.
Assurez-vous que l’antenne est complètement déployé.
5.1.4 Pour chercher la staon désirée, appuyez sur le bouton FORWARD (6) ou BACKWARD (5)
pour basculer entre les staons disponibles.
Puis appuyez sur le bouton ENTER pour écouter
la staon de votre choix ou aendez quelques secondes et la radio se réglera
automaquement.
5.2 Mode DAB-recherche manuelle
Cee foncon vous permet d’ajouter un ensemble spécifique ou nouveau à les staons déjà
disponibles.
5.2.1 Tenez le bouton ENTER enfoncée jusqu’à ce que l’écran affiche « manual tune »(Fig.4).
Fig.4
5.2.2 Appuyez sur le bouton FORWARD (6) ou BACKWARD (5) pour basculer entre les canaux DAB
et leurs fréquences. Lorsque l’ensemble/ fréquence de votre choix s’ache sur l’écran (p.ex.
Fig.5), vous appuyez sur le
bouton ENTER pour ajouter l’ensemble et acher le nom.
Fig.5
5.2.3. Appuyez sur le bouton FORWARD (6) ou BACKWARD (5) pour basculer entre les staons
incluses à l’ensemble et appuyez sur le bouton ENTER pour écouter la staon de votre choix
et quier le mode recherche manuelle.
5.3 MODE DAB-SERVICES SECONDAIRES
Quelques staons orent des service secondaires et si disponibles le symbole « > »s’achera
après le nom de la staon. Pour avoir acs à ce service appuyez sur le bouton ENTER.
30
6 UTILISER LA RADIO - MODE FM
6.1 Meez en marche la radio, appuyez sur le bouton MODE et séleconnez le mode FM.
« switching to FM »s’achera sur l’écran et la radio est syntonisée sur la fréquence 87,50
MHz.
6.2 Pour acver la recherche automaque, appuyez brièvement sur le bouton SCAN et la radio
commencera la recherche des fréquences et s’arrête sur la première staon trouvée. Pour
chercher vers le bas, appuyez le bouton SCAN et tenez enfoncée pour au moins une seconde.
6.3 Pour une recherche manuelle, appuyez sur le bouton FORWARD (6) ou BACKWARD (5) pour
une augmentaon de fréquence de 0,05 MHz.
6.4 Pour changer le mode audio (auto ou mono), appuyez sur le bouton ENTER de l’appareil, le
mode passera de auto en mono, appuyez une autre fois pour repasser en mode auto. En
mode auto la radio basculera automaquement entre les modes stéréo et mono.(Note :
Parce que l’appareil est doté d’un seule haut-parleur ça n’effectuera pas la producon de son
de l’haut-parleur).
6.5 Si un FM RDS (Radio Data Signal) est disponible, l’écran affichera automaquement le nom
de la staon et texte de la radio (si disponible).
7. MODES ÉCRAN RA
DIO
Si vous appuyez sur le bouton MENU plusieurs fois lorsque la radio est en opéraon, la
deuxième ligne de la radio basculera entre les modes suivants, après chaque fois que vous
appuyez sur le bouton :
En mode DAB :
En mode FM :
Ensemble/Mulplex (Nom de la Groupe)- L’ensemble / mulplexe est un groupe de staons
regroupé en bouquets et diusé ensembles par une seule fréquence. Il y a des mulplexes
naonales et locales, les mulplexes locales qui conennent les staons spécifiques pour une
région locale.
Puissance du signal – Sur l’écran sera affiché une barre de force indiquant la puissance du
signal. Plus longue est la barre, plus fort est le signal.
DLS (dynamic label segment)/texte Radio – Le diffuseur pourra diuser des messages
défilants du programme actuel.
Type de Programme – Cela décrit le style de programme. Si l’informaon n’est pas disponible
l’écran affichera « Programme Type ».
Heure et date – L’Heure et la date sont mise à jour automaquement par le signal horaire
radiodiffusé.
Mode Audio - Sur l’écran sera affiché si la fréquence du staon qui est reçue est en stéréo
ou mono.
Fréquence – L’écran achera la fréquence du staon diusée.
Débit Binaire – L’écran achera le débit binaire numérique qui est reçu.
31
8 FONCTION STATION PREREGLE
Cee foncon vous permet de programmer jusqu’à 10 staons et les mémoriser aussi bien
pour la bande DAM que pour la bande FM/.
8.1 Suivez les instrucons ci-dessous pour séleconner la staon de votre choix.
8.2 Appuyez sur le bouton PRESET et tenez enfoncée jusqu’au moment que l’écran ache un
numéro de préréglage (Fig.8).
8.3 Appuyez sur le bouton FORWARD (6) ou BACKWARD (5) pour séleconner la staon préréglé
de votre choix et appuyez sur le bouton ENTER pour conrmer. La staon actuelle sera
sauvegard
ée sur la posion séleconnée (Fig.9).
8.4 Pour enregistrer autres staons, appuyez sur le bouton PRESET et tenez enfoncée, puis
appuyez sur le bouton FORWARD (6) ou BACKWARD (5) plusieurs fois jusqu’au moment que
vous avez trouvé une locaon vide. Appuyez sur le bouton ENTER pour sauvegarder la
staon.
Fig.8 Fig.9 Fig.10
8.5 Pour écouter une staon préréglée, appuyez sur le bouton PRESET une fois et puis appuyez
sur le bouton FORWARD (6) ou BACKWARD (5) pour séleconner le numéro de la locaon de
votre choix. Lorsque le numéro de la staon est affiché. Appuyez sur le b
outon ENTER pour
écouter la staon préréglée. Si vous ne l’avez pas sauvegardée l’écran affichera « Preset
Empty » (Fig.10).
9 FONCTION RÉVEIL
Cee radio est dotée d’une foncon double alarme et vous permet de régler deux heures
d’alarme différentes. Vous vous pouvez réveillez avec la sonnerie ou votre station radio
DAB/FM favorite. Vous pouvez régler l’alarme en veille ou en fonconnement.
9.1 Pour régler la première alarme. Vous appuyez sur le bouton ALARM 1 pour acher l’état de
la première alarme, par le bouton FORWARD (6) ou BACKWARD (5) jusqu’à « Alarm
status
ON »s’ache sur l’écran, appuyez sur le bouton ENTER pour entrer le mode réglage.
9.2 Maintenant sur l’écran vous voyez l’heure actuelle, l’heure de réveil, les chiffres des heures
de réveil clignotent. Appuyez sur le bouton FORWARD (6) ou BACKWARD (5) pour
séleconner l’heure désirée.
9.3 Appuyez sur le bouton ENTER pour conrmer, maintenant les chires des minutes clignotent.
Appuyez sur le bouton FORWARD (6) ou BACKWARD (5) pour séleconner les minutes
désirées.
9.4 Appuyez sur le bouton ENTER pour conrmer et la fréquence ( p.ex. tous les jours, les jours
ouvrés, les
weekends, une fois) de l’alarme sera achée. Ulisez le bouton FORWARD (6) ou
BACKWARD (5) pour régler la fréquence de l’alarme.
9.5 Appuyez sur le bouton ENTER pour conrmer, maintenant le mode de réveil ( p.ex. signal
sonore, DAB ou FM) s’achera. Appuyez sur le bouton FORWARD (6) ou BACKWARD (5)
pour séleconner le mode de réveil désiré.
9.6 Appuyez sur le bouton ENTER pour conrmer, maintenant le volume de l’arme s’achera.
Appuyez sur le bouton FORWARD (6) ou BACKWARD (5) pour séleconner le volume désiré.
9.7 Appuyez sur le bouton ENTER une autre fois et quiez le mode de réglage. Le signe d’alarme
( 1) sera affiché sur l’écran en mode veille.
9.8 Maintenant l’alarme est réglée et est sauvegardée quand l’appareil est en mode veille.
9.9 Lorsque le temps réel est le même que l’heure de réveil, l’alarme sonne et l’écran clignote.
9.10 L’alarme sonne pendant une heure, puis s’arrête automaquement. Pour arrêter l’alarme,
appuyez sur le bouton STANDBY (q). Si vous avez réglé l’alarme tous les jours, le signe
32
d’alarme sera affiché sur l’écran et le prochaine jour l’alarme sonnera au même temps
jusqu’au moment que vous désacvez l’alarme.
9.11 Pour acver la foncon snooze (répéon de réveil), appuyez sur le bouton SNOOZE/SLEEP
quand l’alarme sonne. Le signe du snooze (Zz) s’affiche sur l’écran ; l’alarme s’arrête et après
environs neuf minutes sonnera une autre fois.
9.12 Pour désacver l’alarme définivement, appuyez sur le bouton ALARM 1 pour afficher l’état
d’alarme. Ulisez le bouton FORWARD (6) ou BACKWARD (5) jusqu’à « Alarm status OFF »
s’affiche sur lécran, puis appuyez sur le bouton ENTER pour confirmer et
quiez le mode.
Maintenant l’alarme est désacvée et le signe n’est plus visible sur l’écran.
Noficaons :
En cas de coupure de courant (ou si vous avez mis l’interrupteur à l’arrière de l’appareil en
posion OFF) et les piles ne se trouvent pas dans le comparment à piles, on perd tout
réglage d’alarme effectué.
Pour régler la seconde alarme, ulisez le bouton ALARM 2 et suivez les étapes ci-dessus.
Si vous avez séleconné l’opon DAB ou FM l’alarme sonne avec la dernière staon que vous
avez écouté.
La taille/neeté de l’écran est définie et ne peuvent pas être ajustées.
10. RÉGLAGE ET UTILISATION FONCTION SLEEP (ARRÊT AUTOMATIQUE)
Cee foncon coupera la radio automaquement après une durée prédéterminée.
10.1 En écoutant la radio de votre choix, vous appuyez sur le bouton SNOOZE/SLEEP et l’état de
cette foncon est affiché sur l’écran.
10.2 Appuyez sur le bouton FORWARD (6) ou BACKWARD (5) plusieurs fois pour séleconner le
temps de l’intervalle désiré (voyez la séquence ci-dessous) affiché sur l’écran.
10.3 Appuyez sur le bouton ENTER pour confirmer. La foncon SLEE
P (arrêt automaque) est
acvée et sur l’écran est affiché le signe de la foncon SLEEP (S) et le temps restant avant
que la radio s’éteint (p.ex. 10).
10.4 En acvant la foncon SLEEP le compte à rebours commence et s’il est à zéro, l’appareil
s’éteindra automaquement.
10.5 Pour désacver la foncon, appuyez sur le bouton SNOOZE/SLEEP et appuyez sur le bouton
FORWARD (6) ou BACKWARD (5) plusieurs fois pour séleconner OFF. Appuyez sur le bouton
ENTER pour confirmer.
11. UTILISATION CASQUE (PAS INCLUS)
Une prise jack pour le casque est fournie afin que l’appareil peut être ulisé sans déranger les
autres personnes. Branchez le casque dans la prise avec le signe à l’arrière de la radio et
réglez le volume de votre choix. Une écoute prolongée à un niveau de volume excessif peut
endommager votre ouïe. L’haut-parleur ne fonconne pas si le casque est branché.
12. RÉINITIALISATION
Si vous avez déplacé la radio vers un autre région du pays, les staon préréglées
probablement ne seront plus disponibles et il faut rétablir les valeurs des paramètres par
défaut.
12.1 Lorsque l’appareil est en foncon, appuyez sur et tenez enfoncée le bouton MENU
/INFO
jusqu’à « system reset »apparait sur l’écran.
12.2 Appuyez sur le bouton ENTER pour confirmer la réinialisaon et « press enter key to
reset »s’affiche sur l’écran.
33
12.3 Appuyez sur le bouton ENTER une autre fois pour conrmer. La radio affichera « system
reset »et la réinialisaon commencera.
12.4 L’analyse démarre et sur l’écran vous voyez la barre de progression.
12.5 Lorsque l’analyse est terminé la radio ouvre la première staon alphanumérique trouvée.
Toutes les staons préréglées seront perdues pendant la réinialisaon.
Noficaons :
Si vous appuyez sur le bouton MENU/INFO ENTER une autre fois rapidement pendant étape
12.1 le numéro de logiciel sera affiché.
13. NETTOYAGE ET ENTRETIEN
Essuyez la surface externe avec u
n chion doux. Lorsque le boiter est très sale, débranchez-le
et essuyez-le en ulisant un chion humidié avec une soluon délicate à base de l’eau et
détergent. Laissez sécher complètement avant ulisaon.
14. GUIDE DE DEPANNAGE
Observaon Cause probable et soluon
L’appareil ne fonconne
pas
Contrôlez si l’adaptateur est bien branché dans la prise de courant et à
l’arrière de l’appareil.
Contrôlez si la prise de courant est sous tension.
Si l’appareil a été débranché et il n’y ont pas des piles dans l’appareil ?
Avez-vous mis l’interrupteur ON/OFF en arrière de l’appareil en
posion « ON » ?
L’appareil ne fonconne
pas avec les piles
Avez-vous débranché l’adaptateur à l’arrière de l’appareil ?
Avez-vous placé les piles correctement ?
Contrôlez si les piles ne sont pas vides.
Avez-vous mis l’interrupteur ON/OFF à l’arrière de l’appareil en
posion « ON » ?
Pas de son Avez-vous mis le volume au minimum ?
Avez-vous branché la casque ?
Récepon de bruit de la
radio (FM)
Étendez l’antenne ou changez la posion de la radio.
FM Stéréo- si la récepon est faible, changez l’interrupteur en posion
MONO car ce signal est moins fort.
Récepon de la radio sons
saccadés et bulleux
Signal faible. Étendez l’antenne ou changez la posion de la radio.
Posionner la radio dans un autre endroit ou près d’une fenêtre
pourrait améliorer la récepon. Note : quelque fois la récepon peut
être améliorée quand vous rétractez l’antenne inférieure à pleine
longueur.
DAB
« pas de signal DAB »
En général il signie que le signal est trop faible, ce ne signie PAS
qu’il n’y a pas de signal. Changez la posion de la radio et faites une
nouvelle recherche. Contrôlez si votre région local ore un service
DAB.
La foncon d’alarme ne
fonconne pas
Avez-vous acvé l’alarme- voyez secon 9.1 ?
Avez-vous acvé l’alarme correcte ?
La foncon SLEEP ne
fonconne pas
Avez-vous acvé la foncon SLEEP-voyez secon 10 ?
15. SPÉCIFICATIONS TECHNIQUES
Tension nominale (transformateur) 100 – 240V ~50/60Hz, 0,15A
34
Puissance transformateur 5V 0,5A
Tension nominale (Radio) DC 6V (1.5V x 4 AA)
Consommaon électrique 3W
Consommaon électrique (en veille) 0.3W
Classe énergéque (transformateur) 2
Puissance Audio 1.5W RMS
Radio DAB 174 – 240 MHz
FM 87.5 – 108MHz
Condions de fonconnement Température : 5°C à 35°C
Humidité : 5% à 90%
Posion d’opéraon Horizontale
35

Documenttranscriptie

DAB/FM Radio Instruction Manual CR624DAB IMPORTANT: Please read all instructions carefully before use and keep for future reference Ver 1.0 1. SAFETY For household and indoor use only. Place the appliance on a flat, stable surface with adequate ventilation and away from other sources of heat. Minimum distances around the appliance for adequate ventilation is 10cm. Do not cover or restrict ventilation openings. Keep the appliance and its cord out of reach of children less than 8 years. Do not allow children to use the appliance without supervision. This appliance can be used by children aged from 8 years and above and persons with reduced physical, sensory or mental capabilities or lack of experience and knowledge if they have been given supervision or instruction concerning use of the appliance in a safe way and understand the hazards involved. Children shall not play with the appliance. Cleaning and user maintenance shall not be made by children unless they are aged from 8 years and above and supervised. Fully unwind the cable before plugging in and ensure the cable is positioned away from areas where it is likely to get damaged or cause a trip hazard. The output cord of this mains adaptor cannot be replaced. In the event of damage to the cable, jack plug or adaptor, the entire adaptor unit should be replaced. Connections must only be made via the mains adaptor supplied, never connect the appliance directly to the 240v mains supply. Never use the adaptor supplied with any other appliance. The mains adaptor will become warm in use; do not cover or place on or near surfaces that could be affected by heat such as table tops and carpets. Remove mains adaptor from supply if appliance is unused for a long period of time, and during thunderstorms. Do not pull on the cable to disconnect from mains supply. Keep appliance, cable, mains adaptor plug dry and away from areas where it is likely to get splashed. Avoid using in hot, humid environments. Do not place items with naked flames or containers with liquids on this appliance. Switch off and unplug when not in use and before cleaning or servicing the appliance. Servicing of this appliance must only be carried out by a qualified electrician. Always ensure the mains adaptor plug is readily unpluggable – do not use with „lockable‟ sockets or permanently wire to mains. 2 1. SAFETY (continued) The lightning flash with arrow-head symbol, within an equilateral triangle, is intended to alert the user to the presence of un-insulated "dangerous voltage" within the product's enclosure that may be of sufficient magnitude to constitute a risk of electric shock. The exclamation point within an equilateral triangle is intended to alert the user to presence of important operating and maintenance (servicing) instructions in the literature accompanying the appliance Warning: to reduce the risk of electric shock, do not remove cover (or back). No user serviceable parts inside, refer servicing to qualified service personnel. 3 PARTS Top view Rear view 20 1. 2. 3. 4. 5. 6. 7. 8. 9. 10. 11. Mode button Standby ( ) button Menu / Info button Alarm 1 button Enter button Alarm 2 button Snooze / Sleep button Preset button Scan button Backward () button Volume - button 12. 13. 14. 15. 16. 17. 18. 19. 20. 4 Forward () button Volume + button Display (on front face) Speaker Antenna On / Off switch DC in jack Headphone jack Battery compartment cover (on underside) 3. BATTERY INSTALLATION AND USE To use the appliance with batteries ensure that the power cord is NOT connected to the mains and install the batteries into the battery compartment. 3.1 Lift off the battery compartment cover from the underside of the radio. Insert 4 x AA 1.5V alkaline batteries (not included) in accordance with the diagram in the battery compartment. Take care to observe the correct polarity (+/ -). Refit the battery compartment cover. Do not expose the batteries or the installed batteries to excessive heat (e.g. fire, sunshine or position close to radiators etc.). 3.2 3.3 3.4 Notes: All DAB radio‟s use more power during use than „traditional‟ radios and so will run batteries down within a few hours. Therefore use of mains power (or rechargeable batteries) is recommended for extended listening. Always switch off using the ON/OFF switch at rear when not in use. Standby mode continues to use power and (if in battery mode) will flatten the batteries within a couple of days. BATTERY SAFETY AND DISPOSAL CAUTION – Danger of explosion if batteries are incorrectly fitted / replaced. Only use „AA‟ 1.5V batteries in this appliance. Be sure to insert batteries correctly taking care to observe the correct polarity (+ and -). Use only batteries of the same or equivalent type as recommended. Batteries should be replaced by an adult. Do not recharge non-rechargeable batteries. Remove rechargeable batteries from appliance before recharging. Never mix old and new batteries (replace all batteries at the same time). Never try to dismantle batteries. Do not short-circuit the supply terminals. Always remove exhausted or dead batteries from the product. Remove batteries from the product before extended storage. Dispose of batteries responsibly at local authority household waste recycling facility. DO NOT dispose of batteries in a fire as the batteries may explode. 5 4. 4.1 4.2 4.3 4.4 4.5 4.6 GETTING STARTED If using mains power, insert the adaptor cord into the power socket at the rear of the radio. Plug the adaptor into the mains supply socket. If using the radio with batteries ensure that the power cord is NOT inserted into the back of the appliance and install the batteries into the battery compartment. Fully extend the telescopic antenna. Move the ON / OFF switch at the rear of the radio to the ‘on’ position the display will illuminate. Fig. 1 Press the STANDBY ( ) button to turn the radio on and a welcome message will be displayed briefly (Fig. 1) and start to tune in. DAB mode will automatically be selected and the radio will perform an autotune full scan (Fig. 2). The display will then show ‘searching’, together with a slide bar (Fig. 3) that indicates the progress of the scan and the number of stations found so far. Fig. 2 4.7 4.8 4.9 4.10 4.11 4.12 4.13 Fig. 3 When the scan is finished the radio will play the first alphanumerically found station. The display will show the station being listened to. If the radio does not find any stations, ‘No signal DAB’ will be displayed. Ensure the antenna is fully extended or try moving the radio to another location (near a window may be better) and repeat the above steps. Adjust the volume to the desired level using VOL + or VOL –buttons. To search the stations that have been found, press the FORWARD () or BACKWARD () buttons to scroll through the available stations. To switch to FM radio, press the MODE button. The display will show ‘ switching to FM’ . Press the button again to return the radio to DAB mode. Press the STANDBY ( ) button to place the unit in standby mode. To turn the clock radio completely off, move the ON / OFF switch at the rear of the radio to the ‘off’ position (note: clock display and alarm will not function in OFF mode). Note: The clock in this radio is equipped to receive a DAB radio frequency time signal or FM time signal with RDS and after turned on, it will automatically tune into a DAB radio station and update the clock. It may be necessary to wait for 1-2 minutes to allow the unit to receive the time signal. 6 5. USING THE RADIO – DAB MODE DAB differs from analogue radio; the separate signals from a number of stations are grouped together and transmitted as a single frequency. These groups are referred to as multiplexes and ensembles. Each time a group has been found the name of the group will be shown on the lower half of the display. 5.1 DAB mode - auto scan This function allows the radio to search automatically for DAB Band III channels. Press the SCAN button and 'Autotune full scan' is displayed (Fig.2). The scan will be initiated and a slide bar will be shown in the display to show the progress of the scan. When the scan is finished the radio will play the first alphanumerically found station. If the radio does not find any stations, „No signal DAB‟ will be displayed. Try moving the radio to another location (near a window may be better) and repeating the above steps. Ensure the antenna is fully extended. To scroll through the stations that have been found, press the FORWARD ( ) or BACKWARD ( ) buttons. Then press the ENTER button listen to the station of choice or wait a few seconds and the radio will automatically retune. 5.1.1 5.1.2 5.1.3 5.1.4 DAB mode – Manual scan This function allows a specific or new ensemble to be manually added to the stations already available on the radio. 5.2.1 Press and hold the ENTER button until the display shows „manual tune‟ (Fig. 4). 5.2.2 Press the FORWARD ( ) OR Fig. 4 BACKWARD ( ) buttons to move through the DAB channels and the associated frequencies. When the desired ensemble / frequency appears in the display (e.g. Fig. 5), press the ENTER button to Fig. 5 add the ensemble and display the name. 5.2.3 Press the FORWARD ( ) OR BACKWARD ( ) buttons to move through the stations included in the ensemble and press the ENTER button to listen to the station of choice and exit the manual tune mode. 5.2 5.3 DAB MODE – SECONDARY SERVICES Some stations include secondary services and when these are available a „>‟ symbol appears after the station name. To access this service press the ENTER button. 7 6. 6.1 6.2 6.3 6.4 6.5 7. USING THE RADIO - FM MODE Turn the radio on, press the MODE button and select the FM mode. The display will show „switching to FM‟ and the radio will tune to 87.50 MHz. To activate auto search, briefly press the SCAN button and the radio will start scanning up the frequency and stop automatically once the next station up has been found. To scan downwards, press and hold the SCAN button for at least 1 second. To search manually, press the FORWARD ( ) or BACKWARD ( ) button to increment the frequency by 0.05MHz. To change the audio mode (auto or mono) press the ENTER button on the unit, this will switch from auto to mono, press and again to switch back. If auto is selected the radio will automatically switch between stereo and mono mode. (Note: as this unit only has a single speaker, these modes will not affect the speaker output) If an FM RDS (Radio Data Signal) is present, the display will automatically show the station name and radio text (where available). RADIO DISPLAY MODES If the MENU button is pressed repeatedly when a radio station is playing, the second line of the station display will scroll through the following modes with each press of the button. In DAB mode In FM mode Ensemble / Multiplex (Group name) - The ensemble / multiplex is a group of station that are bundled and transmitted together in a single frequency. There are national and local multiplexes, local ones contain stations that are specific to the local area. Signal strength – the display will show a slide bar to indicate the strength of the signal. The stronger the signal, the longer the bar. DLS (dynamic label segment) / Radio text - The broadcaster may include a scrolling message about the current programme. Programme type – this describes the style of the programme. If the information is not available the display will show „<Programme type>‟. Time and date - the time and date will be automatically updated by the radio time signal. Audio mode – the display will show if the station being received is stereo or mono. Frequency – display will show the frequency of the station being broadcast. Audio bit rate – the display will show the digital audio bit rate being received. 8 8. 8.1 8.2 8.3 8.4 PROGRAMMED STATION FUNCTION This function allows up to 10 stations to be programmed into the memory and stored in the DAB and FM modes. Follow the directions above to select a radio station. Press and hold the PRESET button until the display shows the flashing PRESET number (Fig. 8). Press the FORWARD ( ) or BACKWARD ( ) buttons to select the preset storage location of choice and then press the ENTER button to confirm. The station now broadcasting has now been stored in the selected location (Fig. 9). To store further stations, press and hold the PRESET button, and then press the FORWARD ( ) or BACKWARD ( ) buttons repeatedly until an empty storage location is found. Press the ENTER button to save the station. Fig. 8 Fig. 9 Fig. 10 8.5 To listen to a preset station, press the PRESET button once and then press the FORWARD ( ) or BACKWARD ( ) button to select the desired preset location. When the storage location of choice is displayed, press the ENTER button to listen to the stored station. If the preset has not been allocated „Preset empty‟ will be shown in the display (Fig. 10). 9. ALARM FUNCTION This radio has a dual alarm function and it is possible to set two individual alarm times. This alarm and may be set to wake as a buzzer tone or to a favourite radio (DAB/FM) station. The alarm can be set in standby or during operation. To set the first alarm, press the ALARM 1 button to display the alarm 1 status, use the FORWARD ( ) or BACKWARD ( ) button until „Alarm status ON‟ is displayed and press the ENTER button to enter the set up mode. The display will now show the current time, the wake up time and the hour digits for the wake up time will flash. Press the FORWARD ( ) or BACKWARD ( ) buttons until the correct alarm hour is displayed. Press the ENTER button to accept and the minute digits will now flash in the display. Use the FORWARD ( ) or BACKWARD ( ) buttons until the correct alarm minute is displayed. Press the ENTER button to accept and the alarm frequency (e.g. daily, weekdays, weekends, once) will now be displayed. Use the FORWARD ( ) or BACKWARD ( ) buttons to set the alarm frequency. Press the ENTER button to accept and the wake up mode (e.g. BEEPER, DAB or FM) will be displayed. Use the FORWARD ( ) or BACKWARD ( ) buttons to select the wake up mode of choice. 9.1 9.2 9.3 9.4 9.5 9 9.6 Press the ENTER button to accept and the alarm volume will now be displayed. Use the FORWARD ( ) or BACKWARD ( ) buttons to set the wake up volume of choice. 9.7 Press the ENTER button once more to accept and exit the set up mode. The alarm indicator ( 1) will now be shown in the display.under standby mode. 9.8 The alarm is now set and will remain in memory when the unit is switched to standby mode. 9.9 When the time on the clock is the same as the alarm time that has been set, the alarm will sound and the display will flash. 9.10 The alarm will continue to sound and stop automatically after one hour. To silence the alarm , press the STANDBY ( ) buttons . If a daily alarm has been set , the alarm indicator will remain illuminated and the alarm will sound again at the same time the following day until the alarm is switched off. 9.11 To activate the snooze function, press the SNOOZE / SLEEP button when the alarm sounds. The snooze indicator (Zz) will be shown in the display; the alarm will silence and then sound again after approximately nine minutes. 9.12 To turn off the alarm permanently, press the ALARM 1 button to display the alarm status. Use the FORWARD ( ) or BACKWARD ( ) button until „Alarm status OFF‟ is displayed, then press the ENTER button to accept and exit the mode. The alarm has now been deactivated and the alarm indicator will no longer be shown in the display. Notes If the power is interrupted (or the unit is switched OFF using the rear switch) and batteries are not fitted in the battery compartment, the alarm settings will be lost. To set the second alarm, use the ALARM 2 button and then follow the steps above to set this alarm. If the DAB or FM radio wake up option is selected the alarm will play the last station listened to in DAB or FM. The clock display size / brightness is fixed and cannot be adjusted. 10 10. SETTING AND USING THE SLEEP FUNCTION This function will switch off the radio automatically after a preset time interval. 10.1 With the radio of choice playing, press the SNOOZE / SLEEP button and the sleep status is shown in the display. 10.2 Press the FORWARD ( ) or BACKWARD ( ) buttons repeatedly until the desired sleep interval (see sequence below) is shown in the display. 10.3 Press the ENTER button to accept. The sleep timer is now activated and the display will show the sleep indicator (S) and the time interval remaining before the radio switches off (e.g. 10). 10.4 The sleep function will count down and the unit will switch off automatically after the time interval selected has lapsed. 10.5 To cancel the sleep timer, press the SNOOZE / SLEEP button and then press the FORWARD ( ) or BACKWARD ( ) button repeatedly until „OFF‟ is shown in the display. Press the ENTER button to accept. 11. USING HEADPHONES (not included) A stereo headphone jack has been provided so that the unit can be used without disturbing others. Plug in the headphones at the point marked „ ‟ at the rear of the radio and adjust the listening volume to your chosen level. Excessive sound pressure from earphones and headphones can cause hearing loss. The speaker will not operate when earphones are fitted. 12. RESET Moving the radio to another location in the country the pre-tuned and stored stations may no longer be available and it will be necessary to reset the radio back to the factory settings. With the unit switched on, press and hold the MENU / INFO button until the display shows the „system reset‟. Press the ENTER button to confirm reset and „press enter key to reset‟ will be displayed. Press the ENTER button once again to confirm. The radio will display „system reset‟ and the reset will begin. A „full scan‟ will then start and the display will show a slow progressing slide bar. When the scan is finished the radio will play the first alphanumerically found station. All stored programmed stations will be lost during reset. 12.1 12.2 12.3 12.4 12.5 Note If the MENU / INFO ENTER button is pressed again quickly in step 12.1 the „software number‟ will be displayed. 11 13. CARE AND MAINTENANCE Wipe external surfaces with a soft cloth. If the cabinet is very dirty, unplug from the mains supply and use a damp cloth soaked in a weak solution of washing up liquid and water. Allow to dry thoroughly before reusing. 14. TROUBLESHOOTING GUIDE Observation Potential cause / solution The unit does not work. The unit does not work on batteries No sound Radio reception noisy (FM) Radio reception stutters / bubbling sounds (DAB) DAB „No signal DAB‟ Alarm function does not work Sleep function does not work Has the adaptor lead been correctly plugged into the mains and the DC input jack at the rear of the unit? Does the socket that is being used have power? Has the power lead been removed from the back of the unit without the batteries being installed? Has the ON/OFF button at the rear of the unit been moved to the „on‟ position? Has the adaptor lead been removed from the back of the unit? Are the batteries inserted correctly? Are the batteries exhausted? Has the ON/OFF button at the rear of the unit been moved to the „on‟ position? Is the volume control set at minimum? Are headphones fitted in the phones jack? Extend the antenna or adjust the position of the radio. FM stereo – if weak switch to MONO as this requires less signal strength. Signal is weak. Extend the antenna or adjust the location of the radio. Positions higher up or nearer windows may improve reception. Note sometimes retracting the aerial slightly (less than full length) may improve reception. This normally means the signal is very weak, not that there is no signal. Try moving the radio to a different location and re-scanning. Check that your local area has DAB coverage on www.ukdigitalradio.com/coverage/postcodesearch/ Has the alarm been activated – see section 9.1? Has the correct alarm been activated? Has the sleep function been activated – see section 10? 12 15. TECHNICAL SPECIFICATION Rated voltage (transformer) 100 – 240V~ 50/60Hz, 0.15A Transformer output 5V 0.5A Rated voltage (radio) DC 6V (1.5V x 4 AA) Power consumption 3W Power consumption (standby) 0.3W Class rating (transformer) 2 Audio output 1.5W RMS Radio DAB 174-240MHz FM 87.5-108MHz Operating conditions Temperature: 5°C to 35°C Humidity 5% to 90% Horizontal Operating position 13 1. VEILIGHEID Uitsluitend voor huishoudelijk gebruik binnenshuis. Plaats het apparaat op een vlakke, stabiele ondergrond met voldoende ventilatie en uit de buurt van hitte bronnen. De minimale afstand rondom het apparaat voor voldoende ventilatie is 10 cm. Bedek of blokkeer de ventilatieopeningen niet. Houd dit apparaat en de elektriciteitskabel buiten bereik van kinderen, jonger dan 8 jaar. Laat kinderen dit apparaat niet gebruiken zonder toezicht. Dit apparaat kan worden gebruikt door kinderen vanaf 8 jaar en personen met een lichamelijke, motorische of geestelijke beperking en personen zonder kennis of ervaring m.b.t. de bediening van dit apparaat, tenzij deze personen onder toezicht staan of instructies hebben gekregen om dit apparaat veilig te bedienen en zich bewust zijn van de eventuele gevaren. Kinderen dienen niet met dit apparaat te spelen. Reiniging en onderhoud dienen niet door kinderen te worden gedaan zonder toezicht. Rol de kabel volledig uit voordat u deze in het stopcontact doet en verzeker u ervan dat de kabel op een plek ligt waar deze niet zal beschadigen of waar men er niet over kan vallen. De kabel van de voedingsadapter kan niet worden vervangen. Indien de kabel, de plug of voedingsadapter is beschadigd, dient de gehele unit te worden vervangen. Verbindingen dienen uitsluitend tot stand te komen door middel van de meegeleverde voedingsadapter, sluit het apparaat nooit direct op een 240V aansluiting aan. De voedingsadapter zal warm worden tijdens gebruik, bedek deze niet of plaats deze nooit op een ondergrond die gevoelig is voor hitte, zoals een aanrecht of een tapijt. Verwijder de voedingsadapter uit het stopcontact indien u het apparaat voor langere tijd niet gebruikt of gedurende onweer. Trek nooit aan de kabel om de voedingsadapter uit het stopcontact te halen. Houd het apparaat, de kabel, en de voedingsadapter stekker droog en vermijd plaatsen waar deze nat kunnen worden. Vermijd gebruik in een warme, vochtige omgeving. Plaats geen open vlammen of containers gevuld met vloeistoffen op dit apparaat. Schakel het apparaat uit indien u deze niet gebruikt of indien het apparaat wordt schoongemaakt of onderhouden. Onderhoud dient uitsluitend te worden uitgevoerd door gekwalificeerd personeel. Verzeker u ervan dat de voedingsadapter altijd gemakkelijk uit het stopcontact is te verwijderen en makkelijk toegankelijk is- gebruik geen vergrendelbare stopcontacten of permanente bekabeling. 14 2. VEILIGHEID Het bliksemschicht met een pijl symbool in een driehoek waarschuwt de gebruiker op de aanwezigheid van niet-geïsoleerde “gevaarlijke voltage”in de behuizing van het apparaat die voldoende sterk kunnen zijn dat er een kans bestaat op een elektrische schok. Het uitroepteken symbool in een driehoek waarschuwt de gebruiker op de aanwezigheid van belangrijke instructies, bijgesloten bij dit apparaat, met betrekking tot de bediening en onderhoud van dit apparaat. ATTENTIE RISICO OP EEN ELEKTRISCHE SCHOK NIET OPENEN Waarschuwing: om het risico op een elektrische schok te reduceren, open de behuizing (voor -en achter) niet. Er bevinden zich geen onderdelen in het apparaat die de gebruiker kan vervangen, wendt u zich tot gekwalificeerd personeel voor onderhoud. 15 ONDERDELEN Boven aanzicht Achter aanzicht 20 1. 2. 3. 4. 5. 6. 7. 8. 9. 10 Modus knop Stand-by (q) knop Menu/Info knop Alarm 1 knop Enter knop Alarm 2 knop Snooze/Sleep knop Preset knop Scan knop Terug (5) knop 11. 12. 13. 14. 15. 16. 17. 18. 19. 20. 16 Volume - knop Vooruit (6) knop Volume + knop Display (Vooraanzicht) Luidspreker Antenne Aan/Uit schakelaar DC in aansluiting Hoofdtelefoon aansluiting Batterij compartiment deksel (onderzijde) 3. 3.1 3.2 3.3 3.4 INSTALLATIE EN GEBRUIK VAN DE BATTERIJEN Indien u dit apparaat met batterijen wilt gebruiken let u dan op dat de elektriciteitsdraad niet is aangesloten op het stopcontact en plaats de batterij in het compartiment. Til het deksel van het compartiment aan de onderzijde van de radio op. Plaats de 4 x AA 1.5V alkaline batterijen (niet inbegrepen) in het compartiment zoals afgebeeld. Let op de juiste polariteit (+/-)van de batterijen. Sluit het deksel van het compartiment. Stel de batterijen en de geïnstalleerde batterijen niet bloot aan overmatige hitte (bijv. vuur, zonlicht of naast radiatoren). N.B.: Alle DAB Radio’s verbruiken meer elektriciteit dan de traditionele radio’s, dus de batterijen zullen binnen enkele uren leeg zijn. Wij adviseren u daarom gebruik te maken van de elektriciteitsaansluiting of van oplaadbare batterijen tijdens langdurig gebruik. Zet het apparaat, indien deze niet gebruikt wordt, altijd uit door middel van de Aan/Uit schakelaar aan de achterzijde van het apparaat. In de Stand-by stand wordt nog altijd elektriciteit verbruikt en (bij batterijgebruik) zullen de batterijen binnen enkele dagen leeg zijn. VEILIGHEID EN VERWIJDERING VAN BATTERIJEN LET OP: gevaar voor explosie indien de batterijen niet correct geplaatst zijn. Gebruik uitsluitend “AA”1.5V batterijen in dit apparaat. Let bij het plaatsen van de batterijen op de juiste polariteit (+/-). Gebruik uitsluitend de genoemde batterijen of gelijkwaardige batterijen zoals hierboven genoemd. Batterijen dienen te worden vervangen door een volwassene. Laad geen batterijen op die niet oplaadbaar zijn. Voordat u oplaadbare batterijen gaat opladen, dient u deze te verwijderen uit het apparaat. Plaats geen lege en volle batterijen samen in het apparaat (alle batterijen tegelijk vervangen). Probeer nooit batterijen uit elkaar te halen. Veroorzaak geen kortsluiting in de stroomaansluiting. Verwijder altijd slecht werkende of lege batterijen uit het apparaat. Indien u het apparaat gedurende lange tijd niet gebruikt, altijd de batterijen verwijderen. Gooi batterijen altijd op een verantwoorde manier weg, infomeer hiervoor bij uw lokale milieupark. Gooi batterijen nooit in een vuur omdat deze kunnen exploderen. 17 4. 4.1 4.3 4.4 4.5 AAN DE SLAG Indien u gebruik maakt van de elektriciteit, sluit u de voedingsadapter plug aan op de achterkant van de radio. Doe de stekker van de voedingsadapter in het stopcontact. Indien u gebruik maakt van erijen let u er dan op dat de elektriciteitskabel niet is aangesloten op de stroomvoorziening. En plaats de ba erijen in het compar ment. Trek de antenne volledig uit. Zet de Aan/Uit schakelaar aan de achterzijde van de radio op “on”. De display zal oplichten. Druk op de Stand-by (q) knop om de radio aan te ze en en er zal kort een welkomstboodschap op het scherm verschijnen (Fig.1) en de radio zal gaan afstemmen. Fig.1 4.6 De DAB modus zal automa h worden geselecteerd en de radio zal een volledige autotune scan uitvoeren (Fig.2). Op de display verschijnt”searching” samen met een voortgangsbalk (Fig.3) die de voortgang aangee en het tot dan toe aantal gevonden sta ons. Fig.2 4.7 4.8 4.9 4.10 4.11 4.12 4.13 N.B.: Fig.3 Zodra de scan is beëindigd zal de radio het eerste alfanumeriek gevonden sta on laten horen. Op de display verschijnt het st on waarnaar op dit moment wordt geluisterd. Indien de radio geen sta ons kan vinden, verschijnt er op het scherm “No Signal DAB”. Controleer of de antenne volledig is uitgetrokken of probeer de radio op een andere plaats te ze en (dichter bij een raam kan een beter resultaat opleveren) en volg de bovenstaande stappen. Pas het volume aan naar eigen inzicht door gebruik te maken van de VOL+ en VOL – knoppen. U kunt, door gebruik te maken van de Vooruit (6)en Terug (5) knoppen zoeken naar een sta on tussen de beschikbare sta ons. Om te schakelen naar FM radio, kunt u gebruik maken van de MODUS knop. Op de display verschijnt “switching to FM). Door nogmaals op de MODUS knop te drukken keert u weer terug naar de DAB modus. Druk op de STAND-BY (q) knop om het apparaat in stand-by modus te ze en. Om de radio volledig uit te schakelen, zet u de Aan/Uit schakelaar aan de achterzijde van de radio op “off” (de klok en alarm display zullen niet werken in de OFF modus). De klok in deze radio is uitgerust om een DAB radio frequ gnaal te ontvangen of een FM d signaal met RDS en nadat u de radio hee aangezet, zal de radio autom h afstemmen op een DAB radio sta on en de klok updaten. Het kan voorkomen dat u 1-2 minuten moet wachten voordat het apparaat het signaal ontvangt. 18 5. GEBRUIK VAN DE RADIO – DAB MODUS DAB wijkt af van de analoge radio; de aparte signalen van verschillende stations worden gegroepeerd en uitgezonden via één frequentie. Deze groepen worden ook wel multiplexen of ensembles genoemd. Iedere keer als er een groep is gevonden zal de naam van die groep verschijnen op de onderste helft van de display. 5.1 DAB Modus – auto scan Door middel van deze functie zal de radio automatisch zoeken naar de DAB Band III kanalen zoeken. Druk op de SCAN knop en op de display verschijnt “Autotune full scan”(Fig.2). De scan zal beginnen en de voortgangsbalk zal op de display verschijnen om de voortgang van de scan te tonen. Zodra de scan is voltooid zal de radio afstemmen op het eerste alfanumerieke station dat gevonden is. Indien de radio geen stations kan vinden, verschijnt er op het scherm “No Signal DAB”. Probeer de radio op een andere plaats te zetten (dichter bij een raam kan een beter resultaat opleveren) en volg de bovenstaande stappen. Controleer of de antenne volledig is uitgetrokken. U kunt, door gebruik te maken van de Vooruit (6)en Terug (5) knoppen zoeken naar een station tussen de beschikbare stations. Druk daarna op de ENTER knop om het station van uw keuze te beluisteren of wacht enkele seconden zodat de radio automatisch opnieuw zal afstemmen. 5.1.1 5.1.2 5.1.3 5.1.4 5.2 5.2.1 DAB mode – Handmatig scannen Door middel van deze functie kunt u een specifiek of nieuw ensemble handmatig toevoegen aan de reeds beschikbare stations. Druk op de ENTER knop en houd deze ingedrukt tot op de display”manual tune” (Fig.4) verschijnt. Fig.4 5.2.2 Druk op de Vooruit (6)of Terug (5) knoppen om zoeken tussen de DAB kanalen en frequenties. Zodra de gewenste ensemble/frequentie op de display verschijnt (bijv. Fig.5), drukt u op de ENTER knop om dit ensemble toe te voegen en de naam op de display weer te geven. Fig.5 5.2.3 Druk op de Vooruit (6)of Terug (5) knoppen om te zoeken tussen de stations die behoren tot het ensemble en druk op de ENTER knop om het door u gewenst station te beluisteren en om de Handmatig afstemmen modus te verlaten. 5.3 DAB Modus – secundaire services Sommige stations bieden secondaire services en indien deze beschikbaar zijn zal het symbool “>”achter de naam van het station verschijnen. Om deze service te openen drukt u op de ENTER knop. 19 6 6.1 6.2 6.3 6.4 6.5 7. GEBRUIK VAN DE RADIO – FM MODUS Zet de radio aan, druk op de MODUS knop en selecteer de FM modus. Op de display verschijnt “switching to FM”en de radio zal afstemmen op 87.50MHz. Om het automatisch zoeken te starten, drukt u kort op de SCAN knop en de radio zal doorgaan met zoeken tot het eerstvolgende station is gevonden. Om terug te zoeken houdt u de SCAN knop minimaal één seconde ingedrukt. Om handmatig te zoeken, drukt u op de Vooruit (6)of Terug (5) knop zodat het zoeken per 0.05MHz zal oplopen of afnemen. Om de audio modus te wijzigen (auto of mono) drukt u op de ENTER knop op het apparaat, hierdoor zal de audio modus van auto naar mono wijzigen, druk nogmaals om weer te veranderen. Indien u auto heeft geselecteerd zal de radio automatisch schakelen tussen stereo en mono (N.B.: Daar dit apparaat één luidspreker heeft zullen de verschillende modi niet beïnvloed worden op de luidspreker output). Indien een FM RDS (Radio Data Signal) aanwezig is, zal op de display automatisch de naam en de tekst van het station verschijnen (indien beschikbaar). RADIO DISPLAY MODI Indien u herhaaldelijk op de MENU knop drukt terwijl een radiostation aan staat, zullen er op de tweede regel van de display verschillende weergaveopties verschijnen, iedere keer als u drukt In DAB Modus In FM Modus Ensemble/Multiplex (groep Naam) – een ensemble of Multiplexe is een groep van station die gebundeld zijn en uitgezonden worden via één frequentie. Er zijn nationale en lokale multiplexen, de lokale omvatten stations die gebonden zijn aan een bepaalde regio. Signaal sterkte – op de display wordt een balk weergegeven die de sterkte van het signaal aangeeft. Hoe sterker het signaal, hoe langer de balk. DLS (dynamic label segment) /Radio Tekst- het uitzendstation kan een rolboodschap meezenden betreffende het huidige programma. Programma type – dit omschrijft de stijl van een programma. Indien dit niet beschikbaar is zal op de display “Programme type” verschijnen. Tijd en datum – de tijd en de datum zal automatisch worden geüpdatet door middel van het radio signaal. Audio modus – op de display wordt weergegeven of het station dat u ontvangt in stereo of mono wordt uitgezonden. Frequentie – op de display verschijnt de frequentie van het huidige station. Audio bit rate (Bitsnelheid)– op de display verschijnt de digitale audio bit rate dat wordt ontvangen. 20 8. 8.1 8.2 8.3 8.4 VOORKEURZENDERS FUNCTIE Door middel van deze functie kunnen 10 radiostations worden opgeslagen in het geheugen voor zowel de DAB als de FM modi. Volg de instructies zoals hierboven weergegeven. Druk op de PRESET knop en houd deze ingedrukt tot op de display een knipperend PRESET nummer verschijnt (Fig.8). Druk op de Vooruit (6)of Terug (5) knop om een locatie voor uw voorkeurzender te selecteren. Druk vervolgens op de ENTER knop om te bevestigen. Het radio station dat u nu beluistert zal op de gekozen locatie worden opgeslagen (Fig.9). Om meerder stations op te slaan, drukt u op de ENTER knop en houd deze ingedrukt, druk daarna op de Vooruit (6)of Terug (5) knop om een beschikbare locatie te vinden. Druk op de ENTER knop om het station op te slaan. Fig.8 Fig.9 Fig.10 8.5 Om een voorkeurzender te beluisteren, drukt u één keer op de PREST knop en daarna op de Vooruit (6)of Terug (5) knop om de gewenste voorkeurzender te selecteren. Zodra de locatie van uw voorkeurzender op de display verschijnt, drukt u op de ENTER knop om dit radio station te beluisteren. Indien de voorkeurzender niet is toegewezen aan een locatie, verschijnt er op de display “Preset Empty” (Fig.10). 9. ALARM FUNCTIE Deze radio beschikt over een dubbele alarmfunctie waarmee het mogelijk is twee verschillende alarmtijden in te stellen. U kunt wakker worden door de zoemer of door de muziek van uw favoriete radio station (DAB/FM). U kunt het alarm instellen in de stand-by modus of als de radio in werking is. Om het eerste alarm in het stellen, drukt u op ALARM 1 om de status van het alarm 1 weer te geven, gebruik de Vooruit (6)of Terug (5) knoppen tot er “Alarm status On”verschijnt en druk op de ENTER knop om het instelmenu te openen. Op de display verschijnt nu de huidige tijd, de wektijd en de uren van de wektijden zullen knipperen. Druk op de Vooruit (6)of Terug (5) knop tot het gewenste uur wordt weergeven. Druk op de enter knop om te bevestigen, nu zullen de minuten knipperen. Druk op de Vooruit (6)of Terug (5) knop tot de gewenste minuten worden weergeven. Druk op de ENTER knop om te bevestigen, vervolgens zal nu de frequentie waarin het alarm wilt instellen worden weergeven (bijv. dagelijks, weekdagen, weekends, eenmalig). Druk op de Vooruit (6)of Terug (5) knop om de gewenste frequentie in te stellen. Druk op de ENTER knop om te bevestigen en de wekmodus (zoemer, DAB of FM) zal worden weergeven. Druk op de Vooruit (6)of Terug (5) knop om de gewenste wekmodus in te stellen. Druk op de ENTER knop om te bevestigen, nu zal het alarm volume worden weergeven. Druk op de Vooruit (6)of Terug (5) knop om het gewenste volume in te stellen. Druk nog één keer op de ENTER knop om te bevestigen en het instel menu te verlaten. De alarm indicator ( 1) zal nu verschijnen op de display in de stand-by modus. Het alarm is nu ingesteld en zal worden opgeslagen in het geheugen in de stand-by modus. Zodra de tijd van het alarm gelijk is aan de huidige tijd zal het alarm afgaan en zal de display knipperen. Het alarm zal blijven afgaan en na een uur automatisch stoppen. Om het alarm uit te zetten, drukt u op de stand-by (q) knop. Indien u de frequentie van het alarm op dagelijks heeft ingesteld zal de alarm indicator op de display aan blijven en de volgende dag op dezelfde tijd weer afgaan tot u deze weer uitzet. 9.1 9.2 9.3 9.4 9.5 9.6 9.7 9.8 9.9 9.10 21 9.11 9.12 Om de Snooze functie te activeren, drukt op de SNOOZE/SLEEP knop zodra het alarm afgaat. De SNOOZE indicator (Zz) zal op de display verschijnen; het alarm zal uitgaan en na ongeveer 9 minuten weer afgaan. Om het alarm helemaal uit te schakelen, drukt u op de ALARM 1 knop om de status van het alarm weer te geven. Druk op de Vooruit (6)of Terug (5) knop tot op de display “Alarm status OFF” verschijnt, druk daarna op de ENTER knop om te bevestigen en het menu te verlaten. Het alarm is nu helemaal uitgeschakeld en de alarm indicator zal niet meer zichtbaar zijn op de display. N.B. Indien de stroomvoorziening is onderbroken of het apparaat is door middel van de schakelaar aan de achterzijde van de radio op OFF gezet of indien de batterijen niet correct zijn geplaatst, zullen de instellingen van het alarm verloren gaan. Om het tweede alarm in te stellen, drukt u op de ALARM 2 knop en volgt u bovengenoemde instructies. Indien u als wekmodus DAB of FM radio heeft ingesteld, zal de zender waarnaar u als laatste heeft geluisterd te horen zijn. De afmeting en helderheid van de display is standaard en kan niet worden gewijzigd. 10. 10.1 10.2 10.3 10.4 10.5 INSTELLEN EN GEBRUIK VAN DE SLEEP (automatisch uitschakelen) FUNCTIE Door middel van deze functie kunt u na een vooringestelde intervaltijd de radio automatisch laten uitschakelen. Terwijl de radio aan het spelen is, drukt u op de SNOOZE/SLEEP knop en de SLEEP status zal op de display verschijnen. Druk herhaaldelijk op de Vooruit (6)of Terug (5) knop tot de gewenste intervaltijd verschijnt (zie onderstaande volgorde). Druk op de ENTER knop om te bevestigen. De SLEEP timer is nu geactiveerd en op de display verschijnt de sleep indicator (S) met daarbij de resterende tijd tot de radio automatisch zal uitschakelen (bijv.10). De SLEEP functie zal aftellen en daarna automatisch uitschakelen nadat de ingestelde intervaltijd is verstreken. Om de SLEEP timer uit te schakelen, drukt u op de SNOOZE/SLEEP knop en daarna drukt u herhaaldelijk op de Vooruit (6)of Terug (5) knoppen tot “OFF”verschijnt op de display. Druk op de ENTER knop om te bevestigen. 11. GEBRUIK VAN DE HOOFDTELEFOON (niet inbegrepen) De radio is voorzien van een stereo hoofdtelefoon aansluiting zodat u het apparaat kunt gebruiken zonder andere mensen te storen. Doe de hoofdtelefoon in de aansluiting die aangegeven wordt met aan de achterzijde van de radio en pas het volume naar uw keuze aan. Excessief geluid van een hoofdtelefoon of oordopjes kan leiden tot gehoorverlies. De luidspreker werkt niet indien een hoofdtelefoon is aangesloten. 12 RESET Indien u de radio verplaatst naar een andere regio in het land kan het voorkomen dat de voorkeurzenders niet mee beschikbaar zijn en is het noodzakelijk om de radio weer te resetten naar de fabrieksinstellingen. Terwijl het apparaat aan staat, drukt u op de MENU/INFO knop en houd deze ingedrukt tot op de display “system reset”verschijnt. 12.1 22 12.2 12.3 12.4 12.5 Druk op de ENTER knop om te bevestigen tot op de display “press enter key to reset” verschijnt. Druk nogmaals op de ENTER knop om te bevestigen. Op de display verschijnt “system reset” en de radio zal beginnen met de reset. De radio zal een volledige scan uitvoeren, op de display verschijnt de voortgangsbalk. Zodra de scan is voltooid zal de radio de eerste alfanumerieke radio zender spelen. Alle voorgaande opgeslagen radio zenders zullen verloren gaan. N.B. Indien u tijdens stap 12.1 nogmaals snel op de MENU/INFO knop drukt zal het “software nummer” worden weergegeven. 13. REINIGING EN ONDERHOUD Reinig de buitenkant van het apparaat met een zachte doek. Indien de behuizing erg vuil is, trekt u de stekker uit het stopcontact en reinigt u het apparaat met een vochtige doek met een lichte oplossing van water en afwasmiddel. Let op dat het apparaat volledig droog is voordat u de stekker weer in het stopcontact doet. 14. PROBLEEM OPLOSSEN Probleem Het apparaat doet het niet Het apparaat doet het niet met batterijen Geen geluid Radio ontvangst geeft herrie (FM) Radio ontvangst hapert en geeft bubbelend geluid (DAB) DAB “No signal DAB” Alarm functie doet het niet Sleep functie doet het niet Mogelijke oorzaak/Oplossing Zit de plug van de voedingsadapter goed in de DC aansluiting aan de achterzijde van de radio en zit de stekker goed in het stopcontact? Staat er stroom op het stopcontact waarin de stekker zit? Is de stroomtoevoer verwijderd zonder dat er batterijen in het apparaat zijn gedaan? Staat de Aan/Uit schakelaar aan de achterzijde van het apparaat in de ON positie? Heeft u de voedingsadapter verwijderd aan de achterzijde van het apparaat? Zijn de batterijen correct geplaatst? Zijn de batterijen leeg? Staat de Aan/Uit schakelaar aan de achterzijde van het apparaat in de ON positie? Staat het volume ingesteld op minimum? Is er een hoofdtelefoon of oordopjes aangesloten op het apparaat? Trek de antenne volledig uit of zet de radio op een andere locatie. FM Stereo – Indien dit signaal zwak is kunt u de radio overzetten naar MONO ontvangst, dit signaal hoeft niet zo sterk te zijn. Het signaal is zwak. Trek de antenne volledig uit of zet de radio op een andere locatie. Plaats de radio wat hoger of dichter bij een raam, dit kan de ontvangst iets verbeteren. N.B.: Soms kan het ontvangst iets beter zijn indien u de antenne niet helemaal uittrekt ( iets korter dan de volledige lengte). Dit betekent over het algemeen dat het signaal te zwak is, niet dat er geen signaal is. Probeer de radio te verplaatsen of voer een nieuwe scan uit. Controleer of er in uw regio een DAB signaal ontvangst is. Heeft u het alarm geactiveerd – zie sectie 9.1? Heeft u het juiste alarm geactiveerd? Heeft u de Sleep functie geactiveerd – zie sectie 10? 23 15 TECHNISCHE SPECIFICATIES Nominale spanning (voedingsadapter) Voedingsadapter Spanning uit Nominale spanning (radio) Stroomverbruik Stroomverbruik (Stand-by) Veiligheidsklasse (Voedingsadapter) 100 – 240V ~50/60Hz, 0,15° 5V 0,5A DC 6V (1.5V x 4 AA) 3W 0.3W 2 Audio output 1.5W RMS Radio DAB 174 – 240MHz FM 87.5 – 108MHz Temperatuur 5°C tot 35°C Vochtigheid 5% tot 90% Horizontaal Gebruiksomstandigheden Gebruikspositie 24 1. SÉCURITÉ Pour une u isa on domes que et à l’intérieur uniquement. Placez l’appareil sur une surface plan et stable en laissant beaucoup d’espace pour la v a on et loin des sources de chaleur. Laissez un minimum d’espace de 10 cm autour de l’appareil pour une v a on correcte. Ne pas couvrir ni bloquer les ouvertures de v a on. Tenez l’appareil et le cordon hors de la portée des enfants de moins de 8 ans. Ne laissez pas les enfants u liser l’appareil sans surveillance. isé par les enfants de 8 ans et plus et des personnes aux capacités Cet appareil peut être physiques, sensorielles ou mentales réduites ou des personnes dénuées d’expérience ou de connaissance sauf si celles-ci sont sous la surveillance ou ont reçu les instruc ons d’u i on appropriées et si on comprend les dangers inhérents. Le ne oyage et l’entre n par l’usager ne doivent pas être effectué par les enfants, sauf s’ils ont plus de 8 ans et s’ils sont surveillés. Déroulez le câble rement avant de brancher-le et assurez-vous de posi onnez-le en prévenant l’endommager ou les chutes éventuelles. Le cordon d’alimenta on de so de l’adaptateur secteur ne peut pas être remplacé. En cas de dommage du cordon, la prise jack ou l’adaptateur, l’unité toute re doit être remplacée. Les branchements doivent être établis par l’adaptateur secteur fourni, ne branchez jamais l’appareil directement à l’alimenta on 240V. N’u isez jamais l’adaptateur fourni avec un autre appareil. L’adaptateur secteur deviendra chaud pendant l’usage ; ne couvrez pas ou ne le posez pas bles de réagir à la chaleur, comme des plateaux de table et des sur des surfaces susc tapis. Si ne vou isez pas l’appareil pendant une période prolongée ou en cas d’orage débranchez l’appareil. Ne pas le câble si vous voulez débrancher l’appareil de la prise secteur. Gardez cet appareil, le câble et l’adaptateur au sec et loin des endroits ou il risques d’être éclaboussé par de l’eau. Evitez des environnements chauds et humides. Ne placez pas des objets avec des flammes nues ou un récipient rempli de liquide sur l’appareil. lisez pas par une période prolongée et avant Eteindrez et débranchez l’appareil si vous ne le ne oyage ou entre en. Le service et l’entre en ne doivent être réalisé que par un personnel qualifié. Assurez-vous que le cordon d’alimenta on puisse être facilement débranché de la prise secteur, n’u isez pas une prise verrouillable ou un cordon d’alimenta on permanent dans la prise de courant. 25 Ce symbole placé dans un triangle équilatéral a pour but d’aver u isateur de la présence d’un voltage dangereux non isolé, dans le bo de l’appareil, qui peut s’avérer d’une amplitude suffisante pour provoquer un risque d’électro on. Ce point d’exclama on dans un triangle équilatéral a pour but d’av r l’u isateur de la présence de direc ves de fonc onnement ou d’entre importantes dans le manuel d’in on qui accompagne l’appareil ATTENTION RISQUE DE CHOC ÉLECTRIQUE NE PAS OUVRIR Afin de minimiser les risques de choc électrique ne pas re rer le couvercle (ou les pièces). Il n'y a pas de pièces pouvant être réparées par l’u isateur dans de ce e unité confier à un agent qualifié 26 2. COMMANDES Vue de dessus Vue d’arrière 20 1. 2. 3. 4. 5. 6. 7. 8. 9. 10. Bouton Mode Bouton Veille Bouton Menu/Info Bouton Alarme 1 Bouton Entrée Bouton Alarme 2 Bouton Répétition/Réveil Bouton Préréglage (Mémorisation) Bouton Balayage Bouton en Arrière (5) 11. 12. 13. 14. 15. 16. 17. 18. 19. 20. 27 Bouton Volume Bouton en avant ( 6) Bouton Volume + Écran (vue frontale) Haut Parleur Antenne Interrupteur Marche/Arrêt Prise Jack DC in Prise Écouteurs/Casque Couvercle compartiment piles (en dessous) 3. INSTALLATION DES PILES ET UTILISATION Pour utiliser l’appareil avec les piles assurez-vous que le cordon d’alimentation n’est pas branché et installez les piles dans le compartiment. 3.1 Enlevez le couvercle du compartiment des piles en dessous la radio. 3.2 Placez 4 x AA 1.5V piles alcalines (pas inclues) selon la diagramme dans le compartiment à piles, en respectant la polarité correcte (+/-). 3.3 Remettez le couvercle du compartiment à piles. 3.4 N’exposez pas le piles ou les piles installées à une source de chaleur telles qu’un feu, le soleil ou radiateur, etc. Notes : Toutes les radios DAB consomment plus d’énergie que les radios traditionnelles, donc les piles seront déchargées au bout de quelques heures. Nous vous conseillons d’utiliser le cordon d’alimentation (ou les piles rechargeables) pour une écoute prolongée. Utilisez toujours l’interrupteur ON/OFF à l’arrière de l’appareil quand vous ne l’utilisez pas. Le mode Veille continue à utiliser d’énergie et (en mode piles) déchargera les piles dans quelques jours. PILES SECURITE ET TRAITEMENT ATTENTION- Danger d’explosion si les piles ne sont pas placé correctement. Utilisez exclusivement les piles AA 1.5V dans cet appareil. Assurez-vous que les piles sont placées correctement en suivant les polarités indiquées (+ et -). Utilisez exclusivement les mêmes piles ou un type équivalent recommandé. Les piles ne peuvent pas être remplacées que par une adulte. Ne recharger pas des piles non rechargeables. Retirez les piles rechargeables de l’appareil avant de les recharger. Jamais utilisez les piles nouvelles et vieilles (remplacez-les toutes en même temps). N’essayez jamais de démonter les piles. Ne court-circuitez pas les bornes d’alimentation. Retirez toujours les piles déchargées de l’appareil. En cas de non utilisation prolongée retirez les piles. Traitez les piles de manière responsable et consultez les autorités locales compétentes pour les options de recyclage et/ou élimination. Ne jetez jamais les piles dans un feu car elles pourraient exploser. 28 4 4.1 4.2 4.3 4.4 4.5 4.6 UTILISATION En cas d’utilisation sur secteur, insérez le cordon de l’adaptateur dans la prise à l’arrière de la radio. Insérez l’adaptateur secteur dans une prise de courant. En cas d’utilisation des piles, assurez-vous que le cordon d’alimentation N’EST PAS connecté à l’arrière de la radio et installez les piles dans le compartiment à piles. Étendez complètement l’antenne télescopique. Mettez l’interrupteur ON/OFF à l’arrière de la radio en position « ON ». L’écran s’allumera. Appuyez sur le bouton STANDBY (q) pour mettre en marche la radio et un message de bienvenue sera affiché brièvement (Fig. 1) et commencera la syntonisation. Fig.1 Le mode DAB sera sélectionné automatiquement et la radio effectuera une recherche automatique (Fig.2). L’écran affichera « searching » et une barre de progression indique la progression de la recherche et le numéro des stations déjà trouvées. Fig.2 Fig.3 Quand la recherche est terminée la radio ouvrera la première station alphanumérique trouvée. L’écran affichera le nom de la station. 4.8 Si la radio ne trouve aucune de station, « No Signal DAB »s’affichera. Assurez-vous que l’antenne est complètement déployée ou déplacez la radio à un endroit de meilleur réception (près d’une fenêtre pourrait être mieux) et répétez la procédure ci-dessus. 4.9 Vous pouvez régler le volume au niveau désiré en utilisant les boutons VOL+ et VOL-. 4.10 Pour chercher la station désirée, appuyez sur le bouton FORWARD (6) ou BACKWARD (5) pour basculer entre les stations disponibles. 4.11 Pour passer en mode FM, appuyez sur le bouton MODE. L’écran affichera le mode FM. Appuyez un autre fois sur le bouton pour retourner en mode DAB. 4.12 Appuyez sur le bouton STANDBY (q) pour passer en mode veille. 4.13 Pour arrêter complètement le radio-réveil, mettez l’interrupteur ON/OFF à l’arrière de la radio en position « OFF » (remarque : l’écran d’affichage et l’alarme ne fonctionnent pas en mode OFF). Remarque : L’horloge dans cette radio est équipée de recevoir le signal de l’heure d’une fréquence DAB radio ou le signal de l’heure FM avec RDS et après mise en marche, la station radio DAB mettra à jour l’horloge. C’est possible que vous devez attendre 1 -2 minutes pour recevoir le signal de l’heure. 4.7 29 5 UTILISATION DE LA RADIO – MODE DAB DAB diffère de la radio analogue ; les signaux séparés de certaines stations radio sont regroupé en bouquets et diffusé comme une seule fréquence. Cette groupes s’appellent multiplexes et ensembles. Chaque fois que la radio trouve un groupe, le nom de ce groupe sera affiché sur la moitié inférieure de l’écran. 5.1 Mode DAB – auto scan Cette fonction permet la radio de chercher automatiquement les canaux DAB Band III. Appuyez sur le bouton SCAN et « Autotune full scan »sera affiché (Fig.2). La recherche commencera et la barre de progression sera affiché sur l’écran pour montrer la progression de la recherche. Quand la recherche est terminée la radio ouvrera la première station alphanumérique trouvée. Si la radio ne trouve aucune de station, « No Signal DAB »s’affichera. Assurez-vous que l’antenne est complètement déployée ou déplacez la radio à un endroit de meilleur réception (près d’une fenêtre pourrait être mieux) et répétez la procédure ci-dessus. Assurez-vous que l’antenne est complètement déployé. Pour chercher la station désirée, appuyez sur le bouton FORWARD (6) ou BACKWARD (5) pour basculer entre les stations disponibles. Puis appuyez sur le bouton ENTER pour écouter la station de votre choix ou attendez quelques secondes et la radio se réglera automatiquement. 5.1.1 5.1.2 5.1.3 5.1.4 5.2 5.2.1 5.2.2 Mode DAB-recherche manuelle Cette fonction vous permet d’ajouter un ensemble spécifique ou nouveau à les stations déjà disponibles. Tenez le bouton ENTER enfoncée jusqu’à ce que l’écran affiche « manual tune »(Fig.4). Fig.4 Appuyez sur le bouton FORWARD (6) ou BACKWARD (5) pour basculer entre les canaux DAB et leurs fréquences. Lorsque l’ensemble/ fréquence de votre choix s’affiche sur l’écran (p.ex. Fig.5), vous appuyez sur le bouton ENTER pour ajouter l’ensemble et afficher le nom. Fig.5 5.2.3. Appuyez sur le bouton FORWARD (6) ou BACKWARD (5) pour basculer entre les stations incluses à l’ensemble et appuyez sur le bouton ENTER pour écouter la station de votre choix et quitter le mode recherche manuelle. 5.3 MODE DAB-SERVICES SECONDAIRES Quelques stations offrent des service secondaires et si disponibles le symbole « > »s’affichera après le nom de la station. Pour avoir accès à ce service appuyez sur le bouton ENTER. 30 6 6.1 6.2 6.3 6.4 6.5 7. UTILISER LA RADIO - MODE FM Mettez en marche la radio, appuyez sur le bouton MODE et sélectionnez le mode FM. « switching to FM »s’affichera sur l’écran et la radio est syntonisée sur la fréquence 87,50 MHz. Pour activer la recherche automatique, appuyez brièvement sur le bouton SCAN et la radio commencera la recherche des fréquences et s’arrête sur la première station trouvée. Pour chercher vers le bas, appuyez le bouton SCAN et tenez enfoncée pour au moins une seconde. Pour une recherche manuelle, appuyez sur le bouton FORWARD (6) ou BACKWARD (5) pour une augmentation de fréquence de 0,05 MHz. Pour changer le mode audio (auto ou mono), appuyez sur le bouton ENTER de l’appareil, le mode passera de auto en mono, appuyez une autre fois pour repasser en mode auto. En mode auto la radio basculera automatiquement entre les modes stéréo et mono.(Note : Parce que l’appareil est doté d’un seule haut-parleur ça n’effectuera pas la production de son de l’haut-parleur). Si un FM RDS (Radio Data Signal) est disponible, l’écran affichera automatiquement le nom de la station et texte de la radio (si disponible). MODES ÉCRAN RADIO Si vous appuyez sur le bouton MENU plusieurs fois lorsque la radio est en opération, la deuxième ligne de la radio basculera entre les modes suivants, après chaque fois que vous appuyez sur le bouton : En mode DAB : En mode FM : Ensemble/Multiplex (Nom de la Groupe)- L’ensemble / multiplexe est un groupe de stations regroupé en bouquets et diffusé ensembles par une seule fréquence. Il y a des multiplexes nationales et locales, les multiplexes locales qui contiennent les stations spécifiques pour une région locale. Puissance du signal – Sur l’écran sera affiché une barre de force indiquant la puissance du signal. Plus longue est la barre, plus fort est le signal. DLS (dynamic label segment)/texte Radio – Le diffuseur pourra diffuser des messages défilants du programme actuel. Type de Programme – Cela décrit le style de programme. Si l’information n’est pas disponible l’écran affichera « Programme Type ». Heure et date – L’Heure et la date sont mise à jour automatiquement par le signal horaire radiodiffusé. Mode Audio - Sur l’écran sera affiché si la fréquence du station qui est reçue est en stéréo ou mono. Fréquence – L’écran affichera la fréquence du station diffusée. Débit Binaire – L’écran affichera le débit binaire numérique qui est reçu. 31 8 8.1 8.2 8.3 8.4 FONCTION STATION PREREGLE Cette fonction vous permet de programmer jusqu’à 10 stations et les mémoriser aussi bien pour la bande DAM que pour la bande FM/. Suivez les instructions ci-dessous pour sélectionner la station de votre choix. Appuyez sur le bouton PRESET et tenez enfoncée jusqu’au moment que l’écran affiche un numéro de préréglage (Fig.8). Appuyez sur le bouton FORWARD (6) ou BACKWARD (5) pour sélectionner la station préréglé de votre choix et appuyez sur le bouton ENTER pour confirmer. La station actuelle sera sauvegardée sur la position sélectionnée (Fig.9). Pour enregistrer autres stations, appuyez sur le bouton PRESET et tenez enfoncée, puis appuyez sur le bouton FORWARD (6) ou BACKWARD (5) plusieurs fois jusqu’au moment que vous avez trouvé une location vide. Appuyez sur le bouton ENTER pour sauvegarder la station. Fig.8 Fig.9 Fig.10 8.5 Pour écouter une station préréglée, appuyez sur le bouton PRESET une fois et puis appuyez sur le bouton FORWARD (6) ou BACKWARD (5) pour sélectionner le numéro de la location de votre choix. Lorsque le numéro de la station est affiché. Appuyez sur le bouton ENTER pour écouter la station préréglée. Si vous ne l’avez pas sauvegardée l’écran affichera « Preset Empty » (Fig.10). 9 FONCTION RÉVEIL Cette radio est dotée d’une fonction double alarme et vous permet de régler deux heures d’alarme différentes. Vous vous pouvez réveillez avec la sonnerie ou votre station radio DAB/FM favorite. Vous pouvez régler l’alarme en veille ou en fonctionnement. Pour régler la première alarme. Vous appuyez sur le bouton ALARM 1 pour afficher l’état de la première alarme, par le bouton FORWARD (6) ou BACKWARD (5) jusqu’à « Alarm status ON »s’affiche sur l’écran, appuyez sur le bouton ENTER pour entrer le mode réglage. Maintenant sur l’écran vous voyez l’heure actuelle, l’heure de réveil, les chiffres des heures de réveil clignotent. Appuyez sur le bouton FORWARD (6) ou BACKWARD (5) pour sélectionner l’heure désirée. Appuyez sur le bouton ENTER pour confirmer, maintenant les chiffres des minutes clignotent. Appuyez sur le bouton FORWARD (6) ou BACKWARD (5) pour sélectionner les minutes désirées. Appuyez sur le bouton ENTER pour confirmer et la fréquence ( p.ex. tous les jours, les jours ouvrés, les weekends, une fois) de l’alarme sera affichée. Utilisez le bouton FORWARD (6) ou BACKWARD (5) pour régler la fréquence de l’alarme. Appuyez sur le bouton ENTER pour confirmer, maintenant le mode de réveil ( p.ex. signal sonore, DAB ou FM) s’affichera. Appuyez sur le bouton FORWARD (6) ou BACKWARD (5) pour sélectionner le mode de réveil désiré. Appuyez sur le bouton ENTER pour confirmer, maintenant le volume de l’arme s’affichera. Appuyez sur le bouton FORWARD (6) ou BACKWARD (5) pour sélectionner le volume désiré. Appuyez sur le bouton ENTER une autre fois et quittez le mode de réglage. Le signe d’alarme ( 1) sera affiché sur l’écran en mode veille. Maintenant l’alarme est réglée et est sauvegardée quand l’appareil est en mode veille. Lorsque le temps réel est le même que l’heure de réveil, l’alarme sonne et l’écran clignote. L’alarme sonne pendant une heure, puis s’arrête automatiquement. Pour arrêter l’alarme, appuyez sur le bouton STANDBY (q). Si vous avez réglé l’alarme tous les jours, le signe 9.1 9.2 9.3 9.4 9.5 9.6 9.7 9.8 9.9 9.10 32 9.11 9.12 d’alarme sera affiché sur l’écran et le prochaine jour l’alarme sonnera au même temps jusqu’au moment que vous désactivez l’alarme. Pour activer la fonction snooze (répétition de réveil), appuyez sur le bouton SNOOZE/SLEEP quand l’alarme sonne. Le signe du snooze (Zz) s’affiche sur l’écran ; l’alarme s’arrête et après environs neuf minutes sonnera une autre fois. Pour désactiver l’alarme définitivement, appuyez sur le bouton ALARM 1 pour afficher l’état d’alarme. Utilisez le bouton FORWARD (6) ou BACKWARD (5) jusqu’à « Alarm status OFF » s’affiche sur l’écran, puis appuyez sur le bouton ENTER pour confirmer et quittez le mode. Maintenant l’alarme est désactivée et le signe n’est plus visible sur l’écran. Notifications : En cas de coupure de courant (ou si vous avez mis l’interrupteur à l’arrière de l’appareil en position OFF) et les piles ne se trouvent pas dans le compartiment à piles, on perd tout réglage d’alarme effectué. Pour régler la seconde alarme, utilisez le bouton ALARM 2 et suivez les étapes ci-dessus. Si vous avez sélectionné l’option DAB ou FM l’alarme sonne avec la dernière station que vous avez écouté. La taille/netteté de l’écran est définie et ne peuvent pas être ajustées. 10. 10.1 10.2 10.3 10.4 10.5 RÉGLAGE ET UTILISATION FONCTION SLEEP (ARRÊT AUTOMATIQUE) Cette fonction coupera la radio automatiquement après une durée prédéterminée. En écoutant la radio de votre choix, vous appuyez sur le bouton SNOOZE/SLEEP et l’état de cette fonction est affiché sur l’écran. Appuyez sur le bouton FORWARD (6) ou BACKWARD (5) plusieurs fois pour sélectionner le temps de l’intervalle désiré (voyez la séquence ci-dessous) affiché sur l’écran. Appuyez sur le bouton ENTER pour confirmer. La fonction SLEEP (arrêt automatique) est activée et sur l’écran est affiché le signe de la fonction SLEEP (S) et le temps restant avant que la radio s’éteint (p.ex. 10). En activant la fonction SLEEP le compte à rebours commence et s’il est à zéro, l’appareil s’éteindra automatiquement. Pour désactiver la fonction, appuyez sur le bouton SNOOZE/SLEEP et appuyez sur le bouton FORWARD (6) ou BACKWARD (5) plusieurs fois pour sélectionner OFF. Appuyez sur le bouton ENTER pour confirmer. 11. UTILISATION CASQUE (PAS INCLUS) Une prise jack pour le casque est fournie afin que l’appareil peut être utilisé sans déranger les autres personnes. Branchez le casque dans la prise avec le signe à l’arrière de la radio et réglez le volume de votre choix. Une écoute prolongée à un niveau de volume excessif peut endommager votre ouïe. L’haut-parleur ne fonctionne pas si le casque est branché. 12. RÉINITIALISATION Si vous avez déplacé la radio vers un autre région du pays, les station préréglées probablement ne seront plus disponibles et il faut rétablir les valeurs des paramètres par défaut. Lorsque l’appareil est en fonction, appuyez sur et tenez enfoncée le bouton MENU/INFO jusqu’à « system reset »apparait sur l’écran. Appuyez sur le bouton ENTER pour confirmer la réinitialisation et « press enter key to reset »s’affiche sur l’écran. 12.1 12.2 33 12.3 12.4 12.5 Appuyez sur le bouton ENTER une autre fois pour confirmer. La radio affichera « system reset »et la réinitialisation commencera. L’analyse démarre et sur l’écran vous voyez la barre de progression. Lorsque l’analyse est terminé la radio ouvre la première station alphanumérique trouvée. Toutes les stations préréglées seront perdues pendant la réinitialisation. Notifications : Si vous appuyez sur le bouton MENU/INFO ENTER une autre fois rapidement pendant étape 12.1 le numéro de logiciel sera affiché. 13. NETTOYAGE ET ENTRETIEN Essuyez la surface externe avec un chiffon doux. Lorsque le boiter est très sale, débranchez-le et essuyez-le en utilisant un chiffon humidifié avec une solution délicate à base de l’eau et détergent. Laissez sécher complètement avant utilisation. 14. GUIDE DE DEPANNAGE Observation L’appareil ne fonctionne pas L’appareil ne fonctionne pas avec les piles Pas de son Réception de bruit de la radio (FM) Réception de la radio sons saccadés et bulleux DAB « pas de signal DAB » La fonction d’alarme ne fonctionne pas La fonction SLEEP ne fonctionne pas 15. Cause probable et solution Contrôlez si l’adaptateur est bien branché dans la prise de courant et à l’arrière de l’appareil. Contrôlez si la prise de courant est sous tension. Si l’appareil a été débranché et il n’y ont pas des piles dans l’appareil ? Avez-vous mis l’interrupteur ON/OFF en arrière de l’appareil en position « ON » ? Avez-vous débranché l’adaptateur à l’arrière de l’appareil ? Avez-vous placé les piles correctement ? Contrôlez si les piles ne sont pas vides. Avez-vous mis l’interrupteur ON/OFF à l’arrière de l’appareil en position « ON » ? Avez-vous mis le volume au minimum ? Avez-vous branché la casque ? Étendez l’antenne ou changez la position de la radio. FM Stéréo- si la réception est faible, changez l’interrupteur en position MONO car ce signal est moins fort. Signal faible. Étendez l’antenne ou changez la position de la radio. Positionner la radio dans un autre endroit ou près d’une fenêtre pourrait améliorer la réception. Note : quelque fois la réception peut être améliorée quand vous rétractez l’antenne inférieure à pleine longueur. En général il signifie que le signal est trop faible, ce ne signifie PAS qu’il n’y a pas de signal. Changez la position de la radio et faites une nouvelle recherche. Contrôlez si votre région local offre un service DAB. Avez-vous activé l’alarme- voyez section 9.1 ? Avez-vous activé l’alarme correcte ? Avez-vous activé la fonction SLEEP-voyez section 10 ? SPÉCIFICATIONS TECHNIQUES Tension nominale (transformateur) 100 – 240V ~50/60Hz, 0,15A 34 Puissance transformateur Tension nominale (Radio) Consommation électrique Consommation électrique (en veille) Classe énergétique (transformateur) 5V 0,5A DC 6V (1.5V x 4 AA) 3W 0.3W 2 Puissance Audio 1.5W RMS Radio DAB 174 – 240 MHz FM 87.5 – 108MHz Conditions de fonctionnement Température : 5°C à 35°C Humidité : 5% à 90% Horizontale Position d’opération 35
  • Page 1 1
  • Page 2 2
  • Page 3 3
  • Page 4 4
  • Page 5 5
  • Page 6 6
  • Page 7 7
  • Page 8 8
  • Page 9 9
  • Page 10 10
  • Page 11 11
  • Page 12 12
  • Page 13 13
  • Page 14 14
  • Page 15 15
  • Page 16 16
  • Page 17 17
  • Page 18 18
  • Page 19 19
  • Page 20 20
  • Page 21 21
  • Page 22 22
  • Page 23 23
  • Page 24 24
  • Page 25 25
  • Page 26 26
  • Page 27 27
  • Page 28 28
  • Page 29 29
  • Page 30 30
  • Page 31 31
  • Page 32 32
  • Page 33 33
  • Page 34 34
  • Page 35 35

Salora CR624DAB de handleiding

Categorie
Radio's
Type
de handleiding

Gerelateerde artikelen