Oregon Scientific RM308PX Handleiding
- Categorie
- Wekkers
- Type
- Handleiding

Classic dual-alarm projection clock
Model: RM308PX / RM308PAX /
RM308PUX
USER MANUAL
OVERVIEW
FRONT VIEW
1
2
11
12
13
14
3
4
5
6
7
8
9
10
1. SNOOZE / LIGHT: activate snooze alarm; activate backlight;
ip projected image 90°
2. : signal reception indicator
3. : main unit batteries low / no battery
4. PM: indicate PM
5. : alarm time is displayed
6. Alarm time / calendar
7. MODE: change settings / display
8. : view alarm status; set alarm; change to alarm /
calendar display
9. ON OFF: activate / deactivate alarm function
10. / : increase / decrease values of the selected
setting; enable / disable clock reception signal
11. Projector: project time / alarm status
12. Clock with seconds / weekday
13. Time zone offset
14. Alarm 1, 2 is ON
REAR VIEW
1
2
3
4
1. FOCUS: focus the projected image
2. RESET: reset unit to default settings
3. PROJECTION ON/OFF: enable / disable continuous
projection (when adaptor is connected)
4. AC adaptor socket
BOTTOM VIEW
1. Battery compartment
GETTING STARTED
POWER SUPPLY
2 x UM-4 (AAA) batteries
To insert batteries:
1. Remove the battery compartment cover.
2. Insert the batteries, matching the polarities (+/ -).
3. Press RESET after each battery change.
MEANING
Battery is low in power
No battery installed – only AC adaptor
1 x adaptor
Alternatively, use the adaptor supplied to power the unit. For
continuous use of projector, adaptor must be installed.
Make sure the adapter is not obstructed and is easily
accessible to the unit.
NOTE
The main unit and adaptor should not be exposed to wet
conditions. No objects filled with liquid, such as vases, should be
placed on the main unit and adaptor.
To completely disconnect from power, the adaptor should be
disconnected from the mains.
CLOCK
CLOCK RECEPTION
This product is designed to synchronize its clock automatically
with a clock signal.
Set the Time Zone
1. Press SNOOZE / LIGHT to activate Time Zone (EU, US, UK)
setting when rst time power on the clock.
2. Press or to select.
3. Press MODE to conrm.
RM308PX:
• EU: DCF-77 signal: within 1500 km (932 miles) of Frankfurt,
Germany.
RM308PAX:
• US: WWVB-60 signal: within 3200km (2000 miles) of Fort
Collins Colorado.
RM308PUX:
• UK: MSF-60 signal: within 1500 km (932 miles) of Anthorn,
England.
To enable / disable signal reception:
Press and hold to enable or to disable signal reception.
NOTE
Reception takes 2-10 minutes. If the signal is weak, it can
take up to 24 hours to get a valid signal.
Clock signal reception indicator:
Strong signal Weak / No signal
If signal reception is unsuccessful, place your unit next to a window,
press and hold to force another signal search.
MANUALLY SET CLOCK
To set the clock manually, disable the clock signal reception first.
1. Press and hold MODE to enter.
2. Press MODE to toggle between displays.
3. Press or to increase / decrease values of the
selected setting.
4. Press MODE to conrm.
The settings order is: time zone offset, 12/24 hr format, hour,
minute, year, calendar format (month–day / day–month), month,
day and language.
Time zone offset sets the clock +/- 23 hours from the received clock
signal time. If you have deactivated the clock signal reception, do
not set a value for time zone.
NOTE
If you enter +1 in the time zone setting, this will give you
your regional time plus 1 hour.
If you are in the US (RM308PAX only) set the clock to:
PA for Pacific time MO for Mountain time
CE for Central time EA for Eastern time
NOTE
The language options are English (E), German (D), French
(F), Italian (I), and Spanish (S).
ALARM
To set the alarm:
1. Press to toggle between Alarm 1 / 2.
2. Press and hold to enter alarm setting.
3. Press / to set hour / minute.
4. Press or MODE to conrm.
/ indicates alarm is ON.
To activate / deactivate alarm 1 and / or 2:
• Press ON OFF repeatedly
OR
1. Press to select alarm 1 or 2.
2. Press ON OFF to activate / deactivate.
To silence the alarm:
• Press SNOOZE / LIGHT to silence it for 8 minutes
OR
• Press any other key to turn the alarm off and activate it again
after 24 hours.
To select display mode:
• Press MODE to toggle between displays (clock, calendar
with seconds and calendar with weekday).
PROJECTION
To activate projection / backlight:
• Press SNOOZE / LIGHT.
To activate / deactivate continuous projection:
• Slide PROJECTION switch to ON/OFF when adaptor is
connected.
To flip image 90° (while image is projected):
• Within 8 seconds of pressing SNOOZE / LIGHT, press
SNOOZE / LIGHT again.
To focus image:
• Turn FOCUS wheel.
NOTE
If projection is illuminated, do not look directly into the projector.
RESET
Press RESET to return to the default settings.
PRECAUTIONS
• Do not subject the unit to excessive force, shock, dust,
temperature or humidity.
• Do not cover the ventilation holes with any items such as
newspapers, curtains etc.
• Do not immerse the unit in water. If you spill liquid over it, dry
it immediately with a soft, lint-free cloth.
• Do not clean the unit with abrasive or corrosive materials.
• Do not tamper with the unit’s internal components. This
invalidates the warranty.
• Only use fresh batteries. Do not mix new and old batteries.
• Images shown in this manual may differ from the actual display.
• When disposing of this product, ensure it is collected separately
for special treatment and not as normal household waste.
• Placement of this product on certain types of wood may
result in damage to its nish for which Oregon Scientic will
not be responsible. Consult the furniture manufacturer’s care
instructions for information.
• The contents of this manual may not be reproduced without
the permission of the manufacturer.
• Do not dispose old batteries as unsorted municipal waste.
Collection of such waste separately for special treatment is
necessary.
• Please note that some units are equipped with a battery
safety strip. Remove the strip from the battery compartment
before rst use.
NOTE
The technical specifications for this product and the contents
of the user manual are subject to change without notice.
NOTE
Features and accessories will not be available in all
countries. For more information, please contact your local retailer.
To download an electronic version of the user manual, please visit
http://global.oregonscientific.com/customerSupport.php.
SPECIFICATIONS
TYPE DESCRIPTION
L x W x H 145 x 94 x 40 mm
(5.7 x 3.7 x 1.6 in)
Weight 157 g ( 5.5 oz) without battery
Power AC/DC 3.6 V/100 mA adaptor
2 x UM-4 (AAA) 1.5 V batteries
EN
ABOUT OREGON SCIENTIFIC
Visit our website www.oregonscientic.com to learn more about
Oregon Scientic products.
For any inquiry, please contact our Customer Services at
info@oregonscientic.com.
Oregon Scientic Global Distribution Limited reserves the right to
interpret and construe any contents, terms and provisions in this
user manual and to amend it, at its sole discretion, at any time
without prior notice. To the extent that there is any inconsistency
between the English version and any other language versions, the
English version shall prevail.
EU-DECLARATION OF CONFORMITY
Hereby the manufacturer, Oregon Scientic Global Distribution
Limited, declares that the radio equipment type Classic dual-alarm
projection clock (Model RM308PX / RM308PAX / RM308PUX) is
in compliance with 2014/53/EU Directive. The full text of the EU
Declaration of Conformity is available at the following internet
address:
http://global.oregonscientic.com/customerSupport.php
COUNTRIES RED APPROVED COMPLIED
All EU countries, Switzerland CH
and Norway N
DISPOSAL INFORMATION FOR USERS
Pursuant to and in accordance with Article 14 of the
Directive 2012/19/EU of the European Parliament on
waste electrical and electronic equipment (WEEE),
and pursuant to and in accordance with Article 20 of
the Directive 2013/56/EU of the European Parliament
on batteries and accumulators and waste batteries.
The barred symbol of the rubbish bin shown on the equipment
indicates that, at the end of its useful life, the product must be
collected separately from other waste.
Please note that the batteries/rechargeable batteries must be
removed from the equipment before it is given as waste. To
remove the batteries/accumulators refer to the specifications
in the user manual. Therefore, any products that have reached
the end of their useful life must be given to waste disposal
centers specializing in separate collection of waste electrical
and electronic equipment, or given back to the dealer when
purchasing a new WEEE, pursuant to and in accordance with
Article 14 as implemented in the country.
The adequate separate collection for the subsequent start-up
of the equipment sent to be recycled, treated and disposal of
in an environmentally compatible way contributes to preventing
possible negative effects on the environment and health and
optimizes the recycling and reuse of components making up the
apparatus.
Abusive disposal of the product by the user involves application
of the administrative sanctions according to the laws in force.
FCC STATEMENT
This device complies with Part 15 of the FCC Rules. Operation
is subject to the following two conditions: (1) This device may
not cause harmful interference, and (2) This device must
accept any interference received, including interference that
may cause undesired operation.
WARNING
Changes or modications to this unit not expressly
approved by the party responsible for compliance could void the
user’s authority to operate the equipment.
NOTE
This equipment has been tested and found to comply
with the limits for a Class B digital device, pursuant to Part 15 of
the FCC Rules. These limits are designed to provide reasonable
protection against harmful interference in a residential installation.
This equipment generates, uses and can radiate radio frequency
energy and, if not installed and used in accordance with the
instructions, may cause harmful interference to radio communications.
However, there is no guarantee that interference will not occur
in a particular installation. If this equipment does cause harmful
interference to radio or television reception, which can be determined
by turning the equipment off and on, the user is encouraged to try to
correct the interference by one or more of the following measures:
• Reorient or relocate the receiving antenna.
• Increase the separation between the equipment and receiver.
• Connect the equipment into an outlet on a circuit different
from that to which the receiver is connected.
• Consult the dealer or an experienced radio / TV technician for help.
DECLARATION OF CONFORMITY
The following information is not to be used as contact for support
or sales. Please call our customer service number (listed on our
website at www.oregonscientic.com), or on the warranty card for
this product) for all inquiries instead.
We
Name: Oregon Scientic Inc.
Address: Brea Corporate Park
3020 Saturn St. Suite 200
Brea, CA 92821
Telephone No.: 1 (888) 950-8889
declare that the product
Product No.: RM308PX / RM308PAX /
RM308PUX
Product Name: Classic dual-alarm projection clock
Manufacturer: Oregon Scientic
Global Distribution Limited
Address: Block C, 9/F, Kaiser Estate,
Phase 1, 41 Man Yue St.,
Hung Hom, Kowloon,
Hong Kong
is in conformity with Part 15 of the FCC Rules. Operation is
subject to the following two conditions: 1) This device may not
cause harmful interference. 2) This device must accept any
interference received, including interference that may cause
undesired operation.
Orologio radiocontrollato con
proiezione dell’ora
Modello: RM308PX / RM308PAX /
RM308PUX
MANUALE PER L’UTENTE
PANORAMICA
VISTA ANTERIORE
1
2
11
12
13
14
3
4
5
6
7
8
9
10
1. SNOOZE / LIGHT: consente di attivare la funzione snooze, e
la retroilluminazione; e di ruotare la proiezione di 90°.
2. : indica lo stato di ricezione del segnale orario
3. : batterie dell’unità principale in esaurimento
4. PM: indica il formato orario a 12 ore
5. : indica che è visualizzata l’ora della sveglia
6. Ora sveglia / calendario
7. MODE: modica le impostazioni e alterna le informazioni sul
display
8. : consente di visualizzare lo stato della sveglia, di
impostare la sveglia e di alternare la visualizzazione di
sveglia e calendario
9. ON OFF: consente di attivare/disattivare la sveglia
10. / : aumenta / diminuisce i valori dell’impostazione
selezionata; attiva / disattiva il segnale di ricezione
dell’orologio
11. Proiettore: proietta l’ora e lo stato della sveglia
12. Orologio con secondi e giorno della settimana
13. Differenza di fuso orario
14. L’allarme 1 / 2 è attivo (ON)
VISTA POSTERIORE
1
2
3
4
1. FOCUS: consente di mettere a fuoco l’immagine proiettata
2. RESET: ripristina le impostazioni dell’unità
3. PROIEZIONE ON / OFF: attiva/disattiva la proiezione
continua (quando è collegato l’alimentatore)
4. Ingresso adattatore AC
VISTA INFERIORE
1. Vano batteria
OPERAZIONI PERLIMINARI
ALIMENTAZIONE
2 batterie UM-4 (AAA)
Inserimento delle batterie:
1. Togliere la copertura del vano batterie.
2. Inserire le batterie, rispettando le polarità indicate (+/-).
3. Premere RESET dopo ogni sostituzione di batteria.
SIGNIFICATO
La batteria è in esaurimento
Nessuna batteria inserita – solo
alimentatore AC
1 alimentatore
In alternativa, utilizzare l’alimentatore in dotazione per alimentare
l’unità. Per mantenere attiva la proiezione dell’ora e dello stato
dell’allarme, l’alimentatore deve essere collegato.
Verificare che l’entrata per l’alimentatore non sia ostruita e sia
facilmente accessibile.
NOTA
L’unità principale e l’alimentatore non devono essere esposti
a umidità. Sull’unità principale e sull’alimentatore non devono
essere appoggiati oggetti contenenti liquidi.
Per scollegare completamente dalla corrente, staccare
l’alimentatore dalla presa.
OROLOGIO
RICEZIONE DELL’ORA
Questo prodotto è progettato per sincronizzare automaticamente
il proprio orologio con un segnale orario.
Selezionare il fuso orario
1. Premere SNOOZE/LIGHT per attivare l’impostazione fuso
orario (EU, SU, UK) quando si accende la prima volta l’orologio.
2. Premere o per selezionare.
3. Premere MODE per confermare.
RM308PX: EU: segnale DCF-77: entro 1500 km da Francoforte,
Germania.
RM308PAX: SU: segnale WWVB-60: entro 3 200 km da Fort Collins,
Colorado. Impostare l’orologio manualmente per selezionare il fuso
orario (Pacific, Mountain, Central oppure Eastern).
RM308PUX: UK: segnale MSF-60: entro 1 500 km da Anthorn,
Inghilterra.
Attivazione / disattivazione della ricezione del segnale:
Per attivare la ricezione del segnale, tenere premuto , per
disattivarla tenere premuto .
NOTA
Per la ricezione sono necessari dai 2 ai 10 minuti. Se il
segnale è debole, possono occorrere fino a 24 ore per riceverne
uno valido.
Indicatore della ricezione del segnale orario:
SEGNALE
FORTE
SEGNALE DEBOLE /
NESSUN SEGNALE
Se la ricezione fallisce, posizionare l’unità vicino a una finestra,
tenere premuto per forzare la ricerca di un segnale valido.
IMPOSTAZIONE MANUALE DELL’ORA
Per impostare l’ora manualmente, disattivare prima la ricezione del
segnale di radiocontrollo.
1. Premere per alcuni secondi MODE.
2. Premere MODE per visualizzare le informazioni da
modicare.
3. Premere o per aumentare/diminuire I valori
dell’impostazione selezionata.
4. Premere MODE per confermare.
L’ordine di impostazione è: fuso orario, formato 12/24 ore, ora,
minuti, anno, formato calendario (mese-giorno / giorno-mese),
mese, giorno e lingua.
La differenza di fuso orario imposta l’orologio a +/- 23 ore rispetto
all’ora del segnale ricevuto. Se la ricezione del segnale orario è
stata disattivata, non impostare nessun valore per il fuso orario.
NOTA
Se si immette il valore +1 nell’impostazione relativa alla
differenza di fuso orario, verrà visualizzata l’ora locale più un’ora.
Se ci si trova negli Stati Uniti (solo per il modello RM308PAX)
impostare l’orologio come segue:
PA per l’ora del Pacifico
MO per l’ora della zona delle montagne (Mountain)
CE per l’ora Centrale (Central)
EA per l’ora della Costa Orientale
NOTA
Le opzioni della lingua sono inglese (E), tedesco (D),
francese (F), italiano (I) e spagnolo (S).
ALLARME
Per impostare l’allarme:
1. Premere per selezionare l’allarme 1/2.
2. Premere per alcuni secondi per accedere alla
impostazione dell’allarme.
3. Premere / per impostare ora/minuti.
4. Premere o MODE per confermare.
/ indica che l’allarme è attivo (ON).
Attivazione / disattivazione della sveglia 1 e /o 2:
• Premere ripetutamente ON OFF
OPPURE
1. Premere per selezionare la sveglia 1 o la 2.
2. Premere ON OFFper attivare / disattivare.
Per spegnere l’allarme:
• Premere SNOOZE / LIGHT per disattivare l’allarme per 8
minuti.
OPPURE
• Premere qualsiasi altro tasto per spegnere la sveglia e per
attivarla nuovamente dopo 24 ore.
Selezione della modalità di visualizzazione:
Premere MODE per alternare le visualizzazioni (orologio, calendario
con secondi e calendario con giorno della settimana).
PROIEZIONE
Attivazione di proiezione e retroilluminazione:
• Premere SNOOZE / LIGHT.
Per attivare/disattivare la proiezione continua:
• Spostare l’interruttore PROJECTION quando l’adattatore è
collegato.
Rotazione dell’immagine di 90° (durante la proiezione
dell’immagine):
• Dopo aver premuto SNOOZE / LIGHT per 8 secondi,
premerlo nuovamente.
Per mettere a fuoco l’immagine:
• Ruotare il selettore FOCUS.
NOTA
Se la proiezione è attiva, non fissare direttamente il
proiettore.
RESET
Premere RESET per ripristinare le impostazioni predefinite.
PRECAUZIONI
• Non sottoporre il prodotto a forza eccessiva, urti, polvere,
temperatura o umidità.
• Non coprire i fori di aerazione con oggetti come giornali,
tende, etc.
• Non immergere l’unità in acqua. Se si versa del liquido sul
prodotto, asciugarlo immediatamente con un panno morbido
e privo di lanugine.
• Non pulire l’unità con materiali abrasivi, corrosivi o contenenti
alcool, in quanto possono causare danni.
• Non manomettere i componenti interni dell’unità. Questo
invalida la garanzia.
• Utilizzare solo batterie nuove. Non mischiare batterie vecchie
e nuove.
• Le immagini del manuale possono differire dalla realtà.
• Al momento dello smaltimento del prodotto, conferirlo ai
centri di raccolta specici.
• Il posizionamento del prodotto su determinati tipi di legno può
provocare danni alle niture per le quali Oregon Scientic
non sarà responsabile. Consultare le istruzioni fornite dal
produttore del mobile per informazioni.
• Il contenuto di questo manuale non può essere riprodotto
senza il permesso del produttore.
• Non smaltire le batterie vecchie come riuto non differenziato.
E’ necessario raccoglieretali riuti separatamente per un
trattamento speciale.
• Si prega di notare che alcune unità sono dotate di una
striscia di sicurezza della batteria. Rimuovere la striscia dal
componente batteria prima del primo utilizzo.
NOTA
Le specifiche tecniche del prodotto e il contenuto del
manuale per l’utente possono essere modificati senza preavviso.
NOTA
Caratteristiche e accessori non disponibili in tutti i paesi.
Per ulteriori informazioni, rivolgersi al proprio rivenditore. Si prega
di visitare il sito
http://global.oregonscientific.com/customerSupport.php per
scaricare una versione elettronica del manuale.
SPECIFICHE TECNICHE
TIPO DESCRIZIONE
L x P x H 145 x 94 x 40 mm
Peso 157 g senza batteria
Alimentazione adattatore AC/DC da 3,6 V/100 mA
e 2 batterie UM-4 (AAA) da 1,5 V
INFORMAZIONI SU OREGON SCIENTIFIC
Per richiedere informazioni, contattate il nostro Servizio Clienti
al seguente collegamento: https://www.nital.it/contatti/index.php.
Oregon Scientific Global Distribution Limited si riserva il diritto di
interpretare e definire eventuali contenuti, termini e disposizioni
contenuti in questo manuale per l’utente e di modificarli, a sua
esclusiva discrezione, in qualsiasi momento e senza preavviso.
Nella misura in cui risultassero incongruenze tra la versione in
inglese e quelle in altre lingue, farà fede la versione in inglese.
DICHIARAZIONE DI CONFORMITA’UE
Con la presente il fabbricante, Oregon Scientific Global Distribution
Limited, dichiara che questo tipo di apparecchiatura Orologio
radiocontrollato con proiezione dell’ora (Modello: RM308PX /
RM308PAX / RM308PUX) è conforme alla direttiva 2014/53/UE.
Il testo completo della Dichiarazione di Conformità UE è disponibile
al seguente indirizzo internet:
http://global.oregonscientific.com/customerSupport.php
PAESI CONFORMI ALLA DIRETTIVA RED
Tutti I Paesi UE, Svizzera CH
e Norvegia N
INFORMAZIONE AGLI UTENTI
Ai sensi dell’art.26 del Decreto Legislativo 14
marzo 2014, n. 49 “Attuazione della Direttiva
2012/19/UE sui riuti di apparecchiature elettriche
ed elettroniche (RAEE)” ed ai sensi dell’art.22
del Decreto Legislativo 188 del 20 novembre
2008 “Attuazione della direttiva 2013/56/EU
concernente pile, accumulatori e relativi riuti “.
Il simbolo del cassonetto barrato riportato
sull’apparecchiatura o sulla sua confezione indica che il
prodotto alla ne della propria vita utile deve essere raccolto
separatamente dagli altri riuti per permetterne un adeguato
trattamento e riciclo.
Si ricorda che le pile/accumulatori devono essere rimosse
dall’apparecchiatura prima che questa sia conferita come
riuto. Per rimuovere le pile/ accumulatori fare riferimento
alle speciche indicazioni riportate nel manuale d’uso.
L’utente dovrà, pertanto, conferire gratuitamente
l’apparecchiatura e la pila giunta a fine vita agli idonei
centri comunali di raccoltadifferenziata dei riuti elettrici ed
elettronici, oppure riconsegnarle al rivenditore secondo le
seguenti modalità:
• sia pile portatili sia apparecchiature di piccole dimensioni,
ovvero con almeno un lato esterno non superiore a 25
cm, è prevista la consegna gratuita senza obbligo di
acquisto presso i negozi con una supercie di vendita delle
apparecchiature elettriche ed elettroniche superiore ai 400
mq. Per negozi con dimensioni inferiori, tale modalità è
facoltativa.
• per apparecchiature con dimensioni superiori a 25 cm, è
prevista la consegna in tutti i punti di vendita in modalità 1
contro 1, ovvero la consegna al rivenditore potrà avvenire
solo all’atto dell’acquisto di un nuovo prodotto equivalente,
in ragione di uno a uno.
L’adeguata raccolta differenziata per l’avvio successivo
dell’apparecchiatura e delle pile/accumulatori dismessi
al riciclaggio, al trattamento e allo smaltimento
ambientalmente compatibile contribuisce ad evitare possibili
effetti negativi sull’ambiente e sulla salute e favorisce il
reimpiego e/o riciclo dei materiali di cui essi sono composti.
Lo smaltimento abusivo di apparecchiature, pile ed
accumulatori da parte dell’utente comporta l’applicazione
delle sanzioni di cui alla corrente normativa di legge.
IT
Réveil projecteur à double alarme
Modèle: RM308PX / RM308PAX /
RM308PUX
MANUEL DE L’UTILISATEUR
VUE D’ENSEMBLE
FACE AVANT
1
2
11
12
13
14
3
4
5
6
7
8
9
10
1. SNOOZE / LIGHT (Rappel d’alarme): active le rappel
d’alarme et le rétro-éclairage; permet de renverser
l’image projetée de 90 degrés
2. : indicateur de réception du signal
3. : les piles de l’appareil principal sont faibles /
aucune pile
4. PM: indique PM
5. : heure de l’alarme afchée
6. Heure de l’alarme / calendrier
7. MODE: modie les réglages / l’afchage
8. : permet d’afcher le statut de l’alarme ; de régler
l’alarme ; d’alterner entre l’afchage de l’alarme /
calendrier
9. ON OFF: permet d’activer / désactiver l’alarme
10. / : augmente / diminue les valeurs du réglage
sélectionné ; active / désactive le signal de réception de
l’horloge
11. Projecteur: projette l’heure et le statut de l’alarme
12. Horloge avec afchage des secondes / jours de la
semaine
13. Fuseau horaire
14. Alarme 1/2 activée
FACE ARRIERE
1
2
3
4
1. FOCUS: mise au point de l’image projetée
2. RESET (REINITIALISER): réinitialise l’appareil aux
réglages par défaut
3. PROJECTION ON/OFF: active / désactive la projection
continue (une fois l’adaptateur branché)
4. Prise adaptateur CA
VUE DU BAS
1. Compartiment des piles
POUR COMMENCER
ALIMENTATION
2 piles UM-4 (AAA)
Pour insérer les piles :
1. Retirez le couvercle du compartiment des piles.
2. Insérez les piles, en respectant les polarités (+/-).
3. Appuyez sur RESET (REINITIALISER) après chaque
changement de pile.
SIGNIFICATION
L’alimentation de la pile est faible
Aucune pile n’est installée - seul
l’adaptateur CA est branché
1 adaptateur
Vous pouvez également utiliser l’adaptateur fourni pour
alimenter l’appareil. Si vous désirez utiliser continuellement le
projecteur et le rétro éclairage, branchez l’adaptateur secteur.
Assurez-vous que l’adaptateur ne soit pas obstrué et qu’il
soit facilement accessible à l’appareil.
REMARQUE
N’exposez ni l’adaptateur ni l’appareil principal
à l’humidité. Ne placez aucun récipient rempli d’eau comme
les vases sur l’appareil principal ou l’adaptateur.
Pour être entièrement déconnecté de l’alimentation électrique,
l’adaptateur doit être débranché de la prise électrique.
HORLOGE
RÉCEPTION DE L’HORLOGE
Ce produit est conçu pour synchroniser automatiquement
l’horloge avec le signal de réception.
Choisir la zone horaire
1. Appuyez sur SNOOZE/LIGHT pour activer le réglage
fuseau horaire (Union européenne, États-Unis, Royaume-
Uni) lorsque vous allumez la première fois sur l’horloge.
2. Appuyez sur ou pour sélectionner.
3. Appuyez sur MODE pour conrmer.
RM308PX: Union européenne : Signal DCF-77 : dans un
rayon de 1 500 km (932 miles) depuis Frankfort, Allemagne.
RM308PAX: États-Unis: Signal WWVB-60 : dans un rayon
de 3 200 km (2 000 miles) de Fort Collins, Colorado. Régler
l’heure manuallement pour choisir la zone horaire (Pacic,
Mountain, Central ou Eastern).
RM308PUX: Royaume-Uni : Signal MSF-60 : dans un rayon
de 1 500 Km (932 miles) de Anthorn, Angleterre.
Pour activer / désactiver le signal de réception de
l’horloge :
Appuyez et maintenez pour activer, ou pour
désactiver le signal de réception de l’horloge.
REMARQUE
La réception prend de 2 à 10 minutes. Si le
signal est faible, 24 heures peuvent être nécessaires pour
obtenir un signal valide.
Indicateur de réception du signal de l’horloge :
SIGNAL FORT SIGNAL FAIBLE / AUCUN
SIGNAL
Si la réception échoue, positionnez votre appareil à proximité
d’une fenêtre, appuyez et maintenez pour forcer la
recherche de signal.
RÉGLER MANUELLEMENT L’HORLOGE
Pour régler manuellement l’horloge, vous devez, tout
d’abord, désactiver la réception du signal.
1. Appuyez et maintenez la touche MODE pour entrer
dans les réglages.
2. Appuyez sur MODE pour alterner entre.
3. Appuyez sur ou pour augmenter / diminuer les
valeurs le réglage sélectionné.
4. Appuyez sur MODE pour conrmer.
Les réglages s’effectuent dans l’ordre suivant : Fuseau
horaire, format 12/24 heures, heure, minutes, année, format
du calendrier (mois-jour / jour-mois), mois, jour et langue.
La fonction de fuseau horaire règle l’horloge à +/- 23 heures
de l’heure du signal reçu. Si vous avez désactivé la réception
du signal de l’horloge, ne congurez pas de valeur pour le
fuseau horaire.
REMARQUE
Si vous entrez +1 dans le réglage du fuseau
horaire, vous obtiendrez votre heure locale plus une heure.
Si vous êtes aux Etats-Unis (modèle RM308PAX) réglez
l’horloge sur :
PA pour l’heure pacique
MO pour l’heure des montages
CE pour l’heure centrale
EA pour l’heure de la côte est
REMARQUE
Les options de langue sont Anglais (E), Alemand
(D), Français (F), Italien (I), et Espagnol (S).
ALARME
Pour régler l’alarme :
1. Appuyez pour alterner entre l’alarme 1 / 2.
2. Appuyez et maintenez la touche pour entrer dans
le réglage de l’alarme.
3. Appuyez sur / pour régler l’heure / les minutes.
4. Appuyez sur ou MODE pour conrmer.
/ indique que l’alarme est activée.
Pour activer / désactiver l’alarme 1 et/ou 2 :
• Appuyez plusieurs fois sur ON OFF
OU
1. Appuyez sur pour sélectionner l’alarme 1 ou 2.
2. Appuyez sur ON OFFpour activer / désactiver.
Pour couper le son de l’alarme :
• Appuyez sur SNOOZE / LIGHT, pour couper le son
pendant 8 minutes
OU
• Appuyez sur n’importe quelle touche pour éteindre
l’alarme et pour qu’elle se déclenche 24 heures plus
tard.
Pour sélectionner le mode d’afchage :
Appuyez sur MODE pour alterner entre les différents
afchages (horloge, calendrier avec secondes et calendrier
avec jour de la semaine).
PROJECTION
Pour activer le rétro-éclairage :
• Appuyez sur SNOOZE / LIGHT.
Pour activer / désactiver la projection continue :
• Appuyez sur l'interrupteur PROJECTION une fois
l’adaptateur connecté.
Pour renverser l’image à 90° (en projection) :
• Dans les 8 secondes après avoir appuyé sur SNOOZE
/ LIGHT, appuyez une nouvelle fois sur SNOOZE /
LIGHT.
Mettre au point l’image :
• Tournez la molette FOCUS.
REMARQUE
Si la projection est activée, ne regardez pas
directement dans le projecteur.
RÉINITIALISATION DU SYSTÈME
Appuyez sur RESET pour que l’appareil revienne aux
réglages par défaut.
PRÉCAUTIONS
• Ne pas soumettre le produit à une force excessive, au
choc, à la poussière, aux changements de température
ou à l’humidité.
• Ne pas soumettre le produit à une force excessive, au
choc, à la poussière, aux changements de température
ou à l’humidité.
• Ne pas couvrir les trous de ventilation avec des
journaux, rideaux etc.
• Ne pas immerger le produit dans l’eau. Si vous renversez
du liquide sur l’appareil, séchez-le immédiatement avec
un tissu doux.
• Ne pas nettoyer l’appareil avec des matériaux corrosifs
ou abrasifs.
• Ne pas traquer les composants internes. Cela
invalidera votre garantie.
• N’utilisez que des piles neuves. Ne pas mélanger des
piles neuves et usagées.
• Les images de ce manuel peuvent différer de l’aspect
réel du produit.
• Lorsque vous désirez vous débarrasser de ce produit,
assurez-vous qu’il soit collecté séparément pour un
traitement adapté.
• Le poser sur certaines surfaces en bois peut
endommager la nition du meuble, et Oregon Scientic
ne peut en être tenu responsable. Consultez les mises
en garde du fabricant du meuble pour de plus amples
informations.
• Le contenu du présent manuel ne peut être reproduit
sans la permission du fabriquant.
• Ne pas jeter les piles usagées dans les containers
municipaux non adaptés. Veuillez effectuer le tri de ces
ordures pour un traitement adapté si nécessaire.
• Veuillez remarquer que certains appareils sont
équipés d’une bande de sécurité. Retirez la bande du
compartiment des piles avant la première utilisation.
REMARQUE
Les caractéristiques techniques de ce produit et
le contenu de ce manuel peuvent être soumis à modications
sans préavis.
REMARQUE
Caractéristiques et accessoires ne seront
pas valables pour tous les pays. Pour plus d’information,
contacter le détaillant le plus proche. Pour télécharger une
version électronique de ce mode d’emploi, veuillez visiter
http://global.oregonscientic.com/customerSupport.php
CARACTÉRISTIQUES
TYPE DESCRIPTION
L x I x H 145 x 94 x 40 mm
(5,7 x 3,7 x 1,6 pouces)
Poids 157 g (5,5 onces) sans les piles
Alimentation adaptateur 3,6 V/100 mA et 2 piles
UM-4 (AAA) 1,5V
À PROPOS D’OREGON SCIENTIFIC
Pour plus d‘informations sur les produits Oregon Scientic
France, rendez-vous sur notre site www.oregonscientic.fr.
Besoin de plus d’informations? Contactez notre service
client expert à info@oregonscientic.fr.
Oregon Scientic Global Distribution Limited se réserve
le droit d’interpréter tout contenu, termes et provisions du
présent manuel de l’utilisateur et de les amender à sa seule
discrétion, n’importe quand et sans avis préalable. Dans la
mesure où des incohérences sont constatées entre la version
anglaise et les versions traduites en langues étrangères, la
version anglaise prévaudra.
EU – DÉCLARATION DE CONFORMITÉ
Le fabricant, Oregon Scientic Global Distribution Limited,
déclare que le type d’équipement radio Réveil projecteur
à double alarme (modèle: RM308PX / RM308PAX /
RM308PUX) est conforme à la directive 2014/53/UE. Le
texte intégral de la déclaration de conformité de l’UE est
disponible à l’adresse Internet suivante:
http://global.oregonscientic.com/customerSupport.php
PAYS CONCERNÉS RED
Tous les pays Européens, la Suisse CH
et la Norvège N
INFORMATIONS AUX USAGERS
Aux termes des Directives européennes 2011/65/
EU et 2012/19/EU, relatives à la réduction de
l’utilisation de substances dangereuses dans
les appareils électriques et électroniques et à
l’élimination des déchets.
Le symbole représentant une poubelle barrée reporté sur
l’appareil indique que le produit doit être collecté séparément
des autres déchets à la n de sa propre vie.
L’usager devra done remettre l’appareil, lorsqu’il ne l’utilisera
plus, à des centres adaptés de collecte sélective pour les
déchets électroniques et électrotechniques, ou bien il devra
le rapporter au revendeur au moment de l’achat d’un nouvel
appareil de type équivalent, en raison d’un contre un.
La collecte sélective adéquate pour la transmission
successive de l’appareil qui n’est plus utilisé au recyclage,
au traitement ou à l’élimination compatible au niveau
environnemental, contribue à éviter les effets négatifs
possibles sur l’environnement et sur la santé et favorise le
recyclage des matériaux dont l’appareil est composé.
L’élimination illégale du produit par l’usager est passible de
l’application de sanctions selon les lois en vigueur.
FR
Klassische Projektionsuhr
mit Dual-Alarm
Modell: RM308PX / RM308PAX /
RM308PUX
BEDIENUNGSANLEITUNG
ÜBERSICHT
VORDERANSICHT
1
2
11
12
13
14
3
4
5
6
7
8
9
10
1. SNOOZE / LIGHT: Schlummeralarm aktivieren;
Hintergrundbeleuchtung aktivieren; Projektionsanzeige
um 90° zu drehen.
2. : Indikator für Signalempfang
3. : Batterien der Basiseinheit sind schwach / kein
Batterie
4. PM: Vor- und Nachmittag (AM / PM) anzeigen
5. : Alarmzeit wird angezeigt
6. Alarmzeit / Kalender
7. MODE: Einstellungen / Anzeige ändern
8. : Alarmstatus anzeigen; Alarm einstellen; auf
Alarm- / Kalenderanzeige ändern
9. ON OFF: Alarmfunktion aktivieren / deaktivieren
10. / : Werte der gewählten Einstellung erhöhen /
verringern; Zeitempfangssignal aktivieren / deaktivieren
11. Projektor: Uhrzeit / Alarmstatus projizieren
12. Uhrzeit mit Sekunden / Wochentag
13. Zeitzonenausgleich
14. Alarm 1 / 2 ist aktiviert (ON)
RÜCKANSICHT
1
2
3
4
1. FOCUS: Projiziertes Bild scharfstellen
2. RESET: Gerät auf Standardeinstellungen zurücksetzen
3. PROJECTION ON/OFF: Dauerprojektion aktivieren /
deaktivieren (bei angeschlossenem Adapter)
4. Anschluss für Netzadapter
UNTERE ANSICHT
1. Batteriefach
ERSTE SCHRITTE
STROMVERSORGUNG
2 x Batterien UM-4 (AAA)
So legen Sie die Batterien ein:
1. Entfernen Sie die Abdeckung des Batteriefachs.
2. Legen Sie die Batterien ein und achten Sie auf die
Übereinstimmung der Polaritäten (+/-).
3. Drücken Sie nach jedem Batteriewechsel auf RESET.
BEDEUTUNG
Die Ladung der Batterie ist niedrig
Keine Batterie installiert – nur Netzadapter
1 x Netzadapter
Benutzen Sie für den Betrieb des Geräts wahlweise den
mitgelieferten Netzadapter. Für die dauerhafte Verwendung
von Projektor / Hintergrundbeleuchtung muss der Netzdapter
angeschlossen sein.
Stellen Sie sicher, dass der Netzadapter nicht blockiert und
für das Gerät leicht zugänglich ist.
HINWEIS
Die Basiseinheit und der Netzadapter dürfen
keinen feuchten Bedingungen ausgesetzt werden. Es dürfen
keine mit Flüssigkeit gefüllte Objekte, wie Blumenvasen, auf
Basiseinheit oder Netzadapter gestellt werden.
Um das Gerät vollständig vom Netz zu trennen, ziehen Sie
den Stecker des Netzadapters aus der Steckdose.
FUNKUHR
ZEITSIGNALEMPFANG
Dieses Produkt synchronisiert seine Uhr automatisch mit
einem Zeitsignal.
Wählen Sie die Zeitzone
1. Drücken Sie SNOOZE/LIGHT, um die Einstellung
Zeitzone (EU, USA, UK) zu aktivieren, wenn die Uhr
zum ersten Mal eingeschaltet wird.
2. Drücken Sie oder , um auszuwählen.
3. Drücken Sie MODE, um zu bestätigen.
RM308PX: EU: DCF-77-Signal: innerhalb von 1500 km von
Frankfurt, Deutschland.
RM308PAX: USA: Signal WWVB-60: innerhalb von 3200km
von Fort Collins, Colorado. Wählen Sie die Zeitzone der Uhr
manuell aus (Pacic, Mountain, Central oder Eastern).
RM308PUX: UK: MSF-60-Signal: innerhalb von 1500 km
von Anthorn, England.
So aktivieren / deaktivieren Sie den Zeitsignalempfang:
Halten Sie gedrückt, um den Zeitsignalempfang zu
aktivieren, oder VOL-, um ihn zu deaktivieren.
HINWEIS
Der Empfang nimmt etwa 2-10 Minuten in
Anspruch. Wenn das Signal schwach ist, kann es bis zu 24
Stunden dauern, bis ein gültiges Signal empfangen wird.
Indikator für Zeitsignalempfang:
STARKES SIGNAL SCHWACHES / KEIN
SIGNAL
Wenn der Signalempfang nicht erfolgreich ist, platzieren
Sie Ihr Gerät in die Nähe eines Fensters und halten Sie
gedrückt, um eine neuerliche Signalsuche zu veranlassen.
DIE UHR MANUELL EINSTELLEN
Um die Uhr manuell einzustellen, müssen Sie zuerst den
Zeitsignalempfang deaktivieren.
1. Halten Sie MODE gedrückt, um die Einstellungen
aufzurufen.
2. Drücken Sie auf MODE, um zwischen den Anzeigearten
umzuschalten.
3. Drücken Sie auf oder , um die Werte der
gewählten Einstellung zu erhöhen / zu verringern.
4. Drücken Sie zur Bestätigung auf MODE.
Die Reihenfolge der Einstellungen lautet: Zeitzonenausgleich,
12-/24-Stundenformat, Stunde, Minute, Jahr, Kalenderformat
(Monat–Tag / Tag–Monat), Monat, Tag und Sprache.
Der Zeitzonenausgleich stellt die Uhr auf bis zu +/- 23
Stunden von der empfangenen Signalzeit ein. Wenn Sie den
Zeitsignalempfang deaktiviert haben, dürfen Sie keinen Wert
für die Zeitzone einstellen.
HINWEIS
Wenn Sie +1 in der Einstellung des Zeitausgleichs
eingeben, ergibt dies Ihre Ortszeit zuzüglich 1 Stunde.
Wenn Sie sich in den USA benden (RM308PAX), stellen
Sie die Uhr wie folgt ein:
PA für Pacic Time MO für Mountain Time
CE für Central Time EA für Eastern Time
HINWEIS
Die Sprachoptionen sind Englisch (E), Deutsch (D),
Französisch (F), Italienisch (I) und Spanisch (S).
ALARM
So stellen Sie den Alarm ein:
1. Drücken Sie auf , um zwischen Alarm 1 / 2
umzuschalten.
2. Halten Sie gedrückt, um die Alarmeinstellung
aufzurufen.
3. Drücken Sie auf / , um Stunde / Minute
einzustellen.
4. Drücken Sie zur Bestätigung auf oder MODE.
/ gibt an, dass der Alarm aktiviert ist (ON).
So aktivieren / deaktivieren Sie Alarm 1 und / oder 2:
• Drücken Sie wiederholt auf ON OFF
ODER
1. Drücken Sie auf , um Alarm 1 oder 2 auszuwählen.
2. Drücken Sie auf ON OFF zu aktivieren / deaktivieren.
So schalten Sie den Alarm stumm:
• Drücken Sie auf SNOOZE / LIGHT, um den Alarm 8
Minuten lang stummzuschalten
ODER
• Drücken Sie eine beliebige andere Taste, um den Alarm
auszuschalten und ihn nach 24 Stunden erneut zu
aktivieren.
So wählen Sie den Anzeigemodus aus:
Drücken Sie auf MODE, um zwischen den Anzeigearten zu
wechseln (Uhrzeit, Kalendar mit Sekunden, und Kalender
mit Wochentag).
PROJEKTION
So aktivieren Sie die Projektion / Hintergrundbeleuchtung:
• Drücken Sie auf SNOOZE / LIGHT.
So aktivieren / deaktivieren Sie die Dauerprojektion:
• Verschieben Sie den Schalter PROJECTION bei
angeschlossenem Netzadapter.
So drehen Sie das Bild um 90 ° (bei projiziertem Bild):
• Drücken Sie innerhalb von 8 Sekunden, nachdem Sie
SNOOZE / LIGHT gedrückt haben, erneut auf SNOOZE
/ LIGHT.
So verstellen Sie die Schärfe des Bildes:
• Drehen Sie das FOCUS-Rad.
HINWEIS
Schauen Sie nicht direkt in den Projektor, wenn die
Projektion beleuchtet ist.
RESET
Drücken Sie auf RESET, um das Gerät auf die
Standardeinstellungen zurückzusetzen.
VORSICHTSMASSNAHMEN
• Setzen Sie das Gerät keiner extremen Gewalteinwirkung
und keinen Stößen aus, und halten Sie es von
übermäßigem Staub, Hitze oder Feuchtigkeit fern.
• Sie dürfen die Belüftungsöffnungen nicht mit
Gegenständen abdecken, wie z.B. Zeitungen,
Vorhänge, usw.
• Tauchen Sie das Gerät niemals in Wasser. Falls Sie
eine Flüssigkeit über das Gerät verschütten, trocknen
Sie es sofort mit einem weichen, faserfreien Tuch.
• Reinigen Sie das Gerät keinesfalls mit scheuernden
oder ätzenden Mitteln.
• Machen Sie sich nicht an den internen Komponenten
des Geräts zu schaffen, da dies zu einem Verlust der
Garantie führen kann.
• Verwenden Sie nur neue Batterien. Verwenden Sie
keinesfalls neue und alte Batterien gemeinsam.
• Die in dieser Anleitung dargestellten Abbildungen
können sich vom Original unterscheiden.
• Entsorgen Sie das Produkt nicht im allgemeinen
Hausmüll, sondern ausschließlich in den dafür
vorgesehenen, kommunalen Sammelstellen, die Sie bei
Ihrer Gemeinde erfragen können.
• Wenn dieses Produkt auf bestimmte Holzächen gestellt
wird, kann die Oberäche beschädigt werden. Oregon
Scientic ist nicht haftbar für solche Beschädigungen.
Entsprechende Hinweise entnehmen Sie bitte der
Pegeanleitung Ihres Möbelherstellers.
• Der Inhalt dieser Anleitung darf ohne Genehmigung des
Herstellers nicht vervielfältigt werden.
• Verbrauchte Batterien gehören nicht in den Hausmüll.
Bitte geben Sie sie bei einer Sammelstelle für
Altbatterien bzw. Sondermüll ab.
• Bitte beachten Sie, dass manche Geräte mit einem
Batterieunterbrechungsstreifen bestückt sind. Vor dem
ersten Gebrauch müssen Sie den Streifen aus dem
Batteriefach ziehen.
HINWEIS
Die technischen Daten für dieses Produkt
und der Inhalt der Bedienungsanleitung können ohne
Benachrichtigung geändert werden.
HINWEIS
Eigenschaften und Zubehör nicht in allen Ländern
verfügbar. Weitere Informationen erhalten Sie von Ihrem
Fachhändler vor Ort. Bitte besuchen Sie unsere Internetseite
http://global.oregonscientific.com/customerSupport.php,
um eine elektronische Version dieser Bedienungsanleitung
herunter zu laden.
TECHNISCHE DATEN
TYP BESCHREIBUNG
Abmessungen
(L x B x H)
145 x 94 x 40 mm
Gewicht 157 g (ohne Batterie)
Stromversorgung AC/DC-Netzadapter 3,6 V/100 mA
2 Batterien UM-4 (AAA) 1,5V
ÜBER OREGON SCIENTIFIC
Besuchen Sie unsere Website www.oregonscientic.de, um
mehr über die Produkte von Oregon Scientic zu erfahren.
Für etwaige Anfragen kontaktieren Sie bitte unseren
Kundendienst unter info@oregonscientic.de.
Oregon Scientic Global Distribution Limited behält sich das
Recht vor, die Inhalte, Bedingungen und Bestimmungen
in dieser Bedienungsanleitung zu interpretieren und
auszulegen, und diese jederzeit nach eigenem Ermessen
ohne vorherige Ankündigung abzuändern. Soweit es
irgendwelche Unterschiede zwischen der englischen
Version und den Versionen in anderen Sprachen gibt, ist die
englische Version maßgebend.
EU-KONFORMITÄTSERKLÄRUNG
Hiermit erklärt der Hersteller, Oregon Scientic Global
Distribution Limited, dass der Funkausrüstungs-Typ Klassische
Projektionsuhr mit Dual-Alarm (Modell: RM308PX / RM308PAX
/ RM308PUX) In Übereinstimmung mit 2014/53/EU ist. Den
vollständigen Wortlaut der EU-Konformitätserklärung nden
Sie unter folgender Internetadresse:
http://global.oregonscientic.com/customerSupport.php
KONFORM IN FOLGENDEN LÄNDERN
Alle Länder der EU, Schweiz CH
und Norwegen N
INFORMATIONEN FÜR DIE BENUTZER
Gemäß den Europäischen Richtlinien 2011/65/
EU und 2012/19/EU über die Reduzierung der
Verwendung gefährlicher Stoffe in elektrischen
und elektronischen Geräten, sowie die
Abfallentsorgung.
Das Symbol der durchgestrichenen Mülltonne auf dem
Gerät besagt, dass es am Ende seiner Verwendungszeit
getrennt von anderen Abfällen entsorgt werden muss.
Der Benutzer muss daher das Gerät nach Beendigung
seiner Verwendungsdauer zu geeigneten Sammelstellen
für die getrennte Abfallentsorgung von elektrischen und
elektronischen Geräten bringen oder es dem Endverkäufer
beim Kauf eines neuen Geräts von ähnlicher Art im
Verhältnis eins zu eins übergeben.
Die angemessene Abfalltrennung und die darauf
folgende Verbringung des aufgelassenen Geräts in den
Recyclingkreislauf zur umweltverträglichen Verwertung
und Entsorgung tragen dazu bei, mögliche negative
Auswirkungen auf die Umwelt und die Gesundheit zu
vermeiden und sie begünstigen das Recycling von
Materialien, aus denen das Gerät besteht.
Die rechtswidrige Entsorgung des Produktes veranlässt die
Verwendung der geltenden Verwaltungssanktionen.
DE

Reloj proyector clásico
con alarma dual
Modelo: RM308PX / RM308PAX /
RM308PUX
MANUAL DE USUARIO
RESUMEN
VISTA FRONTAL
1
2
11
12
13
14
3
4
5
6
7
8
9
10
1. REPETICIÓN DE ALARMA / LUZ: activar repetición de
alarma; activar iluminación; invertir la imagen proyectada
90°.
2. : indicador de recepción de señal
3. : las pilas de la unidad principal están casi gastadas
/ no queda pila
4. PM: indica PM
5. : se muestra la hora de la alarma
6. Hora de la alarma / calendario
7. MODE: cambiar conguración / pantalla
8. : ver estado de la alarma, entrar en alarma /
pantalla de calendario
9. ON OFF: activa / desactiva la función de alarma
10. / : subir / bajar valores del ajuste deseado;
activar / desactivar la señal de recepción del reloj
11. Proyector: Proyecta la hora y el estado de la alarma
12. Reloj con segundos / día de la semana
13. Conguración de husos horarios
14. Alarma 1/2 activada
VISTA TRASERA
1
2
3
4
1. FOCUS: enfoca la imagen proyectada
2. RESET: la unidad vuelve a los ajustes predeterminados
3. PROYECCIÓN ON / OFF: activar / desactivar proyección
continua (cuando el adaptador está conectado)
4. Toma del adaptador CA
VISTA INFERIOR
1. Compartimento para las pilas
CÓMO EMPEZAR
SUMINISTRO DE CORRIENTE
2 pilas UM-4 (AAA)
Para introducir las pilas:
1. Retire la cubierta del compartimento para pilas.
2. Introduzca las pilas haciendo coincidir la polaridad (+/-).
3. Pulse RESET cada vez que cambie las pilas.
SIGNIFICADO
La pila está casi gastada
No lleva pila, sólo adaptador de CA
1 adaptador
También puede utilizar el adaptador suministrado para
alimentar la unidad. Si desea utilizar la función de proyección
/ retroiluminación de manera continuada, deberá instalar el
adaptador.
Asegúrese de que el adaptador no tenga obstáculos y de que
sea accesible para la unidad.
NOTA
La unidad principal y el adaptador no deberían estar en
entornos húmedos. No coloque ningún objeto lleno de líquido
(como por ejemplo un jarrón) encima de la unidad principal
ni del adaptador.
Para desconectar completamente la entrada de energía,
desenchufe el adaptador.
RELOJ
RECEPCIÓN DEL RELOJ
Este producto ha sido diseñado para sincronizar
automáticamente su reloj con una señal de reloj.
Elegir la zona horaria
1. Presione SNOOZE/LIGHT para activar el ajuste de la
zona horaria (UE, EEUU, Reino Unido) cuando energía
de la primera vez en el reloj.
2. Presione o para seleccionar.
3. Pulse MODE para conrmar.
RM308PX: UE: señal DCF-77: a 1 500 km (932 millas) de
Frankfurt, Alemania.
RM308PAX: EEUU: Señal WWVB-60: a 3 200 km (2 000
millas) de Fort Collins, Colorado. Configure el reloj para
elegir la zona horaria (Pacífico, Montaña, Central u Oriental).
RM308PUX: Reino Unido: señal MSF-60: a 1 500 km (932
millas) de Anthorn, Inglaterra.
Para activar / desactivar la recepción de señal del reloj:
Pulse y manténgalo pulsado para activar o desactivar
la recepción de señal del reloj.
NOTA
La recepción tarda entre 2 y 10 minutos. Si la señal de
radio es débil, puede tardarse hasta 24 horas en conseguir
una señal válida.
Recepción del indicador de la señal del reloj:
SEÑAL FUERTE SEÑAL DÉBIL / SIN SEÑAL
Si no se encuentra señal, coloque la unidad cerca de una
ventana, pulse y manténgalo pulsado para forzar una
búsqueda de señal.
AJUSTE MANUAL DEL RELOJ
Para configurar manualmente el reloj, primero deberá
desactivar la señal de recepción del reloj.
1. Púlselo MODE y manténgalo pulsado para acceder al
modo de reloj.
2. Pulse MODE para pasar de una pantalla a otra.
3. Pulse o para subir / bajar los valores del ajuste
seleccionado.
4. Pulse MODE para conrmar.
La secuencia de configuración es: huso horario, formato de
12 ó 24 horas, hora, minuto, año, formato del calendario (mes/
día, día/mes), mes, día e idioma.
La zona horaria ajusta el reloj a +/- 23 horas de la hora recibida
por la señal del reloj. Si ha desactivado la recepción de señal
del reloj, no ajuste un valor para la zona horaria.
NOTA
Si introduce +1 en el ajuste de huso horario, le
indicará su hora actual más una hora. Si está en los EEUU
(RM308PAX), configure el reloj tal y como se indica a
continuación:
PA para hora del Pacífico MO para hora de de Montaña
CE para hora Central EA para hora del Este
NOTA
Las opciones de idioma son inglés (E), alemán (D),
francés (F), italiano (I) y español (S).
ALARMA
Para configurar la alarma:
1. Pulse para alternar entre la alarma 1 y la 2.
2. Pulse y manténgalo pulsado para introducir el
ajuste de la alarma.
3. Pulse / para congurar hora / minuto.
4. Pulse o MODE para conrmar.
/ indica que la alarma está activada.
Para activar o desactivar la alarma 1 y/o 2:
• Pulse ON OFF repetidamente
O bien
1. Pulse para seleccionar la alarma 1 o 2.
2. Pulse ON OFF para activar / desactivar.
Para silenciar la alarma:
• Pulse SNOOZE / LIGHT para silenciarla durante 8
minutos
O bien
• Pulse cualquier tecla para silenciar la alarma y que se
active de nuevo pasadas 24 horas.
Cómo seleccionar el modo de pantalla:
Pulse MODE para alternar entre pantallas (reloj, calendario
con segundos y calendario con día de la semana).
PROYECCIÓN
Para activar la proyección / iluminación de pantalla:
• Pulse SNOOZE / LIGHT (REPETICIÓN DE ALARMA /
LUZ).
Para activar / desactivar la proyección continua:
• Deslice el interruptor de PROYECCIÓN cuando el
adaptador esté conectado.
Cómo dar la vuelta 90° a la imagen (durante la proyección):
• En los ochos segundos siguientes a pulsar SNOOZE /
LIGHT (REPETICIÓN DE ALARMA / LUZ), púlselo de
nuevo.
Para enfocar la imagen:
• Haga girar la rueda FOCUS.
NOTA
Si la proyección está iluminada, no mire directamente
al interior del proyector.
RESTABLECER
Pulse RESET para volver a la configuración predeterminada.
PRECAUCIÓN
• No exponga el producto a fuerza extrema, descargas,
polvo, uctuaciones de temperatura o humedad.
• No cubra los oricios de ventilación con objetos como
periódicos, cortinas, etc.
• No sumerja el dispositivo en agua. Si se vertiera
líquido en la unidad, límpiela con un paño suave y sin
electricidad estática.
• No limpie la unidad con materiales abrasivos o corrosivos.
• No manipule los componentes internos. De hacerlo se
invalidaría la garantía.
• Use siempre pilas nuevas. No mezcle pilas viejas con
pilas nuevas.
• Las imágenes de esta guía para el usuario pueden ser
distintas al producto en sí.
• Cuando elimine este producto, asegúrese de que no
vaya a parar a la basura general, sino separadamente
para recibir un tratamiento especial.
• La colocación de este producto encima de ciertos tipos
de madera puede provocar daños a sus acabados.
Oregon Scientic no se responsabilizará de dichos
daños. Consulte las instrucciones de cuidado del
fabricante para obtener más información.
• Los contenidos de este manual no pueden reproducirse
sin permiso del fabricante.
• No elimine las pilas gastadas con la basura normal.
Es necesario desecharlas separadamente para poder
tratarlas.
• Tenga en cuenta que algunas unidades disponen de
una cinta de seguridad para las pilas. Retire la cinta de
compartimento para pilas antes de usarlo por primera vez.
NOTA
La ficha técnica de este producto y los contenidos de
este manual de usuario pueden experimentar cambios sin
previo aviso.
NOTA
No todas las funciones y accesorios estarán disponibles
en todos los países. Sírvase ponerse en contacto con su
distribuidor local si desea más información. Por favor, visite
http://global.oregonscientific.com/customerSupport.php para
descargar una versión electrónica del manual de usuario.
FICHA TÉCNICA
TIPO DESCRIPCIÓN
L X A X A 145 x 94 x 40 mm
(5,7 x 3,7 x 1,6 pulgadas)
Peso 157 g (5,5 oz) sin pilas
Alimentación Adaptador AC/CC de 3,6 V/100 mA
2 pilas UM-4 (AAA) de 1,5V
SOBRE OREGON SCIENTIFIC
Visite nuestro sitio web www.oregonscientic.com para
obtener más información sobre los productos de Oregon
Scientic.
Si tiene alguna duda, póngase en contacto con nuestros
servicios al cliente en info@oregonscientic.com.
Oregon Scientic Global Distribution Limited se reserva el
derecho de interpretar e inferir cualquier contenido, términos
y provisiones de este manual de usuario y corregirlo, a
su discreción en cualquier momento y sin aviso previo. Si
hubiese alguna divergencia entre la versión en inglés y las
versiones de otros idiomas, prevalecerá la versión en inglés.
EU - DECLARACIÓN DE CONFORMIDAD
Por la presente el fabricante, Oregon Scientic Global
Distribution Limited, declara que el tipo de radio equipo
Reloj proyector clásico con alarma dual (modelo: RM308PX
/ RM308PAX / RM308PUX) está en el cumplimiento de la
Directiva 2014/53/UE. El texto completo de la declaración
de conformidad de la UE está disponible en la siguiente
dirección de Internet:
http://global.oregonscientic.com/customerSupport.php
PAÍSES BAJO LA DIRECTIVA RED
Todos los países de la UE, Suiza CH
y Norue N
INFORMACIÒN DE USUARIOS
Segùn las Directrices Europeas 2011/65/EU y
2012/19/EU, relativas a la reducción del uso de
sustancias peligrosas en los aparatos eléctricos
y electrónicos, además del desecho de los
residuos.
El símbolo tachado del contenedor que se encuentra
en el aparato indica que el producto, al nal de su vida
útil, deberá depositarse en un lugar separado de los
demás residuos. Por lo tanto, el usuario deberá entregar
el aparato, cuando deje de utilizarse, a los adecuados
centros de recogida diferenciada de residuos electrónicos
y electrotécnicos, o deberá devolverlo al vendedor en
el momento de compra de un nuevo aparato de tipo
equivalente, uno a cambio de otro.
La adecuada recogida diferenciada del aparato inutilizado
para el sucesivo reciclaje, tratamiento y desecho
ambientalmente compatibles, contribuye a evitar posibles
efectos negativos en el medioambiente y en la salud,
y favorece el reciclaje de los materiales de los que se
compone el aparato.
El desecho abusivo del producto por parte del usuario
implica la aplicación de las sanciones previstas por la ley.
ES
Relógio de projeção classic
com alarme duplo
Modelo: RM308PX / RM308PAX /
RM308PUX
MANUAL DO USUÁRIO
VISÃO GERAL
VISTA FRONTAL
1
2
11
12
13
14
3
4
5
6
7
8
9
10
1. SNOOZE / LIGHT: ativa o alarme Soneca; ativa a luz de
fundo; rodar o conteúdo da Projeção 90°
2. : indicador de recepção do sinal
3. : indicador de pilhas fracas da unidade principal /
nenhuma pilha
4. PM: indica PM
5. : hora do alarme é indicada
6. Hora do alarme / calendário
7. MODE: altera os ajustes / display
8. : exibe o status do alarme; ajusta o alarme; altera
para o display de alarme / calendário
9. ON OFF: ativa / desativa a função de alarme
10. / : aumenta / diminui os valores do ajuste
selecionado; ativa / desativa o sinal de recepção do relógio
11. Projetor: projeta o status da hora / do alarme
12. Relógio com segundos / dias da semana
13. Fuso horário
14. Alarme 1 / 2 ativado (ON)
VISTA TRASEIRA
1
2
3
4
1. FOCUS: focaliza a imagem projetada
2. RESET: retorna a unidade aos valores de ajuste padrão
3. PROJECTION ON/OFF: ativa / desativa a projeção
continua (quando o adaptador estiver conectado)
4. Soquete adaptador de CA / CC
VISTA INFERIOR
1. Compartimento de pilha
PRIMEIROS PASSOS
FONTE DE ALIMENTAÇÃO
2 pilhas UM-4 (AAA)
Para inserir as baterias:
1. Remova a tampa do compartimento de pilhas.
2. Insira as pilhas, fazendo a correspondência das
polaridades (+/-).
3. Pressione RESET após cada troca de pilhas.
SIGNIFICADO
A bateria está fraca.
Nenhuma pilha instalada – adaptador
CA apenas
1 adaptador
Como alternativa, use o adaptador fornecido para alimentar
a unidade. Para uso contínuo do projetor/luz de fundo,
instale o adaptador.
Verique se o adaptador não está obstruído e se está
facilmente acessível para a unidade.
NOTA
A unidade principal e o adaptador não devem ser
expostos a condições de umidade. Não coloque objetos
com líquido, tais como vasos, na unidade principal e no
adaptador.
Para interromper completamente o suprimento de energia,
desligue o adaptador da tomada.
RELÓGIO
RECEPÇÃO DO RELÓGIO
Este produto foi projetado para sincronizar seu relógio
automaticamente com um sinal de relógio.
Selecionar o fuso horário
1. Pressione SNOOZE/LIGHT para activar a regulação do
fuso horário (UE, EUA, RU) quando a primeira vez que
ligar o relógio.
2. Pressione ou para selecionar.
3. Pressione MODE para conrmar.
RM308PX: UE: Sinal DCF-77: dentro de 1 500 Km (932
milhas) de Frankfurt, Alemanha.
RM308PAX: EUA: Sinal WWVB-60: dentro de 3200 Km (2000
milhas) de Fort Collins, Colorado. Ajuste manualmente o
relógio para selecionar o fuso horário (Pacíco, Montanhas,
Central ou Leste).
RM308PUX: RU: Sinal MSF-60: dentro de 1 500 Km (932
milhas) de Anthorn, Inglaterra.
Para ativar / desativar a recepção do sinal do relógio:
Pressione e mantenha pressionado para ativar ou
para desativar a recepção do sinal do relógio.
NOTA
A recepção leva de 2 a 10 minutos. Se o sinal estiver
fraco, pode levar até 24 horas para obter um sinal válido.
Indicador de recepção do sinal do relógio:
SINAL FORTE SINAL FRACO / AUSENTE
Se a recepção do sinal não for bem sucedida, coloque
seu aparelho perto de uma janela e pressione e mantenha
pressionado para forçar outra busca de sinal.
AJUSTE MANUAL DO RELÓGIO
Para ajustar o relógio manualmente, desative primeiro a
recepção do sinal do relógio.
1. Pressione e segure MODE para entrar.
2. Pressione MODE para alternar entre os displays.
3. Pressione ou para aumentar / diminuir os
valores do ajuste selecionado.
4. Pressione MODE para conrmar.
A ordem de ajuste é: deslocamento de fuso horário, formato
de 12/24 horas, hora, minuto, ano, formato do calendário
(mês–dia / dia–mês), mês, dia e idioma.
O fuso horário ajusta o relógio em +/- 23 horas com base
na hora do sinal do relógio recebido. Caso você tenha
desativado a recepção do sinal do relógio, não dena um
valor para o fuso horário.
NOTA
Caso você insira +1 no ajuste da hora, você obterá a
hora local mais uma hora. Se estiver nos EUA (RM308PAX)
ajuste o relógio para:
PA para Pacíco MO para Montanhas
CE para Central EA para Leste
NOTA
As opções de idioma são inglês (E), alemão (D),
francês (F), italiano (I) e espanhol (S).
ALARME
Para ajustar o alarme:
1. Pressione para alternar entre o alarme 1 / 2.
2. Pressione e segure para entrar no modo de ajuste
de alarme.
3. Pressione / para ajustar a hora / minuto.
4. Pressione ou MODE para conrmar.
/ indica que o alarme está ativado (ON).
Para ativar / desativar o alarme 1 e/ou 2:
• Pressione ON OFF repetidamente
OU
1. Pressione para selecionar alarme 1 ou 2.
2. Pressione ON OFF para ativar / desativar.
Para silenciar o alarme:
• Pressione SNOOZE / LIGHT para silenciá-lo por 8 minutos
OU
• Pressione qualquer outro botão para desativar o alarme
e ativá-lo novamente após 24 horas.
Para selecionar o modo de display:
Pressione MODE para alternar os displays (relógio, calendário
com segundos e calendário com dia da semana).
PROJEÇÃO
Para ativar a projeção / luz de fundo:
• Pressione SNOOZE / LIGHT.
Para ativar / desativar a projeção contínua:
• Deslize o interruptor de PROJECTION quando o
adaptador estiver conectado.
Para virar a imagem 90° (durante a projeção):
• Pressione SNOOZE / LIGHT e, após 8 segundos,
pressione SNOOZE / LIGHT outra vez.
Para focalizar a imagem:
• Gire a roda de FOCUS.
NOTA
Se a projeção estiver acionada, não olhe diretamente
para o projetor.
REINICIALIZAR
Pressione RESET para retornar aos ajustes padrão.
PRECAUÇÕES
• Não submeta a unidade a forças excessivas, impactos,
poeiras, oscilações de temperatura ou umidade.
• Não obstrua as aberturas de ventilação com itens como
jornais, cortinas, etc.
• Não mergulhe a unidade na água. Se respingar líquido
nela, seque-a imediatamente com um pano macio e que
não solte apos.
• Não limpe a unidade com material abrasivo ou corrosivo.
• Não altere os componentes internos da unidade. Isso
invalidará sua garantia.
• Utilize apenas pilhas novas. Não misture pilhas novas
e usadas. Retire as pilhas caso pretenda guardar o
produto.
• As imagens mostradas neste manual podem diferir da
imagem real.
• Os materiais utilizados nos produtos Oregon podem
ser reutilizados e reciclados após o m de sua vida útil.
Encaminhe os produtos a serem descartados aos locais
de coleta apropriados, atentando para as legislações
locais.
• A colocação deste produto sobre certos tipos de
madeira pode resultar em danos ao seu acabamento,
pelos quais a Oregon Scientic não se responsabilizará.
Consulte as instruções de cuidados do fabricante do
móvel para obter informações.
• O conteúdo deste manual não pode ser reproduzido
sem a permissão do fabricante.
• Não descarte baterias usadas em locais não
apropriados. É necessária a coleta do lixo em questão
de maneira separada para tratamento especial.
• Observe que algumas unidades estão equipadas com
uma tira de segurança da bateria. Remova a tira do
compartimento de bateria antes do primeiro uso.
OBSERVAÇÃO As especicações técnicas deste produto e
o conteúdo do manual do usuário estão sujeitos a alterações
sem aviso prévio.
NOTA
Recursos e acessórios não estão disponíveis para
todos os países. Para obter mais informações, entre em
contato com o seu distribuidor local. Para descarregar uma
versão eletrônica do manual de utilizador, por favor visite
http://global.oregonscientic.com/customerSupport.php
ESPECIFICAÇÕES
TIPO DESCRIÇÃO
C x L x A 145 x 94 x 40 mm
(5,7 x 3,7 x 1,6 polegadas)
Peso 157 g (5,5 oz) sem pilha
Energia Adaptador CA/CC de 3,6 V/100 mA
2 pilhas UM-4 (AAA) de 1,5 V
SOBRE A OREGON SCIENTIFIC
Visite o nosso website www.oregonscientic.com.br para
saber mais sobre os produtos da Oregon Scientic.
Para colocar qualquer tipo de questão, contacte o nosso
Serviço de Apoio ao Cliente através do endereço sac@
oregonscientic.com.br.
Para maiores informações, contatar o SAC - Serviço de
Atendimento a Cliente - (11) 3523-1934 ou email: sac@
oregonscientic.com.br.
A Oregon Scientic Global Distribution Limited reserva o
direito de interpretar e denir quaisquer conteúdos, termos e
disposições neste manual do usuário, e de o modicar a seu
exclusivo critério, em qualquer altura e sem aviso prévio.
No caso de existir alguma inconsistência entre a versão
em inglês e as outras versões noutras línguas, a versão em
inglês prevalecerá.
CE – DECLARAÇÃO DE CONFORMIDADE
Com isso o fabricante, Oregon Scientic Global Distribution
Limited, declara que o tipo de rádio equipmment Relógio
de projeção classic com alarme duplo (modelo: RM308PX
/ RM308PAX / RM308PUX) está em conformidade com a
Directiva 2014/53/UE. O texto integral da Declaração de
Conformidade da UE está disponível no endereço Internet
seguinte:
http://global.oregonscientic.com/customerSupport.php
PAISES SUJEITOS A NORMA RED
Todos os paises da União Européia, Suíça CH
e Noruega N
INFORMAÇÕES AOS UTENTES
Nos termos das Diretivas Europeias 2011/65/
EU e 2012/19/EU, relativas à redução do uso de
substãncias perigosas nos aparelhos elétricos
e eletrônicos, além da eliminação de resíduos
sólidos.
O símbolo da lata de lixo traçada indicada no aparelho
signica que o produto ao m de sua vida útil, deverá ser
eliminado separadamente de outros resíduos sólidos.
O consumidor deverá, portanto, entregar o aparelho após
o término de sua vida útil, aos centros encarregados pela
coleta diferenciada de resíduos eletrônicos e eletrotécnicos,
ou mesmo, entregá-lo de volta ao revendedor no momento
da compra de um novo aparelho de tipo equivalente, na
proporção de um para um.
A coleta diferenciada adequada para a eliminação
sucessiva do aparelho fora de uso a ser reciclado, para o
tratamento do lixo em modo compatível com o ambiente,
contribui para evitar possíveis efeitos negativos ao meio
ambiente e à saúde e facilita a reciclagem dos materiais
dos quais o aparelho é constituído.
A eliminação do produto sem respeitar as normas por parte
do consumidor implica na aplicação das sanções de acordo
com as leis vigentes.
POR
Klassieke dual-alarm projectieklok
Model: RM308PX / RM308PAX /
RM308PUX
HANDLEIDING
OVERZICHT
VOORKANT
1
2
11
12
13
14
3
4
5
6
7
8
9
10
1. SNOOZE / LIGHT: snooze-alarm activeren; schermverlichting
activeren; geprojecteerde beeld 90° draaien
2. : ontvangstindicator signaal
3. : batterij van het apparaat zwak / geen batterij
4. PM: geeft PM aan
5. : weergave alarmtijd
6. Alarmtijd / kalender
7. MODE: instellingen / scherm aanpassen
8. : bekijk alarmstatus; stel alarm in; ga naar alarm- /
kalenderscherm
9. ON OFF: activeer / deactivateer alarmfunctie
10. / : verhogen / verlagen waarde van de instelling;
aanzetten / uitzetten klok ontvangstsignaal
11. Projector: projecteert tijd- / alarmstatus
12. Klok met seconden / weekdag
13. Tijdzone
14. Alarm 1 / 2 is AAN
ACHTERKANT
1
2
3
4
1. FOCUS: stel het geprojecteerde beeld scherp
2. RESET: het apparaat terugzetten op standaardinstellingen
3. PROJECTIE AAN / UIT: continue projectie in- /
uitschakelen (wanneer een adapter is aangesloten)
4. Adapteringang
ONDERKANT
1. Batterijvak
STARTEN
VOEDING
2 x UM-4 (AAA) batterijen
Om batterijen te plaatsen:
1. Verwijder het klepje van het batterijvak.
2. Plaats de batterijen volgens de aangegeven polariteit
(+/-).
3. Druk altijd op RESET wanneer u de batterijen vervangen
heeft.
BETEKENIS
Batterij raakt leeg
Geen batterij aanwezig – alleen adapter
1 x adapter
U kunt ook de meegeleverde adapter gebruiken om het
apparaat van stroom te voorzien. Voor continu gebruik van
projector / schermverlichting moet de adapter aangesloten zijn.
Zorg dat de adapter in de buurt is van het apparaat en dat de
adapter niet wordt geblokkeerd.
NB
Stel het apparaat en de adapter niet bloot aan vochtige
omstandigheden. Plaats nooit voorwerpen met vloeistof, zoals
vazen, op het apparaat of de adapter.
Om de stroom helemaal af te sluiten, trekt u de adapter uit
het stopcontact.
KLOK
KLOK ONTVANGST
Dit product is ontworpen om zijn klok automatisch te
synchroniseren door middel van een kloksignaal.
Geselecteerde tijdzone
1. Druk op SNOOZE/LIGHT om de tijd zone ( EU, VS, VK)
te activeren wanneer de eerste keer stroom op de klok.
2. Druk op of om te selecteren.
3. Druk op MODE om te bevestigen.
RM308PX: EU: DCF-77 signaal: binnen 1 500 km (932 mijl)
van Frankfurt, Duitsland.
RM308PAX: VS: WWVB-60 signaal: binnen 3200km (2000
mijl) van Fort Collins, Colorado (VS). Stel de klok handmatig
in op de geselecteerde tijdzone (Westkust, Gebergte, Centraal
of Oostkust).
RM308PUX: VK: MSF-60 signaal: binnen 1 500 km (932 mijl)
van Anthorn, Engeland.
Om signaalontvangst klok aan/uit te zetten:
Houd ingedrukt om signaalontvangst aan te zetten of
om het uit te zetten.
NB
Ontvangst kan 2- 10 minuten duren. Als het signaal zwak
is, kan het tot 24 uur duren om een geldig signaal te ontvangen.
Ontvangstindicator van kloksignaal:
STERK SIGNAAL ZWAK / GEEN SIGNAAL
Indien geen signaal gevonden wordt, zet het apparaat dan
bij een raam en houd ingedrukt om het zoeken naar een
signaal te forceren.
KLOK HANDMATIG INSTELLEN
Om de klok handmatig in te stellen, moet u eerst
klokontvangstsignaal uit zetten.
1. Houd MODE ingedrukt om in te stellen.
2. Druk op MODE om tussen weergave-opties te kiezen.
3. Druk of om geselecteerde instelling te verhogen
/ verlagen
4. Druk op MODE om te bevestigen.
De volgorde van instellingen is: tijzone, 12 / 24 uur formaat,
uren, minuten, jaar, kalenderformaat (maand–dag / dag–
maand), maand, dag en taal.
De tijdzone stelt de klok in op tot +/- 23 uur van het ontvangen
kloksignaal. Als u kloksignaalontvangst hebt uitgezet, dan
hoeft u geen tijdzone in te stellen.
NB
Als u +1 als tijdzone instelt, resulteert dit in uw lokale tijd
plus één uur. Wanneer u in de VS bent (RM308PAX) stelt
u de klok in op:
PA voor Westkust MO voor Bergtijd
CE voor Centrale tijd EA voor Oostkust
NB
De beschikbare talen zijn Engels (E), Duits (D), Frans (F),
Italiaans (I) en Spaans (S).
ALARM
Om het alarm in te stellen:
1. Druk om tussen alarm 1 en 2 te kiezen.
2. Houd ingedrukt om het alarm in te stellen.
3. Druk / om uren / minuten in te stellen.
4. Druk op of MODE om te bevestigen.
/ geeft aan dat het alarm AAN is.
Activeren / deactiveren van alarm 1 en/of 2:
• Druk herhaaldelijk op ON OFF
OF
1. Druk op om alarm 1 of 2 te selecteren.
2. Druk op ON OFF om te activeren / deactiveren.
Om het alarm te stoppen:
• Druk SNOOZE / LIGHT om het alarm 8 minuten uit te
zetten
OF
• Druk een willekeurige knop om het alarm uit te zetten,
waarna het pas na 24 uur weer zal afgaan.
Om de weergavemodus te selecteren:
Druk op MODE om te kiezen tussen weergave (klok, kalender
met seconden en kalender met dag van de week).
PROJECTIE
Om projectie / schermverlichting te activeren:
• Druk SNOOZE / LIGHT.
Om continue projectie te activeren / deactiveren:
• Schuif de PROJECTION schakelaar wanneer de
adapter is aangesloten.
Om het beeld 90° te draaien (terwijl het geprojecteerd
wordt):
• Druk binnen 8 seconden na op SNOOZE / LIGHT te
drukken, nogmaals op SNOOZE / LIGHT.
Om het beeld scherp te stellen:
• Draai aan het FOCUS Wiel.
NB
Kijk niet rechtstreeks in de projector wanneer deze aan
staat.
RESET
Druk RESET om de standaardinstellingen te gebruiken.
WAARSCHUWINGEN
• Stel het apparaat niet bloot aan extreme klappen,
schokken, stof, temperatuur of vochtigheid.
• Dek de ventilatiegaten niet af met kranten, gordijnen etc.
• Dompel het product nooit onder in water. Als u water
over het apparaat morst, droog het dan onmiddellijk af
met een zachte stofvrije doek.
• Reinig het apparaat niet met krassende of bijtende
materialen.
• Laat de interne componenten met rust. Anders kan dit
de garantie beïnvloeden.
• Gebruik alleen nieuwe batterijen. Gebruik nooit oude en
nieuwe batterijen door elkaar.
• De in deze handleiding weergegeven plaatjes kunnen
afwijken van de werkelijkheid.
• Wanneer u dit product weg gooit, zorg dan dat het
opgehaald wordt door de daarvoor bestemde afvaldienst.
• Dit product kan eventueel schade veroorzaken aan de
laklaag van bepaalde houtsoorten. Oregon Scientic is
hiervoor niet aansprakelijk. Lees de instructies van de
fabrikant van het meubel voor meer informatie.
• De inhoud van deze handleiding mag niet worden
vermenigvuldigd zonder toestemming van de fabrikant.
• Gooi lege batterijen niet bij het huisvuil. Dergelijk afval
moet gescheiden verwerkt worden.
• Let op, sommige apparaten zijn voorzien van een
batterijstrip. Verwijder deze strip uit het batterijvak
alvorens het apparaat te gebruiken.
NB
De technische specificaties van dit product en de inhoud
van de handleiding zijn zonder voorafgaande waarschuwing
aan veranderingen onderhevig.
NB
Niet alle functies en accessoires zijn beschikbaar in alle
landen. Neem contact op met uw plaatselijke verkooppunt
voor meer informatie. U kunt een elektronische versie van
deze handleiding downloaden op
http://global.oregonscientific.com/customerSupport.php
SPECIFICATIES
TYPE BESCHRIJVING
L x B x H 145 x 94 x 40 mm
(5,7 x 3,7 x 1,6 in)
Gewicht 157 g (5,5 oz) zonder batterij
Voeding 3,6 V/100 mA Adapter
2 x UM-4 (AAA) 1,5V batterijen
OVER OREGON SCIENTIFIC
Bezoek onze website www.oregonscientic.com voor meer
informatie over de producten van Oregon Scientic.
Mocht u vragen hebben, neem dan contact op met onze
klantenservice op info@oregonscientic.com.
Oregon Scientic Global Distribution Limited behoudt zich
het recht voor enige inhoud, bepalingen en voorwaarden
in deze gebruikershandleiding te interpreteren en deze
te allen tijde naar eigen inzicht en zonder voorafgaande
kennisgeving te wijzigen. Met dien verstande dat, indien er
enige inconsistentie bestaat tussen de Engelstalige versie
en een versie in enige andere taal, de Engelse versie
bindend is.
EU CONFORMITEITS VERKLARING
Hierbij de fabrikant, Oregon Scientic Global Distribution
Limited, verklaart dat de radio equipmment soort Klassieke
dual-alarm projectieklok (model: RM308PX / RM308PAX /
RM308PUX) in overeenstemming is met 2014/53/EU-richtlijn.
De volledige tekst van de verklaring van overeenstemming
EU is beschikbaar op het volgende internetadres:
http://global.oregonscientic.com/customerSupport.php
LANDEN DIE ZIJN ONDERWORPEN AAN RED
Alle EU landen, Zwitserland CH
en Noorwegen N
INFORMATIE VOOR DE GEBRUIKERS
Krachtens de EG-richtlijnen 2011/65/EU en
2012/19/EU met betrekking tot de beperking van
het gebruik van bepaalde gevaarlijke stoffen in
elektrische en elektronische apparatuur en de
afdanking van deze apparatuur.
Het symbool van de doorstreepte vuilnisbak aangebracht op
de apparatuur geeft aan dat het product op het einde van
zijn levensduur afzonderlijk van het ander afval afgedankt
moet worden.
De gebruiker dient de apparatuur op het einde van zijn
levensduur dus toe te vertrouwen aan een geschikt
centrum voor de gscheden verwerking van elektronisch en
elektrotechnisch afval, of aan de verkoper te bezorgen bij
de aankoop van een nieuwe apparatuur van gelijkaardig
type, in de verhouding één tot één.
De correcte gescheiden omhaling voor de latere recyclage,
verwerking en milieuvriendelijke vernietiging van de
apparatuur draagt bij tot het voorkomen van mogelijke
negatieve invloeden op het milieu en de gezondheid en
bevordert de recyclage van de materialen waarvan de
apparatuur samengesteld is.
De abusievelijk afdanking van het product vanwege de
gebruiker geeft aanleiding tot de toepassing van administra-
tieve boetes volgens de wetgeving.
NL
Klassisk dubbel-alarm
projektionsklocka
Modell: RM308PX / RM308PAX /
RM308PUX
BRUKSANVISNING
PRODUKTÖVERSIKT
VY FRAMSIDA
1
2
11
12
13
14
3
4
5
6
7
8
9
10
1. SNOOZE / LIGHT: aktivera snoozefunktion; aktivera
bakgrundsbelysningen; rotera projektionen 90°
2. : indikator för signalmottagning
3. : låg batterinivå i huvudenheten / inget batteri
4. PM: indikerar PM
5. : alarmtiden visas
6. Alarmtid / datum
7. MODE: ändra display / inställningar
8. : visa alarmstatus; ställa alarm; växla till alarm /
datumvisning
9. ON OFF: aktivera / inaktivera alarmfunktionen
10. / : öka / minska värden för vald inställning;
aktivera / inaktivera radiokontrollerad klocka
11. Projektor: projicerar tid / alarmstatus
12. Klocka med sekunder / veckodag
13. Offset för tidszon
14. Alarm 1 / 2 är ON
VY BAKSIDA
1
2
3
4
1. FOKUS: fokuserar den projicerade bilden
2. RESET: återställ enheten till fabriksinställning
3. PROJEKTION ON / OFF: aktivera / inaktivera
kontinuerlig projektion (när nätadapter är ansluten)
4. AC uttag
VY UNDERSIDA
1. Batterifack
ATT KOMMA IGÅNG
STRÖMFÖRSÖRJNING
2 x UM-4 (AAA) batterier
Att sätta i batterierna:
1. Öppna batteriluckan.
2. Se till att batterierna sätts in med rätt polaritet (+/-).
3. Tryck RESET efter varje batteribyte.
FÖRKLARING
Låg batterinivå
Batterier ej installerade – endast adapter
1 x adapter
Använd annars, adaptern som medföljde huvudenheten. För
kontinuerlig projektion / bakgrundsbelysning måste nätadapter
användas.
Kolla så att adapterpluggen går lätt att ansluta till enheten.
NOTERA
Huvudenheten och adaptern får ej utsättas för fukt.
Inga föremål fyllda med vätska, såsom vaser, får placeras på
huvudenheten eller adaptern.
För att totalt bortkoppla spänningen, skall adaptern tas bort
från huvudenheten och vägguttaget.
KLOCKA
KLOCKMOTTAGNING
Denna produkt är gjord för att automatiskt synkronisera
klockan när den tar emot en klocksignal.
Välja tidszon
1. Tryck på SNOOZE/LIGHT för att aktivera inställningen
tidszon (EU, USA,UK ) när du första gången trycker på
klockan.
2. Tryck på eller för att välja.
3. Tryck på MODE för att bekräfta.
RM308PX: EU: DCF-77 signal: inom 1 500 km från Frankfurt,
Tyskland.
RM308PAX: USA: WWVB-60 signal: inom 3 200km från Fort
Collins Colorado. Ställ klockan manuellt för att välja tidszon
(Pacific, Mountain, Central eller Eastern).
RM308PUX: UK: MSF-60 signal: inom 1 500 km från Anthorn,
England.
Att aktivera / avaktivera klocksignalmottagning:
Tryck och håll inne för att aktivera eller för att
avaktivera signalmottagningen.
NOTERA
Mottagning tar 2- 10 minuter. Om signalen är svag
kan det ta upp till 24 timmar för enheten att få kontakt med
signalen.
Indikator för radiomottagningssignal:
STARK SIGNAL SVAG / INGEN SIGNAL
Om signalmottagningen är otillräcklig, placera enheten i
närheten av ett fönster, tryck och håll inne för att starta
en ny sökning.
MANUELL INSTÄLLNING AV KLOCKAN
Avaktivera radiomottagningen innan manuell inställning.
1. Tryck och håll inne MODE för att ställa in.
2. Tryck MODE för att växla mellan displayer.
3. Tryck eller för att öka / minska värden för den
valda inställningen
4. Tryck MODE för att bekräfta.
Ordningen för inställningarna är: Zontidsoffset, 12/24 timmars
format, timme, minut, år, datumformat (månad–dag / dag–
månad), månad, dag och språk.
Tidszonsinställningen kan användas för att ställa klockan
upp till +/- 23 timmar från den mottagna klocktiden. Om
klockradiosignalen är avaktiverad, skall inget offsetvärde för
tidszonen ställas in.
NOTERA
Om du matar in +1 i tidszoninställningen kommer
detta innebära att din tid blir den lokala tiden plus 1 timme.
Om du är i USA (RM308PAX) sätt klockan till:
PA för Pacific tid MO för Mountain tid
CE för Central tid EA för Eastern tid
NOTERA
Språkalternativen är (E) Engelska, (F) Franska, (D)
Tyska, (I) Italienska och (S) Spanska.
ALARM
Att ställa alarmet:
1. Tryck för att växla mellan alarm 1 / 2.
2. Tryck och håll inne för att gå in i
alarminställningsläget.
3. Tryck / för att ställa timme / minut.
4. Tryck eller MODE för att bekräfta.
/ indikerar att alarm är PÅ
För att aktivera / avaktivera alarm 1 och / eller 2:
• Tryck upprepade gånger på ON OFF
ELLER
1. Tryck för att välja alarm 1 eller 2.
2. Tryck ON OFF för att aktivera / inaktivera.
För att stänga av alarmet:
• Tryck SNOOZE / LIGHT för att stänga av alarmet i 8
minuter
ELLER
• Tryck på annan valfri knapp för att stänga av larmet i 24
timmar.
Att välja visningsläge:
Tryck MODE för att växla mellan visning av (klocka, datum
med sekunder och datum med veckodag).
PROJEKTION
Att aktivera projektion / bakgrundsbelysning:
• Tryck SNOOZE / LIGHT.
För att aktivera / inaktivera kontinuerlig projektion:
• Skjut PROJEKTION väljaren när adaptern är ansluten.
Att flippa projektionen 90° (under projektion):
• Inom 8 sek från att ha tryckt SNOOZE / LIGHT, tryck
SNOOZE / LIGHT igen.
Fokusering av projektionsbilden:
• Vrid FOKUS hjulet.
NOTERA
Titta ej in i projektorn när projektorn är på.
ÅTERSTÄLLNING
Tryck RESET för att återställa produkten till grundinställning.
FÖRSIKTIGHETSÅTGÄRDER
• Utsätt inte apparaten för kraftigt våld, stötar, damm,
extrema temperaturer eller fukt.
• Täck inte för ventilationshålen. Försäkra dig om att
närliggande föremål såsom tidningar, dukar, gardiner
m.m. inte täcker för ventilationshålen.
• Utsätt inte produkten för vatten. Om du spiller vätska
över den, torka omedelbart med en mjuk, luddfri trasa.
• Rengör inte apparaten med frätande eller slipande
material.
• Mixtra inte med enhetens interna komponenter då detta
kan påverka garantin.
• Använd enbart nya batterier. Blanda inte nya och gamla
batterier.
• Av trycktekniska skäl, kan displaybilderna i denna
manual skilja sig från dem i verkligheten.
• Förbrukad produkt måste sorteras som specialavfall
på avsedd miljöstation och får inte slängas som vanligt
restavfall.
• Om denna produkt placeras på ytor med speciell nish
såsom lackat trä etc. kan dessa ytor skadas. Ta kontakt
med din möbeltillverkare för att få mer information om
huruvida det går bra att placera föremål på ytan. Oregon
Scientic kan inte hållas ansvariga för skador på träytor
som uppkommit på grund av kontakt med denna
produkt.
• Innehållet I denna manual får ej kopieras utan
tillverkarens medgivande.
• Kassera inte gamla batterier som osorterade sopor.
Insamling av kasserade batterier måste ske separat.
• Notera att vissa enheter är utrustade med en
batterisäkerhetsstrip. Ta bort denna strip från
batteriutrymmet innan produkten används första
gången.
NOTERA
De tekniska specifikationerna för denna produkt och
innehållet I användarmanualen kan komma att ändras utan
vidare upplysning.
NOTERA
Egenskaper och tillbehör kan skilja mellan olika
länder. För mer information, kontakta ditt lokala inköpsställe.
För att ladda ner en elektronisk version av manualen, vänligen
besök http://global.oregonscientific.com/customerSupport.php
SPECIFIKATIONER
TYP BESKRIVNING
L x B x H 145 x 94 x 40 mm
(5,7 x 3,7x 1,6 tum)
Vikt 157 g utan batteri
Drift 3,6 V/100 mA adapter och
2 x UM-4 (AAA)1,5V batterier
OM OREGON SCIENTIFIC
Besök vår webbsajt www.oregonscientic.se för att ta reda
på mer om Oregon Scientics produkter.
Om du har några frågor är du välkommen att kontakta vår
Kundtjänst på info@oregonscientic.se.
Oregon Scientic Global Distribution Limited reserverar
sig rätten att redigera och uttolka innehåll, terminologi och
föreskrifter i denna manual samt att göra tillägg när som
helst utan föregående meddelande. Om skillnader nns
mellan den engelska versionen och andra språkversioner,
gäller den engelska.
EU-FÖRSÄKRAN OM ÖVERENSSTÄMMELSE
Härmed deklarerar tillverkaren Oregon Scientic Global
Distribution Limited att radioutrustning typKlassisk dubbel-
alarm projektionsklocka (modell: RM308PX / RM308PAX
/ RM308PUX) Står i överensstämmelse med 2014/53/
EU-direktiv. Den fullständiga texten av EU-försäkran om
överensstämmelse nns tillgänglig på följande Internetadress:
http://global.oregonscientic.com/customerSupport.php
LÄNDER SOM OMFATTAS AV RED-DIREKTIVET
Alla länder inom EU, Schweiz CH
och Norge N
INFORMATION TILL ALLA ANVÄNDARE
I enlighet med de europeiska direktiven 2011/65/
EU och 2012/19/EU, som hänsyftar till användning
av farliga substanser i elektrisk och elektronisk
apparatur liksom avyttring av avfall.
Symbolen med den överkryssade soptunnan som nns
på apparaten, anger att produkten måste samlas upp och
avyttras separat i förhållande till annat avfall när den fullgjort
sin livstid.
Användaren mäste därför överlämna den utslitna
apparaturen till lämpliga uppsamlingsställen för sorterat
elektroniskt och elektrotekniskt avfall eller lämna tillbaka
den till återförsäljaren på samma gång som han/hon köper
en ny likvärdig apparat, enligt principen en gammal produkt
i utbyte mot en ny. Lämplig sortering
av den nedskrotade apparaturens olika delar för därpå
följande återvinning, behandling och miljövänlig sanering
bidrar till att undvika förorening av miljön och negativa
effekter på hälsan, liksom att det gynnar återanvändning av
de material som apparaturen är gjord av.
Om användaren nedskrotar produkten felaktigt medför
det att sanktioner enligt gällande lagstiftning kommer att
tillämpas.
SWE
© 2018 Oregon Scientific. All rights reserved.
P/N: 300102624-00019-10
-
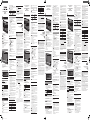 1
1
-
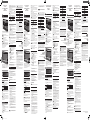 2
2


Oregon Scientific RM308PX Handleiding
- Categorie
- Wekkers
- Type
- Handleiding
in andere talen
- English: Oregon Scientific RM308PX User manual
- italiano: Oregon Scientific RM308PX Manuale utente
- français: Oregon Scientific RM308PX Manuel utilisateur
- español: Oregon Scientific RM308PX Manual de usuario
- Deutsch: Oregon Scientific RM308PX Benutzerhandbuch
- português: Oregon Scientific RM308PX Manual do usuário
Gerelateerde artikelen
-
 Oregon Scientific RM309P / RM309PU / RM309PA / RA309P Handleiding
-
 Oregon Scientific RM368P Handleiding
-
Oregon Scientific RM336PESA Handleiding
-
Oregon Scientific RRM320P Handleiding
-
-
 Oregon Scientific EW96 Handleiding
-
 Oregon Scientific TW369 Handleiding
-
 Oregon Scientific OSRM938-BLA de handleiding
-
Oregon Scientific RRM116U de handleiding
-
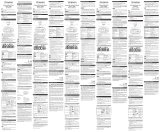 Oregon Scientific CIR600 de handleiding


