
Snelstartgids
LG-C660
Ga naar www.lg.com om de nieuwste, volle-
dige versie van de gebruikershandleiding te
downloaden op uw PC of laptop.
NEDERLANDS
FRANÇAIS
ENGLISH

LG
A
Index
LG
—
C660 - Overzicht
Installatie
Beginscherm
Scherm ontgrendelen
Meldingenscherm
Oproep plaatsen/bericht verzenden
Contacten
Internet/Kaarten
Camera & Videocamera
Google-account
Applicaties downloaden
E-mail
Synchroniseer uw telefoon met uw computer
01
02
05
06
07
08
09
10
11
12
13
14
15

1
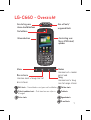
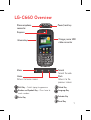
LG-C660 - Overzicht
Basisscherm
Hiermee keert u terug naar het
basisscherm.
Zoeken
Hiermee kunt u zoeken
op het web.
Terug
Hiermee keert u terug
naar het vorige scherm.
Menu
Aansluiting voor
stereo-hoofdtelefoon
Oortelefoon
Aan-uittoets/
vergrendeltoets
Aansluiting voor
Micro USB-kabel/
oplader
Volumetoetsen
Shift-toets – Overschakelen naar typen met hoofdletters.
Delete-toets
Cijfers/symbolen-toets – Druk twee keer om cijfers in
te voegen
Taaltoets
Enter-toets
Agendatoets
E-mailtoets

2
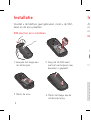
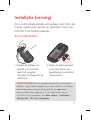
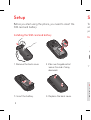
Voordat u de telefoon gaat gebruiken, moet u de SIM-
kaart en de accu plaatsen:
Installatie
1. Verwijder het klepje aan
de achterzijde.
3. Plaats de accu.
2. Zorg dat de SIM-kaart
met het contactpunt naar
beneden is geplaatst.
4. Plaats het klepje aan de
achterzijde terug.
SIM-kaart en accu installeren
Als
me
mi
In
1. S
De
W
t
b
o
m
O

3
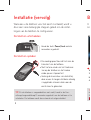
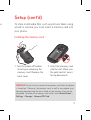
Als u multimediabestanden wilt opslaan, zoals foto's die
met de ingebouwde camera zijn gemaakt, moet u een
microSD in de telefoon plaatsen.
Installatie (vervolg)
1. Schakel de telefoon uit
voordat u de microSD
plaatst of verwijdert.
Verwijder het klepje aan de
achterzijde.
2. Plaats de geheugenkaart
in de sleuf. Plaats het
goudkleurige contactpunt
naar onderen.
De microSD plaatsen
WAARSCHUWING! Plaats of verwijder de microSD niet wanneer de
telefoon is ingeschakeld. Hierdoor kunnen de microSD en uw telefoon
beschadigd raken en kunnen ook de data die zijn opgeslagen
op de microSD, beschadigd raken.
Ga als volgt te werk om de
microSD veilig te verwijderen: kies Basis-scherm > Instellingen >
Opslagruimte > SD-kaart ontkoppelen..

4
TIP!
Als de telefoon is vergrendeld en niet werkt, houdt u de Aan-
uitknop/vergrendelknop 8 seconden ingedrukt om de telefoon uit te
schakelen. De telefoon wordt dan automatisch uitgeschakeld.
U
sn
e
B
W
S
M
A
T
d
ti
k
Wanneer u de telefoon voor het eerst inschakelt, wordt u
door een serie belangrijke stappen geleid om de instel-
lingen van de telefoon te confi gureren.
Houd de toets Power/Lock enkele
seconden ingedrukt.
Installatie (vervolg)
De telefoon uitschakelen
De telefoon opladen
De voedingspoort bevindt zich aan de
linkerkant van de telefoon.
Sluit het ene einde van het laadsnoer
aan op de telefoon en het andere
einde op een stopcontact.
Verleng de levensduur van de batterij
door ervoor te zorgen dat deze volledig
is opgeladen alvorens deze voor de
eerste keer te gebruiken.

5
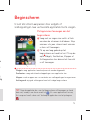
U kunt elk scherm aanpassen door widgets of
snelkoppelingen naar uw favoriete applicaties toe te voegen.
Beginscherm
Veeg met uw vinger naar rechts of links
om door de schermen te bladeren. Stop
wanneer u bij een scherm komt waaraan
u items wilt toevoegen.
Tik op een leeg gebied op het
beginscherm en houd het vast. Tik op de
optie Widgets, Sneltoetsen, Mappen of
Achtergrond en kies daarna het item dat
u wilt toevoegen.
Widgets: voeg applicaties toe die dynamisch worden bijgewerkt
Sneltoetsen: voeg rechtstreekse koppelingen naar applicaties toe
Mappen: maak mappen om uw contacten en snelkoppelingen te organiseren
Achtergrond: wijzig de achtergrond voor het huidige beginscherm
Pictogrammen toevoegen aan het
beginscherm
TIP! Tik op de applicatie die u aan het beginscherm wilt toevoegen en houd
deze vast, waarbij u een keuze maakt uit
. Als u een applicatie wilt wissen,
tikt u erop en houdt u deze vast. Versleep de applicatie naar het pictogram
.
e
r
j
dig

6
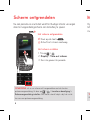
Druk op de toets .
Schuif het scherm omhoog.
Na een periode van inactiviteit wordt het huidige scherm vervangen
door het vergrendelingsscherm om de batterij te sparen.
Scherm ontgrendelen
1. Tik op >
2. Display > Time-out scherm.
3. Kies de gewenste periode.
Het scherm ontgrendelen
Het scherm instellen
OPMERKING: als u uw scherm wilt vergrendelen met de functie
patroonvergrendeling, tik dan op
> > Locatie en beveiliging >
Schermvergrendeling instellen. Een korte tutorial helpt u bij het instel-
len van een patroonvergrendeling.
Op
GP
me
M
TI
Zo

7
gen
-
Op dit scherm kunt u beltonen, Wi-Fi, Bluetooth,
GPS, de muziekspeler enz. bekijken en beheren. De
meldingenbalk bevindt zich boven aan het scherm.
Meldingenscherm
1. Tik op de meldingenbalk en
schuif deze omlaag om het
meldingengebied te openen.
2. Tik op de pictogrammen om de
betreffende functies in of uit te
schakelen.
Functies in- en uitschakelen
Tik op > > Verbindingen.
Meer opties voor instellingen tonen
TIP! Schakel Wi-Fi, Bluetooth en GPS uit wanneer u deze niet gebruikt.
Zo verlengt u de accuduur.
3GGPS
Bluetooth
Wi-Fi
Beltoon
– Trillen
<meldingenbalk>

8
U
sy
n
co
C
O
co
o
T
o
of
Met een paar handelingen kunt u een gesprek voeren of
een bericht verzenden.
Oproep plaatsen/bericht verzenden
1. Tik op .
2. Kies het nummer dat u wilt bellen of begin de naam van een
contact te typen.
Een oproep plaatsen
1. Tik op .
2. Tik op Nieuw bericht.
3. Voer het nummer in waaraan u het bericht wilt zenden, of tik op
om een nummer te kiezen in uw contactenlijst.
4. Stel uw bericht op en druk op Zenden.
Een bericht verzenden
OPMERKING: sleep het pictogram om een inkomende oproep
te beantwoorden.

9
U kunt de contacten op uw telefoon automatisch
synchroniseren met uw online adresboeken, en u kunt ook
contacten importeren vanaf een andere SIM/MicroSD.
Contacten
Tik op > Meer > Importeren/
Exporteren.
Contacten importeren/exporteren
OPMERKING: als u het nummer van een recente oproep aan uw
contacten wilt toevoegen, zoek het nummer dan op in uw logboek met
oproepen. Tik op het nummer en houd het vast, en kies vervolgens
Toevoegen aan contacten. Tik op
om een nieuw contact te maken
of kies een contact in een lijst met bestaande contacten.
of
en
en
op

10
Met de webbrowser kunt u gemakkelijk webpagina's
bekijken. Gebruik Kaarten tijdens een reis om uw locatie
op te zoeken of om onderweg te controleren of er
verkeersinformatie is.
Internet/Kaarten
1. Tik op > .
2. Tik op .
Voer tekst in met behulp van het
schermtoetsenbord.
3. Blader omhoog/omlaag of breng
uw vingers naar elkaar toe om de
webpagina te bekijken.
1. Tik op
> .
2. Stel de verbinding in op Wi-Fi of
3G/GPS.
Surfen op internet
Kaarten instellen
Zoomen met uw vingers: schuif uw wijsvinger en duim naar elkaar
toe of van elkaar af om in of uit te zoomen op een pagina in de
webbrowser, op een kaart of op foto's.
O
n
o
C
V

11
e
OPMERKING: u moet eerst een microSD plaatsen voordat u een foto
neemt. Als u geen microSD hebt geplaatst, kunt u geen foto maken
of opslaan.
Camera
Videocamera
Zoomen
Helderheid
Instellingen
Kleureffect
Videomodus
Een foto maken
Galerij
Zoomen
Helderheid
Instellingen
Duur
Cameramodus
Opnemen starten
Galerij

12
Do
An
T
A
Wanneer u de applicatie Google voor de eerste keer
opent, moet u zich aanmelden. Indien u geen Google-
account hebt, wordt u gevraagd een account te maken.
1. Tik op >
2. Tik op Volgende en
Maken om de Gmail-
installatiewizard te starten.
3. Tik op
om het toetsenbord te
openen en voer uw naam
of gebruikersnaam in.
4. Tik op Volgende.
U moet de installatie-
instructies volgen en de
benodigde informatie
invoeren om uw account te
activeren. Wacht terwijl uw
account op de server wordt
gemaakt.
Een Google-account maken
TIP! Wanneer u uw Gmail-account hebt gemaakt, hebt u toegang
tot Gmail, Google Apps en vele andere Google-diensten op de
telefoon.
Google-account

13
Download leuke games en nuttige applicaties van
Android Market.
1. Tik op >
2. Meld u aan bij uw Google-
account.
3. Kies een applicatie in de lijst of
gebruik de zoekfunctie.
Tik op
> > Applicaties.
Het is niet mogelijk de vooraf
geïnstalleerde applicaties te
verwijderen.
Vanaf Android Market
Applicaties beheren
TIP! Start de gedownloade applicatie met het pictogram .
Applicaties downloaden
.
t

14
Als
syn
uw
via
lg.c
Su
uw
fi rm
ver
Sy
1. S
3. O
Mu
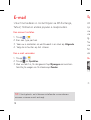
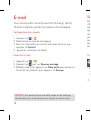
U kunt met anderen in contact blijven via MS Exchange,
Yahoo!, Hotmail en andere populair e-mailproviders.
1. Tik op >
2. Kies een type postvak.
3. Voer uw e-mailadres en wachtwoord in en druk op Volgende.
4. Volg de instructies op het scherm.
1. Tik op >
2. Tik op en Opstellen.
3. Voer uw tekst in, tik desgewenst op Bijvoegen om een bes-
tand bij te voegen en tik daarna op Zenden.
Een account instellen
Een e-mail verzenden
TIP! U kunt geluids- en trilalarmen instellen die u waarschuwen
wanneer u nieuwe e-mail ontvangt.
E-mail

15
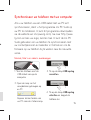
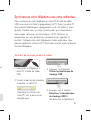
Als u uw telefoon via een USB-kabel met uw PC wilt
synchroniseren, dient u het programma LG PC Suite op
uw PC te installeren. U kunt dit programma downloaden
via de website van LG (www.lg.com). Ga naar http://www.
lg.com en kies uw regio, land en taal. U kunt de LG PC
Suite gebruiken om uw telefoon te synchroniseren met
uw contactpersonen en kalender in Outlook en om de
fi rmware op uw telefoon bij te werken naar de nieuwste
versie.
Synchroniseer uw telefoon met uw computer
1. Sluit de telefoon met de
USB-kabel aan op de
computer.
Kopieer de bestanden van
uw PC naar de stationsmap.
2. Tik op de knop USB-opslag
aanzetten.
4. Tik op de knop USB-opslag
uitzetten en koppel de
telefoon los.
3. Open de map van het
verwijderbare geheugen op
uw PC.
Muziek, foto's en video's overbrengen
e.
-

Wi-Fi
(WLAN)
Deze apparatuur kan in alle Europese landen worden
gebruikt.
In de EU kan WLAN zonder beperkingen binnenshuis
worden gebruikt. Gebruik buitenshuis is niet toegestaan
in Frankrijk, Rusland en de Oekraïne.
www.lg.com

Guide de démarrage rapide
LG-C660
Pour télécharger la dernière version complète
du guide de l'utilisateur, allez sur www.lg.com
à partir de votre PC ou ordinateur portable.
FRANÇAIS

P
Index
Présentation du LG
—
C660
Confi guration
Mode Veille
Écran de déverrouillage
Écran de notifi cation
Passer un appel/Envoyer un message
Contacts
Internet/Google Maps
Appareil photo & Caméra vidéo
Compte Google
Téléchargement d'applications
E-mail
Synchronisez votre téléphone avec votre ordinateur
01
02
05
06
07
08
09
10
11
12
13
14
15

1
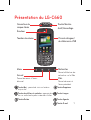
Présentation du LG-C660
Accueil
Permet de revenir à l'écran
d'accueil.
Rechercher
Permet d'effectuer des
recherches sur le Web.
Préc.
Permet de revenir à
l'écran précédent.
Menu
Connecteur du
casque stéréo
Écouteur
Touche Marche-
Arrêt/Verrouillage
Prise du chargeur/
du câble micro-USB
Touches de volume
Touche Maj. : permet de saisir un texte en
majuscules.
Touche Supprimer
Touche de chiffres et symboles : appuyez deux
fois sur cette touche pour insérer des chiffres
Touche Langue
Touche Entrée
Touche Agenda
Touche E-mail

2
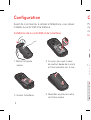
Avant de commencer à utiliser le téléphone, vous devez
installer la carte SIM et la batterie :
Confi guration
1. Retirez la façade
arrière.
3. Insérez la batterie.
2. Assurez-vous que la zone
de contact dorée de la carte
est bien orientée vers le bas.
4. Remettez en place le cache
de la face arrière.
Installation de la carte SIM et de la batterie
Po
im
ins
C
1. A
u
le
f
Ins
A
lo
c
s
t
sé
R

3
ez
rte
as.
e
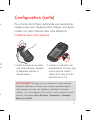
Pour stocker des fi chiers multimédia, par exemple des
images prises avec l'appareil photo intégré, vous devez
insérer une carte mémoire dans votre téléphone.
Confi guration (suite)
1. Avant d'insérer ou de retirer
une carte mémoire, éteignez
le téléphone. Retirez la
façade arrière.
2. Insérez la carte dans son
emplacement. Assurez-vous
que la zone de contact
dorée de la carte est bien
orientée vers le bas.
Installation de la carte mémoire
AVERTISSEMENT N'insérez pas et ne retirez pas la carte mémoire
lorsque le téléphone est allumé. Vous risqueriez d'endommager la
carte mémoire ainsi que votre téléphone et d'altérer les données
stockées sur la carte mémoire.
Pour retirer la carte mémoire en toute
sécurité, sélectionnez Écran d'Accueil > Paramètres > Stockage >
Retirer la carte SD.

4
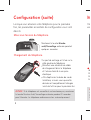
ASTUCE !
Si le téléphone est verrouillé et ne fonctionne pas, maintenez
la touche Marche-Arrêt/Verrouillage enfoncée pendant 8 secondes
pour l'éteindre. Le téléphone redémarrera alors automatiquement.
Vo
wid
M
W
Ra
Do
Fo
A
s
P
fa
Lorsque vous allumez votre téléphone pour la première
fois, les paramètres essentiels de confi guration vous sont
décrits.
Maintenez la touche Marche-
arrêt/Verrouillage enfoncée pendant
quelques secondes.
Confi guration (suite)
Mise sous tension du téléphone
Chargement du téléphone
Le port de recharge est situé sur le
côté gauche du téléphone.
Branchez une extrémité du câble
de chargement dans le téléphone
et l'autre extrémité à une prise
électrique.
Afi n d'optimiser la durée de vie de
la batterie, assurez-vous que cette
dernière est complètement chargée
avant de l'utiliser pour la première fois.

5
ez
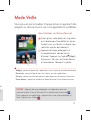
Vous pouvez personnaliser chaque écran en ajoutant des
widgets ou des raccourcis vers vos applications préférées.
Mode Veille
Faites glisser votre doigt vers la gauche
ou la droite pour faire défi ler les écrans.
Arrêtez-vous sur l'écran sur lequel vous
souhaitez ajouter des éléments.
Appuyez de façon prolongée sur
un emplacement vide de l'écran
d'accueil. Appuyez sur l'option Widgets,
Raccourcis, Dossiers ou Fonds d'écran
et sélectionnez l'élément à ajouter.
Widgets : permet d'ajouter des applications mises à jour de manière dynamique
Raccourcis : permet d'ajouter des liens directs vers des applications
Dossiers : permet de créer des dossiers pour organiser vos contacts/raccourcis
Fonds d'écran : permet de modifi er le fond d'écran de l'écran d'accueil actuel
Ajout d'icônes sur l'écran d'accueil
ASTUCE ! Appuyez de façon prolongée sur l'application que vous
souhaitez ajouter à l'écran d'accueil en la sélectionnant à partir de
.
Pour supprimer une application, appuyez dessus de façon prolongée et
faites-la glisser vers l'icône
.
ois.

6
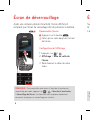
Appuyez sur la touche
.
Faites glisser votre doigt vers le haut
de l'écran.
Après une certaine période d'inactivité, l'écran affi ché est
remplacé par l'écran de verrouillage afi n de préserver la batterie.
Écran de déverrouillage
1. Appuyez sur >
2. Affi chage > Mise en veille de
l'écran.
3. Sélectionnez le délai de votre
choix.
Déverrouiller l'écran
Confi guration de l'affi chage
REMARQUE : Pour verrouiller votre écran à l'aide de la fonction de
verrouillage par code, appuyez sur > > Sécurité et localisation
> Verrouillage de l'écran. Un didacticiel vous explique rapidement
comment confi gurer un verrouillage par schéma.
Su
le W
La
É
A
W

7
ut
ie.
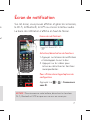
Sur cet écran, vous pouvez affi cher et gérer les sonneries,
le Wi-Fi, le Bluetooth, le GPS ou encore le lecteur audio.
La barre de notifi cation s'affi che en haut de l'écran.
Écran de notifi cation
1. Appuyez sur la barre de notifi cation
et développez-la vers le bas.
2. Appuyez sur les icônes pour
activer ou désactiver les fonctions
correspondantes.
Activation/désactivation de fonctions
Appuyez sur > > Connexions
sans fi l.
Pour affi cher davantage d'options de
confi guration
ASTUCE ! Pour économiser votre batterie, désactivez les fonctions
Wi-Fi, Bluetooth et GPS lorsque vous ne vous en servez pas.
3GGPS
Bluetooth
Wi-Fi
Sonnerie
— Vibra-
tion
<barre de notifi cation>

8
Vo
d
u
bie
SIM
C
R
co
ap
au
sé
Vous pouvez passer un appel ou envoyer un message en
quelques pressions.
Passer un appel/Envoyer un message
1. Appuyez sur .
2. Composez le numéro que vous souhaitez appeler ou
saisissez le nom du contact.
Émission d'un appel
1. Appuyez sur .
2. Appuyez sur Nouveau message.
3. Composez le numéro auquel vous souhaitez envoyer un
message ou appuyez sur pour sélectionner le numéro dans
vos contacts.
4. Saisissez votre message et appuyez sur Envoyer.
Envoi d'un message
REMARQUE : Pour répondre à un appel entrant, faites glisser l'icône
.

9
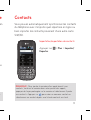
Vous pouvez automatiquement synchroniser les contacts
du téléphone avec n'importe quel répertoire en ligne ou
bien importer les contacts provenant d'une autre carte
SIM/SD.
Contacts
Appuyez sur > Plus > Importer/
Exporter.
Importation/exportation de contacts
REMARQUE : Pour ajouter le numéro d'un appel récent à vos
contacts, localisez le numéro dans votre journal des appels,
appuyez de façon prolongée sur le numéro et sélectionnez Ajouter
aux contacts. Appuyez sur
pour créer un nouveau contact ou
sélectionnez un contact depuis une liste de contacts existants.
en
e
ns
e

10
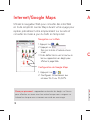
Utilisez le navigateur Web pour consulter des sites Web
en toute simplicité. Lancez Maps durant votre voyage pour
repérer précisément votre emplacement sur la carte et
consulter les mises à jour du trafi c en temps réel.
Internet/Google Maps
1. Appuyez sur > .
2. Appuyez sur .
Saisissez le texte à l'aide du clavier
visuel.
3. Faites défi ler l'écran vers le haut ou le
bas ou rapprochez vos doigts pour
affi cher la page Web.
1. Appuyez sur > .
2. Confi gurez la connexion aux
réseaux Wi-Fi ou 3G/GPS.
Navigation sur le Web
Confi guration de Google Maps
Zoom par pincement : rapprochez ou écartez les doigts sur l'écran
pour effectuer un zoom avant ou arrière lorsque vous naviguez sur
Internet ou lorsque vous visionnez une carte ou une image.
R
m
d
A
C

11
ur
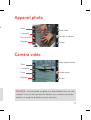
REMARQUE : Avant de prendre une photo, vous devez d'abord insérer une carte
mémoire. Si vous n'insérez pas de carte mémoire, vous ne pourrez pas prendre
de photos ni enregistrer les photos que vous avez prises.
Appareil photo
Caméra vidéo
Zoom
Luminosité
Réglages
Effet de couleur
Mode vidéo
Prendre une photo
Galerie
Zoom
Luminosité
Réglages
Durée
Mode Appareil photo
Lancer enreg.
Galerie

12
Té
de
A
Té
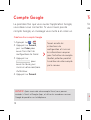
La première fois que vous ouvrez l'application Google,
vous devez vous connecter. Si vous n'avez pas de
compte Google, un message vous invite à en créer un.
1. Appuyez sur >
2. Appuyez sur Suivant,
puis sur Créer pour
ouvrir l'assistant de
confi guration de Gmail.
3. Appuyez sur
pour
ouvrir le clavier, puis
saisissez votre nom/nom
d'utilisateur.
4. Appuyez sur Suivant.
Suivez ensuite les
instructions de
confi guration et saisissez
les informations requises
pour l'activation du compte.
Veuillez patienter pendant
la création de votre compte
par le serveur.
Création d'un compte Google
ASTUCE ! Après avoir créé votre compte Gmail, vous pouvez
accéder à Gmail et Google Apps, et utiliser les nombreux services
Google disponibles sur le téléphone.
Compte Google

13
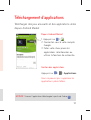
Téléchargez des jeux amusants et des applications utiles
depuis Android Market.
1. Appuyez sur >
2. Connectez-vous à votre compte
Google.
3. Faites votre choix parmi les
applications sélectionnées ou
utilisez la fonction de recherche.
Appuyez sur
> > Applications.
Vous ne pouvez pas supprimer les
applications préinstallées.
Depuis Android Market
Gestion des applications
ASTUCE ! Lancez l'application téléchargée à partir de l'icône .
Téléchargement d'applications

14
1.
C
v
U
3. O
Tra
Vous pouvez rester connecté avec MS Exchange, Yahoo!,
Hotmail et d'autres grands fournisseurs de messagerie.
1. Appuyez sur >
2. Sélectionnez un type de messagerie.
3. Saisissez votre adresse e-mail et votre mot de passe, puis
appuyez sur Suivant.
4. Suivez les instructions restantes.
1. Appuyez sur >
2. Appuyez sur , puis sur Nouveau message.
3. Rédigez votre texte, appuyez sur Pièce jointe pour joindre un
fi chier (le cas échéant), puis appuyez sur Envoyer.
Confi guration d'un compte
Envoi d'un e-mail
ASTUCE ! Vous pouvez activer une alerte sonore et une alerte par
vibration pour vous avertir lorsque vous recevez un nouvel e-mail.
E-mail
Pou
US
Vou
lg.c
vot
pro
con
pou
de
Sy

15
1. Connectez le téléphone à
votre PC à l'aide du câble
USB.
Transférez les fi chiers de
votre PC vers le dossier du
périphérique.
2. Appuyez sur le bouton
Activer le périphérique de
stockage USB.
4. Appuyez sur le bouton
Désactiver le périphérique
de stockage USB et
déconnectez le téléphone.
3. Ouvrez le dossier de mémoire
amovible sur votre PC.
Transfert de musique, photos et vidéos
un
l
Pour synchroniser votre téléphone et votre PC à l'aide du câble
USB, vous devez installer le programme LG PC Suite sur votre PC.
Vous pouvez télécharger ce programme sur le site Web LG (www.
lg.com). Rendez-vous sur http://www.lg.com, puis sélectionnez
votre région, votre pays et votre langue. LG PC Suite est un
programme qui vous permet de synchroniser vos agendas et
contacts Outlook entre votre téléphone et votre ordinateur. Vous
pouvez également utiliser LG PC Suite pour mettre à jour le logiciel
de votre téléphone.
Synchronisez votre téléphone avec votre ordinateur

Wi-Fi
(WLAN)
Ce périphérique peut être utilisé dans tous les pays
européens.
En Europe, le WLAN peut être utilisé à l'intérieur sans
aucune restriction. En revanche, il est impossible de
l'utiliser à l'extérieur en France, en Russie et en Ukraine.
www.lg.com

Quick start guide
LG-C660
To download the latest full version of the user
guide, go to
www.lg.com on your PC or
laptop.
ENGLISH

LGIndex
LG
—
C660 Overview
Setup
Home screen
Unlock screen
Notification screen
Make a call/Send a message
Contacts
Internet/Maps
Camera & Video Camera
Google account
Downloading applications
Email
Sync your phone with your computer
01
02
05
06
07
08
09
10
11
12
13
14
15

1
LG-C660 Overview
Home
Returns to home screen.
Search
Search the web.
Back
Returns to the
previous screen.
Menu
Stereo earphone
connector
Earpiece
Power/Lock key
Charger, micro USB
cable connector
Volume keys
Shift Key — Switch typing to uppercase.
Delete Key
Number and Symbols Key — Press twice to
insert numbers
Language Key
Enter Key
Calendar Key
Email Key

2
To
a
b
yo
S
1. T
Ins
W
is
b
c
S
Before you start using the phone, you need to insert the
SIM card and battery:
Setup
1. Remove the back cover.
3. Insert the battery.
2. Make sure the gold contact
area on the card is facing
downwards.
4. Replace the back cover.
Installing the SIM card and battery

3
To store multimedia fi les, such as pictures taken using
a built-in camera, you must insert a memory card into
your phone.
Setup (cont'd)
1. Turn the phone off before
inserting or removing the
memory card. Remove the
back cover.
2. Insert the memory card
into the slot. Make sure
the gold contact area is
facing downwards.
Installing the memory card
WARNING! Do not insert or remove the memory card when the phone
is turned on. Otherwise, the memory card, as well as your phone, may
become damaged and the data stored on the memory card may be
corrupted. To remove the memory card safely, select Home Screen >
Settings > Storage > Unmount SD Card.
he

4
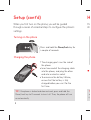
When you fi rst turn on the phone, you will be guided
through a series of essential steps to confi gure the phone's
settings.
Press and hold the Power/Lock key for
a couple of seconds.
Setup (cont'd)
Turning on the phone
Charging the phone
The charging port is on the side of
the phone.
Insert one end of the charging cable
into the phone, and plug the other
end into an electric socket.
To maximise the battery lifetime,
ensure that the battery is fully
charged before you use it for the
fi rst time.
TIP! If the phone is locked and does not work, press and hold the
Power/Lock key for 8 seconds to turn it off. Then, the phone will turn
on automatically.
Yo
sh
H
T
sc
it,

5
's
for
f
ble
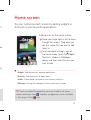
You can customise each screen by adding widgets or
shortcuts to your favourite applications.
Home screen
Swipe your fi nger right or left to move
through the screens. Stop when you
get to a screen that you want to add
items to.
Touch and hold an empty area on
the home screen. Touch the Widgets,
Shortcuts, Folders or Wallpapers
option, and then select the item you
want to add.
Widgets: Add dynamically updating applications
Shortcuts: Add direct links to applications
Folders: Create folders to organise your contacts/shortcuts
Wallpaper: Change the wallpaper for the current home screen
Adding icons to the home screen
TIP! Touch and hold the application you want to add to the home
screen, selecting it from . To delete an application, touch and hold
it, then drag it to the
icon.

6
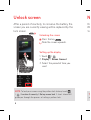
Press the key .
Slide the screen upwards.
After a period of inactivity, to conserve the battery, the
screen you are currently viewing will be replaced by the
lock screen.
Unlock screen
1. Touch >
2. Display > Screen timeout.
3. Select the period of time you
want.
Unlocking the screen
Setting up the display
NOTE: To lock your screen using the pattern lock feature, touch
>
> Location & security > Set up screen lock. A short tutorial will
guide you through the process of setting a pattern lock.
On
Wi
'no
N
T
y
o

7
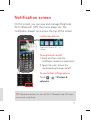
On this screen, you can view and manage Ringtones,
Wi-Fi, Bluetooth, GPS, the music player etc. The
'notification drawer' runs across the top of the screen.
Notification screen
1. Touch and then slide the
notifi cation drawer bar downwards.
2. Touch the icons to turn the
corresponding features on/off.
Turning features on/off
Touch > > Wireless &
networks.
To view further settings options
TIP! To preserve battery life, turn off Wi-Fi, Bluetooth and GPS when
you are not using them.
3GGPS
Bluetooth
Wi-Fi
Ringtone
—
Vibration
<notifi cation drawer>

8
Yo
p
h
im
C
N
n
c
o
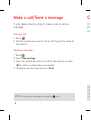
It only takes a few touches to make a call or send a
message.
Make a call/Send a message
1. Touch .
2. Dial the number you want to call or start typing the name of
the contact.
Making a call
1. Touch .
2. Touch New message.
3. Enter the number you want to send the message to, or touch
to select a number from your contacts.
4. Compose your message and press Send.
Sending a message
NOTE: To answer an incoming call, drag the icon.

9
You can automatically synchronise the contacts on the
phone with any of your online address books, or even
import contacts from another SIM/SD card.
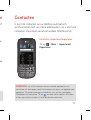
Contacts
Touch > More > Import/Export.
Importing/Exporting contacts
NOTE: To add a number from a recent call to your contacts, locate the
number in your call log, touch and hold the number, then select Add to
contacts. Touch
to create a new contact entry, or choose from a list
of existing contacts.
of

10
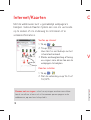
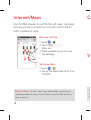
Use the Web browser to surf the Net with ease. Use Maps
during a journey to pinpoint your location and check for
traffi c updates en route.
Internet/Maps
1. Touch > .
2. Touch .
Enter text.
3. Scroll up/down or pinch to view
the webpage.
1. Touch
> .
2. Set up the connection to Wi-Fi or
3G/GPS.
Browsing the Web
Setting up Maps
Pinch-to-Zoom: Use your index finger and thumb in a pinching or
spreading motion to zoom in or out when using the Web browser, a
map or pictures.
N
y
o
C
V

11
ps
or
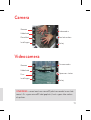
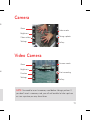
NOTE: You need to insert a memory card before taking a picture. If
you don't insert a memory card, you will not be able to take a picture
or save a picture you may have taken.
Camera
Video Camera
Zoom
Brightness
Settings
Colour effect
Video mode
Taking a photo
Gallery
Zoom
Brightness
Settings
Duration
Camera mode
Start recording
Gallery

12
Do
Ma
T
D
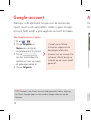
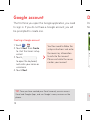
The fi rst time you open the Google application, you need
to sign in. If you do not have a Google account, you will
be prompted to create one.
1. Touch >
2. Touch Next then Create
to start the Gmail setup
wizard.
3. Touch
to open the keyboard,
and enter your name or
username.
4. Touch Next.
You then need to follow the
setup instructions and enter
the necessary information
to activate the account.
Please wait while the server
creates your account.
Creating a Google account
TIP! Once you have created your Gmail account, you can access
Gmail and Google Apps, and use Google's many services on the
phone.
Google account

13
Download fun games and useful apps from the Android
Market.
1. Touch >
2. Sign in to your Google account.
3. Select an app from the list of
featured apps or use the search
feature.
Touch
> > Applications.
You cannot delete the pre-installed
applications.
From the Android Market
Managing applications
TIP! Launch the downloaded application from the icon.
Downloading applications
ed
l
r

14
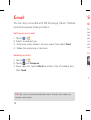
You can stay connected with MS Exchange, Yahoo!, Hotmail
and other popular email providers.
1. Touch >
2. Select a mailbox type.
3. Enter your email address and password, then touch Next.
4. Follow the remaining instructions.
1. Touch >
2. Touch
and Compose.
3. Enter your text, touch Attach to attach a fi le (if needed) and
then Send.
Setting up an account
Sending an email
TIP! You can set sound and vibration alerts to notify you when you
receive a new email.
Email
To
nee
fro
yo
u
syn
you
ver
S
co
1. C
3. O
Tra

15
mail
d
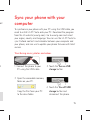
To synchronise your phone with your PC using the USB cable, you
need to install LG PC Suite onto your PC. Download the program
from the LG website (www.lg.com). Go to www.lg.com and select
your region, country and language. You can use the LG PC Suite to
sync Outlook contacts and calendar between your computer and
your phone, and can use to update your phone fi rmware with latest
version.
Sync your phone with your
computer
1. Connect the phone to your
PC using the USB cable.
Copy the fi les from your PC
to the drive folder.
2. Touch the Turn on USB
storage button.
4. Touch the Turn off USB
storage button and
disconnect the phone.
3. Open the removable memory
folder on your PC.
Transferring music, photos and videos


Wi-Fi
(WLAN)
This equipment may be used in all European countries.
In the EU, the WLAN can be used indoors with no
restrictions, but cannot be used outdoors in France,
Russia and Ukraine.
www.lg.comP/N: MBM63479005 (1.0)
-
 1
1
-
 2
2
-
 3
3
-
 4
4
-
 5
5
-
 6
6
-
 7
7
-
 8
8
-
 9
9
-
 10
10
-
 11
11
-
 12
12
-
 13
13
-
 14
14
-
 15
15
-
 16
16
-
 17
17
-
 18
18
-
 19
19
-
 20
20
-
 21
21
-
 22
22
-
 23
23
-
 24
24
-
 25
25
-
 26
26
-
 27
27
-
 28
28
-
 29
29
-
 30
30
-
 31
31
-
 32
32
-
 33
33
-
 34
34
-
 35
35
-
 36
36
-
 37
37
-
 38
38
-
 39
39
-
 40
40
-
 41
41
-
 42
42
-
 43
43
-
 44
44
-
 45
45
-
 46
46
-
 47
47
-
 48
48
-
 49
49
-
 50
50
-
 51
51
-
 52
52
-
 53
53
-
 54
54
-
 55
55
-
 56
56


