Panasonic CNDV1800EN Handleiding
- Categorie
- Navigators
- Type
- Handleiding

DV1800
MOVILE NAVIGATION
SYSTEM
LA
S
T
DEST
ENTER
POS
ZOOM
M
O
D
E
P
O
P
U
P
S
E
T
U
P
V
O
IC
E
MOBILE NAVIGATION SYSTEM
NAVIGATIONSSYSTEM
SYSTEME DE NAVIGATION MOBILE
MOBIEL NAVIGATIESYSTEEM
SISTEMA DI NAVIGAZIONE MOBILE
CN
-
DV1800EN
Operating Instructions
Bedienungsanleitung
Manuel d’instruction
Gebruiksaanwijzing
Manuale di istruzioni
Matsushita Electric Industrial Co., Ltd.
Central P.O. Box 288, Osaka 530-91, Japan
YEFM283704 B1200-0 Printed in Japan
¡Please read these instructions carefully before using this product and save this manual for future use.
¡Bitte lesen Sie diese Bedienungsanleitung vor der Verwendung dieses Produktes aufmerksam durch und bewahren Sie sie
danach für spätere Nachschlagzwecke sorgfältig auf.
¡Prière de lire ces instructions attentivement avant d’utiliser le produit et garder ce manuel pour l’utilisation ultérieure.
¡Leest u deze instructie alstublieft zorgvuldig door voor u dit product in gebruik neemt en bewaar deze handleiding voor
later gebruik.
¡
Si prega di leggere attentamente queste istruzioni prima di usare questo prodotto e di conservare questo manuale per usi futuri.
CN-DV1800EN-00-01 \ 00.12.12 4:40 PM y [ W 1

2 287
ITALIANO
Features.................................................................. 8
Use This Product Safely ....................................... 8
Introduction............................................................ 9
Precautions .......................................................... 10
Warning.............................................................. 11
Caution .............................................................. 11
Preparing the System for Initial Use.................. 12
Names and Functions of Remote Control Buttons .... 12
Starting the Mobile Navigation System.............. 13
System Overview............................................... 14
Map Displays ..................................................... 15
Pop up Menu ..................................................... 18
Wiring Check ..................................................... 19
Automatic Distance Correction Check ............... 20
Checking GPS Satellite Reception .................... 21
Operating the System While Driving.................. 21
Destination Input and Route Search.................. 22
Character Input.................................................. 22
Entering an Address as Destination .................. 24
Entering an Intersection as Destination............. 27
Entering a POI as Destination ........................... 29
Entering a Destination from Your Destination
History ............................................................... 35
Entering a Destination Stored in your Marked Point
...... 36
Selecting a Destination Directly from the Map
Display............................................................... 37
Voice Guidance.................................................... 38
Terminating Route Search .................................. 39
Previewing a Route ............................................. 39
Canceling a Route ............................................... 39
Merkmale .............................................................. 64
Für einen sicheren Gebrauch dieses Gerätes
.......... 64
Vorwort ................................................................. 65
Sicherheitshinweise ............................................ 66
Warnung ............................................................ 67
Vorsicht.............................................................. 67
Vorbereitung des Systems ................................. 68
Funktionen der Fernbedienung......................... 68
Starten des Navigationssystems ....................... 69
Landkarten......................................................... 71
Pop-up-Menü..................................................... 74
Überprüfen der Anschlüsse ............................... 75
Überprüfen der automatischen
Entfernungskorrektur ......................................... 76
Überprüfen der GPS-Satellitenempfangs ......... 77
Bedienung des Systems während der Fahrt ..... 77
Zieleingabe und Routenplanung........................ 78
Zeicheneingabe................................................. 78
Routenplanung anhand der Adresse................. 80
Routenplanung anhand einer Kreuzung............ 83
POI-Kategorie.................................................... 85
Routenplanung anhand eines Ziels aus dem
Zielarchiv ........................................................... 91
Routenplanung anhand von markierten Punkten
...... 92
Routenplanung anhand eines direkt auf der Karten
gewählten Ziels.................................................. 93
Akustische Fahrhinweise ................................... 94
Abbrechen der Routenplanung.......................... 95
Routenvorschau .................................................. 95
Löschen einer geplanten Route ......................... 95
Avantages
.................................................................. 120
Utilisation du produit en sécurité
....................... 120
Introduction
............................................................... 121
Précautions à prendre
............................................ 122
Avertissement .......................................................... 123
Attention................................................................... 123
Préparation pour l’utilisation initiale du système.... 124
Noms et fonctions des touches de télécommande.. 124
Démarrage du système de navigation mobile ......... 125
Affichage des cartes ................................................ 127
Menu ascendant ...................................................... 130
Vérification des connexions..................................... 131
Vérification de la correction automatique de distance
...... 132
Vérification de la réception du satellite GPS............ 133
Utilisation du système pendant le voyage ............... 133
Entrée de la destination et recherche de l’itinéraire
. 134
Entrée des caractères.............................................. 134
Entrée d’une adresse comme destination ............... 136
Définition d’une intersection par l’entrée d’un
nom de rue............................................................... 139
Entrée d’un point d’intérêt comme destination......... 141
Entrée d’une destination à partir de l’historique
de vos destinations.................................................. 147
Entrée d’une destination enregistrée dans votre
Site coché................................................................ 148
Destination directe d’une destination à partir du
plan affichée ............................................................ 149
Guidage vocal
........................................................... 150
Fin de la recherche de l’itinéraire
....................... 151
Simulation d’un itinéraire
...................................... 151
ENGLISH DEUTSCH FRANÇAIS
Generali
Alimentazione : C.c.12V (Tensione di prova 14,4 V), massa negativa
Consumo di corrente : Meno di 2,5 A
Dimensioni : 178(L) x 50(A) x 170(P) mm
Peso : 2,0 kg
Frequenza di ricezione : 1575,42 MHz
Sensibilità di ricezione : –130 dBm
Metodo di ricezione : 8 canali parallelo
Codice di ricezione : Codice C/A
Sistema del canale : Multicanale
Canali : 8
Satelliti GPS ricevuti : Massimo 8
Cartina di guida : Formato DVD SDAL
Uscita immagine : RGB: Schermata di navigazione
NTSC: 1,0 Vp-p, 75 Ω, spinotto RCA
(Schermata di navigazione)
Antenna GPS
Tipo Microstrip Planer
Dimensioni 42(L) x 14(A) x 50(P) mm
Peso 120 g
Telecomando
Dimensioni 42(L) x 43(A) x 152(P) mm
Peso 78 g
Nota: Il disegno e i dati tecnici sono soggetti a cambiamenti senza preavviso. Il peso
e le dimensioni sono approssimative.
CN-DV1800EN-00-01 \ 00.12.12 4:40 PM y [ W 2

3
Detouring.............................................................. 40
Alternative Route ............................................... 40
Detour xxkm ...................................................... 40
Avoid Streets ..................................................... 41
Via Point ............................................................ 41
Marked Point ........................................................ 43
Marking your Current Position........................... 43
Marking Any Point on the Map........................... 43
Changing a Marked Point Icon .......................... 44
Renaming a Marked Point................................. 45
Deleting a Marked Point .................................... 46
Setup Menu .......................................................... 47
Basic Setup Menu Operations........................... 47
Map.................................................................... 48
Route................................................................. 50
System Setup .................................................... 51
System Information............................................ 53
Simulation.......................................................... 53
Demonstration ................................................... 53
Edit Marked Point .............................................. 54
Vehicle Position ................................................. 54
GPS ....................................................................... 55
Map Matching.................................................... 55
Intelligent Map Matching..................................... 56
Positioning Accuracy ......................................... 56
Route Search ....................................................... 57
Route Guide ......................................................... 58
Troubleshooting .................................................. 59
Specifications ...................................................... 63
Abweichen von der geplanten Route ................ 96
Alternativroute.................................................... 96
Umgehungxxkm................................................. 96
Strassen vermeiden........................................... 97
Zwischenziele.................................................... 97
Speichern von markierten Punkten im Punktspeieher
...... 99
Markieren des aktuellen Standorts.................... 99
Markieren eines beliebigen Punktes auf der Karte
........ 99
Zuweisen eines Icons...................................... 100
Zuweisen eines Namens ................................. 101
Löschen eines markierten Punktes ................. 102
Setup -Menü ....................................................... 103
Inhalt des Setup-menüs................................... 103
Karte................................................................ 109
Route............................................................... 106
System-Präferenzen........................................ 107
Systeminfarmationen....................................... 109
Simulation........................................................ 109
Demonstration ................................................. 109
Editieren von markierten Punkten.................... 110
Fahrzeugposition ............................................. 110
GPS...................................................................... 111
Map-Matching .................................................. 111
Intelligentes Map-Matching............................... 112
Zuverlässigkeit der Positionsdaten .................. 112
Routenplanung .................................................. 113
Routenführung................................................... 114
Störungsbeseitigung ........................................ 115
Technischen Daten ............................................ 119
Annulation d’un itinéraire
..................................... 151
Détour
......................................................................... 152
Itinéraire alternatif.................................................... 152
Détour de xx km....................................................... 152
Exclusion des rues................................................... 153
Point de passage..................................................... 153
Site coché
.................................................................. 155
Repérage de votre position actuelle ........................ 155
Repérage d’un site sur carte.................................... 155
Changement d’icône d’un site coché....................... 156
Changement de nom d’un site coché ...................... 157
Suppression d’un point repéré................................. 158
Menu d
’Installation.................................................... 159
Opérations de base sur le menu
d
’Installation ....... 159
Carte........................................................................ 160
Itinéraire................................................................... 162
Installation du système ............................................ 163
Informations............................................................. 165
Simulation................................................................ 165
Démonstration ......................................................... 165
Edition du site coché................................................ 166
Position du véhicule................................................. 166
GPS
............................................................................. 167
Concordance avec la carte...................................... 167
Collationnement intelligent avec la carte
......... 168
Précision de positionnement.................................... 168
Recherche d’un itinéraire
...................................... 169
Guide des itinéraires
.............................................. 170
Dépistage de défauts
.............................................. 171
Spécifications
........................................................... 175
ENGLISH DEUTSCH FRANÇAIS

4
Kenmerken .................................................................. 176
Gebruik dit toestel op een veilige manier................. 176
Introductie ................................................................... 177
Voorzorgen .................................................................. 178
Waarschuwing ......................................................... 179
Let op....................................................................... 179
Voorbereiden van het systeem alvorens het in gebruik
te nemen ...................................................................... 180
Namen en functies van toetsen van de afstandsbedien-
ing............................................................................ 180
Starten van het mobiel navigatiesysteem................ 181
Kaartdisplays ........................................................... 183
Pop Up menu........................................................... 186
Controleren van de bedrading ................................. 187
Controle voor automatische afstandcorrectie .......... 188
Controleren van de GPS-satellietontvangst............. 189
Bediening van het systeem tijdens het rijden .......... 189
Invoeren van de bestemming en zoeken naar een
route........................................................................ 190
Invoeren van tekens ................................................ 190
Invoeren van een adres voor de bestemming
..... 192
Invoeren van een kruising voor een bestemming
........ 195
Invoeren van een IP voor de bestemming............... 197
Invoeren van de bestemming uit uw bestemming-
geschiedenis............................................................ 203
Invoeren van een bestemming die als gemarkeerd punt
is vastgelegd............................................................ 204
Direct een bestemming van het kaartdisplay kiezen
..................................................................................205
Stem-begeleiding
..................................................... 206
Stoppen van het route-zoeken
............................. 207
Vooraf bekijken van de route
................................ 207
Caratteristiche
.......................................................... 232
Utilizzo sicuro del prodotto
.................................. 232
Introduzione
.............................................................. 233
Precauzioni
............................................................... 234
Avvertenza............................................................... 235
Precauzione............................................................. 235
Preparazione del sistema per l’utilizzo iniziale
236
Nomi e funzioni dei tasti del telecomando ............... 236
Avvio del sistema di navigazione mobile ................. 237
Visualizzazioni della cartina..................................... 239
Menù a comparsa.................................................... 242
Controllo del cablaggio ............................................ 243
Preparazione del sistema per l’utilizzo iniziale ........ 244
Controllo della ricezione satellitare GPS ................. 245
Azionamento del sistema durante la guida.............. 245
Immissione della destinazione e ricerca del
percorso
..................................................................... 246
Immissione di caratteri............................................. 246
Immissione di un indirizzo come destinazione......... 248
Immissione di un incrocio come destinazione ......... 251
Immissione di un punto d’interesse come destinazione
................................................................................. 253
Immissione di una destinazione dalla propria cronologia
delle destinazioni ..................................................... 259
Immissione di una destinazione memorizzata nei propri
punti contrassegnati................................................. 260
Selezione di una destinazione direttamente dalla visual-
izzazione della cartina ............................................. 261
Istruzioni vocali di guida
....................................... 262
Interruzione della ricerca del percorso
............. 263
Anteprima di un percorso
..................................... 263
Cancellazione di un percorso
.............................. 263
Deviazione
................................................................. 264
Percorso alternativo................................................. 264
NEDERLANDS ITALIANO

5
Annuleren van een route
....................................... 207
Andere routes
........................................................... 208
Alternatieve route..................................................... 208
Omeiding met xx km................................................ 208
Te Vermijd straten .................................................... 209
Tussenpunt .............................................................. 209
Gemarkeerd punt
..................................................... 211
Markeren van de huidige positie .............................. 211
Markeren van een punt op de kaart ......................... 211
Veranderen van een icoon voor een gemarkeerd punt
..... 212
Veranderen van een naam voor een gemarkeerd punt .....
213
Wissen van een gemarkeerd punt........................... 214
Instellingen menu
.................................................... 215
Basishandelingen met het Instellingen menu .......... 215
Kaart ........................................................................ 216
Route ....................................................................... 218
Systeem Informatie.................................................. 219
Informatie Instellingen.............................................. 221
Simulatie.................................................................. 221
Demonstratie ........................................................... 221
Gemarkeerd Punt Configureren............................... 222
Positie voertung....................................................... 222
GPS (Global Positioning System)
....................... 223
Kaart-vergelijking..................................................... 223
Intelligente kaart-vergelijking
............................... 224
Positie-nauwkeurigheid............................................ 224
Zoeken naar een route
........................................... 225
Route-begeleiding
................................................... 226
Oplossen van problemen
...................................... 227
Technische gegevens
............................................. 231
Deviazione xxKm..................................................... 264
Aggiramento di strade.............................................. 265
Punto intermedio...................................................... 265
Punto contrassegnato
............................................ 267
Contrassegnare la propria posizione corrente......... 267
Contrassegnare qualsiasi punto sulla cartina.......... 267
Cambiare l’icona di un punto contrassegnato.......... 268
Cambiare nome a un punto contrassegnato............ 269
Eliminare un punto contrassegnato ......................... 270
Menù d’Installazione
............................................... 271
Operazioni fondamentali del
Menù d’Installazione................................................ 271
Cartina ..................................................................... 272
Percorso .................................................................. 274
Impostaione del sistema.......................................... 275
Informazioni del sistema.......................................... 277
Simulazione ............................................................. 277
Dimostrazione.......................................................... 277
Configurazione di un punto contrassegnato ............ 278
Posizione veicolo..................................................... 278
GPS
............................................................................. 279
Corrispondenza della Cartina .................................. 279
Corrispondenza intelligente della Cartina
...................................................................................... 280
Precisione del posizionamento................................ 280
Ricerca del percorso
.............................................. 281
Istruzioni di guida del percorso
......................... 282
Correzione dei difetti di funzionamento
............ 283
Dati tecnici
................................................................. 287
NEDERLANDS ITALIANO

6
Label Indications and Their Locations
Warnetiketten und deren Anbringungsort
Indications portées les étiquettes et
emplacement
Aanduiding van de labels en hun plaats
Indicazioni delle etichette e le loro posizioni
VORSICHT!
UNSICHTBARE LASERSTRAHLUNG!
WENN ABDECKUNG GEÖFFNET IST,
NICHT DEM LASERSTRAHL AUSSETZEN.
¡Caution Mark
¡Warnzeichen
¡Marque d’avertissement
¡Waarschuwingsteken
¡Marca di precauzione
CLASS 1
LASER PRODUCT
¡APPAREIL À LASER DE CLASSE 1
¡KLASS 1 LASER APPARAT
¡LUOKAN 1 LASERPLAITE
¡APPARECCHIO LASER CLASSE 1
VARO! Avattaessa ja suojalukitus ohitettaessa
olet alttiina näkymättömälle lasersäteilylle. Älä
kasto säteeseen.
VARNING! Osynlig laserstrålning när denna
del är öppnad och spärren är urkopplad.
Betrakta ej strålen.
ADVERSEL! Usynlig laserstråling når deksel
åpnes og sikkerhedslås brytes. Unngå
eksponering for strålen.
DANGER! Invisible laser radiation when open.
Avoid direct exposure to beam.
ADVARSEL! Usynligt laserlys udstråles ved
åbning. Undgå direkte bestråling.
¡Deck Ass’y (Upper Side)
¡Geräteansicht
(Oberseite)
¡Assemblage de la table
lecture (Côté supérieur)
¡Dekkbevestig
(Bovenkant)
¡Gruppo della piastra
(Lato superiore)
Accessories and Documentation
The mobile navigation system comes with the
accessories shown right. Please make sure that all
accessories are included. In the event that a part
should be missing, please contact your dealer.
Zubehör und Dokumentation
Das Navigationssystem wird mit dem unten
aufgeführten Zubehör geliefert. Bitte vergewissern
Sie sich, dass alle Teile vorhanden sind. Sollte die
Lieferung nicht vollständig sein, wenden Sie sich
bitte an Ihren Fachhändler.
Accessoires et documentation
Le système de navigation mobile est fourni avec
les accessoires indiqués ci-dessous. Assurez-vous
de la présence de tous les accessoires. Au cas où
une pièce serait manquante, contactez le distribu-
teur local.
Accessoires en documentatie
Bij dit mobiel navigatiesysteem zijn de volgende
accessoires geleverd.
Controleer bij het uitpakken dat alle accessoires
aanwezig zijn. Mocht er iets ontbreken, neem dan
direct contact op met de plaats van aankoop.
Accessori e documentazione
Il sistema di navigazione mobile viene fornito con
gli accessori mostrati sotto.
Assicurarsi che tutti gli accessori siano inclusi. Nel
caso in cui una parte dovesse mancare, contattare
il proprio rivenditore.
Inserting Batteries into the Remote
Control
Einsetzen der Batterien in die
Fernbedienung
Mise en place des piles dans la
télécommande
Plaatsen van batterijen in de afstands-
bediening
Inserimento delle pile nel telecomando

7
8 Remote Control
Fernbedienung
Téléco mmande
Afstandsbediening
Telecomando
7 Remote Control Holder
Fernbedienungshalter
Porte-télécommande
Houder voor afstandsbediening
Portatelecomando
9 Two AA Batteries (R6PU)
Zwei Mignon-Batterien (R6PU)
Deux piles AA (R6PU)
Twee AA batterijen (R6PU)
Due pile AA (R6PU)
Operating Instructions
(this manual)
Bedienungsanleitung
(das vorliegende Handbuch)
Instructions d’utilisation
(ce manuel)
Gebruiksaanwijzing (dit
boekje)
Manuale di istruzioni
(questo manuale)
Installation Instruction
Einbauanleitung
Instructions d
’installation
Installatie-aanwijzingen
Instruzioni per l
’instal-
lazione
4 GPS Antenna
GPS-Antenne
Antenne de GPS
GPS-antenne
Antenna GPS
Operation Chart
Kurzanleitung
Diagramme d'utili-
sation
Bedieningsschem
a
Diagramma delle
operazioni
q
Insert new batteries.
Note : Observing correct polarity (+ and –).
Neue Batterien einlegen.
Hinweis: Polarität beachten (+ und –).
Mettez des piles neuves en place.
Remarque : Observez la polarité cor-
recte (+ et –).
Inzetten van nieuwe batterijen.
Note : Opmerking: Let op de juiste
plaatsing van de polen (+ en –).
Inserire pile nuove.
Nota : osservare la polarità corretta (+
e –).
Close the battery compartment cover.
Batteriefachdeckel schliessen.
Remettez le couvercle du comparti-
ment de piles en place.
Sluit de afdekking van het batterijvak.
Chiudere il coperchio del vano delle
pile.
e
Warranty Card
Garantieschein
Carte de garantie
Garantiebewijs
Certificato di
garanzia
SET UPVOICE
Z
O
O
M
M
O
D
E
S
E
T
U
P
L
A
S
T
D
E
S
T
P
O
S
ENTER
D
V
1
8
0
0
XXXXXXXXXXXXXXX
XXXXXXXXXXXXXXXXX
XXXXXXXXXXXXXX
XXXXXXXXXXXXXXXX
CN
-
DV1800EN
Operating Instructions
XXXXXXXXXXX
XXXXXXXXXXXXXX
XXXXXXXXXXX
XXXXXXXXX
PANEUROPEAN
GUARANTEE
/ Technics
SET UPVOICE
Z
O
O
M
M
O
D
E
S
E
T
U
P
L
A
S
T
D
E
S
T
P
O
S
ENTER
D
V
1
8
0
0
XXXXXXXXXXXXXXX
XXXXXXXXXXXXXXXXX
XXXXXXXXXXXXXX
XXXXXXXXXXXXXXXX
CN
-
DV1800EN
XXXXXXXXXXX
XXXXXXXXXXXXXX
XXXXXXXXXXX
XXXXXXXXX
i{j
i{j
i|j
i|j
w
Open the battery compartment cover.
Lift up the tab .
Batteriefachdeckel öffnen.
Den Fingernagel in den Schlitz
einführen und den Batteriefachdeckel unter
leichtem Druck abschieben.
Otez le couvercle du compartiment de piles.
Soulevez le taquet .
Open de afdekking van het batterijvak.
Druk het lipje omhoog om de afdekking
te verwijderen.
Aprire il coperchio del vano delle pile.
Sollevare la linguetta .
For other mounting kit, refer to the
Installation Instructions.
Für andere Montagesätze siehe die
Einbauanleitungen.
Pour d’autres pièces de montage, référez-
vous aux instructions d’installation.
Raadpleeg de installatie-aanwijzingen voor
andere bevestigingsmaterialen.
Per altre parti di montaggio far riferimento
alle istruzioni per l’installazione.
Panasonic
MOBILE NAVIGATIONSYSTEM
Operation Chart
CN-DV1800EN
Destination setting by address
D
E
S
T
M
E
N
U
ENTER
ENTER
ENTER
ENTER
ENTER
ENTER
Press DEST. Select [Address]
using the joystick. Press
ENTER.
Select [Street] using the joystick.
Press ENTER.
Input a street name using the
joystick. Press ENTER.
Select [City] using the joystick.
Press ENTER.
Input a city name using the joy-
stick. Press ENTER.
Select [Postal Code] using the
joystick. Press ENTER.
Input a postal code using the
joystick. Select [End] using the
joystick. Press ENTER.
ENTER
YEFMXXXXC
ENGLISH

ENGLISH
8
Panasonic welcomes you to our ever growing family of electronic product owners. We
know that this product will bring you many hours of enjoyment. Our reputation is built
on precise electronic and mechanical engineering, and our products are manufactured
with carefully selected components and assembled by people who take pride in their
work. Once you discover the quality, reliability, and value we have built into this prod-
uct, you too will be proud to be a member of our family.
❑ Features
The CN-DV1800EN DVD Mobile Navigation System has following special features:
• Detailed maps are used.
Selected destinations will be displayed for easy viewing.
• Desired places can be registered.
A destination can be set whenever you like from among the desired places
and facilities registered.
* : A DVD (Digital Versatile Disc) is a storage media capable of storing 4.7 GB of data,
which is about 7 times larger than the storage capacity of a CD-ROM.
* : DVD Audio and video are not supported by this unit.
* : All formats of Video CD and CD are not supported by this unit.
❑ Use This Product Safety
When Driving
Keep the volume level low enough to be aware of road and traffic conditions.
When Car Washing
Do not expose the product to water or excessive moisture. This could cause electrical
shorts, fire or other damage.
When Parked
Parking in direct sunlight can produce very high temperatures inside your vehicle. Give
the interior a chance to cool down before starting navigation.
Use the Proper Power Supply
This product is designed to operate with a 12 volt DC, negative ground battery system.
Protect the Disc Mechanism
Avoid inserting any foreign objects into the slot of this unit.
Failure to observe this many cause malfunction due to the precise mechanism of this
unit.
Use Authorized Servicenters
Do not attempt to disassemble or adjust this precision product. Please refer to the
Service Centre list included with this product for service assistance.
For Installation
The unit should be installed in a horizontal position with the front end up at a conve-
nient angle, but not more than 30°.
Your in-vehicle navigation system requires a complex installation procedure to ensure
reliable operation. If you experience any operational difficulties, or require a repair,
please refer to the original installer or your supplying dealer for assistance.

ENGLISH
9
Mobile Navigation System
Map Related Issues
This mobile navigation system utilizes GPS* satellite signals to track and display
your vehicle's current position, and guide you from your starting point to your
destination along a calculated route.
* : GPS (Global Positioning System) is a position detecting system utilizing the
signals from GPS satellites deployed by the U.S. Defense Department.
Notice to Customers
Map discs you may use are optionally available. For more information,
contact the store where you purchased the product.
Map Disc
This product supports the Navtech DVD-SDAL map disc format only.
Panasonic cannot be responsible for accidents resulting from the use of map
discs of other formats.
If you believe there to be an error in the map data, please report this directly to
Navigation Technologies via the ‘driver feedback’ form located on their website.
www.navtech.com or if you do not have access to the web, please forward this infor-
mation to the following address.
Note: Please have the map and software version numbers available in advance. This
information can be found by:
1. Press SET UP on the remote control.
2. Using the remote control joystick scroll
through the menu options and select “System
Information” and press ENTER.
3. Select “Version” and press ENTER. Map and
software Versions are now displayed.
For further assistance please refer to pages 53 of the instruction book.
Navigation Technologies’ address:
Navigation Technologies Customer Service
PO Box 501 7300 AM Apeldoorn The Netherlands
TELEPHONE NUMBER
+ 800 18 23 53 22 (Toll Free) or + 31 555 384 245
FAX NUMBER
+ 31 555 433 947
(When calling, replace the + sign with the international dialling
code for The Netherlands from your country)
For UK Customers Only
For all other enquires please contact Panasonic U.K Customer Care Centre on
Tel: 08705 357357. Or visit our website at: www.panasonic.co.uk

ENGLISH
10
Read the operating instructions for the player and all other components of your Mobile
Navigation System carefully before using the system. They contain instructions on how to
use the system in a safe and effective manner. Panasonic assumes no responsibility for
problems resulting from failure to observe the instructions given in this manual.
This manual uses pictographs to show you how to use the product safely and alert you
to potential dangers resulting from improper connections and operations. The meanings of
the pictographs are explained at right. It is important that you fully understand their mean-
ings in order to use this manual and the system properly.
AGREEMENT
PLEASE READ THIS AGREEMENT CAREFULLY BEFORE USING OUR PRODUCT
This software and data (“Software”) is provided for your personal, non-commercial use only. Copyright and other
Laws protect it.
By using this Software you agree to the following terms and conditions.
You agree to use this Software for solely personal use or, if applicable, for use in your business‘ internal opera-
tions, and not for service bureau, time-sharing or other similar purposes. Except to save it on your hard drive, you
may not copy or reproduce this Software, and may not distribute it in any form, for any purpose. You agree not to
disassemble, decompile or otherwise reverse engineer the Software, except to the extent expressly permitted by
mandatory laws.
Further Restrictions
. You may not use this Software with: (i) any positioning devices, including without limitation,
any GPS receivers, compasses, wheel sensors, or any other distance or direction sensors; or (ii) any products,
systems or applications installed in or otherwise connected to or in communication with vehicles, or capable of
vehicle navigation, positioning, dispatch, real time route guidance, fleet management or similar applications; or (iii)
any hand-held computer devices, cell phones or similar mobile devices.
No warranty. This Software is provided to you “as is,” and you agree to use it at your own risk. Panasonic and its
suppliers and licencers make no guarantees, representations or warranties of any kind, express or implied, arising
by law or otherwise, including but not limited to, content, quality, accuracy, completeness, effectiveness, reliability,
fitness for a particular purpose, usefulness, use or results to be obtained from this Software will be uninterrupted or
error-free.
Disclaimer of Warranty
: Panasonic AND ITS SUPPLIERS AND LICENSORS DISCLAIM ANY WARRANTIES,
EXPRESS OR IMPLIED, OF QUALITY, PERFORMANCE, MERCHANTABILITY, FITNESS FOR A PARTICULAR
PURPOSE OR NON-INFRINGEMENT. Some States, Territories and Countries do not allow certain warranty
exclusions, so to that extent the above exclusion may not apply to you.
Disclaimer of Liability
: Panasonic AND ITS SUPPLIERS AND LICENSORS SHALL NOT BE LIABLE TO YOU: IN
RESPECT OF ANY CLAIM, DEMAND OR ACTION, IRRESPECTIVE OF THE NATURE OF THE CAUSE OF THE
CLAIM, DEMAND OR ACTION ALLEGING ANY LOSS, INJURY OR DAMAGES, DIRECT OR INDIRECT, WHICH
MAY RESULT FROM THE USE OR POSSESSION OF THE SOFTWARE; OR FOR ANY LOSS OF PROFIT,
REVENUE, CONTRACTS OR SAVINGS, OR ANY OTHER DIRECT, INDIRECT, INCIDENTAL, SPECIAL OR
CONSEQUENTIAL DAMAGES ARISING OUT OF YOUR USE OF OR INABILITY TO USE THIS SOFTWARE,
ANY DEFECT IN THE SOFTWARE, OR THE BREACH OF THESE TERMS OR CONDITIONS, WHETHER IN AN
ACTION IN CONTRACT OR TORT OR BASED ON A WARRANTY, EVEN IF Panasonic OR ITS LICENSORS
HAVE BEEN ADVISED OF THE POSSIBILITY OF SUCH DAMAGES. Some states, Territories and Countries do
not allow certain liability exclusions or damages limitations, so to that extent the above may not apply to you.
Indemnity. You agree to indemnify and hold Panasonic and its suppliers and licensors harmless from any liability
or loss of any kind arising out of or in connection with any use by you of this Software.
Export Control
. You agree not to export from anywhere any part of the Software provided to you or any direct
product thereof except in compliance with applicable export laws, rules and regulations.
Governing Law
. The above terms and conditions shall be governed by the laws of the Netherlands, without giving
effect to (i) its conflict of laws provisions, or (ii) the United Nations Convention for contracts for the international
Sale of Goods.

ENGLISH
11
Caution
This label intends to alert the user to the pres-
ence of important operating instructions.
Failure to heed the instructions may result in
injury or material damage.
Cautions :
• COMPLY WITH LOCAL TRAFFIC REGULATIONS
WHILE DRIVING
When using the navigation system, always comply with the local traffic reg-
ulations.
• DO NOT USE THE SYSTEM OUTSIDE THE VEHICLE
Do not use the system for purposes other than described in this manual.
Failure to do so may result in electric shock or injury.
• STOP THE VEHICLE BEFORE CARRYING OUT ANY
OPERATIONS THAT COULD INTERFERE WITH
YOUR DRIVING
If loading or unloading a disc or raising or lowering the monitor could inter-
fere with your driving (for example gear lever shifting), stop the vehicle in a
safe location first, then operate the system.
Caution
How to abandon battery cells
(Netherlands)
This appliance contains a lithium battery for memory back-up
Please consult your dealer when the battery needs replacement.
Do not throw away the battery. Instead, take it to the designated collection point
and hand it in as hazardous waste.
Bij dit produkt zijn batterijen geleverd. Wanneer deze
leeg zijn, moet u ze niet weggooien maar inleveran als
KCA.
Warning
This label intends to alert the user to the pres-
ence of important operating instructions.
Failure to heed the instructions may result in
severe injury or death.
Warning :
DO NOT OPERATE THE SYSTEM NOR LOOK AT
THE MONITOR SCREEN WHILE DRIVING.
Do not change settings and destination locations while driving the vehicle.
Minimize the amount of viewing the monitor screen and listen to the voice
guidance while driving. Operating the system will distract the driver from look-
ing ahead of the vehicle and cause accidents. Always stop the vehicle in a
safe location before operating the system.
Warning

ENGLISH
12
When to Replace Batteries
• Replace the batteries as soon as possible when the sys-
tem does not respond properly to remote control opera-
tions. Or if the remote control does not work.
• When placing the Remote Control into the console box,
make sure there is no pressure applied to any of the
remote control buttons. Pressure on any of the buttons
will drain the batteries.
Batteries: 2 AA batteries (R6PU)
Battery life: Approximately five months in normal use
(based on manganese batteries at room
temperature)
LAST
DEST
1
2
3
4
5
6
7
89
0
OK
POS
ZOOM
NUMERIC KEYS
These 12 keys are
not assigned to any
functions by now.
Names and Functions of Remote Control Buttons
MOVILE NAVIGATION
SYSTEM
LAST
DEST
ENTER
POS
ZOOM
MODE
POP UP
SET UP
VOICE
Joystick
Tilting the joystick up, down, to the
right and left
¡selects a highlighted item within
menus and
¡scrolls map displays.
ENTER
Press to execute a highlighted
item in a menu and apply set-
tings.
Infrared Transmitter
Direct it at Remote Control Sensor on the
Panasonic monitor or the optional infrared
receiver.
DEST (Destination)
Opens the [Select Destination]
menu for destination input and
route search (a page 24).
POS (Position)
¡Displays your current position.
¡In route guidance, switches
between Current Position Map
and Guide mode Map
(a page 15).
POP UP
Opens pop-up menus
(a page 18).
CROSS CURSOR KEYS
¡These four keys are not assigned to
any functions by now.
SET UP
Opens the Setup Menu
(a page 47).
LAST
Switches back to the previous
screen.
ZOOM
¡Changes the map scale
(a page 17).
¡Scrolls up or down the
pages of the list displayed.
MODE
Switch the screen mode between
navigation and others.
If the monitor is switched to external input
while the navigation system is in opera-
tion, the screen background color may
change to black.
In this case, switch the mode to NAV.
VOICE
Initiates vocal guidance for route maneuver
(a page 38).
Lock Switch
Up: NAV (Navigation) Mode
Down: Key Lock Mode

ENGLISH
13
Insert the map DVD-ROM (optional) into the unit to start the
Mobile Navigation System.
•ALL IN VIEW GPS RECEIVER
• GYROSCOPE SENSOR
M
E
T
S
Y
S
N
O
I
T
A
G
I
V
A
N
E
L
I
B
O
M
D
V
D
D
V
1800
• FM MULTIPLEY RECEIVER
• MEMORY CARD SLOT
M
E
M
O
R
Y
C
A
R
D
S
LO
T
DV2000
M
E
T
S
Y
S
N
O
I
T
A
G
I
V
A
N
E
L
I
B
O
M
D
V
D
DV1800
Starting the Mobile Navigation System
Turn the vehicle's ignition
switch to the ON or ACC
position.
Slide the front cover of the
unit.
Insert the map DVD-ROM
with the printed side facing
up, and close the front cover
by pushing it up.
a After displaying [Accessing Data], the
opening screen appears, followed by the
[CAUTION] screen.
* The map DVD-ROM is not included with
the CN-DV1800EN.
Opening screen
Current Position Map
[CAUTION] screen
After reading the contents of the [CAUTION]
screen, press ENTER. The screen remains unchanged till the
button is pressed.
a As the system starts up, the Current Position Map is displayed.
ENTER
Map Disc
This product supports the Navtech DVD-SDAL map disc for-
mat only. Panasonic cannot be responsible for accidents
resulting from the use of map discs of other formats.

ENGLISH
14
Removing the Map DVD-ROM
Push the front cover of the player all the way down. Press the
u(EJECT) button, and then remove the map DVD-ROM.
Important Notes:
• The map DVD-ROM cannot be inserted or ejected while the igni-
tion switch is in the OFF position.
• Remember that the battery can run down if the ignition switch is
kept in the ON or ACC position for a long time with the engine not
running.
• To allow the system to stabilize, do not start driving until the
opening screen closes.
• The map displayed when you first turn on the player will show a
different area from where your vehicle is currently located. The
map display will change to your current area once GPS position-
ing signals are received.
• After the system has calculated the location of your vehicle, you
may need to change the map area displayed to the country that
you are in, this will increase the detail displayed. (See page 52
for details.)
•
F
M
M
U
L
T
I
P
L
E
Y
R
E
C
E
IV
E
R
•
M
E
M
O
R
Y
C
A
R
D
S
L
O
T
MEMORY CARD SLOT
DV2000
M
E
T
S
Y
S
N
O
I
T
A
G
I
V
A
N
E
L
I
B
O
M
D
V
D
D
V
1
8
0
0
The default display and voice guidance language of the unit is English.
You can select other languages (German, French, Dutch and Italian) for the
display and voice guidance. (a page 51)
System Overview

ENGLISH
15
Map Displays
Current Position Map
Shows the current position of your vehicle on
the selected magnification scale. Pressing POS
on the Remote Control during route guidance
switches to the Guide Mode Map.
Guide Mode Map
Shows the road on which your vehicle is cur-
rently traveling on an enlarged scale. Pressing
POS while the Current Position Map is dis-
played switches to this Guide Mode Map.
Pressing POS again returns you to the Current
Position Map.
If you deviate from the route in the guide mode
after setting that route, guide mode is switched
to 2D Mode Map.
Intersection Zoom Map
As you approach an intersection, the upcoming
junction is automatically enlarged. To use this
feature, the necessary advance settings have to
be made in the [Setup Menu].(a page 49)
2D Mode Map
This is a scrollable map with a crosshairs cursor.
Operating the joystick on the Current Position
Map will automatically switch to this map dis-
play.
Types of Map Displays
Note:
As you get close to your destination, a flag marked with a appears on
the Guide Mode Map. Note though that the place where the flag is dis-
played is not your destination.

ENGLISH
16
How to Read Map Displays
Current Position Map
Guide Mode Map
Intersection Zoom Map
2D Mode Map
Vehicle position
Current Road Name
Map scale
Map orientation
Clock
Arrow guidance for the
next junction
Distance to the next turn
Destination direction
Destination distance
Distance to the the next turn
Distance to the turn after the
next turn.
Crosshairs cursor
Move the crosshairs cursor on a road,
and press ENTER to display the street
name.

ENGLISH
17
ZOOM OUT
ZOOM IN
ZOOM IN
ZOOM OUT
Press POP UP to open the Pop Up
menu.
For details about the Pop Up menu
see page 18.
Select [North-Up] or [Head-Up] by moving the joystick, and press
ENTER.
a The map is displayed in the selected orientation.
[North-Up]: North Up
[Head-Up]: Head Up
Press ZOOM.
ZOOM OUT }: Reduces the map detail displayed.
ZOOM IN {: Increase the map detail displayed.
Changing the Map Orientation
You can choose the map displaying way between “North up” and “Head
up”.
North Up: The geographic north is always up on the map.
Head Up: The heading direction is always up on the map.
North Up Head Up
Changing the Map Scale
You can change the scale of the map display. 12 scales within the range
of 1/10,000 to 1/25,000,000 are available.
POP UP

ENGLISH
18
Pop Up Menu
All basic operations of the mobile navigation system are accessed from
the Pop Up menu shown below. Press POP UP to open the Pop Up
menu. Use the joystick to highlight an item in the Pop Up menu, and
press ENTER to execute it.
To change the route after having input the destination
To display the entire route from the point of
departure to the destination
To display a list of destinations from the point of departure
To register a list of marked points
To change the map orientation
To change the method of route setting to the destination
If auto reroute is set to
OFF on the Setup
menu, reroute can be
manually set. (Not
displayed when auto
reroute is ON.)
To stop route search
Some functions provide access to a submenu as shown below.
Example: Submenu associated with [Detour]
The Pop Up menu is not available on the Intersection Zoom Map.

ENGLISH
19
Wiring Check
Check that the mobile navigation system is properly wired to the vehicle.
Press SET UP to open the [Setup
Menu].
On the [Setup Menu], select [System
Information] by moving the joystick,
and press ENTER.
On the [Setup Menu - System
Information] menu, select [Wiring
Check], and press ENTER.
a Check the wiring information.
Perform the following operations and
confirm that the 4 lights on the car illus-
tration are turned on.
Select [End], and press ENTER.
Press POS to return to the map display.
• Turn on the sidelights a [Side Light] lamp on
• Pull the side brake a [Hand Brake] lamp on
• Pull the side brake and shift into reverse (R)
a [Reverse Light] lamp on
• [GPS] lamp on
The [Wiring Check Information] menu also contains the following
information:
• Speed: Shows the vehicle speed.
• ACC Volt: Shows the voltage of the car battery (11 V to 16 V).
• Speed Pulse: Shows the speed pulse emitted by the vehicle.
• Accuracy level: Shows the learning level of vehicle positioning accuracy.
ENTER
ENTER
ENTER
POS
ENTER

ENGLISH
20
Automatic Distance Correction Check
The mobile navigation system calculates and indicates the vehicle position on the
map by multiplying the speed pulse emitted by the vehicle with a correction coeffi-
cient. The speed pulse emitted varies with the type of vehicle, and differences in tyre
pressure and wear. A different correction coefficient might be required even for the
same type vehicles.
The system corrects distance deviations automatically based on GPS data. To be
able to use the system effectively in the following cases, make sure to carry out the
procedure described below.
• Before initial use • After a tyre change
• After tyre rotation • When installing a navigation system previously installed
in another vehicle
Press SET UP to open the [Setup Menu].
On the [Setup Menu], select [System
Information] by moving the joystick, and press
ENTER.
On the [Setup Menu - System Information]
menu, select [Wiring Check], and press
ENTER.
Select [Clear], and press ENTER.
a [Accuracy level] is reset to [Level 0].
ENTER
ENTER
ENTER
Select [End], and press ENTER.
Press POS to return to the map display.
Drive your vehicle for about 30 minutes with the Current Position Map displayed.
a As the distance correction coefficient becomes more accurate, any deviation
between the actual vehicle position and that on the map is eliminated.
POS
Important Notes:
• Do not start driving until the opening screen closes.
• You should drive at an average speed of at least 20 km per hour in the
open area for reception of GPS signals.
• The mobile navigation system uses GPS data for distance correction.
Make sure that GPS signals are being received (checking for GPS recep-
tion is described on the next page).
Depending on the Vehicle Model
The vehicle position indicator may disappear temporarily after speed raised. This is a
normal phenomenon indicating that the system is calculating for distance correction.

ENGLISH
21
Checking GPS Satellite Reception
Press SET UP to open the [Setup Menu].
On the [Setup Menu], select [System Information]
by moving the joystick, and press ENTER.
On the [Setup Menu - Information] menu, select
[GPS], and press ENTER.
a The [GPS Information] menu opens with the
following information:
• Satellite number
• Latitude and longitude of the
current position
• Current date and time
Press POS to return to the map display.
Important Notes:
• After the system has been installed in the vehicle, it takes about 30 min-
utes until satisfactory GPS signal reception is established.
• Check GPS reception in an open area location.
ENTER
ENTER
POS
Any operation performed while driving, other than
the POS button operation, will cause the mes-
sage to be displayed.
WARNING
Press ENTER.
a The warning is inhibited, and you can operate the system.
* When the display returns to the Current Position Map after the opera-
tion, will be displayed again.
Repeat the above procedure every time you want to operate the sys-
tem while driving.
WARNING
Operating the System While Driving
When you attempt to operate the system while driving, a warning prohibiting opera-
tion is displayed. You can inhibit this message if you wish. Note though that
Panasonic cannot be responsible for any resulting accidents.
ENTER
Mode
If the monitor is switched to external input while the navigation system is in opera-
tion, the screen background color may change to black.
In this case, press MODE to switch the mode to NAV.
MODE

ENGLISH
22
Once you have input your destination, the system will search for the best
route for you to reach the destination. Desired destinations can be
selected among these 6 categories:
• Addresses
• Intersections
• POI (Point of Interest) categories (hotels, airport, etc.)
• History (Recent destinations)
• Destinations stored in the system memory
• Destinations selected directly from the map display
To input a destination selected from addresses and intersections, you
can search by street name, city name, or post code. Enter the necessary
alphanumeric characters.
The planned route may not always take you to
your destination in the shortest route or avoid
motorways as it does not take the road and traffic
situation into account.
Character Input
Proceed as follows to enter alphanumeric characters.
Letter Input
This is how you enter a street name, for example.
Set the first letter of the desired street
name in the slot by moving the joystick.
Set the second letter of the street
name in the slot by moving the joy-
stick.
* You can enter up to 6 letters.
Press ENTER.
a A list of street names starting with
the letters entered is displayed.
Select the desired street name from the
list, and press ENTER.
a The street name is registered.
List
Slot
Example: Entering a street name
* If <Hamburg (Hamburg)>, for example, is shown on the list, “Hamburg” indicates a street
name, and “(Hamburg)”indicates a city name.
* If the desired street name is not contained in the list, expand the search in item 2 by
entering 3 letters or less.
ENTER
ENTER

ENGLISH
23
Numeral Input
This is how you enter a post code, for example.
Select numerals and letters by moving
the joystick on the screen, and press
ENTER.
* Select [SP] to enter a space, or
[BS] to move the input cursor one
space back.
Select [End], and press ENTER.
Example: Entering a post code
ENTER
ENTER
NOTICE
If you have problems with selecting street names, please observe the following examples.
Street types (such as STRASSE, WEG, RING, etc) cannot be selected.
The following examples will help you select your desired street.
Street : ANBERG
Enter by selecting alpha characters:
Street : ACHSTRASSE
Enter by selecting alpha characters:
Street : BERGACKERSTRASSE
Enter by selecting alpha characters:
Street : STRASSE DES 17 JUNI
Enter by selecting alpha characters:
Street : BERGBLICKSTRASSE
Enter by selecting alpha characters:
Street : BURGBERGRING
Enter by selecting alpha characters:
The list may not always be in alphabetic order.
Press the ENTER key to display list of street.
Select desired street from the list.
EBGRUB
Press the ENTER key to display list of street.
Select desired street from the list.
LBGREB
Press the ENTER key to display list of street.
Select desired street from the list.
71SED
Press the ENTER key to display list of street.
Select desired street from the list.
CAGREB
Press the ENTER key to display list of street.
Select desired street from the list.
HCA
Press the ENTER key to display list of street.
Select desired street from the list.
NA

ENGLISH
24
Entering an Address as Destination
This is how you specify your destination by entering a street name, city
name or post code.
Entering a Destination by Street Name
Press DEST to open the [Select Destination] menu.
Select [Address] by moving the joystick, and press
ENTER.
Select [Street], and press ENTER.
Enter the street name closest to your destination (a page 23),
and Select [End].
Select any of the following routing methods:
• Shortest Route:
The route to reach the destination in the shortest time will
be searched for.
• Avoid Motorway:
When the vehicle position, via-points, or the destination is on a motorway
or only connected by motorways, a route which uses a minimum section
of the motorway is calculated.
• Map:
The vicinal area of the selected street directly from map is displayed.
(After you select [Map], use the crosshairs cursor to select your destination.)
Press ENTER.
a Route search starts.
DEST
ENTER
ENTER
ENTER
ENTER
ENTER
ENTER
ENTER
ENTER
Note:
Select [Marked Point] on the list if you want to register the point you
have just searched for.

ENGLISH
25
Entering a Destination by City Name
Press DEST to open the [Select Destination] menu.
Select [Address] by moving the joystick, and press
ENTER.
Select [City], and press ENTER.
Enter the name of your destination city (a page 23),
and press ENTER.
The street name in the city entered from the [Select
Street in ...] are displayed on a list. Select the street
you want to go to, then press ENTER.
Select any of the following routing methods:
• Shortest Route:
The route to reach the destination in the shortest time will
be searched for.
• Avoid Motorway:
When the vehicle position, via-points, or the destination is on a motorway
or only connected by motorways, a route which uses a minimum section
of the motorway is calculated.
• Map:
The vicinal area of the selected street directly from map is displayed.
(After you select [Map], use the crosshairs cursor to select your destination.)
Press ENTER.
a Route search starts.
ENTER
ENTER
ENTER
ENTER
ENTER
DEST
ENTER
ENTER
ENTER
Note:
Select [Marked Point] on the list if you want to register the point you
have just searched for.
ENTER

ENGLISH
26
Press DEST to open the [Select Destination] menu.
Select [Address] by moving the joystick, and press
ENTER.
Select [Post Code], and press ENTER.
Enter the first part of the post code, then a space, fol-
lowed by the number from the second part of the post
code (a page 23) – E. G. For RG12 8FT, enter [R],
[G], [1], [2], [SP], [8] then select [End] - and press
ENTER.
a The [Select Street] menu opens with a list of
street names for the post code you entered.
a If this is unsuccessful, then enter the full post
code with a space between the two parts.
Select the street closest to your destination, and press ENTER,
and select [End].
Select any of the following routing methods:
• Shortest Route:
The route to reach the destination in the shortest time will
be searched for.
• Avoid Motorway:
When the vehicle position, via-points, or the destination is on a motorway
or only connected by motorways, a route which uses a minimum section
of the motorway is calculated.
• Map:
The vicinal area of the selected street directly from map is displayed.
(After you select [Map], use the crosshairs cursor to select your destination.)
Entering a Destination by Post Code
Press ENTER.
a Route search starts.
ENTER
ENTER
ENTER
ENTER
ENTER
DEST
ENTER
ENTER
ENTER
Note:
Select [Marked Point] on the list if you want to register the point you
have just searched for.

ENGLISH
27
Entering an Intersection as Destination
The destination will be specified by screening main streets and cross
streets based on street and city information.
Entering an Intersection by Street Name
Press DEST to open the [Select Destination] menu.
Select [Intersection] by moving the joystick, and
press ENTER.
Select [Street], and press ENTER.
Enter the street name closest to your destination intersection
(a page 23), and press ENTER.
Enter the first letter of your destination intersection (a page 23),
select the target Cross Street from the list, and then press
ENTER.
Select any of the following routing methods:
• Shortest Route:
The route to reach the destination in the shortest time will
be searched for.
• Avoid Motorway:
When the vehicle position, via-points, or the destination is on a motorway
or only connected by motorways, a route which uses a minimum section
of the motorway is calculated.
• Map:
The vicinal area of the selected street directly from map is displayed.
(After you select [Map], use the crosshairs cursor to select your destination.)
Press ENTER.
a Route search starts.
ENTER
ENTER
ENTER
ENTER
DEST
ENTER
ENTER
Note:
Select [Marked Point] on the list if you want to register the point you
have just searched for.
ENTER
ENTER

ENGLISH
28
Entering an Intersection by City Name
Press DEST to open the [Select Destination] menu.
Select [Intersection] by moving the joystick, and
press ENTER.
Select [City], and press ENTER.
Enter the city name where the
Intersection exists, and press
ENTER.
Enter the street name closest to
your destination intersection (a
page 23), and press ENTER.
Enter the first letter of your desti-
nation intersection (a page 23),
select the target Cross Street
from the list, and then press
ENTER.
Select any of the following routing methods:
• Shortest Route:
The route to reach the destination in the shortest time will
be searched for.
• Avoid Motorway:
When the vehicle position, via-points, or the destination is on a motorway
or only connected by motorways, a route which uses a minimum section
of the motorway is calculated.
• Map:
The vicinal area of the selected street directly from map is displayed.
(After you select [Map], use the crosshairs cursor to select your destination.)
Press ENTER.
a Route search starts.
ENTER
ENTER
ENTER
ENTER
DEST
ENTER
ENTER
ENTER
Note:
Select [Marked Point] on the list if you want to register the point you
have just searched for.
ENTER
ENTER
ENTER

ENGLISH
29
Glossary of POI Icons
Entering a POI as Destination
PUBLIC SPORT AIR-
PORT
RAIL WAY STATION
FERRY TERMINAL
COMMUTER RAIL
STATION
BUS STATION
AIR PORT
TRANSPORTA-
TION
SHOPPING CENTRE
SHOPPING
UNIVERSITY OR COL-
LEGE
EXHIBITION OR CON-
FERENCE CENTRE
COMMUNITY CENTRE
CITY HALL
PUBLIC FACILI-
TY
WINERY
TOURIST OFFICE
TOURIST ATTRACTION
SPORTS CENTRE
SPORTS ACTIVITY
SKI RESORT
THEATRE
RECREATION FACILITY
NIGHT LIFE
MUSEUM
MARINA
ICE SKATING RINK
HISTORICAL MONU-
MENT
GOLF COURSE
CINEMA
CASINO
BOWLING CENTRE
AMUSEMENT PARK
LEISURE/REC-
REATION
HOTEL OR
MOTEL
HOSPITAL POLYCLIN-
IC
EMERGENCY
CITY CENTRE
BUSINESS
FACILITY
BORDER
CROSSING
MOTORING ORGANA-
TION OFFICE
VEHICLE REPAIR
FACILITY
REST AREA
RENT A CAR FACILITY
PETROL STATION
PARK & RIDE
OPEN PARKING AREA
PARKING GARAGE
AUTOMOBILE DEAL-
ERSHOP
AUTO SERVICE

ENGLISH
30
POI Category plus [Name]
Press DEST to open the [Select Destination] menu.
Select [Point of Interest] by moving the joystick, and
press ENTER.
Select the desired category, and press ENTER. If you
do not know the category of your destination, select
[ALL].
Select [Name] and press ENTER.
a The [Select POI] menu opens with a list in the
selected category.
Select your destination from the list on the [Select
POI] menu, and press ENTER.
Select any of the following routing methods:
• Shortest Route:
The route to reach the destination in the
shortest time will be searched for.
• Avoid Motorway:
When the vehicle position, via-points, or the destination is on
a motorway or only connected by motorways, a route which
uses a minimum section of the motorway is calculated.
• Map:
The vicinal area of the selected street directly from map is
displayed.
(After you select [Map], use the crosshairs cursor to select
your destination.)
Press ENTER.
a Route search starts.
ENTER
ENTER
ENTER
ENTER
DEST
ENTER
ENTER
Note:
Select [Marked Point] on the list if you want to register the point you
have just searched for.
* Some items can not be selected in certain categories. For example, if you select
[AUTOMOVILE DEALERSHOP], [PETROL STATION] in [AUTO SERVICES] or
[HOTEL OR MOTEL] as the category, the [NAME] item is not available unless
you select [ALL].

ENGLISH
31
POI Category plus [Within City]
Press DEST to open the [Select Destination] menu.
Select [Point of Interest] by moving the joystick, and
press ENTER.
Select the desired category, and press ENTER. If you do not know
the category of your destination, select [ALL].
Select [Within City], and press ENTER.
a The [Select POI] menu opens with a list in the
selected category in which the items are located
within the city where you currently are.
Select your destination from the list on the [Select POI] menu, and
press ENTER.
Select any of the following routing methods:
• Shortest Route:
The route to reach the destination in the shortest time will
be searched for.
• Avoid Motorway:
When the vehicle position, via-points, or the destination is on a motorway
or only connected by motorways, a route which uses a minimum section
of the motorway is calculated.
• Map:
The vicinal area of the selected street directly from map is displayed.
(After you select [Map], use the crosshairs cursor to select your destination.)
Press ENTER.
a Route search starts.
DEST
ENTER
ENTER
ENTER
ENTER
ENTER
ENTER
ENTER
ENTER
ENTER
ENTER
Note:
Select [Marked Point] on the list if you want to register the point you
have just searched for.

ENGLISH
32
POI Category plus [Nearest]
This is how you narrow down your search in the selected category within
a 10 kilometre radius of your current location.
Press DEST to open the [Select Destination] menu.
Select [Point of Interest] by moving the joystick, and
press ENTER.
Select a desired category, and press ENTER. If you do not know
the category of your destination, select [ALL].
Select [Nearest], and press ENTER.
a The [Select POI] menu opens showing a list of
places in the selected category within 10 km from
the current position.
Select your destination from the list on the [Select
POI] menu, and press ENTER.
Select any of the following routing methods:
• Shortest Route:
The route to reach the destination in the
shortest time will be searched for.
• Avoid Motorway:
When the vehicle position, via-points, or the destination is on
a motorway or only connected by motorways, a route which
uses a minimum section of the motorway is calculated.
• Map:
The vicinal area of the selected street directly from map is
displayed.
(After you select [Map], use the crosshairs cursor to select
your destination.)
Press ENTER.
a Route search starts.
DEST
ENTER
ENTER
ENTER
ENTER
ENTER
ENTER
ENTER
Note:
Select [Marked Point] on the list if you want to register the point you
have just searched for.

ENGLISH
33
a) Press SET UP to open the [Setup Menu].
b) Select [System Setup] using the joystick, and press
ENTER.
c) Scroll down the screen until the next page comes using the
joystick.
d) After 2nd page appears, select [Map Area] using the joy-
stick, and press ENTER.
e) The area list appears. Then, select an area, and press
ENTER.
MRE (Major Roads of Europe)
A route can be set from the current position to other country using Major Roads.
Major Roads of Europe:
Major Roads of Europe are selected by NAVTECH based on the volume of traf-
fic, the importance at local, the connection to major city, and other information.
Please understand some of the motorways are not provided.
Press DEST to display the Select Destination screen.
Select [Point of Interest] using the joystick, and press
ENTER.
Select [CITY CENTRE] using the joystick, and press
ENTER, then select the [NAME] using the joistick,
and press ENTER.
Select a city center which is the nearest to the desti-
nation from among the displayed list.
Select a favorite method of route calculation from the
confirm screen.
Follow the guidance. Then, change the displayed map
to a map of the current country version after arriving
at or approaching the set city center.
Important Note:
Only major roads and their accompanying roads are displayed in the map while using MRE.
Therefore, the following method is recommended to set the destination.
When setting a destination in Continental Europe from the UK only, please follow these steps (this is
necessary because the Mainland UK map does not contain MRE information):
1. Change the map area to the map area of the destination country (follow parts a to e in step 6
below).
2. Set the vehicle position to where you will join the nearest Motorway (see page 54 for details).
3. Follow the steps below, except steps 6 and 7.
4. When you near the city that was set, please set the final destination by the ordinary method.
DEST
ENTER
ENTER
ENTER
ENTER
ENTER
ENTER
ENTER

ENGLISH
34
Note regarding MRE (Major Roads of Europe)
When carrying out steps a to c, the effects described in points 1 and 2 might
occur.
a. Select the destination country in [Map Area] whilst in the country of
departure.
b. After arriving in the destination country using the MRE, you do not
change the [Map Area] to the destination country.
c. Before you depart for another country (including the departing country),
input another destination.
1. The following may occur:
• Indicate that you should join a Motorway between junctions
• Indicate to join a Motorway travelling in the opposite direction to
your destination then ask you to do a U-turn or calculate a detour.
This is because this system draws a straight line between your vehicle
and the nearest MRE.
2. When you input a destination, use a large map scale zoom out the map.
Otherwise, the nearest MRE will not be displayed as the MRE uses
reduced detailed map information.
After changing the map to the current country version, set the des-
tination by the ordinary method.
Country (area) MAP MRE
BENELUX ""
CENTRAL EUROPE ""
FRANCE ""
NORTHERN GERMANY ""
SOUTHERN GERMANY ""
ITALY ""
DENMARK/SWEDEN ""
IBERIA ""
GREAT BRITAIN "
–
Please note, the “GREAT BRITAIN” map area only covers the
Mainland UK.

ENGLISH
35
Note:
Up to 50 previous destinations, including the last starting point, are
retained in memory.
Entering a Destination from Your Destination History
Press DEST to open the [Select
Destination] menu.
Select [History] by moving the joystick,
and press ENTER.
a The [Select History Point] menu
opens with a list of recent destina-
tions.
Select a destination, and press
ENTER.
Select any of the following routing
methods:
• Shortest Route:
The route to reach the destination in the
shortest time will be searched for.
• Avoid Motorway:
When the vehicle position, via-points, or the
destination is on a motorway or only con-
nected by motorways, a route which uses a
minimum section of the motorway is calcu-
lated.
• Map:
The vicinal area of the selected street
directly from map is displayed.
(After you select [Map], use the crosshairs
cursor to select your destination.)
Press ENTER.
a Route search starts.
DEST
ENTER
ENTER
ENTER
ENTER
Note:
Select [Marked Point] on the list if you want to register the point you
have just searched for.

ENGLISH
36
Entering a Destination Stored in Your Marked Point
This is how you specify an address stored in your Marked Point as your
destination. For storing addresses in your Marked Point, see page 43.
Press DEST to open the [Select
Destination] menu.
Select [Marked Point] by moving the
joystick, and press ENTER.
a The [Select Marked Point] menu
opens with a list of locations stored
in your Marked Point.
Select a destination, and press
ENTER.
Select any of the following routing
methods:
• Shortest Route:
The route to reach the destination in the
shortest time will be searched for.
• Avoid Motorway:
When the vehicle position, via-points, or the
destination is on a motorway or only con-
nected by motorways, a route which uses a
minimum section of the motorway is calcu-
lated.
• Map:
The vicinal area of the selected street
directly from map is displayed.
(After you select [Map], use the crosshairs
cursor to select your destination.)
Press ENTER.
a Route search starts.
DEST
ENTER
ENTER
ENTER
ENTER

ENGLISH
37
Selecting a Destination Directly from the Map Display
Press DEST to open the [Select
Destination] menu.
Select [Map Scroll] by moving the joy-
stick, and press ENTER.
a A map showing the current position
of your vehicle is displayed.
By moving the joystick, move the
crosshairs cursor to the desired desti-
nation, and press ENTER.
Select any of the following routing
methods:
• Shortest Route:
The route to reach the destination in the
shortest time will be searched for.
• Avoid Motorway:
When the vehicle position, via-points, or the
destination is on a motorway or only con-
nected by motorways, a route which uses a
minimum section of the motorway is calcu-
lated.
• Map:
The vicinal area of the selected street
directly from map is displayed.
(After you select [Map], use the crosshairs
cursor to select your destination.)
Press ENTER.
a Route search starts.
DEST
ENTER
ENTER
ENTER
ENTER
Note:
Select [Marked Point] on the list if you want to register the point you
have just searched for.

ENGLISH
38
Second branching point
First branching point
500m
500m
Route
Left turn 700m ahead.
Left turn 500m ahead,
then right turn.
Voice guidance has the following functions.
Intersection Guidance
The system vocally announces the distance to an upcoming turn and the
turning direction.
a This guidance function is automatic (therefore, you do not have to
set it) and cannot be disabled.
Highway Guidance as Part of Route
Guidance
When you approach a branching point or junction on a highway, the distance to that
point will be given by voice.
The system vocally announces the distance to an upcoming highway
branching point or junction.
a This guidance function can be set in the [Setup menu]. For details,
see page 50.
Roundabout.
Take the second
exit.
When two roundabouts are close together, the voice guidance for the
second may be late.
When two junctions are close together, the voice guidance may be late.
Note:
Mini-roundabouts may be treated as a normal junction because there is minimum
size for roundabouts on the map DVD-ROM.

ENGLISH
39
While route search is under way, press
POP UP.
Select [Stop Calc] by moving the joy-
stick, and press ENTER.
a Route search is terminated.
A map display allows you to preview a all the way of your route.
Press POP UP.
Select [Route Preview] by moving the
joystick, and press ENTER.
a A map showing all the way of your
route is displayed.
This is how you can cancel a calculated route.
Press SET UP and select [Route] by
moving the joystick, and press ENTER.
Set [Route Guidance] to [Off] by mov-
ing the joystick.
Select [End], and press ENTER.
Press POS to return to the map dis-
play.
POP UP
POP UP
ENTER
ENTER
ENTER
ENTER
Press POS to return to the current
position map display.

ENGLISH
40
The system allows you to choose an alternative route to the same desti-
nation in one of the following four ways.
Alternative Route
A search is made for routes other than that displayed. Up to three routes
can be searched for, including the one currently displayed.
Detour xxKm
A search is made for a route that detours the original route by a distance
you specify. To specify the distance, see page 50.
Press POP UP.
Select [Detour] by moving the joystick,
and press ENTER.
Select [Alt Route], and press ENTER.
a Up to three routes, including the
current one, are displayed.
Select a route by moving the joystick,
and press ENTER.
Press POP UP.
Select [Detour] by moving the joystick,
and press ENTER.
Select [Detour xxKm], and press
ENTER.
a A detour route of the specified dis-
tance is displayed. The [Detour
xxKm] item in the menu shows the
distance you specified.
• Alternative Route
• Detour xxKm
• Avoid Streets
• Via Point
Important Note:
The detour may be longer than the distance you specified.
POP UP
ENTER
ENTER
POP UP
ENTER

ENGLISH
41
Avoid Streets
A search is made for a route that detours specified streets.
Via Point
A search is made for a route that takes you to multiple destinations, or via
points. You can specify up to five via points.
Entering 1 Via Point
Press POP UP.
Select [Detour] by moving the joystick,
and press ENTER.
Select [Avoid Streets], and press
ENTER.
a The [Choose Streets to Avoid] menu
opens, showing a list of street names.
Select the streets you want to avoid.
a The names of streets to be avoided are
shown in gray. Only the remaining streets
are included in the route search.
Confirm that all streets you want to
avoid are displayed in gray, and then
select [End] and press ENTER.
Press POP UP.
Select [Detour] by moving the joystick,
and press ENTER.
Select [Via Point], and press ENTER.
a The [Select Via Point] menu opens. Enter
a via point by the same procedure as
described for destination input (pages 22
to 37), and start route search.
POP UP
ENTER
POP UP
ENTER
ENTER
ENTER

ENGLISH
42
Entering Multiple Via Points
Enter the first via point as described for "Entering 1 Via Point". To enter
all subsequent ones, proceed as follows.
Press POP UP.
Select [Detour] by moving the joystick,
and press ENTER.
Select [Via Point], then [Add], and
press ENTER.
* When selecting [Via Point] to specify the
first via point, the submenu items [Add]
(to add a via point) appear .
Press ENTER.
a The [Select Via Point] menu opens. Enter
the via points by the same procedure as
described for destination input (pages 22
to 37), and start route search.
Enter the second via point by one of
the following methods:
• Add a via point between your current
location and the first via point.
• Add a via point between the first via point
and your destination.
* Proceed in the same manner for the third
and subsequent via points (adding a via
point between your current location and
the first via point, and between the sec-
ond via point and the destination).
Important Notes:
¡You can set up to five via points. If you try to add the sixth point, the
[Delete] menu opens, prompting you to delete the currently selected via
points.
¡If you add a via point near your current position when adding via points,
Avoid Motorway may not be selectable by the route search method in
some cases.
To delete a Via Point
To delete a via point, select [Via Point] and then [Delete]. A list of currently selected
via points is displayed. Select the via point you want to delete, and press ENTER.
POP UP
ENTER
ENTER
ENTER

ENGLISH
43
Warning:
Stop your vehicle before the following operations.
You can store up to 100 points you want to remember in your point mem-
ory. Each stored point is memorized with its name and icon, and shown
on the map. You can rename the marked points and change their icons.
Marking Your Current Position
Marking Any Point on the Map
Display the Current Position Map, and
press POP UP.
Select [Marked Point] by moving the joystick, and press ENTER.
Place the crosshairs cursor on the
point you want to mark on the map,
and press POP UP.
Select [Marked Point] by moving the joystick, and press ENTER.
Name and Icon
Each stored point is memorized with its name and icon, and shown on
the map. You can rename the marked points and change their icons
(a page 44).
* If the same point is stored in “Marking Your Current Position” above, it is registered
in one local name on the list. If the same point is stored in different processes, for
example, as in “Marking Your Current Position” and “Marking Any Point on the
Map”, two local names, identical with each other, will be shown on the list.
POP UP
ENTER
POP UP
ENTER

ENGLISH
44
Changing a Marked Point Icon
Press SET UP.
Select [Edit Marked Point] by moving
the joystick, and press ENTER.
Select [Edit], and press ENTER.
a A list of marked points is displayed.
Select the name whose icon you want
to change, and press ENTER.
a The [User POI Information] menu
for the selected marked point
opens.
Select [Icon], and press ENTER.
Select an icon, and press ENTER.
a The screen returns to the [User POI
Information] menu.
Select [OK], and press ENTER.
a The new icon is applied.
ENTER
ENTER
ENTER
ENTER
ENTER
ENTER

ENGLISH
45
Renaming a Marked Point
Press SET UP.
Select [Edit Marked Point] by moving
the joystick, and press ENTER.
Select [Edit], and press ENTER.
a A list of marked points is displayed.
Select the point you want to rename,
and press ENTER.
a The [User POI Information] menu
for the selected marked point
opens.
Select [Name], and press ENTER.
Enter a name, select [End], and press
ENTER.
a The screen returns to the [User POI
Information] menu.
Select [OK], and press ENTER.
a The new name is applied.
ENTER
ENTER
ENTER
ENTER
ENTER
ENTER

ENGLISH
46
Deleting a Marked Point
Press SET UP.
Select [Edit Marked Point] by moving
the joystick, and press ENTER.
Select [Edit], and press ENTER.
a A list of marked points is displayed.
Select the point you want to delete, and
press ENTER.
a The [User POI Information] menu
for the selected marked point
opens.
Select [Delete], and press ENTER.
a The marked point is deleted.
ENTER
ENTER
ENTER
ENTER

ENGLISH
47
From the Setup Menu, you can set the basic functions of the mobile navi-
gation system to suit your preferences.
Basic Setup Menu Operations
This is how you perform basic operations on the Setup Menu.
Press SET UP.
Select [End], and press ENTER.
a The setting is applied, and the
setup menu closes.
From the menus listed on the [Setup
Menu], select the menu you want to set
by moving the joystick and press
ENTER.
* The parameters that can be set on each
menu are described in detail on the fol-
lowing pages.
ENTER
ENTER
Reset
To restore the default, select [Reset] and press ENTER.
ENTER
Press POS to return to the map display.
POS

ENGLISH
48
Map
Here you can set your preferences for the
map displays.
Display mode
Lets you choose a screen color between day-
time version and nighttime driving version.
• [Day]: Screen color suited to daytime
driving
• [Night]: Screen color suited to nighttime
driving
• [Auto]: [Day] is automatically switched to
[Night] when the headlights are
turned on.
Default: Auto
Colour
Lets you choose one of the following three
background colors for map displays.
• [Green]
• [Beige]
• [Black]
Default: Beige
Map Direction
Lets you choose either [North-Up] or [Head-
Up] as map orientation.
• [North Up]: The geographic north is
always up on the map.
• [Head Up]: The heading direction is
always up on the map.
Default: North-Up

ENGLISH
49
Vehicle Position
This lets you specify display current vehicle
position indicator displayed in the center or at
the bottom of the screen.
• [Centre]: Current vehicle position indicator dis-
played in the center of the screen
• [Off Ctr]: Current vehicle position indicator dis-
played at the bottom of the screen
(When the Head Up).
Default : Centre
Zoom
This lets you have an enlarged intersection
map displayed as you approach the intersec-
tion.
• [On]: Intersection Zoom in Map is displayed.
• [Off]: Intersection Zoom in Map is not displayed.
Default : On
POI Icon
This lets you have icons displayed on the map
for each marked point.
• [On]: Icons are displayed.
• [Off]: Icons are not displayed.
Default : On
System Mode
Select either map mode or guide mode for
map display.
• [Map]: Map mode
• [Guide]: Guide mode
Default : Map
Trace Mark
Select whether or not to mark the route the
vehicle has travelled.
• [On]: To mark
• [Off]: Not to mark
Default : On

ENGLISH
50
Route
Here you can set your preferences for route search.
Guidance Without Route
This lets you to have voice guidance automatically activated
as your vehicle approaches any of the following two types
of places.
Select [Guidance Without Route] by moving the joystick,
and press ENTER.
Select [On] to activate any of these features.
• [Merge]: Highway junctions
• [Splits]: Highway branching points
Default : On
Detour (Km)
This lets you specify the distance for a route that detours
the originally searched route. Select one of the following
distances.
Est. Travel Time
This lets you choose to have the estimated travel time to on
or off as voice guidance.
• [On]: Voice guide On
• [Off]: Voice guide Off
Default : On
Auto Re-route
This lets you choose to have another route search made to
guide you back to your original route after having deviated
from it.
• [On]: To search
• [Off]: Not to search
Default : On
Route Guidance
This lets you delete all set routes.
• [On]: Not to delete
• [Off]: To delete
Default : On
• [ 1 ]: 1 km
• [ 2 ]: 2 km
• [ 5 ]: 5 km
• [10]: 10 km
• [20]: 20 km
Default : 5 km

ENGLISH
51
Volume Control
This lets you set the sound volume for voice
guidance. The volume can be adjusted in five
steps.
Default : 2
Beep
This lets you enable the beep produced when
operating the buttons on the remote control.
• [On]: Beep sounds.
• [Off]: No Beep sounds.
Default : On
Voice Feedback
Voice guidance will be repeated.
• [On]: Voice Feedback enabled.
• [Off]: Voice Feedback disabled.
Default : On
Clock
This lets you choose to have the clock dis-
played on the screen.
• [On]: Clock displayed.
• [Off]: Clock not displayed.
Default : On
Language
This lets you choose one of the following six
display and voice guidance languages.
[GB]: English
[FRE]: French
[GER]: German
[ITA]: Italian
[SPA]: Spanish
[DUT]: Dutch
Default: GB
System Setup
Here you can set your system preferences.

ENGLISH
52
Meter/Mile Switch
This lets you choose to have distances shown
in meters or miles.
[Metric]: Meters
[Imperial]: Mile
Default : Metric
DST (Summer Time)
This lets you activate daylight saving time.
• [On]: Daylight saving time applied.
• [Off]: Daylight saving time not applied.
Default : On
Screen Position
This lets you adjust the display position on the
monitor screen.
Select [Screen Pos] by moving the joystick,
and press ENTER.
Adjust the display position by moving the joy-
stick.
• [X]: Horizontal direction.
• [Y]: Vertical direction.
Default : X : 0 / Y : 0
Map Area
Select a map to use. Select [Map Area] by
moving the joystick, and press ENTER. The
area list appears. Then, select an area, and
press ENTER.

ENGLISH
53
System Information
Simulation
Here you can check the wiring of the mobile
navigation system, GPS reception, and the
software version.
Wiring check
This lets you check whether the mobile navi-
gation system is properly wired to the vehicle.
GPS
This lets you check the reception status of
GPS signals.
Version
This lets you check the mapping software ver-
sion of your mobile navigation system.
You can check your route from the starting
point to the destination.
Stopa Press DEST.
Settle your departing point and destination to
activate the demonstration function.
Demonstration
* To stop the demonstration, start driving or
go to the steps below.
q Press SET UP.
w Select [Demonstration] and press
ENTER.
e Select [Stop Demo] and press ENTER.

ENGLISH
54
Edit Marked Point
Edit
Here you can edit previously marked points by
making the changes listed below. For operating
procedures and detailed descriptions, see the
referenced pages.
• Renaming a Marked Point (a page 45)
• Changing a Marked Point Icon (a page 44)
• Deleting a Marked Point (a page 46)
Vehicle Position
Here you can move the current vehicle position indicator to any point on
the map display.
Important Note:
Normally, this operation is not necessary. Use this function only when the
actual position of your vehicle differs from its position on the map. This
would be the case, for example, after having installed a navigation system
previously installed in another car.
Select [Vehicle Position] and press
ENTER.
a The current position map is dis-
played.
Vehicle Position
Move the cursor to the position where
you currently are, and press ENTER.
Vehicle Direction
The Vehicle Position Mark rotates
when tilting the joystick horizontally.
Display Icon
This lets you choose to have the icon displayed on the map or not.
• [On]: icons are displayed.
• [Off]: icons are not displayed.
Default : On
a: 11.25 degrees clockwise
b: 11.25 degrees counterclockwise
* 90 degrees at 8 times and 180 degrees at 16 times.

ENGLISH
55
GPS is a position detecting system utilizing the signals
from GPS satellites deployed by the U.S. Department of
Defence.
The Mobile Navigation System uses input from three or
more satellites and calculates the vehicle position based
on the principle of triangulation.
The positioning accuracy of the system corresponds to
the error display of the GPS of about 30 to 200 meters.
Time to detect the current position
If you are using the system for the first time, or if you have not used it for some time, it takes
about 5 minutes (or about 2 minutes in places of open area) to calculate your vehicle's posi-
tion.
GPS signal reception is poor in the following places:
In tunnels Among high-rise
buildings
Under elevated roads In wooded areas
¡If you have a roofrack on your vehicle, install the GPS antenna away from the roofrack.
¡The GPS satellites are controlled by the U.S. Defense Department, which may intentionally
lower positioning accuracy. In such cases, there may be vehicle position deviations.
Notes:
¡There may be vehicle position deviations for some time till GPS signals are
received after turning on the ignition.
¡Using a spare tyre in place of the regular one may cause vehicle position devia-
tions.
¡Any difference between the direction in which your vehicle actually travels and
that shown on the map is automatically eliminated by azimuth correction.
Map Matching
This function compares your vehicle's tracking data with the road data on the map DVD-ROM,
applies dead reckoning to determine the road where you are driving, and displays your vehicle
on that road on the map.

ENGLISH
56
STOP
CAR FERRY
Running on an elevated
road
Making a turn after dri-
ving on a long straight
road
Running on a steep
mountain road
Running on a spiral
road
Entering a fork where a
road branches off at a
small angle
Running crisscross on a
network of parallel
roads
Running on a slippery
road with chains on
tyres
Snaking on a wide road
Vehicle on a turntable
with ignition turned off
After getting off a ferry-
boat or vehicle train
Intelligent map matching addresses the following problems to
achieve high accuracy in vehicle positioning.
Position Correction for Elevated Roads
Position accuracy is improved by detecting whether the vehicle
is running on or under an elevated road.
Position Correction for Parking Garages
Position accuracy is improved by detecting whether the vehicle
is driving in an elevated or underground parking garage.
High-precision Gyrosensor
A gyro detects turns with an accuracy of 0.05° per second.
Combined with a speed sensor, it enables the system to display
the current vehicle position even in locations where GPS sig-
nals may be blocked.
Positioning Accuracy
In the following situations, your vehicle position may not be displayed correctly on the
map. But as you keep driving, your vehicle position will be corrected automatically utiliz-
ing map matching and GPS data.

ENGLISH
57
Although you may encounter the following problems in route search, there is
nothing wrong with the system.
?
?
?
?
?
?
?
It may also show roads
out of use due to the
opening of a new road
or other reasons
The route shown
reaches only to a point
near your destination if
your destination has
no direct access road
or the road is too
narrow.
It may also show roads
that permit one-way
traffic only, for
example.
It may show a route
where you’ll have to
make a U-turn.
The guide map may
show roads not
passable due to closure
in winter or other
reasons.
It may show a
common road
under, or over, an
elevated road.
• There may be cases
where the route remains
unchanged after another
search.
• A congested route may
be shown.
Destination
Road
out of
use
Destination
Destination
Destination

ENGLISH
58
Although you may encounter the following problems in route search, there is
nothing wrong with the system.
300m
0m
Right turn
about 300 m
ahead
Right turn
about 300 m
ahead
Left turn
ahead
For certain shapes of intersection, the
upcoming turn or the name of the intersec-
tion may not be announced.
For certain shapes of intersection, you may
be prompted to turn right or left when you
actually should stay on the same road.
Voice guidance for the planned route may
continue even after you have deviated from
that route, e.g., turned too early.
Some branching points on highways or toll
roads may neither be displayed nor
announced.
The Intersection Zoom Map may not always
agree with the actual shape of the intersec-
tion.
The announced distance to an upcoming
turn may differ slightly from reality.

ENGLISH
59
There may be some problems due to operational errors or mistakes. Please read this
manual again and verify that there really is a problem before calling a service person
to ask for repair services.
The GPS signals can not
be received.
Drive for some time with
receiving GPS signals.
Your car position has
changed while was ACC
OFF.
¡Car transported by ferry
¡Car turned on a turntable
at a car parking facility
¡Car moved by a tow
truck or similar vehicle
Your car position is not cor-
rectly shown while driving.
Read the manual and
check the connection.
The light sensor is improp-
erly wired.
Point the remote control at
the infrared receiver.
Remote control is not point-
ed at the infrared receiver.
Insert the battery correctly.Batteries are inserted
wrong.
Replace the batteries.Remote control batteries
are week or dead.
Remote control buttons do
not work.
Recharge or replace the
car battery.
Car battery voltage is low.
Read the manual and
check the connection.
Video signal connector is
improperly or incompletely
connected.
Consult the store where
you purchased the product.
Fuse is blown.
Press the mode button.Mode is changed.
Switch it on.Display is not switched on.Nothing shown on the mon-
itor display
Problem Possible Cause Probable Solution

ENGLISH
60
Check if the map disc is
wet due to condensation,
scratched, or dirty.
Map disc is wet due to con-
densation, scratched, or
dirty.
Map is not displayed
(Screen blank)
Set the monitor appropri-
ately for the type of an
optional display unit con-
nected.
Beep was set improperly
during an optional display
unit setup.
Turn the beep on.Beep is set to OFF.Remote control buttons do
not beep.
Repeat route search.
Check the direction for your
destination.
The vehicle is going back-
wards on the route.
Check the route guide dis-
play on the current position
map. Repeat route search.
The vehicle is off the route.
Raise the voice guide vol-
ume.
Voice guide volume is set
to zero.
No voice guide
Press the POS button.The system is in map
mode.
Your car location is not
shown.
Check GPS antenna con-
nection with the wiring
check screen. (If the cable
is unconnected, read the
manual and check the con-
nection.)
GPS antenna cable con-
nection is incomplete.
GPS signals will be
received when there are
not any more obstacles.
GPS signals cannot be
received due to an obsta-
cle.
GPS symbol is not dis-
played.
Read the manual and
check the connection.
Vehicle speed pulses are
not correctly connected.
Check if distance compen-
sation has been completed.
(See page 20.)
Distance compensation is
incomplete.
The vehicle position is not
correctly shown while trav-
eling.
Problem Possible Cause Probable Solution

ENGLISH
61
What to do with these messages
The following messages will appear in some cases.
Take proper action in accordance with the list.
Change your destination
and route, and repeat route
search.
Input Destination.
Unable to select Destination.
Please Select another
point.
If the same message
appears after repeating the
operation, consult the store
where you purchased the
product.
Various operations were
performed.
Check if the map disc is wet
due to condensation,
scratched, or dirty.
If the same message is dis-
played when this operation
is repeated after
checking, then consult the
store where you purchased
the product.
Opening screen is on.Accessing Data
Please wait....
Insert the specified map
disc. Check the map disc.
Map disc was inserted
upside down.
Cannot Read Disc
Change your destination
and route, and repeat route
search.
Route Calculation failed
Error Message When Action

ENGLISH
62
Error message Remedy
The disc is condensation, dirty, scratched, or upside
down, or the disc cannot be played with this unit. Eject
the disc and check it.
Cannot Read Disc
The playback mechanism is seriously damaged.
Eject the disc and contact your nearest authorized
Panasonic Service Center.
DVD deck error
• Ensure that the Lock switch of the remote control is
released.
No key operations are effec-
tive.
• Ensure that the unit is connected properly.
• Ensure that the input settings for the stereo system
are correct.
No sound from the external
speakers of the stereo system
or other equipment.
• Ensure that the unit is connected properly.
• Ensure that the input settings of the connected dis-
play unit are done correctly.
No picture.
Symptom Probable solution / explanation
Note:
It is recommended that you have information on the handling and care of map discs.
For details, see the Handling and Care of Map Discs in the Manual for Car Navigation
Operation.

ENGLISH
63
Note:
Design and specifications are subject to change without notice. Weight and
dimensions are approximate.
General
Power Supply : DC12V (Test Voltage14.4V), Negative ground
Current Consumption : Less than 2.5A
Dimensions : 178(W) x 50(H) x 170(D) mm
Weight : 2.0kg
Reception Frequency : 1575.42MHz
Reception Sensitivity : –130dBm
Reception Method : Parallel 8 channels
Receiving Code : C/A Code
Channel System : multichannel
Channels : 8
GPS Satellites Received : 8 max.
Guide Map : DVD SDAL FORMAT
Picture Output : RGB: Navigation screen
NTSC: 1.0 Vp-p, 75 Ω, RCA pin jack (Navigation
screen)
GPS Antenna
Type Microstrip Planer
Dimensions 42(W) x 14(H) x 50(D) mm
Weight 120 g
Remote Control
Dimensions 42(W) x 43(H) x 152(D) mm
Weight 78 g

DV1800
MOVILE NAVIGATION
SYSTEM
LA
S
T
DEST
ENTER
POS
ZOOM
M
O
D
E
P
O
P
U
P
S
E
T
U
P
V
O
IC
E
MOBILE NAVIGATION SYSTEM
NAVIGATIONSSYSTEM
SYSTEME DE NAVIGATION MOBILE
MOBIEL NAVIGATIESYSTEEM
SISTEMA DI NAVIGAZIONE MOBILE
CN
-
DV1800EN
Operating Instructions
Bedienungsanleitung
Manuel d’instruction
Gebruiksaanwijzing
Manuale di istruzioni
Matsushita Electric Industrial Co., Ltd.
Central P.O. Box 288, Osaka 530-91, Japan
YEFM283704 B1200-0 Printed in Japan
¡Please read these instructions carefully before using this product and save this manual for future use.
¡Bitte lesen Sie diese Bedienungsanleitung vor der Verwendung dieses Produktes aufmerksam durch und bewahren Sie sie
danach für spätere Nachschlagzwecke sorgfältig auf.
¡Prière de lire ces instructions attentivement avant d’utiliser le produit et garder ce manuel pour l’utilisation ultérieure.
¡Leest u deze instructie alstublieft zorgvuldig door voor u dit product in gebruik neemt en bewaar deze handleiding voor
later gebruik.
¡
Si prega di leggere attentamente queste istruzioni prima di usare questo prodotto e di conservare questo manuale per usi futuri.
CN-DV1800EN-00-01 \ 00.12.12 4:40 PM y [ W 1
-
 1
1
-
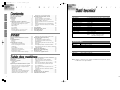 2
2
-
 3
3
-
 4
4
-
 5
5
-
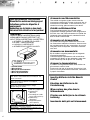 6
6
-
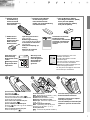 7
7
-
 8
8
-
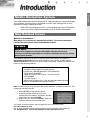 9
9
-
 10
10
-
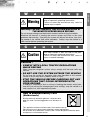 11
11
-
 12
12
-
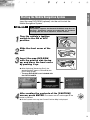 13
13
-
 14
14
-
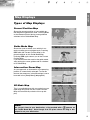 15
15
-
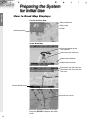 16
16
-
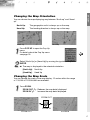 17
17
-
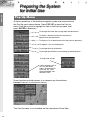 18
18
-
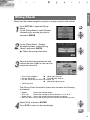 19
19
-
 20
20
-
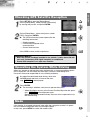 21
21
-
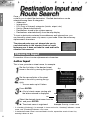 22
22
-
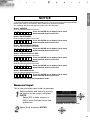 23
23
-
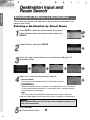 24
24
-
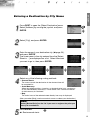 25
25
-
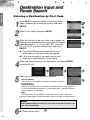 26
26
-
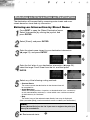 27
27
-
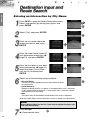 28
28
-
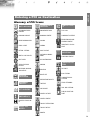 29
29
-
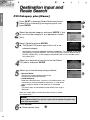 30
30
-
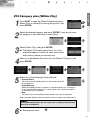 31
31
-
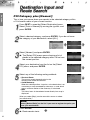 32
32
-
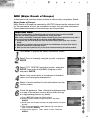 33
33
-
 34
34
-
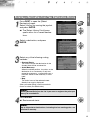 35
35
-
 36
36
-
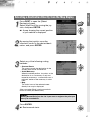 37
37
-
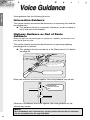 38
38
-
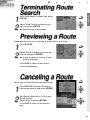 39
39
-
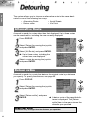 40
40
-
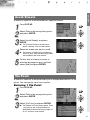 41
41
-
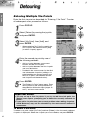 42
42
-
 43
43
-
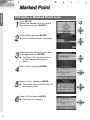 44
44
-
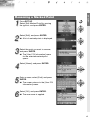 45
45
-
 46
46
-
 47
47
-
 48
48
-
 49
49
-
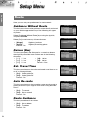 50
50
-
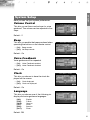 51
51
-
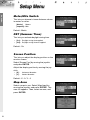 52
52
-
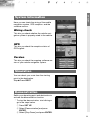 53
53
-
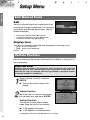 54
54
-
 55
55
-
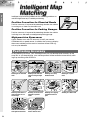 56
56
-
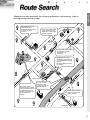 57
57
-
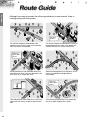 58
58
-
 59
59
-
 60
60
-
 61
61
-
 62
62
-
 63
63
-
 64
64


Panasonic CNDV1800EN Handleiding
- Categorie
- Navigators
- Type
- Handleiding
