
Model name indication position
See Removing the trim plate (P.24)
Position d'indication du nom du modèle
Voir Retrait de la plaque de garniture
(p.50)
Anzeigeposition der Modellbezeichnung
Siehe Entfernen der Ziertafel (S.76)
Model naam indicatie positie
Zie Verwijderen van de afwerkingsplaat
(P.102)
Trim plate
Plaque de garniture
Ziertafel
Afwerkingsplaat
B5H-0357-04 (E)© 2020 JVCKENWOOD Corporation
KW-M560BT
MONITOR WITH RECEIVER
Quick Start Guide
ÉCRAN AVEC RÉCEPTEUR
Guide de démarrage rapide
MONITOR MIT EMPFÄNGER
Kurzanleitung
MONITOR MET ONTVANGER
Snelstartgids
• Updated information (the latest Instruction Manual, system updates, new
functions, etc.) is available from
• Des informations actualisées (le dernier mode d'emploi, les mises à jour du
système, les nouvelles fonctions, etc.) sont disponibles sur
• Die aktuellsten Informationen (die neueste Bedienungsanleitung,
Systemupdates, neue Funktionen usw.) nden Sie unter
• Bijgewerkte informatie (de meest recente gebruiksaanwijzing,
systeemupdates, nieuwe functies, enz.) is beschikbaar op
<https://www.jvc.net/cs/car/>
!B5H-0357-04_QSG_JVC_KWM_E_EnFrDeNl.indb 1 2020/02/17 18:05

2
Important Notice on Software
Ñ Software License on This Product
The software embedded in this product comprises a
number of independent software components, each
of which is copyrighted by JVCKENWOOD Corporation
or by a third party.
This product uses software components that
are based on an End-User License Agreement
(hereinafter called “EULA”) stipulated by JVCKENWOOD
Corporation and by third parties.
The EULA dictates the availability of the source codes
of free-software components as a prerequisite to
distributing them in executable form under the
terms of the GNU General Public License or the Lesser
General Public License (hereinafter called “GPL/LGPL”).
To get information about the software components
that are subject to the terms of the GPL/LGPL, please
visit the following Website:
Website URL
https://www3.jvckenwood.com/english/download/gpl/
Queries concerning the contents of the source code or
the like will not be accepted.
Please note that software components based on a
EULA that is not subject to the terms of the GPL/LGPL
or those that have been developed or created by
JVCKENWOOD Corporation will be excluded from the
scope of source code disclosure.
Because licenses to use software components
distributed under the GPL/LGPL are offered to the
customers for free of charge, no warranty is granted to
the customers, whether explicitly or implicitly, to the
extent of the applicable laws.
Unless otherwise stipulated by the applicable laws
or agreed upon in writing, the copyright holders or
those who are entitled to modify and redistribute the
software components are not held responsible for
any and all damages resulting from their use or from
inability to use them. For more information about the
terms of use of the software components, required
items of compliance and so on, please refer to the
GPL/LGPL.
Customers wishing themselves to use a software
component that is subject to the GPL/LGPL embedded
in this product are encouraged to read the terms of
the corresponding license before use. Because each
individual license is prescribed by a third party other
than JVCKENWOOD Corporation, the original (English)
of the license is presented.
EULA
Ñ Software License Agreement
JVCKENWOOD Corporation (hereinafter called
“Licensor”) holds either the copyright to the
embedded software or the right to sublicense it. This
agreement establishes the conditions under which the
customer uses this “Licensed Software.”
The customer shall agree to the terms of this license
agreement before proceeding to use Licensed
Software.
This agreement is deemed to have taken effect when
the customer (hereinafter called “User”) has used a
product implementation of Licensed Software.
The Licensed Software may contain software Licensor
has been licensed to use by third parties directly
or indirectly. Some third parties may have terms of
use prescribed for their customers, apart from this
Software License Agreement. This agreement does not
apply to such software. Be sure to consult “Important
Notice on Software” as presented separately.
Article 1 (General)
Licensor grants to User a non-exclusive, non-
assignable right of use Licensed Software within
the country where the User purchases the Product
(hereinafter the "Country") (except for the exception
provided for in Paragraph 1, Article 3).
Article 2 (Right of Use)
1. The rise of use granted under this agreement is the
right to use Licensed Software in this product.
2. User may not duplicate, copy, modify, add to,
translate or otherwise alter, or loan licensed Software
and the associated literature in whole or in part.
3. Use of Licensed Software is limited to a private
extent , and Licensed Software may not be
distributed, licensed or sublicensed for any purposes
whatsoever, including commercial use.
4. User shall use Licensed Software as per the
instruction manual or instructions given in the help
file and may not use or duplicate data in violations
of the regulations of the Copyright Law or other
governing laws by using Licensed Software in whole
or in part.
!B5H-0357-04_QSG_JVC_KWM_E_EnFrDeNl.indb 2 2020/02/17 18:05

3
Article 3 (Terms of License)
1. In assigning this product, User may not retain
the original copy of the embedded Licensed
Software (including associated literature, updates
and upgrades) and any duplicates and associated
literature with regard to the license to use Licensed
Software. User may transfer Licensed Software only
to the condition of binding the assignee to abide by
the terms of this Software License Agreement.
2. User may not reverse-engineer, disassemble,
decompile or otherwise analyze the source code of
Licensed Software.
Article 4 (Rights to Licensed Software)
All rights to Licensed Software and the associated
literature, including copyrights, shall reside with
Licensor or the original right holder who has granted
the Right of Use and right to sublicense to Licensor
(hereinafter referred to as “Original Right Holder”), and
User does not have any rights other than Right of Use
granted hereunder with regard to Licensed Software
and the associated literature.
Article 5 (Exemption Granted to Licensor)
1. Licensor and Original Right Holder do not assume
any responsibility for damages caused to User or
third parties resulting from the exercise by User of
the license granted hereunder, unless otherwise
provided by any law to the contrary.
2. Licensor does not warrant Licensed Software to
be merchantable, compatible and fit for specific
purposes.
Article 6 (Responsibility for Third Parties)
If disputes over the infringement of third parties’
intellectual property rights, such as copyrights and
patent rights, arise out of the use of Licensed Software
by User, User shall resolve these disputes at User’s
own expenses while keep Licensor and Original Right
Holder harmless.
Article 7 (Secrecy Obligation)
User shall keep confidential Licensed Software
provided hereunder, information contained in the
associated literature or the like and those provisions of
this agreement not yet in public knowledge and may
not disclose or leak these to third parties without prior
written consent from Licensor.
Article 8 (Cancellation of the Agreement)
Licensor reserves the right to cancel this agreement
forthwith and claim compensation from User for the
damages caused by such cancellation when User:
(1) Breaches any of the provisions of this agreement, or
(2) Has received a petition for seizure, provisional
seizure, provisional disposition or any other kind of
compulsory execution.
Article 9 (Destruction of Licensed Software)
If this agreement is terminated under the provision of
the foregoing paragraph, User shall destroy Licensed
Software, along with all associated literature and its
duplicates, within two (2) weeks from the date of
termination.
Article 10 (Copyright Protection)
1. Copyrights and all other intellectual property
rights relating to Licensed Software shall reside
with Licensor and Original Right Holder and in no
circumstances with User.
2. User shall abide by the laws relating to copyrights
and intellectual property rights in using Licensed
Software.
Article 11 (Export Control)
1. Licensed Software and the associated literature or
the like may not be exported to places outside the
Country (including transmission outside the Country
over the Internet or the like).
2. User agrees that Licensed Software is subject to
export controls imposed by the Country and the
United States of America.
3. User agrees to comply with all the international
and domestic laws that apply to this software (U.S.
Export Administration Regulations and regulations
established by the U.S., the Country and their
governmental agencies regarding usage by end
users and export destinations).
Article 12 (Miscellaneous)
1. Even if this agreement is invalidated in part by law,
all other provisions shall remain in effect.
2. Licensor and User shall consult each other in
good faith to resolve any matters not provided for
in this agreement or questions arising from the
interpretation of this agreement.
3. Licensor and User agree that this agreement is
governed by the law of Japan and that all disputes
involving claims and obligations that may arise out
of this agreement will be settled by arbitration at the
Tokyo District Court as the court of first instance.
!B5H-0357-04_QSG_JVC_KWM_E_EnFrDeNl.indb 3 2020/02/17 18:05

Before Use
4
Contents
Before Use
About the Quick start guide
This Quick Start Guide describes basic functions
of this unit.
For detailed operations and information, refer
to the INSTRUCTION MANUAL on the following
website:
<https://www.jvc.net/cs/car/>
The Instruction manual is subject to change for
modification of specifications and so forth.
Be sure to download the latest edition of the
Instruction manual for reference.
How to read this manual
• The screens and panels shown in this manual are
examples used to provide clear explanations of the
operations.
For this reason, they may be different from the actual
screens or panels used, or some display patterns may
be different.
• Indication language: English indications are used
for the purpose of explanation. You can select the
indication language from the [SETUP] menu. See
Instruction Manual.
Before Use ..................................................................... 4
About the Quick start guide ...........................................................4
How to read this manual ..................................................................4
Precautions ................................................................................................5
Basic Operations ......................................................... 6
Functions of the Buttons on the Front Panel ....................... 6
Turning on the Unit .............................................................................6
Getting Started ....................................................................................... 7
Adjusting the volume .........................................................................8
Touch screen operations ..................................................................8
HOME screen descriptions ..............................................................9
Source selection screen descriptions .......................................9
Source control screen descriptions ........................................11
FUNCTION screen ..............................................................................12
List screen ...............................................................................................12
USB ................................................................................13
Connecting a USB device..............................................................13
USB Basic Operation ......................................................................... 13
Tuner .............................................................................14
Tuner Basic Operation ..................................................................... 14
Memory Operation ...........................................................................15
Bluetooth Control.....................................................16
Register from the Bluetooth device........................................16
Using Hands-Free Unit .................................................................... 17
Controlling Audio ..................................................... 20
Connection/Installation .........................................22
Before Installation ..............................................................................22
Installing the unit ............................................................................... 23
Appendix .....................................................................27
Specifications ........................................................................................27
About this Unit ....................................................................................27
!B5H-0357-04_QSG_JVC_KWM_E_EnFrDeNl.indb 4 2020/02/17 18:05

Before Use
5English
Precautions
# WARNINGS
Ñ To prevent injury or re, take
the following precautions:
• To prevent a short circuit, never put or leave
any metallic objects (such as coins or metal
tools) inside the unit.
• Do not watch or fix your eyes on the unit’s
display when you are driving for any extended
period.
• If you experience problems during installation,
consult your JVC dealer.
Ñ Precautions on using this unit
• When you purchase optional accessories,
check with your JVC dealer to make sure that
they work with your model and in your area.
• You can select language to display menus,
audio file tags, etc. See Instruction Manual.
• The Radio Data System or Radio Broadcast
Data System feature won’t work where the
service is not supported by any broadcasting
station.
Ñ Protecting the monitor
• To protect the monitor from damage, do not
operate the monitor using a ball point pen or
similar tool with the sharp tip.
Ñ Cleaning the unit
• If the faceplate of this unit is stained, wipe it
with a dry soft cloth such as a silicon cloth.
If the faceplate is stained badly, wipe the
stain off with a cloth moistened with neutral
cleaner, then wipe it again with a clean soft
dry cloth.
NOTE
• Applying spray cleaner directly to the unit may
affect its mechanical parts. Wiping the faceplate
with a hard cloth or using a volatile liquid such
as thinner or alcohol may scratch the surface or
erase screened print.
Ñ How To Reset Your Unit
• If the unit or the connected unit fails to
operate properly, reset the unit.1 Press the
<Reset> button.The unit returns to factory
settings.
Reset button
!B5H-0357-04_QSG_JVC_KWM_E_EnFrDeNl.indb 5 2020/02/17 18:05

Basic Operations
6
Basic Operations
Functions of the Buttons on
the Front Panel
1
2
3
4
5
6
NOTE
• The panels shown in this guide are examples
used to provide clear explanations of the
operations. For this reason, they may be different
from the actual panels.
Name
• Motion
1
Remote Sensor
• Receives the remote control signal.
2
[ ]
• Displays the Voice Recognition screen.
3
[FNC] / [ ]
• Displays the FUNCTION screen.
• Pressing for 1 second displays the APP
(Apple CarPlay/ Android Auto) screen.
4
[], [] (Volume)
• Adjusts volume.
The volume will go up until 15 when you
keep pressing .
5
[ ] / [ ]
• Displays the HOME screen (P.9).
• Pressing for 1 second turns the power off.
• When the power off, turns the power on.
6
Reset
• If the unit or the connected unit fails to
operate properly, the unit returns to initial
settings when this button is pressed.
Turning on the Unit
The method of turning on is different
depending on the model.
1
Press the [ ] button.
The unit is turned on.
● To turn off the unit:
1
Press the [ ] button for 1 second.
NOTE
• If it is your first time turning the unit on after
installation, it will be necessary to perform Initial
setup (P.7).
!B5H-0357-04_QSG_JVC_KWM_E_EnFrDeNl.indb 6 2020/02/17 18:05

Basic Operations
7English
Getting Started
Initial setup
Perform this setup when you use this unit first
time.
1
Set each item as follows.
■ [Language]
Select the language used for the control
screen and setting items. Default is “[British
English(en)]”.
1Touch [Language].
2Touch [Language Select].
3Select the desired language.
4Touch [
].
■ [Clock]
Adjusts clock.
For detailed operation, see Calendar/clock
settings (P.7).
■ [Display]
Set the image on the screen.
1Touch [Display].
2Touch [Background].
3Select the image.
4Touch [
].
For detailed operation, see Instruction
Manual.
■ [Camera]
Set the parameters for the camera.
1Touch [Camera].
2Set each item and touch [
].
For detailed operation, see Instruction
Manual.
■ [DEMO]
Set the demonstration mode. Default is “ON”.
1Touch [DEMO] and set [ON] or [OFF].
2
Touch [Finish].
NOTE
• These settings can be set from the SETUP menu.
Calendar/clock settings
1
Press the [FNC] button.
FUNCTION screen appears.
2
Touch [ ].
SETUP Menu screen appears.
!B5H-0357-04_QSG_JVC_KWM_E_EnFrDeNl.indb 7 2020/02/17 18:05

Basic Operations
8
3
Touch [User Interface].
User Interface screen appears.
4
Touch [Clock Adjust].
5
Adjust the date, then adjust the time.
6
Touch [Set].
NOTE
• Deactivate [RDS CT] before adjusting the clock.
See Instruction Manual.
Adjusting the volume
To adjust the volume (0 to 40),
Press [] to increase, and press [] to decrease.
Holding [] increases the volume continuously
to level 15.
Touch screen operations
To perform operations on the screen, you need
to touch, touch and hold, flick or swipe to select
an item, display setting menu screen or to
change the page, etc.
● Touch
Touch the screen gently to
select an item on the screen.
● Touch and hold
Touch the screen and keep
your finger in place until the
display changes or a message
is displayed.
● Flick
Slide your finger quickly to
the left or right on the screen
to change the page.
You can scroll the list screen
by flicking the screen up/
down.
● Swipe
Slide your finger up or down
on the screen to scroll the
screen.
!B5H-0357-04_QSG_JVC_KWM_E_EnFrDeNl.indb 8 2020/02/17 18:05

Basic Operations
9English
Gesture Touch Control:
You can also control playback by moving your
finger on the touch panel as follows (for some
sources, the gesture control is not available).
• Sliding the finger towards up/down:
- Functions same as pressing [
] / [ ]
(Media) in the USB Control screen.
- For the Tuner, tuner preset broadcast stations
are switched.
• Sliding the finger towards left/right: Functions
same as pressing [E] / [F].
• Moving your finger clockwise or counter-
clockwise: increases/decreases the volume.
HOME screen descriptions
Most functions can be performed from the
HOME screen.
41 5 6
1 2 3 1
1
• Short-cut playback source icons. (P.10)
2
• Current source information.
• Touch to display the control screen of current
source.
3
• Widget
4
• Displays the source selection screen. (P.10)
5
• Displays the SETUP Menu screen.
6
• Displays the Hands Free screen. (P.17)
• When connecting as Apple CarPlay or
Android Auto, it works as a phone provided
in Apple CarPlay or Android Auto.
Display the HOME screen
1
Press the [ ] button.
HOME screen appears.
Source selection screen
descriptions
You can display all playback sources and options
on the source selection screen.
2 3
1
1
• Changes the playback source.
For playback sources, see Select the
playback source (P.10).
2
• Returns to previous screen.
3
• Displays the SETUP Menu screen.
!B5H-0357-04_QSG_JVC_KWM_E_EnFrDeNl.indb 9 2020/02/17 18:05

Basic Operations
10
Select the playback source
1
Touch [ ] on the HOME screen.
From the screen, you can select the
following sources and functions.
• Switches to the Apple CarPlay screen from
the connected iPhone.
• Switches to the USB Mirroring screen from
the connected Android smartphone.
It is necessary to connect Android
smartphone with “Mirroring OA for JVC”
application installed and to set [Mode] to
[Mirroring for Android™].
• Switches to the Radio broadcast. (P.14)
• Displays the Hands Free screen. (P.17)
When neither Apple CarPlay, Android
Auto, nor a Bluetooth Hands-Free phone
is connected, displays "[Disconnected]"
message in the TEL screen.
When connecting as Apple CarPlay
or Android Auto, it works as a phone
provided in Apple CarPlay or Android
Auto.
• Switches to the Android Auto screen from
the connected Android smartphone.
It is necessary to connect Android
smartphone compatible with
Android Auto and to set [Mode] to
[Android Auto].
• Plays a Bluetooth audio player.
• Plays files on a USB device. (P.13)
• Switches to an external component
connected to the AV-IN input terminal.
• Turns off the AV source. (P.10)
To turn o the AV source
1
Touch [ ] on the HOME screen.
2
Touch [AV Off].
!B5H-0357-04_QSG_JVC_KWM_E_EnFrDeNl.indb 10 2020/02/17 18:05

Basic Operations
11English
Source control screen
descriptions
There are some functions which can be
operated from most screens.
Indicators
1
2
3
4
Sub menu
1
[ ]/[ ]
Connected Bluetooth device information.
2
All sources icon
Displays all sources.
3
Secondary screen
• [
]/[ ] : The Secondary screen changes every
time you touch it. You can also change the
Secondary screen by flicking left or right on
the screen.
• Indicators: Displays the current source
condition and so on.
– [MUTE]: The mute function is active.
– [LOUD]: The loudness control function is on.
• Sub menu
– [ ]: Operation when the icon is touched:
The first touch darkens the screen, the second
touch darkens the screen further, and the third
touch restores the screen to its original brightness.
– [
]: Displays the Graphic Equalizer screen.
(P.21)
– [
]: Displays the APP (Apple CarPlay/ Android
Auto) screen.
4
[Û]
Touch to display the Hands Free screen.
(P.17)
When connecting as Apple CarPlay or Android
Auto, it works as a phone provided in Apple
CarPlay or Android Auto.
!B5H-0357-04_QSG_JVC_KWM_E_EnFrDeNl.indb 11 2020/02/17 18:05

Basic Operations
12
FUNCTION screen
1
Press the [FNC] button.
FUNCTION screen appears.
2
Touch to display the FUNCTION screen.
The contents of the menu are as follows.
• Displays the SETUP Menu screen.
• Displays the APP (Apple CarPlay/Android
Auto) screen.
• Displays the Screen Adjust screen.
• Displays the view camera.
• Displays the source selection screen.
(P.10)
• Turns the display off. (P.12)
• Displays the Audio screen. (P.20)
• Close the FUNCTION screen.
Turn o the screen
1
Select [ ] on the FUNCTION screen.
● To turn on the screen
1
Touch the display.
List screen
There are some common function keys in the
list screens of most sources.
61 2
3 4 5
1
Displays list type selection window.
2
Displays music/movie file list.
3
Text scroll
Scrolls the displayed text.
4
etc.
Keys with various functions are displayed here.
• [
] : Plays all tracks in the folder containing
the current track.
• [
] [ ] : Moves to the upper hierarchy.
5
[ ] / [ ] / [ ] / [ ] Page scroll
You can change the page to display more items
by pressing [
]/[ ].
• [
]/[ ] : Displays the top or bottom page.
6
Return
Returns to previous screen.
NOTE
• Buttons which cannot be activated from the list
screen are not displayed.
!B5H-0357-04_QSG_JVC_KWM_E_EnFrDeNl.indb 12 2020/02/17 18:05

USB
13English
USB
Connecting a USB device
1
Connect the USB device with the USB
cable. (P.25)
2
Press the [ ] button.
3
Touch [ ].
4
Touch [USB]. (P.10)
Ñ Disconnect the USB device
1
Press the [ ] button.
2
Touch [ ].
3
Touch a source other than [USB].
4
Detach the USB device.
Ñ Usable USB device
You can use a mass-storage-class USB device on
this unit.
The word “USB device” appearing in this manual
indicates a flash memory device.
USB Basic Operation
Most functions can be controlled from the
source control screen and playback screen.
Control screen
2
3
1
1
[ ] / [ ]
• [
] : Repeats the current track/folder. Each
time you touch the key, repeat mode switches
in the following sequence;
File repeat ([
]), Folder repeat ([ ]), Repeat
all ([
])
• [
] : Randomly plays all tracks in current
folder. Each time you touch the key, random
mode switches in the following sequence;
File random ([
]), Random off ([ ])
2
Track information
Displays the information of the current file.
3
[Operation keys
• [1] : Searches track/file. For details on search
operation, see Instruction Manual.
• [E] [F] : Searches the previous/next track/
file.
Touch and hold to fast forward or fast
backward.
• [D/H] : Plays or pauses.
• [
] : Touch to mute or not to mute.
!B5H-0357-04_QSG_JVC_KWM_E_EnFrDeNl.indb 13 2020/02/17 18:05

Tuner
14
Tuner
Tuner Basic Operation
Most functions can be controlled from the
source control screen.
To enter Tuner source, touch [Tuner] icon in the
source selection screen. (P.10)
Control screen
4
6
5
3
1
2
Open the drawer
4
7
5
1
Information display
Displays the information of the current station:
Frequency
Touching [ ] allows you to switch between
Content A and Content B.
– Content A: PS name, Radio Text, PTY Genre
– Content B: Radio Text plus, Title Artist
[Preset#]: Preset number
2
Seek mode
Switches the seek mode in the following
sequence; [AUTO1], [AUTO2], [MANUAL].
• [AUTO1]: Tunes in a station with good
reception automatically.
• [AUTO2]: Tunes in stations in memory one
after another.
• [MANUAL]: Switches to the next frequency
manually.
3
Operation keys
• [E] [F] : Tunes in a station. The method of
frequency switching can be changed (see 2
in table).
• [
] : Touch to mute or not to mute.
4
Preset list
• Touch on the right side of the screen to
display the Preset list. Touch again to close
the list.
• Recalls the memorized station.
• When touched for 2 seconds, stores the
current receiving station in memory.
5
Function panel
Touch on the left side of the screen to display
the function panel. Touch again to close the
panel.
• [TI] (FM only): Sets the traffic information mode
on. For details, see Instruction Manual.
• [SETUP] (FM only): Displays the Tuner SETUP
screen. For details, see Instruction Manual.
• [AME]: Presets stations automatically. For
details, see Instruction Manual.
• [PTY] (FM only): Searches a program by setting
program type. For details, see Instruction
Manual.
• [MONO] (FM only): Select the Monaural
reception.
• [LO.S] (FM only): Turns the Local Seek function
on or off.
6
[FM] [AM]
Switches the band.
7
Indicator Items
• [ST]: A stereo broadcast is being received.
• [MONO]: The forced monaural function is on.
• [AF]: The AF search function is on.
• [LOS]: The Local Seek function is on.
• [RDS]: Indicates the state of the Radio Data
System station when the AF function is on.
White: Radio Data System is being received.
Orange: Radio Data System is not being
received.
!B5H-0357-04_QSG_JVC_KWM_E_EnFrDeNl.indb 14 2020/02/17 18:05

Tuner
15English
• [TI]: Indicates the reception state of traffic
information.
White: TP is being received.
Orange: TP is not being received.
Memory Operation
Ñ Auto memory
You can store stations with good reception in
memory automatically.
1
Touch desired band key.
2
Touch [ ] on the left side of the screen.
Touch [AME].
A confirmation screen appears.
3
Touch [Ye s ].
Auto memory starts.
Ñ Manual memory
You can store the current receiving station in
memory.
1
Select a station you wish to store in
memory.
2
Touch [FM#] (#: 1-24) or [AM#] (#: 1-12) in
which you want to store the station for 2
seconds.
!B5H-0357-04_QSG_JVC_KWM_E_EnFrDeNl.indb 15 2020/02/17 18:05

Bluetooth Control
16
Bluetooth Control
Ñ About the cell-phone and
Bluetooth audio player
This unit conforms to the following Bluetooth
specifications:
Version
Bluetooth Ver. 4.1
Profile
Cell-phone:
HFP (Hands Free Profile)
SPP (Serial Port Profile)
PBAP (Phonebook Access Profile)
Audio player:
A2DP (Advanced Audio Distribution Profile)
AVRCP (Audio/Video Remote Control Profile)
Sound codec
SBC, AAC
NOTE
• The units supporting the Bluetooth function
have been certified for conformity with the
Bluetooth Standard following the procedure
prescribed by Bluetooth SIG.
• However, it may be impossible for such units to
communicate with your cell-phone depending
on its type.
Register from the Bluetooth
device
It is necessary to register the Bluetooth audio
player or cell-phone to this unit before using the
Bluetooth function.
1
Turn on the Bluetooth function on your
smartphone/cell-phone.
2
Search the unit (“KW-M*****”) from your
smartphone/cell-phone.
3
Operate your smartphone/cell-phone
according to the displayed messages.
■ Confirm the request on the
smartphone/cell-phone.
■ If a PIN code is required, enter the PIN
code (“0000”).
4
Press the [FNC] button.
FUNCTION screen appears.
5
Touch [ ].
SETUP Menu screen appears.
6
Touch [Bluetooth].
Bluetooth SETUP screen appears.
!B5H-0357-04_QSG_JVC_KWM_E_EnFrDeNl.indb 16 2020/02/17 18:05

Bluetooth Control
17English
7
Touch [Select Device] in the Bluetooth
SETUP screen.
8
Touch [ ] you want to connect.
NOTE
• If the icon is lighted, it means that the unit will
use that device.
To delete the registered Bluetooth
device
1
Touch [ ].
Confirmation message appears.
2
Touch [Ye s ].
Using Hands-Free Unit
You can use telephone function by connecting
the Bluetooth telephone to this unit.
NOTE
• While Apple CarPlay or Android Auto is being
connected, Bluetooth Hands-Free function
cannot be used. Only Apple CarPlay or Android
Auto Hands-Free function can be used.
Ñ Make a call
1
Touch [Phone]/[Û].
Hands Free screen appears.
2
Select a dialing method.
• [ ]: Call using call records
• [
]: Call using the phonebook
• [
]: Call using the preset number
• [
]: Call by entering a phone number
• [
]: Voice Recognition
• [
]: Bluetooth SETUP
● Bluetooth SETUP
1) Touch [ ].
Bluetooth SETUP screen appears.
NOTE
• The status icons such as battery and antenna
displayed may differ from those displayed on the
cell-phone.
• Setting the cell-phone in the private mode can
disable the hands-free function.
!B5H-0357-04_QSG_JVC_KWM_E_EnFrDeNl.indb 17 2020/02/17 18:05

Bluetooth Control
18
Call using call records
1
Touch [ ].
2
Select the phone number from the list.
Call by entering a phone number
1
Touch [ ].
2
Enter a phone number with number keys.
3
Touch [ ].
Call using the preset number
1
Touch [ ].
2
Touch the Name or phone number.
Call using the phonebook
1
Touch [ ].
2
Select the person you want to call from
the list.
3
Select the phone number from the list.
NOTE
• If no Phonebook has been downloaded,
touching [Download Phonebook Now] will
start downloading the Phonebook.
!B5H-0357-04_QSG_JVC_KWM_E_EnFrDeNl.indb 18 2020/02/17 18:05

Bluetooth Control
19English
Ñ Receive a call
1
Touch [ ] to answer a phone call or [ ]
to reject an incoming call.
NOTE
• While monitoring the view camera, this screen
does not appear even if a call comes in. To
display this screen, return the shift knob of car to
the driver position.
To end call
1
While talking, touch [ ].
Ñ Operations during a call
● Adjust the receiver volume
Press the [] or [] button.
● Output the dial tone
Touch [DTMF] to display the tone input screen.
You can send tones by touching desired keys on
the screen.
● Switching the speaking voice output
Touching [
]/ [ ] each time switches the
speaking voice output between cell-phone and
speaker.
● Call-waiting
When you receive a call while talking on another
call, you can answer the newly received call by
touching [
]. The current call is on hold.
Each time you touch [
], the caller will change.
When you touch [
], the current call will end
and switch to the call in hold.
!B5H-0357-04_QSG_JVC_KWM_E_EnFrDeNl.indb 19 2020/02/17 18:05

Controlling Audio
20
Controlling Audio
You can adjust the various settings such as
audio balance or subwoofer level.
1
Press the [FNC] button.
FUNCTION screen appears.
2
Touch [ ].
Ñ Controlling General Audio
1
Press the [FNC] button.
FUNCTION screen appears.
2
Touch [ ].
Audio screen appears.
3
Touch [Fader / Balance].
4
Set each item as follows.
■ [Fader] / [Balance]
Adjust the volume balance around the
touched area.
[C] and [D] adjust the right and left volume
balance.
[R] and [S] adjust the front and rear volume
balance.
■ [Center]
Clear the adjustment.
!B5H-0357-04_QSG_JVC_KWM_E_EnFrDeNl.indb 20 2020/02/17 18:05

Controlling Audio
21English
Ñ Equalizer Control
You can adjust equalizer by selecting the
optimized setting for each category.
1
Press the [FNC] button.
FUNCTION screen appears.
2
Touch [ ].
Audio screen appears.
3
Touch [Equalizer].
4
Touch the screen and set the Graphic
Equalizer as desired.
■ [ALL SRC]
Apply the adjusted equalizer to all sources.
Touch [ALL SRC] and then touch [OK] on the
confirmation screen.
■ Gain level (dotted frame area)
Adjust the gain level by touching the each
frequency bar.
You can select frequency bar and adjust its
level by [R], [S].
■ [Preset Select]
Displays the screen to recall the preset
equalizer curve.
■ [Initialize]
The current EQ curve returns to flat.
■ [Memory]
Saves the adjusted equalizer curve from
“[User1]” to “[User3]”.
■ [Bass EXT] (Bass Extend Settings)
When turned on, the frequency lower than
62.5 Hz is set to the same gain level as 62.5
Hz.
■ [SW Level]
Adjusts the subwoofer volume.
!B5H-0357-04_QSG_JVC_KWM_E_EnFrDeNl.indb 21 2020/02/17 18:05

Connection/Installation
22
Connection/Installation
Before Installation
Before installation of this unit, please note the
following precautions.
# WARNINGS
• If you connect the ignition wire (red) and
the battery wire (yellow) to the car chassis
(ground), you may cause a short circuit, that
in turn may start a fire. Always connect those
wires to the power source running through
the fuse box.
• Do not cut out the fuse from the ignition wire
(red) and the battery wire (yellow). The power
supply must be connected to the wires via
the fuse.
# CAUTION
• Install this unit in the console of your vehicle.
Do not touch the metal part of this unit during
and shortly after the use of the unit. Metal part
such as the heat sink and enclosure become
hot.
NOTE
• Mounting and wiring this product requires
skills and experience. For best safety, leave the
mounting and wiring work to professionals.
• Make sure to ground the unit to a negative 12V
DC power supply.
• Do not install the unit in a spot exposed to
direct sunlight or excessive heat or humidity.
Also avoid places with too much dust or the
possibility of water splashing.
• If the power is not turned ON (“There is an
error in the speaker wiring. Please check
the connections.” is displayed), the speaker
wire may have a short-circuit or touched
the chassis of the vehicle and the protection
function may have been activated. Therefore,
the speaker wire should be checked.
• If your car’s ignition does not have an ACC
position, connect the ignition wires to a power
source that can be turned on and off with the
ignition key. If you connect the ignition wire
to a power source with a constant voltage
supply, such as with battery wires, the battery
may be drained.
• If the console has a lid, make sure to install the
unit so that the front panel will not hit the lid
when closing and opening.
• If the fuse blows, first make sure the wires
aren’t touching to cause a short circuit, then
replace the old fuse with one with the same
rating.
• Insulate unconnected wires with vinyl tape
or other similar material. To prevent a short
circuit, do not remove the caps on the ends of
the unconnected wires or the terminals.
• Connect the speaker wires correctly to the
terminals to which they correspond. The unit
may be damaged or fail to work if you share
the ¤ wires or ground them to any metal part
in the car.
• When only two speakers are being connected
to the system, connect the connectors either
to both the front output terminals or to both
the rear output terminals (do not mix front
and rear). For example, if you connect the ¢
connector of the left speaker to a front output
terminal, do not connect the ¤ connector to
a rear output terminal.
• After the unit is installed, check whether the
brake lamps, blinkers, wipers, etc. on the car
are working properly.
• Do not press hard on the panel surface when
installing the unit to the vehicle. Otherwise
scars, damage, or failure may result.
• Reception may drop if there are metal objects
near the Bluetooth antenna.
Bluetooth antenna unit
!B5H-0357-04_QSG_JVC_KWM_E_EnFrDeNl.indb 22 2020/02/17 18:05

Connection/Installation
23English
Ñ Supplied accessories for
installation
1
(3 m)
x1
2
x1
3
(2 m)
x1
4
x1
5
x2
Ñ Installation procedure
1) To prevent a short circuit, remove the key
from the ignition and disconnect the ¤
terminal of the battery.
2) Make the proper input and output wire
connections for each unit.
3) Connect the ISO connector to the unit.
4) Install the unit in your car.
5) Reconnect the ¤ terminal of the battery.
6) Press the reset button.
Installing the unit
Bend the tabs of the
mounting sleeve with
a screwdriver or similar
utensil and attach it in
place.
NOTE
• Make sure that the unit is installed securely
in place. If the unit is unstable, it may
malfunction (eg, the sound may skip).
Ñ Trim plate
1) Attach accessory 2 to the unit.
2
!B5H-0357-04_QSG_JVC_KWM_E_EnFrDeNl.indb 23 2020/02/17 18:05

Connection/Installation
24
Ñ Microphone unit
1) Check the installation position of the
microphone (accessory 1).
2) Clean the installation surface.
3) Remove the separator of the microphone
(accessory 1), and stick the microphone to
the place shown below.
4) Wire the microphone cable up to the unit
with it secured at several positions using tape
or other desired method.
5) Adjust the direction of the microphone
(accessory 1) to the driver.
1
Fix a cable with a commercial item of tape.
NOTE
• Swap the clips if necessary.
Ñ Removing the trim plate
1) Use the extraction key (accessory 4) to lever
out the four tabs (two on the left part, two on
the right part).
4
2) Pull the trim plate forward.
Ñ Removing the unit
1) Remove the trim plate by referring to step 1 in
“Removing the trim plate”.
2) Insert the extraction key (accessory 5) deeply
into the slot as shown. (The protrusion at the
tip of the extraction key must face toward
the unit.)
5
3) With the inserted extraction key secured,
insert the other extraction key into the slot.
5
4) Pull out the unit halfway.
NOTE
• Be careful to avoid injury from the catch
pins on the extraction key.
5) Pull the unit all the way out with your hands,
being careful not to drop it.
!B5H-0357-04_QSG_JVC_KWM_E_EnFrDeNl.indb 24 2020/02/17 18:05

Connection/Installation
25English
PRK SW
STEERING
WHEEL
REMOTE
INPUT
2 4 6 8
1 3 5 7
2 4 6 8
1 3 5 7
REVERSE
SUB
WOOFER
1 2 3 4
5V
=
1.5A
ST REMOTE
INPUT 1
ST REMOTE
INPUT 2
ST REMOTE
GND
Connect to the vehicle’s
parking brake detection
switch harness.
For best safety, be sure
to connect the parking
sensor.
Light Green (Parking sensor wire)
Accessory 3: Parking Extention cable
Purple/White (Reverse
sensor wire)
To steering remote
To use the steering wheel remote control feature,
you need an exclusive remote adapter (not
supplied) matched to your car.
Connect to vehicle’s
reverse lamp harness
when using the
optional rear view
camera.
Light Blue/Yellow (Steering remote control wire)
Fuse (15A)
Ñ Connecting wires to terminals
Subwoofer Preout
Cap
Cap
FM/AM antenna
Connector A
Connector B
USB device
[2]
USB terminal
[1]
(1.0 m)
[1]
USB maximum power supply current :
DC 5 V = 1.5 A
[2]
Sold separately
ISO Connector
FRONT OUTREAR OUT
VIDEO OUTCAM IN
Rear Audio Preout
(Left; White, Right; Red)
Front Audio Preout
(Left; White, Right; Red)
Visual Output (Yellow)
Rear view camera input (Yellow)
AV-IN (1; Left audio, 2; Composite video,
3; Ground, 4; Right audio).
Accessory 1:
Bluetooth Microphone
Bright Green/Red
Purple/Red
Gray/Red
Connect to vehicle’s steering remote harness.
Contact your JVC dealer for details.
!B5H-0357-04_QSG_JVC_KWM_E_EnFrDeNl.indb 25 2020/02/17 18:05

Connection/Installation
26
Ñ Connecting an iPhone/Android
5V
=
1.5A
KS-U62 (0.8m)
[3]
USB cable
[2]
iPhone
[2]
Lightning connector
Android smartphone
[2]
Cap
USB terminal
[1]
(1.0 m)
[1]
iPhone maximum power supply current :
DC 5 V = 1.5 A
[2]
Sold separately
[3]
Optional accessory
Ñ ISO Connector function guide
Pin Color and function
A-4 Yellow Battery
A-5 Blue Power Antenna
[1]
A-6 Orange/White Illumination
A-7 Red Ignition (ACC)
A-8 Black Earth (Ground)
Connection
B-1/ B-2 Purple (+) /
Purple/Black (–)
Rear Right
B-3/ B-4 Gray (+) /
Gray/Black (–)
Front Right
B-5/ B-6 White (+) /
White/Black (–)
Front Left
B-7/ B-8 Green (+) /
Green/Black (–)
Rear Left
[1]
Max. 150 mA, 12V
• Speaker Impedance: 4-8 Ω
! CAUTION
Before you connect the commercially
available ISO connectors to the unit, check the
following condition:
• Make sure that the pin assignment of the
connector matches with the JVC unit.
• Take extra notice of the power wire.
• In case battery wire and ignition wire are not
corresponding then change them accordingly.
• In case the car does not have an ignition wire,
use a commercially available interface.
!B5H-0357-04_QSG_JVC_KWM_E_EnFrDeNl.indb 26 2020/02/17 18:05

Appendix
27English
Appendix
Specications
■ Bluetooth section
Frequency
: 2.402 – 2.480 GHz
RF Output Power (E.I.R.P.)
: +8 dBm (Avg.), Power Class 1
■ General
Operating Voltage
: 12V DC Car Battery
Speaker Impedance
: 4 – 8 Ω
Specications subject to change without
notice.
About this Unit
■ Copyrights
• The Bluetooth® word mark and logos are registered
trademarks owned by Bluetooth SIG, Inc. and any use
of such marks by JVCKENWOOD Corporation is under
license. Other trademarks and trade names are those of
their respective owners.
• Windows Media is a registered trademark or trademark
of Microsoft Corporation in the United States and/or
other countries.
• This product is protected by certain intellectual
property rights of Microsoft. Use or distribution of
such technology outside of this product is prohibited
without a license from Microsoft.
• Use of the Made for Apple badge means that an
accessory has been designed to connect specifically
to the Apple product(s) identified in the badge, and
has been certified by the developer to meet Apple
performance standards. Apple is not responsible for
the operation of this device or its compliance with
safety and regulatory standards. Please note that the
use of this accessory with an Apple product may affect
wireless performance.
• Apple, iPhone and Lightning are trademarks of Apple
Inc., registered in the U.S. and other countries.
• Apple, Siri, Apple CarPlay and Apple CarPlay logo are
trademarks of Apple Inc., registered in the U.S. and other
countries.
• App Store is a service mark of Apple Inc., registered in
the U.S. and other countries.
• IOS is a trademark or registered trademark of Cisco in
the U.S. and other countries and is used under license.
• Google, Android, Google Play and Android Auto are
trademarks of Google LLC.
• To use Android Auto on your car display, you’ll need an
Android Auto compatible vehicle or aftermarket stereo,
an Android phone running Android 5.0 or higher, and
the Android Auto app.
• Linux® is the registered trademark of Linus Torvalds in
the U.S. and other countries.
• THIS PRODUCT IS LICENSED UNDER THE AVC PATENT
PORTFOLIO LICENSE FOR THE PERSONAL USE OF A
CONSUMER OR OTHER USES IN WHICH IT DOES NOT
RECEIVE REMUNERATION TO (¡)ENCODE VIDEO IN
COMPLIANCE WITH THE AVC STANDARD (“AVC VIDEO”)
AND/OR (¡¡)DECODE AVC VIDEO THAT WAS ENCODED BY
A CONSUMER ENGAGED IN A PERSONAL ACTIVITY AND/
OR WAS OBTAINED FROM A VIDEO PROVIDER LICENSED
TO PROVIDE AVC VIDEO. NO LICENSE IS GRANTED OR
SHALL BE IMPLIED FOR ANY OTHER USE. ADDITIONAL
INFORMATION MAY BE OBTAINED FROM MPEG LA, L.L.C.
SEE HTTP://WWW.MPEGLA.COM
• THIS PRODUCT IS LICENSED UNDER THE MPEG-4 VISUAL
PATENT PORTFOLIO LICENSE FOR THE PERSONAL
AND NON-COMMERCIAL USE OF A CONSUMER FOR
!B5H-0357-04_QSG_JVC_KWM_E_EnFrDeNl.indb 27 2020/02/17 18:05

Appendix
28
(¡) ENCODING VIDEO IN COMPLIANCE WITH THE
MPEG-4 VISUAL STANDARD (“MPEG-4 VIDEO”) AND/
OR (¡¡) DECODING MPEG-4 VIDEO THAT WAS ENCODED
BY A CONSUMER ENGAGED IN A PERSONAL AND
NON-COMMERCIAL ACTIVITY AND/OR WAS OBTAINED
FROM A VIDEO PROVIDER LICENSED BY MPEG LA TO
PROVIDE MPEG-4 VIDEO. NO LICENSE IS GRANTED OR
SHALL BE IMPLIED FOR ANY OTHER USE. ADDITIONAL
INFORMATION INCLUDING THAT RELATING TO
PROMOTIONAL, INTERNAL AND COMMERCIAL USES
AND LICENSING MAY BE OBTAINED FROM MPEG LA, LLC.
SEE HTTP://WWW.MPEGLA.COM.
• THIS PRODUCT IS LICENSED UNDER THE VC-1 PATENT
PORTFOLIO LICENSE FOR THE PERSONAL AND NON-
COMMERCIAL USE OF A CONSUMER TO ( i ) ENCODE
VIDEO IN COMPLIANCE WITH THE VC-1 STANDARD
(“VC-1 VIDEO”) AND/OR ( ii ) DECODE VC-1 VIDEO
THAT WAS ENCODED BY A CONSUMER ENGAGED IN A
PERSONAL AND NON-COMMERCIAL ACTIVITY AND/
OR WAS OBTAINED FROM A VIDEO PROVIDER LICENSED
TO PROVIDE VC-1 VIDEO. NO LICENSE IS GRANTED OR
SHALL BE IMPLIED FOR ANY OTHER USE. ADDITIONAL
INFORMATION MAY BE OBTAINED FROM MPEG LA, L.L.C.
SEE HTTP://WWW.MPEGLA.COM
• libFLAC
Copyright (C) 2000,2001,2002,2003,2004,2005,2006,2007
,2008,2009 Josh Coalson
Redistribution and use in source and binary forms, with
or without modification, are permitted provided that
the following conditions are met:
– Redistributions of source code must retain the above
copyright notice, this list of conditions and the
following disclaimer.
– Redistributions in binary form must reproduce the
above copyright notice, this list of conditions and the
following disclaimer in the documentation and/or
other materials provided with the distribution.
– Neither the name of the Xiph.org Foundation nor the
names of its contributors may be used to endorse or
promote products derived from this software without
specific prior written permission.
THIS SOFTWARE IS PROVIDED BY THE COPYRIGHT
HOLDERS AND ONTRIBUTORS ``AS IS’’ AND ANY
EXPRESS OR IMPLIED WARRANTIES, INCLUDING,
BUT NOT LIMITED TO, THE IMPLIED WARRANTIES OF
MERCHANTABILITY AND FITNESS FOR A PARTICULAR
PURPOSE ARE DISCLAIMED. IN NO EVENT SHALL THE
FOUNDATION OR CONTRIBUTORS BE LIABLE FOR ANY
DIRECT, INDIRECT, INCIDENTAL, SPECIAL, EXEMPLARY,
OR CONSEQUENTIAL DAMAGES (INCLUDING, BUT NOT
LIMITED TO, PROCUREMENT OF SUBSTITUTE GOODS
OR SERVICES; LOSS OF USE, DATA, OR PROFITS; OR
BUSINESS INTERRUPTION) HOWEVER CAUSED AND ON
ANY THEORY OF LIABILITY, WHETHER IN CONTRACT,
STRICT LIABILITY, OR TORT (INCLUDING NEGLIGENCE OR
OTHERWISE) ARISING IN ANY WAY OUT OF THE USE OF
THIS SOFTWARE, EVEN IF ADVISED OF THE POSSIBILITY
OF SUCH DAMAGE.
• libvorbis
Copyright (c) 2002-2008 Xiph.org Foundation
Redistribution and use in source and binary forms, with
or without modification, are permitted provided that
the following conditions are met:
– Redistributions of source code must retain the above
copyright notice, this list of conditions and the
following disclaimer.
– Redistributions in binary form must reproduce the
above copyright notice, this list of conditions and the
following disclaimer in the documentation and/or
other materials provided with the distribution.
– Neither the name of the Xiph.org Foundation nor the
names of its contributors may be used to endorse or
promote products derived from this software without
specific prior written permission.
THIS SOFTWARE IS PROVIDED BY THE COPYRIGHT
HOLDERS AND CONTRIBUTORS ``AS IS’’ AND ANY
EXPRESS OR IMPLIED WARRANTIES, INCLUDING,
BUT NOT LIMITED TO, THE IMPLIED WARRANTIES OF
MERCHANTABILITY AND FITNESS FOR A PARTICULAR
PURPOSE ARE DISCLAIMED. IN NO EVENT SHALL THE
FOUNDATION OR CONTRIBUTORS BE LIABLE FOR ANY
DIRECT, INDIRECT, INCIDENTAL, SPECIAL, EXEMPLARY,
OR CONSEQUENTIAL DAMAGES (INCLUDING, BUT NOT
LIMITED TO, PROCUREMENT OF SUBSTITUTE GOODS
OR SERVICES; LOSS OF USE, DATA, OR PROFITS; OR
BUSINESS INTERRUPTION) HOWEVER CAUSED AND ON
ANY THEORY OF LIABILITY, WHETHER IN CONTRACT,
STRICT LIABILITY, OR TORT (INCLUDING NEGLIGENCE OR
OTHERWISE) ARISING IN ANY WAY OUT OF THE USE OF
THIS SOFTWARE, EVEN IF ADVISED OF THE POSSIBILITY
OF SUCH DAMAGE.
• libogg
Copyright (c) 2002, Xiph.org Foundation Redistribution
and use in source and binary forms, with or without
modification, are permitted provided that the following
conditions are met:
– Redistributions of source code must retain the above
copyright notice, this list of conditions and the
following disclaimer.
– Redistributions in binary form must reproduce the
above copyright notice, this list of conditions and the
following disclaimer in the documentation and/or
other materials provided with the distribution.
– Neither the name of the Xiph.org Foundation nor the
names of its contributors may be used to endorse or
promote products derived from this software without
specific prior written permission.
THIS SOFTWARE IS PROVIDED BY THE COPYRIGHT
HOLDERS AND CONTRIBUTORS ``AS IS’’ AND ANY
EXPRESS OR IMPLIED WARRANTIES, INCLUDING,
BUT NOT LIMITED TO, THE IMPLIED WARRANTIES OF
MERCHANTABILITY AND FITNESS FOR A PARTICULAR
PURPOSE ARE DISCLAIMED. IN NO EVENT SHALL THE
FOUNDATION OR CONTRIBUTORS BE LIABLE FOR ANY
DIRECT, INDIRECT, INCIDENTAL, SPECIAL, EXEMPLARY,
OR CONSEQUENTIAL DAMAGES (INCLUDING, BUT NOT
LIMITED TO, PROCUREMENT OF SUBSTITUTE GOODS
OR SERVICES; LOSS OF USE, DATA, OR PROFITS; OR
BUSINESS INTERRUPTION) HOWEVER CAUSED AND ON
ANY THEORY OF LIABILITY, WHETHER IN CONTRACT,
STRICT LIABILITY, OR TORT (INCLUDING NEGLIGENCE OR
OTHERWISE) ARISING IN ANY WAY OUT OF THE USE OF
THIS SOFTWARE, EVEN IF ADVISED OF THE POSSIBILITY
OF SUCH DAMAGE.
!B5H-0357-04_QSG_JVC_KWM_E_EnFrDeNl.indb 28 2020/02/17 18:05

Appendix
29English
■ Information on Disposal of Old
Electrical and Electronic Equipment
and Batteries (applicable for EU
countries that have adopted separate
waste collection systems)
Products and batteries with the symbol (crossed-out
wheeled bin) cannot be disposed as household waste.
Old electrical and electronic equipment and batteries
should be recycled at a facility capable of handling
these items and their waste byproducts.
Contact your local authority for details in locating a
recycle facility nearest to you.
Proper recycling and waste disposal will help conserve
resources whilst preventing detrimental effects on our
health and the environment.
Notice: The sign “Pb” below the symbol for batteries
indicates that this battery contains lead.
■ ילמשח דויצ לש הפשאל הכלשה רבדב עדימ
תונידמל יטנוולר( תוללוס ןכו ןשי ינורטקלאו
.)תדרפומ הפשא ףוסיא תכרעמב תושמתשמש
X םע הפשא חפ( ןומיסה םע תוללוסו םירצומ ךילשהל ןתינ אל
.הליגר תיתיב הפשאכ )וילע
ןקתמב תוללוס ןכו ןשי ינורטקלאו ילמשח דויצ רזחמל שי
.םהלש יאוולה ירצותבו הלאכ םיטירפב לפטל לגוסמה
ןקתמ תודוא םיטרפ תלבקל תימוקמה תושרה םע רשק ורצ
ורזעי םיתואנ הפשאל הכלשהו רוזחימ .םכילא בורקה רוזחימה
לעו ונתואירב לע תוילילש תועפשה עונמלו םיבאשמ רמשל
.הביבסה
ןייצמ תוללוס רובע ןומיסל תחתמש Pb ןומיסה :בל ומיש
.תרפוע הליכמ הללוסהש
!B5H-0357-04_QSG_JVC_KWM_E_EnFrDeNl.indb 29 2020/02/17 18:05

Avant l'utilisation
30
Table des matières
Avant l'utilisation
À propos du guide de
démarrage rapide
Ce Guide de démarrage rapide décrit les
fonctions de base de cet appareil.
Pour des informations et des opérations
détaillées, reportez-vous au MODE D'EMPLOI sur
le site Web suivant :
<https://www.jvc.net/cs/car/>
Le mode d'emploi est susceptible d'être modifié
suite aux changements pouvant être apportés
aux spécifications etc.
Téléchargez impérativement la dernière édition
du mode d'emploi à titre de référence.
Comment lire ce manuel
• Les écrans et façades illustrés dans le présent manuel
sont des exemples destinés à fournir des explications
plus claires des opérations.
C'est pourquoi il est possible qu'ils soient différents
des écrans effectivement affichés ou de la façade de
l'appareil, ou que certaines séquences d'affichage
soient différentes.
• Langue des indications : Les indications en anglais
sont utilisées dans un but explicatif. Vous pouvez
choisir la langue des indications à partir du menu
[SETUP]. Voir le Mode d'emploi.
Avant l'utilisation ...................................................... 30
À propos du guide de démarrage rapide ........................... 30
Comment lire ce manuel ..............................................................30
Précautions ............................................................................................. 31
Utilisation de base....................................................32
Fonctions des boutons en façade ...........................................32
Mise en marche de l'appareil ......................................................32
Mise en route ........................................................................................ 33
Régler le volume. ................................................................................ 34
Fonctionnement tactile .................................................................34
Descriptions de l'écran d'ACCUEIL ..........................................35
Descriptions de l'écran de sélection de source ..............35
Descriptions de l'écran de commande de source.........37
Écran FONCTIONS ..............................................................................38
Écran des listes ..................................................................................... 38
USB ................................................................................39
Connecter un périphérique USB ..............................................39
Utilisation de base USB ...................................................................39
Tuner .............................................................................40
Utilisation de base de la radio .................................................... 40
Utilisation de la mémorisation ...................................................41
Utilisation du Bluetooth ......................................... 42
Enregistrez depuis le périphérique Bluetooth .................42
Utilisation du module mains-libres ......................................... 43
Contrôle de l'audio ..................................................46
Connexion/Installation ...........................................48
Avant l'installation .............................................................................48
Installation de l'appareil ................................................................. 49
Annexes .......................................................................53
Spécifications ........................................................................................53
À propos de cet appareil ...............................................................53
!B5H-0357-04_QSG_JVC_KWM_E_EnFrDeNl.indb 30 2020/02/17 18:05

Avant l'utilisation
31Français
Précautions
#AVERTISSEMENTS
Ñ Pour éviter toute blessure
ou incendie, prenez les
précautions suivantes:
• Pour éviter un court-circuit, ne mettez ni ne
laissez jamais d'objets métalliques (comme
des pièces de monnaie ou des outils en métal)
à l'intérieur de l'appareil.
• Ne regardez pas ni ne fixez votre regard
sur l'affichage de l'appareil trop longtemps
pendant la conduite.
• Si vous rencontrez des problèmes pendant
l'installation, consultez votre revendeur JVC.
Ñ Précautions d'utilisation de
l'appareil
• Lorsque vous achetez des accessoires en
option, vérifiez auprès de votre revendeur JVC
qu'ils fonctionneront avec votre modèle et
dans votre région.
• Vous avez le choix de la langue dans laquelle
s'affichent les menus, les balises des fichiers
audio, etc. Voir le Mode d'emploi.
• Les fonctions Radio Data System ou Radio
Broadcast Data System sont inopérantes dans
les zones où le service n'est pris en charge par
aucune station de radiodiffusion.
Ñ Protection du moniteur
• Ne touchez pas le moniteur avec un stylo à
bille ou tout autre outil pointu. Cela pourrait
l'endommager.
Ñ Nettoyage de l'appareil
• Si la façade de l'appareil est tâchée, essuyez-la
avec un chiffon doux et sec comme un chiffon
en silicone. Si la façade est très sale, essuyez-
la avec un chiffon imbibé d'un produit de
nettoyage neutre, puis essuyez-la à nouveau
avec un chiffon doux et sec propre.
REMARQUE
• La pulvérisation directe de produit de nettoyage
sur l'appareil risque d'endommager les pièces
mécaniques. Si vous nettoyez la façade avec
un chiffon trop rugueux ou un liquide volatil,
comme un solvant ou de l'alcool, vous risquez
d'en rayer la surface ou d'effacer les caractères
sérigraphiés.
Ñ Comment réinitialiser votre
appareil
• Si l'appareil ou l'appareil raccordé ne
fonctionne pas correctement, réinitialisez
l'appareil. 1 Appuyez sur le bouton <Reset>.
L'appareil revient aux réglages d'usine.
Bouton de réinitialisation
!B5H-0357-04_QSG_JVC_KWM_E_EnFrDeNl.indb 31 2020/02/17 18:05

Utilisation de base
32
Utilisation de base
Fonctions des boutons en
façade
1
2
3
4
5
6
REMARQUE
• Les écrans illustrés dans le présent guide sont
des exemples destinés à fournir des explications
plus claires des opérations. Pour cette raison,
il peut arriver qu'ils soient différents de ceux
rencontrés dans la réalité.
Désignation
• Mouvement
1
Capteur à distance
• Reçoit le signal de la télécommande.
2
[ ]
• Affiche l'écran de reconnaissance vocale.
3
[FNC]/[ ]
• Affiche l'écran FONCTIONS.
• Appuyez pendant 1 seconde pour afficher
l'écran APP (Apple CarPlay/Android Auto).
4
[], [] (Volume)
• Règle le volume.
Le volume augmentera jusqu'à 15 tant que
vous maintiendrez enfoncé.
5
[ ] / [ ]
• Affiche l'écran d'ACCUEIL (p.35).
• Appuyez pendant 1 seconde pour éteindre
l'appareil.
• Permet de mettre l'appareil en marche
lorsqu'il est éteint.
6
Réinitialisation
• Si l'appareil ou l'appareil qui y est connecté
ne fonctionne pas correctement, appuyez
sur ce bouton pour que l'appareil retrouve
les réglages initiaux.
Mise en marche de l'appareil
La méthode d'allumage est différente selon le
modèle.
1
Appuyez sur le bouton [ ].
L'appareil se met en marche.
● Pour éteindre l'appareil:
1
Appuyez sur le bouton [ ] pendant 1
seconde.
REMARQUE
• Si c'est la première fois que vous mettez en
marche l'appareil après son installation, il
vous faut procéder à la Configuration initiale
(p.33).
!B5H-0357-04_QSG_JVC_KWM_E_EnFrDeNl.indb 32 2020/02/17 18:05

Utilisation de base
33Français
Mise en route
Conguration initiale
Effectuez cette configuration lors de la première
utilisation de cet appareil.
1
Réglez chaque option comme suit.
■ [Language]
Sélectionne la langue utilisée sur l'écran
de commande et sur les éléments de
configuration. La langue sélectionnée par
défaut est «[British English(en)]».
1Appuyez sur [Language].
2Touchez [Language Select].
3Sélectionnez la langue désirée.
4Touchez [
].
■ [Clock]
Règle l'horloge.
Pour les explications détaillées, voir Réglages
du calendrier/horloge (p.33).
■ [Display]
Réglez l'image à l'écran.
1Appuyez sur [Display].
2Touchez [Background].
3Sélectionnez l'image.
4Touchez [
].
Pour un fonctionnement détaillé, voir le
Mode d'emploi.
■ [Camera]
Configurez les paramètres de caméra.
1Touchez [Camera].
2Réglez chaque option et touchez [
].
Pour un fonctionnement détaillé, voir le
Mode d'emploi.
■ [DEMO]
Permet de paramétrer le mode de
démonstration. Le choix par défaut est “ON”.
1Appuyez sur [DEMO] et définissez [ON]
ou [OFF].
2
Touchez [Finish].
REMARQUE
• Ces réglages sont paramétrables depuis le menu
de configuration.
Réglages du calendrier/horloge
1
Appuyez sur le bouton [FNC].
L'écran FONCTIONS s'affiche.
2
Touchez [ ].
L'écran de menu de configuration
s'affiche.
!B5H-0357-04_QSG_JVC_KWM_E_EnFrDeNl.indb 33 2020/02/17 18:05

Utilisation de base
34
3
Touchez [User Interface].
L'écran d'interface utilisateur s'affiche.
4
Touchez [Clock Adjust].
5
Réglez la date puis l'heure.
6
Touchez [Set].
REMARQUE
• Désactivez [RDS CT] avant de régler l'horloge.
Voir le Mode d'emploi.
Régler le volume.
Pour régler le volume (0 à 40),
Appuyez sur [] pour augmenter, et appuyez
sur [] pour réduire.
Maintenez [] enfoncé pour augmenter le
volume de façon continue jusqu'au niveau 15.
Fonctionnement tactile
Pour réaliser des opérations sur l'écran, vous
devez toucher, toucher longuement, feuilleter
ou défiler pour sélectionner un élément, afficher
l'écran de menu de réglage, changer la page,
etc.
● Toucher
Touchez légèrement l'écran
pour sélectionner un élément
sur l'écran.
● Toucher longuement
Touchez l'écran et gardez
votre doigt sur l'écran jusqu'à
ce que l'affichage change ou
qu'un message soit affiché.
● Feuilleter
Faites glisser votre doigt
rapidement vers la gauche ou
vers la droite sur l'écran pour
changer de page.
Vous pouvez faire défiler
l'écran de la liste en le faisant
défiler au doigt vers le haut
ou vers le bas.
● Défiler
Faites glisser votre doigt vers
le haut ou le bas pour faire
défiler l'écran.
!B5H-0357-04_QSG_JVC_KWM_E_EnFrDeNl.indb 34 2020/02/17 18:05

Utilisation de base
35Français
Commande tactile :
Vous pouvez aussi commander la lecture en
déplaçant votre doit sur le panneau tactile de
la façon suivante (pour certaines sources, le
contrôle gestuel n'est pas disponible).
• Glissement du doigt vers le haut/bas :
- Fonctionne de la même manière qu'en
appuyant sur [
]/[ ] (Média) dans l'écran
de commande USB.
- Pour le tuner, les stations de diffusion
préréglées du tuner sont commutées.
• Glissement du doigt vers la gauche/droit :
Fonctionne de la même façon que par
pression sur [E]/[F].
• Bougez votre doigt dans le sens horaire ou
antihoraire : augmente/diminue le volume.
Descriptions de l'écran
d'ACCUEIL
La plupart des fonctions sont accessibles depuis
l'écran ACCUEIL.
41 5 6
1 2 3 1
1
• Icônes de raccourci de source de lecture
(p.36)
2
• Informations sur la source actuelle.
• Touchez pour afficher l'écran de contrôle de
la source en cours.
3
• Widget (élément graphique)
4
• Affiche l'écran de sélection de la source.
(p.36)
5
• Affiche l'écran du menu CONFIGURATION.
6
• Affiche l'écran Mains libres. (p.43)
• Lorsque vous vous connectez avec Apple
CarPlay ou Android Auto, le mode de
fonctionnement est le même que sur un
téléphone fourni dans Apple CarPlay ou
Android Auto.
Ache l'écran d'ACCUEIL
1
Appuyez sur le bouton [ ].
L'écran d'ACCUEIL apparaît.
Descriptions de l'écran de
sélection de source
Vous pouvez afficher toutes les sources de
lecture et les options sur l'écran de sélection de
source.
2 3
1
1
• Change la source de lecture.
Pour les sources de lecture, voir Sélectionnez
la source de lecture (p.36).
2
• Revient à l'écran précédent.
3
• Affiche l'écran du menu CONFIGURATION.
!B5H-0357-04_QSG_JVC_KWM_E_EnFrDeNl.indb 35 2020/02/17 18:05

Utilisation de base
36
Sélectionnez la source de lecture
1
Touchez [ ] sur l'écran d'ACCUEIL.
Depuis cet écran, vous pouvez sélectionner
les sources et fonctions suivantes.
• Passe à l'écran Apple CarPlay depuis
l'iPhone connecté.
• Passe à l'écran Miroitage USB depuis le
smartphone Android connecté.
Il est nécessaire de connecter
un smartphone Android avec
l'application «Mirroring OA for JVC»
installée et de régler [Mode] sur
[Mirroring for Android™].
• Commute sur la réception radio. (p.40)
• Affiche l'écran Mains libres. (p.43)
Lorsque ni Apple CarPlay, ni Android
Auto, ni un téléphone mains libres
Bluetooth n'est connecté, le message
«[Disconnected]» s'affiche sur l'écran TEL.
Lorsque vous vous connectez avec Apple
CarPlay ou Android Auto, le mode de
fonctionnement est le même que sur un
téléphone fourni dans Apple CarPlay ou
Android Auto.
• Passe à l'écran Android Auto depuis le
smartphone Android connecté.
Il est nécessaire de connecter un
smartphone Android compatible avec
Android Auto et de régler [Mode] sur
[Android Auto].
• Lit les fichiers sur un lecteur audio
Bluetooth.
• Joue les fichiers d'un périphérique USB.
(p.39)
• Passe à un élément externe connecté à la
borne d'entrée AV-IN.
• Met hors service la source AV. (p.36)
Pour éteindre la source AV
1
Touchez [ ] sur l'écran d'ACCUEIL.
2
Touchez [AV Off].
!B5H-0357-04_QSG_JVC_KWM_E_EnFrDeNl.indb 36 2020/02/17 18:05

Utilisation de base
37Français
Descriptions de l'écran de
commande de source
Certaines fonctions sont accessibles depuis la
plupart des écrans.
Indicateurs
1
2
3
4
Sous-menu
1
[ ]/[ ]
Informations concernant les périphériques
Bluetooth connectés.
2
Icône de toutes les sources
Affiche toutes les sources.
3
Écran secondaire
• [
]/[ ] : L'écran secondaire change à chaque
fois que vous le touchez. Vous pouvez aussi
changer l'écran secondaire en faisant défiler
vers la gauche ou la droite sur l'écran.
• Indicateurs : Affiche l'état actuel de la source
et ainsi de suite.
– [MUTE]: La fonction de réglage de coupure de son
(sourdine) est active.
– [LOUD]: La fonction de réglage du volume est
active.
• Sous-menu
– [ ]: Opération lorsque l'icône est touchée :
La première touche assombrit l'écran, la deuxième
touche assombrit davantage l'écran et la troisième
touche restaure l'écran à sa luminosité d'origine.
– [
] : Affiche l'écran de l'égaliseur graphique.
(p.47)
– [
]: Affiche l'écran APP (Apple CarPlay/Android
Auto).
4
[Û]
Touchez pour afficher l'écran mains-libres.
(p.43)
Lorsque vous vous connectez avec Apple
CarPlay ou Android Auto, le mode de
fonctionnement est le même que sur un
téléphone fourni dans Apple CarPlay ou Android
Auto.
!B5H-0357-04_QSG_JVC_KWM_E_EnFrDeNl.indb 37 2020/02/17 18:05

Utilisation de base
38
Écran FONCTIONS
1
Appuyez sur le bouton [FNC].
L'écran FONCTIONS s'affiche.
2
Touchez pour afficher l'écran
FONCTIONS.
Le menu contient les options suivantes.
• Affiche l'écran du menu CONFIGURATION.
• Affiche l'écran APP (Apple CarPlay/Android
Auto).
• Affiche l'écran de réglage de l'écran.
• Affiche la caméra de vue.
• Affiche l'écran de sélection de la source.
(p.36)
• Éteint l'affichage. (p.38)
• Affiche l'écran audio. (p.46)
• Fermez l'écran FONCTIONS.
Mettez l'écran hors tension
1
Sélectionnez [ ] sur l'écran
FONCTIONS.
● Pour allumer l'écran
1
Appuyez sur l'affichage.
Écran des listes
Certaines touches de fonction sont communes
aux écrans de liste de la plupart des sources.
61 2
3 4 5
1
Affiche la fenêtre de sélection de type liste.
2
Affiche la liste des fichiers de musique ou de
film.
3
Défilement du texte
Fait défiler le texte affiché.
4
etc.
Les touches ayant plusieurs fonctions s'affichent
ici.
• [
] : Joue toutes les pistes dans le dossier
contenant la piste actuelle.
• [
] [ ] : Remonte au niveau hiérarchique
supérieur.
5
[ ] / [ ] / [ ] / [ ] Défilement de la
page
Vous pouvez changer de page pour afficher
plus d'éléments en appuyant sur [
]/[ ].
• [
]/[ ] : Affiche la page du haut ou la
page du bas.
6
Retour
Revient à l'écran précédent.
REMARQUE
• Les boutons qui ne peuvent pas être activés
depuis la liste ne sont pas affichés.
!B5H-0357-04_QSG_JVC_KWM_E_EnFrDeNl.indb 38 2020/02/17 18:05

USB
39Français
USB
Connecter un périphérique
USB
1
Branchez le périphérique USB avec le
câble USB. (p.51)
2
Appuyez sur le bouton [ ].
3
Touchez [ ].
4
Touchez [USB]. (p.36)
Ñ Déconnectez le périphérique
USB
1
Appuyez sur le bouton [ ].
2
Touchez [ ].
3
Sélectionner une source autre que [USB].
4
Débranchez le périphérique USB.
Ñ Périphérique USB utilisable
Vous pouvez utiliser sur cet appareil une clé USB
de mémoire de masse.
Le terme « USB device » indique dans ce manuel
un dispositif mémoire flash.
Utilisation de base USB
La plupart des fonctions sont utilisables depuis
l'écran de contrôle de la source et depuis l'écran
de lecture.
Écran de contrôle
2
3
1
1
[ ] / [ ]
• [
] : Répète la piste/le dossier en cours.
Chaque fois que vous touchez la touche,
le mode de répétition change dans l'ordre
suivant ;
Répétition de fichier ([
]), Répétition de
dossier ([
]), Répétition de tous ([ ])
• [
] : Lit de manière aléatoire tous les
morceaux du dossier en cours. Chaque fois
que vous touchez la touche, le mode aléatoire
change dans l'ordre suivant ;
Fichier au hasard ([
]), Fonction sur arrêt
([
])
2
Informations sur la piste
Affiche les informations concernant le fichier
en cours.
3
[Touches d'opération
• [1] : Fait une recherche de piste/fichier. Pour
plus de détails sur les recherches, voir le Mode
d'emploi.
• [E] [F] : Recherche la piste/fichier
précédent/suivant.
Touchez et maintenez enfoncé pour effectuer
une avance ou un retour rapide.
• [D/H] : Lit ou effectue une pause.
• [
] : Touchez pour désactiver le son ou ne
pas le désactiver.
!B5H-0357-04_QSG_JVC_KWM_E_EnFrDeNl.indb 39 2020/02/17 18:05

Tuner
40
Tuner
Utilisation de base de la radio
La plupart des fonctions sont utilisables depuis
l'écran de contrôle des sources.
Pour passer sur la source Tuner, touchez l'icône
[Tuner] sur l'écran de sélection de la source.
(p.36)
Écran de contrôle
4
6
5
3
1
2
Ouvrez le tiroir
4
7
5
1
Affichage des informations
Affiche les informations concernant la station en
cours : Fréquence
Toucher [ ] vous permet de basculer entre le
Contenu A et le Contenu B.
– Contenu A : Nom du PS, texte radio, genre PTY
– Contenu B : Texte radio plus, titre de l'artiste
[Preset#]: Numéro de préréglage
2
Mode de recherche
Sélectionne successivement les modes
d'exploration des fréquences, dans l'ordre
suivant : [AUTO1], [AUTO2], [MANUAL].
• [AUTO1]: Syntonise automatiquement sur une
station offrant une bonne réception.
• [AUTO2]: Syntonise les stations en mémoire
les unes après les autres.
• [MANUAL] : Commute sur la fréquence
suivante manuellement.
3
Touches d'opération
• [E] [F] : Syntoniser sur une station. Il est
possible de changer de méthode de sélection
des fréquences (voir 2 dans le tableau).
• [
] : Touchez pour désactiver le son ou ne
pas le désactiver.
4
Liste des présélections
• Touchez le côté droit de l'écran pour afficher
la Liste de préréglage. Appuyez de nouveau
pour fermer la liste.
• Rappelle la station mémorisée.
• En le touchant pendant 2 secondes, il
mémorise la station en cours de réception.
5
Panneau de fonction
Appuyez sur le côté gauche de l'écran pour
afficher le panneau de fonction. Appuyez de
nouveau pour fermer le panneau.
• [TI] (FM uniquement) : Active le mode infos-
trafic. Pour plus de détails, voir le Mode
d'emploi.
• [SETUP] (FM uniquement) : Affiche l'écran
de CONFIGURATION du tuner. Pour plus de
détails, voir le Mode d'emploi.
• [AME]: Prédéfinit automatiquement les
stations. Pour plus de détails, voir le Mode
d'emploi.
• [PTY] (FM uniquement) : Recherche un
programme en spécifiant un type de
programme. Pour plus de détails, voir le Mode
d'emploi.
• [MONO] (FM uniquement) : Sélectionne la
réception en mono.
• [LO.S] (FM uniquement) : Active ou désactive
la fonction de recherche locale.
6
[FM] [AM]
Change la bande.
7
Éléments indicateurs
• [ST]: Indique que l´émission stéréo est
actuellement reçue.
• [MONO]: Indique que la fonction
monophonique forcée est active.
• [AF]: Indique que la fonction recherche AF est
active.
• [LOS]: Indique que la fonction recherche locale
est active.
!B5H-0357-04_QSG_JVC_KWM_E_EnFrDeNl.indb 40 2020/02/17 18:05

Tuner
41Français
• [RDS]: Indique l'état de la station Radio Data
System lorsque la fonction AF est sur ON.
Blanc : Le Radio Data System est
actuellement reçu.
Orange : Le Radio Data System n'est pas reçu.
• [TI]: Indique l´état de réception des
informations routières.
Blanc : Le signal TP est reçu.
Orange : Le signal TP n'est pas reçu.
Utilisation de la mémorisation
Ñ Mémoire automatique
Vous pouvez mémoriser automatiquement les
stations offrant une bonne réception.
1
Touchez la touche de la bande de votre
choix.
2
Touchez [ ] sur le côté gauche de l'écran.
Touchez [AME].
Un écran de confirmation s'affiche.
3
Touchez [Ye s ].
La mémorisation automatique se lance.
Ñ Mémoire manuelle
Vous pouvez mémoriser la station que vous êtes
en train de recevoir.
1
Sélectionnez la station que vous
souhaitez mémoriser.
2
Touchez [FM#] (#: 1-24) ou [AM#] (#: 1-12)
dans lequel vous souhaitez enregistrer la
station pendant 2 secondes.
!B5H-0357-04_QSG_JVC_KWM_E_EnFrDeNl.indb 41 2020/02/17 18:05

Utilisation du Bluetooth
42
Utilisation du Bluetooth
Ñ À propos du téléphone mobile
et du lecteur audio Bluetooth
Cet appareil est conforme aux caractéristiques
techniques suivantes de la norme Bluetooth :
Version
Bluetooth Ver. 4.1
Profil
Téléphone mobile :
HFP (Profil mains libres)
SPP (Profil port série)
PBAP (Profil d'accès au répertoire
téléphonique)
Lecteur audio :
A2DP (Profil de distribution audio avancée)
AVRCP (Profil de télécommande audio/vidéo)
Codec son
SBC, AAC
REMARQUE
• Les appareils disposant de la fonction Bluetooth
sont certifiés conformes à la norme Bluetooth
d'après la procédure prescrite par Bluetooth SIG.
• Cependant, il est possible que ces appareils ne
puissent pas communiquer avec certains types
de téléphones portables.
Enregistrez depuis le
périphérique Bluetooth
Il est indispensable de déclarer à l'appareil le
lecteur audio ou le téléphone mobile Bluetooth
avant de pouvoir utiliser la fonction Bluetooth.
1
Activer la fonction Bluetooth sur votre
smartphone/téléphone portable.
2
Recherchez l'appareil («KW-M*****») à
partir de votre smartphone/téléphone
portable.
3
Utilisez votre smartphone/téléphone
portable en fonction des messages
affichés.
■ Confirmez la requête sur le
smartphone/téléphone portable.
■ Si un code PIN est requis, entrez le code
PIN (« 0000 »).
4
Appuyez sur le bouton [FNC].
L'écran FONCTIONS s'affiche.
5
Touchez [ ].
L'écran de menu de configuration s'affiche.
6
Touchez [Bluetooth].
L'écran de configuration Bluetooth s'affiche.
!B5H-0357-04_QSG_JVC_KWM_E_EnFrDeNl.indb 42 2020/02/17 18:05

Utilisation du Bluetooth
43Français
7
Touchez [Select Device] sur l'écran de
CONFIGURATION du Bluetooth.
8
Touchez [ ] que vous souhaitez
connecter.
REMARQUE
• Si le pictogramme est en surbrillance, cela
indique que l'appareil correspondant sera utilisé.
Pour supprimer le périphérique
Bluetooth enregistré
1
Touchez [ ].
Le message de confirmation s'affiche.
2
Touchez [Ye s ].
Utilisation du module mains-
libres
Vous pouvez utiliser la fonction téléphone
de l'appareil en lui connectant un téléphone
Bluetooth.
REMARQUE
• Lorsque l'application Apple CarPlay ou Android
Auto est connectée, la fonction Bluetooth mains
libres ne peut pas être utilisée. Seule la fonction
mains-libres d'Apple CarPlay ou d'Android Auto
peut être utilisée.
Ñ Passer un appel
1
Touchez [Phone]/[Û].
L'écran mains-libres s'affiche.
2
Sélectionnez une méthode de
numérotation.
• [ ]: Appel depuis l'historique des appels
• [
]: Appel depuis le répertoire
téléphonique
• [
]: Appel depuis un numéro
présélectionné
• [
]: Appel en saisissant un numéro de
téléphone
• [
]: Reconnaissance vocale
• [
]: CONFIGURATION Bluetooth
!B5H-0357-04_QSG_JVC_KWM_E_EnFrDeNl.indb 43 2020/02/17 18:05

Utilisation du Bluetooth
44
● Configuration Bluetooth
1) Touchez [
].
L'écran de configuration Bluetooth s'affiche.
REMARQUE
• Les pictogrammes d'état affichés, notamment
ceux représentant une batterie et une antenne,
peuvent être différents de ceux affichés sur le
téléphone portable.
• Le fait de configurer le téléphone portable au
mode privé peut désactiver la fonction mains
libres.
Appel depuis l'historique des appels
1
Touchez [ ].
2
Sélectionnez dans la liste le numéro de
téléphone.
Appel par entrée d'un numéro de
téléphone
1
Touchez [ ].
2
Utilisez les touches numériques pour
entrer un numéro de téléphone.
3
Touchez [ ].
Appel depuis un numéro présélectionné
1
Touchez [ ].
2
Touchez le nom ou le numéro de
téléphone.
Appel depuis le répertoire téléphonique
1
Touchez [ ].
2
Sélectionnez la personne que vous
souhaitez appeler dans la liste.
3
Sélectionnez dans la liste le numéro de
téléphone.
REMARQUE
• Si aucun répertoire n'a été téléchargé, toucher
[Download Phonebook Now] va commencer
le téléchargement du répertoire.
!B5H-0357-04_QSG_JVC_KWM_E_EnFrDeNl.indb 44 2020/02/17 18:05

Utilisation du Bluetooth
45Français
Ñ Réception d'un appel
1
Touchez [ ] pour répondre à un appel
téléphonique ou [
] pour rejeter un
appel entrant.
REMARQUE
• Lorsque l'affichage est déjà occupé par la caméra
de vision, cet écran ne s'affiche pas même si un
appel est reçu. Pour afficher cet écran, remettez
le bouton de changement de vitesse de la
voiture en position de conduite.
Pour mettre fin à l'appel
1
Pendant une conversation, touchez [ ].
Ñ Actions possibles pendant un
appel
● Régler le volume de réception
Appuyez sur le bouton [] ou [].
● Envoyer la tonalité de numérotation
Touchez [DTMF] pour afficher l'écran de saisie
des tonalités.
Vous pouvez envoyer des tonalités en touchant
les touches voulues à l'écran.
● Sélection de la sortie vocale
En touchant [
]/ [ ], la sortie vocale
bascule systématiquement entre le téléphone
portable et le haut-parleur.
● Attente d'appel
Lorsque vous recevez un appel alors que vous
êtes en cours de conversation, vous pouvez
répondre à l'appel entrant en touchant [
].
L'appel en cours est alors mis en attente.
À chaque appui sur [
], vous changez de
correspondant.
Touchez [
] pour mettre fin à l'appel en cours
et passer sur l'appel en attente.
!B5H-0357-04_QSG_JVC_KWM_E_EnFrDeNl.indb 45 2020/02/17 18:05

Contrôle de l'audio
46
Contrôle de l'audio
Vous pouvez agir sur les différents paramètres,
comme la balance audio ou le niveau du caisson
de graves par exemple.
1
Appuyez sur le bouton [FNC].
L'écran FONCTIONS s'affiche.
2
Touchez [ ].
Ñ Contrôle de l’audio en général
1
Appuyez sur le bouton [FNC].
L'écran FONCTIONS s'affiche.
2
Touchez [ ].
L'écran audio s'affiche.
3
Touchez [Fader / Balance].
4
Réglez chaque option comme suit.
■ [Fader]/[Balance]
Réglez la balance en agissant sur les touches
périphériques.
[C] et [D] permettent de régler la balance
droite/gauche.
[R] et [S] permettent de régler la balance
avant/arrière.
■ [Center]
Annulez le réglage.
!B5H-0357-04_QSG_JVC_KWM_E_EnFrDeNl.indb 46 2020/02/17 18:05

Contrôle de l'audio
47Français
Ñ Contrôle d'égaliseur
Vous pouvez régler l'égaliseur en sélectionnant
le réglage optimal pour chaque catégorie.
1
Appuyez sur le bouton [FNC].
L'écran FONCTIONS s'affiche.
2
Touchez [ ].
L'écran audio s'affiche.
3
Touchez [Equalizer].
4
Touchez l'écran pour configurer
l'égaliseur graphique comme vous le
souhaitez.
■ [ALL SRC]
Appliquer l'égaliseur réglé pour toutes les
sources. Touchez [ALL SRC] puis touchez
[OK] sur l'écran de confirmation.
■ Niveau de gain (zone de cadre
pointillé)
Réglez le niveau de gain en touchant
chacune des barres de fréquences.
Vous pouvez sélectionner la barre de
fréquence et ajuster son niveau en utilisant
[R], [S].
■ [Preset Select]
Affiche l'écran pour présenter à nouveau la
courbe prédéfinie de l'égaliseur.
■ [Initialize]
La courbe EQ actuelle est revenue en
position linéaire.
■ [Memory]
Enregistre la courbe d'égaliseur ajustée en
tant que «[User1]» à «[User3]».
■ [Bass EXT] (Paramètres étendus des
graves)
Lorsque cette fonction est active, toute
fréquence inférieure à 62,5 Hz est configurée
sur le même niveau de gain que la fréquence
62,5 Hz.
■ [SW Level]
Règle le volume du caisson de graves.
!B5H-0357-04_QSG_JVC_KWM_E_EnFrDeNl.indb 47 2020/02/17 18:05

Connexion/Installation
48
Connexion/Installation
Avant l'installation
Avant d'installer cet appareil, veuillez prendre les
mesures de précaution suivantes.
#AVERTISSEMENTS
• Si vous branchez le câble d'allumage (rouge)
et le câble de la batterie (jaune) au châssis de
la voiture (masse), il peut y avoir un court-
circuit entraînant, à son tour, un incendie. Il
faut toujours brancher ces câbles à la source
d'alimentation fonctionnant via le boîtier de
fusibles.
• Ne débranchez pas le fusible du câble
d'allumage (rouge) ni du câble de la batterie
(jaune). L'alimentation électrique doit être
connectée aux câbles via le fusible.
#ATTENTION
• Installez cet appareil dans la console du
véhicule.
Ne touchez pas les éléments métalliques de
cet appareil pendant et juste après l'utilisation
de l'appareil. Les éléments métalliques tels
que le dissipateur thermique et le coffret sont
très chauds.
REMARQUE
• Le montage et le câblage de ce produit
requièrent expérience et savoir-faire. Pour des
questions de sécurité, les travaux de montage
et de câblage doivent être effectués par des
professionnels.
• Veillez à brancher l'appareil à une alimentation
électrique négative de 12 Vcc avec mise à la
terre.
• N'installez pas l'appareil dans un endroit
directement exposé aux rayons du soleil, à
une chaleur excessive ou à l'humidité. Évitez
également les endroits trop poussiéreux ou
susceptibles d'être éclaboussés par de l'eau.
• Si l'appareil n'est pas sous tension (« There is
an error in the speaker wiring. Please check
the connections. » (Il y a un problème avec
le câblage du haut-parleur. Veuillez vérifier
les branchements) s'affiche), le câble du
haut-parleur est peut-être en court-circuit
ou est en contact avec le châssis du véhicule
et la fonction de protection a peut-être été
enclenchée. C'est pourquoi il faut vérifier le
câble de l'enceinte.
• Si l'allumage de votre véhicule ne possède
pas de position ACC, branchez les câbles
d'allumage à une source d'alimentation que
la clé de contact peut allumer ou éteindre.
Si vous branchez le câble d'allumage à une
source d'alimentation à tension constante
comme les câbles de la batterie, il se peut que
la batterie se décharge.
• Si la console est dotée d'un couvercle, veillez
à installer l'appareil de sorte que la façade ne
heurte pas le couvercle quand elle s'ouvre ou
se ferme.
• Si le fusible saute, vérifiez d'abord que les
câbles ne se touchent pas afin d'éviter tout
court-circuit, puis remplacez l'ancien fusible
par un nouveau fusible de même puissance.
• Isolez les câbles non connectés avec un ruban
vinyl, ou tout autre matériau similaire. Pour
éviter tout court-circuit, ne retirez pas les
capuchons placés aux extrémités des câbles
non connectés ou des bornes.
• Branchez correctement les câbles de
l'enceinte aux bornes correspondantes.
L'appareil peut subir des dommages et ne plus
fonctionner si vous partagez les fils ¤ ou les
mettez à la masse avec une partie métallique
du véhicule.
• Si seulement deux enceintes sont branchées
au système, branchez les connecteurs soit
aux bornes de sortie avant soit aux bornes de
sortie arrière (ne pas mélanger les bornes de
sortie avant et arrière). Par exemple, si vous
connectez le connecteur ¢ de l'enceinte
gauche à une borne de sortie avant, ne
connectez pas le connecteur ¤ à une borne
de sortie arrière.
• Une fois l'appareil installé, vérifiez que les feux
de freinage, les clignotants et les essuie-glace,
etc. du véhicule fonctionnent correctement.
• N'exercez pas de pression excessive sur la
surface du panneau lors de l'installation de
l'appareil dans le véhicule. Cela risque de rayer
la surface, de l'endommager ou d'entraîner
une défaillance.
!B5H-0357-04_QSG_JVC_KWM_E_EnFrDeNl.indb 48 2020/02/17 18:05

Connexion/Installation
49Français
• Il se peut que la réception soit mauvaise si des
objets métalliques se trouvent à proximité de
l'antenne Bluetooth.
Antenne Bluetooth
Ñ Accessoires fournis pour
l'installation
1
(3 m)
x1
2
x1
3
(2 m)
x1
4
x1
5
x2
Ñ Procédure d'installation
1) Pour éviter les courts-circuits, retirez la clé de
contact, puis débranchez la borne ¤ de la
batterie.
2) Veillez à effectuer correctement les
connexions des câbles d'entrée et de sortie
pour chaque appareil.
3) Branchez le connecteur ISO sur l'appareil.
4) Installez l'appareil dans votre véhicule.
5) Reconnectez la borne ¤ de la batterie.
6) Appuyez sur le bouton réinitialiser.
Installation de l'appareil
Courbez les languettes
de la douille de montage
à l'aide d'un tournevis ou
d'un outil similaire, puis
fixez-la en place.
REMARQUE
• Vérifiez que l'appareil est correctement
en place. Si l'appareil n'est pas stable, cela
peut occasionner un dysfonctionnement
(le son peut par exemple sauter).
Ñ Plaque de garniture
1) Fixez l'accessoire 2 sur l'appareil.
2
!B5H-0357-04_QSG_JVC_KWM_E_EnFrDeNl.indb 49 2020/02/17 18:05

Connexion/Installation
50
Ñ Microphone
1) Vérifiez la position d'installation du microphone
(accessoire 1).
2) Nettoyez la surface d'installation.
3) Retirez le séparateur du microphone (accessoire
1) et collez le microphone à l'emplacement
indiqué ci-dessous.
4) Branchez le câble du microphone sur l'appareil
en le fixant à divers endroits à l'aide de ruban
adhésif ou de toute autre méthode appropriée.
5) Réglez l'orientation du microphone (accessoire
1) en direction du conducteur.
1
Fixez un câble avec du ruban spécialement prévu à
cet effet.
REMARQUE
• Échanger les attaches si nécessaire.
Ñ
Retrait de la plaque de garniture
1) Utilisez la clé d'extraction (accessoire 4)
pour sortir les quatre languettes (deux sur la
partie gauche, deux sur la partie droite) en
effectuant un mouvement de levier.
4
2) Tirez la plaque de garniture vers l'avant.
Ñ Retrait de l'appareil
1) Retirez la plaque de garniture en vous référant
à l'étape 1 dans «Retrait de la plaque de
garniture».
2) Insérez la clé d'extraction (accessoire
5) profondément dans l'emplacement,
comme illustré. (La saillie à la pointe de la clé
d'extraction doit faire face à l'appareil.)
5
3) Une fois que vous avez correctement inséré la
clé d'extraction, insérez l'autre clé d'extraction
dans l'emplacement.
5
4) Extraire l'appareil à moitié.
REMARQUE
• Veillez à ne pas vous blesser avec les
broches d'arrêt sur la clé d'extraction.
5) Tenez l'appareil des deux mains et faites-le
sortir complètement en veillant à ne pas le
laisser tomber.
!B5H-0357-04_QSG_JVC_KWM_E_EnFrDeNl.indb 50 2020/02/17 18:05

Connexion/Installation
51Français
PRK SW
STEERING
WHEEL
REMOTE
INPUT
2 4 6 8
1 3 5 7
2 4 6 8
1 3 5 7
REVERSE
SUB
WOOFER
1 2 3 4
5V
=
1.5A
ST REMOTE
INPUT 1
ST REMOTE
INPUT 2
ST REMOTE
GND
Connexion au
commutateur de détection
du frein à main.
Par mesure de
sécurité, connectez
le détecteur de
stationnement.
Vert clair (Câble du détecteur de stationnement)
Accessoire 3: Câble d'extension de stationnement
Violet/Blanc (Câble du
détecteur de marche
arrière)
Vers la télécommande au volant
Pour utiliser la fonction de télécommande au
volant, vous avez besoin d'un adaptateur de
télécommande spécial (non fourni) qui correspond
à votre véhicule.
Connexion au faisceau
du feu de marche
arrière du véhicule
lors de l'utilisation de
la vue arrière de la
caméra.
Bleu ciel/Jaune (Câble de la télécommande au volant)
Fusible (15 A)
Ñ Connexion des câbles sur les contacts électriques
Préamplification du caisson de basses
Capuchon
Capuchon
Antenne FM/AM
Connecteur A
Connecteur B
Périphérique
USB
[2]
Borne USB
[1]
(1,0 m)
[1]
Courant d'alimentation maximum USB :
CC 5 V = 1,5 A
[2]
Vendue séparément
Connecteur ISO
FRONT OUTREAR OUT
VIDEO OUTCAM IN
Sortie Audio Arrière
(Gauche ; Blanc, Droite ; Rouge)
Préamplification audio avant
(Gauche : blanc, Droite : rouge)
Sortie vidéo (jaune)
Entrée de la caméra vue arrière (jaune)
AV-IN (1; audio gauche, 2; vidéo
composite, 3; masse, 4; audio droite).
Accessoire 1:
Microphone Bluetooth
Vert clair/Rouge
Violet/Rouge
Gris/Rouge
Connexion au faisceau des commandes au volant
du véhicule. Contactez votre revendeur JVC pour
les détails.
!B5H-0357-04_QSG_JVC_KWM_E_EnFrDeNl.indb 51 2020/02/17 18:05

Connexion/Installation
52
Ñ Branchement d'un iPhone/
Android
5V
=
1.5A
KS-U62 (0,8 m)
[3]
Câble USB
[2]
iPhone
[2]
Connecteur lumineux
Smartphone Android
[2]
Capuchon
Borne USB
[1]
(1,0 m)
[1]
Tension d'alimentation maximum pour iPhone :
CC 5 V = 1,5 A
[2]
Vendue séparément
[3]
Accessoire en option
Ñ Guide de la fonction
Connecteur ISO
Broche Couleur et fonction
A-4 Jaune Batterie
A-5 Bleu Antenne électrique
[1]
A-6 Orange/Blanc Éclairage
A-7 Rouge Allumage (ACC)
A-8 Noir Branchement à la terre
(masse)
B-1/B-2 Violet (+) /
Violet/Noir (–)
Arrière droit
B-3/B-4 Gris (+) /
Gris/Noir (–)
Avant droit
B-5/B-6 Blanc (+) /
Blanc/Noir (–)
Avant gauche
B-7/B-8 Vert (+)/
Vert/Noir (–)
Arrière gauche
[1]
Max. 150 mA, 12 V
• Impédance d'enceinte : 4-8 Ω
! ATTENTION
Avant de connecter les connecteurs ISO
(disponibles dans le commerce) à l'unité,
vérier les conditions suivantes :
• Veiller à ce que l'affectation des broches du
connecteur corresponde à l'unité JVC.
• Prendre un avis supplémentaire pour le câble
d'alimentation.
• Si les câbles d'alimentation et de contact
ne correspondent pas, les changer en
conséquence.
• Si le véhicule ne dispose pas d'un câble de
démarrage, utiliser une interface disponible
dans le commerce.
!B5H-0357-04_QSG_JVC_KWM_E_EnFrDeNl.indb 52 2020/02/17 18:05

Annexes
53Français
Annexes
Spécications
■ Section Bluetooth
Fréquence
: 2,402 – 2,480 GHz
Puissance de sortie RF (EIRP)
: +8 dBm (moy.), Classe de puissance 1
■ Général
Tension de fonctionnement
: batterie de voiture 12 V CC
Impédance d'enceinte
: 4 – 8 Ω
Les spécications sont sujettes à changements
sans notication.
À propos de cet appareil
■ Copyrights
• La marque du mot et les logos Bluetooth® sont des
marques déposées de Bluetooth SIG, Inc. et toute
utilisation de ces marques par JVCKENWOOD est
faite sous licence. Les autres marques déposées et
appellations commerciales appartiennent à leurs
propriétaires respectifs.
• Windows Media is a registered trademark or trademark
of Microsoft Corporation in the United States and/or
other countries.
• This product is protected by certain intellectual
property rights of Microsoft. Use or distribution of
such technology outside of this product is prohibited
without a license from Microsoft.
• Use of the Made for Apple badge means that an
accessory has been designed to connect specifically
to the Apple product(s) identified in the badge, and
has been certified by the developer to meet Apple
performance standards. Apple is not responsible for
the operation of this device or its compliance with
safety and regulatory standards. Please note that the
use of this accessory with an Apple product may affect
wireless performance.
• Apple, iPhone and Lightning are trademarks of Apple
Inc., registered in the U.S. and other countries.
• Apple, Siri, Apple CarPlay and Apple CarPlay logo are
trademarks of Apple Inc., registered in the U.S. and other
countries.
• App Store is a service mark of Apple Inc., registered in
the U.S. and other countries.
• IOS is a trademark or registered trademark of Cisco in
the U.S. and other countries and is used under license.
• Google, Android, Google Play and Android Auto are
trademarks of Google LLC.
• To use Android Auto on your car display, you’ll need an
Android Auto compatible vehicle or aftermarket stereo,
an Android phone running Android 5.0 or higher, and
the Android Auto app.
• Linux® is the registered trademark of Linus Torvalds in
the U.S. and other countries.
• THIS PRODUCT IS LICENSED UNDER THE AVC PATENT
PORTFOLIO LICENSE FOR THE PERSONAL USE OF A
CONSUMER OR OTHER USES IN WHICH IT DOES NOT
RECEIVE REMUNERATION TO (¡)ENCODE VIDEO IN
COMPLIANCE WITH THE AVC STANDARD (“AVC VIDEO”)
AND/OR (¡¡)DECODE AVC VIDEO THAT WAS ENCODED BY
A CONSUMER ENGAGED IN A PERSONAL ACTIVITY AND/
OR WAS OBTAINED FROM A VIDEO PROVIDER LICENSED
TO PROVIDE AVC VIDEO. NO LICENSE IS GRANTED OR
SHALL BE IMPLIED FOR ANY OTHER USE. ADDITIONAL
INFORMATION MAY BE OBTAINED FROM MPEG LA, L.L.C.
SEE HTTP://WWW.MPEGLA.COM
• THIS PRODUCT IS LICENSED UNDER THE MPEG-4 VISUAL
PATENT PORTFOLIO LICENSE FOR THE PERSONAL
!B5H-0357-04_QSG_JVC_KWM_E_EnFrDeNl.indb 53 2020/02/17 18:05

Annexes
54
AND NON-COMMERCIAL USE OF A CONSUMER FOR
(¡) ENCODING VIDEO IN COMPLIANCE WITH THE
MPEG-4 VISUAL STANDARD (“MPEG-4 VIDEO”) AND/
OR (¡¡) DECODING MPEG-4 VIDEO THAT WAS ENCODED
BY A CONSUMER ENGAGED IN A PERSONAL AND
NON-COMMERCIAL ACTIVITY AND/OR WAS OBTAINED
FROM A VIDEO PROVIDER LICENSED BY MPEG LA TO
PROVIDE MPEG-4 VIDEO. NO LICENSE IS GRANTED OR
SHALL BE IMPLIED FOR ANY OTHER USE. ADDITIONAL
INFORMATION INCLUDING THAT RELATING TO
PROMOTIONAL, INTERNAL AND COMMERCIAL USES
AND LICENSING MAY BE OBTAINED FROM MPEG LA, LLC.
SEE HTTP://WWW.MPEGLA.COM.
• THIS PRODUCT IS LICENSED UNDER THE VC-1 PATENT
PORTFOLIO LICENSE FOR THE PERSONAL AND NON-
COMMERCIAL USE OF A CONSUMER TO ( i ) ENCODE
VIDEO IN COMPLIANCE WITH THE VC-1 STANDARD
(“VC-1 VIDEO”) AND/OR ( ii ) DECODE VC-1 VIDEO
THAT WAS ENCODED BY A CONSUMER ENGAGED IN A
PERSONAL AND NON-COMMERCIAL ACTIVITY AND/
OR WAS OBTAINED FROM A VIDEO PROVIDER LICENSED
TO PROVIDE VC-1 VIDEO. NO LICENSE IS GRANTED OR
SHALL BE IMPLIED FOR ANY OTHER USE. ADDITIONAL
INFORMATION MAY BE OBTAINED FROM MPEG LA, L.L.C.
SEE HTTP://WWW.MPEGLA.COM
• libFLAC
Copyright (C) 2000,2001,2002,2003,2004,2005,2006,2007
,2008,2009 Josh Coalson
Redistribution and use in source and binary forms, with
or without modification, are permitted provided that
the following conditions are met:
– Redistributions of source code must retain the above
copyright notice, this list of conditions and the
following disclaimer.
– Redistributions in binary form must reproduce the
above copyright notice, this list of conditions and the
following disclaimer in the documentation and/or
other materials provided with the distribution.
– Neither the name of the Xiph.org Foundation nor the
names of its contributors may be used to endorse or
promote products derived from this software without
specific prior written permission.
THIS SOFTWARE IS PROVIDED BY THE COPYRIGHT
HOLDERS AND ONTRIBUTORS ``AS IS’’ AND ANY
EXPRESS OR IMPLIED WARRANTIES, INCLUDING,
BUT NOT LIMITED TO, THE IMPLIED WARRANTIES OF
MERCHANTABILITY AND FITNESS FOR A PARTICULAR
PURPOSE ARE DISCLAIMED. IN NO EVENT SHALL THE
FOUNDATION OR CONTRIBUTORS BE LIABLE FOR ANY
DIRECT, INDIRECT, INCIDENTAL, SPECIAL, EXEMPLARY,
OR CONSEQUENTIAL DAMAGES (INCLUDING, BUT NOT
LIMITED TO, PROCUREMENT OF SUBSTITUTE GOODS
OR SERVICES; LOSS OF USE, DATA, OR PROFITS; OR
BUSINESS INTERRUPTION) HOWEVER CAUSED AND ON
ANY THEORY OF LIABILITY, WHETHER IN CONTRACT,
STRICT LIABILITY, OR TORT (INCLUDING NEGLIGENCE OR
OTHERWISE) ARISING IN ANY WAY OUT OF THE USE OF
THIS SOFTWARE, EVEN IF ADVISED OF THE POSSIBILITY
OF SUCH DAMAGE.
• libvorbis
Copyright (c) 2002-2008 Xiph.org Foundation
Redistribution and use in source and binary forms, with
or without modification, are permitted provided that
the following conditions are met:
– Redistributions of source code must retain the above
copyright notice, this list of conditions and the
following disclaimer.
– Redistributions in binary form must reproduce the
above copyright notice, this list of conditions and the
following disclaimer in the documentation and/or
other materials provided with the distribution.
– Neither the name of the Xiph.org Foundation nor the
names of its contributors may be used to endorse or
promote products derived from this software without
specific prior written permission.
THIS SOFTWARE IS PROVIDED BY THE COPYRIGHT
HOLDERS AND CONTRIBUTORS ``AS IS’’ AND ANY
EXPRESS OR IMPLIED WARRANTIES, INCLUDING,
BUT NOT LIMITED TO, THE IMPLIED WARRANTIES OF
MERCHANTABILITY AND FITNESS FOR A PARTICULAR
PURPOSE ARE DISCLAIMED. IN NO EVENT SHALL THE
FOUNDATION OR CONTRIBUTORS BE LIABLE FOR ANY
DIRECT, INDIRECT, INCIDENTAL, SPECIAL, EXEMPLARY,
OR CONSEQUENTIAL DAMAGES (INCLUDING, BUT NOT
LIMITED TO, PROCUREMENT OF SUBSTITUTE GOODS
OR SERVICES; LOSS OF USE, DATA, OR PROFITS; OR
BUSINESS INTERRUPTION) HOWEVER CAUSED AND ON
ANY THEORY OF LIABILITY, WHETHER IN CONTRACT,
STRICT LIABILITY, OR TORT (INCLUDING NEGLIGENCE OR
OTHERWISE) ARISING IN ANY WAY OUT OF THE USE OF
THIS SOFTWARE, EVEN IF ADVISED OF THE POSSIBILITY
OF SUCH DAMAGE.
• libogg
Copyright (c) 2002, Xiph.org Foundation Redistribution
and use in source and binary forms, with or without
modification, are permitted provided that the following
conditions are met:
– Redistributions of source code must retain the above
copyright notice, this list of conditions and the
following disclaimer.
– Redistributions in binary form must reproduce the
above copyright notice, this list of conditions and the
following disclaimer in the documentation and/or
other materials provided with the distribution.
– Neither the name of the Xiph.org Foundation nor the
names of its contributors may be used to endorse or
promote products derived from this software without
specific prior written permission.
THIS SOFTWARE IS PROVIDED BY THE COPYRIGHT
HOLDERS AND CONTRIBUTORS ``AS IS’’ AND ANY
EXPRESS OR IMPLIED WARRANTIES, INCLUDING,
BUT NOT LIMITED TO, THE IMPLIED WARRANTIES OF
MERCHANTABILITY AND FITNESS FOR A PARTICULAR
PURPOSE ARE DISCLAIMED. IN NO EVENT SHALL THE
FOUNDATION OR CONTRIBUTORS BE LIABLE FOR ANY
DIRECT, INDIRECT, INCIDENTAL, SPECIAL, EXEMPLARY,
OR CONSEQUENTIAL DAMAGES (INCLUDING, BUT NOT
LIMITED TO, PROCUREMENT OF SUBSTITUTE GOODS
OR SERVICES; LOSS OF USE, DATA, OR PROFITS; OR
BUSINESS INTERRUPTION) HOWEVER CAUSED AND ON
ANY THEORY OF LIABILITY, WHETHER IN CONTRACT,
STRICT LIABILITY, OR TORT (INCLUDING NEGLIGENCE OR
OTHERWISE) ARISING IN ANY WAY OUT OF THE USE OF
THIS SOFTWARE, EVEN IF ADVISED OF THE POSSIBILITY
OF SUCH DAMAGE.
!B5H-0357-04_QSG_JVC_KWM_E_EnFrDeNl.indb 54 2020/02/17 18:05

Annexes
55Français
■ Informations sur le traitement des
appareils électriques et électroniques
et des batteries usagés (applicable aux
pays de l'UE ayant adopté un système
de tri des déchets)
Les produits et les batteries comprenant le symbole
(poubelle barrée) ne peuvent pas être jetés parmi les
déchets ménagers.
Les anciens équipements électriques et électroniques
et les piles électriques doivent être recyclés sur des sites
capables de traiter ces produits et leurs sous-produits
déchets.
Contactez vos autorités locales pour connaître le site de
recyclage le plus proche.
Recycler de manière adaptée et jeter ses déchets
au bon endroit aide à préserver les ressources tout
en évitant les effets néfastes sur notre santé et
l'environnement.
Avis : La marque “Pb” en dessous du symbole des piles
indique que cette pile contient du plomb.
!B5H-0357-04_QSG_JVC_KWM_E_EnFrDeNl.indb 55 2020/02/17 18:05

Vor Verwendung
56
Inhalt
Vor Verwendung
Über diese Kurzanleitung
Die Kurzanleitung erläutert die grundlegenden
Funktionen dieses Geräts.
Detaillierte Informationen finden Sie in der
BEDIENUNGSANLEITUNG auf der folgenden
Website:
<https://www.jvc.net/cs/car/>
Änderungen der Bedienungsanleitung
aufgrund der Änderung der Spezifikationen
usw. sind vorbehalten.
Laden Sie zum Nachschlagen stets die aktuellste
Ausgabe der Bedienungsanleitung herunter.
Hinweise zu diesem Handbuch
• Die in diesem Handbuch gezeigten Bildschirme
und Bedienelemente sind Beispiele, die zur
Verdeutlichung der Funktionen dienen sollen.
Aus diesem Grund können sie sich von den
tatsächlichen Bildschirmen oder verwendeten
Bedienelementen unterscheiden oder es werden
andere Anzeigemuster verwendet.
• Anzeigesprache: Englischsprachige Anzeigen
werden zur Erklärung verwendet. Sie können die
Anzeigesprache im [SETUP]-Menü wählen. Siehe
Bedienungsanleitung.
Vor Verwendung .......................................................56
Über diese Kurzanleitung..............................................................56
Hinweise zu diesem Handbuch ................................................ 56
Vorsichtsmaßnahmen .....................................................................57
Grundfunktionen ...................................................... 58
Tastenfunktionen auf dem Frontpanel .................................58
Gerät einschalten ...............................................................................58
Erste Schritte .........................................................................................59
Die Lautstärke einstellen ...............................................................60
Sensordisplay-Bedienungen .......................................................60
HOME-Bildschirm Beschreibungen ........................................61
Quellauswahlbildschirm-Beschreibungen ......................... 61
Quellsteuerungsbildschirm-Beschreibungen ..................63
FUNCTION-Bildschirm ..................................................................... 64
Bildschirm-Liste ...................................................................................64
USB ................................................................................65
Anschluss eines USB-Geräts ........................................................65
USB-Grundfunktionen .....................................................................65
TUNER ........................................................................... 66
Tuner-Grundfunktionen ................................................................. 66
Speicherfunktionen .......................................................................... 67
Bluetooth-Steuerung ..............................................68
Registrieren des Bluetooth-Geräts ..........................................68
Verwendung der Freisprecheinrichtung .............................69
Audio-Steuerung ......................................................72
Verbindung/Installation .........................................74
Vor der Installation.............................................................................74
Installation des Geräts ..................................................................... 75
Anhang.........................................................................79
Technische Daten ..............................................................................79
Wissenswertes über dieses Gerät.............................................79
!B5H-0357-04_QSG_JVC_KWM_E_EnFrDeNl.indb 56 2020/02/17 18:05

Vor Verwendung
57Deutsch
Vorsichtsmaßnahmen
#WARNHINWEISE
Ñ Folgende
Vorsichtsmaßnahmen
beachten, um Brand oder
Verletzungen zu vermeiden:
• Kurzschlüsse verhindern. Niemals
Metallgegenstände (z. B. Münzen oder
Werkzeug) ins Gerät stecken oder darin
belassen.
• Verfolgen Sie die Anzeige des Geräts während
der Fahrt nicht für längere Zeit.
• Falls bei der Installation Probleme auftreten,
nehmen Sie Kontakt mit Ihrem JVC-Händler
auf.
Ñ Vorsichtsmaßnahmen bei der
Verwendung dieses Gerätes
• Falls Sie optionale Zusatzgeräte kaufen,
wenden Sie sich an Ihren JVC-Händler, um
sicherzustellen, dass sie mit Ihrem Modell
kompatibel sind und in Ihrer Region
verwendet werden können.
• Sie können eine Sprache zur Darstellung von
Menüs, Audiodatei-Tags usw. wählen. Siehe
Bedienungsanleitung.
• Das Radio Data System bzw. Radio Broadcast
Data System funktioniert nur in Regionen mit
Sendern, die diese Dienste unterstützen.
Ñ Schutz des Monitors
• Um den Monitor vor Beschädigungen zu
schützen, sollten Sie Ihn nicht mit einem
Kugelschreiber oder einem ähnlichen spitzen
Gegenstand bedienen.
Ñ Gerät reinigen
• Ist die Frontplatte des Geräts verschmutzt,
reinigen Sie sie mit einem weichen trockenen
Tuch, z. B. mit einem Silikontuch. Ist die
Frontplatte stark verschmutzt, entfernen Sie
den Schmutz mit einem angefeuchteten
Tuch (mit neutralem Reinigungsmittel) und
wischen Sie es anschließend wieder mit einem
weichen trockenen Tuch ab.
HINWEIS
• Kein Reinigungsmittel direkt auf das Gerät
sprühen. Dies könnte die mechanischen Bauteile
beschädigen. Die Frontplatte nicht mit einem
harten Tuch oder Lösungsmitteln wie z. B.
Verdünner oder Alkohol reinigen. Dies könnte
die Oberfläche zerkratzen oder Aufdrucke
löschen.
Ñ Gerät zurücksetzen
• Wenn das Gerät oder das angeschlossene
Gerät nicht richtig funktioniert, setzen
Sie das Gerät zurück. Drücken Sie auf die
Zurücksetzen-Taste. Das Gerät kehrt zu den
Werkseinstellungen zurück.
Reset-Taste
!B5H-0357-04_QSG_JVC_KWM_E_EnFrDeNl.indb 57 2020/02/17 18:05

Grundfunktionen
58
Grundfunktionen
Tastenfunktionen auf dem
Frontpanel
1
2
3
4
5
6
HINWEIS
• Die in dieser Anleitung gezeigten
Bedienelemente sind Beispiele, die zur
Verdeutlichung der Funktionen dienen sollen.
Aus diesem Grund kann es zu Abweichungen
vom vorliegenden Panel kommen.
Name
• Handlung
1
Fernbedienung
• Empfängt das Fernbedienungssignal.
2
[ ]
• Zeigt den Spracherkennungsbildschirm an.
3
[FNC]/[ ]
• Zeigt den FUNCTION-Bildschirm an.
• 1 Sekunde lang gedrückt halten, um den
APP-Bildschirm (Apple CarPlay/Android
Auto) anzuzeigen.
4
[], [] (Lautstärke)
• Lautstärkeregelung.
Die Lautstärke wird bis 15 erhöht, wenn Sie
gedrückt halten.
5
[ ] / [ ]
• Zeigt den HOME-Bildschirm an (S.61).
• Drücken Sie die Taste länger als 1 Sekunde,
um die Stromversorgung auszuschalten.
• Ist die Stromversorgung ausgeschaltet, wird
sie hierdurch eingeschaltet.
6
Zurücksetzen
• Wenn das Gerät oder das angeschlossene
Gerät nicht richtig funktioniert, wird
das Gerät auf die Grundeinstellungen
zurückgesetzt, sobald diese Taste gedrückt
wird.
Gerät einschalten
Das Einschaltverfahren ist je nach Modell
unterschiedlich.
1
Drücken Sie die Taste [ ].
Das Gerät ist eingeschaltet.
● Zum Ausschalten des Geräts:
1
Drücken Sie die Taste [ ] 1 Sekunde
lang.
HINWEIS
• Wird das Gerät erstmals nach der
Installation eingeschaltet, müssen einige
Grundeinstellungen durchgeführt werden
(S.59).
!B5H-0357-04_QSG_JVC_KWM_E_EnFrDeNl.indb 58 2020/02/17 18:05

Grundfunktionen
59Deutsch
Erste Schritte
Erst-Setup
Nehmen Sie diese Einstellung vor, wenn Sie das
Gerät zum ersten Mal benutzen.
1
Jedes Element wie folgt einstellen.
■ [Language]
Wählen Sie die für den Steuerungsbildschirm
und die Einstellungselemente zu
verwendende Sprache. Die Werkseinstellung
ist „[British English(en)]“.
1Berühren Sie [Language].
2Berühren Sie [Language Select].
3Wählen Sie die gewünschte Sprache.
4Berühren Sie [
].
■ [Clock]
Stellt die Uhr ein.
Für Details zur Vorgehensweise siehe
Kalender-/Uhreinstellungen (S.59).
■ [Display]
Legen Sie das Hintergrundbild für den
Bildschirm fest.
1Berühren Sie [Display].
2Berühren Sie [Background].
3Wählen Sie das Bild aus.
4Berühren Sie [
].
Detaillierte Informationen finden Sie in der
Bedienungsanleitung.
■ [Camera]
Stellen Sie die Parameter für die Kamera ein.
1Berühren Sie [Camera].
2Stellen Sie jede Funktion ein und
berühren Sie [
].
Detaillierte Informationen finden Sie in der
Bedienungsanleitung.
■ [DEMO]
Zum Einstellen des Demonstrationsmodus.
Werkseinstellung ist „ON“.
1Berühren Sie [DEMO] und stellen Sie [ON]
oder [OFF] ein.
2
Berühren Sie [Finish].
HINWEIS
• Diese Einstellungen lassen sich im SETUP-Menü
einstellen.
Kalender-/Uhreinstellungen
1
Drücken Sie die [FNC]-Taste.
Der FUNCTION-Bildschirm erscheint.
2
Berühren Sie [ ].
Der SETUP-Menübildschirm wird
angezeigt.
!B5H-0357-04_QSG_JVC_KWM_E_EnFrDeNl.indb 59 2020/02/17 18:05

Grundfunktionen
60
3
Berühren Sie [User Interface].
Zeigt den Bedienoberflächenbildschirm
an.
4
Berühren Sie [Clock Adjust].
5
Stellen Sie das Datum ein und dann die
Uhrzeit.
6
Berühren Sie [Set].
HINWEIS
• Deaktivieren Sie [RDS CT], bevor Sie die Uhrzeit
einstellen. Siehe Bedienungsanleitung.
Die Lautstärke einstellen
Um die Lautstärke (0 bis 40) einzustellen,
drücken Sie [] für höhere und [] für
niedrigere Lautstärke.
Durch Halten von [] wird die Lautstärke
kontinuierlich bis zum Pegel 15 gesteigert.
Sensordisplay-Bedienungen
Um Bedienungen auf dem Bildschirm
auszuführen, können Sie berühren, berührt
halten, wischen oder streichen, um einen
Gegenstand zu wählen, das Displayeinstellung-
Menü-Schirmbild aufrufen, die Seite umblättern
usw.
● Berühren
Berühren Sie den Bildschirm
sanft, um einen Gegenstand
auf dem Bildschirm zu
wählen.
● Berührt halten
Berühren Sie den Bildschirm
und lassen Sie Ihren Finger
an der gleichen Stelle, bis die
Anzeige wechselt oder eine
Meldung angezeigt wird.
● Wischen
Ziehen Sie Ihren Fingers nach
links oder rechts auf dem
Bildschirm entlang, um die
Seite zu wechseln.
Sie können durch die
Listenansicht scrollen, indem
Sie sie mit dem Finger nach
oben/unten streichen.
● Streichen
Ziehen Sie Ihren Fingers nach
oben oder unten auf dem
Bildschirm entlang, um das
Schirmbild weiterzublättern.
!B5H-0357-04_QSG_JVC_KWM_E_EnFrDeNl.indb 60 2020/02/17 18:05

Grundfunktionen
61Deutsch
Gestensteuerung:
Sie können die Wiedergabe auch steuern,
indem Sie einfach Ihren Finger auf dem
Sensordisplay bewegen, wie folgt (für manche
Quellen ist die Gestensteuerung nicht
verfügbar).
• Den Finger nach oben/unten schieben:
- Hat die gleiche Funktion wie Drücken
von [
]/[ ] (Medien) im USB-
Steuerungsbildschirm.
- Für den Tuner werden die voreingestellten
Sendestationen des Tuners umgeschaltet.
• Den Finger nach links/rechts schieben: Hat die
gleiche Funktion wie Drücken von [E]/[F].
• Bewegen Ihres Fingers im Uhrzeigersinn oder
gegen den Uhrzeigersinn: erhöht/senkt die
Lautstärke.
HOME-Bildschirm
Beschreibungen
Die meisten Funktionen lassen sich über den
HOME-Bildschirm ausführen.
41 5 6
1 2 3 1
1
• Verknüpfungssymbole für die
Wiedergabequelle. (S.62)
2
• Aktuelle Quelle-Information.
• Berühren Sie dies, um den
Steuerungsbildschirm der aktuellen Quelle
anzuzeigen.
3
• Widget
4
• Zeigt den Quellenauswahlbildschirm an.
(S.62)
5
• Zeigt den Einstellungs-Menü-Bildschirm an.
6
• Zeigt den Freisprechbildschirm an. (S.69)
• Beim Anschließen als Apple CarPlay oder
Android Auto funktioniert es als ein in Apple
CarPlay oder Android Auto zur Verfügung
gestelltes Telefon.
Den HOME-Bildschirm aufrufen
1
Drücken Sie die Taste [ ].
Der HOME-Bildschirm erscheint.
Quellauswahlbildschirm-
Beschreibungen
Sie können alle Wiedergabequellen und
Optionen auf dem Quellenauswahl-Bildschirm
anzeigen.
2 3
1
1
• Ändert die Wiedergabequelle.
Siehe Wiedergabequellen, Wählen Sie die
Wiedergabequelle aus (S.62).
2
• Kehrt zurück zum vorherigen Bildschirm.
3
• Zeigt den Einstellungs-Menü-Bildschirm an.
!B5H-0357-04_QSG_JVC_KWM_E_EnFrDeNl.indb 61 2020/02/17 18:05

Grundfunktionen
62
Wählen Sie die Wiedergabequelle
aus
1
Berühren Sie [ ] auf dem HOME-
Bildschirm.
In diesem Bildschirm können Sie die
folgenden Quellen und Funktionen
auswählen.
• Wechselt zum Apple CarPlay-Bildschirm
des angeschlossenen iPhone.
• Wechselt zum USB-Mirroring-Bildschirm
des angeschlossenen Android-
Smartphones.
Sie müssen ein Android-Smartphone
anschließen, auf dem „Mirroring OA
for JVC“ installiert ist, und [Mode] auf
[Mirroring for Android™] einstellen.
• Schaltet auf Radio um. (S.66)
• Zeigt den Freisprechbildschirm an.
(S.69)
Wenn weder Apple CarPlay, Android
Auto noch ein Bluetooth-Telefon mit
Freisprecheinrichtung angeschlossen ist,
wird die Meldung „[Disconnected]“ auf
dem TEL-Bildschirm angezeigt.
Beim Anschließen als Apple CarPlay oder
Android Auto funktioniert es als ein in
Apple CarPlay oder Android Auto zur
Verfügung gestelltes Telefon.
• Wechselt zum Android-Auto-Bildschirm
des angeschlossenen Android-
Smartphones.
Sie müssen ein mit Android Auto
kompatibles Android-Smartphone
anschließen und [Mode] auf
[Android Auto] einstellen.
• Spielt einen Bluetooth-Audioplayer ab.
• Gibt die Dateien auf einem USB-Gerät
wieder. (S.65)
• Wechselt zu einer externen Komponente,
die an den AV-IN-Eingangsanschluss
angeschlossen ist.
• Schaltet die AV-Quelle aus. (S.62)
Zum Ausschalten der AV-Quelle
1
Berühren Sie [ ] auf dem HOME-
Bildschirm.
2
Berühren Sie [AV Off].
!B5H-0357-04_QSG_JVC_KWM_E_EnFrDeNl.indb 62 2020/02/17 18:05

Grundfunktionen
63Deutsch
Quellsteuerungsbildschirm-
Beschreibungen
Es gibt eine Reihe von Funktionen, die von
praktisch jedem Bildschirm aus aufgerufen
werden können.
Anzeigen
1
2
3
4
Untermenü
1
[ ]/[ ]
Angeschlossene Bluetooth-Geräte-
Informationen.
2
Alle Quellsymbole
Zeigt alle Quellen an.
3
Zweiter Bildschirm
• [
]/[ ]: Der zweite Bildschirm wechselt mit
jeder Berührung. Sie können auch den
Zweiten Bildschirm wechseln, indem Sie
auf dem Bildschirm nach links oder rechts
wischen.
• Anzeigen: Zeigt die aktuelle
Quellenbedingung und so weiter an.
– [MUTE]: Die Stummschaltfunktion ist aktiv.
– [LOUD]: Die Loudness-Funktion ist aktiviert.
• Untermenü
– [ ]: Funktion, wenn das Symbol berührt wird:
Die erste Berührung verdunkelt den Bildschirm,
die zweite Berührung verdunkelt den Bildschirm
weiter und die dritte Berührung stellt die
ursprüngliche Helligkeit des Bildschirms wieder
her.
– [
]: Zeigt den Bildschirm des grafischen
Equalizers an. (S.73)
– [
]: Zeigt den APP-Bildschirm (Apple CarPlay/
Android Auto) an.
4
[Û]
Zum Anzeigen des Freisprechbildschirms
berühren. (S.69)
Beim Anschließen als Apple CarPlay oder
Android Auto funktioniert es als ein in Apple
CarPlay oder Android Auto zur Verfügung
gestelltes Telefon.
!B5H-0357-04_QSG_JVC_KWM_E_EnFrDeNl.indb 63 2020/02/17 18:05

Grundfunktionen
64
FUNCTION-Bildschirm
1
Drücken Sie die [FNC]-Taste.
Der FUNCTION-Bildschirm erscheint.
2
Berühren, um den FUNCTION-Bildschirm
anzuzeigen.
Der Inhalt des Menüs ist wie folgt.
• Zeigt den Einstellungs-Menü-Bildschirm
an.
• Zeigt den APP-Bildschirm (Apple CarPlay/
Android Auto) an.
• Zeigt den Bildschirm-
Einstellungsbildschirm an.
• Zeigt die Kameraansicht an.
• Zeigt den Quellenauswahlbildschirm an.
(S.62)
• Schaltet die Anzeige aus. (S.64)
• Zeigt den Audio-Bildschirm an. (S.72)
• Schließen Sie den FUNCTION-Bildschirm.
Schalten Sie den Bildschirm aus
1
Wählen Sie [ ] auf dem FUNCTION-
Bildschirm aus.
● Um den Bildschirm einzuschalten
1
Berühren Sie das Display.
Bildschirm-Liste
Die meisten Bildschirm-Listen haben einige
gemeinsame Funktionstasten.
61 2
3 4 5
1
Zeigt das Listentyp-Wahlfenster an.
2
Zeigt die Musik/Film-Dateienliste an.
3
Text scrollen
Scrollt die Textanzeige.
4
usw.
Tasten mit unterschiedlichen Funktionen
werden hier angezeigt.
• [
]: Spielt alle Titel im Ordner mit dem
aktuellen Titel ab.
• [
] [ ]: Springt in die obere Hierarchie.
5
[ ] / [ ] / [ ] / [ ] Seite scrollen
Sie können die Seite ändern, um mehr Elemente
anzuzeigen, indem Sie auf [
]/[ ] drücken.
• [
]/[ ]: Zeigt die oberste oder unterste
Seite an.
6
Rückkehr
Kehrt zurück zum vorherigen Bildschirm.
HINWEIS
• Die Tasten, die im Listenbildschirm nicht betätigt
werden können, werden nicht angezeigt.
!B5H-0357-04_QSG_JVC_KWM_E_EnFrDeNl.indb 64 2020/02/17 18:05

USB
65Deutsch
USB
Anschluss eines USB-Geräts
1
Verbinden Sie das USB-Gerät mit dem
USB-Kabel. (S.77)
2
Drücken Sie die Taste [ ].
3
Berühren Sie [ ].
4
Berühren Sie [USB]. (S.62)
Ñ Trennen Sie das USB-Gerät
1
Drücken Sie die Taste [ ].
2
Berühren Sie [ ].
3
Berühren Sie eine andere Quelle als [USB].
4
Trennen Sie das USB-Gerät ab.
Ñ Verwendbare USB-Geräte
Sie können ein USB-Gerät mit Massenspeicher
mit diesem Gerät verwenden.
In diesem Handbuch wird der Begriff „USB
device“ für Flash-Speichergeräte verwendet.
USB-Grundfunktionen
Die meisten Funktionen lassen sich über
den Quellensteuerungsbildschirm und den
Wiedergabebildschirm bedienen.
Steuerungsbildschirm
2
3
1
1
[ ] / [ ]
• [
]: Wiederholt den aktuellen Titel/Ordner.
Jedes Mal, wenn Sie die Taste berühren,
schaltet der Wiederholungsmodus in die
folgende Reihenfolge um.
Datei wiederholen ([
]), Ordner wiederholen
([
]), Alle wiederholen ([ ])
• [
]: Spielt alle Titel im aktuellen Ordner in
zufälliger Reihenfolge ab. Jedes Mal, wenn Sie
die Taste berühren, schaltet der Zufallsmodus
in die folgende Reihenfolge um.
Datei zufällig ([
]), Zufällig aus ([ ])
2
Titelinformation
Zeigt die Information zur aktuellen Datei an.
3
[Bedientasten
• [1] : Durchsucht Titel/Datei. Weitere Details
zu den Suchfunktionen finden Sie in der
Bedienungsanleitung.
• [E] [F] : Antippen, um vorige/nächste
Datei zu suchen.
Für schnellen Vorlauf oder schnellen Rücklauf
anhaltend drücken.
• [D/H] : Wiedergabe oder Pause.
• [
] : Berühren, um stummzuschalten oder
die Stummschaltung aufzuheben.
!B5H-0357-04_QSG_JVC_KWM_E_EnFrDeNl.indb 65 2020/02/17 18:05

TUNER
66
TUNER
Tuner-Grundfunktionen
Die wichtigsten Funktionen lassen sich vom
Quellensteuerungsbildschirm bedienen.
Um die Tuner-Quelle aufzurufen, berühren Sie
das Symbol [Tuner] auf dem Quellenauswahl-
Bildschirm. (S.62)
Steuerungsbildschirm
4
6
5
3
1
2
Öffnen Sie das Diskfach
4
7
5
1
Informationsanzeige
Zeigt die Information zum aktuellen Sender an:
Frequenz
Berühren von [ ] ermöglicht das Umschalten
zwischen Inhalt A und Inhalt B.
– Inhalt A: PS-Name, Radiotext, PTY-Genre
– Inhalt B: Radiotext Plus, Titel, Interpret
[Preset#]: Voreinstellungsnummer
2
Suchmodus
Schaltet den Suchmodus in der folgenden
Reihenfolge um; [AUTO1], [AUTO2], [MANUAL].
• [AUTO1]: Stellt automatisch einen Sender mit
gutem Empfang ein.
• [AUTO2]: Stellt einen Sender nach dem
anderen aus dem Speicher ein.
• [MANUAL]: Schaltet manuell zur nächsten
Frequenz um.
3
Bedientasten
• [E] [F] : Schaltet auf einen Sender. Die
Methode zum Umschalten der Frequenz kann
geändert werden (siehe 2 in der Tabelle).
• [
] : Berühren, um stummzuschalten oder
die Stummschaltung aufzuheben.
4
Presetliste
• Tippen Sie auf die rechte Seite des Bildschirms,
um die Voreinstellungsliste anzuzeigen.
Tippen Sie erneut, um die Liste zu schließen.
• Ruft den gespeicherten Sender auf.
• Wenn Sie die Taste 2 Sekunden lang gedrückt
halten, wird der gerade empfangene Sender
gespeichert.
5
Funktionspanel
Tippen Sie auf die linke Seite des Bildschirms,
um das Funktionspanel anzuzeigen. Tippen Sie
erneut, um das Panel zu schließen.
• [TI] (nur FM): Schaltet den
Verkehrsnachrichtenmodus ein.
Detaillierte Informationen finden Sie in der
Bedienungsanleitung.
• [SETUP](nur FM): Zeigt den Tuner-SETUP-
Bildschirm an. Detaillierte Informationen
finden Sie in der Bedienungsanleitung.
• [AME]: Stellt Sender automatisch vorab ein.
Detaillierte Informationen finden Sie in der
Bedienungsanleitung.
• [PTY] (nur FM): Sucht ein Programm
mit der Einstellung Programmsparte.
Detaillierte Informationen finden Sie in der
Bedienungsanleitung.
• [MONO] (nur FM): Schaltet auf Mono-Empfang.
• [LO.S] (nur FM): Schaltet die lokale
Suchfunktion ein oder aus.
6
[FM] [AM]
Schaltet das Band um.
7
Anzeigepunkte
• [ST]: Ein Stereo-Radiosignal wird empfangen.
• [MONO]: Die erzwungene Mono-Funktion ist
aktiviert.
• [AF]: Die AF-Suchfunktion ist aktiviert.
• [LOS]: Die lokale Suchfunktion ist aktiviert.
!B5H-0357-04_QSG_JVC_KWM_E_EnFrDeNl.indb 66 2020/02/17 18:05

TUNER
67Deutsch
• [RDS]: Zeigt den Status des Radio-Data-
System-Senders an, wenn die AF-Funktion
aktiviert ist.
weiß: Radio-Data-System wird empfangen.
orange: Radio-Data-System wird nicht
empfangen.
• [TI]: Zeigt dem Empfangsstatus von
Verkehrsdurchsagen an.
weiß: TP wird empfangen.
orange: TP wird nicht empfangen.
Speicherfunktionen
Ñ Automatische
Programmspeicherung
Sie können Sender mit gutem Empfang
automatisch im Senderspeicher speichern.
1
Drücken Sie auf die gewünschte
Frequenzbandtaste.
2
Berühren Sie [ ] auf der linken Seite des
Bildschirms.
Berühren Sie [AME].
Ein Bestätigungsbildschirm wird
angezeigt.
3
Berühren Sie [Ye s ].
Automatische Programmspeicherung
startet.
Ñ Manuelle Speicherung
Sie können den aktuell empfangenen Sender
speichern.
1
Wählen Sie den zu speichernden Sender.
2
Tippen Sie 2 Sekunden lang auf [FM#] (#:
1-24) oder [AM#] (#: 1-12), je nachdem, wo
Sie den Sender speichern möchten.
!B5H-0357-04_QSG_JVC_KWM_E_EnFrDeNl.indb 67 2020/02/17 18:05

Bluetooth-Steuerung
68
Bluetooth-Steuerung
Ñ Wissenswertes über
Mobiltelefon und Bluetooth-
Audioplayer
Dieses Gerät entspricht den folgenden
Bluetooth-Spezifikationen:
Version
Bluetooth Ver. 4.1
Profil
Mobiltelefon:
HFP (Hands Free Profile)
SPP (Serial Port Profile)
PBAP (Phonebook Access Profile)
Audioplayer :
A2DP (Advanced Audio Distribution Profile)
AVRCP (Audio/Video Remote Control Profile)
Soundcodec
SBC, AAC
HINWEIS
• Die Geräte mit Bluetooth-Unterstützung wurden
gemäß den Vorschriften der Bluetooth SIG
auf Konformität mit dem Bluetooth-Standard
zertifiziert.
• Je nach Typ Ihres Mobiltelefons kann es
trotzdem sein, dass diese Geräte nicht mit
diesem kommunizieren können.
Registrieren des Bluetooth-Geräts
Bluetooth-Audioplayer bzw. Mobiltelefon
müssen bei diesem Gerät registriert werden, um
die Bluetooth-Funktion nutzen zu können.
1
Schalten Sie die Bluetooth-Funktion an Ihrem
Smartphone/Mobiltelefon ein.
2
Suchen Sie von Ihrem Smartphone/
Mobiltelefon aus nach dem Gerät („KW-
M*****“).
3
Bedienen Sie Ihr Smartphone/Mobiltelefon
entsprechend den angezeigten Mitteilungen.
■ Bestätigen Sie die Anfrage am
Smartphone/Mobiltelefon.
■ Wenn die Eingabe eines PIN-Codes
erforderlich ist, geben Sie den PIN-Code
(„0000“) ein.
4
Drücken Sie die [FNC]-Taste.
Der FUNCTION-Bildschirm erscheint.
5
Berühren Sie [ ].
Der SETUP-Menübildschirm wird angezeigt.
6
Berühren Sie [Bluetooth].
Der Bluetooth-SETUP-Bildschirm wird
angezeigt.
!B5H-0357-04_QSG_JVC_KWM_E_EnFrDeNl.indb 68 2020/02/17 18:05

Bluetooth-Steuerung
69Deutsch
7
Berühren Sie [Select Device] im
Bluetooth-SETUP-Bildschirm.
8
Berühren Sie [ ] des Geräts, zu dem Sie
eine Verbindung herstellen möchten.
HINWEIS
• Wird das Icon hervorgehoben, so bedeutet dies,
dass das Gerät akzeptiert wurde.
Löschen des registrierten Bluetooth-
Geräts
1
Berühren Sie [ ].
Es erscheint eine Bestätigungsmeldung.
2
Berühren Sie [Ye s ].
Verwendung der
Freisprecheinrichtung
Sie können die Telefonfunktionen nutzen, in
dem Sie ein Bluetooth-Telefon an dieses Gerät
anschließen.
HINWEIS
• Während Apple CarPlay oder Android
Auto verbunden ist, kann die Bluetooth-
Freisprechfunktion nicht verwendet werden. Nur
die Freisprechfunktion von Apple CarPlay oder
Android Auto ist verwendbar.
Ñ Einen Anruf durchführen
1
Berühren Sie [Phone]/[Û].
Freisprech-Bildschirm wird angezeigt.
2
Wählverfahren auswählen.
• [ ]: Anruf mittels Anruflisten tätigen
• [
]: Anruf mittels Telefonbuch tätigen
• [
]: Anruf mittels gespeicherter
Nummer tätigen
• [
]: Anruf durch Eingabe einer
Telefonnummer
• [
]: Spracherkennung
• [
]: Bluetooth-SETUP
!B5H-0357-04_QSG_JVC_KWM_E_EnFrDeNl.indb 69 2020/02/17 18:05

Bluetooth-Steuerung
70
● Bluetooth-SETUP
1) Berühren Sie [
].
Der Bluetooth-SETUP-Bildschirm wird
angezeigt.
HINWEIS
• Die am Steuergerät angezeigten Symbole, wie z.
B. Batterie und Antenne können sich von denen
des Mobiltelefons unterscheiden.
• Durch Einstellen des privaten Modus am
Mobiltelefon kann die freihändige Bedienung
deaktiviert werden.
Anruf tätigen mittels Anruflisten
1
Berühren Sie [ ].
2
Wählen Sie die Telefonnummer von der
Liste.
Anruf durch Eingabe einer
Telefonnummer
1
Berühren Sie [ ].
2
Geben Sie eine Telefonnummer mittels
Zifferntasten ein.
3
Berühren Sie [ ].
Anruf tätigen mittels Speichernummer
1
Berühren Sie [ ].
2
Berühren Sie den Namen oder die
Telefonnummer.
Anruf tätigen mittels Telefonbuch
1
Berühren Sie [ ].
2
Wählen Sie die Person, die Sie anrufen
möchten, aus der Liste aus.
3
Wählen Sie die Telefonnummer von der
Liste.
HINWEIS
• Wenn kein Telefonbuch heruntergeladen
wurde, wird durch Berühren von
[Download Phonebook Now] das
Herunterladen des Telefonbuchs gestartet.
!B5H-0357-04_QSG_JVC_KWM_E_EnFrDeNl.indb 70 2020/02/17 18:05

Bluetooth-Steuerung
71Deutsch
Ñ Einen Anruf empfangen
1
Berühren Sie [ ] zur Annahme eines
Telefonanrufes oder [
], um einen
eingehenden Anruf abzuweisen.
HINWEIS
• Wird die Ansichtskamera überwacht, wird dieser
Bildschirm nicht angezeigt, auch wenn ein Anruf
eingeht. Schalten Sie die Schaltung wieder
zurück, um diesen Bildschirm anzuzeigen.
Auflegen
1
Berühren Sie während des Gesprächs
[
].
Ñ Bedienvorgänge während
eines Anrufs
● Hörerlautstärke einstellen
Drücken Sie die Taste [] oder [].
● Wählton-Ausgabe
Berühren Sie [DTMF] zur Anzeige des
Toneingangsbildschirms.
Durch Berührung der entsprechenden
Touchkeys auf dem Bildschirm können Sie
Wahltöne festlegen.
● Umschalten der Gesprächsstimme-
Ausgabe
Mit jedem Berühren von [
]/ [ ] wechselt
die Gesprächsausgabe zwischen Mobiltelefon
und Lautsprecher.
● Anklopfen
Wenn Sie einen Anruf erhalten, während Sie
bereits einen Anruf tätigen, können Sie den neu
eingehenden Anruf annehmen, indem Sie [
]
berühren. Der aktuelle Anruf wird gehalten.
Der Anrufer wechselt bei jedem Berühren von
[
].
Wenn Sie [
] berühren, wird der aktuelle
Anruf beendet und zum gehaltenen Anruf
gewechselt.
!B5H-0357-04_QSG_JVC_KWM_E_EnFrDeNl.indb 71 2020/02/17 18:05

Audio-Steuerung
72
Audio-Steuerung
Sie können die unterschiedlichen Einstellungen
wie Audio-Balance oder Subwoofer-Level
einstellen.
1
Drücken Sie die [FNC]-Taste.
Der FUNCTION-Bildschirm erscheint.
2
Berühren Sie [ ].
Ñ Allgemeine Audio-Steuerung
1
Drücken Sie die [FNC]-Taste.
Der FUNCTION-Bildschirm erscheint.
2
Berühren Sie [ ].
Der Audio-Bildschirm wird angezeigt.
3
Berühren Sie [Fader / Balance].
4
Jedes Element wie folgt einstellen.
■ [Fader]/[Balance]
Einstellung der Lautstärke-Balance im
berührten Bereich.
[C] und [D] regeln die Lautstärke-Balance
zwischen links und rechts.
[R] und [S] regeln die Lautstärke-Balance
zwischen vorn und hinten.
■ [Center]
Die Anpassung löschen.
!B5H-0357-04_QSG_JVC_KWM_E_EnFrDeNl.indb 72 2020/02/17 18:05

Audio-Steuerung
73Deutsch
Ñ Equalizer-Steuerung
Sie können den Equalizer durch Auswahl der
optimierten Einstellung für jede Kategorie
anpassen.
1
Drücken Sie die [FNC]-Taste.
Der FUNCTION-Bildschirm erscheint.
2
Berühren Sie [ ].
Der Audio-Bildschirm wird angezeigt.
3
Berühren Sie [Equalizer].
4
Berühren Sie den Bildschirm und nehmen
Sie die gewünschte Einstellung des
Graphic-Equalizers vor.
■ [ALL SRC]
Wendet den eingestellten Equalizer auf
alle Quellen an. Berühren Sie [ALL SRC]
und berühren Sie dann [OK] auf dem
Bestätigungsbildschirm.
■ Verstärkungspegel (Fläche mit
gepunktetem Rahmen)
Stellen Sie den Gain-Level durch Berührung
des jeweiligen Frequenzbalkens ein.
Sie können die Frequenzleiste auswählen
und den Pegel mit [R], [S] anpassen.
■ [Preset Select]
Zeigt den Bildschirm an, um die
voreingestellte Equalizer-Kurve abzurufen.
■ [Initialize]
Die aktuelle EQ-Kurve wird wieder flach.
■ [Memory]
Speichert die angepasste Equalizerkurve als
„[User1]“ bis „[User3]“.
■ [Bass EXT] (Einstellungen für die
Basserweiterung)
Beim Einschalten wird eine Frequenz
unter 62,5 Hz auf den Gain-Level 62,5 Hz
eingestellt.
■ [SW Level]
Regelt die Subwoofer-Lautstärke.
!B5H-0357-04_QSG_JVC_KWM_E_EnFrDeNl.indb 73 2020/02/17 18:05

Verbindung/Installation
74
Verbindung/Installation
Vor der Installation
Vor der Installation dieses Geräts beachten Sie
bitte die folgenden Vorsichtsmaßnahmen.
#WARNHINWEISE
• Verbinden Sie Zünddraht (rot) und
Batteriekabel (gelb) mit dem Fahrzeugchassis
(Erde), so könnte dies zu einem Kurzschluss
führen, der ein Feuer entzündet. Schließen Sie
diese Drähte nur an eine Stromquelle an, die
durch den Sicherungskasten geführt wird.
• Zündkabel (rot) und Batteriekabel (gelb)
dürfen nie ohne Einbindung einer Sicherung
installiert werden. Zwischen Stromversorgung
und Kabel muss immer eine Sicherung
installiert sein.
#ACHTUNG
• Montieren Sie dieses Gerät in der Konsole Ihres
Fahrzeugs.
Berühren Sie die Metallteile des Geräts
während oder kurz nach der Benutzung
nicht. Metallteile wie der Kühlkörper und das
Gehäuse werden heiß.
HINWEIS
• Die Montage sowie die Verkabelung dieses
Gerätes macht besondere Fähigkeiten
und Erfahrung erforderlich. Überlassen Sie
die Montage- und Verkabelungsarbeiten
aus Sicherheitsgründen ausgewiesenem
Fachpersonal.
• Betreiben Sie das Gerät ausschließlich
mit 12-Volt-Gleichstrom und negativer
Masseverbindung.
• Setzen Sie weder die Frontblende noch deren
Etui direktem Sonnenlicht, extremer Wärme
oder Luftfeuchtigkeit aus. Schützen Sie diese
Teile außerdem vor Staub und Spritzwasser.
• Wenn die Stromversorgung nicht
eingeschaltet ist (Anzeige: „There is an
error in the speaker wiring. Please check
the connections.“ / Es liegt ein Fehler
in der Lautsprecherverkabelung vor.
Bitte überprüfen Sie die Verbindungen.),
liegt möglicherweise ein Kurzschluss im
Lautsprecherkabel vor oder das Kabel
hat das Fahrzeugchassis berührt und die
Schutzfunktion wurde deswegen aktiviert.
Daher sollte das Lautsprecherkabel überprüft
werden.
• Wenn die Zündung Ihres Fahrzeuges keine
ACC-Stellung hat, dann schließen Sie die
Zündkabel an eine Stromquelle an, die mit
dem Zündschlüssel ein- und ausgeschaltet
werden kann. Wenn Sie das Zündkabel an eine
Stromquelle mit konstanten Stromversorgung
anschließen, wie z. B. Batteriekabel, kann dies
die Batterie entleeren.
• Hat die Konsole eine Klappe, dann stellen Sie
bei der Installation des Gerätes sicher, dass das
Frontpanel beim Öffnen und Schließen nicht
gegen die Klappe stößt.
• Wenn die Sicherung durchbrennt, überprüfen
Sie zuerst, dass die Drähte sich nicht berühren
und einen Kurzschluss verursachen. Ersetzen
Sie dann die durchgebrannte Sicherung
durch eine neue Sicherung mit den gleichen
Nenngrößen.
• Isolieren Sie nicht angeschlossene Kabel mit
Vinylband oder ähnlichem Material. Entfernen
Sie nicht die Kappen von den Enden nicht
angeschlossener Kabel und Anschlüsse, damit
keine Kurzschlüsse entstehen.
• Schließen Sie beide Pole der Lautsprecher
an den Lautsprecherausgängen am Gerät
an. Das Gerät kann beschädigt werden oder
den Dienst versagen, wenn Sie die ¤-Leiter
zusammenführen oder über Metallteile des
Fahrzeugs erden.
• Sind nur zwei Lautsprecher an das System
angeschlossen, nutzen Sie die Anschlüsse
entweder an den beiden vorderen oder an
den beiden hinteren Ausgangsklemmen
(nicht 1x vorne und 1x hinten anschließen).
Wenn Sie zum Beispiel den ¢-Stecker des
linken Lautsprechers an eine Ausgangsbuchse
für vorne anschließen, darf der ¤-Stecker
nicht an eine Ausgangsbuchse für hinten
angeschlossen werden.
• Überprüfen Sie nach der Montage des Geräts,
ob die Bremslichter, Blinker, Scheibenwischer
usw. ordnungsgemäß funktionieren.
• Bei der Installation des Gerätes im
Fahrzeug dürfen Sie nicht zu sehr auf die
Paneloberfläche drücken. Ansonsten könnte
es zu Kratzern, Beschädigungen oder
Fehlfunktionen kommen.
!B5H-0357-04_QSG_JVC_KWM_E_EnFrDeNl.indb 74 2020/02/17 18:05

Verbindung/Installation
75Deutsch
• Die Empfangsqualität wird u. U. durch
metallische Gegenstände in der Nähe der
Bluetooth-Antenne beeinträchtigt.
Bluetooth-Antenne
Ñ Für die Installation
mitgeliefertes Zubehör
1
(3 m)
x1
2
x1
3
(2 m)
x1
4
x1
5
x2
Ñ Installationsvorgang
1) Um einem Kurzschluss vorzubeugen, ziehen
Sie bitte den Schlüssel aus dem Zündschloss
und trennen Sie die ¤-Klemme der Batterie
ab.
2) Schließen Sie die Eingangs- und
Ausgangskabel jedes Gerätes richtig an.
3) Schließen Sie den ISO-Anschluss am Gerät an.
4) Bauen Sie das Autoradio in Ihrem Fahrzeug
ein.
5) Schließen Sie die ¤-Klemme der Batterie
wieder an.
6) Drücken Sie die Reset-Taste.
Installation des Geräts
Sichern Sie das
Gerät, indem Sie die
Metalllaschen mit einem
Schraubendreher o. Ä.
umbiegen.
HINWEIS
• Stellen Sie sicher, dass das Gerät fest sitzt.
Falls das Gerät nicht fest sitzt, können
Fehlfunktionen (beispielsweise Sprünge
bei der Wiedergabe) auftreten.
Ñ Ziertafel
1) Bringen Sie das Zubehör 2 am Gerät an.
2
!B5H-0357-04_QSG_JVC_KWM_E_EnFrDeNl.indb 75 2020/02/17 18:05

Verbindung/Installation
76
Ñ Mikrofoneinheit
1) Überprüfen Sie die Einbauposition des
Mikrofons (Zubehör 1).
2) Säubern Sie die Installationsfläche.
3) Entfernen Sie die Schutzfolie vom Mikrofon
(Zubehör 1) und kleben Sie das Mikrofon an
die unten gezeigte Stelle.
4) Verlegen Sie das Mikrofonkabel bis zum Gerät
und befestigen Sie es an mehreren Punkten
mit Klebeband oder Ähnlichem.
5) Richten Sie die Richtung des Mikrofons
(Zubehör 1) auf den Fahrer aus.
1
Befestigen Sie das Kabel mit handelsüblichem
Klebeband.
HINWEIS
• Tauschen Sie bei Bedarf die Clips aus.
Ñ Entfernen der Ziertafel
1) Nutzen Sie den Entnahmeschlüssel (Zubehör
4), um die vier Laschen auszuhebeln (zwei
am linken Teil, zwei am rechten Teil).
4
2) Ziehen Sie die Zierplatte nach vorn.
Ñ Ausbauen des Geräts
1) Entfernen Sie wie unter Schritt 1 von
„Entfernen der Ziertafel“ beschrieben die
Ziertafel.
2) Führen Sie den Entnahmeschlüssel (Zubehör
5) wie abgebildet tief in den Schlitz ein.
(Der vorstehende Teil an der Spitze des
Entnahmeschlüssels muss zum Gerät zeigen.)
5
3) Wenn der Entnahmeschlüssel eingerastet ist,
führen Sie den anderen Entnahmeschlüssel in
den Schlitz ein.
5
4) Ziehen Sie das Gerät halb heraus.
HINWEIS
• Gehen Sie vorsichtig vor, um sich
nicht an den Vorsprüngen des
Entnahmwerkzeugs zu verletzen.
5) Umfassen Sie das Gerät mit beiden Händen
und ziehen Sie es vorsichtig heraus, damit es
nicht herunterfällt.
!B5H-0357-04_QSG_JVC_KWM_E_EnFrDeNl.indb 76 2020/02/17 18:05

Verbindung/Installation
77Deutsch
PRK SW
STEERING
WHEEL
REMOTE
INPUT
2 4 6 8
1 3 5 7
2 4 6 8
1 3 5 7
REVERSE
SUB
WOOFER
1 2 3 4
5V
=
1.5A
ST REMOTE
INPUT 1
ST REMOTE
INPUT 2
ST REMOTE
GND
Am Feststellbremsen-
Erkennungsschalterkabelbaum
des Fahrzeugs anschließen.
Aus
Sicherheitsgründen
muss der
Feststellbremsen-
Sensor unbedingt
angeschlossen
werden.
Hellgrün (Parksensorkabel)
Zubehör 3: Verlängerungskabel zum Parksensor
Lila/Weiß
(Rückwärtsgangsensorkabel)
Zur Lenkrad-Fernbedienung
Für die Verwendung der Lenkrad-
Fernbedienungsfunktion benötigen Sie einen
speziellen Fernbedienungsadapter (nicht im
Lieferumfang enthalten), der auf Ihr Fahrzeug
abgestimmt ist.
An den Rückfahrlicht-
Kabelbaum des
Fahrzeugs anschließen
bei Verwendung
der optionalen
Rückspiegelkamera.
Hellblau/Gelb (Lenkrad-Fernbedienungskabel)
Sicherung (15 A)
Ñ Anschließen der Kabel an die Anschlüsse
Subwoofer-Vorverstärker
Deckel
Deckel
UKW/MW-Antenne
Anschluss A
Anschluss B
USB-Gerät
[2]
USB-Anschluss
[1]
(1,0 m)
[1]
Maximale Stromstärke der USB-
Stromversorgung : DC 5 V = 1,5 A
[2]
Separat erhältlich
ISO-Steckverbinder
FRONT OUTREAR OUT
VIDEO OUTCAM IN
Hinterer Audiovorverstärker
(Links; Weiß, Rechts; Rot)
Vorderer Audiovorverstärker
(Links; Weiß, Rechts; Rot)
Videoausgang (Gelb)
Rückfahrkameraeingang (Gelb)
AV-IN (1: Ton links, 2: Composite Video,
3: Masse, 4: Ton rechts).
Zubehör 1:
Bluetooth-Mikrofon
Hellgrün/Rot
Lila/Rot
Grau/Rot
Am Lenkrad-Fernbedienungskabelbaum des
Fahrzeugs anschließen. Wenden Sie sich für
Einzelheiten an Ihren JVC-Händler.
!B5H-0357-04_QSG_JVC_KWM_E_EnFrDeNl.indb 77 2020/02/17 18:05

Verbindung/Installation
78
Ñ Anschluss eines iPhones/
Android-Smartphones
5V
=
1.5A
KS-U62 (0,8 m)
[3]
USB-Kabel
[2]
iPhone
[2]
Lightning-Anschluss
Android-Smartphone
[2]
Deckel
USB-Anschluss
[1]
(1,0 m)
[1]
Max. iPhone-Stromversorgung :
DC 5 V = 1,5 A
[2]
Separat erhältlich
[3]
Optionales Zubehör
Ñ Stiftbelegung des ISO-
Anschlusses
Stift Farbe und Funktion
A-4 Gelb Batterie
A-5 Blau Power-Antenne
[1]
A-6 Orange/weiß Beleuchtung
A-7 Rot Zündung (ACC)
A-8 Black Erdungsanschluss
(Masse)
B-1/B-2 Lila (+) /
Lila/Schwarz (–)
Hinten rechts
B-3/B-4 Grau (+) /
Grau/Schwarz (–)
Vorne rechts
B-5/B-6 Weiß (+) /
Weiß/Schwarz (–)
Vorne links
B-7/B-8 Grün (+)/
Grün/Schwarz (–)
Hinten links
[1]
Max. 150 mA, 12 V
• Lautsprecherimpedanz: 4-8 Ω
! ACHTUNG
Überprüfen Sie die folgende Bedingung,
bevor Sie die handelsüblichen ISO-Stecker an
das Gerät anschließen:
• Überprüfen Sie, ob die Stiftbelegung des
Steckers mit dem JVC-Gerät übereinstimmt.
• Achten Sie besonders auf das Stromkabel.
• Wenn das Batteriekabel und das Zündkabel
nicht übereinstimmen, tauschen Sie sie
entsprechend aus.
• Verwenden Sie eine handelsübliche
Schnittstelle, wenn Ihr Auto über kein
Zündkabel verfügt.
!B5H-0357-04_QSG_JVC_KWM_E_EnFrDeNl.indb 78 2020/02/17 18:05

Anhang
79Deutsch
Anhang
Technische Daten
■ Bluetoothbereich
Frequenz
: 2,402 – 2,480 GHz
HF-Ausgangsleistung (EIRP)
: +8 dBm (Durchschn.) Leistungsklasse 1
■ Allgem.
Betriebsspannung
: 12-V-Gleichstrom-Autobatterie
Lautsprecherimpedanz
: 4 – 8 Ω
Die technischen Daten können ohne
Vorankündigung geändert werden.
Wissenswertes über dieses
Gerät
■ Urheberrechte
• Die Bluetooth® Wortmarke und Logos sind
eingetragene Markenzeichen der Bluetooth SIG, Inc.
und jegliche Verwendung dieser Marken durch die
JVCKENWOOD Corporation geschieht unter Lizenz.
Andere Warenzeichen und Handelsmarken sind
Eigentum der jeweiligen Inhaber.
• Windows Media is a registered trademark or trademark
of Microsoft Corporation in the United States and/or
other countries.
• This product is protected by certain intellectual
property rights of Microsoft. Use or distribution of
such technology outside of this product is prohibited
without a license from Microsoft.
• Use of the Made for Apple badge means that an
accessory has been designed to connect specifically
to the Apple product(s) identified in the badge, and
has been certified by the developer to meet Apple
performance standards. Apple is not responsible for
the operation of this device or its compliance with
safety and regulatory standards. Please note that the
use of this accessory with an Apple product may affect
wireless performance.
• Apple, iPhone and Lightning are trademarks of Apple
Inc., registered in the U.S. and other countries.
• Apple, Siri, Apple CarPlay and Apple CarPlay logo are
trademarks of Apple Inc., registered in the U.S. and other
countries.
• App Store is a service mark of Apple Inc., registered in
the U.S. and other countries.
• IOS is a trademark or registered trademark of Cisco in
the U.S. and other countries and is used under license.
• Google, Android, Google Play and Android Auto are
trademarks of Google LLC.
• To use Android Auto on your car display, you’ll need an
Android Auto compatible vehicle or aftermarket stereo,
an Android phone running Android 5.0 or higher, and
the Android Auto app.
• Linux® is the registered trademark of Linus Torvalds in
the U.S. and other countries.
• THIS PRODUCT IS LICENSED UNDER THE AVC PATENT
PORTFOLIO LICENSE FOR THE PERSONAL USE OF A
CONSUMER OR OTHER USES IN WHICH IT DOES NOT
RECEIVE REMUNERATION TO (¡)ENCODE VIDEO IN
COMPLIANCE WITH THE AVC STANDARD (“AVC VIDEO”)
AND/OR (¡¡)DECODE AVC VIDEO THAT WAS ENCODED BY
A CONSUMER ENGAGED IN A PERSONAL ACTIVITY AND/
OR WAS OBTAINED FROM A VIDEO PROVIDER LICENSED
TO PROVIDE AVC VIDEO. NO LICENSE IS GRANTED OR
SHALL BE IMPLIED FOR ANY OTHER USE. ADDITIONAL
INFORMATION MAY BE OBTAINED FROM MPEG LA, L.L.C.
SEE HTTP://WWW.MPEGLA.COM
!B5H-0357-04_QSG_JVC_KWM_E_EnFrDeNl.indb 79 2020/02/17 18:05

Anhang
80
• THIS PRODUCT IS LICENSED UNDER THE MPEG-4 VISUAL
PATENT PORTFOLIO LICENSE FOR THE PERSONAL
AND NON-COMMERCIAL USE OF A CONSUMER FOR
(¡) ENCODING VIDEO IN COMPLIANCE WITH THE
MPEG-4 VISUAL STANDARD (“MPEG-4 VIDEO”) AND/
OR (¡¡) DECODING MPEG-4 VIDEO THAT WAS ENCODED
BY A CONSUMER ENGAGED IN A PERSONAL AND
NON-COMMERCIAL ACTIVITY AND/OR WAS OBTAINED
FROM A VIDEO PROVIDER LICENSED BY MPEG LA TO
PROVIDE MPEG-4 VIDEO. NO LICENSE IS GRANTED OR
SHALL BE IMPLIED FOR ANY OTHER USE. ADDITIONAL
INFORMATION INCLUDING THAT RELATING TO
PROMOTIONAL, INTERNAL AND COMMERCIAL USES
AND LICENSING MAY BE OBTAINED FROM MPEG LA, LLC.
SEE HTTP://WWW.MPEGLA.COM.
• THIS PRODUCT IS LICENSED UNDER THE VC-1 PATENT
PORTFOLIO LICENSE FOR THE PERSONAL AND NON-
COMMERCIAL USE OF A CONSUMER TO ( i ) ENCODE
VIDEO IN COMPLIANCE WITH THE VC-1 STANDARD
(“VC-1 VIDEO”) AND/OR ( ii ) DECODE VC-1 VIDEO
THAT WAS ENCODED BY A CONSUMER ENGAGED IN A
PERSONAL AND NON-COMMERCIAL ACTIVITY AND/
OR WAS OBTAINED FROM A VIDEO PROVIDER LICENSED
TO PROVIDE VC-1 VIDEO. NO LICENSE IS GRANTED OR
SHALL BE IMPLIED FOR ANY OTHER USE. ADDITIONAL
INFORMATION MAY BE OBTAINED FROM MPEG LA, L.L.C.
SEE HTTP://WWW.MPEGLA.COM
• libFLAC
Copyright (C) 2000,2001,2002,2003,2004,2005,2006,2007
,2008,2009 Josh Coalson
Redistribution and use in source and binary forms, with
or without modification, are permitted provided that
the following conditions are met:
– Redistributions of source code must retain the above
copyright notice, this list of conditions and the
following disclaimer.
– Redistributions in binary form must reproduce the
above copyright notice, this list of conditions and the
following disclaimer in the documentation and/or
other materials provided with the distribution.
– Neither the name of the Xiph.org Foundation nor the
names of its contributors may be used to endorse or
promote products derived from this software without
specific prior written permission.
THIS SOFTWARE IS PROVIDED BY THE COPYRIGHT
HOLDERS AND ONTRIBUTORS ``AS IS’’ AND ANY
EXPRESS OR IMPLIED WARRANTIES, INCLUDING,
BUT NOT LIMITED TO, THE IMPLIED WARRANTIES OF
MERCHANTABILITY AND FITNESS FOR A PARTICULAR
PURPOSE ARE DISCLAIMED. IN NO EVENT SHALL THE
FOUNDATION OR CONTRIBUTORS BE LIABLE FOR ANY
DIRECT, INDIRECT, INCIDENTAL, SPECIAL, EXEMPLARY,
OR CONSEQUENTIAL DAMAGES (INCLUDING, BUT NOT
LIMITED TO, PROCUREMENT OF SUBSTITUTE GOODS
OR SERVICES; LOSS OF USE, DATA, OR PROFITS; OR
BUSINESS INTERRUPTION) HOWEVER CAUSED AND ON
ANY THEORY OF LIABILITY, WHETHER IN CONTRACT,
STRICT LIABILITY, OR TORT (INCLUDING NEGLIGENCE OR
OTHERWISE) ARISING IN ANY WAY OUT OF THE USE OF
THIS SOFTWARE, EVEN IF ADVISED OF THE POSSIBILITY
OF SUCH DAMAGE.
• libvorbis
Copyright (c) 2002-2008 Xiph.org Foundation
Redistribution and use in source and binary forms, with
or without modification, are permitted provided that
the following conditions are met:
– Redistributions of source code must retain the above
copyright notice, this list of conditions and the
following disclaimer.
– Redistributions in binary form must reproduce the
above copyright notice, this list of conditions and the
following disclaimer in the documentation and/or
other materials provided with the distribution.
– Neither the name of the Xiph.org Foundation nor the
names of its contributors may be used to endorse or
promote products derived from this software without
specific prior written permission.
THIS SOFTWARE IS PROVIDED BY THE COPYRIGHT
HOLDERS AND CONTRIBUTORS ``AS IS’’ AND ANY
EXPRESS OR IMPLIED WARRANTIES, INCLUDING,
BUT NOT LIMITED TO, THE IMPLIED WARRANTIES OF
MERCHANTABILITY AND FITNESS FOR A PARTICULAR
PURPOSE ARE DISCLAIMED. IN NO EVENT SHALL THE
FOUNDATION OR CONTRIBUTORS BE LIABLE FOR ANY
DIRECT, INDIRECT, INCIDENTAL, SPECIAL, EXEMPLARY,
OR CONSEQUENTIAL DAMAGES (INCLUDING, BUT NOT
LIMITED TO, PROCUREMENT OF SUBSTITUTE GOODS
OR SERVICES; LOSS OF USE, DATA, OR PROFITS; OR
BUSINESS INTERRUPTION) HOWEVER CAUSED AND ON
ANY THEORY OF LIABILITY, WHETHER IN CONTRACT,
STRICT LIABILITY, OR TORT (INCLUDING NEGLIGENCE OR
OTHERWISE) ARISING IN ANY WAY OUT OF THE USE OF
THIS SOFTWARE, EVEN IF ADVISED OF THE POSSIBILITY
OF SUCH DAMAGE.
• libogg
Copyright (c) 2002, Xiph.org Foundation Redistribution
and use in source and binary forms, with or without
modification, are permitted provided that the following
conditions are met:
– Redistributions of source code must retain the above
copyright notice, this list of conditions and the
following disclaimer.
– Redistributions in binary form must reproduce the
above copyright notice, this list of conditions and the
following disclaimer in the documentation and/or
other materials provided with the distribution.
– Neither the name of the Xiph.org Foundation nor the
names of its contributors may be used to endorse or
promote products derived from this software without
specific prior written permission.
THIS SOFTWARE IS PROVIDED BY THE COPYRIGHT
HOLDERS AND CONTRIBUTORS ``AS IS’’ AND ANY
EXPRESS OR IMPLIED WARRANTIES, INCLUDING,
BUT NOT LIMITED TO, THE IMPLIED WARRANTIES OF
MERCHANTABILITY AND FITNESS FOR A PARTICULAR
PURPOSE ARE DISCLAIMED. IN NO EVENT SHALL THE
FOUNDATION OR CONTRIBUTORS BE LIABLE FOR ANY
DIRECT, INDIRECT, INCIDENTAL, SPECIAL, EXEMPLARY,
OR CONSEQUENTIAL DAMAGES (INCLUDING, BUT NOT
LIMITED TO, PROCUREMENT OF SUBSTITUTE GOODS
OR SERVICES; LOSS OF USE, DATA, OR PROFITS; OR
BUSINESS INTERRUPTION) HOWEVER CAUSED AND ON
ANY THEORY OF LIABILITY, WHETHER IN CONTRACT,
STRICT LIABILITY, OR TORT (INCLUDING NEGLIGENCE OR
OTHERWISE) ARISING IN ANY WAY OUT OF THE USE OF
THIS SOFTWARE, EVEN IF ADVISED OF THE POSSIBILITY
OF SUCH DAMAGE.
!B5H-0357-04_QSG_JVC_KWM_E_EnFrDeNl.indb 80 2020/02/17 18:05

Anhang
81Deutsch
■ Entsorgung von gebrauchten
elektrischen und elektronischen
Geräten und Batterien (anzuwenden
in EU-Ländern mit einem separaten
Sammelsystem für solche Geräte)
Das Symbol (durchgestrichene Mülltonne) auf
dem Produkt oder seiner Verpackung weist
darauf hin, dass dieses Produkt nicht als normaler
Haushaltsabfall behandelt werden darf, sondern an
einer Annahmestelle für das Recycling von elektrischen
und elektronischen Geräten und batterien abgegeben
werden muss.
Alte elektrische und elektronische Geräte müssen in
einer Anlage recycelt werden, die für den Umgang mit
diesen Artikeln und dem Begleitabfall geeignet sind.
Unsachgemäße oder falsche Entsorgung gefährden
Umwelt und Gesundheit.
Weitere Informationen über das Recycling dieses
Produktes erhalten Sie von Ihrer Gemeinde oder den
kommunalen Entsorgungsbetrieben.
Hinweis: Das Zeichen „Pb“ unter dem Symbol für
Batterien zeigt an, dass diese Batterie Blei enthält.
!B5H-0357-04_QSG_JVC_KWM_E_EnFrDeNl.indb 81 2020/02/17 18:05

Voor ingebruikname
82
Inhoud
Voor ingebruikname
Over de snelstartgids
In deze snelstartgids worden de basisfuncties
van dit apparaat besproken.
Raadpleeg de GEBRUIKSAANWIJZING op
de volgende website voor gedetailleerde
bedieningen en informatie:
<https://www.jvc.net/cs/car/>
De gebruiksaanwijzing is onderhevig aan
wijzigingen van specificaties en dergelijke.
Download de laatste editie van de
gebruiksaanwijzing ter referentie.
De handleiding gebruiken
• De in deze handleiding weergegeven schermen en
panelen worden als voorbeelden gebruikt om de
bediening te verduidelijken.
Ze kunnen daarom afwijken van de werkelijk
gebruikte schermen en panelen, of sommige
schermpatronen kunnen verschillen.
• Taal voor aanduidingen: De schermaanduidingen
voor de uitleg worden in het Engels getoond. U
kunt de taal voor de aanduidingen kiezen met het
[SETUP] menu. Zie de Gebruiksaanwijzing.
Voor ingebruikname ...............................................82
Over de snelstartgids ....................................................................... 82
De handleiding gebruiken ........................................................... 82
Voorzorgsmaatregelen ...................................................................83
Basisbediening ..........................................................84
Functies van de knoppen op het voorpaneel..................84
Het toestel inschakelen .................................................................. 84
Aan de Slag ............................................................................................ 85
Instellen van het volume ............................................................... 86
Gebruik aanraakscherm .................................................................86
Beschrijvingen van het startscherm ....................................... 87
Beschrijvingen bronselectiescherm ....................................... 87
Beschrijvingen bronbedieningsscherm ............................... 89
FUNCTIE-scherm.................................................................................90
Lijstscherm .............................................................................................90
USB ................................................................................91
Een USB-apparaat aansluiten......................................................91
Basisbediening van de USB..........................................................91
Tuner .............................................................................92
Basisbediening van de Tuner ...................................................... 92
Geheugenfunctie ............................................................................... 93
Bluetoothregeling ....................................................94
Registreer vanaf het Bluetooth-apparaat ............................ 94
De handsfree-eenheid gebruiken ...........................................95
Audio regelen ............................................................98
Verbinden/installeren .......................................... 100
Vóór de installatie ............................................................................100
De unit installeren...........................................................................101
Appendix .................................................................. 105
Technische gegevens ...................................................................105
Informatie over dit toestel ......................................................... 105
!B5H-0357-04_QSG_JVC_KWM_E_EnFrDeNl.indb 82 2020/02/17 18:05

Voor ingebruikname
83Nederlands
Voorzorgsmaatregelen
#WAARSCHUWINGEN
Ñ Neem de volgende
voorzorgsmaatregelen om
persoonlijk letsel of brand te
voorkomen:
• Om kortsluiting te voorkomen plaats u
nooit metalen voorwerpen (zoals munten of
metalen gereedschappen) in het toestel of
laat u deze in het toestel achter.
• Kijk niet naar het scherm of richt uw ogen niet
op het scherm als u langere tijd aan het rijden
bent.
• Raadpleeg uw JVC-dealer als u tijdens de
installatie problemen ondervindt.
Ñ Voorzorgsmaatregelen voor
het gebruik van het toestel
• Neem wanneer u optionele toebehoren
aanschaft contact op met uw JVC-dealer om
te controleren of deze optionele toebehoren
met uw model en in uw regio functioneren.
• U kunt een taal selecteren om menu's,
audiobestandlabels, enz. weer te geven. Zie
de Gebruiksaanwijzing.
• De functie Radio Data System of Radio
Broadcast Data System werkt niet als deze
functie niet wordt ondersteund door een te
ontvangen radiostation.
Ñ De monitor beschermen
• Om de monitor tegen beschadigingen te
beschermen, mag u de monitor niet bedienen
met een balpen of een soortgelijk hulpmiddel
met een scherpe punt.
Ñ Het toestel reinigen
• Als er vlekken op het frontje van dit toestel
zitten, veeg deze er dan met een droge,
zachte doek, zoals een siliconendoekje, van
af. Als er hardnekkige vlekken op het frontje
zitten, veeg deze er dan eerst met een met
neutraal reinigingsmiddel bevochtigde doek
en vervolgens met een schone, zachte, droge
doek van af.
OPMERKING
• Als u reinigingsspray rechtstreeks op het toestel
spuit, kunnen de mechanische onderdelen ervan
beschadigd raken. Als u het frontje met een
harde doek of met een vluchtige vloeistof zoals
thinner of alcohol afveegt, kunnen er krassen
ontstaan of wordt opgedrukte tekst gewist.
Ñ Uw toestel resetten
• Als het apparaat of het aangesloten apparaat
niet goed werkt, reset u het apparaat.1 Druk
op de knop <Reset>-knop. Het apparaat keert
terug naar de fabrieksinstellingen.
Resetknop
!B5H-0357-04_QSG_JVC_KWM_E_EnFrDeNl.indb 83 2020/02/17 18:05

Basisbediening
84
Basisbediening
Functies van de knoppen op
het voorpaneel
1
2
3
4
5
6
OPMERKING
• De panelen die in deze handleiding worden
weergegeven, zijn voorbeelden om een
duidelijke uitleg van de werking te kunnen
geven. Om die reden kunnen de panelen
afwijken van de werkelijke panelen.
Naam
• Beweging
1
Sensor op afstand
• Ontvangt het signaal van de
afstandsbediening.
2
[ ]
• Geeft het scherm Spraakherkenning weer.
3
[FNC]/[ ]
• Geeft het FUNCTIE-scherm weer.
• Door ingedrukt te houden voor één seconde
verschijnt het scherm APP (Apple CarPlay/
Android Auto).
4
[], [] (Volume)
• Regelt het volume.
Het volume gaat omhoog tot niveau 15
wanneer u blijft indrukken.
5
[ ] / [ ]
• Geeft het START-scherm weer (P.87).
• Als de knop 1 seconde wordt ingedrukt,
wordt het toestel uitgeschakeld.
• Als het toestel is uitgeschakeld, wordt het
ingeschakeld.
6
Reset
• Als de eenheid of de hiermee verbonden
eenheid niet correct werkt, dan
zal de eenheid terugkeren naar de
begininstellingen wanneer er op deze knop
wordt gedrukt.
Het toestel inschakelen
De methode voor het inschakelen verschilt
afhankelijk van het model.
1
Druk de [ ]-knop in.
Het toestel wordt ingeschakeld.
● Het toestel uitschakelen:
1
Druk op de [ ]-knop gedurende 1
seconde.
OPMERKING
• Als u het toestel na de installatie voor de eerste
keer inschakelt, is het noodzakelijk om de
begininstellingen uit te voeren (P.85).
!B5H-0357-04_QSG_JVC_KWM_E_EnFrDeNl.indb 84 2020/02/17 18:05

Basisbediening
85Nederlands
Aan de Slag
Begininstellingen
Begin met deze instellingen als u dit toestel
voor de eerste keer gebruikt.
1
Stel de verschillende items als volgt in.
■ [Language]
Selecteer de taal die wordt gebruikt voor het
regelscherm en de in te stellen opties. De
standaardinstelling is „[British English(en)]”.
1Raak [Language] aan.
2Raak [Language Select] aan.
3Selecteer de gewenste taal.
4Raak [
] aan.
■ [Clock]
Regelt de klok.
Voor meer informatie over de bediening,
zie Instellingen voor de kalender/klok
(P.85).
■ [Display]
Stel het beeld in op het scherm.
1Raak [Display] aan.
2Raak [Background] aan.
3Selecteer de afbeelding.
4Raak [
] aan.
Zie de Gebruiksaanwijzing voor meer details
over de bediening.
■ [Camera]
Stel de parameters voor de camera in.
1Raak [Camera] aan.
2Stel elk item in en raak [
] aan.
Zie de Gebruiksaanwijzing voor meer details
over de bediening.
■ [DEMO]
Stel de demonstratiemodus in. De
standaardinstelling is „ON” (aan).
1Raak [DEMO] aan en zet op [ON] of [OFF].
2
Raak [Finish] aan.
OPMERKING
• Deze instellingen kunnen ingesteld worden via
het menu SETUP.
Instellingen voor de kalender/klok
1
Druk op de knop [FNC].
FUNCTIE-scherm verschijnt.
2
Raak [ ] aan.
Het scherm SETUP Menu verschijnt.
!B5H-0357-04_QSG_JVC_KWM_E_EnFrDeNl.indb 85 2020/02/17 18:05

Basisbediening
86
3
Raak [User Interface] aan.
Het scherm User Interface verschijnt.
4
Raak [Clock Adjust] aan.
5
Pas de datum aan en pas vervolgens de
tijd aan.
6
Raak [Set] aan.
OPMERKING
• Deactiveer [RDS CT] voordat u de klok aanpast.
Zie de Gebruiksaanwijzing.
Instellen van het volume
Om het volume aan te passen (0 tot 40),
Druk op [] om te verhogen, en druk op [] om
te verlagen.
Door [] ingedrukt te houden, wordt het
volume continue verhoogd tot niveau 15.
Gebruik aanraakscherm
Voor bediening met het scherm moet u voor
het kiezen van een onderdeel, het tonen van
het instelmenu, het veranderen van pagina, etc.
op het scherm tikken, het scherm iets langer
aanraken, met uw vinger over het scherm vegen
of uw vinger snel over het scherm bewegen.
● Tikken
Tik licht op het scherm om
een onderdeel op het scherm
te kiezen.
● Iets langer aanraken
(lang tikken)
Tik op het scherm en houd
uw vinger op zijn plaats
totdat het display verandert
of een mededeling wordt
getoond.
● Vegen
Schuif uw vinger snel naar
links of rechts op het scherm
om van pagina te veranderen.
U kunt door de tekst op het
lijstscherm bladeren door
het scherm via kort aanraken
snel omhoog/omlaag te
bewegen.
● Snel bewegen
Schuif uw vinger omhoog of
omlaag op het scherm om
het scherm te rollen.
!B5H-0357-04_QSG_JVC_KWM_E_EnFrDeNl.indb 86 2020/02/17 18:05

Basisbediening
87Nederlands
Aanraakbediening met Gebaar:
U kunt de weergave tevens regelen door
uw vinger als volgt op het aanraakpaneel te
bewegen (vingerbewegingen kunnen voor
bepaalde bronnen niet worden gebruikt).
• Uw vinger omhoog/omlaag schuiven:
- Werkt hetzelfde als het drukken op [
]/[ ]
(Media) in het USB-bedieningsscherm.
- Voor de Tuner worden vooraf ingestelde
tunerzenders omgeschakeld.
• Uw vinger naar links/rechts schuiven:
Functioneert als een druk op [E] / [T].
• Uw vinger rechtsom of linksom bewegen:
verhogen/verlagen van het volume.
Beschrijvingen van het
startscherm
De meeste functies kunnen worden uitgevoerd
met het START-scherm.
41 5 6
1 2 3 1
1
• Snelkoppelingspictogrammen voor de
weergavebron. (P.88)
2
• Huidige broninformatie.
• Raak aan om het bedieningsscherm van de
huidige bron te weergeven.
3
• Widget
4
• Geeft het bronselectiescherm weer. (P.88)
5
• Geeft het SETUP-menuscherm weer.
6
• Geeft het scherm Hands Free weer. (P.95)
• Bij aansluiten als Apple CarPlay of Android
Auto, werkt het als een telefoon mits in Apple
CarPlay of Android Auto.
Geef het HOME-scherm weer
1
Druk de [ ]-knop in.
START-scherm verschijnt.
Beschrijvingen
bronselectiescherm
U kunt alle weergavebronnen en opties op het
bronselectiescherm weergeven.
2 3
1
1
• Wijzigt de weergavebron.
Voor afspeelbronnen, zie Selecteer de
weergavebron (P.88).
2
• Terugkeren naar het vorige scherm.
3
• Geeft het SETUP-menuscherm weer.
!B5H-0357-04_QSG_JVC_KWM_E_EnFrDeNl.indb 87 2020/02/17 18:05

Basisbediening
88
Selecteer de weergavebron
1
Raak [ ] aan op het startscherm.
In dit scherm kunt u de volgende bronnen
en functies selecteren.
• Schakelt over naar het Apple CarPlay-
scherm vanaf de aangesloten iPhone.
• Schakelt over naar het scherm USB
Mirroring vanaf de aangesloten Android-
smartphone.
Het is noodzakelijk om een Android-
smartphone te verbinden met de
geïnstalleerde applicatie „Mirroring OA
for JVC” en om [Mode] in te stellen op
[Mirroring for Android™].
• Schakelt over naar de radio-uitzending.
(P.92)
• Geeft het scherm Hands Free weer.
(P.95)
Wanneer noch Apple CarPlay, Android
Auto, noch een Bluetooth hands-free
telefoon is verbonden, zal het bericht
„[Disconnected]” worden weergegeven in
het TEL-scherm.
Bij aansluiten als Apple CarPlay of Android
Auto, werkt het als een telefoon mits in
Apple CarPlay of Android Auto.
• Schakelt over naar het Android Auto-
scherm vanaf de aangesloten Android-
smartphone.
Het is noodzakelijk om een Android-
smartphone die compatibel is met
Android Auto te verbinden en [Mode] in
te stellen op [Android Auto].
• Afspelen van een Bluetooth-audiospeler.
• Speelt bestanden op een USB-apparaat
af. (P.91)
• Schakelt naar een extern component
aangesloten op de AV-IN-aansluiting.
• Schakelt de AV-bron uit. (P.88)
Om de AV-bron uit te schakelen
1
Raak [ ] aan op het startscherm.
2
Raak [AV Off] aan.
!B5H-0357-04_QSG_JVC_KWM_E_EnFrDeNl.indb 88 2020/02/17 18:05

Basisbediening
89Nederlands
Beschrijvingen
bronbedieningsscherm
Er is een aantal functies dat in de meeste
schermen uitgevoerd kan worden.
Indicators
1
2
3
4
Submenu
1
[ ]/[ ]
Informatie aangesloten Bluetooth-apparaat.
2
Pictogram Alle bronnen
Geeft alle bronnen weer.
3
Tweede scherm
• [
]/[ ] : Het Tweede scherm verandert telkens
wanneer u het aanraakt. U kunt tevens het
Secundaire scherm veranderen door op het
scherm links of rechts te tikken.
• Indicators: Geeft de huidige bronstatus
enzovoorts aan.
– [MUTE]: De dempingsfunctie is actief.
– [LOUD]: De functie Loudnessregeling is
ingeschakeld.
• Submenu
– [ ]: Bewerking wanneer het pictogram wordt
aangeraakt:
Door de eerste keer aan te raken wordt het scherm
donkerder, door nogmaals aan te raken wordt het
scherm nog donkerder en door voor de derde keer
aan te raken wordt de originele helderheid van het
scherm weer hersteld.
– [
]: Geeft het scherm Grafische Equalizer weer.
(P.99)
– [
]: Geeft het scherm APP (Apple CarPlay/
Android Auto) weer.
4
[Û]
Raak aan om het Hands Free-scherm weer te
geven. (P.95)
Bij aansluiten als Apple CarPlay of Android Auto,
werkt het als een telefoon mits in Apple CarPlay
of Android Auto.
!B5H-0357-04_QSG_JVC_KWM_E_EnFrDeNl.indb 89 2020/02/17 18:05

Basisbediening
90
FUNCTIE-scherm
1
Druk op de knop [FNC].
FUNCTIE-scherm verschijnt.
2
Aanraken om het FUNCTIE-scherm weer
te geven.
De inhoud van het menu is als volgt:
• Geeft het SETUP-menuscherm weer.
• Geeft het scherm APP (Apple CarPlay/
Android Auto) weer.
• Geeft het scherm Aanpassen weer.
• Geeft de weergavecamera weer.
• Geeft het bronselectiescherm weer.
(P.88)
• Schakelt het display uit. (P.90)
• Geeft het Audio-scherm weer. (P.98)
• Sluit het FUNCTIE-scherm.
Uitschakelen van het scherm
1
Selecteer [ ] op het FUNCTIE-scherm.
● Om het scherm aan te zetten
1
Raak het scherm aan.
Lijstscherm
Er is een aantal basisfunctietoetsen in de
lijstschermen van de meeste bronnen.
61 2
3 4 5
1
Toont het lijsttype-keuzevenster.
2
Geeft een muziek/film-bestandslijst weer.
3
Tekst scrollen
Bladert door de weergegeven tekst.
4
enz.
Hier worden toetsen met verschillende functies
weergegeven.
• [
] : Speelt alle nummers in de map met
het huidige nummer af.
• [
] [ ] : Gaat naar het bovenste
hiërarchie-niveau.
5
[ ] / [ ] / [ ] / [ ] Pagina scrollen
Door [
]/[ ] in te drukken, kunt u de pagina
veranderen om meer items weer te geven.
• [
]/[ ] : Geeft de bovenste of onderste
pagina weer.
6
Terug
Terugkeren naar het vorige scherm.
OPMERKING
• Toetsen die niet geactiveerd kunnen worden
vanaf het Lijstscherm worden niet getoond.
!B5H-0357-04_QSG_JVC_KWM_E_EnFrDeNl.indb 90 2020/02/17 18:05

USB
91Nederlands
USB
Een USB-apparaat aansluiten
1
Sluit het USB-apparaat via de USB-kabel
aan. (P.103)
2
Druk de [ ]-knop in.
3
Raak [ ] aan.
4
Raak [USB] aan.(P.88)
Ñ Verwijder het USB-apparaat
1
Druk de [ ]-knop in.
2
Raak [ ] aan.
3
Raak een andere bron dan [USB] aan.
4
Ontkoppel het USB-apparaat.
Ñ Bruikbaar USB-apparaat
U kunt een USB-apparaat van de klasse mass-
storage bij dit toestel gebruiken.
De term „USB device” in deze handleiding
verwijst naar een apparaat met flashgeheugen.
Basisbediening van de USB
De meeste functies kunnen worden uitgevoerd
in het bronregelscherm en het afspeelscherm.
Regelscherm
2
3
1
1
[ ] / [ ]
• [
] : Herhaalt het huidige nummer/map.
Telkens als u de toets aanraakt, heeft de
herhaalmodus de hierna genoemde volgorde:
Bestand herhalen ([
]), Map herhalen ([ ]),
Alles herhalen ([
])
• [
] : Speelt alle nummers in huidige map
willekeurig af. Telkens als u de toets aanraakt,
heeft de randommodus de hierna genoemde
volgorde:
Willekeurig bestand ([
]), Willekeurig uit
([
])
2
Nummerinformatie
Informatie over het huidige bestand wordt
weergegeven.
3
[Bedieningstoetsen
• [1] : Zoekt nummer/bestand. Zie de
Gebruiksaanwijzing voor meer informatie over
zoekbewerkingen.
• [E] [F] : Zoekt naar het vorige/volgende
nummer/bestand.
Aangeraakt houden om snel vooruit of snel
achteruit te gaan.
• [D/H] : Speelt af of onderbreekt het afspelen.
• [
] : Tik om te dempen of om niet te
dempen.
!B5H-0357-04_QSG_JVC_KWM_E_EnFrDeNl.indb 91 2020/02/17 18:05

Tuner
92
Tuner
Basisbediening van de Tuner
De meeste functies kunnen via het
bronregelscherm worden uitgevoerd.
Om naar de afstelbron te gaan, Raak het [Tuner]
pictogram aan in het bronselectiescherm.
(P.88)
Regelscherm
4
6
5
3
1
2
Open de lade
4
7
5
1
Informatieweergave
Geeft de informatie van de huidige zender
weer: Frequentie
Als u [ ] aanraakt, kunt u schakelen tussen
content A en content B.
– Content A: Stationnaam, radiotekst, PTY-genre
– Content B: Radiotekst plus, titel artiest
[Preset#]: Voorkeuzenummer
2
Zoekmodus
Wijzigt de zoekmodus in deze volgorde;
[AUTO1], [AUTO2], [MANUAL].
• [AUTO1]: stemt automatisch af op een zender
met goede ontvangst.
• [AUTO2]: stemt een voor een af op zenders in
het geheugen.
• [MANUAL]: schakelt handmatig over naar de
volgende frequentie.
3
Bedieningstoetsen
• [E] [F] : Stemt af op een zender. De
manier waarop een andere frequentie wordt
geselecteerd, kan gewijzigd worden (zie 2 in
tabel).
• [
] : Tik om te dempen of om niet te
dempen.
4
Voorkeurslijst
• Raak het scherm aan de rechterkant aan
om de voorkeur-lijst weer te geven. Raak
nogmaals aan om de lijst te sluiten.
• Roept de opgeslagen zender op.
• Als deze toets 2 seconden wordt aangeraakt,
wordt de huidige zender in het geheugen
opgeslagen.
5
Functiepaneel
Raak de linkerkant van het scherm aan om het
functiepaneel weer te geven. Raak nogmaals
aan om het paneel te sluiten.
• [TI] (alleen FM): Stelt de
verkeersinformatiemodus in. Zie de
Gebruiksaanwijzing voor meer informatie.
• [SETUP] (alleen FM): Geeft het Tuner SETUP-
scherm weer. Zie de Gebruiksaanwijzing voor
meer informatie.
• [AME]: Stelt zenders vooraf automatisch in. Zie
de Gebruiksaanwijzing voor meer informatie.
• [PTY] (alleen FM): Zoekt een programma
met het ingestelde programmatype. Zie de
Gebruiksaanwijzing voor meer informatie.
• [MONO] (alleen FM): Selecteert de monaurale
ontvangst.
• [LO.S] (alleen FM): Schakelt de lokale
zoekfunctie in of uit.
6
[FM] [AM]
Schakelt de band om.
7
Indicatoritems
• [ST]: Er wordt een stereo-uitzending
ontvangen.
• [MONO]: De functie voor geforceerd mono is
ingeschakeld.
• [AF]: De AF-zoekfunctie is ingeschakeld.
• [LOS]: De functie Lokaal zoeken is
ingeschakeld.
!B5H-0357-04_QSG_JVC_KWM_E_EnFrDeNl.indb 92 2020/02/17 18:05

Tuner
93Nederlands
• [RDS]: Geeft de status van de Radio Data
System-zender aan wanneer de AF-functie is
ingeschakeld.
Wit: Radio Data System wordt ontvangen.
Oranje: Radio Data System wordt niet
ontvangen.
• [TI]: Geeft de ontvangststatus van
verkeersinformatie aan.
Wit: TP wordt ontvangen.
Oranje: TP wordt niet ontvangen.
Geheugenfunctie
Ñ Automatisch geheugen
U kunt zenders met goede ontvangst
automatisch in het geheugen opslaan.
1
Raak de gewenste frequentiebandtoets
aan.
2
Raak [ ] aan de linkerkant van het scherm
aan.
Raak [AME] aan.
Er verschijnt een bevestigingsscherm.
3
Raak [Ye s ] aan.
Het automatisch geheugen start.
Ñ Handmatig geheugen
U kunt de huidig ontvangen zender in het
geheugen opslaan.
1
Selecteer een zender die u in het
geheugen wilt opslaan.
2
Houdt [FM#] (#: 1-24) of [AM#] (#: 1-12)
ingedrukt waarin u de zender wilt
opslaan gedurende 2 seconden.
!B5H-0357-04_QSG_JVC_KWM_E_EnFrDeNl.indb 93 2020/02/17 18:05

Bluetoothregeling
94
Bluetoothregeling
Ñ Info over de mobiele telefoon
en Bluetooth-audiospeler
Dit toestel voldoet aan de volgende Bluetooth-
specificaties:
Versie
Bluetooth ver. 4.1
Profiel
Mobiele telefoon:
HFP (Hands-free-profiel)
SPP (Serial Port Profile)
PBAP (Phonebook Access Profile)
Audiospeler:
A2DP (Advanced Audio Distribution Profile)
AVRCP (Geluid/Video
afstandsbedieningsprofiel)
Geluidscodec
SBC, AAC
OPMERKING
• De toestellen die de Bluetooth-functie
ondersteunen zijn gecertificeerd voor
conformiteit met de Bluetooth-norm aan de
hand van de procedure die voorgeschreven
wordt door Bluetooth SIG.
• Maar de mogelijkheid bestaat dat dergelijke
toestellen niet met uw mobiele telefoon kunnen
communiceren, afhankelijk van het type.
Registreer vanaf het
Bluetooth-apparaat
U dient de Bluetooth-audiospeler of mobiele
telefoon te registreren voordat u de Bluetooth-
functie kunt gebruiken.
1
Zet de Bluetooth-functie op uw
smartphone/mobiele telefoon aan.
2
Zoek naar het apparaat („KW-M*****”)
vanaf uw smartphone/mobiele telefoon.
3
Bedien uw smartphone/mobiele telefoon
volgens de weergegeven berichten.
■ Bevestig het verzoek op de
smartphone/mobiele telefoon.
■ Als er een PIN-code is vereist, voert u de
pincode („0000”) in.
4
Druk op de knop [FNC].
FUNCTIE-scherm verschijnt.
5
Raak [ ] aan.
Het scherm SETUP Menu verschijnt.
6
Raak [Bluetooth] aan.
Het scherm Bluetooth SETUP verschijnt.
!B5H-0357-04_QSG_JVC_KWM_E_EnFrDeNl.indb 94 2020/02/17 18:05

Bluetoothregeling
95Nederlands
7
Raak [Select Device] in het Bluetooth
SETUP-scherm aan.
8
Raak [ ] aan waar u verbinding mee
wilt maken.
OPMERKING
• Als het pictogram wordt verlicht, betekent dit
dat de eenheid dat apparaat gebruikt.
Om het geregistreerde Bluetooth
apparaat te verwijderen
1
Raak [ ] aan.
Bevestigingsbericht verschijnt.
2
Raak [Ye s ] aan.
De handsfree-eenheid
gebruiken
U kunt de handsfreefunctie gebruiken door
de Bluetooth-telefoon met deze eenheid te
verbinden.
OPMERKING
• Terwijl Apple CarPlay of Android Auto wordt
verbonden, kan de Bluetooth Handsfree-functie
niet worden gebruikt. Alleen de Apple CarPlay
of Android Auto Hands-free-functie kan worden
gebruikt.
Ñ Een telefoongesprek tot stand
brengen
1
Raak [Phone]/[Û] aan.
Het scherm Hands Free verschijnt.
2
Selecteer een methode om het nummer
te kiezen.
• [ ]: Bellen via de gesprekslijsten
• [
]: Bellen via het telefoonboek
• [
]: Bellen met het voorkeursnummer
• [
]: Bellen door een telefoonnummer in
te voeren
• [
]: Spraakherkenning
• [
]: Bluetooth SETUP
!B5H-0357-04_QSG_JVC_KWM_E_EnFrDeNl.indb 95 2020/02/17 18:05

Bluetoothregeling
96
● Bluetooth SETUP
1) Raak [
] aan.
Het scherm Bluetooth SETUP verschijnt.
OPMERKING
• De statuspictogrammen die worden
weergegeven, zoals batterij en antenne, kunnen
afwijken van de pictogrammen die op de
mobiele telefoon worden weergegeven.
• Wanneer u de mobiele telefoon in de
persoonlijke modus zet, kunnen hierdoor de
handsfree functies worden uitgeschakeld.
Bellen via de gesprekslijsten
1
Raak [ ] aan.
2
Selecteer het telefoonnummer uit de lijst.
Bellen door een telefoonnummer in te
voeren
1
Raak [ ] aan.
2
Voer een telefoonnummer in met de
nummertoetsen.
3
Raak [ ] aan.
Bellen met behulp van het
voorkeurnummer
1
Raak [ ] aan.
2
Raak de naam of het telefoonnummer
aan.
Bellen via het telefoonboek
1
Raak [ ] aan.
2
Selecteer de persoon die u wilt bellen uit
de lijst.
3
Selecteer het telefoonnummer uit de lijst.
OPMERKING
• Als er geen telefoonlijst is gedownload, wordt
door [Download Phonebook Now] aan te
raken het downloaden van het adresboek
gestart.
!B5H-0357-04_QSG_JVC_KWM_E_EnFrDeNl.indb 96 2020/02/17 18:05

Bluetoothregeling
97Nederlands
Ñ Een telefoongesprek
ontvangen
1
Raak [ ] aan om een inkomend gesprek
aan te nemen of [
] te weigeren.
OPMERKING
• Wanneer u de weergavecamera bekijkt, wordt
dit scherm niet weergegeven, ook niet als er
een oproep binnenkomt. Om dit scherm weer
te geven zet u de versnellingspook van de auto
terug in de bestuurderspositie.
Een telefoongesprek beëindigen
1
Tijdens een gesprek, raak [ ] aan.
Ñ Bediening tijdens een
telefoongesprek
● Het volume van de ontvanger aanpassen
Druk op de [] of [] knop.
● De kiestoon weergeven
Raak [DTMF] aan om het tooninvoerscherm
weer te geven.
U kunt tonen versturen door de gewenste
toetsen op het scherm aan te raken.
● Stemweergavebron wijzigen
Telkens als [
]/ [ ] wordt aangeraakt,
wordt de stemweergavebron gewijzigd van
mobiele telefoon in luidspreker of vice versa.
● Gesprek in de wacht
Wanneer u een gesprek ontvangt terwijl u
een ander gesprek voert, kunt u het nieuwe
binnenkomende gesprek beantwoorden door
[
] aan te raken. Het huidige gesprek wordt in
de wacht geplaatst.
Elke keer als u [
] aanraakt, wordt er gewisseld
van gesprekspartner.
Wanneer u [
] aanraakt, wordt het huidige
gesprek beëindigd en schakelt u over naar het
gesprek in de wacht.
!B5H-0357-04_QSG_JVC_KWM_E_EnFrDeNl.indb 97 2020/02/17 18:05

Audio regelen
98
Audio regelen
U kunt de diverse instellingen, bijvoorbeeld
audiobalans of subwoofervolume, aanpassen.
1
Druk op de knop [FNC].
FUNCTIE-scherm verschijnt.
2
Raak [ ] aan.
Ñ Algemene audio regelen
1
Druk op de knop [FNC].
FUNCTIE-scherm verschijnt.
2
Raak [ ] aan.
Het scherm Audio verschijnt.
3
Raak [Fader / Balance] aan.
4
Stel de verschillende items als volgt in.
■ [Fader]/[Balance]
Voor het aanpassen van de volumebalans
rond het aangeraakte gedeelte.
Met [C] en [D] wordt de balans tussen rechts
en links geregeld.
Met [R] en [S] wordt de balans tussen voor
en achter geregeld.
■ [Center]
Wis de aanpassing.
!B5H-0357-04_QSG_JVC_KWM_E_EnFrDeNl.indb 98 2020/02/17 18:05

Audio regelen
99Nederlands
Ñ Equalizerregeling
U kunt de equalizer afstellen door de
geoptimaliseerde instelling voor elke categorie
te selecteren.
1
Druk op de knop [FNC].
FUNCTIE-scherm verschijnt.
2
Raak [ ] aan.
Het scherm Audio verschijnt.
3
Raak [Equalizer] aan.
4
Raak het scherm aan en stel de Graphic
Equalizer in zoals u wenst.
■ [ALL SRC]
De aangepaste equalizer op alle
bronnen toepassen. Raak [ALL SRC]
aan en raak vervolgens [OK] aan op het
bevestigingsscherm.
■ Gain-niveau (gestippeld kader)
Stel het versterkingsniveau af door de
frequentiebalken aan te raken.
U kunt de frequentiebalk selecteren en het
niveau aanpassen met behulp van [R], [S].
■ [Preset Select]
Geeft het scherm weer om de vooraf
ingestelde equalizercurve op te roepen.
■ [Initialize]
De huidige EQ-kromming gaat terug naar
plat.
■ [Memory]
Slaat de aangepaste equalizercurve op als
„[User1]” tot „[User3]”.
■ [Bass EXT] (Uitgebreide Instellingen
Bass)
Door deze optie in te schakelen worden de
frequenties onder de 62,5 Hz op hetzelfde
versterkingsniveau ingesteld als 62,5 Hz.
■ [SW Level]
Stelt het subwoofervolume in.
!B5H-0357-04_QSG_JVC_KWM_E_EnFrDeNl.indb 99 2020/02/17 18:05

Verbinden/installeren
100
Verbinden/installeren
Vóór de installatie
Neem vóór de installatie van dit toestel de
volgende voorzorgsmaatregelen in acht.
#WAARSCHUWINGEN
• Als u de ontstekingskabel (rood) en de
accukabel (geel) op het chassis van de
auto (massa) aansluit, kunt u kortsluiting
veroorzaken waardoor brand kan
ontstaan. Sluit deze kabels altijd aan op de
voedingsbron die door de zekeringkast loopt.
• Verwijder niet de zekering van de
ontstekingskabel (rood) en de accukabel
(geel). De voeding moet zijn aangesloten op
de kabels via de zekering.
#LET OP
• Installeer dit toestel in de console van uw
auto.
Raak het metalen deel van dit toestel tijdens
of na het gebruik niet aan. Metalen delen zoals
de behuizing worden heet.
OPMERKING
• De montage en aansluiting van dit product
vereist kennis en ervaring. Voor uw eigen
veiligheid dient u de montage en aansluiting
over te laten aan deskundigen.
• Zorg dat het toestel op een negatieve 12 Volt
gelijkstroomvoeding is geaard.
• Installeer het toestel niet op plaatsen die
aan direct zonlicht, overmatige hitte of
vochtigheid blootstaan. Vermijd tevens zeer
stoffige plaatsen of plaatsen waar het toestel
nat zou kunnen worden.
• Indien de stroom niet is ingeschakeld,
(„er is een storing in de bedrading van de
luidspreker. Controleer de aansluitingen.”
Indien wordt weergegeven), is er misschien
een kortsluiting van de luidspreker draden of
komen de draden in aanraking met het chassis
van het voertuig en is de beschermingsfunctie
mogelijk geactiveerd. Controleer in dit geval
de luidsprekerkabel.
• Als het contact van uw auto geen ACC-stand
heeft, moet u de ontstekingskabel met
een spanningsbron verbinden die gelijk
met het contact van de auto wordt in- of
uitgeschakeld. Als u de ontstekingskabel
verbindt met een spanningsbron waar
constant spanning op staat, zoals een
accukabel, kan de accu leeglopen.
• Als de console een deksel heeft, moet u er
bij de installatie van het toestel op letten dat
het voorpaneel het deksel bij het openen en
sluiten niet raakt.
• Als de zekering is doorgebrand, controleert
u eerst of de kabels elkaar niet raken en zo
een kortsluiting veroorzaken en vervangt u
de zekering door een nieuwe met dezelfde
stroomsterkte.
• Isoleer niet-aangesloten kabels met
isolatieband of ander geschikt materiaal.
Voorkom kortsluiting door de kapjes op het
uiteinde van de niet-aangesloten kabels of
aansluitingen niet te verwijderen.
• Sluit de luidsprekerkabels correct aan op de
corresponderende aansluitingen. Het toestel
kan beschadigd raken of niet langer werken
als u de ¤-draden deelt of deze aardt met
een metalen onderdeel van het voertuig.
• Indien er maar twee luidsprekers op het
systeem worden aangesloten, moeten de
connectors óf op de beide voorste uitgangen
óf op de beide achterste uitgangen worden
aangesloten (verwissel voor en achter niet).
Indien u bijvoorbeeld de ¢ connector van
de linker luidspreker op een voorste uitgang
aansluit, mag u de ¤ connector niet op een
achterste uitgang aansluiten.
• Controleer na het installeren van het
toestel of de remlichten, richtingaanwijzers,
ruitenwissers etc. van de auto correct
functioneren.
• Duw niet te hard op het paneeloppervlak
tijdens de installatie van het toestel in het
voertuig. Dit kan leiden tot krassen, schade of
het niet meer goed functioneren.
!B5H-0357-04_QSG_JVC_KWM_E_EnFrDeNl.indb 100 2020/02/17 18:05

Verbinden/installeren
101Nederlands
• De ontvangst wordt mogelijk slechter
wanneer zich metalen voorwerpen in de
buurt van de Bluetooth-antenne bevinden.
Bluetooth-antenne
Ñ Meegeleverde accessoires voor
installatie
1
(3 m)
x1
2
x1
3
(2 m)
x1
4
x1
5
x2
Ñ Installatieprocedure
1) Voorkom kortsluiting door de sleutel uit
het contactslot te verwijderen en de ¤
aansluiting van de accu los te koppelen.
2) Verbind de juiste in- en uitgangskabels van
elk toestel.
3) Sluit de connector van de ISO op het toestel
aan.
4) Installeer het toestel in uw auto.
5) Sluit de ¤-pool van de batterij weer aan.
6) Druk op de resetknop.
De unit installeren
Buig de lipjes van de
bevestigingshuls met een
schroevendraaier of iets
dergelijks en bevestig
deze op zijn plaats.
OPMERKING
• Zorg ervoor dat het toestel stevig op zijn
plaats zit. Als het toestel instabiel is, kan
het slecht functioneren (het geluid kan
bijvoorbeeld overslaan).
Ñ Sierplaat
1) Bevestig de accessoire 2 aan het toestel.
2
!B5H-0357-04_QSG_JVC_KWM_E_EnFrDeNl.indb 101 2020/02/17 18:05

Verbinden/installeren
102
Ñ De microfoon
1) Controleer de installatiepositie van de
microfoon (accessoire 1).
2) Reinig het installatieoppervlak.
3) Verwijder de beschermstrook van de microfoon
(accessoire 1) en plak de microfoon op de plek
die hieronder wordt getoond.
4) Leid de microfoonkabel tot aan de handsfreekit
en zet de kabel op verschillende plaatsen vast
met tape of vergelijkbaar materiaal.
5) Verstel de richting van de microfoon (accessoire
1) in de richting van de bestuurder.
1
Bevestig de kabel met in de handel verkrijgbare tape.
OPMERKING
• Wissel, zo nodig, de klemmen om.
Ñ Verwijderen van de
afwerkingsplaat
1) Gebruik de extractiesleutel (accessoire 4)
om de vier lipjes los te wippen (twee aan de
linkerkant, twee aan de rechterkant).
4
2) Trek de afwerkingsplaat naar voren.
Ñ De eenheid verwijderen
1) Zie stap 1 in „Verwijderen van de
afwerkingsplaat” voor het verwijderen van
het inbouwframe.
2) Plaats de extractiesleutel (accessoire
5) diep in de opening zoals afgebeeld.
(Het uitsteeksel aan het eind van de
extractiesleutel moet naar de eenheid toe
wijzen.)
5
3) Wanneer de geplaatste extractiesleutel vastzit,
steekt u de andere extractiesleutel in de
opening.
5
4) Trek de eenheid half uit.
OPMERKING
• Wees voorzichtig om verwonding door
de klempennen op de uitbouwsleutel
te vermijden.
5) Trek het toestel met uw handen geheel naar
voren en let op dat u het toestel niet laat
vallen.
!B5H-0357-04_QSG_JVC_KWM_E_EnFrDeNl.indb 102 2020/02/17 18:05

Verbinden/installeren
103Nederlands
PRK SW
STEERING
WHEEL
REMOTE
INPUT
2 4 6 8
1 3 5 7
2 4 6 8
1 3 5 7
REVERSE
SUB
WOOFER
1 2 3 4
5V
=
1.5A
ST REMOTE
INPUT 1
ST REMOTE
INPUT 2
ST REMOTE
GND
Verbinden met de
bedradingsbundel van de
parkeerremdetectieschakelaar.
Uit het oogpunt
van veiligheid is het
beslist noodzakelijk
om de kabel van de
parkeersensor aan te
sluiten.
Lichtgroen (Kabel van parkeersensor)
Accessoire 3: Parkeerverlengkabel
Paars/Wit (Kabel van
achteruitrij-sensor)
Naar stuurafstandsbediening
Om de stuurafstandsbediening te gebruiken, hebt
u een adapter nodig (niet meegeleverd) die bij uw
auto past.
Verbinden met de
bedradingsbundel van
de achteruitrijlamp
van de auto wanneer
de optionele
achteruitzichtcamera
wordt gebruikt.
Lichtblauw/geel (stuurafstandsbedieningsingang)
Zekering (15 A)
Ñ Verbinden van kabels met aansluitingen
Preout subwoofer
Afdekking
Afdekking
FM/AM antenne
Connector A
Connector B
USB-apparaat
[2]
USB-aansluiting
[1]
(1,0 m)
[1]
USB maximale stroomsterkte :
DC 5 V = 1,5 A
[2]
Apart verkocht
ISO-aansluiting
FRONT OUTREAR OUT
VIDEO OUTCAM IN
Audio-preout achter
(Links; wit, rechts; rood)
Audio-preout voor
(Links; wit, rechts; rood)
Visuele uitgang (geel)
Ingang achteruitzichtcamera (geel)
AV-IN (1; Audio links, 2; Composiet
video, 3; Aarde, 4; Audio rechts).
Accessoire 1:
Bluetooth Microfoon
Helder Groen/Rood
Paars/Rood
Grijs/Rood
Verbinden met de stuurafstandsharnas van het
voertuig. Neem contact op met uw JVC-dealer voor
meer informatie.
!B5H-0357-04_QSG_JVC_KWM_E_EnFrDeNl.indb 103 2020/02/17 18:05

Verbinden/installeren
104
Ñ Aansluiten van een iPhone/
Android
5V
=
1.5A
KS-U62 (0,8 m)
[3]
USB-kabel
[2]
iPhone
[2]
Verlichtingsconnector
Android-smartphone
[2]
Afdekking
USB-aansluiting
[1]
(1,0 m)
[1]
Maximale voedingsstroom iPhone :
DC 5 V = 1,5 A
[2]
Apart verkocht
[3]
Optionele accessoire
Ñ ISO-aansluiting functiegids
Pen Kleur en functie
A-4 Geel Accu
A-5 Blauw Stroomantenne
[1]
A-6 Oranje/wit Verlichting
A-7 Rood Ontsteking (ACC)
A-8 Zwart Aardaansluiting (massa)
B-1/ B-2 Paars (+) /
Paars/Zwart (–)
Rechts achter
B-3/ B-4 Grijs (+) /
Grijs/Zwart (–)
Rechts voor
B-5/ B-6 Wit (+) /
Wit/Zwart (–)
Links voor
B-7/ B-8 Groen (+)/
Groen/Zwart (–)
Links achter
[1]
Max. 150 mA, 12 V
• Luidsprekerimpedantie: 4-8 Ω
! VOORZICHTIG
Controleer de volgende toestand, voordat u
de vrij verkrijgbare ISO-aansluitingen aansluit
aan het apparaat:
• Wees ervan verzekerd dat de pinbezetting van
de aansluiting past op het JVC-apparaat.
• Let extra op de stroomkabel.
• In het geval dat de batterijkabel en de
ontstekingskabel niet overeenkomen, wissel
ze dan.
• In het geval dat de auto geen
ontstekingskabel heeft, gebruik dan een vrij
verkrijgbare interface.
!B5H-0357-04_QSG_JVC_KWM_E_EnFrDeNl.indb 104 2020/02/17 18:05

Appendix
105Nederlands
Appendix
Technische gegevens
■ Bluetooth-gedeelte
Frequentie
: 2,402 – 2,480 GHz
RF-Uitgangsvermogen (E.I.R.P.)
: +8 dBm (Gem.), Power Class 1
■ Algemeen
Bedrijfsspanning
: 12 V Gelijkstroom Autoaccu
Luidsprekerimpedantie
: 4 – 8 Ω
Technische gegevens zijn zonder
voorafgaande kennisgeving wijzigbaar.
Informatie over dit toestel
■ Auteursrechten
• Het Bluetooth®-woordmerk logo
'
s zijn geregistreerde
handelsmerken die eigendom zijn van Bluetooth SIG,
Inc. en het gebruik van dergelijke handelsmerken door
JVCKENWOOD Corporation is onder licentie. Andere
handelsmerken en handelsnamen zijn het eigendom
van hun respectievelijke houders.
• Windows Media is a registered trademark or trademark
of Microsoft Corporation in the United States and/or
other countries.
• This product is protected by certain intellectual
property rights of Microsoft. Use or distribution of
such technology outside of this product is prohibited
without a license from Microsoft.
• Use of the Made for Apple badge means that an
accessory has been designed to connect specifically
to the Apple product(s) identified in the badge, and
has been certified by the developer to meet Apple
performance standards. Apple is not responsible for
the operation of this device or its compliance with
safety and regulatory standards. Please note that the
use of this accessory with an Apple product may affect
wireless performance.
• Apple, iPhone and Lightning are trademarks of Apple
Inc., registered in the U.S. and other countries.
• Apple, Siri, Apple CarPlay and Apple CarPlay logo are
trademarks of Apple Inc., registered in the U.S. and other
countries.
• App Store is a service mark of Apple Inc., registered in
the U.S. and other countries.
• IOS is a trademark or registered trademark of Cisco in
the U.S. and other countries and is used under license.
• Google, Android, Google Play and Android Auto are
trademarks of Google LLC.
• To use Android Auto on your car display, you’ll need an
Android Auto compatible vehicle or aftermarket stereo,
an Android phone running Android 5.0 or higher, and
the Android Auto app.
• Linux® is the registered trademark of Linus Torvalds in
the U.S. and other countries.
• THIS PRODUCT IS LICENSED UNDER THE AVC PATENT
PORTFOLIO LICENSE FOR THE PERSONAL USE OF A
CONSUMER OR OTHER USES IN WHICH IT DOES NOT
RECEIVE REMUNERATION TO (¡)ENCODE VIDEO IN
COMPLIANCE WITH THE AVC STANDARD (“AVC VIDEO”)
AND/OR (¡¡)DECODE AVC VIDEO THAT WAS ENCODED BY
A CONSUMER ENGAGED IN A PERSONAL ACTIVITY AND/
OR WAS OBTAINED FROM A VIDEO PROVIDER LICENSED
TO PROVIDE AVC VIDEO. NO LICENSE IS GRANTED OR
SHALL BE IMPLIED FOR ANY OTHER USE. ADDITIONAL
INFORMATION MAY BE OBTAINED FROM MPEG LA, L.L.C.
SEE HTTP://WWW.MPEGLA.COM
• THIS PRODUCT IS LICENSED UNDER THE MPEG-4 VISUAL
PATENT PORTFOLIO LICENSE FOR THE PERSONAL
!B5H-0357-04_QSG_JVC_KWM_E_EnFrDeNl.indb 105 2020/02/17 18:05

Appendix
106
AND NON-COMMERCIAL USE OF A CONSUMER FOR
(¡) ENCODING VIDEO IN COMPLIANCE WITH THE
MPEG-4 VISUAL STANDARD (“MPEG-4 VIDEO”) AND/
OR (¡¡) DECODING MPEG-4 VIDEO THAT WAS ENCODED
BY A CONSUMER ENGAGED IN A PERSONAL AND
NON-COMMERCIAL ACTIVITY AND/OR WAS OBTAINED
FROM A VIDEO PROVIDER LICENSED BY MPEG LA TO
PROVIDE MPEG-4 VIDEO. NO LICENSE IS GRANTED OR
SHALL BE IMPLIED FOR ANY OTHER USE. ADDITIONAL
INFORMATION INCLUDING THAT RELATING TO
PROMOTIONAL, INTERNAL AND COMMERCIAL USES
AND LICENSING MAY BE OBTAINED FROM MPEG LA, LLC.
SEE HTTP://WWW.MPEGLA.COM.
• THIS PRODUCT IS LICENSED UNDER THE VC-1 PATENT
PORTFOLIO LICENSE FOR THE PERSONAL AND NON-
COMMERCIAL USE OF A CONSUMER TO ( i ) ENCODE
VIDEO IN COMPLIANCE WITH THE VC-1 STANDARD
(“VC-1 VIDEO”) AND/OR ( ii ) DECODE VC-1 VIDEO
THAT WAS ENCODED BY A CONSUMER ENGAGED IN A
PERSONAL AND NON-COMMERCIAL ACTIVITY AND/
OR WAS OBTAINED FROM A VIDEO PROVIDER LICENSED
TO PROVIDE VC-1 VIDEO. NO LICENSE IS GRANTED OR
SHALL BE IMPLIED FOR ANY OTHER USE. ADDITIONAL
INFORMATION MAY BE OBTAINED FROM MPEG LA, L.L.C.
SEE HTTP://WWW.MPEGLA.COM
• libFLAC
Copyright (C) 2000,2001,2002,2003,2004,2005,2006,2007
,2008,2009 Josh Coalson
Redistribution and use in source and binary forms, with
or without modification, are permitted provided that
the following conditions are met:
– Redistributions of source code must retain the above
copyright notice, this list of conditions and the
following disclaimer.
– Redistributions in binary form must reproduce the
above copyright notice, this list of conditions and the
following disclaimer in the documentation and/or
other materials provided with the distribution.
– Neither the name of the Xiph.org Foundation nor the
names of its contributors may be used to endorse or
promote products derived from this software without
specific prior written permission.
THIS SOFTWARE IS PROVIDED BY THE COPYRIGHT
HOLDERS AND ONTRIBUTORS ``AS IS’’ AND ANY
EXPRESS OR IMPLIED WARRANTIES, INCLUDING,
BUT NOT LIMITED TO, THE IMPLIED WARRANTIES OF
MERCHANTABILITY AND FITNESS FOR A PARTICULAR
PURPOSE ARE DISCLAIMED. IN NO EVENT SHALL THE
FOUNDATION OR CONTRIBUTORS BE LIABLE FOR ANY
DIRECT, INDIRECT, INCIDENTAL, SPECIAL, EXEMPLARY,
OR CONSEQUENTIAL DAMAGES (INCLUDING, BUT NOT
LIMITED TO, PROCUREMENT OF SUBSTITUTE GOODS
OR SERVICES; LOSS OF USE, DATA, OR PROFITS; OR
BUSINESS INTERRUPTION) HOWEVER CAUSED AND ON
ANY THEORY OF LIABILITY, WHETHER IN CONTRACT,
STRICT LIABILITY, OR TORT (INCLUDING NEGLIGENCE OR
OTHERWISE) ARISING IN ANY WAY OUT OF THE USE OF
THIS SOFTWARE, EVEN IF ADVISED OF THE POSSIBILITY
OF SUCH DAMAGE.
• libvorbis
Copyright (c) 2002-2008 Xiph.org Foundation
Redistribution and use in source and binary forms, with
or without modification, are permitted provided that
the following conditions are met:
– Redistributions of source code must retain the above
copyright notice, this list of conditions and the
following disclaimer.
– Redistributions in binary form must reproduce the
above copyright notice, this list of conditions and the
following disclaimer in the documentation and/or
other materials provided with the distribution.
– Neither the name of the Xiph.org Foundation nor the
names of its contributors may be used to endorse or
promote products derived from this software without
specific prior written permission.
THIS SOFTWARE IS PROVIDED BY THE COPYRIGHT
HOLDERS AND CONTRIBUTORS ``AS IS’’ AND ANY
EXPRESS OR IMPLIED WARRANTIES, INCLUDING,
BUT NOT LIMITED TO, THE IMPLIED WARRANTIES OF
MERCHANTABILITY AND FITNESS FOR A PARTICULAR
PURPOSE ARE DISCLAIMED. IN NO EVENT SHALL THE
FOUNDATION OR CONTRIBUTORS BE LIABLE FOR ANY
DIRECT, INDIRECT, INCIDENTAL, SPECIAL, EXEMPLARY,
OR CONSEQUENTIAL DAMAGES (INCLUDING, BUT NOT
LIMITED TO, PROCUREMENT OF SUBSTITUTE GOODS
OR SERVICES; LOSS OF USE, DATA, OR PROFITS; OR
BUSINESS INTERRUPTION) HOWEVER CAUSED AND ON
ANY THEORY OF LIABILITY, WHETHER IN CONTRACT,
STRICT LIABILITY, OR TORT (INCLUDING NEGLIGENCE OR
OTHERWISE) ARISING IN ANY WAY OUT OF THE USE OF
THIS SOFTWARE, EVEN IF ADVISED OF THE POSSIBILITY
OF SUCH DAMAGE.
• libogg
Copyright (c) 2002, Xiph.org Foundation Redistribution
and use in source and binary forms, with or without
modification, are permitted provided that the following
conditions are met:
– Redistributions of source code must retain the above
copyright notice, this list of conditions and the
following disclaimer.
– Redistributions in binary form must reproduce the
above copyright notice, this list of conditions and the
following disclaimer in the documentation and/or
other materials provided with the distribution.
– Neither the name of the Xiph.org Foundation nor the
names of its contributors may be used to endorse or
promote products derived from this software without
specific prior written permission.
THIS SOFTWARE IS PROVIDED BY THE COPYRIGHT
HOLDERS AND CONTRIBUTORS ``AS IS’’ AND ANY
EXPRESS OR IMPLIED WARRANTIES, INCLUDING,
BUT NOT LIMITED TO, THE IMPLIED WARRANTIES OF
MERCHANTABILITY AND FITNESS FOR A PARTICULAR
PURPOSE ARE DISCLAIMED. IN NO EVENT SHALL THE
FOUNDATION OR CONTRIBUTORS BE LIABLE FOR ANY
DIRECT, INDIRECT, INCIDENTAL, SPECIAL, EXEMPLARY,
OR CONSEQUENTIAL DAMAGES (INCLUDING, BUT NOT
LIMITED TO, PROCUREMENT OF SUBSTITUTE GOODS
OR SERVICES; LOSS OF USE, DATA, OR PROFITS; OR
BUSINESS INTERRUPTION) HOWEVER CAUSED AND ON
ANY THEORY OF LIABILITY, WHETHER IN CONTRACT,
STRICT LIABILITY, OR TORT (INCLUDING NEGLIGENCE OR
OTHERWISE) ARISING IN ANY WAY OUT OF THE USE OF
THIS SOFTWARE, EVEN IF ADVISED OF THE POSSIBILITY
OF SUCH DAMAGE.
!B5H-0357-04_QSG_JVC_KWM_E_EnFrDeNl.indb 106 2020/02/17 18:05

Appendix
107Nederlands
■ Informatie over het verwijderen van
oude elektrische en elektronische
apparatuur en batterijen (van
toepassing op Europese landen waar
afval wordt gescheiden)
Dit symbool geeft aan dat gebruikte elektrische,
elektronische producten en batterijen niet bij het
normale huishoudelijke afval mogen.
Lever deze producten in bij de aangewezen
inzamelingspunten, waar ze gratis worden
geaccepteerd en op de juiste manier worden verwerkt,
teruggewonnen en hergebruikt.
Raadpleeg de lokale betreffende instantie voor details
aangaande een geschikte recycle-faciliteit in uw buurt.
Het juist recyclen en weggooien van vuil helpt bronnen
te besparen en vermindert een schadelijke invloed op
uw gezondheid en het milieu.
Opmerking: De "Pb"-markering onder het symbool voor
batterijen geeft aan dat de batterij lood bevat.
!B5H-0357-04_QSG_JVC_KWM_E_EnFrDeNl.indb 107 2020/02/17 18:05

!B5H-0357-04_QSG_JVC_KWM_E_EnFrDeNl.indb 108 2020/02/17 18:05

!B5H-0357-04_QSG_JVC_KWM_E_EnFrDeNl.indb 109 2020/02/17 18:05

Declaration of Conformity with regard to the RE
Directive 2014/53/EU
Declaration of Conformity with regard to the RoHS
Directive 2011/65/EU
Manufacturer:
JVCKENWOOD Corporation
3-12, Moriyacho, Kanagawa-ku, Yokohama-shi,
Kanagawa 221-0022, JAPAN
EU Representative:
JVCKENWOOD Europe B.V.
Amsterdamseweg 37, 1422 AC UITHOORN, The
Netherlands
Déclaration de conformité se rapportant à la
directive RE 2014/53/UE
Déclaration de conformité se rapportant à la
directive RoHS 2011/65/UE
Fabricant:
JVCKENWOOD Corporation
3-12, Moriyacho, Kanagawa-ku, Yokohama-shi,
Kanagawa 221-0022, JAPON
Représentant dans l’UE:
JVCKENWOOD Europe B.V.
Amsterdamseweg 37, 1422 AC UITHOORN, Pays-Bas
Konformitätserklärung in Bezug auf die RE-
Richtlinie 2014/53/EU
Konformitätserklärung in Bezug auf die RoHS-
Richtlinie 2011/65/EU
Hersteller:
JVCKENWOOD Corporation
3-12, Moriyacho, Kanagawa-ku, Yokohama-shi,
Kanagawa 221-0022, JAPAN
EU-Vertreter:
JVCKENWOOD Europe B.V.
Amsterdamseweg 37, 1422 AC UITHOORN,
Niederlande
Conformiteitsverklaring met betrekking tot RE-
richtlijn 2014/53/EU
Conformiteitsverklaring met betrekking tot RoHS-
richtlijn 2011/65/EU
Fabrikant:
JVCKENWOOD Corporation
3-12, Moriyacho, Kanagawa-ku, Yokohama-shi,
Kanagawa 221-0022, JAPAN
EU-vertegenwoordiger:
JVCKENWOOD Europa B.V.
Amsterdamseweg 37, 1422 AC UITHOORN, Nederland
!B5H-0357-04_QSG_JVC_KWM_E_EnFrDeNl.indb 110 2020/02/17 18:05

English
Hereby, JVCKENWOOD declares that the radio equipment KW-M560BT is in
compliance with Directive 2014/53/EU. The full text of the EU declaration of
conformity is available at the following internet address:
Français
Par la présente, JVCKENWOOD déclare que l’équipement radio KW-M560BT
est conforme à la directive 2014/53/UE. L’intégralité de la déclaration de
conformité UE est disponible à l’adresse Internet suivante :
Deutsch
Hiermit erklärt JVCKENWOOD, dass das Funkgerät KW-M560BT der Richtlinie
2014/53/EU entspricht. Der volle Text der EU-Konformitätserklärung steht
unter der folgenden Internetadresse zur Verfügung:
Nederlands
Hierbij verklaart JVCKENWOOD dat de radioapparatuur KW-M560BT in
overeenstemming is met Richtlijn 2014/53/EU. De volledige tekst van de EU-
verklaring van overeenstemming is te vinden op het volgende internetadres:
Italiano
Con la presente, JVCKENWOOD dichiara che l’apparecchio radio KW-M560BT
è conforme alla Direttiva 2014/53/UE. Il testo integrale della dichiarazione di
conformità UE è disponibile al seguente indirizzo internet:
Español
Por la presente, JVCKENWOOD declara que el equipo de radio KW-M560BT
cumple la Directiva 2014/53/EU. El texto completo de la declaración de
conformidad con la UE está disponible en la siguiente dirección de internet:
Português
Deste modo, a JVCKENWOOD declara que o equipamento de rádio
KW-M560BT está em conformidade com a Diretiva 2014/53/UE. O texto
integral da declaração de conformidade da UE está disponível no seguinte
endereço de internet:
Polska
Niniejszym, JVCKENWOOD deklaruje, że sprzęt radiowy KW-M560BT jest
zgodny z dyrektywą 2014/53/UE. Pełny tekst deklaracji zgodności EU jest
dostępny pod adresem:
Český
Společnost JVCKENWOOD tímto prohlašuje, že rádiové zařízení KW-M560BT
splňuje podmínky směrnice 2014/53/EU. Plný text EU prohlášení o shodě je
dostupný na následující internetové adrese:
Magyar
JVCKENWOOD ezennel kijelenti, hogy a KW-M560BT rádióberendezés
megfelel a 2014/53/EU irányelvnek. Az EU konformitási nyilatkozat teljes
szövege az alábbi weboldalon érhető el:
Hrvatski
JVCKENWOOD ovim izjavljuje da je radio oprema KW-M560BT u skladu
s Direktivom 2014/53/EU. Cjeloviti tekst deklaracije Europske unije o
usklađenosti dostupan je na sljedećoj internet adresi:
Svenska
Härmed försäkrar JVCKENWOOD att radioutrustningen KW-M560BT är i
enlighet med direktiv 2014/53 / EU. Den fullständiga texten av EU-försäkran
om överensstämmelse finns på följande Internetadress :
Suomi
JVCKENWOOD julistaa täten, että radiolaite KW-M560BT on direktiivin
2014/53/EU mukainen. EU-vaatimustenmukaisuusvakuutus löytyy
kokonaisuudessaan seuraavasta internet-osoitteesta:
Slovensko
S tem JVCKENWOOD izjavlja, da je radijska oprema KW-M560BT v skladu z
Direktivo 2014/53/EU. Celotno besedilo direktive EU o skladnosti je dostopno
na tem spletnem naslovu:
Slovensky
Spoločnosť JVCKENWOOD týmto vyhlasuje, že rádiové zariadenie KW-M560BT
vyhovuje smernici 2014/53/EÚ. Celý text EÚ vyhlásenia o zhode nájdete na
nasledovnej internetovej adrese:
Dansk
Herved erklærer JVCKENWOOD, at radioudstyret KW-M560BT
er i overensstemmelse med Direktiv 2014/53/EU. EU-
overensstemmelseserklæringens fulde ordlyd er tilgængelig på følgende
internetadresse:
Norsk
JVCKENWOOD erklærer herved at radioutstyret KW-M560BT er i samsvar med
Direktiv 2014/53/EU. Den fullstendige teksten til EU-konformitetserklæringen
er tilgjengelig på følgende internettaddresse:
Ελληνικά
Με το παρόν, η JVCKENWOOD δηλώνει ότι ο ραδιοεξοπλισμός KW-M560BT
συμμορφώνεται με την Οδηγία 2014/53/ΕΕ. Το πλήρες κείμενο της δήλωσης
συμμόρφωσης της ΕΕ είναι διαθέσιμο στην ακόλουθη διεύθυνση στο διαδίκτυο:
Eesti
Käesolevaga JVCKENWOOD kinnitab, et KW-M560BT raadiovarustus on
vastavuses direktiiviga 2014/53/EL. ELi vastavusdeklaratsiooni terviktekst on
kättesaadav järgmisel internetiaadressil:
Latviešu
JVCKENWOOD ar šo deklarē, ka radio aparatūra KW-M560BT atbilst direktīvas
2014/53/ES prasībām. Pilns ES atbilstības deklarācijas teksts ir pieejams šādā
tīmekļa adresē:
Lietuviškai
Šiuo JVCKENWOOD pažymi, kad radijo įranga KW-M560BT atitinka 2014/53/
EB direktyvos reikalavimus. Visą EB direktyvos atitikties deklaracijos tekstą
galite rasti šiuo internetiniu adresu:
Malti
B’dan, JVCKENWOOD jiddikjara li t-tagħmir tar-radju KW-M560BT huwa
konformi mad-Direttiva 2014/53/UE. It-test kollu tad-dikjarazzjoni ta’
konformità huwa disponibbli fl-indirizz intranet li ġej:
Українська
Таким чином, компанія JVCKENWOOD заявляє, що радіообладнання
KW-M560BT відповідає Директиві 2014/53/EU. Повний текст декларації
про відповідність ЄС можна знайти в Інтернеті за такою адресою:
Türkçe
Burada, JVCKENWOOD KW-M560BT radyo ekipmanının 2014/53/AB
Direktifine uygun olduğunu bildirir. AB uyumluluk deklarasyonunun tam
metni aşağıdaki internet adresinde mevcuttur.
Русский
JVCKENWOOD настоящим заявляет, что радиооборудование KW-M560BT
соответствует Директиве 2014/53/EU. Полный текст декларации
соответствия ЕС доступен по следующему адресу в сети Интернет:
Limba română
Prin prezenta, JVCKENWOOD declară că echipamentul radio KW-M560BT
este în conformitate cu Directiva 2014/53/UE. Textul integral al declarației de
conformitate UE este disponibil la urmatoarea adresă de internet:
Български език
С настоящото JVCKENWOOD декларира, че радиооборудването на
KW-M560BT е в съответствие с Директива 2014/53/ЕС. Пълният текст на
ЕС декларацията за съответствие е достъпен на следния интернет адрес:
URL: https://www.jvc.net/cs/car/eudoc/
!B5H-0357-04_QSG_JVC_KWM_E_EnFrDeNl.indb 111 2020/02/17 18:05

!B5H-0357-04_QSG_JVC_KWM_E_EnFrDeNl.indb 112 2020/02/17 18:05
-
 1
1
-
 2
2
-
 3
3
-
 4
4
-
 5
5
-
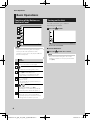 6
6
-
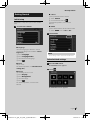 7
7
-
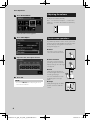 8
8
-
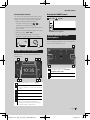 9
9
-
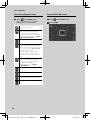 10
10
-
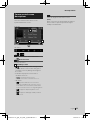 11
11
-
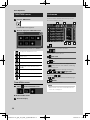 12
12
-
 13
13
-
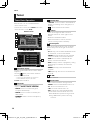 14
14
-
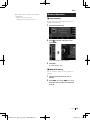 15
15
-
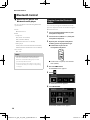 16
16
-
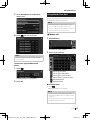 17
17
-
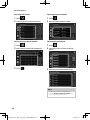 18
18
-
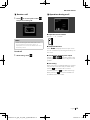 19
19
-
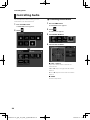 20
20
-
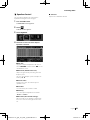 21
21
-
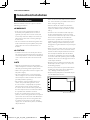 22
22
-
 23
23
-
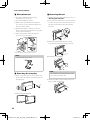 24
24
-
 25
25
-
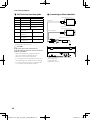 26
26
-
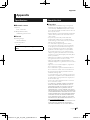 27
27
-
 28
28
-
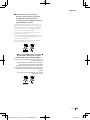 29
29
-
 30
30
-
 31
31
-
 32
32
-
 33
33
-
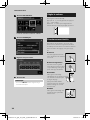 34
34
-
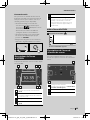 35
35
-
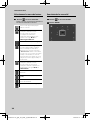 36
36
-
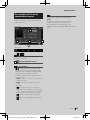 37
37
-
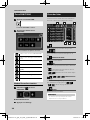 38
38
-
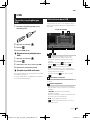 39
39
-
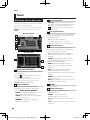 40
40
-
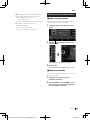 41
41
-
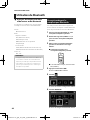 42
42
-
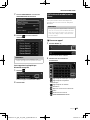 43
43
-
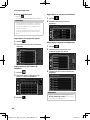 44
44
-
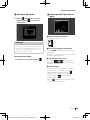 45
45
-
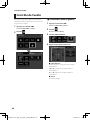 46
46
-
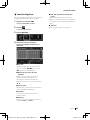 47
47
-
 48
48
-
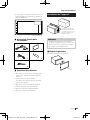 49
49
-
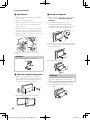 50
50
-
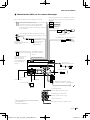 51
51
-
 52
52
-
 53
53
-
 54
54
-
 55
55
-
 56
56
-
 57
57
-
 58
58
-
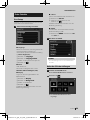 59
59
-
 60
60
-
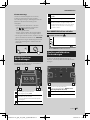 61
61
-
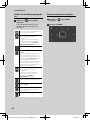 62
62
-
 63
63
-
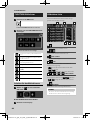 64
64
-
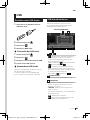 65
65
-
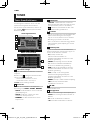 66
66
-
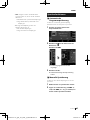 67
67
-
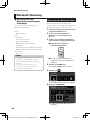 68
68
-
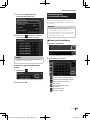 69
69
-
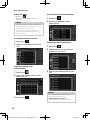 70
70
-
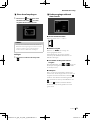 71
71
-
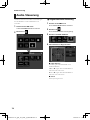 72
72
-
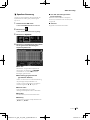 73
73
-
 74
74
-
 75
75
-
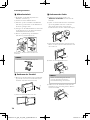 76
76
-
 77
77
-
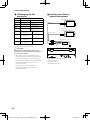 78
78
-
 79
79
-
 80
80
-
 81
81
-
 82
82
-
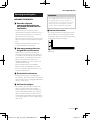 83
83
-
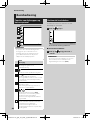 84
84
-
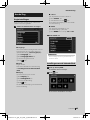 85
85
-
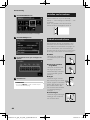 86
86
-
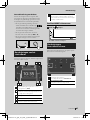 87
87
-
 88
88
-
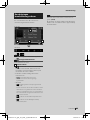 89
89
-
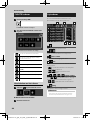 90
90
-
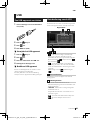 91
91
-
 92
92
-
 93
93
-
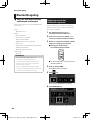 94
94
-
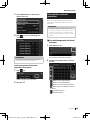 95
95
-
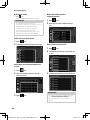 96
96
-
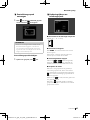 97
97
-
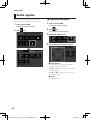 98
98
-
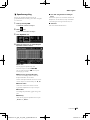 99
99
-
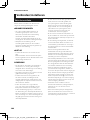 100
100
-
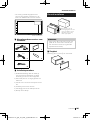 101
101
-
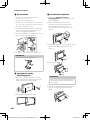 102
102
-
 103
103
-
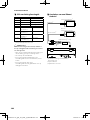 104
104
-
 105
105
-
 106
106
-
 107
107
-
 108
108
-
 109
109
-
 110
110
-
 111
111
-
 112
112


JVC KW-M560BT de handleiding
- Type
- de handleiding
- Deze handleiding is ook geschikt voor
in andere talen
- English: JVC KW-M560BT Owner's manual
- italiano: JVC KW-M560BT Manuale del proprietario
- français: JVC KW-M560BT Le manuel du propriétaire
- Deutsch: JVC KW-M560BT Bedienungsanleitung
Gerelateerde papieren
Andere documenten
-
Kenwood DMX100BT de handleiding
-
 Planet Aaudio P100CPA Handleiding
-
 Planet Aaudio P90CPA Handleiding
-
Kenwood DPX-M3200BT de handleiding
-
Kenwood KDC-BT450DAB Handleiding
-
Kenwood KMM-BT306 de handleiding
-
Kenwood KDC-BT440U de handleiding
-
Kenwood KDC-BT730DAB de handleiding
-
-
GROHE Blue Home 36 407 Operating Instructions Manual

