Montagehandleiding
1. Overzicht onderdelen. 4. Draai de stelschroeven (in
volgorde positie 1, 2 & 3)
terug tot circa 3 mm boven
de unit.
5. Plaats de warmtegeleider
op de unit.
6. Positioneer de unit voor-
zichtig onder het werkblad.
21. Laat de knoppen zakken
totdat de knop minimaal
5 mm en maximaal 7 mm
boven de afdichtingschaal
uitsteekt.
12. De brander is compleet
opgebouwd.
13. Sluit de gasslang aan.
Plaats daarna de stekker
in een geaarde wandcontact-
doos.
7. Plaats de hitteschilden
over de branders.
Let op de uitsparingen.
25. Steek de bedieningsknop
in de afdichtingschaal. Zorg
dat de indicatie van de knop
overeen komt met de indica-
tie van de afdichtingschaal.
18. Druk de bedieningsknop
stevig naar beneden. Bij het
loslaten komt de bedienings-
knop in de afstelpositie (zie
foto 19).
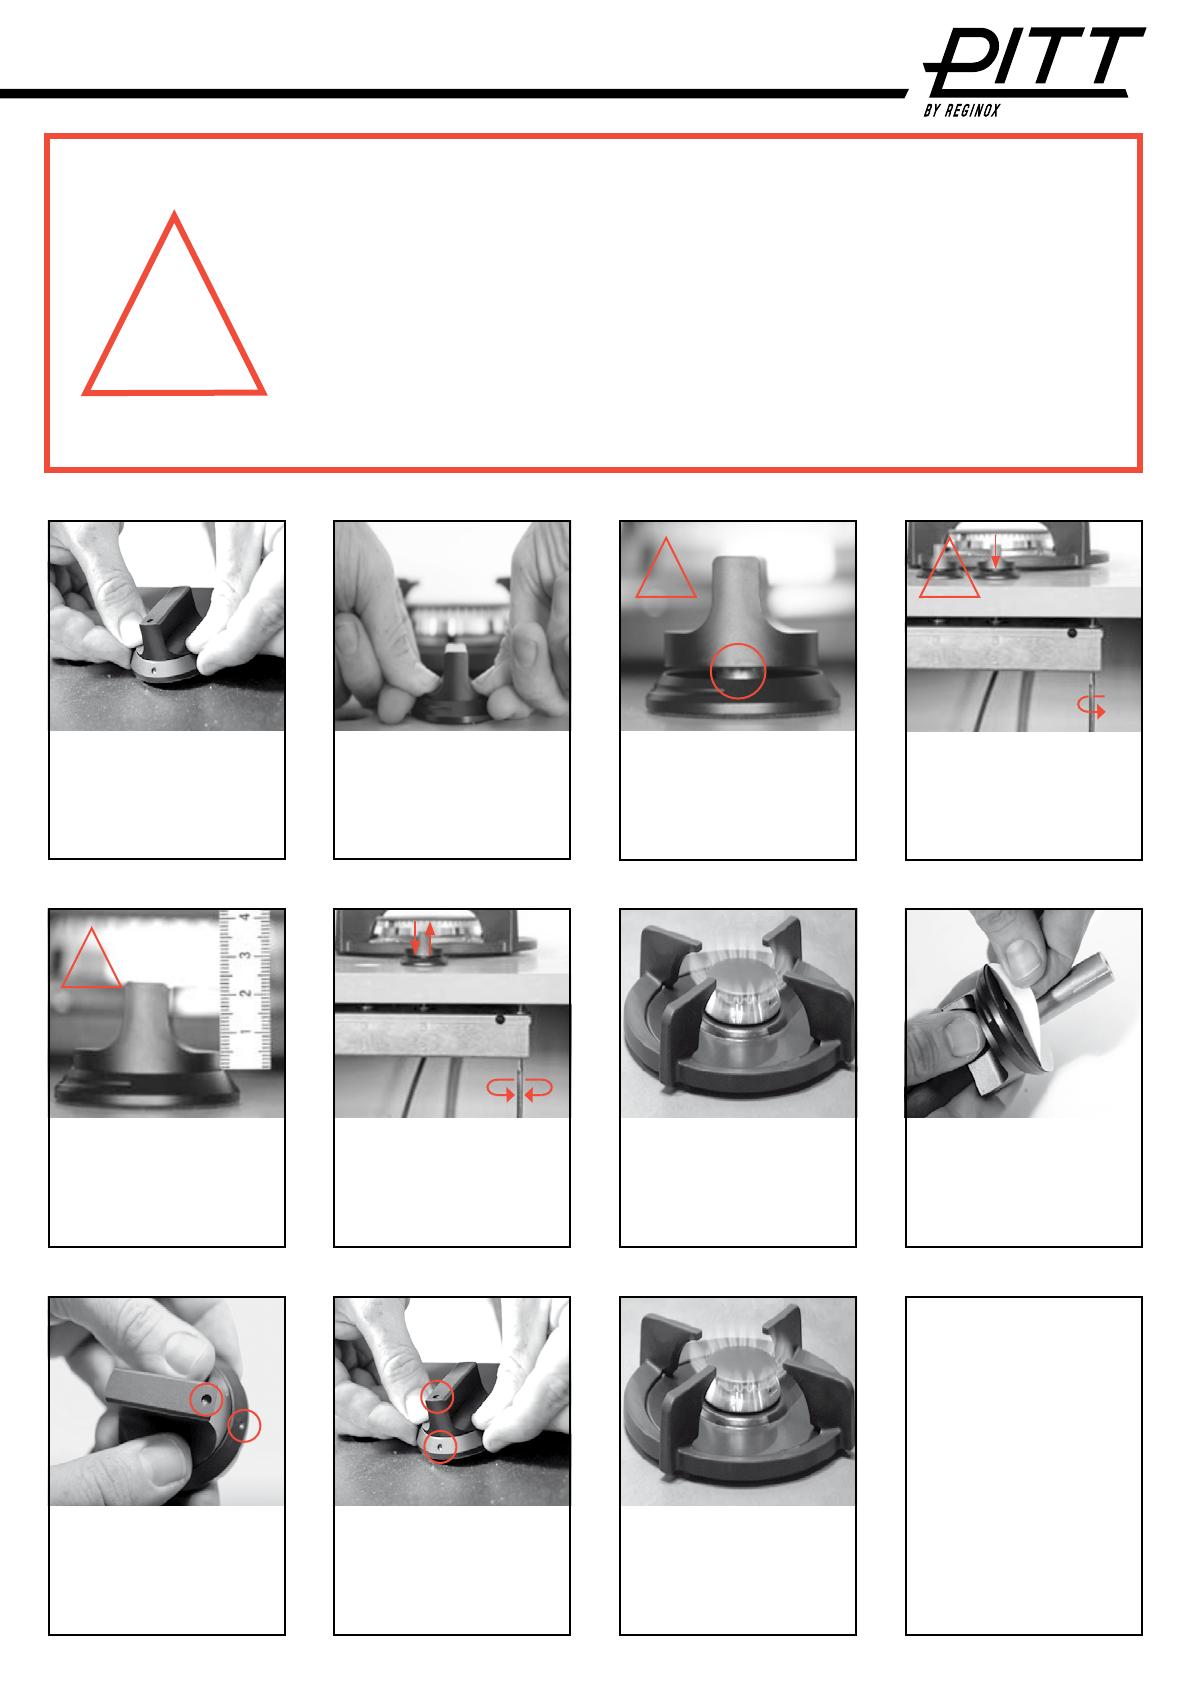
2. Druk de afdichtingsring
voorzichtig over de rand van
het het hitteschild. Contro-
leer of de ring in zijn geheel
goed aansluit.
3. Overzicht stelschroeven.
2
1
3
1
2
3
8. De 2kW en 3kW brander
kunnen op slechts één posi-
tie worden geplaatst.
9. Schroef de hitteschilden
handvast.
10. Zorg ervoor bij de wok-
brander dat de V-vormige
uitsparing in lijn staat met
de as van de brander.
11. Let op de fixatiepen bij
het plaatsen van de pan-
nendrager. Deze zorgt voor
stabiliteit.
15. Draai beide stelschroe-
ven 1 handvast tot dat de
warmegeleider goed contact
maakt met de onderkant van
het werkblad.
1
16. Draai beide stelschroe-
ven 2 handvast aan tot dat
de warmtegeleider goed con-
tact maakt met de onderkant
van het werkblad.
2
14. Overzicht stelschroeven.
1
2
2
3
3
1
Gasaansluiting
17. Positioneer alle afdich-
tingschalen inclusief de
bedieningsknoppen op het
werkblad. Let op: nog niet
vastplakken, eerst afstellen.
19. De onderzijde van de
bedieningsknop is zichtbaar
boven de afdichtingsschaal.
20. Draai de stelschroeven 3
(zie afb. 14) rechtsom zodat
de bedieningsknop in de
afdichtingschaal zakt.
3
22. Controleer alle bedie-
ningsknoppen op de juiste
hoogte en stel deze indien
nodig met de stelschroeven
3 af.
A
B
A
B
3
23. Controleer iedere gas-
brander of deze ontsteekt
en blijft branden. Indien dat
niet het geval is controleer
dan opnieuw de knophoogte
24. Verwijder de plakstrip
van de afdichtingschaal.
Belangrijk!
Bij het niet juist afstellen van de bedieningsknoppen
zullen de branders niet of slecht ontvlammen.
Om de garantie en het goed functioneren van de kookunit
te waarborgen dient de montage zoals beschreven in
deze handleiding zorgvuldig uitgevoerd te worden.
!
!
! !
26. Druk de bedieningsknop
en afdichtingschaal als één
geheel op de gaskraan
en druk deze vast op het
werkblad.
Het PITT
®
cooking-systeem
is nu gereed voor gebruik!
Voor meer informatie kunt u
terecht op:
www.pittcooking.nl
Of neem contact op via
Tel. 088 088 7070
27. Controleer iedere gas-
brander of deze ontsteekt
en blijft branden en alles
naar behoren werkt. Voor
storingen z.o.z.
17. Positioning all sealing
scales including the con-
trols on the worksheet.
Please note: first tweaking
in position no adhesion yet.
18. Press the control
knob down firmly. When
releasing, the control knob
will be in the adjustment
position (see Photo 19).
19. The bottom of the
control knob is visible
above the sealing scale.
20. Tighten the set screws
(3) (see Photo 14) clockwise
so that the control knob in
the sealing scale drops.
21. Let the buttons go down
until the button extends for
a minimum 5 mm and up
to 7 mm above the sealing
scale.
22. Check all control
buttons for the right height
and adjust if necessary
with the set screws (3).
23. Check each gas burner
for ignition and if they
remain lit. If that is not the
case then check the button
height again.
24. Remove the adhesive
strip from the sealing scale.
25. Plug the control knob in
the sealing scale. Make sure
that the indication of the
button corresponds to the
indication of the sealing scale.
26. Press the control knob
on the gas as a whole and
sealing scale and press it
on the worksheet.
27. Check each gas
burner for ignition and if
they remain lit and/or for
proper functioning. Check
malfunctions on next page.
If you have any questions,
you can always give us a
call, or send us an e-mail.
Reginox Far East
PITT
®
by Reginox
2 Loyang Lane # 03-03
Singapore 508913
T + 65 (0)67 88 53 63
F + 65 (0)67 88 38 35
www.pittbyreginox.com
Important!
When not properly adjusted, the burners will not ignite.
For warranty and the proper functioning of the cooking
unit, ensure the mounting is as described in this manual
to the letter.


