
Instructions pour utilisation et installation
Instructions for installation and use
FRIDGE-FREEZER 2 DOORS
KOEL-VRIESKAST MET 2 DEUREN
GELADEIRA FREEZER 2 PORTAS
ШХGЕЙП КБФБШХКФЗS 2 РПСФЕS
LEDNIÈKA A MRAZÁK SE DVEMI DVEØMI
Handleiding voor gebruik en installatie
Instruções de instalação e utilização
Návod na obsluhu a údržbu
FRIGO CONGELATEUR 2 PORTES

2
Cet appareil destiné à conserver et congeler des denrées alimentaires, est réservé à un
usage domestique:
toute autre utilisation est impropre.
L'installation doit être effectuée selon les instructions de la notice; une installation incorrecte
peut endommager l'appareil. Pour d'éventuels problèmes de fonctionnement de l'appareil,
adressez-vous à un Service Après Vente ou bien à un professionnel qualifié.
Avant chaque opération d'entretien, débranchez l’appareil en évitant de tirer le câble
d'alimentation.
Conservez cette notice avec soin et transmettez-la à un éventuel futur propriétaire de
l'appareil.
Pour être en accord avec les plus récentes dispositions législatives sur la protection de
l'environnement, nous utilisons, en petite quantité, des réfrigérants appelés R600a ou R134a
selon le modèle. Le type de réfrigérant est explicitement indiqué sur les caractéristiques. Pour
les appareils dotés de R600a, en cas de dommages sur les composants du circuit frigorifique
(tubes etc.), il est recommandé d'aérer le local dans lequel se trouve l'appareil et de ne pas
provoquer de flammes, étincelles ou autres sources d'inflammation pendant quelques
minutes.
Les parties, qui sont en contact avec les aliments, sont conformes aux dispositions de la
directive CEE 89/109.
Excellent choix!
Avec l'achat de notre électroménager vous avez choisi un produit de confiance, offrant de
grandes prestations, discret, efficace, utile: grâce au froid qui conserve les aliments, notre
alimentation est plus variée et saine.
Votre nouvel appareil est facile à utiliser. Nous vous prions quand même de lire attentivement
les instructions, pour découvrir les petits détails qui vous permettront d'exploiter au
maximum les capacités de votre appareil, en économisant de l'énergie.
Certains que l'utilisation vous satisfera, nous souhaitons de vous avoir toujours comme clients.
FÉLICITATIONS!
Si cet appareil en remplace un autre avec fermeture à déclic, à ressort, à serrure, etc.,
rappelez-vous, avant de le débarrasser, de rendre inutilisable la fermeture, ou mieux encore,
dèmontez la porte pour éviter que quelqu'un puisse y rester enfermé (enfants qui jouent,
animaux...).
Enlevez la fiche de la prise et coupez le câble d'alimentation. Les réfrigérateurs et les
congélateurs contiennent des gaz réfrigérants et des substances qui exigent une évacuation
appropriée, et qui contiennent en outre beaucoup de matériaux qui peuvent être recyclés.
Apportez les produits dans des centres appropriés de ramassages: votre Commune pourra
vous donner les indications nécessaires sur une élimination écologique correcte.
EVACUATION DU PRODUIT USAGÉ
Le marquage CE atteste que cet appareil est conforme aux dispositions des Directives Européennes
suivantes: 89/336 (compatibilité électromagnétique), 73/23 (basse tension), 96/57 (efficacité énergétique)
et à leurs modifications ultérieures.
CONSIGNES DE SÉCURITÉ
TABLE DES MATIÈRES
PROCÉDURE DE MISE EN MARCHE
CONSIGNES DE SÉCURITÉ
DECOUVREZ VOTRE APPAREIL
RÉVERSIBILITÉ DES PORTES
INSTALLATION DE L’APPAREIL
COMMENT ÉCONOMISER DE L'ÉNERGIE
BRANCHEMENT ÉLECTRIQUE
UTILISATION DE L'APPAREIL
CONGÉLATION
DÉCONGÉLATION
DÉGIVRAGE
NETTOYAGE
PETITES PANNES ET ANOMALIES
EVACUATION DU PRODUIT USAGÉ

Normalement, l’ouverture de la porte
est à gauche (charnières à droite); si
vous préférez qu’elle soit à droite, vous
pouvez la modifier en vous conformant
aux explications illustrées aux pages
suivantes.
1. Couchez délicatement l’appareil
sur l’arrière (de façon à ce que les
portes soient vers le haut)
2. Ôtez la plinthe (en la tirant vers le
haut) (fig. 3)
3. Dévissez les charnières inférieures
A et B (fig 4/5)
4. Ôtez le pivot de la charnière A et
enfilez-le sur la B (fig. 6)
5. Dégagez la porte du congélateur
de la charnière intermédiaire C
(fig. 7)
6. Dévissez la charnière C (fig. 8) et
bouchez les trous à l’aide des
bouchons que vous ôtez à gauche
(fig. 9)
3
DESCRIPTION
A Partie congélateur
B Partie réfrigérateur
C Plinthe
D Bouton régulateur thermostat
E Boîte éclairage
F Levier d’interrupteur de lumière
G Etagères de porte
H Porte-bouteilles
I Bac à légumes
L Trou d’écoulement de l’eau
M Pieds réglables
N Compresseur
O Bac de récupération
P Condenseur
Dessin uniquement explicatif
Decouvrez votre appareil
Réversibilité des portes

4
Si les poignées de l’appareil sont
verticales, vous devez les dévisser du
côté gauche et les revisser à droite en
déplaçant les bouchons de protection
du côté droit au côté gauche.
Réversibilité des poignées
7. Enlevez la porte du congélateur
de la charnière supérieure D (10)
8. Enlevez le pivot de la charnière D
(11) et montez-le à gauche (12)
9. Introduire la porte du congélateur
dans le pivot de la charnière D
(13)
10. Enlevez le pivot P de la charnière
C, maintenant à droite, et enfilez-le
dans l'emplacement de gauche
(14)
11. Vissez la charnière C à gauche et
réintroduisez la porte du
réfrigérateur (15)
12. Revissez les charnières A et B,
déjà modifiées au point 4, dans les
emplacements d'origine (16).
13. Enlevez la languette E de
l'emplacement de gauche du socle
et réindroduisez-la dans
l'emplacement de droite (17)
14. Réintroduisez le socle et replacez
l'appareil en position verticale.

5
Si l'appareil a été transporté chez vous en position horizontale, attendez deux heures avant
d'introduire la fiche électrique, pour permettre à l'huile de circuler dans le compresseur
Nettoyez l'intérieur (voir le chapitre Nettoyage) et branchez l'appareil sur la prise de courant
.
Procédure de mise en marche
Cet appareil offre de meilleures performances quand la température ambiante est comprise
entre 16 °C et 32 °C.
Après avoir déballé l'appareil, contrôlez qu'il ne soit pas endommagé. Les dommages
éventuels doivent être signalés immédiatement à votre vendeur.
Ne jetez pas l'emballage dans la nature (sachets en plastique, bandes de polystyène, etc.) et
ne les laissez pas à la portée des enfants.
Si l'appareil a été transporté chez vous en position horizontale, attendez deux heures
avant de le brancher afin de permettre au liquide réfrigérant de se stabiliser.
Placez l'appareil dans un endroit sec et aéré, à l'abri des agents atmosphériques.
Eviter les balcons, les vérandas, les terrasses: la chaleur excessive en été et le froid en hiver
pourraient altérer le fonctionnement de l'appareil ou même l'endommager.
Ne le mettez pas près d'une source de chaleur comme un four ou un radiateur et
maintenez-le à une distance minimale des autres meubles de 3/5 cm sur les côtés et de 10 cm
au-dessus.
Tenez l'appareil écarté du mur au moyen des entretoises à monter sur l'arrière.
Réglez les pieds antérieurs pour que l'appareil soit légèrement incliné en arrière : de
cette façon, vous faciliterez la fermeture correcte de la porte.
Nettoyez-le à l'intérieur en utilisant du bicarbonate de soude dissous dans l'eau (1 cuillère
pour 4 litres d' eau). N'utilisez pas d'alcool, de poudres abrasives ou de détergents.
Installation de l’appareil
La première façon pour économiser de l'énergie est de bien choisir l'endroit où placer
l'appareil, comme cela a été expliqué dans la partie concernant l'installation.
La deuxième façon d'économiser de l'énergie est de ne pas faire entrer de chaleur dans les
compartiments: laissez donc les portes ouvertes le moins possible, et n'introduisez pas
d'aliments encore chauds, surtout s'il s'agit de soupes ou de plats semblables qui dégagent
une grande quantité de vapeur. Contrôlez périodiquement les joints des portes et
assurez-vous qu'elles se ferment toujours correctement, dans le cas contraire, adressez-vous
au Service Après Vente.
La troisième façon d'économiser de l'énergie est de maintenir intactes les parties qui
échangent la chaleur: ne laissez pas le givre s'accumuler dans le congélateur (dégivrez-le
quand l'épaisseur du givre dépasse 1-2 cm., dans le cas d'appareils no-frost cela n'est pas
nécessaire) et nettoyez périodiquement le condensateur comme il est indiqué plus loin dans
la notice.
Comment économiser de
l'énergie
Important pour votre securité.
Prévoyez une prise de courant 10-16 A avec prise de terre. Assurez vous que la tension
indiquée sur la plaque signalétique de l’appareil (celle-ci se trouve à l’intérieur de votre
appareil, à gauche au niveau du/des bac/bacs à légumes) correspond bien à la tension de
l’installation électrique de l’habitation.
La mise à la terre de l’appareil est obligatoire aux termes de la loi. Nous ne pouvons
être tenus pour responsables pour tout incident causé par la non observation de cette
exigence.
Veillez à ce que vous puissiez accéder facilement à la prise qui alimente l’appareil, de façon à
pouvoir le brancher et débrancher aisément (nettoyage, dégivrage, etc.).
Si le câble d’alimentation est détérioré, faites-le remplacer immédiatement par un autre du
même modèle et veillez à bien connecter le câble de terre jaune/vert.
Branchement électrique

Réglage Thermostat du Réfrigérateur
Pour régler la température du réfrigérateur tournez le bouton thermostat qui se trouve dans la
zone des commandes. Positionnez le thermostat en position intermédiaire. Laissez votre
réfrigérateur ainsi pendant 24 heures. Ajustez ultérieurement le réglage en fonction de vos
besoins. La position 1 indique le réglage le moins froid et la position maximum le rélage le
plus froid. Normalement, une position intermédiarie est conseillée.
L'index 0 interrompt le fonctionnement du compresseur.
ATTENTION! quand le thermostat est sur la position "0" l'appareil est toujours sous
tension. Avant d'effectuer une quelconque intervention sur l'appareil, débranchez-le.
Les températures intérieures sont influencées par la température ambiante, par la fréquence
d'ouverure des portes, par la quantité d'aliments introduits. Selon les cas, vous pouvez choisir
la position qui vous donne la meilleure température. Dans des conditions environnantes
extrêmes, il est recommandé d'utiliser le thermostat différemment. Quand la température
environnante est très chaude (ex en été) il est conseillé de régler le thermostat au minimum.
Inversement, avec des températures environnantes froides, il est conseillé de régler le
thermostat au maximum.
• Les emballages et les aliments ne
doivent toucher en aucun cas la paroi
du fond du réfrigérateur.
• Ne mettez jamais d’aliments encore
chauds dans le réfrigérateur, laissez-les
refroidir à température ambiante.
• Pour éviter toute contamination entre
les différents produits alimentaires,
veillez à les ranger séparés les uns des
autres, bien emballés ou protégés dans
des récipients.
Stockez les aliments les plus sensibles
dans la zone la plus froide de l’appareil
(voir croquis).
Les aliments à congeler doivent être placés sur la grille à l'intérieur du compartiment de
congélation.
La plaque signalétique (fig. 20 p. 33) indique la quantité maximum des aliments que vous
pouvez congeler en 24 heures. N’y introduisez jamais une quantité supérieure.
Remarques importantes
Si vous achetez des produits surgelés
vérifiez:
• qu’ils soient bien fermés ou
enveloppés, que l’emballage soit
intact et qu’ils n’aient pas été abîmés;
• qu’il n’y ait pas de gouttelettes
glacées (qui indiquent que le produit
a été partiellement décongelé);
• qu’ils indiquent bien la date de
préparation ainsi que les dates
correspondant aux différents modèles
de congélateurs (le votre est ****)
• qu’ils ne se soient pas, même
partiellement, décongelés
entre-temps.
Ne mangez pas les produits lorsqu’ils
sont à peine sortis du congélateur
(glaces, esquimaux, glaçons, etc.): la
température très froide à laquelle ils se
trouvent pourrait provoquer des
brûlures par le froid, spécialement sur
la langue. En cas de coupure de
courant prolongée, transférez les
aliments congelés dans un congélateur
qui marche. Même si les aliments ne
se sont que partiellement
décongelés, ils ne pourront être
recongelés qu’après avoir été
cuisinés.
6
Utilisation de l'appareil
Congélation
Effectuez cette opération le plus hygiéniquement possible, étant donné que la congélation ne
stérilise pas les aliments. II est préférable de congeler les aliments en les subdivisant dans des
sacs, et en quantités consommables lors d’un seul repas. N’introduisez jamais d’aliments
chauds, ni même tièdes! Avant de mettre les aliments dans le congélateur, veillez à bien les
envelopper dans des sacs en plastique, dans des feuilles de polyéthylène ou d’aluminium ou
bien mettez-les dans des barquettes destinées à la congélation (ce matériel est en vente avec
l’étiquette “pour congélateur”). Chaque sac, chaque boîte, etc. que vous mettrez dans le
congélateur devra respecter les conditions suivantes:
• indication de la date de préparation et de la date de validité.
• le nombre de portions qui y sont contenues;
• les pots en verre devront être du type Pyrex et ils ne devront JAMAIS être entièrement
remplis (la congélation dilate les liquides);
• les sacs auront été comprimés afin d’en éliminer l’air à l’intérieur et ils devront être le plus
plats possible;
• chaque emballage, quelqu’il soit, devra être fermé de façon à bien protéger les aliments.
La plaque signalétique indique la quantité maximum des aliments que vous pouvez congeler
en 24 heures. N’y introduisez jamais une quantité supérieure. N’approchez pas les aliments
frais des aliments surgelés, afin de ne pas rehausser la température de ces derniers.
Congélation

Dégivrage du congélateur
Dégivrez le congélateur lorsque l’intérieur de ce dernier présente une formation de givre et
de glace supérieure à 1-2 cm. Cette couche réduit le pouvoir de refroidissement et augmente
la consommation d’électricité.
Débranchez l’appareil avant toute opération. Enveloppez les aliments dans du papier-journal
et ensuite dans des morceaux de couverture (on peut se servir aussi de sacs isothermes), puis
mettez-les au frais en attendant de les remettre dans le congélateur.
Vous pouvez accélérer la liquéfaction de la glace en posant une casserole d’eau chaude à
l’intérieur du congélateur, en ayant soin de l’isoler, sur le fond, au moyen d’une planchette en
bois. N’utilisez jamais ni radiateur, ni sèche-cheveux ni autres appareils électriques, couteaux
ni autres objets en métal: vous pourriez endommager définitivement l’appareil.
Après avoir dégivré l’appareil, suivez attentivement les indications se rapportant au nettoyage
et à la réintroduction des produits.
7
Décongelez les produits seulement avant l'utilisation immédiate. La décongélation peut être
exécutée de quatre façons:
• dans le réfrigérateur;
• à température ambiante;
• dans un four traditionnel à 40/50° ou dans un four à micro-ondes;
• directement à la cuisson.
La décongélation dans le réfrigérateur est la plus lente mais la plus sûre et vous permet
d'économiser de l'énergie (le froid transmis durant la décongélation est cédé au réfrigérateur).
Décongélation
Dégivrage du réfrigérateur
Il est automatique et l’eau qui se forme s’écoule par l’orifice d’écoulement dans le bac de
récupération. Elle s’évapore ensuite grâce à la chaleur transmise par le compresseur.
Dégivrage
Nettoyage intérieur
Avant de commencer n'importe quelle opération il faut tout d'abord enlever la fiche de la
prise de courant.Il est recommandé de nettoyer et désinfecter fréquemment votre appareil.
Effectuer le nettoyage aussi bien du réfrigérateur que du congélateur en utilisant du
bicarbonate de soude dissout dans de l'eau ( 1 cuillère tous les 4 litres d'eau). NE PAS
UTILISER DE PRODUITS DETERGENTS ABRASIFS. Rincer avec de l'eau et essuyer à l'aide d'
un chiffon. Brancher la fiche dans la prise de courant. Positionner le bouton du frigidaire sur
la température de conservation. Attendre pendant 3/4 heures avant d'introduire les aliments.
Nettoyage extérieur
Avant de commencer toute opération, débranchez préalablement le congélateur. Pour le
nettoyage extérieure, répétez les mêmes opérations, toujours avec les mêmes précautions que
celles effectuées lors du nettoyage intérieur. N’oubliez pas de nettoyer, de temps en temps, le
condenseur situé derrière l’appareil. Pour cette opération, servez-vous d’un chiffon sec ou,
mieux encore, de l’aspirateur.
Nettoyage

Gouttes d’eau sur le fond du
compartiment réfrigérateur
Le trou de drainage de l’eau est
bouché. Nettoyez-le à l’aide d’une
aiguille à tricoter (fig. L3).
La lumière intérieure du
réfrigérateur est éteinte
• Vérifiez les points qui sont annoncés
au paragraphe “La puissance de
refroidissement diminue”.
• L’ampoule est grillée.
Changez-la en procédant de la façon
suivante: débranchez l’appareil, faites
levier sur un tournevis pour ôter la
boîte d’éclairage (elle est emboîtée sous
pression) (fig. L1); changez l’ampoule
en veillant qu’elle soit semblable (max
15 WATT) (fig. L2): remettez la boîte.
Retirez l’ampoule grillée seulement si
vous en avez une autre qui puisse la
remplacer aussitôt.
Avant de faire appel au Service Après Vente, vérifier si vous pouvez y remédier en effectuant
les contrôles suivants:
Bruits inhabituels: Vous n'avez pas bien réglé les pieds et le congélateur vibre.
La puissance de refroidissement diminue: Vous avez introduit une trop grande quantité
d'aliments. Vous avez ouvert la porte trop souvent. La porte n'est pas bien fermée.
L'appareil ne refroidit pas: Vérifiez que le câble d'alimentation soit bien relié à la prise de
courant. Vous avez peut-être un fusible dans l'installation électrique qui est grillé. Votre
interrupteur général a disjoncté. Le thermostat est placé sur la position 0.
Les parois extérieures de l'appareil sont chaudes: C’est normal car un système intégré à
l’appareil permet d’éviter la condensation sur les parties extérieures du congélateur.
Les viandes congelées ont des striures blanchâtres: Vous utilisez des températures trop
basses ou bien vous n'avez pas respecté les dates d'échéances indiquées dans les tableaux.
La congélation est incomplète: Il est tout à fait normal que les produits qui contiennent
beaucoup de sucre, de graisse et d'alcool comme les glaces ou bien les jus de fruits ne se
congèlent pas complètement et qu'ils restent partiellement mous.
Il y a des gouttes d'eau sur les parois extérieures de l'appareil: Au cours des saisons
intermédiaires, au printemps et en automne, quand il n'y a pas de chauffage dans la maison,
il peut arriver que les parois extérieures de l'appareil se recouvrent de petites gouttes d'eau
(eau de condensation). Ce phénomène ne compromet absolument pas le bon fonctionnement
de l'appareil et il ne comporte aucun danger pour les personnes.
Formation de givre à l'intérieur: Vous n'avez pas bien fermé les portes. Vous avez ouvert
les portes trop fréquemment.
Il y a des gouttes d'eau ou bien de la glace sur la paroi verticale du fond du
réfrigérateur: Il s’agit du fonctionnement normal du systeme de dégivrage.
La porte ne s'ouvre pas facilement: Il est tout à fait normal, surtout aussitôt après l'avoir
refermée, que la porte offre une certaine résistance lorsqu'on l'ouvre à nouveau; et ce afin
d'assurer une parfaite étanchéité.
Petites pannes et
anomalies
8

Viande fraîche
Nous vous conseillons de décongeler complètement la viande avant de la cuisiner, afin d’évi-
ter qu’elle ne cuise plus vite à l’extérieur qu’à l’intérieur, à l’exception des petites tranches
panées, qui peuvent être sautées directement à feu doux/moyen, et des viandes bouillies.
Volailles - Lapins
Préparez-les plumés/écorchés, étripés et de préférence coupés en morceaux, lavés et essuyés.
Gibier
Préparez-le plumé/écorché, étripé et de préférence coupé en morceaux, lavé et essuyé.
Poisson
Aliments cuisinés
La durée de conservation des plats cuisinés diminue si vous vous servez de lard ou de bacon
pour relever les plats.
Mettez directement sur le feu ou au four, sans décongeler.
PRODUIT VALIDITÉ
Agneau petits morceaux 8 mois
Porc rôti 5 mois
Côtes de porc 4 mois
Boeuf bouilli, rosbif 10 mois
Boeuf biftecks, entrecôtes, en sauce
8 mois
Veau rôti
Veau biftecks, côtelettes 10 mois
Viande hachée 4 mois
Saucisses 2 mois
PRODUIT VALIDITÉ
Canard 4 mois
Lapin 6 mois
Poule pour bouillon 7 mois
Oie 4 mois
Poulet 10 mois
Dinde 6 mois
Abats 3 mois
PRODUIT VALIDITÉ
Canard sauvage
8 moisBécasse
Faisan
Lièvre 6 mois
Perdrix
8 mois
Caille
PRODUIT VALIDITÉ PRÉPARATION
Carpe
2 mois Ecaillez, videz, ôtez la tête. Lavez, essuyez et surgelez.
Brochet
Turbot
Saumon
Maquereau
Tanche
Truite
Daurade
3 mois
Ecaillez, videz, ôtez la tête, lavez, mettez-la pendant 30 secondes dans de l’eau froide
salée, essuyez et surgelez.
Sole
PRODUIT VALIDITÉ CUISSON
Sauce au jus de viande
3 mois
mi-cuisson
Sauce à la tomate à point
“Minestrone” aux légumes 2 mois sans pâtes
Lasagne 4 mois mi-cuisson
Rôtis 2 mois à point
Rouelle de veau 1 mois
mi-cuisson
Viandes en sauce 3 mois
Civets de gibier
2 mois
à point
Poisson cuit à l’eau
Poisson au four
Poivrons, aubergines
Courgettes farcies avec de la viande
Champignons sautés avec ail et persil, ratatouille
de poivrons
mi-cuisson
Epinards cuits à l’eau
Pizza 6 mois à point
9
Tableaux congélation

Légumes
Nous vous conseillons de blanchir les légumes à la vapeur, afin qu’ils ne perdent ni leurs
vitamines ni leurs sels minéraux dans l’eau de cuisson. Ainsi, vous n’aurez pas non plus be-
soin d’attendre qu’ils soient secs pour les congeler, il suffira d’attendre qu’ils refroidissent.
En général, les légumes sont meilleurs s’ils sont cuits directement sans être décongelés. Ré-
duisez les temps de cuisson en tenant compte du blanchiment avant la congélation.
Fruits
Les fruits devront être recouverts de sucre ou de sirop, suivant les cas. La quantité de sucre
à utiliser pour la conservation est d’environ 250 gr. pour 1 kilo de fruits. Les sirops sont uti-
lisés dans des proportions variables; on les prépare en faisant bouillir de l’eau sucrée. Les
différentes concentrations sont les suivantes:
• solution à 30%, sucre 450 gr. par litre d’eau;
• solution à 40%, sucre 650 gr. par litre d’eau;
• solution à 50%, sucre 800 gr. par litre d’eau;
Pour que la couleur des fruits ne soit pas altérée, mettez-les dans du jus de citron avant de
les recouvrir de sucre, ou bien versez du jus de citron dans le sirop. Les récipients de fruits
à congeler devront rester une heure au réfrigérateur avant d’être introduits dans le congéla-
teur. Les fruits devront être entièrement recouverts de sirop.
Pain
On peut le conserver 2 mois. Décongelez au four à 50 ˚C, en l’allumant après y avoir mis le pain.
Beurre et fromage
Congelez le beurre et le fromage en les divisant par morceaux pour une consommation heb-
domadaire. Le beurre et les fromages durs (ex. parmesan) se conservent 8 mois, les autres
fromages 4 mois. On doit les décongeler dans le réfrigérateur en veillant à la condensation
qui se formera sur ces produits.
PRODUIT VALIDITÉ PRÉPARATION TEMPS DE
BLANCHIMENT
Asperges 12 mois Lavez et retirez les fils 2 minutes
Choux, chou-fleur 6 mois nettoyez, coupez en morceaux 2 minutes
(1)
Artichauds
12 mois
Enlevez les feuilles externes 6 minutes
(1)
Haricots Ecossez 3 minutes
Haricots verts Lavez, enlevez les queues 4 minutes
Champignons Nettoyez 2 minutes
(1)
Aubergines Lavez, coupez en tranches 4 minutes
(2)
Poivrons
(3)
Lavez, coupez en tranches, enlevez les graines
ne pas les
blanchir
Petits pois, Tomates (3)
Ecossez et congelez immédiatement en les disposant
sur une seule couche puis enveloppez
Persil, basilic 8 mois
Lavez
Epinards
12 mois
2 minutes
Jardinière pour minestrone
(céleri, carottes, bettes,
poireaux, etc.)
Lavez, coupez en morceaux, divisez en portions. N’y
mettez pas de pommes de terre, elles moircissent.
ne pas le
blanchir
(1) Mettez un peu de vinaigre et de citron dans l’eau de cuisson (eau acidulée).
(2) Saumurez avant de procéder à la cuisson.
(3) Lors de la décongélation, ces légumes se réduisent en bouillie, car ils contiennent énormément d’eau. Nous vous conseillons
donc de décongeler uniquement si vous avez l’intention de les manger cuits.
PRODUIT VALIDITÉ PRÉPARATION
Abricots 8 mois Lavez, dénoyautez, sirop à 30%
Ananas
10 mois
Epluchez, coupez en tranches, sirop à 30%
Oranges
Cerises Lavez, dénoyautez, recouvrez de sucre ou de sirop à 30%
Fraises
12 mois
Lavez, retirez le pédoncule et recouvrez de sucre
Melon
Epluchez, coupez en tranches, retirez les graines, recouvrez de sirop à
30%
Pêches 8 mois Epluchez, dénoyautez, coupez en tranches, recouvrez de sirop à 50%
Pamplemousse 12 mois Epluchez, coupez en tranches, sirop à 30%
Jus d’agrumes 10 mois Pressez, retirez les pépins, sucrez à volonté
Prunes
12 mois
Lavez, dénoyautez, recouvrez de sucre ou de sirop à 50%
Raisin
Séparez les grains de la grappe, lavez, recouvrez de sucre ou de sirop
à 30%
Myrtilles, mûres, cassis,
framboises, groseilles
10 mois Lavez, retirez les pédoncules, recouvrez de sucre
10

11
This appliance preserves and freezes foodstuffs for household use. Avoid any other use.
Installation of the appliance must be carried out according to the Instructions Manual.
An incorrect installation may damage the appliance.
Should you have any problems regarding the good performance of the appliance, kindly
contact the authorized Service Centres, or, specialized technicians only.
Prior to any maintenance operation, unplug the appliance from the power supply.
Avoid pulling off the feed cable or the appliance itself. Simply pull out the plug.
Keep the Instructions Manual in good condition and pass it on to any future owner of the
appliance.
In adherence to the most recent laws on the protection of the evironment, we use small
quantities of a coolant called R600a or R134a, according to the model. The type of refrigerant
is clearly specified on the data plate. In the case of damage to the components of the
refrigerating curcuit (tubing, etc) of apparatuses supplied with R600a, the room in which the
apparatus is situated must be aired and flames, sparks or other sources of fire must be
avoided for a few minutes.
The parts destined to be in contact with foods are in accordance with the EEC 89/109
directives.
You have made an excellent choice!
By purchasing our domestic appliance, you have chosen a reliable, highly performing,
non-cumbersome, efficient and useful product. Indeed, the perfect way to preserve your
foodstuffs for the preparation of varied, healthy meals.
Your new appliance is easy to use. Nevertheless, please read the instructions and the tips
described therein, to enable you to use your refrigerator to its highest capacity, whilst saving
on electricity.
We are certain that this appliance will meet with your requirements and we look forward to
having you as one of our permanent clients.
CONGRATULATIONS!
Should this appliance replace another equipped with snap, spring or lock closing devices, etc.
please remember to remove these before disposing of your old appliance, or better still, do
disassemble the door so as to prevent anyone, like for instance, children at play, animals, etc.
from becoming entrapped within.
Remove the plug from the socket and cut the power supply to the cables.
The refrigerators and freezers contain refrigerant gases and substances which require to be
properly disposed of. Furthermore, they contain others materials which can be recycled.
Please dispose of such materials by delivering them to specific collection centres. Your own
Municipality will be able to advise you on correct ecological disposal methods.
DISPOSAL OF USED APPLIANCES
CE marking certifies that this appliance complies with EEC Directives 89/336 (electromagnetic
compatibility), 73/23 (low voltage), 96/57 (energy efficiency) and their subsequent
amendments.
SAFETY REGULATIONS
INDEX
STARTING PROCEDURE
SAFETY REGULATIONS
YOUR APPLIANCE
REVERSIBILITY OF THE DOORS
APPLIANCE INSTALLATION
SAVING ENERGY
ELECTRICAL CONNECTION
USE OF THE APPLIANCE
FREEZING
DEFREEZING
DEFROSTING
CLEANING
MINOR BREAKDOWNS AND ANOMALIES
DISPOSAL OF USED APPLIANCES

The doors normally open on the left
(with the hinge on the right). If instead
you wish to revert the process, you may
proceed as shown in the illustration on
the following pages.
1. Lay the appliance carefully on its
back (with the doors upwards)
2. Remove the base trim (by pulling
it upwards) (fig 3)
3. Unscrew the lower hinges A and B
(figures 4/5)
4. Remove the pin from the A hinge
and insert it into B (fig. 6)
5. Remove the refrigerator door from
the intermediate hinge C, (fig 7)
6. Unscrew the C hinge, (fig. 8) and
close off the holes with the caps
which you have removed from the
left-hand side (fig. 9)
12
CAPTION
A Freezer zone
B Refrigerator zone
C Base trim
D Thermostat knob
E Light box
F Light switch
G Deer trays
H Bottle holders
I Salad/vegetable drawer
L Water drainage outlet
M Adjustable feet
N Compressor
O Water collecting tray
P Condenser
Drawing is purely illustrative
Your appliance
Reversibility of the doors

13
If the appliance has vertical handles,
you must unscrew them from the
left-hand side and screw them on the
right moving the protection caps from
right to left.
Reversibility of the handles
7. Remove freezer door from upper
hinge D (10)
8. Remove hinge pin D (11) and
assemble on the left (12)
9. Insert freezer door into the hinge
pin D (13)
10. Remove hinge C and pin P which
is now on the left and fit it into the
left housing (14)
11. Screw hinge C on the left and
insert the door in the refrigerator
(15).
12. Refasten the hinges A and B,
already modified at point 4, into
their original housings (16).
13. Remove the tongue E from the left
housing of the base and fit it into
right housing (17).
14. Put the base back and place the
appliance in a vertical position.

14
Important: if the appliance has been transported to your house in a horizontal
position, please wait for a few hours before plugging in the appliance to allow oil to
flew back into the compressor.
Proceed with the Internal cleaning , then connect the appliance to the electric socket without
using an adaptor (see Electrical connection).
Adjust the thermostats to the food preservation position of your choice (see Instructions for
fridge-freezer use).
Starting procedure
This appliance works best when the ambient temperature is between 16 °C and 32 °C.
After installing your appliance, check that nothing has been damaged. Should you detect any
possible damage to the appliance, please contact your appliance salesman immediately.
Do not disperse packaging material such as plastic bags, polystyrene strips, etc., around the
environment. Keep such material away from children.
If the appliance has been transported in a horizontal position, do not plug in the
appliance but wait for a few hours in order to allow the oil to flow back into the
compressor. Place the appliance in a dry and aerated environment, duly protected from
weather elements. Avoid placing your appliance on balconies, verandas, terraces. Excessive
heat during summer and cold during winter could alter the good functioning operation of the
appliance or even damage it altogether.
Do not position your appliance near a source of heat like an oven or a central heating plant.
Do not place your appliance next to other pieces of furniture, but leave at least a 3 to 5 cm
space on the sides and 10 cm on the top.
Keep your appliance away from the wall by inserting spacers at the back of the said
appliance.
Adjust the front legs so that the appliance will lean slightly backwards, to allow the
door to close properly.
Clean your refrigerator compartment with a solution of sodium bicarbonate dissolved in water
(1 spoon for every 4 litres of water). Do not use alcohol, abrasive powders or detergents, as
these could ruin the surface.
Appliance installation
The first way to save electricity is to select the correct place for appliance installation as
specified above under installation instructions.
The second way to save electricity is to prevent heat from entering the refrigerator
compartments. Keep the refrigerator doors open for as little time as possible and never store
hot food inside, like soups or similar dishes in particular, as these will produce a great deal of
steam. Periodically check the door gaskets. Ensure the perfect closure of the doors. Should
this not be the case, please contact the Service Centre.
The third way to save electricity is to maintain the heat exchange parts in good condition.
Prevent condensation from accumulating in the refrigerator. Defrost the appliance whenever
the frost thickness exceeds 1-2 cm. This is not necessary with NO-FROST appliances. Clean
the condenser periodically as specified below in this Booklet.
Saving energy
Please ensure that the voltage (Volt, V) of the mains socket matches the indications on the
data plate which you will find inside your appliance.
Should the socket and the appliance plug not be compatible, do not use adapters,
multiple plugs or extensions, but have the socket replaced with another suitable kind
by qualified personnel.
The socket which feeds the appliance must be kept operational for future operations
(cleaning, defrosting, etc.).
Should the cable become damaged, replace it timeously by contacting specialized Service
Centres for the purchase and assembly of the said cable.
Electric safety of this appliance is assured only when it has been connected to a perfectly
effective earthing installation as specified in the electric safety norms in force.
Electrical connection

Thermostat Adjustment
To adjust the internal temperature, turn the thermostat KNOB positioned on the controls
section. Position 1 corresponds to milder temperatures. For colder temperatures turn knob to
higher numbers. Normally, an intermediate position will be appropriate.
To switch the appliance off, turn the thermostat knob to the 0/STOP position.
WARNING: the appliance remains "live"!
The internal temperatures are influenced by ambient temperatures, according to how many
times the refrigerator door has been opened and the quantity of food placed in the
refrigerator. You can choose the perfect temperature accordingly.
In extreme ambient conditions, it is best to use the thermostat differently.
When the room temperature is very hot (e.g. in summer) we recommend adjusting the knob
to the lower numbers. On the other hand, with cold room temperatures, we recommend
adjusting the knob to higher numbers.
Packaged foodstuffs and other food that
has been packed on the shelves must
not touch the back wall of the
appliance.
In order to preserve foodstuffs properly,
store them in the correct refrigeration
compartment, as there are areas in the
refrigerator where the temperature is
colder than in others .
For freezing foodstuffs, position the products on the inside grid of the freezing compartment.
The maximum quantity of food which can be stored within a period of 24 hours is shown on
the data table (fig. 20, page 15). Never store a higher quantity of food than indicated.
Important notice
If you purchase frozen foodstuffs verify that:
• the packing has boon well sealed and
not mishandled or damaged;
• there are no iced lenses (this means that
the product has already been oven
partially thawed);
• the processing date and dates relevant to
the type of freezer have boon clearly
marked (yours is * * * * );
• in the meantime the products have not
thawed, not oven partially;
Never put into your mouth frozen products
that have just been taken out of the freezer
(ice-cream, ice-blues, ice cubes, etc.), where
the low temperature to which they have
been subjected may cause ice burns and
possible tongue damage.
In case of prolonged current absence transfer
the frozen foodstuffs into another working
freezer.
If the food stuffs have been thawed, even
partially, you may re-freeze them only
after having cooked them!
15
USE OF THE APPLIANCE
Freezing
Ensure that your freezing operations are carried out under the most hygienic conditions as
freezing alone does not sterilise the food. It is advisable to freeze the food by packing it into
separate meal portions and not in bulk form. Never put hot or even warm foodstuffs into the
freezer! Prior to storing the frozen food, pack it in plastic bags, polyethylene sheets,
aluminium foil or freezing containers (this material is found on the market and is labelled
“suitable for freezing”). Each pack or container, etc. which you will store into the freezer must
follow the instructions below:
• freezing date and expiry date;
• number of portions;
• the glass containers must be of the Pyrex type and MUST NEVER be filled to the brim:
(freezing expands liquids);
• the packs must be pressed down for air elimination within and must be as flat as possible;
• all frozen food packs, whatever the type, must be closed in order to protect the food.
The maximum quantity of food which can be stored within a period of 24 hours is shown on
the data table. Never store a higher quantity of food than indicated.
Do not place fresh foodstuffs next to frozen food. This would cause an increase in the
temperature of the frozen foodstuffs.
Freezing

Defrosting of the freezer
Defrost every time you notice the formation of frost or ice 5-6 mm. thick. This layer of ice will
reduce the freezing power and will increase energy consumption.
Wrap the frozen food in newspaper and then cover out with wrappers (insulated bags or
boxes are also suitable). Place them in a cool place, preferably in the fridge, awaiting to be
put into the freezer again. Before carrying out any other operation unplug the electric current.
You may hasten this process by placing inside the freezer a pot with hot water isolating it
from the bottom with a small wooden board.
Do not use heaters, hairdryers or other electrical appliances, knives or any other metal
objects. You may damage the freezer beyond repair.
Once the defrosting has been completed, in order to carry out cleaning operation and
re-packing the freezer you have to strictly follow the instructions.
16
Defrost foodstuffs for immediate use only. Defrosting can be carried out in the following four
manners:
• inside the refrigerator;
• in ambient temperatures;
• inside an oven at 40/50° or in a micro-wave oven;
• directly by cooking.
Defrosting in the refrigerator is a slower but safer operation and allows you to save electricity.
The freezing temperature of the foodstuff is released into the refrigerator during defrosting.
Defreezing
Defrosting of the refrigerator
This is an automatic operation and the water which is formed is discharged through the
DRAINAGE OUTLET into the COLLECTION TRAY. The water will then evaporate through the
heat transmitted by the COMPRESSOR.
Defrosting
Internal cleaning
Before carrying out any other operation, unplug the freezer. Clean both the refrigerator and
the freezer by using sodium bicarbonate dissolved in water (1 spoonful every 4 litres of
water).
DO NOT USE ABRASIVE DETERGENTS.
Rinse off with water and dry with a cloth. Plug into the socket. Turn the knob to the
conservation temperature position. Wait 3-4 hours before placing food inside.
External cleaning
Before carrying out any other operation, unplug the freezer. Use the same delicate method for
external cleaning as you did for the internal cleaning. Remember to dust off the condenser
placed at the back of the appliance. Use a dry brush or better still, a vacuum cleaner.
Cleaning

Water droplets at the bottom of the
refrigerator
The water drainage outlet is obstructed.
Clean it with the help of a small wire
(fig. L3).
The light inside the refrigerator is off
• Check the points detailed
under “No cooling power”
• The refrigerator light is burnt
out.
Replace bulb in this manner: unplug the
electric current, prise open the light box
with a screwdriver (it has been pressure
fitted), (fig. L1); replace bulb with a
similar one (max 15 WATT), (fig. L2);
insert it into the light box. Remove the
burnt-out bulb only if you have another
to replace it.
Before calling the Service department, check whether you can solve the problem through the
following check-points:
Unusual noises - You haven't regulated the base properly and so the freezer vibrates.
Reduced cooling power - You have placed a larger quantity of food than advisable. You
have opened the door too many times. The door has not been properly closed.
The appliance does not cool - Check that the plug and socket are making contact. You may
have blown a mains fuse. The main light switch has tripped. The thermostat is off, the knob is
on "0" position.
The exterior of the appliance is hot - This is NOT a defect, but helps to prevent formation
of condensate on the external parts of the appliance.
White streaking on frozen meats - The temperature is too low or you have not heeded the
expiry dates indicated on the freezing chart.
Part-freezing - Normally, products containing lots of sugar, fats and alcohol such as
ice-creams or juices, do not freeze completely and remain partially soft.
Water droplets on the external walls of the appliance - During the Spring and Autumn
seasons, when the house heating is turned off, it may happen that the external walls of the
appliance show some water droplets (condensate). This phenomenon does not interfere with
the good functioning of the appliance and is not dangerous to people.
Frost build up inside - The doors are not properly shut. You have opened the doors too
often.
Water or ice droplets on the back vertical wall of the refrigerator compartment - This
is not a defect.
The door opens with difficulty - It is normal for the door to offer some resistance to
opening after being closed. This is to ensure a perfect seal of the doors. Wait a few minutes
before opening once again.
Minor breakdowns and
anomalies
17

Fresh meat
We advise you to thaw the meat completely before cooking it to avoid meat from cooking
quicker on the outside than on the inside, with the exception of schnitzels that can be put
directly to cook with a low/medium flame and for boiled meats.
Poultry
They must be plucked, skinned and the innards removed, cut into pieces, washed and dried.
Feathered game
They must be plucked, skinned and the innards removed, cut into pieces, washed and dried.
Fish
Cooked food
N.B. The time limit of preservation of cooked food is reduced if you use fat bacon or lard as sauces.
Put directly onto the flame or into the oven without thawing.
PRODUCT TIME LIMIT
Small cuts of lamb 6 months
Roasted pig 5 months
Pork chops 4 months
Boiled beef, roast beef 10 months
Beef steaks, ribs, stew
8 months
Roast veal
Veal steaks, choice veal cuts 10 months
Minced meat 4 months
Giblets 3 months
Sausages 2 months
PRODUCT TIME LIMIT
Duck 4 months
Rabbit 6 months
Chicken for broth 7 months
Goose 4 months
Chicken 10 months
Turkey 6 months
Giblets 3 months
PRODUCT TIME LIMIT
Wild duck
8 monthsWoodcock
Pheasant
Hare 6 months
Partridge
8 months
Quail
PRODUCT TIME LIMIT PREPARATION
Carp
2 months Remove scales, gut and clean fish, remove head, wash, dry and freeze
Pike
Rhomb
Salmon
Mackerel
Tench
Trout
Gilthead
3 months
Remove scales, gut and clean fish, remove head, wash, immerse in cold salt water
for 30 seconds, dry and freeze
Sole
PRODUCT TIME LIMIT COOKING PREPARATIONS
Meat stew sauce
3 months
Not fully cooked
Tomato sauce Fully cooked
Vegetable soup 2 months Without pasta
Lasagne 4 months Not fully cooked
Roast 2 months Fully cooked
Osso buco (Marrow-bone) 1 month
Not fully cooked
Meat stews 3 months
Game in salmi
2 months
Fully cooked
Boiled fish
Baked fish
Pepperoni, eggplant (aubergines), Meat-stuffed
baby marrows
Not fully cooked
Boiled spinach
Pizza 6 months Fully cooked
18
Freezing tables

It is advisable to steam cook the vegetables so as not to loose the vitamins and minerals into
the water. Therefore there is no need to wait for them to dry before freezing them, but allow
them to cool first.
Generally, the vegetables are better if they are cooked directly without thawing. Reduce the
cooking times bearing in mind the boiling effected before freezing.
Fruit must be covered with sugar or syrup according to the cases. The quantity of sugar to
use in order to preserve it is about 250 gr. per kg of fruit. Syrups are to be used in different
percentages and they are prepared by boiling water with some sugar already melted in it.
The various concentration are:
•
30% solution, 450 gr. of sugar for every litre of water
•
40% solution, 650 gr. of sugar for every litre of water
•
50% solution, 800 gr. of sugar for every litre of water
To maintain the colour of the fruit unaltered, dip it into some lemon juice before covering it with
sugar, or otherwise add some lemon juice to the syrup. Fruit to be freezed needs an hour in the
fridge for setting before being placed into the freezer. The syrup must cover the fruit completely.
To be preserved for 2 months. Defreeze the bread in the oven at 50 C having put it in be-
fore switching the oven on.
Before freezing butter and cheese, cut them into pieces for weekly consumption. Butter is
preserved for 8 months and so is hard cheese (parmesan). Other types of cheese need 4
months. defreezing must be done in the fridge being careful about the condensation which
logically forms on these products.
Asparagus 12 months Wash, remove hard parts 2 minutes
Cabbage, cauliflower 6 months Wash, cut into pieces 2 minutes
(1)
Artichokes
12 months
Remove external leaves 6 minutes (1)
Beans Shell 3 minutes
French beans Wash, remove stalk 4 minutes
Mushrooms Wash 2 minutes
(1)
Eggplants Wash, slice 4 minutes (2)
Pepperonies (3) Wash, slice, remove pips
Do not boil
Peas, tomatoes (3)
Shell, freeze, immediately placing them on one layer
only, pack them
Parsley, basil 8 months
Wash
Spinach
12 months
2 minutes
Mixed vegetables ready for
soup (Celery, carrots,
beetroot, leaks, etc.)
Wash, cut into pieces, divide into portions, do not
put potatoes as they turn black
Do not boil
(1) Put a bit of vinegar or lemon in the cooking water.
(2) Salt well before cooking.
(3) The vegetables become mushy during the thawing, owing to the high content of water in them. We advise freezing only if you
intend consuming the cooked products.
Apricots 8 months Wash, stone, 40% syrup
Pineapple
10 months
Peel, slice, 50% syrup
Oranges Peel, slice, 30% syrup
Cherries Wash, stone, cover with sugar or with 30% syrup
Strawberries
12 months
Wash, remove stalks and cover with sugar
Melons Peel, slice, remove pips and cover with 30% syrup
Peaches 8 months Peel, stone, slice and cover with 50% syrup
Grapefruit 12 months Peel, slice, 30% syrup
Citrus juice 10 months Squeeze, remove pips, sugar according to taste
Plums
12 months
Peel, stone, cover with sugar or with 50% syrup
Grapes Separate the grapes from the stalk, wash, cover with sugar or with 30% syrup
Whortleberries, blackberries
red, black current goose
berries, raspberries
10 months Wash, remove stalks, cover with sugar
19

20
Dit apparaat heeft als functie om voedingswaren voor huishoudelijk gebruik te bevriezen en
te bewaren: elk ander gebruik wordt als niet correct beschouwd.
De installatie moet plaatsvinden volgens de aanwijzingen uit deze handleiding; een verkeerde
installatie kan het apparaat beschadigen. Mochten er problemen optreden tijdens de werking
van het apparaat, neem dan contact op met onze servicedienst of met u winckelick.
Alvorens u onderhoudswerkzaamheden gaat uit voeren moet u eerst de voedingskabel
uittrekken: doe dit door rechtstreeks aan de stekker te trekken en niet aan de kabel zelf.
Bewaar deze handleiding met zorg.
Om te voldoen aan de meest recente wettelijke beschikkingen inzake milieubescherming gebruiken wij
kleine hoeveelheden van het koelmiddel R600a of R134a, afhankelijk van het model. Het exacte type
koelmiddel wordt expliciet vermeld op het typeplaatje. Voor de apparaten voorzien van het koelmiddel
R600a raden wij strikt aan in geval van schade aan de onderdelen van het koelcircuit of de koelkast
(leidingen enz...) het lokaal waar het apparaat zich bevindt goed te verluchten en geen vlammen,
vonken of andere ontstekingbronnen te veroorzaken gedurende enkele minuten.
De onderdelen die met levensmiddelen in aanraking komen, voldoen aan de EG 89/109
richtlijnen.
Hartelijk gefeliciteerd met uw uitstekende keuze!
Met de aankoop van dit huishoudelyk apparaat heeft u een uiterst betrouwbaar product
gekozen met hoge prestaties, dat tevens discreet, efficiënt en zeer energie zuinig is.
Uw nieuwe apparaat is zeer gemakkelijk in het gebruik. Toch raden wij u ten zeerste aan om
deze handleiding nauwkeurig door te lezen, zodat u de kleine details kan ontdekken die u
zullen toelaten om het apparaat om zijn best te gebruiken: maximale prestaties met een
minimaal energieverbruik.
Wij zijn ervan overtuigd dat u tevreden zal zijn over ons product en hopen u ook in de
toekomst onder onze klanten te kunnen verwelkomen.
GEFELICITEERD!
Indien dit toestel deel uitmaakt van een geheel voorzien met een sluiting met blokkering door een
mechanisme dat dichtklikt, door een veersysteem, met een slot, enz., denk er dan aan dat u alvorens het
slopen deze mechanismen onfunctioneel moet maken, of beter nog dat u de deur demonteert om te
vermijden dat er iemand in verstrikt zou kunnen geraken (bv. spelende kinderen, dieren, enz.).
Trek de stekker uit het stopcontact en snijd de voedingskabel door. Koelkasten en diepvriezen bevatten
koelgassen en stoffen die een speciale afvalverwerking vereisen en bevatten bovendien ook verscheidene
materialen die gerecycleerd kunnen worden.
Breng deze materialen naar de recyclingcentra: bij uw gemeente kan u de geschikte informatie verkrijgen
inzake een ecologisch correcte ontmanteling.
ONTMANTELING VAN HET GEBRUIKTE TOESTEL
Het EG-merk is een attestatie van de overeenstemming van dit apparaat met de Europese
Richt-lijn 89/336 (elektromagnetische compatibiliteit), 73/23 (laagspanning) 96/57 (efficiënt
energiegebruik), en hun wijzigingen.
VEILIGHEIDSVOORSCHRIFTEN
INDEX
STARTPROCEDURE
VEILIGHEIDSVOORSCHRIFTEN
VERKLARING DER TEKENS
OMKEREN VAN DE DEUREN
INSTALLATIE VAN HET APPARAAT
HOE ENERGIE BESPAREN
ELEKTRISCHE AANSLUITING
GEBRUIK VAN HET APPARAAT
INVRIEZEN
ONTDOOIEN
ONTDOOIING
SCHOONMAKEN
KLEINE DEFECTEN EN ONREGELMATIGHEDEN
ONTMANTELING VAN HET GEBRUIKTE

De deuren worden normalerwijze aan de
linkerkant geopend (scharnier gelegen op de
rechterkant); indien u om persoonlijke
redenen deze aan de rechterkant wenst te
openen, ga dan te werk zoals geïllustreerd
wordt op de volgende bladzijden.
1. Leg het toestel voorzichtig neer op de
achterkant (met de deuren naar boven
gericht).
2. Verwijder het basisstuk (door het naar
boven toe te trekken) (fig. 3)
3. Schroef de twee onderste scharnieren A
en B (fig. 4/5)
4. Verwijder de pen van scharnier A en
voeg hem in scharnier B (6)
5. Schuif de deur van het vriesvak uit het
tussenscharnier C (fig. 7).
6. Schroef de scharnier C (8) los en stop
de openingen met de doppen (die u links
heeft verwijderd) dicht (9).
21
LEGENDE
A Vriesvak
B IJskast
C Basis
D Draaiknop thermostaat
E Verlichtingsdoos
F Hendeltje verlichting
G Deurvakken
H Flessenrek
I Groetenlade
L Waterafvoeropening
M Instelbare steunvoetjes
N Compressor
O Wateropvangbakje
P Condensor
Illustrerende tekening
VERKLARING DER
TEKENS
OMKEREN VAN DE
DEUREN

22
Indien het toestel uitgerust is met
verticale handvatten kunnen deze van
de linkerkant losgeschroefd worden en
op de rechterkant terug bevestigd
worden. Verplaats hierbij de
afschermingsdopjes die de openingen
afsluiten.
OMKERING VAN DE
HANDVATTEN
7. Schuif de deur van het vriesvak uit het
bovenste scharnier D (10).
8. Schuif de pen uit het scharnier D (11)
en plaats deze op de linkerkant (12).
9. Plaats de deur van het vriesvak in de
pen van het scharnier D (13).
10. Schuif de pen P, die zich nu rechts
bevindt, uit het scharnier C en voeg
deze in de linker invoegplaats (14).
11. Schroef het scharnier C links vast en
plaats de deur van de ijskast (15) terug.
12. Schroef de scharnieren A en B die
reeds in puntje 4 aangepast werden
vast in de oorspronkelijke
invoegplaatsen (16).
13. Schuif het lipje E uit de linker
invoegplaats van de basis en voeg het
terug in de rechter invoegplaats (17).
14. Monteer de basis terug en plaats de
toestel terug verticaal.

23
Indien het apparaat in zijn horizontale stand in huis werd geleverd, moet u enkele uren
wachten alvorens de stekker in het stopcontact te steken, zodat de olie naar de
compressor kan terugvloeien. Reinig de binnenkant van het apparaat (zie Reiniging van de
binnenkant) en steek vervolgens de stekker in het stopcontact zonder het gebruik van
verloopstekkers / adapters (zie ELEKTRISCHE AANSLUITING). Stel de thermostaat in op de
stand voor bewaring die voor u het meest geschikt is (zie GEBRUIK VAN HET APPARAAT).
STARTPROCEDURE
Dit apparaat werkt het best bij een omgevingstemperatuur tussen 16 °C en 32 °C.
Controleer na het uitpakken van het apparaat of dit geen beschadigingen vertoont. Mocht het
apparaat beschadigingen vertonen, meldt dit dan onmiddellijk aan de verkoper.
Laat de delen van de verpakking (plastic zakjes, onderdelen in polystirol, enz.) niet achter in
het milieu, noch in het bereik van kinderen.
Indien het apparaat werd getransporteerd in horizontale positie, wacht dan een paar
uren alvorens u de stekker in het stopcontact steekt zodat de olie kan terugvloeien naar
de compressor.
Plaats het apparaat in een droge en luchtige omgeving. Vermijd de plaatsing op balkons,
terrassen of veranda's: een overdreven hitte tijdens de zomer en de koude tijdens de winter
zouden de werking van het apparaat kunnen wijzigen en het zelfs beschadigen. Plaats het
apparaat niet in de nabijheid van een warmtebron, zoals een oven of een
radiator/verwarmingselement en laat een minimum afstand van 3 à 5 cm zijdelings en 10 cm
langs boven tussen het apparaat en de omringende meubels. Plaats het apparaat op een
zekere afstand van de muur door middel van de afstandshouders die op de achterzijde
gemonteerd moeten worden.
Regel de voorste steunvoetjes zodanig dat het apparaat lichtjes naar achter helt: op
deze manier zal u de deur gemakkelijker op een correcte manier kunnen sluiten.
Reinig het apparaat binnenin met natriumbicarbonaat opgelost in water (1 lepel per 4 liter
water). Gebruik geen alcohol, schuurmiddelen of detergenten: deze producten zouden de
oppervlakten van het apparaat kunnen beschadigen.
INSTALLATIE VAN HET
APPARAAT
De eerste manier om energie te besparen is de juiste keuze van de plaats van het apparaat,
zoals werd beschreven in de paragraaf gewijd aan de installatie. De tweede manier is door te
vermijden dat er warmte binnentreedt in de compartimenten: houd de deuren enkel open
voor een minimale duur en plaats geen warme voedingswaren in het apparaat, vooral geen
soepen of gelijkaardige producten die een grote hoeveelheid damp vrijstellen. Controleer
regelmatig de isolatieranden van de deuren en verzeker er u van dat deze nog op een
efficiënte manier aansluiten. Indien dit niet meer het geval is, neem dan contact op met onze
servicedienst of uw winkelier. Een derde manier om energie te besparen is het efficiënt
houden van de delen die zorgen voor de warmte-uitwisseling: vermijd een te grote
accumulatie van ijs in het vriesvak (verwijder het ijs als de dikte van de laag groter is dan 1-2
cm - bij apparaten van het type "no-frost" is dit overbodig) en reinig regelmatig de condensor
(zie aanwijzingen verderop in de handleiding).
HOE ENERGIE
BESPAREN
Controleer of de elektrische spanning (Volt, V) van het voedingsnet overeenstemt met de
gegevens vermeld op het typeplaatje dat zich binnenin het apparaat bevindt. Bij
incompatibiliteit tussen het stopcontact van het voedingsnet en de stekker van het
toestel raden wij u ten zeerste aan om geen verloopstekkers, meervoudige stekkers of
verlengdraden te gebruiken, maar om het stopcontact te vervangen door één van een
geschikt type. Dit moet worden uitgevoerd door een gespecialiseerde technicus. Het
voedingscontact van het apparaat moet bereikbaar blijven voor interventies in de toekomst
(reiniging, ontdooiing, enz.). Bij beschadiging van de voedingskabel moet u deze
onmiddellijk laten vervangen: neem dan contact op met onze servicedienst of uw winkelier.
De elektrische veiligheid van dit apparaat wordt enkel gegarandeerd indien het aangesloten is
op een efficiënte aarding, zoals dit vereist is door de geldende normen inzake de elektrische
veiligheid.
ELEKTRISCHE
AANSLUITING

Instelling draaiknop van koelkast
Om de binnentemperatuur te regelen moet u aan de DRAAIKNOP van de thermostaat, gelegen ter hoogte
van het instrumentenpaneel, draaien. Positie 1 stemt overeen met een temperatuur die minder koud is,
terwijl de hogere nummers overeenstemmen met koudere temperaturen. Normalerwijze volstaat een
intermediaire positie. U kan het apparaat uitschakelen door de draaiknop van de thermostaat tot op de
positie 0/STOP te draaien.
OPGELET: Het apparaat blijft ook nu onder spanning staan.
De temperaturen binnenin zijn onderhevig aan de temperatuur van de omgeving, de frequentie van
opening van de deuren en de hoeveelheid voedingswaren die zich binnenin bevinden. Naargelang deze
verschillende gevallen kan u de stand instellen die u de optimale temperatuur zal geven. In extreme
omgevingsomstandigheden is het raadzaam om de thermostaat op een verschillende manier te gebruiken.
Wanneer de omgevingstemperatuur zeer hoog is (bv. in de zomer) is het raadzaam om de draaiknop op
een lage stand in te stellen. Omgekeerd, bij koude omgevingstemperaturen is het raadzaam om de
draaiknop op de hoge nummers te plaatsen.
De geplaatste verpakkingen en
voedingswaren mogen de achterwand
van de koelruimte niet raken.
Elk voedingswaar moet voor een goede
bewaring op de juiste plaats in de
koelruimte worden geplaatst, tenzÿ de
temperatuur op bepaalde plaatsen
kouder is.
De in te vriezen voedingswaren moeten geplaatst worden op het interne rooster van het
vriesvak.
De maximale hoeveelheid die u kan invriezen staat vermeld op het plaatje met gegevens,
onder het opschrift "Capacità di congelazione/Freezing capacity/Vriescapaciteit (kg/24h)".
Plaats nooit tegelijkertijd een hoeveelheid die groter is dan de vermelde hoeveelheid.
Belangrijke opmerkingen
Bij aankoop van reeds bevroren producten
moet u op het volgende letten:
• zijn de verpakkingen goed gesloten en
werden ze niet gemanipuleerd of niet
beschadigd;
• zijn ze vrij van ijsvorming (ijsvorming
betekent dat het product volledig of
gedeeltelijk ontvrozen is geweest);
• staat de verpakkingsdatum vermeld en
de maximum bewaringsdatum voor de
verschillende toestellen (uw toestel is
van het type ****).
• tijdens het transport naar huis toe mag
het product niet ontdooien, zelfs niet
gedeeltelijk.
Steek geen bevroren producten in uw mond
die pas uit de vriesruimte werden gehaald
(ijsroom, ijslollies, ijsblokjes enz.): de zeer
lage temperatuur van deze producten zou
vrieswonden aan de tong kunnen
veroorzaken. Bij een energie-uitval van
enkele uren moet u de bevroren
voedingswaren overbrengen naar een andere
werkende vriesruimte. Ontdooide of
gedeeltelijk ontdooide voedingswaren
mogen enkel terug ingevroren worden
nadat zij bereid/gekookt werden!
24
GEBRUIK VAN HET
APPARAAT
Invriezen
Bereid deze handeling voor op een zo hygiënisch mogelijk wijze vermits invriezen uw
voedsel niet steriliseert. Het is raadzaam om uw voedingswaren in te vriezen in porties voor
één maaltijd. Plaats nooit warme of zelfs lauwe producten in de vriesruimte!
Verpak de voedingswaren in plastic zakjes, polyethyleen folie, aluminiumfolie of invriespotjes
alvorens ze in de vriesruimte te plaatsen (dit materiaal is op de markt verkrijgbaar met het
opschrift "geschikt voor invriezen").
Elke portie, potje, enz. dat in de vriesruimte wordt geplaatst moet aan de volgende eisen
voldoen:
• vermelding van de verpakkingsdatum en vervaldatum;
• vermelding van het aantal porties;
• glazen recipiënten moeten in pyrexglas vervaardigd zijn en mogen NOOIT volledig
worden gevuld (bij invriezen zetten vloeistoffen uit);
• de verpakkingen moeten samengedrukt worden om lucht te laten ontsnappen en moeten
zo plat mogelijk zijn;
• alle soorten van verpakkingen moeten gesloten worden om de voedingswaren te
beschermen.
Plaats geen verse producten in de nabijheid van reeds ingevroren producten, zodat diens
temperatuur niet verhoogd wordt.
INVRIEZEN

Ontdooiing van de vriesruimte
Ontdooi telkens u binnenin de vriesruimte ijs- en rijpvorming van meer dan 5-6 mm bemerkt.
Deze laag vermindert het koelvermogen en veroorzaakt een groter energieverbruik.
Wikkel de pas uit de vriesruimte genomen producten in krantenpapier en vervolgens in
dekens (ook thermische zakken zijn geschikt); plaats alles op een koele plaats of zelfs in een
koelkast. Trek dan de stekker uit het stopcontact.
Om de ontdooiing van het ijs te versnellen kan u een pan met heet water in de vriesruimte
plaatsen op een houten plankje.
Gebruik geen verwarmingselementen, haardrogers of andere elektrische toestellen, messen of
andere metalen voorwerpen; op die manier zou u het toestel op een onherstelbare wijze
kunnen beschadigen. Na de ontdooiing moet u zorgvuldig de instructies vermeld in het
hoofdstuk "Reiniging" volgen voor de reiniging en de terug plaatsing van de voedingswaren
in de vriesruimte.
25
Ontdooi de producten die u onmiddellijk wenst te consumeren. De ontdooiing kan volgens vier methoden
plaatsvinden:
• in de koelkast;
• bij kamertemperatuur;
• in de oven bij 40/50° of in de magnetron;
• rechtstreeks door de bereiding van het voedingsmiddel.
De ontdooiing in de koelkast is de meest langzame maar ook veiligste methode en laat u tevens toe om
energie te besparen (de koude die wordt vrijgesteld tijdens de ontdooiing komt in de koelkast terecht).
ONTDOOIEN
Ontdooiing van de koelruimte
Gebeurt automatisch en het gevormde dooiwater vloeit samen, via het drainagegat, in het
dooiwateropvangbakje GELEGEN BOVEN DE COMPRESSOR. Vervolgens zal het water
verdampen door de warmte verspreid door de compressor. Opmerking: het is mogelijk dat er
ijs of waterdruppels aanwezig zijn op de verticale achterwand van het toestel. Dit is geen
defect.
ONTDOOIING
Schoonmaken van de binnenkant
Trek de stekker uit het stopcontact alvorens gelijk welke werkzaamheid uit te voeren. Maak zowel de
ijskast als het vriesvak schoon met natriumbicarbonaat opgelost in water (1 lepel per 4 liter water).
GEBRUIK GEEN SCHUURMIDDELEN. Spoel met water en droog met een doek. Plaats de stekker in een
stopcontact. Plaats de knop van de ijskast op de geschikte bewaartemperatuur. Wacht 3/4 uur alvorens u
de
voedingswaren terugplaatst.
Schoonmaken van de buitenkant
Trek de stekker uit het stopcontact alvorens gelijk welke werkzaamheid uit te voeren. Maak de buitenkant
schoon met dezelfde methode en met dezelfde voorzichtigheid als die beschreven werd voor de
binnenkant. Denk eraan dat ook af en toe de condensator die zich op de achterkant van het toestel
bevindt moet schoongemaakt worden.
Gebruik hiervoor een droog penseel of beter nog een stofzuiger.
SCHOONMAKEN
SCHOONMAKEN

Waterdruppels op de bodem van de
koelruimte
Het draingegat van het dooiwater zit
verstopt. Maak het vrij met behulp van
bijvoorbeeld een breinaald (fig. L3).
De binnenverlichting van de koelkast
is uit
• Controleer de puntjes opgesomd in
"Het toestel koelt niet af".
• Het lampje is doorgebrand.
Vervang het lampje op de volgende
wijze: trek de stekker uit het
stopcontact, open door drukuitoefening
met een schroevendraaier het
verlichtingskastje (is via
drukmechanisme gesloten) (fig. L1);
vervang het lampje met een gelijkaardig
lampje (max 15 WATT) (fig. L2); plaats
het kastje terug. Vervang het
doorgebrande lampje enkel indien u
beschikt over een nieuwe lamp.
Ga aan de hand van de volgende controles na of u het probleem kan oplossen alvorens
technische ondersteuning te vragen.
Ongewoon lawaai - De voetjes werden NIET correct ingesteld en de vriesruimte vibreert.
De koelcapaciteit vermindert - U heeft een hoeveelheid voedingswaren geplaatst die groter
is dan de aanbevolen hoeveelheid. U heeft de deur te vaak geopend. De deur is niet goed
gesloten.
Het apparaat koelt niet af - Controleer of de stekker goed in het stopcontact steekt. Er is een
elektrische zekering in uw huis gesprongen. De hoofdzekering van uw huis is gesprongen.
De thermostaat is uitgeschakeld, de draaiknop staat op 0.
De buitenkant van de vrieskast is warm - Dit is GEEN defect, maar moet de vorming van
condensatie op de buitenkant van het toestel voorkomen.
Het ingevroren vlees vertoont witte strepen - U gebruikt een te lage temperatuur of de
vervaldatum vermeld in de tabel werd niet gerespecteerd.
Onvolledige invriezing - Het is normaal dat producten met een hoog gehalte aan suiker, vet
en alcohol (zoals ijsroom en sappen) niet volledig bevriezen maar gedeeltelijk zacht blijven.
Waterdruppels op de buitenwand van het apparaat - In de tussenseizoenen (lente en
herfst), wanneer de huisverwarming niet werkt, kan het voorkomen dat er waterdruppels
(condensatie) op de buitenwanden van het apparaat verschijnen. Dit fenomeen is niet nadelig
voor de goede werking van het apparaat en is niet gevaarlijk voor personen.
Ijs/rijpvorming aan de binnenkant - De deuren werden niet goed gesloten of werden te
vaak geopend.
Waterdruppels of ijs aanwezig op de verticale achterwand van het apparaat - Dit is geen
defect.
De deur gaat moeizaam open - Het is normaal dat de deur, vooral nadat ze juist werd
gesloten, enige weerstand biedt tegen het terug openen: dit is noodzakelijk om een perfecte
afdichting van de deuren te garanderen. Het volstaat om enkele minuten te wachten alvorens
de deuren terug te openen.
KLEINE DEFECTEN EN
ONREGELMATIGHEDEN
26

Vers Vlees
Verwijder zoveel mogelijk vet.
Wij raden aan het vlees volledig te ontdooien vóór u het bereidt. Dit voorkomt dat het vlees
aan de buitenkant sneller gaar wordt dan binnenin. Een uitzondering hierop vormen zowel
gepaneerde schnitzels, die meteen op middelhoog of laag vuur kunnen worden bereid, en
soepvlees dat gekookt wordt.
Wild en Gevogelte
Dit moet worden geplukt of gevild, de ingewanden verwijderd, eventueel in stukken gesne-
den, gewassen en gedroogd.
Vis
Bereide Levensmiddelen
Opmerking: De bewaartijd van bereide levensmiddelen wordt korter als u bij de bereiding
bacon of spek gebruikt hebt.
Plaats deze gerechten rechtstreeks in de pan of in de oven zonder ze te ontdooien.
PRODUCT HOUDBAARHEID
Kleine stukjes lamsvlees 8 maanden
Te braden varkensvlees 5 maanden
Rundersoepvlees, rosbief 10 maanden
Runderbiefstuk, ribstuk, goulasch 8 maanden
Te braden kalfsvlees 8 maanden
Kalfsschnitzel 10 maanden
Gehakt 4 maanden
Orgaanvlees 3 maanden
Braadworst 2 maanden
PRODUCT HOUDBAARHEID
Eend 4 maanden
Haas 6 maanden
Soepkip 7 maanden
Gans 4 maanden
Braadkip 10 maanden
Kalkoen 6 maanden
Orgaanvlees 3 maanden
Wilde eend 8 maanden
Snip, fazant 8 maanden
Patrijs, kwartel 7 maanden
PRODUCT HOUDBAARHEID VOORBEREIDING
Karper 2 maanden Schubben, ingewanden en kop verwijderen, wassen, droog deppen.
Snoek
Tarbot
Zalm
Makreel
Zeelt
Forel
Brasem, tong 3 maanden Huid, ingewanden en kop verwijderen, 30 seconden in koud zout
water dompelen en droog deppen
PRODUCT HOUDBAARHEID GARING
Vleesragout 3 maanden niet volledig
Tomatensaus 3 maanden volledig
Groentenstamppot 2 maanden zonder noedels
Lasagne 4 maanden niet volledig
Gebraden vlees 2 maanden volledig
Kalfshaas 1 maand niet volledig
Suddervlees 3 maanden niet volledig
Wildragout 2 maanden volledig
Gekookte vis 2 maanden volledig
Vis uit de oven 2 maanden volledig
Met vlees gevulde paprika’s, aubergines, zucchinis 2 maanden volledig
Paddestoelen, groentenmix 2 maanden volledig
Gekookte spinazie 2 maanden volledig
Pizza 6 maanden volledig
27
Invriestabellen

Bedek het fruit met suiker of siroop. De voor de conservering benodigde hoeveelheid suiker
is 250 gram suiker per kilo fruit. Voor de vruchtensiroop wordt, al naargelang het soort fruit,
een verschillende hoeveelheid suiker gebruikt. Om siroop te maken moet u water waarin sui-
ker is opgelost aan de kook brengen. De verschillende concentraties zijn:
•
30%-oplossing: 450 gram suiker per liter water
•
40%-oplossing: 650 gram suiker per liter water
•
50%-oplossing: 800 gram suiker per liter water
Om de oorspronkelijke kleur van het fruit te behouden, moet u het eerst in citroensap on-
derdompelen voor u het met suiker bedekt, of wat citroensap aan de siroop toevoegen. De
verpakte vruchten moeten eerst een uur in de koelkast tot rust komen voor u ze kunt invrie-
zen. De siroop moet het fruit volledig bedekken.
Wij raden aan om groenten met stoom te blancheren om verlies van vitaminen en mineralen
te voorkomen. Bij deze manier hoeft u niet te wachten tot de groenten droog zijn, maar is
het voldoende om ze af te laten koelen.
Wij bevelen aan om deze groenten onmiddellijk te bereiden zonder ze eerst te ontdooien.
Trek de blancheertijd van de bereidingstijd af.
(1) Voeg een beetje azijn of citroensap aan het kookwater toe.
(2) Zout de groenten voor het koken.
(3) Bij het ontdooien hebben deze groentesoorten de neiging om hun vorm te verliezen vanwege het hoge waterge-
halte. Daarom raden wij aan deze groentesoorten alleen in te vriezen wanneer zij in gekookte toestand zullen wor-
den gegeten.
Brood kan 2 maanden worden bewaard. Ontdooien bij 50 ˚C in een niet voorverwarmde oven.
Boter en kaas moet u in porties voor één week invriezen. Boter is 8 maanden houdbaar, net als
harde kaassoorten (Parmesaanse kaas). De houdbaarheid van andere kaassoorten is 4 maanden.
Ontdooien moet in de koelkast plaatsvinden, waarbij u moet letten op condenswater dat zich op
de producten vormt. De fabrikant is niet aansprakelijk voor eventuele fouten of onvolledigheden
in dit boekje en behoudt zich het recht voor om te allen tijde, zonder voorafgaande kennisgeving,
eventuele wijzigingen door te voeren, die hij om technische of commerciële redenen nodig acht.
Abrikozen 8 maanden wassen, pitten verwijderen, 40% siroop
Ananas 10 maanden schillen, snijden, 50% siroop
sinaasappelen 10 maanden schillen, snijden, 30% siroop
Kersen 10 maanden wassen, pitten verwijderen, bedekken met suiker of
30% siroop
Aardbeien 12 maanden wassen, steeltjes verwijderen, met suiker bedekken
Meloenen 12 maanden schillen, snijden, kern verwijderen, bedekken met 50%
siroop
Perziken 8 maanden schillen, pitten verwijderen, snijden, bedekken met
50% siroop
Grapefruit 12 maanden schillen, snijden, 30% siroop
Citrusvruchtensap 10 maanden uitpersen, kern verwijderen, suiker naar smaak
Druiven 12 maanden steeltjes verwijderen, wassen en bedekken met suiker
of 30% siroop
Bosbessen, braambessen,
frambozen, kruisbessen, aalbessen
10 maanden steeltjes verwijderen, wassen, met suiker bedekken
Asperges 12 maanden wassen, schillen 2 minuten
Kool, bloemkool 6 maanden schoonmaken, in stukken snijden 2 minuten (1)
Artisjokken 12 maanden buitenste bladeren verwijderen 5 minuten (1)
Witte bonen 12 maanden uit peul halen 3 minuten
Sperziebonen 12 maanden wassen, steeltjes verwijderen 4 minuten
Paddestoelen 12 maanden schoonmaken 2 minuten (1)
Aubergines 12 maanden schoonmaken, in schijven snijden 4 minuten (2)
Paprika (3) 12 maanden schoonmaken, snijden, zaadlijsten verwijderen niet blancheren
Erwten (3) 12 maanden uit peul halen en onmiddellijk in één laag invriezen, niet
blancheren daarna verpakken
Peterselie, basilicum 8 maanden wassen niet blancheren
Spinazie 12 maanden wassen 2 minuten
Gemengde soepgroeten 12 maanden snijden, in porties verdelen, blancheren, (selderij, worteltjes,
prei, rapen) geen aardappelen omdat deze zwart worden.
28

29
O aparelho foi feito para conservar e congelar alimentos para uso doméstico: qualquer outro
uso não é recomendável.
A instalação deve ser efetuada segundo as instruções do manual, uma instalação errada pode
danificar o aparelho, para quaisquer problemas de funcionamento do aparelho procurar os
centros de assistência autorizados ou, de qualquer forma, só pessoal especializado.
Antes de qualquer operação de manutenção desligar da tomada de alimentação elétrica
evitando de puxar o fio de alimentação ou o aparelho mas pegando diretamente no pino.
Conservar o manual com cuidado e da-lo ao eventual futuro proprietário do aparelho.
Para ficar de acordo com as mais recentes disposições legislativas sobre a proteção do meio
ambiente usamos em pequenas quantidades refrigerantes chamados R600a ou R134a, de
acordo com o modelo. O tipo de refrigerante vem explicitamente indicado na placa dos
dados. Para os aparelhos dotados de R600a, no caso de danos aos componentes do circuito
refrigerador (tubos etc.) se recomenda de arejar o local no qual se encontra o aparelho e não
provocar faiscas, chamas ou outras fontes de ignição por alguns minutos.
As peças que ficam em contacto com os alimentos estão em conformidade com as directivas
CEE 89/109.
Ótima escolha!
Com a compra do nosso eletrodoméstico vocês escolheram um produto confiável e de alta
qualidade, discreto, eficiente, útil: graças ao frio com que conserva os nossos alimentos a
nossa alimentação pode ser mais variada e saudável.
O seu novo aparelho é fácil de usar.
De qualquer maneira, recomendamos ler as instruções, para descobrir aqueles pequenos
macetes que lhe permitirão usar da melhor maneira possível as potencialidades do seu
aparelho economizando energia.
Certos de que o seu uso será satisfatório, esperamos sempre ter-lhes como nossos clientes.
PARABÉNS!
Se este aparelho for substituído por um outro, e se este tem fechadura de tranqueta, a mola
ou fecho etc.... lembre-se, antes de demoli-lo, de inutilizar o fecho, ou melhor ainda,
desmontar a porta para evitar que alguém fique preso dentro (crianças que brincam, animais,
etc. )
Tirar o pino da tomada e cortar o cabo de alimentação. As geladeiras e os congeladores
contém gás refrigerante e substâncias que requerem uma demolição apropriada, e contém
alem disso muitos materiais que podem ser reutilizados.
Entregue os produtos nos apropriados centros de coleta: o seu município poderá dar as
indicações necessárias para uma demolição ecologicamente correta.
DESMANCHE DO APARELHO USADO
A marcação CE atesta que este aparelho corresponde às Directivas Europeias 89/336
(compatibilidade electromagnética), 73/23 (baixa tensão), 96/57 (eficiência energética) e suas
modificações.
NORMAS DE SEGURANÇA
INDICE
PROCEDIMENTO PARA A LIGAÇÃO
NORMAS DE SEGURANÇA
CONHECER O SEU APARELHO
REVERSIBILIDADE DAS PORTAS
INSTALAÇÃO DO APARELHO
COMO ECONOMIZAR ENERGIA
LIGAÇÃO ELÉCTRICA
USO DO APARELHO
CONGELAMENTO
DESCONGELAMENTO
DESCONGELAMENTO
LIMPEZA
PEQUENOS PROBLEMAS E ANOMALIAS
DESMANCHE DO APARELHO USADO

A abertura das portas normalmente é a
esquerda ( dobradiça a direita); se por uma
exigência pessoal se quer transferir para a
direita, pode-se fazer a modificação na
maneira ilustrada a seguir:
1.
Deitar delicadamente o aparelho para
trás ( portas viradas para cima).
2.
Retirar o pedestal ( puxando-o para
cima) ( 3 )
3.
Desparafusar as duas dobradiças
inferiores A e B (4/5)
4.
Remover o pino da dobradiça A e
recolocar na B (6)
5.
Tirar a porta do congelador da
dobradiça intermediaria C (fig. 7).
6.
Desparafusar a dobradiça C (8) e fechar
os furos com as tampas que foram tiradas da
esquerda.(9).
30
LEGENDA
A Parte congelador
B Parte frigorífero
C Pedestal *
D Manopla termostato
E Caixa de luz
F Alavanca de luz
G Compartimentos
H Porta-garrafas
I Gaveta para verdura
L Furo de drenagem da água
M Pézinhos reguláveis
N Compressor
O Recipiente de coleta de água
P Condensador
Desenho somente ilustrativo
Conhecer o seu aparelho
Reversibilidade das
portas

31
Se o aparelho tem manilhas verticais,
desparafusar do lado esquerdo e
parafusar do lado direito deslocando as
tampas de proteção que fecham os
furos.
Reversibilidade das manilhas
7. Tirar a porta do congelador do pino da
dobradiça superior D (10)
8. Desparafusar o pino da dobradiça D
(11) e montar a mesma à esquerda (12)
9. Colocar a porta do congelador no pino
da dobradiça D(13)
10. Tirar da dobradiça C o pino P, agora a
direita, e coloca-lo na posição da
esquerda (14)
11. Parafusar a dobradiça C a esquerda e
recolocar a porta na geladeira (15)
12. Parafusar a dobradiça A e B, já
modificada no ponto 4, no lugar de
origem (16)
13. Tirar a lignueta E da sua posição
esquerda do pedestal e recolocar na
posição da direita (17).
14. Recolocar o pedestal, e recolocar o
aparelho na posição vertical.

32
Se a aparelhagem foi transportada para a sua casa na posição horizontal, esperar
algumas horas antes de ligar o pino a eletricidade, para permitir ao óleo de refluir no
compressor.
Proceder a limpeza interna (ver, Limpeza Interna) e depois ligar o seu aparelho a
corrente elétrica sem usar redutores (ver LIGAÇÃO ELÉTRICA).
Regular o termostato na posição de conservação mais adequada para vocês (ver, USO DO
APARELHO).
Procedimento para a ligação
Este aparelho oferece o melhor desempenho quando a temperatura ambiente é compreendida
entre 16 e 32 °C.
Depois de desembalar o aparelho, controlar que não seja danificado. Eventuais danos vão
sinalizados imediatamente ao revendedor.
Não sujar o ambiente com as partes da embalagem (sacos de plástico, pedaços de isopor, etc.
) nem deixar à mão das crianças.
Se o aparelho foi transportado em posição horizontal para a sua casa, esperar umas
duas horas antes de ligar na tomada, permitindo ao óleo de refluir no compressor.
Colocar o aparelho em um ambiente seco e arejado, protegido dos agentes atmosféricos.
Evitar balcões, varandas, terraços, o calor excessivo no verão e o frio no inverno podem
alterar o funcionamento do aparelho ou mesmo danifica-lo.
Não colocar perto de uma fonte de calor como um forno ou uma caldeira e manter uma
distância mínima entre os móveis de 3/5 cm nas laterais e 10 cm na parte superior.
Colocar o aparelho longe da parede usando um afastador apropriado que deve ser montado
na parte posterior.
Regular os pézinhos anteriores de forma que o aparelho fique levemente inclinado
para trás: esta maneira facilita o bom fechamento da porta.
Limpar internamente usando bicarbonato de sódio dissolvido em água ( uma colher para
cada 4 litros de água). Não usar álcool, pós abrasivos ou detergentes, porque podem estragar
as superfícies.
Instalação do aparelho
A primeira maneira para economizar energia é escolher bem o lugar onde colocar o aparelho,
como explicado na parte dedicada a instalação.
A segunda maneira para economizar energia é não permitir a entrada de calor nos
compartimentos, logo ficar com a porta aberta o menor tempo possível, e não colocar
alimentos quentes, sobretudo se forem sopas ou similares que liberam uma grande
quantidade de vapor. Controlar periodicamente as guarnições das portas e ter certeza que se
fecham sempre de maneira eficaz, caso contrario procurar um centro de assistência.
A terceira maneira para economizar energia é manter eficiente as partes que trocam calor
não deixando acumular muito gelo no congelador (descongelar quando a espessura do gelo
superar 1-2cm, no caso de aparelhos no-frost isto não é necessário) e limpar periodicamente
o condensador como indicado mais para frente neste manual.
Como economizar
energia
Ter certeza que a tensão elétrica (Volt, V) da tomada de alimentação corresponda aquela
escrita na placa de identificação que se encontra dentro do aparelho.
No caso de incompatibilidade entre a tomada e o pino do aparelho, não usar
adaptadores, tomadas múltiplas ou extensões mas fazer substituir o pino com um
outro adequado, pelo pessoal qualificado.
A tomada que alimenta o aparelho deve ser acessível para intervenções futuras ( limpeza,
descongelamento, etc. )
Em caso de dano ao cabo, substituir tempestivamente procurando os centros especializados
para a compra do cabo e para a sua montagem.
A segurança elétrica deste aparelho é dada por uma eficaz instalação de fio terra como
previsto das atuais normas de segurança elétrica.
Ligação eléctrica

Regulagem botão da geladeira
Para regular a temperatura interna girar o BOTÃO termostato que se encontra na zona dos comandos. A
posição 1 corresponde a temperatura menos fria, números maiores sempre as temperaturas mais frias.
Normalmente se usa uma posição intermediária.
Para desligar o aparelho girar o botão do termostato até a posição 0/ Stop.
ATENÇÃO: o aparelho continua sob tensão.
As temperaturas internas são influenciadas pela temperatura ambiente, pela freqüência com que se abrem
as portas, pela quantidade de alimentos colocados. De acordo com cada caso se pode escolher a posição
que lhes garanta uma temperatura ótima.
Em condições ambientais extremas é oportuno usar o termostato de maneira diferente.
Quando a temperatura ambiente é muito alta(ex. de verão) é aconselhável colocar o botão nos números
baixos. Vice e versa, se a temperatura ambiente é muito fria é aconselhável regular o botão nos números
mais altos.
As embalagens e os alimentos
colocados nas prateleiras não devem
encostar na parte posterior da cela.
Cada alimento deve ser colocado no
lugar certo já que, na geladeira, a
temperatura é em alguns pontos mais
fria com a finalidade de conservar
melhor.
Os alimentos a serem colgelados devem ser colocados na grelha dentro do compartimento de
congelamento
A quantidade máxima de alimentos que podem ser congelador está escrito na placa de dados
na parte "capacidade de congelamento/Freezing capacity (kg/24h)". Nunca colocar uma
quantidade superior toda de uma vez.
O aparelho sairá automaticamente da posição de "super" depois de 3 dias.
Observações Importantes
Quando se compra produtos já congelados,
verificar que:
• as embalagens estejam bem fechadas e
não violadas ou danificadas;
• não apresentem pedaços de gelo (isto
quer dizer que já sofreram um
descongelamento mesmo que parcial);
• apresentem a data de embalagem e a
data máxima de conservação de acordo
com os vários tipos de aparelhos (o seu
é ****).
Não colocar na boca os produtos congelados
apenas tirados do congelador (sorvetes,
picolés, cubos de gelo, etc.): a baixíssima
temperatura na qual se encontram poderia
causar queimaduras de frio, possíveis lesões
na língua.
No caso em que falte corrente por muitas
horas, providenciar a transferência dos
alimentos congelados em um outro
congelador, que funcione.
Se os alimentos se descongelaram,
mesmo parcialmente, recongelar
somente depois de tê-los cozinhado.
33
Uso do aparelho
Congelamento
Preparar-se para esta operação com as melhores condições de higiene enquanto o
congelamento não esteriliza.
É a aconselhável congelar os alimentos subdividindo em embalagens que possam ser
consumidas em uma só refeição.
Não introduzir nunca alimentos quentes, nem mornos!
Embalar os alimentos antes de colocar no congelador em saquinhos de plástico, folhas de
polietileno, folhas de alumínio ou caixas para congelamento ( este material se encontra no
comércio com a indicação "adequado ao congelamento").
Cada pacote, caixa, etc. , que se coloca no congelador deve conter os seguintes requisitos:
• a data de embalagem e validade;
• número de porções que contém;
• as embalagens de vidro devem ser do tipo pirex e NUNCA completamente cheias( o
congelamento dilata os líquidos);
• as embalagens vão comprimidas para eliminar o ar de dentro e para ficar o mais achatada
possível.
Cada embalagem. do que quer que seja, deve ser fechada para proteger os alimentos.
Não aproximar alimentos frescos àqueles já congelados para não causar a estes últimos um
aumento da temperatura.
Congelamento

Descongelamento do congelador
Realizar o descongelamento toda vez que se nota dentro do congelador a formação de geada
e de gelo superior a 5-6mm. Tal camada reduz o poder de resfriamento e causa um maior
consumo de energia.
Enrolar os produtos apenas tirados em folha de jornal, depois em cobertas ( também vão bem
as bolsas térmicas); recolocar tudo em local fresco ou mesmo na geladeira.
Concluída esta operação, desligar o pino de alimentação elétrica.
Para favorecer e acelerar a liquidificação do gelo, colocar uma panela de água quente dentro
do congelador isolando-a, no fundo, com um suportezinho de madeira.
Não usar aquecedores, secadores de cabelo ou outros aparelhos elétricos, facas ou outros
objetos de metal: pode-se danificar irremediavelmente o aparelho. Feito o descongelamento
para realizar a limpeza e a recolocação dos produtos no congelador seguir escrupulosamente
as indicações do capítulo "Limpeza".
34
Descongelar os produtos só pára um uso imediato. O descongelamento pode ser feito de 4
maneiras:
• na geladeira;
• temperatura, ambiente;
• em forno a 40/50º com microondas;
• diretamente no fogo.
O descongelamento na geladeira é mais lento mas é a mais seguro e permite economizar
energia (o frio do alimento congelado é utilizado pela geladeira).
Descongelamento
Descongelamento da geladeira
É automático e a água que se forma é canalizada, através do furo de drenagem, no
tanquezinho de recolhimento da ÁGUA COLOCADO EM CIMA DO COMPRESSOR. Em
seguida a água evapora por causa do calor transmitido pelo compressor. Obs: gotas de água
ou gelo na parede vertical no fundo da geladeira não constituem defeito.
Descongelamento
Limpeza Interna
Antes de cada operação desligar o pino da tomada de energia elétrica.. Realizar a limpeza da geladeira
como do freezer usando bicarbonato de sódio dissolvido em água ( 1 colher para cada 4 litros de água).
NÃO USAR DETERGENTES ABRASIVOS. Enxaguar com água e enxugar com um pano. Colocar o pino na
tomada. . Colocar a manopla do frigorifero na temperatura de conservação. Esperar ¾ horas antes de
colocar alimentos.
Limpeza Externa
Antes de cada operação desligar o pino da tomada de energia elétrica. Para a limpeza externa usar os
mesmos métodos e a mesma delicadeza usada para a limpeza interna. Lembrar, de vez em quando, de
limpar o condensador que se acha na parte de traz do aparelho. Para esta limpeza, usar um pincel seco
ou, melhor ainda, um aspirador de pó.
LIMPEZA

Gotas de água no fundo da cela
frigorífera.
O furo de drenagem da água está
entupido. Limpa-lo com a ajuda de um
ferrozinho .(fig.L3)
A luz interna dentro da geladeira
está desligada
• Controlar os pontos indicados na
seção "o aparelho não esfria"
• A lâmpada está queimada.
Fazer a substituição da seguinte
maneira: tirar o pino da corrente
elétrica, usar uma chave de fenda como
alavanca na caixa de luz ( é colocada a
pressão) (fig. L1) substituir a
lâmpadazinha com uma igual (15 WATT
max. ) (fig.L2); recolocar a caixa. Tirar a
lâmpadazinha queimada somente se
tivermos uma pronta para a
substituição.
Antes de chamar o serviço de assistência, verificar se pode eliminar o problema com base
nos seguintes controles.
Rumores estranhos - Os pezinhos do congelador NÃO foram regulados corretamente e o
congelador vibra.
A potência de resfriamento diminui - Uma quantidade de alimentos maior do que o
aconselhável foi colocada no congelador. A porta foi aberta em excesso. A porta não foi
fechada bem.
O aparelho não resfria - Controlar que o pino esteja ligado na tomada. Um fusível da
instalação da casa esta queimado. O interruptor geral da sua casa saltou. Termostato
desligado e manopla em 0.
Exterior do móvel quente - NÃO é um defeito, mas serve para prevenir a formação de
condensa na parte externa do aparelho.
As carnes congeladas tem estrias esbranquiçadas - Esta se usando temperaturas muito
baixas ou não foi respeitado a data de validade indicadas nas tabelas.
Congelamento incompleto - É normal que produtos que contém muito açúcar, gordura e
álcool como os sorvetes ou sucos não congelem completamente e continuem parcialmente
moles.
Gotas de água nas paredes externa do aparelho - Nas estações intermediárias, primavera e
outono, quando o aquecimento doméstico não esta funcionando, pode acontecer que as
paredes externas do aparelho fiquem cobertas de gotinhas de água (condensa). O fenômeno
não compromete o bom funcionamento do aparelho e não é perigoso para o ser humano.
Formação de geada na parte interna - As portas não foram bem fechadas. As portas foram
abertas com muita freqüência.
Gotas de água ou gelo na parede vertical no fundo do refrigerador - Não constitui um
defeito.
A porta se abre com dificuldade - É normal que, especialmente depois de ter apenas sido
fechada, a porta ofereça uma certa resistência à abertura: isto serve para garantir uma perfeita
vedação da porta. É suficiente esperar alguns minutos antes de reabrir.
Pequenos problemas e
anomalias
35

Carne fresca
É aconselhável descongelar completamente a carne antes de cozinhá-la, de modo a evitar que coza mais
depressa no exterior do que no interior, à excepção dos bifes panados, que podem ser colocados
directamente a cozer a lume baixo/médio.
Aves domésticas
Deve tirar as penas, a pele e as tripas, cortar em pedaços, lavar e secar.
Aves de caça
Deve tirar as penas, a pele e as tripas, cortar em pedaços, lavar e secar.
Peixe
Alimentos cozidos
O prazo de conservação dos alimentos cozidos é reduzido se usar condimentos como bacon ou banha.
Colocar directamente no lume ou no forno sem descongelar.
PRODUTO LIMITE DE CONSERVAÇÃO
Pedaços de cordeiro 8 meses
Carne de porco assada 5 meses
Costeletas de porco 4 meses
Cozido de carne, rosbife 10 meses
Vitelo, bifes, costeletas, guisado
8 meses
Vitelo assado
Bifes de vitelo, lombo 10 meses
Carne picada 4 meses
Miudezas 3 meses
Salsichas 2 meses
PRODUTO LIMITE DE CONSERVAÇÃO
Pato 4 meses
Coelho 6 meses
Galinha para canja 7 meses
Ganso 4 meses
Frango 10 meses
Peru 6 meses
Miudezas 3 meses
PRODUTO LIMITE DE CONSERVAÇÃO
Pato selvagem
8 mesesGalinhola
Faisão
Lebre 6 meses
Perdiz
8 meses
Codorniz
PRODUTO LIMITE DE
CONSERVAÇÃO
PREPARAÇÃO
Carpa
2 meses Escamar, tirar as tripas e a cabeça, lavar, secar e congelar
Lúcio
Rodovalho
Salmão
Cavala
Tenca
Truta
Dourada
3 meses
Escamar, tirar as tripas e a cabeça, lavar, colocar em água fria com sal durante
30 segundos, secar e congelar
Solha
PRODUTO LIMITE DE
CONSERVAÇÃO
PREPARAÇÃO DOS PRATOS
Molho de carne
3 meses
Não completa
Molho de tomate Completa
Sopa de legumes 2 meses Sem massas
Lasanha 4 meses Não completa
Carne assada 2 meses Completa
Ossobuco (osso com tutano) 1 mês
Não completa
Estufado de carne 3 meses
Animais de caça à salmis
2 meses
Completa
Peixe cozido
Peixe assado no forno
Pimentão, beringelas, aboborinhas recheadas com
carne
Cogumelos de fricassé, molho de pimentão
Não completa
Espinafres cozidos
Pizza 6 meses Completa
36
Tabelas de Congelação

É aconselhável cozer os legumes a vapor, para conservar as vitaminas e os minerais. Assim, não será
necessário aguardar que sequem antes de os congelar. Deixe-os apenas arrefecer.
Em geral, é melhor cozinhar os legumes directamente sem os descongelar. Reduza os tempos de
cozedura, tendo em consideração a fervura realizada antes da congelação.
A fruta deve ser coberta com açúcar ou xarope, conforme os casos. A quantidade de açúcar a utilizar
para a conservação é de cerca de 250 gramas por quilo de fruta. Os xaropes devem ser utilizados
em diferentes percentagens e são preparados fervendo água com um pouco de açúcar já derretido. As
várias concentrações são:
•
30% solução, 450 gramas de açúcar para cada litro de água;
•
40% solução, 650 gramas de açúcar para cada litro de água;
•
50% solução, 800 gramas de açúcar para cada litro de água.
Para que a fruta não perca a cor, deite-a num sumo de limão antes de cobri-la com açúcar, ou então
acrescente sumo de limão ao xarope. A fruta a congelar precisa de estar uma hora no frigorífico antes de
ser colocada no congelador. O xarope deve cobrir totalmente a fruta.
Conserva-se durante 2 meses. Descongele o pão no forno a 50˚ C., colocando-o antes de ligar o
mesmo.
Antes de congelar manteiga e queijo, corte-os em pedaços segundo o consumo semanal. A manteiga
conserva-se durante 8 meses, assim como os queijos duros (por ex. parmesão), os outros queijos 4
meses. A descongelação deve ser feita no frigorífico, tendo em atenção a condensação que
inevitavelmente se formará nesses produtos.
Espargos 12 meses Lavar, retirar as partes mais duras 2 minutos
Couves, couve-flor 6 meses Lavar, cortar em pedaços 2 minutos
(1)
Alcachofras
12 meses
Retirar as folhas exteriores 6 minutos (1)
Feijões Retirar a casca 3 minutos
Feijão verde Lavar, retirar o pedúnculo 4 minutos
Cogumelos Lavar 2 minutos
(1)
Beringelas Lavar, cortar em fatias 4 minutos (2)
Pimentão (3) Lavar, cortar em fatias, tirar as pevides
Não ferver
Ervilhas, Tomates (3)
Descascar, dispor imediatamente numa única
camada, embalar e congelar
Salsa, manjericão 8 meses
Lavar
Espinafre
12 meses
2 minutos
Variedade de legumes para
sopa (aipo, cenouras,
beterraba, alho-porro, etc.)
Lavar, cortar em pedaços, dividir em porções.
Não colocar batatas pois enegrecem
Não ferver
(1) Deite um pouco de vinagre ou de limão na água de cozedura (água acidulada)
(2) Salgar antes de cozinhar.
(3) Durante a descongelação, os legumes desfazem-se devido ao elevado conteúdo de água que possuem. É aconselhável
congelar apenas se pretender consumir os produtos cozidos
Damascos 8 meses Lavar, descaroçar, 40% xarope
Ananás
10 meses
Descascar, cortar em fatias, 50% xarope
Laranjas Descascar, cortar em fatias, 30% xarope
Cerejas Lavar, descaroçar, cobrir com açúcar ou com 30% xarope
Morangos
12 meses
Lavar, tirar os pedúnculos e cobrir com açúcar
Melão Descascar, cortar em fatias, tirar as pevides e cobrir com 30% xarope
Pêssegos 8 meses Descascar, descaroçar, cortar em fatias e cobrir com 50% xarope
Toranja 12 meses Descascar, cortar em fatias, 30% xarope
Sumo de limão 10 meses Espremer, tirar as pevides, adoçar a gosto
Ameixas
12 meses
Descascar, descaroçar, cobrir com açúcar ou com 50% xarope
Uvas
Separar as uvas do cacho, lavar, cobrir com açúcar ou com 30%
xarope
Murtinhos, amoras,
groselhas, framboesas
10 meses Lavar, tirar os pedúnculos, cobrir com açúcar
37

38
Η συσκευή είναι κατάλληλη για να συντηρεί και να καταψύχει τρόφιµα οικιακής χρήσης:
οποιαδήποτε άλλη χρήση είναι ανάρµοστη.
Η εγκατάσταση πρέπει να γίνει ανάλογα µε τις οδηγίες του εγχειριδίου, διότι µία λανθασµένη
εγκατάσταση µπορεί να προκαλέσει ζηµιά στην συσκευή. Για ενδεχόµενα προβλήµατα
λειτουργίας της συσκευής, θα
πρέπει να απευθύνεστε στα εξουσιοδοτηµένα κέντρα τεχνικών
υπηρεσιών ή αποκλειστικά και µόνον σε εξειδικευµένο προσωπικό.
Πριν από κάθε ενέργεια συντήρησης, πρέπει να βγάζετε το φις της ηλεκτρικής τροφοδοσίας,
αποφεύγοντας να τραβάτε το καλώδιο της τροφοδοσίας ή την συσκευή αλλά βγάζοντας
κατευθείαν το φις. ∆ιατηρείτε το εγχειρίδιο µε επιµέλεια
και το δίνετε στον ενδεχόµενο
µελλοντικό κάτοχο της συσκευής.
Για να είµαστε στην ίδια γραµµή µε τις πιο πρόσφατες νοµοθετικές διατάξεις που αφορούν την προστασία
του περιβάλλοντος, χρησιµοποιούµε σε µικρή ποσότητα ψυκτικά στοιχεία τα οποία ονοµάζονται R600a ή
R134a ανάλογα µε το µοντέλο. Ο τύπος του ψυκτικού στοιχείου φαίνεται καθαρά στην πινακίδα των
στοιχείων. Για τις συσκευές
που είναι εφοδιασµένες µε το R600a, στην περίπτωση ζηµιών στα συστατικά
του κυκλώµατος του ψυγείου (σωλήνες κ.λ.π.) συνιστάται να αερίζετε τον χώρο στον οποίο βρίσκεται η
συσκευή και να µην προκαλείτε φλόγες, σπίθες ή οποιαδήποτε άλλη πηγή ανάµµατος για λίγα λεπτά.
Τα µέρη που προορίζονται για
επαφή µε τα τρόφιµα, είναι ανάλογα µε το D.L. αρ. 108 της 25/01/1992 και
µε την ντιρεκτίβα CEE 89/109.
Τέλεια επιλογή !
Με την αγορά της δικής µας ηλεκτρικής οικιακής συσκευής, έχετε επιλέξει ένα προϊόν
εµπιστοσύνης και υψηλών επιδόσεων, διακριτικό, αποτελεσµατικό, χρήσιµο: χάρη στην ψύξη
του η οποία συντηρεί τις τροφές, η διατροφή µας είναι διαφόρων ποικιλιών και περισσότερο
υγιεινή.
Η νέα συσκευή σας είναι εύκολη στην χρήση. Σας
παρακαλούµε πάντως να διαβάσετε
προσεκτικά τις οδηγίες, µε τρόπο ώστε να ανακαλύψετε ορισµένα µικρά τεχνάσµατα που θα
σας επιτρέψουν να εκµεταλλευτείτε όσο το δυνατόν περισσότερο, τις δυνατότητες της
συσκευής σας εξοικονοµώντας ενέργεια.
Είµαστε βέβαιοι ότι η χρησιµότητα της συσκευής θα σας ικανοποιήσει και ευχόµαστε
να σας
έχουµε πάντα ως δικούς µας πελάτες.
Εάν αυτή η συσκευή πρόκειται να αντικαταστήσει µία άλλη µε κλείσιµο πιέσεως, ελατηρίου,
κλειδαριάς, κτλ., θυµηθείτε, πριν να την συντρίψετε, να αχρηστεύσετε το κλείσιµο ή καλύτερα
να ξεµοντάρετε την πόρτα για να αποφύγετε το ενδεχόµενο πως κάποιος µπορεί να
παγιδευτεί (παιδιά που παίζουν, ζώα, κτλ.).
Βγάζετε το
φις από την πρίζα και κόβετε το καλώδιο της τροφοδοσίας. Τα ψυγεία και οι
καταψύκτες περιέχουν ψυκτικά αέρια και ουσίες που απαιτούν µία σωστή αποχέτευση,
επιπλέον περιέχουν πολλά υλικά τα οποία µπορούν να ανακυκλωθούν.
∆ίνετε τα προϊόντα στα ειδικά κέντρα συλλογής: ο ∆ήµος σας µπορεί να σας δώσει τις
απαραίτητες
ενδείξεις για µία αποχέτευση οικολογικά σωστή.
PTES T ETAES SSE
Το σήµα CE πιστοποιεί την αντιστοιχία αυτής της συσκευής µε τις Ευρωπαϊκές Ντιρεκτίβες, 89/336
(ηλεκτροµαγνητική προσαρµογή), 73/23 (χαµηλή τάση), 96/57 (ενεργειακή αποδοτικότητα) και µε τις
τροποποιήσεις τους.
∆ιαδικασία Ενόρξεως
#$%&' &$$ ()
Γνωρίζετε Την Συσκευή Σας
Εγκατόσταση
Πως Εξοικονοµείτε Ενέργεια
Ηλεκτρική Σύνδεση
Χρήση Της Συσκευής
Κατάψυξη
Îεπόγωµα
Απόψυξη
Καθαριοτητα
Ìικρές Βλόβες Και Ανωµαλίες
P'TE*S+ T+ -ETAE%/%S-$+
S*S&E*

Το άνοιγµα στις πόρτες κανονικά γίνεται από
αριστερά (µεντεσέδες δεξιά), εάν για να
ικανοποιήσετε τις δικές σας ανάγκες,
επιθυµείτε να ανοίγετε την πόρτα από δεξιά,
µπορείτε να προχωρήσετε στην τροποποίηση
της µε τον τρόπο που φαίνετε στην συνέχεια.
1. Ξαπλώνετε προσεκτικά την συσκευή
προς τα πίσω (πόρτες γυρισµένες προς
τα
πάνω).
2. Βγάζετε το υπόβαθρο (τραβώντας
προς τα πάνω) (3)
3. Ξεβιδώνετε τους δύο κατώτερους
µεντεσέδες Α και Β (4/5)
4. Ξηλώνετε το στήριγµα από τον
µεντεσέ Α και το περνάτε στον Β (6)
5. Ξηλώνετε την πόρτα του ψυγείου
από τον ενδιάµεσο µεντεσέ C (7)
6. Ξεβιδώνετε τον µεντεσέ C (8) και
κλείνετε τις οπές µε
τις τάπες που θα βγάλετε
από αριστερά (9)
39
ΠΕΡΙΕΧΟΜΕΝΑ
A
Μέρος καταψύκτη
B
Μέρος ψυγείου
C
Υπόβαθρο*
D
∆ιακόπτης θερµοστάτη
E
Κουτί φωτός
F
Μοχλός φωτός
G
Μπαλκονάκια
H
Θήκη για µπουκάλια
I
Συρτάρι λαχανικών
L
Οπή αποστράγγισης νερού
M
Ρυθµιζόµενα πόδια
N
Συµπιεστής
O
Λεκανάκι συλλογής νερού
P
Συµπυκνωτής
Σχέδιο µόνο ερµηνευτικό
Γνωρίζετε Την Συσκευή
Σας

40
,
,
.
!"
7. Ξηλώνετε την πόρτα του καταψύκτη
από τον πάνω µεντεσέ D(10).
8. Ξηλώνετε το στήριγµα από τον µεντεσέ
D (11) και το συναρµολογείτε στην
αριστερή πλευρά (12).
9. Περνάτε την πόρτα του καταψύκτη στο
στήριγµα του µεντεσέ D (13).
10. Ξηλώνετε από τον µεντεσέ C το
στήριγµα P, τώρα δεξιά και το περνάτε
στην αριστερή έδρα (14).
11. Βιδώνετε τον µεντεσέ
C στην αριστερή
πλευρά και ξαναπερνάτε την πόρτα του
ψυγείου(15).
12. Βιδώνετε και πάλι τους µεντεσέδες Α
και Β, που ήδη έχουν τροποποιηθεί στο
σηµείο 4, στις αρχικές έδρες (16).
13. Ξηλώνετε την γλωσσίτσα Ε από την
αριστερή έδρα του υπόβαθρου και την
ξαναπερνάτε στην δεξιά έδρα (17).
14. Ξαναπερνάτε το υπόβαθρο και
επαναφέρετε την συσκευή στην
κάθετη
θέση.

41
Εάν η συσκευή έχει µεταφερθεί στο σπίτι σας σε οριζόντια θέση, περιµένετε δύο ώρες πριν
να βάλετε το φις στην ηλεκτρική πρίζα, ούτως ώστε να δώσετε τον απαραίτητο χρόνο για να
τρέξει το λάδι στον συµπιεστή. Συνεχίζετε µε την εσωτερική καθαριότητα (βλέπε Εσωτερική
καθαριότητα) έπειτα συνδέετε την συσκευή σας µε
την ηλεκτρική πρίζα χωρίς να
χρησιµοποιήσετε προσαρµοστές (βλέπε ΗΛΕΚΤΡΙΚΗ ΣΥΝ∆ΕΣΗ).
Ρυθµίζετε τον θερµοστάτη στην θέση της συντήρησης που επιθυµείτε (βλέπε ΧΡΗΣΗ ΤΗΣ
ΣΥΣΚΕΥΗΣ).
∆ιαδικασία Ενόρξεως
Αυτή η συσκευή προσφέρει τις καλύτερες αποδόσεις, γιατί η θερµοκρασία περιβάλλοντος
συµπεριλαµβάνεται µεταξύ 16°C και 32°C.
Αφού πριν έχετε βγάλει την συσκευή από την συσκευασία της, ελέγχετε ότι δεν έχει υποστεί καµία ζηµιά.
Ενδεχόµενες ζηµιές θα πρέπει να επισηµανθούν αµέσως στον µεταπωλητή.
Μην σκορπάτε στο περιβάλλον τα τεµάχια της συσκευασίας (πλαστικά σακουλάκια, λωρίδες φελιζόλ, κτλ.)
και µην τα αφήνετε στην
διάθεση των παιδιών.
Εάν η συσκευή έχει µεταφερθεί στο σπίτι σας σε οριζόντια θέση, περιµένετε δύο ώρες πριν να βάλετε το
ηλεκτρικό φις στην πρίζα, ούτως ώστε να δώσετε τον απαραίτητο χρόνο στο λάδι για να τρέξει στον
συµπιεστή. Τοποθετείτε την συσκευή σε ένα χώρο στεγνό και µε καλό
εξαερισµό, προστατευµένο από τους
ατµοσφαιρικούς παράγοντες.
Αποφύγετε τα µπαλκόνια, τις βεράντες και τις ταράτσες: η υπερβολική ζέστη του καλοκαιριού και το κρύο
του χειµώνα, µπορούν να παραποιήσουν την λειτουργία της συσκευής ή κυριολεκτικά να την χαλάσουν.
Μην την τοποθετείτε κοντά σε µία εστία θερµότητας όπως ένας φούρνος
ή ένα καλοριφέρ και κρατάτε µία
ελάχιστη απόσταση από τα άλλα έπιπλα των 3/5 cm για τις πλευρές και 10 cm επάνω.
Κρατάτε την συσκευή σε απόσταση από τον τοίχο διαµέσου µηχανισµών που κρατούν την απόσταση και
που πρέπει να συναρµολογήσετε στην πίσω πλευρά.
Ρυθµίζετε τα µπροστινά πόδια µε τρόπο ώστε
η συσκευή να κλίνει ελαφρά προς τα πίσω: µε αυτό τον
τρόπο θα διευκολύνετε το σωστό κλείσιµο της πόρτας.
Την καθαρίζετε εσωτερικά χρησιµοποιώντας σόδα του φαγητού διαλυµένη σε νερό (1 κουτάλι για κάθε 4
λίτρα νερού): Μην χρησιµοποιείτε οινόπνευµα, σκόνες που χαράζουν ή απορρυπαντικά, γιατί µπορούν να
καταστρέψουν τις
επιφάνειες.
Εγκατόσταση
Ο πρώτος τρόπος για να εξοικονοµείτε ενέργεια είναι να διαλέξετε σωστά την θέση όπου θα τοποθετήσετε
την συσκευή, όπως εξηγείται στο µέρος που είναι αφιερωµένο στην εγκατάσταση. Ο δεύτερος τρόπος για
να εξοικονοµείτε ενέργεια είναι να µην επιτρέπετε την είσοδο θερµότητας στα χωρισµένα τµήµατα:
επο
µένως κρατάτε ανοιχτές τις πόρτες όσο το δυνατόν για πολύ µικρό χρονικό διάστηµα και µην βάζετε
φαγητά που είναι ακόµη ζεστά, πάνω απ’όλα όταν πρόκειται για σούπες ή παρόµοια που βγάζουν µία
µεγάλη ποσότητα ατµού. Ελέγχετε κατά περιόδους τα πλαίσια στις πόρτες για να είστε σίγουροι
ότι
κλείνουν πάντα µε τον σωστό τρόπο, στην αντίθετη περίπτωση θα πρέπει να απευθύνεστε στο κέντρο
τεχνικής εξυπηρέτησης. Ο τρίτος τρόπος για να εξοικονοµείτε ενέργεια είναι να διατηρείτε αποδοτικά τα
τµήµατα τα οποία ανταλλάσσουν την θερµότητα: µην επιτρέπετε να µαζεύεται υπερβολική πάχνη στον
καταψύκτη (κάνετε την απόψυξη όταν
το πάχος της πάχνης ξεπερνάει τα 1-2 cm., στην περίπτωση
συσκευών no-frost αυτό δεν είναι απαραίτητο) και καθαρίζετε κατά περιόδους τον συµπυκνωτή ανάλογα µε
τις ενδείξεις που αναφέρονται παρακάτω στο εγχειρίδιο.
Πως Εξοικονοµείτε
Ενέργεια
Σιγουρευτείτε ότι η ηλεκτρική τάση (Volt, V) της πρίζας τροφοδοσίας ανταποκρίνεται σε ότι
αναφέρεται στην πινακίδα µε τα στοιχεία η οποία βρίσκεται στο εσωτερικό της συσκευής σας.
Στην περίπτωση που δεν ταιριάζουν µεταξύ τους η πρίζα και το φις της συσκευής, µην
χρησιµοποιείτε προσαρµοστές, πολλαπλές πρίζες ή προεκτάσεις αλλά ζητείτε να γίνει
η
αλλαγή της πρίζας, µε µία άλλη κατάλληλου τύπου, από εξειδικευµένο προσωπικό.
Η πρίζα η οποία τροφοδοτεί την συσκευή πρέπει να παραµείνει εφαρµόσιµη για µελλοντικές
επεµβάσεις (καθαριότητα, απόψυξη, κτλ.). Στην περίπτωση που έχει χαλάσει το καλώδιο,
πρέπει να προβλέψετε έγκαιρα για την αντικατάσταση του, απευθυνόµενοι
στα ειδικά κέντρα
για την αγορά του καλωδίου και για την συναρµολόγησή του.
Η ηλεκτρική ασφάλεια αυτής της συσκευής, είναι εξασφαλισµένη µόνο όταν αυτή είναι
συνδεδεµένη σε µία αποτελεσµατική εγκατάσταση γείωσης, όπως προβλέπεται από τους
ισχύοντες κανονισµούς της ηλεκτρικής ασφαλείας.
Ηλεκτρική Σύνδεση

Ρύθµιση ∆ιακόπτη Ψυγείου
Για να ρυθµίζετε τις εσωτερικές θερµοκρασίες, περιστρέφετε τον ∆ΙΑΚΟΠΤΗ θερµοστάτη που βρίσκεται
στην περιοχή των χειρισµών. Η θέση 1 αντιστοιχεί σε θερµοκρασίες λιγότερο κρύες και οι µεγαλύτεροι
αριθµοί αντιστοιχούν σε θερµοκρασίες περισσότερο κρύες. Κανονικά είναι κατάλληλη µία µεσαία θέση.
Για να σβήνετε την συσκευή περιστρέφετε τον
διακόπτη του θερµοστάτη µέχρι την θέση 0/STOP.
ΠΡΟΣΟΧΗ: η συσκευή παραµένει υπό τάση.
Οι εσωτερικές θερµοκρασίες επηρεάζονται από την θερµοκρασία περιβάλλοντος, από την συχνότητα του
ανοίγµατος των πόρτων, από την ποσότητα των τροφίµων που βάζετε. Ανάλογα µε τις περιπτώσεις,
µπορείτε να διαλέγετε την θέση που
σας δίνει την τέλεια θερµοκρασία. Σε έσχατες συνθήκες περιβάλλοντος,
είναι ενδεδειγµένο να χρησιµοποιείτε τον θερµοστάτη µε διαφορετικό τρόπο.
Όταν η θερµοκρασία του περιβάλλοντος είναι πολύ ζεστή (π.χ. το καλοκαίρι) συνιστάται να ρυθµίζετε τον
διακόπτη στους µικρότερους αριθµούς. Αντιθέτως σε θερµοκρασίες περιβάλλοντος κρύες
συνιστάται να
ρυθµίζετε τον διακόπτη στους µεγαλύτερους αριθµούς.
Ïι συσκευασίες και τα τρόφιµα που είναι
τακτοποιηµένα στα ράφια, δεν πρέπει
να αγγίζουν το πίσω τοίχωµα
τουθαλάµου.
Κάθε τροφή πρέπει να τοποθετείτε
καταλλήλως γιατί, στο ψυγείο, η
θερµοκρασία σε µερικά σηµεία είναι πιο
κρύα ούτως ώστε να υπάρχει καλύτερη
συντ
ήρη
σ
η
.
Τα τρόφιµα που πρόκειται να καταψυχθούν, πρέπει να τοποθετούνται επάνω στην σχάρα,
στο εσωτερικό µέρος της κατάψυξης.
Η µέγιστη ποσότητα τροφίµων που µπορείτε να καταψύχετε, αναφέρεται στην πινακίδα
στοιχείων υπό τον όρο “∆υνατότητα κατάψυξης/Freezing capacity (kg/24h)”. Μην βάζετε ποτέ
µία ανώτερη ποσότητα σε µία φορά όλη µαζί.
Η συσκευή θα βγει
αυτόµατα από την θέση του “super” έπειτα από 3 περίπου ηµέρες.
Σηµαντικές Σηµειώσεις
Όταν αγοράζετε προϊόντα ήδη κατεψυγµένα
ελέγχετε πως:
• οι συσκευασίες είναι καλά κλειστές και δεν
έχουν φθαρεί ή χαλάσει
• δεν παρουσιάζουν κρύσταλλα πάγου (πάει
να πει ότι έχουν ήδη υποστεί µία απόψυξη
έστω και αν αυτή είναι µερική)
• φέρουν την ηµεροµηνία της συσκευασίας
και τις µέγιστες ηµεροµηνίες της
συντήρησης
που είναι σχετικές µε τους διάφορους τύπους
των συσκευών (το δικό σας είναι ****)
• και πως κατά την διαδροµή προς το σπίτι
δεν ξεπαγώνουν, ούτε µερικώς.
Μην βάζετε στον στόµα τα παγωµένα
προϊόντα που µόλις βγήκαν από τον
καταψύκτη (παγωτά, γρανίτες, παγάκια κτλ.):
η πολύ χαµηλή θερµοκρασία στην
οποία
βρίσκονται µπορεί να προκαλέσει πληγές
ψύχους και πιθανές κακώσεις στην γλώσσα.
Στην περίπτωση που θα υπάρξει έλλειψη
ηλεκτρικής ενέργειας για πολλές ώρες,
πρέπει να προβλέψετε για την µεταφορά των
κατεψυγµένων τροφίµων σε ένα άλλο
καταψύκτη, ο οποίος να βρίσκεται σε
λειτουργία.
Εάν τα τρόφιµα έχουν ήδη ξεπαγώσει,
έστω και µ
ερικώς, µπορείτε να τα
καταψύξετε και πάλι µόνο όταν τα έχετε
µαγειρέψει και µετά!
42
Χρήση Της Συσκευής
Κατόψυξη
Προετοιµαστείτε γι΄αυτή την ενέργεια µε τις καλύτερες συνθήκες υγιεινής, γιατί η κατάψυξη δεν
αποστειρώνει. Συνιστάται για την κατάψυξη των τροφίµων, να τα χωρίζετε σε συσκευασίες που πρόκειται
να καταναλωθούν σε ένα µόνο γεύµα. Μην βάζετε ποτέ ζεστά τρόφιµα αλλά ούτε και χλιαρά !
Συσκευάζετε τα τρόφιµα πριν να
τα βάλετε στον καταψύκτη µέσα σε πλαστικά σακουλάκια, µε φύλλα
πολυαιθυλενίου, µε αλουµινόχαρτα ή µέσα σε κουτιά για κατάψυξη (αυτό το υλικό βρίσκεται στο εµπόριο
µε την ένδειξη “κατάλληλο για την κατάψυξη”.
Κάθε πακέτο, κουτί, κτλ., που βάζετε στον καταψύκτη πρέπει να έχει τα ακόλουθα προσόντα:
• την ηµ
εροµηνία της συσκευασίας και της λήξεως
• τον αριθµό των µερίδων που περιέχει
• τα γυάλινα βάζα πρέπει να είναι τύπου πυρέξ και ΠΟΤΕ τελείως γεµάτα (η κατάψυξη διαστέλλει
τα υγρά)
• τα πακέτα πρέπει να πιέζονται για να αφαιρείται ο αέρας από το εσωτερικό τους και να είναι όσο
το
δυνατόν περισσότερο πλατιά
• κάθε συσκευασία, οποιουδήποτε τύπου και αν είναι, πρέπει να είναι κλειστή για να προστατεύει
τα τρόφιµα.
Μην βάζετε κοντά τα φρέσκα τρόφιµα µε αυτά που είναι ήδη κατεψυγµένα για να µην προκαλέσετε στα
κατεψυγµένα τρόφιµα µία αύξηση της θερµοκρασίας.
Κατάψυξη

Απόψυξη του καταψύκτη
Εκτελείτε την απόψυξη κάθε φορά που παρατηρείτε στο εσωτερικό του καταψύκτη
σχηµατισµούς πάχνης και πάγου ανώτερους από τα 5-6 mm. Αυτό το στρώµα µειώνει την
δυνατότητα της ψύξης και προκαλεί µία µεγαλύτερη κατανάλωση ενέργειας.
Τυλίγετε τα προϊόντα που µόλις βγάλατε, πριν σε χαρτιά εφηµερίδων, µετά σε κουβέρτες
(είναι καλές και
οι θερµικές τσάντες) και τα εναποθέτετε σε ένα δροσερό χώρο ή ακόµη
καλύτερα σε ένα ψυγείο.
Μετά την ολοκλήρωση αυτής της εργασίας, βγάζετε το φις από την ηλεκτρική τροφοδοσία.
Για να διευκολύνετε και να επιταχύνετε το λιώσιµο του πάγου, τοποθετείτε µία κατσαρόλα µε
ζεστό νερό µέσα στον καταψύκτη
και την αποµονώνετε στον πάτο µε µία µικρή ξύλινη σανίδα.
Μην χρησιµοποιείτε µικρές σόµπες, πιστολάκια µαλλιών ή άλλες ηλεκτρικές συσκευές,
µαχαίρια ή άλλα µετάλλινα αντικείµενα, γιατί µπορούν να χαλάσουν ανεπανόρθωτα την
συσκευή. Μετά την απόψυξη για να κάνετε την καθαριότητα και να ξαναβάλετε τα προϊόντα
στον καταψύκτη, ακολουθείτε σχολαστικά τις ενδείξεις που βρίσκονται στο κεφάλαιο
“Καθαριότητα”.
43
Ξεπαγώνετε τα προϊόντα µόνο για µία άµεση χρήση. Το ξεπάγωµα µπορεί να γίνεται µε τέσσερις τρόπους:
• στο ψυγείο
• σε θερµοκρασία περιβάλλοντος
• στον φούρνο στους 40/50° ή σε φούρνο µικροκυµάτων
• κατευθείαν στο ψήσιµο.
Το ξεπάγωµα στο ψυγείο είναι ο πιο αργός αλλά ο πιο σίγουρος τρόπος
και σας επιτρέπει να εξοικονοµείτε
ενέργεια (το ψύχος που βγαίνει κατά την διάρκεια του ξεπαγώµατος µένει µέσα στο ψυγείο).
Îεπόγωµα
Απόψυξη του ψυγείου
Είναι αυτόµατη και το νερό που δηµιουργείται µεταφέρεται, διαµέσου της οπής
αποστράγγισης, στο λεκανάκι της συλλογής ΝΕΡΟ ΤΟΠΟΘΕΤΗΜΕΝΟ ΕΠΑΝΩ ΑΠΟ ΤΟΝ
ΣΥΜΠΙΕΣΤΗ. Στην συνέχεια το νερό εξατµίζεται µέσωτης θερµότητας που µεταδίδεται από
τον συµπιεστή. Σηµείωση: σταγόνες νερού ή πάγος στο κάθετο τοίχωµα τουβάθους ψυγείου
δεν
αποτελούν ελάττωµα.
Απόψυξη
Εσωτερική Καθαριότητα
Πριν από κάθε ενέργεια βγάζετε το φις από την πρίζα του ηλεκτρικού ρεύµατος. Εκτελείτε την καθαριότητα
στο ψυγείο και στον καταψύκτη χρησιµοποιώντας σόδα του φαγητού διαλυµένη σε νερό (1 κουτάλι για
κάθε 4 λίτρα νερού). ΜΗΝ ΧΡΗΣΙΜΟΠΟΙΕΙΤΕ ΑΠΟΡΡΥΠΑΝΤΙΚΑ ΠΟΥ ΧΑΡΑΖΟΥΝ. Ξεβγάζετε µε νερό
και στεγνώνετε µε ένα πανί. Βάζετε το φις
στην ηλεκτρική πρίζα.
Γυρίζετε τον διακόπτη του ψυγείου στην θερµοκρασία της συντήρησης. Περιµένετε 3/4 ώρες πριν να βάλετε
τα τρόφιµα.
Εξωτερική Καθαριότητα
Πριν από κάθε ενέργεια βγάζετε το φις από την πρίζα του ηλεκτρικού ρεύµατος. Για την εξωτερική
καθαριότητα ακολουθείτε τις ίδιες µεθόδους και την ίδια λεπτότητα που εφαρµόσατε για την εσωτερική
καθαριότητα. Θυµηθείτε πως κατά διαστήµατα πρέπει να καθαρίζετε τον συµπυκνωτή, ο οποίος βρίσκεται
στο πίσω µέρος της
συσκευής.
Για να καθαρίζετε τον συµπυκνωτή, χρησιµοποιείτε ένα στεγνό πινέλο ή ακόµη καλύτερα, την ηλεκτρική
σκούπα.
Καθαριοτητα

Σταγόνες νερού στον πυθµένα του
ψυκτικού θαλάµου.
Βούλωσε η οπή της αποστράγγισης
του νερού. Καθαρίζετε την οπή µε την
βοήθεια ενός µικρού σύρµατος.
Είναι σβηστό το εσωτερικό φως του
ψυγείου
•
Ελέγχετε τα σηµεία που
αναφέρονται στην παράγραφο “Η
συσκευή δεν παράγει ψύξη”.
•
Κάηκε το λαµπάκι.
Προχωρήστε κάνοντας την
αντικατάσταση µε τον εξής τρόπο:
βγάζετε το φις από την πρίζα του
ηλεκτρικού ρεύµατος, ανασηκώνετε µε
ένα κατσαβίδι το κουτί του φωτός (είναι
περασµένο µε πίεση) (εικ. L1).
Αντικαθιστάτε το λαµπάκι µε ένα άλλο
όµοιο. (max 15 WATT) (εικ. L2).
Ξαναπερνάτε το κουτί. Βγάζετε το
καµένο
λαµπάκι µόνο όταν έχετε ένα
άλλο έτοιµο για την αντικατάσταση.
Πριν να καλέσετε την τεχνική υπηρεσία, επαληθεύετε εάν µπορείτε να λύσετε το πρόβληµα,
βασιζόµενοι στους ακόλουθους ελέγχους. Παράξενοι θόρυβοι – ∆ΕΝ έχετε ρυθµίσει σωστά
τα πόδια και ο καταψύκτης πάλλεται. Η ισχύς της ψύξης ελαττώνεται – Έχετε βάλει µία
ανώτερη ποσότητα τροφίµων από αυτή που συνιστάται. Έχετε ανοίξει πάρα πολλές
φορές
την πόρτα. ∆εν έχετε κλείσει καλά την πόρτα. Η συσκευή δεν ψύχει – Ελέγχετε εάν: το φις
βρίσκεται σε επαφή µε την πρίζα, έχει καεί µία ασφάλεια της ηλεκτρικής εγκατάστασης του
σπιτιού, έπεσε ο γενικός διακόπτης του σπιτιού σας, ο θερµοστάτης είναι σβηστός, ο
διακόπτης στο 0. Ο θάλαµος είναι ζεστός
εξωτερικά – ∆ΕΝ αποτελεί ένα ελάττωµα, αλλά
χρησιµεύει για να προβλέπει τον σχηµατισµό της υγρασίας στην εξωτερική πλευρά της
συσκευής. Τα κατεψυγµένα κρέατα έχουν άσπρες λωρίδες – Χρησιµοποιείτε
θερµοκρασίες υπερβολικά χαµηλές ή δεν έχετε τηρήσει τις ηµεροµηνίες λήξεως που
υποδεικνύονται στις πινακίδες. Ατελής κατάψυξη
– Είναι φυσιολογικό ότι τα προϊόντα που
περιέχουν πολύ ζάχαρη, λιπαρά και οινόπνευµα όπως τα παγωτά ή οι χυµοί, να µην
καταψύχονται τελείως και να παραµένουν µερικώς µαλακά. Σταγόνες νερού στα εξωτερικά
τοιχώµατα της συσκευής – Στις ενδιάµεσες εποχές, άνοιξη και φθινόπωρο, όταν η οικιακή
θέρµανση δεν
βρίσκεται σε λειτουργία, µπορεί να συµβεί ώστε τα εξωτερικά τοιχώµατα της
συσκευής να γεµίσουν µε σταγόνες νερού (συµπύκνωση). Αυτό το φαινόµενο δεν εκθέτει την
σωστή λειτουργία της συσκευής και δεν είναι επικίνδυνο για τον άνθρωπο. Σχηµατισµός
πάχνης στο εσωτερικό – ∆εν έχετε κλείσει καλά τις πόρτες
. Έχετε ανοίξει πάρα πολλές
φορές τις πόρτες. Σταγόνες νερού ή πάγος στο κάθετο τοίχωµα του βάθους ψυγείου –
∆εν αποτελεί ένα ελάττωµα. ∆εν ανοίγει εύκολα η πόρτα – Είναι φυσικό πως, ειδικά
αµέσως µετά το κλείσιµο της, η πόρτα να κάνει µία κάποια αντίσταση κατά το άνοιγµα της
:
αυτό χρησιµεύει για να εξασφαλίζει ένα τέλειο κράτηµα στις πόρτες. Είναι αρκετό να
περιµένετε µερικά λεπτά πριν να την ξανανοίξετε.
Ìικρές Βλόβες Και
Ανωµαλίες
44

,
/ .
/, ,
.
/,
, .
.
, .
8
5
4
, 10
,,,
8
, 10
4
3
2
4
6
7
4
10
6
3
8
6
8
2
,
, .
3
, ,
30 ,
.
3
2
4
2
1
3
2
, ,
,
6
45
!"

#$
, , .
,
.
, , .
,
.
%
.
250 gr/kg .
. :
•
30%, 450 gr ;
•
40%, 650 gr ;
•
50%, 800 gr .
.
. .
&
2 . 50 °C
.
'%
. (.. ) 8 ,
4 . ,
.
(
)
12 , 2
, 6 , 2
(1)
12
6
(1)
3
, 4
2
(1)
, 4
(2)
(3)
, ,
, (3)
.
, 8
12
2
(, ,
, .).
, ,
. .
(1) ( )
(2) .
(3) , .
’ .
8 , , 40%
10
, , 50%
, , 30%
, ,
30%
12
,
, ,
30%
8
, , ,
50%
- 12 , , 30%
10
, ,
12
, ,
50%
, ,
30%
, ,
,
,
10 ,
46

47
Spotřebič je vhodný pro konservaci a zamražení potravin v domácnosti, jakékoliv jiné použití je
nevhodné.
Instalace musí být provedena podle instrukcí v příručce; nesprávná instalace může spotřebič poškodit. V
případě eventuálních problémů s provozem ledničky se obraťte na autorizovaná servisní střediska, vždy
však na kvalifikovaný personál.
Před každým údržbářským úkonem, je spotřebič nutno odpojit od elektrické sítě. To však nikdy
neprovádíme tak, že bychom táhli za přívodní kabel nebo pohybovali spotřebičem, ale uchopíme vždy
přímo zástrčku.
Příručku si pečlivě uschovejte a v budoucnosti ji předejte eventuálnímu novému vlastníkovi spotřebiče.
Ve smyslu nejnovějších zákonným směrnicí o ochraně životního prostředí používáme malé množství
chladicích médií nazývaných R600a nebo R134a podle modelu. Typ chladicího média je označen na
štítku zařízení. V případě škod na součástech chladicího obvodu u zařízení, ve kterém byl instalován
R600a, doporučujeme vyvětrat místnost, ve které se zař
ízení nachází a po dobu několika minut
nepoužívat otevřený oheň, vyhnout se nebezpečí jiskření a jiným zápalným zdrojům.
Části, které se dostávají do styku s potravinami odpovídají vyhlášce č. 108 ze dne 25. 1. 1992 a Evropské
vyhlášce CEE 89/109.
Vynikající volba!
Tím, že jste si zakoupili náš elektrický spotřebič, zvolili jste spolehlivý výrobek s vysokým výkonem,
diskrétní, účinný, užitečný: díky chladu, který konservuje potraviny, je naše strava pestřejší a zdravější.
Používat vaše nové zařízení je sice velmi snadné, nicméně Vás prosíme, abyste si pozorně přečetli
uživatelské instrukce: objevíte přitom několik nepatrných triků, které vám umožní maximálně využít
výkonnosti vašeho spotřebiče a ještě při tom ušetřit energii.
Jsem přesvědčení, že budete spokojeni a přejeme si, abyste se stali našimi trvalými zákazníky.
SRDEČNÁ BLAHOPŘÁNÍ!
Pokud bude toto zařízení nahrazeno jiným zařízením se závěrem na západku, pružinu nebo podobným
typem uzavírání, pak nesmíte zapomenout na to, že před sešrotováním je třeba uzavírání znemožnit, nebo
ještě lépe demontovat dvéře, aby dovnitř nemohl být nikdo uvězněn (hrající si děti, zvířata, atd.).
Vytáhnout zástrčku ze zásuvky a odříznout přívodní kabel. Ledničky a mrazničky obsahují mrazící plyn a
látky, které vyžadují speciální likvidaci; navíc obsahují řadu materiálů, které je možno recyklovat.
Materiály dodejte na sběrná místa: Obecní úřad Vám jistě poskytne instrukce, jak provést likvidaci
správnou z hlediska ekologie.
EKOLOGICKY VHODNÁ LIKVIDACE
Označení CE dotvrzuje, že tento výrobek odpovídá Evropským Vyhláškám 89/336 (elektromagnetická
kompatibilita), 73/23 (nízké napětí), 96/57 (energetická účinnost), i jejich dalším úpravám.
VšEOBECNÁ PRAVIDLA BEZPEČNOSTI
OBSAH
PROCEDURA SPOUšTĚNÍ
VšEOBECNÁ PRAVIDLA BEZPEČNOSTI
POPIS PRÍSTROJE
MOžNOST PŘEHODIT DVÍŘKA
INSTALACE
JAK UšETŘIT ENERGII
ELEKTRICKÉ PŘIPOJENÍ
POUžITÍ
ZAMRAZOVÁNÍ
ROZMRAZOVÁNÍ
ODMRAZENÍ
ČIŠTENÍ
DROBNÉ PORUCHY A ANOMÁLIE
EKOLOGICKY VHODNÁ LIKVIDACE

Možnost zmeny smeru otevírání dverí
dvere se bežne otevírají zleva (závesy dverí
jsou vpravo). Pokud chcete záves dverí
vymenit, postupujte následovne (viz obrázek):
1. Chladnicku položte opatrne dvermi nahoru.
2. Odejmete spodní lištu (obr.3)
3. Odšroubujte spodní závesy A a B (obr.4/5)
4. Kolík ze závesu A namontujte na záves B
(obr.6)
5. Dvere chladnicky vyjmete ze stredního
závesu C (obr.7)
6. Odšroubujte záves C (obr.8) a zakryjte
všechny otvory záslepkami, které jste
odstranili z levé strany (obr.9).
48
A Prostor mraznicky s drátenou policí
a tácky na led
B Prostor chladnicky
C Dolní kryt
D Ovladac termostatu
E Osvetlení s krytem
F Pácka osvetlení
G Police ve dverích
H Prihrádka na láhve (Maxi Bottle)
I Prihrádka na zeleninu
L Odtok kondenzátu
M Výškove seriditelné nožky
N Kompresor
O Zásobník na kondenzát
P Kondenzátor
Q Sklenené police
POPIS PRÍSTROJE
Možnost přehodit dvířka

49
Pokud má spotřebič vertikální držáky,
odšroubujte je z levé strany a přišroubujte j
na stranu pravou, přitom také přemístíte
zátky, které uzavírají otvory.
Možnost přehození
držadla
7. Mraznicku uvolnete z horního závesu D
(obr.10)
8. Kolík D odstrante z pravé strany závesu
(11) a dejte jej na levou stranu (12).
9. Nasadte dvere chladnicky na kolík D na
levé strane (13)
10. Presunte záves C a kolík P a pripevnete je
na levé strane (14)
11. Zašroubujte záves C nalevo a namontujte
dvere (15)
12. Znovu pripevnete závesy A a B (viz bod 4)
na puvodní místo (16)
13. Odstrante jazýcek E u levé strany krytu a
dejte je na pravou stranu (17)
14. Spodní kryt nasadte zpeta postavte
chladnicku.

50
Pokud byl spotřebič do vašeho bytu dopraven v horizontální poloze, počkejte několik hodin a teprve
potom zasunte elektrickou zástrčku, umožníte tím to, že olej steče do kompresoru.
Provedte vyčištění vnitřku (viz Vyčištění vnitřku) a teprve potom svůj spotřebič připojte na elektrickou
zásuvku* nepoužívejte redukci (viz ELEKTRICKÉ PŘIPOJENÍ).
Termostat nastavte na polohu konservace, jaké vám nejlépe vyhovuje (viz POUžITÍ ZAŘÍZENÍ).
PROCEDURA SPOUšTĚNÍ
Tento spotřebič poskytuje nejlepší výkony za teploty v místnosti v rozsahu od 16°C do 32°C.
Když zařízení vybalíte, zkontrolujte, zda není poškozeno. Eventuální poškození je třeba okamžitě sdělit
prodejci.
Jednotlivé části (plastikové sáčky, proužky polystyrénu, atd) obalu neodhazujte ani je neponechávejte v
dosahu dětí.
Pokud bylo zařízení do vašeho bytu dopraveno v horizontální poloze, pak je nepřipojujte na elektrickou
zásuvku hned, ale počkejte několik hodin, aby olej měl čas stéci do kompresoru.
Spotřebič umístěte do suché a větrané místnosti, kde je chráněn pře působením povětrnostních vlivů.
Nevhodné jsou balkóny, verandy nebo terasy; nadměrná teplota v létě a velmi nízká teplota v zimě by
mohly nepříznivě ovlivnit provoz spotřebiče, nebo jej dokonce poškodit.
Spotřebič nestavte do blízkosti tepelných zdrojů jako jsou kamna nebo vyhřívací zařízení a dbejte na to,
aby vzdálenost mezi spotřebičem a jinými kusy nábytku byla alespon 3-5 cm po stranách a 10 cm nad
spotřebičem.
Spotřebič odsadíte ode zdi pomocí distančních rozpěrek, které je třeba instalovat na zadní stěnu (viz
obrázek).
Přední nožky seřídíte takovým způsobem, aby spotřebič byl nepatrně skloněný dozadu; usnadníte tím
spolehlivé zavíraní dvířek.
Vnitřek ledničky dobře vyčistíte vodu, ve které rozpustíte sodu (1 lžičku na každé 4 litry vody).
Nepoužívejte líh, brusné prášky nebo saponáty, protože byste mohli poškodit vnitřní plochy spotřebiče.
INSTALACE
První způsob jak energii ušetřit spočívá ve správném výběru místa pro umístění spotřebiče, jak jsme to
ostatně vysvětlili v části věnované instalaci.
Druhé opatření, kterým energii ušetříme, spočívá v tom, že nedovolíme, aby do vnitřku spotřebiče
pronikalo teplo; dbáme na to, aby dvířka byla otevřená co nejméně a do ledničky nedáváme potraviny,
které jsou ještě teplé, zejména polévky, nebo podobná jídla, která uvolnují značné množství páry.
Pravidelně kontrolujte těsnící obložení dvířek a přesvědčete se, že dvířka dobře přiléhají; v opačném
případě se obraťte na servis.
Třetím způsobem jak energii ušetřit je udržovat v účinném stavu ty části, které slouží k výměně tepla:
nedopusťte, aby se na mrazáku nahromadilo příliš mnoho ledu (odmrazte jej, jakmile námraza překro
čí
tloušťku 1-2 cm, (v případě spotřebičů typu non-frost to není nutné) a pravidelně čistěte kondensátor tak,
jak to vysvětlíme v další textu této příručky.
JAK UšETŘIT ENERGII
Nejdříve se přesvědčíte, že elektrické napětí (Volty) přívodní zásuvky odpovídají tomu co je napsáno na
štítku s údaji, který naleznete uvnitř vašeho spotřebiče.
V případě, že údaje pro zásuvku a zástrčku spotřebiče nejsou v souladu, nepoužívejte adptéry,
vícenásobné zásuvky nebo prodlužky, ale požádejte kvalifikovaného elektrikáře, aby vám vaši
zásuvku vyměnil za jinou, vhodnější.
Zásuvka musí být přístupná, abychom později mohli ledničku čistit a odmrazovat. nebo eventuálně
provádět jiné zásahy.
V případě poškození kabelu jej okamžitě necháme vyměnit pracovníkem střediska, které kabel prodává a
zajišťuje jeho instalaci.
Elektrická bezpečnost tohoto spotřebiče je zajištěna pouze pokud je připojen na účinné uzemnění, jak to
vyžadují platné normy pro elektrickou bezpečnost.
ELEKTRICKÉ
PŘIPOJENÍ

Nastavení Koflíku Ledničky
Chcete-li zregulovat vnitřní teplotu, otáčejte KNOFLÍKEM termostatu, který se nachází v zóně
ovládacích prvků. Poloha 1 odpovídá vyšší teplotě, vyšší čísla teplotám s vyšším stupněm chladu. Za
normálních okolností je vhodná střední teplota. Chcete-li spotřebič vypnout, otočte knoflíkem až do
polohy O/STOP.
UPOZORNĚNÍ: spotřebič zůstává pod napětím.
Na vnitřní teplotu má vliv teplota místnosti, to jak často otvíráme dvířka a množství uložených potravin.
Podle okolností si tedy můžete zvolit pozici, která vám poskytne optimální teplou.
V extrémních podmínkách je vhodné používat termostat jiným způsobem. Když je teplota v místnosti
příliš vysoká (například v létě) doporučuje se nastavit knoflík na nízká čísla. Naopak pokud je v prostředí
chladno, doporučuje se nastavit knoflík na vysoká čísla.
Balíčky s potravinami i volné potraviny
uložená na jednotlivých patrech ledničky se
nesmějí dotýkat zadní stěny chladícího
prostoru.
Každý druh potravin je třeba do ledničky
vhodně umístit, protože v některých místech
je dosahováno vyššího stupně chladu a tedy i
lepší konservace.
Důležité informace
Pokud si koupíte potravinářské výrobky, které
jsou již zmraženy, ověřte si, že:
· balení je dobře uzavřeno, není natrženo nebo
poškozeno;
· ve výrobku nezjistíme kusy ledu (znamenalo
by to, že již byl rozmražen, byť jen zčásti);
· datum balení a datum maximální
uchovatelnosti pro různé spotřebiče (Váš má
….);
· než výrobky donesete domů, nerozmrazí se a
to ani částečně.
Neberte do úst zamražené výrobky, které jste
právě vytáhli z mrazáku (zmrzliny, nanuky,
kostky ledu, atd.); extrémně nízká teplota,
jakou se vyznačují, by mohla způsobit
popálení mrazem, zejména pak poranění
jazyka.
V případě, že by došlo k výpadku energie na
více hodin, postarejte se o přemístění potravin
do jiného funkčního mrazáku.
Pokud dojde k rozmrazení potravin a to i k
částečnému, pak je můžete znovu zamrazit
pouze tehdy, když je před tím povaříte!
51
POUžITÍ
Zamrazování
Pro provádění tohoto úkonu si připravte co nejlepší hygienické podmínky, protože zamrazování není
sterilizací.
Doporučuje se zamrazovat potraviny rozdělené do porcí, které lze spotřebovat za jedenkrát.
Neukládejte nikdy teplé a ani vlažné potraviny!
Před uložením do mrazáku si potraviny rozdělte do rozdělte do sáčků z umělé hmoty, polyetylénových
nebo hliníkových folií, zamrazovacích nádobek (tento materiál najdete v obchodech pod označením
„vhodné pro zamrazování").
Každý sáček, nádobky a podobný obal, který do mrazáku ukládáte, by měl odpovídat následujícím
požadavkům:
· datum zabalení a trvanlivost,
· počet porcí v balení,
· konservační sklenice musejí být typu pyrex a NIKDY je nenaplníme beze zbytku (zamrazení zvětší
objem kapalin),
· každé balení a to nezávisle na typu, musí být uzavřeno, aby potraviny byly opravdu chráněny.
Čerstvé potraviny nepřidávejte do těsné blízkosti potravin zamražených, abyste tím nezvýšili jejich
teplotu.
ZAMRAZOVÁNÍ

Odmrazení mrazáku
Odmrazení provádějte vždy, když zjistíte, že uvnitř mrazáku se vytvořila námraza a led ve více než 5-6
mm. Taková vrstva snižuje mrazící schopnost a způsobuje větší spotřebu energie.
Odpojte zásuvku. Jakmile potravinářské výrobky vyjmete, zabalte je nejdříve do novin a pak do obalu
(vyhovující jsou termické sáčky); vše pak uložte na chladné místo, nebo ještě lépe do ledničky. Když tuto
operaci ukončíte, vytáhněte zástrčku ze zásuvky.
Abyste usnadnili a urychlili rozpouštění ledu, vložte do mrazáku hrnec s vodou, který postavíte na
dřevěnou podložku.
Nepoužívejte kamínka, fén, nebo jiné elektrické přístroje, nože či jiné kovové předměty; mohli byste si
neopravitelně poškodit svůj spotřebič.
Když odmrazování skončíte, dodržujte při následném čištění a opětovném uložení potravin pečlivě
všechny pokyny uvedené v kapitole “Čištění”.
52
Výrobky rozmrazujte výhradně před bezprostředním použitím. Rozmrazování lze provádět čtyřmi
způsoby:
· v ledničce
· za teploty v místnosti
· v troubě při 40/50o nebo v mikrovlnami
· přímo vařením.
Rozmazování v ledničce je nejpomalejší, ale zároven nejjistější metoda, která Vám umožní ušetřit energii
(chlad, který se při rozmrazování uvolnuje přechází do ledničky).
ROZMRAZOVÁNÍ
Odmrazení ledničky
Je automatické a voda, která se při tom vytváří se drenážním otvorem odvádí do sběrné nádobky. Tato
voda se následně odpaří teplem přenášeným z kompresoru.
ODMRAZENÍ
Vnitřní čištění
Pred jakoukoli manipulací vypnete chladnicku ze zásuvky. Vnitrek chladnicky i mraznicky
vycistete roztokem vody se sodou bikarbonou (1 lžíce na 4 l vody). Nepoužívejte abrazivní
prostredky. Opláchnete cistou vodou a vysušte suchým hadríkem. Znovu zapnete do zásuvky
a nastavte termostat. Potraviny vkládejte do chladnicky po 3 - 4 hodinách provozu.
Vnější čištění
Stejným zpusobem cistete chladnicku také zvencí. K cištení kondenzátoru na zadní strane
spotrebice použijte kartác nebo ješte lépe vysavac.
ČIŠTENÍ

Kapky vody na dně komory ledničky.
Ucpal se drenážní otvor pro odtok vody.
vyčistěte jej pomocí želízka (obr. L3).
Vnitřní světlo ledničky nesvítí.
· Zkontrolovat body uvedené části „Spotřebič
nechladí".
· Je spálená žárovečka.
K výměně přistoupíte následujícím
způsobem: zástrčku vytáhnete ze zásuvky
elektrického proudu, šroubovákem
nadzvednete krabici světla (je přitlačena)
(obr. L1); spálenou žárovečku nahradíte
novou (10 Wattů) (obr. L2); krabicové víčko
opět přitlačíte. Spálenou žárovečku vyjímejte
pouze pokud máte připravenou novou na
výměnu.
Dříve než zavoláte servisní službu, pokuste se poruchu odstranit na základě následujících kontrol.
Neobvyklé zvuky - Neseřídili jste patřičně nožky a mrazák vibruje.
Chladící výkon se snižuje. - Uložili jste více potravin, než kolik je doporučeno. Příliš často jste otvírali
dvířka. Dvířka nejsou dobře uzavřena.
Spotřebič nechladí. - Zkontrolujte, zda má zástrčka dobrý kontakt v zásuvce. Shořela Vám pojistka v
bytě. Vyskočila automatická pojistka připojení do bytu. Termostat vypnut, knoflík je na 0.
Vnějšek spotřebiče je teplý. To NEZNAMENÁ, že jde o závadu, tato vlastnost slouží k tomu, aby se na
vnější stěně spotřebiče nesrážela voda.
Zamrazené maso vykazuje bělavé proužky. - Používáte příliš nízké teploty, nebo jste nedodrželi datum
trvanlivosti uvedené v tabulkách.
Nedokonalé zamrazení. - Je zcela normální, že potravinářské výrobky, které obsahují větší množství
cukru, tuků a alkoholu, jako jsou zmrzliny nebo štávy se úplně nezamrazí a zůstanou v částečně změklém
stavu.
Kapky vody na vnějších stě
nách spotřebiče. - V přechodných obdobích, na jaře a na podzim, když se
byty nevytápí, se může stát, že vnější stěny spotřebiče budou pokryty kapkami vody (kondensátu). Tento
jev nijak nepříznivě neovlivnuje spolehlivý provoz spotřebiče a není ani pro nikoho nebezpečný.
Vytváření námrazy uvnitř. - Nezavřeli jste dobře dvířka. Dvířka jste otvírali příliš často.
Kapky vody nebo ledu na svislé zadní stěně ledničky. - Nejde o závadu.
Dvířka se obtížně otvírají. - Je to celkem normální, zejména bezprostředně po uzavření, že dvířka
vykazují jistý odpor při otvírání: tato vlastnost napomáhá dokonalému těsnění dvířek. Postačí, když
počkáme několik minut a pak je znovu otevřeme.
DROBNÉ PORUCHY A
ANOMÁLIE
53

54
Tabulky doby zamrazení
potravin

55

174.5897.0
-
 1
1
-
 2
2
-
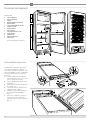 3
3
-
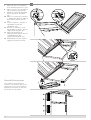 4
4
-
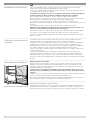 5
5
-
 6
6
-
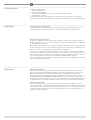 7
7
-
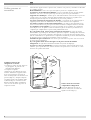 8
8
-
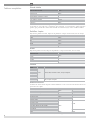 9
9
-
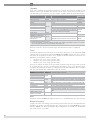 10
10
-
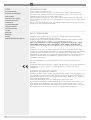 11
11
-
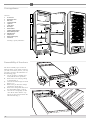 12
12
-
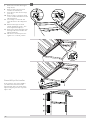 13
13
-
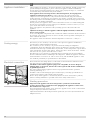 14
14
-
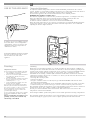 15
15
-
 16
16
-
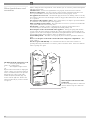 17
17
-
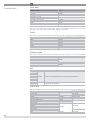 18
18
-
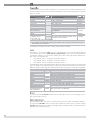 19
19
-
 20
20
-
 21
21
-
 22
22
-
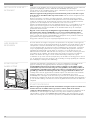 23
23
-
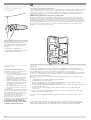 24
24
-
 25
25
-
 26
26
-
 27
27
-
 28
28
-
 29
29
-
 30
30
-
 31
31
-
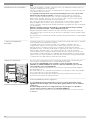 32
32
-
 33
33
-
 34
34
-
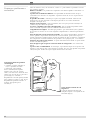 35
35
-
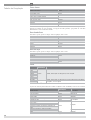 36
36
-
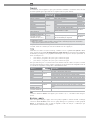 37
37
-
 38
38
-
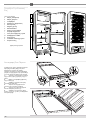 39
39
-
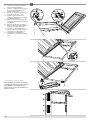 40
40
-
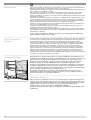 41
41
-
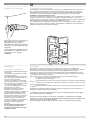 42
42
-
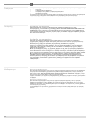 43
43
-
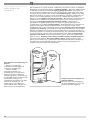 44
44
-
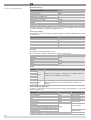 45
45
-
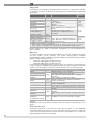 46
46
-
 47
47
-
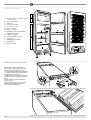 48
48
-
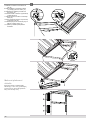 49
49
-
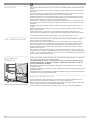 50
50
-
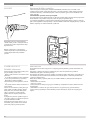 51
51
-
 52
52
-
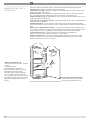 53
53
-
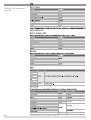 54
54
-
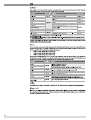 55
55
-
 56
56


in andere talen
- English: Fagor D2710 Owner's manual
- français: Fagor D2710 Le manuel du propriétaire
- português: Fagor D2710 Manual do proprietário
- slovenčina: Fagor D2710 Návod na obsluhu