
RM338PX/RM338PAX/RM338PUX
PROJI
Projection Clock
User Manual

- 1 -
CONTENTS
EN........................................................................................................................................................ 2
IT ......................................................................................................................................................... 16
FR ........................................................................................................................................................ 28
DE........................................................................................................................................................ 40
ES ........................................................................................................................................................ 52
POR ..................................................................................................................................................... 64
NL ........................................................................................................................................................ 76
SWE .................................................................................................................................................... 88
TC ........................................................................................................................................................ 100
SC........................................................................................................................................................ 110
EN
INTRODUCTION
Thank you for purchasing the Oregon Scientic™ PROJI Projection Clock (model: RM338PX/
RM338PAX/RM338PUX). This device bundles precise time keeping, alarm and temperature
monitoring features into a single tool you can use from the convenience of your home. Keep this
manual handy as you use your new product. It contains practical step-by-step instructions, as
well as technical specications and warnings you should know.
PACKAGE CONTENTS
Main unit AAA batteries for main unit x 2

EN
- 2 -
EN
INTRODUCTION
Thank you for purchasing the Oregon Scientic™ PROJI Projection Clock (model: RM338PX/
RM338PAX/RM338PUX). This device bundles precise time keeping, alarm and temperature
monitoring features into a single tool you can use from the convenience of your home. Keep this
manual handy as you use your new product. It contains practical step-by-step instructions, as
well as technical specications and warnings you should know.
PACKAGE CONTENTS
Main unit AAA batteries for main unit x 2

EN
- 3 -
OVERVIEW
TOP VIEW
4
5
6
1
2
3
1. + - Press to increase settings, or press and hold to increase rapidly in setting mode.
2. SNOOZE | LIGHT - Press to snooze an alarm or activate the backlight and projection.
Press and hold until you hear a beep to activate the projection for 5 minutes.
3. - Press to toggle between current time, calendar or alarm 1/2 displays for 5 seconds.
Press and hold to enter setting mode.
4. – - Press to decrease settings, press and hold to decrease settings rapidly.
5. Projection lens
6. - Press to turn on/off alarms, press and hold to enter alarm setting mode.

EN
- 4 -
REAR VIEW
1
23 4
5
1. Battery compartment
2. RESET - Press to reset the unit to default.
3. / PROJECTION - Press to ip the projection content in 90°. Press and hold to toggle
continuous projection on/off.
4. RCC – Press to turn on and search RCC signal. Press and hold to turn off.
5. Battery compartment cover

EN
- 5 -
LCD SCREEN
1
23
1. Time display
2. Weekday display
3. Indoor temperature display
Symbol Description
Alarm 1 is on.
Alarm 2 is on.
RCC signal received
Main unit low battery
GETTING STARTED
INSERT BATTERIES
1. Gently push the battery compartment cover downwards to remove it from the main unit.
2. Insert the batteries, matching the polarities (+/-).
NOTE Replace the batteries when displays , or when the display is dim.

EN
- 6 -
CLOCK
CLOCK RECEPTION
This clock synchronizes automatically with a clock signal. Press RCC to turn on and search for
the clock signal.
The main unit is able to receive RF clock data with different RCC signal:
Model number Region Signal
RM338PX EU DCF
RM338PUX UK MSF
RM338PAX US WWVB
Clock signal reception indicator:
Icons Description
Main unit is searching for clock signal strength
(ash)
Main unit is searching for clock signal
No clock signal
Strong RCC signal received
Weak RCC signal received

EN
- 7 -
NOTE
• It takes 2-10 minutes to receive the clock signal. If the signal is weak, it could take up to 24 hours
to receive a valid signal.
• Not applicable to Asia and non-designated areas.
SET THE CLOCK MANUALLY
1. Press and hold . The screen displays ZONE and the number ashes.
2. Press once or press and hold +/- to adjust the setting.
• For EU/UK, the time-zone offset sets the clock up to +/- 23 hours from the received clock
signal time.
• For US, the time-zone setting is Atlantic (A); Mountain (M); Pacic (P); Central (C); Eastern
(E); Newfoundland (N).
3. Press to conrm.
4. Press once or press and hold +/- to adjust the setting for 12/24h hour format, hour, minute,
year, calendar format (month-day/day-month), month, date, temperature unit (°C/°F) , language
and daylight saving time (DST) (ON/OFF) for US.
5. Press to conrm each setting.
NOTE
• The language options are English (ENG), Spanish (SPA), Italian (ITA), French (FRE) and
German (GER).
• The signal reception is on after each reset or battery replacement.
• While in the setting mode, press and hold to save the settings and leave the setting mode.
• The daylight saving time (DST) is set to OFF when the RCC is turned off, or when the time/
year, month or date is changed.
ALARM
SETTING/ADJUSTING ALARM TIME
1. Press and hold .
2. Press once or press and hold +/- to adjust the hour and minute setting, then press to
conrm.
3. Press +/- to toggle the weekday alarm ON/OFF, then press to conrm.
• The alarm rings only on weekdays when the setting is ON.
4. Repeat step 2 – 4 for alarm 2 setting.
TURN ON/OFF ALARMS:
Press to turn on/off the alarm in sequence:
Alarm1 > Alarm 2 > Both ON > Both OFF.
OPERATION
When the alarm rings, the backlight will ash. You may:
• Press to stop. The alarm will ring again on the next day.
• Press SNOOZE | LIGHT to snooze. The alarm rings again after 8 minutes.

EN
- 8 -
• While in the setting mode, press and hold to save the settings and leave the setting mode.
• The daylight saving time (DST) is set to OFF when the RCC is turned off, or when the time/
year, month or date is changed.
ALARM
SETTING/ADJUSTING ALARM TIME
1. Press and hold .
2. Press once or press and hold +/- to adjust the hour and minute setting, then press to
conrm.
3. Press +/- to toggle the weekday alarm ON/OFF, then press to conrm.
• The alarm rings only on weekdays when the setting is ON.
4. Repeat step 2 – 4 for alarm 2 setting.
TURN ON/OFF ALARMS:
Press to turn on/off the alarm in sequence:
Alarm1 > Alarm 2 > Both ON > Both OFF.
OPERATION
When the alarm rings, the backlight will ash. You may:
• Press to stop. The alarm will ring again on the next day.
• Press SNOOZE | LIGHT to snooze. The alarm rings again after 8 minutes.

EN
- 9 -
PROJECTION
The projector displays the time on your ceiling for easy viewing in a darkened room. For the optimal
projection results, place the unit within 1.5 - 2 m (5 - 6.5 ft) from the ceiling or wall.
• Press SNOOZE | LIGHT to activate the backlight and projection for 5 seconds.
• Press and hold SNOOZE | LIGHT until you hear a beep to activate the projection for 5 minutes.
• Press / PROJECTION to ip the projection content by 90°.
• Press and hold / PROJECTION to toggle the continuous projection on/off.
NOTE The continuous projection function is disabled when the main unit is not connected to
the power adapter.
PRECAUTIONS
• Do not subject the unit to excessive force, shock, dust, temperature or humidity.
• Do not immerse the unit in water. If you spill liquid over it, dry it immediately with a soft, lint-free
cloth.
• Do not clean the unit with abrasive or corrosive materials.
• Do not tamper with the unit’s internal components. This invalidates the warranty.
• Only use fresh batteries. Do not mix new and old batteries.
• Images shown in this manual may differ from the actual display.
• When disposing of this product, ensure it is collected separately for special treatment.
• Placement of this product on certain types of wood may result in damage to its nish for which
Oregon Scientic will not be responsible. Consult the furniture manufacturer’s care instructions
for information.
• The contents of this manual may not be reproduced without the permission of the manufacturer.
• Do not dispose old batteries as unsorted municipal waste. Collection of such waste separately
for special treatment is necessary.
• Please note that some units are equipped with a battery safety strip. Remove the strip from the
battery compartment before rst use.
NOTE The technical specications for this product and the contents of the user manual are subject
to change without notice.

EN
- 10 -
PRECAUTIONS
• Do not subject the unit to excessive force, shock, dust, temperature or humidity.
• Do not immerse the unit in water. If you spill liquid over it, dry it immediately with a soft, lint-free
cloth.
• Do not clean the unit with abrasive or corrosive materials.
• Do not tamper with the unit’s internal components. This invalidates the warranty.
• Only use fresh batteries. Do not mix new and old batteries.
• Images shown in this manual may differ from the actual display.
• When disposing of this product, ensure it is collected separately for special treatment.
• Placement of this product on certain types of wood may result in damage to its nish for which
Oregon Scientic will not be responsible. Consult the furniture manufacturer’s care instructions
for information.
• The contents of this manual may not be reproduced without the permission of the manufacturer.
• Do not dispose old batteries as unsorted municipal waste. Collection of such waste separately
for special treatment is necessary.
• Please note that some units are equipped with a battery safety strip. Remove the strip from the
battery compartment before rst use.
NOTE The technical specications for this product and the contents of the user manual are subject
to change without notice.

EN
- 11 -
NOTE Features and accessories will not be available in all countries. For more information,
please contact your local retailer. To download an electronic version of the user manual, please
visit http://global.oregonscientic.com/customerSupport.php.
SPECIFICATIONS
MAIN UNIT
L x W x H 108 x 26 x 77 mm (4.25 x 1.02 x 3.03 in)
Weight 112 g
Temperature range -5°C to 50°C (23°F to 122°F)
Accuracy 0°C to 40°C: ±1°C (±2.0°F) < 0°C and >40°C: ±2°C (± 4.0°F)
Resolution 0.1°C (0.2°F)
Power 2 x UM-4 (AAA) 1.5 V batteries
ABOUT OREGON SCIENTIFIC
Visit our website www.oregonscientic.com to learn more about Oregon Scientic products.
For any enquiry, please contact our Customer Services at info@oregonscientic.com.
Oregon Scientic Global Distribution Limited reserves the right to interpret and construe any contents,
terms and provisions in this user manual and to amend it, at its sole discretion, at any time without
prior notice. To the extent that there is any inconsistency between the English version and any other
language versions, the English version shall prevail.

EN
- 12 -
EU-DECLARATION OF CONFORMITY
Hereby the manufacturer, Oregon Scientic Global Distribution Limited, declares that the
radio equipment type PROJI Projection Clock (model: RM338PX/RM338PAX/RM338PUX) is
in compliance with 2014/53/EU Directive. The full text of the EU Declaration of Conformity is
available at the following Internet address : http://global.oregonscientic.com/customerSupport.php
All EU countries, Switzerland CH
and Norway N
Countries RED Approval Complied
DISPOSAL INFORMATION FOR USERS
Pursuant to and in accordance with Article 14 of the Directive 2012/19/EU of the
European Parliament on waste electrical and electronic equipment (WEEE), and
pursuant to and in accordance with Article 20 of the Directive 2013/56/EU of the
European Parliament on batteries and accumulators and waste batteries.
The barred symbol of the rubbish bin shown on the equipment indicates that, at
the end of its useful life, the product must be collected separately from other waste.
Please note that the batteries/rechargeable batteries must be removed from the equipment
before it is given as waste. To remove the batteries/accumulators refer to the specifications
in the user manual. Therefore, any products that have reached the end of their useful
life must be given to waste disposal centers specializing in separate collection of waste
electrical and electronic equipment, or given back to the dealer when purchasing a new
WEEE, pursuant to and in accordance with Article 14 as implemented in the country.

EN
- 13 -
The adequate separate collection for the subsequent start-up of the equipment sent to
be recycled, treated and disposal of in an environmentally compatible way contributes
to preventing possible negative effects on the environment and health and optimizes the
recycling and reuse of components making up the apparatus.
Abusive disposal of the product by the user involves application of the administrative
sanctions according to the laws in force.
FCC STATEMENT
This device complies with Part 15 of the FCC Rules. Operation is subject to the following two
conditions: (1) This device may not cause harmful interference, and (2) This device must accept
any interference received, including interference that may cause undesired operation.
WARNING Changes or modications not expressly approved by the party responsible for
compliance could void the user’s authority to operate the equipment.
This equipment has been tested and found to comply with the limits for a Class B digital device,
pursuant to Part 15 of the FCC Rules. These limits are designed to provide reasonable protection
against harmful interference in a residential installation.
NOTE This equipment generates, uses and can radiate radio frequency energy and, if not
installed and used in accordance with the instructions, may cause harmful interference to radio
communications. However, there is no guarantee that interference will not occur in a particular
installation. If this equipment does cause harmful interference to radio or television reception,
which can be determined by turning the equipment off and on, the user is encouraged to try to
correct the interference by one or more of the following measures:

EN
- 14 -
• Reorient or relocate the receiving antenna.
• Increase the separation between the equipment and receiver.
• Connect the equipment into an outlet on a circuit different from that to which the receiver is
connected.
• Consult the dealer or an experienced radio/TV technician for help.
This Class B digital apparatus complies with Canadian ICES- 3(B)/NMB-3(B)
DECLARATION OF CONFORMITY
The following information is not to be used as contact for support or sales. Please call our customer
service number (listed on our website at www.oregonscientic.com), or on the warranty card for
this product) for all inquiries instead.
We
Name: Oregon Scientic Inc.
Address: Brea Corporate Park 3020 Saturn St. Suite 200 Brea, CA 92821
Telephone No.:
1 (888) 950-8889

EN
- 15 -
declare that the product
Product No.: RM338PX/RM338PAX/RM338PUX
Product Name: PROJI Projection Clock
Manufacturer: Oregon Scientic Global Distribution Limited
Address: Block C, 9/F, Kaiser Estate, Phase 1, 41 Man Yue St.,
Hung Hom, Kowloon, Hong Kong
is in conformity with Part 15 of the FCC Rules. Operation is subject to the following two conditions:
1) This device may not cause harmful interference. 2) This device must accept any interference
received, including interference that may cause undesired operation.

IT
- 16 -
IT
INTRODUZIONE
Grazie per aver acquistato PROJI Orologio con proiezione di Oregon Scientic™ (modello:
RM338PX/RM338PAX/RM338PUX). Questo dispositivo riunisce le caratteristiche di un orario
preciso, una sveglia e il controllo della temperatura in un singolo strumento che potete utilizzare
dalla comodità della vostra sede. Vogliate tenere questo manuale a portata di mano mentre usate
il vostro nuovo prodotto. Esso contiene istruzioni pratiche passo passo, come pure le speciche
tecniche e le avvertenze di cui dovreste essere a conoscenza.
CONTENUTO DELLA CONFEZIONE
Unità Principale Batterie AAA per l’unità principale x 2

IT
- 17 -
PANORAMICA
VISTA DALL’ALTO
4
5
6
1
2
3
1. Premete + - per aumentare impostazioni, oppure tenete premuto per aumentare rapidamente
in modalità impostazione.
2. SNOOZE | LIGHT - premere per rinviare la sveglia o attivare la retroilluminazione e la
proiezione, tenere premuto no a che non sentiate un bip per attivare la proiezione per 5
minuti.
3. - Premere per cambiare per 5 secondi la visualizzazione fra l’ora attuale, la data o sveglia
1/2. Tenete premuto per entrare in modalità impostazione.
4. Premere – - per diminuire le impostazioni, tenete premuto per diminuire rapidamente le
impostazioni.
5. Lenti di proiezione
6. - Premere per accendere/spegnere le sveglie, tenere premuto per entrare in modalità
impostazione sveglia.
VISTA POSTERIORE
1
23 4 5
1. Compartimento batterie
2. RESET [RIPRISTINO] – Premere per ripristinare le impostazioni di default.
3. /PROJECTION – Premere per ruotare la proiezione di 90°. Tenere premuto per
accendere/spegnere la proiezione.
4. RCC - Premere per accendere e cercare il segnale RCC. Tenete premuto per spegnere.
5. Coperchio compartimento batterie

IT
- 18 -
VISTA POSTERIORE
1
23 4
5
1. Compartimento batterie
2. RESET [RIPRISTINO] – Premere per ripristinare le impostazioni di default.
3. /PROJECTION – Premere per ruotare la proiezione di 90°. Tenere premuto per
accendere/spegnere la proiezione.
4. RCC - Premere per accendere e cercare il segnale RCC. Tenete premuto per spegnere.
5. Coperchio compartimento batterie

IT
- 19 -
SCHERMO A CRISTALLI LIQUIDI
1
23
1. Visualizzazione ora
2. Visualizzazione giorno della settimana
3. Visualizzazione temperatura interna
Simbolo Descrizione
Sveglia 1 attiva.
Sveglia 2 attiva.
Segnale RCC ricevuto
Batteria scarica unità principale
COME INIZIARE
INSERIRE LE BATTERIE
1. Spingere delicatamente la copertura dello scompartimento batterie verso il basso per
rimuoverlo dall'unità principale.
2. Inserire le batterie, rispettando le polarità (+/-).
NOTA Sostituire le batterie quando viene visualizzata l’icona , o quando la visualizzazione
è oca.
OROLOGIO
RICEZIONE OROLOGIO
Questo orologio si sincronizza automaticamente con un segnale orario. Premere RCC per
accendere e cercare il segnale orario.
L'unità principale può ricevere i dati dell'orologio in RF con diversi segnali RCC:
Numero di modello:r Regione Segnale
RM338PX EU DCF
RM338PUX UK MSF
Indicatore ricezione segnale orario:
Icone Descrizione
L’unità principale sta cercando il segnale orario
(lampeggia)
L’unità principale sta cercando il segnale orario
Nessun segnale orario
Forte segnale RCC ricevuto
Debole segnale RCC ricevuto

IT
- 20 -
OROLOGIO
RICEZIONE OROLOGIO
Questo orologio si sincronizza automaticamente con un segnale orario. Premere RCC per
accendere e cercare il segnale orario.
L'unità principale può ricevere i dati dell'orologio in RF con diversi segnali RCC:
Numero di modello:r Regione Segnale
RM338PX EU DCF
RM338PUX UK MSF
Indicatore ricezione segnale orario:
Icone Descrizione
L’unità principale sta cercando il segnale orario
(lampeggia)
L’unità principale sta cercando il segnale orario
Nessun segnale orario
Forte segnale RCC ricevuto
Debole segnale RCC ricevuto

IT
- 21 -
NOTA
• Ci vogliono da 2 a 10 minuti per ricevere il segnale orario. Se il segnale è debole, ci potrebbero
volere no a 24 ore per ricevere un segnale valido.
• Non applicabile in Asia e in aree non designate.
IMPOSTARE MANUALMENTE L’OROLOGIO
1. Tenere premuto . Lo schermo mostra ZONE ed il numero lampeggia.
2. Premere una volta o tenere premuto +/- per regolare l’impostazione. Per UE/RU, la
compensazione del fuso orario imposta l’orologio no a +/- 23 ore dall’ora del segnale orario
ricevuto.
3. Premere per confermare.
4. Premere una volta o tenere premuto +/- per regolare l’impostazione per il formato 12/24h, ore,
minuti, anno, formato di calendario (mese-giorno/giorno-mese), mese, data, unità di misura
della temperatura (°C/°F) e lingua.
5. Premere per confermare ogni impostazione.
NOTA
• Le opzioni della lingua sono Inglese (ENG), Spagnolo (SPA), Italiano (ITA), Francese (FRE),
Tedesco (GER).
• La ricezione del segnale RCC si attiva dopo ogni ripristino o sostituzione batterie.
• In modalità impostazione, premere e tenere premuto per salvare le impostazioni e uscire
dalla modalità di impostazione.
SVEGLIA
IMPOSTAZIONE/REGOLAZIONE ORARIO DI SVEGLIA
1. Tenere premuto .
2. Premere una volta o tenere premuto +/- correggere l'impostazione ora e minuti, quindi premere
per confermare.
3. Premere +/- per cambiare la sveglia del giorno della settimana tra ON/OFF, quindi premere
per confermare.
• La sveglia squilla soltanto nei giorni della settimana in cui la regolazione è ON.
4. Ripetere i passi 2 - 4 per l’impostazione della sveglia.
COME ACCENDERE/SPEGNERE LE SVEGLIE:
Premere per accendere/spegnere la sveglia in sequenza:
Sveglia 1 > Sveglia 2 > Entrambe ON > Entrambe OFF.
FUNZIONAMENTO
Funzionamento Quando la sveglia suona, la retroilluminazione lampeggia. Potete:
• Premere per arrestare. La sveglia squillerà ancora il giorno seguente.
• Premere SNOOZE | LIGHT per rinviare la sveglia. La sveglia suonerà di nuovo dopo 8 minuti.

IT
- 22 -
SVEGLIA
IMPOSTAZIONE/REGOLAZIONE ORARIO DI SVEGLIA
1. Tenere premuto .
2. Premere una volta o tenere premuto +/- correggere l'impostazione ora e minuti, quindi premere
per confermare.
3. Premere +/- per cambiare la sveglia del giorno della settimana tra ON/OFF, quindi premere
per confermare.
• La sveglia squilla soltanto nei giorni della settimana in cui la regolazione è ON.
4. Ripetere i passi 2 - 4 per l’impostazione della sveglia.
COME ACCENDERE/SPEGNERE LE SVEGLIE:
Premere per accendere/spegnere la sveglia in sequenza:
Sveglia 1 > Sveglia 2 > Entrambe ON > Entrambe OFF.
FUNZIONAMENTO
Funzionamento Quando la sveglia suona, la retroilluminazione lampeggia. Potete:
• Premere per arrestare. La sveglia squillerà ancora il giorno seguente.
• Premere SNOOZE | LIGHT per rinviare la sveglia. La sveglia suonerà di nuovo dopo 8 minuti.

IT
- 23 -
PROIEZIONE
Il proiettore visualizza l’ora sul vostro softto per una facile vista in una stanza scura. Per risultati
ottimali della proiezione, posizionare l'unità entro 1,5 - 2 m. (5 - 6.5 piedi) dal softto o dalla parete.
• Premere SNOOZE | LIGHT per attivare la retroilluminazione e la proiezione per 5 secondi.
• Tenere premuto SNOOZE | LIGHT no a che non si sente un bip per attivare la proiezione per
5 minuti.
• Premere /PROJECTION per ruotare la proiezione di 90°.
• Tenere premuto /PROJECTION per accendere/spegnere la proiezione continua.
NOTA La funzione di proiezione continua è disabilitata quando l’unità principale non è collegata
all’adattatore di alimentazione.
SPECIFICHE
UNITÀ PRINCIPALE
Lu x La x H 108 x 26 x 77 mm (4,25 x 1,02 x 3,03 pollici)
Peso 112 g (3,95 once) senza batterie
Intervallo temperatura da - 5°C a 50°C (da 23°F a 122°F)
Tolleranza 0°C a 40°C: ± 1°C (±2.0°F) < 0°C e >40°C: ± 2°C (±4.0°F)
Risoluzione 0,1°C (0,2°F)
Alimentazione 2 x batterie UM-4 (AAA) da 1,5 V
PRECAUZIONI
• Non sottoporre il prodotto a forza eccessiva, urti, polvere, sbalzi eccessivi di temperatura o umidità.
• Non otturare i fori di aerazione con oggetti come giornali, tende, etc.
• Non immergere l’unità in acqua. Se si versa del liquido sul prodotto, asciugarlo immediatamente
con un panno morbido e liscio.
• Non pulire l’unità con materiali abrasivi o corrosivi.
• Non manomettere i componenti interni. In questo modo si invalida la garanzia.
• Oregon Scientic declina ogni responsabilità per eventuali danni alle niture causati dal
posizionamento del prodotto su determinati tipi di legno. Consultare le istruzioni fornite dal
fabbricante del mobile per ulteriori informazioni.

IT
- 24 -
SPECIFICHE
UNITÀ PRINCIPALE
Lu x La x H 108 x 26 x 77 mm (4,25 x 1,02 x 3,03 pollici)
Peso 112 g (3,95 once) senza batterie
Intervallo temperatura da - 5°C a 50°C (da 23°F a 122°F)
Tolleranza 0°C a 40°C: ± 1°C (±2.0°F) < 0°C e >40°C: ± 2°C (±4.0°F)
Risoluzione 0,1°C (0,2°F)
Alimentazione 2 x batterie UM-4 (AAA) da 1,5 V
PRECAUZIONI
• Non sottoporre il prodotto a forza eccessiva, urti, polvere, sbalzi eccessivi di temperatura o umidità.
• Non otturare i fori di aerazione con oggetti come giornali, tende, etc.
• Non immergere l’unità in acqua. Se si versa del liquido sul prodotto, asciugarlo immediatamente
con un panno morbido e liscio.
• Non pulire l’unità con materiali abrasivi o corrosivi.
• Non manomettere i componenti interni. In questo modo si invalida la garanzia.
• Oregon Scientic declina ogni responsabilità per eventuali danni alle niture causati dal
posizionamento del prodotto su determinati tipi di legno. Consultare le istruzioni fornite dal
fabbricante del mobile per ulteriori informazioni.

IT
- 25 -
• Le immagini del manuale possono differire dalla realtà.
• Il contenuto di questo manuale non può essere ristampato senza l’autorizzazione del fabbricante.
• Utilizzare solo batterie nuove. Non mescolare batterie nuove con batterie vecchie.
• Al momento dello smaltimento del prodotto, attenersi alla nota relativa in allegato.
• Non smaltire le batterie vecchie come riuto indifferenziato. È necessario che questo riuto
venga smaltito mediante raccolta differenziata per essere trattato in modo idoneo.
• Alcune unità sono dotate di una striscia di sicurezza per le batterie. Rimuovere la striscia dal
vano batterie prima del primo utilizzo.
NOTA Le speciche tecniche del prodotto e il contenuto del manuale per l’utente possono essere
modicati senza preavviso.
NOTA Caratteristiche e accessori non disponibili in tutti i paesi. Per ulteriori informazioni, rivolgersi
al proprio rivenditore.
Si prega di visitare il sito http://global.oregonscientic.com/ customerSupport.php per scaricare
una versione elettronica del manuale.
INFORMAZIONI SU OREGON SCIENTIFIC
Per ulteriori informazioni sui prodotti Oregon Scientic, visitate il nostro sito web
www.oregonscientic.it
Per richiedere informazioni, contattate il nostro Servizio Clienti all’indirizzo info@oregonscientic.it.
Oregon Scientic Global Distribution Limited si riserva il diritto di interpretare e denire eventuali
contenuti, termini e disposizioni contenuti in questo manuale per l’utente e di modicarli, a sua
esclusiva discrezione, in qualsiasi momento e senza preavviso. Nella misura in cui risultassero
incongruenze tra la versione in inglese e quelle in altre lingue, farà fede la versione in inglese.
DICHIARAZIONE DI CONFORMITA’ UE
Con la presente il fabbricante, Oregon Scientic Global Distribution Limited, dichiara che questo tipo
di apparecchiatura PROJI Orologio con proiezione (modello: RM338PX/RM338PAX/RM338PUX)
è conforme alla direttiva 2014/53/UE. Il testo completo della Dichiarazione di Conformità UE è
disponibile al seguente indirizzo internet : http://global.oregonscientic.com/customerSupport.php
PAESI CONFORMI ALLA DIRETTIVA RED
Tutti I Paesi UE, Svizzera CH
e Norvegia N
INFORMAZIONE AGLI UTENTI
Ai sensi dell’art.26 del Decreto Legislativo 14 marzo 2014, n. 49 “Attuazione della
Direttiva 2012/19/UE sui riuti di apparecchiature elettriche ed elettroniche (RAEE)”
ed ai sensi dell’art.22 del Decreto Legislativo 188 del 20 novembre 2008 “Attuazione
della direttiva 2013/56/EU concernente pile, accumulatori e relativi riuti “.
Il simbolo del cassonetto barrato riportato sull’apparecchiatura o sulla sua confezione
indica che il prodotto alla ne della propria vita utile deve essere raccolto separatamente dagli
altri riuti per permetterne un adeguato trattamento e riciclo.

IT
- 26 -
Oregon Scientic Global Distribution Limited si riserva il diritto di interpretare e denire eventuali
contenuti, termini e disposizioni contenuti in questo manuale per l’utente e di modicarli, a sua
esclusiva discrezione, in qualsiasi momento e senza preavviso. Nella misura in cui risultassero
incongruenze tra la versione in inglese e quelle in altre lingue, farà fede la versione in inglese.
DICHIARAZIONE DI CONFORMITA’ UE
Con la presente il fabbricante, Oregon Scientic Global Distribution Limited, dichiara che questo tipo
di apparecchiatura PROJI Orologio con proiezione (modello: RM338PX/RM338PAX/RM338PUX)
è conforme alla direttiva 2014/53/UE. Il testo completo della Dichiarazione di Conformità UE è
disponibile al seguente indirizzo internet : http://global.oregonscientic.com/customerSupport.php
PAESI CONFORMI ALLA DIRETTIVA RED
Tutti I Paesi UE, Svizzera CH
e Norvegia N
INFORMAZIONE AGLI UTENTI
Ai sensi dell’art.26 del Decreto Legislativo 14 marzo 2014, n. 49 “Attuazione della
Direttiva 2012/19/UE sui riuti di apparecchiature elettriche ed elettroniche (RAEE)”
ed ai sensi dell’art.22 del Decreto Legislativo 188 del 20 novembre 2008 “Attuazione
della direttiva 2013/56/EU concernente pile, accumulatori e relativi riuti “.
Il simbolo del cassonetto barrato riportato sull’apparecchiatura o sulla sua confezione
indica che il prodotto alla ne della propria vita utile deve essere raccolto separatamente dagli
altri riuti per permetterne un adeguato trattamento e riciclo.

IT
- 27 -
Si ricorda che le pile/accumulatori devono essere rimosse dall’apparecchiatura prima che questa sia
conferita come riuto. Per rimuovere le pile/ accumulatori fare riferimento alle speciche indicazioni
riportate nel manuale d'uso.
L’utente dovrà, pertanto, conferire gratuitamente l’apparecchiatura e la pila giunta a ne vita agli
idonei centri comunali di raccolta differenziata dei riuti elettrici ed elettronici, oppure riconsegnarle
al rivenditore secondo le seguenti modalità:
• sia pile portatili sia apparecchiature di piccole dimensioni, ovvero con almeno un lato esterno
non superiore a 25 cm, è prevista la consegna gratuita senza obbligo di acquisto presso i negozi
con una supercie di vendita delle apparecchiature elettriche ed elettroniche superiore ai
400 mq. Per negozi con dimensioni inferiori, tale modalità è facoltativa.
• per apparecchiature con dimensioni superiori a 25 cm, è prevista la consegna in tutti i punti
di vendita in modalità 1 contro 1, ovvero la consegna al rivenditore potrà avvenire solo all’atto
dell’acquisto di un nuovo prodotto equivalente, in ragione di uno a uno.
L’adeguata raccolta differenziata per l’avvio successivo dell’apparecchiatura e delle pile/
accumulatori dismessi al riciclaggio, al trattamento e allo smaltimento ambientalmente compatibile
contribuisce ad evitare possibili effetti negativi sull’ambiente e sulla salute e favorisce il reimpiego
e/o riciclo dei materiali di cui essi sono composti.
Lo smaltimento abusivo di apparecchiature, pile ed accumulatori da parte dell’utente comporta
l’applicazione delle sanzioni di cui alla corrente normativa di legge.
FR
INTRODUCTION
Merci d’avoir choisi le Réveil Projecteur PROJI d’Oregon Scientic™ (modèles: RM338PX/
RM338PAX/RM338PUX). Cet appareil regroupe une mesure du temps précise, deux alarmes,
et un suivi des températures dans un outil unique que vous pouvez utiliser dans le confort de
votre maison. Conservez ce mode d’emploi à disposition lors des premières utilisations de ce
produit. Il contient des instructions étape par étape, ainsi que des spécications techniques et
autres avertissements que vous vous devez de connaitre.
CONTENU DE L’EMBALLAGE
Unite principale
2 piles AAA pour l’unite principale

FR
- 28 -
FR
INTRODUCTION
Merci d’avoir choisi le Réveil Projecteur PROJI d’Oregon Scientic™ (modèles: RM338PX/
RM338PAX/RM338PUX). Cet appareil regroupe une mesure du temps précise, deux alarmes,
et un suivi des températures dans un outil unique que vous pouvez utiliser dans le confort de
votre maison. Conservez ce mode d’emploi à disposition lors des premières utilisations de ce
produit. Il contient des instructions étape par étape, ainsi que des spécications techniques et
autres avertissements que vous vous devez de connaitre.
CONTENU DE L’EMBALLAGE
Unite principale
2 piles AAA pour l’unite principale

FR
- 29 -
VUE D’ENSEMBLE
VUE DE DESSUS
4
5
6
1
2
3
1. + - Appuyez ici pour augmenter les réglages, ou maintenez appuyé pour augmenter rapidement
les valeurs en mode réglage.
2. SNOOZE | LIGHT (Veille/Lumière) - Appuyez pour mettre en veille l’alarme ou activer le
retro-éclairage et la projection. Maintenez appuyé jusqu’à ce que vous entendiez un bip
sonore pour activer le projection pendant 5 minutes.
3. - Appuyez pour alterner entre l’afchage de l’heure, du calendrier ou de l’alarme 1 ou 2
pendant 5 secondes. Maintenez appuyé pour entrer dans le mode de réglage.
4. – - Appuyez ici pour diminuer les réglages, ou maintenez appuyé pour diminuer rapidement
les valeurs en mode réglage.
5. Lentille de projection
6. - Appuyez pour activer/désactiver les alarmes, maintenez appuyé pour entrer dans le mode
de réglage des alarmes.
VUE ARRIERE
1
23 4 5
1. Compartiment à piles
2. RESET (Réinitialisation) – Appuyez ici pour réinitialiser l’appareil.
3. /PROJECTION – Appuyez ici pour inverser l’image projetée de 90 degrés. Maintenez
appuyé pour mettre la projection en continue sur on/off.
4. RCC – Appuyez pour activer et rechercher le signal RCC. Maintenez appuyé pour désactiver.
5. Couvercle du compartiment à piles

FR
- 30 -
VUE ARRIERE
1
23 4
5
1. Compartiment à piles
2. RESET (Réinitialisation) – Appuyez ici pour réinitialiser l’appareil.
3. /PROJECTION – Appuyez ici pour inverser l’image projetée de 90 degrés. Maintenez
appuyé pour mettre la projection en continue sur on/off.
4. RCC – Appuyez pour activer et rechercher le signal RCC. Maintenez appuyé pour désactiver.
5. Couvercle du compartiment à piles

FR
- 31 -
ECRAN LCD
1
23
1. Afchage de l’heure
2. Afchage des jours de la semaine
3. Afchage de la température intérieure
Symbole Description
Alarme 1 activée
Alarme 2 activée
Signal RCC reçu
Niveau des piles de l’unité
principale faible
POUR COMMENCER
INSTALLATION DES PILES
1. Poussez doucement le couvercle du compartiment à piles vers le bas pour le retirer de l’unité
principale.
2. Installez les piles en respectant les indications de polarité (+/-).
REMARQUE Remplacez les piles lorsque l’icone s’afche ou lorsque la luminosité de
l’afchage diminue.
HORLOGE
RECEPTION DE L’HORLOGE
L’horloge est désignée pour se synchroniser automatiquement avec un signal d’horloge. Appuyez
sur RCC pour activer et rechercher le signal d’horloge.
L’unité principale est capable de recevoir des données d’horloge RF suivant différents signaux RCC:
Numéro du modèle Région Signal
RM338PX EU DCF
RM338PUX UK MSF
Indicateur de réception du signal d’horloge
Icones Description
L’unité principale est à la recherche d’un signal d’horloge
sufsement puissant.
(ash)
L’unite principale est à la recherche d’un signal d’horloge.
Pas de signal d’horloge
Signal RCC reçu fort
Signal RCC reçu faible

FR
- 32 -
HORLOGE
RECEPTION DE L’HORLOGE
L’horloge est désignée pour se synchroniser automatiquement avec un signal d’horloge. Appuyez
sur RCC pour activer et rechercher le signal d’horloge.
L’unité principale est capable de recevoir des données d’horloge RF suivant différents signaux RCC:
Numéro du modèle Région Signal
RM338PX EU DCF
RM338PUX UK MSF
Indicateur de réception du signal d’horloge
Icones Description
L’unité principale est à la recherche d’un signal d’horloge
sufsement puissant.
(ash)
L’unite principale est à la recherche d’un signal d’horloge.
Pas de signal d’horloge
Signal RCC reçu fort
Signal RCC reçu faible

FR
- 33 -
REMARQUE
• Cela peut prendre entre 2 et 10 minutes pour recevoir le signal d’horloge. Si le signal est faible,
cela pourra prendre jusqu’ à 24 heures pour recevoir un signal valide.
• Ne s'applique pas à l'Asie et aux zones non prévues.
REGLAGE MANUEL DE L’HORLOGE
1. Maintenez appuyé RCC pour désactiver le signal de réception. L’icone s’éteint.
2. Maintenez appuyé . L’écran afche alors ZONE et les chiffres clignotent.
3. Appuyez une fois sur ou maintenez appuyé +/- pour ajuster les réglages. Pour EU/UK, le
réglage de la zone horaire règle l’horloge avec une différence de +/- par rapport au signal
d’horloge reçu.
4. Appuyez sur pour conrmer
5. Appuyez une fois sur ou maintenez appuyé +/- pour régler le format de l’heure sur 12/24h,
l’heure, les minutes, l’année, le format du calendrier (mois-jour/jour-mois), du mois, de la date,
de l’unité de température (°C/°F) e de la langue.
6. Appuyez sur pour conrmer chaque réglage.
REMARQUE
• Les options de langue sont l’anglais (ENG), l’espagnol (SPA), l’italien (ITA), le français (FRE)
et l’allemand (GER).
• Le signal de réception RCC est activé après chaque Reset ou changement de piles.
• Appuyez et maintenez pour sauvegarder les réglages et quitter le mode réglages.
ALARME
REGLAGES/AJUSTEMENT DE L’HEURE DE L’ALARME
1. Maintenez appuyé .
2. Appuyez une fois sur ou maintenez appuyé +/- pour ajuster le réglage de l’heure et des
minutes, puis appuyez sur pour conrmer.
3. Appuyez sur +/- pour mettre l’alarme des jours de la semaine sur ON/OFF, puis appuyez sur
pour conrmer.
• L’alarme ne se déclenche pendant les jours de la semaine que lorsque le réglage est sur ON.
4. Répétez les étapes 2 – 4 pour les réglages de l’alarme 2.
ACTIVEZ/DESACTIVEZ LES ALARMES
Appuyez sur pour activer/désactiver l’alarme en suivant la séquence suivante:
Alarm1 > Alarm 2 > es deux sur ON > les deux sur OFF.
OPERATION
Lorsque l’alarme sonne, le retro-éclairage clignotera. Vous pouvez alors:
• Appuyez sur pour arrêter l’alarme. L’alarme sonnera de nouveau le lendemain.
• Appuyez sur SNOOZE | LIGHT pour mettre en veille l’alarme. L’alarme sonne de nouveau
après 8 minutes.

FR
- 34 -
ALARME
REGLAGES/AJUSTEMENT DE L’HEURE DE L’ALARME
1. Maintenez appuyé .
2. Appuyez une fois sur ou maintenez appuyé +/- pour ajuster le réglage de l’heure et des
minutes, puis appuyez sur pour conrmer.
3. Appuyez sur +/- pour mettre l’alarme des jours de la semaine sur ON/OFF, puis appuyez sur
pour conrmer.
• L’alarme ne se déclenche pendant les jours de la semaine que lorsque le réglage est sur ON.
4. Répétez les étapes 2 – 4 pour les réglages de l’alarme 2.
ACTIVEZ/DESACTIVEZ LES ALARMES
Appuyez sur pour activer/désactiver l’alarme en suivant la séquence suivante:
Alarm1 > Alarm 2 > es deux sur ON > les deux sur OFF.
OPERATION
Lorsque l’alarme sonne, le retro-éclairage clignotera. Vous pouvez alors:
• Appuyez sur pour arrêter l’alarme. L’alarme sonnera de nouveau le lendemain.
• Appuyez sur SNOOZE | LIGHT pour mettre en veille l’alarme. L’alarme sonne de nouveau
après 8 minutes.

FR
- 35 -
PROJECTION
Le projecteur afche l’heure sur votre plafond pour une meilleure lecture de l’heure dans une
pièce sombre. Placez l’appareil à une distance d’environ 1.5-2 m de la meilleure position pour
le visionnage de l’heure.
• Appuyez sur SNOOZE | LIGHT pour activer le retro-éclairage et la projection pendant 5 secondes.
• Maintenez appuyé SNOOZE | LIGHT jusqu’à ce que vous entendiez un bip sonore pour activer
le projection pendant 5 minutes.
• Appuyez sur / PROJECTION pour faire basculer le contenu de la projection de 90 degrés.
• Maintenez appuyé / PROJECTION pour choisir entre une projection en continue On ou Off.
REMARQUE La fonction de projection en continue est désactivée lorsque l’unité principale
n’est pas connectée à l’alimentation secteur.
PRECAUTIONS
• Ne pas soumettre le produit à une force excessive, au choc, à la poussière, aux changements de
température ou à l’humidité.
• Ne pas couvrir les trous de ventilation avec des journaux, rideaux etc...
• Ne pas immerger le produit dans l’eau. Si vous renversez du liquide sur l’appareil, séchez-le
immédiatement avec un tissu doux.
• Ne pas nettoyer l’appareil avec des matériaux corrosifs ou abrasifs.
• Ne pas trafiquer les composants internes. Cela invalidera votre garantie.
• N’utilisez que des piles neuves. Ne pas mélanger des piles neuves et usagées.
• Les images de ce manuel peuvent différer de l’aspect réel du produit.
• Lorsque vous désirez vous débarrasser de ce produit, assurez-vous qu’il soit collecté
séparément pour un traitement adapté.
• Le poser sur certaines surfaces en bois peut endommager la finition du meuble, et Oregon
Scientific ne peut en être tenu responsable. Consultez les mises en garde du fabricant du
meuble pour de plus amples informations.
• Le contenu du présent manuel ne peut être reproduit sans la permission du fabriquant.
• Ne pas jeter les piles usagées dans les containers municipaux non adaptés. Veuillez effectuer
le tri de ces ordures pour un traitement adapté si nécessaire.
• Veuillez remarquer que certains appareils sont équipés d’une bande de sécurité. Retirez la
bande du compartiment des piles avant la première utilisation.

FR
PROJECTION
Le projecteur afche l’heure sur votre plafond pour une meilleure lecture de l’heure dans une
pièce sombre. Placez l’appareil à une distance d’environ 1.5-2 m de la meilleure position pour
le visionnage de l’heure.
• Appuyez sur SNOOZE | LIGHT pour activer le retro-éclairage et la projection pendant 5 secondes.
• Maintenez appuyé SNOOZE | LIGHT jusqu’à ce que vous entendiez un bip sonore pour activer
le projection pendant 5 minutes.
• Appuyez sur / PROJECTION pour faire basculer le contenu de la projection de 90 degrés.
• Maintenez appuyé / PROJECTION pour choisir entre une projection en continue On ou Off.
REMARQUE La fonction de projection en continue est désactivée lorsque l’unité principale
n’est pas connectée à l’alimentation secteur.
- 36 -
PRECAUTIONS
• Ne pas soumettre le produit à une force excessive, au choc, à la poussière, aux changements de
température ou à l’humidité.
• Ne pas couvrir les trous de ventilation avec des journaux, rideaux etc...
• Ne pas immerger le produit dans l’eau. Si vous renversez du liquide sur l’appareil, séchez-le
immédiatement avec un tissu doux.
• Ne pas nettoyer l’appareil avec des matériaux corrosifs ou abrasifs.
• Ne pas trafiquer les composants internes. Cela invalidera votre garantie.
• N’utilisez que des piles neuves. Ne pas mélanger des piles neuves et usagées.
• Les images de ce manuel peuvent différer de l’aspect réel du produit.
• Lorsque vous désirez vous débarrasser de ce produit, assurez-vous qu’il soit collecté
séparément pour un traitement adapté.
• Le poser sur certaines surfaces en bois peut endommager la finition du meuble, et Oregon
Scientific ne peut en être tenu responsable. Consultez les mises en garde du fabricant du
meuble pour de plus amples informations.
• Le contenu du présent manuel ne peut être reproduit sans la permission du fabriquant.
• Ne pas jeter les piles usagées dans les containers municipaux non adaptés. Veuillez effectuer
le tri de ces ordures pour un traitement adapté si nécessaire.
• Veuillez remarquer que certains appareils sont équipés d’une bande de sécurité. Retirez la
bande du compartiment des piles avant la première utilisation.

FR
- 37 -
REMARQUE Les caractéristiques techniques de ce produit et le contenu de ce manuel
peuvent être soumis à modifications sans préavis.
REMARQUE Caractéristiques et accessoires ne seront pas valables pour tous les pays. Pour
plus d’information, contacter le détaillant le plus proche.
Pour télécharger une version électronique de ce mode d’emploi, veuillez visiter
http://global.oregonscientific.com/customerSupport.php.
SPECIFICATIONS
UNITE PRINCIPALE
L x W x H 108 x 26 x 77 mm (4.25 x 1.02 x 3.03 in)
Poids 112 g (3.95 oz) sans les piles
Plage de température -5°C à 50°C (23°F à 122°F)
Exactitude 0°C à 40°C: ±1°C (±2.0°F) < 0°C et >40°C: ±2°C (±4.0°F)
Résolution 0.1°C (0.2°F)
Alimentation 2 piles UM-4 (AAA) 1.5 V

FR
- 38 -
À PROPOS D’OREGON SCIENTIFIC
Pour plus d‘informations sur les produits Oregon Scientific France, rendez-vous sur notre site
www.oregonscientific.fr.
Besoin de plus d’informations? Contactez notre service client expert à [email protected].
Oregon Scientific Global Distribution Limited se réserve le droit d’interpréter tout contenu, termes
et provisions du présent manuel de l’utilisateur et de les amender à sa seule discrétion, n’importe
quand et sans avis préalable. Dans la mesure où des incohérences sont constatées entre la
version anglaise et les versions traduites en langues étrangères, la version anglaise prévaudra.
UE DÉCLARATION DE CONFORMITÉ
Le fabricant, Oregon Scientific Global Distribution Limited, déclare que le type d’équipement radio
Réveil Projecteur PROJI (Modèle : RM338PX/RM338PAX/RM338PUX) est conforme à la directive
2014/53/UE. Le texte intégral de la déclaration de conformité de l’UE est disponible à l’adresse
Internet suivante : http://global.oregonscientific.com/customerSupport.php
Tous les pays membres de l’EU, la Suisse CH
et la Norvège N
PAYS CONCERNÉS RED

FR
- 39 -
INFORMATIONS AUX USAGERS
Aux termes des Directives européennes 2011/65/EU et 2012/19/EU, relatives à la
réduction de l’utilisation de substances dangereuses dans les appareils électriques
et électroniques et à l’élimination des déchets.
Le symbole représentant une poubelle barrée reporté sur l’appareil indique que le produit
doit être collecté séparément des autres déchets à la n de sa propre vie.
L’usager devra done remettre l’appareil, lorsqu’il ne l’utilisera plus, à des centres adaptés
de collecte sélective pour les déchets électroniques et électrotechniques, ou bien il devra le
rapporter au revendeur au moment de l’achat d’un nouvel appareil de type équivalent, en raison
d’un contre un.
La collecte sélective adéquate pour la transmission successive de l’appareil qui n’est plus utilisé
au recyclage, au traitement ou à l’élimination compatible au niveau environnemental, contribue
à éviter les effets négatifs possibles sur l’environnement et sur la santé et favorise le recyclage
des matériaux dont l’appareil est composé.
L’élimination illégale du produit par l’usager est passible de l’application de sanctions selon les
lois en vigueur.
DE
EINFÜHRUNG
Vielen Dank für den Kauf dieser Oregon Scientic™ PROJI Projektionsuhr (Modell: RM338PX/
RM338PAX/RM338PUX). Dieses Gerät bietet die Funktionen der präzisen Zeitanzeige,
Alarmfunktionen und Temperaturmessung in einem einfach zu bedienenden Gerät in Ihrem
Zuhause. Bitte bewahren Sie diese Bedienungsanleitung zur Bezugnahme bei der Bedienung Ihres
neuen Gerätes auf. Diese Bedienungsanleitung enthält sowohl detaillierte Bedienungshinweise,
als auch Angaben zu den technischen Daten sowie wichtige Warnhinweise, die Sie unbedingt
beachten sollten.
PACKUNGSINHALT
Basisgerät
AAA Batterien für
Basisgerät x 2

DE
- 40 -
DE
EINFÜHRUNG
Vielen Dank für den Kauf dieser Oregon Scientic™ PROJI Projektionsuhr (Modell: RM338PX/
RM338PAX/RM338PUX). Dieses Gerät bietet die Funktionen der präzisen Zeitanzeige,
Alarmfunktionen und Temperaturmessung in einem einfach zu bedienenden Gerät in Ihrem
Zuhause. Bitte bewahren Sie diese Bedienungsanleitung zur Bezugnahme bei der Bedienung Ihres
neuen Gerätes auf. Diese Bedienungsanleitung enthält sowohl detaillierte Bedienungshinweise,
als auch Angaben zu den technischen Daten sowie wichtige Warnhinweise, die Sie unbedingt
beachten sollten.
PACKUNGSINHALT
Basisgerät
AAA Batterien für
Basisgerät x 2

DE
- 41 -
ÜBERSICHT
ANSICHT VON OBEN
4
5
6
1
2
3
1. + - Betätigen, um die Anzeigewerte aufwärts einzustellen, oder gedrückt halten, um
Einstellungen im Einstellmodus schnell aufwärts vorzunehmen.
2. SCHLUMMERN/LICHT (SNOOZE | LIGHT) - Betätigen, um die Schlummern-Funktion für
den Alarm zu aktivieren, oder um die Anzeigebeleuchtung und die Zeitprojektion; halten Sie
dazu die Taste gedrückt, bis Sie einen Piepton hören, um die Zeitprojektion 5 Minuten lang
zu aktivieren.
3. - Ca. 5 Sekunden lang betätigen, um zwischen der Anzeige der aktuellen Uhrzeit, der
Kalenderanzeige oder Alarm 1/2 umzuschalten. Halten Sie de Taste gedrückt, um den
Einstellmodus zu aktivieren.
4. – - Betätigen, um die Anzeigewerte abwärts einzustellen, oder gedrückt halten, um
Einstellungen im Einstellmodus schnell abwärts vorzunehmen.
5. Projektionsobjektiv
6. - Betätigen, um die Alarmfunktion “ein/aus” zu schalten, oder gedrückt halten, um den
Alarm-Einstellmodus zu aktivieren.

DE
- 42 -
ANSICHT VON HINTEN
1
23 4 5
1. Batteriefach
2. RÜCKSETZUNG (RESET) - Betätigen, um eine Rücksetzung des Gerätes auf die
Werksvorgaben auszuführen.
3. / PROJEKTION - Betätigen, um die Projektionsanzeige um 90° zu drehen. Gedrückt halten,
um die fortlaufende Zeitprojektion ein/aus zu schalten.
4. RCC – Betätigen, um die Suche nach dem RCC-Zeitsignal zu aktivieren. Gedrückt halten,
um die Funktion zu deaktivieren.
5. Batteriefachabdeckung

DE
- 43 -
LCD-ANZEIGE
1
23
1. Zeitanzeige
2. Wochentag-Anzeige
3. Innentemperatur-Anzeige
Symbol Beschreibung
Alarm 1 ist ein.
Alarm 2 ist ein.
RCC-Signal wird empfangen
Basisgerät - schwache Batterien
VORBEREITUNG ZUM EINSATZ
BATTERIEN EINLEGEN
1. Drücken Sie vorsichtig auf die Batteriefachabdeckung, um diese vom Basisgerät abzunehmen.
2. Legen Sie die Batterien ein, und achten Sie auf die korrekte Ausrichtung der
Polarisierungsangaben (+/-).
HINWEIS Wechseln Sie die Batterien aus, sobald der -Indikator in der Anzeige erscheint,
oder wenn die Anzeige schwächer wird.

DE
- 44 -
UHR
FUNKZEITSIGNAL-EMPFANG
Diese Uhr kann die Zeitanzeige automatisch mit einem Funkzeitsignal synchronisieren. Betätigen
Sie die RCC-Taste, um die Funktion einzuschalten, und das Gerät sucht nun nach einem
verwendbaren Funkzeitsignal.
Das Basisgerät kann RF-Funkzeitsignale verschiedener RCC-Signalstandards empfangen:
Modellnummer Region Signal
RM338PX EU DCF
RM338PUX UK MSF
Funkzeitsignal-Empfangsindikator:
Symbole Beschreibung
Das Basisgerät sucht nach einem verwendbaren Funkzeitsignal.
(ash)
Das Basisgerät empfängt das Funkzeitsignal.
Kein Funkzeitsignal vorhanden.
Starkes RCC- Signal wird empfangen.
Schwaches RCC-Signal wird empfangen.

DE
- 45 -
NOTE
• Der Empfang des Funkzeitsignals dauert ca. 2-10 Minuten. Wenn das Funkzeitsignal sehr
schwach ist, kann der Empfang eines verwendbaren Signals bis zu 24 Stunden dauern.
• Nicht anwendbar auf Asien und nicht benannte Gebiete.
UHRZEIT MANUELL EINSTELLEN
1. Drücken und halten Sie . In der Anzeige erscheint nun die Meldung ZONE (ZEITZONE),
und die Nummer der Zeitzone blinkt.
2. Drücken Sie einmal, oder halten Sie die Tasten +/- gedrückt, um die Einstellung auszuführen.
Für EU/UK kann eine Zeitzoneneinstellung +/- 23 Stunden bezüglich des empfangenen
Zeitsignals eingestellt werden.
3. Betätigen Sie , um die Einstellungen zu bestätigen.
4. Die Tasten einmal betätigen oder gedrückt halten, um die Einstellungen für das 12/24-Stundenformat,
die Stunden, Minuten, das Jahr, das Kalenderformat (Monat-Datum/Datum-Monat), den Monat,
das Datum, die Temperatureinheitenanzeige (°C/°F) und die Anzeigesprache.
5. Betätigen Sie , um die Einstellungen jeweils zu bestätigen.
HINWEIS
• Die Optionen für die Sprachenauswahl sind Englisch (ENG), Spanisch (SPA), Italienisch (ITA),
Französisch (FRE) und Deutsch German (GER).
• Der RCC-Funkzeitsignalempfang wird nach jeder Rücksetzung, oder nach einem
Batteriewechsel erneut aktiviert.
• Im Einstellungsmodus, drücken und halten Sie um die Einstellungen zu speichern und den
Einstellungsmodus zu verlassen.

DE
- 46 -
ALARM
AKTIVIERUNG/EINSTELLUNG DER ALARMZEIT
1. Drücken und halten Sie .
2. Die Tasten +/- einmal drücken, oder gedrückt halten, um die Stunden- und Minutenanzeige
einzustellen; betätigen Sie , um zu bestätigen.
3. Die Tasten +/- betätigen, um den Wochentagalarm EIN/AUS zu schalten; betätigen Sie to conrm.
• Der Alarm ertönt nur an Wochentagen wenn diese Einstellung EIN-geschaltet ist.
4. Wiederholen Sie die Schritte 2 – 4 für die Einstellung von Alarm 2. In der Anzeige erscheint
/ und zeigt an, wenn die Alarmfunktionen aktiviert sind.
ALARMFUNKTIONEN EIN/AUS SCHALTEN:
Betätigen Sie , um die Alarmfunktionen wie folgt „ein/aus“ zu schalten:
Alarm1 > Alarm 2 > Beide EIN > Beide AUS.
BETRIEB
Die Anzeigebeleuchtung blinkt sobald der Alarm ertönt. Gehen Sie wie folgt vor:
• Betätigen Sie , um den Alarm abzuschalten. Der Alarm ertönt erneut zur eingestellten
Alarmzeit am nächsten Tag.
• Betätigen Sie die Taste SCHLUMMERN/LICHT (SNOOZE | LIGHT), um die Schlummerfunktion
zu aktivieren. Der Alarm ertönt nun erneut nach 8 Minuten.

DE
- 47 -
PROJEKTION DER ZEITANZEIGE
Der Projektor kann die Zeit an Ihre Zimmerdecke projizieren, so dass Sie die Zeit leicht in
einem abgedunkelten Raum ablesen können. Das Gerät sollte sich in einem Abstand von ca.
1.5-2m (5 – 6.5 Fuß) von der Decke oder Wand benden, um eine optimale Projektionsqualität
zu gewährleisten.
• Betätigen Sie die Taste SCHLUMMERN/LICHT (SNOOZE | LIGHT). um die Anzeigebeleuchtung
und die Zeitprojektion ca. 5 Sekunden lang einzuschalten.
• Drücken und halten sie die Taste SCHLUMMERN/LICHT (SNOOZE | LIGHT) bis Sie einen
Piepton hören, um die Zeitprojektion 5 Minuten lang einzuschalten.
• Betätigen Sie die / PROJEKTION -Taste, um die Zeitprojektion 90° zu drehen.
• Drücken und halten Sie die / PROJEKTION -Taste, um die kontinuierliche Projektion der
Zeitanzeige “ein/aus” zu schalten.
HINWEIS Die kontinuierliche Zeitprojektion ist deaktiviert während das Gerät nicht mittels eines
Netzadapters betrieben wird.
VORSICHTSMASSNAHMEN
• Setzen Sie das Gerät keiner extremen Gewalteinwirkung und keinen Stößen aus, und halten
Sie es von übermäßigem Staub, Hitze oder Feuchtigkeit fern.
• Sie dürfen die Belüftungsöffnungen nicht mit Gegenständen abdecken, wie z.B. Zeitungen,
Vorhänge, usw.
• Tauchen Sie das Gerät niemals in Wasser. Falls Sie eine Flüssigkeit über das Gerät verschütten,
trocknen Sie es sofort mit einem weichen, faserfreien Tuch.
• Reinigen Sie das Gerät keinesfalls mit scheuernden oder ätzenden Mitteln.
• Machen Sie sich nicht an den internen Komponenten des Geräts zu schaffen, da dies zu einem
Verlust der Garantie führen kann.
• Verwenden Sie nur neue Batterien. Verwenden Sie keinesfalls neue und alte Batterien gemeinsam.
• Die in dieser Anleitung dargestellten Abbildungen können sich vom Original unterscheiden.
• Entsorgen Sie das Gerät ausschließlich in den dafür vorgesehenen, kommunalen Sammelstellen,
die Sie bei Ihrer Gemeinde erfragen können.
• Wenn dieses Produkt auf bestimmte Holzächen gestellt wird, kann die Oberäche beschädigt
werden. Oregon Scientic ist nicht haftbar für solche Beschädigungen. Entsprechende Hinweise
entnehmen Sie bitte der Pegeanleitung Ihres Möbelherstellers.
• Der Inhalt dieser Anleitung darf ohne Genehmigung des Herstellers nicht vervielfältigt werden.

DE
- 48 -
HINWEIS Die kontinuierliche Zeitprojektion ist deaktiviert während das Gerät nicht mittels eines
Netzadapters betrieben wird.
VORSICHTSMASSNAHMEN
• Setzen Sie das Gerät keiner extremen Gewalteinwirkung und keinen Stößen aus, und halten
Sie es von übermäßigem Staub, Hitze oder Feuchtigkeit fern.
• Sie dürfen die Belüftungsöffnungen nicht mit Gegenständen abdecken, wie z.B. Zeitungen,
Vorhänge, usw.
• Tauchen Sie das Gerät niemals in Wasser. Falls Sie eine Flüssigkeit über das Gerät verschütten,
trocknen Sie es sofort mit einem weichen, faserfreien Tuch.
• Reinigen Sie das Gerät keinesfalls mit scheuernden oder ätzenden Mitteln.
• Machen Sie sich nicht an den internen Komponenten des Geräts zu schaffen, da dies zu einem
Verlust der Garantie führen kann.
• Verwenden Sie nur neue Batterien. Verwenden Sie keinesfalls neue und alte Batterien gemeinsam.
• Die in dieser Anleitung dargestellten Abbildungen können sich vom Original unterscheiden.
• Entsorgen Sie das Gerät ausschließlich in den dafür vorgesehenen, kommunalen Sammelstellen,
die Sie bei Ihrer Gemeinde erfragen können.
• Wenn dieses Produkt auf bestimmte Holzächen gestellt wird, kann die Oberäche beschädigt
werden. Oregon Scientic ist nicht haftbar für solche Beschädigungen. Entsprechende Hinweise
entnehmen Sie bitte der Pegeanleitung Ihres Möbelherstellers.
• Der Inhalt dieser Anleitung darf ohne Genehmigung des Herstellers nicht vervielfältigt werden.

DE
- 49 -
• Verbrauchte Batterien gehören nicht in den Hausmüll. Bitte geben Sie sie bei einer Sammelstelle
für Altbatterien bzw. Sondermüll ab.
• Bitte beachten Sie, dass manche Geräte mit einem Batterieunterbrechungsstreifen bestückt
sind. Vor dem ersten Gebrauch müssen Sie den Streifen aus dem Batteriefach ziehen.
HINWEIS Die technischen Daten für dieses Produkt und der Inhalt der Bedienungsanleitung
können ohne Benachrichtigung geändert werden.
HINWEIS Eigenschaften und Zubehör nicht in allen Ländern verfügbar. Weitere Informationen
erhalten Sie von Ihrem Fachhändler vor Ort. Bitte besuchen Sie unsere Internetseite
http://global.oregonscientific.com/customerSupport.php, um eine elektronische Version dieser
Bedienungsanleitung herunter zu laden.
TECHNISCHE DATEN
MAIN UNIT
L x B x H 108 x 26 x 77 mm
Gewicht 112g ohne Batterien
Temperaturanzeigebereich -5°C bis 50°C
Genauigkeit 0°C bis 40°C: ±1°C (±2.0°F) < 0°C und >40°C: ±2°C (±4.0°F)
Auösung 0.1°C (0.2°F)
Stromversorgung 2 x UM-4 (AAA) 1.5 V Batterien
ÜBER OREGON SCIENTIFIC
Besuchen Sie unsere Website www.oregonscientific.de, um mehr über die Produkte von Oregon
Scientific zu erfahren.
Für etwaige Anfragen kontaktieren Sie bitte unseren Kundendienst unter [email protected].
Oregon Scientific Global Distribution Limited behält sich das Recht vor, die Inhalte, Bedingungen
und Bestimmungen in dieser Bedienungsanleitung zu interpretieren und auszulegen, und
diese jederzeit nach eigenem Ermessen ohne vorherige Ankündigung abzuändern. Soweit es
irgendwelche Unterschiede zwischen der englischen Version und den Versionen in anderen
Sprachen gibt, ist die englische Version maßgebend.
EU-KONFORMITÄTSERKLÄRUNG
Hiermit erklärt der Hersteller, Oregon Scientific Global Distribution Limited, dass der
Funkausrüstungs-Typ PROJI Projektionsuhr (Modell:RM338PX/RM338PAX/RM338PUX) In
Übereinstimmung mit 2014/53/EU ist. Den vollständigen Wortlaut der EU-Konformitätserklärung
finden Sie unter folgender Internetadresse: http://global.oregonscientific.com/customerSupport.php
KONFORM IN FOLGENDEN LÄNDERN
Alle Länder der EU, Schweiz CH
und Norwegen N

DE
- 50 -
ÜBER OREGON SCIENTIFIC
Besuchen Sie unsere Website www.oregonscientific.de, um mehr über die Produkte von Oregon
Scientific zu erfahren.
Für etwaige Anfragen kontaktieren Sie bitte unseren Kundendienst unter [email protected].
Oregon Scientific Global Distribution Limited behält sich das Recht vor, die Inhalte, Bedingungen
und Bestimmungen in dieser Bedienungsanleitung zu interpretieren und auszulegen, und
diese jederzeit nach eigenem Ermessen ohne vorherige Ankündigung abzuändern. Soweit es
irgendwelche Unterschiede zwischen der englischen Version und den Versionen in anderen
Sprachen gibt, ist die englische Version maßgebend.
EU-KONFORMITÄTSERKLÄRUNG
Hiermit erklärt der Hersteller, Oregon Scientific Global Distribution Limited, dass der
Funkausrüstungs-Typ PROJI Projektionsuhr (Modell:RM338PX/RM338PAX/RM338PUX) In
Übereinstimmung mit 2014/53/EU ist. Den vollständigen Wortlaut der EU-Konformitätserklärung
finden Sie unter folgender Internetadresse: http://global.oregonscientific.com/customerSupport.php
KONFORM IN FOLGENDEN LÄNDERN
Alle Länder der EU, Schweiz CH
und Norwegen N

DE
- 51 -
INFORMATIONEN FÜR DIE BENUTZER
Gemäß den Europäischen Richtlinien 2011/65/EU und 2012/19/EU über die
Reduzierung der Verwendung gefährlicher Stoffe in elektrischen und
elektronischen Geräten, sowie die Abfallentsorgung.
Das Symbol der durchgestrichenen Mülltonne auf dem Gerät besagt, dass es am Ende
seiner Verwendungszeit getrennt von anderen Abfällen entsorgt werden muss.
Der Benutzer muss daher das Gerät nach Beendigung seiner Verwendungsdauer zu geeigneten
Sammelstellen für die getrennte Abfallentsorgung von elektrischen und elektronischen Geräten
bringen oder es dem Endverkäufer beim Kauf eines neuen Geräts von ähnlicher Art im Verhältnis
eins zu eins übergeben.
Die angemessene Abfalltrennung und die darauf folgende Verbringung des aufgelassenen Geräts
in den Recyclingkreis-lauf zur umweltverträglichen Verwertung und Entsorgung tragen dazu
bei, mögliche negative Auswirkungen auf die Umwelt und die Gesundheit zu vermeiden und sie
begünsti-gen das Recycling von Materialien, aus denen das Gerät besteht.
Die rechtswidrige Entsorgung des Produktes veranlässt die Verwendung der geltenden
Verwaltungssanktionen.

ES
- 52 -
ES
INTRODUCCIÓN
Gracias por adquirir el PROJI Proyector con Alarma de Oregon Scientic™ (modelo: RM338PX/
RM338PAX/RM338PUX). Esta unidad proporciona una hora precisa junto con las funciones de
alarma y monitoreo de la temperatura para que pueda utilizarla de manera conveniente desde
cualquier lugar de su casa. Tenga este manual a mano al utilizar su nuevo producto, ya que
contiene instrucciones prácticas paso a paso, así como datos técnicos y advertencias que es
preciso conocer.
CONTENIDO
Unidad principal
Pilas AAA (x 2) para la unidad principal

ES
- 53 -
DESCRIPCIÓN GENERAL
VISTA SUPERIOR
4
5
6
1
2
3
1. + - En el modo de ajuste, pulse este botón para incrementar los valores de los parámetros,
o manténgalo pulsado para incrementarlos con más rapidez.
2. SNOOZE | LIGHT - Pulse este botón para activar la función de repetición de alarma o la
retroiluminación y la proyección. Mantenga el botón pulsado hasta escuchar un pitido para
activar la proyección durante 5 minutos.
3. - Pulse este botón para mostrar la hora, la fecha o la alarma 1/ alarma 2 durante 5 segundos.
Mantenga el botón pulsado para acceder al modo de ajuste.
4. – - Pulse este botón para reducir los valores de los parámetros, o manténgalo pulsado para
reducirlos con más rapidez.
5. Lente de proyección
6. - Pulse este botón para activar o desactivar las alarmas, o manténgalo pulsado para
acceder al modo de ajuste de la alarma.

ES
- 54 -
VISTA TRASERA
1
23 4 5
1. Compartimento de las pilas
2. RESET - Pulse este botón para resetear la unidad a los valores por defecto.
3. / PROJECTION - Pulse este botón para invertir la imagen proyectada 90°. Mantenga el botón
pulsado para activar o desactivar la proyección continua.
4. RCC – Pulse este botón para activar y buscar la señal RCC. Manténgalo pulsado para
desactivarla.
5. Tapa del compartimento de las pilas

ES
- 55 -
PANTALLA LCD
1
23
1. Pantalla de la hora
2. Día de la semana
3. Temperatura interior
Símbolo Descripción
Alarma 1 está activada.
Alarma 2 está activada.
Señal RCC recibida.
Pilas de la unidad principal bajas
GUÍA DE INICIO
INSTALACIÓN DE LAS PILAS
1. Empuje con cuidado la tapa del compartimento de las pilas hacia abajo para retirarla de la
unidad principal.
2. Inserte las pilas haciendo coincidir los polos (+/-).
NOTA Cambie las pilas cuando la pantalla muestre o se atenúe.

ES
- 56 -
RELOJ
RECEPCIÓN DE LA HORA
Este reloj se sincroniza automáticamente con la señal horaria. Pulse RCC para activar esta
función y buscar la señal horaria.
La unidad principal podrá recibir los datos horarios RF de las diferentes señales RCC:
Número de modelo Región Señal
RM338PX EU DCF
RM338PUX UK MSF
Indicador de recepción de la señal horaria:
Iconos Descripción
La unidad principal está detectando la intensidad de la señal
horaria
(parpadeando)
La unidad principal está buscando una señal horaria
No se ha encontrado una señal horaria
Señal RCC fuerte recibida
Señal RCC débil recibida

ES
- 57 -
NOTA
• La recepción de la señal puede tardar de 2 a 10 minutos en establecerse. Si la señal es débil,
puede tardar hasta 24 horas en recibir una señal válida.
• No aplicable en Asia u otras áreas no designadas.
AJUSTE MANUAL DEL RELOJ
1. Mantenga pulsado el botón La pantalla mostrará ZONE y los dígitos parpadearán.
2. Pulse reiteradamente, o mantenga pulsados, los botones +/- para ajustar los dígitos del reloj.
Para EU/UK, la compensación del huso horario permite ajustar la señal horaria en un
intervalo comprendido entre +/- 23 horas.
3. Pulse para conrmar.
4. Pulse reiteradamente, o mantenga pulsado, +/- para ajustar los valores del formato de 12/24
horas, las horas, los minutos, el año, el formato de fecha (mes-día/día-mes), el mes, el día
del mes, la unidad de temperatura (°C/°F) y el idioma.
5. Pulse para conrmar cada parámetro.
NOTA
• Los idiomas disponibles son inglés (ENG), español (SPA), italiano (ITA), francés (FRE) y alemán
(GER).
• La recepción de la señal RCC se activará cada vez que resetee la unidad o cambie las pilas.
• En el modo de ajuste, pulse y mantenga pulsado para guardar los ajustes y salir del modo
de ajuste.

ES
NOTA
• La recepción de la señal puede tardar de 2 a 10 minutos en establecerse. Si la señal es débil,
puede tardar hasta 24 horas en recibir una señal válida.
• No aplicable en Asia u otras áreas no designadas.
AJUSTE MANUAL DEL RELOJ
1. Mantenga pulsado el botón La pantalla mostrará ZONE y los dígitos parpadearán.
2. Pulse reiteradamente, o mantenga pulsados, los botones +/- para ajustar los dígitos del reloj.
Para EU/UK, la compensación del huso horario permite ajustar la señal horaria en un
intervalo comprendido entre +/- 23 horas.
3. Pulse para conrmar.
4. Pulse reiteradamente, o mantenga pulsado, +/- para ajustar los valores del formato de 12/24
horas, las horas, los minutos, el año, el formato de fecha (mes-día/día-mes), el mes, el día
del mes, la unidad de temperatura (°C/°F) y el idioma.
5. Pulse para conrmar cada parámetro.
NOTA
• Los idiomas disponibles son inglés (ENG), español (SPA), italiano (ITA), francés (FRE) y alemán
(GER).
• La recepción de la señal RCC se activará cada vez que resetee la unidad o cambie las pilas.
• En el modo de ajuste, pulse y mantenga pulsado para guardar los ajustes y salir del modo
de ajuste.
- 58 -
ALARMA
AJUSTE/ACTIVACIÓN DE LA ALARMA
1. Mantenga pulsado el botón .
2. Pulse una vez, o mantenga pulsado, los botones +/- para ajustar las horas y los minutos, y
pulse para conrmar.
3. Pulse +/- para activar o desactivar la alarma de los días entre semana, y pulse para
conrmar.
• Cuando está activada, la alarma solo suena los días entre semana.
4. Repita los pasos del 2 al 4 para establecer la alarma 2.
ACTIVACIÓN Y DESACTIVACIÓN DE LAS ALARMAS
Pulse para activar o desactivar la alarma siguiendo esta secuencia:
Alarma 1 > Alarma 2 > Ambas activadas >Ambas desactivadas.
MODO DE EMPLEO
La retroiluminación parpadeará cuando suene la alarma. Puede hacer lo siguiente:
• Pulse para detenerla. La alarma volverá a sonar al día siguiente.
• Pulse SNOOZE | LIGHT para activar la función de repetición de alarma. La alarma sonará de
nuevo después de 8 minutos.

ES
- 59 -
PROYECCIÓN
La unidad proyecta la hora en la pared para poder verla con facilidad en una habitación a oscuras.
Para conseguir una buena proyección, coloque la unidad entre 1,5 y 2 m (de 5 a 6.5 pies) del
techo o la pared.
• Pulse SNOOZE | LIGHT para activar la retroiluminación y la proyección durante 5 segundos.
• Mantenga pulsado SNOOZE | LIGHT hasta que escuche un pitido para activar la proyección
durante 5 minutos.
• Pulse PROJECTION para invertir la proyección 90°.
• Mantenga pulsado PROJECTION para activar o desactivar la proyección continua.
NOTA La función de proyección continua permanece desactivada cuando la unidad principal
no está conectada al adaptador principal.

ES
- 60 -
PRECAUCIÓN
• No exponga el producto a fuerza extrema, descargas, polvo, uctuaciones de temperatura
o humedad.
• No cubra los oricios de ventilación con objetos como periódicos, cortinas, etc.
• No sumerja el dispositivo en agua. Si se vertiera líquido en la unidad, límpiela con un paño
suave y sin electricidad estática.
• No limpie la unidad con materiales abrasivos o corrosivos.
• No manipule los componentes internos. De hacerlo se invalidaría la garantía.
• Use siempre pilas nuevas. No mezcle pilas viejas con pilas nuevas.
• Las imágenes de esta guía para el usuario pueden ser distintas al producto en sí.
• Cuando elimine este producto, asegúrese de que no vaya a parar a la basura general, sino
separadamente para recibir un tratamiento especial.
• La colocación de este producto encima de ciertos tipos de madera puede provocar daños
a sus acabados. Oregon Scientic no se responsabilizará de dichos daños. Consulte las
instrucciones de cuidado del fabricante para obtener más información.
• Los contenidos de este manual no pueden reproducirse sin permiso del fabricante.
• No elimine las pilas gastadas con la basura normal. Es necesario desecharlas separadamente
para poder tratarlas.
• Tenga en cuenta que algunas unidades disponen de una cinta de seguridad para las pilas.
Retire la cinta de compartimento para pilas antes de usarlo por primera vez.

ES
- 61 -
NOTA La cha técnica de este producto y los contenidos de este manual de usuario pueden
experimentar cambios sin previo aviso.
NOTA No todas las funciones y accesorios estarán disponibles en todos los países. Sírvase
ponerse en contacto con su distribuidor local si desea más información.Por favor, visite
http://global.oregonscientic.com/customerSupport. php para descargar una versión electrónica
del manual de usuario.
ESPECIFICACIONES
UNIDAD PRINCIPAL
La. x An. x Al. 108 x 26 x 77 mm (4,25 x 1,02 x 3,03 pulgadas)
Peso 112 g (3,95 onzas) sin pilas
Intervalo de temperatura De -5°C a 50°C (de 23°F a 122°F)
Precisión 0°C a 40°C: ±1°C (±2.0°F) < 0°C y >40°C: ±2°C (±4.0°F)
Resolución 0.1°C (0.2°F)
Alimentación 2 pilas UM-4 (AAA) 1.5 V

ES
- 62 -
SOBRE OREGON SCIENTIFIC
Visite nuestro sitio web www.oregonscientic.com para obtener más información sobre los
productos de Oregon Scientic.
Si tiene alguna duda, póngase en contacto con nuestros servicios al cliente en
info@oregonscientic.com.
Oregon Scientic Global Distribution Limited se reserva el derecho de interpretar e inferir cualquier
contenido, términos y provisiones de este manual de usuario y corregirlo, a su discreción en
cualquier momento y sin aviso previo. Si hubiese alguna divergencia entre la versión en inglés y
las versiones de otros idiomas, prevalecerá la versión en inglés.
UE – DECLARACIÓN DE CONFORMIDAD
Por la presente el fabricante, Oregon Scientic Global Distribution Limited, declara que el tipo de
radio equipo PROJI Proyector con Alarma de Oregon Scientic™ (modelo : RM338PX/RM338PAX/
RM338PUX) está en el cumplimiento de la Directiva 2014/53/UE. El texto completo de la declaración de
conformidad de la UE está disponible en la siguiente dirección de Internet: http://global.oregonscientic.
com/customerSupport.php
CH
N
.
PAÍSES CON HOMOLOGACIÓN RED
Todos los países de la UE, Suiza
y Noruega

ES
- 63 -
INFORMACIÒN DE USUARIOS
Segùn las Directrices Europeas 2011/65/EU y 2012/19/EU, relativas a la reducción
del uso de sustancias peligrosas en los aparatos eléctricos y electrónicos,
además del desecho de los residuos.
El símbolo tachado del contenedor que se encuentra en el aparato indica que el producto,
al nal de su vida útil, deberá depositarse en un lugar separado de los demás residuos. Por lo
tanto, el usuario deberá entregar el aparato, cuando deje de utilizarse, a los adecuados centros de
recogida diferenciada de residuos electrónicos y electrotécnicos, o deberá devolverlo al vendedor
en el momento de compra de un nuevo aparato de tipo equivalente, uno a cambio de otro.
La adecuada recogida diferenciada del aparato inutilizado para el sucesivo reciclaje, tratamiento
y desecho ambientalmente compatibles, contribuye a evitar posibles efectos negativos en el
medioambiente y en la salud, y favorece el reciclaje de los materiales de los que se compone
el aparato.
El desecho abusivo del producto por parte del usuario implica la aplicación de las sanciones
previstas por la ley.

POR
- 64 -
POR
INTRODUÇÃO
Obrigado por adquirir o Relógio de PROJI relógio de projeção da Oregon Scientic™ (modelo:
RM338PX/RM338PAX/RM338PUX). Este dispositivo une a manutenção da hora de forma precisa,
funcionalidades de alarme e monitoração de temperatura numa única ferramenta que pode usar
a partir da conveniência de sua casa. Mantenha este manual acessível enquanto utiliza o seu
novo produto. Este contém instruções passo-a-passo práticas, bem como especicações técnicas
e avisos de que deve ter conhecimento.
CONTEÚDO DA EMBALAGEM
Unidade principal Baterias AAA para unidade principal x 2

POR
- 65 -
VISTA GERAL
VISTA SUPERIOR
4
5
6
1
2
3
1. + - Pressione para aumentar as congurações, ou pressione e mantenha para aumentar
rapidamente no modo de conguração.
2. SNOOZE | LIGHT - Pressione para atrasar um alarme ou ativar a retroiluminação e Projeção,
pressione e mantenha até ouvir um beep para ativar a Projeção durante 5 minutos.
3. - Pressione para alternar entre as telas da hora atual, calendário ou alarme 1/2 durante
5 segundos. Pressione e mantenha para entrar no modo de conguração.
4. – - Pressione para diminuir as congurações, pressione e mantenha para diminuir as
congurações rapidamente.
5. Lente de Projeção
6. - Pressione para ligar/desligar alarmes, pressione e mantenha para entrar no modo de
conguração do alarme.
VISTA TRASEIRA
1
23 4 5
1. Compartimento da bateria
2. RESET - Pressione para repôr a unidade nas congurações padrão.
3. / PROJECTION - Pressione para rodar o conteúdo da Projeção 90°. Pressione e mantenha
para alternar a Projeção contínua ligada/desligada.
4. RCC – Pressione para ligar e procurar um sinal RCC. Pressione e mantenha para desligar.
5. Tampa do compartimento da bateria

POR
- 66 -
VISTA TRASEIRA
1
23 4
5
1. Compartimento da bateria
2. RESET - Pressione para repôr a unidade nas congurações padrão.
3. / PROJECTION - Pressione para rodar o conteúdo da Projeção 90°. Pressione e mantenha
para alternar a Projeção contínua ligada/desligada.
4. RCC – Pressione para ligar e procurar um sinal RCC. Pressione e mantenha para desligar.
5. Tampa do compartimento da bateria

POR
- 67 -
ECRÃ LCD
1
23
1. Apresentação da hora
2. Apresentação do dia da semana
3. Apresentação da temperatura de interior
Símbolo Descrição
Alarme 1 ligado.
Alarme 2 ligado.
Sinal RCC recebido
Bateria fraca na unidade principal
INÍCIO
INSIRA AS BATERIAS
1. Empurre cuidadosamente a tampa do compartimento das baterias para baixo para o remover
da unidade principal.
2. Insira as baterias, correspondendo as polaridades (+/-).
NOTA Substitua as baterias quando seja apresentado, ou quando a tela estiver desvanecido.

POR
- 68 -
RELÓGIO
RECEPÇÃO DE RELÓGIO
Este relógio está concebido para sincronizar o seu relógio automaticamente com um sinal de
relógio. Pressione RCC para ligar e procurar por um sinal de relógio.
A unidade principal é capaz de receber dados de relógio RF com sinais RCC diferentes:
Número de modelo Região Sinal
RM338PX UE DCF
RM338PUX UK MSF
Indicador de recepção do sinal de relógio:
Ícones Descrição
A unidade principal está a procurar pela intensidade do sinal de
relógio.
(piscar)
A unidade principal está a procurar pelo sinal de relógio.
Sem recepção de sinal de relógio
Forte sinal RCC recebido
Fraco sinal RCC recebido

POR
- 69 -
NOTA
• Demora 2-10 minutos para receber o sinal de relógio. Caso o sinal seja fraco, pode demorar
até 24 horas a receber um sinal válido.
• Não aplicável à Ásia e áreas não designadas.
DEFINIÇÃO MANUAL DO RELÓGIO
1. Pressione e mantenha . A tela apresenta ZONE (ZONA) e o número pisca.
2. Pressione uma vez ou pressione e mantenha +/- para ajustar a denição. Para EU/UK, o
desvio de fuso horário congura o relógio até +/- 23 horas da hora do sinal de relógio recebido.
3. Pressione para conrmar.
4. Pressione uma vez ou pressione e mantenha +/- para ajustar a conguração da hora, minuto,
ano, formato de calendário (mês-dia/dia-mês), mês, data, unidade de temperatura (°C/°F) e
idioma.
5. Pressione para conrmar cada denição.
NOTA
• As opções de idioma são Inglês (ENG), Espanhol (SPA), Italiano (ITA), Francês (FRE) e Alemão
(GER).
• A recepção de sinal RCC é ligada após cada reset ou substituição de bateria.
• Enquanto estiver no modo de conguração, pressione e segure para salvar as congurações
e sair deste modo.
ALARME
DEFINIÇÃO/AJUSTE DA HORA DE ALARME
1. Pressione e mantenha .
2. Pressione uma vez ou pressione e mantenha +/- para ajustar a conguração de hora e minuto,
depois pressione para conrmar.
3. Pressione +/- para alternar o dia da semana do alarme ON/OFF, tdepois pressione para
conrmar.
• O alarme toca apenas nos dias da semana quando a denição está ON.
4. Repita os passos 2 – 4 para a conguração do alarme 2.
LIGAR/DESLIGAR ALARMES:
Pressione para ligar/desligar o alarme em sequência:
Alarme 1 > Alarme 2 > Ambos LIGADOS > Ambos DESLIGADOS.
FUNCIONAMENTO
Quando o alarme toca, a retroiluminação irá piscar. Pode:
• Pressionar para parar. O alarme tocará novamente no dia seguinte.
• Pressionar SNOOZE | LIGHT para atrasar. O alarme toca novamente após 8 minutos.

POR
- 70 -
ALARME
DEFINIÇÃO/AJUSTE DA HORA DE ALARME
1. Pressione e mantenha .
2. Pressione uma vez ou pressione e mantenha +/- para ajustar a conguração de hora e minuto,
depois pressione para conrmar.
3. Pressione +/- para alternar o dia da semana do alarme ON/OFF, tdepois pressione para
conrmar.
• O alarme toca apenas nos dias da semana quando a denição está ON.
4. Repita os passos 2 – 4 para a conguração do alarme 2.
LIGAR/DESLIGAR ALARMES:
Pressione para ligar/desligar o alarme em sequência:
Alarme 1 > Alarme 2 > Ambos LIGADOS > Ambos DESLIGADOS.
FUNCIONAMENTO
Quando o alarme toca, a retroiluminação irá piscar. Pode:
• Pressionar para parar. O alarme tocará novamente no dia seguinte.
• Pressionar SNOOZE | LIGHT para atrasar. O alarme toca novamente após 8 minutos.

POR
- 71 -
PROJEÇÃO
O projetor apresenta a hora no seu texto para visualização fácil num quarto escurecido. Para
resultados de Projeção ótimas, coloque a unidade a 1.5 - 2 m (5 – 6.5 pés) do teto ou parede.
• Pressione SNOOZE | LIGHT para ativar a retroiluminação e Projeção durante 5 segundos.
• Pressione e mantenha SNOOZE | LIGHT até ouvir um beep para ativar a Projeção durante 5
minutos.
• Pressione / PROJECTION para rodar o conteúdo da Projeção em 90°.
• Pressione e mantenha / PROJECTION para alternar a Projeção contínua ligada/desligada.
NOTA A função de Projeção contínua está desativada quando a unidade principal não está
ligada ao adaptador de corrente.
PRECAUÇÕES
• Não submeta a unidade a forças excessivas, impactos, poeiras, oscilações de temperatura ou umidade.
• Não obstrua as aberturas de ventilação com itens como jornais, cortinas, etc.
• Não mergulhe a unidade na água. Se respingar líquido nela, seque-a imediatamente com um
pano macio e que não solte apos.
• Não limpe a unidade com material abrasivo ou corrosivo.
• Não altere os componentes internos da unidade. Isso invalidará sua garantia.
• Utilize apenas pilhas novas. Não misture pilhas novas e usadas. Retire as pilhas caso pretenda
guardar o produto.
• As imagens mostradas neste manual podem diferir da imagem real.
• Os materiais utilizados nos produtos Oregon podem ser reutilizados e reciclados após o m de
sua vida útil. Encaminhe os produtos a serem descartados aos locais de coleta apropriados,
atentando para as legislações locais.
• A colocação deste produto sobre certos tipos de madeira pode resultar em danos ao seu
acabamento, pelos quais a Oregon Scientic não se responsabilizará. Consulte as instruções
de cuidados do fabricante do móvel para obter informações.
• O conteúdo deste manual não pode ser reproduzido sem a permissão do fabricante.
• Não descarte baterias usadas em locais não apropriados. É necessária a coleta do lixo em
questão de maneira separada para tratamento especial.
• Observe que algumas unidades estão equipadas com uma tira de segurança da bateria. Remova
a tira do compartimento de bateria antes do primeiro uso.

POR
- 72 -
PRECAUÇÕES
• Não submeta a unidade a forças excessivas, impactos, poeiras, oscilações de temperatura ou umidade.
• Não obstrua as aberturas de ventilação com itens como jornais, cortinas, etc.
• Não mergulhe a unidade na água. Se respingar líquido nela, seque-a imediatamente com um
pano macio e que não solte apos.
• Não limpe a unidade com material abrasivo ou corrosivo.
• Não altere os componentes internos da unidade. Isso invalidará sua garantia.
• Utilize apenas pilhas novas. Não misture pilhas novas e usadas. Retire as pilhas caso pretenda
guardar o produto.
• As imagens mostradas neste manual podem diferir da imagem real.
• Os materiais utilizados nos produtos Oregon podem ser reutilizados e reciclados após o m de
sua vida útil. Encaminhe os produtos a serem descartados aos locais de coleta apropriados,
atentando para as legislações locais.
• A colocação deste produto sobre certos tipos de madeira pode resultar em danos ao seu
acabamento, pelos quais a Oregon Scientic não se responsabilizará. Consulte as instruções
de cuidados do fabricante do móvel para obter informações.
• O conteúdo deste manual não pode ser reproduzido sem a permissão do fabricante.
• Não descarte baterias usadas em locais não apropriados. É necessária a coleta do lixo em
questão de maneira separada para tratamento especial.
• Observe que algumas unidades estão equipadas com uma tira de segurança da bateria. Remova
a tira do compartimento de bateria antes do primeiro uso.

POR
- 73 -
NOTA As especicações técnicas deste produto e o conteúdo do manual do usuário estão
sujeitos a alterações sem aviso prévio.
NOTA Recursos e acessórios não estão disponíveis para todos os países. Para obter mais
informações, entre em contato com o seu distribuidor local. Para descarregar uma versão eletrônica
do manual de utilizador, por favor visite
http://global.oregonscientic.com/customerSupport.php.
ESPECIFICAÇÕES
UNIDADE PRINCIPAL
C x L x A 108 x 26 x 77 mm (4.25 x 1.02 x 3.03 pol)
Peso 112 g (3.95 oz) sem baterias
Intervalo de temperatura -5°C para 50°C (23°F para 122°F)
Precisão 0°C para 40°C: ±1°C (±2.0°F) < 0°C e >40°C: ±2°C
(±4.0°F)
Resolução 0.1°C (0.2°F)
Alimentação 2 baterias x UM-4 (AAA) 1.5 V

POR
- 74 -
SOBRE A OREGON SCIENTIFIC
Visite o nosso website www.oregonscientic.com.br para saber mais sobre os produtos da
Oregon Scientic.
Para colocar qualquer tipo de questão, contacte o nosso Serviço de Apoio ao Cliente através do
endereço sac@oregonscientic.com.br.
Para maiores informações, contatar o SAC - Serviço de Atendimento a Cliente - (11) 3523-1934
ou email: sac@oregonscientic.com.br
A Oregon Scientic Global Distribution Limited reserva o direito de interpretar e denir quaisquer
conteúdos, termos e disposições neste manual do usuário, e de o modicar a seu exclusivo critério,
em qualquer altura e sem aviso prévio. No caso de existir alguma inconsistência entre a versão
em inglês e as outras versões noutras línguas, a versão em inglês prevalecerá.
CE – DECLARAÇÃO DE CONFORMIDADE
Com isso o fabricante, Oregon Scientic Global Distribution Limited, declara que o tipo de rádio
equipmment PROJI relógio de projeção (Modelo: RM338PX/RM338PAX/RM338PUX) está em
conformidade com a Directiva 2014/53/UE. O texto integral da Declaração de Conformidade da UE
está disponível no endereço Internet seguinte: http://global.oregonscientic.com/customerSupport.php
PAISES SUJEITOS A NORMA RED
Todos os paises da União Européia, Suíça CH
e Noruega N

POR
- 75 -
INFORMAÇÕES AOS UTENTES
Nos termos das Directivas Europeias 2011/65/EU e 2012/19/EU, relativas à
redução do uso de substãncias perigosas nos aparelhos eléctricos e
electrónicos, além da eliminação de resíduos sólidos.
O símbolo no contentor traçado indicado no aparelho signica que o produto ao m de
sua vida útil, deverá ser eliminado separadamente de outros resíduos sólidos.
O utente deverá, portanto, entregar o aparelho após o término de sua vida útil, aos centros
encarregados pela colecta diferenciada de resíduos electrónicos e electrotécnicos, ou mesmo,
entregá-lo de volta ao revendedor no momento da compra de um novo aparelho de tipo
equivalente, na proporção de um para um.
A colecta diferenciada adequada para a eliminação sucessiva do aparelho fora de uso a ser
reciclado, para o tratamento do lixo em modo compatível com o ambiente, contribui a evitar
possíveis efeitos negativos ao meio ambiente e à saúde e facilita a reciclagem dos materiais
dos quais o aparelho é constituído.
A eliminação do produto sem respeitar as normas por parte do utente implica na aplicação das
sanções de acordo com as leis vigentes.

NL
- 76 -
NL
INLEIDING
Dank u voor de aankoop van de Oregon Scientic™ PROJI Projectieklok (model: RM338PX/
RM338PAX/RM338PUX). Dit apparaat combineert nauwkeurige tijdswaarneming, alarm en
temperatuurbewaking-functies in één toestel die u eenvoudig kunt bedienen. Bewaar deze
gebruikershandleiding om later te kunnen raadplegen. Het bevat praktische stapsgewijze
instructies, evenals technische specicaties en waarschuwingen waarmee u bekend moet zijn.
INHOUDSVERPAKKING
Hoofdapparaat AAA batterijen voor hoofdtoestel x 2

NL
- 77 -
OVERZICHT
BOVENKANT
4
5
6
1
2
3
1. + - Indrukken om instellingen te verhogen, ingedrukt houden om instellingen snel te verhogen.
2. SNOOZE | LIGHT - Indrukken voor het sluimeralarm of om de achtergrondverlichting en
projectie in te schakelen; ingedrukt houden totdat u een piep hoort om de projectie 5 minuten
te activeren.
3. - 5 seconden ingedrukt houden om tussen de huidige tijd, kalender of alarm 1/2 displays
te schakelen. Ingedrukt houden om de instellingmodus te openen.
4. – - Indrukken om instellingen te verlagen, ingedrukt houden om instellingen snel te verlagen.
5. Projectielens
6. - Indrukken om aan/uit te schakelen en ingedrukt houden om de alarminstellingmodus te
openen.
ACHTERKANT
1
23 4 5
1. Batterijcompartiment
2. RESET - Indrukken om alle instellingen te resetten.
3. / PROJECTION - ndrukken om de projectie 90° te draaien. Ingedrukt houden om projectie
aan/uit te schakelen.
4. RCC – Indrukken om in te schakelen en het RCC-signaal te zoeken. Ingedrukt houden om uit te
schakelen
5. Klepje van batterijvak

NL
- 78 -
ACHTERKANT
1
23 4 5
1. Batterijcompartiment
2. RESET - Indrukken om alle instellingen te resetten.
3. / PROJECTION - ndrukken om de projectie 90° te draaien. Ingedrukt houden om projectie
aan/uit te schakelen.
4. RCC – Indrukken om in te schakelen en het RCC-signaal te zoeken. Ingedrukt houden om uit te
schakelen
5. Klepje van batterijvak

NL
- 79 -
LIQUID CRYSTAL DISPLAY
1
23
1. Tijdsweergave
2. Weekdag-weergave
3. Binnentemperatuur-weergave
Symbool Beschrijving
Alarm 1 is aan.
Alarm 2 is aan.
RCC-signaal ontvangen
Zwakke batterij hoofdtoestel
VOORBEREIDING
DE BATTERIJEN PLAATSEN
1. Het klepje van het batterijvak voorzichtig naar beneden drukken om het klepje te verwijderen.
2. Plaats de batterijen en let daarbij op de polariteit (+/-).
NB Vervang de batterijen wanneer verschijnt of wanneer het scherm donker is.
KLOK
KLOKONTVANGST
Deze klok wordt automatisch gesynchroniseerd met een kloksignaal. Druk op RCC om in te
schakelen en naar het kloksignaal te zoeken.
Het apparaat is in staat om RF-klokgegevens met verschillende RCC signalen te ontvangen:
Modelnummer Regio Signaal
RM338PX EU DCF
RM338PUX UK MSF
Klokontvangstsignaal-indicator:
Pictogrammen Beschrijving
Hoofdtoestel zoekt naar kloksignaal-sterkte
(knippert)
Hoofdtoestel zoekt naar kloksignaal
Geen kloksignaal
Sterk RCC-signaal ontvangen
Zwak RCC-signaal ontvangen

NL
- 80 -
KLOK
KLOKONTVANGST
Deze klok wordt automatisch gesynchroniseerd met een kloksignaal. Druk op RCC om in te
schakelen en naar het kloksignaal te zoeken.
Het apparaat is in staat om RF-klokgegevens met verschillende RCC signalen te ontvangen:
Modelnummer Regio Signaal
RM338PX EU DCF
RM338PUX UK MSF
Klokontvangstsignaal-indicator:
Pictogrammen Beschrijving
Hoofdtoestel zoekt naar kloksignaal-sterkte
(knippert)
Hoofdtoestel zoekt naar kloksignaal
Geen kloksignaal
Sterk RCC-signaal ontvangen
Zwak RCC-signaal ontvangen

NL
- 81 -
NB
• Het duurt 2 tot 10 minuten om het kloksignaal te ontvangen. Als het signaal te zwak is, kan het
maximaal 24 uur duren om een goed signaal te ontvangen.
• Niet van toepassing op Azië en niet-aangewezen gebieden.
DE KLOK HANDMATIG INSTELLEN
1. De toets . ingedrukt houden. Het scherm toont ZONE en het nummer knippert.
2. De toet +/- een keer indrukken of ingedrukt houden om de instelling te wijzingen.
3. Druk op om te bevestigen.
4. De toet +/- indrukken of ingedrukt houden voor de instelling van 12/24 uur aanduiding, uur, minuut,
jaar, kalenderformaat (maand-dag/dag-maand), maand, datum, temperatuureenheid (°C/°F) en taal.
5. Druk op om elke instelling te bevestigen.
NB
• De taalopties zijn Engels (ENG), Spaans (SPA), Italiaans (ITA), Frans (FRE) en Duits (GER).
• Het RCC-signaalontvangst is aan wanneer u het apparaat reset of de batterijen vervangt.
• Wanneer in setup modus, druk en houd toets om de gegevens op te slaan en de setup
modus te verlaten.
ALARM
ALARMTIJD INSTELLEN/BIJSTELLEN
1. De toets ingedrukt houden.
2. De toets +/- indrukken of ingedrukt houden om de instelling voor uur en minuut in te stellen.
Op drukken om te bevestigen.
3. Druk op +/- om te schakelen tussen weekdag-alarm ON/OFF, en druk op om te bevestigen.
• Het alarm klinkt alleen op weekdagen wanneer de instelling op ON staat.
4. Herhaal stappen 2 – 4 voor alarm 2 instelling.
ALARMEN IN/UITSCHAKELEN:
Druk op om het alarm in onderstaande volgorde aan/uit te schakelen:
Alarm 1 > Alarm 2 > Beide AAN > Beide UIT.
BEDIENING
De achtergrondverlichting knippert wanneer het alarm klinkt. U kunt:
• Op drukken om het alarm te stoppen. Het alarm klinkt de volgende dag opnieuw.
• Druk op SNOOZE | LIGHT om te sluimeren. Het alarm klinkt opnieuw na 8 minuten.

NL
- 82 -
ALARM
ALARMTIJD INSTELLEN/BIJSTELLEN
1. De toets ingedrukt houden.
2. De toets +/- indrukken of ingedrukt houden om de instelling voor uur en minuut in te stellen.
Op drukken om te bevestigen.
3. Druk op +/- om te schakelen tussen weekdag-alarm ON/OFF, en druk op om te bevestigen.
• Het alarm klinkt alleen op weekdagen wanneer de instelling op ON staat.
4. Herhaal stappen 2 – 4 voor alarm 2 instelling.
ALARMEN IN/UITSCHAKELEN:
Druk op om het alarm in onderstaande volgorde aan/uit te schakelen:
Alarm 1 > Alarm 2 > Beide AAN > Beide UIT.
BEDIENING
De achtergrondverlichting knippert wanneer het alarm klinkt. U kunt:
• Op drukken om het alarm te stoppen. Het alarm klinkt de volgende dag opnieuw.
• Druk op SNOOZE | LIGHT om te sluimeren. Het alarm klinkt opnieuw na 8 minuten.

NL
- 83 -
PROJECTIE
De projector projecteert de tijd op uw plafond zodat het gemakkelijk te zien is in een donkere
kamer. Voor de optimale projectieresultaten plaatst u het apparaat binnen 1,5-2 meter van het
plafond of de muur.
• Druk op SNOOZE | LIGHT om de achtergrondverlichting en projectie 5 seconden in te schakelen.
• De toets SNOOZE | LIGHT ingedrukt houden totdat u een piepgeluid hoort om de projectie 5
minuten in te schakelen.
• Druk op / PROJECTION om de projectie 90° te draaien.
• De toets / PROJECTION ingedrukt houden om de projectie aan/uit te schakelen.
NB De continue projectiefunctie is uitgeschakeld wanneer het apparaat niet op de
voedingsadapter is aangesloten.

NL
- 84 -
WAARSCHUWINGEN
• Stel het apparaat niet bloot aan extreme klappen, schokken, stof, temperatuur of vochtigheid.
• Dek de ventilatiegaten niet af met kranten, gordijnen etc.
• Dompel het product nooit onder in water. Als u water over het apparaat morst, droog het dan
onmiddellijk af met een zachte stofvrije doek.
• Reinig het apparaat niet met krassende of bijtende materialen.
• Laat de interne componenten met rust. Anders kan dit de garantie beïnvloeden.
• Gebruik alleen nieuwe batterijen. Gebruik nooit oude en nieuwe batterijen door elkaar.
• De in deze handleiding weergegeven plaatjes kunnen afwijken van de werkelijkheid.
• Wanneer u dit product weg gooit, zorg dan dat het opgehaald wordt door de daarvoor
bestemde afvaldienst.
• Dit product kan eventueel schade veroorzaken aan de laklaag van bepaalde houtsoorten.
Oregon Scientic is hiervoor niet aansprakelijk. Lees de instructies van de fabrikant van het
meubel voor meer informatie.
• De inhoud van deze handleiding mag niet worden vermenigvuldigd zonder toestemming van
de fabrikant.
• Gooi lege batterijen niet bij het huisvuil. Dergelijk afval moet gescheiden verwerkt worden.
• Let op, sommige apparaten zijn voorzien van een batterijstrip. Verwijder deze strip uit het
batterijvak alvorens het apparaat te gebruiken.

NL
- 85 -
NB De technische specicaties van dit product en de inhoud van de handleiding zijn zonder
voorafgaande waarschuwing aan veranderingen onderhevig.
NB Niet alle functies en accessoires zijn beschikbaar in alle landen. Neem contact op met uw
plaatselijke verkooppunt voor meer informatie. U kunt een elektronische versie van deze handleiding
downloaden op http://global.oregonscientic.com/customerSupport.php.
SPECIFICATIES
HOOFDAPPARAAT
L x B x H 108 x 26 x 77 mm (4,25 x 1,02 x 7,70 cm)
Gewicht 112 gram zonder batterijen
Temperatuurbereik -5°C tot 50°C (-5,00°C tot 50,00°C)
Nauwkeurigheid 0°C tot 40°C: ± 1°C (±2.0°F) < 0°C en >40°C: ± 2°C (±4.0°F)
Resolutie 0,1°C (0,2°F)
Voeding 2 x UM-4 (AAA) 1,5 V batterijen

NL
- 86 -
OVER OREGON SCIENTIFIC
Bezoek onze website www.oregonscientic.com voor meer informatie over de producten van
Oregon Scientic.
SMocht u vragen hebben, neem dan contact op met onze klantenservice op info@oregonscientic.com.
Oregon Scientic Global Distribution Limited behoudt zich het recht voor enige inhoud, bepalingen
en voorwaarden in deze gebruikershandleiding te interpreteren en deze te allen tijde naar eigen
inzicht en zonder voorafgaande kennisgeving te wijzigen. Met dien verstande dat, indien er enige
inconsistentie bestaat tussen de Engelstalige versie en een versie in in enige andere taal, de
Engelse versie bindend is.
EU CONFORMITEITS VERKLARING
Hierbij de fabrikant, Oregon Scientic Global Distribution Limited, verklaart dat de radio equipmment
soort PROJI Projectieklok (Model: RM338PX/RM338PAX/RM338PUX) in overeenstemming is met
2014/53/EU-richtlijn. De volledige tekst van de verklaring van overeenstemming EU is beschikbaar
op het volgende internetadres: http://global.oregonscientic.com/customerSupport.php
LANDEN DIE ZIJN ONDERWORPEN AAN RED
Tous les pays Européens, la Suisse CH
et la Norège N

NL
- 87 -
INFORMATIE VOOR DE GEBRUIKERS
Krachtens de EG-richtlijnen 2011/65/EU en 2012/19/ EU met betrekking tot de
beperking van het gebruik van bepaalde gevaarlijke stoffen in elektrische en
elektronische apparatuur en de afdanking van deze apparatuur.
Het symbool van de doorstreepte vuilnisbak aangebracht op de apparatuur geeft aan
dat het product op het einde van zijn levensduur afzonderlijk van het ander afval afgedankt moet
worden.
De gebruiker dient de apparatuur op het einde van zijn levensduur dus toe te vertrouwen aan een
geschikt centrum voor de gescheiden verwerking van elektronisch en elektrotechnisch afval, of
aan de verkoper te bezorgen bij de aankoop van een nieuwe apparatuur van gelijkaardig type,
in de verhouding één tot één.
De correcte gescheiden omhaling voor de latere recyclage, verwerking en milieuvriendelijke
vernietiging van de apparatuur draagt bij tot het voorkomen van mogelijke negatieve invloeden op
het milieu en de gezondheid en bevordert de recyclage van de materialen waarvan de apparatuur
samengesteld is.
De abusievelijk afdanking van het product vanwege de gebruiker geeft aanleiding tot de toepassing
van administra-tieve boetes volgens de wetgeving.

SWE
- 88 -
SWE
INTRODUKTION
Tack för att du valt Oregon Scientic™ PROJI projektions klocka (modell: RM338PX/RM338PAX/
RM338PUX). Den här enheten levererar exakt tid, larm och övervakning av temperaturen i ett
enda verktyg du bekvämt kan använda i ditt hem. Förvara denna handbok lätt tillgänglig när du
använder din nya produkt. Den innehåller praktiska steg-för-steg-instruktioner, samt tekniska
specikationer och varningar du bör känna till.
PAKETETS INNEHÅLL
Huvudenhet AAA-batterierna i huvudenheten x 2

SWE
- 89 -
ÖVERSIKT
VY UPPIFRÅN
4
5
6
1
2
3
1. + - Tryck på för att öka inställningar, eller tryck och håll ner för att öka snabbt i inställningsläget.
2. SNOOZE | LIGHT - Tryck till för att uppskjuta ett larm eller aktivera bakgrundsbelysningen
och projektionen, tryck och håll inne tills du hör ett pip för att aktivera bakgrundsbelysningen
i 5 minuter.
3. - Tryck för att växla mellan aktuell tid, kalender eller alarm 1/2 visning i 5 sekunder. Tryck
på och håll ned för att ange inställningsläget.
4. – - Tryck för att minska inställningarna, tryck på och håll ned för att snabbt minska
inställningarna.
5. Projektionsobjektiv
6. - Tryck för att slå på/stänga av larm, tryck på och håll ned för att ange aktiveras
larminställningsläge.
BAKIFRÅN
1
23 4 5
1. Batterifack
2. RESET (ÅTERSTÄLL) - tryck för att återställa enheten till standardinställningarna.
3. / PROJECTION - tryck för att rotera projektionen 90°.
Tryck och håll ned för att aktivera kontinuerlig projektion på/av.
4. RCC – tryck för att slå på och söka efter RCC signal. Tryck och håll ned för att stänga av.
5. Lucka till batterifack

SWE
- 90 -
BAKIFRÅN
1
23 4
5
1. Batterifack
2. RESET (ÅTERSTÄLL) - tryck för att återställa enheten till standardinställningarna.
3. / PROJECTION - tryck för att rotera projektionen 90°.
Tryck och håll ned för att aktivera kontinuerlig projektion på/av.
4. RCC – tryck för att slå på och söka efter RCC signal. Tryck och håll ned för att stänga av.
5. Lucka till batterifack

SWE
- 91 -
LCD-SKÄRM
1
23
1. Visning av tid
2. Visning av veckodag
3. Visa inomhustemperatur
Symbol Beskrivning
Larm 1.
Larm 2.
RCC signal mottagen
Huvudenheten har låg batterinivå
KOMMA IGÅNG
SÄTT I BATTERIER
1. Tryck försiktigt luckan till batterifacket nedåt och ta bort den från huvudenheten.
2. Sätt i batterierna med rätt polariteter (+/-).
NOTERA Byt ut batterierna när visas, eller när skärmen är mörk.
KLOCKA
KLOCKMOTTAGNING
Denna klocka är framtagen för att automatiskt synkronisera sin klocka med en klocksignal. Tryck
på RCC till att slå på och söka efter klocksignalen.
Huvudenheten kan ta emot klockdata via radio med olika RCC signal:
Modellnummer Region Signal
RM338PX EU DCF
RM338PUX UK MSF
Mottagningsindikator för klocksignal:
Ikoner Beskrivning
Huvudenheten söker efter signalstyrka
(blinkar)
Huvudenheten söker efter klocksignal
Ingen klocksignal
Utmärkt mottagen RCC-signal
Svag mottagen RCC-signal

SWE
- 92 -
KLOCKA
KLOCKMOTTAGNING
Denna klocka är framtagen för att automatiskt synkronisera sin klocka med en klocksignal. Tryck
på RCC till att slå på och söka efter klocksignalen.
Huvudenheten kan ta emot klockdata via radio med olika RCC signal:
Modellnummer Region Signal
RM338PX EU DCF
RM338PUX UK MSF
Mottagningsindikator för klocksignal:
Ikoner Beskrivning
Huvudenheten söker efter signalstyrka
(blinkar)
Huvudenheten söker efter klocksignal
Ingen klocksignal
Utmärkt mottagen RCC-signal
Svag mottagen RCC-signal

SWE
- 93 -
NOTERA
• Det Dtar 2-10 minuter för att ta emot signal klocka. Om signalen är svag kan det ta upp till 24
timmar för att få en god signal.
• Ej tillämplig i Asien och icke angivna områden.
STÄLLA IN KLOCKAN MANUELLT
1. Tryck på och håll ned . Skärmen visar ZONE (ZON) och numret blinkar.
2. Tryck en gång eller tryck på och håll ned +/- för att justera inställningen. För EU/UK, ställer
tidszon offset in klockan upp till +/- 23 timmar från den mottagna klocksignalens tid.
3. Tryck på för att bekräfta.
4. Tryck en gång eller tryck på och håll ned +/- för att justera inställningen för 12/24h timmars format,
timme, minut, år, kalenderformat (månad-dag/dag-månad), månad, dag, temperaturenhet (°C/°F)
och språk.
5. Tryck på för att bekräfta inställningen.
NOTERA
• Språket är engelska (ENG), spanska (SPA), italienska (ITA), franska (FRE) och tyska (GER).
• RCC-signalmottagningen är på efter varje återställning eller batteribyte.
• Medan i inställningsläget, tryck och håll för att spara inställningarna och lämna
inställningsläget.

SWE
- 94 -
LARM
INSTÄLLNING/JUSTERING AV LARMET
1. Tryck på och håll ned .
2. Tryck en gång eller tryck på och håll ned +/- för att ställa in timme och minut inställning,
tryck sedan på för att bekräfta.
3. Tryck på +/- för att växla veckodagslarm ON/OFF (PÅ/AV) och tryck sedan på för att
bekräfta.
• Larmet ringer endast på vardagar när inställningen är ON (PÅ).
4. Upprepa steg 2 - 4 för inställning av larm 2.
SLÅ PÅ/STÄNGA AV LARM:
Tryck på för att i tur och ordning slå på/stänga av larm:
Larm 1 > Larm 2 > Båda ON (PÅ) > Båda OFF (AV).
FUNKTION
När larmet ljuder, blinkar belysningen. Du kan:
• Trycka på för att stoppa. Larmet ljuder igen nästa dag.
• Tryck på SNOOZE | LIGHT för att somna om. Larmet ljuder igen efter 8 minuter.

SWE
- 95 -
PROJEKTION
Projektorn visar tiden i taket för enkel visning i ett mörkt rum. För optimalt projektionsresultat,
placera enheten 1,5-2 m
(5 – 6.5 fot) från taket eller väggen.
• Tryck på SNOOZE | LIGHT om du vill aktivera bakgrundsbelysningen och projektionen under
5 sekunder.
• Tryck och håll inne SNOOZE | LIGHT tills du hör ett pip för att aktivera projektionen i 5 minuter.
• Tryck på knappen / PROJECTION för att vända projektionen 90°.
• Tryck på och håll inne / PROJECTION för att aktivera kontinuerlig projektion på/av.
NOTERA Kontinuerlig projektion är inaktiverad när huvudenheten inte är ansluten till nätadaptern.

SWE
- 96 -
FÖRSIKTIGHETSÅTGÄRDER
• Utsätt inte apparaten för kraftigt våld, stötar, damm, extrema temperaturer eller fukt.
• Täck inte för ventilationshålen. Försäkra dig om att närliggande föremål såsom tidningar, dukar,
gardiner m.m. inte täcker för ventilationshålen.
• Utsätt inte produkten för vatten. Om du spiller vätska över den, torka omedelbart med en mjuk,
luddfri trasa.
• Rengör inte apparaten med frätande eller slipande material.
• Mixtra inte med enhetens interna komponenter då detta kan påverka garantin.
• Använd enbart nya batterier. Blanda inte nya och gamla batterier.
• Av trycktekniska skäl, kan displaybilderna i denna manual skilja sig från dem i verkligheten.
• Förbrukad produkt måste sorteras som specialavfall på avsedd miljöstation och får inte slängas
som vanligt restavfall.
• Om denna produkt placeras på ytor med speciell nish såsom lackat trä etc. kan dessa ytor
skadas. Ta kontakt med din möbeltillverkare för att få mer information om huruvida det går bra
att placera föremål på ytan. Oregon Scientic kan inte hållas ansvariga för skador på träytor
som uppkommit på grund av kontakt med denna produkt.
• Innehållet I denna manual får ej kopieras utan tillverkarens medgivande.
• Kassera inte gamla batterier som osorterade sopor. Insamling av kasserade batterier måste
ske separat.
• Notera att vissa enheter är utrustade med en batterisäkerhetsstrip. Ta bort denna strip från
batteriutrymmet innan produkten används första gången.

SWE
- 97 -
NOTERING De tekniska specikationerna för denna produkt och innehållet I användarmanualen
kan komma att ändras utan vidare upplysning.
NOTERING Egenskaper och tillbehör kan skilja mellan olika länder. För mer information, kontakta
ditt lokala inköpsställe. För att ladda ner en elektronisk version av manualen, vänligen besök
http://global.oregonscientic.com/customerSupport.php.
OM OREGON SCIENTIFIC
HUVUDENHET
L x W x H 108 x 26 x 77 mm (4.25 x 1.02 x 3.03 in)
Vikt 112 g (3,95 oz) utan batterier
Temperaturområde -5°C till 50°C (23°F till 122°F)
Noggrannhet 0°C till 40°C: ±1°C (±2.0°F) < 0°C och >40°C: ±2°C (±4.0°F)
Upplösning 0.1°C (0.2°F)
Ström 2 x UM-4 (AAA) 1.5 V batterier

SWE
- 98 -
OM OREGON SCIENTIFIC
Besök vår webbsajt www.oregonscientic.se för att ta reda på mer om Oregon Scientics produkter.
Om du har några frågor är du välkommen att kontakta vår Kundtjänst på info@oregonscientic.se.
Oregon Scientic Global Distribution Limited reserverar sig rätten att redigera och uttolka innehåll,
terminologi och föreskrifter i denna manual samt att göra tillägg när som helst utan föregående
meddelande. Om skillnader nns mellan den engelska versionen och andra språkversioner,
gäller den engelska.
EU - FÖRSÄKRAN OM ÖVERENSSTÄMMELSE
Häri tillverkaren Oregon Scientic Global Distribution Limited att radio equipmment typ PROJI
projektionsklocka (modell: RM338PX/RM338PAX/RM338PUX) Står i överensstämmelse med
2014/53/ EU-direktiv. Den fullständiga texten av EU-försäkran om överensstämmelse nns
tillgänglig på följande Internetadress: http://global.oregonscientic.com/customerSupport.php
LÄNDER SOM OMFATTAS AV RED-DIREKTIVET
Alla länder inom EU, Schweiz CH
och Norge N

SWE
- 99 -
INFORMATION TILL ALLA ANVÄNDARE
I enlighet med de europeiska direktiven 2011/65/EU och 2012/19/EU, som hänsyftar
till användning av farliga substanser i elektrisk och elektronisk apparatur liksom
avyttring av avfall.
Symbolen med den överkryssade soptunnan som nns på apparaten, anger att produkten
måste samlas upp och avyttras separat i förhållande till annat avfall när den fullgjort sin livstid.
Användaren mäste därför överlämna den utslitna apparaturen till lämpliga uppsamlingsställen för
sorterat elektroniskt och elektrotekniskt avfall eller lämna tillbaka den till återförsäljaren på samma
gång som han/hon köper en ny likvärdig apparat, enligt principen en gammal produkt i utbyte mot
en ny. Lämplig sortering av den nedskrotade apparaturens olika delar för därpå följande återvinning,
behandling och miljövänlig sanering bidrar till att undvika förorening av miljön och negativa effekter
på hälsan, liksom att det gynnar återanvändning av de material som apparaturen är gjord av.
Om användaren nedskrotar produkten felaktigt medför det att sanktioner enligt gällande lagstiftning
kommer att tillämpas.

TC
- 100 -
TC
簡介
多謝閣下選購Oregon Scientific
TM
PROJI 投射時計 (型號: RM338PX/RM338PAX/RM338PUX)。此
裝置集準確時間、響鬧和溫度監測功能於一身,十分適合在家居使用。使用新產品時,請將用戶手
冊存放於方便易取的地方。手冊中包含了循序漸進的說明,以及技術規格和警告事項。
包裝內容
主裝置 安裝於主裝置中的AAA 電池 x 2

TC
- 101 -
概覽
俯視圖
4
5
6
1
2
3
1. + - 按下以增加設定值,或長按以在設定模式中快速增加數值。
2. SNOOZE | LIGHT (小睡 | 燈) – 按下以將響鬧暫停一會或開啟背光燈及投射功能,長按直至聽
到一下“咇”聲即可啟動投射功能5分鐘。
3. - 按下以在目前時間、行事曆或響鬧1/2之間切換,以顯示5秒。長按以進入設定模式。
4. – - 按下以降低設定值,或長按以在設定模式中快速降低數值。
5. 投射透鏡
6. - 按下以開啟/關閉響鬧,長按以進入響鬧設定模式。
背視圖
1
23 4 5
1. 電池插槽
2. RESET (重設) – 按下以將裝置重設回預設狀態。
3. / PROJECTION (投射) – 按下以將投射內容翻轉90°。長按以開啟/關閉持續投射功能。
4. RCC – 按下以開啟及搜尋RCC訊號,長按則關閉。
5. 電池槽蓋

TC
- 102 -
背視圖
1
23 4
5
1. 電池插槽
2. RESET (重設) – 按下以將裝置重設回預設狀態。
3. / PROJECTION (投射) – 按下以將投射內容翻轉90°。長按以開啟/關閉持續投射功能。
4. RCC – 按下以開啟及搜尋RCC訊號,長按則關閉。
5. 電池槽蓋

TC
- 103 -
LCD 屏幕
1
23
1. 時間顯示
2. 星期顯示
3. 室內溫度顯示
符號 描述
已開啟響鬧 1。
已開啟響鬧 2。
已收到RCC訊號
主裝置電量不足
開始使用
安裝電池
1. 輕輕地將電池槽蓋向下推開,並從主裝置上移除下來。
2. 以符合電極 (+/-) 的方式安裝電池。
註 當 出現或屏幕變暗時,請更換電池。
時鐘
時鐘接收
此時鐘可以將時間與時鐘訊號同步。按下 RCC 以開啟及搜尋時鐘訊號。
主裝置可以接收有不同RCC訊號的 RF 時鐘資料:
型號 地區 訊號
RM338PX
歐洲
DCF
RM338PUX
英國
MSF
時鐘訊號接收指示器:
圖示 描述
主裝置正在搜尋時鐘訊號的強度
(閃動)
主裝置正在搜尋時鐘訊號
沒有時鐘訊號
已收到強烈的RCC 信號
已收到微弱的RCC 信號

TC
- 104 -
時鐘
時鐘接收
此時鐘可以將時間與時鐘訊號同步。按下 RCC 以開啟及搜尋時鐘訊號。
主裝置可以接收有不同RCC訊號的 RF 時鐘資料:
型號 地區 訊號
RM338PX
歐洲
DCF
RM338PUX
英國
MSF
時鐘訊號接收指示器:
圖示 描述
主裝置正在搜尋時鐘訊號的強度
(閃動)
主裝置正在搜尋時鐘訊號
沒有時鐘訊號
已收到強烈的RCC 信號
已收到微弱的RCC 信號

TC
- 105 -
註
• 設備需要 2-10 分鐘來接收時鐘訊號。如果訊號微弱,設備最多需要 24 小時來接收有效的訊號。
•不適用於亚洲和未指定地區。
手動設定時鐘
1. 長按 。屏幕會顯示 ZONE (地區) 以及號碼會閃動。
2. 按一次或長按 +/- 以調整設定值。對於歐洲/英國地區,時區偏移會從接收到的時鐘訊號,設定
時鐘最多 +/- 23 小時。
3. 按下 以確定。
4. 按一下或長按 +/- 以調整以下設定:12/24 小時格式、小時、分鐘、年份、行事曆格式 (月-日/日-
月)、月份、日期、溫度單位 (°C/°F) 及語言。
5. 按下 以確定每一個設定值。
註
•可選語言包括英文 (ENG)、西班牙文 (SPA)、意大利文 (ITA)、法文 (FRE) 及德文 (GER)。
•每次重設或更換電池後,RCC 訊號接收都會開啟。
•當主裝置在設定模式時,長按 來儲存設定及離開設定模式。

TC
- 106 -
響鬧
設定/調整響鬧時間
1. 長按 。
2. 按一下或長按 +/- 以調整小時及分鐘設定,然後按下 以確定。
3. 按下 +/- 以 ON/OFF (開啟/關閉) 平日響鬧,然後按 以確定。
•如設定為 ON (開啟),響鬧只會於平日響起。
4. 重覆第 2-4 個步驟以設定響鬧 2。
開啟/關閉響鬧:
按 以順序地開啟/關閉響鬧:
響鬧 1 > 響鬧 2 > 兩個響鬧同時開啟 > 兩個響鬧同時關閉。
操作
當響鬧響起時,背光燈會閃動。你可以:
•按下 以停止。響鬧會於下一天再次響起。
•按下 SNOOZE | LIGHT (小睡 | 燈) 以暫停一會。響鬧會在 8 分鐘後再次響起。

TC
- 107 -
投射
投射器會將時間顯示在天花板上,以方便你在黑暗房間中查看。請將裝置放置於 1.5-2 米 (5-6.5
呎) 範圍內以得到最佳的查看效果。
•按下 SNOOZE | LIGHT (小睡 | 燈) 以開啟背光燈及投射功能 5 秒。
•長按 SNOOZE | LIGHT (小睡 | 燈) 直至聽到一下「咇」聲,以啟動投射功能 5 分鐘。
•按下 /PROJECTION (投射) 以將投射內容翻轉 90°。
•長按 /PROJECTION (投射) 以開啟/關閉持續投射功能。
註 當主裝置沒有連接電源轉換器時,持續投射功能便會無效。
注意事項
•不得對機體猛力施壓、撞擊、或放在温差大或過於濕度方。
•請勿將機體浸水若不慎將機體沾水,立即使用柔軟、不含麻布將之擦拭。
•不得使用磨損或腐蝕性的物質清潔機體。
•不得以硬物刮液晶體顯示屏,此舉可能導致顯示屏的損壞。
•不要干擾機體的內部零件。此舉將使保證失效。
•必須使用新電池。請勿混合使用新舊電池。
•本指南所示圖像也許與實物不同。
•棄置本產品時,確認已個別將之回收。
•把產品放在某些木材表面可能會損壞其塗層。我們對此 等損壞概不負責。請諮詢傢具製造商,
了解保養傢具的資訊。
•未經製造商的許可,不可複製手冊中的任何內容。丟棄舊電池時,不得視之為不必分類的都市廢
棄丟棄舊電池時,不得視之為不必分類的都市廢棄物。必須以特別方式 另行處理此等廢棄物。
•請注意,部份機體配備電池安全繫帶。首次使用前,請將之從電池格中拆下。
註 我們有權更改本產品的技術規格和本使用指南之內容,而無需另行通知。
註 產品特點及配件不適用於所有國家。欲索取更多資訊,請聯絡當地零售商。請於
http://global.oregonscientific.com/customerSupport.php 下載手冊電子版本。

TC
- 108 -
注意事項
•不得對機體猛力施壓、撞擊、或放在温差大或過於濕度方。
•請勿將機體浸水若不慎將機體沾水,立即使用柔軟、不含麻布將之擦拭。
•不得使用磨損或腐蝕性的物質清潔機體。
•不得以硬物刮液晶體顯示屏,此舉可能導致顯示屏的損壞。
•不要干擾機體的內部零件。此舉將使保證失效。
•必須使用新電池。請勿混合使用新舊電池。
•本指南所示圖像也許與實物不同。
•棄置本產品時,確認已個別將之回收。
•把產品放在某些木材表面可能會損壞其塗層。我們對此 等損壞概不負責。請諮詢傢具製造商,
了解保養傢具的資訊。
•未經製造商的許可,不可複製手冊中的任何內容。丟棄舊電池時,不得視之為不必分類的都市廢
棄丟棄舊電池時,不得視之為不必分類的都市廢棄物。必須以特別方式 另行處理此等廢棄物。
•請注意,部份機體配備電池安全繫帶。首次使用前,請將之從電池格中拆下。
註 我們有權更改本產品的技術規格和本使用指南之內容,而無需另行通知。
註 產品特點及配件不適用於所有國家。欲索取更多資訊,請聯絡當地零售商。請於
http://global.oregonscientific.com/customerSupport.php 下載手冊電子版本。

TC
- 109 -
規格
主裝置
長 x 闊 x 高 108 x 26 x 77 毫米 (4.25 x 1.02 x 3.03 吋)
重量 112 克 (3.95安士) (不包括電池)
溫度範圍 -5°C 至 50°C (23°F 至 122°F)
準確度 0°C 至 40°C: ±1°C (±2.0°F) < 0°C 及 >40°C: ±2°C (±4.0°F)
辨識度 0.1°C (0.2°F)
電源 2 x UM-4 (AAA) 1.5 V 電池
關於OREGON SCIENTIFIC (歐西亞)
瀏覽我們的網站www.oregonscientific.com.hk瞭解更多關於歐西亞的產品。
如有任何疑問,請聯絡我們的客戶服務 [email protected].
Oregon Scientific Global Distribution Limited保留權利,隨時行使獨立裁決權,於未事前通知
情況下詮釋和解釋本用戶手冊之任何內容、條款與條件並修改之。若英語版本與任何其他語言
版本有任何不一致處,將以英語版本為準。
©2018 歐西亞保留所有權利

SC
- 110 -
SC
简介
谢谢阁下选购Oregon Scientic™ PROJI 投射时钟 (型号:RM338PX/RM338PAX/RM338PUX)
。此设备集准确时间、响闹和温度监测功能于一身,十分适合在家居使用。使用新产品时,请将
用户手册存放于方便易取的地方。手册中包含了循序渐进的说明,以及技术规格和警告事项。
包装内容
主装置 安装于主装置中的AAA 电池 x 2

SC
- 111 -
概览
俯视图
4
5
6
1
2
3
1. + - 按下以增加设定值,或长按以在设定模式中快速增加数值。
2. SNOOZE | LIGHT(小睡 | 灯) – 按下以将响闹暂停一会或开启背后灯及投射功能,长按直至听
到一下“咇”声即可启动投射功能5分钟。
3. - 按下以在目前时间、行事历或响闹1/2之间切换,以显示5秒。长按以进入设定模式。
4. – - 按下以降低设定值,或长按以在设定模式中快速降低数值。
5. 投射透境
6. - 按下以开启/关闭响闹,长按以进入响闹设定模式。
背视图
1
23 4 5
1. 电池插槽
2. RESET (重置) – 按下以将装置重置回黙认状态。
3. / PROJECTION (投射) – 按下以将投射内容翻转90°。长按以开启/关闭持续投射功能。
4. RCC – 按下以开启及搜寻RCC信号,长按则关闭。
5. 电池槽盖

SC
- 112 -
背视图
1
23 4
5
1. 电池插槽
2. RESET (重置) – 按下以将装置重置回黙认状态。
3. / PROJECTION (投射) – 按下以将投射内容翻转90°。长按以开启/关闭持续投射功能。
4. RCC – 按下以开启及搜寻RCC信号,长按则关闭。
5. 电池槽盖

SC
- 113 -
LCD 屏幕
1
23
1. 时间显示
2. 星期显示
3. 户内温度显示
符号 描述
已开启响闹 1。
已开启响闹 2。
已收到RCC信号
主装置电量不足
开始使用
安装电池
1. 轻轻地将电池槽盖向下推开,并从主装置上移除下来。
2. 以符合电极 (+/-) 的方式安装电池。
注意 当 出现或屏幕变暗时,请更换电池。

SC
- 114 -
时钟
时钟接收
此时钟能够自动地与时钟信号同步。按下 RCC 以开启及搜寻时钟信号。
主装置可以接收有不同RCC信号的 RF 时钟数据:
型号 地区 信号
RM338PX
欧洲
DCF
RM338PUX
英国
MSF
时钟信号接收指示器:
图示 描述
主装置正在搜寻时钟信号的强度
(闪动)
主装置正在搜寻时钟信号
没有时钟信号
已收到强烈的RCC 信号
已收到微弱的RCC 信号

SC
- 115 -
注意
• 设备需要 2-10 分钟来接收时钟信号。如果信号微弱,设备最多需要 24 小时来接收有效的信号。
• 不适用于亚洲和未指定地区。
手动设定时钟
1. 长按 。屏幕会显示 ZONE (地区) 以及号码会闪动。
2. 按一次或长按 +/- 以调整设定值。对于欧洲/英国地区,时区偏移会从接收到的时钟信号,设定
时钟最多 +/- 23 个小时。
3. 按下 以确定。
4. 单击或长按 +/- 以调整以下设定:12/24 小时格式、小时、分钟、年份、行事历格式 (月-日/日-
月)、月份、日期、温度单位 (°C/°F) 及语言。
5. 按下 以确定每一个设定值。
注意
• 可选语言包括英文 (ENG)、西班牙文 (SPA)、意大利文 (ITA)、法文 (FRE) 及德文 (GER)。
• 每次重设或更换电池后,RCC 信号接收都会开启。
• 当主装置在设定模式时,长按 来储存设定及离开设定模式。
响闹
设定/调整响闹时间
1. 长按 。
2. 单击或长按 +/- 以调整小时及分钟设定,然后按下 以确定。
3. 按下 +/- 以 ON/OFF (开启/关闭) 平日响闹,然后按 以确定。
• 如设定为 ON (开启),响闹只会于平日响起。
4. 重复第 2-4 个步骤以设定响闹 2。
开启/关闭响闹:
按 以顺序地开启/关闭响闹:
响闹 1 > 响闹 2 > 两个响闹同时开启 > 两个响闹同时关闭。
操作
当响闹响起时,背后灯会闪动。你可以:
• 按下 以停止。响闹会于下一天再次响起。
• 按下 SNOOZE | LIGHT (小睡 | 灯) 以暂停一会。响闹会在 8 分钟后再次响起。

SC
- 116 -
响闹
设定/调整响闹时间
1. 长按 。
2. 单击或长按 +/- 以调整小时及分钟设定,然后按下 以确定。
3. 按下 +/- 以 ON/OFF (开启/关闭) 平日响闹,然后按 以确定。
• 如设定为 ON (开启),响闹只会于平日响起。
4. 重复第 2-4 个步骤以设定响闹 2。
开启/关闭响闹:
按 以顺序地开启/关闭响闹:
响闹 1 > 响闹 2 > 两个响闹同时开启 > 两个响闹同时关闭。
操作
当响闹响起时,背后灯会闪动。你可以:
• 按下 以停止。响闹会于下一天再次响起。
• 按下 SNOOZE | LIGHT (小睡 | 灯) 以暂停一会。响闹会在 8 分钟后再次响起。

SC
- 117 -
投射
投射器会将时间显示在天花板上,以方便你在黑暗房间中查看。请将装置放置于 1.5-2 米 (5-6.5
尺) 范围内以得到最佳的查看效果。
• 按下 SNOOZE | LIGHT (小睡 | 灯) 以开启背后灯及投射功能 5 秒。
• 按下 /PROJECTION (投射) 以将投射内容翻转 90°。
• 长按 SNOOZE | LIGHT (小睡 | 灯) 直至听到一下“咇”声,以启动背后灯 5 分钟。
• 长按 /PROJECTION (投射) 以开启/关闭持续投射功能。
注意 当主装置没有连接电源适配器时,持续投射功能便会无效。
注意事项
• 不得对机体猛力施压、撞击、或放在温差过大或过于潮湿的地方。
• 请勿将机体浸水。若机体不慎沾水,请立即使用无绒软布擦拭干净。
• 不得使用磨损或腐蚀性物质清洁机体。
• 请勿使用硬物刮擦液晶显示屏,以免损坏显示屏。
• 不要干扰机体内部零件,以免使保修失效。
• 必须使用新电池。请勿混合使用新旧电池。
• 本手册所示图像可能与实物有所不同。
• 弃置本产品时,确保妥当回收以备处置。
• 把产品放在某些木材表面可能会损坏其涂层,对此类损坏我们恕不负责。请咨询家具制造商,
了解有关家具保养的详细信息。
• 未经制造商许可,不可复制本手册中的任何内容丢弃旧电池时,不得将其视为不可分类废弃物,
而必须以特别方式另行处理。
• 请注意,部份机体配备电池安全系带。首次使用前,请将其从电池格中拆下。
注意 我们保留权限随时变更本产品的技术规格和本使用手册内容,恕不另行通知。
注意 并非所有国家都能提供产品性能和配件。欲知详情,请联系您所在地的零售商。请访问
http://global.oregonscientic.com/customerSupport.php 下载电子版的用户手册。

SC
- 118 -
注意事项
• 不得对机体猛力施压、撞击、或放在温差过大或过于潮湿的地方。
• 请勿将机体浸水。若机体不慎沾水,请立即使用无绒软布擦拭干净。
• 不得使用磨损或腐蚀性物质清洁机体。
• 请勿使用硬物刮擦液晶显示屏,以免损坏显示屏。
• 不要干扰机体内部零件,以免使保修失效。
• 必须使用新电池。请勿混合使用新旧电池。
• 本手册所示图像可能与实物有所不同。
• 弃置本产品时,确保妥当回收以备处置。
• 把产品放在某些木材表面可能会损坏其涂层,对此类损坏我们恕不负责。请咨询家具制造商,
了解有关家具保养的详细信息。
• 未经制造商许可,不可复制本手册中的任何内容丢弃旧电池时,不得将其视为不可分类废弃物,
而必须以特别方式另行处理。
• 请注意,部份机体配备电池安全系带。首次使用前,请将其从电池格中拆下。
注意 我们保留权限随时变更本产品的技术规格和本使用手册内容,恕不另行通知。
注意 并非所有国家都能提供产品性能和配件。欲知详情,请联系您所在地的零售商。请访问
http://global.oregonscientic.com/customerSupport.php 下载电子版的用户手册。

SC
- 119 -
规格
主装置
长 x 阔 x 高 108 x 26 x 77 毫米(4.25 x 1.02 x 3.03 吋)
重量 112 克(3.95盎司) (不包括电池)
温度范围 -5°C 至 50°C (23°F 至 122°F)
准确度 0°C 至 40°C: ±1°C (±2.0°F)< 0°C 及 >40°C: ±2°C (±4.0°F)
辨识度 0.1°C (0.2°F)
电源 2 x UM-4 (AAA) 1.5 V 电池
关于欧西亚
浏览我们的网站www.oregonscientic.com.cn了解更多关于欧西亚的产品。
如有任何疑问,请联络我们的客户服务 enquiry@oregonscientic.com.cn.
Oregon Scientic Global Distribution Limited保留权利,随时行使独立裁决权,于未事前通知情
况下诠释和解释本用户手册之任何内容、条款与条件并修改之。若英语版本与任何其他语言版本
有任何不一致处,将以英语版本为准。

SC
- 120 -
关于欧西亚
浏览我们的网站www.oregonscientic.com.cn了解更多关于欧西亚的产品。
如有任何疑问,请联络我们的客户服务 enquiry@oregonscientic.com.cn.
Oregon Scientic Global Distribution Limited保留权利,随时行使独立裁决权,于未事前通知情
况下诠释和解释本用户手册之任何内容、条款与条件并修改之。若英语版本与任何其他语言版本
有任何不一致处,将以英语版本为准。
300103963-00001-10
-
 1
1
-
 2
2
-
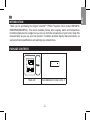 3
3
-
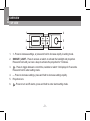 4
4
-
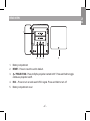 5
5
-
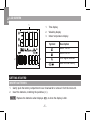 6
6
-
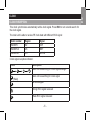 7
7
-
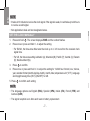 8
8
-
 9
9
-
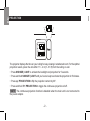 10
10
-
 11
11
-
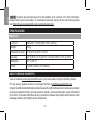 12
12
-
 13
13
-
 14
14
-
 15
15
-
 16
16
-
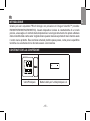 17
17
-
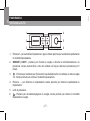 18
18
-
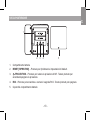 19
19
-
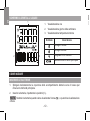 20
20
-
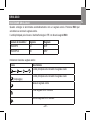 21
21
-
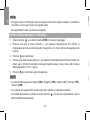 22
22
-
 23
23
-
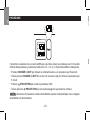 24
24
-
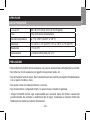 25
25
-
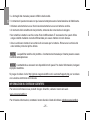 26
26
-
 27
27
-
 28
28
-
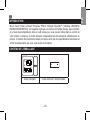 29
29
-
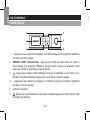 30
30
-
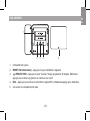 31
31
-
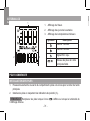 32
32
-
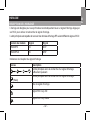 33
33
-
 34
34
-
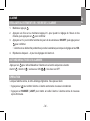 35
35
-
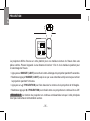 36
36
-
 37
37
-
 38
38
-
 39
39
-
 40
40
-
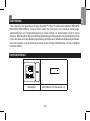 41
41
-
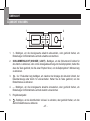 42
42
-
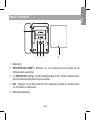 43
43
-
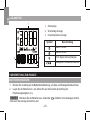 44
44
-
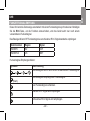 45
45
-
 46
46
-
 47
47
-
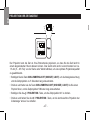 48
48
-
 49
49
-
 50
50
-
 51
51
-
 52
52
-
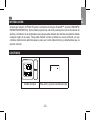 53
53
-
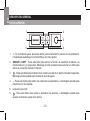 54
54
-
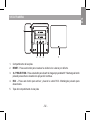 55
55
-
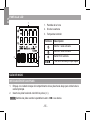 56
56
-
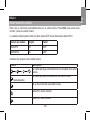 57
57
-
 58
58
-
 59
59
-
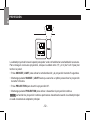 60
60
-
 61
61
-
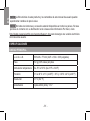 62
62
-
 63
63
-
 64
64
-
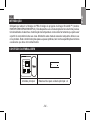 65
65
-
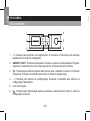 66
66
-
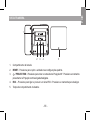 67
67
-
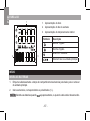 68
68
-
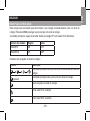 69
69
-
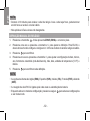 70
70
-
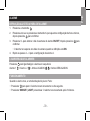 71
71
-
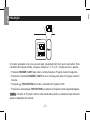 72
72
-
 73
73
-
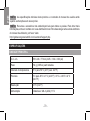 74
74
-
 75
75
-
 76
76
-
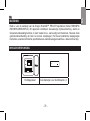 77
77
-
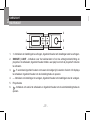 78
78
-
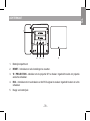 79
79
-
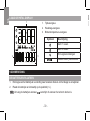 80
80
-
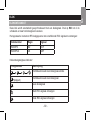 81
81
-
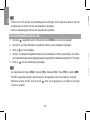 82
82
-
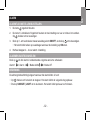 83
83
-
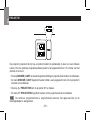 84
84
-
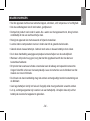 85
85
-
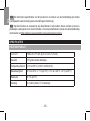 86
86
-
 87
87
-
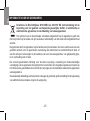 88
88
-
 89
89
-
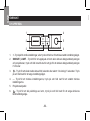 90
90
-
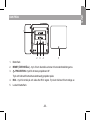 91
91
-
 92
92
-
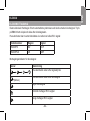 93
93
-
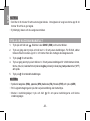 94
94
-
 95
95
-
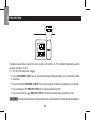 96
96
-
 97
97
-
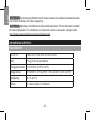 98
98
-
 99
99
-
 100
100
-
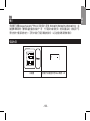 101
101
-
 102
102
-
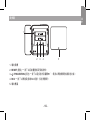 103
103
-
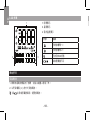 104
104
-
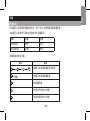 105
105
-
 106
106
-
 107
107
-
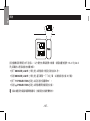 108
108
-
 109
109
-
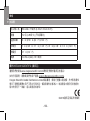 110
110
-
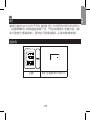 111
111
-
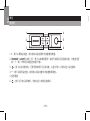 112
112
-
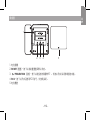 113
113
-
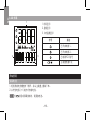 114
114
-
 115
115
-
 116
116
-
 117
117
-
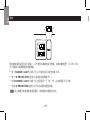 118
118
-
 119
119
-
 120
120
-
 121
121


Oregon Scientific PROJI de handleiding
- Categorie
- Wekkers
- Type
- de handleiding
in andere talen
- English: Oregon Scientific PROJI Owner's manual
- italiano: Oregon Scientific PROJI Manuale del proprietario
- français: Oregon Scientific PROJI Le manuel du propriétaire
- español: Oregon Scientific PROJI El manual del propietario
- Deutsch: Oregon Scientific PROJI Bedienungsanleitung
- português: Oregon Scientific PROJI Manual do proprietário
Gerelateerde artikelen
-
 Oregon Scientific RM338P-BK de handleiding
-
 Oregon Scientific RM313PNF Handleiding
-
 Oregon Scientific OSRM313PNF-WHI de handleiding
-
 Oregon Scientific BAR368P de handleiding
-
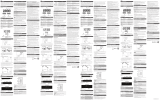 Oregon Scientific RMR221P Handleiding
-
 Oregon Scientific JW208 Handleiding
-
Oregon Scientific OSRM120 de handleiding
-
 Oregon Scientific radio controlled GLAZE digital wall clock black de handleiding
-
 Oregon Scientific RRM612PA Handleiding
-


