
BI 0001 / BI 0002 / BI 0006
BISON N° 1 / 2 / 6

Achtung:
1. Bitte achten Sie darauf, dass die Einstellungen des Datums nicht zwischen 18 Uhr und 2 Uhr getätigt werden, um
die Mechanik der Uhr nicht zu beschädigen.
2.
Beachten Sie bitte, dass alle Einstellungen mittels der Drücker mit »sanfter Gewalt« durchgeführt werden müssen,
da
sonst der Aufziehmechanismus der Uhr beschädigt werden könnte. Drücker können je nach Modell innen und/
oder aussen liegen sowie auch verschraubt sein.
Das Einstellen der Uhrzeit:
1. Ziehen Sie die Krone heraus in die zweite Position. (Bei Modellen mit verschraubter Krone bzw. Kronenschutz
muss dieser zuerst aufgeschraubt werden)
2. Stellen Sie mit Hilfe der Krone die gewünschten Stunden und Minuten der Uhrzeit ein.
3. Drücken Sie die Krone zurück in ihre Ausgangsposition.
4. Ziehen Sie die Krone vorsichtig etwa 20 mal im Uhrzeigersinn auf. Wenn die Uhr nun normal am Arm getragen
wird, zieht sie sich automatisch auf.
Das Einstellen der Datumsanzeige / Kalender:
1. Ziehen Sie die Krone heraus in die erste Position und bewegen Sie die Krone im Uhrzeigersinn, um das gewünschte
Datum einzustellen.
2. Ziehen Sie die Krone heraus in die erste Position und bewegen Sie die Krone gegen den Uhrzeigersinn, um den
gewünschten Tag einzustellen.
3. Drücken Sie auf den Drücker A, um den kleinen Zeiger für die Monatsanzeige einzustellen. (Er muss per Hand
eingestellt werden, er läuft nicht automatisch mit).
4. Drücken Sie auf den Drücker B, um den kleinen Zeiger für die Jahresanzeige einzustellen.
Genauigkeit:
1. 21.600 Schläge pro Stunde.
2. Genauigkeit zwischen -30 und +30 Sek. pro Tag (unter normalen Umständen getragen).
3. Gangreserve je nach Kaliber bei komplett aufgezogenem Uhrwerk zwischen 26 - 40 Stunden.
Wasserdichtigkeit:
1. Auf der Rückseite des Uhrengehäuses finden Sie den Hinweis ob und bis wieviel ATM die Uhr wasserbeständig ist.
Krone und Drücker müssen dabei in Ausgangsposition oder verschraubt sein.
BEDIENUNGSANLEITUNG FÜR UHR MIT AUTOMATIKAUFZUG
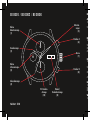
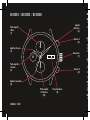
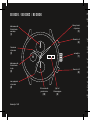
Kleine
Jahresanzeige
[3]
Stundenzeiger
[2]
Kaliber: 520
Minuten-
zeiger
[5]
Drücker B
[8]
Drücker A
[6]
Krone
[7]
Datum/
Kalenderanzeige
[9]
BI 0001 / BI 0002 / BI 0006
Kleine
Monatsanzeige
[1]
Sekundenzeiger
[4]
24-Stunden-
Anzeige
[10]

Achtung:
1. Bitte achten Sie darauf, dass die Einstellungen des Datums nicht zwischen 18 Uhr und 2 Uhr getätigt werden, um
die Mechanik der Uhr nicht zu beschädigen.
2. Beachten Sie bitte, dass alle Einstellungen mittels der Drücker mit »sanfter Gewalt« durchgeführt werden müssen,
da sonst der Aufziehmechanismus der Uhr beschädigt werden könnte. Drücker können je nach Modell innen und/
oder aussen liegen sowie auch verschraubt sein.
Das Einstellen der Uhrzeit:
1. Ziehen Sie die Krone heraus in die zweite Position. (Bei Modellen mit verschraubter Krone bzw. Kronenschutz
muss dieser zuerst aufgeschraubt werden)
2. Stellen Sie mit Hilfe der Krone die gewünschten Stunden und Minuten der Uhrzeit ein.
3. Drücken Sie die Krone zurück in ihre Ausgangsposition.
4. Ziehen Sie die Krone vorsichtig etwa 20 mal im Uhrzeigersinn auf. Wenn die Uhr nun normal am Arm getragen
wird, zieht sie sich automatisch auf.
Das Einstellen der Datumsanzeige / Kalender:
1. Ziehen Sie die Krone heraus in die erste Position und bewegen Sie die Krone im Uhrzeigersinn, um das gewünschte
Datum einzustellen.
2. Ziehen Sie die Krone heraus in die erste Position und bewegen Sie die Krone gegen den Uhrzeigersinn, um den
gewünschten Tag einzustellen.
3. Drücken Sie auf den Drücker A, um den kleinen Zeiger für die Monatsanzeige einzustellen. (Er muss per Hand
eingestellt werden, er läuft nicht automatisch mit).
4. Drücken Sie auf den Drücker B, um den kleinen Zeiger für die Jahresanzeige einzustellen.
Genauigkeit:
1. 21.600 Schläge pro Stunde.
2. Genauigkeit zwischen -30 und +30 Sek. pro Tag (unter normalen Umständen getragen).
3. Gangreserve je nach Kaliber bei komplett aufgezogenem Uhrwerk zwischen 26 - 40 Stunden.
Wasserdichtigkeit:
1. Auf der Rückseite des Uhrengehäuses finden Sie den Hinweis ob und bis wieviel ATM die Uhr wasserbeständig ist.
Krone und Drücker müssen dabei in Ausgangsposition oder verschraubt sein.
BEDIENUNGSANLEITUNG FÜR UHR MIT AUTOMATIKAUFZUG
Kaliber: 520
Minuten-
zeiger
[5]
Drücker B
[8]
Drücker A
[6]
Krone
[7]
BI 0001 / BI 0002 / BI 0006

Attention:
1. Please pay attention that the setting time for the date is restricted and shall not be executed between 6 o’clock p.m.
and 2 o’ clock a.m. This is due to construction limitations and in case of infringement parts of the mechanism could
be damaged.
2.
All adjustments by means of the pushers have to be carried out using „gentle“ pressing force otherwise the
mechanism of the watch could be damaged. Depending on the respective model he pushers can be found on the
inside or on the outside but they can as well be screwed in place.
Setting the time:
1.
Pull the crown out into the second position (In case of models with screwed crown or crown cover this has to be
screwed in place at first).
2. You can now adjust the time by means of turning the crown.
3. Push the crown back into its initial position.
4. Now wind the crown carefully clockwise approximately 20 times. When the watch is normally worn on the wrist
the winding will be done automatically.
Setting the date / calendar:
1. Pull the crown out into the first position and move it clockwise to set the date.
2. Pull the crown out into the first position and move it anti-clockwise to set the day.
3. Press button A to set the small hand for the indication of the month. (It has to be adjusted by hand, it does not run
automatically).
4. Press button B to set the small hand fort he indication of the year.
Time standard:
1. 21.600 beats per hour.
2. Accuracy between -30 and +30 sec. A day (worn under normal circumstances).
3. Energy reserve depending on the respective model at a completely wound movement between 26 and 40 hours.
Water resistance:
1. On the backside of the watchcase you find the indication whether and to what extend your watch is waterresistant.
In any case crown and pushers have to be in their initial position or have to be screwed in place.
AUTOMATIC MOVEMENT OPERATION MANUAL
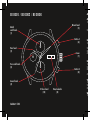
Year small hand
[3]
Hour hand
[2]
Caliber: 520
Minute hand
[5]
Button B
[8]
Button A
[6]
Crown
[7]
Date/calendar
[9]
BI 0001 / BI 0002 / BI 0006
Month
small hand
[1]
Second hand
[4]
24 hour hand
[10]

Attention:
1. Please pay attention that the setting time for the date is restricted and shall not be executed between 6 o’clock p.m.
and 2 o’ clock a.m. This is due to construction limitations and in case of infringement parts of the mechanism could
be damaged.
2. All adjustments by means of the pushers have to be carried out using „gentle“ pressing force otherwise the
mechanism of the watch could be damaged. Depending on the respective model he pushers can be found on the
inside or on the outside but they can as well be screwed in place.
Setting the time:
1. Pull the crown out into the second position (In case of models with screwed crown or crown cover this has to be
screwed in place at first).
2. You can now adjust the time by means of turning the crown.
3. Push the crown back into its initial position.
4. Now wind the crown carefully clockwise approximately 20 times. When the watch is normally worn on the wrist
the winding will be done automatically.
Setting the date / calendar:
1. Pull the crown out into the first position and move it clockwise to set the date.
2. Pull the crown out into the first position and move it anti-clockwise to set the day.
3. Press button A to set the small hand for the indication of the month. (It has to be adjusted by hand, it does not run
automatically).
4. Press button B to set the small hand fort he indication of the year.
Time standard:
1. 21.600 beats per hour.
2. Accuracy between -30 and +30 sec. A day (worn under normal circumstances).
3. Energy reserve depending on the respective model at a completely wound movement between 26 and 40 hours.
Water resistance:
1. On the backside of the watchcase you find the indication whether and to what extend your watch is waterresistant.
In any case crown and pushers have to be in their initial position or have to be screwed in place.
AUTOMATIC MOVEMENT OPERATION MANUAL
Caliber: 520
Minute hand
[5]
Button B
[8]
Button A
[6]
Crown
[7]
BI 0001 / BI 0002 / BI 0006

Attention:
1. Veuillez ne mettre ni la date ni le jour de semaine à l’heure entre 18 heures de l’après-midi et 2 heures du matin,
le mouvement pourrait être endommagé.
2.
Faites attention de mouvoir les boutons très doucement et sans aucune violence. En cas d’emploi de la violence,
le mécanisme pour remonter la montre peut être endommagé. Selon le modèle de la montre, les boutons peuvent
être soit apparents soit intégrés dans le boitier
.
La mise à l’heure:
1. Tirez le remontoir en deuxième position. Au cas où la couronne est vissée, il faut d’abord la dévisser dans le sens
inverse des aiguilles de la montre.
2. Mettez à l’heure les heures et les minutes désirées grâce au remontoir.
3. Après la mise à l’heure repoussez le remontoir dans sa position initiale.
4. Remontez la montre par le biais da la couronne une vingtaine de fois dans le sens de l’aiguille. En portant la
montre au poignet, celle-ci se remonte automatiquement.
La mise à l’heure de la date/calendrier:
1. Tirez le remontoir dans la première position et mettez la date désirée en tournant la couronne dans le sens de
l’aiguille.
2. Tirez le remontoir dans la première position et mettez le jour en tournant la couronne dans le sens inverse de
l’aiguille.
3. Pressez le bouton A pour ajuster la petite aiguille pour l’indication du mois. (Elle doit être ajustée manuellement,
cela ne se fait pas automatiquement).
4. Pressez le bouton B pour ajuster la petite aiguille pour l’indication du jour de l’ année.
Précision:
1. 21.600 coups par heure.
2. Précision d’environ -30 et +30 seconde par jour (si la montre est portée de façon régulière).
3. Réserve d’énergie selon le modèle entre 26 et 40 heures si le mouvement est remonté correctement dès le départ.
Etanchéité à l’eau:
1. Au verso de la boîte vous trouverez l’indication si et jusqu’à combien de ATM la montre est étanche à l’eau. La
couronne et les boutons doivent être dans la position initiale ou doivent être revissés.
MODE D’EMPLOI POUR MODÈLE AVEC MOUVEMENT AUTOMATIQUE
Petite aiguille
«Année»
[3]
Aiguille «Heures»
[2]
Calibre : 520
Aiguille
«Minutes»
[5]
Bouton B
[8]
Bouton A
[6]
Remontoir
[7]
Date/calendrier
[9]
BI 0001 / BI 0002 / BI 0006
Petite aiguille
«Mois»
[1]
Aiguille «Secondes»
[4]
Petite aiguille
«24 Heures»
[10]

Attention:
1. Veuillez ne mettre ni la date ni le jour de semaine à l’heure entre 18 heures de l’après-midi et 2 heures du matin,
le mouvement pourrait être endommagé.
2. Faites attention de mouvoir les boutons très doucement et sans aucune violence. En cas d’emploi de la violence,
le mécanisme pour remonter la montre peut être endommagé. Selon le modèle de la montre, les boutons peuvent
être soit apparents soit intégrés dans le boitier.
La mise à l’heure:
1. Tirez le remontoir en deuxième position. Au cas où la couronne est vissée, il faut d’abord la dévisser dans le sens
inverse des aiguilles de la montre.
2. Mettez à l’heure les heures et les minutes désirées grâce au remontoir.
3. Après la mise à l’heure repoussez le remontoir dans sa position initiale.
4. Remontez la montre par le biais da la couronne une vingtaine de fois dans le sens de l’aiguille. En portant la
montre au poignet, celle-ci se remonte automatiquement.
La mise à l’heure de la date/calendrier:
1. Tirez le remontoir dans la première position et mettez la date désirée en tournant la couronne dans le sens de
l’aiguille.
2. Tirez le remontoir dans la première position et mettez le jour en tournant la couronne dans le sens inverse de
l’aiguille.
3. Pressez le bouton A pour ajuster la petite aiguille pour l’indication du mois. (Elle doit être ajustée manuellement,
cela ne se fait pas automatiquement).
4. Pressez le bouton B pour ajuster la petite aiguille pour l’indication du jour de l’ année.
Précision:
1. 21.600 coups par heure.
2. Précision d’environ -30 et +30 seconde par jour (si la montre est portée de façon régulière).
3. Réserve d’énergie selon le modèle entre 26 et 40 heures si le mouvement est remonté correctement dès le départ.
Etanchéité à l’eau:
1. Au verso de la boîte vous trouverez l’indication si et jusqu’à combien de ATM la montre est étanche à l’eau. La
couronne et les boutons doivent être dans la position initiale ou doivent être revissés.
MODE D’EMPLOI POUR MODÈLE AVEC MOUVEMENT AUTOMATIQUE
Calibre : 520
Aiguille
«Minutes»
[5]
Bouton B
[8]
Bouton A
[6]
Remontoir
[7]
BI 0001 / BI 0002 / BI 0006

Attenzione:
1. Si prega di aver cura affinchè le impostazioni della data non avvengano nella fascia oraria tra le ore 18 e le ore
2 per non danneggiare il meccanismo dell’orologio.
2.
Si prega di prendere nota che per qualsiasi impostazione da attuarsi attraverso i pulsanti occorre agire con
delicatezza, in caso contrario si potrebbe provocare possibili danni al meccanismo di caricamento dell’orologio.
A seconda del modello i pulsanti possono venire a trovarsi internamente / o esternamente come pure in versione
pulsanti avvitati.
Impostazione dell’
ora:
1. Tirare la corona verso la seconda posizione (per i modelli con corona a vite oppure con corona protetta si dovrà
prima procedere allo svitamento della stessa).
2. Servendosi della corona impostare l’ora ed i minuti desiderati.
3. Riportare la corona alla sua posizione iniziale.
4. Azionare delicatamente la fase di caricamento facendo girare la corona circa 20 volte in senso orario. Ora
l’orologio prende a caricarsi automaticamente se indossato normalmente al polso.
Impostazione dell’indicatore della data / calendario:
1. Tirare la corona verso la prima posizione e facendola girare in senso orario impostare la data desiderata.
2. Tirare la corona verso la prima posizione e facendola girare in senso antiorario impostare il giorno desiderato.
3. Premere il pulsante A per impostare il mini indicatore del mese (tale funzione non si svolge automaticamente,
essa dev’essere impostata a mano).
4. Premere il pulsante B per impostare il mini indicatore dell’anno.
Precisione:
1. Precisione di marcia: 21.600 battiti all’ora.
2. Tolleranza: circa -30 e +30 sec. al giorno (se indossato in modo regolare).
3. Allorchè il meccanismo è completamente carico la riserva di carica è di 26 - 40 ore a seconda del calibro.
Resistenza all’acqua:
1. Vedasi sul retro della cassa dell’orologio l’indicazione se lo stesso è resistente all’aqua e fino a quanti ATM. In tale
ambito occorre che la corona e i pulsanti siano riposti nella posizione iniziale oppure chiusi a vite.
MODALITÀ D’IMPIEGO PER MODELLI CON MOVIMENTO AUTOMATICO
Mini indicatore
«anno»
[3]
Lancetta «ora»
[2]
Calibro: 520
Lancetta
«minuti»
[5]
Bottone B
[8]
Bottone A
[6]
Corona
[7]
Data/calendario
[9]
BI 0001 / BI 0002 / BI 0006
Mini indicatore
«mese»
[1]
Lancetta «secondi»
[4]
Mini lancetta
«24 ore»
[10]

Attenzione:
1. Si prega di aver cura affinchè le impostazioni della data non avvengano nella fascia oraria tra le ore 18 e le ore
2 per non danneggiare il meccanismo dell’orologio.
2. Si prega di prendere nota che per qualsiasi impostazione da attuarsi attraverso i pulsanti occorre agire con
delicatezza, in caso contrario si potrebbe provocare possibili danni al meccanismo di caricamento dell’orologio.
A seconda del modello i pulsanti possono venire a trovarsi internamente / o esternamente come pure in versione
pulsanti avvitati.
Impostazione dell’ora:
1. Tirare la corona verso la seconda posizione (per i modelli con corona a vite oppure con corona protetta si dovrà
prima procedere allo svitamento della stessa).
2. Servendosi della corona impostare l’ora ed i minuti desiderati.
3. Riportare la corona alla sua posizione iniziale.
4. Azionare delicatamente la fase di caricamento facendo girare la corona circa 20 volte in senso orario. Ora
l’orologio prende a caricarsi automaticamente se indossato normalmente al polso.
Impostazione dell’indicatore della data / calendario:
1. Tirare la corona verso la prima posizione e facendola girare in senso orario impostare la data desiderata.
2. Tirare la corona verso la prima posizione e facendola girare in senso antiorario impostare il giorno desiderato.
3. Premere il pulsante A per impostare il mini indicatore del mese (tale funzione non si svolge automaticamente,
essa dev’essere impostata a mano).
4. Premere il pulsante B per impostare il mini indicatore dell’anno.
Precisione:
1. Precisione di marcia: 21.600 battiti all’ora.
2. Tolleranza: circa -30 e +30 sec. al giorno (se indossato in modo regolare).
3. Allorchè il meccanismo è completamente carico la riserva di carica è di 26 - 40 ore a seconda del calibro.
Resistenza all’acqua:
1. Vedasi sul retro della cassa dell’orologio l’indicazione se lo stesso è resistente all’aqua e fino a quanti ATM. In tale
ambito occorre che la corona e i pulsanti siano riposti nella posizione iniziale oppure chiusi a vite.
MODALITÀ D’IMPIEGO PER MODELLI CON MOVIMENTO AUTOMATICO
Calibro: 520
Lancetta
«minuti»
[5]
Bottone B
[8]
Bottone A
[6]
Corona
[7]
BI 0001 / BI 0002 / BI 0006

Attentie:
1. Let u er even op dat, om het mechanisme van het horloge niet te beschadigen, de instellingen van de datum niet
tussen 18 uur en 2 uur mogen worden veranderd.
2.
Houdt u er s.v.p. rekening mee dat alle instellingen die u invoert met behulp van de drukknop met „lichte
druk“ moeten worden uitgevoerd, omdat anders het opwindmechanisme van het horloge beschadigd kan raken.
Drukknoppen kunnen zich al naar gelang het model aan de binnen- en/of de buitenkant bevinden, ter
wijl ze ook
de vorm van een schroef kunnen hebben.
De tijd instellen:
1. Trek de opwindknop uit tot in de tweede positie. (Bij modellen met een vastgeschroefde opwindknop of
beschermkap moet deze eerst worden losgedraaid)
2. Stel met de opwindknop de gewenste uren en minuten voor de kloktijd in.
3. Druk de opwindknop terug in zijn uitgangspositie.
4. Draai de opwindknop voorzichtig ongeveer 20 keer rond, met de wijzers van de klok mee. Wanneer het horloge
nu normaal aan de pols wordt gedragen, windt het zich automatisch op.
De datumaanduiding / kalender instellen:
1. Trek de opwindknop uit tot in de eerste positie en verdraai de opwindknop met de wijzers van de klok mee om de
gewenste datum in te stellen.
2. Trek de opwindknop uit tot in de eerste positie en verdraai de opwindknop tegen de wijzers van de klok in om de
gewenste dag in te stellen.
3. Druk op drukknop A om de kleine wijzer voor de maandweergave in te stellen. (Deze moet met de hand worden
ingesteld, hij loopt niet automatisch mee).
4. Druk op drukknop B om de kleine wijzer voor de jaaraanduiding in te stellen.
Nauwkeurigheid:
1. 21.600 slagen per uur.
2. Afwijking tussen de -30 en +30 sec. per dag (bij dragen onder normale omstandigheden).
3. Gangreserve al naar gelang het kaliber bij volledig opgewonden uurwerk tussen de 26 - 40 uur.
Waterdichtheid:
1. Aan de achterzijde van de behuizing staat vermeld of, en zo ja, tot hoeveel atm. het horloge waterbestendig is. De
opwindknop en de drukknoppen moeten daarbij in de uitgangspositie staan of ingeschroefd zijn.
GEBRUIKSAANWIJZING VOOR EEN AUTOMATISCH HORLOGE
kleine
Jaaraanduiding
[3]
Uurwijzer
[2]
Kaliber: 520
Minutenwijzer
[5]
Drukknop B
[8]
Drukknop A
[6]
Opwindknop
[7]
Datum/kalender
[9]
BI 0001 / BI 0002 / BI 0006
kleine
Maandaanduiding
[1]
Secondenwijzer
[4]
kleine
24-uurs-weergave
[10]

Attentie:
1. Let u er even op dat, om het mechanisme van het horloge niet te beschadigen, de instellingen van de datum niet
tussen 18 uur en 2 uur mogen worden veranderd.
2. Houdt u er s.v.p. rekening mee dat alle instellingen die u invoert met behulp van de drukknop met „lichte
druk“ moeten worden uitgevoerd, omdat anders het opwindmechanisme van het horloge beschadigd kan raken.
Drukknoppen kunnen zich al naar gelang het model aan de binnen- en/of de buitenkant bevinden, terwijl ze ook
de vorm van een schroef kunnen hebben.
De tijd instellen:
1. Trek de opwindknop uit tot in de tweede positie. (Bij modellen met een vastgeschroefde opwindknop of
beschermkap moet deze eerst worden losgedraaid)
2. Stel met de opwindknop de gewenste uren en minuten voor de kloktijd in.
3. Druk de opwindknop terug in zijn uitgangspositie.
4. Draai de opwindknop voorzichtig ongeveer 20 keer rond, met de wijzers van de klok mee. Wanneer het horloge
nu normaal aan de pols wordt gedragen, windt het zich automatisch op.
De datumaanduiding / kalender instellen:
1. Trek de opwindknop uit tot in de eerste positie en verdraai de opwindknop met de wijzers van de klok mee om de
gewenste datum in te stellen.
2. Trek de opwindknop uit tot in de eerste positie en verdraai de opwindknop tegen de wijzers van de klok in om de
gewenste dag in te stellen.
3. Druk op drukknop A om de kleine wijzer voor de maandweergave in te stellen. (Deze moet met de hand worden
ingesteld, hij loopt niet automatisch mee).
4. Druk op drukknop B om de kleine wijzer voor de jaaraanduiding in te stellen.
Nauwkeurigheid:
1. 21.600 slagen per uur.
2. Afwijking tussen de -30 en +30 sec. per dag (bij dragen onder normale omstandigheden).
3. Gangreserve al naar gelang het kaliber bij volledig opgewonden uurwerk tussen de 26 - 40 uur.
Waterdichtheid:
1. Aan de achterzijde van de behuizing staat vermeld of, en zo ja, tot hoeveel atm. het horloge waterbestendig is. De
opwindknop en de drukknoppen moeten daarbij in de uitgangspositie staan of ingeschroefd zijn.
GEBRUIKSAANWIJZING VOOR EEN AUTOMATISCH HORLOGE
Kaliber: 520
Minutenwijzer
[5]
Drukknop B
[8]
Drukknop A
[6]
Opwindknop
[7]
BI 0001 / BI 0002 / BI 0006

Внимание:
1.Следите, пожалуйста, за тем, чтобы число не устанавливалось между 18 часами и 2
часами,чтобынеповредитьмеханизмчасов.
2.Примите, пожалуйста, во внимание, что все установки при помощи кнопок должны
проводиться с »легким усилием«, поскольку в противном случае можно повредить
заводноймеханизмчасов.Взависимостиотмодели,кнопкимогутрасполагатьсявнутрии/
илиснаружи,атакжебытьзавинчены.
Установкавремени:
1.Выньтештифтввторуюпозицию.(Вмоделяхсзавинченнымштифтомилизащитойштифта
егонужносначаларазвинтить)
2.Припомощиштифтаустановитежелаемыезначениячасовиминутвремени.
3.Нажмитештифтназадвегоисходнуюпозицию.
4.Осторожно, примерно 20 раз, заведите штифт по часовой стрелке. Если часы теперь
обычноносятсянаруке,онизаводятсяавтоматически.
Установкауказателячисла/календаря:
1.Выньтештифтвпервуюпозициюивращайтештифтпочасовойстрелкечтобыустановить
желаемоечисло.
2.Выньте штифт в первую позицию и вращайте штифт против часовой стрелки чтобы
установитьжелаемыйдень.
3.Нажмите на кнопку A чтобы установить маленький указатель для месяца. (ее нужно
установитьвручную,онанедвигаетсяавтоматическивместесдругимистрелками).
4.НажмитенакнопкуBчтобыустановитьмаленькийуказательдлягода.
Точность:
1.21600удароввчас.
2.Точностьот-30до+30сек.задень(еслиноситьчасывнормальныхусловиях).
3.Запасходавзависимостиоткалибраприполностьюзаведенномчасовоммеханизмеот26
до40часов.
Водонепроницаемость:
1.Наобратнойсторонекорпусачасоввынайдетеуказание,являютсяличасыводостойкимии
досколькихатмосфер.Штифтикнопкиприэтомдолжнынаходитьсявисходнойпозиции
илибытьзавинчены.
Руководствопоэксплуатациидляавтоматическогочасовогомеханизма
Маленький
Указатель
года
[3]
Часовая
стрелка
[2]
Калибр:520
Минутная
стрелка
[5]
КнопкаB
[8]
КнопкаA
[6]
штифта
[7]
Дата/
Календарь
[9]
BI 0001 / BI 0002 / BI 0006
Маленький
Указатель
месяца
[1]
секундная
стрелка
[4]
24-часовой
указатель
[10]

Внимание:
1.Следите, пожалуйста, за тем, чтобы число не устанавливалось между 18 часами и 2
часами,чтобынеповредитьмеханизмчасов.
2.Примите, пожалуйста, во внимание, что все установки при помощи кнопок должны
проводиться с »легким усилием«, поскольку в противном случае можно повредить
заводноймеханизмчасов.Взависимостиотмодели,кнопкимогутрасполагатьсявнутрии/
илиснаружи,атакжебытьзавинчены.
Установкавремени:
1.Выньтештифтввторуюпозицию.(Вмоделяхсзавинченнымштифтомилизащитойштифта
егонужносначаларазвинтить)
2.Припомощиштифтаустановитежелаемыезначениячасовиминутвремени.
3.Нажмитештифтназадвегоисходнуюпозицию.
4.Осторожно, примерно 20 раз, заведите штифт по часовой стрелке. Если часы теперь
обычноносятсянаруке,онизаводятсяавтоматически.
Установкауказателячисла/календаря:
1.Выньтештифтвпервуюпозициюивращайтештифтпочасовойстрелкечтобыустановить
желаемоечисло.
2.Выньте штифт в первую позицию и вращайте штифт против часовой стрелки чтобы
установитьжелаемыйдень.
3.Нажмите на кнопку A чтобы установить маленький указатель для месяца. (ее нужно
установитьвручную,онанедвигаетсяавтоматическивместесдругимистрелками).
4.НажмитенакнопкуBчтобыустановитьмаленькийуказательдлягода.
Точность:
1.21600удароввчас.
2.Точностьот-30до+30сек.задень(еслиноситьчасывнормальныхусловиях).
3.Запасходавзависимостиоткалибраприполностьюзаведенномчасовоммеханизмеот26
до40часов.
Водонепроницаемость:
1.Наобратнойсторонекорпусачасоввынайдетеуказание,являютсяличасыводостойкимии
досколькихатмосфер.Штифтикнопкиприэтомдолжнынаходитьсявисходнойпозиции
илибытьзавинчены.
Руководствопоэксплуатациидляавтоматическогочасовогомеханизма
Калибр:520
Минутная
стрелка
[5]
КнопкаB
[8]
КнопкаA
[6]
штифта
[7]
BI 0001 / BI 0002 / BI 0006

BI 0001 / BI 0002 / BI 0006
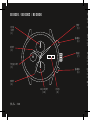
注意:
1.日付設定の時間帯は制限されており、午後6時から午前2時の間は日付設定を行うことは禁止さ
れています。その理由は、設計上の制限に由来しており、この設定に関する制限事項に反した
場合は、メカの一部に破損が生じる可能性があります。
2.プッシャーを用いた調節は、どれも軽く押す程度で行ってください。そうしないと、腕時計の
メカが壊れる可能性があります。モデルによっては、プッシャーが内部または外部に取り付け
られており、又、その位置にねじ留めされていることもあります。
時刻の設定
1.クラウンを二番目の位置にまで引き出してください(ねじ留めタイプのクラウンまたはクラウ
ンカバーの場合、最初に定位置にねじ留めする必要があります)。
2.その後、クラウンを回して時刻を設定できます。
3.クラウンを押して元の位置に戻してください。
4.その後、クラウンを注意深く時計回り方向に約20回まわしてください。通常腕時計を腕につけ
ている場合は、自動的にねじ巻きが行われます。
日付/カレンダーの設定
1.クラウンを最初の位置にまで引き出して、時計回り方向にまわして日付を設定してください。
2.クラウンを最初の位置にまで引き出して、時計と反対回り方向にまわして曜日を設定してくだ
さい。
3.ボタンAを押して、月表示のための短針を設定します。(月表示は、自動的に変更されないた
め、手で調節する必要があります)。
4.ボタンBを押して、年表示のための短針を設定します。
精度:
1.毎時21.600回のクロックビート
2.精度は一日あたり-30と+30秒以内(通常の環境内での着用時)。
3.パワーリザーブは、完全に巻き上げた状態の時計で、モデルによって26から40時間の間。
耐水性:
1.腕時計ケースの背面に、腕時計の耐水性の有無と程度についての表示があります。
クラウンとプッシャーは、いずれにせよ最初の位置状態にあるか、あるいはねじ留めされてい
なければなりません。
自動巻き腕時計取扱説明書
年の短針
[3]
時針
[2]
キャリバー520
分針
[5]
ボタンB
[8]
ボタンA
[6]
クラウン
[7]
日付/カレ
ンダー
[9]
月
短針
[1]
秒針
[4]
24時針
[10]

BI 0001 / BI 0002 / BI 0006
注意:
1.日付設定の時間帯は制限されており、午後6時から午前2時の間は日付設定を行うことは禁止さ
れています。その理由は、設計上の制限に由来しており、この設定に関する制限事項に反した
場合は、メカの一部に破損が生じる可能性があります。
2.プッシャーを用いた調節は、どれも軽く押す程度で行ってください。そうしないと、腕時計の
メカが壊れる可能性があります。モデルによっては、プッシャーが内部または外部に取り付け
られており、又、その位置にねじ留めされていることもあります。
時刻の設定
1.クラウンを二番目の位置にまで引き出してください(ねじ留めタイプのクラウンまたはクラウ
ンカバーの場合、最初に定位置にねじ留めする必要があります)。
2.その後、クラウンを回して時刻を設定できます。
3.クラウンを押して元の位置に戻してください。
4.その後、クラウンを注意深く時計回り方向に約20回まわしてください。通常腕時計を腕につけ
ている場合は、自動的にねじ巻きが行われます。
日付/カレンダーの設定
1.クラウンを最初の位置にまで引き出して、時計回り方向にまわして日付を設定してください。
2.クラウンを最初の位置にまで引き出して、時計と反対回り方向にまわして曜日を設定してくだ
さい。
3.ボタンAを押して、月表示のための短針を設定します。(月表示は、自動的に変更されないた
め、手で調節する必要があります)。
4.ボタンBを押して、年表示のための短針を設定します。
精度:
1.毎時21.600回のクロックビート
2.精度は一日あたり-30と+30秒以内(通常の環境内での着用時)。
3.パワーリザーブは、完全に巻き上げた状態の時計で、モデルによって26から40時間の間。
耐水性:
1.腕時計ケースの背面に、腕時計の耐水性の有無と程度についての表示があります。
クラウンとプッシャーは、いずれにせよ最初の位置状態にあるか、あるいはねじ留めされてい
なければなりません。
自動巻き腕時計取扱説明書
キャリバー520
分針
[5]
ボタンB
[8]
ボタンA
[6]
クラウン
[7]

BI 0001 / BI 0002 / BI 0006
注意:
1.由于构造原因,请勿在下午6:00至凌晨2:00之间设定日期,有可能导致相关
零件损坏。
2.使用按钮设置时请采用轻缓的力度,以免损坏手表机构零件。根据不同的
型号,按钮可以位于内侧或外侧,或需另外装上。
设置时间:
1.将表冠拉出至第二段(个别型号需要先将表冠装上扭紧)。
2.通过转动表冠调校时间。
3.将表冠推回原本位置。
4.现在请顺时针小心转动表冠约20次。如果您通常将手表佩戴于腕上,则已自动
上弦。
设置日期/日历
1.将表冠拉出至第一段,顺时针转动设置日期。
2.将表冠拉出至第一段,逆时针转动设置星期。
3.按下按钮A转动小针设置月份。(必须手动设置,非自动运行)。
4.按下按钮B转动小针设置年。
时间标准:
1.摆频每小时21,600次。
2.每天误差为+/-30秒(正常佩戴情况下)。
3.完全上弦后的动力储备根据各种型号有所不同,约在26至40小时之间。
防水性:
1.手表背面标明是否防水以及防水性能系数。在任何情况下都应将表冠和按钮拧
紧复原。
自动上链式手表说明书
年份小针
[3]
时针
[2]
机芯:520
分针
[5]
按钮B
[8]
按钮A
[6]
表冠
[7]
日历
[9]
月份
小针
[1]
秒针
[4]
24小时针
[10]

BI 0001 / BI 0002 / BI 0006
注意:
1.由于构造原因,请勿在下午6:00至凌晨2:00之间设定日期,有可能导致相关
零件损坏。
2.使用按钮设置时请采用轻缓的力度,以免损坏手表机构零件。根据不同的
型号,按钮可以位于内侧或外侧,或需另外装上。
设置时间:
1.将表冠拉出至第二段(个别型号需要先将表冠装上扭紧)。
2.通过转动表冠调校时间。
3.将表冠推回原本位置。
4.现在请顺时针小心转动表冠约20次。如果您通常将手表佩戴于腕上,则已自动
上弦。
设置日期/日历
1.将表冠拉出至第一段,顺时针转动设置日期。
2.将表冠拉出至第一段,逆时针转动设置星期。
3.按下按钮A转动小针设置月份。(必须手动设置,非自动运行)。
4.按下按钮B转动小针设置年。
时间标准:
1.摆频每小时21,600次。
2.每天误差为+/-30秒(正常佩戴情况下)。
3.完全上弦后的动力储备根据各种型号有所不同,约在26至40小时之间。
防水性:
1.手表背面标明是否防水以及防水性能系数。在任何情况下都应将表冠和按钮拧
紧复原。
自动上链式手表说明书
机芯:520
分针
[5]
按钮B
[8]
按钮A
[6]
表冠
[7]

Atenção:
1. Preste atenção já que a definição do horário para a data é limitada e não deve ser executada entre as 18 horas
e as 2 horas. Essa limitação acontece devido às limitações de construção e, em caso de violação, as peças do
mecanismo podem ser danificados.
2. Todos os ajustes são feitos por meio dos botões, usando força "moderada", caso contrário o mecanismo
do relógio pode ser danificado. Dependendo do modelo, os botões estão na parte interna ou externa, mas
também podem estar aparafusados.
Definir o horário:
1. Puxe a coroa para a segunda posição (no caso dos modelos com coroa aparafusada ou coroa coberta, essa deve ser
aparafusada no local primeiramente).
2. Ajuste o horário girando a coroa.
3. Empurre a coroa para que retorne à sua posição inicial.
4. Gire a coroa cuidadosamente no sentido horário aproximadamente 20 vezes. Se o relógio for utilizado sob
condições normais no pulso, a corda será carregada automaticamente.
Definir a data / calendário:
1. Puxe a coroa para a primeira posição e gire-a no sentido horário para definir a data.
2. Puxe a coroa para a primeira posição e gire-a no sentido anti-horário para definir o dia.
3. Pressione o botão A para definir o ponteiro pequeno para a indicação do mês. (O botão deve ser ajustado
manualmente. Não gira automaticamente).
4. Pressione o botão B para definir o ponteiro pequeno para a indicação do ano.
Horário padrão:
1. 21.600 ciclos por hora.
2. Precisão entre -30 e +30 segundos por dia (usado sob condições normais).
3. Reserva de energia em função do respectivo modelo com um movimento de giro completo entre 26 e 40 horas.
Resistência à água:
1. Na parte de trás da caixa do relógio está o indicador que mostra se o seu relógio é resistente à água e até que profundidade.
Em qualquer caso, a coroa e os botões devem estar nas posições iniciais ou devem estar aparafusados.
MANUAL DE OPERAÇÃO DO MODELO COM MOVIMENTO AUTOMÁTICO
Ponteiro pequeno
do ano
[3]
Ponteiro de
horas
[2]
Calibre: 520
Ponteiro de
minutos
[5]
Botão B
[8]
Botão A
[6]
Coroa
[7]
Data /
calendário
[9]
BI 0001 / BI 0002 / BI 0006
Ponteiro
pequeno
do mês
[1]
Ponteiro de
segundos
[4]
Ponteiro de 24
horas
[10]

Atenção:
1. Preste atenção já que a definição do horário para a data é limitada e não deve ser executada entre as 18 horas
e as 2 horas. Essa limitação acontece devido às limitações de construção e, em caso de violação, as peças do
mecanismo podem ser danificados.
2. Todos os ajustes são feitos por meio dos botões, usando força "moderada", caso contrário o mecanismo
do relógio pode ser danificado. Dependendo do modelo, os botões estão na parte interna ou externa, mas
também podem estar aparafusados.
Definir o horário:
1. Puxe a coroa para a segunda posição (no caso dos modelos com coroa aparafusada ou coroa coberta, essa deve ser
aparafusada no local primeiramente).
2. Ajuste o horário girando a coroa.
3. Empurre a coroa para que retorne à sua posição inicial.
4. Gire a coroa cuidadosamente no sentido horário aproximadamente 20 vezes. Se o relógio for utilizado sob
condições normais no pulso, a corda será carregada automaticamente.
Definir a data / calendário:
1. Puxe a coroa para a primeira posição e gire-a no sentido horário para definir a data.
2. Puxe a coroa para a primeira posição e gire-a no sentido anti-horário para definir o dia.
3. Pressione o botão A para definir o ponteiro pequeno para a indicação do mês. (O botão deve ser ajustado
manualmente. Não gira automaticamente).
4. Pressione o botão B para definir o ponteiro pequeno para a indicação do ano.
Horário padrão:
1. 21.600 ciclos por hora.
2. Precisão entre -30 e +30 segundos por dia (usado sob condições normais).
3. Reserva de energia em função do respectivo modelo com um movimento de giro completo entre 26 e 40 horas.
Resistência à água:
1. Na parte de trás da caixa do relógio está o indicador que mostra se o seu relógio é resistente à água e até que profundidade.
Em qualquer caso, a coroa e os botões devem estar nas posições iniciais ou devem estar aparafusados.
MANUAL DE OPERAÇÃO DO MODELO COM MOVIMENTO AUTOMÁTICO
Calibre: 520
Ponteiro de
minutos
[5]
Botão B
[8]
Botão A
[6]
Coroa
[7]
BI 0001 / BI 0002 / BI 0006


GARANTIE
Diese Uhr wurde unter Einsatz der neuesten Technologie hergestellt. Jedes Exemplar wird individuell getestet und
durchläuft strenge Qualitätskontrollen. Dieser Artikel besitzt eine zweijährige Garantie ab dem Datum des Kaufs
beim Einzelhändler.
Zur Anwendung der Garantie muss die Garantiekarte bei Kauf vom Händler ausgefüllt werden. Ihre gesetzlichen
Rechte bleiben davon unberührt.
Schäden infolge von unsachgemäßer Nutzung oder mangelnder Sorgfalt sowie Uhrenbänder, Armreife und Gläser
sind nicht in der Garantie enthalten.
Die Garantie gilt nur, wenn die Uhr von einer im Garantieheft genannten autorisierten Reparaturwerkstätte aus-
einander genommen oder repariert wurde.
GUARANTEE
This timepiece has been produced using the latest technology, each watch is individually tested and has gone through
strict quality controls. This timepiece is guaranteed for a period of two years from the date of purchase from the
retailer.
For the guarantee to the supported the guarantee card must be completed by the retailer at the time of purchase.
This does not affect your statutory rights.
The guarantee does not cover damage caused by misuse or neglect, also bracelets, straps, and the glasses are
not covered.
The guarantee will only be valid if the timepiece has been taken apart or repaired by an authorised service centre
as stated in the guarantee booklet.
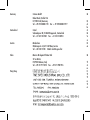
Germany
Switzerland
Austria
Italia
Hong Kong
Cristano GmbH
Robert-Bosch Straße 14A
D-77815 Bühl, Germany
Tel : +49 7223 8000 770 Fax : + 49 7223 8000 7719
Cristal
Schmiedgasse 48, CH-8640 Rapperswil, Switzerland
Tel : +41 552 10 8784 Fax : + 41 552 10 8784
Mondschein
Ottakringerstr. 65, AT-1160 Wien, Austria
Tel : +43 1581 2748 E-Mail: [email protected]
Maestro Orologiaio Plattner Karl
22 via Bottai
IT-39100 Bolzano, Italy
Tel : +39 471 977 078 Fax : + 39 471 980 955

GARANTIE
Diese Uhr wurde unter Einsatz der neuesten Technologie hergestellt. Jedes Exemplar wird individuell getestet und
durchläuft strenge Qualitätskontrollen. Dieser Artikel besitzt eine zweijährige Garantie ab dem Datum des Kaufs
beim Einzelhändler.
Zur Anwendung der Garantie muss die Garantiekarte bei Kauf vom Händler ausgefüllt werden. Ihre gesetzlichen
Rechte bleiben davon unberührt.
Schäden infolge von unsachgemäßer Nutzung oder mangelnder Sorgfalt sowie Uhrenbänder, Armreife und Gläser
sind nicht in der Garantie enthalten.
Die Garantie gilt nur, wenn die Uhr von einer im Garantieheft genannten autorisierten Reparaturwerkstätte aus-
einander genommen oder repariert wurde.
GUARANTEE
This timepiece has been produced using the latest technology, each watch is individually tested and has gone through
strict quality controls. This timepiece is guaranteed for a period of two years from the date of purchase from the
retailer.
For the guarantee to the supported the guarantee card must be completed by the retailer at the time of purchase.
This does not affect your statutory rights.
The guarantee does not cover damage caused by misuse or neglect, also bracelets, straps, and the glasses are
not covered.
The guarantee will only be valid if the timepiece has been taken apart or repaired by an authorised service centre
as stated in the guarantee booklet.
Cristano GmbH
Robert-Bosch Straße 14A
D-77815 Bühl, Germany
Tel : +49 7223 8000 770 Fax : + 49 7223 8000 7719
Cristal
Schmiedgasse 48, CH-8640 Rapperswil, Switzerland
Tel : +41 552 10 8784 Fax : + 41 552 10 8784
Mondschein
Ottakringerstr. 65, AT-1160 Wien, Austria
Tel : +43 1581 2748 E-Mail: [email protected]
Maestro Orologiaio Plattner Karl
22 via Bottai
IT-39100 Bolzano, Italy
Tel : +39 471 977 078 Fax : + 39 471 980 955

#
Name:
Model Number:
Date:
Retailer Stamp:
-
 1
1
-
 2
2
-
 3
3
-
 4
4
-
 5
5
-
 6
6
-
 7
7
-
 8
8
-
 9
9
-
 10
10
-
 11
11
-
 12
12
-
 13
13
-
 14
14
-
 15
15
-
 16
16
-
 17
17
-
 18
18
-
 19
19
-
 20
20
-
 21
21
-
 22
22
-
 23
23
-
 24
24


Bison BI 0002 Handleiding
- Categorie
- Horloges
- Type
- Handleiding
in andere talen
- English: Bison BI 0002 User manual
- italiano: Bison BI 0002 Manuale utente
- русский: Bison BI 0002 Руководство пользователя
- français: Bison BI 0002 Manuel utilisateur
- Deutsch: Bison BI 0002 Benutzerhandbuch
- português: Bison BI 0002 Manual do usuário
- 日本語: Bison BI 0002 ユーザーマニュアル
Andere documenten
-
Seiko 6M13 Handleiding
-
-
Timex Classic Chronographs Gebruikershandleiding
-
Hamilton MW028 Handleiding
-
Hamilton Caliber H-21 General Instruction Manual
-
-
-
Bulova 63L63 Handleiding
-
-