Kruger Matz KM1961 de handleiding
- Categorie
- Auto media-ontvangers
- Type
- de handleiding

Micro Hi-Fi System
KM1961
FR EN DENLPLROSK
MANUEL DE L'UTILISATEUR
OWNER’S MANUAL
BEDIENUNGSANLEITUNG
HANDLEIDING
INSTRUKCJA OBSŁUGI
MANUAL DE UTILIZARE
POUŽÍVATEĽSKÁ PRÍRUČKA

Bedienungsanleitung
DE
3
SICHERHEITSANWEISUNGEN
Lesen Sie vor dem Gebrauch die Bedienungsanleitung sorgfältig durch und
bewahren Sie sie zum späteren Nachschlagen auf. Der Hersteller haftet nicht
für eine unsachgemäße Verwendung des Produkts.
1. Stellen Sie das Gerät auf eine ebene, stabile Oberfläche.
2. Stellen Sie keine schweren Gegenstände auf das Gerät.
3. Stellen Sie nichts in das Innere der Lautsprecher.
4. Stellen Sie das Gerät nicht in der Nähe von Wärmequellen wie Heizkörpern
usw. auf. Stellen Sie das Gerät nicht auf instabile Oberflächen.
5. Stellen Sie das Gerät an einem ordnungsgemäß belüfteten Ort auf.
Blockieren Sie nicht die Belüftung, indem Sie die Belüftungsönungen
abdecken.
6. Schützen Sie dieses Gerät vor Feuchtigkeit, Wasser und anderen
Flüssigkeiten. Vermeiden Sie die Verwendung / Lagerung bei extremen
Temperaturen. Setzen Sie es nicht direktem Sonnenlicht und anderen
Wärmequellen aus.
7. Stellen Sie vor dem Anschließen des Geräts an das Stromnetz sicher, dass
die am Gerät angegebene Spannung mit der Spannung in der Steckdose
übereinstimmt.
8. Halten Sie die Lautstärke während der gesamten Zeit der Verwendung des
Lautsprechers auf einem angemessenen Niveau. Um Gehörschäden zu
vermeiden, die Lautstärke nicht zu hoch einstellen.
9. Die Lautsprecher nicht weiter verwenden, wenn Sie einen Tinnitus fühlen,
Hörbeschwerden, Reizung oder andere Nebenwirkungen fühlen.
10. Stellen Sie sicher, dass das Gerät nicht in der Nähe von elektrischen
Geräten aufgestellt ist, die Strom erzeugen
11. Trennen Sie das Gerät von der Stromversorgung, wenn es für eine längere
Zeit nicht verwendet wird.
12. Fassen Sie dieses Gerät nicht mit nassen Händen an.
13. Verwenden Sie dieses Gerät nicht weiter, wenn es beschädigt wurde.
14. Versuchen Sie nicht, dieses Gerät selbst zu reparieren. Im Falle einer
Beschädigung wenden Sie sich zur Überprüfung oder Reparatur an einen
autorisierten Kundendienst.
15. Trennen Sie immer das Produkt vor der Reinigung von der Stromquelle.
16. Reinigen Sie dieses Gerät mit einem weichen, leicht feuchten Tuch.
Verwenden Sie zum Reinigen dieses Geräts keine chemischen Mittel.
17. Fassen und ziehen Sie beim Abtrennen des Netzkabels am Stecker, niemals
am Kabel.
18. Schützen Sie das Netzkabel vor dem Betreten oder Verbiegen,
insbesondere an den Steckern und dem Austritt aus dem Gerät.

BedienungsanleitungBedienungsanleitung
DE
DE
4 5
BESCHREIBUNG DER HAUPTEINHEIT
1
6
14 15 16 17 18
7 8 9 10 11 12 13
2 3 4 5
1. Taste Modus
2. CD Fach
3. Display
4. Taste CD Fach auswerfen
5. Lautstärkeregler
6. Audioeingang (3,5 mm)
7. Netztaste
8. Taste Wiedergabe/Pause
9. Taste vorheriger Titel
10. Taste nächster Titel
11. Taste Bass
12. Taste Höhen
13. 3,5 mm Audioausgang (Klinke)
14. Netzanschluss
15. RCA Eingang
16. USB Steckplatz
17. Antenneneingang DAB / UKW
18. AUX Eingang
BESCHREIBUNG DER FERNBEDIENUNG
116
17 18
19 20
21 22
23
2
34
5
7
8
9
10
11
12
13
14
15 29
27
28
26
25 24
6
1. Taste Bereitschaft
2. Taste Radio UKW / DAB+
3. Taste CD Player
4. Taste Intro (Im USB und CD
Modus, drücken um die ersten
10 Sekunden jedes Titels
abzuspielen)
5. Taste Wiederholung (Drücken
um einen Titel, Ordner zu
wiederholen oder die Option
auszuschalten)
6. Taste Equalizer (Wählen Sie
die voreingestellten
Einstellungen)
7. Taste Loudness
8. Taste Uhreinstellung
9. Taste Nächster Titel
10. Taste Zurück
11. Taste vorheriger Titel
12. Play / Pause / Pairing-Taste
13. Nächstes/Vorheriges Album
14. Numerisches Tastenfeld (Titel
auswählen / gespeicherte
Radiosender)
15. Auswahl einer Nummer größer
als 9 (Drücken Sie diese Taste
und dann eine andere Taste
am Tastenfeld für Nummern
größer als 9)
16. CD Fach önen/schließen
17. Taste Bluetooth, AUX und
Audio Modus (Taste
wiederholt drücken um
zwischen die Modi zu
wechseln)
18. Taste USB Modus
19. Taste DIM (Einstellen der
Display-Helligkeit)
20.Zufällige Wiedergabe
21. Taste Timer
22. Taste Bass verstärken
23. Alarmuhr
24. Taste Auswahl der
Informationsanzeige während
der Wiedergabe (drücken zum
Umschalten zwischen
vergangene Titelspielzeit,
verbleibende Titelspielzeit,
verbleibende Albumzeit)
25. Taste Vorwärts
26.STOP / SCAN-Taste
27. Tasten Lautstärke erhöhen/
verringern
28.Taste Ton aus
29.Taste Radiosender-Speicher

BedienungsanleitungBedienungsanleitung
DE
DE
6 7
1. Lösen Sie die Schraube an der Rückseite der
Fernbedienung.
2.Entfernen Sie den isolierenden Mylarstreifen von der
Batterie, wenn die Batterie zum ersten Mal
verwendet wird. Er befindet sich an der unteren
Rückseite der Fernbedienung.
3.Ziehen Sie das Batteriefach mit den Fingernägeln
heraus.
4.Setzen Sie eine neue Batterie (Größe 2025) korrekt
ein und setzen das Batteriefach wieder vollständig
in die ursprüngliche Position ein.
Achtung:
• Entfernen Sie die Batterien, wenn die Fernbedienung längere Zeit nicht
verwendet wird.
• Um mögliche Fehler zu vermeiden, lesen Sie die folgenden Anweisungen
und behandeln die Fernbedienung richtig.
• Lassen Sie die Fernbedienung nicht fallen und setzen dieser keine Stöße
aus.
• Verschütten Sie kein Wasser oder andere Flüssigkeiten auf der
Fernbedienung und legen diese nicht auf nasse Oberflächen.
• Legen Sie die Fernbedienung nicht in direktes Sonnenlicht oder in die Nähe
von Wärmequellen.
• Reinigen Sie diese Fernbedienung nur mit
einem weichen, leicht feuchten Tuch.
Reichweite der Fernbedienung
BATTERIEN EINLEGEN
1. Richten Sie die Fernbedienung auf den
IR-Fernbedienungssensor an der
Vorderseite des Geräts.
2.Stellen Sie sicher, dass sich kein
Hindernis zwischen dem Infrarot-
Fernbedienungssensor des Geräts und
der Fernbedienung befindet.
6 m
ANSCHLIESSEN
Lautsprecher anschließen
1. Um die Lautsprecher anzuschließen, schrauben Sie die Muttern an den
Buchsen auf der Rückseite des Hauptgeräts leicht ab.
2.Führen Sie den abisolierten Teil des Kabels vollständig ein. Die rechten
Lautsprecherkabel sollten an die Buchse "R" angeschlossen werden, die
linken Lautsprecherkabel an die Buchse "L". stellen Sie sicher, dass die
Lautsprecher in der selben weise an das Hauptgerät angeschlossen sind,
(rote Buchse des Hauptgerätes an die rote Buchse des Lautsprechers,
ebenso die schwarze Buchse)
3.Ziehen Sie die Überwurfmuttern fest an, damit die eingeführten Drähte
nicht herausfallen.
1. Um ein externes Gerät an das KM1961 Hi-Fi System, durch ein RCA Kabel
(nicht im Lieferumfang) anzuschließen, verbinden Sie das Kabel wie folgt:
• Die AUDIO IN (L&R) Buchsen an dieses Gerät.
• Die Audio-Ausgangsbuchsen an das externe Audiogerät
2.Verbinden Sie an die AUX IN Buchse ein Kabel (3,5 mm Klinke) wie folgt:
• Die AUX IN Buchse dieses Gerätes
• Die Kopfhörerbuchse am externen Audiogerät
Anschließen externer Geräte

BedienungsanleitungBedienungsanleitung
DE
DE
8 9
BETRIEB
Ein / Ausschalten
ADrücken Sie die Taste Bereitschaft STANDBY, um das Gerät einzuschalten. Das
Gerät wechselt zur zuletzt ausgewählten Quelle.
Bereitschafts-Modus
Halten Sie die Taste Bereitschaft gedrückt, um das Gerät in den Eco Energie-
Bereitschafts-Modus zu schalten. Die rote Eco Energie-Anzeige leuchtet auf.
Hinweis: Nach 15 Minuten Inaktivität wechselt das Gerät automatisch in den
Standby-Modus (außer UKW / DAB Radio und Bluetooth-Modus mit
angeschlossenem externem Gerät).
Schlaf-Timer einstellen
Dieses Gerät kann nach einer eingestellten Zeit automatisch in den
Bereitschafts-Modus schalten.
• Wenn das Gerät eingeschaltet ist, drücken Sie wiederholt die Taste SLEEP,
um einen voreingestellten Zeitraum (in Minuten) auszuwählen.
Anschließen der UKW / DAB Antenne
1. Schließen Sie die UKW / DAB Antenne
an die UKW / DAB Radiobuchse an der
Rückseite des Gerätes an.
2.Wenn der Empfang schwach ist,
schließen Sie die Außenantenne an.
Achtung: Um Rauschen zu vermeiden,
halten Sie Antennen vom System, dem
Anschlusskabel und dem Netzkabel fern.
Anschließen an die Stromversorgung
Achtung:
• Stellen Sie sicher, dass die
Netzspannung mit der auf der
Rückseite oder Unterseite des Gerätes
aufgedruckten Spannung
übereinstimmt.
• Stellen Sie vor dem Anschließen des
Netzkabels sicher, dass Sie alle
anderen Verbindungen hergestellt
haben.
Einstellen der Uhr
Einstellen der Display-Helligkeit
1. Im Bereitschaftsmodus, die Taste Uhreinstellung [CLOCK] drücken und
halten, um in den Modus Uhreinstellung zu wechseln.
2.Mit den Tasten Vorheriger/Nächster Titel gewünschten Wert einstellen.
3.Taste Uhreinstellung an der Fernbedienung drücken um zur nächsten Option
zu wechseln.
Im Bereitschaftsmodus, drücken Sie die Taste DIM zum Einstellen der Display-
Helligkeitsstufe.
• Um den Schlaf-Timer zu desaktivieren, drücken Sie wiederholt die Taste
SLEEP, bis [OFF] (Schlaf aus) erscheint.
WIEDERGABE VON BLUETOOTH-GERÄTEN
Um Ihr Bluetooth-Gerät mit diesem Gerät zu verbinden, müssen Sie beide
Geräte koppeln. Die Kopplung muss nur einmal durchgeführt werden.
1. Um Geräte zu verbinden, schalten Sie den Bluetooth-Modus an diesem
Gerät ein, indem Sie die Taste Bluetooth auf der Fernbedienung oder die
Taste Modus am Hauptgerät verwenden.
2.Schalten Sie die Bluetooth-Funktion Ihres Geräts ein.
3.Suchen Sie mit Ihrem Gerät nach einem anderen Bluetooth-Gerät.
4.Wählen Sie „KM1961“ in der Kopplungs-Liste.
5.Geben Sie bei Bedarf das Standardpasswort „0000“ ein.
6.Die Taste Bluetooth drücken und halten, um die Kopplung zu löschen.
Das Gerät verfügt außerdem über ein NFC Kommunikationsmodul, dank dem
Sie auch ein externes Gerät mit der Hi-Fi-Anlage koppeln können, ohne in
verfügbaren Bluetooth-Geräten danach suchen zu müssen. Schalten Sie dazu
einfach NFC am externen Gerät ein und legen es auf die Platte im oberen Teil
des Hauptgeräts, und danach müssen Sie am Bildschirm des externen Geräts
die Kopplung akzeptieren.
Achtung:
• Die Reichweite zwischen diesem Gerät und einem Bluetooth-Gerät beträgt
etwa 8 m.
• Die Kompatibilität mit allen Bluetooth-Geräten wird nicht garantiert.
• Jedes Hindernis zwischen diesem Gerät und einem Bluetooth-Gerät kann
die Betriebsreichweite verringern.
• Halten Sie dieses Gerät von anderen elektronischen Geräten fern, die
Störungen verursachen könnten.
• Wenn die Entfernung zwischen den Geräten die Kommunikationsreichweite
überschreitet, werden die Geräte getrennt. Um die Verbindung
wiederherzustellen, bringen Sie das externe Gerät in Betriebsreichweite.

BedienungsanleitungBedienungsanleitung
DE
DE
10 11
Radiosender manuell speichern
1. Drücken Sie die Taste UKW [FM] auf der Fernbedienung oder verwenden die
Taste Modus am Hauptgerät, um UKW-Radio auszuwählen.
2.Tasten Vorheriger/Nächster Titel an der Vorderseite (oder auf der
Fernbedienung), drücken und halten, das Radio stellt automatisch einen
ersten Sender ein.
3.Wiederholen Sie Schritt 2, um weitere Sender einzustellen. Um einen
Sender manuell einzustellen, drücken Sie wiederholt die Tasten Vorheriger/
Nächster Titel, bis Sie die gewünschte Frequenz gefunden haben.
UKW / DAB-RADIO
UKW / DAB-Sender einstellen
Sie können maximal 20 voreingestellte Radiosender programmieren. Halten Sie
die Taste Radiosender Speichern [PROG] gedrückt, um die automatische
Programmierung zu aktivieren.
• AUTO wird kurz angezeigt.
• Alle verfügbaren Sender werden in der Reihenfolge der Empfangsstärke des
Wellenbereichs programmiert.
Sie können maximal 30 voreingestellte Radiosender programmieren. Halten Sie
die Taste Radiosender Speichern [SCAN] gedrückt, um die automatische
Programmierung zu aktivieren.
• SCANNING wird kurz angezeigt.
• Alle verfügbaren Sender werden in der Reihenfolge der Empfangsstärke des
Wellenbereichs programmiert.
UKW-Radiosender automatisch speichern
DAB-Radiosender automatisch speichern
VON EINEM EXTERNEN GERÄT ABSPIELEN
1. Um Titel von einem externen Gerät abzuspielen, verbinden Sie die Geräte mit
einem Audiokabel (Kabel nicht im Lieferumfang enthalten), das den AUX IN-
Buchsen / AUDIO IN-Buchse entspricht.
2.Drücken Sie die entsprechende Taste AUDIO IN / AUX IN, um den
Audioeingang auszuwählen.
3.Starten Sie die Wiedergabe auf dem externen Gerät.
1. Stellen Sie einen Radiosender ein.
2.Drücken Sie die Taste PROG, um die Programmierung zu aktivieren. PROG
beginnt zu blinken, zur Bestätigung erneut drücken. Die Speichernummer
und die Frequenz des gespeicherten Radiosenders werden angezeigt.
3.Wiederholen Sie die vorherigen Schritte, um andere Sender zu
programmieren.
Drücken Sie die Taste Vorheriger / Nächster Titel auf der Vorderseite (oder der
Fernbedienung), um die Nummer eines gespeicherten Radiosenders
auszuwählen.
Um zwischen MONO- und STEREO-Modus umzuschalten, drücken Sie die
REPEAT-Taste auf der Fernbedienung.
Um zwischen den aktuell angezeigten Informationen umzuschalten, drücken
Sie die INFO-Taste auf der Fernbedienung.
Auswahl eines gespeicherten Radiosenders
Stellen Sie die Modi MONO und STEREO ein
Umschalten der aktuell angezeigten Informationen
Drücken Sie während der Wiedergabe die Tasten Lautstärke erhöhen/verringern
[VOL +/-] auf der Fernbedienung, oder verwenden den Lautstärkeregler am
Hauptgerät, um die Lautstärke zu erhöhen / zu verringern.
Drücken Sie während der Wiedergabe die Taste Bass verstärken [S-BASS], um
die Superbass-Verstärkung ein- oder auszuschalten. Wenn die Funktion
eingeschaltet ist, zeigt das Display BASS an.
Drücken Sie während der Wiedergabe die Taste LOUDNESS, um die Loudness-
Funktion ein- oder auszuschalten.
LAUTSTÄRKE UND KLANGEFFEKT ANPASSEN
Lautstärke anpassen
Bass verstärken
Loudness-Funktion
Drücken Sie während der Wiedergabe die Taste Ton aus [MUTE], um den Ton
auszuschalten oder wiederherzustellen.
Ton ausschalten
Hinweis: Um einen programmierten Sender zu überschreiben, speichern Sie
einen anderen Sender an seiner Stelle.
Drücken Sie während der Wiedergabe wiederholt die Taste P-EQ-, um
Folgendes auszuwählen:
FLAT / POP / JAZZ / ROCK / CLASSIC
Wählen eines voreingestellten Klangeektes

BedienungsanleitungBedienungsanleitung
DE
DE
12 13
Hinweis: Stellen Sie sicher, dass Sie die Uhrzeit richtig eingestellt haben.
1. Halten Sie im Bereitschafts-Modus die Taste TIMER gedrückt, bis [TIMER
SET] auf dem Display durchläuft. Die Stundenziern werden angezeigt und
beginnen zu blinken.
2.Drücken Sie die Taste Vorheriger / Nächster Titel auf der Frontplatte oder
der Fernbedienung, um den Weckmodus und die Stunde einzustellen, und
drücken dann zur Bestätigung erneut die Taste TIMER. Die Minutenziern
werden angezeigt und beginnen zu blinken.
3.Drücken Sie die Taste Vorheriger / Nächster Titel auf der Vorderseite oder
der Fernbedienung, um die Minute einzustellen. Drücken Sie zum
Bestätigen die Taste TIMER.
4.Drücken Sie die Taste VOL +/–, um die Lautstärke einzustellen, und drücken
dann zur Bestätigung die Taste TIMER.
5.Drücken Sie im Bereitschafts-Modus wiederholt die Taste TIMER, um den
Timer zu aktivieren/ desaktivieren. Die entsprechende Meldung TIMER EIN
[TIMER ON] oder TIMER AUS [TIMER OFF] erscheint am Bildschirm.
Nach dem Anschließen von USB-Geräten (Flash-Speicher, Speicherkartenleser)
spielt das Gerät auf dem externen Datenträger gespeicherte Songs ab. Um dies
zu tun:
1. Schließen Sie ein USB-Gerät an den USB-Port des KM1961 an.
2.Um die USB-Funktion auszuwählen, verwenden Sie das Modus-Wahlrad am
Hauptgerät oder die USB-Taste auf der Fernbedienung. Auf dem Display wird
„USB“ angezeigt.
3.Um die Wiedergabe zu starten, drücken Sie die Play/Pause-Taste auf der
Fernbedienung oder dem Hauptgerät.
4.Um den Titel zu stoppen, drücken Sie die Play/Pause-Taste oder die STOP-
Taste auf der Fernbedienung.
5.Um den Titel zu wechseln, drücken Sie die Taste zum vorherigen/nächsten
Titel.
6.Um einen Titel zurückzuspulen, halten Sie die Rückwärts-/Vorwärtstaste
gedrückt.
7. Um das Album zu wechseln, drücken Sie die Taste für den nächsten /
vorherigen Titel.
Aufladen externer Geräte
Wenn das Gerät an das Stromnetz angeschlossen ist, kann der USB-Anschluss
an der Frontplatte zum Laden externer Geräte verwendet werden. Die
maximale Ladespannung beträgt 5V 1A.
1. Verwenden Sie das Modus-Wahlrad am Hauptgerät oder die CD-Taste auf
der Fernbedienung, um die CD-Funktion auszuwählen. „DISC“ erscheint im
Display.
2.Drücken Sie die Auswurftaste des Fachs auf der Fernbedienung oder
Zentraleinheit, legen Sie eine Disc darauf und drücken Sie dann die
Auswurftaste am Laufwerk.
3.Um die Wiedergabe zu starten, drücken Sie die Play/Pause-Taste auf der
Fernbedienung oder dem Hauptgerät.
4.Um den Titel zu stoppen, drücken Sie die Play/Pause-Taste oder die STOP-
Taste auf der Fernbedienung.
5.Um den Titel zu wechseln, drücken Sie die Taste zum vorherigen/nächsten
Titel.
6.Um einen Titel zurückzuspulen, halten Sie die Rückwärts-/Vorwärtstaste
gedrückt.
7. Um das Album zu wechseln, drücken Sie die Taste für den nächsten /
vorherigen Titel.
Wiedergabe programmieren
Das Gerät kann nur ausgewählte Titel auf der Disc wiedergeben.
1. Um die Wiedergabe zu programmieren, drücken Sie die STOP-Taste auf der
Fernbedienung.
2.Drücken Sie dann die PROG-Taste auf der Fernbedienung – auf dem
Gerätebildschirm wird die Meldung 001 P-01 angezeigt.
3.Drücken Sie die Taste für den nächsten / vorherigen Titel oder verwenden
Sie die Zierntastatur, um eine Titelnummer auszuwählen. Auf dem
Bildschirm wird die Nummer des ausgewählten Titels angezeigt.
4.Um zur Programmiermöglichkeit des nächsten Titels zu gelangen, drücken
Sie die Taste PROG.
5.Aufeinanderfolgende Stücke sollten auf die gleiche Weise programmiert
werden.
6.Um die Wiedergabe der programmierten Titel zu starten, drücken Sie die
Play/Pause-Taste.
7. Um die programmierte Wiedergabefunktion zu deaktivieren, drücken Sie die
STOP-Taste.
WECKER EINSTELLEN
WIEDERGABE VON USB
ABSPIELEN VON CDS

BedienungsanleitungBedienungsanleitung
DE
DE
14 15
Deutsch
Korrekte Entsorgung dieses Produkts
(Elektromüll
Es ist verboten, Geräteabfälle, die mit dem Symbol einer durchgestrichenen
Mülltonne gekennzeichnet sind, zusammen mit anderen Abfällen zu entsorgen.
Dieses Gerät unterliegt der Sammlung und dem Recycling. Die darin
enthaltenen Schadstoe können Umweltbelastungen verursachen und eine
Gefahr für die menschliche Gesundheit darstellen.
Hergestellt in China für LECHPOL ELECTRONICS Sp. z o.o. Sp.k., ul. Garwolińska 1,
08-400 Miętne.
ERFAHREN SIE MEHR
Für weitere informationen zu diesem gerät finden sie unter: www.krugermatz.com.
Lesen sie die bedienungsanleitung sorgfältig durch, bevor sie das gerät verwenden.
Besuchen sie www.krugermatz.com website für weitere produkte und zubehör.
Im Falle irgendwelcher Zweifel oder Fragen siehe unsere Seite mit Häufig gestellten
Fragen.
SPEZIFIKATION
Allgemeine Information
Röhrenvorverstärker
CD Disc-Player
Radio: FM / DAB+
Bluetooth + NFC
Fernbedienung
Wiedergabe von USB
Aufladen externer Geräte
Technische Daten
DAB+ Frequenzbereich: 174,928 - 239,200 MHz
UKW-Frequenzbereich: 87,5 - 108 MHz
Profile Bluetooth: A2DP
Reichweite: biz zu 8 Meter
Max. Bluetooth-Sendeleistung: 4 dBm
NFC-Arbeitsfrequenz: 13,56 MHz
Woofer: 4,3” (110 mm)
Tweeter: 1,5” (38 mm)
Ausgangsleistung (RMS): 2 x 30 W
Impedanz: 6 Ohm
THD: <1% (1 KHz, 1 W)
Eingänge / Ausgänge:
Kopfhörerausgang 3,5 mm
2 x Cinch-Lautsprecherausgänge
Klinke 3,5-mm-Audioeingang
AUX-Eingang
USB-Anschluss (5 V 1 A)
Antennenanschluss
Netzanschluss
Leistungsaufnahme: 35 W
Stromversorgung: AC 100 - 240 V~; 50 - 60 Hz
Abmessungen:
Hauptgerät: 250 x 276 x 146 mm
Lautsprecher: 160 x 202 x 244 mm

Owner’s manualOwner’s manual
EN
EN
16 17
MAIN UNIT DESCRIPTION
1
6 7 8 9 10 11 12 13
2 3 4 5
1. Mode change knob
2. CD drive
3. Display
4. Eject the tray from the disk
drive button
5. Volume knob
6. Audio input (3,5 mm)
7. Power button
8. Play / pause button
9. Previous track button
10. Next track button
11. BASS button
12. TREBLE button
13. 3,5 mm audio jack output
14. Power socket
15. RCA input
16. USB port
17. Antenna DAB / FM input
18. AUX input
SAFETY INSTRUCTIONS
Read this instruction manual and keep it for future reference. Producer does
not take responsibility for damages caused by inappropriate handling and use
of the product.
1. Place the device on flat, stable surface.
2. Do not place heavy objects on the device.
3. Do not place anything in speakers interior.
4. Do not place the device in close proximity to heat sources, such as
radiators etc. Do not place the device on unstable surfaces.
5. Position the device in a properly ventilated place. Do not obstruct
ventilation by covering ventilation openings.
6. Protect this device from humidity, water and other liquid. Avoid using/
storing it in extreme temperatures. Do not expose it to direct sunlight and
other sources of heat.
7. Before connecting the device to power supply socket, make sure the
voltage indicated on the appliance corresponds to the voltage in the power
supply socket.
8. Keep the volume at a reasonable level throughout entire time of using the
speaker. To prevent damage to your hearing, do not raise the volume too
high.
9. If you experience tinnitus, discomfort or other concerning behaviors, stop
using the device immediately.
10. Make sure, that the device is placed away from electrical devices that
generate
11. Disconnect from power outlet if the device is not going to be used for a
long time.
12. Do not handle this device with wet hands.
13. Do not use this device if it has been damaged.
14. Do not attempt to repair this device yourself. In case of damage, contact
authorized service point for check-up or repair.
15. Always disconnect the product from the power source before cleaning.
16. Clean this device with a soft, slightly damp cloth. Do not use any chemical
agents to clean this device.
17. When disconnecting the power cord, grasp and pull the plug, never the
cord.
18. Protect the power cord from being walked on or bent particularly at plug
plugs and exiting from the apparatus.
14 15 16 17 18

Owner’s manualOwner’s manual
EN
EN
18 19
1. Unscrew the screw at the back of the remote
control.
2.Remove the insulating mylar strip from the battery
if the battery is being used for the first time. It is
located at the bottom back side of the remote
control.
3.Pull out the battery compartment with your
fingernails.
4.Replace a new battery (size 2025) correctly and fully
insert the battery compartment back to the original
position.
Caution:
• Remove the batteries if the remote control is not going to be used for an
extended period of time.
• To avoid possible failure, read the following instructions and handle the
remote control properly.
• Do not drop or cause impact to the remote control.
• Do not spill water or any liquid on the remote control, nor place it on wet
surfaces.
• Do not place the remote control under the direct sunlight or near sources
of heat.
• Clean this remote control only with soft,
slightly damp cloth.
Remote Control Operation Range
BATTERY INSTALLATION
1. Point the remote control towards the
remote sensor IR of the front of the
unit.
2.Make sure that there is no obstacle
between the infrared remote sensor of
the unit and remote control. 6 m
REMOTE DESCRIPTION
116
17 18
19 20
21 22
23
2
34
5
7
8
9
10
11
12
13
14
15 29
27
28
26
25 24
6
1. Standby button
2. FM / DAB+ radio button
3. CD player button
4. Intro button (In USB and CD
mode, press to play only the
first 10 seconds of each track)
5. Repeat button (Press to loop
through one track, whole
folder, or turn this option o)
6. Equalizer button (Select the
preset equalizer)
7. Loudness button
8. Clock settings button
9. Next track button
10. Back button
11. Previous track button
12. Play / pause / pairing button
13. Next / previous album
14. Numeric keypad (Select track
/ saved radio station)
15. Select a number greater than
9 (Press this button and then
one of the numeric keypad
buttons to dial a number
greater than 9)
16. Open / close disc
compartment
17. Bluetooth, AUX and Audio
mode button (keep pressing
to change between modes)
18. USB mode button
19. DIM button (Adjust display
brightness)
20.Random playing
21. Timer button
22. Enhanced bass button
23. Alarm clock
24. Information display selection
button during song playback
(press to switch between
elapsed song time, remaining
song time, remaining album
time)
25. Forward button
26.STOP / SCAN button
27. Volume buttons
28.Mute button
29.Radio preset button

Owner’s manualOwner’s manual
EN
EN
20 21
OPERATION
Turn on / o
Press STANDBY button to turn the unit on. The device will switch to the last
selected source.
Standby mode
Press and hold STANDBY to switch the unit to Eco Power standby mode. The
red Eco Power indicator turns on.
Note: After 15 minutes of inactivity, the device will automatically enter standby
mode (except FM / DAB radio and Bluetooth mode with connected external
device).
Sleep timer
This unit can switch to standby mode automatically after a set period.
• When the unit is turned on, press SLEEP button repeatedly to select a
preset period (in minutes)
• To deactivate the sleep timer, press SLEEP button repeatedly until [OFF]
(sleep o) appears.
Connecting FM/DAB antenna
1. Connect the FM / DAB antenna to FM
radio socket at the back of the unit.
2.If connection is poor, connect the
outside antenna.
Caution: To avoid noise, keep antennas
away from the system, the connecting
cord and the AC power cord.
Connecting to power supply
Caution:
• Ensure that the power supply voltage
corresponds to the voltage printed on
the back or the underside of the unit.
• Before connecting the AC power cord,
ensure you have completed all other
connections.
CONNECTING
Connecting speakers
1. To connect the speakers, slightly unscrew the nuts on the sockets on the
back of the main unit.
2.Insert the stripped part of the wire completely. The right speaker cables
should be connected to the "R" socket, the left speaker cables to the "L"
socket, making sure that the cables connected to the central unit are
connected to the speakers in the same way (red socket on the central unit
to the red socket on the loudspeaker, black in the same way as red)
3.Tighten the socket nuts firmly so that the inserted wires do not fall out.
1. To connect an external device to the KM1961 hi-fi system using an RCA cable
(not included), connect the cable to:
• the AUDIO IN (L&R) sockets on this unit.
• the audio output sockets on the external audio device
2.Connect an AUX IN (3,5 Jack) cable to:
• the AUX IN socket on this unit.
• the headphone socket on the external audio device
Connecting external device

Owner’s manualOwner’s manual
EN
EN
22 23
Program radio stations manually
1. Press FM button on the remote or use mode knob on the main unit to chose
FM radio.
2.Press and hold forward / back button on the front panel (or on the remote
control), the radio tunes to a first station automatically.
3.Repeat step 2 to tune to more stations. To tune to a station manually, press
the next / previous track button repeatedly until you find desired frequency.
FM / DAB RADIO
Tune FM / DAB stations
You can program a maximum of 20 preset radio stations. Press and hold the
PROG button to activate automatic programming.
• AUTO is displayed briefly.
• All available stations are programmed in the order of waveband reception
strength.
You can program a maximum of 30 preset radio stations. Press and hold the
SCAN button to activate automatic programming.
• AUTO is displayed briefly.
• All available stations are programmed in the order of waveband reception
strength.
Program FM radio stations automatically
Program DAB radio stations automatically
PLAY FROM AN EXTERNAL DEVICE
1. To play tracks from an external device, connect the devices with an audio
cable (cable not included), corresponding to the AUX IN jacks / AUDIO IN jack.
2.Press corresponding AUDIO IN/AUX IN button to select the audio input.
3.Start playing on the external device.
1. Tune to a radio station.
2.Press the PROG button to activate programming. The PROG begins to blink,
press it again to confirm. The preset number and the frequency of the
preset station are displayed.
3.Repeat the previous steps to program other stations.
Note: To overwrite a programmed station, store another station in its place.
Setting the clock
Adjusting the Display Brightness
1. In standby mode, press and hold CLOCK button to activate the clock setting
mode.
2.Use the track change buttons to select the desired value.
3.Press CLOCK button on the remote to go to next option.
In standby mode, press the DIM button to select brightness level.
PLAY FROM BLUETOOTH DEVICE
To connect your Bluetooth device to the unit, you need to pair the device to the
unit. Pairing needs only to be done once.
1. To connect devices, turn on the Bluetooth mode on this unit using the
Bluetooth button on the remote control or the mode knob on the head unit.
2.Turn on the Bluetooth function on your device.
3.Search for other Bluetooth device with your device.
4..Select “KM1961” in the pairing list.
5.Enter default password “0000” if necessary.
6.Press and hold pairing cleared button (PAIRING) to clear pairings.
The device also has an NFC communication module, thanks to which you can
also pair an external device with the Hi-Fi system without the need to search
for it in available Bluetooth devices. To do this, just turn on the NFC on the
external device and put it on the plate in the upper part of the main unit, and
then on the screen of the external device you must accept the pairing.
Caution:
• The operational range between this unit and a Bluetooth device is
approximately 8 m.
• Compatibility with all Bluetooth devices is not guaranteed.
• Any obstacle between this unit and a Bluetooth device can reduce the
operational range.
• Keep this unit away from any other electronic device that may cause
interference.
• If the distance between the devices exceeds the communication range, the
devices will be disconnected. To reconnect, place external device in
operational range.

Owner’s manualOwner’s manual
EN
EN
24 25
Note: Make sure that you have set the time correctly.
1. In standby mode, press and hold TIMER button, until [TIMER SET] scrolls on
the display. The hour digits are displayed and begin to blink.
2.Press next / previous track button on the front panel or remote control to
set alarm mode and set hour, then press TIMER button again to confirm.
The minutes digits are displayed and begin to blink.
3.Press next / previous track button on the front panel or remote control to
set minute. Press TIMER button to confirm.
4.Press VOL +/– button to adjust volume, then press TIMER button to confirm.
5.In standby mode, press TIMER button repeatedly to activate / deactivate
timer The corresponding message TIMER ON or TIMER OFF will appear on
the screen.
SET ALARM TIMER
Press next / previous track button on the front panel ( or remote control) to
select a preset number
To switch between MONO and STEREO modes, press the REPEAT button on the
remote control.
To switch the currently displayed information, press the INFO button on the
remote control.
Tune to a preset radio station
Set the MONO and STEREO modes
Switching the currently displayed information
During play, press the VOL+/- button on the remote on use volume regulation
knob on the main unit to increase/decrease the volume level.
During play, press S-BASS button to turn on/o super bass enhancement. If
the function is on, the display will show BASS.
During play, press LOUDNESS button to turn on/o loudness function.
ADJUST VOLUME LEVEL AND SOUND EFFECT
Adjust volume level
Enhance bass
Loudness function
During play, press MUTE button to mute or restore sound
Mute sound
During play, press P-EQ button repeatedly to select:
FLAT / POP / JAZZ / ROCK / CLASSIC
Select a preset sound eect
After connecting USB devices (flash memory, memory card reader), the device
will play songs saved on the external data carrier. To do this:
1. Connect a USB device to the KM1961 USB port.
2.To select the USB function, use the mode dial on the main unit or the USB
button on the remote control. "USB" will appear on the display.
3.To start playback, press the play / pause button on the remote control or
the main unit.
4.To stop the track, press the play / pause button or the STOP button on the
remote control.
5.To change track, press the previous / next track button.
6.To rewind a track, press and hold the backward / forward button.
7. To change album, press the next / previous track button.
Charging external devices
When the device is connected to the power supply, the USB port on the front
panel can be used to charge external devices. The maximum charging voltage
is 5V 1 A.
PLAYBACK FROM USB
1. Use the mode dial on the main unit or the CD button on the remote to
select the CD function. "DISC" appears on the display.
2.Press the tray eject button on the remote or central unit, then place a disc
on it, and then press the tray eject button again.
3.To start playback, press the play / pause button on the remote control or
the main unit.
PLAYING FROM CDS

Owner’s manualOwner’s manual
EN
EN
26 27
4. To stop the track, press the play / pause button or the STOP button on the
remote control.
5.To change track, press the previous / next track button.
6.To rewind a track, press and hold the backward / forward button.
7. To change album, press the next / previous track button.
Programming playback
The device can play only selected tracks on the disc.
1. To program playback, press the STOP button on the remote control.
2.Then press the PROG button on the remote control - the device screen will
display the message 001 P-01.
3.Press the next / previous track button or use the numeric keypad to select
a track number. The screen will show the number of the selected track.
4.To move to the possibility of programming the next track, press the PROG
button.
5.Successive pieces should be programmed in the same way.
6.To start playback of the programmed tracks, press the play / pause button.
7. To disable the Programmed Playback function, press the STOP button.
SPECIFICATION
General information
Tube preamplifier
CD disc player
Radio: FM / DAB+
Bluetooth + NFC
Remote control
Playback from USB
Charging external devices
Technical data
DAB+ frequency range: 174,928 - 239,200 MHz
FM frequency range: 87,5 - 108 MHz
Profiles Bluetooth: A2DP
Range: up to 8 meters
Max. Bluetooth transmission power: 4 dBm
NFC working frequency: 13,56 MHz
Woofer: 4,3” (110 mm)
Tweeter: 1,5” (38 mm)
Output power (RMS): 2 x 30 W
Impedance: 6 Ohm
THD: <1% (1 KHz, 1 W)
Inputs / outputs:
Headphone output Jack 3,5 mm
2 x RCA speaker outputs
Audio input Jack 3,5 mm
AUX input
USB port (5 V 1 A)
Antenna socket
Power socket
Power consumption: 35 W
Power supply: AC 100 - 240 V~; 50 - 60 Hz
Dimensions:
Main unit: 250 x 276 x 146 mm
Speaker: 160 x 202 x 244 mm
English
Correct Disposal of This Product
(Waste Electrical & Electronic Equipment)
It is forbidden to place equipment waste marked with the symbol of a crossed-
out trash bin together with other waste. This equipment is subject to collection
and recycling. The harmful substances it contains can cause environmental
pollution and pose a threat to human health.
Made in China for LECHPOL ELECTRONICS Sp. z o.o. Sp.k., ul. Garwolińska 1,
08-400 Miętne.
LEARN MORE
For more information on this device visit: www.krugermatz.com. Read owner's
manual carefully before using. Visit www.krugermatz.com website for more
products and accessories. In case of any doubts or questions reach out to our
Frequently Asked Questions section.

Manuel de l'UtilisateurManuel de l'Utilisateur
FR
FR
28 29
SÉCURITÉ
Avant utilisation, lisez attentivement le manuel d'instructions et conservez-le
pour référence future. Le fabricant n'est pas responsable de l'utilisation
incorrecte du produit.
1. Placez l’appareil sur une surface plane, sèche et stable.
2. Ne placez pas d’objets lourds sur l’appareil.
3. N’introduisez pas d’objets dans le haut-parleur.
4. Ne placez pas l’appareil à proximité des sources de chaleur, telles que les
radiateurs, etc. Ne placez pas l’appareil sur des surfaces mobiles.
5. Assurez une bonne circulation de l’air autour de l’appareil. Ne perturbez
pas la ventilation par la couverture des orifices de ventilation.
6. Protégez l’appareil contre l’humidité, l’eau et d’autres liquides.
N’entreposez ni n’utilisez pas l’appareil à des températures trop élevées.
N’exposez pas l’appareil au soleil ou à d’autres sources de chaleur.
7. Avant de brancher l’appareil à l’alimentation, vérifiez la conformité de la
tension de courant dans la prise secteur avec la tension de l’appareil.
8. N’utilisez pas les hauts-parleurs au niveau sonore le plus élevé pendant
longtemps. Pour éviter les lésions auditives, il n’est pas conseillé d’utiliser
l’appareil au niveau sonore le plus élevé.
9. Arrêtez immédiatement l’utilisation des hauts-parleurs en cas d’apparition
des acouphènes, d’inconfort ou d’autres réactions secondaires.
10. Assurez-vous que l’appareil se trouve à l’écart des appareils électroniques
qui peuvent causer des perturbations.
11. Si l’appareil n’est pas utilisé pendant une longue période de temps,
débranchez-le de la source d’alimentation.
12. Ne pas utiliser l’appareil avec les mains mouillées.
13. Il est interdit d’utiliser l’appareil s’il est endommagé.
14. Il est interdit de réparer l’appareil par vous-même. En cas de dommage,
contactez un service technique agréé pour contrôle/réparation.
15. Avant le nettoyage, débranchez TOUJOURS l’appareil de l’alimentation
électrique.
16. Nettoyez l’appareil à l’aide d’un chion doux, légèrement humidifié. Ne pas
utiliser de produits chimiques ou de détergents pour nettoyer l’appareil
17. Toujours saisir la fiche, jamais le câble, pour débrancher l’appareil de
l’alimentation.
18. Éviter de marcher sur le câble ou de le tordre, surtout dans les zones de
la fiche et du raccord à l’appareil.
INSTALLATION DES PILES
1
6 7 8 9 10 11 12 13
2 3 4 5
1. Manette de changement du
mode
2. Lecteur CD
3. Écran d’achage
4. Touche d’ouverture du
compartiment à disques
5. Manette de réglage du volume
6. Entrée Audio (3,5 mm)
7. Touche d’alimentation
8. Touche de lecture / pause
9. Piste précédente
10. Piste suivante
11. Touche BASS
12. Touche TREBLE
13. Sortie écouteurs 3,5 mm
14. Prise d’alimentation
15. Entrée RCA
16. Entrée UDB
17. Entrée antenne DAB/FM
18. Entrées AUX
14 15 16 17 18

Manuel de l'UtilisateurManuel de l'Utilisateur
FR
FR
30 31
DESCRIPTION DE LA TÉLÉCOMMANDE
116
17 18
19 20
21 22
23
2
34
5
7
8
9
10
11
12
13
14
15 29
27
28
26
25 24
6
1. Touche du mode de veille
2. Touche de radio FM / DAB+
3. Touche du lecteur CD
4. Touche Intro (Appuyer en
mode USB, CD pour lire
seulement les 10 premières
secondes de chaque piste)
5. Touche de répétition (Appuyer
pour lire en boucle une piste,
un dossier ou pour désactiver
l’option)
6. Touche de l’égaliseur
(Sélection des paramètres de
l’égaliseur)
7. Touche de volume augmenté
8. Touche de réglage de l’horloge
9. Piste suivante
10. Touche arrière
11. Piste précédente
12. Bouton Lecture / Pause /
Couplage
13. Album précédent / suivant
14. Clavier numérique (Sélection
de la piste / de la station de
radio sauvegardée)
15. Sélection d’un nombre
supérieur à 9 (Appuyer sur
cette touche et ensuite l’une
des touches du clavier
numérique pour sélectionner
un nombre supérieur à 9)
16. Ouvrir / fermer le
compartiment à disque CD
17. Touche du mode Bluetooth,
AUX et Audio (appuyer pour
passer d’un mode à l’autre)
18. Touche du mode USB
19. Niveau d’éclairage de l’écran
LCD
20.Lecture aléatoire
21. Réglage de l’interrupteur
horaire
22. Touche augmentation basse
23. Touche de réveil
24. Touche de sélection des
informations achées lors de
la lecture de la piste (appuyer
pour choisir entre la durée
écoulée de la piste, le temps
restant de la piste, le temps
restant de l’album)
25. Touche avant
26.Touche ARRÊT / SCAN
27. Touche de réglage du volume
28.Touche de désactivation du
son
29.Touche de sauvegarde de la
station de radio
1. Avant d’utiliser la télécommande, dévisser la vis de
fixation du couvercle arrière de la pile.
2.Enlever la protection en plastique de la pile.
3.Sortir le compartiment de la pile.
4.Y placer la nouvelle pile CR2025, conformément aux
pôles indiqués (+/-) et ensuite, replacer le
compartiment de la pile à la position initiale et
visser la vis de fixation.
Attention:
• Si la télécommande n’est pas utilisée pendant une longue période de
temps, retirer les piles.
• Pour éviter les pannes, lire attentivement le mode d’emploi.
• Ne pas faire tomber ni ne faire subir de chocs à la télécommande.
• Protéger l’appareil et la télécommande contre l’eau et l’humidité.
• Ne pas exposer l’appareil ni la télécommande au soleil ou à d’autres sources
de chaleur.
• N’utiliser qu’un chion doux légèrement humide pour nettoyer l’appareil,
sans détergents.
Rayon d’action de la télécommande
INSTALLATION DES PILES
1. Diriger la télécommande sur le capteur
à infrarouges à l’avant de l’appareil.
2.S’assurer qu’il n’y ait aucun obstacle
entre le capteur à infrarouges sur
l’appareil et la télécommande.
6 m

Manuel de l'UtilisateurManuel de l'Utilisateur
FR
FR
32 33
RACCORDEMENT
Connexion des haut-parleurs
1. Pour brancher les hauts-parleurs, desserrer légèrement les écrous se
trouvant sur les raccords à l’arrière de l’unité principale.
2.Insérer jusqu’au bout l’extrémité non isolée du câble. Raccorder les câbles
du haut-parleur droit au raccord « R » et les câbles du haut-parleur gauche
au raccord « L ». Ne pas oublier que les câbles raccordés à l’unité principale
doivent être raccordés aux hauts-parleurs de la même manière (raccord
rouge sur l’unité principale au raccord rouge sur le haut-parleur et par
analogie, le noir comme le rouge)
3.Serrer jusqu’au bout les écrous afin que les câbles raccordés ne sortent
pas.
1. Pour raccorder un périphérique à la chaîne HiFi KM1961 à l’aide du câble RCA
(non fourni), raccorder le câble à:
• la prise AUDIO IN L/R sur l’appareil donné
• la prise de sortie audio sur le périphérique.
2.Pour raccorder cet appareil à un périphérique à l’aide d’un câble audio avec
un raccord 3,5 mm Jack (non fourni), raccorder le câble à:
• la prise AUX IN sur l’appareil donné
• la sortie écouteurs du périphérique.
Raccordement d’appareils accessoires
UTILISATION
Marche / arrêt
Pour mettre en marche ou arrêter l’appareil, appuyer sur la touche STANDBY.
L’appareil passe au dernier mode utilisé.
Mode de veille
Pour passer en mode de veille, appuyer sur la touche STANDBY et la maintenir
pressée. Le témoin rouge indique le mode ECO.
Remarque : Après 15 minutes d'inactivité, l'appareil passe automatiquement en
mode veille (sauf pour la radio FM / DAB et le mode Bluetooth avec un appareil
externe connecté).
Interrupteur horaire
L’appareil dispose de la fonction d’interrupteur horaire. Une fois activée, la
chaîne HiFi passera immédiatement en mode de veille à l’heure indiquée au
préalable.
• Quand l’appareil est en marche, appuyer sur la touche Sleep pour régler la
durée choisie (en minutes).
Raccordement de l’antenne FM / DAB
1. Raccorder l’antenne radio à la prise de
l’antenne FM se trouvant l’arrière de
l’appareil.
2.Si le signal est faible, brancher une
antenne extérieure.
Attention: pour éviter les bruits parasites,
éloigner l’antenne de l’appareil, du câble
de raccordement et du câble
d’alimentation AC.
Raccordement de l’alimentation
Attention:
• Avant le raccordement à l’alimentation,
s’assurer que la tension d’alimentation
est conforme à la tension indiquée sur
l’étiquette sur la partie inférieure de
l’appareil.
• Raccorder l’appareil à l’alimentation
seulement après avoir raccordé tous
les autres câbles.

Manuel de l'UtilisateurManuel de l'Utilisateur
FR
FR
34 35
• Pour désactiver la fonction, appuyer plusieurs fois sur la touche Sleep
jusqu’à ce que le message OFF s’ache.
Réglage de l’horloge
Réglage de la luminosité de l’écran d’achage
1. En mode de veille, appuyer sur la touche CLOCK et la maintenir pressée pour
activer le réglage de l’horloge.
2.À l’aide des touches de changement des pistes, sélectionner la valeur voulue.
3.Pour passe à l’option suivante, appuyer sur la touche CLOCK sur la
télécommande.
En mode veille, appuyer plusieurs fois sur la touche DIM pour choisir le niveau
de luminosité voulu.
LECTURE AVEC APPAREIL BLUETOOTH
Pour lire des pistes d’un périphérique utilisant la connexion Bluetooth, coupler
les appareils avant la première utilisation. Le couplage des appareils se fait une
seule fois.
1. Pour coupler les appareils, activer le mode Bluetooth sur l’appareil à l’aide
de la touche Bluetooth sur la télécommande ou de la manette de sélection
du mode sur l’unité principale.
2.Activer la connexion Bluetooth sur l’appareil périphérique.
3.Rechercher les appareils Bluetooth accessibles.
4.Sélectionner « KM1961 » sur la liste des appareils à coupler.
5.Si nécessaire, indiquer le mot de passe par défaut « 0000 ».
6.Pour eacer les connexions, appuyer sur la touche PAIRING et la maintenir
pressée.
L’appareil dispose également d’un module de connexion NFC, grâce auquel il
est possible de coupler un périphérique à la chaîne HiFi sans la nécessité de
rechercher l’appareil dans les appareils Bluetooth accessibles. Pour ce faire, il
sut d’activer la fonction NFC sur le périphérique et et le rapprocher à la
plaque sur la partie supérieure de la chaîne et ensuite, accepter le couplage
sur l’écran du périphérique.
Attention:
• La portée de la connexion entre l’appareil et l’appareil Bluetooth est de 8
m.
• Le fabricant ne garantit pas la compatibilité avec tous les appareils
Bluetooth.
• Tout obstacle entre l’appareil et l’appareil Bluetooth peut limiter la portée
de la connexion.
• L’appareil ne doit pas se trouver à proximité directe d’autres appareils
électroniques, car ceci peut causer des interférences.
1. Pour entrer en mode radio FM / DAB, appuyez sur le bouton FM / DAB de la
télécommande ou utilisez la molette pour sélectionner le mode FM ou DAB
sur l'unité principale.
2.Appuyer sur la touche avant / arrière et la maintenir pressée pour lancer la
recherche automatique des stations de radio.
3.Pour rechercher les autres stations, répéter l’étape 2. Pour rechercher la
station de radio manuellement, appuyer plusieurs fois sur la touche de la
piste suivante / précédente, jusqu’à atteindre la fréquence voulue.
RADIO FM / DAB
Recherche des stations de radio FM / DAB
La mémoire des FM stations de radio préférées peut sauvegarder 20 stations
au maximum. En FM mode radio, appuyer sur la touche PROG et la maintenir
pressée pour activer la sauvegarde automatique.
• L’écran d’achage ache AUTO.
• L’appareil sauvegarde toutes les stations de radio FM automatiquement
selon la puissance du signal et ensuite, il lancera la première station
sauvegardée.
La mémoire des DAB stations de radio préférées peut sauvegarder 23 stations
au maximum. En DAB mode radio, appuyer sur la touche SCAN et la maintenir
pressée pour activer la sauvegarde automatique.
• L’écran d’achage ache SCANNING.
• L’appareil sauvegarde toutes les stations de radio DAB automatiquement
selon la puissance du signal et ensuite, il lancera la première station
sauvegardée.
Sauvegarde automatique des stations de radio FM
Sauvegarde automatique des stations de radio DAB
LECTURE À PARTIR DU PÉRIPHÉRIQUE
1. Pour lire les pistes du périphérique, connecter les appareils à l’aide d’un
câble audio (le câble n’est pas fourni), en utilisant les raccords
correspondants AUX IN/raccord AUDIO IN.
2.Appuyer sur la touche AUDIO IN/AUX IN correspondante sur la
télécommande.
3.Lancer la lecture depuis l’appareil périphérique.
• Si la distance entre les appareils est supérieure que la portée de la
connexion, les appareils seront déconnectés. Pour reconnecter les
appareils, les rapprocher.

Manuel de l'UtilisateurManuel de l'Utilisateur
FR
FR
36 37
Sauvegarde manuelle des stations de radio
1. Pour sauvegarder la station de radio choisie, choisir d’abord sa fréquence.
2.Appuyer sur la touche PROG pour activer le mode de sauvegarde. PROG
commence à clignoter, appuyer de nouveau sur PROG pour confirmer.
L’écran d’achage ache le numéro sous lequel la station a été
sauvegardée et sa fréquence.
3.Pour sauvegarder les autres stations, répéter l’étape -2.
Attention: Pour eacer une station de la liste des préférées, sauvegarder à sa
place une autre station.
Pour passer à la station de radio sauvegardée précédemment, appuyer
plusieurs fois sur la touche piste suivante / précédente, jusqu’à atteindre le
numéro de la station sauvegardée.
Pour basculer entre les modes MONO et STEREO, appuyez sur le bouton
REPEAT de la télécommande.
Pour changer les informations actuellement achées, appuyez sur la touche
INFO de la télécommande.
Sélection de la station de radio sauvegardée
Réglez les modes MONO et STEREO
Changer les informations actuellement achées
Lors de la lecture, appuyer sur la touche VOL +/- sur la télécommande ou utiliser
la manette de réglage du volume sur l’unité principale pour augmenter / baisser
le volume.
Lors de la lecture, appuyer sur la touche S-BASS pour activer / désactiver
l’augmentation de la basse.
Pour activer / désactiver la fonction Loudness, appuyer sur la touche LOUDNESS
lors de la lecture.
RÉGLAGE DU VOLUME ET DES PARAMÈTRES DU SON
Réglage du volume
Augmentation de la basse
Fonction Loudness
Lors de la lecture, appuyer sur la touche MUTE pour activer / désactiver le son.
Touche de désactivation du son
Attention: S’assurer que l’heure est correctement réglée.
1. En mode de veille, appuyer sur la touche Timer et la maintenir pressée
jusqu’à ce que l’écran d’achage ache TIMER SET. Les chires des heures
commencent à clignoter.
2.À l’aide des touches piste suivante / précédente sur la télécommande ou
l’appareil, choisir le type et l’heure du réveil et confirmer en appuyant sur
la touche TIMER. L’écran d’achage ache les chires des minutes qui
commencent à clignoter.
3.À l’aide des touches piste suivante / précédente sur la télécommande ou
l’appareil, choisir les minutes et confirmer en appuyant sur la touche Timer.
4.À l’aide des touches VOL + / -, régler le volume et ensuite, confirmer avec
la touche Timer.
5.Pour mettre en marche ou arrêter le réveil, appuyer sur la touche Timer sur
la télécommande. L’écran d’achage ache le message correspondant
TIMER ON ou TIMER OFF.
RÉGLAGE D RÉVEIL
Lors de la lecture, appuyer sur la touche de l’égaliseur P-EQ plusieurs fois pour
sélectionner:
FLAT / POP / JAZZ / ROCK / CLASSIC
Réglage de l’égaliseur
Note: Make sure that you have set the time correctly.
1. In standby mode, press and hold TIMER button, until [TIMER SET] scrolls on
the display. The hour digits are displayed and begin to blink.
2.Press next / previous track button on the front panel or remote control to
set alarm mode and set hour, then press TIMER button again to confirm.
The minutes digits are displayed and begin to blink.
3.Press next / previous track button on the front panel or remote control to
set minute. Press TIMER button to confirm.
4.Press VOL +/– button to adjust volume, then press TIMER button to confirm.
5.In standby mode, press TIMER button repeatedly to activate / deactivate
timer The corresponding message TIMER ON or TIMER OFF will appear on
the screen.
SET ALARM TIMER
Après avoir connecté des périphériques USB (mémoire flash, lecteur de carte
mémoire), l'appareil lit les chansons enregistrées sur le support de données
externe. Pour faire ça:
1. Connectez un périphérique USB au port USB du KM1961.
LECTURE DEPUIS USB

Manuel de l'UtilisateurManuel de l'Utilisateur
FR
FR
38 39
2.Pour sélectionner la fonction USB, utilisez le sélecteur de mode de l'unité
principale ou le bouton USB de la télécommande. « USB » apparaîtra sur
l'écran.
3.Pour démarrer la lecture, appuyez sur le bouton lecture/pause de la
télécommande ou de l'unité principale.
4.Pour arrêter la piste, appuyez sur le bouton lecture/pause ou sur le bouton
STOP de la télécommande.
5.Pour changer de piste, appuyez sur le bouton piste précédente/suivante.
6.Pour rembobiner une piste, appuyez et maintenez enfoncé le bouton
arrière/avant.
7. Pour changer d'album, appuyez sur le bouton de piste suivante/précédente.
Charger des appareils externes
When the device is connected to the power supply, the USB port on the front
panel can be used to charge external devices. The maximum charging voltage
is 5V 1 A.
1. Utilisez le sélecteur de mode de l'unité principale ou la touche CD de la
télécommande pour sélectionner la fonction CD. "DISC" apparaît sur
l'achage.
2.Appuyez sur le bouton d'éjection du plateau de la télécommande ou de
l'unité centrale, puis placez un disque dessus, puis appuyez sur le bouton
d'éjection du lecteur.
3.Pour démarrer la lecture, appuyez sur le bouton lecture/pause de la
télécommande ou de l'unité principale.
4.Pour arrêter la piste, appuyez sur le bouton lecture/pause ou sur le bouton
STOP de la télécommande.
5.Pour changer de piste, appuyez sur le bouton piste précédente/suivante.
6.Pour rembobiner une piste, appuyez et maintenez enfoncé le bouton
arrière/avant.
7. Pour changer d'album, appuyez sur le bouton de piste suivante/précédente.
Programmation de la lecture
L'appareil ne peut lire que les pistes sélectionnées sur le disque.
1. Pour programmer la lecture, appuyez sur le bouton STOP de la
télécommande.
2.Appuyez ensuite sur le bouton PROG de la télécommande - l'écran de
l'appareil achera le message 001 P-01.
3.Appuyez sur le bouton de piste suivante/précédente ou utilisez le clavier
numérique pour sélectionner un numéro de piste. L'écran achera le
numéro de la piste sélectionnée.
4.Pour passer à la possibilité de programmer la piste suivante, appuyez sur le
bouton PROG.
LECTURE À PARTIR DE CD
SPECIFICAȚIE
informations générales
Préamplificateur à tubes
lecteur CD
Radio FM / DAB+
Bluetooth + NFC
Télécommande
Lecture depuis USB
Charger des appareils externes
Données techniques
Domeniu frecvență DAB+: 174,928 - 239,200 MHz
Domeniu frecvență FM: 87,5 - 108 MHz
Profile Bluetooth: A2DP
Raza de acțiune: până la 8 metri
Max. Putere transmisie Bluetooth: 4 dBm
Răspuns în frecvență NFC: 13,56 MHz
Woofer: 4,3” (110 mm)
Tweeter: 1,5” (38 mm)
Putere de ieșire (RMS): 2 x 30 W
Impedanță: 6 Ohm
THD: <1% (1 KHz, 1 W)
Intrări / Ieșiri:
Ieșire cască jack 3,5 mm
2 ieșiri difuzor RCA
Intrare audio jack 3,5 mm
Intrare AUX
Port USB (5 V 1 A)
Mufă antenă
Mufă alimentare
Consum: 35 W
Alimentare: AC 100 - 240 V~; 50 - 60 Hz
Dimensions
Unité principale: 250 x 276 x 146 mm
Haut-parleur: 160 x 202 x 244 mm
5.Les pièces successives doivent être programmées de la même manière.
6.Pour lancer la lecture des pistes programmées, appuyez sur le bouton
lecture/pause.
7. Pour désactiver la fonction de lecture programmée, appuyez sur le bouton
STOP.

Français
Élimination correcte de ce produit
(Déchets d’équipements électriques et électroniques)
L’équipement électrique marqué par le symbole de poubelle barrée ne peut
pas être jeté avec les ordures ménagères. Cet équipement doit être collecté et
traité. Les substances entrant dans sa composition peuvent polluer
l’environnement et constituer un danger pour la santé humaine.
Fabriqué en République populaire de Chine pour LECHPOL ELECTRONICS Sp. z o.o.
Sp.k., ul Garwolińska 1, 08-400 Miętne.
Manuel de l'Utilisateur
FR
40
Handleiding
NL
41
VELIGHEIDSKWESTIES
Lees voor gebruik de gebruiksaanwijzing aandachtig door en bewaar deze voor
toekomstig gebruik. De fabrikant is niet verantwoordelijk voor onjuist gebruik
van het product.
1. Plaats het toestel op een vlak, droog en stabiel oppervlak.
2. Plaats geen zware voorwerpen op het toestel.
3. Steek geen voorwerpen in de luidspreker.
4. Plaats het toestel niet in de buurt van warmtebronnen zoals radiatoren
enz. Plaats het toestel niet op een beweegbaar oppervlak.
5. Plaats het toestel op een plaats met een goede luchtcirculatie. De
ventilatie mag niet worden belemmerd door de ventilatieopeningen af te
dekken.
6. Bescherm het toestel tegen vocht, water en andere vloeistoen. Gebruik of
bewaar het toestel niet bij te hoge temperaturen. Het toestel moet worden
beschermd tegen direct zonlicht en warmtebronnen.
7. Controleer voor de aansluiting op de voedingsbron of de spanning van het
stopcontact en het toestel compatibel zijn.
8. Gebruik de luidsprekers niet gedurende langere tijd op het hoogste
volumeniveau. Gebruik het toestel niet op het hoogste volumeniveau en
voorkom gehoorschade.
9. Stop onmiddellijk met het gebruik van de luidsprekers als u last krijgt van
oorsuizingen, ongemak of andere bijwerkingen.
10. Zorg ervoor dat het toestel niet in de buurt staat van elektronische
apparaten die storing kunnen veroorzaken.
11. Koppel het toestel los van de stroombron als u het langere tijd niet
gebruikt.
12. Bedien het toestel niet met natte handen.
13. Het is verboden om het toestel te gebruiken wanneer het beschadigd is.
14. Het is verboden om het toestel zelf te repareren. Neem in geval van schade
contact op met een erkend servicecentrum voor inspectie / reparatie.
15. Koppel het toestel ALTIJD los van de voedingsbron voordat u het
schoonmaakt.
16. Reinig het toestel alleen met een zachte, licht bevochtigde doek. Gebruik
geen chemicaliën of reinigingsmiddelen om het toestel schoon te maken
17. Pak bij het losmaken van het voedingssnoer altijd de stekker vast, nooit het
snoer.
18. Zorg ervoor dat er niet op het netsnoer wordt getrapt of dat het niet wordt
verbogen, vooral bij de stekker en het stopcontact.

HandleidingHandleiding
NL
NL
42 43
BESCHRIJVING VAN HET HOOFDTOESTEL
1
6 7 8 9 10 11 12 13
2 3 4 5
1. Draaiknop voor modusselectie
2. CD-station
3. Display
4. Uitwerpknop voor de CD/lade
5. Volumeknop
6. Audio-ingang (3,5 mm)
7. Aan / uit-knop
8. Afspeel- / pauzeknop
9. Vorige track
10. Volgende track
11. BASS-knop
12. TREBLE-knop
13. 3,5 mm hoofdtelefoon uitgang
14. Stopcontact
15. RCA-ingang
16. USB-ingang
17. DAB/FM-antenne-ingang
18. AUX-ingangen
BESCHRIJVING AFSTANDSBEDIENING
116
17 18
19 20
21 22
23
2
34
5
7
8
9
10
11
12
13
14
15 29
27
28
26
25 24
6
1. Stand-by knop
2. FM / DAB+ radio knop
3. CD-speler knop
4. Intro knop (In USB, CD modus
indrukken om alleen de
eerste 10 seconden van elke
track af te spelen)
5. Repeat-knop (Druk hierop om
één track of een hele map af
te spelen of om deze optie uit
te schakelen)
6. Equalizer knop (Kiezen
equalizer instellingen)
7. Volume omhoog knop
8. Klok Instellingen knop
9. Volgende track
10. Terug-knop
11. Vorige track
12. Afspeel- / pauzeknop /
koppelen
13. Volgende / vorige album
14. Numeriek toetsenbord (Kiezen
van een track / Opgeslagen
radiozender)
15. Kiezen boven 9 (Druk op deze
knop en vervolgens op een
van de knoppen van het
numerieke toetsenbord om
een nummer boven 9 te
kiezen)
16. Uitwerpen / Invoegen CD
houder
17. Bluetooth-, AUX- en
audiomodusknop (indrukken
om tussen modi te schakelen)
18. Knop USB-modus
19. LCD-
achtergrondverlichtingsniveau
wijzigen
20.Willekeurig afspelen
21. Timer instellingen
22. Basversterkingsknop
23. Wekker knop
24. Knop selectie weergave
tijdens afspelen van een track
(druk hierop om heen en weer
te gaan tussen de verstreken
tijd van de track, de
resterende tijd ervan en de
resterende albumtijd)
25. Vooruit knop
26.STOP / SCAN knop
27. Volumeknoppen
28.Mute-knop
29.Knop voor het opslaan van
radiozenders
14 15 16 17 18

HandleidingHandleiding
NL
NL
44 45
1. Voordat u de afstandsbediening gebruikt, verwijdert
u de schroef waarmee het batterijdeksel aan de
achterkant vastzit.
2.Verwijder de plastic batterijbescherming.
3.Haal het accuvak eruit.
4.Plaats een nieuwe CR2025 accu volgens de
aangegeven polariteit (+/-), plaats vervolgens het
accuvak in zijn oorspronkelijke positie en draai de
bevestigingsschroef vast.
Let op:
• Verwijder de accu’s als u de afstandsbediening langere tijd niet gebruikt.
• Lees de instructies zorgvuldig door om storingen te voorkomen.
• Laat de afstandsbediening niet vallen en sla er niet op.
• Houd het toestel en de afstandsbediening uit de buurt van water en vocht.
• Het toestel en de afstandsbediening moeten worden beschermd tegen
direct zonlicht en warmtebronnen.
• Gebruik voor het reinigen alleen een zachte, licht vochtige doeken zonder
reinigingsmiddel.
Bereik van de afstandsbediening
INSTALLATIE VAN DE ACCU’S
1. Richt de afstandsbediening op de
infraroodsensor aan de voorkant van
het apparaat.
2.Zorg ervoor dat er geen obstructies zijn
tussen de infraroodsensor op het
apparaat en de afstandsbediening. 6 m
AANSLUITING
Luidsprekers aansluiten
1. Om de luidsprekers aan te sluiten, draait u de moeren op de bussen aan de
achterzijde van het hoofdtoestel wat los.
2.Steek het ongeïsoleerde deel van de draad in het uiteinde. Sluit de draden
van de rechter luidspreker aan op de "R"-aansluiting en de draden van de
linker luidspreker op de "L"-aansluiting, en zorg ervoor dat de draden die op
het hoofdtoestel zijn aangesloten op dezelfde manier op de luidsprekers
worden aangesloten (rode aansluiting op de hoofdeenheid op de rode
aansluiting op de luidspreker, zwarte aansluiting naar analogie op de rode)
3.Draai de moeren stevig aan, zodat de ingevoerde snoeren er niet uitvallen.
1. Om een extern apparaat op de KM1961-toren aan te sluiten met een RCA-
snoer (niet meegeleverd), sluit u dit snoer aan op:
• AUDIO IN L/R aansluitingen op dit apparaat
• audio-uitgangen op het externe apparaat.
2.Om dit toestel op een extern apparaat aan te sluiten met behulp van een
audiosnoer met een 3,5 mm jack plug (niet meegeleverd), sluit u dit snoer
aan op:
• de AUX IN-aansluiting op dit toestel
• de hoofdtelefoonaansluiting op het externe apparaat.
Aansluiten van extra apparaten

HandleidingHandleiding
NL
NL
46 47
BEDIENING
Aan / uit
Om het toestel aan of uit te zetten drukt u op de STANDBY-knop. Het apparaat
schakelt over naar de laatst gebruikte modus.
Stand-by
Om in stand-by modus te gaan, houdt u de STANDBY toets ingedrukt. Het rode
lampje geeft de ECO-modus aan.
Opmerking: na 15 minuten inactiviteit gaat het apparaat automatisch naar de
stand-bymodus (behalve FM / DAB-radio en Bluetooth-modus met een extern
apparaat aangesloten).
Timer
Het apparaat heeft een timerfunctie. Indien deze wordt geactiveerd, zal de
toren na een vooraf bepaalde tijd automatisch in standby-modus gaan.
• Wanneer het apparaat aan staat, drukt u op de Sleep-knop om een
ingestelde tijd (in minuten) te kiezen.
Aansluiten FM / DAB-antenne
1. Sluit de radioantenne aan op de FM /
DAB-antenneaansluiting aan de
achterzijde van het toestel.
2.Als de ontvangst slecht is, sluit dan
een externe antenne aan.
Opmerking: om ruis te voorkomen dient u
de antennes ver van het toestel, het
aansluitsnoer en het netsnoer te
plaatsen.
De stroom aansluiten
Let op:
• Voordat u het apparaat op het lichtnet
aansluit, dient u te controleren of de
voedingsspanning overeenkomt met de
spanning die op de onderzijde van het
apparaat staat vermeld.
• Sluit dit toestel pas op het stroomnet
aan wanneer alle andere snoeren zijn
aangesloten.
Klok instellen
Instellen helderheid display
1. Houd in de stand-by modus de knop CLOCK op de afstandsbediening
ingedrukt om de klokinstellingen te activeren.
2.Gebruik de track-wisseltoetsen om de gewenste waarde te kiezen.
3.Druk op de knop CLOCK van de afstandsbediening om naar de volgende optie
te gaan.
Druk in de stand-bymodus verschillende keren op de DIM-knop om het
gewenste helderheidsniveau te selecteren.
• Om deze functie uit te schakelen drukt u verschillende keren op de Sleep-
knop totdat "OFF" wordt weergegeven.
AFSPELEN VANAF EEN BLUETOOTH-APPARAAT
Om tracks af te spelen van een extern Bluetooth-apparaat, koppelt u de
apparaten vóór het eerste gebruik. Koppelen hoeft maar één keer te gebeuren.
1. Om apparaten te verbinden, schakelt u de Bluetooth-modus op dat
apparaat in met de Bluetooth-knop op de afstandsbediening of de
moduskeuzeknop op de hoofdeenheid.
2.Schakel de Bluetooth-functie op het externe apparaat in.
3.Zoek naar beschikbaar Bluetooth-apparaat.
4.Selecteer "KM1961" uit de lijst van te koppelen apparaten.
5.Voer zo nodig het standaardwachtwoord "0000" in.
6.Om de koppeling te wissen houdt u de knop PAIRING ingedrukt.
Het toestel heeft ook een NFC-verbindingsmodule, zodat u ook een extern
apparaat aan de toren kunt koppelen zonder het te moeten zoeken in de
beschikbare Bluetooth-apparaten. Om dit te doen, zet u NFC aan op het
externe apparaat en plaatst u het tegen de plaat bovenaan de toren, waarna u
de koppeling accepteert op het scherm van het externe apparaat.
Let op:
• Het bereik tussen dit apparaat en een Bluetooth-apparaat bedraagt
maximaal 8 m.
• De fabrikant garandeert geen compatibiliteit met alle Bluetooth-apparaten.
• Obstakels tussen dit apparaat en een Bluetooth-apparaat kunnen het
communicatiebereik beperken.
• Dit apparaat mag niet in de nabijheid van andere elektronische apparaten
worden geplaatst. Dit kan namelijk storingen veroorzaken.
• Als de afstand tussen de apparaten groter is dan het communicatiebereik,
zullen de apparaten de verbinding verbreken. Om de apparaten opnieuw te
verbinden, dient u ze binnen bereik te plaatsen.

HandleidingHandleiding
NL
NL
48 49
Handmatig opslaan van radiozenders
1. Om de FM / DAB-radiomodus te activeren drukt u op de FM / DAB-knop op
de afstandsbediening of gebruikt u de draaiknop om de FM / DAB-modus
op de hoofdeenheid te selecteren.
2.Houd de vooruit/achteruit knop ingedrukt om automatisch naar
radiozenders te beginnen zoeken.
3.Herhaal stap 2 om naar meer zenders te zoeken. Om handmatig naar een
radiozender te zoeken drukt u verschillende keren op de knop voor de
volgende / vorige track tot de juiste frequentie is gevonden.
FM / DAB-RADIO
Afstemmen op FM / DAB-radiozenders
In het geheugen voor favoriete radiozenders kunnen tot 20 zenders worden
opgeslagen. Houd in de radiomodus de PROG knop ingedrukt om automatisch
opslaan te activeren.
• Op het scherm wordt “AUTO” weergegeven.
• Het apparaat slaat alle FM-radiozenders automatisch op volgens de
signaalsterkte en speelt vervolgens de eerste opgeslagen zender af.
In het geheugen voor favoriete radiozenders kunnen tot 30 zenders worden
opgeslagen. Houd in de radiomodus de SCAN knop ingedrukt om automatisch
opslaan te activeren.
• Op het scherm wordt SCANNING weergegeven.
• Het apparaat slaat alle DAB-radiozenders automatisch op volgens de
signaalsterkte en speelt vervolgens de eerste opgeslagen zender af.
Automatisch opslaan van FM radiozenders
Automatisch opslaan van DAB radiozenders
AFSPELEN VANAF EEN EXTERN APPARAAT
1. Om tracks vanaf een extern apparaat af te spelen, sluit u de apparaten met
een audiosnoer (niet meegeleverd) aan op respectievelijk de AUX IN/ AUDIO
IN aansluitingen.
2.Druk op de overeenkomstige AUDIO IN/AUX IN knop van de
afstandsbediening.
3.Start de weergave op het externe apparaat.
1. Om de geselecteerde radiozender op te slaan selecteert u eerst de
frequentie.
2.Druk op de PROG knop om de opslagmodus te activeren. PROG zal
beginnen te knipperen - om te bevestigen drukt u nogmaals op de PROG
knop. Op het scherm verschijnt het nummer waaronder deze zender is
opgeslagen alsook de frequentie ervan.
3.Om meer zenders op te slaan herhaalt u stappen 1-2.
Om naar een eerder opgeslagen radiozender te gaan drukt u meerdere malen
op de knop voor de volgende / vorige track tot u het nummer van de opgeslagen
zender bereikt.
Druk op de REPEAT-knop op de afstandsbediening om te schakelen tussen
MONO- en STEREO-modi.
Druk op de INFO-knop op de afstandsbediening om de momenteel
weergegeven informatie te wisselen.
Afstemmen op een opgeslagen radiozender
De MONO- en STEREO-modi instellen
De momenteel weergegeven informatie wijzigen
Druk tijdens het afspelen op VOL+/- van de afstandsbediening of gebruik de
volumeknop op de hoofdeenheid om het volume te verhogen/verlagen.
Druk tijdens het afspelen op de knop S-BASS om de versterking van de lage
tonen aan of uit te zetten.
Om de loudness functie aan/uit te zetten drukt u tijdens het afspelen op de knop
LOUDNESS.
INSTELLEN VAN HET VOLUME EN GELUIDSINSTELLINGEN
Instellen van het volume
Basversterking
Loudness functie
Druk tijdens het afspelen op de MUTE-knop om de versterking van de lage
tonen aan of uit te zetten.
Audio dempen
Let op: Om een zender uit de favorietenlijst te verwijderen overschrijft u deze
met een andere zender.
Druk tijdens weergave meerdere malen op de P-EQ Equalizer knop om te
kiezen uit de volgende mogelijkheden:
FLAT / POP / JAZZ / ROCK / CLASSIC
Equalizer instellingen

HandleidingHandleiding
NL
NL
50 51
Let op: Zorg ervoor dat de tijd correct is ingesteld.
1. Houd in stand-by de toets Timer ingedrukt tot TIMER SET op het scherm
verschijnt. De uurcijfers beginnen te knipperen.
2.Gebruik de knoppen voor de volgende / vorige track op de
afstandsbediening of het paneel van het apparaat om het type en de tijd van
de wekker te selecteren en bevestig met de TIMER-knop. De minuutcijfers
verschijnen op het scherm en beginnen te knipperen.
3.Gebruik de knoppen voor de volgende / vorige track op de
afstandsbediening of het paneel van het apparaat om de minuten te
selecteren en bevestig met de TIMER-knop.
4.Gebruik de knoppen VOL +/- om het volume aan te passen, bevestig daarna
opnieuw met de TIMER-knop.
5.Om de wekker aan of uit te zetten drukt u op de TIMER-knop op de
afstandsbediening. Het juiste bericht TIMER AAN of TIMER UIT verschijnt op
het scherm.
WEKKER INSTELLINGEN
Na het aansluiten van USB-apparaten (flashgeheugen, geheugenkaartlezer)
speelt het apparaat nummers af die op de externe gegevensdrager zijn
opgeslagen. Om dit te doen:
1. Sluit een USB-apparaat aan op de KM1961 USB-poort.
2.Gebruik de modusknop op de hoofdeenheid of de USB-knop op de
afstandsbediening om de USB-functie te selecteren. Op het display
verschijnt "USB".
3.Om het afspelen te starten, drukt u op de afspeel-/pauzeknop op de
afstandsbediening of het hoofdapparaat.
4.Om de track te stoppen, drukt u op de afspeel-/pauzeknop of de STOP-
knop op de afstandsbediening.
5.Druk op de vorige / volgende track-knop om van nummer te veranderen.
6.Om een nummer terug te spoelen, houdt u de achteruit/vooruit-knop
ingedrukt.
7. Om van album te wisselen, drukt u op de volgende/vorige track-knop.
Externe apparaten opladen
Wanneer het apparaat is aangesloten op de voeding, kan de USB-poort op het
voorpaneel worden gebruikt om externe apparaten op te laden. De maximale
laadspanning is 5V 1 A.
AFSPELEN VANAF USB
1. Gebruik de modusknop op het hoofdapparaat of de CD-knop op de
afstandsbediening om de CD-functie te selecteren. "DISC" verschijnt op het
display.
2.Druk op de uitwerpknop van de lade op de afstandsbediening of de centrale
eenheid, plaats er een schijf op en druk vervolgens op de uitwerpknop op
het station.
3.Om het afspelen te starten, drukt u op de afspeel-/pauzeknop op de
afstandsbediening of het hoofdapparaat.
4.Om de track te stoppen, drukt u op de afspeel-/pauzeknop of de STOP-
knop op de afstandsbediening.
5.Druk op de vorige / volgende track-knop om van nummer te veranderen.
6.Om een track terug te spoelen, houdt u de achteruit/vooruit-knop
ingedrukt.
7. Om van album te wisselen, drukt u op de volgende/vorige track-knop.
Afspelen programmeren
Het apparaat kan alleen geselecteerde nummers op de schijf afspelen.
1. Om het afspelen te programmeren, drukt u op de STOP-knop op de
afstandsbediening.
2.Druk vervolgens op de PROG-knop op de afstandsbediening - op het
scherm van het apparaat wordt het bericht 001 P-01 weergegeven.
3.Druk op de volgende / vorige track-knop of gebruik het numerieke
toetsenbord om een tracknummer te selecteren. Het scherm toont het
nummer van de geselecteerde track.
4.Om naar de mogelijkheid om de volgende track te programmeren te gaan,
drukt u op de PROG-toets.
5.Opeenvolgende stukken moeten op dezelfde manier worden
geprogrammeerd.
6.Om het afspelen van de geprogrammeerde tracks te starten, drukt u op de
afspeel-/pauzeknop.
7. Om de geprogrammeerde afspeelfunctie uit te schakelen, drukt u op de
STOP-knop.
AFSPELEN VAN CD'S

HandleidingHandleiding
NL
NL
52 53
SPECIFICATIE
Algemene informatie
Buizen voorversterker
CD Speler
FM / DAB+ radio
Bluetooth + NFC
Afstandsbediening
Afspelen vanaf USB
Externe apparaten opladen
Technische data
DAB+ frequentiebereik: 174,928 - 239,200 MHz
FM-frequentiebereik: 87,5 - 108 MHz
Bluetooth-profielen: A2DP
Bluetooth-bereik: tot 8 meter
Bluetooth-zendvermogen: 4 dBm
NFC-werkfrequentie: 13,56 MHz
Woofer: 4,3" (110 mm)
Tweeter: 1,5" (38 mm)
Uitgangsvermogen (RMS): 2 x 30 W
Impedantie: 6 Ohm
THD: <1% (1 KHz, 1 W)
Ingangen / uitgangen:
Jack 3,5 mm koptelefoonuitgang
2 x RCA-luidsprekeruitgangen
Jack 3,5 mm audio-ingang
AUX-ingang
USB-poort (5 V 1 A)
Antenne aansluiting
Stopcontact
Stroomverbruik: 35 W
Voeding: AC 100 - 240 V~; 50 - 60 Hz
Dimensies
Hoofdeenheid: 250 x 276 x 146 mm
Luidspreker: 160 x 202 x 244 mm
Netherlands
Juiste manier van het afvoeren van het product
(afgedankte elektrische en elektronische toestellen)
Elektrische apparatuur met het symbool van een doorgehaalde prullenbak op
wieltjes mag niet samen met het huisvuil worden weggegooid. Dergelijke
apparatuur moet worden ingezameld en gerecycled. De erin vervatte
schadelijke stoen kunnen het milieu verontreinigen en vormen een bedreiging
voor de menselijke gezondheid.
Geproduceerd in Volksrepubliek China voor LECHPOL ELECTRONICS, Sp. z o.o.
Sp.k., ul. Garwolińska 1, 08-400 Miętne.

Instrukcja obsługiInstrukcja obsługi
PL
PL
54 55
KWESTIE BEZPIECZEŃSTWA
Przed użyciem należy dokładnie zapoznać się z treścią instrukcji obsługi oraz
zachować ją w celu późniejszego wykorzystania. Producent nie ponosi
odpowiedzialności za nieprawidłowe użycie produktu.
1. Urządzenie należy umieścić na płaskiej, suchej i stabilnej powierzchni.
2. Nie należy umieszczać na urządzeniu ciężkich przedmiotów.
3. Nie należy wkładać przedmiotów do głośnika.
4. Nie należy umieszczać urządzenia w pobliżu źródeł ciepła, takich jak
grzejniki itp. Nie należy umieszczać urządzenia na ruchomych
powierzchniach.
5. Urządzenie należy umieścić w miejscu z prawidłową cyrkulacją powietrza.
Nie należy zakłócać wentylacji poprzez zakrywanie otworów
wentylacyjnych.
6. Urządzenie należy chronić przed wilgocią, wodą oraz innymi płynami. Nie
należy używać ani przechowywać urządzenia w zbyt wysokich
temperaturach. Urządzenie należy chronić przed bezpośrednim
nasłonecznieniem oraz źródłami ciepła.
7. Przed podłączeniem do źródła zasilania, należy sprawdzić zgodność
napięcia prądu gniazda sieciowego i urządzenia.
8. Nie należy używać głośników na najwyższym poziomie głośności przez
dłuższy czas. Aby uniknąć uszkodzenia słuchu, nie zaleca się używania
urządzenia na najwyższym poziomie głośności.
9. Należy natychmiast przerwać używanie głośników w przypadku
wystąpienia szumu w uszach, dyskomfortu lub innych reakcji ubocznych.
10. Należy upewnić się, że urządzenie znajduje się z dala od urządzeń
elektronicznych, które mogą powodować zakłócenia.
11. Jeśli urządzenie nie jest używane przez dłuższy czas, należy odłączyć je od
źródła zasilania.
12. Nie należy obsługiwać urządzenia mokrymi rękami.
13. Zabrania się używać urządzenia, jeśli jest uszkodzone.
14. Zabrania się własnoręcznej naprawy sprzętu. W wypadku uszkodzenia,
należy skontaktować się z autoryzowanym punktem serwisowym w celu
sprawdzenia/naprawy.
15. Należy ZAWSZE odłączyć urządzenie od źródła zasilania przed
czyszczeniem.
16. Urządzenie należy czyścić jedynie za pomocą miękkiej, lekko wilgotnej
ściereczki. Nie należy używać środków chemicznych lub detergentów do
czyszczenia tego urządzenia
17. Gdy odłączasz kabel zasilania, zawsze chwytaj za wtyczkę, nigdy za kabel.
18. Chroń kabel zasilania przed deptaniem i zginaniem, zwłaszcza przy
wtyczce i wyjściu z urządzenia.
JEDNOSTKA GŁÓWNA
1
6 7 8 9 10 11 12 13
2 3 4 5
1. Pokrętło zmiany trybu
2. Stacja dysków CD
3. Wyświetlacz
4. Przycisk wysunięcia tacki ze
stacji dysków
5. Pokrętło regulacji poziomu
głośności
6. Wejście Audio (3,5 mm)
7. Przycisk zasilania
8. Przycisk odtwarzanie / pauza
9. Poprzedni utwór
10. Następny utwór
11. Przycisk BASS
12. Przycisk TREBLE
13. Wyjście słuchawkowe 3,5 mm
14. Gniazdo zasilania
15. Wejścia RCA
16. Wejście USB
17. Wejście antenowe DAB/FM
18. Wejścia AUX
14 15 16 17 18

Instrukcja obsługiInstrukcja obsługi
PL
PL
56 57
PILOT
116
17 18
19 20
21 22
23
2
34
5
7
8
9
10
11
12
13
14
15 29
27
28
26
25 24
6
1. Przycisk trybu czuwania
2. Przycisk radia FM / DAB+
3. Przycisk odtwarzacza CD
4. Przycisk Intro (W trybie USB,
CD naciśnij, aby odtwarzać
tylko pierwsze 10 sekund
każdego utworu)
5. Przycisk powtarzania (Naciśnij
aby w pętli odtwarzać jeden
utwór, cały folder lub
wyłączyć tę opcję)
6. Przycisk equalizera (Wybór
ustawień equalizera)
7. Przycisk zwiększonej
głośności
8. Przycisk ustawień zegara
9. Następny utwór
10. Przycisk wstecz
11. Poprzedni utwór
12. Przycisk odtwarzania / pauza
/ parowania
13. Następny / poprzedni album
14. Klawiatura numeryczna
(Wybór utworu / zapisanej
stacji radiowej)
15. Wybór numeru powyżej 9
(Naciśnij ten przycisk a
następnie jeden z przycisków
klawiatury numerycznej, aby
wybrać numer powyżej 9)
16. Wysuń / wsuń kieszeń na
płytę CD
17. Przycisk trybu Bluetooth, AUX
i Audio (naciskaj, aby
przełączać między trybami)
18. Przycisk trybu USB
19. Zmiana poziomu
podświetlenia ekranu LCD
20.Odtwarzanie losowe
21. Ustawienia wyłącznika
czasowego
22. Przycisk wzmocnienia bassu
23. Przycisk budzika
24. Przycisk wyboru
wyświetlanych informacji
podczas odtwarzania utworu
(naciskaj, aby przełączać się
miedzy upłyniętym czasem
utworu, pozostałym czasem
utworu, pozostałym czasem
albumu)
25. Przycisk naprzód
26.Przycisk STOP / SCAN
27. Przyciski regulacji poziomu
głośności
28.Przycisk wyciszenia dźwięków
29.Przycisk zapisu stacji radiowej
1. Przed użyciem pilota, należy odkręcić śrubkę
mocującą tylną klapkę baterii.
2.Usunąć plastikowe zabezpieczenie baterii.
3.Wyciągnąć gniazdo baterii.
4.Umieścić w nim nową baterię CR2025 zgodnie z
zaznaczoną polaryzacją (+/-), a następnie umieścić
gniazdo na baterie w pozycji początkowej i zakręcić
śrubkę mocującą.
Uwaga:
• Jeśli pilot nie będzie używany przez dłuższy czas, należy wyjąć z niego
baterie.
• By uniknąć awarii, należy dokładnie przeczytać instrukcję użytkowania.
• Nie należy upuszczać lub uderzać pilota.
• Urządzenie i pilot należy chronić przed wodą i wilgocią.
• Urządzenie i pilot należy chronić przed bezpośrednim nasłonecznieniem i
źródłami ciepła.
• Do czyszczenia należy używać wyłącznie miękkiej, lekko wilgotnej
ściereczki, bez użycia detergentów.
Zasięg działania pilota
INSTALACJA BATERII
1. Pilot należy skierować w stronę
czujnika podczerwieni z przodu
urządzenia.
2.Należy upewnić się, że nie ma
przeszkód między czujnikiem
podczerwieni na urządzeniu i pilotem. 6 m

Instrukcja obsługiInstrukcja obsługi
PL
PL
58 59
PODŁĄCZANIE
Podłączanie głośników
1. Aby podłączyć głośniki należy lekko odkręcić nakrętki znajdujące się na
gniazdach z tyłu jednostki głównej.
2.Wsunąć do końca nieizolowaną część przewodu. Przewody prawego
głośnika należy podłączyć do gniazda „R”, przewody lewego głośnika do
gniazda „L, pamiętając aby przewody podłączone do jednostki centralnej
były podłączone do głośników w ten sam sposób (czerwone gniazdo na
jednostce centralnej do czerwonego gniazda na głośniku, czarne
analogicznie do czerwonych)
3.Dokręcić mocno nakrętki gniazd tak, aby włożone przewody nie wypadały.
1. Aby połączyć urządzenie zewnętrzne z wieżą KM1961 za pomocą kabla RCA
(niedołączony do zestawu), należy podłączyć kabel do:
• gniazd AUDIO IN L/R na tym urządzeniu
• gniazd wyjścia audio na urządzeniu zewnętrznym.
2.Aby połączyć to urządzenie z urządzeniem zewnętrznym za pomocą kabla
audio z wtyczką 3,5 mm Jack (niedołączony do zestawu), należy podłączyć
kabel do:
• gniazda AUX IN na tym urządzeniu
• gniazda słuchawkowego na urządzeniu zewnętrznym.
Podłączanie dodatkowych urządzeń
OBSŁUGA
Włącz / wyłącz
Aby włączyć urządzenie należy nacisnąć przycisk STANDBY. Urządzenie
przejdzie do ostatnio używanego trybu.
Tryb czuwania
Aby przejść do trybu czuwania należy nacisnąć i przytrzymać przycisk
STANDBY. Czerwona kontrolka świadczy o trybie ECO.
Uwaga: Po 15 minutach bezczynności urządzenie automatycznie przejdzie do
trybu czuwania (z wyjątkiem radia FM/DAB i trybu Bluetooth z podłaczonym
urządzeniem zewnętrznym).
Wyłącznik czasowy
Urządzenie posiada funkcję wyłącznika czasowego, po jej włączeniu, wieża
automatycznie przejdzie w stan czuwania po wyznaczonym wcześniej czasie.
• Gdy urządzenie jest włączone, należy nacisnąć przycisk Sleep, aby wybrać
określoną ilość czasu (w minutach).
Podłączanie anteny FM / DAB
1. Antenę radiową należy podłączyć do
gniazda anteny FM / DAB znajdującej
się z tyłu urządzenia.
2.Jeśli odbiór jest słaby, należy
podłączyć antenę zewnętrzną.
Uwaga: by uniknąć szumów, należy
umieścić anteny daleko od urządzenia,
kabla łączącego i kabla zasilania AC.
Podłączanie zasilania
Uwaga:
• Przed podłączeniem do zasilania
sieciowego należy upewnić się, że
napięcie zasilania jest zgodne z
napięciem znajdującym się na nadruku
na spodzie urządzenia.
• Podłączenie tego urządzenia do
zasilanie może nastąpić jedynie po
podłączeniu wszystkich innych
przewodów.

Instrukcja obsługiInstrukcja obsługi
PL
PL
60 61
Ustawianie zegara
Ustawianie jasności wyświetlacza
1. W trybie czuwania, naciśnij i przytrzymaj na pilocie przycisk CLOCK, aby
włączyć ustawienia zegara.
2.Za pomocą przycisków zmiany utworu należy wybrać odpowiednią wartość.
3.Aby przejść do następnej opcji należy nacisnąć przycisk CLOCK na pilocie.
W trybie oczekiwania, należy kilkukrotnie nacisnąć przycisk DIM aby wybrać
odpowiedni poziom jasności.
• Aby wyłączyć tę funkcję, należy kilkukrotnie nacisnąć przycisk Sleep aż
wyświetli się napis OFF.
ODTWARZANIE Z URZĄDZENIA BLUETOOTH
Aby odtwarzać utwory z urządzenia zewnętrznego obsługującego łączność
Bluetooth, należy sparować urządzenia przed pierwszym użyciem. Parowanie
urządzeń musi być przeprowadzone tylko raz.
1. Aby połączyć urządzenia należy włączyć tryb Bluetooth na tym urządzeniu
za pomocą przycisku Bluetooth na pilocie zdalnego sterowania lub pokrętła
wyboru trybu na jednostce głównej.
2.Włączyć łączność Bluetooth w urządzeniu zewnętrznym.
3.Wyszukać dostępne urządzenie Bluetooth.
4.Wybrać „KM1961” z listy urządzeń do sparowania.
5.Jeśli będzie to konieczne, podać domyślne hasło „0000”.
6.Aby wyczyścić parowania, należy nacisnąć i przytrzymać przycisk PAIRING.
Urządzenie posiada także moduł łączności NFC, dzięki któremu również można
parować urządzenie zewnętrzne z wieżą bez potrzeby wyszukiwania jej w
dostępnych urządzeniach Bluetooth. Aby to zrobić wystarczy włączyć NFC na
urządzeniu zewnętrznym i przyłożyć je do płytki w górnej części wieży, po
czym na ekranie urządzenia zewnętrznego należy zaakceptować parowanie.
Uwaga:
• Zasięg działania między tym urządzeniem i urządzeniem Bluetooth wynosi
do 8 m.
• Producent nie gwarantuje zgodności ze wszystkimi urządzeniami Bluetooth.
• Wszelkie przeszkody między tym urządzeniem i urządzeniem Bluetooth
mogą zmniejszyć zasięg łączności.
• Urządzenie nie powinno zostać zlokalizowane w bezpośrednim sąsiedztwie
innych urządzeń elektronicznych, gdyż może to powodować zakłócenia.
• Jeśli odległość między urządzeniami będzie większa niż zasięg łączności,
nastąpi rozłączenie urządzeń. Aby połączyć urządzenia ponownie, należy
umieść je w zasięgu.
Ręczne zapisywanie stacji radiowych
1. Aby przejść w tryb radia FM/DAB, należy nacisnąć przycisk FM/DAB na
pilocie lub za pomocą pokrętła wybrać tryb FM lub DAB na jednostce
głównej.
2.Nacisnąć i przytrzymać przycisk naprzód / wstecz by rozpocząć
automatyczne wyszukiwanie stacji radiowych.
3.Aby wyszukać kolejne stacje należy powtórzyć krok 2. Aby wyszukać stację
radiową ręcznie należy kilkukrotnie nacisnąć przycisk następnego /
poprzedniego utworu, aż do uzyskania właściwej częstotliwości.
RADIO FM / DAB
Strojenie stacji radiowych FM / DAB
Pamięć ulubionych stacji radiowych FM może pomieścić maksymalnie 20 stacji.
W trybie radia FM należy nacisnąć i przytrzymać przycisk PROG, aby aktywować
automatyczne zapisywanie.
• Na ekranie wyświetli się napis AUTO.
• Urządzenie zapisze wszystkie stacje radiowe FM automatycznie według siły
sygnału, po czym odtworzy pierwszą zapisaną stację.
Pamięć ulubionych stacji radiowych DAB może pomieścić maksymalnie 30
stacji. W trybie radia DAB należy nacisnąć i przytrzymać przycisk SCAN, aby
aktywować automatyczne zapisywanie.
• Na ekranie wyświetli się napis SCANNING.
• Urządzenie zapisze wszystkie stacje radiowe DAB automatycznie według
siły sygnału, po czym odtworzy pierwszą zapisaną stację.
Automatyczne zapisywanie stacji radiowych FM
Automatyczne zapisywanie stacji radiowych DAB
ODTWARZANIE Z URZĄDZENIA ZEWNĘTRZNEGO
1. Aby odtwarzać utwory z urządzenia zewnętrznego, należy połączyć
urządzenia za pomocą kabla audio (kabel nie znajduje się w zestawie),
odpowiednio do gniazd AUX IN/gniazda AUDIO IN.
2.Nacisnąć stosowny przycisk AUDIO IN/AUX IN na pilocie zdalnego sterowania.
3.Rozpocząć odtwarzanie na urządzeniu zewnętrznym.
1. Aby zapisać wybraną stację radiową, należy najpierw wybrać jej
częstotliwość.
2.Nacisnąć przycisk PROG by aktywować tryb zapisywania. PROG zacznie
migać, aby zatwierdzić należy ponownie nacisnąć przycisk PROG. Na
ekranie wyświetli się numer pod którym została zapisana ta stacja i jej
częstotliwość.
3.Aby zapisać kolejne stacje należy powtórzyć kroki 1-2.

Instrukcja obsługiInstrukcja obsługi
PL
PL
62 63
Aby przejść do poprzednio zapisanej stacji radiowej należy kilkukrotnie
nacisnąć przycisk poprzedni / następny utwór, aż do osiągnięcia numeru
zapisanej stacji.
Aby przełączyć pomiędzy trybami MONO i STEREO, należy nacisnąć przycisk
REPEAT na pilocie.
Aby przełączać aktualnie wyświetlane informacje należy naciskać przycisk
INFO na pilocie.
Wybieranie zapisanej stacji radiowej
Ustawienie trybu MONO i STEREO
Przełączanie aktualnie wyświetlanych informacji
W trakcie odtwarzania, należy nacisnąć przycisk VOL+/- na pilocie lub użyć
pokrętła regulacji poziomu głośności na jednostce centralnej, aby zwiększyć /
zmniejszyć poziom głośności.
W trakcie odtwarzania, należy nacisnąć przycisk S-BASS aby włączyć/wyłączyć
wzmocnienie basu.
Aby włączyć/wyłączyć funkcję Loudness, w trakcie odtwarzania należy nacisnąć
przycisk LOUDNESS.
REGULACJA POZIOMU GŁOŚNOŚCI I USTAWIEŃ DŹWIĘKU
Regulacja poziomu głośności
Wzmocnienie basu
Funkcja Loudness
W trakcie odtwarzania, należy nacisnąć przycisk wyciszenia MUTE by wyciszyć
/ włączyć ponownie dźwięk.
Wyciszenie dźwięku
Uwaga: Aby usunąć stację z listy ulubionych należy nadpisać na niej kolejną
stację.
W trakcie odtwarzania, należy nacisnąć przycisk Equalizera P-EQ kilkukrotnie
aby wybrać jedno z poniższych ustawień:
FLAT / POP / JAZZ / ROCK / CLASSIC
Ustawienia Equalizera
Uwaga: Należy upewnić się, że godzina jest ustawiona prawidłowo.
1. W stanie czuwania, należy nacisnąć i przytrzymać przycisk Timer, aż na
ekranie wyświetli się napis TIMER SET. Cyfry godzin zaczną migać.
2.Za pomocą przycisków następny / poprzedni utwór na pilocie lub panelu
urządzenia należy wybrać rodzaj i godzinę budzika oraz zatwierdzić
przyciskiem TIMER. Na ekranie wyświetlą się cyfry minut i zaczną migać.
3.Za pomocą przycisków następny / poprzedni utwór na pilocie lub panelu
urządzenia należy wybrać minutę, po czym nacisnąć przycisk Timer w celu
zatwierdzenia.
4.Za pomocą przycisków VOL +/- ustawić głośność, po czym ponownie
zatwierdzić przyciskiem Timer.
5.Aby włączyć lub wyłączyć budzik należy nacisnąć przycisk Timer na pilocie.
Na ekranie pojawi się odpowiedni komunikat TIMER ON lub TIMER OFF.
USTAWIENIA BUDZIKA
Po podłączeniu urządzeń USB (pamięci flash, czytnika kart pamięci),
urządzenie będzie odtwarzać utwory zapisane na zewnętrznym nośniku
danych. Aby to zrobić należy:
1. Podłączyć urządzenie USB do portu USB wieży KM1961.
2.Aby wybrać funkcję USB należy użyć pokrętła zmiany trybu na jednostce
centralnej lub przycisku USB na pilocie. Na wyświetlaczu pojawi się napis
"USB".
3.Aby rozpocząć odtwarzanie należy nacisnąć przycisk odtwarzania / pauzy
na pilocie lub jednostce centralnej.
4.Aby zatrzymać utwór należy nacisnąć przycisk odtwarzania / pauzy lub
przycisk STOP na pilocie.
5.Aby zmienić utwór należy nacisnąć przycisk poprzedniego / następnego
utworu.
6.A by przewinąć utwór należy nacisnąć i przytrzymać przycisk wstecz /
naprzód.
7. Aby zmienić album należy nacisnąć przycisk następny / poprzedni utwór.
Ładowanie urządzeń zewnętrznych
Kiedy urządzenie jest podłączone do zasilania, port USB na panelu przednim
może służyć do ładowania urządzeń zewnętrznych. Maksymalne napięcie
ładowania wynosi 5 V 1 A.
ODTWARZANIE Z USB

Instrukcja obsługiInstrukcja obsługi
PL
PL
64 65
1. Aby wybrać funkcję CD należy użyć pokrętła zmiany trybu na jednostce
centralnej lub przycisku CD na pilocie. Na wyświetlaczu pojawi się napis
"DISC".
2.Należy nacisnąć przycisk wysunięcia tacki ze stacji dysków na pilocie lub
jednostce centralnej ,położyć na niej płytę, a następnie ponownie nacisnąć
przycisk wysunięcia tacki ze stacji dysków.
3.Aby rozpocząć odtwarzanie należy nacisnąć przycisk odtwarzania / pauzy
na pilocie lub jednostce centralnej.
4.Aby zatrzymać utwór należy nacisnąć przycisk odtwarzania / pauzy lub
przycisk STOP na pilocie.
5.Aby zmienić utwór należy nacisnąć przycisk poprzedniego / następnego
utworu.
6.A by przewinąć utwór należy nacisnąć i przytrzymać przycisk wstecz /
naprzód.
7. Aby zmienić album należy nacisnąć przycisk następny / poprzedni utwór.
Programowanie odtwarzania
Urządzenie posiada funkcję odtwarzania wyłącznie wybranych utworów z płyty.
1. A by zaprogramować odtwarzanie należy nacisnąć przycisk STOP na pilocie.
2.Następnie należy nacisnąć przycisk PROG na pilocie – na ekranie urządzenia
wyświetli się napis 001 P-01.
3.Aby wybrać numer utworu należy naciskać przycisk następnego /
poprzedniego utworu lub użyć klawiatury numerycznej. Na ekranie pojawi
się cyfra odpowiadająca numerowi wybranego utworu.
4.Aby przejść do możliwości zaprogramowania kolejnego utworu należy
nacisnąć przycisk PROG.
5.Analogicznie należy programować kolejne utwory.
6.Aby rozpocząć odtwarzanie zaprogramowanych utworów należy nacisnąć
przycisk odtwarzania / pauzy.
7. Aby wyłączyć funkcję zaprogramowanego odtwarzania należy nacisnąć
przycisk STOP.
ODTWARZANIE Z PŁYT CD SPECYFIKACJA
Informacje ogólne
Przedwzmacniacz lampowy
Odtwarzacz płyt CD
Radio FM / DAB+
Bluetooth + NFC
Pilot zdalnego sterowania
Odtwarzanie z USB
Ładowanie urządzeń zewnętrznych
Dane techniczne
Zakres częstotliwości DAB+: 174,928 - 239,200 MHz
Zakres częstotliwości FM: 87,5 - 108 MHz
Profile Bluetooth: A2DP
Zasięg Bluetooth: do 8 metrów
Maks. moc nadawania Bluetooth: 4 dBm
Częstotliwość pracy NFC: 13,56 MHz
Głośnik niskotonowy: 4,3” (110 mm)
Głośnik wysokotonowy: 1,5” (38 mm)
Moc wyjściowa (RMS): 2 x 30 W
Impedancja: 6 Ohm
THD: <1% (1 KHz, 1 W)
Wejścia / wyjścia:
Wyjście słuchawkowe Jack 3,5 mm
Wyjścia głośnikowe 2 x RCA
Wejście audio Jack 3,5 mm
Wejście AUX
Port USB (5 V 1 A)
Gniazdo antenowe
Gniazdo zasilania
Pobór mocy: 35 W
Zasilanie: AC 100 - 240 V~; 50 - 60 Hz
Wymiary
Jednostka główna: 250 x 276 x 146 mm
Głośnik: 160 x 202 x 244 mm

Poland
Prawidłowe usuwanie produktu
(Zużyty sprzęt elektryczny i elektroniczny)
Oznaczenie przekreślonego kosza umieszczone na produkcie lub w
odnoszących się do niego tekstach wskazuje, że po upływie okresu
użytkowania nie należy usuwać go z innymi odpadami pochodzącymi z
gospodarstw domowych. Aby uniknąć szkodliwego wpływu na środowisko
naturalne i zdrowie ludzi wskutek niekontrolowanego usuwania odpadów,
prosimy o oddzielenie produktu od innego typu odpadów oraz odpowiedzialny
recykling w celu promowania ponownego użycia zasobów materialnych, jako
stałej praktyki. W celu uzyskania informacji na temat miejsca i sposobu
bezpiecznego dla środowiska recyklingu tego produktu użytkownicy w
gospodarstwach domowych powinni skontaktować się z punktem sprzedaży
detalicznej, w którym dokonali zakupu produktu, lub z organem władz
lokalnych. Użytkownicy w firmach powinni skontaktować się ze swoim
dostawcą i sprawdzić warunki umowy zakupu. Produktu nie należy usuwać
razem z innymi odpadami komunalnymi. Taki sprzęt podlega selektywnej
zbiórce i recyklingowi. Zawarte w nim szkodliwe substancje mogą powodować
zanieczyszczenie środowiska i stanowić zagrożenie dla życia i zdrowia ludzi.
Wyprodukowano w CHRL dla LECHPOL ELECTRONICS Sp. z o.o. Sp.K., Ul.
Garwolińska 1, 08-400 Miętne.
WIĘCEJ
Więcej informacji na temat tego urządzenia dostępne są na stronie:
www.krugermatz.com.
Przed użyciem należy dokładnie zapoznać się z treścią instrukcji obsługi.
Odwiedź stronę www.krugermatz.com, aby poznać więcej produktów i
akcesoriów.
W przypadku pytań lub wątpliwości zachęcamy do zapoznania się z Najczęściej
Zadawanymi Pytaniami w zakładce Pomoc.
Instrukcja obsługi
PL
66
Manual de utilizare
RO
67
INSTRUCTIUNI PRIVIND SIGURANTA
Cititi cu atentie manualul de utilizare inainte de prima utilizare si pastrati-l
pentru consultari ulterioare.
1. Puneți dispozitivul pe o suprafață plană și stabilă.
2. Nu puneți obiecte grele pe dispozitiv.
3. Nu puneți nimic în interiorul difuzoarelor.
4. Nu puneți dispozitivul în apropierea surselor de căldură cum ar fi
radiatoare, etc. Nu puneți dispozitivul pe suprafețe instabile.
5. Poziționați dispozitivul într-un loc bine ventilat. Nu obstrucționați ventilața
- nu acoperiți fantele de ventilație.
6. Protejați acest dispozitiv de umiditate, apă și alte lichide. Evitați utilizarea/
depozitarea dispozitivului la temperaturi extreme. Nu expuneți produsul la
lumina directă a soarelui și la alte surse de căldură.
7. Înainte de a conecta dispozitivul la sursa de alimentare, asigurați-vă că
tensiunea indicată pe aparat corespunde cu tensiunea de pe priză.
8. Păstrați volumul la un nivel rezonabil pe toata perioada utilizării
dispozitivului. Pentru a preveni deteriorarea auzului nu ridicați volumul la
un nivel prea mare.
9. Dacă aveți tinitus (sunetul din ureche asemănător unui țârâit apărut fără a
exista un zgomot sonor) , disconfort sau alte aspecte legate de
comportament, încetați să utilizați dispozitivul imediat.
10. Asigurați-vă că dispozitivul este pus departe de dispozitive electrice care
generează câmp electromagnetic.
11. Deconectați dispozitivul de la priză dacă nu va fi folosit o perioadă mai
lungă de timp.
12. Nu manipulați produsul cu mâinile ude.
13. Nu utilizați produsul dacă este deteriorat.
14. Nu încercați să reparați produsul singur. În caz de deteriorare, contactați
un service autorizat pentru verificare sau reparații.
15. Deconectați întotdeauna produsul de la sursa de alimentare înainte de
curățare.
16. Curățați dispozitivul cu un material textil moale, ușor umezit. Nu utilizați
agenți chimici pentru a curăța acest dispozitiv.
17. Pri odpájaní napájacieho kábla uchopte a ťahajte za zástrčku, nikdy nie za
kábel.
18. Chráňte napájací kábel pred kráčaním alebo ohýbaním, najmä pri
zástrčkách a pri výstupe zo zariadenia.

Manual de utilizareManual de utilizare
RO
RO
68 69
DESCRIERE UNITATE PRINCIPALĂ
1
6 7 8 9 10 11 12 13
2 3 4 5
1. Buton schimbare mod
2. CD drive
3. Ecran
4. Buton de scoatere a tăvii de
unitate CD
5. Buton volum
6. Intrare audio (3,5 mm)
7. Buton alimentare
8. Buton redare/pauză
9. Buton melodia anterioră
10. Buton melodia următoare
11. Buton BASS
12. Buton TREBLE
13. Ieșire audio jack 3,5 mm
14. Mufă alimentare
15. Intrare RCA
16. Port USB
17. Intrare antenă DAB / FM input
18. Intrare AUX
DESCRIERE TELECOMANDĂ
116
17 18
19 20
21 22
23
2
34
5
7
8
9
10
11
12
13
14
15 29
27
28
26
25 24
6
1. Buton Standby
2. Buton FM / DAB+ radio
3. Buton CD player
4. Buton Intro (în modul USB și
CD, apăsați pentru a reda
doar primele 10 secunde ale
fiecărei piese)
5. Buton repetare (apăsați
pentru a comuta între o
singură piesă, întregul fișier
sau dezactivați această
opțiune)
6. Buton egalizator (Selectați
egalizatorul presetat)
7. Buton Loudness
8. Buton setări ceas
9. Buton melodia următoare
10. Buton înapoi
11. Buton melodia anterioară
12. Buton redare / pauză /
asocierea
13. Albumul următor / anterior
14. Taste numerice (Selectați
piese / postul de radio salvat)
15. Selectați un număr mai amre
de 9 (Apăsați acest buton și
apoi unul dintre butoanele
tastaturii numerice pentru a
forma un număr mai mare de
9)
16. Deschideți / închideți
compartimentul pentru disc
17. Buton mod Bluetooth, AUX și
audio (continuați să apăsați
pentru a comuta între moduri)
18. Buton mod USB
19. Buton DIM (Reglați
luminozitatea afișajului)
20.Redare aleatorie
21. Buton temporizator
22. Buton îmbunătățire bass
23. Alarmă ceas
24. Buton de selectare a
informațiilor de pe afișaj în
timpul redării melodiei
(apăsați pentru a comuta între
timpul scurs din melodie,
timpul rămas din melodie,
timpul rămas al albumului)
25. Buton înainte
26.Buton STOP / SCAN
27. Butoane volum
28.Buton mute
29.Buton presetare radio
14 15 16 17 18

Manual de utilizareManual de utilizare
RO
RO
70 71
1. Deșurubați șurubul din spatele telecomenzii.
2.Îndepărtați banda izolantă de pe baterie dacă este
utilizată pentru prima dată. Aceasta este situată în
partea din spate a telecomenzii.
3.Scoateți compartimentul pentru baterii.
4.Înlocuiți corect o baterie nouă (tip CR2025) și
introduceți complet compartimentul pentru baterii
înapoi în poziția inițială.
Atenție:
• Scoateți bateriile dacă telecomanda nu va fi folosită o perioadă mai lungă
de timp.
• Pentru a evita o eventuală defecțiune, citiți următoarele instrucțiuni și
utilizați corect telecomanda.
• Nu scăpați telecomanda și nu o supuneți unui impact puternic.
• Nu vărsați apă sau alte lichide pe telecomandă și nu o puneți pe suprafețe
umede.
• Nu puneți telecomanda la lumina directă a soarelui sau în apropierea
surselor de căldură.
• Curățați telecomanda cu un material
textil moale, ușor umezit.
Raza de acțiune a telecomenzii
INSTALAREA BATERIILOR
1. Îndreptați telecomanda către senzorul
IR din partea din față a unității.
2.Asigurați-vă că nu este niciun obstacol
între senzorul IR al aparatului și
telecomandă.
6 m
CONECTAREA
Conectarea difuzoarelor
1. Pentru a conecta difuzoarele, deșurubați ușor piulițele de la mufele din
spatele unității principale.
2.Introduceți complet partea neizolată a firului. Cablurile difuzorului din
dreapta trebuie conectat la mufa ”R”, cablurile difuzorului din stânga la
mufa ”L”, asigurându-vă că cablurile conectate la unitatea centrală sunt
conectate la difuzoare în același mod (mufa roșie de pe unitatea centrală la
mufa roșie a difuzorului, negru în același mod ca roșu).
3.Strângeți bine piulițele, astfel încât firele introduse să nu cadă.
1. Pentru a conecta un dispozitiv extern la sistemul HI-FI KM1961 utilizând un
cablu RCA (nu este inclus), conectați cablul la:
• Mufele AUDIO IN (L&R) de pe această unitate.
• Mufele de ieșire audio de pe dispozitivul audio extern.
2.Conectați un cablu AUX IN (3,5 jack) la:
• mufa AUX IN de pe această unitate.
• mufa pentru căști de pe dispozitivul audio extern
Conectarea dispozitivului extern

Manual de utilizareManual de utilizare
RO
RO
72 73
FUNCȚIONARE
Pornire / oprire
Apăsați butonul STANDBY pentru a porni unitatea. Dispozitivul va porni de la
ultima sursă selectată.
Mod standby
Apăsați și țineți apăsat STANDBY pentru a comuta unitatea în modul de
așteptare Eco Power. Indicatorul roșu Eco Power se aprinde.
Notă: După 15 minute de inactivitate, dispozitivul va intra automat în modul de
așteptare (cu excepția radioului FM / DAB și a modului Bluetooth cu
dispozitivul extern conectat).
Setați temporizatorul
Această unitate poate trece automat în modul de așteptare după o perioadă
stabilită.
• Când unitatea este pornită, apăsați butonul SLEEP în mod repetat pentru a
selecta o perioadă prestabilită (în minute)
Conectarea antenei FM / DAB
1. Conectați antena FM l/ DAB a mufa
radio FM / DAB din partea din spate a
unității.
2.Dacă conexiunea este slabă, conectați
antena exterioară.
Atenție: Pentru a evita zgomotul, țineți
antenele departe de sistem, cablu de
conectare și cablul de alimentare AC.
Conectarea la alimentare
Atenție:
• Asigurați-vă că tensiunea de
alimentare corespunde cu tensinea de
la aparat.
• Înainte de a conecta cablul de
alimentare AC, asigurați-vă că ați
finalizat toate celelalte conexiuni.
Setarea ceasului
Reglarea luminozității afișajului
1. În modul de așteptare, țineți apăsat butonul CLOCK pentru a activa modul de
setare a ceasului.
2.Utilizați butoanele de schimbare a piesei pentru a selecta valoarea dorită.
3.Apăsați butonul CLOCK de pe telecomandă pentru a merge la următoarea
opțiune.
În modul de așteptare, apăsați butonul DIM pentru a selecta nivelul de
luminozitate.
• Pentru a dezactiva, apăsați butonul SLEEP în mod repetat până când apare
[OFF] (sleep o).
REDAREA DE PE UN DISPOZITIV BLUETOOTH
Pentru a conecta dispozitivul Bluetooth la unitate, trebuie să asociați
dispozitivul la unitate. Asocierea trebuie efectuată doar o dată.
1. Pentru a conecta dispozitive, activați modul Bluetooth al acestei unități
utilizând butonul Bluetooth de pe telecomandă sau butonul mod de pe
unitatea principală.
2.Activați funcția Bluetooth de pe dispozitivul dumneavoastră.
3.Căutați alte dispozitive Bluetooth de pe dispozitivul extern.
4.Selectați ”KM1961” din lista de dispozitive.
5.Introduceți parola implicită ”0000” dacă este necesar.
6.Apăsați și țineți apăsat butonul asociere (PAIRING) pentru a șterge asocierile
existente.
Dispozitivul are, de asemenea, modul de comunicare NFC, datorită căruia
puteți asocia și un dispozitiv extern cu sistemul Hi-Fi fără a fi nevoie să îl
căutați în dispozitivele Bluetooth disponibile. Pentru a face acest lucru, pur și
simplu porniți NFC pe dispozitivul extern și puneți-l pe placa din partea
superioară a unității principale, apoi pe ecranul dispozitivului extern trebuie să
acceptați asocierea.
Atenție:
• Raza operațională dintre această unitate și un dispozitiv Bluetooth este de
aproximativ 8 m.
• Compatibilitatea cu toate dispozitivele Bluetooth nu este garantată.
• Orice obstacol între această unitate și un dispozitiv Bluetooth poate reduce
domeniul operațional.
• Păstrați această unitate departe de orice alt dispozitiv electronic care poate
provoca interferențe.
• Dacă distanța dintre dispozitive depășește domeniul de comunicare,
dispozitivele vor fi deconectate. Pentru a vă reconecta, plasați dispozitivul
extern în domeniul de operare.

Manual de utilizareManual de utilizare
RO
RO
74 75
Programare manuală a posturilor de radio
1. Apăsați butonul FM / DAB de pe telecomandă sau utilizați butonul de mod
de pe unitatea principală pentru a alege radio FM / DAB.
2.Apăsați și țineți apăsat butonul înainte / înapoi de pe panoul frontal (sau de
pe telecomandă), radioul se oprește automat la primul post.
3.Repetați pasul 2 pentru a regla mai multe stații. Pentru a regla manual o
stație, apăsați în mod repetat butonul următor / precedent până găsiți
frecvența dorită.
RADIO FM / DAB
Reglați posturile FM / DAB
Puteți programa maximum 20 de posturi de radio presetate. Țineți apăsat
butonul PROG pentru a activa programarea automată.
• AUTO este afișat scurt.
• Toate stațiile disponibile sunt programate în ordinea puterii de recepție a
benzii de undă.
Puteți programa maximum 30 de posturi de radio DAB presetate. Țineți apăsat
butonul SCAN pentru a activa programarea automată.
• SCANNING este afișat scurt.
• Toate stațiile disponibile sunt programate în ordinea puterii de recepție a
benzii de undă.
Programare automată a posturilor de radio FM
Programare automată a posturilor de radio DAB
REDARE DE PE UN DISPOZITIV EXTERN
1. Pentru a reda piese de pe un dispozitiv extern, conectați dispozitivele cu un
cablu audio (cablul nu este inclus), corespunzător mufelor AUX IN / mufei
AUDIO IN.
2.Apăsați butonul AUDIO IN / AUX IN corespunzător pentru a selecta intrarea
audio.
3.Începeți să redați pe dispozitivul extern.
1. Reglați un post de radio.
2.Apăsați butonul PROG pentru a activa programarea. PROG începe să
pâlpâie, apăsați-l din nou pentru a confirma. Sunt afișate numărul
presetat și frecvența postului presetat.
3.Repetați pașii anteriori pentru a programa alte posturi.
Notă: Pentru a suprascrie o stație programată, stocați o altă stație la locul ei.
Apăsați butonul următor / anterior de pe panoul frontal (sau telecomandă)
pentru a selecta un număr presetat.
Pentru a comuta între modurile MONO și STEREO, apăsați butonul REPEAT de
pe telecomandă.
Pentru a comuta informațiile afișate în prezent, apăsați butonul INFO de pe
telecomandă.
Reglați un post de radio presetat
Setați modurile MONO și STEREO
Comutarea informațiilor afișate în prezent
În timpul redării, apăsați butonul VOL +/- de pe telecomandă sau utilizați
butonul de reglare a volumului de pe unitatea principală pentru a crește / reduce
nivelul volumului.
În timpul redării, apăsați butonul S-BASS pentru a activa / dezactiva
îmbunătățirea super basului. Dacă funcția este activată, pe ecran va fi afișat
BASS.
În timpul redării, apăsați butonul LOUDNESS pentru a activa / dezactiva funcția de
sunet.
REGLAȚI NIVELUL VOLUMULUI ȘI EFECTUL DE SUNET
Reglați nivelul volumului
Enhance bass
Funcția de sunet
În timpul redării, apăsați butonul MUTE pentru a dezactiva sau restabili
sunetul.
Oprire sunet (mute)
În timpul redării, apăsați în mod repetat butonul P-EQ pentru a selecta:
FLAT / POP / JAZZ / ROCK / CLASSIC
Selectați un efect de sunet presetat

Manual de utilizareManual de utilizare
RO
RO
76 77
Notă: Asigurați-vă că ați setat corect ora.
1. În modul de așteptare, țineți apăsat butonul TIMER, până când [TIMER SET]
se derulează pe afișaj. Cifrele orei sunt afișate și încep să pâlpâie.
2.Apăsați butonul următor / anterior de pe panoul frontal sau de pe
telecomandă pentru a seta modul de alarmă și setați ora, apoi apăsați din
nou butonul TIMER pentru a confirma. Cifrele minute sunt afișate și încep
să pâlpâie.
3.Apăsați butonul următor / anterior de pe panoul frontal sau de pe
telecomandă pentru a seta minutul. Apăsați butonul TIMER pentru a
confirma.
4.Apăsați butonul VOL +/– pentru a regla volumul, apoi apăsați butonul TIMER
pentru a confirma.
5.În modul de așteptare, apăsați butonul TIMER în mod repetat pentru a
activa / dezactiva cronometrul. Mesajul corespunzător TIMER ON sau TIMER
OFF va apărea pe ecran.
SETAȚI ALARMA
După conectarea dispozitivelor USB (memorie flash, cititor de card de
memorie), dispozitivul va reda melodiile salvate pe suportul de date extern.
Pentru a face acest lucru:
1. Conectați un dispozitiv USB la portul USB KM1961.
2.Pentru a selecta funcția USB, utilizați selectorul de mod de pe unitatea
principală sau butonul USB de pe telecomandă. Pe ecran va apărea „USB”.
3.Pentru a începe redarea, apăsați butonul de redare / pauză de pe
telecomandă sau de pe unitatea principală.
4.Pentru a opri pista, apăsați butonul de redare / pauză sau butonul STOP de
pe telecomandă.
5.Pentru a schimba pista, apăsați butonul de track anterior / următor.
6.Pentru a derula înapoi o piesă, țineți apăsat butonul înapoi / înainte.
7. Pentru a schimba albumul, apăsați butonul următor / anterior.
Încărcarea dispozitivelor externe
Când dispozitivul este conectat la sursa de alimentare, portul USB de pe
panoul frontal poate fi utilizat pentru a încărca dispozitive externe. Tensiunea
maximă de încărcare este de 5V 1 A.
REDARE DE PE USB
1. Utilizați selectorul de moduri de pe unitatea principală sau butonul CD de
pe telecomandă pentru a selecta funcția CD. Pe ecran apare „DISC”.
2.Apăsați butonul de evacuare a tăvii de pe telecomandă sau unitatea
centrală, apoi așezați un disc pe el, apoi apăsați butonul de evacuare de pe
unitate.
3.Pentru a începe redarea, apăsați butonul de redare / pauză de pe
telecomandă sau de pe unitatea principală.
4.Pentru a opri pista, apăsați butonul de redare / pauză sau butonul STOP de
pe telecomandă.
5.Pentru a schimba pista, apăsați butonul de track anterior / următor.
6.Pentru a derula înapoi o piesă, apăsați și țineți apăsat butonul înapoi /
înainte.
7. Pentru a schimba albumul, apăsați butonul următor / anterior.
Programarea redării
Dispozitivul poate reda numai piesele selectate de pe disc.
1. Pentru a programa redarea, apăsați butonul STOP de pe telecomandă.
2.Apoi apăsați butonul PROG de pe telecomandă - ecranul dispozitivului va
afișa mesajul 001 P-01.
3.Apăsați butonul următor / anterior sau utilizați tastatura numerică pentru a
selecta un număr de pistă. Ecranul va arăta numărul piesei selectate.
4.Pentru a trece la posibilitatea de a programa următoarea piesă, apăsați
butonul PROG.
5.Piesele succesive trebuie programate în același mod.
6.Pentru a începe redarea pieselor programate, apăsați butonul de redare /
pauză.
7. Pentru a dezactiva funcția Redare programată, apăsați butonul STOP.
REDAREA DE PE CD-URI
SPECIFICAȚIE
Informații generale
Preamplificator tub
CD disc player
Radio: FM / DAB+
Bluetooth + NFC
Telecomandă
Redare de pe USB
Încărcarea dispozitivelor externe
Date tehnice
Domeniu frecvență DAB+: 174,928 - 239,200 MHz
Domeniu frecvență FM: 87,5 - 108 MHz

Profile Bluetooth: A2DP
Raza de acțiune: până la 8 metri
Max. Putere transmisie Bluetooth: 4 dBm
Răspuns în frecvență NFC: 13,56 MHz
Woofer: 4,3” (110 mm)
Tweeter: 1,5” (38 mm)
Putere de ieșire (RMS): 2 x 30 W
Impedanță: 6 Ohm
THD: <1% (1 KHz, 1 W)
Intrări / Ieșiri:
Ieșire cască jack 3,5 mm
2 ieșiri difuzor RCA
Intrare audio jack 3,5 mm
Intrare AUX
Port USB (5 V 1 A)
Mufă antenă
Mufă alimentare
Consum: 35 W
Alimentare: AC 100 - 240 V~; 50 - 60 Hz
Dimensiuni
Unitate principală: 250 x 276 x 146 mm
Difuzor: 160 x 202 x 244 mm
Romania
Reciclarea corecta a acestui produs
(reziduuri provenind din aparatura electrica si electronica)
Este interzisă depozitarea deșeurilor de echipamente marcate cu simbolul unui
coș de gunoi barat împreună cu alte deșeuri. Acest echipament este supus
colectării și reciclării selective. Substanțele nocive pe care le conține pot
provoca poluarea mediului și reprezintă o amenințare pentru sănătatea umană.
Distribuit de Lechpol Electronic SRL, Republicii nr. 5, Resita, CS, ROMANIA.
AFLĂ MAI MULTE
Pentru mai multe informații despre acest dispozitiv vizitati:
www.krugermatz.com. Citiți manualul de utilizare cu atenție înainte de a utiliza
dispozitivul. Vizitati site-ul web www.krugermatz.com pentru mai multe
produse si accesorii. În cazul in care aveti întrebări va rugam sa va adresati
secțiunii Întrebări frecvente
Manual de utilizare
RO
78
Používateľská príručka
SK
79
BEZPEČNOSTNÉ PREDPISY
Pred použitím si pozorne prečítajte návod na obsluhu a odložte si ho pre
budúce použitie. Výrobca nezodpovedá za nesprávne použitie výrobku.
1. Zariadenie umiestnite na rovný, suchý a stabilný povrch.
2. Na zariadenie neumiestňujte ťažké predmety.
3. Do reproduktora nevkladajte žiadne predmety.
4. Neumiestňujte zariadenie v blízkosti zdrojov tepla, ako sú ohrievače atď.
Neumiestňujte zariadenie na pohyblivé povrchy.
5. Zariadenie umiestnite na miesto so správnou cirkuláciou vzduchu.
Nebráňte cirkulácii zakrytím ventilačných otvorov.
6. Chráňte zariadenie pred vlhkosťou, vodou a inými tekutinami. Zariadenie
nepoužívajte ani neskladujte pri príliš vysokých teplotách. Chráňte
zariadenie pred priamym slnečným žiarením a zdrojmi tepla.
7. Pred pripojením k zdroju napájania skontrolujte kompatibilitu elektrickej
zásuvky a zariadenia.
8. Nepoužívajte reproduktory dlhú dobu s nastavenou najvyššou úrovňou
hlasitosti. Aby ste predišli poškodeniu sluchu, neodporúča sa používať
zariadenie veľmi hlasno.
9. Ak pocítite hluk v ušiach, nepríjemný pocit a iné vedľajšie účinky, ihneď
prestaňte reproduktory používať.
10. Uistite sa, že sa zariadenie nachádza mimo dosahu akýchkoľvek
elektronických zariadení, ktoré môžu spôsobovať rušenie.
11. Ak zariadenie dlhší čas nepoužívate, odpojte ho od zdroja napájania.
12. Neobsluhujte zariadenie mokrými rukami.
13. Je zakázané používať zariadenie, ak je poškodené.
14. Je zakázané opravovať zariadenie svojpomocne. V prípade poškodenia sa
obráťte na autorizované servisné stredisko, kde vám zariadenie skontrolujú
/ opravia.
15. VŽDY pred čistením odpojte zariadenie od zdroja napájania.
16. Čistite zariadenie iba mäkkou, mierne navlhčenou handričkou. Na čistenie
nepoužívajte chemikálie ani čistiace prostriedky.
17. Pri odpájaní napájacieho kábla uchopte a ťahajte za zástrčku, nikdy nie za
kábel / šnúru.
18. Chráňte napájací kábel pred zašliapnutím alebo zlomením, najmä pri
zástrčke a pri výstupe zo zariadenia.

Používateľská príručkaPoužívateľská príručka
SK
SK
80 81
POPIS HLAVNEJ JEDNOTKY
1
6 7 8 9 10 11 12 13
2 3 4 5
1. Prepínač zmeny režimu
2. Slot CD
3. Displej
4. Tlačidlo vysunutia CD
5. Regulátor hlasitosti
6. Vstup Audio (3,5 mm)
7. Tlačidlo napájania
8. Tlačidlo prehrávania / pauza
9. Predchádzajúca skladba
10. Nasledujúca skladba
11. Tlačidlo BASS
12. Tlačidlo TREBLE
13. Slúchadlový výstup 3,5 mm
14. Zásuvka napájania
15. RCA vstup
16. USB vstup
17. Anténny vstup DAB/FM
18. Vstup AUX
POPIS OVLÁDAČA
116
17 18
19 20
21 22
23
2
34
5
7
8
9
10
11
12
13
14
15 29
27
28
26
25 24
6
1. Tlačidlo pohotovostného
režimu
2. Tlačidlo rádia FM / DAB+
3. Tlačidlo prehrávača CD
4. Tlačidlo Intro (V režime USB,
CD stlačením prehráte iba
prvých 10 sekúnd každej
stopy)
5. Tlačidlo opakovania
(Stlačením budete prehrávať
v slučke jednu skladbu, celý
priečinok alebo túto funkciu
vypnete)
6. Tlačidlo ekvalizéra (Výber
nastavení ekvalizéra)
7. Tlačidlo zvýšenia hlasitosti
8. Tlačidlo nastavenia hodín
9. Nasledujúca skladba
10. Tlačidlo späť
11. Predchádzajúca skladba
12. Tlačidlo prehrávania / pauza /
párovania
13. Nasledujúci / predchádzajúci
album
14. Numerická klávesnica (Výber
skladby / uloženej rozhlasovej
stanice)
15. Výber čísla väčšieho ako 9
(Stlačte toto tlačidlo
a následne jedno tlačidlo
z tlačidiel numerickej
klávesnice, čím zvolíte číslo
vyššie ako 9)
16. Vysunutie / zasunutie tácky
na CD disk
17. Tlačidlo režimu Bluetooth,
AUX a Audio (stláčaním
prepínate medzi režimami)
18. Tlačidlo režimu USB
19. Zmena úrovne podsvietenia
LCD displeja
20.Náhodné prehrávanie
21. Nastavenie časovača
22. Tlačidlo zvýraznenia basov
23. Tlačidlo budíka
24. Tlačidlo výberu zobrazovaných
informácií počas prehrávania
skladby (stlačením prepnete
medzi uplynutým časom
skladby, zostávajúcim časom
skladby a zostávajúcim časom
celého albumu)
25. Tlačidlo vpred
26.Tlačidlo STOP / SCAN
27. Tlačidlá regulácie hlasitosti
28.Tlačidlo stlmenia zvuku
29.Tlačidlo uloženia rádiovej
stanice
14 15 16 17 18

Používateľská príručkaPoužívateľská príručka
SK
SK
82 83
1. Pred použitím diaľkového ovládača odskrutkujte
skrutku, ktorá zaisťuje zadný kryt batérie.
2.Odstráňte plastovú fóliu z batérie.
3.Vytiahnite slot batérie.
4.Vložte doň novú batériu CR2025 podľa vyznačenej
polarity (+/-) a následne slot zasuňte na miesto
a zaistite skrutkou.
Poznámka:
• Ak nebudete diaľkový ovládač dlhší čas používať, vyberte z neho batérie.
• Aby ste predišli poškodeniu, pozorne si prečítajte návod na použitie.
• Zabráňte pádu a otrasom diaľkového ovládača.
• Zariadenie a diaľkové ovládanie chráňte pred vodou a vlhkosťou.
• Zariadenie a diaľkové ovládanie chráňte pred priamym slnečným žiarením
a zdrojmi tepla.
• Na čistenie používajte iba mäkkú, mierne navlhčenú handričku bez
čistiacich prostriedkov.
Dosah diaľkového ovládania
INŠTALÁCIA BATÉRIÍ
1. Namierte diaľkový ovládač na
infračervený senzor nachádzajúci sa na
prednej časti zariadenia.
2.Uistite sa, že medzi infračerveným
snímačom na zariadení a ovládačom
nie sú žiadne prekážky. 6 m
PRIPOJENIE
Pripojenie reproduktorov
1. Ak chcete pripojiť reproduktory, jemne odskrutkujte matice konektorov
terminálu, nachádzajúcich sa na zadnej strane hlavnej jednotky.
2.Úplne zasuňte odizolovanú časť kábla. Káble pravého reproduktora by mali
byť pripojené k terminálu „R”, káble ľavého reproduktora k terminálu „L,
pamätajte na to, že káble pripojené k hlavnej jednotke by mali byť
k reproduktorom pripojené rovnakým spôsobom (červený terminál na
hlavnej jednotke prepojený s červeným terminálom na reproduktore, čierny
terminál s čiernym terminálom reproduktora).
3.Pevne utiahnite matice terminálov, aby vložené káble nevypadli.
1. Ak chcete pripojiť externé zariadenie k audiosystému KM1961 pomocou
kábla RCA (nie je súčasťou balenia), zapojte kábel do:
• konektorov AUDIO IN L/R na tomto zariadení
• konektorov audio výstupu na externom zariadení.
2.Ak chcete pripojiť toto zariadenie k externému zariadeniu pomocou audio
kábla s konektorom Jack 3,5 mm (nie je súčasťou balenia), zapojte kábel do:
• konektora AUX IN na tomto zariadení
• slúchadlového konektora na externom zariadení.
Pripojenie ďalších zariadení

Používateľská príručkaPoužívateľská príručka
SK
SK
84 85
POUŽITIE
Zapnutie / vypnutie
Zariadenie zapnete alebo vypnete stlačením tlačidla STANDBY. Zariadenie
prejde do posledného používaného režimu.
Pohotovostný režim
Do pohotovostného režimu vstúpite stlačením a podržaním tlačidla STANDBY.
Červená kontrolka signalizuje režim ECO.
Poznámka: Po 15 minútach nečinnosti sa zariadenie automaticky prepne do
pohotovostného režimu (s výnimkou režimu rádia FM / DAB a režimu Bluetooth
s pripojeným externým zariadením).
Časovač
Zariadenie je vybavené funkciou časovača vypnutia, kde po jej aktivovaní sa
audiosystém po vopred nastavenom čase automaticky prepne do
pohotovostného režimu.
• Pri zapnutom zariadení stlačením tlačidla Sleep vyberte konkrétny čas (v
Pripojenie FM / DAB antény
1. Pripojte rádiovú anténu k konektoru
zásuvky FM / DAB antény,
nachádzajúcej sa na zadnej strane
zariadenia.
2.Ak je príjem slabý, pripojte vonkajšiu
anténu FM / DAB.
Poznámka: aby ste predišli rušeniu,
umiestnite anténu ďalej od zariadenia,
prepojovacieho a napájacieho AC kábla.
Pripojenie napájania
Upozornenie:
• Pred pripojením k sieťovému napájaniu
sa uistite, že sa napájacie napätie
zásuvky zhoduje s napätím
vyznačeným na štítku v spodnej časti
zariadenia.
• Pripojenie tohto zariadenia k napájaniu
vykonávajte až po zapojení všetkých
ostatných prepojovacích káblov.
Nastavenie hodín
Nastavenie jasu displeja
1. V pohotovostnom režime stlačte a podržte na diaľkovom ovládači tlačidlo
CLOCK, čím vstúpite do nastavení hodín.
2.Pomocou tlačidiel zmeny skladby zvoľte požadovanú hodnotu.
3.Ak chcete prejsť na ďalšiu možnosť, stlačte na ovládači tlačidlo CLOCK.
V pohotovostnom režime vyberte požadovanú úroveň jasu opakovaným
stláčaním tlačidla DIM.
minútach).
• Ak chcete túto funkciu vypnúť, opakovane stláčajte tlačidlo Sleep, kým sa
nezobrazí nápis OFF.
PREHRÁVANIE Z BLUETOOTH ZARIADENIA
Ak chcete prehrávať skladby z externého zariadenia pomocou pripojenia
Bluetooth, pred prvým použitím musíte zariadenia spárovať. Párovanie
zariadení je potrebné vykonať iba raz.
1. Ak chcete pripojiť zariadenia, zapnite na tomto audio systéme režim
Bluetooth, pomocou tlačidla Bluetooth na diaľkovom ovládači alebo
pomocou prepínača zmeny režimu na hlavnej jednotke.
2.Zapnite pripojenie Bluetooth na externom zariadení.
3.Vyhľadajte dostupné zariadenie Bluetooth.
4.Vyberte „KM1961” zo zoznamu dostupných zariadení.
5.V prípade potreby zadajte predvolené heslo „0000”.
6.Ak chcete párovanie zrušiť, stlačte a podržte tlačidlo PAIRING.
Zariadenie je taktiež vybavené komunikačným modulom NFC, vďaka ktorému
môžete s týmto audiosystémom spárovať externé zariadenie bez nutnosti
vyhľadávania dostupných Bluetooth zariadení. Ak to chcete urobiť, stačí zapnúť
NFC na externom zariadení a položiť ho na platňu v hornej časti audiosystému.
Následne na displeji externého zariadenia povoľte párovanie.
Poznámka:
• Dosah prenosu medzi týmto zariadením a externým Bluetooth zariadení je
až do 8 m.
• Výrobca nezaručuje kompatibilitu so všetkými Bluetooth zariadeniami.
• Akákoľvek prekážka medzi týmto zariadením a zariadením Bluetooth môže
znižovať komunikačný dosah.
• Zariadenie by nemalo byť umiestnené v bezprostrednej blízkosti iných
elektronických zariadení, ktoré môžu spôsobovať rušenie.
• Ak vzdialenosť medzi zariadeniami bude väčšia ako komunikačný dosah,
zariadenia sa odpoja. Pre opätovné spojenie zariadení medzi sebou ich
umiestnite v ich dosahu.

Používateľská príručkaPoužívateľská príručka
SK
SK
86 87
Manuálne uloženie rozhlasových staníc
1. Pre vstup do režimu rádia FM / DAB stlačte tlačidlo FM / DAB na diaľkovom
ovládači alebo pomocou prepínača zmeny režimu vyberte FM alebo DAB na
hlavnej jednotke.
2.Automatické vyhľadávanie staníc spustíte stlačením a podržaním tlačidla
vpred / späť.
3.Ak chcete vyhľadať ďalšie stanice, opakujte krok 2. Ak chcete rozhlasovú
stanicu vyhľadať ručne, niekoľkokrát stlačte tlačidlo vpred / späť, až kým
nenájdete požadovanú frekvenciu.
FM / DAB RÁDIO
Ladenie rozhlasových staníc FM / DAB
Do pamäte obľúbených rozhlasových staníc je možné uložiť maximálne 20
staníc. V režime rádia stlačte a podržte tlačidlo PROG pre spustenie
automatického ukladania.
• Na displeji sa zobrazí nápis AUTO.
• Zariadenie automaticky uloží všetky rozhlasové stanice FM podľa sily
signálu a následne spustí prvú uloženú stanicu.
Do pamäte obľúbených rozhlasových staníc je možné uložiť maximálne 30
staníc. V režime rádia stlačte a podržte tlačidlo SCAN pre spustenie
automatického ukladania.
• Na displeji sa zobrazí nápis SCANNING.
• Zariadenie automaticky uloží všetky rozhlasové stanice DAB podľa sily
signálu a následne spustí prvú uloženú stanicu.
Automatické uloženie rozhlasových staníc FM
Automatické uloženie rozhlasových staníc DAB
PREHRÁVANIE Z EXTERNÉHO ZARIADENIA
1. Ak chcete prehrávať skladby z externého zariadenia, prepojte ho pomocou
audio kábla (kábel nie je súčasťou balenia) s príslušnými konektormi AUX IN
/ AUDIO IN.
2.Stlačte príslušné tlačidlo AUDIO IN/AUX IN na diaľkovom ovládači.
3.Spustite prehrávanie na externom zariadení.
1. Ak chcete uložiť požadovanú rozhlasovú stanicu, najskôr vyberte jej
frekvenciu.
2.Stlačením tlačidla PROG spustíte režim ukladania. PROG začne blikať, pre
potvrdenie opäť stlačte tlačidlo PROG. Na displeji sa zobrazí číslo, na
ktorej pozícii bola stanica uložená a jej frekvencia.
3.Pre uloženie ďalších staníc opakujte kroky 1-2.
Poznámka: Ak chcete odstrániť stanicu z pamäte, musíte ju prepísať ďalšou
stanicou.
Pre zvolenie predtým uloženej rozhlasovej stanice opakovane stláčajte tlačidlo
nasledujúci / predchádzajúci album, až kým nedosiahnete číslo uloženej
stanice.
Na prepnutie medzi režimami MONO a STEREO stlačte tlačidlo REPEAT na
diaľkovom ovládači.
Na prepínanie medzi aktuálne zobrazenými informáciami stlačte tlačidlo INFO
na diaľkovom ovládači.
Výber uloženej rozhlasovej stanice
Nastavte režimy MONO a STEREO
Prepínanie aktuálne zobrazených informácií
Pre zvýšenie / zníženie hlasitosti stlačte počas prehrávania tlačidlo VOL+/- na
diaľkovom ovládači alebo použite ovládač hlasitosti na hlavnej jednotke.
Počas prehrávania stlačením tlačidla S-BASS zapnete / vypnete zosilnenie
basov.
Ak chcete zapnúť / vypnúť funkciu Loudness, počas prehrávania stlačte tlačidlo
LOUDNESS.
REGULÁCIA HLASITOSTI A NASTAVENIA ZVUKU
Regulácia úrovne hlasitosti
Zvýraznenie basov
Funkcia Loudness
Počas prehrávania stlačením tlačidla stíšenia MUTE zapnete / vypnete zvuk.
Stlmenie zvuku
Počas prehrávania opakovane stlačte tlačidlo Ekvalizéra P-EQ a vyberte
z nasledujúcich možností:
FLAT / POP / JAZZ / ROCK / CLASSIC
Nastavenie ekvalizéra

Používateľská príručkaPoužívateľská príručka
SK
SK
88 89
Poznámka: Uistite sa, že je čas nastavený správne.
1. V pohotovostnom režime stlačte a podržte tlačidlo Timer, kým sa na displeji
nezobrazí nápis TIMER SET. Číslice hodín začnú blikať.
2.Pomocou tlačidiel nasledujúci / predchádzajúci album na ovládači alebo na
hlavnom paneli vyberte druh, čas budíka a potvrďte tlačidlom TIMER. Na
displeji sa zobrazia číslice minút, ktoré blikajú.
3.Pomocou tlačidiel nasledujúci / predchádzajúci album na ovládači alebo
hlavnom paneli nastavte čas a stlačením tlačidla Timer výber potvrďte.
4.Pomocou tlačidiel VOL +/- nastavte hlasitosť a znovu potvrďte výber
tlačidlom Timer.
5.Budík zapnete alebo vypnete stlačením tlačidla Timer na ovládači. Na
displeji sa zobrazí nápis TIMER ON alebo TIMER OFF.
NASTAVENIE BUDÍKA
Po pripojení zariadení USB (flash pamäť, čítačka pamäťových kariet) bude
zariadenie prehrávať skladby uložené na externom dátovom nosiči. Robiť to:
1. Pripojte zariadenie USB k portu USB KM1961.
2.Na zvolenie funkcie USB použite volič režimov na hlavnej jednotke alebo
tlačidlo USB na diaľkovom ovládači. Na displeji sa zobrazí „USB“.
3.Prehrávanie spustíte stlačením tlačidla prehrávania / pozastavenia na
diaľkovom ovládači alebo na hlavnej jednotke.
4.Skladbu zastavíte stlačením tlačidla prehrávania / pozastavenia alebo
tlačidla STOP na diaľkovom ovládači.
5.Ak chcete zmeniť skladbu, stlačte tlačidlo predchádzajúcej / nasledujúcej
stopy.
6.Ak chcete skladbu previnúť dozadu, stlačte a podržte tlačidlo vzad / vpred.
7. Ak chcete zmeniť album, stlačte tlačidlo nasledujúcej / predchádzajúcej
stopy.
Nabíjanie externých zariadení
Keď je zariadenie pripojené k zdroju napájania, port USB na prednom paneli je
možné použiť na nabíjanie externých zariadení. Maximálne nabíjacie napätie je
5V 1 A.
PREHRÁVANIE Z USB
1. Na zvolenie funkcie CD použite volič režimov na hlavnej jednotke alebo
tlačidlo CD na diaľkovom ovládaní. Na displeji sa zobrazí „DISC“.
2.Stlačte tlačidlo na vysunutie zásobníka na diaľkovom alebo centrálnom
zariadení, vložte naň disk a potom stlačte tlačidlo vysunutia na jednotke.
3.Prehrávanie spustíte stlačením tlačidla prehrávania / pozastavenia na
diaľkovom ovládači alebo na hlavnej jednotke.
4.Skladbu zastavíte stlačením tlačidla prehrávania / pozastavenia
PREHRÁVANIE Z DISKOV CD
alebo tlačidla STOP na diaľkovom ovládači.
5.Ak chcete zmeniť skladbu, stlačte tlačidlo predchádzajúcej / nasledujúcej
stopy.
6.Ak chcete skladbu previnúť dozadu, stlačte a podržte tlačidlo vzad / vpred.
7. Ak chcete zmeniť album, stlačte tlačidlo nasledujúcej / predchádzajúcej
skladby.
Programovanie prehrávania
Zariadenie môže prehrávať iba vybrané skladby na disku.
1. Na naprogramovanie prehrávania stlačte tlačidlo STOP na diaľkovom
ovládači.
2.Potom stlačte tlačidlo PROG na diaľkovom ovládači - na obrazovke
zariadenia sa zobrazí správa 001 P -01.
3.Stlačte tlačidlo nasledujúcej / predchádzajúcej stopy alebo pomocou
numerickej klávesnice vyberte číslo skladby. Na obrazovke sa zobrazí číslo
zvolenej stopy.
4.Ak chcete prejsť na možnosť programovania ďalšej stopy, stlačte tlačidlo
PROG.
5.Nasledujúce kusy by mali byť naprogramované rovnakým spôsobom.
6.Prehrávanie naprogramovaných skladieb spustíte stlačením tlačidla
prehrávania / pozastavenia.
7. Ak chcete deaktivovať funkciu programovaného prehrávania, stlačte tlačidlo
STOP.
ŠPECIFIKÁCIA
Všeobecné vlastnosti
Elektrónkový predzosilňovač
CD prehrávač
Rádio FM / DAB+
Bluetooth + NFC
Diaľkové ovládanie
Prehrávanie z USB
Nabíjanie externých zariadení
Technické parametre
Frekvenčný rozsah DAB+: 174,928 - 239,200 MHz
Frekvenčný rozsah FM: 87,5 - 108 MHz
Profily Bluetooth: A2DP
Dosah Bluetooth: až 8 metrov
Max. vysielací výkon Bluetooth: 4 dBm
Prevádzková frekvencia NFC: 13,56 MHz
Basový reproduktor: 4,3” (110 mm)
Výškový reproduktor: 1,5” (38 mm)

Používateľská príručka
SK
90
Výstupný výkon (RMS): 2 x 30 W
Impedancia: 6 Ohm
THD: <1% (1 KHz, 1 W)
Vstupy / výstupy:
Slúchadlový výstup Jack 3,5 mm
Reproduktorový výstup 2 x RCA
Audio vstup Jack 3,5 mm
AUX vstup
Port USB (5 V 1 A)
Anténna zásuvka
Napájacia zásuvka
Príkon: 35 W
Napájanie: AC 100 - 240 V~; 50 - 60 Hz
Rozmery
Hlavná jednotka: 250 x 276 x 146 mm
Reproduktor: 160 x 202 x 244 mm
Slovensko
Správna likvidácia tohto produktu
(O odpade z elektronických zariadení a ich
príslušenstva)
Elektrické zariadenie označené symbolom preškrtnutého koša nemožno
vyhadzovať do komunálneho odpadu. Takéto zariadenie je potrebné zbierať a
recyklovať. Škodlivé látky ktoré obsahuje, môžu spôsobiť znečistenie životného
prostredia a ohroziť tým ľudské zdravie.
Vyrobené v Číne pre LECHPOL ELECTRONICS Sp. z o.o. Sp.k., ul. Garwolińska 1, 08-
400 Miętne.

www.krugermatz.com
is a registered trademark
-
 1
1
-
 2
2
-
 3
3
-
 4
4
-
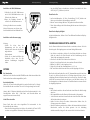 5
5
-
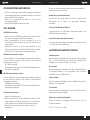 6
6
-
 7
7
-
 8
8
-
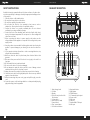 9
9
-
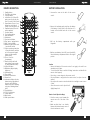 10
10
-
 11
11
-
 12
12
-
 13
13
-
 14
14
-
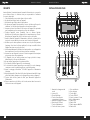 15
15
-
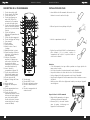 16
16
-
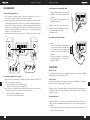 17
17
-
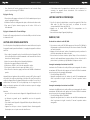 18
18
-
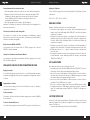 19
19
-
 20
20
-
 21
21
-
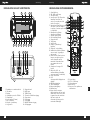 22
22
-
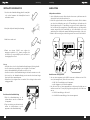 23
23
-
 24
24
-
 25
25
-
 26
26
-
 27
27
-
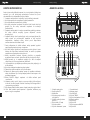 28
28
-
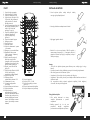 29
29
-
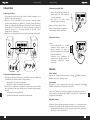 30
30
-
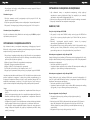 31
31
-
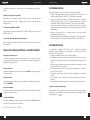 32
32
-
 33
33
-
 34
34
-
 35
35
-
 36
36
-
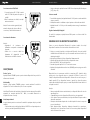 37
37
-
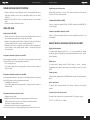 38
38
-
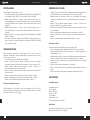 39
39
-
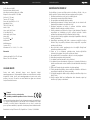 40
40
-
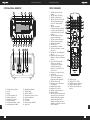 41
41
-
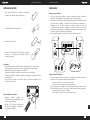 42
42
-
 43
43
-
 44
44
-
 45
45
-
 46
46
-
 47
47


Kruger Matz KM1961 de handleiding
- Categorie
- Auto media-ontvangers
- Type
- de handleiding
in andere talen
- français: Kruger Matz KM1961 Le manuel du propriétaire
- Deutsch: Kruger Matz KM1961 Bedienungsanleitung
- slovenčina: Kruger Matz KM1961 Návod na obsluhu
- polski: Kruger Matz KM1961 Instrukcja obsługi
- română: Kruger Matz KM1961 Manualul proprietarului
Gerelateerde papieren
Andere documenten
-
Lenco DAR-060 Handleiding
-
Lenco DAR-045BK Handleiding
-
-
Lenco MC-150 Handleiding
-
TechniSat DIGITRADIO 3 BLACK/SILVER de handleiding
-
Medion MD 84597 Handleiding
-
audizio 102.334 Handleiding
-
-
Imperial DABMAN i200 BLACK de handleiding
-
Imperial DABMAN i200 CD Handleiding