
FRITEUSE
instructieboekie
FRIGIDEIRA
manual de instruções
FREIDORA
manual de instrucciones
FRITIERGERÄT
Bedienungsanleitung
FRITEUSE
notice d’emploi
FRYER
operating instructions
FRIGGITRICE
libretto istruzioni
IT
GB
FR
DE
ES
NL
PT
COD. 1.000.45.0
DOMINO
De Fabrikant wijst iedere verantwoordelijkheid af voor enige onjuistheden in deze brochure welke geweten
kunnen worden aan copie - of drukfouten. Hij behoudt zich het recht voor aan zijn eigen produkten
wijzigingen aan te brengen die hij voor noodzakelijk of nuttig houdt zonder dat de wezenlijke kenmerken
erdoor benadeeld worden.
El constructor declina toda responsabilidad por las posibles inexactitudes contenidas en el presente
documento, imputables a errores de impresión o relacionadas. El constructor se reserva el derecho de
aportar a sus propios productos aquellas modificaciones que se considere necesarias o útiles, sin
perjudicar las características esenciales.
O Fabricante não assume nenhuma responsabilidade acerca de eventuais inexactidões contidas na
presente publicação, devidas a erros de impressão ou de transcrição. Reserva-se o direito de efectuar nos
próprios produtos as eventuais modificações que considerar necessárias ou úteis, sem prejudicar as
características essenciais.
The manufacturer declines all responsibility for possible inaccuracies contained in this pamphlet, due to
printing or copying errors. We reserve the right to make on our own products those changes to be
considered necessary or useful, without jeopardizing the essential characteristics.
Dans un souci constant d’amélioration qualitative, le constructeur se réserve la possibilité d’apporter à ses
produits les modifications utiles, sans compromettre ses caractéristiques essentielles.
Le constructeur décline toutes responsabilité pour d’eventuelles inexactitudes contenues dans cette
notice, imputables à des erreurs d’impression ou de transcription.
Die Herstellerfirma übernimmt keinerlei Verantwortung für eventuell in dieser Broschüre enthaltene
Ungenauigkeiten, die auf Druckfehler zurückzuführen sind und behält sich das Recht vor an ihren
Produkten alle für notwendig erachteten Änderungen anzubringen, ohne die wesentlichen Eigenschaften
zu beeinflussen.
La Casa costruttrice declina ogni responsabilità per le possibili inesattezze contenute nel presente
opuscolo, imputabili ad errori di stampa o di trascrizione. Si riserva il diritto di apportare ai propri prodotti
quelle modifiche che ritiene necessarie o utili, senza pregiudicarne le caratteristiche essenziali.

Fig. 1
Fig. 2
FRIGGITRICE libretto istruzioni 1
FRYER operating instructions 5
FRITEUSE notice d’emploi 9
FRITIERGERÄT Bedienungsanleitung 13
FREIDORA manual de instrucciones 17
FRITEUSE instructieboekie 21
FRIGIDEIRA manual de instruções 25
Apparecchio classe I tipo Y
Apparatus class 1 Type Y
Appareil de classe I type Y
Gerät der Klasse I Typ Y
Aparato clase I tipo Y
Apparaat klasse I typo Y
Aparelho classe 1 tipo Y
QUESTO
PRODOTTO
È
STATO
CONCEPITO
PER
UN
IMPIEGO
DI
TIPO
DOMESTICO
.
IL
COSTRUTTORE
DECLINA
OGNI
RESPONSABILITÀ
NEL
CASO
DI
EVENTUALI
DANNI
A
COSE
O
PERSONE
DERIVANTI
DA
UNA
NON
CORRETTA
INSTALLAZIONE
O
DA
USO
IMPROPRIO
,
ERRONEO
OD
ASSURDO
.
THIS
APPLIANCE
IS
CONCEIVED
FOR
DOMESTIC
USE
ONLY
.
THE
MANUFACTURER
SHALL
NOT
IN
ANY
WAY
BE
HELD
RESPONSIBLE
FOR
WHATEVER
INJURIES
OR
DAMAGES
ARE
CAUSED
BY
INCORRECT
INSTALLATION
OR
BY
UNSUITABLE
,
WRONG
OR
ABSURD
USE
.
CE
PRODUIT
EST
CONÇU
EXCLUSIVEMENT
POUR
USAGE
DOMESTIQUE
.
LE
CONSTRUCTEUR
DÉCLINE
TOUTE
RESPONSABILITÉ
POUR
DOMMAGES
ET
BLESSURES
CAUSÉES
PAR
UNE
INSTALLATION
INCORRECTE
OU
PAR
UN
USAGE
IMPROPRE
,
ERRONÉ
OU
ABSURDE
.
DIESES
PRODUKT
IST
ALS
HAUSHALTSGERÄT
GEDACHT
.
FÜR
SCHADEN
AN
SACHEN
ODER
PERSONEN
,
DIE
AUF
FALSCHE
INSTALLATION
BZW
.
UNGEEIGNETEN
GEBRAUCH
ODER
MISSBRAUCH
ZURÜCKZUFÜHREN
SIND
,
ÜBERNIMMT
DER
HERSTELLER
KEINERLEI
VERANTWORTUNG
.
ESTE
PRODUCTO
FUE
CONCEBIDO
PARA
UN
USO
DE
TIPO
DOMÉSTICO
.
EL
CONSTRUCTOR
DECLINA
CUALQUIER
RESPONSABILIDAD
EN
EL
CASO
DE
DAÑOS
EVENTUALES
A
COSAS
O
PERSONAS
QUE
DERIVEN
DE
UNA
INSTALACIÓN
INCORRECTA
O
DE
UN
USO
IMPROPIO
,
ERRADO
O
ABSURDO
.
DIT
PRODUKT
IS
ALS
HUISHOUDELIJK
APPARAAT
GEDACHT
.
VOOR
BESCHADIGINGEN
AAN
SPULLEN
OF
PERSONEN
DIE
AAN
VERKEERDE
INSTALLATIE
,
MISBRUIK
OF
VERKEERDE
GEBRUIK
ZIJN
TE
WIJTEN
,
NEEMT
DE
FABRIKANT
GEEN
VERANTWOORDELIJKHEID
OP
ZICH
.
ESTE
PRODUTO
FOI
CONCEBIDO
PARA
UMA
UTILIZAÇÃO
DE
TIPO
DOMÉSTICA
.
O
FABRICANTE
DECLINA
TODAS
AS
RESPONSABILIDADES
NO
CASO
DE
EVENTUAIS
DANOS
A
COISAS
OU
PESSOAS
DERIVADOS
DE
UMA
INSTALAÇÃO
INCORRECTA
OU
DE
USO
IMPRÓPRIO
,
ERRÓNEO
OU
ABSURDO
.
mng.9511175000
mng.9511174900
mng.9912210400
mng.9912211200
mng.9912210800

1
Caro Cliente,
sentitamente La ringraziamo e ci congratuliamo per la scelta
da Lei fatta.
Questo nuovo prodotto, accuratamente progettato e costruito
con materiali di primissima qualità, è stato attentamente
collaudato per poter soddisfare tutte le Sue esigenze di una
perfetta cottura.
La preghiamo pertanto di leggere e rispettare le facili istru-
zioni che Le permetteranno di raggiungere eccellenti risultati
sin dalla prima utilizzazione.
Con questo moderno apparecchio Le formuliamo i nostri più
vivi auguri.
IL COSTRUTTORE
INDICE
Istruzioniperl’utente
Installazione 2
Uso 2
Manutenzione 3
Istruzioniperl’installatore
Installazione 4
Posizionamento 4
Collegamento elettrico 4
Datitecnici
Alimentazione ~230 V
Potenza 2300 W
Cavo di alimentazione H05RR-F (3x1,5 mm
2
)
H05RN-F (3x1,5 mm
2
)

2
Istruzioniperl’utente
Tutte le operazioni relative all’installazione (allaccia-
mento elettrico) devono essere eseguite da personale
qualificato secondo le norme vigenti.
Per le istruzioni specifiche vedi la parte riservata
all’installatore.
Installazione
Uso
(Fig.1) La messa in funzione dell’apparecchio si effettua
agendo sulla manopola di comando posta sul frontalino
che consente di impostare una temperatura compresa
fra 40 e 200 °C.
Una spia luminosa segnala l’entrata in funzione della
resistenza, mentre lo spegnimento indica che la tempe-
ratura desiderata è stata raggiunta.
Una seconda spia (generale) rimane sempre accesa quan-
do l’apparecchio è in funzione.
La friggitrice è dotata di un termostato che mantiene
costante la temperatura del bagno d’olio, inoltre un ter-
mostato di sicurezza entra automaticamente in funzione
in caso di difettoso funzionamento del termostato prin-
cipale, impedendo all’olio di raggiungere temperature
troppo elevate, circa 220 °C.
L’uso di questo apparecchio è molto semplice, tuttavia
per ottenere i migliori risultati è opportuno adottare
alcuni facili accorgimenti come:
- prima di mettere l’olio per la prima volta, pulire accu-
ratamente le parti d’acciaio e la resistenza in modo da
eliminare gli eventuali residui di lavorazione.
- Non accendere mai l’apparecchio con le resistenze ruo-
tate fuori dalla vasca
- Non accendere mai l’apparecchio senza che vi sia l’olio
nella vaschetta.
- Usare sempre olii vegetali adatti per friggere: sono
sconsigliati gli olii di semi vari e l’olio di semi di gira-
sole.
- La quantità di olio contenuta nella vasca varia da un
minimo di l 2 ad un massimo di l 2,7. Se durante l’uso
il livello dell’olio dovesse scendere sotto il minimo, si
dovrà intervenire con un’aggiunta di olio fresco.
Si consiglia di effettuare le aggiunte con olio dello stesso
tipo. I livelli massimo e minimo sono contrassegnati con
due incisioni sulla parete verticale della vaschetta.

3
- L’olio può essere usato più volte, si consiglia però di
filtrarlo fra una cottura e l’altra, in modo da eliminare i
depositi che si possono verificare.
- Si consiglia comunque di cambiare l’olio molto spesso
perché anche se ben filtrato piccole particelle residue
possono prendere fuoco durante la cottura.
- Prima di introdurre i cibi nella friggitrice, controllare
che siano perfettamente asciutti. Attendere che l’olio
abbia raggiunto la temperatura desiderata.
- Per i cibi surgelati si consiglia di scongelare a bassa
temperatura e successivamente friggere ad alta tempe-
ratura.
- Nella preparazione di alcuni piatti (patatine fritte) i
migliori risultati si ottengono effettuando una precottu-
ra a 160 °C ed una cottura successiva a 180 °C.
- Spesso durante la cottura si devono aggiungere sale o
aromi: evitate, per quanto possibile, di effettuare queste
aggiunte direttamente nella friggitrice perché il sale,
cadendo nei bagni d’olio, ne riduce la qualità.
- In caso di mancato funzionamento, prima di richiedere
l’intervento tecnico, provare a ripristinare il termostato
di sicurezza premendo il pulsantino visibile, dopo aver
tolto la vaschetta dell’olio e svitato il tappo di protezione,
sulla parete interna anteriore.
Prima di ogni operazione disinserire elettricamente l’ap-
parecchiatura.
Per una maggiore durata dell’apparecchiatura è indi-
spensabile eseguire periodicamente un’accurata pulizia
generale tenendo presente quanto segue:
- le parti in acciaio e/o smaltate devono essere pulite con
prodotti idonei (reperibili in commercio) non abrasivi o
corrosivi. Evitare prodotti a base di cloro (varecchina,
ecc;);
- evitare di lasciare sul piano lavoro sostanze acide o
alcaline (aceto, sale, succo di limone, ecc.).
Manutenzione

4
Le presenti istruzioni sono rivolte all’installatore quali-
ficato quale guida all’installazione, regolazione e manu-
tenzione secondo le leggi e le normative in vigore.
Gli interventi devono sempre essere effettuati ad appa-
recchiatura disinserita elettricamente.
(Fig. 2) L’apparecchio è previsto per essere incassato in
un piano di lavoro come illustrato nell’apposita figura.
Predisporre su tutto il perimetro del piano il sigillante
a corredo.
Prima di effettuare l’allacciamento elettrico accertarsi
che:
- le caratteristiche dell’impianto siano tali da soddisfare
quanto indicato sulla targa matricola applicata sul fon-
do del piano:
- l’impianto sia munito di un efficace collegamento
di terra secondo le norme e le disposizioni di legge
in vigore. La messa a terra è obbligatoria a termini di
legge.
Nel caso che l’apparecchiatura non sia munita di cavo
e/o di relativa spina utilizzare materiale idoneo per
l’assorbimento indicato in targa matricola e per la tem-
peratura di lavoro. Il cavo in nessun punto dovrà rag-
giungere una temperatura superiore di 50 °C a quella
ambiente.
Desiderando un collegamento diretto alla rete, è neces-
sario interporre un interruttore onnipolare con apertura
minima fra i contatti di 3 mm dimensionato per il carico
di targa e rispondere alle norme in vigore (il cavo di
terra giallo/verde non deve essere interrotto dall’inter-
ruttore). La presa o l’interruttore onnipolare devono
essere facilmente raggiungibili con l’apparechiatura
installata.
N.B.: Il costruttore declina ogni responsabilità nel caso
che quanto sopra e le usuali norme antiinfortunistiche
non vengano rispettate.
Istruzioniperl’installatore
Installazione
Posizionamento
Collegamentoelettrico

5
Dear Customer,
We would like to congratulate you on the choice you have
made.
This new product, carefully designed and constructed from
materials of the highest quality, has been carefully tested so as
to be able to meet all your requirements for perfect cooking.
We would ask you, nevertheless, to read and follow the simple
instructions that will allow you to obtain excellent results
right from the beginning.
With this up-to-date apparatus, we would like to wish you
every success.
THE MANUFACTURER
CONTENTS
Instructionsfortheuser
Installation 6
Use 6
Maintenance 7
Instructionsfortheinstallationist
Installation 8
Positioning 8
Electrical connections 8
Technicaldata
Power supply ~ 230 V
Power 2300 W
Supply cable H05RR-F (3x1,5 sq. mm)
H05RN-F (3x1,5 sq. mm)

6
Instructionsfortheuser
All the operations relating to the installation (electrical
connection) must be carried out by qualified personnel
according to the regulations in force.
Installation
Use (Fig. 1) The apparatus is switched on by turning the
control knob on the front that allows a temperature to be
set from 40 to 200 °C.
A signal light comes on to show that the resistance is
operating, and when it goes off it shows that it has
reached the required temperature.
A second (general) light always stays on when the
apparatus is operating. The fryer is equipped with a
thermostat that constantly maintains the temperature of
the oil bath. Furthermore, a safety thermostat automa-
tically goes into operation in case of faulty working of
the main thermostat, preventing the oil from reaching
too high a temperature, about 220 °C.
The use of this equipment is very simple, however, to
obtain the best results, it is advisable to follow these
instructions:
- before putting oil in for the first time, carefully clean
the steel parts and the resistance, so as to remove any
residue left from manufacture.
- Never turn on the apparatus with the resistance turned
out of the bowl.
- Never turn on the apparatus unless there is oil in the
bowl.
- Always use vegetable oil suitable for frying: we do not
recommend oil from assorted seeds or sunflower.
- The quantity of oil contained in the bowl varies from a
minimum of 2 litres to a maximum of 2,7 litres. If, during
use, the oil level should drop below the minimum, fresh
oil must be added.
It is advisable to add oil of the same type. The minimum
and maximum levels are shown by two marks cut into
the vertical side of the bowl.
- The oil can be used several times, but we recommend
it is filtered between one cooking and the next, so as to
eliminate deposits which can occur.

7
- It is best to change the oil very often, however, because,
even if it is well filtered, small residual particles can
catch fire during cooking.
- Before putting the food into the fryer, check that is
perfectly dry.
Wait until the oil has reached the required temperature.
- For frozen food, it is advisable to defrost it at a low
temperature and then fry it at high temperature.
- In preparing certain dishes (fried potatoes) you will
get the best results by precooking at a temperature of
160 °C, and then subsequently cooking at 180 °C.
- During cooking, it is often necessary to add salt or
flavourings. Avoid, if at all possible, doing this directly
into the fryer, because salt, by falling into the oil, has its
quality reduced.
- In the case of a breakdown, before calling a technician,
try resetting the safety thermostat, by pressing the
button visible, after having removed the oil bowl and
unscrewed the safety plug on the front, interior side.
Before doing any operation, cut off the electricity from
the apparatus.
In order to give your equipment a long life, it is vital to
thoroughly clean it all over, remembering the following
points:
- the steel and/or painted parts must be cleaned using
suitable products (available on the market) which are not
abrasive or corrosive. Avoid products based on chlorine
(bleach, etc);
- avoid leaving acids or alkalis on the work surface
(vinegar, salt, lemon-juice, etc.)
Maintenance

8
These instructions are intended to be used by a qualified
installationist, who will be responsible for the installation,
adjustment and maintenance according to the laws and
regulations in force.
All operations must always be carried out with the
equipment disconnected from the electricity.
Instructionsfortheinstallationist
Installation
Positioning
Electricconnections
(Fig. 2) The apparatus is designed to be set into a work
surface, as shown in the relevant illustration.
Fit the seal provided round the whole perimeter of the
surface.
Before connecting up the electricity, ensure that:
- the specification of the system is such as to match that
shown on the serial number plate applied to the under-
neath of the work surface.
- the system is supplied with an efficient earth con-
nection to the ground, according to the regulations and
the laws in force. The earth connection is obligatory by
law.
In the case where the equipment is not supplied with
cable and/or relevant plug, make use of materials suited
to the input current shown on the serial number plate,
and to the working temperature. The cable must not
reach a temperature of more than 50°C higher than the
ambient temperature in any part of its length.
In order to connect directly to the mains supply, it is
necessary to insert a multipolar switch with a minimum
aperture between contacts of 3 mm, of a size suitable
for the load marked on the plate, and conforming to the
regulations in force (the yellow and green earth cable
must not be turned off by the switch). The plug or multi-
polar switch must be easily reached with the equipment
installed in position.
N.B.: The manufacturer declines any responsibility in the
case where the above and the normal accident prevention
regulations have not been respected.

9
Cher Client,
nous vous remercions beaucoup et nous nous congratulons du
choix que vous avez fait.
Ce nouveau produit, conçu et réalisé soigneusement avec des
matériaux de première qualité, a été attentivement essayé
pour pouvoir satisfaire toutes vos exigences pour une parfaite
cuisson.
Pourtant nous vous prions de bien lire et respecter ces
instructions faciles qui vous permettront d’atteindre des
résultats excellents dès votre premier emploi.
Avec ce moderne appareil nous vous souhaitons nos meilleurs
voeux.
LE CONSTRUCTEUR
INDEX
Instructionspourl’usager
Installation 10
Emploi 10
Entretien 11
Instructionspourl’installateur
Installation 12
Positionnement 12
Enclenchement électrique 12
Donnéestechniques
Alimentation ~230 V
Puissance 2300 W
Câble d’alimentation H05RR-F (3x1,5 mm
2
)
H05RN-F (3x1,5 mm
2
)

10
Instructionspourl’usager
Toutes les opérations concernant l’installation
(branchement électrique) doivent être effectuées par
parsonnel qualifié suivant les normes en vigueur.
Installation
Emploi
(Fig. 1) La mise en fonction de cet appareil a lieu en
tournant le bouton de commande placé sur la partie
devant qui permet de programmer une température qui
va de 40 à 220 °C.
Un temoin lumineux allumé signale l’entrée en fonction
de la résistance, tandis que s’il est éteint indique que la
température souhaitée a été atteinte.
Un deuxième temoin lumineux (général) reste allumé
continuellement lorsque l’appareil est en marche. La
friteuse est équipée d’un thermostat qui maintient
constante la température du bain d’huile, en plus
un thermostat de sécurité entre automatiquement
en marche en cas de fonctionnement défectueux du
thermostat principal, en empêchant que l’huile atteigne
des températures trop élevées, 220 °C environ.
L’emploi de cet appareil est très simple, toutefois
pour obtenir les résultats les meilleurs il est opportun
d’adopter des moyens astucieux comme:
- avant de verser l’huile pour la première fois, nettoyer
soigneusement les parties en acier et la résistance de
façon à éliminer les résidus éventuels d’usinage.
- Ne jamais allumer l’appareil si les résistances sont
tournées dehors du bac.
- Ne jamais allumer l’appareil s’il n’y a pas d’huile dans
le bac.
- Employer toujours des huiles végétales adéquates pour
frire: on déconseille les huiles de différentes graines et
l’huile de tournesol.
- La quantité d’huile contenue dans le bac varie d’un
minimum de 2 l à un maximum de 2,7 l. Si pendant
l’utilisation le niveau de l’huile devait descendre au
dessous du minimum, il sera nécessaire d’ajouter de
l’huile fraîche.
Il est conseillé d’ajouter de l’huile du même type. Les
niveaux maximum et minimum sont marqués de deux

11
entailles sur le côté vertical du bac.
- L’huile peut être employée plusieurs fois, mais il est
conseillé de la filtrer entre une cuisson et l’autre, de
façon à éliminer les résidus qui peuvent se trouver.
- Il est de toute façon conseillé de changer l’huile très
souvent parce que, même si elle est bien filtrée, de
petites particules résidues peuvent se brûler pendant
la cuisson.
- Avant d’introduire les nourritures dans la friteuse,
il faut contrôler qu’elles soient parfaitement sèches.
Attendre que l’huile atteigne la température souhaitée.
- Pour les nourritures surgelées, il est conseillé de les
décongeler à basse température et ensuite frire à haute
température.
- Au cours de la confection de certains plats (pommes
frites) l’on peut obtenir de très bons résultats en
effectuant une précuisson à 160 °C et une cuisson
successive à 180 °C.
- Souvent pendant la cuisson on doit ajouter du sel
ou des aromes: il faut éviter, si possible, de les ajouter
directement dans la friteuse parce que le sel, par exemple,
en tombant dans les bains d’huile, en réduit la qualité.
- En cas de mauvais fonctionnement, avant d’appeler
un technicien, on peut essayer de remettre en état le
thermostat de sécurité en appuyant sur la touche que
l’on voit après avoir enlevé le bac de l’huile et dévissé le
bouchon de protection, sur la paroi intérieur devant.
Avant de chaque opération il faut débrancher électri-
quement l’appareil.
Pour une durée de vie plus longue de l’appareil, il est
indispensable d’effectuer périodiquement un nettoyage
général soigné en tenant compte des points suivants:
- les parties en acier et/ou vernies doivent être nettoyées
avec des produits appropriés (se trouvant en commerce)
non abrasifs ou corrosifs. Eviter les produits à base de
chlore (eau de Javel, etc.);
- éviter de laisser des substances acides ou alcalines
(vinaigre, sel, jus de citron, etc.) sur le plan.
Entretien

12
Les instructions présentes sont adressées à l’installateur
qualifié, qui est responsable de l’installation, du réglage
et de l’entretien suivant les lois et les normes en vigueur.
Les interventions doivent toujours être effectuées lorsque
l’appareil est débranché électriquement.
Instructionspourl’installateur
Installation
Positionnement
Enclenchementélectrique
L’appareil est conçu pour être encastré dans un plan de
travail comme d’après photo (fig. 2).
Disposer la colle le long du périmètre du plan.
Avant d’effectuer le branchement électrique il faut
s’assurer que:
- les caractéristiques de l’installation puissent satisfaire
ce qui est indiqué sur la plaque avec numéro de série
appliquée sur le fond du plan;
- l’installation soit équipée d’une bonne connexion de
terre suivant les normes et les termes de la loi en vigueur.
La mise à la terre est obligatoire aux termes de la loi. Au
cas où l’appareil ne serait pas muni de câble et/ou de
fiche correspondante, employer du matériau approprié
pour l’absorption indiquée sur la plaque et pour la
température de travail. Le câble ne devra atteindre en
aucun point une température supérieure de 50 °C à la
température ambiente.
Si l’on désire un branchement directe au réseau, il est
nécessaire de placer un interrupteur multipolaire avec
une ouverture minimale entre les contacts de 3 mm
approprié pour la charge comme indiqué sur la plaque et
de respecter les normes en vigeur (le câble de terre jaune/
vert ne doit par être interrompu par l’interrupteur). La
prise ou l’interrupteur multipolaire doivent être aisément
atteints avec l’appareil installé.
N.B.: Le constructeur décline toute responabilité au cas
où l’on ne respecterait pas ce qu’on vient de mentionner
ci-dessus et les normes habituelles pour la prévention
des accidents.

13
Verehrter Kunde,
Wir gratulieren Ihnen zu Ihrer Wahl und bedanken uns für
das entgegengebrachte Vertrauen.
Dieses neue, sorgfältig geplante und entwickelte Produkt wurde
mit erstklassigen Materialien konstruiert und genauestens
erprobt, um allen Ihren Ansprüchen an perfektes Kochen zu
entsprechen. Wir bitten Sie daher, diese einfachen Anleitungen
aufmerksam zu lesen, damit Sie von Angang an beste
Ergebnisse erzielen können.
Mit diesem modernen Gerät sprechen wir Ihnen unsere besten
Wünsche aus.
DER HERSTELLER
INHALT
Gebrauchsanleitungen
Installation 14
Gebrauch 14
Wartung 15
AnleitungenfürdenInstallateur
Installation 16
Aufstellung 16
Elektroanschluß 16
TechnischeDaten
Speisung ~230 V
Leistung 2300 W
Speisekabel H05 RR - F (3 x 1,5 mm
2
)
H05 RN - F (3 x 1,5 mm
2
)

14
Gebrauchsanleitungen
Sämtliche Installationsarbeiten (Elektroanschluß) müssen
laut der geltenden Vorschriften durch Fachpersonal
ausgeführt werden. Für die spezi-fischen Anleitungen
verweisen wir an den dem Installateur vorbehaltenen
Teil.
Installation
Gebrauch
(Fig. 1) Die Einregulierung des Geräts erfolgt durch
Verstellen des Drehknopfes auf der Stirnseite, durch
welchen eine Temperatur zwischen 40 un 200 °C vorge-
geben werden kann.
Eine Kontrolleuchte zeigt den Betrieb des Widerstandes
an; bei Erreichen der gewünschten Temperatur erlischt
sie.
Eine zweite Betriebs-Kontrolleuchte bleibt immer
erleuchtet, solange das Gerät in Betrieb ist.
Das Fritiergerät ist mit einem Thermostat ausgestattet,
der die Temperatur des Ölbades kontrolliert; ein zweiter
Sicherheitsthermostat schaltet automatisch immer dann
aus, wenn der Hauptthermostat nicht mehr richtig
funktionieren sollte und vermeidet in solchen Fällen das
Aufheizen des Öles auf mehr als 220 °C.
Der Gebrauch des Geräts ist sehr einfach; um einen ein-
wandfreien Betrieb und eine lange Lebensdauer zu ver-
sichern, sollten dennoch die nachstehenden einfachen
Richtlinien beachtet werden:
- Vor dem ersten Öleinfüllen sind die Stahlteile und
der Widerstand sorgfältig zu reinigen, um alle eventuell
verbliebenen Rückstände zu beseitigen.
- Das Gerät darf nicht mit den Widerständen außerhalb
der Wanne einschaltet werden.
- Das Gerät darf nicht eingeschaltet werden, wenn sich
kein Öl in der Wanne befindet.
- Pflanzliches, zum Braten geeignetes Öl verwenden:
der Gebrauch von Samen- und Sonnenblumenöl ist zu
vermeiden.
- Die in der Wanne enthaltene Ölmenge liegt zwischen
mindestens 2 l und höchstens 2,7 l. Wenn der Östand
während des Fritierens unter den Mindestand sinken
sollte, ist unverzüglich frisches Öl nachzugießen. Zum
Nachfüllen ist vorzugsweise Öl der gleichen Art zu ver-
wenden. Der Öl-Mindest- und Höchststand sind durch

15
zwei Kerben auf der Wannenwand ersichtlich.
- Das Öl kann mehrere Male verwendet werden, sollte
aber bei jedem neuen Gebrauch gefiltert werden, um die
verbliebenen Rückstände zu entfernen.
- Es empfiehlt sich, das Öl sehr oft zu wechseln, auch
wenn es gut filtriert wird; kleine verbliebene Rück-
stände können nämlich beim Kochen verbrennen.
- Vor dem Einlegen der Speisen in das Fritiergerät ist
darauf zu achten, sie vorher sorgfältig zu trocknen; das
Öl muß die gewünschte Temperatur erreicht haben.
- Tiefgefrorene Speisen sollten zunächst bei niedriger
Temperatur aufgefroren und anschließend bei hoher
Temperatur gegart werden.
- Bei der Zubereitung einiger Gerichte (zum Beispiel
Pommes frites) erzielt man bessere Ergebnisse, wenn
zunächst bei 160° vorgekocht und schließlich auf 180 °C
gar gebacken wird.
- Oft müssen während des Fritierens Salz oder Aromen
zugegeben werden. Diese Zugaben sollten vorzugsweise
nicht direkt in das Fritiergerät erfolgen, da Salz und
Gewürze die Qualität des Öles beeinträchtigen.
- Wenn das Gerät nicht funktioniert, bevor Sie den
Eingriff eines Technikers anfordern, versuchen Sie
den Sicherheitsthermostat durch Drücken des kleinen
Druckknopfes wieder einzustellen, der nach Entfernung
der Ölwanne und nach Losschrauben des Schutzstopfens
an der vorderen Innenwand sichtbar wird.
Vor jeder Wartungsarbeit das Gerät ausschalten.
Für eine lange Lebensdauer des Geräts muß es unbedingt
regelmäßig gründlich gereinigt werden. Dazu folgendes
beachten:
Die Teile aus Stahl und/oder Email müssen mit milden,
im Handel erhältlichen Mitteln gesäubert werden. Ver-
wenden Sie auf keinen Fall chlorhal-tige Mittel (Bleich-
mittel, usw.).
Lassen Sie keine säurehaltigen oder alkalischen Speise-
reste (Essig, Zitronensaft, usw.) auf der Arbeitsfläche.
Wartung

16
Diese Anleitungen sind als Hilfe für den Fachmann
bei der Installation, Einstellung und Wartung nach den
gesetzlichen Vorschriften gedacht.
Sämtliche Eingriffe müssen stets bei ausgeschaltetem
Gerät durchgeführt werden.
AnleitungenfürdenInstallateur
Installation
Aufstellung
Elektroanschluß
(Abb.2) Das Gerät ist für den Einbau in einer Arbeits-
fläche vorgesehen, wie aus der Abbildung ersichtlich
wird. Die gesamte Außenlinie der Fläche mit dem mit-
gelieferten Abdichtungsmittel versiegeln.
Bevor der Elektroanschluß hergestellt wird, versichern
Sie sich:
- ob die Merkmale der Anlage den Angaben des Kenn-
datenschilds an der Unterseite der Kochfläche ent-
sprechen;
- ob die Anlage selbst nach den gesetzlichen Vorschriften
geerdet ist. Die Erdung ist bindend vorgeschrieben.
Falls das Gerät kein Kabel und/oder keinen Stecker
besitzt, verwenden Sie den Kenndaten und der Betrieb-
stemperatur entsprechendes Material. Das Kabel darf
an keiner Stelle eine Temperatur erreichen, die mehr als
50°C über der Raumtemperatur liegt.
Falls direkt an das Netz angeschlossen werden soll, wird
ein allpoliger Schalter mit einer minimalen Öffnung der
Kontakte von 3 mm entsprechend der Kenndaten und
der geltenden Vorschriften (das gelb/grüne Erdungskabe
darf nicht vom Schalter unter-brochen werden) benötigt.
Die Steckdose oder der allpoliger Schalter müssen bei
installiertem Gerät einfach zu erreichen sein.
N.B. Der Hersteller übernimmt keinerlei Ver-
antwortung falls die angeführten Sicherheitsvorschriften
nicht eingehalten werden.

17
17
Querido cliente,
sinceramente le agradecemos y nos congratulamos por su
elección.
Este nuevo producto, esmeradamente proyectado y construido
con materiales de primísima calidad, ha sido cuidadosamente
ensayado para satisfacer todas sus exigencias para una cocción
perfecta.
Por lo tanto, por favor lea y respete las fáciles instrucciones
que le consentirán alcanzar excelentes resultados ya desde la
primera utilización.
Con este moderno aparato le expresamos nuestros deseos más
vivos.
EL CONSTRUCTOR
INDICE
Instruccionesparaelusuario
Instalación 18
Uso 18
Mantenimiento 19
Instruccionesparaelinstalador
Instalación 20
Colocación 20
Conexión eléctrica 20
Datostécnicos
Alimentación ~230 V
Potencia 2300W
Cable de alimentación H05RR-F (3x1,5 mm
2
)
H05RN-F (3x1,5 mm
2
)

18
Instruccionesparaelusuario
Todas las operaciones relativas a la instalación (conexión
eléctrica) se deben siempre efectuar por personal
calificado según las normas vigentes.
Instalación
Uso
(Fig. 1) La puesta en función del aparato se efectúa
actuando sobre el botón de mando colocado en la
parte delantera que permite programar una temperatura
comprendida entre 40 y 200 °C.
Una luz de aviso señala la entrada en función de la
resistencia, mientras el apagado indica que la tempe-
ratura deseada ha sido alcanzada.
Una segunda luz de aviso (general) queda siempre
encendida durante el funcionamiento del aparato. La
freidora está provista de un termostato que mantiene
constante la temperatura del baño de aceite. Además,
un termostato de seguridad entra automáticamente en
función en caso de funcionamiento defectuoso del ter-
mostato principal, impidiendo al aceite alcanzar tempe-
raturas demasiado elevadas, aproximadamente 220 °C.
El uso de este aparato es muy sencillo, sin embargo para
obtener los mejores resultados es oportuno adoptar unas
fáciles precauciones como:
- antes de poner el aceite por primera vez, limpiar
esmeradamente las partes de acero y la resistencia para
eliminar los eventuales residuos de transporte.
- No encender nunca el aparato con las resistencias
giradas fuera de la cubeta.
- No encender nunca el aparato si no hay aceite en la
cubeta.
- Utilizar siempre aceites vegetales adecuados para freir:
se desaconsejan los aceites de semillas varias y el aceite
de semillas de girasol.
- La cantidad de aceite contenida en la cubeta oscila
de un mínimo de 2 litros a un máximo de 2,7 litros.
Si durante el uso el nivel de aceite descende bajo el
mínimo, es necesario intervenir añadiendo aceite fresco.
Se aconseja añadir aceite del mismo tipo. Los niveles
m·ximo y mínimo están marcados con dos incisiones en
la pared vertical de la cubeta.

19
- El aceite se puede utilizar varias veces; se aconseja,
sin embargo, filtrarlo después de cada cocción, para
eliminar los eventuales depósitos.
- De todo modo, se aconseja cambiar el aceite muy fre-
cuentemente porque, también si bien filtrado, pequeñas
particulas residuas pueden incendiarse durante la coc-
ción.
- Antes de introducir los alimentos en la freidora, con-
trolar que sean perfectamente secos.
Esperar que el aceite haya alcanzado la temperatura
deseada.
- Para los alimentos congelados se aconseja descongelar
a baja temperatura y sucesivamente freír a temperatura
elevada.
- En la elaboración de ciertos platos (patatas fritas) los
mejores resultados se obtienen efectuando una precoc-
ción a 160 °C y una cocción sucesiva a 180 °C.
- A menudo durante la cocción se deben añadir sal o
aromas: eviten, lo más posible, efectuar estas adiciones
directamente en la freidora porque la sal, cayendo en los
baños de aceite, reduce su calidad.
- Si el aparato no funciona, antes de solicitar la inter-
vención técnica, tratar de reponer el termostato de segu-
ridad presionando el pequeño pulsador visible después
de haber quitado la cubeta del aceite y destornillado el
tapón de protección, en la pared interna anterior.
Antes de cada operación desconectar eléctricamente el
equipo.
Para una mayor duración del equipo es indispensable
efectuar periódicamente una esmerada limpieza general,
teniendo presente lo siguiente:
- las partes de acero y/o esmaltadas se deben limpiar
con productos idóneos (disponibles en comercio) no
abrasivos o corrosivos. Evitar productos a base de cloro
(lejía, etc.);
- evitar dejar sobre el tablero de trabajo substancias áci-
das o alcalinas (vinagre, sal, zumo de limón, etc.).
Mantenimiento
19

20
Las presentes instrucciones se dirigen al instalador cali-
ficado como guía para la instalación, regulación y man-
tenimiento según las leyes y normativas vigentes.
Las intervenciones se deben siempre efectuar con el
equipo desconectado eléctricamente.
Instruccionesparaelinstalador
Instalación
Colocación
Conexióneléctrica
(Fig. 2) El aparato está previsto para ser empotrado en
un tablero de trabajo como representado en la relativa
figura.
Predisponer a lo largo de todo el perímetro del tablero la
masilla impermeable del equipamiento.
Antes de efectuar la conexión eléctrica asegurarse de
que:
- las características de la instalación sean conformes a
lo indicado en la placa de característica aplicada en el
fondo del tablero;
- la instalación esté provista de una eficaz conexión de
tierra según las normas y las disposiciones de ley vigen-
tes. La puesta a tierra es obligatoria según la ley.
Si el aparato no está provisto de cable y/o de relativa
clavija, debe utilizar material idóneo para la absorción
indicada en la placa matrícula y para la temperatura de
trabajo. En ningún punto el cable deberá alcanzar una
temperatura superior de 50 °C a la del aire ambiente.
Si se desea una conexión directa a la red, es necesario
interponer un interruptor omnipolar con abertura
mínima entre los contactos de 3 mm, dimensionado para
la carga de placa, conforme a las normas vigentes (el cable
de tierra amarillo/verde no debe ser interrumpido por
el interruptor). La base o el interruptor omnipolar deben
ser fácilmente alcanzables con el equipo instalado.
N.B.: El constructor rechaza toda responsabilidad en la
eventualidad de que no se observe cuanto arriba indi-
cado ni las usuales normas para la prevención de acci-
dentes.

21
Geachte Klant,
Wij danken u vriendelijk voor de uitstekende keuze die u
gedaan heeft. Dit nieuw produkt, op een zorgvuldige wijze
ontworpen en vervaardigd met materialen van bijzondere
kwaliteit, is gekeurd om aan al uw bakeisen te voldoen.
Wij verzoeken u de instructies aandachtig te lezen en te
volgen om buitengewone resultaten te bereiken vanaf het
eerste gebruik van uw apparaat.
Met dit zeer modern bakapparaat wensen wij u het allerbeste.
DE FABRIKANT
INDEX
Instructiesvoordeverbruiker
Installatie 22
Gebruik 22
Onderhoud 23
Instructiesvoordeinstallateur
Installatie 24
Plaatsing 24
Elektrische aansluiting 24
Technischegegevens
Voeding ~230 V
Vermogen 2300 W
Voedingeskabel H05RR-F (3x1,5 mm
2
)
H05RN-F (3x1,5 mm
2
)

22
Instructiesvoordeverbruiker
Alle handelingen die betrekking hebben op de installatie
(elektrische aansluiting) moeten verricht worden door
gekwalificeerd personeel volgens de bestaande geldende
normen.
Installatie
Gebruik
(Fig. 1) Het apparaat wordt in bedrijf gesteld door de
bedieningsknop die zich op het frontpaneel bevindt en
die toestaat een temperatuur tussen 40 en 200 °C in te
stellen.
Een controlelampje geeft aan dat de weerstand in bedrijf
is, terwijl het uitgaan van het lampje aangeeft dat de
gewenste temperatuur is bereikt.
Een twede (algemeen) controlelampje blijft steeds
branden wanneer het apparaat in bedrijf is. De friteuse
is voorzien van een thermostaat die de temperatuur
van het oliebad constant houdt, terwijl een veilighoids-
thermostaat automatisch in werking treedt wanneer de
hoofdthermostaat slecht functioneert, en verhindert dat
de olie te hoge temperaturen bereikt, ongeveer 220 °C.
Het gebruik van dit apparaat is gewoon, maar om de
beste resultaten te bereiken is het noodzakelijk enkele
maatregelen te nemen en wel:
- maak de stalen onderdelen en de weerstand goed
schoon alvorens de olie voor de eerste keer te gebruiken,
om eventuele beworkings-overblijfselen to verwijderen;
- zet het apparaat nooit aan indien de weerstanden
buiten de kuip zijn gedraaid;
- zet het apparaat nooit aan indien geen olie in het bakje
zit;
- gebruik steeds voor het bakken geschikte plantaardige
olie;
niet aan te raden is olie van algemene zaden en zonne-
bloem-olie.
- de in het bakje aanwezige olie varieert tussen 2 liter
als minimum en 2,7 liter als maximum. Indien tijdens
het gebruik de hoogte van de olie onder de minimum
hoogte komt te liggen, dient verse olie bijgevoogd te
worden.
Aangeraden wordt olie van dezelfde soort bij te voegen.

23
De maximum en minimum peilhoogte van de olie is
aangeduid door twee peilschalen op de verticale wand
van het bakje.
- de olie kan meer keren gebruikt worden, maar het
is beter de olie tussen een en andere bakprocedure te
filtreren, om eventuele aanwezige neerslagen te ver-
wijderen.
- Aan te raden is echter de olie dikwijls te vervangen met
nieuwe olie, daar kleine na de filtratie achtergebleven
resten tijdens het bakken in brand kunnen vliegen.
- alvorens de gerechten in het bakapparaat te plaatsen,
zie dat ze good droog zijn. Wacht totdat de olie de
gewenste temperatuur heeft bereikt.
- voor diepvries gerechten ontvries deze eerst op lage
temperatuur en bak ze daarna op hoge temperatuur.
- Bij het klaarmaken van bepaalde gerechten (frietjes)
bereikt men de beste resultaten door de gerechten eerst
op 160 °C te bakken en daarna op 180 °C.
- Tijdens het bakken moet men vaak zout of aroma’s bij-
voegen: voeg deze bij, indien mogelijk, niet rechtsreeks
in de friteuse daar zout dat in het oliebad valt de
kwaliteit van de olie aantast.
- In het geval dat het apparaat een storing vertoont,
vraag niet direkt de interventie van de technische dienst,
maar probeer zelf de veiligheidsthermostaat weer in
werking te stellen. Verwijder het oliebakje, schroef de
beschermingsdop los en druk op de knop die zich op de
binnenste voorste wand bevindt.
Schakel het apparaat elektrisch uit alvorens met het
bakken te beginnen. Om het apparaat goed te behouden,
maak het regelmatig schoon en volg zorgvuldig die
hieronder staande handelingen:
- de stalen en/of geëmailleerde gedeelten moeten schoon-
gemaakt worden met een passend niet bijtend reinigings-
middel die op de markt te vinden is. Gebruik geen chloor
bevattende produkten (bleekwater en dergelijke);
- zorg dat op de werkvlaklen geen zuur- of alkalische
stoffen blijven liggen (zoals azijn, zout, citroensap, enz.)
Onderhoud

24
Deze instructies zijn bestemd voor de bevoegde
gekwalificeerde installateur en gelden voor de installatie,
de regeling en het onderhoud van het apparaat volgens
de bestaande geldende wetten en normen. De interventies
dienen uitsluitend verricht te worden nadat het apparaat
elektrisch is uitgeschakeld.
Instructiesvoordeinstallateur
Installatie
Plaatsing/inbouw
Elektrischeaansluiting
(Fig. 2) Het apparaat kan tussen een werkvlak geplaatst
worden zoals in de betreffende figuur is aangeduid.
Verzegel de omtrek van het vlak met de moegeleverde
silicone.
Alvorens over te gaan tot de elektrische aansluiting
overtuig u ervan:
- dat de netspanning van uw woning overeenkomt met
de netspanning die op het typeplaatje, dat zich op de
bodem van het vlak bevindt, aangegeven is.
- dat de installatie voorzien is van een deugdelijk
aardkontakt overeenkomstig de plaatselijke geldende
voorschriften en normen. Het aard-kontakt is volgens
de wet verplicht.
Indien het apparaat niet is voorzien van snoer en/of
passende stekker, gebruik materiaal dat geschikt is voor
het op het typeplaatje aangegeven opneminsvermogen
en werk-temperatuur. De snoor mag in geen enkel punt
een temperatuur bereiken die 50 °C hoger is dan de
omgevingstemperatuur.
Indien een rechtstreckse aansluiting op de netspanning is
gewenst, dient een omnipolaire schakelaar ingevoegd te
worden met een minimum opening tussen de kontakten
van 3 mm., afgestemd op de op het typoplaatje aange-
geven belasting volgens de bestaande geldende normen.
(de geel/groene aardsnoer moet niet door de schakelaar
onderbroken worden). Het stopkontakt of de omnipolaire
schakelaar moeten makkelijk te bereiken zijn nadat het
apparaat is gefinstalleerd.
N.B.: De fabrikant wijst elke verantwoordelijkheid van
zich af indien deze en vorenstaande veiligheidsmaat-
regelen niet werden getroffen.

25
Ex.mo cliente,
desejamos agradecer e congratular-nos consigo pela escolha
que fez.
Este novo aparelho, cuidadosamente projectado e montado com
materiais de primeira qualidade, foi verificado com atenção
para satisfazer á todas às exigências de fritura perfeita.
Pedimo-lhe portanto de ler e respectar as fáceis instruções para
obter os melhores resultados desde a primeira utilização.
Com este moderno aparelho desejamos cumprimentar e
desejamos também o melhor para si.
O CONSTRUCTOR
INDICE
Instruçõesparaoutilizador
Instalação 26
Uso 26
Manutenção 27
Instruçõesparaoinstalador
Instalação 28
Posição 28
Ligação eléctrica 28
Dadostécnicos
Alimentação ~230 V
Potência 2300 W
Cabo de alimentação H05RR-F (3x1,5 mm
2
)
H05RN-F (3x1,5 mm
2
)

26
Instruçõesparaoutilizador
Todas as operações de instalação (ligação eléctrica) tem
que ser efectuadas por pessoas qualificadas segundo as
leis vigentes.
Instalação
Uso
(Fig. 1) O aparelho liga-se pelo botão colocado na frente
que permite também a escolha da temperatura entre 40
e 200°C.
Quando a luz está acesa a resistência está a funcionar,
quando se apaga indica que a frigideira atingiu a tempe-
ratura escolhida.
Uma segunda luz (geral) fica sempre acesa em quanto o
aparelho está ligado e funciona. Esta frigideira tem um
termostato que mantém costante a temperatura do óleo
e um segundo termostato que começa a funcionar so no
caso que o primeiro esteja estragado; isso para evitar que
o óleo fique demasiado quente, acerca de 220 °C.
A utilização deste aparelho è muito simples, desejamos
em todo o caso dar-lhe alguns conselhos para obter os
melhores resultados:
- antes de pôr o óleo pela primeira vez, limpe com cui-
dado todas as partes de aço, e a resistência também, para
eliminar possíveis restos de material de trabalho;
- nunca ligue o aparelho com as resistências fora do
contentor do óleo;
- nunca ligue o aparelho sem óleo entro do contentor;
-utilize sempre óleos vegetais para fritar (nós desacon-
selhamos óleo de sementes vários e óleo de sementes
de girassol);
- a quantidade de óleo no contentor è de litros 2 (mini-
mo) até litros 2,7 (máximos). Se o óleo descer debaixo
do nivel mínimo tem que se juntar novo óleo. E’ melhor
usar sempre óleo do mesmo tipo. Os níveis de quanti-
dade de óleo (mínimo e máximo) estão indicados no
contentor.
- O óleo para fritar pode ser utilizado várias vezes mas
è melhor filtra-lo para eliminar possíveis depositos. E’
conselhavel, em todo o caso, mudar completamente de
óleo frequentemente porque pequenos residuos de fritu-
ras precedentes podem-se queimar;

27
- antes de pôr os alimentos dentro do óleo, controle que
não estejam molhos;
- espère que o óleo fique quente até a temperatura
desejada;
- os alimentos congelados tém que descongelar em tem-
peratura baixa e depois podem fritar-se em alta tempe-
ratura;
- alguns pratos (batatas fritas) ficam melhor con duas
frituras: a primeira a 160 °C e a segunda a 180 °C;
- se possível, evite por sal o aromas em quanto os ali-
mentos estão a fritar, o sal baixa a qualidade de prato
porque cai no óleo;
- no caso de falta de funcionamento, antes de solicitar a
intervenção da assistência técnica, restabeleca o termó-
stato de segurança agindo no seguinte modo: retire o
recipiente do óleo e a tampa de protecção seguidamente
carregue no botão que se encontra na parte da frente
do interior.
Antes de efectuar todas as operações desligue o
aparelho.
Para o bom estado da frigideira nós conselhamos uma
limpeza geral de vez em quando. Atenção:
- os elementos de aço e/ou esmaltados limpam-se com
os próprios produtos (encontráveis no mercado) que não
sejam abrasivos ou corrosivos. Evite produtos com cloro
(lixivia, ecc.)
- evite deixar em cima do piano de trabalho substancias
ácidas ou alcalinas (vinagre, sal, sumo de limão, ecc.).
Manutenção

28
As seguintes instruções são aqui postas as pessoas qua-
lificadas que instala, regula e ocupa-se de manutenção
do aparelho segundo as leis vigentes.
Desligue sempre o aparelho antes de efectuar qualquer
operação.
Instruçõesparaoinstalador
Instalação
Posição
Ligaçãoeléctrica
(Fig. 2) O aparelho foi projectado para ficar em cima
dum plano de trabalho segundo a ilustração.
Ponha material de lacrar ao longo do perimetro do
plano.
Antes de ligar o aparelho verifique que:
- as caracteristicas do aparelho sejam conformes às indi-
cadas na placa debaixo do plano;
- o aparelho fique firme ao chão segundo as leis vigentes.
Segundo tais leis o aparelho tem que ficar bem firme
ao chão.
Se não haver cabo ou ficha utilize material conforme as
instruções da placa e de temperatura. O cabo não tem
que atingir uma temperatura superior de 50 °C à do
ambiente.
Pode ligar o aparelho derectamente ao resto da rede por
um interruptor omnipolar com abertura mínima de 3
mm entre os contactos, cujas medidas são as indicadas
na placa e pelas leis vigentes (o cabo de chão ama-
relo/verde tem que estar sempre ligado ao interruptor).
A tomada de corrente ou o interruptor tém que ficar
sempre facilmente atingíveis pelo aparelho instalado.
N.B.: O constructor declina qualquer responsabilidade
no caso o cliente não siga os conselhos sobre mencio-
nados ou não respeite as leis de prevenção dos acidentes
de trabalho.
Documenttranscriptie
La Casa costruttrice declina ogni responsabilità per le possibili inesattezze contenute nel presente opuscolo, imputabili ad errori di stampa o di trascrizione. Si riserva il diritto di apportare ai propri prodotti quelle modifiche che ritiene necessarie o utili, senza pregiudicarne le caratteristiche essenziali. FRIGGITRICE The manufacturer declines all responsibility for possible inaccuracies contained in this pamphlet, due to printing or copying errors. We reserve the right to make on our own products those changes to be considered necessary or useful, without jeopardizing the essential characteristics. FRYER Dans un souci constant d’amélioration qualitative, le constructeur se réserve la possibilité d’apporter à ses produits les modifications utiles, sans compromettre ses caractéristiques essentielles. Le constructeur décline toutes responsabilité pour d’eventuelles inexactitudes contenues dans cette notice, imputables à des erreurs d’impression ou de transcription. FRITEUSE Die Herstellerfirma übernimmt keinerlei Verantwortung für eventuell in dieser Broschüre enthaltene Ungenauigkeiten, die auf Druckfehler zurückzuführen sind und behält sich das Recht vor an ihren Produkten alle für notwendig erachteten Änderungen anzubringen, ohne die wesentlichen Eigenschaften zu beeinflussen. FRITIERGERÄT El constructor declina toda responsabilidad por las posibles inexactitudes contenidas en el presente documento, imputables a errores de impresión o relacionadas. El constructor se reserva el derecho de aportar a sus propios productos aquellas modificaciones que se considere necesarias o útiles, sin perjudicar las características esenciales. FREIDORA De Fabrikant wijst iedere verantwoordelijkheid af voor enige onjuistheden in deze brochure welke geweten kunnen worden aan copie - of drukfouten. Hij behoudt zich het recht voor aan zijn eigen produkten wijzigingen aan te brengen die hij voor noodzakelijk of nuttig houdt zonder dat de wezenlijke kenmerken erdoor benadeeld worden. FRITEUSE O Fabricante não assume nenhuma responsabilidade acerca de eventuais inexactidões contidas na presente publicação, devidas a erros de impressão ou de transcrição. Reserva-se o direito de efectuar nos próprios produtos as eventuais modificações que considerar necessárias ou úteis, sem prejudicar as características essenciais. FRIGIDEIRA IT libretto istruzioni GB operating instructions FR notice d’emploi Bedienungsanleitung ES manual de instrucciones NL instructieboekie PT manual de instruções DOMINO COD. 1.000.45.0 DE mng.9511174900 mng.9511175000 FRIGGITRICE FRYER FRITEUSE Fig. 1 FRITIERGERÄT libretto istruzioni 1 operating instructions 5 notice d’emploi 9 Bedienungsanleitung 13 FREIDORA manual de instrucciones 17 FRITEUSE instructieboekie 21 manual de instruções 25 mng.9912210800 FRIGIDEIRA QUESTO PRODOTTO È STATO CONCEPITO PER UN IMPIEGO DI TIPO DOMESTICO. IL COSTRUTTORE DECLINA OGNI RESPONSABILITÀ mng.9912210400 NEL CASO DI EVENTUALI DANNI A COSE O PERSONE DERIVANTI DA UNA NON CORRETTA INSTALLAZIONE O DA USO IMPROPRIO, ERRONEO OD ASSURDO. THIS APPLIANCE IS CONCEIVED FOR DOMESTIC USE ONLY. THE MANUFACTURER SHALL NOT IN ANY WAY BE HELD RESPONSIBLE FOR WHATEVER INJURIES OR DAMAGES ARE CAUSED BY INCORRECT INSTALLATION OR BY UNSUITABLE, WRONG OR ABSURD USE. CE PRODUIT EST CONÇU EXCLUSIVEMENT POUR USAGE DOMESTIQUE. LE CONSTRUCTEUR DÉCLINE TOUTE RESPONSABILITÉ POUR mng.9912211200 DOMMAGES ET BLESSURES CAUSÉES PAR UNE INSTALLATION INCORRECTE OU PAR UN USAGE IMPROPRE, ERRONÉ OU ABSURDE. DIESES PRODUKT IST ALS HAUSHALTSGERÄT GEDACHT. FÜR SCHADEN AN SACHEN ODER PERSONEN, DIE AUF FALSCHE INSTALLATION BZW. UNGEEIGNETEN GEBRAUCH ODER MISSBRAUCH ZURÜCKZUFÜHREN SIND, ÜBERNIMMT DER HERSTELLER KEINERLEI VERANTWORTUNG. ESTE PRODUCTO FUE CONCEBIDO PARA UN USO DE TIPO DOMÉSTICO. EL CONSTRUCTOR DECLINA CUALQUIER RESPONSABILIDAD Fig. 2 Apparecchio classe I tipo Y Apparatus class 1 Type Y Appareil de classe I type Y Gerät der Klasse I Typ Y Aparato clase I tipo Y Apparaat klasse I typo Y Aparelho classe 1 tipo Y EN EL CASO DE DAÑOS EVENTUALES A COSAS O PERSONAS QUE DERIVEN DE UNA INSTALACIÓN INCORRECTA O DE UN USO IMPROPIO, ERRADO O ABSURDO. DIT PRODUKT IS ALS HUISHOUDELIJK APPARAAT GEDACHT. VOOR BESCHADIGINGEN AAN SPULLEN OF PERSONEN DIE AAN VERKEERDE INSTALLATIE, MISBRUIK OF VERKEERDE GEBRUIK ZIJN TE WIJTEN, NEEMT DE FABRIKANT GEEN VERANTWOORDELIJKHEID OP ZICH. ESTE PRODUTO FOI CONCEBIDO PARA UMA UTILIZAÇÃO DE TIPO DOMÉSTICA. O FABRICANTE DECLINA TODAS AS RESPONSABILIDADES NO CASO DE EVENTUAIS DANOS A COISAS OU PESSOAS DERIVADOS DE UMA INSTALAÇÃO INCORRECTA OU DE USO IMPRÓPRIO, ERRÓNEO OU ABSURDO. Caro Cliente, sentitamente La ringraziamo e ci congratuliamo per la scelta da Lei fatta. Questo nuovo prodotto, accuratamente progettato e costruito con materiali di primissima qualità, è stato attentamente collaudato per poter soddisfare tutte le Sue esigenze di una perfetta cottura. La preghiamo pertanto di leggere e rispettare le facili istruzioni che Le permetteranno di raggiungere eccellenti risultati sin dalla prima utilizzazione. Con questo moderno apparecchio Le formuliamo i nostri più vivi auguri. IL COSTRUTTORE INDICE Istruzioni per l’utente Installazione Uso Manutenzione 2 2 3 Istruzioni per l’installatore Installazione Posizionamento Collegamento elettrico 4 4 4 Dati tecnici Alimentazione Potenza Cavo di alimentazione 1 ~230 V 2300 W H05RR-F (3x1,5 mm2) H05RN-F (3x1,5 mm2) Istruzioni per l’utente Installazione Tutte le operazioni relative all’installazione (allacciamento elettrico) devono essere eseguite da personale qualificato secondo le norme vigenti. Per le istruzioni specifiche vedi la parte riservata all’installatore. Uso (Fig.1) La messa in funzione dell’apparecchio si effettua agendo sulla manopola di comando posta sul frontalino che consente di impostare una temperatura compresa fra 40 e 200 °C. Una spia luminosa segnala l’entrata in funzione della resistenza, mentre lo spegnimento indica che la temperatura desiderata è stata raggiunta. Una seconda spia (generale) rimane sempre accesa quando l’apparecchio è in funzione. La friggitrice è dotata di un termostato che mantiene costante la temperatura del bagno d’olio, inoltre un termostato di sicurezza entra automaticamente in funzione in caso di difettoso funzionamento del termostato principale, impedendo all’olio di raggiungere temperature troppo elevate, circa 220 °C. L’uso di questo apparecchio è molto semplice, tuttavia per ottenere i migliori risultati è opportuno adottare alcuni facili accorgimenti come: - prima di mettere l’olio per la prima volta, pulire accuratamente le parti d’acciaio e la resistenza in modo da eliminare gli eventuali residui di lavorazione. - Non accendere mai l’apparecchio con le resistenze ruotate fuori dalla vasca - Non accendere mai l’apparecchio senza che vi sia l’olio nella vaschetta. - Usare sempre olii vegetali adatti per friggere: sono sconsigliati gli olii di semi vari e l’olio di semi di girasole. - La quantità di olio contenuta nella vasca varia da un minimo di l 2 ad un massimo di l 2,7. Se durante l’uso il livello dell’olio dovesse scendere sotto il minimo, si dovrà intervenire con un’aggiunta di olio fresco. Si consiglia di effettuare le aggiunte con olio dello stesso tipo. I livelli massimo e minimo sono contrassegnati con due incisioni sulla parete verticale della vaschetta. 2 - L’olio può essere usato più volte, si consiglia però di filtrarlo fra una cottura e l’altra, in modo da eliminare i depositi che si possono verificare. - Si consiglia comunque di cambiare l’olio molto spesso perché anche se ben filtrato piccole particelle residue possono prendere fuoco durante la cottura. - Prima di introdurre i cibi nella friggitrice, controllare che siano perfettamente asciutti. Attendere che l’olio abbia raggiunto la temperatura desiderata. - Per i cibi surgelati si consiglia di scongelare a bassa temperatura e successivamente friggere ad alta temperatura. - Nella preparazione di alcuni piatti (patatine fritte) i migliori risultati si ottengono effettuando una precottura a 160 °C ed una cottura successiva a 180 °C. - Spesso durante la cottura si devono aggiungere sale o aromi: evitate, per quanto possibile, di effettuare queste aggiunte direttamente nella friggitrice perché il sale, cadendo nei bagni d’olio, ne riduce la qualità. - In caso di mancato funzionamento, prima di richiedere l’intervento tecnico, provare a ripristinare il termostato di sicurezza premendo il pulsantino visibile, dopo aver tolto la vaschetta dell’olio e svitato il tappo di protezione, sulla parete interna anteriore. Manutenzione Prima di ogni operazione disinserire elettricamente l’apparecchiatura. Per una maggiore durata dell’apparecchiatura è indispensabile eseguire periodicamente un’accurata pulizia generale tenendo presente quanto segue: - le parti in acciaio e/o smaltate devono essere pulite con prodotti idonei (reperibili in commercio) non abrasivi o corrosivi. Evitare prodotti a base di cloro (varecchina, ecc;); - evitare di lasciare sul piano lavoro sostanze acide o alcaline (aceto, sale, succo di limone, ecc.). 3 Istruzioni per l’installatore Installazione Le presenti istruzioni sono rivolte all’installatore qualificato quale guida all’installazione, regolazione e manutenzione secondo le leggi e le normative in vigore. Gli interventi devono sempre essere effettuati ad apparecchiatura disinserita elettricamente. Posizionamento (Fig. 2) L’apparecchio è previsto per essere incassato in un piano di lavoro come illustrato nell’apposita figura. Predisporre su tutto il perimetro del piano il sigillante a corredo. Collegamento elettrico Prima di effettuare l’allacciamento elettrico accertarsi che: - le caratteristiche dell’impianto siano tali da soddisfare quanto indicato sulla targa matricola applicata sul fondo del piano: - l’impianto sia munito di un efficace collegamento di terra secondo le norme e le disposizioni di legge in vigore. La messa a terra è obbligatoria a termini di legge. Nel caso che l’apparecchiatura non sia munita di cavo e/o di relativa spina utilizzare materiale idoneo per l’assorbimento indicato in targa matricola e per la temperatura di lavoro. Il cavo in nessun punto dovrà raggiungere una temperatura superiore di 50 °C a quella ambiente. Desiderando un collegamento diretto alla rete, è necessario interporre un interruttore onnipolare con apertura minima fra i contatti di 3 mm dimensionato per il carico di targa e rispondere alle norme in vigore (il cavo di terra giallo/verde non deve essere interrotto dall’interruttore). La presa o l’interruttore onnipolare devono essere facilmente raggiungibili con l’apparechiatura installata. N.B.: Il costruttore declina ogni responsabilità nel caso che quanto sopra e le usuali norme antiinfortunistiche non vengano rispettate. 4 Dear Customer, We would like to congratulate you on the choice you have made. This new product, carefully designed and constructed from materials of the highest quality, has been carefully tested so as to be able to meet all your requirements for perfect cooking. We would ask you, nevertheless, to read and follow the simple instructions that will allow you to obtain excellent results right from the beginning. With this up-to-date apparatus, we would like to wish you every success. THE MANUFACTURER CONTENTS Instructions for the user Installation Use Maintenance 6 6 7 Instructions for the installationist Installation Positioning Electrical connections 8 8 8 Technical data Power supply Power Supply cable 5 ~ 230 V 2300 W H05RR-F (3x1,5 sq. mm) H05RN-F (3x1,5 sq. mm) Instructions for the user Installation All the operations relating to the installation (electrical connection) must be carried out by qualified personnel according to the regulations in force. Use (Fig. 1) The apparatus is switched on by turning the control knob on the front that allows a temperature to be set from 40 to 200 °C. A signal light comes on to show that the resistance is operating, and when it goes off it shows that it has reached the required temperature. A second (general) light always stays on when the apparatus is operating. The fryer is equipped with a thermostat that constantly maintains the temperature of the oil bath. Furthermore, a safety thermostat automatically goes into operation in case of faulty working of the main thermostat, preventing the oil from reaching too high a temperature, about 220 °C. The use of this equipment is very simple, however, to obtain the best results, it is advisable to follow these instructions: - before putting oil in for the first time, carefully clean the steel parts and the resistance, so as to remove any residue left from manufacture. - Never turn on the apparatus with the resistance turned out of the bowl. - Never turn on the apparatus unless there is oil in the bowl. - Always use vegetable oil suitable for frying: we do not recommend oil from assorted seeds or sunflower. - The quantity of oil contained in the bowl varies from a minimum of 2 litres to a maximum of 2,7 litres. If, during use, the oil level should drop below the minimum, fresh oil must be added. It is advisable to add oil of the same type. The minimum and maximum levels are shown by two marks cut into the vertical side of the bowl. - The oil can be used several times, but we recommend it is filtered between one cooking and the next, so as to eliminate deposits which can occur. 6 - It is best to change the oil very often, however, because, even if it is well filtered, small residual particles can catch fire during cooking. - Before putting the food into the fryer, check that is perfectly dry. Wait until the oil has reached the required temperature. - For frozen food, it is advisable to defrost it at a low temperature and then fry it at high temperature. - In preparing certain dishes (fried potatoes) you will get the best results by precooking at a temperature of 160 °C, and then subsequently cooking at 180 °C. - During cooking, it is often necessary to add salt or flavourings. Avoid, if at all possible, doing this directly into the fryer, because salt, by falling into the oil, has its quality reduced. - In the case of a breakdown, before calling a technician, try resetting the safety thermostat, by pressing the button visible, after having removed the oil bowl and unscrewed the safety plug on the front, interior side. Maintenance Before doing any operation, cut off the electricity from the apparatus. In order to give your equipment a long life, it is vital to thoroughly clean it all over, remembering the following points: - the steel and/or painted parts must be cleaned using suitable products (available on the market) which are not abrasive or corrosive. Avoid products based on chlorine (bleach, etc); - avoid leaving acids or alkalis on the work surface (vinegar, salt, lemon-juice, etc.) 7 Instructions for the installationist Installation These instructions are intended to be used by a qualified installationist, who will be responsible for the installation, adjustment and maintenance according to the laws and regulations in force. All operations must always be carried out with the equipment disconnected from the electricity. Positioning (Fig. 2) The apparatus is designed to be set into a work surface, as shown in the relevant illustration. Fit the seal provided round the whole perimeter of the surface. Electric connections Before connecting up the electricity, ensure that: - the specification of the system is such as to match that shown on the serial number plate applied to the underneath of the work surface. - the system is supplied with an efficient earth connection to the ground, according to the regulations and the laws in force. The earth connection is obligatory by law. In the case where the equipment is not supplied with cable and/or relevant plug, make use of materials suited to the input current shown on the serial number plate, and to the working temperature. The cable must not reach a temperature of more than 50°C higher than the ambient temperature in any part of its length. In order to connect directly to the mains supply, it is necessary to insert a multipolar switch with a minimum aperture between contacts of 3 mm, of a size suitable for the load marked on the plate, and conforming to the regulations in force (the yellow and green earth cable must not be turned off by the switch). The plug or multipolar switch must be easily reached with the equipment installed in position. N.B.: The manufacturer declines any responsibility in the case where the above and the normal accident prevention regulations have not been respected. 8 Cher Client, nous vous remercions beaucoup et nous nous congratulons du choix que vous avez fait. Ce nouveau produit, conçu et réalisé soigneusement avec des matériaux de première qualité, a été attentivement essayé pour pouvoir satisfaire toutes vos exigences pour une parfaite cuisson. Pourtant nous vous prions de bien lire et respecter ces instructions faciles qui vous permettront d’atteindre des résultats excellents dès votre premier emploi. Avec ce moderne appareil nous vous souhaitons nos meilleurs voeux. LE CONSTRUCTEUR INDEX Instructions pour l’usager Installation Emploi Entretien 10 10 11 Instructions pour l’installateur Installation Positionnement Enclenchement électrique 12 12 12 Données techniques Alimentation Puissance Câble d’alimentation 9 ~230 V 2300 W H05RR-F (3x1,5 mm2) H05RN-F (3x1,5 mm2) Instructions pour l’usager Installation Toutes les opérations concernant l’installation (branchement électrique) doivent être effectuées par parsonnel qualifié suivant les normes en vigueur. Emploi (Fig. 1) La mise en fonction de cet appareil a lieu en tournant le bouton de commande placé sur la partie devant qui permet de programmer une température qui va de 40 à 220 °C. Un temoin lumineux allumé signale l’entrée en fonction de la résistance, tandis que s’il est éteint indique que la température souhaitée a été atteinte. Un deuxième temoin lumineux (général) reste allumé continuellement lorsque l’appareil est en marche. La friteuse est équipée d’un thermostat qui maintient constante la température du bain d’huile, en plus un thermostat de sécurité entre automatiquement en marche en cas de fonctionnement défectueux du thermostat principal, en empêchant que l’huile atteigne des températures trop élevées, 220 °C environ. L’emploi de cet appareil est très simple, toutefois pour obtenir les résultats les meilleurs il est opportun d’adopter des moyens astucieux comme: - avant de verser l’huile pour la première fois, nettoyer soigneusement les parties en acier et la résistance de façon à éliminer les résidus éventuels d’usinage. - Ne jamais allumer l’appareil si les résistances sont tournées dehors du bac. - Ne jamais allumer l’appareil s’il n’y a pas d’huile dans le bac. - Employer toujours des huiles végétales adéquates pour frire: on déconseille les huiles de différentes graines et l’huile de tournesol. - La quantité d’huile contenue dans le bac varie d’un minimum de 2 l à un maximum de 2,7 l. Si pendant l’utilisation le niveau de l’huile devait descendre au dessous du minimum, il sera nécessaire d’ajouter de l’huile fraîche. Il est conseillé d’ajouter de l’huile du même type. Les niveaux maximum et minimum sont marqués de deux 10 entailles sur le côté vertical du bac. - L’huile peut être employée plusieurs fois, mais il est conseillé de la filtrer entre une cuisson et l’autre, de façon à éliminer les résidus qui peuvent se trouver. - Il est de toute façon conseillé de changer l’huile très souvent parce que, même si elle est bien filtrée, de petites particules résidues peuvent se brûler pendant la cuisson. - Avant d’introduire les nourritures dans la friteuse, il faut contrôler qu’elles soient parfaitement sèches. Attendre que l’huile atteigne la température souhaitée. - Pour les nourritures surgelées, il est conseillé de les décongeler à basse température et ensuite frire à haute température. - Au cours de la confection de certains plats (pommes frites) l’on peut obtenir de très bons résultats en effectuant une précuisson à 160 °C et une cuisson successive à 180 °C. - Souvent pendant la cuisson on doit ajouter du sel ou des aromes: il faut éviter, si possible, de les ajouter directement dans la friteuse parce que le sel, par exemple, en tombant dans les bains d’huile, en réduit la qualité. - En cas de mauvais fonctionnement, avant d’appeler un technicien, on peut essayer de remettre en état le thermostat de sécurité en appuyant sur la touche que l’on voit après avoir enlevé le bac de l’huile et dévissé le bouchon de protection, sur la paroi intérieur devant. Entretien Avant de chaque opération il faut débrancher électriquement l’appareil. Pour une durée de vie plus longue de l’appareil, il est indispensable d’effectuer périodiquement un nettoyage général soigné en tenant compte des points suivants: - les parties en acier et/ou vernies doivent être nettoyées avec des produits appropriés (se trouvant en commerce) non abrasifs ou corrosifs. Eviter les produits à base de chlore (eau de Javel, etc.); - éviter de laisser des substances acides ou alcalines (vinaigre, sel, jus de citron, etc.) sur le plan. 11 Instructions pour l’installateur Installation Les instructions présentes sont adressées à l’installateur qualifié, qui est responsable de l’installation, du réglage et de l’entretien suivant les lois et les normes en vigueur. Les interventions doivent toujours être effectuées lorsque l’appareil est débranché électriquement. Positionnement L’appareil est conçu pour être encastré dans un plan de travail comme d’après photo (fig. 2). Disposer la colle le long du périmètre du plan. Enclenchement électrique Avant d’effectuer le branchement électrique il faut s’assurer que: - les caractéristiques de l’installation puissent satisfaire ce qui est indiqué sur la plaque avec numéro de série appliquée sur le fond du plan; - l’installation soit équipée d’une bonne connexion de terre suivant les normes et les termes de la loi en vigueur. La mise à la terre est obligatoire aux termes de la loi. Au cas où l’appareil ne serait pas muni de câble et/ou de fiche correspondante, employer du matériau approprié pour l’absorption indiquée sur la plaque et pour la température de travail. Le câble ne devra atteindre en aucun point une température supérieure de 50 °C à la température ambiente. Si l’on désire un branchement directe au réseau, il est nécessaire de placer un interrupteur multipolaire avec une ouverture minimale entre les contacts de 3 mm approprié pour la charge comme indiqué sur la plaque et de respecter les normes en vigeur (le câble de terre jaune/ vert ne doit par être interrompu par l’interrupteur). La prise ou l’interrupteur multipolaire doivent être aisément atteints avec l’appareil installé. N.B.: Le constructeur décline toute responabilité au cas où l’on ne respecterait pas ce qu’on vient de mentionner ci-dessus et les normes habituelles pour la prévention des accidents. 12 Verehrter Kunde, Wir gratulieren Ihnen zu Ihrer Wahl und bedanken uns für das entgegengebrachte Vertrauen. Dieses neue, sorgfältig geplante und entwickelte Produkt wurde mit erstklassigen Materialien konstruiert und genauestens erprobt, um allen Ihren Ansprüchen an perfektes Kochen zu entsprechen. Wir bitten Sie daher, diese einfachen Anleitungen aufmerksam zu lesen, damit Sie von Angang an beste Ergebnisse erzielen können. Mit diesem modernen Gerät sprechen wir Ihnen unsere besten Wünsche aus. DER HERSTELLER INHALT Gebrauchsanleitungen Installation Gebrauch Wartung 14 14 15 Anleitungen für den Installateur Installation Aufstellung Elektroanschluß 16 16 16 Technische Daten Speisung Leistung Speisekabel 13 ~230 V 2300 W H05 RR - F (3 x 1,5 mm2) H05 RN - F (3 x 1,5 mm2) Gebrauchsanleitungen Installation Sämtliche Installationsarbeiten (Elektroanschluß) müssen laut der geltenden Vorschriften durch Fachpersonal ausgeführt werden. Für die spezi-fischen Anleitungen verweisen wir an den dem Installateur vorbehaltenen Teil. Gebrauch (Fig. 1) Die Einregulierung des Geräts erfolgt durch Verstellen des Drehknopfes auf der Stirnseite, durch welchen eine Temperatur zwischen 40 un 200 °C vorgegeben werden kann. Eine Kontrolleuchte zeigt den Betrieb des Widerstandes an; bei Erreichen der gewünschten Temperatur erlischt sie. Eine zweite Betriebs-Kontrolleuchte bleibt immer erleuchtet, solange das Gerät in Betrieb ist. Das Fritiergerät ist mit einem Thermostat ausgestattet, der die Temperatur des Ölbades kontrolliert; ein zweiter Sicherheitsthermostat schaltet automatisch immer dann aus, wenn der Hauptthermostat nicht mehr richtig funktionieren sollte und vermeidet in solchen Fällen das Aufheizen des Öles auf mehr als 220 °C. Der Gebrauch des Geräts ist sehr einfach; um einen einwandfreien Betrieb und eine lange Lebensdauer zu versichern, sollten dennoch die nachstehenden einfachen Richtlinien beachtet werden: - Vor dem ersten Öleinfüllen sind die Stahlteile und der Widerstand sorgfältig zu reinigen, um alle eventuell verbliebenen Rückstände zu beseitigen. - Das Gerät darf nicht mit den Widerständen außerhalb der Wanne einschaltet werden. - Das Gerät darf nicht eingeschaltet werden, wenn sich kein Öl in der Wanne befindet. - Pflanzliches, zum Braten geeignetes Öl verwenden: der Gebrauch von Samen- und Sonnenblumenöl ist zu vermeiden. - Die in der Wanne enthaltene Ölmenge liegt zwischen mindestens 2 l und höchstens 2,7 l. Wenn der Östand während des Fritierens unter den Mindestand sinken sollte, ist unverzüglich frisches Öl nachzugießen. Zum Nachfüllen ist vorzugsweise Öl der gleichen Art zu verwenden. Der Öl-Mindest- und Höchststand sind durch 14 zwei Kerben auf der Wannenwand ersichtlich. - Das Öl kann mehrere Male verwendet werden, sollte aber bei jedem neuen Gebrauch gefiltert werden, um die verbliebenen Rückstände zu entfernen. - Es empfiehlt sich, das Öl sehr oft zu wechseln, auch wenn es gut filtriert wird; kleine verbliebene Rückstände können nämlich beim Kochen verbrennen. - Vor dem Einlegen der Speisen in das Fritiergerät ist darauf zu achten, sie vorher sorgfältig zu trocknen; das Öl muß die gewünschte Temperatur erreicht haben. - Tiefgefrorene Speisen sollten zunächst bei niedriger Temperatur aufgefroren und anschließend bei hoher Temperatur gegart werden. - Bei der Zubereitung einiger Gerichte (zum Beispiel Pommes frites) erzielt man bessere Ergebnisse, wenn zunächst bei 160° vorgekocht und schließlich auf 180 °C gar gebacken wird. - Oft müssen während des Fritierens Salz oder Aromen zugegeben werden. Diese Zugaben sollten vorzugsweise nicht direkt in das Fritiergerät erfolgen, da Salz und Gewürze die Qualität des Öles beeinträchtigen. - Wenn das Gerät nicht funktioniert, bevor Sie den Eingriff eines Technikers anfordern, versuchen Sie den Sicherheitsthermostat durch Drücken des kleinen Druckknopfes wieder einzustellen, der nach Entfernung der Ölwanne und nach Losschrauben des Schutzstopfens an der vorderen Innenwand sichtbar wird. Wartung Vor jeder Wartungsarbeit das Gerät ausschalten. Für eine lange Lebensdauer des Geräts muß es unbedingt regelmäßig gründlich gereinigt werden. Dazu folgendes beachten: Die Teile aus Stahl und/oder Email müssen mit milden, im Handel erhältlichen Mitteln gesäubert werden. Verwenden Sie auf keinen Fall chlorhal-tige Mittel (Bleichmittel, usw.). Lassen Sie keine säurehaltigen oder alkalischen Speisereste (Essig, Zitronensaft, usw.) auf der Arbeitsfläche. 15 Anleitungen für den Installateur Installation Diese Anleitungen sind als Hilfe für den Fachmann bei der Installation, Einstellung und Wartung nach den gesetzlichen Vorschriften gedacht. Sämtliche Eingriffe müssen stets bei ausgeschaltetem Gerät durchgeführt werden. Aufstellung (Abb.2) Das Gerät ist für den Einbau in einer Arbeitsfläche vorgesehen, wie aus der Abbildung ersichtlich wird. Die gesamte Außenlinie der Fläche mit dem mitgelieferten Abdichtungsmittel versiegeln. Elektroanschluß Bevor der Elektroanschluß hergestellt wird, versichern Sie sich: - ob die Merkmale der Anlage den Angaben des Kenndatenschilds an der Unterseite der Kochfläche entsprechen; - ob die Anlage selbst nach den gesetzlichen Vorschriften geerdet ist. Die Erdung ist bindend vorgeschrieben. Falls das Gerät kein Kabel und/oder keinen Stecker besitzt, verwenden Sie den Kenndaten und der Betriebstemperatur entsprechendes Material. Das Kabel darf an keiner Stelle eine Temperatur erreichen, die mehr als 50°C über der Raumtemperatur liegt. Falls direkt an das Netz angeschlossen werden soll, wird ein allpoliger Schalter mit einer minimalen Öffnung der Kontakte von 3 mm entsprechend der Kenndaten und der geltenden Vorschriften (das gelb/grüne Erdungskabe darf nicht vom Schalter unter-brochen werden) benötigt. Die Steckdose oder der allpoliger Schalter müssen bei installiertem Gerät einfach zu erreichen sein. N.B. Der Hersteller übernimmt keinerlei Verantwortung falls die angeführten Sicherheitsvorschriften nicht eingehalten werden. 16 Querido cliente, sinceramente le agradecemos y nos congratulamos por su elección. Este nuevo producto, esmeradamente proyectado y construido con materiales de primísima calidad, ha sido cuidadosamente ensayado para satisfacer todas sus exigencias para una cocción perfecta. Por lo tanto, por favor lea y respete las fáciles instrucciones que le consentirán alcanzar excelentes resultados ya desde la primera utilización. Con este moderno aparato le expresamos nuestros deseos más vivos. EL CONSTRUCTOR INDICE Instrucciones para el usuario Instalación Uso Mantenimiento 18 18 19 Instrucciones para el instalador Instalación Colocación Conexión eléctrica 20 20 20 Datos técnicos Alimentación Potencia Cable de alimentación 17 ~230 V 2300W H05RR-F (3x1,5 mm2) H05RN-F (3x1,5 mm2) Instrucciones para el usuario Instalación Todas las operaciones relativas a la instalación (conexión eléctrica) se deben siempre efectuar por personal calificado según las normas vigentes. Uso (Fig. 1) La puesta en función del aparato se efectúa actuando sobre el botón de mando colocado en la parte delantera que permite programar una temperatura comprendida entre 40 y 200 °C. Una luz de aviso señala la entrada en función de la resistencia, mientras el apagado indica que la temperatura deseada ha sido alcanzada. Una segunda luz de aviso (general) queda siempre encendida durante el funcionamiento del aparato. La freidora está provista de un termostato que mantiene constante la temperatura del baño de aceite. Además, un termostato de seguridad entra automáticamente en función en caso de funcionamiento defectuoso del termostato principal, impidiendo al aceite alcanzar temperaturas demasiado elevadas, aproximadamente 220 °C. El uso de este aparato es muy sencillo, sin embargo para obtener los mejores resultados es oportuno adoptar unas fáciles precauciones como: - antes de poner el aceite por primera vez, limpiar esmeradamente las partes de acero y la resistencia para eliminar los eventuales residuos de transporte. - No encender nunca el aparato con las resistencias giradas fuera de la cubeta. - No encender nunca el aparato si no hay aceite en la cubeta. - Utilizar siempre aceites vegetales adecuados para freir: se desaconsejan los aceites de semillas varias y el aceite de semillas de girasol. - La cantidad de aceite contenida en la cubeta oscila de un mínimo de 2 litros a un máximo de 2,7 litros. Si durante el uso el nivel de aceite descende bajo el mínimo, es necesario intervenir añadiendo aceite fresco. Se aconseja añadir aceite del mismo tipo. Los niveles m·ximo y mínimo están marcados con dos incisiones en la pared vertical de la cubeta. 18 - El aceite se puede utilizar varias veces; se aconseja, sin embargo, filtrarlo después de cada cocción, para eliminar los eventuales depósitos. - De todo modo, se aconseja cambiar el aceite muy frecuentemente porque, también si bien filtrado, pequeñas particulas residuas pueden incendiarse durante la cocción. - Antes de introducir los alimentos en la freidora, controlar que sean perfectamente secos. Esperar que el aceite haya alcanzado la temperatura deseada. - Para los alimentos congelados se aconseja descongelar a baja temperatura y sucesivamente freír a temperatura elevada. - En la elaboración de ciertos platos (patatas fritas) los mejores resultados se obtienen efectuando una precocción a 160 °C y una cocción sucesiva a 180 °C. - A menudo durante la cocción se deben añadir sal o aromas: eviten, lo más posible, efectuar estas adiciones directamente en la freidora porque la sal, cayendo en los baños de aceite, reduce su calidad. - Si el aparato no funciona, antes de solicitar la intervención técnica, tratar de reponer el termostato de seguridad presionando el pequeño pulsador visible después de haber quitado la cubeta del aceite y destornillado el tapón de protección, en la pared interna anterior. Mantenimiento Antes de cada operación desconectar eléctricamente el equipo. Para una mayor duración del equipo es indispensable efectuar periódicamente una esmerada limpieza general, teniendo presente lo siguiente: - las partes de acero y/o esmaltadas se deben limpiar con productos idóneos (disponibles en comercio) no abrasivos o corrosivos. Evitar productos a base de cloro (lejía, etc.); - evitar dejar sobre el tablero de trabajo substancias ácidas o alcalinas (vinagre, sal, zumo de limón, etc.). 19 Instrucciones para el instalador Instalación Las presentes instrucciones se dirigen al instalador calificado como guía para la instalación, regulación y mantenimiento según las leyes y normativas vigentes. Las intervenciones se deben siempre efectuar con el equipo desconectado eléctricamente. Colocación (Fig. 2) El aparato está previsto para ser empotrado en un tablero de trabajo como representado en la relativa figura. Predisponer a lo largo de todo el perímetro del tablero la masilla impermeable del equipamiento. Conexión eléctrica Antes de efectuar la conexión eléctrica asegurarse de que: - las características de la instalación sean conformes a lo indicado en la placa de característica aplicada en el fondo del tablero; - la instalación esté provista de una eficaz conexión de tierra según las normas y las disposiciones de ley vigentes. La puesta a tierra es obligatoria según la ley. Si el aparato no está provisto de cable y/o de relativa clavija, debe utilizar material idóneo para la absorción indicada en la placa matrícula y para la temperatura de trabajo. En ningún punto el cable deberá alcanzar una temperatura superior de 50 °C a la del aire ambiente. Si se desea una conexión directa a la red, es necesario interponer un interruptor omnipolar con abertura mínima entre los contactos de 3 mm, dimensionado para la carga de placa, conforme a las normas vigentes (el cable de tierra amarillo/verde no debe ser interrumpido por el interruptor). La base o el interruptor omnipolar deben ser fácilmente alcanzables con el equipo instalado. N.B.: El constructor rechaza toda responsabilidad en la eventualidad de que no se observe cuanto arriba indicado ni las usuales normas para la prevención de accidentes. 20 Geachte Klant, Wij danken u vriendelijk voor de uitstekende keuze die u gedaan heeft. Dit nieuw produkt, op een zorgvuldige wijze ontworpen en vervaardigd met materialen van bijzondere kwaliteit, is gekeurd om aan al uw bakeisen te voldoen. Wij verzoeken u de instructies aandachtig te lezen en te volgen om buitengewone resultaten te bereiken vanaf het eerste gebruik van uw apparaat. Met dit zeer modern bakapparaat wensen wij u het allerbeste. DE FABRIKANT INDEX Instructies voor de verbruiker Installatie Gebruik Onderhoud 22 22 23 Instructies voor de installateur Installatie Plaatsing Elektrische aansluiting 24 24 24 Technische gegevens Voeding Vermogen Voedingeskabel 21 ~230 V 2300 W H05RR-F (3x1,5 mm2) H05RN-F (3x1,5 mm2) Instructies voor de verbruiker Installatie Alle handelingen die betrekking hebben op de installatie (elektrische aansluiting) moeten verricht worden door gekwalificeerd personeel volgens de bestaande geldende normen. Gebruik (Fig. 1) Het apparaat wordt in bedrijf gesteld door de bedieningsknop die zich op het frontpaneel bevindt en die toestaat een temperatuur tussen 40 en 200 °C in te stellen. Een controlelampje geeft aan dat de weerstand in bedrijf is, terwijl het uitgaan van het lampje aangeeft dat de gewenste temperatuur is bereikt. Een twede (algemeen) controlelampje blijft steeds branden wanneer het apparaat in bedrijf is. De friteuse is voorzien van een thermostaat die de temperatuur van het oliebad constant houdt, terwijl een veilighoidsthermostaat automatisch in werking treedt wanneer de hoofdthermostaat slecht functioneert, en verhindert dat de olie te hoge temperaturen bereikt, ongeveer 220 °C. Het gebruik van dit apparaat is gewoon, maar om de beste resultaten te bereiken is het noodzakelijk enkele maatregelen te nemen en wel: - maak de stalen onderdelen en de weerstand goed schoon alvorens de olie voor de eerste keer te gebruiken, om eventuele beworkings-overblijfselen to verwijderen; - zet het apparaat nooit aan indien de weerstanden buiten de kuip zijn gedraaid; - zet het apparaat nooit aan indien geen olie in het bakje zit; - gebruik steeds voor het bakken geschikte plantaardige olie; niet aan te raden is olie van algemene zaden en zonnebloem-olie. - de in het bakje aanwezige olie varieert tussen 2 liter als minimum en 2,7 liter als maximum. Indien tijdens het gebruik de hoogte van de olie onder de minimum hoogte komt te liggen, dient verse olie bijgevoogd te worden. Aangeraden wordt olie van dezelfde soort bij te voegen. 22 De maximum en minimum peilhoogte van de olie is aangeduid door twee peilschalen op de verticale wand van het bakje. - de olie kan meer keren gebruikt worden, maar het is beter de olie tussen een en andere bakprocedure te filtreren, om eventuele aanwezige neerslagen te verwijderen. - Aan te raden is echter de olie dikwijls te vervangen met nieuwe olie, daar kleine na de filtratie achtergebleven resten tijdens het bakken in brand kunnen vliegen. - alvorens de gerechten in het bakapparaat te plaatsen, zie dat ze good droog zijn. Wacht totdat de olie de gewenste temperatuur heeft bereikt. - voor diepvries gerechten ontvries deze eerst op lage temperatuur en bak ze daarna op hoge temperatuur. - Bij het klaarmaken van bepaalde gerechten (frietjes) bereikt men de beste resultaten door de gerechten eerst op 160 °C te bakken en daarna op 180 °C. - Tijdens het bakken moet men vaak zout of aroma’s bijvoegen: voeg deze bij, indien mogelijk, niet rechtsreeks in de friteuse daar zout dat in het oliebad valt de kwaliteit van de olie aantast. - In het geval dat het apparaat een storing vertoont, vraag niet direkt de interventie van de technische dienst, maar probeer zelf de veiligheidsthermostaat weer in werking te stellen. Verwijder het oliebakje, schroef de beschermingsdop los en druk op de knop die zich op de binnenste voorste wand bevindt. Onderhoud Schakel het apparaat elektrisch uit alvorens met het bakken te beginnen. Om het apparaat goed te behouden, maak het regelmatig schoon en volg zorgvuldig die hieronder staande handelingen: - de stalen en/of geëmailleerde gedeelten moeten schoongemaakt worden met een passend niet bijtend reinigingsmiddel die op de markt te vinden is. Gebruik geen chloor bevattende produkten (bleekwater en dergelijke); - zorg dat op de werkvlaklen geen zuur- of alkalische stoffen blijven liggen (zoals azijn, zout, citroensap, enz.) 23 Instructies voor de installateur Installatie Deze instructies zijn bestemd voor de bevoegde gekwalificeerde installateur en gelden voor de installatie, de regeling en het onderhoud van het apparaat volgens de bestaande geldende wetten en normen. De interventies dienen uitsluitend verricht te worden nadat het apparaat elektrisch is uitgeschakeld. Plaatsing/inbouw (Fig. 2) Het apparaat kan tussen een werkvlak geplaatst worden zoals in de betreffende figuur is aangeduid. Verzegel de omtrek van het vlak met de moegeleverde silicone. Elektrische aansluiting Alvorens over te gaan tot de elektrische aansluiting overtuig u ervan: - dat de netspanning van uw woning overeenkomt met de netspanning die op het typeplaatje, dat zich op de bodem van het vlak bevindt, aangegeven is. - dat de installatie voorzien is van een deugdelijk aardkontakt overeenkomstig de plaatselijke geldende voorschriften en normen. Het aard-kontakt is volgens de wet verplicht. Indien het apparaat niet is voorzien van snoer en/of passende stekker, gebruik materiaal dat geschikt is voor het op het typeplaatje aangegeven opneminsvermogen en werk-temperatuur. De snoor mag in geen enkel punt een temperatuur bereiken die 50 °C hoger is dan de omgevingstemperatuur. Indien een rechtstreckse aansluiting op de netspanning is gewenst, dient een omnipolaire schakelaar ingevoegd te worden met een minimum opening tussen de kontakten van 3 mm., afgestemd op de op het typoplaatje aangegeven belasting volgens de bestaande geldende normen. (de geel/groene aardsnoer moet niet door de schakelaar onderbroken worden). Het stopkontakt of de omnipolaire schakelaar moeten makkelijk te bereiken zijn nadat het apparaat is gefinstalleerd. N.B.: De fabrikant wijst elke verantwoordelijkheid van zich af indien deze en vorenstaande veiligheidsmaatregelen niet werden getroffen. 24 Ex.mo cliente, desejamos agradecer e congratular-nos consigo pela escolha que fez. Este novo aparelho, cuidadosamente projectado e montado com materiais de primeira qualidade, foi verificado com atenção para satisfazer á todas às exigências de fritura perfeita. Pedimo-lhe portanto de ler e respectar as fáceis instruções para obter os melhores resultados desde a primeira utilização. Com este moderno aparelho desejamos cumprimentar e desejamos também o melhor para si. O CONSTRUCTOR INDICE Instruções para o utilizador Instalação Uso Manutenção 26 26 27 Instruções para o instalador Instalação Posição Ligação eléctrica 28 28 28 Dados técnicos Alimentação Potência Cabo de alimentação 25 ~230 V 2300 W H05RR-F (3x1,5 mm2) H05RN-F (3x1,5 mm2) Instruções para o utilizador Instalação Todas as operações de instalação (ligação eléctrica) tem que ser efectuadas por pessoas qualificadas segundo as leis vigentes. Uso (Fig. 1) O aparelho liga-se pelo botão colocado na frente que permite também a escolha da temperatura entre 40 e 200°C. Quando a luz está acesa a resistência está a funcionar, quando se apaga indica que a frigideira atingiu a temperatura escolhida. Uma segunda luz (geral) fica sempre acesa em quanto o aparelho está ligado e funciona. Esta frigideira tem um termostato que mantém costante a temperatura do óleo e um segundo termostato que começa a funcionar so no caso que o primeiro esteja estragado; isso para evitar que o óleo fique demasiado quente, acerca de 220 °C. A utilização deste aparelho è muito simples, desejamos em todo o caso dar-lhe alguns conselhos para obter os melhores resultados: - antes de pôr o óleo pela primeira vez, limpe com cuidado todas as partes de aço, e a resistência também, para eliminar possíveis restos de material de trabalho; - nunca ligue o aparelho com as resistências fora do contentor do óleo; - nunca ligue o aparelho sem óleo entro do contentor; -utilize sempre óleos vegetais para fritar (nós desaconselhamos óleo de sementes vários e óleo de sementes de girassol); - a quantidade de óleo no contentor è de litros 2 (minimo) até litros 2,7 (máximos). Se o óleo descer debaixo do nivel mínimo tem que se juntar novo óleo. E’ melhor usar sempre óleo do mesmo tipo. Os níveis de quantidade de óleo (mínimo e máximo) estão indicados no contentor. - O óleo para fritar pode ser utilizado várias vezes mas è melhor filtra-lo para eliminar possíveis depositos. E’ conselhavel, em todo o caso, mudar completamente de óleo frequentemente porque pequenos residuos de frituras precedentes podem-se queimar; 26 - antes de pôr os alimentos dentro do óleo, controle que não estejam molhos; - espère que o óleo fique quente até a temperatura desejada; - os alimentos congelados tém que descongelar em temperatura baixa e depois podem fritar-se em alta temperatura; - alguns pratos (batatas fritas) ficam melhor con duas frituras: a primeira a 160 °C e a segunda a 180 °C; - se possível, evite por sal o aromas em quanto os alimentos estão a fritar, o sal baixa a qualidade de prato porque cai no óleo; - no caso de falta de funcionamento, antes de solicitar a intervenção da assistência técnica, restabeleca o termóstato de segurança agindo no seguinte modo: retire o recipiente do óleo e a tampa de protecção seguidamente carregue no botão que se encontra na parte da frente do interior. Manutenção Antes de efectuar todas as operações desligue o aparelho. Para o bom estado da frigideira nós conselhamos uma limpeza geral de vez em quando. Atenção: - os elementos de aço e/ou esmaltados limpam-se com os próprios produtos (encontráveis no mercado) que não sejam abrasivos ou corrosivos. Evite produtos com cloro (lixivia, ecc.) - evite deixar em cima do piano de trabalho substancias ácidas ou alcalinas (vinagre, sal, sumo de limão, ecc.). 27 Instruções para o instalador Instalação As seguintes instruções são aqui postas as pessoas qualificadas que instala, regula e ocupa-se de manutenção do aparelho segundo as leis vigentes. Desligue sempre o aparelho antes de efectuar qualquer operação. Posição (Fig. 2) O aparelho foi projectado para ficar em cima dum plano de trabalho segundo a ilustração. Ponha material de lacrar ao longo do perimetro do plano. Ligação eléctrica Antes de ligar o aparelho verifique que: - as caracteristicas do aparelho sejam conformes às indicadas na placa debaixo do plano; - o aparelho fique firme ao chão segundo as leis vigentes. Segundo tais leis o aparelho tem que ficar bem firme ao chão. Se não haver cabo ou ficha utilize material conforme as instruções da placa e de temperatura. O cabo não tem que atingir uma temperatura superior de 50 °C à do ambiente. Pode ligar o aparelho derectamente ao resto da rede por um interruptor omnipolar com abertura mínima de 3 mm entre os contactos, cujas medidas são as indicadas na placa e pelas leis vigentes (o cabo de chão amarelo/verde tem que estar sempre ligado ao interruptor). A tomada de corrente ou o interruptor tém que ficar sempre facilmente atingíveis pelo aparelho instalado. N.B.: O constructor declina qualquer responsabilidade no caso o cliente não siga os conselhos sobre mencionados ou não respeite as leis de prevenção dos acidentes de trabalho. 28-
 1
1
-
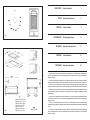 2
2
-
 3
3
-
 4
4
-
 5
5
-
 6
6
-
 7
7
-
 8
8
-
 9
9
-
 10
10
-
 11
11
-
 12
12
-
 13
13
-
 14
14
-
 15
15
-
 16
16
-
 17
17
-
 18
18
-
 19
19
-
 20
20
-
 21
21
-
 22
22
-
 23
23
-
 24
24
-
 25
25
-
 26
26
-
 27
27
-
 28
28
-
 29
29
-
 30
30


in andere talen
- English: Brandt TE206XF1 Owner's manual
- italiano: Brandt TE206XF1 Manuale del proprietario
- français: Brandt TE206XF1 Le manuel du propriétaire
- español: Brandt TE206XF1 El manual del propietario
- Deutsch: Brandt TE206XF1 Bedienungsanleitung
- português: Brandt TE206XF1 Manual do proprietário