
MANUEL D’INSTRUCTION FR
INSTRUCTION MANUAL EN
MANUAL DE INSTRUCCIONES ES
GEBRUIKSHANDLEIDING NL
ﻞﯿﻐﺸﺘﻟاو تادﺎﺷرﻹا ﻞﯿﻟد ﺔﯿﺑﺮﻌﻟا ﺔﻐﻠﻟا
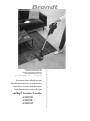
Aspirateur balai Multifonction
Multifunction brush vacuum cleaner
Aspiradora escoba multifuncional
Multifunctionele steelstofzuiger
ﻒﺋﺎظﻮﻟا ةدﺪﻌﺘﻣ ﺔﺴﻨﻜﻣ
ASB20B
ASB20R
ASB20W

2
Chère Cliente, Cher Client,
Vous venez d’acquérir un produit BRANDT et nous vous remercions de la confiance que
vous nous accordez.
Nous avons conçu et fabriqué ce produit en pensant à vous, à votre mode de vie, à vos
besoins, pour qu’il réponde au mieux à vos attentes. Nous y avons mis notre savoir-faire,
notre esprit d’innovation et toute la passion qui nous anime depuis plus de 60 ans.
Dans un souci permanent de toujours mieux satisfaire vos exigences, notre service
consommateurs est à votre disposition et à votre écoute pour répondre à toutes vos
questions ou suggestions.
Connectez-vous aussi sur notre site www.brandt.com où vous trouverez nos dernières
innovations, ainsi que des informations utiles et complémentaires.
BRANDT est heureux de vous accompagner au quotidien et vous souhaite de profiter
pleinement de votre achat.
Important : Avant de mettre votre appareil en marche, veuillez lire
attentivement ce guide d’installation et d’utilisation afin de vous familiariser
plus rapidement avec son fonctionnement.

3
SOMMAIRE
1) À L’ATTENTION DE L’UTILISATEUR ................................................................................. 4
a) Consignes de sécurité ................................................................................................. 4
b) Données techniques : .................................................................................................. 7
c) Protection de l’environnement...................................................................................... 7
2) INSTALLATION DE VOTRE APPAREIL .............................................................................. 8
a) Description de votre appareil ......................................................................................... 8
b) Assembler votre appareil en toute sécurité ................................................................... 8
3) UTILISATION DE VOTRE ASPIRATEUR ............................................................................ 9
a) Mode d’emploi ............................................................................................................ 9
b) Chargement de l’aspirateur ........................................................................................ 10
c) Entretien .................................................................................................................. 10
4) RÉSOLUTION DE PROBLÈMES....................................................................................... 11
5) RELATIONS CONSOMMATEURS FRANCE........................................................................ 12

4
1) À L’ATTENTION DE L’UTILISATEUR
INSTRUCTIONS DE SÉCURITÉ IMPORTANTES
LIRE AVE
C ATTENTION ET GARDER POUR DE FUTURES
UTILISATIONS
Cet appareil est destiné à être utilisé dans des
applications domestiques et analogues telles que :
Les coins cuisines réservés au personnel des
magasins, bureaux et autres environnements
professionnels;
Les fermes;
L’utilisation par les clients des hôtels, motels et
autres environnements à caractère résidentiel;
Les environnements de type chambre d’hôtes.
Conservez ce mode d’emploi avec votre appareil.
En cas de vente ou de cession de cet appareil à
une autre personne, assurez-vous de
transmettre ce mode d’emploi au nouveau
propriétaire. Merci de prendre connaissance de
ces conseils avant d’installer et d’utiliser votre
appareil. Ils ont été rédigés pour votre sécurité
et celle d’autrui.
a) Consignes de sécurité
Installation
L’appareil est utilisé uniquement avec l’alimentation fournie avec
l’appareil.
L’appareil est alimenté uniquement sous la très basse tension de
sécurité correspondant au marquage de l’appareil.

5
Vérifiez que la puissance d’alimentation est de 220-240V.
Utilisation
Cet appareil peut être utilisé par des enfants âgés d'au moins 8
ans et par des personnes ayant des capacités physiques,
sensorielles ou mentales réduites ou dénuées d’expérience ou de
connaissance, s'ils sont correctement surveillés ou si des
instructions relatives à l'utilisation de l'appareil en toute sécurité
leur ont été données et si les risques encourus ont été
appréhendés.
Maintenir l’appareil et son cordon hors de portée des enfants de
moins de 8 ans.
Les enfants ne doivent pas jouer avec l’appareil.
N’aspirez pas de surfaces mouillées, d’eau, de liquides, de
matériaux et produits inflammables.
N’aspirez pas de substances ultrafines (cendres, ciment…).
N’utilisez pas l’appareil sans l’un des filtres car vous risqueriez
d’endommager le moteur.
Ne pas ranger ou utiliser l’aspirateur près d’un endroit très chaud.
Si un bruit anormal, une odeur, de la fumée ou toute autre
détérioration se produise pendant une utilisation, éteignez
l’appareil et débranchez-le. Ne cherchez pas à le réparer.
Entretien
Le nettoyage et l'entretien par l'usager ne doivent pas
être effectués par des enfants sans surveillance.
La fiche de prise de courant du câble d'alimentation doit
être enlevée du socle avant de nettoyer l'appareil ou
d'entreprendre les opérations d'entretien.

6
Si le câble d'alimentation est endommagé, il doit être
remplacé par le fabricant, son service après-vente ou
des personnes de qualification similaire afin d'éviter un
danger.
Nettoyer les filtres lorsqu’ils sont saturés.
Ce produit est garanti par votre distributeur. Pour plus
de détails, veuillez-vous reporter aux conditions de
garantie fournies par votre distributeur.
Instructions particulières applicables aux batteries
Modèle adaptateur
ZD012A350040EU
Entrée adaptateur
100-240V 50Hz 0.5A
Sortie adaptateur
35VDC / 400mA
MISE EN GARDE : Pour le rechargement de la
batterie, utiliser uniquement l’unité d’alimentation
amovible fournie avec l’appareil.
Cet appareil contient des batteries qui ne peuvent pas
être remplacées.
L’opération de charge
Pour charger l’aspirateur, éteindre l’appareil et le placer
sur sa base de charge. Branchez ensuite l’adaptateur
dans une prise de courant et attendre 4h30 pour une
charge complète.

7
Utilisation non conforme
Le fabricant se dégage de toute responsabilité en cas
d’utilisations non conformes.
b) Données techniques :
Modèle
ASB20B/ ASB20R/ ASB20W
Alimentation
100-240 V~50 Hz
Consommation nominale
350W
Dimensions (HxLxP)
1100 x 260x 160mm
Poids net
2,70kg
c) Protection de l’environnement
Les matériaux d’emballage de cet appareil sont
recyclables. Participez à leur recyclage et contribuez
ainsi
à la protection de l’environnement en les déposant dans
les conteneurs municipaux prévus à cet effet.
Votre appareil contient également de nombreux
matériaux recyclables. Il est donc marqué de ce logo af
in
de vous indiquer que les appareils usagés ne doivent pas
être mélangés avec d’autres déchets. Le recyclage des
appareils qu’organise votre fabricant sera ainsi
réalisé
dans les meilleures conditions, conformément à la
directive européenne en vigueur sur les déchets
d’équipements électriques et électroniques. Adressez-
vous à votre mairie ou à votre revendeur pour connaître
les points de collecte des appareils usagés les plu
s
proches de votre domicile.
Nous vous remercions pour votre collaboration à
la
protection de l’environnement.
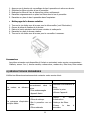
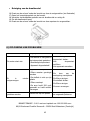
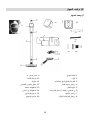
ELEMENTS
D’EMBALLAGE
FR

8
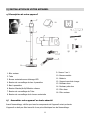
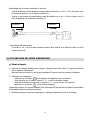
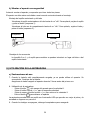
2) INSTALLATION DE VOTRE APPAREIL
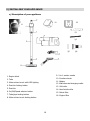
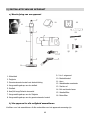
a) Description de votre appareil
b) Assembler votre appareil en toute sécurité
Avant l’assemblage, vérifier que tous les composants de l’appareil soient présents.
L’appareil ne doit pas être branché à une prise électrique lors de l’assemblage.
11
12
13
14
4
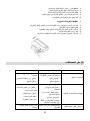
1. Bloc moteur
2. Tube
3. Brosse motorisée avec éclairage LED
4. Bouton de verrouillage du bac à poussière
5. Bac à poussière
6. Bouton Marche/Arrêt/Sélection vitesse
7. Bouton de verrouillage du Tube
8. Bouton de verrouillage de la brosse motorisée
9. Suceur 2 en 1.
10. Brosse meuble
11. Batterie
12. Support mural de charge
13. Rouleau doux
14. Rouleau poils durs
15. Filtre tissu
16. Filtre moteur
6
15
4
16
4

9
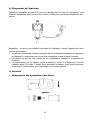
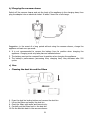
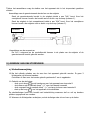
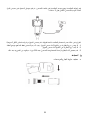
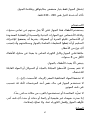
Assemblage de la brosse motorisée et du tube
Insérer la brosse motorisée dans le tube jusqu’à entendre un « clic ». Pour la retirer, tenir
la brosse et appuyer sur le bouton (schéma 1).
Insérer le tube dans le compartiment jusqu’à entendre un « clic ». Pour le retirer, tenir le
tube et appuyer sur le bouton (Schéma 2).
Assemblage des accessoires
Le suceur 2 en 1 et la brosse meuble peuvent être insérés à la place du tube ou de la
brosse motorisée.
3) UTILISATION DE VOTRE ASPIRATEUR
a)
Mode d’emploi
1. Une fois la batterie entièrement chargée, l’appareil peut être utilisé. 3 signaux lumineux
sur la batterie s’allumeront.
Assurez-vous que celui-ci a été chargé pendant 5 heures avant la première utilisation.
2. Utilisation de l’aspirateur :
- appuyez sur le bouton de la poignée de l’appareil pour la vitesse 1
- puis appuyez sur le bouton central « -/+ » pour la seconde vitesse
- appuyez à nouveau sur le bouton central « -/+ » pour revenir à la vitesse 1
- appuyez sur le bouton pour arrêter l’appareil
L’aspirateur balai a une brosse équipée d’un éclairage LED qui permet de traquer la poussière
et les saletés dans les endroits sombres.
3. Quand les signaux lumineux disparaitront, éteignez l’aspirateur pour le recharger.
Schéma 2
Schéma 1

10
b)
Chargement de l’aspirateur
Désactivez l’aspirateur et placez le corps de l’appareil dans la base de chargement, puis
branchez l’adaptateur dans une prise de courant. Le délai pour une charge complète est de 5
heures.
Suggestion : en cas de non-utilisation prolongée de l’aspirateur, chargez l’appareil au moins
une fois par semaine.
1. Il n’est pas recommandé d’enlever la batterie de son emplacement pendant le chargement
de l’appareil. Le chargement ne doit se faire uniquement comme indiqué ci-dessus.
2. La batterie ne doit pas être retirée de son emplacement pendant le chargement de
l’appareil.
3. Les performances de la batterie (durée d’aspiration, durée de chargement) pourront
s’affaiblir après 500 cycles. Il faudra alors renouveler la batterie. Vous pouvez contacter
notre service consommateur pour commander une nouvelle batterie.
c)
Entretien
Nettoyage du bac à poussière et des filtres

11
1. Appuyez sur le bouton de verrouillage du bac à poussière et retirez ce dernier.
2. Soulevez les filtres et videz le bac à poussière.
3. Nettoyez les filtres à l’eau et laissez-les sécher entièrement.
4. Remettez soigneusement en place les filtres dans le bac à poussière.
5. Remettez en place le bac à poussière dans l'aspirateur.
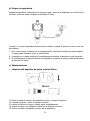
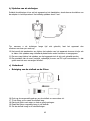
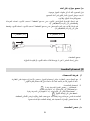
Nettoyage de la brosse rotative
1. Tournez la vis située sous la brosse pour la déverrouiller (voir l’illustration).
2. Ouvrez la pièce de fixation de la brosse.
3. Retirez la partie pivotante de la brosse rotative et nettoyez-la.
4. Remettez en place la brosse rotative.
5. Tournez la vis située sous la brosse pour la verrouiller à nouveau.
Accessoires
Les pièces suivantes sont disponibles à l’achat en contactant notre service consommateur :
Batterie, suceur 2 en 1, brosse meuble, rouleau doux, rouleau dur, filtre tissu, filtre moteur
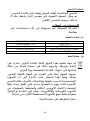
4) RÉSOLUTION DE PROBLÈMES
Vérifiez les éléments suivants avant de contacter notre service client.
Problème
Raison possible
Action
Le moteur ne démarre
pas.
-Fiche non branchée
correctement dans la
prise.
-Prise endommagée
-Appareil éteint
-
Brancher correctement la
fiche.
-Vérifier la prise.
-Allumer l’appareil.
La puissance d’aspiration
est plus faible.
-Appareil obstrué
-Filtres à nettoyer
-Bac
à poussière non en
place
-Filtres obstrués
-
Retirer la source
d'obstruction.
-Nettoyer les filtres.
-Fermer le bac à
poussière.

12
-La batterie a atteint 500
cycles et est affaiblie
- Nettoyer les filtres
-Changer la batterie.
Impossible de fermer le
bac à poussière. Filtres non en place
Remettre en place les
filtres et réessayer.
5) RELATIONS CONSOMMATEURS FRANCE
Pour en savoir plus sur nos produits ou nous contacter, vous pouvez:
Consulter notre site : www.brandt.fr
Nous écrire à l’adresse postale suivante :
Service Consommateurs BRANDT
5 avenue des Béthunes
CS69526 SAINT OUEN L’AUMONE
95060 CERGY PONTOISE CEDEX
Nous appeler du lundi au vendredi de 8h30 à 18h00 au :
BRANDT FRANCE – SAS au capital de 100.000.000 euros
89/91 Boulevard Franklin Roosevelt – 92500 Rueil-Malmaison (France)

13
Dear Customer,
Thank you for buying a BRANDT product and for your confidence in our company.
This product has been designed and manufactured for you considering your lifestyle and
your requirements, so that it meets your expectations in the best way possible. We have
invested it with our expertise, spirit of innovation and all the enthusiasm which has driven
us for more than 60 years.
So that we are always able to satisfy your requirements as well as possible, our customer
service is available, ready to listen and answer all your questions or suggestions
You can also visit our website www.brandt.com where you will find our latest
innovations as well as additional useful information.
BRANDT is happy to support you daily and hopes you will enjoy your purchase to the
full.
Important: Before starting your machine, please read this guide for
installation and us
e carefully in order to familiarise yourself with how it
operates quickly.

14
CONTENTS
1) FOR THE USER'S ATTENTION ....................................................................................... 15
a) Safety Instructions .................................................................................................... 15
b) Technical Data: ......................................................................................................... 17
c) Environmental Protection ........................................................................................... 18
2) INSTALLING YOUR APPLIANCE ..................................................................................... 19
a) Description of your appliance ..................................................................................... 19
b) Assembling your appliance safely ............................................................................... 20
3) USING YOUR VACUUM CLEANER ................................................................................... 20
a) Instructions .............................................................................................................. 20
b) Charging the vacuum cleaner .................................................................................... 21
c) Care ......................................................................................................................... 21
4) PROBLEM-SOLVING ..................................................................................................... 22

15
1) FOR THE USER'S ATTENTION
IMPORTANT SAFETY INSTRUCTIONS
PLEASE READ CAREFULLY AND KEEP FOR FUTURE USE
This appliance is intended to be used for domestic and
other related applications, such as:
staff kitchen areas in shops, offices and other
professional environments;
farms;
use by guests in hotels, motels and other
residential environments;
environments such as bed and breakfast
accommodation.
Keep these instructions with your appliance. If
you sell this appliance to another person second-
hand, make sure you give the new owner these
instructions. Please read these instructions
before installing and using your appliance. They
are written for your safety and that of others.
a) Safety Instructions
Installation
The appliance should only be used with the power supply that is
provided.
The appliance should only be powered using a very low safety
voltage, in line with that which is indicated on the appliance.
Check that the power supplied is 220-240V.

16
Use
This appliance may be used by children aged 8 and over and by
people with reduced physical, sensory or mental capacities or
without experience or knowledge, if they are properly supervised
or if they have been given instructions about using the appliance
safely and if they have understood the risks involved.
Keep the appliance and its lead out of reach of children under
the age of 8.
Children must not play with the appliance.
Do not vacuum wet surfaces, water, liquids, or products or
materials that are flammable.
Do not vacuum very ultra fine substances (ashes, cement...).
Do not use the appliance without a filter, as you risk damaging
the motor.
Do not clean or use the vacuum near anywhere that is very hot.
If there is an unusual noise, a smell, smoke or any other sign of
deterioration during use, turn the appliance off and unplug it. Do
not try to repair it.
Maintenance
Cleaning and maintenance by the user should not be
carried out by children without supervision.
The power cable’s plug should be removed from the
socket before cleaning the appliance or undertaking
maintenance work.
If the power cable is damaged, it must be replaced by
the manufacturer, its after-sales service or any other
similarly qualified person to avoid any dangers.
Clean the filters when they are clogged.

17
This product is guaranteed by your distributor. For more
details please refer to the guarantee conditions
provided by your distributor.
Specific instructions applicable to batteries
Adapter model
ZD012A350040EU
Adapter input
100-240V 50Hz 0.5A
Adapter output
35VDC / 400mA
WARNING: To recharge the battery, only use the
removable power unit provided with the appliance.
This appliance contains batteries that cannot be
replaced.
Charging operation
To charge the vacuum cleaner, turn off the unit and place it
on its charging base. Then plug the adapter into an electrical
outlet and wait 4h30 for a full charge.
Non-compliant use
The manufacturer denies all responsibility in the event
of non-compliant use.
b) Technical Data:
Model
ASB20B/ ASB20R/ ASB20W
Power supply
100-240 V~50 Hz
Energy consumption
350W
Dimensions mm (HxWxD)
1100 x 260x 160mm
Net weight
2,70kg

18
c) Environmental Protection
This appliance’s packaging is recyclable. Recycle it,
disposing of it in the relevant local recycling containers in
order to help protect the environment.
Yo
ur appliance also contains various recyclable materials.
Therefore, it is stamped with this logo to indicate that
used appliances should not be mixed with other waste.
The manufacturer will organise to have your appliance
recycled under the best possible c
onditions, complying
with the applicable European directive related to electrical
and electronic waste. Contact your local council or your
retailer to find out where the points for the collection of
used appliances nearest to your home are.
Thank you for your help in protecting the environment.

19
2) INSTALLING YOUR APPLIANCE
a)
Description of your appliance
11
12
13
14
4
1. Engine block
2. Tube
3. Motor-driven brush with LED lighting
4. Dust bin locking button
5. Dust bin
6. On/Off/Speed selector button
7. Tube/pipe locking button
8. Motor-driven brush locking button
9. 2-in-1 suction nozzle
10. Furniture brush
11. Battery
12. Wall-mounted charging cradle
13. Soft roller
14. Hard bristle roller
15. Fabric filter
16. Engine filter
6
15
4
16
4

20
b)
Assembling your appliance safely
Before assembly, verify that all of the appliance's components are present.
The appliance must not be connected to an electrical socket when assembling.
Assembly of the motor-driven brush and tube
Insert the motor-driven brush into the tube until you hear a “click”. To remove it, hold the
brush and press the button (diagram 1).
Insert the tube into the compartment until you hear a “click”. To remove it, hold the tube
and press the button (diagram 2).
Assembly of accessories
The 2-in-1 suction nozzle and the furniture brush can be inserted instead of the tube or
the motor-driven brush.
3) USING YOUR VACUUM CLEANER
a)
Instructions
4. When the battery is fully charged, the appliance can be used. 3 light signals on the battery
will come on.
Ensure that it has been charged for 5 hours prior to using for the first time.
5. Using the vacuum cleaner:
- press the button on the handle of the appliance for speed 1
- then press the central button “-/+” for the second speed
- press the central button “-/+” to return to speed 1
- press the Power button to stop the appliance.
The brush vacuum cleaner has a brush fitted with LED lighting which makes it possible to see
dust and dirt in dark places.
6. When the light signals go off, switch off the vacuum cleaner to recharge it.
Diagram 2
Diagram 1

21
b)
Charging the vacuum cleaner
Switch off the vacuum cleaner and put the body of the appliance in the charging base, then
plug the adapter into an electrical socket. It takes 5 hours for a full charge.
Suggestion: in the event of a long period without using the vacuum cleaner, charge the
appliance at least once per week.
4. It is not recommended to remove the battery from its position when charging the
appliance. Charging must only take place as indicated above.
5. The battery must not be removed from its position when charging the appliance.
6. The battery's performance (vacuuming time, charging time) may decrease after 500
cycles.
c)
Care
Cleaning the dust bin and the filters
6. Press the dust bin locking button and remove the dust bin.
7. Lift up the filters and empty the dust bin.
8. Clean the filters with water and leave to dry.
9. Carefully put the filters back in the dust bin.
10. Put the dust bin back in the vacuum cleaner.

22
Cleaning the rotary brush
6. Turn the screw located under the brush to unlock it (see illustration).
7. Open the brush fastening part.
8. Remove the pivoting part of the rotary brush and clean it.
9. Put the rotary brush back.
10. Turn the screw located under the brush to lock it again.
4) PROBLEM-SOLVING
Problem
Possible reason
Action
The engine does not start.
-Plug not plugged
correctly into the socket.
-Damaged plug
-Appliance switched off
-Correctly plug in the plug.
-Verify the plug.
-Switch on the appliance.
The vacuum power has
decreased.
-Appliance obstructed
-Filters need to be cleaned
-Dust bin not in place
-Filters are obstructed
-The ba
ttery has reached
500 cycles and is weak
-Remove the source of
obstruction.
-Clean the filters.
-Close the dust bin.
-Clean the filters
-Change the battery.
Impossible to close the
dust bin. Filters not in place
Put the filters back in place
and try again.
BRANDT FRANCE - Simplified Joint Stock Company with capital of 100,000,000 Euros
89/91 Boulevard Franklin Roosevelt - 92854 Rueil-Malmaison (France)

23
Estimada Clienta, estimado Cliente:
Acaba usted de adquirir un producto BRANDT, y le agradecemos la confianza que ha
depositado en nosotros.
Hemos diseñado y fabricado este producto pensando en Usted, en su modo de vida, en
sus necesidades, para satisfacer lo mejor posible sus expectativas. Hemos puesto en él
nuestros conocimientos, nuestro espíritu innovador y toda la pasión que nos mueve desde
hace más de 60 años.
En nuestro deseo permanente de satisfacer cada vez mejor sus exigencias, nuestro
servicio de atención al consumidor está a su disposición, para escucharle y responder a
todas sus dudas o sugerencias.
También puede entrar en nuestro sitio web www.brandt.com, donde encontrará
nuestras innovaciones más recientes, además de útil información complementaria.
A BRANDT le encanta acompañarle en su día a día y le desea que disfrute plenamente
de su compra.
Importante: Antes de poner en marcha el aparato, lea atentamente este
manual de instalación y de uso para familiarizarse más rápidamente con su
funcionamiento.

24
ÍNDICE
1) A LA ATENCIÓN DEL USUARIO ..................................................................................... 25
a) Instrucciones de seguridad ........................................................................................ 25
b) Datos técnicos: ......................................................................................................... 28
c) Conservación del medio ambiente .............................................................................. 28
2) MONTAJE DEL APARATO .............................................................................................. 29
a) Descripción del aparato ............................................................................................. 29
b) Montar el aparato con seguridad ................................................................................ 30
3) UTILIZACIÓN DE LA ASPIRADORA ................................................................................ 30
a) Instrucciones de uso ................................................................................................. 30
b) Cargar la aspiradora .................................................................................................. 31
c) Mantenimiento .......................................................................................................... 31
4) RESOLUCIÓN DE PROBLEMAS ...................................................................................... 32

25
1) A LA ATENCIÓN DEL USUARIO
INSTRUCCIONES DE SEGURIDAD IMPORTANTES
LEER ATENTAMENTE Y GUARDAR PARA FUTURAS
CONSULTAS
Este producto ha sido diseñado para aplicaciones
domésticas y similares, tales como:
zonas de cocinas reservadas al personal de las
tiendas, oficinas y otros entornos profesionales;
granjas;
utilización por clientes de hoteles, moteles y
otros entornos de carácter residencial;
entornos de alojamientos para huéspedes.
Conserve este manual de uso junto a su aparato.
En caso de venta o cesión de este aparato a otra
persona, asegúrese de transmitir este manual de
uso al nuevo propietario. Tenga en cuenta estas
recomendaciones antes de instalar y utilizar el
aparato. Han sido redactadas pensando en su
seguridad y en la de los demás.
a) Instrucciones de seguridad
Instalación
El aparato se utiliza únicamente con la alimentación que se
suministra con el aparato.
El aparato se alimenta únicamente bajo muy baja tensión de
seguridad de acuerdo con las marcas del aparato.
Asegúrese de que la potencia de alimentación es 220-240V.
Utilización

26
Pueden utilizar este aparato los niños que tengan 8 años o más,
y personas que tengan sus capacidades físicas, sensoriales o
mentales disminuidas, o que no tengan experiencia o los
conocimientos adecuados, pero solamente si alguien las vigila, o
tras haber recibido la información necesaria referente al uso del
aparato en condiciones de seguridad, de forma que sean
conscientes de los peligros que supone hacerlo.
Guarde el aparato y su cable fuera del alcance de niños menores
de 8 años.
Los niños no deben jugar con el aparato.
No aplique la aspiradora en superficies mojadas, agua, líquidos,
materiales y productos inflamables.
No aplique la aspiradora a sustancias ultrafinas (cenizas,
cemento,…).
No utilice el aparato sin alguno de los filtros, porque existe el
riesgo de dañar el motor.
No guarde o utilice la aspiradora cerca de sitios muy calientes.
Si observa un ruido anormal, un olor, humo o cualquier otro
deterioro durante el uso, apague el aparato y desconéctelo. No
intente repararlo.
Mantenimiento
Los niños no debe limpiar ni realizar tareas de
conservación del aparato destinadas al usuario, si no
están vigilados.
Retire el enchufe de la toma del cable de alimentación
de la base antes de limpiar el aparato o realizar
cualquier tarea de mantenimiento.

27
Si el cable sufriera algún daño, debe sustituirlo el
fabricante, su servicio posventa o personas de
cualificación similar para evitar cualquier peligro.
Limpiar los filtros cuando estén saturados.
Este producto cuenta con la garantía de su distribuidor.
Para obtener más información, consulte las condiciones
de garantía proporcionadas por su distribuidor.
Instrucciones específicas aplicables a las baterías
Modelo del adaptador
ZD012A350040EU
Entrada del adaptateur
100-240V 50Hz 0.5A
salida del adaptador
35 VDC / 400 mA
PRECAUCIONES: Para recargar la batería, utilizar
únicamente la unidad de alimentación desmontable que
se suministra con el aparato.
Este aparato incluye baterías que no pueden ser
cambiadas.
Operación de carga
Para cargar la aspiradora, apague la unidad y colóquela
en su base de carga. Luego enchufe el adaptador en una
toma de corriente y espere 4h30 para una carga
completa.
Utilización inadecuada:
El fabricante declina cualquier responsabilidad en caso
de utilizaciones no adecuadas.

28
b) Datos técnicos:
c) Conservación del medio ambiente
Los materiales de embalaje de este aparato son
reciclables.
Cumpla con su reciclaje para contribuir a la
protección
del medio ambiente. Deposítelos en los
contenedores municipales previstos a tal efecto.
Su aparato también contiene numerosos materiales
reciclables. Por lo tanto, está marcado con este logotipo
que indica que los aparatos desechables no deben
mezclarse co
n otros residuos. El reciclaje de aparatos que
organiza su fabricante se realiza en las mejores
condiciones, de conformidad con la directiva europea
vigente sobre residuos de aparatos eléctricos y
electrónicos. Consulte con su ayuntamiento o a su
distribui
dor para conocer los puntos de recogida de los
aparatos usados más cercanos a su domicilio.
Le agradecemos su colaboración para proteger el medio
ambiente.
Modelo
ASB20B/ ASB20R/ ASB20W
Corriente eléctrica
100-240 V~50 Hz
Consumo energético
350W
Dimensiones (H. x L. x P.)
1100 x 260x 160mm
Peso neto
2,70kg

29
2) MONTAJE DEL APARATO
a)
Descripción del aparato
11
12
13
14
4
1. Bloque motor
2. Tubo
3. Cepillo motorizado con iluminación LED
4. Botón de bloqueo del depósito de polvo
5. Depósito de polvo
6. Botón Marcha/Parada/Selección de velocidad
7. Botón de bloqueo del tubo
8. Botón de bloqueo del cepillo motorizado
9. Boquilla 2 en 1
10. Cepillo para muebles
11. Batería
12. Base de carga con fijación mural
13. Rodillo cerdas suaves
14. Rodillo cerdas duras
15. Filtro de tela
16. Filtro motor
6
15
4
16
4

30
b)
Montar el aparato con seguridad
Antes de montar el aparato, compruebe que tiene todas las piezas.
El aparato no debe estar enchufado a una toma de corriente durante el montaje.
Montaje del cepillo motorizado y del tubo
Introduzca el cepillo motorizado en el tubo hasta oír un "clic". Para quitarlo, sujete el cepillo
y pulse el botón (esquema 1).
Introduzca el tubo en el compartimento hasta oír un "clic". Para quitarlo, sujete el tubo y
pulse el botón (esquema 2).
Montaje de los accesorios
La boquilla 2 en 1 y el cepillo para muebles se pueden introducir en lugar del tubo o del
cepillo motorizado.
3) UTILIZACIÓN DE LA ASPIRADORA
a)
Instrucciones de uso
7. Cuando la batería esté completamente cargada, ya se puede utilizar el aparato. Se
encenderán 3 testigos de la batería.
Asegúrese de haber cargado el aparato durante 5 horas antes del primer uso.
8. Utilización de la aspiradora:
- Pulse el botón del mango del aparato para la velocidad 1
- Pulse el botón central «-/+» para la segunda velocidad
- Pulse de nuevo el botón central «-/+» para volver a la velocidad 1
- Pulse el botón para detener el aparato
La aspiradora escoba tiene un cepillo con iluminación LED que permite ver mejor el polvo y la
suciedad en lugares con poca luz.
9. Cuando los testigos se apaguen, detenga la aspiradora para recargarla.
Esquema 2
Esquema 1

31
b)
Cargar la aspiradora
Apague la aspiradora, colóquela en la base de carga y enchufe el adaptador en una toma de
corriente. Para una carga completa se necesitan 5 horas.
Consejo: si no usa la aspiradora durante mucho tiempo, cargue el aparato al menos una vez
por semana.
7. No conviene sacar la batería de su emplazamiento mientras el aparato se está cargando.
La carga debe realizarse como se indica arriba.
8. La batería no se debe quitar de su emplazamiento mientras el aparato se está cargando.
9. El rendimiento de la batería (duración de aspiración, duración de carga) puede deteriorarse
al cabo de 500 ciclos.
c)
Mantenimiento
Limpieza del depósito de polvo y de los filtros
11. Pulse el botón de bloqueo del depósito de polvo y saque el depósito.
12. Levante los filtros y vacíe el depósito de polvo.
13. Limpie los filtros con agua y déjelos secar completamente.
14. Vuelva a colocar con cuidado los filtros en el depósito de polvo.
15. Vuelva a colocar el depósito de polvo en la aspiradora.

32
Limpieza del cepillo giratorio
11. Gire el tornillo situado debajo del cepillo para desbloquearlo (ver imagen).
12. Abra la pieza de fijación del cepillo.
13. Retire la parte giratoria del cepillo y límpiela.
14. Vuelva a poner el cepillo giratorio en su lugar.
15. Gire el tornillo situado debajo del cepillo para bloquearlo de nuevo.
4) RESOLUCIÓN DE PROBLEMAS
Problema
Causa posible
Acción
El motor no arranca
- Enchufe mal conectado
en la toma de corriente
-
Toma de corriente
deteriorada
- Aparato apagado
- Conectar bien el enchufe
-
Verificar el estado de la
toma de corriente
- Encender el aparato
Potencia de aspiración
débil
- Aparato obstruido
- Filtros sucios
- Falta depósito de polvo
- Filtros obstruidos
-
La batería ha alcanzado
500 ciclos y no funciona
bien
- Retirar la fuente de
obstrucción
- Limpiar los filtros
-
Cerrar el depósito de
polvo
- Limpiar los filtros
- Cambiar la batería
No se puede cerrar el
depósito de polvo Faltan filtros
Volver a poner los filtros
en su lugar
y probar de
nuevo
BRANDT FRANCE - SAS con un capital social de 100 000 000 euros
89/91 Boulevard Franklin Roosevelt - 92854 Rueil-Malmaison (Francia)

33
Geachte Klant,
U heeft een product van BRANDT aangeschaft. Wij willen u graag bedanken voor uw
vertrouwen.
Wij hebben bij het ontwerpen en tijdens de vervaardiging van dit product aan u gedacht,
aan uw levenswijze, uw behoeften, opdat het zo goed mogelijk aan uw verwachten zou
voldoen. We hebben tijdens het ontwerpen al onze know-how, zin voor innovatie en alle
passie die ons reeds meer dan 60 jaar bezielt aangewend.
Onze klantendienst probeert voortdurend zo goed mogelijk tegemoet te komen aan de
eisen die u stelt. Onze mensen staan ten dienste van onze klanten en zijn bereid uw
vragen of suggesties te beantwoorden.
Kijk op onze website www.brandt.com, daar vindt u al onze laatste innovaties en
nuttige en aanvullende informatie.
BRANDT is blij u dagelijks bij te staan en hoopt dat u ten volle kan genieten van uw
aankoop.
Belangrijk: Voor installatie en gebruik van uw apparaat deze installatie- en
gebruikersgids aandachtig lezen. U zult snel gewend raken aan de werking
ervan.

34
INHOUD
1) TER ATTENTIE VAN DE GEBRUIKER .............................................................................. 35
a) Veiligheidsvoorschriften ............................................................................................. 35
b) Technische gegevens: ............................................................................................... 38
c) Bescherming van het milieu ....................................................................................... 38
2) INSTALLATIE VAN UW APPARAAT ................................................................................. 40
a) Beschrijving van uw apparaat .................................................................................... 40
b) Uw apparaat in alle veiligheid assembleren ................................................................. 40
3) GEBRUIK VAN UW STOFZUIGER ................................................................................... 41
a) Gebruiksaanwijzing ................................................................................................... 41
b) Opladen van de stofzuiger ......................................................................................... 42
c) Onderhoud ............................................................................................................... 42
4) OPLOSSING VAN PROBLEMEN ...................................................................................... 43

35
1) TER ATTENTIE VAN DE GEBRUIKER
BELANGRIJKE VEILIGHEIDSINSTRUCTIES
AANDACHTIG LEZEN EN BIJHOUDEN VOOR LATER
GEBRUIK
Dit apparaat is bedoeld voor gebruik in huishoudelijke
of soortgelijke toepassingen:
Keukenruimtes gereserveerd voor het personeel
van winkels, kantoren en andere professionele
omgevingen;
boerderijen;
gebruik door klanten van hotels, motels en
andere verblijfplaatsen;
bed and breakfasts.
Bewaar deze gebruikshandleiding bij het
apparaat. Indien u het apparaat verkoopt of
afstaat aan iemand anders, zorg er dan voor dat
deze gebruikshandleiding aan de nieuwe
eigenaar bezorgd wordt. Wij verzoeken u kennis
te nemen van deze handleiding voordat u het
apparaat installeert en gebruikt. Deze
handleiding werd opgesteld voor uw veiligheid
en die van anderen.
a) Veiligheidsvoorschriften
Installatie
Het apparaat mag enkel gebruikt worden met de meegeleverde
voeding.

36
Het apparaat wordt enkel gevoed door een bijzonder lage
veiligheidsspanning zoals aangeduid op het merkplaatje van het
apparaat.
Controleer of de stroomvoorziening 220-240V is.
Gebruik
Dit apparaat mag gebruikt worden door kinderen vanaf 8 jaar en
door personen met lichamelijke, motorieke of geestelijke
beperkingen of door personen met onvoldoende ervaring/kennis
op voorwaarde dat zij onder toezicht staan OF nadat ze de nodige
informatie gekregen hebben in verband met het veilige gebruik
van dit apparaat en ze op de hoogte zijn van de mogelijke
gevaren.
Houd dit apparaat en het snoer ervan buiten het bereik van
kinderen jonger dan 8 jaar.
Kinderen mogen niet met het apparaat spelen.
Zuig geen natte oppervlakken, water, vloeistoffen of brandbare
materialen en producten op.
Zuig geen ultrafijne stoffen (as, cement, ...) op.
Gebruik het apparaat niet zonder één van de filters, dit kan de
motor ernstig beschadigen.
Bewaar of gebruik de stofzuiger niet in de buurt van een zeer
warme plaats.
Als er tijdens het gebruik abnormale geluiden, geuren, rook of
andere beschadigingen optreden, schakel het apparaat uit en
trek de stekker uit het stopcontact. Probeer het apparaat niet zelf
te repareren.

37
Onderhoud
Het apparaat mag niet zonder toezicht worden
schoongemaakt en onderhouden door kinderen.
De stekker van de voedingskabel moet worden
verwijderd uit de basis voordat reinigings- of
onderhoudswerken worden uitgevoerd.
Als de voedingskabel beschadigd is, moet deze
vervangen worden door de fabrikant, zijn dienst-na-
verkoop, of een bekwaam persoon om elk gevaar te
voorkomen.
Reinig de filters als deze verzadigd zijn.
Het product is onder garantie bij uw verdeler. Voor meer
details verwijzen we naar de garantievoorwaarden die u
door uw verdeler werden bezorgd.
Bijzondere instructies voor de batterijen
Adapter model
ZD012A350040EU
Adapterinput
100-240V 50Hz 0.5A
Adapteruitgang
35VDC / 400mA
WAARSCHUWING: Gebruik voor het opladen van de
batterij alleen de verwijderbare voedingseenheid die
met het apparaat is meegeleverd.
Dit apparaat bevat batterijen die niet kunnen worden
vervangen.

38
Laadproces
Om de stofzuiger op te laden, schakelt u het apparaat uit
en plaatst u het op de oplaadbasis. Sluit vervolgens de
adapter aan op een stopcontact en wacht 4u30 op een
volledige lading.
Onzorgvuldig gebruik
De fabrikant wijst iedere aansprakelijkheid van de hand
in geval van onzorgvuldig gebruik.
b) Technische gegevens:
c) Bescherming van het milieu
Het verpakkingsmateriaal van dit apparaat is
recycleerbaar. Laat het recycleren en draag zo bij aan de
bescherming van het milieu door het te deponeren in één
van de daarvoor bestemde gemeentelijke containers.
Uw apparaat bevat eveneens tal van recycleerbare
materialen. Daarom is het voorzien van dit logo om u aan
te duiden dat de gebruikte apparaten niet gemengd
moeten worden met ander afval. De apparaten zullen
onder de beste omstandigheden door uw fabrikant
gerecycled worden, overeenkomstig de geldende
Model
ASB20B/ ASB20R/ ASB20W
Voeding
100-240 V~50 Hz
Energieverbruik
350W
Afmetingen (HxBxD)
1100 x 260x 160mm
Nettogewicht
2,70kg

39
Europese richtlijn betreffende afgedankte elektrische en
elektronische apparatuur. Neem contact op met uw
gemeente of uw verkoper om het dichtstbijzijnde
verzamelpunt voor gebruikte apparaten te kennen.
Wij bedanken u voor uw bijdrage aan de bescherming van
het milieu.

40
2) INSTALLATIE VAN UW APPARAAT
a)
Beschrijving van uw apparaat
b)
Uw apparaat in alle veiligheid assembleren
Verifieer voor het assembleren of alle onderdelen van het apparaat aanwezig zijn.
11
12
13
14
4
1. Motorblok
2. Zuigbuis
3. Gemotoriseerde borstel met ledverlichting
4. Vergrendelingsknop van de stofbak
5. Stofbak
6. Aan/Uit-knop/Selectie toerental
7. Vergrendelingsknop van de Zuigbuis
8. Vergrendelingsknop van de gemotoriseerde borstel
9. 2-in-1 zuigmond
10. Meubelborstel
11. Accu
12. Wandhouder acculader
13. Zachte rol
14. Rol met harde haren
15. Weefselfilter
16. Motorfilter
6
15
4
16
4

41
Tijdens het assembleren mag de stekker van het apparaat niet in het stopcontact gestoken
worden.
Assemblage van de gemotoriseerde borstel en van de zuigbuis
Steek de gemotoriseerde borstel in de zuigbuis totdat u een “klik” hoort. Voor het
verwijderen hiervan houdt u de borstel vast en drukt u op de knop (schema 1).
Steek de zuigbuis in het compartiment totdat u een “klik” hoort. Voor het verwijderen
hiervan houdt u de zuigbuis vast en drukt u op de knop (schema 2).
Assemblage van de accessoires
De 2-in-1 zuigmond en de meubelborstel kunnen in de plaats van de zuigbuis of de
gemotoriseerde borstel gebruikt worden.
3) GEBRUIK VAN UW STOFZUIGER
a)
Gebruiksaanwijzing
10. Na het volledig opladen van de accu kan het apparaat gebruikt worden. Er gaan 3
lichtsignalen op de accu branden.
Controleer of deze voor het eerste gebruik gedurende 5 uur is opgeladen.
11. Gebruik van de stofzuiger:
- druk op de knop op de handgreep van het apparaat voor toerental 1
- druk daarna op de centrale knop “-/+” voor het tweede toerental
- druk nogmaals op de centrale knop “-/+” om terug te keren naar toerental 1
- druk op de knop om het apparaat uit te schakelen
De steelstofzuiger heeft een borstel met ledverlichting waarmee stof en vuil op donkere
plekken opgespoord kan worden.
12. Wanneer de lichtsignalen verdwijnen, zet de stofzuiger dan uit om hem op te laden.
Schema 2
Schema 1

42
b)
Opladen van de stofzuiger
Schakel de stofzuiger uit en zet het apparaat op het laadstation, steek daarna de stekker van
de adapter in het stopcontact. Het volledig opladen duurt 5 uur.
Tip: wanneer u de stofzuiger lange tijd niet gebruikt, laat het apparaat dan
minstens een keer per week op.
10. Het wordt niet aanbevolen om tijdens het opladen van het apparaat de accu uit zijn vak
te halen. Het opladen mag uitsluitend plaatsvinden zoals hierboven is aangegeven.
11. De accu mag tijdens het opladen van het apparaat niet uit zijn vak gehaald worden.
12. De prestaties van de accu (zuigtijd, oplaadtijd) kunnen na 500 cycli verminderen. In dat
geval moet de accu vervangen worden.
c)
Onderhoud
Reiniging van de stofbak en de filters
16. Druk op de vergrendelingsknop van de stofbak en neem deze uit.
17. Til de filters op en maak de stofbak leeg.
18. Reinig de filters met water en laat ze goed opdrogen.
19. Plaats de filters zorgvuldig terug in de stofbak.
20. Zet de stofbak terug in de steelstofzuiger.

43
Reiniging van de draaiborstel
16. Draai aan de schroef onder de borstel om deze te ontgrendelen (zie illustratie).
17. Open het bevestigingsstuk van de borstel.
18. Verwijder het draaiende gedeelte van de draaiborstel en reinig dit.
19. Zet de draaiborstel terug.
20. Draai aan de schroef onder de borstel om deze opnieuw te vergrendelen.
4) OPLOSSING VAN PROBLEMEN
Probleem
Mogelijke oorzaak
Handeling
De motor start niet.
-De stekker is niet goed in
het stopcontact gestoken.
-Beschadigd stopcontact
-Apparaat uitgeschakeld
-De stekker goed in het
stopcontact steken.
-
Het stopcontact
verifiëren.
-Het apparaat aanzetten.
Er is minder
zuigvermogen.
-Apparaat verstopt
-
Filters moeten gereinigd
worden
-
De stofbak is niet op zijn
plaats
-Filters verstopt
-
De accu heeft 500 cycli
gemaakt en heeft minder
vermogen
-
De bron van de
verstopping verwijderen.
-De filters reinigen.
-De stofbak sluiten.
-De filters reinigen
-De accu vervangen.
De stofbak kan niet
gesloten worden. Filters niet op hun plaats
De filters terugplaatsen en
het nogmaals proberen.
BRANDT FRANCE - S.A.S. met een kapitaal van 100.000.000 euro
89/91 Boulevard Franklin Roosevelt - 92854 Rueil-Malmaison (Frankrijk)

54
BRANDT FRANCE – SAS au capital de 100.000.000 euros
89/91 Boulevard Franklin Roosevelt – 92500 Rueil-Malmaison (France)

53
1. .ﺎﮭﺒﺤﺳاو رﺎﺒﻐﻟا ﺔﻳوﺎﺣ ﻞﻔﻗ رز ﻰﻠﻋ ﻂﻐﺿا
2. .رﺎﺒﻐﻟا ﺔﻳوﺎﺣ ﻎﻳﺮﻔﺘﺑ ﻢﻗو تﺎﺤﺷﺮﻤﻟا عﺰﻧا
3. .ﺎًﻣﺎﻤﺗ ﻒﺠﺗ ﺎﮭﻛﺮﺗاو ءﺎﻤﻟﺎﺑ تﺎﺤﺷﺮﻤﻟا ﻒّﻈﻧ
4. ﺔﻳوﺎﺣ ﻲﻓ ﺔﻳﺎﻨﻌﺑ ﺎﮭﻧﺎﻜﻣ ﻰﻟإ تﺎﺤﺷﺮﻤﻟا ﺪﻋأ .رﺎﺒﻐﻟا
5. .ﺔﺴﻨﻜﻤﻟا ﻲﻓ رﺎﺒﻐﻟا ﺔﻳوﺎﺣ ﻊﺿو ﺪﻋأ
ةراّوﺪﻟا ةﺎﺷﺮُﻔﻟا ﻒﯿﻈﻨﺗ
1. .(ةرﻮﺼﻟا ﺮﻈﻧا) ﻞﻔﻘﻟا ﺮﻳﺮﺤﺘﻟ ةﺎﺷﺮُﻔﻟا ﺖﺤﺗ دﻮﺟﻮﻤﻟا ﻲﻏﺮﺒﻟا ﻒﻠﺑ ﻢﻗ
2. .ةﺎﺷﺮُﻔﻟا ﺖﯿﺒﺜﺗ ﺔﻌﻄﻗ ﺢﺘﻓا
3. .ﺎﮭﻔﯿﻈﻨﺘﺑ ﻢﻗو ةراّوﺪﻟا ةﺎﺷﺮُﻔﻟا ﻲﻓ راّوﺪﻟا ءﺰﺠﻟا ﺐﺤﺳا
4. .ةراّوﺪﻟا ةﺎﺷﺮُﻔﻟا ﺐﯿﻛﺮﺗ ﺪﻋأ
5. ا ﻲﻏﺮﺒﻟا ﻒﻠﺑ ﻢﻗ.ىﺮﺧأ ةﺮﻣ ﺎﮭﻠﻔﻘﻟ ةﺎﺷﺮُﻔﻟا ﺖﺤﺗ دﻮﺟﻮﻤﻟ
4 (تﻼﻜﺸﻤﻟا ﻞﺣ
ﺔﻠﻜﺸﻤﻟا
ﻞﻤﺘﺤﻤﻟا ﺐﺒﺴﻟا
ﺬﺨﺘﻤﻟا فﺮﺼﺘﻟا
ﻞﻤﻌﻳ ﻻ كﺮﺤﻤﻟا
- ﻞﺻﻮﻣ ﺮﯿﻏ ءﺎﺑﺮﮭﻜﻟا ﺲﺑﺎﻗ
.ءﺎﺑﺮﮭﻜﻟا ﺲﺒﻘﻣ ﻲﻓ مﺎﻜﺣﺈﺑ
- ﻒﻟﺎﺗ ﺲﺑﺎﻘﻟا
- ﻖﻠﻐﻣ زﺎﮭﺠﻟا
- ﻞﻜﺸﺑ زﺎﮭﺠﻟا ﻞﯿﺻﻮﺘﺑ ﻢﻗ
.ﺢﯿﺤﺻ
- .ﺲﺒﻘﻤﻟا ﺔﻣﻼﺳ ﻦﻣ ﻖﻘﺤﺗ
- ﺎﮭﺠﻟا ﻞّﻐﺷ.ز
.ﻒﻌﺿأ ﺖﺤﺒﺻأ ﻂﻔﺸﻟا ةﻮﻗ
- دوﺪﺴﻣ زﺎﮭﺠﻟا
- ﻰﻟإ ﺢﺷﺮﻤﻟا جﺎﺘﺤﻳ
ﻒﯿﻈﻨﺘﻟا
- ﻲﻓ ﺖﺴﯿﻟ رﺎﺒﻐﻟا ﺔﻳوﺎﺣ
ﺢﯿﺤﺼﻟا ﺎﮭﻧﺎﻜﻣ
- دوﺪﺴﻣ ﺢﺷﺮﻤﻟا
- ﻰﻟإ ﺔﻳرﺎﻄﺒﻟا ﺖﻠﺻو500 .ﺔﻔﯿﻌﺿ ﺖﺤﺒﺻأو ةرود
- .داﺪﺴﻧﻻا رﺪﺼﻣ ﻦﻣ ﺺﻠﺨﺗ
.تﺎﺤﺷﺮﻤﻟا ﻒّﻈﻧ
- .رﺎﺒﻐﻟا ﺔﻳوﺎﺣ ﻖﻠﻏأ
- .تﺎﺤﺷﺮﻤﻟا ﻒّﻈﻧ
- ﻟا ﺮﯿﯿﻐﺘﺑ ﻢﻗ.ﺔﻳرﺎﻄﺒ
.رﺎﺒﻐﻟا ﺔﻳوﺎﺣ ﻖﻠﻏ ﻦﻜﻤﻳ ﻻ
ﻪﻧﺎﻜﻣ ﻲﻓ ﺲﯿﻟ رﺎﺒﻐﻟا ﺢﺷﺮﻣ
ﺢﯿﺤﺼﻟا
لوﺎﺣو رﺎﺒﻐﻟا ﺢﺷﺮﻣ ﺖﺒﺛ
.اًدﺪﺠﻣ

52
.رﺎﯿﺘﻟا ﺲﺒﻘﻣ ﻲﻓ لﻮﺤﻤﻟا ﻞﯿﺻﻮﺘﺑ ﻢﻗ ﻢﺛ ،ﻦﺤﺸﻟا ةﺪﻋﺎﻗ ﻲﻓ ﺔﺴﻨﻜﻤﻟا ﻢﺴﺟ ﻊﺿو ﺔﺴﻨﻜﻤﻟا فﺎﻘﻳﺈﺑ ﻢﻗ
ﻲھ ﻞﻣﺎﻜﻟا ﻦﺤﺸﻠﻟ ﺔﯿﻨﻣﺰﻟا ةﺪﻤﻟا5 .تﺎﻋﺎﺳ
ﺔﻟﺎﺣ ﻲﻓ :حاﺮﺘﻗا.ﺎًﯿﻋﻮﺒﺳأ ﻞﻗﻷا ﻰﻠﻋ ةﺪﺣاو ةﺮﻣ زﺎﮭﺠﻟا ﻦﺤﺸﺑ ﻢﻗ ،ﺔﻠﻳﻮط ةﺪﻤﻟ ﺔﺴﻨﻜﻤﻟا ماﺪﺨﺘﺳا مﺪﻋ
1. .هﻼﻋأ ﺢﺿﻮﻣ ﻮھ ﺎﻤﻛ ﻂﻘﻓ ﻦﺤﺸﻟا ﻢﺘﻳ نأ ﺐﺠﻳ .زﺎﮭﺠﻟا ﻦﺤﺷ ءﺎﻨﺛأ ﺎﮭﻧﺎﻜﻣ ﻦﻣ ﺔﻳرﺎﻄﺒﻟا عﺰﻨﺑ ﻰﺻﻮﻳ ﻻ
2. .زﺎﮭﺠﻟا ﻦﺤﺷ ءﺎﻨﺛأ ﺎﮭﻧﺎﻜﻣ ﻦﻣ ﺔﻳرﺎﻄﺒﻟا عﺰﻧ ﺐﺠﻳ ﻻ
3. ﻟا ةﺪﻣو ﻂﻔﺸﻟا ةﺪﻣ) ﺔﻳرﺎﻄﺒﻟا ءادأ ﺾﻔﺨﻨﻳ ﺪﻗ ﺪﻌﺑ (ﻦﺤﺸ500 ﻚﻟذ ﺪﻌﺑ يروﺮﻀﻟا ﻦﻣ نﻮﻜﯿﺳ .ةرود
ج( ﺔﻧﺎﯿﺼﻟا
تﺎﺤﺷﺮﻤﻟاو رﺎﺒﻐﻟا ﺔﻳوﺎﺣ ﻒﯿﻈﻨﺗ

51
نﺎﻣأ ﻞﻜﺑ كزﺎﮭﺟ ﻊﯿﻤﺠﺗ (ب
.ةدﻮﺟﻮﻣ زﺎﮭﺠﻟا تﺎﻧﻮﻜﻣ ﻞﻛ نأ ﺪﻛﺄﺗ ،ﻊﯿﻤﺠﺘﻟا ﻞﺒﻗ
.ﻊﯿﻤﺠﺘﻟا ءﺎﻨﺛأ ﻲﺋﺎﺑﺮﮭﻜﻟا رﺎﯿﺘﻟﺎﺑ زﺎﮭﺠﻟا ﻞﯿﺻﻮﺗ ﺐﺠﻳ ﻻ
بﻮﺒﻧﻷاو ةراﱠوﺪﻟا ةﺎﺷﺮُﻔﻟا ﻊﯿﻤﺠﺗ
ُﻔﻟا لﺎﺧدﺈﺑ ﻢﻗ ةﺎﺷﺮﻔﻟا ﻚﺴﻣا ،بﻮﺒﻧﻷا ﺐﺤﺴﻟ ."ﺔﻘﻄﻘط" ﻊﻤﺴﺗ ﻰﺘﺣ بﻮﺒﻧﻷا ﻲﻓ ةراﱠوﺪﻟا ةﺎﺷﺮ
ﻲﻄﯿﻄﺨﺘﻟا ﻢﺳﺮﻟا) رﺰﻟا ﻰﻠﻋ ﻂﻐﺿاو1.(
ﻂﻐﺿاو بﻮﺒﻧﻷا ﻚﺴﻣا ،بﻮﺒﻧﻷا ﺐﺤﺴﻟ ."ﺔﻘﻄﻘط" ﻊﻤﺴﺗ ﻰﺘﺣ ﻞﻘﺘﺴﻤﻟا ءﺰﺠﻟا ﻲﻓ بﻮﺒﻧﻷا لﺎﺧدﺈﺑ ﻢﻗ
ﻲﻄﯿﻄﺨﺘﻟا ﻢﺳﺮﻟا) رﺰﻟا ﻰﻠﻋ2.(
تﺎﻘﺤﻠﻤﻟا ﻊﯿﻤﺠﺗ
دإ ﻦﻜﻤﻳ صﺎﻤﻟا لﺎﺧ2 ﻲﻓ1 .ةراﱠوﺪﻟا ةﺎﺷﺮُﻔﻟا وأ بﻮﺒﻧﻷا نﺎﻜﻣ ثﺎﺛﻷا ةﺎﺷﺮﻓو
3 (ﺔﺴﻨﻜﻤﻟا ماﺪﺨﺘﺳا
أ( لﺎﻤﻌﺘﺳﻻا ﺔﻘﻳﺮط
1. ءﻲﻀﺘﺳ .زﺎﮭﺠﻟا ماﺪﺨﺘﺳا ﻦﻜﻤﻳ ،ﺔﻳرﺎﻄﺒﻟا ﻦﺤﺷ لﺎﻤﺘﻛا ﺪﻌﺑ3 .ﺔﻳرﺎﻄﺒﻟا ﻰﻠﻋ ﺔﯿﺋﻮﺿ تارﺎﺷإ
ةﺪﻤﻟ ﻪﻨﺤﺷ ﻢﺗ ﺪﻗ زﺎﮭﺠﻟا نأ ﺪﻛﺄﺗ5 .ﻰﻟوﻷا ةﺮﻤﻠﻟ ماﺪﺨﺘﺳﻻا ﻞﺒﻗ تﺎﻋﺎﺳ
2. ﺳا:ﺔﺴﻨﻜﻤﻟا ماﺪﺨﺘ
- ﻢﻗر ﺔﻋﺮﺴﻠﻟ زﺎﮭﺠﻟا ﺾﺒﻘﻣ رز ﻰﻠﻋ ﻂﻐﺿا1
- ﻂﺳوﻷا رﺰﻟا ﻰﻠﻋ ﻂﻐﺿا ﻢﺛ» -+/ «ﺔﯿﻧﺎﺜﻟا ﺔﻋﺮﺴﻠﻟ - ﻂﺳوﻷا رﺰﻟا ﻰﻠﻋ اًدﺪﺠﻣ ﻂﻐﺿا» -+/ « ﻢﻗر ﺔﻋﺮﺴﻟا ﻰﻟإ ةدﻮﻌﻠﻟ1
- زﺎﮭﺠﻟا فﺎﻘﻳﻹ رﺰﻟا ﻰﻠﻋ ﻂﻐﺿا
و رﺎﺒﻐﻟا ﺐﻘﻌﺗ ﺢﯿﺘﺗ ﺪﯿﻟ ةءﺎﺿﺈﺑ ةدوﺰﻣ ةﺎﺷﺮﻔﺑ ﺲﻨﻜﺗ ﺔﺴﻨﻜﻤﻟا.ﺔﻤﻠﻈﻤﻟا ﻦﻛﺎﻣﻷا ﻲﻓ خﺎﺳوﻷا
3. .ﺎﮭﻨﺤﺷ ةدﺎﻋﻹ ﺔﺴﻨﻜﻤﻟا فﺎﻘﻳﺈﺑ ﻢﻗ ،ﺔﺌﯿﻀﻤﻟا تارﺎﺷﻹا ﻲﻔﺘﺨﺗ ﺎﻣﺪﻨﻋ
ب( ﺔﺴﻨﻜﻤﻟا ﻦﺤﺷ
ﻲﻄﯿﻄﺨﺗ ﻢﺳر2
ﻲﻄﯿﻄﺨﺗ ﻢﺳر1

50
2 (زﺎﮭﺠﻟا ﺐﯿﻛﺮﺗ
زﺎﮭﺠﻟا ﻒﺻو (أ
11
12
13
14
4
1رﻮﺗﻮﻤﻟا ﺔﻠﺘﻛ .
2بﻮﺒﻧأ .
3ﺪﯿﻟ ةءﺎﺿإ ﻊﻣ ةراﱠوﺪﻟا ةﺎﺷﺮُﻔﻟا .
4رﺎﺒﻐﻟا ﺔﻳوﺎﺣ ﻞﻔﻗ رز .
5رﺎﺒﻐﻟا ﺔﻳوﺎﺣ .
6 ﺔﻋﺮﺴﻟا رﺎﯿﺘﺧا / فﺎﻘﻳإ / ﻞﯿﻐﺸﺗ رز .
7ﻔﻗ رز .بﻮﺒﻧﻷا ﻞ
8ةراﱠوﺪﻟا ةﺎﺷﺮُﻔﻟا ﻞﻔﻗ رز .
9 صﺎﻣ .2 ﻲﻓ1.
10ثﺎﺛﻷا ةﺎﺷﺮﻓ .
11ﺔﻳرﺎﻄﺑ .
12ﻦﺤﺸﻠﻟ ﻲﻧﺪﻌﻣ ﻞﻣﺎﺣ .
13ﺔﻤﻋﺎﻧ ﺔﻧاﻮﻄﺳأ .
14ﻦﺸﺧ ﺮﺑو ﺔﻧاﻮﻄﺳأ .
15ﺞﯿﺴﻨﻠﻟ ﺢﺷﺮﻣ .
16رﻮﺗﻮﻤﻠﻟ ﺢﺷﺮﻣ .
6
15
4
16
4

49
ﻦﺤﺸﻟا ﺔﯿﻠﻤﻋ
.ﻦﺤﺸﻟا ةﺪﻋﺎﻗ ﻰﻠﻋ ﻪﻌﺿو زﺎﮭﺠﻟا ﻒﻗوأ ،ﺔﺴﻨﻜﻤﻟا ﻦﺤﺸﻟ
ةّﺪﻣ ﺮﻈﺘﻧاو رﺎﯿﺘﻟا ﺲﺒﻘﻣ ﻲﻓ لﻮﺤﻤﻟا لﻮﺤﻤﻟا ﻞّﺻو ﻢﺛ4
.ﻞﻣﺎﻜﻟا ﻦﺤﺸﻠﻟ ﻒﺼﻧو تﺎﻋﺎﺳ
ﻖﺑﺎﻄﻤﻟا ﺮﯿﻏ ماﺪﺨﺘﺳﻻا
ﻦﻋ ﺔﻟوﺆﺴﻣ ﺮﯿﻏ ﺔﻌﻨﺼﻤﻟا ﺔﻛﺮﺸﻟايأ ﺮﯿﻏ تﺎﻣاﺪﺨﺘﺳا
.ﺔﻘﺑﺎﻄﻣ
ب( :ﺔﯿﻨﻔﻟا تﺎﻧﺎﯿﺒﻟا
ﻳدﻮﻤﻟاﻞ
ASB20B/ ASB20R/ ASB20W
ءﺎﺑﺮﮭﻜﻟا رﺪﺼﻣ
100 - 240 ،ﻂﻠﻓ50 ﺰﺗﺮھ
ﻲﻤﺳﻷا كﻼﮭﺘﺳﻻا
350 طاو
عﺎﻔﺗرا) تﺎﺳﺎﻘﻤﻟا × ضﺮﻋ ×(ﻖﻤُﻋ
1100 ×260 ×160 ﻢﻣ
ﻲﻓﺎﺼﻟا نزﻮﻟا
2.7 ﻢﺠﻛ
ج( ﺔﺌﯿﺒﻟا ﺔﻳﺎﻤﺣ
ا ةدﺎﻋﻹ ﺔﻠﺑﺎﻗ زﺎﮭﺠﻟا اﺬھ ﻒﯿﻠﻐﺗ داﻮﻣ نإ ﻲﻓ كرﺎﺷ .ﺮﻳوﺪﺘﻟ
لﻼﺧ ﻦﻣ ﺔﺌﯿﺒﻟا ﺔﻳﺎﻤﺣ ﻲﻓ ﻚﻟﺬﺑ ﻢﮭﺳأو ،ﺎھﺮﻳوﺪﺗ ةدﺎﻋإ
.ضﺮﻐﻟا اﺬﮭﺑ ﺔﺼﺼﺨﻤﻟا ﺔﻳﺪﻠﺒﻟا تﺎﻳوﺎﺣ ﻲﻓ ﺎﮭﻋاﺪﻳإ
.ﺮﻳوﺪﺘﻠﻟ ﺔﻠﺑﺎﻘﻟا داﻮﻤﻟا ﻦﻣ ﺪﻳﺪﻌﻟا ﻰﻠﻋ ﺎﻀﻳأ زﺎﮭﺠﻟا يﻮﺘﺤﻳ
ﻚﻟﺬﻟو
ةﺰﮭﺟﻷا نأ ﻰﻟإ ًةرﺎﺷإ ﻪﯿﻠﻋ رﺎﻌﺸﻟا اﺬھ ﻊﺿُو
ﺧﻷا تﺎﻳﺎﻔﻨﻟا ﻊﻣ ﺎﮭﻄﻠﺧ ﺐﺠﻳ ﻻ ﺔﻣﺪﺨﺘﺴﻤﻟا
ﺮﻳوﺪﺘﻟا ةدﺎﻋإ .ىﺮ
ﺎﻘﻓو ،ﻪﺟو ﻞﻀﻓأ ﻰﻠﻋ ﻢﺘﯿﺳ ﻊﻨﺼﻤﻟا ﻪﺑ مﻮﻘﻳ يﺬﻟا ةﺰﮭﺟﻸﻟ
ﻦﻣ تﺎﻔﻠﺨﻤﻟﺎﺑ ﺔﻘﻠﻌﺘﻤﻟاو ةﺬﻓﺎﻨﻟا ﻲﺑوروﻷا دﺎﺤﺗﻻا تﺎﻤﯿﻠﻌﺘﻟ
ﻞﯿﻛﻮﻟا وأ ﺔﻳﺪﻠﺒﻟا ﻰﻟإ ﻪّﺟﻮﺗ .ﺔﯿﻧوﺮﺘﻜﻟﻹاو ﺔﯿﺋﺎﺑﺮﮭﻜﻟا ةﺰﮭﺟﻷا
.ﻚﻟﺰﻨﻣ ﻦﻣ بﺮﻗﻷا ﺔﻠﻤﻌﺘﺴﻤﻟا ةﺰﮭﺟﻷا ﻊﻤﺟ طﺎﻘﻧ ﺔﻓﺮﻌﻤﻟ
ﻲﻓ ﻢﻜﻧوﺎﻌﺘﻟ اﺮﻜﺷ ﺔﺌﯿﺒﻟا ﺔﻳﺎﻤﺣ

48
لﺎﻔطﻷا ﻦﯿﻣﺪﺨﺘﺴﻤﻟا ﺔﻄﺳاﻮﺑ ﺔﻧﺎﯿﺻ وأ ﻒﯿﻈﻨﺗ ﻢﺘﻳ ﻻأ ﺐﺠﻳ
.فاﺮﺷﻺﻟ عﻮﻀﺨﻟا نود
ﻒﯿﻈﻨﺗ ﻞﺒﻗ ةﺪﻋﺎﻘﻟا ﻦﻣ ﻲﺋﺎﺑﺮﮭﻜﻟا رﺎﯿﺘﻟا ﺲﺑﺎﻗ عﺰﻧ ﺐﺠﻳ
.ﺔﻧﺎﯿﺼﻟا تﺎﯿﻠﻤﻋ ةﺮﺷﺎﺒﻣ وأ زﺎﮭﺠﻟا
،ﺎًﻔﻟﺎﺗ ءﺎﺑﺮﮭﻜﻟا ﻞﺑﺎﻛ نﺎﻛ اذإ ﺐﺠﻳ ﻪﻟﺪﺒﺘﺴﻳ نأ ﻦﻣ ،ﻊِﻨﺼُﻤﻟا
ﻞھﺆﻣ ﺺﺨﺷ يأ ﻖﻳﺮط ﻦﻋ وأ ﻊﯿﺒﻟا ﺪﻌﺑ ﺎﻣ ﺔﻣﺪﺧ لﻼﺧ
.ﺮﻄﺧ يأ يدﺎﻔﺘﻟ
.ﺔﻌّﺒﺸُﻣ ﺖﻧﺎﻛ اذإ تﺎﺤﺷﺮﻤﻟا ﻒﯿﻈﻨﺘﺑ ﻢﻗ
،ﻞﯿﺻﺎﻔﺘﻟا ﻦﻣ ﺪﻳﺰﻤﻟ .عّزﻮﻤﻟا ﻪﻨﻤﻀﻳ زﺎﮭﺠﻟا اﺬﮭﻓ ،ﻚﻟذ ﻊﻣو
.ﻚﺑ صﺎﺨﻟا عّزﻮﻤﻟا ﺎﮭﻣﺪﻘﻳ ﻲﺘﻟا نﺎﻤﻀﻟا طوﺮﺷ ﻊﺟار
ﺒﻟا ﻰﻠﻋ ﻖﺒﻄﻨﺗ ﺔﺻﺎﺧ تﺎﻤﯿﻠﻌﺗتﺎﻳرﺎﻄ
لﻮﺤﻤﻟا ﻞﻳدﻮﻣ
ZD012A350040EU
لﻮﺤﻤﻟا ﻞﺧﺪﻣ
100 - 240 ،ﻂﻠﻓ50 ،ﺰﺗﺮھ0.5 ﺮﯿﺒﻣأ
لﻮﺤﻤﻟا جﺮﺨﻣ
35 / ﺮﺷﺎﺒﻣ رﺎﯿﺗ ﻂﻠﻓ400 ﺮﯿﺒﻣأ ﻲﻠﻣ
:ﺮﻳﺬﺤﺗ داﺪﻣﻹا ةﺪﺣو ﻂﻘﻓ مﺪﺨﺘﺳا ،ﺔﻳرﺎﻄﺒﻟا ﻦﺤﺷ ةدﺎﻋﻹ
.زﺎﮭﺠﻟا ﻊﻣ ﺔﻋﺎﺒُﻤﻟا ﻞﺼﻔﻠﻟ ﺔﻠﺑﺎﻘﻟا رﺎﯿﺘﻟﺎﺑ
ﻻ تﺎﻳرﺎﻄﺑ ﻰﻠﻋ زﺎﮭﺠﻟا اﺬھ يﻮﺘﺤﻳ.ﺎﮭﻟاﺪﺒﺘﺳا ﻦﻜﻤﻳ

47
ﺨﻨﻣ رﺎﯿﺘﺑ ﻂﻘﻓ زﺎﮭﺠﻟا ﻞّﻐﺸُﻳ.زﺎﮭﺠﻟا ﺔﻣﻼﻋو ﻖﻓاﻮﺘﻳاّﺪﺟ ﺾﻔ
ﻲھ رﺎﯿﺘﻟا ةﺪﺷ نأ ﺪﻛﺄﺗ220 - 240 .ﻂﻠﻓ
ماﺪﺨﺘﺳﻻا
تاﻮﻨﺳ ﻲﻧﺎﻤﺛ ﻦﻋ ﻢﮭﻨﺳ ﻞﻘﻳ ّ
ﻻأ ﻰﻠﻋ زﺎﮭﺠﻟا اﺬھ لﺎﻔطﻷا مﺪﺨﺘﺴﻳ
ةدوﺪﺤﻤﻟا ﺔﯿﻠﻘﻌﻟا وأ ﺔﯿﺴﺤﻟاو ﺔﯿﻧﺪﺒﻟا تارﺎﮭﻤﻟا ووذ صﺎﺨﺷﻷا ﻚﻟﺬﻛو
اﺮﺷﻺﻟ اﻮﻌﻀﺨﻳ نأ طﺮﺸﺑ ،ﺔﻓﺮﻌﻤﻟا وأ ةﺮﺒﺨﻟا ﻮﻠﯿﻠﻗ صﺎﺨﺷﻷا وأ ف
ﺐﻨﺠﺘُﻳ نأو ﻢﮭﺘﻣﻼﺴﺑو زﺎﮭﺠﻟﺎﺑ ﺔﺻﺎﺨﻟا تﺎﻤﯿﻠﻌﺘﻟا اﻮَﻄﻌُﻳ نأ وأ ﻢﯿﻠﺴﻟا
.رﺎﻄﺧﻷا ﻦﻣ عﻮﻧ يأ
لﺎﻔطﻷا لوﺎﻨﺘﻣ ﻦﻋ اﺪﯿﻌﺑ ﻪﺑ صﺎﺨﻟا ءﺎﺑﺮﮭﻜﻟا ﻞﺑﺎﻛو زﺎﮭﺠﻟا ﻰﻠﻋ ﻆﻓﺎﺣ
ﻦﻣ ﻞﻗﻷا8 .تاﻮﻨﺳ
.زﺎﮭﺠﻟﺎﺑ لﺎﻔطﻷا ﺚﺒﻌﻳ ّ
ﻻأ ﻲﻐﺒﻨﻳ
ﻮﻤﻟا وأ ﻞﺋاﻮﺴﻟا وأ هﺎﯿﻤﻟﺎﺑ ﺔﻠﻠﺒﻤﻟا ﺢﻄﺳﻷا ﺢﺴﻤﺑ ﻢﻘﺗ ﻻﺔﻠﺑﺎﻘﻟا دا
.لﺎﻌﺘﺷﻼﻟ
.(...ﺦﻟإ ،ﺖﻨﻤﺳﻷا ،دﺎﻣﺮﻟا) ﺮﻐﺼﻟا ﺔﯿھﺎﻨﺘﻤﻟا داﻮﻤﻟا ﻂﻔﺸﺗ ﻻ
ﺐﺒﺴﺘﺗ ﺪﻗ ﻚﻧﻷ تﺎﺤﺷﺮﻤﻟا ﺪﺣأ ﺺﻘﻧ لﺎﺣ ﻲﻓ زﺎﮭﺠﻟا مﺪﺨﺘﺴﺗ ﻻ
.رﻮﺗﻮﻤﻟا ﻒﻠﺗ ﻲﻓ
.اًﺪﺟ ﻦﺧﺎﺳ نﺎﻜﻣ ﻦﻣ بﺮﻘﻟﺎﺑ ﺎﮭﻣﺪﺨﺘﺴﺗ وأ ﺔﺴﻨﻜﻤﻟا نُﺰﺨﺗ ﻻ
أ ثﺪﺣ وأ نﺎﺧد وأ ﺔﺤﺋار وأ ﺔﯿﻌﯿﺒط ﺮﯿﻏ ءﺎﺿﻮﺿ ترﺪﺻ اذإ ،ﺮﺧآ ﻒﻠﺗ ي
.ﻪﺣﻼﺻإ لوﺎﺤﺗ ﻻو .ﻪﻨﻋ ءﺎﺑﺮﮭﻜﻟا ﻞﺼﻓاو زﺎﮭﺠﻟا ﻒﻗوﺄﻓ
ﺔﻧﺎﯿﺼﻟا

46
1 (مﺪﺨﺘﺴﻤﻟا ﻰﻟإ رﺎﻌﺷإ
ﺔﻤﮭﻤﻟا ﺔﻣﻼﺴﻟا تﺎﻤﯿﻠﻌﺗ
.ﻞﺒﻘﺘﺴﻤﻟا ﻲﻓ ﺎﮭﻣاﺪﺨﺘﺳﻻ ﺎﮭﺑ ظﺎﻔﺘﺣﻻاو اًﺪّﯿﺟ ﺎﮭﺗءاﺮﻗ ﻰﺟﺮﻳ
ﻢّﻤُﺻ ﻚﻟذ ﻰﻟإ ﺎﻣو ﺔﯿﻟﺰﻨﻤﻟا تﺎﻣاﺪﺨﺘﺳﻼﻟ زﺎﮭﺠﻟا اﺬھ
ﻣ:ﻞﺜ
تﻼﺤﻤﻟا ﻲﻓ ﻦﯿﻔظﻮﻤﻟﺎﺑ ﺔﺼﺼﺨﻤﻟا ﺦﺒﻄﻟا ﻦﻛﺎﻣأ
؛ﻞﻤﻌﻟا تﺎﺌﯿﺑ ﻦﻣ ﺎھﺮﯿﻏو ﺐﺗﺎﻜﻤﻟاو ﺔﻳرﺎﺠﺘﻟا
؛عراﺰﻤﻟا ﻲﻓ
ﻦﻣ ﺎھﺮﯿﻏو تﻼﯿﺗﻮﻤﻟاو قدﺎﻨﻔﻟا ءﻼﻤﻋ ﻪﻣﺪﺨﺘﺴﯿﻟو
؛ﺔﯿﻨﻜﺴﻟا تﺎﺌﯿﺒﻟا
؛ﺔﻓﺎﯿﻀﻟا فﺮﻏو
ﺔﻟﺎﺣ ﻲﻓ .زﺎﮭﺠﻟا ﻊﻣ اﺬھ ماﺪﺨﺘﺳﻻا ﻞﯿﻟﺪﺑ ﻆﻔﺘﺣا
ﺺﺨﺷ ﻰﻟإ ﻪﻨﻋ لزﺎﻨﺘﻟا وأ زﺎﮭﺠﻟا اﺬھ ﻊﯿﺑ ﺪﻛﺄﺗ ،ﺮﺧآ
اﺮﻜﺷ .ﺪﻳﺪﺠﻟا ﻚﻟﺎﻤﻟا ﻰﻟإ ﻞﯿﻟﺪﻟا اﺬھ ﺮﻳﺮﻤﺗ ﻦﻣ
زﺎﮭﺠﻟا ﺐﯿﻛﺮﺗ ﻞﺒﻗ تﺎﻤﯿﻠﻌﺘﻟا هﺬھ ةءاﺮﻘﻟ
ﺖﻧأ ﻚﺘﻣﻼﺳ ﻰﻠﻋ ظﺎﻔﺤﻠﻟ ﺖﺒﺘُﻛ ﺪﻘﻓ .ﻪﻣاﺪﺨﺘﺳاو
.ﻦﻳﺮﺧﻵاو
ﺔﻣﻼﺴﻟا تﺎﻤﯿﻠﻌﺗ (أ
ﺐﯿﻛﺮﺘﻟا
.ﻂﻘﻓ زﺎﮭﺠﻟا ﻊﻣ عﺎﺒُﻤﻟا ءﺎﺑﺮﮭﻜﻟا ﻞﺑﺎﻛ زﺎﮭﺠﻟا ﻊﻣ مﺪﺨﺘﺴُﻳ

45
ﺺﺨﻠﻣ
1 (رﺎﻌﺷإ ﻰﻟإ مﺪﺨﺘﺴﻤﻟا ....................................................................................................... 46
أ (تﺎﻤﯿﻠﻌﺗ ﺴﻟاﺔﻣﻼ ............................................................................................................ 46
ب( تﺎﻧﺎﯿﺒﻟا ﺔﯿﻨﻔﻟا: ............................................................................................................ 49
ج( ﺔﻳﺎﻤﺣ ﺔﺌﯿﺒﻟا ................................................................................................................ 49
2 (ﺐﯿﻛﺮﺗ زﺎﮭﺠﻟا .................................................................................................................... 50
أ (ﻒﺻو زﺎﮭﺠﻟا ................................................................................................................... 50
ب (ﻊﯿﻤﺠﺗ كزﺎﮭﺟ ﻞﻜﺑ نﺎﻣأ .................................................................................................. 51
3 (ماﺪﺨﺘﺳا ﺔﺴﻨﻜﻤﻟا ............................................................................................................ 51
أ( ﺔﻘﻳﺮط لﺎﻤﻌﺘﺳﻻا ........................................................................................................ 51
ب( ﻦﺤﺷ ﺔﺴﻨﻜﻤﻟا ........................................................................................................... 51
ج( ﺔﻧﺎﯿﺼﻟا ....................................................................................................................... 52
4 (ﻞﺣ تﻼﻜﺸﻤﻟا ................................................................................................................. 53

44
،ﻞﯿﻤﻌﻟا يﺰﻳﺰﻋ ،ﺔﻠﯿﻤﻌﻟا ﻲﺗﺰﻳﺰﻋ
ﻮﺘﻠﻟ ﺖﻳﺮﺘﺷا ﺪﻘﻟاًزﺎﮭﺟ ﻦﻣBRANDT .ﺎﻨﺑ ﻚﺘﻘﺛ ﻚﻟﺮﻜﺸﻧ ﻦﺤﻧو
ﻂﻤﻨﻟ ﻪﺘﻣءﻼﻣو ،ﻪﻨﻋ ﻢﻛﺎﺿر ﺎﻨﻧﺎﺒﺴﺣ ﻲﻓ ﻦﯿﻌﺿاو ﻪﻌﯿﻨﺼﺗو ﺞﺘﻨﻤﻟا اﺬھ ﻢﯿﻤﺼﺘﺑ ﺎﻨﻤﻗ ﺪﻘﻟ
.نﺎﻜﻣﻹا رﺪﻘﺑ ﻢﻜﺗﺎﻌﻗﻮﺗ ىﻮﺘﺴﻣ ﻰﻠﻋ نﻮﻜﻳ ﻲﻜﻟ ؛ﻢﻜﺗﺎﺟﺎﺣو ،ﻢﻜﺗﺎﯿﺣ اﺬھ ﻲﻓ ﺎﻨﻌﺿو ﻦﺤﻧ
ﻦﻣ ﺮﺜﻛأ ﺬﻨﻣ ﺎﻨﻔﻐﺷ ﻞﻛو ﺎﻨﻳﺪﻟ رﺎﻜﺘﺑﻻا حورو ﺎﻨﺗﺮﺒﺧ زﺎﮭﺠﻟا60 .ﺎًﻣﺎﻋ
،ﻞﻀﻓأ ﻞﻜﺸﺑ ﻢﻜﺗﺎﺟﺎﯿﺘﺣا ﺔﯿﺒﻠﺘﻟ ﺎًﻤﺋاد ﻰﻌﺴﻧ ﻦﺤﻧ،ﻚﻟﺬﻟو ﻲﻓو ةﺮﻓﻮﺘﻣ ءﻼﻤﻌﻟا ﺔﻣﺪﺧ نﺈﻓ
.ﻢﻜﺗﺎﺣاﺮﺘﻗاو ﻢﻜﺘﻠﺌﺳأ ﻊﯿﻤﺟ ﻰﻠﻋ دﺮﻠﻟ ﻢﻜﻳﺪﻳأ لوﺎﻨﺘﻣ
ﻲﻧوﺮﺘﻜﻟﻻا ﺎﻨﻌﻗﻮﻣ ةرﺎﻳز ﺎًﻀﻳأ ﻢﻜﻨﻜﻤﻳ www.brandt.com ﻚﻟﺬﻛو ،ﺎﻨﺗارﺎﻜﺘﺑا ﺮﺧآ نوﺪﺠﺗ ﺚﯿﺣ
.ﺔﻠﻣﺎﻜﺘﻣو ةﺪﯿﻔﻣ تﺎﻣﻮﻠﻌﻣ
BRANDT .ﻢﻜﺗﺎﻳﺮﺘﺸﻣ ﻦﻣ ﺔﻠﻣﺎﻜﻟا ةدﺎﻔﺘﺳﻻا ﻢﻜﻟ ﻰﻨﻤﺘﺗو ﺎًﯿﻣﻮﯨ ﻢﻜﺘﻘﻓاﺮﻤﺑ ﺪﻌﺴﺗ
:ﻢﮭﻣ فﺮﻌﺘﻠﻟ ﺔﻳﺎﻨﻌﺑ ماﺪﺨﺘﺳﻻاو ﺐﯿﻛﺮﺘﻟا ﻞﯿﻟد ةءاﺮﻗ ﻰﺟﺮﻳ ،زﺎﮭﺠﻟا ماﺪﺨﺘﺳا ﻞﺒﻗ
ًﻌﻳﺮﺳ.ﻪﻠﯿﻐﺸﺗ ﺔﻘﻳﺮط ﻰﻠﻋ ﺎ
-
 1
1
-
 2
2
-
 3
3
-
 4
4
-
 5
5
-
 6
6
-
 7
7
-
 8
8
-
 9
9
-
 10
10
-
 11
11
-
 12
12
-
 13
13
-
 14
14
-
 15
15
-
 16
16
-
 17
17
-
 18
18
-
 19
19
-
 20
20
-
 21
21
-
 22
22
-
 23
23
-
 24
24
-
 25
25
-
 26
26
-
 27
27
-
 28
28
-
 29
29
-
 30
30
-
 31
31
-
 32
32
-
 33
33
-
 34
34
-
 35
35
-
 36
36
-
 37
37
-
 38
38
-
 39
39
-
 40
40
-
 41
41
-
 42
42
-
 43
43
-
 44
44
-
 45
45
-
 46
46
-
 47
47
-
 48
48
-
 49
49
-
 50
50
-
 51
51
-
 52
52
-
 53
53
-
 54
54


