Sony walkman wm fx290 de handleiding
- Categorie
- Radio's
- Type
- de handleiding

3-261-583-22(1)
Radio
Cassette Player
©2004 Sony Corporation Printed in China
WM-FX290
Operating Instructions
Mode d’emploi
(au verso)
Gebruiksaanwijzing (achterzijde)
“WALKMAN” is a registered trademark of Sony Corporation to
represent Headphone Stereo products.
is a trademark of Sony Corporation.
“WALKMAN” est une marque déposée par Sony Corporation pour
représenter les produits stéréo dotés d’écouteurs.
est une marque de Sony Corporation.
The validity of the CE marking is restricted to only those
countries where it is legally enforced, mainly in the
countries EEA (European Economic Area).
La marque CE est valable uniquement dans les pays où
elle a force de loi, c’est-à-dire principalement dans les
pays de l’EEE (Espace Economique Européen).
De geldigheid van het CE-keurmerk is beperkt tot de
landen waar dit keurmerk wettelijk moet worden nageleefd,
hoofdzakelijk in EER (Europese Economische Ruimte).
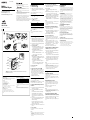
A
AM
B C
FM
N PLAY**
M FF
m REW
VOL*
i
x STOP
ENTER
AM
FM
RADIO OFF
HOLD
MENU
SET
AA (R6) x 1
PRESET/TUNING +/–
Preparations
To Insert Battery A
1 Slide open the battery compartment lid,
and insert one R6 (size AA) dry battery with
correct polarity.
Replace the battery with new one when " "
flashes in the display.
Playing a Tape
1 Insert a cassette. B
2 Press N PLAY.
Adjust the volume with VOL.
To Press
Stop playback x STOP
Wind rapidly* M FF or m REW
* If you leave the unit after the tape has been wound or
rewound, the battery will be consumed rapidly. Be
sure to press x STOP.
Note
Do not open the cassette holder while the tape is
running.
Listening to the Radio
1 If the HOLD function is turned on, set the
HOLD switch in the opposite direction of
the G mark to unlock the controls. Make
sure that the tape has stopped completely.
2 Press FM or AM to select the desired band
and to turn on the radio.
3 For manual tuning:
1 Press MENU repeatedly to set “_” (the
cursor) in the display to TUNE MODE
and press SET to choose “MANUAL”.
2 Press PRESET/TUNING + or –
repeatedly to tune in to the desired
station.
Hold down PRESET/TUNING + or – for
a few seconds to scan for stations.
For preset tuning:
1 Press MENU repeatedly to set the cursor
in the display to TUNE MODE and press
SET to choose “PRESET”.
2 Press PRESET/TUNING + or –
repeatedly to recall the desired preset
station.
To use preset tuning, preset the station
first (see “Presetting Radio Stations”).
To turn off the radio
Press RADIO OFF.
To improve broadcast reception C
•For FM: Extend the headphones/earphones cord
(antenna). If the reception is still not good, press
MENU repeatedly to set the cursor in the display to
FM MODE. Then press SET to switch between
“LOCAL” and none (DX), or “MONO” and none
(stereo) for best reception.
•For AM: Reorient the unit itself.
Presetting Radio Stations
You can preset up to 40 stations.
For Canada and Central/South America: 30 for FM
and 10 for AM.
For other countries: 35 for FM and 5 for AM.
Presetting Automatically Scanned
Stations
1 Press FM or AM to select the desired band
and to turn on the radio.
2 Press and hold ENTER for more than 3
seconds.
Preset number 1 will flash in the display
and the Walkman starts scanning the
stations from the lower frequencies and
stops for about 5 seconds when a station is
received.
3 If you wish to preset the currently received
station, press ENTER while the preset
number is flashing.
The received station is preset on preset
number 1 and the unit starts scanning for
the next receivable station.
4 Repeat step 3 until all receivable stations are
preset.
To stop scanning
Press RADIO OFF. The radio is turned off at the
same time.
Notes
• If stations are already stored, the newly preset stations
replace the old ones when the above procedure is
completed.
• If stations cannot be preset automatically, preset them
manually.
Presetting Stations Manually
1 Press FM or AM to select the desired band
and to turn on the radio.
2 Press ENTER.
The frequency digits will flash in the
display.
3 While the frequency digits are flashing, tune
in to a station you wish to store using
PRESET/TUNING + or – and press ENTER.
The preset number will flash in the display.
4 While the preset number is flashing, select
the preset number you want using
PRESET/TUNING + or – and press ENTER.
Notes
• If you cannot complete step 3 or 4 while the indicators
are flashing, repeat from step 2.
• If a station is already stored, the new station replaces
the old one.
Playing the Preset Radio Stations
1 Press FM or AM to select the desired band
and to turn on the radio.
2 Press MENU repeatedly to set the cursor in
the display to TUNE MODE. Then press
SET to display “PRESET”.
3 Press PRESET/TUNING + or –.
To cancel a stored station
1 Follow the procedure above and in step 3, select
the preset number you want to cancel and then
press ENTER. The frequency digits will flash in the
display.
2 Press and hold PRESET/TUNING + or –. The
frequency digit starts running up or down. Keep
holding down the button until “- - - -” is displayed.
3 Press ENTER while “- - - -” is flashing. A preset
number will flash in the display.
4 Press ENTER to cancel the stored station.
Scanning the Preset Radio Stations
— DAPS (Digital Auto Preset Scanning)
1 Press FM or AM to select the desired band
and to turn on the radio.
2 Press and hold FM or AM pressed in step 1
for 2 seconds or more.
The preset stations of the selected band will
be played for about 5 seconds each. (During
DAPS the indicators in the display flash.)
3 Press FM or AM again to select the station
while the desired preset station is being
played.
Notes
• If there are no stations stored, the DAPS function does
not work.
• Until a station is selected in step 3, the DAPS function
turned on in step 2 will continue.
• In step 2 or 3, if you select a band which you did not
select in step 1 by pressing FM or AM, the newly
selected band will be played normally.
Using Other Functions
Locking the Controls
Set the HOLD switch in the direction of the G mark
to lock the controls.
The HOLD function only locks the radio operation
buttons, MENU, SET, PRESET/TUNING + or – and
ENTER.
Emphasizing Bass Sound
Press MENU repeatedly to set the cursor to MB
(mega bass) in the display. Then, press SET to turn
MB on. With each press, the indications change as
follows.
MB (mega bass) : emphasizes bass sound
No message: off (normal)
Notes
• If the sound is distorted with the mode “MB”, turn
down the volume or select normal mode.
• Bass emphasis may not show great effect if the volume
is turned up too high.
Protecting Your Hearing—AVLS
(Automatic Volume Limiter System)
Press MENU repeatedly to set the cursor to AVLS in
the display. Then press SET to show “ ”.
The maximum volume is kept down to protect your
ears.
Precautions
On batteries
• Do not carry dry batteries with coins or other metallic objects.
It can generate heat if the positive and negative terminals of the
batteries are accidentally contacted by a metallic object.
• When you are not going to use your Walkman for a long time,
remove the battery to prevent damage from battery leakage
and corrosion.
On handling
• Do not leave the unit in a location near heat sources, or in a
place subject to direct sunlight, excessive dust or sand,
moisture, rain, mechanical shock, or in a car with its windows
closed.
•We do not recommend the use of tape longer than 90 minutes.
They are very thin and tend to be stretched easily. This may
cause malfunction of the unit or sound deterioration.
• The LCD display may become hard to see or slow down when
using the unit at high temperatures (above 40°C/104°F) or at
low temperatures (below 0°C/32°F). At room temperature, the
display will return to its normal operating condition.
• If the unit has not been used for a long time, set it in the
playback mode to warm it up for a few minutes before you
start using it again.
On headphones/earphones
Road safety
Do not use headphones/earphones while driving, cycling, or
operating any motorized vehicle. It may create a traffic hazard
and is illegal in some areas. It can also be potentially dangerous
to play your headphones/earphones at high volume while
walking, especially at pedestrian crossings.
You should exercise extreme caution or discontinue use in
potentially hazardous situations.
Preventing hearing damage
Do not use headphones/earphones at high volume. Hearing
experts advise against continuous, loud and extended play. If
you experience a ringing in your ears, reduce the volume or
discontinue use.
Caring for others
Keep the volume at a moderate level. This will allow you to hear
outside sounds and to be considerate to the people around you.
On maintenance
• Clean the tape head and tape path using a cotton swab and
commercially available cleaning solvent after every 10 hours of
use.
•To clean the exterior, use a soft cloth slightly moistened in
water. Do not use alcohol, benzine or thinner.
• Clean the headphones/earphones plugs periodically.
English
* There is a tactile dot beside VOL on the main unit to show the direction to turn up the
volume.
** The button has a tactile dot.
Specifications
• Frequency range
FM: 87.5 - 108 MHz
AM: 530 - 1 710 kHz (North, Central and South America)
531 - 1 602 kHz (Other countries)
• Output
Headphone (i) jack
Load impedance 8 – 300 Ω
• Power requirements
1.5V DC, battery R6 (size AA) x 1
• Dimensions (w/h/d)
Approx. 83.6 x 112.0 x 28.3 mm (3
3
⁄
8
× 4
1
⁄
2
× 1
1
⁄
8
inches)
excl. projecting parts and controls
• Mass
Approx. 130 g (4.6 oz) (main unit only)
• Supplied accessories
Stereo headphones or Stereo earphones (1)
Carrying case with belt clip or Carrying pouch (1)
Design and specifications are subject to change without
notice.
Battery life* (approximate hours)
Sony alkaline LR6 (SG)** Sony R6P (SR)
Tape playback 35 9
Radio reception 40 14
* Measured value by the standard of JEITA (Japan Electronics
and Information Technology Industries Association). (Using
a Sony HF series cassette tape)
**When using a Sony LR6 (SG) alkaline dry battery (produced
in Japan).
Note
The battery life may be shorter depending on the operating
condition, the surrounding temperature and battery type.

Français
A
AM
B C
FM
AA (R6) x 1
A pleine puissance, l’écoute prolongée du baladeur
peut endommager l’oreille de l’utilisateur.
Préparations
Insertion de la pile A
1 Faites glisser le couvercle du logement de la
pile pour l’ouvrir et insérez une pile sèche
R6 (format AA) en respectant la polarité.
Remplacez la pile par une pile neuve lorsque
l’indication « » se met à clignoter sur l’afficheur.
Lecture d’une cassette
1 Insérez une cassette. B
2 Appuyez sur N PLAY.
Réglez le volume avec VOL.
Pour Appuyez sur
Arrêter la lecture x STOP
Rembobiner rapidement* M FF ou m REW
* Si vous n’utilisez pas l’appareil après l'avoir faite
défiler ou rembobinée, la pile s’use rapidement.
Appuyez toujours sur x STOP.
Remarque
N’ouvrez pas le logement de la cassette pendant la
lecture d’une bande.
Ecoute de la radio
1 Si la fonction HOLD est activée, positionnez
le commutateur HOLD dans le sens opposé
à la marque G pour déverrouiller les
commandes.
Assurez-vous que la cassette est
complètement arrêtée.
2 Appuyez sur FM ou AM pour sélectionner
la bande de votre choix et allumer la radio.
3 Pour l’accord manuel
1 Appuyez sur MENU plusieurs fois pour
mettre «_» (le curseur) du écran sur
TUNE MODE et appuyez sur SET pour
voir le «MANUAL».
2 Appuyez de façon répétée sur PRESET/
TUNING + ou – pour accorder la station
souhaitée. Maintenez enfoncée PRESET/
TUNING + ou – pendant quelques
secondes pour rechercher des stations.
Pour l’accord d’une station préréglée
1 Appuyez sur MENU plusieurs fois pour
mettre le curseur du écran sur TUNE
MODE et appuyez sur SET pour voir le
«PRESET».
2 Appuyez de façon répétée sur PRESET/
TUNING + ou – pour rappeler la station
préréglée souhaitée.
Pour pouvoir accorder une station
préréglée, il faut prérégler au préalable
les stations (voir «Préréglage des stations
radio»).
Pour éteindre la radio
Appuyez sur RADIO OFF.
Pour améliorer la réception des émissions
C
•FM: Déployez le câble (antenne) du casque
d’écoute/des écouteurs. Si la qualité de la réception
n’est toujours pas satisfaisante, appuyez plusieurs
fois sur MENU afin de régler le curseur de
l’afficheur sur FM MODE. Appuyez ensuite sur
SET pour commuter le réglage entre «LOCAL» et
aucun (DX) ou «MONO» (monaural) et aucun
(stéréo) pour une réception optimale.
•AM: Réorientez l’appareil proprement dit.
Préréglage des stations
radio
Vous pouvez prérégler jusqu’à 40 stations.
Canada, Amérique centrale et Amérique du sud : 30
en FM et 10 en AM.
Autres pays : 35 en FM et 5 en AM.
Préréglage des stations syntonisées
automatiquement
1 Appuyez sur FM ou AM pour sélectionner
la bande de votre choix et pour mettre la
radio sous tension.
2 Appuyez sur ENTER pendant plus de 3
secondes.
Le numéro de préréglage 1 clignote sur
l’afficheur et le Walkman commence à
syntoniser les stations à partir des
fréquences les plus basses et s’arrête
environ 5 secondes lorsqu’une station est
reçue.
3 Si vous souhaitez prérégler la station reçue,
appuyez sur ENTER pendant que le numéro
préréglé clignote.
La station reçue est préréglée sur le numéro
de préréglage 1 et l’appareil commence à
rechercher la station suivante.
4 Répétez l’étape 3 jusqu’à ce que toutes les
stations soient préréglées.
Pour arrêter la syntonisation
Appuyez sur RADIO OFF. La radio est mise hors
tension en même temps.
Remarques
• Si des stations sont déjà mémorisées, les nouvelles
stations préréglées remplacent les anciennes lorsque la
procédure ci-dessus est utilisée.
• Si les stations ne peuvent pas être préréglées
automatiquement, préréglez-les manuellement.
Préréglage manuel des stations
1 Appuyez sur FM ou AM pour sélectionner
la bande de votre choix et pour mettre la
radio sous tension.
2 Appuyez sur ENTER.
Les chiffres de la fréquence clignotent sur
l’afficheur.
3 Pendant que les chiffres de la fréquence
clignotent, syntonisez une station que vous
souhaitez mémoriser à l’aide de PRESET/
TUNING + ou – et appuyez sur ENTER.
Le numéro de préréglage clignote sur
l’afficheur.
4 Tandis que le numéro préréglé clignote,
sélectionnez le numéro préréglé que vous
souhaitez à l’aide de PRESET/TUNING +
ou – et appuyez sur ENTER.
Remarques
• Si vous ne pouvez pas effectuer l’étape 3 ou 4 pendant
que les voyants clignotent, reprenez à l’étape 2.
• Si une station est déjà mémorisée, la nouvelle station
remplace l’ancienne.
Ecouter les stations radio préréglées
1 Appuyez sur FM ou AM pour sélectionner
la bande de votre choix et pour mettre la
radio sous tension.
2 Appuyez plusieurs fois sur MENU pour
régler le curseur sur TUNE MODE dans
l’afficheur. Appuyez ensuite sur SET pour
afficher «PRESET».
3 Appuyez sur PRESET/TUNING + ou –.
Pour annuler une station mémorisée
1 Suivez la procédure ci-dessus et à l’étape 3,
sélectionnez le numéro de préréglage que vous
souhaitez annuler, puis appuyez sur ENTER. Les
chiffres de la fréquence clignotent sur l’afficheur.
2 Appuyez et maintenez enfoncée la touche
PRESET/TUNING + ou –. Le numéro de fréquence
augmente ou diminue. Maintenez la touche
enfoncée jusqu’à ce que « - - - - » s’affiche.
3 Appuyez sur ENTER lorsque « - - - - » clignote. Un
numéro de préréglage clignote sur l’afficheur.
4 Appuyez sur ENTER pour annuler la station
enregistrée.
Syntonisation des stations radio
préréglées — DAPS (Digital Auto Preset
Scanning)
1 Appuyez sur FM ou AM pour sélectionner
la bande de votre choix et pour mettre la
radio sous tension.
2 Maintenez enfoncée la touche FM ou AM à
l’étape 1 pendant au moins 2 secondes.
Les stations préréglées de la bande
sélectionnée sont chacune reproduite
pendant environ 5 secondes. (En mode
DAPS les voyants de l’afficheur clignotent.)
3 Appuyez de nouveau sur FM ou AM pour
sélectionner la station pendant que vous
écoutez la station préréglée.
Remarques
• Si aucune station n’est mémorisée, la fonction DAPS
est inopérante.
• Jusqu’à ce qu’une station soit sélectionnée à l’étape 3,
la fonction DAPS activée à l’étape 2 reste active.
•A l’étape 2 ou 3, si vous sélectionnez une bande que
vous n’aviez pas sélectionnée à l’étape 1 en appuyant
sur FM ou AM, la nouvelle bande sélectionnée sera
reproduite normalement.
Autres fonctions
Verrouillage des commandes
Positionnez le commutateur HOLD dans le sens de
la marque G afin de verrouiller les commandes.
La fonction HOLD permet uniquement de
verrouiller les touches de la radio, MENU, SET,
PRESET/TUNING + ou – et ENTER .
Pour amplifier les graves
Appuyez plusieurs fois sur MENU afin de régler le
curseur de l’afficheur sur MB (mega bass). Appuyez
ensuite sur SET pour activer le mode MB. A chaque
pression, l’indication change comme suit.
MB (mega bass) : graves amplifiés
Aucun message : désactivé (normal)
Remarques
• Si le son est déformé une distorsion alors que le mode
«MB» est activé, baissez le volume ou sélectionnez le
mode normal.
• L’amplification des graves risque de s’avérer peu
efficace si le volume est trop élevé.
Protection de l’ouïe—Fonction AVLS
(limitation automatique du volume)
Appuyez plusieurs fois sur MENU afin de régler le
curseur de l’afficheur sur AVLS. Appuyez ensuite
sur SET pour afficher « ».
Le volume maximum est maintenu à un niveau
relativement faible afin de protéger votre ouïe.
Précautions
Piles
• Ne transportez pas des piles sèches avec des pièces de monnaie
ou autres objets métalliques. Les piles peuvent produire de la
chaleur si leurs pôles positif et négatif entrent accidentellement
en contact avec un objet métallique.
• Lorsque vous n'utilisez pas votre Walkman pendant un
moment, ôtez la pile pour éviter les fuites et la corrosion.
Manipulation
• Ne laissez pas l’appareil près d’une source de chaleur. Ne
l’exposez pas au soleil, à une poussière intense, au sable, à
l’humidité, à la pluie, à des chocs mécaniques ; ne laissez pas
l’appareil dans une voiture avec les fenêtres fermées.
• L'utilisation de cassettes supérieures à 90 minutes n'est pas
recommandée. Elles sont très fines et tendent à s'étirer
facilement. Ceci risque de provoquer un dysfonctionnement de
l'appareil ou une déformation du son.
•L’afficheur LCD risque d’être à peine visible ou de réagir
lentement si vous utilisez l’appareil à des températures élevées
(supérieures à 40°C/104°F) ou basses (inférieures à 0°C/32°F).
Il redeviendra normal à température ambiante.
• Si l’appareil n’a pas été utilisé depuis longtemps, mettez-le en
mode de lecture pendant quelques minutes pour le chauffer,
avant de l’utiliser.
Casques d’écoute/écouteurs
Sécurité routière
N’utilisez pas les écouteurs/le casque pendant la conduite d’une
voiture, d’une moto ou de tout autre véhicule motorisé, afin
d’éviter tout accident de la circulation. En outre, ceci est interdit
dans certains pays d’utiliser un casque ou des écouteurs en
conduisant. Il peut être également dangereux d’écouter à volume
élevé tout en marchant, spécialement aux croisements.
Soyez toujours extrêmement prudent et cessez d’utiliser cet
appareil dans les situations présentant des risques d’accident.
Prévention des troubles de l’ouïe
Evitez d’utiliser les écouteurs/le casque à volume élevé. Les
médecins déconseillent une écoute continue à volume trop élevé.
Si vous percevez un sifflement dans les oreilles, réduisez le
volume ou cessez l’écoute.
Respect d’autrui
Maintenez un volume d’écoute modéré. Vous pourrez ainsi
entendre les sons extérieurs et respecter les gens qui vous
entourent.
Entretien
•Toutes les 10 heures d’utilisation, nettoyez la tête et le passage
de bande de la cassette avec un coton-tige et un solvant de
nettoyage disponible dans le commerce.
• Pour nettoyer le coffret, utilisez un chiffon doux légèrement
humide. N’utilisez pas d’alcool, de benzine, ou de diluant.
• Nettoyez régulièrement les bornes des écouteurs ou du casque.
* Un point tactile à côté de VOL sur l’appareil
principal indique le sens de rotation du bouton
de volume.
** Le bouton comporte un point en relief.
* Er zit een voelstip naast de VOL schakelaar op
het toestel om aan te geven in welke richting het
volume wordt verhoogd.
** De toets is voorzien van een voelstip.
N PLAY**
M FF
m REW
VOL*
i
x STOP
ENTER
AM
FM
RADIO OFF
HOLD
MENU
SET
PRESET/TUNING +/–
Nederlands
Voorbereidingen
Batterij plaatsen A
1 Schuif het deksel van de batterijhouder
open en plaats één droge R6 (AA) batterij
met de juiste polariteit.
De batterij moet worden vervangen wanneer “ “
knippert in het uitleesvenster.
Een cassette afspelen
1 Plaats een cassette. B
2 Druk op N PLAY.
Regel het volume met VOL.
Om Druk op
De weergave te stoppen x STOP
Snel te spoelen* M FF of m REW
* Wanneer u het toestel aan laat staan na het vooruit-
of terugspoelen, raakt de batterij snel leeg. Druk op
x STOP.
Opmerking
Open de cassettehouder niet terwijl de band loopt.
Luisteren naar de radio
1 Indien de HOLD functie aan staat, schuif
dan de HOLD schakelaar in de
tegenovergestelde richting van G om de
bedieningselementen te ontgrendelen.
Controleer of de cassetteband volledig is
gestopt.
2 Druk op FM of AM om de gewenste
golfband te kiezen de radio aan te zetten.
3 Handmatig afstemmen
1 Druk herhaaldelijk op MENU om “_” (de
cursor) in het display in te stellen op de
TUNE MODE en druk op SET om
“MANUAL” weer te geven.
2 Druk enkele malen op de PRESET/
TUNING + of – toets om af te stemmen
op de gewenste radiozender.
Hou PRESET/TUNING + of – enkele
seconden ingedrukt om zenders te
zoeken.
Geheugenafstemming
1 Druk herhaaldelijk op MENU om de
cursor in het display in te stellen op de
TUNE MODE en druk op SET om
“PRESET” weer te geven.
2 Druk enkele malen op de PRESET/
TUNING + of – toets om de gewenste
voorkeurzender te kiezen.
Voor het gebruik van de
geheugenafstemming zult u eerst de
gewenste radiozenders vast moeten
leggen als voorkeurzenders (zie
“Voorinstellen van radiozenders”).
De radio afzetten
Druk op RADIO OFF.
De ontvangst verbeteren C
•Voor FM: Strek het snoer van de hoofdtelefoon/
oortelefoon (antenne) uit. Wanneer de ontvangst
nog altijd niet goed is, druk dan herhaaldelijk op
MENU om de cursor in het uitleesvenster op FM
MODE te zetten. Druk vervolgens op SET om over
te schakelen tussen “LOCAL” en geen (DX) of
“MONO” (mono) en geen (stereo) voor de beste
ontvangst.
•Voor AM: Richt het toestel zelf.
Radiozenders
voorinstellen
Er kunnen maximaal 40 zenders worden
vooringesteld.
Voor Canada en Midden-/Zuid-Amerika: 30 voor
FM en 10 voor AM.
Voor andere landen: 35 voor FM en 5 voor AM.
Zenders voorinstellen waarop
automatisch is afgestemd
1 Druk op FM of AM om de gewenste band te
selecteren en om de radio aan te zetten.
2 Houd ENTER langer dan 3 seconden
ingedrukt.
Het voorinstelnummer 1 knippert in het
uitleesvenster en de Walkman begint vanaf
de laagste frequentie zenders te zoeken en
stopt ongeveer 5 seconden bij elke zender
die wordt ontvangen.
3 Om de ontvangen zender voorin te stellen,
drukt u op ENTER terwijl het
voorinstelnummer knippert.
De ontvangen zender wordt opgeslagen
onder voorinstelnummer 1 en het toestel
begint naar de volgende ontvangbare
zender te zoeken.
4 Herhaal stap 3 tot alle ontvangbare zenders
zijn vooringesteld.
Stoppen met zoeken
Druk op RADIO OFF. De radio wordt tegelijkertijd
uitgezet.
Opmerkingen
• Indien er al zenders zijn opgeslagen, worden de oude
zenders vervangen door de nieuwe wanneer de
bovenvermelde procedure is voltooid.
• Stel zenders handmatig voorin wanneer deze niet
automatisch kunnen worden vooringesteld.
Handmatig zenders voorinstellen
1 Druk op FM of AM om de gewenste band te
selecteren en om de radio aan te zetten.
2 Druk op ENTER.
De frequentienummers knipperen in het
uitleesvenster.
3 Terwijl de frequentienummers knipperen,
stemt u met PRESET/TUNING + of – af op
een zender die u wilt opslaan en drukt u
vervolgens op ENTER.
In het uitleesvenster gaat een
voorinstelnummer knipperen.
4 Terwijl het voorinstelnummer knippert,
selecteert u het voorinstelnummer met
PRESET/TUNING + of – en drukt u
vervolgens op ENTER.
Opmerkingen
• Wanneer u stap 3 of 4 niet kunt voltooien terwijl de
indicatoren knipperen, herhaalt u de procedure vanaf
stap 2.
• Indien er al een zender is opgeslagen, vervangt de
nieuwe zender de oude.
Voorinstelzenders beluisteren
1 Druk op FM of AM om de gewenste band te
selecteren en om de radio aan te zetten.
2 Druk herhaaldelijk op MENU om de cursor
in het uitleesvenster op TUNE MODE te
zetten. Druk vervolgens op SET om
“PRESET” weer te geven.
3 Druk op PRESET/TUNING + of –.
Een opgeslagen zender wissen
1 Volg de bovenstaande procedure en selecteer in
stap 3 de voorinstelnummer dat u wilt annuleren.
Druk vervolgens op ENTER. De
frequentienummers knipperen in het
uitleesvenster.
2 Houd PRESET/TUNING + of – ingedrukt. Het
frequentienummer wordt verhoogd of verlaagd.
Houd de toets ingedrukt tot “- - - -” wordt
weergegeven.
3 Druk op ENTER terwijl “- - - -” knippert. Een
voorinstelnummer knippert in het uitleesvenster.
4 Druk op ENTER om de opgeslagen zender te
annuleren.
Voorinstelzenders zoeken — DAPS
(Digital Auto Preset Scannit)
1 Druk op FM of AM om de gewenste band te
selecteren en om de radio aan te zetten.
2 Druk in stap 1 op FM of AM en houd deze
minimaal 2 seconden ingedrukt.
De voorinstelzenders van de geselecteerde
band worden elk gedurende 5 seconden
afgespeeld. (Tijdens DAPS knipperen de
indicatoren in het uitleesvenster.)
3 Druk nogmaals op FM of AM om de zender
te selecteren terwijl de gewenste
voorinstelzender wordt afgespeeld.
Opmerkingen
• Als er geen zenders zijn opgeslagen, werkt de DAPS
functie niet.
• De DAPS functie die in stap 2 is ingeschakeld, wordt
pas uitgeschakeld als u een station hebt geselecteerd in
stap 3.
• Als u in stap 2 of 3 een band selecteert die u in stap 1
niet hebt geselecteerd met FM of AM, wordt de
nieuwe band gewoon afgespeeld.
Overige functies
Bedieningselementen vergrendelen
Schuif de HOLD schakelaar in de richting van G om
de bedieningselementen te vergrendelen.
Alleen de radiobedieningstoetsen, MENU, SET,
PRESET/TUNING + of – en ENTER zijn
vergrendeld.
Bass-geluid accentueren
Druk herhaaldelijk op MENU om de cursor in het
uitleesvenster op MB (mega bass) te zetten. Druk
vervolgens op SET om MB aan te zetten. Bij elke
druk op de toets veranderen de indicaties als volgt.
MB (mega bass) : lage tonen versterkt
Geen bericht: uit (normaal)
Opmerkingen
• Indien het geluid is vervormd wanneer “MB” is
geactiveerd, zet dan het volume of kies de normale
weergavestand.
• Wanneer het volume te hoog staat, kan het effect van
de lagetonenversterking kleiner zijn.
Uw gehoor beschermen — AVLS
(Automatic Volume Limiter System)
Druk herhaaldelijk op MENU om de cursor in het
uitleesvenster op AVLS te zetten. Druk vervolgens
op SET om “ ” te laten verschijnen.
Het maximum volume wordt beperkt om uw gehoor
te beschermen.
Voorzorgsmaatregelen
Batterijen
• Draag batterijen niet samen met munten of andere metalen
voorwerpen mee. Wanneer de positieve en negatieve
batterijklemmen in aanraking komen met een metalen
voorwerp, kan er warmte worden opgewekt.
•Wanneer u uw Walkman gedurende lange tijd niet gebruikt,
verwijder dan de batterij om beschadiging door batterijlekkage
en corrosie te vermijden.
Behandeling
• Laat het toestel niet achter in de buurt van warmtebronnen of
op een plek waar het is blootgesteld aan directe zonnestraling,
overmatig stof of zand, vocht, regen, mechanische schokken of
in een auto met gesloten ruiten.
• Gebruik geen cassettes met een langere speelduur dan 90
minuten. De tape van dergelijke cassettes is erg dun en wordt
gemakkelijk uitgerekt. Dit kan storingen van het toestel of
verminderde geluidskwaliteit tot gevolg hebben.
• Het LC-display kan minder goed afleesbaar zijn of trager
werken bij hoge (meer dan 40°C) of lage
omgevingstemperaturen (minder dan 0°C). Bij
kamertemperatuur werkt het display weer normaal.
• Indien het toestel gedurende lange tijd niet is gebruikt, moet u
het enkele minuten in de weergavestand laten opwarmen
alvorens het weer in gebruik te nemen.
Hoofdtelefoon/oortelefoon
Verkeersveiligheid
Gebruik de hoofdtelefoon/oortelefoon niet tijdens het rijden,
fietsen of het besturen van een motorvoertuig. Dat kan leiden tot
gevaarlijke verkeerssituaties en is in bepaalde streken verboden.
Ook het gebruik van een hoofdtelefoon/oortelefoon met hoog
volume kan gevaarlijk zijn tijdens het wandelen, vooral ter
hoogte van oversteekplaatsen.
In potentieel gevaarlijke situaties dient u extra goed op te letten
of het gebruik stop te zetten.
Voorkom oorletsel
Zet de muziek op de hoofdtelefoon/oortelefoon niet te hard.
Oorspecialisten raden langdurig luisteren naar geluid met hoog
volume af. Als uw oren “ruisen”, moet u het volume lager zetten
of stoppen.
Denk om anderen
Houd de geluidsterkte op een redelijk niveau. U kunt dan
geluiden van buitenaf nog steeds horen terwijl u tegelijkertijd
rekening houdt overdreven geluidsdruk te voorkomen.
Onderhoud
• Reinig de bandkop en het bandloopwerk om de 10
gebruiksuren met een wattenstokje en een in de handel
verkrijgbaar reinigingsmiddel.
• Reinig de behuizing met een zachte, lichtjes met water
bevochtigde doek. Gebruik geen alcohol, benzine of thinner.
• Reinig de dopjes van de hoofdtelefoon/oortelefoon regelmatig.
Spécifications
• Plage de fréquences
FM: 87,5 - 108 MHz
AM: 530 - 1 710 kHz (Amérique du Nord, Centrale et du Sud)
531 - 1 602 kHz (Autres pays)
• Sortie
Ecouteurs (prise i)
Impédance de charge de 8 – 300 Ω
• Alimentation
1,5V CC, 1 pile R6 (format AA)
• Dimensions (l/h/p)
Environ. 83,6 x 112,0 x 28,3 mm (3
3
⁄
8
× 4
1
⁄
2
× 1
1
⁄
8
pouces)
parties saillantes et commandes non comprises
• Poids
Environ 130 g (4,6 oz) (uniquement appareil principal)
• Accessoires fournis
Casque ou écouteurs stéréo (1)
Etui avec attache pour ceinture ou pochette de transport (1)
Pour les utilisateurs en France
En cas de remplacement du casque/écouteurs, référez-vous aux modèles
de casques/écouteurs adaptés à votre appareil et indiqués ci-dessous.
MDR-E808LP
MDR-E708LP
MDR-E0Z1LP
La conception et les spécifications peuvent être modifiées
sans préavis.
Autonomie de la pile* (Approx. en heures)
Pile alcaline Sony LR6 (SG)**
Sony R6P (SR)
Lecture de cassette 35 9
Réception radio 40 14
*Valeur mesurée conformément aux normes JEITA (Japan
Electronics and Information Technology Industries
Association). (Avec une cassette Sony de série HF)
**Lorsque vous utilisezune une pile sèche alcaline Sony LR6
(SG) (produite au Japon).
Remarque
L’autonomie de la pile peut être plus courte selon les conditions
de fonctionnement, la température ambiante et le type de pile.
Documenttranscriptie
3-261-583-22(1) English “WALKMAN” is a registered trademark of Sony Corporation to represent Headphone Stereo products. Radio Cassette Player is a trademark of Sony Corporation. “WALKMAN” est une marque déposée par Sony Corporation pour représenter les produits stéréo dotés d’écouteurs. est une marque de Sony Corporation. Operating Instructions Mode d’emploi (au verso) Gebruiksaanwijzing (achterzijde) To Insert Battery A 1 Slide open the battery compartment lid, and insert one R6 (size AA) dry battery with correct polarity. The validity of the CE marking is restricted to only those countries where it is legally enforced, mainly in the countries EEA (European Economic Area). Replace the battery with new one when " flashes in the display. La marque CE est valable uniquement dans les pays où elle a force de loi, c’est-à-dire principalement dans les pays de l’EEE (Espace Economique Européen). Playing a Tape De geldigheid van het CE-keurmerk is beperkt tot de landen waar dit keurmerk wettelijk moet worden nageleefd, hoofdzakelijk in EER (Europese Economische Ruimte). Presetting Stations Manually Preparations " 1 Insert a cassette. B 2 Press N PLAY. Adjust the volume with VOL. To Press Stop playback x STOP WM-FX290 Wind rapidly* M FF or m REW ©2004 Sony Corporation Printed in China * If you leave the unit after the tape has been wound or rewound, the battery will be consumed rapidly. Be sure to press x STOP. 1 Press FM or AM to select the desired band and to turn on the radio. 2 Press ENTER. The frequency digits will flash in the display. 3 While the frequency digits are flashing, tune in to a station you wish to store using PRESET/TUNING + or – and press ENTER. The preset number will flash in the display. 4 While the preset number is flashing, select the preset number you want using PRESET/TUNING + or – and press ENTER. Notes • If you cannot complete step 3 or 4 while the indicators are flashing, repeat from step 2. • If a station is already stored, the new station replaces the old one. Playing the Preset Radio Stations Note Do not open the cassette holder while the tape is running. A Listening to the Radio AA (R6) x 1 B C PRESET/TUNING +/– SET 1 If the HOLD function is turned on, set the HOLD switch in the opposite direction of the G mark to unlock the controls. Make sure that the tape has stopped completely. 2 Press FM or AM to select the desired band and to turn on the radio. 3 For manual tuning: 1 Press MENU repeatedly to set “_” (the cursor) in the display to TUNE MODE and press SET to choose “MANUAL”. 2 Press PRESET/TUNING + or – repeatedly to tune in to the desired station. Hold down PRESET/TUNING + or – for a few seconds to scan for stations. For preset tuning: 1 Press MENU repeatedly to set the cursor in the display to TUNE MODE and press SET to choose “PRESET”. 2 Press PRESET/TUNING + or – repeatedly to recall the desired preset station. To use preset tuning, preset the station first (see “Presetting Radio Stations”). RADIO OFF To turn off the radio FM Press RADIO OFF. FM AM i HOLD VOL* x STOP M FF N PLAY** m REW MENU ENTER AM * There is a tactile dot beside VOL on the main unit to show the direction to turn up the volume. ** The button has a tactile dot. To improve broadcast reception C •For FM: Extend the headphones/earphones cord (antenna). If the reception is still not good, press MENU repeatedly to set the cursor in the display to FM MODE. Then press SET to switch between “LOCAL” and none (DX), or “MONO” and none (stereo) for best reception. •For AM: Reorient the unit itself. Specifications • Frequency range FM: 87.5 - 108 MHz AM: 530 - 1 710 kHz (North, Central and South America) 531 - 1 602 kHz (Other countries) • Output Headphone (i) jack Load impedance 8 – 300 Ω • Power requirements 1.5V DC, battery R6 (size AA) x 1 • Dimensions (w/h/d) Approx. 83.6 x 112.0 x 28.3 mm (3 3⁄8 × 4 1⁄2 × 1 1⁄8 inches) excl. projecting parts and controls • Mass Approx. 130 g (4.6 oz) (main unit only) • Supplied accessories Stereo headphones or Stereo earphones (1) Carrying case with belt clip or Carrying pouch (1) Design and specifications are subject to change without notice. Battery life* (approximate hours) Sony alkaline LR6 (SG)** Sony R6P (SR) Tape playback 35 Radio reception 40 9 14 * Measured value by the standard of JEITA (Japan Electronics and Information Technology Industries Association). (Using a Sony HF series cassette tape) **When using a Sony LR6 (SG) alkaline dry battery (produced in Japan). Note The battery life may be shorter depending on the operating condition, the surrounding temperature and battery type. Presetting Radio Stations You can preset up to 40 stations. For Canada and Central/South America: 30 for FM and 10 for AM. For other countries: 35 for FM and 5 for AM. Presetting Automatically Scanned Stations 1 Press FM or AM to select the desired band and to turn on the radio. 2 Press and hold ENTER for more than 3 seconds. Preset number 1 will flash in the display and the Walkman starts scanning the stations from the lower frequencies and stops for about 5 seconds when a station is received. 3 If you wish to preset the currently received station, press ENTER while the preset number is flashing. The received station is preset on preset number 1 and the unit starts scanning for the next receivable station. 4 Repeat step 3 until all receivable stations are preset. To stop scanning Press RADIO OFF. The radio is turned off at the same time. Notes • If stations are already stored, the newly preset stations replace the old ones when the above procedure is completed. • If stations cannot be preset automatically, preset them manually. 1 Press FM or AM to select the desired band and to turn on the radio. 2 Press MENU repeatedly to set the cursor in the display to TUNE MODE. Then press SET to display “PRESET”. 3 Press PRESET/TUNING + or –. To cancel a stored station 1 Follow the procedure above and in step 3, select the preset number you want to cancel and then press ENTER. The frequency digits will flash in the display. 2 Press and hold PRESET/TUNING + or –. The frequency digit starts running up or down. Keep holding down the button until “- - - -” is displayed. 3 Press ENTER while “- - - -” is flashing. A preset number will flash in the display. 4 Press ENTER to cancel the stored station. Scanning the Preset Radio Stations — DAPS (Digital Auto Preset Scanning) 1 Press FM or AM to select the desired band and to turn on the radio. 2 Press and hold FM or AM pressed in step 1 for 2 seconds or more. The preset stations of the selected band will be played for about 5 seconds each. (During DAPS the indicators in the display flash.) 3 Press FM or AM again to select the station while the desired preset station is being played. Notes • If there are no stations stored, the DAPS function does not work. • Until a station is selected in step 3, the DAPS function turned on in step 2 will continue. • In step 2 or 3, if you select a band which you did not select in step 1 by pressing FM or AM, the newly selected band will be played normally. Using Other Functions Locking the Controls Set the HOLD switch in the direction of the G mark to lock the controls. The HOLD function only locks the radio operation buttons, MENU, SET, PRESET/TUNING + or – and ENTER. Emphasizing Bass Sound Press MENU repeatedly to set the cursor to MB (mega bass) in the display. Then, press SET to turn MB on. With each press, the indications change as follows. MB (mega bass) : emphasizes bass sound No message: off (normal) Notes • If the sound is distorted with the mode “MB”, turn down the volume or select normal mode. • Bass emphasis may not show great effect if the volume is turned up too high. Protecting Your Hearing—AVLS (Automatic Volume Limiter System) Press MENU repeatedly to set the cursor to AVLS in the display. Then press SET to show “ ”. The maximum volume is kept down to protect your ears. Precautions On batteries • Do not carry dry batteries with coins or other metallic objects. It can generate heat if the positive and negative terminals of the batteries are accidentally contacted by a metallic object. • When you are not going to use your Walkman for a long time, remove the battery to prevent damage from battery leakage and corrosion. On handling • Do not leave the unit in a location near heat sources, or in a place subject to direct sunlight, excessive dust or sand, moisture, rain, mechanical shock, or in a car with its windows closed. • We do not recommend the use of tape longer than 90 minutes. They are very thin and tend to be stretched easily. This may cause malfunction of the unit or sound deterioration. • The LCD display may become hard to see or slow down when using the unit at high temperatures (above 40°C/104°F) or at low temperatures (below 0°C/32°F). At room temperature, the display will return to its normal operating condition. • If the unit has not been used for a long time, set it in the playback mode to warm it up for a few minutes before you start using it again. On headphones/earphones Road safety Do not use headphones/earphones while driving, cycling, or operating any motorized vehicle. It may create a traffic hazard and is illegal in some areas. It can also be potentially dangerous to play your headphones/earphones at high volume while walking, especially at pedestrian crossings. You should exercise extreme caution or discontinue use in potentially hazardous situations. Preventing hearing damage Do not use headphones/earphones at high volume. Hearing experts advise against continuous, loud and extended play. If you experience a ringing in your ears, reduce the volume or discontinue use. Caring for others Keep the volume at a moderate level. This will allow you to hear outside sounds and to be considerate to the people around you. On maintenance • Clean the tape head and tape path using a cotton swab and commercially available cleaning solvent after every 10 hours of use. • To clean the exterior, use a soft cloth slightly moistened in water. Do not use alcohol, benzine or thinner. • Clean the headphones/earphones plugs periodically. Spécifications A • Plage de fréquences FM: 87,5 - 108 MHz AM: 530 - 1 710 kHz (Amérique du Nord, Centrale et du Sud) 531 - 1 602 kHz (Autres pays) • Sortie Ecouteurs (prise i) Impédance de charge de 8 – 300 Ω • Alimentation 1,5V CC, 1 pile R6 (format AA) • Dimensions (l/h/p) Environ. 83,6 x 112,0 x 28,3 mm (3 3⁄8 × 4 1⁄2 × 1 1⁄8 pouces) parties saillantes et commandes non comprises • Poids Environ 130 g (4,6 oz) (uniquement appareil principal) • Accessoires fournis Casque ou écouteurs stéréo (1) Etui avec attache pour ceinture ou pochette de transport (1) i HOLD * Un point tactile à côté de VOL sur l’appareil principal indique le sens de rotation du bouton de volume. ** Le bouton comporte un point en relief. AA (R6) x 1 VOL* B C FM AM x STOP ENTER * M FF PRESET/TUNING +/– SET N PLAY** Er zit een voelstip naast de VOL schakelaar op het toestel om aan te geven in welke richting het volume wordt verhoogd. ** De toets is voorzien van een voelstip. RADIO OFF m REW FM MENU * Valeur mesurée conformément aux normes JEITA (Japan Electronics and Information Technology Industries Association). (Avec une cassette Sony de série HF) **Lorsque vous utilisezune une pile sèche alcaline Sony LR6 (SG) (produite au Japon). Nederlands A pleine puissance, l’écoute prolongée du baladeur peut endommager l’oreille de l’utilisateur. Préparations Insertion de la pile Pile alcaline Sony LR6 (SG)** Sony R6P (SR) Lecture de cassette 35 9 Réception radio 40 14 Remarque L’autonomie de la pile peut être plus courte selon les conditions de fonctionnement, la température ambiante et le type de pile. AM Français Pour les utilisateurs en France En cas de remplacement du casque/écouteurs, référez-vous aux modèles de casques/écouteurs adaptés à votre appareil et indiqués ci-dessous. MDR-E808LP MDR-E708LP MDR-E0Z1LP La conception et les spécifications peuvent être modifiées sans préavis. Autonomie de la pile* (Approx. en heures) A 1 Faites glisser le couvercle du logement de la pile pour l’ouvrir et insérez une pile sèche R6 (format AA) en respectant la polarité. Remplacez la pile par une pile neuve lorsque l’indication « » se met à clignoter sur l’afficheur. Lecture d’une cassette 1 Insérez une cassette. B 2 Appuyez sur N PLAY. Réglez le volume avec VOL. Pour Appuyez sur Arrêter la lecture x STOP Rembobiner rapidement* M FF ou m REW * Si vous n’utilisez pas l’appareil après l'avoir faite défiler ou rembobinée, la pile s’use rapidement. Appuyez toujours sur x STOP. Remarque N’ouvrez pas le logement de la cassette pendant la lecture d’une bande. Ecoute de la radio 1 Si la fonction HOLD est activée, positionnez le commutateur HOLD dans le sens opposé à la marque G pour déverrouiller les commandes. Assurez-vous que la cassette est complètement arrêtée. 2 Appuyez sur FM ou AM pour sélectionner la bande de votre choix et allumer la radio. 3 Pour l’accord manuel 1 Appuyez sur MENU plusieurs fois pour mettre «_» (le curseur) du écran sur TUNE MODE et appuyez sur SET pour voir le «MANUAL». 2 Appuyez de façon répétée sur PRESET/ TUNING + ou – pour accorder la station souhaitée. Maintenez enfoncée PRESET/ TUNING + ou – pendant quelques secondes pour rechercher des stations. Pour l’accord d’une station préréglée 1 Appuyez sur MENU plusieurs fois pour mettre le curseur du écran sur TUNE MODE et appuyez sur SET pour voir le «PRESET». 2 Appuyez de façon répétée sur PRESET/ TUNING + ou – pour rappeler la station préréglée souhaitée. Pour pouvoir accorder une station préréglée, il faut prérégler au préalable les stations (voir «Préréglage des stations radio»). Pour éteindre la radio Appuyez sur RADIO OFF. Pour améliorer la réception des émissions C • FM: Déployez le câble (antenne) du casque d’écoute/des écouteurs. Si la qualité de la réception n’est toujours pas satisfaisante, appuyez plusieurs fois sur MENU afin de régler le curseur de l’afficheur sur FM MODE. Appuyez ensuite sur SET pour commuter le réglage entre «LOCAL» et aucun (DX) ou «MONO» (monaural) et aucun (stéréo) pour une réception optimale. • AM: Réorientez l’appareil proprement dit. Préréglage des stations radio Vous pouvez prérégler jusqu’à 40 stations. Canada, Amérique centrale et Amérique du sud : 30 en FM et 10 en AM. Autres pays : 35 en FM et 5 en AM. Préréglage des stations syntonisées automatiquement 1 Appuyez sur FM ou AM pour sélectionner la bande de votre choix et pour mettre la radio sous tension. 2 Appuyez sur ENTER pendant plus de 3 secondes. Le numéro de préréglage 1 clignote sur l’afficheur et le Walkman commence à syntoniser les stations à partir des fréquences les plus basses et s’arrête environ 5 secondes lorsqu’une station est reçue. 3 Si vous souhaitez prérégler la station reçue, appuyez sur ENTER pendant que le numéro préréglé clignote. La station reçue est préréglée sur le numéro de préréglage 1 et l’appareil commence à rechercher la station suivante. 4 Répétez l’étape 3 jusqu’à ce que toutes les stations soient préréglées. Pour arrêter la syntonisation Appuyez sur RADIO OFF. La radio est mise hors tension en même temps. Remarques • Si des stations sont déjà mémorisées, les nouvelles stations préréglées remplacent les anciennes lorsque la procédure ci-dessus est utilisée. • Si les stations ne peuvent pas être préréglées automatiquement, préréglez-les manuellement. Préréglage manuel des stations 1 Appuyez sur FM ou AM pour sélectionner la bande de votre choix et pour mettre la radio sous tension. 2 Appuyez sur ENTER. Les chiffres de la fréquence clignotent sur l’afficheur. 3 Pendant que les chiffres de la fréquence clignotent, syntonisez une station que vous souhaitez mémoriser à l’aide de PRESET/ TUNING + ou – et appuyez sur ENTER. Le numéro de préréglage clignote sur l’afficheur. 4 Tandis que le numéro préréglé clignote, sélectionnez le numéro préréglé que vous souhaitez à l’aide de PRESET/TUNING + ou – et appuyez sur ENTER. Remarques • Si vous ne pouvez pas effectuer l’étape 3 ou 4 pendant que les voyants clignotent, reprenez à l’étape 2. • Si une station est déjà mémorisée, la nouvelle station remplace l’ancienne. Ecouter les stations radio préréglées 1 Appuyez sur FM ou AM pour sélectionner la bande de votre choix et pour mettre la radio sous tension. 2 Appuyez plusieurs fois sur MENU pour régler le curseur sur TUNE MODE dans l’afficheur. Appuyez ensuite sur SET pour afficher «PRESET». 3 Appuyez sur PRESET/TUNING + ou –. Pour annuler une station mémorisée 1 Suivez la procédure ci-dessus et à l’étape 3, sélectionnez le numéro de préréglage que vous souhaitez annuler, puis appuyez sur ENTER. Les chiffres de la fréquence clignotent sur l’afficheur. 2 Appuyez et maintenez enfoncée la touche PRESET/TUNING + ou –. Le numéro de fréquence augmente ou diminue. Maintenez la touche enfoncée jusqu’à ce que « - - - - » s’affiche. 3 Appuyez sur ENTER lorsque « - - - - » clignote. Un numéro de préréglage clignote sur l’afficheur. 4 Appuyez sur ENTER pour annuler la station enregistrée. Syntonisation des stations radio préréglées — DAPS (Digital Auto Preset Scanning) 1 Appuyez sur FM ou AM pour sélectionner la bande de votre choix et pour mettre la radio sous tension. 2 Maintenez enfoncée la touche FM ou AM à l’étape 1 pendant au moins 2 secondes. Les stations préréglées de la bande sélectionnée sont chacune reproduite pendant environ 5 secondes. (En mode DAPS les voyants de l’afficheur clignotent.) 3 Appuyez de nouveau sur FM ou AM pour sélectionner la station pendant que vous écoutez la station préréglée. Remarques • Si aucune station n’est mémorisée, la fonction DAPS est inopérante. • Jusqu’à ce qu’une station soit sélectionnée à l’étape 3, la fonction DAPS activée à l’étape 2 reste active. • A l’étape 2 ou 3, si vous sélectionnez une bande que vous n’aviez pas sélectionnée à l’étape 1 en appuyant sur FM ou AM, la nouvelle bande sélectionnée sera reproduite normalement. Autres fonctions Verrouillage des commandes Positionnez le commutateur HOLD dans le sens de la marque G afin de verrouiller les commandes. La fonction HOLD permet uniquement de verrouiller les touches de la radio, MENU, SET, PRESET/TUNING + ou – et ENTER . Pour amplifier les graves Appuyez plusieurs fois sur MENU afin de régler le curseur de l’afficheur sur MB (mega bass). Appuyez ensuite sur SET pour activer le mode MB. A chaque pression, l’indication change comme suit. MB (mega bass) : graves amplifiés Aucun message : désactivé (normal) Remarques • Si le son est déformé une distorsion alors que le mode «MB» est activé, baissez le volume ou sélectionnez le mode normal. • L’amplification des graves risque de s’avérer peu efficace si le volume est trop élevé. Protection de l’ouïe—Fonction AVLS (limitation automatique du volume) Appuyez plusieurs fois sur MENU afin de régler le curseur de l’afficheur sur AVLS. Appuyez ensuite sur SET pour afficher « ». Le volume maximum est maintenu à un niveau relativement faible afin de protéger votre ouïe. Précautions Piles • Ne transportez pas des piles sèches avec des pièces de monnaie ou autres objets métalliques. Les piles peuvent produire de la chaleur si leurs pôles positif et négatif entrent accidentellement en contact avec un objet métallique. • Lorsque vous n'utilisez pas votre Walkman pendant un moment, ôtez la pile pour éviter les fuites et la corrosion. Manipulation • Ne laissez pas l’appareil près d’une source de chaleur. Ne l’exposez pas au soleil, à une poussière intense, au sable, à l’humidité, à la pluie, à des chocs mécaniques ; ne laissez pas l’appareil dans une voiture avec les fenêtres fermées. • L'utilisation de cassettes supérieures à 90 minutes n'est pas recommandée. Elles sont très fines et tendent à s'étirer facilement. Ceci risque de provoquer un dysfonctionnement de l'appareil ou une déformation du son. • L’afficheur LCD risque d’être à peine visible ou de réagir lentement si vous utilisez l’appareil à des températures élevées (supérieures à 40°C/104°F) ou basses (inférieures à 0°C/32°F). Il redeviendra normal à température ambiante. • Si l’appareil n’a pas été utilisé depuis longtemps, mettez-le en mode de lecture pendant quelques minutes pour le chauffer, avant de l’utiliser. Casques d’écoute/écouteurs Sécurité routière N’utilisez pas les écouteurs/le casque pendant la conduite d’une voiture, d’une moto ou de tout autre véhicule motorisé, afin d’éviter tout accident de la circulation. En outre, ceci est interdit dans certains pays d’utiliser un casque ou des écouteurs en conduisant. Il peut être également dangereux d’écouter à volume élevé tout en marchant, spécialement aux croisements. Soyez toujours extrêmement prudent et cessez d’utiliser cet appareil dans les situations présentant des risques d’accident. Prévention des troubles de l’ouïe Evitez d’utiliser les écouteurs/le casque à volume élevé. Les médecins déconseillent une écoute continue à volume trop élevé. Si vous percevez un sifflement dans les oreilles, réduisez le volume ou cessez l’écoute. Om Druk op 2 Houd ENTER langer dan 3 seconden ingedrukt. Het voorinstelnummer 1 knippert in het uitleesvenster en de Walkman begint vanaf de laagste frequentie zenders te zoeken en stopt ongeveer 5 seconden bij elke zender die wordt ontvangen. 3 Om de ontvangen zender voorin te stellen, drukt u op ENTER terwijl het voorinstelnummer knippert. De ontvangen zender wordt opgeslagen onder voorinstelnummer 1 en het toestel begint naar de volgende ontvangbare zender te zoeken. 4 Herhaal stap 3 tot alle ontvangbare zenders zijn vooringesteld. De weergave te stoppen x STOP Stoppen met zoeken Snel te spoelen* M FF of m REW Druk op RADIO OFF. De radio wordt tegelijkertijd uitgezet. Voorbereidingen Batterij plaatsen A 1 Schuif het deksel van de batterijhouder open en plaats één droge R6 (AA) batterij met de juiste polariteit. De batterij moet worden vervangen wanneer “ knippert in het uitleesvenster. “ Een cassette afspelen 1 Plaats een cassette. B 2 Druk op N PLAY. Regel het volume met VOL. * Wanneer u het toestel aan laat staan na het vooruitof terugspoelen, raakt de batterij snel leeg. Druk op x STOP. Opmerking Open de cassettehouder niet terwijl de band loopt. Luisteren naar de radio Handmatig zenders voorinstellen 1 Indien de HOLD functie aan staat, schuif dan de HOLD schakelaar in de tegenovergestelde richting van G om de bedieningselementen te ontgrendelen. Controleer of de cassetteband volledig is gestopt. 2 Druk op FM of AM om de gewenste golfband te kiezen de radio aan te zetten. 3 Handmatig afstemmen 1 Druk herhaaldelijk op MENU om “_” (de cursor) in het display in te stellen op de TUNE MODE en druk op SET om “MANUAL” weer te geven. 2 Druk enkele malen op de PRESET/ TUNING + of – toets om af te stemmen op de gewenste radiozender. Hou PRESET/TUNING + of – enkele seconden ingedrukt om zenders te zoeken. Geheugenafstemming 1 Druk herhaaldelijk op MENU om de cursor in het display in te stellen op de TUNE MODE en druk op SET om “PRESET” weer te geven. 2 Druk enkele malen op de PRESET/ TUNING + of – toets om de gewenste voorkeurzender te kiezen. Voor het gebruik van de geheugenafstemming zult u eerst de gewenste radiozenders vast moeten leggen als voorkeurzenders (zie “Voorinstellen van radiozenders”). 1 Druk op FM of AM om de gewenste band te selecteren en om de radio aan te zetten. 2 Druk op ENTER. De frequentienummers knipperen in het uitleesvenster. 3 Terwijl de frequentienummers knipperen, stemt u met PRESET/TUNING + of – af op een zender die u wilt opslaan en drukt u vervolgens op ENTER. In het uitleesvenster gaat een voorinstelnummer knipperen. 4 Terwijl het voorinstelnummer knippert, selecteert u het voorinstelnummer met PRESET/TUNING + of – en drukt u vervolgens op ENTER. De radio afzetten Druk op RADIO OFF. De ontvangst verbeteren C • Voor FM: Strek het snoer van de hoofdtelefoon/ oortelefoon (antenne) uit. Wanneer de ontvangst nog altijd niet goed is, druk dan herhaaldelijk op MENU om de cursor in het uitleesvenster op FM MODE te zetten. Druk vervolgens op SET om over te schakelen tussen “LOCAL” en geen (DX) of “MONO” (mono) en geen (stereo) voor de beste ontvangst. • Voor AM: Richt het toestel zelf. Respect d’autrui Maintenez un volume d’écoute modéré. Vous pourrez ainsi entendre les sons extérieurs et respecter les gens qui vous entourent. Entretien • Toutes les 10 heures d’utilisation, nettoyez la tête et le passage de bande de la cassette avec un coton-tige et un solvant de nettoyage disponible dans le commerce. • Pour nettoyer le coffret, utilisez un chiffon doux légèrement humide. N’utilisez pas d’alcool, de benzine, ou de diluant. • Nettoyez régulièrement les bornes des écouteurs ou du casque. Opmerkingen • Indien er al zenders zijn opgeslagen, worden de oude zenders vervangen door de nieuwe wanneer de bovenvermelde procedure is voltooid. • Stel zenders handmatig voorin wanneer deze niet automatisch kunnen worden vooringesteld. Radiozenders voorinstellen Er kunnen maximaal 40 zenders worden vooringesteld. Voor Canada en Midden-/Zuid-Amerika: 30 voor FM en 10 voor AM. Voor andere landen: 35 voor FM en 5 voor AM. Zenders voorinstellen waarop automatisch is afgestemd 1 Druk op FM of AM om de gewenste band te selecteren en om de radio aan te zetten. Opmerkingen • Wanneer u stap 3 of 4 niet kunt voltooien terwijl de indicatoren knipperen, herhaalt u de procedure vanaf stap 2. • Indien er al een zender is opgeslagen, vervangt de nieuwe zender de oude. Voorinstelzenders beluisteren 1 Druk op FM of AM om de gewenste band te selecteren en om de radio aan te zetten. 2 Druk herhaaldelijk op MENU om de cursor in het uitleesvenster op TUNE MODE te zetten. Druk vervolgens op SET om “PRESET” weer te geven. 3 Druk op PRESET/TUNING + of –. Een opgeslagen zender wissen 1 Volg de bovenstaande procedure en selecteer in stap 3 de voorinstelnummer dat u wilt annuleren. Druk vervolgens op ENTER. De frequentienummers knipperen in het uitleesvenster. 2 Houd PRESET/TUNING + of – ingedrukt. Het frequentienummer wordt verhoogd of verlaagd. Houd de toets ingedrukt tot “- - - -” wordt weergegeven. 3 Druk op ENTER terwijl “- - - -” knippert. Een voorinstelnummer knippert in het uitleesvenster. 4 Druk op ENTER om de opgeslagen zender te annuleren. Voorinstelzenders zoeken — DAPS (Digital Auto Preset Scannit) 1 Druk op FM of AM om de gewenste band te selecteren en om de radio aan te zetten. 2 Druk in stap 1 op FM of AM en houd deze minimaal 2 seconden ingedrukt. De voorinstelzenders van de geselecteerde band worden elk gedurende 5 seconden afgespeeld. (Tijdens DAPS knipperen de indicatoren in het uitleesvenster.) 3 Druk nogmaals op FM of AM om de zender te selecteren terwijl de gewenste voorinstelzender wordt afgespeeld. Opmerkingen • Als er geen zenders zijn opgeslagen, werkt de DAPS functie niet. • De DAPS functie die in stap 2 is ingeschakeld, wordt pas uitgeschakeld als u een station hebt geselecteerd in stap 3. • Als u in stap 2 of 3 een band selecteert die u in stap 1 niet hebt geselecteerd met FM of AM, wordt de nieuwe band gewoon afgespeeld. Overige functies Bedieningselementen vergrendelen Schuif de HOLD schakelaar in de richting van G om de bedieningselementen te vergrendelen. Alleen de radiobedieningstoetsen, MENU, SET, PRESET/TUNING + of – en ENTER zijn vergrendeld. Bass-geluid accentueren Druk herhaaldelijk op MENU om de cursor in het uitleesvenster op MB (mega bass) te zetten. Druk vervolgens op SET om MB aan te zetten. Bij elke druk op de toets veranderen de indicaties als volgt. MB (mega bass) : lage tonen versterkt Geen bericht: uit (normaal) Opmerkingen • Indien het geluid is vervormd wanneer “MB” is geactiveerd, zet dan het volume of kies de normale weergavestand. • Wanneer het volume te hoog staat, kan het effect van de lagetonenversterking kleiner zijn. Uw gehoor beschermen — AVLS (Automatic Volume Limiter System) Druk herhaaldelijk op MENU om de cursor in het uitleesvenster op AVLS te zetten. Druk vervolgens op SET om “ ” te laten verschijnen. Het maximum volume wordt beperkt om uw gehoor te beschermen. Voorzorgsmaatregelen Batterijen • Draag batterijen niet samen met munten of andere metalen voorwerpen mee. Wanneer de positieve en negatieve batterijklemmen in aanraking komen met een metalen voorwerp, kan er warmte worden opgewekt. • Wanneer u uw Walkman gedurende lange tijd niet gebruikt, verwijder dan de batterij om beschadiging door batterijlekkage en corrosie te vermijden. Behandeling • Laat het toestel niet achter in de buurt van warmtebronnen of op een plek waar het is blootgesteld aan directe zonnestraling, overmatig stof of zand, vocht, regen, mechanische schokken of in een auto met gesloten ruiten. • Gebruik geen cassettes met een langere speelduur dan 90 minuten. De tape van dergelijke cassettes is erg dun en wordt gemakkelijk uitgerekt. Dit kan storingen van het toestel of verminderde geluidskwaliteit tot gevolg hebben. • Het LC-display kan minder goed afleesbaar zijn of trager werken bij hoge (meer dan 40°C) of lage omgevingstemperaturen (minder dan 0°C). Bij kamertemperatuur werkt het display weer normaal. • Indien het toestel gedurende lange tijd niet is gebruikt, moet u het enkele minuten in de weergavestand laten opwarmen alvorens het weer in gebruik te nemen. Hoofdtelefoon/oortelefoon Verkeersveiligheid Gebruik de hoofdtelefoon/oortelefoon niet tijdens het rijden, fietsen of het besturen van een motorvoertuig. Dat kan leiden tot gevaarlijke verkeerssituaties en is in bepaalde streken verboden. Ook het gebruik van een hoofdtelefoon/oortelefoon met hoog volume kan gevaarlijk zijn tijdens het wandelen, vooral ter hoogte van oversteekplaatsen. In potentieel gevaarlijke situaties dient u extra goed op te letten of het gebruik stop te zetten. Voorkom oorletsel Zet de muziek op de hoofdtelefoon/oortelefoon niet te hard. Oorspecialisten raden langdurig luisteren naar geluid met hoog volume af. Als uw oren “ruisen”, moet u het volume lager zetten of stoppen. Denk om anderen Houd de geluidsterkte op een redelijk niveau. U kunt dan geluiden van buitenaf nog steeds horen terwijl u tegelijkertijd rekening houdt overdreven geluidsdruk te voorkomen. Onderhoud • Reinig de bandkop en het bandloopwerk om de 10 gebruiksuren met een wattenstokje en een in de handel verkrijgbaar reinigingsmiddel. • Reinig de behuizing met een zachte, lichtjes met water bevochtigde doek. Gebruik geen alcohol, benzine of thinner. • Reinig de dopjes van de hoofdtelefoon/oortelefoon regelmatig.-
 1
1
-
 2
2

