Telefunken CHAUFFANT BLC5X de handleiding
- Categorie
- Blenders
- Type
- de handleiding

BLENDER CHAUFFANT
BLC5X

FRANÇAIS
INSTRUCTIONS DE SÉCURITÉ
LIRE IMPÉRATIVEMENT CE MODE D’EMPLOI ET LE CONSERVER
AFIN DE POUVOIR LE CONSULTER ULTÉRIEUREMENT. IL
COMPORTE DES INFORMATIONS IMPORTANTES. DANS LE CAS
OÙ VOUS CÉDEZ CET APPAREIL Á UN TIERS, N’OUBLIEZ PAS DE
FOURNIR CETTE NOTICE AVEC L’APPAREIL.
CET APPAREIL EST DESTINÉ Á ETRE UTILISÉ DANS DES
APPLICATIONS DOMESTIQUES ET ANALOGUES TELLES QUE:
o DES COINS CUISINES RÉSERVÉS AU PERSONNEL DANS DES
MAGASINS, BUREAUX ET AUTRES ENVIRONNEMENTS
PROFESSIONNELS;
o DES FERMES;
o L’UTILISATION PAR LES CLIENTS DES HÔTELS, MOTELS ET
AUTRES ENVIRONNEMENTS Á CARACTÈRE RÉSIDENTIEL;
o DES ENVIRONNEMENTS DU TYPE CHAMBRES D’HÔTES.
CET APPAREIL NE DOIT PAS ÊTRE UTILISÉ PAR LES ENFANTS.
CONSERVER L'APPAREIL ET SON CÂBLE HORS DE PORTÉE DES
ENFANTS.
CET APPAREIL PEUT ÊTRE UTILISÉ PAR DES PERSONNES DONT
LES CAPACITÉS PHYSIQUES, SENSORIELLES OU MENTALES
SONT RÉDUITES OU DONT L’EXPÉRIENCE OU LES
CONNAISSANCES NE SONT PAS SUFFISANTES, Á CONDITION
QU’ILS BÉNÉFICIENT D'UNE SURVEILLANCE OU QU’ILS AIENT
REÇU DES INSTRUCTIONS QUANT Á L'UTILISATION DE
L'APPAREIL EN TOUTE SÉCURITÉ ET EN COMPRENNENT BIEN
LES DANGERS POTENTIELS. LES ENFANTS NE DOIVENT PAS
UTILISER L’APPAREIL COMME UN JOUET. LE NETTOYAGE ET
L’ENTRETIEN PAR L’USAGER NE DOIVENT PAS ÊTRE RÉALISÉS
PAR DES ENFANTS.

FRANÇAIS
TOUJOURS DÉCONNECTER L'APPAREIL DE L’ALIMENTATION SI
ON LE LAISSE SANS SURVEILLANCE ET AVANT MONTAGE,
DÉMONTAGE OU NETTOYAGE.
L’APPAREIL DOIT ÊTRE UTILISÉ UNIQUEMENT AVEC LE SOCLE
FOURNI.
AVERTISSEMENT : RISQUES DE BLESSURES EN CAS DE
MAUVAISE UTILISATION DE L’APPAREIL !
DES PRÉCAUTIONS DOIVENT ÊTRE PRISES LORS DE LA
MANIPULATION DES COUTEAUX AFFÛTÉS, LORSQU’ON VIDE
LE BOL ET LORS DU NETTOYAGE.
METTRE L'APPAREIL Á L'ARRÊT ET LE DÉCONNECTER DE
L’ALIMENTATION AVANT DE CHANGER LES ACCESSOIRES OU
D'APPROCHER LES PARTIES QUI SONT MOBILES LORS DU
FONCTIONNEMENT.
MISE EN GARDE: ÉVITER TOUT DEBORDEMENT SUR LE
CONNECTEUR.
SOYEZ PRUDENT SI DU LIQUIDE CHAUD EST VERSE DANS LE
ROBOT MULTIFONCTIONS OU BLENDER CAR IL PEUT ETRE
EJECTE DE L'APPAREIL EN RAISON D'UN BRUSQUE
DEGAGEMENT DE VAPEUR D'EAU.
ATTENTION SURFACE CHAUDE !
LES SURFACES SONT DE NATURE Á CHAUFFER PENDANT
L’UTILISATION.
LA TEMPÉRATURE DES SURFACES EST ÉLEVÉE PENDANT LE
FONCTIONNEMENT DE L’APPAREIL, CE QUI PEUT PROVOQUER
DES BRÛLURES. NE TOUCHEZ PAS LES SURFACES CHAUDES DE
L’APPAREIL.
L’APPAREIL NE DOIT PAS ÊTRE IMMERGÉ.

FRANÇAIS
SI LE CÂBLE D’ALIMENTATION EST ENDOMMAGÉ, IL DOIT ÊTRE
REMPLACÉ PAR LE FABRICANT, SON SERVICE APRÈS-VENTE OU
DES PERSONNES COMPÉTENTES DE QUALIFICATION SIMILAIRE
AFIN D’ÉVITER TOUT DANGER.
EN CE QUI CONCERNE LES DURÉES DE FONCTIONNEMENT ET
LES RÉGLAGES DE VITESSE POUR LES ACCESSOIRES, RÉFÉREZ-
VOUS AU PARAGRAPHE CI-APRÈS DE LA NOTICE DONNÉE DANS
LA SECTION « MISE EN SERVICE ET UTILISATION ».
INSTRUCTIONS DE SÉCURITÉ CONCERNANT LE NETTOYAGE ET
L’ENTRETIEN
AVANT TOUTE OPÉRATION DE NETTOYAGE OU D’ENTRETIEN,
DÉBRANCHEZ L’APPAREIL POUR COUPER L’ALIMENTATION
ÉLECTRIQUE.
AVANT TOUTE OPÉRATION DE NETTOYAGE, DÉBRANCHEZ ET
LAISSEZ REFROIDIR L’APPAREIL COMPLÈTEMENT.
NE JAMAIS PLONGER L’APPAREIL, SON FIL ÉLECTRIQUE ET SA
PRISE DE COURANT DANS L’EAU OU AUTRE LIQUIDE.
IL EST CONSEILLÉ D’EXAMINER RÉGULIÈREMENT LE CÂBLE
D’ALIMENTATION POUR DÉCELER TOUT SIGNE DE
DÉTÉRIORATION ÉVENTUELLE.
EN CE QUI CONCERNE LES INFORMATIONS DÉTAILLÉES SUR LA
MANIÈRE DE NETTOYER LES SURFACES EN CONTACT AVEC LES
ALIMENTS, RÉFÉREZ-VOUS AU PARAGRAPHE CI-APRÈS DE LA
NOTICE DONNÉE DANS LA SECTION « NETTOYAGE ET
ENTRETIEN ».
MISE EN GARDE
APRÈS AVOIR DEBALLÉ VOTRE APPAREIL, ASSUREZ-VOUS
D’ABORD QU’IL N’A PAS ÉTÉ ABIMÉ. SI VOUS AVEZ UN DOUTE,

FRANÇAIS
N’UTILISEZ PAS VOTRE APPAREIL, ET CONSULTEZ UNE
PERSONNE COMPÉTENTE.
N’UTILISEZ JAMAIS D’ACCESSOIRES OU DE PIÈCES D’UN AUTRE
FABRICANT. L’UTILISATION DE CE TYPE D’ACCESSOIRES OU DE
PIÈCES ENTRAÎNE L’ANNULATION DE LA GARANTIE.
L’APPAREIL NE DOIT PAS ÊTRE UTILISÉ S’IL A CHUTÉ, S’IL
PRÉSENTE DES DOMMAGES APPARENTS, S’IL FUIT OU
PRÉSENTE DES ANOMALIES DE FONCTIONNEMENT.
DÉBRANCHEZ TOUJOURS LE PRODUIT EN CAS DE LONGUE
PÉRIODE SANS UTILISATION.
ENLEVEZ BIEN TOUS LES ÉLÉMENTS DE L’EMBALLAGE, ET NE
LAISSEZ PAS LES ÉLÉMENTS TELS QUE LES SACS PLASTIQUES,
DU POLYSTYRÈNE OU DES ÉLASTIQUES Á PORTÉE DES ENFANTS.
CES ÉLÉMENTS POURRAIENT ÊTRE DANGEREUX POUR EUX.
APRÈS DÉBALLAGE DE L’APPAREIL, ASSUREZ-VOUS DE POSER
L’APPAREIL SUR UNE SURFACE PLANE ET STABLE NE
CRAIGNANT PAS LA CHALEUR. VÉRIFIEZ QUE VOUS LAISSEZ
UNE LIBRE CIRCULATION DE L’AIR TOUT AUTOUR DE VOTRE
APPAREIL. RESPECTEZ ENTRE L’APPAREIL ET TOUT PLAN
MURAL, UNE DISTANCE DE 50CM VERS LE HAUT ET DE 20CM
SUR LES COTÉS.
CET APPAREIL DOIT ÊTRE CONNECTÉ Á UNE PRISE RELIÉE Á LA
TERRE.
PRENEZ TOUTES LES PRÉCAUTIONS NÉCESSAIRES POUR ÉVITER
QU’UNE PERSONNE NE SE PRENNE LES PIEDS DANS LE CÂBLE.
NE PAS UTILISER DE RALLONGE POUR CONNECTER L’APPAREIL
AU RESEAU.
NE LE METTEZ PAS SUR D’AUTRES APPAREILS.
POUR VOTRE SECURITÉ, NOUS VOUS RECOMMANDONS DE NE
JAMAIS LAISSER VOTRE APPAREIL DANS UN ENDROIT EXPOSÉ
AUX INTEMPÉRIES ET A L’HUMIDITÉ.

FRANÇAIS
NE LAISSEZ PAS VOTRE APPAREIL BRANCHÉ SANS L’UTILISER.
NE BRANCHEZ PAS LE PRODUIT ET N’APPUYEZ PAS SUR LES
BOUTONS DU PANNEAU DE COMMANDE SI VOS MAINS SONT
MOUILLÉES. N’UTILISEZ PAS L’APPAREIL LES PIEDS NUS OU
MOUILLÉS.
PENDANT SON FONCTIONNEMENT, ÉVITEZ DE DÉPLACER
L’APPAREIL.
NORMES DE SÉCURITÉ
CET APPAREIL EST CONFORME AUX DIRECTIVES ET NORMES EN
VIGUEURS.
INSTRUCTIONS DE SÉCURITÉ CONCERNANT LA MISE AU REBUT
DE VOTRE APPAREIL
La directive européenne sur les Déchets des
Equipements Electriques et Electroniques (DEEE), exige
que les appareils ménagers usages ne soient pas jetés
dans le flux normal des déchets municipaux. Les
appareils usagés doivent être collectés séparément afin
d'optimiser le taux de récupération et le recyclage des matériaux
qui les composent, et réduire l'impact sur la santé humaine et
l'environnement.
Lorsqu’il ne fonctionnera plus, ne jetez pas l’appareil avec les
ordures ménagères mais déposez-le dans un centre de collecte
agréé afin qu’il puisse être recyclé. Vous contribuerez ainsi à la
protection de l’environnement.

FRANÇAIS
SOMMAIRE
DESCRIPTION ............................................................................... 1
MISE EN SERVICE ET UTILISATION ............................................... 2
Avant toute première utilisation .............................................. 2
Montage et démontage de l’appareil ....................................... 3
Descriptif du panneau de contrôle et des programmes
automatiques ............................................................................ 4
Utiliser votre appareil ............................................................... 6
ANOMALIES DE FONCTIONNEMENT ........................................... 8
NETTOYAGE ET ENTRETIEN ......................................................... 9
INFORMATION TECHNIQUE ...................................................... 10

FRANÇAIS
1
DESCRIPTION
1. Gobelet doseur
2. Couvercle du bol
3. Panier vapeur
4. Bol blender en inox
5. Lame en acier inoxydable
6. Poignée
7. Connecteur électrique poignée
8. Connecteur électrique base bol
9. Ecran d’affichage minuteur
10. Panneau de contrôle électronique
11. Cordon d’alimentation
12. Corps de l’appareil
13. Pieds anti-dérapants

FRANÇAIS
2
MISE EN SERVICE ET UTILISATION
Avant toute première utilisation
Déballez l’appareil et les accessoires de son
emballage, assurez-vous que l’appareil n’a
subi aucun dommage et qu’il ne soit pas
abimé.
Enlevez bien tous les éléments de
l’emballage, et ne laissez pas les éléments
tels que les sacs plastiques, du polystyrène
ou des élastiques á portée des enfants. Ces
éléments pourraient être dangereux pour
eux.
Lavez tous les accessoires avec une éponge
imbibée de produits liquides puis rincez-les à
l’eau chaude avant de les sécher avec un
torchon propre.
Ne jamais mettre les accessoires
au lave-vaisselle.
Mise en garde: éviter tout
débordement sur les connecteurs
électriques du bol blender.
Nettoyer le corps de l’appareil avec
un chiffon sec et doux.
Ne jamais immerger le corps
de l’appareil.
Ne jamais mettre au lave-
vaisselle le corps de l’appareil.

FRANÇAIS
3
Montage et démontage de l’appareil
Avertissement : Ne jamais
brancher l’appareil avant la
mise en place des
accessoires. Et toujours
débrancher l’appareil pour
le retrait des accessoires.
1. Abaissez le bol sur le bloc moteur et
appuyez vers le bas jusqu'à ce qu'il
s'enclenche à sa place (il y a une seule
position d'ajustement).
2. Insérez le panier vapeur dans le bol
blender si vous utilisez la fonction cuisson
vapeur.
3. Pour fixer le couvercle, tournez le
couvercle dans le sens des aiguilles d’une
montre et faites glisser la pointe du bec
verseur dans l’espace situé à l’avant du
couvercle. Puis poussez la partie arrière du
couvercle vers l’encoche de la poignée du
bol, jusqu’à ce que vous entendiez que le
verrou du couvercle s’enclenche à sa place.
4. Insérez le gobelet dans le trou du
couvercle.
Pour démonter l’appareil, suivez les étapes
en sens inverse.

FRANÇAIS
4
Affichage des
programmes de
cuisson
automatiques
Boutons de
contrôle du
panneau
Boutons de
contrôle du
panneau
Ecran d’affichage
minuteur
Descriptif du panneau de contrôle et des programmes automatiques
Description des boutons de contrôle du panneau électronique
Bouton « Marche / Arrêt » : après avoir branché votre appareil, ce dernier est automatiquement mis
en mode veille et émettra un bip. Le bouton « Marche / Arrêt clignotera pour vous indiquer que
l’appareil est en mode veille.
Après avoir sélectionné votre programme, appuyez sur ce bouton « Marche / Arrêt » pour démarrer
le mixage et/ou la cuisson de vos préparations.
A la fin de votre utilisation, l’appareil émet 3 bips et l’écran d’affichage minuteur indique « OFF ».
Appuyez une fois sur le bouton « Marche / Arrêt », l’appareil se mettra en veille (moteur éteint,
élément chauffant éteint).
Bouton « Menu » : ce bouton vous permet de sélectionner un des 4 programmes automatiques. Il
vous suffit d’appuyer sur ce bouton pour sélectionner votre programme.
A noter : le programme de cuisson automatique clignotera sur le panneau de contrôle lorsqu’il est
sélectionné et reste illuminé lors de son fonctionnement.
Bouton « Mixage à basse vitesse » : appuyez une fois sur ce bouton pour sélectionner le mixage à
basse vitesse puis appuyez sur le bouton « Marche / Arrêt » pour démarrer le mixage. Ré-appuyez sur
le bouton « Marche / Arrêt » pour arrêter le mixage. En fin de mixage, l’appareil émet 3 bips et l’écran
d’affichage minuteur indique « OFF ». Appuyez une fois sur le bouton « Marche / Arrêt », l’appareil
se mettra en veille.
A noter : le programme clignotera sur le panneau de contrôle lorsqu’il est sélectionné et reste illuminé
lors de son fonctionnement.
Fonctionnement : mixage pendant 3 minute jusqu’à 7000 tours/min.

FRANÇAIS
5
Bouton « Mixage à grande vitesse » : appuyez une fois sur ce bouton pour sélectionner le mixage à
grande vitesse puis appuyez sur le bouton « Marche / Arrêt » pour démarrer le mixage. Ré-appuyez
sur le bouton « Marche / Arrêt » pour arrêter le mixage. En fin de mixage, l’appareil émet 3 bips et
l’écran d’affichage minuteur indique « OFF ». Appuyez une fois sur le bouton « Marche / Arrêt »,
l’appareil se mettra en veille.
A noter : le programme clignotera sur le panneau de contrôle lorsqu’il est sélectionné et reste illuminé
lors de son fonctionnement.
Fonctionnement : mixage pendant 3 minutes à 15000 tours/min.
Bouton « Pulse / Broyage de glaçons » : appuyez une fois sur ce bouton pour sélectionner le mixage
Pulse / Broyage de glaçons, le programme démarre automatiquement. Ré-appuyez sur le bouton «
Marche / Arrêt » pour arrêter le mixage. En fin de mixage, l’appareil émet 3 bips et l’écran d’affichage
minuteur indique « OFF ». Appuyez une fois sur le bouton « Marche / Arrêt », l’appareil se mettra en
veille.
A noter : le programme s’illuminera sur le panneau de contrôle et reste illuminé lors de son
fonctionnement.
Fonctionnement : mixage pendant 10 secondes à 15000 tours/min.
Description des 4 programmes de cuisson automatiques
Smooth soup
Programme « Smooth soup » : cuisson automatique des potages veloutés.
Sélectionnez ce programme en appuyant sur le bouton « Menu » puis démarrez la cuisson en
appuyant sur le bouton « Marche / Arrêt ».
Ré-appuyez sur le bouton « Marche / Arrêt » pour arrêter le programme automatique.
En fin de cuisson, l’appareil émet 3 bips et l’écran d’affichage minuteur indique « OFF ». Appuyez
une fois sur le bouton « Marche / Arrêt », l’appareil se mettra en veille.
Fonctionnement : durée totale de 30 minutes avec alternance phase de chauffe (max. 100°C) et
phase de mixage de la préparation.
Thick soup
Programme « Thick soup » : cuisson automatique des potages avec morceaux.
Sélectionnez ce programme en appuyant sur le bouton « Menu » puis démarrez la cuisson en
appuyant sur le bouton « Marche / Arrêt ».
Ré-appuyez sur le bouton « Marche / Arrêt » pour arrêter le programme automatique.
En fin de cuisson, l’appareil émet 3 bips et l’écran d’affichage minuteur indique « OFF ». Appuyez
une fois sur le bouton « Marche / Arrêt », l’appareil se mettra en veille.
Fonctionnement : durée totale de 30 minutes avec uniquement phase de chauffe (max. 100°c).
Steam
Programme « Steam » : programme automatique de cuisson à la vapeur.
Sélectionnez ce programme en appuyant sur le bouton « Menu » puis démarrez la cuisson en
appuyant sur le bouton « Marche / Arrêt ».
Ré-appuyez sur le bouton « Marche / Arrêt » pour arrêter le programme automatique.
En fin de cuisson, l’appareil émet 3 bips et l’écran d’affichage minuteur indique « OFF ». Appuyez
une fois sur le bouton « Marche / Arrêt », l’appareil se mettra en veille.
Fonctionnement : durée totale de 30 minutes avec uniquement phase de chauffe (max. 100°c).
Reheat
Programme « Reheat » : programme automatique de réchauffage.
Sélectionnez ce programme en appuyant sur le bouton « Menu » puis démarrez le programme en
appuyant sur le bouton « Marche / Arrêt ».
Ré-appuyez sur le bouton « Marche / Arrêt » pour arrêter le programme automatique.
En fin de cuisson, l’appareil émet 3 bips et l’écran d’affichage minuteur indique « OFF ». Appuyez
une fois sur le bouton « Marche / Arrêt », l’appareil se mettra en veille.
Fonctionnement : durée totale de 40 minutes avec uniquement phase de chauffe (75°C – 85°C).

FRANÇAIS
6
Utiliser votre appareil
1. Placez votre appareil sur un plan de travail stable and plate.
2. Mettez l’ensemble des ingrédients de votre préparation dans le bol
blender et/ou panier vapeur.
3. Après avoir assemblé votre appareil et vérifié que l’ensemble des
accessoires soient bien montés sur l’appareil.
4. Branchez votre appareil à une prise murale. Après avoir branché
votre appareil, ce dernier est automatiquement mis en mode veille et
émettra un bip. Le bouton « Marche / Arrêt clignotera pour vous
indiquer que l’appareil est en mode veille.
Cuisiner avec les 4 programmes automatiques :
1. Après avoir mis vos ingrédients dans le bol blender et fini le montage de l’appareil. Vérifiez que votre appareil
est branché et est en mode veille.
2. Appuyez une fois sur le bouton « Menu » pour sélectionner l’un des 4 programmes automatiques de cuisson
et appuyez sur le bouton «Marche / Arrêt » pour mettre en marche le programme automatique.
3. En fin de cuisson, l’appareil émet 3 bips et l’écran d’affichage minuteur indique « OFF ». Appuyez une fois sur
le bouton « Marche / Arrêt », l’appareil se mettra en veille.
Mixer avec les 2 programmes de mixages (basse vitesse/grande vitesse) :
1. Après avoir mis vos ingrédients dans le bol blender et fini le montage de l’appareil. Vérifiez que votre appareil
est branché et est en mode veille.
2. Sélectionnez l’un des 2 programmes de mixage et appuyez sur le bouton «Marche / Arrêt » pour mettre en
marche le programme automatique.
3. A la fin du cycle de mixage, l’appareil émet 3 bips et l’écran d’affichage minuteur indique « OFF ». Appuyez une
fois sur le bouton « Marche / Arrêt », l’appareil se mettra en veille.
Mixer avec le programme Pulse/Broyage de glaçons :
1. Après avoir mis vos ingrédients dans le bol blender et fini le montage de l’appareil. Vérifiez que votre appareil
est branché et est en mode veille.
2. Appuyez une fois sur ce bouton pour sélectionner le mixage Pulse / Broyage de glaçons, le programme démarre
automatiquement. Ré-appuyez sur le bouton « Marche / Arrêt » pour arrêter le mixage si besoin.
3. En fin de mixage, l’appareil émet 3 bips et l’écran d’affichage minuteur indique « OFF ». Appuyez une fois sur
le bouton « Marche / Arrêt », l’appareil se mettra en veille.
Avertissement :
Toujours déconnecter l'appareil de l’alimentation si on le laisse sans surveillance et avant
montage, démontage ou nettoyage.
Mise en garde: éviter tout débordement sur le connecteur.
Ne jamais dépasser le niveau maximal dans le bol blender pour éviter tout risque de blessures :
o 1.5L MAX. pour les préparations froides.
o 1.2L MAX. pour les préparations chaudes.
Ne jamais insérer votre main ou autres objets dans le trou du couvercle.
Ne jamais enlever le couvercle et gobelet doseur lors du fonctionnement de l’appareil.
Ne pas faire fonctionner l’appareil à vide pendant plus de 30 secondes après sa mise en marche.
S’assurer que les différents blocs de l’appareil soient bien montés.

FRANÇAIS
7
Ne jamais utiliser l’appareil avec les mains mouillées.
Ne jamais déplacer l’appareil pendant qu’il est en marche.
Idées recettes :
Recettes
Programmes
Ingrédients
Préparation
Potage de
légumes
marocain
Thick soup
1 oignon rouge pelé et haché
1 poireau lavé et haché
1 poivron rouge épépiné et haché
1 branche de céleri hachée
1 poivron vert, épépiné et haché
2 gousses d’ail, pelées et hachées
1 cuillère à café d'épices ras el hanout
400 g de tomates hachées
1 cuillère à soupe de purée de
tomates
1 cube de bouillon (légumes)
250ml d’eau
Sel et poivre
Mettez tous les ingrédients dans le bol
blender. Fermez le bol.
Sélectionnez le programme
automatique « Thick soup » et appuyez
sur le bouton «Marche / Arrêt » pour
mettre en marche le programme
automatique.
Velouté de
potiron
Smooth soup
500g de potiron, épépiné et haché
2 petites pommes de terre, pelé et
haché
1 oignon, pelé et haché
60cl d’eau
1 cube de bouillon de volaille
20cl de crème fraîche
Sel et poivre du moulin
Mettez tous les ingrédients dans le bol
blender. Fermez le bol.
Sélectionnez le programme
automatique « Smooth soup » et
appuyez sur le bouton «Marche /
Arrêt » pour mettre en marche le
programme automatique.
Gaspacho
+
1 oignon pelé et haché
1/2 poivron rouge épépiné et haché
1/2 poivron vert, épépiné et haché
1/2 concombre coupé en morceaux
1 gousse d’ail, pelée et hachée
500 g de tomates hachées
1 cuillère à soupe vinaigre
1 tranche de pain de mie
2 cuillères à soupe d’huile d’olive
Basilic
Sel et poivre du moulin
Placez les légumes, l’ail et l’oignon dans
le bol. Sélectionnez la fonction «
Mixage à basse vitesse ».
Ajoutez le pain de mie grossièrement
coupé en dés et appuyez à quelques
reprises sur le bouton Pulse.
Assaisonnez, ajoutez l’huile d’olive, le
basilic et le vinaigre. Mixez à nouveau à
quelques reprises sur Pulse. Laissez
reposer au moins 2 heures au frais
avant de servir.
Glace pilée
200g de glaçons
Mettez les glaçons dans le bol blender.
Fermez le bol. Sélectionnez le
programme automatique Pulse.
Purée de
pommes de
terre
Steam
+
800g de pommes de terre, pelés et
coupés en dés
1 oignon, pelé et haché
1 gousse d’ail, pelée et hachée
25cl d’eau
25cl de crème fraîche
1 pincée de noix de muscade
Sel et poivre du moulin
Placez les pommes de terres coupés en
dés dans le panier vapeur. Versez de
l’eau dans le bol jusqu’au marquage
1.0L, placez le panier dans le bol et
fermez le couvercle. Sélectionnez la
fonction vapeur.
En fin de cuisson, sortez le panier
vapeur, videz l’eau de cuisson et versez
les pommes de terre cuites dans le bol.
Ajoutez le reste des ingrédients dans le
bol, refermez le couvercle et
sélectionnez le programme « Mixage à
grande vitesse ».

FRANÇAIS
8
Réchauffage
Reheat
Préparation froide
Mettez votre préparation dans le bol
blender. Fermez le bol.
Sélectionnez le programme
automatique « Reheat » et appuyez sur
le bouton «Marche / Arrêt » pour
mettre en marche le programme
automatique.
Milkshake
anti-stress
4 bananes épluchés
125ml de lait
3 cuillères à soupe de crème fraîche
1 boule de glace à la vanille
Mettez votre préparation dans le bol
blender. Refermez le bol et
sélectionnez le programme « Mixage à
grande vitesse ».
Mango lassi
1 mangue, pelée, dénoyautée et
hachée
20cl de lait
20cl de yogourt nature
2 cuillère à café de miel
Mettez votre préparation dans le bol
blender. Refermez le bol et
sélectionnez le programme « Mixage à
basse vitesse ».
Œufs mollets
Steam
4 Œufs
Placez les oeufs en dés dans le panier
vapeur. Versez de l’eau dans le bol
jusqu’au marquage 1.0L, placez le
panier dans le bol et fermez le
couvercle. Sélectionnez la fonction
vapeur, laissez cuire pendant 6 minutes
à compter de la phase d’ébullition.
Appuyez sur le bouton «Marche /
Arrêt » pour arrêter le programme
automatique.
ANOMALIES DE FONCTIONNEMENT
Anomalies
Causes
Solutions
L’appareil ne fonctionne
pas après branchement.
1. Mauvais montage des accessoires.
2. Le couvercle est mal mis.
1. Démonter et remonter les accessoires.
2. Débranchez l’appareil et remettez le
couvercle.
Bruit pendant le
fonctionnement.
1. Bruits de grincement/craquement.
2. Vibration du moteur, des accessoires.
Ceci est normal : ces sons indiquent que
les ingrédients sont en train d’être mixés.
Bruits ou vibrations
anormaux.
1. Les accessoires sont mal assemblés.
2. L’appareil n’est pas posé sur une
surface plane et stable.
1. Débranchez l’appareil et remontez
correctement les accessoires.
2. Débranchez l’appareil et placez-le sur
une surface plane et stable.
Les aliments sont brûlés
et collés au fond de
l’appareil.
1. Les ingrédients ont des très hautes
teneurs en amidon et/ou sucre.
2. Trop d'aliments et pas assez de
liquide dans la recette.
1. Modifier la recette pour la prochaine
fois.
2. Rajoutez du liquide.
Les ingrédients ne sont
pas assez cuits à la
fin du programme.
1. Les ingrédients ont été coupés trop
grossièrement.
2. Trop d'eau ou d'aliments.
3. Certains ingrédients nécessitent une
cuisson plus longue.
1. Refaites un autre cycle de cuisson.
Pensez à couper plus petits vos ingrédients
(2-3cm).
2. Enlevez l’excédent d’eau ou d’aliments.
3. Refaites un autre cycle de cuisson.

FRANÇAIS
9
NETTOYAGE ET ENTRETIEN
1. A la fin de votre utilisation, éteignez votre appareil en
appuyant sur le bouton « Marche / Arrêt ».
2. Débranchez le câble d’alimentation de la prise secteur.
3. Assurez-vous de toujours débrancher l’appareil avant toute
opération de nettoyage. Ne placez pas le corps de l’appareil
dans le lave-vaisselle et n’immergez pas l’appareil dans l’eau.
Nettoyer le corps de l’appareil :
Utilisez un chiffon doux pour
nettoyer les surfaces de
l’appareil.
Nettoyer les accessoires :
Lavez les accessoires avec une
éponge imbibée de liquide
vaisselle, les rincez à l’eau chaude
puis les séchez avec un chiffon
doux.
Ne jamais mettre les accessoires au
lave-vaisselle.
Mise en garde: éviter tout
débordement sur les connecteurs
électriques du bol blender.
N’utilisez pas de produits tranchants, toxiques et agressifs tel
que alcools à brûler, décapants industriels, solvants pour nettoyer
votre appareil car ces derniers risquent de l’endommager.
Ne jamais immerger l’appareil dans l’eau.

FRANÇAIS
10
INFORMATION TECHNIQUE
Modèle
BLC5X
Tension d’alimentation
220-240V ~ 50Hz
Puissance moteur
350W
Puissance cuisson
700-900W
Capacité max. pour préparation froide
1.5L MAX.
Capacité max. pour préparation chaude
1.2L MAX.

HEATING BLENDER
BLC5X

ENGLISH
SAFETY WARNINGS
READ CAREFULLY THE INSTRUCTIONS BEFORE INSTALLING
AND USING THIS APPLIANCE. IT CONTAINS IMPORTANT
INFORMATIONS. IN THE CASE YOU RESELL THIS APPLIANCE,
PLEASE MAKE SURE TO PROVIDE THIS INSTRUCTION MANUAL
TO YOUR BUYER.
THIS APPLIANCE IS INTENDED TO BE USED IN HOUSEHOLD AND
SIMILAR APPLICATIONS SUCH AS:
o STAFF KITCHEN AREAS IN SHOPS, OFFICES AND OTHER
WORKING ENVIRONMENTS;
o FARM HOUSES;
o BY CLIENTS IN HOTELS, MOTELS AND OTHER RESIDENTIAL
TYPE ENVIRONMENTS;
o BED AND BREAKFAST TYPE ENVIRONMENTS.
THIS APPLIANCE SHALL NOT BE USED BY CHILDREN. KEEP THE
APPLIANCE AND ITS CORD OUT OF REACH OF CHILDREN.
THIS APPLIANCE CAN BE USED BY PERSONS WITH REDUCED
PHYSICAL, SENSORY OR MENTAL CAPABILITIES OR LACK OF
EXPERIENCE AND KNOWLEDGE IF THEY HAVE BEEN GIVEN
SUPERVISION OR INSTRUCTION CONCERNING USE OF THE
APPLIANCE IN A SAFE WAY AND IF THEY UNDERSTAND THE
HAZARDS INVOLVED. CHILDREN SHALL NOT PLAY WITH THE
APPLIANCE. CLEANING AND MAINTENANCE SHALL NOT BE
MADE BY CHILDREN.
ALWAYS DISCONNECT THE APPLIANCE FROM THE SUPPLY IF IT
IS LEFT UNATTENDED AND BEFORE ASSEMBLING,
DISASSEMBLING OR CLEANING.
WARNING: POTENTIAL INJURY FROM MISUSE.
WARNING: AVOID SPILLAGE ON THE CONNECTOR.
EXTRA CARE SHALL BE TAKEN WHEN HANDLING THE SHARP

ENGLISH
CUTTING BLADES, EMPTYING THE BOWL AND DURING
CLEANING.
BE CAREFUL IF HOT LIQUID IS POURED INTO THE FOOD
PROCESSOR OR BLENDER AS IT CAN BE EJECTED OUT OF THE
APPLIANCE DUE TO A SUDDEN STEAMING.
SWITCH OFF THE APPLIANCE AND DISCONNECT FROM SUPPLY
BEFORE CHANGING ACCESSORIES OR APPROACHING PARTS
THAT MOVE IN USE.
THIS APPLIANCE CAN ONLY BE USED WITH ITS PROVIDED
STAND.
SURFACES ARE LIABLE TO GET HOT DURING USE.
DURING USE, THIS APPLIANCE MAY REACH VERY HIGH
TEMPERATURE AND CAUSE BURNS.
SOME PARTS OF THIS PRODUCT CAN BECOME VERY HOT AND
CAUSE BURNS. PARTICULAR ATTENTION HAS TO BE GIVEN
WHERE CHILDREN AND VULNERABLE PEOPLE ARE PRESENT.
THE APPLIANCE MUST NOT BE IMMERSED.
IF THE SUPPLY CORD IS DAMAGED, IT MUST BE REPLACED BY
THE MANUFACTURER, ITS SERVICE AGENT OR SIMILARLY
QUALIFIED PERSONS IN ORDER TO AVOID A HAZARD.
REGARDING THE INFORMATION FOR OPERATING TIMES AND
ACCESSORIES SETTING, THANKS TO REFER TO THE BELOW
PARAGRAPH OF THE MANUAL.
SAFETY INSTRUCTIONS FOR CLEANING AND MAINTENANCE
ALWAYS UNPLUG THE APPLIANCE AND LET IT COOL DOWN
COMPLETELY BEFORE ANY CLEANING OPERATION.
NEVER IMMERSE IN WATER OR ANY OTHER LIQUID THIS
APPLIANCE, ITS ELECTRIC PLUG AND CORD.

ENGLISH
THE SUPPLY CORD SHOULD BE REGULARLY EXAMINED FOR
SIGNS OF DAMAGE AND THE APPLIANCE IS NOT TO BE USED IF
THE CORD IS DAMAGED.
FOR THE DETAILS ON HOW TO CLEAN SURFACES IN CONTACT
WITH FOOD, PLEASE SEE SECTION “CLEANING AND
MAINTENANCE”.
SAFETY CAUTIONS
AFTER UNPACKING THE APPLIANCE, MAKE SURE IT IS NOT
DAMAGED. IN CASE OF DOUBT, DO NOT USE THE APPLIANCE
AND CONTACT YOUR SUPPLIER OR A QUALIFIED TECHNICIAN.
THE USE OF ACCESSORY AND ATTACHMENTS NOT
RECOMMENDED BY THE MANUFACTURER MAY CAUSE
INJURIES.
THE APPLIANCE MUST NOT BE USED IF IT HAS BEEN DROPPED,
IF IT HAS ANY VISIBLE DAMAGE, IF IT LEAKS OR IF IT FUNCTIONS
ABNORMALLY IN ANY WAY.
ALWAYS UNPLUG THE APPLIANCE IF NOT USING IT FOR A
PERIOD OF TIME.
REMOVE ALL PACKAGING AND DO NOT LEAVE THE PACKAGING
MATERIAL SUCH AS PLASTIC BAGS, POLYSTYRENE AND ELASTIC
BANDS IN EASY REACH OF CHILDREN AS THEY MAY CAUSE
SERIOUS INJURIES.
AFTER UNPACKING YOUR APPLIANCE, MAKE SURE YOU HAVE
PUT IT ON A FLAT, STABLE AND HEAT-RESISTANT SURFACE.
CHECK YOU HAD LEAVE ENOUGH SPACE BETWEEN YOUR
APPLIANCE AND SURROUNDING WALL TO LET THE AIR
CIRCULATE AROUND. THERE SHOULD BE AT LEAST 50CM ON
THE TOP AND 20CM ON SIDES APART FROM THE APPLIANCE.
THIS APPLIANCE MUST BE EARTHED.
CHECK THAT YOUR ELECTRICAL INSTALLATION IS SUFFICIENT

ENGLISH
FOR SUPPLYING THIS APPLIANCE.
TAKE ALL NECESSARY MEASURE WITH CORDS AND
EXTENSIONS TO AVOID ANY INJURIES WHILE IN USE.
FOR YOUR OWN SAFETY, WE RECOMMEND YOU NEVER LEAVE
THE APPLIANCE IN A PLACE THAT IS EXPOSED TO HUMIDITY OR
INCLEMENT WEATHER CONDITION.
DO NOT PUT THIS APPLIANCE ON TOP OF OTHERS.
NEVER LEAVE APPLIANCE PLUGGED IN WHEN NOT IN USE.
NEVER MOVE THE APPLIANCE WHEN IN USE.
NEVER PLUG THE APPLIANCE AND TOUCH THE THERMOSTAT
WITH WET HANDS. NEVER USE THE APPLIANCE WITH BARE OR
WET FEET.
NEVER UNPLUG THE APPLIANCE BY PULLING THE POWER
CABLE. ALWAYS UNPLUG THE APPLIANCE FROM THE MAIN
SOCKET.
STANDARDS
THIS APPLIANCE IS CONFORMED TO CURRENT DIRECTIVES AND
STANDARDS.
SAFETY INSTRUCTIONS ON RECYCLING
The European Directive on Waste Electrical and Electronic
Equipment (WEEE) requires that old household electrical
appliances must not be disposed of in the normal unsorted
municipal waste stream. Old appliances must be collected separately in
order to optimize the recovery and recycling of the materials they
contain, and reduce the impact on human health and the environment.
The crossed out “wheeled bin” symbol on the product reminds you of
your obligation, that when you dispose of the appliance, it must be
separately collected.
Consumers should contact their local authority or retailer for
information concerning the correct disposal of their old appliance.

ENGLISH
TABLE OF CONTENTS
DESCRIPTION ............................................................................... 1
SET UP AND USE .......................................................................... 2
Before first use .......................................................................... 2
Assembling and disassembling the appliance ........................... 3
Description of the control panel and the automatic program .. 4
Using your appliance ................................................................. 6
TROUBLESHOOTING .................................................................... 8
CLEANING AND MAINTENANCE .................................................. 9
TECHNICAL INFORMATION ....................................................... 10

ENGLISH
1
DESCRIPTION
1. Measuring cup
2. Cover lid
3. Steam basket
4. Stainless steel jar
5. Stainless steel blades
6. Jar handle
7. Electric connector on handle
8. Electric connector on jar base
9. Timer display
10. Electronic control panel
11. Power cord
12. Main body
13. Anti-slip feet

ENGLISH
2
SET UP AND USE
Before first use
Remove all packaging and do not leave the
packaging material such as plastic bags,
polystyrene and elastic bands in easy
reach of children as they may cause
serious injuries.
Wash all accessories with a sponge damped
with dishwashing liquid. Rinse throughly and
dry them with a clean cloth.
Never put the accessories into a
dishwasher.
Warning: Avoid spillage on the jar
electric connectors.
Clean the outer body with a dry clean
cloth.
Do not immerse the appliance
into water.
Do not put the appliance into a
dishwasher.

ENGLISH
3
Assembling and disassembling the appliance
Warning:
Never plug in the appliance
before assembling the
accessories. Always plug out
when disassembling the
appliance.
Ensure that all accessories are
well assembled before
switching on the appliance. If
not the case, the appliance will
not work.
1. Lower the jar on to the motor unit, and
press down till it clicks into place (it will only
fit one way).
2. Insert the steam basket into the jar if you
decide to use the steam function.
3. To fit the lid, turn clockwise the cover lid
and slide the tip of the spout into the space
at the front of the lid. Then push the back
rear of the cover towards the notch on top of
the handle till you hear the lid lock click into
place.
4. Insert the measuring cup into the hole of
the cover lid.
To disassemble the appliance, proceed to
reverse steps.

ENGLISH
4
Display of the
automatic cooking
programs
Control panel
buttons
Control panel
buttons
Timer display
Description of the control panel and the automatic program
Control panel buttons description
« ON/OFF » button: after the appliance is plugged in, the buzzer will beep and the power lamp will
flash to enter into standby status.
After selecting your program, press on the « ON/OFF » button to start the blending and/or cooking of
your dish. At the end of your program, the blender will produce 3 bips sound and the timer display
will show “OFF”. Press one time on the button « ON/OFF » to enter standby mode (motor off, heating
element off).
« Menu » button: this button allow you to select one of the 4 automatic cooking programs. Press
this button until you have selected your program.
Note: the auto program selected will flash on the panel and remain light on during functioning.
«Blending at low speed» button: press this button one time to select the blending at low speed then
press on the « ON/OFF » button to start the blending. Press again the « ON/OFF » button to stop the
blending. At the end of your program, the blender will produce 3 bips sound and the timer display
will show “OFF”. Press one time on the button « ON/OFF » to enter standby mode.
Note: the program selected will flash on the panel and remain light on during functioning.
Operating mode: blending for 3 minutes up to 7000rpm.
«Blending at high speed» button: press this button one time to select the blending at high speed
then press on the « ON/OFF » button to start the blending. Press again the « ON/OFF » button to
stop the blending. At the end of your program, the blender will produce 3 bips sound and the timer
display will show “OFF”. Press one time on the button « ON/OFF » to enter standby mode.
Note: the program selected will flash on the panel and remain light on during functioning.
Operating mode: blending for 3 minutes up to 15000rpm.

ENGLISH
5
«Pulse/Ice crush» button: press this button one time to select the Pulse/Ice crush program, the
program will start automatically. Press again the « ON/OFF » button to stop the blending. At the end
of your program, the blender will produce 3 bips sound and the timer display will show “OFF”. Press
one time on the button « ON/OFF » to enter standby mode.
Note: the program selected will light on the panel and remain light on during functioning.
Operating mode: blending for 10 seconds up to 15000rpm.
Description of the 4 automatic cooking programs
Smooth soup
« Smooth soup » program: automatic cooking program for smooth soup.
Select this program by pressing on the « Menu » button then press on the « ON/OFF » button to
start the blending and/or cooking of your dish. At the end of your program, the blender will
produce 3 bips sound and the timer display will show “OFF”. Press one time on the button
« ON/OFF » to enter standby mode (motor off, heating element off).
Operating mode: total working time of 30 minutes alternating between heating phase (max.
100°C) and blending phase.
Thick soup
« Thick soup » program: automatic cooking program for chunky soup.
Select this program by pressing on the « Menu » button then press on the « ON/OFF » button to
start the cooking of your dish. At the end of your program, the blender will produce 3 bips sound
and the timer display will show “OFF”. Press one time on the button « ON/OFF » to enter standby
mode (motor off, heating element off).
Operating mode: total working time of 30 minutes with only heating phase (max. 100°C).
Steam
« Steam » program: automatic program for steam cooking.
Select this program by pressing on the « Menu » button then press on the « ON/OFF » button to
start the cooking of your dish. At the end of your program, the blender will produce 3 bips sound
and the timer display will show “OFF”. Press one time on the button « ON/OFF » to enter standby
mode (motor off, heating element off).
Operating mode: total working time of 30 minutes with only heating phase (max. 100°C).
Reheat
« Reheat » program: automatic program for reheat.
Select this program by pressing on the « Menu » button then press on the « ON/OFF » button to
start the cooking of your dish. At the end of your program, the blender will produce 3 bips sound
and the timer display will show “OFF”. Press one time on the button « ON/OFF » to enter standby
mode (motor off, heating element off).
Operating mode: total working time of 40 minutes with only heating phase (75°C – 85°C).

ENGLISH
6
Using your appliance
1. Place your appliance on a flat and stable surface.
2. Place all the ingredients inside the blender jar and/or steam basket.
3. Ensure that all accessories are well assembled before switching on
the appliance.
4. Plug the appliance to a power socket.
After the appliance is plugged in, the buzzer will beep and the power
lamp will flash to enter into standby status.
Cooking with the 4 automatic cooking programs:
1. After adding your ingredients into the blender and finish assembling the appliance. Ensure that your appliance
is plugged in and is on standby mode.
2. Press one time on the « Menu » button to select one of the 4 auto cooking program then press on the
« ON/OFF » button to start the program.
3. At the end of your program, the blender will produce 3 bips sound and the timer display will show “OFF”. Press
one time on the button « ON/OFF » to enter standby mode.
Blending with the 2 blending programs:
1. After adding your ingredients into the blender and finish assembling the appliance. Ensure that your appliance
is plugged in and is on standby mode.
2. Select one of the 2 blending programs by pressing one time on it then press on the « ON/OFF » button to start
the program.
3. At the end of your program, the blender will produce 3 bips sound and the timer display will show “OFF”. Press
one time on the button « ON/OFF » to enter standby mode.
Blending with the Pulse/Ice crush program:
1. After adding your ingredients into the blender and finish assembling the appliance. Ensure that your appliance
is plugged in and is on standby mode.
2. Press one time the Pulse/Ice crush button, the program will start automatically. Press again the « ON/OFF »
button to stop the blending if necessary.
3. At the end of your program, the blender will produce 3 bips sound and the timer display will show “OFF”. Press
one time on the button « ON/OFF » to enter standby mode.
Warning:
Always disconnect the appliance from the supply if it is left unattended and before assembling,
disassembling or cleaning.
Warning: avoid spillage on the electric connector.
Never exceed the maximal level marked on the jar to avoid any injuries:
o 1.5L MAX. for cold dishes.
o 1.2L MAX. for hot dishes.
Never insert your hands or any objects into the hole of the cover.
Do not open the cover lid and measuring cup during use.
Do not let the appliance work for more than 30 seconds without any food or water.
Always ensure all the accessories are well assembled.

ENGLISH
7
Never use the appliance with wet hands.
Do not move the appliance when in use.
Recipes:
Recipes
Programs
Ingredients
Preparation
Moroccan
vegetables
soup
Thick soup
1 red onion peeled and chopped
1 leek washed and chopped
1 red pepper deseeded and chopped
1 stick celeri chopped
1 green pepper deseeded and
chopped
2 garlics peeled and chopped
1 coffee spoon of ras el hanout spices
400 g chopped tomatoes
1 tablespoon of tomato purée
1 stock cube (vegetables)
250ml water
Salt and pepper
Put all ingredients into the jar blender.
Close the jar blender with its lid.
Select the « Thick soup » programm and
press on the « ON/OFF » button to start
the program.
Creamy
pumpkin
soup
Smooth soup
500g pumpkin deseeded and chopped
2 small potatoes peeled and chopped
1 onion peeled and chopped
60cl water
1 chicken stock cube
20cl fresh cream
Salt and pepper
Put all ingredients into the jar blender.
Close the jar blender with its lid.
Select the « Smooth soup » program and
press on the « ON/OFF » button to start
the program.
Gaspacho
+
1 onion peeled and chopped
1/2 red pepper peeled and chopped
1/2 green pepper deseeded and
chopped
1/2 cucumber chopped
1 garlic peeled and chopped
500 g chopped tomatoes
1 tablespoon of vinegar
1 slice of sandwich loaf
Basil leaves
2 tablespoon of olive oil
Salt and pepper
Place the vegetables, garlic and onion
into the blender. Select the program «
Blending at high speed ».
At the end of the program, add the
chopped sandwich load and press Pulse.
Season, add the oilive oil, basil leaves
and vinegar. Press again on Pulse
button. Let the preparation rest inside
the fridge for 2 hours.
Crushed ice
200g ice cubes
Put the ice cubes into the blender, close
it. Press on the « Pulse/Ice crush »
button.
Mash
potatoes
Steam
+
800g potatoes peeled and cut in cubes
1 onion peeled and chopped
1 garlic peeled and chopped
25cl water
25cl fresh cream
1 pinch a nutmeg
Salt and pepper
Put the cut potatoes into the steam
basket. Pour water into the blender up
to 1.0L marking, put the steam basket
inside the blender and close it. Select
the steam auto cooking program.
At the end of the steaming, take out the
steam basket, pour out the remaining
water and place the cooked potatoes
inside the blender. Add the remaining
ingredients into the blender, close the
lid and press on « Blending at high speed
» button.

ENGLISH
8
Reheat
Reheat
Cold dishes
Put all ingredients into the jar blender.
Close the jar blender with its lid.
Select the auto program « Reheat »
press on the « ON/OFF » button to start
the program
Anti-stress
milkshake
4 peeled bananas
125ml milk
3 tablespoon of fresh cream
1 scoop of vanilla ice cream
Add the ingredients into the blender,
close the lid and press on « Blending at
high speed » button.
Mango lassi
1 mango peeled, stoned and chopped
20cl milk
20cl yoghurt
2 coffee spoons honey
Add the ingredients into the blender,
close the lid and press on « Blending at
low speed » button.
Mollets eggs
Steam
4 eggs
Put the eggs into the steam basket. Pour
water into the blender up to 1.0L
marking, put the steam basket inside the
blender and close it. Select the steam
auto cooking program, let the eggs cook
for 6 minutes after the start of water
boiling.
Press on the « ON/OFF » button to stop
the program.
TROUBLESHOOTING
Problems
Causes
Solutions
The appliance is not
working after plugged in.
1. Wrong assembling of accessories.
2. The cover is not well assembled.
1. Disassemble and assemble again all
accessories.
2. Switch off the appliance and replace
correctly the cover.
Noise during operation.
1. Squeaking/cracking noises.
2. Vibration of motor/accessories.
This is normal: these noises indicate your
machine is extracting the juice.
Abnormal noises or
vibrations.
1. Accessories are not well assembled.
2. The appliance is not placed on a flat
and stable surface.
1. Switch off the appliance, disassemble
and assemble again the accessories
2. Switch off the appliance and place the
appliance on a flat and stable surface.
Ingredients are burned
and sticked at the
bottom of the jar.
1. The ingredients have high volume of
stash and/or sugar.
2. Too much ingredients and not enough
water.
1. Change your recipe for next time.
2. Add liquids to your preparation.
Ingredients are not
cooked enough at the
end of the program.
1. Ingredients are too big.
2. Too much water or ingredients.
3. Some ingredients need longer cooking
time.
1. Repeat the cooking program. Ensure to
cut your ingredients smaller (2-3cm).
2. Take out the excess of water or
ingredients.
3. Repeat the cooking program.

ENGLISH
9
CLEANING AND MAINTENANCE
1. At the end of the program, switch off your appliance by
pressing the button “ON/OFF”.
2. Unplug your appliance from the power socket.
3. Ensure to always unplug your appliance before any cleaning
operation. Never put the motor unit into the dishwashing or
under the water.
Cleaning the body motor unit:
Clean the outer surface with a
soft cloth (or sponge) on the
surfaces of the appliance.
Cleaning the accessories:
Wash the accessories with a
sponge and dishwashing liquid
and rinse them.
Do not put the appliance into a
dishwasher.
Warning: avoid spillage on the
electric connectors of the blender.
Do not use a hard brush or any others cleaners to avoid
scratching or damaging the appliance. Never immerse the
appliance.

ENGLISH
10
TECHNICAL INFORMATION
Model
BLC5X
Voltage
220-240V ~ 50Hz
Motor power
350W
Heating power
700-900W
Max. Capacity for cold dishes
1.5L MAX.
Max. Capacity for hot dishes
1.2L MAX.

CLIMATIZADA BLENDER
BLC5X

ESPAÑOL
INSTRUCCIONES DE SEGURIDAD
LEA OBLIGATORIAMENTE ESTE MANUAL DE INSTRUCCIONES Y
CONSÉRVELO PARA CONSULTAS POSTERIORES. CONTIENE
INFORMACIONES IMPORTANTES. RECUERDE ENTREGAR ESTA
RESEÑA BREVE CON EL APARATO EN CASO DE DEJARLO EN
MANOS DE UN TERCERO.
ESTE APARATO ESTÁ DISEÑADO PARA SER UTILIZADO EN
APLICACIONES DOMÉSTICAS Y ANÁLOGAS TALES COMO:
o COCINAS RESERVADAS PARA EL PERSONAL DE TIENDAS,
OFICINAS Y OTRAS ÁREAS PROFESIONALES;
o GRANJAS;
o EL USO POR PARTE DE CLIENTES DE HOTELES Y MOTELES,
ASÍ COMO DE OTROS ENTORNOS DE CARÁCTER
RESIDENCIAL;
o ESTABLECIMIENTOS DE TIPO HOTELERO.
ESTE APARATO NO DEBE SER UTILIZADO POR NIÑOS.
MANTENGA EL APARATO Y SU CABLE FUERA DEL ALCANCE DE
LOS NIÑOS.
LAS PERSONAS CON FACULTADES FÍSICAS, SENSORIALES O
MENTALES REDUCIDAS O SIN EXPERIENCIA O CON
CONOCIMIENTOS INSUFICIENTES PODRÁN UTILIZAR ESTE
APARATO SIEMPRE Y CUANDO CUENTEN CON SUPERVISIÓN O
HAYAN RECIBIDO LAS INSTRUCCIONES PERTINENTES
CORRESPONDIENTES A LA UTILIZACIÓN SEGURA DEL APARATO
Y QUE COMPRENDAN BIEN LO RIESGOS POTENCIALES. LOS
NIÑOS NO DEBEN UTILIZAR ESTE APARATO COMO UN
JUGUETE. LA LIMPIEZA Y EL MANTENIMIENTO POR PARTE DEL
USUARIO NO DEBEN SER REALIZADOS POR NIÑOS.
DESCONECTE SIEMPRE EL APARATO DE LA FUENTE DE
ALIMENTACIÓN ANTES DE SU MONTAJE, DESMONTAJE Y

ESPAÑOL
LIMPIEZA, O SI LO VA A DEJAR SIN SUPERVISIÓN.
UTILICE EL APARATO ÚNICAMENTE CON LA BASE
SUMINISTRADA.
ADVERTENCIA: ¡LA UTILIZACIÓN INAPROPIADA DEL APARATO
CONLLEVA EL RIESGO DE LESIONES PERSONALES!
TOME LAS PRECAUCIONES DEBIDAS AL UTILIZAR CUCHILLOS
AFILADOS MIENTRAS VACIA EL BOL Y DURANTE LA LIMPIEZA.
ADVERTENCIAS: EVITE CUALQUIER DERRAMAMIENTO SOBRE
EL CONECTOR.
LA SUPERFICIE DEL ELEMENTO CALENTADOR TEENDRÁ CALOR
RESIDUAL DESPUÉS DE UTILIZARLO.
¡ATENCIÓN, SUPERFICIE CALIENTE!
LAS SUPERFICIES SON SUSCEPTIBLES DE CALENTARSE
DURANTE EL USO.
LA TEMPERATURA DE LAS SUPERFICIES AUMENTA DURANTE EL
FUNCIONAMIENTO DEL APARATO, LO QUE PUEDE PROVOCAR
QUEMADURAS. NO TOQUE LAS SUPERFICIES CALIENTES DEL
APARATO.
EL APARATO NO DEBE SUMERGIRSE.
APAGUE EL APARATO Y DESCONÉCTELO DE LA FUENTE DE
ALIMENTACIÓN ANTES DE CAMBIAR LOS ACCESORIOS O DE
ENTRAR EN CONTACTO CON LAS PIEZAS MÓVILES.
SI EL CABLE DE ALIMENTACIÓN SE ENCUENTRA DAÑADO, ESTE
DEBE SER REEMPLAZADO POR EL FABRICANTE, SU SERVICIO
POSVENTA O POR UNA PERSONA COMPETENTE CON
CUALIFICACIÓN SIMILAR PARA EVITAR CUALQUIER DAÑO.
PARA MÁS INFORMACIÓN SOBRE LA DURACIÓN DE
FUNCIONAMIENTO Y LOS AJUSTES DE VELOCIDAD PARA LOS
ACCESORIOS, CONSULTE EL PÁRRAFO SIGUIENTE DE LA

ESPAÑOL
RESEÑA BREVE INCLUIDA EN LA SECCIÓN "PUESTA EN
MARCHA Y UTILIZACIÓN"
INSTRUCCIONES DE SEGURIDAD RELATIVAS
A LA LIMPIEZA Y EL MANTENIMIENTO
ANTES DE REALIZAR CUALQUIER OPERACIÓN DE LIMPIEZA O DE
MANTENIMIENTO, DESENCHUFE EL APARATO PARA CORTAR
LA ALIMENTACIÓN ELÉCTRICA.
ANTES DE REALIZAR CUALQUIER OPERACIÓN DE LIMPIEZA,
DESENCHUFE Y DEJE ENFRIAR COMPLETAMENTE EL APARATO.
NUNCA SUMERJA EL APARATO, SU CABLE Y SU TOMA DE
CORRIENTE EN AGUA U OTRO LÍQUIDO.
ES ACONSEJABLE REVISAR EL CABLE DE ALIMENTACIÓN
REGULARMENTE A FIN DE DETECTAR CUALQUIER SEÑAL DE UN
EVENTUAL DETERIORO.
EN LO QUE RESPECTA A LAS INFORMACIONES DETALLADAS
RELATIVAS A LA FORMA DE LIMPIAR LAS SUPERFICIES EN
CONTACTO CON LOS ALIMENTOS, CONSULTE EN EL PÁRRAFO
SIGUIENTE LA RESEÑA BREVE INCLUIDA EN LA SECCIÓN
"LIMPIEZA Y MANTENIMIENTO".
ADVERTENCIAS
DESPUÉS DE DESEMBALAR EL APARATO, COMPRUEBE
INMEDIATAMENTE QUE NO SE ENCUENTRA DAÑADO. EN
CASO DE DUDA, NO UTILICE EL APARATO Y CONSULTE A UNA
PERSONA COMPETENTE.
NUNCA UTILICE ACCESORIOS O PIEZAS DE OTRO FABRICANTE.
EL USO DE ESTE TIPO DE ACCESORIOS O PIEZAS IMPLICA LA
ANULACIÓN DE LA GARANTÍA.

ESPAÑOL
NO DEBE UTILIZAR EL APARATO SI SE HA CAÍDO, SI PRESENTA
DAÑOS APARENTES, SI TIENE FUGAS O PRESENTA ANOMALÍAS
EN EL FUNCIONAMIENTO.
DESENCHUFE SIEMPRE EL PRODUCTO EN CASO DE UN LARGO
PERÍODO DE INUTILIZACIÓN.
RETIRE CORRECTAMENTE TODOS LOS ELEMENTOS DEL
EMBALAJE Y NO DEJE DICHOS ELEMENTOS TALES COMO
BOLSAS DE PLÁSTICO, POLIESTIRENO O ELÁSTICOS AL ALCANCE
DE LOS NIÑOS. DICHOS ELEMENTOS PODRÍAN RESULTAR
PELIGROSOS PARA ELLOS.
TRAS DESEMBALAR EL APARATO, ASEGÚRESE DE COLOCARLO
SOBRE UNA SUPERFICIE PLANA, ESTABLE Y RESISTENTE AL
CALOR. ASEGÚRESE DE QUE EL AIRE CIRCULE LIBREMENTE
ALREDEDOR DE SU APARATO. RESPETE UNA DISTANCIA
MÍNIMA, ENTRE EL APARATO Y CUALQUIER ELEMENTO
ARQUITECTÓNICO, DE 50 CM RESPECTO A LA VERTICAL Y DE
20 CM RESPECTO A LOS LADOS.
ESTE APARATO DEBE ESTAR CONECTADO A UN ENCHUFE CON
TOMA DE TIERRA.
TOME TODAS LAS PRECAUCIONES NECESARIAS PARA EVITAR
QUE ALGUIEN PISE EL CABLE.
NO UTILICE ALARGADORES PARA CONECTAR EL APARATO A LA
RED ELÉCTRICA.
NO LO COLOQUE ENCIMA DE OTROS APARATOS.
POR SU SEGURIDAD, LE RECOMENDAMOS QUE NUNCA DEJE EL
APARATO EN UN LUGAR EXPUESTO A LA INTEMPERIE Y LA
HUMEDAD.
NO DEJE EL APARATO ENCHUFADO SI NO LO VA A UTILIZAR.
NO ENCHUFE EL APARATO NI PULSE LOS BOTONES DEL PANEL
DE CONTROL SI TIENE LAS MANOS HÚMEDAS. NO UTILICE EL
APARATO CON LOS PIES DESCALZOS O HÚMEDOS.

ESPAÑOL
DURANTE SU FUNCIONAMIENTO, EVITE MOVER EL APARATO.
NORMAS DE SEGURIDAD
ESTE APARATO SE AJUSTA A LAS DIRECTIVAS Y NORMAS
VIGENTES.
INSTRUCCIONES DE SEGURIDAD PARA DESECHAR SU APARATO
La directiva europea sobre Residuos de Aparatos
Eléctricos y Electrónicos (RAEE), exige que los aparatos
domésticos utilizados no sean desechados mediante el
flujo normal de residuos municipales. Los aparatos
utilizados deberán ser recogidos de manera separada para
optimizar la tasa de recuperación y el reciclaje de los materiales
que lo componen y reducir el impacto sobre la salud humana y el
medio ambiente.
Cuando deje de funcionar, no lo deseche como basura doméstica
y deposítelo en un centro de recogida autorizado para que pueda
ser reciclado. De esta manera contribuirá a la protección del
medio ambiente.

ESPAÑOL
RESUMEN
DESCRIPCIÓN ............................................................................... 1
PUESTA EN MARCHA Y UTILIZACIÓN .......................................... 2
Antes de utilizar por primera vez .............................................. 2
Montaje y desmontaje del aparato .......................................... 3
Descriptivo del panel de control y de los programas
automáticos .............................................................................. 4
Utilización de su aparato .......................................................... 6
ANOMALÍAS DE FUNCIONAMIENTO ........................................... 9
LIMPIEZA Y MANTENIMIENTO .................................................... 9
INFORMACIÓN TÉCNICA ........................................................... 10

ESPAÑOL
1
DESCRIPCIÓN
1. Taza de medir
2. Tapa
3. Cesta de vapor
4. Bol de acero inoxidable
5. Hoja de acero inoxidable
6. Asa
7. Conector eléctrico del asa
8. Conector eléctrico del bol
9. Pantalla del temporizador
10. Panel de control electrónico
11. Cable de alimentación
12. Carcasa del aparato
13. Patas antideslizantes

ESPAÑOL
2
PUESTA EN MARCHA Y UTILIZACIÓN
Antes de utilizar por primera vez
Desembale el aparato y los accesorios y
asegúrese de que el aparato no haya
sufrido ningún daño y que esté en buen
estado.
Retire correctamente todos los
elementos del embalaje y no deje dichos
elementos tales como bolsas de
plástico, poliestireno o elásticos al
alcance de los niños. Dichos elementos
podrían resultar peligrosos para ellos.
Lave todos los accesorios con una esponja
empapada de un producto líquido y, luego,
enjuáguelos con agua caliente y séquelos
con un paño limpio.
No introduzca nunca el aparato
en el lavavajillas.
Advertencias: evite cualquier
derramamiento sobre el
conector del bol.
Limpie la carcasa del aparato con
un paño suave y seco.
No sumerja nunca la carcasa
del aparato.
No introduzca nunca la
carcasa del aparato en el
lavavajillas.

ESPAÑOL
3
Montaje y desmontaje del aparato
Advertencia: Nunca conecte el
aparato antes de haber
instalado los accesorios.
Desenchufe siempre el aparato
antes de extraer los accesorios.
Atención: Compruebe que
todos los elementos estén bien
montados en el aparato. Si el
montaje es incorrecto, el
aparato no funcionará.
1. Coloque la jarra sobre la unidad motora y
empújela hacia abajo hasta que encaje en su
sitio con un clic (solo encaja en una posición).
2. Coloque el cesta de vapor en el interior del
bol si está utilizando la función de vapor.
3. Para acoplar la tapa, gire el tapa en el
sentido de las agujas del reloj hasta
bloquearlo y deslice la punta del pico hacia
dentro del espacio situado en la parte
delantera de la tapa. Luego, empuje la
cubierta posterior a las ranuras en el mango
de la taza hasta que sienta que el cierre de la
tapa encaje en su sitio con un clic.
4. Inserte la taza de medir en el agujero de la
tapa.
Para desmontar la unidad, siga los pasos en
orden inverso.

ESPAÑOL
4
Visualización de
los programas de
cocción
automática
Interruptor
de control del
panel
Interruptor
de control
del panel
Pantalla del
temporizador
Descriptivo del panel de control y de los programas automáticos
Descripción de los interruptores de control del panel
Interruptor de "Encendido/Apagado": después de enchufar su aparato, este se pone en modo pausa
automáticamente y emite un pitido. El interruptor de encendido/apagado parpadeará para indicarle
que el aparato está en modo pausa.
Una vez seleccionado su programa automático, pulse una vez este interruptor para iniciar la
mezcladora y/o cocción de su preparación. Cuando termine de utilizar el aparato, el blender emitirá
3 pitidos y el reloj indicará « OFF » en la pantalla.
Pulse una vez el interruptor de "Encendido/Apagado", el aparato se pondrá en modo de espera
automáticamente (motor apagado, calentador apagado).
Interruptor "Menú": este interruptor le permite seleccionar uno de los cuatro programas de cocción
automática. Solo tiene que pulsar este interruptor para seleccionar su programa.
Nota: el programa automático parpadeará cuando esté seleccionado y permanece iluminado durante
el funcionamiento.
Interruptor de "Mezcla de baja de velocidad": pulse una vez seleccionar la mezcladora de baja
velocidad y pulse el interruptor de "Encendido/Apagado" para iniciar la mezcladora de su
preparación. Vuelva a pulsar el interruptor de "Encendido/Apagado" para detener el programa
automático.
Cuando termine de utilizar el aparato, el blender emitirá 3 pitidos y el reloj indicará « OFF » en la
pantalla. Pulse una vez el interruptor de "Encendido/Apagado", el aparato se pondrá en modo de
espera automáticamente
Nota: el programa automático parpadeará cuando esté seleccionado y permanece iluminado durante
el funcionamiento.
Modo de funcionamiento: mezclar durante 3 min hasta 7000rpm.

ESPAÑOL
5
Interruptor de "Mezcla de alta de velocidad": pulse una vez seleccionar la mezcladora de alta
velocidad y pulse el interruptor de "Encendido/Apagado" para iniciar la mezcladora de su
preparación. Vuelva a pulsar el interruptor de "Encendido/Apagado" para detener el programa
automático.
Cuando termine de utilizar el aparato, el blender emitirá 3 pitidos y el reloj indicará « OFF » en la
pantalla. Pulse una vez el interruptor de "Encendido/Apagado", el aparato se pondrá en modo de
espera automáticamente.
Nota: el programa automático parpadeará cuando esté seleccionado y permanece iluminado durante
el funcionamiento.
Modo de funcionamiento: mezclar durante 3 min hasta 15000rpm.
Interruptor de "Pulse/Ice crush": pulse una vez el botón “Pulse/Ice crush” para iniciar la mezcladora
de su preparación. Vuelva a pulsar el interruptor de "Encendido/Apagado" para detener el programa
automático.
Cuando termine de utilizar el aparato, el blender emitirá 3 pitidos y el reloj indicará « OFF » en la
pantalla. Pulse una vez el interruptor de "Encendido/Apagado", el aparato se pondrá en modo de
espera automáticamente
Nota: el programa automático iluminará cuando esté seleccionado y permanece iluminado durante
el funcionamiento.
Modo de funcionamiento: mezclar durante 10 secundo hasta 15000rpm.
Descripción de los 4 programas de cocción automática
Smooth soup
Programa de « Smooth soup »: programa de cocción automática para sopa suave.
Seleccione el programa de cocción deseado pulsando el botón « Menu » y pulse el interruptor de
"Encendido/Apagado" para iniciar la cocción de su preparación.
Vuelva a pulsar el interruptor de "Encendido/Apagado" para detener el programa automático.
Cuando termine de utilizar el aparato, el blender emitirá 3 pitidos y el reloj indicará « OFF » en la
pantalla. Pulse una vez el interruptor de "Encendido/Apagado", el aparato se pondrá en modo de
espera automáticamente.
Modo de funcionamiento: el tiempo total de operación de 30 minutos alternando entre la fase de
calentamiento (máximo 100 ° C) y la fase de mezcla
Thick soup
Programa de « Thick soup »: programa de cocción automática para sopa de tropezones.
Seleccione el programa de cocción deseado pulsando el botón « Menu » y pulse el interruptor de
"Encendido/Apagado" para iniciar la cocción de su preparación.
Vuelva a pulsar el interruptor de "Encendido/Apagado" para detener el programa automático.
Cuando termine de utilizar el aparato, el blender emitirá 3 pitidos y el reloj indicará « OFF » en la
pantalla. Pulse una vez el interruptor de "Encendido/Apagado", el aparato se pondrá en modo de
espera automáticamente.
Modo de funcionamiento: el tiempo total de operación de 30 minutos con solamente fase de
calentamiento (máximo 100 ° C).
Steam
Programa de « Steam »: programa de cocción automática para la cocción el vapor.
Seleccione el programa de cocción deseado pulsando el botón « Menu » y pulse el interruptor de
"Encendido/Apagado" para iniciar la cocción de su preparación.
Vuelva a pulsar el interruptor de "Encendido/Apagado" para detener el programa automático.
Cuando termine de utilizar el aparato, el blender emitirá 3 pitidos y el reloj indicará « OFF » en la
pantalla. Pulse una vez el interruptor de "Encendido/Apagado", el aparato se pondrá en modo de
espera automáticamente.
Modo de funcionamiento: el tiempo total de operación de 30 minutos con solamente fase de
calentamiento (máximo 100 ° C).

ESPAÑOL
6
Reheat
Programa de « Reheat » : programa automático para recalentar sus platos.
Seleccione el programa de cocción deseado pulsando el botón « Menu » y pulse el interruptor de
"Encendido/Apagado" para iniciar la cocción de su preparación.
Vuelva a pulsar el interruptor de "Encendido/Apagado" para detener el programa automático.
Cuando termine de utilizar el aparato, el blender emitirá 3 pitidos y el reloj indicará « OFF » en la
pantalla. Pulse una vez el interruptor de "Encendido/Apagado", el aparato se pondrá en modo de
espera automáticamente.
Modo de funcionamiento: el tiempo total de operación de 40 minutos con solamente fase de
calentamiento (75°C – 85°C).
Utilización de su aparato
1. Coloque su aparato en una encimera estable y plana.
2. Coloque todos los ingredientes en el bol y / o en la cesta de vapor.
3. Podrá utilizar su aparato una vez que lo haya montado y después
de comprobar que todos los accesorios estén bien montados en
dicho aparato.
4. Enchufe el aparato a una toma de corriente de pared.
Después de enchufar su aparato, este se pone en modo pausa
automáticamente y emite un pitido. El interruptor de
encendido/apagado parpadeará para indicarle que el aparato está
en modo pausa.
Cocinar con los 4 programas de cocción automática:
1. Después de coloque los ingredientes en el bol y finalizar la instalación del dispositivo. Asegúrese de que su
dispositivo está conectado y se encuentra en modo de espera.
2. Pulse una vez el botón « Menu » para seleccionar uno de los cuatro programas de cocción automática y pulse
el interruptor de "Encendido/Apagado" para iniciar la cocción de su preparación.
3. Cuando termine de utilizar el aparato, el blender emitirá 3 pitidos y el reloj indicará « OFF » en la pantalla. Pulse
una vez el interruptor de "Encendido/Apagado", el aparato se pondrá en modo de espera automáticamente.
Mezclar con los 2 programas de mezcla (baja velocidad/alta velocidad):
1. Después de coloque los ingredientes en el bol y finalizar la instalación del dispositivo. Asegúrese de que su
dispositivo está conectado y se encuentra en modo de espera.
2. Seleccione uno de los dos programas de mezcla automática y pulse el interruptor de "Encendido/Apagado" para
detener el programa automático.
3. Cuando termine de utilizar el aparato, el blender emitirá 3 pitidos y el reloj indicará « OFF » en la pantalla. Pulse
una vez el interruptor de "Encendido/Apagado", el aparato se pondrá en modo de espera automáticamente.
Mezclar con el programa de Pulse/Ice crush:
1. Después de coloque los ingredientes en el bol y finalizar la instalación del dispositivo. Asegúrese de que su
dispositivo está conectado y se encuentra en modo de espera.
2. Pulse una vez el botón “Pulse/Ice crush” para iniciar la mezcladora de su preparación. Vuelva a pulsar el
interruptor de "Encendido/Apagado" para detener el programa automático.
3. Cuando termine de utilizar el aparato, el blender emitirá 3 pitidos y el reloj indicará « OFF » en la pantalla.
Pulse una vez el interruptor de "Encendido/Apagado", el aparato se pondrá en modo de espera
automáticamente.

ESPAÑOL
7
Advertencia:
Desconecte siempre el aparato de la fuente de alimentación antes de su montaje,
desmontaje y limpieza, o si lo va a dejar sin supervisión.
Advertencias: evite cualquier derramamiento sobre el conector.
Nunca exceda el nivel máximo en el para evitar el riesgo de lesiones:
o 1.5L MAX. para los platos fríos.
o 1.2L MAX. para los platos calientes.
No introduzca nunca su mano ni otros objetos en la abertura del aparato.
No abra la tapa con abertura ni desmonte el bol cuando el aparato esté en funcionamiento.
No haga funcionar el aparato en vacío durante más de 30 segundos después de ponerlo en
funcionamiento.
Asegúrese de que todos los elementos del aparato estén bien montados.
No utilice nunca el aparato con las manos mojadas.
No desplace nunca el aparato cuando esté funcionamiento.
Ideas de recetas:
Recetas
Programas
Ingredientes
Preparación
Sopa de
verduras al
estilo marroquí
Thick soup
1 cebolla roja, pelada y picada
1 puerro, lavado y picado
1 pimiento rojo, sin pepitas y picado
1 tallo de apio, picado
1 pimiento verde, sin pepitas y picado
2 dientes de ajo, pelados y picados
1 cucharadita de mezcla de especias
ras el hanut
400 g de pulpa de tomate picada
1 cucharada de puré de tomate
1 cubito de caldo (verduras)
250ml del agua
Sal y pimienta
Coloque todos los ingredientes en el
bol. Cierre la tapa de la unidad.
Seleccione el programa de cocción de
« Thick soup » deseado pulsando el
botón « Menu » y pulse el interruptor
de "Encendido/Apagado" para iniciar
la cocción de su preparación.
Crema de
calabaza
Smooth soup
500 g de calabaza, semillas y picado
2 patatas pequeñas, peladas y picadas
1 cebolla, pelada y picada
60cl de agua
cubo de caldo de pollo 1
20cl de crema
Sal y pimienta
Coloque todos los ingredientes en el
bol. Cierre la tapa de la unidad.
Seleccione el programa de cocción de
« Smooth soup » y pulse el
interruptor de "Encendido/Apagado"
para iniciar la cocción de su
preparación.
Gaspacho
+
1 cebolla peladas y picadas
1/2 pimiento rojo, sin pepitas y picado
1/2 pimiento verde, sin pepitas y
picado
1/2 pepino cortó en piezas
1 diente de ajo, pelados y picados
500 g de pulpa de tomate picada
1 cucharada vinagre
1 rebanada de pan
2 cucharadas de aceite de oliva
Albahaca
Sal y pimienta
Colocar las verduras, el ajo y la
cebolla en el tazón. Seleccione la
"mezcla de baja velocidad."
Añadir el pan cortado en trozos
grandes en cubos y pulse varias veces
el botón de pulso. Temporada, añadir
el aceite de oliva, albahaca y vinagre.
Mezclar de nuevo un par de veces en
el pulso. Dejar reposar por lo menos
2 horas en la nevera antes de servir.

ESPAÑOL
8
Hielo picado
200g cubito de hielo
Coloque todos los ingredientes en el
bol. Cierre la tapa de la unidad.
Seleccione el programa de
automatica « Pulse/Ice Crush»
Puré de patata
Steam
+
800 g de patatas peladas y cortadas en
cubos
1 cebolla peladas y picadas
1 diente de ajo, pelados y picados
25cl del agua
25cl de crema
1 pizca de nuez moscada
Sal y pimienta
Colocar las patatas en dados tierra en
la cesta de vapor. Vierta agua en el
recipiente hasta 1.0L marcado,
colocar el cesto en el recipiente y
cierre la tapa. Seleccione la función
de cocción el vapor.
Cuando esté cocido, retirar la cesta
de vapor, drenar el agua de cocción y
verter las patatas cocidas en el plato.
Añadir el resto de ingredientes en el
recipiente, cierre la tapa y seleccione
el programa « Mezcla de alta de
velocidad ».
Recalentamient
Reheat
Los platos fríos
Coloque todos los ingredientes en el
bol. Cierre la tapa de la unidad.
Seleccione el programa de cocción de
« Reheat » y pulse el interruptor de
"Encendido/Apagado" para iniciar la
cocción de su preparación..
Milkshake
antiestrés
4 bananas, peladas
125ml de leche
3 cucharadas de crema
1 bola de helado de vainilla
Coloque todos los ingredientes en el
bol. Cierre la tapa de la unidad y
seleccione el programa « Mezcla de
alta de velocidad ».
Mango lassi
1 mango, pelado, sin hueso y planta
20cl de leche
20cl de yogur
2 cucharadita de miel
Coloque todos los ingredientes en el
bol. Cierre la tapa de la unidad y
seleccione el programa « Mezcla de
baja de velocidad ».
Huevo mollets
Steam
4 huevo
Coloque los huevos en la cesta de
vapor. Vierta agua en el recipiente
hasta 1.0L marcado, colocar el cesto
en el recipiente y cierre la tapa.
Seleccione la función de cocción el
vapor, cocinar por 6 minutos después
de la fase de ebullición. Pulse el
interruptor de "Encendido/Apagado"
para detener el programa
automático.

ESPAÑOL
9
ANOMALÍAS DE FUNCIONAMIENTO
Anomalías
Causas
Soluciones
El aparato no funciona
después de haberlo
enchufado.
1. Montaje incorrecto de los accesorios.
2. La tapa está mal colocada.
1. Desmonte y vuelva a montar los
accesorios.
2. Desenchufe el aparato y vuelva a poner
la tapa.
Ruido durante el
funcionamiento.
1. Ruidos de chirridos y crujidos.
2. Vibración del motor o de los accesorios.
Esto es normal, estos sonidos indican que
los ingredientes están siendo mezcla.
Ruidos o vibraciones
anormales.
1. Los accesorios están mal montados.
2. El aparato no está colocado sobre una
superficie plana y estable.
1. Desenchufe el aparato y vuelva a
montar correctamente los accesorios.
2. Desenchufe el aparato y colóquelo
sobre una superficie plana y estable.
La comida se quema y
se pegó a la parte
inferior de la unidad.
1. Los ingredientes tienen niveles muy
altos de almidón y / o azúcar.
2. El exceso de comida y no suficiente
líquido en la receta.
1. Modificar la receta para la próxima vez.
2. Añadir más líquido.
Los ingredientes no son
lo suficientemente
cocidos al final del
programa.
1. Los ingredientes se cortan demasiado
grueso.
2. El exceso de agua o alimentos.
3. Algunos ingredientes requieren una
cocción más prolongada
1. Repetir otro ciclo de cocción.
Asegúrese de cortar los ingredientes de
menor tamaño (2-3 cm).
2. Retire el exceso de agua o alimento.
3. Repita otro ciclo de cocción.
LIMPIEZA Y MANTENIMIENTO
1. Al final de la operación de prelimpieza con el programa de
limpieza automática, apague su aparato pulsando el
interruptor de "Encendido/Apagado".
2. Desenchufe el cable de alimentación de la toma de corriente.
3. Asegúrese siempre de desenchufar el aparato antes de
limpiarlo. No coloque la carcasa del aparato en el lavavajillas
ni la sumerja en agua.
Limpieza de la carcasa del aparato:
Use un paño suave para limpiar
la superficie del aparato.

ESPAÑOL
10
Limpieza de los accesorios:
Lave los accesorios con una
esponja empapada de detergente
líquido para vajillas, enjuáguelos
con agua caliente y, luego,
séquelos con un paño suave.
No introduzca nunca el aparato
en el lavavajillas.
Advertencias: evite cualquier
derramamiento sobre el
conector del bol.
INFORMACIÓN TÉCNICA
Modelo
BLC5X
Tensión de la corriente
220-240 V ~ 50Hz
Potencia del motor
350 W
Potencia del cocción
700-900 W
Capacidad máxima de preparación para los platos fríos
1.5L MAX.
Capacidad máxima de preparación para los platos caliente
1.2L MAX.
No utilice productos afilados, tóxicos y agresivos, tales
como alcohol de quemar, decapantes industriales y
solventes, para limpiar el aparato ya que éstos podrían
dañarlo. Nunca sumerja el aparato en agua.

VERWARMDE BLENDER
BLC5X

NEDERLANDS
VEILIGHEIDSINSTRUCTIES
LEES DEZE GEBRUIKSHANDLEIDING ZORGVULDIG DOOR EN
BEWAAR ZE VOOR LATERE RAADPLEGING. ZE BEVAT
BELANGRIJKE INFORMATIE. WANNEER U DIT APPARAAT AAN
DERDEN OVERDRAAGT, MOET DEZE HANDLEIDING BIJ HET
APPARAAT WORDEN GEVOEGD.
DIT APPARAAT IS BESTEMD VOOR HUISHOUDELIJK EN
GELIJKAARDIG GEBRUIK ZOALS:
o DE KEUKENHOEK VOOR HET PERSONEEL IN WINKELS,
KANTOREN EN ANDERE WERKOMGEVINGEN;
o BOERDERIJEN;
o HOTEL- EN MOTELKAMERS EN ANDERE OMGEVINGEN
MET EEN RESIDENTIEEL KARAKTER;
o GASTENKAMERS EN GELIJKAARDIGE OMGEVINGEN.
DIT APPARAAT MAG NIET WORDEN GEBRUIKT DOOR
KINDEREN. HOUD HET APPARAAT EN HET NETSNOER BUITEN
HET BEREIK VAN KINDEREN.
DIT APPARAAT MAG ENKEL WORDEN GEBRUIKT DOOR
PERSONEN MET EEN LICHAMELIJKE, ZINTUIGLIJKE OF
MENTALE BEPERKING OF PERSONEN MET ONVOLDOENDE
ERVARING OF KENNIS ALS DIE PERSONEN ONDER TOEZICHT
STAAN OF ZE INSTRUCTIES KREGEN OVER EEN VEILIG GEBRUIK
VAN HET APPARAAT EN ZE OP DE HOOGTE ZIJN VAN DE
MOGELIJKE GEVAREN. KINDEREN MOGEN NIET MET HET
APPARAAT SPELEN. REINIGING EN ONDERHOUD DOOR DE
GEBRUIKER MOGEN NIET WORDEN TOEVERTROUWD AAN
KINDEREN.
HAAL DE STEKKER VAN HET APPARAAT ALTIJD UIT HET
STOPCONTACT ALS HET ZONDER TOEZICHT WORDT GELATEN
EN ALVORENS HET TE MONTEREN, DEMONTEREN OF REINIGE.

NEDERLANDS
HET APPARAAT MOET UITSLUITEND MET DE MEEGELEVERDE
MOTORUNIT WORDEN GEBRUIKT.
WAARSCHUWING: RISICO OP VERWONDING BIJ VERKEERD
GEBRUIK VAN HET APPARAAT!
NEEM UW VOORZORGEN BIJ HET HANTEREN VAN DE SCHERPE
MESSEN, HET LEEGMAKEN VAN DE KOM EN HET REINIGEN.
WAARSCHUWING: VERMIJD HET OVERKOKEN OP DE
AANSLUITSTEKKER.
HET OPPERVLAK VAN HETVERWARMINGSELEMENT BLIJFT
NOG EEN TIJD HEET NA GEBRUIK.
OPGELET HEET OPPERVLAK!
DE OPPERVLAKKEN KUNNEN HEET WORDEN TIJDENS HET
GEBRUIK.
DE TEMPERATUUR VAN DE OPPERVLAKKEN LOOPT HOOG OP
TIJDENS DE WERKING VAN HET APPARAAT, WAT
BRANDWONDEN KAN VEROORZAKEN. RAAK DE HETE
OPPERVLAKKEN VAN HET APPARAAT NIET AAN.
HET APPARAAT MAG NIET IN WATER OF EEN ANDERE
VLOEISTOF WORDEN GEDOMPELD.
ZET HET APPARAAT UIT EN TREK DE STEKKER UIT HET
STOPCONTACT ALVORENS DE HULPSTUKKEN TE WISSELEN OF
IN DE BUURT TE KOMEN VAN BEWEGENDE DELEN TIJDENS DE
WERKING.
ALS HET NETSNOER BESCHADIGD IS, MOET HET WORDEN
VERVANGEN DOOR DE FABRIKANT, ZIJN KLANTENDIENST OF
GELIJKAARDIG BEVOEGDE PERSONEN OM ALLE GEVAAR UIT TE
SLUITEN.
WAT DE BEDRIJFSDUUR EN DE SNELHEIDSINSTELLINGEN VOOR
DE HULPSTUKKEN BETREFT, ZIE DE HIERNA VOLGENDE

NEDERLANDS
PARAGRAAF VAN DE HANDLEIDING ONDER DE TITEL
"INBEDRIJFSTELLING EN GEBRUIK".
VEILIGHEIDSINSTRUCTIES BETREFFENDE
REINIGING EN ONDERHOUD
HAAL DE STEKKER VAN HET APPARAAT UIT HET STOPCONTACT
ALVORENS HET APPARAAT TE REINIGEN OF ER ONDERHOUD
AAN TE VERRICHTEN.
ALVORENS HET APPARAAT TE REINIGEN MOET U HET
NETSNOER UIT HET STOPCONTACT HALEN EN HET APPARAAT
VOLLEDIG LATEN AFKOELEN.
DOMPEL HET APPARAAT, HET NETSNOER EN DE STEKKER
NOOIT IN WATER OF EEN ANDERE VLOEISTOF.
HET WORDT AANBEVOLEN HET NETSNOER REGELMATIG TE
CONTROLEREN OP EVENTUELE TEKENEN VAN BESCHADIGING.
VOOR DE GEDETAILLEERDE INFORMATIE OVER HET REINIGEN
VAN DE OPPERVLAKKEN DIE IN CONTACT KOMEN MET
VOEDINGSMIDDELEN, ZIE DE HIERNA VOLGENDE PARAGRAAF
VAN DE HANDLEIDING ONDER DE TITEL "REINIGING EN
ONDERHOUD".
WAARSCHUWING
VERGEWIS U ERVAN, NADAT U HET APPARAAT HEBT
UITGEPAKT, DAT HET NIET BESCHADIGD IS. GEBRUIK HET
APPARAAT NIET IN GEVAL VAN TWIJFEL EN RAADPLEEG EEN
BEVOEGD PERSOON.
GEBRUIK NOOIT ACCESSOIRES OF ONDERDELEN VAN EEN
ANDERE FABRIKANT. BIJ GEBRUIK VAN ZULKE ACCESSOIRES OF
ONDERDELEN VERVALT DE GARANTIE.

NEDERLANDS
HET APPARAAT MAG NIET WORDEN GEBRUIKT ALS HET IS
GEVALLEN, ALS HET ZICHTBARE SCHADE VERTOONT, ALS HET
LEKT OF BEDRIJFSSTORINGEN VERTOONT.
HAAL HET NETSNOER ALTIJD UIT HET STOPCONTACT WANNEER
HET APPARAAT LANGDURIG NIET ZAL WORDEN GEBRUIKT.
VERWIJDER ZORGVULDIG ALLE VERPAKKINGSMATERIAAL EN
LAAT GEEN ZAKEN ALS PLASTIC ZAKKEN, POLYSTYREEN OF
ELASTIEKEN BINNEN HET BEREIK VAN KINDEREN LIGGEN. DIE
ZAKEN KUNNEN VOOR HEN GEVAARLIJK ZIJN.
PLAATS HET APPARAAT NADAT HET IS UITGEPAKT OP EEN VLAK,
STABIEL EN HITTEBESTENDIG OPPERVLAK. ZORG DAT ER VRIJE
LUCHTCIRCULATIE RONDOM HET HELE APPARAAT MOGELIJK
IS. NEEM TUSSEN HET APPARAAT EN DE WAND EEN AFSTAND
VAN 50 CM AAN DE BOVENKANT EN 20 CM AAN DE ZIJKANTEN
IN ACHT.
DIT APPARAAT MOET WORDEN AANGESLOTEN OP EEN
GEAARD STOPCONTACT.
NEEM ALLE NODIGE VOORZORGEN OM TE VOORKOMEN DAT
IEMAND OVER HET NETSNOER STRUIKELT.
GEBRUIK GEEN VERLENGSNOER OM HET APPARAAT OP HET
NET AAN TE SLUITEN.
PLAATS HET NIET BOVEN OP ANDERE APPARATEN.
VOOR UW VEILIGHEID WORDT AANBEVOLEN HET APPARAAT
NOOIT BLOOT TE STELLEN AAN SLECHTE
WEERSOMSTANDIGHEDEN EN VOCHT.
LAAT DE STEKKER VAN UW APPARAAT NIET IN HET
STOPCONTACT ZITTEN WANNEER HET NIET WORDT GEBRUIKT.
SLUIT HET PRODUCT NIET AAN EN DRUK NIET OP DE KNOPPEN
VAN HET BEDIENINGSPANEEL ALS UW HANDEN VOCHTIG ZIJN.
GEBRUIK HET APPARAAT NIET BLOOTSVOETS OF MET
VOCHTIGE VOETEN.

NEDERLANDS
VERPLAATS HET APPARAAT NIET TERWIJL HET IN WERKING IS.
VEILIGHEIDSNORMEN
DIT APPARAAT VOLDOET AAN DE GELDENDE RICHTLIJNEN EN
NORMEN.
VEILIGHEIDSINSTRUCTIES VOOR HET AFDANKEN VAN UW
APPARAAT
Overeenkomstig de Europese richtlijn betreffende
Afgedankte Elektrische en Elektronische Apparatuur
(AEEA) mogen afgedankte huishoudelijke apparaten
niet met het gewone huisvuil worden meegegeven.
Afgedankte apparaten moeten gescheiden worden ingezameld
om het hergebruik en de recyclage van de bestanddelen ervan te
optimaliseren en de impact op de gezondheid van de mens en
het milieu te verminderen.
Wanneer het niet meer zal werken, mag u het niet bij het huisvuil
zetten maar afleveren in een erkend inzamelcentrum zodat het
kan worden gerecycleerd. Zo levert u een bijdrage aan de
bescherming van het milieu.

NEDERLANDS
INHOUDSOPGAVE
BESCHRIJVING ............................................................................. 2
INBEDRIJFSTELLING EN GEBRUIK ................................................ 3
Vóór het eerste gebruik ............................................................ 3
Het apparaat ineenzetten en demonteer het apparaat na
gebruik ...................................................................................... 4
Beschrijving van het bedieningspaneel en van de automatische
programma's ............................................................................. 5
Uw apparaat gebruiken ............................................................ 7
BEDRIJFSSTORINGEN ................................................................... 9
REINIGING EN ONDERHOUD ..................................................... 10
TECHNISCHE INFORMATIE ........................................................ 11

NEDERLANDS
2
BESCHRIJVING
1. Meetbeker
2. Dekking deksel
3. Stoommand
4. Roestvrij stalen pot
5. Staanloze stalen bladen
6. Handgreep
7. Elektrische aansluiting op de handgreep
8. Elektrische aansluiting op potbasis
9. Timer display
10. Elektronisch bedieningspaneel
11. Stroomdraad
12. Motorunit
13. Antislipvoeten

NEDERLANDS
3
INBEDRIJFSTELLING EN GEBRUIK
Vóór het eerste gebruik
Haal het apparaat en de hulpstukken uit
hun verpakking, vergewis u ervan dat het
apparaat in goede staat en niet beschadigd
is.
Verwijder zorgvuldig alle
verpakkingsmateriaal en laat geen zaken
als plastic zakken, polystyreen of elastieken
binnen het bereik van kinderen liggen. Die
zaken kunnen voor hen gevaarlijk zijn.
Was alle hulpstukken af met een in vloeibare
producten gedrenkte spons en spoel ze af met
warm water alvorens ze met een schone
keukenhanddoek af te drogen.
Was de hulpstukken nooit in de
vaatwasser.
Waarschuwing: vermijd het
overkoken op de aansluitstekker.
Reinig het apparaat met een droge en
zachte doek.
Dompel de motorunit nooit in
water of een andere vloeistof.
Was de motorunit nooit in de
vaatwasser.

NEDERLANDS
4
Het apparaat ineenzetten en demonteer het apparaat na gebruik
1. Zet de pot op de motorunit en druk er naar
beneden totdat het op zijn plaats klikt (er is
slechts één justeerpositie).
2. Steek de stoommand in de pot als u besluit
om de stoomfunctie te gebruiken.
3. Om het deksel te bevestigen, zet het
deksel in de richting van de klok in en schuift
het uiteinde van de tuit in de ruimte op het
voorpaneel. Druk vervolgens de achterkant
van de sleuven in het handvat van de kom,
totdat u het deksel van het slot vastklikt.
4. Steek de meetbeker in de opening van de
deksel.
Om het apparaat te demonteren, volg de
stappen in omgekeerde volgorde.
Waarschuwing: Steek de
stekker van het apparaat nooit
in het stopcontact voordat de
hulpstukken zijn gemonteerd.
Haal de stekker altijd uit het
stopcontact om hulpstukken te
verwijderen.
Opgelet: Controleer of alle
elementen zorgvuldig op het
apparaat zijn gemonteerd. Bij
verkeerde montage zal het
apparaat niet functioneren.

NEDERLANDS
5
Weergave van de
automatische
programma's
Bedieningsknop
pen van het
paneel
Timer display
Beschrijving van het bedieningspaneel en van de automatische programma's
Beschrijving van de bedieningsknoppen van het paneel
Knop "Aan/Uit": na uw apparaat te hebben aangesloten, wordt dit automatisch in stand-by geplaatst
en produceert het een bieptoon. De knop "Aan/Uit" knippert om aan te duiden dat het apparaat in
stand-by staat. Nadat u uw programma hebt geselecteerd, drukt u op de "Aan/Uit" knop om de
afzetting en / of koken van uw gerecht te beginnen. Aan het einde van uw programma zal de blender
3 bips geluid produceren en de timer display zal "OFF" tonen. Druk één keer op de toets "Aan/Uit"
om de standby-modus in te schakelen (motor uit, verwarmingselement uit).
Knop "Menu": met dit knop kunt u één van de 4 automatische programma's selecteren. Het volstaat
op deze knop te drukken om uw programma te selecteren.
Let wel: het automatisch programma knippert wanneer het wordt geselecteerd.
Knop "Blending bij lage snelheid": druk één keer op deze knop om de mix te selecteren bij lage
snelheid en druk dan op de "Aan/Uit" knop om het mengsel te beginnen. Druk nogmaals op de
"Aan/Uit" knop om het mengsel te stoppen. Aan het einde van uw programma zal de blender 3 bips
geluid produceren en de timer display zal "OFF" tonen. Druk één keer op de toets “Aan/Uit” om de
standby-modus in te voeren.
Opmerking: het geselecteerde programma knippert op het paneel en blijft licht tijdens het werken.
Werkingsmodus: gedurende 3 minuten tot 7000 rpm.

NEDERLANDS
6
Knop "Blending bij hoge snelheid": druk één keer op deze knop om de mix te selecteren bij lage
snelheid en druk dan op de "Aan/Uit" knop om het mengsel te beginnen. Druk nogmaals op de
"Aan/Uit" knop om het mengsel te stoppen. Aan het einde van uw programma zal de blender 3 bips
geluid produceren en de timer display zal "OFF" tonen. Druk één keer op de toets “Aan/Uit” om de
standby-modus in te voeren.
Opmerking: het geselecteerde programma knippert op het paneel en blijft licht tijdens het werken.
Werkingsmodus: gedurende 3 minuten tot 7000 rpm.
Knop " Pulse / Ice crush ": druk één keer op deze knop om het Pulse / Ice crush programma te
selecteren, het programma start automatisch. Druk nogmaals op de «ON / OFF» knop om het
mengsel te stoppen. Aan het einde van uw programma zal de blender 3 bips geluid produceren en
de timer display zal "OFF" tonen. Druk één keer op de toets «ON / OFF» om de standby-modus in te
voeren.
Opmerking: het geselecteerde programma licht op het paneel aan en blijft tijdens het functioneren
licht aan.
Werkingsmodus: Blending 10 seconden tot 15000rpm.
Beschrijving van de 4 automatische bereidingsprogramma's
Smooth soup
« Smooth soup » programma: automatisch bereidingsprogramma's voor soepele soep.
Selecteer het programma door te drukken op de knop "Menu" en dan beginnen koken door op
de knop "On / Off". Druk nogmaals op de "On / Off" om de automatische programma te stoppen.
Als ze worden gekookt, het apparaat piept 3 keer en de timer display "OFF". Druk eenmaal op de
knop "On / Off", zal het toestel gaan slapen.
Werkingsmodus: totale duur van 30 minuten afwisselend verwarmingsfase en mengfase van het
preparaat (max 100 ° C).
Thick soup
« Thick soup » programma: automatisch bereidingsprogramma's voor soep met
stukken.
Selecteer het programma door te drukken op de knop "Menu" en dan beginnen koken door op
de knop "On / Off".
Druk nogmaals op de "On / Off" om de automatische programma te stoppen.
Als ze worden gekookt, het apparaat piept 3 keer en de timer display "OFF". Druk eenmaal op de
knop "On / Off", zal het toestel gaan slapen.
Werkingsmodus: totale duur van 30 minuten slechts verwarmingsfase (max 100 ° C).
Steam
« Steam » programma: automatisch bereidingsprogramma's voor het stomen.
Selecteer het programma door te drukken op de knop "Menu" en dan beginnen koken door op
de knop "On / Off".
Druk nogmaals op de "On / Off" om de automatische programma te stoppen.
Als ze worden gekookt, het apparaat piept 3 keer en de timer display "OFF". Druk eenmaal op de
knop "On / Off", zal het toestel gaan slapen.
Werkingsmodus: totale duur van 30 minuten slechts verwarmingsfase (max 100 ° C).
Reheat
« Reheat » programma: automatisch bereidingsprogramma's voor opwarmen.
Selecteer het programma door te drukken op de knop "Menu" en dan beginnen koken door op
de knop "On / Off".
Druk nogmaals op de "On / Off" om de automatische programma te stoppen.
Als ze worden gekookt, het apparaat piept 3 keer en de timer display "OFF". Druk eenmaal op de
knop "On / Off", zal het toestel gaan slapen.
Werkingsmodus: totale duur van 40 minuten slechts verwarmingsfase (75°C – 85°C).

NEDERLANDS
7
Uw apparaat gebruiken
1. Plaats u het op een stabiel en effen werkblad.
2. Plaats alle ingrediënten van uw voorbereiding in de blender
kom en / of stoomboot.
3. Nadat u uw apparaat hebt ineengezet en gecontroleerd of alle
hulpstukken zorgvuldig zijn gemonteerd.
4. Sluit uw apparaat aan op een wandcontactdoos.
Na uw apparaat te hebben aangesloten, wordt dit automatisch in
stand-by geplaatst en produceert het een bieptoon. De knop
"Aan/Uit" knippert om aan te duiden dat het apparaat in stand-by
staat.
Bereidingen met de 4 automatische bereidingsprogramma's:
1. Nadat uw ingrediënten in de blender kom en voltooi de installatie van het apparaat. Zorg ervoor dat uw
apparaat is aangesloten en zich in de standby-modus.
2. Drukt u op de « Menu » van de 4 automatische bereidingsprogramma's selecteren en drukt op de « Aan/Uit »
om het koken van uw bereiding te starten.
3. Als ze worden gekookt, het apparaat piept 3 keer en de timer display "OFF". Druk eenmaal op de knop
« Aan/Uit » , dat het apparaat in stand-by staat.
Mix met de 2 mixprogramma's (lage snelheid / hoge snelheid):
1. Nadat uw ingrediënten in de blender kom en voltooi de installatie van het apparaat. Zorg ervoor dat uw
apparaat is aangesloten en zich in de standby-modus.
2. Selecteer een van de twee het mengen van programma's en druk op de « Aan/Uit » voor het inschakelen van
het automatische programma.
3. Aan het einde van de mengcyclus, het apparaat piept 3 keer en de timer display "OFF". Druk eenmaal op de
knop « Aan/Uit » , dat het apparaat in stand-by staat.
Mix met de programma « Pulse/Ice crush »:
1. Nadat uw ingrediënten in de blender kom en voltooi de installatie van het apparaat. Zorg ervoor dat uw
apparaat is aangesloten en zich in de standby-modus.
2. Druk één keer op deze knop om het Pulse/Ice crush programma te selecteren, het programma start
automatisch. Druk nogmaals op de « Aan/Uit » knop om het mengsel te stoppen.
3. Aan het einde van de mengcyclus, het apparaat piept 3 keer en de timer display "OFF". Druk eenmaal op de
knop « Aan/Uit » , dat het apparaat in stand-by staat.
Waarschuwing:
Haal de stekker van het apparaat altijd uit het stopcontact als het zonder toezicht wordt
gelaten en alvorens het te monteren, demonteren of reinige.
Waarschuwing: vermijd het overkoken op de aansluitstekker.
• Overschrijd nooit het maximale niveau in de blender kom om het risico van letsel te voorkomen:
o 1.5L MAX. voor koude bereidingen.
o 1.2L MAX. voor warme bereidingen.
Steek nooit uw hand of andere voorwerpen in de vultrechter.
Laat het apparaat na het starten niet langer dan 30 seconden onbelast draaien.
Vergewis u ervan dat de verschillende elementen van het apparaat zorgvuldig gemonteerd zijn.

NEDERLANDS
8
Gebruik het apparaat nooit met natte handen.
Het geheel van deksel en vultrechter niet openen of de sapcentrifugekom niet demonteren
terwijl het apparaat in bedrijf is.
Het apparaat nooit verplaatsen terwijl het in bedrijf is.
Receptideeën:
Storingen
Programma
Oorzaken
Oplossingen
Marokkaanse
Groentesoep
Thick soup
1 rode ui, geschild en in stukjes
gesneden
1 gewassen en gesneden prei
1 rode paprika, zonder zaden en
fijngesneden
1 fijngesneden selderij stengel
1 groene paprika, zaadjes en
fijngesneden
2 knoflooktenen, fijngesneden
1 theelepel kruid ras el hanout
400 g gehakte tomaten
1 eetlepel tomatenpuree soep
1 bouillonblokje (groenten)
250ml water
Zout en peper
Zet alle ingrediënten in de
blenderkom. Sluit de kom.
Kies het automatische programma «
Thick soup » en druk op de
« Aan/Uit » voor het inschakelen van
het automatische programma.
Pompoensoep
Smooth soup
500g pompoen, zaden en fijngehakt
2 kleine aardappelen, geschild en in
stukken gesneden
1 ui, geschild en gesneden
60 cl water
1 kipbakje
20cl crème
Zout en peper
Zet alle ingrediënten in de
blenderkom. Sluit de kom.
Kies het automatische programma
« Smooth soup » en druk op de
« Aan/Uit » voor het inschakelen van
het automatische programma.
Gaspacho
+
1 ui gepeld en fijngehakt
1/2 rode paprika gezaaid en
fijngesneden
1/2 groene paprika, zonder zaden en
fijngesneden
1/2 komkommer in stukken gesneden
1 knoflook, fijngesneden
500 g gehakte tomaten
1 eetlepel azijn
1 snee brood
2 eetlepels olijfolie
basilicum
Zout en pepe
Leg de groenten, knoflook en ui in
de kom. Selecteer de " Blending bij
lage snelheid”.
Voeg de grof gesneden brood in
blokjes en druk op een paar keer aan
de pols te drukken. Seizoen, voeg de
olijfolie, basilicum en azijn. Blend
weer een paar keer op Pulse. Laat
staan minstens 2 uur in de koelkast
voor het opdienen.
Gemalen ijs
200 g ijs
Doe ijsblokjes in de blender kom.
Sluit de kom.
Selecteer de automatische Pulse
programma.
Aardappelpur
ee
Steam
+
800 g aardappelen, geschild en in
blokjes
1 ui, geschild en in stukjes gesneden
1 knoflook, fijngesneden
25 cl water
Doe de aardappelen in blokjes
gesneden land in het stoommandje.
Giet water in de kom tot 1.0L
markering, plaats de mand in de kom

NEDERLANDS
9
25cl room
1 snufje nootmuskaat
Zout en peper
en sluit het deksel. Selecteer de
stoomfunctie.
Als ze worden gekookt, verwijder het
stoommandje, laat het kokende
water en giet de gekookte
aardappelen in de kom. Voeg de
overige ingrediënten in de kom, sluit
het deksel en selecteer het
programma " Blending bij hoge
snelheid ".
Opwarmen
Reheat
Koude bereidingen.
Zet alle ingrediënten in de
blenderkom. Sluit de kom.
Kies het automatische programma
« Reheat » en druk op de « Aan/Uit »
voor het inschakelen van het
automatische programma
Milkshake
anti-stress
4 bananen, gepeld
125 ml melk
3 eetlepels room
1 bolletje vanille-ijs
Zet alle ingrediënten in de
blenderkom. Sluit de kom. Selecteer
het programma " Blending bij hoge
snelheid ".
Mango lassi
1 mango, geschild, ontpit en gemalen
20 cl melk
20 cl yogurt
2 theelepels honing
Zet alle ingrediënten in de
blenderkom. Sluit de kom. Selecteer
het programma " Blending bij lage
snelheid”.
BEDRIJFSSTORINGEN
Storingen
Oorzaken
Oplossingen
Het apparaat werkt
niet na aansluiting op
een stopcontact.
1. Hulpstukken slecht gemonteerd.
2. Het deksel is niet juist geplaatst.
1. Neem de hulpstukken uiteen en zet ze
weer ineen.
2. Haal de stekker van het apparaat uit het
stopcontact en plaats het deksel terug.
Geluid terwijl het
apparaat in bedrijf is.
1. Piepende/krakende geluiden.
2. Trillen van de motor, van de
hulpstukken.
Dit is normaal: die geluiden geven aan dat de
ingrediënten worden geperst.
Ongewone geluiden
of trillingen.
1. De hulpstukken zijn niet correct
ineengezet.
2. Het apparaat staat niet op een effen en
stabiel oppervlak.
1. Haal de stekker van het apparaat uit het
stopcontact en zet de hulpstukken weer
correct ineen.
2. Haal het stopcontact van het apparaat uit
het stopcontact en plaats het apparaat op
een effen en stabiel oppervlak.
Het voedsel wordt
verbrand en vast aan
de onderkant van het
toestel.
1. De ingrediënten zeer hoog gehalte aan
zetmeel en / of suiker.
2. Te veel eten en niet genoeg vloeistof in
het recept.
1. Pas het recept voor de volgende keer.
2. Voeg meer vloeistof.
De ingrediënten
worden niet warm
genoeg om einde van
het programma.
1. De ingrediënten werden ook gesneden
grof.
2. Te veel water of voedsel.
3. Sommige ingrediënten vereisen een
langere koken.
1. Herhaal dit nog een kookproces. Zorg
ervoor dat u uw ingrediënten kleiner (2-3 cm)
te snijden.
2. Verwijder overtollig water of voedsel.
3. Herhaal dit nog een kookproces.

NEDERLANDS
10
REINIGING EN ONDERHOUD
1. Schakel uw apparaat na afloop van de voorspoeling met het
automatisch reinigingsprogramma uit door te drukken op de knop
Aan/Uit".
2. Haal de stekker van het netsnoer uit het stopcontact.
3. Vergewis u er altijd van dat de stekker uit het stopcontact is
gehaald alvorens het apparaat te reinigen. Plaats de motorunit niet
in de vaatwasser en dompel het apparaat niet in water.
De motorunit reinigen:
Gebruik een zachte doek om de
oppervlakken van het apparaat te
reinigen.
De hulpstukken reinigen:
De hulpstukken kunt u afwassen
met een in afwasmiddel
gedrenkte spons, afspoelen in
warm water en dan afdrogen
met een zachte doek.
Was de hulpstukken nooit in de
vaatwasser.
Waarschuwing: vermijd het
overkoken op de
aansluitstekker.

NEDERLANDS
11
TECHNISCHE INFORMATIE
Model
BLC5X
Netspanning
220-240V ~ 50Hz
Motorvermogen
350W
Bereidingsvermogen
700-900W
Maximumcapaciteit voor koude bereidingen
1.5L MAX.
Maximumcapaciteit voor warme bereidingen
1.2L MAX.
Gebruik geen scherpe voorwerpen of toxische en
agressieve producten zoals spiritus, industriële
afbijtmiddelen of oplosmiddelen om uw apparaat te reinigen
want daarmee loopt u het risico het te beschadigen. Dompel
het apparaat nooit in water.

Vestel France, 17 rue de la Couture – 94563 Rungis CEDEX
Cette notice est aussi disponible sur le site suivant: http://pieces-detachees.sogedis.fr/
This manual instruction is also available on the following website: http://pieces-detachees.sogedis.fr/
Este manual se encuentra también disponible en el siguiente enlace: http://pieces-detachees.sogedis.fr/
Deze gebruikshandleiding is ook beschikbaar op de volgende website: http://pieces-detachees.sogedis.fr/
Documenttranscriptie
BLENDER CHAUFFANT BLC5X FRANÇAIS INSTRUCTIONS DE SÉCURITÉ LIRE IMPÉRATIVEMENT CE MODE D’EMPLOI ET LE CONSERVER AFIN DE POUVOIR LE CONSULTER ULTÉRIEUREMENT. IL COMPORTE DES INFORMATIONS IMPORTANTES. DANS LE CAS OÙ VOUS CÉDEZ CET APPAREIL Á UN TIERS, N’OUBLIEZ PAS DE FOURNIR CETTE NOTICE AVEC L’APPAREIL. CET APPAREIL EST DESTINÉ Á ETRE UTILISÉ DANS DES APPLICATIONS DOMESTIQUES ET ANALOGUES TELLES QUE: o DES COINS CUISINES RÉSERVÉS AU PERSONNEL DANS DES MAGASINS, BUREAUX ET AUTRES ENVIRONNEMENTS PROFESSIONNELS; o DES FERMES; o L’UTILISATION PAR LES CLIENTS DES HÔTELS, MOTELS ET AUTRES ENVIRONNEMENTS Á CARACTÈRE RÉSIDENTIEL; o DES ENVIRONNEMENTS DU TYPE CHAMBRES D’HÔTES. CET APPAREIL NE DOIT PAS ÊTRE UTILISÉ PAR LES ENFANTS. CONSERVER L'APPAREIL ET SON CÂBLE HORS DE PORTÉE DES ENFANTS. CET APPAREIL PEUT ÊTRE UTILISÉ PAR DES PERSONNES DONT LES CAPACITÉS PHYSIQUES, SENSORIELLES OU MENTALES SONT RÉDUITES OU DONT L’EXPÉRIENCE OU LES CONNAISSANCES NE SONT PAS SUFFISANTES, Á CONDITION QU’ILS BÉNÉFICIENT D'UNE SURVEILLANCE OU QU’ILS AIENT REÇU DES INSTRUCTIONS QUANT Á L'UTILISATION DE L'APPAREIL EN TOUTE SÉCURITÉ ET EN COMPRENNENT BIEN LES DANGERS POTENTIELS. LES ENFANTS NE DOIVENT PAS UTILISER L’APPAREIL COMME UN JOUET. LE NETTOYAGE ET L’ENTRETIEN PAR L’USAGER NE DOIVENT PAS ÊTRE RÉALISÉS PAR DES ENFANTS. FRANÇAIS TOUJOURS DÉCONNECTER L'APPAREIL DE L’ALIMENTATION SI ON LE LAISSE SANS SURVEILLANCE ET AVANT MONTAGE, DÉMONTAGE OU NETTOYAGE. L’APPAREIL DOIT ÊTRE UTILISÉ UNIQUEMENT AVEC LE SOCLE FOURNI. AVERTISSEMENT : RISQUES DE BLESSURES EN CAS DE MAUVAISE UTILISATION DE L’APPAREIL ! DES PRÉCAUTIONS DOIVENT ÊTRE PRISES LORS DE LA MANIPULATION DES COUTEAUX AFFÛTÉS, LORSQU’ON VIDE LE BOL ET LORS DU NETTOYAGE. METTRE L'APPAREIL Á L'ARRÊT ET LE DÉCONNECTER DE L’ALIMENTATION AVANT DE CHANGER LES ACCESSOIRES OU D'APPROCHER LES PARTIES QUI SONT MOBILES LORS DU FONCTIONNEMENT. MISE EN GARDE: ÉVITER TOUT DEBORDEMENT SUR LE CONNECTEUR. SOYEZ PRUDENT SI DU LIQUIDE CHAUD EST VERSE DANS LE ROBOT MULTIFONCTIONS OU BLENDER CAR IL PEUT ETRE EJECTE DE L'APPAREIL EN RAISON D'UN BRUSQUE DEGAGEMENT DE VAPEUR D'EAU. ATTENTION SURFACE CHAUDE ! LES SURFACES SONT DE NATURE Á CHAUFFER PENDANT L’UTILISATION. LA TEMPÉRATURE DES SURFACES EST ÉLEVÉE PENDANT LE FONCTIONNEMENT DE L’APPAREIL, CE QUI PEUT PROVOQUER DES BRÛLURES. NE TOUCHEZ PAS LES SURFACES CHAUDES DE L’APPAREIL. L’APPAREIL NE DOIT PAS ÊTRE IMMERGÉ. FRANÇAIS SI LE CÂBLE D’ALIMENTATION EST ENDOMMAGÉ, IL DOIT ÊTRE REMPLACÉ PAR LE FABRICANT, SON SERVICE APRÈS-VENTE OU DES PERSONNES COMPÉTENTES DE QUALIFICATION SIMILAIRE AFIN D’ÉVITER TOUT DANGER. EN CE QUI CONCERNE LES DURÉES DE FONCTIONNEMENT ET LES RÉGLAGES DE VITESSE POUR LES ACCESSOIRES, RÉFÉREZVOUS AU PARAGRAPHE CI-APRÈS DE LA NOTICE DONNÉE DANS LA SECTION « MISE EN SERVICE ET UTILISATION ». INSTRUCTIONS DE SÉCURITÉ CONCERNANT LE NETTOYAGE ET L’ENTRETIEN AVANT TOUTE OPÉRATION DE NETTOYAGE OU D’ENTRETIEN, DÉBRANCHEZ L’APPAREIL POUR COUPER L’ALIMENTATION ÉLECTRIQUE. AVANT TOUTE OPÉRATION DE NETTOYAGE, DÉBRANCHEZ ET LAISSEZ REFROIDIR L’APPAREIL COMPLÈTEMENT. NE JAMAIS PLONGER L’APPAREIL, SON FIL ÉLECTRIQUE ET SA PRISE DE COURANT DANS L’EAU OU AUTRE LIQUIDE. IL EST CONSEILLÉ D’EXAMINER RÉGULIÈREMENT LE CÂBLE D’ALIMENTATION POUR DÉCELER TOUT SIGNE DE DÉTÉRIORATION ÉVENTUELLE. EN CE QUI CONCERNE LES INFORMATIONS DÉTAILLÉES SUR LA MANIÈRE DE NETTOYER LES SURFACES EN CONTACT AVEC LES ALIMENTS, RÉFÉREZ-VOUS AU PARAGRAPHE CI-APRÈS DE LA NOTICE DONNÉE DANS LA SECTION « NETTOYAGE ET ENTRETIEN ». MISE EN GARDE APRÈS AVOIR DEBALLÉ VOTRE APPAREIL, ASSUREZ-VOUS D’ABORD QU’IL N’A PAS ÉTÉ ABIMÉ. SI VOUS AVEZ UN DOUTE, FRANÇAIS N’UTILISEZ PAS VOTRE APPAREIL, ET CONSULTEZ UNE PERSONNE COMPÉTENTE. N’UTILISEZ JAMAIS D’ACCESSOIRES OU DE PIÈCES D’UN AUTRE FABRICANT. L’UTILISATION DE CE TYPE D’ACCESSOIRES OU DE PIÈCES ENTRAÎNE L’ANNULATION DE LA GARANTIE. L’APPAREIL NE DOIT PAS ÊTRE UTILISÉ S’IL A CHUTÉ, S’IL PRÉSENTE DES DOMMAGES APPARENTS, S’IL FUIT OU PRÉSENTE DES ANOMALIES DE FONCTIONNEMENT. DÉBRANCHEZ TOUJOURS LE PRODUIT EN CAS DE LONGUE PÉRIODE SANS UTILISATION. ENLEVEZ BIEN TOUS LES ÉLÉMENTS DE L’EMBALLAGE, ET NE LAISSEZ PAS LES ÉLÉMENTS TELS QUE LES SACS PLASTIQUES, DU POLYSTYRÈNE OU DES ÉLASTIQUES Á PORTÉE DES ENFANTS. CES ÉLÉMENTS POURRAIENT ÊTRE DANGEREUX POUR EUX. APRÈS DÉBALLAGE DE L’APPAREIL, ASSUREZ-VOUS DE POSER L’APPAREIL SUR UNE SURFACE PLANE ET STABLE NE CRAIGNANT PAS LA CHALEUR. VÉRIFIEZ QUE VOUS LAISSEZ UNE LIBRE CIRCULATION DE L’AIR TOUT AUTOUR DE VOTRE APPAREIL. RESPECTEZ ENTRE L’APPAREIL ET TOUT PLAN MURAL, UNE DISTANCE DE 50CM VERS LE HAUT ET DE 20CM SUR LES COTÉS. CET APPAREIL DOIT ÊTRE CONNECTÉ Á UNE PRISE RELIÉE Á LA TERRE. PRENEZ TOUTES LES PRÉCAUTIONS NÉCESSAIRES POUR ÉVITER QU’UNE PERSONNE NE SE PRENNE LES PIEDS DANS LE CÂBLE. NE PAS UTILISER DE RALLONGE POUR CONNECTER L’APPAREIL AU RESEAU. NE LE METTEZ PAS SUR D’AUTRES APPAREILS. POUR VOTRE SECURITÉ, NOUS VOUS RECOMMANDONS DE NE JAMAIS LAISSER VOTRE APPAREIL DANS UN ENDROIT EXPOSÉ AUX INTEMPÉRIES ET A L’HUMIDITÉ. FRANÇAIS NE LAISSEZ PAS VOTRE APPAREIL BRANCHÉ SANS L’UTILISER. NE BRANCHEZ PAS LE PRODUIT ET N’APPUYEZ PAS SUR LES BOUTONS DU PANNEAU DE COMMANDE SI VOS MAINS SONT MOUILLÉES. N’UTILISEZ PAS L’APPAREIL LES PIEDS NUS OU MOUILLÉS. PENDANT SON FONCTIONNEMENT, ÉVITEZ DE DÉPLACER L’APPAREIL. NORMES DE SÉCURITÉ CET APPAREIL EST CONFORME AUX DIRECTIVES ET NORMES EN VIGUEURS. INSTRUCTIONS DE SÉCURITÉ CONCERNANT LA MISE AU REBUT DE VOTRE APPAREIL La directive européenne sur les Déchets des Equipements Electriques et Electroniques (DEEE), exige que les appareils ménagers usages ne soient pas jetés dans le flux normal des déchets municipaux. Les appareils usagés doivent être collectés séparément afin d'optimiser le taux de récupération et le recyclage des matériaux qui les composent, et réduire l'impact sur la santé humaine et l'environnement. Lorsqu’il ne fonctionnera plus, ne jetez pas l’appareil avec les ordures ménagères mais déposez-le dans un centre de collecte agréé afin qu’il puisse être recyclé. Vous contribuerez ainsi à la protection de l’environnement. FRANÇAIS SOMMAIRE DESCRIPTION ............................................................................... 1 MISE EN SERVICE ET UTILISATION ............................................... 2 Avant toute première utilisation .............................................. 2 Montage et démontage de l’appareil ....................................... 3 Descriptif du panneau de contrôle et des programmes automatiques ............................................................................ 4 Utiliser votre appareil ............................................................... 6 ANOMALIES DE FONCTIONNEMENT ........................................... 8 NETTOYAGE ET ENTRETIEN ......................................................... 9 INFORMATION TECHNIQUE ...................................................... 10 FRANÇAIS DESCRIPTION 1. Gobelet doseur 2. Couvercle du bol 3. Panier vapeur 4. Bol blender en inox 5. Lame en acier inoxydable 6. Poignée 7. Connecteur électrique poignée 8. Connecteur électrique base bol 9. Ecran d’affichage minuteur 10. Panneau de contrôle électronique 11. Cordon d’alimentation 12. Corps de l’appareil 13. Pieds anti-dérapants 1 FRANÇAIS MISE EN SERVICE ET UTILISATION Avant toute première utilisation Déballez l’appareil et les accessoires de son emballage, assurez-vous que l’appareil n’a subi aucun dommage et qu’il ne soit pas abimé. Enlevez bien tous les éléments de l’emballage, et ne laissez pas les éléments tels que les sacs plastiques, du polystyrène ou des élastiques á portée des enfants. Ces éléments pourraient être dangereux pour eux. Lavez tous les accessoires avec une éponge imbibée de produits liquides puis rincez-les à l’eau chaude avant de les sécher avec un torchon propre. Ne jamais mettre les accessoires au lave-vaisselle. Mise en garde: éviter tout débordement sur les connecteurs électriques du bol blender. Nettoyer le corps de l’appareil avec un chiffon sec et doux. Ne jamais immerger le corps de l’appareil. Ne jamais mettre au lavevaisselle le corps de l’appareil. 2 FRANÇAIS Montage et démontage de l’appareil 1. Abaissez le bol sur le bloc moteur et appuyez vers le bas jusqu'à ce qu'il s'enclenche à sa place (il y a une seule position d'ajustement). 2. Insérez le panier vapeur dans le bol blender si vous utilisez la fonction cuisson vapeur. 3. Pour fixer le couvercle, tournez le couvercle dans le sens des aiguilles d’une montre et faites glisser la pointe du bec verseur dans l’espace situé à l’avant du couvercle. Puis poussez la partie arrière du couvercle vers l’encoche de la poignée du bol, jusqu’à ce que vous entendiez que le verrou du couvercle s’enclenche à sa place. 4. Insérez le gobelet dans le trou du couvercle. Pour démonter l’appareil, suivez les étapes en sens inverse. Avertissement : Ne jamais brancher l’appareil avant la mise en place des accessoires. Et toujours débrancher l’appareil pour le retrait des accessoires. 3 FRANÇAIS Descriptif du panneau de contrôle et des programmes automatiques Ecran d’affichage minuteur Affichage des programmes de cuisson automatiques Boutons de contrôle du panneau Boutons de contrôle du panneau Description des boutons de contrôle du panneau électronique Bouton « Marche / Arrêt » : après avoir branché votre appareil, ce dernier est automatiquement mis en mode veille et émettra un bip. Le bouton « Marche / Arrêt clignotera pour vous indiquer que l’appareil est en mode veille. Après avoir sélectionné votre programme, appuyez sur ce bouton « Marche / Arrêt » pour démarrer le mixage et/ou la cuisson de vos préparations. A la fin de votre utilisation, l’appareil émet 3 bips et l’écran d’affichage minuteur indique « OFF ». Appuyez une fois sur le bouton « Marche / Arrêt », l’appareil se mettra en veille (moteur éteint, élément chauffant éteint). Bouton « Menu » : ce bouton vous permet de sélectionner un des 4 programmes automatiques. Il vous suffit d’appuyer sur ce bouton pour sélectionner votre programme. A noter : le programme de cuisson automatique clignotera sur le panneau de contrôle lorsqu’il est sélectionné et reste illuminé lors de son fonctionnement. Bouton « Mixage à basse vitesse » : appuyez une fois sur ce bouton pour sélectionner le mixage à basse vitesse puis appuyez sur le bouton « Marche / Arrêt » pour démarrer le mixage. Ré-appuyez sur le bouton « Marche / Arrêt » pour arrêter le mixage. En fin de mixage, l’appareil émet 3 bips et l’écran d’affichage minuteur indique « OFF ». Appuyez une fois sur le bouton « Marche / Arrêt », l’appareil se mettra en veille. A noter : le programme clignotera sur le panneau de contrôle lorsqu’il est sélectionné et reste illuminé lors de son fonctionnement. Fonctionnement : mixage pendant 3 minute jusqu’à 7000 tours/min. 4 FRANÇAIS Bouton « Mixage à grande vitesse » : appuyez une fois sur ce bouton pour sélectionner le mixage à grande vitesse puis appuyez sur le bouton « Marche / Arrêt » pour démarrer le mixage. Ré-appuyez sur le bouton « Marche / Arrêt » pour arrêter le mixage. En fin de mixage, l’appareil émet 3 bips et l’écran d’affichage minuteur indique « OFF ». Appuyez une fois sur le bouton « Marche / Arrêt », l’appareil se mettra en veille. A noter : le programme clignotera sur le panneau de contrôle lorsqu’il est sélectionné et reste illuminé lors de son fonctionnement. Fonctionnement : mixage pendant 3 minutes à 15000 tours/min. Bouton « Pulse / Broyage de glaçons » : appuyez une fois sur ce bouton pour sélectionner le mixage Pulse / Broyage de glaçons, le programme démarre automatiquement. Ré-appuyez sur le bouton « Marche / Arrêt » pour arrêter le mixage. En fin de mixage, l’appareil émet 3 bips et l’écran d’affichage minuteur indique « OFF ». Appuyez une fois sur le bouton « Marche / Arrêt », l’appareil se mettra en veille. A noter : le programme s’illuminera sur le panneau de contrôle et reste illuminé lors de son fonctionnement. Fonctionnement : mixage pendant 10 secondes à 15000 tours/min. Description des 4 programmes de cuisson automatiques Programme « Smooth soup » : cuisson automatique des potages veloutés. Smooth soup Sélectionnez ce programme en appuyant sur le bouton « Menu » puis démarrez la cuisson en appuyant sur le bouton « Marche / Arrêt ». Ré-appuyez sur le bouton « Marche / Arrêt » pour arrêter le programme automatique. En fin de cuisson, l’appareil émet 3 bips et l’écran d’affichage minuteur indique « OFF ». Appuyez une fois sur le bouton « Marche / Arrêt », l’appareil se mettra en veille. Fonctionnement : durée totale de 30 minutes avec alternance phase de chauffe (max. 100°C) et phase de mixage de la préparation. Programme « Thick soup » : cuisson automatique des potages avec morceaux. Thick soup Sélectionnez ce programme en appuyant sur le bouton « Menu » puis démarrez la cuisson en appuyant sur le bouton « Marche / Arrêt ». Ré-appuyez sur le bouton « Marche / Arrêt » pour arrêter le programme automatique. En fin de cuisson, l’appareil émet 3 bips et l’écran d’affichage minuteur indique « OFF ». Appuyez une fois sur le bouton « Marche / Arrêt », l’appareil se mettra en veille. Fonctionnement : durée totale de 30 minutes avec uniquement phase de chauffe (max. 100°c). Programme « Steam » : programme automatique de cuisson à la vapeur. Steam Sélectionnez ce programme en appuyant sur le bouton « Menu » puis démarrez la cuisson en appuyant sur le bouton « Marche / Arrêt ». Ré-appuyez sur le bouton « Marche / Arrêt » pour arrêter le programme automatique. En fin de cuisson, l’appareil émet 3 bips et l’écran d’affichage minuteur indique « OFF ». Appuyez une fois sur le bouton « Marche / Arrêt », l’appareil se mettra en veille. Fonctionnement : durée totale de 30 minutes avec uniquement phase de chauffe (max. 100°c). Programme « Reheat » : programme automatique de réchauffage. Reheat Sélectionnez ce programme en appuyant sur le bouton « Menu » puis démarrez le programme en appuyant sur le bouton « Marche / Arrêt ». Ré-appuyez sur le bouton « Marche / Arrêt » pour arrêter le programme automatique. En fin de cuisson, l’appareil émet 3 bips et l’écran d’affichage minuteur indique « OFF ». Appuyez une fois sur le bouton « Marche / Arrêt », l’appareil se mettra en veille. Fonctionnement : durée totale de 40 minutes avec uniquement phase de chauffe (75°C – 85°C). 5 FRANÇAIS Utiliser votre appareil 1. Placez votre appareil sur un plan de travail stable and plate. 2. Mettez l’ensemble des ingrédients de votre préparation dans le bol blender et/ou panier vapeur. 3. Après avoir assemblé votre appareil et vérifié que l’ensemble des accessoires soient bien montés sur l’appareil. 4. Branchez votre appareil à une prise murale. Après avoir branché votre appareil, ce dernier est automatiquement mis en mode veille et émettra un bip. Le bouton « Marche / Arrêt clignotera pour vous indiquer que l’appareil est en mode veille. Cuisiner avec les 4 programmes automatiques : 1. Après avoir mis vos ingrédients dans le bol blender et fini le montage de l’appareil. Vérifiez que votre appareil est branché et est en mode veille. 2. Appuyez une fois sur le bouton « Menu » pour sélectionner l’un des 4 programmes automatiques de cuisson et appuyez sur le bouton «Marche / Arrêt » pour mettre en marche le programme automatique. 3. En fin de cuisson, l’appareil émet 3 bips et l’écran d’affichage minuteur indique « OFF ». Appuyez une fois sur le bouton « Marche / Arrêt », l’appareil se mettra en veille. Mixer avec les 2 programmes de mixages (basse vitesse/grande vitesse) : 1. Après avoir mis vos ingrédients dans le bol blender et fini le montage de l’appareil. Vérifiez que votre appareil est branché et est en mode veille. 2. Sélectionnez l’un des 2 programmes de mixage et appuyez sur le bouton «Marche / Arrêt » pour mettre en marche le programme automatique. 3. A la fin du cycle de mixage, l’appareil émet 3 bips et l’écran d’affichage minuteur indique « OFF ». Appuyez une fois sur le bouton « Marche / Arrêt », l’appareil se mettra en veille. Mixer avec le programme Pulse/Broyage de glaçons : 1. Après avoir mis vos ingrédients dans le bol blender et fini le montage de l’appareil. Vérifiez que votre appareil est branché et est en mode veille. 2. Appuyez une fois sur ce bouton pour sélectionner le mixage Pulse / Broyage de glaçons, le programme démarre automatiquement. Ré-appuyez sur le bouton « Marche / Arrêt » pour arrêter le mixage si besoin. 3. En fin de mixage, l’appareil émet 3 bips et l’écran d’affichage minuteur indique « OFF ». Appuyez une fois sur le bouton « Marche / Arrêt », l’appareil se mettra en veille. Avertissement : Toujours déconnecter l'appareil de l’alimentation si on le laisse sans surveillance et avant montage, démontage ou nettoyage. Mise en garde: éviter tout débordement sur le connecteur. Ne jamais dépasser le niveau maximal dans le bol blender pour éviter tout risque de blessures : o 1.5L MAX. pour les préparations froides. o 1.2L MAX. pour les préparations chaudes. Ne jamais insérer votre main ou autres objets dans le trou du couvercle. Ne jamais enlever le couvercle et gobelet doseur lors du fonctionnement de l’appareil. Ne pas faire fonctionner l’appareil à vide pendant plus de 30 secondes après sa mise en marche. S’assurer que les différents blocs de l’appareil soient bien montés. 6 FRANÇAIS Ne jamais utiliser l’appareil avec les mains mouillées. Ne jamais déplacer l’appareil pendant qu’il est en marche. Idées recettes : Recettes Programmes Potage de légumes marocain Thick soup Velouté de potiron Smooth soup Gaspacho + Glace pilée Purée de pommes de terre Steam + Ingrédients 1 oignon rouge pelé et haché 1 poireau lavé et haché 1 poivron rouge épépiné et haché 1 branche de céleri hachée 1 poivron vert, épépiné et haché 2 gousses d’ail, pelées et hachées 1 cuillère à café d'épices ras el hanout 400 g de tomates hachées 1 cuillère à soupe de purée de tomates 1 cube de bouillon (légumes) 250ml d’eau Sel et poivre Préparation Mettez tous les ingrédients dans le bol blender. Fermez le bol. Sélectionnez le programme automatique « Thick soup » et appuyez sur le bouton «Marche / Arrêt » pour mettre en marche le programme automatique. 500g de potiron, épépiné et haché 2 petites pommes de terre, pelé et haché 1 oignon, pelé et haché 60cl d’eau 1 cube de bouillon de volaille 20cl de crème fraîche Sel et poivre du moulin Mettez tous les ingrédients dans le bol blender. Fermez le bol. Sélectionnez le programme automatique « Smooth soup » et appuyez sur le bouton «Marche / Arrêt » pour mettre en marche le programme automatique. 1 oignon pelé et haché 1/2 poivron rouge épépiné et haché 1/2 poivron vert, épépiné et haché 1/2 concombre coupé en morceaux 1 gousse d’ail, pelée et hachée 500 g de tomates hachées 1 cuillère à soupe vinaigre 1 tranche de pain de mie 2 cuillères à soupe d’huile d’olive Basilic Sel et poivre du moulin Placez les légumes, l’ail et l’oignon dans le bol. Sélectionnez la fonction « Mixage à basse vitesse ». Ajoutez le pain de mie grossièrement coupé en dés et appuyez à quelques reprises sur le bouton Pulse. Assaisonnez, ajoutez l’huile d’olive, le basilic et le vinaigre. Mixez à nouveau à quelques reprises sur Pulse. Laissez reposer au moins 2 heures au frais avant de servir. 200g de glaçons Mettez les glaçons dans le bol blender. Fermez le bol. Sélectionnez le programme automatique Pulse. 800g de pommes de terre, pelés et coupés en dés 1 oignon, pelé et haché 1 gousse d’ail, pelée et hachée 25cl d’eau 25cl de crème fraîche 1 pincée de noix de muscade Sel et poivre du moulin Placez les pommes de terres coupés en dés dans le panier vapeur. Versez de l’eau dans le bol jusqu’au marquage 1.0L, placez le panier dans le bol et fermez le couvercle. Sélectionnez la fonction vapeur. En fin de cuisson, sortez le panier vapeur, videz l’eau de cuisson et versez les pommes de terre cuites dans le bol. Ajoutez le reste des ingrédients dans le bol, refermez le couvercle et sélectionnez le programme « Mixage à grande vitesse ». 7 FRANÇAIS Réchauffage Préparation froide Mettez votre préparation dans le bol blender. Fermez le bol. Sélectionnez le programme automatique « Reheat » et appuyez sur le bouton «Marche / Arrêt » pour mettre en marche le programme automatique. 4 bananes épluchés 125ml de lait 3 cuillères à soupe de crème fraîche 1 boule de glace à la vanille Mettez votre préparation dans le bol blender. Refermez le bol et sélectionnez le programme « Mixage à grande vitesse ». 1 mangue, pelée, dénoyautée et hachée 20cl de lait 20cl de yogourt nature 2 cuillère à café de miel Mettez votre préparation dans le bol blender. Refermez le bol et sélectionnez le programme « Mixage à basse vitesse ». 4 Œufs Placez les oeufs en dés dans le panier vapeur. Versez de l’eau dans le bol jusqu’au marquage 1.0L, placez le panier dans le bol et fermez le couvercle. Sélectionnez la fonction vapeur, laissez cuire pendant 6 minutes à compter de la phase d’ébullition. Appuyez sur le bouton «Marche / Arrêt » pour arrêter le programme automatique. Reheat Milkshake anti-stress Mango lassi Œufs mollets Steam ANOMALIES DE FONCTIONNEMENT Anomalies Causes Solutions L’appareil ne fonctionne pas après branchement. 1. Mauvais montage des accessoires. 2. Le couvercle est mal mis. 1. Démonter et remonter les accessoires. 2. Débranchez l’appareil et remettez le couvercle. Bruit pendant le fonctionnement. 1. Bruits de grincement/craquement. 2. Vibration du moteur, des accessoires. Ceci est normal : ces sons indiquent que les ingrédients sont en train d’être mixés. Bruits ou vibrations anormaux. 1. Les accessoires sont mal assemblés. 2. L’appareil n’est pas posé sur une surface plane et stable. 1. Débranchez l’appareil et remontez correctement les accessoires. 2. Débranchez l’appareil et placez-le sur une surface plane et stable. Les aliments sont brûlés et collés au fond de l’appareil. 1. Les ingrédients ont des très hautes teneurs en amidon et/ou sucre. 2. Trop d'aliments et pas assez de liquide dans la recette. 1. Modifier la recette pour la prochaine fois. 2. Rajoutez du liquide. Les ingrédients ne sont pas assez cuits à la fin du programme. 1. Les ingrédients ont été coupés trop grossièrement. 2. Trop d'eau ou d'aliments. 3. Certains ingrédients nécessitent une cuisson plus longue. 1. Refaites un autre cycle de cuisson. Pensez à couper plus petits vos ingrédients (2-3cm). 2. Enlevez l’excédent d’eau ou d’aliments. 3. Refaites un autre cycle de cuisson. 8 FRANÇAIS NETTOYAGE ET ENTRETIEN 1. A la fin de votre utilisation, éteignez votre appareil en appuyant sur le bouton « Marche / Arrêt ». 2. Débranchez le câble d’alimentation de la prise secteur. 3. Assurez-vous de toujours débrancher l’appareil avant toute opération de nettoyage. Ne placez pas le corps de l’appareil dans le lave-vaisselle et n’immergez pas l’appareil dans l’eau. Nettoyer le corps de l’appareil : Utilisez un chiffon doux pour nettoyer les surfaces de l’appareil. Nettoyer les accessoires : Lavez les accessoires avec une éponge imbibée de liquide vaisselle, les rincez à l’eau chaude puis les séchez avec un chiffon doux. Ne jamais mettre les accessoires au lave-vaisselle. Mise en garde: éviter tout débordement sur les connecteurs électriques du bol blender. N’utilisez pas de produits tranchants, toxiques et agressifs tel que alcools à brûler, décapants industriels, solvants pour nettoyer votre appareil car ces derniers risquent de l’endommager. Ne jamais immerger l’appareil dans l’eau. 9 FRANÇAIS INFORMATION TECHNIQUE Modèle BLC5X Tension d’alimentation 220-240V ~ 50Hz Puissance moteur 350W Puissance cuisson 700-900W Capacité max. pour préparation froide 1.5L MAX. Capacité max. pour préparation chaude 1.2L MAX. 10 HEATING BLENDER BLC5X ENGLISH SAFETY WARNINGS READ CAREFULLY THE INSTRUCTIONS BEFORE INSTALLING AND USING THIS APPLIANCE. IT CONTAINS IMPORTANT INFORMATIONS. IN THE CASE YOU RESELL THIS APPLIANCE, PLEASE MAKE SURE TO PROVIDE THIS INSTRUCTION MANUAL TO YOUR BUYER. THIS APPLIANCE IS INTENDED TO BE USED IN HOUSEHOLD AND SIMILAR APPLICATIONS SUCH AS: o STAFF KITCHEN AREAS IN SHOPS, OFFICES AND OTHER WORKING ENVIRONMENTS; o FARM HOUSES; o BY CLIENTS IN HOTELS, MOTELS AND OTHER RESIDENTIAL TYPE ENVIRONMENTS; o BED AND BREAKFAST TYPE ENVIRONMENTS. THIS APPLIANCE SHALL NOT BE USED BY CHILDREN. KEEP THE APPLIANCE AND ITS CORD OUT OF REACH OF CHILDREN. THIS APPLIANCE CAN BE USED BY PERSONS WITH REDUCED PHYSICAL, SENSORY OR MENTAL CAPABILITIES OR LACK OF EXPERIENCE AND KNOWLEDGE IF THEY HAVE BEEN GIVEN SUPERVISION OR INSTRUCTION CONCERNING USE OF THE APPLIANCE IN A SAFE WAY AND IF THEY UNDERSTAND THE HAZARDS INVOLVED. CHILDREN SHALL NOT PLAY WITH THE APPLIANCE. CLEANING AND MAINTENANCE SHALL NOT BE MADE BY CHILDREN. ALWAYS DISCONNECT THE APPLIANCE FROM THE SUPPLY IF IT IS LEFT UNATTENDED AND BEFORE ASSEMBLING, DISASSEMBLING OR CLEANING. WARNING: POTENTIAL INJURY FROM MISUSE. WARNING: AVOID SPILLAGE ON THE CONNECTOR. EXTRA CARE SHALL BE TAKEN WHEN HANDLING THE SHARP ENGLISH CUTTING BLADES, EMPTYING THE BOWL AND DURING CLEANING. BE CAREFUL IF HOT LIQUID IS POURED INTO THE FOOD PROCESSOR OR BLENDER AS IT CAN BE EJECTED OUT OF THE APPLIANCE DUE TO A SUDDEN STEAMING. SWITCH OFF THE APPLIANCE AND DISCONNECT FROM SUPPLY BEFORE CHANGING ACCESSORIES OR APPROACHING PARTS THAT MOVE IN USE. THIS APPLIANCE CAN ONLY BE USED WITH ITS PROVIDED STAND. SURFACES ARE LIABLE TO GET HOT DURING USE. DURING USE, THIS APPLIANCE MAY REACH VERY HIGH TEMPERATURE AND CAUSE BURNS. SOME PARTS OF THIS PRODUCT CAN BECOME VERY HOT AND CAUSE BURNS. PARTICULAR ATTENTION HAS TO BE GIVEN WHERE CHILDREN AND VULNERABLE PEOPLE ARE PRESENT. THE APPLIANCE MUST NOT BE IMMERSED. IF THE SUPPLY CORD IS DAMAGED, IT MUST BE REPLACED BY THE MANUFACTURER, ITS SERVICE AGENT OR SIMILARLY QUALIFIED PERSONS IN ORDER TO AVOID A HAZARD. REGARDING THE INFORMATION FOR OPERATING TIMES AND ACCESSORIES SETTING, THANKS TO REFER TO THE BELOW PARAGRAPH OF THE MANUAL. SAFETY INSTRUCTIONS FOR CLEANING AND MAINTENANCE ALWAYS UNPLUG THE APPLIANCE AND LET IT COOL DOWN COMPLETELY BEFORE ANY CLEANING OPERATION. NEVER IMMERSE IN WATER OR ANY OTHER LIQUID THIS APPLIANCE, ITS ELECTRIC PLUG AND CORD. ENGLISH THE SUPPLY CORD SHOULD BE REGULARLY EXAMINED FOR SIGNS OF DAMAGE AND THE APPLIANCE IS NOT TO BE USED IF THE CORD IS DAMAGED. FOR THE DETAILS ON HOW TO CLEAN SURFACES IN CONTACT WITH FOOD, PLEASE SEE SECTION “CLEANING AND MAINTENANCE”. SAFETY CAUTIONS AFTER UNPACKING THE APPLIANCE, MAKE SURE IT IS NOT DAMAGED. IN CASE OF DOUBT, DO NOT USE THE APPLIANCE AND CONTACT YOUR SUPPLIER OR A QUALIFIED TECHNICIAN. THE USE OF ACCESSORY AND ATTACHMENTS NOT RECOMMENDED BY THE MANUFACTURER MAY CAUSE INJURIES. THE APPLIANCE MUST NOT BE USED IF IT HAS BEEN DROPPED, IF IT HAS ANY VISIBLE DAMAGE, IF IT LEAKS OR IF IT FUNCTIONS ABNORMALLY IN ANY WAY. ALWAYS UNPLUG THE APPLIANCE IF NOT USING IT FOR A PERIOD OF TIME. REMOVE ALL PACKAGING AND DO NOT LEAVE THE PACKAGING MATERIAL SUCH AS PLASTIC BAGS, POLYSTYRENE AND ELASTIC BANDS IN EASY REACH OF CHILDREN AS THEY MAY CAUSE SERIOUS INJURIES. AFTER UNPACKING YOUR APPLIANCE, MAKE SURE YOU HAVE PUT IT ON A FLAT, STABLE AND HEAT-RESISTANT SURFACE. CHECK YOU HAD LEAVE ENOUGH SPACE BETWEEN YOUR APPLIANCE AND SURROUNDING WALL TO LET THE AIR CIRCULATE AROUND. THERE SHOULD BE AT LEAST 50CM ON THE TOP AND 20CM ON SIDES APART FROM THE APPLIANCE. THIS APPLIANCE MUST BE EARTHED. CHECK THAT YOUR ELECTRICAL INSTALLATION IS SUFFICIENT ENGLISH FOR SUPPLYING THIS APPLIANCE. TAKE ALL NECESSARY MEASURE WITH CORDS AND EXTENSIONS TO AVOID ANY INJURIES WHILE IN USE. FOR YOUR OWN SAFETY, WE RECOMMEND YOU NEVER LEAVE THE APPLIANCE IN A PLACE THAT IS EXPOSED TO HUMIDITY OR INCLEMENT WEATHER CONDITION. DO NOT PUT THIS APPLIANCE ON TOP OF OTHERS. NEVER LEAVE APPLIANCE PLUGGED IN WHEN NOT IN USE. NEVER MOVE THE APPLIANCE WHEN IN USE. NEVER PLUG THE APPLIANCE AND TOUCH THE THERMOSTAT WITH WET HANDS. NEVER USE THE APPLIANCE WITH BARE OR WET FEET. NEVER UNPLUG THE APPLIANCE BY PULLING THE POWER CABLE. ALWAYS UNPLUG THE APPLIANCE FROM THE MAIN SOCKET. STANDARDS THIS APPLIANCE IS CONFORMED TO CURRENT DIRECTIVES AND STANDARDS. SAFETY INSTRUCTIONS ON RECYCLING The European Directive on Waste Electrical and Electronic Equipment (WEEE) requires that old household electrical appliances must not be disposed of in the normal unsorted municipal waste stream. Old appliances must be collected separately in order to optimize the recovery and recycling of the materials they contain, and reduce the impact on human health and the environment. The crossed out “wheeled bin” symbol on the product reminds you of your obligation, that when you dispose of the appliance, it must be separately collected. Consumers should contact their local authority or retailer for information concerning the correct disposal of their old appliance. ENGLISH TABLE OF CONTENTS DESCRIPTION ............................................................................... 1 SET UP AND USE .......................................................................... 2 Before first use.......................................................................... 2 Assembling and disassembling the appliance ........................... 3 Description of the control panel and the automatic program.. 4 Using your appliance................................................................. 6 TROUBLESHOOTING .................................................................... 8 CLEANING AND MAINTENANCE .................................................. 9 TECHNICAL INFORMATION ....................................................... 10 ENGLISH DESCRIPTION 1. Measuring cup 2. Cover lid 3. Steam basket 4. Stainless steel jar 5. Stainless steel blades 6. Jar handle 7. Electric connector on handle 8. Electric connector on jar base 9. Timer display 10. Electronic control panel 11. Power cord 12. Main body 13. Anti-slip feet 1 ENGLISH SET UP AND USE Before first use Remove all packaging and do not leave the packaging material such as plastic bags, polystyrene and elastic bands in easy reach of children as they may cause serious injuries. Wash all accessories with a sponge damped with dishwashing liquid. Rinse throughly and dry them with a clean cloth. Never put the accessories into a dishwasher. Warning: Avoid spillage on the jar electric connectors. Clean the outer body with a dry clean cloth. Do not immerse the appliance into water. Do not put the appliance into a dishwasher. 2 ENGLISH Assembling and disassembling the appliance 1. Lower the jar on to the motor unit, and press down till it clicks into place (it will only fit one way). 2. Insert the steam basket into the jar if you decide to use the steam function. 3. To fit the lid, turn clockwise the cover lid and slide the tip of the spout into the space at the front of the lid. Then push the back rear of the cover towards the notch on top of the handle till you hear the lid lock click into place. 4. Insert the measuring cup into the hole of the cover lid. To disassemble the appliance, proceed to reverse steps. Warning: Never plug in the appliance before assembling the accessories. Always plug out when disassembling the appliance. Ensure that all accessories are well assembled before switching on the appliance. If not the case, the appliance will not work. 3 ENGLISH Description of the control panel and the automatic program Timer display Display of the automatic cooking programs Control panel buttons Control panel buttons Control panel buttons description « ON/OFF » button: after the appliance is plugged in, the buzzer will beep and the power lamp will flash to enter into standby status. After selecting your program, press on the « ON/OFF » button to start the blending and/or cooking of your dish. At the end of your program, the blender will produce 3 bips sound and the timer display will show “OFF”. Press one time on the button « ON/OFF » to enter standby mode (motor off, heating element off). « Menu » button: this button allow you to select one of the 4 automatic cooking programs. Press this button until you have selected your program. Note: the auto program selected will flash on the panel and remain light on during functioning. «Blending at low speed» button: press this button one time to select the blending at low speed then press on the « ON/OFF » button to start the blending. Press again the « ON/OFF » button to stop the blending. At the end of your program, the blender will produce 3 bips sound and the timer display will show “OFF”. Press one time on the button « ON/OFF » to enter standby mode. Note: the program selected will flash on the panel and remain light on during functioning. Operating mode: blending for 3 minutes up to 7000rpm. «Blending at high speed» button: press this button one time to select the blending at high speed then press on the « ON/OFF » button to start the blending. Press again the « ON/OFF » button to stop the blending. At the end of your program, the blender will produce 3 bips sound and the timer display will show “OFF”. Press one time on the button « ON/OFF » to enter standby mode. Note: the program selected will flash on the panel and remain light on during functioning. Operating mode: blending for 3 minutes up to 15000rpm. 4 ENGLISH «Pulse/Ice crush» button: press this button one time to select the Pulse/Ice crush program, the program will start automatically. Press again the « ON/OFF » button to stop the blending. At the end of your program, the blender will produce 3 bips sound and the timer display will show “OFF”. Press one time on the button « ON/OFF » to enter standby mode. Note: the program selected will light on the panel and remain light on during functioning. Operating mode: blending for 10 seconds up to 15000rpm. Description of the 4 automatic cooking programs « Smooth soup » program: automatic cooking program for smooth soup. Select this program by pressing on the « Menu » button then press on the « ON/OFF » button to start the blending and/or cooking of your dish. At the end of your program, the blender will produce 3 bips sound and the timer display will show “OFF”. Press one time on the button « ON/OFF » to enter standby mode (motor off, heating element off). Smooth soup Operating mode: total working time of 30 minutes alternating between heating phase (max. 100°C) and blending phase. « Thick soup » program: automatic cooking program for chunky soup. Thick soup Select this program by pressing on the « Menu » button then press on the « ON/OFF » button to start the cooking of your dish. At the end of your program, the blender will produce 3 bips sound and the timer display will show “OFF”. Press one time on the button « ON/OFF » to enter standby mode (motor off, heating element off). Operating mode: total working time of 30 minutes with only heating phase (max. 100°C). « Steam » program: automatic program for steam cooking. Steam Select this program by pressing on the « Menu » button then press on the « ON/OFF » button to start the cooking of your dish. At the end of your program, the blender will produce 3 bips sound and the timer display will show “OFF”. Press one time on the button « ON/OFF » to enter standby mode (motor off, heating element off). Operating mode: total working time of 30 minutes with only heating phase (max. 100°C). « Reheat » program: automatic program for reheat. Reheat Select this program by pressing on the « Menu » button then press on the « ON/OFF » button to start the cooking of your dish. At the end of your program, the blender will produce 3 bips sound and the timer display will show “OFF”. Press one time on the button « ON/OFF » to enter standby mode (motor off, heating element off). Operating mode: total working time of 40 minutes with only heating phase (75°C – 85°C). 5 ENGLISH Using your appliance 1. Place your appliance on a flat and stable surface. 2. Place all the ingredients inside the blender jar and/or steam basket. 3. Ensure that all accessories are well assembled before switching on the appliance. 4. Plug the appliance to a power socket. After the appliance is plugged in, the buzzer will beep and the power lamp will flash to enter into standby status. Cooking with the 4 automatic cooking programs: 1. After adding your ingredients into the blender and finish assembling the appliance. Ensure that your appliance is plugged in and is on standby mode. 2. Press one time on the « Menu » button to select one of the 4 auto cooking program then press on the « ON/OFF » button to start the program. 3. At the end of your program, the blender will produce 3 bips sound and the timer display will show “OFF”. Press one time on the button « ON/OFF » to enter standby mode. Blending with the 2 blending programs: 1. After adding your ingredients into the blender and finish assembling the appliance. Ensure that your appliance is plugged in and is on standby mode. 2. Select one of the 2 blending programs by pressing one time on it then press on the « ON/OFF » button to start the program. 3. At the end of your program, the blender will produce 3 bips sound and the timer display will show “OFF”. Press one time on the button « ON/OFF » to enter standby mode. Blending with the Pulse/Ice crush program: 1. After adding your ingredients into the blender and finish assembling the appliance. Ensure that your appliance is plugged in and is on standby mode. 2. Press one time the Pulse/Ice crush button, the program will start automatically. Press again the « ON/OFF » button to stop the blending if necessary. 3. At the end of your program, the blender will produce 3 bips sound and the timer display will show “OFF”. Press one time on the button « ON/OFF » to enter standby mode. Warning: Always disconnect the appliance from the supply if it is left unattended and before assembling, disassembling or cleaning. Warning: avoid spillage on the electric connector. Never exceed the maximal level marked on the jar to avoid any injuries: o 1.5L MAX. for cold dishes. o 1.2L MAX. for hot dishes. Never insert your hands or any objects into the hole of the cover. Do not open the cover lid and measuring cup during use. Do not let the appliance work for more than 30 seconds without any food or water. Always ensure all the accessories are well assembled. 6 ENGLISH Never use the appliance with wet hands. Do not move the appliance when in use. Recipes: Recipes Programs Moroccan vegetables soup Thick soup Creamy pumpkin soup Smooth soup Gaspacho + Crushed ice Mash potatoes Steam + Ingredients 1 red onion peeled and chopped 1 leek washed and chopped 1 red pepper deseeded and chopped 1 stick celeri chopped 1 green pepper deseeded and chopped 2 garlics peeled and chopped 1 coffee spoon of ras el hanout spices 400 g chopped tomatoes 1 tablespoon of tomato purée 1 stock cube (vegetables) 250ml water Salt and pepper 500g pumpkin deseeded and chopped 2 small potatoes peeled and chopped 1 onion peeled and chopped 60cl water 1 chicken stock cube 20cl fresh cream Salt and pepper Preparation Put all ingredients into the jar blender. Close the jar blender with its lid. Select the « Thick soup » programm and press on the « ON/OFF » button to start the program. Put all ingredients into the jar blender. Close the jar blender with its lid. Select the « Smooth soup » program and press on the « ON/OFF » button to start the program. 1 onion peeled and chopped 1/2 red pepper peeled and chopped 1/2 green pepper deseeded and chopped 1/2 cucumber chopped 1 garlic peeled and chopped 500 g chopped tomatoes 1 tablespoon of vinegar 1 slice of sandwich loaf Basil leaves 2 tablespoon of olive oil Salt and pepper Place the vegetables, garlic and onion into the blender. Select the program « Blending at high speed ». At the end of the program, add the chopped sandwich load and press Pulse. Season, add the oilive oil, basil leaves and vinegar. Press again on Pulse button. Let the preparation rest inside the fridge for 2 hours. 200g ice cubes Put the ice cubes into the blender, close it. Press on the « Pulse/Ice crush » button. Put the cut potatoes into the steam basket. Pour water into the blender up to 1.0L marking, put the steam basket 800g potatoes peeled and cut in cubes inside the blender and close it. Select 1 onion peeled and chopped the steam auto cooking program. 1 garlic peeled and chopped At the end of the steaming, take out the 25cl water steam basket, pour out the remaining 25cl fresh cream water and place the cooked potatoes 1 pinch a nutmeg inside the blender. Add the remaining Salt and pepper ingredients into the blender, close the lid and press on « Blending at high speed » button. 7 ENGLISH Reheat Cold dishes Put all ingredients into the jar blender. Close the jar blender with its lid. Select the auto program « Reheat » press on the « ON/OFF » button to start the program 4 peeled bananas 125ml milk 3 tablespoon of fresh cream 1 scoop of vanilla ice cream Add the ingredients into the blender, close the lid and press on « Blending at high speed » button. 1 mango peeled, stoned and chopped 20cl milk 20cl yoghurt 2 coffee spoons honey Add the ingredients into the blender, close the lid and press on « Blending at low speed » button. 4 eggs Put the eggs into the steam basket. Pour water into the blender up to 1.0L marking, put the steam basket inside the blender and close it. Select the steam auto cooking program, let the eggs cook for 6 minutes after the start of water boiling. Press on the « ON/OFF » button to stop the program. Reheat Anti-stress milkshake Mango lassi Mollets eggs Steam TROUBLESHOOTING Problems Causes Solutions The appliance is not working after plugged in. 1. Wrong assembling of accessories. 2. The cover is not well assembled. 1. Disassemble and assemble again all accessories. 2. Switch off the appliance and replace correctly the cover. Noise during operation. 1. Squeaking/cracking noises. 2. Vibration of motor/accessories. This is normal: these noises indicate your machine is extracting the juice. Abnormal noises or vibrations. 1. Accessories are not well assembled. 2. The appliance is not placed on a flat and stable surface. 1. Switch off the appliance, disassemble and assemble again the accessories 2. Switch off the appliance and place the appliance on a flat and stable surface. Ingredients are burned and sticked at the bottom of the jar. 1. The ingredients have high volume of stash and/or sugar. 2. Too much ingredients and not enough water. 1. Change your recipe for next time. 2. Add liquids to your preparation. Ingredients are not cooked enough at the end of the program. 1. Ingredients are too big. 2. Too much water or ingredients. 3. Some ingredients need longer cooking time. 1. Repeat the cooking program. Ensure to cut your ingredients smaller (2-3cm). 2. Take out the excess of water or ingredients. 3. Repeat the cooking program. 8 ENGLISH CLEANING AND MAINTENANCE 1. At the end of the program, switch off your appliance by pressing the button “ON/OFF”. 2. Unplug your appliance from the power socket. 3. Ensure to always unplug your appliance before any cleaning operation. Never put the motor unit into the dishwashing or under the water. Cleaning the body motor unit: Clean the outer surface with a soft cloth (or sponge) on the surfaces of the appliance. Cleaning the accessories: Wash the accessories with a sponge and dishwashing liquid and rinse them. Do not put the appliance into a dishwasher. Warning: avoid spillage on the electric connectors of the blender. Do not use a hard brush or any others cleaners to avoid scratching or damaging the appliance. Never immerse the appliance. 9 ENGLISH TECHNICAL INFORMATION Model BLC5X Voltage 220-240V ~ 50Hz Motor power 350W Heating power 700-900W Max. Capacity for cold dishes 1.5L MAX. Max. Capacity for hot dishes 1.2L MAX. 10 CLIMATIZADA BLENDER BLC5X ESPAÑOL INSTRUCCIONES DE SEGURIDAD LEA OBLIGATORIAMENTE ESTE MANUAL DE INSTRUCCIONES Y CONSÉRVELO PARA CONSULTAS POSTERIORES. CONTIENE INFORMACIONES IMPORTANTES. RECUERDE ENTREGAR ESTA RESEÑA BREVE CON EL APARATO EN CASO DE DEJARLO EN MANOS DE UN TERCERO. ESTE APARATO ESTÁ DISEÑADO PARA SER UTILIZADO EN APLICACIONES DOMÉSTICAS Y ANÁLOGAS TALES COMO: o COCINAS RESERVADAS PARA EL PERSONAL DE TIENDAS, OFICINAS Y OTRAS ÁREAS PROFESIONALES; o GRANJAS; o EL USO POR PARTE DE CLIENTES DE HOTELES Y MOTELES, ASÍ COMO DE OTROS ENTORNOS DE CARÁCTER RESIDENCIAL; o ESTABLECIMIENTOS DE TIPO HOTELERO. ESTE APARATO NO DEBE SER UTILIZADO POR NIÑOS. MANTENGA EL APARATO Y SU CABLE FUERA DEL ALCANCE DE LOS NIÑOS. LAS PERSONAS CON FACULTADES FÍSICAS, SENSORIALES O MENTALES REDUCIDAS O SIN EXPERIENCIA O CON CONOCIMIENTOS INSUFICIENTES PODRÁN UTILIZAR ESTE APARATO SIEMPRE Y CUANDO CUENTEN CON SUPERVISIÓN O HAYAN RECIBIDO LAS INSTRUCCIONES PERTINENTES CORRESPONDIENTES A LA UTILIZACIÓN SEGURA DEL APARATO Y QUE COMPRENDAN BIEN LO RIESGOS POTENCIALES. LOS NIÑOS NO DEBEN UTILIZAR ESTE APARATO COMO UN JUGUETE. LA LIMPIEZA Y EL MANTENIMIENTO POR PARTE DEL USUARIO NO DEBEN SER REALIZADOS POR NIÑOS. DESCONECTE SIEMPRE EL APARATO DE LA FUENTE DE ALIMENTACIÓN ANTES DE SU MONTAJE, DESMONTAJE Y ESPAÑOL LIMPIEZA, O SI LO VA A DEJAR SIN SUPERVISIÓN. UTILICE EL APARATO ÚNICAMENTE CON LA BASE SUMINISTRADA. ADVERTENCIA: ¡LA UTILIZACIÓN INAPROPIADA DEL APARATO CONLLEVA EL RIESGO DE LESIONES PERSONALES! TOME LAS PRECAUCIONES DEBIDAS AL UTILIZAR CUCHILLOS AFILADOS MIENTRAS VACIA EL BOL Y DURANTE LA LIMPIEZA. ADVERTENCIAS: EVITE CUALQUIER DERRAMAMIENTO SOBRE EL CONECTOR. LA SUPERFICIE DEL ELEMENTO CALENTADOR TEENDRÁ CALOR RESIDUAL DESPUÉS DE UTILIZARLO. ¡ATENCIÓN, SUPERFICIE CALIENTE! LAS SUPERFICIES SON SUSCEPTIBLES DE CALENTARSE DURANTE EL USO. LA TEMPERATURA DE LAS SUPERFICIES AUMENTA DURANTE EL FUNCIONAMIENTO DEL APARATO, LO QUE PUEDE PROVOCAR QUEMADURAS. NO TOQUE LAS SUPERFICIES CALIENTES DEL APARATO. EL APARATO NO DEBE SUMERGIRSE. APAGUE EL APARATO Y DESCONÉCTELO DE LA FUENTE DE ALIMENTACIÓN ANTES DE CAMBIAR LOS ACCESORIOS O DE ENTRAR EN CONTACTO CON LAS PIEZAS MÓVILES. SI EL CABLE DE ALIMENTACIÓN SE ENCUENTRA DAÑADO, ESTE DEBE SER REEMPLAZADO POR EL FABRICANTE, SU SERVICIO POSVENTA O POR UNA PERSONA COMPETENTE CON CUALIFICACIÓN SIMILAR PARA EVITAR CUALQUIER DAÑO. PARA MÁS INFORMACIÓN SOBRE LA DURACIÓN DE FUNCIONAMIENTO Y LOS AJUSTES DE VELOCIDAD PARA LOS ACCESORIOS, CONSULTE EL PÁRRAFO SIGUIENTE DE LA ESPAÑOL RESEÑA BREVE INCLUIDA EN LA SECCIÓN "PUESTA EN MARCHA Y UTILIZACIÓN" INSTRUCCIONES DE SEGURIDAD RELATIVAS A LA LIMPIEZA Y EL MANTENIMIENTO ANTES DE REALIZAR CUALQUIER OPERACIÓN DE LIMPIEZA O DE MANTENIMIENTO, DESENCHUFE EL APARATO PARA CORTAR LA ALIMENTACIÓN ELÉCTRICA. ANTES DE REALIZAR CUALQUIER OPERACIÓN DE LIMPIEZA, DESENCHUFE Y DEJE ENFRIAR COMPLETAMENTE EL APARATO. NUNCA SUMERJA EL APARATO, SU CABLE Y SU TOMA DE CORRIENTE EN AGUA U OTRO LÍQUIDO. ES ACONSEJABLE REVISAR EL CABLE DE ALIMENTACIÓN REGULARMENTE A FIN DE DETECTAR CUALQUIER SEÑAL DE UN EVENTUAL DETERIORO. EN LO QUE RESPECTA A LAS INFORMACIONES DETALLADAS RELATIVAS A LA FORMA DE LIMPIAR LAS SUPERFICIES EN CONTACTO CON LOS ALIMENTOS, CONSULTE EN EL PÁRRAFO SIGUIENTE LA RESEÑA BREVE INCLUIDA EN LA SECCIÓN "LIMPIEZA Y MANTENIMIENTO". ADVERTENCIAS DESPUÉS DE DESEMBALAR EL APARATO, COMPRUEBE INMEDIATAMENTE QUE NO SE ENCUENTRA DAÑADO. EN CASO DE DUDA, NO UTILICE EL APARATO Y CONSULTE A UNA PERSONA COMPETENTE. NUNCA UTILICE ACCESORIOS O PIEZAS DE OTRO FABRICANTE. EL USO DE ESTE TIPO DE ACCESORIOS O PIEZAS IMPLICA LA ANULACIÓN DE LA GARANTÍA. ESPAÑOL NO DEBE UTILIZAR EL APARATO SI SE HA CAÍDO, SI PRESENTA DAÑOS APARENTES, SI TIENE FUGAS O PRESENTA ANOMALÍAS EN EL FUNCIONAMIENTO. DESENCHUFE SIEMPRE EL PRODUCTO EN CASO DE UN LARGO PERÍODO DE INUTILIZACIÓN. RETIRE CORRECTAMENTE TODOS LOS ELEMENTOS DEL EMBALAJE Y NO DEJE DICHOS ELEMENTOS TALES COMO BOLSAS DE PLÁSTICO, POLIESTIRENO O ELÁSTICOS AL ALCANCE DE LOS NIÑOS. DICHOS ELEMENTOS PODRÍAN RESULTAR PELIGROSOS PARA ELLOS. TRAS DESEMBALAR EL APARATO, ASEGÚRESE DE COLOCARLO SOBRE UNA SUPERFICIE PLANA, ESTABLE Y RESISTENTE AL CALOR. ASEGÚRESE DE QUE EL AIRE CIRCULE LIBREMENTE ALREDEDOR DE SU APARATO. RESPETE UNA DISTANCIA MÍNIMA, ENTRE EL APARATO Y CUALQUIER ELEMENTO ARQUITECTÓNICO, DE 50 CM RESPECTO A LA VERTICAL Y DE 20 CM RESPECTO A LOS LADOS. ESTE APARATO DEBE ESTAR CONECTADO A UN ENCHUFE CON TOMA DE TIERRA. TOME TODAS LAS PRECAUCIONES NECESARIAS PARA EVITAR QUE ALGUIEN PISE EL CABLE. NO UTILICE ALARGADORES PARA CONECTAR EL APARATO A LA RED ELÉCTRICA. NO LO COLOQUE ENCIMA DE OTROS APARATOS. POR SU SEGURIDAD, LE RECOMENDAMOS QUE NUNCA DEJE EL APARATO EN UN LUGAR EXPUESTO A LA INTEMPERIE Y LA HUMEDAD. NO DEJE EL APARATO ENCHUFADO SI NO LO VA A UTILIZAR. NO ENCHUFE EL APARATO NI PULSE LOS BOTONES DEL PANEL DE CONTROL SI TIENE LAS MANOS HÚMEDAS. NO UTILICE EL APARATO CON LOS PIES DESCALZOS O HÚMEDOS. ESPAÑOL DURANTE SU FUNCIONAMIENTO, EVITE MOVER EL APARATO. NORMAS DE SEGURIDAD ESTE APARATO SE AJUSTA A LAS DIRECTIVAS Y NORMAS VIGENTES. INSTRUCCIONES DE SEGURIDAD PARA DESECHAR SU APARATO La directiva europea sobre Residuos de Aparatos Eléctricos y Electrónicos (RAEE), exige que los aparatos domésticos utilizados no sean desechados mediante el flujo normal de residuos municipales. Los aparatos utilizados deberán ser recogidos de manera separada para optimizar la tasa de recuperación y el reciclaje de los materiales que lo componen y reducir el impacto sobre la salud humana y el medio ambiente. Cuando deje de funcionar, no lo deseche como basura doméstica y deposítelo en un centro de recogida autorizado para que pueda ser reciclado. De esta manera contribuirá a la protección del medio ambiente. ESPAÑOL RESUMEN DESCRIPCIÓN............................................................................... 1 PUESTA EN MARCHA Y UTILIZACIÓN .......................................... 2 Antes de utilizar por primera vez .............................................. 2 Montaje y desmontaje del aparato .......................................... 3 Descriptivo del panel de control y de los programas automáticos .............................................................................. 4 Utilización de su aparato .......................................................... 6 ANOMALÍAS DE FUNCIONAMIENTO ........................................... 9 LIMPIEZA Y MANTENIMIENTO .................................................... 9 INFORMACIÓN TÉCNICA ........................................................... 10 ESPAÑOL DESCRIPCIÓN 1. Taza de medir 2. Tapa 3. Cesta de vapor 4. Bol de acero inoxidable 5. Hoja de acero inoxidable 6. Asa 7. Conector eléctrico del asa 8. Conector eléctrico del bol 9. Pantalla del temporizador 10. Panel de control electrónico 11. Cable de alimentación 12. Carcasa del aparato 13. Patas antideslizantes 1 ESPAÑOL PUESTA EN MARCHA Y UTILIZACIÓN Antes de utilizar por primera vez Desembale el aparato y los accesorios y asegúrese de que el aparato no haya sufrido ningún daño y que esté en buen estado. Retire correctamente todos los elementos del embalaje y no deje dichos elementos tales como bolsas de plástico, poliestireno o elásticos al alcance de los niños. Dichos elementos podrían resultar peligrosos para ellos. Lave todos los accesorios con una esponja empapada de un producto líquido y, luego, enjuáguelos con agua caliente y séquelos con un paño limpio. No introduzca nunca el aparato en el lavavajillas. Advertencias: evite cualquier derramamiento sobre el conector del bol. Limpie la carcasa del aparato con un paño suave y seco. No sumerja nunca la carcasa del aparato. No introduzca nunca la carcasa del aparato en el lavavajillas. 2 ESPAÑOL Montaje y desmontaje del aparato 1. Coloque la jarra sobre la unidad motora y empújela hacia abajo hasta que encaje en su sitio con un clic (solo encaja en una posición). 2. Coloque el cesta de vapor en el interior del bol si está utilizando la función de vapor. 3. Para acoplar la tapa, gire el tapa en el sentido de las agujas del reloj hasta bloquearlo y deslice la punta del pico hacia dentro del espacio situado en la parte delantera de la tapa. Luego, empuje la cubierta posterior a las ranuras en el mango de la taza hasta que sienta que el cierre de la tapa encaje en su sitio con un clic. 4. Inserte la taza de medir en el agujero de la tapa. Para desmontar la unidad, siga los pasos en orden inverso. Advertencia: Nunca conecte el aparato antes de haber instalado los accesorios. Desenchufe siempre el aparato antes de extraer los accesorios. Atención: Compruebe que todos los elementos estén bien montados en el aparato. Si el montaje es incorrecto, el aparato no funcionará. 3 ESPAÑOL Descriptivo del panel de control y de los programas automáticos Pantalla del temporizador Visualización de los programas de cocción automática Interruptor de control del panel Interruptor de control del panel Descripción de los interruptores de control del panel Interruptor de "Encendido/Apagado": después de enchufar su aparato, este se pone en modo pausa automáticamente y emite un pitido. El interruptor de encendido/apagado parpadeará para indicarle que el aparato está en modo pausa. Una vez seleccionado su programa automático, pulse una vez este interruptor para iniciar la mezcladora y/o cocción de su preparación. Cuando termine de utilizar el aparato, el blender emitirá 3 pitidos y el reloj indicará « OFF » en la pantalla. Pulse una vez el interruptor de "Encendido/Apagado", el aparato se pondrá en modo de espera automáticamente (motor apagado, calentador apagado). Interruptor "Menú": este interruptor le permite seleccionar uno de los cuatro programas de cocción automática. Solo tiene que pulsar este interruptor para seleccionar su programa. Nota: el programa automático parpadeará cuando esté seleccionado y permanece iluminado durante el funcionamiento. Interruptor de "Mezcla de baja de velocidad": pulse una vez seleccionar la mezcladora de baja velocidad y pulse el interruptor de "Encendido/Apagado" para iniciar la mezcladora de su preparación. Vuelva a pulsar el interruptor de "Encendido/Apagado" para detener el programa automático. Cuando termine de utilizar el aparato, el blender emitirá 3 pitidos y el reloj indicará « OFF » en la pantalla. Pulse una vez el interruptor de "Encendido/Apagado", el aparato se pondrá en modo de espera automáticamente Nota: el programa automático parpadeará cuando esté seleccionado y permanece iluminado durante el funcionamiento. Modo de funcionamiento: mezclar durante 3 min hasta 7000rpm. 4 ESPAÑOL Interruptor de "Mezcla de alta de velocidad": pulse una vez seleccionar la mezcladora de alta velocidad y pulse el interruptor de "Encendido/Apagado" para iniciar la mezcladora de su preparación. Vuelva a pulsar el interruptor de "Encendido/Apagado" para detener el programa automático. Cuando termine de utilizar el aparato, el blender emitirá 3 pitidos y el reloj indicará « OFF » en la pantalla. Pulse una vez el interruptor de "Encendido/Apagado", el aparato se pondrá en modo de espera automáticamente. Nota: el programa automático parpadeará cuando esté seleccionado y permanece iluminado durante el funcionamiento. Modo de funcionamiento: mezclar durante 3 min hasta 15000rpm. Interruptor de "Pulse/Ice crush": pulse una vez el botón “Pulse/Ice crush” para iniciar la mezcladora de su preparación. Vuelva a pulsar el interruptor de "Encendido/Apagado" para detener el programa automático. Cuando termine de utilizar el aparato, el blender emitirá 3 pitidos y el reloj indicará « OFF » en la pantalla. Pulse una vez el interruptor de "Encendido/Apagado", el aparato se pondrá en modo de espera automáticamente Nota: el programa automático iluminará cuando esté seleccionado y permanece iluminado durante el funcionamiento. Modo de funcionamiento: mezclar durante 10 secundo hasta 15000rpm. Descripción de los 4 programas de cocción automática Programa de « Smooth soup »: programa de cocción automática para sopa suave. Smooth soup Seleccione el programa de cocción deseado pulsando el botón « Menu » y pulse el interruptor de "Encendido/Apagado" para iniciar la cocción de su preparación. Vuelva a pulsar el interruptor de "Encendido/Apagado" para detener el programa automático. Cuando termine de utilizar el aparato, el blender emitirá 3 pitidos y el reloj indicará « OFF » en la pantalla. Pulse una vez el interruptor de "Encendido/Apagado", el aparato se pondrá en modo de espera automáticamente. Modo de funcionamiento: el tiempo total de operación de 30 minutos alternando entre la fase de calentamiento (máximo 100 ° C) y la fase de mezcla Programa de « Thick soup »: programa de cocción automática para sopa de tropezones. Thick soup Seleccione el programa de cocción deseado pulsando el botón « Menu » y pulse el interruptor de "Encendido/Apagado" para iniciar la cocción de su preparación. Vuelva a pulsar el interruptor de "Encendido/Apagado" para detener el programa automático. Cuando termine de utilizar el aparato, el blender emitirá 3 pitidos y el reloj indicará « OFF » en la pantalla. Pulse una vez el interruptor de "Encendido/Apagado", el aparato se pondrá en modo de espera automáticamente. Modo de funcionamiento: el tiempo total de operación de 30 minutos con solamente fase de calentamiento (máximo 100 ° C). Programa de « Steam »: programa de cocción automática para la cocción el vapor. Steam Seleccione el programa de cocción deseado pulsando el botón « Menu » y pulse el interruptor de "Encendido/Apagado" para iniciar la cocción de su preparación. Vuelva a pulsar el interruptor de "Encendido/Apagado" para detener el programa automático. Cuando termine de utilizar el aparato, el blender emitirá 3 pitidos y el reloj indicará « OFF » en la pantalla. Pulse una vez el interruptor de "Encendido/Apagado", el aparato se pondrá en modo de espera automáticamente. Modo de funcionamiento: el tiempo total de operación de 30 minutos con solamente fase de calentamiento (máximo 100 ° C). 5 ESPAÑOL Programa de « Reheat » : programa automático para recalentar sus platos. Reheat Seleccione el programa de cocción deseado pulsando el botón « Menu » y pulse el interruptor de "Encendido/Apagado" para iniciar la cocción de su preparación. Vuelva a pulsar el interruptor de "Encendido/Apagado" para detener el programa automático. Cuando termine de utilizar el aparato, el blender emitirá 3 pitidos y el reloj indicará « OFF » en la pantalla. Pulse una vez el interruptor de "Encendido/Apagado", el aparato se pondrá en modo de espera automáticamente. Modo de funcionamiento: el tiempo total de operación de 40 minutos con solamente fase de calentamiento (75°C – 85°C). Utilización de su aparato 1. Coloque su aparato en una encimera estable y plana. 2. Coloque todos los ingredientes en el bol y / o en la cesta de vapor. 3. Podrá utilizar su aparato una vez que lo haya montado y después de comprobar que todos los accesorios estén bien montados en dicho aparato. 4. Enchufe el aparato a una toma de corriente de pared. Después de enchufar su aparato, este se pone en modo pausa automáticamente y emite un pitido. El interruptor de encendido/apagado parpadeará para indicarle que el aparato está en modo pausa. Cocinar con los 4 programas de cocción automática: 1. Después de coloque los ingredientes en el bol y finalizar la instalación del dispositivo. Asegúrese de que su dispositivo está conectado y se encuentra en modo de espera. 2. Pulse una vez el botón « Menu » para seleccionar uno de los cuatro programas de cocción automática y pulse el interruptor de "Encendido/Apagado" para iniciar la cocción de su preparación. 3. Cuando termine de utilizar el aparato, el blender emitirá 3 pitidos y el reloj indicará « OFF » en la pantalla. Pulse una vez el interruptor de "Encendido/Apagado", el aparato se pondrá en modo de espera automáticamente. Mezclar con los 2 programas de mezcla (baja velocidad/alta velocidad): 1. Después de coloque los ingredientes en el bol y finalizar la instalación del dispositivo. Asegúrese de que su dispositivo está conectado y se encuentra en modo de espera. 2. Seleccione uno de los dos programas de mezcla automática y pulse el interruptor de "Encendido/Apagado" para detener el programa automático. 3. Cuando termine de utilizar el aparato, el blender emitirá 3 pitidos y el reloj indicará « OFF » en la pantalla. Pulse una vez el interruptor de "Encendido/Apagado", el aparato se pondrá en modo de espera automáticamente. Mezclar con el programa de Pulse/Ice crush: 1. Después de coloque los ingredientes en el bol y finalizar la instalación del dispositivo. Asegúrese de que su dispositivo está conectado y se encuentra en modo de espera. 2. Pulse una vez el botón “Pulse/Ice crush” para iniciar la mezcladora de su preparación. Vuelva a pulsar el interruptor de "Encendido/Apagado" para detener el programa automático. 3. Cuando termine de utilizar el aparato, el blender emitirá 3 pitidos y el reloj indicará « OFF » en la pantalla. Pulse una vez el interruptor de "Encendido/Apagado", el aparato se pondrá en modo de espera automáticamente. 6 ESPAÑOL Advertencia: Desconecte siempre el aparato de la fuente de alimentación antes de su montaje, desmontaje y limpieza, o si lo va a dejar sin supervisión. Advertencias: evite cualquier derramamiento sobre el conector. Nunca exceda el nivel máximo en el para evitar el riesgo de lesiones: o 1.5L MAX. para los platos fríos. o 1.2L MAX. para los platos calientes. No introduzca nunca su mano ni otros objetos en la abertura del aparato. No abra la tapa con abertura ni desmonte el bol cuando el aparato esté en funcionamiento. No haga funcionar el aparato en vacío durante más de 30 segundos después de ponerlo en funcionamiento. Asegúrese de que todos los elementos del aparato estén bien montados. No utilice nunca el aparato con las manos mojadas. No desplace nunca el aparato cuando esté funcionamiento. Ideas de recetas: Recetas Programas Sopa de verduras al estilo marroquí Thick soup Crema de calabaza Smooth soup Gaspacho + Ingredientes Preparación 1 cebolla roja, pelada y picada 1 puerro, lavado y picado 1 pimiento rojo, sin pepitas y picado 1 tallo de apio, picado 1 pimiento verde, sin pepitas y picado 2 dientes de ajo, pelados y picados 1 cucharadita de mezcla de especias ras el hanut 400 g de pulpa de tomate picada 1 cucharada de puré de tomate 1 cubito de caldo (verduras) 250ml del agua Sal y pimienta Coloque todos los ingredientes en el bol. Cierre la tapa de la unidad. Seleccione el programa de cocción de « Thick soup » deseado pulsando el botón « Menu » y pulse el interruptor de "Encendido/Apagado" para iniciar la cocción de su preparación. 500 g de calabaza, semillas y picado 2 patatas pequeñas, peladas y picadas 1 cebolla, pelada y picada 60cl de agua cubo de caldo de pollo 1 20cl de crema Sal y pimienta Coloque todos los ingredientes en el bol. Cierre la tapa de la unidad. Seleccione el programa de cocción de « Smooth soup » y pulse el interruptor de "Encendido/Apagado" para iniciar la cocción de su preparación. 1 cebolla peladas y picadas 1/2 pimiento rojo, sin pepitas y picado 1/2 pimiento verde, sin pepitas y picado 1/2 pepino cortó en piezas 1 diente de ajo, pelados y picados 500 g de pulpa de tomate picada 1 cucharada vinagre 1 rebanada de pan 2 cucharadas de aceite de oliva Albahaca Sal y pimienta Colocar las verduras, el ajo y la cebolla en el tazón. Seleccione la "mezcla de baja velocidad." Añadir el pan cortado en trozos grandes en cubos y pulse varias veces el botón de pulso. Temporada, añadir el aceite de oliva, albahaca y vinagre. Mezclar de nuevo un par de veces en el pulso. Dejar reposar por lo menos 2 horas en la nevera antes de servir. 7 ESPAÑOL Hielo picado Steam Puré de patata + Recalentamient 200g cubito de hielo Coloque todos los ingredientes en el bol. Cierre la tapa de la unidad. Seleccione el programa de automatica « Pulse/Ice Crush» 800 g de patatas peladas y cortadas en cubos 1 cebolla peladas y picadas 1 diente de ajo, pelados y picados 25cl del agua 25cl de crema 1 pizca de nuez moscada Sal y pimienta Colocar las patatas en dados tierra en la cesta de vapor. Vierta agua en el recipiente hasta 1.0L marcado, colocar el cesto en el recipiente y cierre la tapa. Seleccione la función de cocción el vapor. Cuando esté cocido, retirar la cesta de vapor, drenar el agua de cocción y verter las patatas cocidas en el plato. Añadir el resto de ingredientes en el recipiente, cierre la tapa y seleccione el programa « Mezcla de alta de velocidad ». Los platos fríos Coloque todos los ingredientes en el bol. Cierre la tapa de la unidad. Seleccione el programa de cocción de « Reheat » y pulse el interruptor de "Encendido/Apagado" para iniciar la cocción de su preparación.. 4 bananas, peladas 125ml de leche 3 cucharadas de crema 1 bola de helado de vainilla Coloque todos los ingredientes en el bol. Cierre la tapa de la unidad y seleccione el programa « Mezcla de alta de velocidad ». 1 mango, pelado, sin hueso y planta 20cl de leche 20cl de yogur 2 cucharadita de miel Coloque todos los ingredientes en el bol. Cierre la tapa de la unidad y seleccione el programa « Mezcla de baja de velocidad ». 4 huevo Coloque los huevos en la cesta de vapor. Vierta agua en el recipiente hasta 1.0L marcado, colocar el cesto en el recipiente y cierre la tapa. Seleccione la función de cocción el vapor, cocinar por 6 minutos después de la fase de ebullición. Pulse el interruptor de "Encendido/Apagado" para detener el programa automático. Reheat Milkshake antiestrés Mango lassi Huevo mollets Steam 8 ESPAÑOL ANOMALÍAS DE FUNCIONAMIENTO Anomalías Causas Soluciones 1. Desmonte y vuelva a montar los accesorios. 2. Desenchufe el aparato y vuelva a poner la tapa. El aparato no funciona después de haberlo enchufado. 1. Montaje incorrecto de los accesorios. 2. La tapa está mal colocada. Ruido durante el funcionamiento. 1. Ruidos de chirridos y crujidos. 2. Vibración del motor o de los accesorios. Esto es normal, estos sonidos indican que los ingredientes están siendo mezcla. Ruidos o vibraciones anormales. 1. Los accesorios están mal montados. 2. El aparato no está colocado sobre una superficie plana y estable. 1. Desenchufe el aparato y vuelva a montar correctamente los accesorios. 2. Desenchufe el aparato y colóquelo sobre una superficie plana y estable. La comida se quema y se pegó a la parte inferior de la unidad. Los ingredientes no son lo suficientemente cocidos al final del programa. 1. Los ingredientes tienen niveles muy altos de almidón y / o azúcar. 2. El exceso de comida y no suficiente líquido en la receta. 1. Los ingredientes se cortan demasiado grueso. 2. El exceso de agua o alimentos. 3. Algunos ingredientes requieren una cocción más prolongada 1. Modificar la receta para la próxima vez. 2. Añadir más líquido. 1. Repetir otro ciclo de cocción. Asegúrese de cortar los ingredientes de menor tamaño (2-3 cm). 2. Retire el exceso de agua o alimento. 3. Repita otro ciclo de cocción. LIMPIEZA Y MANTENIMIENTO 1. Al final de la operación de prelimpieza con el programa de limpieza automática, apague su aparato pulsando el interruptor de "Encendido/Apagado". 2. Desenchufe el cable de alimentación de la toma de corriente. 3. Asegúrese siempre de desenchufar el aparato antes de limpiarlo. No coloque la carcasa del aparato en el lavavajillas ni la sumerja en agua. Limpieza de la carcasa del aparato: Use un paño suave para limpiar la superficie del aparato. 9 ESPAÑOL Limpieza de los accesorios: Lave los accesorios con una esponja empapada de detergente líquido para vajillas, enjuáguelos con agua caliente y, luego, séquelos con un paño suave. No introduzca nunca el aparato en el lavavajillas. Advertencias: evite cualquier derramamiento sobre el conector del bol. No utilice productos afilados, tóxicos y agresivos, tales como alcohol de quemar, decapantes industriales y solventes, para limpiar el aparato ya que éstos podrían dañarlo. Nunca sumerja el aparato en agua. INFORMACIÓN TÉCNICA Modelo BLC5X Tensión de la corriente 220-240 V ~ 50Hz Potencia del motor 350 W Potencia del cocción 700-900 W Capacidad máxima de preparación para los platos fríos 1.5L MAX. Capacidad máxima de preparación para los platos caliente 1.2L MAX. 10 VERWARMDE BLENDER BLC5X NEDERLANDS VEILIGHEIDSINSTRUCTIES LEES DEZE GEBRUIKSHANDLEIDING ZORGVULDIG DOOR EN BEWAAR ZE VOOR LATERE RAADPLEGING. ZE BEVAT BELANGRIJKE INFORMATIE. WANNEER U DIT APPARAAT AAN DERDEN OVERDRAAGT, MOET DEZE HANDLEIDING BIJ HET APPARAAT WORDEN GEVOEGD. DIT APPARAAT IS BESTEMD VOOR HUISHOUDELIJK EN GELIJKAARDIG GEBRUIK ZOALS: o DE KEUKENHOEK VOOR HET PERSONEEL IN WINKELS, KANTOREN EN ANDERE WERKOMGEVINGEN; o BOERDERIJEN; o HOTEL- EN MOTELKAMERS EN ANDERE OMGEVINGEN MET EEN RESIDENTIEEL KARAKTER; o GASTENKAMERS EN GELIJKAARDIGE OMGEVINGEN. DIT APPARAAT MAG NIET WORDEN GEBRUIKT DOOR KINDEREN. HOUD HET APPARAAT EN HET NETSNOER BUITEN HET BEREIK VAN KINDEREN. DIT APPARAAT MAG ENKEL WORDEN GEBRUIKT DOOR PERSONEN MET EEN LICHAMELIJKE, ZINTUIGLIJKE OF MENTALE BEPERKING OF PERSONEN MET ONVOLDOENDE ERVARING OF KENNIS ALS DIE PERSONEN ONDER TOEZICHT STAAN OF ZE INSTRUCTIES KREGEN OVER EEN VEILIG GEBRUIK VAN HET APPARAAT EN ZE OP DE HOOGTE ZIJN VAN DE MOGELIJKE GEVAREN. KINDEREN MOGEN NIET MET HET APPARAAT SPELEN. REINIGING EN ONDERHOUD DOOR DE GEBRUIKER MOGEN NIET WORDEN TOEVERTROUWD AAN KINDEREN. HAAL DE STEKKER VAN HET APPARAAT ALTIJD UIT HET STOPCONTACT ALS HET ZONDER TOEZICHT WORDT GELATEN EN ALVORENS HET TE MONTEREN, DEMONTEREN OF REINIGE. NEDERLANDS HET APPARAAT MOET UITSLUITEND MET DE MEEGELEVERDE MOTORUNIT WORDEN GEBRUIKT. WAARSCHUWING: RISICO OP VERWONDING BIJ VERKEERD GEBRUIK VAN HET APPARAAT! NEEM UW VOORZORGEN BIJ HET HANTEREN VAN DE SCHERPE MESSEN, HET LEEGMAKEN VAN DE KOM EN HET REINIGEN. WAARSCHUWING: VERMIJD HET OVERKOKEN OP DE AANSLUITSTEKKER. HET OPPERVLAK VAN HETVERWARMINGSELEMENT BLIJFT NOG EEN TIJD HEET NA GEBRUIK. OPGELET HEET OPPERVLAK! DE OPPERVLAKKEN KUNNEN HEET WORDEN TIJDENS HET GEBRUIK. DE TEMPERATUUR VAN DE OPPERVLAKKEN LOOPT HOOG OP TIJDENS DE WERKING VAN HET APPARAAT, WAT BRANDWONDEN KAN VEROORZAKEN. RAAK DE HETE OPPERVLAKKEN VAN HET APPARAAT NIET AAN. HET APPARAAT MAG NIET IN WATER OF EEN ANDERE VLOEISTOF WORDEN GEDOMPELD. ZET HET APPARAAT UIT EN TREK DE STEKKER UIT HET STOPCONTACT ALVORENS DE HULPSTUKKEN TE WISSELEN OF IN DE BUURT TE KOMEN VAN BEWEGENDE DELEN TIJDENS DE WERKING. ALS HET NETSNOER BESCHADIGD IS, MOET HET WORDEN VERVANGEN DOOR DE FABRIKANT, ZIJN KLANTENDIENST OF GELIJKAARDIG BEVOEGDE PERSONEN OM ALLE GEVAAR UIT TE SLUITEN. WAT DE BEDRIJFSDUUR EN DE SNELHEIDSINSTELLINGEN VOOR DE HULPSTUKKEN BETREFT, ZIE DE HIERNA VOLGENDE NEDERLANDS PARAGRAAF VAN DE HANDLEIDING ONDER DE TITEL "INBEDRIJFSTELLING EN GEBRUIK". VEILIGHEIDSINSTRUCTIES BETREFFENDE REINIGING EN ONDERHOUD HAAL DE STEKKER VAN HET APPARAAT UIT HET STOPCONTACT ALVORENS HET APPARAAT TE REINIGEN OF ER ONDERHOUD AAN TE VERRICHTEN. ALVORENS HET APPARAAT TE REINIGEN MOET U HET NETSNOER UIT HET STOPCONTACT HALEN EN HET APPARAAT VOLLEDIG LATEN AFKOELEN. DOMPEL HET APPARAAT, HET NETSNOER EN DE STEKKER NOOIT IN WATER OF EEN ANDERE VLOEISTOF. HET WORDT AANBEVOLEN HET NETSNOER REGELMATIG TE CONTROLEREN OP EVENTUELE TEKENEN VAN BESCHADIGING. VOOR DE GEDETAILLEERDE INFORMATIE OVER HET REINIGEN VAN DE OPPERVLAKKEN DIE IN CONTACT KOMEN MET VOEDINGSMIDDELEN, ZIE DE HIERNA VOLGENDE PARAGRAAF VAN DE HANDLEIDING ONDER DE TITEL "REINIGING EN ONDERHOUD". WAARSCHUWING VERGEWIS U ERVAN, NADAT U HET APPARAAT HEBT UITGEPAKT, DAT HET NIET BESCHADIGD IS. GEBRUIK HET APPARAAT NIET IN GEVAL VAN TWIJFEL EN RAADPLEEG EEN BEVOEGD PERSOON. GEBRUIK NOOIT ACCESSOIRES OF ONDERDELEN VAN EEN ANDERE FABRIKANT. BIJ GEBRUIK VAN ZULKE ACCESSOIRES OF ONDERDELEN VERVALT DE GARANTIE. NEDERLANDS HET APPARAAT MAG NIET WORDEN GEBRUIKT ALS HET IS GEVALLEN, ALS HET ZICHTBARE SCHADE VERTOONT, ALS HET LEKT OF BEDRIJFSSTORINGEN VERTOONT. HAAL HET NETSNOER ALTIJD UIT HET STOPCONTACT WANNEER HET APPARAAT LANGDURIG NIET ZAL WORDEN GEBRUIKT. VERWIJDER ZORGVULDIG ALLE VERPAKKINGSMATERIAAL EN LAAT GEEN ZAKEN ALS PLASTIC ZAKKEN, POLYSTYREEN OF ELASTIEKEN BINNEN HET BEREIK VAN KINDEREN LIGGEN. DIE ZAKEN KUNNEN VOOR HEN GEVAARLIJK ZIJN. PLAATS HET APPARAAT NADAT HET IS UITGEPAKT OP EEN VLAK, STABIEL EN HITTEBESTENDIG OPPERVLAK. ZORG DAT ER VRIJE LUCHTCIRCULATIE RONDOM HET HELE APPARAAT MOGELIJK IS. NEEM TUSSEN HET APPARAAT EN DE WAND EEN AFSTAND VAN 50 CM AAN DE BOVENKANT EN 20 CM AAN DE ZIJKANTEN IN ACHT. DIT APPARAAT MOET WORDEN AANGESLOTEN OP EEN GEAARD STOPCONTACT. NEEM ALLE NODIGE VOORZORGEN OM TE VOORKOMEN DAT IEMAND OVER HET NETSNOER STRUIKELT. GEBRUIK GEEN VERLENGSNOER OM HET APPARAAT OP HET NET AAN TE SLUITEN. PLAATS HET NIET BOVEN OP ANDERE APPARATEN. VOOR UW VEILIGHEID WORDT AANBEVOLEN HET APPARAAT NOOIT BLOOT TE STELLEN AAN SLECHTE WEERSOMSTANDIGHEDEN EN VOCHT. LAAT DE STEKKER VAN UW APPARAAT NIET IN HET STOPCONTACT ZITTEN WANNEER HET NIET WORDT GEBRUIKT. SLUIT HET PRODUCT NIET AAN EN DRUK NIET OP DE KNOPPEN VAN HET BEDIENINGSPANEEL ALS UW HANDEN VOCHTIG ZIJN. GEBRUIK HET APPARAAT NIET BLOOTSVOETS OF MET VOCHTIGE VOETEN. NEDERLANDS VERPLAATS HET APPARAAT NIET TERWIJL HET IN WERKING IS. VEILIGHEIDSNORMEN DIT APPARAAT VOLDOET AAN DE GELDENDE RICHTLIJNEN EN NORMEN. VEILIGHEIDSINSTRUCTIES VOOR HET AFDANKEN VAN UW APPARAAT Overeenkomstig de Europese richtlijn betreffende Afgedankte Elektrische en Elektronische Apparatuur (AEEA) mogen afgedankte huishoudelijke apparaten niet met het gewone huisvuil worden meegegeven. Afgedankte apparaten moeten gescheiden worden ingezameld om het hergebruik en de recyclage van de bestanddelen ervan te optimaliseren en de impact op de gezondheid van de mens en het milieu te verminderen. Wanneer het niet meer zal werken, mag u het niet bij het huisvuil zetten maar afleveren in een erkend inzamelcentrum zodat het kan worden gerecycleerd. Zo levert u een bijdrage aan de bescherming van het milieu. NEDERLANDS INHOUDSOPGAVE BESCHRIJVING ............................................................................. 2 INBEDRIJFSTELLING EN GEBRUIK ................................................ 3 Vóór het eerste gebruik ............................................................ 3 Het apparaat ineenzetten en demonteer het apparaat na gebruik ...................................................................................... 4 Beschrijving van het bedieningspaneel en van de automatische programma's ............................................................................. 5 Uw apparaat gebruiken ............................................................ 7 BEDRIJFSSTORINGEN ................................................................... 9 REINIGING EN ONDERHOUD ..................................................... 10 TECHNISCHE INFORMATIE ........................................................ 11 NEDERLANDS BESCHRIJVING 1. Meetbeker 2. Dekking deksel 3. Stoommand 4. Roestvrij stalen pot 5. Staanloze stalen bladen 6. Handgreep 7. Elektrische aansluiting op de handgreep 8. Elektrische aansluiting op potbasis 9. Timer display 10. Elektronisch bedieningspaneel 11. Stroomdraad 12. Motorunit 13. Antislipvoeten 2 NEDERLANDS INBEDRIJFSTELLING EN GEBRUIK Vóór het eerste gebruik Haal het apparaat en de hulpstukken uit hun verpakking, vergewis u ervan dat het apparaat in goede staat en niet beschadigd is. Verwijder zorgvuldig alle verpakkingsmateriaal en laat geen zaken als plastic zakken, polystyreen of elastieken binnen het bereik van kinderen liggen. Die zaken kunnen voor hen gevaarlijk zijn. Was alle hulpstukken af met een in vloeibare producten gedrenkte spons en spoel ze af met warm water alvorens ze met een schone keukenhanddoek af te drogen. Was de hulpstukken nooit in de vaatwasser. Waarschuwing: vermijd het overkoken op de aansluitstekker. Reinig het apparaat met een droge en zachte doek. Dompel de motorunit nooit in water of een andere vloeistof. Was de motorunit nooit in de vaatwasser. 3 NEDERLANDS Het apparaat ineenzetten en demonteer het apparaat na gebruik 1. Zet de pot op de motorunit en druk er naar beneden totdat het op zijn plaats klikt (er is slechts één justeerpositie). 2. Steek de stoommand in de pot als u besluit om de stoomfunctie te gebruiken. 3. Om het deksel te bevestigen, zet het deksel in de richting van de klok in en schuift het uiteinde van de tuit in de ruimte op het voorpaneel. Druk vervolgens de achterkant van de sleuven in het handvat van de kom, totdat u het deksel van het slot vastklikt. 4. Steek de meetbeker in de opening van de deksel. Om het apparaat te demonteren, volg de stappen in omgekeerde volgorde. Waarschuwing: Steek de stekker van het apparaat nooit in het stopcontact voordat de hulpstukken zijn gemonteerd. Haal de stekker altijd uit het stopcontact om hulpstukken te verwijderen. Opgelet: Controleer of alle elementen zorgvuldig op het apparaat zijn gemonteerd. Bij verkeerde montage zal het apparaat niet functioneren. 4 NEDERLANDS Beschrijving van het bedieningspaneel en van de automatische programma's Timer display Weergave van de automatische programma's Bedieningsknop pen van het paneel Beschrijving van de bedieningsknoppen van het paneel Knop "Aan/Uit": na uw apparaat te hebben aangesloten, wordt dit automatisch in stand-by geplaatst en produceert het een bieptoon. De knop "Aan/Uit" knippert om aan te duiden dat het apparaat in stand-by staat. Nadat u uw programma hebt geselecteerd, drukt u op de "Aan/Uit" knop om de afzetting en / of koken van uw gerecht te beginnen. Aan het einde van uw programma zal de blender 3 bips geluid produceren en de timer display zal "OFF" tonen. Druk één keer op de toets "Aan/Uit" om de standby-modus in te schakelen (motor uit, verwarmingselement uit). Knop "Menu": met dit knop kunt u één van de 4 automatische programma's selecteren. Het volstaat op deze knop te drukken om uw programma te selecteren. Let wel: het automatisch programma knippert wanneer het wordt geselecteerd. Knop "Blending bij lage snelheid": druk één keer op deze knop om de mix te selecteren bij lage snelheid en druk dan op de "Aan/Uit" knop om het mengsel te beginnen. Druk nogmaals op de "Aan/Uit" knop om het mengsel te stoppen. Aan het einde van uw programma zal de blender 3 bips geluid produceren en de timer display zal "OFF" tonen. Druk één keer op de toets “Aan/Uit” om de standby-modus in te voeren. Opmerking: het geselecteerde programma knippert op het paneel en blijft licht tijdens het werken. Werkingsmodus: gedurende 3 minuten tot 7000 rpm. 5 NEDERLANDS Knop "Blending bij hoge snelheid": druk één keer op deze knop om de mix te selecteren bij lage snelheid en druk dan op de "Aan/Uit" knop om het mengsel te beginnen. Druk nogmaals op de "Aan/Uit" knop om het mengsel te stoppen. Aan het einde van uw programma zal de blender 3 bips geluid produceren en de timer display zal "OFF" tonen. Druk één keer op de toets “Aan/Uit” om de standby-modus in te voeren. Opmerking: het geselecteerde programma knippert op het paneel en blijft licht tijdens het werken. Werkingsmodus: gedurende 3 minuten tot 7000 rpm. Knop " Pulse / Ice crush ": druk één keer op deze knop om het Pulse / Ice crush programma te selecteren, het programma start automatisch. Druk nogmaals op de «ON / OFF» knop om het mengsel te stoppen. Aan het einde van uw programma zal de blender 3 bips geluid produceren en de timer display zal "OFF" tonen. Druk één keer op de toets «ON / OFF» om de standby-modus in te voeren. Opmerking: het geselecteerde programma licht op het paneel aan en blijft tijdens het functioneren licht aan. Werkingsmodus: Blending 10 seconden tot 15000rpm. Beschrijving van de 4 automatische bereidingsprogramma's « Smooth soup » programma: automatisch bereidingsprogramma's voor soepele soep. Selecteer het programma door te drukken op de knop "Menu" en dan beginnen koken door op de knop "On / Off". Druk nogmaals op de "On / Off" om de automatische programma te stoppen. Als ze worden gekookt, het apparaat piept 3 keer en de timer display "OFF". Druk eenmaal op de knop "On / Off", zal het toestel gaan slapen. Smooth soup Werkingsmodus: totale duur van 30 minuten afwisselend verwarmingsfase en mengfase van het preparaat (max 100 ° C). « Thick soup » programma: automatisch bereidingsprogramma's voor soep met stukken. Thick soup Selecteer het programma door te drukken op de knop "Menu" en dan beginnen koken door op de knop "On / Off". Druk nogmaals op de "On / Off" om de automatische programma te stoppen. Als ze worden gekookt, het apparaat piept 3 keer en de timer display "OFF". Druk eenmaal op de knop "On / Off", zal het toestel gaan slapen. Werkingsmodus: totale duur van 30 minuten slechts verwarmingsfase (max 100 ° C). « Steam » programma: automatisch bereidingsprogramma's voor het stomen. Steam Selecteer het programma door te drukken op de knop "Menu" en dan beginnen koken door op de knop "On / Off". Druk nogmaals op de "On / Off" om de automatische programma te stoppen. Als ze worden gekookt, het apparaat piept 3 keer en de timer display "OFF". Druk eenmaal op de knop "On / Off", zal het toestel gaan slapen. Werkingsmodus: totale duur van 30 minuten slechts verwarmingsfase (max 100 ° C). « Reheat » programma: automatisch bereidingsprogramma's voor opwarmen. Reheat Selecteer het programma door te drukken op de knop "Menu" en dan beginnen koken door op de knop "On / Off". Druk nogmaals op de "On / Off" om de automatische programma te stoppen. Als ze worden gekookt, het apparaat piept 3 keer en de timer display "OFF". Druk eenmaal op de knop "On / Off", zal het toestel gaan slapen. Werkingsmodus: totale duur van 40 minuten slechts verwarmingsfase (75°C – 85°C). 6 NEDERLANDS Uw apparaat gebruiken 1. Plaats u het op een stabiel en effen werkblad. 2. Plaats alle ingrediënten van uw voorbereiding in de blender kom en / of stoomboot. 3. Nadat u uw apparaat hebt ineengezet en gecontroleerd of alle hulpstukken zorgvuldig zijn gemonteerd. 4. Sluit uw apparaat aan op een wandcontactdoos. Na uw apparaat te hebben aangesloten, wordt dit automatisch in stand-by geplaatst en produceert het een bieptoon. De knop "Aan/Uit" knippert om aan te duiden dat het apparaat in stand-by staat. Bereidingen met de 4 automatische bereidingsprogramma's: 1. Nadat uw ingrediënten in de blender kom en voltooi de installatie van het apparaat. Zorg ervoor dat uw apparaat is aangesloten en zich in de standby-modus. 2. Drukt u op de « Menu » van de 4 automatische bereidingsprogramma's selecteren en drukt op de « Aan/Uit » om het koken van uw bereiding te starten. 3. Als ze worden gekookt, het apparaat piept 3 keer en de timer display "OFF". Druk eenmaal op de knop « Aan/Uit » , dat het apparaat in stand-by staat. Mix met de 2 mixprogramma's (lage snelheid / hoge snelheid): 1. Nadat uw ingrediënten in de blender kom en voltooi de installatie van het apparaat. Zorg ervoor dat uw apparaat is aangesloten en zich in de standby-modus. 2. Selecteer een van de twee het mengen van programma's en druk op de « Aan/Uit » voor het inschakelen van het automatische programma. 3. Aan het einde van de mengcyclus, het apparaat piept 3 keer en de timer display "OFF". Druk eenmaal op de knop « Aan/Uit » , dat het apparaat in stand-by staat. Mix met de programma « Pulse/Ice crush »: 1. Nadat uw ingrediënten in de blender kom en voltooi de installatie van het apparaat. Zorg ervoor dat uw apparaat is aangesloten en zich in de standby-modus. 2. Druk één keer op deze knop om het Pulse/Ice crush programma te selecteren, het programma start automatisch. Druk nogmaals op de « Aan/Uit » knop om het mengsel te stoppen. 3. Aan het einde van de mengcyclus, het apparaat piept 3 keer en de timer display "OFF". Druk eenmaal op de knop « Aan/Uit » , dat het apparaat in stand-by staat. Waarschuwing: Haal de stekker van het apparaat altijd uit het stopcontact als het zonder toezicht wordt gelaten en alvorens het te monteren, demonteren of reinige. Waarschuwing: vermijd het overkoken op de aansluitstekker. • Overschrijd nooit het maximale niveau in de blender kom om het risico van letsel te voorkomen: o 1.5L MAX. voor koude bereidingen. o 1.2L MAX. voor warme bereidingen. Steek nooit uw hand of andere voorwerpen in de vultrechter. Laat het apparaat na het starten niet langer dan 30 seconden onbelast draaien. Vergewis u ervan dat de verschillende elementen van het apparaat zorgvuldig gemonteerd zijn. 7 NEDERLANDS Gebruik het apparaat nooit met natte handen. Het geheel van deksel en vultrechter niet openen of de sapcentrifugekom niet demonteren terwijl het apparaat in bedrijf is. Het apparaat nooit verplaatsen terwijl het in bedrijf is. Receptideeën: Storingen Programma Marokkaanse Groentesoep Thick soup Pompoensoep Smooth soup Gaspacho + Gemalen ijs Aardappelpur ee Steam + Oorzaken Oplossingen 1 rode ui, geschild en in stukjes gesneden 1 gewassen en gesneden prei 1 rode paprika, zonder zaden en fijngesneden 1 fijngesneden selderij stengel 1 groene paprika, zaadjes en fijngesneden 2 knoflooktenen, fijngesneden 1 theelepel kruid ras el hanout 400 g gehakte tomaten 1 eetlepel tomatenpuree soep 1 bouillonblokje (groenten) 250ml water Zout en peper Zet alle ingrediënten in de blenderkom. Sluit de kom. Kies het automatische programma « Thick soup » en druk op de « Aan/Uit » voor het inschakelen van het automatische programma. 500g pompoen, zaden en fijngehakt 2 kleine aardappelen, geschild en in stukken gesneden 1 ui, geschild en gesneden 60 cl water 1 kipbakje 20cl crème Zout en peper Zet alle ingrediënten in de blenderkom. Sluit de kom. Kies het automatische programma « Smooth soup » en druk op de « Aan/Uit » voor het inschakelen van het automatische programma. 1 ui gepeld en fijngehakt 1/2 rode paprika gezaaid en fijngesneden 1/2 groene paprika, zonder zaden en fijngesneden 1/2 komkommer in stukken gesneden 1 knoflook, fijngesneden 500 g gehakte tomaten 1 eetlepel azijn 1 snee brood 2 eetlepels olijfolie basilicum Zout en pepe Leg de groenten, knoflook en ui in de kom. Selecteer de " Blending bij lage snelheid”. Voeg de grof gesneden brood in blokjes en druk op een paar keer aan de pols te drukken. Seizoen, voeg de olijfolie, basilicum en azijn. Blend weer een paar keer op Pulse. Laat staan minstens 2 uur in de koelkast voor het opdienen. 200 g ijs Doe ijsblokjes in de blender kom. Sluit de kom. Selecteer de automatische Pulse programma. 800 g aardappelen, geschild en in blokjes 1 ui, geschild en in stukjes gesneden 1 knoflook, fijngesneden 25 cl water Doe de aardappelen in blokjes gesneden land in het stoommandje. Giet water in de kom tot 1.0L markering, plaats de mand in de kom 8 NEDERLANDS 25cl room 1 snufje nootmuskaat Zout en peper Opwarmen en sluit het deksel. Selecteer de stoomfunctie. Als ze worden gekookt, verwijder het stoommandje, laat het kokende water en giet de gekookte aardappelen in de kom. Voeg de overige ingrediënten in de kom, sluit het deksel en selecteer het programma " Blending bij hoge snelheid ". Zet alle ingrediënten in de blenderkom. Sluit de kom. Kies het automatische programma « Reheat » en druk op de « Aan/Uit » voor het inschakelen van het automatische programma Koude bereidingen. Reheat Milkshake anti-stress Mango lassi 4 bananen, gepeld 125 ml melk 3 eetlepels room 1 bolletje vanille-ijs Zet alle ingrediënten in de blenderkom. Sluit de kom. Selecteer het programma " Blending bij hoge snelheid ". 1 mango, geschild, ontpit en gemalen 20 cl melk 20 cl yogurt 2 theelepels honing Zet alle ingrediënten in de blenderkom. Sluit de kom. Selecteer het programma " Blending bij lage snelheid”. BEDRIJFSSTORINGEN Storingen Oorzaken Oplossingen Het apparaat werkt niet na aansluiting op een stopcontact. 1. Hulpstukken slecht gemonteerd. 2. Het deksel is niet juist geplaatst. Geluid terwijl het apparaat in bedrijf is. 1. Piepende/krakende geluiden. 2. Trillen van de motor, van de hulpstukken. Ongewone geluiden of trillingen. Het voedsel wordt verbrand en vast aan de onderkant van het toestel. De ingrediënten worden niet warm genoeg om einde van het programma. 1. Neem de hulpstukken uiteen en zet ze weer ineen. 2. Haal de stekker van het apparaat uit het stopcontact en plaats het deksel terug. Dit is normaal: die geluiden geven aan dat de ingrediënten worden geperst. 1. Haal de stekker van het apparaat uit het 1. De hulpstukken zijn niet correct stopcontact en zet de hulpstukken weer ineengezet. correct ineen. 2. Het apparaat staat niet op een effen en 2. Haal het stopcontact van het apparaat uit stabiel oppervlak. het stopcontact en plaats het apparaat op een effen en stabiel oppervlak. 1. De ingrediënten zeer hoog gehalte aan zetmeel en / of suiker. 1. Pas het recept voor de volgende keer. 2. Te veel eten en niet genoeg vloeistof in 2. Voeg meer vloeistof. het recept. 1. De ingrediënten werden ook gesneden 1. Herhaal dit nog een kookproces. Zorg grof. ervoor dat u uw ingrediënten kleiner (2-3 cm) 2. Te veel water of voedsel. te snijden. 3. Sommige ingrediënten vereisen een 2. Verwijder overtollig water of voedsel. langere koken. 3. Herhaal dit nog een kookproces. 9 NEDERLANDS REINIGING EN ONDERHOUD 1. Schakel uw apparaat na afloop van de voorspoeling met het automatisch reinigingsprogramma uit door te drukken op de knop Aan/Uit". 2. Haal de stekker van het netsnoer uit het stopcontact. 3. Vergewis u er altijd van dat de stekker uit het stopcontact is gehaald alvorens het apparaat te reinigen. Plaats de motorunit niet in de vaatwasser en dompel het apparaat niet in water. De motorunit reinigen: Gebruik een zachte doek om de oppervlakken van het apparaat te reinigen. De hulpstukken reinigen: De hulpstukken kunt u afwassen met een in afwasmiddel gedrenkte spons, afspoelen in warm water en dan afdrogen met een zachte doek. Was de hulpstukken nooit in de vaatwasser. Waarschuwing: vermijd het overkoken op de aansluitstekker. 10 NEDERLANDS Gebruik geen scherpe voorwerpen of toxische en agressieve producten zoals spiritus, industriële afbijtmiddelen of oplosmiddelen om uw apparaat te reinigen want daarmee loopt u het risico het te beschadigen. Dompel het apparaat nooit in water. TECHNISCHE INFORMATIE Model BLC5X Netspanning 220-240V ~ 50Hz Motorvermogen 350W Bereidingsvermogen 700-900W Maximumcapaciteit voor koude bereidingen 1.5L MAX. Maximumcapaciteit voor warme bereidingen 1.2L MAX. 11 Vestel France, 17 rue de la Couture – 94563 Rungis CEDEX Cette notice est aussi disponible sur le site suivant: http://pieces-detachees.sogedis.fr/ This manual instruction is also available on the following website: http://pieces-detachees.sogedis.fr/ Este manual se encuentra también disponible en el siguiente enlace: http://pieces-detachees.sogedis.fr/ Deze gebruikshandleiding is ook beschikbaar op de volgende website: http://pieces-detachees.sogedis.fr/-
 1
1
-
 2
2
-
 3
3
-
 4
4
-
 5
5
-
 6
6
-
 7
7
-
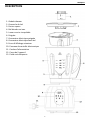 8
8
-
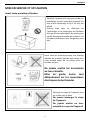 9
9
-
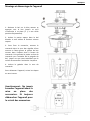 10
10
-
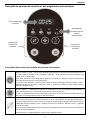 11
11
-
 12
12
-
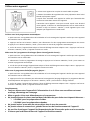 13
13
-
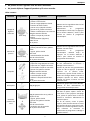 14
14
-
 15
15
-
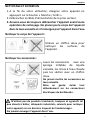 16
16
-
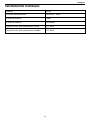 17
17
-
 18
18
-
 19
19
-
 20
20
-
 21
21
-
 22
22
-
 23
23
-
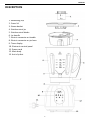 24
24
-
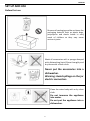 25
25
-
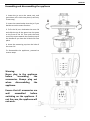 26
26
-
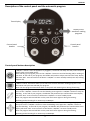 27
27
-
 28
28
-
 29
29
-
 30
30
-
 31
31
-
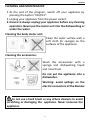 32
32
-
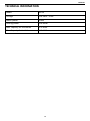 33
33
-
 34
34
-
 35
35
-
 36
36
-
 37
37
-
 38
38
-
 39
39
-
 40
40
-
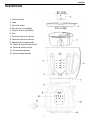 41
41
-
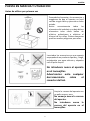 42
42
-
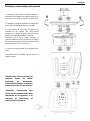 43
43
-
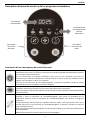 44
44
-
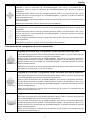 45
45
-
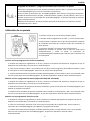 46
46
-
 47
47
-
 48
48
-
 49
49
-
 50
50
-
 51
51
-
 52
52
-
 53
53
-
 54
54
-
 55
55
-
 56
56
-
 57
57
-
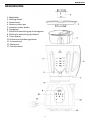 58
58
-
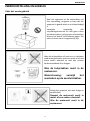 59
59
-
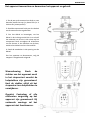 60
60
-
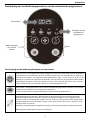 61
61
-
 62
62
-
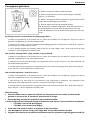 63
63
-
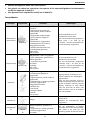 64
64
-
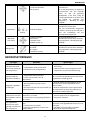 65
65
-
 66
66
-
 67
67
-
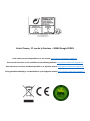 68
68


Telefunken CHAUFFANT BLC5X de handleiding
- Categorie
- Blenders
- Type
- de handleiding
in andere talen
Andere documenten
-
Brandt BLE615EG Handleiding
-
Brandt BLE250G Handleiding
-
LAGRANGE 609010 de handleiding
-
Philips SCF881/01 Handleiding
-
Moulinex LM9245 de handleiding
-
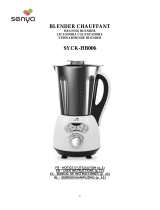 SENYA CHAUFFANT SYCK-HB006 de handleiding
-
Moulinex LM9051B1 Handleiding
-
Philips HR2098/30 Handleiding
-
-
Tefal BL908160 Handleiding
