Samsung CM851RVS Handleiding
- Categorie
- Keuken-
- Type
- Handleiding
Deze handleiding is ook geschikt voor

GEBRUIKSAANWIJZING
INSTRUCTIONS FOR USE
OVEN
OVEN
CM751ZT
CM851RVS
CM851ZT

NL Gebruiksaanwijzing NL 3 - NL 54
EN Instructions for use EN 3 - EN 54

NL 3
Bedieningspaneel ........................................................4
Ovenfuncties .............................................................5
Toebehoren ..............................................................6
Gebruik van deze handleiding ...............................................7
De klok instellen ..........................................................8
De energiebesparingsstand instellen ..........................................9
Verwarmingsmogelijkheden ................................................10
De werking van een magnetronoven .........................................12
De magnetronfunctie gebruiken .............................................13
De ovenfuncties gebruiken .................................................23
De bereidingstijd instellen ..................................................29
De eindtijd instellen .......................................................30
De bereidingstijd uitstellen .................................................31
De combifuncties gebruiken ................................................32
De automatische menustand gebruiken ......................................36
De snelkookstand gebruiken ...............................................42
De aqua clean-stand gebruiken .............................................47
De pieptoon uitschakelen ..................................................48
De kinderslot ............................................................49
De magnetronoven reinigen ................................................50
De magnetronoven opbergen en repareren ....................................50
Problemen oplossen ......................................................51
Foutcodes ..............................................................52
Technische specificaties ...................................................53
Verwijderen van apparaat en verpakking ......................................54
INHOUDSOPGAVE

NL 4
BEDIENINGSPANEEL
1. VERLICHTING AAN/UITTOETS
2. DISPLAY
3. START TOETS
4. FUNCTIEKEUZETOETS
5. TIMERTOETS
6. INSTELTOETS ‘OMLAAG’
7. INSTELTOETS ‘OMHOOG’
8. SELECTIETOETS
9. STOP/ANNULEREN TOETS
1
2
3
94 87
6
5

NL 5
OVENFUNCTIES
Opmerking
•
Niveau 1 bevindt zich onderaan in de oven en de hogere niveaus bevinden zich hierboven.
•
Niveau 4 en 5 worden hoofdzakelijk gebruikt voor de grillfunctie.
•
Niveau 1 wordt met name gebruikt voor de magnetronfunctie met de keramische bakplaat.
•
Raadpleeg de bereidingsrichtlijnen in deze handleiding om het juiste niveau voor uw
gerechten te bepalen.
Bedieningspaneel
Bovenste
verwarmingselementen
Niveau 5
Niveau 4
Niveau 3
Niveau 2
Ovenniveaus
Magnetronniveau 1
Deurvergrendeling
Deur
Handgreep

NL 6
De volgende toebehoren worden bij uw magnetronoven geleverd:
Keramische bakplaat
(te gebruiken voor magnetronstand)
Bakblik
(NIET gebruiken voor magnetronstand)
Ceramic Tray
Grill insert
Grillrooster voor keramische bakplaat
(te gebruiken voor snelmenu en
grillstand)
Stoommand
Gebruik de kunststof Stoommand om
gerechten te bereiden door middel
van stoom.
Opmerking
Raadpleeg de bereidingsrichtlijnen in deze handleiding om het juiste toebehoren voor uw
gerechten te bepalen.
1 2
3 4
TOEBEHOREN
inzetrooster
keramische
bakplaat

NL 7
GEBRUIK VAN DEZE HANDLEIDING
Inleiding
Gefeliciteerd met uw keuze voor deze Etna oven. In het ontwerp van dit product heeft
eenvoudige bediening en optimale gebruiksvriendelijkheid centraal gestaan. De oven biedt een
uitgebreide reeks instellingen, zodat u altijd de juiste bereidingswijze kunt kiezen.
In deze handleiding leest u hoe u deze oven het best kunt gebruiken. Naast informatie over de
bediening, vindt u hier ook achtergrondinformatie die u tijdens het gebruik van het apparaat van
pas kan komen.
Lees de afzonderlijke veiligheidsinstructies voordat u het
apparaat in gebruik neemt!
Lees deze gebruikershandleiding door voordat u het apparaat in gebruik neemt, en berg de
handleiding daarna veilig op voor toekomstig gebruik.
De installatie-instructies worden afzonderlijk meegeleverd.

NL 8
Wanneer u het apparaat voor het eerst op de netspanning aansluit, wordt het DISPLAY
verlicht. Na drie seconden gaan het kloksymbool en ‘12:00’ knipperen op het DISPLAY.
De klok instellen
Druk gelijktijdig op de insteltoets
‘omhoog’ en de selectietoets. '12'
begint te knipperen.
Stel het uur in met de insteltoetsen.
Druk opnieuw op de selectietoets. '00'
begint te knipperen.
Stel de minuten in met de
insteltoetsen.
Druk opnieuw op de selectietoets.
Opmerking
Als u op een toets drukt, begint de instelling te knipperen. U kunt de instelling nu wijzigen. U
kunt de instelling alleen wijzigen als deze knippert. Als het knipperen is gestopt, moet u op de
toets drukken, zodat de instelling weer gaat knipperen.
1 2
3 4
5
DE KLOK INSTELLEN

NL 9
DE ENERGIEBESPARINGSSTAND INSTELLEN
De oven beschikt over een energiebesparingsstand. Deze stand bespaart elektriciteit als de
oven niet in gebruik is.
Stand-bystand
Als de oven 2 minuten niet is gebruikt, wordt de stand-bystand ingeschakeld. (standaard).
ECO-stand
In de ECO-stand wordt de huidige tijd niet weergegeven. U kunt de oven niet gebruiken.
Houd de selectietoets 3 seconden
ingedrukt. De oven schakelt over naar
de ECO-stand en er wordt niets op
het display weergegeven.
Open de deur of druk op een toets als
u naar de stand-bystand wilt gaan.
Op het display wordt de huidige tijd
weergegeven en de oven is klaar voor
gebruik.
1

NL 10
In het volgende overzicht ziet u de verschillende beschikbare verwarmingsmogelijkheden
en instellingen van de oven. Gebruik de bereidingsrichtlijnen op de volgende pagina’s om de
juiste stand en instelling voor uw recepten te bepalen.
MAGNETRONSTAND
A:01
U:01
Voor het bereiden en ontdooien van voedsel worden microgolven
gebruikt. Gerechten worden snel en eciënt bereid zonder dat de
kleur of vorm van het voedsel wordt aangetast. Het vermogen en de
bereidingstijd stelt u handmatig in voor de verschillende gerechten.
OVENSTAND
A:01
U:01
Convectie
In deze stand wordt het boven- en onderelement en de ventilator
geactiveerd. De warmte wordt gelijkmatig verdeeld in de oven.
Deze stand is geschikt voor grote hoeveelheden voedsel waarvoor
warmtetoevoer nodig is, zoals grote gratins en taarten.
Aanbevolen temperatuur: 180 °C
A:01
U:01
Grillstand
De Grillstand is vooral voor kleinere hoeveelheden geschikt, zoals
stokbrood, visfilet of het gratineren van een ovenschotel. Plaats het
gerecht in het midden van het Grillrooster met keramische bakplaat
omdat het element zich in het midden van de oven bevindt.
Aanbevolen temperatuur: 180 °C
A:01
U:01
Maxi Grillstand
Beide bovenelementen verhitten het gerecht. Maxi Grill is geschikt voor
het grillen van biefstuk, worstjes en tosties.
Aanbevolen temperatuur: 220 °C
A:01
U:01
Grill + ventilator
De warmte die door de bovenste verwarmingselementen wordt
gegenereerd, wordt door de ventilator verspreid. Deze stand kan worden
gebruikt voor het grillen van vlees en vis. Aanbevolen temperatuur: 220 °C
AUTOMATISCHE FUNCTIES
A:01
U:01
ONTDOOISTAND
Kies uit 5 voorgeprogrammeerde ontdooistanden. Tijdens het ontdooien
is de ventilator bij een lage temperatuur ingeschakeld. Keer het gerecht
tijdens het ontdooien. U hoeft alleen het programma en het gewicht te
kiezen om het ontdooien te starten.
A:01
U:01
AQUA CLEAN
Door de hete stoom wordt de binnenzijde van de oven nat, waardoor u
de oven eenvoudig kunt reinigen. Het Aqua Clean-programma duurt
15 minuten.
VERWARMINGSMOGELIJKHEDEN

NL 11
A:01
U:01
GROENTE MENUSTAND
Kies uit 10 voorgeprogrammeerde ‘groente menustanden’.
Bereidingstijd en vermogen worden automatisch gekozen. U hoeft
alleen het programma en het gewicht te kiezen om het kookproces te
starten.
A:01
U:01
AUTOMATISCHE MENUSTAND
Kies uit 10 voorgeprogrammeerde automatische bereidingsinstellingen.
De tijd en temperatuur worden automatisch ingesteld. U hoeft alleen het
programma en het gewicht te kiezen om het kookproces te starten.
COMBIFUNCTIES
A:01
U:01
Magnetron + hete lucht
Deze functie is geschikt voor alle soorten vlees en gevogelte, maar ook
voor stoofschotels, gegratineerde schotels, rosbief, biscuitdeeg en lichte
vruchtencakes, taarten en kruimelgebak.
A:01
U:01
Magnetron + grill
Deze functie is geschikt voor alle soorten bereid voedsel dat moet
worden opgewarmd en gebruind (bijv. gebakken pasta) en gerechten die
een korte bereidingstijd vereisen voor een bruin korstje.
Daarnaast kan deze stand worden gebruikt voor dikke porties waarbij
een bruin, knapperig korstje lekker is (bijv. kippenpoten).
VERWARMINGSMOGELIJKHEDEN

NL 12
Microgolven zijn hoogfrequente elektromagnetische golven. De energie maakt het
mogelijk om gerechten te garen of op te warmen zonder de vorm of kleur aan te tasten.
U kunt uw magnetron gebruiken voor het volgende:
• Magnetronstand
• Combifuncties
Bereidingsprincipe
1. De microgolven die door de magnetron worden
gegenereerd, worden gelijkmatig verspreid door
middel van een distributiesysteem. Het gerecht
wordt zo gelijkmatig gegaard.
2. De microgolven worden tot een diepte van ongeveer
2,5 cm door het gerecht geabsorbeerd. Het garen
gaat dan door, omdat de warmte in het gerecht
wordt verspreid.
3. De bereidingstijden variëren en hangen af van de
schaal die u gebruikt en de eigenschappen van het
gerecht:
•
Hoeveelheid en dichtheid
•
Watergehalte
•
Begintemperatuur (wel of niet gekoeld)
Belangrijk
Het gerecht wordt vanbinnen gegaard door middel van warmteverspreiding. Het garen gaat
zelfs nog door als u het gerecht uit de oven hebt gehaald.
Rusttijden in recepten en in dit boekje dienen daarom te worden aangehouden om te zorgen
voor
•
Gelijkmatige verwarming tot binnen in het gerecht;
•
Gelijke temperaturen in alle delen van het gerecht.
DE WERKING VAN EEN MAGNETRONOVEN

NL 13
DE MAGNETRONSTAND GEBRUIKEN
Microgolven zijn hoogfrequente elektromagnetische golven. Bij gebruik van de
magnetron dringen microgolven in het voedsel. Deze golven worden aangetrokken
en geabsorbeerd door water, vet en suiker in het voedsel. Door de microgolven gaan
de moleculen in het voedsel snel bewegen. De snelle beweging van deze moleculen
veroorzaakt wrijving en het voedsel wordt verwarmd door de warmte die hierbij
vrijkomt.
BELANGRIJK: gebruik de keramische bakplaat op niveau 1.
Magnetronstand
Druk 1x op de functiekeuzetoets. De
tijd en het vermogen worden op het
DISPLAY weergegeven.
Druk op de insteltoetsen om de
gewenste bereidingstijd in te stellen.
Max. in te stellen bereidingstijd is
90 minuten.
Als u het vermogen wilt wijzigen, drukt
u op de selectietoets. en stelt u met de
insteltoetsen het gewenste vermogen in.
Druk op de starttoets om de bereiding
te starten.
1
2
43

NL 14
Richtlijnen voor het vermogen van de magnetron
VERMOGEN PERCENTAGE
(%)
UITGANGSVERMOGEN
(W)
OPMERKING
MAXIMUM 100 800
Voor het verwarmen
van vloeistoen.
HOOG 83 700
Voor het verwarmen
en bereiden van
gerechten.
MIDDELHOOG 67 600
Voor het verwarmen
en bereiden van
gerechten.
GEMIDDELD 50 450
Voor het bereiden van
vlees en het verwarmen
van delicate gerechten.
MIDDELLAAG 33 300
ONTDOOIEN 20 180
Voor ontdooien en
doorgaren.
LAAG 11 100
Voor het ontdooien van
delicate gerechten.
DE MAGNETRONSTAND GEBRUIKEN

NL 15
DE MAGNETRONSTAND GEBRUIKEN
Richtlijnen voor magnetronkookgerei
Kookgerei dat u voor de magnetronstand gebruikt, mag de microgolven niet blokkeren.
Metalen zoals roestvrij staal, aluminium en koper weerkaatsen microgolven. Gebruik daarom
geen metalen kookgerei. Kookgerei waarop staat aangegeven dat het magnetronbestendig
is, kan veilig worden gebruikt. Raadpleeg voor meer informatie over geschikt kookgerei
de volgende richtlijnen en gebruik altijd de keramische bakplaat op niveau 1 als u de
magnetronstand gebruikt.
KOOKGEREI MAGNETRON
VEILIG
OPMERKINGEN
Aluminiumfolie
37
Kan in kleine hoeveelheden worden
gebruikt om te voorkomen dat bepaalde
delen van het gerecht te gaar worden.
Vonkontlading kan voorkomen als de
folie zich te dicht bij de ovenwand
bevindt of als er te veel folie wordt
gebruikt.
Porselein en aardewerk
3
Porselein, aardewerk, aardewerk met
een glanslaag en ivoorporselein zijn
doorgaans geschikt, tenzij ze zijn
voorzien van een metalen randje.
Wegwerpservies van
polyester of karton
3
Soms worden diepvriesmaaltijden
verpakt in wegwerpservies.
Fastfoodverpakkingen
•
Polystyreenbekers
•
Papieren zakken of
krantenpapier
•
Gerecycled papier
of metalen randjes
3
7
7
Kan worden gebruikt voor het verwarmen
van gerechten. Bij oververhitting kan het
polystyreen smelten.
Kan vlam vatten.
Kan vonkontlading veroorzaken.
Glaswerk
•
Ovenschalen
•
Fijn glaswerk
•
Glazen potten
3
3
3
Kan worden gebruikt, tenzij voorzien van
een metalen randje. Kan worden gebruikt
voor het verwarmen van gerechten of
vloeistoen. Dun glas kan breken of
barsten bij plotselinge verhitting.
Het deksel moet worden verwijderd.
Alleen geschikt voor verwarmen.

NL 16
KOOKGEREI MAGNETRON
VEILIG
OPMERKINGEN
Metaal
•
Schalen
•
Sluitstrips voor
diepvrieszakjes
7
7
Kan vonkontlading of brand veroorzaken.
Papier
•
Borden, bekers,
servetten en
keukenpapier
•
Gerecycled papier
3
7
Voor korte bereidingstijden en
verwarmen. Voor het absorberen van
overtollig vocht.
Kan vonkontlading veroorzaken.
Plastic
•
Bakjes
•
Huishoudfolie
Diepvrieszakjes
3
3
37
Met name hittebestendig
thermoplastisch materiaal. Andere
soorten plastic kunnen kromtrekken
of verkleuren bij hoge temperaturen.
Gebruik geen melamineplastic.
Kan worden gebruikt om vocht vast te
houden. Raak het gerecht niet aan. Wees
voorzichtig wanneer u de folie verwijdert;
er kan hete stoom ontsnappen.
Alleen indien kook- of ovenbestendig.
Mag niet luchtdicht zijn. Indien nodig
inprikken met een vork.
Was- of bakpapier
3
Kan worden gebruikt om vocht vast te
houden en spatten te voorkomen.
Opmerking
Vonken in de magnetron noemt men ook wel vonkontlading.
3: Aanbevolen
37: Voorzichtig
7 : Onveilig
DE MAGNETRONSTAND GEBRUIKEN

NL 17
DE MAGNETRONSTAND GEBRUIKEN
Algemene bereidingsrichtlijnen voor de magnetronfunctie
Gerechten geschikt voor bereiding in de magnetron
Verschillende soorten gerechten kunnen in de magnetron worden bereid, zoals verse of
ingevroren groenten, fruit, pasta, rijst, granen, bonen, vis en vlees. Ook saus, custard, soep,
gestoomde pudding, vruchtengelei en chutney kunt u in een magnetron bereiden.
Afdekken tijdens bereiding
Gerechten dienen te worden afgedekt voor de bereiding, omdat het water verdampt en de
stoom bijdraagt aan het bereidingsproces. U kunt gerechten op verschillende manieren
afdekken, bijvoorbeeld met een keramisch bord, een plastic deksel of magnetronbestendige
huishoudfolie.
Rusttijden
Na de bereiding is het belangrijk om het gerecht gedurende de aanbevolen tijd te laten rusten
voor een gelijkmatige verdeling van de temperatuur in het gerecht.
Algemene bereidingsrichtlijnen voor ingevroren groenten
Gebruik een geschikte glazen pyrexschaal met deksel. Houd gedurende de minimumtijd
afgedekt (zie de tabel).
Zet de bereiding voort voor het gewenste resultaat. Roer tijdens de bereiding twee keer
door en na de bereiding nog eens. Voeg na de bereiding zout, kruiden of boter toe. Houd
gedurende de rusttijd afgedekt.
Gerecht Portie
(g)
Vermogen
(W)
Tijd
(min.)
Rusttijd
(min.)
Instructies
Spinazie 150 600 5 - 6 2 - 3 Voeg 15 ml (1
eetlepel) koud
water toe.
Broccoli 300 600 8 - 9 2 - 3 Voeg 30 ml (2
eetlepels) koud
water toe.
Doperwten 300 600 7 - 8 2 - 3 Voeg 15 ml (1
eetlepel) koud
water toe.
Sperziebonen 300 600 7½ - 8½ 2 - 3 Voeg 30 ml (2
eetlepels) koud
water toe.
Gemengde
groenten
(wortelen/doperwten/
maïs)
300 600 7 - 8 2 - 3 Voeg 15 ml (1
eetlepel) koud
water toe.
Gemengde groenten
(Chinese groentenmix)
300 600 7½ - 8½ 2 - 3 Voeg 15 ml (1
eetlepel) koud
water toe.

NL 18
Bereidingsrichtlijnen voor verse groenten
Gebruik een geschikte glazen pyrexschaal met deksel. Voeg 30 - 45 ml (2 - 3 eetlepels) koud
water toe voor elke 250g, tenzij een andere hoeveelheid water wordt aanbevolen (zie de
tabel). Houd gedurende de minimumtijd afgedekt (zie de tabel). Zet de bereiding voort voor
het gewenste resultaat. Roer tijdens de bereiding eenmaal door en na de bereiding nog eens.
Voeg na de bereiding zout, kruiden of boter toe. Dek af tijdens de rusttijd van 3 minuten.
Tip: snijd verse groenten in stukken van gelijke grootte. Hoe kleiner de stukjes, hoe
korter de bereiding.
Opmerking: Alle verse groenten dienen te worden bereid op vol vermogen (800 W).
Gerecht Portie
(g)
Tijd
(min.)
Rusttijd
(min.)
Instructies
Broccoli 250
500
4 - 5
5 - 6
3
Zorg voor roosjes van gelijke grootte.
Laat de steeltjes naar het midden wijzen.
Spruitjes
250 5 - 6 3 Voeg 60 - 75 ml (5 - 6 eetlepels) water
toe.
Wortelen 250 5 - 6 3 Snijd de wortelen in schijfjes van gelijke
grootte.
Bloemkool 250
500
5 - 6
7 - 8
3 Zorg voor roosjes van gelijke grootte.
Snijd grote roosjes doormidden. Laat de
steeltjes naar het midden wijzen.
Courgette 250 3 - 4 3 Snijd de courgette in plakjes. Voeg 30 ml
(2 eetlepels) water of een klontje boter toe.
Kook ze tot ze beetgaar zijn.
Aubergine 250 3 - 4 3 Snijd de aubergine in dunne plakjes
en sprenkel er 1 eetlepel citroensap
overheen.
Prei 250 3 - 4 3 Snijd de prei in dikke ringen.
Champignons 125
250
1 - 2
2 - 3
3 Gebruik bij de bereiding kleine
champignons in zijn geheel en snijd
grotere champignons in schijfjes.
Voeg geen water toe. Besprenkel met
citroensap. Breng op smaak met peper
en zout.
Giet voor het serveren af.
Uien 250 4 - 5 3 Snijd de uien in ringen of halve ringen.
Voeg slechts 15 ml (1 eetlepel) koud
water toe.
Paprika 250 4 - 5 3 Snijd de paprika in kleine reepjes.
Aardappelen 250
500
4 - 5
7 - 8
3 Weeg de geschilde aardappelen en snijd
ze doormidden (of eventueel in vieren)
voor stukken van gelijke grootte.
Koolraap 250 5 - 6 3 Snijd de koolraap in blokjes.
DE MAGNETRONSTAND GEBRUIKEN

NL 19
DE MAGNETRONSTAND GEBRUIKEN
Bereidingsrichtlijnen voor rijst en pasta
Rijst Gebruik een grote, glazen pyrexschaal met deksel. (Houd er rekening mee dat rijst
tijdens de bereiding in volume verdubbelt.) Houd afgedekt tijdens de bereiding.
Roer na de bereiding en voor de rusttijd door. Voeg zout of kruiden en boter toe. De
rijst heeft mogelijk niet al het water geabsorbeerd nadat de bereiding is voltooid.
Pasta Gebruik een grote, glazen pyrexschaal. Voeg kokend water en een snufje zout toe
en roer het geheel goed door. Dek niet af tijdens de bereiding. Roer tijdens en na
de bereiding enkele malen door. Dek tijdens de rusttijd af en giet daarna goed af.
Gerecht Portie
(g)
Vermogen
(W)
Tijd
(min.)
Rusttijd
(min.)
Instructies
Witte rijst
(parboiled)
250
375
800
17 - 18
18 - 20
5
Voeg 500 ml koud water toe.
Voeg 750 ml koud water toe.
Bruine rijst
(parboiled)
250
375
800
20 - 22
22 - 24
5
Voeg 500 ml koud water toe.
Voeg 750 ml koud water toe.
Gemengde rijst
(rijst+wilde rijst)
250 800 17 - 19 5
Voeg 500 ml koud water toe.
Gemengde
granen
(rijst+graan)
250 800 18 - 20 5
Voeg 400 ml koud water toe.
Pasta 250 800 10 - 11 5 Voeg 1000 ml warm water toe.
OPWARMEN
De magnetronoven heeft voor het opwarmen van gerechten slechts een fractie van de tijd
nodig die een traditionele oven gebruikt.
Indelen en afdekken
Vermijd het opwarmen van grote stukken voedsel. Deze worden mogelijk te gaar en drogen uit
voordat ze vanbinnen warm genoeg zijn. Het opwarmen van kleinere stukken werkt beter. Als
u gerechten afdekt tijdens het verwarmen, voorkomt u uitdroging.
Instellingen voor het vermogen
Voor het opwarmen van gerechten kunnen verschillende vermogens worden ingesteld.
Doorgaans is het raadzaam om een laag vermogen te gebruiken voor delicate gerechten of
gerechten die snel warm zijn, zoals vruchtengebak.
Roeren
Roer gerechten goed door of draai het om tijdens het opwarmen voor de beste resultaten.
Roer het indien mogelijk voor het opdienen nog eens door. Roeren is vooral belangrijk als u
vloeistoen verwarmt.
Opwarmings- en rusttijden
Als u gerechten voor het eerst opwarmt, is het handig om de benodigde tijd te noteren om
in de toekomst te kunnen raadplegen. Voorkom oververhitting. Als u niet zeker bent over de
bereidingstijd, kunt u beter een korte tijd aanhouden. U kunt dan, indien nodig, nog extra tijd
toevoegen. Zorg er altijd voor dat opgewarmde gerechten door en door verhit zijn.
Laat gerechten na het opwarmen kort staan voor een gelijkmatige verdeling van de
temperatuur. De aanbevolen rusttijd na het verwarmen is 2 - 4 minuten.

NL 20
DE MAGNETRONSTAND GEBRUIKEN
Vloeistoen opwarmen
Wees voorzichtig bij het verwarmen van vloeistoen. Om spatten en mogelijke verbranding te
voorkomen, zet u een lepel of glazen roerstaafje in de drank. Roer tijdens en zeker ook na het
verwarmen door. Laat na het verwarmen ten minste 20 seconden staan voor een gelijkmatige
verdeling van de temperatuur.
Babyvoeding opwarmen
Babyvoeding
Wees voorzichtig bij het verwarmen van babyvoeding. Doe het gerecht in een diep keramisch
bord. Dek het af met een plastic deksel. Roer na het verwarmen goed door. Laat voor gebruik
2 - 3 minuten staan. Roer het opnieuw door en controleer de temperatuur.
De aanbevolen gebruikstemperatuur is 30-40 °C.
Babymelk
Giet melk in een gesteriliseerde glazen fles. Verwarm zonder de fles af te dekken. Verwarm
een babyfles nooit met de speen erop. De fles kan bij oververhitting ontploen. Schud de fles
goed voor de rusttijd en schud deze voor gebruik opnieuw. Controleer altijd de temperatuur
van babyvoeding of melk voordat u uw baby voedt.
De aanbevolen gebruikstemperatuur is 37 °C.
Babyvoeding en melk opwarmen
Neem het vermogen en de tijd in deze tabel als richtlijn voor het opwarmen.
Gerecht Portie Vermogen
(W)
Tijd Rusttijd
(min.)
Instructie
Babyvoeding
(groenten +
vlees)
190 g 600 W
30 -
40 sec.
2 - 3
Schep de inhoud op een diep
keramisch bord. Houd afgedekt
tijdens de bereiding. Roer het
voedsel na de bereiding door. Laat
2-3 minuten staan. Roer het voor
gebruik goed door en controleer de
temperatuur zorgvuldig.
Babypap
(granen +
melk + fruit)
190 g 600 W
20 -
30 sec.
2 - 3
Schep de inhoud op een diep
keramisch bord. Houd afgedekt
tijdens de bereiding. Roer het
voedsel na de bereiding door. Laat
2-3 minuten staan. Roer het voor
gebruik goed door en controleer de
temperatuur zorgvuldig.
Babymelk
100
ml
200
ml
300 W
30 - 40
sec.
50 sec.
tot
1min.
2 - 3
Roer of schud de inhoud goed en
giet deze in een gesteriliseerde
glazen fles. Zet de fles in het midden
van de keramische bakplaat. Dek
niet af tijdens de bereiding. Schud
de fles goed en laat deze ten minste
3 minuten staan. Schud de inhoud
goed voor gebruik en controleer de
temperatuur zorgvuldig.

NL 21
DE MAGNETRONSTAND GEBRUIKEN
Vloeistoen en voedsel opwarmen
Neem het vermogen en de tijd in deze tabel als richtlijn voor het opwarmen.
Gerecht Portie vermogen
(W)
Tijd Rusttijd
(min.)
Instructie
Drank
250 ml
(1 mok)
500 ml
(2
mokken)
800 W
1½ - 2
2-3
1-2
Giet de drank in een keramische
beker en verwarm de drank
zonder de beker af te dekken.
Zet de beker in het midden van
de keramische bakplaat. Roer
de inhoud voor en na de rusttijd
voorzichtig door.
Soep
(gekoeld)
250 g 800 W 3-4 2-3
Giet het gerecht in een diep
keramisch bord. Dek het af met
een plastic deksel. Roer na het
verwarmen goed door. Roer voor
het opdienen nog eens door.
Stoofschotel
(gekoeld)
350 g 600 W 5-6 2-3
Giet het gerecht in een diep
keramisch bord. Dek het af met
een plastic deksel. Roer na het
verwarmen goed door. Roer voor
het opdienen nog eens door.
Pasta
met saus
(gekoeld)
350 g 600 W 5-6 2-3
Giet het gerecht in een diep
keramisch bord. Dek het af met
een plastic deksel. Roer na het
verwarmen goed door. Roer voor
het opdienen nog eens door.
Complete
maaltijd
(gekoeld)
350 g
450 g
600 W
5-6
6-7
3
Schep 2-3 gekoelde gerechten
op een keramisch bord. Dek het
geheel af met huishoudfolie.
ONTDOOIEN
Met magnetrons kunt u bevroren gerechten uitstekend ontdooien. Microgolven zorgen ervoor
dat bevroren gerechten in korte tijd geleidelijk wordt ontdooid. Dit kan een groot voordeel zijn
als u onverwachte gasten hebt. Bevroren gevogelte moet vóór de bereiding geheel ontdooid
zijn. Verwijder eventuele metalen strips en haal het product uit de verpakking om vocht te laten
weglopen. Leg het bevroren gerechten op een bord zonder dit af te dekken. Draai het halverwege
om, laat eventueel vocht weglopen en verwijder eventuele organen zo snel mogelijk. Controleer het
gerecht nu en dan om ervoor te zorgen dat het niet warm wordt. Als kleinere, dunnere stukken van
het bevroren gerecht warm worden, kunt u ze beschermen door ze in te pakken met kleine stukken
aluminiumfolie. Als het gevogelte aan de buitenkant warm wordt, drukt u op STOP/ANNULEREN en
laat u het 20 minuten staan voordat u verdergaat. Laat vis, vlees en gevogelte staan om verder te
ontdooien. De rusttijd voor volledig ontdooien is afhankelijk van de hoeveelheid voedsel die u wilt
ontdooien. Raadpleeg de tabel op de volgende pagina.
Tip: platte gerechten kunt u sneller ontdooien dan dikke stukken, en voor kleine
hoeveelheden kost dit minder tijd dan voor grote. Houd hier rekening mee
wanneer u het gerecht invriest en ontdooit.

NL 22
DE MAGNETRONSTAND GEBRUIKEN
Voor het ontdooien van bevroren gerechten met een temperatuur van ongeveer -18 tot
-20 °C houdt u de volgende tabel aan als richtlijn.
Bevroren gerechten dienen te worden ontdooid op het ontdooivermogen (180 W).
Plaats het gerecht op de keramische bakplaat en schuif deze op niveau 1 in de magnetron.
Gerecht Portie
(g)
Tijd
(min.)
Rusttijd
(min.)
Instructies
Vlees
Rundergehakt
Varkenslapjes
250
500
250
6 - 7
8 - 12
7 - 8
15 - 30
Leg het vlees op een keramisch bord.
Pak dunnere randjes in met
aluminiumfolie.
Draai het voedsel op de helft van de
ontdooitijd om.
Gevogelte
Kipstukken
Hele
kip
500
(2
stuks)
1200
12 - 14
28 - 32
15 - 60 Leg kipstukken met de huid naar
beneden en hele kippen met het
borststuk naar beneden op een
keramisch bord. Pak dunnere delen
zoals de vleugels en uiteinden in met
aluminiumfolie. Draai het voedsel op de
helft van de ontdooitijd om.
Vis
Visfilets
Hele vis
200
400
6 - 7
11 - 13
10 - 25 Leg bevroren vis in het midden van een
keramisch bord. Leg dunnere delen
onder de dikkere delen. Pak de smalle
uiteinden van de filets en de staart van
de hele vis in met aluminiumfolie. Draai
het voedsel op de helft van de ontdooitijd
om.
Fruit
Bessen 300 6 - 7 5 - 10 Verdeel het fruit in een grote, platte,
ronde glazen schaal.
Brood
Broodjes (elk
ca. 50 g)
Geroosterd
brood/tosti
2 stuks
4 stuks
250
500
1 - 1½
2½ - 3
4 - 4½
7 - 9
5 - 20 Leg broodjes in een cirkel of leg het
brood horizontaal op keukenpapier op de
keramische bakplaat. Draai het voedsel
op de helft van de ontdooitijd om.

NL 23
DE OVENFUNCTIES GEBRUIKEN
Deze stand biedt vier instellingen. Raadpleeg de bereidingsrichtlijnen om de juiste
instelling te bepalen.
Ovenstanden
Druk op de functiekeuzetoets om een
ovenstand te selecteren.
Druk meerdere keren op de
functiekeuzetoets tot de gewenste
ovenstand in de display verschijnt.
A:01
U:01
Hetelucht
Druk 2x op de functietoets
A:01
U:01
Grill + ventilator
Druk 3x op de functietoets
A:01
U:01
Maxi grill
Druk 4x op de functietoets
A:01
U:01
Grill
Druk 5x op de functietoets
1

NL 24
DE OVENFUNCTIES GEBRUIKEN
Als u de temperatuur wilt wijzigen, drukt
u op de selectietoets en stelt u met de
insteltoetsen de gewenste temperatuur
in. Tijdens de bereiding kunt u de
temperatuur aanpassen.
Druk op de timertoets en de instel-
toetsen om de gewenste bereidings-
tijd in te stellen. Max. in te stellen
bereidingstijd is 10 uur. Tijdens de
bereiding kunt u de bereidingstijd
aanpassen.
Druk op de starttoets om de bereiding
te starten.
Opmerking
1) Tijdens de bereiding kunt u de bereidingstijd en de temperatuur aanpassen.
2) Als de ovenstand wordt gebruikt, wordt de werking van de elementen regelmatig
onderbroken om de temperatuur te reguleren.
2 3
4

NL 25
Hetelucht
In deze stand wordt het boven- en onderelement en de ventilator geactiveerd. De warmte
wordt gelijkmatig verdeeld in de oven. Deze stand is geschikt voor grote hoeveelheden
voedsel waarvoor warmtetoevoer nodig is, zoals grote gratins en taarten.
De bakplaat of het Grillrooster met keramische
bakplaat wordt meestal geplaatst op niveau 2.
* Temperatuurinstelling: van 40 - 230 °C.
* Gebruik ovenservies dat bestand is tegen een temperatuur van 250 °C.
Kooktabel
De temperatuur en bereidingstijden in deze tabel zijn richtlijnen.
Wij adviseren om de oven voor te verwarmen bij gebruik van de intensief functie.
Gerecht Niveau Toebehoren Temperatuur (°C) Tijd (min)
Lasagne 2 kg
2
Grillrooster met
keramische
bakplaat
180 0:20 - 0:25
Groente Gratin 2 kg
2
Grillrooster met
keramische
bakplaat
170 0:40 - 0:50
Aardappel Gratin 2 kg
2 Grillrooster met
keramische
bakplaat
170 0:50 - 1:00
Runderbraadstuk/2 kg
half doorbakken
2 Grillrooster met
keramische
bakplaat
160 1:30 - 1:40
Hele eend / 2 kg
2 Grillrooster met
keramische
bakplaat
180 1:30 - 1:40
2 hele kippen /
elk 1,2 kg
2 Grillrooster met
keramische
bakplaat
180 1:30 - 1:40
Let op
Het is niet noodzakelijk om het gerecht om te keren, maar als u dit halverwege wel doet, krijgt
u een beter resultaat.
DE OVENFUNCTIES GEBRUIKEN

NL 26
Grill
Deze functie is bedoeld voor het grillen van kleinere hoeveelheden vlakke gerechten zoals
biefstuk, schnitzel, vis en toast. Plaats de gerechten in het midden op het rooster. Alleen het
boven element is ingeschakeld.
3
4
Gebruik voor grillen het grillrooster met
keramische bakplaat op niveau 4 en de
bakplaat op niveau 3.
* Temperatuurinstelling: vanaf 180 °C.
Grilltabel
De temperatuur en bereidingstijden in deze tabel zijn richtlijnen.
Gerecht Niveau Toebehoren Temperatuur (°C) Tijd (min)
Camembert smelten
(2 – 4 elk 75 g)
De oven niet voorverwarmen
4 Grillrooster
met
keramische
bakplaat
200 9 - 11
Diepvries stokbrood met
beleg (tomaat-mozzarella of
ham & kaas)
4 Grillrooster
met
keramische
bakplaat
200 14 - 16
Vissticks, diepvries
(300-450 g)
De oven niet voorverwarmen
4 Grillrooster
met
keramische
bakplaat
200 15 - 20
Visburger, diepvries
(300-450 g)
De oven niet voorverwarmen
3 Bakplaat 180 23 - 27
Pizza, diepvries (300-400 g)
De oven niet voorverwarmen
4 Grillrooster
met
keramische
bakplaat
170 15 - 18
DE OVENFUNCTIES GEBRUIKEN

NL 27
Maxi grill
De maxi grill is uitermate geschikt voor het grillen van grotere hoeveelheden vlakke gerechten,
zoals biefstuk, schnitzel en vis. De maxi grill is tevens geschikt voor het bereiden van toast.
Beide bovenelementen en het grillelement zijn ingeschakeld wanneer u deze ovenfunctie kiest.
Het is aan te bevelen de oven voor te verwarmen wanneer u de maxi grill gebruikt.
Gebruik voor grillen het grillrooster met
keramische bakplaat op niveau 4.
* Temperatuurinstelling: van 150 - 230 °C.
* Gebruik ovenservies dat bestand is tegen een temperatuur van 230 °C.
Grilltabel
De temperatuur en bereidingstijden in deze tabel zijn richtlijnen.
Gerecht Niveau Toebehoren Temperatuur (°C) Tijd (min)
Worstjes (dik)
5-8 stuks
4 Grillrooster met
keramische
bakplaat
180 5 - 7
keren
5 - 7
Worstjes (dun) 8-10 stuks 4 Grillrooster met
keramische
bakplaat
180 4 - 5
keren
4 - 5
Toast 5-10 stuks 4 Grillrooster met
keramische
bakplaat
230 1 - 2
keren
1 - 2
Tosties 4-6 stuks 4 Grillrooster met
keramische
bakplaat
200 4 - 8
Gevulde pannenkoek
(350-450 g)
4 Bakplaat 200 20 - 25
Biefstuk (400-800 g) 4 Grillrooster met
keramische
bakplaat
230 7 - 8
keren
6 - 7
DE OVENFUNCTIES GEBRUIKEN

NL 28
Grill + ventilator
Het grillelement en de ventilator in de achterzijde van de oven zijn ingeschakeld. De ventilator
laat de hete lucht circuleren. U kunt de oven het beste voorverwarmen voordat u gerechten in
de oven plaatst.
Voor het grillen wordt het grillrooster met
keramische bakplaat of de bakplaat doorgaans
op niveau 4 geplaatst.
* Temperatuurstand: 150 - 230 °C
* Zorg ervoor dat de glazen schalen die u gebruikt
bestand zijn tegen temperaturen van 40 - 250 °C.
Bereidingsrichtlijnen
Neem de temperaturen en tijden in deze tabel als richtlijn voor het grillen. Stel een
grilltemperatuur van 170-220 °C in en verwarm de oven 5 minuten voor.
Gerecht Niveau
rooster
Tijd
(minuten)
Toebehoren
Temperatuur (°C)
Worsten 250-350g 4 7 - 9
Grillrooster met keramische
bakplaat
200
Aardappelpartjes 4
stuks
4 20 - 23
Grillrooster met keramische
bakplaat
210
Bevroren ovenfrites
400-500 g
4 11 - 15
Bakplaat
220
Bevroren
aardappelkroketjes
6-8 elk
4 18 - 22
Bakplaat
210
Bevroren kipnuggets
400-500 g
4 9 - 13
Bakplaat
220
Zalmmoot 400-500 g
4 12 - 15
Grillrooster met keramische
bakplaat/bakplaat
220
Vislet 300-400 g
4 12 - 15
Grillrooster met keramische
bakplaat/bakplaat
180
Hele vis 300-400 g
4 10 - 13
Grillrooster met keramische
bakplaat/bakplaat
180
Kipstukken 400-500 g
4 27 - 32
Grillrooster met keramische
bakplaat/bakplaat
180
Opmerking
Voorverwarmen wordt aanbevolen.
Als de deur wordt geopend tijdens de bereiding, stopt de oven. Sluit de deur en druk op Start
om de oven opnieuw te starten.
DE OVENFUNCTIES GEBRUIKEN

NL 29
DE BEREIDINGSTIJD INSTELLEN
U kunt een bereidingstijd van maximaal 10 uur instellen. Als de bereidingstijd verstreken
is schakelt de oven automatisch uit.
Voorbeeld: instellen van een bereidingstijd.
Kies de gewenste stand en functie (en
stel indien gewenst de temperatuur
in).
Druk op de timertoets.
Het symbool van de bereidingstijd
licht op in de display.
Stelt met de insteltoetsen de gewenste
bereidingstijd in. Druk op de timertoets.
Druk op START. De bereiding wordt
gestart.
Opmerking
1) Wanneer de ingestelde tijd verstreken is, hoort u 4 geluidssignalen. Op het display
knippert ‘0:00’ en de oven schakelt automatisch uit. De huidige tijd wordt op het display
weergegeven.
2) U kunt de geprogrammeerde bereidingstijd op bovenstaande manier opnieuw instellen.
3) Als u de geprogrammeerde bereidingstijd wilt annuleren, drukt u de timertoets en stelt u met
de insteltoetsen de tijd in op nul.
1
2
4
3

NL 30
Stel een eindtijd in wanneer u de oven wilt laten uitschakelen. Voorbeeld: oven
uitschakelen om 14.00 uur.
Kies de gewenste stand en functie (en
stel indien gewenst de temperatuur in).
Druk 3 seconden op de timertoets.
De huidige tijd wordt knippert.
Het ‘eindtijd’ symbool licht op.
Voorbeeld
Het is 13:00 uur.
De cijfers '13:00' knipperen.
Stel met de insteltoetsen de gewenste
eindtijd (14:00) in.
Voorbeeld: De gewenste tijd is 14:00.
Druk opnieuw op de timertoets.
Voorbeeld: De huidige tijd is 13:00.
De gewenste eindtijd is 14:00.
Druk op START om de bereiding te
starten. De bereidingstijd '1:00' wordt
weergegeven. De bereiding wordt
gestart.
Opmerking
1) Op het tijddisplay wordt de resterende tijd weergegeven. Wanneer de ingestelde tijd
verstreken is, hoort u 4 geluidssignalen. Op het display knippert ‘0:00’ en de oven schakelt
automatisch uit. De huidige tijd wordt op het display weergegeven.
2) Tijdens de bereiding kunt u de vooraf ingestelde bereidingstijd aanpassen voor betere resultaten.
Druk op de timertoets en pas de tijd aan met de insteltoetsen.
3) Als u de geprogrammeerde bereidingstijd wilt annuleren, drukt u de timertoets en stelt u
met de insteltoetsen de tijd in op nul. Druk opnieuw op de timertoets.
3) U kunt de eindtijd op bovenstaande manier opnieuw instellen. Als u de geprogrammeerde
eindtijd wilt annuleren, drukt u op EINDTIJD en stelt u de tijd in op de huidige tijd.
1 2
4
3
5
DE EINDTIJD INSTELLEN

NL 31
DE BEREIDINGSTIJD UITSTELLEN
Stel een eindtijd in (de tijd wanneer de oven uit moet schakelen) en een bereidingstijd in.
Voorbeeld: Instellen van een bereidingstijd (2 uur) en een eindtijd (18.00 uur)
Voorbeeld met de heteluchtstand: Huidige tijd: 12:00 uur
Bereidingstijd: 2 uur
Eindtijd: u wilt de bereiding stopzetten om 18:00 uur
Kies de gewenste stand en functie (en
stel indien gewenst de temperatuur
in).
Druk op de timertoets. Stelt met de
insteltoetsen de gewenste bereidingstijd
in (2 uur). Het symbool van de
bereidingstijd licht op in de display.
Druk 3 seconden op de timertoets.
De bereidingstijd wordt bij de
huidige tijd opgeteld en '14:00'
wordt weergegeven. Het symbool
van de eindtijd licht op.
Stel met de insteltoetsen de gewenste
eindtijd (18:00) in. Wacht 5 seconden
totdat de eindtijd ingestelt is.
Druk op START om de bereiding te
starten.
Op het display wordt een figuur
weergegeven dat aangeeft dat de
uitstelfunctie is geactiveerd.
De oven start automatisch op
de ingestelde tijd (16:00) en de
bereidingstijd wordt weergegeven.
Opmerking
•
De bereidingstijd en de eindtijd kunnen voor de ingestelde tijd worden gewijzigd.
•
Wanneer de ingestelde tijd verstreken is, hoort u 4 geluidssignalen. Op het display knippert
‘0:00’ en de oven schakelt automatisch uit.
WAARSCHUWING
Laat het gerecht niet te lang in de oven staan; het kan bederven.
1 2
3 4

NL 32
DE COMBIFUNCTIES GEBRUIKEN
Magnetron + grill
In deze stand worden stralingswarmte van de grill en de snelle bereiding door middel van de
magnetron gecombineerd.
De bereidingstijd wordt verkort en het resultaat is een gebruind, knapperig laagje.
Deze functie is geschikt voor alle soorten bereid voedsel dat moet worden opgewarmd en
gebruind (bijv. gebakken pasta) en gerechten die een korte bereidingstijd vereisen voor een
bruin korstje. Daarnaast kan deze stand worden gebruikt voor dikke porties waarbij een bruin,
knapperig korstje lekker is (bijv. kippenpoten).
Als u beide zijden van het voedsel wilt bruinen, draait u het halverwege de bereiding om.
De functie magnetron + grill selecteren
Druk 6x op de functiekeuzetoets
om de stand magnetron + grill te
selecteren.
De functie magnetron + grill, de
bereidingstijd en het vermogen zijn
zichtbaar in de display.
Druk op de insteltoetsen om de
gewenste bereidingstijd in te stellen.
Drukt u op de selectietoets en stel met
de insteltoetsen het vermogen in.
Druk op de selectietoets en stel
met de insteltoetsen de gewenste
temperatuur in. Tijdens de bereiding
kunt u de temperatuur aanpassen.
Druk op de starttoets om de bereiding
te starten.
1 2
3 4
5 6

NL 33
Voor de stand grill + magnetron wordt de
keramische bakplaat doorgaans met het
grillrooster op niveau 4 geplaatst.
* Magnetronvermogen: 100 - 600 W
* Temperatuurstand: 40 - 200 °C
* Zorg ervoor dat de glazen schalen die u gebruikt bestand zijn tegen temperaturen
van 40 - 250 °C.
Bereidingsrichtlijnen
Neem de temperaturen en tijden in deze tabel als richtlijn voor de bereiding.
Voorverwarmen is niet nodig.
Gerecht Niveau Vermogen
(W)
Temperatuur
(°C)
Tijd 1
e
(min.)
Tijd 2
e
(min.)
Toebehoren
Gebakken
aardappelen
400-500 g
4 450 200 12 - 14 -
Keramische
bakplaat
Gegrilde
tomaten 3 elk
4 180 170 7 - 9 -
Keramische
bakplaat met
grillrooster
Groentegratin
450-600 g
3 450 180 15 - 18 -
Keramische
bakplaat met
grillrooster
Geroosterde
vis 1 stuks
4 300 180 06 - 08 06 - 08
Keramische
bakplaat met
grillrooster
Kipstukken
400-500 g
4 300 180 10 - 13 10 - 13
Keramische
bakplaat met
grillrooster
DE COMBIFUNCTIES GEBRUIKEN

NL 34
DE COMBIFUNCTIES GEBRUIKEN
Magnetron + hetelucht
In deze stand wordt de magnetronfunctie gecombineerd met hete lucht, waardoor de
bereidingstijd wordt verkort en gerechten een bruin, knapperig laagje krijgen. Deze functie is
geschikt voor alle soorten vlees en gevogelte, maar ook voor stoofschotels, gegratineerde
schotels, rosbief, biscuitdeeg en lichte vruchtencakes, taarten en kruimelgebak.
De functie magnetron + hetelucht selecteren
Druk 7x op de functiekeuzetoets om
de stand magnetron + hetelucht te
selecteren.
De functie magnetron + hetelucht,
de bereidingstijd en vermogen zijn
zichtbaar in de display.
Druk op de insteltoetsen om de
gewenste bereidingstijd in te stellen.
Drukt u op de selectietoets en stel met
de insteltoetsen het vermogen in.
Druk op de selectietoets en stel
met de insteltoetsen de gewenste
temperatuur in. Tijdens de bereiding
kunt u de temperatuur aanpassen.
Druk op de starttoets om de bereiding
te starten.
1 2
3 4
6
5

NL 35
Voor de stand magnetron + hete lucht wordt
de keramische bakplaat doorgaans met het
grillrooster op niveau 3 geplaatst.
* Magnetronvermogen: 100 - 600 W
* Temperatuurstand: 40 - 200 °C
* Zorg ervoor dat de glazen schalen die u gebruikt bestand zijn tegen temperaturen
van 40 - 250 °C.
Bereidingsrichtlijnen
Neem de temperaturen en tijden in deze tabel als richtlijn voor de bereiding.
Voorverwarmen is niet nodig.
Gerecht Niveau
Vermogen
(W)
Temperatuur
(°C)
Tijd 1
e
(min.)
Tijd 2
e
(min.)
Toebehoren
Hele kip 1,2 kg 3 300 180 25 - 27 15 - 18
Keramische
bakplaat met
grillrooster
Rosbief/lam (half
doorbakken)
450-700 g
3 300 180 17 - 20 17 - 20
Keramische
bakplaat met
grillrooster
Diepvrieslasagne/
pastagratin
450-500 g
3 450 180 18 - 22 -
Keramische
bakplaat met
grillrooster
Aardappelgratin
500-600 g
3 450 190 20 - 25 -
Keramische
bakplaat met
grillrooster
Verse
vruchtenvlaai
3 100 170 40 - 45
Keramische
bakplaat
DE COMBIFUNCTIES GEBRUIKEN

NL 36
Met de automatische menustanden kunt u kiezen uit 25 vooraf geprogrammeerde instellingen
(10 voor automatische bereiding, 10 voor de groente menustand en 5 voor automatisch
ontdooien) voor een handige bereiding van uw favoriete gerechten. De bereidingstijd en
het vermogen worden automatisch ingesteld. Selecteer een van de 25 instellingen, stel het
gewicht in en start de bereiding.
Automatische bereiding
Druk 8x op de functiekeuzetoets om
de ‘automatische bereiding’ stand te
selecteren. Het ‘A:01’ licht op in de
display.
Druk op de insteltoetsen om de
gewenste menustand te selecteren.
Druk op de selectietoets.
•
Raadpleeg de tabellen voor
een beschrijving van de 10
automatische menu-instellingen.
Druk op de insteltoetsen om het
gewenste gewicht te selecteren.
Als u geen gewicht kiest wordt er
automatisch na 5 seconden een
gewicht ingesteld.
Druk op START om de bereiding te
starten.
Opmerking
•
Voor sommige automatische menu’s zijn geen verdere handelingen nodig. Bij andere menu’s
dient het gerecht te worden omgedraaid. De oven geeft een signaal om dit aan te geven.
•
De ingestelde oventemperatuur en de bereidingstijd worden weergegeven wanneer het
automatische menu actief is.
•
De temperaturen en tijden kunnen niet worden gewijzigd tijdens de bereiding.
1
2
DE AUTOMATISCHE MENUSTANDEN GEBRUIKEN
3
4

NL 37
Richtlijnen voor automatische bereiding
In de volgende tabel ziet u 10 automatische programma's voor opwarmen, koken, braden en
bakken. De hoeveelheden, rusttijden en bijbehorende aanbevelingen worden aangegeven.
Deze automatische programma's bevatten speciale, handige bereidingsstanden.
Nr. Gerecht Gewicht
(kg)
Toebehoren Niveau Instructie
A:01
Complete
maaltijd
0,3 - 0,35
0,4 - 0,45
Keramische
bakplaat
1
Schep de gerechten op een
keramische bakplaat en dek het
voedsel af met huishoudfolie.
Dit programma is geschikt voor
maaltijden die uit 3 gerechten
bestaan (bijv. vlees met saus,
groenten en aardappelen, rijst
of pasta). Laat na de bereiding 3
min. staan.
A:02
Diepvries
pizza
0,3-0,35
0,4-0,45
Grillrooster +
keramische
bakplaat
2
Leg de diepvriespizza op het
grillrooster met keramische
bakplaat en plaats deze in de
oven.
A:03
Diepvries
lasagne
0,4-0,45
0,6-0,65
Grillrooster +
keramische
bakplaat
2
Leg de diepvrieslasagne in een
geschikte glazen pyrexschaal of
op het grillrooster met keramiche
bakplaat. Laat na het opwarmen
2-3 minuten staan.
A:04 Hele kip
1,1-1,15
1,2-1,25
Grillrooster +
keramische
bakplaat
2
Maak een mengsel van olijfolie of
boter met peper en zout. Smeer
de kip aan de binnenkant en
buitenkant goed in. Plaats de kip
met de borst naar beneden op
het grillrooster met keramische
bakplaat in de oven. Draai de kip
om zodra een ovensignaal klinkt
en druk op START. Laat na de
bereiding 3 min. staan.
A:05 Kipdelen
0,6-0,7
0,9-1,0
Grillrooster +
keramische
bakplaat
4
Maak een mengsel van olijfolie of
boter met peper en zout. Smeer
de kipdelen goed in. Plaats
de kipdelen met de huid naar
beneden op het grillrooster met
keramische bakplaat in de oven.
Draai de kipdelen om zodra een
ovensignaal klinkt en druk op
START. Laat na de bereiding 3
min. staan.
DE AUTOMATISCHE MENUSTANDEN GEBRUIKEN

NL 38
DE AUTOMATISCHE MENUSTANDEN GEBRUIKEN
Nr. Gerecht Gewicht
(kg)
Toebehoren Niveau Instructie
A:06 Lamsgebraad
0,8-0,9
1,1-1,2
Grill +
keramische
bakplaat
3
Plaats de gemarineerde
lamsgebraad op het grillrooster
met keramische bakplaat in de
oven. Draai het lamsgebraad om
zodra een ovensignaal klinkt en
druk op START.
A:07
Bevroren
ovenfrites
0,3-0,4
0,45-0,5
Bakplaat 3
Verdeel de bevroren ovenfrites
over een metalen bakplaat.
A:08
Gebakken halve
aardappels
0,4-0,5
0,6-0,7
Grill +
keramische
bakplaat
4
Aardappelen over de lengte
doorsnijden en de platte kant
bestrooien met zout. Met
platte kant naar boven op het
grillrooster met keramische
bakplaat plaatsen. Laat na de
bereiding 3 min. staan.
A:09 Appeltaart 1,2-1,4 Bakplaat 2
Bereid de appeltaart in een
springvorm en plaats deze op de
bakplaat. Het gewicht is inclusief
appels etc.
A:10 Cake 0,7-0,8 Bakplaat 3
Plaats de cakevorm (25 cm)
met cakebeslag over de
lengterichting (ten opzichte van
de deur) op de bakplaat in de
oven.

NL 39
DE AUTOMATISCHE MENUSTANDEN GEBRUIKEN
Ontdooistand
Deze programma’s maken uitsluitend gebruik van microgolven. Verwijder alle verpakking voor het
ontdooien. Leg vlees, gevogelte en vis op de keramische bakplaat.
De ontdooistand selecteren
Druk 9x op de functiekeuzetoets om
de ontdooistand te selecteren.
Het ‘d:01’ licht op in de display.
Druk op de insteltoetsen om de
gewenste ontdooistand te selecteren.
Druk op de selectietoets.
•
Raadpleeg de tabel op de volgende
pagina voor een beschrijving van de
5 automatische menu-instellingen.
Druk op de insteltoetsen om het
gewenste gewicht te selecteren.
Als u geen gewicht kiest wordt er
automatisch na 5 seconden een
gewicht ingesteld.
Druk op START om de bereiding te
starten.
1
2
3
4

NL 40
Richtlijnen voor de automatische snelle ontdooistand
In de volgende tabel ziet u de verschillende programma's voor automatisch ontdooien, hoeveelheden,
rusttijden en de bijbehorende aanbevelingen.
Nr. Gerecht Gewicht
(kg)
Toebehoren Niveau Rusttijd
(min.)
Instructie
d:01 Vlees 0,2 - 1,5
Keramische
bakplaat
1 20 - 60
Pak de randen in met aluminium-
folie. Draai het vlees om wanneer de
oven een signaal geeft.
Dit programma is geschikt voor
rundvlees, lamsvlees, varkensvlees,
steaks, karbonades, gehakt.
d:02 Gevogelte 0,2 - 1,5
Keramische
bakplaat
1 20 - 60
Pak de uiteinden van bouten en
vleugels in met aluminiumfolie. Draai
het gevogelte om wanneer
de oven een signaal geeft.
Dit programma is geschikt voor hele
kippen en kipstukken.
d:03 Vis 0,2 - 1,5
Keramische
bakplaat
1 20 - 60
Pak de staart van een hele vis in
met aluminiumfolie. Draai de vis om
wanneer de oven een signaal geeft.
Dit programma is geschikt voor hele
vissen en visfilets.
d:04
Brood/
cake
0,1 - 1,8
Keramische
bakplaat
1 10 - 30
Leg het brood op een stuk
keukenpapier en draai het om
wanneer de oven een signaal geeft.
Plaats de cake op de keramische
bakplaat en draai deze indien
mogelijk om wanneer de oven een
signaal geeft.
(De werking van de oven wordt
onderbroken wanneer u de deur
opent.) Dit programma is geschikt
voor alle soorten brood (gesneden
of hele broden), gistgebak, biscuit,
kwarktaart en bladerdeeg maar
ook voor broodjes en stokbroden.
Leg broodjes in een cirkel. Het is
niet geschikt voor kruimeldeeg,
vruchten-/roomtaart en cakes met
een chocoladelaag.
d:05 Fruit 0,1 - 0,6
Keramische
bakplaat
1 5 - 15
Verdeel het bevroren fruit gelijkmatig
over de keramische bakplaat. Dit
programma is geschikt voor fruit als
frambozen, en gemengde bessen.
Belangrijk! De snelle ontdooistand maakt gebruik van microgolven om voedsel te verwarmen.
Bij gebruik van deze stand dienen de richtlijnen voor kookgerei en andere voorzorgsmaatregelen
voor een veilig gebruik van de magnetron dan ook zorgvuldig te worden opgevolgd.
DE AUTOMATISCHE MENUSTANDEN GEBRUIKEN

NL 41
DE AUTOMATISCHE MENUSTANDEN GEBRUIKEN
Groenten menustand
Voeg 30-45 ml koud water per 250 g toe, tenzij een andere hoeveelheid water wordt
aanbevolen (zie tabel). Dek de groente voor een minimale tijd af (zie tabel). Vervolg het
bereiden tot u het gewenste resultaat hebt. Roer tijdens en na de bereiding de groente even
door. Voeg na het bereiden van het gerecht zout, kruiden of boter toe. Dek het gerecht af en
laat deze gedurende 3 minuten staan. Snij verse groenten in stukken van gelijke grootte. Hoe
kleiner ze zijn, hoe sneller ze zullen koken.
De functie groenten menustand selecteren
Druk 10x op de functiekeuzetoets om
de groenten menustand te selecteren.
Het symbool ‘groenten menustand’
licht op in de display.
Druk op de insteltoetsen om de
gewenste groenten menufunctie te
selecteren. Druk op de selectietoets.
Druk op de insteltoetsen om het
gewenste gewicht te selecteren.
Als u geen gewicht kiest wordt er
automatisch na 5 seconden een
gewicht ingesteld.
Druk op START om de bereiding te
starten.
1
2
3
4

NL 42
DE AUTOMATISCHE MENUSTANDEN GEBRUIKEN
Tabel groenten menustand
Neem deze tabel als richtlijn voor de bereiding. Voorverwarmen is niet nodig.
Nr. Gerecht Portie
(kg)
Toebehoren
Niveau Instructies
U:01 Broccoli
roosjes
0,2-0,3
0,3-0,4
Stoommand
1 Spoel de broccoli af en maak
deze schoon. Plaats in een
glazen ovenschaal met deksel.
Voeg 2 eetlepels (0,2-0,3 kg)
of 3 a 4 eetlepels (0,3-0,4 kg)
water toe. Plaats de kom met
deksel in het midden van de
bakplaat. Goed roeren na de
bereiding.
U:02 Bloemkool
roosjes
0,2-0,3
0,3-0,4
Stoommand
1 Spoel de bloemkool af en
maak deze schoon. Plaats
de bloemkool in een glazen
ovenschaal met deksel. Voeg
2 eetlepels (bij 0,2-0,3 kg) of
3 a 4 eetlepels (bij 0,3-0,4 kg)
water toe. Plaats de kom met
deksel in het midden van de
bakplaat. Goed roeren na de
bereiding.
U:03 Gesneden
Wortelen
0,2-0,3
0,4-0,5
Stoommand
1 Spoel de wortels af en
maak deze schoon. Plaats
de wortels in een glazen
ovenschaal met deksel. Voeg
2 eetlepels (bij 0,2-0,3 kg) of
3 a 4 eetlepels (bij 0,4-0,5 kg)
water toe. Plaats de kom met
deksel in het midden van de
bakplaat. Goed roeren na de
bereiding.
U:04 Aardappelen
in schil
0,3-0,4
0,7-0,8
Stoommand
1 Spoel de aardappelen af en
maak deze schoon. Vet de
aardappelen in met olijfolie
en prik in de schil met een
vork. Plaats ze in de kom met
deksel en laat het gerecht na
bereiding nog 3-5 minuten
staan.

NL 43
DE AUTOMATISCHE MENUSTANDEN GEBRUIKEN
U:05 Aardappelen
geschilt
0,4-0,5
0,7-0,8
Stoommand
1 Spoel de aardappelen af en
maak deze schoon. Snij ze
in helften en plaats ze in de
kom met deksel. Voeg 1-2
eetlepels water toe. Goed
roeren na de bereiding. Bij
grote hoeveelheden halvewege
het kookproces nog even extra
doorroeren. Laat het gerecht
na bereiding nog 3-5 minuten
staan.
U:06 Courgette 0,2-0,3
0,3-0,4
Stoommand
1 Snijd de courgette in plakjes.
Voeg 2 eetlepels water of een
klontje boter toe. Plaats ze in
de kom met deksel. Kook ze
met de deksel op de kom tot ze
beetgaar zijn.
U:07 Gesneden
Aubergine
0,1-0,2
0,3-0,4
Stoommand
1 Snijd de aubergine in dunne
plakjes en sprenkel er 1
eetlepel citroensap overheen.
Plaats ze in de kom met deksel.
Kook ze met de deksel op
de kom. Goed roeren na de
bereiding.
U:08 Gesneden Ui 0,2-0,3
0,4-0,5
Stoommand
1 Snijd de uien in ringen of halve
ringen. Voeg slechts 1 eetlepel
koud water toe. Plaats ze in de
kom met deksel. Kook ze met
de deksel op de kom. Goed
roeren na de bereiding.
U:09 Gemengde
groenten
0,2-0,3
0,4-0,5
Stoommand
1 Spoel de gemengde groenten
af en maak deze schoon.
Plaats de groenten in de kom
met deksel. Voeg 1 eetlepel (bij
0,2-0,3 kg) of 3 a 4 eetlepels
(bij 0,4-0,5 kg) water toe. Plaats
de kom met deksel in het
midden van de bakplaat. Goed
roeren na de bereiding.
U:10 Witte rijst 0,2-0,3
Stoommand
1 Gebruik de kom met deksel
(let op! het water volume van
rijst verdubbeld tijdens het
koken). Kook de rijst met de
deksel op de kom. Giet na de
bereiding overtollig water af.
Voeg zout, kruiden en boter
toe, roer de rijst door en laat het
daarna even staan.

NL 44
De stoommand is gebaseerd op het principe van koken met stoom, en is ontworpen
voor snel, gezond koken in uw Etna Magnetron. Bij gebruik van koken met stoom wordt
gebruikt gemaakt van de magnetron functie.
Dit accessoire is ideaal voor het koken van rijst, pasta, groenten, etc. in recordtijd, met
behoud van hun voedingswaarden.
De stoommand bestaat uit drie onderdelen:
Alle onderdelen geschikt voor
magnetron gebruik en zijn bestand
tegen temperaturen van -10 °C tot
130 °C.
Geschikt voor bewaren in een vriezer.
Kan afzonderlijk of samen worden
gebruikt.
Gebruik
•
Niet gebruiken:
Om gerechten te koken met een hoog suiker of vetgehalte.
Op een grillstand of op een kookplaat.
•
Was voor het eerste gebruik het mandje eerst goed af met een sopje
•
Raadpleeg voor kooktijden de tabel voor stomen.
Onderhoud
•
De stoommand kan worden gereinigd in een vaatwasser.
•
Maak bij het wassen met de hand gebruik van warm water met afwasmiddel. Gebruik geen
schuurmiddelen.
•
Sommige gerechten (zoals gerechten met tomaat) kunnen het kunststof verkleuren.
Ontdooien:
•
Plaats bevroren gerechten in de stoommand zonder de deksel te gebruiken. Het vocht blijft
dan op de bodem van de kom en beinvloed het gerecht niet.
DE STOOMMAND GEBRUIKEN
kom zeef deksel

NL 45
Tabel voor stomen
In de volgende tabel vindt u richtlijnen voor het bereden van diverse gerechten met gebruik
van de stoommand. De hoeveelheden, vermogen, kooktijd en bijbehorende aanbevelingen
worden aangegeven.
Gerecht Gewicht
(g)
Vermogen
(W)
Kooktijd
(min.)
Toebehoren Aanbeveling
Artisjokken
300
(1-2
stukken)
800 5-6 Stoommand
Spoel de artisjokken af met
maak deze schoon. Zet de
zeef in de kom en plaats de
antisjokken in de zeef. Voeg 1
eetlepel citroensap toe. Plaats
de deksel. Laat na de bereiding
1-2 minuten staan.
Verse
groenten
300 800 4-5 Stoommand
Maak de groente schoon,
snij deze in gelijke stukken.
Weeg de groente (bijvoorbeeld
broccoli, bloemkool, wortel of
peper). Zet de zeef in de kom
en plaats de groente in de zeef.
Voeg 2 eetlepels water toe.
Plaats de deksel. Goed roeren
na de bereiding en laat 1-2
minuten staan.
Bevroren
groenten
300 600 8-9 Stoommand
Zet de zeef in de kom en plaats
de groente in de zeef. Voeg 1
eetlepel water toe. Plaats de
deksel. Laat na de bereiding
1-2 minuten staan.
Rijst 250 800 15-18
Kom met
deksel
Plaats de rijst in de kom.
Voeg 500 ml koud water toe.
Plaats de deksel. Laat na de
bereiding witte rijst 5 minuten
en zilvervliesrijst 10 minuten
staan.
Aardappelen
in schil
500 800 7-8
Kom met
deksel
Spoel de aardappelen af, weeg
deze en plaats ze in de kom.
Voeg 3 eetlepels water toe.
Plaats de deksel. Laat na de
bereiding 2-3 minuten staan.
Stoofpot
(afgekoeld)
400 600 5,5-6,5
Kom met
deksel
Plaats de stoofpot in de kom.
Plaats de deksel.
Goed roeren
na de bereiding en laat 1-2
minuten staan.
DE STOOMMAND GEBRUIKEN

NL 46
Gerecht Gewicht
(g)
Vermogen
(W)
Kooktijd
(min.)
Toebehoren Aanbeveling
Soep
(afgekoeld)
400 800 3-4
Kom met
deksel
Plaats de soep in de kom.
Plaats de deksel.
Goed roeren
na de bereiding en laat 1-2
minuten staan.
Soep
(bevroren)
400 800 8-10
Kom met
deksel
Plaats de bevroren soep in de
kom. Plaats de deksel.
Goed
roeren na de bereiding en laat
2-3 minuten staan.
Bevroren
gist/
Knoedel met
jamvulling.
400 400 8-10
Kom met
deksel
Bevochtig de bovenkant van de
knoedel. Plaats 1-2 bevroren
knoedel naast elkaar in de
kom.
Plaats de deksel. Laat
na de bereiding 2-3 minuten
staan.
Fruit
compote
250 800 3-4
Kom met
deksel
Weeg na het pellen het verse
fruit (bijvoorbeeld appels,
peren, abrikoos, mango’s of
ananas).
Maak het fruit schoon,
snij deze in gelijke stukken of
blokjes. Plaats de compote in
de kom. Voeg 1-2 eetlepels
water en 1-2 eetlepels suiker
toe. Plaats de deksel. Laat
na de bereiding 2-3 minuten
staan.
Let op!
•
Tijdens gebruik kan de deksel zeer het worden!
•
Gebruik ovenhandschoenen bij het hanteren van de stoommand na bereiding van het
gerecht.
DE STOOMMAND GEBRUIKEN
+
kom met deksel stoommand

NL 47
DE AQUA CLEAN-STAND GEBRUIKEN
Met de Aqua Clean-stand reinigt u uw oven in slechts 15 minuten.
Druk 11x op de functiekeuzetoets om
AQUA CLEAN te selecteren.
Giet ongeveer 100 ml water onder
in de lege oven.
Druk op START. De oven begint
automatisch.
Na 15 minuten stopt de oven
automatisch. Veeg de oven uit met
een droge doek.
Belangrijk
•
Gebruik deze functie alleen als de oven volledig is afgekoeld tot kamertemperatuur.
•
Gebruik GEEN gedistilleerd water.
•
Maak GEEN gebruik van hogedrukreinigers of stoomreinigers voor de reiniging van de
magnetronoven.
1
2

NL 48
Als u de pieptoon wilt uitschakelen,
houdt u de beide insteltoetsen
gedurende 1 seconden tegelijkertijd
ingedrukt.
Als u de pieptoon weer wilt
inschakelen, houdt u de beide
insteltoetsen gedurende 1 seconden
tegelijkertijd ingedrukt.
DE PIEPTOON UITSCHAKELEN
1 2

NL 49
DE KINDERSLOT
Met het kinderslot van de oven kunt u het bedieningspaneel vergrendelen om onbedoeld
gebruik van de oven te voorkomen.
De oven vergrendelen
De oven ontgrendelen
Houd de insteltoets ‘omlaag’ en de
bereidingstijdtoets tegelijkertijd
3 seconden ingedrukt.
Er wordt een vergrendelingssymbool
weergegeven op het display, wat
aangeeft dat alle functies vergrendeld
zijn.
1 2
Houd de insteltoets ‘omlaag’ en de
bereidingstijdtoets tegelijkertijd
3 seconden ingedrukt.
Het vergrendelingssymbool verdwijnt
van het display, wat aangeeft dat alle
functies ontgrendeld zijn.
1 2

NL 50
DE MAGNETRONOVEN REINIGEN
Reinig de oven regelmatig om te voorkomen dat vet en voedselresten zich ophopen, met
name op de oppervlakken aan de binnen- en buitenkant, de deur en de afdichting.
1. Reinig de oppervlakken aan de buitenkant met een zachte doek en warm water met zeep.
Veeg na met een schone, natte doek en droog de oppervlakken af.
2. Verwijder spetters en vlekken op de oppervlakken aan de binnenkant met een doek met
zeep. Veeg na met een schone, natte doek en droog de oppervlakken af.
3. Om hardnekkige voedselresten en geuren te verwijderen, zet u een beker met verdund
citroensap onder in de lege oven. Verwarm het sap gedurende tien minuten op maximaal
vermogen.
4. Neem de binnenkant af met een vochtige doek.
Belangrijk
•
Let erop dat er GEEN water in de ventilatieopeningen komt.
•
Gebruik NOOIT schurende schoonmaakmiddelen of chemische oplosmiddelen.
•
Zorg er ALTIJD voor dat de afdichting van de deur schoon is. Zo voorkomt u de ophoping
van vuil en kunt u de deur goed sluiten.
DE MAGNETRONOVEN OPBERGEN EN REPAREREN
Reparaties dienen uitsluitend te worden uitgevoerd door een gekwalificeerde
servicemonteur.
Als er onderhoud moet worden gepleegd, trekt u de stekker uit het stopcontact en
neemt u contact op met de klantenservice van Etna.
Houd de volgende informatie bij de hand wanneer u belt:
•
Het modelnummer en serienummer (deze vindt u aan de binnenzijde van de
ovendeur)
•
Garantiegegevens
•
Een duidelijke omschrijving van het probleem
Kies een schone, droge plek als u de oven tijdelijk moet opbergen, aangezien stof en
vocht het apparaat kunnen beschadigen.

NL 51
PROBLEMEN OPLOSSEN
Probeer onderstaande oplossingen als u problemen hebt met uw oven. Mogelijk
bespaart u zich zo de tijd en moeite van een onnodig telefoontje naar de klantenservice.
Het voedsel wordt niet bereid.
•
Controleer of de timer is ingesteld en op START is gedrukt.
•
Sluit de deur goed.
•
Controleer of er geen zekering is doorgebrand en er geen stroomonderbreker is
geactiveerd.
Voedsel is te gaar of niet gaar genoeg.
•
Controleer of de juiste bereidingstijd is ingesteld.
•
Controleer of het juiste vermogen is ingesteld.
Er treedt vonkontlading in de oven op.
•
Zorg ervoor dat u het juiste kookgerei gebruikt (zonder metalen randjes).
•
Controleer of er geen vorken of ander metalen gerei in de oven is geplaatst.
•
Zorg er bij gebruik van aluminiumfolie voor dat deze zich niet te dicht bij de wanden
bevindt.
De oven veroorzaakt storingen in radio's of televisies.
•
De oven kan, als deze in werking is, lichte storingen in televisies of radio's
veroorzaken.
Installeer de oven niet in de buurt van televisies, radio's en antennes om dit eect te
beperken.
Bij elektronische storingen wordt het DISPLAY gereset.
•
Haal de stekker uit het stopcontact en steek deze er weer in. Stel de tijd opnieuw in.
Er zit condens aan de binnenkant van de oven.
•
Dit is normaal. Veeg de oven na gebruik schoon.
De ventilator blijft werken nadat de oven is uitgezet.
•
Dit is normaal. De koelventilator blijft, nadat de oven is gestopt, mogelijk nog
maximaal drie minuten werken.
Een luchtstroom is voelbaar bij de deur en de buitenkant van het apparaat.
•
Dit is normaal.
Licht weerkaatst bij de deur en de buitenkant van het apparaat.
•
Dit is normaal.
Er ontsnapt stoom bij de deur of de ventilatieopeningen.
•
Dit is normaal.
Tijdens de werking van de oven, en met name in de ontdooistand, klinken
klikgeluiden.
•
Dit is normaal.

NL 52
FOUTCODES
Foutcode Algemene functies
FOUT TEMPERATUURSENSOR OPEN
Deze fout treedt op bij een defecte sensor, onjuiste aansluitingen, een
defecte printplaat en wanneer de door MICOM gedetecteerde A/D-
waarde lager is dan 10.
FOUT TEMPERATUURSENSOR KORT
Deze fout treedt op bij een defecte sensor, onjuiste aansluitingen, een
defecte printplaat en wanneer de door MICOM gedetecteerde A/D-
waarde hoger is dan 252.
DOELTEMPERATUUR TEMPERATUURSENSOR
Deze fout treedt op wanneer het voorverwarmen niet is voltooid en de
temperatuur in de oven gedurende 30 minuten lager is dan 120 °C.
FOUT ABNORMALE TEMPERATUURDETECTIE
Deze fout treedt op wanneer de temperatuur in de oven gedurende 10
minuten hoger is dan 250 °C.
FOUT ABNORMALE TEMPERATUURDETECTIE MAGNETRON
Deze fout treedt op wanneer de temperatuur in de oven in de
magnetronstand hoger is dan 210 °C.
FOUT TOETS KORT
Deze fout treedt op als u een knop langer dan 60 seconden ingedrukt
houdt.
Deze fout treedt mogelijk op als er water in het bedieningspaneel komt
of als er stofdeeltjes aan het AANRAAKPANEEL
blijven hangen.
FOUT NAK-SIGNAAL
Het NAK-signaal wordt gegeven als het inschakelen van het apparaat
langer dan 10 seconden duurt.
COMMUNICATIEFOUT
Deze fout treedt op wanneer er langer dan 10 seconden geen
communicatie plaatsvindt tussen de hoofd- en subprintplaat.
FOUT EEPROM OPEN
Deze fout treedt op wanneer er tijdens het instellen van het vermogen
iets misgaat in de EEPROM-communicatie.
FOUT EEPROM LEZEN & SCHRIJVEN
Eeprom wordt niet gebruikt.
Als een van deze fouten optreedt, neemt u contact op met de klantenservice van Etna.

NL 53
TECHNISCHE SPECIFICATIES
Model CM751ZT / CM851RVS / CM851ZT
Voedingsbron 230 V ~ 50 Hz
Energieverbruik
Maximaal vermogen
Magnetronstand
Grillstand
Heteluchtstand
3000 W
1650 W
2500 W
2500 W
Uitgangsvermogen 100 W/800 W (IEC - 705)
Gebruiksfrequentie 2450 MHz
Magnetron OM75P (21)
Koelmethode Motor koelventilator
Afmetingen
Afmetingen apparaat:
Afmetingen bij inbouw:
595 x 454 x 569,4 mm (w x h x d) (CM751)
596,4 x 456 x 569,4 mm (w x h x d) (CM851)
555 x 445 x 548,8 mm (w x h x d)
Volume 50 l
Gewicht
Netto
Verzending
38,3 kg
45,5 kg

NL 54
VERWIJDEREN VAN APPARAAT EN VERPAKKING
De verpakking van dit apparaat kan worden gerecycled en is mogelijk
gemaakt van:
•
karton
•
papier
•
polyethyleenfolie (PE)
•
CFC-vrij polystyreen (hard PS-schuim)
•
polypropyleentape (PP)
Gooi deze materialen op een verantwoorde manier weg overeenkomstig
de wettelijke bepalingen.
Op het product is het symbool van een doorgekruiste vuilnisbak
aangebracht om op de verplichting tot gescheiden verwerking te wijzen.
Dit voorkomt negatieve gevolgen voor het milieu en de gezondheid.
Dit houdt in dat het product aan het eind van de levensduur naar een
speciaal centrum voor gescheiden afvalinzameling van de gemeente of
naar de leverancier moet worden gebracht.
Het aparte verwerken zorgt ervoor dat materialen waaruit dit apparaat
bestaat, kunnen worden teruggewonnen, wat een aanzienlijke
besparing van energie en grondstoffen betekent.
Verklaring van overeenstemming
Wij verklaren dat onze producten voldoen aan de toepasselijke
Europese richtlijnen, normen en voorschriften, alsook aan alle vereisten
in de normen waarnaar wordt verwezen.

EN 3
TABLE OF CONTENTS
Control panel . . . . . . . . . . . . . . . . . . . . . . . . . . . . . . . . . . . . . . . . . . . . . . . . . . . . . . . . . . . . . . 4
Oven functions . . . . . . . . . . . . . . . . . . . . . . . . . . . . . . . . . . . . . . . . . . . . . . . . . . . . . . . . . . . . . 5
Accessories . . . . . . . . . . . . . . . . . . . . . . . . . . . . . . . . . . . . . . . . . . . . . . . . . . . . . . . . . . . . . . . 6
Using this user manual . . . . . . . . . . . . . . . . . . . . . . . . . . . . . . . . . . . . . . . . . . . . . . . . . . . . . . . 7
Setting the clock . . . . . . . . . . . . . . . . . . . . . . . . . . . . . . . . . . . . . . . . . . . . . . . . . . . . . . . . . . . 8
Setting the energy saving setting . . . . . . . . . . . . . . . . . . . . . . . . . . . . . . . . . . . . . . . . . . . . . . . 9
Heating possibilities . . . . . . . . . . . . . . . . . . . . . . . . . . . . . . . . . . . . . . . . . . . . . . . . . . . . . . . . 10
How a microwave oven works . . . . . . . . . . . . . . . . . . . . . . . . . . . . . . . . . . . . . . . . . . . . . . . . 12
Using the microwave setting . . . . . . . . . . . . . . . . . . . . . . . . . . . . . . . . . . . . . . . . . . . . . . . . . 13
Using the oven functions . . . . . . . . . . . . . . . . . . . . . . . . . . . . . . . . . . . . . . . . . . . . . . . . . . . . 23
Setting cooking time . . . . . . . . . . . . . . . . . . . . . . . . . . . . . . . . . . . . . . . . . . . . . . . . . . . . . . . . 29
Setting an end time . . . . . . . . . . . . . . . . . . . . . . . . . . . . . . . . . . . . . . . . . . . . . . . . . . . . . . . . . 30
Postponing the cooking time . . . . . . . . . . . . . . . . . . . . . . . . . . . . . . . . . . . . . . . . . . . . . . . . . 31
Using the combi functions . . . . . . . . . . . . . . . . . . . . . . . . . . . . . . . . . . . . . . . . . . . . . . . . . . . 32
Using the automatic menu settings . . . . . . . . . . . . . . . . . . . . . . . . . . . . . . . . . . . . . . . . . . . . 36
Using the steamer basket . . . . . . . . . . . . . . . . . . . . . . . . . . . . . . . . . . . . . . . . . . . . . . . . . . . 42
Using the Aqua Clean setting . . . . . . . . . . . . . . . . . . . . . . . . . . . . . . . . . . . . . . . . . . . . . . . . . 47
Deactivating the beep alarm . . . . . . . . . . . . . . . . . . . . . . . . . . . . . . . . . . . . . . . . . . . . . . . . . . 48
Childproof lock . . . . . . . . . . . . . . . . . . . . . . . . . . . . . . . . . . . . . . . . . . . . . . . . . . . . . . . . . . . . 49
Cleaning the microwave oven . . . . . . . . . . . . . . . . . . . . . . . . . . . . . . . . . . . . . . . . . . . . . . . . . 50
Storing and repairing the microwave oven . . . . . . . . . . . . . . . . . . . . . . . . . . . . . . . . . . . . . . . 50
Solving problems . . . . . . . . . . . . . . . . . . . . . . . . . . . . . . . . . . . . . . . . . . . . . . . . . . . . . . . . . . 51
Error codes . . . . . . . . . . . . . . . . . . . . . . . . . . . . . . . . . . . . . . . . . . . . . . . . . . . . . . . . . . . . . . . 52
Technical specifications . . . . . . . . . . . . . . . . . . . . . . . . . . . . . . . . . . . . . . . . . . . . . . . . . . . . . 53
Disposal of appliance and packaging . . . . . . . . . . . . . . . . . . . . . . . . . . . . . . . . . . . . . . . . . . . 54

EN 4
CONTROL PANEL
1. LIGHTING ON/OFF BUTTON
2. DISPLAY
3. START BUTTON
4. FUNCTION SELECTOR BUTTON
5. TIMER BUTTON
6. SETTINGS BUTTON ‘REDUCE’
7. SETTINGS BUTTON ‘INCREASE’
8. SELECTION BUTTON
9. STOP/CANCEL BUTTON
1
2
3
94 87
6
5

EN 5
OVEN FUNCTIONS
Note
•
Level 1 is located at the bottom of the oven and the higher levels are located above this.
•
Levels 4 and 5 are used mainly for thegrill function.
•
Level 1 is used mainly for the microwave function with the ceramic baking plate.
•
Consult the cookingguidelines in this user manual to determine the correct level for your dishes.
Control panel
Upper heating elements
Level 5
Level 4
Level 3
Level 2
Oven levels
Microwave level 1
Door lock
Door
Handle

EN 6
The following accessories are supplied with your microwave oven:
Ceramic baking tray
(use with microwave setting)
Baking tray
(do NOT use with microwave setting)
Ceramic Tray
Grill insert
Grill rack for ceramic baking tray
(use with quick menu andgrill setting)
Steamer basket
Use the plastic steamer basket to
cook dishes with steam.
Note
Consult the cookingguidelines in this user manual to determine the correct accessories for
your dishes.
1 2
3 4
ACCESSORIES
slide-in grill
ceramic
baking tray

EN 7
USING THIS USER MANUAL
Introduction
Congratulations on choosing this Etna oven. This product is designed with simple operation
and optimum comfort in mind. The oven has a wide range of settings enabling you to select the
correct cooking method every time.
This manual shows how you can best use this oven. In addition to information about operating
the oven, you will also find background information that may be useful when using the appliance.
Read the separate safety instructions before using
the appliance!
Read this manual before using the appliance and keep it in a safe place for future use.
Installation instructions are supplied separately.

EN 8
When you connect the appliance to the mains electricity for the first time, the DISPLAY
lights up. After threeseconds the clock symbol and ‘12:00’ flash on the DISPLAY.
Setting the clock
Press the settings button
‘increase’ and the selection button
simultaneously. ‘12’ starts flashing.
Use the settings buttons to set thehour.
Press the selection button again. ‘00’
will start flashing.
Use the settings buttons to set
theminutes.
Press the selection button again.
Note
If you press a button, the setting starts to flash. You can now change the setting. You can only
change the setting if it is flashing. If it stops flashing, you must press the button so that the
setting starts flashing again.
1 2
3 4
5
SETTING THE CLOCK

EN 9
SETTING THE ENERGY SAVING SETTING
The oven has an energy-saving setting. This setting saves electricity when the oven is not in use.
Standby setting
If the oven is not used for 2minutes, the standby setting is activated (standard).
ECO setting
The current time is not displayed in the ECO setting. You cannot use the oven.
Press the selection button for 3seconds.
The oven switches to ECO setting and
there is nothing in the display.
Open the door or press a button if you
want togo to the standby setting. The
current time is shown on the display
and the oven is ready for use.
1

EN 10
The following list shows the dierent heating possibilities and oven settings that are
available. Use the cookingguidelines on the following pages to determine the correct
mode and setting for your recipes.
MICROWAVE SETTING
A:01
U:01
Microwaves are used for cooking and defrosting foods. Dishes are
cooked quickly and eciently without the colour or form of the food
being aected. You set the power and cooking time manually for the
dierent dishes.
OVEN SETTING
A:01
U:01
Convection
In this setting the top and bottom heating elements and the fan are
activated. The heat is distributed evenly in the oven.
This setting is suitable for large amounts of food which need heat
supply, such as large augratins and pies.
Recommended temperature: 180°C
A:01
U:01
Grill setting
Thegrill setting is particularly suitable forgrilling smaller quantities, such as
baguette, fish fillets or for oven dishes ‘augratin’. Put the dish in the middle
of the grill rack + ceramic baking, because the element is in the middle of
the oven.
Recommended temperature: 180°C
A:01
U:01
Maxigrill setting
Both top elements heat the dish. Maxigrill is suitable forgrilling steaks,
sausages, and making cheese on toast.
Recommended temperature: 220°C
A:01
U:01
Grill + fan
The fan distributes the heatgenerated from the top heating element.
You can use this setting forgrilling meat and fish. Recommended
temperature: 220°C
AUTOMATIC FUNCTIONS
A:01
U:01
DEFROST SETTING
Select from 5 preset defrost settings. The fan is switched on with a low
temperature during defrosting. Turn the food over during defrosting. You
only have to choose the programme and the weight to start defrosting.
A:01
U:01
AQUA CLEAN
The hot steam makes the interior of the oven wet, so you can clean the
oven easily. The Aqua Clean programme takes 15minutes.
HEATING POSSIBILITIES

EN 11
A:01
U:01
VEGETABLE MENU SETTING
Select from 10 preset ‘vegetable menu settings’. Cooking time
and power are chosen automatically. You only have to choose the
programme and the weight to start the cooking process.
A:01
U:01
AUTOMATIC MENU SETTING
Select from 10 preset automatic cooking settings. The time and
temperature are set automatically. You only have to choose the
programme and the weight to start the cooking process.
COMBI FUNCTIONS
A:01
U:01
Microwave + hot air
This function is suitable for all types of meat and poultry, but also for
casseroles, augratin casseroles, roast beef, biscuit dough and light
fruitcakes, tarts and crumble desserts.
A:01
U:01
Microwave +grill
This function is suitable for all kinds of food that has to be warmed up
and browned (e.g. baked pasta) and dishes that require a short cooking
time for a brown crust.
This setting can also be used for thick portions for which a brown,
crunchy crust is tasty (e.g. chicken drumsticks).
HEATING POSSIBILITIES

EN 12
Microwaves are high-frequency electromagnetic waves. The energy makes it possible to
cook or warm up dishes without aecting the form or colour.
You can use your microwave for the following:
• Microwave setting
• Combi functions
Cooking principle
1. The microwaves which the microwavegenerates are
spread evenly by a distribution system. This cooks
the dish evenly.
2. The microwaves are absorbed to a depth of
approximately 2.5 cm by the dish. Cooking then
continues, because the heat is spread in the dish.
3. The cooking times vary and depend on the dish you
use and the properties of the food:
•
Quantity and density
•
Moisture content
•
Starting temperature (whether or not it is cooled)
Important
The dish is cooked from the inside out by means of heat distribution. The cooking continues
even when you take the dish from the oven.
Standing times in recipes and in this book must therefore be adhered to, in order to ensure
•
Even heating into the middle of the dish;
•
Equal temperatures in all parts of the dish.
HOW A MICROWAVE OVEN WORKS

EN 13
USING THE MICROWAVE SETTING
Microwaves are high-frequency electromagnetic waves. When the microwave is used,
microwaves penetrate the food. These waves are attracted and absorbed by water, fat
and sugar in the food. The microwaves make the molecules in the food move faster.
Thefast movement of these molecules causes friction and the food is warmed up by the
heat which this releases.
IMPORTANT: use the ceramic baking tray on level 1.
Microwave setting
Press the function selection button
once. The DISPLAY shows the time
and the power.
Press the settings buttons to set the
desired cooking time. The maximum
cooking time you can set is 90minutes.
If you want to change the power,
press the selection button and set
the desired level using the settings
buttons.
Press the start button to start cooking.
1
2
43

EN 14
Guidelines for the microwave power
POWER PERCENTAGE
(%)
OUTPUT POWER
(W)
NOTE
MAXIMUM 100 800
For warming up liquids.
HIGH 83 700
For warming up and
cooking dishes.
MEDIUM HIGH 67 600
For warming up and
cooking dishes.
MEDIUM 50 450
For cooking meat and
warming up delicate
dishes.
MEDIUM LOW 33 300
DEFROSTING 20 180
For defrosting and
continued cooking.
LOW 11 100
For defrosting delicate
dishes.
USING THE MICROWAVE SETTING

EN 15
USING THE MICROWAVE SETTING
Guidelines for microwave cookware
Cookware that you use for the microwave setting should not block the microwaves. Metals
such as stainless steel, aluminium and copper reflect microwaves. For that reason, do not use
metal cookware. Cookware which is designated as microwave-safe can be used safely. For
more information about suitable cookware, consult the followingguidelines and always use
the ceramic baking tray on level 1 if you use the microwave setting.
COOKWARE MICROWAVE-
SAFE
REMARKS
Aluminium foil
37
Can be used in small quantities to
prevent certain parts of the dish from
overcooking. Arcing can occur if the foil
is too close to the oven wall or if too
much foil is used.
Porcelain and earthenware
3
Porcelain, earthenware,glazed
earthenware and ivory porcelain are
usually suitable, unless they have a
metal edge.
Disposable crockery
made from polyester or
cardboard
3
Frozen meals are sometimes packaged
in disposable crockery.
Fast food packaging
•
Polystyrene cups
•
Paper bags or
newspaper
•
Recycled paper or
metal edges
3
7
7
Can be used to warm up dishes.
Polystyrene can melt if it overheats.
Can catch fire.
Can cause arcing.
Glassware
•
Oven dishes
•
Fineglassware
•
Glass jars
3
3
3
Can be used, unless it has a metal edge.
Can be used to warm up dishes or
liquids. Thinglass can break or shatter
with sudden heating.
The lid must be removed. Only suitable
for warming up.

EN 16
COOKWARE MICROWAVE-
SAFE
REMARKS
Metal
•
Dishes
•
Metal strips for
freezer bags
7
7
Can cause arcing or fire.
Paper
•
Plates, cups,
serviettes and
kitchen paper
•
Recycled paper
3
7
For short cooking times and warming up.
For absorbing excess moisture.
Can cause arcing.
Plastic
•
Trays
•
Cling film
•
Freezer bags
3
3
37
Especially heat-resistant thermoplastic
material. Other types of plastic can warp
or discolour at high temperatures. Do not
use melamine plastic.
Can be used to hold moisture. Do not
touch the food. Be careful when you
remove the film; hot steam can escape.
Only if boil-proof or ovenproof. Must not
be airtight. If necessary, prick it with a fork.
Waxed or baking paper
3
Can be used to hold moisture and
prevent splashes.
Note
Sparks in the microwave are also called arcing.
3: Recommended
37: Careful
7: Unsafe
USING THE MICROWAVE SETTING

EN 17
USING THE MICROWAVE SETTING
General cookingguidelines for the microwave function
Dishes suitable for cooking in the microwave
Various kinds of dishes can be prepared in the microwave, such as fresh or frozen vegetables,
fruit, pasta, rice,grains, beans, fish and meat. You can also prepare sauce, custard, soup,
steamed pudding, fruit preserves and chutney in a microwave.
Cover during cooking
Dishes should be covered during cooking, because the water evaporates and the steam
contributes to the cooking process. There are various ways to cover dishes, for example with
a ceramic plate, a plastic lid or microwave-proof cling film.
Standing times
It is important after cooking that the dish is allowed to stand the recommended time so that
the temperature can spread evenly in the dish.
General cookingguidelines for frozen vegetables
Use a suitableglass Pyrex dish with lid. Keep it covered during the minimum time (see the table).
Continue cooking for the desired result. Stir two times during cooking and one more time after
cooking. After cooking, add salt, herbs or butter. Keep the dish covered during the standing time.
Dish Portion
(g)
Power
(W)
Time
(min.)
Standing time
(min.)
Instructions
Spinach 150 600 5 - 6 2 - 3 Add 15ml
(1 tablespoon)
of cold water.
Broccoli 300 600 8 - 9 2 - 3 Add 30ml
(2 tablespoons)
of cold water.
Peas 300 600 7 - 8 2 - 3 Add 15ml
(1 tablespoon)
of cold water.
Green beans 300 600 7½ - 8½ 2 - 3 Add 30ml
(2 tablespoons)
of cold water.
Mixed
vegetables
(carrots/peas/
sweetcorn)
300 600 7 - 8 2 - 3 Add 15ml
(1 tablespoon)
of cold water.
Mixed vegetables
(Chinese vegetable mix)
300 600 7½ - 8½ 2 - 3 Add 15ml
(1 tablespoon)
of cold water.

EN 18
Preparationguidelines for fresh vegetables
Use a suitableglass Pyrex dish with lid. Add 30 - 45ml (2 - 3 tablespoons) of cold water
for every 250g, unless a dierent amount of water is recommended (see the table). Keep it
covered during the minimum time (see the table). Continue cooking for the desired result. Stir
once during cooking and one more time after cooking. After cooking, add salt, herbs or butter.
Keep covered during the standing time of 3minutes.
Tip: cut fresh vegetables into pieces of equal size. The smaller the pieces, the shorter
the cooking time.
Note: All fresh vegetables should be cooked on full power (800 W).
Dish Portion
(g)
Time
(min.)
Standing time
(min.)
Instructions
Broccoli 250
500
4 - 5
5 - 6
3 Make sure the florets are of equal
size. Point the stalks to the middle.
Brussels
sprouts
250 5 - 6 3 Add 60 - 75ml (5 - 6 tablespoons)
of water.
Carrots 250 5 - 6 3 Cut the carrots into slices of equal
size.
Cauliflower 250
500
5 - 6
7 - 8
3 Make sure the florets are of equal
size. Cut large florets in half. Point
the stalks to the middle.
Courgette 250 3 - 4 3 Cut the courgette into slices. Add
30ml (2 tablespoons) of water or a
knob of butter. Cook it until it is al
dente.
Aubergine 250 3 - 4 3 Cut the aubergine into thin slices
and sprinkle them with 1 tablespoon
of lemon juice.
Leek 250 3 - 4 3 Cut the leek into thick rings.
Mushrooms 125
250
1 - 2
2 - 3
3 Cook small mushrooms whole, and
cut larger mushrooms into slices. Do
not add water. Sprinkle with lemon
juice. Season with pepper and salt.
Drain before serving.
Onions 250 4 - 5 3 Cut the onions into rings or half
rings. Add only 15ml (1 tablespoon)
of cold water.
Capsicum 250 4 - 5 3 Cut the capsicum into small strips.
Potatoes 250
500
4 - 5
7 - 8
3 Weigh the peeled potatoes and cut
them in half (or in four pieces) for
pieces of equal size.
Swede 250 5 - 6 3 Cut the swede into cubes.
USING THE MICROWAVE SETTING

EN 19
USING THE MICROWAVE SETTING
Preparationguidelines for rice and pasta
Rice Use a large,glass Pyrex dish with lid. (Take into consideration that rice
doubles in volume during cooking.) Keep covered during cooking. Stir after
cooking and before the standing time. Add salt or herbs and butter. The rice
may not have absorbed all the water after cooking is completed.
Pasta Use a large,glass Pyrex dish. Add boiling water and a pinch of salt and stir it
all thoroughly. Do not cover during cooking. Stir several times during and after
cooking. Cover during the standing time and then drain well.
Dish Portion
(g)
Power
(W)
Time
(min.)
Standing time
(min.)
Instructions
White rice
(parboiled)
250
375
800
17 - 18
18 - 20
5
Add 500ml of cold water.
Add 750ml of cold water.
Brown rice
(parboiled)
250
375
800
20 - 22
22 - 24
5
Add 500ml of cold water.
Add 750ml of cold water.
Mixed rice
(rice + wild rice)
250 800 17 - 19 5
Add 500ml of cold water.
Mixedgrains
(rice +grain)
250 800 18 - 20 5
Add 400ml of cold water.
Pasta 250 800 10 - 11 5
Add 1000ml of warm
water.
WARMING UP
The microwave oven only needs a fraction of the time a traditional oven requires to warm up
dishes.
Dividing and covering
Avoid warming up large pieces of food. They may become overcooked and dry out before
they are warm enough inside. Warming up smaller pieces works better. If you cover dishes
during the warming up, you prevent them from drying out.
Power settings
Dierent power settings can be used to warm up dishes. Ingeneral it is advisable to use a low
power for delicate dishes or dishes which heat up fast, such as fruit pie.
Stirring
For best results, stir dishes thoroughly or turn them over during the warming up. If possible, stir
one more time before serving. Stirring is particularly important if you are warming up liquids.
Warming up and standing times
If you are warming up dishes for the first time, it is useful to note down the time required, so
that you can consult this in the future. Avoid overheating. If you are not sure about the cooking
time, it is better to stick to a short time. In that case you can always add extra time if you need
it. Always make sure that warmed up dishes are heated thoroughly.
Let dishes stand for a short while after warming up to ensure that the temperature is evenly
distributed. The recommended standing time after warming up is 2 - 4minutes.

EN 20
USING THE MICROWAVE SETTING
Warming up liquids
Take care when warming up liquids. Prevent splashes and possible burning by putting a spoon
orglass stirrer in the drink. Stir during and definitely after the warming up. After the warming
up, let stand for at least 20seconds to ensure that the temperature is evenly distributed.
Warming up baby food
Baby food
Take care when warming up baby food. Put the food in a deep ceramic plate. Cover it with a
plastic lid. After warming up, stir it thoroughly. Let stand for 2 to 3minutes before use. Stir it
again and check the temperature.
The recommended usage temperature is 30-40°C.
Baby milk
Pour milk into a sterilisedglass bottle. Warm the bottle up without covering it. Never warm up
a baby bottle with the teat on it. The bottle can explode if it overheats. Shake the bottle well
before the standing time, and shake it again before use. Always check the temperature of the
baby food or milk before you feed your baby.
The recommended usage temperature is 37°C.
Warming up baby food and milk
Use the power and times in this table as aguideline for warming up.
Dish Portion Power
(W)
Time Standing
time
(min.)
Instructions
Baby food
(vegetables +
meat)
190g 600 W
30 -
40 sec.
2 - 3
Spoon the contents into a deep
ceramic plate. Keep covered
during cooking. Stir the food
thoroughly after cooking. Let
it stand for 2-3minutes. Stir
it thoroughly before use and
check the temperature carefully.
Baby cereal
(grains +
milk + fruit)
190g 600 W
20 -
30 sec.
2 - 3
Spoon the contents into a deep
ceramic plate. Keep covered
during cooking. Stir the food
thoroughly after cooking. Let
it stand for 2-3minutes. Stir
it thoroughly before use and
check the temperature carefully.
Baby milk
100ml
200ml
300 W
30 - 40 sec.
50 sec. to
1min.
2 - 3
Stir or shake the content
thoroughly and pour it into
a sterilisedglass bottle. Put
the bottle in the middle of the
ceramic baking tray. Do not
cover during cooking. Shake
the bottle thoroughly and allow
it to stand for at least 3minutes.
Shake the content thoroughly
before use and check the
temperature carefully.

EN 21
USING THE MICROWAVE SETTING
Warming up liquids and food
Use the power and times in this table as aguideline for warming up.
Dish Portion Power
(W)
Time Standing
time
(min.)
Instructions
Beverages
250ml
(1 mug)
500ml
(2 mugs)
800 W
1½ - 2
2-3
1-2
Pour the beverage into a
ceramic mug and warm up the
beverage without covering the
mug. Put the mug in the middle
of the ceramic baking tray. Stir
the content carefully before and
after the standing time.
Soup
(cooled)
250g 800 W 3-4 2-3
Pour the food into a deep
ceramic plate. Cover it with a
plastic lid. After warming up, stir
it thoroughly. Stir one more time
before serving.
Casserole
(cooled)
350g 600 W 5-6 2-3
Pour the food into a deep
ceramic plate. Cover it with a
plastic lid. After warming up, stir
it thoroughly. Stir one more time
before serving.
Pasta with
sauce
(cooled)
350g 600 W 5-6 2-3
Pour the food into a deep
ceramic plate. Cover it with a
plastic lid. After warming up, stir
it thoroughly. Stir one more time
before serving.
Complete
meal
(cooled)
350g
450g
600 W
5-6
6-7
3
Scoop 2-3 cooled dishes on to a
ceramic plate. Cover the whole
with cling film.
DEFROSTING
Microwaves are excellent for defrosting frozen dishes. Microwaves ensure that frozen
dishes aregradually defrosted in a short time. This can be agreat advantage if you receive
unexpectedguests. Frozen poultry must be fully defrosted before cooking. Remove any metal
strips and take the product out of the packaging to allow moisture to drain o. Put the frozen
dish on a plate and do not cover it. Turn it over halfway through and drain any moisture.
Remove any organs as soon as possible. Check the dish now and then to ensure that it does
not become too warm. If smaller, thinner parts of the frozen dish become warm, you can
protect them by wrapping them in small pieces of aluminium foil. If the poultry becomes warm
on the outside, press STOP/CANCEL and let it stand for 20minutes before continuing. Let
fish, meat and poultry stand to defrost further. The standing time for full defrosting depends
on the amount of food you want to defrost. Consult the table on the next page.
Tip: Flat dishes defrost faster than thick ones, and small quantities take less time
than larger ones. Take this into consideration when you freeze the dish and
defrost it.

EN 22
USING THE MICROWAVE SETTING
Use the following table asguideline for defrosting frozen dishes with a temperature of
approximately -18 to -20°C.
Frozen dishes should be defrosted at the defrosting power (180 W).
Put the dish on the ceramic baking tray and slide it on to level 1 in the microwave.
Dish Portion
(g)
Time
(min.)
Standing
time
(min.)
Instructions
Meat
Minced beef
Pork chops
250
500
250
6 - 7
8 - 12
7 - 8
15 - 30
Put the meat on a ceramic plate.
Wrap thinner edges in aluminium foil.
Turn the food over halfway through the
defrosting time.
Poultry
Chicken pieces
Whole
chicken
500
(2 pieces)
1200
12 - 14
28 - 32
15 - 60 Put chicken pieces skin down and
whole chickens with the breast down
on a ceramic plate. Wrap thinner
pieces such as the wings and ends
in aluminium foil. Turn the food over
halfway through the defrosting time.
Fish
Fish fillets
Entire fish
200
400
6 - 7
11 - 13
10 - 25 Put frozen fish in the middle of a
ceramic plate. Put thinner pieces
under the thicker pieces. Wrap the
narrow ends of the fillets and the tail
of the whole fish in aluminium foil.
Turn the food over halfway through the
defrosting time.
Fruit
Berries 300 6 - 7 5 - 10 Distribute the fruit on a large, flat,
roundglass dish.
Bread
Bread rolls
(each approx.
50g)
Toasted
bread/toasted
sandwich
2 pieces
4 pieces
250
500
1 - 1½
2½ - 3
4 - 4½
7 - 9
5 - 20 Put bread rolls in a circle or place the
bread horizontally on kitchen paper on
the ceramic baking tray. Turn the food
over halfway through the defrosting
time.

EN 23
USING THE OVEN FUNCTIONS
This mode oers four settings. Consult the cookingguidelines to determine the correct
setting
Oven settings
Press the function selection button to
select the oven setting.
Press several times on the function
selection button until the desired oven
setting appears in the display.
A:01
U:01
Hot air
Press the function selection
button twice.
A:01
U:01
Grill + fan
Press the function selection
button three times.
A:01
U:01
Maxigrill
Press the function selection
button four times.
A:01
U:01
Grill
Press the function selection
button five times.
1

EN 24
USING THE OVEN FUNCTIONS
If you want to change the temperature,
press the selection button and set the
desired temperature using the settings
buttons. During cooking you can
change the temperature.
Press the timer button and the
settings buttons to set the desired
cooking time. The maximum cooking
time you can set is 10hours. During
cooking you can change the cooking
time.
Press the start button to start cooking.
Note
1) During cooking you can change the cooking time and the temperature.
2) If you use the oven setting, the operation of the heating elements is interrupted regularly to
regulate the temperature.
2 3
4

EN 25
Hot air
In this setting the top and bottom heating elements and the fan are activated. The heat is
distributed evenly in the oven. This setting is suitable for large amounts of food which need
heat supply, such as large au gratins and pies.
The baking tray or the grill rack + ceramic
baking is usually placed on level 2.
* Temperature setting: 40 - 230 °C.
* Use oven crockery that is resistant to a temperature of 250 °C.
Cooking table
The temperatures and cooking times in this table are guidelines.
We recommend you preheat the oven if you use the intensive function.
Dish Level Accessories Temperature (°C) Time (min.)
Lasagne 2 kg
2 Grill rack + Ceramic
baking tray
180 0:20 - 0:25
Vegetable gratin 2 kg
2 Grill rack + Ceramic
baking tray
170 0:40 - 0:50
Potato gratin 2 kg
2 Grill rack + Ceramic
baking tray
170 0:50 - 1:00
Roast beef / 2 kg medium
2 Grill rack + Ceramic
baking tray
160 1:30 - 1:40
Whole duck / 2 kg
2 Grill rack + Ceramic
baking tray
180 1:30 - 1:40
2 whole chickens /
each 1.2 kg
2 Grill rack + Ceramic
baking tray
180 1:30 - 1:40
Please note
You do not have to turn the food over, but if you do this halfway through, you have a better result.
USING THE OVEN FUNCTIONS

EN 26
Grill
This function is for grilling smaller quantities of flat dishes such as steaks, schnitzels, fish and
toast. Put the dishes in the middle on the rack. Only the top heating element is turned on.
3
4
For grilling, use the grill rack + ceramic baking
on level 4 and the baking tray on level 3.
* Temperature setting: 180 °C.
Grill Table
The temperatures and cooking times in this table are guidelines.
Dish Level Accessories Temperature (°C) Time (min.)
Melting Camembert
(2 - 4 each 75g)
Do not pre-heat the oven
4 Grill rack
+ ceramic
baking tray
200 9 - 11
Frozen baguette with filling
(mozzarella and tomato or
ham and cheese)
4 Grill rack
+ Ceramic
baking tray
200 14 - 16
Fish fingers, frozen
(300 - 450g)
Do not pre-heat the oven
4 Grill rack
+ ceramic
baking tray
200 15 - 20
Fish burger, frozen
(300 - 450g)
Do not pre-heat the oven
3 Baking tray 180 23 - 27
Pizza, frozen (300 - 400g)
Do not pre-heat the oven
4 Grill rack
+ Ceramic
baking tray
170 15 - 18
USING THE OVEN FUNCTIONS

EN 27
Maxigrill
The maxi grill is highly suited for grilling larger quantities of flat dishes such as steak, schnitzel
and fish. The maxi grill is also suitable for making toast. Both top heating elements and
the grill element are turned on when you select this oven function. It is recommended you
preheat the oven when you use the maxi grill.
For grilling, use the grill rack + ceramic baking
on level 4.
* Temperature setting: from 150 - 230 °C.
* Use oven crockery that can withstand temperatures of 230 °C.
Grill Table
The temperatures and cooking times in this table are guidelines.
Dish Level Accessories Temperature (°C) Time (min.)
Sausages (thick)
5 - 8 pieces
4 Grill rack + Ceramic
baking tray
180 5 - 7
turn over
5 - 7
Sausages (thin)
8 - 10 pieces
4 Grill rack + Ceramic
baking tray
180 4 - 5
turn over
4 - 5
Toast 5 - 10 pieces 4 Grill rack + Ceramic
baking tray
230 1 - 2
turn over
1 - 2
Toasted sandwiches
4 - 6 pieces
4 Grill rack + Ceramic
baking tray
200 4 - 8
Filled pancake
(350 - 450g)
4 Baking tray 200 20 - 25
Steak (400 - 800g) 4 Grill rack + Ceramic
baking tray
230 7 - 8
turn over
6 - 7
USING THE OVEN FUNCTIONS

EN 28
Grill + fan
The grill element and the fan in the back of the oven are turned on. The fan circulates the hot
air. It is best to preheat the oven before placing dishes in the oven.
Forgrilling, the grill rack + ceramic baking or
the baking tray are usually placed on level 4.
* Temperature setting: 150 - 230°C
* Make sure theglass dishes you use can withstand temperatures of 40 - 250°C.
Cookingguidelines
Use the temperatures and times in this table as aguideline forgrilling. Set agrilling
temperature of 170-220°C and preheat the oven for 5minutes.
Dish Rack
level
Time
(minutes)
Accessories
Temperature
(°C)
Sausages 250-350g 4 7 - 9 Grill rack + ceramic baking
200
Potato segments 4 pieces 4 20 - 23 Grill rack + ceramic baking
210
Frozen oven fries 400-
500g
4 11 - 15 Baking tray
220
Frozen potato rissoles
6-8 ea
4 18 - 22 Baking tray
210
Frozen chicken nuggets
400-500g
4 9 - 13 Baking tray
220
Salmon steak 400-500g 4 12 - 15
Grill rack + ceramic baking
/ baking tray
220
Fish fillet 300-400g 4 12 - 15
Grill rack + ceramic baking
/ baking tray
180
Entire fish 300-400g 4 10 - 13
Grill rack + ceramic baking
/ baking tray
180
Chicken pieces 400-500g 4 27 - 32
Grill rack + ceramic baking
/ baking tray
180
Note
Preheating is recommended.
If you open the door during cooking, the oven will stop. Close the door and press Start to
start the oven again.
USING THE OVEN FUNCTIONS

EN 29
SETTING COOKING TIME
You can set a cooking time of up to 10hours. The oven switches o automatically once
the cooking time has elapsed.
Example: setting the cooking time.
Select the desired setting and function
(and set the temperature if desired).
Press the timer button.
The cooking time symbol lights up in
the display.
Set the desired cooking time using
the settings buttons. Press the timer
button.
Press START. Cooking will start.
Note
1) When the set time has expired you will hear 4 beeps. ‘0:00’ flashes on the display and the
oven switches o automatically. The current time appears on the display.
2) You can set the programmed cooking time again as shown above.
3) If you want to cancel the programmed cooking time, press the timer button and use the
settings buttons to set the time to zero.
1
2
43

EN 30
Set and end time for when you would like to switch o the oven. Example: switch o
oven at 14.00hours.
Select the desired setting and function
(and set the temperature if desired).
Press the timer button for 3seconds.
The current time flashes.
The ‘end time’ symbol lights up.
Example:
It is 1.00 pm.
The figure ‘13:00’ flashes.
Set the desired end time (14:00) using
the settings buttons.
Example: The desired time is
14:00hours.
Press the timer button again.
Example: The current time is
13:00hours.
The desired end time is 14:00hours.
Press START to start cooking.
The cooking time ‘1:00’ is shown.
Cooking will start.
Note
1) The time display shows the remaining time. Once the set time has expired, you will hear 4
beeps. ‘0:00’ flashes on the display and the oven switches o automatically. The current
time appears on the display.
2) During cooking you can change the preset cooking time and the temperature for better
results. Press the timer button and change the time with the settings buttons.
3) If you want to cancel the programmed cooking time, press the timer button and use the
settings buttons to set the time to zero. Press the timer button again.
3) You can set the end time again as shown above. If you want to cancel the programmed
cooking time, press END TIME and set the time to the current time.
1 2
4
3
5
SETTING AN END TIME

EN 31
POSTPONING THE COOKING TIME
Set the end time (the time when the oven should switch o) and a cooking time.
Example: Setting a cooking time (2hours) and an end time (18:00hours).
Example with the hot air setting: Current time: 12:00hours
Cooking time: 2hours
End time: You want the cooking to end at 18:00hours
Select the desired setting and function
(and set the temperature if desired).
Press the timer button. Set the desired
cooking time using the settings
buttons (2hours). The cooking time
symbol lights up in the display.
Press the timer button for 3seconds.
The cooking time is added to
the current time and ‘14:00’ is
displayed. The end time symbol
lights up.
Set the desired end time (18:00) using
the settings buttons. Wait 5seconds
until the end time has been set.
Press START to start cooking.
The display shows a figure which
indicates that the postpone
function has been activated.
The oven starts automatically
at the set time (16:00) and the
cooking time is shown.
Note
•
The cooking time and the end time can be changed before the set times elapse.
•
Once the set time has expired, you will hear 4 beeps. ‘0:00’ flashes on the display and the
oven switches o automatically.
WARNING
Do not leave the dish too long in the oven; it could spoil.
1 2
3 4

EN 32
USING THE COMBI FUNCTIONS
Microwave +grill
This setting combines the radiant heat from thegrill and the fast cooking through the microwave.
The cooking time is shortened and the result is a browned, crispy layer.
This function is suitable for all kinds of food that has to be warmed up and browned
(e.g. baked pasta) and dishes that require a short cooking time for a brown crust. This setting
can also be used for thick portions for which a brown, crunchy crust is tasty (e.g. chicken
drumsticks).
If you want to brown both sides of the food, turn it over halfway through cooking.
Selecting the microwave +grill function
Press the function selection button six
times to select the microwave +grill
setting.
The microwave +grill function, the
cooking time and power are visible in
the display.
Press the settings buttons to set the
desired cooking time.
Press the selection button and set the
power using the settings buttons.
Press the selection button and set the
desired temperature using the settings
buttons. During cooking you can
change the temperature.
Press the start button to start cooking.
1 2
3 4
5 6

EN 33
For thegrill + microwave setting, the ceramic
baking tray is usually placed with thegrill rack
on level 4.
* Microwave power: 100 - 600 W
* Temperature setting: 40 - 200°C
* Make sure theglass dishes you use can withstand temperatures of 40 - 250°C.
Cookingguidelines
Take the temperatures and times in this table as aguideline for cooking.
Preheating is not necessary.
Dish Level Power
(W)
Temperature
(°C)
Time 1
st
(min.)
Time 2
nd
(min.)
Accessories
Fried potatoes
400-500g
4 450 200 12 - 14 -
Ceramic
baking tray
Grilled tomatoes
3 each
4 180 170 7 - 9 -
Ceramic
baking tray
withgrill rack
Vegetablegratin
450-600g
3 450 180 15 - 18 -
Ceramic
baking tray
withgrill rack
Grilled fish each
1 piece
4 300 180 06 - 08 06 - 08
Ceramic
baking tray
withgrill rack
Chicken pieces
400-500g
4 300 180 10 - 13 10 - 13
Ceramic
baking tray
withgrill rack
USING THE COMBI FUNCTIONS

EN 34
USING THE COMBI FUNCTIONS
Microwave + hot air
In this setting, the microwave function is combined with hot air. This reduces the cooking
time and dishes obtain a brown, crispy layer. This function is suitable for all types of meat
and poultry, but also for casseroles, augratin casseroles, roast beef, biscuit dough and light
fruitcakes, tarts and crumble desserts.
Selecting the microwave + hot air function
Press the function selection button
seven times to select the microwave +
hot air setting.
The microwave + hot air function, the
cooking time and power are visible in
the display.
Press the settings buttons to set the
desired cooking time.
Press the selection button and set the
power using the settings buttons.
Press the selection button and set the
desired temperature using the settings
buttons. During cooking you can
change the temperature.
Press the start button to start cooking.
1 2
3 4
65

EN 35
For the microwave + hot air setting, the ceramic
baking tray is usually placed with thegrill rack
on level 3.
* Microwave power: 100 - 600 W
* Temperature setting: 40 - 200°C
* Make sure theglass dishes you use can withstand temperatures of 40 - 250°C.
Cookingguidelines
Take the temperatures and times in this table as aguideline for cooking.
Preheating is not necessary.
Dish Level Power
(W)
Temperature
(°C)
Time 1
st
(min.)
Time 2
nd
(min.)
Accessories
Whole chicken,
1.2kg
3 300 180 25 - 27 15 - 18
Ceramic
baking tray
withgrill rack
Roast beef/
lamb (medium)
450-700g
3 300 180 17 - 20 17 - 20
Ceramic
baking tray
withgrill rack
Frozen lasagne/
pastagratin
450-500g
3 450 180 18 - 22 -
Ceramic
baking tray
withgrill rack
Potatogratin
500-600g
3 450 190 20 - 25 -
Ceramic
baking tray
withgrill rack
Fresh fruit flan 3 100 170 40 - 45
Ceramic
baking tray
USING THE COMBI FUNCTIONS

EN 36
The automatic menu settings oer you 25 pre-programmed settings (10 for automatic
cooking, 10 for the vegetable menu setting and 5 for automatic defrosting) for handy cooking
of your favourite dishes. The cooking time and power are set automatically. Select one of the
25settings, enter the weight and start cooking.
Automatic cooking
Press the function selection button
eight times to select the ‘automatic
cooking’ setting. The ‘A:01’ lights up
in the display.
Press the settings buttons to set
the desired menu setting. Press the
selection button.
•
Consult the tables for a description
of the 10 automatic menu settings.
Press the settings buttons to set the
desired weight.
If you do not select a weight, a weight
is set automatically after 5seconds.
Press START to start cooking.
Note
•
Some automatic menus require no further action. Other menus require the dish to be turned
over. The ovengives a signal to indicate this.
•
The set oven temperature and the cooking time are displayed when the automatic menu is
active.
•
The temperatures and times cannot be changed during cooking.
1 2
USING THE AUTOMATIC MENU SETTINGS
3 4

EN 37
Guidelines for automatic cooking
The following table shows you 10 automatic programmes for warming up, cooking, roasting
and baking. The quantities, standing times and corresponding recommendations aregiven.
These automatic programmes contain special, useful cooking settings.
No. Dish Weight
(kg)
Accessories Level Instructions
A:01 Complete meal
0.3 - 0.35
0.4 - 0.45
Ceramic
baking tray
1
Put the food on a ceramic baking
tray and cover the food with cling
film. This programme is suitable
for meals which consist of 3
dishes (e.g. meat with sauce,
vegetables and potatoes, rice
or pasta). Let the meal stand for
3minutes after cooking.
A:02 Frozen pizza
0.3 - 0.35
0.4 - 0.45
Grill rack +
ceramic
baking tray
2
Put the frozen pizza on thegrill
rack with the ceramic baking tray
and place it in the oven.
A:03 Frozen lasagne
0.4 - 0.45
0.6 - 0.65
Grill rack +
ceramic
baking tray
2
Put the frozen lasagne in a
suitableglass Pyrex dish or on
the grill rack with the ceramic
baking tray. Let it stand for 2 to
3minutes after warming up.
A:04 Whole chicken
1.1 - 1.15
1.2 - 1.25
Grill rack +
ceramic
baking tray
2
Mix olive oil or butter with pepper
and salt. Rub this thoroughly into
the chicken on the inside and the
outside. Put the chicken with the
breast downwards on thegrill
rack with the ceramic baking tray
in the oven. Turn the chicken
over when the ovengives a
signal, and press START. Let the
meal stand for 3minutes after
cooking.
A:05 Chicken pieces
0.6 - 0.7
0.9 - 1.0
Grill rack +
ceramic
baking tray
4
Mix olive oil or butter with pepper
and salt. Rub this thoroughly
into the chicken pieces. Put the
chicken pieces with the skin
side down on thegrill rack with
ceramic baking tray in the oven.
Turn the chicken pieces over
when the ovengives a signal,
and press START. Let the meal
stand for 3minutes after cooking.
USING THE AUTOMATIC MENU SETTINGS

EN 38
USING THE AUTOMATIC MENU SETTINGS
No. Dish Weight
(kg)
Accessories Level Instructions
A:06 Roast lamb
0.8 - 0.9
1.1 - 1.2
Grill + ceramic
baking tray
3
Put the marinated lamb roast on
thegrill rack with ceramic baking
tray in the oven. Turn the lamb
roast over when the ovengives a
signal, and press START.
A:07
Frozen
oven fries
0.3 - 0.4
0.45 - 0.5
Baking tray 3
Distribute the frozen oven fries on
a metal baking tray.
A:08
Grilled potato
halves
0.4 - 0.5
0.6 - 0.7
Grill + ceramic
baking tray
4
Cut potatoes lengthwise and
sprinkle salt on the flat side. Put
them flat side up on thegrill rack
with ceramic baking tray. Let the
meal stand for 3minutes after
cooking.
A:09 Apple pie 1.2 - 1.4 Baking tray 2
Prepare the apple pie in a spring
form and put it on the baking tray.
The weight includes apples, etc.
A:10 Cake 0.7 - 0.8 Baking tray 3
Put the cake form (25 cm)
with cake mix lengthwise (with
respect to the door) on the
baking tray in the oven.

EN 39
USING THE AUTOMATIC MENU SETTINGS
Defrost setting
These programmes use only microwaves. Remove all packaging before defrosting. Put meat,
poultry and fish on the ceramic baking tray.
Selecting the defrost setting
Press the function selection button
nine times to select defrost setting.
The ‘d:01’ lights up in the display.
Press the settings buttons to set
the desired defrost time. Press the
selection button.
•
Consult the tables on the following
page for a description of the
5automatic menu settings.
Press the settings buttons to set the
desired weight.
If you do not select a weight, a weight
is set automatically after 5seconds.
Press START to start cooking.
1 2
3 4

EN 40
Guidelines for the automatic rapid defrost setting
The following table shows you the dierent programmes for automatic defrosting, quantities,
standing times and the corresponding recommendations.
No.
Dish
Weight
(kg)
Accessories Level Standing
time
(min.)
Instructions
d:01 Meat 0.2 - 1.5
Ceramic
baking tray
1 20 - 60
Wrap the edges with aluminium
foil. Turn the meat over when the
ovengives a signal.
This programme is suitable for
beef, lamb, pork, steaks, chops
and mince.
d:02 Poultry 0.2 - 1.5
Ceramic
baking tray
1 20 - 60
Wrap the ends of drumsticks and
wings with aluminium foil. Turn the
poultry over when the ovengives
a signal.
This programme is suitable for
whole chickens and chicken pieces.
d:03 Fish 0.2 - 1.5
Ceramic
baking tray
1 20 - 60
Wrap the tail of a whole fish in
aluminium foil. Turn the fish over
when the ovengives a signal. This
programme is suitable for whole
fish and fish fillets.
d:04
Bread/
cake
0.1 - 0.8
Ceramic
baking tray
1 10 - 30
Put the bread on a piece of kitchen
paper and turn it over when the
ovengives a signal. Put the cake
on the ceramic baking tray and
if possible, turn it over when the
ovengives a signal.
(The oven stops working when you
open the door.) This programme
is suitable for all kinds of bread
(sliced or whole loaves), yeast
pastry, biscuit, cheesecake and
pu pastry, but also for bread rolls
and baguettes. Place bread rolls in
a circle. It is not suitable for crumbly
pastry, fruit/cream pie and cakes
with a chocolate layer.
d:05 Fruit 0.1 - 0.6
Ceramic
baking tray
1 5 - 15
Divide the frozen fruit evenly on
the ceramic baking tray. This
programme is suitable for fruit such
as raspberries and mixed berries.
Important! The rapid defrost setting uses microwaves to warm up food. When you use this
setting, you must carefully follow theguidelines for cookware and other precautions for safe
use of the microwave.
USING THE AUTOMATIC MENU SETTINGS

EN 41
USING THE AUTOMATIC MENU SETTINGS
Vegetable menu setting
Add 30 - 45ml of cold water for every 250g, unless a dierent amount of water is
recommended (see table). Cover the vegetables for the minimum time (see table). Continue
cooking until you have the desired results. Stir the vegetables during and after cooking. After
cooking the dish, add salt, herbs or butter. Cover the dish and allow this to stand for 3minutes.
Cut fresh vegetables into pieces of equal size. The smaller they are, the faster they will cook.
Selecting the vegetable menu function
Press the function selection button ten
times to select the vegetable menu
setting. The ‘vegetable menu setting’
symbol lights up in the display.
Press the settings buttons to set the
desired vegetable menu function.
Press the selection button.
Press the settings buttons to set the
desired weight.
If you do not select a weight, a weight
is set automatically after 5seconds.
Press START to start cooking.
1 2
3 4

EN 42
USING THE AUTOMATIC MENU SETTINGS
Vegetable menu settings table
Use this table as aguideline for cooking. Preheating is not necessary.
No. Dish Portion
(kg)
Accessories
Level Instructions
U:01 Broccoli
florets
0.2 - 0.3
0.3 - 0.4
Steamer
basket
1 Rinse the broccoli and clean it.
Place in aglass oven dish with
lid. Add 2 tablespoons (for 0.2 -
0.3kg) or 3 to 4 tablespoons (for
0.3 - 0.4kg) of water. Place the
bowl with lid in the centre of the
baking tray. Stir well after cooking.
U:02 Cauliflower
florets
0.2 - 0.3
0.3 - 0.4
Steamer
basket
1 Rinse the cauliflower and clean
it. Place the cauliflower in
aglass oven dish with lid. Add 2
tablespoons (for 0.2 - 0.3kg) or 3
to 4 tablespoons (for 0.3 - 0.4kg)
of water. Place the bowl with lid
in the centre of the baking tray.
Stir well after cooking.
U:03 Sliced
carrots
0.2 - 0.3
0.4 - 0.5
Steamer
basket
1 Rinse the carrots and clean
them. Place the carrots in
aglass oven dish with lid. Add 2
tablespoons (for 0.2 - 0.3kg) or 3
to 4 tablespoons (for 0.4 - 0.5kg)
of water. Place the bowl with lid
in the centre of the baking tray.
Stir well after cooking.
U:04 Potatoes in
skin
0.3 - 0.4
0.7 - 0.8
Steamer
basket
1 Rinse the potatoes and clean
them. Rub the potatoes with olive
oil and prick the skin with a fork.
Place them in the bowl with lid and
let the dish stand for 3 - 5 minutes
after cooking.
U:05 Peeled
potatoes
0.4 - 0.5
0.7 - 0.8
Steamer
basket
1 Rinse the potatoes and clean
them. Cut them in half and put
them in the bowl with lid. Add
1 - 2 tablespoons of water. Stir
well after cooking. For large
quantities, also stir thoroughly
halfway through the cooking
process. Let the dish stand
another 3 - 5minutes after
cooking.

EN 43
USING THE AUTOMATIC MENU SETTINGS
U:06 Courgette 0.2 - 0.3
0.3 - 0.4
Steamer
basket
1 Cut the courgette into slices.
Add 2 tablespoons of water or
a knob of butter. Place them in
the bowl with lid. Cook them
with the lid on in the bowl until
they are al dente.
U:07 Sliced
aubergine
0.1 - 0.2
0.3 - 0.4
Steamer
basket
1 Cut the aubergine into thin
slices and sprinkle them with
1 tablespoon of lemon juice.
Place them in the bowl with lid.
Cook with the lid on the bowl.
Stir well after cooking.
U:08 Sliced
onion
0.2 - 0.3
0.4 - 0.5
Steamer
basket
1 Cut the onions into rings or half
rings. Add only 1 tablespoon of
cold water. Place them in the
bowl with lid. Cook with the
lid on the bowl. Stir well after
cooking.
U:09 Mixed
vegetables
0.2 - 0.3
0.4 - 0.5
Steamer
basket
1 Rinse the mixed vegetables and
clean them. Put the vegetables
in the bowl with lid. Add 1
tablespoon (for 0.2 - 0.3kg) or 3
to 4 tablespoons (for 0.4 - 0.5kg)
of water. Place the bowl with lid
in the centre of the baking tray.
Stir well after cooking.
U:10 White rice 0.2 - 0.3
Steamer
basket
1 Use the bowl with lid (please
note! the water volume of rice
doubles during cooking). Cook
the rice with the lid on the bowl.
After cooking, drain o the
excess water. Add salt, herbs
and butter, stir the rice and let it
stand for a moment.

EN 44
The steamer basket is based on the principle of cooking with steam and has been
designed for fast, healthy cooking in your Etna microwave. In using cooking with steam,
the microwave function is used.
This accessory is ideal for preparing rice, pasta, vegetables, etc. in record time, while
preserving their nutritional values.
The steamer basket has three components:
All components are suitable for
microwave use and can withstand
temperatures from -10°C to 130°C.
Suitable for storing in a freezer. Can
be used separately or in combination.
Use
•
Do not use:
To cook dishes with a high sugar or fat content.
On agrill setting or on a hob.
•
Before first use, wash the basket thoroughly in soapy water.
•
Consult the steaming table for cooking times.
Maintenance
•
The steamer basket can be cleaned in a dishwasher.
•
When washing by hand, use warm water with detergent. Do not use abrasives.
•
Some dishes (such as dishes with tomato) can discolour the plastic.
Defrosting:
•
Put frozen dishes in the steamer basket without using the lid. The moisture remains at the
bottom of the bowl and does not aect the dish.
USING THE STEAMER BASKET
bowl basket lid

EN 45
Steaming table
The following table hasguidelines for cooking various dishes using the steamer basket. The
quantities, power, cooking time and corresponding recommendations aregiven.
Dish Weight
(g)
Power
(W)
Cooking
time
(min.)
Accessories Recommendation
Artichokes
300
(1-2 pieces)
800 5 - 6
Steamer
basket
Rinse the artichokes and clean
them. Put the basket in the
bowl and put the artichokes in
the basket. Add 1 tablespoon
of lemon juice. Put the lid on.
Let it stand for 1 - 2minutes
after cooking.
Fresh
vegetables
300 800 4 - 5
Steamer
basket
Clean the vegetables, cut
them into equal pieces. Weigh
the vegetables (for example
broccoli, cauliflower, carrots or
pepper). Put the basket in the
bowl and put the vegetables in
the basket. Add 2 tablespoons
of water. Put the lid on. Stir well
after cooking and let stand for
1 - 2minutes.
Frozen
vegetables
300 600 8 - 9
Steamer
basket
Put the basket in the bowl
and put the vegetables in the
basket. Add 1 tablespoon of
water. Put the lid on. Let it
stand for 1 - 2minutes after
cooking.
Rice 250 800 15 - 18 Bowl with lid
Put the rice in the bowl. Add
500ml of cold water. Put the
lid on. After cooking, let white
rice stand for 5minutes and
unpolished rice stand for
10minutes.
Potatoes
in skin
500 800 7 - 8 Bowl with lid
Rinse the potatoes, weigh them
and put them in the bowl. Add 3
tablespoons of water. Put the lid
on. Let stand for 2 - 3minutes
after cooking.
Stew
(cooled)
400 600
5.5 - 6.5 Bowl with lid
Put the stew in the bowl. Put
the lid on. Stir well after cooking
and let stand for 1 - 2minutes.
Soup
(cooled)
400 800 3 - 4 Bowl with lid
Put the soup in the bowl. Put
the lid on. Stir well after cooking
and let stand for 1 - 2minutes.
USING THE STEAMER BASKET

EN 46
Dish Weight
(g)
Power
(W)
Cooking
time
(min.)
Accessories Recommendation
Soup
(frozen)
400 800 8 - 10 Bowl with lid
Put the frozen soup in the bowl.
Put the lid on. Stir well after
cooking and let stand for
2 - 3minutes.
Frozen
yeast/Bun
with jam
filling
400 400 8 - 10 Bowl with lid
Moisten the top of the bun. Put
1 - 2 frozen buns next to each
other in the bowl. Put the lid
on. Let stand for 2 - 3minutes
after cooking.
Stewed
fruit
250 800 3 - 4 Bowl with lid
After peeling, weigh the fresh
fruit (for example apples, pears,
apricots, mangos or pineapple).
Clean the fruit, cut it into equal
pieces or cubes. Put the fruit
stew in the bowl. Add 1 - 2
tablespoons of water and 1 - 2
tablespoons of sugar. Put the lid
on. Let stand for 2 - 3minutes
after cooking.
Please note!
•
The lid can become very hot during use!
•
Use oven mitts when handling the steamer basket after cooking the dish.
USING THE STEAMER BASKET
+
bowl with lid steamer basket

EN 47
USING THE AQUA CLEAN SETTING
With the Aqua Clean setting you can clean your oven in just 15minutes.
Press the function selection button
eleven times to select AQUA CLEAN.
Pour approximately 100ml water in
the bottom of the empty oven.
Press START. The oven starts
automatically.
After 15minutes the oven stops
automatically. Wipe out the oven
with a dry cloth.
Important
•
Use this function only when the oven has cooled down fully to room temperature.
•
Do NOT use distilled water.
•
Do NOT use high-pressure cleaners or steam cleaners to clean the microwave oven.
1 2

EN 48
If you want to deactivate the beep
alarm, press both settings buttons
simultaneously and keep them
pressed for 1 second.
If you want to activate the beep alarm
again, press both settings buttons
simultaneously and keep them
pressed for 1 second.
DEACTIVATING THE BEEP ALARM
1 2

EN 49
CHILDPROOF LOCK
With the childproof lock of the oven you can lock the control panel to prevent
unintended use of the oven.
Locking the oven
Unlocking the oven
Press the settings button ‘reduce’ and
cooking time button simultaneously
for 3seconds.
The display shows a lock symbol,
which means that all functions are
locked.
1 2
Press the settings button ‘reduce’ and
cooking time button simultaneously
for 3seconds.
The lock symbol disappears from the
display, which means that all functions
are unlocked.
1 2

EN 50
CLEANING THE MICROWAVE OVEN
Clean the oven regularly to prevent fat and leftover food from accumulating, especially
on the surfaces of the interior and the exterior, the door and the seal.
1. Clean the exterior surfaces with a soft cloth and warm water with soap. Wipe afterwards
with a clean, damp cloth and dry the surfaces.
2. Remove splashes and stains on the interior surfaces with a cloth with soap. Wipe
afterwards with a clean, damp cloth and dry the surfaces.
3. To remove stubborn leftover food and odours, put a mug with diluted lemon juice at the
bottom of the empty oven. Heat the juice for tenminutes at maximum power.
4. Wipe the interior with a damp cloth.
Important
•
Take care that NO water enters the vents.
•
NEVER use abrasive cleaning materials or chemical solvents.
•
ALWAYS ensure that the seal of the door is clean. This prevents accumulation of dirt and
allows you to close the door properly.
STORING AND REPAIRING THE MICROWAVE OVEN
Repairs must be performed only by a qualified service technician.
If maintenance is required, pull the plug from the socket and contact the Etna customer
service.
Have the following information at hand when you call:
•
The model number and serial number (you can find them on the inside of the
oven door)
•
Guarantee information
•
A clear description of the problem
Choose a clean, dry place if you have to store the oven temporarily, since dust and
moisture can damage the appliance.

EN 51
SOLVING PROBLEMS
Try the solutions below if you have problems with your oven. You might save yourself the
time and eort of an unnecessary phone call to the customer service.
The food is not cooked.
•
Check whether the timer has been set and you have pressed START.
•
Close the door properly.
•
Check whether a fuse has blown and whether a circuit breaker has been activated.
Food is overcooked or undercooked.
•
Check whether the correct cooking time has been set.
•
Check whether the correct power has been set.
There is arcing in the oven.
•
Make sure you use the correct cookware (without metal edges).
•
Check whether forks or other metal utensils have been placed in the oven.
•
Make sure when you use aluminium foil that it does not come too close to the walls.
The oven causes disturbances in radios or televisions.
•
When it is operating, the oven can cause minor disturbance to televisions or radios.
To limit this eect, do not install the oven in the vicinity of televisions, radios and
antennas.
If there are electronic interruptions, the DISPLAY is reset.
•
Pull the plug from the socket and put it back in again. Set the time again.
There is condensation on the interior of the oven.
•
This is normal. Wipe the oven clean after use.
The fan keeps working after the oven is switched off.
•
This is normal. The cooling fan can run for a maximum of threeminutes after the
oven has stopped.
An air flow can be felt at the door and the exterior of the appliance.
•
This is normal.
Light reflects on the door and the exterior of the appliance.
•
This is normal.
Steam escapes from the door or the vents.
•
This is normal.
When the oven is working, and particularly in the defrost setting, click sounds can be
heard.
•
This is normal.

EN 52
ERROR CODES
Error code General functions
ERROR TEMPERATURE SENSOR OPEN
This error occurs if there is a faulty sensor, incorrect connections, a
faulty PCB and if the A/D value detected by MICOM is lower than 10.
ERROR TEMPERATURE SENSOR SHORT
This error occurs if there is a faulty sensor, incorrect connections, a
faulty PCB and if the A/D value detected by MICOM is higher than 252.
TARGET TEMPERATURE TEMPERATURE SENSOR
This error occurs if the preheating was not completed and the
temperature in the oven is lower than 120°C for 30minutes.
ERROR ABNORMAL TEMPERATURE DETECTION
This error occurs if the temperature in the oven is higher than 250°C for
10minutes.
ERROR ABNORMAL TEMPERATURE DETECTION MICROWAVE
This error occurs if the temperature in the oven in the microwave setting
is higher than 210°C.
ERROR BUTTON SHORT
This error occurs if you press and hold a button for longer than
60seconds.
This error may occur if watergets into the control panel or if dust
particles stick on theTOUCH PANEL
.
ERROR NAK SIGNAL
The NAK signal isgiven if it takes longer than 10seconds to switch on
the appliance.
COMMUNICATION ERROR
This error occurs if there is no communication between the main PCB
and the sub PCB for longer than 10seconds.
ERROR EEPROM OPEN
This error occurs if somethinggoes wrong in the EEPROM
communication when you are setting the power.
ERROR EEPROM READ & WRITE
Eeprom is not used.
If one of these errors occurs, contact the Etna customer service.

EN 53
TECHNICAL SPECIFICATIONS
Model CM751ZT / CM851RVS / CM851ZT
Power source 230 V ~ 50 Hz
Energy consumption
Maximum power
Microwave setting
Grill setting
Hot air setting
3000 W
1650 W
2500 W
2500 W
Output power 100 W/800 W (IEC - 705)
Nominal frequency 2450 MHz
Microwave OM75P (21)
Cooling method Engine cooling fan
Dimensions
Appliance dimensions:
Built-in dimensions:
595 x 454 x 569.4 mm (w x h x d) CM751
596.4 x 456 x 569.4 mm (w x h x d) CM851
555 x 445 x 548.8 mm (w x h x d)
Volume 50 l
Weight
Net
Shipping
38.3kg
45.5kg

EN 54
DISPOSAL OF APPLIANCE AND PACKAGING
The packaging of the appliance can be recycled and may be made from:
•
cardboard
•
paper
•
polyethylene wrap (PE)
•
CFC-free polystyrene (hard PS foam)
•
polypropylene tape (PP)
Dispose of these materials in a responsible manner in accordance with
legal provisions.
The product is marked with a crossed-out dustbin symbol to remind you
to dispose of it separately. This prevents any potential negative impact
on the environment and on health. This means that at the end of its
working life, the product must be taken to a special centre for separated
waste collection or to the supplier.
Separate processing ensures that the materials from which this
appliance are made can be recovered, which means considerable
savings in power and raw materials.
Declaration of conformity
We declare that our products comply with the relevant European
directives, standards and regulations as well as all requirements referred
to in the standards.

EN 55

682305 / VER 2 / 07-11-2017
682305
*682305*
DE68-04315D-00
-
 1
1
-
 2
2
-
 3
3
-
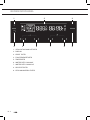 4
4
-
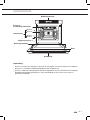 5
5
-
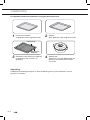 6
6
-
 7
7
-
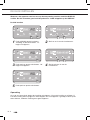 8
8
-
 9
9
-
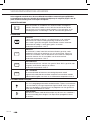 10
10
-
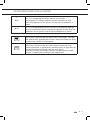 11
11
-
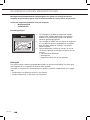 12
12
-
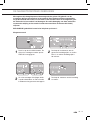 13
13
-
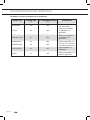 14
14
-
 15
15
-
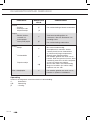 16
16
-
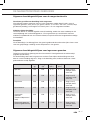 17
17
-
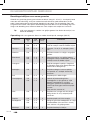 18
18
-
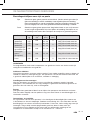 19
19
-
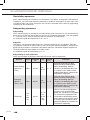 20
20
-
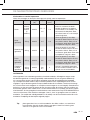 21
21
-
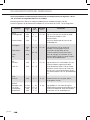 22
22
-
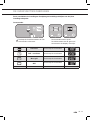 23
23
-
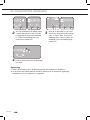 24
24
-
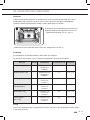 25
25
-
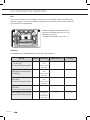 26
26
-
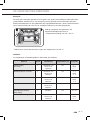 27
27
-
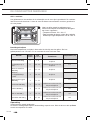 28
28
-
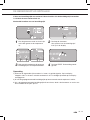 29
29
-
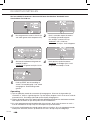 30
30
-
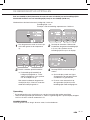 31
31
-
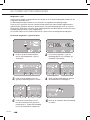 32
32
-
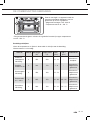 33
33
-
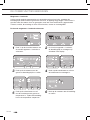 34
34
-
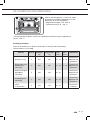 35
35
-
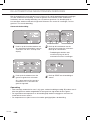 36
36
-
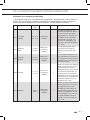 37
37
-
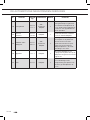 38
38
-
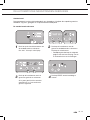 39
39
-
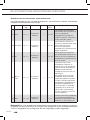 40
40
-
 41
41
-
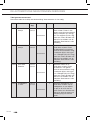 42
42
-
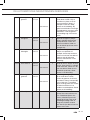 43
43
-
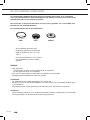 44
44
-
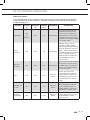 45
45
-
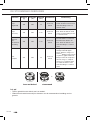 46
46
-
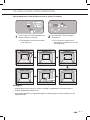 47
47
-
 48
48
-
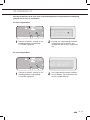 49
49
-
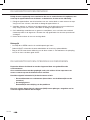 50
50
-
 51
51
-
 52
52
-
 53
53
-
 54
54
-
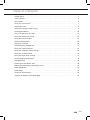 55
55
-
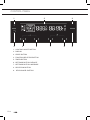 56
56
-
 57
57
-
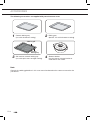 58
58
-
 59
59
-
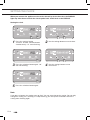 60
60
-
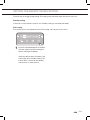 61
61
-
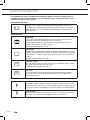 62
62
-
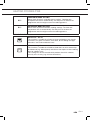 63
63
-
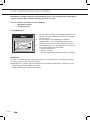 64
64
-
 65
65
-
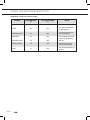 66
66
-
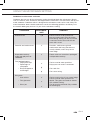 67
67
-
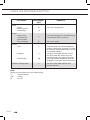 68
68
-
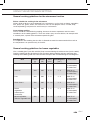 69
69
-
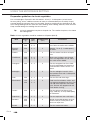 70
70
-
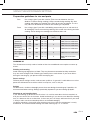 71
71
-
 72
72
-
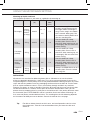 73
73
-
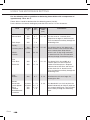 74
74
-
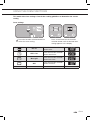 75
75
-
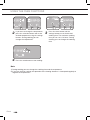 76
76
-
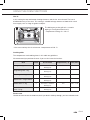 77
77
-
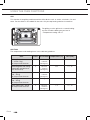 78
78
-
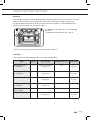 79
79
-
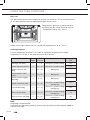 80
80
-
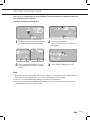 81
81
-
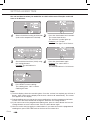 82
82
-
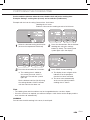 83
83
-
 84
84
-
 85
85
-
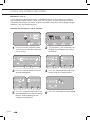 86
86
-
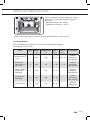 87
87
-
 88
88
-
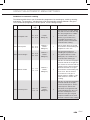 89
89
-
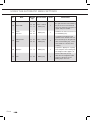 90
90
-
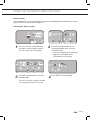 91
91
-
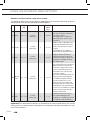 92
92
-
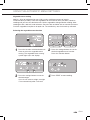 93
93
-
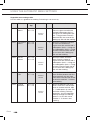 94
94
-
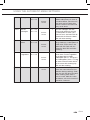 95
95
-
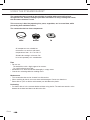 96
96
-
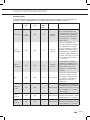 97
97
-
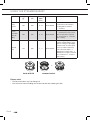 98
98
-
 99
99
-
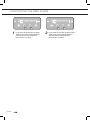 100
100
-
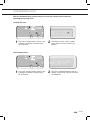 101
101
-
 102
102
-
 103
103
-
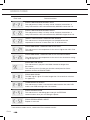 104
104
-
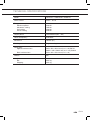 105
105
-
 106
106
-
 107
107
-
 108
108


Samsung CM851RVS Handleiding
- Categorie
- Keuken-
- Type
- Handleiding
- Deze handleiding is ook geschikt voor
in andere talen
- English: Samsung CM851RVS User manual
Gerelateerde papieren
Andere documenten
-
Whirlpool MWD 344 IX Gebruikershandleiding
-
Silvercrest SDG 950 C3 Operating Instructions Manual
-
Philips HR1040/91 Handleiding
-
Cleveland Range 1SCE-OPM Handleiding
-
-
Tefal RK900132 Handleiding
-
-
Topcom Multi Steamer 401 Handleiding
-
 Elna (N-EA) 553RVS Handleiding
-
 Convotherm +3 (previous series) Installatie gids

