
Wet & Dry Liliput
Akkusauger
Battery-Operated Vacuum Cleaner
Mini-aspirateur à accus
Aspirapolvere ad accumulatore
Gebrauchsanweisung
Operating instructions
Mode d’emploi
Istruzioni per l’uso

2
4
5
7
11
8
9
12
3
1
2
6
10
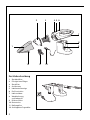
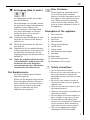
Gerätebeschreibung
1 Staubbehälter
2 Flüssigkeitsauffänger
3 Staubfilter
4 Auslösetaste
5 Ladekontrollanzeige
6 Ein/Ausschalter
7 Ladesteckdose
8 Wandhalterung
und Ladegerät
9 Klinkenstecker
10 Netzstecker
11 Naßsaugdüse
12 Ausklappbare Fugendüse
A

3
D
E
B
C
F
G

4
K
L
H
J

g
7
2 Entsorgung (Abb. K und L)
Ihr Staubsauger enthält eine auflad-
bare NiCd-Batterie.
Der Staubsauger ist viele Male auflad-
bar und hat eine lange Lebensdauer bei
wiederholt voller Saugleistung.
Sollte es dennoch eines Tages nötig
sein, Ihren Akkusauger zu ersetzen,
denken Sie bitte an eine umwelt-
freundliche Entsorgung:
0 Schalten Sie den Staubsauger ein und
lassen Sie ihn laufen, bis die Batterie
völlig leer ist.
0 Öffnen Sie das Gehäuse des Akkusau-
gers (Abb. K).
0 Vergewissern Sie sich, daß die Batterie
nicht kurzgeschlossen ist. Entfernen Sie
die Batterien und ziehen Sie die Ver-
bindungsleitungen der Akkuanschlüsse
ab (Abb. L).
0 Geben Sie ausgebaute Batterie nicht
in die Mülltonne, sondern geben Sie
die Batterie bei einer Reparatur-
werkstatt oder bei einer öffentlichen
Sammelstellen für Batterien ab.
Der Kundenservice
Für unsere Produkte gelten höchste
Qualitätsansprüche.
Sollten für Sie dennoch Fragen bei der
Benutzung dieses Gerätes entstehen,
dann schreiben Sie uns. Nur mit Ihrer
Unterstützung sind wir in der Lage,
Geräte zu entwickeln, die Ihren
Bedürfnissen entsprechen.
g
Dear Customer,
Please read these operating instruc-
tions carefully. Above all please
observe the safety information on the
first pages of these operating instruc-
tions! Please keep these operating
instructions for later reference. Pass
them on to any subsequent owner of
the appliance.
Description of the appliance
1 Dust container
2 Liquid collector
3 Dust filter
4 Release button
5 Charge control display
6 On/off switch
7 Charge socket
8 Wall mounting and charger
9 Jack plug
10 Mains plug
11 Wet vacuuming nozzle
12 Fold-down crevice nozzle
1 Safety instructions
• Do not vacuum wet surfaces.
• Do not use the vacuum cleaner on sur-
faces that have been treated with
flammable solvents until they are com-
pletely dry.
• Do not use your vacuum cleaner to
vacuum hot items such as a glowing
cigarette end.
• Never use the vacuum cleaner to pick
up combustible dust.
• Under no circumstances should you oil
or grease the motor.
• Do not expose the vacuum cleaner to
direct sunlight or any source of heat.
• For maintenance and repair please
contact your local dealer or authorised
service personnel. Never attempt to
repair your vacuum cleaner yourself.
• Only use the appropriate original
charging devices for this model.

g
8
;
This appliance complies with the fol-
lowing EC directives:
– 73/23/EWG dated 19.02.1973 “Low
Voltage Directive“, including Direc-
tive Amendment 93/68/EWG
– 89/336/EWG dated 03.05.1989 “EMC
Directive“, including Amendment
Directive 92/31/EWG
Before using for the first time
Before you use your vacuum cleaner
for the first time you should charge
the battery for approx. 14-16 hours.
With a fully charged battery you can
vacuum for approx. 9 minutes.
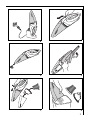
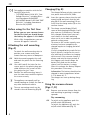
Attaching the wall mounting
(Fig. A)
To attach the wall mounting select a
position near a room socket and
remote from any source of dampness.
0 Hold the mounting against the wall
and mark the points for the fastening
screws.
0 Use a drill to drill the holes for the
screws, push in the plastic plugs pro-
vided and insert the screws so that
they project by just 7 mm.
0 Position the wall mounting, lower it
over the two screws and then tighten
the screws securely.
3
The appliance can equally well be
stored standing on a table, the floor or
any other horizontal surface.
3
The wet vacuuming nozzle can be
stored in the wall mounting (Fig. B).
Charging (Fig. B)
The charger (8) may only be connected
to a power source of 230V, 50Hz.
0 Insert the vacuum cleaner into the wall
mounting (8) and check that the jack
plug (9) on the wall mounting fits cor-
rectly into the charge socket (7) on the
vacuum cleaner.
3
The charge control display (5) will
come on and charging will begin. It will
also come on if the battery is already
fully charged. Always leave your vac-
uum cleaner in the wall mounting
when not in use in order to guarantee
optimal suction power.
To return to full suction capacity once
a battery has been completely dis-
charged requires a charging period of
18 hours.
If a fully charged battery works for less
than 9 minutes it might be the result
of a build up of resistance to charging
which occurs if the vacuum cleaner is
always used only for short periods. If
this happens you should charge the
battery fully and use the vacuum
cleaner until the battery is empty.
After this recharge the battery. Repeat
this procedure if necessary.
Information: The battery should not be
charged in room temperatures below
0 °C or above 40 °C.
The charger can heat up during charg-
ing.
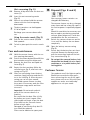
Using the vacuum cleaner
(Figs. C, D)
0 Remove your vacuum cleaner from the
wall mounting by pushing it straight
upwards.
Dry vacuuming
0 To switch on the appliance push the
on/off switch (6) forwards.
To switch the appliance off, push the
on/off switch backwards (Fig. C).

g
9
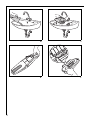
Wet vacuuming (Fig. D)
0 Remove all dry dust from the dust con-
tainer (1).
0 Insert the wet vacuuming nozzle
(Fig. D).
0 When in use always hold the vacuum
cleaner with the suction opening
downwards.
3
The dust container can hold approx.
2.5 dl of liquid.
Recharge your vacuum cleaner after
use.
Using the crevice nozzle (Fig. E)
0 Pull out the crevice nozzle (12) and
fold upwards.
0 To lock in place push the crevice nozzle
in.
Care and maintenance
0 Hold the vacuum cleaner with the suc-
tion opening downwards.
0 Push in the release button (4) and lift the
dust container out of the motor unit.
0 Remove the dust filter and liquid col-
lector (Fig. F).
0 Empty the dust container (after dry
vacuuming see Fig. G, after wet vacu-
uming see Fig. H).
0 After wet vacuuming clean the dust
container, liquid collector and dust fil-
ter in the sink (Fig. J). After dry vacu-
uming you can use your normal
household vacuum cleaner to clean
these parts. If necessary, wash the filter
in lukewarm soapy water and then
rinse well.
Important: Do not wash synthetic
parts of the vacuum cleaner in a
machine.
Be careful that the dust filter is fully
dry before you insert it again. After
cleaning do not forget to put the dust
filter back into the vacuum cleaner
before using it again.
Damaged or excessively dirty dust fil-
ters should be replaced.
Filters can be obtained as spare parts.
2 Disposal (Figs. K und L)
Your vacuum cleaner contains a re-
chargable NiCd battery.
The vacuum cleaner can be re-charged
many times and has a long life-span if
the suction power is repeatedly topped
up.
Should it nonetheless be necessary one
day to replace your battery-powered
vacuum, please dispose of it with due
consideration for the environment.
0 Switch the vacuum cleaner on and let
it run until the battery has run down
completely.
0 Open the battery vacuum casing
(Fig. K).
0 Ensure that the battery has not short-
circuited. Remove the batteries and
pull the connection leads off the bat-
tery connections (Fig. L).
0 Do not put the removed battery into
the dustbin but hand it in at a repair
workshop or at a public battery col-
lecting point.
Customer Service
Our products are of the highest quality.
Should you nevertheless have ques-
tions concerning the use of this appli-
ance, please write to us. Only with your
support can we be sure to develop
appliances to suit your needs.

AEG Kundendienst in Europa
Deutschland Europa
Garantiebedingungen
Für dieses Gerät leisten wir - zusätzlich zu
der gesetzlichen Gewährleistung des
Händlers aus Kaufvertrag - dem Endabneh-
mer gegenüber zu den nachstehenden Be-
dingungen Garantie:
1. Die Garantiezeit beträgt 12 Monate und
beginnt mit dem Zeitpunkt der Übergabe
des Geräts, der durch Rechnung oder
andere Unterlagen zu belegen ist. Die
Garantiezeit ist auf 6 Monate beschränkt,
wenn das Gerät gewerblich genutzt wird.
2. Die Garantie umfaßt die Behebung aller
innerhalb der Garantiezeit auftretenden
Schäden oder Mängel des Geräts, die
nachweislich auf Material- oder Ferti-
gungsfehlern beruhen. Nicht unter die
Garantie fallen Schäden oder Mängel aus
nicht vorschriftsmäßiger Handhabung
sowie Nichtbeachtung der Gebrauchsan-
weisungen.
3. Im Garantiefall senden Sie das Gerät an
die für Ihren Wohnort zuständige AEG
Kleingeräte-Zentralwerkstatt oder über-
geben es Ihrem Fachhändler.
Bei Einsendung achten Sie bitte auf gute
Verpackung, Ihre vollständige Absender-
Anschrift und eine kurze Fehlerbeschrei-
bung. Fügen Sie zum Nachweis Ihres
Garantieanspruchs den Kaufbeleg bei.
4. Die Garantieleistungen werden ohne jede
Berechnung durchgeführt; sie bewirken
weder eine Verlängerung noch einen
Neubeginn der Garantiezeit. Ausgewech-
selte Teile gehen in unser Eigentum über.
Guarantee
This appliance is covered by the following
guarantee and is in addition to your statuto-
ry and other legal rights. All components
wich fail due to defective manufacture will
be repaired or replaced free of charge for a
period of 12 months from the date of
purchase. We will not accept claims if un-
authorised modification is made or if non-
standard components are used. The appli-
ance must be used in accordance with the
operating instructions and the guarantee
does not cover any damage caused during
transit or through misuse. In order to esta-
blish the date of purchase, advice note or si-
milar document must be produced whenever
the guarantee is claimed.
Garantie
Pour toute mise en œvre de garantie ou de
service après vente, vous devez yous adresser
à votre vendeur.
AEG assure au vendeur le remplacement gra-
tuit des pièces détachées nécessaires à la ré-
paration pendant 1 an, à partir de la date de
votre facture, sauf en cas de non respect des
prescriptions d’utilisation ou lorsqu’une cau-
se étrangère à l’appareil est responsable de la
défaillance.
Les dispositions stipulées ci-dessus ne sont
pas exclusives du bénéfice au profit de
l’acheteur de la garantie légale pour défaut
et vice cachés qui s’applique, en tout état de
cause, dans les conditions des articles 1641 et
suivants, du code civil.
Garantie
AEG Huishoudelijke Apparaten neemt voor
reparaties binnen de garantietermijn - voor
zover de defecten zijn terug te voeren op
materiaal - en/of constructiefouten - de ko-
sten op zich voor materiaal en arbeidsloon.
De garantie bedraagt 12 maanden en gaat in
op de dag van aankoop. Wanneer garantie
wordt verlangd, dient de faktuur can aanko-
op te worden overlegd. De garantietermijn
wordt door reparaties niet verlengd. Buiten
elke garantieverplichting vallen losse onder-
delen van glas en/of kunststof. Alle overige
kosten, zoals voorrijdkosten, kosten van op-
zending en administratie, zijn voor rekening
van de eigenaar.
Garanzia
Duranti i primi 12 mesi d’esercizio, vengono
fornite gratuitamente dall’AEG le parti di ri-
cambio riconosciute difettose. La garanzia ha
inizio con il giorno dell’acquisto che deve ve-
nir comprovato a mezzo della fattura o bo-
letta di consegna. Per il resto valgono le
condizioni generali di fornitura della rispetti-
va rappresentanza nazionale.
Garantia
Durante los primeros 12 meses, la AEG se
hace cargo de cuantos costes de material y
horas de trabajos invertidas se produzcan en
la subsanación de defectos. La garantia em-
pieza a regir a partir de la fecha de la entre-
ga, la que deberá justificarse mediante
presentación de la factura o de la nota de de-
pacho. Por lo demás serán de aplicación las
condiciones generales de venta se gun rigen
en el respectivo pais de nuestra representa-
ción.
Garantie
In Belgien ist nur die durch belge AEG ausge-
gebene Garantiekarte gültig.
En Belgique, seule la carte de garantie émise
par la belge AEG est valable.
In België is slechts de door de belge AEG uit-
gegeven waarborgkaart geldig.
Sollte dieses AEG Kleingerät wider Erwarten nicht
funktionieren, senden Sie es bitte an folgende Adresse:
Beginnt die Postleitzahl Ihres Wohnortes
mit 2 - 3 - 4 - 5
AEG Kleingeräte-Zentralwerkstatt
Firma Elektro Stefan Irsen
Sachtlebenstraße 1
41541 Dormagen
Beginnt die Postleitzahl Ihres Wohnortes
mit 0 - 1 - 6 - 7 - 8 - 9
AEG Kleingeräte-Zentralwerkstatt
Firma Trepesch GmbH
Steinstraße 500
90419 Nürnberg
In Deutschland steht Ihnen für Fragen , Anregungen
oder bei Problemen rund um unsere Kleingeräte und
Raumpflegegeräte montags bis freitags von 8 bis 18 Uhr
unsere AEG Serviceline unter 01805-30 60 80* zur
Verfügung.
*(Deutsche Telekom 24 Pf/Min.)
Österreich, 1230 Wien, 01/8 66 43-333
Belgique/België, 1502 Lembeek, 02/363.04.44
Danmark, 7000 Fredericia, 70 11 74 00
España, Madrid, 1-885-2700
France, 60307 Senlis, 03-44 62 24 24
Great Britain, Service Force 09 90 92 99 29
Hellas, 18346 MO”XATO, 01/4822646
Island, Reykjavik (Bræóurnir Ormsson hf), 91-3 88 20
Italia, 20394 Agrate Brianza (Milano), 39 / 68 99-8 39
Luxembourg, 1273 Luxembourg-Hamm, 4 24 31-433
Nederland, 2400 AC Alphen aan den Rijn, 0172-468 300
Norge, 0516 Oslo, 22 72 58 00
Portugal, 2635-445 Rio de Mouro, (01) 926 75 75
Schweiz/Svizzera, 5506 Mägenwil, 0848 848 348
Suomi, Porissa, puh. (02) 622 3300
Sverige, 10545 Stockholm, 08-738 60 00
AEG Hausgeräte GmbH, Muggenhofer Straße 135, D-90429 Nürnberg ANC 822.949.113 - 0800
Documenttranscriptie
Wet & Dry Liliput Akkusauger Battery-Operated Vacuum Cleaner Mini-aspirateur à accus Aspirapolvere ad accumulatore Gebrauchsanweisung Operating instructions Mode d’emploi Istruzioni per l’uso 3 2 45 6 7 8 1 9 12 11 10 Gerätebeschreibung 1 2 3 4 5 6 7 8 Staubbehälter Flüssigkeitsauffänger Staubfilter Auslösetaste Ladekontrollanzeige Ein/Ausschalter Ladesteckdose Wandhalterung und Ladegerät 9 Klinkenstecker 10 Netzstecker 11 Naßsaugdüse 12 Ausklappbare Fugendüse A 2 B C D E F G 3 4 H J K L g 2 Entsorgung (Abb. K und L) 0 0 0 0 Ihr Staubsauger enthält eine aufladbare NiCd-Batterie. Der Staubsauger ist viele Male aufladbar und hat eine lange Lebensdauer bei wiederholt voller Saugleistung. Sollte es dennoch eines Tages nötig sein, Ihren Akkusauger zu ersetzen, denken Sie bitte an eine umweltfreundliche Entsorgung: Schalten Sie den Staubsauger ein und lassen Sie ihn laufen, bis die Batterie völlig leer ist. Öffnen Sie das Gehäuse des Akkusaugers (Abb. K). Vergewissern Sie sich, daß die Batterie nicht kurzgeschlossen ist. Entfernen Sie die Batterien und ziehen Sie die Verbindungsleitungen der Akkuanschlüsse ab (Abb. L). Geben Sie ausgebaute Batterie nicht in die Mülltonne, sondern geben Sie die Batterie bei einer Reparaturwerkstatt oder bei einer öffentlichen Sammelstellen für Batterien ab. Der Kundenservice Für unsere Produkte gelten höchste Qualitätsansprüche. Sollten für Sie dennoch Fragen bei der Benutzung dieses Gerätes entstehen, dann schreiben Sie uns. Nur mit Ihrer Unterstützung sind wir in der Lage, Geräte zu entwickeln, die Ihren Bedürfnissen entsprechen. g Dear Customer, Please read these operating instructions carefully. Above all please observe the safety information on the first pages of these operating instructions! Please keep these operating instructions for later reference. Pass them on to any subsequent owner of the appliance. Description of the appliance 1 2 3 4 5 6 7 8 9 10 11 12 Dust container Liquid collector Dust filter Release button Charge control display On/off switch Charge socket Wall mounting and charger Jack plug Mains plug Wet vacuuming nozzle Fold-down crevice nozzle 1 Safety instructions • Do not vacuum wet surfaces. • Do not use the vacuum cleaner on surfaces that have been treated with flammable solvents until they are completely dry. • Do not use your vacuum cleaner to vacuum hot items such as a glowing cigarette end. • Never use the vacuum cleaner to pick up combustible dust. • Under no circumstances should you oil or grease the motor. • Do not expose the vacuum cleaner to direct sunlight or any source of heat. • For maintenance and repair please contact your local dealer or authorised service personnel. Never attempt to repair your vacuum cleaner yourself. • Only use the appropriate original charging devices for this model. 7 g ; This appliance complies with the following EC directives: – 73/23/EWG dated 19.02.1973 “Low Voltage Directive“, including Directive Amendment 93/68/EWG – 89/336/EWG dated 03.05.1989 “EMC Directive“, including Amendment Directive 92/31/EWG Before using for the first time Before you use your vacuum cleaner for the first time you should charge the battery for approx. 14-16 hours. With a fully charged battery you can vacuum for approx. 9 minutes. Attaching the wall mounting (Fig. A) To attach the wall mounting select a position near a room socket and remote from any source of dampness. 0 Hold the mounting against the wall and mark the points for the fastening screws. 0 Use a drill to drill the holes for the screws, push in the plastic plugs provided and insert the screws so that they project by just 7 mm. 0 Position the wall mounting, lower it over the two screws and then tighten the screws securely. 3 The appliance can equally well be stored standing on a table, the floor or any other horizontal surface. 3 The wet vacuuming nozzle can be stored in the wall mounting (Fig. B). Charging (Fig. B) The charger (8) may only be connected to a power source of 230V, 50Hz. 0 Insert the vacuum cleaner into the wall mounting (8) and check that the jack plug (9) on the wall mounting fits correctly into the charge socket (7) on the vacuum cleaner. 3 The charge control display (5) will come on and charging will begin. It will also come on if the battery is already fully charged. Always leave your vacuum cleaner in the wall mounting when not in use in order to guarantee optimal suction power. To return to full suction capacity once a battery has been completely discharged requires a charging period of 18 hours. If a fully charged battery works for less than 9 minutes it might be the result of a build up of resistance to charging which occurs if the vacuum cleaner is always used only for short periods. If this happens you should charge the battery fully and use the vacuum cleaner until the battery is empty. After this recharge the battery. Repeat this procedure if necessary. Information: The battery should not be charged in room temperatures below 0 °C or above 40 °C. The charger can heat up during charging. Using the vacuum cleaner (Figs. C, D) 0 Remove your vacuum cleaner from the wall mounting by pushing it straight upwards. Dry vacuuming 0 To switch on the appliance push the on/off switch (6) forwards. To switch the appliance off, push the on/off switch backwards (Fig. C). 8 g Wet vacuuming (Fig. D) 0 Remove all dry dust from the dust container (1). 0 Insert the wet vacuuming nozzle (Fig. D). 0 When in use always hold the vacuum cleaner with the suction opening downwards. 3 2 Disposal (Figs. K und L) The dust container can hold approx. 2.5 dl of liquid. Recharge your vacuum cleaner after use. Using the crevice nozzle (Fig. E) 0 Pull out the crevice nozzle (12) and fold upwards. 0 To lock in place push the crevice nozzle in. Care and maintenance 0 Hold the vacuum cleaner with the suction opening downwards. 0 Push in the release button (4) and lift the dust container out of the motor unit. 0 Remove the dust filter and liquid collector (Fig. F). 0 Empty the dust container (after dry vacuuming see Fig. G, after wet vacuuming see Fig. H). 0 After wet vacuuming clean the dust container, liquid collector and dust filter in the sink (Fig. J). After dry vacuuming you can use your normal household vacuum cleaner to clean these parts. If necessary, wash the filter in lukewarm soapy water and then rinse well. Important: Do not wash synthetic parts of the vacuum cleaner in a machine. Be careful that the dust filter is fully dry before you insert it again. After cleaning do not forget to put the dust filter back into the vacuum cleaner before using it again. Damaged or excessively dirty dust filters should be replaced. Filters can be obtained as spare parts. 0 0 0 0 Your vacuum cleaner contains a rechargable NiCd battery. The vacuum cleaner can be re-charged many times and has a long life-span if the suction power is repeatedly topped up. Should it nonetheless be necessary one day to replace your battery-powered vacuum, please dispose of it with due consideration for the environment. Switch the vacuum cleaner on and let it run until the battery has run down completely. Open the battery vacuum casing (Fig. K). Ensure that the battery has not shortcircuited. Remove the batteries and pull the connection leads off the battery connections (Fig. L). Do not put the removed battery into the dustbin but hand it in at a repair workshop or at a public battery collecting point. Customer Service Our products are of the highest quality. Should you nevertheless have questions concerning the use of this appliance, please write to us. Only with your support can we be sure to develop appliances to suit your needs. 9 AEG Kundendienst in Europa Deutschland Europa Sollte dieses AEG Kleingerät wider Erwarten nicht funktionieren, senden Sie es bitte an folgende Adresse: Beginnt die Postleitzahl Ihres Wohnortes mit 2 - 3 - 4 - 5 AEG Kleingeräte-Zentralwerkstatt Firma Elektro Stefan Irsen Sachtlebenstraße 1 41541 Dormagen Beginnt die Postleitzahl Ihres Wohnortes mit 0 - 1 - 6 - 7 - 8 - 9 AEG Kleingeräte-Zentralwerkstatt Firma Trepesch GmbH Steinstraße 500 90419 Nürnberg In Deutschland steht Ihnen für Fragen , Anregungen oder bei Problemen rund um unsere Kleingeräte und Raumpflegegeräte montags bis freitags von 8 bis 18 Uhr unsere AEG Serviceline unter 01805-30 60 80* zur Verfügung. Österreich, 1230 Wien, 01/8 66 43-333 Belgique/België, 1502 Lembeek, 02/363.04.44 Danmark, 7000 Fredericia, 70 11 74 00 España, Madrid, 1-885-2700 France, 60307 Senlis, 03-44 62 24 24 Great Britain, Service Force 09 90 92 99 29 Hellas, 18346 MO”XATO, 01/4822646 Island, Reykjavik (Bræóurnir Ormsson hf), 91-3 88 20 Italia, 20394 Agrate Brianza (Milano), 39 / 68 99-8 39 Luxembourg, 1273 Luxembourg-Hamm, 4 24 31-433 Nederland, 2400 AC Alphen aan den Rijn, 0172-468 300 Norge, 0516 Oslo, 22 72 58 00 Portugal, 2635-445 Rio de Mouro, (01) 926 75 75 Schweiz/Svizzera, 5506 Mägenwil, 0848 848 348 Suomi, Porissa, puh. (02) 622 3300 Sverige, 10545 Stockholm, 08-738 60 00 *(Deutsche Telekom 24 Pf/Min.) Garantiebedingungen Für dieses Gerät leisten wir - zusätzlich zu der gesetzlichen Gewährleistung des Händlers aus Kaufvertrag - dem Endabnehmer gegenüber zu den nachstehenden Bedingungen Garantie: 1. Die Garantiezeit beträgt 12 Monate und beginnt mit dem Zeitpunkt der Übergabe des Geräts, der durch Rechnung oder andere Unterlagen zu belegen ist. Die Garantiezeit ist auf 6 Monate beschränkt, wenn das Gerät gewerblich genutzt wird. 2. Die Garantie umfaßt die Behebung aller innerhalb der Garantiezeit auftretenden Schäden oder Mängel des Geräts, die nachweislich auf Material- oder Fertigungsfehlern beruhen. Nicht unter die Garantie fallen Schäden oder Mängel aus nicht vorschriftsmäßiger Handhabung sowie Nichtbeachtung der Gebrauchsanweisungen. 3. Im Garantiefall senden Sie das Gerät an die für Ihren Wohnort zuständige AEG Kleingeräte-Zentralwerkstatt oder übergeben es Ihrem Fachhändler. Bei Einsendung achten Sie bitte auf gute Verpackung, Ihre vollständige AbsenderAnschrift und eine kurze Fehlerbeschreibung. Fügen Sie zum Nachweis Ihres Garantieanspruchs den Kaufbeleg bei. 4. Die Garantieleistungen werden ohne jede Berechnung durchgeführt; sie bewirken weder eine Verlängerung noch einen Neubeginn der Garantiezeit. Ausgewechselte Teile gehen in unser Eigentum über. Guarantee This appliance is covered by the following guarantee and is in addition to your statutory and other legal rights. All components wich fail due to defective manufacture will be repaired or replaced free of charge for a period of 12 months from the date of purchase. We will not accept claims if unauthorised modification is made or if nonstandard components are used. The appliance must be used in accordance with the operating instructions and the guarantee does not cover any damage caused during transit or through misuse. In order to establish the date of purchase, advice note or similar document must be produced whenever the guarantee is claimed. Garantie Pour toute mise en œvre de garantie ou de service après vente, vous devez yous adresser à votre vendeur. AEG assure au vendeur le remplacement gratuit des pièces détachées nécessaires à la réparation pendant 1 an, à partir de la date de votre facture, sauf en cas de non respect des prescriptions d’utilisation ou lorsqu’une cause étrangère à l’appareil est responsable de la défaillance. Les dispositions stipulées ci-dessus ne sont pas exclusives du bénéfice au profit de l’acheteur de la garantie légale pour défaut et vice cachés qui s’applique, en tout état de cause, dans les conditions des articles 1641 et suivants, du code civil. Garantie AEG Huishoudelijke Apparaten neemt voor reparaties binnen de garantietermijn - voor zover de defecten zijn terug te voeren op materiaal - en/of constructiefouten - de kosten op zich voor materiaal en arbeidsloon. De garantie bedraagt 12 maanden en gaat in AEG Hausgeräte GmbH, Muggenhofer Straße 135, D-90429 Nürnberg op de dag van aankoop. Wanneer garantie wordt verlangd, dient de faktuur can aankoop te worden overlegd. De garantietermijn wordt door reparaties niet verlengd. Buiten elke garantieverplichting vallen losse onderdelen van glas en/of kunststof. Alle overige kosten, zoals voorrijdkosten, kosten van opzending en administratie, zijn voor rekening van de eigenaar. Garanzia Duranti i primi 12 mesi d’esercizio, vengono fornite gratuitamente dall’AEG le parti di ricambio riconosciute difettose. La garanzia ha inizio con il giorno dell’acquisto che deve venir comprovato a mezzo della fattura o boletta di consegna. Per il resto valgono le condizioni generali di fornitura della rispettiva rappresentanza nazionale. Garantia Durante los primeros 12 meses, la AEG se hace cargo de cuantos costes de material y horas de trabajos invertidas se produzcan en la subsanación de defectos. La garantia empieza a regir a partir de la fecha de la entrega, la que deberá justificarse mediante presentación de la factura o de la nota de depacho. Por lo demás serán de aplicación las condiciones generales de venta se gun rigen en el respectivo pais de nuestra representación. Garantie In Belgien ist nur die durch belge AEG ausgegebene Garantiekarte gültig. En Belgique, seule la carte de garantie émise par la belge AEG est valable. In België is slechts de door de belge AEG uitgegeven waarborgkaart geldig. ANC 822.949.113 - 0800-
 1
1
-
 2
2
-
 3
3
-
 4
4
-
 5
5
-
 6
6
-
 7
7
-
 8
8


in andere talen
- English: Electrolux ZB264X AUS User manual
- Deutsch: Electrolux ZB264X AUS Benutzerhandbuch