
Copyright © 2023 VETUS Schiedam Holland
344399.01
NEDERLANDS 2
ENGLISH 5
Installation manual
Waterheater connection M2, M3
Installatiehandleiding
Boileraansluiting M2, M3

2 44399.01 Waterheater connection M2, M3
Volg de onderstaande stappen voor het monteren van de boileraan-
sluiting.
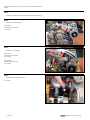
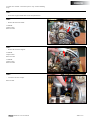
STAP 1
• Controleer of de motor is gevuld met koelmiddel. Tap zonodig af.
STAP 2
• Demonteer de dynamoriem.
1x bout M8
Aanhaalmoment 30 Nm
Sl.w. 13 mm
STAP 3
• Demonteer de spansteun.
2x bout M6
Aanhaalmoment 15 Nm
Sl.w. 10 mm
1x bout M8
Aanhaalmoment 30 Nm
Sl.w. 13 mm
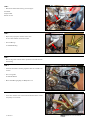
STAP 4
• Neem de twee slangklemmen los.
Sl.w. 7 mm

344399.01 3
Waterheater connection M2, M3
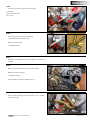
STAP 6
• Vervang het pijpje door de boileraansluiting.
1 x 08-01188 boileraansluiting 13 mm
• Gebruik nieuwe O-ringen.
2 x STM1238 O-Ring
STAP 7
• Verwijder alle pakkingresten van de cilinderkop en het thermo-
staathuis.
STAP 5
• Demonteer het thermostaathuis, deksel en pijpje.
2x bout M6
Aanhaalmoment 15 Nm
Sl.w. 10 mm
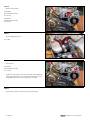
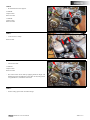
STAP 9
• Borg de boileraansluiting achter de M6 bout van de circulatie-
pomp. Zie rode pijl.
STAP 8
• Monteer het thermostaathuis met de boileraansluiting.
• Gebruik een nieuwe pakking.
1 x STM3967 Pakking
• Vet beide O-ringen licht in met Molykote 111©
Pijpje. Boileraansluiting.
NEDERLANDS

4 44399.01 Waterheater connection M2, M3
STAP 13
• Vul het koelsysteem en controleer het geheel op lekkage.
STAP 11
• Zet de slangklemmen vast.
Sl.w. 7 mm
STAP 10
• Monteer de spansteun.
2x bout M6
Aanhaalmoment 15 Nm
Sl.w. 10 mm
1x bout M8
Aanhaalmoment 30 Nm
Sl.w. 13 mm
STAP 12
• Span de riem.
1x bout M8
Aanhaalmoment 30 Nm
Sl.w. 13 mm
• Controleer de spanning van de riem door hem met de wijsvinger
te bewegen. Indien deze meer dan 12 mm te bewegen is, met ca.
10 kg duimkracht, dient de snaar gespannen te worden.

344399.01 5
Waterheater connection M2, M3
To install the calorier connections please carry out the following
steps.
STEP 1
• Check if the engine is lled with coolant. If required drain.
STEP 2
• Remove the alternator V-belt.
1x bolt M8
Torque 30 Nm
Wrench 13 mm
STEP 3
• Remove the tensioner support.
2x bolt M6
Torque 15 Nm
Wrench 10 mm
1x bolt M8
Torque 30 Nm
Wrench 13 mm
STEP 4
• Loosen the two hose clamps.
Wrench 7 mm
ENGLISH

6 44399.01 Waterheater connection M2, M3
STEP 6
• Replace the pipe by the calorier connection.
1x 08-01188 calorier connection 13 mm
• Use new O-rings.
2 x STM1238 O-Ring
STEP 7
• Remove all gasket remnants of the cylinder head and the thermo-
stat housing.
STEP 5
• Remove the thermostat housing, cover and pipe.
2x bolt M6
Torque 15 Nm
Wrench 10 mm
STEP 9
• Secure the calorier connection with the M6 bolt of the circula-
tion pump. See red arrow.
STEP 8
• Install the thermostat housing together with the calorier con-
nection.
• Use a new gasket.
1x STM3967 Gasket
• Grease both O-rings lightly; use Molykote 111©
Pipe. Calorier connection.

344399.01 7
Waterheater connection M2, M3
STEP 13
• Fill the cooling system and check for leakages.
STEP 11
• Secure the hose clamps.
Wrench 7 mm
STEP 10
• Re-install the tensioner support.
2x bolt M6
Torque 15 Nm
Wrench 10 mm
1x bolt M8
Torque 30 Nm
Wrench 13 mm
STEP 12
• Tension the V-belt.
1x bolt M8
Torque 30 Nm
Wrench 13 mm
• Check the tension of the belt by applying moderate nger and
thumb pressure. If the deection is more than 12 mm, using about
10 kg thumb force, it should be tensioned.
ENGLISH

Printed in the Netherlands
344399.01 2023-01
Fokkerstraat 571 - 3125 BD Schiedam - Holland
Tel.: +31 (0)88 4884700 - [email protected] - www.vetus.com
-
 1
1
-
 2
2
-
 3
3
-
 4
4
-
 5
5
-
 6
6
-
 7
7
-
 8
8


