Life & Mobility Vivo Handleiding
- Categorie
- Scooters
- Type
- Handleiding


NL3
Geachte gebruiker,
Met uw keuze voor een Vivo scootmobiel heeft u
gekozen voor ongeëvenaarde zekerheid, kwaliteit en
rijplezier! Wij wensen u vele comfortabele en veilige
kilometers toe en hopen dat u zult genieten van de
vrijheid die de Vivo u biedt.
In deze gebruikershandleiding vindt u alles over de
Vivo, van veiligheidsinstructies en bedienings functies
tot onderhoudstips. Lees de gebruikershandleiding
goed door zodat u het beste uit uw scootmobiel haalt.
Graag houden wij u op de hoogte van nieuwtjes,
gebruikerservaringen en andere wetens waardig-
heden. Op de website www.life-mobility.com kunt u
regelmatig de laatste ontwikkelingen lezen.
Hartelijke groet,
Directie en medewerkers van Life & Mobility

NL5NL4
Veiligheidsvoorschriften
U bent als gebruiker van de scootmobiel altijd ver-
antwoordelijk voor het naleven van de plaatse lijk
geldende veiligheidsvoorschriften en -richtlijnen.
Het is belangrijk om eerst rijervaring op te doen
onder begeleiding van een ervaren instructeur.
Uw dealer kan u daarbij behulpzaam zijn.
Life & Mobility aanvaardt geen aansprakelijkheid
voor schade of letsel veroorzaakt door
onachtzaamheid of het niet naleven van de
veiligheidsvoorschriften.
Let op:
Ziet u dit teken in de handleiding, dan
volgt een aanvullende instructie. Volg
deze instructies altijd op. Nalatigheid kan
de werking van de scootmobiel nadelig
beïnvloeden en mogelijk leiden tot lichamelijk
letsel of tot schade aan de scootmobiel, de
directe omgeving of het milieu.
Algemeen
Waarschuwing:
Wijzig de constructie van de scootmobiel
nooit.
Gebruik de scootmobiel alleen waarvoor
deze bedoeld is.
Blijf met de scootmobiel uit de buurt van
open vuur.
Laat kinderen niet zonder toezicht in de
buurt van de scootmobiel spelen.
Voorzichtig:
Gebruik alleen het mandje voor het
vervoeren van spullen.
Gebruik uw scootmobiel niet om wagens,
karretjes e.d. te trekken.
Denk om uitstekende vaste of losse delen
van, in en aan de scootmobiel. Deze kunnen
Inhoudsopgave
Veiligheidsvoorschriften 5
Inleiding 11
Technische specificaties 12
Productbeschrijving 13
Instellingen en verstellingen 16
Gebruik 18
Onderhoud 22
Transport en opslag 25
Garantie 27
Afvoeren product en verpakking 28

NL7NL6
VeiligheidsvoorschriftenVeiligheidsvoorschriften
U dient voldoende gezichtsvermogen te
hebben om in elke mogelijke gebruikssituatie
veilig met de scootmobiel te kunnen rijden.
Houd u aan de geldende verkeersregels.
Zorg dat u altijd door andere verkeers-
deelnemers wordt opgemerkt. In het verkeer
bent u als scootmobielgebruiker kwetsbaar.
Vermijd eenzame routes. Zorg dat er in geval
van nood voor hulp gezorgd kan worden.
Zet de scootmobiel uit als u uw mobiele
telefoon gebruikt. Winkelpoortjes kunnen
geactiveerd worden.
Monteren en afstellen
(zie ook hoofdstuk ‘Instellingen en verstellingen’)
Waarschuwing:
Controleer voordat u de scootmobiel
gebruikt of alle onderdelen van de scoot-
mobiel goed gemonteerd zijn en goed
vastzitten.
Let op:
Verwijder nooit de antikiepwieltjes.
Zitten in de scootmobiel
Waarschuwing:
Zorg dat vingers en ledematen niet bekneld
raken. Wees vooral waakzaam:
- Bij het wegklappen van armleggers.
- Wanneer u niet de volledige controle over
armen of benen heeft.
Rijden met de scootmobiel
(zie ook hoofdstuk ‘Gebruik’)
Waarschuwing:
Rijd niet op de openbare autowegen.
schade veroorzaken aan de omgeving en de
scootmobiel.
Let op:
Deze scootmobiel is geschikt voor het
vervoeren van één persoon. Neem geen
passagiers mee.
Gebruik uitsluitend originele Life & Mobility
onderdelen en accessoires.
De veiligheidsinstructies en stickers nooit
afdekken of verwijderen.
Laat de scootmobiel altijd uitgeschakeld
en zonder contactsleutel achter. Hiermee
voorkomt u ongewild gebruik en/of diefstal.
Gebruik in regen, mist, ijzel, sneeuw en
strooizout heeft een nadelig effect op het
elektrisch systeem.
Deze scootmobiel heeft géén verlichting;
rijd daarom niet in het donker.
Deze scootmobiel heeft géén richting-
aanwijzer, steek uw hand uit als u van richting
verandert.
Eisen aan de persoon
Waarschuwing:
Als u onder invloed bent van middelen die
de rijvaardigheid kunnen beïnvloeden, mag
u geen scootmobiel rijden.
In bepaalde (medische) situaties is het wen-
se lijk dat u eerst een rijvaardigheidstraining
volgt bij een daartoe toegeruste dealer.
Let op:
Neem contact op met uw arts als u
voorgeschreven medicijnen gebruikt of fysieke
beperkingen hebt. Sommige medicijnen of
beperkingen kunnen uw rijvaardigheid beïn-
vloeden.

NL9NL8
VeiligheidsvoorschriftenVeiligheidsvoorschriften
De maximale drempelhoogte die u kunt
oprijden is 5 cm.
Zacht, glad of ongelijk terrein verhoogt het
risico op gevaarlijke situaties.
Transport van de scootmobiel zonder inzit-
tende (zie ook hoofdstuk ‘Transport en opslag’)
Levensgevaarlijk:
Maak bij vervoer van de scootmobiel in
een motorvoertuig altijd een transfer naar
een vaste zitplaats van het motorvoertuig.
Scootmobielen mogen nooit gebruikt
worden als zitondersteuning in een motor-
voertuig.
Blijf nooit in de scootmobiel zitten wanneer
deze in een takel of ophijssysteem hangt.
Hier is de scootmobiel niet op berekend.
Waarschuwing:
Zorg dat uw vingers niet bekneld raken
tijdens het verkleinen van de scootmobiel.
Til de scootmobiel nooit aan de kunststof
delen van de behuizing.
Let op:
Zorg dat de scootmobiel volledig gemon-
teerd is voordat u deze gaat gebruiken.
Overige
Waarschuwing:
Zet de scootmobiel niet in direct zonlicht:
de bekleding kan heet worden met mogelijk
verbranding of overgevoeligheid van de
huid tot gevolg.
Voorzichtig:
Probeer een storing nooit zelf te verhelpen.
Neem contact op met uw dealer.
Pas op dat er geen kledingstukken los-
hangen. Deze kunnen tussen de wielen
komen.
Hang niets aan het stuur.
Laat niemand op de achterkant van uw
scootmobiel staan.
Let op:
Controleer voordat u gaat rijden of de
scootmobiel in rijstand staat en niet in de
vrijloop.
Verwijder altijd de contactplug voor u in- of
uitstapt.
Verwijder de contactplug niet als de
scootmobiel nog rijdt. U komt dan zeer
abrupt tot stilstand.
Hellingen en andere obstakels
Waarschuwing:
Vermijd hellingen steiler dan 10° (17,5%).
Het (voor- of achteruit) berijden hiervan is
gevaarlijk.
Wees waakzaam tegen kantelen bij het
oprijden van een helling. Gebruik beslist niet
de vrijloop op een helling.
Rijd een helling altijd recht van voren op,
niet zijwaarts.
Rijd voorzichtig langs een (stoep)rand.
Ongelijke ondergrond verhoogt de kans op
kantelen.
Let op:
Uw zwaartepunt verplaatst zich als u een
helling op- of afrijdt. Wees hierop bedacht.
Keer voorzichtig op een steile helling in
verband met kantelgevaar.
Rijd een drempel altijd recht van voren op.
Rijd nooit achterwaarts van een stoeprand of
obstakel.
Maximale hellinghoek
10°
Een drempel benaderen

NL11NL10
De Vivo is een elektrisch aangedreven scootmobiel,
geschikt voor zowel jonge als oudere mensen die
moeite hebben om zich over een langere afstand
voort te bewegen.
Deze handleiding omschrijft uitsluitend de
standaardinstellingen van uw scootmobiel. Meer
informatie vind u op onze website:
www.life-mobility.com
InleidingVeiligheidsvoorschriften
Laat de scootmobiel niet in contact komen
met zeewater: zeewater is agressief en tast
de scootmobiel aan.
Laat de scootmobiel niet in contact komen
met zand: zand kan doordringen tot in
de draaiende delen van de scootmobiel,
waardoor onnodig snelle slijtage optreedt.
Let op:
Om uw veiligheid nog beter te kunnen
waarborgen is er een aantal technische
voorzorgsmaatregelen in acht genomen:
Bij een aangesloten acculader is de wegrijd-
blokkering actief.
Bij signalering van een elektronisch defect
zal de scootmobiel gecontroleerd tot
stilstand komen.
Delen waartussen lichaamsdelen beklemd
kunnen raken zijn zoveel mogelijk
afgeschermd.
EMC goedgekeurd
De scootmobiel is EMC (Elektro Magnetische
Compatibiliteit) goedgekeurd. Uit proeven
is gebleken dat de scootmobiel niet
gevoelig of schadelijk is voor mobiele
communicatieapparatuur en elektronisch
gestuurde apparatuur. Wees desondanks
voorzichtig bij het gelijktijdig gebruik van
de scootmobiel en mobiele of elektronische
apparatuur.

NL13NL12
Productbeschrijving
Bedoeld gebruik: buitenshuis, tussen -25° C en
+ 50° C
L x b x h: 107 x 58 x 91,5 cm
Gewicht (incl. accu’s): 58 kg
Gewicht accubox: 14 kg (5 kg per accu)
Zitdiepte: 41 cm
Zitbreedte: 41 cm
Zithoogte t.o.v. voetplateau (instelbaar): 40/42,5/
45 cm
Hoogte tussen voetplateau en grond: 9 cm
Max. rij-afstand met volgeladen accu’s: 20 km*
Max. (programmeer bare) snelheid: 6 km/h*
Draaistraal (radius): 135 cm
Max. gebruikersgewicht: 120 kg
Accucapaciteit: 24 V (2x12V) / 22 Ah
Max. laadvermogen: 2A / 120/240 V / 50/60Hz
Wielmaat: 24 x 7,5 cm
Voldoet aan: EN 12184 klasse A
Service en technische ondersteuning
Raadpleeg uw dealer in geval van vragen over
specifi eke instellingen, onderhoud of reparatie. Houd
altijd het serienummer bij de hand. Deze vindt u op
de CE-sticker op de stoelkolom van de scootmobiel
(zie ook p. 15).
Technische specificaties
Controle van de levering
Controleer voordat u de scootmobiel gaat gebruiken of
de levering overeenkomt met onderstaande product-
beschrijving. Indien u bij afl evering transport schade
constateert, geef dit dan door aan uw dealer. Life &
Mobility vertrouwt erop dat de scootmobiel aan uw
verwachtingen voldoet en wenst u er veel gemak van.
Productbeschrijving
I. CE-sticker
J. Accubox
K. Voetplateau
L. Voorwiel
M. Snelspanner stuur-
hoek
N. Mandje
O. Stuur met
bedieningspaneel
A. Neerklapbare rug-
leuning
B. Opklapbare
armleggers
C. Stoelhendel
D. Handvat
E. Refl ector
F. Anti-kiep wieltjes
G. Vrijloophendel
H. Geveerde
achterwielen
Productbeschrijving
scootmobiel
A
B
C
N
L
M
O
H
G
JI K
F
D
E
* Afhankelijk van de
ingestelde snelheid,
buitentemperatuur,
gewicht gebruiker, etc.

NL15NL14
Aanduidingen op de scootmobiel
Op de scootmobiel bevinden zich een aantal
stickers. Hieronder een overzicht, met de locatie
waar zij zich bevinden.
CE-sticker
De scootmobiel voldoet aan de bepalingen
gesteld in de richtlijn voor Medische
Hulpmiddelen en is voorzien van een
CE-markering.
De CE-sticker (I) bevindt zich op de stoelkolom
van uw scootmobiel.
Vrijloopsticker (zie ook pag. 21)
De sticker boven de vrijloophendel (G) geeft
aan dat de scootmobiel gereed is om elektrisch
te rijden.
De sticker onder de vrijloophendel geeft de
“duwstand” aan. In deze stand is de scootmobiel
vrij te verrijden.
CE-sticker
Vrijloophendel
G
Elektrische rij-stand
Duwstand
Bedieningspaneel
P. Contactslot met contactplug
Q. Claxon
R. Accu-indicator
S. Aan/uit indicatielampje
T. Snelheidsniveau stand schildpad
(langzaam)
U. Snelheidsknop
V. Snelheidsniveau stand haas (snel)
W. Duimgashendel achteruit
X. Duimgashendel vooruit
Y. Acculaadcontact
Niet afgebeeld
Diverse accessoires zijn optioneel leverbaar,
waaronder:
Stokhouders
Achteruitkijkspiegel
Rugleuningtas
Voor meer accessoires zie www.life-mobility.com.
Productbeschrijving
bedieningspaneel
Productbeschrijving stuur
Acculaadcontact
ProductbeschrijvingProductbeschrijving
P
S
W X
Y
T
U
V
Q
R

NL17NL16
Demonteren
De scootmobiel kan makkelijk gedemonteerd
worden voor transport of opslag (zie ook hoofd-
stuk ‘Transport en opslag’).
Waarschuwing:
Wees uiterst voorzichtig bij het demonteren
van de scootmobiel. Zorg dat handen
en vingers niet bekneld raken tussen het
scharniersysteem.
1. Trek de ontgrendelhendel (b) aan de
achterzijde van de scootmobiel rechtstandig
omhoog.
2. Duw gelijktijdig het handvat (D) naar de
grond.
3. Til nu het voorste deel los van het achterste
deel (Z).
Monteren
1. Kantel het achterdeel (Z) van de scootmobiel
in een hoek van 45 graden tot op de
antikiepwieltjes.
Let op:
Bepaal nauwkeurig de aanhaakpositie
om beschadiging van de bekapping te
voorkomen.
2. Til het voorste deel van de scootmobiel op
en haak deze zorgvuldig aan de framebuis
van het lagergelegen achterdeel.
3. Laat het voorste deel voorzichtig naar
beneden zakken tot beide delen in elkaar
klikken.
Gedemonteerde scootmobiel
Ontgrendelen
b
D
Positie bepalen
Z
Monteren
Instellingen en verstellingenInstellingen en verstellingen
Zitbreedte instellen
1. Draai de inbusbouten (a) aan de achter-
onder zijde van de stoel los.
2. Stel de breedte naar uw persoonlijke
voorkeur in.
3. Draai de inbusbouten weer vast.
De armleuningen zijn in de huidige stand
vergrendeld.
Armleggers
Klap de armleggers (B) op om uitstappen te
vergemakkelijken.
Stuurhoek verstellen
Let op:
Verstel de hoek van de stuurkolom niet
tijdens het rijden.
Stel de stuurkolom zo dat u makkelijk bij de
bediening en het display kan. De stuurkolom is
verstelbaar middels een vertanding.
1. Draai de snelspanner (M) onderaan de
stuurkolom los.
2. Til de stuurkolom iets omhoog uit de
vertanding en zet de stuurkolom in de
gewenste hoek. Zorg dat de vertanding in
elkaar schuift.
3. Draai de snelspanner weer vast.
De stuurkolom is nu vergrendeld.
Zithoogte instellen (3 standen)
1. Verwijder de stoel.
2. Neem de accubak uit.
3. Draai de bout los en stel de zitkolom in op
de gewenste zithoogte.
4. Plaats de accubak terug.
5. Plaats de stoel terug.
Zitbreedte veranderen
a
Armleggers
B
Stuurhoek veranderen
M

NL19NL18
Controle vooraf
Controleer voor het wegrijden het volgende:
De accustatus in de display (zie pag. 21),
De remmen,
Of de vrijloophendel omhoog wijst
(elek trische rij-stand, zie pag. 21),
Of de acculader verwijderd is.
Zelf in- en uitstappen
Let op:
Zorg ervoor dat de stoel goed vergrendeld
is voordat u gaat rijden.
Instappen / Uitstappen
1. Duw de stoelhendel (C) omlaag.
2. Houd de stoelhendel omlaag en draai de
stoel een kwartslag linksom of rechtsom.
3. Stap in of uit.
4. Laat de stoelhendel los.
De stoel is nu vergrendeld.
Inschakelen
1. Steek de contactplug in het contactslot (P)
en druk door.
Het aan-/uit-indicatielampje (S) gaat branden.
De scootmobiel is nu klaar om te rijden.
Maximale snelheid
De maximale snelheid is af fabriek 6 km/h maar
programmeerbaar naar lagere waarden door de
dealer.
Waarschuwing:
Doseer uw snelheid vóórdat u een bocht
instuurt. De scootmobiel kan kantelen.
Ondanks de kleine draaicirkel van de scoot-
mobiel kan het indraaien van liften of deuren
moeilijk zijn. Zorg dat u altijd de juiste
lage snelheidsinstelling gebruikt voor kort
manoeuvreren.
In- en uitstappen
C
Inschakelen
Let op:
Doseer uw snelheid met de duimgas hendel.
De snelheidsinstelling bepaalt hoe hard
u rijdt als u de duimgashendel volledig
inknijpt.
Controleer of de weg achter u vrij is tijdens
het achteruit rijden.
De scootmobiel rijdt langzamer achteruit
dan vooruit.
De maximale snelheid is standaard ingesteld
op 6 km/u. Uw dealer heeft de mogelijkheid
om de snelheidsinstelling aan te passen.
1. Draai de snelheidsknop (U) linksom naar
‘stand schildpad’ voor langzaam rijden.
2. Draai de snelheidsknop rechtsom naar
‘stand haas’ voor snel rijden.
Kies voor iedere situatie een geschikte snel-
heids instelling.
Vooruit en achteruit rijden
1.
Knijp de duimgashendel (X) langzaam in.
De scootmobiel gaat vooruit rijden.
2. Knijp de duimgashendel verder in.
De scootmobiel gaat sneller vooruit rijden.
3. Laat de duimgashendel los.
De scootmobiel stopt.
4. Gebruik duimgashendel (W) om achteruit te
rijden.
Accu’s
Waarschuwing:
Verbind nooit een kabel met de AC/DC-
converter of de acculader. Contact met
onderdelen kan een elektrische schok
veroorzaken.
Snelheidsinstelling veranderen
U
Productbeschrijving stuur
W X
Gebruik Gebruik
P
S

NL21NL20
Voorzichtig:
Nieuwe accu’s moeten ingereden worden.
Accu’s beschikken pas na een aantal keer
gebruiken en opladen over hun volledige
capaciteit. Houd daar rekening mee bij uw
eerste ritten.
Laad de accu’s dagelijks op, dit verlengt de
levensduur.
Laad de accu’s altijd volledig op.
Voorkom dat de accu’s geheel ontladen
worden. De scootmobiel valt stil en het heeft
een negatieve uitwerking op de levensduur
van de accu.
Laad volledig ontladen accu’s zo snel
mogelijk in een cyclus van 24 uur op.
Houd uw accu’s niet gedurende langere tijd
in ontladen toestand.
Leg nooit metalen delen op de accu’s: dit
kan kortsluiting veroorzaken en de accu’s
beschadigen.
Let op:
Bij lage temperaturen hebben de accu’s een
lagere capaciteit. Hierdoor neemt ook de
actieradius af.
Zet de scootmobiel iedere nacht aan de
oplader weg.
U kunt de meegeleverde accu’s niet
overladen. Dankzij spanningsbegrenzing
schakelt de lader automatisch uit als de
accu’s vol zijn.
Gebruik uitsluitend acculaders van Life &
Mobility.
Aflezen van de accu-status
De accu-indicator (R) op het bedienings-
paneel toont de resterende accucapaciteit:
Accustatus Indicatie
Groen De accu’s zijn vol.
Oranje Bij voorkeur nu
opladen.
Rood De scootmobiel z.s.m.
opladen.
Opladen accu’s
1. Steek de stekker van de acculader in het
acculaadcontact (Y).
2. Steek de stekker van het netsnoer in een
wandcontactdoos.
3. Maak de laadcyclus van 8 - 10 uur altijd
geheel af. De accu’s zijn vol als het groene
lampje gaat branden.
Vrijloophendel
Waarschuwing:
Gebruik deze functie nooit op een helling
of tijdens het rijden. De rem is dan buiten
werking.
Duw de vrijloophendel na elk gebruik van de
vrijloopfunctie naar boven om de rem weer
in te schakelen.
1. Duw de vrijloophendel (G) naar beneden om
de scootmobiel met de hand te verrijden.
2. Duw de vrijloophendel weer naar boven
voor de elektrische rij-stand. Wen uzelf dit
aan na elk gebruik.
Accu-indicator
Acculaadcontact
Y
Vrijloophendel
G
Gebruik Gebruik
R

NL23NL22
Reinigen
Voorzichtig:
Gebruik geen bleek- of oplosmiddelen.
Gebruik geen hogedrukreiniger om de
scootmobiel te reinigen.
Let op:
Reinig de bekleding en het frame regelmatig.
Bekleding
1. Verwijder lichte verontreiniging met een
oplossing van mild reinigingsmiddel en
warm water.
2. Schrob de bekleding met een zachte borstel
voorzichtig af wanneer de verontreiniging in
de bekleding is getrokken.
Frame
1. Reinig de behuizing met een niet-schurende
reiniger.
2. Zet het frame in een niet-schurende autowas.
Accu’s (zie ook hoofdstuk ‘Gebruik’)
Let op:
Laad accu’s voorafgaand aan het eerste
gebruik altijd volledig op.
Laat de accu’s minimaal één keer per maand
gedurende 24 uur aaneen gesloten opladen.
De aansluitwijze van de accu’s is op een
schema in het accudeksel verduidelijkt.
Wees voorzichtig met beschadigde accu’s.
Laat het (milieuvriendelijk) vervangen van de
accu’s over aan uw dealer.
Voorzichtig:
Accu’s kunnen gevaarlijk zijn. Laat uw accu’s
uitsluitend installeren en onderhouden door
een gekwalificeerde scootermonteur. Deze
beschikt over de benodigde kwalificatie en
Onderhoud
gereedschappen om de inbouw en het onderhoud
veilig en correct uit te voeren.
De scooter maakt gebruik van twee accu’s met 24-
volt serieschakeling. Gebruik nooit tegelijkertijd:
- Accu’s van verschillende fabrikanten
- Accu’s met verschillende technologieën
- Accu’s met verschillende datumcodes
Service en technische ondersteuning
Breng de scootmobiel minimaal 1 keer per jaar
voor een servicebeurt en controle naar uw dealer.
Preventief onderhoud voorziet in de controle op het
goede en juiste functioneren van alle bewegende
delen, alsmede de elektronica en de conditie van de
accu’s.
Reparaties dienen uitsluitend door uw dealer of
door Life & Mobility te worden uitgevoerd, waarbij
uitsluitend door Life & Mobility geleverde originele
onderdelen mogen worden gebruikt.
Onderhoud

NL25NL24
Onderhoudsmatrix
In onderstaande matrix zijn de onderdelen
aangegeven die regelmatig gecontroleerd moeten
worden. Als er een gebrek is ontstaan kunt u de
dealer inschakelen om dit te verhelpen.
Onderdeel Actie
Dagelijks
Wekelijks
Maandelijks
Per kwartaal
Per jaar
Acculader Controleren op
werking
X
Behuizing Reinigen met
vochtige doek
X
Verbindingen Controleren op
breuk
X
Draai-
mechanisme
Controleren
op werking en
speling
X
Accu’s 24-uurs
oplaadcyclus
X
Banden Controleren op
slijtage
X
Scootmobiel Servicebeurt X
Onderhoud
Transport van de scootmobiel
Levensgevaarlijk:
Maak bij vervoer van de scootmobiel in een
motorvoertuig een transfer naar een vaste
zitplaats van het motorvoertuig. Scoot-
mobielen mogen nooit gebruikt worden als
zitondersteuning in een motorvoertuig, ook
niet wanneer de scootmobiel met een taxi-
vergrendeling wordt vastgezet.
Blijf nooit in de scootmobiel zitten wanneer
deze in een takel of ophijssysteem hangt.
Hier is de scootmobiel niet op berekend.
Voorzichtig:
Til de scootmobiel nooit aan de kunststof
delen van de behuizing.
Let op:
De stoel is zwaar. Vraag indien nodig om
hulp.
De stoel verwijderen
1. Ga naast de scootmobiel staan.
2. Duw de rugleuning voorover.
3. Draai de hendel (C) naar beneden.
4. Draai de stoel een kwartslag linksom of
rechtsom.
5. Til de stoel van de scootmobiel.
De stuurkolom platleggen
1. Draai de snelspanner (M) onderaan de
stuurkolom los.
2. Beweeg de stuurkolom zo ver mogelijk in de
richting van de stoel.
Tip: wanneer de stoel verwijderd is kan de
stuurkolom verder platgelegd worden.
3. Draai de hendel weer vast.
Stoel verwijderen
C
Stuurkolom platleggen
M
Transport en opslag

NL27NL26
Transport
Na het verwijderen van de stoel kunt u de
scootmobiel bijvoorbeeld in de kofferbak
transporteren.
Indien gewenst kunt u de scootmobiel
verder demonteren, zie pagina 17: hoofdstuk
‘Instellingen en verstellingen’.
Opslag bij niet gebruiken van de scoot mobiel
Let op:
Berg accu’s altijd in volledig geladen
toestand op.
Volledig opgeladen gelaccu’s en AGM-
accu’s kunnen hun lading tot zes maanden
vasthouden, maar moeten altijd worden
opgeladen voorafgaand aan gebruik.
Vermijd opslag van accu’s bij extreem hoge
of extreem lage temperaturen.
Bij gesloten gelaccu’s en AGM accu’s hoeft
geen water bijgevuld te worden. Raadpleeg
een gekwalificeerde scootermonteur bij
eventuele prestatie-problemen.
Langer dan een week:
Sluit minimaal 1 keer per week de acculader
aan om de conditie van de accu’s op peil
te houden of zet de scootmobiel aan de
acculader weg.
Zeer langdurig (bv. tijdens de winter of door
ziekte):
Laat de bedrading van de accu’s door uw
dealer ontkoppelen.
Transport en opslag
Garantie
Op uw nieuwe scootmobiel geldt een garantieperiode
van 12 maanden. De accu’s hebben een garantie van
3 maanden.
Buiten de garantie vallen gebreken ontstaan door:
niet in acht nemen van gebruiks- en onderhouds-
voorschriften, anders dan normaal gebruik, slijtage,
onachtzaamheid, overbelasting, ongeval door
derden, toegepaste, niet originele onderdelen en
gebreken waarvan de oorzaak is gelegen buiten het
product.
Met deze garantie vervalt elke andere garantie; in de
wet bepaald, of mondeling meegedeeld, behoudens
dat wat door Life & Mobility schriftelijk wordt
gegarandeerd.
Garanties gelden uitsluitend binnen de EU.
Garantie

NL29NL28
Afvoeren product en verpakking
Alle onderdelen van uw scootmobiel zijn recycle baar.
De dealer is bekend met de inzamelpunten voor het
afdanken van de scootmobiel.
Vanuit milieuoogpunt adviseren wij om de verpakking
en de scootmobiel zoveel mogelijk gescheiden af
te voeren, zodat de gebruikte materialen efficiënt
gerecycled kunnen worden.
Afvoeren product en verpakking
Deze handleiding is met de grootst mogelijke zorg
samengesteld en is gebaseerd op de informatie
zoals bij Life & Mobility bekend op het moment
van verschijnen. Life & Mobility neemt geen
verantwoordelijkheid voor eventuele fouten in de
tekst of gevolgen daarvan.
De informatie in deze handleiding is van toepassing
op de standaard uitvoering van het product. Life &
Mobility neemt geen verantwoordelijkheid voor
eventuele schade ontstaan door wijzigingen in of
aanpassingen op het product na het moment van
eerste verkoop. Tevens kan Life & Mobility niet
aansprakelijk gesteld worden voor schade door
werkzaamheden door derden.
De informatie in deze handleiding mag op geen
enkele manier vermenigvuldigd en/of openbaar
gemaakt worden, zonder de voorafgaande schriftelijke
toestemming van Life & Mobility.
De door Life & Mobility gebruikte handelsnaam en
handels merken mogen krachtens de handelsnaamwet
niet als vrij worden beschouwd.
Aan deze tekst kunnen geen rechten worden
ontleend. Wijzigingen voorbehouden.
© Life & Mobility – Alle rechten voorbehouden

GB3
Dear user,
By choosing a Vivo mobility scooter you have chosen
unequalled safety, quality and driving pleasure! We
hope you will drive many comfortable and safe miles
and trust that you will enjoy the freedom offered by
the Vivo.
In this user manual you will find everything you need
to know about the
Vivo, from safety instructions and
operating functions
to maintenance tips. Carefully
read the user manual, so you can get the most out of
your mobility scooter.
We would like to keep you informed about updates,
user experiences and other useful information. You
can regularly read about the latest developments on
the www.life-mobility.com website.
Kind regards,
Management and staff of Life & Mobility
Preface

GB5GB4
Safety instructions
As the user of the mobility scooter, you are
always responsible for complying with the locally
applicable safety instructions and guidelines. It
is important to first acquire driving experience
under the supervision of an experienced
instructor. Your dealer can advise you on this.
Life & Mobility accepts no liability for any loss
or injury caused by negligence or by failure to
comply with the safety instructions.
Attention:
If you see this symbol in the manual, it
indicates a supplementary instruction.
Always follow this instruction. Negligence
may adversely affect the operation of the
mobility scooter and may cause physical
injury or damage to the mobility scooter, the
immediate vicinity or the environment.
General
Warning:
Never change the construction of the
mobility scooter.
Only use the mobility scooter for its intended
purpose.
Keep the mobility scooter away from open
fire.
Never allow children to play unsupervised
near the mobility scooter.
Be careful:
Use the basket only to transport objects.
Do not use your mobility scooter to pull
vehicles, carts, etc.
Remember that there are protruding parts,
both fixed and loose, in and on the mobility
scooter. These can cause damage to the
surroundings and the mobility scooter.
Contents
Safety instructions 5
Introduction 11
Technical specifications 12
Product description 13
Settings and adjustments 16
Use 18
Maintenance 22
Transport and storage 25
Warranty 27
Disposal of product and packaging 28

GB7GB6
Safety instructions
Please follow the relevant traffic rules that
apply.
Make sure that you can always be seen by
other road users. As a user of a mobility
scooter you are very vulnerable on the road.
Avoid quiet routes. Make sure that help can
be arranged in the event of an emergency.
Switch off the mobility scooter if you are
using your mobile telephone. Your mobility
scooter may activate security gates in shops.
Assembling and adjustment
(see also the chapter ‘Settings and adjustments’)
Warning:
Before using the mobility scooter, check that
all components of the mobility scooter are
properly mounted and secured.
Attention:
Never remove the anti-tipping wheels.
Sitting in the mobility scooter
Warning:
Make sure that your fingers and limbs do not
get trapped. Always be very careful:
- When folding away armrests.
- If you are not in full control of your arms or
legs.
Driving the mobility scooter
(see also the chapter ‘Use’)
Warning:
Never drive on public roads.
Make sure that no loose clothing can get
caught. These may become trapped in the
wheels.
Do not transport anything on the handlebars.
Safety instructions
Attention:
This mobility scooter is suitable for
transporting a single person. Do not carry
passengers.
Only use original Life & Mobility parts and
accessories.
Never cover or remove the safety instructions
and stickers.
Always switch off the mobility scooter and
take out the ignition key before leaving it.
This prevents unwanted use and/or theft.
Use in rain, mist, black ice, snow and on
salted roads may have an adverse effect on
the electrical system.
This mobility scooter does not have lights;
therefore, do not ride it in the dark.
This mobility scooter does not have
indicators, use hand-signals when changing
direction.
Personal requirements
Warning:
If you are under the influence of substances
that may affect your ability to drive, you may
not drive the mobility scooter.
There are certain (medical) situations
where it is desirable to first undergo driver-
competence training supervised by a
suitably equipped dealer.
Attention:
Please contact your doctor if you are taking
prescription medicines or if you have physical
limitations. Some medicines or limitations
may affect your driving ability.
Your vision must be adequate to drive the
mobility scooter safely in any situation that
may occur during use.

GB9GB8
Safety instructions
Transport the mobility scooter without pas-
senger (see the ‘Transport and storage’ chapter)
Extremely dangerous:
When transporting the mobility scooter in
a motor vehicle, always make sure you are
seated in a fixed seat of the motor vehicle.
Never use your mobility scooter as a seat in
a motor vehicle.
Never remain seated in the mobility scooter
while it is suspended in a hoist or lifting
system. The mobility scooter was not
designed for this.
Warning:
Make sure that your fingers do not get
trapped when folding down the mobility
scooter.
Never carry the mobility scooter by the
plastic parts of the housing.
Attention:
Make sure that the mobility scooter is fully
assembled before use.
Miscellaneous
Warning:
Do not put the mobility scooter in direct
sunlight: the upholstery can become too
hot, and cause burns or irritation to the skin.
Be careful:
Never attempt to resolve a fault yourself.
Contact your dealer instead.
Do not allow the mobility scooter to come
into contact with seawater: seawater is
corrosive and will damage the mobility
scooter.
Approaching a curb
Safety instructions
Do not let anyone stand on the rear of your
mobility scooter.
Attention:
Before driving-off check that the mobility
scooter is in the driving status and not in
freewheel.
Always remove the key before getting on or
off.
Never remove the key when the mobility
scooter is still moving. You would stop very
abruptly in that case.
Slopes and other obstacles
Warning:
Avoid slopes with a gradient greater than
10° (17.5%). Driving on slopes (forwards or in
reverse) is always dangerous.
Be careful you do not overturn when driving
on a slope. Never freewheel down a slope.
Always drive straight up/down a slope, never
angle across it.
Drive carefully along (pavement) edges.
An uneven surface increases the risk of
overturning.
Attention:
Your centre of gravity moves when you drive
up or down a slope. Please beware.
Turn around carefully on a steep slope as
there is a greater risk of overturning.
Always approach a curb from directly in front.
Never reverse over a curb or obstacle.
The maximum curb height you can drive
over is 5 cm.
Soft, slippery or uneven surfaces increase
the risk of a dangerous situation.
Maximum gradient
10°

GB11GB10
The Vivo is an electrically powered mobility scooter,
suitable for both young and older people who have
difficulty walking long distances.
This manual only describes the default settings of
your mobility scooter. You will find more information
on our website:
www.life-mobility.com
IntroductionSafety instructions
Do not allow the mobility scooter to come
into contact with sand: sand may penetrate
to the moving parts of the mobility scooter,
causing faster wear and tear.
Attention:
A number of technical precautions have been
implemented to further guarantee your safety:
The immobiliser is activated whenever a
battery charger is connected.
In the event of an electronic fault, the
mobility scooter will make a controlled stop.
To avoid the risk of body parts becoming
trapped, the necessary components have
been guarded where possible.
EMC-approved
The mobility scooter is approved for EMC
(Electro-Magnetic Compatibility). Tests have
shown that mobility scooters are not sensitive or
damaging to mobile communication equipment
and electronically controlled equipment.
Despite this, please be careful when using
the mobility scooter and mobile or electronic
equipment at the same time.

GB13GB12
Product description
Checking the delivery
Before using the mobility scooter, check if the delivery
matches the product description below. If you fi nd
any transport damage upon delivery, please inform
your dealer. Life & Mobility trusts that the mobility
scooter meets your expectations and hopes it brings
you much convenience.
Product description
J. Battery box
K. Footrest
L. Front wheel
M. Steering angle quick-
release
N. Basket
O. Handlebars with
control panel
A. Folding backrest
B. Folding
armrests
C. Seat lever
D. Handle
E. Refl ector
F. Anti-tipping wheels
G. Freewheel lever
H. Sprung
rear wheels
I. CE sticker
Mobility scooter
product description
A
B
C
N
L
M
O
H
G
JI K
F
D
E
Intended use: outdoors, between -25° C and
+ 50° C
L x w x h: 107 x 58 x 91.5 cm
Weight (incl. batteries): 58 kg
Weight of battery box: 14 kg (5 kg per battery)
Seat depth: 41 cm
Seat width: 41 cm
Seat height above footrest (adjustable): 40/42,5/
45 cm
Height between footrest and ground: 9 cm
Max. driving distance with fully-charged batteries:
20 km* (12 miles approximately*)
Max. (programmable) speed: 6 km/h* (4 mph*)
Turning circle (radius): 135 cm
Max. user weight: 120 kg (19 st)
Battery capacity: 24 V (2x12V) / 22 Ah
Max. load: 2A / 120/240 V / 50/60Hz
Wheel size: 24 x 7.5 cm (9.4” x 3)
Complies with: EN 12184 Class A
Service and technical support
Contact your dealer if you have any questions about
specifi c settings, maintenance or repairs. Always
have the serial number ready. You can fi nd it on the
CE sticker on the seat column on the mobility scooter
(see p. 15 also).
Technical specifications
* Depending on the
set speed, outside
temperature, weight of
the user, etc.

GB15GB14
Markings on the mobility scooter
There are a number of stickers on the mobility
scooter. Below is an overview of these stickers,
with their location.
CE-sticker
The mobility scooter meets the provisions of
the Directive for Medical Devices and has a
CE label.
The CE sticker (l) can be found on the seat
column on your mobility scooter.
Freewheel sticker (see also page 21)
The sticker above the freewheel lever (G)
indicates that the mobility scooter is ready to be
electrically driven.
The sticker below the freewheel lever indicates
the “push position”. In this setting the mobility
scooter can be moved freely.
CE-sticker
Freewheel lever
G
Electric driving position
Push position
Product description
Control panel
P. Ignition lock with ignition key
Q. Horn
R. Battery indicator
S. Indicator on/off
T. Tortoise speed setting (slow)
U. Speed button
V. Hare speed setting (fast)
W. Reversing thumb control lever
X. Forward thumb control lever
Y. Battery charger contact
Not pictured
Various accessories are optionally available,
including:
Crutch holders
Rear-view mirror
Backrest bag
See www.life-mobility.com for more accessories.
Product description
control panel
Product description handlebars
Battery charger contact
Product description
P
S
W X
Y
T
U
V
Q
R

GB17GB16
Dismantling
The mobility scooter can easily be dismantled
for transport or storage (see the ‘Transport and
Storage’ chapter also).
Warning:
Be very careful when dismantling the mobility
scooter. Ensure that your hands and fi ngers
do not get trapped in the hinge system.
1. Pull the unlocking lever (b) on the rear of
mobility scooter vertically upwards.
2. At the same time press the handle (D) toward
the ground.
3. Now, lift the front section away from the rear
section (Z).
Assembling
1. Tilt the rear section (Z) of the mobility
scooter at an angle of 45 degrees onto the
anti-tipping wheels.
Attention:
Determine the hook-in position accurately
to prevent damage to the body shell.
2. Lift the front section of the mobility scooter
and carefully hook it onto the frame tube of
the lower rear section.
3. Allow the front section to lower gently, until
both sections click together.
Disassembled mobility scooter
Unlocking
b
D
Determining the position
Z
Assembling
Settings and adjustmentsSettings and adjustments
Adjust seat width
1. Loosen the socket screws (a) on the bottom-
rear of the seat.
2. Set the width to suit your personal
requirements.
3. Re-tighten the socket screws.
The arm rests are now locked in the current
position.
Armrests
Fold the armrests (B) up to make getting-out
easier.
Adjusting the steering angle
Attention:
Do not adjust the angle of the steering
column while driving.
Adjust the steering column so that you can easily
reach the controls and the display. The steering
column can be adjusted by a toothed-wheel.
1. Loosen the quick-release lever (M) at the
bottom of the steering column
2. Lift the steering column slightly out of the
toothed-wheel and adjust the steering
column to the required angle. Ensure that
the teeth on the wheel engage.
3. Re-tighten the quick-release lever.
The steering column is now locked in place.
Adjusting the seat height (3 positions)
1. Remove the seat.
2. Remove the battery box.
3. Loosen the bolt and adjust the seat column
to the required seating height.
4. Replace the battery box.
5. Replace the seat.
Changing the seat width
a
Armrests
B
Change handlebar angle
M

GB19GB18
you always use the correct low speed setting
for tight manoeuvring.
Attention:
Adjust your speed using the thumb control
lever. The speed setting determines how fast
you can go if you squeeze the thumb control
lever all the way.
Check that the road behind you is clear
when reversing.
The mobility scooter reverses more slowly
than when it drives forward.
By default the maximum speed is set to
6 km/h. Your dealer can adjust the speed
setting for you.
1. Turn the speed button (U) anticlockwise to
the ‘tortoise setting’ to drive slowly.
2. Turn the speed button clockwise to the ‘hare
setting’ to drive quickly.
Choose a suitable speed setting for each
situation.
Driving forward and reversing
1.
Slowly squeeze the thumb control lever (X).
The mobility scooter starts moving forwards.
2. Squeeze the thumb control lever further.
The mobility scooter will start moving
forward more quickly.
3. Release the thumb control lever.
The mobility scooter will stop.
4. Use the thumb control lever (W) to reverse.
Batteries
Warning:
Never connect a cable to the AC/DC
converter or the battery charger. Contact
with components may cause electric shock.
Adjusting the speed setting
U
Product description handlebars
W X
Use
Advance checks
Check the following before driving off:
The battery status on the display (see page 21),
The brakes,
Whether the freewheel lever is pointing up
(electric driving position, see page 21),
Whether the battery charger has been
removed.
Getting in and out by yourself
Attention:
Make sure that the seat is properly locked in
place before driving off.
Getting in/out
1. Push the seat lever (C) down.
2. Keep the seat lever pushed down and turn
the seat a quarter turn to the left or right.
3. Get in or out.
4. Release the seat lever.
The seat is now locked in place.
Starting
1. Insert the key into the ignition lock (P) and
push home.
The on/off indicator lamp (S) lights up. The
mobility scooter is now ready to drive.
Maximum speed
The maximum speed ex-factory is 6 km/h but
your dealer can program a lower speed.
Warning:
Adjust your speed before steering into a
bend. The scooter may overturn.
Despite the small turning circle of the
mobility scooter, it may still be diffi cult to
turn into lifts or doorways. Make sure that
Getting in and out
C
Starting
Use
P
S

GB21GB20
Reading the battery status
The battery indicator (R) on the control panels
shows the remaining battery capacity:
Battery status Indicator
Green The batteries are full.
Amber You should start
charging now.
Red Recharge the mobility
scooter as soon as
possible.
Charging the batteries
1. Insert the battery charger plug into the
battery charger contact (Y).
2. Insert the plug of the mains cord in a wall
socket.
3. Always fully complete the charging cycle of
8 - 10 hours. The batteries are fully charged
when the green lamp is lit
Freewheel lever
Warning:
Never use this function on a slope or while
driving. It will disable the brakes.
Always push the freewheel lever upwards
to re-engage the brakes after using the
freewheel function.
1. Push the freewheel lever (G) down to move
the mobility scooter by hand.
2. Push the freewheel lever back up for the
electric drive position. Teach yourself to do
this each time you have used it.
Battery indicator
Battery charger contact
Y
Freewheel lever
G
Use
R
Be careful:
New batteries must be run in. The full
capacity of batteries is only reached after
they have been used and charged a couple
of times. Take this into account during your
first few trips.
Charge the batteries every day, this will
extend their service life.
Always charge the batteries to full capacity.
Avoid draining the batteries completely. The
mobility scooter will lose power which will
have a negative effect on the service life of
the battery.
Charge fully drained batteries as soon as
possible using a 24-hour cycle.
Do not keep your batteries fully drained for
a prolonged period of time.
Never put metal parts on the batteries: this
may short-circuit the batteries and damage
them.
Attention:
At lower temperatures the capacity of the
batteries is reduced. This also reduces the
operating range.
Always connect the charger when putting
the mobility scooter away for the night.
You cannot overcharge the batteries
supplied. Thanks to a voltage limiter, the
charger automatically switches off when the
batteries are full.
Only use Life & Mobility battery chargers.
Use

GB23GB22
Be careful:
Batteries can be dangerous. Only allow your
batteries to be installed and maintained by
a qualified scooter mechanic. They have the
required qualifications and tools to perform
the installation and maintenance safely and
correctly.
The scooter uses two batteries with a 24-volt
series connection. Never use both batteries
at the same time:
- Batteries from different manufacturers
- Batteries with different technologies
- Batteries with different date codes
Service and technical support
At least once a year have the mobility scooter
checked and serviced by your dealer. Preventive
maintenance ensures that the proper and correct
functioning of all moving parts is checked, as
well as the electronics and the condition of the
batteries.
Repairs should only be performed by your
dealer or by Life & Mobility, and only original
parts supplied by Life & Mobility should be used
for this.
Maintenance
Cleaning
Be careful:
Do not use bleach or solvents.
Do not use a high-pressure cleaner to clean
the mobility scooter.
Attention:
Regularly clean the upholstery and the
frame.
Upholstery
1. Remove any light dirt with a solution of a
mild cleaning agent and warm water.
2. Carefully scrub the upholstery with a soft
brush if the dirt has been absorbed into the
upholstery.
Frame
1. Clean the housing with a non-abrasive
cleaning product.
2. Apply non-abrasive car wax to the entire
frame.
Batteries (see also the chapter ‘Use’)
Attention:
Always fully charge batteries before using
them for the first time.
Charge the batteries continuously for 24
hours at least once a month.
The battery connection method is illustrated
on a diagram on the inside of the battery
cover.
Be careful with damaged batteries. Leave
(environmentally-friendly) replacement of
the batteries to your dealer.
Maintenance

GB25GB24
Transporting the mobility scooter
Extremely dangerous:
When transporting the mobility scooter in
a motor vehicle, always make sure you are
seated in a fi xed seat of the motor vehicle.
Mobility scooters may never be used as
seating support in a motor vehicle, even if
the mobility scooter is secured with a taxi
restraint system.
Never remain seated in the mobility scooter
while it is suspended in a hoist or lifting
system. The mobility scooter was not
designed for this.
Be careful:
Never carry the mobility scooter by the
plastic parts of the housing.
Attention:
The seat is heavy. Ask for help if required.
Removing the seat
1. Stand next to the mobility scooter.
2. Push the backrest forward.
3. Turn the lever (C) downwards.
4. Rotate the seat a quarter turn to the left or to
the right.
5. Lift the seat from the mobility scooter.
Folding down the steering column
1. Loosen the quick-release lever (M) at the
bottom of the steering column
2. Move the steering column as far as possible
towards the seat.
Tip: if the seat is removed, the steering
column can be folded down further.
3. Re-tighten the lever.
Removing the seat
C
Folding down the steering
column
M
Transport and storage
Maintenance matrix
The following matrix indicates which parts should be
regularly checked. If a defect occurs, contact your
dealer to resolve this issue.
Part Action
Daily
Weekly
Monthly
Each quarter
Annually
Battery charger Check
functioning
X
Housing Clean with
damp cloth
X
Connections Check for
breakages
X
Rotating
mechanism
Check
functioning and
play
X
Batteries 24-hour
charging cycle
X
Tyres Check wear and
tear
X
Mobility scooter Servicing X
Maintenance

GB27GB26
Warranty
Your new mobility scooter is covered by a 12-month
warranty. The batteries are covered by a 3-month
warranty.
The warranty does not apply to defects caused
by: failure to observe the instructions for use and
maintenance, use other than normal use, wear and
tear, negligence, overloading, third-party accidents,
non-original parts used and defects not caused by the
product.
This warranty replaces any other warranty, either
stipulated by law or communicated orally, except for
anything guaranteed in writing by Life & Mobility.
Warranties are only valid within the EU.
Warranty
Transport
Once the seat has been removed you can
transport the mobility scooter in the boot, for
example.
If required, the mobility scooter can be further
dismantled, see page 17: ‘Settings and
adjustments’ chapter.
Storage when not using the mobility scooter
Attention:
Always store batteries fully charged.
Fully charged gel batteries and AGM
batteries will retain their charge for up to six
months, but they must always be charged
before use.
Avoid storage of batteries at extremely high
or low temperatures.
Sealed gel batteries and AGM batteries
do not need to be topped up with water.
Contact a qualified scooter mechanic if you
have any performance issues.
Longer than a week:
Connect the battery charger at least once
a week to maintain the condition of the
batteries or put the mobility scooter away
for the night with the battery charger
connected.
Very long term (e.g. during winter or due to
illness):
Have your dealer disconnect the wiring of
the batteries.
Transport and storage

GB29GB28
This manual has been prepared with the utmost care
and is based on information known to Life & Mobility
at the time of publication. Life & Mobility does
not accept liability for any errors in the text or the
consequences thereof.
The information in this manual applies to the standard
version of the product. Life & Mobility does not accept
responsibility for any damage that may occur due to
changes or modifications to the product after selling
it for the first time. Neither can Life & Mobility be held
liable for any damage caused by third-party work.
The information in this manual may not be reproduced
and/or made public by any means without prior
written permission from Life & Mobility.
Pursuant to the Trade Names Act, the trade name
and trademarks used by Life & Mobility may not be
considered free.
No rights can be derived from this text. Subject to
changes.
© Life & Mobility – All rights reserved
Disposal of product and packaging
All parts of your mobility scooter are recyclable. Your
dealer will know the collection points for disposal of
the mobility scooter.
From an environmental perspective, we recommend
that you dispose of the packaging and the mobility
scooter by separating the waste as much as possible,
allowing the waste materials to be recycled efficiently.
Disposal of product and packaging

FR3
Cher utilisateur,
En choisissant un scooter électrique Vivo, vous
avez opté pour la sécurité, la qualité et un plaisir
de conduire sans pareil ! Nous vous souhaitons une
conduite confortable et sûre, et nous espérons que
vous profiterez pleinement de la liberté que le Vivo
vous procurera.
Dans ce mode d’emploi, vous trouverez tous les
renseignements sur le
Vivo, des instructions de
sécurité, aux fonctions de conduite
en passant par
les conseils d’entretien. Lisez attentivement le mode
d’emploi afin de profiter au maximum de votre
scooter électrique.
C’est un plaisir pour nous de partager avec vous les
dernières nouvelles, les expériences des utilisateurs
et d’autres informations. Sur notre site internet
www.life-mobility.com vous pouvez vous tenir au
courant des nouveautés.
Cordialement,
La direction et les collaborateurs de Life & Mobility
Préface

FR5FR4
Instructions de sécurité
En tant qu’utilisateur du scooter électrique,
vous êtes toujours tenu de suivre les consignes
et indications de sécurité locales en application.
Il est important d’effectuer le premier trajet
accompagné par un instructeur expérimenté.
Votre revendeur peut vous y aider.
Life & Mobility décline toute responsabilité en
cas de dégâts ou dommages dus à la négligence
ou au non-respect des consignes de sécurité.
Attention :
Lorsque ce symbole apparait dans le mode
d’emploi, cela signifie qu’une instruction
supplémentaire sera apportée. Suivez
toujours ces instructions. La négligence
peut avoir des conséquences négatives
sur le scooter électrique, et peu entrainer
des blessures ou des dégâts au niveau du
scooter ou de l’environnement direct.
Général
Avertissement :
Ne modifiez en aucun cas la construction du
scooter électrique.
N’utilisez le scooter électrique que pour
l’utilisation prévue.
Gardez le scooter électrique à l’écart du feu nu.
Ne laissez pas les enfants jouer sans
surveillance près du scooter électrique.
Attention :
N’utilisez le panier que pour le transport
d’objets.
N’utilisez pas votre scooter électrique pour
tirer des véhicules, des remorques, etc.
Faites attention aux pièces saillantes,
fixes ou lâches, se trouvant à l’intérieur et
à l’extérieur du scooter électrique. Elles
Table des matières
Instructions de sécurité 5
Introduction 11
Spécifications techniques 12
Description du produit 13
Paramètres et réglages 16
Utilisation 18
Entretien 22
Transport et entreposage 25
Garantie 27
Transport du produit et emballage 28

FR7FR6
Instructions de sécuritéInstructions de sécurité
Votre vue doit être suffisante pour pouvoir
conduire le scooter électrique en toute
sécurité et dans toutes les circonstances
d’utilisation.
Respectez le code de la route en vigueur.
Assurez-vous d’être toujours vu par les
autres conducteurs. En tant que conducteur
de scooter électrique, vous êtes vulnérable
sur la route.
Evitez les routes isolées. Assurez-vous qu’en
cas d’urgence, une aide puisse vous être
apportée.
Eteignez votre scooter électrique lorsque
vous utilisez votre GSM. Les alarmes antivol
peuvent se déclencher.
Montage et réglage
(voir aussi le chapitre ‘Paramètres et réglages’)
Avertissement :
Avant d’utiliser le scooter électrique, assurez-
vous que toutes les pièces du scooter soient
bien montées et fixées.
Attention :
Ne retirez jamais les roues anti-bascule.
S’asseoir sur le scooter électrique
Avertissement :
Assurez-vous que les doigts et les membres
ne se coincent pas. Faites particulièrement
attention :
- A rabattre les accoudoirs.
- Lorsque vous ne disposez pas d’un contrôle
total sur vos bras ou sur vos jambes.
peuvent endommager l’environnement et le
scooter électrique.
Attention :
Ce scooter électrique ne peut transporter
qu’une seule personne. Ne prenez pas de
passagers.
Utilisez uniquement les pièces et accessoires
originaux de Life & Mobility.
Ne jamais couvrir ou enlever les instructions
de sécurité et les autocollants.
N’oubliez jamais d’éteindre le scooter
électrique et d’enlever la clé de contact.
Vous éviterez ainsi une utilisation indésirable
et/ou le vol.
L’utilisation en cas de pluie, brouillard,
verglas et de sel de déneigement a un
impact négatif sur le système électrique.
Ce scooter électrique n’a pas de phares ; ne
roulez donc pas lorsqu’il fait sombre.
Ce scooter électrique n’est pas doté de
clignotants, tendez votre bras lorsque vous
changez de direction.
Recommandations
Avertissement :
Vous ne pouvez conduire le scooter
électrique lorsque vous êtes sous l’emprise de
substances pouvant influencer votre conduite.
Dans certaines situations (médicales), il
est préférable que vous suiviez d’abord
une formation de conduite auprès d’un
revendeur qualifié.
Attention :
Contactez votre médecin si vous prenez des
médicaments sur ordonnance, ou si vous
avez des possibilités physiques réduites.
Certains médicaments ou limitations
peuvent avoir un impact sur votre conduite.

FR9FR8
Instructions de sécuritéInstructions de sécurité
Attention :
Votre centre de gravité se déplace lorsque
vous montez ou descendez une pente.
Ne l’oubliez pas.
Tournez doucement sur une pente à forte
déclivité pour éviter de basculer.
Montez toujours sur une bordure en vous
plaçant bien en face.
Ne roulez jamais en marche arrière sur un
trottoir ou un obstacle.
La hauteur de bordure maximale sur laquelle
vous pouvez monter est de 5 cm.
Un terrain meuble, glissant ou inégal
augmente le risque de dangers.
Transport du scooter électrique sans passager
(voir également chapitre ‘Transport et entrepo-
sage’)
Danger de mort :
Pendant le transport du scooter électrique
dans un véhicule motorisé, asseyez-vous
toujours sur un siège du véhicule. Les
scooters électriques ne peuvent jamais être
utilisés comme sièges dans un véhicule
motorisé.
Ne restez jamais sur le scooter électrique
lorsqu’il est dans un appareil de levage ou
qu’il est suspendu à un système de hissage. Le
scooter électrique n’est pas prévu à cet effet.
Avertissement :
Attention à ne pas coincer vos doigts lorsque
vous diminuez la taille du scooter.
Ne portez jamais le scooter électrique par
les parties en plastique du capot.
Attention :
Assurez-vous que le scooter électrique soit
complètement monté avant de l’utiliser.
Conduire avec le scooter électrique
(voir aussi le chapitre ‘Utilisation’)
Avertissement :
Ne roulez pas sur les voies publiques.
Faites attention à ce que vos vêtements ne
dépassent pas. Ils peuvent se prendre dans
les roues.
N’accrochez rien au volant.
Ne faites monter personne à l’arrière de
votre scooter électrique.
Attention :
Avant de conduire, vérifiez que le scooter
électrique est sur le mode conduite, et non
pas en roue libre.
Retirez toujours la prise de contact avant de
monter ou de descendre du scooter.
Ne retirez pas la prise de contact lorsque le
scooter électrique roule encore. Car alors
vous arrêterez le scooter abruptement.
Pentes et autres obstacles
Avertissement :
vitez les pentes d’une déclivité supérieure à
10° (17,5%). Il est dangereux de faire marche
avant ou marche arrière sur ces pentes.
Faites attention de ne pas basculer lorsque
vous roulez sur une pente. Ne soyez jamais
en roue libre sur une pente.
Montez et descendez toujours une pente en
vous plaçant bien en face de la bordure, et
pas sur le côté.
Roulez prudemment le long des trottoirs.
Un sol inégal augmente les risques de
basculement.
Angle d’inclinaison maximal
10°
Approcher une bordure

FR11FR10
Le Vivo est un scooter électrique adapté aux
personnes de tous âges, ayant des difficultés à se
déplacer sur de longues distances.
Ce mode d’emploi décrit uniquement les paramètres
généraux de votre scooter électrique. Vous trouverez
plus d’informations sur notre site internet :
www.life-mobility.com
IntroductionInstructions de sécurité
Divers
Avertissement :
Ne placez pas le scooter électrique au soleil :
le revêtement peut chauffer et causer des
brûlures ou des irritations cutanées.
Attention :
N’essayez jamais de réparer un
dysfonctionnement vous-même. Contactez
votre revendeur.
Evitez tout contact avec l’eau de mer : l’eau
de mer est agressive et attaque le scooter.
Evitez tout contact avec le sable : le sable
peut s’infiltrer dans les pièces rotatives du
scooter électrique, ce qui entraine une usure
rapide et inutile.
Attention :
Afin d’assurer une plus grande sécurité,
certaines précautions techniques ont été prises
en compte :
Lorsqu’un chargeur de batterie est branché,
l’immobilisation du véhicule est activée.
En cas de signalement d’un problème
électronique, le scooter électrique s’arrêtera
progressivement.
Les parties entre lesquelles les membres du
corps peuvent se coincer sont protégées au
maximum.
Homologué CEM
Le scooter électrique est homologué CEM
(Compatibilité Electromagnétique). Des études
ont démontré que le scooter électrique n’est
pas sensible ou néfaste pour les appareils
de communication mobile ou à commande
électronique. Cependant, soyez vigilants lors de
l’utilisation simultanée du scooter électrique et
d’appareils mobiles ou électroniques.

FR13FR12
Description du produit
Utilisation prévue : à l’extérieur, entre -25° C et
+ 50° C
L x l x h : 107 x 58 x 91,5 cm
Poids (batteries comprises) : 58 kg
Poids boîtier batteries : 14 kg (5 kg par batterie)
Profondeur d’assise : 41 cm
Largeur d’assise : 41 cm
Hauteur d’assise par rapport au trépied (réglable)
: 40/42,5/45 cm
Hauteur entre le trépied et le sol : 9 cm
Distance parcourue max. avec batteries
complètement chargées : 20 km*
Max. vitesse (programmable) : 6 km/h*
Rayon de rotation (rayon) : 135 cm
Poids max. utilisateur : 120 kg
Capacité des batteries : 24 V (2x12V) / 22 Ah
Capacité de charge max. : 2A / 120/240 V / 50/60Hz
Dimension roue : 24 x 7,5 cm
Correspond à : EN 12184 classe A
Service et support technique
Demandez conseil à votre revendeur en cas de
questions portant sur des paramètres spécifi ques,
l’entretien ou la réparation. Gardez toujours le
numéro de série à portée de main. Vous le trouverez
sur l’autocollant CE sur la barre du siège du scooter
électrique (voir aussi page).
Spécifications techniques
Contrôle de la livraison
Avant d’utiliser le scooter électrique, vérifi ez que
la livraison corresponde à la description du produit
ci-dessous. Si vous constatez des dégats dus au
transport, avertissez-en votre revendeur. Life & Mobility
est certain que le scooter électrique répondra à vos
attentes, et vous en souhaite une bonne utilisation.
Description du produit
I. Autocollant CE
J. Boîtier de batteries
K. Trépied
L. Roue avant
M. Tendeur de fi l rapide
angle du guidon
N. Panier
O. Guidon avec panneau
de commande
A. Dossier rabattable
B. Accoudoirs
rabattables
C. Levier siège
D. Poignée
E. Réfl ecteur
F. Roues anti-bascule
G. Manette de roue libre
H. Roues arrières
à rainures
Description du produit
scooter électrique
A
B
C
N
L
M
O
H
G
JI K
F
D
E
* Dépend de la vitesse
programmée, de la
température extérieure,
du poids de l’utilisateur,
etc.

FR15FR14
Indications sur le scooter électrique
Vous trouverez un certain nombre d’autocollants
sur le scooter électrique. Ci-dessous un aperçu
indiquant leur emplacement.
Autocollant CE
Le scooter électrique répond aux
critères définis dans la directive sur les
Dispositifs Médicaux et comporte un
marquage CE.
L’autocollant CE (I) se trouve sur la barre du
siège de votre scooter électrique.
Autocollant roue libre (voir aussi page 21)
L’autocollant sous la manette de roue libre
(G) indique que le scooter est prêt pour une
utilisation électrique.
L’autocollant sous la manette de roue libre
indique la position «pousse». Dans cette
position il est possible de pousser le scooter
électrique.
Autocollant CE
Manette de roue libre
G
Mode conduite électrique
Mode pousse
Panneau de commande
P. Serrure de contact d’allumage avec prise
de contact
Q. Klaxon
R. Indicateur de batterie
S. Indicateur lumineux allumé/éteint
T. Niveau de vitesse : tortue (lent)
U. Bouton de vitesse
V. Niveau de vitesse lièvre (rapide)
W. Commande de pouce marche arrière
X. Commande de pouce marche avant
Y. Contact chargeur batterie
Non représenté
Certains accessoires sont livrables en option,
dont :
Le porte-canne
Le rétroviseur
Sacoche dossier
Pour plus d’accessoires, rendez-vous sur
www.life-mobility.com.
Description du produit
panneau de commande
Description du produit guidon
Contact chargeur batteriet
Description du produitDescription du produit
P
S
W X
Y
T
U
V
Q
R

FR17FR16
Démonter
Le scooter électrique peut être démonté faci-
lement pour le transport ou l’entreposage (voir
aussi chapitre ‘Transport et entreposage’).
Avertissement :
Soyez très attentif lorsque vous démontez le
scooter électrique. Faites attention à ce que
vos mains ou vos doigts ne se coincent pas
dans le système d’articulation.
1. Tirez la poignée de déverrouillage (b), se
trouvant à l’arrière du scooter électrique,
vers le haut, en position verticale.
2. Poussez en même temps la poignée (D) vers
le sol.
3. A présent, détachez la partie avant de la
partie arrière (Z).
Monter
1. Faites pivoter la partie arrière (Z) du scooter
électrique à un angle de 45 degrés jusqu’aux
roulettes anti-bascule.
Attention :
Choisissez minutieusement la position
d’accroche, afi n d’éviter d’endommager la
peinture.
2. Soulevez la partie avant du scooter
électrique et accrochez-la bien au tube de
cadre de la partie arrière abaissée.
3. Faites descendre doucement la partie avant
vers le bas, jusqu’à ce que les deux parties
s’emboitent.
Scooter électrique démonté
Déverrouiller
b
D
Déterminer la position
Z
Monter
Paramètres et réglagesParamètres et réglages
Régler la largeur d’assise
1. Desserrez les vis à trou hexagonal (a) sous
l’arrière du siège.
2. Réglez la largeur comme vous le désirez.
3. Serrez de nouveau les vis à trou hexagonal.
Les accoudoirs sont bloqués dans la position
actuelle.
Accoudoirs
Relevez les accoudoirs (B) pour descendre plus
facilement du scooter.
Réglage de l’angle du guidon
Attention :
Ne modifi ez pas l’angle de la colonne de
direction pendant la conduite.
Réglez le guidon de manière à avoir facilement
accès aux commandes et à l’écran. Le réglage
du guidon se fait grâce à une denture.
1. Desserrez le tendeur de fi l rapide (M) sous le
guidon.
2. Soulevez légèrement le guidon de la denture
et placez-le à l’angle souhaité. Assurez-vous
d’avoir bien repositionné la denture.
3. Serrez de nouveau le tendeur de fi l rapide.
La colonne de direction est à présent
bloquée.
Régler la hauteur d’assise (3 niveaux)
1. Retirez le siège.
2. Otez le boîtier de batterie.
3. Desserrez le boulon et placez la barre du
siège à la hauteur d’assise souhaitée.
4. Replacez le boîtier de batterie.
5. Replacez le siège.
Modifi er la largeur de l’assise
a
Accoudoirs
B
Modifi er l’inclinaison du guidon
M

FR19FR18
Contrôle préalable
Avant de prendre la route, vérifi ez :
Le niveau de la batterie à l’écran (voir page 21),
Les freins,
Si la manette roue libre est positionnée vers
le haut (mode de conduite électrique, voir
page 21),
Si le chargeur de batterie est retiré.
Monter et descendre du scooter
Attention :
Assurez-vous que le siège soit bien bloqué
avant de prendre la route.
Monter / Descendre
1. Baissez le levier du siège (C).
2. Maintenez le levier du siège vers le bas, et
tournez le siège d’un quart de tour vers la
gauche ou vers la droite.
3. Montez ou descendez.
4. Lâchez la poignée du siège.
Le siège est à présent bloqué.
Mise sous tension
1. Branchez la prise de contact dans la serrure
de contact d’allumage (P) et maintenez la
pression.
L’indicateur lumineux allumé/éteint (S)
s’allumera. Le scooter électrique peut
maintenant être utilisé.
Vitesse maximale
La vitesse maximale à la sortie de l’usine est
réglée à 6 km/h, mais il est possible de la faire
baisser par le revendeur.
Avertissement :
Adaptez votre vitesse avant d’entamer un
virage. Le scooter peut basculer.
Monter et descendre
C
Mise sous tension
Malgré la présence du petit cercle de
giration du scooter électrique, il peut être
diffi cile de rentrer dans les ascenseurs ou de
passer les portes. Assurez-vous de toujours
enclencher le réglage de vitesse minimum
pour les manoeuvres courtes.
Attention :
Adaptez votre vitesse avec la commande de
pouce. Le réglage de vitesse détermine votre
allure lorsque vous appuyez pleinement sur
la commande de pouce.
Vérifi ez que la route soit dégagée derrière
vous avant d’entamer la marche arrière.
Le scooter électrique roule plus lentement
en marche arrière qu’en marche avant.
La vitesse maximale est placée par défaut
sur 6 km/h. Votre revendeur peut adapter les
réglages de vitesse.
1. Tournez le bouton de vitesse (U) vers la gauche,
sur le ‘mode tortue’ pour une conduite lente.
2. Tournez le bouton de vitesse vers la droite sur
le ‘mode lièvre’ pour une conduite rapide.
Choisissez un paramètre de vitesse pour chaque
situation.
Marche avant et marche arrière
1.
Appuyez doucement sur la commande de
pouce (X).
Le scooter électrique va en marche avant.
2. Appuyez un peu plus sur la commande de
pouce.
Le scooter électrique avance plus vite.
3. Lâchez la commande de pouce.
Le scooter électrique s’arrête.
4. Utilisez la commande de pouce (W) pour
faire marche arrière.
Modifi er les réglages de vitesse
U
Description du produit guidon
W X
Utilisation Utilisation
P
S

FR21FR20
Batteries
Avertissement :
Ne raccordez jamais un câble au
convertisseur AC/DC ou au chargeur de
batteries. Le contact avec des pièces peut
provoquer un choc électrique.
Attention :
Les batteries neuves doivent être rodées.
Les batteries ne disposent de leur capacité
totale qu’après avoir été utilisées et chargées
plusieurs fois. Tenez-en compte lors de vos
premiers déplacements.
Chargez les batteries tous les jours, ceci
rallonge leur durée de vie.
Chargez les batteries totalement de manière
régulière.
Evitez que les batteries se déchargent
totalement. Le scooter électrique cesse de
fonctionner et cela a un impact négatif sur la
durée de vie de la batterie.
Rechargez rapidement des batteries
complètement déchargées, pendant une
période de 24 heures.
Ne laissez pas vos batteries déchargées trop
longtemps.
Ne placez jamais de pièces métalliques
sur les batteries : ceci peut provoquer des
courts-circuits et endommager les batteries.
Attention :
En cas de températures basses, la capacité
des batteries est diminuée. L’autonomie
baisse également.
Branchez le scooter électrique au chargeur
toutes les nuits.
Il est impossible de trop charger les batteries
livrées avec le scooter. Une limitation permet
au chargeur de s’éteindre automatiquement
lorsque les batteries sont totalement
rechargées.
N’utilisez que les chargeurs de batteries de
Life & Mobility.
Lire le niveau de batterie
L’indicateur de batterie (R) sur le panneau de
contrôle indique la capacité de batterie restante :
Niveau de batterie Indication
Vert Les batteries sont com-
plètement chargées.
Orange Il est préférable de
recharger maintenant.
Rouge Charger le scooter
électrique le plus
rapidement possible.
Charger les batteries
1. Branchez la fiche du chargeur dans la prise
de chargement de batterie (Y).
2. Branchez la fiche de la prise dans un socle fixe.
3. Chargez toujours pendant un cycle complet
de 8 à 10 heures. Lorsque les batteries sont
chargées, la lampe verte s’allume.
Manette de roue libre
Avertissement :
N’utilisez jamais cette fonction sur une
pente ou pendant la conduite. Car le frein
ne fonctionnera pas.
Baissez la manette de roue libre après
chaque utilisation de la fonction roue libre
afin d’actionner de nouveau le frein
1. Tournez la manette de roue libre (G) vers le
bas afin de pousser manuellement le scooter
électrique.
2. Levez de nouveau la manette de roue libre
pour activer le mode conduite électrique.
Habituez-vous à faire ce geste après chaque
utilisation.
Indicateur de batterie
Contact chargeur batterie
Y
Manette de roue libre
G
Utilisation Utilisation
R

FR23FR22
Nettoyage
Attention :
N’utilisez pas d’eau de Javel ou de solvants.
N’utilisez pas de nettoyeur haute pression
pour nettoyer le scooter.
Attention :
Nettoyez régulièrement le revêtement et le
châssis.
Revêtement
1. Nettoyez les petites saletés avec un mélange
de nettoyant doux et d’eau chaude.
2. Frottez le revêtement délicatement avec une
brosse douce, lorsque la saleté a pénétré
dans le revêtement.
Châssis
1. Lavez le capot avec un nettoyant non abrasif.
2. Placez le châssis dans de la cire non abrasive.
Batteries ( voir aussi le chapitre ‘Utilisation’)
Attention :
Chargez les batteries pleinement avant la
première utilisation.
Rechargez les batteries au moins une fois
par an pendant 24 heures de suite.
La méthode de raccordement des batteries
est expliquée dans un schéma situé sous le
couvercle des batteries.
Soyez prudent avec des batteries
endommagées. Demandez à votre
revendeur de remplacer les batteries
(écologiques).
Attention :
Les batteries peuvent être dangereuses.
Vos batteries doivent uniquement être
installées et entretenues par un mécanicien
Entretien
scooter qualifié. Il possède les qualifications et les
outils nécessaires pour effectuer le montage et
l’entretien correctement, et de manière sûre.
Le scooter fonctionne avec deux batteries ayant
un couplage en série de 24 volts. N’utilisez jamais
en même temps :
- Des batteries de différents fabriquants
- Des batteries de différentes technologies
- Des batteries de différents codes dates
Service et support technique
Emmenez votre scooter au moins 1 fois par an chez
votre revendeur pour une révision et un contrôle.
L’entretien préventif permet de vérifier, pendant le
contrôle, le bon fonctionnement de toutes les parties
mobiles, ainsi que les pièces électroniques et l’état
des batteries.
Les réparations doivent exclusivement être réalisées
par votre revendeur ou bien par Life & Mobility, et
seules les pièces originales livrées par Life & Mobility
peuvent être utilisées.
Entretien

FR25FR24
Tableau d’entretien
Dans le tableau ci-dessous vous retrouverez les
pièces devant être contrôlées régulièrement. Si
vous constatez un défaut, vous pouvez contacter le
revendeur pour y remédier.
Pièce Action
Quotidienne
Hebdomadaire
Mensuelle
Trimestrielle
Annuelle
Chargeur
batterie
Contrôler le
fonctionnement
X
Capot Nettoyer avec
un chiffon
humide
X
Assemblage Vérifi er qu'il n'y
ait pas de casse
X
Méchanisme
rotatif
Contrôler le
fonctionnement
et le jeu
X
Batteries Cycle de
chargement de
24 heures
X
Pneus Contrôler
l'usure
X
Scooter
électrique
Révision X
Entretien
Transport du scooter électrique
Danger de mort :
Lors du transport du scooter électrique dans
un véhicule motorisé, asseyez-vous sur un
siège du véhicule. Les scooters électriques
ne peuvent en aucun cas être utilisés comme
sièges dans un véhicule motorisé, même
lorsque le scooter électrique est fi xé par un
verrouillage pour taxi.
Ne restez jamais sur le scooter électrique
lorsqu’il est dans un appareil de levage ou
qu’il est suspendu à un système de hissage. Le
scooter électrique n’est pas prévu à cet effet.
Attention :
Ne portez jamais le scooter électrique par
les parties en plastique du capot.
Attention :
Le siège est lourd. Demandez de l’aide, si
nécessaire.
Enlever le siège
1. Placez-vous à côté du scooter électrique.
2. Penchez le dossier vers l’avant.
3. Baissez le levier (C).
4. Tournez le siège d’un quart de tour vers la
gauche ou vers la droite.
5. Otez le siège du scooter électrique.
Abaisser la colonne de direction
1. Déserrez le tendeur de fi l rapide (M) sous le
guidon.
2. Bougez la colonne de direction le plus loin
possible, dans la direction de la chaise.
Astuce : lorsque vous avez ôté le siège, la
colonne de direction peut plus s’abaisser.
3. Serrez de nouveau le levier.
Retirer le siège
C
Abaisser la colonne de direction
M
Transport et entreposage

FR27FR26
Transport
Après avoir retiré le siège, vous pouvez
transporter le scooter électrique dans le coffre,
par exemple.
Si vous le souhaitez, vous pouvez continuer à
démonter le scooter électrique, voir page 17 :
chapitre ‘Paramètres et réglages’.
Entreposage lorsque le scooter n’est pas uti-
lisé
Attention :
Lorsque vous rangez les batteries, assurez-
vous qu’elles soient toujours chargées.
Les batteries à gel et ACM pleinement
chargées gardent la charge pendant six
mois, mais doivent toujours être chargées
de nouveau avant utilisation.
Evitez de ranger les batteries lors de
températures très froides ou très chaudes.
Pour les batteries à gel et ACM fermées, il
n’est pas nécessaire de rajouter de l’eau. En
cas de problèmes de prestation, demandez
conseil à un mécanicien scooter qualifié.
Plus d’une semaine :
Branchez au moins 1 fois par semaine le
chargeur de batteries afin de les entretenir,
ou retirez le scooter du chargeur de batterie.
Pendant une longue période (pendant l’hiver,
ou des suites d’une maladie) :
Demandez à votre revendeur de débrancher
les câbles des batteries.
Transport et entreposage
Garantie
Votre nouveau scooter électrique est garanti pendant
une période de 12 mois. Les batteries sont garanties
3 mois.
Ne sont pas couverts par la garantie les dégâts
causés par : le non-respect des consignes d’utilisation
et d’entretien, une utilisation anormale, l’usure, la
négligence, la surcharge, un accident causé par un
tiers, l’installation de pièces autres que celles fournies,
ainsi que tout dommage causé par des éléments
extérieurs au produit.
Par cette garantie, toute autre garantie définie par la
loi, ou communiquée oralement prend fin, excepté ce
qui a été garanti par écrit par Life & Mobility.
Les garanties ne sont valables qu’au sein de l’UE.
Garantie

FR29FR28
Transport du produit et emballage
Toutes les pièces de votre scooter électrique sont
recyclables. Le fournisseur connait l’emplacement des
centres de collecte pouvant récupérer votre scooter
électrique.
D’un point de vue écologique, nous vous conseillons
de jeter l’emballage et le scooter électrique
séparément, afin que les matériaux utilisés soient
recyclés efficacement.
Transport du produit et emballage
Ce mode d’emploi a été conçu avec le plus grand
soin, et se base sur les informations connues par Life
& Mobility au moment de sa parution. Life & Mobility
décline toute responsabilité en cas d’erreur éventuelle
dans le texte, ou tout problème en découlant.
Les informations contenues dans ce manuel se basent
sur une utilisation standard du produit. Life & Mobility
décline toute responsabilité en cas de dommage
éventuel, causé par des modifications apportées
au produit après la première vente. En outre, Life &
Mobility ne peut être tenu responsable de dommages
occasionnés par des tiers.
Les informations contenues dans ce manuel ne
peuvent en aucun cas être reproduites et/ou publiées
sans l’accord écrit préalable de Life & Mobility.
Le nom commercial et les marques commerciales
utilisés par Life & Mobility ne peuvent êtres considérés
comme libres de droit, en vertu de la loi sur les noms
commerciaux.
Aucun droit ne peut être tiré de ce texte. Sous réserve
de toute modification.
© Life & Mobility – Tous droits réservés


-
 1
1
-
 2
2
-
 3
3
-
 4
4
-
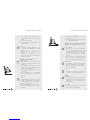 5
5
-
 6
6
-
 7
7
-
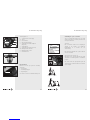 8
8
-
 9
9
-
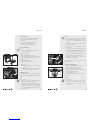 10
10
-
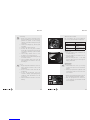 11
11
-
 12
12
-
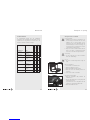 13
13
-
 14
14
-
 15
15
-
 16
16
-
 17
17
-
 18
18
-
 19
19
-
 20
20
-
 21
21
-
 22
22
-
 23
23
-
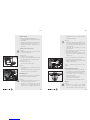 24
24
-
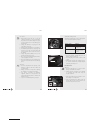 25
25
-
 26
26
-
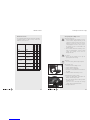 27
27
-
 28
28
-
 29
29
-
 30
30
-
 31
31
-
 32
32
-
 33
33
-
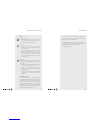 34
34
-
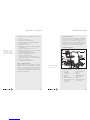 35
35
-
 36
36
-
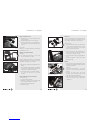 37
37
-
 38
38
-
 39
39
-
 40
40
-
 41
41
-
 42
42
-
 43
43
-
 44
44
-
 45
45


Life & Mobility Vivo Handleiding
- Categorie
- Scooters
- Type
- Handleiding
in andere talen
- English: Life & Mobility Vivo User manual
- français: Life & Mobility Vivo Manuel utilisateur
Gerelateerde papieren

Andere documenten
-
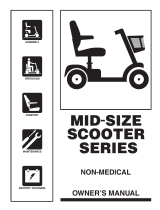 Pride Mobility Mid-Size Scooter de handleiding
-
Pride Mobility FULL-SIZE 714 de handleiding
-
 Micro Explorer S Handleiding
-
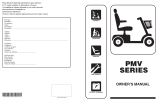 Pride Mobility PMV de handleiding
-
Denver SCK-5400PINK Handleiding
-
 URBANGLIDE REFMU13090 Handleiding
-
Vermeiren Antares 4 WT-T4J de handleiding
-
-
-


