
Elba electric oval
Models / Modelos / Modèle / Modellen
PRO 400 | 450 | 500 | 550
MANUAL DE INSTALACIÓN Y USO
Página 20
MANUAL DE INSTALAÇÃO E UTILIZAÇÃO
Página 38
ES
PT
INSTRUCTIONS & INSTALLATION GUIDE
Page 02
EN
INSTALLATIE- EN GEBRUIKERSHANDLEIDING
Bladzijde 74
NL
MANUEL D’INSTALLATION ET D’UTILISATION
Page 56
FR

2
Installation & safety precautions (EN 60335 Standards)
Before switching on the product, please read the “Installation & Safety Precautions” in detail rst to
ensure the correct operation of the product.
Installation precautions
The product is designed for household or residential use. You are advised to have the product installed
by an authorized professional installer. Make sure the product is properly connected to 230V.
ATTENTION
Children under 3 years of age should be kept out of reach of the appliance
unless continuously supervised. Children from the age of 3 years to 8
years should only switch the appliance on/off when it has been placed
or installed in its normal intended use position and when they have been
given supervision or instruction concerning use of the appliance in a safe
way and understand the hazards involved. Children from 3 years of age to
8 years of age should not plug in, adjust or clean the appliance or carry out
maintenance operations.
This appliance can be used by children aged from 8 years and above
and persons with reduced physical sensory or mental capabilities or lack
of experience and knowledge if they are supervised or have been given
instruction concerning use of the appliance in a safe way and understand
the hazards involved. Children should not play with the appliance. Cleaning
and user maintenance should not be carried out by children without
supervision. Children must be supervised at all times to ensure that they
do not interfere with the product.
This product is lled with a precise amount of special oil that does not
need any maintenance. Any repairs requiring the opening of the oil tank
must only be done by an ofcial Rointe installer or its after-sales service
personnel, who should also be notied should an oil leak be noticed. The
regulations on discarding oil when the heater is being disposed of must be
observed.
Do not cut the power supply cable under any circumstances in order to
avoid electrical risks and to guarantee the correct operation of the towel
rail.
Do not switch on the product if you notice any external damage when
unpacking or installing the towel rail. If the power cable is damaged, it
must be replaced by the manufacturer, its after-sales service or authorized
personnel in order to avoid any damage.

3
ELBA OVAL
EN
Do not spray or wet the product. During operation, keep the product
away from combustible materials such as curtains, furniture, etc. Do not
place anything other than clothes, towels or non-ammable fabrics on the
product.
The towel rail must be installed in such a way that the power plug is always
accessible. The power cable must never be in contact with the product
during operation.
CAUTION - Never touch the product with wet hands or any wet
body parts.
CAUTION - Some parts of this product may become very hot
and cause burns. Particular care should be taken when children
and vulnerable persons are present.
Contents
1. Technical Specications ..........................................................................................................................4
2. Product Installation........ .........................................................................................................................8
2.1. Mounting ..........................................................................................................................................8
2.2. Connecting instructions .................................................................................................................8
2.3. Specic regulations for bathrooms...............................................................................................9
3. Control panel description and functions...............................................................................................10
3.1. Control panel........................................................................................................................................10
3.2. Power and Stand-by........................................................................................................................10
3.3. Set temperature selection..............................................................................................................10
3.4. Consumption identication................................................................................................................11
3.5. Keypad lock.......................................................................................................................................11
3.6. MAX POWER mode..........................................................................................................................11
3.7. Remote control.....................................................................................................................................12
3.8. Troubleshooting.............................................................................................................................13
4. Maintenance & Cleaning............... .........................................................................................................14
5. Guarantee......................................... ......................................................................................................14
6. How to register your guarantee....... .......................................................................................................16
7. ERP Directive (EU) 2015/1188....... ..........................................................................................................18

4
1. Technical specifications (Models 400, 450, 500 & 550)
MODEL - Width 400
WHITE
TELV*40B077 TELV*40B112 TELV*40B150 TELV*40B172
CHROME
TELV*40C077 TELV*40C112 TELV*40C150 TELV*40C172
DIMENSIONS
Width (mm) 400 400 400 400
Height without control panel (mm) 770 1,120 1,500 1,720
Height with control panel (mm) 865 1,215 1,595 1,815
Depth (mm) 50 50 50 50
Installed depth (mm) 100 100 100 100
MECHANICAL CHARACTERISTICS
Stainless steel heating element
Thermal fluid
Oval control panel
Infrared remote control
Finish
White RAL 9016
Chrome
ELECTRICAL CHARACTERISTICS
Nominal power (W)
White 300 500 750 1,000
Chrome 300 300 500 750
Voltage (V) 230 V ~ 230 V ~ 230 V ~ 230 V ~
Current (A)
White 1.3 2.2 3.2 4.4
Chrome 1.3 1.3 2.2 3.2
Class II
SAFETY & INSTALLATION
Installation kit included
Safety thermostat
Protection grade IP 44 IP 44 IP 44 IP 44

5
ELBA OVAL
EN
MODEL - Width 450
WHITE
TELV*45B077 TELV*45B112 TELV*45B150 TELV*45B172
CHROME
TELV*45C077 TELV*45C112 TELV*45C150 TELV*45C172
DIMENSIONS
Width (mm) 450 450 450 450
Height without control panel (mm) 770 1,120 1,500 1,720
Height with control panel (mm) 865 1,215 1,595 1,815
Depth (mm) 50 50 50 50
Installed depth (mm) 100 100 100 100
MECHANICAL CHARACTERISTICS
Stainless steel heating element
Thermal fluid
Oval control panel
Infrared remote control
Finish
White RAL 9016
Chrome
ELECTRICAL CHARACTERISTICS
Nominal power (W)
White 300 500 750 1,000
Chrome 300 300 500 750
Voltage (V) 230 V ~ 230 V ~ 230 V ~ 230 V ~
Current (A)
White 1.3 2.2 3.2 4.4
Chrome 1.3 1.3 2.2 3.2
Class II
SAFETY & INSTALLATION
Installation kit included
Safety thermostat
Protection grade IP 44 IP 44 IP 44 IP 44

6
MODEL - Width 500
WHITE
TELV*50B077 TELV*50B112 TELV*50B150 TELV*50B172
CHROME
TELV*50C077 TELV*50C112 TELV*50C150 TELV*50C172
DIMENSIONS
Width (mm) 500 500 500 500
Height without control panel (mm) 770 1,120 1,500 1,720
Height with control panel (mm) 865 1,215 1,595 1,815
Depth (mm) 50 50 50 50
Installed depth (mm) 100 100 100 100
MECHANICAL CHARACTERISTICS
Stainless steel heating element
Thermal fluid
Oval control panel
Infrared remote control
Finish
White RAL 9016
Chrome
ELECTRICAL CHARACTERISTICS
Nominal power (W)
White 300 500 750 1,000
Chrome 300 300 500 750
Voltage (V) 230 V ~ 230 V ~ 230 V ~ 230 V ~
Current (A)
White 1.3 2.2 3.2 4.4
Chrome 1.3 1.3 2.2 3.2
Clase II
SAFETY & INSTALLATION
Installation kit included
Safety thermostat
Protection grade IP 44 IP 44 IP 44 IP 44

7
ELBA OVAL
EN
MODEL - Width 550
WHITE
TELV*55B077 TELV*55B112 TELV*55B150 TELV*55B172
CHROME
TELV*55C077 TELV*55C112 TELV*55C150 TELV*55C172
DIMENSIONS
Width (mm) 550 550 550 550
Height without control panel (mm) 770 1,120 1,500 1,720
Height with control panel (mm) 865 1,215 1,595 1,815
Depth (mm) 50 50 50 50
Installed depth (mm) 100 100 100 100
MECHANICAL CHARACTERISTICS
Stainless steel heating element
Thermal fluid
Oval control panel
Infrared remote control
Finish
White RAL 9016
Chrome
ELECTRICAL CHARACTERISTICS
Nominal power (W)
White 300 500 750 1,000
Chrome 300 300 500 750
Voltage (V) 230 V ~ 230 V ~ 230 V ~ 230 V ~
Current (A)
White 1.3 2.2 3.2 4.4
Chrome 1.3 1.3 2.2 3.2
Class II
SAFETY & INSTALLATION
Installation kit included
Safety thermostat
Protection grade IP 44 IP 44 IP 44 IP 44

8
2. Product installation
2.1. Mounting instructions
Inside the packaging you will nd a xing kit. Please nd the instructions below:
1. Choose the right part of the wall.
2. Place the mounting stencil on the wall, marking the places for the holes.
3. Remove the stencil and make the holes in the wall.
4. Insert the rawl plugs in the holes made.
5. Screw the plastic fastener to the wall with the 5.5 x 50 mm screw.
6. Screw the two brackets for supporting the product and the plastic fastener to the horizontal tube
of the product like in Figure 1 with the 8 x 26 mm screw.
7. Insert what you have assembled in Section 6 into the plastic piece and x well with the 5 x 12 mm
screw.
8. Place the cover on the piece supporting the product.
NO. ELEMENT
1 10 x 40 mm Rawl Plug
2 Bracket
3 5.5 x 50 mm Screw
4 5 x 12 mm Screw
5 Bracket Insert
6 Bracket Head
7 8 x 26 mm Screw
8 Cap
9 Product
2.2. Connecting instructions
Connection to the mains must be made observing the voltage stated on the product technical data label.
This product is designed to be permanently installed connected to xed facilities. The product power
supply circuit must have an all-pole circuit breaker switch with a separation of at least 3 mm between
the contacts.
The product must be installed, if possible, away from any source of draughts (windows, doors) or any
other thing which may affect its functioning. In this way, the temperature will not be affected. Place any
object which might prevent the air ow (furniture, armchairs) 50 cm away from the front of the product.
The product must never be installed immediately below a power point. The lower part of the control
panel must be placed at least 15 cm from the oor.
1
5

9
ELBA OVAL
EN
For any product, if the power cable is damaged, it must be replaced by a specic cable. The replacement
of the cable must be done by the Rointe after-sales service or qualied personnel. The technical
specications of your product appear on the technical data label.
OK
IMPORTANT - This product must never be installed with its control
panel at the top. This product must not be installed horizontally. During
installation, use wedges so that the control panel will not be in contact
with the floor.
2.3. Specific Regulations for Bathrooms
This product can be safety installed in Zones 3. For installations in Zones 2 (check the scheme below),
please consider the following limitations:
•
In bathrooms, the product must never be installed in such a way that the control panel may be touched
by someone in the bathtub or having a shower. The control panel should be located at least 600 mm
distance from any wet areas. The body of the product can be placed in Zones 2 if the control panel is
located inside Zone 3.
• In a kitchen or bathroom, the body of the product must be placed at least 25 cm from the oor.

10
3. Control panel description and functions
3.1. Control panel
The control panel is made up of 7 LEDs and 4 mechanical buttons with the following functionalities:
Power / Stand-by / Conrmation button
Increase temperature button
Decrease temperature button
Maximum power button
Infrared sensor
1 2 3 4 5 6
7
3.2. Power and Stand-by
To turn on the product, press the button once. To turn off the product, press the button again.
3.3. Set temperature selection
You can regulate the set temperature of the towel rail by the buttons and . Pressing the
key increases the setpoint temperature. In the same way, pressing the key reduces the setpoint
temperature.
The minimum operating temperature is 7ºC and the maximum is 30ºC. The factory set temperature
is 21ºC. The 6 LED indicators, located in the upper part of the control panel, identify the established
setpoint temperature.
Iindicator LED Temperature Iindicator LED Temperature
1 LED
Led 1: short
blink every 2
seconds
Led 2: OFF
Led 3: OFF
Led 4: OFF
Led 5: OFF
Led 6: OFF
7ºC
1 LED
Led 1: ON
Led 2: OFF
Led 3: OFF
Led 4: OFF
Led 5: OFF
Led 6: OFF
15ºC

11
ELBA OVAL
EN
Iindicator LED Temperature Iindicator LED Temperature
2 LED
Led 1: ON
Led 2: ON
Led 3: OFF
Led 4: OFF
Led 5: OFF
Led 6: OFF
18ºC
3 LED
Led 1: ON
Led 2: ON
Led 3: ON
Led 4: OFF
Led 5: OFF
Led 6: OFF
21ºC
4 LED
Led 1: ON
Led 2: ON
Led 3: ON
Led 4: ON
Led 5: OFF
Led 6: OFF
24ºC
5 LED
Led 1: ON
Led 2: ON
Led 3: ON
Led 4: ON
Led 5: ON
Led 6: OFF
27ºC
6 LED
Led 1: ON
Led 2: ON
Led 3: ON
Led 4: ON
Led 5: ON
Led 6: ON
30ºC
3.4. Consumption identification
The last temperature indicator LED will ash to indicate the heating element is active and the product
is consuming energy.
3.5. Keypad lock
By pressing the and keys together for 3 seconds, you can lock/unlock the control panel keypad.
If any key is pressed while the panel is locked, all the LEDs will ash twice.
For safety reasons, the on/off button
will respond even if the panel is locked. To switch the
product on or off when the panel locked, press and hold the button for 3 seconds.
3.6. MAX POWER mode
The MAX POWER mode activates the towel rail heating element to maximum power continuously
regardless of the sensor reading. To activate this function from the control panel, press the button
. You can also activate this mode, even when the product is switched off.
Pressing
once will activate this mode for 15 minutes. If you press (X) again within the next two
seconds, the next period (30 minutes) will be activated. Consecutive presses will activate the
following periods as shown in the table below:

12
Iindicator LED Time Iindicator LED Time
1 LED
Led 1: ashing
Led 2: OFF
Led 3: OFF
Led 4: OFF
Led 5: OFF
Led 6: OFF
Led 7: ON
15
minutes
2 LED
Led 1: ashing
Led 2: ashing
Led 3: OFF
Led 4: OFF
Led 5: OFF
Led 6: OFF
Led 7: ON
30
minutes
3 LED
Led 1: ashing
Led 2: ashing
Led 3: ashing
Led 4: OFF
Led 5: OFF
Led 6: OFF
Led 7: ON
45
minutes
4 LED
Led 1: ashing
Led 2: ashing
Led 3: ashing
Led 4: ashing
Led 5: OFF
Led 6: OFF
Led 7: ON
60
minutes
5 LED
Led 1: ashing
Led 2: ashing
Led 3: ashing
Led 4: ashing
Led 5: ashing
Led 6: OFF
Led 7: ON
90
minutes
6 LED
Led 1: ashing
Led 2: ashing
Led 3: ashing
Led 4: ashing
Led 5: ashing
Led 6: ashing
Led 7: ON
120
minutes
If you press the button 7 times, you will return to the starting point (activation for 15 minutes).
The LEDs will work as a countdown, turning off as the time elapses. Once the time has elapsed, the
product will automatically return to the previous mode or will switch off if it was already in stand-by.
The MAX POWER mode can be stopped at any time by a short press on the button
. The towel rail
will return to its previous state.
3.7. Remote control
(optional)
The towel rails with the OVAL control panel can be controlled using the Rointe AIR and BASIC Control
remotes (sold separately). The use of the remote control extends the functionality of the towel rail by
allowing:

13
ELBA OVAL
EN
• Complete control without the need to use the control panel.
• More accurate setpoint temperatures to be set (half a degree by half a degree between 15 and
30 ºC e.g. 19.5 ºC).
• 24 hours a day, 7 days a week personalised programming or by using one of the 4 pre-installed
programmes on the BASIC Control remote.
To learn more about Rointe remote controls and their functions, go to our web portal or consult their
user manual.
IMPORTANT: When the product is programmed using a Rointe remote control, LED
number 7 (corresponding to MAX POWER mode) will ash.
WARNING: If the towel rail is automatically programmed and you wish to use it again
in manual mode, you must hold down the on/off button for 3 seconds (with the product
unlocked). The product will no longer be programmed and you will be able to control it
manually using the buttons on the control panel.
3.8. Troubleshooting
During normal operation of the towel rail, any malfunctions can be indicated by the LED indicators on
the product. See table below to identify the error codes:
Indicator Code Error Solution
LED 6
ashing
Led 1: OFF
Led 2: OFF
Led 3: OFF
Led 4: OFF
Led 5: OFF
Led 6: ashing
Led 7: OFF
Temperature sensor
failure due to short-
circuit or open sensor.
Please contact the
Rointe Technical Support
department by calling our
support team.
4. Maintenance & Cleaning
The product does not require any type of maintenance. We recommend that all parts of the product
are kept clean (behind, underneath, upper ns, etc.). Do not use any abrasive product on the steel
main body. Clean it with a damp cloth and a pH neutral soap, and the control panel with a dry cloth.

14
European Directive 2012/19/UE
Under the European Directive 2012/19/UE on waste electrical and electronic equipment (WEEE), the
product cannot be disposed in the usual council bins and containers. They must be separated to
optimize the recovery and recycling of all of the components and materials and reducing the impact
to human health and the environment. The symbol of the container crossed out over a horizontal line
is marked on all of Rointe products to remind the consumer of the obligation to separate them on
disposal.
The consumer should contact the local authority or original point of sale to learn more about the
correct disposal of this product.
5. Guarantee
In this section, we hereby describe the guarantee conditions which the buyer acquires on buying a
new Rointe product. These conditions comply with all the rights construed in the national legislation
in force, as well as any additional rights and guarantees which are offered by Rointe.
5.1. Any incident that you might detect in your Rointe product can be sorted by the product seller or
quickly by the manufacturer. Please contact Rointe by telephoning (UK) 0203 321 5929 or (Ireland)
01 553 0523 for technical support. If you live in a different country, please check the correct phone
number on the back of this manual.
ELBA 500 300W
TELON45B077
300 W
You will need to state the product reference (located on the label indicating product features), serial
number, proof of purchase and the type of incident at hand when contacting us so that we can check
the guarantee. In addition, please attach a copy of the product invoice.
5.2. Rointe guarantees that there are no material defects of design or manufacture at the time of
original acquisition and guarantees the steel main body for a period of 120 months and 24 months for
any electronic and electrical components.
5.3. If during the guarantee period, the product does not work correctly under normal use, and any
design, material or manufacturing defect is found, Rointe will repair or substitute the product as it
may see t, in accordance with the terms and conditions as follows:
5.3.1. The guarantee is only applicable if the original guarantee is issued by the seller and when
the said guarantee is lled in correctly including product reference, series number (marked on the
product’s label indicating technical features), purchase date and the seller’s stamp.
Rointe reserves the right to reject the guarantee service when this information has been removed or
modied after the original product purchase.

15
ELBA OVAL
EN
5.3.2. The guarantee only applies to those cases that concern material, design and manufacturing
defects, and under no circumstances covers damage to the product for the following reasons:
5.3.2.1 Incorrect use of the product, i.e. used for other purposes that are not construed as its
normal use or for not respecting the instructions of use and maintenance given by Rointe as well as
incorrect installation or use of the product that may not comply with the current technical standards
of safety.
Corrosion caused by direct exposure to salt water is excluded from the guarantee. When the product
is installed no more than 200m from the coast the guarantee for damages caused by corrosion the
period will be reduced by 50%.
5.3.2.2 Any unauthorized repairs carried out by unauthorized technicians or opening of the
product by unauthorized people.
5.3.2.3 Any accidents that are deemed outside the control of Rointe, such as lightning, res,
oods, public disorders, etc.
5.3.3. Any repairs or substitutions that are included in this guarantee do not allow any additions
or new periods of guarantee.
5.3.4. Any repairs or substitutions covered under this guarantee must be parts that are functional-
ly equivalent. The defective parts or parts removed or replaced shall become the property of Rointe.
5.4. The technical service of Rointe will advise you if you need to buy any parts not covered under
the guarantee or out of guarantee.
5.5. This guarantee does not affect the buyer’s legal rights stipulated in the current national legisla-
tion, nor affects those rights against the distributor or installer that could come forth in compliance
with the purchase contract.
5.6. In the absence of a national legal legislation applicable, this guarantee shall prevail and may be
construed as the buyer’s only protection. Rointe, its ofces, distributors and installers may not be
held responsible for any accidental damage that emerges due to infringement of any rules implicitly
related to this product.

16
6. How to register your product guarantee
IMPORTANT: It’s important to register your ROINTE product as part of our guarantee service, in
case you wish to make a claim.
You can register your ROINTE product in the following ways:
WEBSITE
1. Go to www.rointe.com/uk/register-your-guarantee/.
2. Login to your existing account or create a new account if you need to.
3. Click on “My products”.
4. Enter your product reference (alphanumeric and in upper case).
5. Enter your serial number (26 digits located on the metal tag on your product and starts with 843).
6. Upload your proof of purchase, such as invoice in PDF, JPEG or PNG format. This is not
mandatory but by doing so you ensure your guarantee period is accurate.
7. Click “Register”.
8. Congratulations! Your product is now registered.
EMAIL
1. Send an email to [email protected] with the following information:
• Customer name
• Address and postcode
• Telephone number and email address
• Product reference (as described above)
• Serial number (as described above)
• Product purchase date and proof of purchase (as described above).
2. Our Technical Support team will conrm your product registration and request any additional
information needed via email.
POST
1. Post the information listed in the EMAIL section above to:
• INDUSTRIAS ROYAL TERMIC, S.L. t/a Rointe UK, C/E Parcela 43, 30140,
Santomera (SPAIN)
2. Please ensure you obtain proof of posting.

17
ELBA OVAL
EN

18
7. ERP DIRECTIVE (EU) 2015/1188
ITEM
White
SYMBOL UNIT
TELV***B077 TELV***B112 TELV***B150 TELV***B172
Chrome TELV***C077 TELV***C112 TELV***C150 TELV***C172
HEAT OUTPUT
Nominal heat output
White
P
nom kW 0.30 0.50 0.75 1.00
Chrome
P
nom kW 0.30 0.30 0.50 0.75
Minimal heat output
P
min kW n/a n/a n/a n/a
Maximum continuous heat output
White
P
max,c kW 0.30 0.50 0.75 1.00
Chrome
P
max,c kW 0.30 0.30 0.50 0.75
AUXILIARY ELECTRICITY CONSUMPTION
At nominal heat output
White
el
MAX kW 0.30 0.50 0.75 1.00
Chrome
el
MAX kW 0.30 0.30 0.50 0.75
At minimum heat output
White
el
MIN kW 0.30 0.50 0.75 1.00
Chrome
el
MIN kW 0.30 0.30 0.50 0.75
In standby mode
el
SB kW 0.002 0.002 0.002 0.002

19
ELBA OVAL
EN
TYPE OF HEAT OUTPUT/ROOM TEMPERATURE CONTROL (SELECT ONE)
Single-level heat output, no internal temperature control — — — — — —
Two or more manual levels, without internal temperature control — — — — — —
Internal temperature control by mechanical thermostat — — — — — —
With electronic interior temperature control — — — — — —
Electronic indoor temperature control and daily timer — — — — — —
Electronic indoor temperature control and weekly timer — —
OTHER CONTROL OPTIONS (MULTIPLE SELECTIONS POSSIBLE)
Interior temperature control with presence detection — — — — — —
Interior temperature control with detection of open windows — —
With remote control / distance option — —
With adaptive start-up control — —
With operating time limitation — —
With black lamp sensor — — —
SEASONAL SPACE HEATING ENERGY EFFICIENCY
n
s — 39.0% 39.0% 39.0% 39.0%

20
Precauciones de instalación y de seguridad (EN 60335 Standards)
Antes de encender el producto léase el apartado de “precauciones de instalación y de seguridad”
detenidamente para asegurar el funcionamiento correcto del producto.
Precauciones de instalación
Este producto está diseñado para uso doméstico o residencial. Se recomienda que el producto sea
instalado por un profesional autorizado. Asegúrese de que el producto esté conectado correctamente
a 230V.
ATENCIÓN
Los niños menores de 3 años deben mantenerse fuera del alcance del
aparato a menos que estén continuamente supervisados. Los niños de 3 a
8 años sólo deben encender y apagar el aparato cuando se haya colocado
o instalado en su posición normal de uso y cuando se les haya supervisado
o instruido sobre el uso del aparato de forma segura y comprendan
los peligros que conlleva. Los niños de 3 a 8 años no deben enchufar,
ajustar o limpiar el aparato ni realizar operaciones de mantenimiento. Este
aparato puede ser utilizado por niños a partir de 8 años y por personas
con capacidades físicas, sensoriales o mentales reducidas o con falta de
experiencia y conocimientos, siempre que estén supervisados o hayan
recibido instrucciones sobre el uso del aparato de forma segura y entiendan
los peligros que conlleva. Los niños no deben jugar con el aparato. La
limpieza y el mantenimiento del usuario no deben ser realizados por los
niños sin supervisión. Los niños deben ser supervisados en todo momento
para asegurarse de que no intereren con el producto.
Este producto de calefacción se rellena con una cantidad precisa de aceite
especial que no necesita mantenimiento. Las reparaciones que necesitan
la apertura del depósito de uido térmico no deberán efectuarse más que
por Rointe o su servicio posventa. Las reglamentaciones concernientes
a la eliminación de este uido después de que el aparato calefactor sea
desechado deben ser respetadas. Si el cable de alimentación está dañado,
debe ser reemplazado por el fabricante, su servicio posventa o personal
cualicado para evitar daños.
No corte el cable de alimentación bajo ningún concepto con el n de evitar
riesgos eléctricos y garantizar el correcto funcionamiento del producto.
No encienda el secatoallas si observa algún daño externo al desembalar
o instalar el producto. Si el cable de alimentación está dañado, debe ser
sustituido por el fabricante, su servicio postventa o personal autorizado
para evitar cualquier daño.

21
ELBA OVAL
ES
No rocíe ni moje el producto. Durante el funcionamiento, mantenga el
producto alejado de materiales combustibles como cortinas, muebles,
etc. No coloque sobre el producto nada que no sea ropa, toallas o tejidos
no inamables.
El secatoallas debe instalarse de forma que el enchufe esté siempre
accesible. El cable de alimentación nunca debe estar en contacto con el
producto durante su funcionamiento.
PRECAUCIÓN - No toque nunca el producto con las manos u
otra parte del cuerpo mojadas.
PRECAUCIÓN - Algunas partes de este producto podrían
ponerse muy calientes y causar quemaduras. Se debe prestar
atención especial cuando niños y personas vulnerables estén
presentes.
Contenido
1. Especicaciones técnicas de producto.................................................................................................21
2. Instalación del secatoallas Rointe ..........................................................................................................26
2.1. Montaje ...............................................................................................................................................26
2.2. Normas de conexión..............................................................................................................................26
2.3. Reglas particulares para los cuartos de baño..................................................................................27
3. Descripción del panel de control y funcionamiento........................................................................28
3.1. Panel de control....................................................................................................................................28
3.2. Encendido y stand-by.............................................................................................................................28
3.3. Selección de temperatura de consigna.............................................................................................28
3.4. Idicativo de consumo..................................................................................................................28
3.5. Bloqueo de teclado.........................................................................................................................28
3.6. Modo MAX POWER.........................................................................................................................28
3.7. Control mediante mando a distancia..............................................................................................31
3.8. Identicación de errores........................................................................................................................32
4. Mantenimiento y limpieza........... ..........................................................................................................32
5. Garantía............................................. ......................................................................................................32
6. Como registrar la garantía del producto.............................................. .................................................34
7. Directiva ERP (EU) 2015/1188.............................................. .............................................................36

22
1. Especificaciones técnicas de producto (Modelos 400, 450, 500 y 550)
MODELO ANCHO 400
BLANCO
TELV*40B077 TELV*40B112 TELV*40B150 TELV*40B172
CROMO
TELV*40C077 TELV*40C112 TELV*40C150 TELV*40C172
DIMENSIONES
Anchura (mm) 400 400 400 400
Altura sin panel de control (mm) 770 1.120 1.500 1.720
Altura con panel de control (mm) 865 1.215 1.595 1.815
Fondo (mm) 50 50 50 50
Fondo instalado (mm) 100 100 100 100
CARACTERÍSTICAS MECÁNICAS
Resistencia de acero blindado
Fluido térmico
Panel de control oval
Control a distancia por infrarrojos
Acabado
Blanco RAL 9016
Cromo
CARACTERÍSTICAS ELÉCTRICAS
Potencia nominal (W)
Blanco 300 500 750 1.000
Cromo 300 300 500 750
Voltaje (V) 230 V ~ 230 V ~ 230 V ~ 230 V ~
Corriente (A)
Blanco 1,3 2,2 3,2 4,4
Cromo 1,3 1,3 2,2 3,2
Clase II
INSTALACIÓN Y PROTECCIÓN
Kit de instalación incluido
Termostato de seguridad
Grado de protección IP 44 IP 44 IP 44 IP 44

23
ELBA OVAL
ES
MODELO ANCHO 450
BLANCO
TELV*45B077 TELV*45B112 TELV*45B150 TELV*45B172
CROMO
TELV*45C077 TELV*45C112 TELV*45C150 TELV*45C172
DIMENSIONES
Anchura (mm) 450 450 450 450
Altura sin panel de control (mm) 770 1.120 1.500 1.720
Altura con panel de control (mm) 865 1.215 1.595 1.815
Fondo (mm) 50 50 50 50
Fondo instalado (mm) 100 100 100 100
CARACTERÍSTICAS MECÁNICAS
Resistencia de acero blindado
Fluido térmico
Panel de control oval
Control a distancia por infrarrojos
Acabado
Blanco RAL 9016
Cromo
CARACTERÍSTICAS ELÉCTRICAS
Potencia nominal (W)
Blanco 300 500 750 1.000
Cromo 300 300 500 750
Voltaje (V) 230 V ~ 230 V ~ 230 V ~ 230 V ~
Corriente (A)
Blanco 1,3 2,2 3,2 4,4
Cromo 1,3 1,3 2,2 3,2
Clase II
INSTALACIÓN Y PROTECCIÓN
Kit de instalación incluido
Termostato de seguridad
Grado de protección IP 44 IP 44 IP 44 IP 44

24
MODELO ANCHO 500
BLANCO
TELV*50B077 TELV*50B112 TELV*50B150 TELV*50B172
CROMO
TELV*50C077 TELV*50C112 TELV*50C150 TELV*50C172
DIMENSIONES
Anchura (mm) 500 500 500 500
Altura sin panel de control (mm) 770 1.120 1.500 1.720
Altura con panel de control (mm) 865 1.215 1.595 1.813
Fondo (mm) 50 50 50 50
Fondo instalado (mm) 100 100 100 100
CARACTERÍSTICAS MECÁNICAS
Resistencia de acero blindado
Fluido térmico
Panel de control oval
Control a distancia por infrarrojos
Acabado
Blanco RAL 9016
Cromo
CARACTERÍSTICAS ELÉCTRICAS
Potencia nominal (W)
Blanco 300 500 750 1.000
Cromo 300 300 500 750
Voltaje (V) 230 V ~ 230 V ~ 230 V ~ 230 V ~
Corriente (A)
Blanco 1,3 2,2 3,2 4,4
Cromo 1,3 1,3 2,2 3,2
Clase II
INSTALACIÓN Y PROTECCIÓN
Kit de instalación incluido
Termostato de seguridad
Grado de protección IP 44 IP 44 IP 44 IP 44

25
ELBA OVAL
ES
MODELO ANCHO 550
BLANCO
TELV*55B077 TELV*55B112 TELV*55B150 TELV*55B172
CROMO
TELV*55C077 TELV*55C112 TELV*55C150 TELV*55C172
DIMENSIONES
Anchura (mm) 550 550 550 550
Altura sin panel de control (mm) 770 1.120 1.500 1.720
Altura con panel de control (mm) 865 1.215 1.595 1.815
Fondo (mm) 50 50 50 50
Fondo instalado (mm) 100 100 100 100
CARACTERÍSTICAS MECÁNICAS
Resistencia de acero blindado
Fluido térmico
Panel de control oval
Control a distancia por infrarrojos
Acabado
Blanco RAL 9016
Cromo
CARACTERÍSTICAS ELÉCTRICAS
Potencia nominal (W)
Blanco 300 500 750 1.000
Cromo 300 300 500 750
Voltaje (V) 230 V ~ 230 V ~ 230 V ~ 230 V ~
Corriente (A)
Blanco 1,3 2,2 3,2 4,4
Cromo 1,3 1,3 2,2 3,2
Clase II
INSTALACIÓN Y PROTECCIÓN
Kit de instalación incluido
Termostato de seguridad
Grado de protección IP 44 IP 44 IP 44 IP 44

26
2. Instalación del secatoallas Rointe
2.1. Montaje
Dentro del embalaje encontrará un kit de instalación. Véase las instrucciones abajo:
1. Seleccionar el lugar adecuado de la pared.
2. Colocar la plantilla en la pared, haciendo pequeñas marcas en los lugares donde van situados
los agujeros.
3. Retirar la plantilla y hacer los agujeros.
4. Insertar los tacos en los agujeros realizados
5. Atornillar la pieza plástica de anclaje a la pared con el tornillo 6.5 x 50 mm.
6. Atornillar las dos piezas sujeta-secatoallas y la pieza plástica de jación al tubo horizontal del
secatoallas como se ve en la Figura 1 con el tornillo 8 x 26 mm.
7. Insertar el conjunto del punto 6 en la pieza plástica de anclaje y sujetar con el tornillo prisionero
de 5 x 12 mm.
8. Colocar el embellecedor en la pieza sujeta-secatoallas.
Nº. ITEM
1 10 x 40 mm taco
2 Pieza metálica anclaje
3 Tornillo 5.5 x 50 mm
4 Tornillo 5 x 12 mm
5 Inserción de tornillo
6 Cabeza de soporte
7 Tornillo 8 x 26 mm
8 Embellecedor
9 Producto
2.2. Normas de conexión
La conexión a la red debe efectuarse respetando la tensión indicada en la etiqueta de características
técnicas del producto. Este aparato está destinado a ser permanentemente conectado a una instalación
ja. El circuito de alimentación del secatoallas debe incorporar un interruptor de corte unipolar con una
separación de contactos de al menos 3 mm. El aparato debe ser instalado, si es posible al abrigo de
las corrientes de aire (ventanas, puertas) o de cualquier otra cosa que pudiera perturbar su regulación.
Así, le aportará el mejor confort térmico. Coloque todo objeto que pueda suponer un impedimento
a la circulación del aire (muebles, sillones) a 50 cm de la cara delantera del aparato. El aparato no
se deberá colocar delante o justo debajo de un enchufe jo. La parte baja de la caja de mandos
debe situarse como mínimo a 15 cm del suelo. Para cualquier aparato, si el cable de alimentación
1
5

27
ELBA OVAL
ES
está deteriorado, debe ser reemplazado por un cable especíco. La sustitución del cable debe ser
efectuada por el fabricante, su servicio posventa o personal cualicado. Las características técnicas
de su aparato están indicadas en la etiqueta de características técnicas.
OK
IMPORTANTE - Este aparato no debe ser instalado nunca con su caja
de mandos en posición alta. El aparato vertical no debe ser utilizado
horizontalmente. Durante la instalación utilice calces para evitar que la caja
de los mandos apoye en el suelo.
2.3. Reglas particulares para los cuartos de baño
Este aparato es conforme con las normas de seguridad de CLASE II (doble aislamiento). Puede estar
instalado en las Zonas 2 y 3, posiciones A y B siempre que se respeten las siguientes normas:
• En los cuartos de baño, el secatoallas nunca debe ser instalado de tal forma que el panel de control
puedan ser alcanzado por una persona que se encuentre en la bañera o ducha. El panel de control debe
estar situado a una distancia mínima de 600 mm de cualquier zona húmeda. El cuerpo del producto
puede colocarse en las Zonas 2 si el panel de control se encuentra dentro de la Zona 3.
• En una cocina o cuarto de baño, el secatoallas deberá ser colocado al menos a 25 cm del suelo.

28
3. Descripción del panel de control y funcionamiento
3.1. Panel de control
El panel de control está constituido por 7 leds y 4 pulsadores mecánicos con las siguientes
funcionalidades:
Tecla Encendido/Stand-by/Conrmación
Tecla AUMENTO de temperatura de consigna
Tecla DISMINUCIÓN de temperatura de consigna
Tecla Máxima Potencia
Sensor de infrarrojos
1 2 3 4 5 6
7
3.2. Encendido y Stand-by
Para encender el producto, realizaremos una pulsación corta sobre el botón . Para apagar el
producto, realizaremos de nuevo una pulsación corta sobre el mismo.
3.3. Selección de temperatura de consigna
Podemos regular la temperatura de consigna del secatoallas mediante los pulsadores y . Al
pulsar la tecla , incrementamos la temperatura de consigna. De igual manera, al pulsar la tecla
reducimos la temperatura de consigna. La temperatura mínima de funcionamiento es de 7ºC,
siendo la máxima de 30ºC. La temperatura congurada desde fábrica es 21ºC. Los 6 indicadores led
ubicados en la parte superior del panel de control, identican la temperatura de consigna establecida.
Indicador Iluminación Temperatura Indicador Iluminación Temperatura
1 LED
Led 1:
parpadeo
corto cada 2
segundos
Led 2: OFF
Led 3: OFF
Led 4: OFF
Led 5: OFF
Led 6: OFF
7ºC
1 LED
Led 1: ON
Led 2: OFF
Led 3: OFF
Led 4: OFF
Led 5: OFF
Led 6: OFF
15ºC

29
ELBA OVAL
ES
Indicador Iluminación Temperatura Indicador Iluminación Temperatura
2 LED
Led 1: ON
Led 2: ON
Led 3: OFF
Led 4: OFF
Led 5: OFF
Led 6: OFF
18ºC
3 LED
Led 1: ON
Led 2: ON
Led 3: ON
Led 4: OFF
Led 5: OFF
Led 6: OFF
21ºC
4 LED
Led 1: ON
Led 2: ON
Led 3: ON
Led 4: ON
Led 5: OFF
Led 6: OFF
24ºC
5 LED
Led 1: ON
Led 2: ON
Led 3: ON
Led 4: ON
Led 5: ON
Led 6: OFF
27ºC
6 LED
Led 1: ON
Led 2: ON
Led 3: ON
Led 4: ON
Led 5: ON
Led 6: ON
30ºC
3.4. Idicativo de consumo
Cuando la temperatura de la estancia sea inferior a la seleccionada, se activará la resistencia. Para
indicar que la resistencia se ha activado y el producto está consumiendo energía, parpadeará el
último led indicativo de temperatura.
3.5. Bloqueo de teclado
Pulsando simultáneamente durante 3 segundos las teclas y , bloqueamos/desbloqueamos el
teclado del panel de control. Si pulsamos cualquier tecla estando el panel bloqueado, parpadean
todos los leds 2 veces.
Por seguridad, el botón de encendido/apagado
si responderá aun estando el panel bloqueado.
Para realizar la acción de encender/apagar con el panel bloqueado, deberá mantenerse pulsado
durante 3 segundos el botón .
3.6. Modo MAX POWER
El modo MAX POWER activa la resistencia del secatoallas a máxima potencia de manera continua
sin tener en cuenta la lectura de la sonda. Para activar esta función desde el panel de control,
realizaremos una pulsación corta sobre el botón . También es posible activar este modo cuando
el producto está apagado.

30
Con una pulsación corta activaremos este modo durante 15 minutos. Si en los siguientes dos
segundos volvemos a pulsar , activaremos el siguiente periodo (30 minutos). Consecutivas
pulsaciones activarán los siguientes periodos tal y como se muestra en la siguiente tabla:
Indicador Iluminación Tiempo Indicador Iluminación Tiempo
1 LED
Led 1: parpadeo
Led 2: OFF
Led 3: OFF
Led 4: OFF
Led 5: OFF
Led 6: OFF
Led 7: ON
15
minutos
2 LED
Led 1: parpadeo
Led 2: parpadeo
Led 3: OFF
Led 4: OFF
Led 5: OFF
Led 6: OFF
Led 7: ON
30
minutos
3 LED
Led 1: parpadeo
Led 2: parpadeo
Led 3: parpadeo
Led 4: OFF
Led 5: OFF
Led 6: OFF
Led 7: ON
45
minutos
4 LED
Led 1: parpadeo
Led 2: parpadeo
Led 3: parpadeo
Led 4: parpadeo
Led 5: OFF
Led 6: OFF
Led 7: ON
60
minutos
Indicador Iluminación Tiempo Indicador Iluminación Tiempo
5 LED
Led 1: parpadeo
Led 2: parpadeo
Led 3: parpadeo
Led 4: parpadeo
Led 5: parpadeo
Led 6: OFF
Led 7: ON
90
minutos
6 LED
Led 1: parpadeo
Led 2: parpadeo
Led 3: parpadeo
Led 4: parpadeo
Led 5: parpadeo
Led 6: parpadeo
Led 7: ON
120
minutos
Si pulsamos 7 veces sobre el botón , volveremos al punto de inicio (activación durante 15 minutos).
Los leds funcionarán como una cuenta regresiva, apagándose conforme vaya transcurriendo el
tiempo. Una vez transcurrido el tiempo, el producto volverá automáticamente al modo anterior o se
apagará si se encontraba en Off.
El modo MAX POWER podrá detenerse en cualquier momento realizando una pulsación corta sobre
el botón
. El secatoallas retornará a su estado anterior.

31
ELBA OVAL
ES
3.7. Control mediante mando a distancia
(opcional)
Los secatoallas con panel de control OVAL permiten ser controlados mediante los mandos a
distancia Rointe AIR Control y BASIC Control (vendidos por separado). El uso del mando a distancia
amplia la funcionalidad del secatoallas al permitir:
• Controlar el secatoallas sin necesidad de utilizar el panel de control
• Establecer temperaturas de consigna con más exactitud (de medio grado en medio grado entre
los 15 y los 30 ºC).
• Programar el producto 24h 7 días a la semana con una programación personalizada o utilizando
una de las 4 programaciones pre-instaladas en el mando a distancia BASIC Control.
Para conocer más sobre los mandos a distancia Rointe y sus funciones, diríjase a nuestro portal web
o consulte el manual de uso de los mismos.
IMPORTANTE: Cuando el producto es programado utilizando un mando a distancia
Rointe, el led número 7 (correspondiente al modo MAX POWER) parpadeará.
AVISO: Si hemos programado nuestro secatoallas y deseamos volver a utilizaro en modo
manual, deberemos mantener pulsado el botón de encendido/apagado
durante 3
segundos (estando el producto desbloqueado). El producto dejará de estar programado
y podremos controlarlo manualmente utilizando los botones del panel de control.
3.8. Identificación de errores
Durante el funcionamiento normal del equipo, se pueden detectar anomalías de funcionamiento que
son indicadas mediante los indicadores leds del producto. Ver tabla para identicar el código de
error:
Indicador Código Error Solución
LED 6
parpadeando
Led 1: OFF
Led 2: OFF
Led 3: OFF
Led 4: OFF
Led 5: OFF
Led 6: parpadeo
Led 7: OFF
Fallo en la sonda de
temperatura debido a
cortocircuito o a sonda
abierta.
Por favor, póngase
en contacto con el
departamento de Soporte
Técnico de Rointe llamando
al 900 103 061 (968 864
363).

32
4. Mantenimiento y limpieza
El producto no necesita ningún tipo de mantenimiento. Recomendamos la limpieza de todo el
producto (parte trasera, inferior del producto, aletas superiores, etc.) No utilice ningún producto
abrasivo en el producto, límpielo con un paño húmedo y jabón pH neutro y la pantalla con un paño
seco.
Normativa Europea 2012/19/UE
En base a la normativa europea 2012/19/UE de Residuos de Aparatos Eléctricos y Electrónicos
(RAEE), dichos aparatos no pueden ser arrojados en los contenedores municipales habituales; tienen
que ser recogidos selectivamente para optimizar la recuperación y reciclado de los componentes y
materiales que los constituyen, y reducir el impacto en la salud humana y el medio ambiente.
El símbolo del cubo de basura tachado sobre barra horizontal se marca sobre todos los productos
Rointe para recordar al consumidor la obligación de separarlos para la recogida selectiva.
El consumidor debe contactar con la autoridad local o con el vendedor para informarse en relación
a la correcta eliminación de su aparato.
5. Garantía
En este apartado, se describen las condiciones de garantía que dispone el comprador al haber
adquirido un nuevo producto de la marca Rointe. Estas condiciones reúnen todos los derechos
que tiene el comprador de acuerdo con la legislación nacional vigente, así como la garantía y los
derechos adicionales que ofrece la marca Rointe.
5.1. Cualquier incidencia que detecte en su producto Rointe, puede ser atendida por el vendedor del
producto o de una forma más ágil a través del propio fabricante.
Rointe, pone a su disposición un TELÉFONO DE ASISTENCIA TÉCNICA (ESPAÑA) 900 103 061
(968 864 363) donde le indicaremos los pasos a seguir para solucionar dicha incidencia. Si reside
en otro país, compruebe el número de teléfono correcto en la parte posterior de este manual.
ELBA OVAL
TELON45B077
300 W
NÚMERO DE
SERIE
Necesitará la referencia de producto (ubicada en la etiqueta de características del producto), número
de serie, fecha de compra y la naturaleza del fallo al contactar con nosotros para mejorar la garantía.
Además, adjuntar una copia de la factura de compra del producto.
5.2. Rointe garantiza que este producto no presenta ningún defecto material, de diseño o de

33
ELBA OVAL
ES
fabricación en el momento de su adquisición original y durante un periodo de 24 meses (2 años) en
componentes electrónicos y 120 meses (10 años) en el cuerpo de acero.
5.3. Si durante el periodo de garantía el producto no funciona correctamente con un uso normal,
y sea fallo de diseño, de los materiales o de fabricación, Rointe, reparará o sustituirá el producto,
según estime oportuno, según términos y condiciones establecidos a continuación:
5.3.1. La garantía sólo se facilita si presenta el certicado de garantía original emitido por el
establecimiento vendedor y cuando la citada garantía este correctamente rellena incluyendo
referencia de producto, número de serie (reejado en la etiqueta de características técnicas del
producto), fecha de compra y sello del vendedor.
Rointe se reserva el derecho de rechazar el servicio de garantía cuando esta información haya sido
retirada o recticada tras la compra original del producto.
5.3.2. La garantía sólo es aplicable a aquellos casos que se reeren a defectos de material, diseño
y fabricación, y en ningún caso cubre los daños al producto por los siguientes motivos:
i) Daños causados por negligencia y/o mal uso del producto, es decir, utilizado para otros
nes que no se consideren su uso normal o por no respetar las instrucciones de uso y
mantenimiento dadas por ROINTE, así como la instalación o el uso incorrecto del producto
que pueda no cumplir con las normas técnicas de seguridad vigentes.
ii) La corrosión de cualquier parte del producto causada por la exposición directa al agua
salada. Cuando el producto se instale a menos de 200 m de la costa, el período de garantía
para los daños causados por la corrosión se reducirá en un 50%.
iii) Cualquier modicación no autorizada o reparaciones del producto llevadas a cabo por
terceros o personas no autorizadas, o la apertura del producto por terceros o personas no
autorizadas.
iv) Cualquier accidente que se considere fuera del control de ROINTE, como (pero no limitado
a): rayos, incendios, inundaciones, desastres naturales, desórdenes públicos, fenómenos
atmosféricos o geológicos, etc.
v) Los fallos que resulten de una instalación incorrecta. En caso de duda, póngase en
contacto con ROINTE.
5.4. El servicio técnico de Rointe le podrá asesorar si necesita comprar algún repuesto fuera del
periodo de garantía.
5.5. Esta garantía no afecta a los derechos legales del comprador previstos por la legislación
nacional vigente, ni los derechos del comprador contra los del distribuidor o instalador que surjan a
partir del contrato de compraventa.
5.6. En ausencia de una legislación nacional vigente aplicable, esta garantía será la única protección
del comprador. Rointe, sus ocinas y distribuidores e instaladores no se responsabilizarán de ningún
tipo de daños, tanto fortuitos como accidentales, derivados de infringir cualquier norma implícita
relacionada con este producto.

34
6. Cómo registrar la garantía del producto
IMPORTANTE: Es importante que registre su producto ROINTE como parte de nuestro servicio
de garantía, en caso de que desee hacer una reclamación.
Puede registrar su producto ROINTE de las siguientes maneras:
WEB
1. Ve a www.rointe.com/compania/registra-tu-garantia/.
2. Ingresa a tu cuenta existente o crea una nueva cuenta si es necesario.
3. Haga clic en “Mis productos”.
4. Introduzca la referencia de su producto (alfanumérica y en mayúsculas).
5. Introduce tu número de serie (26 dígitos situados en la etiqueta metálica de tu producto y
comienza con 843).
6. Sube tu prueba de compra, como la factura en formato PDF, JPEG o PNG. Esto no es
obligatorio, pero al aseguras de que tu período de garantía es exacto.
7. Haga clic en “Registro”. ¡Enhorabuena! Su producto ya está registrado.
CORREO ELECTRÓNICO
1. Envía un correo electrónico a [email protected] con la siguiente información:
• Nombre del cliente
• Dirección y código postal
• Número de teléfono y dirección de correo electrónico
• Referencia del producto (alfanumérica y en mayúsculas)
• Número de serie (26 dígitos situados en la etiqueta metálica de su producto y
comienza con 843)
• La fecha de compra del producto y el comprobante de compra (como la factura)
2. Nuestro equipo de soporte técnico conrmará el registro de su producto y solicitará
cualquier información adicional necesaria por correo electrónico.
POSTAL
1. Envíe la información que gura en la sección de CORREO ELECTRÓNICO de arriba a:
• INDUSTRIAS ROYAL TERMIC, S.L. - ROINTE, C/E Parcela 43, 30140, Santomera
(SPAIN)
2. Por favor, asegúrese de obtener una prueba de envío.

35
ELBA OVAL
ES

36
7. DIRECTIVA ERP (EU) 2015/1188
ITEM
Blanco
Símbolo Unidad
TELV***B077 TELV***B112 TELV***B150 TELV***B172
Cromo
TELV***C077 TELV***C112 TELV***C150 TELV***C172
POTENCIA CALORÍFICA
Potencia caloríca nominal
Blanco
P
nom kW 0,30 0,50 0,75 1,00
Cromo
P
nom kW 0,30 0,30 0,50 0,75
Potencia carloríca mínima
P
min kW n/a n/a n/a n/a
Potencia carloríca máxima continuada
Blanco
P
max,c kW 0,30 0,50 0,75 1,00
Cromo
P
max,c kW 0,30 0,30 0,50 0,75
CONSUMO AUXILIAR DE ELECTRICIDAD
A potencia caloríca nominal
Blanco
el
MAX kW 0,30 0,50 0,75 1,00
Cromo
el
MAX kW 0,30 0,30 0,50 0,75
A potencia caloríca mínima
Blanco
el
MIN kW 0,30 0,50 0,75 1,00
Cromo
el
MIN kW 0,30 0,30 0,50 0,75
En modo de espera
el
SB kW 0,002 0,002 0,002 0,002

37
ELBA OVAL
ES
TIPO DE CONTROL DE POTENCIA CALORÍFICA / DE TEMPERATURA INTERIOR (SELECCIONE UNO)
Potencia calorífica de un solo nivel, sin control de temperatura interior
— — — — — —
Dos o más niveles manuales, sin control de temperatura interior
— — — — — —
Con control de temperatura interior mediante termostato mecánico
— — — — — —
Con control electrónico de temperatura interior
— — — — — —
Control electrónico de temperatura interior y temporizador diario
— — — — — —
Control electrónico de temperatura interior y temporizador semanal
— —
OTRAS OPCIONES DE CONTROL (PUEDEN SELECCIONARSE VARIAS)
Control de temperatura interior con detección de presencia
— — — — — —
Control de temperatura interior con detección de ventanas abiertas
— —
Con opción de control a distancia
— —
Con control de puesta en marcha adaptable
— —
Con limitación de tiempo de funcionamiento
— —
Con sensor de lámpara negra
— — —
RENDIMIENTO DE EFICIENCIA ENERGÉTICA ESTACIONAL
n
s — 39,0% 39,0% 39,0% 39,0%

38
Precauções de instalação e segurança (EN Standard 60335)
Antes de instalar o produto, ler cuidadosamente a secção “Instalação e Precauções de Segurança”
para assegurar o funcionamento adequado do produto.
Precauções de instalação
O radiador foi concebido para uso doméstico ou residencial. Recomenda-se que o radiador seja
instalado por um prossional autorizado. Certicar-se de que o produto está devidamente ligado a
230V.
ATENÇÃO
As crianças com menos de 3 anos de idade devem ser mantidas fora do
alcance do aparelho, a menos que sejam continuamente supervisionadas.
As crianças dos 3 aos 8 anos de idade só devem ligar e desligar o aparelho
quando este tiver sido colocado ou instalado na sua posição normal de
utilização e quando lhes tiver sido dada supervisão ou instruções relativas
à utilização do aparelho de uma forma segura e compreender os perigos
envolvidos. As crianças dos 3 aos 8 anos de idade não devem ligar,
ajustar, limpar ou reparar o aparelho. Este aparelho pode ser utilizado por
crianças a partir dos 8 anos de idade e por pessoas com capacidades
físicas, sensoriais ou mentais reduzidas ou com falta de experiência e
conhecimentos, se lhes tiver sido dada supervisão ou instruções relativas
à utilização do aparelho de uma forma segura e compreender os perigos
envolvidos. As crianças não devem brincar com o aparelho. A limpeza
e a manutenção do utilizador não devem ser feitas por crianças sem
supervisão. As crianças devem ser sempre supervisionadas para garantir
que não interferem com o produto.
Este produto de aquecimento é enchido com uma quantidade precisa de
óleo especial que não requer manutenção. As reparações que requerem a
abertura do tanque de uido térmico só devem ser efectuadas pela Rointe
ou pelo seu serviço pós-venda. Os regulamentos relativos à eliminação
deste uido depois de o aparelho de aquecimento ser descartado devem
ser respeitados. Se o cabo de alimentação for danicado, deve ser
substituído pelo fabricante, pelo seu serviço pós-venda ou por pessoal
qualicado para evitar danos.
Não cortar o cabo eléctrico em nenhuma circunstância para evitar riscos
eléctricos e para assegurar o correcto funcionamento do produto.
Não ligar o seca-toalhas se notar qualquer dano externo ao desempacotar
ou instalar o produto. Se o cabo de alimentação for danicado, deve ser
substituído pelo fabricante, o seu serviço pós-venda ou pessoal autorizado,

39
ELBA OVAL
PT
a m de evitar qualquer dano.
Não pulverizar nem molhar o produto. Durante o funcionamento, manter o
produto distante de materiais combustíveis tais como cortinas, mobiliário,
etc. Não colocar nada além de vestuário, toalhas ou tecidos não inamáveis
sobre o produto.
O seca-toalhas deve ser instalado de tal forma que a toma de corrente
esteja sempre acessível. O cabo de alimentação nunca deve estar em
contacto com o produto durante o funcionamento.
CUIDADO - Nunca tocar o produto com as mãos ou qualquer
outra parte do corpo molhada.
CUIDADO - Partes deste produto podem tornar-se muito
quentes e causar queimaduras. Preste especial atenção quando
estão presentes crianças e pessoas vulneráveis.
Conteúdo
1. Especicações técnicas do produto ................................................................................................... 40
2. Instalação do seca-toalhas Rointe ..................................................................................................... 44
2.1. Montagem ............................................................................................................................................ 44
2.2. Regras de ligação ............................................................................................................................... 44
2.3. Regras instalação nas casas de banho................................................................................................ 45
3. Descrição do painel de controlo e funcionamento........................................................................ 46
3.1. Painel de controlo.................................................................................................................................... 46
3.2. Ligar e Desligar.............................................................................................................................. 46
3.3. Seleção da temperatura de setpoint.................................................................................................. 46
3.4. Indicador de consumo.................................................................................................................. 47
3.5. Bloqueio de teclado......................................................................................................................... 47
3.6. Modo MAX POWER......................................................................................................................... 47
3.7. Comando à distância......................................................................................................................... 49
3.8. Identicação de erro......................................................................................................................... 49
4. Manutenção e limpeza ........... ................................................................................................................ 50
5. Garantia............................................. ....................................................................................................... 50
6. Como registar a garantia do produto ................................................. ................................................. 52
7. ERP. Regulamento da Comissão (EU) 2015/1188.................................... ................................................. 54

40
1. Especificações técnicas do produto (Modelos 400, 450, 500 e 550)
MODELO LARGO 400
BRANCO
TELV*40B077 TELV*40B112 TELV*40B150 TELV*40B172
CROMADO
TELV*40C077 TELV*40C112 TELV*40C150 TELV*40C172
DIMENSÕES
Largura (mm) 400 400 400 400
Altura sem painel de control (mm) 770 1.120 1.500 1.720
Altura com painel de control (mm) 865 1.215 1.595 1.815
Profundidade (mm) 50 50 50 50
Profundidade instalado (mm) 100 100 100 100
CARACTERÍSTICAS MECÂNICAS
Resistência do aço blindado
Fluido térmico
Painel de control oval
Controlo remoto por infravermelhos
Acabamento
Branco RAL 9016
Cromado
CARACTERÍSTICAS ELÉTRICAS
Potência nominal (W)
Branco 300 500 750 1.000
Cromado 300 300 500 750
Voltagem (V) 230 V ~ 230 V ~ 230 V ~ 230 V ~
Corrente (A)
Branco 1,3 2,2 3,2 4,4
Cromado 1,3 1,3 2,2 3,2
Classe II
INSTALAÇÃO E PROTECÇÃO
Kit de instalação incluído
Termóstato de segurança
Grau de protecção IP 44 IP 44 IP 44 IP 44

41
ELBA OVAL
PT
MODELO LARGO 450
BRANCO
TELV*45B077 TELV*45B112 TELV*45B150 TELV*45B172
CROMADO
TELV*45C077 TELV*45C112 TELV*45C150 TELV*45C172
DIMENSÕES
Largura (mm) 450 450 450 450
Altura sem painel de control (mm) 770 1.120 1.500 1.720
Altura com painel de control (mm) 865 1.215 1.595 1.815
Profundidade (mm) 50 50 50 50
Profundidade instalado (mm) 100 100 100 100
CARACTERÍSTICAS MECÂNICAS
Resistência do aço blindado
Fluido térmico
Painel de control oval
Controlo remoto por infravermelhos
Acabamento
Branco RAL 9016
Cromado
CARACTERÍSTICAS ELÉTRICAS
Potência nominal (W)
Branco 300 500 750 1.000
Cromado 300 300 500 750
Voltagem (V) 230 V ~ 230 V ~ 230 V ~ 230 V ~
Corrente (A)
Branco 1,3 2,2 3,2 4,4
Cromado 1,3 1,3 2,2 3,2
Classe II
INSTALAÇÃO E PROTECÇÃO
Kit de instalação incluído
Termóstato de segurança
Grau de protecção IP 44 IP 44 IP 44 IP 44

42
MODELO LARGO 500
BRANCO
TELV*50B077 TELV*50B112 TELV*50B150 TELV*50B172
CROMADO
TELV*50C077 TELV*50C112 TELV*50C150 TELV*50C172
DIMENSÕES
Largura (mm) 500 500 500 500
Altura sem painel de control (mm) 770 1.120 1.500 1.720
Altura com painel de control (mm) 865 1.215 1.595 1.815
Profundidade (mm) 50 50 50 50
Profundidade instalado (mm) 100 100 100 100
CARACTERÍSTICAS MECÂNICAS
Resistência do aço blindado
Fluido térmico
Painel de control on/off
Controlo remoto por infravermelhos
Acabamento
Branco RAL 9016
Cromado
CARACTERÍSTICAS ELÉTRICAS
Potência nominal (W)
Branco 300 500 750 1.000
Cromado 300 300 500 750
Voltagem (V) 230 V ~ 230 V ~ 230 V ~ 230 V ~
Corrente (A)
Branco 1,3 2,2 3,2 4,4
Cromado 1,3 1,3 2,2 3,2
Classe II
INSTALAÇÃO E PROTECÇÃO
Kit de instalação incluído
Termóstato de segurança
Grau de protecção IP 44 IP 44 IP 44 IP 44

43
ELBA OVAL
PT
MODELO LARGO 550
BRANCO
TELV*55B077 TELV*55B112 TELV*55B150 TELV*55B172
CROMADO
TELV*55C077 TELV*55C112 TELV*55C150 TELV*55C172
DIMENSÕES
Largura (mm) 550 550 550 550
Altura sem painel de control (mm) 770 1.120 1.500 1.720
Altura com painel de control (mm) 865 1.215 1.595 1.815
Profundidade (mm) 50 50 50 50
Profundidade instalado (mm) 100 100 100 100
CARACTERÍSTICAS MECÂNICAS
Resistência do aço blindado
Fluido térmico
Painel de control on/off
Controlo remoto por infravermelhos
Acabamento
Branco RAL 9016
Cromado
CARACTERÍSTICAS ELÉTRICAS
Potência nominal (W)
Branco 300 500 750 1.000
Cromado 300 300 500 750
Voltagem (V) 230 V ~ 230 V ~ 230 V ~ 230 V ~
Corrente (A)
Branco 1,3 2,2 3,2 4,4
Cromado 1,3 1,3 2,2 3,2
Classe II
INSTALAÇÃO E PROTECÇÃO
Kit de instalação incluído
Termóstato de segurança
Grau de protecção IP 44 IP 44 IP 44 IP 44

44
2. Instalação do seca-toalhas Rointe
2.1. Montagem
Dentro da embalagem encontrará um kit de instalação. Ver instruções abaixo:
1. Seleccionar o lugar adequado na parede.
2. Colocar o molde de montagem na parede, faça pequenas marcas nos lugares onde vai realizar as
furações.
3. Retire o molde de montagem e faça as furações na parede.
4. Introduza as buchas nas furações..
5. Aparafuse as quatro peças metálicas de xação à parede com os parafusos nº3 (ver imagem anexa).
6. Aparafuse as duas peças de xação do seca-toalhas e a peça plástica de xação ao tubo horizontal do
seca-toalhas conforme a imagem com o parafuso nº 7.
7. Introduza o conjunto do ponto 6 na peça plástica de xação e prenda com o parafuso nº 4.
8. Colocar o adorno na peça do xador do seca-toalhas.
Nº. ITEM
1
Tomada 10 x 40 cm
2
Suporte
3
Parafuso 5,5 x 50 mm
4
Parafuso 5 x 12 mm
5
Inserção do suporte
6
Cabeça de suporte
7
Parafuso 8 x 26 mm
8
Tampa
9
Seca-toalhas
2.2. Regras de ligação
A ligação à rede deve ser feita em conformidade com a tensão indicada na etiqueta de dados técnicos
do produto. Este dispositivo destina-se a ser permanentemente ligado a uma instalação xa. O circuito
de alimentação do seca-toalhas deve ser equipado com um disjuntor de um pólo com uma separação
de contacto de pelo menos 3 mm. O aparelho deve ser instalado, se possível, numa localização que não
esteja exposto a correntes de ar (janelas, portas) ou a qualquer outra coisa que possa interferir com
o seu funcionamento. Isto irá proporcionar o melhor conforto térmico. Colocar qualquer objecto que
possa impedir a circulação do ar (mobiliário, poltronas) a 50 cm da frente do aparelho. O aparelho não
deve ser colocado em frente ou apenas debaixo de uma tomada xa. O painel de controlo deve estar
a pelo menos 15 cm do chão. Para qualquer aparelho, se o cabo de alimentação for danicado, deve
1
5

45
ELBA OVAL
PT
ser substituído por um cabo especíco. A substituição de cabos deve ser efectuada pelo fabricante,
pelo seu serviço pós-venda ou por pessoal qualicado. As características técnicas do seu aparelho
são indicadas na etiqueta de características técnicas.
OK
IMPORTANTE: Este aparelho não deve ser instalado com o painel de
controlo para cima. O aparelho é para ser instalado em posição vertical e
jamais horizontal. Durante a instalação utilize calços para evitar que o painel
de controle seja apoiadono chão.
2.3. Regras particulares para quartos de banho
Este aparelho cumpre as normas de segurança da CLASSE II (duplo isolamento). Pode ser instalado
nas Zonas 2 e 3, posições A e B, seguindo as as seguintes regras:
• Nas casas de banho, o seca-toalhas nunca deve ser instalado de modo a que o painel de controlo
possa ser alcançado por uma pessoa na banheira ou no duche. O painel de controlo deve estar situado a
uma distância mínima de 600 mm de quaisquer zonas húmidas. O corpo do produto pode ser colocado
nas zonas 2 se o painel de controlo estiver localizado dentro da zona 3.
• Numa cozinha ou casa de banho, o toalheiro deve ser colocado a pelo menos 25 cm do chão.

46
3. Descrição do painel de controlo e funcionamento
3.1. Painel de controlo
O painel de controlo é composto por 7 Leds e 4 botões com as seguintes funções:
Botão On / Stand-by / Conrmação
Botão AUMENTO de temperatura de setpoint
Botão DIMINUIR de temperatura de setpoint
Botão Potência máxima
Sensor de infravermelhos
1 2 3 4 5 6
7
3.2. Ligar e Desligar
Para ligar o produto, carregar brevemente o botão . Para desligar o produto, carregar novamente
o botão
brevemente.
3.3. Seleção da temperatura de setpoint
Podemos regular a temperatura denida do seca toalhas pelos botões e . Carregar no botão
para aumenta a temperatura do desejada. Da mesma forma, ao carregar a tecla , reduzimos a
temperatura denida.
A temperatura mínima de funcionamento é de 7ºC, e a temperatura máxima é de 30ºC. A temperatura
denida de fábrica é de 21ºC.
Os 6 indicadores LED localizados na parte superior do painel de controlo identicam a temperatura
de setpoint.
Indicador Iluminação Temperatura Indicador Iluminação Temperatura
1 LED
Led 1: A
piscar a cada
2 segundos
Led 2: OFF
Led 3: OFF
Led 4: OFF
Led 5: OFF
Led 6: OFF
7ºC
1 LED
Led 1: ON
Led 2: OFF
Led 3: OFF
Led 4: OFF
Led 5: OFF
Led 6: OFF
15ºC

47
ELBA OVAL
PT
Indicador Iluminação Temperatura Indicador Iluminação Temperatura
2 LED
Led 1: ON
Led 2: ON
Led 3: OFF
Led 4: OFF
Led 5: OFF
Led 6: OFF
18ºC
3 LED
Led 1: ON
Led 2: ON
Led 3: ON
Led 4: OFF
Led 5: OFF
Led 6: OFF
21ºC
4 LED
Led 1: ON
Led 2: ON
Led 3: ON
Led 4: ON
Led 5: OFF
Led 6: OFF
24ºC
5 LED
Led 1: ON
Led 2: ON
Led 3: ON
Led 4: ON
Led 5: ON
Led 6: OFF
27ºC
6 LED
Led 1: ON
Led 2: ON
Led 3: ON
Led 4: ON
Led 5: ON
Led 6: ON
30ºC
3.4. Idicativo de consumo
Quando a temperatura ambiente é inferior à temperatura selecionada, a resistência será ativada.
Para indicar que a resistência seja ativada e que o produto está a consumir energia, o último LED
indicador de temperatura irá piscar.
3.5. Bloqueio de teclado
Carregar simultaneamente durante 3 segundos nas teclas e para bloquear/desbloquear o
teclado do painel de controlo. Se carregar no botão enquanto o painel estiver bloqueado, todos os
LEDs piscarão duas vezes.
Por razões de segurança, o botão on/off
responderá mesmo que o painel esteja bloqueado.
Para executar a ação de ligar/desligar com o painel bloqueado, deve carregar no botão durante
3 segundos.
3.6. Modo MAX POWER
O modo MAX POWER ativa a resistência do toalheiro na potência máxima, sem ter em conta a leitura
da sonda. Para ativar esta função a partir do painel de controlo, carregue brevemente o botão .
Também é possível ativar este modo quando o produto está desligado.
Uma breve pressão irá ativar este modo durante 15 minutos. Se carregar
novamente nos

48
dois segundos seguintes, o período seguinte (30 minutos) será ativado. Se carregar assim
consecutivamente ativará os períodos indicados no quadro seguinte:
Indicador Iluminação Tempo Indicador Iluminação Tempo
1 LED
Led 1: A piscar
Led 2: OFF
Led 3: OFF
Led 4: OFF
Led 5: OFF
Led 6: OFF
Led 7: ON
15
minutos
2 LED
Led 1: A piscar
Led 2: A piscar
Led 3: OFF
Led 4: OFF
Led 5: OFF
Led 6: OFF
Led 7: ON
30
minutos
3 LED
Led 1: A piscar
Led 2: A piscar
Led 3: A piscar
Led 4: OFF
Led 5: OFF
Led 6: OFF
Led 7: ON
45
minutos
4 LED
Led 1: A piscar
Led 2: A piscar
Led 3: A piscar
Led 4: A piscar
Led 5: OFF
Led 6: OFF
Led 7: ON
60
minutos
Indicador Iluminação Tempo Indicador Iluminação Tempo
5 LED
Led 1: A piscar
Led 2: A piscar
Led 3: A piscar
Led 4: A piscar
Led 5: A piscar
Led 6: OFF
Led 7: ON
90
minutos
6 LED
Led 1: A piscar
Led 2: A piscar
Led 3: A piscar
Led 4: A piscar
Led 5: A piscar
Led 6: A piscar
Led 7: ON
120
minutos
Se carregar 7 vezes no botão , voltará a ativação inicial (ativação durante 15 minutos).
Os LEDs funcionarão como um temporizador de contagem decrescente, desligando-se à medida
que o tempo passa. Depois de decorrido o tempo, o produto regressará automaticamente ao modo
anterior ou desligar-se-á se tiver sido denido para desligado.
O modo MAX POWER pode ser interrompido a qualquer momento, carregando brevemente o botão
. O seca toalhas regressará á sua programação anterior.

49
ELBA OVAL
PT
3.7. Comando à distância
(opcional)
Os seca toalhas com painel de controlo OVAL podem ser controlados por meio dos comandos à
distância Rointe AIR Control e BASIC Control (vendidos separadamente). A utilização do comando à
distância amplia as funcionalidades dos seca toalhas, permitindo:
• Controlar o seca toalhas sem utilizar o painel de controlo.
• Denir temperaturas de setpoint mais precisas (de meio grau em meio grau entre 15 e 30 ºC).
• Programar o produto 24horas po dia, 7 dias por semana com programação personalizada ou
utilizar uma das 4 programações pré-instalados no comando à distância.
Para saber mais sobre os comandos à distância Rointe e as suas funções, vá ao nosso site e
consulte o manual.
IMPORTANTE: Quando o produto é programado utilizando um comando à distância
Rointe, o LED número 7 (correspondente ao modo MAX POWER) irá piscar.
AVISO: Se tivermos programado o seca toalhas e desejarmos utilizá-lo em modo
manual, devemos carregar o botão ligar/desligar
durante 3 segundos (enquanto o
produto está desbloqueado). O produto já não será programado e poderemos controlá-
lo manualmente utilizando os botões do painel de controlo.
3.8. Identificação de erros
Durante o funcionamento normal do equipamento, as avarias podem ser detectadas e são indicadas
pelos indicadores LED. No quadro pode identicar o código de erro:
Indicador Código Erro Solução
LED 6
A piscar
Led 1: OFF
Led 2: OFF
Led 3: OFF
Led 4: OFF
Led 5: OFF
Led 6: A piscar
Led 7: OFF
Falha na sonda de
temperatura devido a
curto-circuito ou sonda
aberta.
Por favor contacte o
departamento de Apoio
Técnico da Rointe através
do telefone 221 200 111.

50
4. Manutenção e limpeza
O seca-toalhas não necessita de qualquer manutenção. Recomendamos a limpeza do produto
completo (ao longo das barras, topo, baixo etc.). Não utilize nenhum produto abrasivo sobre o corpo
de aço. Limpe-o com um pano húmido e sabão de pH neutro. Para a limpeza do ecrã, utilize um
pano seco.
Normativa Europeia 2012/19/UE
Com base na diretiva europea 2012/19/UE relativa aos Resíduos de Aparelhos Elétricos e Eletrónicos
(RAEE), os aparelhos em questão não podem ser deitados nos contentores municipais comuns,
devendo ser recolhidos seletivamente, de modo a otimizar a recuperação e reciclagem dos
componentes e materiais que os constituem e reduzindo assim o impacto na saúde humana e no
meio ambiente. Todos os produtos ROINTE encontram-se assinalados com um símbolo constituído
por um contentor de lixo barrado com uma cruz, de modo a recordar o consumidor da obrigação
de separá-los e garantir que os mesmos sejam recolhidos seletivamente. O consumidor deve entrar
em contacto com a autoridade local ou com o revendedor, a m de se informar sobre a eliminação
correta do seu aparelho.
5. Garantia
Nesta secção descrevem-se as condições de garantia de que o comprador dispõe ao adquirir um
novo produto da marca Rointe. Estas condições reúnem todos os direitos do comprador de acordo
com a legislação nacional vigente, bem como a garantia e todos os direitos adicionais que a marca
Rointe oferece.
5.1 Se tiver de enviar o seu Radiador ROINTE para o serviço de garantia, remeta-o para o fornecedor/
instalador onde o adquiriu. No caso de surgirem problemas, a ROINTE põe à sua disposição o
TELEFONE DE ASSISTÊNCIA TÉCNICA (PORTUGAL) 221 200 111, bem como o correio eletrónico
info@rointe.pt. Se vive num país diferente, por favor verique o número de telefone correcto no verso
deste manual.
ELBA OVAL
TELVN45B077
300 W
NÚMERO DE
SÉRIE
Quando nos contactar, será necessário indicar a referência do produto (situada na etiqueta de
características), bem como o número de série, a data de compra e uma descrição do problema.
Além disso, iremos pedir-lhe que nos remeta uma cópia da fatura relativa à compra do produto.
5.2. A Rointe garante que este produto não apresenta nenhum defeito material de conceção ou de
fabrico no momento da sua aquisição original e dá uma garantia de 120 meses (10 anos) no que
respeita ao aço e estancamento e de 24 meses (2 anos) nos componentes elétricos e eletrónicos.

51
ELBA OVAL
PT
5.3. Se, após um uso normal, o produto não funcionar corretamente dentro do período da garantia,
tendo sido detetadas falhas de conceção, material ou fabrico, a ROINTE procederá ao conserto ou
à substituição do produto, segundo considerar oportuno e de acordo com os termos e condições
estabelecidos abaixo:
5.3.1. A garantia só é fornecida se apresentar o certicado de garantia original emitido pelo
estabelecimento vendedor e quando a referida garantia for correctamente preenchida, incluindo
a referência do produto, o número de série (reectido no rótulo das características técnicas do
produto), a data de compra e carimbo do vendedor.
Rointe reserva-se o direito de recusar o serviço de garantia quando esta informação tiver sido
removida ou recticada após a compra original do produto.
5.3.2. A garantia aplica-se apenas aos casos relativos a defeitos de material, conceção ou fabrico.
Em nenhum caso serão abrangidos os casos em que os danos no Radiador foram provocados por
um dos seguintes motivos:
i) Danos causados por negligência e/ou má utilização do produto, ou seja, utilizado para ns
diferentes do seu uso normal ou não respeitando as instruções de utilização e manutenção
dadas pela ROINTE, bem como instalação ou utilização incorrecta do produto que possa
não estar em conformidade com as normas técnicas de segurança em vigor.
(ii) Corrosão de qualquer parte do produto causada pela exposição directa a água salgada
Quando o produto é instalado a menos de 200 m da costa, o período de garantia para danos
por corrosão será reduzido em 50%.
iii) Qualquer modicação ou reparação não autorizada do produto por um terceiro ou pessoa
não autorizada, ou a abertura do produto por um terceiro ou pessoa não autorizada.
iv) Qualquer acidente considerado fora do controlo de ROINTE, como (mas não limitado
a): raios, incêndios, inundações, catástrofes naturais, desordens públicas, fenómenos
atmosféricos ou geológicos, etc.
v) Falhas resultantes de instalação inadequada. Em caso de dúvida, por favor contacte
ROINTE.
5.4. O serviço técnico da Rointe pode aconselhá-lo se necessitar de comprar quaisquer peças
sobressalentes fora do período de garantia.
5.5. Esta garantia não afecta os direitos legais do comprador ao abrigo da actual legislação nacional,
nem os direitos do comprador contra os do distribuidor ou instalador decorrentes do contrato de
venda.
5.6. Na ausência de legislação nacional aplicável em vigor, esta garantia será a única protecção do
comprador. A Rointe, os seus escritórios e distribuidores e instaladores não serão responsáveis
por quaisquer danos, acidentais ou consequentes, decorrentes da violação de quaisquer regras
implícitas relativas a este produto.

52
6. Como registar a garantia do produto
IMPORTANTE: É importante que registe o seu produto ROINTE como parte do nosso serviço de
garantia, no caso de querer fazer uma reclamação.
Pode registar o seu produto ROINTE das seguintes formas:
WEB
1. Vá a www.rointe.com/pt/registe-a-sua-garantia/.
2. Inicie sessão na sua conta existente ou crie uma nova conta se necessário.
3. Clique em “Os Meus Produtos”.
4. Introduza a referência do seu produto (alfanumérica e em letras maiúsculas).
5. Introduza o seu número de série (26 dígitos localizados na etiqueta metálica do seu produto
começando por 84).
6. Carregue a sua prova de compra, tal como uma factura em formato PDF, JPEG ou PNG. Isto
não é obrigatório, mas ao fazê-lo garante que o seu período de garantia é preciso.
7. Clique em “Registar”.
8. Parabéns! O seu produto está agora registado.
EMAIL
1. Enviar um e-mail para [email protected] com as seguintes informações:
• Nome do cliente
• Endereço e código postal
• Número de telefone e endereço de correio electrónico
• Referência do produto
• Número de série
• A data de compra do produto e a prova de compra (como descrito acima na secção
do WEBSITE).
2. A nossa equipa de apoio técnico conrmará o registo do produto e solicitará qualquer
informação adicional requerida por correio electrónico.
POSTAL
1. Por favor envie a informação na secção EMAIL para:
• INDUSTRIAS ROYAL TERMIC, S.L. - Rointe C/E Parcela 43, 30140, Santomera
(ESPANHA)
2. Por favor, não se esqueça de obter uma prova de envio.

53
ELBA OVAL
PT

54
7. ERP. REGULAMENTO DA COMISSÃO (EU) 2015/1188
ITEM
Branco
Signo Unidade
TELV***B077 TELV***B112 TELV***B150 TELV***B172
Cromo
TELV***C077 TELV***C112 TELV***C150 TELV***C172
POTÊNCIA CALORÍFICA
Potência calorífica nominal
Branco
P
nom kW 0,30 0,50 0,75 1,00
Cromo
P
nom kW 0,30 0,30 0,50 0,75
Potência carlorífica mínima (indicativa)
P
min kW n/a n/a n/a n/a
Potência carlorífica máxima continuada
Branco
P
max,c kW 0,30 0,50 0,75 1,00
Cromo
P
max,c kW 0,30 0,30 0,50 0,75
CONSUMO AUXILIAR DE ELECTRICIDADE
A potência calorífica nominal
Branco
el
MAX kW 0,30 0,50 0,75 1,00
Cromo
el
MAX kW 0,30 0,30 0,50 0,75
A potência calorífica mínima
Branco
el
MIN kW 0,30 0,50 0,75 1,00
Cromo
el
MIN kW 0,30 0,30 0,50 0,75
Em modo de espera
el
SB kW 0,002 0,002 0,002 0,002

55
ELBA OVAL
PT
TIPO DE CONTROLE DE POTÊNCIA CALORÍFICA / DE TEMPERATURA INTERIOR (SELECCIONE UM)
Potência calorífica de um sozinho nível, sem controle de temperatura interior
— — — — — —
Dois ou mais níveis manuais, sem controle de temperatura interior
— — — — — —
Com controle de temperatura interior mediante termostato mecânico
— — — — — —
Com controle eletrónico de temperatura interior
— — — — — —
Controle eletrónico de temperatura interior e temporizador diário
— — — — — —
Controle eletrónico de temperatura interior e temporizador semanal
— —
OUTRAS OPÇÕES DE CONTROLE (PODEM SELECCIONAR-SE VÁRIAS)
Controle de temperatura interior com detecção de presença
— — — — — —
Controle de temperatura interior com detecção de janelas abertas
— —
Com opção de controle a distancia
— —
Com controle de posta em marcha adaptável
— —
Com limitação de tempo de funcionamento
— —
Com sensor de lustre negro
— — —
RENDIMENTO DE EFICIÊNCIA ENERGÉTICA ESTACIONAL
n
s — 39,0% 39,0% 39,0% 39,0%

56
Précautions d’installation et de sécurité (normes EN 60335)
Avant d’installer l’appareil, lisez attentivement le chapitre “Consignes d’installation et de sécurité”
pour vous assurer du bon fonctionnement de l’appareil.
Précautions d’installation
Ce produit est conçu pour un usage domestique ou résidentiel. Il est recommandé que le produit
soit installé par un professionnel. Assurez-vous que le produit est correctement branché au 230V.
ATTENTION
Les enfants de moins de 3 ans doivent être tenus hors de portée de
l’appareil, sauf s’ils sont surveillés en permanence. Les enfants âgés de
3 à 8 ans ne doivent allumer et éteindre l’appareil que lorsqu’il a été placé
ou installé dans sa position d’utilisation normale et lorsqu’ils ont reçu
une supervision ou des instructions concernant l’utilisation de l’appareil
de manière sûre et qu’ils comprennent les risques encourus. Les enfants
âgés de 3 à 8 ans ne doivent pas brancher, régler, nettoyer ou entretenir
l’appareil. Cet appareil peut être utilisé par des enfants âgés de 8 ans et
plus et par des personnes ayant des capacités physiques, sensorielles ou
mentales réduites ou manquant d’expérience et de connaissances si elles
ont été supervisées ou ont reçu des instructions concernant l’utilisation
de l’appareil en toute sécurité et comprennent les risques encourus. Les
enfants ne doivent pas jouer avec l’appareil. Le nettoyage et l’entretien des
utilisateurs ne doivent pas être effectués par des enfants sans surveillance.
Les enfants doivent être surveillés à tout moment pour s’assurer qu’ils
n’interfèrent pas avec le produit.
Ce produit de chauffage est rempli d’une quantité précise d’huile spéciale
sans entretien. Les réparations nécessitant l’ouverture du réservoir d’huile
ne doivent être effectuées que par Rointe ou son service après-vente.
Les normes concernant l’élimination d’huile après la mise au rebut de
l’appareil de chauffage doivent être respectées. Si le câble d’alimentation
est endommagé, il doit être remplacé par le fabricant, son service après-
vente ou un personnel qualié pour éviter tout dommage.
Ne coupez en aucun cas le câble électrique pour éviter les risques et pour
assurer le bon fonctionnement du produit.
Ne branchez pas le sèche-serviettes si vous remarquez des dommages
externes lors du déballage ou de l’installation du produit. Si le câble
d’alimentation est endommagé, il doit être remplacé par le fabricant, son
service après-vente ou le personnel autorisé an d’éviter tout dommage.

57
ELBA OVAL
FR
Ne pas pulvériser ou mouiller le produit. Pendant le fonctionnement, tenez
le produit éloigné des matériaux combustibles tels que les rideaux, les
meubles, etc. Ne placez rien d’autre que des vêtements, des serviettes ou
des tissus ininammables sur le produit.
Le sèche-serviettes doit être installé de manière à ce que la prise de
courant soit toujours accessible. Le câble d’alimentation ne doit jamais
être en contact avec le produit pendant son fonctionnement.
AVERTISSEMENT - Ne touchez jamais le produit avec les mains
ou toute autre partie du corps mouillée.
AVERTISSEMENT - Certaines parties de ce produit peuvent
devenir très chaudes et causer des brûlures. Une attention
particulière devrait être accordée lorsque des enfants et des
personnes vulnérables sont présents.
Contenu
1. Spécications techniques du produit .................................................................................................... 58
2. Installation d’un sèche-serviettes Rointe .......................................................................................... 62
2.1. Montage ....................................................................................................................................... 62
2.2. Instructions de connexion .................................................................................................................. 62
2.3. Règles particulières pour les salles de bains................................................................................... 63
3. Description du panneau de contrôle et de son fonctionnement.............................................................. 64
3.1. Panneau de contrôle............................................................................................................................. 64
3.2. Mise en marche et mise en veille......................................................................................................... 64
3.3. Sélection de la température de consigne............................................................................................. 64
3.4. Indicateur de consommation.............................................................................................................. 65
3.5. Verrouillage du clavier........................................................................................................................ 65
3.6. Mode MAX POWER....................................................................................................................... 65
3.7. Contrôle par télécommande............................................................................................................ 67
3.8. Identication des erreurs..................................................................................................................... 67
4. Entretien et nettoyage ........... .................................................................................................................... 68
5. Garantie ............................................. ...................................................................................................... 68
6. Comment enregistrer la garantie du produit ....................................... ................................................ 70
7. ERP. Règlement de la Commission (EU) 2015/1188. ............................................................................ 72

58
1. Spécifications techniques du produit (Modèle 400, 450, 500 et 550)
MODÈLE LARGEUR 400
BLANC
TELV*40B077 TELV*40B112 TELV*40B150 TELV*40B172
CHROME
TELV*40C077 TELV*40C112 TELV*40C150 TELV*40C172
DIMENSIONS
Largeur (mm) 400 400 400 400
Hauteur sans panneau de contrôle (mm) 770 1.120 1.500 1.720
Hauteur avec panneau de contrôle (mm) 865 1.215 1.595 1.815
Profondeur (mm) 50 50 50 50
Profondeur produit installé (mm) 100 100 100 100
CARACTÉRISTIQUES MÉCANIQUES
Élément chauffant d’acier blindé
Fluide caloporteur
Panneau de contrôle ovale
contrôle à distance par infrarouge
Finition
Blanc RAL 9016
Chrome
CARACTÉRISTIQUES ÉLECTRIQUES
Puissance nominale (W)
Blanc 300 500 750 1.000
Chrome 300 300 500 750
Voltage (V) 230 V ~ 230 V ~ 230 V ~ 230 V ~
Courrant (A)
Blanc 1,3 2,2 3,2 4,4
Chrome 1,3 1,3 2,2 3,2
Class II
INSTALLATION ET PROTECTION
Kit d’installation inclus
Thermostat de sécurité
Indice de protection IP 44 IP 44 IP 44 IP 44

59
ELBA OVAL
FR
MODÈLE LARGEUR 450
BLANC
TELV*45B077 TELV*45B112 TELV*45B150 TELV*45B172
CHROME
TELV*45C077 TELV*45C112 TELV*45C150 TELV*45C172
DIMENSIONS
Largeur (mm) 450 450 450 450
Hauteur sans panneau de contrôle (mm) 770 1.120 1.500 1.720
Hauteur avec panneau de contrôle (mm) 865 1.215 1.595 1.815
Profondeur (mm) 50 50 50 50
Profondeur produit installé (mm) 100 100 100 100
CARACTÉRISTIQUES MÉCANIQUES
Élément chauffant d’acier blindé
Fluide caloporteur
Panneau de contrôle ovale
contrôle à distance par infrarouge
Finition
Blanc RAL 9016
Chrome
CARACTÉRISTIQUES ÉLECTRIQUES
Puissance nominale (W)
Blanc 300 500 750 1.000
Chrome 300 300 500 750
Voltage (V) 230 V ~ 230 V ~ 230 V ~ 230 V ~
Courrant (A)
Blanc 1,3 2,2 3,2 4,4
Chrome 1,3 1,3 2,2 3,2
Class II
INSTALLATION ET PROTECTION
Kit d’installation inclus
Thermostat de sécurité
Indice de protection IP 44 IP 44 IP 44 IP 44

60
MODÈLE LARGEUR 500
BLANC
TELV*50B077 TELV*50B112 TELV*50B150 TELV*50B172
CHROME
TELV*50C077 TELV*50C112 TELV*50C150 TELV*50C172
DIMENSIONS
Largeur (mm) 500 500 500 500
Hauteur sans panneau de contrôle (mm) 770 1.120 1.500 1.720
Hauteur avec panneau de contrôle (mm) 865 1.215 1.595 1.815
Profondeur (mm) 50 50 50 50
Profondeur produit installé (mm) 100 100 100 100
CARACTÉRISTIQUES MÉCANIQUES
Élément chauffant d’acier blindé
Fluide caloporteur
Panneau de contrôle ovale
contrôle à distance par infrarouge
Finition
Blanc RAL 9016
Chrome
CARACTÉRISTIQUES ÉLECTRIQUES
Puissance nominale (W)
Blanc 300 500 750 1.000
Chrome 300 300 500 750
Voltage (V) 230 V ~ 230 V ~ 230 V ~ 230 V ~
Courrant (A)
Blanc 1,3 2,2 3,2 4,4
Chrome 1,3 1,3 2,2 3,2
Class II
INSTALLATION ET PROTECTION
Kit d’installation inclus
Thermostat de sécurité
Indice de protection IP 44 IP 44 IP 44 IP 44

61
ELBA OVAL
FR
MODÈLE LARGEUR 550
BLANC
TELV*55B077 TELV*55B112 TELV*55B150 TELV*55B172
CHROME
TELV*55C077 TELV*55C112 TELV*55C150 TELV*55C172
DIMENSIONS
Largeur (mm) 550 550 550 550
Hauteur sans panneau de contrôle (mm) 770 1.120 1.500 1.720
Hauteur avec panneau de contrôle (mm) 865 1.215 1.595 1.815
Profondeur (mm) 50 50 50 50
Profondeur produit installé (mm) 100 100 100 100
CARACTÉRISTIQUES MÉCANIQUES
Élément chauffant d’acier blindé
Fluide caloporteur
Panneau de contrôle ovale
contrôle à distance par infrarouge
Finition
Blanc RAL 9016
Chrome
CARACTÉRISTIQUES ÉLECTRIQUES
Puissance nominale (W)
Blanc 300 500 750 1.000
Chrome 300 300 500 750
Voltage (V) 230 V ~ 230 V ~ 230 V ~ 230 V ~
Courrant (A)
Blanc 1,3 2,2 3,2 4,4
Chrome 1,3 1,3 2,2 3,2
Class II
INSTALLATION ET PROTECTION
Kit d’installation inclus
Thermostat de sécurité
Indice de protection IP 44 IP 44 IP 44 IP 44

62
2. Installation du sèche-serviettes
2.1. Montage
A l’intérieur de l’emballage se trouve un gabarit de pose.
1. Choisir l’emplacement où xer le sèche-serviettes au mur.
2. Positionner le gabarit de pose contre le mur et marquer les trous à l’aide d’un crayon.
3. Retirer le gabarit de pose et faire les trous au mur.
4. Insérer les chevilles dans les trous.
5. Visser au mur la pièce d’ancrage en plastique avec les vises nº 3 de l’image jointe.
6. Visser les deux pièces accroche- sèche-serviettes et la pièce en plastique de xation au
tubehorizontal du sèche-serviettes comme sur la gure 1 avec la vis nº 7.
7. Insérer l’ensemble du point 6 dans la pièce d’ancrage en plastique et tenir avec la vis conique nº
4 (voir image jointe).
8. Poser l’ embellisseur sur la pièce qui tient le sèche-serviettes.
Nº. ITEM
1 10 x 40 mm cheville
2 Pièce plastique d´ancrage
3 Vis 5.5 x 50 mm
4 Vis 5 x 12 mm
5 Pièce plastique de xation
6 Accroche-Sèche-serviettes
7 Vis 8 x 26 mm
8 Embellisseur
9 Product
2.2. Instructions de connexion
Le branchement au réseau doit être effectué conformément à la tension indiquée sur l’étiquette
des données techniques du produit. Ce dispositif est destiné à être connecté en permanence à
une installation xe. Le circuit d’alimentation du sèche-serviettes doit être équipé d’un disjoncteur
unipolaire avec une séparation des contacts d’au moins 3 mm. L’appareil doit être installé, si possible,
dans un endroit non exposé aux courants d’air (fenêtres, portes) ou à tout autre élément susceptible
de gêner son fonctionnement.
Cela permettra d’obtenir le meilleur confort thermique. Placez tout objet susceptible d’entraver la
circulation de l’air (meubles, fauteuils) à 50 cm de l’appareil. L’appareil ne doit pas être placé devant
ou juste sous une prise de courant xe. Le fond du boîtier de contrôle doit se trouver à 15 cm du
sol. Pour tout appareil, si le câble d’alimentation est endommagé, il doit être remplacé par un câble
1
5

63
ELBA OVAL
FR
spécique. Le remplacement des câbles doit être effectué par le fabricant, son service après-vente ou
un personnel qualié. Les caractéristiques techniques de votre appareil sont indiquées sur l’étiquette
des caractéristiques techniques.
OK
IMPORTANT - Cet appareil ne doit jamais être installé avec son boîtier
de commande en position haute. L’appareil ne doit pas être utilisé
horizontalement. Utilisez des cales lors de l’installation pour éviter que le
boîtier de commande ne repose sur le sol.
2.3. Règles particulières pour les salles de bains
Cet appareil est conforme aux normes de sécurité de la CLASSE II (double isolation). Il peut être
installé dans les zones 2 et 3, positions A et B, selon les règles suivantes:
•
Dans les salles de bains, le sèche-serviettes ne doit jamais être installé de manière à ce que le panneau
de commande puisse être atteint par une personne dans la baignoire ou la douche. Le panneau de
contrôle doit être situé à une distance minimale de 600 mm de toute zone humide. Le corps du produit
peut être placé dans la zone 2 si le panneau de contrôle est situé dans la zone 3.
• Dans une cuisine ou une salle de bains, le porte-serviettes doit être placé à au moins 25 cm du sol.

64
3. Description du panneau de contrôle et de son fonctionnement
3.1. Panneau de contrôle
Le panneau de contrôle se compose de 7 LED et de 4 touches mécaniques avec les fonctions
suivantes:
Touche On/Stand-by/Conrmation
Touche Augmenter la température de consigne
Touche Baisser la température de consigne
Touche puissance maximale
Détecteur infrarouge
1 2 3 4 5 6
7
3.2. Mise en marche et mise en veille
Pour allumer le produit, appuyez brièvement sur la touche . Pour éteindre le produit, appuyez à
nouveau sur la touche .
3.3. Sélection de la température de consigne
Nous pouvons régler la température de consigne du sèche-serviettes à l’aide des touches et
. En appuyant sur la touche , vous augmentez la température de consigne. De la même manière,
en appuyant sur la touche , nous baissons la température de consigne. La température minimale
de fonctionnement est de 7ºC, et la température maximale de 30ºC. La température réglée en usine
est de 21ºC. Les 6 voyants LED situés sur la partie supérieure du panneau de contrôle identient la
température de consigne.
Voyant
Lumineux
Éclairage Température
Voyant
Lumineux
Éclairage Température
1 LED
Led 1:
clignotement
court toutes
les 2 secondes
Led 2: OFF
Led 3: OFF
Led 4: OFF
Led 5: OFF
Led 6: OFF
7ºC
1 LED
Led 1: ON
Led 2: OFF
Led 3: OFF
Led 4: OFF
Led 5: OFF
Led 6: OFF
15ºC

65
ELBA OVAL
FR
Voyant
Lumineux
Éclairage Température
Voyant
Lumineux
Éclairage Température
2 LED
Led 1: ON
Led 2: ON
Led 3: OFF
Led 4: OFF
Led 5: OFF
Led 6: OFF
18ºC
3 LED
Led 1: ON
Led 2: ON
Led 3: ON
Led 4: OFF
Led 5: OFF
Led 6: OFF
21ºC
4 LED
Led 1: ON
Led 2: ON
Led 3: ON
Led 4: ON
Led 5: OFF
Led 6: OFF
24ºC
5 LED
Led 1: ON
Led 2: ON
Led 3: ON
Led 4: ON
Led 5: ON
Led 6: OFF
27ºC
6 LED
Led 1: ON
Led 2: ON
Led 3: ON
Led 4: ON
Led 5: ON
Led 6: ON
30ºC
3.4. Indicateur de consommation
Lorsque la température de la pièce est inférieure à la température choisie, la résistance chauffante
se déclenche. Pour signaler que la résistance chauffante a été activée et que le produit consomme
de l’énergie, la dernière LED d’indication de température clignote.
3.5. Verrouillage du clavier
En appuyant simultanément pendant 3 secondes sur les touches et , on verrouille/déverrouille
le clavier du panneau de contrôle. Si vous appuyez sur une touche alors que le panneau est
verrouillé, toutes les leds clignotent deux fois. Pour des raisons de sécurité, la touche marche/arrêt
fonctionnera même si le panneau est verrouillé. Pour procéder à l’action de marche/arrêt avec
le panneau de contrôle verrouillé, il est nécessaire de maintenir la touche enfoncée pendant 3
secondes.
3.6. Mode MAX POWER
Le mode MAX POWER active la résistance du sèche-serviettes à la puissance maximale de manière
continue sans tenir en compte la lecture de la sonde. Pour activer cette fonction depuis le panneau
de contrôle, il suft d’appuyer brièvement sur la touche . Il est également possible d’activer ce
mode lorsque le produit est éteint.

66
Une courte pression active ce mode pendant 15 minutes. Si vous appuyez à nouveau sur dans un
délai de deux secondes, la période suivante (de 30 minutes) sera activée. Des pressions consécutives
activeront les périodes suivantes, comme indiqué dans le tableau ci-dessous :
Voyant
Lumineux
Éclairage Temps
Voyant
Lumineux
Éclairage Temps
1 LED
Led 1: Clignotement
Led 2: OFF
Led 3: OFF
Led 4: OFF
Led 5: OFF
Led 6: OFF
Led 7: ON
15 minutes
2 LED
Led 1: Clignotement
Led 2: Clignotement
Led 3: OFF
Led 4: OFF
Led 5: OFF
Led 6: OFF
Led 7: ON
30 minutes
3 LED
Led 1: Clignotement
Led 2: Clignotement
Led 3: Clignotement
Led 4: OFF
Led 5: OFF
Led 6: OFF
Led 7: ON
45 minutes
4 LED
Led 1: Clignotement
Led 2: Clignotement
Led 3: Clignotement
Led 4: Clignotement
Led 5: OFF
Led 6: OFF
Led 7: ON
60 minutes
5 LED
Led 1: Clignotement
Led 2: Clignotement
Led 3: Clignotement
Led 4: Clignotement
Led 5: Clignotement
Led 6: OFF
Led 7: ON
90 minutes
6 LED
Led 1: Clignotement
Led 2: Clignotement
Led 3: Clignotement
Led 4: Clignotement
Led 5: Clignotement
Led 6: Clignotement
Led 7: ON
120 minutes
Si on appuie 7 fois sur la touche , on revient au point de départ (activation pendant 15 minutes).
Les LED fonctionnent comme un compte à rebours et s’éteignent au fur et à mesure que le temps
s’écoule. Une fois le temps écoulé, le produit revient automatiquement au mode précédent ou s’éteint
s’il était en mode “Off”.
Le mode MAX POWER peut être arrêté à tout moment par une courte pression sur la touche
. Le
sèche-serviettes récupère son mode de fonctionnement antérieur.

67
ELBA OVAL
FR
3.7. Contrôle par télécommande
(opcional)
Les séche-serviettes avec panneau de contrôle OVAL peuvent être contrôlés grâce aux
télécommandes Rointe AIR Control et BASIC Control (vendues séparément). L’utilisation de la
télécommande complète la fonctionnalité du sèche-serviettes en permettant de:
• Contrôlez le sèche-serviettes sans avoir à utiliser le panneau de contrôle.
• Dénir des températures de consigne plus précises (d’un demi-degré sur un demi-degré entre
15 et 30 ºC).
• Programmez le produit 24 heures sur 24, 7 jours sur 7 avec une programmation personnalisée
ou en utilisant l’un des 4 programmes préinstallés sur la télécommande BASIC Control.
Pour en savoir plus sur les télécommandes Rointe et leurs fonctions, rendez-vous sur notre site web
ou consultez leur manuel d’utilisation.
IMPORTANT: Lorsque le produit est programmé à l’aide d’une télécommande Rointe, la
led numéro 7 (correspondant au mode MAX POWER) clignote.
ATTENTION: Si nous avons programmé notre sèche-serviettes et nous souhaitons
l’utiliser à nouveau en mode manuel, nous devons maintenir la touche marche/arrêt
enfoncée pendant 3 secondes (avec le produit déverrouillé). Le produit ne sera plus
programmé et nous pourrons le contrôler manuellement à l’aide des touches du panneau
de contrôle.
3.8. Identification des erreurs
Dans des conditions normales de fonctionnement, des anomalies peuvent être détectées, qui sont
signalées par les indicateurs LED du produit. Voir le tableau pour identier le code d’erreur:
Voyant Lumineux Code Erreur Solution
LED 6
Clignotement
Led 1: OFF
Led 2: OFF
Led 3: OFF
Led 4: OFF
Led 5: OFF
Led 6: Clignotement
Led 7: OFF
Défaut de la sonde
de température dû à
un court-circuit ou à
une sonde ouverte.
Veuillez contacter le service
d'assistance technique de
Rointe en appelant au 01 73
05 70 01.

68
4. Entretien et nettoyage
Le sèche-serviettes n’a pas besoin d’entretien. Nous recommandons un nettoyage sur tout le
produit (partie postérieure, les rails…). N’utilisez pas de produits abrasifs sur le produit. Nettoyez-le
avec un chiffon humide et du savon pH neutre et l’écran avec un chiffon sec.
Règlement européen 2012/19/UE
Selon le règlement européen 2012/19/UE sur les déchets d’équipements électriques et électroniques
(DEEE), ces équipements ne peuvent pas être éliminés dans les conteneurs municipaux normaux ; ils
doivent être collectés séparément an d’optimiser la récupération et le recyclage de leurs composants
et matériaux et de réduire l’impact sur la santé humaine et l’environnement. Le symbole de la poubelle
barrée est apposé sur tous les produits Rointe pour rappeler au consommateur l’obligation de les
séparer pour une collecte séparée. Le consommateur doit contacter l’autorité locale ou le détaillant
pour obtenir des informations concernant l’élimination appropriée de son appareil.
5. Garantie
Cette section décrit les conditions de garantie offertes à l’acheteur lors de l’achat d’un nouveau
produit de la marque Rointe. Ces conditions réunissent tous les droits dont dispose l’acheteur selon
la législation nationale en vigueur, ainsi que la garantie et les droits supplémentaires offerts par la
marque Rointe.
5.1 Tout incident détecté sur votre produit peut être suivi par le vendeur du produit ou de manière
plus agile par le fabricant. met à votre disposition un TÉLÉPHONE D’ASSISTANCE TECHNIQUE
(FRANCE) 01 73 05 70 01 où nous vous indiquerons les étapes à suivre pour résoudre cet incident. Si
vous vivez dans un autre pays, veuillez vérier le numéro de téléphone correct au dos de ce manuel.
ELBA OVAL
TELVN45B077
300 W
NUMÉRO DE
SÉRIE
Vous aurez besoin de la référence du produit (située sur l’étiquette des caractéristiques du produit),
du numéro de série, de la date d’achat et de la nature du défaut lorsque vous nous contacterez pour
améliorer la garantie. De plus, joignez une copie de la facture d’achat du produit.
5.2. Rointe garantit que ce produit est exempt de tout défaut de matériau, de conception ou de
fabrication au moment de l’achat initial et pour une période de 120 mois pour le corps d’acier.
5.3. Si, pendant la période de garantie, le produit ne fonctionne pas correctement dans des conditions
normales d’utilisation et qu’il s’agit d’un défaut de conception, de matériau ou de fabrication, Rointe
réparera ou remplacera, à sa convenance, le produit conformément aux termes et conditions énoncés
ci-dessous:

69
ELBA OVAL
FR
5.3.1. La garantie n’est accordée que si vous présentez le certicat de garantie original délivré par le
concessionnaire et si la garantie est correctement remplie, y compris la référence du produit, le numéro
de série (indiqué sur l’étiquette des caractéristiques techniques du produit), la date d’achat et le sceau
du concessionnaire.
Rointe se réserve le droit de refuser le service de garantie lorsque ces informations ont été retirées ou
rectiées après l’achat initial du produit.
5.3.2. La garantie ne s’applique qu’en cas de défauts de matériel, de conception ou de fabrication, en
aucun cas elle ne couvre les dommages au sèche-serviettes pour les raisons suivantes:
5.3.2.1. Utilisation incorrecte du produit, à des ns autres que normales ou pour non-respect
des instructions d’utilisation et d’entretien données par Rointe, ainsi que l’installation ou
l’utilisation du produit d’une manière non conforme aux normes techniques de sécurité en
vigueur. Réparations non autorisées effectuées par du personnel non autorisé ou ouverture du
sèche-serviettes par des personnes non autorisées. Accidents imprévus indépendants de la
volonté d’Rointe, tels que foudre, incendie, inondation, désordre public, etc.
5.3.2.2. Les réparations ou remplacements couverts par cette garantie ne prolongent ni ne
redémarrent la période de garantie.
5.3.2.3. Les réparations ou remplacements couverts par cette garantie doivent être effectués
avec des unités fonctionnellement équivalentes. Les pièces défectueuses ou les pièces
enlevées ou remplacées deviennent la propriété de Rointe.
5.4. Le service technique de Rointe pourra vous conseiller si vous avez besoin d’acheter des pièces de
rechange en dehors de la période de garantie.
5.5. Cette garantie n’affecte pas les droits légaux de l’acheteur en vertu du droit national applicable, ni
les droits de l’acheteur contre ceux du distributeur ou de l’installateur découlant du contrat de vente.
5.6. En l’absence de législation nationale en vigueur, cette garantie est la seule protection de l’acheteur.
Rointe, ses bureaux et ses distributeurs et installateurs ne sont pas responsables des dommages de
quelque nature que ce soit, accessoires ou consécutifs, résultant d’une violation d’une règle implicite
relative à ce produit.

70
6. Comment enregistrer la garantie de votre produit
IMPORTANT: Il est important que vous enregistriez votre produit ROINTE dans le cadre de notre
service de garantie, au cas où vous souhaiteriez faire une réclamation.
Vous pouvez enregistrer votre produit ROINTE de la manière suivante:
WEB
1. Consultez le site www.rointe.com/fr/enregistrez-votre-garantie/.
2. Connectez-vous à votre compte existant ou créez un nouveau compte si nécessaire.
3. Cliquez sur “Mes produits”.
4. Saisissez la référence de votre produit (en alphanumérique et en majuscules).
5. Saisissez votre numéro de série (26 chiffres situés sur l’étiquette métallique de votre produit).
6. Téléchargez votre preuve d’achat, telle qu’une facture sous format PDF, JPEG ou PNG. Ce
n’est pas obligatoire, mais cela permet de garantir l’exactitude de votre période de garantie.
7. Cliquez sur “Enregistrement”.
8. Félicitations ! Votre produit est maintenant enregistré.
EMAIL
1. Envoyez un courriel à rointe@rointe.fr avec les informations suivantes:
• Nom du client
• Adresse et code postal
• Numéro de téléphone et adresse électronique
• Référence du produit
• Numéro de série
• La date d’achat du produit et la preuve d’achat (comme décrit dans la section du
site web ci-dessus).
2. Notre équipe de support technique conrmera l’enregistrement du produit et demandera
toute information supplémentaire requise par courrier électronique.
COURRIER
1. Envoyez les informations demandées dans la section EMAIL à:
• INDUSTRIAS ROYAL TERMIC, S.L. - ROINTE, C/E Parcela 43, 30140, Santomera
(SPAIN)
2. Veillez à obtenir une preuve d’expédition.

71
ELBA OVAL
FR

72
7. ERP. RÈGLEMENT DE LA COMMISSION (EU) 2015/1188
ITEM
Blanc
Symbole Unite
TELV***B077 TELV***B112 TELV***B150 TELV***B172
Chrome
TELV***C077 TELV***C112 TELV***C150 TELV***C172
PUISSANCE THERMIQUE
Puissance thermique nominale
Branc
P
nom kW 0,30 0,50 0,75 1,00
Chrome
P
nom kW 0,30 0,30 0,50 0,75
Puissance thermique minimale
P
min kW n/a n/a n/a n/a
Puissance thermique maximale continue
Branc
P
max,c kW 0,30 0,50 0,75 1,00
Chrome
P
max,c kW 0,30 0,30 0,50 0,75
CONSOMMATION AUXILIAIRE D´ÉLECTRICITÉ
À la puissance thermique nominale
Branc
el
MAX kW 0,30 0,50 0,75 1,00
Chrome
el
MAX kW 0,30 0,30 0,50 0,75
À la puissance thermique minimale
Branc
el
MIN kW 0,30 0,50 0,75 1,00
Chrome
el
MIN kW 0,30 0,30 0,50 0,75
En mode vieille
el
SB kW 0,002 0,002 0,002 0,002

73
ELBA OVAL
FR
TYPE DE CHAUFFAGE INTÉRIEUR/RÉGULATION DE LA TEMPÉRATURE (EN CHOISIR UN)
Puissance calorifique mono-niveau, pas de régulation de la température intérieure
— — — — — —
Deux niveaux manuels ou plus, pas de contrôle de la température intérieure
— — — — — —
Avec contrôle de la température intérieure par thermostat mécanique
— — — — — —
Avec régulation électronique de la température intérieure
— — — — — —
Régulation électronique de la température intérieure et minuterie journalière
— — — — — —
Régulation électronique de la température intérieure et minuterie hebdomadaire
— —
AUTRES OPTIONS DE COMMANDE (PLUSIEURS PEUVENT ÊTRE SÉLECTIONNÉES)
Régulation de la température intérieure avec détection de présence
— — — — — —
Régulation de la température intérieure avec détection de fenêtre ouverte
— —
Avec option télécommande
— —
Avec commande de démarrage adaptative
— —
Avec limitation du temps de fonctionnement
— —
Avec capteur de lampe noir
— — —
RENDEMENT SAISONNIER EN MATIÈRE D’EFFICACITÉ ÉNERGÉTIQUE
n
s — 39,0% 39,0% 39,0% 39,0%

74
Installatie- en veiligheidsmaatregelen (EN 60335-normen)
Lees voordat u het product inschakelt eerst de “installatie- en veiligheidsmaatregelen” zorgvuldig
om er zeker van te zijn dat het product correct werkt.
Voorzorgsmaatregelen bij de installatie
Het product is ontworpen voor huishoudelijk of residentieel gebruik. U wordt geadviseerd om het
product te laten installeren door een professionele installateur. Zorg ervoor dat het product correct
is aangesloten op 230v en is geaard.
BELANGRIJK
Kinderen jonger dan 3 jaar moeten buiten het bereik van het apparaat worden
gehouden, tenzij zij voortdurend onder toezicht staan. Kinderen tussen 3
en 8 jaar mogen het toestel alleen in- en uitschakelen wanneer het in de
normale gebruiksstand is geplaatst of geïnstalleerd en wanneer zij onder
toezicht staan of instructies hebben gekregen over hoe zij het toestel veilig
kunnen gebruiken en de risico’s ervan begrijpen. Kinderen tussen 3 en 8 jaar
mogen het toestel niet aansluiten, afstellen, schoonmaken of onderhouden.
Dit apparaat kan worden gebruikt door kinderen van 8 jaar en ouder en
door personen met verminderde lichamelijk, zintuiglijke of geestelijke
vermogens of gebrek aan ervaring en kennis, mits ze onder toezicht staan
of instructies hebben gekregen over hoe het apparaat op een veilige manier
gebruikt kan worden en ze de gevaren ervan begrijpen. Kinderen mogen
niet met het apparaat spelen. Reiniging en gebruikersonderhoud mogen
niet zonder toezicht door kinderen worden uitgevoerd. Kinderen moeten te
allen tijde onder toezicht staan om ervoor te zorgen dat ze het product niet
hinderen. Dit product is gevuld met een precieze hoeveelheid speciale olie
die geen onderhoud nodig heeft. Alle reparaties waarbij het openen van
de olietank vereist is, mogen alleen worden uitgevoerd door een ofciële
rointe-installateur of diens klantenservicepersoneel, die ook op de hoogte
moeten worden gebracht indien een olielekkage wordt opgemerkt.
De voorschriften voor het weggooien van olie bij het weggooien van de
kachel moeten in acht worden genomen. Als de voedingskabel beschadigd
is, moet deze worden vervangen door de fabrikant, diens klantenservice
of geautoriseerd personeel om schade te voorkomen. Snijd de elektrische
kabel in geen geval door om risico’s te vermijden en de goede werking van
het product te garanderen.
Sluit de handdoekverwarmer niet aan als u bij het uitpakken of installeren van
het product uitwendige schade constateert. Als het netsnoer beschadigd

75
ELBA OVAL
NL
is, moet het worden vervangen door de fabrikant, zijn servicedienst of
bevoegd personeel om schade te voorkomen.
Het product niet sproeien of nat maken. Houd het product tijdens het
gebruik uit de buurt van brandbare materialen zoals gordijnen, meubels,
enz. Plaats geen andere voorwerpen dan niet-ontvlambare kleding,
handdoeken of stoffen op het product.
De handdoekverwarmer moet zo worden geïnstalleerd dat het stopcontact
altijd bereikbaar is. Het netsnoer mag tijdens het gebruik nooit in contact
komen met het product.
WAARSCHUWING - Raak het product nooit aan met natte
handen of andere natte delen van het lichaam.
WAARSCHUWING - Delen van dit product kunnen zeer heet
worden en brandwonden veroorzaken. Bijzondere aandacht
moet worden besteed aan de aanwezigheid van kinderen en
kwetsbare personen.
Inhoud
1. Technische specicaties.......................................................................................................................76
2. Installatie van Rointe handdoekrekken.............................................................................................80
2.1. Montage-instructies....................................................................................................................80
2.2. Aansluitinstructies..................................................................................................................80
2.3. Specieke voorschriften voor badkamers...............................................................................81
3. Bedieningspaneel beschrijving en functies............................................................................................... 82
3.1. Bedieningspaneel............................................................................................................................. 82
3.2. Aan-/Uitknop en Stand-by......................................................................................................... 82
3.3. Ingestelde temperatuurselectie............................................................................................. 82
3.4. Verbruiksidenticatie.............................................................................................................. 83
3.5. Toetsenpaneel vergrendelen............................................................................................................. 83
3.6. MAX POWER modus....................................................................................................................... 83
3.7. Afstandsbediening................................................................................................................ 84
3.8. Probleemoplossing..................................................................................................................... 85
4. Onderhoud en reiniging........................................................................................................................85
5. Garantie.....................................................................................................................................................86
6. Hoe u uw productgarantie registreert.....................................................................................................88
7. ERP richtlijn (EU) 2015/1188.....................................................................................................90

76
1. Technische specificaties (Modellen 400, 450, 500 en 550)
MODEL - Breedte 400
WIT
TELV*40B077 TELV*40B112 TELV*40B150 TELV*40B172
CHROOM
TELV*40C077 TELV*40C112 TELV*40C150 TELV*40C172
AFMETINGEN
Breedte (mm) 400 400 400 400
Hoogte zonder bedieningspaneel (mm) 770 1.120 1.500 1.720
Hoogte met bedieningspaneel (mm) 865 1.215 1.595 1.815
Diepte (mm) 50 50 50 50
Geïnstalleerde diepte (mm) 100 100 100 100
MECHANISCHE EIGENSCHAPPEN
Verwarmingselement van roestvrij staal
Thermische vloeistof
Ovaal bedieningspaneel
Infrarood afstandsbediening
Afwerking
Wit RAL 9016
Chroom
ELEKTRISCHE EIGENSCHAPPEN
Nominaal vermogen (W)
Wit 300 500 750 1.000
Chroom 300 300 500 750
Spanning (V) 230 V ~ 230 V ~ 230 V ~ 230 V ~
Stroomsterkte (A)
Wit 1,3 2,2 3,2 4,4
Chroom 1,3 1,3 2,2 3,2
Klasse II
VEILIGHEID & INSTALLATIE
Inclusief montageset
Veiligheidsthermostaat
Beschermingsklasse IP 44 IP 44 IP 44 IP 44

77
ELBA OVAL
NL
MODEL - Breedte 450
WIT
TELV*45B077 TELV*45B112 TELV*45B150 TELV*45B172
CHROOM
TELV*45C077 TELV*45C112 TELV*45C150 TELV*45C172
AFMETINGEN
Breedte (mm) 450 450 450 450
Hoogte zonder bedieningspaneel (mm) 770 1.120 1.500 1.720
Hoogte met bedieningspaneel (mm) 865 1.215 1.595 1.815
Diepte (mm) 50 50 50 50
Geïnstalleerde diepte (mm) 100 100 100 100
MECHANISCHE EIGENSCHAPPEN
Verwarmingselement van roestvrij staal
Thermische vloeistof
Ovaal bedieningspaneel
Infrarood afstandsbediening
Afwerking
Wit RAL 9016
Chroom
ELEKTRISCHE EIGENSCHAPPEN
Nominaal vermogen (W)
Wit 300 500 750 1.000
Chroom 300 300 500 750
Spanning (V) 230 V ~ 230 V ~ 230 V ~ 230 V ~
Stroomsterkte (A)
Wit 1,3 2,2 3,2 4,4
Chroom 1,3 1,3 2,2 3,2
Klasse II
VEILIGHEID & INSTALLATIE
Inclusief montageset
Veiligheidsthermostaat
Beschermingsklasse IP 44 IP 44 IP 44 IP 44

78
MODEL - Breedte 500
WIT
TELV*50B077 TELV*50B112 TELV*50B150 TELV*50B172
CHROOM
TELV*50C077 TELV*50C112 TELV*50C150 TELV*50C172
AFMETINGEN
Breedte (mm) 500 500 500 500
Hoogte zonder bedieningspaneel (mm) 770 1.120 1.500 1.720
Hoogte met bedieningspaneel (mm) 865 1.215 1.595 1.815
Diepte (mm) 50 50 50 50
Geïnstalleerde diepte (mm) 100 100 100 100
MECHANISCHE EIGENSCHAPPEN
Verwarmingselement van roestvrij staal
Thermische vloeistof
Ovaal bedieningspaneel
Infrarood afstandsbediening
Afwerking
Wit RAL 9016
Chroom
ELEKTRISCHE EIGENSCHAPPEN
Nominaal vermogen (W)
Wit 300 500 750 1.000
Chroom 300 300 500 750
Spanning (V) 230 V ~ 230 V ~ 230 V ~ 230 V ~
Stroomsterkte (A)
Wit 1,3 2,2 3,2 4,4
Chroom 1,3 1,3 2,2 3,2
Klasse II
VEILIGHEID & INSTALLATIE
Inclusief montageset
Veiligheidsthermostaat
Beschermingsklasse IP 44 IP 44 IP 44 IP 44

79
ELBA OVAL
NL
MODEL - Breedte 550
WIT
TELV*55B077 TELV*55B112 TELV*55B150 TELV*55B172
CHROOM
TELV*55C077 TELV*55C112 TELV*55C150 TELV*55C172
AFMETINGEN
Breedte (mm) 550 550 550 550
Hoogte zonder bedieningspaneel (mm) 770 1.120 1.500 1.720
Hoogte met bedieningspaneel (mm) 865 1.215 1.595 1.815
Diepte (mm) 50 50 50 50
Geïnstalleerde diepte (mm) 100 100 100 100
MECHANISCHE EIGENSCHAPPEN
Verwarmingselement van roestvrij staal
Thermische vloeistof
Ovaal bedieningspaneel
Infrarood afstandsbediening
Afwerking
Wit RAL 9016
Chroom
ELEKTRISCHE EIGENSCHAPPEN
Nominaal vermogen (W)
Wit 300 500 750 1.000
Chroom 300 300 500 750
Spanning (V) 230 V ~ 230 V ~ 230 V ~ 230 V ~
Stroomsterkte (A)
Wit 1,3 2,2 3,2 4,4
Chroom 1,3 1,3 2,2 3,2
Klasse II
VEILIGHEID & INSTALLATIE
Inclusief montageset
Veiligheidsthermostaat
Beschermingsklasse IP 44 IP 44 IP 44 IP 44

80
2. Installatie van Rointe handdoekrekken
2.1. Montage-instructies
In de verpakking vindt u een bevestigingsset. Hieronder vindt u de instructies:
1. Kies het juiste deel van de muur.
2. Plaats het montagesjabloon op de muur en markeer de plaatsen voor de gaten.
3. Verwijder het sjabloon en maak de gaten in de muur.
4. Steek de rawlpluggen in de gemaakte gaten.
5. Schroef de kunststof sluiting met de 5,5 x 50 mm schroef aan de muur vast.
6. Schroef de twee beugels voor het ondersteunen van het product en de plastic sluiting aan de
Horizontale buis van het product zoals in guur 1 met de 8 x 26 mm schroef.
7. Steek wat u in sectie 6 hebt geassembleerd in het plastic stuk. Goed vastzetten met de 5 x 12
mm schroef.
8. Plaats de hoes op het stuk dat het product ondersteunt.
Nº. ITEM
1
10 x 40 mm Rawlplug
2
Beugel
3
5,5 x 50 mm schroef
4
5 x 12 mm schroef
5
Beugel inzetstuk
6
Beugelkop
7
8 x 26 mm schroef
8
Dop
9
Product
2.2. Aansluitinstructies
Bij de aansluiting op het elektriciteitsnet moet rekening worden gehouden met de spanning die staat
vermeld op het technische gegevenslabel van het product.
Dit product is ontworpen om permanent te worden geïnstalleerd in verbinding met vaste voorzieningen.
Het voedingscircuit van het product moet een meerpolige stroomonderbreker hebben met een afstand
van minimaal 3 mm tussen de contacten.
Het product moet, indien mogelijk, worden geïnstalleerd uit de buurt van tochtbronnen (ramen, deuren)
of andere zaken die de werking ervan kunnen beïnvloeden. Op deze manier wordt de temperatuur
niet beïnvloed. Plaats voorwerpen die de luchtstroom kunnen verhinderen (meubels, fauteuils) op 50
cm afstand van de voorkant van het product.
1
5

81
ELBA OVAL
NL
Het product mag nooit direct onder een stopcontact worden geïnstalleerd. Het onderste deel van
het bedieningspaneel moet minimaal 15 cm van de vloer worden geplaatst. Als de voedingskabel
beschadigd is, moet deze voor elk product worden vervangen door een specieke kabel. De vervanging
van de kabel moet worden gedaan door de fabrikant, diens klantenservice of gekwaliceerd personeel.
De technische specicaties van uw product staan op het technische gegevenslabel.
OK
BELANGRIJK - Dit product mag nooit worden geïnstalleerd met het
bedieningspaneel aan de bovenzijde. Dit product mag niet horizontaal
worden geïnstalleerd. Gebruik bij de installatie wiggen zodat het
bedieningspaneel niet in contact komt met de vloer.
2.3. Specifieke voorschriften voor badkamers
Dit toestel voldoet aan de veiligheidsnormen van KLASSE II (dubbele isolatie). Hij kan worden
geïnstalleerd in zone 2 en 3, posities A en B, volgens de onderstaande regels:
• In badkamers mag de handdoekbeugel nooit zo worden geïnstalleerd dat het bedieningspaneel
kan worden bereikt door een persoon in de badkuip of douche. Het bedieningspaneel moet zich
op een afstand van minimaal 600 mm van elke natte zone bevinden. De romp van het product
mag in zone 2 worden geplaatst als het bedieningspaneel zich in zone 3 bevindt.
• In een keuken of badkamer moet de handdoekbeugel ten minste 25 cm boven de vloer worden
geplaatst.

82
3. Bedieningspaneel beschrijving en functies
3.1. Bedieningspaneel
Het bedieningspaneel is gemaakt met 7 LED lampjes en 4 mechanische knoppen met de volgende
functies:
Aan-/Uitknop / Stand-by / Bevestigknop
Temperatuur verhogen knop
Temperatuur verlagen knop
Max power knop
Infraroodsensor
1 2 3 4 5 6
7
3.2. Aan-/Uitknop en Stand-by
Druk eenmaal op de knop om het product aan te zetten. Druk nogmaals op de knop om het
product uit te zetten.
3.3. Ingestelde temperatuurselectie
U kunt de ingestelde temperatuur van het handdoek radiator reguleren met de en knoppen. Op
de knop drukken verhoogt de ingestelde temperatuur. Op dezelfde manier zorgt het drukken op
de knop voor verlaging van de ingestelde temperatuur.
De minimale werkende temperatuur is 7ºC en de maximale is 30ºC.
De standaardtemperatuur na fabricatie is 21ºC.De 6 LED lampjes, die zich bovenaan het
bedieningspaneel bevinden, geven de ingestelde temperatuur aan.
Indicator LED Temperatuur Indicator LED Temperatuur
1 LED
Led 1: korte
its elke 2
seconden
Led 2: UIT
Led 3: UIT
Led 4: UIT
Led 5: UIT
Led 6: UIT
7ºC
1 LED
Led 1: AAN
Led 2: UIT
Led 3: UIT
Led 4: UIT
Led 5: UIT
Led 6: UIT
15ºC

83
ELBA OVAL
NL
Indicator LED Temperatuur Indicator LED Temperatuur
2 LED
Led 1: AAN
Led 2: AAN
Led 3: UIT
Led 4: UIT
Led 5: UIT
Led 6: UIT
18ºC
3 LED
Led 1: AAN
Led 2: AAN
Led 3: AAN
Led 4: UIT
Led 5: UIT
Led 6: UIT
21ºC
4 LED
Led 1: AAN
Led 2: AAN
Led 3: AAN
Led 4: AAN
Led 5: UIT
Led 6: UIT
24ºC
5 LED
Led 1: AAN
Led 2: AAN
Led 3: AAN
Led 4: AAN
Led 5: AAN
Led 6: UIT
27ºC
6 LED
Led 1: AAN
Led 2: AAN
Led 3: AAN
Led 4: AAN
Led 5: AAN
Led 6: AAN
30ºC
3.4. Verbruiksidentificatie
De laatste LED temperatuurindicator knippert om aan te geven dat het verwarmingselement
geactiveerd is en dat het product stroom verbruikt.
3.5. Toetsenpaneel vergrendelen
Door de en knoppen samen 3 seconden lang in te houden, kunt u het toetsenpaneel van het
bedieningspaneel vergrendelen/ontgrendelen. Indien er een knop wordt ingedrukt terwijl het paneel
vergrendeld is, zullen alle LED lampjes tweemaal knipperen.
Vanwege veiligheidsredenen reageert de aan-/uitknop
wél, zelfs als het paneel vergrendeld is.
Om het product aan of uit te zetten terwijl het paneel vergrendeld is, houd de knop 3 seconden
lang ingedrukt.
3.6. MAX POWER modus
De MAX POWER modus activeert het verwarmingselement van de handdoek radiator om op maximale
kracht te verwarmen, ongeacht de huidige temperatuur. Om deze functie op het bedieningspaneel
te activeren, druk op de knop. U kunt deze modus ook activeren wanneer het product uitstaat.
Eenmaal op
drukken activeert deze modus 15 minuten lang. Als u binnen twee seconden
nogmaals op drukt, wordt de volgende tijdsduur (30 minuten) geactiveerd. Iedere volgende druk

84
zal andere tijdsperiodes starten volgens onderstaande tabel:
Indicator LED Tijd Indicator LED Tijd
1 LED
Led 1: Knipperend
Led 2: UIT
Led 3: UIT
Led 4: UIT
Led 5: UIT
Led 6: UIT
Led 7: AAN
15 minuten
2 LED
Led 1: Knipperend
Led 2: Knipperend
Led 3: UIT
Led 4: UIT
Led 5: UIT
Led 6: UIT
Led 7: AAN
30 minuten
3 LED
Led 1: Knipperend
Led 2: Knipperend
Led 3: Knipperend
Led 4: UIT
Led 5: UIT
Led 6: UIT
Led 7: AAN
45 minuten
4 LED
Led 1: Knipperend
Led 2: Knipperend
Led 3: Knipperend
Led 4: Knipperend
Led 5: UIT
Led 6: UIT
Led 7: AAN
60 minuten
5 LED
Led 1: Knipperend
Led 2: Knipperend
Led 3: Knipperend
Led 4: Knipperend
Led 5: Knipperend
Led 6: UIT
Led 7: AAN
90 minuten
6 LED
Led 1: Knipperend
Led 2: Knipperend
Led 3: Knipperend
Led 4: Knipperend
Led 5: Knipperend
Led 6: Knipperend
Led 7: AAN
120 minuten
Indien u de knop 7 keer indrukt, zult u terugkeren naar het startpunt (15 minuten actief). De LED
lampjes tellen de tijd af, waarbij elk lampje uitgaat na een bepaalde tijd. Zodra de hele tijd afgelopen
is, zal het product automatisch terugkeren naar de vorige werkmodus, of worden uitgezet als deze
hiervoor op stand-by stond.
3.7. Afstandsbediening
(optioneel)
De handdoek radiatoren met het OVAL bedieningspaneel kunnen worden bestuurd met de Rointe AIR
en BASIC Afstandsbedieningen (apart verkocht). Het gebruik van een afstandsbediening vergroot de
functies van de handdoek radiator op de volgende manieren:

85
ELBA OVAL
NL
• Complete controle zonder het bedieningspaneel te hoeven gebruiken.
• Nauwkeurigere ingestelde temperaturen (stapjes van een halve graden tussen de 15 en 30 ºC,
bv. 19,5 ºC).
• 24 uur per dag, 7 dagen per week gepersonaliseerde programmering, of één van de 4 vooraf
ingestelde programma’s op de BASIC Control afstandsbediening.
Ga naar ons webportaal of de overeenkomende gebruikshandleidingen om meer te weten te komen
over Rointe afstandsbedieningen en hun functies.
BELANGRIJK: Wanneer het product via een Rointe afstandsbediening geprogrammeerd
is, knippert LED nummer 7 (komt overeen met de MAX POWER modus).
WAARSCHUWING: Als de handdoek radiator automatisch geprogrammeerd is en u
deze in handmatige modus wilt gebruiken, dient u de aan-/uitknop 3 seconden lang
in te drukken (wanneer het product ontgrendeld is). Het product volgt niet langer een
programma, waardoor u in staat bent om het handmatig te bedienen middels de
knoppen op het bedieningspaneel.
3.8. Probleemoplossing
Onder normale werkomstandigheden van de handdoek radiator, worden enige defecten aangegeven
via de LED lampjes op het product. Zie de tabel hieronder om de foutcodes te identiceren:
Indicator Code Fout Oplossing
LED 6
knipperend
Led 1: UIT
Led 2: UIT
Led 3: UIT
Led 4: UIT
Led 5: UIT
Led 6: Knipperend
Led 7: UIT
Temperatuursensor
defect vanwege
kortsluiting of een
open sensor.
Neem alstublieft contact op
met de Rointe Technische
Supportafdeling door 010
742 00 46 te bellen.
4. Onderhoud en reiniging
Het product heeft geen onderhoud nodig. We raden aan om alle onderdelen van het product schoon
te houden (achter, onder, bovenste vinnen, enz.). Gebruik geen schuurmiddel op de stalen behuizing.

86
Maak het schoon met een vochtige doek en een ph-neutrale zeep, en het bedieningspaneel met een
droge doek.
Europese richtlijn 2012/19/EU
Volgens de europese richtlijn 2012/19/eu betreffende afgedankte elektrische en elektronische
apparatuur (aeea) mag het product niet in de gebruikelijke gemeentelijke afvalbakken en containers
worden afgevoerd. Ze moeten worden gescheiden om de terugwinning en recycling van alle
componenten en materialen te optimaliseren en de impact op de menselijke gezondheid en het
milieu te verminderen. Het symbool van de container die over een horizontale lijn is doorgekruist, is
op alle rointe-producten aangebracht om de consument eraan te herinneren dat ze bij verwijdering
gescheiden moeten worden gehouden.
De consument dient contact op te nemen met de lokale overheid of het oorspronkelijke verkooppunt
voor meer informatie over de juiste verwijdering van dit product.
5. Garantie
In deze sectie beschrijven we hierbij de garantievoorwaarden die de koper verwerft bij aankoop
van een nieuw Rointe-product. Deze voorwaarden zijn in overeenstemming met alle rechten die zijn
uitgelegd in de geldende nationale wetgeving, evenals alle aanvullende rechten en garanties die door
Rointe worden geboden.
5.1. Elk incident dat u in uw Rointe-product ontdekt, kan door de productverkoper of snel door de
fabrikant worden opgelost. Neem voor technische ondersteuning contact op met Rointe door te
bellen naar (NEDERLAND) 010 742 00 46. Als u in een ander land woont, raadpleeg dan het juiste
telefoonnummer op de achterkant van deze handleiding.
ELBA OVAL
TELVN45B077
300 W
SERIENUMMER
U moet de productreferentie (op het etiket met productkenmerken), het serienummer, het
aankoopbewijs en het soort incident vermelden wanneer u contact met ons opneemt, zodat we de
garantie kunnen controleren. Voeg bovendien een kopie van de productfactuur toe.
5.2. Rointe garandeert dat er geen materiële gebreken zijn in het ontwerp of de fabricage op het
moment van de oorspronkelijke aanschaf en geeft garantie op de stalen behuizing voor een periode
van 120 maanden en 24 maanden voor alle elektronische en elektrische componenten.
5.3. Als het product tijdens de garantieperiode niet correct werkt bij normaal gebruik en er een
ontwerp-, materiaal- of fabricagefout wordt geconstateerd, zal Rointe het product repareren of
vervangen naar eigen inzicht, in overeenstemming met de algemene voorwaarden als volgt:

87
ELBA OVAL
NL
5.3.1. De garantie is alleen van toepassing als de originele garantie is afgegeven door de verkoper
en deze garantie correct is ingevuld inclusief productreferentie, serienummer (aangegeven op het
productlabel met daarop de technische kenmerken), aankoopdatum en de stempel van de verkoper.
Rointe behoudt zich het recht voor om de garantieservice te weigeren wanneer deze informatie is
verwijderd of gewijzigd na de oorspronkelijke aankoop van het product.
5.3.2. De garantie is alleen van toepassing op die gevallen die betrekking hebben op materiaal-,
ontwerp- en fabricagefouten, en dekt in geen geval schade aan het product om de volgende redenen:
5.3.2.1 Onjuist gebruik van het product, d.w.z. gebruikt voor andere doeleinden die niet worden
opgevat als normaal gebruik of voor het niet respecteren van de gebruiksinstructies en onderhoud
instructies gegeven door Rointe, evenals onjuiste installatie of gebruik van het product dat mogelijk
niet voldoet aan de huidige technische veiligheidsnormen.
Corrosie veroorzaakt door directe blootstelling aan zout water valt niet onder de garantie. Als het
product niet verder dan 200 meter van de kust wordt geïnstalleerd, wordt de garantie voor schade
veroorzaakt door corrosie met 50% verminderd.
5.3.2.2 Ongeautoriseerde reparaties uitgevoerd door ongeautoriseerde technici of het openen van
het product door ongeautoriseerde mensen.
5.3.2.3 Alle ongevallen die geacht worden buiten de controle van Rointe te vallen, zoals blikseminslag,
branden, overstromingen, openbare onrust, enz.6.3.3. Eventuele reparaties of vervangingen die
onder deze garantie vallen, staan geen aanvullingen of nieuwe garantietermijnen toe.
5.3.4. Alle reparaties of vervangingen die onder deze garantie vallen, moeten onderdelen zijn die
functioneel gelijkwaardig zijn. De defecte onderdelen of onderdelen die zijn verwijderd of vervangen,
worden eigendom van Rointe.
5.4. De technische dienst van Rointe zal u adviseren als u onderdelen moet kopen die niet onder de
garantie of buiten de garantie vallen.
5.5. Deze garantie heeft geen invloed op de wettelijke rechten van de koper zoals bepaald in de
huidige nationale wetgeving, noch op die rechten jegens de distributeur of installateur die naar voren
zouden kunnen komen in overeenstemming met het koopcontract.
5.6. Bij gebrek aan toepasselijke nationale wetgeving, prevaleert deze garantie en kan deze worden
opgevat als de enige bescherming van de koper. Rointe, diens kantoren, distributeurs en installateurs
kunnen niet verantwoordelijk worden gehouden voor eventuele accidentele schade die ontstaat als
gevolg van overtreding van regels die impliciet verband houden met dit product.

88
6. Hoe u uw productgarantie registreert
BELANGRIJK: het is belangrijk om uw ROINTE-product te registreren als onderdeel van onze
garantieservice, voor geval u een claim wilt indienen.
U kunt uw ROINTE-product op de volgende manieren registreren:
WEBSITE
1. Ga naar https://rointe.com/nl/uw-garantie-registeren/.
2. Log in op uw bestaande account of maak een nieuwe account aan als dat nodig is.
3. Klik op “Mijn producten”.
4. Voer uw productreferentie in (alfanumeriek en in hoofdletters
5. Voer uw serienummer in (26 cijfers op het metalen plaatje op uw product en begint met 843).
6. Upload uw aankoopbewijs, zoals factuur in pdf-, jpeg- of png-indeling. Dit is niet verplicht,
maar hierdoor zorgt u ervoor dat uw garantieperiode klopt.
7. Klik op “Registreren”.
8. Gefeliciteerd! Uw product is nu geregistreerd.
EMAIL
1. Stuur een e-mail naar [email protected] met de volgende informatie:
• Klantnaam
• Adres en postcode
• Telefoonnummer en e-mailadres
• Productreferentie (zoals hierboven beschreven)
• Serienummer (zoals hierboven beschreven)
• Aankoopdatum van het product en aankoopbewijs (zoals hierboven beschreven
2. Ons technische ondersteuningsteam bevestigt uw productregistratie en vraagt om enige
aanvullende informatie via e-mail.
POST
1. Post de informatie zoals in het gedeelte EMAIL hierboven naar:
• INDUSTRIAS ROYAL TERMIC, S.L. t/a Rointe, C/E Parcela 43, 30140, Santomera
(SPANJE)
2. Zorg ervoor dat u een bewijs van verzending vraagt.

89
ELBA OVAL
NL

90
7. ERP RICHTLIJN (EU) 2015/1188
ITEM
Wit
Symbool Eenhed
TELV***B077 TELV***B112 TELV***B150 TELV***B172
Chroom
TELV***C077 TELV***C112 TELV***C150 TELV***C172
WARMTE-OUTPUT
Nominale warmte-output
Wit
P
nom kW 0,30 0,50 0,75 1,00
Chroom
P
nom kW 0,30 0,30 0,50 0,75
Minimale warmte-output
P
min kW n/a n/a n/a n/a
Maximale continue warmte-output
Wit
P
max,c kW 0,30 0,50 0,75 1,00
Chroom
P
max,c kW 0,30 0,30 0,50 0,75
AANVULLEND ELEKTRICITEITSVERBRUIK
Bij nominale warmte-output
Wit
el
MAX kW 0,30 0,50 0,75 1,00
Chroom
el
MAX kW 0,30 0,30 0,50 0,75
Bij minimale warmte-output
Wit
el
MIN kW 0,30 0,50 0,75 1,00
Chroom
el
MIN kW 0,30 0,30 0,50 0,75
In stand-bymodus
el
SB kW 0,002 0,002 0,002 0,002

91
ELBA OVAL
NL
TYPE WARMTE-OUTPUT/KAMERTEMPERATUURBEHEERSING (SELECTEER ER EEN)
Warmteoutput enkel niveau, geen interne kamertemperatuurbeheersing — — — — — —
Twee of meer handmatige niveaus, zonder interne kamertemperatuurbeheersing — — — — — —
Interne temperatuurbeheersing door mechanische thermostaat — — — — — —
Met elektronische interieur temperatuurbeheersing — — — — — —
Elektronische indoor temperatuurbeheersing en dagelijkse timer — — — — — —
Elektronische indoor temperatuurbeheersing en wekelijkse timer — —
ANDERE CONTROLE-OPTIES (MEERDERE SELECTIES MOGELIJK)
Interieur temperatuurbeheersing met aanwezigheidsdetectie — — — — — —
Interieur temperatuurbeheersing met open ramen detectie — —
Met afstandsbediening / afstandsoptie — —
Met aanpasbare opstartcontrole — —
Met tijdslimitatie voor bediening — —
Met zwarte lamp sensor — — —
SEIZOENSGEBONDEN ENERGIEZUINIGHEID RUIMTEVERWARMING
n
s — 39,0% 39,0% 39,0% 39,0%

92

93
NOTES

94

95
NOTES

Rointe United Kingdom
Hampton Business Park, Club Way,
Peterborough PE7 8JA
T. 0203 321 5928
Rointe Ireland
Blackrock, County Louth
T. 01 553 0523
Rointe España & Portugal
P.I. Vicente Antolinos - C/ E, p. 43, 30140 Murcia
T. (ES) 900 103 061 / T. (PT) 221 200 114
Rointe France
6 Rue Duret, 75116 Paris
T. 01 73 05 70 01
Rointe Nederland
3197 LG Botlek, RT
T. 010 742 00 46
Copyright © Rointe Heating 2021.
All rights reserved. As part of our policy of continuous
improvement, we reserve the right to alter or modify
any product or specifications without prior notice.
This also applies to products that have already been
ordered, provided that such alterations can be made
without subsequent changes to the already agreed
specifications. We cannot accept responsibility for any
errors in catalogues or other printed materials.
IMESPMU21V3-OVAL
Documenttranscriptie
Elba electric oval Models / Modelos / Modèle / Modellen PRO 400 | 450 | 500 | 550 EN INSTRUCTIONS & INSTALLATION GUIDE Page 02 FR MANUEL D’INSTALLATION ET D’UTILISATION Page 56 ES MANUAL DE INSTALACIÓN Y USO Página 20 NL INSTALLATIE- EN GEBRUIKERSHANDLEIDING Bladzijde 74 PT MANUAL DE INSTALAÇÃO E UTILIZAÇÃO Página 38 Installation & safety precautions (EN 60335 Standards) Before switching on the product, please read the “Installation & Safety Precautions” in detail first to ensure the correct operation of the product. Installation precautions The product is designed for household or residential use. You are advised to have the product installed by an authorized professional installer. Make sure the product is properly connected to 230V. ATTENTION Children under 3 years of age should be kept out of reach of the appliance unless continuously supervised. Children from the age of 3 years to 8 years should only switch the appliance on/off when it has been placed or installed in its normal intended use position and when they have been given supervision or instruction concerning use of the appliance in a safe way and understand the hazards involved. Children from 3 years of age to 8 years of age should not plug in, adjust or clean the appliance or carry out maintenance operations. This appliance can be used by children aged from 8 years and above and persons with reduced physical sensory or mental capabilities or lack of experience and knowledge if they are supervised or have been given instruction concerning use of the appliance in a safe way and understand the hazards involved. Children should not play with the appliance. Cleaning and user maintenance should not be carried out by children without supervision. Children must be supervised at all times to ensure that they do not interfere with the product. This product is filled with a precise amount of special oil that does not need any maintenance. Any repairs requiring the opening of the oil tank must only be done by an official Rointe installer or its after-sales service personnel, who should also be notified should an oil leak be noticed. The regulations on discarding oil when the heater is being disposed of must be observed. Do not cut the power supply cable under any circumstances in order to avoid electrical risks and to guarantee the correct operation of the towel rail. Do not switch on the product if you notice any external damage when unpacking or installing the towel rail. If the power cable is damaged, it must be replaced by the manufacturer, its after-sales service or authorized personnel in order to avoid any damage. 2 ELBA OVAL EN Do not spray or wet the product. During operation, keep the product away from combustible materials such as curtains, furniture, etc. Do not place anything other than clothes, towels or non-flammable fabrics on the product. The towel rail must be installed in such a way that the power plug is always accessible. The power cable must never be in contact with the product during operation. CAUTION - Never touch the product with wet hands or any wet body parts. CAUTION - Some parts of this product may become very hot and cause burns. Particular care should be taken when children and vulnerable persons are present. Contents 1. Technical Specifications...........................................................................................................................4 2. Product Installation..................................................................................................................................8 2.1. Mounting...........................................................................................................................................8 2.2. Connecting instructions..................................................................................................................8 2.3. Specific regulations for bathrooms...............................................................................................9 3. Control panel description and functions...............................................................................................10 3.1. Control panel........................................................................................................................................10 3.2. Power and Stand-by........................................................................................................................10 3.3. Set temperature selection..............................................................................................................10 3.4. Consumption identification................................................................................................................11 3.5. Keypad lock.......................................................................................................................................11 3.6. MAX POWER mode..........................................................................................................................11 3.7. Remote control.....................................................................................................................................12 3.8. Troubleshooting.............................................................................................................................13 4. Maintenance & Cleaning.........................................................................................................................14 5. Guarantee................................................................................................................................................14 6. How to register your guarantee...............................................................................................................16 7. ERP Directive (EU) 2015/1188..................................................................................................................18 3 1. Technical specifications (Models 400, 450, 500 & 550) WHITE TELV*40B077 TELV*40B112 TELV*40B150 TELV*40B172 CHROME TELV*40C077 TELV*40C112 TELV*40C150 TELV*40C172 Width (mm) 400 400 400 400 Height without control panel (mm) 770 1,120 1,500 1,720 Height with control panel (mm) 865 1,215 1,595 1,815 Depth (mm) 50 50 50 50 Installed depth (mm) 100 100 100 100 Stainless steel heating element Thermal fluid Oval control panel Infrared remote control MODEL - Width 400 DIMENSIONS MECHANICAL CHARACTERISTICS White RAL 9016 Finish Chrome ELECTRICAL CHARACTERISTICS White 300 500 750 1,000 Chrome 300 300 500 750 230 V ~ 230 V ~ 230 V ~ 230 V ~ White 1.3 2.2 3.2 4.4 Chrome 1.3 1.3 2.2 3.2 Installation kit included Safety thermostat Protection grade IP 44 IP 44 IP 44 IP 44 Nominal power (W) Voltage (V) Current (A) Class II SAFETY & INSTALLATION 4 EN ELBA OVAL WHITE TELV*45B077 TELV*45B112 TELV*45B150 TELV*45B172 CHROME TELV*45C077 TELV*45C112 TELV*45C150 TELV*45C172 Width (mm) 450 450 450 450 Height without control panel (mm) 770 1,120 1,500 1,720 Height with control panel (mm) 865 1,215 1,595 1,815 Depth (mm) 50 50 50 50 Installed depth (mm) 100 100 100 100 Stainless steel heating element Thermal fluid Oval control panel Infrared remote control MODEL - Width 450 DIMENSIONS MECHANICAL CHARACTERISTICS White RAL 9016 Finish Chrome ELECTRICAL CHARACTERISTICS White 300 500 750 1,000 Chrome 300 300 500 750 230 V ~ 230 V ~ 230 V ~ 230 V ~ White 1.3 2.2 3.2 4.4 Chrome 1.3 1.3 2.2 3.2 Installation kit included Safety thermostat Protection grade IP 44 IP 44 IP 44 IP 44 Nominal power (W) Voltage (V) Current (A) Class II SAFETY & INSTALLATION 5 WHITE TELV*50B077 TELV*50B112 TELV*50B150 TELV*50B172 CHROME TELV*50C077 TELV*50C112 TELV*50C150 TELV*50C172 Width (mm) 500 500 500 500 Height without control panel (mm) 770 1,120 1,500 1,720 Height with control panel (mm) 865 1,215 1,595 1,815 Depth (mm) 50 50 50 50 Installed depth (mm) 100 100 100 100 Stainless steel heating element Thermal fluid Oval control panel Infrared remote control MODEL - Width 500 DIMENSIONS MECHANICAL CHARACTERISTICS White RAL 9016 Finish Chrome ELECTRICAL CHARACTERISTICS White 300 500 750 1,000 Chrome 300 300 500 750 230 V ~ 230 V ~ 230 V ~ 230 V ~ White 1.3 2.2 3.2 4.4 Chrome 1.3 1.3 2.2 3.2 Installation kit included Safety thermostat Protection grade IP 44 IP 44 IP 44 IP 44 Nominal power (W) Voltage (V) Current (A) Clase II SAFETY & INSTALLATION 6 EN ELBA OVAL WHITE TELV*55B077 TELV*55B112 TELV*55B150 TELV*55B172 CHROME TELV*55C077 TELV*55C112 TELV*55C150 TELV*55C172 Width (mm) 550 550 550 550 Height without control panel (mm) 770 1,120 1,500 1,720 Height with control panel (mm) 865 1,215 1,595 1,815 Depth (mm) 50 50 50 50 Installed depth (mm) 100 100 100 100 Stainless steel heating element Thermal fluid Oval control panel Infrared remote control MODEL - Width 550 DIMENSIONS MECHANICAL CHARACTERISTICS White RAL 9016 Finish Chrome ELECTRICAL CHARACTERISTICS White 300 500 750 1,000 Chrome 300 300 500 750 230 V ~ 230 V ~ 230 V ~ 230 V ~ White 1.3 2.2 3.2 4.4 Chrome 1.3 1.3 2.2 3.2 Installation kit included Safety thermostat Protection grade IP 44 IP 44 IP 44 IP 44 Nominal power (W) Voltage (V) Current (A) Class II SAFETY & INSTALLATION 7 2. Product installation 2.1. Mounting instructions Inside the packaging you will find a fixing kit. Please find the instructions below: 1. Choose the right part of the wall. 2. Place the mounting stencil on the wall, marking the places for the holes. 3. Remove the stencil and make the holes in the wall. 4. Insert the rawl plugs in the holes made. 5. Screw the plastic fastener to the wall with the 5.5 x 50 mm screw. 6. Screw the two brackets for supporting the product and the plastic fastener to the horizontal tube of the product like in Figure 1 with the 8 x 26 mm screw. 7. Insert what you have assembled in Section 6 into the plastic piece and fix well with the 5 x 12 mm screw. 8. Place the cover on the piece supporting the product. NO. ELEMENT 1 10 x 40 mm Rawl Plug 2 Bracket 3 5.5 x 50 mm Screw 4 5 x 12 mm Screw 5 Bracket Insert 6 Bracket Head 7 8 x 26 mm Screw 8 Cap 9 Product 1 5 2.2. Connecting instructions Connection to the mains must be made observing the voltage stated on the product technical data label. This product is designed to be permanently installed connected to fixed facilities. The product power supply circuit must have an all-pole circuit breaker switch with a separation of at least 3 mm between the contacts. The product must be installed, if possible, away from any source of draughts (windows, doors) or any other thing which may affect its functioning. In this way, the temperature will not be affected. Place any object which might prevent the air flow (furniture, armchairs) 50 cm away from the front of the product. The product must never be installed immediately below a power point. The lower part of the control panel must be placed at least 15 cm from the floor. 8 ELBA OVAL EN For any product, if the power cable is damaged, it must be replaced by a specific cable. The replacement of the cable must be done by the Rointe after-sales service or qualified personnel. The technical specifications of your product appear on the technical data label. OK IMPORTANT - This product must never be installed with its control panel at the top. This product must not be installed horizontally. During installation, use wedges so that the control panel will not be in contact with the floor. 2.3. Specific Regulations for Bathrooms This product can be safety installed in Zones 3. For installations in Zones 2 (check the scheme below), please consider the following limitations: • In bathrooms, the product must never be installed in such a way that the control panel may be touched by someone in the bathtub or having a shower. The control panel should be located at least 600 mm distance from any wet areas. The body of the product can be placed in Zones 2 if the control panel is located inside Zone 3. • In a kitchen or bathroom, the body of the product must be placed at least 25 cm from the floor. 9 3. Control panel description and functions 3.1. Control panel The control panel is made up of 7 LEDs and 4 mechanical buttons with the following functionalities: 1 2 3 4 5 6 Power / Stand-by / Confirmation button Increase temperature button Decrease temperature button Maximum power button 7 Infrared sensor 3.2. Power and Stand-by To turn on the product, press the button once. To turn off the product, press the button again. 3.3. Set temperature selection You can regulate the set temperature of the towel rail by the buttons key increases the setpoint temperature. In the same way, pressing the temperature. and . Pressing the key reduces the setpoint The minimum operating temperature is 7ºC and the maximum is 30ºC. The factory set temperature is 21ºC. The 6 LED indicators, located in the upper part of the control panel, identify the established setpoint temperature. Iindicator 1 LED 10 LED Led 1: short blink every 2 seconds Led 2: OFF Led 3: OFF Led 4: OFF Led 5: OFF Led 6: OFF Temperature 7ºC Iindicator 1 LED LED Led 1: ON Led 2: OFF Led 3: OFF Led 4: OFF Led 5: OFF Led 6: OFF Temperature 15ºC ELBA OVAL Iindicator 2 LED 4 LED 6 LED LED Temperature Led 1: ON Led 2: ON Led 3: OFF Led 4: OFF Led 5: OFF Led 6: OFF Iindicator LED EN Temperature 18ºC Led 1: ON Led 2: ON Led 3: ON Led 4: OFF Led 5: OFF Led 6: OFF 21ºC Led 1: ON Led 2: ON Led 3: ON Led 4: ON Led 5: OFF Led 6: OFF 24ºC Led 1: ON Led 2: ON Led 3: ON Led 4: ON Led 5: ON Led 6: OFF 27ºC Led 1: ON Led 2: ON Led 3: ON Led 4: ON Led 5: ON Led 6: ON 30ºC 3 LED 5 LED 3.4. Consumption identification The last temperature indicator LED will flash to indicate the heating element is active and the product is consuming energy. 3.5. Keypad lock By pressing the and keys together for 3 seconds, you can lock/unlock the control panel keypad. If any key is pressed while the panel is locked, all the LEDs will flash twice. For safety reasons, the on/off button will respond even if the panel is locked. To switch the product on or off when the panel locked, press and hold the button for 3 seconds. 3.6. MAX POWER mode The MAX POWER mode activates the towel rail heating element to maximum power continuously regardless of the sensor reading. To activate this function from the control panel, press the button . You can also activate this mode, even when the product is switched off. Pressing once will activate this mode for 15 minutes. If you press (X) again within the next two seconds, the next period (30 minutes) will be activated. Consecutive presses will activate the following periods as shown in the table below: 11 Iindicator LED Time 1 LED Iindicator LED Time 2 LED Led 1: flashing Led 2: OFF Led 3: OFF Led 4: OFF Led 5: OFF Led 6: OFF Led 7: ON 15 minutes 3 LED Led 1: flashing Led 2: flashing Led 3: OFF Led 4: OFF Led 5: OFF Led 6: OFF Led 7: ON 30 minutes Led 1: flashing Led 2: flashing Led 3: flashing Led 4: flashing Led 5: OFF Led 6: OFF Led 7: ON 60 minutes Led 1: flashing Led 2: flashing Led 3: flashing Led 4: flashing Led 5: flashing Led 6: flashing Led 7: ON 120 minutes 4 LED Led 1: flashing Led 2: flashing Led 3: flashing Led 4: OFF Led 5: OFF Led 6: OFF Led 7: ON 45 minutes 5 LED 6 LED Led 1: flashing Led 2: flashing Led 3: flashing Led 4: flashing Led 5: flashing Led 6: OFF Led 7: ON If you press the button 90 minutes 7 times, you will return to the starting point (activation for 15 minutes). The LEDs will work as a countdown, turning off as the time elapses. Once the time has elapsed, the product will automatically return to the previous mode or will switch off if it was already in stand-by. The MAX POWER mode can be stopped at any time by a short press on the button . The towel rail will return to its previous state. 3.7. Remote control (optional) The towel rails with the OVAL control panel can be controlled using the Rointe AIR and BASIC Control remotes (sold separately). The use of the remote control extends the functionality of the towel rail by allowing: 12 ELBA OVAL EN • Complete control without the need to use the control panel. • More accurate setpoint temperatures to be set (half a degree by half a degree between 15 and 30 ºC e.g. 19.5 ºC). • 24 hours a day, 7 days a week personalised programming or by using one of the 4 pre-installed programmes on the BASIC Control remote. To learn more about Rointe remote controls and their functions, go to our web portal or consult their user manual. IMPORTANT: When the product is programmed using a Rointe remote control, LED number 7 (corresponding to MAX POWER mode) will flash. WARNING: If the towel rail is automatically programmed and you wish to use it again in manual mode, you must hold down the on/off button for 3 seconds (with the product unlocked). The product will no longer be programmed and you will be able to control it manually using the buttons on the control panel. 3.8. Troubleshooting During normal operation of the towel rail, any malfunctions can be indicated by the LED indicators on the product. See table below to identify the error codes: Indicator LED 6 flashing Code Led 1: OFF Led 2: OFF Led 3: OFF Led 4: OFF Led 5: OFF Led 6: flashing Led 7: OFF Error Temperature sensor failure due to shortcircuit or open sensor. Solution Please contact the Rointe Technical Support department by calling our support team. 4. Maintenance & Cleaning The product does not require any type of maintenance. We recommend that all parts of the product are kept clean (behind, underneath, upper fins, etc.). Do not use any abrasive product on the steel main body. Clean it with a damp cloth and a pH neutral soap, and the control panel with a dry cloth. 13 European Directive 2012/19/UE Under the European Directive 2012/19/UE on waste electrical and electronic equipment (WEEE), the product cannot be disposed in the usual council bins and containers. They must be separated to optimize the recovery and recycling of all of the components and materials and reducing the impact to human health and the environment. The symbol of the container crossed out over a horizontal line is marked on all of Rointe products to remind the consumer of the obligation to separate them on disposal. The consumer should contact the local authority or original point of sale to learn more about the correct disposal of this product. 5. Guarantee In this section, we hereby describe the guarantee conditions which the buyer acquires on buying a new Rointe product. These conditions comply with all the rights construed in the national legislation in force, as well as any additional rights and guarantees which are offered by Rointe. 5.1. Any incident that you might detect in your Rointe product can be sorted by the product seller or quickly by the manufacturer. Please contact Rointe by telephoning (UK) 0203 321 5929 or (Ireland) 01 553 0523 for technical support. If you live in a different country, please check the correct phone number on the back of this manual. 300 W TELON45B077 ELBA 500 300W You will need to state the product reference (located on the label indicating product features), serial number, proof of purchase and the type of incident at hand when contacting us so that we can check the guarantee. In addition, please attach a copy of the product invoice. 5.2. Rointe guarantees that there are no material defects of design or manufacture at the time of original acquisition and guarantees the steel main body for a period of 120 months and 24 months for any electronic and electrical components. 5.3. If during the guarantee period, the product does not work correctly under normal use, and any design, material or manufacturing defect is found, Rointe will repair or substitute the product as it may see fit, in accordance with the terms and conditions as follows: 5.3.1. The guarantee is only applicable if the original guarantee is issued by the seller and when the said guarantee is filled in correctly including product reference, series number (marked on the product’s label indicating technical features), purchase date and the seller’s stamp. Rointe reserves the right to reject the guarantee service when this information has been removed or modified after the original product purchase. 14 ELBA OVAL EN 5.3.2. The guarantee only applies to those cases that concern material, design and manufacturing defects, and under no circumstances covers damage to the product for the following reasons: 5.3.2.1 Incorrect use of the product, i.e. used for other purposes that are not construed as its normal use or for not respecting the instructions of use and maintenance given by Rointe as well as incorrect installation or use of the product that may not comply with the current technical standards of safety. Corrosion caused by direct exposure to salt water is excluded from the guarantee. When the product is installed no more than 200m from the coast the guarantee for damages caused by corrosion the period will be reduced by 50%. 5.3.2.2 Any unauthorized repairs carried out by unauthorized technicians or opening of the product by unauthorized people. 5.3.2.3 Any accidents that are deemed outside the control of Rointe, such as lightning, fires, floods, public disorders, etc. 5.3.3. Any repairs or substitutions that are included in this guarantee do not allow any additions or new periods of guarantee. 5.3.4. Any repairs or substitutions covered under this guarantee must be parts that are functionally equivalent. The defective parts or parts removed or replaced shall become the property of Rointe. 5.4. The technical service of Rointe will advise you if you need to buy any parts not covered under the guarantee or out of guarantee. 5.5. This guarantee does not affect the buyer’s legal rights stipulated in the current national legislation, nor affects those rights against the distributor or installer that could come forth in compliance with the purchase contract. 5.6. In the absence of a national legal legislation applicable, this guarantee shall prevail and may be construed as the buyer’s only protection. Rointe, its offices, distributors and installers may not be held responsible for any accidental damage that emerges due to infringement of any rules implicitly related to this product. 15 6. How to register your product guarantee IMPORTANT: It’s important to register your ROINTE product as part of our guarantee service, in case you wish to make a claim. You can register your ROINTE product in the following ways: WEBSITE 1. Go to www.rointe.com/uk/register-your-guarantee/. 2. Login to your existing account or create a new account if you need to. 3. Click on “My products”. 4. Enter your product reference (alphanumeric and in upper case). 5. Enter your serial number (26 digits located on the metal tag on your product and starts with 843). 6. Upload your proof of purchase, such as invoice in PDF, JPEG or PNG format. This is not mandatory but by doing so you ensure your guarantee period is accurate. 7. Click “Register”. 8. Congratulations! Your product is now registered. EMAIL 1. 2. Send an email to [email protected] with the following information: • Customer name • Address and postcode • Telephone number and email address • Product reference (as described above) • Serial number (as described above) • Product purchase date and proof of purchase (as described above). Our Technical Support team will confirm your product registration and request any additional information needed via email. POST 1. Post the information listed in the EMAIL section above to: • 2. 16 INDUSTRIAS ROYAL TERMIC, S.L. t/a Rointe UK, C/E Parcela 43, 30140, Santomera (SPAIN) Please ensure you obtain proof of posting. ELBA OVAL EN 17 18 In standby mode At minimum heat output At nominal heat output AUXILIARY ELECTRICITY CONSUMPTION Maximum continuous heat output Minimal heat output Nominal heat output HEAT OUTPUT ITEM 7. ERP DIRECTIVE (EU) 2015/1188 kW Pmax,c kW kW elMIN elSB kW elMIN White Chrome kW kW elMAX elMAX kW kW Pmin Pmax,c kW kW UNIT Pnom Pnom SYMBOL Chrome White Chrome White Chrome White Chrome White 0.002 0.30 0.30 0.30 0.30 0.30 0.30 n/a 0.30 0.30 TELV***C077 TELV***B077 0.002 0.30 0.50 0.30 0.50 0.30 0.50 n/a 0.30 0.50 TELV***C112 TELV***B112 0.002 0.50 0.75 0.50 0.75 0.50 0.75 n/a 0.50 0.75 TELV***C150 TELV***B150 0.002 0.75 1.00 0.75 1.00 0.75 1.00 n/a 0.75 1.00 TELV***C172 TELV***B172 — — — — — Two or more manual levels, without internal temperature control Internal temperature control by mechanical thermostat With electronic interior temperature control Electronic indoor temperature control and daily timer Electronic indoor temperature control and weekly timer — — — — — — — ns Interior temperature control with detection of open windows With remote control / distance option With adaptive start-up control With operating time limitation With black lamp sensor SEASONAL SPACE HEATING ENERGY EFFICIENCY — — — — — — — — — — — — Interior temperature control with presence detection OTHER CONTROL OPTIONS (MULTIPLE SELECTIONS POSSIBLE) — Single-level heat output, no internal temperature control TYPE OF HEAT OUTPUT/ROOM TEMPERATURE CONTROL (SELECT ONE) 39.0% — — — — — — — 39.0% — — — — — — 39.0% — — — — — — 39.0% — — — — — — ELBA OVAL EN 19 Precauciones de instalación y de seguridad (EN 60335 Standards) Antes de encender el producto léase el apartado de “precauciones de instalación y de seguridad” detenidamente para asegurar el funcionamiento correcto del producto. Precauciones de instalación Este producto está diseñado para uso doméstico o residencial. Se recomienda que el producto sea instalado por un profesional autorizado. Asegúrese de que el producto esté conectado correctamente a 230V. ATENCIÓN Los niños menores de 3 años deben mantenerse fuera del alcance del aparato a menos que estén continuamente supervisados. Los niños de 3 a 8 años sólo deben encender y apagar el aparato cuando se haya colocado o instalado en su posición normal de uso y cuando se les haya supervisado o instruido sobre el uso del aparato de forma segura y comprendan los peligros que conlleva. Los niños de 3 a 8 años no deben enchufar, ajustar o limpiar el aparato ni realizar operaciones de mantenimiento. Este aparato puede ser utilizado por niños a partir de 8 años y por personas con capacidades físicas, sensoriales o mentales reducidas o con falta de experiencia y conocimientos, siempre que estén supervisados o hayan recibido instrucciones sobre el uso del aparato de forma segura y entiendan los peligros que conlleva. Los niños no deben jugar con el aparato. La limpieza y el mantenimiento del usuario no deben ser realizados por los niños sin supervisión. Los niños deben ser supervisados en todo momento para asegurarse de que no interfieren con el producto. Este producto de calefacción se rellena con una cantidad precisa de aceite especial que no necesita mantenimiento. Las reparaciones que necesitan la apertura del depósito de fluido térmico no deberán efectuarse más que por Rointe o su servicio posventa. Las reglamentaciones concernientes a la eliminación de este fluido después de que el aparato calefactor sea desechado deben ser respetadas. Si el cable de alimentación está dañado, debe ser reemplazado por el fabricante, su servicio posventa o personal cualificado para evitar daños. No corte el cable de alimentación bajo ningún concepto con el fin de evitar riesgos eléctricos y garantizar el correcto funcionamiento del producto. No encienda el secatoallas si observa algún daño externo al desembalar o instalar el producto. Si el cable de alimentación está dañado, debe ser sustituido por el fabricante, su servicio postventa o personal autorizado para evitar cualquier daño. 20 ELBA OVAL ES No rocíe ni moje el producto. Durante el funcionamiento, mantenga el producto alejado de materiales combustibles como cortinas, muebles, etc. No coloque sobre el producto nada que no sea ropa, toallas o tejidos no inflamables. El secatoallas debe instalarse de forma que el enchufe esté siempre accesible. El cable de alimentación nunca debe estar en contacto con el producto durante su funcionamiento. PRECAUCIÓN - No toque nunca el producto con las manos u otra parte del cuerpo mojadas. PRECAUCIÓN - Algunas partes de este producto podrían ponerse muy calientes y causar quemaduras. Se debe prestar atención especial cuando niños y personas vulnerables estén presentes. Contenido 1. Especificaciones técnicas de producto.................................................................................................21 2. Instalación del secatoallas Rointe...........................................................................................................26 2.1. Montaje................................................................................................................................................26 2.2. Normas de conexión..............................................................................................................................26 2.3. Reglas particulares para los cuartos de baño..................................................................................27 3. Descripción del panel de control y funcionamiento........................................................................28 3.1. Panel de control....................................................................................................................................28 3.2. Encendido y stand-by.............................................................................................................................28 3.3. Selección de temperatura de consigna.............................................................................................28 3.4. Idicativo de consumo..................................................................................................................28 3.5. Bloqueo de teclado.........................................................................................................................28 3.6. Modo MAX POWER.........................................................................................................................28 3.7. Control mediante mando a distancia..............................................................................................31 3.8. Identificación de errores........................................................................................................................32 4. Mantenimiento y limpieza......................................................................................................................32 5. Garantía....................................................................................................................................................32 6. Como registrar la garantía del producto................................................................................................34 7. Directiva ERP (EU) 2015/1188............................................................................................................36 21 1. Especificaciones técnicas de producto (Modelos 400, 450, 500 y 550) BLANCO TELV*40B077 TELV*40B112 TELV*40B150 TELV*40B172 CROMO TELV*40C077 TELV*40C112 TELV*40C150 TELV*40C172 Anchura (mm) 400 400 400 400 Altura sin panel de control (mm) 770 1.120 1.500 1.720 Altura con panel de control (mm) 865 1.215 1.595 1.815 Fondo (mm) 50 50 50 50 Fondo instalado (mm) 100 100 100 100 Resistencia de acero blindado Fluido térmico Panel de control oval Control a distancia por infrarrojos MODELO ANCHO 400 DIMENSIONES CARACTERÍSTICAS MECÁNICAS Blanco RAL 9016 Acabado Cromo CARACTERÍSTICAS ELÉCTRICAS Blanco 300 500 750 1.000 Cromo 300 300 500 750 230 V ~ 230 V ~ 230 V ~ 230 V ~ Blanco 1,3 2,2 3,2 4,4 Cromo 1,3 1,3 2,2 3,2 Kit de instalación incluido Termostato de seguridad IP 44 IP 44 IP 44 IP 44 Potencia nominal (W) Voltaje (V) Corriente (A) Clase II INSTALACIÓN Y PROTECCIÓN Grado de protección 22 ES ELBA OVAL BLANCO TELV*45B077 TELV*45B112 TELV*45B150 TELV*45B172 CROMO TELV*45C077 TELV*45C112 TELV*45C150 TELV*45C172 Anchura (mm) 450 450 450 450 Altura sin panel de control (mm) 770 1.120 1.500 1.720 Altura con panel de control (mm) 865 1.215 1.595 1.815 Fondo (mm) 50 50 50 50 Fondo instalado (mm) 100 100 100 100 Resistencia de acero blindado Fluido térmico Panel de control oval Control a distancia por infrarrojos MODELO ANCHO 450 DIMENSIONES CARACTERÍSTICAS MECÁNICAS Blanco RAL 9016 Acabado Cromo CARACTERÍSTICAS ELÉCTRICAS Blanco 300 500 750 1.000 Cromo 300 300 500 750 230 V ~ 230 V ~ 230 V ~ 230 V ~ Blanco 1,3 2,2 3,2 4,4 Cromo 1,3 1,3 2,2 3,2 Kit de instalación incluido Termostato de seguridad IP 44 IP 44 IP 44 IP 44 Potencia nominal (W) Voltaje (V) Corriente (A) Clase II INSTALACIÓN Y PROTECCIÓN Grado de protección 23 BLANCO TELV*50B077 TELV*50B112 TELV*50B150 TELV*50B172 CROMO TELV*50C077 TELV*50C112 TELV*50C150 TELV*50C172 Anchura (mm) 500 500 500 500 Altura sin panel de control (mm) 770 1.120 1.500 1.720 Altura con panel de control (mm) 865 1.215 1.595 1.813 Fondo (mm) 50 50 50 50 Fondo instalado (mm) 100 100 100 100 Resistencia de acero blindado Fluido térmico Panel de control oval Control a distancia por infrarrojos MODELO ANCHO 500 DIMENSIONES CARACTERÍSTICAS MECÁNICAS Blanco RAL 9016 Acabado Cromo CARACTERÍSTICAS ELÉCTRICAS Blanco 300 500 750 1.000 Cromo 300 300 500 750 230 V ~ 230 V ~ 230 V ~ 230 V ~ Blanco 1,3 2,2 3,2 4,4 Cromo 1,3 1,3 2,2 3,2 Kit de instalación incluido Termostato de seguridad IP 44 IP 44 IP 44 IP 44 Potencia nominal (W) Voltaje (V) Corriente (A) Clase II INSTALACIÓN Y PROTECCIÓN Grado de protección 24 ES ELBA OVAL BLANCO TELV*55B077 TELV*55B112 TELV*55B150 TELV*55B172 CROMO TELV*55C077 TELV*55C112 TELV*55C150 TELV*55C172 Anchura (mm) 550 550 550 550 Altura sin panel de control (mm) 770 1.120 1.500 1.720 Altura con panel de control (mm) 865 1.215 1.595 1.815 Fondo (mm) 50 50 50 50 Fondo instalado (mm) 100 100 100 100 Resistencia de acero blindado Fluido térmico Panel de control oval Control a distancia por infrarrojos MODELO ANCHO 550 DIMENSIONES CARACTERÍSTICAS MECÁNICAS Blanco RAL 9016 Acabado Cromo CARACTERÍSTICAS ELÉCTRICAS Blanco 300 500 750 1.000 Cromo 300 300 500 750 230 V ~ 230 V ~ 230 V ~ 230 V ~ Blanco 1,3 2,2 3,2 4,4 Cromo 1,3 1,3 2,2 3,2 Kit de instalación incluido Termostato de seguridad IP 44 IP 44 IP 44 IP 44 Potencia nominal (W) Voltaje (V) Corriente (A) Clase II INSTALACIÓN Y PROTECCIÓN Grado de protección 25 2. Instalación del secatoallas Rointe 2.1. Montaje Dentro del embalaje encontrará un kit de instalación. Véase las instrucciones abajo: 1. Seleccionar el lugar adecuado de la pared. 2. Colocar la plantilla en la pared, haciendo pequeñas marcas en los lugares donde van situados los agujeros. 3. Retirar la plantilla y hacer los agujeros. 4. Insertar los tacos en los agujeros realizados 5. Atornillar la pieza plástica de anclaje a la pared con el tornillo 6.5 x 50 mm. 6. Atornillar las dos piezas sujeta-secatoallas y la pieza plástica de fijación al tubo horizontal del secatoallas como se ve en la Figura 1 con el tornillo 8 x 26 mm. 7. Insertar el conjunto del punto 6 en la pieza plástica de anclaje y sujetar con el tornillo prisionero de 5 x 12 mm. 8. Colocar el embellecedor en la pieza sujeta-secatoallas. Nº. ITEM 1 10 x 40 mm taco 2 Pieza metálica anclaje 3 Tornillo 5.5 x 50 mm 4 Tornillo 5 x 12 mm 5 Inserción de tornillo 6 Cabeza de soporte 7 Tornillo 8 x 26 mm 8 Embellecedor 9 Producto 1 5 2.2. Normas de conexión La conexión a la red debe efectuarse respetando la tensión indicada en la etiqueta de características técnicas del producto. Este aparato está destinado a ser permanentemente conectado a una instalación fija. El circuito de alimentación del secatoallas debe incorporar un interruptor de corte unipolar con una separación de contactos de al menos 3 mm. El aparato debe ser instalado, si es posible al abrigo de las corrientes de aire (ventanas, puertas) o de cualquier otra cosa que pudiera perturbar su regulación. Así, le aportará el mejor confort térmico. Coloque todo objeto que pueda suponer un impedimento a la circulación del aire (muebles, sillones) a 50 cm de la cara delantera del aparato. El aparato no se deberá colocar delante o justo debajo de un enchufe fijo. La parte baja de la caja de mandos debe situarse como mínimo a 15 cm del suelo. Para cualquier aparato, si el cable de alimentación 26 ELBA OVAL ES está deteriorado, debe ser reemplazado por un cable específico. La sustitución del cable debe ser efectuada por el fabricante, su servicio posventa o personal cualificado. Las características técnicas de su aparato están indicadas en la etiqueta de características técnicas. OK IMPORTANTE - Este aparato no debe ser instalado nunca con su caja de mandos en posición alta. El aparato vertical no debe ser utilizado horizontalmente. Durante la instalación utilice calces para evitar que la caja de los mandos apoye en el suelo. 2.3. Reglas particulares para los cuartos de baño Este aparato es conforme con las normas de seguridad de CLASE II (doble aislamiento). Puede estar instalado en las Zonas 2 y 3, posiciones A y B siempre que se respeten las siguientes normas: • En los cuartos de baño, el secatoallas nunca debe ser instalado de tal forma que el panel de control puedan ser alcanzado por una persona que se encuentre en la bañera o ducha. El panel de control debe estar situado a una distancia mínima de 600 mm de cualquier zona húmeda. El cuerpo del producto puede colocarse en las Zonas 2 si el panel de control se encuentra dentro de la Zona 3. • En una cocina o cuarto de baño, el secatoallas deberá ser colocado al menos a 25 cm del suelo. 27 3. Descripción del panel de control y funcionamiento 3.1. Panel de control El panel de control está constituido por 7 leds y 4 pulsadores mecánicos con las siguientes funcionalidades: 1 2 3 4 5 6 Tecla Encendido/Stand-by/Confirmación Tecla AUMENTO de temperatura de consigna Tecla DISMINUCIÓN de temperatura de consigna Tecla Máxima Potencia 7 Sensor de infrarrojos 3.2. Encendido y Stand-by Para encender el producto, realizaremos una pulsación corta sobre el botón producto, realizaremos de nuevo una pulsación corta sobre el mismo. . Para apagar el 3.3. Selección de temperatura de consigna Podemos regular la temperatura de consigna del secatoallas mediante los pulsadores y . Al pulsar la tecla , incrementamos la temperatura de consigna. De igual manera, al pulsar la tecla reducimos la temperatura de consigna. La temperatura mínima de funcionamiento es de 7ºC, siendo la máxima de 30ºC. La temperatura configurada desde fábrica es 21ºC. Los 6 indicadores led ubicados en la parte superior del panel de control, identifican la temperatura de consigna establecida. Indicador 1 LED 28 Iluminación Led 1: parpadeo corto cada 2 segundos Led 2: OFF Led 3: OFF Led 4: OFF Led 5: OFF Led 6: OFF Temperatura 7ºC Indicador 1 LED Iluminación Led 1: ON Led 2: OFF Led 3: OFF Led 4: OFF Led 5: OFF Led 6: OFF Temperatura 15ºC ELBA OVAL Indicador 2 LED 4 LED 6 LED Iluminación Temperatura Led 1: ON Led 2: ON Led 3: OFF Led 4: OFF Led 5: OFF Led 6: OFF Indicador Iluminación ES Temperatura 18ºC Led 1: ON Led 2: ON Led 3: ON Led 4: OFF Led 5: OFF Led 6: OFF 21ºC Led 1: ON Led 2: ON Led 3: ON Led 4: ON Led 5: OFF Led 6: OFF 24ºC Led 1: ON Led 2: ON Led 3: ON Led 4: ON Led 5: ON Led 6: OFF 27ºC Led 1: ON Led 2: ON Led 3: ON Led 4: ON Led 5: ON Led 6: ON 30ºC 3 LED 5 LED 3.4. Idicativo de consumo Cuando la temperatura de la estancia sea inferior a la seleccionada, se activará la resistencia. Para indicar que la resistencia se ha activado y el producto está consumiendo energía, parpadeará el último led indicativo de temperatura. 3.5. Bloqueo de teclado Pulsando simultáneamente durante 3 segundos las teclas y , bloqueamos/desbloqueamos el teclado del panel de control. Si pulsamos cualquier tecla estando el panel bloqueado, parpadean todos los leds 2 veces. Por seguridad, el botón de encendido/apagado si responderá aun estando el panel bloqueado. Para realizar la acción de encender/apagar con el panel bloqueado, deberá mantenerse pulsado durante 3 segundos el botón . 3.6. Modo MAX POWER El modo MAX POWER activa la resistencia del secatoallas a máxima potencia de manera continua sin tener en cuenta la lectura de la sonda. Para activar esta función desde el panel de control, realizaremos una pulsación corta sobre el botón . También es posible activar este modo cuando el producto está apagado. 29 Con una pulsación corta activaremos este modo durante 15 minutos. Si en los siguientes dos segundos volvemos a pulsar , activaremos el siguiente periodo (30 minutos). Consecutivas pulsaciones activarán los siguientes periodos tal y como se muestra en la siguiente tabla: Indicador Iluminación Tiempo 1 LED Iluminación Tiempo Led 1: parpadeo Led 2: parpadeo Led 3: OFF Led 4: OFF Led 5: OFF Led 6: OFF Led 7: ON 30 minutos Led 1: parpadeo Led 2: parpadeo Led 3: parpadeo Led 4: parpadeo Led 5: OFF Led 6: OFF Led 7: ON 60 minutos Iluminación Tiempo Led 1: parpadeo Led 2: parpadeo Led 3: parpadeo Led 4: parpadeo Led 5: parpadeo Led 6: parpadeo Led 7: ON 120 minutos 2 LED Led 1: parpadeo Led 2: OFF Led 3: OFF Led 4: OFF Led 5: OFF Led 6: OFF Led 7: ON 15 minutos 3 LED Indicador Indicador 4 LED Led 1: parpadeo Led 2: parpadeo Led 3: parpadeo Led 4: OFF Led 5: OFF Led 6: OFF Led 7: ON 45 minutos Iluminación Tiempo 5 LED Indicador 6 LED Led 1: parpadeo Led 2: parpadeo Led 3: parpadeo Led 4: parpadeo Led 5: parpadeo Led 6: OFF Led 7: ON Si pulsamos 7 veces sobre el botón 90 minutos , volveremos al punto de inicio (activación durante 15 minutos). Los leds funcionarán como una cuenta regresiva, apagándose conforme vaya transcurriendo el tiempo. Una vez transcurrido el tiempo, el producto volverá automáticamente al modo anterior o se apagará si se encontraba en Off. El modo MAX POWER podrá detenerse en cualquier momento realizando una pulsación corta sobre el botón . El secatoallas retornará a su estado anterior. 30 ELBA OVAL ES 3.7. Control mediante mando a distancia (opcional) Los secatoallas con panel de control OVAL permiten ser controlados mediante los mandos a distancia Rointe AIR Control y BASIC Control (vendidos por separado). El uso del mando a distancia amplia la funcionalidad del secatoallas al permitir: • Controlar el secatoallas sin necesidad de utilizar el panel de control • Establecer temperaturas de consigna con más exactitud (de medio grado en medio grado entre los 15 y los 30 ºC). • Programar el producto 24h 7 días a la semana con una programación personalizada o utilizando una de las 4 programaciones pre-instaladas en el mando a distancia BASIC Control. Para conocer más sobre los mandos a distancia Rointe y sus funciones, diríjase a nuestro portal web o consulte el manual de uso de los mismos. IMPORTANTE: Cuando el producto es programado utilizando un mando a distancia Rointe, el led número 7 (correspondiente al modo MAX POWER) parpadeará. AVISO: Si hemos programado nuestro secatoallas y deseamos volver a utilizaro en modo manual, deberemos mantener pulsado el botón de encendido/apagado durante 3 segundos (estando el producto desbloqueado). El producto dejará de estar programado y podremos controlarlo manualmente utilizando los botones del panel de control. 3.8. Identificación de errores Durante el funcionamiento normal del equipo, se pueden detectar anomalías de funcionamiento que son indicadas mediante los indicadores leds del producto. Ver tabla para identificar el código de error: Indicador LED 6 parpadeando Código Led 1: OFF Led 2: OFF Led 3: OFF Led 4: OFF Led 5: OFF Led 6: parpadeo Led 7: OFF Error Fallo en la sonda de temperatura debido a cortocircuito o a sonda abierta. Solución Por favor, póngase en contacto con el departamento de Soporte Técnico de Rointe llamando al 900 103 061 (968 864 363). 31 4. Mantenimiento y limpieza El producto no necesita ningún tipo de mantenimiento. Recomendamos la limpieza de todo el producto (parte trasera, inferior del producto, aletas superiores, etc.) No utilice ningún producto abrasivo en el producto, límpielo con un paño húmedo y jabón pH neutro y la pantalla con un paño seco. Normativa Europea 2012/19/UE En base a la normativa europea 2012/19/UE de Residuos de Aparatos Eléctricos y Electrónicos (RAEE), dichos aparatos no pueden ser arrojados en los contenedores municipales habituales; tienen que ser recogidos selectivamente para optimizar la recuperación y reciclado de los componentes y materiales que los constituyen, y reducir el impacto en la salud humana y el medio ambiente. El símbolo del cubo de basura tachado sobre barra horizontal se marca sobre todos los productos Rointe para recordar al consumidor la obligación de separarlos para la recogida selectiva. El consumidor debe contactar con la autoridad local o con el vendedor para informarse en relación a la correcta eliminación de su aparato. 5. Garantía En este apartado, se describen las condiciones de garantía que dispone el comprador al haber adquirido un nuevo producto de la marca Rointe. Estas condiciones reúnen todos los derechos que tiene el comprador de acuerdo con la legislación nacional vigente, así como la garantía y los derechos adicionales que ofrece la marca Rointe. 5.1. Cualquier incidencia que detecte en su producto Rointe, puede ser atendida por el vendedor del producto o de una forma más ágil a través del propio fabricante. Rointe, pone a su disposición un TELÉFONO DE ASISTENCIA TÉCNICA (ESPAÑA) 900 103 061 (968 864 363) donde le indicaremos los pasos a seguir para solucionar dicha incidencia. Si reside en otro país, compruebe el número de teléfono correcto en la parte posterior de este manual. NÚMERO DE SERIE 300 W TELON45B077 ELBA OVAL Necesitará la referencia de producto (ubicada en la etiqueta de características del producto), número de serie, fecha de compra y la naturaleza del fallo al contactar con nosotros para mejorar la garantía. Además, adjuntar una copia de la factura de compra del producto. 5.2. Rointe garantiza que este producto no presenta ningún defecto material, de diseño o de 32 ELBA OVAL ES fabricación en el momento de su adquisición original y durante un periodo de 24 meses (2 años) en componentes electrónicos y 120 meses (10 años) en el cuerpo de acero. 5.3. Si durante el periodo de garantía el producto no funciona correctamente con un uso normal, y sea fallo de diseño, de los materiales o de fabricación, Rointe, reparará o sustituirá el producto, según estime oportuno, según términos y condiciones establecidos a continuación: 5.3.1. La garantía sólo se facilita si presenta el certificado de garantía original emitido por el establecimiento vendedor y cuando la citada garantía este correctamente rellena incluyendo referencia de producto, número de serie (reflejado en la etiqueta de características técnicas del producto), fecha de compra y sello del vendedor. Rointe se reserva el derecho de rechazar el servicio de garantía cuando esta información haya sido retirada o rectificada tras la compra original del producto. 5.3.2. La garantía sólo es aplicable a aquellos casos que se refieren a defectos de material, diseño y fabricación, y en ningún caso cubre los daños al producto por los siguientes motivos: i) Daños causados por negligencia y/o mal uso del producto, es decir, utilizado para otros fines que no se consideren su uso normal o por no respetar las instrucciones de uso y mantenimiento dadas por ROINTE, así como la instalación o el uso incorrecto del producto que pueda no cumplir con las normas técnicas de seguridad vigentes. ii) La corrosión de cualquier parte del producto causada por la exposición directa al agua salada. Cuando el producto se instale a menos de 200 m de la costa, el período de garantía para los daños causados por la corrosión se reducirá en un 50%. iii) Cualquier modificación no autorizada o reparaciones del producto llevadas a cabo por terceros o personas no autorizadas, o la apertura del producto por terceros o personas no autorizadas. iv) Cualquier accidente que se considere fuera del control de ROINTE, como (pero no limitado a): rayos, incendios, inundaciones, desastres naturales, desórdenes públicos, fenómenos atmosféricos o geológicos, etc. v) Los fallos que resulten de una instalación incorrecta. En caso de duda, póngase en contacto con ROINTE. 5.4. El servicio técnico de Rointe le podrá asesorar si necesita comprar algún repuesto fuera del periodo de garantía. 5.5. Esta garantía no afecta a los derechos legales del comprador previstos por la legislación nacional vigente, ni los derechos del comprador contra los del distribuidor o instalador que surjan a partir del contrato de compraventa. 5.6. En ausencia de una legislación nacional vigente aplicable, esta garantía será la única protección del comprador. Rointe, sus oficinas y distribuidores e instaladores no se responsabilizarán de ningún tipo de daños, tanto fortuitos como accidentales, derivados de infringir cualquier norma implícita relacionada con este producto. 33 6. Cómo registrar la garantía del producto IMPORTANTE: Es importante que registre su producto ROINTE como parte de nuestro servicio de garantía, en caso de que desee hacer una reclamación. Puede registrar su producto ROINTE de las siguientes maneras: WEB 1. Ve a www.rointe.com/compania/registra-tu-garantia/. 2. Ingresa a tu cuenta existente o crea una nueva cuenta si es necesario. 3. Haga clic en “Mis productos”. 4. Introduzca la referencia de su producto (alfanumérica y en mayúsculas). 5. Introduce tu número de serie (26 dígitos situados en la etiqueta metálica de tu producto y comienza con 843). 6. Sube tu prueba de compra, como la factura en formato PDF, JPEG o PNG. Esto no es obligatorio, pero al aseguras de que tu período de garantía es exacto. 7. Haga clic en “Registro”. ¡Enhorabuena! Su producto ya está registrado. CORREO ELECTRÓNICO 1. 2. Envía un correo electrónico a [email protected] con la siguiente información: • Nombre del cliente • Dirección y código postal • Número de teléfono y dirección de correo electrónico • Referencia del producto (alfanumérica y en mayúsculas) • Número de serie (26 dígitos situados en la etiqueta metálica de su producto y comienza con 843) • La fecha de compra del producto y el comprobante de compra (como la factura) Nuestro equipo de soporte técnico confirmará el registro de su producto y solicitará cualquier información adicional necesaria por correo electrónico. POSTAL 1. Envíe la información que figura en la sección de CORREO ELECTRÓNICO de arriba a: • 2. 34 INDUSTRIAS ROYAL TERMIC, S.L. - ROINTE, C/E Parcela 43, 30140, Santomera (SPAIN) Por favor, asegúrese de obtener una prueba de envío. ELBA OVAL ES 35 36 En modo de espera A potencia calorífica mínima A potencia calorífica nominal CONSUMO AUXILIAR DE ELECTRICIDAD Potencia carlorífica máxima continuada Potencia carlorífica mínima Potencia calorífica nominal POTENCIA CALORÍFICA ITEM 7. DIRECTIVA ERP (EU) 2015/1188 kW Pmax,c kW kW elMIN elSB kW elMIN Blanco Cromo kW kW elMAX elMAX kW kW Pmin Pmax,c kW kW Unidad Pnom Pnom Símbolo Cromo Blanco Cromo Blanco Cromo Blanco Cromo Blanco 0,002 0,30 0,30 0,30 0,30 0,30 0,30 n/a 0,30 0,30 TELV***C077 TELV***B077 0,002 0,30 0,50 0,30 0,50 0,30 0,50 n/a 0,30 0,50 TELV***C112 TELV***B112 0,002 0,50 0,75 0,50 0,75 0,50 0,75 n/a 0,50 0,75 TELV***C150 TELV***B150 0,002 0,75 1,00 0,75 1,00 0,75 1,00 n/a 0,75 1,00 TELV***C172 TELV***B172 — — — — — — — — — — Dos o más niveles manuales, sin control de temperatura interior Con control de temperatura interior mediante termostato mecánico Con control electrónico de temperatura interior Control electrónico de temperatura interior y temporizador diario Control electrónico de temperatura interior y temporizador semanal — — — — — — — — — — — — — ns Control de temperatura interior con detección de presencia Control de temperatura interior con detección de ventanas abiertas Con opción de control a distancia Con control de puesta en marcha adaptable Con limitación de tiempo de funcionamiento Con sensor de lámpara negra RENDIMIENTO DE EFICIENCIA ENERGÉTICA ESTACIONAL OTRAS OPCIONES DE CONTROL (PUEDEN SELECCIONARSE VARIAS) — — Potencia calorífica de un solo nivel, sin control de temperatura interior 39,0% — — — — — — — TIPO DE CONTROL DE POTENCIA CALORÍFICA / DE TEMPERATURA INTERIOR (SELECCIONE UNO) 39,0% — — — — — — 39,0% — — — — — — 39,0% — — — — — — ELBA OVAL ES 37 Precauções de instalação e segurança (EN Standard 60335) Antes de instalar o produto, ler cuidadosamente a secção “Instalação e Precauções de Segurança” para assegurar o funcionamento adequado do produto. Precauções de instalação O radiador foi concebido para uso doméstico ou residencial. Recomenda-se que o radiador seja instalado por um profissional autorizado. Certificar-se de que o produto está devidamente ligado a 230V. ATENÇÃO As crianças com menos de 3 anos de idade devem ser mantidas fora do alcance do aparelho, a menos que sejam continuamente supervisionadas. As crianças dos 3 aos 8 anos de idade só devem ligar e desligar o aparelho quando este tiver sido colocado ou instalado na sua posição normal de utilização e quando lhes tiver sido dada supervisão ou instruções relativas à utilização do aparelho de uma forma segura e compreender os perigos envolvidos. As crianças dos 3 aos 8 anos de idade não devem ligar, ajustar, limpar ou reparar o aparelho. Este aparelho pode ser utilizado por crianças a partir dos 8 anos de idade e por pessoas com capacidades físicas, sensoriais ou mentais reduzidas ou com falta de experiência e conhecimentos, se lhes tiver sido dada supervisão ou instruções relativas à utilização do aparelho de uma forma segura e compreender os perigos envolvidos. As crianças não devem brincar com o aparelho. A limpeza e a manutenção do utilizador não devem ser feitas por crianças sem supervisão. As crianças devem ser sempre supervisionadas para garantir que não interferem com o produto. Este produto de aquecimento é enchido com uma quantidade precisa de óleo especial que não requer manutenção. As reparações que requerem a abertura do tanque de fluido térmico só devem ser efectuadas pela Rointe ou pelo seu serviço pós-venda. Os regulamentos relativos à eliminação deste fluido depois de o aparelho de aquecimento ser descartado devem ser respeitados. Se o cabo de alimentação for danificado, deve ser substituído pelo fabricante, pelo seu serviço pós-venda ou por pessoal qualificado para evitar danos. Não cortar o cabo eléctrico em nenhuma circunstância para evitar riscos eléctricos e para assegurar o correcto funcionamento do produto. Não ligar o seca-toalhas se notar qualquer dano externo ao desempacotar ou instalar o produto. Se o cabo de alimentação for danificado, deve ser substituído pelo fabricante, o seu serviço pós-venda ou pessoal autorizado, 38 ELBA OVAL PT a fim de evitar qualquer dano. Não pulverizar nem molhar o produto. Durante o funcionamento, manter o produto distante de materiais combustíveis tais como cortinas, mobiliário, etc. Não colocar nada além de vestuário, toalhas ou tecidos não inflamáveis sobre o produto. O seca-toalhas deve ser instalado de tal forma que a toma de corrente esteja sempre acessível. O cabo de alimentação nunca deve estar em contacto com o produto durante o funcionamento. CUIDADO - Nunca tocar o produto com as mãos ou qualquer outra parte do corpo molhada. CUIDADO - Partes deste produto podem tornar-se muito quentes e causar queimaduras. Preste especial atenção quando estão presentes crianças e pessoas vulneráveis. Conteúdo 1. Especificações técnicas do produto ................................................................................................... 40 2. Instalação do seca-toalhas Rointe ..................................................................................................... 44 2.1. Montagem ............................................................................................................................................ 44 2.2. Regras de ligação ............................................................................................................................... 44 2.3. Regras instalação nas casas de banho................................................................................................ 45 3. Descrição do painel de controlo e funcionamento........................................................................ 46 3.1. Painel de controlo.................................................................................................................................... 46 3.2. Ligar e Desligar.............................................................................................................................. 46 3.3. Seleção da temperatura de setpoint.................................................................................................. 46 3.4. Indicador de consumo.................................................................................................................. 47 3.5. Bloqueio de teclado......................................................................................................................... 47 3.6. Modo MAX POWER......................................................................................................................... 47 3.7. Comando à distância......................................................................................................................... 49 3.8. Identificação de erro......................................................................................................................... 49 4. Manutenção e limpeza ............................................................................................................................ 50 5. Garantia..................................................................................................................................................... 50 6. Como registar a garantia do produto ................................................................................................... 52 7. ERP. Regulamento da Comissão (EU) 2015/1188......................................................................................54 39 1. Especificações técnicas do produto (Modelos 400, 450, 500 e 550) BRANCO TELV*40B077 TELV*40B112 TELV*40B150 TELV*40B172 CROMADO TELV*40C077 TELV*40C112 TELV*40C150 TELV*40C172 Largura (mm) 400 400 400 400 Altura sem painel de control (mm) 770 1.120 1.500 1.720 Altura com painel de control (mm) 865 1.215 1.595 1.815 Profundidade (mm) 50 50 50 50 Profundidade instalado (mm) 100 100 100 100 Resistência do aço blindado Fluido térmico Painel de control oval Controlo remoto por infravermelhos MODELO LARGO 400 DIMENSÕES CARACTERÍSTICAS MECÂNICAS Branco RAL 9016 Acabamento Cromado CARACTERÍSTICAS ELÉTRICAS Branco 300 500 750 1.000 Cromado 300 300 500 750 230 V ~ 230 V ~ 230 V ~ 230 V ~ Branco 1,3 2,2 3,2 4,4 Cromado 1,3 1,3 2,2 3,2 Kit de instalação incluído Termóstato de segurança IP 44 IP 44 IP 44 IP 44 Potência nominal (W) Voltagem (V) Corrente (A) Classe II INSTALAÇÃO E PROTECÇÃO Grau de protecção 40 PT ELBA OVAL BRANCO TELV*45B077 TELV*45B112 TELV*45B150 TELV*45B172 CROMADO TELV*45C077 TELV*45C112 TELV*45C150 TELV*45C172 Largura (mm) 450 450 450 450 Altura sem painel de control (mm) 770 1.120 1.500 1.720 Altura com painel de control (mm) 865 1.215 1.595 1.815 Profundidade (mm) 50 50 50 50 Profundidade instalado (mm) 100 100 100 100 Resistência do aço blindado Fluido térmico Painel de control oval Controlo remoto por infravermelhos MODELO LARGO 450 DIMENSÕES CARACTERÍSTICAS MECÂNICAS Branco RAL 9016 Acabamento Cromado CARACTERÍSTICAS ELÉTRICAS Branco 300 500 750 1.000 Cromado 300 300 500 750 230 V ~ 230 V ~ 230 V ~ 230 V ~ Branco 1,3 2,2 3,2 4,4 Cromado 1,3 1,3 2,2 3,2 Kit de instalação incluído Termóstato de segurança IP 44 IP 44 IP 44 IP 44 Potência nominal (W) Voltagem (V) Corrente (A) Classe II INSTALAÇÃO E PROTECÇÃO Grau de protecção 41 BRANCO TELV*50B077 TELV*50B112 TELV*50B150 TELV*50B172 CROMADO TELV*50C077 TELV*50C112 TELV*50C150 TELV*50C172 Largura (mm) 500 500 500 500 Altura sem painel de control (mm) 770 1.120 1.500 1.720 Altura com painel de control (mm) 865 1.215 1.595 1.815 Profundidade (mm) 50 50 50 50 Profundidade instalado (mm) 100 100 100 100 Resistência do aço blindado Fluido térmico Painel de control on/off Controlo remoto por infravermelhos MODELO LARGO 500 DIMENSÕES CARACTERÍSTICAS MECÂNICAS Branco RAL 9016 Acabamento Cromado CARACTERÍSTICAS ELÉTRICAS Branco 300 500 750 1.000 Cromado 300 300 500 750 230 V ~ 230 V ~ 230 V ~ 230 V ~ Branco 1,3 2,2 3,2 4,4 Cromado 1,3 1,3 2,2 3,2 Kit de instalação incluído Termóstato de segurança IP 44 IP 44 IP 44 IP 44 Potência nominal (W) Voltagem (V) Corrente (A) Classe II INSTALAÇÃO E PROTECÇÃO Grau de protecção 42 PT ELBA OVAL BRANCO TELV*55B077 TELV*55B112 TELV*55B150 TELV*55B172 CROMADO TELV*55C077 TELV*55C112 TELV*55C150 TELV*55C172 Largura (mm) 550 550 550 550 Altura sem painel de control (mm) 770 1.120 1.500 1.720 Altura com painel de control (mm) 865 1.215 1.595 1.815 Profundidade (mm) 50 50 50 50 Profundidade instalado (mm) 100 100 100 100 Resistência do aço blindado Fluido térmico Painel de control on/off Controlo remoto por infravermelhos MODELO LARGO 550 DIMENSÕES CARACTERÍSTICAS MECÂNICAS Branco RAL 9016 Acabamento Cromado CARACTERÍSTICAS ELÉTRICAS Branco 300 500 750 1.000 Cromado 300 300 500 750 230 V ~ 230 V ~ 230 V ~ 230 V ~ Branco 1,3 2,2 3,2 4,4 Cromado 1,3 1,3 2,2 3,2 Kit de instalação incluído Termóstato de segurança IP 44 IP 44 IP 44 IP 44 Potência nominal (W) Voltagem (V) Corrente (A) Classe II INSTALAÇÃO E PROTECÇÃO Grau de protecção 43 2. Instalação do seca-toalhas Rointe 2.1. Montagem Dentro da embalagem encontrará um kit de instalação. Ver instruções abaixo: 1. Seleccionar o lugar adequado na parede. 2. Colocar o molde de montagem na parede, faça pequenas marcas nos lugares onde vai realizar as furações. 3. Retire o molde de montagem e faça as furações na parede. 4. Introduza as buchas nas furações.. 5. Aparafuse as quatro peças metálicas de fixação à parede com os parafusos nº3 (ver imagem anexa). 6. Aparafuse as duas peças de fixação do seca-toalhas e a peça plástica de fixação ao tubo horizontal do seca-toalhas conforme a imagem com o parafuso nº 7. 7. Introduza o conjunto do ponto 6 na peça plástica de fixação e prenda com o parafuso nº 4. 8. Colocar o adorno na peça do fixador do seca-toalhas. Nº. ITEM 1 Tomada 10 x 40 cm 2 Suporte 3 Parafuso 5,5 x 50 mm 4 Parafuso 5 x 12 mm 5 Inserção do suporte 6 Cabeça de suporte 7 Parafuso 8 x 26 mm 8 Tampa 9 Seca-toalhas 1 5 2.2. Regras de ligação A ligação à rede deve ser feita em conformidade com a tensão indicada na etiqueta de dados técnicos do produto. Este dispositivo destina-se a ser permanentemente ligado a uma instalação fixa. O circuito de alimentação do seca-toalhas deve ser equipado com um disjuntor de um pólo com uma separação de contacto de pelo menos 3 mm. O aparelho deve ser instalado, se possível, numa localização que não esteja exposto a correntes de ar (janelas, portas) ou a qualquer outra coisa que possa interferir com o seu funcionamento. Isto irá proporcionar o melhor conforto térmico. Colocar qualquer objecto que possa impedir a circulação do ar (mobiliário, poltronas) a 50 cm da frente do aparelho. O aparelho não deve ser colocado em frente ou apenas debaixo de uma tomada fixa. O painel de controlo deve estar a pelo menos 15 cm do chão. Para qualquer aparelho, se o cabo de alimentação for danificado, deve 44 ELBA OVAL PT ser substituído por um cabo específico. A substituição de cabos deve ser efectuada pelo fabricante, pelo seu serviço pós-venda ou por pessoal qualificado. As características técnicas do seu aparelho são indicadas na etiqueta de características técnicas. OK IMPORTANTE: Este aparelho não deve ser instalado com o painel de controlo para cima. O aparelho é para ser instalado em posição vertical e jamais horizontal. Durante a instalação utilize calços para evitar que o painel de controle seja apoiadono chão. 2.3. Regras particulares para quartos de banho Este aparelho cumpre as normas de segurança da CLASSE II (duplo isolamento). Pode ser instalado nas Zonas 2 e 3, posições A e B, seguindo as as seguintes regras: • Nas casas de banho, o seca-toalhas nunca deve ser instalado de modo a que o painel de controlo possa ser alcançado por uma pessoa na banheira ou no duche. O painel de controlo deve estar situado a uma distância mínima de 600 mm de quaisquer zonas húmidas. O corpo do produto pode ser colocado nas zonas 2 se o painel de controlo estiver localizado dentro da zona 3. • Numa cozinha ou casa de banho, o toalheiro deve ser colocado a pelo menos 25 cm do chão. 45 3. Descrição do painel de controlo e funcionamento 3.1. Painel de controlo O painel de controlo é composto por 7 Leds e 4 botões com as seguintes funções: 1 2 3 4 5 6 Botão On / Stand-by / Confirmação Botão AUMENTO de temperatura de setpoint Botão DIMINUIR de temperatura de setpoint Botão Potência máxima 7 Sensor de infravermelhos 3.2. Ligar e Desligar Para ligar o produto, carregar brevemente o botão o botão brevemente. . Para desligar o produto, carregar novamente 3.3. Seleção da temperatura de setpoint Podemos regular a temperatura definida do seca toalhas pelos botões e . Carregar no botão para aumenta a temperatura do desejada. Da mesma forma, ao carregar a tecla , reduzimos a temperatura definida. A temperatura mínima de funcionamento é de 7ºC, e a temperatura máxima é de 30ºC. A temperatura definida de fábrica é de 21ºC. Os 6 indicadores LED localizados na parte superior do painel de controlo identificam a temperatura de setpoint. Indicador 1 LED 46 Iluminação Led 1: A piscar a cada 2 segundos Led 2: OFF Led 3: OFF Led 4: OFF Led 5: OFF Led 6: OFF Temperatura 7ºC Indicador 1 LED Iluminação Led 1: ON Led 2: OFF Led 3: OFF Led 4: OFF Led 5: OFF Led 6: OFF Temperatura 15ºC ELBA OVAL Indicador 2 LED 4 LED 6 LED Iluminação Temperatura Led 1: ON Led 2: ON Led 3: OFF Led 4: OFF Led 5: OFF Led 6: OFF Indicador Iluminação PT Temperatura 18ºC Led 1: ON Led 2: ON Led 3: ON Led 4: OFF Led 5: OFF Led 6: OFF 21ºC Led 1: ON Led 2: ON Led 3: ON Led 4: ON Led 5: OFF Led 6: OFF 24ºC Led 1: ON Led 2: ON Led 3: ON Led 4: ON Led 5: ON Led 6: OFF 27ºC Led 1: ON Led 2: ON Led 3: ON Led 4: ON Led 5: ON Led 6: ON 30ºC 3 LED 5 LED 3.4. Idicativo de consumo Quando a temperatura ambiente é inferior à temperatura selecionada, a resistência será ativada. Para indicar que a resistência seja ativada e que o produto está a consumir energia, o último LED indicador de temperatura irá piscar. 3.5. Bloqueio de teclado Carregar simultaneamente durante 3 segundos nas teclas e para bloquear/desbloquear o teclado do painel de controlo. Se carregar no botão enquanto o painel estiver bloqueado, todos os LEDs piscarão duas vezes. Por razões de segurança, o botão on/off responderá mesmo que o painel esteja bloqueado. Para executar a ação de ligar/desligar com o painel bloqueado, deve carregar no botão durante 3 segundos. 3.6. Modo MAX POWER O modo MAX POWER ativa a resistência do toalheiro na potência máxima, sem ter em conta a leitura da sonda. Para ativar esta função a partir do painel de controlo, carregue brevemente o botão . Também é possível ativar este modo quando o produto está desligado. Uma breve pressão irá ativar este modo durante 15 minutos. Se carregar novamente nos 47 dois segundos seguintes, o período seguinte (30 minutos) será ativado. Se carregar assim consecutivamente ativará os períodos indicados no quadro seguinte: Indicador Iluminação Tempo 1 LED Iluminação Tempo 2 LED Led 1: A piscar Led 2: OFF Led 3: OFF Led 4: OFF Led 5: OFF Led 6: OFF Led 7: ON 15 minutos 3 LED Led 1: A piscar Led 2: A piscar Led 3: OFF Led 4: OFF Led 5: OFF Led 6: OFF Led 7: ON 30 minutos Led 1: A piscar Led 2: A piscar Led 3: A piscar Led 4: A piscar Led 5: OFF Led 6: OFF Led 7: ON 60 minutos 4 LED Led 1: A piscar Led 2: A piscar Led 3: A piscar Led 4: OFF Led 5: OFF Led 6: OFF Led 7: ON Indicador Indicador Iluminação 45 minutos Tempo 5 LED Indicador Iluminação Tempo 6 LED Led 1: A piscar Led 2: A piscar Led 3: A piscar Led 4: A piscar Led 5: A piscar Led 6: OFF Led 7: ON Se carregar 7 vezes no botão 90 minutos Led 1: A piscar Led 2: A piscar Led 3: A piscar Led 4: A piscar Led 5: A piscar Led 6: A piscar Led 7: ON 120 minutos , voltará a ativação inicial (ativação durante 15 minutos). Os LEDs funcionarão como um temporizador de contagem decrescente, desligando-se à medida que o tempo passa. Depois de decorrido o tempo, o produto regressará automaticamente ao modo anterior ou desligar-se-á se tiver sido definido para desligado. O modo MAX POWER pode ser interrompido a qualquer momento, carregando brevemente o botão . O seca toalhas regressará á sua programação anterior. 48 ELBA OVAL PT 3.7. Comando à distância (opcional) Os seca toalhas com painel de controlo OVAL podem ser controlados por meio dos comandos à distância Rointe AIR Control e BASIC Control (vendidos separadamente). A utilização do comando à distância amplia as funcionalidades dos seca toalhas, permitindo: • Controlar o seca toalhas sem utilizar o painel de controlo. • Definir temperaturas de setpoint mais precisas (de meio grau em meio grau entre 15 e 30 ºC). • Programar o produto 24horas po dia, 7 dias por semana com programação personalizada ou utilizar uma das 4 programações pré-instalados no comando à distância. Para saber mais sobre os comandos à distância Rointe e as suas funções, vá ao nosso site e consulte o manual. IMPORTANTE: Quando o produto é programado utilizando um comando à distância Rointe, o LED número 7 (correspondente ao modo MAX POWER) irá piscar. AVISO: Se tivermos programado o seca toalhas e desejarmos utilizá-lo em modo manual, devemos carregar o botão ligar/desligar durante 3 segundos (enquanto o produto está desbloqueado). O produto já não será programado e poderemos controlálo manualmente utilizando os botões do painel de controlo. 3.8. Identificação de erros Durante o funcionamento normal do equipamento, as avarias podem ser detectadas e são indicadas pelos indicadores LED. No quadro pode identificar o código de erro: Indicador LED 6 A piscar Código Led 1: OFF Led 2: OFF Led 3: OFF Led 4: OFF Led 5: OFF Led 6: A piscar Led 7: OFF Erro Falha na sonda de temperatura devido a curto-circuito ou sonda aberta. Solução Por favor contacte o departamento de Apoio Técnico da Rointe através do telefone 221 200 111. 49 4. Manutenção e limpeza O seca-toalhas não necessita de qualquer manutenção. Recomendamos a limpeza do produto completo (ao longo das barras, topo, baixo etc.). Não utilize nenhum produto abrasivo sobre o corpo de aço. Limpe-o com um pano húmido e sabão de pH neutro. Para a limpeza do ecrã, utilize um pano seco. Normativa Europeia 2012/19/UE Com base na diretiva europea 2012/19/UE relativa aos Resíduos de Aparelhos Elétricos e Eletrónicos (RAEE), os aparelhos em questão não podem ser deitados nos contentores municipais comuns, devendo ser recolhidos seletivamente, de modo a otimizar a recuperação e reciclagem dos componentes e materiais que os constituem e reduzindo assim o impacto na saúde humana e no meio ambiente. Todos os produtos ROINTE encontram-se assinalados com um símbolo constituído por um contentor de lixo barrado com uma cruz, de modo a recordar o consumidor da obrigação de separá-los e garantir que os mesmos sejam recolhidos seletivamente. O consumidor deve entrar em contacto com a autoridade local ou com o revendedor, a fim de se informar sobre a eliminação correta do seu aparelho. 5. Garantia Nesta secção descrevem-se as condições de garantia de que o comprador dispõe ao adquirir um novo produto da marca Rointe. Estas condições reúnem todos os direitos do comprador de acordo com a legislação nacional vigente, bem como a garantia e todos os direitos adicionais que a marca Rointe oferece. 5.1 Se tiver de enviar o seu Radiador ROINTE para o serviço de garantia, remeta-o para o fornecedor/ instalador onde o adquiriu. No caso de surgirem problemas, a ROINTE põe à sua disposição o TELEFONE DE ASSISTÊNCIA TÉCNICA (PORTUGAL) 221 200 111, bem como o correio eletrónico [email protected]. Se vive num país diferente, por favor verifique o número de telefone correcto no verso deste manual. NÚMERO DE SÉRIE 300 W TELVN45B077 ELBA OVAL Quando nos contactar, será necessário indicar a referência do produto (situada na etiqueta de características), bem como o número de série, a data de compra e uma descrição do problema. Além disso, iremos pedir-lhe que nos remeta uma cópia da fatura relativa à compra do produto. 5.2. A Rointe garante que este produto não apresenta nenhum defeito material de conceção ou de fabrico no momento da sua aquisição original e dá uma garantia de 120 meses (10 anos) no que respeita ao aço e estancamento e de 24 meses (2 anos) nos componentes elétricos e eletrónicos. 50 ELBA OVAL PT 5.3. Se, após um uso normal, o produto não funcionar corretamente dentro do período da garantia, tendo sido detetadas falhas de conceção, material ou fabrico, a ROINTE procederá ao conserto ou à substituição do produto, segundo considerar oportuno e de acordo com os termos e condições estabelecidos abaixo: 5.3.1. A garantia só é fornecida se apresentar o certificado de garantia original emitido pelo estabelecimento vendedor e quando a referida garantia for correctamente preenchida, incluindo a referência do produto, o número de série (reflectido no rótulo das características técnicas do produto), a data de compra e carimbo do vendedor. Rointe reserva-se o direito de recusar o serviço de garantia quando esta informação tiver sido removida ou rectificada após a compra original do produto. 5.3.2. A garantia aplica-se apenas aos casos relativos a defeitos de material, conceção ou fabrico. Em nenhum caso serão abrangidos os casos em que os danos no Radiador foram provocados por um dos seguintes motivos: i) Danos causados por negligência e/ou má utilização do produto, ou seja, utilizado para fins diferentes do seu uso normal ou não respeitando as instruções de utilização e manutenção dadas pela ROINTE, bem como instalação ou utilização incorrecta do produto que possa não estar em conformidade com as normas técnicas de segurança em vigor. (ii) Corrosão de qualquer parte do produto causada pela exposição directa a água salgada Quando o produto é instalado a menos de 200 m da costa, o período de garantia para danos por corrosão será reduzido em 50%. iii) Qualquer modificação ou reparação não autorizada do produto por um terceiro ou pessoa não autorizada, ou a abertura do produto por um terceiro ou pessoa não autorizada. iv) Qualquer acidente considerado fora do controlo de ROINTE, como (mas não limitado a): raios, incêndios, inundações, catástrofes naturais, desordens públicas, fenómenos atmosféricos ou geológicos, etc. v) Falhas resultantes de instalação inadequada. Em caso de dúvida, por favor contacte ROINTE. 5.4. O serviço técnico da Rointe pode aconselhá-lo se necessitar de comprar quaisquer peças sobressalentes fora do período de garantia. 5.5. Esta garantia não afecta os direitos legais do comprador ao abrigo da actual legislação nacional, nem os direitos do comprador contra os do distribuidor ou instalador decorrentes do contrato de venda. 5.6. Na ausência de legislação nacional aplicável em vigor, esta garantia será a única protecção do comprador. A Rointe, os seus escritórios e distribuidores e instaladores não serão responsáveis por quaisquer danos, acidentais ou consequentes, decorrentes da violação de quaisquer regras implícitas relativas a este produto. 51 6. Como registar a garantia do produto IMPORTANTE: É importante que registe o seu produto ROINTE como parte do nosso serviço de garantia, no caso de querer fazer uma reclamação. Pode registar o seu produto ROINTE das seguintes formas: WEB 1. Vá a www.rointe.com/pt/registe-a-sua-garantia/. 2. Inicie sessão na sua conta existente ou crie uma nova conta se necessário. 3. Clique em “Os Meus Produtos”. 4. Introduza a referência do seu produto (alfanumérica e em letras maiúsculas). 5. Introduza o seu número de série (26 dígitos localizados na etiqueta metálica do seu produto começando por 84). 6. Carregue a sua prova de compra, tal como uma factura em formato PDF, JPEG ou PNG. Isto não é obrigatório, mas ao fazê-lo garante que o seu período de garantia é preciso. 7. Clique em “Registar”. 8. Parabéns! O seu produto está agora registado. EMAIL 1. 2. Enviar um e-mail para [email protected] com as seguintes informações: • Nome do cliente • Endereço e código postal • Número de telefone e endereço de correio electrónico • Referência do produto • Número de série • A data de compra do produto e a prova de compra (como descrito acima na secção do WEBSITE). A nossa equipa de apoio técnico confirmará o registo do produto e solicitará qualquer informação adicional requerida por correio electrónico. POSTAL 1. Por favor envie a informação na secção EMAIL para: • 2. 52 INDUSTRIAS ROYAL TERMIC, S.L. - Rointe C/E Parcela 43, 30140, Santomera (ESPANHA) Por favor, não se esqueça de obter uma prova de envio. ELBA OVAL PT 53 54 Em modo de espera A potência calorífica mínima A potência calorífica nominal CONSUMO AUXILIAR DE ELECTRICIDADE Potência carlorífica máxima continuada Potência carlorífica mínima (indicativa) Potência calorífica nominal POTÊNCIA CALORÍFICA ITEM kW Pmax,c kW kW elMIN elSB kW elMIN Branco Cromo kW kW elMAX elMAX kW kW Pmin Pmax,c kW kW Unidade Pnom Pnom Signo Cromo Branco Cromo Branco Cromo Branco Cromo Branco 7. ERP. REGULAMENTO DA COMISSÃO (EU) 2015/1188 0,002 0,30 0,30 0,30 0,30 0,30 0,30 n/a 0,30 0,30 TELV***C077 TELV***B077 0,002 0,30 0,50 0,30 0,50 0,30 0,50 n/a 0,30 0,50 TELV***C112 TELV***B112 0,002 0,50 0,75 0,50 0,75 0,50 0,75 n/a 0,50 0,75 TELV***C150 TELV***B150 0,002 0,75 1,00 0,75 1,00 0,75 1,00 n/a 0,75 1,00 TELV***C172 TELV***B172 — — — — — — — — — — Dois ou mais níveis manuais, sem controle de temperatura interior Com controle de temperatura interior mediante termostato mecânico Com controle eletrónico de temperatura interior Controle eletrónico de temperatura interior e temporizador diário Controle eletrónico de temperatura interior e temporizador semanal — — — — — — — — — — — — — ns Controle de temperatura interior com detecção de presença Controle de temperatura interior com detecção de janelas abertas Com opção de controle a distancia Com controle de posta em marcha adaptável Com limitação de tempo de funcionamento Com sensor de lustre negro RENDIMENTO DE EFICIÊNCIA ENERGÉTICA ESTACIONAL OUTRAS OPÇÕES DE CONTROLE (PODEM SELECCIONAR-SE VÁRIAS) — — Potência calorífica de um sozinho nível, sem controle de temperatura interior 39,0% — — — — — — — TIPO DE CONTROLE DE POTÊNCIA CALORÍFICA / DE TEMPERATURA INTERIOR (SELECCIONE UM) 39,0% — — — — — — 39,0% — — — — — — 39,0% — — — — — — ELBA OVAL PT 55 Précautions d’installation et de sécurité (normes EN 60335) Avant d’installer l’appareil, lisez attentivement le chapitre “Consignes d’installation et de sécurité” pour vous assurer du bon fonctionnement de l’appareil. Précautions d’installation Ce produit est conçu pour un usage domestique ou résidentiel. Il est recommandé que le produit soit installé par un professionnel. Assurez-vous que le produit est correctement branché au 230V. ATTENTION Les enfants de moins de 3 ans doivent être tenus hors de portée de l’appareil, sauf s’ils sont surveillés en permanence. Les enfants âgés de 3 à 8 ans ne doivent allumer et éteindre l’appareil que lorsqu’il a été placé ou installé dans sa position d’utilisation normale et lorsqu’ils ont reçu une supervision ou des instructions concernant l’utilisation de l’appareil de manière sûre et qu’ils comprennent les risques encourus. Les enfants âgés de 3 à 8 ans ne doivent pas brancher, régler, nettoyer ou entretenir l’appareil. Cet appareil peut être utilisé par des enfants âgés de 8 ans et plus et par des personnes ayant des capacités physiques, sensorielles ou mentales réduites ou manquant d’expérience et de connaissances si elles ont été supervisées ou ont reçu des instructions concernant l’utilisation de l’appareil en toute sécurité et comprennent les risques encourus. Les enfants ne doivent pas jouer avec l’appareil. Le nettoyage et l’entretien des utilisateurs ne doivent pas être effectués par des enfants sans surveillance. Les enfants doivent être surveillés à tout moment pour s’assurer qu’ils n’interfèrent pas avec le produit. Ce produit de chauffage est rempli d’une quantité précise d’huile spéciale sans entretien. Les réparations nécessitant l’ouverture du réservoir d’huile ne doivent être effectuées que par Rointe ou son service après-vente. Les normes concernant l’élimination d’huile après la mise au rebut de l’appareil de chauffage doivent être respectées. Si le câble d’alimentation est endommagé, il doit être remplacé par le fabricant, son service aprèsvente ou un personnel qualifié pour éviter tout dommage. Ne coupez en aucun cas le câble électrique pour éviter les risques et pour assurer le bon fonctionnement du produit. Ne branchez pas le sèche-serviettes si vous remarquez des dommages externes lors du déballage ou de l’installation du produit. Si le câble d’alimentation est endommagé, il doit être remplacé par le fabricant, son service après-vente ou le personnel autorisé afin d’éviter tout dommage. 56 ELBA OVAL FR Ne pas pulvériser ou mouiller le produit. Pendant le fonctionnement, tenez le produit éloigné des matériaux combustibles tels que les rideaux, les meubles, etc. Ne placez rien d’autre que des vêtements, des serviettes ou des tissus ininflammables sur le produit. Le sèche-serviettes doit être installé de manière à ce que la prise de courant soit toujours accessible. Le câble d’alimentation ne doit jamais être en contact avec le produit pendant son fonctionnement. AVERTISSEMENT - Ne touchez jamais le produit avec les mains ou toute autre partie du corps mouillée. AVERTISSEMENT - Certaines parties de ce produit peuvent devenir très chaudes et causer des brûlures. Une attention particulière devrait être accordée lorsque des enfants et des personnes vulnérables sont présents. Contenu 1. Spécifications techniques du produit .................................................................................................... 58 2. Installation d’un sèche-serviettes Rointe .......................................................................................... 62 2.1. Montage ....................................................................................................................................... 62 2.2. Instructions de connexion .................................................................................................................. 62 2.3. Règles particulières pour les salles de bains................................................................................... 63 3. Description du panneau de contrôle et de son fonctionnement.............................................................. 64 3.1. Panneau de contrôle............................................................................................................................. 64 3.2. Mise en marche et mise en veille......................................................................................................... 64 3.3. Sélection de la température de consigne............................................................................................. 64 3.4. Indicateur de consommation.............................................................................................................. 65 3.5. Verrouillage du clavier........................................................................................................................ 65 3.6. Mode MAX POWER....................................................................................................................... 65 3.7. Contrôle par télécommande............................................................................................................ 67 3.8. Identification des erreurs..................................................................................................................... 67 4. Entretien et nettoyage ................................................................................................................................ 68 5. Garantie .................................................................................................................................................... 68 6. Comment enregistrer la garantie du produit ........................................................................................ 70 7. ERP. Règlement de la Commission (EU) 2015/1188.............................................................................. 72 57 1. Spécifications techniques du produit (Modèle 400, 450, 500 et 550) BLANC TELV*40B077 TELV*40B112 TELV*40B150 TELV*40B172 CHROME TELV*40C077 TELV*40C112 TELV*40C150 TELV*40C172 Largeur (mm) 400 400 400 400 Hauteur sans panneau de contrôle (mm) 770 1.120 1.500 1.720 Hauteur avec panneau de contrôle (mm) 865 1.215 1.595 1.815 Profondeur (mm) 50 50 50 50 Profondeur produit installé (mm) 100 100 100 100 Élément chauffant d’acier blindé Fluide caloporteur Panneau de contrôle ovale contrôle à distance par infrarouge MODÈLE LARGEUR 400 DIMENSIONS CARACTÉRISTIQUES MÉCANIQUES Blanc RAL 9016 Finition Chrome CARACTÉRISTIQUES ÉLECTRIQUES Blanc 300 500 750 1.000 Chrome 300 300 500 750 230 V ~ 230 V ~ 230 V ~ 230 V ~ Blanc 1,3 2,2 3,2 4,4 Chrome 1,3 1,3 2,2 3,2 Kit d’installation inclus Thermostat de sécurité IP 44 IP 44 IP 44 IP 44 Puissance nominale (W) Voltage (V) Courrant (A) Class II INSTALLATION ET PROTECTION Indice de protection 58 FR ELBA OVAL BLANC TELV*45B077 TELV*45B112 TELV*45B150 TELV*45B172 CHROME TELV*45C077 TELV*45C112 TELV*45C150 TELV*45C172 Largeur (mm) 450 450 450 450 Hauteur sans panneau de contrôle (mm) 770 1.120 1.500 1.720 Hauteur avec panneau de contrôle (mm) 865 1.215 1.595 1.815 Profondeur (mm) 50 50 50 50 Profondeur produit installé (mm) 100 100 100 100 Élément chauffant d’acier blindé Fluide caloporteur Panneau de contrôle ovale contrôle à distance par infrarouge MODÈLE LARGEUR 450 DIMENSIONS CARACTÉRISTIQUES MÉCANIQUES Blanc RAL 9016 Finition Chrome CARACTÉRISTIQUES ÉLECTRIQUES Blanc 300 500 750 1.000 Chrome 300 300 500 750 230 V ~ 230 V ~ 230 V ~ 230 V ~ Blanc 1,3 2,2 3,2 4,4 Chrome 1,3 1,3 2,2 3,2 Kit d’installation inclus Thermostat de sécurité IP 44 IP 44 IP 44 IP 44 Puissance nominale (W) Voltage (V) Courrant (A) Class II INSTALLATION ET PROTECTION Indice de protection 59 BLANC TELV*50B077 TELV*50B112 TELV*50B150 TELV*50B172 CHROME TELV*50C077 TELV*50C112 TELV*50C150 TELV*50C172 Largeur (mm) 500 500 500 500 Hauteur sans panneau de contrôle (mm) 770 1.120 1.500 1.720 Hauteur avec panneau de contrôle (mm) 865 1.215 1.595 1.815 Profondeur (mm) 50 50 50 50 Profondeur produit installé (mm) 100 100 100 100 Élément chauffant d’acier blindé Fluide caloporteur Panneau de contrôle ovale contrôle à distance par infrarouge MODÈLE LARGEUR 500 DIMENSIONS CARACTÉRISTIQUES MÉCANIQUES Blanc RAL 9016 Finition Chrome CARACTÉRISTIQUES ÉLECTRIQUES Blanc 300 500 750 1.000 Chrome 300 300 500 750 230 V ~ 230 V ~ 230 V ~ 230 V ~ Blanc 1,3 2,2 3,2 4,4 Chrome 1,3 1,3 2,2 3,2 Kit d’installation inclus Thermostat de sécurité IP 44 IP 44 IP 44 IP 44 Puissance nominale (W) Voltage (V) Courrant (A) Class II INSTALLATION ET PROTECTION Indice de protection 60 FR ELBA OVAL BLANC TELV*55B077 TELV*55B112 TELV*55B150 TELV*55B172 CHROME TELV*55C077 TELV*55C112 TELV*55C150 TELV*55C172 Largeur (mm) 550 550 550 550 Hauteur sans panneau de contrôle (mm) 770 1.120 1.500 1.720 Hauteur avec panneau de contrôle (mm) 865 1.215 1.595 1.815 Profondeur (mm) 50 50 50 50 Profondeur produit installé (mm) 100 100 100 100 Élément chauffant d’acier blindé Fluide caloporteur Panneau de contrôle ovale contrôle à distance par infrarouge MODÈLE LARGEUR 550 DIMENSIONS CARACTÉRISTIQUES MÉCANIQUES Blanc RAL 9016 Finition Chrome CARACTÉRISTIQUES ÉLECTRIQUES Blanc 300 500 750 1.000 Chrome 300 300 500 750 230 V ~ 230 V ~ 230 V ~ 230 V ~ Blanc 1,3 2,2 3,2 4,4 Chrome 1,3 1,3 2,2 3,2 Kit d’installation inclus Thermostat de sécurité IP 44 IP 44 IP 44 IP 44 Puissance nominale (W) Voltage (V) Courrant (A) Class II INSTALLATION ET PROTECTION Indice de protection 61 2. Installation du sèche-serviettes 2.1. Montage A l’intérieur de l’emballage se trouve un gabarit de pose. 1. Choisir l’emplacement où fixer le sèche-serviettes au mur. 2. Positionner le gabarit de pose contre le mur et marquer les trous à l’aide d’un crayon. 3. Retirer le gabarit de pose et faire les trous au mur. 4. Insérer les chevilles dans les trous. 5. Visser au mur la pièce d’ancrage en plastique avec les vises nº 3 de l’image jointe. 6. Visser les deux pièces accroche- sèche-serviettes et la pièce en plastique de fixation au tubehorizontal du sèche-serviettes comme sur la figure 1 avec la vis nº 7. 7. Insérer l’ensemble du point 6 dans la pièce d’ancrage en plastique et tenir avec la vis conique nº 4 (voir image jointe). 8. Poser l’ embellisseur sur la pièce qui tient le sèche-serviettes. Nº. ITEM 1 10 x 40 mm cheville 2 Pièce plastique d´ancrage 3 Vis 5.5 x 50 mm 4 Vis 5 x 12 mm 5 Pièce plastique de fixation 6 Accroche-Sèche-serviettes 7 Vis 8 x 26 mm 8 Embellisseur 9 Product 1 5 2.2. Instructions de connexion Le branchement au réseau doit être effectué conformément à la tension indiquée sur l’étiquette des données techniques du produit. Ce dispositif est destiné à être connecté en permanence à une installation fixe. Le circuit d’alimentation du sèche-serviettes doit être équipé d’un disjoncteur unipolaire avec une séparation des contacts d’au moins 3 mm. L’appareil doit être installé, si possible, dans un endroit non exposé aux courants d’air (fenêtres, portes) ou à tout autre élément susceptible de gêner son fonctionnement. Cela permettra d’obtenir le meilleur confort thermique. Placez tout objet susceptible d’entraver la circulation de l’air (meubles, fauteuils) à 50 cm de l’appareil. L’appareil ne doit pas être placé devant ou juste sous une prise de courant fixe. Le fond du boîtier de contrôle doit se trouver à 15 cm du sol. Pour tout appareil, si le câble d’alimentation est endommagé, il doit être remplacé par un câble 62 ELBA OVAL FR spécifique. Le remplacement des câbles doit être effectué par le fabricant, son service après-vente ou un personnel qualifié. Les caractéristiques techniques de votre appareil sont indiquées sur l’étiquette des caractéristiques techniques. OK IMPORTANT - Cet appareil ne doit jamais être installé avec son boîtier de commande en position haute. L’appareil ne doit pas être utilisé horizontalement. Utilisez des cales lors de l’installation pour éviter que le boîtier de commande ne repose sur le sol. 2.3. Règles particulières pour les salles de bains Cet appareil est conforme aux normes de sécurité de la CLASSE II (double isolation). Il peut être installé dans les zones 2 et 3, positions A et B, selon les règles suivantes: • Dans les salles de bains, le sèche-serviettes ne doit jamais être installé de manière à ce que le panneau de commande puisse être atteint par une personne dans la baignoire ou la douche. Le panneau de contrôle doit être situé à une distance minimale de 600 mm de toute zone humide. Le corps du produit peut être placé dans la zone 2 si le panneau de contrôle est situé dans la zone 3. • Dans une cuisine ou une salle de bains, le porte-serviettes doit être placé à au moins 25 cm du sol. 63 3. Description du panneau de contrôle et de son fonctionnement 3.1. Panneau de contrôle Le panneau de contrôle se compose de 7 LED et de 4 touches mécaniques avec les fonctions suivantes: 1 2 3 4 5 6 Touche On/Stand-by/Confirmation Touche Augmenter la température de consigne Touche Baisser la température de consigne Touche puissance maximale 7 Détecteur infrarouge 3.2. Mise en marche et mise en veille Pour allumer le produit, appuyez brièvement sur la touche nouveau sur la touche . . Pour éteindre le produit, appuyez à 3.3. Sélection de la température de consigne Nous pouvons régler la température de consigne du sèche-serviettes à l’aide des touches et . En appuyant sur la touche , vous augmentez la température de consigne. De la même manière, en appuyant sur la touche , nous baissons la température de consigne. La température minimale de fonctionnement est de 7ºC, et la température maximale de 30ºC. La température réglée en usine est de 21ºC. Les 6 voyants LED situés sur la partie supérieure du panneau de contrôle identifient la température de consigne. 64 Voyant Lumineux Éclairage 1 LED Led 1: clignotement court toutes les 2 secondes Led 2: OFF Led 3: OFF Led 4: OFF Led 5: OFF Led 6: OFF Température 7ºC Voyant Lumineux 1 LED Éclairage Led 1: ON Led 2: OFF Led 3: OFF Led 4: OFF Led 5: OFF Led 6: OFF Température 15ºC ELBA OVAL Voyant Lumineux 2 LED 4 LED 6 LED Éclairage Température Led 1: ON Led 2: ON Led 3: OFF Led 4: OFF Led 5: OFF Led 6: OFF Voyant Lumineux Éclairage FR Température 18ºC Led 1: ON Led 2: ON Led 3: ON Led 4: OFF Led 5: OFF Led 6: OFF 21ºC Led 1: ON Led 2: ON Led 3: ON Led 4: ON Led 5: OFF Led 6: OFF 24ºC Led 1: ON Led 2: ON Led 3: ON Led 4: ON Led 5: ON Led 6: OFF 27ºC Led 1: ON Led 2: ON Led 3: ON Led 4: ON Led 5: ON Led 6: ON 30ºC 3 LED 5 LED 3.4. Indicateur de consommation Lorsque la température de la pièce est inférieure à la température choisie, la résistance chauffante se déclenche. Pour signaler que la résistance chauffante a été activée et que le produit consomme de l’énergie, la dernière LED d’indication de température clignote. 3.5. Verrouillage du clavier En appuyant simultanément pendant 3 secondes sur les touches et , on verrouille/déverrouille le clavier du panneau de contrôle. Si vous appuyez sur une touche alors que le panneau est verrouillé, toutes les leds clignotent deux fois. Pour des raisons de sécurité, la touche marche/arrêt fonctionnera même si le panneau est verrouillé. Pour procéder à l’action de marche/arrêt avec le panneau de contrôle verrouillé, il est nécessaire de maintenir la touche enfoncée pendant 3 secondes. 3.6. Mode MAX POWER Le mode MAX POWER active la résistance du sèche-serviettes à la puissance maximale de manière continue sans tenir en compte la lecture de la sonde. Pour activer cette fonction depuis le panneau de contrôle, il suffit d’appuyer brièvement sur la touche . Il est également possible d’activer ce mode lorsque le produit est éteint. 65 Une courte pression active ce mode pendant 15 minutes. Si vous appuyez à nouveau sur dans un délai de deux secondes, la période suivante (de 30 minutes) sera activée. Des pressions consécutives activeront les périodes suivantes, comme indiqué dans le tableau ci-dessous : Éclairage Temps Voyant Lumineux Éclairage Temps Led 1: Clignotement Led 2: Clignotement Led 3: OFF Led 4: OFF Led 5: OFF Led 6: OFF Led 7: ON 15 minutes Led 1: Clignotement Led 2: OFF Led 3: OFF Led 4: OFF Led 5: OFF Led 6: OFF Led 7: ON Led 1: Clignotement Led 2: Clignotement Led 3: Clignotement Led 4: Clignotement Led 5: Clignotement Led 6: Clignotement Led 7: ON 6 LED Led 1: Clignotement Led 2: Clignotement Led 3: Clignotement Led 4: Clignotement Led 5: Clignotement Led 6: OFF Led 7: ON Si on appuie 7 fois sur la touche 90 minutes 5 LED Led 1: Clignotement Led 2: Clignotement Led 3: Clignotement Led 4: Clignotement Led 5: OFF Led 6: OFF Led 7: ON 60 minutes 4 LED Led 1: Clignotement Led 2: Clignotement Led 3: Clignotement Led 4: OFF Led 5: OFF Led 6: OFF Led 7: ON 45 minutes 3 LED 30 minutes 2 LED 1 LED 120 minutes Voyant Lumineux , on revient au point de départ (activation pendant 15 minutes). Les LED fonctionnent comme un compte à rebours et s’éteignent au fur et à mesure que le temps s’écoule. Une fois le temps écoulé, le produit revient automatiquement au mode précédent ou s’éteint s’il était en mode “Off”. Le mode MAX POWER peut être arrêté à tout moment par une courte pression sur la touche sèche-serviettes récupère son mode de fonctionnement antérieur. 66 . Le ELBA OVAL 3.7. Contrôle par télécommande FR (opcional) Les séche-serviettes avec panneau de contrôle OVAL peuvent être contrôlés grâce aux télécommandes Rointe AIR Control et BASIC Control (vendues séparément). L’utilisation de la télécommande complète la fonctionnalité du sèche-serviettes en permettant de: • Contrôlez le sèche-serviettes sans avoir à utiliser le panneau de contrôle. • Définir des températures de consigne plus précises (d’un demi-degré sur un demi-degré entre 15 et 30 ºC). • Programmez le produit 24 heures sur 24, 7 jours sur 7 avec une programmation personnalisée ou en utilisant l’un des 4 programmes préinstallés sur la télécommande BASIC Control. Pour en savoir plus sur les télécommandes Rointe et leurs fonctions, rendez-vous sur notre site web ou consultez leur manuel d’utilisation. IMPORTANT: Lorsque le produit est programmé à l’aide d’une télécommande Rointe, la led numéro 7 (correspondant au mode MAX POWER) clignote. ATTENTION: Si nous avons programmé notre sèche-serviettes et nous souhaitons l’utiliser à nouveau en mode manuel, nous devons maintenir la touche marche/arrêt enfoncée pendant 3 secondes (avec le produit déverrouillé). Le produit ne sera plus programmé et nous pourrons le contrôler manuellement à l’aide des touches du panneau de contrôle. 3.8. Identification des erreurs Dans des conditions normales de fonctionnement, des anomalies peuvent être détectées, qui sont signalées par les indicateurs LED du produit. Voir le tableau pour identifier le code d’erreur: Voyant Lumineux LED 6 Clignotement Code Erreur Solution Led 1: OFF Led 2: OFF Led 3: OFF Led 4: OFF Led 5: OFF Led 6: Clignotement Led 7: OFF Défaut de la sonde de température dû à un court-circuit ou à une sonde ouverte. Veuillez contacter le service d'assistance technique de Rointe en appelant au 01 73 05 70 01. 67 4. Entretien et nettoyage Le sèche-serviettes n’a pas besoin d’entretien. Nous recommandons un nettoyage sur tout le produit (partie postérieure, les rails…). N’utilisez pas de produits abrasifs sur le produit. Nettoyez-le avec un chiffon humide et du savon pH neutre et l’écran avec un chiffon sec. Règlement européen 2012/19/UE Selon le règlement européen 2012/19/UE sur les déchets d’équipements électriques et électroniques (DEEE), ces équipements ne peuvent pas être éliminés dans les conteneurs municipaux normaux ; ils doivent être collectés séparément afin d’optimiser la récupération et le recyclage de leurs composants et matériaux et de réduire l’impact sur la santé humaine et l’environnement. Le symbole de la poubelle barrée est apposé sur tous les produits Rointe pour rappeler au consommateur l’obligation de les séparer pour une collecte séparée. Le consommateur doit contacter l’autorité locale ou le détaillant pour obtenir des informations concernant l’élimination appropriée de son appareil. 5. Garantie Cette section décrit les conditions de garantie offertes à l’acheteur lors de l’achat d’un nouveau produit de la marque Rointe. Ces conditions réunissent tous les droits dont dispose l’acheteur selon la législation nationale en vigueur, ainsi que la garantie et les droits supplémentaires offerts par la marque Rointe. 5.1 Tout incident détecté sur votre produit peut être suivi par le vendeur du produit ou de manière plus agile par le fabricant. met à votre disposition un TÉLÉPHONE D’ASSISTANCE TECHNIQUE (FRANCE) 01 73 05 70 01 où nous vous indiquerons les étapes à suivre pour résoudre cet incident. Si vous vivez dans un autre pays, veuillez vérifier le numéro de téléphone correct au dos de ce manuel. NUMÉRO DE SÉRIE 300 W TELVN45B077 ELBA OVAL Vous aurez besoin de la référence du produit (située sur l’étiquette des caractéristiques du produit), du numéro de série, de la date d’achat et de la nature du défaut lorsque vous nous contacterez pour améliorer la garantie. De plus, joignez une copie de la facture d’achat du produit. 5.2. Rointe garantit que ce produit est exempt de tout défaut de matériau, de conception ou de fabrication au moment de l’achat initial et pour une période de 120 mois pour le corps d’acier. 5.3. Si, pendant la période de garantie, le produit ne fonctionne pas correctement dans des conditions normales d’utilisation et qu’il s’agit d’un défaut de conception, de matériau ou de fabrication, Rointe réparera ou remplacera, à sa convenance, le produit conformément aux termes et conditions énoncés ci-dessous: 68 ELBA OVAL FR 5.3.1. La garantie n’est accordée que si vous présentez le certificat de garantie original délivré par le concessionnaire et si la garantie est correctement remplie, y compris la référence du produit, le numéro de série (indiqué sur l’étiquette des caractéristiques techniques du produit), la date d’achat et le sceau du concessionnaire. Rointe se réserve le droit de refuser le service de garantie lorsque ces informations ont été retirées ou rectifiées après l’achat initial du produit. 5.3.2. La garantie ne s’applique qu’en cas de défauts de matériel, de conception ou de fabrication, en aucun cas elle ne couvre les dommages au sèche-serviettes pour les raisons suivantes: 5.3.2.1. Utilisation incorrecte du produit, à des fins autres que normales ou pour non-respect des instructions d’utilisation et d’entretien données par Rointe, ainsi que l’installation ou l’utilisation du produit d’une manière non conforme aux normes techniques de sécurité en vigueur. Réparations non autorisées effectuées par du personnel non autorisé ou ouverture du sèche-serviettes par des personnes non autorisées. Accidents imprévus indépendants de la volonté d’Rointe, tels que foudre, incendie, inondation, désordre public, etc. 5.3.2.2. Les réparations ou remplacements couverts par cette garantie ne prolongent ni ne redémarrent la période de garantie. 5.3.2.3. Les réparations ou remplacements couverts par cette garantie doivent être effectués avec des unités fonctionnellement équivalentes. Les pièces défectueuses ou les pièces enlevées ou remplacées deviennent la propriété de Rointe. 5.4. Le service technique de Rointe pourra vous conseiller si vous avez besoin d’acheter des pièces de rechange en dehors de la période de garantie. 5.5. Cette garantie n’affecte pas les droits légaux de l’acheteur en vertu du droit national applicable, ni les droits de l’acheteur contre ceux du distributeur ou de l’installateur découlant du contrat de vente. 5.6. En l’absence de législation nationale en vigueur, cette garantie est la seule protection de l’acheteur. Rointe, ses bureaux et ses distributeurs et installateurs ne sont pas responsables des dommages de quelque nature que ce soit, accessoires ou consécutifs, résultant d’une violation d’une règle implicite relative à ce produit. 69 6. Comment enregistrer la garantie de votre produit IMPORTANT: Il est important que vous enregistriez votre produit ROINTE dans le cadre de notre service de garantie, au cas où vous souhaiteriez faire une réclamation. Vous pouvez enregistrer votre produit ROINTE de la manière suivante: WEB 1. Consultez le site www.rointe.com/fr/enregistrez-votre-garantie/. 2. Connectez-vous à votre compte existant ou créez un nouveau compte si nécessaire. 3. Cliquez sur “Mes produits”. 4. Saisissez la référence de votre produit (en alphanumérique et en majuscules). 5. Saisissez votre numéro de série (26 chiffres situés sur l’étiquette métallique de votre produit). 6. Téléchargez votre preuve d’achat, telle qu’une facture sous format PDF, JPEG ou PNG. Ce n’est pas obligatoire, mais cela permet de garantir l’exactitude de votre période de garantie. 7. Cliquez sur “Enregistrement”. 8. Félicitations ! Votre produit est maintenant enregistré. EMAIL 1. 2. Envoyez un courriel à [email protected] avec les informations suivantes: • Nom du client • Adresse et code postal • Numéro de téléphone et adresse électronique • Référence du produit • Numéro de série • La date d’achat du produit et la preuve d’achat (comme décrit dans la section du site web ci-dessus). Notre équipe de support technique confirmera l’enregistrement du produit et demandera toute information supplémentaire requise par courrier électronique. COURRIER 1. Envoyez les informations demandées dans la section EMAIL à: • 2. 70 INDUSTRIAS ROYAL TERMIC, S.L. - ROINTE, C/E Parcela 43, 30140, Santomera (SPAIN) Veillez à obtenir une preuve d’expédition. ELBA OVAL FR 71 72 En mode vieille À la puissance thermique minimale À la puissance thermique nominale CONSOMMATION AUXILIAIRE D´ÉLECTRICITÉ Puissance thermique maximale continue Puissance thermique minimale Puissance thermique nominale PUISSANCE THERMIQUE ITEM kW Pmax,c kW kW elMIN elSB kW elMIN Branc Chrome kW kW elMAX elMAX kW kW Pmin Pmax,c kW kW Unite Pnom Pnom Symbole Chrome Branc Chrome Branc Chrome Branc Chrome Blanc 7. ERP. RÈGLEMENT DE LA COMMISSION (EU) 2015/1188 0,002 0,30 0,30 0,30 0,30 0,30 0,30 n/a 0,30 0,30 TELV***C077 TELV***B077 0,002 0,30 0,50 0,30 0,50 0,30 0,50 n/a 0,30 0,50 TELV***C112 TELV***B112 0,002 0,50 0,75 0,50 0,75 0,50 0,75 n/a 0,50 0,75 TELV***C150 TELV***B150 0,002 0,75 1,00 0,75 1,00 0,75 1,00 n/a 0,75 1,00 TELV***C172 TELV***B172 — — — — — — — — — — Deux niveaux manuels ou plus, pas de contrôle de la température intérieure Avec contrôle de la température intérieure par thermostat mécanique Avec régulation électronique de la température intérieure Régulation électronique de la température intérieure et minuterie journalière Régulation électronique de la température intérieure et minuterie hebdomadaire — — — — — — — — — — — — — ns Régulation de la température intérieure avec détection de présence Régulation de la température intérieure avec détection de fenêtre ouverte Avec option télécommande Avec commande de démarrage adaptative Avec limitation du temps de fonctionnement Avec capteur de lampe noir RENDEMENT SAISONNIER EN MATIÈRE D’EFFICACITÉ ÉNERGÉTIQUE AUTRES OPTIONS DE COMMANDE (PLUSIEURS PEUVENT ÊTRE SÉLECTIONNÉES) — — Puissance calorifique mono-niveau, pas de régulation de la température intérieure TYPE DE CHAUFFAGE INTÉRIEUR/RÉGULATION DE LA TEMPÉRATURE (EN CHOISIR UN) 39,0% — — — — — — — 39,0% — — — — — — 39,0% — — — — — — 39,0% — — — — — — ELBA OVAL FR 73 Installatie- en veiligheidsmaatregelen (EN 60335-normen) Lees voordat u het product inschakelt eerst de “installatie- en veiligheidsmaatregelen” zorgvuldig om er zeker van te zijn dat het product correct werkt. Voorzorgsmaatregelen bij de installatie Het product is ontworpen voor huishoudelijk of residentieel gebruik. U wordt geadviseerd om het product te laten installeren door een professionele installateur. Zorg ervoor dat het product correct is aangesloten op 230v en is geaard. BELANGRIJK Kinderen jonger dan 3 jaar moeten buiten het bereik van het apparaat worden gehouden, tenzij zij voortdurend onder toezicht staan. Kinderen tussen 3 en 8 jaar mogen het toestel alleen in- en uitschakelen wanneer het in de normale gebruiksstand is geplaatst of geïnstalleerd en wanneer zij onder toezicht staan of instructies hebben gekregen over hoe zij het toestel veilig kunnen gebruiken en de risico’s ervan begrijpen. Kinderen tussen 3 en 8 jaar mogen het toestel niet aansluiten, afstellen, schoonmaken of onderhouden. Dit apparaat kan worden gebruikt door kinderen van 8 jaar en ouder en door personen met verminderde lichamelijk, zintuiglijke of geestelijke vermogens of gebrek aan ervaring en kennis, mits ze onder toezicht staan of instructies hebben gekregen over hoe het apparaat op een veilige manier gebruikt kan worden en ze de gevaren ervan begrijpen. Kinderen mogen niet met het apparaat spelen. Reiniging en gebruikersonderhoud mogen niet zonder toezicht door kinderen worden uitgevoerd. Kinderen moeten te allen tijde onder toezicht staan om ervoor te zorgen dat ze het product niet hinderen. Dit product is gevuld met een precieze hoeveelheid speciale olie die geen onderhoud nodig heeft. Alle reparaties waarbij het openen van de olietank vereist is, mogen alleen worden uitgevoerd door een officiële rointe-installateur of diens klantenservicepersoneel, die ook op de hoogte moeten worden gebracht indien een olielekkage wordt opgemerkt. De voorschriften voor het weggooien van olie bij het weggooien van de kachel moeten in acht worden genomen. Als de voedingskabel beschadigd is, moet deze worden vervangen door de fabrikant, diens klantenservice of geautoriseerd personeel om schade te voorkomen. Snijd de elektrische kabel in geen geval door om risico’s te vermijden en de goede werking van het product te garanderen. Sluit de handdoekverwarmer niet aan als u bij het uitpakken of installeren van het product uitwendige schade constateert. Als het netsnoer beschadigd 74 ELBA OVAL NL is, moet het worden vervangen door de fabrikant, zijn servicedienst of bevoegd personeel om schade te voorkomen. Het product niet sproeien of nat maken. Houd het product tijdens het gebruik uit de buurt van brandbare materialen zoals gordijnen, meubels, enz. Plaats geen andere voorwerpen dan niet-ontvlambare kleding, handdoeken of stoffen op het product. De handdoekverwarmer moet zo worden geïnstalleerd dat het stopcontact altijd bereikbaar is. Het netsnoer mag tijdens het gebruik nooit in contact komen met het product. WAARSCHUWING - Raak het product nooit aan met natte handen of andere natte delen van het lichaam. WAARSCHUWING - Delen van dit product kunnen zeer heet worden en brandwonden veroorzaken. Bijzondere aandacht moet worden besteed aan de aanwezigheid van kinderen en kwetsbare personen. Inhoud 1. Technische specificaties.......................................................................................................................76 2. Installatie van Rointe handdoekrekken.............................................................................................80 2.1. Montage-instructies....................................................................................................................80 2.2. Aansluitinstructies..................................................................................................................80 2.3. Specifieke voorschriften voor badkamers...............................................................................81 3. Bedieningspaneel beschrijving en functies............................................................................................... 82 3.1. Bedieningspaneel............................................................................................................................. 82 3.2. Aan-/Uitknop en Stand-by......................................................................................................... 82 3.3. Ingestelde temperatuurselectie............................................................................................. 82 3.4. Verbruiksidentificatie.............................................................................................................. 83 3.5. Toetsenpaneel vergrendelen............................................................................................................. 83 3.6. MAX POWER modus....................................................................................................................... 83 3.7. Afstandsbediening................................................................................................................ 84 3.8. Probleemoplossing..................................................................................................................... 85 4. Onderhoud en reiniging........................................................................................................................85 5. Garantie.....................................................................................................................................................86 6. Hoe u uw productgarantie registreert.....................................................................................................88 7. ERP richtlijn (EU) 2015/1188.....................................................................................................90 75 1. Technische specificaties (Modellen 400, 450, 500 en 550) WIT TELV*40B077 TELV*40B112 TELV*40B150 TELV*40B172 CHROOM TELV*40C077 TELV*40C112 TELV*40C150 TELV*40C172 Breedte (mm) 400 400 400 400 Hoogte zonder bedieningspaneel (mm) 770 1.120 1.500 1.720 Hoogte met bedieningspaneel (mm) 865 1.215 1.595 1.815 Diepte (mm) 50 50 50 50 Geïnstalleerde diepte (mm) 100 100 100 100 Verwarmingselement van roestvrij staal Thermische vloeistof Ovaal bedieningspaneel Infrarood afstandsbediening MODEL - Breedte 400 AFMETINGEN MECHANISCHE EIGENSCHAPPEN Wit RAL 9016 Afwerking Chroom ELEKTRISCHE EIGENSCHAPPEN Wit 300 500 750 1.000 Chroom 300 300 500 750 230 V ~ 230 V ~ 230 V ~ 230 V ~ Wit 1,3 2,2 3,2 4,4 Chroom 1,3 1,3 2,2 3,2 Inclusief montageset Veiligheidsthermostaat IP 44 IP 44 IP 44 IP 44 Nominaal vermogen (W) Spanning (V) Stroomsterkte (A) Klasse II VEILIGHEID & INSTALLATIE Beschermingsklasse 76 NL ELBA OVAL WIT TELV*45B077 TELV*45B112 TELV*45B150 TELV*45B172 CHROOM TELV*45C077 TELV*45C112 TELV*45C150 TELV*45C172 Breedte (mm) 450 450 450 450 Hoogte zonder bedieningspaneel (mm) 770 1.120 1.500 1.720 Hoogte met bedieningspaneel (mm) 865 1.215 1.595 1.815 Diepte (mm) 50 50 50 50 Geïnstalleerde diepte (mm) 100 100 100 100 Verwarmingselement van roestvrij staal Thermische vloeistof Ovaal bedieningspaneel Infrarood afstandsbediening MODEL - Breedte 450 AFMETINGEN MECHANISCHE EIGENSCHAPPEN Wit RAL 9016 Afwerking Chroom ELEKTRISCHE EIGENSCHAPPEN Wit 300 500 750 1.000 Chroom 300 300 500 750 230 V ~ 230 V ~ 230 V ~ 230 V ~ Wit 1,3 2,2 3,2 4,4 Chroom 1,3 1,3 2,2 3,2 Inclusief montageset Veiligheidsthermostaat IP 44 IP 44 IP 44 IP 44 Nominaal vermogen (W) Spanning (V) Stroomsterkte (A) Klasse II VEILIGHEID & INSTALLATIE Beschermingsklasse 77 WIT TELV*50B077 TELV*50B112 TELV*50B150 TELV*50B172 CHROOM TELV*50C077 TELV*50C112 TELV*50C150 TELV*50C172 Breedte (mm) 500 500 500 500 Hoogte zonder bedieningspaneel (mm) 770 1.120 1.500 1.720 Hoogte met bedieningspaneel (mm) 865 1.215 1.595 1.815 Diepte (mm) 50 50 50 50 Geïnstalleerde diepte (mm) 100 100 100 100 Verwarmingselement van roestvrij staal Thermische vloeistof Ovaal bedieningspaneel Infrarood afstandsbediening MODEL - Breedte 500 AFMETINGEN MECHANISCHE EIGENSCHAPPEN Wit RAL 9016 Afwerking Chroom ELEKTRISCHE EIGENSCHAPPEN Wit 300 500 750 1.000 Chroom 300 300 500 750 230 V ~ 230 V ~ 230 V ~ 230 V ~ Wit 1,3 2,2 3,2 4,4 Chroom 1,3 1,3 2,2 3,2 Inclusief montageset Veiligheidsthermostaat IP 44 IP 44 IP 44 IP 44 Nominaal vermogen (W) Spanning (V) Stroomsterkte (A) Klasse II VEILIGHEID & INSTALLATIE Beschermingsklasse 78 NL ELBA OVAL WIT TELV*55B077 TELV*55B112 TELV*55B150 TELV*55B172 CHROOM TELV*55C077 TELV*55C112 TELV*55C150 TELV*55C172 Breedte (mm) 550 550 550 550 Hoogte zonder bedieningspaneel (mm) 770 1.120 1.500 1.720 Hoogte met bedieningspaneel (mm) 865 1.215 1.595 1.815 Diepte (mm) 50 50 50 50 Geïnstalleerde diepte (mm) 100 100 100 100 Verwarmingselement van roestvrij staal Thermische vloeistof Ovaal bedieningspaneel Infrarood afstandsbediening MODEL - Breedte 550 AFMETINGEN MECHANISCHE EIGENSCHAPPEN Wit RAL 9016 Afwerking Chroom ELEKTRISCHE EIGENSCHAPPEN Wit 300 500 750 1.000 Chroom 300 300 500 750 230 V ~ 230 V ~ 230 V ~ 230 V ~ Wit 1,3 2,2 3,2 4,4 Chroom 1,3 1,3 2,2 3,2 Inclusief montageset Veiligheidsthermostaat IP 44 IP 44 IP 44 IP 44 Nominaal vermogen (W) Spanning (V) Stroomsterkte (A) Klasse II VEILIGHEID & INSTALLATIE Beschermingsklasse 79 2. Installatie van Rointe handdoekrekken 2.1. Montage-instructies In de verpakking vindt u een bevestigingsset. Hieronder vindt u de instructies: 1. Kies het juiste deel van de muur. 2. Plaats het montagesjabloon op de muur en markeer de plaatsen voor de gaten. 3. Verwijder het sjabloon en maak de gaten in de muur. 4. Steek de rawlpluggen in de gemaakte gaten. 5. Schroef de kunststof sluiting met de 5,5 x 50 mm schroef aan de muur vast. 6. Schroef de twee beugels voor het ondersteunen van het product en de plastic sluiting aan de Horizontale buis van het product zoals in figuur 1 met de 8 x 26 mm schroef. 7. Steek wat u in sectie 6 hebt geassembleerd in het plastic stuk. Goed vastzetten met de 5 x 12 mm schroef. 8. Plaats de hoes op het stuk dat het product ondersteunt. Nº. ITEM 1 10 x 40 mm Rawlplug 2 Beugel 3 5,5 x 50 mm schroef 4 5 x 12 mm schroef 5 Beugel inzetstuk 6 Beugelkop 7 8 x 26 mm schroef 8 Dop 9 Product 1 5 2.2. Aansluitinstructies Bij de aansluiting op het elektriciteitsnet moet rekening worden gehouden met de spanning die staat vermeld op het technische gegevenslabel van het product. Dit product is ontworpen om permanent te worden geïnstalleerd in verbinding met vaste voorzieningen. Het voedingscircuit van het product moet een meerpolige stroomonderbreker hebben met een afstand van minimaal 3 mm tussen de contacten. Het product moet, indien mogelijk, worden geïnstalleerd uit de buurt van tochtbronnen (ramen, deuren) of andere zaken die de werking ervan kunnen beïnvloeden. Op deze manier wordt de temperatuur niet beïnvloed. Plaats voorwerpen die de luchtstroom kunnen verhinderen (meubels, fauteuils) op 50 cm afstand van de voorkant van het product. 80 ELBA OVAL NL Het product mag nooit direct onder een stopcontact worden geïnstalleerd. Het onderste deel van het bedieningspaneel moet minimaal 15 cm van de vloer worden geplaatst. Als de voedingskabel beschadigd is, moet deze voor elk product worden vervangen door een specifieke kabel. De vervanging van de kabel moet worden gedaan door de fabrikant, diens klantenservice of gekwalificeerd personeel. De technische specificaties van uw product staan op het technische gegevenslabel. OK BELANGRIJK - Dit product mag nooit worden geïnstalleerd met het bedieningspaneel aan de bovenzijde. Dit product mag niet horizontaal worden geïnstalleerd. Gebruik bij de installatie wiggen zodat het bedieningspaneel niet in contact komt met de vloer. 2.3. Specifieke voorschriften voor badkamers Dit toestel voldoet aan de veiligheidsnormen van KLASSE II (dubbele isolatie). Hij kan worden geïnstalleerd in zone 2 en 3, posities A en B, volgens de onderstaande regels: • In badkamers mag de handdoekbeugel nooit zo worden geïnstalleerd dat het bedieningspaneel kan worden bereikt door een persoon in de badkuip of douche. Het bedieningspaneel moet zich op een afstand van minimaal 600 mm van elke natte zone bevinden. De romp van het product mag in zone 2 worden geplaatst als het bedieningspaneel zich in zone 3 bevindt. • In een keuken of badkamer moet de handdoekbeugel ten minste 25 cm boven de vloer worden geplaatst. 81 3. Bedieningspaneel beschrijving en functies 3.1. Bedieningspaneel Het bedieningspaneel is gemaakt met 7 LED lampjes en 4 mechanische knoppen met de volgende functies: 1 2 3 4 5 6 Aan-/Uitknop / Stand-by / Bevestigknop Temperatuur verhogen knop Temperatuur verlagen knop Max power knop 7 Infraroodsensor 3.2. Aan-/Uitknop en Stand-by Druk eenmaal op de knop product uit te zetten. om het product aan te zetten. Druk nogmaals op de knop om het 3.3. Ingestelde temperatuurselectie U kunt de ingestelde temperatuur van het handdoek radiator reguleren met de en knoppen. Op de knop drukken verhoogt de ingestelde temperatuur. Op dezelfde manier zorgt het drukken op de knop voor verlaging van de ingestelde temperatuur. De minimale werkende temperatuur is 7ºC en de maximale is 30ºC. De standaardtemperatuur na fabricatie is 21ºC.De 6 LED lampjes, die zich bovenaan het bedieningspaneel bevinden, geven de ingestelde temperatuur aan. Indicator 1 LED 82 LED Led 1: korte flits elke 2 seconden Led 2: UIT Led 3: UIT Led 4: UIT Led 5: UIT Led 6: UIT Temperatuur 7ºC Indicator 1 LED LED Led 1: AAN Led 2: UIT Led 3: UIT Led 4: UIT Led 5: UIT Led 6: UIT Temperatuur 15ºC ELBA OVAL Indicator 2 LED 4 LED 6 LED LED Temperatuur Led 1: AAN Led 2: AAN Led 3: UIT Led 4: UIT Led 5: UIT Led 6: UIT Indicator LED NL Temperatuur 18ºC Led 1: AAN Led 2: AAN Led 3: AAN Led 4: UIT Led 5: UIT Led 6: UIT 21ºC Led 1: AAN Led 2: AAN Led 3: AAN Led 4: AAN Led 5: UIT Led 6: UIT 24ºC Led 1: AAN Led 2: AAN Led 3: AAN Led 4: AAN Led 5: AAN Led 6: UIT 27ºC Led 1: AAN Led 2: AAN Led 3: AAN Led 4: AAN Led 5: AAN Led 6: AAN 30ºC 3 LED 5 LED 3.4. Verbruiksidentificatie De laatste LED temperatuurindicator knippert om aan te geven dat het verwarmingselement geactiveerd is en dat het product stroom verbruikt. 3.5. Toetsenpaneel vergrendelen Door de en knoppen samen 3 seconden lang in te houden, kunt u het toetsenpaneel van het bedieningspaneel vergrendelen/ontgrendelen. Indien er een knop wordt ingedrukt terwijl het paneel vergrendeld is, zullen alle LED lampjes tweemaal knipperen. Vanwege veiligheidsredenen reageert de aan-/uitknop wél, zelfs als het paneel vergrendeld is. Om het product aan of uit te zetten terwijl het paneel vergrendeld is, houd de knop 3 seconden lang ingedrukt. 3.6. MAX POWER modus De MAX POWER modus activeert het verwarmingselement van de handdoek radiator om op maximale kracht te verwarmen, ongeacht de huidige temperatuur. Om deze functie op het bedieningspaneel te activeren, druk op de knop. U kunt deze modus ook activeren wanneer het product uitstaat. Eenmaal op nogmaals op drukken activeert deze modus 15 minuten lang. Als u binnen twee seconden drukt, wordt de volgende tijdsduur (30 minuten) geactiveerd. Iedere volgende druk 83 zal andere tijdsperiodes starten volgens onderstaande tabel: LED Tijd 1 LED Indicator LED Tijd 15 minuten Led 1: Knipperend Led 2: Knipperend Led 3: UIT Led 4: UIT Led 5: UIT Led 6: UIT Led 7: AAN Led 1: Knipperend Led 2: Knipperend Led 3: Knipperend Led 4: Knipperend Led 5: Knipperend Led 6: Knipperend Led 7: AAN 6 LED Led 1: Knipperend Led 2: Knipperend Led 3: Knipperend Led 4: Knipperend Led 5: Knipperend Led 6: UIT Led 7: AAN 90 minuten 5 LED Led 1: Knipperend Led 2: Knipperend Led 3: Knipperend Led 4: Knipperend Led 5: UIT Led 6: UIT Led 7: AAN 60 minuten 4 LED Led 1: Knipperend Led 2: Knipperend Led 3: Knipperend Led 4: UIT Led 5: UIT Led 6: UIT Led 7: AAN 45 minuten 3 LED 30 minuten 2 LED Led 1: Knipperend Led 2: UIT Led 3: UIT Led 4: UIT Led 5: UIT Led 6: UIT Led 7: AAN 120 minuten Indicator Indien u de knop 7 keer indrukt, zult u terugkeren naar het startpunt (15 minuten actief). De LED lampjes tellen de tijd af, waarbij elk lampje uitgaat na een bepaalde tijd. Zodra de hele tijd afgelopen is, zal het product automatisch terugkeren naar de vorige werkmodus, of worden uitgezet als deze hiervoor op stand-by stond. 3.7. Afstandsbediening (optioneel) De handdoek radiatoren met het OVAL bedieningspaneel kunnen worden bestuurd met de Rointe AIR en BASIC Afstandsbedieningen (apart verkocht). Het gebruik van een afstandsbediening vergroot de functies van de handdoek radiator op de volgende manieren: 84 ELBA OVAL NL • Complete controle zonder het bedieningspaneel te hoeven gebruiken. • Nauwkeurigere ingestelde temperaturen (stapjes van een halve graden tussen de 15 en 30 ºC, bv. 19,5 ºC). • 24 uur per dag, 7 dagen per week gepersonaliseerde programmering, of één van de 4 vooraf ingestelde programma’s op de BASIC Control afstandsbediening. Ga naar ons webportaal of de overeenkomende gebruikshandleidingen om meer te weten te komen over Rointe afstandsbedieningen en hun functies. BELANGRIJK: Wanneer het product via een Rointe afstandsbediening geprogrammeerd is, knippert LED nummer 7 (komt overeen met de MAX POWER modus). WAARSCHUWING: Als de handdoek radiator automatisch geprogrammeerd is en u deze in handmatige modus wilt gebruiken, dient u de aan-/uitknop 3 seconden lang in te drukken (wanneer het product ontgrendeld is). Het product volgt niet langer een programma, waardoor u in staat bent om het handmatig te bedienen middels de knoppen op het bedieningspaneel. 3.8. Probleemoplossing Onder normale werkomstandigheden van de handdoek radiator, worden enige defecten aangegeven via de LED lampjes op het product. Zie de tabel hieronder om de foutcodes te identificeren: Indicator LED 6 knipperend Code Led 1: UIT Led 2: UIT Led 3: UIT Led 4: UIT Led 5: UIT Led 6: Knipperend Led 7: UIT Fout Oplossing Temperatuursensor defect vanwege kortsluiting of een open sensor. Neem alstublieft contact op met de Rointe Technische Supportafdeling door 010 742 00 46 te bellen. 4. Onderhoud en reiniging Het product heeft geen onderhoud nodig. We raden aan om alle onderdelen van het product schoon te houden (achter, onder, bovenste vinnen, enz.). Gebruik geen schuurmiddel op de stalen behuizing. 85 Maak het schoon met een vochtige doek en een ph-neutrale zeep, en het bedieningspaneel met een droge doek. Europese richtlijn 2012/19/EU Volgens de europese richtlijn 2012/19/eu betreffende afgedankte elektrische en elektronische apparatuur (aeea) mag het product niet in de gebruikelijke gemeentelijke afvalbakken en containers worden afgevoerd. Ze moeten worden gescheiden om de terugwinning en recycling van alle componenten en materialen te optimaliseren en de impact op de menselijke gezondheid en het milieu te verminderen. Het symbool van de container die over een horizontale lijn is doorgekruist, is op alle rointe-producten aangebracht om de consument eraan te herinneren dat ze bij verwijdering gescheiden moeten worden gehouden. De consument dient contact op te nemen met de lokale overheid of het oorspronkelijke verkooppunt voor meer informatie over de juiste verwijdering van dit product. 5. Garantie In deze sectie beschrijven we hierbij de garantievoorwaarden die de koper verwerft bij aankoop van een nieuw Rointe-product. Deze voorwaarden zijn in overeenstemming met alle rechten die zijn uitgelegd in de geldende nationale wetgeving, evenals alle aanvullende rechten en garanties die door Rointe worden geboden. 5.1. Elk incident dat u in uw Rointe-product ontdekt, kan door de productverkoper of snel door de fabrikant worden opgelost. Neem voor technische ondersteuning contact op met Rointe door te bellen naar (NEDERLAND) 010 742 00 46. Als u in een ander land woont, raadpleeg dan het juiste telefoonnummer op de achterkant van deze handleiding. SERIENUMMER 300 W TELVN45B077 ELBA OVAL U moet de productreferentie (op het etiket met productkenmerken), het serienummer, het aankoopbewijs en het soort incident vermelden wanneer u contact met ons opneemt, zodat we de garantie kunnen controleren. Voeg bovendien een kopie van de productfactuur toe. 5.2. Rointe garandeert dat er geen materiële gebreken zijn in het ontwerp of de fabricage op het moment van de oorspronkelijke aanschaf en geeft garantie op de stalen behuizing voor een periode van 120 maanden en 24 maanden voor alle elektronische en elektrische componenten. 5.3. Als het product tijdens de garantieperiode niet correct werkt bij normaal gebruik en er een ontwerp-, materiaal- of fabricagefout wordt geconstateerd, zal Rointe het product repareren of vervangen naar eigen inzicht, in overeenstemming met de algemene voorwaarden als volgt: 86 ELBA OVAL NL 5.3.1. De garantie is alleen van toepassing als de originele garantie is afgegeven door de verkoper en deze garantie correct is ingevuld inclusief productreferentie, serienummer (aangegeven op het productlabel met daarop de technische kenmerken), aankoopdatum en de stempel van de verkoper. Rointe behoudt zich het recht voor om de garantieservice te weigeren wanneer deze informatie is verwijderd of gewijzigd na de oorspronkelijke aankoop van het product. 5.3.2. De garantie is alleen van toepassing op die gevallen die betrekking hebben op materiaal-, ontwerp- en fabricagefouten, en dekt in geen geval schade aan het product om de volgende redenen: 5.3.2.1 Onjuist gebruik van het product, d.w.z. gebruikt voor andere doeleinden die niet worden opgevat als normaal gebruik of voor het niet respecteren van de gebruiksinstructies en onderhoud instructies gegeven door Rointe, evenals onjuiste installatie of gebruik van het product dat mogelijk niet voldoet aan de huidige technische veiligheidsnormen. Corrosie veroorzaakt door directe blootstelling aan zout water valt niet onder de garantie. Als het product niet verder dan 200 meter van de kust wordt geïnstalleerd, wordt de garantie voor schade veroorzaakt door corrosie met 50% verminderd. 5.3.2.2 Ongeautoriseerde reparaties uitgevoerd door ongeautoriseerde technici of het openen van het product door ongeautoriseerde mensen. 5.3.2.3 Alle ongevallen die geacht worden buiten de controle van Rointe te vallen, zoals blikseminslag, branden, overstromingen, openbare onrust, enz.6.3.3. Eventuele reparaties of vervangingen die onder deze garantie vallen, staan geen aanvullingen of nieuwe garantietermijnen toe. 5.3.4. Alle reparaties of vervangingen die onder deze garantie vallen, moeten onderdelen zijn die functioneel gelijkwaardig zijn. De defecte onderdelen of onderdelen die zijn verwijderd of vervangen, worden eigendom van Rointe. 5.4. De technische dienst van Rointe zal u adviseren als u onderdelen moet kopen die niet onder de garantie of buiten de garantie vallen. 5.5. Deze garantie heeft geen invloed op de wettelijke rechten van de koper zoals bepaald in de huidige nationale wetgeving, noch op die rechten jegens de distributeur of installateur die naar voren zouden kunnen komen in overeenstemming met het koopcontract. 5.6. Bij gebrek aan toepasselijke nationale wetgeving, prevaleert deze garantie en kan deze worden opgevat als de enige bescherming van de koper. Rointe, diens kantoren, distributeurs en installateurs kunnen niet verantwoordelijk worden gehouden voor eventuele accidentele schade die ontstaat als gevolg van overtreding van regels die impliciet verband houden met dit product. 87 6. Hoe u uw productgarantie registreert BELANGRIJK: het is belangrijk om uw ROINTE-product te registreren als onderdeel van onze garantieservice, voor geval u een claim wilt indienen. U kunt uw ROINTE-product op de volgende manieren registreren: WEBSITE 1. Ga naar https://rointe.com/nl/uw-garantie-registeren/. 2. Log in op uw bestaande account of maak een nieuwe account aan als dat nodig is. 3. Klik op “Mijn producten”. 4. Voer uw productreferentie in (alfanumeriek en in hoofdletters 5. Voer uw serienummer in (26 cijfers op het metalen plaatje op uw product en begint met 843). 6. Upload uw aankoopbewijs, zoals factuur in pdf-, jpeg- of png-indeling. Dit is niet verplicht, maar hierdoor zorgt u ervoor dat uw garantieperiode klopt. 7. Klik op “Registreren”. 8. Gefeliciteerd! Uw product is nu geregistreerd. EMAIL 1. 2. Stuur een e-mail naar [email protected] met de volgende informatie: • Klantnaam • Adres en postcode • Telefoonnummer en e-mailadres • Productreferentie (zoals hierboven beschreven) • Serienummer (zoals hierboven beschreven) • Aankoopdatum van het product en aankoopbewijs (zoals hierboven beschreven Ons technische ondersteuningsteam bevestigt uw productregistratie en vraagt om enige aanvullende informatie via e-mail. POST 1. Post de informatie zoals in het gedeelte EMAIL hierboven naar: • 2. 88 INDUSTRIAS ROYAL TERMIC, S.L. t/a Rointe, C/E Parcela 43, 30140, Santomera (SPANJE) Zorg ervoor dat u een bewijs van verzending vraagt. ELBA OVAL NL 89 90 In stand-bymodus Bij minimale warmte-output Bij nominale warmte-output AANVULLEND ELEKTRICITEITSVERBRUIK Maximale continue warmte-output Minimale warmte-output Nominale warmte-output WARMTE-OUTPUT ITEM 7. ERP RICHTLIJN (EU) 2015/1188 kW Pmax,c kW kW elMIN elSB kW elMIN Wit Chroom kW kW elMAX elMAX kW kW Pmin Pmax,c kW kW Eenhed Pnom Pnom Symbool Chroom Wit Chroom Wit Chroom Wit Chroom Wit 0,002 0,30 0,30 0,30 0,30 0,30 0,30 n/a 0,30 0,30 TELV***C077 TELV***B077 0,002 0,30 0,50 0,30 0,50 0,30 0,50 n/a 0,30 0,50 TELV***C112 TELV***B112 0,002 0,50 0,75 0,50 0,75 0,50 0,75 n/a 0,50 0,75 TELV***C150 TELV***B150 0,002 0,75 1,00 0,75 1,00 0,75 1,00 n/a 0,75 1,00 TELV***C172 TELV***B172 — — — — — Twee of meer handmatige niveaus, zonder interne kamertemperatuurbeheersing Interne temperatuurbeheersing door mechanische thermostaat Met elektronische interieur temperatuurbeheersing Elektronische indoor temperatuurbeheersing en dagelijkse timer Elektronische indoor temperatuurbeheersing en wekelijkse timer — — — — — — — ns Interieur temperatuurbeheersing met open ramen detectie Met afstandsbediening / afstandsoptie Met aanpasbare opstartcontrole Met tijdslimitatie voor bediening Met zwarte lamp sensor SEIZOENSGEBONDEN ENERGIEZUINIGHEID RUIMTEVERWARMING — — — — — — — — — — — — Interieur temperatuurbeheersing met aanwezigheidsdetectie ANDERE CONTROLE-OPTIES (MEERDERE SELECTIES MOGELIJK) — Warmteoutput enkel niveau, geen interne kamertemperatuurbeheersing TYPE WARMTE-OUTPUT/KAMERTEMPERATUURBEHEERSING (SELECTEER ER EEN) 39,0% — — — — — — — 39,0% — — — — — — 39,0% — — — — — — 39,0% — — — — — — ELBA OVAL NL 91 92 NOTES 93 94 NOTES 95 Rointe United Kingdom Hampton Business Park, Club Way, Peterborough PE7 8JA T. 0203 321 5928 Rointe Ireland Blackrock, County Louth T. 01 553 0523 Rointe España & Portugal P.I. Vicente Antolinos - C/ E, p. 43, 30140 Murcia T. (ES) 900 103 061 / T. (PT) 221 200 114 Rointe France 6 Rue Duret, 75116 Paris T. 01 73 05 70 01 Rointe Nederland 3197 LG Botlek, RT T. 010 742 00 46 Copyright © Rointe Heating 2021. All rights reserved. As part of our policy of continuous improvement, we reserve the right to alter or modify any product or specifications without prior notice. This also applies to products that have already been ordered, provided that such alterations can be made without subsequent changes to the already agreed specifications. We cannot accept responsibility for any errors in catalogues or other printed materials. IMESPMU21V3-OVAL-
 1
1
-
 2
2
-
 3
3
-
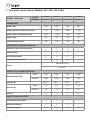 4
4
-
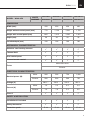 5
5
-
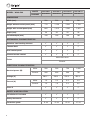 6
6
-
 7
7
-
 8
8
-
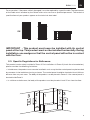 9
9
-
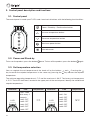 10
10
-
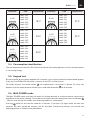 11
11
-
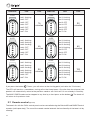 12
12
-
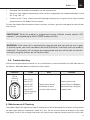 13
13
-
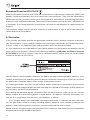 14
14
-
 15
15
-
 16
16
-
 17
17
-
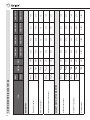 18
18
-
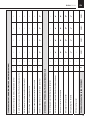 19
19
-
 20
20
-
 21
21
-
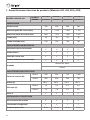 22
22
-
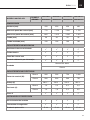 23
23
-
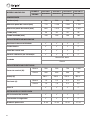 24
24
-
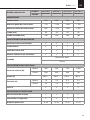 25
25
-
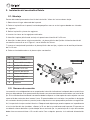 26
26
-
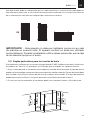 27
27
-
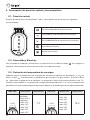 28
28
-
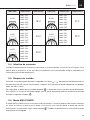 29
29
-
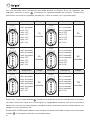 30
30
-
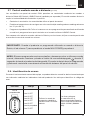 31
31
-
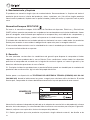 32
32
-
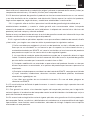 33
33
-
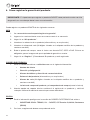 34
34
-
 35
35
-
 36
36
-
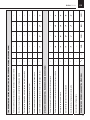 37
37
-
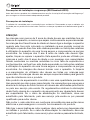 38
38
-
 39
39
-
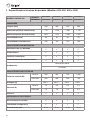 40
40
-
 41
41
-
 42
42
-
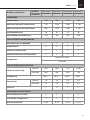 43
43
-
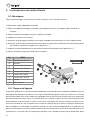 44
44
-
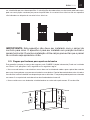 45
45
-
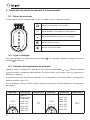 46
46
-
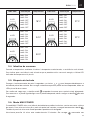 47
47
-
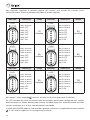 48
48
-
 49
49
-
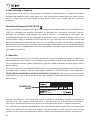 50
50
-
 51
51
-
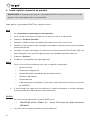 52
52
-
 53
53
-
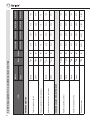 54
54
-
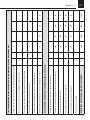 55
55
-
 56
56
-
 57
57
-
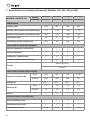 58
58
-
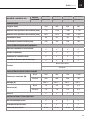 59
59
-
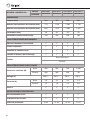 60
60
-
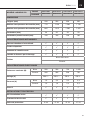 61
61
-
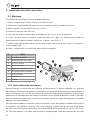 62
62
-
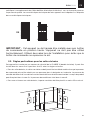 63
63
-
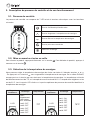 64
64
-
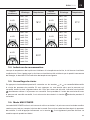 65
65
-
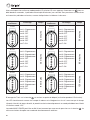 66
66
-
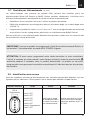 67
67
-
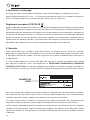 68
68
-
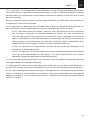 69
69
-
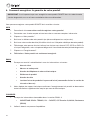 70
70
-
 71
71
-
 72
72
-
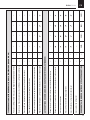 73
73
-
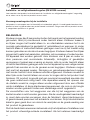 74
74
-
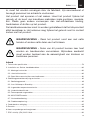 75
75
-
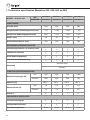 76
76
-
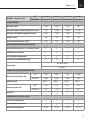 77
77
-
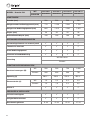 78
78
-
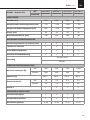 79
79
-
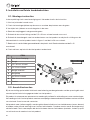 80
80
-
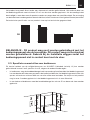 81
81
-
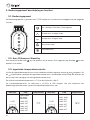 82
82
-
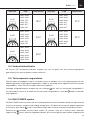 83
83
-
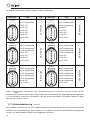 84
84
-
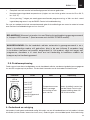 85
85
-
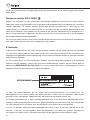 86
86
-
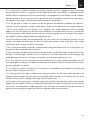 87
87
-
 88
88
-
 89
89
-
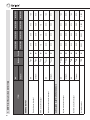 90
90
-
 91
91
-
 92
92
-
 93
93
-
 94
94
-
 95
95
-
 96
96


Rointe Elba Oval electric de handleiding
- Type
- de handleiding
- Deze handleiding is ook geschikt voor
in andere talen
Gerelateerde papieren
-
Rointe Torino OVAL de handleiding
-
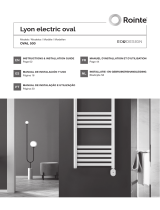 Rointe Lyon OVAL de handleiding
-
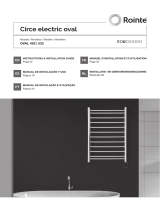 Rointe Circe OVAL de handleiding
-
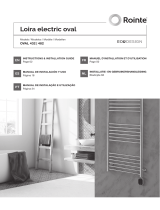 Rointe Loira OVAL de handleiding
-
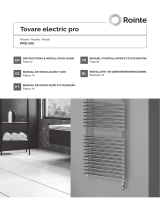 Rointe Tovare PRO de handleiding
-
 Rointe Giza Oval de handleiding
-
 Rointe Circe PRO de handleiding
-
 Rointe Lyon PRO de handleiding
-
 Rointe Loira PRO de handleiding
-
 Rointe Elba Pro de handleiding


