Thrustmaster 360 MODENA FORCE GT de handleiding
- Categorie
- Spelbesturing
- Type
- de handleiding

QUICK INSTALL
THRUSTMASTER
®
U
S
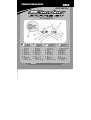
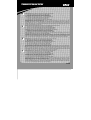
TECHNICAL
FEATURES
1. Progressive gas &
brake levers
2. Action buttons
3. D-Pad
4. Back button
5. Sensitivity button
6. Start button
7. Program button
8. LED
9. Vibration button
10. Vibration/
Force Effects switch
D
TECHNISCHE
MERKMALE
1. Progressive Gas- und
Bremshebel
2. Aktionstasten
3. Richtungskreuz
4. Back-Taste
5. Sensitivity-Taste
6. Start-Taste
7. Program-Taste
8. LED
9. Vibration-Taste
10. Vibration/
Force Effects-Schalter
E
CARACTERÍSTICAS
TÉCNICAS
1. Palancas progresivas
de gas y freno
2. Botones de acción
3. D-Pad
4. Botón Back
5. Botón Sensitivity
6. Botón Start
7. Botón Program
8. LED
9. Botón Vibration
10. Interruptor
Vibration/Force Effects
P
CARACTERÍSTICAS
TÉCNICAS
1. Alavancas de aceleração
e travagem progressivas
2. Botões de acção
3. Almofada digital
4. Botão Back
5. Botão Sensitivity
6. Botão Start
7. Botão Program
8. LED
9. Botão Vibration
10. Comutador Vibration/
Force Effects
For use with Xbox™ video game system. IMPORTANT! Before using this product, read the
Xbox™ video game system instruction manual for safety, health and other information.
Pagina wordt geladen...
Pagina wordt geladen...
Pagina wordt geladen...
Pagina wordt geladen...

THRUSTMASTER
®
U
S
Sensitivit
y
button (5): controls sensitivity when turning the wheel. To change the default setting (high):
1. Press the button once: the LED turns red, and then turns off (sensitivity = medium).
2. Press the button again: the LED turns green, and then turns off (sensitivity = low).
3. Press the button once more: the LED turns yellow, and then turns off (sensitivity = high).
Vibration button (9): sets the degree of vibration for the motors. To change the default setting (100%):
1. Press the button once: the LED turns yellow, and then turns off (vibration = 50%).
2. Press the button again: the LED turns green, and then turns off (vibration = 0%).
3. Press the button once more: the LED button turns red, and then turns off (vibration = 100%).
Re-centering function: press the Program and Sensitivity buttons simultaneously to disable (LED flashes green) or enable (LED flashes red) the wheel’s
automatic re-centering function (this function is enabled by default).
Force Effects: press the Program and Vibration buttons simultaneously to toggle between the wheel’s two different effect modes: mode 1 (default) is more
realistic (LED flashes green); mode 2 is more powerful (LED flashes red). If, in some games, Force effects cannot be removed using the Vibration/Force Effects
switch (10), switch off your console, set the Vibration/Force Effects switch to the Force Effects position and then restart your console and your game: the
Vibration/Force Effects switch should now function correctly.
D
Sensitivit
y
-Taste (5): Reguliert die Empfindlichkeit beim Drehen des Lenkrads. Die Standardeinstellung (hoch) ändern Sie so:
1. Drücken Sie die Taste einmal: Die LED leuchtet rot und ist dann aus (Empfindlichkeit = mittel).
2. Drücken Sie die Taste noch einmal: Die LED leuchtet grün und ist dann aus (Empfindlichkeit = niedrig).
3. Drücken Sie die Taste noch einmal: Die LED leuchtet gelb und ist dann aus (Empfindlichkeit = hoch).
Vibration-Taste (9): Stellt den Grad der Vibration für die Motoren ein. Die Standardeinstellung (100%) ändern Sie so:
1. Drücken Sie die Taste einmal: Die LED leuchtet gelb auf, und geht dann aus (Vibration = 50%).
2. Drücken Sie die Taste noch einmal: Die LED leuchtet grün auf, und geht dann aus (Vibration = 0%).
3. Drücken Sie die Taste noch einmal: Die LED leuchtet rot auf, und geht dann aus (Vibration = 100%).
Zentrierungs-Funktion: Drücken Sie die Program und Sensitivity Taste gleichzeitg zum Aus- (das LED leuchtet grün) oder Einschalten (das LED leuchtet rot) der
automatischen Zentrierungs-Funktion des Lenkrades (in der Voreinstellung eingeschaltet).
Force Effekte: Drücken Sie die Program- und Vibration- Taste gleichzeitig um zwischen den zwei verschiedenen Effekteinstellungen des Lenkrades
umzuschalten: Mode 1 (Standard) ist realistischer (das LED leuchtet grün); Mode 2 ist leistungsfähiger (das LED leuchtet rot). Falls, in einigen Spielen, die Force
Effekte durch den Vibration/Force Effects-Schalter (10) nicht ausgeschaltet werden können, schalten Sie die Konsole aus, stellen Sie den Vibration/Force Effects-
Schalter auf die Force Effects Position und starten Sie die Konsole und das Spiel neu: der Vibration/Force Effects-Schalter sollte jetzt korrekt funktionieren.
E
Botón Sensitivity
(5): controla la sensibilidad cuando se gira el volante. Para cambiar el valor por defecto (alta):
1. Pulsa el botón una vez: el LED se pone en rojo, y después se apaga (sensibilidad = media).
2. Pulsa el botón de nuevo: el LED se pone verde, y después se apaga (sensibilidad = baja).
3. Pulsa el botón una vez más: el LED se pone amarillo, y después se apaga (sensibilidad = alta).
Botón Vibration (9): controla el grado de vibración de los motores. Para cambiar el valor por defecto (100%):
1. Pulsa el botón una vez: el LED se pone en amarillo, y después se apaga (vibración = 50%).
2. Pulsa el botón de nuevo: el LED se pone verde, y después se apaga (vibración = 0%).
3. Pulsa el botón una vez más: el LED se pone rojo, y después se apaga (vibración = 100%).
Función de recentrado: pulsa simultáneamente los botones Program y Sensitivity para desactivar (el LED parpadea en verde) o activar (el LED parpadea en
rojo) la función de recentrado automático del volante (esta función está activada por defecto).
Efectos Force: pulsa simultáneamente los botones Program y Vibration para cambiar entre los dos modos diferentes de efectos del volante: el modo 1 (por
defecto) es más realista (el LED parpadea en verde); el modo 2 es más potente (el LED parpadea en rojo). Si, en algunos juegos, los efectos Force no se
eliminan utilizando el interruptor Vibration/Force Effects (10), apaga tu consola, pon el interruptor Vibration/Force Effects en la posición Force Effects y después
reinicia tu consola y tu juego: en ese momento, el interruptor Vibration/Force Effects debería funcionar correctamente.
P
Botão Sensitivity
(5): controla a sensibilidade quando se roda o volante. Para mudar a definição padrão (alta):
1. Prima uma vez o botão: o LED fica vermelho, apagando-se em seguida (sensibilidade = média).
2. Prima novamente o botão: o LED fica verde e depois apaga-se (sensibilidade = baixa).
3. Prima uma vez mais o botão: o LED fica amarelo, apagando-se em seguida (sensibilidade = alta).
Botão Vibration (9): ajusta o grau de vibração para os motores. Para mudar a definição padrão (100%):
1. Prima uma vez o botão: o LED fica amarelo, apagando-se em seguida (vibração = 50%).
2. Prima novamente o botão: o LED fica verde e depois apaga-se (vibração = 0%).
3. Prima uma vez mais o botão: o LED fica vermelho, apagando-se em seguida (vibração = 100%).
Função de recentragem: prima os botões Program e Sensitivity simultaneamente para desactivar (o LED pisca a verde) ou activar (o LED pisca a vermelho) a
função de recentragem automática do volante (esta função está activada por defeito).
Efeitos de força: prima os botões Program e Vibration simultaneamente para alternar entre os dois modos diferentes de efeitos do volante: o modo 1 (padrão) é
mais realista (o LED pisca a verde); o modo 2 é mais potente (o LED pisca a vermelho). Se nalguns casos não for possível remover os efeitos de força usando o
comutador Vibration/Force Effects (10), desligue a consola, regule o comutador Vibration/Force Effects para a posição Force Effects e em seguida reinicie a
consola e o jogo: o comutador Vibration/Force Effects deverá agora funcionar correctamente.
5074809
Pagina wordt geladen...
Pagina wordt geladen...
Pagina wordt geladen...

Da usare col sistema di videogiochi Xbox™. IMPORTANTE! Prima di utilizzare questo prodotto leggere
il manuale di istruzioni del sistema di videogiochi Xbox™ per informazioni sulla sicurezza, salute ed altro.
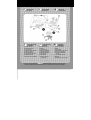
F
CARACTÉRISTIQUES
TECHNIQUES
11. Connecteur Xbox™
12. Système de fixation
13. Vis de serrage
14. Connecteur pour le pédalier
15. Câble du pédalier
16. Pédalier progressif
17. Parties latérales amovibles
18. Adaptateur secteur
19. Connecteur pour l’adaptateur
I
CARATTERISTICHE
TECNICHE
11. Connettore Xbox™
12. Morsa
13. Vite della morsa
14. Attacco per pedaliera
15. Connettore pedaliera
16. Pedaliera progressiva
17. Ali asportabili
18. Alimentatore
19. Cavo connettore di
alimentazione
NL
TECHNISCHE
KENMERKEN
11. Xbox™ aansluiting
12. Klem
13. Klemschroef
14. Ansluitkabel voor de pedalen
15. Kabel voor de pedalen
16. Progressief reagerende
pedalen
17. Verwijderbare vleugels
18. Adapter
19. Aansluitkabel van de adapter
F
INSTALLATION
DU VOLANT
NL
INSTALLATIE
VAN HET STUUR
I
INSTALLAZIONE
DEL VOLANTE

I
INSTALLAZIONE DEL VOLANTE
Regolazione della morsa da tavolo (A)
1. Posiziona il volante su un tavolo o su una superficie piana.
2. Inserisci la vite della morsa (13) nella morsa stessa (12) e stringila sin quando il volante non risulti ben fissato.
Installazione del sistema knee-top (B)
1. Spostare dolcemente le ali asportabili (17) su entrambi i lati del knee-top sino al completo fissaggio.
2. Posizionare la vite della morsa (13) nel foro del knee-top e poi avvitare l'unità al foro nella parte inferiore del volante sino
a quando risulta completamente fissato.
N.B.: fai attenzione a non stringere troppo la vite, in modo tale da evitare danni alla morsa, al tavolo e/o al knee-top.
F
INSTALLATION DU VOLANT
Fixation à une table (A)
1. Placez le volant sur une table ou autre surface plane.
2. Placez la vis de serrage (13) dans le système de fixation (12) puis vissez l’ensemble dans l’emplacement prévu, sous le
volant, jusqu’à ce que ce dernier soit parfaitement stable.
Installation du support pour les genoux (B)
1. Faites coulisser les parties latérales amovibles (17) dans la partie centrale du support pour les genoux.
2. Placez la vis de serrage (13) dans la partie centrale du support pour les genoux, puis vissez l’ensemble dans
l’emplacement prévu sous le volant, jusqu’à ce que le support soit correctement positionné.
Remarque : ne serrez pas trop fort la vis car vous risquez d’endommager le système de fixation, la table ou le support.
NL
INSTALLATIE VAN HET STUUR
Tafelklem installatie (A)
1. Plaats het stuur op een tafel of op een vlakke ondergrond.
2. Plaats de klemschroef (13) in de klem (12) en schroef het klemgedeelte in het gat aan de onderkant van het stuur, tot
deze stevig op zijn plaats zit.
Montage van de knee-top basis (B)
1. Schuif langzaam de verwijderbare vleugels (17) op beide kanten van de knee-top basis.
2. Plaats de klemschroef (13) in het gat van de knee-top basis en schroef deze vervolgens vast aan de onderkant van het
stuur tot deze goed vast zit.
N.B.: draai de klem niet te strak vast, om beschadiging aan de klem, tafel of de knee-top te voorkomen.
Voor gebruik met het Xbox™ videogamesysteem. BELANGRIJK! Lees voordat je dit product gaat gebruiken
eerst de Xbox™ videogamesysteem handleiding voor veiligheid, gezondheid en ander informatie.

F
RELIER LE VOLANT
1. Reliez le connecteur pour le pédalier (14) au câble du pédalier (15).
2. Reliez le connecteur pour l’adaptateur (19) à l’adaptateur secteur (18) et branchez l’adaptateur sur le secteur.
3. Éteignez votre console avant de brancher le volant.
4. Positionnez l’interrupteur Vibration/Force Effects (10) sur la position Force Effects.
5. Branchez le connecteur Xbox™ (11) sur le port 1 de votre console de jeu et rallumez votre console.
PROGRAMMATION DES BOUTONS ET DES AXES
• La fonction allouée à chacun des boutons analogiques peut s’appliquer à n’importe quel autre bouton analogique, à une
direction de la croix multidirectionnelle ou à un axe (les axes étant les leviers d’accélération et de freinage, ainsi que les
directions gauche et droite du volant).
• La fonction allouée à chacun des axes peut s’appliquer à n’importe quel autre axe, bouton analogique ou direction de la
croix multidirectionnelle.
• Si une direction de la croix multidirectionnelle est programmée sur un bouton analogique, ce bouton devient alors
numérique.
• Si un bouton analogique est programmé sur une direction de la croix multidirectionnelle, cette direction reste numérique.
Remarque : les boutons Start, Back, Program, Vibration et Sensitivity ainsi que les pédales d’accélération et de frein ne
peuvent pas être programmés.
I
CONNESSIONE DEL VOLANTE
1. Collega il attacio per pedaliera (14) al cavo connettore pedaliera (15).
2. Collega il cavo connettore di alimentazione (19) all’alimentatore stesso (18) e collega quest’ultimo alla presa di corrente.
3. Prima di collegare il volante, accertati di aver spento la tua console.
4. Posiziona il selettore Vibration/Force Effects (10) in Force Effects.
5. Collega il connettore Xbox™ (11) alla porta 1 della tua console e riaccendila.
PROGRAMMAZIONE DI ASSI E PULSANTI
• La funzione associata ad un pulsante analogico può essere associata ad un altro pulsante analogico, direzione del D-Pad
o asse (come assi si intendono anche le leve di acceleratore e freno e le direzioni destra e sinistra di sterzata del volante).
• La funzione associata ad ogni asse può essere associata ad un altro asse, pulsante analogico o direzione del
D-Pad.
• Se ad un pulsante analogico viene associata una direzione del D-Pad, il pulsante analogico diverrà digitale.
• Se ad una direzione del D-Pad viene associato un pulsante, la direzione del D-Pad resterà digitale.
N.B.: i pulsanti Start, Back, Program, Vibration e Sensitivity, così come i pedali di acceleratore e freno, non possono essere
programmati.
NL
AANSLUITEN VAN HET STUUR
1. Sluit de aansluitkabel voor de pedalen (14) aan op de kabel voor de pedalen (15).
2. Verbindt de aansluitkabel van de adapter (19) met de adapter (18) en stop de adapter in het stopcontact.
3. Zet de console uit voordat het stuur wordt aangesloten.
4. Stel de Vibration/Force Effects schakelaar (10) op de Force Effects positie.
5. Sluit de Xbox™ aansluiting (11) aan op poort 1 van de console en zet de console weer aan.
FUNCTIES WIJZIGEN VAN KNOPPEN EN ASSEN
• De functie van elke analoge knop kan worden toegekend aan een andere analoge knop, D-Pad richting of as (als as wordt
ook beschouwd: het remhendel, het gashendel en het naar links of rechts draaien van het stuur).
• De functie van elke as kan ook worden toegekend aan een andere as, analoge knop of D-Pad richting.
• Als een D-Pad richting is toegekend aan een analoge knop, dan wordt de analoge knop digitaal.
• Als een analoge knop is toegekend aan een D-Pad richting, dan blijft de D-Pad richting digitaal.
N.B.: aan de knoppen Start, Back, Program, Vibration en Sensitivity kan geen andere functie worden toegekend, net zo min
als aan het gas- en rempedaal.

F 1.
A
ppuyez sur le bouton Program
(7) : le voyant (8) s’allume en rouge*.
2. Sélectionnez le bouton ou l’axe émulant la fonction que vous souhaitez programmer sur un autre bouton ou axe : le voyant
rouge clignote* (sélectionner un axe signifie : tourner le volant à gauche ou à droite, ou actionner un levier).
3. Sélectionnez le bouton ou l’axe sur lequel vous souhaitez programmer la fonction choisie à l’étape 2 : le voyant devient
vert, puis s’éteint.
4. Le bouton ou l’axe dernièrement sélectionné (étape 3) émule désormais la même fonction que le bouton ou l’axe
sélectionné à l’étape 2. Le bouton ou l’axe sélectionné à l’étape 2 conserve sa fonction d’origine.
* Si vous n’appuyez pas sur un autre bouton ou axe dans les 5 secondes, le voyant s’éteint et aucune modification n’est prise
en compte.
Pour rétablir la configuration par défaut :
Maintenez le bouton Program (7) enfoncé pendant plus de 3 secondes : le voyant (8) s’allume en rouge, puis devient vert
pendant 2 secondes. La configuration par défaut est restaurée.
© Guillemot Corporation 2003. Tous droits réservés. Thrustmaster® est une marque déposée de Guillemot Corporation S.A. Ferrari® et 360 Modena® sont des
marques déposées de Ferrari Idea S.A. Xbox™ et le logo Xbox™ sont des marques et/ou des marques déposées de Microsoft Corporation aux États-Unis et/ou
dans d’autres pays. Toutes les autres marques déposées et noms commerciaux sont reconnus par les présentes et sont la propriété de leurs propriétaires
respectifs. Illustrations non contractuelles. Le contenu, la conception et les spécifications sont susceptibles de changer sans préavis et de varier selon les pays.
I
1. Premete il pulsante Program (7): il LED (8) si illuminerà di rosso*.
2. Premete il pulsante/asse la cui funzione intendete attribuire ad un altro pulsante/asse: il LED lampeggerà di rosso* (per gli
assi, dovrete girare completamente il volante verso destra o sinistra, oppure premere a fondo una leva).
3. Premete il pulsante/asse al quale intendete attribuire la funzione del pulsante/asse premuto al Punto 2: il LED diventerà
verde e poi si spegnerà.
4. Al pulsante/asse premuto al Punto 3 corrisponde ora la medesima funzione del pulsante/asse premuto al Punto 2. Il
pulsante/asse premuto al Punto 2 manterrà la sua funzione originale.
* Se non premete alcun pulsante/asse entro 5 secondi, il LED si spegnerà e non verrà effettuata alcuna modifica.
Per ritornare alla configurazione di default:
Tenete premuto per più di 3 secondi il pulsante Program (7): durante questo perido di tempo, il LED (8) diventerà rosso e
quindi verde per 2 secondi. Avrete così ripristinato la configurazione originale.
© Guillemot Corporation 2003. Tutti i diritti riservati. Thrustmaster® è un marchio registrato da Guillemot Corporation S.A. Ferrari® e 360 Modena® ™ sono marchi
registrati da Ferrari Idea S.A. Xbox™ ed il logo Xbox™ sono marchi o marchi registrati da Microsoft Corporation negli Stati Uniti e/o in altri paesi. Tutti gli altri marchi
sono qui riconosciuti e registrati ai rispettivi proprietari. Foto escluse. I contenuti, il design e le caratteristiche possono essere oggetto di modifiche senza preavviso e
possono variare da un paese all’altro.
NL
1. Druk op de knop Program (7): de LED (8) wordt rood*.
2. Druk op de knop/as waarvan je de functie wilt kopiëren: de LED knippert rood* (bij assen betekent dit dat het stuurwiel
volledig naar links of rechts moet worden gedraaid of dat het pedaal volledig moet worden ingetrapt).
3. Druk op de knop/as die dezelfde functie moet krijgen als de knop/as ingedrukt onder Stap 2, hierboven: de LED wordt
groen en gaat dan uit.
4. De knop/as ingedrukt onder Stap 3 heeft nu dezelfde functie gekregen als de knop/as ingedrukt onder Stap 2. De knop/as
ingedrukt onder Stap 2 behoudt de oorspronkelijke functie.
* Als je binnen 5 seconden geen andere knop/as indrukt, dan gaat de LED uit en wordt er niets aan de instellingen gewijzigd.
Terug naar de standaard instelling:
Houd de knop Program (7) langer dan 3 seconden ingedrukt: de LED (8) zal rood branden en daarna 2 seconden groen
worden. De standaard instellingen zijn hersteld.
© Guillemot Corporation 2003. Alle rechten voorbehouden. Thrustmaster® is een geregistreerd handelsmerk van Guillemot Corporation S.A. Ferrari® en
360 Modena® zijn geregistreerde handelsmerken van Ferrari Idea S.A. Xbox™ en de Xbox™ logo zijn handelsmerken en/of geregistreerde handelsmerken van
Microsoft Corporation in de Verenigde Staten en/of andere landen. Alle andere handelsmerken en merknamen zijn hierbij erkend en zijn het eigendom van de
desbetreffende eigenaren. Illustraties zijn niet bindend. Inhoud, ontwerpen en specificaties kunnen zonder voorafgaande kennisgeving gewijzigd worden en afwijken
in verschillende landen.
Pagina wordt geladen...
Pagina wordt geladen...
Pagina wordt geladen...
Pagina wordt geladen...

Save time by registering your product online!
Go directly to our Website (europe.thrustmaster.com
) and click on Support/Register. Registering with us in
this way will simplify the process if you ever need to contact our technical support team. If you wish, you can
also be added to our priority mailing list to receive information about our new Thrustmaster products and our
latest special offers.
This product offers a two (2) year warranty by exchange from the date of purchase.
Sparen Sie Zeit, indem Sie Ihr Produkt online registrieren lassen!
Gehen Sie direkt zu unserer Webseite (de.thrustmaster.com
) und klicken Sie auf Support/Online
Registrierung. Wenn Sie sich auf diese Weise bei uns registrieren, wird den Prozeß vereinfachen wenn Sie
einmal mit unserem technischen Support Team Kontakt aufnehmen müssen. Wenn Sie möchten, können Sie
sich auch in die Mailingliste eintragen lassen, um Informationen über neue Thrustmaster Produkte und spezielle
Angebote zu erhalten.
Wir gewähren auf dieses Produkt eine Garantie von 2 Jahren ab dem Kaufdatum.
¡Ahorre tiempo en registrar tus productos online!
Ve directamente a nuestro sitio web (es.thrustmaster.com
) y haz clic en Soporte Técnico/Registro.
Registrándote con nosotros de esta forma simplificará el proceso si alguna vez necesitas contactar con nuestro
equipo de servicio técnico. Si quieres, se te puede añadir a nuestra lista de correos prioritaria para recibir
información acerca de nuestras novedades de Thrustmaster y nuestras últimas ofertas.
Este producto beneficia de 2 años de garantía a partir de la fecha de compra.
Poupe tempo fazendo o registo do seu produto online!
Vá directamente até ao nosso site (europe.thrustmaster.com
) e clique em Support/Register. Ao registar-se
connosco desta forma simplificará o processo caso alguma vez precise de contactar a nossa equipa de suporte
técnico. Se desejar, pode também ser acrescentado à nossa lista de correio prioritário para receber
informações sobre os nossos novos produtos Thrustmaster e as ofertas especiais mais recentes.
Este produto oferece 2 anos de garantia a partir da data de compra.
Gagnez du temps en enregistrant votre produit en ligne !
Connectez-vous dès maintenant sur notre site web (www.thrustmaster.fr
) et cliquez sur Support
technique/Enregistrement. Cet enregistrement facilitera vos démarches lors de contacts éventuels avec notre
support technique. Vous pourrez également bénéficier, si vous le souhaitez, de l’envoi d’informations
privilégiées sur les nouveaux produits Thrustmaster et les dernières promotions.
Ce produit bénéficie d’une garantie de 2 ans à compter de la date d’achat.
Risparmia tempo registrando il tuo prodotto online!
Collegati direttamente al nostro Sito (it.thrustmaster.com
) e clicca su Supporto/Registra. Questo tipo di
registrazione semplifica il processo nel caso tu voglia contattare il nostro team di Supporto Tecnico. Se lo
desideri, puoi anche essere inserito nella nostra mailing list prioritaria per ricevere informazioni sugli ultimi
prodotti Thrustmaster e sulle ultime offerte speciali.
Questo prodotto è coperto da una garanzia di 2 anni dalla data di acquisto.
Bespaar tijd en registreer je product online!
Ga naar onze website (europe.thrustmaster.com
) en klik op Support/Register. Registreren heeft als
voordeel dat het proces met de helpdesk, mocht contact nodig zijn, eenvoudiger zal worden. Je kan je ook
opgeven voor de mailinglijst om de laatste productinformatie te ontvangen en op de hoogte gehouden te worden
van speciale aanbiedingen.
Dit produkt recht heeft een 2 jaren garantie, ingaande de dag van aankoop.
UK
E
P
F
I
D
NL
THRUSTMASTER
®
www.thrustmaster.com

• Should you have any technical queries, please call our technical support hotline.
• Bei technischen Fragen wenden Sie sich bitte an unseren technischen Support.
• Para todo problema de instalación, de configuración o de programación, puede contactar con nuestros técnicos en el teléfono.
• No caso de surgir alguma dúvida, por favor, contacte a nossa linha telefónica de serviço de assistência técnica.
• Pour tout problème d‘installation, de configuration ou de programmation, vous pouvez contacter notre hotline.
• Per la risoluzione di problemi tecnici puoi chiamare il nostro supporto tecnico.
• Voor alle installatieproblemen, wat betreft configuratie of programmering, kunt u onze hotline bellen.
•
United Kingdom Thrustmaster, Inc. c/o GUILLEMOT Ltd. – 3
rd
Floor, Central House – 27 Park Street – Croydon – SURREY – CR0 1YD – U.K.
(Open Monday to Friday from 12:00 to 21:00)
Tel: 020 7216 0047 / Fax: +31-(0)30-6026279 / E-mail: thru[email protected]
United States For e-mail support, please go to us.thrustmaster.com, click on Support on the top of the Home page and then search our FAQ’s
to access the Support Request page.
France Thrustmaster, Inc. c/o GUILLEMOT Service Après-Vente – Rue des Peupliers – 56910 Carentoir – FRANCE
(de 13h00 à 22h00, du lundi au vendredi)
N° Indigo : 0 892 690 024 (0,34 €/minute) / Fax : 02 99 08 96 45 / E-mail : thrustmaster.fr@guillemotsupport.com
Deutschland / Thrustmaster, Inc. c/o GUILLEMOT GmbH – techn. Hotline/Reklamation
Österreich (Montag bis Donnerstag 8:30 Uhr bis 17 Uhr, Freitag 8:30 bis 16 Uhr)
Tel: 0190/662789 (0.433 €/Min.) / Fax: 030/29666839 / E-Mail: thrustmast[email protected]
Belgique / Thrustmaster, Inc. c/o GUILLEMOT S.A. – Chaussée de Louvain 775 – 1140 Brussels – BELGIUM
Belgïe (de 9h30 à 12h30 et de 14h00 à 18h00, du lun. au ven. / van maandag t/m vrijdag van 9.30 tot 12.30 en van 14.00 tot 18.00)
Tel: +32 2 639 40 30 / Fax: +32 2 735 31 89 / E-mail: [email protected]
Italia Thrustmaster, Inc. c/o GUILLEMOT S.r.l. – Viale Cassala, 22 – 20143 Milano – ITALIA
(Dal Lunedì al Venerdì dalle 14.30 alle 18.30)
Tel: 02 83 312 1 / Fax: 02 83 312 300 / E-mail: assist[email protected]
España / Thrustmaster, Inc. c/o GUILLEMOT S.A. – Carretera de Rubi 72/74 Atico – Edificio Horizon –
Portugal 08190 Sant Cugat del Vallès – Barcelona – ESPAÑA
(De lunes a viernes – Mañanas: de 09h a 13h30 – Tardes: de 15h a 18h30)
Tel: +34 935 90 69 60 / Fax: +31-(0)30-6026279 / E-mail: thrustmaster.[email protected]
Suisse / Thrustmaster, Inc. c/o LOGICOSOFTWARE S.A. – Avenue des Boveresses 46 – Case postale 15 –
Schweiz 1000 Lausanne 21 – SUISSE
Tel: 022 5675120 (Suisse francophone); 07734-940873999 (deutschsprachige Schweiz)
Fax: +31-(0)30-6026279 / E-mail: [email protected]
Australia Thrustmaster, Inc. c/o GUILLEMOT Australia PTY Ltd – Level 3 – 111-117 Devonshire Street, Surry Hills –
NSW 2010 – Sydney – AUSTRALIA
Technical support: 1902 262 514 (cost of call $1.98 per minute, higher for mobile/public phone)
Tel: 61 2 8303 1818 / Fax: 61 2 9319 0422 / E-mail: thrustmaster.a[email protected]
Scandinavia Thrustmaster, Inc. c/o GUILLEMOT Nordic A/S – Nordre Fasanvej 108, 1
st
Floor – 2000 Frederiksberg – DANMARK
(open from 9am to 5pm every working day)
Tel: Denmark: 82 33 28 58; Sweden: 08 519 920 32; Norway: 23 50 01 16; Finland: 09 817 101 54
E-mail: thrustmaster[email protected]
Nederland Thrustmaster, Inc. c/o GUILLEMOT BV – Huizermaatweg 3A – 1273 NA Huizen – NEDERLAND
Technische support (maandag t/m vrijdag van 09.00 tot 18.00)
Tel: 0900 2026 765 (0.25 €/Min.) / Fax: 030-6026279 / E-mail: thrustmaster.nl@guillemotsupport.com
TEL: 03-5823-2053 / FAX: 03-5823-2052
For other countries, please contact our headquarters in France.
THRUSTMASTER
®
www.thrustmaster.com
5074735
Documenttranscriptie
THRUSTMASTER ® QUICK INSTALL US TECHNICAL FEATURES 1. Progressive gas & brake levers 2. Action buttons 3. D-Pad 4. Back button 5. Sensitivity button 6. Start button 7. Program button 8. LED 9. Vibration button 10. Vibration/ Force Effects switch D TECHNISCHE MERKMALE 1. Progressive Gas- und Bremshebel 2. Aktionstasten 3. Richtungskreuz 4. Back-Taste 5. Sensitivity-Taste 6. Start-Taste 7. Program-Taste 8. LED 9. Vibration-Taste 10. Vibration/ Force Effects-Schalter Xbox™ E CARACTERÍSTICAS TÉCNICAS 1. Palancas progresivas de gas y freno 2. Botones de acción 3. D-Pad 4. Botón Back 5. Botón Sensitivity 6. Botón Start 7. Botón Program 8. LED 9. Botón Vibration 10. Interruptor Vibration/Force Effects P CARACTERÍSTICAS TÉCNICAS 1. Alavancas de aceleração e travagem progressivas 2. Botões de acção 3. Almofada digital 4. Botão Back 5. Botão Sensitivity 6. Botão Start 7. Botão Program 8. LED 9. Botão Vibration 10. Comutador Vibration/ Force Effects For use with video game system. IMPORTANT! Before using this product, read the Xbox™ video game system instruction manual for safety, health and other information. THRUSTMASTER ® US D E P Sensitivity button (5): controls sensitivity when turning the wheel. To change the default setting (high): 1. Press the button once: the LED turns red, and then turns off (sensitivity = medium). 2. Press the button again: the LED turns green, and then turns off (sensitivity = low). 3. Press the button once more: the LED turns yellow, and then turns off (sensitivity = high). Vibration button (9): sets the degree of vibration for the motors. To change the default setting (100%): 1. Press the button once: the LED turns yellow, and then turns off (vibration = 50%). 2. Press the button again: the LED turns green, and then turns off (vibration = 0%). 3. Press the button once more: the LED button turns red, and then turns off (vibration = 100%). Re-centering function: press the Program and Sensitivity buttons simultaneously to disable (LED flashes green) or enable (LED flashes red) the wheel’s automatic re-centering function (this function is enabled by default). Force Effects: press the Program and Vibration buttons simultaneously to toggle between the wheel’s two different effect modes: mode 1 (default) is more realistic (LED flashes green); mode 2 is more powerful (LED flashes red). If, in some games, Force effects cannot be removed using the Vibration/Force Effects switch (10), switch off your console, set the Vibration/Force Effects switch to the Force Effects position and then restart your console and your game: the Vibration/Force Effects switch should now function correctly. Sensitivity-Taste (5): Reguliert die Empfindlichkeit beim Drehen des Lenkrads. Die Standardeinstellung (hoch) ändern Sie so: 1. Drücken Sie die Taste einmal: Die LED leuchtet rot und ist dann aus (Empfindlichkeit = mittel). 2. Drücken Sie die Taste noch einmal: Die LED leuchtet grün und ist dann aus (Empfindlichkeit = niedrig). 3. Drücken Sie die Taste noch einmal: Die LED leuchtet gelb und ist dann aus (Empfindlichkeit = hoch). Vibration-Taste (9): Stellt den Grad der Vibration für die Motoren ein. Die Standardeinstellung (100%) ändern Sie so: 1. Drücken Sie die Taste einmal: Die LED leuchtet gelb auf, und geht dann aus (Vibration = 50%). 2. Drücken Sie die Taste noch einmal: Die LED leuchtet grün auf, und geht dann aus (Vibration = 0%). 3. Drücken Sie die Taste noch einmal: Die LED leuchtet rot auf, und geht dann aus (Vibration = 100%). Zentrierungs-Funktion: Drücken Sie die Program und Sensitivity Taste gleichzeitg zum Aus- (das LED leuchtet grün) oder Einschalten (das LED leuchtet rot) der automatischen Zentrierungs-Funktion des Lenkrades (in der Voreinstellung eingeschaltet). Force Effekte: Drücken Sie die Program- und Vibration- Taste gleichzeitig um zwischen den zwei verschiedenen Effekteinstellungen des Lenkrades umzuschalten: Mode 1 (Standard) ist realistischer (das LED leuchtet grün); Mode 2 ist leistungsfähiger (das LED leuchtet rot). Falls, in einigen Spielen, die Force Effekte durch den Vibration/Force Effects-Schalter (10) nicht ausgeschaltet werden können, schalten Sie die Konsole aus, stellen Sie den Vibration/Force EffectsSchalter auf die Force Effects Position und starten Sie die Konsole und das Spiel neu: der Vibration/Force Effects-Schalter sollte jetzt korrekt funktionieren. Botón Sensitivity (5): controla la sensibilidad cuando se gira el volante. Para cambiar el valor por defecto (alta): 1. Pulsa el botón una vez: el LED se pone en rojo, y después se apaga (sensibilidad = media). 2. Pulsa el botón de nuevo: el LED se pone verde, y después se apaga (sensibilidad = baja). 3. Pulsa el botón una vez más: el LED se pone amarillo, y después se apaga (sensibilidad = alta). Botón Vibration (9): controla el grado de vibración de los motores. Para cambiar el valor por defecto (100%): 1. Pulsa el botón una vez: el LED se pone en amarillo, y después se apaga (vibración = 50%). 2. Pulsa el botón de nuevo: el LED se pone verde, y después se apaga (vibración = 0%). 3. Pulsa el botón una vez más: el LED se pone rojo, y después se apaga (vibración = 100%). Función de recentrado: pulsa simultáneamente los botones Program y Sensitivity para desactivar (el LED parpadea en verde) o activar (el LED parpadea en rojo) la función de recentrado automático del volante (esta función está activada por defecto). Efectos Force: pulsa simultáneamente los botones Program y Vibration para cambiar entre los dos modos diferentes de efectos del volante: el modo 1 (por defecto) es más realista (el LED parpadea en verde); el modo 2 es más potente (el LED parpadea en rojo). Si, en algunos juegos, los efectos Force no se eliminan utilizando el interruptor Vibration/Force Effects (10), apaga tu consola, pon el interruptor Vibration/Force Effects en la posición Force Effects y después reinicia tu consola y tu juego: en ese momento, el interruptor Vibration/Force Effects debería funcionar correctamente. Botão Sensitivity (5): controla a sensibilidade quando se roda o volante. Para mudar a definição padrão (alta): 1. Prima uma vez o botão: o LED fica vermelho, apagando-se em seguida (sensibilidade = média). 2. Prima novamente o botão: o LED fica verde e depois apaga-se (sensibilidade = baixa). 3. Prima uma vez mais o botão: o LED fica amarelo, apagando-se em seguida (sensibilidade = alta). Botão Vibration (9): ajusta o grau de vibração para os motores. Para mudar a definição padrão (100%): 1. Prima uma vez o botão: o LED fica amarelo, apagando-se em seguida (vibração = 50%). 2. Prima novamente o botão: o LED fica verde e depois apaga-se (vibração = 0%). 3. Prima uma vez mais o botão: o LED fica vermelho, apagando-se em seguida (vibração = 100%). Função de recentragem: prima os botões Program e Sensitivity simultaneamente para desactivar (o LED pisca a verde) ou activar (o LED pisca a vermelho) a função de recentragem automática do volante (esta função está activada por defeito). Efeitos de força: prima os botões Program e Vibration simultaneamente para alternar entre os dois modos diferentes de efeitos do volante: o modo 1 (padrão) é mais realista (o LED pisca a verde); o modo 2 é mais potente (o LED pisca a vermelho). Se nalguns casos não for possível remover os efeitos de força usando o comutador Vibration/Force Effects (10), desligue a consola, regule o comutador Vibration/Force Effects para a posição Force Effects e em seguida reinicie a consola e o jogo: o comutador Vibration/Force Effects deverá agora funcionar correctamente. 5074809 F F INSTALLATION DU VOLANT CARACTÉRISTIQUES TECHNIQUES 11. Connecteur Xbox™ 12. Système de fixation 13. Vis de serrage 14. Connecteur pour le pédalier 15. Câble du pédalier 16. Pédalier progressif 17. Parties latérales amovibles 18. Adaptateur secteur 19. Connecteur pour l’adaptateur I INSTALLAZIONE DEL VOLANTE I CARATTERISTICHE TECNICHE 11. Connettore Xbox™ 12. Morsa 13. Vite della morsa 14. Attacco per pedaliera 15. Connettore pedaliera 16. Pedaliera progressiva 17. Ali asportabili 18. Alimentatore 19. Cavo connettore di alimentazione Xbox™ NL INSTALLATIE VAN HET STUUR NL TECHNISCHE KENMERKEN 11. Xbox™ aansluiting 12. Klem 13. Klemschroef 14. Ansluitkabel voor de pedalen 15. Kabel voor de pedalen 16. Progressief reagerende pedalen 17. Verwijderbare vleugels 18. Adapter 19. Aansluitkabel van de adapter Da usare col sistema di videogiochi . IMPORTANTE! Prima di utilizzare questo prodotto leggere il manuale di istruzioni del sistema di videogiochi Xbox™ per informazioni sulla sicurezza, salute ed altro. F INSTALLATION DU VOLANT Fixation à une table (A) 1. Placez le volant sur une table ou autre surface plane. 2. Placez la vis de serrage (13) dans le système de fixation (12) puis vissez l’ensemble dans l’emplacement prévu, sous le volant, jusqu’à ce que ce dernier soit parfaitement stable. Installation du support pour les genoux (B) 1. Faites coulisser les parties latérales amovibles (17) dans la partie centrale du support pour les genoux. 2. Placez la vis de serrage (13) dans la partie centrale du support pour les genoux, puis vissez l’ensemble dans l’emplacement prévu sous le volant, jusqu’à ce que le support soit correctement positionné. Remarque : ne serrez pas trop fort la vis car vous risquez d’endommager le système de fixation, la table ou le support. I INSTALLAZIONE DEL VOLANTE Regolazione della morsa da tavolo (A) 1. Posiziona il volante su un tavolo o su una superficie piana. 2. Inserisci la vite della morsa (13) nella morsa stessa (12) e stringila sin quando il volante non risulti ben fissato. Installazione del sistema knee-top (B) 1. Spostare dolcemente le ali asportabili (17) su entrambi i lati del knee-top sino al completo fissaggio. 2. Posizionare la vite della morsa (13) nel foro del knee-top e poi avvitare l'unità al foro nella parte inferiore del volante sino a quando risulta completamente fissato. N.B.: fai attenzione a non stringere troppo la vite, in modo tale da evitare danni alla morsa, al tavolo e/o al knee-top. NL INSTALLATIE VAN HET STUUR Tafelklem installatie (A) 1. Plaats het stuur op een tafel of op een vlakke ondergrond. 2. Plaats de klemschroef (13) in de klem (12) en schroef het klemgedeelte in het gat aan de onderkant van het stuur, tot deze stevig op zijn plaats zit. Montage van de knee-top basis (B) 1. Schuif langzaam de verwijderbare vleugels (17) op beide kanten van de knee-top basis. 2. Plaats de klemschroef (13) in het gat van de knee-top basis en schroef deze vervolgens vast aan de onderkant van het stuur tot deze goed vast zit. N.B.: draai de klem niet te strak vast, om beschadiging aan de klem, tafel of de knee-top te voorkomen. Xbox™ Voor gebruik met het videogamesysteem. BELANGRIJK! Lees voordat je dit product gaat gebruiken eerst de Xbox™ videogamesysteem handleiding voor veiligheid, gezondheid en ander informatie. F RELIER LE VOLANT 1. 2. 3. 4. 5. Reliez le connecteur pour le pédalier (14) au câble du pédalier (15). Reliez le connecteur pour l’adaptateur (19) à l’adaptateur secteur (18) et branchez l’adaptateur sur le secteur. Éteignez votre console avant de brancher le volant. Positionnez l’interrupteur Vibration/Force Effects (10) sur la position Force Effects. Branchez le connecteur Xbox™ (11) sur le port 1 de votre console de jeu et rallumez votre console. PROGRAMMATION DES BOUTONS ET DES AXES • La fonction allouée à chacun des boutons analogiques peut s’appliquer à n’importe quel autre bouton analogique, à une direction de la croix multidirectionnelle ou à un axe (les axes étant les leviers d’accélération et de freinage, ainsi que les directions gauche et droite du volant). • La fonction allouée à chacun des axes peut s’appliquer à n’importe quel autre axe, bouton analogique ou direction de la croix multidirectionnelle. • Si une direction de la croix multidirectionnelle est programmée sur un bouton analogique, ce bouton devient alors numérique. • Si un bouton analogique est programmé sur une direction de la croix multidirectionnelle, cette direction reste numérique. Remarque : les boutons Start, Back, Program, Vibration et Sensitivity ainsi que les pédales d’accélération et de frein ne peuvent pas être programmés. I CONNESSIONE DEL VOLANTE 1. 2. 3. 4. 5. Collega il attacio per pedaliera (14) al cavo connettore pedaliera (15). Collega il cavo connettore di alimentazione (19) all’alimentatore stesso (18) e collega quest’ultimo alla presa di corrente. Prima di collegare il volante, accertati di aver spento la tua console. Posiziona il selettore Vibration/Force Effects (10) in Force Effects. Collega il connettore Xbox™ (11) alla porta 1 della tua console e riaccendila. PROGRAMMAZIONE DI ASSI E PULSANTI NL • La funzione associata ad un pulsante analogico può essere associata ad un altro pulsante analogico, direzione del D-Pad o asse (come assi si intendono anche le leve di acceleratore e freno e le direzioni destra e sinistra di sterzata del volante). • La funzione associata ad ogni asse può essere associata ad un altro asse, pulsante analogico o direzione del D-Pad. • Se ad un pulsante analogico viene associata una direzione del D-Pad, il pulsante analogico diverrà digitale. • Se ad una direzione del D-Pad viene associato un pulsante, la direzione del D-Pad resterà digitale. N.B.: i pulsanti Start, Back, Program, Vibration e Sensitivity, così come i pedali di acceleratore e freno, non possono essere programmati. AANSLUITEN VAN HET STUUR 1. 2. 3. 4. 5. Sluit de aansluitkabel voor de pedalen (14) aan op de kabel voor de pedalen (15). Verbindt de aansluitkabel van de adapter (19) met de adapter (18) en stop de adapter in het stopcontact. Zet de console uit voordat het stuur wordt aangesloten. Stel de Vibration/Force Effects schakelaar (10) op de Force Effects positie. Sluit de Xbox™ aansluiting (11) aan op poort 1 van de console en zet de console weer aan. FUNCTIES WIJZIGEN VAN KNOPPEN EN ASSEN • De functie van elke analoge knop kan worden toegekend aan een andere analoge knop, D-Pad richting of as (als as wordt ook beschouwd: het remhendel, het gashendel en het naar links of rechts draaien van het stuur). • De functie van elke as kan ook worden toegekend aan een andere as, analoge knop of D-Pad richting. • Als een D-Pad richting is toegekend aan een analoge knop, dan wordt de analoge knop digitaal. • Als een analoge knop is toegekend aan een D-Pad richting, dan blijft de D-Pad richting digitaal. N.B.: aan de knoppen Start, Back, Program, Vibration en Sensitivity kan geen andere functie worden toegekend, net zo min als aan het gas- en rempedaal. F 1. Appuyez sur le bouton Program (7) : le voyant (8) s’allume en rouge*. 2. Sélectionnez le bouton ou l’axe émulant la fonction que vous souhaitez programmer sur un autre bouton ou axe : le voyant rouge clignote* (sélectionner un axe signifie : tourner le volant à gauche ou à droite, ou actionner un levier). 3. Sélectionnez le bouton ou l’axe sur lequel vous souhaitez programmer la fonction choisie à l’étape 2 : le voyant devient vert, puis s’éteint. 4. Le bouton ou l’axe dernièrement sélectionné (étape 3) émule désormais la même fonction que le bouton ou l’axe sélectionné à l’étape 2. Le bouton ou l’axe sélectionné à l’étape 2 conserve sa fonction d’origine. * Si vous n’appuyez pas sur un autre bouton ou axe dans les 5 secondes, le voyant s’éteint et aucune modification n’est prise en compte. Pour rétablir la configuration par défaut : Maintenez le bouton Program (7) enfoncé pendant plus de 3 secondes : le voyant (8) s’allume en rouge, puis devient vert pendant 2 secondes. La configuration par défaut est restaurée. © Guillemot Corporation 2003. Tous droits réservés. Thrustmaster® est une marque déposée de Guillemot Corporation S.A. Ferrari® et 360 Modena® sont des marques déposées de Ferrari Idea S.A. Xbox™ et le logo Xbox™ sont des marques et/ou des marques déposées de Microsoft Corporation aux États-Unis et/ou dans d’autres pays. Toutes les autres marques déposées et noms commerciaux sont reconnus par les présentes et sont la propriété de leurs propriétaires respectifs. Illustrations non contractuelles. Le contenu, la conception et les spécifications sont susceptibles de changer sans préavis et de varier selon les pays. I 1. Premete il pulsante Program (7): il LED (8) si illuminerà di rosso*. 2. Premete il pulsante/asse la cui funzione intendete attribuire ad un altro pulsante/asse: il LED lampeggerà di rosso* (per gli assi, dovrete girare completamente il volante verso destra o sinistra, oppure premere a fondo una leva). 3. Premete il pulsante/asse al quale intendete attribuire la funzione del pulsante/asse premuto al Punto 2: il LED diventerà verde e poi si spegnerà. 4. Al pulsante/asse premuto al Punto 3 corrisponde ora la medesima funzione del pulsante/asse premuto al Punto 2. Il pulsante/asse premuto al Punto 2 manterrà la sua funzione originale. * Se non premete alcun pulsante/asse entro 5 secondi, il LED si spegnerà e non verrà effettuata alcuna modifica. Per ritornare alla configurazione di default: Tenete premuto per più di 3 secondi il pulsante Program (7): durante questo perido di tempo, il LED (8) diventerà rosso e quindi verde per 2 secondi. Avrete così ripristinato la configurazione originale. © Guillemot Corporation 2003. Tutti i diritti riservati. Thrustmaster® è un marchio registrato da Guillemot Corporation S.A. Ferrari® e 360 Modena® ™ sono marchi registrati da Ferrari Idea S.A. Xbox™ ed il logo Xbox™ sono marchi o marchi registrati da Microsoft Corporation negli Stati Uniti e/o in altri paesi. Tutti gli altri marchi sono qui riconosciuti e registrati ai rispettivi proprietari. Foto escluse. I contenuti, il design e le caratteristiche possono essere oggetto di modifiche senza preavviso e possono variare da un paese all’altro. NL 1. Druk op de knop Program (7): de LED (8) wordt rood*. 2. Druk op de knop/as waarvan je de functie wilt kopiëren: de LED knippert rood* (bij assen betekent dit dat het stuurwiel volledig naar links of rechts moet worden gedraaid of dat het pedaal volledig moet worden ingetrapt). 3. Druk op de knop/as die dezelfde functie moet krijgen als de knop/as ingedrukt onder Stap 2, hierboven: de LED wordt groen en gaat dan uit. 4. De knop/as ingedrukt onder Stap 3 heeft nu dezelfde functie gekregen als de knop/as ingedrukt onder Stap 2. De knop/as ingedrukt onder Stap 2 behoudt de oorspronkelijke functie. * Als je binnen 5 seconden geen andere knop/as indrukt, dan gaat de LED uit en wordt er niets aan de instellingen gewijzigd. Terug naar de standaard instelling: Houd de knop Program (7) langer dan 3 seconden ingedrukt: de LED (8) zal rood branden en daarna 2 seconden groen worden. De standaard instellingen zijn hersteld. © Guillemot Corporation 2003. Alle rechten voorbehouden. Thrustmaster® is een geregistreerd handelsmerk van Guillemot Corporation S.A. Ferrari® en 360 Modena® zijn geregistreerde handelsmerken van Ferrari Idea S.A. Xbox™ en de Xbox™ logo zijn handelsmerken en/of geregistreerde handelsmerken van Microsoft Corporation in de Verenigde Staten en/of andere landen. Alle andere handelsmerken en merknamen zijn hierbij erkend en zijn het eigendom van de desbetreffende eigenaren. Illustraties zijn niet bindend. Inhoud, ontwerpen en specificaties kunnen zonder voorafgaande kennisgeving gewijzigd worden en afwijken in verschillende landen. UK Save time by registering your product online! Go directly to our Website (europe.thrustmaster.com) and click on Support/Register. Registering with us in this way will simplify the process if you ever need to contact our technical support team. If you wish, you can also be added to our priority mailing list to receive information about our new Thrustmaster products and our latest special offers. This product offers a two (2) year warranty by exchange from the date of purchase. D Sparen Sie Zeit, indem Sie Ihr Produkt online registrieren lassen! Gehen Sie direkt zu unserer Webseite (de.thrustmaster.com) und klicken Sie auf Support/Online Registrierung. Wenn Sie sich auf diese Weise bei uns registrieren, wird den Prozeß vereinfachen wenn Sie einmal mit unserem technischen Support Team Kontakt aufnehmen müssen. Wenn Sie möchten, können Sie sich auch in die Mailingliste eintragen lassen, um Informationen über neue Thrustmaster Produkte und spezielle Angebote zu erhalten. Wir gewähren auf dieses Produkt eine Garantie von 2 Jahren ab dem Kaufdatum. E ¡Ahorre tiempo en registrar tus productos online! Ve directamente a nuestro sitio web (es.thrustmaster.com) y haz clic en Soporte Técnico/Registro. Registrándote con nosotros de esta forma simplificará el proceso si alguna vez necesitas contactar con nuestro equipo de servicio técnico. Si quieres, se te puede añadir a nuestra lista de correos prioritaria para recibir información acerca de nuestras novedades de Thrustmaster y nuestras últimas ofertas. Este producto beneficia de 2 años de garantía a partir de la fecha de compra. P Poupe tempo fazendo o registo do seu produto online! Vá directamente até ao nosso site (europe.thrustmaster.com) e clique em Support/Register. Ao registar-se connosco desta forma simplificará o processo caso alguma vez precise de contactar a nossa equipa de suporte técnico. Se desejar, pode também ser acrescentado à nossa lista de correio prioritário para receber informações sobre os nossos novos produtos Thrustmaster e as ofertas especiais mais recentes. Este produto oferece 2 anos de garantia a partir da data de compra. F Gagnez du temps en enregistrant votre produit en ligne ! Connectez-vous dès maintenant sur notre site web (www.thrustmaster.fr) et cliquez sur Support technique/Enregistrement. Cet enregistrement facilitera vos démarches lors de contacts éventuels avec notre support technique. Vous pourrez également bénéficier, si vous le souhaitez, de l’envoi d’informations privilégiées sur les nouveaux produits Thrustmaster et les dernières promotions. Ce produit bénéficie d’une garantie de 2 ans à compter de la date d’achat. I Risparmia tempo registrando il tuo prodotto online! Collegati direttamente al nostro Sito (it.thrustmaster.com) e clicca su Supporto/Registra. Questo tipo di registrazione semplifica il processo nel caso tu voglia contattare il nostro team di Supporto Tecnico. Se lo desideri, puoi anche essere inserito nella nostra mailing list prioritaria per ricevere informazioni sugli ultimi prodotti Thrustmaster e sulle ultime offerte speciali. Questo prodotto è coperto da una garanzia di 2 anni dalla data di acquisto. NL Bespaar tijd en registreer je product online! Ga naar onze website (europe.thrustmaster.com) en klik op Support/Register. Registreren heeft als voordeel dat het proces met de helpdesk, mocht contact nodig zijn, eenvoudiger zal worden. Je kan je ook opgeven voor de mailinglijst om de laatste productinformatie te ontvangen en op de hoogte gehouden te worden van speciale aanbiedingen. Dit produkt recht heeft een 2 jaren garantie, ingaande de dag van aankoop. THRUSTMASTER ® www.thrustmaster.com • Should you have any technical queries, please call our technical support hotline. • Bei technischen Fragen wenden Sie sich bitte an unseren technischen Support. • Para todo problema de instalación, de configuración o de programación, puede contactar con nuestros técnicos en el teléfono. • No caso de surgir alguma dúvida, por favor, contacte a nossa linha telefónica de serviço de assistência técnica. • Pour tout problème d‘installation, de configuration ou de programmation, vous pouvez contacter notre hotline. • Per la risoluzione di problemi tecnici puoi chiamare il nostro supporto tecnico. • Voor alle installatieproblemen, wat betreft configuratie of programmering, kunt u onze hotline bellen. • United Kingdom Thrustmaster, Inc. c/o GUILLEMOT Ltd. – 3rd Floor, Central House – 27 Park Street – Croydon – SURREY – CR0 1YD – U.K. (Open Monday to Friday from 12:00 to 21:00) Tel: 020 7216 0047 / Fax: +31-(0)30-6026279 / E-mail: [email protected] United States For e-mail support, please go to us.thrustmaster.com, click on Support on the top of the Home page and then search our FAQ’s to access the Support Request page. France Thrustmaster, Inc. c/o GUILLEMOT Service Après-Vente – Rue des Peupliers – 56910 Carentoir – FRANCE (de 13h00 à 22h00, du lundi au vendredi) N° Indigo : 0 892 690 024 (0,34 €/minute) / Fax : 02 99 08 96 45 / E-mail : [email protected] Deutschland / Österreich Thrustmaster, Inc. c/o GUILLEMOT GmbH – techn. Hotline/Reklamation (Montag bis Donnerstag 8:30 Uhr bis 17 Uhr, Freitag 8:30 bis 16 Uhr) Tel: 0190/662789 (0.433 €/Min.) / Fax: 030/29666839 / E-Mail: [email protected] Belgique / Belgïe Thrustmaster, Inc. c/o GUILLEMOT S.A. – Chaussée de Louvain 775 – 1140 Brussels – BELGIUM (de 9h30 à 12h30 et de 14h00 à 18h00, du lun. au ven. / van maandag t/m vrijdag van 9.30 tot 12.30 en van 14.00 tot 18.00) Tel: +32 2 639 40 30 / Fax: +32 2 735 31 89 / E-mail: [email protected] Italia Thrustmaster, Inc. c/o GUILLEMOT S.r.l. – Viale Cassala, 22 – 20143 Milano – ITALIA (Dal Lunedì al Venerdì dalle 14.30 alle 18.30) Tel: 02 83 312 1 / Fax: 02 83 312 300 / E-mail: [email protected] España / Portugal Thrustmaster, Inc. c/o GUILLEMOT S.A. – Carretera de Rubi 72/74 Atico – Edificio Horizon – 08190 Sant Cugat del Vallès – Barcelona – ESPAÑA (De lunes a viernes – Mañanas: de 09h a 13h30 – Tardes: de 15h a 18h30) Tel: +34 935 90 69 60 / Fax: +31-(0)30-6026279 / E-mail: [email protected] Suisse / Schweiz Thrustmaster, Inc. c/o LOGICOSOFTWARE S.A. – Avenue des Boveresses 46 – Case postale 15 – 1000 Lausanne 21 – SUISSE Tel: 022 5675120 (Suisse francophone); 07734-940873999 (deutschsprachige Schweiz) Fax: +31-(0)30-6026279 / E-mail: [email protected] Australia Thrustmaster, Inc. c/o GUILLEMOT Australia PTY Ltd – Level 3 – 111-117 Devonshire Street, Surry Hills – NSW 2010 – Sydney – AUSTRALIA Technical support: 1902 262 514 (cost of call $1.98 per minute, higher for mobile/public phone) Tel: 61 2 8303 1818 / Fax: 61 2 9319 0422 / E-mail: [email protected] Scandinavia Thrustmaster, Inc. c/o GUILLEMOT Nordic A/S – Nordre Fasanvej 108, 1st Floor – 2000 Frederiksberg – DANMARK (open from 9am to 5pm every working day) Tel: Denmark: 82 33 28 58; Sweden: 08 519 920 32; Norway: 23 50 01 16; Finland: 09 817 101 54 E-mail: [email protected] Nederland Thrustmaster, Inc. c/o GUILLEMOT BV – Huizermaatweg 3A – 1273 NA Huizen – NEDERLAND Technische support (maandag t/m vrijdag van 09.00 tot 18.00) Tel: 0900 2026 765 (0.25 €/Min.) / Fax: 030-6026279 / E-mail: [email protected] TEL: 03-5823-2053 / FAX: 03-5823-2052 THRUSTMASTER ® www.thrustmaster.com 5074735 For other countries, please contact our headquarters in France.-
 1
1
-
 2
2
-
 3
3
-
 4
4
-
 5
5
-
 6
6
-
 7
7
-
 8
8
-
 9
9
-
 10
10
-
 11
11
-
 12
12
-
 13
13
-
 14
14
-
 15
15
-
 16
16
-
 17
17
-
 18
18
-
 19
19


Thrustmaster 360 MODENA FORCE GT de handleiding
- Categorie
- Spelbesturing
- Type
- de handleiding
in andere talen
- English: Thrustmaster 360 MODENA FORCE GT Owner's manual
- italiano: Thrustmaster 360 MODENA FORCE GT Manuale del proprietario
- français: Thrustmaster 360 MODENA FORCE GT Le manuel du propriétaire
- español: Thrustmaster 360 MODENA FORCE GT El manual del propietario
- Deutsch: Thrustmaster 360 MODENA FORCE GT Bedienungsanleitung
- português: Thrustmaster 360 MODENA FORCE GT Manual do proprietário
Gerelateerde papieren
-
Thrustmaster 360 MODENA RACING WHEEL de handleiding
-
-
Thrustmaster FIRESTORM PROGRAMMABLE de handleiding
-
-
-
-
Thrustmaster Ferrari GT Experience de handleiding
-
-
-