
S5100
Gebruikershandleiding
S5100
Gebruikershandleiding
De inhoud van deze handleiding kan op bepaalde punten afwijken van
uw telefoon, afhankelijk van de software op de telefoon of uw service
provider.
S5100 G e b r u i ke r s h a n d l e i d i n g
NEDERLANDS
FRANÇAIS
ENGLISH
P/N : MMBB0192605
(
1.0
)
W

Uw oude toestel wegdoen
1.
Als het symbool met de doorgekruiste verrijdbare afvalbak op een product staat, betekent dit
dat het product valt onder de Europese Richtlijn 2002/96/EC.
2.
Elektrische en elektronische producten mogen niet worden meegegeven met het
huishoudelijk afval, maar moeten worden ingeleverd bij speciale inzamelingspunten die door
de lokale of landelijke overheid zijn aangewezen.
3.
De correcte verwijdering van uw oude toestel helpt negatieve gevolgen voor het milieu en de
menselijke gezondheid voorkomen.
4.
Wilt u meer informatie over de verwijdering van uw oude toestel? Neem dan contact op met
uw gemeente, de afvalophaaldienst of de winkel waar u het product hebt gekocht.
S5100 GEBRUIKERSHANDLEIDING
- NEDERLANDS

Inhoudsopgave
2
Inhoudsopgave
Introductie 5
Richtlijnen voor juist
en veilig gebruik 6
S5100 functies 10
Onderdelen van de telefoon
Scherminformatie 14
Toestel klaarmaken
voor gebruik 15
De SIM-kaart en de batterij
installeren
De batterij opladen 17
Adapter loskoppelen 18
Telefoon aan- en uitzetten 19
Toegangscodes
Blokkeerwachtwoord 20
Hoofdfuncties 21
Bellen en gebeld worden
Contacten 26
Menu in gesprek 27
Conferentiegesprekken 28
Menu-overzicht 31
Selecteren van functies
en opties 33
Profielen 34
Activeren
Personaliseren
Naam wijzigen 35
Oproep-info 36
Gemiste oproepen
Ontvangen oproepen
Uitgaande oproepen
Laatste oproepen verwijderen 37
Oproeptarieven
Oproepduur
Oproepkosten
Instellingen 38
GPRS info.
Oproepduur
Gegevensvolumes
Extra 39
Alarmklok
Bluetooth
Gekoppelde apparaten 40
Handsfree-apparaten
Instellingen
Calculator
Conversieprogr.
Wereldtijd 42
Modem

Inhoudsopgave
3
Planner 42
Contacten
Zoeken
Nieuw toevoegen 43
Bellersgroepen
Snelkiezen 44
Instellingen
Alles Kopiëren
Alles verwijderen 45
Informatie
Kalender 46
Nieuwe toevoegen 47
Bekijk dagelijkse planning
Laatste verwijderen
Alles verwijderen
Ga naar datum
Waarschuwingsgeluid instellen
Memo
Berichten 48
Nieuw bericht
SMS schrijven
MMS schrijven 49
Inbox 51
Outbox 52
Concepten 53
Voicemail beluisteren
Info-bericht 54
Lezen
Onderwerpen
Sjablonen
Tekstsjabloon
MMS-sjablonen 55
Mijn visitekaartje
Instellingen 56
SMS
MMS
Voicemail Centrale 57
Info-bericht
Push-berichten
Multimedia 58
Foto maken
Videocamera
Mijn foto’s 59
Mijn video’s
MP3 60
MP3-speler 61
Afspeellijst 62
Instellingen
Spraakrecorder 64
Opnemen
Lijst bekijken
Instellingen
Camera
Videocamera

4
Inhoudsopgave
Instellingen 64
Datum & tijd
Datum instellen
Tijd instellen
Telefooninstellingen
Instellingen weergeven
Thema instellingen 65
Taal
Oproepinstellingen
Oproep doorschakelen
Antwoordmodus 66
Mijn nummer meezenden
Oproep in wacht 67
Minuutmelder
Automatische nummerherhaling
Beveiligingsinstellingen 67
PIN-code vragen
Telefoonblokkering 68
Oproep blokkeren
Vast oproepnummer 69
Codes wijzigen
Netwerkinstellingen
Netwerkkeuze 70
Bandkeuze
GPRS-instellingen
Instellingen resetten
Geheugenstatus 71
Toestel geheugen
Multimedia geheugen
Diensten 72
Internet 73
Startpagina
Favorieten
Ga naar URL
Instellingen 74
SIM-service 76
Downloads 77
Games en toepassingen
Games en toepassingen
Profielen 78
Afbeeldingen
Geluiden 79
Bestandsopslag
Accessoires 82
Technische gegevens 83
Inhoudsopgave

Gefeliciteerd met de aanschaf van de geavanceerde en
compacte mobiele telefoon S5100, met de laatste
digitale mobiele communicatietechnologie.
Introductie
Introductie
5
Deze gebruikershandleiding bevat belangrijke
informatie over het gebruik en de bediening van
uw telefoon. Lees alle informatie aandachtig door
om het toestel optimaal te benutten en schade
aan of misbruik van de telefoon te voorkomen. Bij
aanpassingen aan de telefoon die niet
uitdrukkelijk in deze gebruikershandleiding zijn
vermeld, kan de garantie op het toestel vervallen.

6
Richtlijnen voor juist en veilig gebruik
Lees deze eenvoudige richtlijnen door. Het niet
respecteren van de voorschriften kan gevaarlijk of
illegaal zijn. Meer informatie vindt u in deze
handleiding.
BLOOTSTELLING AAN RF-
ENERGIE
Informatie over blootstelling aan
radiogolven en over SAR
(Specific Absorption Rate)
Deze mobiele telefoon, model S5100, is ontworpen in
overeenstemming met de limiet voor blootstelling aan
radiogolven. Deze limiet is gebaseerd op
wetenschappelijke richtlijnen waarbij veiligheidsmarges
zijn ingebouwd om de veiligheid van alle personen te
kunnen waarborgen, ongeacht hun leeftijd of
gezondheidstoestand.
• De richtlijnen voor blootstelling aan radiogolven
maken gebruik van de maateenheid SAR (Specific
Absorption Rate). SAR-testen worden uitgevoerd
volgens een standaardmethode, waarbij de telefoon
in alle frequentiebanden het hoogst toegestane
energieniveau gebruikt.
• Hoewel er verschillen kunnen zijn tussen de
SAR-niveaus van verschillende modellen
LG-telefoons, voldoen deze allemaal aan de eisen
op het gebied van blootstelling aan radiogolven.
• De door de ICNIRP (International Commission on
Non-Ionizing Radiation Protection) geadviseerde
SAR-limiet is gemiddeld 2 W/kg per tien (10) gram
weefsel.
• De hoogst gemeten SAR-waarde voor dit type
telefoon tijdens tests tegen het oor is 0.174 W/kg
(per 10 gram).
ONDERHOUD
• Haal het toestel niet uit elkaar. Raadpleeg voor
reparaties een erkend technicus.
WAARSCHUWING!
Gebruik uitsluitend originele
batterijen, opladers en accessoires die zijn goedgekeurd
voor dit specifieke type telefoon. Het gebruik van andere
types kan gevaarlijk zijn en kan de garantie op het toestel
doen vervallen.
6
Richtlijnen voor juist en veilig gebruik

Richtlijnen voor juist en veilig gebruik
7
• Houd het toestel uit de buurt van elektrische
apparaten zoals tv, radio en pc.
• Houd het toestel uit de buurt van warmtebronnen
zoals radiators en fornuizen.
• Laat het toestel niet vallen.
• Stel het toestel niet bloot aan mechanische trillingen
of schokken.
• Het omhulsel van het toestel kan beschadigd raken
als het wordt verpakt in papier of vinylpapier.
• Gebruik een droge doek om de buitenkant van het
toestel te reinigen. (Gebruik geen oplosmiddelen
zoals benzeen, thinner of alcohol.)
• Stel het toestel niet bloot aan overmatige rook of
stof.
• Houd het toestel uit de buurt van creditcards en
andere pasjes; dit kan de informatie op de
magnetische strips beïnvloeden.
• Tik niet op het scherm met scherpe objecten, dit kan
de telefoon beschadigen.
• Stel het toestel niet bloot aan vocht.
• Gebruik de accessoires zoals de oortelefoon
zorgvuldig. Raak de antenne niet onnodig aan.
ELEKTRONISCHE APPARATEN
Alle mobiele telefoons kunnen onderhevig zijn aan
storingen die de prestaties nadelig beïnvloeden.
• Gebruik uw telefoon niet in de buurt van medische
apparatuur zonder hiervoor vooraf toestemming te
vragen. Houd de telefoon op afstand van uw
pacemaker, draag deze niet in een borstzak.
• Sommige gehoorapparaten kunnen storing
ondervinden van mobiele telefoons.
• De telefoon kan ook enige storing veroorzaken bij
tv’s, radio’s, pc’s, enz.
VEILIGHEID OP DE WEG
Kijk de bestaande wetten en regels na over het gebruik
van mobiele telefoons in uw voertuig in de landen waar
u rijdt.
• Houd de telefoon niet in de hand terwijl u aan het
rijden bent.
• Houd uw aandacht bij de weg.

8
Richtlijnen voor juist en veilig gebruik
• Maak gebruik van een handsfree kit, indien
beschikbaar.
• Als dit gezien de rijomstandigheden verstandiger is,
verlaat dan de weg en parkeer uw auto alvorens een
telefoongesprek te gaan voeren.
• RF-energie kan sommige elektronische systemen in
uw gemotoriseerde voertuig, zoals autoradio en
beveiligingsapparatuur, nadelig beïnvloeden.
• Als uw voertuig is voorzien van een airbag, plaats dan
geen geïnstalleerde of draadloze apparatuur in de
ruimte boven de airbag of waar de airbag wordt
opgeblazen. Dit kan ernstige verwondingen
veroorzaken als de airbag wordt opgeblazen.
GEBIED WAAR ONTPLOFFINGEN
PLAATSVINDEN
Gebruik de telefoon niet op plaatsen waar met
explosieven wordt gewerkt. Houd u aan de geldende
voorschiften en regels.
MOGELIJK EXPLOSIEVE ATMOSFEER
• Gebruik de telefoon niet in de nabijheid van
tankstations. Gebruik hem niet in de buurt van
brandstof of chemicaliën.
• Vervoer of bewaar geen brandbaar gas, vloeistof of
ander materiaal op dezelfde plaats in uw voertuig als
uw mobiele telefoon en accessoires.
VLIEGTUIG
Draadloze apparatuur kan storingen veroorzaken in
vliegtuigen.
• Schakel uw mobiele telefoon uit voordat u aan boord
van een vliegtuig gaat.
• Gebruik de telefoon niet aan de grond zonder
toestemming van de bemanning.
Richtlijnen voor juist en veilig gebruik

9
KINDEREN
Bewaar de telefoon op een veilige plaats buiten het
bereik van kinderen. De telefoon bevat kleine
afneembare onderdelen die tot verstikking kunnen
leiden.
ALARMNUMMERS
Alarmnummers kunt u niet via alle GSM-netwerken
bellen. Zorg daarom dat u in noodsituaties nooit
alleen afhankelijk bent van de telefoon. Neem contact
op met uw netwerkexploitant voor meer informatie.
INFORMATIE EN ONDERHOUD
BATTERIJ
• U hoeft de batterij niet volledig te ontladen voor u
deze oplaadt. In tegenstelling tot andere
batterijsystemen heeft dit systeem geen
geheugeneffect dat de capaciteit van de batterij
beïnvloedt.
• Gebruik uitsluitend LG-batterijen en -laders.
LG-laders zorgen voor een maximale levensduur van
de batterij.
• Haal de batterij niet uit elkaar en voorkom
kortsluiting in de batterij.
• Houd de metalen contactpunten van de batterij
schoon.
• De batterij kan honderden malen worden opgeladen
voordat deze aan vervanging toe is.
• Laad de batterij opnieuw op als deze lange tijd niet is
gebruikt, voor een optimale betrouwbaarheid.
• Stel de batterijlader niet bloot aan direct zonlicht en
gebruik deze niet in vochtige ruimtes, zoals de
badkamer.
• Bewaar de batterij niet op warme of koude plaatsen,
omdat dit de capaciteit van de batterij nadelig kan
beïnvloeden.
Richtlijnen voor juist en veilig gebruik

ONDERDELEN VAN DE TELEFOON
Voorkant
S5100 functies
10
3
Flitser
Opmerking
]
Vuil op de cameralens
kan de beeldkwaliteit
beïnvloeden.
Hoofdtelefoon aansluiting
1
• Hoofdtelefoon hier aansluiten
Zijtoetsen omhoog/omlaag
2
• Druk op deze toets als u de
huidige tijd wilt weergeven op het
scherm aan de voorzijde.
• Hiermee regelt u het volume van
de toetsentonen in de standby-
modus bij geopende klep.
• Hiermee regelt u het volume van
de oormicrofoon tijdens een
telefoongesprek.
5
Scherm voorzijde
4
Cameralens
S5100 functies

Rechterkant Achterkant
11
Ontgrendelingsknop
Druk op deze knop om de batterijklep
te verwijderen.
Opening
voor een
draagkoord
Ruimte
voor
SIM-kaart
Batterijklep
Batterij
Batterijcontacten
SIM-kaart-terminals
Opladeraansluiting/
Kabelaansluiting
Multimediatoets/Sneltoets MP3
Houd deze toets ingedrukt als
u de cameramodus, MP3 of
videcamera wilt activeren.
Gebruik deze toets ook om een
opname te maken.
S5100 functies

12
Oortelefoon
1
Verzendtoets
3
U kunt een telefoonnummer kiezen en
een oproep beantwoorden. In de
standby-modus hebt u ook snel
toegang tot de laatste inkomende,
uitgaande en gemiste oproepen.
5
Einde-/Aan-uit-toets
U kunt een oproep beëindigen of
weigeren met deze toets, en tevens
teruggaan naar de standby-modus.
U houdt de toets ingedrukt om de
telefoon aan of uit te zetten.
Klep open
Alfanumerieke toetsen
4
U kunt cijfers, letters en speciale tekens
invoeren.
7
Microfoon
U kunt het geluid van de microfoon
tijdens een oproep uitschakelen.
6
Speciale functietoetsen
•
0
: Door deze toets lang in te
drukken wordt het internationale
oproep- teken
“ + ” ingevoerd.
•
=
: Door tijdens het intoetsen van
een telefoonnummer lang op
deze toets te drukken wordt er
een pauze ingelast.
S5100 functies
Hoofdscherm
2
Geeft icoontjes met
telefoonstatus weer, evenals
menuopties, webinformatie,
foto’s en meer, in kleur.
'SRXEGXIR
'SRXEGXIR
'SRXEGXIR
'SRXEGXIR
'SRXEGXIR
'SRXEGXIR
'SRXEGXIR
'SRXEGXIR'SRXEGXIR
'SRXEGXIR
'SRXEGXIR
'SRXEGXIR
'SRXEGXIR
'SRXEGXIR
'SRXEGXIR
'SRXEGXIR
'SRXEGXIR
1IRY
1IRY
1IRY
1IRY
1IRY
1IRY
1IRY
1IRY
1IRY
1IRY
1IRY
1IRY
S5100 functies

13
b
Sneltoets MP3
Activeert direct het MP3-menu.
0
Navigatietoetsen
Hiermee kunt u door menu's bladeren en de cursor
verplaatsen.
a
Bevestigingstoets
Selecteert en bevestigt opties en bevestigt acties.
c
Sneltoets Camera
Activeert direct het cameramenu.
d
Annuleertoets
Als u de toets kort indrukt worden de tekens
een voor een gewist, als u de toets ingedrukt
houdt worden alle tekens op het scherm
gewist. U kunt met deze toets ook teruggaan
naar het vorige scherm.
8
,
9
Linker softkey/ Rechter softkey
Elk van deze toetsen verricht de functie die erboven in
het scherm wordt weergegeven.
S5100 functies

SCHERMINFORMATIE
Op het scherm worden verschillende pictogrammen
weergegeven. Hieronder vindt u een beschrijving van
elk pictogram of icoontje dat op het scherm kan
verschijnen.
Opmerking
]
gebruik de camera- of de multimediafuncties
niet als de batterijstatus aangeeft dat de
batterij bijna leeg is.
]
Wanneer u de multimediafuncties gebruikt,
verandert de batterijstatus mogelijk.
14
S5100 functies
Pictogram Beschrijving
Luid menu in profiel.
Stil menu in profiel.
Headsetmenu in profiel.
Normaal menu in profiel.
Geeft aan dat u de diensten voor push-
berichten kunt beheren.
Geeft aan dat de telefoon verbinding
maakt met WAP.
Geeft aan dat u GPRS gebruikt.
U kunt uw planning bekijken.
U kunt een oproep doorschakelen.
U hebt het Bluetooth-menu geactiveerd.
Pictogram Beschrijving
Geeft aan hoe sterk het netwerksignaal
is.
Verschijnt wanneer er een gesprek
wordt gevoerd.
Geeft aan dat u gebruik maakt van een
roamingdienst.
Geeft aan dat GPRS-diensten
beschikbaar zijn.
Geeft aan dat de alarmklok is ingesteld
en actief is.
Geeft de status van de batterij aan.
Duidt het ontvangstbewijs van een
bericht aan.
Geeft aan dat u een spraakbericht hebt
ontvangen.
Geeft aan dat de trilfunctie is ingesteld.
S5100 functies

15
Toestel klaarmaken voor gebruik
DE SIM-KAART EN DE BATTERIJ
INSTALLEREN
Zorg ervoor dat de telefoon is uitgeschakeld voor u de
batterij verwijdert.
1. De batterijklep verwijderen
Druk op de vergrendeling en schuif de batterijklep
naar beneden. Verwijder de batterijklep.
2. De batterij verwijderen
Neem de batterij aan de boven- en onderzijde vast
en trek deze uit het batterijvak.
Opmerking
]
Verwijdering van de batterij als het toestel
aanstaat, kan tot storingen of defecten leiden.
Toestel klaarmaken voor gebruik

16
Toestel klaarmaken voor gebruik
3. De SIM-kaart installeren
Plaats de SIM-kaart in de kaarthouder. Schuif de
SIM-kaart volledig in de houder. Plaats de kaart met
het metalen stukje naar beneden. Om de SIM-kaart
te verwijderen drukt u enigszins op de kaart en trekt
u deze uit de houder.
4. De batterij installeren
Plaats eerst de onderzijde van de batterij in het
batterijvak. Druk vervolgens op de bovenzijde tot
de batterij vastklikt.
5. De batterijklep plaatsen
Schuif de batterijklep opnieuw in de telefoon totdat
de vergrendeling van de klep vastklikt.
LET OP!
Het metalen stukje in de SIM-kaart kan
gemakkelijk worden beschadigd door krassen. Behandel de
SIM-kaart daarom voorzichtig en volg de bij de kaart
geleverde instructies op.
Plaatsen van de SIM-kaart Verwijderen van de SIM-kaart
Toestel klaarmaken voor gebruik

17
DE BATTERIJ OPLADEN
Als u de reisadapter wilt aansluiten op de telefoon,
dient de batterij te zijn geïnstalleerd.
1. Zorg ervoor dat de batterij volledig is opgeladen
voor u de telefoon voor het eerst gebruikt.
2. Sluit het andere uiteinde van de reisadapter aan op
een stopcontact. Gebruik alleen de meegeleverde
batterijoplader.
3. Als de balkjes van het batterijpictogram niet meer
bewegen, is de batterij volledig opgeladen.
WAARSCHUWING!
•
Koppel bij onweer het stroomsnoer en de oplader los, om
elektrische schokken of brand te voorkomen.
•
Zorg dat er geen scherpe voorwerpen zoals tanden en
nagels van huisdieren in contact komen met de batterij.
Hierdoor zou brand kunnen ontstaan.
•
Gebruik de telefoon niet tijdens het opladen. Dit kan
leiden tot kortsluiting en/of elektrische schokken of
brand.
LET OP!
•
Oefen niet te veel druk uit op de aansluiting om
beschadiging van telefoon en/of oplader te voorkomen.
•
Plaats de batterijoplader verticaal in het stopcontact.
•
Gebruikt u de batterijoplader in het buitenland, zorg er
dan voor dat u de juiste aansluitingsadapter hebt en de
lader van de correcte netspanning word voorzien.
•
Verwijder de batterij of de SIM-kaart nooit terwijl het
toestel aan het opladen is.
Toestel klaarmaken voor gebruik

18
Toestel klaarmaken voor gebruik
ADAPTER LOSKOPPELEN
1. Als de balkjes van het batterijpictogram niet meer
bewegen en ‘Vol’ op het scherm verschijnt, is de
batterij volledig opgeladen.
2. Haal de adapter uit het stopcontact. Koppel de
adapter los van de telefoon door op de grijze
toetsen aan de zijkant van de aansluiting te drukken
terwijl u deze uit de telefoon trekt.
Opmerking
]
Zorg ervoor dat de batterij volledig is
opgeladen voor u de telefoon voor het eerst
gebruikt.
]
Verwijder de batterij of de SIM-kaart nooit
terwijl het toestel aan het opladen is.
]
ls de batterij niet voldoende opgeladen,
probeer deze dan nogmaals op te laden nadat
u de telefoon uit en aan hebt gezet met de aan-
/uit-toets. Verwijder eventueel de batterij uit
het toestel. Plaats de batterij terug en probeer
opnieuw op te laden.
Toestel klaarmaken voor gebruik

19
TELEFOON AAN- EN UITZETTEN
Telefoon aanzetten
1. Sluit de telefoon aan op bijvoorbeeld de
reisadapter, de aanstekeradapter of de handsfree
carkit. Of plaats een opgeladen batterij in de
telefoon.
2. Druk enkele seconden op
b
tot het LCD-scherm
oplicht.
3. Afhankelijk van de PIN-code-instellingen, dient u al
dan niet de PIN-code in te toetsen.
Telefoon uitzetten
1. Druk enkele seconden op
b
tot het LCD-scherm
wordt uitgeschakeld.
TOEGANGSCODES
Met de in dit hoofdstuk beschreven toegangscodes
voorkomt u dat er ongeoorloofd gebruik wordt
gemaakt van uw telefoon. De toegangscodes (met
uitzondering van de PUK1- en PUK2-codes) kunnen
worden gewijzigd via de functie
Codes wijzigen
(Menu 7.4.5).
PIN-code
(4 tot 8 cijfers)
De PIN-code (Personal Identification Number)
beveiligt de SIM-kaart tegen onbevoegd gebruik.
Gewoonlijk wordt deze code samen met de SIM-kaart
geleverd. Als u
PIN-code invoeren hebt geactiveerd,
moet u telkens als u het toestel aanzet deze code
intoetsen. Is de functie
PIN-code invoeren
gedeactiveerd, dan maakt het toestel rechtstreeks
verbinding met het netwerk zonder om de PIN-code te
vragen.
Toestel klaarmaken voor gebruik

PIN2-code
(4 tot 8 cijfers)
De PIN2-code, die bij sommige SIM-kaarten wordt
geleverd, hebt u nodig om toegang te krijgen tot
bepaalde functies zoals Overzicht telefoonrekening of
Beperkt kiezen. Deze functies zijn alleen beschikbaar
als ze door uw SIM-kaart worden ondersteund.
PUK1-code
(4 tot 8 cijfers)
De PUK1-code (Personal Unblocking Key) is vereist
om een geblokkeerde PIN-code te wijzigen. Mogelijk
zit de PUK1-code al bij de SIM-kaart. Is dat niet het
geval, neem dan contact op met de netwerkexploitant
om de code aan te vragen. Neem ook bij verlies van de
PUK1-code contact op met uw netwerkexploitant.
PUK2-code
(4 tot 8 cijfers)
De PUK2-code, die bij sommige SIM-kaarten wordt
geleverd, hebt u nodig om een geblokkeerde
PIN2-code te wijzigen. Neem ook bij verlies van de
PUK2-code contact op met uw netwerkexploitant.
Beveiligingscode
(4 tot 8 cijfers)
De beveiligingscode voorkomt dat onbevoegden
gebruik kunnen maken van uw telefoon. De code is
standaard op ‘
0000’ ingesteld en u hebt de code
nodig om alle ingevoerde telefoongegevens te wissen
en om het menu
Instellingen resetten te activeren. U
hebt deze tevens nodig om de telefoonbeveiliging te
activeren en deactiveren. Door de telefoonbeveiliging
te activeren voorkomt u ongeoorloofd gebruik van uw
telefoon. U kunt de standaardcode wijzigen in het
menu
Beveiligingsinstellingen.
BLOKKEERWACHTWOORD
Het blokkeerwachtwoord hebt u nodig als u gebruik
wilt maken van de functie
oproepen blokkeren. Het
wachtwoord krijgt u van uw netwerkexploitant nadat u
zich op deze dienst hebt geabonneerd.
20
Toestel klaarmaken voor gebruik
Toestel klaarmaken voor gebruik

Hoofdfuncties
21
BELLEN EN GEBELD WORDEN
Een oproep verrichten
1. Controleer of uw telefoon is ingeschakeld.
2. Toets het volledige telefoonnummer in, dus inclusief
het netnummer.
]
Houd de annuleertoets (
c
) enige tijd
ingedrukt om het volledige nummer te wissen.
3. Druk op de verzendtoets (
a
) om het nummer
dat wordt weergegeven te bellen.
4. Om het gesprek te beëindigen drukt u op (
b
)
of de rechter.
Bellen via de verzendtoets
1. Als u in de standby-modus op de verzendtoets
(
a
) drukt worden de telefoonnummers van de
laatste inkomende, uitgaande en gemiste oproepen
weergegeven.
2. Selecteer het gewenste nummer met de
navigatietoetsen.
3. Druk op
a
.
Internationaal bellen
1. Houd de toets
0
ngedrukt om de internationale
toegangscode in te voeren. Het teken ‘+’ kunt u
vervangen door de internationale toegangscode.
2. Voer de landcode, het netnummer en het
telefoonnummer in.
3. Druk op
a
.
Een oproep beëindigen
Als u een oproep wilt beëindigen, drukt u op de toets
(
b
).
Bellen via het Telefoonboek
U kunt namen en telefoonnummers die u regelmatig
belt opslaan op de Sim-kaart of in het
telefoongeheugen, in de Contacten.
U kunt een nummer bellen door simpelweg de
bijbehorende naam op te zoeken in Contacten en
vervolgens op
a
te drukken.
Hoofdfuncties

22
Hoofdfuncties
Volume aanpassen
U kunt tijdens een gesprek het volume aanpassen met
behulp van de zijtoetsen (
o
) . Druk op de bovenste
zijtoets om het geluid harder te zetten en op de
onderste zijtoets om het geluid zachter te zetten.
Een oproep beantwoorden
Als u wordt gebeld gaat de telefoon over en verschijnt
een knipperend telefoontje op het scherm. Als de
beller bekend is wordt het telefoonnummer (of de
naam, als het nummer is opgeslagen in de Contacten)
weergegeven.
1. Als u een binnenkomende oproep wilt
beantwoorden, klapt u de telefoon open. (Als de
antwoordmodus is ingesteld op
Klep open. (Menu
7.3.2).)
]
U kunt een inkomende oproep weigeren door een
van de zijtoetsen aan de linkerkant van het
toestel ingedrukt te houden terwijl de klep
gesloten is.
]
U kunt een oproep beantwoorden terwijl u het
adresboek of andere menufuncties gebruikt.
2. Om het gesprek te beëindigen sluit u de klep of
drukt u op
b
.
Stijlmodus
(snel)
U kunt de stijlmodus activeren door na het
openklappen van de telefoon de toets
k
ingedrukt te
houden.
Opmerking
]
Als Willekeurige toets is ingesteld als
antwoordmodus kunt u een inkomende oproep
beantwoorden door op een willekeurige toets
te drukken, behalve
b
of de rechter softkey.
Opmerking
]
In de standby-modus, als de schuifklep open is,
kunt u het volume van het toetsenbord
aanpassen met de zijtoetsen.
Hoofdfuncties

23
Sterkte netwerksignaal
U hoeft de antenne niet uit te trekken, deze zit vast.
Als u zich in een gebouw bevindt kan het zijn dat u een
betere ontvangst hebt als u bij een raam staat. U kunt
de sterkte van uw netwerksignaal aflezen aan de
signaalsterkte-indicator ( ) op het scherm van uw
telefoon.
Tekst invoeren
U kunt alfanumerieke tekens invoeren met behulp van
het toetsenbord. Om bijvoorbeeld namen op te slaan
in de Contacten, een bericht te schrijven, een
persoonlijke welkomsttekst op te stellen of afspraken
in de agenda te zetten, moet u tekst invoeren.
Op uw telefoon kunt u tekst op de volgende manieren
invoeren:
T9-invoermodus
In deze modus hoeft u maar één keer op de juiste
toets te drukken om een letter in te geven. Onder
elke toets zitten meerdere letters. In T9 worden
uw toetsaanslagen automatisch vergeleken met
woorden in een ingebouwd woordenboek, waarin
wordt gezocht naar overeenkomende woorden.
U kunt snel en eenvoudig woorden invoeren, met
een minimaal aantal toetsaanslagen.
ABC-invoermodus
In deze modus kunt u letters ingeven door de
toets waar de gewenste letter onder zit een, twee,
drie of vier keer kort in te drukken, tot de
gewenste letter op het scherm verschijnt.
123-invoermodus (numerieke modus)
U kunt met behulp van het toetsenbord nummers
invoeren. Om de modus te wijzigen van een
tekstmodus naar 123 drukt u op de
toets
=
tot op het scherm 123-modus wordt
weergegeven.
Hoofdfuncties

24
Verander de modus voor tekstinvoer
1. Al u in een veld staat waarin
tekens ingevoerd kunnen
worden, ziet u rechtsonder op
het scherm de huidige
invoermodus.
2. U kunt de modus voor
tekstinvoer veranderen door
op
=
. te drukken.
Rechtsonder in het scherm ziet u de huidig e
invoermodus.
]
Gebruik T9-modus
De T9-modus voor tekstinvoer met woordenlijst
maakt het mogelijk woorden snel en eenvoudig in te
voeren, met een minimaal aantal toetsaanslagen. Om
een letter in te voeren, drukt u gewoon eenmaal op de
bijbehorende toets en het toestel kiest de letter die
hoort bij het woord dat het denkt dat u aan het
ingeven bent, gebaseerd op een ingebouwde
woordenlijst. U kunt ook nieuwe woorden aan de lijst
toevoegen. Het woord verandert telkens als u een
letter toevoegt in het woord dat het toestel denkt dat
u aan het ingeven bent.
1. In de T9-modus voor tekstinvoer met woordenlijst
kunt u woorden invoeren met behulp van de
toetsen
2
tot
9
. Druk eenmaal op een toets
voor een letter.
- Het woord verandert naarmate u meer letters
invoert. Negeer wat op het scherm staat tot u het
volledige woord hebt ingegeven.
- Als daarna niet het juiste woord op het scherm
staat, drukt u een of meerdere keren op de
onderste navigatietoets om door de andere
mogelijke woorden te bladeren.
Voorbeeld:
Toets
4663
om GOOD in te voeren.
Toets
4663
en vervolgens
[onderste navigatietoets] om
Home in te voeren.
- Als het gewenste woord niet in de woordenlijst
voorkomt, kunt u het toevoegen in de ABC-modus.
tekstinvoer modus
Opties Invoegen
Hoofdfuncties
Hoofdfuncties

25
- U kunt de taal voor de T9-invoermodus
selecteren. Druk op de linker softkey [Opties] en
selecteer vervolgens
T9-talen. Kies nu de
gewenste taal voor de T9-invoermodus. U kunt de
T9-modus ook uitschakelen door
T9 uit te
selecteren. De telefoon is standaard ingesteld op
de T9-invoermodus.
2. Voer het volledige woord in voor u toetsaanslagen
bewerkt of wist.
3. Voer aan het einde van elk woord een spatie in door
op toets
0
te drukken. Druk op
c
om letters
te wissen. Houd de toets
c
enige tijd ingedrukt
om volledige woorden te wissen.
]
Gebruik ABC-modus
Voer woorden in met behulp van de toetsen
2
tot
9
.
1. Druk op de toets waarop de gewenste letter staat:
- een keer voor de eerste letter,
- twee keer voor de tweede letter,
- enzovoort.
2. Druk eenmaal op
0
om een spatie in te voegen.
Druk op
c
om letters te wissen. Houd de
toets
c
enige tijd ingedrukt om het scherm leeg
te maken.
Opmerking
]
Om de modus voor tekstinvoer te verlaten
zonder de ingevoerde tekst op te slaan, drukt u
op
b
. keert terug naar het vorige scherm.
Hoofdfuncties

26
Toets
Beschrijving tekens Hoofdletters
Hoofdletters Kleine letters
. , / ? ! - : ‘ ‘’ 1 @ . , / ? ! - : ‘ ‘’ 1 @
A B C 2 Ä À Á Â Ã Å a b c 2 ä à á â ã å
D E F 3 Ë È É Ê d e f 3 ë è é ê
G H I 4 Ï Ì Í Î G
ˇ
g h i 4 ï ì í î gˇ
J K L 5 j k l 5
M N O 6 Ñ Ö Ø Ò Ó Ô Õ Œ m n o 6 ñ ö ø ò ó ô õ œ
P Q R S 7 ß S¸ p q r s 7 ß s¸
T U V 8 Ü Ù Ú Û t u v 8 ü ù ú û
W X Y Z 9 w x y z 9
Spatietoets, 0 Spatietoets, 0
]
Gebruik 123(nummer)-modus
In de 123-modus kunt u nummers invoeren in een
tekstbericht (bijvoorbeeld een telefoonnummer).
Druk op de gewenste nummertoetsen voor u
handmatig teruggaat naar de juiste modus voor
tekstinvoer.
CONTACTEN
U kunt namen en nummers opslaan in het geheugen
van uw SIM-kaart.
Bovendien kunt u tot 1000 namen en nummers
opslaan in het telefoongeheugen.
Het totale geheugen van de SIM-kaart en de telefoon,
hoewel op andere plaatsen opgeslagen, omvat alle
Contacten.
Opmerking
]
In de onderstaande tabel vindt u een
beschrijving van de beschikbare tekens onder
de alfanumerieke toetsen.
1
2
3
4
5
6
7
8
9
0
Hoofdfuncties
Hoofdfuncties

27
MENU IN GESPREK
Uw toestel biedt u toegang tot extra functies terwijl u
een gesprek voert. Voor toegang tot deze functies
drukt u op de linker softkey [Opties] tijdens het
gesprek.
Tijdens een oproep
Het menu dat tijdens een oproep op het scherm wordt
weergegeven, verschilt van het standaard hoofdmenu
in de standby-modus. Hieronder vindt u een
beschrijving van de opties.
Een tweede oproep verrichten
U kunt een nummer opvragen uit het Telefoonboek
om een tweede nummer te bellen. Druk op de rechter
softkey en selecteer vervolgens
Zoeken. Om een
nummer tijdens een oproep in het Telefoonboek op te
slaan, drukt u op de rechter softkey en selecteert u
Nieuw toevoegen.
Tussen twee oproepen wisselen
Als u tussen de twee gesprekken wilt wisselen, drukt u
op de linker softkey en kiest u
Wisselgesprek.
Een inkomende oproep beantwoorden
Om bij een belsignaal een inkomende oproep aan te
nemen, drukt u op de toets
a
. U kunt ook worden
gewaarschuwd als u een oproep ontvangt wanneer u
reeds in gesprek bent. Er klinkt dan een geluid in de
oortelefoon en op het scherm wordt aangegeven dat
er een tweede oproep in de wacht staat. De functie
Oproep in wacht is alleen beschikbaar als het netwerk
deze ondersteunt. Zie
Oproep in wacht (Menu
7.4.3) voor meer informatie over het activeren en
deactiveren van deze functie.
Als
Oproep in wacht is geactiveerd, kunt u de eerste
oproep in de wachtstand zetten en de tweede oproep
beantwoorden door op
a
te drukken of door op
de linker softkey te drukken en vervolgens In
wacht &
Beantwoorden
te selecteren. U kunt de huidige
oproep beëindigen en de oproep in de wachtstand
beantwoorden door op de linker softkey te drukken en
vervolgens
Einde & Beantwoorden.
Hoofdfuncties

28
Hoofdfuncties
Een inkomende oproep weigeren
U kunt een inkomende oproep weigeren zonder deze
eerst te beantwoorden door op de toets
b
te
drukken.
Wanneer u in gesprek bent, kunt u een inkomende
oproep weigeren door op de linker softkey [Menu] te
drukken en vervolgens
Conferentie/Weigeren te
selecteren of door op de toets e
b
te drukken.
Microfoon uitschakelen
U kunt het geluid van de microfoon tijdens een oproep
uitschakelen door op de toets [Menu] te drukken en
vervolgens
Microfoon uit te selecteren. U kunt het
geluid opnieuw aanzetten door
Microfoon aan te
selecteren. Als het geluid op het toestel wordt
uitgeschakeld, kan de beller u niet horen, maar u hem
of haar wel.
DTMF-tonen aanzetten tijdens een
oproep
Om tijdens een oproep DTMF-tonen in te schakelen,
drukt u op de linker softkey en vervolgens selecteert u
DTMF aan. U kunt DTMF-tonen op dezelfde wijze
uitschakelen. Met DTMF-tonen kan uw telefoon
gebruik maken van een automatische centrale.
CONFERENTIEGESPREKKEN
De ‘multiparty’- of conferentieservice biedt u de
mogelijkheid om tegelijkertijd met meer dan één beller
te praten, mits uw netwerkexploitant deze functie
ondersteunt. Een conferentiegesprek kan alleen
worden opgezet als u reeds één actieve oproep hebt
en er een oproep in de wacht staat en wanneer beide
oproepen zijn beantwoord. Als een conferentiegesprek
is opgezet, kunnen daar andere oproepen aan worden
toegevoegd. Ook kunnen er verbindingen worden
verbroken of gescheiden (d.w.z uit het
conferentiegesprek worden gehaald maar nog steeds
in verbinding zijn) door de persoon die het
conferentiegesprek heeft opgezet. Deze opties zijn
beschikbaar vanuit het menu Inkomende oproepen en
worden beschreven in het desbetreffende hoofdstuk.
Er kunnen maximaal vijf personen deelnemen aan een
conferentiegesprek. Als u het conferentiegesprek hebt
opgezet, hebt u de leiding over het gesprek en kunt
alleen u oproepen aan het conferentiegesprek
toevoegen.
Hoofdfuncties

29
Een tweede oproep verrichten
U kunt een tweede oproep verrichten terwijl u reeds in
gesprek bent. Geef het nummer in en druk op de
toets
a
. Wanneer de verbinding tot stand is
gebracht, wordt de eerste oproep automatisch in de
wacht gezet. U kunt tussen de twee oproepen wisselen
door op de linker softkey te drukken en vervolgens
Wisselen te selecteren.
Een conferentiegesprek opzetten
U kunt een nummer bellen en een actieve oproep in de
wacht plaatsen om een conferentiegesprek op te
zetten door de linker softkey in te toetsen en
vervolgens
Conferentie/Allen deelnemen te kiezen.
Een conferentiegesprek in de wacht
zetten
Druk op de linker softkey en selecteer vervolgens
Conferentie/Allen in wacht.
Een conferentiegesprek in de wacht
terugnemen
Druk op de linker softkey en selecteer vervolgens
Conferentie/Allen deelnemen.
Oproepen aan een conferentiegesprek
toevoegen
U kunt deelnemers aan een conferentiegesprek
toevoegen door op de linker softkey te drukken en
vervolgens
Conferentie/Allen deelnemen te
selecteren.
Deelnemers aan een conferentiegesprek
weergeven
U kunt op het toestel bladeren door de nummers van
de deelnemers aan een conferentiegesprek met behulp
van de navigatietoetsen.
Hoofdfuncties

Een privé-gesprek in een
conferentiegesprek
Voor een privé-gesprek met een van de deelnemers
aan een conferentiegesprek laat u het nummer van de
persoon waarmee u apart wilt spreken op het scherm
verschijnen, waarna u op de linker softkey drukt.
Vervolgens kiest u
Conferentie/Privé om alle andere
deelnemers in de wacht te zetten.
Een conferentiegesprek beëindigen
U kunt de verbinding met de deelnemer die op het
scherm wordt weergegeven verbreken door op de
toets
b
te drukken. Om een conferentiegesprek te
beëindigen, drukt u op de linker softkey en vervolgens
selecteert u
Conferentiegesprek/
Einde conferentiegesprek
. Als u, nadat u de linker
softkey hebt ingetoetst, de optie
Conferentiegesprek/ Einde allen kiest, worden alle
actieve oproepen en oproepen in de wachtstand
beëindigd.
Hoofdfuncties
30
Hoofdfuncties

Menu-overzicht
31
Het volgende overzicht geeft de beschikbare menustructuur weer en:
]
het cijfer dat is toegewezen aan elke menuoptie.
5.1 Nieuw bericht
5.2 Inbox
5.3 Outbox
5.4 Concepten
5.5 Voicemail beluisteren
5.6 Info-bericht
5.7 Sjablonen
5.8 Instellingen
3.1 Alarmklok
3.2 Bluetooth
3.3 Calculator
3.4 Conversieprogr.
3.5 Wereldtijd
3.6 Modem
4.1 Contacten
4.2 Kalender
4.3 Memo
1.x.
1 Activeren
1.x.
2 Personaliseren
1.x.
3 Naam wijzigen
2.
1 Gemiste oproepen
2.
2 Ontvangen oproepen
2.
3 Uitgaande oproepen
2.
4
Laatste oproepen verwijderen
2.
5 Oproeptarieven
2.
6 GPRS info.
1.
Profielen
3. Extra 5. Berichten
4. Planner2.
Oproep-info
Menu-overzicht

32
Menu-overzicht
7.1 Datum & tijd
7.2 Telefooninstellingen
7.3 Oproepinstellingen
7.4 Beveiligingsinstellingen
7.5 Netwerkinstellingen
7.6 GPRS-instellingen
7.7 Instellingen resetten
7.8
Geheugenstatus
6.1 Foto maken
6.2 Videocamera
6.3 Mijn foto's
6.4 Mijn video’s
6.5 MP3
6.6 Spraakrecorder
6.7 instellingen
6. Multimedia 7. Instellingen
8.
1 Internet
8.
2 SIM-service
9.
1 Games en toepassingen
9.
2 Afbeeldingen
9.
3 Geluiden
9.
4 Bestandsopslag
8. Diensten
9. Downloads
Menu-overzicht

33
Uw telefoon biedt tal van functies waarmee u het
toestel kunt afstemmen op uw wensen. Deze functies
zijn ondergebracht in menu’s en submenu’s die
toegankelijk zijn via de twee softkeys
d
en
e
.
In elk menu en submenu kunt u de instellingen van een
bepaalde functie bekijken en aanpassen.
De functie van de softkeys is afhankelijk van het menu
of submenu waarin u zich bevindt, direct boven de
toetsen ziet u in het scherm de huidige functie van de
toetsen.
Druk op de rechter
softkey om de
gewenste optie te
activeren.
Druk op de linker
softkey om het
geselecteerde
menu te openen.
Selecteren van functies en opties
'SRXEGXIR
'SRXEGXIR
'SRXEGXIR
'SRXEGXIR
'SRXEGXIR
'SRXEGXIR
'SRXEGXIR
'SRXEGXIR'SRXEGXIR
'SRXEGXIR
'SRXEGXIR
'SRXEGXIR
'SRXEGXIR
'SRXEGXIR
'SRXEGXIR
'SRXEGXIR
'SRXEGXIR
1IRY
1IRY
1IRY
1IRY
1IRY
1IRY
1IRY
1IRY
1IRY
1IRY
1IRY
1IRY
Selecteren van functies en opties

34
In Profielen kunt u beltonen instellen voor
verschillende gebeurtenissen, omgevingen en
bellergroepen. Er zijn zes standaardprofielen:
Alleen
trillen, Stil, Normaal, Luid
en Hoofdrelefoon.
Elk profiel kunt u aan uw persoonlijke wensen
aanpassen. Druk op de linker softkey
[Menu] en
selecteer
Profielen met behulp van de
navigatietoetsen omhoog/omlaag.
Activeren
(Menu 1.x.1)
1. Er verschijnt een lijst met profielen.
2. Blader in de lijst met Profielen naar het profiel dat u
wilt activeren en druk op de linker
softkey
d
[Kies] of de OK-toets.
3. Selecteer vervolgens
Activeren.
Personaliseren
(Menu 1.x.2)
Scroll naar het gewenste profiel in de lijst Profielen.
Nadat u hebt gedrukt op de linker softkey
d
of de
toets OK, selecteert u
Personaliseren. Er verschijnt
een lijst met profielinstellingen. Selecteer de gewenste
optie.
]
Type oproepsignaal: type oproepsignaal voor
inkomende gesprekken instellen.
]
Beltoon: selecteer de gewenste beltoon uit de lijst.
]
Belvolume: volume van de beltoon instellen.
]
Type berichtsignaal: Om het waarschuwingssignaal
bij ontvangst van een bericht in te stellen.
]
Berichttoon: Om de toon van
hetwaarschuwingssignaal bij ontvangst van een
bericht in te stellen.
]
Toetsentoon: selecteer de gewenste
toetsenbordtoon.
]
Toetsenvolume: volume van de toetsenbordtonen
instellen.
]
Toon bij openen/sluiten: Om de gewenste
fliptoon in te stellen.
]
Effectvolume: Om het volume van het
effectgeluiden in te stellen.
Opmerking
]
als de klep is geopend, is het maximale
geluidsniveau 3, om uw gehoor te beschermen.
Profielen
Profielen

35
Profielen
35
]
Aan/Uit-volume: Instelling van het volume van de
toon als het toestel aan- of uitgezet wordt.
]
Automatisch beantwoorden: Deze functie kan
alleen worden geactiveerd als de telefoon op de
handsfree carkit of headset is aangesloten.
•
Uit: de gesprekken worden niet automatisch
aangenomen.
• Na 5 sec.: na 5 seconden wordt het gesprek
automatisch aangenomen.
• Na 10 sec.: na 10 seconden wordt het gesprek
automatisch aangenomen.
Naam wijzigen
(Menu 1.x.3)
U kunt de naam van het profiel wijzigen in wat u maar
wilt.
1. Voor het wijzigen van een profielnaam scrollt u naar
het profiel in de lijst met profielen, drukt u op de
linker softkey
d
of de toets OK en selecteert u
vervolgens
Naam wijzigen.
2. Voer de gewenste naam in en druk op de OK-toets
of de linker softkey
d
[OK].
Opmerking
]
De profielen Alleen trillen, Stil en
Hoofdrelefoon niet worden hernoemd.

36
Oproep-info
Als uw netwerkexploitant Caller Line Identification
(CLI) ondersteunt, kunt u een overzicht opvragen van
gemiste, ontvangen en uitgaande oproepen.
Het nummer en de naam (indien beschikbaar) worden
samen met de datum en tijd van de oproep
weergegeven. U kunt timers ook weergeven.
GEMISTE OPROEPEN
MENU 2.1
Met deze optie kunt u de laatste 10 onbeantwoorde
oproepen weergeven. U kunt ook:
• Het nummer weergeven en bellen (indien
beschikbaar) of dit opslaan in het adresboek.
• Een nieuwe naam voor het nummer invoeren en beide
opslaan in het adresboek.
• Een bericht verzenden naar dit nummer.
• Het nummer uit het overzicht verwijderen.
ONTVANGEN OPROEPEN
MENU 2.2
Met deze optie kunt u de laatste 10 binnenkomende
oproepen weergeven. U kunt ook:
• Het nummer weergeven en bellen (indien
beschikbaar) of dit opslaan in het adresboek.
• Een nieuwe naam voor het nummer invoeren en beide
opslaan in het adresboek.
• Een bericht verzenden naar dit nummer.
• Het nummer uit het overzicht verwijderen.
UITGAANDE OPROEPEN
MENU 2.3
Met deze optie kunt u de laatste 20 uitgaande
oproepen weergeven (daadwerkelijk gebeld of
geprobeerd te bellen). U kunt ook:
• Het nummer weergeven en bellen (indien
beschikbaar) of dit opslaan in Adresboek
• Een nieuwe naam voor het nummer invoeren en beide
opslaan in Adresboek.
• Een bericht verzenden naar dit nummer.
Oproep-info

37
• Het nummer uit het overzicht verwijderen.
LAATSTE OPROEPEN
VERWIJDEREN
MENU 2.4
Hiermee kunt u lijsten met Gemiste oproepen en
Ontvangen oproepen verwijderen. U kunt
tegelijkertijd lijsten met
Uitgaande oproepen en Alle
oproepen
verwijderen.
OPROEPTARIEVEN
MENU 2.5
Oproepduur
(Menu 2.5.1)
Met deze functie kunt u nagaan hoe lang uw Laatste
oproep, Alle oproepen, en Inkomende en Uitgaande
oproepen hebben geduurd (uitgedrukt in uren,
minuten en seconden). Ook is het mogelijk de
tijdsduurtellers terug te stellen.
]
Laatste oproep: duur van de laatste oproep.
]
Alle oproepen: De totale lengte van alle geplaatste
en binnenkomende oproepen na de laatste keer dat
de timer opnieuw was ingesteld.
]
Ontvangen oproepen: duur van de inkomende
oproepen.
]
Uitgaande oproepen: duur van de uitgaande
oproepen.
]
Alles resetten: Hiermee kunt u de lengte van alle
oproepen op nul zetten door op de linker
softkey
d
[Ja] te drukken.
Oproepkosten
(Menu 2.5.2)
Met deze functie kunt u nagaan wat de
Gesprekskosten zijn van uw Laatste oproep of van Alle
oproepen. Ook kunt u hiermee uw beltegoed
controleren en de gesprekskostenteller terugstellen.
Om de teller terug te stellen, hebt u de PIN2-code
nodig.
Oproep-info

Oproep-info
38
Instellingen
(Menu 2.5.3)
(Afhankelijk van SIM)
]
Tarief instellen: U kunt de naam van de
munteenheid en de eenheidsprijs instellen. Neem
contact op met uw netwerkexploitant voor de
geldende eenheidsprijzen. Om de munteenheid of
eenheidsprijs in dit menu te selecteren, hebt u de
PIN2-code nodig.
]
Limiet instellen: Met deze netwerkdienst kunt u de
kosten van uw oproepen beperken tot een bepaald
aantal gesprekseenheden. Selecteer
Lezen om het
aantal resterende eenheden weer te geven.
Selecteer
Veranderen om de kostenlimiet te
wijzigen.
]
Automatisch weergeven: Met deze netwerkdienst
kunnen de gesprekskosten van uw laatste oproep
automatisch worden weergegeven. Als u Ja
selecteert, verschijnen de kosten van het laatste
gesprek op het scherm na beëindiging van het
gesprek.
GPRS INFO.
MENU 2.6
U kunt de hoeveelheid verzonden en ontvangen data
over het netwerk via GPRS controleren. Daarnaast
kunt u zien hoeveel tijd u online bent.
Oproepduur
(Menu 2.6.1)
U kunt de gespreksduur van uw Laatste oproep en
Alle oproepen bekijken. Ook is het mogelijk de
tijdsduurtellers terug te stellen.
Gegevensvolumes
(Menu 2.6.2)
U kunt het volume van de Verzonden, Ontvangen en
Alle datavolumes controleren en Alles resetten.
Oproep-info

39
Extra
Extra
ALARMKLOK
MENU 3.1
U kunt tot 5 alarmen instellen om op een bepaald
tijdstip af te gaan.
1. Selecteer Alarm en geef de door u gewenste
alarmtijd in.
2. Kies de regelmaat waarmee dit moet worden
herhaald:
Eenmalig, Ma
`
Vrij, Ma
`
Zat, Elke dag.
3. Selecteer het door u gewenste alarmsignaal en druk
op
d
[OK].
4. Wijzig de alarmnaam en druk op
d
[OK].
BLUETOOTH
MENU 3.2
Met Bluetooth kunnen compatibele mobiele
apparaten, randapparatuur en computers die zich in
dezelfde buurt bevinden direct met elkaar
communiceren (zonder draden). Deze handset
ondersteunt ingebouwde Bluetooth-connectiviteit,
waardoor deze kan worden aangesloten op
compatibele Bluetooth-headsets, Bluetooth-
computertoepassingen en meer.
Als u gegevens van een ander Bluetooth-apparaat
ontvangt, wordt u om een bevestiging gevraagd.
Nadat u de overdracht hebt bevestigd, wordt het
bestand naar uw telefoon gekopieerd.
Het bestand wordt, afhankelijk van het bestandstype,
in een van de volgende mappen opgeslagen:
-
MP3-bestanden: MP3-map (Menu 6.5.2)
-
Videobestanden (.3GP): videomap (Menu 6.4)
-
Contactpersoonbestanden (.VCF): telefoonboek
(Menu 4.1.1)
- Andere bestanden: bestandsopslagmap (Menu 9.4)
Opmerking
]
Vanwege een compatibiliteitsprobleem bieden
sommige apparaten mogelijk geen
ondersteuning voor deze functie.

Extra
40
Gekoppelde apparaten
(Menu 3.2.1)
U kunt alle apparaten bekijken die compatibel zijn met
de Bluetooth-telefoon.
Handsfree-apparaten
(Menu 3.2.2)
U kunt de lijst met handsfree apparaten bekijken die
compatibel zijn met de Bluetooth-telefoon.
Instellingen
(Menu 3.2.3)
Wanneer apparaten compatibel zijn met Bluetooth
kunnen ze als nieuw apparaat aangemeld worden op
het toestel. Eenmaal aangemeld, kan er snel een
verbinding gemaakt worden. Hiervoor dient wel een
wachtwoord ingevoerd te worden.
CALCULATOR
MENU 3.3
Deze bevat de standaardfuncties zoals
k
,
l
,
m
,
n
:
Optellen, Aftrekken, Vermenigvuldigen en Delen.
1. Voer de getallen in met behulp van de numerieke
toetsen.
2. Met een navigatietoets selecteert u een rekenteken.
3. Voer de cijfers in.
4. Druk op
d
[Resultaat] om de uitkomst te zien.
5. Druk op de linker softkey
d
[Opnieuw instellen]
of voer cijfers in om nog een berekening uit te
voeren.
6. Sluit de
Calculator af door op de rechter softkey
e
[Terug] te drukken.
CONVERSIEPROGR.
MENU 3.4
Met deze functie converteert u een willekeurige
eenheidsmaat in een andere eenheidsmaat naar keuze.
Er zijn 7 typen die naar eenheden kunnen worden
geconverteerd:
Valuta, Oppervlakte, Lengte,
Gewicht, Temperatuur, Volume en Gebied.
Opmerking
]
Als u op de
`
-toets drukt, kunt u een
negatief getal invoeren. En als u op de
=
-
toets drukt, kunt u een decimaal getal
invoeren.
Extra

1. U kunt een van de vier soorten eenheidsmaten
kiezen door op de toets
d
[Eenheid] te drukken.
2. Kies de eenheidsmaat die u wilt converteren met
behulp van
i
en
j
.
3. U kunt de geconverteerde waarde controleren aan
de hand van de door u gekozen waarde.
WERELDTIJD
MENU 3.5
U kunt bekijken hoe laat het is in alle grote
wereldsteden.
1. Selecteer de stad (tijdzone) door op de toetsen
k
en
l
te drukken.
2. U kunt de huidige tijd ook instellen op de door u
gekozen stadstijd door op
d
[Instellen] te
drukken.
MODEM
MENU 3.6
Met deze functie kunt u de modem gebruiken.
41
Extra

Planner
Planner
42
CONTACTEN
MENU 4.1
Zoeken
(Menu 4.1.1)
(bellen vanuit het telefoonboek)
1. Selecteer Zoeken door op de linker
softkey
d
[kies] of [OK] te drukken.
Opmerking
]
U kunt direct zoeken door de eerste letter van
de naam of van het telefoonnummer in te
voeren.
Opmerking
]
Druk in de standby-modus op de rechter
softkey
e
[Contacten] voor directe
toegang.
2. Selecteer de linker softkey
d
[Opties] als u een
vermelding wilt bewerken, verwijderen, kopiëren of
als u spraak aan een vermelding wilt toevoegen. Het
volgende menu wordt weergegeven.
]
Bewerken: de naam, het nummer, de groep, het
teken en de afbeelding bewerken met behulp van de
navigatietoets.
]
SMS /MMS schrijven: als u het gezochte nummer
hebt gevonden, kunt u een
bericht/multimediabericht aan het geselecteerde
nummer verzenden.
]
Verzenden via Bluetooth: Gegevens uit het
telefoonboek kunnen via Bluetooth verzonden
worden naar een ander apparaat. Hiervoor is het wel
noodzakelijk dat beide toestellen Bluetooth
compatibel zijn.
]
Kopiëren: u kunt een ingevoerd item kopiëren van
de SIM-kaart naar het Telefoongeheugen en van het
Telefoongeheugen naar de SIM-kaart.

Planner
43
a. Druk op
d
[OK] om een naam in te geven.
b. Druk op
d
[OK], hierna kunt u een nummer
invoeren.
c. Druk nogmaals op
d
[OK].
d. U kunt een groep selecteren met de
toetsen
k
en
l
:
e. U kunt een symbool en een afbeelding bij het item
selecteren met de toetsen
i
,
j
,
k
en
l
.
Bellersgroepen
(Menu 4.1.3)
U kunt 20 leden in een groep opslaan. Er zijn zeven
groepen waarvoor u lijsten kunt maken.
]
Ledenlijst: De leden van de geselecteerde groep
worden weergegeven.
]
Bellersgroep beltoon: U kunt een beltoon voor
elke groep instellen.
]
Bellersgroep icoon: U kunt een pictogram aan elke
groep toevoegen.
]
Lid toevoegen: U kunt leden aan belgroepen
toevoegen. De naam van een groepslid mag uit
maximaal 20 tekens bestaan.
]
Hoofdnummer: u kunt het nummer (mobiel, thuis,
kantoor) selecteren dat u het meest gebruikt. Als u
dit instelt, wordt het hoofdnummer steeds als
eerste weergegeven.
]
Verwijderen: u kunt een ingevoerd item wissen.
Nieuw toevoegen
(Menu 4.1.2)
Met deze functie kunt u een item aan het telefoonboek
toevoegen. In het telefoongeheugen kunnen maximaal
1000 items worden opgeslagen. De capaciteit van de
SIM-kaart is afhankelijk van de netwerkexploitant.
Ook op de SIM-kaart kunnen tekens worden
opgeslagen. Het aantal tekens dat u in het SIM-
geheugen kunt opslaan, is afhankelijk van het type
SIM-kaart.
1. Selecteer
Nieuwe toevoegen door op de linker
softkey
d
[Kies] of [OK] te drukken.
2. Selecteer het geheugen waarin u het item wilt
opslaan: SIM of Telefoon. Als u Telefoon
selecteert, dient u het nummer te selecteren dat u
als Hoofdnummer wilt.

44
Planner
]
Lid verwijderen : Hiermee kunt u een lid uit een
belgroep verwijderen. De naam en het nummer van
het lid blijven wel in het telefoonboek staan.
]
Naam wijzigen: U kunt de groepsnaam wijzigen.
Snelkiezen
(Menu 4.1.4)
Aan een in de naamlijst ingevoerd item kunt u een
willekeurige toets van
2
t/m
9
toekennen. U
kunt het nummer dan direct bellen door op deze toets
te drukken.
1. Open eerst het telefoonboek door in de standby-
modus op
e
[Contacten] te drukken.
2. Blader naar
Snelkiezen en druk op
d
[Kies].
3. Als u een snelkeuzetoets wilt toevoegen, selecteert
u (Leeg). Vervolgens kunt u in het telefoonboek de
naam opzoeken.
4. Als u de gewenste naam selecteert voor Snelkiezen
kunt u de naam
Veranderen of wissen.
Instellingen
(Menu 4.1.5)
1. Druk in de standby-modus op
e
[Contacten].
2. Blader naar
Instellingen en druk op
d
[Kies].
]
Geheugeninstellen
Blader naar Geheugeninstellen en druk
d
[Kies].
- Als u
Variabel selecteert, wordt u gevraagd waar
het item moet worden opgeslagen.
- Als u SIM of Telefoon selecteert, bewaart het
toestel het item in het door u geselecteerde
geheugen.
]
Weergave-opties
Blader naar Weergave-opties en druk op
d
[Kies].
-
Alleen naam: in het telefoonboek wordt een lijst
met alleen namen weergegeven.
- Met foto’s: in het telefoonboek wordt een lijst
met naam en foto weergegeven.
- Naam & nummer: stel de telefoonboeklijst in op
het weergeven van naam en nummer.
Alles Kopiëren
(Menu 4.1.6)
U kunt items kopiëren of verplaatsen van het SIM-
geheugen naar het telefoongeheugen en vice versa.
Planner

45
1. Open eerst het Telefoonboek door in de standby-
modus op
e
[Contacten] te drukken.
2. Blader naar
Alles kopiëren en druk vervolgens
d
[Kies] om dit menu te openen.
•
SIM naar telefoon: u kunt het item van het SIM-
geheugen naar het Telefoongeheugen kopiëren.
• Telefoon naar SIM: u kunt het item van het
Telefoon-geheugen naar het SIM-geheugen
kopiëren.
3. De onderstaande submenu’s worden weergegeven.
•
Origineel behouden: als u een nummer kopieert,
blijft het originele nummer bewaard.
• Origineel wissen: als u een nummer kopieert,
wordt het originele nummer gewist.
Alles verwijderen
(Menu 4.1.7)
Alle items in het SIM- en telefoongeheugen worden
gewist. Voor deze functie hebt u de Beveiligingscode
nodig.
1. Druk in de standby-modus op
e
[Contacten],
selecteer Alles wissen en druk op
d
[Kies].
2. Selecteer vervolgens het te wissen geheugen.
3. Geef de beveiligingscode in en druk op
d
[OK]
of
e
[Terug].
Informatie
(Menu 4.1.8)
]
Servicenummer
Met deze functie krijgt u toegang tot een bepaalde
lijst van diensten die uw netwerkexploitant ter
beschikking stelt (mits deze door de SIM-kaart
worden ondersteund).
1. Open eerst het telefoonboek door in de standby-
modus op
e
[Contacten] te drukken en
selecteer
Informatie.
2. Blader naar
Servicenummer en druk vervolgens
op
d
[Kies] om dit menu te openen.
3. De namen van de beschikbare diensten
verschijnen op het scherm.
4. Selecteer een dienst met behulp van
i
en
j
Druk op
b
[Verzenden].
Planner

Planner
46
]
Geheugenstatus
Met deze functie kunt u nagaan hoeveel items u nog
in het telefoonboek kunt invoeren.
1. Open eerst het telefoonboek door in de standby-
modus op
e
[Namen] te drukken. Kies
Informatie door op
d
[Kies] te drukken.
2. Blader naar
Controleer geheugen en druk op
d
[OK].
]
Eigen nummerlijst (afhankelijk van SIM-kaart)
U kunt uw eigen nummer in de SIM-kaart opslaan en
controleren.
KALENDER
MENU 4.2
Als u dit menu opent, verschijnt een Kalender op het
scherm. Boven in het scherm wordt de datum
weergegeven. Als u de datum wijzigt, wordt ook de
kalender aangepast. De dag wordt aangegeven via een
vierkante cursor. Een geplande activiteit of
gebeurtenis wordt op de kalender aangeduid met een
platliggend streepje onder de dag. Dit is een goed
geheugensteuntje voor uw geplande activiteiten en
memo’s.
Indien u dat instelt, klinkt een alarmtoon bij de notitie.
U stelt dag, maand en jaar als volgt in.
Druk in de kalender op de linker softkey
d
[Opties].
Toetsen Beschrijving Toetsen Beschrijving
Jaarlijks Wekelijks
Maandelijks Dagelijks
13ij
`=
kl
Planner

47
Nieuwe toevoegen
(Menu 4.2.1)
Hiermee kunt u een nieuwe planning aan de
geselecteerde dag toevoegen.
Voer het onderwerp in en druk op de linker softkey
d
[OK].
Bekijk dagelijkse planning
(Menu 4.2.2)
U kunt een gedetailleerde planning weergeven, dat wil
zeggen de volledige inhoud van de door u ingestelde
planning.
Laatste verwijderen
(Menu 4.2.3)
U kunt de laatst geplande gebeurtenis wissen nadat
deze u is meegedeeld.
Alles verwijderen
(Menu 4.2.4)
Hiermee kunt u alle items verwijderen.
Ga naar datum
(Menu 4.2.5)
U kunt de gewenste datum weergeven door deze in te
voeren.
Waarschuwingsgeluid instellen
(Menu 4.2.6)
Als u het alarm hebt ingesteld, gaat het gekozen
alarmgeluid af.
MEMO
MENU 4.3
1. Selecteer de memo door op de linker softkey
d
[Kies] te drukken.
2. Als deze leeg is, kunt u een nieuwe toevoegen door
op de linker softkey
d
[Toevoegen] te drukken.
3. Voer de memo in en druk op de linker softkey
d
[OK].
Opmerking
]
ls u de tekstinvoermodus wilt wijzigen, drukt u
op de toets
=
totdat u de gewenste modus
hebt.
Planner

Berichten
48
Druk op de Menu-toets (
d
) en selecteer
Berichten met de navigatietoetsen.
NIEUW BERICHT
MENU 5.1
SMS schrijven
(Menu 5.1.1)
U kunt met uw toestel meldingsberichten voor
voicemail en short message service (SMS)-berichten
ontvangen.
Voicemail en SMS zijn netwerkdiensten. Neem voor
meer informatie contact op met uw netwerkexploitant.
Als het -pictogram verschijnt, hebt u een
voicemail ontvangen. Als het -pictogram
verschijnt, hebt u een nieuw tekstbericht ontvangen.
Als het berichtengeheugen vol is verschijnt een
foutmelding op het scherm, het -pictogram
knippert en u kunt geen nieuwe berichten meer
ontvangen. Wis oude berichten met behulp van de
optie
Wissen in de Inbox. Als er ruimte is vrijgemaakt
in het berichtengeheugen ontvangt u deze berichten
alsnog (op voorwaarde dat het vrijgemaakte geheugen
voldoende ruimte biedt).
1. Geef de tekst in. Kijk voor meer informatie over
tekst invoeren op pagina 23-26 (Tekst invoeren).
2. Als u de volledige tekst hebt ingegeven, drukt u op
de linker softkey [Opties].
De onderstaande opties verschijnen op het scherm.
]
Verzenden: voer het telefoonnummer in of
selecteer een nummer uit het telefoonboek of uit
het overzicht van recente oproepen.
U kunt een bericht aan maximaal vijf personen in een
keer versturen. Druk op de linker softkey [Opties].
Het volgende optiemenu wordt weergegeven.
A
Verzenden (verschijnt alleen nadat een
telefoonnummer is ingegeven)
B
Recent nummer
C
Contacten
]
Opslaan in Concept: bewaar het bericht om later
te verzenden.
]
Lettertype: stel het lettertype en de stijl in.
]
Kleur: selecteer de kleur van de voor- en
achtergrond.
Berichten

49
]
Uitlijning: stel de positie van het bericht in -Rechts,
Centreren of Links.
]
Toevoegen aan T9-woordenboek: u kunt
woorden toevoegen. Dit menu wordt alleen
weergegeven wanneer de modus Edit is ingesteld op
Predictive.
]
T9 talen: Selecteer de taal voor de T9-
invoermodus. U kunt de T9-invoermodus ook
deactiveren door ‘T9 uit ‘ te selecteren.
]
Afsluiten: Als u op Afsluiten drukt terwijl u een
bericht typt, gaat u terug naar het berichtenmenu.
Het bericht dat u hebt getypt is niet opgeslagen.
3. U kunt de hieronder genoemde items toevoegen
aan het bericht door op de rechter softkey te
drukken als u in het bericht zit.
]
Afbeelding: verstuur en ontvang tekstberichten
met foto’s, zogenaamde ‘beeldberichten’. Er staan
verschillende standaardfoto’s in de telefoon, deze
kunt u vervangen door nieuwe foto’s die u
bijvoorbeeld download of ontvangt.
]
Geluid: voeg een animatie aan een bericht toe met
behulp van EMS (Enhanced Messaging Service). U
kunt kiezen uit een van de 15 animaties in de
telefoon.
]
Tekstsjabloon: gebruik een tekstsjabloon die al in
de telefoon opgeslagen is.
]
Contacten: voeg een telefoonnummer toe aan het
bericht.
]
Symbool: voeg speciale tekens toe.
]
Mijn visitekaartje: voeg uw naamkaartje toe.
MMS schrijven
(Menu 5.1.2)
Een mms-bericht kan tekst, afbeeldingen en/of
soundclips bevatten.
U kunt deze functie alleen gebruiken als deze wordt
ondersteund door uw netwerkexploitant. Alleen
apparaten met compatibele functionaliteit voor mms-
berichten of e-mail kunnen mms-berichten ontvangen
en versturen.
1. Voer het tekstbericht in. Met behulp van de rechter
softkey kunt u symbolen, nummers en emoticons
invoeren, of gebruik de T9-invoermodus. Druk op
de linker softkey [OK] nadat de tekst is ingevoerd.
2. Voeg een afbeelding en/of geluid toe. U gaat naar
het volgende onderdeel met de navigatietoetsen.
Berichten

50
3. U kunt een dia toevoegen door te bladeren naar
[ ] n vervolgens op de OK-toets of de linker
navigatietoets [Kies] te drukken. U kunt tevens een
dia toevoegen met behulp van de rechter softkey
[Menu].
4. Druk op de rechter softkey [Opties]. De
onderstaande opties verschijnen op het scherm.
]
Verzenden: U kunt meerdere nummers en
e-mailadressen invoeren.
]
Preview: Bekijk de door u geschreven mms-
berichten.
]
Opslaan: Sla het MMS-bericht op als concept of
sjabloon.
]
Pagina toevoegen: Voeg een dia toe voor of na de
geselecteerde dia.
]
Ga naar pagina: hiermee gaat u naar de volgende
of vorige dia.
]
Pagina verwijderen: hiermee verwijdert u de
geselecteerde dia.
]
Pagina instellingen
- Timer instellen: u kunt de timer voor dia’s, tekst,
foto’s en geluid instellen.
-
Tekst en foto verwisselen: u kunt de positie van
de tekst en de foto in het bericht wijzigen.
]
Media verwijderen: u kunt de foto of het geluid van
de dia verwijderen. Deze optie wordt alleen
weergegeven als er een mediabestand is.
]
Toevoegen aan T9-woordenboek: u kunt zelf
woorden toevoegen. Dit menu wordt alleen
weergegeven wanneer de modus Bewerken is
ingesteld op Voorspellen.
]
T9 talen: Selecteer de taal voor de T9-
invoermodus. U kunt de T9-invoermodus ook
deactiveren door ‘T9 uit’ te selecteren.
]
Afsluiten: Als u op Afsluiten drukt terwijl u een
bericht typt, gaat u terug naar het berichtenmenu.
Het bericht dat u hebt getypt is niet opgeslagen.
5. U kunt de hieronder genoemde items toevoegen
aan het bericht door op de rechter softkey te
drukken als u in het bericht zit.: Symbool, Foto,
Nieuw Foto, Afbeelding, Geluid, Spraakmemo, SMS-
sjablonen, Contacten, Mijn visitekaartje.
Berichten
Berichten

51
INBOX
MENU 5.2
U kunt zoeken in ontvangen tekstberichten en de
inhoud bekijken. Ontvangen tekstberichten worden
weergegeven op datum en tijd; het meest recente
bericht staat bovenaan.
Druk op de Menu-toets en selecteer
Berichten
o
SMS-bericht’ Inbox.
Voor elk ontvangen bericht hebt u de volgende opties.
Druk op de linker softkey [Opties].
]
Bekijken: wis het geselecteerde bericht.
]
Antwoorden: beantwoord het SMS-bericht, het
oorspronkelijke bericht is in het antwoord
opgenomen.
]
Doorsturen: stuur een ontvangen bericht door
naar anderen. Nadat u de nummers van de
ontvangers hebt ingevoerd kunt u het bericht
doorsturen.
]
Terugbellen: hiermee belt u de afzender terug.
]
Wissen: wis het geselecteerde bericht.
]
Informatie: u kunt tevens informatie over
ontvangen berichten bekijken.
Opmerking
]
SIM-bericht verwijst naar het bericht dat
opgeslagen is in het SIM-geheugen. Het
netwerk maakt bij inkomende berichten
onderscheid tussen SIM-berichten en gewone
berichten.
Berichten
Pictogram Beschrijving
Ongelezen MMS-berichten
Ongelezen bericht
SIM-bericht
gelezen MMS-berichten
Gelezen bericht
Push-bericht
Push-bericht lezen
Gemeld multimediabericht

Berichten
52
]
Alles verwijderen: hiermee verwijdert u alle
berichten.
Wanneer u berichten ontvangt wordt er een symbool
op het scherm weergegeven. De berichten worden
opgeslagen in de Inbox. U kunt de verschillende
berichten in de Inbox onderscheiden door
pictogrammen. Zie de toelichting op pictogrammen
hieronder voor meer informatie.
Als de telefoon ‘Geen ruimte voor bericht’ meer heeft
kunt u ruimte maken door het verwijderen van
berichten, media en applicaties.
•
Antwoorden: beantwoord het SMS-bericht, het
oorspronkelijke bericht is in het antwoord
opgenomen.
•
Doorsturen: stuur een ontvangen bericht door naar
anderen. Nadat u de nummers van de ontvangers
hebt ingevoerd kunt u het bericht doorsturen.
•
Terugbellen: bel de persoon die het bericht heeft
gestuurd terug.
• Wissen: wis het geselecteerde bericht.
OUTBOX
MENU 5.3
In dit menu kunt u verzonden tekstberichten en hun
inhoud bekijken en controleren of berichten goed
verstuurd zijn.
De onderstaande opties verschijnen op het scherm.
]
Doorsturen: stuur het geselecteerde bericht door
naar andere telefoonnummers.
]
Wissen: wis het geselecteerde bericht uit de
Outbox.
Berichten
Pictogram Beschrijving
MMS verzonden
MMS niet verzonden
MMS verzendrapport
SMS verzonden
SMS niet verzonden
SMS verzendrapport

53
Gebruik dit menu om verzonden berichten weer te
geven. Bij elk verzonden bericht wordt een
statusrapport weergeven.
•
Wissen: wis het geselecteerde bericht.
•
Doorsturen: stuur het geselecteerde bericht door
naar andere telefoonnummers.
• Weergeven: hiermee geeft u informatie weer over de
Outbox-berichten, bijv. het onderwerp (alleen voor
MMS-berichten), de datum & tijd, het berichttype
en de berichtgrootte.
CONCEPTEN
MENU 5.4
In dit menu krijgt u een overzicht van de berichten die
zijn opgeslagen als draft. Blader door de lijst met de
navigatietoetsen. Voor elk bericht hebt u de volgende
opties.
]
Bekijken: hiermee geeft u de berichten weer die zijn
opgeslagen als draft.
]
Bewerken: hiermee kunt u het bericht bewerken
voordat u het verzendt.
]
Verwijderen: hiermee wist u het geselecteerde
bericht.
]
Informatie: controleer de datum & tijd, het type en
de grootte van het bericht.
]
Alles verwijderen: hiermee verwijdert u alle
berichten in Concepten.
VOICEMAIL BELUISTEREN
MENU 5.5
Via dit menu hebt u snel toegang tot uw voicemailbox
(indien ondersteund door uw netwerkexploitant).
Voor u van deze dienst gebruik kunt maken, moet u
het servernummer invoeren. Dit kunt u aanvragen bij
uw netwerkaanbieder.
Bij ontvangst van nieuwe Spraakberichten berichten
verschijnt het symbool op het scherm. Neem
contact op met uw netwerkexploitant voor meer
informatie over deze dienst, zodat u uw toestel correct
kunt configureren.
Berichten

54
INFO-BERICHT
MENU 5.6
Informatieberichten zijn tekstberichten die door het
netwerk worden verzonden aan GSM-gebruikers.
Deze berichten bevatten algemene informatie over
weer, verkeer, taxi’s, apothekers, beurskoersen, enz.
Elk soort informatie heeft een eigen nummer, dat u
kunt aanvragen bij de netwerkexploitant. Wanneer u
een informatiebericht hebt ontvangen verschijnt een
melding op het scherm dat u een nieuw bericht hebt
ontvangen, of het bericht verschijnt direct op het
scherm. In de standby-modus verschijnen de
onderstaande opties in het scherm.
Lezen
(Menu 5.6.1)
Selecteer Lezen om een ontvangen bericht weer te
geven op het scherm.
Onderwerpen
(Menu 5.6.2)
Druk op de linker softkey [Opties] en selecteer
vervolgens
Nieuw toevoegen om nieuwe
onderwerpen te maken. U kunt opgeslagen
onderwerpen tevens uitschakelen, bewerken of wissen
met de linker softkey [Opties].
SJABLONEN
MENU 5.7
U hebt tien sjablonen. Deze kant-en-klare berichten
kunt u bewerken of u kunt nieuwe berichten creëren.
Er zijn twee types sjablonen beschikbaar: SMS en
MMS.
Tekstsjabloon
(Menu 5.7.1)
• Bel me terug aub
• Ik ben wat later. Ik ben er om
• Waar ben je nu?
• Ik ben onderweg
• Zeer dringend! Bel me.
• Ik hou van je
De onderstaande opties verschijnen op het scherm.
]
Bekijken: hiermee geeft u het geselecteerde bericht
weer.
]
Bewerken: u kunt een nieuw bericht schrijven of het
geselecteerde standaardbericht bewerken.
Berichten
Berichten

55
Berichten
]
Berichten schrijven
-SMS-bericht schrijven: u kunt de geselecteerde
tekstsjabloon via SMS versturen.
- MMS-bericht schrijven: u kunt het geselecteerde
tekstbericht via MMS versturen.
]
Nieuw toevoegen: u kunt nieuwe
standaardberichten maken.
]
Wissen: wis de geselecteerde tekstsjabloon.
]
Alles wissen: hiermee wist u alle sjablonen.
MMS-sjablonen
(Menu 5.7.2)
]
Preview: bekijk de door u geschreven MMS-
berichten.
]
Opslaan: sla het MMS-bericht op als concept of
sjabloon.
]
Onderwerp bewerken: : u kan het onderwerp
redigeren.
Onderwerp bewerken
]
Pagina toevoegen: voeg een dia toe voor of na de
geselecteerde dia.
]
Ga naar pagina: hiermee gaat u naar de volgende
of vorige dia.
Dia-formaat instellen
]
Pagina verwijderen: hiermee verwijdert u de
geselecteerde dia.
]
Pagina instellingen: bepaal hoelang dia’s en tekst
getoond worden en hoe de inhoud van een bericht
uitgelijnd wordt (rechts, links, boven of onder).
]
Toevoegen aan T9-woordenboek: u kunt zelf
woorden toevoegen. Dit menu wordt alleen
weergegeven wanneer de modus Bewerken is
ingesteld op Voorspellen.
]
T9 talen: hiermee selecteert u de T9-invoermodus.
]
Afsluiten: hiermee verlaat u het menu.
Mijn visitekaartje
(Menu 5.7.3)
In dit menu kunt u uw eigen naamkaartje maken. Voer
uw naam, mobiele nummer, kantoornummer,
faxnummer en e-mailadres in.

Berichten
56
INSTELLINGEN
MENU 5.8
SMS
(Menu 5.8.1)
]
Berichttype
Tekst, Spraak, Fax, Nat. Oppiepen, X.400, E-
mail, ERMES
Doorgaans is het berichttype ingesteld op Tekst.
U kunt de tekst omzetten in een andere indeling.
Neem contact op met de netwerkexploitant voor
meer informatie over de beschikbaarheid van deze
functie.
]
Geldigheidsperiode: Via deze netwerkdienst kunt u
opgeven hoe lang de tekstberichten worden
opgeslagen in de berichtencentrale.
]
Ontvangstrapport: Stel de functie in op Ja als u
wilt controleren of uw bericht is verzonden.
]
Kosten voor opnieuw afspelen: Wanneer u een
bericht hebt verzonden, kan de ontvanger
antwoorden op uw kosten.
]
SMS-centrale: In dit menu vindt u het adres van de
SMS-centrale, dat is vereist voor het verzenden van
tekstberichten.
MMS
(Menu 5.8.2)
]
Prioriteit: U kunt de prioriteit instellen van het
bericht dat u kiest.
]
Geldigheidsperiode: Via deze netwerkdienst kunt u
opgeven hoe lang de tekstberichten worden
opgeslagen in de berichtencentrale.
]
Afleveringsrapport: Stel deze optie in op Ja om te
controleren of uw bericht is verzonden.
]
Automatisch downloaden: Als u Aan selecteert,
ontvangt u automatisch multimediaberichten. Als u
Uit selecteert, ontvangt u alleen een
meldingsbericht.
Als u Alleen thuisnetwerk selecteert, hangt het van
uw plaatselijke netwerk af of u multimediaberichten
kunt ontvangen.
]
Netwerkinstellingen: als u de multimediaserver
selecteert, kunt u de URL van de server instellen.
]
Toegestane berichttypen
Persoonlijk:
persoonlijk bericht.
Advertentie: commercieel bericht.
Informatie: noodzakelijke informatie.
Berichten

57
Voicemail Centrale
(Menu 5.8.3)
Het opvragen van uw voicemail is mogelijk als uw
netwerkexploitant deze functie ondersteunt. Bij
ontvangst van een nieuw voicemailbericht verschijnt
het bijbehorende symbool op het scherm. Neem
contact op met uw netwerkexploitant voor meer
informatie over deze dienst, zodat u uw toestel correct
kunt configureren.
]
Berichtencentrale: U kunt uw voicemailberichten
beluisteren door
Thuis te selecteren.
]
Roaming: Als u in het buitenland bent, kunt u uw
voicemails beluisteren als deze dienst wordt
ondersteund.
Info-bericht
(Menu 5.8.4)
]
Ontvangen
Ja:
Als u deze functie selecteert, kunt u
informatieberichten ontvangen.
Nee: Als u deze functie selecteert, kunt u geen
informatieberichten ontvangen.
]
Signaaltoon
Ja:
Wanneer u informatieberichten ontvangt laat uw
toestel een pieptoon horen.
Nee: Uw toestel laat geen pieptoon horen wanneer
u informatieberichten ontvangt.
]
Talen
U kunt de gewenste taal selecteren door op
[Aan/Uit] te drukken. Vervolgens verschijnen de
informatieberichten in de door u gekozen taal op
het scherm.
Push-berichten
(Menu 5.8.5)
U kunt instellen of u het bericht wel of niet wilt
ontvangen.
Berichten

Multimedia
58
FOTO MAKEN
MENU 6.1
Met deze toepassing kunt u foto's maken. U kunt
foto's maken in een door u gewenst formaat en ze
gebruiken als foto's van contactpersonen, voor het
basisscherm en voor algemenere doeleinden. Foto's
die u hebt gemaakt, kunt u verzenden als MMS-bericht
of per e-mail.
Druk op de linker softkey [Opties] als u de volgende
popup menu-items wilt weergeven.
]
Helderheid: hiermee kunt u de helderheid instellen.
]
Grootte: hiermee kunt u de grootte van een
afbeelding opgeven.
]
Timer: hiermee kunt u de vertragingstimer instellen.
]
Kwaliteit: hiermee kunt u de kwaliteit van een
afbeelding opgeven.
]
Witbalance: U kunt de instellingen aanpassen aan
de omgeving.
]
Album: hiermee kunt u de gemaakte foto's
weergeven.
]
Afsluiten: De camera afsluiten.
]
Modus: hiermee kunt u het maken van meerdere
opnamen in- of uitschakelen.
]
Effect: hiermee kunt u speciale effecten aan een
foto toevoegen.
]
Flits: hiermee kunt u de flitser in- of uitschakelen.
]
Zoom: hiermee kunt u het zoombereik opgeven.
VIDEOCAMERA
MENU 6.2
Met deze toepassing kunt u videoclips opnemen.
U kunt opgeslagen videobestanden met deze functie
afspelen en bekijken. Videoclips die u hebt gemaakt,
kunt u verzenden als MMS-bericht of per e-mail.
Druk op de linker softkey [Opties] als u de volgende
popup menu-items wilt weergeven.
]
Helderheid: hiermee kunt u de helderheid instellen.
]
Grootte: hiermee kunt u de dempingsfunctie in- of
uitschakelen.
]
Timer: hiermee kunt u de vertragingstimer
opgeven.
Opmerking
]
Opnamen kunnen alleen worden ingelijst in de
pixelresolutie 128 x 160.
Multimedia

59
]
Kwaliteit: hiermee kunt u de kwaliteit van een
videoclip opgeven.
]
Witbalance : U kunt de instellingen aanpassen aan
de omgeving.
]
Opnametijd: hiermee kunt u de opnametijd
opgeven.
]
Album: hiermee kunt u de opgenomen videoclips
bekijken.
]
Afsluiten: De videocamera afsluiten.
]
Effect: hiermee kunt u speciale effecten aan een
videoclip toevoegen.
]
Flits: hiermee kunt u de flitser in- of uitschakelen.
]
Zoom: hiermee kunt u het zoombereik opgeven.
MIJN FOTO’S
MENU 6.3
U kunt een foto weergeven en verzenden. Bovendien
kunt u de foto als achtergrond instellen.
Opties
]
Multi-weergave: u kunt maximaal 9 miniaturen
weergeven in één scherm.
]
Verzenden via Bluetooth: u kunt een foto via
Bluetooth verzenden.
]
MMS schrijven: u kunt een foto via MMS
verzenden.
]
Als achtergrond instellen: u kunt een foto als
achtergrond instellen.
]
Diavoorstelling: met dit menu kunt u automatisch
een diavoorstelling weergeven.
]
Verwijderen: u kunt foto's verwijderen.
]
Titel wijzigen: u kunt de titel van de foto wijzigen.
]
Informatie: u kunt de informatie weergeven over
Titel, Grootte, Datum en Tijd die u hebt vastgelegd.
MIJN VIDEO’S
MENU 6.4
U kunt video's afspelen en verzenden.
Opties
]
Afspelen: de video afspelen
]
Verzenden via Bluetooth: u kunt de video via
Bluetooth verzenden.
]
Naam wijzigen: u kunt de titel van de video bewerken.
Multimedia

]
Verwijderen: u kunt de video verwijderen.
]
Alles verwijderen: u kunt alle video's uit dit
bestand verwijderen.
]
Informatie: u kunt de informatie over de video
weergeven.
MP3
MENU 6.5
De S5100 heeft een geïntegreerde MP3-speler. U
kunt naar MP3-muziekbestanden in het geheugen van
de telefoon luisteren met een compatibele headset of
door middel van de interne luidspreker.
De muziekspeler ondersteunt de volgende
indelingen:
• MPEG-1 Layer III: bemonsteringsfrequentie tot 48
kHz, bitfrequentie tussen 32 kbps en 192 kbps,
stereo
•
MPEG-2 Layer III: bemonsteringsfrequentie tot 24
kHz, bitfrequentie tussen 32 kbps en 160 kbps,
stereo
•
AAC: ADIF- en ADTS-indelingen
(bemonsteringsfrequentie tot 48 kHz)
Met LG Contents Bank op de cd-rom in de verpakking
kunt u MP3-bestanden overzetten van een
compatibele computer naar het geheugen van de
telefoon.
Opmerking
]
S5100 ondersteunt geen varianten van MP3-
en AAC-bestanden. Het heeft dus geen zin de
bestandsindeling van VBR-MP3-bestanden
niet veranderen in AAC.
Opmerking
]
Doordat de luidspreker zo klein is, kan de audio
in bepaalde gevallen worden vervormd. Dit is
vooral het geval bij maximaal volume of als de
muziek veel bastonen heeft. Daarom adviseren
wij u de stereo hoofdtelefoon te gebruiken. Zo
heeft de muziek de beste kwaliteit.
Multimedia
60
Multimedia

MP3-speler
(Menu 6.5.1)
1. Druk op het menu MP3 en selecteer vervolgens
MP3-speler.
2. Druk op de linker softkey
d
[Opties] als u naar
de volgende menu's wilt gaan.
]
Afspeellijsten weergeven
U kunt de afspeellijst weergeven terwijl u naar de
muziek luistert.
]
Sectie herhalen: als u dit inschakelt, wordt de
selectie van de huidige muziek herhaald.
]
Instellen als ringtone
Met dit menu kunt u het MP3-bestand instellen als
beltoon.
U kunt het bestand ook in Profiel instellen als
beltoon.
]
Instellingen:
- Equalizer:
Met dit menu kunt u verschillende omgevingen
aanpassen tijdens het luisteren naar de muziek. De
telefoon ondersteunt vier vooraf ingestelde
menu's. Als u naar dit menu gaat, kunt u de huidige
waarden van de equalizer weergeven.
Als u de telefoon met de meegeleverde USB-kabel (in
dezelfde verpakking) op de computer aansluit, dient u
een stuurprogramma te installeren. Raadpleeg voor
meer informatie de handleiding van de cd-rom.
Opmerking
]
Op de computer moet Windows 98 SE,
Windows ME, Windows 2000 of Windows XP
worden uitgevoerd.
]
U kunt de USB-kabel niet alleen gebruiken om
MP3-bestanden te downloaden naar de
telefoon: u kunt er ook foto's die u met de
telefoon hebt gemaakt mee naar de computer
uploaden. Bovendien kunt u het telefoonboek,
de planner en de Memo beheren vanaf de
computer. Raadpleeg een geautoriseerde
verkoper over beschikbare accessoires.
]
Als u MP3-bestanden wilt downloaden in
Windows 2000, dient u de mapopties op de
computer als volgt in te stellen: Weergeven als
webpagina
o
Standaardmap Windows
gebruiken (I).
61
Multimedia

navigatietoets in te drukken.
Daarnaast kunt u, als u het optiemenu selecteert, het
bestand verwijderen of de informatie ervan bekijken.
Instellingen
(Menu 6.5.3)
Met dit menu kunt u de volgende items instellen:
Equalizer, Afspeelmodus, Shuffle instellen en Visueel
effect.
Note
]
Muziek is auteursrechtelijk beschermd door
middel van internationale verdragen en
nationale auteurswetgeving. Het kan gebeuren
dat u toestemming of een licentie aan dient te
vragen om muziek te reproduceren of kopiëren.
Volgens de nationale wetgeving van bepaalde
landen is het verboden kopieën voor privé-
gebruik te maken van auteursrechtelijk
beschermd materiaal. Controleer de nationale
wetgeving met betrekking tot dergelijke
materialen van het betreffende land.
-
Afspeelmodus
Met dit menu kunt u de afspeelmodus instellen op
Alles afspelen, Alles herhalen, Alles willekeurig, Eén
afspelen of Eén herhalen.
-
Willekeurige weergave
U kan luisteren naar MP3 muziek alle willekeurig.
-
Visueel effect: U kunt de volgende visuele
effecten selecteren: Licht, Stuiter en Gitarist.
Met dit menu kunt u de achtergrond van het
hoofd-LCD-scherm en het sub-LCD-scherm
tijdens het afspelen van een MP3-bestand
wijzigen.
-
Bij openen/sluiten:
Doorgaan met afspelen
De afspeelmodus wordt niet onderbroken als u de
klep sluit tijdens het afspelen.
Afspelen stoppen
U kunt de afspeelmodus afsluiten door de klep te
sluiten.
Afspeellijst
(Menu 6.5.2)
Met dit menu kunt u de volledige afspeellijst
weergeven. U kunt een track verplaatsen door de
Multimedia
62
Multimedia

SPRAAKRECORDER
MENU 6.6
Met de functie Spraakopname kunt u tot tien
spraakberichten opnemen, van maximaal 20 seconden.
Opnemen
(Menu 6.6.1)
U kunt spraakmemo’s opnemen in het menu
Spraakopname.
1. Als de opname gestart is, wordt het bericht en de
resterende tijd op het scherm weergegeven.
2. Als u de opname wilt beëindigen, drukt u op
d
[Opslaan].
3. Voer de titel van de spraakmemo in en druk op
d
[OK].
Lijst bekijken
(Menu 6.6.2)
Alle spraakmemo’s worden weergegeven. U kunt de
verschillende spraakmemo’s Terugspelen en Wissen.
INSTELLINGEN
MENU 6.7
Camera
(Menu 6.7.1)
]
Automatisch opslaan: als u deze optie inschakelt,
worden de afbeeldingen automatisch opgeslagen,
zonder dat de menubalk voor opslaan wordt
weergegeven.
]
Alle foto's verwijderen: met dit menu kunt u alle
foto's verwijderen nadat u een bevestiging hebt
gegeven.
Videocamera
(Menu 6.7.2)
]
Alle video's verwijderen: met dit menu kunt u alle
video's verwijderen.
63
Multimedia

U kunt de volgende menu’s instellen volgens uw
voorkeuren en behoeften.
1. Druk in de standby-modus op
d
[Menu].
2. Druk op
7
om rechtstreeks naar het menu
Instellingen te gaan.
DATUM & TIJD
MENU 7.1
In dit menu kunt u de datum en tijd op het toestel
instellen.
Datum instellen
(Menu 7.1.1)
Datum instellen
U kunt de huidige datum ingeven.
Datumnotatie
In dit menu kunt u de weergave van de datum instellen,
bijvoorbeeld DD/MM/JJJJ, MM/DD/JJJJ of JJJJ/MM/DD.
(D: Dag / M: Maand / J: Jaar)
Tijd instellen
(Menu 7.1.2)
Tijd instellen
U kunt de juiste tijd ingeven.
Tijdnotatie
U hebt de keuze tussen een 12- of 24-uursweergave.
TELEFOONINSTELLINGEN
MENU 7.2
U kunt functies voor de telefoon instellen.
Instellingen weergeven
(Menu 7.2.1)
]
Achtergrond: Achtergrond: U kunt de achtergrond
voor de standby-modus instellen.
- Hoofddisplay
- Sub-display
standaard
U kunt een afbeelding of animatie als achtergrond
selecteren door te drukken op
k
of
l
.
Instellingen
64
Instellingen

65
Mijn map
U kunt een afbeelding of animatie als achtergrond
kiezen.
]
Displaytekst: als u aan selecteert, kunt u de tekst
bewerken die in de standby-modus wordt
weergegeven.
]
Display: U kunt de verlichtingsduur van het scherm
instellen.
]
Netwerknaam: Als u AAN instelt, wordt de naam
van de serviceprovider op het interne LCD-display
weergegeven.
Thema instellingen
(Menu 7.2.2)
Hiermee kunt u één van de vooraf ingestelde thema's
selecteren.
Taal
(Menu 7.2.3)
In dit menu kunt u de taal voor het scherm wijzigen.
Deze wijziging is ook van invloed op de Taal
Invoermodus.
OPROEPINSTELLINGEN
MENU 7.3
U kunt het menu instellen voor een oproep door op
d
[Kies] te drukken in het menu Instellingen.
Oproep doorschakelen
(Menu 7.3.1)
Met de dienst Doorschakelen kunt u inkomende
spraak-, fax- en dataoproepen naar een ander nummer
doorschakelen. Neem voor meer informatie contact op
met uw netwerkexploitant.
]
Alle oproepen: Spraakoproepen onvoorwaardelijk
doorschakelen.
]
Indien bezet: Oproepen doorschakelen als u in
gesprek bent.
]
Bij geen gehoor: Oproepen doorschakelen als u
niet opneemt.
]
Indien buiten bereik: Oproepen doorschakelen als
het toestel uitstaat of als u buiten bereik van het
netwerk bent.
]
Alle data-oproepen: Onvoorwaardelijk
doorschakelen naar een nummer met een
pc-verbinding.
Instellingen

66
]
Alle fax-oproepen: Onvoorwaardelijk
doorschakelen naar een nummer met een
faxverbinding.
]
Alles annuleren: hiermee annuleert u alle
doorschakelservices.
De submenu’s
Het menu Oproep doorschakelen bevat de volgende
submenu’s.
• Activeren
De bijbehorende dienst activeren.
Naar voice mail centrale
Het bericht doorsturen naar de berichtencentrale.
Deze functie is niet beschikbaar in de menu’s Alle
dataoproepen en Alle faxoproepen.
Naar ander nummer
Het nummer invoeren waarnaar de oproep moet
worden doorgeschakeld.
Naar favoriete nummer
De lijst met de vijf doorschakelnummers word
tweergegeven.
•
Annuleren
De bijbehorende dienst deactiveren.
•
Status weergeven
De status van de bijbehorende dienst controleren.
Antwoordmodus
(Menu 7.3.2)
]
Bij openen: Als u deze functie selecteert, kunt u een
inkomende oproep beantwoorden door de klep te
openen.
]
Willekeurige toets: Als u deze functie selecteert,
kunt u een inkomende oproep beantwoorden door
op een willekeurige toets te drukken, behalve de
toets
b
[Einde].
]
Alleen verzendtoets: Als u deze functie selecteert,
kunt u een inkomende oproep beantwoorden door
op de toets
a
[Verzenden] te drukken.
Mijn nummer meezenden
(Menu 7.3.3)
(afhankelijk van netwerk en abonnement)
]
Bepaald door netwerk: Als u deze functie
selecteert, kunt u uw telefoonnummer meesturen
als u twee lijnen hebt.
Instellingen
Instellingen

67
]
Aan: U kunt uw telefoonnummer verzenden naar
een ander nummer. Uw telefoonnummer zal dan
worden weergegeven op het toestel van de persoon
die uw oproep ontvangt.
]
Uit: Uw telefoonnummer wordt niet weergegeven.
Oproep in wacht
(Menu 7.3.4)
(netwerkdienst)
]
Activeren: Als deze dienst actief is, kunt u een
(inkomend) gesprek in wachtstand beantwoorden.
]
Annuleren: Als u Annuleren selecteert, kunt u een
(inkomende) oproep niet beantwoorden als u in
gesprek bent.
]
Status weergeven: De status van de dienst Oproep
in de wacht controleren.
Minuutmelder
(Menu 7.3.5)
Als u Aan selecteert, kunt u de gespreksduur
controleren aan de hand van een pieptoon die tijdens
een oproep elke minuut klinkt.
Automatische nummerherhaling
(Menu 7.3.6)
]
Aan: Indien deze functie ingeschakeld is, zal
hettoestel automatisch nieuwe belpogingen
ondernemen na een niet-geslaagde belpoging.
]
Uit: Als de functie is uitgeschakeld, volgen er na een
mislukte oproep geen nieuwe belpogingen.
BEVEILIGINGSINSTELLINGEN
MENU 7.4
PIN-code vragen
(Menu 7.4.1)
In dit menu kunt u instellen of om de PIN-code van uw
SIM-kaart moet worden gevraagd wanneer het toestel
wordt aangezet. Als deze functie actief is, wordt u
gevraagd eerst de PIN-code in te toetsen.
1. Selecteer Verzoek PIN-code in het menu
Beveiligingsinstellingen en druk op
d
[Kies].
2. Stel in op Aan of
Uit.
3. Als u de instelling wilt wijzigen, voert u uw PIN-code
in als u het toestel aanzet.
Instellingen

Instellingen
68
4. Als u meer dan drie keer een onjuiste PIN-code
invoert, wordt de telefoon geblokkeerd. Als de
telefoon geblokkeerd is, dient u de PUK-code in te
toetsen.
5. U kunt uw PUK-code tot tien keer toe proberen in
te toetsen. Als u meer dan tien keer een onjuiste
PUK-code invoert, kunt u het toestel niet meer
deblokkeren. U zult contact moeten opnemen met
uw netwerkexploitant.
Telefoonblokkering
(Menu 7.4.2)
De beveiligingscode voorkomt dat onbevoegden
gebruik kunnen maken van uw telefoon. Als u de
telefoonbeveiliging activeert, wordt altijd om de
beveiligingscode gevraagd als u het toestel aanzet. Als
u de telefoonbeveiliging op
Automatisch instelt,
wordt alleen om de beveiligingscode gevraagd als u de
SIM-kaart verwisselt.
Oproep blokkeren
(Menu 7.4.3)
Met de dienst Blokkeren voorkomt u bepaalde soorten
uitgaande of inkomende oproepen. Voor deze functie
hebt u het wachtwoord nodig voor het blokkeren van
oproepen. De volgende submenu’s worden
weergegeven.
]
Alle uitgaande oproepen: Deze dienst blokkeert
alle inkomende oproepen.
]
Internationaal: Deze dienst blokkeert alle
internationale uitgaande oproepen.
]
Internationaal bij roam: Deze dienst blokkeert alle
internationale uitgaande oproepen behalve die naar
het thuisnetwerk.
]
Alle inkomende oproepen: Deze dienst blokkeert
alle inkomende oproepen.
]
Inkomend bij roam: Deze dienst blokkeert alle
inkomende oproepen als u geen verbinding via uw
thuisnetwerk hebt.
]
Alles annuleren: U kunt alle blokkeerdiensten
annuleren.
]
Wachtwoord wijzigen: U kunt het wachtwoord
wijzigen voor de dienst Oproepen blokkeren.
Instellingen

69
De submenu’s:
• Activeren
U kunt oproepbeperkingen instellen.
•
Annuleren
Uitschakelen van de geselecteerde oproepbeperking.
•
Status weergeven
Controleer of de oproepen worden geblokkeerd of
niet.
Vast oproepnummer
(Menu 7.4.4)
(afhankelijk van SIM)
U kunt uw uitgaande oproepen beperken tot
geselecteerde telefoonnummers. De nummers worden
beschermd door uw PIN2- code.
]
Activeren: U kunt uw uitgaande oproepen
beperken tot geselecteerde telefoonnummers.
]
Uitschakelen: U kunt oproepen verrichten naar alle
telefoonnummers.
]
FDN-lijst: U kunt de lijst met nummers bekijken die
als vaste nummers zijn opgeslagen.
Codes wijzigen
(Menu 7.4.5)
PIN is een afkorting van Personal Identification
Number en voorkomt dat er ongeoorloofd gebruik
wordt gemaakt van uw telefoon.
U kunt de volgende toegangscodes wijzigen:
PIN2-
code
en Beveiligingscode.
1. Als u de PIN2-code, Beveiligingscode wilt wijzigen,
voert u uw oorspronkelijke code in en drukt u op
d
[OK].
2. Voer de nieuwe PIN2-code, Beveiligingscode in en
controleer deze.
NETWERKINSTELLINGEN
MENU 7.5
Het netwerk waarin u wordt geregistreerd, kan
automatisch of handmatig worden gekozen. Standaard
staat deze functie op het toestel ingesteld op
Automatisch.
Instellingen

Instellingen
70
Netwerkkeuze
(Menu 7.5.1)
Automatisch
Het telefoontoestel selecteert automatisch het
netwerk dat in uw regio beschikbaar is. Als de telefoon
staat ingesteld op Automatisch verandert deze
instelling niet, ook niet als het toestel aan of uit wordt
gezet.
Handmatig
De lijst met beschikbare netwerken wordt op het
scherm weergegeven. Vervolgens kunt u kiezen welk
netwerk u wilt gebruiken, mits dit netwerk een
roamingovereenkomst heeft met uw
netwerkexploitant. Als de telefoon geen verbinding
kan maken met het geselecteerde netwerk kunt u een
ander netwerk selecteren.
Favorieten
U kan een lijst met voorkeursnetwerken instellen
waarmee het toestel eerst verbinding moet trachten te
maken, voor er een verbinding met andere netwerken
tot stand wordt gebracht. Deze lijst wordt opgemaakt
aan de hand van de in het toestel aanwezige lijst van
netwerken.
Bandkeuze
(Menu 7.5.2)
Hiermee kunt u de netwerkband instellen op twee
opties, EGSM/DCS(900/1800) of
EGSM/PCS(900/1900).
GPRS-INSTELLINGEN
MENU 7.6
Afhankelijk van de situatie kunt u de GPRS-service
instellen.
INSTELLINGEN RESETTEN
MENU 7.7
U kunt het toestel instellen op de
standaardconfiguratie. Voor deze functie hebt u de
Beveiligingscode nodig.
Instellingen

GEHEUGENSTATUS
MENU 7.8
Toestel geheugen
(Menu 7.8.1)
Met deze functie kunt u de status van het
gebruikersgeheugen van de handset weergeven.
Multimedia geheugen
(Menu 7.8.2)
Met deze functie kunt u de status van het
multimediageheugen van de handset weergeven.
71
Instellingen

U hebt toegang tot verschillende WAP-diensten
(Wireless Application Protocol), zoals bankdiensten,
nieuws, weerberichten en vluchtgegevens. Deze
diensten zijn speciaal voor mobiele telefoons en
worden onderhouden door aanbieders van WAP-
diensten.
Neem contact op met de netwerkexploitant en/of
service provider van de dienst die u wilt gebruiken voor
de beschikbaarheid, prijzen en tarieven van WAP-
diensten. De aanbieder kan u ook instructies geven
voor het gebruik van deze diensten.
Als de verbinding tot stand is gebracht verschijnt de
homepage op het scherm. De inhoud is afhankelijk van
uw service provider. Om internet af te sluiten drukt u
op de toets (
b
). U keert terug naar de standby-
modus.
Navigeren met de WAP-browser
U kunt over het internet surfen met behulp van het
toetsenbord of het menu WAP-browser.
Met het toetsenbord
Als u over het internet surft hebben de toetsen een
andere functie dan wanneer u oproepen verricht.
Met het menu WAP-browser
Er zijn verschillende menuopties als u draadloos over
het internet surft.
Opmerking
]
De WAP-browser menu’s kunnen verschillen,
afhankelijk van uw browserversie.
Diensten
72
Toets Beschrijving
Blader naar de vorige of volgende regel
op de pagina
Terug naar de vorige pagina
Selecteert opties en bevestigt acties
ij
c
h
Diensten

73
INTERNET
MENU 8.1
Startpagina
(Menu 8.1.1)
Hiermee gaat u naar de geconfigureerde startpagina
die in het actieve profiel is opgegeven. Als u het
actieve profiel niet instelt, wordt de startpagina door
de netwerkexploitant geconfigureerd.
Favorieten
(Menu 8.1.2)
In dit menu kunt u de URL van uw favoriete websites
opslaan voor eenvoudige toegang op een later
tijdstip. Uw telefoon heeft een paar vooraf
geïnstalleerde favorieten. Deze vooraf geïnstalleerde
favorieten kunnen niet worden gewist.
Een favoriet opslaan
1. Druk op de linker softkey
d
[Opties].
2. Selecteer Nieuw toevoegen en druk op de OK-
toets.
3. Voer de gewenste URL en naam in en druk op de
OK-toets.
*
Tip: Gebruik de toetsen “
1
” en
`
om
symbolen in te voeren. Om “.” in te voeren, druk
op “
1
”.
Nadat de gewenste favoriet geselecteerd is, zijn de
volgende opties beschikbaar,
]
Verbinden: maakt verbinding met de gekozen
favoriet.
]
Nieuw toevoegen: selecteer deze optie om een
nieuwe favoriet toe te voegen.
]
Bewerken: u kunt de URL en/of de titel van de
geselecteerde favoriet bewerken.
]
Verwijderen: de geselecteerde favoriet wordt
verwijderd.
]
Alles verwijderen: alle favorieten worden
verwijderd.
Ga naar URL
(Menu 8.1.3)
U kunt direct naar de gewenste website gaan.
Daarvoor moet u de specifieke URL invoeren. Nadat u
deze hebt ingevoerd, drukt u op de OK-toets.
Diensten

Diensten
74
Instellingen
(Menu 8.1.4)
Profielen
Een profiel omvat de netwerkinformatie die wordt
gebruikt om verbinding te maken met het internet.
Elk profiel heeft de volgende submenu’s:
]
Activeren: het gekozen profiel activeren.
]
Instellingen: u kunt de WAP-instellingen van het
geselecteerde profiel bewerken en wijzigen.
- Startpagina: hier kunt u het adres (URL) opgeven
van de website die u als startpagina wilt gebruiken.
U hoeft niet voor elke URL “http://” te typen, deze
aanduiding wordt automatisch toegevoegd.
-
Drager: u kunt de dragende dienst instellen.
1 GSM
2 GPRS
- Gegevensinstellingen: verschijnt alleen als u
Gegevensinstellingen hebt geselecteerd als
dragerdienst.
Nummer kiezen: geef het telefoonnummer in
waarmee u toegang krijgt tot uw WAP-gateway.
Nummer kiezen: Geef het telefoonnummer voor
de WAP-gateway op.
User ID: de gebruikersidentiteit voor uw
inbelservice (NIET voor de WAP-gateway).
Wachtwoord: het wachtwoord dat u nodig hebt
om u bij uw inbelservice (NIET bij de WAP-
gateway) te identificeren.
Soort oproep: selecteer het type dataoproep;
Analoog of Digitaal (ISDN).
Wachttijd: U moet een time-outperiode opgeven.
Na invoering daarvan zal de WAP-navigatieservice
onbeschikbaar zijn als er geen gegevens worden
ingevoerd of overgebracht.
Opmerking
]
als de SIM-kaart SAT-services (SIM Application
Toolkit) ondersteunt, heeft dit menu de naam
van de operatorservice die is opgeslagen op de
SIM-kaart. Als de SIM-kaart geen SAT-services
ondersteunt, is de naam van dit menu Profielen.
Diensten

75
Verbindingssnelheid: de snelheid van uw
dataverbinding is 9600 of 14400. u moet een
time-outperiode invoeren. WAP zal niet
beschikbaar zijn als gedurende deze tijd geen
gegevens zijn ingevoerd of overgebracht.
-
GPRS-instellingen: de onderstaande
dienstinstellingen zijn alleen beschikbaar als GPRS
is geselecteerd als dragerdienst.
APN: geef de APN van de GPRS in.
User ID: de gebruikersidentiteit voor uw APN-
server.
Wachtwoord: het wachtwoord dat u nodig hebt
om u te identificeren bij uw APN-server.
-
Proxy-instellingen
Proxy:
aan/uit
IP-adres: geef het IP-adres in van de proxy-server
waarmee u verbinding wilt maken.
Poortnummer: geef de proxy-poort in.
-
DNS-instellingen
Eerste server:
geef het IP-adres in van de eerste
DNS-server waarmee u verbinding wilt maken.
Tweede server: geef het IP-adres in van de
tweede DNS-server waarmee u verbinding wilt
maken.
]
Hernoemen: u kunt de profielnaam wijzigen.
]
Naam wijzigen: u kunt het profiel wissen.
]
Nieuw toevoegen: u kunt een nieuw profiel
toevoegen.
Cache
Stel in of een verbindingspoging via het
cachegeheugen wordt gemaakt of niet.
Cookies
Controleer of een cookie is ingeschakeld of niet.
Cache wissen
Het cachegeheugen wordt geleegd.
Cookies verwijderen
Alle cookies worden verwijderd.
Beveiliging
Er wordt een lijst van de beschikbare certificaten
weergegeven.
Diensten

]
Autoriteit: u ziet een overzicht van de
autorisatiecertificaten die in uw telefoon zijn
opgeslagen.
]
Persoonlijk: u ziet een overzicht van de
persoonlijke certificaten die in uw telefoon zijn
opgeslagen.
SIM-SERVICE
MENU 8.2
Via de SIM-kaart kan uw serviceprovider speciale
toepassingen leveren, zoals die voor thuisbankieren,
handelen in aandelen enz. Als u op een van deze
services bent geabonneerd, is de naam ervan aan het
einde van het hoofdmenu zichtbaar. Met het SIM
Services-menu gaat uw telefoon met de tijd mee en
worden toepassingen van uw serviceprovider
ondersteund.
Neem contact op met uw serviceprovider voor meer
informatie.
76
Diensten
Diensten

77
Downloads
GAMES EN TOEPASSINGEN
MENU 9.1
Games en toepassingen
(Menu 9.1.1)
In dit menu kunt u de geïnstalleerde Java-applicaties
op uw telefoon beheren. U kunt gedownloade
applicaties afspelen of verwijderen, of de verbinding
instellen. De gedownloade toepassingen worden
bewaard in mappen. Druk op de linker softkey
d
[Selecteren] om de geselecteerde map te
openen of de geselecteerde midlet te starten. Gebruik
de linker softkey
d
[Opties] voor de volgende
beschikbare menu’s:
]
Opstarten: Start de geselecteerde toepassing.
]
Info: Zeigt Informationen über die Anwendung.
]
Opties: Einige Java-Anwendungen benötigen eine
Datenverbindung. Wählen Sie eine der folgenden
Verbindungsoptionen.
-
Altijd: de verbinding wordt direct tot stand
gebracht zonder melding.
- Vragen: u wordt gevraagd of de verbinding tot
stand gebracht moet worden.
-
Nooit: er wordt geen verbinding gemaakt.
Opmerking
]
U kunt de voorgeïnstalleerde map of games in
deze map niet verwijderen of hernoemen.
Java
TM
is een door Sun Microsystems ontwikkelde
technologie. Net zoals u een Java-applet kunt
downloaden via de Netscape of MS Internet
Explorer browsers, kunt u Java MIDlet
downloaden via een telefoon die WAP
ondersteunt. Afhankelijk van de service provider
kunnen alle Java-programma’s zoals spelletjes
worden gedownload naar een telefoon en worden
opgestart. Eenmaal gedownload hebt u toegang
tot het Java-programma via
Games en
toepassingen
, waar u programma’s kunt
selecteren, uitvoeren of wissen. De Java-
programma’s worden opgeslagen in de telefoon
als JAD- en JAR-bestanden.
Downloads

Downloads
78
Profielen
(Menu 9.1.2)
Dit menu bevat dezelfde instellingen als het menu
Internet. Als u nieuwe toepassingen wilt downloaden,
hebt u een WAP-verbinding nodig.
AFBEELDINGEN
MENU 9.2
De linker softkey
d
[Opties] geeft de volgende
opties.
]
Als achtergrond instellen: De huidige
geselecteerde afbeelding kan als achtergrond
worden ingesteld.
]
MMS schrijven: De gedownloade afbeelding kan via
MMS worden verzonden.
]
Verzenden via Bluetooth: de foto kan via
Bluetooth worden verzonden.
LET OP!
•
Alleen op J2ME (Java 2 Micro Edition) gebaseerde
programma’s kunnen gebruikt worden in de camera-
modus. De op J2SE (Java 2 Standard Edition)
gebaseerde programma’s kunnen alleen gebruikt worden
in de pc-modus.
Opmerking
]
Het JAR-bestand is een gecomprimeerd
formaat van het Java-programma en het JAD-
bestand is een beschrijvingsbestand dat alle
gedetailleerde informatie bevat. Voor het
downloaden kunt u via het netwerk alle
bestandsbeschrijvingen uit het JAD-bestand
bekijken.
]
Hoewel ze op een standaardtaal zij gebaseerd
(J2ME), zijn niet alle Java-toepassingen
compatibel met alle telefoons die verkrijgbaar
zijn, omdat voor een bepaalde telefoon wellicht
een specifieke bibliotheek moet worden
gebruikt. Mogelijk wordt de software
geblokkeerd of schakelt deze zichzelf uit als
Java-toepassingen die niet speciaal voor deze
telefoon zijn gemaakt worden gedownload. Op
zo’n moment moet de telefoon opnieuw
worden gestart. Dergelijke problemen worden
door de toepassing veroorzaakt, en niet door
de telefoon.
Downloads

79
GELUIDEN
MENU 9.3
De linker softkey
d
[Opties] geeft de volgende
opties.
]
Instellen als ringtone: Het huidige geselecteerde
geluid wordt als beltoon ingesteld.
]
Berichten schrijven: Melodie geluid kan via SMS en
MMS worden verzonden.
]
Verzenden via Bluetooth: de melodie kan via
Bluetooth worden verzonden.
BESTANDSOPSLAG
MENU 9.4
Deze map dient voor het opslaan van bestanden. In de
map staan alle bestanden die zijn overgedragen via
UMS of Bluetooth, zoals afbeeldingen,
geluidsbestanden en algemene bestanden die de
telefoon niet kan lezen.
Als u op de softkey [Opties] drukt, kunt u het bestand
weergeven of afspelen (indien ondersteund),
verwijderen of via Bluetooth verzenden.
USB-connectiviteit
De S5100 kan met een USB-kabel op een PC worden
aangesloten om bestanden en andere inhoud over te
dragen en om de ingebouwde modem te gebruiken. In
het volgende gedeelte vindt u alle details bij deze
functie.
USB-mediaopslag (UMS)
Met UMS (USB-mediaopslag) kunt u
multimediabestanden gebruiken die staan opgeslagen
in het interne geheugen (64 MB) van de telefoon. Dit
geheugen wordt gebruikt als een gewone USB-
geheugenpen. Om deze functie te gebruiken hoeft u
geen extra software te installeren.
U kunt JPG-bestanden (maximaal 460 K), en GIF-
bestanden (maximaal 100 K) weergeven en geluiden
afspelen die als bijlagen aan MMS-berichten zijn
toegevoegd.
Opmerking
]
Tijdens het gebruik van UMS kunt u geen
oproepen of berichten ontvangen.
Downloads

80
Downloads
1. Sluit de telefoon met de USB-kabel aan op de PC
wanneer de telefoon in stand-by staat. De PC
identificeert het randapparaat na een aantal
seconden.
2. het hoofd-LCD-scherm van de telefoon wordt
“USB” weergegeven
3. Op de PC wordt de telefoon aangeduid als
“Verwijderbare schijf” in de map Mijn computer. Er
wordt tevens een stationsletter aan de telefoon
toegewezen, bijvoorbeeld “E:\”. Vervolgens kunt u
bestanden naar de telefoon uploaden en van de
telefoon downloaden, net als bij een gewone
Windows-map.
4. Dubbelklik op “Verwijderbare schijf” en open de
map “Mijn media”. Er worden vier nieuwe mappen
weergegeven:
-
Muziek: in deze map kunt u muziekbestanden
opslaan. De ondersteunde indelingen zijn: MP3,
AAC, AAC+, AAC++ en WMA, MP4 (audio). U
kunt de bestanden in deze map afspelen met de
ingebouwde MP3-speler van de telefoon.
-
Foto's: deze map is speciaal bedoeld voor de
foto's die u maakt met de digitale camera van de
telefoon. U kunt de foto's van de telefoon naar de
PC overdragen door deze met de PC te 'kopiëren
en plakken'.
-
Opslag: deze map dient voor het opslaan van
bestanden. U kunt alle typen bestanden naar deze
map uploaden: afbeeldingen, geluidsbestanden en
zelfs bestanden die de telefoon niet kan lezen
(zoals Word- en Excel-bestanden). Deze laatste
kunt u dan toch gewoon meenemen en later op
een andere PC zetten. Op de telefoon worden de
in deze map opgeslagen bestanden weergegeven
in (Menu – Downloads – File Storage).
-
Video's: in deze map kunt u de filmpjes die u met
de digitale camera van de telefoon hebt gemaakt,
downloaden naar de PC. Zo hebt u in deze map
Opmerking
]
Ook al kunt u nieuwe foto's uploaden vanaf de
PC, deze foto's zullen niet verschijnen in het
menu Mijn foto's van de telefoon. Daarom
wordt het afgeraden iets naar deze map te
uploaden. Wilt u nieuwe achtergronden naar
de telefoon uploaden, gebruik dan het speciaal
daarvoor ontwikkelde programma dat u op de
cd-rom vindt.
Downloads

weer vrije ruimte voor nieuwe filmpjes. U kunt in
deze map 3GP-bestanden opslaan. Op de
telefoon kunt u de bestanden in deze map
bekijken in (Menu – Multimedia – Mijn video).
5. Zodra de bestandsoverdracht is voltooid, kunt u
het USB-randapparaat in Windows verwijderen en
de kabel van de telefoon ontkoppelen.
PC-programma's en internet
U kunt de telefoon op uw PC aansluiten om uw
contactpersonen te beheren, om nieuwe inhoud te
uploaden zoals achtergronden en beltonen, en om de
ingebouwde modem te gebruiken.
1. Installeer de programma's die u op de cd-rom
aantreft.
2. Open op de telefoon het menu Extra– Modem en
bevestig de activering.
3. Sluit de telefoon met de USB-kabel aan op de PC en
start het gewenste programma.
4. Na gebruik van de modem wordt het aanbevolen
deze te deactiveren in het menu Extra - Modem.
Opmerking
]
gebruik de USB-aansluiting pas een paar
minuten nadat u de telefoon hebt
ingeschakeld, als het niet-actieve scherm wordt
weergegeven.
WAARSCHUWING!
•
Ontkoppel de telefoon nooit als er nog een
bestandsoverdracht plaatsvindt. Doet u dit toch, dan kan
het geheugen beschadigd raken. Verwijder altijd eerst het
randapparaat in Windows alvorens de kabel te
ontkoppelen.
Opmerking
]
Zo lang het geheugen nog niet vol is, maakt het
niet uit hoe groot de bestanden zijn die u
uploadt.
]
U kunt maximaal tien onderliggende mappen
maken in de vier standaardmappen.
]
Als u de standaardnaam van de map wijzigt,
werkt deze niet langer naar behoren.
81
Downloads

Batterij
Headset
Hiermee kunt u handsfree bellen.
Inclusief oortelefoon en microfoon.
Reisadapter
Met deze oplader kunt u de
batterij opladen als u onderweg
bent.
Datakabel
Om uw telefoon aan te sluiten
op een computer.
Opmerking
]
Gebruik altijd originele LG-accessoires.
]
Als u dit niet doet kan uw garantie vervallen.
]
Accessoires kunnen per regio verschillen;
gelieve contact op te nemen met onze
regionale servicebedrijf of vertegenwoordiging
voor meer informatie.
Accessoires
82
Er zijn verschillende accessoires verkrijgbaar voor uw mobiele telefoon. U kunt een keuze maken uit deze
opties, afgestemd op uw persoonlijke communicatiebehoeften. Vraag uw leverancier naar de beschikbare
accessoires.
Accessoires

83
Technische gegevens
ALGEMEEN
Productnaam: S5100
Systeem : GSM 900 / DCS 1800 / PCS 1900
OMGEVINGSTEMPERATUREN
Max: : +55°C (ontladen)
: +45°C (laden)
Min: -10°C
Technische gegevens


S5100 GUIDE DE L’UTILISATEUR
- FRANÇAIS
Élimination de votre ancien appareil
1. Ce symbole, représentant une poubelle sur roulettes barrée d’une croix, signifie que le produit est
couvert par la directive européenne 2002/96/EC.
2. Les éléments électriques et électroniques doivent être jetés séparément, dans les vide-ordures
prévus à cet effet par votre municipalité.
3. Une élimination conforme aux instructions aidera à réduire les conséquences négatives et risques
éventuels pour l’environnement et la santé humaine.
4. Pour plus d’information concernant l’élimination de votre ancien appareil, veuillez contacter votre
mairie, le service des ordures ménagères ou encore la magasin où vous avez acheté ce produit.

TABLE DES MATIÈRES
2
PRECAUTIONS D'USAGE DE
L'APPAREIL 5
PRÉSENTATION 7
RECOMMANDATIONS POUR
UNE UTILISATION SÛRE ET
EFFICACE 8
CARACTÉRISTIQUES DU
S5100 13
Description du téléphone
Informations à l'écran 17
MISE EN ROUTE 18
Installation de la carte SIM et de
la batterie.
Chargement de la batterie 20
Débranchement du chargeur 21
Mise en marche/Arrêt du
téléphone 22
Codes d'accès
Code réseau 23
FONCTIONS GÉNÉRALES
24
Émission et réception d’un appel
Contacts 29
Menu Appel en cours 30
Appels multiparties ou
conférences téléphoniques 32
ARBORESCENCE DES
MENUS 34
SÉLECTION DE FONCTIONS
ET D'OPTIONS 36
PROFILS AUDIO 37
Activer
Personnaliser
Renommer 38
JOURNAL APPELS 39
Appels en absence
Appels reçus
Appels émis
Supprimer les appels 40
Frais d'appel
Durée appel
Coût de l’appe
Réglages
Info GPRS 41
Durée appel
Volume données
OUTILS 42
Réveil
Bluetooth
Périphériques associés
Kit piéton 43
Réglages 44
Calculatrice
Convertisseur 45
Fuseaux horaires
Modem
TABLE DES MATIÈRES

TABLE DES MATIÈRES
3
AGENDA 46
Contacts
Liste
Ajouter 47
Groupes d
'
appel
N° abrégés 48
Réglages
Copier tout 49
Tout supprimer
Informations
Calendrier 50
Ajouter 51
Afficher agendas quotidiens
Supprimer anciens
Tout supprimer
Aller à date
Définir sonnerie d'alarme
Mémos
MESSAGES 52
Nouveau message
Ecrire SMS
Ecrire MMS 54
Boîte de réception 55
Boîte d'envoi 57
Brouillons 58
Messagerie vocale
Message d’information
Lire 59
Thèmes
Modèles
Modéles SMS
Modèles MMS 60
Signature
Réglages 61
SMS
MMS
Centre messagerie vocale 62
Message d'information
Messages Push
MULTIMÉDIA 63
Photo
Caméra vidéo
Mes photos 64
Mes Vidéos 65
MP3
Lecteur MP3 67
Liste d'écoute
Réglages 68
Mémo vocal
Enregistrer
Voir liste
Réglages 69
Photo
Caméra vidéo

TABLE DES MATIÈRES
4
RÉGLAGES 70
Date et heure
Date
Heure
Téléphone
Affichage
Thèmes 71
Langue
Appels
Renvoi d'appel
Mode de réponse 73
Envoyer mon numéro
Double appel
Bip minute
Rappel auto
Sécurité 74
Demander code PIN
Verrouillage téléphone
Interdiction d'appels
Appels restreints 75
Modifier les codes
Réseau 76
Sélection du réseau
Sélection de bande
Activ. GPRS
Réinitialiser réglages
Etat mémoire 77
Mémoire interne
Mémoire Multimédia
NAVIGATEUR 78
Internet 79
Page d'accueil
Favoris
Aller à l’URL
Réglages 80
Services SIM 82
TÉLÉCHARGEMENTS 83
Jeux et applis
Jeux et applis
Profils 84
Images 85
Sons
Clé USB
ACCESSOIRES 89
DONNÉES TECHNIQUES 90
TABLE DES MATIÈRES

PRECAUTIONS D'USAGE DE L'APPAREIL
PRECAUTIONS D'USAGE DE L'APPAREIL
5
MESURES DE SECURITE
OBLIGATOIRES
Remarque d’ordre générale
Pour préserver votre sécurité et celle des autres, nous
vous demandons de ne pas utiliser les téléphones
mobiles dans certaines conditions (en conduisant par
exemple) et dans certains lieux (avions, hôpitaux,
stations services, et ateliers garagistes).
Précautions à prendre par les porteurs
d’implants électroniques
La distance entre le simulateur cardiaque (ou la pompe
à insuline) et le téléphone mobile doit être au
minimum de 15 cm. Le téléphone mobile (lors d’un
appel) doit être à l’opposé de l’emplacement de
l’implant.
MESURES DE PRECAUTIONS*
A/ Un indicateur de ‘niveau de réception’ vous permet
de savoir si votre appareil est en mesure de recevoir et
d’émettre un signal dans de bonnes conditions. En
effet, plus le niveau de réception est faible, plus la
puissance d’émission de votre téléphone est élevée.
De ce fait et afin de réduire au maximum le
rayonnement émis par les téléphones mobiles, utilisez
votre appareil dans de bonnes conditions de
réception.
Ne pas utiliser votre appareil dans les sous-terrains,
parkings, sous-sol, ou dans un véhicule en mouvement
(train ou voiture). B/ Lors d’une communication,
utilisez le kit ‘piéton’ ou ‘mains libres’ qui vous permet
d’éloigner le téléphone de votre tête. C/ Evitez aussi
de positionner le téléphone à côté du ventre des
femmes enceintes ou du bas du ventre des
adolescents.

Ces mesures vous permettrons de
réduire considérablement l’absorption,
par les parties sensibles de votre corps,
de la puissance rayonnée par votre
téléphone.
* Aucun constat de dangerosité d’utilisation des
téléphones mobiles n’ayant été constaté, seul le
principe de ‘précaution’ nous pousse à vous
demander de respecter ces quelques mesures.
PRECAUTIONS D'USAGE DE L'APPAREIL
PRECAUTIONS D'USAGE DE L'APPAREIL
6

PRÉSENTATION
PRÉSENTATION
7
Félicitations ! Vous venez de faire l’acquisition du
S5100, un téléphone portable sophistiqué et
compact, conçu pour tirer parti des toutes dernières
technologies de communication mobile numérique.
Ce guide de l’utilisateur contient des
informations importantes relatives à l’utilisation
et au fonctionnement de ce téléphone. Lisez
attentivement les informations afin d’optimiser
l’utilisation de votre téléphone et d’éviter de
l’endommager. Tout changement ou toute
modification non approuvé expressément dans
ce guide de l’utilisateur peut annuler la garantie
de votre téléphone.

8
RECOMMANDATIONS POUR UNE UTILISATION SÛRE ET EFFICACE
Lisez ces recommandations. Leur non-respect peut
s’avérer dangereux, voire illégal. Des informations
détaillées sont également disponibles dans ce manuel.
EXPOSITION AUX
RADIOFRÉQUENCES
Informations sur l’exposition aux ondes
radio et sur le débit d’absorption
spécifique (SAR, Specific Absorption
Rate)
Le S5100 est conforme aux exigences de sécurité
relatives à l’exposition aux ondes radio. Ces exigences
sont basées sur des recommandations scientifiques
qui comprennent des marges de sécurité destinées à
garantir la sécurité de toutes les personnes, quels que
soient leur âge et leur condition physique.
• Les recommandations relatives à l’exposition aux
ondes radio utilisent une unité de mesure connue
sous le nom de débit d’absorption spécifique (SAR).
Les tests de SAR sont effectués via des méthodes
normalisées, en utilisant le niveau de puissance
certifié le plus élevé du téléphone, dans toutes les
bandes de fréquence utilisées.
• Même si tous les modèles de téléphones LG
n’appliquent pas les mêmes niveaux de SAR, ils sont
tous conformes aux recommandations appropriées
en matière d’exposition aux ondes radio.
• La limite de SAR recommandée par l’ICNIRP
(Commission internationale de protection contre les
rayonnements non ionisants) est de 2 W/kg en
moyenne sur dix (10) grammes de tissus.
• La valeur de SAR la plus élevée pour ce modèle a été
mesurée par DASY4 (pour une utilisation à l’oreille)
à 0.174 W/kg (10g).
8
RECOMMANDATIONS POUR
UNE UTILISATION SÛRE ET EFFICACE

RECOMMANDATIONS POUR UNE UTILISATION SÛRE ET EFFICACE
9
ENTRETIEN ET RÉPARATION
• Ne démontez pas votre téléphone. En cas de
réparation, confiez-le à un technicien qualifié.
• Tenez votre téléphone éloigné d’appareils
électriques, tels qu’un téléviseur, une radio ou un
ordinateur.
• Ne placez pas votre téléphone à proximité de
sources de chaleur, telles qu’un radiateur ou une
cuisinière.
• Ne le faites pas tomber.
• Ne soumettez pas votre téléphone à des vibrations
mécaniques ou à des chocs.
• Si vous appliquez un revêtement vinyle sur la coque
de votre téléphone, vous risquez de l’endommager.
• Pour nettoyer l’extérieur du combiné, utilisez un
chiffon sec. (N’utilisez pas de solvant, tel que du
benzène, un diluant ou de l’alcool.)
• Ne placez pas votre téléphone dans des endroits
trop enfumés ou trop poussiéreux.
• Ne placez pas votre téléphone à proximité de cartes
de crédit ou de titres de transport, car il pourrait
nuire aux données des bandes magnétiques.
• Ne touchez pas l’écran avec un objet pointu, vous
risqueriez d’endommager votre téléphone.
• Ne mettez pas votre téléphone en contact avec des
liquides ou des éléments humides.
• Utilisez les accessoires tels que l’oreillette avec la
plus grande précaution. Ne manipulez pas l’antenne
inutilement.
AVERTISSEMENT!
utilisez uniquement des batteries,
chargeurs et accessoires agréés pour ce modèle de
téléphone. L’utilisation de tout autre type de batterie, de
chargeur et d’accessoire peut s’avérer dangereuse et peut
annuler tout accord ou garantie applicable au téléphone.

10
RECOMMANDATIONS POUR
UNE UTILISATION SÛRE ET EFFICACE
APPAREILS ÉLECTRONIQUES
Tous les téléphones portables peuvent provoquer des
interférences pouvant affecter les performances des
appareils électroniques.
• N’utilisez pas votre téléphone près d’équipements
médicaux sans permission. Évitez de placer votre
téléphone à proximité de votre stimulateur
cardiaque, comme une poche poitrine.
• Les téléphones portables peuvent nuire au bon
fonctionnement de certaines prothèses auditives.
• Des interférences mineures peuvent perturber le bon
fonctionnement des téléviseurs, radios, ordinateurs,
etc.
SÉCURITÉ AU VOLANT
Vérifiez les lois et règlements en vigueur en matière
d’utilisation des téléphones portables dans les zones
où vous conduisez.
• Ne tenez pas le téléphone dans votre main alors que
vous conduisez.
• Concentrez toute votre attention sur la conduite.
• Utilisez un kit mains libres, si possible.
• Quittez la route et garez-vous avant d’émettre ou de
recevoir un appel, si les conditions de conduite le
requièrent.
• Les radiofréquences peuvent affecter certains
systèmes électroniques de votre véhicule, tels que le
système audio stéréo ou les équipements de
sécurité.
• Lorsque votre véhicule est équipé d’un airbag, ne
gênez pas son déclenchement avec un équipement
sans fil ou fixe. Il pourrait en effet provoquer de
graves blessures en raison de performances
inadéquates.
ZONE DE DYNAMITAGE
N’utilisez pas votre téléphone lorsque des opérations
de dynamitage sont en cours. Respectez les
restrictions, les règlements et les lois.
RECOMMANDATIONS POUR UNE UTILISATION SÛRE ET EFFICACE

11
SITES POTENTIELLEMENT
DANGEREUX
• N’utilisez pas votre téléphone dans une station-
service. N’utilisez pas votre téléphone à proximité de
carburant ou de produits chimiques.
• Ne transportez pas et ne stockez pas de produits
dangereux, de liquides ou de gaz inflammables dans
le coffre de votre voiture, à proximité de votre
téléphone portable et de ses accessoires.
DANS UN AVION
Les appareils sans fil peuvent générer des
interférences dans les avions.
• Éteignez votre téléphone avant d’embarquer dans un
avion.
• Ne l’utilisez pas sur la piste sans autorisation de
l’équipage.
AVEC LES ENFANTS
Conservez votre téléphone dans un endroit sûr, hors
de la portée des enfants. En effet, votre téléphone est
composé de petites pièces qui peuvent présenter un
danger d’étouffement.
APPELS D’URGENCE
Les numéros d’urgence peuvent ne pas être
disponibles sur tous les réseaux cellulaires. Vous ne
devez donc pas dépendre uniquement de votre
téléphone portable pour émettre un appel d’urgence.
Renseignez-vous auprès de votre fournisseur de
service local.
INFORMATIONS SUR LA BATTERIE
ET PRÉCAUTIONS D’USAGE
• Il n’est pas nécessaire de décharger complètement la
batterie avant de la recharger. Contrairement aux
autres batteries, elle n’a pas d’effet mémoire pouvant
compromettre ses performances.
RECOMMANDATIONS POUR UNE UTILISATION SÛRE ET EFFICACE

• Utilisez uniquement les batteries et chargeurs LG.
Les chargeurs LG sont conçus pour optimiser la
durée de vie de votre batterie.
• Ne démontez pas et ne court-circuitez pas la
batterie.
• Les Répertoire métalliques de la batterie doivent
toujours rester propres.
• Procédez au remplacement de la batterie lorsque
celle-ci n’offre plus des performances acceptables.
La batterie peut être rechargée des centaines de fois
avant qu’il soit nécessaire de la remplacer.
• Rechargez la batterie en cas de non-utilisation
prolongée afin d’optimiser sa durée d’utilisation.
• N’exposez pas le chargeur de la batterie au
rayonnement direct du soleil. Ne l’utilisez pas non
plus dans des lieux très humides, tels que les salles de
bain.
• Ne placez pas votre téléphone dans des endroits
chauds ou froids, cela pourrait affecter les
performances de la batterie.
RECOMMANDATIONS POUR
UNE UTILISATION SÛRE ET EFFICACE
RECOMMANDATIONS POUR UNE UTILISATION SÛRE ET EFFICACE
12

CARACTÉRISTIQUES DU S5100
CARACTÉRISTIQUES DU S5100
13
DESCRIPTION DU TÉLÉPHONE
Vue avant
3
Flash
Remarque
v
Si l'objectif de l'appareil
photo est encrassé,
la qualité d'image peut
être réduite.
Prise casque
1
• Connectez un casque ici.
Touches latérales haut/bas
2
• Pour afficher l'heure actuelle sur
l'écran LCD externe, maintenez
cette touche enfoncée.
• Permet de contrôler le volume
des bips touches en mode veille,
lorsque le clapet est ouvert.
• Permet de contrôler le volume
de l'écouteur en cours de
communication.
5
Ecran
4
Objectif de
l’appareil photo

CARACTÉRISTIQUES DU S5100
CARACTÉRISTIQUES DU S5100
14
Vue latérale Vue arrière
Bouton d'ouverture/
fermeture de la batterie
Appuyez sur ce bouton pour retirer
le couvercle de la batterie.
Orifice
pour la
dragonne
Logement
de la carte
SIM
Pôles de la
batterie
Pôles carte SIM
Prise du chargeur /
Prise du câble
Touche appareil photo /
Touche de MP3
Appuyez sur cette touche pour
activer le mode appareil photo.
Utilisez également cette
touche pour prendre une
photo.
Batterie
Couvercle de
la batterie

CARACTÉRISTIQUES DU S5100
15
Écouteur
1
Touche d’envoi
3
permet de composer un numéro de
téléphone et de répondre aux appels
entrants. En mode veille, vous pouvez
également accéder rapidement
aux derniers appels entrants,
sortants ou manqués,
en appuyant sur cette touche.
5
Touche de fin/marche-arrêt
permet de mettre fin à un appel,
de rejeter un appel et de passer en mode
veille. Pour allumer/éteindre votre
téléphone, maintenez cette
touche enfoncée.
Vue clapet ouvert
Touches alphanumériques
4
permettent d’entrer des
chiffres, des lettres et certains
caractères spéciaux.
7
Microphone
peut être désactivé en cours de
communication pour ne pas être
entendu par votre correspondant.
6
Touche de fonctions
•
0
: appuyez longuement sur cette
touche pour saisir le signe "+"
pour un appel international.
•
=
: lorsque vous composez
un numéro, appuyez longuement
sur cette touche pour mettre
en pause.
Ecran interne
2
affiche notamment les icones d’état
du téléphone, les options de menu,
des informations Web, des images,
le tout en couleur.
'SRXEGXW
'SRXEGXW
'SRXEGXW
'SRXEGXW
'SRXEGXW
'SRXEGXW
'SRXEGXW
'SRXEGXW
'SRXEGXW
'SRXEGXW
'SRXEGXW
'SRXEGXW1IRY
1IRY
1IRY
1IRY
1IRY
1IRY
1IRY
1IRY
1IRY
1IRY
1IRY
1IRY

16
CARACTÉRISTIQUES DU S5100
CARACTÉRISTIQUES DU S5100
b
Touche MP3
Le menu MP3 est activé directement.
0
Touches de navigation
Utilisez ces touches pour parcourir les menus et
déplacer le curseur.
a
Touche de confirmation
permet de sélectionner des options de menu et de
confirmer des actions.
c
Touche Appareil photo
Le menu Appareil photo est activé directement.
d
Touche d’effacement
chaque pression sur cette touche efface un
caractère. Pour effacer tous les caractères de
l’entrée, maintenez cette touche enfoncée.
Utilisez également cette touche pour revenir
à l’écran précédent.
8
,
9
Touche de fonction gauche/ droite
chacune de ces touches exécute la fonction indiquée
par le texte situé juste au-dessus d’elle.

17
CARACTÉRISTIQUES DU S5100
INFORMATIONS À L’ÉCRAN
Le tableau ci-dessous présente les différentes icones
et indicateurs qui s’affichent sur l’écran de votre
téléphone.
Icones affichées à l’écran
Remarque
]
Si la batterie est déchargée, vous risquez de ne
pas pouvoir utiliser les fonctions Photos et
Multimédia.
]
L'état de la batterie peut varier lors de
l'utilisation des fonctions Multimédia.
Icône Instructions sur les icônes
Indique que le profil Kit piéton est activé.
Indique que le profil Général est activé.
Indique que vous pouvez utiliser le service
de messages Push.
Indique que le téléphone accède au WAP.
Indique que vous utilisez la technologie
GPRS.
Vous pouvez afficher votre agenda.
Vous pouvez renvoyer un appel.
Indique que vous avez accédé à
une page sécurisée.
Icône Instructions sur les icônes
Indique la puissance du signal réseau.
Indique qu’un appel est en cours.
Indique que vous êtes en itinérance sur un
autre réseau.
Indique que le service GPRS est disponible.
Indique que l’alarme a été programmée et
qu’elle est activée.
Indique l’état de chargement de la
batterie.
Indique la réception d’un message.
Indique la reception d’un message vocal.
Indique que le mode Vibreur est activé.
Indique que le profil Fort est activé.
Indique que le profil Silencieux est activé.

MISE EN ROUTE
18
INSTALLATION DE LA CARTE SIM
ET DE LA BATTERIE
Assurez-vous que le mobile est éteint avant de la
retirerla batterie.
1. Retirez le couvercle de la batterie.
Appuyez sur le bouton d’ouverture/fermeture de la
batterie et faites glisser le couvercle de la batterie
vers le bas du téléphone. Et retirez le couvercle de
la batterie.
2. Retirez la batterie.
Saisissez la partie supérieure de la batterie et
soulevez-la de son emplacement.
Remarque
v
Retirer la batterie alors que le téléphone est en
marche risque de provoquer des
dysfonctionnements.
MISE EN ROUTE

MISE EN ROUTE
19
3. Installation de la carte SIM
Insérez la carte SIM dans son logement. Faites
glisser la carte SIM dans le logement approprié.
Assurez-vous qu’elle est insérée correctement et
que la zone de contact dorée de la carte est bien
orientée vers le bas. Pour retirer la carte SIM,
appuyez légèrement dessus et tirez-la dans la
direction opposée.
4. Installation de la batterie.
Placez tout d’abord la partie inférieure de la
batterie dans la partie inférieure de l’emplacement
de la batterie. Poussez la partie supérieure de la
batterie vers le bas jusqu’à ce qu’elle s’enclenche
dans l’emplacement prévu.
5. Replacez le couvercle de la batterie.
Placez le couvercle de la batterie à l'emplacement
prévu et faites glisser jusqu'au déclic.
ATTENTION!
Le contact métallique de la carte SIM
peut facilement être endommagé par des rayures.
Manipulez donc la carte SIM avec précautions.
Suivez les instructions fournies avec la carte SIM.
Pour insérer la carte SIM Pour retirer la carte SIM

MISE EN ROUTE
20
CHARGEMENT DE LA BATTERIE
Pour brancher le chargeur de voyage au téléphone,
vous devez avoir installé la batterie.
1. La flèche vous faisant face, comme indiqué dans
l’illustration, branchez la fiche de l’adaptateur de
batterie sur la prise, en bas du téléphone, jusqu’à ce
qu’elle soit insérée dans son logement. Vous devez
sentir un déclic.
2. Branchez l’autre extrémité de l’adaptateur de
voyage sur la prise murale. Utilisez uniquement le
chargeur compris dans le pack.
3. Les barres animées de l’icône de la batterie
s’arrêteront dès la fin du chargement.
AVERTISSEMENT!
• Par temps d’orage, débranchez le cordon d’alimentation
et le chargeur afin d’éviter les risques d’électrocution ou
d’incendie.
• Mettez la batterie à l’abri d’objets pointus tels que les
crocs ou les griffes d’un animal. Ceci peut provoquer un
incendie.
• Lorsque le téléphone est en charge, ne l’utilisez pas pour
appeler ou pour répondre aux appels. Ceci peut
provoquer un court-circuit et/ou entraîner un risque
d’électrocution ou d’incendie.
ATTENTION!
• Veillez à ne pas forcer le connecteur car cela peut
endommager le téléphone et/ou le chargeur de voyage.
• Branchez le chargeur de la batterie verticalement à la
prise murale.
• Si vous utilisez le chargeur de la batterie dans un pays
étranger, veillez à utiliser un adaptateur approprié.
• Ne retirez pas la batterie ou la carte SIM pendant le
chargement.
MISE EN ROUTE

MISE EN ROUTE
21
DÉBRANCHEMENT DU
CHARGEUR
1. Lorsque le chargement est terminé, l’indicateur de
chargement de la batterie s’arrête et ‘Pleine’
s’affiche.
2. Débranchez le chargeur de la prise de courant.
Débranchez le chargeur du téléphone en exerçant
une pression sur les touches grises situées de part
et d’autre de la prise et débranchez-la.
Remarque
v
Assurez-vous que la batterie est complètement
chargée avant d’utiliser le téléphone pour la
première fois.
v
Ne retirez pas la batterie ou la carte SIM
pendant le chargement.
v
Si la batterie n’est pas rechargée correctement,
éteignez votre téléphone et remettez-le en
marche, en utilisant la touche Marche/Arrêt,
puis rechargez la batterie. Lorsque vous retirez,
puis remettez en place la batterie, rechargez-la.

MISE EN MARCHE/ARRÊT DU
TÉLÉPHONE
Mise en marche du téléphone
1. Mettez en place la batterie dans le téléphone et
connectez ce dernier à une source d’alimentation
externe, telle que le chargeur de voyage, le chargeur
allume-cigare ou le kit mains libres voiture. Vous
pouvez aussi installer une batterie rechargée dans le
téléphone.
2. Appuyez sur
b
pendant quelques secondes,
jusqu’à ce que l’écran à cristaux liquides s’allume.
3. Selon l’état du paramètre Demander code PIN,
vous pouvez être invité à entrer votre code PIN.
Arrêt du téléphone
1. Appuyez sur
b
pendant quelques secondes,
jusqu’à ce que l’écran à cristaux liquides s’éteigne.
CODES D’ACCÈS
Vous pouvez utiliser les codes d’accès décrits dans
cette section pour éviter l’utilisation frauduleuse de
votre téléphone. Les codes d’accès (sauf les codes
PUK1 et PUK2) peuvent être modifiés à l’aide de la
fonction
Modifier les codes (Menu 7.4.5).
Code PIN (4 à 8 chiffres)
Le code PIN (Personal Identification Number, numéro
d’identification personnel) protège votre carte SIM
contre toute utilisation non autorisée. Le code PIN est
généralement fourni avec la carte SIM. Lorsque
l’option
Demander code PIN est activée, vous êtes
invité à entrer ce code chaque fois que vous mettez
votre téléphone en marche . Par contre, lorsque
l’option
Demander code PIN est définie sur
Désactiver, votre téléphone se connecte directement
au réseau sans demander ce code.
22
MISE EN ROUTE
MISE EN ROUTE

Code PIN2 (4 à 8 chiffres)
Le code PIN2, fourni avec certaines cartes SIM, est
nécessaire pour accéder à certaines fonctions telles
que Conseil sur les frais d’appel, Numéro fixe à
composer. Ces fonctions ne sont disponibles que si
votre carte SIM les prend en charge.
Code PUK1 (4 à 8 chiffres)
Le code PUK1 (PIN Unblocking Key, clé de déblocage
personnelle) est nécessaire pour modifier un code PIN
bloqué. Le code PUK1 peut être fourni avec la carte
SIM. Dans le cas contraire, contactez votre fournisseur
de service local pour obtenir le code. Si vous perdez le
code, contactez également votre fournisseur de
service local.
Code PUK2 (4 à 8 chiffres)
Le code PUK2, fourni avec certaines cartes SIM, est
nécessaire pour modifier un code PIN2 bloqué. Si vous
perdez le code, contactez également votre fournisseur
de service local.
Code de sécurité (4 à 8 chiffres)
Le code de sécurité empêche toute utilisation non
autorisée de votre téléphone. Ce code est nécessaire
pour supprimer toutes les entrées de téléphone et
pour activer le menu Réinitialiser réglages.
Le nombre par défaut est ‘
0000’. Vous pouvez
également le modifier à partir du menu
Sécurité.
CODE RÉSEAU
Le mot de passe d’interdiction est requis lorsque vous
utilisez la fonction Interdiction d'appels. C’est votre
opérateur réseau qui vous communique ce mot de
passe lorsque vous vous abonnez à ce service.
23
MISE EN ROUTE

FONCTIONS GÉNÉRALES
24
ÉMISSION ET RÉCEPTION D’UN
APPEL
Émission d’un appel
1. Assurez-vous que votre téléphone est allumé.
2. Entrez un numéro de téléphone avec l’indicatif de
zone.
v
Pour effacer l’intégralité du numéro, maintenez
enfoncée la touche d’effacement (
c
).
3. Pour appeler le numéro, appuyez sur la touche
d’envoi (
a
).
4. Pour mettre fin à la conversation, appuyez sur la
touche de fin/marche-arrêt (
b
) ou sur la
touche de fonction droite.
Émission d’un appel à l’aide de la touche
d’envoi
1. En mode veille, appuyez sur la touche d’envoi
(
a
). Les derniers numéros d’appels entrants,
sortants ou manqués s’affichent.
2. Sélectionnez le numéro souhaité à l’aide des
touches de navigation haut/bas.
3. Appuyez sur
a
.
Émission d’un appel international
1. Pour obtenir le préfixe international, maintenez la
touche
0
enfoncée. Le caractère ‘ + ’ sélectionne
automatiquement le code d’accès international.
2. Saisissez le code du pays, l’indicatif de zone, et le
numéro de téléphone.
3. Appuyez sur
a
.
Fin d’un appel
Une fois la conversation terminée, appuyez sur la
touche de fin/marche-arrêt (
b
).
FONCTIONS GÉNÉRALES

FONCTIONS GÉNÉRALES
25
Émission d’un appel à l’aide du
répertoire
Vous pouvez enregistrer les noms et numéros de
téléphone que vous appelez régulièrement dans la
mémoire de votre carte SIM et/ou de votre téléphone,
qui constitue le répertoire. Pour composer un numéro,
il vous suffit de rechercher le nom souhaité dans le
répertoire. Pour plus d’informations sur la fonction
Contacts.
Réglage du volume
Si vous souhaitez régler le volume de l’écouteur au
cours d’une communication, utilisez les touches
latérales (
o
). Appuyez sur la touche latérale
supérieure pour augmenter le volume et sur la touche
latérale inférieure pour le baisser.
Réception d’un appel
Lorsque vous recevez un appel, le téléphone sonne. Si
l’appelant peut être identifié, son numéro de
téléphone (ou son nom, s’il figure dans le répertoire)
s’affiche.
1. Pour décrocher un appel, ouvrez le clapet du
téléphone (quand l’ouverture clapet est définie
comme
Mode de réponse.(Menu 7.3.2)).
v
Pour rejeter un appel entrant, maintenez
enfoncée l’une des touches situées sur le côté
gauche du téléphone sans ouvrir le clapet.
2. Pour mettre fin à la conversation, refermez le clapet
ou appuyez sur la touche
b
.
R
emarque
v
Si l’option Toutes touches touche a été définie
comme mode de réponse, vous pouvez
répondre aux appels en appuyant sur
n’importe quelle touche, à l’exception de la
touche
b
ou de la touche de fonction
droite.
R
emarque
v
En mode veille, lorsque le clapet est fermé, les
touches latérales permettent de régler le
volume des touches.

26
Mode vibreur (accès direct)
Vous pouvez activer le mode Vibreur en faisant un
appui long sur la touche
k
.
Signal réseau
L’indicateur de signal ( ) qui s’affiche sur l’écran à
cristaux liquides de votre téléphone vous permet de
vérifier la force du signal. Celle-ci peut varier, surtout à
l’intérieur des bâtiments. Pour essayer d’améliorer la
réception, approchez-vous d’une fenêtre.
Saisie de texte
Vous pouvez entrer des caractères alphanumériques à
l’aide du clavier de votre téléphone. Pour ajouter un
contact, écrire un message, créer un message d’accueil
personnalisé ou des événements dans l’agenda, par
exemple, vous devez saisir du texte.
Vous pouvez choisir parmi les méthodes de saisie
suivantes :
FONCTIONS GÉNÉRALES
Mode T9
Ce mode vous permet de saisir des mots en
appuyant une seule fois sur une touche pour
entrer une lettre. Chaque touche du clavier
correspond à plusieurs lettres. Le mode T9
compare automatiquement les touches enfoncées
aux termes du dictionnaire interne, afin de
déterminer e mot juste. Ce mode de saisie
nécessite donc beaucoup moins de frappes que le
mode ABC classique. Il est également connu sous
le nom de saisie textuelle intuitive.
Mode ABC
Ce mode vous permet d’entrer des lettres en
appuyant une fois, deux fois, trois fois ou quatre
fois sur la touche correspondant à la lettre
désirée, jusqu’à ce que celle-ci apparaisse.
Mode 123 (chiffres)
Pour entrer un chiffre, appuyez une seule fois sur
la touche correspondante. Pour accéder au mode
123 dans un champ de texte, appuyez sur la
touche
=
jusqu’à ce que le mode 123
apparaisse.
FONCTIONS GÉNÉRALES

27
FONCTIONS GÉNÉRALES
Modification du mode de saisie de texte
1. Lorsque le curseur se
trouve dans un champ qui
autorise la saisie de
caractères, un indicateur
de mode de saisie s’affiche
dans le coin supérieur droit
de l’écran.
2. Vous pouvez modifier le
mode de saisie en appuyant sur la touche
=
.
Le mode de saisie en courss’affiche dans le coin
supérieur droit de l’écran.
v
Utilisation du mode T9
Le mode de saisie textuelle intuitive T9 vous permet
de saisir facilement des mots en utilisant au minimum
les touches du téléphone. À chaque touche enfoncée,
le téléphone affiche les caractères susceptibles d’être
entrés, en se basant sur son dictionnaire intégré. Vous
pouvez également ajouter de nouveaux mots au
dictionnaire. À mesure que de nouveaux mots sont
ajoutés, le mot est modifié pour afficher le mot le plus
proche du dictionnaire.
1. Lorsque vous êtes en mode de saisie textuelle
intuitive T9, commencez par taper un mot en
utilisant les touches de
2
à
9
. Appuyez une
seule fois par lettre.
- Le mot est modifié à mesure que vous entrez des
lettres. Ne tenez pas compte du texte qui s’affiche
à l’écran tant que le mot n’est pas entièrement
saisi.
- Une fois le mot saisi, si le mot affiché n’est pas
correct, appuyez une ou plusieurs fois sur la
touche de navigation bas pour consulter les autres
mots proposés.
Exemple: Appuyez sur
2284
3
pour entrer
Actif
.
Appuyez sur la touche de navigation bas pour
sélectionner le mot désiré.
- Si le mot souhaité ne figure pas dans la liste de
mots proposés, ajoutez-le en utilisant le sous-
menu Ajout dictionnaire.
Options Insérer
Mode de saisie
du texte

FONCTIONS GÉNÉRALES
28
- Vous pouvez choisir la langue du mode T9.
Appuyez sur la touche de fonction gauche
[Options], puis sélectionnez
Langue T9.
Sélectionnez la langue souhaitée pour le mode T9.
Vous pouvez également désactiver le mode T9 en
sélectionnant T9
Désactivé. Par défaut, le mode
T9 est activé sur votre téléphone.
2. Entrez le mot complet avant de modifier ou de
supprimer des caractères
3. Séparez chaque mot d’un espace en appuyant sur la
touche
0
. Pour supprimer des lettres, appuyez
sur la touche
c
. Pour supprimer tous les mots,
maintenez enfoncée la touche
c
.
v
Utilisation du mode ABC
Pour entrer du texte, utilisez les touches de
2
à
9
.
1. Appuyez sur la touche correspondant à la lettre
souhaitée :
- Une fois, pour la première lettre de la touche.
- Deux fois, pour la deuxième lettre de la touche.
- Etc.
2. Pour insérer un espace, appuyez une fois sur la
touche
0
Pour supprimer des lettres, appuyez
sur la touche
c
. Pour effacer l’ensemble du
texte entré, maintenez enfoncée la touche
c
.
R
emarque
v
Pour quitter le mode de saisie de texte sans
enregistrer le texte entré, appuyez sur la
touche
b
. Le téléphone passe en mode
veille.
FONCTIONS GÉNÉRALES

FONCTIONS GÉNÉRALES
29
Touche
Caractères dans l’ordre d’affichage
Majuscules Minuscules
. , / ? ! - : ‘ ‘’ 1 . , / ? ! - : ‘ ‘’ 1
A B C 2 À Ç Â Ä Á Ã Å Æ a b c 2 à ç â ä á ã å æ
D E F 3 É Ê Ë È d e f 3 é ê ë è
G H I 4 Î Ï Ì Í g h i 4 î ï ì í
J K L 5 j k l 5
M N O 6 Ô Œ Ñ Ö Ò Ó Õ m n o 6 ô œ ñ ö ò ó õ
P Q R S 7 ß p q r s 7 ß
T U V 8 Û Ù Ü Ú t u v 8 û ù ü ú
W X Y Z 9 w x y z 9
Touche Espace 0 Touche Espace 0
v
Utilisation du mode 123 (chiffres)
Le mode 123 vous permet de saisir des chiffres dans
un message textuel (par exemple, un numéro de
téléphone).
Appuyez sur les touches correspondant aux chiffres
souhaités avant de revenir manuellement au mode de
saisie de texte souhaité.
CONTACTS
Vous pouvez stocker des numéros de téléphone et les
noms des personnes auxquels ils correspondent dans
la mémoire de votre carte SIM.
En outre, vous pouvez stocker jusqu’à 1000 numéros
et noms dans la mémoire de votre téléphone.
Les mémoires de la carte SIM et du téléphone
s’utilisent toutes deux de la même façon dans le menu
Contacts.
R
emarque
v
Pour plus d’informations sur les caractères
disponibles via les touches alphanumériques,
reportez-vous au tableau ci-dessous.
1
2
3
4
5
6
7
8
9
0

30
MENU APPEL EN COURS
Votre téléphone comprend des fonctions de réglage
que vous pouvez utiliser au cours d’une
communication. Pour accéder à ces fonctions au cours
d’une communication, appuyez sur la touche de
fonction gauche [Options].
Pendant un appel
Le menu affiché sur l’écran du combiné pendant un
appel est différent du menu principal qui apparaît par
défaut en mode veille. Voici la description des options.
Volume
Pour augmenter ou diminuer le volume de l’écouteur.
Émission d’un second appel
Vous pouvez rechercher un numéro dans le répertoire
afin d’émettre un second appel. Appuyez sur la touche
de fonction droite, puis sélectionnez
Liste.
Pour enregistrer un numéro dans le répertoire au cours
d’une communication, appuyez sur la touche de
fonction droite, puis sélectionnez
Ajouter.
En attente
Pour mettre son correspondant en attente.
Reprendre
Lorsque le correspondant est en attente, à la place de
“en attente” s’affiche “reprendre”. Cela permet de
reprendre la conversation.
Permuter
Lors d’un double appel, permet de basculer d’un appel
à l’autre.
Terminer tout
Pour mettre fin à tous les appels.
Conférence
Voir explications page 32.
Messages
Pour accéder au menu Messages.
FONCTIONS GÉNÉRALES
FONCTIONS GÉNÉRALES

31
Haut-parleur activé
Vous pouvez activer la fonction mains libres de votre
téléphone en sélectionnant l'option Haut-parleur
activé. Vous pouvez également activer cette fonction
en appuyant sur la touche Ok pendant l'appel.
Réception d'un appel entrant
Pour répondre à un appel entrant lorsque le combiné
sonne, appuyez simplement sur la touche
a
[Envoyer]ou sur réponse.
Le combiné peut également vous prévenir lorsque
vous recevez un appel entrant en cours de
communication. Un son se fait entendre dans
l’écouteur, et l’écran affiche un second appel en
attente. Cette fonction, appelée Mise en attente, n’est
disponible que si votre réseau le prend en charge. Pour
plus d’informations sur l’activation et la désactivation
de cette fonction, reportez-vous à la rubrique Mise en
attente.
Refus d’un appel entrant
Vous pouvez refuser un appel entrant sans avoir à y
répondre. Il vous suffit pour cela d’appuyer sur la
touche
b
.
Activation de tonalité de touches
(DTMF) pendant un appel
Pour activer des tonalités DTMF pendant un appel,
appuyez sur la touche de fonction gauche, puis
sélectionnez
Envoi touches. Les tonalités DTMF
peuvent être désactivées de la même manière. Ces
tonalités permettent à votre téléphone d’utiliser un
standard automatisé.
Désactiver le microphone
Vous pouvez désactiver le microphone pendant un
appel en appuyant sur la touche [Options] et en
sélectionnant
Silence. Le microphone du poste GSM
peut être activé en sélectionnant
Retour. Quand le
microphone est désactivé, vous pouvez toujours
entendre la personne qui vous appelle sans qu’elle
vous entende.
FONCTIONS GÉNÉRALES

APPELS MULTIPARTIES OU
CONFÉRENCES TÉLÉPHONIQUES
Le service d’appels multiparties ou de conférences
téléphoniques vous permet d’avoir une conversation
simultanée avec plusieurs appelants, si votre opérateur
réseau prend en charge cette fonction. Il est possible
de configurer uniquement un appel multiparties
lorsque vous disposez d’un appel actif et d’un appel en
attente, et que vous avez répondu aux deux appels.
Dès qu’un appel multiparties est configuré, la
personne qui a configuré cet appel peut ajouter,
déconnecter ou séparer les appels (c’est-à-dire, retirer
un appel de l’appel multipartie tout en restant
connecté avec vous). Toutes ces options sont
disponibles à partir du menu Appel en conférence. Le
nombre maximum d’appelants dans un appel
multiparties est de cinq. Dès le départ, vous contrôlez
l’appel multiparties, et vous êtes le seul à pouvoir y
ajouter des appelants.
Émission d’un second appel
Vous pouvez rechercher un numéro dans le répertoire
afin d’émettre un second appel. Appuyez sur la touche
de fonction droite, puis sélectionnez
Liste. Pour
enregistrer un numéro dans le répertoire au cours
d’une communication, appuyez sur la touche de
fonction droite, puis sélectionnez
Ajouter.
Configuration d’une conférence
téléphonique
Mettez un appel en attente et lorsque l’appel en cours
est activé, appuyez sur la touche de fonction gauche
et sélectionnez
Conférence / Joindre tout.
Mise en attente d’une conférence
téléphonique
Appuyez sur la touche de fonction gauche, puis
sélectionnez
Conférence téléphonique/Tout mettre
en attente
.
FONCTIONS GÉNÉRALES
FONCTIONS GÉNÉRALES
32

Activation d’une conférence
téléphonique en attente
Appuyez sur la touche de fonction gauche, puis
sélectionnez
Conférence téléphonique/Tout
joindre
.
Ajout d’appels à la conférence
téléphonique
Pour ajouter un appel à une conférence téléphonique
en cours, appuyez sur la touche de fonction gauche et
sélectionnez
Conférence téléphonique/Tout
joindre
.
Affichage des appelants dans une
conférence téléphonique
Pour consulter à l’écran les numéros des appelants qui
participent à la conférence, utilisez les touches de
navigation haut/bas.
Conversation privée au cours d’une
conférence téléphonique
Pour avoir une conversation privée avec l’un des
appelants de la conférence, affichez à l’écran le numéro
de l’appelant avec qui vous souhaitez parler, puis
appuyez sur la touche de fonction gauche.
Sélectionnez
Conférence téléphonique/Privé pour
mettre en attente tous les autres appelants.
Fin d’une conférence téléphonique
L’appelant actuellement affiché d’une conférence
téléphonique peut être déconnecté en appuyant sur la
touche
b
. Pour mettre fin à une conférence
téléphonique, appuyez sur la touche de fonction
gauche, puis sélectionnez
Conférence téléphonique/
Fin multipartie
. Après avoir appuyé sur la touche de
fonction de gauche, sélectionnez
Conférence
téléphonique/Tout terminer
pour mettre fin à tous
les appels actifs et en attente.
FONCTIONS GÉNÉRALES
33

ARBORESCENCE DES MENUS
34
ARBORESCENCE DES MENUS
The following illustration shows the available menu structure and indicates the:
v
Number assigned to each menu option.
5.1 Nouveau message
5.2 Boîte de réception
5.3 Boîte d'envoi
5.4 Brouillons
5.5 Messagerie vocale
5.6 Message d’information
5.7 Modèles
5.8 Réglages
3.1 Réveil
3.2 Bluetooth
3.3 Calculatrice
3.4 Convertisseur
3.5 Fuseaux horaires
3.6 Modem
4.1 Contacts
4.2 Calendrier
4.3 Mémos
1.x.
1 Activer
1.x.
2 Personnaliser
1.x.
3 Renommer
2.
1 Appels en absence
2.
2 Appels reçus
2.
3 Appels émis
2.
4 Supprimer les appels
2.
5 Frais d’appel
2.
6 Info GPRS
1.
Profils audio
3. Outils 5. Messages
4. Agenda2.
Journal appels

ARBORESCENCE DES MENUS
35
7.1 Date et heure
7.2 Téléphone
7.3 Appels
7.4 Sécurité
7.5 Réseau
7.6 Activ. GPRS
7.7 Réinitialiser réglages
7.8 Etat mémoire
6.1 Photo
6.2
Caméra vidéo
6.3 Mes photos
6.4 Mes vidéos
6.5 MP3
6.6 Mémo vocal
6.7 Réglages
6. Multimédia 7. Réglages
8.
1 Internet
8.
2 Bouygtel
9.
1 Jeux et applis
9.
2 Images
9.
3 Sons
9.
4 Cl
é USB
8. Navigateur
9. Téléchargements

36
Votre téléphone comprend un ensemble de fonctions
qui vous permettent de le personnaliser. Ces fonctions
sont classées dans des menus et sous-menus,
accessibles via les deux touches de fonction [
d
]
et [
e
]. Chaque menu et sous-menu vous permet
de consulter et de modifier les paramètres d’une
fonction spécifique.
Les rôles des touches de fonction varient selon le
contexte. Le texte indiqué sur la dernière ligne de
l’écran, juste au-dessus de ces touches, indique la
fonction actuelle.
SÉLECTION DE FONCTIONS ET D'OPTIONS
SÉLECTION DE FONCTIONS ET D'OPTIONS
Pour accéder à la
liste des Contacts
disponibles,
appuyez sur la
touche de fonction
droite.
Pour accéder au
menu, appuyez sur
la touche de
fonction de
gauche.
'SRXEGXW
'SRXEGXW
'SRXEGXW
'SRXEGXW
'SRXEGXW
'SRXEGXW
'SRXEGXW
'SRXEGXW
'SRXEGXW
'SRXEGXW
'SRXEGXW
'SRXEGXW1IRY
1IRY
1IRY
1IRY
1IRY
1IRY
1IRY
1IRY
1IRY
1IRY
1IRY
1IRY

37
PROFILS AUDIO
PROFILS AUDIO
37
Dans Profils audio, vous pouvez régler et personnaliser
les sonneries du téléphone selon différents
événements, environnements ou groupes d’appelants.
Il existe six profils prédéfinis :
Vibreur seul, Silence,
Général
, Extérieur et Kit piéton. Chaque profil peut
être personnalisé.
Appuyez sur la touche de fonction [Menu] et
sélectionnez
Profils audio à l'aide des touches de
navigation haut/bas.
Activer
(
Menu 1.x.1)
1. La liste des profils s’affiche.
2. Dans la liste des
Profils audio, faites défiler
l’affichage pour sélectionner le profil que vous
souhaitez activer, puis appuyez sur la touche de
fonction gauche [OK] ou sur la touche OK.
3. Sélectionnez ensuite
Activer.
Personnaliser
(
Menu 1.x.2)
Accédez au profil de votre choix dans la liste. Après
avoir appuyé sur la touche OK ou sur la touche de
fonction gauche, sélectionnez
Personnaliser. L’option
des paramètres du profil s’ouvre.
Définissez l’option souhaitée.
v
Alerte appels: permet de définir le type de signal
souhaité pour les appels entrants.
v
Mélodie appels: permet de sélectionner dans une
liste la tonalité de sonnerie souhaitée.
v
Volume mélodie: Permet d'ajuster le volume de la
mélodie.
v
Alerte messages: permet de définir le type de
signal souhaité pour les messages.
v
Mélodie messages: permet de sélectionner le
signal des messages.
R
emarque
]
Pour préserver la qualité d'écoute lorsque le
clapet est ouvert, le volume maximal est réglé
sur 3.

38
v
Bip touches: permet de sélectionner la tonalité du
clavier.
v
Volume clavier: permet de régler le volume du son
du clavier.
v
Bip slide: vous permet de définir le bip du clapet en
fonction de l'environnement.
v
Volume effets sonores: permet de régler le volume
des effets sonores.
v
Volume marche/arrêt: permet de régler le volume
de la sonnerie lorsque vous allumez ou éteignez le
téléphone.
v
Réponse automatique (uniquement pour les
profils
Kit piéton): Cette fonction est activée
uniquement lorsque votre téléphone est connecté
au kit mains libres.
•
Désactivé: Le téléphone ne répondra pas
automatiquement.
•
Après 5 s: Après 5 secondes, le téléphone
répondra automatiquement.
•
Après 10 s: Après 10 secondes, le téléphone
répondra automatiquement.
Renommer
(
Menu 1.x.3
)
Vous pouvez renommer un profil avec le nom de votre
choix.
1. Pour modifier le nom d’un profil, accédez au profil
de votre choix dans la liste des profils, puis appuyez
sur la touche OK ou sur la touche de fonction
gauche et sélectionnez
Renommer.
2. Saisissez le nouveau nom du profil, puis appuyez sur
OK ou sur la touche de fonction [OK].
R
emarque
v
Les profils Vibreur seul, Silence et Kit piéton
ne peuvent pas être renommés.
PROFILS AUDIO
PROFILS AUDIO

39
JOURNAL APPELS
Vous pouvez consulter la liste des appels manqués,
des appels reçus et des numéros composés
uniquement si le réseau prend en charge le service CLI
(Calling Line Identification, identification de la ligne
appelante) dans la zone de couverture.
Le numéro et le nom (si disponibles) s’affichent tous
deux avec la date et l’heure de l’appel. Vous pouvez
également consulter la durée des appels.
APPELS EN ABSENCE
MENU 2.1
Cette option permet de consulter les 10 derniers
appels auxquels vous n’avez pas répondu. Vous pouvez
également :
•
Consulter le numéro, s’il est disponible, et l’appeler
ou l’enregistrer dans votre carnet d’adresses
•
Entrer un nouveau nom pour ce numéro et
l’enregistrer dans votre carnet d’adresses
•
•
Envoyer un message à ce numéro (SMS ou MMS)
•
Supprimer l’appel de la liste.
APPELS REÇUS
MENU 2.2
Cette option permet de consulter les 10 derniers
appels entrants. Vous pouvez également :
•
Consulter le numéro, s’il est disponible, et l’appeler
ou l’enregistrer dans votre carnet d’adresses
•
Entrer un nouveau nom pour ce numéro et
l’enregistrer dans votre carnet d’adresses
•
Envoyer un message à ce numéro (SMS ou MMS)
•
Supprimer l’appel de la liste.
APPELS ÉMIS
MENU 2.3
Cette option permet de consulter les appels émis
(numéros que vous avez appelés ou essayé d’appeler).
Vous pouvez également :
•
Consulter le numéro, s’il est disponible, et l’appeler
ou l’enregistrer dans votre carnet d’adresses.
•
Entrer un nouveau nom pour ce numéro et
l’enregistrer dans votre carnet d’adresses.
JOURNAL APPELS

JOURNAL APPELS
JOURNAL APPELS
40
•
Envoyer un message à ce numéro (SMS ou MMS).
•
Supprimer l’appel de la liste.
SUPPRIMER LES APPELS
MENU 2.4
Cette fonction vous permet de supprimer les listes des
Appels en absence et des Appels reçus. Vous pouvez
effacer la liste des
Appels émis et celle de Tous les
appels
en même temps.
FRAIS D’APPEL
MENU 2.5
Durée appel
(
Menu 2.5.1
)
Cette fonction vous permet de consulter la durée des
appels entrants et sortants. Vous pouvez également
réinitialiser les minuteurs d’appels. Les options de
minuterie disponibles sont les suivantes :
v
Dernier appel: durée du dernier appel.
v
Tous les appels: Durée totale de tous les appels
émis ou reçus depuis la dernière réinitialisation.
v
Appels reçus: durée des appels reçus.
v
Appels émis: durée des appels émis
v
Réinitialiser: Vous permet d’effacer la durée de
tous les appels en appuyant sur la touche de
fonction gauche
d
[Oui].
Coût de l’appel
(
Menu 2.5.2
)
Cette fonction vous permet de vérifier le coût de votre
dernier appel, de tous les appels, de conserver et de
réinitialiser les coûts. Pour réinitialiser le coût, vous
avez besoin du code PIN2.
Réglages
(
Menu 2.5.3
)
(dépendant de la carte SIM)
v
Tarif/unité: Vous pouvez spécifier le type de devise
et le prix unitaire. Contactez votre fournisseur de
service pour obtenir les prix unitaires. Pour
sélectionner la monnaie ou l’unité dans ce menu,
vous avez besoin du code PIN2.

41
v
Régl. crédit: Ce service du réseau vous permet de
limiter le coût de vos appels en sélectionnant des
unités de facturation. Si vous sélectionnez Lire, le
nombre d’unités restantes s’affiche. Si vous
sélectionnez Changer, vous pouvez modifier votre
limite de facturation.
v
Afficher durée: Ce service du réseau vous permet
de voir automatiquement le coût de vos derniers
appels. S’il est défini sur Activé, vous pouvez voir le
dernier coût à la fin de l’appel.
INFO GPRS
MENU 2.6
Vous pouvez vérifier la quantité de données
transférées via le réseau au moyen de l’option Info
GPRS. De plus, vous pouvez afficher le temps passé en
ligne.
Durée appel
(
Menu 2.6.1
)
Vous pouvez vérifier la durée du Dernier appel et de
Tous les appels. Vous pouvez également réinitialiser
les minuteurs d’appels.
Volume données
(
Menu 2.6.2
)
Vous pouvez vérifier les volumes
Envoyés(Dernier/Total), Reçus(Dernier/Total) ou
Tout et Réinitialiser.
JOURNAL APPELS

OUTILS
42
RÉVEIL
MENU 3.1
Vous pouvez définir jusqu’à 5 réveils pour être réveillé
à une heure spécifique.
1. Sélectionnez Activer et entrez l’heure de réveil de
votre choix.
2. Sélectionnez la période de répétition du réveil : Une
seule fois, Lun
`
Ven, Lun
`
Sam, Tous les jours.
3. Sélectionnez la sonnerie d’alarme de votre choix et
appuyez sur la touches
d
[OK].
4. Modifiez le nom de l’alarme et appuyez sur
d
[OK].
BLUETOOTH
MENU 3.2
Bluetooth est un dispositif qui permet aux dispositifs,
périphériques et ordinateurs compatibles qui se
trouvent à proximité de communiquer entre eux sans
filé Ce téléphone dispose d’une connectivité
Bluetooth intégrée qui vous permet de le connecter à
des dispositifs Bluetooth compatibles.
Lorsque vous recevez des données d'un périphérique
Bluetooth, une confirmation est requise.
Une fois le transfert confirmé, le fichier est copié sur
votre téléphone Selon son type, le fichier est stocké
dans l'un des dossiers suivants :
-
Fichier MP3: dossier MP3 (Menu 6.5.2)
-
Fichier vidéo (.3GP): dossier Vidéo (Menu 6.4)
-
Contact du répertoire (.VCF): Répertoire (Menu
4.1.1)
- Autre type de fichiers: dossier de stockage de
fichiers (Menu 9.4)
Périphériques associés
(
Menu 3.2.1
)
Vous permet d'afficher tous les périphériques
compatibles Bluetooth.
Si aucun périphérique est associé à votre téléphone,
Sélectionnez Ajouter. La liste des périphériques
Bluetooth trouvés à proximité de votre téléphone
s’affiche.
R
emarque
]
Pour des raisons de compatibilité, certains
périphériques peuvent ne pas prendre en
charge cette fonction.
OUTILS

OUTILS
43
Pour associer votre téléphone a un des périphériques,
Sélectionnez le périphérique voulu et appuyer sur
Associer. Une fenêtre s’affiche et vous demande de
taper un mot de passe. Choisissez un mot de passe de
4 chiffres et tapez le même mot de passe sur l’autre
périphérique Bluetooth. Le message Association
terminée s’affiche. Une fois votre périphérique associé,
vous avez les options suivantes :
v
Connexion: vous permet de vous connecter au
périphérique.
v
Ajouter: permet d’associer un nouveau
périphérique Bluetooth.
v
Renommer: vous permet de rennomer le
périphérique avec lequel vous êtes connecté.
v
Autoriser: permet de recevoir des alertes lorsque
les données sont reçues du périphérique.
v
Tous services: affiche la liste des services
disponibles sur le périphérique auquel vous êtes
connecté.
v
Supprimer: vous permet de supprimer l’association
a ce périphérique
v
Tout supprimer: vous permet de supprimer tous
les périphérique associés.
Pour échanger des données avec votre périphérique,
choisissez un fichier et sélectionnez Envoyer par
Bluetooth dans le menu Options.
Kit piéton
(
Menu 3.2.2
)
Vous permet d'afficher la liste des dispositifs mains-
libres compatibles Bluetooth.
Si aucun périphérique est associé a votre téléphone,
sélectionnez Ajouter. La liste des périphériques mains
libres Bluetooth trouvés à proximité de votre
téléphone s’affiche.
Pour associer votre téléphone a un des périphériques
mains libres, sélectionnez le périphérique voulu et
appuyer sur Associer.
Une fenêtre s’affiche et vous demande de taper un
mot de passe. Tapez le mot de passe de votre
périphérique mains libres. Le mesasge Association
terminée s’affiche.
Une fois votre périphérique mains libres associé, vous
avez les options suivantes :
v
Connexion: vous permet de vous connecter au
périphérique.
v
Ajouter: permet d’associer un nouveau
périphérique Bluetooth.

v
Renommer: vous permet de rennomer le
périphérique avec lequel vous êtes connecté.
v
Autoriser: permet de recevoir des alertes lorsque
les données sont reçues du périphérique.
v
Tous services: affiche la liste des services
disponibles sur le périphérique auquel vous êtes
connecté.
v
Supprimer: vous permet de supprimer l’association
a ce périphérique.
v
Tout supprimer: vous permet de supprimer tous
les périphériques associés.
Choisissez Connexion pour connecter votre
périphérique mains libres a votre téléphone. Vous
pouvez desormais avoir une conversation
téléphonique sur votre périphérique mains libres.
Réglages
(
Menu 3.2.3
)
v
Activer bluetooth: pour utiliser la fonction
Bluetooth de votre téléphone, vous devez d’abord
l’activer en selectionnant Actif. Si vous ne souhaitez
pas l’utiliser, sélectionnez Inactif.
v
Afficher mon téléphone: choisissez le paramètre
Afficher pour que les autres périphériques
Bluetooth puissent détecter votre téléphone
lorsque le bluetooth est activé. Si vous choisissez le
paramètre Masqué, les autres périphériques ne
pourront pas détecter votre téléphone.
v
Nom: permet de donner un nom a votre téléphone
ou de le renommer. Ce nom s’affiche sur l'écran des
autres périphériques, uniquement lorsque vous avez
activé la fonction Afficher.
CALCULATRICE
MENU 3.3
Ce menu permet d’exécuter des fonctions standard,
telles que
des additions, des soustractions, des
multiplications
et des divisions (
k
,
m
,
l
,
n
)
1. Entrez un nombre à l’aide des touches numériques.
2. Utilisez la touche de navigation pour sélectionner
un signe de calcul.
3. Entrez un nouveau nombre.
4. Appuyez sur la touche
d
[Résult.] pour afficher
le résultat.
OUTILS
44
OUTILS

3. Vous pouvez vérifier la valeur convertie de l’unité de
votre choix.
FUSEAUX HORAIRES
MENU 3.5
Vous pouvez consulter l’heure correspondant aux
principales villes du monde.
1. Sélectionnez la ville située dans le fuseau horaire en
appuyant sur la touche
k
,
l
.
2. Vous pouvez synchroniser l’heure actuelle sur
l’heure de la ville sélectionnée en appuyant sur
d
[Définir].
MODEM
MENU 3.6
Cette fonction vous permet d'utiliser le modem.
5. Appuyez sur la touche
d
[Réinit] ou entrez de
nouveaux nombres pour répéter la procédure ci-
dessus.
6. Pour quitter la
Calculatrice, appuyez sur
e
[Retour].
CONVERTISSEUR
MENU 3.4
Ce menu permet de convertir une mesure en l’unité de
votre choix.
1. Pour sélectionner l’un des septante types d’unité,
appuyez sur la touche
d
[OK].
2. Sélectionnez l’unité que vous souhaitez convertir en
appuyant sur les touches
i
et
j
.
R
emarque
v
Utilisez la touche pour effacer un chiffre ou un
signe. Si vous appuyez sur la touche
`
, vous
pouvez entrer une valeur négative. Vous
pouvez également entrer une valeur décimale
en appuyant sur la touche
=
.
45
OUTILS

CONTACTS
MENU 4.1
Liste
(
Menu 4.1.1)
(appel depuis l’annuaire)
1. Sélectionnez Rechercher en appuyant sur la touche
de fonction droite
d
[Sélect.] ou [OK].
2. Pour modifier, supprimer ou copier une entrée ou
associer une fonction vocale à une entrée,
sélectionnez
d
[Options]. Les menus suivants
apparaissent.
v
Modifier: Vous pouvez modifier le nom, le numéro,
le groupe et l’image en utilisant la touche de
navigation.
v
Ecrire SMS/MMS: Après avoir trouvé le numéro de
votre choix, vous pouvez lui envoyer un SMS/MMS.
v
Envoyer par Bluetooth: permet d’envoyer le
contact par Bluetooth.
v
Copier: Vous pouvez copier une entrée de la carte
SIM vers le téléphone ou du téléphone vers la carte
SIM.
v
N° principal: Vous pouvez sélectionner un numéro
de portable, de bureau ou de domicile que vous
appelez souvent. Si vous activez cette fonction, le
numéro principal apparaît en premier lors des
recherches.
v
Effacer: Ce sous-menu permet de supprimer une
entrée.
R
emarque
v
Pour lancer une recherche instantanée, entrez
le premier caractère du nom ou du numéro à
rechercher.
R
emarque
v
En mode veille, appuyez sur la touche de
fonction droite
e
[Contacts] pour
accéder directement au menu.
AGENDA
46
AGENDA

Ajouter
(
Menu 4.1.2
)
Cette fonction vous permet d’ajouter une entrée à
l’annuaire. La capacité de la mémoire du téléphone est
de 1000 entrées. La capacité de la mémoire de la
carte SIM dépend de votre fournisseur de services
mobiles. Eenregistrer des caractères sur la carte SIM
(le nombre de caractères dépend de la carte SIM
utilisée).
1. Sélectionnez
Ajouter nouveau en appuyant sur la
touche de fonction gauche
d
[OK] ou [OK].
2. Sélectionnez la mémoire dans laquelle enregistrer :
SIM ou Téléphone. Si vous choisissez d’enregistrer
dans la mémoire du téléphone, vous devez
sélectionner le numéro que vous souhaitez définir
en tant que numéro principal.
a. Appuyez sur
d
[OK] pour entrer un nom.
b. Appuyez sur
d
[Enreg.], puis entrez un
numéro.
c. Appuyez sur
d
[Enreg].
d. Vous pouvez définir un groupe pour l’entrée en
appuyant sur
k
,
l
:
e. Vous pouvez définir un caractère pour l’entrée en
appuyant sur
i
,
j
,
k
,
l
.
Groupes d’appel
(
Menu 4.1.3
)
Vous pouvez intégrer 20 membres maximum par
groupe. Vous pouvez dresser une liste pour 7 groupes.
v
Liste: Affiche les membres du groupe sélectionné.
v
Mélodie: Permet de définir une tonalité spécifique
lorsque les membres d’un groupe appellent.
v
Icône: Permet de sélectionner l’icône du groupe.
v
Ajouter: Vous pouvez ajouter des membres au
groupe. Les groupes ne doivent pas compter plus
de 20 membres.
v
Effacer: Vous pouvez supprimer un membre d’un
groupe. Cependant, le nom et le numéro de cette
personne restent enregistrés dans l’annuaire.
v
Renommer: Vous pouvez modifier le nom d’un
groupe.
AGENDA
47

48
N° abrégés
(
Menu 4.1.4
)
Vous pouvez assigner n’importe quelle touche (de
2
à
9
) à une entrée de la liste de noms. Vous
pouvez appeler directement une personne en
appuyant sur cette touche.
1. Ouvrez l’annuaire en appuyant sur la touche
e
[Contacts] en mode veille.
2. Accédez à
N° abrégé, puis appuyez sur
d
[OK].
3. Pour ajouter une numérotation abrégée,
sélectionnez Ajouter. Recherchez ensuite le nom
dans l’annuaire.
4. Sélectionnez l’option d’association d’un nom à la
numérotation abrégée, puis choisissez
Modifier ou
Effacer pour modifier le nom.
Réglages
(
Menu 4.1.5
)
1. Appuyez sur la touche
e
[Contacts] en mode
veille.
2. Accédez à
Réglages, puis appuyez sur la touche
d
[OK].
v
Mémoire
Faites défiler l’affichage pour sélectionner Mémoire,
puis appuyez sur la touche
d
[OK].
- Si vous sélectionnez
Variable, le téléphone vous
demande où stocker l’enregistrement lorsque vous
ajoutez une entrée.
- Si vous sélectionnez
SIM ou Téléphone, le
téléphone enregistre l’entrée sur la carte SIM ou le
téléphone.
v
Affichage
Faites défiler l’affichage pour sélectionner les
options d’affichage, puis appuyez sur
d
[OK]
-
Nom uniquement : affiche uniquement les noms
du répertoire.
- Avec images : affiche les noms du répertoire avec
les textes et les images.
- Nom & numéro : permet d’afficher le nom et le
numéro de téléphone dans le répertoire.
AGENDA
AGENDA

49
Copier tout
(
Menu 4.1.6
)
Vous pouvez copier/déplacer des entrées de la
mémoire de la carte SIM vers la mémoire du téléphone
et vice versa.
1. Ouvrez l’annuaire en appuyant sur
e
[Contacts] en mode veille.
2. Accédez à
Copier tout, puis appuyez sur la touche
d
[OK] pour ouvrir ce menu.
v
SIM vers tél. : Vous pouvez copier l’entrée de la
carte SIM vers la mémoire du téléphone.
v
Tél. vers SIM : Vous pouvez copier l’entrée de la
mémoire du téléphone vers la carte SIM.
3. Les sous-menus suivants apparaissent :
v
Conserver l’original : Lors de la copie, le numéro
d’origine est conservé.
v
Effacer original : Lors de la copie, le numéro
d’origine est effacé.
Tout supprimer
(
Menu 4.1.7
)
Vous pouvez supprimer toutes les entrées de la carte
SIM et du téléphone.
1. Appuyez sur la touche
e
[Contacts] en mode
veille et sélectionnez Tout supprimer, puis appuyez
sur la touche
d
[OK].
2. Sélectionnez ensuite une mémoire à effacer.
3. Entrez le code de sécurité et appuyez sur la touche
d
[OK] ou
e
[Retour].
Informations
(
Menu 4.1.8
)
v
SDN
Utilisez cette fonction pour accéder à une liste
spécifique de services fournis par votre opérateur
réseau (si cette fonction est prise en charge par
votre carte SIM).
1. Ouvrez l’annuaire en appuyant sur la
touche
e
[Contacts] en mode veille, puis
sélectionnez
Informations.
2. Accédez à
SDN, puis appuyez sur la touche
d
[OK] pour ouvrir ce menu.
AGENDA

AGENDA
50
3. Les noms des services disponibles apparaissent.
4. Utilisez
i
et
j
pour sélectionner un
service. Appuyez sur la touche
b
[Envoyer].
v
Etat mémoire
Cette fonction vous permet d’estimer la quantité de
mémoire utilisée et libre dans votre annuaire.
1. Ouvrez l’annuaire en appuyant sur
e
[Contacts] en mode veille. Sélectionnez
Informations en appuyant sur la touche
d
[OK].
2. Accédez à
État mémoire, puis appuyez sur la
touche
d
[OK].
v
Mes numéros (dépendant de la carte SIM)
Vous pouvez consulter et enregistrer votre numéro
personnel sur votre carte SIM.
CALENDRIER
MENU 4.2
Lorsque vous accédez à ce menu, un calendrier
apparaît. En haut de l’écran figurent des sections
relatives à la date. Lorsque vous changez la date, le
calendrier est mis à jour en fonction de la nouvelle
date. Vous sélectionnez le jour de votre choix à l’aide
d’un curseur en forme de carré. Si une barre apparaît
sous le calendrier, cela signifie qu’un agenda ou un
mémo est prévu ce jour. Cette fonction vous aide à
vous rappeler vos agendas et mémos. Vous pouvez
paramétrer une sonnerie d’alarme pour chaque note
que vous enregistrez.
Pour changer le jour, le mois et l’année :
Dans le sous menu calendrier, appuyez sur la touche
de fonction gauche
d
[Options] comme suit :
AGENDA
Touche Description Touche Description
Tous les ans
Toutes les semaines
Tous les mois Tous les jours
13
ij
`=
kl

51
Ajouter
(
Menu 4.2.1
)
Cette fonction vous permet d'ajouter un nouvel
agenda pour un jour choisi. Saisissez le sujet puis
appuyez sur la touche de fonction gauche
d
[OK].
Afficher agendas quotidiens
(Menu 4.2.2)
Vous pouvez consulter un agenda détaillé, autrement
dit l'intégralité du contenu de l'agenda que vous avez
configuré.
Supprimer anciens
(
Menu 4.2.3
)
Vous pouvez supprimer une ancienne entrée de
l’agenda.
Tout supprimer
(
Menu 4.2.4
)
Vous pouvez supprimer toutes les notes.
Aller à date
(Menu 4.2.5)
Vous pouvez afficher la date souhaitée en la saisissant
directement.
Définir sonnerie d'alarme
(Menu 4.2.6)
Si vous avez configuré l'alarme, l'alarme définie
sonnera.
MÉMOS
MENU 4.3
1. Sélectionnez le mémo en appuyant sur la touche de
fonction gauche
d
[OK].
2. Si la liste est vide, appuyez sur la touche de fonction
gauche
d
[Ajouter] pour en créer un nouveau.
3. Saisissez le mémo puis appuyez sur la touche de
fonction gauche
d
[OK].
R
emarque
v
Appuyez sur
=
pour modifier le mode de
saisie du texte.
AGENDA

MESSAGES
52
Appuyez sur la touche Menu (
d
) et sélectionnez
Messages à l’aide des touches de navigation.
NOUVEAU MESSAGE
MENU 5.1
Ecrire SMS
(
Menu 5.1.1
)
Votre téléphone peut recevoir des messages de
notification de message vocal et de SMS (Short
Message Service, Service de messages courts).
La messagerie vocale et les SMS sont des services
réseau. Pour plus d’informations, contactez votre
opérateur réseau.
Lorsque l’icone apparaît, vous avez reçu un
message vocal. Lorsque l’icone apparaît, vous avez
reçu un nouveau message texte. Lorsque la mémoire
message est pleine, un message s’affiche, l’icone
clignote et vous ne pouvez plus recevoir de nouveaux
messages. Pour supprimer des messages obsolètes,
utilisez l’option Effacer, dans le menu Boîte réception.
Lorsque de l’espace est de nouveau disponible dans la
mémoire message, tous les SMS non remis sont reçus
(à condition que suffisamment d’espace soit
disponible).
1. Tapez votre message. Pour plus d’informations
sur la saisie de texte, reportez-vous aux pages 26
(Saisie de texte).
2. Touche de fonction gauche [Options] pour
sélectionner l’option souhaitée.
Les options disponibles sont les suivantes :
v
Envoyer: permet d’entrer le numéro ou de le
sélectionner dans les contacts ou dans la liste des
numéros récents. Vous pouvez envoyer un message
à cinq personnes simultanément. Appuyez sur la
touche de fonction gauche [Liste]. Les options
suivantes apparaissent :
A
Contacts
B
Appels récents
C
Envoyer (s’affiche uniquement si vous avez entré
un numéro de téléphone)
v
Enregistrer dans brouillons: permet d’enregistrer
le message et de l’envoyer ultérieurement.
v
Police: permet de choisir la police d’écriture.
v
Couleur: permet de choisir la couleur du premier
plan et de l’arrière plan.
MESSAGES

53
MESSAGES
v
Alignement: permet de choisir l’alignement du
texte.
v
Ajout dictionnaire: permet d’enregistrer de
nouveaux mots dans le dictionnaire T9.
v
Langue T9: permet de sélectionner la langue du
mode de saisie T9. Vous pouvez également
désactiver le mode de saisie T9 en sélectionnant
‘T9 désactivé’.
v
Quitter: si vous sélectionnez cette option lors de la
rédaction de messages, vous pouvez quitter le
message et revenir à l’écran précédent. Le message
que vous avez rédigé n’est pas enregistré.
3. Lorsque vous saisissez un message, vous pouvez
également envoyer des pièces jointes en appuyant
sur la touche de fonction droite [Insérer].
v
Images: permet d’envoyer et de recevoir des
messages texte contenant des images, connus
également sous le nom de ‘messages image’.
Plusieurs images prédéfinies sont déjà disponibles
dans votre téléphone. Vous pouvez les remplacer
par de nouvelles images issues d’autres sources.
v
Sons: si disponible, permet de joindre un son à un
message court.
v
Modèles SMS: permet d’utiliser des modèles de
texte déjà définis dans votre téléphone.
v
Contacts: permet d’ajouter des numéros de
téléphone dans vos messages.
v
Symbole: permet de joindre des caractères
spéciaux.
v
Signature: vous pouvez joindre votre carte de
visite.

54
Ecrire MMS
(
Menu 5.1.2
)
Un message multimédia peut inclure du texte des
images et/ou des clips audio.
Cette fonction n’est disponible que si elle est prise en
charge par votre opérateur ou votre fournisseur de
services. Seuls les appareils présentant des fonctions
de message multimédia ou de message électronique
compatibles peuvent envoyer et recevoir des
messages multimédia.
1. Tapez le multimédia du message. Avec la touche de
fonction droite, vous pouvez enter des symboles,
des chiffres et des binettes. Vous pouvez également
sélectionner le mode de saisie de texte. Une fois le
multimédia saisi, appuyez sur la touche de fonction
gauche [Effectué].
2. Ajoutez une image et/ou du son. Vous pouvez
passer à la section suivante à l’aide des touches de
navigation haut/bas.
3. Vous pouvez ajouter une diapositive en déplaçant le
curseur sur , puis en appuyant sur la touche OK
ou sur la touche de fonction gauche [Sélect].
Vous pouvez également ajouter une diapositive à
l’aide de la touche de fonction droite [Menu].
4. Appuyez sur la touche de fonction droite [Option].
Les options suivantes sont disponibles.
v
Envoyer: prend en charge plusieurs numéros et
adresses email.
v
Aperçu: affiche le message multimédia que vous
souhaitez envoyer.
v
Enregistrer: enregistre le message multimédia
comme brouillon ou comme modèle.
v
Ajouter diapo: ajoute une diapo avant ou après la
diapo en cours.
v
Aller à diapo: permet d'accéder à la diapositive
précédente ou suivante.
v
Supprimer diapo: permet de supprimer les
diapositives actuelles.
v
Format diapo
- Définir la minuterie:
permet de définir le minuteur
pour la diapositive, le texte, l’image et le son.
v
Ajout dictionnaire: permet d'ajouter vos propres
mots dans le dictionnaire. Ce menu s’affiche
uniquement lorsque le mode d'édition est
Intuitif
(T9Abc/T9abc/T9ABC)
.
MESSAGES
MESSAGES

55
v
Langue T9: permet de sélectionner la langue pour le
mode de saisie T9. Vous pouvez également
désactiver le mode de saisie T9 en sélectionnant
“T9 désactivé”.
v
Quitter: si vous sélectionnez cette option lors de la
rédaction de messages, vous pouvez quitter le
message et revenir à l'écran précédent. Le message
que vous avez rédigé n'est pas enregistré.
5. Appuyez sur la touche de fonction droite "Insérer".
Vous pouvez insérer des Symboles, des Photos,
prendre un Nouvelle photo, un Son ou un Nouveau
son.
BOÎTE DE RÉCEPTION
MENU 5.2
Vous êtes averti lorsque vous recevez des messages.
Ils sont stockés dans la Boîte de réception. Les
messages de la boîte de réception sont identifiés par
des icônes. Pour plus d’informations, reportez-vous
aux instructions sur les icônes.
Si le téléphone affiche «Pas d’espace pour message
SIM», vous devez supprimer tous les messages SIM de
votre boîte d’envoi ou boîte de réception. Si le
téléphone affiche «Pas d’espace pour message», vous
pouvez libérer de l’espace dans chaque dossier en
supprimant les messages, les médias et les
applications.
MESSAGES
Icône Instructions sur les icônes
MMS
SMS
Message SIM
MMS lu
SMS lu
Message Push
Message Push lu
Notification de MMS

MESSAGES
56
Pour la notification de MMS, vous devez attendre le
téléchargement et le traitement du message.
Pour lire un message, sélectionnez un des messages en
appuyant sur la touche
d
.
v
Afficher: Vous pouvez afficher les messages reçus.
v
Supprimer: Vous pouvez supprimer le message
actuel.
v
Répondre: Vous pouvez répondre à l’expéditeur.
v
Transférer: Vous pouvez transférer le message
sélectionné à une autre personne.
v
Appeler: Vous pouvez rappeler l’expéditeur.
v
Informations: Vous pouvez afficher les informations
sur les messages reçus : l’adresse de l’expéditeur,
l’objet (uniquement pour les MMS), la date et heure
du message, le type, la taille du message.
v
Tout supprimer: Vous pouvez supprimer tous les
messages.
Options MMS spécifiques
v
Répéter: permet de répéter le message multimédia.
v
Recevoir: (notification de MMS uniquement). Les
messages multimédia, contrairement aux messages
SMS, doivent être téléchargés depuis le serveur
automatiquement ou manuellement. Le réseau
envoie au préalable une notification de MMS :
lorsque l'option Téléchargement auto est
désactivée ou lorsqu'une erreur s'est produite, vous
devez confirmer la réception en sélectionnant
[Recevoir]. Lorsque l'option Téléchargement auto
est activée, le message est automatiquement
téléchargé après réception de la notification.
Options spécifiques des messages téléchargés
v
Informations: permet d'afficher le contenu des
messages téléchargés.
v
Charger: Lance la connexion WAP vers l'URL
contenue dans le message téléchargé. Le téléphone
doit être configuré pour que les services WAP aient
accès aux messages téléchargés.
Message SIM
«Message SIM» signifie que le message a été
exceptionnellement stocké sur la carte SIM. Vous
pouvez déplacer ce message vers le téléphone.
MESSAGES

57
BOÎTE D'ENVOI
MENU 5.3
C’est ici que vous pouvez visualiser les messages
envoyés ou non. Pour le message envoyé, vous pouvez
voir l’état de livraison. La navigation est identique à
celle de la boîte de réception.
Lorsque vous utilisez le message qui a déjà été
envoyé.
v
Afficher: Vous pouver afficher les message envoyés
v
Transférer: Vous pouvez transférer le message
actuel à d’autres destinataires.
v
Supprimer: Vous pouvez supprimer le message
actuel.
v
Informations: Vous pouvez afficher les informations
sur les messages de la boîte d’envoi : l’adresse de
l’expéditeur, l’objet (uniquement pour les messages
multimédias), la date et heure du message, le type la
taille du message Rapport.
v
Tout supprimer: Permet de supprimer tous les
messages non envoyés.
Non envoyé
v
Afficher: permet d'afficher les messages non
envoyés.
v
Supprimer: Vous pouvez supprimer le message
actuel.
v
Envoyer: Vous pouvez transférer le message actuel
à d’autres destinataires.
v
Informations: Vous pouvez afficher les informations
sur les messages de la boîte d’envoi.
v
Envoyer tout: Vous pouvez envoyer tous les
messages qui ne l’ont pas encore été.
v
Tout supprimer: Permet de supprimer tous les
messages non envoyés.
MESSAGES
Icône Instructions sur les icônes
MMS envoyé
MMS non envoyé
MMS livraison confirmée
SMS envoyé
SMS non envoyé
SMS livraison confirmée

MESSAGES
58
BROUILLONS
MENU 5.4
En utilisant ce menu, vous pouvez prérégler jusqu'à
cinq messages de multimédia que vous utilisez
fréquemment .ce menu montre le préréglages de la
liste des messages multimédia.
Les options suivantes sont disponibles :
v
Afficher: Afficher le message que vous choisissez.
v
Modifier: Modifiez le message que vous choisissez.
v
Supprimer: Supprimez les messages que vous
choisissez.
v
Informations: Pour voir les informations du
message.
v
Tout supprimer: Supprimez tous les messages dans
le repertoire.
MESSAGERIE VOCALE
MENU 5.5
Ce menu présente un moyen rapide d’accéder à votre
messagerie vocale (si disponible via votre réseau).
Avant d’utiliser cette fonction, vous devez entrer le
numéro du serveur vocal que vous a communiqué
votre opérateur réseau.
Lorsqu’un nouveau message vocal est reçu, le
symbole apparaît à l’écran. Demandez à votre
fournisseur de services plus d’informations sur ses
services afin de configurer correctement votre
téléphone.
MESSAGE D’INFORMATION
MENU 5.6
Les messages du service d’info sont des messages
texte envoyés par le réseau aux utilisateurs de
téléphones portables. Ils fournissent toutes sortes
d’informations générales, telles que des bulletins
météorologiques, des informations sur le trafic routier,
les taxis, les pharmacies ou le cours de la Bourse.
MESSAGES

59
Chaque type d’information est associé à un numéro,
qui peut être obtenu auprès de votre opérateur
réseau. Lorsque vous recevez un message du service
d’info, un message contextuel indique que vous avez
reçu un nouveau message ou le message du service
d’info s’affiche directement. En mode veille, lorsque
vous consultez des messages du service d’info, vous
avez accès aux options suivantes :
Lire
(
Menu 5.6.1
)
Lorsque vous avez reçu un message de diffusion et
sélectionné
Lire pour afficher le message, celui-ci
s’affiche à l’écran.
Thèmes
(
Menu 5.6.2
)
Pour créer de nouvelles catégories, appuyez sur la
touche de fonction gauche [Options], puis
sélectionnez
Ajouter. Si vous avez déjà des catégories,
vous pouvez les désactiver, les modifier ou les
supprimer via la touche de fonction gauche [Options].
MODÈLES
MENU 5.7
La liste comprend des messages prédéfinis. Vous
pouvez consulter et modifier les modèles ou en créer
de nouveaux. Deux types de modèles sont disponibles
: SMS et MMS.
Modèles SMS
(
Menu 5.7.1
)
• Rappelez-moi SVP.
•
Je suis en retard, J’arriverai à
• Où êtes-vous ?
• Je suis en route.
•
Urgent. Appelez-moi.
•
Je t’aime.
Les options disponibles sont les suivantes:
v
Afficher: affiche le message sélectionné.
v
Supprimer: efface le modèle.
v
Ajouter: permet de créer un nouveau modèle.
v
Envoyer via: pour envoyer un message via SMS ou
MMS.
MESSAGES

MESSAGES
60
v
Modifier: permet d’écrire un nouveau message ou
de modifier un modèle de la liste des modèles de
texte.
v
Tout supprimer: efface tous les modèles.
Modèles MMS
(
Menu 5.7.2
)
Les options disponibles sont les suivantes.
v
Aperçu: permet d'afficher le brouillon du message
multimédia.
v
Enregistrer: permet d'enregistrer les messages
multimédia en tant que brouillon ou modèle.
v
Modifier sujet: vous pou vez éditer le sujet.
v
Ajouter diapo: permet d'ajouter une diapositive
avant ou après la diapositive actuelle.
v
Aller à diapo: permet d'accéder aux diapositives
précédentes ou suivantes.
v
Supprimer diapo: permet de supprimer la
diapositive sélectionnée.
v
Format diapo: permet de définir le minuteur pour la
diapositive, le texte, ou d'aligner le contenu du
message à droite, à gauche, en haut ou en bas.
v
Ajout dictionnaire: permet d'ajouter des termes au
dictionnaire. Ce menu s'affiche uniquement lorsque
le mode édition est Intuitif.
v
LangueT9: permet de sélectionner le mode de saisie
T9.
v
Quitter: permet de quitter le menu.
Signature
(Menu 5.7.3)
Cette option permet de réaliser votre propre carte de
visite. Tapez votre nom, votre numéro de téléphone
portable, votre numéro de téléphone professionnel,
votre numéro de fax et votre adresse email.
MESSAGES

61
RÉGLAGES
MENU 5.8
SMS
(
Menu 5.8.1
)
v
Types de message
Texte, Voix, Fax, Téléappel, X.400, E-mail,
ERMES
Généralement, le type de message est défini sur
Texte. Vous pouvez convertir votre texte dans
d’autres formats. Contactez votre fournisseur de
service pour connaître la disponibilité de cette
fonction.
v
Durée de validité: Ce service du réseau vous
permet de définir la durée de stockage de vos
messages texte dans le centre de messages.
v
Accusé de réception: Si vous avez défini sur Oui,
vous pouvez vérifier que votre message a été
correctement envoyé.
v
Réponse en cours de chargement : Lorsqu’un
message est envoyé, les destinataires peuvent
répondre et reporter le coût de la réponse sur votre
facture téléphonique.
v
Centre SMS: Si vous souhaitez envoyer le message
texte, vous pouvez recevoir l’adresse du centre SMS
via ce menu.
MMS
(
Menu 5.8.2
)
v
Priorité: Vous pouvez définir la priorité du message
sélectionné.
v
Durée de validité: Ce service du réseau vous
permet de définir la durée de stockage de vos
messages texte dans le centre de messages.
v
Accusé de réception: Si vous avez défini cette
option sur Oui dans ce menu, vous pouvez vérifier
que votre message a été correctement envoyé.
v
Récupération auto: Si vous sélectionnez Activé,
vous recevrez les messages multimédias
automatiquement. Si vous sélectionnez Désactivé,
vous recevrez uniquement un message de
notification dans la boîte de réception. Vous
pourrez ensuite vérifier cette notification. Si vous
sélectionnez Réseau local seulement, les messages
multimédias que vous recevez dépendent du réseau
local.
MESSAGES

MESSAGES
62
v
Profils: Si vous sélectionnez serveur de messages
multimédias, vous pouvez définir l’URL au serveur de
messages multimédias.
v
Message autorisés
Personnels:
Message personnel.
Publicités: Message commercial.
Informations: Informations nécessaires.
Centre messagerie vocale
(Menu 5.8.3)
Vous pouvez recevoir des messages vocaux si cette
fonction est prise en charge par le fournisseur de
service réseau. Lorsqu’un nouveau message arrive dans
la boîte vocale, le symbole apparaît à l’écran. Veuillez
demander à votre fournisseur de service réseau plus
d’informations sur ses services afin de configurer le
téléphone en conséquence.
v
Numéro abrégé: Vous pouvez écouter la boîte
vocale en sélectionnant Numéro abrégé.
v
Depuis l’étranger: Même si vous êtes à l’étranger,
vous pouvez écouter la boîte vocale si le service
itinérant est pris en charge.
Message d’information
(
MENU 5.8.4
)
v
Charger
Oui:
Si vous sélectionnez ce menu, votre téléphone
recevra les messages de service d’information.
Non: Si vous sélectionnez ce menu, votre téléphone
ne recevra plus les messages de service
d’information.
v
Alerte
Oui:
Votre téléphone émettra un bip à la réception
des numéros de message du service d’information.
Non: Votre téléphone n’émettra pas de bip à la
réception des messages du service d’information.
v
Langues
Vous pouvez sélectionner la langue voulue en
appuyant sur [Activé/Désactivé]. Les messages du
service d’information s’affichent désormais dans la
langue que vous avez sélectionnée.
Messages Push
(
Menu 5.8.5
)
Vous pouvez définir cette option selon que vous
souhaitez recevoir le message ou non.
MESSAGES

63
PHOTO
MENU 6.1
Cette application vous permet de prendre des photos.
Vous pouvez prendre une photo au format de votre
choix et l'utiliser dans votre répertoire, pour votre
écran d'accueil ou à d'autres fins. Dès que vous avez
pris la photo, vous pouvez l'envoyer par MMS ou
message électronique.
Appuyez sur la touche de fonction gauche [Options]
pour afficher les options de menu contextuel
suivantes.
v
Luminosité: détermine le degré de luminosité.
v
Taille: détermine la taille d'une image.
v
Retardateur: détermine le délai d'attente.
v
Qualité: détermine la qualité d'une image.
]
Balance des blancs: détermine la balance des
blancs.
v
Album: Quitter le mode App. photo.
]
Quitter: Permet de partir le mode de Photo.
v
Mode: permet d'activer la photographie en rafale
ou avec des cardres.
v
Effet: détermine les effets spéciaux appliqués à la
photo.
v
Flash: détermine le fonctionnement du flash.
v
Zoom: détermine la puissance du zoom.
CAMÉRA VIDÉO
MENU 6.2
Cette application vous permet d'enregistrer un clip
vidéo. Vous pouvez lire un fichier vidéo enregistré
pendant que vous utilisez cette fonction. Dès la fin de
l'enregistrement, vous pouvez envoyer le clip vidéo par
MMS ou message électronique.
Appuyez sur la touche de fonction gauche [Options]
pour afficher les options de menu contextuel
suivantes.
v
Luminosité: détermine le degré de luminosité.
v
Taille: détermine la taille d’enregistrement de la
video.
R
emarque
]
Les images fixes sont disponibles avec une
résolution de 128 x 160 pixels uniquement.
MULTIMÉDIA
MULTIMÉDIA

v
Retardateur: détermine la durée avant le début de
l’enregistrement.
v
Qualitè: détermine la qualité d'un clip vidéo.
]
Balance des blancs: détermine la balance des
blancs de la vidéo.
]
Temps d’enregistrement: détermine le temps
d'enregistrement de la vidéo.
v
Album: Quitter le mode Vidéo.
]
Quitter: Permet de partir le mode de Caméra vidéo.
v
Effet: détermine les effets spéciaux appliqués au clip
vidéo.
v
Flash: détermine le fonctionnement du flash.
v
Zoom: détermine la puissance du zoom.
MES PHOTOS
MENU 6.3
Permet de visionner et d’envoyer une image. En outre,
ce menu permet de sélectionner une image d’arrière-
plan.
Options
v
Miniature: permet d’afficher jusqu’à 9 vues
miniatures simultanément.
v
Envoyer par Bluetooth: vous pouvez envoyer
votre photo par Bluetooth.
v
Ecrire MMS: vous pouvez envoyer votre photo par
MMS.
v
Mettre en fond d'écran: permet définir une photo
comme papier peint.
v
Diaporama: permet de visualiser automatiquement
les images sous forme de diaporama.
v
Supprimer: permet de supprimer une image.
v
Modifier titre: permet de modifier le titre d’une
image.
v
Informations: permet d'afficher les informations
relatives au titre, à la taille, à la date et à l'heure.
MULTIMÉDIA
64
MULTIMÉDIA

65
MES VIDÉOS
MENU 6.4
Vous pouvez lire et envoyer un clip vidéo.
Options
v
Lire: permet de lire la vidéo.
v
Envoyer par Bluetooth: permet d'envoyer la vidéo
via Bluetooth.
v
Renommer: permet de modifier le titre d'une
vidéo.
v
Supprimer: permet de supprimer une vidéo.
v
Tout supprimer: permet de supprimer tous les
fichiers vidéo enregistrés dans ce dossier.
v
Informations: permet d'afficher les informations
relatives à la vidéo.
MP3
MENU 6.5
Le S5100 est équipé d'un lecteur MP3 intégré. Vous
pouvez écouter de la musique enregistrée au format
MP3 dans la mémoire de votre téléphone, en utilisant
un casque compatible ou le haut-parleur interne.
Le lecteur audio prend en charge :
• MPEG-1 Layer III: fréquence d'échantillonnage max.
: 48 KHz, débit binaire : de 32 Kbps à 192 Kbps,
stéréo
•
MPEG-2 Layer III: fréquence d'échantillonnage max.
: 24 KHz, débit binaire : de 32 Kbps à 160 Kbps,
stéréo
•
AAC: formats ADIF, ADTS (fréquence
d'échantillonnage jusqu'à 48 KHz)
R
emarque
v
En raison de la petite taille du haut-parleur,
dans certains cas, des distorsions peuvent se
produire, notamment lorsque le volume est au
niveau maximum et lorsque les basses sont très
présentes. Nous vous recommandons d'utiliser
le casque stéréo pour profiter pleinement de
votre musique.
MULTIMÉDIA

66
Vous pouvez transférer des fichiers MP3 d'un
ordinateur compatible vers la mémoire de votre
téléphone portable à l'aide de l'application Contents
Bank présente sur le CD-ROM fourni avec votre
téléphone.
Avant de connecter le téléphone au PC à l'aide du
câble USB (fourni avec votre téléphone), vous devez
installer un pilote. Pour plus d'informations, reportez-
vous au manuel du CD-ROM.
R
emarque
v
Le PC utilisé doit fonctionner sous Windows
98 Second Edition, Windows 2000, Windows
ME ou Windows XP.
v
Outre la possibilité de télécharger des fichiers
MP3 vers votre téléphone, vous pouvez
également télécharger sur un ordinateur les
photos prises avec votre téléphone, à l'aide du
câble USB fourni. Vous pouvez également
gérer votre répertoire, votre agenda ainsi que
vos mémos depuis votre ordinateur. Contactez
votre revendeur agréé pour connaître les
accessoires disponibles.
v
Pour télécharger des fichiers MP3 sous
Windows 2000, nous vous conseillons de
définir les options de dossier comme suit :
Mode Web
o
Utiliser les dossiers classiques
de Windows(I).
R
emarque
v
Le modèle S5100 ne prend pas en charge le
débit variable des fichiers MP3 et AAC.
En conséquence, le format de fichier MP3 à
débit variable ne peut être converti en AAC.
MULTIMÉDIA
MULTIMÉDIA

67
Lecteur MP3
(Menu 6.5.1)
1. Appuyez sur Menu MP3, puis sélectionnez Lecteur
MP3.
2. Appuyez sur la touche de fonction gauche
d
[Options] pour accéder aux menus suivants:
v
Liste d'écoute: Vous permet de sélectionnér le
autre ficher MP3 lors de lecture la ficher.
v
Répétition de plage: cette fonction permet de
répéter la zone musicale souhaitée en appuyant sur
la touche d'activation du menu.
v
Définir comme sonnerie: ce menu vous permet de
définir le fichier MP3 en tant que sonnerie. Vous
pouvez également le définir comme sonnerie dans le
profil.
v
Réglages
- Equalizer
Ce menu vous permet d'ajuster l'equalizer en
écoutant la musique. Ce téléphone comprend six
menus prédéfinis. Lorsque vous accédez à ce
menu, la valeur actuelle de l'equalizer s'affiche.
- Mode de lecture
Ce menu vous permet de définir le mode de
lecture.
- Lecture aléatoire
Vous pouvez écouter tous les fichiers MP3 au
hasard.
- Effets visuels
Vous pouvez sélectionner les menus suivants :
Lumière, Rebond et Guitariste.
- Réglage slide
Continuer lecture
Lorsque le clapet est fermé sur jouer, le mode de
lecture est continué sans une pause.
Arrêter lecture
Quand le clapet est fermé sur jouer, vous permez
arrêter le mode de lecture.
Liste d’écoute
(Menu 6.5.2)
Ce menu vous permet d'afficher la liste d'écoute dans
son intégralité. Vous pouvez basculer d'une piste à
l'autre en appuyant sur la touche de navigation.
De plus, si vous sélectionnez le menu Options, vous
MULTIMÉDIA

MULTIMÉDIA
68
pouvez supprimer un fichier ou en afficher les
informations.
Réglages
(Menu 6.5.3)
ce menu permet de définir les éléments suivants :
Equalizer, Mode de lecture, Lecture aléatoire Effets
visuels et Réglage slide.
MÉMO VOCAL
MENU 6.6
La fonction Mémo vocal permet d'enregistrer jusqu'à
10 messages vocaux ; chaque mémo peut durer
jusqu'à 20 secondes.
Enregistrer
(
Menu 6.6.1
)
Vous pouvez enregistrer un mémo vocal dans le menu
Mémo vocal.
1. Une fois l'enregistrement démarré, l'enregistrement
du message et le temps restant sont affichés.
2. Pour arrêter l'enregistrement, appuyez sur la touche
de fonction gauch
d
[Enreg.].
3. Entrez le titre du mémo vocal. Puis appuyez sur la
touche de fonction gauch
d
[OK].
Voir liste
(
Menu 6.6.2
)
Le téléphone affiche la liste des mémos vocaux. Vous
pouvez
écouter et supprimer le mémo vocal
enregistré.
R
emarque
v
Le contenu musical est protégé par un
copyright dans des lois et des traités nationaux
et internationaux. La copie ou la reproduction
d'un contenu musical peut donc être soumise à
l'obtention d'autorisations ou de licences
particulières.
Dans certains pays, la législation en vigueur
interdit la copie à usage privé de tout contenu
protégé par un copyright. Veuillez vous
conformer à la législation de votre pays de
résidence avant d'utiliser d'un tel contenu.
MULTIMÉDIA

69
RÉGLAGES
MENU 6.7
Photo
(
Menu 6.7.1
)
v
Enregistrement auto: si vous sélectionnez Activé,
les images seront automatiquement enregistrées
sans que la barre de menus ne s'affiche.
v
Supprimer toutes photos: ce menu vous permet
de supprimer toutes les photos après confirmation.
Caméra vidéo
(Menu 6.7.2)
v
Supprimer toutes vidéos: ce menu permet de
supprimer tous les fichiers vidéo.
MULTIMÉDIA

Vous pouvez définir les menus suivants à votre gré.
1. Appuyez sur la touche
d
[Menu] en mode veille.
2. Appuyez sur la touche
7
pour accéder
directement aux Réglages.
DATE ET HEURE
MENU 7.1
Vous pouvez définir des fonctions relatives à la date et
à l’heure.
Date
(
Menu 7.1.1
)
v
Définir date: Vous pouvez entrer la date du jour.
v
Format date: Vous pouvez définir les formats de
date suivants : JJ/MM/AAAA, MM/JJ/AAAA,
AAAA/MM/JJ
(J : Jour / M : Mois / A : Année).
Heure
(
Menu 7.1.2
)
v
Définir heure: Vous pouvez entrer l’heure actuelle.
v
Format heure: Vous pouvez définir le format
d’heure sur 24 heures ou 12 heures.
TÉLÉPHONE
MENU 7.2
Vous pouvez définir des fonctions relatives au
téléphone.
Affichage
(
Menu 7.2.1
)
v
Fond d’écran : Vous pouvez sélectionner des
images d’arrière-plan en mode veille.
RÉGLAGES
70
RÉGLAGES

Écran principal
Vous pouvez sélectionner une image ou une
animation en fond d'écran en appuyant sur
k
ou
l
.
2éme écran
Vous pouvez sélectionner une image ou une
animation comme fond d'écran.
v
Message d’accueil: Si vous sélectionnez Activer,
vous pouvez modifier le texte affiché en mode veille.
v
Rétroéclairage: Vous pouvez définir la durée de
fonctionnement de l’éclairage de l'écran interne ou
externe.
v
Nom du réseau: Si vous sélectionnez Activer, le
nom du réseau (le nom du fournisseur de services)
apparaît dans l'écran interne.
Thèmes
(Menu 7.2.2)
Vous permet de faire votre choix parmi 4 jeux de
couleurs Passion, City, Arc en ciel et Zen.
Langue
(
Menu 7.2.3
)
Vous pouvez modifier la langue des textes affichés sur
votre téléphone. Vous avez le choix entre les langues
suivantes : English / Deutsch / Français / Español /
Italiano / Português / Nederlands /
Ελληνικ′α
/
Suomi / Svenska / Norsk / Dansk / Türkçe.
APPELS
MENU 7.3
Vous pouvez définir le menu correspondant à un appel
en appuyant sur la touche
d
[OK] dans le menu
Réglages.
Renvoi d’appel
(
Menu 7.3.1
)
Le service de transfert d’appel vous permet de
transférer des appels vocaux entrants, des appels de
fax et des appels de données vers un autre numéro.
Pour plus de détails, contactez votre fournisseur de
services.
v
Tous les appels vocaux: Transfère tous les appels
vocaux, sans conditions.
71
RÉGLAGES

72
v
Si occupé: Transfère les appels vocaux lorsque le
téléphone est en cours d’utilisation.
v
Si pas réponse: Transfère les appels vocaux
auxquels vous ne répondez pas.
v
Si non disponible: Transfère les appels vocaux
lorsque le téléphone est éteint ou hors de la zone de
couverture.
v
Appels données: Transfère vers un numéro avec
une connexion PC, sans conditions.
v
Appels fax: Transfère vers un numéro avec une
connexion fax, sans conditions.
v
Tout annuler: Annule tous les services de transfert
d’appel.
Sous-menus
Les menus de Renvoi d’appel disposent des sous-
menus suivants.
• Activer
Active le service correspondant.
Boîte vocale
Transmet les appels au centre de messagerie. Cette
fonction n’apparaît pas dans les menus Tous les
appels de données et Tous les appels de fax.
Nouveau numéro
Permet d’entrer le numéro vers lequel effectuer le
transfert.
N° favoris
Vous pouvez consulter les 5 derniers numéros
transférés.
• Annuler
Désactive le service correspondant.
•
Afficher l’état
Affiche l’état du service correspondant.
RÉGLAGES
RÉGLAGES

73
Mode de réponse
(
Menu 7.3.2
)
v
Ouverture slide: Si vous sélectionnez ce menu, vous
pouvez recevoir un appel entrant en ouvrant le slide.
v
Toute touche: Si vous sélectionnez ce menu, vous
pouvez recevoir un appel en appuyant sur n’importe
quelle touche, à l’exception de la touche
b
[Terminer].
v
Touche décrocher: Si vous sélectionnez ce menu,
vous pouvez recevoir un appel en appuyant sur la
touche
a
[Envoyer].
Envoyer mon numéro
(
Menu 7.3.3
)
(fonction dépendant du réseau et de
l’abonnement)
v
Définir par réseau: Si vous sélectionnez ce menu,
vous pouvez envoyer votre numéro de téléphone à
l’une des deux lignes d’un correspondant disposant
d’un abonnement deux lignes.
v
Activé: Vous pouvez choisir d’envoyer votre numéro
de téléphone à votre correspondant. Votre numéro
apparaît alors sur le téléphone du correspondant.
v
Désactivé: Votre numéro n’apparaît pas sur le
téléphone du correspondant.
Double appel
(
Menu 7.3.4
)
(fonction dépendante du réseau)
v
Activer: Si vous sélectionnez Activer, vous pouvez
accepter un appel en attente (reçu).
v
Annuler: Si vous sélectionnez Annuler, vous ne
pouvez pas reconnaître l’appel en attente (reçu).
v
Afficher l’état: Affiche l’état de l’appel en attente.
Bip minute
(
Menu 7.3.5
)
Si vous sélectionnez Activé, vous pouvez contrôler la
durée de l’appel via l’émission d’un bip toutes les
minutes lors d’un appel.
Rappel auto
(
Menu 7.3.6
)
v
Activé: Si cette fonction est activée, le téléphone
essaie automatiquement de recomposer le numéro
en cas d’échec de la connexion d’un appel.
RÉGLAGES

RÉGLAGES
74
v
Désactivé: Votre téléphone n’effectue aucune
tentative de recomposition si l’appel d’origine n’a
pas été connecté.
SÉCURITÉ
MENU 7.4
Demander code PIN
(
Menu 7.4.1
)
Dans ce menu, vous pouvez paramétrer le téléphone
afin qu’il demande le code PIN de votre carte SIM
lorsque le téléphone est allumé. Lorsque cette
fonction est activée, vous êtes invité à entrer le code
PIN.
1. Sélectionnez Demander code PIN dans le menu
Réglages, puis appuyez sur la touche
d
[OK].
2. Sélectionnez Activer/Désactiver.
3. Pour modifier ce paramètre, vous devez entrer votre
code PIN lorsque vous allumez le téléphone.
4. Si vous entrez un code PIN erroné plus de 3 fois de
suite, le téléphone est verrouillé. Dans ce cas, vous
devez entrer votre code PUK.
5. Vous disposez de 10 tentatives maximum pour
entrer votre code PUK. Si vous entrez un code PUK
erroné plus de 10 fois de suite, votre téléphone ne
peut plus être déverrouillé. Vous devez alors
contacter votre fournisseur de services.
Verrouillage téléphone
(Menu 7.4.2)
Pour éviter toute utilisation non autorisée du
téléphone, vous pouvez utiliser un code de sécurité.
À chaque fois que vous allumez votre téléphone, ce
dernier vous invite à entrer le code de sécurité, si vous
définissez le verrouillage du téléphone sur Activé.
Si vous définissez le verrouillage du téléphone sur
Automatique, votre téléphone ne demande le code de
sécurité que lorsque vous changez de carte SIM.
Interdiction d'appels
(
Menu 7.4.3
)
Le service d’interdiction d’appels empêche votre
téléphone de passer ou de recevoir certaines
catégories d’appels. Cette fonction requiert un mot de
passe d’interdiction d’appels. Le menu correspondant
comporte les sous-menus suivants.
RÉGLAGES

75
v
Tous apples sortants: Le service d’interdiction
s’applique à tous les appels sortants.
v
Vers l’international: Le service d’interdiction
s’applique à tous les appels vers l’international.
v
Vers l’international quand itinérant: Le service
d’interdiction s’applique à tous les appels vers
l’international, à l’exception du réseau du pays
d’origine.
v
Entrant quand à l’étranger: Le service
d’interdiction s’applique à tous les appels entrants
lorsque l’utilisateur est itinérant.
v
Tout annuler: Ce sous-menu permet d’annuler tous
les services d’interdiction.
v
Modifier le mot de passe: Ce sous-menu permet de
modifier le mot de passe du service d’inter diction
d’appels.
Appels restreints
(
Menu 7.4.4
)
(fonction dépendante de la carte SIM)
Vous pouvez restreindre vos appels sortants à des
numéros de téléphone sélectionnés. Les numéros sont
protégés par votre code PIN2.
v
Activer: Vous pouvez restreindre vos appels
sortants à des numéros de téléphone sélectionnés.
v
Désactiver: Vous pouvez désactiver la fonction de
numéro fixe.
v
Liste de numéros: Vous pouvez visualiser la liste
des numéros enregistrés en tant que numéros fixes.
Modifier les codes
(
Menu 7.4.5
)
PIN est l’abréviation de Personal Identification
Number (numéro d’identification personnel) ; ce
numéro permet d’empêcher l’utilisation du téléphone
par une personne non autorisée.
Vous pouvez modifier les codes d’accès :
Code PIN2,
Code de sécurité
.
1. Pour modifier le code de sécurité ou les codes PIN2,
entrez votre code d’origine, puis appuyez sur la
touche
d
[OK].
2. Entrez votre nouveau code de sécurité ou PIN2 et
vérifiez-le.
RÉGLAGES

RÉGLAGES
76
RÉSEAU
MENU 7.5
Vous pouvez sélectionner un réseau qui sera
enregistré automatiquement ou manuellement.
Généralement, la sélection du réseau est définie sur
Automatique.
Sélection du réseau
(Menu 7.5.1)
v
Automatique: Si vous sélectionnez le mode
automatique, le téléphone recherche et sélectionne
automatiquement un réseau à votre place. Une fois
le mode automatique sélectionné, le téléphone est
défini sur
Automatique même quand le téléphone
est éteint et allumé.
v
Manuelle: Le téléphone recherche la liste des
réseaux disponibles et vous la présente. Vous
pouvez alors sélectionner le réseau de votre choix,
dans la mesure où ce dernier dispose d’une clause
d’itinérance avec l’opérateur réseau de votre pays
d’origine. Le téléphone vous invite à sélectionner un
autre réseau s’il n’arrive pas à accéder au réseau
sélectionné.
v
Préféré: Vous pouvez dresser la liste de vos réseaux
préférés ; le téléphone tente alors de vous
enregistrer auprès des réseaux de la liste avant de
vous proposer d’autres réseaux. Vous créez cette
liste à partir de la liste prédéfinie des réseaux
connus de votre téléphone.
Sélection de bande
(Menu 7.5.2)
Permet de choisir entre deux réseaux :
EGSM/DCS(900/1800) of EGSM/PCS
(900/1900).
ACTIV. GPRS
MENU 7.6
Vous pouvez définir différents modes d'utilisation du
service GPRS.
RÉINITIALISER RÉGLAGES
MENU 7.7
Vous pouvez initialiser tous les paramètres d’usine par
défaut. Pour activer cette fonction, le code de sécurité
est nécessaire.
RÉGLAGES

ETAT MÉMOIRE
MENU 7.8
Mémoire interne
(Menu 7.8.1)
Cette fonction affiche l'état de la mémoire du
téléphone.
Mémoire Multimédia
(Menu 7.8.2)
Cette fonction affiche l'état de la mémoire multimédia
du téléphon.
77
RÉGLAGES

Vous avez accès à différents services WAP (Wireless
Application Protocol : protocole d’application sans fil),
tels que les services bancaires en ligne, les actualités, la
météo et le trafic aérien. Tous ces services ont été
spécialement conçus pour les téléphones portables et
sont gérés par des fournisseurs de services WAP.
Consultez votre opérateur réseau et/ou votre
fournisseur de services pour plus d’informations sur la
disponibilité et les tarifs des services WAP proposés.
Vous obtiendrez également les instruc-tions
nécessaires à l’utilisation de ces services.
Une fois la connexion établie, la page d’accueil
s’affiche. Son contenu dépend du fournisseur de
services. Pour quitter le navigateur à tout moment,
appuyez sur la touche
b
. Le téléphone passe alors
en mode veille.
Utilisation du navigateur WAP
Vous pouvez surfer sur le WAP à l’aide des touches du
téléphone ou du menu du navigateur WAP.
Utilisation des touches du téléphone
Lorsque vous surfez sur Internet, les touches du
téléphone ont d’autres propriétés qu’en mode
téléphone.
Utilisation du menu du navigateur WAP
De nombreuses options sont disponibles lors de la
navigation sur Internet mobile.
R
emarque
v
Les menus peuvent varier en fonction de la
version de votre navigateur WAP.
NAVIGATEUR
78
Touche Description
Permettent de faire défiler chaque
ligne de la zone de contenu
Permet de revenir à la page
précédente
Permet de sélectionner des options et
de confirmer des actions
ij
c
h
NAVIGATEUR

79
INTERNET
MENU 8.1
Page d’accueil
(
Menu 8.1.1
)
Ce menu permet d’accéder à la page d’accueil. La page
d’accueil est le site qui se trouve dans le profil activé.
Elle est définie par le opérateur par défaut si vous ne
l’avez pas fait dans le profil activé.
Favoris
(
Menu 8.1.2
)
Ce menu permet de stocker l’URL de vos pages Web
préférées pour y accéder facilement ultérieurement.
Votre téléphone intègre plusieurs favoris pré-installés
que vous ne pouvez pas supprimer.
Pour créer un favori
1. Appuyez sur la touche de fonction gauche
d
[Options].
2. Sélectionnez Ajouter nouveau et appuyez sur la
touche OK.
3. Après avoir saisi l’URL et le titre souhaités, appuyez
sur la touche OK.
*
Astuce: les touches “
1
” et
`
permettent
d’entrer des symboles. Pour saisir
. ,
appuyez sur “
1
”.
Une fois un favori sélectionné, vous avez accès aux
options suivantes.
v
Se connecter: permet de se connecter au favori
sélectionné.
v
Ajouter: permet de créer un nouveau favori.
v
Modifier: permet de modifier l’URL et/ou le titre du
favori sélectionné.
v
Effacer: permet de supprimer le favori sélectionné.
v
Tout supprimer: permet de supprimer tous les
favoris.
Aller à l’URL
(Menu 8.1.3)
Vous pouvez vous connecter directement au site de
votre choix. Après avoir saisi une URL, appuyez sur la
touche OK.
NAVIGATEUR

NAVIGATEUR
80
Réglages
(Menu 8.1.4)
Profils
Un profil est constitué des informations réseau
requises pour se connecter au WAP.
Chaque profil comporte les sous-menus suivants :
v
Activer: permet d’activer le profil sélectionné.
v
Réglages: permet de modifier les paramètres WAP
du profil sélectionné.
- Page d’accueil: permet d’entrer l’adresse (URL)
d’un site que vous souhaitez utiliser comme page
d’accueil. Vous n’avez pas besoin d’entrer la
formule
http:// au début de chaque URL : le
navigateur WAP l’insère automatiquement.
- Type service: permet de définir le service de
données de support.
1 Données
2 GPRS
Paramètres de données:
accessible uniquement si
vous sélectionnez Paramètres de données comme
support/service.
Numéro d’appel: entrez le numéro de téléphone à
composer pour accéder à la passerelle WAP.
ID utilisateur: identité des utilisateurs pour votre
serveur de composition (et NON pour la passerelle
WAP).
Mot de passe: mot de passe requis par votre
serveur de composition (et NON par la passerelle
WAP) afin de vous identifier.
Type d’appel: permet de sélectionner le type
d’appel de données, Analogique ou Numérique
(RNIS).
Temps d’attente: vous devez entrer une période
d’attente. Le service de navigation WAP devient
indisponible si aucune donnée n’est entrée ou
transférée au cours de la période définie.
R
emarque
]
Si la carte SIM prend en charge les services SAT
(SIM Application Toolkit), ce menu correspond
au nom de service spécifique de l'opérateur
stocké sur la carte SIM.
Si la carte SIM ne prend pas en charge les
services SAT, ce menu correspond à Profils.
NAVIGATEUR

81
Vitesse d’appel: vitesse de votre connexion de
données, 9600 ou 14400.
- Activation GPRS: les paramètres de ce service ne
sont disponibles que si vous avez sélectionné
GPRS comme service de support.
APN: permet d’entrer l’APN du service GPRS.
ID utilisateur: identité des utilisateurs pour votre
serveur APN.
Mot de passe: mot de passe requis par votre
serveur APN.
-
Paramètres proxy
Proxy:
Activé/Désactivé
Adresse IP: permet d’entrer l’adresse IP du serveur
proxy auquel vous accédez.
Numéro de port : permet d’entrer le port proxy.
-
Paramètres DNS
Serveur principal:
permet d’entrer l’adresse IP du
serveur DNS principal auquel vous accédez.
Serveur secondaire: permet d’entrer l’adresse IP
du serveur DNS secondaire auquel vous accédez.
v
Renommer: permet de modifier le nom du profil.
v
Ajouter: permet d’ajouter un nouveau profil.
v
Supprimer: permet de supprimer de la liste le profil
sélectionné.
Cache
Permet de décider si la tentative de connexion doit
d’abord passer par le cache ou non.
Cookie
Permet de vérifier si un cookie est utilisé ou non.
Effacer cache
Permet d’effacer toutes les données enregistrées dans
le cache.
Supprimer cookie
Permet d’effacer toutes les données enregistrées dans
le cookie.
Certificats
Une liste répertoriant les certificats disponibles
s’affiche.
NAVIGATEUR

82
v
Autorité: permet de consulter la liste des certificats
d’autorité stockés dans votre téléphone.
v
Personnel: permet de consulter la liste des
certificats personnels stockés dans votre téléphone.
SERVICES SIM
MENU 8.2
(dépendant de la carte SIM)
Votre opérateur peut proposer des applications
spéciales via votre carte SIM, notamment l’accès à des
services bancaires ou à la bourse. Si vous avez souscrit
à l’un de ces services, le nom du service s’affiche au bas
du menu principal. Grâce au menu des services SIM,
votre téléphone ne sera jamais obsolète et pourra
prendre en charge d’autres services de votre
fournisseur. Pour plus d’informations, contactez votre
fournisseur de services.
NAVIGATEUR
NAVIGATEUR

83
TÉLÉCHARGEMENTS
JEUX ET APPLIS
MENU 9.1
Jeux et applis
(
Menu 9.1.1
)
Dans ce menu, vous pouvez gérer les applications Java
installées sur votre téléphone. Vous pouvez lire ou
supprimer les applications téléchargées ou définir
l’option de connexion. Les applications téléchargées
sont organisées en dossiers.
Appuyez sur la touche de fonction gauche
d
[OK]. pour ouvrir le dossier sélectionné ou lancer
l'application sélectionnée.
Si vous utilisez la touche de fonction gauche
d
[Options], vous aurez accès aux menus suivants :
v
Démarrage: lance l'application sélectionnée.
v
Infos: permet d’afficher les informations relatives à
l’application.
v
Mettre à jour: permet de mettre à jour une
application via le WAP.
v
Options: certaines applications Java requièrent
l’établissement d’une connexion de données.
Sélectionnez cette option pour définir les options de
connexion.
-
Toujours: la connexion est créée immédiatement
sans notification.
- Invite: vous devez confirmer l’action avant que
l’application ne se connecte.
- Jamais: aucune connexion n’est autorisée.
R
emarque
v
Vous ne pouvez ni supprimer ni renommer le
dossier préinstallé ou un jeu figurant dans ce
dossier.
TÉLÉCHARGEMENTS

84
Java
TM
est une technologie développée par Sun
Microsystems. À l’instar des applets Java que vous
téléchargez à l’aide des navigateurs standard
Netscape ou MS Internet Explorer, les
applications Java peuvent être téléchargés à l’aide
d’un téléphone WAP. Selon votre fournisseur de
services, tous les programmes basés sur Java, tels
que les jeux Java, peuvent être téléchargés et
exécutés sur un téléphone. Une fois téléchargés,
les programmes Java apparaissent dans le menu
Jeux et applis, dans lequel vous pouvez les
sélectionner, les exécuter ou les supprimer. Les
fichiers de programme Java sont enregistrés dans
votre téléphone au format .JAD ou .JAR.
Profils
(
Menu 9.1.2
)
Ce menu contient les mêmes paramètres que le menu
Internet. Pour télécharger de nouvelles applications,
une connexion WAP est requise.
ATTENTION !
Seuls les programmes J2ME (Java 2
Micro Edition) peuvent être exécutés sur un téléphone. Les
programmes J2SE (Java 2 Standard Edition) ne
fonctionnent que sur PC.
R
emarque
v
Les fichiers JAR sont des programmes Java au
format compressé et les fichiers JAD sont des
fichiers de description contenant toutes les
informations nécessaires. À partir du réseau, il
vous est possible d’afficher toutes les
informations du fichier JAD avant de
télécharger le programme.
TÉLÉCHARGEMENTS
TÉLÉCHARGEMENTSTÉLÉCHARGEMENTS

85
IMAGES
MENU 9.2
La touche de fonction gauche
d
[Options] vous
permet d'accéder accéder aux fonctions suivantes :
v
Mettre en fond d'écran: l'image sélectionnée peut
être établie en tant que fond d'écran.
v
Ecrire MMS: l'image téléchargée peut être envoyée
via MMS.
v
Envoyer par Bluetooth: l'image peut être envoyée
via Bluetooth.
SONS
MENU 9.3
La touche de fonction gauche
d
[Options] vous
permet d'accéder accéder aux fonctions suivantes :
v
Définir comme sonnerie: le fichier son sélectionné
peut être établi en tant que sonnerie.
v
Ecrire message: le fichier son peut être envoyé via
SMS ou MMS.
v
Envoyer par Bluetooth: le fichier son peut être
envoyé via Bluetooth.
CLÉ USB
MENU 9.4
Ce dossier est similaire à une mémoire de stockage. Il
contient tous les fichiers transférés à l'aide de la
fonction UMS ou Bluetooth, tels que les images, sons
et tout type de fichier non pris en charge par le
téléphone.
Appuyez sur la touche de fonction [Option] pour
afficher ou lire un fichier (s'il est pris en charge), le
supprimer ou l'envoyer à l'aide de la fonction
Bluetooth.
Connectivité USB
En connectant le S5100 à un ordinateur à l'aide d'un
câble USB, vous pouvez utiliser le modem intégré et
transférer des fichiers et leur contenu. La section
suivante contient toutes les informations relatives à
cette fonction.
Technologie UMS (USB Media Storage)
La fonction UMS permet de manipuler les fichiers
multimédias enregistrés dans la mémoire interne du
téléphone (64 Mo), utilisant ce dernier comme une clé
USB. Cette fonction ne nécessite l'installation d'aucun
logiciel supplémentaire.
TÉLÉCHARGEMENTS

86
TÉLÉCHARGEMENTS
Vous pouvez générer l'aperçu d'un fichier JPG (Max
460 K), GIF (Max 100 K) ou lire les fichiers son joints
aux MMS.
1. Lorsque le téléphone est en mode veille, connectez
le câble USB au téléphone et à l'ordinateur.
L'ordinateur reconnaît le périphérique après
quelques secondes.
2. Le téléphone affiche alors « USB » sur l'écran
principal
3. Sur l'ordinateur, le téléphone est indiqué comme «
Disque amovible » dans le Poste de travail. Une
lettre de volume lui est également attribuée par le
système, telle que« E:\ ». Vous pouvez maintenant
télécharger des fichiers depuis et vers votre
téléphone, comme s'il s'agissait d'un dossier
Windows classique.
4. Double-cliquez sur « Disque amovible » et ouvrez le
dossier « Mes supports ». Quatre nouveaux dossiers
s'affichent :
-
Musique: vous pouvez copier des fichiers
musicaux dans ce dossier. Les formats suivants
sont pris en charge : MP3, AAC, AAC+, AAC++,
WMA et MP4(audio). Ecoutez les fichiers
contenus dans ce dossier grâce au lecteur MP3 du
téléphone.
-
Photos: ce dossier est réservé aux photos prises
avec l'appareil photo numérique du téléphone.
Vous pouvez les transférer vers l'ordinateur en
effectuant un simple copier-coller.
Remarque
]
Bien que vous puissiez télécharger de
nouvelles photos de l'ordinateur vers le
téléphone, celui-ci ne les affiche pas dans le
menu Mes photos. C'est pourquoi nous vous
conseillons de ne télécharger aucune photo
vers ce dossier. Si vous souhaitez télécharger
de nouveaux fonds d'écran vers le téléphone,
utilisez le programme spécifique inclus sur le
CD-Rom.
Remarque
]
Vous ne pouvez pas recevoir d'appel ou de
message, lorsque vous utilisez la fonction
UMS.
TÉLÉCHARGEMENTSTÉLÉCHARGEMENTS

- Stockage: ce dossier est similaire à une mémoire
de stockage. Vous pouvez y télécharger tout type
de fichier : images, musique ou même des fichiers
que le téléphone ne prend pas en charge (fichiers
Word et Excel, par exemple), afin de les
transporter et de les télécharger vers un autre
ordinateur. Sur le téléphone, les fichiers
enregistrés dans ce dossier sont répertoriés dans
Menu – Téléchargements – Stockage des fichiers.
-
Vidéos: via ce dossier, vous pouvez télécharger
vers l'ordinateur les vidéos réalisées avec l'appareil
photo numérique du téléphone. Réciproquement,
ce dossier permet également de charger de
nouvelles vidéos sur le téléphone. Ce dossier
prend en charge le format de fichier 3GP. Sur le
téléphone, vous pouvez afficher les fichiers
enregistrés dans ce dossier dans Menu –
Multimédia – Ma vidéo.
5. Une fois le transfert des fichiers terminé,
déconnectez le périphérique USB de Windows, puis
débranchez le câble du téléphone.
AVERTISSEMENT!
•
Ne jamais déconnecter le téléphone lorsqu'un transfert
de fichiers est en cours. La mémoire pourrait être
endommagée. Déconnectez toujours le périphérique à
l'aide de l'option Windows appropriée avant de
débrancher le câble.
Remarque
]
Tant que la mémoire n'est pas saturée, vous
pouvez télécharger des fichiers de toute taille.
]
Les 4 dossiers par défaut peuvent contenir
jusqu'à 10 sous-dossiers.
]
Ne modifiez pas le nom du dossier par défaut :
cela pourrait entraîner un dysfonctionnement.
87
TÉLÉCHARGEMENTS

Programmes de l'ordinateur et Internet
En connectant le téléphone à un ordinateur, vous
pouvez gérer les contacts du répertoire, télécharger
de nouveaux contenus, tels que des fonds d'écran et
des sonneries, ou utiliser le modem intégré.
1. Installer les programmes inclus sur le CD-Rom.
2. Sur le téléphone, ouvrez le menu Outils – Modem,
puis confirmez l'activation.
3. Connectez le téléphone à l'ordinateur à l'aide du
câble USB et lancez le programme de votre choix.
4. Lorsque vous avez terminé d'utiliser le modem, nous
vous conseillons de le désactiver dans le menu
Outils - Modem.
Remarque
]
Pour connecter un périphérique USB, attendez
quelques minutes après la mise sous tension
du téléphone et que l'écran soit en veille.
TÉLÉCHARGEMENTS
88
TÉLÉCHARGEMENTS

ACCESSOIRES
89
Batterie standard
Kit piéton
Permet d’utiliser le téléphone en
mode mains libres. Il comprend un
écouteur et un microphone.
Chargeur de batterie
Ce chargeur vous accompagne
lors de vos deplacements, et vous
permet de charger la batterie loin
de votre maison ou de votre
bureau.
CD/Kit pour données
Vous pouvez connecter votre
téléphone au PC pour échanger
les données.
R
emarque
v
Utilisez toujours d’authentiques accessoires
LG.
v
Le non-respect de cette recommandation
risque d’entraîner l’annulation de votre
garantie.
v
Les accessoires peuvent différer selon les pays.
Contactez votre fournisseur pour vous
procurer des accessoires supplémentaires.
Il existe divers accessoires pour votre téléphone portable. Vous pouvez choisir parmi ces options selon vos
propres habitudes de communication.
ACCESSOIRES

DONNÉES TECHNIQUES
90
GÉNÉRALITÉS
Code de produit : S5100
Système : GSM 900 / DCS 1800 / PCS 1900
TEMPÉRATURES DE
FONCTIONNEMENT
Max : +55°C (déchargement...)
: +45°C (chargement…)
Min :
m
10°C
DONNÉES TECHNIQUES


MEMO

S5100 USER GUIDE
- ENGLISH
Disposal of your old appliance
1. When this crossed-out wheeled bin symbol is attached to a product it means the product is
covered by the European Directive 2002/96/EC.
2. All electrical and electronic products should be disposed of separately from the municipal waste
stream via designated collection facilities appointed by the government or the local authorities.
3. The correct disposal of your old appliance will help prevent potential negative consequences for
the environment and human health.
4. For more detailed information about disposal of your old appliance, please contact your city office,
waste disposal service or the shop where you purchased the product.

TABLE OF CONTENTS
2
INTRODUCTION 5
GUIDELINES FOR SAFE AND
EFFICIENT USE 6
S5100 FEATURES 10
Parts of the phone
Display information 14
GETTING STARTED 16
Installing the SIM card and
battery
Charging the battery 18
Disconnecting the adapter 19
Turning your phone
on and off 20
Access codes
Barring password 21
GENERAL FUNCTIONS 22
Making and answering calls
Contacts 27
In-call menu
Multiparty or conference calls
28
MENU TREE 30
SELECTING FUNCTIONS
AND OPTIONS 32
PROFILES 33
Activate
Personalise
Rename 34
CALL REGISTER 35
Missed calls
Received calls
Dialled calls
Delete recent calls 36
Call charges
Call duration
Call costs
Settings
GPRS information 37
Call duration
Data volumes
TOOLS 38
Alarm clock
Bluetooth
Paired devices
Handsfree devices 39
Settings
Calculator
Unit converter
World time 40
Modem
TABLE OF CONTENTS

TABLE OF CONTENTS
33
ORGANISER 41
Contacts
Search
Add new
Caller groups 42
Speed dial
Settings 43
Copy all
Delete all 44
Information
Calendar 45
Add new
View daily schedules
Delete past
Delete all
Go to date
Set alarm tone
Memo 46
MESSAGES 47
New message
Write text message
Write multimedia message 48
Inbox 50
Outbox 51
Drafts 52
Listen to voice mail
Info message 53
Read
Topics
Templates
Text templates
Multimedia templates 54
My business card
Settings
Text message
Multimedia message 55
Voice mailbox number
Info message 56
Push messages
MULTIMEDIA 57
Camera
Video camera 60
My photo 62
My video
MP3 63
MP3 player 64
Playlist 65
Settings
Voice recorder
Record
View list 66
Settings
Camera
Video camera

TABLE OF CONTENTS
4
SETTINGS 67
Date & Time
Date
Time
Phone settings
Display settings
Theme Settings 68
Language
Call settings
Call divert
Answer mode 69
Send my number
Call waiting
Minute minder
Auto redial 70
Security settings
PIN code request
Handset lock
Call barring
Fixed dial number 71
Change codes
Network settings 72
Network selection
Band selection
GPRS setting
Reset settings
Memory status 73
Internal memory
Multimedia memory
SERVICE 74
Internet
Home
Bookmarks 75
Go to URL
Settings
SIM service 77
DOWNLOADS 78
Games & Apps
Games & Apps
Profiles 79
Images
Sounds 80
File storage
ACCESSORIES 83
TECHNICAL DATA 84
TABLE OF CONTENTS

Congratulations on your purchase of the advanced
and compact S5100 mobile phone, designed to
operate with the latest digital mobile communication
technology.
INTRODUCTION
INTRODUCTION
5
This user’s guide contains important information
on the use and operation of this phone. Please
read all the information carefully for optimal
performance and to prevent any damage to or
misuse of the phone. Any changes or
modifications not expressly approved in this
user’s guide could void your warranty for this
equipment.

6
GUIDELINES FOR SAFE AND EFFICIENT USE
Read these simple guidelines. Breaking the rules may
be dangerous or illegal. Further detailed information is
given in this manual.
EXPOSURE TO RADIO
FREQUENCY ENERGY
Radio wave exposure and Specific
Absorption Rate (SAR) information
This mobile phone model S5100 has been designed
to comply with applicable safety requirement for
exposure to radio waves. This requirement is based on
scientific guidelines that include safety margins
designed to assure the safety of all persons, regardless
of age and health.
• The radio wave exposure guidelines employ a unit of
measurement known as the Specific Absorption Rate,
or SAR. Tests for SAR are conducted using
standardized methods with the phone transmitting
at its highest certified power level in all used
frequency bands.
• While there may be differences between the SAR
levels of various LG phone models, they are all
designed to meet the relevant guidelines for
exposure to radio waves.
• The SAR limit recommended by the international
Commission on Non-Ionizing Radiation Protection
(ICNIRP), which is 2W/kg averaged over ten (10)
gram of tissue.
• The highest SAR value for this model phone tested
by DASY4 for use at the ear is 0.174 W/kg (10g).
PRODUCT CARE AND
MAINTENANCE
• Do not disassemble this unit. Take it to a qualified
service technician when repair work is required.
WARNING!
Only use batteries, chargers and
accessories approved for use with this particular phone
model. The use of any other types may invalidate any
approval or warranty applying to the phone, and may be
dangerous.
6
GUIDELINES FOR SAFE AND EFFICIENT USE

GUIDELINES FOR SAFE AND EFFICIENT USE
7
• Keep away from electrical appliances such as a TV,
radio or personal computer.
• The unit should be kept away from heat sources such
as radiators or cookers.
• Do not drop.
• Do not subject this unit to mechanical vibration or
shock.
• The coating of the phone may be damaged if
covered with wrap or vinyl wrapper.
• Use dry cloth to clean the exterior of the unit. (Do
not use solvent such as benzene, thinner or alcohol.)
• Do not subject this unit to excessive smoke or dust.
• Do not keep the phone next to credit cards or
transport tickets; it can affect the information on the
magnetic strips.
• Do not tap the screen with a sharp object as it may
damage the phone.
• Do not expose the phone to liquid or moisture.
• Use the accessories like an earphone cautiously. Do
not touch the antenna unnecessarily.
ELECTRONICS DEVICES
All mobile phones may get interference, which could
affect performance.
• Do not use your mobile phone near medical
equipment without requesting permission.
Avoid placing the phone over pacemakers, (i.e. in
your breast pocket).
• Some hearing aids might be disturbed by mobile
phones.
• Minor interference may affect TVs, radios, PCs, etc.
ROAD SAFETY
Check the laws and regulations on the use of mobile
phones in the areas when you drive.
• Do not use a hand-held phone while driving.
• Give full attention to driving.
• Use a hands-free kit, if available.
• Pull off the road and park before making or answering
a call if driving conditions so require.

8
GUIDELINES FOR SAFE AND EFFICIENT USE
• RF energy may affect some electronic systems in
your motor vehicle such as car stereo or safety
equipment.
• When your vehicle is equipped with an air bag, do
not obstruct with installed or portable wireless
equipment. It can cause serious injury due to
improper performance.
BLASTING AREA
Do not use the phone where blasting is in progress.
Observe restrictions, and follow any regulations or
rules.
POTENTIALLY EXPLOSIVE
ATMOSPHERES
• Do not use the phone at a refueling point. Don’t use
near fuel or chemicals.
• Do not transport or store flammable gas, liquid, or
explosives in the compartment of your vehicle, which
contains your mobile phone and accessories.
IN AIRCRAFT
Wireless devices can cause interference in aircraft.
• Turn off your mobile phone before boarding any
aircraft.
• Do not use it on the ground without crew
permission.
CHILDREN
Keep the phone in a safe place out of small children’s
reach. It includes small parts which if detached may
cause a choking hazard.
EMERGENCY CALLS
Emergency calls may not be available under all cellular
networks. Therefore, you should never depend solely
on the phone for emergency calls. Check with your
local service provider.
GUIDELINES FOR SAFE AND EFFICIENT USE

9
BATTERY INFORMATION AND
CARE
• You do not need to completely discharge the
battery before recharging. Unlike other battery
systems, there is no memory effect that could
compromise the battery’s performance.
• Use only LG batteries and chargers. LG chargers are
designed to maximize the battery life.
• Do not disassemble or short-circuit the battery pack.
• Keep the metal contacts of the battery pack clean.
• Replace the battery when it no longer provides
acceptable performance. The battery pack may be
recharged hundreds of times until it needs replacing.
• Recharge the battery if it has not been used for a
long time to maximize usability.
• Do not expose the battery charger to direct sunlight
or use it in high humidity, such as the bathroom.
• Do not leave the battery in hot or cold places, this
may deteriorate the battery performance.
GUIDELINES FOR SAFE AND EFFICIENT USE

PARTS OF THE PHONE
Front view
S5100 FEATURES
S5100 FEATURES
10
3
Flash
Note
]
Dirt on the camera lens
could affect the image
quality.
Headset jack
1
• Connect a headset here
Up/down side keys
2
• When the phone is closed, press
this key to display the current
time on the front screen.
• Controls the volume of keypad
tone in standby mode with the
phone open.
• Controls the earpiece volume
during a phone call.
5
Front screen
4
Camera lens

Right side view Rear view
S5100 FEATURES
11
Battery latch
Press this button to remove the
battery cover.
Holes for a
carrying
strap
SIM card
socket
Battery cover
Battery pack
Battery terminals
SIM card terminals
Charger connector/
Cable connector
Camera / MP3 key
You can take pictures with the
phone closed. Press and hold
down this key to activate the
camera mode. Also use this key
to take a shot. Use the front
screen as a viewfinder.

12
S5100 FEATURES
Earpiece
1
Send key
3
Dials a phone number and answers
incoming calls. You can also quickly
access the latest incoming,
outgoing and missed calls by
pressing the key in standby mode.
5
End/Power key
Used to end a call or reject a call
and also to go back to standby
mode. Hold this key down to turn
the phone on/off.
Open view
Alphanumeric keys
4
Enter numbers, letters and some special
characters.
7
Microphone
Can be muted during a call for privacy.
6
Special function keys
•
0
: A long press of this key enters
the international call character
“+”.
•
=
: While keying in a phone number,
a long press of this key enters a
pause.
S5100 FEATURES
Main screen
2
Displays phone status icons,
menu items, Web information,
pictures and more in full colour.
'SRXEGXW
'SRXEGXW
'SRXEGXW
'SRXEGXW
'SRXEGXW
'SRXEGXW
'SRXEGXW
'SRXEGXW
'SRXEGXW
'SRXEGXW
'SRXEGXW
'SRXEGXW1IRY
1IRY
1IRY
1IRY
1IRY
1IRY
1IRY
1IRY
1IRY
1IRY
1IRY
1IRY

13
S5100 FEATURES
b
MP3 hot key
Activate the MP3 menu directly.
0
Navigation keys
Use to scroll through menus and move the cursor.
a
Confirm key
Selects menu options and confirms actions.
c
Camera hot key
Activates the camera menu directly.
d
Clear key
Deletes a character with each press.
Hold the key down to clear all input.
Use this key to go back to a previous screen.
8
,
9
Left soft key/ Right soft key
Performs the function indicated by the text on
the screen immediately above it.

S5100 FEATURES
14
DISPLAY INFORMATION
The table below describes various display indicators or
icons that appear on the phone’s display screen.
On-Screen Icons
Note
]
*The quality of the conversation may change
depending on network coverage. When the
signal strength is below 2 bars, you may
experience muting, call drop and bad audio.
Please take the network bars as indicator for
your calls. When there are no bars, that means
that there is no network coverage: in this case,
you won’t be able to access the network for
any service (call, messages and so on).
Icon Description
Indicates the strength of the network
signal. *
Indicates a call is in progress.
Indicates that you are roaming on another
network.
Indicates that GPRS service is available.
S5100 FEATURES

S5100 FEATURES
15
Icon Description
Agenda event set
Call divert service active
Bluetooth enabled
Icon Description
Indicates the alarm has been set and is on.
Indicates the status of the battery charge.
Indicates the receipt of a message.
Indicates the receipt of a voice message.
Indicates that the vibration ringer has
been set.
Indicates the Loud profile is activated.
Indicates the Silent profile is activated.
Indicates the Headset profile is activated.
Indicates the General profile is activated.
Indicates that you can use the push
message service.
Indicates that the phone is accessing the
WAP.
Indicates that you are using GPRS.
Note
]
When the status of the battery indicates low,
you may not use Camera or Multimedia
function.
]
While using Multimedia function, the status of
the battery is changeable.

GETTING STARTED
16
INSTALLING THE SIM CARD AND
BATTERY
Make sure the power is off before you remove the
battery.
1. Remove the battery cover.
Press the battery release latch and slide the battery
cover toward the bottom of the phone. Remove the
battery cover.
2. Remove the battery.
Hold the top edge of the battery and lift the
battery from the battery compartment.
Note
]
Removing the battery from the phone when
the power is on may cause the phone to
malfunction.
GETTING STARTED

GETTING STARTED
17
3. Install the SIM card
Insert the SIM card into the holder. Slide the SIM
card into the SIM card holder. Make sure that the
SIM card is inserted properly and that the gold
contact area on the card is facing downwards.
To remove the SIM card, press down lightly and pull
it in the reverse direction.
4. Install the battery.
Insert the bottom of the battery first into the
bottom edge of the battery compartment.
Push down the top of the battery until it snaps into
space.
5. Replace the battery cover.
Lay the battery cover in place of the phone and
slide it until the latch clicks.
CAUTION!
The metal contact of the SIM card can be
easily damaged by scratches. Pay special attention to the
SIM card while handling. Follow the instructions supplied
with the SIM card.
To insert the SIM card To remove SIM card

GETTING STARTED
18
CHARGING THE BATTERY
To connect the mains adapter to the phone, you must
have installed the battery.
1. With the arrow facing you as shown in the diagram
push the plug on the battery adapter into the
socket on the bottom of the phone until it clicks
into place.
2. Connect the other end of the mains adapter to the
mains socket. Only use the charger included in the
box.
3. The moving bars of battery icon will stop after
charging is complete.
WARNING!
•
Unplug the power cord and charger during lightning
storms to avoid electric shock or fire.
•
Make sure that no sharp-edged items such as animal
teeth or nails come into contact with the battery. There is
a risk of this causing a fire.
•
Do not place or answer calls while charging the phone as
it may short-circuit the phone and/or cause electric shock
or fire.
CAUTION!
•
Do not force the connector as this may damage the
phone and/or the charger.
•
If you use the battery pack charger out of your own
country, use an attachment plug adapter for the proper
configuration.
•
Do not remove your battery or the SIM card while
charging.
GETTING STARTED

GETTING STARTED
19
DISCONNECTING THE ADAPTER
1. When charging is finished, the moving bars of the
battery icon stop and ‘Full’ is displayed on the
screen.
2. Unplug the adapter from the power outlet.
Disconnect the adapter from the phone by pressing
the grey tabs on both sides of the connector and
pull the connector out.
Note
]
Ensure the battery is fully charged before using
the phone for the first time.
]
Do not remove the battery or SIM card while
charging.
]
In the case the battery is not properly charged,
please turn the phone off and on using the
power key. Then detach and reattach the
battery, and recharge the phone.

TURNING YOUR PHONE ON
AND OFF
Turning your phone ON
1. Install a battery to the handset and connect the
phone to an external power source such as the
travel adapter, cigarette lighter adapter or hands-
free car kit. Or install a charged battery pack to the
handset.
2. Press and hold
b
for a few seconds until the
LCD screen is turned on.
3. Depending on the status of the PIN code request
setting you may need to enter your PIN code.
Turning your phone OFF
1. Press and hold
b
for a few seconds until the
LCD screen is turned off.
ACCESS CODES
You can use the access codes described in this section
to avoid unauthorised use of your phone. The access
codes (except PUK1 and PUK2 codes) can be
changed by using the
Change codes feature (Menu
7.4.5).
PIN code (4 to 8 digits)
The PIN (Personal Identification Number) code
protects your SIM card against unauthorised use.
The PIN code is usually supplied with the SIM card.
When the
PIN code request is set to Enable, your
phone will request the PIN code every time the phone
is switched on. When the
PIN code request is set to
Disable, your phone connects to the network directly
without the PIN code.
PIN2 code (4 to 8 digits)
The PIN2 code, supplied with some SIM cards, is
required to access functions such as
Advice of Call
Charge
and Fixed dial number. These functions are
only available if supported by your SIM card. Check
with your network operator for further information.
20
GETTING STARTED
GETTING STARTED

PUK1 code (4 to 8 digits)
The PUK1 (PIN Unblocking Key) code is required to
unlock a PIN blocked phone. The PUK1 code may be
supplied with the SIM card. If not, contact your
network operator for the code. If you lose the code,
also contact your network operator.
PUK2 code (4 to 8 digits)
The PUK2 code, supplied with some SIM cards, is
required to change a blocked PIN2 code. If you lose
the code, please contact your network operator.
Security code (4 to 8 digits)
The security code protects the unauthorised use of
your phone. The default security code is set to
‘‘
0000
’’
and the security code is required to delete all
phone entries and to activate the
Reset settings
menu. Also, the security code is required to enable or
disable the phone lock function to prevent
unauthorised use of the phone. The security code
default setting can be modified from the
Security
settings
menu.
BARRING PASSWORD
The barring password is required when you use Call
barring
(Menu 7.4.3) function. You obtain the
password from your network operator when you
subscribe to this function.
21
GETTING STARTED

GENERAL FUNCTIONS
22
MAKING AND ANSWERING CALLS
Making a call
1. Make sure your phone is switched on.
2. Enter a phone number, including the area code.
]
Press and hold the clear key (
c
) to erase
the entire number.
3. Press the send key (
a
) to call the number.
4. To end the call, press the end key (
b
) or the
right soft key.
Making a call from the call history list
1. In standby mode, press the send key (
a
), and
the latest incoming, outgoing and missed phone
numbers will be displayed.
2. Select the desired number by using the up/down
navigation keys.
3. Press
a
to call the number.
Making an international call
1. Press and hold the
0
key for the international
prefix. The ‘+’ character automatically selects the
international access code.
2. Enter the country code, area code, and the phone
number.
3. Press
a
to call the number.
Ending a call
When you have finished your call, press the end
(
b
) key.
Making a call from the phonebook
You can save the names and phone numbers dialled
regularly in Contacts. You can save them to the SIM
card and/or phone memory. You can dial a number by
simply looking up the desired name in the phonebook
and pressing the (
a
) key.
GENERAL FUNCTIONS

GENERAL FUNCTIONS
23
Adjusting the volume
If you want to adjust the earpiece volume during a call,
use the side keys (
o
) . Press the up side key to
increase and down side key to decrease the volume.
Answering a call
When you receive a call, the phone rings and the
flashing phone icon appears on the screen. If the caller
can be identified, the caller’s phone number (or name
if saved in the phonebook) is displayed.
1. To answer an incoming call, open the phone(When
Flip open has been set as the answer mode(Menu
7.3.2).).
]
To reject an incoming call, press and hold one of
the side keys on the left side of the phone
without opening the phone.
]
You can answer a call while using the address
book or other menu features.
2. To end the call, close the phone or press the
b
key.
Manner mode (Quick)
You can activate the manner mode by pressing and
holding down the
k
key after opening the phone.
Signal strength
You can check the strength of your signal by the signal
indicator ( ) on the LCD screen of your phone.
Signal strength can vary, particularly inside buildings.
Moving near to a window may improve reception.
Note
]
If Press any key has been set as the answer
mode, any key press will answer a call except for
the
b
or the right soft key.
Note
]
In standby mode with the phone open, pressing
the side keys adjusts the key tone volume.

24
Entering text
You can enter alphanumeric characters by using the
phone’s keypad. For example, storing names in the
phonebook, writing a message, creating a personal
greeting.
The following text input methods are available in the
phone.
Changing the text input mode
1. When you are in a field that
allows characters to be
entered, you will notice the
text input mode indicator in
the top right corner of the LCD
screen.
2. Change the text input mode by
pressing
=
. You can check
the current text input mode in the top right corner
of the LCD screen.
GENERAL FUNCTIONS
T9 mode
This mode lets you enter words with only one
keystroke per letter. Each key on the keypad has
more than one letter. The T9 mode automatically
compares your keystrokes with an internal
dictionary to determine the correct word, thus
requiring far fewer keystrokes than the traditional
ABC mode. This is sometimes known as predictive
text.
ABC mode
This mode lets you enter letters by pressing the
key labelled with the required letter once, twice,
three or four times until the letter is displayed.
text input mode
Options Insert
123 mode (Number mode)
Type numbers using one keystroke per number.
To change to 123 mode in a text entry field,
press the
=
key until 123 mode is displayed.
GENERAL FUNCTIONS

25
GENERAL FUNCTIONS
]
Using the T9 mode
The T9 predictive text input mode lets you enter
words easily with a minimum number of key presses.
As you press each key, the phone begins to display the
characters that it thinks you are typing based on the
built-in dictionary. You can also add new words in the
dictionary. As new words are added, the word changes
to reflect the most likely candidate from the
dictionary. You can turn the T9 mode on or off, and
change the T9 language by holding down the (
`
)
key.
1. When you are in the T9 predictive text input mode,
start entering a word by pressing keys
2
to
9
. Press one key per letter.
- The word changes as letters are typed. Ignore
what’s on the screen until the word is typed
completely.
- If the word is still incorrect after typing completely,
press the down navigation key once or more to
cycle through the other word options.
Example:
Press
4663
to type
Good
Press
4663
[Down navigation key] to
type
Home
- If the desired word is missing from the word choice
list, add it using the ABC mode.
- You can select the language of the T9 mode. Press
the left soft key [Option], then select
T9
languages
. Select the desired language of T9
mode. You can also turn off the T9 mode by
selecting
T9 off. The default setting on the phone
is T9 enabled mode.
2. Enter the whole word before editing or deleting any
keystrokes.
3. Complete each word with a space by pressing
the
0
key. To delete letters, press
c
. Press
and hold down
c
to erase entire words.
Note
]
To exit from the text input mode without
saving your input, press
b
. The phone goes
back to standby mode.

GENERAL FUNCTIONS
26
]
Using the ABC mode
Use the
2
to
9
keys to enter your text.
1. Press the key labelled with the required letter:
- Once for the first letter
- Twice for the second letter
- And so on
2. To insert a space, press the
0
key once. To
delete letters, press the
c
key. Press and hold
down the
c
key to clear the whole display.
Note
]
Refer to the table below for more information
on the characters available using the
alphanumeric keys.
Key
Characters in the order display
Upper Case Upper Case
. , / ? ! - : ‘ ‘’ 1 . , / ? ! - : ‘ ‘’ 1
AB C 2 a b c 2
D E F 3 d e f 3
G H I 4 g h i 4
J K L 5 j k l 5
M N O 6 m n o 6
P Q R S 7 p q r s 7
T U V 8 t u v 8
W X Y Z 9 w x y z 9
Space, 0 Space, 0
1
2
3
4
5
6
7
8
9
0
GENERAL FUNCTIONS

GENERAL FUNCTIONS
27
]
Using the 123 (Number) mode
The 123 mode enables you to enter numbers in a text
message (a telephone number, for example).
Press the keys corresponding to the required digits
before manually switching back to the appropriate
text entry mode. You can quickly switch from letters
to numbers by pressing and holding the (
=
) key.
CONTACTS
You can store phone numbers and their corresponding
names in the memory of your SIM card.
In addition, you can store up to 1000 numbers and
names in the phone memory.
The SIM card and phone are both used in the same
way in the
Contacts menu.
IN-CALL MENU
Your phone provides a number of control functions that
you can use during a call. To access these functions
during a call, press the left soft key [Options].
During a call
The menu displayed on the handset screen during a
call is different to the default main menu displayed
when in standby mode, and the options are described
below.
Making a second call
You can get a number you wish to dial from the
phonebook to make a second call. Press the right soft
key then select
Search. To save the dialled number
into the phonebook during a call, press the right soft
key then select
Add new.
Switching between two calls
To switch between two calls, press the left soft key
then select
Swap.
Answering an incoming call
To answer an incoming call when the handset is
ringing, simply press the
a
key. The handset is also
able to warn you of an incoming call while you are
already on a call. A tone sounds in the earpiece, and
the display will show that a second call is waiting.

28
This feature, known as Call waiting, is only available if
your network supports it. For details of how to
activate and deactivate it see
Call waiting
(Menu 7.3.4) .
If
Call waiting is activated, you can put the first call on
hold and answer the second, by pressing
a
or by
selecting the left soft key, then
Hold & Answer. You
can end the current call and answer the waiting call by
selecting the left soft key and then End & Answer.
Rejecting an incoming call
You can reject an incoming call without answering by
simply pressing the
b
key.
During a call, you can reject an incoming call by
pressing the left soft key [Menu] key and selecting the
Conference/Reject or by pressing the
b
.
Muting the microphone
You can mute the microphone during a call by pressing
the [Menu] key then selecting
Mute on. The handset
can be unmuted by selecting
Mute off. When the
handset is muted, the caller cannot hear you, but you
can still hear them.
Switching DTMF tones on during a call
To turn DTMF tones on during a call, press the left
soft key, and then select
DTMF on. DTMF tones can
be turned off the same way. DTMF tones allow your
phone to make use of an automated switchboard.
MULTIPARTY OR CONFERENCE
CALLS
The multiparty or conference service provides you
with the ability to have a simultaneous conversation
with more than one caller, if your network operator
supports this feature. A multiparty call can only be set
up when you have one active call and one call on hold,
both calls having been answered. Once a multiparty
call is set up, calls can be added, disconnected or
separated (that is, removed from the multiparty call
but still connected to you) by the person who set up
the multiparty call. These options are all available from
the In-Call menu. The maximum callers in a multiparty
call are five. Once started, you are in control of the
multiparty call, and only you can add callers to the
multiparty call.
GENERAL FUNCTIONS
GENERAL FUNCTIONS

29
Making a second call
You can make a second call while currently on a call.
Enter the second number and press the
a
key.
When the second call is connected, the first call is
automatically placed on hold. You can swap between
calls by pressing the left soft key then selecting
Swap.
Setting up a conference call
Place one call on hold and while the active call is on,
press the left soft key and then select the
Conference/Join all.
Putting a conference call on hold
Press the left soft key, then select the
Conference/Hold all.
Activate the conference call on hold
Press the left soft key, then select the
Conference/Join all.
Adding calls to the conference call
To add a call to an existing conference call, press the
left soft key, then select the
Conference/Join all.
Displaying callers in a conference call
To scroll through the numbers of the callers who make
up a conference call on the handset screen, use the
up/down navigation keys.
Taking a private call during a conference
call
To have a private call with one caller from a conference
call, display the number of the caller you wish to talk
to on the screen, then press the left soft key. Select
the
Conference/Private to put all the other callers on
hold.
Ending a conference call
The currently displayed caller from a conference call
can be disconnected by pressing
b
the key. To
end a conference call, press the left soft key, then
select the
Conference/End multiparty. After
pressing the left soft key, selecting
Conference/End
all
will end all the active and on-hold calls.
GENERAL FUNCTIONS

MENU TREE
30
The following illustration shows the available menu structure and indicates the:
]
Number assigned to each menu option.
MENU TREE
5.1 New message
5.2 Inbox
5.3 Outbox
5.4 Drafts
5.5 Listen to voice mail
5.6 Info message
5.7 Templates
5.8 Settings
3.1 Alarm clock
3.2 Bluetooth
3.3 Calculator
3.4 Unit converter
3.5 World time
3.6 Modem
4.1 Contacts
4.2 Calendar
4.3 Memo
1.x.1 Activate
1.x.2 Personalise
1.x.3 Rename
2.
1 Missed calls
2.
2 Received calls
2.
3 Dialled calls
2.
4 Delete recent calls
2.
5 Call charges
2.
6 GPRS information
1.
Profiles
3. Tools 5. Messages
4. Organiser2. Call register

MENU TREE
31
7.1 Date & Time
7.2 Phone settings
7.3 Call settings
7.4 Security settings
7.5 Network settings
7.6 GPRS setting
7.7 Reset settings
7.8 Memory status
6.1 Camera
6.2 Video camera
6.3 My photo
6.4 My video
6.5 MP3
6.6 Voice recorder
6.7 Settings
6. Multimedia 7. Settings
8.
1 Internet
8.
2 SIM service
This menu depends on
SIM and the network
services.
9.
1 Games & Apps
9.
2 Images
9.
3 Sounds
9.
4 File storage
8. Service
9. Downloads

32
Your phone offers a set of functions that allow you to
customise the phone. These functions are arranged in
menus and sub-menus, accessed via the two soft keys
marked [
d
] and [
e
]. Each menu and sub-
menu lets you view and alter the settings of a
particular function.
The role of the soft keys vary according to the current
context or the label on the bottom line of the screen
just above each key indicates its current role.
SELECTING FUNCTIONS AND OPTIONS
SELECTING FUNCTIONS AND OPTIONS
Press the right soft
key to access the
available Contacts.
Press the left soft
key to access the
available menu.
'SRXEGXW
'SRXEGXW
'SRXEGXW
'SRXEGXW
'SRXEGXW
'SRXEGXW
'SRXEGXW
'SRXEGXW
'SRXEGXW
'SRXEGXW
'SRXEGXW
'SRXEGXW1IRY
1IRY
1IRY
1IRY
1IRY
1IRY
1IRY
1IRY
1IRY
1IRY
1IRY
1IRY

33
PROFILES
PROFILES
33
In Profiles, you can adjust and customise the phone
tones for different events, environments, or caller
groups. There are five preset profiles:
Vibrate only,
Silent, General, Loud and Headset. Each profile can
be personalised. Press the left soft key
[Menu] and
select
Profiles using up/down navigation keys.
Activate
(Menu 1.x.1)
1. A list of profiles is displayed.
2. In the
Profiles list, scroll to the profile you want to
activate and press the left soft key
d
[Select] or
OK key.
3. Then, select Activate.
Personalise
(Menu 1.x.2)
Scroll to the desired profile in the Profile list. After
pressing the left soft key
d
or the OK key, select
Personalise. The profile setting option opens. Set the
options as required.
]
Call alert type: Set the alert type for incoming
calls.
]
Ring tone: Select the desired ring tone from the
list.
]
Ring volume: Set the volume of the ringing tone.
]
Message alert type: Set the alert type for
messages.
]
Message tone: Select the alert tone for messages.
]
Keypad tone: Select the desired keypad tone.
]
Keypad volume: Set the volume of keypad tone.
]
Flip tone: Allows to set the flip tone for adjusting
environment.
]
Effect sound volume: Set the volume of effect
sound.
]
Power on/off volume: Set the volume of the
ringing tone when switching the phone on/off.
]
Auto answer: This function will be activated only
when your phone is connected to the headset.
• Off: The phone will not answer automatically.
•
After 5 secs: After 5 seconds, the phone will
answer automatically.
Note
]
To protect the sense of hearing while Folder
open, maximum volume level is 3.

34
• After 10 secs: After 10 seconds, the phone will
answer automatically.
Rename
(Menu 1.x.3)
You can rename a profile and give it any name you
want.
1. To change the name of a profile, scroll to the profile
in the profile list and after pressing the left soft key
d
or the OK key, select Rename.
2. Key in the desired name and press the OK key or
the left soft key
d
[OK].
Note
]
Vibrate only, Silent and Headset profiles
cannot be renamed.
PROFILES
PROFILES

35
CALL REGISTER
You can check the record of missed, received, and
dialled calls only if the network supports the Calling
Line Identification (CLI) within the service area.
The number and name (if available) are displayed
together with the date and time at which the call was
made. You can also view call times.
MISSED CALLS
MENU 2.1
This option lets you view the last 10 unanswered calls.
You can also:
• View the number if available and call it, or save it in
the phonebook.
• Enter a new name for the number and save both in
the phonebook.
• Send a message to this number.
• Delete the call from the list.
RECEIVED CALLS
MENU 2.2
This option lets you view the last 10 incoming calls.
You can also:
• View the number if available and call it, or save it in
the phonebook.
• Enter a new name for the number and save both in
the phonebook.
• Send a message to this number.
• Delete the call from the list.
DIALLED CALLS
MENU 2.3
This option lets you view the last 20 outgoing calls
(called or attempted).
You can also:
• View the number if available and call it or save it in
the phonebook.
• Enter new name for the number and save both in the
phonebook.
• Send a message to this number.
• Delete the call from the list.
CALL REGISTER

CALL REGISTER
CALL REGISTER
36
DELETE RECENT CALLS
MENU 2.4
Allows you to delete Missed calls and Received calls
lists. You can delete Dialled calls and All calls lists at
one time.
CALL CHARGES
MENU 2.5
Call duration
(Menu 2.5.1)
Allows you to view the duration of your incoming and
outgoing calls. You can also reset the call times. The
following timers are available:
]
Last call: Length of the last call.
]
All calls: Total length of all calls made and incoming
calls since the timer was last reset.
]
Received calls: Length of the incoming calls.
]
Dialled calls: Length of the outgoing calls.
]
Reset all: Allows you to reset the timers of all calls
by pressing the left soft key
d
[Yes ].
Call costs
(Menu 2.5.2)
Allows you to check the cost of your last call, all calls,
remaining and reset the cost. To reset the cost, you
need to know your PIN2 code.
Settings
(SIM Dependent)
(Menu 2.5.3)
]
Set tariff: You can set the currency type and the
unit price. Contact your service providers to obtain
charging unit prices. To select the currency or unit
in this menu, you need the PIN2 code.
]
Set credit: This network allows you to limit the cost
of your calls by selected charging units.If you select
Read, the number of remaining unit is shown. If you
select
Change, you can change your change limit.
]
Auto display: This network service allows you to
see automatically the cost of your last calls. If set to
On, you can see the last cost when the call is
released.

37
GPRS INFORMATION
MENU 2.6
You can check the amount of data transferred over the
network through the GPRS information option. In
addition, you can also view how much time you are
online.
Call duration
(Menu 2.6.1)
You can check the duration of Last call and All calls.
You can also reset the call timers.
Data volumes
(Menu 2.6.2)
You can check the Sent(Last/All),
Received(Last/All) or All data volumes and Reset all.
CALL REGISTER

TOOLS
38
ALARM CLOCK
MENU 3.1
You can set up to 5 alarm clocks to go off at a
specified time.
1. Select On and enter the alarm time you want.
2. Select the repeat period:
Once, Mon
``
Fri,
Mon
``
Sat, Everyday.
3. Select the alarm tone you want and press
d
[OK].
4. Edit the alarm name and press
d
[OK].
BLUETOOTH
MENU 3.2
Bluetooth enables compatible mobile devices,
peripherals and computers that are in close proximity
to communicate directly with each other without
wires. This handset supports built-in Bluetooth
connectivity, which makes it possible to connect them
with compatible Bluetooth headsets, computer
applications and so on.
When you receive data from another Bluetooth
device, the phone requests for a confirmation.
After confirming the transfer, the file will be copied in
your phone.
Depending on the file type, it will be stored in the
following folders:
-
MP3: MP3 folder (Menu 6.5.2)
-
Video (.3GP): video folder (Menu 6.4)
-
Phonebook contacts (.VCF): Phonebook (Menu
4.1.1)
-
Other files: File storage folder (Menu 9.4)
Paired devices
(Menu 3.2.1)
You can view all devices which are compatible with
your Bluetooth phone.
Note
]
Due to a compatibility problem, some devices
may not support this function.
TOOLS

TOOLS
39
Handsfree devices
(Menu 3.2.2)
You can view the list of handsfree devices which are
compatible with your Bluetooth phone.
Settings
(Menu 3.2.3)
You can register a new device which is compatible with
Bluetooth. If you already have added the device, you
can connect to it after entering a password
(usually 0000).
CALCULATOR
MENU 3.3
This contains the standard functions such as
k
,
m
,
l
,
n
: Addition, Subtraction, Multiplication, and
Division.
1. Input the numbers by pressing numeric keys.
2. Use a navigation key to select a sign for calculation.
3. Then input the numbers.
4. Press the left soft key
d
[Result] to view the
result.
5. Press the left soft key
d
[Reset] or enter numbers
to repeat the procedure above.
6. To end Calculator, press the right soft key
e
[Back].
UNIT CONVERTER
MENU 3.4
This converts any measurement into a unit you want.
There are 7 types that can be converted into units:
Currency, Surface, Length, Weight, Temperature,
Volume
and Velocity.
1. You can select one of unit types by pressing
d
[Unit] key.
2. Select the unit you want to convert by
pressing
i
and
j
.
Note
]
Use
c
key to erase any numbers or signs. If
you press
`
key, you can input a minus
number. In addition, press
=
key, you can
input a decimal number.

3. You can check the converted value for the unit you
want.
WORLD TIME
MENU 3.5
You can view clocks of the world’s major cities.
1. Select the city belonged to the time zone by
pressing
k
,
l
key.
2. You can set the current time to the city time you
select by pressing the left soft key
d
[Set].
MODEM
MENU 3.6
This function allows you to use the modem.
TOOLS
40
TOOLS

CONTACTS
MENU 4.1
Search
(Calling from phonebook)
(Menu 4.1.1)
1. Select Search by pressing the left soft key
d
[Select] or [OK].
2. If you want to edit, delete or copy an entry, select
the left soft key
d
[Options]. The following
menu will be displayed.
]
Edit: You can edit the name, number, group,
character and picture by using the navigation key.
]
Write text/multimedia message: After you have
found the number you want, you can send a text/
multimedia message to the selected number.
]
Send via Bluetooth: You can send the data of
phone book to devices which is compatible with
Bluetooth through Bluetooth.
]
Copy: You can copy an entry from SIM to phone or
from phone to SIM.
]
Main number: You can select the one out of
mobile, home, office that you often use. After you
set this, the main number will be displayed first,
when you search.
]
Delete: You can delete an entry.
Add new
(Menu 4.1.2)
You can add phonebook entry by using this function.
Phone memory capacity is 1000 entries. SIM card
memory capacity depends on the service provider.
The number of characters you can save in the SIM card
is a SIM dependent feature.
1. Select
Add new by pressing the left soft key
d
[Select] or [OK].
2. Select the memory you want to save:
SIM or Phone.
If you set to Phone, you need to select which
number you want as Main number.
Note
]
Instant searching is available by inputting the
initial letter of the name you want to search.
Note
]
In standby mode, press right soft key
e
[Contacts] to access directly.
ORGANISER
41
ORGANISER

42
]
Remove member: You can remove the member
from the Group member list. But the name and the
number will remain in the phonebook.
]
Rename: You can change a group name.
Speed dial
(Menu 4.1.4)
Assign contacts to any of the keys
2
to
9
. You
can then call that contact by pressing the
corresponding number key.
1. Open the phonebook first by pressing the Right
soft key
e
[Contacts] in standby mode.
2. Scroll to
Speed dial, then press the left soft key
d
[Select].
3. If you want to add Speed dial, select (
empty). Then,
you can search the name in phonebook.
4. After assigning the number as speed dial, you can
change and delete the entry. You can also make a
call or send a message to this number.
ORGANISER
ORGANISER
a. Press
d
[OK] to input a name.
b. Press
d
[Save], then you can input a number.
c. Press
d
[Save].
d. You can set a group for the entry by pressing
k
,
l
:
e. You can set a character and a picture for the
entry by pressing
i
,
j
,
k
,
l
.
Caller groups
(Menu 4.1.3)
You can add up to 20 members per group, with up to
a maximum of 7 groups on total.
]
Member list: Shows the group members you have
selected.
]
Group ring tone: Allows you to specify ring tone
for the group members’ call.
]
Group icon: Allows you to select the icon
dependent on Group.
]
Add member: You can add group members. Each
group should not exceed 20 members.

43
Settings
(Menu 4.1.5)
1. Press the right soft
e
[Contacts] in standby
mode.
2. Scroll to Settings, then press the left soft key
d
[Select].
]
Set memory
Scroll to highlight Set memory, and then press the
left soft key
d
[Select].
- If you select
Variable, when adding entry, the
phone will ask whether you wish to store on the
sim or phone.
- If you select
SIM or Phone, the phone will store an
entry to SIM or phone.
]
View options
Scroll to highlight View options, and then press the
left soft key
d
[Select].
-
Name only: Set the phonebook list by displaying
the name only.
- With pictures: Set the phonebook list with the
information of character and picture.
- Name & number: Set the phonebook list by
displaying the name and number.
Copy all
(Menu 4.1.6)
You can copy/move entries from SIM card memory to
Phone memory and vice versa.
1. Open the Phonebook first by pressing the right soft
key
e
[Contacts] in standby mode.
2. Scroll to
Copy all, and then press the left soft key
d
[Select] to enter this menu.
•
SIM to Phone: You can copy/move the entries
from SIM Card to Phone memory.
• Phone to SIM: You can copy/move the entries
from Phone memory to SIM Card.
3. You can see the following submenus.
•
Keep original: When copying the Original Dial
Number is kept.
• Delete original: When copying the Original Dial
Number is erased.
ORGANISER

ORGANISER
44
Delete all
(Menu 4.1.7)
You can delete all entries in the SIM and Phone. This
function requires the Security code.
1. Press the right soft key
e
[Contacts] in standby
mode and select Delete all, press
d
[Select].
2. Highlight the memory you wish to erase, and then
press the left soft key (
d
) [Select].
3. Enter the security code and press the left soft key
d
[OK] or the right soft key
e
[Back].
Information
(Menu 4.1.8)
]
Service dial number
Use this function to access a particular list of
services provided by your network operator
(if supported by the SIM card).
1. Open the phonebook first by pressing the right
soft key
e
[Contacts] in standby mode and
select
Information.
2. Scroll to
Service dial number, then press the left
soft key
d
[Select] to enter.
3. The names of the available services will be shown.
4. Use
i
and
j
to select a service. Press
a
[Send].
]
Memory status
This feature allows you to see how many entries are
in use, or free in your phonebook.
1. Open the phonebook first by pressing the
right
e
soft key [Contacts] in standby mode.
Select
Information by pressing the left soft
key
d
[Select].
2. Scroll to
Memory status, then press the left soft
key
d
[OK].
]
Own number (SIM dependent)
You can check and save your own number in the SIM
card.
ORGANISER

45
CALENDAR
MENU 4.2
When you enter this menu a Calendar will be
displayed.
The month and year are shown at the top of the
screen. Whenever you change the date under the
Settings menu, the calender will update automatically.
The current date will be highlighted in green and any
schedule or memos will be indicated with a red triangle
at the top left hand corner of the corresponding
square. An audible alarm can be set for memo's and
reminders.
To change the day, month, and year.
In the scheduler mode, press left soft key
d
[Options] as follows;
Add new
(Menu 4.2.1)
Allows you to add a new schedule for the chosen day.
Input the subject and then press the left soft
key
d
[OK].
View daily schedules
(Menu 4.2.2)
You can refer to a detailed schedule, that is the whole
contents of the schedule configured by you.
Delete past
(Menu 4.2.3)
You can delete the past schedule that is no longer
required.
Delete all
(Menu 4.2.4)
You can delete all notes.
Go to date
(Menu 4.2.5)
You can go to the chosen date directly.
Set alarm tone
(Menu 4.2.6)
You can set the alarm tone.
ORGANISER
Key Description Key Description
Yearly Weekly
Monthly Daily
13
ij
`=
kl

ORGANISER
46
MEMO
MENU 4.3
1. Select the Memo by pressing the left soft
key
d
[Select].
2. If the entry is empty, add new by pressing the left
soft key
d
[Add].
3. Input the memo and then press the left soft
key
d
[Ok].
Note
]
If you want to change the text input mode,
press the
=
in order.
ORGANISER

47
MESSAGES
MESSAGES
Press the Menu key (
d
) and select Messages
using navigation keys.
NEW MESSAGE
MENU 5.1
Write text message
(Menu 5.1.1)
Your phone receives voice mail notification messages
and Short Message Service(SMS) messages. Voice
mail and SMS are network services. Please contact
your network operator for more information.
When the icon appears, you have received voice
mail. When the icon appears, you have received a
new text message. If the message memory is full, a
message is displayed, the icon flashes and you
cannot receive any new messages. Use the
Delete
option in the Inbox menu to delete obsolete
messages. Once there is space in the message
memory, any undelivered SMS messages will be
received (provided sufficient space is available).
1. Key in your message. For details on how to enter
text, refer to page 24 through 27 (Entering Text).
2. After you complete the message, to select the
required option, press the left soft key [Options].
The following options are available.
]
Send: Enter the number or select the number from
the phonebook or the recent numbers. You can
send a message up to 5 phone numbers at a time.
Press the left soft key [Options]. The following
options will be displayed.
A
Send (It only shows after a phone number is
entered)
B
Recent numbers
C
Search
]
Save to drafts: Allows you to save the message so
that it can be sent later.
]
Font: Sets the font size and style.
]
Colour: You can set the colour of the text
(foreground) and the background.
]
Alignment: You can set the position of the
message - Right, Centre or Left.

48
MESSAGES
MESSAGES
]
Add T9 dictionary: You can add your own words.
This menu will only be shown when the edit mode
has been set to T9ABC/T9Abc/T9abc.
]
T9 languages: Select the desired language for T9
input mode. You can also deactivate the T9 input
mode by selecting ‘T9 off ’.
]
Exit: If you select this whilst writing a message, you
will be taken back to the message menu. Also the
written message will not have been saved.
3. You can also send attachments with the message by
pressing the right soft key [Insert], while you’re
entering a message.
]
Images: You can send and receive text messages
that contain pictures, known as ‘picture messages’.
Several preset pictures are available in the phone
and they can be replaced with new ones received
from other sources.
]
Sounds: If available, you can attach a sound
available for a short message.
]
Text templates: You can use text templates
already set in the phone.
]
Contacts: You can add phone numbers in the
message.
]
Symbol: You can attach special characters.
]
My business card: You can attach your name card.
Write multimedia message
(Menu 5.1.2)
A multimedia message can contain text, images,
and/or sound clips. This feature can be used only if it
is supported by your network operator or service
provider. Only devices that offer compatible
multimedia message or e-mail features can receive and
send multimedia messages.
1. Key in the multimedia message. Using the right soft
key, you can input symbols and numbers, or use T9
input mode. After the multimedia message input,
press the left soft key [OK].
2. Add an image and/or sound. You can move to the
next section using the up/down navigation.
3. You can add a slide by option menu using the left
soft key. If press the left key and select "Add slide"
from the option menu, you can add the new slide.

49
4. Press the left soft key [Options]. The following
options are available.
]
Send: Supports multiple numbers and email
addresses.
]
Preview: Displays the multimedia message you wish
to send.
]
Save: Saves the multimedia message in drafts or as
a template.
]
Add slide: Adds a slide before or after the current
slide.
]
Move to slide: Moves to the next or previous slide.
]
Delete slide: Deletes the selected slide.
]
Set slide format
- Set timer:
You can set the timer for slide, text,
picture and sound.
- Swap text and picture: You can switch the
position of picture and text of the message.
]
Remove media: You can remove a picture or sound
in the slide. This option can be shown only when
any media file has been added.
]
Add T9 dictionary: You can add your own word.
This menu will only be shown when the edit mode
has been set to T9ABC/T9Abc/T9abc.
]
T9 languages: Select the language for T9 input
mode. You can also deactivate the T9 input mode
by selecting ‘T9 off ’.
]
Exit: If you select this whilst writing a message, you
will be taken back to the message menu. Also the
written message will not have been saved.
5. Press the right soft key [Insert]. You can insert a
symbol, photos, Images or New photo, sounds,
contacts, New sound, Text templates and My
business card
.
MESSAGES

MESSAGES
50
Icon Icon directive
Multimedia message
Short message
SIM message
Read multimedia message
Read text message
Push message
Read push message
Notified multimedia message
INBOX
MENU 5.2
You will be alerted when you have received messages.
They will be stored in the Inbox.
In the Inbox, you can identify each message by icons.
For detail, see the icon directive.
If the phone shows ‘No space for SIM message’, you
only have to delete the SIM messages from the Inbox.
If the phone displays ‘No space for message’, you will
then need to delete messages, media or applications
to free up space.
* SIM message
SIM message means that the message is
exceptionally stored in the SIM card. You can move
this message to the phone.
When you are notified that you have received a
multimedia message, you have to wait for the message
to be downloaded before you can view it.
To read a message, select one of the messages by
pressing the left soft key
d
.
]
View: You can view the received messages.
]
Delete: You can delete the current message.
]
Reply: You can reply to the sender.
]
Forward: You can forward the selected message to
another party.
]
Return call: You can call back to the sender.
MESSAGES

51
]
Information: You can view information about
received messages; Sender’s address, Subject
(only for Multimedia message), Message date &
time, Message type, Message size.
]
Delete all: You can delete all messages.
* Specific MMS options
]
Repeat: Allows you to repeat reproduction of the
selected multimedia message.
]
Receive: (for multimedia message notification
only). Multimedia messages, unlike text messages,
must be downloaded from the server automatically
or manually. The network initially sends multimedia
message notification: If the Auto retrieve option is
off or an error has occurred, receipt must be
confirmed by selecting [Receive]. If the Auto
retrieve option is on, the message is automatically
downloaded after receipt of notification.
* Specific download message options
]
Information: Shows the content of the
downloaded messages.
]
Load: Launches the WAP connection to the URL
contained in the download message. The phone
must be configured for WAP services to download
messages.
OUTBOX
MENU 5.3
You can see the sent and unsent messages here. For
sent messages, you can see the delivery status. The
browsing is same as that for the inbox message.
MESSAGES
Icon Icon directive
MMS Sent
MMS Unsent
MMS delivery confirmed
SMS sent
SMS unsent
SMS delivery confirmed

MESSAGES
52
When you already sent the message:
]
View: You can view the sent messages.
]
Forward: You can forward the current message to
other recipients.
]
Delete: You can delete the current message.
]
Information: You can view information about
outbox messages; Recipient’s address, Subject
(only for Multimedia message), Message date &
time, Message type, Message size.
]
Delete all: You can delete all messages in the
outbox.
When you didn’t send the message:
]
View: You can view messages you didn't.
]
Delete: You can delete the current message.
]
Send: You can send the message.
]
Information: You can view information about
outbox
]
Delete all: You can delete all messages that have
not been sent.
DRAFTS
MENU 5.4
Using this menu, you can preset up to five multimedia
messages that you use most frequently. This menu
shows the preset multimedia message list. The
following options are available.
]
View: You can see the multimedia messages.
]
Edit: Allows you to modify the chosen message.
]
Delete: Deletes the message you choose.
]
Information: To view the information of the
message.
]
Delete all: Deletes all of the messages in the folder.
LISTEN TO VOICE MAIL
MENU 5.5
This menu provides you with a quick way of accessing
your voice mailbox (if provided by your network).
Before using this feature, you must enter the voice
server number obtained from your network operator.
When new voice message is received, the symbol
will be displayed on the screen. Please check with your
network provider for details of their service in order to
configure the handset correctly.
MESSAGES

53
INFO MESSAGE
MENU 5.6
(DEPENDANT TO NETWORK AND
SUBSCRIPTION)
Info service messages are text messages sent by the
network to mobile phone users. They provide general
information such as weather reports, traffic news, taxis,
pharmacies, and stock prices. When you receive an info
service message, a popup message will indicate a new
message receipt or the info service message will be
displayed directly. In standby mode, the following
options are available when viewing info service messages.
Read
(Menu 5.6.1)
When you have received broadcast messages and
select
Read to view the message, it will be displayed
on the screen.
Topics
(Menu 5.6.2)
To create new topics, press the left soft key [Option]
then select
Add new. If you already have topics, you
can deactivate, edit, or delete them by using the left
soft key [Options].
TEMPLATES
MENU 5.7
There are pre-defined messages in the list. You can
view and edit the template messages or create new
messages. Two types of templates are available: Text
and Multimedia.
Text templates
(Menu 5.7.1)
• Please call me back.
• I’m late. I will be there at
• Where are you now?
• I am on the way.
• Top urgent. Please contact.
• I love you.
The following options are available.
]
View: Views the selected message.
]
Delete: Deletes the template.
]
Add new: Uses this to create new template.
]
Send via: To send via Text message or Multimedia
message.
]
Edit: Use this to edit the selected template.
MESSAGES

MESSAGES
54
]
Delete all: Deletes all templates.
Multimedia templates
(Menu 5.7.2)
]
Preview: Displays the draft multimedia message.
]
Save: Saves multimedia messages as templates.
]
Edit subject: You can edit the subject.
]
Add Slide: Adds a slide before or after the current
slide.
]
Move to slide: Moves to the next or previous slide.
]
Delete slide: Deletes the highlighted slide.
]
Set slide format: Sets the timer for slide, text, or to
align the message contents right, left, top and
bottom.
]
Add T9 dictionary: You can add our own word.
This menu can be shown only when the edit mode is
Predictive.
]
T9 languages: Selects T9 input mode.
]
Exit: Exits the menu.
My business card
(Menu 5.7.3)
This option helps you to make your own name card.
Key in the name, mobile phone number, office number,
Fax number, and E-mail address.
SETTINGS
MENU 5.8
Text message
(Menu 5.8.1)
]
Message types:
Text, Voice, Fax, Natl. paging, X.400, Email,
ERMES
Usually, the type of message is set to Text. You can
convert your text into alternative formats. Contact
your service provider for the availability of this
function.
]
Validity period:
1 hour, 12 hours, 1 day, Maximum
This network service allows you to set how long
your text messages will be stored at the message
centre.
MESSAGES

55
]
Delivery report: If you set to Yes, you can check
whether your message is sent successfully.
]
Reply charging: When a message is sent, it allows
the recipients to reply and charge the cost of the
reply to your telephone bill. This feature is not
supported by some network operators.
]
SMS centre: If you want to send the text message,
you can receive the address of SMS centre through
this menu.
Multimedia message
(Menu 5.8.2)
]
Priority:
High, Normal, Low
You can set the priority of the message you choose.
]
Validity period:
1 hour, 12 hours, 1 day, Maximum
This network service allows you to set how long
your multimedia messages will be stored at the
message centre.
]
Delivery report: If it is set to Yes in this menu, you
can check whether your message is sent
successfully.
]
Auto retrieve: If you select on, you receive
multimedia messages automatically. If you select
Off, you receive only notification message in the
inbox and then you can check this notification. If
you select
Home network only, you receive
multimedia messages depends on Homenetwork.
]
Network settings: If you select multimedia
message server, you can set URL for multimedia
message server.
]
Permitted Message types
Personal:
Personal message.
Advertisements: Commercial message.
Information: Necessary information.
Voice mailbox number
(Menu 5.8.3)
You can receive the voicemail if your network service
provider supports this feature. When a new voicemail
has arrived, the symbol will be displayed on the screen.
Please check with your network service provider for
details of their service in order to configure the phone
accordingly.
]
Home: You can listen to voice mails by selecting
Home.
MESSAGES

MESSAGES
56
]
Roaming: Even when you are in abroad, you can
listen to voice mails if a roaming service is
supported.
Info message
(Menu 5.8.4)
]
Receive
Yes:
If you select this menu, your phone will receive
Info service messages.
No: If you select this menu, your phone will not
receive Info service messages any more.
]
Alert
Yes:
Your phone will beep when you have received
Info service message numbers.
No: Your phone will not beep even though you have
received info service messages.
]
Languages
You can select the language you want by pressing
[On/Off]. Then, the info service message will be
shown in the language that you selected.
Push messages
(Menu 5.8.5)
You can set the option whether you will receive the
message or not.
MESSAGES

57
CAMERA
MENU 6.1
You can take pictures with the integrated camera and
send them via MMS. You an easily take pictures of
subjects in front of you using the camera on the upper
folder. To take self-portrait pictures, you can simply
close the folder and access the camera menu long
pressing the camera side-key. In this case, the picture
will be displayed on the sub-LCD.
S5100 has a built-in 1.3M pixel digital camera, which
allows to take pictures at 1280x960 pixel (also
known as SXGA). The CMOS sensor allows high
quality pictures and additional functions as 4x digital
zoom (depending on the resolution), brightness and
white balance control, various effects and so on.
Through the integrated flash, you can take also
pictures in low light conditions.
•
Taking pictures with open folder
1. Select Camera. To directly access to this menu,
long press the camera side-key from stand-by
mode.
2. Center you subject on the viewfinder and press the
OK key or the camera side-key to take the photo.
3. If you want to save the picture, select the disk icon.
Camera icons description
After taking a picture, the following option window
appears:
]
: Send the picture through MMS. Only pictures
below 100KB can be sent through MMS.
]
: Store the pictures in the Photo album.
]
: Delete the photo.
To change the camera settings, press the left soft-key
. Use the left/right directional keys to scroll the
various options and press OK to change them,
following the indications described below:
MULTIMEDIA
MULTIMEDIA
Resolution
Multi shot
indicator
Flash on/off
Timer
indicator
Zoom level
Settings
menu

58
]
Brightness: changes the brightness of the
photo among 5 levels (-2, -1, 0, 1 and 2). You can
also change the brightness of the picture using the
left/right directional keys from the viewfinder.
]
Size: Set the size (resolution) of the picture.
You can choose between 320x240, 640x480,
1280x960, 48x48 – for phonebook – e 128x160
– to be used as wallpaper.
]
Timer : Using this function you can delay the
camera shutter time by selecting either None, 3
seconds, 5 seconds or 10 seconds.
]
Quality: You can select the desired quality of
picture by selecting either S-Fine, Fine or Normal.
]
White balance: Using this function you can
adjust the tone of the background picture
according to the weather by selecting either Auto,
Cloudy, Incandescent, Fluorescent and Daylight.
]
Album: Show all the pictures stored in the
album.
]
Exit: Exit from the settings menu.
]
Modo: Set the kind of picture to be taken.
You can choose among the following options:
• Still shot: Takes a standard picture.
•
Multi shot: You can take up to 9
consecutive shots, depending on the resolution.
After shooting, you can check each picture, one by
one, pressing the down directional key.
Note
]
A high quality setting will increase the
definition of the photo, but the memory size
will be bigger.
Note
]
You can set the timer pressing the key
`
from the viewfinder.
Note
]
Bigger size pictures will take more memory to
be saved.
MULTIMEDIA
MULTIMEDIA

59
After checking the photos, you can either save
them or delete them choosing the relative icons.
•
Frame shot: You can apply 10 kinds of
frame effects when taking a picture. To select the
frame, press the up directional key and confirm
your choice pressing OK.
]
Effect: Changes the color of the pictures.
Available options are: Color, night, Sepia, Black &
white and Negative.
]
Flash: Toggles the flash to take pictures in low
light conditions.
]
Zoom: The digital camera integrates a zoom
function up to 4X. There are 4 zoom levels you can
change using the left/right directional keys. You can
also change the zoom level using the up/down
directional keys from the viewfinder.
Note
]
The zoom function is available only in specific
resolutions. Please refer to the following table
for more details:
- 48x48: Zoom 1x
- 128x160: Zoom 1x
- 320x240: Zoom 1x, 2x, 3x, 4x
- 640x480: Zoom 1x, 2x
- 1280x960: Zoom 1x
Note
]
You can toggle the flash also pressing the key
=
from the viewfinder.
Note
]
Frame shots are only available with the
128x160 pixel resolution.
Note
]
The multi shot function is only available if the
resolution is set as 320x240 or 640x480. You
can take 9 consecutive shots with 320x240,
while only 3 with 640x480. The pictures will be
handled all together (deleted or saved), you can’t
handle them one by one.
MULTIMEDIA

MULTIMEDIA
60
• Taking pictures with closed folder
Taking a self-portrait, you can see your picture on the
sub-LCD.
1. Long press the camera side key.
2. Select Take picture using the volume side keys
followed by the camera side key to confirm it.
3. Choose the subject to acquire and press the camera
side key. The picture will be automatically saved in
the Photo album.
4. To exit the camera mode, long press the camera side
key.
Long press the camera side key when the folder is
closed to open the following menu (use the volume
side keys to move between the options and confirm
the selections through the camera side key):
•
MP3: Plays the music files in the phone. Check (Menu
6.5.1) for further details.
•
Take picture: Enter the camera mode.
•
Slide show: Display a slide show of all the pictures in
the photo album.
•
Torch: Toggle the flash functionality.
•
Exit: Exits the menu.
VIDEO CAMERA
MENU 6.2
S5100 includes a video camera which can take every
kind of video at resolution of 176x144 or 128x96
pixel. Video duration depends on the available
memory. Videos are encoded in 3gp format.
To record a video, follow the instructions below:
1. Turn on the video camera (Menu 6.2)
2. Change the video camera settings according to
your needing, pressing the left softkey . The video
camera settings are mostly the same as camera
settings described in (Menu 6.1).
Note
]
Taking a self-portrait, you can’t change the
camera settings (zoom, brightness, quality and
so on). The phone will automatically use the
latest camera settings. Also, you can’t use the
Flash or use the Multi shot and the Frame shot
functions.
MULTIMEDIA

61
]
Brightness: Changes the brightness of the
video among 5 levels (-2, -1, 0, 1 and 2). You can
also change the brightness of the video using the
left/right directional keys from the viewfinder.
]
Size: Set the size (resolution) of the video.
You can choose between 176x144 or 128x96
pixel.
]
Timer : Using this function you can delay the
video recording start time by selecting either None,
3 seconds, 5 seconds or 10 seconds.
]
Quality: You can select the desired quality of
the video by selecting either S-Fine, Fine or Normal.
]
White balance: Using this function you can
adjust the tone of the video according to the
weather by selecting either Auto, Cloudy,
Incandescent, Fluorescent and Daylight.
]
Record time:: Set the video duration time
(Unlimited, 1 minute, 5 minutes, 30 minutes or 90
minutes).
]
Album: Show all the videos stored in the
album.
]
Exit: Exit from the settings menu.
]
Effect: Changes the color of the video.
Available options are: Color, night, Sepia, Black &
white and Negative.
]
Flash: Toggles the flash to record videos in
low light conditions.
Nota
]
A high quality setting will increase the
definition of the video, but the memory size will
be bigger.
Note
]
You can set the timer pressing the key
`
from the viewfinder.
Note
]
Bigger size videos will take more memory to be
saved.
MULTIMEDIA

]
Zoom: The video camera integrates a zoom
function up to 4X. There are 4 zoom levels you can
change using the left/right directional keys. You can
also change the zoom level using the up/down
directional keys from the viewfinder.
3. Put the camcorder where you want it and press the
OK key to start recording. A red timer will indicate
the recording time. Press again the OK key to stop
the recording. The recorded video is automatically
saved in the gallery (Menu 6.4).
MY PHOTO
MENU 6.3
You can view and send a picture. In addition, you can
set the window picture as a wallpaper.
Options
]
Multi view: You can view the maximum of 9
thumbnails in a screen.
]
Send via Bluetooth: You can send a pciture via
Bluetooth.
]
Write multimedia messages: You can send a
picture via MMS.
]
Set as wallpaper: You can set a picture as a
wallpaper.
]
Slide show: This menu allows you to view as a slide
show automatically.
]
Delete: You can delete a picture.
]
Edit title: You can edit the title of picture.
]
Information: You can view the information about
Title, Size, Date and Time you’ve taken.
MY VIDEO
MENU 6.4
You can play and send a video.
Options
]
Play : Play the video
]
Send via Bluetooth : You can send the video by
Bluetooth.
]
Rename : You can edit the title of video.
Note
]
You can toggle the flash also pressing the
=
key from the viewfinder.
MULTIMEDIA
62
MULTIMEDIA

]
Delete : You can delete the video.
]
Delete all : You can delete all files.
]
Information : You can view the information of the
video.
MP3
MENU 6.5
The S5100 has an integrated MP3 player built-in.
You can enjoy listening to MP3 music files on your
phone memory using a compatible headset or via the
internal loudspeaker.
The music player supports:
• MPEG-1 Layer III,MPEG-2 Layer III,MPEG-2.5 Layer
III Sampling frequency up from 8KHz to 48KHz.
Bit rate up to 320Kbps, stereo.
•
AAC: ADIF, ADTS formats (Sampling frequency from
8KHz to 48KHz)
• AAC+: V1 : (Bit rate 16 28Kbps)
V2 : (Bit rate 16
48Kbps)
(Sampling frequency from 8KHz to 48KHz)
•
MP4 , M4A : Sampling frequency up from 8KHz to
48KHz, Bit rate up to 320Kbps, stereo.
• WMA : Sampling frequency up from 8KHz to 48KHz,
Bit rate up to 320Kbps, stereo.
You can transfer MP3 files from a compatible PC to
the memory in your phone using the Mass Storage.
when you connect the phone to a PC using the USB
cable(supplied in the same package), you just try to
Note
]
S5100 doesn't support the variable rate of
MP3 and AAC file. Therefore, you can't change
the file from VBR MP3 format to AAC.
Note
]
Because of the small dimension of the speaker,
in some cases the audio could be distorted,
especially at maximum volume and when there
are lots of bass sounds. Therefore, we
recommend you to use the stereo headset in
order to appreciate the high quality of your
music.
63
MULTIMEDIA

connect to PC via USB cable. If you use on win98 SE,
you have to install Mass storage drive for windows 98
on CD-ROM.
MP3 player
(Menu 6.5.1)
1. Press MP3 menu, and then select MP3 player.
2. Press the left soft key
d
[Options] to access
the following menus.
]
View play list: You can view the play list on listening
to the music.
]
Area repeat: The special area part of the current
music is repeated when you select ON of the menu.
]
Set as ring tone: This menu allows to set the MP3
file as a ring tone. You can also set it as a ring tone
in Profile.
]
Settings:
- Equalizer: This menu helps you to adjust a varity
of environment on listening to the music. This
phone supports four preset menus. When you
enter this menu, you can view current value of
equalizer.
-
Playmode : This menu allows to set the play
mode.
- Set shuffle: You can listen to MP3 music all
randomly.
- Visual effect : You can select the visual effect
menus:Light, Bounce and Guitarist.
This menu allows to change the backgroud of main
LCD and sub LCD on playing MP3 file.
Note
]
The PC should run Windows 98 SE, Windows
ME, Windows 2000, Windows XP operating
system.
]
Besides downloading the MP3 files to the
phone, you can upload the pictures taken on
the phone to the PC using the USB cable. And
you can also manage the phonebook,
scheduler, and Memo on the PC. Consult with
the authorised dealer for availability of
accessories.
]
To download MP3 file in Windows 2000, you
should set folder option in PC as follow: View
WEB->Use Windows default folder (I).
MULTIMEDIA
64
MULTIMEDIA

- Flip setting
Continue playing:
Although you close the flip on
playing, the play mode is continued without a
pause.
Stop playing: When you close the flip, you can
stop the play mode.
Playlist
(Menu 6.5.2)
This menu allows to view the whole Playlist. You can
move the track by pressing the navigation key.
In addition, if you select option menu, you can delete
the file or view its information .
Settings
(Menu 6.5.3)
This menu allows to set the following items; Equalizer,
Playmode, Set shuffle, Visual effect and Flip setting.
VOICE RECORDER
MENU 6.6
The voice memo feature you to record up to 10 voice
messages and each memo is up to 20 Seconds.
Record
(Menu 6.6.1)
You can record a voice memo in the Voice recorder
menu.
1. Once recording has started, the message Recording
and the remaining time is displayed.
Note
]
The copyright of music files can be protected
in international treaties and national copyright
laws.
Therefore, it may be necessary to obtain a
permission or a license to reproduce or copy
music. In some countries national law prohibits
private copying of copyrighted material.
Before downloading or copying the file, please
check the national legislation of the applicable
country concerning the use of such material.
65
MULTIMEDIA

2. If you want to finish recording, press the left soft
key
d
[Save].
3. Key in Voice memo title, press the left soft key
d
[OK].
View list
(Menu 6.6.2)
The phone shows voice memo list. You can Playback
and Delete the recorded voice memo.
SETTINGS
MENU 6.7
Camera
(Menu 6.7.1)
]
Auto save: If you set On, the images will be saved
automatically without displaying menu bar to save.
]
Delete all photos: This menu allows to delete all
photos after asking your confirmation.
Video camera
(Menu 6.7.2)
]
Delete all videos: This menu allows you to delete
all the videos.
MULTIMEDIA
66
MULTIMEDIA

You can set the following menus for your convenience
and preferences.
1. Press
d
[Menu] in standby mode.
2. Press
7
for direct access to enter Settings.
DATE & TIME
MENU 7.1
You can set functions relating to the date and time.
Date
(Menu 7.1.1)
Set Date
You can enter the current date.
Date format
You can set the Date format such as DD/MM/YYYY,
MM/DD/YYYY, YYYY/MM/DD.
(D: Day / M: Month / Y: Year)
Time
(Menu 7.1.2)
Set Time
You can enter the current time.
Time format
Your can set the time format between 24-hour and
12-hour.
PHONE SETTINGS
MENU 7.2
You can set functions relating to the phone.
Display settings
(Menu 7.2.1)
]
Wallpaper: You can select the background pictures
in standby mode.
-
Main LCD
- Sub LCD
Default
You can select a picture or an animation of
wallpaper by pressing
k
or
l
.
My folder
You can select a picture or an animation as
wallpaper.
SETTINGS
67
SETTINGS

68
]
Standby text: If you select On, you can edit the
text which is displayed in standby mode.
]
Backlight time: You can set the light-up duration
of the display.
]
Network name: If you set ON, Network name (the
name of service provider) will be appeared in
Internal LCD.
Theme settings
(Menu 7.2.2)
Allows you to choose from one of the preset themes.
Language
(Menu 7.2.3)
You can change the language for the display texts in
your phone. This change will also affect the Language
Input mode.
CALL SETTINGS
MENU 7.3
You can set the menu relevant to a call by pressing
d
[Select] in the Setting menu.
Call divert
(Menu 7.3.1)
The Call divert service allows you to divert incoming
voice calls, fax calls, and data calls to another number.
For details, contact your service provider.
]
All voice calls: Diverts voice calls unconditionally.
]
If busy: Diverts voice calls when the phone is in use.
]
If no reply: Diverts voice calls which you do not
answer.
]
If out of reach: Diverts voice calls when the phone
is switched off or out of coverage.
]
All data calls: Diverts to a number with a PC
connection unconditionally.
]
All fax calls: Diverts to a number with a fax
connection unconditionally.
]
Cancel all: Cancels all call divert service.
The submenus
Call divert
menus have the submenus shown below.
• Activate
Activate the corresponding service.
SETTINGS
SETTINGS

69
To voice mail centre
Forwards to message centre. This function is not
shown at All data calls and All fax calls menus.
To other number
Inputs the number for diverting.
To favorite number
You can check recent 5 diverted numbers.
• Cancel
Deactivate the corresponding service.
•
View status
View the status of the corresponding service.
Answer mode
(Menu 7.3.2)
]
Flip open: If you select this menu, you can receive
an incoming call by simply opening flip.
]
Any key: If you select this menu, you can receive a
call by pressing any key except
b
[End] key.
]
Send key only: If you select this menu, you can
receive a call by only pressing
a
[Send] key.
Send my number
(Menu 7.3.3)
(network and subscription dependent)
]
Set by network: If you select this, you can send
your phone number depending on two line service
such as line 1 or line 2.
]
On: You can send your phone number to another
party. Your phone number will be shown on the
receiver’s phone.
]
Off: Your phone number will not be shown.
Call waiting
(network dependent)
(Menu 7.3.4)
]
Activate: If you select Activate, you can accept a
waiting (receiving) call.
]
Cancel: If you select Cancel, you cannot recognize
the waiting (receiving) call.
]
View status: Shows the status of Call waiting.
Minute minder
(Menu 7.3.5)
If you select On, you can check the call duration by
deep sound given every minute during a call.
SETTINGS

SETTINGS
70
Auto redial
(Menu 7.3.6)
]
On: When this function is activated, the phone will
automatically try to redial in the case of failure to
connect a call.
]
Off: Your phone will not make any attempts to
redial when the original call has not connected.
SECURITY SETTINGS
MENU 7.4
PIN code request
(Menu 7.4.1)
In this menu, you can set the phone to ask for the PIN
code of your SIM card when the phone is switched on.
If this function is activated, you’ll be requested to
enter the PIN code.
1. Select PIN code request in the security settings
menu, and then press
d
[Select].
2. Set
On/Off.
3. If you want to change the setting, you need to enter
PIN code when you switch on the phone.
4. If you enter wrong PIN code more than 3 times, the
phone will lock out. If the PIN is blocked, you will
need to key in the PUK code.
5. You can enter your PUK code up to 10 times. If you
put wrong PUK code more than 10 times, you can
not unlock your phone. You will need to contact
your service provider.
Handset lock
(Menu 7.4.2)
You can use security code to avoid unauthorized use
of the phone. Whenever you switch on the phone, the
phone will request security code if you set phone lock
to
On. If you set phone lock to Automatic, your
phone will request security code only when you
change your SIM card.
Call barring
(Menu 7.4.3)
The Call barring service prevents your phone from
making or receiving certain category of calls. This
function requires the call barring password. You can
view the following submenus.
]
All outgoing: The barring service for all outgoing
calls.
SETTINGS

71
]
International: The barring service for all outgoing
international calls.
]
International when roaming: The barring service
for all international outgoing calls except home
network.
]
All incoming: The barring service for all incoming
calls.
]
Incoming when roaming: The barring service for all
incoming calls when roaming.
]
Cancel all: You can cancel all barring services.
]
Change password: You can change the password
for Call Barring Service.
The submenus:
• Activate
Allows to request the network to set call restriction
on.
• Cancel
Set the selected call restriction off.
• View status
View the status whether the calls are barred or not.
Fixed dial number
(Menu 7.4.4)
(SIM dependent)
You can restrict your outgoing calls to selected phone
numbers.
The numbers are protected by your PIN2 code.
]
Enable: You can restrict your outgoing calls to
selected phone numbers.
]
Disable: You can cancel fixed dialling function.
]
Number list: You can view the number list saved as
Fixed dial number.
Change codes
(Menu 7.4.5)
PIN is an abbreviation of Personal Identification
Number to prevent use by unauthorized person.
You can change the access codes:
PIN2 code,
Security code.
1. If you want to change the Security code/PIN2 code
input your original code, and then press
d
[OK].
2. Input new Security code/PIN2 code and verify
them.
SETTINGS

SETTINGS
72
NETWORK SETTINGS
MENU 7.5
You can select a network which will be registered
either automatically or manually. Usually, the network
selection is set to
Automatic.
Network selection
(Menu 7.5.1)
Automatic
If you select Automatic mode, the phone will
automatically search for and select a network for you.
Once you have selected “Automatic”, the phone will
be set to “Automatic” even though the power is off
and on.
Manual
The phone will find the list of available networks and
show you them. Then you can select the network
which you want to use if this network has a roaming
agreement with your home network operator. The
phone will let you select another network if the phone
fails to access the selected network.
Preferred
You can set a list of preferred networks phone will
attempt to register with first, before attempting to
register to any other networks. This list is set from the
phone’s predefined list of known networks.
Band selection
(Menu 7.5.2)
Use this to set the network band between two
choices, EGSM / DCS (900/1800) or EGSM / PCS
(900/1900).
GPRS SETTING
MENU 7.6
You can set GPRS service depending on various
situations.
RESET SETTINGS
MENU 7.7
You can initialize all default settings. You need the
Security code to activate this function.
SETTINGS

73
MEMORY STATUS
MENU 7.8
Internal memory
(Menu 7.8.1)
This function shows the status of the user memory of
the handset.
Multimedia memory
(Menu 7.8.2)
This function shows the status of the multimedia
memory of the handset.
SETTINGS

74
You can access various WAP (Wireless Application
Protocol) services such as banking, news, weather
reports and flight information. These services are
specially designed for mobile phones and they are
maintained by WAP service providers.
Check the availability of WAP services, pricing and
tariffs with your network operator and/or the service
provider whose service you wish to use. Service
providers will also give you instructions on how to use
their services.
Once connected, the homepage is displayed. The
content depends on the service provider. To exit the
browser at any time, press the (
b
) key. The
phone will return to the previous menu.
Navigating with the WAP browser
You can surf the Internet using either the phone keys
or the WAP browser menu.
Using the phone keys
When surfing the Internet, the phone keys function
differently to phone mode.
Using the WAP browser menu
There are various menu options available when surfing
the Mobile Web.
INTERNET
MENU 8.1
Home
(Menu 8.1.1)
Connects to a homepage. The homepage will be the
site which is defined in the activated profile. It will be
defined by the service provider if you have not defined
it in the activated profile.
Note
]
The WAP browser menus may vary, depending
on your browser version.
Key Description
Scrolls each line of the content area
Returns to the previous page
Selects options and confirms actions
ij
c
h
SERVICE
SERVICE

75
Bookmarks
(Menu 8.1.2)
This menu allows you to store the URL of favorite web
pages for easy access at a later time. Your phone has
several pre-installed bookmarks. These pre-installed
bookmarks cannot be deleted.
To create a bookmark
1. Press the left soft key
d
[Options].
2. Select Add new and press the OK key.
3. After entering the desired URL and title, press the
OK key.
*
Tip: Use the “
1
” key and
`
key to enter
symbols. To enter “ . ”, press “
1
” .
After selecting a desired bookmark, the following
options are available.
]
Connect: Connects to the selected bookmark.
]
Add new: Select this to create a new bookmark.
]
Edit: You can edit the URL and/or the title of the
selected bookmark.
]
Delete: Deletes the selected bookmark.
]
Delete all: Deletes all the bookmarks.
Go to URL
(Menu 8.1.3)
You can connect directly to the site you want. After
entering a specific URL, press the OK key.
Settings
(Menu 8.1.4)
Profiles
A profile is the network information used to connect
to the Internet.
Each profile has submenus as follows:
]
Activate: Activates the selected profile.
]
Settings: Use this to edit and change WAP settings
for the selected profile.
Note
]
In case the SIM card support SAT(i.e. SIM
Application Toolkit) services, this menu will be
the operator specific service name stored on
the SIM card. In case the SIM card does not
support SAT services, this menu will be Profiles.
SERVICE

SERVICE
76
- Homepage: This setting allows you to enter the
address (URL) of a site you want to use as
homepage. You do not need to type http:// at the
front of each URL as the WAP Browser will
automatically add it.
-
Bearer: You can set the bearer data service.
1 Data
2 GPRS
- Data settings: Appears only if you select Data
Settings as a Bearer / service.
Dial number: Enter the telephone number to dial
to access your WAP gateway.
User ID: The users identity for your dial-up server
(and NOT the WAP gateway).
Password: The password required by your dial-up
server (and NOT the WAP gateway) to identify
you.
Call type: Select the type of data call : Analogue
of Digital (ISDN)
Linger time: You need to enter timeout period.
After entering that, the WAP navigation service will
be unavailable if any data is not input or transferred.
Call speed: The speed of your data connection ;
9600 or 14400
- GPRS settings: The service settings are only
available when GPRS is chosen as a bearer service.
APN: Input the APN of the GPRS.
User ID: The users identify for your APN server.
Password: The password required by your APN
server.
Connection Type: The options for connection
type are Temporary or Continuous and depend on
the gateway you are using.
-
Proxy settings
Proxy:
On/Off
IP address: Input the IP address of the Proxy
server you access.
Port: Input the Proxy Port
DNS settings
Primary server:
Input the IP address of the
primary DNS server you access
Secondary server: Input the IP address of the
secondary DNS server you access
SERVICE

77
]
Rename: You can change the profile name.
]
Delete: Deletes the selected profile from the list.
]
Add new: You can add a new profile.
Cache
Set a value whether a connection attempt is made
through cache or not.
Cookie
Check whether a cookie is used or not.
Clear cache
Removes all context saved in cache.
Clear cookie
Removes all context saved in cookie.
Security
A list of the available certification is shown.
]
Authority: You can see the list of authority
certificates that have been stored in your phone.
]
Personal: You can see the list of personal
certificates that have been stored in your phone.
SIM SERVICE
(SIM DEPENDENT)
MENU 8.2
Your service provider can offer special applications
through the SIM card, such as home banking, stock
market, etc. If you are registered for one of these
services, the service name will appear at the end of the
Main Menu. With the SIM Services menu your phone is
future-proof and will support additions to your service
provider’s service.
For more information contact your service provider.
SERVICE

78
GAMES & APPS
MENU 9.1
Games & Apps
(Menu 9.1.1)
In this menu, you can manage the Java applications
installed in your phone. You can play or delete
downloaded applications, or set the connect option.
The downloaded applications are organised in folders.
Press the left soft key
d
[Select] to open the
selected folder or launch the selected midlet. Using
the left soft key
d
[Options], the following menus
are available.
]
Launch: Start the selected application.
]
Information: Shows the information of the
application.
]
Permissions: Some Java applications may require a
data connection to be made. Select this to set the
connecting options.
-
Always: The connection is created immediately
without a notification.
- Prompt: You will be asked before the application
makes the connection.
- Never: No connection is allowed.
Note
]
You cannot remove or rename the preinstalled
folder or a game in the folder.
Note
]
After downloading any Java game, press the
“Ok” Key (
h
) to save it in the root folder.
DOWNLOADS
Java
TM
, is a technology developed by Sun
Microsystems. Similar to the way you would
download the Java Applet using the standard MS
Internet Explorer browser, Java MIDlets can be
downloaded using the WAP enabled phone.
Depending on the service provider, all Java based
programs such as Java games can be downloaded
and run on a phone. Once downloaded, the Java
program can be viewed in the
Games & Apps
menu where you can select, execute, or delete.
The Java program files saved in the phone are in
.JAD or .JAR format.
DOWNLOADS

79
Profiles
(Menu 9.1.2)
This menu contains the same settings of the Internet
menu. In fact, in order to download new applications, a
WAP connection is needed.
IMAGES
MENU 9.2
The left soft key
d
[Options] will bring up the
following options.
]
Set as wallpaper: Currently selected Picture can be
set as a Wallpaper.
]
Write multimedia message: Downloaded Picture
can be sent via MMS.
]
Send via Bluetooth: The picture can be sent via
Bluetooth.
Note
]
The JAR file is a compressed format of the Java
program and the JAD file is a description file
that includes all detailed information. From the
network, prior to download, you can view all
detailed file descriptions from the JAD file.
]
While being based on a standard language
(J2ME), not all Java applications are compatible
with all handsets on sale in so far as specific
libraries may be used for a telephone model.
The software may be blocked or switch itself on
when Java applications not specifically
developed for the phone is downloaded. We
would like to point out that these problems are
caused by incompatible applications and are
not a product fault.
Caution
]
Only J2ME (Java 2 Micro Edition) based
programs will run in a phone environment. The
J2SE (Java 2 Standard Edition) based programs
will only run in a PC environment.
DOWNLOADS

SOUNDS
MENU 9.3
The left soft key
d
[Options] will bring up the
following options.
]
Set as ringtone: This sets the Ring Tone with
currently selected Sound.
]
Write messages: Melody Sound can be sent via
SMS and MMS.
]
Send via Bluetooth: Melody Sound can be sent via
Bluetooth.
FILE STORAGE
MENU 9.4
This folder is similar to a file storage. It contains all the
file transferred through UMS functionality or
Bluetooth, as images, sounds and generic files not
supported by the phone.
Pressing the [Option] softkey, you can view or play
the file (if supported), delete it or send it via
Bluetooth.
USB connectivity
S5100 can be connected to a PC through a USB
cable in order to transfer files, contents and to use the
built-in modem. You can find all the details related to
this functionality in the following section.
USB Media Storage (UMS)
The UMS functionality (USB Media Storage) allows to
handle multimedia files stored in the phone’s internal
memory (64MB), treating it as a common USB
memory key. This function doesn’t require the
installation of additional software.
You can preview JPG(Max 460K), GIF(Max 100K) and
can play sound can be attached in MMS.
1. From the phone’s stand-by screen, connect the
USB cable to the phone and the PC. The PC will
identify the peripheral after some seconds.
Note
]
While using the UMS functionality, you won’t
be able to receive any call or message.
80
DOWNLOADS
DOWNLOADS

81
2. The phone will display “USB” on the main LCD
3. On the PC, the phone will be identified as
“Removable disk” in My Computer folder. Also, a
system disk letter will be assigned, such as “E:\”.
After that, you can upload or download files from
the phone treating it just as a common Windows
folder.
4. Double-click on “Removable disk” and open the
folder “My Media”. Four new folders will appear:
-
Music: In this folder you can copy music files. The
supported formats are: MP3, AAC, AAC+, AAC++,
WMA and MP4 (audio). The files in this folder can
be played using the MP3 player of the phone.
-
Photos: This folder is reserved for the pictures
taken with the phone’s digital camera. You can
transfer the pictures from the phone to the PC
using the commands copy and paste of the PC.
-
Storage: This folder is similar to a file storage. You
can upload any kind of file here, images, audio or
even files not specifically supported by the phone
(i.e. word and excel files) just to carry them with
you and download them later to another PC. On
the phone, the files stored in this folder are listed
in the (Menu – Downloads – File Storage).
-
Videos: In this folder you can download on PC the
videos taken with the phones’ digital camera and
upload new videos on the phone. This folder
supports the 3GP file format. On the phone, you
can view the files in this folder in the (Menu –
Multimedia – My video).
Note
]
Even though you can upload new pictures from
the PC, the phone won’t list them in the My
photo menu. Therefore, we recommend not to
upload anything to this folder. If you want to
upload new wallpapers to the phone, please
use the dedicated program available in the
CD-Rom.
DOWNLOADS

5. Once the file transfer is finished, disconnect the
USB peripheral from Windows and disconnect the
cable from the phone.
PC programs and Internet
You can connect the phone to your PC to manage
your phonebook contacts, upload new contents such
as wallpapers and ringtones or use the built in modem.
1. Install the programs included in the CD-Rom.
2. On the phone, open the menu Tools – Modem and
confirm the activation.
3. Connect the phone to the PC using the USB cable
and start the desired program.
4. After using the modem, it is recommended to
deactivate it from the menu Tools - Modem.
Note
]
To connect USB, several minutes after power
on phone and in the idle window.
WARNING!
•
Never disconnect the phone while there’s a file transfer in
progress. Doing so may damage the memory. Always
disconnect the peripheral through Windows options
before disconnecting the cable.
Note
]
You can upload files of any size, until the
memory is full.
]
You can create up to 10 nested folders in the
4 default folders.
]
Do not change the defualt folder name, or it
does not work properly.
DOWNLOADS
82
DOWNLOADS

ACCESSORIES
83
Standard Battery
Headset
Allows hands-free operation.
Includes earpiece and microphone.
Travel Adapter
This charger allows you to charge
the battery while away from home
or your office.
Data Cable/CD
You can connect your phone to
PC to exchange the data
between them.
Note
]
Always use genuine LG accessories.
]
Failure to do this may invalidate your warranty.
]
Accessories may be different in different
regions; please check with our regional service
company or agent for further enquires.
There are various accessories for your mobile phone. You can select these options according to your
personal communication requirements.
ACCESSORIES

84
TECHNICAL DATA
GENERAL
Product name: S5100
System : GSM 900 / DCS 1800 / PCS 1900
AMBIENT TEMPERATURES
Max: +55°C (discharging)
: +45°C (charging)
Min: -10°C
TECHNICAL DATA


MEMO

MEMO

MEMO
-
 1
1
-
 2
2
-
 3
3
-
 4
4
-
 5
5
-
 6
6
-
 7
7
-
 8
8
-
 9
9
-
 10
10
-
 11
11
-
 12
12
-
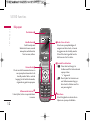 13
13
-
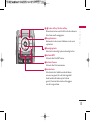 14
14
-
 15
15
-
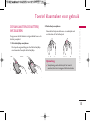 16
16
-
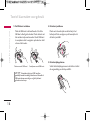 17
17
-
 18
18
-
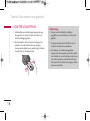 19
19
-
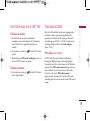 20
20
-
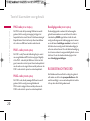 21
21
-
 22
22
-
 23
23
-
 24
24
-
 25
25
-
 26
26
-
 27
27
-
 28
28
-
 29
29
-
 30
30
-
 31
31
-
 32
32
-
 33
33
-
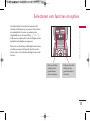 34
34
-
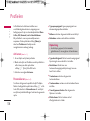 35
35
-
 36
36
-
 37
37
-
 38
38
-
 39
39
-
 40
40
-
 41
41
-
 42
42
-
 43
43
-
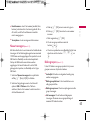 44
44
-
 45
45
-
 46
46
-
 47
47
-
 48
48
-
 49
49
-
 50
50
-
 51
51
-
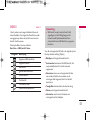 52
52
-
 53
53
-
 54
54
-
 55
55
-
 56
56
-
 57
57
-
 58
58
-
 59
59
-
 60
60
-
 61
61
-
 62
62
-
 63
63
-
 64
64
-
 65
65
-
 66
66
-
 67
67
-
 68
68
-
 69
69
-
 70
70
-
 71
71
-
 72
72
-
 73
73
-
 74
74
-
 75
75
-
 76
76
-
 77
77
-
 78
78
-
 79
79
-
 80
80
-
 81
81
-
 82
82
-
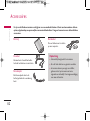 83
83
-
 84
84
-
 85
85
-
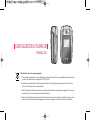 86
86
-
 87
87
-
 88
88
-
 89
89
-
 90
90
-
 91
91
-
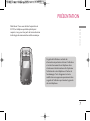 92
92
-
 93
93
-
 94
94
-
 95
95
-
 96
96
-
 97
97
-
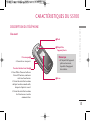 98
98
-
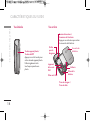 99
99
-
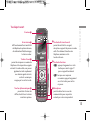 100
100
-
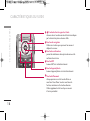 101
101
-
 102
102
-
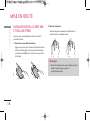 103
103
-
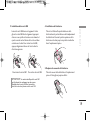 104
104
-
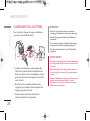 105
105
-
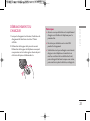 106
106
-
 107
107
-
 108
108
-
 109
109
-
 110
110
-
 111
111
-
 112
112
-
 113
113
-
 114
114
-
 115
115
-
 116
116
-
 117
117
-
 118
118
-
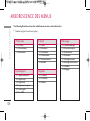 119
119
-
 120
120
-
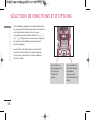 121
121
-
 122
122
-
 123
123
-
 124
124
-
 125
125
-
 126
126
-
 127
127
-
 128
128
-
 129
129
-
 130
130
-
 131
131
-
 132
132
-
 133
133
-
 134
134
-
 135
135
-
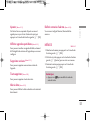 136
136
-
 137
137
-
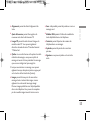 138
138
-
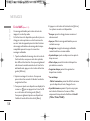 139
139
-
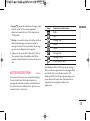 140
140
-
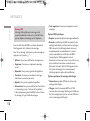 141
141
-
 142
142
-
 143
143
-
 144
144
-
 145
145
-
 146
146
-
 147
147
-
 148
148
-
 149
149
-
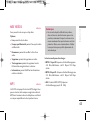 150
150
-
 151
151
-
 152
152
-
 153
153
-
 154
154
-
 155
155
-
 156
156
-
 157
157
-
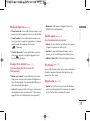 158
158
-
 159
159
-
 160
160
-
 161
161
-
 162
162
-
 163
163
-
 164
164
-
 165
165
-
 166
166
-
 167
167
-
 168
168
-
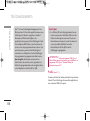 169
169
-
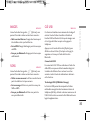 170
170
-
 171
171
-
 172
172
-
 173
173
-
 174
174
-
 175
175
-
 176
176
-
 177
177
-
 178
178
-
 179
179
-
 180
180
-
 181
181
-
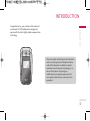 182
182
-
 183
183
-
 184
184
-
 185
185
-
 186
186
-
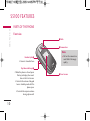 187
187
-
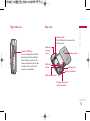 188
188
-
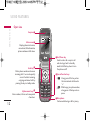 189
189
-
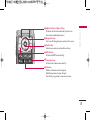 190
190
-
 191
191
-
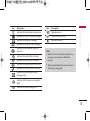 192
192
-
 193
193
-
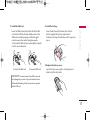 194
194
-
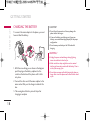 195
195
-
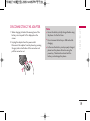 196
196
-
 197
197
-
 198
198
-
 199
199
-
 200
200
-
 201
201
-
 202
202
-
 203
203
-
 204
204
-
 205
205
-
 206
206
-
 207
207
-
 208
208
-
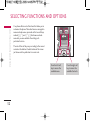 209
209
-
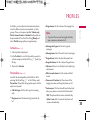 210
210
-
 211
211
-
 212
212
-
 213
213
-
 214
214
-
 215
215
-
 216
216
-
 217
217
-
 218
218
-
 219
219
-
 220
220
-
 221
221
-
 222
222
-
 223
223
-
 224
224
-
 225
225
-
 226
226
-
 227
227
-
 228
228
-
 229
229
-
 230
230
-
 231
231
-
 232
232
-
 233
233
-
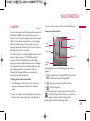 234
234
-
 235
235
-
 236
236
-
 237
237
-
 238
238
-
 239
239
-
 240
240
-
 241
241
-
 242
242
-
 243
243
-
 244
244
-
 245
245
-
 246
246
-
 247
247
-
 248
248
-
 249
249
-
 250
250
-
 251
251
-
 252
252
-
 253
253
-
 254
254
-
 255
255
-
 256
256
-
 257
257
-
 258
258
-
 259
259
-
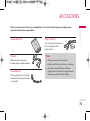 260
260
-
 261
261
-
 262
262
-
 263
263
-
 264
264
-
 265
265


in andere talen
- English: LG S5100 User manual
- français: LG S5100 Manuel utilisateur
Gerelateerde papieren
Andere documenten
-
Konrow Slider Handleiding
-
Thomson Serea 75 SIL Handleiding
-
-
-
 Mode TLINK28 BLK Handleiding
-
EDENWOOD BT1100 de handleiding
-
MPMan ICR 112 Gebruikershandleiding
-
MyKronoz ZeNano Specificatie
-
Auerswald Internet Telephony Adapter Box Handleiding
