Samsung PS50A40 Handleiding
- Categorie
- Lcd-tv's
- Type
- Handleiding
Deze handleiding is ook geschikt voor

imagine the possibilities
Plasma TV
user manual
BN68-01528A-01
Contact SAMSUNG WORLD-WIDE
If you have any questions or comments relating to Samsung products, please contact the SAMSUNG
customer care centre.
Country
Customer Care Centre
Web Site
AUSTRIA 0800-SAMSUNG(726-7864) www.samsung.com/at
BELGIUM 0032 (0)2 201 24 18 www.samsung.com/be
CZECH REPUBLIC
844 000 844 www.samsung.com/cz
Distributor pro Českou republiku:
Samsung Zrt., česka organizační složka Vyskočilova 4, 14000 Praha 4
DENMARK 70 70 19 70 www.samsung.com/dk
EIRE 0818 717 100 www.samsung.com/ie
ESTONIA 800-7267 www.samsung.ee
FINLAND 030-6227 515 www.samsung.com/fi
FRANCE
"3260 SAMSUNG (€ 0,15/Min)
08 25 08 65 65 (€ 0,15/Min)"
www.samsung.com
GERMANY 01805 - SAMSUNG(726-7864 € 0,14/Min) www.samsung.com
HUNGARY 06-80-SAMSUNG(726-7864) www.samsung.com
ITALIA 800-SAMSUNG(726-7864) www.samsung.com
KAZAKHSTAN 8-10-800-500-55-500 www.samsung.kz
KYRGYZSTAN 00-800-500-55-500 -
LATVIA 800-7267 www.samsung.com/lv
LITHUANIA 8-800-77777 www.samsung.lt
LUXEMBURG 0035 (0)2 261 03 710 www.samsung.com/be
NETHERLANDS 0900-SAMSUNG (726-7864 € 0,10/Min) www.samsung.com/nl
NORWAY 815-56 480 www.samsung.com/no
POLAND
"0 801 801 881
022-607-93-33"
www.samsung.com/pl
PORTUGAL 80820-SAMSUNG(726-7864) www.samsung.com/pt
RUSSIA 8-800-555-55-55 www.samsung.ru
SLOVAKIA 0800-SAMSUNG(726-7864) www.samsung.com/sk
SPAIN 902 10 11 30 www.samsung.com
SWEDEN 0771-400 200 www.samsung.com/se
SWITZERLAND 0800-SAMSUNG(726-7864) www.samsung.com/ch
TURKEY 444 77 11 www.samsung.com
TADJIKISTAN 8-10-800-500-55-500 -
U.K 0845 SAMSUNG (7267864) www.samsung.com
UKRAINE 8-800-502-0000 www.samsung.com
UZBEKISTAN 8-10-800-500-55-500 www.samsung.uz
Thank you for purchasing this Samsung product.
To receive more complete service, please register
your product at
www.samsung.com/global/register
Model Serial No.
BN68-01528A-Eng.indb 1 2008-04-18 오후 1:43:54

English - 2
© 2008 Samsung Electronics Co., Ltd. All rights reserved.
User Instructions
Screen Image retention
Do not display a still image (such as on a video game or when hooking up a PC to this PDP) on the
plasma monitor panel for more than 2 hours as it can cause screen image retention. This image
retention is also known as “screen burn”. To avoid such image retention, reduce the degree of
brightness and contrast of the screen when displaying a still image.
Height
The PDP can normally operate only under 2000m in height. It might abnormally function at a place
over 2000m in height so do not install and operate there.
Heat on the top of the PDP TV
The top side of the product may be hot after long period of use as heat dissipates from the panel
through the vent hole in the upper part of the product. This is normal and does not indicate any defect
or operation failure of the product. However, children should be prevented from touching the upper
part of the product.
The product is making a ‘cracking’ noise.
A ‘cracking’ noise may occur when the product contracts or expands due to a change of surrounding
environment such as temperature or humidity. This is normal and not a defect of the unit.
Cell Defects
The PDP uses a panel consisting of 1,230,000(SD-level) to 3,150,000(HD-level) pixels which require
sophisticated technology to produce. However, there may be few bright or dark pixels on the screen.
These pixels will have no impact on the performance of the product.
Avoid operating the TV at temperatures below 5°C(41°F)
A still image displayed too long may cause permanent damage to the PDP Panel.
Watching the PDP TV in 4:3 format for a long period of time may leave traces
of borders displayed on the left, right and centre of the screen caused by the
difference of light emission on the screen. Playing a DVD or a game console
may cause similar effect to the screen. Damages caused by the above effect are
not covered by the Warranty.
Afterimage on the Screen.
Displaying still images from Video games and PC for longer than a certain period of time may
produce partial afterimages. To prevent this effect, reduce the ‘brightness’ and ‘contrast’ when
displaying still images.
Warranty
- Warranty does not cover any damage caused by image retention.
- Burn-in is not covered by the warranty.
Installation
Be sure to contact an authorized service centre, when installing your set in a location with heavy
dust, high or low temperatures, high humidity, chemical substance and where it operates continually
such as the airport, the train station etc. Failure to do so may cause a serious damage to your set.
Contact SAMSUNG WORLDWIDE
If you have any questions or comments relating to Samsung products, please contact the SAMSUNG
customer care centre. (See back cover for more informations.)
BN68-01528A-Eng.indb 2 2008-04-18 오후 1:43:55

English - 3
Symbols
☛ ➢
Press
Important
Note
Contents
General Information
User Instructions ............................................. 2
Checking Parts ................................................ 4
Using the Stand-Base ..................................... 4
Control Panel ................................................. 5
Connection Panel ............................................ 6
Viewing the Remote Control ........................... 8
Operation
Switching Your Television On and Off ............. 9
Viewing the Menus .......................................... 9
Plug & Play Feature ...................................... 10
Using the TOOLS Button .............................. 12
Viewing an External Signal Sources ............. 12
Editing Device Names ................................... 13
Channel Control
Storing Channels Automatically .................... 13
Storing Channels Manually ........................... 14
Adding / Locking Channels ........................... 15
Sorting the Stored Channels ......................... 16
Assigning Names to Channels ...................... 16
Fine Tuning Channel Reception .................... 17
Picture Control
Changing the Picture Standard ..................... 18
Customizing the Picture Settings .................. 18
Conguring Detailed Settings on the Picture
... 19
Picture Options .............................................20
Using the 3D Function .................................. 22
Resetting the Picture Settings to the Factory
Defaults ......................................................... 24
Sound Control
Sound Features ............................................25
Selecting the Sound Mode
(depending on the model) ............................. 26
Connecting Headphones (Sold separately) .. 26
Function Description
Time Features ............................................... 27
Language / Melody / Light Effect /
Entertainment / Energy Saving/ PIP .............. 28
PC Display
Setting up Your PC Software
(Based on Windows XP) ............................... 29
Input Mode (PC) ............................................ 30
Setting the PC ............................................... 31
About Anynet
+
What is Anynet
+
? .......................................... 32
Connecting Anynet
+
Devices ........................ 32
Setting Up Anynet
+
...................................... 33
Scanning and Switching between Anynet
+
Devices ......................................................... 33
Recording ...................................................... 34
Listening through a Receiver ........................ 35
Check Points before Requesting Service ..... 35
Appendix
Teletext Feature (depending on the model) .. 36
Wall Mount Kit Specications (VESA) ........... 38
Wall- mount adjustment (Sold separately) .... 39
How to assemble the Stand-Base
(depending on the model) ............................. 40
Securing the TV to the Wall .......................... 41
Troubleshooting ............................................42
Specications ................................................ 43
English
BN68-01528A-Eng.indb 3 2008-04-18 오후 1:43:56

English - 4
Checking Parts
Owner’s Instructions Remote Control/
AAA Batteries
Power Cord Cloth-Clean
Warranty Card/
Safety Guide Manual
(Not available in all
locations)
Cover-Bottom / Screws (2ea)
(Refer to page 40)
Ferrite Core for Power Cord Ferrite Core for S-Video
Sold Separately
Antenna Cable Component Cables Audio Cables PC Cable
Scart Cable PC Audio Cable HDMI Cable HDMI/DVI Cable
➢
Ferrite Core (Power Cord, S- Video)
The ferrite cores are used to shield the cables from interference.
When connecting a cable, open the ferrite core and clip it around the
cable near the plug.
Using the Stand-Base
➢
Two or more people should carry
the PDP. Never lay the PDP on the
floor because of possible damage
to the screen. Always keep the
PDP upright.
The PDP can rotate 20 degrees in
right and left directions.
-20° ~ 20°
BN68-01528A-Eng.indb 4 2008-04-18 오후 1:43:59

English - 5
Control Panel
1
SOURCE
Toggles between all the available input sources
(TV, Ext.1, Ext.2, AV, S-Video, Component,
PC, HDMI1, HDMI2, HDMI3).
➢
In the on-screen menu, use this button as
you would use the ENTER button on the
remote control.
2
MENU
Press to see an on-screen menu of your TV’s
features.
3
– +
Press to increase or decrease the volume. In
the on-screen menu, use the – + buttons
as you would use the ◄ and ► buttons on the
remote control.
4
C/P.
Press to change channels. In the on-screen
menu, use the C/P. buttons as you
would use the ▲ and ▼ buttons on the remote
control.
5
Power Indicator
Blinks and turns off when the power is on and
lights up in stand-by mode.
6
POWER
Press to turn the TV on and off.
7
Remote Control Sensor
Aim the remote control towards this spot on the
TV.
8
Speakers
Front (or Side) Panel
➢
The product colour and shape may vary depending on the model.
BN68-01528A-Eng.indb 5 2008-04-18 오후 1:44:00

English - 6
Connection Panel
Continued...
☛
Whenever you connect an audio or video system to your set, ensure that all elements are
switched off.
When connecting an external device, match the colour of the connection terminal to the cable.
1
POWER IN
Connect the supplied power cord.
2
COMPONENT IN
Audio (AUDIO L/R) and video (Y/P
B/PR) inputs
for Component.
3
PC IN / AUDIO
Connect to the video and audio output jack on
your PC.
4
EXT 1, EXT 2
Inputs or outputs for external devices, such as
VCR, DVD, video game device or video disc
players.
Input/Output Specification
Connector
Input Output
Video Audio(L/R) RGB
Video + Audio(L/R)
EXT 1
✔ ✔ ✔
Only TV output is
available.
EXT 2
✔ ✔
Output you can
choose.
5
3D SYNC OUT
Connect to 3D IR Emitter.
6
Connecting external Audio Devices
Connect RCA audio signals from the TV to an
external source, such as Audio equipment.
7
SERVICE
− Connector for service.
− Connect the serial jack between the
electro-motion wall mount bracket and your
TV when you want to adjust the TV viewing
angle using your remote control.
Rear Panel
➢
The product colour and shape may vary depending on the model.
Cable Television
Network
1
432 6 8
9
7
or
or
5
BN68-01528A-Eng.indb 6 2008-04-18 오후 1:44:03

English - 7
8
HDMI IN 1,2
− No additional Audio connection is needed
for an HDMI to HDMI connection.
- When using an HDMI/DVI cable connection,
you must use the HDMI IN 2 jack.
➢
What is HDMI?
- “High Definition Multimedia interface”
allows the ansmission of high definition
digital video data and multiple channels
of digital audio.
- The HDMI/DVI terminal supports DVI
connection to an extended device with
the appropriate cable (not supplied).
The difference between HDMI and DVI
is that the HDMI device is smaller in
size, has the HDCP (High Bandwidth
Digital Copy Protection) coding feature
installed, and supports multi - channel
digital audio.
DVI IN (HDMI 2) AUDIO R/L
DVI audio outputs for external devices.
9
ANT IN
75Ω Coaxial connector for Aerial/Cable
Network.
Supported modes for HDMI/DVI and Component
480i 480p 576i 576p 720p 1080i
HDMI/DVI 50Hz X X X O O O
HDMI/DVI 60Hz X O X X O O
Component O O O O O O
➢
The product colour and shape may vary depending on the model.
Side Panel
1
HDMI IN 3
Connect to the HDMI jack of a device with
HDMI output.
2
S-VIDEO or VIDEO / AUDIO L/R
Video (S-Video or Video) and audio inputs for
external devices, such as a camcorder or VCR.
3
Headphones jack
You can connect a set of headphones if you
wish to watch a television programme without
disturbing the other people in the room.
➢
Prolonged use of headphones at a high
volume may damage your hearing.
3
1
or
2
BN68-01528A-Eng.indb 7 2008-04-18 오후 1:44:05

English - 8
Viewing the Remote Control
1
POWER button
(turns the TV on and off)
2
Selects the TV mode directly
3
Number buttons for direct
channel access
4
One/Two-digit channel
selection
5
Temporary sound switch-off
6
Volume increase
Volume decrease
7
Channel control button
(Refer to page 15)
8
Use to quickly select
frequently used functions.
9
Control the cursor in the
menu
0
Use to see information on
the current broadcast
#
Press to select the optional
display and sound modes for
sports, cinema and games.
$
VCR/DVD Function (Rewind,
Stop, Play/Pause, Fast/
Forward)
%
Available source selection
^
Previous channel
&
Next channel
Previous channel
*
Displays the main on-screen
menu
(
TruSurround XT mode button
)
Returns to the previous
menu
a
Exit the on-screen menu
b
Picture size selection
c
Use this when connecting
a SAMSUNG DMA (Digital
Media Adapter) device
through an HDMI interface
and switching to DMA mode.
(The DMA button is optional.)
For more information on the
operating procedures, refer
to the user manual of the
DMA. This button is available
when “Anynet+(HDMI-CEC)"
is “On” (see page 33)
d
Picture effect selection.
(Refer to page 18)
e
Use to watch 3D movies or
games dimensionally with 3D
glasses.
Teletext Functions
(Refer to page 36)
2
Exit from the teletext display
(depending on the model)
7
Teletext store
8
Teletext size
0
Teletext reveal
!
Fastext topic selection
@
Teletext display/mix both
teletext information and the
normal broadcast
%
Teletext mode selection
(LIST/FLOF)
^
Teletext sub page
&
P :Teletext next page
P :Teletext previous page
*
Teletext index
)
Teletext hold
a
Teletext cancel
Continued...
BN68-01528A-Eng.indb 8 2008-04-18 오후 1:44:07

English - 9
Installing Batteries in the Remote Control
1 Lift the cover at the back of the remote control upward as
shown in the figure.
2 Install two AAA size batteries.
➢
Make sure to match the “+” and “–” ends of the
batteries with the diagram inside the compartment.
Do not mix battery types, i.e. alkaline and
manganese.
3 Close the cover as shown in the figure.
➢
Remove the batteries and store them in a cool and dry
place if you won’t be using the remote control for a long time. The remote control can be used up
to about 23 feet from the TV. (Assuming typical TV usage, the batteries last for about one year.)
➢
If the remote control doesn’t work! Check the following:
1. Is the TV power on?
2. Are the plus and minus ends of the batteries reversed?
3. Are the batteries drained?
4. Is there a power cut, or is the power cord unplugged?
5. Is there a special fluorescent light or a neon sign nearby?
Switching Your Television On and Off
The main lead is attached to the rear of the television.
1 Plug the main lead into an appropriate socket.
➢
The main voltage is indicated on the rear of the television and the frequency is 50 or 60Hz.
2 Press the (Power) button (On/Off) on the front of the television or press the POWER button on the
remote control to switch the television on. The programme that you were watching last is re-selected
automatically. If you have not yet stored any channels, no clear picture appears. Refer to “Storing
Channels Automatically” on page 13 or “Storing Channels Manually” on page 14.
➢
If the television is initially powered on, several basic customer settings proceed automatically.
Refer to “Plug & Play Feature” on page 10.
3 To switch the television off, press the (Power) button (On/Off) on the front of the television or press
the POWER button on the remote control.
4 To switch the TV on, press the (Power) button (On/Off) on the front of the TV or press the POWER
button or number buttons on the remote control.
Viewing the Menus
1 Press the MENU button.
The main menu is displayed on the screen.
Its left side has six icons: Picture, Sound, Channel, Setup,
Input.
2 Press the ▲ or ▼ button to select one of the icons.
Press the ENTER button to access the icon’s sub-menu.
3 Press the ▲ or ▼ button to move to items in the menu.
Press the ENTER button to enter items in the menu.
4 Press the ▲/▼/◄/► button to change the selected items.
Press the RETURN button to return to the previous menu.
5 Press the EXIT button to exit from the menu.
Move
Enter
Exit
Mode : Standard
Cell Light 7
Contrast 95
Brightness 45
Sharpness 50
Colour 50
Tint G50 R50
Detailed Settings
Picture Options
Reset : OK
Picture
T V
BN68-01528A-Eng.indb 9 2008-04-18 오후 1:44:08

English - 10
Plug & Play Feature
When the television is initially powered on, several basic
customer settings proceed automatically and subsequently.
The following settings are available.
☛
If you accidentally select the wrong country for your TV, the
characters on the screen may be wrongly displayed.
1 If the television is in standby mode, press the POWER button
on the remote control. The message Start Plug & Play is
displayed. Press the ENTER button.
2 The Language menu will automatically appear after several
seconds.
3 Select the appropriate language by pressing the ▲ or ▼
button.
Press the ENTER button. The message Select ‘Home Use’
when installing this TV in your home. is displayed.
4 Press the ◄ or ► button to select Store Demo or Home Use,
then press the ENTER button. The message to check the
connected status of the antenna is displayed.
➢
The default selection is Home Use.
➢
We recommend setting the TV to Home Use mode for the
best picture in your home environment.
➢
Store Demo mode is only intended for use in retail
environments.
➢
If the unit is accidentally set to Store Demo mode and you
want to return to Home Use (Standard): Press the Volume
button. When the volume OSD is displayed, press and
hold the MENU button for 5 seconds.
5 Make sure that the antenna is connected to the TV.
Press the ENTER button. The Country menu is displayed.
6 Select your country or area by pressing the ▲ or ▼ button.
Press the ENTER button.
Continued...
Plug & Play
Start Plug & Play.
OK
Enter
Plug & Play
Language
Move
Enter
English
Deutsch
Français
Italiano
▼
Plug & Play
Select ‘Home Use’
when installing this TV in your home.
Move
Enter
Store Demo Home Use
Plug & Play
Check antenna input.
Enter
OK
Plug & Play
P 1 C -- 40 MHz
0 %
Enter
Skip
Start
Skip
Plug & Play
Country
▲
United Kingdom
Austria
Eastern Europe
Others
Move
Enter
Skip
BN68-01528A-Eng.indb 10 2008-04-18 오후 1:44:10

English - 11
7 Press the ENTER button to start search the channels.
The channel search will start and end automatically. After
all the available channels are stored, Clock Set menu is
automatically displayed. Press the ENTER button.
8 Press the ◄ or ► button to select Month, Day, Year, Hour,
or Minute. Set these by pressing the ▲ or ▼ button.
➢
You can set the Month, Day, Year, Hour, or Minute
directly by pressing the numeric buttons on the remote
control.
9 Press the ENTER button to confirm your setting. The
message Enjoy your viewing is displayed. When you have
finished, press the ENTER button.
➢
Even if the ENTER button is not pressed, the message
will automatically disappear after several seconds.
If you want to reset this feature …
1
Press the MENU button to display the menu.
2 Press the ▲ or ▼ button to select Setup, then press the
ENTER button.
3 Press the ENTER button again to select Plug & Play.
The message Start Plug & Play is displayed.
Plug & Play
Move
Adjust
Enter
01 01 2008 00 00
Clock Set
Month Day Year Hour
Minute
OK
Enjoy your viewing
Move
Enter
Return
Plug & Play
Language : English
Time
Light Effect
: In Watching TV
Wall-Mount Adjustment
Melody : Off
Entertainment
:
Off
Energy Saving :
Off
PIP
Setup
T V
BN68-01528A-Eng.indb 11 2008-04-18 오후 1:44:10

English - 12
Viewing External Signal Sources
You can switch between viewing signals from connected
equipment, such as a VCR, DVD, Set-Top Box, and the TV
source (broadcast or cable).
1 Press the MENU button to display the menu.
2 Press the ▲ or ▼ button to select Input, then press the
ENTER button.
3 Press the ENTER button again to select Source List.
4 Press the ▲ or ▼ button to select the signal source, then
press the ENTER button.
Available signal sources:
TV, Ext.1, Ext.2, AV, S-Video,
Component, PC, HDMI1, HDMI2, HDMI3
➢
You can choose only those external devices that are connected
to the TV.
➢
You can select these options simply by pressing the SOURCE
button on the remote control.
➢
To watch television programme again, press the TV button and
select the channel number required.
Using the TOOLS Button
You can use the TOOLS button to select your frequently used functions quickly and easily. The
“Tools” menu changes depending on which external input mode you are viewing.
1 Press the TOOLS button.
The Tools menu will appear.
2 Press the ▲ or ▼ button to select a menu, then press the
ENTER button.
3 Press the ▲/▼/◄/►/ENTER buttons to display, change, or use
the selected items.
For a more detailed description of each function, refer to the
corresponding page.
• Anynet+(HDMI-CEC), see page 32
• Picture Mode, see page 18
• Sound Mode, see page 25
• Sleep Timer, see page 27
• SRS TS XT, see page 25
• Energy Saving, see page 29
• Dual I-II, see page 26
Move
Enter
Return
Source List :
TV
Edit Name
Anynet+ (HDMI-CEC)
Input
T V
Move
Enter
Return
TV
Ext.1 :−−−−
Ext.2 :−−−−
AV :−−−−
S-Video :−−−−
Component :−−−−
PC :−−−−
HDMI1 :−−−−
HDMI2 :−−−−
HDMI3 :−−−−
Source List
T V
Tools
Anynet+ (HDMI-CEC)
PictureMode ◄ Standard►
Sound Mode : Custom
Sleep Timer : Off
SRS TS XT : Off
Energy Saving : Off
Dual I-II : Mono
◄►
Adjust
ExitMove
BN68-01528A-Eng.indb 12 2008-04-18 오후 1:44:11

English - 13
Editing Device Names
You can give a name to the external source.
1 Press the MENU button to display the menu.
2 Press the ▲ or ▼ button to select Input, then press the
ENTER button.
3 Press the ▲ or ▼ button to select Edit Name, then press the
ENTER button.
4 Press the ▲ or ▼ button to select the external source to be
edited, then press the ENTER button.
5 Select the required device by pressing ▲ or ▼, then press the
ENTER button.
Available device names:
VCR, DVD, Cable STB, Satellite
STB, PVR STB, AV Receiver, Game, Camcorder, PC, TV,
IPTV, Blu-Ray, HD DVD, DMA.
6 Press the EXIT button to exit.
Storing Channels Automatically
You can scan for the frequency ranges available to you
(availability depends on your country).
Automatically allocated programme numbers may not
correspond to actual or desired programme numbers.
However you can sort numbers manually and clear any
channels you do not wish to watch.
1 Press the MENU button to display the menu.
2 Press the ▲ or ▼ button to select Channel, then press the
ENTER button.
3 Press the ENTER button again. The available countries are
listed.
4 Select your country by pressing the ▲ or ▼ button, then press
the ENTER button.
5 Press the ▲ or ▼ button to select Auto Store, then press the
ENTER button.
6 Press the ENTER button again to start the search.
The search will end automatically.
➢
To stop the search before it has finished, press the MENU
or the ENTER button.
Move
Enter
Return
Source List :
TV
Edit Name
Anynet+ (HDMI-CEC)
Input
T V
Move
Enter
Return
Country :
United Kingdom
Auto Store
Manual Store
Channel Manager
Sort
Name
Fine Tune
Channel
T V
Auto Store
P 1 C -- 40 MHz
0 %
Enter
Return
Start
Move
Enter
Return
Ext.1 :−−−−
Ext.2 : −−−−
AV :
S-Video :
Component : −−−−
PC : −−−−
HDMI1 :
HDMI2 :
HDMI3 :
Edit Name
T V
----
VCR
DVD
Cable STB
Satellite STB
PVR STB
AV Receiver
Game
▼
Move
Enter
Return
Country :
United Kingdom
Auto Store
Manual Store
Channel Manager
Sort
Name
Fine Tune
Channel
Belgium
France
Germany
Italy
Netherlands
Spain
Switzerland
United Kingdom
▼
T V
BN68-01528A-Eng.indb 13 2008-04-18 오후 1:44:13

English - 14
Storing Channels Manually
You can store television channels, including those received
via cable networks.
When storing channels manually, you can choose:
Whether or not to store each of the channels found.
The programme number of each stored channel which you
wish to identify.
1 Press the MENU button to display the menu.
2 Press the ▲ or ▼ button to select Channel, then press the
ENTER button.
3 Press the ▲ or ▼ button to select Manual Store, then press
the ENTER button.
4 Select the required option by pressing the ▲ or ▼ button, then
press the ENTER button.
5 When you are satisfied with your setting, press the ENTER
button.
6 Press the EXIT button to exit.
Programme (Programme number to be assigned to a channel)
− Press the ▲ or ▼ button until you find the correct number.
➢
You can also select the channel number directly by pressing the numeric buttons (0~9).
Colour System: Auto/PAL/SECAM/NTSC4.43
− Press the ▲ or ▼ button to select the required colour standard.
Sound System: BG/DK/I/L
− Press the ▲ or ▼ button to select the required sound standard.
Channel (When you know the number of the channel to be stored)
− Press the ▲ or ▼ button to select
C (Air channel) or S (Cable channel).
− Press the ► button, then press the ▲ or ▼ button to select the required number.
➢
You can also select the channel number directly by pressing the numeric buttons (0~9).
➢
If there is abnormal sound or no sound, re-select the sound standard required.
Search (When you do not know the channel numbers)
− Press the ▲ or ▼ button to start the search.
− The tuner scans the frequency range until the first channel or the channel that you selected is
received on the screen.
Store (When you store the channel and associated programme number)
− Set to
OK by pressing the ENTER button.
☛
Channel mode
P (Programme mode): When completing tuning, the broadcasting stations in your area have
been assigned to position numbers from P00 to P99. You can select a channel by entering the
position number in this mode.
C (Air channel mode): You can select a channel by entering the assigned number to each air
broadcasting station in this mode.
S (Cable channel mode): You can select a channel by entering the assigned number for each
cable channel in this mode.
Move
Enter
Return
Country :
United Kingdom
Auto Store
Manual Store
Channel Manager
Sort
Name
Fine Tune
Channel
T V
Move
Enter
Return
Programme :
P 1
Colour System : Auto
Sound System : BG
Channel : C 6
Search : 175 MHz
Store : ?
Manual Store
T V
BN68-01528A-Eng.indb 14 2008-04-18 오후 1:44:13

English - 15
Adding / Locking Channels
Using the Channel Manager, you can conveniently lock or add
channels.
1 Press the MENU button to display the menu.
2 Press the ▲ or ▼ button to select Channel, then press the
ENTER button.
3 Press the ▲ or ▼ button to select Channel Manager, then
press the ENTER button.
Adding channels
Using the Channel List, you can add channels.
4 Select Channel List by pressing the ENTER button.
5 Move to the ( ) field by pressing the ▲/▼/◄/► buttons,
select a channel to be added, and press the ENTER button to
add the channel.
➢
If you press the ENTER button again, the ( ) symbol
next to the channel disappears and the channel is not
added.
Locking channels
This feature allows you to prevent unauthorized users, such as
children, from watching unsuitable programmes by muting out
video and audio.
6 Press the ▲ or ▼ button to select Child Lock, then press the
ENTER button.
7 Select On by pressing the ▲ or ▼ button, then press the
ENTER button.
8 Press the ▲ or ▼ button to select Channel List, then press
the ENTER button.
9 Move to the ( ) field by pressing the ▲/▼/◄/► buttons,
select a channel to be locked, and press the ENTER button.
➢
If you press the ENTER button again, the ( ) symbol next to the channel disappears and the
channel lock is canceled.
➢
A blue screen is displayed when Child Lock is activated.
10 Press the EXIT button to exit.
➢
You can select these options simply by pressing the CH LIST
button on the remote control.
Move
Enter
Return
Country :
United Kingdom
Auto Store
Manual Store
Channel Manager
Sort
Name
Fine Tune
Channel
T V
Move
Enter
Return
Channel List
Child Lock : Off
Channel Manager
T V
Channel List
P 1 C 6
1 / 10
▲
▼
Prog.
0
C 1
1 C 6
2 C 5
3 C 8
4 C 11
5 C 22
6 C 26
7 C 36
8 C 52
9 C 24
Add Lock
Move Enter
Page Return
BN68-01528A-Eng.indb 15 2008-04-18 오후 1:44:16

English - 16
Sorting the Stored Channels
This operation allows you to change the programme numbers
of the stored channels.
This operation may be necessary after using the auto store.
1 Press the MENU button to display the menu.
2 Press the ▲ or ▼ button to select Channel, then press the
ENTER button.
3 Press the ▲ or ▼ button to select Sort, then press the ENTER
button.
4 Select the channel that you wish to move by pressing the ▲ or
▼ button, then press the ENTER button.
5 Select the number of the programme to which the channel is to
be moved by pressing the ▲ or ▼ button.
Press the ENTER button. The channel is moved to its new
position and all other channels are shifted accordingly.
6 Repeat steps 4 to 5 until you have moved all the channels to
the required programme numbers.
7 Press the EXIT button to exit.
Assigning Names to Channels
Channel names will be assigned automatically when channel
information is broadcast. These names can be changed,
allowing you to assign new names.
1 Press the MENU button to display the menu.
2 Press the ▲ or ▼ button to select Channel, then press the
ENTER button.
3 Press the ▲ or ▼ button to select Name, then press the
ENTER button.
4 Press the ▲ or ▼ button to select the channel to be assigned
to a new name, then press the ENTER button.
5 Press the ▲ or ▼ button to select a letter, a number, or a
symbol (Results in this sequence: A~Z, 0~9, +, -, *, /, blank).
Move on to the previous or next letter by pressing the ◄ or ►
button, then press the ENTER button.
6 Repeat steps 4 to 5 for each channel to be assigned to a new
name.
7 Press the EXIT button to exit.
Move
Enter
Return
Country :
United Kingdom
Auto Store
Manual Store
Channel Manager
Sort
Name
Fine Tune
Channel
T V
Move
Enter
Return
Prog. Ch. Name
▲
0 C-- −−−−−
1 C04 −−−−−
2 C05 −−−−−
3 C08 −−−−−
4 C09 −−−−−
5 C11 −−−−−
6 C13 −−−−−
7 C15 −−−−−
8 C17 −−−−−
9 C18 −−−−−
▼
Sort
T V
Move
Enter
Return
Prog. Ch. Name
▲
0 C-- −−−−−
1 C04 −−−−−
2 C05 −−−−−
3 C08 −−−−−
4 C09 −−−−−
5 C11 −−−−−
6 C13 −−−−−
7 C15 −−−−−
8 C17 −−−−−
9 C18 −−−−−
▼
Name
T V
Move
Enter
Return
Country :
United Kingdom
Auto Store
Manual Store
Channel Manager
Sort
Name
Fine Tune
Channel
T V
BN68-01528A-Eng.indb 16 2008-04-18 오후 1:44:16

English - 17
Fine Tuning Channel Reception
If the reception is clear, you do not have to fine tune the
channel, as this is done automatically during the search and
store operation.
If the signal is weak or distorted, you may have to fine tune the
channel manually.
1 Press the MENU button to display the menu.
2 Press the ▲ or ▼ button to select Channel, then press the
ENTER button.
3 Press the ▲ or ▼ button to select Fine Tune, then press the
ENTER button.
4 To obtain a sharp, and clear picture and good sound quality,
press the ◄ or ► button until you reach the optimal setting.
Press the ENTER button.
➢
Press the INFO button. Fine Tune Store will change the
colour of the Channel OSD (On Screen Display) from
White to Red and add the “*” mark.
➢
To reset the fine tuning to 0, select Reset by pressing the
▲ or ▼ button. Press the ENTER button.
5 Press the EXIT button to exit.
Fine Tune
P 1
+ 3
Adjust
Save
Return
Reset
P 1 *
Mono
Picture : Standard
Sound : Custom
SRS TS XT : Off
−−
:
−−
Move
Enter
Return
Country :
United Kingdom
Auto Store
Manual Store
Channel Manager
Sort
Name
Fine Tune
Channel
T V
BN68-01528A-Eng.indb 17 2008-04-18 오후 1:44:17

English - 18
Customizing the Picture Settings
Your television has several setting options that allow you to
control the picture quality.
1 Press
the MENU button to display the menu.
2 Press
the ENTER button to select Picture.
3 Press
the ENTER button again to select Mode.
4 Select the required mode by pressing the ▲ or ▼ button, then
press
the
ENTER
button.
Available modes: Dynamic, Standard, Movie
5 Select the required option by pressing the ▲ or ▼ button, then press the ENTER
button.
6 When you are satisfied with your setting, press the ENTER
button.
7 Press
the EXIT button to exit.
Cell Light - Contrast
– Brightness – Sharpness – Colour – Tint
➢
In Analog TV, Ext., AV, S-Video modes of the PAL system, you cannot use the Tint Function.
➢
In PC mode, you can only make changes to Cell Light, Contrast, and Brightness.
Press the ◄ or ► button until you reach the optimal setting.
Changing the Picture Standard
You can select the type of picture which best corresponds to
your viewing requirements.
1 Press
the MENU button to display the menu.
2 Press
the ENTER button to select Picture.
3 Press
the ENTER button again to select Mode.
4 Select the required mode by pressing the ▲ or ▼ button, then
press
the
ENTER
button.
Available modes: Dynamic, Standard, Movie
➢
The settings values may vary depending on the input
source.
5 Press
the EXIT button to exit.
➢
Choose Dynamic for viewing the TV during the day or
when there is bright light in the room.
Choose Standard for general TV watching mode.
Choose Movie when viewing the movie.
Easy Setting
1
Press the TOOLS button on the remote control.
2 Press the ▲ or ▼ button to select Picture Mode.
3 Press the ◄ or ► button to select the required option.
Move
Enter
Return
Mode : Standard
Cell Light
7
Contrast 95
Brightness 45
Sharpness 50
Colour 50
Tint G50 R50
Detailed Settings
Picture Options
Reset : OK
Picture
T V
Tools
Anynet+ (HDMI-CEC)
Picture Mode ◄ Standard ►
Sound Mode : Custom
Sleep Timer : Off
SRS TS XT : Off
Energy Saving : Off
Dual I-II : Mono
Adjust
ExitMove
Move
Enter
Return
Mode : Standard
Cell Light
7
Contrast 95
Brightness 45
Sharpness 50
Colour 50
Tint G50 R50
Detailed Settings
Picture Options
Reset : OK
Picture
T V
Mode : Standard
Cell Light 7
Contrast 95
Brightness 45
Sharpness 50
Colour 50
Tint G50 R50
Detailed Settings
Picture Options
Reset : OK
Picture
Dynamic
Standard
Movie
Move
Enter
Return
T V
BN68-01528A-Eng(01-21).indd 18 2008-04-21 오전 8:53:23

English - 19
Configuring Detailed Settings on the Picture
You can set detailed picture settings.
1 Press the MENU button to display the menu.
2 Press the ENTER button to select Picture.
3 Press the ▲ or ▼ button to select Detailed Settings, then
press the ENTER button.
4 Select the required option by pressing the ▲ or ▼ button, then
press the ENTER button.
Available options:
Black Adjust, Dynamic Contrast,
Gamma, Colour Space, White Balance, Flesh Tone, Edge
Enhancement
5 When you are satisfied with your setting, press the ENTER
button.
6 Press the EXIT button to exit.
➢
Detailed Settings is available in Standard or Movie mode.
➢
In PC mode, you can only make changes to Dynamic
Contrast, Gamma and White Balance from among the
Detailed Settings items.
Black Adjust: Off/Low/Medium/High
You can directly select the black level on the screen to adjust the screen depth.
Dynamic Contrast: Off/Low/Medium/High
You can adjust the screen contrast so that the optimal contrast is provided.
Gamma: -3 ~ +3
You can adjust the middle brightness of pictures.
Press the ◄ or ► button until you reach the optimal setting.
Colour Space: Auto/Native/Custom
Colour space is a colour matrix composed of red, green and blue colours.
Select your favorite colour space to experience the most natural colour.
− Auto: Auto Colour Space automatically adjusts to the most natural colour tone based on program
sources.
−
Native: Native Colour Space offers deep and rich colour tone.
− Custom: Adjusts the colour range to suit your preference. (see “Customizing the Colour Space”)
Customizing the Colour Space
Colour: Red/Green/Blue/Yellow/Cyan/Magenta
Adjusts the Colour range to suit your preference.
Colour is available when Colour Space is set to Custom.
Press the ▲ or ▼ button to select Red, Green, Blue, Yellow, Cyan or Magenta.
Press the ENTER button.
− Red/Green/Blue: In Colour, you can adjust the RGB values for the selected colour.
Press the ▲ or ▼ button to select Red, Green or Blue to change it. Press the ENTER button.
Press the ◄ or ► button to decrease or increase the value of a particular item.
Press the ENTER button.
− Reset: Resets the colour space to the default values.
White Balance: R-Offset/G-Offset/B-Offset/R-Gain/G-Gain/B-Gain/Reset
You can adjust the color temperature for more natural picture colors.
R-Offset/G-Offset/B-Offset/R-Gain/G-Gain/B-Gain: Changing the adjustment value will refresh the
adjusted screen.
Select the required option by pressing the ▲ or ▼ button, then press the ENTER button.
Press the ◄ or ► button until you reach the optimal setting.
Reset: The previously adjusted white balance will be reset to the factory defaults.
Flesh Tone:-15~+15
You can emphasize the pink tone in the picture.
Press the ◄ or ► button until you reach the optimal setting.
➢
Changing the adjustment value will refresh the adjusted screen.
Edge Enhancement: Off/On
You can emphasize object boundaries.
Move
Enter
Return
Black Adjust :
Off
Dynamic Contrast : Medium
Gamma : 0
Colour Space : Native
White Balance
Flesh Tone : 0
Edge Enhancement
: On
Detailed Settings
T V
Move
Enter
Return
Mode : Standard
Cell Light 7
Contrast 95
Brightness 45
Sharpness 50
Colour 50
Tint G50 R50
Detailed Settings
Picture Options
Reset : OK
Picture
T V
BN68-01528A-Eng.indb 19 2008-04-18 오후 1:44:18

English - 20
Picture Options
You can set detailed picture settings.
1 Press the MENU button to display the menu.
2 Press the ENTER button to select Picture.
3 Press the ▲ or ▼ button to select Picture Options, then press
the ENTER button.
4 Select the required option by pressing the ▲ or ▼ button, then
press the ENTER button.
5 When you are satisfied with your setting, press the ENTER
button.
6 Press the EXIT button to exit.
➢
In PC mode, you can only make changes to the Color Tone
and Size from among the items in Picture Options.
Colour Tone: Cool2/Cool1/Normal/Warm1/Warm2
➢
When the picture mode is set to Dynamic or Standard,
Warm1 and Warm2 cannot be selected.
Size: Auto Wide/16:9/Wide Zoom/Zoom/4:3/Just Scan
You can select the picture size which best corresponds to your
viewing requirements.
−
Auto Wide: Expanding and pulling up the picture from 4:3 to
16:9 ratio.
− 16:9
: Sets the picture to 16:9 wide mode.
−
Wide Zoom: Magnify the size of the picture more than 4:3.
Move the screen up/down using the ▲ or ▼ button after
selecting the by pressing the ► or ENTER button.
−
Zoom: Magnify the size of the picture vertically on screen.
− 4:3
: Sets the picture to 4:3 normal mode.
−
Just Scan: Use the function to see the full image without
any cutoff when HDMI (720p/1080i), or Component (1080i)
signals are input.
After selecting Just Scan in HDMI (1080i) or Component
(1080i) mode
:
Press the ◄ or ► button to select
, then press the ENTER button.
Press the ▲, ▼, ◄ or ► button to move the picture up, down, left and right.
Reset: Press the ◄ or ► button to select Reset, then press the ENTER button. You can initialize
the setting.
➢
With the HDMI Just Scan picture size, depending on the AV devices, the screen may be cut off
or a specific colour appears on the screen.
➢
For an HDMI (1080p) connection of 24, 25, 30, 50, and 60 Hz, and for a Component (1080p)
connection of 50 and 60Hz, only the input source is supported.
➢
You can change the picture size simply by pressing the P.SIZE button on the remote control.
➢
Depending on the input source, the picture size options may vary.
➢
The items available may differ depending on the selected mode.
➢
Auto Wide function is available only in TV, Ext.1, Ext.2, AV, and S-Video mode.
➢
Settings can be adjusted and stored for each external device you have connected to an input of the
TV.
➢
In PC Mode, only “16:9” and “4:3” mode can be adjusted.
Positioning and Sizing the screen using Zoom
Resizing the screen using the Zoom enables the positioning and sizing of the screen to up/down
direction using the ▲ or ▼ button as well as the screen size.
Move the screen up/down using the ▲ or ▼ button after selecting the by pressing the ◄ or ►
button.
Resize the screen vertically using the ▲ or ▼ button after selecting the by pressing the ◄ or ►
button.
Continued...
Move
Enter
Return
Colour Tone :
Normal
Size : Auto Wide
Screen Mode : 16:9
Digital NR : Auto
Real 100 Hz Demo : Off
DNle : Off
HDMI Black Level : Normal
Blue only mode : Off
Screen Burn Protection
3D Effect
Picture Options
T V
Move
Enter
Return
Mode : Standard
Cell Light 7
Contrast 95
Brightness 45
Sharpness 50
Colour 50
Tint G50 R50
Detailed Settings
Picture Options
Reset : OK
Picture
T V
Move
Enter
Return
Auto Wide
16:9
Wide Zoom
Zoom
4:3
Just Scan
Size
T V
BN68-01528A-Eng.indb 20 2008-04-18 오후 1:44:19

English - 21
Screen Mode: 16:9/Wide Zoom/Zoom/4:3
When setting the picture size to Auto Wide in a 16:9 wide TV,
you can determine the picture size you want to see the 4:3
WSS (Wide Screen Service) image or nothing. Each individual
European country requires different picture size so this function
is intended for users to select it.
−16:9:
Sets the picture to 16:9 wide mode.
−Wide Zoom:
Magnify the size of the picture more than 4:3.
−Zoom:
Magnify the size of the picture vertically on screen.
−4:3:
Sets the picture to 4:3 normal mode.
➢
This function is available in Auto Wide mode.
➢
This function is not available in Component or HDMI mode.
Digital NR: Off/Low/Medium/High/Auto
If
the signal received by the television is weak, you can activate this feature to reduce any static and
ghosting that may appear on the screen.
➢
When the signal is weak, select one of the other options until the best picture is displayed.
Real 100Hz Demo: Off/On
Y
ou can get a clear distinction between "Real 100Hz" and 50Hz, especially when watching fast
moving scenes. Therefore, when seeing slow moving scenes, you will not be able to distinguish
between "Real 100Hz and 50Hz." Demo 100Hz works only with 50Hz signal. Real 100Hz demo mode
is provided for shop demonstration with special pictures.
DNIe: Off/Demo/On
This
TV includes the DNIe function so as to provide a high visual quality. If you set DNIe to on, you
can view the screen with the DNIe feature activated. If you set the DNIe to Demo, you can view the
applied DNIe and normal pictures on the screen, for demonstration purposes. Using this function, you
can view the difference in the visual quality.
➢
DNIe
TM
(Digital Natural Image engine)
This feature brings you more detailed image with 3D noise reduction, detail enhancement, contrast
enhancement and white enhancement. New image compensation Algorithm gives brighter, clearer,
more detailed image to you. DNIe
TM
technology will fit every signal into your eyes.
➢
This cofunction is not available in PC mode.
➢
DNIe is only available in Dynamic mode.
HDMI Black Level: Normal/Low
Using this function, you can adjust the image quality when the screen burn (appearance of black level,
low contrast, low color, etc.) is encountered by the HDMI input for RGB limited range (16 to 235).
➢
This function is active only when the external input connects to HDMI(RGB signals).
Blue Only Mode: Off/On
This
function is for AV device measurement experts. This function displays the blue signal only by
removing the red and green signals from the video signal so as to provide a Blue Filter effect that is
used to adjust the Colour and Tint of video equipment such as DVD players, Home Theaters, etc.
Using this function, you can adjust the Colour and Tint to preferred values appropriate to the signal
level of each video device using the Red/Green/Blue/Cyan/
Magenta/Yellow Colour Bar Patterns, without using an
additional Blue Filter.
➢
Blue Only Mode is available when the picture mode is set
to Movie or Standard.
Screen Burn Protection
To reduce the possibility of screen burn, this unit is equipped
with screen burn prevention technology. This technology
enables you to set picture movement up/down (Vertical Line)
and side to side (Horizontal Dot). The Time setting allows
you to program the time between movement of the picture in
minutes.
−Pixel Shift:
Using this function, you can minutely move
pixels on the PDP in horizontal or vertical direction to
minimize after image on the screen.
• Set Pixel Shift
to Onbypressingthe▲or▼button,then
press the ENTER button.
•Selecttherequiredoptionbypressingthe▲or▼button,
then press the ENTER
button.
Available options: Horizontal Dot, Vertical Line, Time
Continued...
Move
Enter
Return
Colour Tone : Normal
Size
: Auto Wide
Screen Mode : 16:9
Digital NR :
Real 100 Hz Demo : Off
DNle :
HDMI Black Level : Normal
Blue Only Mode : Off
Screen Burn Protection
3D Effect
Picture Options
T V
16:9
Wide Zoom
Zoom
4:3
Move
Enter
Return
Colour Tone : Normal
Size
: Auto Wide
Screen Mode : 16:9
Digital NR : Auto
Real 100 Hz Demo : Off
DNle : On
HDMI Black Level : Normal
Blue Only Mode : Off
Screen Burn Protection
3D Effect
Picture Options
T V
Move
Enter
Return
Pixel Shift
White
Scrolling
Side Gray : Dark
Screen Burn Protection
T V
BN68-01528A-Eng(01-21).indd 21 2008-04-21 오후 4:13:13

English - 22
➢
Optimum condition for pixel shift;
PC TV/Ext/AV/Component/HDMI
Horizontal Dot 1 2
Vertical Line 1 2
Time (minute) 2 2 min
➢
The Pixel Shift value may differ depending on the monitor
size (inches) and mode.
➢
This function is not available in the Just Scan mode.
− White: This function helps remove after images on the screen by changing the colour of pixels to
white. Use this function when there are remaining after images or symbols on the screen especially
when you displayed a still image on the screen for a long time.
− Scrolling: This function helps remove after images on the screen by moving all the pixels on the
PDP according to a pattern. Use this function when there are remaining after images or symbols on
the screen especially when you displayed a still image on the screen for a long time.
− Side Gray: When you watch TV with the screen ratio of 4:3, the screen is prevented from any
damage by adjusting the white balance on both extreme left and right sides.
Dark: When you set the screen ratio to 4:3, it darkens the left and right sides.
Light: When you set the screen ratio to 4:3, it brightens the left and right sides.
➢
To remove after images on the screen, use either White or Scrolling function. Although both of
the two functions remove after images on the screen, Scrolling is more effective.
➢
The after image removal function has to be executed for a long time (approximately 1 hour) to
effectively remove after images on the screen. If after image is not improved after the execution
of the function, repeat the function again.
➢
Press any button on the remote control to cancel this feature.
Using the 3D Function
You can enjoy 3D movies and games on your TV. The 3D effects function enables you to view 3D
images using special 3D glasses.
3.5 mm Stereo plug to RCA Cable (Not supplied)
3D Glasses
(Not supplied)
3D IR Emitter
(Not supplied)
PC
HDMI/DVI Cable (Not supplied)
TV Rear Panel
Connections
➢
The appearance of the 3D glasses (including Emitter) may differ depending on the model of your glasses.
Move
Enter
Return
Pixel Shift : On
Horizontal Dot : 2
Vertical Line : 2
Time : 2 min
Pixel Shift
T V
BN68-01528A-Eng.indb 22 2008-04-18 오후 1:44:22

English - 23
1 Connect a HDMI/DVI cable between the HDMI IN 2 jack on the TV and the PC output jack on your
computer.
2
Connect a 3.5mm Stereo/2RCA cable between the DVI IN (HDMI 2) [R-AUDIO-L] jack on the TV and
the Audio Out jack of the sound card on your computer.
3
Connect the Emitter to the 3D SYNC OUT port on the rear panel of the TV.
4
Turn the TV on and set the source of the TV to HDMI2.
For more information on the 3D glasses (including the Emitter), refer to the user manual of your 3D
glasses.
Adjust the PC resolution: PS50A470: 1024 x 768@60Hz,1360 x 768@60Hz
Optimum PC resolution for PS50A470 is 1360x768. When 1024x768 signal is connected in 3D mode,
the picture will be shown in 4:3 format with left and right side grey bars appeared.
The 3D IR Emitter communicates with the 3D glasses.
Therefore, the 3D IR Emitter should be located near the 3D glasses.
It is activated when the HDMI or DVI input signal is RGB, and DVI Sound is supported.
When the power is turned on or off, the mode changes to the default (Off) and the Format is saved.
The 3D Effect is turned on or off regardless of the Picture Mode.
When 3D Effect is on, only the Contrast, Brightness, 3D Effect, and Reset picture menus are
activated.
To use the 3D Effect function, a graphics card supporting 3D or 3D software is required.
The 3D glasses and the Emitter must be manufacturer by the same company.
If you play a game or watch TV while wearing the 3D glasses for long periods of time, you may
experience eyestrain or a headache.
3D glasses (including the Emitter) not manufactured by Samsung may not be supported.
If you find the screen flickering while the 3D function is used, change the environmental lighting
darker or turn off the fluorescent lamp to watch the screen for its best condition.
Changing the Mode
Changing the Mode will exchange the pictures for each eye by
exchanging the left and right output signals.
1 Connect
the TV, PC and 3D IR Emitter as shown in the figure.
2 Press
the SOURCE button to select HDMI .
3 Press
the MENU button to display the menu.
Press the ▲ or ▼ button to select Picture,
then press the
ENTER
button.
4 Press the ▲ or ▼ button to select Picture,
Option then press
the
ENTER
button.
Press the ▲ or ▼ button to select 3D Effect
then press the
ENTER
button.
5 Press the ▲ or ▼ button to select Mode,
then press the
ENTER
button.
Press the ▲ or ▼ button to select Off,
Mode1, Mode2 or 2D
Conversion
then press the ENTER button.
• Off : Turns the 3D Effect function off.
• Mode1 : Mode
1 operates with right sync first.
• Mode2 : Mode
2 operates with left sync first.
• 2D Conversion : Provides picture converted 3D to 2D.
You can choose this to watch 2D picture temporally when you feel
dizzy, but you should choose “Off” to end 3D Effect completely.
If the 3D effect is not working properly, it means the Mode and
3D glasses may not be syncing properly. To put them in sync,
switch to the other mode.
Continued...
Move
Enter
Return
Mode
:
Format :
3D Effect
T V
Off
Mode1
Mode2
2D Conversion
Move
Enter
Return
Mode : Standard
Cell Light
7
Contrast 95
Brightness 45
Sharpness 50
Colour 50
Tint G50 R50
Detailed Settings
Picture Options
Reset
: OK
Picture
T V
Move
Enter
Return
Colour Tone : Normal
Size
: Auto Wide
Screen Mode : 16:9
Digital NR : Auto
Real 100 Hz Demo : Off
DNle : Off
HDMI Black Level : Normal
Blue only mode :
Off
Screen Burn Protection
3D Effect
Picture Options
T V
BN68-01528A-Eng(22-48).indd 23 2008-04-23 오전 11:15:11

English - 24
Changing the Format
Select the optimal input format to match your graphic cards or 3D
software.
See the descriptions for Steps 1 to 4 above.
5 Press the ▲ or ▼ button to select Format, then press the
ENTER button.
6 Press the ▲ or ▼ button to select Checker Board, Horizontal
or Vertical then press the ENTER button.
Checker Board
If the output format of your graphic card or 3D
software is Checkerboard, select this input
format.
Horizontal
If the output format of your graphic card or 3D
software is Horizontal interleaved, select this input
format.
Vertical
If the output format of your graphic card or 3D
software is Vertical interleaved, select this input
format.
➢
You can press the 3D button on the remote control
repeatedly to change the 3D mode.
Easy Setting
1 Press the
TOOLS button on the remote control.
2 Press the ◄ or ► button to select 3D Mode
.
3 Press the
ENTER button to start the 3D Effect.
Resetting the Picture Settings to the Factory Defaults
You can set detailed picture settings.
1 Press the MENU button to display the menu.
2 Press the ENTER button to select Picture.
3 Press the ▲ or ▼ button to select Reset, then press the
ENTER button.
4 Press the ▲ or ▼ button to select OK or Cancel then press
the ENTER button.
➢
Each mode can be reset.
Move
Enter
Return
Mode : Mode 1
Format :
3D Effect
T V
Checker Board
Horizontal
Vertical
Tools
3DEffect ◄ Off ►
Anynet+ (HDMI-CEC)
Picture Mode : Dynamic
Sound Mode : Standard
Sleep Timer : Off
SRS TS XT : Off
Energy Saving : Off
Adjust
ExitMove
Move
Enter
Return
Mode : Standard
Cell Light 7
Contrast 95
Brightness 45
Sharpness 50
Colour 50
Tint G50 R50
Detailed Settings
Picture Options
Reset : OK
Picture
T V
OK
Cancel
BN68-01528A-Eng.indb 24 2008-04-18 오후 1:44:24

English - 25
Sound Features
1 Press the MENU button to display the menu.
2 Press the ▲ or ▼ button to select Sound, then press the
ENTER button.
3 Select the required option by pressing the ▲ or ▼ button, then
press the ENTER button.
Available options:
Mode, Equalizer, SRS TS XT, Auto
Volume, TV Speaker, Sound Select
4 When you are satisfied with your setting, press the ENTER
button.
5 Press the EXIT button to exit.
Mode: Standard/Music/Movie/Speech/Custom
You can select the type of special sound effect to be used
when watching a given broadcast.
Easy Setting
1 Press the TOOLS button on the remote control.
2 Press the ▲ or ▼ button to select Sound Mode.
3 Press the ◄ or ► button to select the required option.
Equalizer: Balance/100Hz/300Hz/1kHz/3kHz/10kHz
The television has several settings which allow you to control
the sound quality.
➢
If you make any changes to these settings, the sound
mode is automatically switched to Custom.
SRS TS XT: Off/On
TruSurround XT is a patented SRS technology that solves the problem of playing 5.1 multichannel
content over two speakers. TruSurround delivers a compelling, virtual surround sound experience
through any two-speaker playback system, including internal television speakers. It is fully
compatible with all multichannel formats.
Easy Setting
1 Press the TOOLS button on the remote control.
2 Press the ▲ or ▼ button to select SRS TS XT.
3 Press the ◄ or ► button to select Off or On.
Auto Volume: Off/On
Each broadcasting station has its own signal conditions,
and so it is not easy to adjust the volume every time the channel is changed. This feature lets you
automatically adjust the volume of the desired channel by lowering the sound output when the
modulation signal is high or by raising the sound output when the modulation signal is low.
TV Speaker: Off/On
If you want to hear the sound through separate speakers, cancel the internal amplifier.
➢
The
+,
- and MUTE buttons do not operate when the TV Speaker is set to Off.
➢
When TV Speaker is set to Off, you can operate only Sound Select (in PIP mode) in Sound
menu.
Sound Select: Main/Sub
When the PIP feature is activated, you can listen to you can operate only Sound Select (in PIP
mode) in Sound menu.
-
Main: Used to listen to the sound of the main picture.
-
Sub: Used to listen to the sound of the sub picture.
Move
Enter
Return
Mode :
Custom
Equalizer
SRS TS XT : Off
Auto Volume : Off
TV Speaker : Off
Sound Select : Main
Sound
T V
Move
Adjust
Return
Equalizer
T V
Balance 100Hz 300Hz 1kHz 3kHz 10kHz
+
0
-
R
L
+
0
-
Tools
Anynet+ (HDMI-CEC)
Picture Mode : Standard
SoundMode ◄ Custom ►
Sleep Timer : Off
SRS TS XT : Off
Energy Saving : Off
Dual I-II : Mono
ExitMove
Adjust
Tools
Picture Mode : Standard
Sound Mode : Custom
Sleep Timer : Off
SRSTSXT ◄ Off ►
Energy Saving : Off
Dual I-II : Mono
ExitMove
Adjust
TruSurround XT, SRS and Symbol are trademarks of SRS Labs, Inc.
TruSurround XT technology is incorporated under license from SRS Labs, Inc.
BN68-01528A-Eng.indb 25 2008-04-18 오후 1:44:25

English - 26
Selecting the Sound Mode (depending on the model)
The DUAL I-II button displays/controls the processing and output of the audio signal. When power
is switched on, the mode is automatically preset to either “DUAL-I” or “Stereo”, depending on the
current transmission.
Easy Setting
1 Press the TOOLS button on the remote control.
2 Press the ▲ or ▼ button to select Dual I-II.
3 Press the ◄ or ► button to select the required option.
Type of broadcast On-screen indication
NICAM
Stereo
Regular broadcast
(Standard audio)
Mono (Normal use)
Regular + NICAM Mono NICAM
Mono
(Normal)
NICAM Stereo
NICAM
stereo
Mono
(Normal)
NICAM DUAL-I/II
NICAM
dual-1
NICAM
dual-2
Mono
(Normal)
A2
Stereo
Regular broadcast
(Standard audio)
Mono (Normal use)
Bilingual or DUAL-I/II Dual I Dual II
Stereo Stereo
Mono
(Forced mono)
➢
If the receiving conditions deteriorate, listening will be easier if the mode is set to Mono.
If the stereo signal is weak and automatic switching occurs, switch to Mono.
Connecting Headphones (Sold separately)
You can connect a set of headphones to your set if you wish to watch a TV program
without disturbing other people in the room.
➢
When you insert the head set jack into the corresponding
port, you can operate only “Auto Volume” in Sound menu.
➢
Prolonged use of headphones at a high volume may
damage your hearing.
➢
You will not hear sound from the speakers when you connect
headphones to the TV.
➢
The headphone volume and TV volume are adjusted
separately.
TV Side Panel
Tools
Anynet+ (HDMI-CEC)
Picture Mode : Standard
Sound Mode : Custom
Sleep Timer : Off
SRS TS XT : Off
Energy Saving : Off
DualI-II ◄ Mono ►
ExitMove
Adjust
BN68-01528A-Eng.indb 26 2008-04-18 오후 1:44:25

English - 27
Time Features
1 Press the MENU button to display the menu.
2 Press the ▲ or ▼ button to select Setup, then press the
ENTER button.
3 Press the ▲ or ▼ button to select Time, then press the
ENTER button.
4 Select the required option by pressing the ▲ or ▼ button, then
press the ENTER button.
Available options:
Clock Set, Sleep Timer, Timer 1, Timer 2,
Timer 3
5 When you are satisfied with your setting, press the ENTER
button.
6 Press the EXIT button to exit.
Clock Set
You can set the television clock so that the current time is
displayed when pressing the INFO button on the remote
control. You must also set the time if you wish to use the
automatic on or off timers.
− Press the ◄ or ► button to select
Month, Day, Year, Hour,
or Minute. Set these by pressing the ▲ or ▼ button.
➢
You can set the Month, Day, Year, Hour, or Minute
directly by pressing the numeric buttons on the remote
control.
➢
In the event of a power interruption or the set being turned
off at the supply, the settings for the Clock will be lost.
Sleep Timer
You can select a time period of between 30 and 180 minutes
after which the television automatically switches to standby
mode.
− Select the preset time interval (
Off, 30, 60, 90, 120, 150, or
180
) for staying on by pressing the ▲ or ▼ button.
Easy Setting
1 Press the TOOLS button on the remote control.
2 Press the ▲ or ▼ button to select Sleep Timer.
3 Press the ◄ or ► button to select the minute, then press the
ENTER button.
Timer 1 / Timer 2 / Timer 3
You can set the On/Off timers so that the television will switch
on or off automatically at the time you select.
☛
You must set the clock first.
− Press the ◄ or ► button to select the required item below.
Press the ▲ or ▼ button to adjust to the setting satisfied.
On Time : Select hour, minute, and On/Off. (To activate timer with the setting satisfied, set to On.)
Off Time : Select hour, minute, and On/Off. (To activate timer with the setting satisfied, set to On.)
Repeat : Select Once, Everyday, Mon~Fri, Mon~Sat, or Sat~Sun.
Volume : Select the required volume level.
➢
You can set the hour, minute, directly by pressing the number buttons on the remote control.
☛
Auto Power Off
When you set the timer “On”, the TV will eventually turn off, if no controls are operated for 3 hours
after the TV was turned on by timer. This function is only available in timer “On” mode and prevents
overheating, which may occur if a TV is on for too long time.
Move
Enter
Return
Clock Set :
00 : 00
Sleep Timer : Off
Timer 1 : Off
Timer 2 : Off
Timer 3 : Off
Time
T V
Move
Enter
Return
Plug & Play
Language : English
Time
Light Effect
: In Watching TV
Wall-Mount Adjustment
Melody : Off
Entertainment : Off
Energy Saving : Off
PIP
Setup
T V
Tools
Anynet+ (HDMI-CEC)
Picture Mode : Standard
Sound Mode : Custom
SleepTimer ◄ Off ►
SRS TS XT : Off
Energy Saving : Off
Dual I-II : Mono
ExitMove
Adjust
Move
Adjust
Return
Timer 1
T V
00 00 Off
On Time
:
Off Time
Repeat
Once
10
Volume
00 00 Off
:
BN68-01528A-Eng.indb 27 2008-04-18 오후 1:44:26

English - 28
Language / Melody / Light Effect / Entertainment /
Energy Saving / PIP
1 Press the MENU button to display the menu.
2 Press the ▲ or ▼ button to select Setup, then press the
ENTER button.
3 Select the required option by pressing the ▲ or ▼ button, then
press the ENTER button.
Available options:
Language, Melody, Light Effect,
Entertainment, Energy Saving, PIP
4 When you are satisfied with your setting, press the ENTER
button.
5 Press the EXIT button to exit.
Language
It is variable depending on the model. When you start using the television for the first time, you must
select the language which will be used for displaying menus and indications.
Light Effect: Off/In Standby/In Watching TV/Always
You can turn on/off the blue LED on the front of TV according to the situation. Use it for saving power
or when the LED dazzles your eyes.
−
Off: The blue LED is always off.
−
In Standby: The blue LED lights while in Standby mode and it turns off when your TV is turned on.
−
In Watching TV: The blue LED lights when watching TV and it turns off when your TV is turned off.
−
Always: The blue LED always lights.
➢
Set the Light Effect to Off to reduce the power consumption.
Melody: Off/Low/Medium/High
The TV power on/off melody sound can be adjusted.
Entertainment: Off/Sports/Cinema/Game
Entertainment mode enables you to select the optimal display and sound for sports, cinema and
games.
−
Off: Switches the Entertainment function off.
−
Sports: Provides the optimal picture and sound quality for sports.
−
Cinema: Provides the optimal picture and sound quality for movie watching.
You can experience a richer picture and enhanced sound.
−
Game: Provides the optimal picture and sound quality for games. This mode accelerates the
playing speed when using an external game console connected to the TV.
➢
If you set any of the three Entertainment modes to On, the settings will be locked and can not be
adjusted. If you want to make Picture and Sound mode adjustments, the Entertainment mode
must be turned off.
➢
The Entertainment settings are saved for each input source.
Continued...
Move
Enter
Return
Plug & Play
Language : English
Time
Light Effect
: In Watching TV
Wall-Mount Adjustment
Melody : Off
Entertainment : Off
Energy Saving : Off
PIP
Setup
T V
BN68-01528A-Eng.indb 28 2008-04-18 오후 1:44:27

English - 29
Setting up Your PC Software (Based on Windows XP)
The Windows display-settings for a typical computer
are shown below. But the actual screens on your PC will
probably be different, depending upon your particular
version of Windows and your particular video card. But even
if your actual screens look different, the same, basic set-up
information will apply in almost all cases. (If not, contact your
computer manufacturer or Samsung Dealer.)
1 Right click the mouse on the Windows Desktop, then click on
Properties.
The Display Properties will be displayed.
2 Click on Settings tab, then set the Display Mode with
reference to the Display Modes Table. You do not need to
change the Colours settings.
3 Click on Advanced. A new settings dialog box will be
displayed.
4 Click on the Monitor tab, then set the Screen refresh rate with reference to the Display Modes
Table. Set the Vertical Frequency and Horizontal Frequency individually if you can do so instead of
setting the Screen refresh rate.
5 Click on OK to close the window, then Click on OK button to the Display Properties window.
Automatic re-booting may commence at this moment.
Energy Saving: Off/Low/Medium/High
This feature adjusts the screen brightness depending on the
surrounding lighting conditions.
− Off: Switches off the Energy Saving mode.
− Low: Operates in standard mode regardless of the
surrounding illumination.
− Medium: Enters Medium power saving mode regardless of
the surrounding illumination.
− High: Enters maximum power saving mode regardless of
the surrounding illumination.
Easy Setting
1 Press the TOOLS button on the remote control.
2 Press the ▲ or ▼ button to select Energy Saving.
3 Press the ◄ or ► button to select the required option.
PIP (Picture in Picture): PIP(On/Off)/Source/Size/Position/Programme
You can display a sub picture within the main picture. In this way you can watch TV programme or
monitor the video input from any connected devices.
−
PIP: On/Off
You can activate or deactivate the PIP function.
Table of PIP Settings
Main Picture Sub Picture
Component
HDMI1, 2, 3
PC
Analog TV broadcasts
only Ext1, Ext2, AV
− Source: TV/Ext.1/Ext.2/AV
You can select a source of the sub-picture.
−
Size: / /
You can select a size of the sub-picture.
➢
If main picture is in PC and Component mode, Size is not available.
−
Position: / / /
You can select a position of the sub-picture.
➢
In Double( , ) mode, Position cannot be selected.
−
Programme
You can select a channel of the sub-picture only when the Source is set to TV.
Tools
Anynet+ (HDMI-CEC)
Picture Mode : Standard
Sound Mode : Custom
Sleep Timer : Off
SRS TS XT : Off
EnergySaving ◄ Off ►
Dual I-II : Mono
ExitMove
Adjust
Move
Enter
Return
PIP :
On
Source : TV
Size :
Position :
Programme : P 1
PIP
T V
BN68-01528A-Eng.indb 29 2008-04-18 오후 1:44:28

English - 30
Input Mode (PC)
Both screen position and size will vary depending on the type of PC monitor and its resolution.
The table below shows all of the display modes that are supported:
D-Sub Input
Mode Resolution
Horizontal
Frequency
(kHz)
Vertical
Frequency
(Hz)
Pixel Clock
Frequency
(MHz)
Sync
Polarity
(H/V)
PS50A470
IBM
640 x 350
720 x 400
31.469
31.469
70.086
70.087
25.175
28.322
+ / -
- / +
✔
✔
VESA
640 x 480
640 x 480
640 x 480
800 x 600
800 x 600
800 x 600
1024 x 768
1024 x 768
1024 x 768
1360 x 768
31.469
37.861
37.500
37.879
48.077
46.875
48.363
56.476
60.023
47.712
59.940
72.809
75.000
60.317
72.188
75.000
60.004
70.069
75.029
60.015
25.175
31.500
31.500
40.000
50.000
49.500
65.000
75.000
78.750
85.500
- / -
- / -
- / -
+ / +
+ / +
+ / +
- / -
- / -
+ / +
+ / +
✔
✔
✔
✔
✔
✔
✔
✔
✔
✔
HDMI/DVI Input
Mode Resolution
Horizontal
Frequency
(kHz)
Vertical
Frequency
(Hz)
Pixel Clock
Frequency
(MHz)
Sync
Polarity
(H/V)
PS50A470
VESA
640 x 480
800 x 600
1024 x 768
1360 x 768
31.469
37.879
48.363
47.712
59.940
60.317
60.004
60.015
25.175
40.000
65.000
85.500
- / -
+ / +
- / -
+ / +
✔
✔
✔
✔
When using an HDMI/DVI cable connection, you must use the HDMI IN 2 jack.
The interlace mode is not supported.
The set might operate abnormally if a non-standard video format is selected.
Separate and Composite modes are supported. SOG is not supported.
For the PS50A470, PC text quality is optimum in VESA mode (1360 x 768@60Hz).
BN68-01528A-Eng.indb 30 2008-04-18 오후 1:44:28

English - 31
Setting the PC
➢
Preset to the PC mode by pressing the SOURCE button.
1 Press the MENU button to display the menu.
2 Press the ▲ or ▼ button to select Picture, then press the
ENTER button.
3 Select the required option by pressing the ▲ or ▼ button, then
press the ENTER button.
4 When you are satisfied with your setting, press the ENTER
button.
5 Press the EXIT button to exit.
Auto Adjustment :
Auto adjustment allows the PC screen of set to self-adjust to
the incoming PC video signal.
The values of fine, coarse and position are adjusted
automatically.
Easy Setting
1 Press the TOOLS button on the remote control.
2 Press the ▲ or ▼ button to select Auto Adjustment, then
press the ENTER button.
Screen Adjustment: Coarse/Fine/Position/Image Reset
Coarse/Fine
The purpose of picture quality adjustment is to remove or
reduce picture noise.
If the noise is not removed by Fine-tuning alone, then adjust
the frequency as best as possible (coarse) and Fine-tune
again.
After the noise has been reduced, re-adjust the picture so that
it is aligned on the center of screen.
1
Press the ▲ or ▼ button to select Coarse or Fine, then
press the ENTER button.
2 Press the ◄ or ► button to adjust the screen quality,
vertical stripes may appear or the picture may be blurry.
Press the ENTER button.
Position
Adjust the PC’s screen positioning if it does not fit the TV
screen.
1 Adjust the position by pressing the ▲/▼/◄/► button.
2 Press the ENTER button.
Image Reset
You can replace all image settings with the factory default
values.
Move
Enter
Return
Coarse 50
Fine 11
Position
Image Reset
Screen Adjustment
T V
Auto Adjustment in Progress
Please wait.
Image Reset is completed.
Move
Enter
Return
Mode :
Standard
Cell Light 7
Contrast 95
Brightness 45
Sharpness 50
Auto Adjustment
Screen Adjustment
Detailed Settings
Picture Options
Reset : OK
Picture
T V
Move
Enter
Return
Position
T V
Tools
Anynet+ (HDMI-CEC)
Picture Mode : Standard
Sound Mode : Custom
Sleep Timer : Off
SRS TS XT : Off
Energy Saving : Off
PIP
Auto Adjustment
ExitMove
Enter
BN68-01528A-Eng.indb 31 2008-04-18 오후 1:44:29

English - 32
What is Anynet
+
?
Anynet
+
is an AV network system that enables an easy-to-use AV interface for users by controlling
all connected AV devices through the Anynet
+
menu when Samsung Electronics AV devices are
connected.
Connecting Anynet
+
Devices
The Anynet
+
system supports AV devices supporting Anynet
+
only.
Check if there is an Anynet
+
mark on the AV device to be connected to the TV.
To directly connect to TV
Connect the [HDMI 1], [HDMI
2] or [HDMI 3] jack on the TV
and the HDMI OUT jack of the
corresponding Anynet
+
device
using the HDMI cable.
To connect to Home Theatre
1 Connect the [HDMI 1],
[HDMI 2] or [HDMI 3]
jack on the TV and the
HDMI OUT jack of the
corresponding Anynet
+
device using the HDMI
cable.
2 Connect the HDMI IN jack
of the home theatre and
the HDMI OUT jack of the
corresponding Anynet
+
device using the HDMI
cable.
➢
Connect only one receiver.
➢
You can connect an Anynet
+
device using the HDMI cable. Some HDMI cables may not support
Anynet
+
functions.
➢
Anynet
+
works when the AV device supporting Anynet
+
is in the Standby or On status.
➢
Anynet
+
supports up to 8 AV devices in total.
Anynet
+
Device 1 Anynet
+
Device 2
Anynet
+
Device 3
TV
HDMI Cable
HDMI Cable
HDMI Cable
TV
Anynet
+
Device 1 Anynet
+
Device 2
Anynet
+
Device 3
HDMI Cable
HDMI Cable
HDMI Cable
HDMI Cable
Home Theatre
BN68-01528A-Eng.indb 32 2008-04-18 오후 1:44:30

English - 33
Setting Up Anynet
+
The following settings are to use Anynet
+
functions.
Using the Anynet
+
Function
1 Press the MENU button to display the menu.
Press the ▲ or ▼ button to select Input, then press the
ENTER button.
2 Press the ▲ or ▼ button to select Anynet
+
(HDMI-CEC), then
press the ENTER button.
3 Press the ▲ or ▼ button to select Setup, then press the
ENTER button.
4 Press the ▲ or ▼ button to select Anynet
+
(HDMI-CEC), then
press the ENTER button.
5 Press the ▲ or ▼ button to select On, then press the ENTER
button.
➢
The Anynet
+
(HDMI-CEC) function is enabled.
➢
If you select Off, Anynet
+
(HDMI-CEC) is disabled.
➢
When the Anynet
+
(HDMI-CEC) function is disabled, all the
Anynet
+
related operations are deactivated.
Turning an Anynet
+
Device Off Automatically when the TV is
Turned Off
4 Press the ▲ or ▼ button to select Auto Turn Off, then press
the ENTER button.
5 Press the ▲ or ▼ button to select Yes, then press the
ENTER button.
➢
The Auto Turn Off function is enabled.
➢
If you select No, the Auto Turn Off function is canceled.
Press the EXIT button to exit.
➢
The Select Device setting of the TV remote control is to be set
to TV to use the Anynet
+
function.
➢
If you set Auto Turn Off to Yes, connected external devices are also turned off when the TV is turned
off. However, if the device is recording, it may not be turned off.
Scanning and Switching between Anynet
+
Devices
1 Press the MENU button to display the menu.
Press the ▲ or ▼ button to select Input, then press the
ENTER button.
2 Press the ▲ or ▼ button to select Anynet
+
(HDMI-CEC), then
press the ENTER button.
3 Press the ▲ or ▼ button to select Select Device, then press
the ENTER button.
4 Press the ▲ or ▼ button to select to a particular device and
press the ENTER button.
It is switched to the selected device.
5 If you cannot find a device you want, press the ▲ or ▼ button
to select Searching Connections, then press the ENTER
button.
The meassage Configuring Anynet
+
connection... is
displayed. When searching devices completes, the connected
devices are listed in the Anynet
+
menu.
➢
Switching to the selected devices may take up to 2 minutes.
You cannot cancel the operation during the switching
operation.
➢
The time required to scan for devices is determined by the
number of connected devices.
➢
When the device scan is complete, the number of found devices is not displayed.
➢
Although the TV automatically scans devices when it is turned on using the POWER button, devices
connected when the TV is on or under a specific circumstance are not displayed in the device list.
Therefore select Searching Connections menu to search devices.
➢
If you have selected external input mode by pressing the SOURCE button, you cannot use the
Anynet
+
function. Make sure to switch to an Anynet
+
device by using the TOOLS button.
Continued...
Setup
Anynet
+
(HDMI-CEC)
: Off
Auto Turn Off
: Off
Searching Connections
Enter ReturnMove
Off
On
Enter
Move
View TV
Select Device
Record
Menu on Device
Device Operation
Receiver :Off
Setup
TV P 1
Return
Enter
Move
View TV
Select Device
Record
Menu on Device
Device Operation
Receiver :Off
Setup
TV P 1
Return
DVDR1
DVDR2
DVD1
DVD2
Setup
Anynet
+
(HDMI-CEC)
: On
Auto Turn Off :
: Off
Searching Connections
Enter Return
Move
No
Yes
Setup
Anynet
+
(HDMI-CEC)
: On
Auto Turn Off
: Yes
Searching Connections
Enter ReturnMove
BN68-01528A-Eng.indb 33 2008-04-18 오후 1:44:31

English - 34
Anynet
+
Menu
The Anynet
+
menu changes depending on the type and status of the Anynet
+
devices connected
to the TV.
Anynet
+
Menu Description
View TV Switches from Anynet
+
to TV broadcast mode.
Select Device Your TV connects to the corresponding device.
Record Starts a recording. (This menu works only for a device supporting
recording.)
Menu on Device Shows the menu of the connected device.
Example. When a DVD Recorder is connected, the DVD Recorder’s
title menu appears.
Device Operation Shows the play control menu of the connected device.
Example. When a DVD Recorder is connected, the play control
menu of the DVD Recorder appears.
Receiver Sound is output through the receiver.
Setup You can set the environment for using Anynet
+
.
TV Remote Control Buttons Available in Anynet
+
Mode
Device Type Operating Status Available Buttons
Anynet
+
Device
After switching to the
device, when the menu of
the corresponding device is
displayed on the screen.
Numeric buttons
▲/▼/◄/►/ENTER buttons
Colour buttons
EXIT button
After switching to the device,
while playing a file
W.LINK
(Backward search)
W.LINK
(Forward search)
W.LINK
(Stop)
W.LINK
W.LINK
(Play/Pause)
Device with built-in Tuner
After switching to the device,
when you are watching a TV
programme
P / button
Audio Device When a Receiver is activated
W.LINK
/
W.LINK
button
MUTE button
➢
The Anynet
+
function only works when the remote control is set to TV.
➢
The REC button works only while in the recordable state.
➢
You cannot control Anynet
+
devices using the buttons on the side of the TV. You can control Anynet
+
devices only using the TV remote control.
➢
The TV remote control may not work under certain conditions. In this case, reselect the Anynet
+
device.
➢
The Anynet
+
functions don’t operate for the products from other manufacturers.
➢
In Anynet
+
mode, the colour buttons may not work properly.
➢
The
W.LINK
,
W.LINK
operations may differ depending on the device.
Recording
You can make a recording of a TV programme using a recorder.
Press the REC button.
Recording begins. (Only when the Anynet
+
enabled recording device is connected.)
➢
The current TV programme is recorded in the Watching TV status. If you are watching video from
another device, the video from the device is recorded.
➢
You can also record the source streams by selecting Record after pressing the TOOLS button.
➢
Before recording, check whether the antenna jack is properly connected to the recording device.
For the antenna connection to the recording device, refer to its user manual.
BN68-01528A-Eng.indb 34 2008-04-18 오후 1:44:32

English - 35
Listening through a Receiver
You can listen to sound through a receiver instead of the TV speaker.
1 Press the MENU button to display the menu.
Press the ▲ or ▼ button to select Input, then press the ENTER button.
2 Press the ▲ or ▼ button to select Anynet
+
(HDMI-CEC), then press the ENTER
button.
3 Press the ▲ or ▼ button to select Receiver, then press the ENTER button.
4 Press the ◄ or ► button to select to On, then press the ENTER button.
Now you can listen to sound through the receiver.
5 Press the EXIT button to exit.
➢
When the receiver is set to On, you can listen to the TV sound through the 2-
channel receiver.
➢
If the receiver is exclusively for a home theater only (supporting audio only), it may
not appear in the device list.
➢
In case of a content with copyright problems, listening through the receiver may not properly operate.
➢
When listening through the receiver, there are restrictions for using the PIP and audio-related menu.
Check Points before Requesting Service
Symptom Solution
Anynet
+
does not work. ■ Check if the device is an Anynet
+
device. The Anynet
+
system
supports Anynet
+
devices only.
■ Connect only one receiver.
■ Check if the Anynet
+
device power cord is properly connected.
■
Check the Anynet
+
device’s Video/Audio/HDMI cable connections.
■ Check whether Anynet
+
(HDMI-CEC) is set to On in the Anynet
+
setup menu.
■ Check whether the TV remote control is in TV mode.
■ Check whether it is Anynet
+
exclusive remote control.
■ Anynet
+
doesn’t work at a certain condition. (Searching channels)
■ When connecting or removing the HDMI cable, please make sure
to search devices again or restart your TV.
■ Check if the Anynet
+
Function of Anynet
+
device is set on.
I want to start Anynet
+
. ■ Check if the Anynet
+
device is properly connected to the TV and
check if the Anynet
+
(HDMI-CEC) is set to On in the Anynet
+
Setup menu.
■ Press the TV button on the TV remote control to switch to TV.
Then press the TOOLS button to show the Anynet
+
menu and
select a menu you want.
I want to exit Anynet
+
. ■ Select View TV in Anynet
+
menu.
■ Press the SOURCE button on the TV remote control and select a
device other than Anynet
+
devices.
■ Press any of P, CH LIST, and PRE-CH to change to the
TV mode. (Note that the channel button operates only when a
tuner-embedded Anynet
+
device is not connected.)
The message Connecting to
Anynet
+
device… appears
on the screen.
■ You cannot use the remote control when you are configuring
Anynet
+
or switching to a view mode.
■ Use the remote control when the Anynet
+
setting or switching to
view mode is complete.
The Anynet
+
device does
not play.
■ You cannot use the play function when Plug & Play is in progress.
The connected device is not
displayed.
■ Check whether or not the device supports Anynet
+
functions.
■ Check whether or not the HDMI cable is properly connected.
■ Check whether Anynet
+
(HDMI-CEC) is set to On in the Anynet
+
setup menu.
■ Search Anynet
+
devices again.
■ You can connect an Anynet
+
device using the HDMI cable only.
Some HDMI cables may not support Anynet
+
functions.
The TV programme cannot
be recorded.
■ Check whether the antenna jack on the recording device is
properly connected.
Enter
Move
View TV
Select Device
Record
Menu on Device
Device Operation
Receiver :On
Setup
TV P 1
Exit
BN68-01528A-Eng.indb 35 2008-04-18 오후 1:44:33

English - 36
Teletext Feature (depending on the model)
Most television stations provide written information services via teletext. The index page of the
teletext service gives you information on how to use the service. In addition, you can select
various options to suit your requirements by using the remote control buttons.
☛
For teletext information to be displayed correctly, channel reception must be stable. Otherwise,
information may be missing or some pages may not be displayed.
1
TV
Exit from the teletext display (depending on the model)
2
(store)
Used to store the teletext pages.
3
(size)
Press to display the double-size letters in the upper half of the
screen. For lower half of the screen, press it again.
To display normal screen, press it once again.
4
(reveal)
Used to display the hidden text (answers to quiz games, for
example). To display normal screen, press it again.
5
Coloured buttons (red/green/yellow/blue)
If the FASTEXT system is used by a broadcasting company, the
different topics covered on a teletext page are colour-coded and
can be selected by pressing the coloured buttons. Press one
of them corresponding to the required. The page is displayed
with other coloured information that can be selected in the same
way.
To display the previous or next page, press the corresponding
coloured button.
6
(teletext on/mix)
Press to activate teletext mode after selecting the channel
providing the teletext service. Press it twice to overlap the
teletext with the current broadcasting screen.
7
(mode)
Press to select the teletext mode (LIST/FLOF).
If you press it in the LIST mode, it switches into the List save
mode.
In the List save mode, you can save teletext page into list using
the (store) button.
8
(sub-page)
Used to display the available sub-page.
9
(page up)
Used to display the next teletext page.
0
(page down)
Used to display the previous teletext page.
!
(index)
Used to display the index (contents) page at any time while you
are viewing teletext.
@
(hold)
Used to hold the display on a given page if the selected page is
linked with several secondary pages
which follow on automatically. To resume, press it again.
#
(cancel)
Used to display the broadcast when searching for a page.
➢
You can change teletext pages by pressing the numeric buttons
on the remote control.
Continued...
BN68-01528A-Eng.indb 36 2008-04-18 오후 1:44:35

English - 37
The teletext pages are organized according to six categories:
Part Contents
A
B
C
D
E
F
Selected page number.
Broadcasting channel identity.
Current page number or search indications.
Date and time.
Text.
Status information.
FASTEXT information.
➢
Teletext information is often divided between several pages
displayed in sequence, which can be accessed by:
Entering the page number
Selecting a title in a list
Selecting a coloured heading (FASTEXT system)
➢
Press the TV button to exit from the teletext display.
BN68-01528A-Eng.indb 37 2008-04-18 오후 1:44:36

English - 38
Wall Mount Kit Specifications (VESA)
Install your wall mount on a solid wall perpendicular to the floor.
When attaching to other building materials, please contact your nearest dealer.
If installed on a ceiling or slanted wall, it may fall and result in severe personal injury.
Product Family inch VESA Spec. (A * B) Standard Screw Quantity
LCD-TV
23 ~ 26 200
*
100 M4
4
32 ~ 40 200
*
200 M6
46 ~ 52
400 * 400
600 * 400
M8
57
700 * 400
(No VESA)
57 ~ 70 800 * 400
80 ~ 1400 * 800
PDP-TV
42 ~ 58
400 * 400
600 * 400
M8
4
63
676 * 407
(No VESA)
6
63 ~ 70 800 * 400 4
80 ~ 1400 * 800 4
➢
We provided the standard dimensions for wall mount kits as shown in the table above.
➢
When purchasing our wall mount kit, a detailed installation manual and all parts necessary for
assembly are provided.
➢
Do not use screws longer than the standard dimension, as they may cause damage to the inside of
the TV set.
➢
For wall mounts that do not comply with the VESA standard screw specifications, the length of the
screws may differ depending on their specifications.
➢
Do not use screws that do not comply with the VESA standard screw specifications.
Do not use fasten the screws too strongly, this may damage the product or cause the product to fall,
leading to personal injury. Samsung is not liable for these kinds of accidents.
➢
Samsung is not liable for product damage or personal injury when a non-VESA or non-specified wall
mount is used or the consumer fails to follow the product installation instructions.
➢
Our 57” and 63” models do not comply with VESA Specifications. Therefore, you should use our
dedicated wall mount kit for this model.
➢
Do not exceed 15 degrees tilt when mounting this TV.
Do not install your Wall Mount Kit while your TV is turned on.
It may result in personal injury due to electric shock.
BN68-01528A-Eng.indb 38 2008-04-18 오후 1:44:36

English - 39
Entering the menu
1
Press the ▲, ▼, ◄ or ► button on your remote control.
➢
The Wall Mount Adjustment screen is displayed.
➢
If the Wall Mount Adjustment screen is not displayed
when clicking on a direction button while watching your
TV, use the menu to display that screen.
• Press the
MENU button to display the menu. Press the
▲ or ▼ button to select Setup, then press the ENTER
button.
• Press the ▲ or ▼ button to select
Wall-Mount
Adjustment, then press the ENTER button.
Remembering the Position
2 Adjust to the desired position using the ▲, ▼, ◄, ► buttons.
➢
If you press an arrow button when no OSD is displayed
on the TV screen, the Adjustment screen appears.
➢
Press the INFO button to reset. Press the ◄ or ► button
to select Yes, then press the ENTER button. The position
is initialized to the default setting.
3 Press the blue button.
Press the ▲ and ▼ buttons to select a save mode from
either Position1, Position2 or Position3 in order to save the
current position.
➢
To not save the current position, press the RETURN
button.
➢
When selecting a save mode, you cannot use the Colour
buttons.
4
Press the ENTER button to save.
➢
When Position1 is selected, the message Current
position saved as Position1 is displayed.
5
Press the ENTER button.
➢
The saved Position appears on the left side of the OSD.
Wall- mount adjustment (Sold separately)
Once the auto wall mount is installed, the position of your TV can be easily adjusted.
Rear Panel Auto Wall-Mount
Serial Cable(1P to 1P)(Not supplied)
Move
Enter
Return
Plug & Play
Language : English
Time
Light Effect
: In Watching TV
Wall-Mount Adjustment
Melody : Off
Entertainment : Cinema
Energy Saving : Off
PIP
Setup
T V
Wall-Mount Adjustment
Adjust
Save Center
►
►
►
►
►
►
►
►
321Position
Save
Return
Move
Enter
Select a mode to Save.
Position 1
Position 2
Position 3
BN68-01528A-Eng.indb 39 2008-04-18 오후 1:44:38

English - 40
How to assemble the Stand-Base (depending on the model)
Using the 6 screws for securing the stand base and the
monitor, firmly attach the monitor to the stand base.
(The exterior of the set may be different than the picture.)
In case of installing your TV on the wall,
close the cover (1) on the stand-base
connection part using two screws for
hiding.
Warning
Firmly secure the stand to the TV
before moving it, as the stand may
fall and could cause serious injury.
➢
Two or more people should carry
the TV. Never lay the TV on the
floor because of possible damage
to the screen.
Always store the TV upright.
Moving to the remembered position
1
Complete Step 1 of Entering the menu.
2 Pressing a Colour (Red, Green, Yellow) button moves the
auto wall mount to the saved position.
➢
You can move the wall mount to one of the 3 pre-set
positions by pressing the Red (Position 1), Green
(Position 2) or Yellow (Position 3) buttons.
➢
If you adjust the position after moving to a pre-set
position, the position display will disappear.
➢
For installation, refer to the Installation Manual provided with
the wall mount.
➢
For product installation and the installation and moving of the
wall mount, make sure to consult a specialized installation
company.
➢
This installation manual is to be used when attaching the wall
mount to a wall. When attaching to other building materials,
please contact your nearest dealer.
➢
The auto wall mount will not work when Anynet+ is operating.
➢
42 inches model is not compatible with the older wall mount
model (WMN5090A).
Position 1
Wall-Mount Adjustment
Adjust
Save Center
►
►
►
►
►
►
►
►
321Position
BN68-01528A-Eng.indb 40 2008-04-18 오후 1:44:40

English - 41
Securing the TV to the Wall
Pulling, pushing, or climbing on the TV may cause the TV to fall. In particular, ensure your
children do not hang over or destabilize the TV; doing so may cause the TV to tip over,
causing serious injuries or death. Follow all safety precautions provided on the included Safety
Flyer. For added stability, install the anti-fall device for safety purposes, as follows.
To avoid the TV from falling:
1.
Putthescrewsintotheclampsandrmlyfastenthemonto
thewall.Conrmthatthescrewshavebeenrmlyinstalled
onto the wall.
You may need additional material such as an anchor
depending on the type of wall.
Since the necessary clamps, screws, and string are not
supplied, please purchase these additionally.
2. Remove the screws from the center back of the
TV, put the
screws into the clamps, and then fasten the screws onto the
TV again.
Screws may not be supplied with the product. In this
case, please purchase the screws of the following
specications.
3.
ConnecttheclampsxedontotheTVandtheclampsxed
onto the wall with a strong string and then tie the string
tightly.
Install the TV near to the wall so that it does not fall
backwards.
Itissafetoconnectthestringsothattheclampsxedon
thewallareequaltoorlowerthantheclampsxedonthe
TV.
Untie the string before moving the TV.
4. V
erify all connections are properly secured. Periodically
check connections for any sign of fatigue for failure.
If you have any doubt about the security of your
connections,contact a professional installer.
➣
➣
➣
➣
➣
➣
Wall
Wall
Caution
BN68-01528A-Eng(22-48).indd 41 2008-04-21 오전 10:42:27

English - 42
Troubleshooting
Before contacting the Samsung after-sales service, perform the following simple checks.
If you cannot solve the problem using the instructions below, note the model and serial number of
the television and contact your local dealer.
No sound or picture
Check that the mains lead has been connected to a wall socket.
Check that you have pressed the (Power) button (On/Off) on the front panel or press the POWER
button on the remote control.
Check the picture contrast and brightness settings.
Check the volume.
Check if TV Speaker is set to Off.
Normal picture but no sound
Check the volume.
Check whether the volume MUTE button on the remote control has been pressed.
No picture or black and white picture
Adjust the colour settings.
Check that the broadcast system selected is correct.
Sound and picture interference
Try to identify the electrical appliance that is affecting the television, then move it further away.
Plug the television into a different main socket.
Blurred or snowy picture, distorted sound
Check the direction, location and connections of your aerial.
This interference often occurs due to the use of an indoor aerial.
Remote control malfunctions
Replace the remote control batteries.
Clean the upper edge of the remote control (transmission window).
Check that the “+” and “–” ends of the batteries are inserted correctly.
Check that the batteries are drained.
Screen is black and power indicator light blinks steadily
On your computer check; Power, Signal Cable.
The TV is using its power management system.
Move the computer’s mouse or press any key on the keyboard.
On your equipment check (STB, DVD, etc) ; Power, Signal Cable.
The TV is using its power management system.
Press the Source button on the panel or remote control.
Turn the TV off and on.
The damaged picture appears in the corner of the screen.
If Just Scan is selected in some external devices, the damaged picture may appear in the corner of
the screen. This symptom is caused by external devices, not TV.
The “Resets all settings to the default values” message appears.
This appears when you press and hold the EXIT button for a while. The product settings are reset to
the factory defaults.
BN68-01528A-Eng.indb 42 2008-04-18 오후 1:44:41

English - 43
Specifications
The descriptions and characteristics in this booklet are given for information purposes only and
are subject to modification without notice.
Model Name PS50A470
Screen Size (Diagonal) 50 inch
PC Resolution 1360 x 768 @ 60 Hz
Sound (Output) 10 W + 10 W
Dimension (WxHxD)
Body
With stand
1290 x 740 x 95 mm
1290 x 804 x 319 mm
Weight
Body
With stand
39 Kg
41 Kg
Environmental
Considerations
Operating Temperature
Operating Humidity
Storage Temperature
Storage Humidity
10 °C to 40 °C (50 °F to 104 °F)
10% to 80%, non-condensing
-20 °C to 45 °C (-4 °F to 113 °F)
5% to 95%, non-condensing
➢
This device is a Class B digital apparatus.
Design and specifications are subject to change without prior notice.
For the power supply and Power Consumption, refer to the label attached to the product.
BN68-01528A-Eng.indb 43 2008-04-18 오후 1:44:42

This page is intentionally
left blank.
BN68-01528A-Eng.indb 44 2008-04-18 오후 1:44:42

Correct Disposal of This Product
(Waste Electrical & Electronic Equipment)
(Applicable in the European Union and other European countries with
separate collection systems)
This marking shown on the product or its literature, indicates that it
should not be disposed with other household wastes at the end of its
working life.
To prevent possible harm to the environment or human health from
uncontrolled waste disposal, please separate this from other types of
wastes and recycle it responsibly to promote the sustainable reuse of
material resources.
Household users should contact either the retailer where they
purchased this product, or their local government office, for details
of where and how they can take this item for environmentally safe
recycling.
Business users should contact their supplier and check the terms and
conditions of the purchase contract. This product should not be mixed
with other commercial wastes for disposal.
BN68-01528A-Eng.indb 45 2008-04-18 오후 1:44:42

Français - 2
Instructions d’utilisation
Rémanence à l’écran
Ne figez pas d’images (telle qu’une image de jeu vidéo ou de PC branché à l’écran à plasma) sur
l’écran du moniteur à plasma pendant plus de deux heures car cela peut entraîner une rémanence
à l’écran. Cette rémanence est également appelée “brûlure d’écran”. Pour éviter la rémanence,
réduisez le niveau de contraste ou de luminosité de l’écran lorsque vous affichez une image figée.
Hauteur
L’écran à plasma est normalement conçu pour être utilisé à une altitude inférieure à 2000 m. Il peut
fonctionner de façon anormale au-dessus de 2 000 m d’altitude. Ne l’installez pas et ne le faites donc
pas fonctionner dans ces conditions.
Chaleur diffusée sur la partie supérieure du téléviseur à plasma
Le dessus de l’appareil peut chauffer en cas d’utilisation prolongée, car la chaleur s’échappe du
panneau par le trou d’aération situé dans la partie supérieure du produit. Ce phénomène est normal
et n’indique aucunement la présence d’un défaut ou d’un dysfonctionnement. Il convient cependant
d’empêcher les enfants de toucher à la partie supérieure de l’écran.
Le produit fait un bruit de “claquement”.
Ce bruit de “claquement” risque d’être perceptible lorsque le produit se contracte ou s’étend suite à
un changement du milieu ambiant, tel que la température ou l’humidité. Ce phénomène est normal et
ne constitue pas un défaut.
Défauts de cellule
L’écran à plasma utilise un panneau constitué de 1 230 000 (niveau SD) à 3 150 000 (niveau HD)
pixels dont la fabrication fait appel à une technologie avancée. Il se peut toutefois que des points
clairs ou sombres apparaissent à l’écran. Ils n’ont aucune incidence sur la performance du produit.
Evitez d’utiliser le téléviseur à plasma à des températures inférieures à 5°C (41°F).
Une image figée affichée pendant une période prolongée peut endommager définitivement
l’écran PDP.
Visionner pendant longtemps le téléviseur à plasma en format 4/3 risque de
laisser apparaître des traces de bordures sur la gauche, sur la droite et au
centre de l’écran. Ces traces sont dues à la différence de luminosité sur l’écran.
Lire un DVD ou un jeu vidéo sur console risque de provoquer un effet similaire
sur l’écran. Les dommages provoqués par l’effet susmentionné ne sont pas
couverts par la garantie.
Rémanence de l’image à l’écran.
Une rémanence partielle de l’image peut éventuellement se produire si des images figées de jeux
vidéo et d’un PC restent affichées pendant un certain temps. Pour empêcher ce phénomène,
réduisez la luminosité et le contraste en cas d’affichage d’images figées.
Garantie
- La garantie ne couvre pas les dommages causés par la rémanence.
- Les brûlures ne sont pas couvertes par la garantie.
Installation
Contacter un centre de service agréé si le téléviseur est destiné à une installation dans des
endroits exposés à la poussière, à des températures faibles ou élevées, à une forte humidité,
à des substances chimiques et s’il a été prévu pour fonctionner en permanence, comme dans
des aéroports, des gares ferroviaires, etc. Le non-respect de ce qui précède peut gravement
endommager le téléviseur.
Contactez SAMSUNG WORLDWIDE
Pour tout commentaire ou toute question concernant un produit Samsung, contactez le service client de
SAMSUNG. (Voir la quatrième de couverture pour plus d'informations.)
© 2008 Samsung Electronics Co., Ltd. All rights reserved.
BN68-01528A-00Fre.indd 2 2008-4-21 15:39:59

Français - 3
Symboles
☛ ➢
Appuyez sur
Important
Remarque
Sommaire
Informations générales
Instructions d’utilisation ................................... 2
Vérication des pièces .................................... 4
Utilisation de la base-support ......................... 4
Panneau de conguration ............................... 5
Panneau de connexion ................................... 6
Présentation de la télécommande ................. 8
Fonctionnement
Mise en marche et arrêt de votre téléviseur .... 9
Afchage des menus ......................................9
Fonction Plug & Play ..................................... 10
Utilisation du bouton TOOLS ........................ 12
Visualisation d’une source de signal externe
.. 12
Modication du nom des périphériques ........ 13
Gestion des canaux
Mémorisation automatique des canaux ........ 13
Mémorisation manuelle des canaux ............. 14
Ajout/verrouillage de canaux ......................... 15
Organisation des canaux mémorisés ............ 16
Attribution de noms aux canaux .................... 16
Réception nette des canaux grâce au
réglage n ..................................................... 17
Réglage de l’image
Changement de la norme Image .................. 18
Personnalisation des paramètres d’image .... 18
Réglages des détails de l’image ................... 19
Options d’image ........................................... 20
Utilisation de la fonction 3D ......................... 22
Reinitialisation des paramètres d'image à
leur valeur par défaut ................................... 24
Réglage du son
Fonctions audio ............................................. 25
Sélection du mode Son
(en fonction du modèle) ................................ 26
Branchement du casque
(vendu séparément) ...................................... 26
Description des fonctions
Fonctions d’horloge ....................................... 27
Langue / Mélodie / Effet lumineux / Loisirs /
Mode éco. / PIP.............................................28
Afchage PC
Conguration de votre logiciel PC
(basée sur Windows XP)
............................... 29
Mode d’entrée (PC) ....................................... 30
Réglage du PC .............................................. 31
A propos de Anynet+
Conguration d’Anynet+................................ 32
Connexion d’appareils Anynet+ .................... 32
Conguration d’Anynet+................................ 33
Recherche d’appareils Anynet+ et
basculement entre des appareils .................. 33
Enregistrement .............................................. 34
Ecoute via un récepteur ................................ 35
Vérications avant de faire appel au service
d’assistance .................................................. 35
Annexe
Fonction de télétexte (en fonction du modèle)
.. 36
Caractéristiques du kit de xation murale
(VESA) .......................................................... 38
Ajustement du support mural
(vendu séparément) ...................................... 39
Assemblage de la base-support
(en fonction du modèle)
................................. 40
Montage mural du téléviseur ......................... 41
Dépannage ...................................................42
Caractéristiques ............................................ 43
Français
BN68-01528A-00Fre.indd 3 2008-4-21 15:39:59

Français - 4
Vérification des pièces
Manuel d’utilisation Télécommande/piles AAA Cordon d’alimentation
Chiffon de nettoyage
Carte de garantie/
Manuel de sécurité
(Non disponible dans
tous les pays)
Capot inférieur / Vis (2ea)
(Reportez-vous à la page 40)
Tore magnétique pour
cordon d’alimentation
Tore magnétique pour
S-Vidéo
Vendu séparément
Câble d’antenne Câbles composants Câbles audio Câble PC
Câble SCART Câble audio PC Câble HDMI Câble HDMI/DVI
➢
Tore magnétique (cordon d’alimentation, S-Vidéo)
Le blindage magnétique sert à protéger les câbles des
interférences. Lors de la connexion d’un câble, ouvrez le blindage
magnétique et rabattez-le autour du câble près de la prise.
Utilisation de la base-support
➢
L’écran à plasma doit être soulevé
par plusieurs personnes. Ne posez
jamais l’écran à plasma sur le sol,
car cela pourrait l’endommager.
Conservez toujours l’écran en
position verticale.
Le PDP peut pivoter de 20 degrés
vers la droite et la gauche.
-20° ~ 20°
BN68-01528A-00Fre.indd 4 2008-4-21 15:40:03

Français - 5
1
SOURCE
Affiche un menu de toutes les sources
disponibles en entrée (
TV, Ext.1, Ext.2, AV,
S-Vidéo, Composant, PC, HDMI1, HDMI2,
HDMI3)
➢
Dans le menu du téléviseur, ce bouton a la
même fonction que le bouton
ENTER de
la télécommande.
2
MENU
Permet d’afficher le menu des fonctions de
votre téléviseur sur l’écran.
3
– +
Appuyez pour augmenter ou réduire le volume.
Dans le menu affiché à l’écran, utilisez les
boutons – + de la même façon que les
boutons ◄ et ► de la télécommande.
4
C/P.
Permet de changer de canal. Dans le menu
affiché à l’écran, utilisez les boutons
C/P. de la même façon que les
boutons ▲ et ▼ de la télécommande.
5
Témoin d’alimentation
Clignote et s’éteint lorsqu’il est sous tension et
s’allume en mode Veille.
6
Bouton (Marche/Arrêt)
Permet d’allumer et d’éteindre le téléviseur.
7
Capteur de la télécommande
Dirigez la télécommande vers ce point du
téléviseur.
8
Haut-parleur
Panneau de configuration
Panneau avant (ou latéral)
➢
La couleur et la forme du produit peuvent varier en fonction du modèle.
BN68-01528A-00Fre.indd 5 2008-4-21 15:40:04

Français - 6
Panneau de connexion
☛
En cas de branchement d’un système audio ou vidéo sur le téléviseur, vérifiez que tous les
appareils sont éteints.
Lorsque vous branchez un périphérique externe, faites correspondre les couleurs de la borne de
connexion et du câble.
Suite…
1
POWER IN
Permet de raccorder le cordon
d’alimentation fourni.
2
COMPONENT IN
Entrées audio (AUDIO G/D) et vidéo (Y/P
B/PR)
pour Composant.
3
PC IN / AUDIO
Pour raccorder la prise de sortie vidéo et audio
de votre PC.
4
EXT 1, EXT 2
Entrées ou sorties pour périphériques tels que
des magnétoscopes, des lecteurs DVD, des
consoles de jeux vidéo ou des lecteurs de
vidéodisques.
Spécifications entrée/sortie
Connecteur
Entrée Sortie
Vidéo Audio (G/D) RGB
Vidéo + Audio (G/D)
EXT 1
✔ ✔ ✔
Seule la sortie TV est
disponible.
EXT 2
✔ ✔
Sortie que vous
pouvez sélectionner.
5
3D SYNC OUT
Connexion à un émetteur 3D IR
6
Connexion de périphériques audio externes
Connectez les signales audio RCA de
la TV à une source externe, telle qu’un
équipement audio.
7
SERVICE
− Prise pour tests.
− Branchez la prise jack série entre
l’équerre murale à commande électrique
et votre téléviseur, de manière à pouvoir
ajuster l’angle de visualisation du téléviseur
à l’aide de la télécommande.
Panneau arrière
➢
La couleur et la forme du produit peuvent varier en fonction du modèle.
1
432
7
6
ou
ou
Télévision câblée
Réseau
5
8
9
BN68-01528A-00Fre.indd 6 2008-4-21 15:40:07

Français - 7
Français - 7
8
HDMI IN 1,2
- Aucune connexion audio supplémentaire
n’est nécessaire pour une connexion HDMI
- HDMI.
- Lorsque vous utilisez une connexion avec
câble HDMI/DVI, vous devez utiliser la borne
HDMI IN2.
➢
Qu’est-ce que HDMI ?
- “High Definition Multimedia interface”
permet la transmission de données vidéo
numériques haute définition et plusieurs
canaux de son numérique.
- Le terminal HDMI/DVI prend en charge
la connexion DVI vers un périphérique
raccordé avec le câble adéquat (non
fourni). La différence entre HDMI et DVI
est que le périphérique HDMI est plus
petit, est équipé de la fonction de codage
HDCP (High Bandwidth Digital Copy
Protection), et gère le son numérique
multicanal.
DVI IN (HDMI 2) AUDIO R/L
Sorties audio DVI pour périphériques externes.
9
ANT IN
Connecteur coaxial 75Ω pour réseau câblé/
hertzien.
Modes pris en charge pour HDMI/DVI et
Composant
480i 480p 576i 576p 720p 1080i
HDMI/DVI 50Hz
X X X O O O
HDMI/DVI 60Hz
X O X X O O
Composant O O O O O O
1 HDMI IN 3
A connecter à la prise HDMI d’un périphérique
équipé d’une sortie HDMI.
2 S-VIDEO ou VIDEO / AUDIO L/R
Entrées audio et vidéo (S-Vidéo ou Vidéo) pour
périphériques externes, tels qu’un caméscope
ou un magnétoscope.
3 Prise casque
Vous pouvez brancher un casque si vous
souhaitez regarder la télévision sans déranger
les autres personnes présentes dans la pièce.
➢
L’utilisation prolongée d’un casque à un
niveau sonore élevé peut endommager
l’ouïe.
➢
La couleur et la forme du produit peuvent varier en fonction du modèle.
Panneau latéral
3
1
2
ou
BN68-01528A-00Fre.indd 7 2008-4-21 15:40:08

Français - 8
Présentation de la télécommande
1
Bouton POWER (permet
d’allumer et d’éteindre le
téléviseur)
2
Sélectionne directement le
mode TV
3
Pavé numérique pour
l’accès direct aux canaux
4
Sélection de canaux à 1 ou
2 chiffres
5
Suppression temporaire du
son
6
Augmentation du volume
Réduction du volume
7
Bouton Channel control
(Reportez-vous à la page 15)
8
Permet de sélectionner
rapidement les fonctions
fréquemment utilisées.
9
Permet de commander le
curseur dans le menu
0
Permet d’afficher les
informations relatives au
programme en cours
#
Permet de sélectionner
l’affichage et les modes son
en option pour le sport, le
cinéma et les jeux.
$
Fonctions du magnétoscope/
lecteur DVD (retour en
arrière, arrêt, lecture/pause,
%
Sélection de la source
disponible
^
Canal précédent
&
Canal suivant
Canal précédent
*
Affiche le menu principal à
l’écran
(
Bouton TruSurround XT mode
)
Revient au menu précédent
a
Permet de quitter le menu
affiché à l’écran
b
Sélection de la taille de
l’image
c
Utilisez ce paramètre
lorsque vous connectez un
appareil SAMSUNG DMA
(Digital Media Adapter)
via une interface HDMI et
basculez en mode DMA. (Le
bouton DMA est en option.)
Pour plus d’informations
sur les procédures de
fonctionnement, reportez-
vous au manuel d’utilisation
de l’appareil DMA. Ce
bouton est disponible si la
fonction “Anynet+ (HDMI-
CEC)” est “Marche” (voir
page 33).
d
Sélection de l'effet d'image
(reportez-vous à la page 18)
e
Permet de regarder des films
et de jouer en trois dimensions
avec des lunettes 3D.
Fonctions télétexte
(Reportez-vous à la page 36)
2
Permet de quitter l’affichage
télétexte (en fonction du
modèle)
7
Mémorisation du télétexte
8
Taille du télétexte
0
Activation du télétexte
!
Sélection des rubriques
Fastext
@
Affichage télétexte/
informations relatives au
télétexte et programme
normal
%
Sélection du mode Télétexte
(LIST/FLOF)
^
Page télétexte secondaire
&
P :Page télétexte
suivante
P
:Page télétexte
précédente
*
Index du télétexte
)
Pause télétexte
a
Annulation du télétexte
Suite…
BN68-01528A-00Fre.indd 8 2008-4-21 15:40:09

Français - 9
Insertion des piles dans la télécommande
1 Soulevez le couvercle situé à l’arrière de la télécommande
comme indiqué sur la figure.
2 Placez deux piles AAA.
➢
Assurez-vous de faire correspondre les bornes “+”
et “
-” des piles avec le schéma situé à l’intérieur du
compartiment.
Ne mélangez pas les types de piles, par exemple une
pile alcaline et une pile manganèse.
3 Refermez le couvercle comme indiqué sur la figure.
➢
Retirez les piles et stockez-les dans un endroit frais
et sec si vous n’utilisez pas la télécommande pendant
longtemps. La télécommande peut être utilisée jusqu’à environ 7 mètres du téléviseur. Dans des
conditions d’utilisation normale du téléviseur, les piles durent environ un an.
➢
Si la télécommande ne fonctionne pas Vérifiez les éléments suivants:
1. Le téléviseur est-il sous tension?
2. Les bornes + et - des piles ne sont-elles pas inversées?
3. Les piles sont-elles déchargées ?
4. Le cordon d’alimentation est-il débranché ou y a-t-il une panne de courant?
5. Une lampe fluorescente ou néon est-elle allumée à proximité?
Mise en marche et arrêt de votre téléviseur
Le câble secteur est fixé à l’arrière du téléviseur.
1 Branchez la prise mâle du câble secteur à une prise femelle appropriée.
➢
La tension électrique principale est indiquée à l’arrière du téléviseur et la fréquence est de
50 ou 60 Hz.
2 Appuyez sur le bouton (Alimentation) (Marche/Arrêt) placé en façade du téléviseur ou sur le
bouton
POWER de la télécommande pour allumer le téléviseur. Le dernier programme que vous
avez regardé est automatiquement sélectionné. Si vous n’avez encore mémorisé aucune chaîne,
aucune image nette n’apparaît. Reportez-vous à la section “Mémorisation automatique des canaux”,
page 13, ou à la section “Mémorisation manuelle des canaux”, page 14.
➢
Lorsque le téléviseur est allumé pour la première fois, plusieurs réglages de base sont exécutés
automatiquement. Reportez-vous à la section “Fonction - Plug & Play”, page 10.
3 Pour éteindre le téléviseur, appuyez sur le bouton (Marche/Arrêt) sur la façade du téléviseur ou
sur le bouton
POWER de votre télécommande.
4 Pour mettre en marche le téléviseur, appuyez sur le bouton (Marche/Arrêt) sur la façade du
téléviseur ou sur le bouton
POWER ou les boutons numériques de votre télécommande.
Affichage des menus
1 Appuyez sur le bouton MENU.
Le menu principal s’affiche à l’écran.
Six icônes s’affichent sur la gauche:
Image, Son, Canal,
Configuration, Entrée.
2 Appuyez sur le bouton ▲ ou ▼ pour sélectionner l’une des
icônes.Appuyez ensuite sur
ENTER pour accéder au sous-
menu de l’icône.
3 Appuyez sur le bouton ▲ ou ▼ pour vous déplacer dans le
menu.Appuyez sur le bouton
ENTER pour entrer dans les
éléments du menu.
4 Appuyez sur le bouton ▲/▼/◄/► pour modifier les éléments
sélectionnés. Appuyez sur le bouton
RETURN pour revenir au
menu précédent.
5 Appuyez sur le bouton EXIT pour quitter le menu.
Déplacer
Entrer
Quitter
Mode :
Standard
Luminosité des cellules
7
Contraste 95
Luminosité 45
Netteté 50
Couleur 50
Teinte V50 R50
Réglages des détails
Options d’image
Réinitialiser : OK
Image
T V
BN68-01528A-00Fre.indd 9 2008-4-21 15:40:10

Français - 10
Plug & Play
Démarrer Plug & Play
OK
Entrer
Plug & Play
Langue
Déplacer
Entrer
English
Deutsch
Français
Italiano
▼
Plug & Play
Vérifier l’entrée de l’antenne.
Entrer
Ignorer
OK
Fonction Plug & Play
Lorsque vous allumez le téléviseur pour la première fois,
plusieurs réglages de base s’effectuent l’un après l’autre de
manière automatique.
Les réglages disponibles sont les suivants:
☛
Si vous sélectionnez par erreur un pays incorrect pour votre
téléviseur, il se peut que les caractères affichés à l’écran soient
incorrects.
1 Si le téléviseur est en mode Veille, appuyez sur le bouton
POWER de la télécommande. Le message Démarrer Plug &
Play s’affiche Appuyez sur le bouton ENTER.
2 Le menu Langue s’affiche automatiquement après quelques
secondes.
3 Sélectionnez la langue appropriée en appuyant de façon
répétée sur le bouton ▲ ou ▼. Appuyez sur le bouton ENTER.
Le message
Sélectionner "Util. domicile" pour installation à
domicile. s’affiche.
4 Appuyez sur le bouton ◄ ou ► pour sélectionner Enr. démo ou
Util. domicile, puis appuyez sur le bouton ENTER. Un message
s’affiche, vous demandant de vérifier l’état de connexion de l’antenne.
➢
La sélection par défaut est Util. domicile.
➢
Nous vous recommandons de régler la télévision sur le
mode
Util. domicile pour une meilleure qualité d'image
dans votre environnement personnel.
➢
Le mode Enr. démo n’est prévu que pour un usage en
magasins.
➢
Si l’unité est accidentellement définie sur mode Enr. démo et
que vous souhaitez revenir au mode
Util. domicile (Standard):
appuyez sur le bouton Volume. Lorsque l’OSD du volume
s’affiche, appuyez pendant 5 secondes sur le bouton
MENU.
5 Avvous que l’antenne est branchée au téléviseur.
Appuyez sur le bouton
ENTER. Le menu Pays s’affiche.
6 Sélectionnez votre pays ou zone en appuyant sur le bouton
▲ ou ▼. Appuyez sur le bouton ENTER.
Plug & Play
Pays
Déplacer
Entrer
Ignorer
Belgique
France
Allemagne
Italie
Autres
Plug & Play
Sélectionner "Util. domicile" pour
installation à domicile.
Déplacer
Entrer
Util. domicile
Enr. démo
Plug & Play
P 1 C -- 40 MHz
0 %
Entrer
Ignorer
Démarrer
Suite…
BN68-01528A-00Fre.indd 10 2008-4-21 15:40:11

Français - 11
7 Appuyez sur le bouton ENTER pour démarrer la recherche des
canaux. La recherche de canaux démarrera et se terminera
automatiquement. Une fois que tous les canaux disponibles sont
mémorisés, le menu
Réglage Horloge s’affiche automatiquement.
Appuyez sur le bouton
ENTER.
➢
Pour arrêter la recherche avant la fin, appuyez sur le bouton
ENTER après avoir sélectionné Arrêter.
8 Appuyez sur le bouton ◄ ou ► pour sélectionner Mois, Date,
Année, Heure ou Minute. Réglez ces éléments en appuyant sur le
bouton ▲ ou ▼.
➢
Vous pouvez régler directement les valeurs Mois, Date,
Année, Heure et Minute en appuyant sur les touches
numériques de la télécommande.
9 Appuyez sur le bouton ENTER pour confirmer votre réglage. Le
message
Profitez de votre visionnage s’affiche. Lorsque vous
avez terminé, appuyez sur le bouton
ENTER.
➢
Même sans pression sur le bouton ENTER, le message
disparaît automatiquement après quelques secondes.
Si vous souhaitez réinitialiser ce paramètre…
1 Appuyez sur le bouton MENU pour afficher le menu.
2 Appuyez sur le bouton ▲ ou ▼ pour sélectionner Configuration,
puis appuyez sur le bouton
ENTER.
3 Appuyez de nouveau sur le bouton ENTER pour sélectionner
le mode
Plug & Play.
Le message
Démarrer Plug & Play s’affiche.
OK
Profitez de votre visionnage
Déplacer
Entrer
Retour
Plug & Play
Langue : Français
Horloge
Effet lumineux
: LED act. marche
Ajustement fixation murale
Mélodie : Arrêt
Loisirs :
Arrêt
Mode éco. : Arrêt
PIP
Configuration
T V
Plug & Play
Déplacer
Régler
Entrer
01 01
2008
00
04
Réglage Horloge
Mois Date Année Heure
Minute
BN68-01528A-00Fre.indd 11 2008-4-21 15:40:12

Français - 12
Utilisation du bouton TOOLS
Vous pouvez utiliser le bouton TOOLS pour sélectionner simplement et rapidement les fonctions que
vous utilisez le plus souvent. Le menu Outils change en fonction du mode d’entrée externe affiché.
1 Appuyez sur le bouton TOOLS.
Le menu
Outils s’affiche.
2 Appuyez sur le bouton ▲ ou ▼ pour sélectionner un enu, puis
appuyez sur le bouton
ENTER.
3 Appuyez sur le bouton ▲/▼/◄/►/ENTER pour afficher,
modifier ou utiliser les éléments sélectionnés.
Pour une description plus détaillée de chaque fonction,
reportez-vous à la page correspondante.
• Anynet+(HDMI-CEC), voir page 32
• Mode Image, voir page 18
• Mode Son, voir page 25
• Veille, voir page 27
• SRS TS XT, voir page 25
• Mode éco, voir page 29
• Dual I-II, voir page 26
Outils
Anynet+ (HDMI-CEC)
Mode Image
:
Standard
Mode Son : Personnalisé
Veille : Arrêt
SRS TS XT : Arrêt
Mode éco. : Arrêt
Dual I-II : Mono
t Régler
QuitterDéplacer
Visualisation d’une source de signal externe
Vous pouvez alterner la visualisation des signaux provenant
des appareils branchés, tels qu’un magnétoscope, un lecteur
de DVD, un décodeur et une source TV (antenne ou câble).
1 Appuyez sur le bouton MENU pour afficher le menu.
2 Appuyez sur le bouton ▲ ou ▼ pour sélectionner Entrée, puis
appuyez sur le bouton
ENTER.
3 Appuyez de nouveau sur le bouton ENTER pour sélectionner
Liste Source.
4 Appuyez sur le bouton ▲ ou ▼ pour sélectionner la source de
signal désirée, puis appuyez sur le bouton
ENTER.
Sources de signal disponibles:
TV, Ext.1, Ext.2, AV, S-Vidéo
Composant, PC, HDMI1, HDMI2 , HDMI3.
➢
Vous ne pouvez sélectionner que les appareils externes
connectés au téléviseur.
➢
Vous pouvez sélectionner ces options en appuyant sur le
bouton
SOURCE de la télécommande.
➢
Pour regarder à nouveau les programmes de télévision,
appuyez sur le bouton
TV et sélectionnez le numéro de canal
désiré.
Déplacer
Entrer
Retour
Liste Source : TV
Modif. Nom
Anynet+ (HDMI-CEC)
Entrée
T V
Déplacer
Entrer
Retour
TV
Ext.1 : −−−−
Ext.2 : −−−−
AV : −−−−
S-Vidéo : −−−−
Composant : −−−−
PC : −−−−
HDMI1 : −−−−
HDMI2 : −−−−
HDMI3 : −−−−
Liste Source
T V
BN68-01528A-00Fre.indd 12 2008-4-21 15:40:12

Français - 13
Modification du nom des périphériques
Vous pouvez modifier le nom de la source externe.
1 Appuyez sur le bouton MENU pour afficher le menu.
2 Appuyez sur le bouton ▲ ou ▼ pour sélectionner Entrée, puis
appuyez sur le bouton
ENTER.
3 Appuyez sur le bouton ▲ ou ▼ pour sélectionner Modif. Nom,
puis appuyez sur le bouton
ENTER.
4 Appuyez sur le bouton ▲ ou ▼ pour sélectionner la source
externe à modifier, puis appuyez sur le bouton
ENTER.
5 Sélectionnez le périphérique désiré en appuyant sur le bouton
▲ ou ▼, puis appuyez sur le bouton ENTER.
Noms de périphérique disponibles :
Magnétoscope, DVD,
Décodeur Câble, Décodeur satellite, Décodeur PVR,
Récepteur AV, Jeu, Caméscope, PC, TV, IPTV, Blu-Ray,
HD DVD, DMA.
6 Appuyez sur le bouton EXIT pour quitter le menu.
Mémorisation automatique des canaux
Vous pouvez chercher les plages de fréquence disponibles
par balayage (leur disponibilité dépend de votre pays).
Il est possible que les numéros de programme attribués
automatiquement ne correspondent pas aux numéros de
programme souhaités ou réels. Vous pouvez toutefois trier les
numéros manuellement et supprimer les canaux que vous ne
souhaitez pas regarder.
1 Appuyez sur le bouton MENU pour afficher le menu.
2 Appuyez sur le bouton ▲ ou ▼ pour sélectionner Canal, puis
appuyez sur le bouton
ENTER.
3 Appuyez sur le bouton ENTER. Les pays disponibles
apparaissent sous la forme d’une liste.
4 Sélectionnez votre pays à l’aide du bouton ▲ ou ▼, puis
appuyez sur le bouton
ENTER.
5
Appuyez sur le bouton ▲ ou ▼ pour sélectionner
Mémorisation Auto, puis appuyez sur le bouton ENTER.
6 Appuyez sur le bouton ENTER pour démarrer la recherche.
La recherche s’arrête automatiquement.
➢
Pour arrêter la recherche avant la fin, appuyez sur le
bouton
MENU ou ENTER.
Déplacer
Entrer
Retour
Liste Source : TV
Modif. Nom
Anynet+ (HDMI-CEC)
Entrée
T V
Déplacer
Entrer
Retour
Pays :
France
Mémorisation Auto
Mémorisation Manuelle
Gestionnaire de Chaînes
Tri des canaux
Nom station
Réglage fin
Canal
T V
Mémorisation Auto
P 1 C -- 40 MHz
0 %
Entrer
Retour
Démarrer
Déplacer
Entrer
Retour
Ext.1 :
−−−−
Ext.2 : −−−−
AV :
S-Vidéo :
Composant : −−−−
PC : −−−−
HDMI1 : −−−−
HDMI2 :
HDMI3 :
Modif. Nom
T V
−−−−
Magnétoscope
DVD
Décodeur Câble
Décodeur satellite
Décodeur PVR
Récepteur AV
Jeu
▼
T V
Déplacer
Entrer
Retour
Pays : France
Mémorisation Auto
Mémorisation Manuelle
Gestionnaire de Chaînes
Tri des canaux
Nom station
Réglage fin
Canal
Belgique
France
Allemagne
Italie
Pays-Bas
Espagne
Suisse
Royaume-Uni
▼
BN68-01528A-00Fre.indd 13 2008-4-21 15:40:13

Français - 14
Mémorisation manuelle des canaux
Vous pouvez mémoriser les canaux de télévision, y compris
ceux reçus via les réseaux câblés.
Lors de la mémorisation manuelle des canaux, vous pouvez
choisir :
de mémoriser ou non chaque canal trouvé;
le numéro du programme qui vous servira à identifier chaque
canal mémorisé.
1 Appuyez sur le bouton MENU pour afficher le menu.
2 Appuyez sur le bouton ▲ ou ▼ pour sélectionner Canal, puis
appuyez sur le bouton
ENTER.
3 Appuyez sur le bouton ▲ ou ▼ pour sélectionner
Mémorisation Manuelle, puis appuyez sur le bouton ENTER.
4 Sélectionnez l’option désirée en appuyant sur le bouton
▲ ou ▼, puis appuyez sur le bouton ENTER.
5 Lorsque vous êtes satisfait du réglage, appuyez sur le bouton
ENTER.
6 Appuyez sur le bouton EXIT pour quitter le menu.
Programme (numéro de programme à attribuer à une chaîne)
− Appuyez sur le bouton ▲ ou ▼ jusqu’à ce que vous trouviez le numéro correct.
➢
Vous pouvez également sélectionner le numéro de canal directement en appuyant sur le
pavé numérique (0~9).
Système de Couleur: Auto./PAL/SECAM/NTSC 4.43
− Appuyez sur le bouton ▲ ou ▼ pour sélectionner la norme de couleurs désirée.
Système Sonore: BG/DK/I/L
− Appuyez sur le bouton ▲ ou ▼ pour sélectionner la norme audio désirée.
Canal (si vous connaissez le numéro de la chaîne à mémoriser)
− Appuyez sur le bouton ▲ ou ▼ pour sélectionner
C (canal hertzien) ou S (canal câblé).
− Appuyez sur le bouton ► , puis sur le bouton ▲ ou ▼ pour sélectionner le numéro de votre
choix.
➢
Vous pouvez également sélectionner le numéro de canal directement en appuyant sur le
pavé numérique (0~9).
➢
S’il n’y a aucun son ou si le son est anormal, re-sélectionnez la norme son désirée.
Recherche (lorsque vous ne connaissez pas les numéros de chaîne)
− Appuyez sur le bouton ▲ ou ▼ pour démarrer la recherche.
− Le syntoniseur balaie la plage de fréquences jusqu’à ce que vous receviez la première chaîne
ou la chaîne que vous avez sélectionnée à l’écran.
Mémoriser (permet de mémoriser la chaîne et le numéro de programme correspondant)
− Sélectionnez
OK en appuyant sur le bouton ENTER.
☛
Mode Canal
P (Mode Programme): A la fin du réglage, des numéros de position compris entre P00 et
P99 sont attribués aux stations de radiodiffusion de votre zone. Dans ce mode, vous pouvez
sélectionner un canal en saisissant son numéro de position.
C (mode chaîne hertzienne): dans ce mode, vous pouvez sélectionner un canal en saisissant
le numéro attribué à chacune des stations de télédiffusion.
S (mode chaîne câblée): dans ce mode, vous pouvez sélectionner un canal en saisissant le
numéro attribué à chacun des canaux câblés.
Déplacer
Entrer
Retour
Programme :
P 1
Système de Couleur
: Auto.
Système Sonore : BG
Canal : C 6
Recherche : 175 MHz
Mémoriser : ?
Mémorisation Manuelle
T V
Déplacer
Entrer
Retour
Pays :
France
Mémorisation Auto
Mémorisation Manuelle
Gestionnaire de Chaînes
Tri des canaux
Nom station
Réglage fin
Canal
T V
BN68-01528A-00Fre.indd 14 2008-4-21 15:40:14

Français - 15
Ajout/verrouillage de canaux
A l’aide de la fonction Gestionnaire de Chaînes, vous pouvez
aisément verrouiller ou ajouter des canaux.
1 Appuyez sur le bouton MENU pour afficher le menu.
2 Appuyez sur le bouton ▲ ou ▼ pour sélectionner Canal, puis
appuyez sur le bouton
ENTER.
3 Appuyez sur le bouton ▲ ou ▼ pour sélectionner
Gestionnaire de Chaînes, puis appuyez sur le bouton
ENTER.
Ajout de canaux
A l’aide de la fonction Liste des chaînes, vous pouvez
aisément ajouter des canaux.
4 Sélectionnez Liste des chaînes en appuyant sur le bouton
ENTER.
5 Passez au champ ( ) en appuyant sur les boutons
▲/▼/◄/►, sélectionnez un canal à ajouter et appuyez sur le
bouton ENTER pour l’ajouter.
➢
Si vous appuyez à nouveau sur le bouton ENTER, le
symbole (
) à côté du canal disparaît et le canal n’est
pas ajouté.
Verrouillage de canaux
Cette fonction, qui bloque la vidéo et coupe le son, vous permet
d’éviter toute utilisation non autorisée, par des enfants par exemple,
qui pourraient visionner des programmes ne leur étant pas destinés.
6 Appuyez sur le bouton ▲ ou ▼ pour sélectionner Verrouillage
Parental, puis appuyez sur le bouton ENTER.
7 Sélectionnez Marche en appuyant sur le bouton ▲ ou ▼, puis
appuyez sur le bouton
ENTER.
8 Appuyez sur le bouton ▲ ou ▼ pour sélectionner Liste des chaînes,
puis appuyez sur le bouton
ENTER.
9 Passez au champ ( ) en appuyant sur les boutons ▲/▼/◄/►,
sélectionnez un canal à verrouiller et appuyez sur le bouton
ENTER pour l’ajouter.
➢
Si vous appuyez à nouveau sur le bouton ENTER, le symbole ( ) à côté du canal disparaît et
le verrouillage du canal est annulé.
➢
Un écran bleu s’affiche lorsque le verrouillage parental est activé.
10 Appuyez sur le bouton EXIT pour quitter le menu.
➢
Vous pouvez sélectionner ces options en appuyant sur le
bouton
CH LIST de la télécommande.
Déplacer
Entrer
Retour
Pays :
France
Mémorisation Auto
Mémorisation Manuelle
Gestionnaire de Chaînes
Tri des canaux
Nom station
Réglage fin
Canal
T V
Déplacer
Entrer
Retour
Liste des chaînes
Verrouillage Parental
: Arrêt
Gestionnaire de Chaînes
T V
Liste des chaînes
P 1 C 6
1 / 10
▲
▼
Prog.
0
C 1
1 C 6
2 C 5
3 C 8
4 C 11
5 C 22
6 C 26
7 C 36
8 C 52
9 C 24
Ajouter Verrouil.
Déplacer Entrer
Page
Retour
BN68-01528A-00Fre.indd 15 2008-4-21 15:40:15

Français - 16
Organisation des canaux mémorisés
Cette opération vous permet de changer les numéros de
programme des canaux mémorisés.
Cette opération peut s’avérer nécessaire après l’utilisation de
la mémorisation automatique.
1 Appuyez sur le bouton MENU pour afficher le menu.
2 Appuyez sur le bouton ▲ ou ▼ pour sélectionner Canal, puis
appuyez sur le bouton
ENTER.
3 Appuyez sur le bouton ▲ ou ▼ pour sélectionner Tri des
canaux, puis appuyez sur le bouton ENTER.
4 Sélectionnez le canal que vous voulez déplacer en appuyant
sur le bouton ▲ ou ▼, puis appuyez sur le bouton ENTER.
5 Sélectionnez le numéro du programme à attribuer au canal en
appuyant sur le bouton ▲ ou ▼.
Appuyez sur le bouton
ENTER. La chaîne est déplacée
vers sa nouvelle position et toutes les autres chaînes sont
replacées en conséquence.
6 Répétez les étapes 4 à 5 jusqu’à ce que vous ayez déplacé
tous les canaux vers les numéros de programme de votre
choix.
7 Appuyez sur le bouton EXIT pour quitter le menu.
Attribution de noms aux canaux
Les noms de canaux sont attribués automatiquement lorsque
des informations sur les canaux sont diffusées. Ces noms
peuvent être modifiés, ce qui vous permet d’attribuer ceux de
votre choix.
1 Appuyez sur le bouton MENU pour afficher le menu.
2 Appuyez sur le bouton ▲ ou ▼ pour sélectionner Canal, puis
appuyez sur le bouton
ENTER.
3 Appuyez sur le bouton ▲ ou ▼ pour sélectionner Nom
station, puis appuyez sur le bouton ENTER.
4 Appuyez sur le bouton ▲ ou ▼ pour sélectionner le canal à
renommer, puis appuyez sur le bouton
ENTER.
5 Appuyez sur le bouton ▲ ou ▼ pour sélectionner une lettre, un
chiffre ou un symbole (les caractères s’affichent dans l’ordre
suivant : A~Z, 0~9, +, -, *, /, blanc).
Passez à la lettre précédente ou suivante en appuyant sur le
bouton ◄ ou ►, puis appuyez sur le bouton ENTER.
6 Répétez les étapes 4 à 5 pour chaque canal auquel un
nouveau nom doit être attribué.
7 Appuyez sur le bouton EXIT pour quitter le menu.
Déplacer
Entrer
Retour
Pays :
France
Mémorisation Auto
Mémorisation Manuelle
Gestionnaire de Chaînes
Tri des canaux
Nom station
Réglage fin
Canal
T V
Déplacer
Entrer
Retour
Pays :
France
Mémorisation Auto
Mémorisation Manuelle
Gestionnaire de Chaînes
Tri des canaux
Nom station
Réglage fin
Canal
T V
Déplacer
Entrer
Retour
Prog. Ch. Nom station
▲
0 C- - −−−−−
1 C04 −−−−−
2 C05 −−−−−
3 C08 −−−−−
4 C09 −−−−−
5 C11 −−−−−
6 C13 −−−−−
7 C15 −−−−−
8 C17 −−−−−
9 C18 −−−−−
▼
Tri des canaux
T V
Déplacer
Entrer
Retour
Prog.
Can.
Nom station
▲
0 C- - −−−−−
1 C04 −−−−−
2 C05 −−−−−
3 C08 −−−−−
4 C09 −−−−−
5 C11 −−−−−
6 C13 −−−−−
7 C15 −−−−−
8 C17 −−−−−
9 C18 −−−−−
▼
Nom station
T V
BN68-01528A-00Fre.indd 16 2008-4-21 15:40:16

Français - 17
Réception nette des canaux grâce au réglage fin
Si la réception est nette, vous n’avez pas besoin d’effectuer
un réglage fin du canal, car cette opération s’effectue
automatiquement pendant la recherche et la mémorisation.
Si le signal est faible ou déformé, vous pouvez être amené à
effectuer manuellement un réglage fin du canal.
1 Appuyez sur le bouton MENU pour afficher le menu.
2 Appuyez sur le bouton ▲ ou ▼ pour sélectionner Canal, puis
appuyez sur le bouton
ENTER.
3 Appuyez sur le bouton ▲ ou ▼ pour sélectionner Réglage fin,
puis appuyez sur le bouton
ENTER.
4 Pour obtenir une image nette et claire ainsi qu’une bonne
qualité sonore, appuyez sur le bouton ◄ ou ► pour parvenir
au réglage optimal. Appuyez sur le bouton
ENTER.
➢
Appuyez sur le bouton INFO. La mémorisation de
syntonisation fine fait passer la couleur de l’OSD
(affichage à l’écran) des canaux du blanc au rouge et
ajoute la marque “*”.
➢
Pour ramener le réglage fin à 0, sélectionnez Réinitial. en
appuyant sur le bouton ▲ ou ▼. Appuyez sur le bouton
ENTER.
5 Appuyez sur le bouton EXIT pour quitter le menu.
P 1 *
Mono
Image : Standard
Son : Personnalisé
SRS TS XT : Arrêt
−−
:
−−
Déplacer
Entrer
Retour
Pays :
France
Mémorisation Auto
Mémorisation Manuelle
Gestionnaire de Chaînes
Tri des canaux
Nom station
Réglage fin
Canal
T V
Réglage fin
P 1
+3
Régler
Sauveg.
Retour
Réinitial.
BN68-01528A-00Fre.indd 17 2008-4-21 15:40:17

Français - 18
Personnalisation des paramètres d’image
Votre téléviseur dispose de plusieurs options qui vous
permettent de régler la qualité de l’image.
1 Appuyez sur le bouton MENU pour afficher le menu.
2 Appuyez sur le bouton ENTER pour sélectionner Image.
3 Appuyez de nouveau sur le bouton ENTER pour sélectionner
Mode.
4 Sélectionnez le mode désiré en appuyant sur le bouton ▲ ou
▼, puis appuyez sur le bouton ENTER.
Modes disponibles:
Dynamique, Standard, Cinéma
5 Sélectionnez l’option désirée en appuyant sur le bouton ▲ ou ▼, puis appuyez sur le bouton ENTER.
6 Lorsque vous êtes satisfait du réglage, appuyez sur le bouton ENTER.
7 Appuyez sur le bouton EXIT pour quitter le menu.
Luminosité des cellules - Contraste – Luminosité – Netteté – Couleur – Teinte
➢
En mode TV, Ext., AV, S-Vidéo et Analogique du système PAL, vous ne pouvez pas utiliser la
fonction Teinte.
➢
En mode PC, vous ne pouvez modifier que les options Luminosité des cellules, Contraste et
Luminosité.
Appuyez sur le bouton ◄ ou ► pour parvenir au réglage optimal.
Changement de la norme Image
Vous pouvez sélectionner le type d’image qui correspond le
mieux à vos exigences d’affichage.
1 Appuyez sur le bouton MENU pour afficher le menu.
2 Appuyez sur le bouton ENTER pour sélectionner Image.
3 Appuyez de nouveau sur le bouton ENTER pour sélectionner
Mode.
4 Sélectionnez le mode désiré en appuyant sur le bouton ▲ ou ▼,
puis appuyez sur le bouton
ENTER.
Modes disponibles:
Dynamique, Standard, Cinéma
➢
La valeur des paramètres peut varier en fonction de la
source d’entrée.
5 Appuyez sur le bouton EXIT pour quitter le menu.
➢
Pour regarder la télévision pendant la journée ou lorsque
la pièce est très éclairée, choisissez
Dynamique.
Choisissez Standard pour regarder la télévision dans des
conditions normales.
Si vous regardez un film, choisissez Cinéma.
Réglages simples
1 Appuyez sur le bouton TOOLS de la télécommande.
2 Appuyez sur le bouton ▲ ou ▼ pour sélectionner le mode
Image.
3 Appuyez sur le bouton ◄ ou ► pour sélectionner l’option de
votre choix.
Outils
Anynet+ (HDMI-CEC)
Mode Image ◄ Standard ►
Mode Son : Personnalisé
Veille : Arrêt
SRS TS XT : Arrêt
Mode éco. : Arrêt
Dual I-II : Mono
Régler
QuitterDéplacer
Déplacer
Entrer
Retour
Mode :
Standard
Luminosité des cellules
7
Contraste 95
Luminosité 45
Netteté 50
Couleur 50
Teinte V50 R50
Réglages des détails
Options d’image
Réinitialiser : OK
Image
T V
Déplacer
Entrer
Retour
Mode :
Standard
Luminosité des cellules
7
Contraste 95
Luminosité 45
Netteté 50
Couleur 50
Teinte V50 R50
Réglages des détails
Options d’image
Réinitialiser : OK
Image
T V
Mode : Standard
Luminosité des cellules
7
Contraste 95
Luminosité 45
Netteté 50
Couleur 50
Teinte G50 R50
Réglages des détails
Options d’image
Réinitialiser : OK
Image
Dynamique
Standard
Cinéma
Déplacer
Entrer
Retour
BN68-01528A-00Fre.indd 18 2008-4-21 15:40:17

Français - 19
Réglages des détails de l’image
Vous pouvez configurer des réglages détaillés de l’image.
1 Appuyez sur le bouton MENU pour afficher le menu.
2 Appuyez sur le bouton ENTER pour sélectionner Image.
3 Appuyez sur le bouton ▲ ou ▼ pour sélectionner Réglages des
détails, puis appuyez sur le bouton ENTER.
4 Sélectionnez l’option désirée en appuyant sur le bouton ▲ ou ▼, puis
appuyez sur le bouton
ENTER.
Options disponibles:
Réglage des noirs, Contraste Dynam., Gamma,
Espace de couleur, Balance blancs, Carnation, Amélioration bords
5 Lorsque vous êtes satisfait du réglage, appuyez sur le bouton ENTER.
6 Appuyez sur le bouton EXIT pour quitter le menu.
➢
Le menu Réglage des détails est disponible dans les modes
Standard ou Cinéma.
➢
En mode PC, vous ne pouvez modifier que les options Contraste
Dynam., Gamme et Balance blancs dans le menu Réglages des
détails.
Réglage des noirs: Arrêt/Bas/Moyen/Elevé
Vous pouvez directement choisir le niveau de noir sur l’écran pour
régler la profondeur de l’écran.
Contraste Dynam.: Arrêt/Bas/Moyen/Elevé
Vous pouvez régler le contraste de l’écran pour obtenir un contraste
optimal.
Gamma: -3 ~ +3
Vous pouvez régler la luminosité moyenne des images. Appuyez sur le bouton ◄ ou ► pour parvenir au réglage
optimal.
Espace de couleur: Auto./Natif/Personnalisé
L’espace de couleur est une matrice de couleurs composée de rouge, de vert et de bleu.
Sélectionnez votre espace de couleur préféré et appréciez la couleur la plus naturelle..
− Auto. : l’espace de couleur auto règle automatiquement la nuance de couleur naturelle basée sur les images
sources.
−
Natif: l’espace de couleur natif offre une nuance de couleur foncée et riche.
− Personnalisé: rège la gamme de couleurs en fonction de vos préférences (voir « Personnalisation de l’espace
de couleur »)
Personnalisation de l’espace de couleur
Couleur: Rouge/Vert/Bleu/Jaune/Cyan/Magenta
Permet de régler la gamme de couleurs en fonction de vos préférences
Couleur est disponible lorsque Espace de couleur est défini sur Personnalisé.
Appuyez sur le bouton▲ ou ▼ pour sélectionner Rouge, Vert, Bleu, Jaune, Cyan ou Magenta.
Appuyez sur le bouton
ENTER.
−
Rouge / Vert / Bleu: Dans Couleur, vous pouvez régler les valeurs RGB pour la couleur sélectionnée.
Appuyez sur le bouton ▲ ou ▼ pour sélectionner
Rouge, Vert, Bleu. Appuyez sur le bouton ENTER.
Appuyez sur le bouton ◄ ou ► pour diminuer ou augmenter la valeur d’un élément spécifique.
Appuyez sur le bouton
ENTER.
−
Réinitialiser: rétablit les valeurs par défaut de l’espace de couleur.
Balance blancs: Aj. Rouge/Aj. Vert/Aj. Bleu/Regl. Rouge/Regl. vert/Regl. bleu/Réinitialiser
Vous pouvez régler la température des couleurs pour que celles-ci soient plus naturelles.
Aj. Rouge/Aj. Vert/Aj. Bleu/Regl. Rouge/Regl. vert/Regl. bleu: la modification des valeurs de réglage permet
d’actualiser l’écran que vous venez de retoucher. Sélectionnez l’option désirée en appuyant sur le bouton ▲
ou ▼, puis appuyez sur le bouton ENTER. Appuyez sur le bouton ◄ ou ► pour parvenir au réglage optimal.
Réinitialiser: La balance des blancs réglée précédemment est ramenée à sa valeur par défaut.
Carnation:-15~+15
Vous pouvez accentuer la nuance rose de l’image.
Appuyez sur le bouton ◄ ou ► pour obtenir le réglage qui convient.
➢
La modification des valeurs de réglage permet d’actualiser l’écran que vous venez de retoucher.
Amélioration bords: Marche/Arrêt
Vous pouvez faire ressortir la bordure des objets.
Déplacer
Entrer
Retour
Réglage des noirs :
Arrêt
Contraste Dynam. : Moyen
Gamma : 0
Espace de couleur : Natif
Balance blancs
Carnation : 0
Amélioration bords
: Marche
Réglages des détails
T V
Déplacer
Entrer
Retour
Mode :
Standard
Luminosité des cellules
7
Contraste 95
Luminosité 45
Netteté 50
Couleur 50
Teinte V50 R50
Réglages des détails
Options d’image
Réinitialiser : OK
Image
T V
BN68-01528A-00Fre.indd 19 2008-4-21 15:40:18

Français - 20
Suite…
Options d’image
Vous pouvez configurer des réglages détaillés de l’image.
1
Appuyez sur le bouton MENU pour afficher le menu.
2 Appuyez sur le bouton ENTER pour sélectionner Image.
3 Appuyez sur le bouton ▲ ou ▼ pour sélectionner Options
d’image , puis appuyez sur le bouton ENTER.
4 Sélectionnez l’option désirée en appuyant sur le bouton
▲ ou ▼, puis appuyez sur le bouton ENTER.
5 Lorsque vous êtes satisfait de la configuration, appuyez sur le
bouton
ENTER.
6 Appuyez sur le bouton EXIT pour quitter le menu.
➢
En mode PC, vous ne pouvez modifier que les options “Nuance
Coul.”, “Taille” et “Protection brûlure écran” dans le menu
“Options d’image”.
Nuance Coul.: Froide2/Froide1/Normal/Chaude1/Chaude2
➢
Lorsque le mode Image est réglé sur Dynamique ou
Standard, les valeurs Chaude1 et Chaude2 ne peuvent pas
être sélectionnées.
Taille: 16/9 auto/16:9/Zoom large/Zoom/4:3/Scan uniquement
Vous pouvez sélectionner la taille d’image qui correspond le mieux
à vos besoins d’affichage.
− 16/9 auto: Agrandissement et adaptation de l’image du format
4:3 au format 16:9.
− 16:9: Règle l’image en mode Large, c’est-à-dire en 16:9.
− Zoom large: Donnez à l’image une taille supérieure à 4:3.
Déplacez l’affichage vers le haut ou le bas à l’aide du bouton
▲ ou ▼ après avoir appuyé sur le bouton ► ou ENTER.
− Zoom: Agrandit la taille de l’image sur l’écran dans le sens
vertical.
− 4:3: Règle l’image en mode Normal, c’est-à-dire en 4:3.
− Scan uniquement:Utilisez la fonction pour voir l’intégralité
de l’image sans coupure lors de l’entrée de signaux HDMI
(720p/1080i), Component (1080i).
Après avoir sélectionné l'option Scan uniquement (Just Scan) en mode HDMI (1080i) ou
Component (1080i):
Appuyez sur le bouton
◄ ou ► pour sélectionner , puis appuyez sur le bouton ENTER.
Appuyez sur le bouton ▲, ▼, ◄ ou ► pour déplacer l'image vers le haut, le bas, la gauche et la droite.
Réinitialiser: Appuyez sur le bouton ◄ ou ► pour sélectionner Réinitialiser, puis appuyez sur le
bouton
ENTER. Vous pouvez initialiser le réglage.
➢En fonction des périphériques AV, avec la taille d’image HDMI Scan uniquement, l’écran peut être
coupé ou une couleur spécifique peut apparaître à l’écran.
➢Pour une connexion HDMI (1080p) de 24, 25, 30, 50 et 60 Hz et pour une connexion Composant
(1080p) de 50 et 60Hz, seule la source d’entrée est prise en charge.
➢Vous pouvez modifier la taille de l’image en appuyant sur le bouton P.SIZE de votre télécommande.
➢
Les options de taille de l’image peuvent varier en fonction de la source d’entrée.
➢
La fonction 16/9 auto n’est disponible qu’en mode TV, Ext.1, Ext.2, AV et S-Vidéo.
➢
Vous pouvez effectuer et enregistrer des réglages pour chaque appareil externe connecté à une sortie
du téléviseur.
➢
Les éléments disponibles peuvent varier en fonction du mode sélectionné.
➢
En mode PC, seuls les modes 16:9 et 4:3 peuvent être sélectionnés.
Positionnement et dimensionnement de l’écran à l’aide du zoom
Le redimensionnement de l’image à l’aide de la fonction Zoom permet de positionner et de dimensionner
l’image vers le haut ou le bas en utilisant le bouton ▲ ou ▼.
Déplacez l’affichage vers le haut ou le bas à l’aide du bouton ▲ ou ▼ après avoir appuyé sur le
bouton ◄ ou ►.
Redimensionnez l’affichage verticalement à l’aide du bouton ▲ ou ▼ après avoir appuyé sur le bouton ◄ ou ►.
Déplacer
Entrer
Retour
Nuance Coul.
: Normal
Taille : 16/9 auto
Mode écran : 16:9
NR numérique
: Auto.
100 Hz réel Démo : Arrêt
DNle : Arrêt
Niveau noir HDMI : Normal
Mode bleu uniquement
: Arrêt
Protection brûlure écran
Effet 3D
Options d’image
T V
Déplacer
Entrer
Retour
16/9 auto
16:9
Zoom large
Zoom
4:3
Scan uniquement
Taille
T V
Déplacer
Entrer
Retour
Mode : Standard
Luminosité des cellules
7
Contraste 95
Luminosité 45
Netteté 50
Couleur 50
Teinte V50 R50
Réglages des détails
Options d’image
Réinitialiser : OK
Image
T V
BN68-01528A-00Fre.indd 20 2008-4-21 15:40:19

Français - 21
Mode écran: 16:9/ Zoom large/ Zoom/ 4:3
Lorsque vous fixez la taille de l’image à 16/9 auto sur un téléviseur
16:9, vous pouvez déterminer la taille selon laquelle vous voulez
afficher une image 4:3 WSS ( service d’écran large) ou rien. Chaque
pays européen emploie une taille d’image; cette fonction permet aux
utilisateurs de sélectionner la leur.
− 16:9: Règle l’image en mode Large, c’est-à-dire en 16:9.
− Zoom large: Donnez à l’image une taille supérieure à 4:3.
− Zoom: Agrandit la taille de l’image sur l’écran dans le sens vertical.
− 4:3: Règle l’image en mode Normal, c’est-à-dire en 4:3.
➢
Cette fonction n’est disponible qu’en mode 16/9 auto.
➢
Cette fonction n’est pas disponible en mode Composant ou HDMI.
NR numérique: Arrêt/Bas/Moyen/Elevé/Auto.
Si le signal reçu par le téléviseur est faible, vous pouvez activer cette fonction pour favoriser la réduction des
images statiques ou fantômes qui peuvent apparaître à l’écran.
➢
Lorsque le signal est faible, sélectionnez une autre option jusqu’à obtention de la meilleure image possible.
Démo 100Hz réel: Arrêt/Marche
Vous pouvez clairement voir la différence entre «100Hz réel» et 50Hz, surtout lorsque vous regardez des scènes
rapides. Lorsqu’une image lente est affichée, vous ne serez pas en mesure de faire la distinction entre «100Hz
réel» et 50Hz. La fonction Démo 100Hz n’est disponible qu’avec un signal 50Hz. Le mode Démo Real 100Hz est
fourni pour des démonstrations en magasin avec des images spéciales.
DNIe: Arrêt/Démo/Marche
Pour offrir une grande qualité d’image, ce téléviseur est doté de la fonction DNIe. Si vous définissez l’option DNIe
sur On, la fonction DNIe sera activée à l’écran. Lorsque vous activez le mode Démo de la fonction DNIe, une
image normale et une image avec la fonction DNIe appliquée s’affichent à l’écran à des fins de démonstration.
Cette fonction vous permet de constater la différence de qualité d’affichage.
➢
DNIe
TM
(Digital Natural Image engine)
Cette fonction vous offre une image plus détaillée tout en permettant une réduction de bruit 3D et une
amélioration des détails, des contrastes et des blancs. Le nouvel algorithme de compensation d’images vous
offre une image plus lumineuse, plus claire et plus détaillée. La technologie DNIe
TM
adaptera tous les signaux à
votre vue, quels qu’ils soient.
➢
Cette fonction n’est pas disponible en mode PC.
➢
DNIe n’est disponible qu’en mode Dynamique.
Niveau noir HDMI: Normal/Bas
Cette fonction permet d’ajuster la qualité d’image si un problème de brûlure d’écran (apparence des niveaux de
noir, contraste bas, faible niveau de couleur, etc.) est rencontré avec l’entrée HDMI pour la gamme RVB limitée
(16 à 235).
➢
Cette fonction n’est active que lorsque l’entrée externe se connecte à HDMI (signaux RVB).
Mode bleu uniquement: Arrêt/Marche
Cette fonction est destinée aux spécialistes de mesure des appareils AV.Cette fonction affiche le signal bleu en
supprimant simplement les signaux rouge et vert du signal vidéo, de manière à fournir un effet Filtre bleu utilisé pour
régler la couleur et la teinte de l'équipement vidéo, tel que des lecteurs de DVD, systèmes de cinéma à domicile, etc.
Cette fonction permet de régler la couleur et la teinte sur des valeurs appropriées au niveau de signal de chaque
dispositif vidéo à l'aide des modèles de barres de couleurs Rouge/Vert/
Bleu/Cyan/Magenta/Jaune, sans utiliser de filtre bleu supplémentaire.
➢
Le mode bleu uniquement n’est disponible que si le mode Image
est défini sur Cinéma ou Standard.
Protection brûlure écran
Pour réduire le risque de brûlure d’écran, cet écran est équipé d’une
technologie de prévention des brûlures. Cette fonction permet de régler
le mouvement de l’image de bas en haut (ligne verticale) et de gauche à
droite (point horizontal). Le réglage de l’horloge permet de programmer
en quelques minutes la durée séparant les mouvements de l’image.
−
Modif. pixel: Cette fonction permet de déplacer les pixels sur
l’écran dans le sens vertical ou horizontal, afin d’éviter une image
résiduelle sur l’écran.
• Réglez
Modif. pixel sur Marche en appuyant sur le bouton
▲ ou ▼, puis appuyez sur le bouton ENTER.
• Sélectionnez l’option désirée en appuyant sur le bouton
▲ ou ▼, puis appuyez sur le bouton ENTER. Options
disponibles: Nbre point horizont., Nbre ligne vertic., Horloge
Suite…
16:9
Zoom large
Zoom
4:3
Déplacer
Entrer
Retour
Options d’image
T V
Nuance Coul.
: Normal
Taille : 16/9 auto
Mode écran :
NR numérique
Démo 100 Hz réel :
DNle :
Niveau noir HDMI : Normal
Mode bleu uniquement
: Arrêt
Protection brûlure écran
Effet 3D
Déplacer
Entrer
Retour
Nuance Coul.
: Normal
Taille : 16/9 auto
Mode écran : 16:9
NR numérique
: Auto.
Démo 100 Hz réel : Marche
DNle : Marche
Niveau noir HDMI : Normal
Mode bleu uniquement
: Arrêt
Protection brûlure écran
Effet 3D
Options d’image
T V
Déplacer
Entrer
Retour
Modif. pixel
Blanc
Défilement
Gris de bord : Sombre
Protection brûlure écran
T V
BN68-01528A-00Fre.indd 21 2008-4-21 15:40:19

Français - 22
➢
Conditions optimales pour la modification des pixels;
PC
TV/Ext/AV/Composant/
HDMI
Nbre point horizont. 1 2
Nbre ligne vertic. 1 2
Horloge (minutes) 2 2 min
➢
La valeur de Modif. pixel peut changer selon le mode et la taille du
moniteur (pouces).
➢
Cette fonction n'est pas disponible en mode Just Scan (Scan uniquement).
−Blanc: Cette fonction aide à supprimer les images résiduelles à l’écran en modifiant la couleur des pixels
pour les faire devenir blancs. Utilisez cette fonction lorsque des images résiduelles ou des symboles
apparaissent à l’écran, particulièrement lorsque vous affichez une image fixe à l’écran pendant longtemps.
−Défilement: Cette fonction aide à supprimer les images résiduelles à l’écran en déplaçant tous les pixels
sur l’écran, selon un motif prédéfini. Utilisez cette fonction lorsque des images résiduelles ou des symboles
apparaissent à l’écran, particulièrement lorsque vous affichez une image fixe à l’écran pendant longtemps.
−Gris de bord: Si vous regardez la télévision dans un rapport d’écran 4:3, l’écran est protégé contre tout
dommage grâce à l’ajustement de la balance des blancs sur les côtés gauche et droit.3
Sombre: Si le rapport d’écran est fixé à 4:3, les bords gauche et droit sont assombris.
Clair: Si le rapport d’écran est fixé à 4:3, les bords gauche et droit sont éclaircis.
➢
Pour supprimer les images résiduelles de l’écran, utilisez la fonction blanc ou Défilement. Bien que ces
deux fonctions suppriment les images résiduelles à l’écran, Défilement est plus efficace.
➢
La fonction de suppression d’images résiduelles doit être exécutée pendant longtemps (environ une heure)
pour supprimer efficacement les images résiduelles. Si l’image résiduelle n’est pas supprimée après
l’exécution de cette fonction, répétez l’opération.
➢
Appuyez sur n’importe quel bouton de la télécommande pour annuler cette fonction.
Utilisation de la fonction 3D
Vous pouvez profiter de jeux et de films en 3D sur votre téléviseur. La fonction Effets 3D vous
permet de voir des images en 3D à l'aide de lunettes 3D.
Câble prise stéréo 3,5 mm vers RCA (non fourni)
Lunettes 3D
(non fournies)
Récepteur 3D IR
(non fourni)
PC
Câble HDMI/DVI (non fourni)
Panneau arrière du
téléviseur
Branchements
➢
L'apparence des lunettes 3D (y compris l'émetteur) peut être différente en fonction du modèle de lunettes.
Déplacer
Entrer
Retour
Modif. pixel : Marche
Nbre point horizont.
: 2
Nbre ligne vertic. : 2
Horloge : 2 min
Modif. pixel
T V
BN68-01528A-00Fre.indd 22 2008-4-21 15:40:21

Français - 23
Changement de mode
Un changement de mode échangera les images pour chaque œil
en inversant les signaux de sortie gauches et droits.
1 Branchez le téléviseur, le PC et l'émetteur 3D IR comme
indiqué dans l'illustration.
2 Appuyez sur le bouton SOURCE pour sélectionner HDMI.
3 Appuyez sur le bouton MENU pour afficher le menu.
Appuyez sur le bouton ▲ ou ▼ pour sélectionner Image, puis
appuyez sur le bouton
ENTER.
4 Appuyez sur le bouton ▲ ou ▼ pour sélectionner Options
d’image, puis appuyez sur le bouton ENTER.
Appuyez sur le bouton ▲ ou ▼ pour sélectionner Effet 3D,
puis appuyez sur le bouton
ENTER.
5 Appuyez sur le bouton ▲ ou ▼ pour sélectionner Mode, puis
appuyez sur le bouton
ENTER.
Appuyez sur le bouton ▲ ou ▼ pour sélectionner Arrêt, Mode 1,
Mode 2 ou Conversion 2D, puis appuyez sur le bouton
ENTER.
• Arrêt : Désactive la fonction Effet 3D.
• Mode 1 : Mode 1 fonctionne avec la synchronisation droite en premier.
• Mode 2 : Mode 2 fonctionne avec la synchronisation gauche en premier.
• Conversion 2D : Affiche une image 3D convertie en 2D.
Cela vous permet de passer temporairement en image 2D lorsque
vous ressentez un vertige. Toutefois, vous devez choisir "Off" pour
désactiver complètement l’effet 3D.
Si le mode Effet 3D ne fonctionne pas correctement, il
est possible que le Mode et les lunettes 3D ne soient pas
correctement synchronisés. Pour les synchroniser, passez à
l'autre mode.
Suite…
1 Branchez un câble HDMI/DVI entre la prise HDMI IN 2 du téléviseur et la prise de sortie PC de votre
ordinateur.
2 Branchez un câble Stéréo/2RCA 3,5 mm entre la prise DVI IN (HDMI 2) [R-AUDIO-L] du téléviseur et
la prise de sortie audio de la carte son de l'ordinateur.
3 Branchez l'émetteur au port 3D SYNC OUT à l'arrière du téléviseur.
4 Mettez le téléviseur sous tension et définissez la source du téléviseur sur HDMI2.
Pour plus d'informations sur les lunettes 3D (y compris l'émetteur), reportez-vous au manuel
utilisateur de vos lunettes 3D.
Réglez la résolution du PC: PS50A470: 1 024 x 768 @ 60 Hz,1 360 x 768 @ 60 Hz
La résolution PC optimale pour le PS50A470 est de 1 360 x 768. Lorsqu’un signal 1 024 x 768 est
connecté en mode 3D, l’image s’affiche en format 4:3 et des barres latérales apparaissent à gauche
et à droite.
L'émetteur 3D IR communique avec les lunettes 3D.
Par conséquent, l'émetteur 3D IR doit se trouver à proximité des lunettes 3D.
Il est activé lorsque le signal d'entrée HDMI ou DVI est sur RGB et que le son DVI est pris en charge.
Une fois l'appareil mis hors ou sous tension, le mode est réglé par défaut (Arrêt) et le Format est
enregistré.
Le mode Effet 3D est mis hors ou sous tension sans tenir compte du mode Image.
Une fois le mode Effet 3D activé, seuls les menus Contraste, Luminosité, Effet 3D et
Réinitialisation de l'image sont activés.
Pour utiliser la fonction Effet 3D, une carte graphique avec prise en charge 3D ou un logiciel 3D sont
nécessaires.
L'émetteur et les lunettes 3D doivent provenir de la même société.
Si vous jouez ou regarder la télévision en portant les lunettes 3D pendant de longues périodes, vous
risquez de souffrir de fatigue visuelle ou de maux de tête.
Des lunettes 3D (y compris l'émetteur) d'un fabricant autre que Samsung ne sont pas prises en charge.
Si vous trouvez que l’écran n’est pas net lors de l’utilisation de la fonction 3D, baissez l’éclairage
ambiant ou coupez la lampe fluorescente pour regarder l’écran dans des conditions optimales.
Déplacer
Entrer
Retour
Mode : Standard
Luminosité des cellules
7
Contraste 90
Luminosité 45
Netteté 50
Couleur 50
Teinte V50 R50
Réglages des détails
Options d'image
Réinitialiser : OK
Image
T V
Déplacer
Entrer
Retour
Nuance Coul. :
Normal
Taille : 16/9 auto
Mode écran : 16:9
NR numérique : Auto.
Démo 100 Hz réel : Arrêt
DNle : Arrêt
Niveau noir HDMI : Normal
Mode bleu uniquement
: Arrêt
Protection brûlure écran
Effet 3D
Options d'image
T V
Déplacer
Entrer
Retour
Mode :
Format :
Effet 3D
T V
Arrêt
Mode 1
Mode 2
Conversion 2D
BN68-01528A-00Fre.indd 23 2008-4-21 15:40:22

Français - 24
Reinitialisation des paramètres d'image à leur valeur par défaut
Vous pouvez configurer des réglages détaillés de l'image.
1 Appuyez sur le bouton MENU pour afficher le menu.
2 Appuyez sur le bouton ENTER pour sélectionner Image.
3 Appuyez sur le bouton ▲ ou ▼ pour sélectionner
Réinitialiser, puis appuyez sur le bouton ENTER.
4 Appuyez sur le bouton ▲ ou ▼ pour sélectionner OK ou
Annuler, puis appuyez sur le bouton ENTER.
➢
Chaque mode peut être réinitialisé.
Move
Enter
Return
Mode : Standard
Luminosité des cellules
7
Contraste 95
Luminosité 45
Netteté 50
Couleur 50
Teinte V50 R50
Réglages des détails
Options d'image
Réinitialiser : OK
Image
T V
OK
Annuler
Changement de format
Sélectionnez le format d'entrée optimal correspondant à votre carte
graphique ou votre logiciel 3D.
Consultez la description des étapes 1 à 4 ci-dessus.
5 Appuyez sur le bouton ▲ ou ▼ pour sélectionner Format, puis
appuyez sur le bouton
ENTER.
6 Appuyez sur le bouton ▲ ou ▼ pour sélectionner Echiquier,
Horizontal ou Vertical, puis appuyez sur le bouton ENTER.
Echiquier
Si le format de sortie de votre carte graphique ou
logiciel 3D est Echiquier, sélectionnez ce format
d'entrée.
Horizontal
Si le format de sortie de votre carte graphique ou
logiciel 3D est Horizontal entrelacé, sélectionnez
ce format d'entrée.
Vertical
Si le format de sortie de votre carte graphique ou
logiciel 3D est Vertical entrelacé, sélectionnez ce
format d'entrée.
Vous pouvez appuyer plusieurs fois sur le bouton 3D de la
télécommande pour modifier le mode 3D.
Réglage simple
1 Appuyez sur le bouton TOOLS de la télécommande.
2 Appuyez sur le bouton ▲ ou ▼ pour sélectionner Mode 3D.
3 Appuyez sur le bouton ENTER pour démarrer la fonction
Effet 3D.
Outils
Mode 3D ◄ Arrêt ►
Anynet+ (HDMI-CEC)
Mode Image : Dynamique
Mode Son : Standard
Veille : Arrêt
SRS TS XT : Arrêt
Mode éco. : Arrêt
Régler
QuitterDéplacer
Déplacer
Entrer
Retour
Mode : Mode 1
Format :
Effet 3D
T V
Echiquier
Horizontal
Vertical
BN68-01528A-00Fre.indd 24 2008-4-21 15:40:23

Français - 25
Fonctions audio
1 Appuyez sur le bouton MENU pour afficher le menu.
2 Appuyez sur le bouton ▲ ou ▼ pour sélectionner Son, puis
appuyez sur le bouton ENTER.
3 Sélectionnez l’option désirée en appuyant sur le bouton
▲ ou ▼, puis appuyez sur le bouton ENTER.
Options disponibles:
Mode, Egaliseur, SRS TS XT, Volume
auto, TV Speaker, Sélection du son
4 Lorsque vous êtes satisfait du réglage, appuyez sur le bouton
ENTER.
5 Appuyez sur le bouton EXIT pour quitter le menu.
Mode: Standard/Musique/Cinéma/Parole/Personnalisé
Vous pouvez sélectionner le type d’effet sonore souhaité
lorsque vous regardez un programme donné.
Réglages simples
1 Appuyez sur le bouton TOOLS de la télécommande.
2
Appuyez sur le bouton ▲ ou ▼ pour sélectionner le mode Son.
3 Appuyez sur le bouton ◄ ou ► pour sélectionner l’option de
votre choix.
Egaliseur: Balance/100Hz/300Hz/1kHz/3kHz/10kHz
Le téléviseur dispose de plusieurs paramètres qui vous
permettent de régler la qualité du son.
➢
Si vous modifiez de quelque façon que ce soit ces
paramètres, le mode de son bascule automatiquement sur
Personnalisé.
SRS TS XT: Arrêt/Marche
Le TruSurround XT est une technologie SRS brevetée qui remédie au problème de la lecture du contenu
d’un disque multicanal 5,1 sur deux haut-parleurs. Le TurSurround produit un son surround virtuel
fascinant au moyen de n’importe quel système de lecture à deux haut-parleurs, dont les haut-parleurs
internes du téléviseur. Il s’adapte parfaitement à tous les formats multicanaux.
Réglages simples
1 Appuyez sur le bouton TOOLS de la télécommande.
2
Appuyez sur le bouton ▲ ou ▼ pour sélectionner SRS TS XT.
3
Appuyez sur le bouton ◄ ou ► pour sélectionner Marche ou Arrêt.
Volume auto: Arrêt/Marche
Chaque station d’émission possède ses propres conditions de
signal et il n’est donc pas facile de régler le volume chaque fois
que vous changez de chaîne. Cette fonction vous permet de
régler automatiquement le volume du canal désiré en réduisant la puissance sonore lorsque le signal de
modulation est élevé ou en augmentant la puissance sonore lorsque le signal de modulation est faible.
TV Speaker: Arrêt/Marche
Pour entendre le son par l’intermédiaire de haut-parleurs séparés, désactivez l’amplificateur interne.
➢
Les boutons
+,
-
et MUTE ne fonctionnent pas lorsque l’option TV Speaker est réglée sur
Arrêt.
➢
Lorsque l'option TV Speaker est définie sur Marche, vous pouvez uniquement utiliser la fonction
Sélection du son (en mode PIP) dans le menu Son.
Sélection du son: Principal/Secondaire
Lorsque la fonction PIP est activée, vous pouvez écouter le son accompagnant l'image secondaire.
−
Principal: pour écouter le son accompagnant l'image principale.
−
Secondaire: pour écouter le son accompagnant l'image secondaire.
Déplacer
Entrer
Retour
Mode :
Personnalisé
Egaliseur
SRS TS XT : Arrêt
Volume auto : Arrêt
TV Speaker : Arrêt
Sélection du son : Principal
Son
T V
Déplacer
Régler
Retour
Egaliseur
T V
+
0
-
D
G
+
0
-
Balance 100Hz 300Hz 1kHz 3kHz 10kHz
Outils
Anynet+ (HDMI-CEC)
Mode Image : Standard
Mode Son : Personnalisé
Veille : Arrêt
SRS TS XT ◄ Arrêt ►
Mode éco. : Arrêt
Dual I-II : Mono
QuitterDéplacer
Régler
Outils
Anynet+ (HDMI-CEC)
Mode Image : Standard
Mode Son :
Personnalisé
Veille : Arrêt
SRS TS XT ◄ Arrêt ►
Mode éco. : Arrêt
Dual I-II : Mono
QuitterDéplacer
Régler
TruSurround XT, SRS et le symbole sont des marques déposées de SRS
Labs, Inc. La technologie TruSurround XT est protégée par la licence de SRS
Labs, Inc.
BN68-01528A-00Fre.indd 25 2008-4-21 15:40:23

Français - 26
Sélection du mode Son (en fonction du modèle)
Le bouton DUAL I-II affiche/commande le traitement et la sortie du signal audio. A la mise sous
tension, le mode est préréglé automatiquement soit sur “DUAL-I” soit sur “Stéréo”, en fonction de
la transmission en cours.
Réglages simple
1 Appuyez sur le bouton TOOLS de la télécommande.
2 Appuyez sur le bouton ▲ ou ▼ pour sélectionner Dual I-II.
3 Appuyez sur le bouton ◄ ou ► pour sélectionner l’option de
votre choix.
Type de programme Indication à l’écran
NICAM
Stéréo
Programme normal
(Audio standard)
Mono (Usage normal)
Normal + Mono NICAM NICAM
Mono
(Normal)
NICAM Stéréo
NICAM
Stéréo
Mono
(Normal)
NICAM DUAL-I/II
NICAM
dual 1
NICAM
dual 2
Mono
(Normal)
A2
Stéréo
Programme normal
(Audio standard)
Mono (Usage normal)
Bilingue ou DUAL-I/II
Dual I Dual II
Stéréo Stéréo
Mono
(Mono forcé)
➢
Si les conditions de réception se détériorent, le mode Mono facilitera l’écoute.
Si le signal stéréo est faible et qu’une permutation automatique se produit, passez
alors en
Mono.
Branchement du casque (vendu séparément)
Vous pouvez brancher un casque à votre téléviseur si vous souhaitez regarder un
programme télévisé sans déranger les autres personnes présentes dans la pièce.
➢
Lorsque vous insérez la prise casque dans le port
correspondant, vous pouvez utiliser uniquement les options
Volume auto. dans le menu Son.
➢
L’utilisation prolongée d’un casque à un niveau sonore élevé
peut endommager l’ouïe.
➢
Aucun son n’est émis des enceintes lorsque vous connectez le
casque au téléviseur.
➢
Le volume du casque et celui du téléviseur sont réglés
séparément.
Panneau latéral du téléviseur
Outils
Anynet+ (HDMI-CEC)
Mode Image : Standard
Mode Son : Personnalisé
Veille : Arrêt
SRS TS XT : Arrêt
Mode éco. : Arrêt
Dual I-II ◄ Mono ►
QuitterDéplacer
Régler
BN68-01528A-00Fre.indd 26 2008-4-21 15:40:24

Français - 27
Fonctions d’horloge
1 Appuyez sur le bouton MENU pour afficher le menu.
2 Appuyez sur le bouton ▲ ou ▼ pour sélectionner
Configuration, puis appuyez sur le bouton ENTER.
3 Appuyez sur le bouton ▲ ou ▼ pour sélectionner Horloge,
puis appuyez sur le bouton
ENTER.
4 Sélectionnez l’option désirée en appuyant sur le bouton
▲ ou ▼, puis appuyez sur le bouton ENTER.
Options disponibles:
Réglages Horloge, Veille, Minuteur 1,
Minuteur 2, Minuteur 3
5
Lorsque vous êtes satisfait du réglage, appuyez sur le bouton ENTER.
6 Appuyez sur le bouton EXIT pour quitter le menu.
Réglage Horloge
Vous pouvez régler l’horloge du téléviseur de sorte que l’heure
actuelle s’affiche lorsque vous appuyez sur le bouton
INFO de
la télécommande. Vous devez également régler l’heure si vous
souhaitez utiliser les minuteries Marche et Arrêt automatiques.
− Appuyez sur le bouton ◄ ou ► pour choisir
Mois, Date,
Année, Heure ou Minute. Réglez ces éléments en appuyant
sur le bouton ▲ ou ▼.
➢
Vous pouvez régler directement les valeurs Mois, Date,
Année, Heure et Minute en appuyant sur les touches
numériques de la télécommande.
➢
En cas de coupure de courant ou si le téléviseur est
déconnecté de l’alimentation, les réglages de l’horloge
seront perdus.
Veille
Vous pouvez sélectionner une durée (entre 30 et 180 minutes)
à l’issue de laquelle le téléviseur passe automatiquement en
mode veille.
− Sélectionnez l’intervalle prédéfini (
Arrêt, 30, 60, 90, 120,
150 ou 180) avant la mise en veille en appuyant sur le
bouton ▲ ou ▼.
Réglages simples
1 Appuyez sur le bouton TOOLS de la télécommande.
2 Appuyez sur le bouton ▲ ou ▼ pour Veille.
3 Appuyez sur le bouton ◄ ou ► pour sélectionner le nombre
de minutes, puis appuyez sur le bouton
ENTER.
Minuteur 1 / Minuteur 2 / Minuteur 3
Vous pouvez régler les minuteries de mise sous/hors tension de
sorte que le téléviseur soit mis sous/hors tension à l’heure que
vous aurez sélectionnée.
☛
Vous devez préalablement régler l’horloge.
− Appuyez sur le bouton ◄ ou ► pour sélectionner l’élément désiré ci-dessous.
Appuyez sur le bouton ▲ ou ▼ pour valider le réglage.
Période d’activation: Sélectionnez les heures et les minutes ainsi que Marche/Arrêt (Pour
activer le minuteur selon les réglages définis, choisissez
Marche.)
Période de désactivation: Sélectionnez les heures et les minutes ainsi que Marche/Arrêt (Pour
activer le minuteur selon les réglages définis, choisissez
Marche.)
Répétition: Choisissez Une fois, Tous les jours, Lun - Ven, Lun - Sam ou Sam - Dim.
Volume: Sélectionnez le niveau de volume désiré.
➢
Vous pouvez régler les heures et les minutes directement à l’aide du pavé numérique de la
télécommande.
☛
Mise hors tension automatique
Lorsque vous réglez la minuterie sur “Marche”, le téléviseur s’éteint si aucune commande n’est
activée dans les 3 heures qui suivent sa mise sous tension par la minuterie. Cette fonction est
disponible uniquement lorsque la minuterie est définie sur “Marche”; elle permet d’éviter toute
surchauffe occasionnée par une utilisation prolongée du téléviseur.
Déplacer
Entrer
Retour
Plug & Play
Langue : Français
Horloge
Effet lumineux
:
LED act. marche
Ajustement fixation murale
Mélodie : Arrêt
Divertissement : Arrêt
Mode éco. : Arrêt
PIP
Configuration
T V
Déplacer
Entrer
Retour
Réglage Horloge : 00 : 00
Veille : Arrêt
Minuteur 1 : Arrêt
Minuteur 2 : Arrêt
Minuteur 3 : Arrêt
Horloge
T V
Outils
Anynet+ (HDMI-CEC)
Mode Image : Standard
Mode Son : Personnalisé
Veille ◄ Arrêt ►
SRS TS XT : Arrêt
Mode éco. : Arrêt
Dual I-II : Mono
QuitterDéplacer
Régler
Déplacer
Régler
Retour
Minuteur 1
T V
00 00 Non
Période d’activation
:
Période de désactivation
Répétition
Une fois
10
Volume
00 00 Non
:
BN68-01528A-00Fre.indd 27 2008-4-21 15:40:25

Français - 28
Langue / Mélodie / Effet lumineux / Divertissement / Mode
éco. / PIP
1 Appuyez sur le bouton MENU pour afficher le menu.
2 Appuyez sur le bouton ▲ ou ▼ pour sélectionner
Configuration, puis appuyez sur le bouton ENTER.
3 Sélectionnez l’option désirée en appuyant sur le bouton ▲ ou ▼,
puis appuyez sur le bouton
ENTER.
Options disponibles:
Langue, Mélodie, Effet lumineux,
Divertissement, Mode éco., PIP
4 Lorsque vous êtes satisfait du réglage, appuyez sur le bouton
ENTER.
5 Appuyez sur le bouton EXIT pour quitter le menu.
Langue
Cela varie selon les modèles. Lorsque vous utilisez votre téléviseur pour la première fois, vous devez
sélectionner la langue utilisée pour afficher les menus et les instructions.
Effet lumineux: Arrêt/LED act. veille/LED act. marche/Marche
Vous pouvez allumer/éteindre la LED bleue à l’avant de votre téléviseur en fonction de la situation.
Recourez à cette fonction pour économiser de l’énergie ou lorsque la LED fatigue vos yeux.
−
Arrêt: La LED bleue est toujours éteinte.
−
LED act. veille: La LED bleue est allumée en mode veille et éteinte quand le téléviseur est sous
tension.
−
LED act. marche: La LED bleue est allumée quand vous regardez la télévision et éteinte quand le
téléviseur est hors tension.
−
Marche: La LED bleue est toujours allumée.
➢
Réglez Effet lumineux sur Arrêt pour réduire la consommation électrique.
Mélodie: Arrêt/Bas/Moyen/Elevé
La mélodie de mise sous/hors tension du téléviseur peut être ajustée.
Déplacer
Entrer
Retour
Plug & Play
Langue : Français
Horloge
Effet lumineux
:
LED act. marche
Ajustement fixation murale
Mélodie : Arrêt
Divertissement : Arrêt
Mode éco. : Arrêt
PIP
Configuration
T V
Divertissement: Arrêt/Sports/Cinéma/Jeu
Le mode Divertissement vous permet de sélectionner les valeurs d’affichage et de son optimales
pour le sport, le cinéma et les jeux.
− Arrêt: Désactive la fonction Divertissement.
− Sports: fournit une qualité d’image et de son optimale pour le sport.
− Cinéma: fournit une qualité d’image et de son optimale pour regarder un film.
Vous pouvez profiter d’une image plus belle et d’un son encore meilleur.
− Jeux: fournit une qualité d’image et de son optimale pour les jeux. Ce mode accélère la
vitesse de lecture lorsqu’une console de jeu est reliée au téléviseur.
➢
ISi vous activez l’un des trois modes Divertissement, les paramètres seront verrouillés
empêchant toute modification. Si vous voulez régler les modes Image et
Son, le mode Divertissement doit être désactivé.
➢
Les réglages du mode Divertissement sont enregistrés pour chaque source d’entrée
.
Suite...
BN68-01528A-00Fre.indd 28 2008-4-21 15:40:25

Français - 29
Configuration de votre logiciel PC (basée sur Windows XP)
Les paramètres d’affichage Windows indiqués ci-dessous sont ceux
d’un ordinateur type. Toutefois, il se peut que les écrans réels de
votre PC soient différents, en fonction de votre version de Windows
et de votre carte vidéo. Cependant, même si les affichages diffèrent,
les informations de configuration de base s’appliquent dans la
plupart des cas. Dans le cas contraire, contactez le fabricant de
votre ordinateur ou votre revendeur Samsung.
1 A l’aide du bouton droit de la souris, cliquez sur le bureau
Windows, puis sur Propriétés.
La boîte de dialogue
Propriétés d’affichage s’affiche.
2 Cliquez sur l’onglet Paramètres, puis réglez le Mode
d’affichage en vous reportant au tableau des modes
d’affichage. Il est inutile de modifier les paramètres Couleurs.
3 Cliquez sur Avancé. Une nouvelle boîte de dialogue de configuration s’affiche.
4 Cliquez sur l’onglet Ecran, puis réglez la Fréquence d’actualisation du moniteur en vous reportant
au tableau des modes d’affichage. Si vous le pouvez, réglez séparément la Fréquence verticale et la
Fréquence horizontale au lieu de paramétrer la Fréquence d’actualisation du moniteur.
5 Cliquez sur OK pour fermer la fenêtre, puis sur OK pour accéder à la fenêtre Propriétés
d’affichage. Il se peut alors que votre ordinateur redémarre automatiquement.
Mode éco.: Arrêt/Bas/Moyen/Elevé
Cette fonction règle la luminosité en fonction des conditions
d’éclairage.
−
Arrêt: Désactive le Mode éco.
−
Bas: Fonctionne en mode standard, quel que soit l’éclairage
ambiant.
−
Moyen: Active le mode d’économie d’énergie moyen, quel
que soit l’éclairage ambiant.
−
Elevé: Active le mode d’économie d’énergie maximale, quel que soit l’éclairage ambiant.
Réglages simples
1 Appuyez sur le bouton TOOLS de la télécommande.
2 Appuyez sur le bouton ▲ ou ▼ pour sélectionner Mode éco.
3 Appuyez sur le bouton ◄ ou ► pour sélectionner l’option de votre choix.
PIP (Image dans l'image): PIP (Marche/Arrêt)/Source/Taille/Position/Programme
Vous pouvez afficher une image secondaire dans l'image principale. De cette manière, vous pouvez
regarder un programme de télévision ou surveiller l'entrée vidéo de n'importe quel périphérique connecté.
−
PIP: Marche/Arrêt
Vous pouvez activer ou désactiver la fonction PIP.
Tableau des paramètres PIP
Image principale Image secondaire
Composant
HDMI1, 2
PC
La TV analogique ne
diffuse que sur Ext1,
Ext2 et AV
− Source: TV/Ext.1/Ext.2/AV
Vous pouvez sélectionner la source de l'image secondaire.
−
Taille: / /
Vous pouvez sélectionner la taille de l'image secondaire.
➢
Si l'image principale est en mode PC et Composant, Taille n'est pas disponible.
−
Position: / / /
Vous pouvez sélectionner la position de l'image secondaire.
➢
En mode Double
( ,
), Position ne peut pas être sélectionnée.
−
Programme
Vous ne pouvez sélectionner une chaîne de l'image secondaire que si la
Source est définie sur TV.
Déplacer
Entrer
Retour
PIP
T V
PIP : Marche
Source : TV
Taille :
Position :
Programme : P 1
Tools
Anynet+ (HDMI-CEC)
Mode Image : Standard
Mode Son : Personnalisé
Veille : Arrêt
SRS TS XT : Arrêt
Mode éco. ◄ Arrêt ►
Dual I-II : Mono
QuitterDéplacer
Régler
BN68-01528A-00Fre.indd 29 2008-4-21 15:40:26

Français - 30
Mode d’entrée (PC)
La taille et la position de l’écran varient en fonction du type d’écran du PC et de sa résolution.
Le tableau ci-dessous indique tous les modes d’affichage pris en charge :
D-Sub Entrée
Mode Résolution
Horizontale
Fréquence
(kHz)
Verticale
Fréquence
(Hz)
Horloge pixels
Fréquence
(MHz)
Polarité
synchronisée
(H/V)
PS50A470
IBM
640 x 350
720 x 400
31.469
31.469
70.086
70.087
25.175
28.322
+ / -
- / +
✔
✔
VESA
640 x 480
640 x 480
640 x 480
800 x 600
800 x 600
800 x 600
1024 x 768
1024 x 768
1024 x 768
1360 x 768
31.469
37.861
37.500
37.879
48.077
46.875
48.363
56.476
60.023
47.712
59.940
72.809
75.000
60.317
72.188
75.000
60.004
70.069
75.029
60.015
25.175
31.500
31.500
40.000
50.000
49.500
65.000
75.000
78.750
85.500
- / -
- / -
- / -
+ / +
+ / +
+ / +
- / -
- / -
+ / +
+ / +
✔
✔
✔
✔
✔
✔
✔
✔
✔
✔
HDMI/DVI Entrée
Mode Résolution
Horizontale
Fréquence
(kHz)
Verticale
Fréquence
(Hz)
Horloge pixels
Fréquence
(MHz)
Polarité
synchronisée
(H/V)
PS50A470
VESA
640 x 480
800 x 600
1024 x 768
1360 x 768
31.469
37.879
48.363
47.712
59.940
60.317
60.004
60.015
25.175
40.000
65.000
85.500
- / -
+ / +
- / -
+ / +
✔
✔
✔
✔
Lorsque vous utilisez une connexion avec câble HDMI/DVI, vous devez utiliser la
Le mode interface n’est pas pris en charge.
Le téléviseur peut fonctionner de façon anormale si un format vidéo non standard est sélectionné.
Des modes séparés et composites sont pris en charge. SVSV n’est pas pris en charge.
La qualité du texte du PC est optimale en mode VESA (1360 x 768 @ 60 Hz) avec le PS50A470.
BN68-01528A-00Fre.indd 30 2008-4-21 15:40:26

Français - 31
Réglage du PC
➢
Préréglez le mode PC en utilisant le bouton SOURCE.
1 Appuyez sur le bouton MENU pour afficher le menu.
2 Appuyez sur le bouton ▲ ou ▼ pour sélectionner Image, puis
appuyez sur le bouton
ENTER.
3 Sélectionnez l’option désirée en appuyant sur le bouton
▲ ou ▼, puis appuyez sur le bouton ENTER.
4 Lorsque vous êtes satisfait du réglage, appuyez sur le bouton
ENTER.
5 Appuyez sur le bouton EXIT pour quitter le menu.
Réglage Automatique
Le réglage automatique permet à l’écran PC affiché sur le
téléviseur d’être ajusté automatiquement en fonction du signal
vidéo PC.
Les valeurs des options Regl. Prec., Regl. Base ou Position
sont définies automatiquement.
Réglage simple
1 Appuyez sur le bouton TOOLS de la télécommande.
2 Appuyez sur le bouton ▲ ou ▼ pour sélectionner Réglage
Automatique, puis appuyez sur le bouton ENTER.
Ecran: Regl. Base/Regl. Prec/Position/Réinitialiser Image
Regl. Base/Regl. prec
Lorsque vous réglez la qualité de l’image, l’objectif est
d’éliminer ou de réduire les parasites visuels.
Si ces parasites ne sont pas éliminés uniquement avec une
syntonisation fine (Regl. Prec.), réglez la fréquence du mieux
que vous pouvez (Regl. Base) puis effectuez à nouveau une
syntonisation plus fine.
Une fois les parasites réduits, réajustez l’image pour l’aligner
au centre de l’écran.
1 Appuyez sur le bouton ▲ ou ▼ pour sélectionner Regl.
Base ou Regl. Prec, puis appuyez sur le bouton ENTER.
2 Appuyez sur le bouton ◄ ou ► pour régler la qualité de
l’écran; il se peut que des bandes verticales apparaissent ou
que l’image soit floue. Appuyez sur le bouton
ENTER.
Position
Réglez la position de l’écran du PC si elle ne convient pas à
l’écran du téléviseur.
1 Réglez la position en appuyant sur le bouton ▲/▼/◄/►.
2 Appuyez sur le bouton ENTER.
Réinitialiser Image
Vous pouvez ramener tous les réglages d’image à leur valeur par défaut.
Ajustement automatique en cours
Attendez, s’il vous plait.
Rappel image effectué
Déplacer
Entrer
Retour
Position
T V
Déplacer
Entrer
Retour
Mode : Standard
Luminosité des cellules
7
Contraste 95
Luminosité 45
Netteté 50
Réglage Automatique
Ecran
Réglages des détails
Options d’image
Réinitialiser : OK
Image
T V
Déplacer
Entrer
Retour
Regl. Base
50
Regl. Prec 11
Position
Réinitialiser Image
Ecran
T V
Tools
Anynet+ (HDMI-CEC)
Mode Image : Standard
Mode Son : Personnalisé
Veille : Arrêt
SRS TS XT : Arrêt
Mode éco. : Arrêt
PIP
Réglage Automatique
QuitterDéplacer
Entrer
BN68-01528A-00Fre.indd 31 2008-4-21 15:40:27

Français - 32
Qu’est-ce que Anynet
+
?
Anynet
+
est un système de réseau AV qui fournit une interface AV conviviale aux utilisateurs,
en contrôlant tous les appareils AV connectés via le menu Anynet
+
lorsque des appareils AV
Samsung Electronics sont connectés.
Connexion d’appareils Anynet
+
Le système Anynet
+
ne prend en charge que les appareils AV compatibles Anynet
+
.
Assurez-vous que l’appareil AV connecté au téléviseur porte bien un label Anynet
+
.
Connexion directe au téléviseur
A l’aide du câble HDMI, reliez
la prise [HDMI 1], [HDMI 2]
ou [HDMI 3] du téléviseur à la
prise HDMI OUT de l’appareil
Anynet
+
correspondant.
Connexion à un système home cinéma
1 A l’aide du câble HDMI,
reliez la prise [HDMI 1],
[HDMI 2] ou [HDMI 3] du
téléviseur à la prise HDMI
OUT de l’appareil Anynet
+
correspondant.
2 A l’aide du câble HDMI,
reliez la prise HDMI IN du
système home cinéma
à la prise HDMI OUT
de l’appareil Anynet
+
correspondant.
➢
Ne connectez qu’un seul récepteur.
➢
Vous pouvez connecter un appareil Anynet
+
à l’aide du câble HDMI. Certains câbles HDMI peuvent
ne pas prendre en charge les fonctions Anynet
+
.
➢
Anynet
+
fonctionne si l’appareil AV compatible est en mode Veille (Standby) ou en marche (On).
➢
Anynet
+
prend en charge jusqu’à 8 appareils AV.
Appareil Anynet
+
1 Appareil Anynet
+
2
Appareil Anynet
+
3
TV
Câble HDMI
Câble HDMI
Câble HDMI
English - 30
TV
Appareil Anynet
+
1
Appareil Anynet
+
2
Appareil Anynet
+
3
Câble HDMI
Câble HDMI
Câble HDMI
Câble HDMI
Home cinéma
English - 30
BN68-01528A-00Fre.indd 32 2008-4-21 15:40:28

Français - 33
Configuration d’Anynet
+
Les fonctions d’Anynet
+
emploient les réglages suivants.
Utilisation de la fonction Anynet
+
1 Appuyez sur le bouton MENU pour afficher le menu.
Appuyez sur le bouton ▲ ou ▼ pour sélectionner Entrée puis
appuyez sur le bouton
ENTER.
2 Appuyez sur le bouton ▲ ou ▼ pour sélectionner Anynet
+
(HDMI-
CEC), puis appuyez sur le bouton ENTER.
3 Appuyez sur le bouton ▲ ou ▼ pour sélectionner Configuration
puis appuyez sur le bouton
ENTER.
4 Appuyez sur le bouton ▲ ou ▼ pour sélectionner Anynet
+
(HDMI-
CEC), puis appuyez sur le bouton ENTER.
5 Sélectionnez Marche en appuyant sur le bouton ▲ ou ▼, puis
appuyez sur le bouton
ENTER.
➢
La fonction Anynet
+
(HDMI-CEC) est activée.
➢
Si vous choisissez
Arrêt, la fonction Anynet
+
(HDMI-CEC) est
désactivée.
➢
Lorsque la fonction Anynet
+
(HDMI-CEC) est désactivée, toutes les
activités associées à Anynet
+
sont indisponibles.
Extinction automatique d’un appareil Anynet+ lorsque le téléviseur
est mis hors tension Hors tension
4 Appuyez sur le bouton ▲ ou ▼ pour sélectionner Arrêt
automatique, puis appuyez sur le bouton ENTER.
5 Sélectionnez Oui en appuyant sur le bouton ▲ ou ▼, puis
appuyez sur le bouton
ENTER.
➢
La fonction Arrêt automatique est activée.
➢
Si vous choisissez Non, la fonction est désactivée.
Appuyez sur le bouton EXIT pour quitter le menu.
➢
Le réglage Sélection appareil de la télécommande du téléviseur doit être réglé sur TV pour pouvoir utiliser la
fonction Anynet
+
.
➢
Si vous réglez Arrêt automatique sur Oui, les appareils externes connectés s’éteignent lorsque le téléviseur
est mis hors tension. Toutefois, si l’appareil est en train d’enregistrer, il ne peut pas être éteint.
Recherche d’appareils Anynet
+
et basculement entre des appareils
1 Appuyez sur le bouton MENU pour afficher le menu.
Appuyez sur le bouton ▲ ou ▼ pour sélectionner Entrée puis
appuyez sur le bouton ENTER.
2 Appuyez sur le bouton ▲ ou ▼ pour sélectionner Anynet
+
(HDMI-
CEC), puis appuyez sur le bouton ENTER.
3 Sélectionnez Sélection appareil en appuyant sur le bouton ▲ ou
▼, puis appuyez sur le bouton ENTER.
4 Appuyez sur le bouton ▲ ou ▼ pour sélectionner un appareil, puis
appuyez sur le bouton ENTER.
Vous passez ainsi à l’appareil sélectionné.
5
Si l’appareil désiré est introuvable, appuyez sur le bouton ▲ ou ▼ pour
sélectionner Rech connectés, puis appuyez sur le bouton ENTER.
Le message Configuration de la connexion Anynet
+
s’affiche.
Au terme de la recherche, les appareils connectés sont indiqués
dans le menu Anynet
+
.
➢
Le basculement vers l’appareil sélectionné peut prendre 2 minutes.
Il est impossible d’annuler l’opération de basculement.
➢
Le temps nécessaire pour rechercher les appareils dépend du
nombre d’appareils connectés.
➢
Au terme de la recherche d’appareils, le nombre d’appareils trouvé
n’est pas indiqué.
➢
Bien que le téléviseur recherche automatiquement les appareils
lorsqu’il est allumé à l’aide du bouton
POWER, les appareils connectés lorsque le téléviseur est allumé ou
dans des conditions spécifiques ne sont pas affichés dans la liste des appareils. Dans un tel cas, utilisez le
menu Rech connectés pour rechercher ces appareils.
➢
Si vous avez choisi un mode d’entrée externe en appuyant sur le bouton
SOURCE, il est impossible
d’utiliser la fonction Anynet
+
. Veillez à basculer vers un appareil Anynet
+
au moyen du bouton
TOOLS.
Configuration
Anynet
+
(HDMI-CEC)
: Off
Arrêt automatique : Off
Rech connectés
Eingabe ZurückNavig.
Arrêt
Marche
Eingabe
Navig.
Voir télévision
Sélection appareil
Enregistrer
Menu du Périphérique
Fonctionnement périph.
Récepteur :Arrêt
Configuration
TV P 1
Zurück
Eingabe
Navig.
Voir télévision
Sélection appareil
Enregistrer
Menu du Périphérique
Fonctionnement périph.
Récepteur :Arrêt
Setup
TV P 1
Zurück
DVDR1
DVDR2
DVD1
DVD2
Configuration
Anynet
+
(HDMI-CEC)
: On
Arrêt automatique :
: Off
Rech connectés
Eingabe ZurückNavig.
Non
Oui
Configuration
Anynet
+
(HDMI-CEC)
: Marche
Arrêt automatique : Arrêt
Rech connectés
Eingabe ZurückNavig.
BN68-01528A-00Fre.indd 33 2008-4-21 15:40:28

Français - 34
Menu Anynet+
Le menu Anynet
+
varie selon le type et l’état des appareils Anynet
+
connectés au téléviseur.
Menu Anynet
+
Description
Voir télévision Passe d’Anynet
+
au mode de diffusion TV.
Sélection appareil Le téléviseur se connecte à l’appareil correspondant.
Enregistrer Pour démarrer un enregistrement. (Ce menu ne fonctionne qu’avec
un appareil capable d’enregistrer.)
Menu du Périphérique Affiche le menu de l’appareil connecté.
Exemple: si un enregistreur de DVD est connecté, son menu titre s’
affiche.
Fonctionnement périph. Affiche le menu de commande de l’appareil connecté.
Exemple: si un enregistreur de DVD est connecté, son menu de
contrôle de lecture qui s’affiche.
Récepteur Le son est émis par l’intermédiaire du récepteur.
Configuration Permet de configurer l’environnement d’utilisation d’Anynet
+
.
Boutons de la télécommande du téléviseur disponibles en mode Anynet
+
Type d’appareil Mode de fonctionnement Boutons disponibles
Appareil Anynet
+
Après le basculement vers cet
appareil, lorsque son menu s’
affiche à l’écran.
Touches numériques
Boutons
▲/▼/◄/►/ENTER
Boutons de couleur
Bouton
EXIT
Après le basculement vers l’
appareil, pendant la lecture d’un
fichier
W.LINK
(Recherche vers l’arrière)
W.LINK
(Recherche vers l’avant)
W.LINK
(Arrêt)
W.LINK
W.LINK
(Lecture/Pause)
Appareil à tuner intégré
Après le basculement vers l’
appareil, lorsque vous regardez
un programme télévisé
Bouton P /
Appareil audio Lorsque le récepteur est activé
Bouton
W.LINK
/
W.LINK
Bouton MUTE
➢
La fonction Anynet
+
n’est utilisable que quand la télécommande est réglée en mode TV.
➢
Le bouton REC ne fonctionne que lorsque l’appareil est dans un état où l’enregistrement est possible.
➢
Il est impossible de commander les appareils Anynet
+
à l’aide des boutons sur le côté du téléviseur.
Les appareils Anynet
+
ne peuvent être commandés qu’au moyen de la télécommande du téléviseur.
➢
Il se peut que la télécommande du téléviseur ne fonctionne pas dans certaines situations. Dans ce
cas, sélectionnez de nouveau l’appareil Anynet
+
.
➢
Les fonctions d’Anynet
+
ne peuvent pas commander des produits d’autres fabricants.
➢
En mode Anynet
+
, les boutons de couleur peuvent ne pas fonctionner correctement.
➢
Les opérations
W.LINK
,
W.LINK
peuvent varier en fonction de l’appareil.
Enregistrement
Vous pouvezenregistrer un programme télévisé à l’aide d’un enregistreur.
Appuyez sur le bouton REC.
L’enregistrement débute. Le système d’enregistrement compatible Anynet
+
doit toutefois être connecté.
➢
Le programme télévisé actuel est enregistré lorsque vous regardez la télévision. Si vous regardez
une vidéo provenant d’un autre appareil, cette vidéo est enregistrée.
➢
Vous pouvez également effectuer un enregistrement en sélectionnant Enregistrer (Record) après
avoir appuyé sur le bouton
TOOLS.
➢
Avant d’enregistrer, vérifiez la connexion de la prise d’antenne au périphérique d’enregistrement.
Pour la connexion de l’antenne au périphérique d’enregistrement, reportez-vous au manuel de
l’utilisateur de ce dernier.
BN68-01528A-00Fre.indd 34 2008-4-21 15:40:30

Français - 35
Vérifications avant de faire appel au service d’assistance
Symptôme Solution
Anynet
+
ne fonctionne
pas.
■ Vérifiez si l’appareil est compatible Anynet
+
. Le système Anynet
+
ne prend en
charge que les appareils compatibles Anynet
+
.
■ Ne connectez qu’un seul récepteur.
■
Vérifiez si le cordon d’alimentation de l’appareil Anynet
+
est bien connecté.
■
Vérifiez la connexion des câbles vidéo/audio/HDMI de l’appareil Anynet
+
.
■ Vérifiez qu’Anynet+ (HDMI-CEC) est défini sur Marche dans le menu de
configuration Anynet
+
.
■ Vérifiez que la télécommande du téléviseur est en mode TV.
■ Vérifiez qu’il s’agit d’une télécommande exclusive Anynet
+
.
■
Anynet
+
ne fonctionne pas dans toutes les conditions. (Recherche de canaux)
■ Lorsque vous branchez ou retirez le câble HDMI, veillez à relancer une
recherche de périphérique ou à redémarrer votre téléviseur.
■
Vérifiez que la fonction Anynet
+
du périphérique Anynet
+
est activée.
Je veux démarrer
Anynet
+
.
■ Assurez-vous que l’appareil Anynet
+
est bien connecté au téléviseur et
assurez-vous que la fonction Anynet
+
(HDMI-CEC) est réglée sur Marche dans
le menu Configuration d’Anynet
+
.
■ Appuyez sur le bouton
TV de la télécommande pour allumer le téléviseur.
Appuyez ensuite sur le bouton
TOOLS pour afficher le menu AnynetAnynet
+
et sélectionnez le menu désiré.
Je veux quitter Anynet
+
. ■ Choisissez Voir télévision dans le menu Anynet
+
.
■ Appuyez sur le bouton
SOURCE de la télécommande et choisissez un appareil
non compatible Anynet
+
.
■ Appuyez sur le bouton
P, CH LIST ou PRE-CH pour modifier le mode TV.
(Remarque : le bouton de canal ne fonctionne que si aucun appareil Anynet
+
à
tuner incorporé n’est connecté.)
Le message Connecting
to Anynet
+
device…
(Connexion à un appareil
Anynet+) apparaît à l’écran.
■ Il est impossible d’employer la télécommande quand vous configurez
Anynet+ou quand vous passez à un mode de visualisation.
■ La télécommande n’est utilisable qu’au terme de la configuration d’Anynet
+
ou
du passage au mode de visualisation.
La lecture ne démarre pas
sur l’appareil Anynet
+
.
■ Vous ne pouvez pas utiliser la fonction de lecture lorsque Plug & Play est en
cours.
L’appareil connecté n’est
pas affiché.
■
Vérifiez si l’appareil est ou non compatible avec les fonctions d’Anynet+.
■ Vérifiez si le câble HDMI est bien connecté.
■ Vérifiez qu’Anynet
+
(HDMI-CEC) est défini sur Marche dans le menu de
configuration Anynet
+
.
■ Lancez une nouvelle recherche d’appareils Anynet
+
.
■ Vous pouvez connecter un appareil Anynet
+
à l’aide du câble HDMI.
Certains
câbles HDMI peuvent ne pas prendre en charge les fonctions Anynet
+
.
Le programme TV ne s’
enregistre pas.
■ Vérifiez que la prise d’antenne du périphérique d’enregistrement est
correctement branchée.
Ecoute via un récepteur
Le son peut être émis par l’intermédiaire d’un récepteur au lieu de l’enceinte du téléviseur.
1 Appuyez sur le bouton MENU pour afficher le menu.
Appuyez sur le bouton ▲ ou ▼ pour sélectionner Entrée puis appuyez sur le bouton
ENTER.
2 Appuyez sur le bouton ▲ ou ▼ pour sélectionner Anynet
+
(HDMI-CEC), puis
appuyez sur le bouton ENTER
.
3 Sélectionnez Récepteur en appuyant sur le bouton ▲ ou ▼, puis appuyez sur le
bouton
ENTER.
4 Sélectionnez Marche en appuyant sur le bouton ◄ ou ►, puis appuyez sur le bouton
ENTER.
Le son est désormais émis via le récepteur.
5 Appuyez sur le bouton EXIT pour quitter le menu.
➢
Lorsque le récepteur est activé, vous pouvez écouter le son du téléviseur via le
récepteur à 2 canaux.
➢
Si le récepteur n’est destiné qu’à un système home cinéma (et ne prend en charge que l’audio), il se peut qu’il
ne figure pas dans la liste des appareils.
➢
Si vous utilisez du contenu confronté à un problème de droits d’auteur, il se peut que l’écoute via le récepteur
ne fonctionne pas correctement.
➢
Lors de l’écoute via le récepteur, des restrictions s’appliquent à l’utilisation des menus liés aux fonctions PIP et
audio.
Entrée
Déplacer
Voir télévision
Sélection appareil
Enregistrer
Menu du Périphérique
Fonctionnement périph.
Récepteur : Marche
Configuration
TV P 1
Quitter
BN68-01528A-00Fre.indd 35 2008-4-21 15:40:31

Français - 36
Fonction de télétexte (en fonction du modèle)
La plupart des canaux de télévision proposent des services
d’informations via le télétexte. La page d’index du télétexte
contient des instructions sur l’utilisation de ce service. Vous
pouvez en outre sélectionner différentes options à l’aide des
boutons de la télécommande.
☛
Pour que l’affichage des informations de télétexte soit correct,
la réception des chaînes doit être stable. Dans le cas contraire,
des informations pourraient manquer ou certaines pages
pourraient ne pas s’afficher.
1
TV
Permet de quitter l’affichage télétexte (en fonction du modèle)
2
(store)
Permet de mémoriser les pages de télétexte.
3
(size)
Permet d’afficher la moitié supérieure de l’écran en caractères
deux fois plus grands. Appuyez à nouveau sur ce bouton pour
afficher la moitié inférieure de l’écran.
Appuyez à nouveau pour rétablir le mode d’affichage normal.
4
(reveal)
Permet d’afficher le texte masqué (par exemple les réponses
d’un jeu). Appuyez à nouveau sur ce bouton pour rétablir le
mode d’affichage normal.
5
Boutons de couleur (rouge/vert/jaune/bleu)
Si la société émettrice utilise le système FASTEXT, les
différents sujets traités dans la page télétexte disposent
d’un code couleur et peuvent être sélectionnés à l’aide des
boutons de couleur de la télécommande. Appuyez sur le
bouton correspondant à la fonctionnalité requise. La page
s’affiche ainsi que d’autres informations en couleur pouvant
être sélectionnées de la même manière. Pour afficher la page
précédente ou la page suivante, appuyez sur le bouton de
couleur correspondant.
6
(teletext on/mix)
Permet d’activer le mode Télétexte après avoir choisi le canal
diffusant le service télétexte. Appuyez deux fois sur ce bouton
pour superposer le télétexte à l’émission diffusée.
7
(mode)
Permet de sélectionner le mode Télétexte (LIST/FLOF).
Si vous appuyez sur ce bouton en mode LISTE, vous accédez
au mode d’enregistrement de liste. Dans ce mode, vous pouvez
enregistrer une page télétexte dans une liste à l’aide du bouton
(store).
8
(sub-page)
Permet d’afficher une page secondaire.
9
(page up)
Permet d’afficher la page télétexte suivante.
0
(page down)
Permet d’afficher la page télétexte précédente.
!
(index)
Permet d’afficher la page d’index du télétexte (sommaire).
@
(hold)
Permet de bloquer l’affichage sur une page précise, si celle-
ci est reliée à plusieurs pages secondaires qui s’affichent
automatiquement l’une après l’autre. Pour reprendre l’affichage
des autres pages, appuyez à nouveau sur ce bouton.
#
(cancel)
Permet d’afficher le programme lors de la recherche d’une
page.
➢
Vous pouvez changer de page télétexte en appuyant sur les
boutons numériques de la télécommande.
Suite…
BN68-01528A-00Fre.indd 36 2008-4-21 15:40:33

Français - 37
Les pages télétexte sont organisées en six catégories :
Catégorie Sommaire
A
B
C
D
E
F
Numéro de la page sélectionnée
Identité du canal émetteur
Numéro de la page actuelle ou indications de recherche
Date et heure
Texte
Informations sur l’état
Informations FASTEXT
➢
Les informations télétexte sont souvent réparties sur plusieurs
pages qui s’affichent l’une après l’autre. Ces pages sont
accessibles en :
entrant le numéro de page ;
sélectionnant un titre dans une liste ;
sélectionnant un en-tête de couleur (système FASTEXT).
➢
Appuyez sur le bouton TV pour quitter l’affichage télétexte.
BN68-01528A-00Fre.indd 37 2008-4-21 15:40:34

Français - 38
Caractéristiques du kit de fixation murale (VESA)
Installez votre fixation murale sur un mur solide perpendiculaire au sol.
Si vous souhaitez la fixer sur d’autres matériaux de construction, veuillez prendre contact avec
votre revendeur le plus proche. Si vous l’installez au plafond ou sur un mur non droit, elle peut
tomber et provoquer des blessures corporelles graves.
Famille de produit pouce Caract. VESA (A * B) Vis standard Quantité
TELEVISEUR LCD
23 ~ 26 200
*
100 M4
4
32 ~ 40 200
*
200 M6
46 ~ 52
400 * 400
600 * 400
M8
57
700 * 400
(Pas VESA)
57 ~ 70
800 * 4000
80 ~
1400 * 800
TELEVISEUR
ECRAN A
PLASMA
42 ~ 58
400 * 400
600 * 400
M8
4
63
676 * 407
(Pas VESA)
6
63 ~ 70
800 * 400 4
80 ~
1400 * 800 4
➢
Nous avons fourni les dimensions standard pour tous les kits de fixation murale, comme indiqué dans
le tableau ci-dessus.
➢
Un manuel d’installation détaillé et toutes les pièces nécessaires au montage sont fournis avec le kit
de fixation mural.
➢
N’utilisez pas de vis plus longues que la dimension standard car elles pourraient endommager
l’intérieur du téléviseur.
➢
Pour les fixations murales non conformes aux caractéristiques des vis VESA standard, la longueur
des vis peut varier, selon leurs caractéristiques.
➢
N’utilisez pas de vis non conformes aux caractéristiques des vis VESA standard. Ne serrez pas
trop les vis : cela pourrait endommager le produit ou provoquer sa chute, entraînant des blessures
corporelles. Samsung ne peut être tenue responsable de ce type d’accident.
➢
Samsung ne peut être tenue responsable de tout dommage au produit ou toute blessure corporelle
dans le cas de l’utilisation d’une fixation murale non-VESA ou non spécifié, ni si l’utilisateur ne suit
pas les instructions d’installation du produit.
➢
Nos modèles 57” et 63” ne sont pas conformes aux caractéristiques VESA. Vous devez par
conséquent utiliser notre kit de fixation mural approprié pour ce modèle.
➢
Lors du montage, l’inclinaison du téléviseur ne doit pas dépasser 15 degrés.
N’installez pas votre kit de montage mural lorsque votre téléviseur est en fonctionnement.
Une blessure par choc électrique pourrait en résulter.
BN68-01528A-00Fre.indd 38 2008-4-21 15:40:34

Français - 39
Ajustement du support mural (vendu séparément)
Grâce à l’installation d’un support mural, vous pouvez régler facilement la position de votre
téléviseur.
Entrée dans le menu
1 Appuyez sur le bouton ▲, ▼, ◄ ou ► de votre télécommande.
➢
L’écran Ajustement support mural s’affiche.
➢
Si l’écran Ajustement support mural ne s’affiche pas lorsque vous
cliquez sur un bouton de direction en regardant la télévision,
utilisez le menu pour l’afficher.
• Appuyez sur le bouton
MENU pour afficher le menu.
Appuyez sur le bouton
▲ ou ▼ pour sélectionner
Configuration, puis appuyez sur le bouton ENTER.
• Appuyez sur le bouton
▲ ou ▼ pour sélectionner Ajustement
fixation murale, puis appuyez sur le bouton ENTER.
Mémorisation de la position
2 Réglez à la position souhaitée à l’aide des boutons ▲, ▼, ◄, ►.
➢
Si vous appuyez sur une touche fléchée alors qu’aucun OSD n’est
affiché sur l’écran du téléviseur, l’écran de réglage s’affiche.
➢
Appuyez sur le bouton INFO pour effectuer une réinitialisation.
Appuyez sur le bouton
◄ ou ► pour sélectionner Oui, puis
appuyez sur le bouton
ENTER. La position est initialisée sur le
réglage par défaut.
3 Appuyez sur le bouton bleu.
Appuyez sur les boutons
▲ et ▼ pour sélectionner un mode
d’enregistrement parmi
Position1, Position2 et Position3 afin
d’enregistrer la position actuelle.
➢
Si vous ne souhaitez pas enregistrer la position actuelle, appuyez
sur le bouton
RETURN.
➢
Vous ne pouvez pas utiliser les boutons de couleur lorsque vous
sélectionnez un mode d’enregistrement.
4 Appuyez sur le bouton
ENTER pour enregistrer.
➢
Si Position1 est sélectionné, le message Position actuelle
enregistrée sous Position 1 est affiché.
5 Appuyez sur le bouton
ENTER.
➢
La position enregistrée apparaît sur le côté gauche de l’OSD.
Déplacer
Entrer
Retour
Plug & Play
Langue : Français
Horloge
Light Effect
:
LED act. marche
Ajustement fixation murale
Mélodie : Arrêt
Divertissement : Cinéma
Mode éco. : Arrêt
PIP
Configuration
T V
Câble série (1P à 1P) (non fourni)
Panneau arrière
Support mural automatique
Sauvegarder
Retour
Déplacer
Entrer
Sélectionner un moyen de sauvegarde
Position 1
Position 2
Position 3
Ajustement fixation murale
Régler
Sauveg
Centre
►
►
►
►
►
►
►
►
321Position
BN68-01528A-00Fre.indd 39 2008-4-21 15:40:36

Français - 40
Assemblage de la base-support (en fonction du modèle)
Au moyen des 6 vis permettant de solidariser la base-support et le
moniteur, fixez fermement le moniteur à la base-support.
L’aspect extérieur de votre téléviseur peut différer de celui présenté
à l’image.
Si vous fixez le téléviseur au mur,
fermez le couvercle (
1) de la
pièce de connexion de la base-
support à l’aide des deux vis.
Avertissement
Fixez fermement le socle au téléviseur
avant de déplacer ce dernier. Il pourrait
tomber et provoquer de graves dommages.
➢
Le téléviseur doit être soulevé par
plusieurs personnes. Ne posez jamais
le téléviseur sur le sol car cela pourrait
l’endommager.
Conservez toujours le téléviseur en
position verticale.
Accès à la position mémorisée
1 Exécutez l’étape 1 de la procédure
Accès au menu.
2 Appuyez sur un bouton de couleur (Rouge, Vert ou Jaune) pour déplacer le
support mural vers la position enregistrée.
➢ Vous pouvez déplacer le support mural sur l’une des trois positions
prédéfinies en appuyant sur le bouton Rouge (Position 1), Vert (Position
2) ou Jaune (Position 3).
➢ Si vous réglez la position après avoir accédé à une position prédéfinie,
l’écran de position disparaît.
➢ Pour l’installation, consultez le manuel d’installation fourni avec le support
mural.
➢ Pour l’installation du produit, ainsi que l’installation et le déplacement du
support mural, adressez-vous à une société d’installation spécialisée.
➢ Utilisez ce manuel d’installation si vous souhaitez fixer le support sur un mur.
Si vous souhaitez la fixer sur d’autres matériaux de construction, veuillez
prendre contact avec votre revendeur le plus proche.
➢ Le support mural automatique ne fonctionne pas lorsque Anynet+ est activé.
➢ Le modèle 42 pouces n'est pas compatible avec l'ancien modèle de support
mural (WMN5090A).
Ajustement fixation murale
Régler
Sauveg
Centre
►
►
►
►
►
►
►
►
321Position
Position 1
BN68-01528A-00Fre.indd 40 2008-4-21 15:40:38

Français - 41
Montage mural du téléviseur
Si vous tirez, poussez ou grimpez sur le téléviseur, celui-ci peut tomber. Veillez, en particulier,
à ce que vos enfants ne se pendent pas, ni ne déséquilibre le téléviseur. Ils pourraient le faire
basculer et entraîner des blessures graves, voire la mort. Respectez toutes les précautions de
sécurité indiquées dans la brochure relative à la sécurité. Pour une stabilité accrue, installez le
dispositif anti-chute comme indiqué.
Pour éviter toute chute du téléviseur:
1. Placez les vis dans les colliers et xez-les fermement au mur.
Assurez-vous que les vis ont été fermement xées au mur.
En fonction du type de mur, il est possible que vous ayez
besoin de matériel supplémentaire, tel que des chevilles.
Les colliers, vis et chaînettes n’étant pas fournis, veuillez
les acheter séparément.
2. Retirez les vis situées sur la partie centrale arrière du
téléviseur, placez les vis dans les bagues, puis xez-les à
nouveau sur le téléviseur.
Il est possible que les vis ne soient pas fournies avec
le produit. Dans ce cas, veuillez acheter des vis aux
caractéristiques suivantes.
3. Reliez les bagues xées au téléviseur et celles xées sur le
mur à l’aide de chaînettes, puis attachez-les fermement.
Installez le téléviseur à proximité du mur an qu’il ne
bascule pas vers l’arrière.
Il est préférable de relier la chaînette an que les bagues
xées au mur soient placées à même hauteur ou plus bas
que celles xées au téléviseur.
Détachez la chaînette avant de déplacer le téléviseur.
4. Vériez que toutes les connexions sont xées correctement.
Vériez régulièrement que les connexions ne présentent
aucun signe d’usure. Si vous avez un doute quand à la
sécurité de vos connexions, contactez un installateur
professionnel.
➣
➣
➣
➣
➣
➣
Mur
Mur
Attention
BN68-01528A-00Fre.indd 41 2008-4-21 15:40:39

Français - 42
Dépannage
Avant de contacter le service après-vente Samsung, effectuez les vérifications élémentaires
suivantes.Si vous ne pouvez pas résoudre le problème en suivant les instructions ci-dessous,
notez le modèle et le numéro de série de votre téléviseur et contactez votre revendeur local.
Aucune image ou aucun son
Vérifiez que le cordon d’alimentation est branché à une prise secteur.
Vérifiez que vous avez appuyé sur le bouton (Mise hors/sous tension) de la façade du téléviseur
ou sur le bouton POWER de la télécommande.
Vérifiez les paramètres de contraste et de luminosité.
Vérifiez le volume.
Vérifiez si TV Speaker est réglé sur Arrêt.
Image normale, mais aucun son
Vérifiez le volume.
Vérifiez si le bouton MUTE de la télécommande a été actionné.
Aucune image ou image en noir et blanc
Réglez les paramètres de couleur.
Vérifiez que le système d’émission sélectionné est correct.
Interférence du son et de l’image
Essayez d’identifier l’appareil électrique affectant le téléviseur et déplacez-le.
Branchez le téléviseur sur une autre prise secteur.
Image neigeuse ou floue, son altéré
Vérifiez l’orientation, l’emplacement et les branchements de votre antenne.
Cette interférence est souvent due à l’utilisation d’une antenne intérieure.Dysfonctionnements de la télécommande
Remplacez les piles de la télécommande.
Nettoyez la partie supérieure de la télécommande (fenêtre de transmission).
Vérifiez que les pôles “+” et “-” des piles sont orientés correctement.
Vérifiez si les piles ne sont pas déchargées.
L’écran est noir et le témoin d’alimentation clignote à intervalle régulier.
Sur votre ordinateur, allez sur : Alimentation, Câble de signal.
Le mode de gestion d’alimentation est activé.
Déplacez la souris de l’ordinateur ou appuyez sur une touche du clavier.
Sur votre appareil, allez sur (STB, DVD, etc): Alimentation, Câble de signal.
Le mode de gestion d’alimentation est activé.
Appuyez sur le bouton Source du panneau ou de la télécommande.
Allumez et éteignez la télévision.
L’image endommagée apparaît dans le coin de l’écran.
Si Scan uniquement est sélectionné dans certains périphériques externes, l’image endommagée
peut apparaitre dans le coin de l’écran. Ce problème est provoqué par les périphériques externes et
non par le téléviseur.
Le message «Rétablit la valeur par défaut de tous les paramètres» apparaît.
Il s’affiche lorsque vous appuyez longuement sur le bouton EXIT. Les paramètres du produit sont
rétablis sur leurs valeurs par défaut.
BN68-01528A-00Fre.indd 42 2008-4-21 15:40:39

Français - 43
Caractéristiques
Les descriptions et caractéristiques fournies dans ce manuel sont données à titre indicatif
seulement et sont susceptibles d’être modifiées sans préavis.
Nom du modèle PS50A470
Taille de l’écran
(diagonale)
50 inch
Résolution PC 1360 x 768 @ 60 Hz
Son (Sortie) 10 W + 10 W
Dimensions (LxHxP)
Corps
Avec pied
1290 x 740 x 95 mm
1290 x 804 x 319 mm
Poids
Corps
Avec pied
39 kg
41 kg
Considérations
environnementales
Température de
fonctionnement
Humidité au cours du
fonctionnement
Température de stockage
Humidité sur le lieu de
stockage
10 °C à 40 °C (50 °F à 104 °F)
10 % à 80 %, sans condensation
-20 °C à 45 °C (-4 °F à 113 °F)
5 % à 95 %, sans condensation
➢
Ce périphérique est un appareil numérique de classe B.
La conception et les spécifications sont susceptibles de changer sans préavis.
Pour les caractéristiques d’alimentation et de consommation électrique, voir l’étiquette fixée au
produit.
BN68-01528A-00Fre.indd 43 2008-4-21 15:40:39

Comment éliminer ce produit
(déchets d’équipements électriques et électroniques)
(Applicable dans les pays de l’Union Européen et aux autres pays
européens disposant de systémes de collecte sélective)
Ce symbole sur le produit ou sa documentation indique qu’il ne doit
pas être éliminé en fin de vie avec les autres déchets ménagers.
L’élimination incontrôlée des déchets pouvant porter préjudice à
l’environnement ou à la santé humaine, veuillez le séparer des autres
types de déchets et le recycler de façon responsable. Vous favoriserez
ainsi la réutilisation durable des ressources matérielles.
Les particuliers sont invités à contacter le distributeur leur ayant vendu
le produit ou à se renseigner auprès de leur mairie pour savoir où et
comment ils peuvent se débarrasser de ce produit afin qu’il soit recyclé
en respectant l’environnement.
Les entreprises sont invitées à contacter leurs fournisseurs et à
consulter les conditions de leur contrat de vente. Ce produit ne doit pas
être éliminé avec les autres déchets commerciaux.
BN68-01528A-00Fre.indd 44 2008-4-21 15:40:39

Deutsch - 2
Benutzerhinweise
Einbrennen von Standbildern
Zeigen Sie Standbilder (z. B. bei einem Videospiel oder bei Anschluss eines PC an diesen
Plasmamonitor) niemals länger als 2 Stunden auf dem Plasmabildschirm an, da das Bild auf diese
Weise einbrennen kann. Das Einbrennen von Standbildern wird auch als „Bildkonservierung“
bezeichnet. Sie können das Einbrennen vermeiden, indem Sie die Helligkeit und den Kontrast des
Monitors beim Anzeigen von Standbildern verringern.
Höhe
Um normalen Betrieb zu gewährleisten, muss der Plasmabildschirm in einer Höhe unter 2000 m
aufgestellt werden. Der Betrieb des Monitors wird möglicherweise gestört, wenn er in mehr als
2000 m Höhe betrieben wird. Sie dürfen den Plasmabildschirm deshalb nicht in einer Höhe von über
2000 m aufstellen und betreiben.
Wärmeentwicklung auf der Oberseite des Plasmabildschirms
Die Oberseite des Produkts kann nach längerem Betrieb warm werden, da die Wärme aus dem
Monitor über die Entlüftungsöffnung im oberen Teil des Geräts abgeführt wird. Dies ist normal und
weist nicht auf einen Defekt oder eine Fehlfunktion des Geräts hin. Allerdings sollten Kinder von dem
oberen Teil des Geräts ferngehalten werden.
Das Gerät verursacht ein „knackendes“ Geräusch.
Ein „knackendes“ Geräusch entsteht, wenn das Gerätematerial sich aufgrund einer Änderung der
Umgebung, wie z. B. Temperaturschwankungen oder Änderung der Luftfeuchtigkeit, zusammenzieht
oder ausdehnt. Das ist normal und stellt keinen Defekt des Geräts dar.
Pixelfehler
Der Plasmabildschirm besitzt eine Bildfläche mit 1.230.000 (bei SD-Auflösung) bis 3.150.000
(bei HD-Auflösung) Pixeln, für dessen Herstellung hoch entwickelte Technologie eingesetzt wird.
Allerdings können ein paar zu helle oder zu dunkle Pixel auf der Bildfläche zu sehen sein. Diese
Pixelfehler haben keinen Einfluss auf die Geräteleistung.
Vermeiden Sie den Betrieb des Plasmabildschirms bei Temperaturen unter 5°C.
Ein Standbild, dass zu lange angezeigt wird, kann zu einer bleibenden Beschädigung des
Plasmabildschirms führen
Der Betrieb des Plasmafernsehers im Format 4:3 über einen längeren Zeitraum
kann links, rechts und in der Mitte des Monitors Spuren der Bildränder
hinterlassen, die durch die unterschiedliche Lichtemission auf dem Bildschirm
verursacht werden. Das Wiedergeben einer DVD oder der Betrieb einer
Spielkonsole kann auf dem Bildschirm zu ähnlichen Effekten führen. Schäden,
die durch die o. g. Effekte verursacht wurden, unterliegen nicht der Garantie.
Nachbilder auf dem Monitor
Das Anzeigen von Standbildern von Videospielen und PC-Anwendungen über einen bestimmten
Zeitraum kann zu partiellen Nachbildern führen. Um diesen Effekt zu verhindern, verringern Sie
Helligkeit und Kontrast, wenn Sie Standbilder anzeigen möchten.
Garantie
– Durch diese Garantie nicht abgedeckt sind Schäden, die durch Einbrennen von Bildern entstehen.
– Das Einbrennen von Bildern wird von der Garantie nicht abgedeckt.
Installieren
Wenden Sie sich an den autorisierten Kundendienst, wenn das Gerät an einem Ort mit hoher
Konzentration an Staubpartikeln, außergewöhnlich hoher oder geringer Raumtemperatur,
extrem hoher Luftfeuchtigkeit, in unmittelbarer Nähe zu chemischen Lösungsmitteln oder für den
Dauerbetrieb, z.B. auf Bahn- oder Flughäfen, aufgestellt werden soll. Eine nicht fachgerechte
Aufstellung kann zu schweren Schäden am Gerät führen.
Wenden Sie sich an SAMSUNG WORLD WIDE
Bei Fragen oder Hinweisen zu Produkten von Samsung setzen Sie sich bitte mit dem SAMSUNG-
Kundendienstzentrum in Verbindung. (Weitere Informationen auf der Rückseite).
© 2008 Samsung Electronics Co., Ltd. Alle Rechte vorbehalten.
BN68-01528A-00_GER.indd 2 2008-4-21 15:17:08

Deutsch - 3
Deutsch
Symbole
☛ ➢
Tastendruck
Wichtig
Hinweis
Inhalt
Allgemeine Informationen
Benutzerhinweise ............................................ 2
Lieferumfang ................................................... 4
Verwenden des Standfußes ........................... 4
Systemsteuerung ............................................ 5
Anschlussfeld .................................................. 6
Fernbedienung für Sehbehinderte
.........................8
Funktion
Ein- und Ausschalten des Fernsehgeräts ....... 9
Anzeigen von Menüs ...................................... 9
Plug & Play-Funktion ....................................10
Verwenden der Taste TOOLS (Extras) .......... 12
Anzeigen externer Signalquellen .................. 12
Gerätenamen bearbeiten .............................. 13
Kanalsteuerung
Automatisches Speichern von Kanälen ........ 13
Manuelles Speichern von Kanälen ............... 14
Sender hinzufügen/sperren ........................... 15
Sortieren der gespeicherten Kanäle ............. 16
Kanäle benennen .......................................... 16
Senderfeinabstimmung durchführen ............. 17
Bildeinstellungen
Bildstandard ändern ...................................... 18
Bildeinstellungen anpassen .......................... 18
Kongurieren detaillierter Bildeinstellungen .. 19
Bildoptionen .................................................. 20
Verwenden der 3D-Funktion ......................... 22
Zurücksetzen der Bildeinstellungen auf die
werkseitig festgelegten Standardwerte ......... 24
Toneinstellungen
Audiofunktionen ............................................ 25
Auswählen des Tonmodus (modellabhängig)
.. 26
Anschließen von Kopfhörern
(separat erhältlich) ........................................ 26
Funktionsbeschreibung
Zeitfunktionen ...............................................27
Sprache / Melodie / Lichteffekt / Entertainment/
Unterhaltung / Energiesparmod. / PIP
. ............. 28
PC-Anzeige
Einrichten der PC-Software
(unter Windows XP) ...................................... 29
Eingangsmodus (PC) .................................... 30
Einstellungen für PC vornehmen .................. 31
Informationen zu Anynet+
Was ist Anynet
+
? .......................................... 32
Anschließen von Anynet+-Geräten ............... 32
Einrichten von Anynet+ ................................. 33
Suchen von Anynet+-Geräten und
Umschalten zwischen diesen Geräten .......... 33
Aufnehmen .................................................... 34
Tonwiedergabe mit einem Receiver .............. 35
Prüfen Sie Folgendes, bevor Sie sich
an den Service wenden ................................ 35
Anhang
Videotext-Funktion (modellabhängig) ........... 36
Spezikation (VESA) der Wandhalterung ..... 38
Verstellbare Wandhalterung
(gesondert lieferbar) ...................................... 39
Montieren des Standfußes
(modellabhängig) .......................................... 40
Befestigen des Fernsehgeräts
an der Wand .................................................. 41
Problembehandlung ...................................... 42
Technische Daten ......................................... 43
BN68-01528A-00_GER.indd 3 2008-4-21 15:17:08

Deutsch - 4
Lieferumfang
Bedienungsanleitung Fernbedienung/
AAA-Batterien
Netzkabel Reinigungstuch
Garantiekarte/
Sicherheitshinweise
(Nicht überall
verfügbar)
Untere Abdeckung /
Schrauben (2 Stück)
(Informationen hierzu finden Sie
auf Seite 40)
Ferritkern für Netzkabel Ferritkern für S-Video
Separat erhältlich
Antennenkabel Komponentenkabel Audiokabel PC-Kabel
SCART-Kabel PC-Audio-Kabel HDMI-Kabel HDMI/DVI-Kabel
➢
Ferritkern (Netzkabel, S-Video)
Ferritkerne werden zum Abschirmen von Kabeln gegen Störungen
verwendet.
Öffnen Sie beim Anschließen eines Kabels den Ferritkern, und
befestigen Sie ihn in der Nähe des Steckers am Kabel.
Verwenden des Standfußes
➢
Der Plasmafernseher sollte
von mindestens zwei Personen
getragen werden. Um
Beschädigungen zu vermeiden,
legen Sie den Plasmafernseher
nie auf den Fußboden. Der
Plasmabildschirm muss sich immer
in aufrechter Position befinden.
Der Plasmabildschirm kann um 20
Grad nach recht und links gedreht
werden.
-20° ~ 20°
BN68-01528A-00_GER.indd 4 2008-4-21 15:17:11

Deutsch - 5
1
SOURCE
Z
eigt ein Menü mit allen verfügbaren
Signalquellen an (TV, Ext.1, Ext.2, AV,
S-Video, Komp, PC, HDMI1, HDMI2,
HDMI3
).
➢
Im Bildschirmmenü können Sie
diese Taste wie die
ENTER auf der
Fernbedienung verwenden.
2
MENU
Drücken Sie diese Taste, um die Funktionen
des Fernsehgeräts in einem Bildschirmmenü
anzuzeigen.
3
– +
Drücken, um die Lautstärke zu erhöhen oder
zu verringern.
Wählen Sie im Bildschirmmenü die
– +
Schaltflächen, so wie Sie die ◄ und ► Tasten
auf der Fernbedienung verwenden.
4
C/P.
Kanal wechseln. Wählen Sie im
Bildschirmmenü die
C/P.
Schaltflächen, so wie Sie die ▲ und ▼ Tasten
auf der Fernbedienung verwenden.
5
Stromversorgungsanzeige
Beim Einschalten des Fernsehgeräts blinkt
die Betriebsanzeige kurz und erlischt
anschließend. Im Standbymodus leuchtet die
Anzeige permanent.
6
(POWER)-Taste
Drücken Sie diese Taste, um das Fernsehgerät
ein- und auszuschalten.
7
Fernbedienungssensor
Richten Sie die Fernbedienung auf diesen
Sensor am Fernsehgerät.
8
Lautsprecher
Systemsteuerung
Vorderseite (oder Seitenverkleidung)
➢
Die Produktfarbe und -form können sich je nach Modell unterscheiden.
BN68-01528A-00_GER.indd 5 2008-4-21 15:17:12

Deutsch - 6
Anschlussfeld
Fortsetzung...
☛
Stellen Sie sicher, dass der Fernseher und alle angeschlossenen Geräte ausgeschaltet sind, ehe
Sie weitere Geräte anschließen.
Achten Sie beim Anschließen eines externen Geräts auf die Farbcodierung: Stecker und Buchse
müssen die gleiche Farbe aufweisen.
1
NETZANSCHLUSS
Zum Anschließen des mitgelieferten
Netzkabels.
2
COMPONENT IN
Audio (AUDIO L/R) und Videoeingänge (Y/P
B/
PR) für Komponentenanschluss.
3
PC IN / AUDIO
Zum Anschließen an den Video- und
Audioausgang eines Computers.
4
EXT 1, EXT 2
Ein- und Ausgänge für externe Geräte wie z. B.
Videorecorder, DVD-Player, Spielekonsolen
oder Video-Disc-Player.
Anschlussmöglichkeiten
Anschluss
Eingang Ausgang
Video Audio (L/R) RGB Video + Audio (L/R)
EXT 1
✔ ✔ ✔
Nur TV-Ausgang ist
verfügbar.
EXT 2
✔ ✔ Ausgang frei wählbar.
5
3D SYNC OUT
An 3D-IR-Sender anschließen.
6
Externe Audiogeräte anschließen
Schließen Sie die Cinch-Audiosignale des
Fernsehgeräts an eine externe Quelle an, z. B.
an ein Audiogerät.
7
SERVICE
− Anschluss für Servicezwecke
− Verbinden Sie das Fernsehgerät über
den seriellen Anschluss mit der elektrisch
angetriebenen Wandhalterung, wenn Sie
den Betrachtungswinkel des Fernsehgeräts
mit der Fernbedienung einstellen möchten.
Rückseite
➢
Die Produktfarbe und -form können sich je nach Modell unterscheiden.
Kabelfernsehen
Netzwerk
1
432 6 8
9
7
oder
oder
5
BN68-01528A-00_GER.indd 6 2008-4-21 15:17:14

Deutsch - 7
8
HDMI IN 1,2
– Beim Anschluss von Geräten über eine
HDMI-Schnittstelle ist keine zusätzliche
Audioverbindung erforderlich.
– Eine Verbindung über HDMI/DVI-Kabel
kann nur über HDMI IN 2 erfolgen.
➢
Was ist HDMI?
− HDMI, die hochauflösende
Multimediaschnittstelle, ermöglicht die
Übertragung von hochauflösenden
digitalen Videodaten und mehreren
Kanälen mit Digitalaudio.
− Mit dem entsprechenden Kabel
ermöglicht der HDMI/DVI-Anschluss
DVI-Verbindungen zu einem
erweiterten Gerät (nicht mitgeliefert).
Der Unterschied zwischen HDMI und
DVI besteht darin, dass ein Gerät mit
HDMI kleiner ist, mit dem Kopierschutz
HDCP (Hoch Bandwidth Digital Copy
Protection/ digitaler Kopierschutz)
ausgestattet ist und digitalen
Mehrkanalton unterstützt.
DVI IN (HDMI 2) AUDIO R/L
DVI-Audioausgänge für externe Geräte.
9
Antenneneingang
75 Ω-Koaxialanschluss für Antenne/
Kabelanschluss.
Unterstützte Modi für HDMI/DVI und
Komponenteneingang
480i 480p 576i 576p 720p 1080i
HDMI/DVI 50 Hz
X X X O O O
HDMI/DVI 60 Hz
X O X X O O
Komp. O O O O O O
1
HDMI IN 3
Zum Anschließen an die HDMI-Buchse von
Geräten mit HDMI-Ausgang
2
S-VIDEO oder VIDEO / AUDIO L/R
S-Video-, Video- und Audioeingänge für
externe Geräte wie z. B. Camcorder oder
Videorecorder.
3
Kopfhörerbuchse
Wenn Sie beim Fernsehen andere Personen
im Zimmer nicht stören möchten, können Sie
Kopfhörer an das Fernsehgerät anschließen.
➢
Das Verwenden von Kopfhörern bei hoher
Lautstärke über einen längeren Zeitraum
kann zu Hörschäden führen.
3
1
2
➢
Die Produktfarbe und -form können sich je nach Modell unterscheiden.
Seitenverkleidung
oder
BN68-01528A-00_GER.indd 7 2008-4-21 15:17:16

Deutsch - 8
1
Netztaste
(Zum An- und Ausschalten
des Fernsehgeräts)
2
TV-Modus direkt aufrufen
3
Zifferntasten für direkte
Programmplatzeingabe
4
Taste für Kanalsteuerung
(Informationen hierzu finden
Sie auf Seite 15.)
5
Ton vorübergehend
ausschalten
6
Lautstärke erhöhen
Lautstärke verringern
7
Taste für Kanalsteuerung
(Informationen hierzu finden
Sie auf Seite 15).
8
Hiermit können Sie häufig
verwendete Funktionen
mithilfe von Symbolen
schnell ausführen.
9
Steuern des Cursors im Menü
0
Anzeigen von Informationen
zur aktuellen Sendung
#
Drücken Sie diese Taste,
um den optionalen Anzeige-
und Audiomodus für Sport,
Kinofilme und Spiele
auszuwählen.
$
Videorekorder /DVD
Funktionen (Rücklauf, Stopp,
Wiedergabe/Pause, Vorlauf)
%
Verfügbare Signalquelle
auswählen
^
Vorheriger Kanal
&
Nächster Kanal
Vorheriger Kanal
*
Bildschirm-Hauptmenü
anzeigen
(
Taste für TruSurround
XT-Modus
)
Zurück zum vorherigen
Menü
a
OSD-Menü ausblenden
b
Auswahl der Bildgröße
c
Verwenden Sie dies, wenn
Sie ein DMA-Gerät von
Samsung über eine HDMI-
Schnittstelle anschließen
und in den DMA-Modus
wechseln. Weitere
Informationen zu den
Betriebsabläufen finden Sie
im Benutzerhandbuch des
DMA-Geräts.
Diese Schaltfläche
ist verfügbar, Diese
Schaltfläche ist verfügbar,
wenn “Anynet+ (HDMI-
CEC)” auf “An” geschaltet
ist. (siehe Seite 33)
d
Bildeffekt wählen (siehe
Seite 18)
e
Räumliche Anzeige von
3-Filmen oder –Spielen mit
einer 3D-Brille.
Videotext-Funktionen
(Informationen hierzu finden Sie
auf Seite 36.)
2
Videotextanzeige beenden
(modellabhängig)
7
Videotextseite speichern
8
Videotextgrösse
0
Verborgenen Inhalt
einblenden
!
Fastext-Thema auswählen
@
Videotext anzeigen/Videotext
und Fernsehsendung
zugleich anzeigen
%
Videotext-Modus auswählen
(LIST/FLOF)
^
Untergeordnete
Videotextseite
&
P : Nächste
Videotextseite
P
: Vorige Seite
*
Videotext-Index
)
Seite weiter anzeigen
(nicht umblättern)
a
Videotext abbrechen
Fernbedienung für Sehbehinderte
Fortsetzung...
BN68-01528A-00_GER.indd 8 2008-4-21 15:17:17

Deutsch - 9
Batterien in die Fernbedienung einsetzen
1 Heben Sie die Abdeckung auf der Rückseite der
Fernbedienung an, wie in der Abbildung dargestellt.
2 Legen Sie zwei AAA-Batterien ein.
➢
Achten Sie darauf, dass die Pole der Batterien
(+ und –) wie im Batteriefach angezeigt ausgerichtet sind.
Verwenden Sie nicht gleichzeitig verschiedene
Batterietypen (z. B. Mangan- und Alkali-Batterien)
3 Schließen Sie die Abdeckung, wie in der Abbildung
dargestellt.
➢
Wenn die Fernbedienung für einen längeren Zeitraum nicht
verwendet wird, nehmen Sie die Batterien heraus, und lagern Sie sie an einem kühlen, trockenen
Ort. Die Fernbedienung funktioniert bis zu einer Entfernung von 7 m zum Fernsehgerät. (Bei
normaler Nutzung der Fernbedienung halten die Batterien ungefähr ein Jahr.)
➢
Wenn die Fernbedienung nicht funktioniert: Überprüfen Sie Folgendes:
1. Ist das Fernsehgerät eingeschaltet?
2. Wurden Plus- und Minuspol der Batterien vertauscht?
3. Sind die Batterien leer?
4. Gibt es einen Stromausfall oder ist das Netzkabel nicht angeschlossen?
5. Befindet sich eine Leuchtstoffröhre oder ein Neonschild in der Nähe?
➢
Batterien und Akkus gehören nicht in den Hausmüll.
Als Verbraucher sind Sie verpflichtet, alte Batterien und Akkus zur umweltschonenden Entsorgung
zurückzugeben.
Sie können alte Batterien und Akkus bei den öffentlichen Sammelstellen in Ihrer Gemeinde oder
überall dort abgeben, wo Batterien und Akkus der betreffenden Art verkauft werden.
Ein- und Ausschalten des Fernsehgeräts
Das Netzkabel wird auf der Rückseite des Fernsehgeräts angeschlossen.
1 Schließen Sie das Netzkabel an eine geeignete Netzsteckdose an.
➢
Die erforderliche Netzspannung ist auf der Rückseite des Geräts angegeben. Zulässige
Netzfrequenzen sind 50 Hz und 60 Hz.
2 Drücken Siezum Einschalten des Fernsehgeräts den Netzschalter auf der Vorderseite des
Fernsehgeräts oder die Taste POWER auf der Fernbedienung. Der Sender, den Sie zuletzt gesehen
haben, wird automatisch wieder aufgerufen. Falls Sie bisher keine Sender gespeichert haben, wird
wahrscheinlich kein deutliches Bild angezeigt. Informationen zum Speichern von Kanälen finden
Sie unter „Sender automatisch einstellen“ auf Seite 13 und unter „Sender manuell einstellen“ auf
Seite 14.
➢
Wenn das Fernsehgerät zum ersten Mal eingeschaltet wird, werden automatisch einige
Grundeinstellungen vorgenommen. Weitere Informationen finden Sie unter „Plug & Play-
Funktion“ auf Seite 10.
3 Drücken Sie zum Ausschalten des Fernsehgeräts den POWERschalter auf der Vorderseite des
Fernsehgeräts oder die Taste POWER auf der Fernbedienung.
4 Drücken Sie zum Einschalten des Fernsehgeräts den POWERschalter auf der Vorderseite des
Fernsehgeräts oder die Taste POWER bzw. die Zifferntasten auf der Fernbedienung.
Anzeigen von Menüs
1 Drücken Sie die Taste MENU. Auf der linken Seite befinden sich
sechs Symbole: Bild, Ton, Sender, Einstellungen, Eingang.
2 Wählen Sie mit den Tasten ▲ oder ▼ eines der Symbole aus.
Drücken Sie die Taste
ENTER, um in das Untermenü des
Symbols zu wechseln.
3 Drücken Sie die Taste ▲ oder ▼, um im Menü zu navigieren.
Drücken Sie die Taste
ENTER, um Menüoptionen auszuwählen.
4 Ändern Sie mit den Tasten ▲/▼/◄/► die gewählte Option.
Durch Drücken der Taste
RETURN gelangen Sie zurück ins
vorherige Menü.
5 Drücken Sie zum Schließen des Menüs die Taste EXIT.
Navig.
Eingabe
Beenden
Modus :
Standard
Zellhelligkeit 7
Kontrast 95
Helligkeit 45
Schärfe 50
Farbe 50
Farbton V50 R50
Detaileinstellungen
Bildoptionen
Reset : OK
Bild
T V
BN68-01528A-00_GER.indd 9 2008-4-21 15:17:18

Deutsch - 10
Plug & Play-Funktion
Wenn das Fernsehgerät zum ersten Mal eingeschaltet wird,
werden automatisch einige Grundeinstellungen vorgenommen.
Die folgenden Einstellungen sind verfügbar.
☛
Wenn Sie versehentlich das falsche Land für Ihren
Fernseher einstellen, werden die Zeichen auf dem Bildschirm
möglicherweise falsch angezeigt.
1
Wenn sich das Gerät im Standby-Modus befindet, drücken Sie die
POWER Taste auf der Fernbedienung. Die Meldung Starten von
Plug&Play wird angezeigt. Drücken Sie die Taste
ENTER
.
2 Das Menü Sprache wird nach einigen Sekunden automatisch
eingeblendet.
3 Wählen Sie mit den Tasten ▲ oder ▼ die gewünschte Sprache aus.
Drücken Sie die Taste
ENTER. Die Meldung Wählen Sie
‘Privatgebrauch’, wenn Sie diesen Fernseher in einem
Privathaushalt verwenden. wird angezeigt.
4 Drücken Sie die Taste ◄ oder ►, um Shop-Demo oder
Privatgebrauch auszuwählen, und drücken Sie dann die Taste
ENTER. Die Meldung zum Überprüfen des Verbindungsstatus
der Antenne wird angezeigt.
➢
Die Standardeinstellung ist Privatgebrauch.
➢
Wir empfehlen Ihnen, das Fernsehgerät im Modus
Privatgebrauch zu verwenden, um das optimale Bild für
den Privatgebrauch zu erzielen.
➢
Der Modus Shop-Demo ist nur geeignet, wenn das Gerät
in einem Verkaufsbereich verwendet wird.
➢
Das Gerät ist versehentlich auf den Modus Shop-Demo
(Shop) eingestellt, und Sie möchten wieder zurück zu
Privatgebrauch (Standard) wechseln: Drücken Sie die
Lautstärketaste. Wenn das Menü “Lautstärke” (Volume)
angezeigt wird, halten Sie die Taste MENÜ 5 Sekunden
lang gedrückt.
5 Stellen Sie sicher, dass die Antenne an den Fernseher
angeschlossen ist. Drücken Sie dann die Taste ENTER. Das
Menü Land wird angezeigt.
6 Wählen Sie durch Drücken der Tasten ▲ oder ▼ Ihr Land (oder
Ihre Region) aus. Drücken Sie auf
ENTER.
Fortsetzung...
Plug & Play
Sprache
Navig.
Eingabe
English
Deutsch
Français
Italiano
▼
Plug & Play
Antenneneingang prüfen
Eingabe
Überspr.
OK
Plug & Play
Starten von Plug&Play
OK
Eingabe
Plug & Play
Wählen Sie ‘Privatgebrauch’, wenn
Sie diesen Fernseher in einem
Privathaushalt verwenden.
Navig.
Eingabe
Shop-Demo
Privatgebrauch
Plug & Play
Land
Navig.
Eingabe
Überspr.
Belgien
Frankreich
Deutschland
Italien
Andere
Plug & Play
P 1 C -- 40 MHz
0 %
Eingabe
Überspr.
Start
BN68-01528A-00_GER.indd 10 2008-4-21 15:17:19

Deutsch - 11
7 Drücken Sie zum Starten des Suchlaufs der Kanäle die
Taste
ENTER. Die Kanalsuche wird automatisch gestartet
und beendet. Wenn Sie alle verfügbaren Sender gespeichert
haben, wird das Menü
Zeit einstellen angezeigt. Drücken Sie
die Taste
ENTER.
8 Drücken Sie auf ◄ oder ►, um Monat, Datum, Jahr, Stunde
oder
Minute einzustellen. Nehmen Sie die Einstellungen mit
den Tasten ▲ oder ▼ vor.
➢
Sie können Monat, Datum, Jahr, Stunde oder Minute
durch Drücken der Zifferntasten auf der Fernbedienung
direkt einstellen.
9 Bestätigen Sie die vorgenommenen Einstellungen mit der Taste
ENTER. Die Meldung Wir wünschen gute Unterhaltung!
wird
angezeigt. Drücken Sie abschließend die Taste ENTER.
➢
Auch wenn Sie die Taste ENTER nicht drücken, verschwindet
die Meldung nach einigen Sekunden von selbst.
So setzen Sie diese Funktion zurück:
1 Drücken Sie die Taste MENU, um das Menü anzuzeigen.
2 Drücken Sie die Taste ▲ or ▼, um Einstellungen
auszuwählen, und drücken Sie dann die Taste
ENTER.
3 Drücken Sie die Taste ENTER, um Plug & Play auszuwählen.
Die Meldung
Starten von Plug & Play wird angezeigt.
OK
Wir wünschen gute Unterhaltung!
Navig.
Eingabe
Zurück
Plug & Play
Sprache : Deutsch
Zeit
Lichteffekt
: TV Modus An
Einstellung für Wandmontage
Melodie : Aus
Entertainment : Aus
Energiesparmod. : Aus
PIP
Einstellungen
T V
Plug & Play
Navig.
Einstellen
Eingabe
01 01 2008 00 04
Zeit einstellen
Monat Datum Jahr Stunde
Minute
BN68-01528A-00_GER.indd 11 2008-4-21 15:17:20

Deutsch - 12
Anzeigen externer Signalquellen
Sie können zwischen dem Eingangssignal angeschlossener
Geräte, wie z. B. Videorecorder, DVD-Player, Set-Top-Box und
der TV-Signalquelle (Antenne oder Kabel) wechseln.
1 Drücken Sie die Taste MENU, um das Menü anzuzeigen.
2 Drücken Sie die Taste ▲ oder ▼, um Eingang auszuwählen,
und drücken Sie dann die Taste
ENTER.
3 Drücken Sie nochmals die Taste ENTER, um Quellen
auszuwählen.
4 Drücken Sie die Taste ▲ oder ▼, um die Signalquelle
auszuwählen, und drücken Sie dann die Taste
ENTER.
Verfügbare Signalquellen:
TV, Ext.1, Ext.2, AV, S-Video,
Komp., PC, HDMI1, HDMI2, HDMI3
➢
Sie können nur solche externen Geräte wählen, die an das
Fernsehgerät angeschlossen sind.
➢
Sie können diese Optionen auswählen, indem Sie einfach die
Taste
SOURCE auf der Fernbedienung drücken.
➢
Um wieder zum regulären
Fernsehprogramm zurückzukehren, drücken Sie die Taste
TV
und wählen die Nummer des gewünschten Kanals.
Navig.
Eingabe
Zurück
Quellen :
TV
Name bearb.
Anynet+ (HDMI-CEC)
Eingang
T V
Navig.
Eingabe
Zurück
TV
Ext.1 : −−−−
Ext.2 : −−−−
AV : −−−−
S-Video : −−−−
Komp. : −−−−
PC : −−−−
HDMI 1 : −−−−
HDMI 2 : −−−−
HDMI 3 : −−−−
QuellenT V
Verwenden der Taste TOOLS (Extras)
Sie können die Taste TOOLS (Extras) verwenden, um häufig verwendete Funktionen schnell und
einfach auszuwählen. Der Inhalt des Menüs Extras hängt davon ab, welche externe Signalquelle
Sie für die Anzeige verwenden.
1 Drücken Sie die Taste TOOLS.
Das Menü
Extras wird geöffnet.
2 Wählen Sie mit der Taste ▲ oder ▼ eine Menüoption aus, und
drücken Sie dann die
ENTER-Taste.
3 Drücken Sie die Taste ▲/▼/◄/►/ENTER, um die
ausgewählten Elemente anzuzeigen, zu ändern oder zu
verwenden.
Ausführliche Beschreibungen der einzelnen Funktionen finden
Sie auf der jeweiligen Seite.
• Anynet+ (HDMI-CEC), siehe Seite 32
• Bildmodus, siehe Seite 18
• Tonmodus, siehe Seite 25
• Sleep-Timer, siehe Seite 27
• SRS TS XT, siehe Seite 25
• Energiesparmodus, siehe Seite 29
• Dual I-II, siehe Seite 26
Extras
Anynet+ (HDMI-CEC)
Bildmodus : Standard
Tonmodus : Benutzerdef.
Sleep-Timer : Aus
SRS TS XT : Aus
Energiesparmod. : Aus
Dual I-II : Mono
BeendenNavig.
t
Einstellen
BN68-01528A-00_GER.indd 12 2008-4-21 15:17:21

Deutsch - 13
Gerätenamen bearbeiten
Sie können der externen Signalquelle einen Namen geben.
1 Drücken Sie die Taste MENU, um das Menü anzuzeigen.
2 Drücken Sie die Taste ▲ oder ▼, um Eingang auszuwählen,
und drücken Sie dann die Taste
ENTER.
3 Drücken Sie die Taste ▲ oder ▼, um Name bearb.
auszuwählen, und drücken Sie dann die Taste
ENTER.
4 Drücken Sie die Taste ▲ oder ▼, um die externe Signalquelle
zum Bearbeiten auszuwählen, und drücken Sie dann die Taste
ENTER.
5 Wählen Sie mit den Tasten ▲ oder ▼ das gewünschten Gerät,
und drücken Sie dann die Taste
ENTER.
Verfügbare Gerätenamen:
VCR, DVD, Kabel-STB, Sat-STB,
PVR-STB, AV-Receiver, Spiel, Camcorder, PC, TV, Internet-
Fernsehen, Blu-Ray, HD-DVD, DMA
6 Drücken Sie zum Beenden die Taste EXIT.
Automatisches Speichern von Kanälen
Sie können nach verfügbaren Frequenzbereichen suchen (die
Verfügbarkeit ist von Land zu Land verschieden).
Die automatisch zugewiesenen Programmplätze entsprechen
unter Umständen nicht den gewünschten Programmplätzen.
Sie können jedoch die Programmplätze manuell sortieren und
nicht gewünschte Sender wieder löschen.
1 Drücken Sie die Taste MENU, um das Menü anzuzeigen.
2 Drücken Sie die Taste ▲ oder ▼, um Kanal auszuwählen, und
drücken Sie dann die Taste
ENTER.
3 Drücken Sie die Taste ENTER. Es wird eine Liste der
verfügbaren Länder angezeigt.
4 Wählen Sie mit den Tasten ▲ und ▼ Ihr Land aus, und drücken
Sie dann die Taste
ENTER.
5
Wählen Sie mit den Tasten ▲ und ▼ die Option Autom.
speichern aus, und drücken Sie dann die Taste ENTER.
6 Drücken Sie zum Starten des Suchlaufs erneut die Taste
ENTER. Die Suche wird automatisch beendet
➢
Um die Suche vorzeitig abzubrechen, drücken Sie die
Taste
MENU oder ENTER.
Navig.
Eingabe
Zurück
Land :
Deutschland
Autom. speichern
Man. speichern
Programmverwaltung
Sortieren
Name
Feinabstimmung
Kanal
T V
Autom. speichern
P 1 C -- 40 MHz
0 %
Eingabe
Zurück
Start
Navig.
Eingabe
Zurück
Ext.1 : −−−−
Ext.2 :
−−−−
AV : −−−−
S-Video : −−−−
Komp. : −−−−
PC : −−−−
HDMI 1 : −−−−
HDMI 2 : −−−−
HDMI 3 : −−−−
Name bearb.
T V
−−−−
VCR
DVD
Kabel-STB
Sat-STB
PVR-STB
AV-Receiver
Spiel
▼
T V
Navig.
Eingabe
Zurück
Land : Deutschland
Autom. speichern
Man. speichern
Programmverwaltung
Sortieren
Name
Feinabstimmung
Kanal
Belgien
Frankreich
Deutschland
Italien
Niederlande
Spanien
Schweiz
GB
▼
Navig.
Eingabe
Zurück
Quellen :
TV
Name bearb.
Anynet+ (HDMI-CEC)
Eingang
T V
BN68-01528A-00_GER.indd 13 2008-4-21 15:17:22

Deutsch - 14
Manuelles Speichern von Kanälen
Sie können Fernsehsender (einschließlich Kabelsender)
speichern.
Bei der manuellen Senderspeicherung sind folgende Optionen
verfügbar:
Gefundene Sender speichern.
Die Programmnummer der einzelnen Sender, die Sie festlegen
möchten.
1 Drücken Sie die Taste MENU, um das Menü anzuzeigen.
2 Drücken Sie die Taste ▲ oder ▼, um Kanal auszuwählen, und
drücken Sie dann die Taste
ENTER.
3 Drücken Sie die Taste ▲ oder ▼, um Man. speichern
auszuwählen, und drücken Sie dann die Taste
ENTER.
4 Wählen Sie mit den Tasten ▲ oder ▼ die gewünschte Option,
und drücken Sie dann die Taste
ENTER.
5 Wenn Sie die gewünschten Änderungen vorgenommen haben,
drücken Sie die Taste
ENTER.
6 Drücken Sie zum Beenden die Taste EXIT.
Programm (der Programmplatz, der dem Kanal zugewiesen werden soll)
− Drücken Sie die Tasten ▲ oder ▼, um die gewünschte Nummer zu wählen.
➢
Die Kanalnummer können Sie auch direkt durch Drücken der Zifferntasten (0 ~ 9)
auswählen.
Fernsehnorm: Auto/PAL/SECAM/NTSC4.43
− Wählen Sie mit den Tasten ▲ oder ▼ die gewünschte Farbnorm aus.
Tonsystem: BG/DK/I/L
− Wählen Sie mit den Tasten ▲ oder ▼ die gewünschte Audionorm aus.
Kanal (Wenn Ihnen die Nummer des zu speichernden Kanals bekannt ist)
− Wählen Sie mit den Tasten ▲ oder ▼ die Option
C (Terrestrischer Kanal) oder S (Kabelkanal)
aus.
− Drücken Sie die Taste ►, und drücken Sie dann die Tasten ▲ oder ▼, um die gewünschte
Nummer auszuwählen.
➢
Die Kanalnummer können Sie auch direkt durch Drücken der Zifferntasten (0 ~ 9)
auswählen.
➢
Falls kein oder nur schlechter Ton zu hören sein sollte, wählen Sie einen anderen
Audiostandard aus.
Suchlauf (Wenn Ihnen die Kanalnummern nicht bekannt sind)
− Drücken Sie zum Starten des Suchlaufs die Taste ▲ oder ▼.
− Der Tuner durchsucht den Frequenzbereich, bis der erste Sender bzw. der ausgewählte Sender
empfangen wird.
Speichern (zum Speichern des Kanals und des zugehörigen Programmplatzes)
− Drücken Sie die Taste
ENTER, um OK zu wählen.
☛
Kanalmodus
P (Programm-Modus): Nach Abschluss der Einstellungen sind den Sendern Ihrer Region
Positionsnummern von P00 bis P99 zugewiesen. In diesem Modus können Sie Sender durch
Eingabe des Programmplatzes auswählen.
C (Antennenempfangsmodus): In diesem Modus können Sie Kanäle durch Eingabe der
Nummer anwählen, die jedem Antennensender zugeordnet ist.
S (Kabelkanal-Modus): In diesem Modus können Sie Sender durch Eingabe der Nummer
wählen, die jedem Kabelsender zugeordnet ist.
Navig.
Eingabe
Zurück
Land :
Deutschland
Autom. speichern
Man. speichern
Programmverwaltung
Sortieren
Name
Feinabstimmung
Kanal
T V
Navig.
Eingabe
Zurück
Programm :
P 1
Fernsehnorm : Auto
Tonsystem : BG
Kanal : C --
Suchlauf : 40 MHz
Speichern : ?
Man. speichern
T V
BN68-01528A-00_GER.indd 14 2008-4-21 15:17:22

Deutsch - 15
Sender hinzufügen/sperren
Mit Hilfe der Programmverwaltung können Sie Sender bequem
sperren oder hinzufügen.
1 Drücken Sie die Taste MENU, um das Menü anzuzeigen.
2 Drücken Sie die Taste ▲ oder ▼, um Kanal auszuwählen, und
drücken Sie dann die Taste
ENTER.
3 Drücken Sie die Taste ▲ oder ▼, um Programmverwaltung
auszuwählen, und drücken Sie dann die Taste
ENTER.
Sender hinzufügen
Mit Hilfe der Kanalliste können Sie Kanäle hinzufügen.
4
Wählen Sie die Kanalliste durch Drücken der Taste ENTER.
5 Wechseln Sie zum Feld ( ), indem Sie die Tasten ▲/▼/◄/►
drücken, und wählen Sie den hinzuzufügenden Sender
aus. Drücken Sie dann die Taste
ENTER, um den Sender
hinzuzufügen.
➢
Wenn Sie erneut die Taste ENTER drücken, wird das
Symbol (
) neben dem Kanal angezeigt, und der Kanal
wird nicht hinzugefügt.
Sender sperren
Mit dieser Funktion können Sie nicht autorisierte Benutzer,
z. B. Kinder, daran hindern, ungeeignete Programme
anzuschauen, indem das Bild blockiert und der Ton
stummgeschaltet wird.
6 Drücken Sie die Taste ▲ oder ▼, um Kindersicherung
auszuwählen, und drücken Sie dann die Taste
ENTER.
7 Wählen Sie durch Drücken der Tasten ▲ oder ▼ die Option
An, und drücken Sie dann die Taste ENTER.
8 Drücken Sie die Tasten ▲ oder ▼, um die Kanalliste
auszuwählen, und drücken Sie dann die Taste
ENTER.
9 Wechseln Sie zum Feld ( ), indem Sie die Tasten ▲/▼/◄/►
drücken, und wählen Sie den zu sperrenden Sender aus. Drücken Sie dann die Taste
ENTER.
➢
Wenn Sie erneut die Taste ENTER drücken, wird das Symbol ( ) neben dem Kanal angezeigt,
und die Kanalsperre wird nicht aufgehoben.
➢
Wenn die Kindersicherung aktiviert ist, wird ein blauer Bildschirm angezeigt.
10 Drücken Sie zum Beenden die Taste EXIT.
➢
Diese Optionen können Sie auch durch Drücken der Taste
CH LIST auf der Fernbedienung aufrufen.
Navig.
Eingabe
Zurück
Land :
Deutschland
Autom. speichern
Man. speichern
Programmverwaltung
Sortieren
Name
Feinabstimmung
Kanal
T V
Navig.
Eingabe
Zurück
Kanalliste
Kindersicherung : Aus
Programmverwaltung
T V
Kanalliste
P 1 C 6
1 / 10
▲
▼
Progr.
0
C --
1 C --
2 C --
3 C --
4 C --
5 C --
6 C --
7 C --
8 C --
9 C --
Zufüg Sperren
Navig. Eingabe
Seite
Zurück
BN68-01528A-00_GER.indd 15 2008-4-21 15:17:24

Deutsch - 16
Sortieren der gespeicherten Kanäle
Mit diesem Vorgang können Sie die Programmnummern
gespeicherter Sender ändern.
Das ist möglicherweise nach dem automatischen Speichern
von Sendern erforderlich.
1 Drücken Sie die Taste MENU, um das Menü anzuzeigen.
2 Drücken Sie die Taste ▲ oder ▼, um Kanal auszuwählen, und
drücken Sie dann die Taste
ENTER.
3 Drücken Sie die Taste ▲ oder ▼, um Sortieren auszuwählen,
und drücken Sie dann die Taste
ENTER.
4 Wählen Sie mit den Tasten ▲ oder ▼ den Kanal aus, den Sie
verschieben möchten, und drücken Sie dann die Taste ENTER
.
5 Wählen Sie mit den Tasten ▲ oder ▼ die Programmnummer,
die dem Kanal zugewiesen werden soll.
Drücken Sie dann die Taste
ENTER. Der Sender befindet sich
nun auf dem neuen Speicherplatz, und alle anderen Sender
wurden entsprechend verschoben.
6 Wiederholen Sie die Schritte 4 und 5, bis Sie allen Kanälen die
gewünschten Programmnummern zugewiesen haben.
7 Drücken Sie zum Beenden die Taste EXIT.
Kanäle benennen
Sendernamen werden automatisch zugewiesen, sofern
diese Information im Sendersignal enthalten ist. Sie können
Sendernamen bearbeiten und ändern.
1 Drücken Sie die Taste MENU, um das Menü anzuzeigen.
2 Drücken Sie die Taste ▲ oder ▼, um Kanal auszuwählen, und
drücken Sie dann die Taste
ENTER.
3 Drücken Sie die Taste ▲ oder ▼, um Name auszuwählen, und
drücken Sie dann die Taste
ENTER.
4 Drücken Sie die Taste ▲ oder ▼, um den Kanal auszuwählen,
dem ein neuer Name zugewiesen werden soll, und drücken
Sie dann die Taste
ENTER.
5 Wählen Sie mit den Tasten ▲ oder ▼ Buchstaben (A~Z),
Zahlen (0-9) und sonstige Zeichen aus. (Führt zu dieser
Reihenfolge: A ~ Z, 0 ~ 9, +, -, *, /, Leerzeichen).
Blättern Sie zum vorherigen oder nächsten Zeichen, indem
Sie die Taste ◄ oder ► und anschließend die Taste ENTER
drücken.
6 Wiederholen Sie die Schritte 4 bis 5 für jeden Kanal, dem Sie
einen neuen Namen zuweisen möchten.
7 Drücken Sie zum Beenden die Taste EXIT.
Navig.
Eingabe
Zurück
Land :
Deutschland
Autom. speichern
Man. speichern
Programmverwaltung
Sortieren
Name
Feinabstimmung
Kanal
T V
Navig.
Eingabe
Zurück
Land :
Deutschland
Autom. speichern
Man. speichern
Programmverwaltung
Sortieren
Name
Feinabstimmung
Kanal
T V
Einstellen
Einstellen
Zurück
Progr. Send. Name
▲
0 C01 −−−−−
1 C- - −−−−−
2 C- - −−−−−
3 C- - −−−−−
4 C- - −−−−−
5 C- - −−−−−
6 C- - −−−−−
7 C- - −−−−−
8 C- - −−−−−
9 C- - −−−−−
▼
Sortieren
T V
Navig.
Eingabe
Zurück
Progr. Send. Name
▲
0 C01 −−−−−
1
C- - −−−−−
2 C- - −−−−−
3 C- - −−−−−
4 C- - −−−−−
5 C- - −−−−−
6 C- - −−−−−
7 C- - −−−−−
8 C- - −−−−−
9 C- - −−−−−
▼
Name
T V
BN68-01528A-00_GER.indd 16 2008-4-21 15:17:24

Deutsch - 17
Senderfeinabstimmung durchführen
Bei klarem Empfang ist keine Feinabstimmung nötig, da diese
automatisch während der Sendersuche erfolgt. Falls das Signal
jedoch schwach oder das Bild verzerrt ist, müssen Sie unter
Umständen eine manuelle Feinabstimmung durchführen.
1 Drücken Sie die Taste MENU, um das Menü anzuzeigen.
2 Drücken Sie die Taste ▲ oder ▼, um Kanal auszuwählen, und
drücken Sie dann die Taste
ENTER.
3 Drücken Sie die Taste ▲ oder ▼, um Feinabstimmung
auszuwählen, und drücken Sie dann die Taste
ENTER.
4 Mit den Tasten ◄ oder ► können Sie durch entsprechende
Einstellungen die Bild- und Tonqualität optimieren. Drücken Sie
die Taste
ENTER.
➢
Drücken Sie die Taste INFO. Durch Speichern
der Feinabstimmung ändert sich die Farbe des
Bildschirmmenüs für den Kanal von Weiß nach Rot und
die Markierung „*“ wird hinzugefügt.
➢
Um die Feinabstimmung auf 0 zurückzusetzen, wählen Sie
mit der Taste ▲ oder ▼ die Option Reset aus. Drücken Sie
die Taste
ENTER.
5 Drücken Sie zum Beenden die Taste EXIT.
P 1 *
Mono
Bild : Standard
Ton : Benutzerdef.
SRS TS XT : Aus
−−
:
−−
Navig.
Eingabe
Zurück
Land :
Deutschland
Autom. speichern
Man. speichern
Programmverwaltung
Sortieren
Name
Feinabstimmung
Kanal
T V
Fine Tune
P 1
0
Einstellen
Speichern
Zurück
Reset
BN68-01528A-00_GER.indd 17 2008-4-21 15:17:25

Deutsch - 18
Bildeinstellungen anpassen
Das Gerät verfügt über mehrere Einstellmöglichkeiten für die
Bildqualität:
1 Drücken Sie die Taste MENU, um das Menü anzuzeigen.
2 Drücken Sie die Taste ENTER, um Bild auszuwählen.
3 Drücken Sie erneut die Taste ENTER, um Modus auszuwählen.
4 Wählen Sie mit den Tasten ▲ oder ▼ den gewünschten Modus,
und drücken Sie dann die Taste
ENTER.
Verfügbare Modi:
Dynamisch, Standard, Film
5 Wählen Sie mit den Tasten ▲ oder ▼ die gewünschte Option, und drücken Sie dann die Taste
ENTER.
6 Wenn Sie die gewünschten Änderungen vorgenommen haben, drücken Sie die Taste ENTER.
7 Drücken Sie zum Beenden die Taste EXIT.
Zellhelligkeit–Kontrast – Helligkeit – Schärfe – Farbe – Farbton
➢
Sie können die Funktion “Farbton” (Tint) im Analog-TV-, Ext.-, AV- oder S-Video-Modus des
PAL-Systems nicht verwenden.
➢
Im PC-Modus können nur Zellhelligkeit, Kontrast und Helligkeit eingestellt werden.
Drücken Sie die Taste ◄ or ►, bis die optimale Einstellung erreicht ist.
Bildstandard ändern
Sie können den Bildstandard auswählen, der für Ihre
Sehgewohnheiten am besten geeignet ist.
1 Drücken Sie die Taste MENU, um das Menü anzuzeigen.
2 Drücken Sie die Taste ENTER, um Bild auszuwählen.
3 Drücken Sie erneut die Taste ENTER, um Modus
auszuwählen.
4 Wählen Sie mit den Tasten ▲ oder ▼ den gewünschten
Modus, und drücken Sie dann die Taste
ENTER.
Verfügbare Modi:
Dynamisch, Standard, Film
➢
D
ie Einstellungswerte können je nach Eingangsquelle
unterschiedlich sein.
5 Drücken Sie zum Beenden die Taste EXIT.
➢
Wählen Sie Dynamisch aus, wenn Sie tagsüber oder bei
starker Umgebungsbeleuchtung fernsehen möchten.
Wählen Sie Standard für den normalen Fernsehmodus.
Wählen Sie Film aus, wenn Sie sich einen Film ansehen
möchten.
Einfaches Einstellen
1 Drücken Sie die Taste TOOLS auf der Fernbedienung.
2 Wählen Sie mit den Tasten ▲ oder ▼ den Bildmodus.
3 Wählen Sie die gewünschte Option mit den Tasten ◄ und ►
Extras
Anynet+ (HDMI-CEC)
Bildmodus ◄ Standard ►
Tonmodus : Benutzerdef.
Sleep-Timer : Aus
SRS TS XT : Aus
Energiesparmod. : Aus
Dual I-II : Mono
Navig.
Eingabe
Zurück
Modus : Standard
Zellhelligkeit 7
Kontrast 95
Helligkeit 45
Schärfe 50
Farbe 50
Farbton V50 R50
Detaileinstellungen
Bildoptionen
Reset : OK
Bild
T V
Navig.
Eingabe
Zurück
Modus : Standard
Zellhelligkeit 7
Kontrast 90
Helligkeit 45
Schärfe 50
Farbe 50
Farbton V50 R50
Detaileinstellungen
Bildoptionen
Reset : OK
Bild
T V
Navig.
Einstellen
Beenden
T V
Navig.
Eingabe
Zurück
Modus : Dynamisch
Zellhelligkeit : 7 7
Kontrast 95
Helligkeit 45
Schärfe 50
Farbe 50
Farbton V50 R50
Detaileinstellungen
Bildoptionen
Reset : OK
Bild
Dynamisch
Standard
Film
BN68-01528A-00_GER.indd 18 2008-4-21 15:17:26

Deutsch - 19
Konfigurieren detaillierter Bildeinstellungen
Sie können die detaillierten Bildparameter einstellen.
1 Drücken Sie die Taste MENU, um das Menü anzuzeigen.
2 Drücken Sie die Taste ENTER, um Bild auszuwählen.
3 Drücken Sie die Taste ▲ oder ▼, um Detaileinstellungen
auszuwählen, und drücken Sie dann die Taste
ENTER.
4 Wählen Sie mit den Tasten ▲ oder ▼ die gewünschte Option,
und drücken Sie dann die Taste ENTER.
Verfügbare Optionen:
Schwarzabgleich, Optimalkontrast,
Gamma, Farbraum, Weißabgleich, Hautton, Kantenglättung.
5 Wenn Sie die gewünschten Änderungen vorgenommen haben,
drücken Sie die Taste ENTER.
6 Drücken Sie zum Beenden die Taste EXIT.
➢
Die Option Detaileinstellungen steht in den Modi Standard
oder Film zur Verfügung.
➢
Im PC-Modus können von den Detaileinstellungen nur
Optimalkontrast, Gamma und Weißabgleich eingestellt
werden.
Schwarzabgleich: Aus/Gering/Mittel/Hoch
Sie können direkt auf dem Bildschirm den Schwarzwert
auswählen, um die Bildschirmtiefe anzupassen.
Optimalkontrast: Aus/Gering/Mittel/Hoch
Sie können den Bildschirmkontrast so anpassen, dass ein optimaler Kontrast gewährleistet ist.
Gamma: -3 ~ +3
Sie können die mittlere Bildhelligkeit einstellen.
Drücken Sie die Taste ◄ oder ►, bis die optimale Einstellung erreicht ist.
Farbraum : Autom./Nativ/Benutzerdef.
Der Farbraum ist eine Farbmatrix bestehend aus den Farben rot, grün und blau.
Wählen Sie Ihren bevorzugten Farbraum, um die Welt in den natürlichsten Farben zu erfahren.
−
Auto: Mit dem Farbraum “Auto” wird, je nach Programmquelle, der natürlichste Farbton eingestellt.
−
Nativ: Der Farbraum “Nativ” ermöglicht tiefe und lebhafte Farbtöne.
−
Benutzerdef.: Hiermit stellen Sie den Farbbereich wunschgemäß ein. (siehe “Anpassen
des Farbraums”)
Anpassen des Farbraums
Farbe: Rot, Grün, Blau, Cyan, Magenta und Gelb
Hiermit stellen Sie den Farbbereich wunschgemäß ein.
Die Option
Farbe ist verfügbar, wenn der Farbraum auf Benutzerdef. eingestellt ist.
Wählen Sie mit den Tasten ▲ order ▼ eine der Optionen
Rot, Grün, Blau, Gelb, Cyan oder
Magenta aus.
Drücken Sie die
Enter-Taste.
−
Rot/Grün/Blau: Im Farbmodus können Sie die RGB-Werte der jeweils ausgewählten Farbe
einstellen.
Wählen Sie mit den Tasten ▲ order ▼ eine der Optionen
Rot, Grün oder Blau aus, um sie zu
ändern. Drücken Sie die Enter-Taste.
Drücken Sie die Taste ◄ order ►, um den Wert einer bestimmten Option zu erhöhen oder zu
verringern.
Drücken Sie die
Enter-Taste.
−
Reset: Setzt den Farbbereich auf die Standardwerte zurück.
Weißabgleich: R-Offset/G-Offset/B-Offset/R-Gain/G-Gain/B-Gain/Reset
Um natürlichere Bildfarben zu erhalten, können Sie die Farbtemperatur anpassen.
R-Offset/G-Offset/B-Offset/R-Gain/G-Gain/B-Gain: Wenn Sie den Anpassungswert ändern, wird
der angepasste Bildschirm aktualisiert.
Wählen Sie mit den Tasten ▲ oder ▼ die gewünschte Option, und drücken Sie dann die Taste
ENTER. Drücken Sie die Taste ◄ oder ►, bis die optimale Einstellung erreicht ist.
Reset: Der zuvor angepasste Weißabgleich wird auf die Werkseinstellungen zurückgesetzt.
Hautton -15~+15
Sie können den Farbton Rosa im betonen.
Drücken Sie die Tasten ◄ und ► bis Sie die optimale Einstellung festgelegt haben.
➢
Wenn Sie den Anpassungswert ändern, wird der angepasste Bildschirm aktualisiert.
Kantenglättung: Ein/Aus
Sie können die Objektgrenzen betonen.
Navig.
Eingabe
Zurück
Schwarzabgleich :
Aus
Optimalkontrast : Mittel
Gamma : 0
Farbraum : Nativ
Weißabgleich
Hautton : 0
Kantenglättung
: Aus
Detaileinstellungen
T V
Navig.
Eingabe
Zurück
Modus : Standard
Zellhelligkeit 7
Kontrast 95
Helligkeit 45
Schärfe 50
Farbe 50
Farbton V50 R50
Detaileinstellungen
Bildoptionen
Reset : OK
Bild
T V
BN68-01528A-00_GER.indd 19 2008-4-21 15:17:26

Deutsch - 20
Bildoptionen
Sie können die detaillierten Bildparameter einstellen.
1 Drücken Sie die Taste MENU, um das Menü anzuzeigen.
2 Drücken Sie die Taste ENTER, um Bild auszuwählen.
3 Drücken Sie die Tasten ▲ oder ▼, um Bildoptionen
auszuwählen, und drücken Sie dann
ENTER.
4 Wählen Sie mit den Tasten ▲ oder ▼ die gewünschte Option,
und drücken Sie dann die Taste
ENTER.
5 Wenn Sie die gewünschten Änderungen vorgenommen haben,
drücken Sie die Taste
ENTER.
6 Drücken Sie zum Beenden die Taste Beenden.
➢
Im PC-Modus können von den Farbtemp., Format nur
Bildschirm-Einbrennschutz und Format eingestellt werden.
Farbtemp.: Kalt2/Kalt1/Normal/Warm1/Warm2
➢
Wenn der Bildmodus auf Dynamisch oder Standard
eingestellt ist, können Sie
Warm1 und Warm2 nicht wählen.
Format: Autom. Breit/ 16:9/Breitenzoom/Zoom, 4:3/Nur Scan
Sie können ein Bildformat auswählen, das Ihren
Sehgewohnheiten am besten entspricht.
−
Autom. Breit: Bild vergrößern und vom 4:3- auf 16:9-
Seitenverhältnis umstellen.
− 16:9: Stellt das Bildformat auf den Breitbildmodus 16:9 ein.
−
Breitenzoom: Diese Option vergrößert das Bild auf mehr als
4:3. Verschieben Sie das Bild mit den Tasten ▲ oder ▼ nach
oben oder nach unten, nachdem Sie
mit der Taste ◄ oder ►
eine Auswahl getroffen haben.
− Zoom: Vergrößert das Bild vertikal.
− 4:3: Stellt das Bildformat auf den Normalmodus 4:3 ein.
− Nur Scan: Mit dieser Funktion wird das ganze Bild auch bei
Versorgung mit HDMI- (720p/1080i),
Komponentensignalen
(1080i) vollständig und ohne Beschneidung angezeigt.
Nach Auswahl von "Nur Scan" im HDMI (1080i) oder
Komponentenmodus (1080i):
Drücken Sie die Tasten
◄ oder ► , um auszuwählen, und drücken Sie dann die ENTER-Taste.
Drücken Sie die Taste
▲, ▼, ◄ oder ►, um das Bild nach oben, unten, links oder rechts zu
verschieben.
Reset: Drücken Sie die Taste
◄ oder ►, um Reset zu wählen, und Sie dann die ENTER-Taste. Sie
können die Einstellung initialisieren.
➢
Beim HDMI-Bildformat „Nur Scan“ kann es je nach AV-Gerät passieren, dass der Bildschirm am
Rand abgeschnitten wird oder dass eine bestimmte Farbe auf den Bildschirm erscheint.
➢
Bei einem HDMI-Anschluss (1080p) mit 24, 25, 30, 50 und 60 Hz und einem
Komponentenanschluss (1080p) mit 50 und 60 Hz wird nur die Signalquelle unterstützt.
➢
Sie können das Bildformat ändern, indem Sie auf der Fernbedienung einfach die Taste P.SIZE drücken.
➢
Je nach Signalquelle können die Bildgrößenoptionen variieren.
➢
Die Funktion Autom. Breit ist nur in den Modi TV, Ext, Ext.2, AV und S-Video verfügbar.
➢
Sie können die Einstellungen für jedes externe Gerät einstellen und speichern, das Sie an einen
Eingang des Fernsehgeräts angeschlossen haben.
➢
Im PC-Modus können nur die Modi “16:9” und “4:3“ eingestellt werden.
Bildgröße und Bildposition mit der Zoom-Funktion ändern
Wenn die Bildgröße über die Zoom-Funktion geändert wird, können die Positionierung und Größe des
Bildes mit den Tasten ▲ oder ▼ vertikal angepasst werden.
Verschieben Sie das Bild mit den Tasten ▲ oder ▼ nach oben oder nach unten, nachdem Sie mit
der Taste ◄ oder ► eine Auswahl getroffen haben.
Verändern Sie mit den Tasten ▲ oder ▼ vertikal die Größe des Bildes, nachdem Sie mit der Taste
◄ oder ► eine Auswahl getroffen haben.
Fortsetzung...
Navig.
Eingabe
Zurück
Farbtemp. : Normal
Format : Autom. Breit
Bildschirmmodus : 16:9
Digitale RM : Auto
Real 100 Hz-Demo : Aus
DNle : Aus
HDMI-Schwarzwert: Normal
Blaumodus : Aus
Bildschirm-Einbrennschutz
3D-Effekt
Bildoptionen
T V
Navig.
Eingabe
Zurück
Autom. Breit
16:9
Breitenzoom
Zoom
4:3
Nur Scan
Format
T V
Navig.
Eingabe
Zurück
Modus : Dynamisch
Zellhelligkeit 7
Kontrast 95
Helligkeit 45
Schärfe 50
Farbe 50
Farbton V50 R50
Detaileinstellungen
Bildoptionen
Reset : OK
Bild
T V
BN68-01528A-00_GER.indd 20 2008-4-21 15:17:27

Deutsch - 21
Navig.
Eingabe
Zurück
Pixel-Shift
Vollweiss
Korrekturmuster
Seite grau : Dunkel
Bildschirm-Einbrennschutz
T V
Fortsetzung...
Bildschirmmodus: 16:9
/
Breitenzoom
/
Zoom/4:3
Wenn Sie die Bildgröße bei einem Fernsehgerät im 16:9-Format
auf Automatisch einstellen, können Sie bestimmen, dass
das Bild als 4:3 WSS (Breitbilddienst) oder gar nicht sehen
angezeigt werden soll. Da jedes europäische Land eine andere
Bildgröße verwendet, können die Benutzer sie damit einstellen.
− 16:9: Stellt das Bildformat auf den Breitbildmodus 16:9 ein.
−
Breitenzoom: Diese Option vergrößert das Bild auf mehr als 4:3
.
− Zoom: Vergrößert das Bild vertikal.
− 4:3: Stellt das Bildformat auf den Normalmodus 4:3 ein.
➢
Diese Funktion ist im Modus Autom. Breit verfügbar.
➢
Diese Funktion ist im Komponenten- oder HDMI-Modus nicht verfügbar
Digitale RM: Aus/Gering/Mittel/Hoch/Auto
Wenn das vom Fernsehgerät empfangene Signal schwach ist, können Sie diese Funktion aktivieren,
um ggf. Bildrauschen und Doppelkonturen auf dem Bildschirm zu verringern.
➢
Bei schwachem Signal wählen Sie diejenige der anderen Optionen, bei der das beste Bild
angezeigt wird.
Real 100Hz-Demo : Aus/Ein
Sie erkennen deutlich den Unterschied zwischen "Real 100Hz" und 50Hz, insbesondere bei
Sendungen mit schnellen Bewegungen. Deshalb können Sie, wenn Sie ein Bild mit langsamen
Bewegungen betrachten, nicht zwischen "Real 100Hz" und 50Hz unterscheiden." Demo 100Hz
funktioniert nur mit einem 50Hz-Signal. Der Demomodus "Real 100Hz" verwendet Spezialbilder, die
bei Geschäftsdemos zum Einsatz kommen.
DNIe: Aus/Demo/Ein
Dieses Fernsehgerät weist die DNIe-Funktion auf und bietet daher hohe Bildqualität. Wenn DNIe
eingestellt wird, ist auf dem Bildschirm die DNIe-Funktion aktiviert. Wenn Sie DNIe auf Demo
festlegen, können Sie auf dem Bildschirm zu Demonstrationszwecken die aktivierte DNIe und ein
normales Bild anzeigen. Mit dieser Funktion können Sie den Unterschied in der Bildqualität erkennen.
➢
DNIe
TM
(Digital Natural Image engine)
Mit dieser Funktion erhalten Sie durch 3D-Rauschunterdrückung, Detailverbesserung,
Kontrastverstärkung und verbesserte Weißdarstellung ein schärferes Bild. Der neue
Bildausgleichsalgorithmus sorgt für ein helleres, klareres und viel detailreicheres Bild. Durch die
DNIe
TM
-Technologie wird jedes Signal Ihren Augen angepasst.
➢
Diese Zusatzfunktion ist im PC-Modus nicht verfügbar.
➢
DNIe ist nur im Modus Dynamisch verfügbar.
HDMI-Schwarzwert: Normal/Gering
Mit dieser Funktion können Sie die Bildqualität einstellen, wenn es mit dem HDMI-Eingang im
eingeschränkten RGB-Bereich (16 bis 235) zu Einbrennerscheinungen (Auftreten von Schwarzwerten,
geringem Kontrast, schwachen Farben usw.) kommt.
➢
Diese Funktion ist nur bei Verbindung des externen Eingangs mit HDMI (RGB-Signale) aktiv.
Blaumodus: Aus/Ein
Diese Funktion ist für Experten zum Ausmessen von AV-Geräten bestimmt. Mit dieser Funktion
werden das rote und das grüne Signal aus dem Videosignal entfernt, sodass nur das blaue Signal
angezeigt wird. Damit wird ein Blaufilter erzeugt, mithilfe dessen die Farbe und der Farbton von
Videogeräten wie DVD-Playern, Heimkinosystemen usw. eingestellt werden können.
Mit dieser Funktion können Sie die Farbe und den Farbton auf Werte einstellen, die dem Signalpegel
der verschiedenen Videogeräte angemessen sind. Verwenden
Sie hierzu die Streifenmuster für die Farben Rot/Grün/
Blau/Cyan/Magenta/Gelb, ohne zusätzlich den Blaufilter zu
verwenden.
➢
Der Blaumodus ist verfügbar, wenn der Bildmodus auf
Film oder Standard eingestellt ist.
Einbrennschutz
Dieses Gerät ist mit Einbrennschutz-Technologie ausgestattet, um die
Möglichkeit des Einbrennens des Monitorbildes zu verringern. Diese
Technologie ermöglicht das Einstellen von vertikalen (Pixel vertikal)
und horizontalen (Pixel horizontal) Bildbewegungen. Die Zeiteinstellung
ermöglicht das Programmieren der Dauer zwischen Bildbewegungen
in Minuten.
− Pixel-Shift: Diese Funktion verschiebt Pixel auf dem
Plasmabildschirm horizontal oder vertikal, um die
Möglichkeit des Einbrennens des Bildes zu minimieren.
• Wählen Sie durch Drücken der Tasten ▲ oder ▼ für
Pixel-Shift die Optionen Aus oder An, und drücken Sie
dann die Taste
ENTER.
•
Wählen Sie mit den Tasten ▲ oder ▼ die gewünschte Option,
und drücken Sie dann die Taste
ENTER.
Verfügbare Optionen: Pixel horizontal, Pixel vertikal, Zeit
Navig.
Eingabe
Zurück
Farbtemp. :
Normal
Format : Autom. Breit
Bildschirmmodus : 16:9
Digitale RM : Auto
Real 100 Hz-Demo :
DNle : Ein
HDMI-Schwarzwert : Normal
Blaumodus : Aus
Bildschirm-Einbrennschutz
3D-Effekt
Bildoptionen
T V
16:9
Breitenzoom
Zoom
4:3
Navig.
Eingabe
Zurück
Farbtemp. :
Normal
Format : Autom. Breit
Bildschirmmodus : 16:9
Digitale RM : Auto
Real 100 Hz-Demo : Aus
DNle : Ein
HDMI-Schwarzwert : Normal
Blaumodus : Aus
Bildschirm-Einbrennschutz
3D-Effekt
Bildoptionen
T V
BN68-01528A-00_GER.indd 21 2008-4-21 15:17:28

Deutsch - 22
Navig.
Eingabe
Zurück
Pixel-Shift : Ein
Pixel horizontal : 2
Pixel vertikal : 2
Zeit : 2 Min
Pixel-Shift
T V
➢
Optimale Einstellung für Pixel den Pixelabstand
PC TV/Ext/AV/Komp./HDMI
Pixel horizontal 1 2
Pixel vertikal 1 2
Zeit (Minuten) 2 2 Min
➢
Der Pixel Shift-Wert kann in Abhängigkeit von der
Monitorgröße (Zoll) und dem ausgewählten Modus variieren.
➢
Diese Funktion ist im Modus “Nur Scan” nicht verfügbar.
− Weiß : Diese Funktion dient zum Entfernen von Nachbildern auf
dem Bildschirm, indem sie die Farbe aller Pixel in Weiß ändert.
Verwenden Sie diese Funktion, wenn Nachbilder oder -symbole
auf dem Bildschirm angezeigt werden. Diese können insbesondere dann auftreten, wenn ein Standbild
über längere Zeit auf dem Bildschirm angezeigt wurde.
− Blättern: Diese Funktion dient zum Entfernen von Nachbildern auf dem Bildschirm, indem alle Pixel des
Plasmabildschirms nach einem bestimmten Muster verschoben werden. Verwenden Sie diese Funktion,
wenn Nachbilder oder -symbole auf dem Bildschirm angezeigt werden. Diese können insbesondere dann
auftreten, wenn ein Standbild über längere Zeit auf dem Bildschirm angezeigt wurde.
− Seite grau: Sie verhindern bei Anzeige im Format 4:3 Beschädigungen des Bildschirms, indem Sie einen
Weißabgleich an den beiden linken Bildschirmrändern vornehmen.
Dunkel: Bei Anzeige im Format 4:3 werden die beiden seitlichen Bildschirmränder abgedunkelt.
Hell: Bei Anzeige im Format 4:3 werden die beiden seitlichen Bildschirmränder aufgehellt.
➢
Zum Entfernen von Nachbildern verwenden Sie entweder die Funktion Weiß oder die Funktion Blättern.
Beide Fun ktionen entfernen Nachbilder auf dem Bildschirm, die Funktion Blättern ist jedoch effektiver.
➢
Die Funktion zum Entfernen von Nachbildern muss über einen längeren Zeitraum (ca. 1 Stunde)
ausgeführt werden, um Nachbilder auf dem Bildschirm effektiv zu entfernen. Wenn das Nachbild nach
dem Ausführen der Funktion nicht entfernt ist, wiederholen Sie die Anwendung der Funktion.
➢
Drücken Sie zum Deaktivieren dieser Funktion eine beliebige Taste auf der Fernbedienung.
Verwenden der 3D-Funktion
Sie können 3D-Filme und Spiele auf Ihrem Fernsehgerät anzeigen. Wenn Sie die 3D-Funktion verwenden,
können Sie mit der 3D-Spezialbrille räumliche Bilder genießen.
3,5 mm Stereoanschluss für RCA-Kabel (nicht im Lieferumfang)
3D-Brille
(nicht im Lieferumfang)
3D-IR-Sender
(nicht im Lieferumfang)
PC
HDMI/DVI-Kabel (nicht im Lieferumfang)
Rückseite des
Fernsehgeräts
Anschlüsse
➢
Das Aussehen der 3D-Brille und des Senders ist vom Modell der Brille abhängig.
BN68-01528A-00_GER.indd 22 2008-4-21 15:17:30

Deutsch - 23
1 Verbinden Sie den PC-Ausgang Ihres Computers über ein HDMI/DVI-Kabel mit dem HDMI IN
2-Anschluss des Fernsehgeräts.
2 Verbinden Sie den Audio Out-Ausgang der Soundkarte des Computers über ein 3,5 mm Stereo/
2RCA-Kabel mit dem DVI IN (HDMI 2) [R-AUDIO-L]-Eingang auf der Rückseite des Fernsehgeräts.
3 Schließen Sie den Sender an den 3D SYNC OUT-Ausgang auf der Rückseite des Fernsehgeräts an.
4 Schalten Sie das Fernsehgerät an, und stellen Sie am Fernsehgerät HDMI2 als Signalquelle ein.
Weitere Informationen zur 3D-Brille (und zum Sender) erhalten Sie im Benutzerhandbuch zur
3D-Brille.
Stellen Sie die PC-Auflösung ein.: PS50A470: 1024 x 768 bei 60 Hz, 1360 x 768 bei 60 Hz
Die optimale PC-Auflösung für PS50A470 beträgt 1360 x 768. Wenm im 3D-Modus ein Signal mit
1024 x 768 angeschlossen ist, wird das Bild im 4:3-Format mit grauen Balken auf der linken und
rechten Seite angezeigt.
Der 3D-IR-Sender tauscht Informationen mit der 3D-Brille aus.
Deshalb sollte sich der 3D-IR-Sender in der Nähe der 3D-Brille befinden.
Er wird aktiviert, wenn das HDMI- oder DVI-Eingangssignal auf RGB gestellt ist, und DVI-Ton
unterstützt wird.
Wenn der Strom an- oder ausgeschaltet wird, wechselt der Modus auf den Standard und das Format
wird gespeichert.
Der 3D-Effekt wird unabhängig vom Bildmodus aktiviert oder deaktiviert.
Wenn der 3D-Effekt aktiviert ist, sind nur die Bildmenüs Kontrast, Helligkeit, 3D-Effekt und Reset aktiviert.
Damit Sie 3D-Effekte verwenden können, muss eine 3D-Grafikkarte oder eine Grafikkarte installiert
sein, die 3D-Software unterstützt.
Die 3D-Brille und der Sender müssen vom gleichen Hersteller stammen.
Wenn Sie ein mit 3D-Brille längere Zeit Spiele spielen oder fernsehen, kann es zu Augenbelastungen
oder Kopfschmerzen kommen.
3D-Brillen (und Sender) von anderen Herstellern als Samsung werden möglicherweise nicht unterstützt.
Wenn Sie feststellen, dass der Bildschirm bei Verwendung der 3D-Funktion flackert, stellen Sie eine
dunklere Umgebungshelligkeit ein, oder schalten Sie die fluoreszierende Lampe aus, damit Sie den
Bildschirm in optimalem Zustand betrachten.
Wechseln des Bildschirmmodus
Durch wechseln des Modus werden die Signale für den linken
und rechten Kanal und so die dem Auge angezeigten Bilder
ausgetauscht.
1 Schließen Sie das Fernsehgerät, den PC und den 3D-IR-
Sender wie in der Abbildung gezeigt an.
2 Drücken Sie die Taste SOURCE und wählen Sie HDMI.
3 Drücken Sie die Taste MENU, um das Menü anzuzeigen.
Wählen Sie mit den Tasten ▲ und ▼ die Option Bild aus, und
drücken Sie dann die Taste
ENTER.
4 Wählen Sie mit den Tasten ▲ und ▼ die Option Bildoptionen
aus, und drücken Sie dann die Taste
ENTER.
Wählen Sie mit den Tasten ▲ und ▼, um 3D-Effekt
auszuwählen, und drücken Sie dann die Taste
ENTER.
5 Wählen Sie mit den Tasten ▲ und ▼, um Modus
auszuwählen, und drücken Sie dann die Taste
ENTER.
Wählen Sie mit den Tasten ▲ und ▼ die Option Aus, Modus1,
Modus2 oder 2D-Konvertierng aus, und drücken Sie dann die
Taste
ENTER.
• Aus: Deaktiviert die 3D-Effekte.
• Modus1: Bei Modus1 wird zuerst die rechte Seite synchronisiert.
• Modus2: Bei Modus2 wird zuerst die linke Seite synchronisiert.
• 2D-Konvertierng
: Erzeugt ein 2D-Bild aus den 3D-Daten.
Sie können diese Option wählen, wenn Sie Schwindel empfinden,
um vorübergehend 2D-Bilder anzuzeigen. Deaktivieren Sie die
3D-Funktion aber vollständig, wenn Sie die räumliche Anzeige
komplett beenden möchten.
Wenn der 3D-Effekt korrekt arbeitet, bedeutet dies, dass der Sender und die 3D-Brille möglicherweise
nicht korrekt synchronisiert sind. Um sie zu synchronisieren, wechseln Sie den Modus.
Navig.
Eingabe
Zurück
Modus : Standard
Zellhelligkeit 7
Kontrast 90
Helligkeit 45
Schärfe 50
Farbe 50
Farbton G50 R50
Detaileinstellungen
Bildoptionen
Reset : OK
Bild
T V
Navig.
Eingabe
Zurück
Farbtemp. :
Normal
Format :
Autom. Breit
Bildschirmmodus :
16:9
Digitale RM :
Auto
Real 100 Hz-Demo : Aus
DNle : Aus
HDMI-Schwarzwert : Normal
Blaumodus : Aus
Bildschirm-Einbrennschutz
3D-Effekt
Bildoptionen
T V
Navig.
Eingabe
Zurück
Modus :
Format :
3D-Effekt
T V
Aus
Modus1
Modus2
2D-Konvertierng
Fortsetzung...
BN68-01528A-00_GER.indd 23 2008-4-21 15:17:30

Deutsch - 24
Zurücksetzen der Bildeinstellungen auf die werkseitig
festgelegten Standardwerte
Sie können die detaillierten Bildparameter einstellen.
1 Drücken Sie die Taste MENU, um das Menü anzuzeigen.
2 Drücken Sie die Taste ENTER, um Bild auszuwählen.
3 Wählen Sie durch Drücken der Tasten ▲ oder ▼ die Option
Reset, und drücken Sie dann die Taste ENTER.
4 Drücken Sie die Taste ▲ oder ▼, um OK oder Abbrechen
auszuwählen, und drücken Sie dann die Taste
ENTER.
➢
Jeder Modus kann zurückgesetzt werden.
Navig.
Eingabe
Zurück
Modus : Standard
Zellhelligkeit
7
Kontrast 95
Helligkeit 45
Schärfe 50
Farbe 50
Farbton G50 R50
Detaileinstellungen
Bildoptionen
Reset : OK
Bild
T V
OK
Abbrechen
Ändern des Formats
Wählen Sie das optimale Eingangsformat für Ihre Grafikkarte oder
3D-Software.
Siehe Beschreibungen für die Schritte 1 bis 4 oben
5 Drücken Sie die Tasten ▲ und ▼, um Format auszuwählen,
und drücken Sie dann die Taste
ENTER.
6 Wählen Sie mit ▲ oder ▼ die Option Schachbrett, Horizontal
oder
Vertikal aus, und drücken Sie dann die Taste ENTER.
Schachbrett
Wenn Schachbrett als Ausgabeformat Ihrer
Grafikkarte oder 3D-Software eingestellt ist,
wählen Sie dieses Eingangsformat.
Horizontal
Wenn Horizontal verschachtelt als Ausgabeformat
Ihrer Grafikkarte oder 3D-Software eingestellt ist,
wählen Sie dieses Eingangsformat.
Vertikal
Wenn Vertikal verschachtelt als Ausgabeformat
Ihrer Grafikkarte oder 3D-Software eingestellt ist,
wählen Sie dieses Eingangsformat.
➢
Sie können mehrmals die Taste 3D auf der Fernbedienung
drücken, um den 3D-Modus wiederholt zu ändern.
Einfaches Einstellen
1 Drücken Sie die Taste TOOLS auf der Fernbedienung.
2 Wählen Sie mit den Tasten ▲ oder ▼ die Option 3D-Modus.
3 Drücken Sie zum Starten des 3D-Effekts die Taste ENTER.
Extras
3D-Modus ◄ Aus ►
Anynet+ (HDMI-CEC)
Bildmodus : Dynamisch
Tonmodus : Standard
Sleep-Timer : Aus
SRS TS XT : Aus
Energiesparmod. : Aus
Einstellen
Beenden
Navig.
Navig.
Eingabe
Zurück
Modus : Modus 1
Format :
3D-Effekt
T V
Schachbrett
Horizontal
Vertikal
BN68-01528A-00_GER.indd 24 2008-4-21 15:17:31

Deutsch - 25
Audiofunktionen
1 Drücken Sie die Taste MENU, um das Menü anzuzeigen.
2 Drücken Sie die Taste ▲ oder ▼, um Ton auszuwählen, und
drücken Sie dann die Taste
ENTER.
3 Wählen Sie mit den Tasten ▲ oder ▼ die gewünschte Option,
und drücken Sie dann die Taste ENTER.
Verfügbare Optionen:
Modus, Equalizer, SRS TS XT,
Auto. Lautst., TV-Lautsprecher, Ton wählen.
4 Wenn Sie die gewünschten Änderungen vorgenommen haben,
drücken Sie die Taste ENTER.
5 Drücken Sie zum Beenden die Taste EXIT.
Modus: Standard/Musik/Film/Sprache/Benutzerdef.
Stellen Sie den Audiomodus ein, der am besten zur jeweiligen
Sendung passt.
Einfaches Einstellen
1 Drücken Sie die Taste TOOLS auf der Fernbedienung.
2 Wählen Sie mit den Tasten ▲ oder ▼ den Tonmodus.
3
Wählen Sie die gewünschte Option mit den Tasten ◄ und ►
Equalizer: Balance/100Hz/300Hz/1kHz/3kHz/10kHz
Das Fernsehgerät verfügt über mehrere Einstellmöglichkeiten
für die Tonqualität.
➢
Wenn Sie Änderungen an dies en Einstellungen
vornehmen, wird der Audiomodus automatisch auf
Benutzerdef. umgestellt.
SRS TS XT: Ein/Aus
TruSurround XT ist eine patentierte SRS-Technologie, die das Problem des Betreibens von
5.1-Mehrkanalinhalten über zwei Lautsprecher löst. Mit TruSurround kommen Sie mit jedem
Stereo-System mit zwei Lautsprechern, auch den internen Fernsehlautsprechern, in den Genuss
überzeugender Virtual Surround-Effekte. Es ist vollständig kompatibel mit allen Mehrkanalformaten.
Einfaches Einstellen
1 Drücken Sie die Taste TOOLS auf der Fernbedienung.
2 Wählen Sie mit den Tasten ▲ oder ▼ SRS TS XT.
3
Drücken Sie die Taste ◄ oder ► um Aus oder Ein auszuwählen
.
Auto. Lautst.: Ein/Aus
Aufgrund unterschiedlicher Signalbedingungen unterscheiden
sich Fernsehsender in der Lautstärke, so dass es erforderlich
sein kann, die Lautstärke beim Umschalten zwischen Sendern jedes Mal nachzuregeln. Mit der
Funktion für automatische Lautstärkeeinstellung wird die Lautstärke automatisch bei starkem
Modulationssignal verringert und bei schwachem Modulationssignal erhöht.
TV-Lautsprecher: Ein/Aus
Wenn Sie den Ton über separate Lautsprecher hören möchten, deaktivieren Sie den internen Verstärker.
➢
Die Tasten
+,
- und MUTE funktionieren nicht, wenn TV-Lautsprecher aus aktiviert ist.
➢
Wenn der TV-Lautsprecher deaktiviert (Aus) ist, können Sie (im PIP-Modus) im Menü Ton nur
die Option Ton wählen verwenden.
Ton wählen: Hauptsender/PIP-Sender
Wenn die PIP-Funktion aktiviert ist, können Sie den Ton des PIP-Bildes wiedergeben.
- Hauptsender: Verwenden Sie diese Option, um den zum Hauptbild gehörenden Ton
wiederzugeben.
-
PIP-sender: Verwenden Sie diese Option, um den zum PIP-Bild gehörenden Ton wiederzugeben.
Navig.
Eingabe
Zurück
Modus :
Benutzerdef.
Equalizer
SRS TS XT : Aus
Auto. Lautst. : Aus
TV-Lautsprecher : Aus
Ton wählen : Hauptsender
Ton
T V
TruSurround XT, SRS und das Symbol sind Marken von SRS Labs, Inc. Das
TruSurround XT-Verfahren wird in Lizenz von SRS Labs, Inc. verwendet.”
Navig.
Einstellen
Zurück
Equalizer
T V
Balance 100Hz 300Hz 1kHz 3kHz 10kHz
+
0
-
R
L
+
0
-
Extras
Anynet+ (HDMI-CEC)
Bildmodus : Standard
Tonmodus ◄ Benutzerdef ►
Sleep-Timer : Aus
SRS TS XT : Aus
Energiesparmod : Aus
Dual I-II : Mono
Navig
Einstellen
Beenden
Extras
Anynet+ (HDMI-CEC)
Bildmodus : Standard
Tonmodus : Benutzerdef
Sleep-Timer : Aus
SRS TS XT ◄ Aus ►
Energiesparmod : Aus
Dual I-II : Mono
Navig
Einstellen
Beenden
BN68-01528A-00_GER.indd 25 2008-4-21 15:17:32

Deutsch - 26
Auswählen des Tonmodus (modellabhängig)
Mit der Taste DUAL I-II wird die Verarbeitung und Ausgabe des Audiosignals angezeigt und
gesteuert. Beim Einschalten ist der Modus Dual-I oder Stereo automatisch voreingestellt
(abhängig von der aktuellen Sendung).
Einfaches Einstellen
1 Drücken Sie die Taste TOOLS auf der Fernbedienung.
2 Wählen Sie mit den Tasten ▲ oder ▼ die Option Dual I-II.
3 Wählen Sie mit den Tasten ◄ und ► die gewünschte Option.
Art der Sendung
Bildschirmanzeige
NICAM
Stereo
Standardsendung
(Standardtonwiedergabe)
Mono (normale Verwendung)
Standard und NICAM-Mono
NICAM
Mono
(Normal)
NICAM-Stereo
NICAM
Stereo
Mono
(Normal)
NICAM Dual-I/II
NICAM
Dual-1
NICAM
Dual-2
Mono
(Normal)
A2
Stereo
Standardsendung
(Standardtonwiedergabe)
Mono (normale Verwendung)
Zweisprachig oder Dual-I/II
Dual I Dual II
Stereo Stereo
Mono
(Mono erzwungen)
➢
Bei schlechten Empfangsbedingungen sind Sendungen im Modus Mono besser zu hören.
Falls das Stereosignal schwach ist und automatisch umgeschaltet wird, sollten Sie zu Mono
wechseln.
Anschließen von Kopfhörern (separat erhältlich)
Sie können Kopfhörer an das Fernsehgerät anschließen, wenn Sie ein
Fernsehprogramm ansehen möchten, ohne andere Personen im selben Raum zu
stören.”
➢
Wenn Sie den Kopfhörerstecker an den entsprechenden
Anschluss anschließen, können Sie im Audiomenü nur
Auto. Lautst. auswählen.
➢
Das Verwenden von Kopfhörern bei hoher Lautstärke über
einen längeren Zeitraum kann zu Hörschäden führen.
➢
Wenn Sie Kopfhörer an das Fernsehgerät anschließen, wird
über die Lautsprecher kein Ton ausgegeben.
➢
Die Lautstärke der Kopfhörer und des Fernsehgeräts
werden getrennt geregelt.
TV Seitenverkleidung
Extras
Anynet+ (HDMI-CEC)
Bildmodus : Standard
Tonmodus : Benutzerdef
Sleep-Timer : Aus
SRS TS XT : Aus
Energiesparmod : Aus
Dual I-II ◄ Mono ►
Navig
Einstellen
Beenden
BN68-01528A-00_GER.indd 26 2008-4-21 15:17:33

Deutsch - 27
Zeitfunktionen
1 Drücken Sie die Taste MENU, um das Menü anzuzeigen.
2 Drücken Sie die Taste ▲ oder ▼, um Einstellungen
auszuwählen, und drücken Sie dann die Taste
ENTER.
3 Drücken Sie die Taste ▲ oder ▼, um Zeit auszuwählen, und
drücken Sie dann die Taste
ENTER.
4 Wählen Sie mit den Tasten ▲ oder ▼ die gewünschte Option,
und drücken Sie dann die Taste
ENTER.
Verfügbare Optionen:
Zeit einstellen, Sleep-Timer, Timer 1,
Timer 2, Timer 3
5 Wenn Sie die gewünschten Änderungen vorgenommen haben,
drücken Sie die Taste
ENTER.
6 Drücken Sie zum Beenden die Taste EXIT.
Zeit einstellen
Sie können die Uhr des Fernsehgeräts stellen, so dass
die aktuelle Uhrzeit angezeigt wird, wenn Sie auf der
Fernbedienung die Taste
Info drücken. Wenn Sie den
automatischen Timer verwenden möchten, müssen Sie die
Uhrzeit einstellen.
− Drücken Sie auf ◄ oder ►, um
Monat, Datum, Jahr,
Stunde, oder Minute einzustellen. Nehmen Sie die
Einstellungen mit den Tasten ▲ oder ▼ vor.
➢
Sie können Monat, Datum, Jahr, Stunde, oder Minute
durch Drücken der Zifferntasten auf der Fernbedienung
direkt einstellen.
➢
Bei einem Stromausfall oder Ausschalten des Geräts über
das Netzteil gehen die Einstellungen der Uhr verloren.
Sleep-Timer
Sie können ein Intervall zwischen 30 und 180 Minuten
auswählen, nach dessen Ablauf das Fernsehgerät automatisch
in den Standby-Modus geschaltet wird.
− Wählen Sie mit den Tasten ▲ oder ▼, nach welcher Zeit das
Gerät ausgeschaltet werden soll (
Aus, 30, 60, 90, 120, 150
oder 180
).
Einfaches Einstellen
1 Drücken Sie die Taste TOOLS auf der Fernbedienung.
2 Wählen Sie mit der Taste ▲ oder ▼ die Option Sleep-
Timer.
3 Wählen Sie mit der Taste ◄ oder ► die Minuten aus, und
drücken Sie dann die
ENTER-Taste.
Timer 1 / Timer 2 / Timer 3
Sie können die Funktionen
Anschaltzeit / Ausschaltzeit so
einstellen, dass das Fernsehgerät zum ausgewählten Zeitpunkt
automatisch ein- bzw. ausgeschaltet wird.
☛
Voraussetzung dafür ist, dass Sie die Uhr gestellt haben.
− Wählen Sie mit den Tasten ◄ oder ► die gewünschte Option aus. Drücken Sie zum Ändern der
Einstellung die Taste ▲ oder ▼.
Anschaltzeit: Wählen Sie Stunde, Minute und Ein/Aus. (Zum Aktivieren des Timers, wenn Sie mit
den Einstellungen fertig sind, wählen Sie
Ein.)
Ausschaltzeit: Wählen Sie Stunde, Minute und Ein/Aus. (Zum Aktivieren des Timers, wenn Sie
mit den Einstellungen fertig sind, wählen Sie
Ein.)
Wiederholmodus: Wählen Sie Einmal, Täglich, Mo - Fr, Mo - Sa oder Sa - So.
Lautstärke: Stellen Sie die gewünschte Lautstärke ein.
➢
Sie können die Stunden und Minuten direkt über die Zifferntasten auf der Fernbedienung
einstellen.
☛
Autom. Ausschalten
Wenn Sie den Timer einstellen, schaltet sich das Fernsehgerät drei Stunden nach dem Einschalten
durch den Timer ab, wenn in dieser Zeit keine weiteren Funktionen bedient werden. Diese Funktion
ist nur im Modus Ein des Timers verfügbar und verhindert Schäden durch Überhitzung, wenn das
Fernsehgerät zu lange eingeschaltet ist.
Navig.
Eingabe
Zurück
Plug & Play
Sprache : Deutsch
Zeit
Lichteffekt
: TV Modus An
Einstellung für Wandmontage
Melodie : Aus
Entertainment : Aus
Energiesparmod. : Aus
PIP
Einstellungen
T V
Navig.
Eingabe
Zurück
Zeit einstellen :
00 : 00
Sleep-Timer : Aus
Timer 1 : Aus
Timer 2 : Aus
Timer 3 : Aus
Zeit
T V
Extras
Anynet+ (HDMI-CEC)
Bildmodus : Standard
Tonmodus : Benutzerdef
Sleep -Timer ◄ Aus ►
SRS TS XT : Aus
Energiesparmod : Aus
Dual I-II : Mono
Navig.
Einstellen
Zurück
Timer 1
T V
00 00 Nein
Anschaltzeit
:
Ausschaltzeit :
Wiederholmodus
Einmal
10
Lautstärke
00 00 Nein
:
Navig
Einstellen
Beenden
BN68-01528A-00_GER.indd 27 2008-4-21 15:17:33

Deutsch - 28
Sprache / Melodie / Lichteffekt / Unterhaltung
Energiesparmod. / PIP
1 Drücken Sie die Taste MENU, um das Menü anzuzeigen.
2 Drücken Sie die Taste ▲ oder ▼, um Einstellungen
auszuwählen, und drücken Sie dann die Taste
ENTER.
3 Wählen Sie mit den Tasten ▲ oder ▼ die gewünschte Option,
und drücken Sie dann die Taste
ENTER.
Verfügbare Optionen:
Sprache, Melodie, Lichteffekt ,
Unterhaltung, Energiesparmod / PIP.
4 Wenn Sie die gewünschten Änderungen vorgenommen haben,
drücken Sie die Taste
ENTER.
5 Drücken Sie zum Beenden die Taste EXIT.
Sprache
Die verfügbaren Optionen in diesem Menü sind modellabhängig. Wenn Sie das Fernsehgerät das
erste Mal verwenden, müssen Sie die Sprache auswählen, in der Menüs und Hinweise angezeigt
werden sollen.
Lichteffekt: Aus/Standby/TV Modus An/Ein
Sie können die blaue LED an der Vorderseite des Fernsehgeräts je nach Wunsch an- bzw.
abschalten. Schalten Sie sie ab, wenn Sie Energie sparen möchten oder die LED Ihre Augen stört.
−
Aus: Die blaue LED ist immer aus.
−
Standby: Die blaue LED leuchtet im Standby-Modus und wird beim Anschalten des Fernsehgeräts
ausgeschaltet.
−
TV-Modus An: Die blaue LED leuchtet bei angeschaltetem Fernsehgerät und wird beim
Ausschalten abgeschaltet.
−
Ein: Die blaue LED leuchtet immer.
➢
Stellen Sie diesen Leichteffekt aus, um den Stromverbrauch zu reduzieren.
Melodie: Aus/Gering/Mittel/Hoch
Sie können die Melodie auswählen, die beim Ein- und Ausschalten des Fernsehers abgespielt wird.
Unterhaltung : Aus/Sport/Kino/Spiel
Im Unterhaltungsmodus können Sie die optimale Anzeige und den optimalen Ton für Sport, Kinofilme
und Spiele auswählen.
-
Aus: Deaktivieren der Funktion Unterhaltung.
-
Sport: Hiermit erzielen Sie optimale Bild- und Tonqualität für Sport.
-
Kino: Hiermit erzielen Sie optimale Bild- und Tonqualität für Kinofilme. Farbe und Ton sind
detailreicher und ansprechender.
-
Spiel: Hiermit erzielen Sie optimale Bild- und Tonqualität für Spiele. In diesem Modus können
Sie die Spielgeschwindigkeit erhöhen, wenn Sie eine externe Spielkonsole an Ihr Fernsehgerät
anschließen.
➢
Wenn Sie einen der drei Modi von Unterhaltung auf An schalten, werden die Einstellungen
gesperrt und können nicht verändert werden. Wenn Sie Änderungen am Bild- und Tonmodus
vornehmen möchten, müssen Sie den Unterhaltungsmodus deaktivieren.
➢
Die Unterhaltungseinstellungen werden für jede Signalquelle gespeichert.
Fortsetzung...
Navig.
Eingabe
Zurück
Plug & Play
Sprache : Deutsch
Zeit
Lichteffekt
: TV Modus An
Einstellung für Wandmontage
Melodie : Aus
Unterhaltung : Aus
Energiesparmod. : Aus
PIP
Einstellungen
T V
BN68-01528A-00_GER.indd 28 2008-4-21 15:17:34

Deutsch - 29
Einrichten der PC-Software (unter Windows XP)
Im Folgenden sind die Windows-Anzeigeeinstellungen für die
meisten Computer aufgeführt. Die auf Ihrem PC angezeigten
Menüs und Fenster entsprechen je nach installierter Windows-
Version und verwendeter Grafikkarte möglicherweise nicht
genau der Abbildung. Trotzdem sind die hier beschriebenen
grundlegenden Informationen in fast allen Fällen anwendbar.
(Wenden Sie sich andernfalls an den Computerhersteller oder
Samsung-Händler.)
1 Klicken Sie mit der rechten Maustaste auf den Windows-
Desktop, und klicken Sie dann auf Eigenschaften.
Eigenschaften von Anzeige wird angezeigt.
2 Klicken Sie auf die Registerkarte Einstellungen, und stellen
Sie einen Anzeigemodus gemäß der Tabelle der Anzeigemodi
ein. Eine Änderung der Farbeinstellungen ist nicht erforderlich.
3 Klicken Sie auf Erweitert. Ein neues Einstellungsdialogfeld wird angezeigt.
4 Klicken Sie auf die Registerkarte Monitor, und stellen Sie anschließend die Bildschirmfrequenz
anhand der Tabelle der Anzeigemodi ein. Stellen Sie wenn möglich die Vertikalfrequenz und die
Horizontalfrequenz separat ein, anstatt die Einstellung Bildschirmfrequenz zu verwenden.
5 Klicken Sie auf OK, um das Fenster zu schließen, und klicken Sie dann auf OK, um das Fenster
Eigenschaften von Anzeige zu öffnen. Möglicherweise wird jetzt automatisch der PC neu gestartet.
Energiesparmod.: Aus/Gering/Mittel/Hoch
Mit dieser Funktion wird die Helligkeit des Bildschirms
entsprechend den Lichtverhältnissen der Umgebung angepasst.
−
Aus: Energiesparmodus ausschalten.
−
Gering:
Das Gerät wird unabhängig von den Lichtverhältnissen
in der Umgebung im Standardmodus betrieben.
− Mittel: Das Gerät wird unabhängig von den
Lichtverhältnissen in der Umgebung in den mittleren
Stromsparmodus versetzt.
−
Hoch: Das Gerät wird unabhängig von den
Lichtverhältnissen in der Umgebung in den maximalen Stromsparmodus versetzt.
Einfaches Einstellen
1 Drücken Sie die Taste TOOLS auf der Fernbedienung.
2 Wählen Sie mit den Tasten ▲ und ▼ die Option Energiesparmod.
3 Wählen Sie mit den Tasten ◄ und ► die gewünschte Option
TOOLS
Anynet+ (HDMI-CEC)
Bildmodus : Standard
Tonmodus : Benutzerdef
Sleep -Timer : Aus
SRS TS XT : Aus
Energiesparmod ◄ Aus ►
Dual I-II : Mono
PIP (Bild im Bild): PIP (Ein/Aus))/Quelle/Größe/ Position/Programm
Sie können innerhalb des Hauptbildes ein PIP-Bild einblenden.
Dadurch können Sie eine Fernsehsendung ansehen oder die
Videosignale eines anderen angeschlossenen Geräts anzeigen.
− PIP: Ein/Aus
Sie können die PIP-Funktion aktivieren oder deaktivieren.
Tabelle der PIP-Einstellungen
Hauptbild PIP-Bild
Komponenten
HDMI1, 2, 3
PC
Analogsendungen nur
Ext1 und Ext2, AV
− Quelle: TV/Ext.1/Ext.2/AV
Wählen Sie eine Signalquelle für das PIP-Bild.
− Größe: / /
Sie können die Größe für das PIP-Bild auswählen.
➢
Wenn sich das Hauptbild im PC- oder Komponenten modus befindet, ist Format nicht
verfügbar.
− Position: / / /
Sie können die Position für das PIP-Bild auswählen.
➢
Im Doppelmodus( , ) können Sie Position nicht wählen.
−
Programm
Sie können nur dann einen Kanal für das PIP-Bild auswählen, wenn Quelle (Source) auf TV
eingestellt ist.
Navig.
Eingabe
Zurück
PIP :
Ein
Quelle : TV
Format :
Position :
Programm : P 1
PIP
T V
Navig
Einstellen
Beenden
BN68-01528A-00_GER.indd 29 2008-4-21 15:17:35

Deutsch - 30
Eingangsmodus (PC)
Bildschirmposition und -größe hängen vom Typ des PC-Monitors und seiner Auflösung ab.
In der nachstehenden Tabelle sind alle unterstützten Monitormodi aufgeführt:
D-Sub Eingang
Vollbildmodus Auflösung
Horizontal
Frequenz
(kHz)
Vertikal
Frequenz
(Hz)
Pixeltakt
Frequenz
(MmHz)
Sync-Polarität
(H/V)
PS50A470
IBM
640 x 350
720 x 400
31.469
31.469
70.086
70.087
25.175
28.322
+ / -
- / +
✔
✔
VESA
640 x 480
640 x 480
640 x 480
800 x 600
800 x 600
800 x 600
1024 x 768
1024 x 768
1024 x 768
1360 x 768
31.469
37.861
37.500
37.879
48.077
46.875
48.363
56.476
60.023
47.712
59.940
72.809
75.000
60.317
72.188
75.000
60.004
70.069
75.029
60.015
25.175
31.500
31.500
40.000
50.000
49.500
65.000
75.000
78.750
85.500
- / -
- / -
- / -
+ / +
+ / +
+ / +
- / -
- / -
+ / +
+ / +
✔
✔
✔
✔
✔
✔
✔
✔
✔
✔
HDMmI/DVI Eingang
Vollbildmodus Auflösung
Horizontal
Frequenz
(kHz)
Vertikal
Frequenz
(Hz)
Pixeltakt
Frequenz
(MmHz)
Sync-Polarität
(H/V)
PS50A470
VESA
640 x 480
800 x 600
1024 x 768
1360 x 768
31.469
37.879
48.363
47.712
59.940
60.317
60.004
60.015
25.175
40.000
65.000
85.500
- / -
+ / +
- / -
+ / +
✔
✔
✔
✔
Eine Verbindung über HDMI/DVI-Kabel kann nur über HDMI IN 2 erfolgen.
Das Zeilensprungverfahren wird nicht unterstützt.
Das Fernsehgerät funktioniert möglicherweise nicht ordnungsgemäß, wenn kein Standardmodus
ausgewählt wird.
Separate- und Composite-Modus werden unterstützt. SOG wird nicht unterstützt.
Der VESA-Modus (1360 x 768 @ 60Hz) ist beim PS50A470 zur Anzeige von Text optimal.
BN68-01528A-00_GER.indd 30 2008-4-21 15:17:35

Deutsch - 31
Einstellungen für PC vornehmen
➢
Wählen Sie den PC-Modus, indem Sie die Taste Quelle
drücken.
1 Drücken Sie die Taste MENU, um das Menü anzuzeigen.
2 Drücken Sie die Taste ▲ oder ▼, um Bild auszuwählen, und
drücken Sie dann die Taste
ENTER.
3 Wählen Sie mit den Tasten ▲ oder ▼ die gewünschte Option,
und drücken Sie dann die Taste
ENTER.
4 Wenn Sie die gewünschten Änderungen vorgenommen haben,
drücken Sie die Taste
ENTER.
5 Drücken Sie zum Beenden die Taste EXIT.
Autom. Einstellung:
Die automatische Einstellung ermöglicht eine automatische
Anpassung des PC-Monitors an das eingehende
PC-Videosignal.
Qualität (fein, grob) und Position des Bildes werden automatisch
eingestellt.
Einfaches Einstellen
1 Drücken Sie die Taste TOOLS auf der Fernbedienung.
2 Wählen Sie mit den Tasten ▲ und ▼ die Option Autom.
Einstellung aus, und drücken Sie dann die ENTER-Taste.
PC-Bildschirm: Grob/Fein/Position/Bild zurücksetzen
Grob/Fein
Durch Einstellung der Bildqualität können Bildstörungen und
Rauschen beseitigt oder verringert werden.
Falls sich Bildrauschen durch die Feinabstimmung allein nicht
beheben lässt, stellen Sie zunächst die Frequenz möglichst
genau ein (Grob). Nachdem Sie das Bildrauschen durch die
Grob- und Feinabstimmung des Bildes verringert haben, stellen
Sie die Position des Bildes so ein, dass es auf dem Bildschirm
zentriert ist.
1
Drücken Sie die Taste ▲ oder ▼, um Grob oder Fein
auszuwählen, und drücken Sie dann die Taste
ENTER.
2 Drücken Sie die Tasten ◄ oder ►, um die Bildqualität
anzupassen. Es können vertikale Streifen auftreten, oder
das Bild kann verschwommen sein. Drücken Sie die Taste
ENTER.
Position
Passen Sie die Position des PC-Bilds an, wenn es nicht auf das
Fernsehbild passt.
1 Stellen Sie die Position mit den Tasten ▲/▼/◄/► ein.
2 Drücken Sie die Taste ENTER.
Bild zurücksetzen
Sie können alle Bildeinstellungen auf die werkseitig
eingestellten Ausgangswerte zurücksetzen.
Navig.
Eingabe
Zurück
Position
T V
Autom. Einstellen läuft
Bitte warten
Bild-Reset ist abgeschlossen.
Navig.
Eingabe
Zurück
Grob 50
Fein 11
Position
Bild zurücksetzen
PC-Bildschirm
T V
Navig.
Eingabe
Zurück
Modus :
Standard
Zellhelligkeit 7
Kontrast 95
Helligkeit 45
Schärfe 50
Autom. Einstellung
PC-Bildschirm
Detaileinstellunge
Bildoptionen
Reset : OK
Bild
T V
Extras
Anynet+ (HDMI-CEC)
Bildmodus : Standard
TonModus : Benutzerdef.
Sleep -Timer : Aus
SRS TS XT : Aus
Energiesparmod. : Aus
PIP
Autom. Einstellung
BeendenNavig.
Eingabe
BN68-01528A-00_GER.indd 31 2008-4-21 15:17:35

Deutsch - 32
English - 30
Anschließen von Anynet
+
-Geräten
Das Anynet
+
-System unterstützt nur AV-Geräte, die ihrerseits Anynet
+
-fähig sind.
Prüfen Sie, ob das AV-Gerät, das Sie an den Fernseher anschließen möchten, eine Anynet
+
-
Kennzeichnung aufweist.
Direkter Anschluss an das Fernsehgerät
Verbinden Sie einen der
Anschlüsse [HDMI 1], [HDMI
2] oder [HDMI 3] am Gerät mit
dem HDMI OUT-Anschluss am
entsprechenden Anynet
+
-Gerät.
Verwenden Sie hierfür das
HDMI-Kabel.
Anschluss an das Heimkinosystem
1 Verbinden Sie einen der
Anschlüsse [HDMI 1],
[HDMI 2] oder [HDMI 3]
am Gerät mit dem HDMI
OUT-Anschluss am
entsprechenden Anynet
+
-
Gerät. Verwenden Sie
hierfür das HDMI-Kabel.
2 Verbinden Sie den
HDMI IN-Anschluss des
Heimkinosystems mit dem
HDMI OUT-Anschluss des
entsprechenden Anynet
+
-
Geräts. Verwenden Sie
hierfür das HDMI-Kabel.
➢
Schließen Sie nur einen Receiver an.
➢
Sie können Anynet
+
-Geräte mithilfe eines HDMI-Kabels verbinden. Einige HDMI-Kabel unterstützen
möglicherweise keine Anynet
+
-Funktionen.
➢
Anynet
+
arbeitet, wenn das AV-Gerät, das Anynet
+
unterstützt, im Standby-Modus oder angeschaltet
ist.
➢
Anynet
+
unterstützt maximal 8 AV-Geräte.
English - 30
Was ist Anynet
+
?
Anynet
+
ist ein AV-Netzwerksystem, mit dem die Benutzer alle angeschlossenen AV-Geräte
durch das Menüsystem von Anynet
+
mittels einer einheitlichen und benutzerfreundlichen AV-
Benutzerschnittstelle steuern können, wenn diese AV-Geräte von Samsung Electronics in einem
Netzwerk miteinander verbunden sind.
Anynet
+
-Gerät 1 Anynet
+
-Gerät 2
Anynet
+
-Gerät 3
TV
HDMI-Kabel
HDMI-Kabel
HDMI-Kabel
TV
Anynet
+
-Gerät 1 Anynet
+
-Gerät 2
Anynet
+
-Gerät
HDMI-Kabel
HDMI-Kabel
HDMI-Kabel
HDMI-Kabel
Heimkino
BN68-01528A-00_GER.indd 32 2008-4-21 15:17:36

Deutsch - 33
Einrichten von Anynet
+
Die folgenden Einstellungen für Anynet
+
sind verfügbar.
Verwenden der Anynet
+
-Funktionen
1 Drücken Sie zum Anzeigen des Menüs die Taste MENU.
Drücken Sie die Taste ▲ oder ▼, um Eingang auszuwählen, und
drücken Sie anschließend die Taste ENTER.
2 Drücken Sie die Taste ▲ oder ▼, um Anynet
+
(HDMI-CEC)
auszuwählen, und drücken Sie dann die Taste ENTER .
3 Drücken Sie die Taste ▲ oder ▼, um Einstellungen auszuwählen,
und drücken Sie dann die Taste ENTER.
4 Drücken Sie die Taste ▲ oder ▼, um Anynet
+
(HDMI-CEC)
auszuwählen, und drücken Sie dann die Taste ENTER .
5 Wählen Sie durch Drücken der Tasten ▲ oder ▼ die Option Ein,
und drücken Sie dann die Taste ENTER.
➢
Die Funktion für Anynet
+
(HDMI-CEC) wird aktiviert.
➢
Wenn Sie
Aus wählen, wird Anynet
+
(HDMI-CEC) deaktiviert.
➢
Wenn die Anynet
+
(HDMI-CEC)-Funktion deaktiviert ist, werden
alle Vorgänge in Verbindung mit Anynet
+
deaktiviert.
Automatisches Abschalten von Anynet
+
-Geräten durch
Abschalten des Fernsehgeräts Ausgeschaltet
4
Drücken Sie die Taste ▲ oder ▼, um Autom. Ausschalten auszuwählen, und drücken Sie dann die Taste ENTER.
5 Drücken Sie die Taste ▲ oder ▼, um Ja auszuwählen, und drücken Sie dann die Taste ENTER.
➢
Die Funktion zum automatischen Ausschalten wird aktiviert.
➢
Wenn Sie
Aus wählen, wird die Funktion zum automatischen
Ausschalten deaktiviert.
Zum Beenden drücken Sie die Taste BEENDEN.
➢
Damit Sie Anynet
+
verwenden können, muss die Geräteauswahl
der Fernbedienung auf TV eingestellt sein.
➢
Wenn Sie
Autom. Ausschalten auf Ja setzen, werden auch
die angeschlossenen externen Geräte ausgeschaltet, wenn Sie
das Fernsehgerät ausschalten. Wenn das Gerät jedoch gerade
aufnimmt, darf es nicht abgeschaltet werden.
Suchen von Anynet
+
-Geräten und Umschalten zwischen
diesen Geräten
1 Drücken Sie zum Anzeigen des Menüs die Taste MENU.
Drücken Sie die Taste ▲ oder ▼, um Eingang auszuwählen, und
drücken Sie anschließend die Taste ENTER.
2 Drücken Sie die Taste ▲ oder ▼, um Anynet
+
(HDMI-CEC)
auszuwählen, und drücken Sie dann die Taste ENTER .
3 Wählen Sie durch Drücken der Tasten ▲ oder ▼ die Option Gerät
auswählen , und drücken Sie dann die Taste ENTER.
4 Wählen Sie ein bestimmtes Gerät durch Drücken der Tasten
▲ oder ▼, und drücken Sie dann die Taste ENTER.
Das System wechselt zum ausgewählten Gerät.
5 Wenn Sie das gewünschte Gerät nicht finden können, drücken Sie
die Tasten ▲ oder ▼, um Gerätesuche auszuwählen, und drücken
Sie dann die Taste ENTER.
Die Meldung Konfigurieren der Anynet
+
-Verbindung wird
angezeigt. Wenn die Suche nach Geräten abgeschlossen ist,
werden die angeschlossenen Geräte im Anynet
+
-Menü aufgeführt.
➢
Das Umschalten zu den ausgewählten Geräten kann bis zu
2 Minuten dauern. Sie können diesen Vorgang während des
Umschaltens nicht abbrechen.
➢
Die zum Suchen nach Geräten erforderliche Zeit hängt von der
Anzahl der angeschlossenen Geräte ab.
➢
Wenn die Gerätesuche abgeschlossen ist, wird die Anzahl der gefundenen Geräte nicht angezeigt.
➢
Zwar sucht das Fernsehgerät beim Anschalten mit der Netztaste automatisch nach Geräten, aber Geräte,
die bei angeschaltetem Fernsehgerät oder unter bestimmten Umständen angeschlossen werden, erscheinen
in der Geräteliste nicht. Wählen Sie deshalb das Menü Gerätesuche), um nach Geräten zu suchen.
➢
Wenn Sie mit der Taste Quelle eine externe Signalquelle eingestellt haben, können Sie die Anynet
+
-Funktion
nicht verwenden. Achten Sie darauf, immer nur mit der Taste
TOOLS zu einem Anynet
+
-Gerät zu wechseln.
Fortsetzung...
Einstellungen
Anynet
+
(HDMI-CEC)
: Off
Autom. Ausschalten
: Off
Gerätesuche
Eingabe ZurückNavig.
Aus
Ein
Eingabe
Navig.
Fernsehen
Gerät auswählen
Aufnehmen
Menü im Gerät
Betrieb des Geräts
Empfänger :Aus
Einstellungen
TV P 1
Beenden
Eingabe
Navig.
Fernsehen
Gerät auswählen
Aufnehmen
Menü im Gerät
Betrieb des Geräts
Empfänger :Aus
Einstellungen
TV P 1
Beenden
DVDR1
DVDR2
DVD1
DVD2
Setup
Anynet
+
(HDMI-CEC)
: Ein
Autom. Ausschalten :
: Off
Gerätesuche
Eingabe ZurückNavig.
Nein
Ja
Setup
Anynet
+
(HDMI-CEC)
: Ein
Autom. Ausschalten : Ja
Gerätesuche
Eingabe ZurückNavig.
BN68-01528A-00_GER.indd 33 2008-4-21 15:17:37

Deutsch - 34
Anynet+-Menü
Der Inhalt des Anynet
+
-Menüs hängt vom Typ und Status der an das Fernsehgerät
angeschlossenen Anynet
+
-Geräte ab.
Anynet
+
-Menü Beschreibung
Fernsehen Wechselt vom Anynet
+
-Modus zum Fernsehmodus.
Gerät auswählen Ihr Fernsehgerät ist an das entsprechende Gerät angeschlossen.
Aufzeichnen Startet ein Aufnahme. (Diese Menüption funktioniert nur bei
aufnahmefähigen Geräten.)
Menü im Gerät Zeigt das Menü des angeschlossenen Geräts an.
Beispiel. Wenn ein DVD-Recorder angeschlossen ist, wird der
Menütitel für den DVD-Recorder angezeigt.
Betrieb des Geräts Zeigt das Menü für die Wiedergabesteuerung des angeschlossenen
Geräts an.
Beispiel. Wenn ein DVD-Recorder angeschlossen ist, wird das Menü
für die Wiedergabesteuerung des DVD-Recorders angezeigt.
Empfänger Die Tonausgabe erfolgt über den Receiver.
Einrichtung
Sie können die Umgebung für die Verwendung von Anynet
+
einstellen.
TV Remote Control Buttons Available in Anynet
+
Mode
Gerätetyp Betriebsstatus Verfügbare Tasten
Anynet
+
-Gerät
Wenn nach dem Wechseln
zum Gerät das Menü des
entsprechenden Geräts auf dem
Bildschirm angezeigt wird.
Zifferntasten Die Tasten
▲/▼/◄/►/und ENTER
Farbtasten
Taste
Beenden
Nach dem Wechseln zum Gerät
beim Abspielen einer Datei
W.LINK
(Rückwärts suchen)
W.LINK
(Vorwärts suchen)
W.LINK
(Stopp)
W.LINK
W.LINK
(Wiedergabe/Pause)
Gerät mit eingebautem Tuner
Nach dem Wechseln zum Gerät
beim Fernsehen
P / -Taste
Audiogerät Beim Aktivieren des Receivers
W.LINK
/
W.LINK
-Taste
MUTE-Taste
➢
The Anynet
+
function only works when the remote control is set to TV.
➢
The REC button works only while in the recordable state.
➢
You cannot control Anynet
+
devices using the buttons on the side of the TV. You can control Anynet
+
devices only using the TV remote control.
➢
The TV remote control may not work under certain conditions. In this case, reselect the Anynet
+
device.
➢
The Anynet
+
functions don’t operate for the products from other manufacturers.
➢
In Anynet
+
mode, the colour buttons may not work properly.
➢
Die
W.LINK
,
W.LINK
Bedienung kann sich je nach Gerät unterscheiden
Aufnehmen
Sie können Fernsehprogramme mit einem Recorder aufnehmen.
Drücken Sie die Taste
REC.
Die Aufnahme beginnt. (Aber nur, wenn ein Anynet
+
-fähiges Aufnahmegerät angeschlossen ist.)
➢
Im Fernsehmodus wird das aktuelle Fernsehprogramm aufgenommen. Wenn Sie Bilder aus einer
anderen Signalquelle anzeigen, wird das Videosignal aus dieser Quelle aufgenommen.
➢
Sie können das Signal der jeweiligen Quelle aufnehmen. Wählen Sie hierzu Aufnehmen, nachdem
Sie die TOOLS-Taste gedrückt haben.
➢
Überprüfen Sie vor der Aufnahme, ob der Antennenstecker ordnungsgemäß am Aufnahmegerät
angeschlossen ist.
Informationen zur Antennenverbindung mit dem Aufnahmegerät finden Sie im Benutzerhandbuch zur
Antennenverbindung.
BN68-01528A-00_GER.indd 34 2008-4-21 15:17:39

Deutsch - 35
Tonwiedergabe mit einem Receiver
Sie können die Tonwiedergabe über einen Receiver anstelle des TV-Lautsprechers laufen lassen.
1 Drücken Sie zum Anzeigen des Menüs die Taste MENU.
Drücken Sie die Taste ▲ oder ▼, um Eingang auszuwählen, und drücken Sie
anschließend die Taste ENTER.
2. Drücken Sie die Taste ▲ oder ▼, um Anynet
+
(HDMI-CEC) auszuwählen, und
drücken Sie dann die Taste ENTER .
3 Wählen Sie durch Drücken der Tasten ▲ oder ▼ die Option Empfänger, und
drücken Sie dann die Taste ENTER.
4 Wählen Sie durch Drücken der Tasten
◄
oder
►
die Option An, und drücken Sie
dann die Taste ENTER.
Sie können jetzt Ton mit dem Receiver wiedergeben.
5. Drücken Sie zum Beenden die Taste Beenden.
➢
Wenn der Receiver angeschaltet ist, erfolgt die Tonwiedergabe durch den 2-Kanal-
Receiver.
➢
Wenn der Receiver ausschließlich für ein Heimkinosystem bestimmt ist (also nur Audio unterstützt), wird er
in der Geräteliste möglicherweise nicht aufgeführt.
➢
Bei Inhalten mit Urheberrechtsproblemen erfolgt die Wiedergabe über den Receiver möglicherweise nicht störungsfrei.
➢
Bei Betrieb über den Receiver bestehen Einschränkungen hinsichtlich der PIP-Funktion und des Audio-Menüs.
Prüfen Sie Folgendes, bevor Sie sich an den Service wenden
Problem Lösung
Anynet
+
funktioniert nicht. ■ Prüfen Sie, ob es sich um ein Anynet
+
-Gerät handelt. Das Anynet
+
-
System unterstützt nur Anynet
+
-fähige Geräte.
■ Schließen Sie nur einen Receiver an.
■
Prüfen Sie, ob das Netzkabel des Anynet
+
-Geräts richtig angeschlossen ist.
■
Prüfen Sie die Video/Audio/HDMI-Kabelverbindungen des Anynet
+
-Geräts.
■ Kontrollieren Sie, ob Anynet+ (HDMI-CEC) im Menü “Einstellungen”
von Anynet
+
auf An eingestellt ist.
■ Überprüfen Sie, ob die Fernbedienung im TV-Modus arbeitet.
■ Prüfen Sie, ob es sich um eine ausschließlich für Anynet
+
geeignete
Fernbedienung handelt.
■ Anynet
+
funktioniert unter bestimmten Umständen nicht. (Kanalsuche)
■
Stellen Sie nach dem Anschließen oder Entfernen des HDMI-Kabels sicher,
dass die Geräte wieder gesucht werden, oder starten Sie das TV-Gerät erneut.
■
Überprüfen Sie, ob die Anynet
+
Funktion des Anynet
+
-Geräts eingeschaltet ist.
Ich möchte Anynet
+
starten. ■ Prüfen Sie, ob das Anynet
+
-Gerät ordnungsgemäß an das
Fernsehgerät angeschlossen ist, und kontrollieren Sie zudem, ob
Anynet
+
im Menü “Einstellungen” von Anynet
+
aktiviert ist.
■
Drücken Sie die Taste TV auf der Fernbedienung, um zum Fernsehgerät
zu wechseln. Drücken Sie dann die TOOLS-Taste, um das Anynet
+
-
Menü anzuzeigen und die gewünschte Menüoption auszuwählen.
Ich möchte Anynet
+
beenden. ■ Wählen Sie im Anynet
+
-Menü die Option
Fernsehen.
■
Drücken Sie die Taste SOURCE auf der TV-Fernbedienung, und wählen
Sie ein Gerät, bei dem es sich nicht um ein Anynet
+
-Gerät handelt.
■
Drücken Sie auf eine der Tasten P, CH LIST oder PRE-CH, um in den
Fernsehmodus zu wechseln. (Beachten Sie, dass die Kanaltaste
nur funktioniert, wenn kein Anynet
+
-Gerät mit integriertem Tuner
angeschlossen ist.)
Die Meldung “Verbinden
mit Anynet
+
-Gerät” wird
angezeigt.
■ Sie können die Fernbedienung nicht verwenden, während Sie Anynet+
konfigurieren. oder in einen anderen Anzeigemodus wechseln.
■ Verwenden Sie die Fernbedienung, wenn das Konfigurieren von
Anynet
+
oder das Ändern des Anzeigemodus abgeschlossen ist.
Keine Wiedergabe mit dem
Anynet
+
-Gerät.
■ Die Wiedergabefunktion kann nicht verwendet werden, wenn der Plug
& Play-Vorgang läuft.
Das angeschlossene Gerät
wird nicht angezeigt.
■ Prüfen Sie, ob das Gerät die Anynet+-Funktionenunterstützt.
■ Vergewissern Sie sich, dass das HDMI-Kabel ordungsgemäß
angeschlossen wurde.
■ Prüfen Sie, ob Anynet
+
(HDMI-CEC) im Menü “Einstellungen” von
Anynet
+
auf An eingestellt ist.
■ Suchen Sie noch einmal nach Anynet
+
-Geräten
■
Sie können Anynet
+
-Geräte mithilfe eines HDMI-Kabels verbinden. Einige
HDMI-Kabel unterstützen möglicherweise keine Anynet
+
-Funktionen.
Das Fernsehprogramm kann
nicht aufgezeichnet werden.
■ Prüfen Sie, ob der Antennenstecker des Aufnahmegeräts
ordnungsgemäß angeschlossen ist.
Eingabe
Navig.
Fernsehen
Gerät auswählen
Aufnehmen
Menü im Gerät
Betrieb des Geräts
Empfänger :Ein
Einstellungen
TV P 1
Beenden
BN68-01528A-00_GER.indd 35 2008-4-21 15:17:39

Deutsch - 36
Videotext-Funktion (modellabhängig)
Die meisten Fernsehsender bieten Informationen per Videotext an. Auf der Videotext-Indexseite finden Sie
Verwendungshinweise zum Videotext. Darüber hinaus können Sie über die Tasten der Fernbedienung nach
Bedarf verschiedene Optionen einstellen.
☛
Für die korrekte Anzeige von Videotextinformationen muss der Senderempfang einwandfrei sein. Andernfalls können
Informationen unvollständig sein oder einige Seiten nicht angezeigt werden.
1 TV
Videotextanzeige beenden (modellabhängig)
2 (Speichern)
Drücken Sie diese Taste, um Videotextseiten zu speichern.
3 (Größe)
Drücken Sie diese Taste, um Videotext in doppelt so großen
Buchstaben in der oberen Hälfte des Bildschirms anzuzeigen. Drücken
Sie die Taste erneut, um den Text in der unteren Hälfte des Bildschirms
anzuzeigen.
4 (Verborgenen Inhalt einblenden)
Drücken Sie diese Taste, um verborgenen Text anzuzeigen (z. B.
Antworten bei Quizsendungen). Drücken Sie die Taste erneut, um den
Videotext auszublenden.
5 Farbtasten (rot/grün/gelb/blau)
Wenn der Sender das FASTEXT-System verwendet, sind die
verschiedenen Themen auf den Videotextseiten farbig gekennzeichnet
und können mit den Farbtasten auf der Fernbedienung angewählt werden.
Drücken Sie die Farbtaste, die dem Thema entspricht, das Sie anzeigen
möchten. Die Seite wird mit anderen farbig markierten Informationen
angezeigt, die auf dieselbe Art ausgewählt werden können.
Drücken Sie die entsprechende Farbtaste, um die vorherige oder
nächste Seite anzuzeigen.
6 (Videotext anzeigen/Videotext und Fernsehsendung
zugleich anzeigen)
Drücken Sie diese Taste, um den Videotextmodus zu aktivieren,
nachdem Sie einen Sender ausgewählt haben, der Videotext anbietet.
Drücken Sie die Taste zweimal, um die Videotextinformationen
gleichzeitig mit der aktuellen Sendung auf dem Bildschirm
einzublenden.
7 (Modus)
Drücken Sie diese Taste, um den Videotextmodus auszuwählen (LISTE/FLOF).
Wenn Sie diese Taste im Modus LIST (Liste) drücken, wird in den
Listenspeichermodus umgeschaltet.Im Listenspeichermodus können
Sie mit der Taste Seite speichern Videotextseiten in einer Liste
speichern.
8 (Untergeordnete Seite)
Drücken Sie diese Taste, um eine verfügbare untergeordnete Seite
anzuzeigen.
9 (Nächste Seite anzeigen)
Drücken Sie diese Taste, um die nächste Videotextseite anzuzeigen.
0 (Vorherige Seite anzeigen)
Drücken Sie diese Taste, um die vorherige Videotextseite anzuzeigen.
Zum Ausblenden des Videotextes drücken Sie die Taste erneut.
! (Index)
Drücken Sie diese Taste, um die Videotext-Indexseite
(Inhaltsverzeichnis) anzuzeigen.
@ (halten)
Drücken Sie diese Taste, um bei einer angezeigten Seite, die mit weiteren,
untergeordnete Seiten verknüpft ist, das automatische Umblättern zu
verhindern. Drücken Sie zum Fortfahren die Taste erneut.
# (Abbrechen)
Drücken Sie diese Taste, um beim Suchen nach einer Seite die
Sendung anzuzeigen.
➢
Sie können die Videotextseiten durch Drücken der Zifferntasten auf der Fernbedienung wechseln.
Fortsetzung...
BN68-01528A-00_GER.indd 36 2008-4-21 15:17:42

Deutsch - 37
Die Videotextseiten sind in sechs Kategorien unterteilt:
Sportergebnisse Inhalt
A
B
C
D
E
F
Gewählte Seitennummer
Senderkennung
Aktuelle Seitenzahl oder Suchhinweise
Datum und Uhrzeit
Text
Statusinformation
FASTEXT-Informationen
➢
Videotextinformationen sind oft auf mehrere, aufeinander
folgende Seiten verteilt, die wie folgt aufgerufen werden
können:
Eingeben der Seitennummer
Auswahl eines Titels in einer Liste
Auswahl einer farbigen Überschrift (FASTEXT-System)
➢
Drücken Sie die Taste TV, um Videotext zu beenden.
BN68-01528A-00_GER.indd 37 2008-4-21 15:17:42

Deutsch - 38
Spezifikation (VESA) der Wandhalterung
Montieren Sie die Wandhalterung an einer soliden Wand, die senkrecht zum Boden steht.
Bei Installation auf anderen Trägermaterialien wenden Sie sich bitte an Ihren Fachhändler.
Bei Montage an einer Decke oder schrägen Wand kann es herunterfallen und zu Verletzungen
kommen.
Produktfamilie Zoll
VESA-Spezifikation (A * B)
Standardschraube Menge
LCD-TV
23 ~ 26 200
*
100 M4
4
32 ~ 40 200
*
200 M6
46 ~ 52
400 * 400
600 * 400
M8
57
700 * 400
(No VESA)
57 ~ 70 800 * 4000
80 ~ 1400 * 800
PDP-TV
42 ~ 58
400 * 400
600 * 400
M8
4
63
676 * 407
(No VESA)
6
63 ~ 70 800 * 400
4
80 ~ 1400 * 800
4
➢
Die von uns empfohlenen Standardabmessungen der Wandhalterung finden Sie in der obigen Tabelle.
➢
Beim Kauf unserer Wandhalterung erhalten Sie ein detailliertes Installationshandbuch sowie alle für
die Montage erforderlichen Teile.
➢
Verwenden Sie keine Schrauben, die länger sind als hier angegeben, da damit innen liegende
Bauteile des Fernsehers beschädigt werden können.
➢
Bei Wandhalterungen, die nicht der VESA-Standardspezifikation für Schrauben entsprechen, kann
die Länge der Schrauben je nach Spezifikation unterschiedlich sein.
➢
Verwenden Sie keine Schrauben, die nicht der VESA-Standardspezifikation für Schrauben
entsprechen. Ziehen Sie die Schrauben nicht zu fest an, weil Sie so das Produkt beschädigen
könnten oder das Produkt dadurch herunterfallen könnte, was zu Verletzungen führen kann.
Samsung haftet nicht bei derartigen Unfällen.
➢
Samsung haftet nicht für Geräteschäden oder Verletzungen, wenn eine Wandhalterung verwendet
wird, die nicht dem VESA-Standard entspricht oder nicht spezifiziert ist, oder wenn der Verbraucher
die Installationsanleitung für das Produkt nicht befolgt.
➢
Unsere 57- und 63-Zoll-Modelle entsprechen nicht der VESA-Spezifikation. Verwenden Sie für dieses
Modell deshalb unseren speziellen Wandmontagesatz.
➢
Bei der Montage dieses Fernsehgeräts dürfen Sie eine Neigung von 15 Grad nicht überschreiten.
Installieren Sie die Wandhalterung nicht bei angeschaltetem Fernsehgerät.
Sie könnten dabei einen Stromschlag erhalten und sich verletzen.
BN68-01528A-00_GER.indd 38 2008-4-21 15:17:43

Deutsch - 39
Serielles Kabel (1 zu 1) (nicht im Lieferumfang)
Rückseite Automatische Wandhalterung
Verstellbare Wandhalterung (gesondert lieferbar)
Nachdem Sie die Wandhalterung montiert haben, können Sie die Position Ihres Fernsehgeräts einfach justieren.
Öffnen des Menüs
1 Drücken Sie auf der Fernbedienung die Taste ▲, ▼, ◄ oder ►.
➢
Das Fenster zum Justieren der Wandhalterung wird
angezeigt
➢
Wenn das Fenster zum Justieren der Wandhalterung nicht
angezeigt wird, nachdem Sie beim Fernsehen auf eine der
Richtungstasten gedrückt haben, öffnen Sie dieses Fenster
mithilfe des Menüs.
• Drücken Sie die Taste
MENU, um das Menü zu öffnen.
Drücken Sie die Taste ▲ oder ▼, um Einstellungen
auszuwählen, und drücken Sie dann die Taste
ENTER.
• Drücken Sie die Taste ▲ oder ▼, um
Einstellung für
Wandmontage auszuwählen, und drücken Sie dann die
Taste
ENTER.
Abspeichern der Position
2 Stellen Sie mit den Tasten ▲,▼,◄ oder ► die gewünschte
Position ein.
➢
Wenn Sie eine Pfeiltaste drücken, während das
Bildschirmmenü nicht auf dem Bildschirm angezeigt wird,
wird das Fenster zum Einstellen angezeigt.
➢
Drücken Sie die Taste INFO, um zurückzusetzen. Wählen
Sie mit der Taste ◄ oder ► Ja, und drücken Sie dann auf
ENTER. Diese Position wird als Standardwert gespeichert.
3 Drücken Sie die blaue Taste.
Drücken Sie auf die Tasten ▲ und ▼, um eine der
gespeicherten Positionen
Position1, Position2 oder
Position3 mit der aktuellen Position zu belegen.
➢
Wenn Sie die aktuelle Position nicht speichern möchten,
drücken Sie auf die Taste
RETURN.
➢
Wenn Sie einen Speicherplatz auswählen möchten,
können Sie die Farbtasten nicht verwenden.
4 Drücken Sie zum Speichern auf die Taste ENTER.
➢
Wenn Sie Position1 wählen, wird die Meldung Aktuelle Position wird als Position1
gespeichert angezeigt.
5 Drücken Sie
ENTER.
➢
Die gespeicherte Position wird links im Bildschirmmenü angezeigt.
Speichern
Zurück
Navig.
Eingabe
Speichern Sie die Position.
Position 1
Position 2
Position 3
Einstellung für Wandmontage
Einstellen
Speichern
Center
►
►
►
►
►
►
►
►
321
Position
Navig.
Eingabe
Zurück
Plug & Play
Sprache : English
Zeit
Lichteffekt
: TV Modus An
Einstellung für Wandmontage
Melodie : Aus
Unterhaltung : Kino
Energiesparmod. : Aus
PIP
Einstellungen
T V
BN68-01528A-00_GER.indd 39 2008-4-21 15:17:44

Deutsch - 40
Einstellen einer gespeicherten Position
1 Führen Sie den 1. Schritt von
Öffnen des Menüs aus.
2 Durch Drücken einer Farbtaste (Rot, Grün, Gelb) wird die
automatische Wandhalterung in die gespeicherte Position
gebracht.
➢
Sie können die Wandhalterung in eine der 3
voreingestellten Positionen bringen. Drücken Sie hierzu
auf die rote (Position 1), grüne (Position 2) oder gelbe
(Position 3) Taste.
➢
Wenn Sie die Position verändern, nachdem Sie eine
gespeicherte Position eingestellt haben, wird die Anzeige
der Position geschlossen.
➢
Einzelheiten zur Installation entnehmen Sie bitte
dem zusammen mit der Wandhalterung gelieferten
Installationshandbuch.
➢
Setzen Sie sich für die Installation des Geräts und zum
Einbauen und Positionieren der Wandhalterung mit einem
Fachbetrieb in Verbindung.
➢
Verwenden Sie dieses Installationshandbuch, wenn Sie die
Wandhalterung an einer Wand befestigen. Bei Installation
auf anderen Trägermaterialien wenden Sie sich bitte an Ihren
Fachhändler.
➢
Die automatische Wandhalterung funktioniert nicht, wenn
Anynet+ aktiv ist.
➢
Das 102 cm-Modell ist nicht kompatibel mit dem älteren
Wandhalterungsmodell (WMN5090A).
Montieren des Standfußes (modellabhängig)
Verwenden Sie die 6 mitgelieferten Schrauben, um den Monitor fest
mit der Bodenplatte zu verschrauben.
(Das Gehäuse Ihres Fernsehers entspricht möglicherweise nicht
genau der Abbildung.)
Bei Wandinstallation Ihres
Fernsehgeräts schließen
Sie die Abdeckung (
1)
am Verbindungsteil des
Standfußes mithilfe der zwei
Verblendschrauben.
Achtung
Befestigen Sie den Standfuß sicher am
Fernsehgerät, ehe Sie ihn bewegen, da der
Standfuß umfallen und schwere Verletzungen
verursachen kann.
➢
Der PDP-Fernseher sollte von mindestens
zwei Personen getragen werden. Um
Beschädigungen zu vermeiden, legen Sie
den Fernseher nie auf den Fußboden.
Bewahren Sie ihn stets aufrecht stehend auf.
Einstellung für Wandmontage
Einstellen
Speichern
Center
321
Position
Position 1
►
►
►
►
►
►
►
►
BN68-01528A-00_GER.indd 40 2008-4-21 15:17:46

Deutsch - 41
Befestigen des Fernsehgeräts an der Wand
Das Fernsehgerät kann hinfallen, wenn Sie daran ziehen, es schieben oder darauf klettern.
Stellen Sie insbesondere sicher, dass sich keine Kinder an das Gerät hängen oder es
aus dem Gleichgewicht bringen. Anderenfalls könnte das Gerät umkippen und schwere
Verletzungen oder den Tod verursachen. Beachten Sie alle Anweisungen der beigefügten
Sicherheitshinweise. Noch mehr Stabilität erreichen Sie, wenn Sie den Kippschutz installieren.
Gehen Sie hierzu folgendermaßen vor.
So verhindern Sie, dass das Fernsehgerät umkippt:
1. Stecken Sie die Schrauben durch die Halterungen und
befestigen Sie sie fest an der Wand. Vergewissern Sie sich,
dass die Schrauben gut halten.
Je nach Ausführung der Wand benötigen Sie zum
Befestigen weiteres Material, wie z. B. einen Dübel.
Da die benötigten Halterungen, Schrauben und das Band
nicht zum Lieferumfang gehören, müssen Sie diese Teile
gesondert erwerben.
2. Entfernen Sie die Schrauben in der Mitte auf der Rückseite
des Fernsehgeräts. Setzen Sie diese Schrauben in die
Halterungen ein und befestigen Sie die Schrauben dann
wieder am Fernsehgerät.
Die Schrauben werden möglicherweise nicht zusammen
mit dem Gerät geliefert. Kaufen Sie in diesem Fall
Schrauben entsprechend den folgenden Angaben.
3. Verbinden Sie die Halterungen an der Wand und die
Halterung am Fernsehgerät mit einem festen Band
miteinander und ziehen Sie das Band dann fest.
Stellen Sie das Fernsehgerät in der Nähe der Wand auf,
damit es nicht nach hinten kippen kann.
Es ist noch sicherer, wenn die Halterungen an der Wand
niedriger als die Halterungen am Fernsehgerät sind.
Lösen Sie das Band, ehe Sie den Fernsehapparat
bewegen.
4. Kontrollieren Sie, ob alle Anschlüsse weiterhin fest
verbunden sind. Prüfen Sie regelmäßig die Verbindungen
auf Zeichen von Ermüdung oder Versagen. Bei Zweifeln
hinsichtlich der Sicherheit Ihrer Halterung wenden Sie sich
an einen professionellen Installationsbetrieb.
➣
➣
➣
➣
➣
➣
Wand
Achtung
Wand
BN68-01528A-00_GER.indd 41 2008-4-21 15:17:47

Deutsch - 42
Problembehandlung
Bevor Sie sich über Ihren Fachhändler an den Kundendienst von Samsung wenden, führen Sie
bitte die nachstehend beschriebenen einfachen Maßnahmen durch.
Wenn Sie das Problem nicht anhand der angegebenen Hinweise lösen können, notieren Sie
Modell- und Seriennummer des Fernsehgeräts, und wenden Sie sich an Ihren Fachhändler.
Kein Ton oder Bild
Stellen Sie sicher, dass das Netzkabel an eine Steckdose angeschlossen ist.
Stellen Sie sicher, dass Sie die Netztaste (Ein/Aus) am vorderen Bedienfeld gedrückt haben, oder
drücken Sie die Taste
POWER auf der Fernbedienung.
Überprüfen Sie die Einstellungen für Kontrast und Helligkeit.
Kontrollieren Sie die Lautstärke.
Überprüfen Sie, ob „TV-Lautsprecher“ auf Aus gestellt ist.
Normales Bild, aber kein Ton
Kontrollieren Sie die Lautstärke.
Überprüfen Sie, ob die Taste Stumm auf der Fernbedienung gedrückt wurde.
Kein Bild oder nur schwarzweißes Bild
Ändern Sie die Farbeinstellungen.
Stellen Sie sicher, dass die korrekte Fernsehnorm ausgewählt ist.
Ton- und Bildstörungen
Suchen Sie das elektrische Gerät, das die Störungen am Fernsehgerät verursacht, und stellen Sie es
in einem größeren Abstand auf.
Schließen Sie das Fernsehgerät an eine andere Steckdose an.
Verzerrtes oder verschneites Bild, verzerrter Ton
Überprüfen Sie Ausrichtung, Standort und Anschlüsse der Antenne.
Interferenzen werden oft durch Zimmerantennen verursacht.
Fernbedienung funktioniert nicht richtig
Tauschen Sie die Batterien der Fernbedienung aus.
Reinigen Sie die Vorderseite der Fernbedienung (dort befindet sich der Infrarotsender).
Überprüfen Sie, ob die Pole („+“ und „–“) der Batterien wie im Batteriefach angezeigt ausgerichtet sind.
Überprüfen Sie, ob die Batterien möglicherweise leer sind.
Der Bildschirm ist schwarz und die Betriebsanzeige blinkt kontinuierlich.
Überprüfen Sie auf Ihrem Computer Stromversorgung und Signalkabel.
Das Fernsehgerät befindet sich im Energiesparmodus.
Bewegen Sie die Maus des Computers, oder drücken Sie eine Taste auf der Tastatur.
Überprüfen Sie bei den Geräten (Set-Top-Box, DVD usw.) Stromversorgung und Signalkabel.
Das Fernsehgerät befindet sich im Energiesparmodus.
Drücken Sie auf der Fernbedienung die Taste SOURCE.
Schaltet das Fernsehgerät ein oder aus.
Das beschädigte Bild wird in der Ecke des Bildschirms angezeigt.
Wenn bei manchen externen Geräten Nur Scan gewählt ist, erscheint das beschädigte Bild in der Ecke des
Bildschirms. Dieses Symptom ist auf das externe Gerät und nicht auf das Fernsehgerät zurückzuführen.
Die Meldung “Resets all settings to the default values (Setzt alle Einstellungen auf die
Standardwerte zurück) wird angezeigt.
Diese erscheint, wenn Sie die EXIT-Taste eine Weile lang gedrückt halten. Die Geräteeinstellungen
werden auf die Werkseinstellungen zurückgesetzt.
BN68-01528A-00_GER.indd 42 2008-4-21 15:17:47

Deutsch - 43
Technische Daten
Die Beschreibungen und Eigenschaften in diesem Handbuch werden nur zu Informationszwecken
herausgegeben und können ohne vorherige Ankündigung geändert werden.
Modell PS50A470
Bildgröße (Diagonal) 50 Zoll
Vertikal PC-Auflösung 1360 x 768 bei 60 Hz
Audio (Ausgang) 10 W + 10 W
Abmessungen (BxHxT)
Gehäuse
Mit Fuß
1290 x 740 x 95 mm
1290 x 804 x 319 mm
Gewicht
Gehäuse
Mit Fuß
39 kg
41 kg
Umgebungsbedingungen
Betriebstemperatur
Luftfeuchtigkeit (bei Betrieb)
Lagerungstemperatur
Luftfeuchtigkeit (Lagerung)
10 °C bis 40 °C (50 °F bis 104 °F)
10% bis 80%, nicht kondensierend
-20 °C bis 45 °C (-20,00 °C bis 45,00 °C)
5% bis 95%, nicht kondensierend
➢
Dies ist ein digitales Gerät der Klasse B.
Änderungen der technischen Daten und des Geräte-Designs vorbehalten.
Die technischen Daten zum Stromverbrauch und zur benötigten Netzspannung finden Sie auf dem
Etikett am Produkt.
BN68-01528A-00_GER.indd 43 2008-4-21 15:17:47

Korrekte Entsorgung von Altgeräten
(Elektroschrott)
(In den Ländern der Europäischen Union und anderen europäischen
Ländern mit einem separaten Sammelsystem)
Die Kennzeichnung auf dem Produkt bzw. auf der dazugehörigen
Dokumentation gibt an, dass es nach seiner Lebensdauer nicht
zusammen mit dem normalen Haushaltsmüll entsorgt werden darf.
Entsorgen Sie dieses Gerät bitte getrennt von anderen Abfällen,
um der Umwelt bzw. der menschlichen Gesundheit nicht durch
unkontrollierte Müllbeseitigung zu schaden. Helfen Sie mit, das Altgerät
fachgerecht zu entsorgen, um die nachhaltige Wiederverwertung von
stofflichen Ressourcen zu fördern.
Private Nutzer wenden sich an den Händler, bei dem das Produkt
gekauft wurde, oder kontaktieren die zuständigen Behörden, um in
Erfahrung zu bringen, wo Sie das Altgerät für eine umweltfreundliche
Entsorgung abgeben können.
Gewerbliche Nutzer wenden sich an ihren Lieferanten und gehen nach
den Bedingungen des Verkaufsvertrags vor. Dieses Produkt darf nicht
zusammen mit anderem Gewerbemüll entsorgt werden.
BN68-01528A-00_GER.indd 44 2008-4-21 15:17:48

© 2008 Samsung Electronics Co., Ltd. All rights reserved.
Instructies voor gebruik
Beeldretentie
Geef een stilstaand beeld (bijvoorbeeld van een videospel of tijdens het aansluiten van een
computer) niet langer dan twee uur op het plasmascherm weer, omdat dit beeldretentie kan
veroorzaken. Beeldretentie wordt ook wel inbranden genoemd. Verlaag bij de weergave van een
stilstaand beeld de helderheid en het contrast om beeldretentie te voorkomen.
Hoogte
Het plasmascherm blijft normaal functioneren tot op een hoogte van 2000 meter. Boven de 2000
meter functioneert het scherm mogelijk niet correct. Installeer en gebruik het scherm niet op
dergelijke plaatsen.
Warmte op de bovenkant van het plasmascherm.
De bovenkant van het scherm kan na een lange gebruiksperiode erg warm worden, omdat de
warmte van het scherm zich door het ventilatiegat aan de bovenkant van het toestel verspreidt. Dit is
normaal en duidt niet op een defect of storing. Zorg dat kinderen de bovenkant van het product niet
kunnen aanraken.
Het product maakt een ‘krakend’ geluid.
Het krakende geluid kan optreden als het product uitzet of inkrimpt door een verandering in de
omgeving, zoals de temperatuur of luchtvochtigheid. Dit is normaal en duidt niet op een defect.
Celdefecten
Het plasmascherm gebruikt het paneel dat bestaat uit 1.230.000 (SD-niveau) tot 3.150.000 (HD-
niveau) pixels, wat het gebruik van geavanceerde productietechnologie vereist. Het scherm kan
echter enkele heldere of donkere pixels bevatten. Deze pixels zijn niet van invloed op de prestaties
van het product.
Gebruik de tv niet bij een temperatuur van minder dan 5°C (41°F)
Als u een stilstaand beeld te lang op het scherm weergeeft, kan plasmascherm permanent
beschadigd raken.
Als u langere tijd in 4:3 formaat naar de plasma-tv kijkt, kunnen resten van
randen links, rechts en in het midden van het scherm achterblijven. Dit wordt
veroorzaakt door het verschil in uitstraling van licht op het scherm. Het afspelen
van een DVD of gebruik maken van een spelcomputer kan hetzelfde effect op
het scherm hebben. Schade ontstaan door het bovengenoemde effect valt niet
onder de garantie.
Na-afdruk op scherm.
De weergave van stilstaande beelden van computerspelletjes en andere computerbeelden kunnen na
langere tijd gedeeltelijk een na-afdruk achterlaten. Om dit te voorkomen kunt u tijdens het weergeven
van stilstaande beelden de helderheid en het contrast verminderen.
Garantie
- De garantievoorwaarden gelden niet voor schade veroorzaakt door beeldretentie.
- Het inbranden van het scherm valt niet onder de garantievoorwaarden.
Installatie
Neem contact op met een erkend servicecentrum wanneer u het apparaat op een locatie installeert
met veel stof, hoge of lage temperaturen, hoge luchtvochtigheid, chemische stoffen en waar het
voortdurend in bedrijf is, zoals op het vliegveld, het spoorwegstation etc.
Doet u dat niet dan kan het apparaat ernstige schade oplopen.
Contact opnemen met SAMSUNG WORLDWIDE
Wanneer u vragen of opmerkingen hebt met betrekking tot Samsung-producten, neemt u contact op met
de klantenservice van SAMSUNG. (Zie de achterzijde voor mee informatie.)
Nederlands - 2
BN68-01528A-00Dut.indd 2 2008-4-21 11:14:00

Symbolen
☛ ➢
Indrukken
Belangrijk
Opmerking
Inhoud
Algemene informatie
Instructies voor gebruik ................................... 2
Controleer de geleverde onderdelen .............. 4
Standaardvoet gebruiken ............................... 4
Conguratiescherm ......................................... 5
Aansluitingspaneel .......................................... 6
Overzicht van de afstandsbediening .............. 8
Bediening
De televisie in- en uitschakelen ......................9
Weergave van de menu’s ............................... 9
Plug & play-functie ........................................ 10
De toets TOOLS gebruiken ........................... 12
Externe signaalbronnen bekijken .................. 12
Toestelnamen aanpassen ............................. 13
Kanaalbeheer
Kanalen automatisch opslaan ....................... 13
Kanalen handmatig opslaan ......................... 14
Kanalen toevoegen of vergrendelen ............. 15
Opgeslagen kanalen rangschikken ............... 16
Kanalen een naam geven ............................. 16
Kanalen nauwkeurig afstemmen ................... 17
Beeldbeheer
De beeldstandaard wijzigen .......................... 18
Beeldinstellingen aanpassen ........................ 18
Gedetailleerde beeldinstellingen
congureren .................................................. 19
Afbeeldingsopties .......................................... 20
De 3D-functie gebruiken ............................... 22
De standaardbeeldinstellingen herstellen ..... 24
Geluidsbeheer
Geluidskenmerken ........................................ 25
De geluidsmodus selecteren
(afhankelijk van model) ................................. 26
De hoofdtelefoon aansluiten
(afzonderlijk verkrijgbaar) .............................. 26
Beschrijving van de functies
Tijdskenmerken ............................................. 27
Taalkeuze / Melodie / Lichteffect /
Entertainment / Spaarstand / PIP ................. 28
Pc-scherm
Software congureren
(gebaseerd op Windows XP) ........................ 29
Invoermodus (PC) ......................................... 30
De pc instellen ..............................................31
Anynet+
Wat is Anynet+? ............................................ 32
Anynet+-apparaten aansluiten ...................... 32
Anynet+instellen............................................ 33
Zoeken naar en schakelen tussen
Anynet+-apparaten ....................................... 33
Opnemen ...................................................... 34
Luisteren via een ontvanger .......................... 35
Controleer het volgende voordat u
om service verzoekt ...................................... 35
Appendix
Teletekstfunctie (afhankelijk van het model)
... 36
Specicaties voor de muurbevestigingskit
(VESA) .......................................................... 38
Aanpassen van de muurbevestiging
(apart verkrijgbaar) ........................................ 39
De standaardvoet monteren
(afhankelijk van het model) ........................... 40
De TV vastzetten aan de wand ..................... 41
Problemen oplossen ..................................... 42
Specicaties .................................................. 43
Nederlandsc
Nederlands - 3
BN68-01528A-00Dut.indd 3 2008-4-21 11:14:01

Standaardvoet gebruiken
➢
Het plasmascherm moet door
twee of meer personen getild
worden. Leg het plasmascherm
nooit op de grond neer om
eventuele beschadiging aan het
scherm te voorkomen. Houd het
plasmascherm altijd recht.
Het plasmascherm kan 20 graden
naar links en naar rechts draaien.
Controleer de geleverde onderdelen
Gebruikershandleiding Afstandsbediening/
AAA-batterijen
Netsnoer Doek-schoon
Garantiekaart/
Veiligheidshandleiding
(Niet op alle plaatsen
beschikbaar)
Bodemkap / schroeven
(2ea)(Zie pagina 40)
Ferrietkern voor netsnoer Ferrietkern voor S-Video
Apart verkrijgbaar
Antennekabel Componentkabels Audiokabels Pc-kabel
SCART-kabel Pc-audiokabel HDMI-kabel HDMI/DVI-kabel
➢
Ferrietkern (stroomkabel, S-Video)
De ferrietkernen worden gebruikt om de kabels af te schermen van
interferentie. Open de ferrietkern bij het aansluiten van een kabel
en klem deze om de kabel bij de plug.
-20° ~ 20°
Nederlands - 4
BN68-01528A-00Dut.indd 4 2008-4-21 11:14:04

Configuratiescherm
➢
De vorm en kleur van het product kunnen, afhankelijk van het model, variëren.
Voor-(of zij)paneel
1
SOURCE
Toont een menu van alle beschikbare
ingangen (TV, Ext.1, Ext.2, AV, S-Video,
Component, PC, HDMI1, HDMI2, HDMI3
).
➢
Gebruik deze toets in het schermmenu
zoals u de toets ENTER op de
afstandsbediening gebruikt.
2
MENU
Druk hierop om een beeldmenu van de
functies van uw tv weer te geven.
3
– +
Druk hierop om het volume hoger oflager
te zetten. In het schermmenu gebruikt u
deknoppen – + op dezelfde manier als
de knoppen◄ en ► op de afstandsbediening.
4
C/P.
Druk hierop om het kanaal te wijzigen. In het
schermmenu gebruikt u de knoppen
C/P.
op dezelfde manier als de
knoppen ▲ en ▼ op de afstandsbediening.
5
Aan/uit-lampje
Als de stroom is ingeschakeld, knippert het
lampje even om vervolgens uit te gaan. In de
stand-bymodus brandt het lampje.
6
Aan/uit-knop
Druk hierop om de tv in of uit te schakelen.
7
Sensor voor afstandsbediening
Richt de afstandsbediening op dit punt van
de tv.
8
Luidspreker
Nederlands - 5
BN68-01528A-00Dut.indd 5 2008-4-21 11:14:04

☛
Wanneer u een audio- of videosysteem op uw toestel aansluit, dient u alle apparaten uit te schakelen.
Zorg bij het aansluiten van een extern apparaat ervoor dat de kleuren van de aansluiting en de
kabel overeenkomen.
Wordt vervolgd...
Aansluitingspaneel
1
AANSLUITEN
Aansluiting voor het netsnoer.
2
COMPONENT IN
Audio (AUDIO L/R) en video (Y/PB/PR)
ingangen voor Component.
3
PC IN / AUDIO
Aansluiting voor de video- en audio-uitvoer van
de computer.
4
EXT 1, EXT 2
Ingangen of uitgangen voor externe apparaten,
zoals een videorecorder, dvd-speler,
spelcomputer of videodiscspeler.
Specificaties voor de invoer/uitvoer
Aansluiting
Ingang Uitgang
Video Audio (L/R) RGB Video + audio (L/R)
EXT 1
✔ ✔ ✔
Alleen de tv-uitgang
is beschikbaar.
EXT 2
✔ ✔
Uitgang naar keuze.
5
3D SYNC OUT
Aansluiten op 3D-infraroodzender
6
Aansluiten op externe geluidsapparatuur
RCA-audiosignalen van de tv aansluiten op
een externe bron, zoals geluidsapparatuur.
7
SERVICE
− Aansluiting voor onderhoud.
− Sluit de seriële bus tussen de elektrisch
aanstuurbare muurbevestigingsbeugel en
uw tv aan wanneer u de weergavehoek
van de tv met uw afstandsbediening wilt
aanpassen.
Achterpaneel
➢
La couleur et la forme du produit peuvent varier en fonction du modèle.
Kabeltelevisie
netwerk
1
432 6 8
9
7
of
of
5
Nederlands - 6
BN68-01528A-00Dut.indd 6 2008-4-21 11:14:08

8
HDMI IN 1,2
− Voor een HDMI-naar-HDMI-verbinding is
geen extra audioaansluiting nodig.
− Bij gebruik van de HDMI/DVI-
kabelverbinding, moet u de HDMI IN 2-
aansluiting gebruiken.
➢ Wat is HDMI?
- “Met HDMI” (High Definition
Multimedia Interface) kunnen digitale
videogegevens met een hoge definitie
en meerdere kanalen met digitale audio
worden verzonden.
- De HDMI/DVI-uitgang ondersteunt
een DVI-aansluiting op externe
apparatuur met een geschikte kabel
(niet meegeleverd). Het verschil tussen
HDMI en DVI is dat het HDMI-apparaat
minder groot is, is voorzien van een
functie voor HDCP-codering
DVI IN (HDMI 2) AUDIO R/L
DVI-audio-uitgangen voor externe apparaten.
9
ANT IN
75Ω Coaxiale aansluiting voor antenne of
kabeltelevisienetwerk.
Ondersteunde modi voor HDMI/DVI en Component
480i 480p 576i 576p 720p 1080i
HDMI/DVI 50 Hz X X X O O O
HDMI/DVI 60 Hz X O X X O O
Component O O O O O O
1
HDMI IN 3
Sluit aan op de HDMI-aansluiting van een
apparaat met HDMI-uitvoer.
2
S-VIDEO of VIDEO / AUDIO L/R
Video-(S-Video of Video) en audio-ingangen
voor externe apparaten, zoals een camcorder
of videorecorder.
3
Koptelefoonaansluiting
U kunt een koptelefoon op de tv aansluiten als
u naar een programma wilt kijken zonder de
andere aanwezigen in de kamer te storen.
➢
Langdurig gebruik van een hoofdtelefoon
met een hoog volume kan het gehoor
beschadigen.
➢
De vorm en kleur van het product kunnen, afhankelijk van het model, variëren.
Zijpaneel
of
3
1
2
Nederlands - 7
BN68-01528A-00Dut.indd 7 2008-4-21 11:14:10

Overzicht van de afstandsbediening
1
Toets POWER
(hiermee wordt de tv in- en
uitgeschakeld)
2
Selecteert rechtstreeks de
tv-modus
3
Cijfertoetsen voor directe
kanaalkeuze
4
Kanaal kiezen met één of
twee cijfers
5
Geluid tijdelijk uitschakelen
6
Volume verhogen
Volume verlagen
7
Knop voor het beheer van
de kanalen (zie pagina 15)
8
Hiermee kunt u snel
veelgebruikte functies
selecteren.
9
Cursor besturen binnen het
menu
0
Informatie over de huidige
uitzending bekijken
#
Druk hierop om de optionele
weergave- en geluidsmodi
voor sport, film en spellen te
selecteren.
$
VCR/DVD-functies
(Terugspoelen, Stoppen,
Afspelen/Pauze,
vooruitspoelen)
%
Beschikbare bron selecteren
^
Vorig kanaal
&
Volgend kanaal
Vorig kanaal
*
Hoofdmenu weergeven
(
Knop voor de TruSurround
XT-modus
)
Terug naar het vorige menu
a
Schermmenu afsluiten
b
Beeldformaat selecteren
c
Gebruik deze toets wanneer
u een SAMSUNG DMA-
apparaat (Digital Media
Adapter) aansluit via
een HDMI-interface en
overschakelt naar de DMA-
modus. (De DMA-knop
is optioneel.) Raadpleeg
de gebruikershandleiding
bij de DMA voor meer
informatie over de
bedieningsprocedures.
Deze knop is beschikbaar
als “Anynet+ (HDMI-CEC)"
is ingesteld op “Aan” (zie
pagina 33).
d
Beeldeffect selecteren (Zie
pagina 18)
e
3D-films en spellen
driedimensionaal bekijken
met een 3D-bril.
Teletekstfuncties
(zie pagina 36)
2
Teletekstmodus verlaten
(afhankelijk van het model)
7
Teletekst opslaan
8
Weergaveformaat voor
teletekst
0
Teletekst weergeven
!
Fastext-onderwerp
selecteren
@
Teletekst weergeven/
teletekstinformatie en
normale uitzending tegelijk
op scherm weergeven
%
Teletekstmodus selecteren
(LIST/FLOF)
^
Teletekst subpagina
&
P : volgende
teletekstpagina
P : vorige teletekstpagina
*
Teletekstindex
)
Teletekst vastzetten
a
Teletekst uitschakelen
Wordt vervolgd...
Nederlands - 8
BN68-01528A-00Dut.indd 8 2008-4-21 11:14:12

Batterijen in de afstandsbediening plaatsen
1 Open het klepje achter op de afstandsbediening met een
opwaartse beweging zoals aangegeven in de afbeelding.
2 Plaats twee AAA batterijen.
➢
Zorg ervoor dat de “+” en “–”-uiteinden van de
batterijen overeenkomen met de afbeelding in het
vakje.
Gebruik batterijen van verschillende soorten niet door
elkaar (bijvoorbeeld alkaline en mangaan).
3 Sluit het klepje zoals aangegeven in de afbeelding.
➢
Verwijder de batterijen en bewaar ze op een koele, droge
plaats indien u de afstandsbediening langere tijd niet
gebruikt. De maximale werkingsafstand tussen de tv en afstandsbediening bedraagt circa 7
meter. (Bij normaal gebruik van de tv gaan de batterijen ongeveer een jaar mee.)
➢
De afstandsbediening doet het niet! Controleer de volgende punten:
1. Is de tv ingeschakeld?
2. Zijn de plus- en minpolen van de batterijen tegengesteld geplaatst?
3. Zijn de batterijen leeg?
4. Is er een stroomstoring of zit de stekker wel in het stopcontact?
5. Schijnt er speciaal fluorescerend licht of neonlicht vlakbij?
De televisie in- en uitschakelen
Het netsnoer bevindt zich aan de achterzijde van het toestel.
1 Steek de stekker in een geschikt stopcontact.
➢
De netspanning is op de achterzijde van de tv aangegeven. De frequentie is 50 of 60 Hz.
2 Druk op de toets (Power) (Aan/Uit) op de voorkant van de televisie of op de toets POWER op
de afstandsbediening om de televisie in te schakelen. Het programma waar u het laatst naar hebt
gekeken, wordt automatisch opnieuw geselecteerd. Als u nog geen kanalen heeft opgeslagen, is het
beeld niet helder. Zie “Kanalen automatisch opslaan” op pagina 13 of “Kanalen handmatig opslaan”
op pagina 14.
➢
Wanneer de tv voor het eerst wordt ingeschakeld, worden enkele basisinstellingen automatisch
toegepast. Zie “Plug & play-functie” op pagina 10.
3 Druk op de toets Power (Aan/Uit) aan de voorzijde van de tv, of druk op de toets POWER op de
afstandsbediening om het toestel uit te schakelen.
4 Druk op de toets Power (Aan/Uit) aan de voorzijde van de tv, of druk op de toets POWER op de
afstandsbediening om het toestel uit te schakelen.
Weergave van de menu’s
1 Druk op de knop MENU.
Het hoofdmenu verschijnt op het scherm.
Aan de linkerkant staan zes pictogrammen: Beeld, Geluid,
Kanaal, Instellingen, Invoer.
2 Druk nogmaals op de toets ▲ of ▼ om Aan of Uit te
selecteren.
Druk op de toets ENTER voor weergave van het submenu van
het pictogram.
3 Druk op de toets ▲ of ▼ om naar items in het menu te gaan.
Druk op de toets ENTER om items in het menu te selecteren.
4
Druk op de toets ▲/▼/◄/► om de geselecteerde items te wijzigen.
Druk op de toets RETURN om naar het vorige menu terug
te keren.
5 Druk op de toets EXIT om het menu te verlaten.
Verpl.
Enter
Sluiten
Modus :Standaard
Cel helderheid
7
Contrast 95
Helderheid 45
Scherpte 50
Kleur 50
Tint G50 R50
Detailinstellingen
Afbeeldingsopties
Reset :OK
Beeld
T V
Nederlands - 9
BN68-01528A-00Dut.indd 9 2008-4-21 11:14:14

Plug & play-functie
Wanneer de tv voor het eerst wordt ingeschakeld, worden
enkele basisinstellingen automatisch achtereenvolgens
uitgevoerd.
De volgende instellingen zijn beschikbaar.
☛
Als u per ongeluk het verkeerde land voor uw tv selecteert,
kunnen de tekens op het scherm onjuist worden weergegeven.
1 Druk op de toets POWER op de afstandsbediening indien het
toestel stand-by staat. het bericht Plug & Play starten wordt
weergegeven. Druk op de toets ENTER.
2 Het menu Taalkeuze verschijnt automatisch na enkele
seconden.
3 Selecteer de gewenste taal door op de toets ▲ of ▼ te drukken.
Druk op de toets ENTER. Het bericht Selecteer
‘Thuisgebruik’ wanneer u deze tv thuis installeert. wordt
weergegeven.
4 Druk op de toets ◄ of ► om Winkeldemo of Thuisgebruik te
selecteren, en druk vervolgens op de toets ENTER. Het bericht
om de verbonden status van de antenne te controleren, wordt
weergegeven.
➢
De standaardselectie is Thuisgebruik.
➢
We raden u aan de televisie in te stellen op de modus
Thuisgebruik voor het beste beeld in uw thuisomgeving.
➢
De modus Winkeldemo is alleen bedoeld voor gebruik in
winkels.
➢
Ga als volgt te werk wanneer het apparaat per ongeluk
in de modus Winkeldemo is ingesteld en u terug wilt
naar de modus Thuisgebruik (Standaard): Druk op de
knop Volume. Wanneer het menu voor het volume wordt
weergegeven, houdt u de knop MENU vijf seconden
ingedrukt.
5 Zorg dat de antenne is aangesloten op de tv, en druk op de
toets ENTER. Het menu Land verschijnt.
6 Selecteer uw land (of regio) door op de toets ▲ of ▼ te drukken.
Druk op de toets ENTER.
Plug & Play
Plug & Play starten
OK
Enter
Plug & Play
Selecteer ‘Thuisgebruik’ wanneer u
deze tv thuis installeert.
Verpl.
Enter
Winkeldemo Thuisgebruik
Plug & Play
Antenne-ingang controleren
Enter
Oversl.
OK
Plug & Play
P 1 C -- 40 MHz
0 %
Enter
Oversl.
Start
Wordt vervolgd...
Plug & Play
Taalkeuze
Verpl.
Enter
Nederlands
Deutsch
Français
Italiano
▼
Plug & Play
Land
▲
Nederland
Spanje
Zwitserland
Overige
Verpl.
Enter
Oversl.
Nederlands - 10
BN68-01528A-00Dut.indd 10 2008-4-21 11:14:16

7 Druk op de toets ENTER om het zoeken naar kanalen
te starten. Het zoeken van de kanalen start en eindigt
automatisch. Nadat alle beschikbare kanalen zijn opgeslagen,
wordt het menu Klok instellen automatisch weergegeven. Druk
op de toets ENTER.
8 Druk op de toets ◄ of ► om Maand, Data, Jaar, Uur of min te
selecteren. Stel deze in door op de toets ▲ of ▼ te drukken.
➢
U kunt Maand, Data, Jaar, Uur of min met de cijfertoetsen
op de afstandsbediening direct instellen.
9 Druk op de toets ENTER om de instelling te bevestigen. Het
bericht Veel kijkplezier verschijnt. Druk op de toets ENTER
wanneer u gereed bent.
➢
Zelfs als u niet op de toets ENTER drukt, verdwijnt het
bericht automatisch na een paar seconden.
Als u deze functie opnieuw wilt instellen...
1 Druk op de toets MENU om het menu weer te geven.
2 Druk op de toets ▲ of ▼ om Instellingen te selecteren en
druk vervolgens op de toets ENTER.
3 Druk nogmaals op de toets ENTER om Plug & Play te
selecteren.
Het bericht Plug & Play starten wordt weergegeven.
Plug & Play
Verpl.
Instellen
Enter
01 01
2008
00 04
Klok instellen
Maand Data Jaar Uur
min
OK
Veel kijkplezier
Verpl.
Enter
Terug
Plug & Play
Taalkeuze :Nederlands
Tijd
Lichteffect
:
Kijkstand aan
Aanpassen van muurbevestiging
Melodie :Uit
Entertainment :Uit
Spaarstand :Uit
PIP
Instellingen
T V
Nederlands - 11
BN68-01528A-00Dut.indd 11 2008-4-21 11:14:17

Externe signaalbronnen bekijken
U kunt schakelen tussen signalen bekijken van aangesloten
bronnen, zoals video, dvd, Set-Top-box, en de tv (via antenne
of kabel).
1 Druk op de toets MENU om het menu weer te geven.
2 Druk op de toets ▲ of ▼ om Invoer te selecteren en druk
vervolgens op de toets ENTER.
3 Druk nogmaals op de toets ENTER om Bronlijst te selecteren.
4 Druk op de toets ▲ of ▼ om de signaalbron te selecteren en
druk vervolgens op de toets ENTER.
Beschikbare signaalbronnen: TV, Ext.1, Ext.2, AV, S-Video,
Component, PC, HDMI1, HDMI2, HDMI3
➢
U kunt alleen de externe apparaten selecteren die op de tv zijn
aangesloten.
➢
U kunt deze opties selecteren door eenvoudig op de toets
SOURCE op de afstandsbediening te drukken.
➢
Om TV-programma’s te kunnen zien drukt u op de toets TV en
kiest u het gewenste kanaalnummer.
Verpl.
Enter
Terug
Bronlijst :TV
Naam wijzigen
Anynet+ (HDMI-CEC)
Invoer
T V
Verpl.
Enter
Terug
TV
Ext.1 :−−−−
Ext.2 :−−−−
AV :−−−−
S-Video :−−−−
Component :−−−−
PC :−−−−
HDMI1 :−−−−
HDMI2 :−−−−
HDMI3 :−−−−
Bronlijst
T V
De toets TOOLS gebruiken
U kunt de toets TOOLS gebruiken om snel en eenvoudig uw meestgebruikte functies te selecteren.
Het menu Extra wordt gewijzigd afhankelijk van de extern invoermodus die u weergeeft.
1 Druk op de toets TOOLS.
Het menu Extra wordt weergegeven
2 Druk op ▲ of ▼ om een menu te selecteren en druk
vervolgens op ENTER.
3 Druk op ▲/▼/◄/►/ENTER om de geselecteerde items weer
te geven, te wijzigen of te gebruiken.
Zie de pagina over de functie voor een gedetailleerde
omschrijving van de verschillende functies.
• Anynet+ (HDMI-CEC), zie pagina 32
• Beeldmodus, zie pagina 18
• Geluidmodus, zie pagina 25
• Slaaptimer, zie pagina 27
• SRS TS XT, zie pagina 25
• Spaarstand, zie pagina 29
• Dual I-II, zie pagina 26
Extra
Anynet+ (HDMI-CEC)
Beeldmodus : Standaard
Geluidmodus : Aangepast
Slaaptimer : Uit
SRS TS XT : Uit
Spaarstand : Uit
Dual I-II : Mono
t
Instellen
SluitenVerpl.
Nederlands - 12
BN68-01528A-00Dut.indd 12 2008-4-21 11:14:17

Kanalen automatisch opslaan
U kunt scannen op de voor u beschikbare frequentiebereiken
(afhankelijk van waar u woont).
Automatisch toegewezen kanaalnummers komen mogelijk
niet overeen met de feitelijke of gewenste kanaalnummers. U
kunt nummers echter handmatig rangschikken en ongewenste
kanalen wissen.
1 Druk op de toets MENU om het menu weer te geven.
2 Druk op de toets ▲ of ▼ om Kanaal te selecteren en druk op
de toets ENTER.
3 Druk op de toets ENTER. De beschikbare landen worden
weergegeven.
4 Druk op de toets ▲ of ▼ om uw land te selecteren en druk op
de toets ENTER.
5 Druk op de toets ▲ of ▼ om Automatisch opslaan te
selecteren en druk vervolgens op de toets ENTER.
6 Druk nogmaals op de toets ENTER om het zoeken te starten.
Het zoeken wordt automatisch beëindigd.
➢
Als u het zoeken voortijdig wilt beëindigen, drukt u op de
toets MENU of ENTER.
Toestelnamen aanpassen
U kunt de externe bron een naam geven.
1 Druk op de toets MENU om het menu weer te geven.
2 Druk op de toets ▲ of ▼ om Invoer te selecteren en druk
vervolgens op de toets ENTER.
3 Druk op de toets ▲ of ▼ om Naam wijzigen te selecteren en
druk vervolgens op de toets ENTER.
4 Druk op de toets ▲ of ▼ om de te wijzigen externe bron te
selecteren en druk vervolgens op de toets ENTER.
5 Selecteer het gewenste apparaat door op de toets ▲ of ▼ te
drukken en druk vervolgens op de toets ENTER.
Beschikbare toestelnamen: VCR, DVD, Kabel STB, Satelliet
STB, PVR STB, AV-ontvanger, Spelcomputer, Camcorder,
PC, TV, IPTV, BLU-Ray, HD DVD, DMA.
6 Druk op de toets EXIT om het menu te verlaten.
Verpl.
Enter
Terug
Bronlijst :TV
Naam wijzigen
Anynet+ (HDMI-CEC)
Invoer
T V
Automatisch opslaan
P 1 C -- 40 MHz
0 %
Enter
Terug
Start
Verpl.
Enter
Terug
Ext.1 :−−−−
Ext.2 :−−−−
AV :
S-Video :
Component :−−−−
PC :−−−−
HDMI 1 :−−−−
HDMI 2 :
HDMI 3 :
Naam wijzigen
T V
−−−−
VCR
DVD
Kabel STB
Satelliet STB
PVR STB
AV-ontvanger
Spelcomputer
▼
Verpl.
Enter
Terug
Land :Nederland
Automatisch opslaan
Handm. opslaan
Kanaalbeheer
Sorteren
Naam
Fijnafstemming
Kanaal
T V
T V
Verpl.
Enter
Terug
Land :Nederland
Automatisch opslaan
Handm. opslaan
Kanaalbeheer
Sorteren
Naam
Fijnafstemming
Kanaal
België
Frankrijk
Duitsland
Italië
Nederland
Spanje
Zwitserland
Ver. Koninkrijk
▼
Nederlands - 13
BN68-01528A-00Dut.indd 13 2008-4-21 11:14:19

Kanalen handmatig opslaan
U kunt tv-kanalen opslaan, waaronder kanalen die via
kabelnetwerken worden ontvangen.
Bij het handmatig opslaan van kanalen kunt u het volgende
kiezen:
Of u een gevonden kanaal al dan niet opslaat.
Het nummer van ieder opgeslagen kanaal waaraan u een
naam wilt toewijzen.
1 Druk op de toets MENU om het menu weer te geven.
2 Druk op de toets ▲ of ▼ om Kanaal te selecteren en druk op
de toets ENTER.
3 Druk op de toets ▲ of ▼ om Handm. opslaan te selecteren
en druk op de toets ENTER.
4 Selecteer de gewenste optie door op de toets ▲ of ▼ te
drukken en druk vervolgens op de toets ENTER.
5 Druk op de toets ENTER wanneer u tevreden bent met de
instelling.
6 Druk op de toets EXIT om het menu te verlaten.
Programma (Programmanummer dat aan een kanaal wordt toegewezen)
− Druk op de toets ▲ of ▼ tot u het juiste nummer vindt.
➢
U kunt het kanaalnummer ook rechtstreeks selecteren door de cijferknoppen (0-9) in te
drukken.
Kleursysteem: Auto/PAL/SECAM/NTSC4.43
− Druk op de toets ▲ of ▼ om de gewenste kleurennorm te selecteren.
Geluidssysteem: BG/DK/I/L
− Druk op de toets ▲ of ▼ om de gewenste geluidsnorm te selecteren.
Kanaal (Als u het nummer weet van het kanaal dat u wilt opslaan)
− Druk op de toets ▲ of ▼ om C (antennekanaal) of S (kabelkanaal) te selecteren.
− Druk op de toets ► en vervolgens op de toets ▲ of ▼ om het gewenste nummer te selecteren.
➢
U kunt het kanaalnummer ook rechtstreeks selecteren door de cijferknoppen (0-9) in te
drukken.
➢
Als er geen geluid is of als het geluid is vervormd, selecteert u nogmaals de gewenste
geluidsstandaard.
Zoeken (Als u de kanaalnummers niet weet)
− Druk op de toets ▲ of ▼ om het zoeken te starten.
− De tuner scant het frequentiebereik totdat het eerste kanaal of het door u geselecteerde kanaal in
beeld komt.
Opslaan (Het kanaal en het bijbehorende programmanummer opslaan)
− Selecteer OK door op de toets ENTER te drukken.
☛
Kanaalmodus
P (Programmamodus): Als u klaar bent met instellen, zijn de zendstations die u kunt ontvangen
toegewezen aan de positienummers P00 tot P99. In deze modus kunt u een kanaalnummer
selecteren door het positienummer in te toetsen.
C (Antennekanaalmodus): In deze modus kunt u een kanaal selecteren door het nummer in te
toetsen dat aan het zendstation is toegewezen.
S (Kabelkanaalmodus): In deze modus kunt u een kanaal selecteren door het nummer in te
toetsen dat aan het kabelkanaal is toegewezen.
Verpl.
Enter
Terug
Land :Nederland
Automatisch opslaan
Handm. opslaan
Kanaalbeheer
Sorteren
Naam
Fijnafstemming
Kanaal
T V
Verpl.
Enter
Terug
Programma :P 1
Kleursysteem :Auto
Geluidssysteem :BG
Kanaal :C --
Zoeken : 40 MHz
Opslaan :?
Handm. opslaan
T V
Nederlands - 14
BN68-01528A-00Dut.indd 14 2008-4-21 11:14:19

Kanalen toevoegen of vergrendelen
Met Kanaalbeheer kunt u eenvoudig kanalen vergrendelen of
toevoegen.
1 Druk op de toets MENU om het menu weer te geven.
2 Druk op de toets ▲ of ▼ om Kanaal te selecteren en druk op
de toets ENTER.
3 Druk op de toets ▲ of ▼ om Kanaalbeheer te selecteren en
druk op de toets ENTER.
Kanalen toevoegen
Met Kanalenlijst kunt u kanalen toevoegen.
4 Selecteer Kanalenlijst door op de toets ENTER te drukken.
5 Ga naar het veld ( ) door op de toetsen ▲/▼/◄/► te
drukken, selecteer een kanaal dat toegevoegd moet worden
en druk op de toets ENTER om het toe te voegen.
➢
Als u nogmaals op de knop ENTER drukt, verdwijnt het
symbool ( ) naast het kanaal en wordt het kanaal niet
toegevoegd.
Kanalen vergrendelen
Door video en geluid uit te zetten kunt u met deze functie
voorkomen dat ongeautoriseerde gebruikers, zoals kinderen,
ongepaste programma’s bekijken.
6 Druk op de toets ▲ of ▼ om Kinderslot te selecteren en druk
op de toets ENTER.
7 Selecteer Aan door op de toets ▲ of ▼ te drukken en druk
vervolgens op de toets ENTER.
8 Druk op de toets ▲ of ▼ om Kanalenlijst te selecteren en
druk op de toets ENTER.
9 Ga naar het veld ( ) door op de toetsen ▲/▼/◄/► te
drukken, selecteer een kanaal dat vergrendeld moet worden
en druk op de toets ENTER.
➢
Als u nogmaals op de knop ENTER drukt, verdwijnt het symbool ( ) naast het kanaal en wordt
de kanaalvergrendeling geannuleerd.
➢
Een blauw scherm wordt weergegeven wanneer het kinderslot is ingeschakeld.
10 Druk op de toets EXIT om het menu te verlaten.
➢
U kunt deze opties selecteren door eenvoudig op de toets
CH LIST op de afstandsbediening te drukken.
Verpl.
Enter
Terug
Land :Nederland
Automatisch opslaan
Handm. opslaan
Kanaalbeheer
Sorteren
Naam
Fijnafstemming
Kanaal
T V
Verpl.
Enter
Terug
Kanalenlijst
Kinderslot :Uit
Kanaalbeheer
T V
Kanalenlijst
P 1 C 6
1 / 10
▲
▼
Prog.
0
C --
1 C --
2 C --
3 C --
4 C --
5 C --
6 C --
7 C --
8 C --
9 C --
Toevoegen Vergrend.
Verpl. Enter
Pagina
Terug
Nederlands - 15
BN68-01528A-00Dut.indd 15 2008-4-21 11:14:22

Opgeslagen kanalen rangschikken
Door opgeslagen kanalen te rangschikken, kunt u de
programmanummers van de opgeslagen kanalen wijzigen.
Deze bewerking kan nodig zijn na gebruik van de functie
kanalen automatisch opslaan.
1 Druk op de toets MENU om het menu weer te geven.
2 Druk op de toets ▲ of ▼ om Kanaal te selecteren en druk op
de toets ENTER.
3 Druk op de toets ▲ of ▼ om Sorteren te selecteren en druk
op de toets ENTER.
4 Selecteer het kanaal dat u wilt verplaatsen door op de toets
▲ of ▼ en vervolgens op de toets ENTER te drukken.
5 Selecteer het nummer van het programma waarnaar u het
kanaal wilt verplaatsten door op de toets ▲ of ▼ te drukken.
Druk vervolgens op de toets ENTER. Het kanaal wordt naar
de nieuwe positie verplaatst en alle andere kanalen schuiven
naargelang op.
6 Herhaal stappen 4 en 5 totdat alle kanalen het gewenste
programmanummer hebben.
7 Druk op de toets EXIT om het menu te verlaten.
Kanalen een naam geven
Kanalen krijgen automatisch een naam toegewezen wanneer
kanaalinformatie wordt uitgezonden. U kunt deze namen
wijzigen en nieuwe namen toewijzen.
1 Druk op de toets MENU om het menu weer te geven.
2 Druk op de toets ▲ of ▼ om Kanaal te selecteren en druk op
de toets ENTER.
3 Druk op de toets ▲ of ▼ om Naam te selecteren en druk
vervolgens op de toets ENTER.
4 Selecteer het kanaal waaraan u een nieuwe naam wilt
toewijzen door op de toets ▲ of ▼ te drukken en druk
vervolgens op ENTER.
5 Druk op de knop ▲ of ▼ om een letter, een cijfer of een
symbool te selecteren (d.w.z.: A~Z, 0~9, +, -, *, /, spatie).
Ga naar de vorige of volgende letter door op ◄ of ► te
drukken en druk vervolgens op ENTER.
6 Herhaal stap 4 en 5 voor elk kanaal waaraan u een nieuwe
naam wilt toewijzen.
7 Druk op de toets EXIT om het menu te verlaten.
Verpl.
Enter
Terug
Land :Nederland
Automatisch opslaan
Handm. opslaan
Kanaalbeheer
Sorteren
Naam
Fijnafstemming
Kanaal
T V
Verpl.
Enter
Terug
Land :Nederland
Automatisch opslaan
Handm. opslaan
Kanaalbeheer
Sorteren
Naam
Fijnafstemming
Kanaal
T V
Verpl.
Enter
Terug
Prog. Kanaal Naam
▲
0 C01 −−−−−
1 C- - −−−−−
2 C-- −−−−−
3 C-- −−−−−
4 C-- −−−−−
5 C-- −−−−−
6 C-- −−−−−
7 C-- −−−−−
8 C-- −−−−−
9 C- - −−−−−
▼
Sorteren
T V
Verpl.
Enter
Terug
Prog. Kanaal Naam
▲
0 C-- −−−−−
1 C04 −−−−−
2 C05 −−−−−
3 C08 −−−−−
4 C09 −−−−−
5 C11 −−−−−
6 C13 −−−−−
7 C15 −−−−−
8 C17 −−−−−
9 C18 −−−−−
▼
Naam
T V
Nederlands - 16
BN68-01528A-00Dut.indd 16 2008-4-21 11:14:23

Kanalen nauwkeurig afstemmen
Als de ontvangst goed is, hoeft u het kanaal niet verder in te
stellen omdat dat tijdens het zoeken en opslaan automatisch
is gebeurd.
Is het signaal echter zwak of vervormd, dan kunt u het kanaal
handmatig fijner afstemmen.
1 Druk op de toets MENU om het menu weer te geven.
2 Druk op de toets ▲ of ▼ om Kanaal te selecteren en druk op
de toets ENTER.
3 Druk op de toets ▲ of ▼ om Fijnafstemming te selecteren en
druk op de toets ENTER.
4 Druk op ◄ of ► tot u een helder beeld en een goede
geluidsweergave heeft verkregen. Druk op de toets ENTER.
➢
Druk op de toets INFO. Door de fijnafstemming op te
slaan verandert de kleur van de OSD (On Screen Display
<weergave op het scherm>) van het kanaal van wit in
rood, en wordt de markering “*” toegevoegd.
➢
Om de fijnafstemming te herstellen naar 0, selecteert u
Reset door op de knop ▲ of ▼ te drukken. Druk op de
toets ENTER.
5 Druk op de toets EXIT om het menu te verlaten.
P 1 *
Mono
Beeld : Standaard
Geluid : Aangepast
SRS TS XT : Uit
−−
:
−−
Verpl.
Enter
Terug
Land :Nederland
Automatisch opslaan
Handm. opslaan
Kanaalbeheer
Sorteren
Naam
Fijnafstemming
Kanaal
T V
Fijnafstemming
P 1
+3
Instellen
Opslaan
Terug
Reset
Nederlands - 17
BN68-01528A-00Dut.indd 17 2008-4-21 11:14:24

De beeldstandaard wijzigen
U kunt het beeld selecteren dat het beste overeenkomt met
uw wensen.
1 Druk op de toets MENU om het menu weer te geven.
2 Druk op de toets ENTER om Beeld te selecteren.
3 Druk op de toets ENTER om Modus te selecteren.
4 Selecteer de gewenste modus door op de toets ▲ of ▼ te
drukken en druk vervolgens op de toets ENTER.
Beschikbare modi: Dynamisch, Standaard, Film
➢
De waarden van de instellingen kunnen variëren
afhankelijk van de ingangsbron.
5 Druk op de toets EXIT om het menu te verlaten.
➢
Kies Dynamisch wanneer u overdag tv kijkt, of wanneer er
fel licht in de kamer is.
Kies Standaard als algemene modus om tv te kijken.
Kies Film om naar films te kijken.
Eenvoudig in te stellen.
1 Druk op de toets TOOLS op de afstandsbediening.
2 Druk op ▲ of ▼ om de Beeldmodus te selecteren.
3 Druk op ◄ of ► om de gewenste optie te selecteren
Beeldinstellingen aanpassen
Uw tv heeft verschillende instelmogelijkheden waarmee u de
beeldkwaliteit kunt beheren.
1 Druk op de toets MENU om het menu weer te geven.
2 Druk op de toets ENTER om Beeld te selecteren.
3 Druk op de toets ENTER om Modus te selecteren.
4 Selecteer de gewenste modus door op de toets ▲ of ▼ te
drukken en druk vervolgens op de toets ENTER.
Beschikbare modi: Dynamisch, Standaard, Film
5 Selecteer de gewenste optie door op de toets ▲ of ▼ te
drukken en druk vervolgens op de toets ENTER.
6 Druk op de toets ENTER wanneer u tevreden bent met de instelling.
7 Druk op de toets EXIT om het menu te verlaten.
Cel helderheidt – Contrast – Helderheid – Scherpte – Kleur – Tint
➢
In de modi Analoge TV, AV, en S-Video van het PAL-systeem kunt u de functie Tint niet
gebruiken.
➢
In de PC-modus kunt u alleen de Cel helderheid, Contrast en Helderheid aanpassen.
Druk op de toets ◄ of ► tot u de beste instelling bereikt.
Modus :Dynamisch
Cel helderheid
7
Contrast 95
Helderheid 45
Scherpte 50
Kleur 50
Tint G50 R50
Detailinstellingen
Afbeeldingsopties
Reset :OK
Verpl.
Enter
Terug
Beeld
T V
Dynamisch
Standaard
Film
Verpl.
Enter
Terug
Modus :Standaard
Cel helderheid
7
Contrast 90
Helderheid 45
Scherpte 50
Kleur 50
Tint G50 R50
Detailinstellingen
Afbeeldingsopties
Reset :OK
Beeld
T V
Verpl.
Enter
Terug
Modus :Standaard
Cel helderheid
7
Contrast 90
Helderheid 45
Scherpte 50
Kleur 50
Tint G50 R50
Detailinstellingen
Afbeeldingsopties
Reset :OK
Beeld
T V
Extra
Anynet+ (HDMI-CEC)
Beeldmodus ◄ Standaard ►
Geluidmodus : Aangepast
Slaaptimer : Uit
SRS TS XT : Uit
Spaarstand : Uit
Dual I-II : Mono
Instellen
SluitenVerpl.
Nederlands - 18
BN68-01528A-00Dut.indd 18 2008-4-21 11:14:25

Gedetailleerde beeldinstellingen configureren
U kunt de beeldinstellingen nauwkeurig afstellen.
1 Druk op de toets MENU om het menu weer te geven.
2 Druk op de toets ENTER om Beeld te selecteren.
3 Druk op de toets ▲ of ▼ om Detailinstellingen te selecteren en
druk op de toets ENTER.
4 Selecteer de gewenste optie door op de toets ▲ of ▼ te drukken en
druk vervolgens op de toets ENTER.
Beschikbare opties: Zwartaanpassing, Dynamisch contrast,
Gamma, Kleurruimte, Witbalans, Huidkleur, Randverbetering.
5 Druk op de toets ENTER wanneer u tevreden bent met de instelling.
6 Druk op de toets EXIT om het menu te verlaten.
➢
Detailinstellingen is beschikbaar in de modus Standaard of Film.
➢
In de PC-modus kunt u in de Gedetailleerde instellingen alleen
wijzigingen aanbrengen voor Dynamisch contrast, Gamma en
Witbalans.
Zwartaanpassing: Uit/Laag/Middel/Hoog
U kunt direct het zwartniveau op het scherm selecteren om de
schermdiepte aan te passen.
Dynamisch contrast: Uit/Laag/Middel/Hoog
U kunt het schermcontrast aanpassen zodat u een optimaal contrast
verkrijgt.
Gamma: -3 ~ +3
U kunt de gemiddelde helderheid van beelden aanpassen.
Druk op de toets ◄ of ► tot u de beste instelling bereikt.
Kleurruimte: Auto/Eigen/ Aangepast
De kleurruimte is een kleurenmatrix opgebouwd uit rood, groen en blauw.
Selecteer de kleurruimte van uw voorkeur om een zo natuurgetrouw mogelijke kleurweergave te verkrijgen.
− Auto: bij de instelling Auto worden de kleuren automatisch en natuurlijk aangepast op basis van de
programmabron.
− Eigen: de kleurruimte Eigen biedt diepe en levendige kleurnuances.
−Aangepast: hiermee kunt u het kleurbereik aan eigen voorkeur instellen. (zie “De kleurruimte aanpassen”)
De kleurruimte aanpassen
Kleur: Rood / Groen / Blauw / Geel / Cyaan / Magenta
Hiermee kunt u de kleuren aanpassen aan uw voorkeuren.
Kleur is beschikbaar als Kleurruimte is ingesteld op Aangepast (Eigen).
Druk op ▲ of ▼ om Rood, Groen, Blauw, Geel, Cyaan of Magenta te selecteren. Druk op de toets ENTER.
− Rood / Groen / Blauw: in Kleur kunt u de RGB-waarden voor de geselecteerde kleur instellen.
Druk op ▲ of ▼ om Rood, Groen, Blauw voor wijziging te selecteren. Druk op de toets ENTER.
Druk op de toets ◄ of ► om de waarde van een bepaald item te verhogen of verlagen.
Druk op de toets ENTER.
− Reset: standaardinstellingen van de kleurruimte herstellen.
Witbalans: R-basis/G-basis/B-basis/R-niveau/G-niveau/B-niveau/Reset
U kunt de kleurtemperatuur aanpassen voor natuurlijkere beeldkleuren.
R-basis/G-basis/B-basis/R-niveau/G-niveau/B-niveau: als u de waarde van aanpassing wijzigt, wordt het
aangepaste scherm vernieuwd.
Selecteer de gewenste optie door op de toets ▲ of ▼ te drukken en druk vervolgens op de toets ENTER. Druk
op de toets ◄ of ► tot u de beste instelling bereikt.
Herstellen: de fabrieksinstellingen van de aangepaste witbalans worden hersteld.
Huidkleur:-15~+15
U kunt de roze tinten in het beeld benadrukken.
Druk op de toets ◄ of ► tot u de beste instelling heeft bereikt.
➢
Als u de waarde van aanpassing wijzigt, wordt het aangepaste scherm vernieuwd.
Randverbetering: Uit/Aan
U kunt randen van objecten benadrukken.
Verpl.
Enter
Terug
Zwartaanpassing :Uit
Dynamisch contrast
:Middel
Gamma :0
Kleurruimte :Eigen
Witbalans
Huidkleur :0
Randverbetering
:Aan
Detailinstellingen
T V
Verpl.
Enter
Terug
Modus :Standaard
Cel helderheid
7
Contrast 90
Helderheid 45
Scherpte 50
Kleur 50
Tint G50 R50
Detailinstellingen
Afbeeldingsopties
Reset :OK
Beeld
T V
Nederlands - 19
BN68-01528A-00Dut.indd 19 2008-4-21 11:14:26

Afbeeldingsopties
Hier kunt u het beeld gedetailleerd instellen.
1 Druk op de toets MENU om het menu weer te geven.
2 Druk op de toets ENTER om Beeld te selecteren.
3 Druk op ▲ of ▼ om Afbeeldingsopties te selecteren en druk
vervolgens op ENTER.
4 Selecteer de gewenste optie door op ▲ of ▼ te drukken en druk
vervolgens op de toets ENTER.
5 Druk op de toets ENTER wanneer u tevreden bent met de instelling.
6 Druk op de toets EXIT om het menu te verlaten.
➢ In de modus PC kunt u alleen wijzigingen aanbrengen in Kleur
tint, Formaat en Bescherming tegen inbranden bij de items in
Afbeeldingsopties.
Kleur tint: Koel2/Koel1/Normaal/Warm1/Warm2
➢
Wanneer het beeld is ingesteld op Dynamisch of Standaard
kunnen Warm1 en Warm2 niet geselecteerd worden.
Formaat: Auto-breed/16:9/Breedbeeldzoom/ Zoom/4:3/ Alleen
scannen
U kunt het beeldformaat selecteren dat het beste overeenkomt met
uw wensen.
Auto-breed, 16:9, Breedbeeldzoom, Zoom, 4:3, Alleen scannen
− Auto-breed: Het beeld wordt vergroot en uitgerekt van 4:3-
tot 16:9-formaat.
− 16:9: Stelt het beeld in op de 16:9 breedbeeldmodus.
− Breedbeeldzoom: Het beeldformaat wordt met meer dan 4:3
vergroot. Verplaats het scherm
omhoog of omlaag met de toets ▲ of ▼ nadat u hebt
geselecteerd door op de toets ► of ENTER te drukken.
− Zoom:
hiermee vergroot u het beeld verticaal op het scherm.
− 4:3: Stelt het beeld in op de 4:3 normale modus.
− Alleen scannen:
Gebruik deze functie om het volledige, niet-
afgekapte beeld weer te geven wanneer er een HDMI-signaal
(720p/1080i), Component-signaal (1080i) wordt ontvangen.
Nadat u Alleen scannen in de modus HDMI (1080i) of
Component (1080i) hebt gekozen:
Druk op
▲ of ▼
om te selecteren en druk vervolgens op de
toets ENTER.
Druk op
▲
,
▼, ◄
en
►
om de afbeelding omhoog, omlaag,
naar links en naar rechts te verplaatsen.
Reset: druk op de toets
◄
of
►
om Reset te selecteren en druk
vervolgens op de toets ENTER.
U kunt de instelling initialiseren.
➢
Met het HDMI-beeldformaat Alleen Scannen kan het scherm worden bijgesneden of kan een
specifieke kleur op het scherm worden weergegeven, afhankelijk van de AV-apparaten.
➢
Voor een HDMI-aansluiting (1080p) van 24, 25, 30, 50 en 60 Hz en een Component-aansluiting
(1080p) van 50 en 60 Hz wordt alleen de ingangsbron ondersteund
➢
U kunt het beeldformaat wijzigen door op de toets P.SIZE op de afstandsbediening te drukken.
➢
Afhankelijk van de ingangsbron kunnen de opties voor beeldformaat variëren.
➢
De beschikbare onderdelen kunnen verschillen afhankelijk van de geselecteerde modus.
➢
De functie Auto-breed is alleen beschikbaar in de modi “TV”, “Ext.1”, “Ext.2”, “AV” en “S-Video”.
➢
U kunt de instellingen aanpassen en opslaan voor elk extern apparaat dat op een ingang van de tv is aangesloten.
➢
In de pc-modus kunt u alleen de modus “16:9” en “4:3” aanpassen.
Positie en formaat van het scherm regelen met Zoom
Door het formaat met Zoom opnieuw in te stellen, kunt u de positie en het formaat van het scherm met de
toets ▲ of ▼ omhoog en omlaag bewegen en het schermformaat instellen.
Verplaats het scherm omhoog of omlaag met de toets ▲ of ▼ nadat u hebt geselecteerd door op de toets
◄ of ► te drukken.
Verplaats het scherm verticaal met de toets ▲ of ▼ nadat u hebt geselecteerd door op de toets
◄ of ► te drukken.
Verpl.
Enter
Terug
Kleur tint :Normaal
Formaat :Auto-breed
Schermmodus :16:9
Dig. ruisfilter :Auto
Echt 100Hz Demo : Uit
DNle :Uit
HDMI-zwartniveau :Normaal
Modus Alleen blauw
:Uit
Bescherming tegen inbranden
3D-effect
Afbeeldingsopties
T V
Verpl.
Enter
Terug
Auto-breed
16:9
Breedbeeldzoom
Zoom
4:3
Alleen scannen
Formaat
T V
Wordt vervolgd...
Verpl.
Enter
Terug
Modus :Standaard
Cel helderheid
7
Contrast 95
Helderheid 45
Scherpte 50
Kleur 50
Tint G50 R50
Detailinstellingen
Afbeeldingsopties
Reset : OK
Beeld
T V
Nederlands - 20
BN68-01528A-00Dut.indd 20 2008-4-21 11:14:27

Schermmodus: 16:9/Breedbeeldzoom/Zoom/4:3
Wanneer u het beeldformaat op een tv met een breedte van 16:9
instelt op Auto-breed, kunt u het gewenste beeldformaat instellen op
4:3 WSS (Wide Screen Service) of niets. Omdat er voor elk land in
Europa een ander beeldformaat geldt, is deze functie bedoeld om
het juiste beeldformaat te kiezen.
−16:9: Stelt het beeld in op de 16:9 breedbeeldmodus.
−Breedbeeldzoom: Vergroot het formaat van het beeld verder dan 4:3.
−Zoom: hiermee vergroot u het beeld verticaal op het scherm.
−4:3: Stelt het beeld in op de 4:3 normale modus.
➢
Deze functie is beschikbaar is de modus Auto-breed.
➢
Deze functie is niet beschikbaar in de modi Component en HDMI.
Dig. ruisfilter: Uit/Laag/Middel/Hoog/Auto.
Als het ontvangen signaal zwak is, kunt u deze functie activeren om statische ruis en echobeelden te
verminderen die mogelijk op het scherm verschijnen.
➢
Als het signaal zwak is, selecteert u één van de andere opties totdat de afbeelding het best wordt weergegeven.
Real 100Hz Demo : Uit/Aan
U kunt duidelijk verschil zien tussen "echt 100Hz" en 50Hz, met name tijdens het kijken naar snelle scènes. Als
u naar langzame scènes kijkt, ziet u geen verschil tussen "echt 100Hz" en 50Hz. Demo 100Hz werkt alleen met
een 50Hz-signaal. De demomodus "echt 100Hz" is bedoeld voor demonstraties in de winkel met speciale films.
DNIe: Uit/Demo/Aan
Deze tv is voorzien van de functie DNIe, waarmee een hoge visuele kwaliteit wordt gewaarborgd. Als u DNIe
aanzet, kunt u het scherm bekijken terwijl de functie DNIe is geactiveerd. Als u DNIe instelt op Demo, kunt
u ter demonstratie normale beelden en een toegepast DNIe-beeld op het scherm zien. Door deze functie te
gebruiken kunt u het verschil in beeldkwaliteit zien.
➢
DNIe
TM
(Digital Natural Image engine)
Deze functie geeft een scherper beeld dankzij de 3D-ruisonderdrukking en de detail-, contrast- en
witverbetering. Dankzij de nieuwe algoritme voor beeldcompensatie is het beeld scherper, helderder en
gedetailleerder. DNIe
TM
-technologie is geschikt voor verschillende beeldsignalen.
➢
Deze functie is niet beschikbaar in de pc-modus.
➢
DNIe is alleen beschikbaar in de modus Dynamisch.
HDMI-zwartniveau: Normaal/Laag
Met deze functie kunt u de beeldkwaliteit aanpassen wanneer u via de HDMI-invoer voor het beperkte RGB-
bereik (16 tot 235) last hebt van scherminbranding (een zwarte waas, laag contrast, zwakke kleuren enz.).
➢
Deze functie is alleen actief wanneer de externe invoer is aangesloten op HDMI (RGB-signalen).
Modus Alleen blauw: Uit/Aan
Deze functie is voor experts op het gebied van AV-apparaten. Deze functie geeft het blauwe signaal weer door
het rode en groene signaal uit het videosignaal te verwijderen, waardoor er een soort blauwfilter-effect ontstaat
dat wordt gebruikt om de kleur en tint van videoapparatuur zoals dvd-spelers en Home Theaters aan te passen.
Met deze functie kunt u voor elk videoapparaat dat gebruikmaakt van de kleurenbalkpatronen Red (Rood)/
Green(Groen)/Blue(Blauw)/Cyan(Cyaan)/Magenta/Yellow(Geel), de
kleur en tint naar wens instellen overeenkomstig het signaalniveau
van elk videoapparaat, zonder dat u een blauwfilter nodig heeft.
➢
Modus Alleen blauw is beschikbaar wanneer de modus
Beeld is ingesteld op Film of Standaard.
Beveiliging tegen scherm doorbranden
Om het risico van het inbranden van het scherm te verkleinen is dit
apparaat uitgerust met technologie voor inbrandpreventie. Met deze
technologie kunt u de beweging van het beeld op en neer (Verticale
lijn) en van links naar rechts (Punten horizontaal) instellen. Met
de tijdsinstelling kunt u de tijd tussen het bewegen van het beeld
programmeren in minuten.
−Pixelverschuiving: Met deze functie worden iedere minuut
de pixels op uw plasmascherm in horizontale of verticale
richting verschoven om de kans op inbranding van uw
scherm te minimaliseren.
• Stel Pixelverschuiving in op Aan door op de toets ▲ of ▼ te
drukken en druk vervolgens op de toets ENTER.
• Selecteer de gewenste optie door op de toets ▲ of ▼ te drukken
en druk vervolgens op de toets ENTER.
Beschikbare opties: Punten horizontaal, Verticale lijn, Tijd
Verpl.
Enter
Terug
Kleur tint :Normaal
Formaat :Auto-breed
Schermmodus :16:9
Dig. ruisfilter : :
Echt 100Hz Demo :
DNle :
HDMI-zwartniveau :Normaal
Modus Alleen blauw
:Off
Bescherming tegen inbranden
3D-effect
Afbeeldingsopties
T V
16:9
Breedbeeldzoom
Zoom
4:3
Verpl.
Enter
Terug
Pixelverschuiv.
Wit
Bladeren
Grijswaarden balken
:Verduisteren
Bescherming tegen inbranden
T V
Verpl.
Enter
Terug
Kleur tint :Normal
Formaat :Auto-breed
Schermmodus :16:9
Dig. ruisfilter :Auto
Echt 100Hz Demo : Uit
DNle :Aan
HDMI-zwartniveau :Normaal
Modus Alleen blauw
:Uit
Bescherming tegen inbranden
3D-effect
Afbeeldingsopties
T V
Wordt vervolgd...
Nederlands - 21
BN68-01528A-00Dut.indd 21 2008-4-21 15:11:44

➢
Optimale instellingen voor pixelverschuiving:
PC TV/Ext/AV/Component/HDMI
Punten
horizontaal
1 2
Verticale lijn 1 2
Tijd (minuten) 2 2 min
➢
De waarde voor Pixelverschuiving kan verschillen afhankelijk van het
formaat (inches) en de modus van de monitor.
➢
Deze functie is niet beschikbaar in de modus Alleen scannen.
− Wit: Deze functie helpt ingebrande beelden op uw scherm te verwijderen door de kleur van de pixels in wit te
veranderen. Gebruik deze functie wanneer er beelden of symbolen op uw scherm achterblijven, vooral na het
langere tijd weergeven van een stilstaand beeld op uw scherm.
− Bladeren: Deze functie helpt ingebrande beelden op het scherm te verwijderen door de pixels op uw
plasmascherm in een bepaald patroon te verschuiven. Gebruik deze functie wanneer er beelden of symbolen
op uw scherm achterblijven, vooral na het langere tijd weergeven van een stilstaand beeld op uw scherm.
− Grijswaarden balken: Wanneer u tv kijkt met de schermverhouding 4:3, wordt voorkomen dat het scherm
beschadigd raakt door de witbalans geheel links en rechts aan te passen.
Verduisteren: Wanneer u de schermratio op 4:3 instelt, worden de linker- en rechterkant donkerder.
Verhelderen: Wanneer u de schermratio op 4:3 instelt, worden de linker- en rechterkant helderder.
➢
Gebruik de functie Wit of Bladeren om ingebrande beelden te verwijderen. Hoewel beide functies ingebrande
beelden op het scherm verwijderen, is Bladeren effectiever.
➢
De functie voor het verwijderen van ingebrande beelden moet gedurende lange tijd (ongeveer een uur)
uitgevoerd worden om alle beelden effectief te verwijderen. Voer de functie nog eens uit als de ingebrande
beelden niet minder zijn geworden na het uitvoeren van de functie.
➢
Druk op een willekeurige toets op de afstandsbediening om deze functie te annuleren.
Verpl.
Enter
Terug
Pixelverschuiv. :Aan
Punten hor. :2
Vert. lijn :2
Tijd :2 min
Pixelverschuiv.
T V
De 3D-functie gebruiken
U kunt genieten van 3D-films en -spellen op uw televisie. Met de functie voor 3D-effecten kunt u
3D-beelden bekijken met de speciale 3D-bril.
3,5 mm stereostekker-naar-RCA-kabel (niet meegeleverd)
3D-bril
(niet meegeleverd)
3D-infraroodzender
(niet meegeleverd)
PC
HDMI/DVI-kabel (niet bijgeleverd)
Achterpaneel televisie
Aansluitingen
➢
Het uiterlijk van de 3D-bril (inclusief zender) kan verschillen afhankelijk van het model van uw bril.
Nederlands - 22
BN68-01528A-00Dut.indd 22 2008-4-21 11:14:33

1 Sluit een HDMI/DVI-kabel aan tussen de HDMI IN 2-aansluiting op de televisie en de pc-uitgang op
uw computer.
2 Sluit een 3,5 mm stereo/2RCA-kabel aan tussen de DVI-ingang (HDMI 2) [R-AUDIO-L] op de
televisie en de audio-uitgang van de geluidskaart op uw computer.
3 Sluit de zender aan op de 3D SYNC OUT-poort op het achterpaneel van de televisie.
4 Zet de tv aan en stel de bron van de tv in op HDMI2.
Raadpleeg de handleiding van uw 3D-bril voor meer informatie over deze bril (inclusief de zender).
Pas de pc-resolutie aan: PS50A470: 1024 x 768@60Hz,1360 x 768@60Hz
De optimale pc-resolutie voor PS50A470 is 1360x768. Wanneer een 1024x768-signaal wordt
gebruikt in de 3D-modus, wordt de film in 4:3-fomaat weergegeven met grijze balken aan weerszijden
van het beeld.
De 3D-infraroodzender communiceert met de 3D-bril.
De 3D-infraroodzender moet zich daarom in de buurt van de 3D-bril bevinden.
Deze wordt geactiveerd wanneer het HDMI- of DVI-invoersignaal RGB is en als DVI-geluid wordt
ondersteund.
Wanneer de voeding wordt in- of uitgeschakeld, verandert de modus naar de standaardmodus (Uit)
en wordt het Formaat opgeslagen.
Het 3D-effect wordt in- of uitgeschakeld, ongeacht de Beeldmodus.
Wanneer 3D-effect is ingeschakeld, worden alleen de beeldmenu's Contrast, Helderheid, 3D-effect
en Reset geactiveerd.
Om de functie 3D-effect te gebruiken, is een grafische kaart met ondersteuning van 3D of
3D-software vereist.
De 3D-bril en de zender moeten van dezelfde fabrikant zijn.
Als u gedurende lange tijd een spel speelt of tv kijkt terwijl u de 3D-bril draagt, kunnen uw ogen
overbelast raken of kunt u hoofdpijn krijgen.
Een 3D-bril (inclusief de zender) de niet door Samsung is vervaardigd, wordt mogelijk niet
ondersteund.
Als het scherm knippert wanneer de 3D-functie is ingesteld, stelt u de functie voor het verduisteren
van het omgevingslicht donkerder in of schakelt u het fluorescerende licht uit om het scherm onder
de beste omstandigheden te bekijken.
De modus wijzigen
Als u de modus wijzigt, worden de beelden voor elk oog omgewisseld
door het omwisselen van de uitvoersignalen links en rechts.
1 Sluit de tv, pc en 3D-infraroodzender aan zoals weergegeven
in de afbeelding.
2 Druk op de toets SOURCE om HDMI te selecteren.
3 Druk op de toets MENU om het menu weer te geven.
Druk op de toets ▲ of▼ om Beeld te selecteren en druk
vervolgens op de toets ENTER.
4 Druk op de toets ▲ of▼ om Afbeeldingsopties te selecteren
en druk vervolgens op ENTER.
Druk op de toets ▲ of▼ om 3D-effect te selecteren en druk
vervolgens op ENTER.
5 Druk op de toets ▲ of▼ om Modus te selecteren, en druk
vervolgens op ENTER.
Druk op de toets ▲ of▼ om Uit, Modus1, Modus2 of 2D-
conversie te selecteren en druk vervolgens op ENTER.
• Uit: schakelt de functie 3D-effect uit.
• Modus 1: Modus 1 werkt eerst met de synchronisatie rechts.
• Modus 2:
Modus 2 werkt eerst met de synchronisatie links.
• 2D-conversie
: zet de afbeelding om van 3D naar 2D.
U kunt ervoor kiezen het beeld tijdelijk in 2D te bekijken als u zich
duizelig voelt, maar u moet “Uit” selecteren als u het 3D-effect
geheel wilt beëindigen.
Als het 3D-effect niet correct werkt, betekent dit dat de Modus
en de 3D-bril niet correct zijn gesynchroniseerd. Om ze in de
synchronisatie te plaatsen, schakelt u naar de andere modus.
Wordt vervolgd...
Verpl.
Enter
Terug
Modus :Standaard
Cel helderheid 7
Contrast 95
Helderheid 45
Scherpte 50
Kleur 50
Tint G50 R50
Detailinstellingen
Afbeeldingsopties
Reset : OK
Beeld
T V
Verpl.
Enter
Terug
Kleur tint :Normal
Formaat :Auto-breed
Schermmodus :16:9
Dig. ruisfilter :Auto
Real 100Hz Demo : Uit
DNle :Aan
HDMI-zwartniveau :Normaal
Modus Alleen blauw
:Uit
Bescherming tegen inbranden
3D-effect
Afbeeldingsopties
T V
Verpl.
Enter
Terug
Modus :
Indeling :
3D-effect
T V
Uit
Modus1
Modus2
2D-conversie
Nederlands - 23
BN68-01528A-00Dut.indd 23 2008-4-21 11:14:35

De standaardbeeldinstellingen herstellen
Hier kunt u het beeld gedetailleerd instellen.
1 Druk op de toets MENU om het menu weer te geven.
2 Druk op de toets ENTER om Beeld te selecteren.
3 Druk op de toets ▲ of ▼ om Reset te selecteren en druk op
de toets ENTER.
4 Druk op de toets ▲ of ▼ om OK of Annuleren te selecteren
en druk op de toets ENTER.
➢
Elke modus kan opnieuw worden ingesteld.
Verpl.
Enter
Terug
Modus : Standaard
Cel helderheid 7
Contrast 95
Helderheid 45
Scherpte 50
Kleur 50
Tint G50 R50
Detailinstellingen
Afbeeldingsopties
Reset :
Beeld
T V
OK
Annuleren
Het formaat wijzigen
Selecteer het optimale invoerformaat dat overeenkomt met uw
grafische kaarten of 3D-software.
Raadpleeg de bovenstaande beschrijvingen voor stappen 1 tot 4.
5 Druk op ▲ of ▼ om Formaat te selecteren en druk
vervolgens op ENTER.
6 Druk op ▲ of ▼ om Schaakbord, Horizontaal of Verticaal te
selecteren en druk vervolgens op ENTER.
Schaakbord
Als het uitvoerformaat van uw grafische kaart
of 3D-software Schaakbord is, selecteert u dit
invoerformaat.
Horizontaal
Als het uitvoerformaat van uw grafische kaart of
3D-software Horizontaal interleaved is, selecteert
u dit invoerformaat.
Verticaal
Als het uitvoerformaat van uw grafische kaart of
3D-software Verticaal interleaved is, selecteert u
dit invoerformaat.
➢
U kunt herhaaldelijk op de toets 3D op de afstandsbediening
drukken om de modus voor 3D te wijzigen.
Eenvoudig in te stellen
1 Druk op de toets TOOLS op de afstandsbediening.
2 Druk op ▲ of ▼ om 3D-modus te selecteren.
3 Druk op de toets ENTER om het 3D-effect te starten.
Extra
3D-modus ◄ Uit ►
Anynet+ (HDMI-CEC)
Beeldmodus : Dynamisch
Geluidmodus : Standaard
Slaaptimer : Uit
SRS TS XT : Uit
Spaarstand : Uit
Instellen
SluitenVerpl.
Verpl.
Enter
Terug
Modus : Modus 1
Indeling :
3D-effect
T V
Schaakbord
Horizontaal
Verticaal
Nederlands - 24
BN68-01528A-00Dut.indd 24 2008-4-21 11:14:36

Geluidskenmerken
1 Druk op de toets MENU om het menu weer te geven.
2 Druk op de toets ▲ of ▼ om Geluid te selecteren en druk op
de toets ENTER.
3 Selecteer de gewenste optie door op de toets ▲ of ▼ te
drukken en druk vervolgens op de toets ENTER.
Beschikbare opties: Modus, Toonregeling, SRS TS XT, Auto
Volume, TV-luidspreker, Geluidskeuze
4 Druk op de toets ENTER wanneer u tevreden bent met de
instelling.
5 Druk op de toets EXIT om het menu te verlaten.
Modus: Standaard/Muziek/Film/Spraak/Aangepast
U kunt het geluidseffect selecteren dat het best overeenkomt
met de beelden die u bekijkt.
Eenvoudig in te stellen
1 Druk op de toets TOOLS op de afstandsbediening.
2 Druk op ▲ of ▼ om de Geluidmodus te selecteren.
3 Druk op ◄ of ► om de gewenste optie te selecteren.
Toonregeling: Balance/100 Hz/300 Hz/1 kHz/3 kHz/10 kHz
De tv heeft verschillende instelmogelijkheden waarmee u de
geluidskwaliteit kunt instellen.
➢
Als u deze instellingen wijzigt, wordt de geluidsmodus
automatisch ingesteld op Aangepast.
SRS TS XT: Uit/Aan
TruSurround XT is een gepatenteerde SRS-technologie die het probleem oplost dat ontstaat
wanneer 5,1 multikanaalgeluid via twee luidsprekers wordt afgespeeld. TruSurround produceert een
meeslepend, virtueel surroundgeluid via ieder afspeelsysteem met twee luidsprekers, waaronder ook
interne luidsprekers van de televisie. Het is volledig compatibel met alle vormen van multichannel.
Eenvoudig in te stellen
1 Druk op de toets TOOLS op de afstandsbediening.
2 Druk op ▲ of ▼ om SRS TS XT te selecteren.
3 Druk op ◄ of ► om Uit of Aan te selecteren
Auto Volume: Uit/Aan
Elk zendstation kent andere signaalvoorwaarden, zodat
het lastig is het volume juist in te stellen wanneer u van
kanaal verandert. Met deze functie wordt het volume van
het gewenste kanaal automatisch ingesteld. Bij een hoog modulatiesignaal wordt de geluidsuitvoer
verlaagd en bij een laag modulatiesignaal wordt de geluidsuitvoer verhoogd.
TV-luidspreker: Uit/Aan
Indien u het geluid door aparte luidsprekers wilt horen, annuleert u de interne versterker.
➢
De toetsen
+,
- en MUTE werken niet wanneer de TV-luidspreker op Uit staat.
➢
Wanneer TV-luidspreker is ingesteld op Uit, kunt u alleen Geluidskeuze(in PIP-modus) in het menu
Sound bedienen.
Geluidskeuze: Hoofdtuner/Subtuner
Wanneer de PIP-functie is geactiveerd, kunt u naar het geluid bij het subbeeld (PIP) luisteren.
-
Hoofdtuner: hiermee geeft u het geluid van het hoofdbeeld weer.
-
Subtuner: hiermee geeft het geluid van het subbeeld weer.
Verpl.
Enter
Terug
Modus :Aangepast
Toonregeling
SRS TS XT :Uit
Auto Volume :Uit
TV-luidspreker :Uit
Geluidskeuze :Hoofdtuner
Geluid
T V
Extra
Anynet+ (HDMI-CEC)
Beeldmodus : Standaard
Geluidmodus ◄ Aangepast ►
Slaaptimer : Uit
SRS TS XT : Uit
Spaarstand : Uit
Dual I-II : Mono
Sluiten
Verpl.
Instellen
Extra
Anynet+ (HDMI-CEC)
Beeldmodus : Standaard
Geluidmodus : Aangepast
Slaaptimer : Uit
SRS TS XT ◄ Uit ►
Spaarstand : Uit
Dual I-II : Mono
SluitenVerpl.
Instellen
TruSurround XT, SRS en het symbool zijn handelsmerken van SRS Labs, Inc.
TruSurround XT technologie valt onder licentie van SRS Labs, Inc.
Verpl.
Instellen
Terug
Toonregeling
T V
Balans 100Hz 300Hz 1kHz 3kHz 10kHz
+
0
-
R
L
+
0
-
Nederlands - 25
BN68-01528A-00Dut.indd 25 2008-4-21 11:14:37

De geluidsmodus selecteren (afhankelijk van model)
Met de toets DUAL I-II kunt u de verwerking en uitvoer van het audiosignaal weergeven en
regelen. Wanneer u het apparaat inschakelt, wordt de modus automatisch ingesteld op “Dual-I” of
“Stereo”, afhankelijk van wat er op dat moment wordt uitgezonden.
Eenvoudig in te stellen
1 Druk op de toets TOOLS op de afstandsbediening.
2 Druk op ▲ of ▼ om Dual I-II te selecteren.
3 Druk op ◄ of ► om de gewenste optie te selecteren.
Type uitzending Aanduiding op scherm
NICAM
Stereo
Normale uitzending
(Standaard audio)
Mono (Normaal gebruik)
Normale en NICAM
Mono
NICAM
Mono
(Normaal)
NICAM Stereo
NICAM
stereo
Mono
(Normaal)
NICAM DUAL-I/II
NICAM
dual-1
NICAM
dual-2
Mono
(Normaal)
A2
Stereo
Normale uitzending
(Standaard audio)
Mono (Normaal gebruik)
Tweetalig of DUAL-I/II Dual I
Dual II
Stereo Stereo
Mono
(Geforceerd mono)
➢
Als de ontvangst slechter wordt, kunt u de geluidskwaliteit verbeteren door Mono te selecteren.
Wanneer het stereosignaal te zwak is en er automatische zenderverdringing optreedt, kunt u
beter naar Mono schakelen.
De hoofdtelefoon aansluiten (afzonderlijk verkrijgbaar)
U kunt een hoofdtelefoon op de tv aansluiten als u naar een programma wilt kijken
zonder de andere aanwezigen in de kamer te storen.
➢
Wanneer u de stekker van de hoofdtelefoon op de
betreffende poort aansluit, kunt u alleen “Auto Volume”
kiezen in het menu Geluid.
➢
Langdurig gebruik van een hoofdtelefoon met een hoog
volume kan het gehoor beschadigen.
➢
Wanneer een hoofdtelefoon op het systeem is aangesloten,
komt er geen geluid uit de luidsprekers.
➢
Het volume van de hoofdtelefoon en het volume van de tv
kunnen afzonderlijk worden aangepast.
Zijpaneel van tv
Extra
Anynet+ (HDMI-CEC)
Beeldmodus : Standaard
Geluidmodus : Aangepast
Slaaptimer : Uit
SRS TS XT : Uit
Spaarstand : Uit
Dual I-II ◄ Mono ►
Sluiten
Verpl.
Instellen
Nederlands - 26
BN68-01528A-00Dut.indd 26 2008-4-21 11:14:38

Tijdskenmerken
1 Druk op de toets MENU om het menu weer te geven.
2 Druk op de toets ▲ of ▼ om Instellingen te selecteren en druk
op de toets ENTER.
3 Druk op de toets ▲ of ▼ om Tijd te selecteren en druk op de
toets ENTER.
4 Selecteer de gewenste optie door op de toets ▲ of ▼ te
drukken en druk vervolgens op de toets ENTER.
Beschikbare opties: Klok instellen, Slaaptimer, Timer 1,
Timer 2, Timer 3
5 Druk op de toets ENTER wanneer u tevreden bent met de
instelling.
6 Druk op de toets EXIT om het menu te verlaten.
Klok instellen
U kunt de klok van de televisie zodanig instellen dat de huidige
tijd wordt weergegeven wanneer u op de toets INFO op de
afstandsbediening drukt. U moet de tijd eveneens instellen als
u gebruik wilt maken van de automatische aan/uit-timers.
− Druk op de toets ◄ of ► om Maand, Data, Jaar, Uur of
min te selecteren. Stel deze in door op de toets ▲ of ▼ te
drukken.
➢
U kunt Maand, Data, Jaar, Uur of min met de
cijfertoetsen op de afstandsbediening direct instellen.
➢
Bij een stroomstoring of wanneer de stroomtoevoer is
uitgeschakeld gaan de klokinstellingen verloren.
Timer stand-by
U kunt een tijdsduur tussen 30 en 180 minuten instellen
waarna de televisie automatisch overschakelt op de stand-by-
modus.
− Selecteer het vooraf ingestelde tijdsinterval (Uit, 30, 60,
90, 120, 150 of 180) door meerdere keren op de toets
▲ of ▼ te drukken.
Eenvoudig in te stellen
1 Druk op de toets TOOLS op de afstandsbediening.
2 Druk op ▲ of ▼ om Slaaptimer te selecteren.
3 Druk op ◄ of ► om de minuten te selecteren en druk
vervolgens o druk op de toets ENTER.
Timer 1 / Timer 2 / Timer 3
U kunt de aan-/uit-timers zodanig instellen dat het toestel
automatisch wordt in- en uitgeschakeld op het door u
geselecteerde tijdstip.
☛
U moet eerst de klok instellen.
− Druk op de toets ◄ of ► om het volgende, verplichte item te
selecteren.
Druk op de toets ▲ of ▼ om de instelling te wijzigen.
Inschakeltijd: Selecteer een uur, minuut en Aan/Uit (Als u de timer met de gewenste instelling wilt
activeren, kiest u Aan.)
Uitschakeltijd: Selecteer een uur, minuut en Aan/Uit (Als u de timer met de gewenste instelling
wilt activeren, kiest u Aan.)
Herhalen: Selecteer Eenmaal, Dagelijks, Ma~Vr, Ma~Za of Za~Zo.
Volume: Selecteer het gewenste geluidsvolume.
➢
U kunt de uren en minuten ook rechtstreeks met de cijfertoetsen op de afstandsbediening
instellen.
☛
Automatisch uitschakelen
Als u de timer instelt op “Aan”, schakelt de televisie uiteindelijk uit wanneer binnen 3 uur na
het automatisch inschakelen van het toestel geen knop wordt ingedrukt. Deze functie is alleen
beschikbaar in de timermodus “Aan”. Met deze functie wordt oververhitting tegengegaan, wat kan
gebeuren als het toestel te lang ingeschakeld blijft staan.
Verpl.
Enter
Terug
Klok instellen :00 : 00
Slaaptimer :Uit
Timer 1 :Uit
Timer 2 :Uit
Timer 3 :Uit
Tijd
T V
Verpl.
Enter
Terug
Plug & Play
Taalkeuze :Nederlands
Tijd
Lichteffect
:
Kijkstand aan
Aanpassen van muurbevestiging
Melodie :Uit
Entertainment :Uit
Spaarstand :Uit
PIP
Instellingen
T V
Extra
Anynet+ (HDMI-CEC)
Beeldmodus : Standaard
Geluidmodus : Aangepast
Slaaptimer ◄ Uit ►
SRS TS XT : Uit
Spaarstand : Uit
Dual I-II : Mono
Sluiten
Verpl.
Instellen
Verpl.
Instellen
Terug
Timer 1
T V
00 00 Nee
Inschakeltijd
:
Uitschakeltijd
Herhalen
Eenmaal
10
Volume
00 00 Nee
:
Nederlands - 27
BN68-01528A-00Dut.indd 27 2008-4-21 11:14:39

Taalkeuze / Melodie / Lichteffect / Entertainment /
Spaarstand / PIP
1 Druk op de toets MENU om het menu weer te geven.
2 Druk op de toets ▲ of ▼ om Instellingen te selecteren en
druk op de toets ENTER.
3 Selecteer de gewenste optie door op de toets ▲ of ▼ te
drukken en druk vervolgens op de toets ENTER.
Beschikbare opties: Taalkeuze, Melodie, Lichteffect,
Entertainment, Spaarstand, PIP
4 Druk op de toets ENTER wanneer u tevreden bent met de
instelling.
5 Druk op de toets EXIT om het menu te verlaten.
Taalkeuze
Afhankelijk van het model van het toestel. Wanneer u de tv voor het eerst gebruikt, moet u selecteren
in welke taal menu’s en aanwijzingen moeten worden weergegeven.
Lichteffect: Uit/Standbystand aan/Kijkstand aan/Aan
U kunt het blauwe lampje op de voorkant van de tv al naar gelang de omstandigheden in of uit
schakelen. Schakel het lampje uit om energie te besparen of wanneer u door het lampje verblind wordt.
− Uit: Het blauwe lampje is altijd uit.
− Standbystand aan: Het blauwe lampje brandt in de standbystand en is uit wanneer uw tv is
ingeschakeld.
− Kijkstand aan: Het blauwe lampje brandt wanneer u tv kijkt en is uit wanneer uw tv is
ingeschakeld.
− Aan: Het blauwe lampje is altijd aan.
➢
Zet Lichteffect op Uit om minder stroom te verbruiken.
Melodie: Uit/Laag/Middel/Hoog
U kunt het melodiegeluid van de tv bijstellen.
Entertainment: Uit/Sport/Film/Spelcomputer
De modus “Entertainment” stelt u in staat om de optimale weergavekwaliteit voor beeld en geluid te
selecteren voor sport, film en spelcomputers.
- Uit: de functie Entertainment uitschakelen.
- Sport: de optimale beeld- en geluidskwaliteit voor sport.
- Film: de optimale beeld- en geluidskwaliteit voor het kijken van een film.
U kunt genieten van een levendiger beeld en een geavanceerde geluidsweergave.
- Spelcomputer: de optimale beeld- en geluidskwaliteit voor het spelen van spellen. Deze modus
accelereert de speelsnelheid wanneer er een externe spelcomputer op de tv wordt aangesloten.
➢
Als u een Entertainment-modi inschakelt Aan worden de instellingen vergrendeld en kunnen
deze niet worden gewijzigd. Als u de beeld- of geluidmodus wilt aanpassen, moet de modus
Entertainment worden uitgeschakeld.
➢
Voor elke ingangsbron worden de Entertainment-instellingen opgeslagen.
Verpl.
Enter
Terug
Plug & Play
Taalkeuze :Nederlands
Tijd
Lichteffect
:
Kijkstand aan
Aanpassen van muurbevestiging
Melodie :Uit
Entertainment :Uit
Spaarstand :Uit
PIP
Instellingen
T V
Wordt vervolgd...
Nederlands - 28
BN68-01528A-00Dut.indd 28 2008-4-21 11:14:40

Software configureren (gebaseerd op Windows XP)
Hieronder ziet u de Windows-beeldscherminstellingen voor
een standaardcomputer. De vensters op uw computer kunnen
enigszins afwijken, afhankelijk van de versie van Windows en
de geïnstalleerde videokaart. Maar ook dan zijn in de meeste
gevallen dezelfde basisinstallatiegegevens van toepassing.
(Neem contact op met de computerfabrikant of Samsung-
leverancier als dit niet het geval is.)
1 Klik met de rechtermuisknop op het Windows bureaublad en
klik vervolgens op Eigenschappen.
De Eigenschappen voor beeldscherm worden
weergegeven.
2 Klik op de tab Instellingen en stel vervolgens de
Weergavemodus in volgens de tabel Weergavemodi. U hoeft
de instellingen voor Kleuren niet te wijzigen.
3 Klik op Geavanceerd. Er verschijnt een nieuw dialoogvenster voor instellingen.
4 Klik op de tab Beeldscherm en stel de Vernieuwingsfrequentie in volgens de tabel Weergavemodi.
Stel de Verticale frequentie en Horizontale frequentie zo mogelijk apart in, in plaats van de
Vernieuwingsfrequentie in te stellen.
5 Klik op OK om het venster te sluiten en klik vervolgens op OK om het venster Eigenschappen voor
beeldscherm te sluiten.Het apparaat kan op dat moment opnieuw opstarten.
Spaarstand: Uit/Laag/Middel/Hoog
Deze functie past de helderheid van het beeld automatisch aan,
afhankelijk van de lichtinval.
− Uit: Hiermee wordt de spaarstand uitgezet.
− Laag: De standaardmodus is ingeschakeld, ongeacht het
omgevingslicht.
− Middel: Gaat over op de modus Gemiddelde energiebesparing,
ongeacht het omgevingslicht.
− Hoog: Gaat over naar de maximale energiebesparingsmodus ongeacht het omgevingslicht.
Eenvoudig in te stellen
1 Druk op de toets TOOLS op de afstandsbediening.
2 Druk op ▲ of ▼ om Spaarstand te selecteren.
3 Druk op ◄ of ► om de gewenste optie te selecteren.
PIP (Beeld in beeld): PIP Aan/Uit / Bron / Formaat / Positie / Programma
U kunt een subbeeld in een hoofdbeeld weergeven. Op deze manier kunt u naar een TV-programma of
beelden van een aangesloten apparaat kijken.
− PIP: Aan/Uit
U kunt de PIP-functie aan- of uitzetten.
Overzicht van PIP-instellingen
Hoofdbeeld Subbeeld
Component
HDMI1, 2
PC
Alleen analoge
TV-uitzendingen, Ext1,
Ext2, AV
− Bron: TV/Ext.1/Ext.2/AV
U kunt de bron voor het subbeeld selecteren.
−
Formaat: / /
U kunt het formaat voor het subbeeld selecteren.
➢
Als het hoofdbeeld is ingesteld in de modus PC en Component, is Formaat niet beschikbaar.
−
Positie: / / /
U kunt de positie van het subbeeld selecteren.
➢
In de modus Dubbel( , ), kan Positie niet geselecteerd worden.
− Programma
U kunt alleen een kanaal voor het subbeeld selecteren als Bron is ingesteld op TV.
Verpl.
Enter
Terug
PIP :
Aan
Bron : TV
Formaat :
Positie :
Programma : P 1
PIP
T V
Extra
Anynet+ (HDMI-CEC)
Beeldmodus : Standaard
Geluidmodus : Aangepast
Slaaptimer : Uit
SRS TS XT : Uit
Spaarstand ◄ Uit ►
Dual I-II : Mono
Sluiten
Verpl.
Instellen
Nederlands - 29
BN68-01528A-00Dut.indd 29 2008-4-21 11:14:41

Invoermodus (PC)
Zowel de beeldpositie als de grootte varieert afhankelijk van het type monitor en de bijbehorende
resolutie.
In de onderstaande tabel ziet u alle ondersteunde beeldschermmodi:
D-Sub Eingang
Modus Resolutie
Horizontaal
Frequentie
(kHz)
Verticaal
Frequentie
(Hz)
Pixelklok
Frequentie
(MHz)
Sync-
polariteit
(H/V)
PS50A470
IBM
640 x 350
720 x 400
31.469
31.469
70.086
70.087
25.175
28.322
+ / -
- / +
✔
✔
VESA
640 x 480
640 x 480
640 x 480
800 x 600
800 x 600
800 x 600
1024 x 768
1024 x 768
1024 x 768
1360 x 768
31.469
37.861
37.500
37.879
48.077
46.875
48.363
56.476
60.023
47.712
59.940
72.809
75.000
60.317
72.188
75.000
60.004
70.069
75.029
60.015
25.175
31.500
31.500
40.000
50.000
49.500
65.000
75.000
78.750
85.500
- / -
- / -
- / -
+ / +
+ / +
+ / +
- / -
- / -
+ / +
+ / +
✔
✔
✔
✔
✔
✔
✔
✔
✔
✔
HDMI/DVI Eingang
Modus Resolutie
Horizontaal
Frequentie
(kHz)
Verticaal
Frequentie
(Hz)
Pixelklok
Frequentie
(MHz)
Sync-
polariteit
(H/V)
PS50A470
VESA
640 x 480
800 x 600
1024 x 768
1360 x 768
31.469
37.879
48.363
47.712
59.940
60.317
60.004
60.015
25.175
40.000
65.000
85.500
- / -
+ / +
- / -
+ / +
✔
✔
✔
✔
Bij gebruik van de HDMI/DVI-kabelverbinding, moet u de HDMI IN 2-aansluiting gebruiken.
De interlacemodus wordt niet ondersteund.
De TV werkt mogelijk niet normaal als een afwijkend videoformaat wordt geselecteerd.
De Separate- en Composite-modus worden ondersteund. SOG wordt niet ondersteund.
Voor de PS50A470 is de tekstkwaliteit van PC-beeld optimaal in de modus VESA (1360 x 768@60Hz).
Nederlands - 30
BN68-01528A-00Dut.indd 30 2008-4-21 11:14:42

De pc instellen
➢
Schakel over naar de PC-stand door op de toets SOURCE te
drukken.
1 Druk op de toets MENU om het menu weer te geven.
2 Druk op de toets ▲ of ▼ om Beeld te selecteren en druk op
de toets ENTER.
3 Selecteer de gewenste optie door op de toets ▲ of ▼ te
drukken en druk vervolgens op de toets ENTER.
4 Druk op de toets ENTER wanneer u tevreden bent met de
instelling.
5 Druk op de toets EXIT om het menu te verlaten.
Autom. afstellen
Met Automatisch afstellen wordt het pc-scherm van de tv
automatisch aangepast aan het binnenkomende
pc-videosignaal.
De waarden voor fijnheid, grofheid en positie worden
automatisch aangepast.
Eenvoudig in te stellen
1 Druk op de toets TOOLS op de afstandsbediening.
2 Druk op de toets ▲ of ▼ om Autom. afstellen te selecteren
en druk vervolgens op de toets ENTER.
Scherm: Grof/Fijn/Positie/Beeld resetten
Grof/fijn
U past de beeldkwaliteit aan om beeldruis te verwijderen of te
verminderen. Als de ruis niet verdwijnt door het kanaal
nauwkeurig af te stemmen, stel dan de frequentie zo goed
mogelijk in (Grof) en voer opnieuw een nauwkeurige instelling
uit.Stel het beeld opnieuw in het midden van het scherm in
nadat de ruis is verminderd.
1 Druk op de toets ▲ of ▼ om Grof of Fijn te selecteren en
druk op de toets ENTER.
2 Druk op de toets ◄ of ► om de beeldkwaliteit in te stellen,
bij verticale strepen of een onscherp beeld. Druk op de
toets ENTER.
Positie
Pas de positie van het pc-scherm aan als deze niet gelijk is
aan het tv-scherm.
1 Stel de positie bij door op de toets ▲/▼/◄/► te drukken.
2 Druk op de toets ENTER.
Beeld resetten
U kunt alle beeldinstellingen vervangen door de
fabrieksinstellingen.
Beeld reresetten.
Bezig met automatisch instellen
Wacht aub
Verpl.
Enter
Terug
Positie
T V
Verpl.
Enter
Terug
Grof 50
Fijn 11
Positie
Beeld resetten
Scherm afstellen
T V
Verpl.
Enter
Terug
Modus :Standaard
Cel helderheid 7
Contrast 95
Helderheid 45
Scherpte 50
Autom. afstellen
Scherm afstellen
Detailinstellingen
Afbeeldingsopties
Reset : OK
Beeld
T V
Extra
Anynet+ (HDMI-CEC)
Beeld Modus : Standaard
moet u de modus : Aangepast
Slaaptimer : Uit
SRS TS XT : Uit
Spaarstand : Uit
PIP
Autom. afstellen
Verpl.
Enter Sluiten
Nederlands - 31
BN68-01528A-00Dut.indd 31 2008-4-21 11:14:43

Wat is Anynet
+
?
Anynet
+
is een AV-netwerksysteem waarmee u dankzij een gebruiksvriendelijke AV-interface alle
aangesloten apparaten kunt bedienen via het Anynet
+
-menu wanneer Samsung Electronics AV-
apparaten zijn aangesloten.
Anynet
+
-apparaten aansluiten
Het Anynet
+
-systeem ondersteunt alleen AV-apparaten die ondersteuning bieden voor Anynet
+
.
Controleer of het AV-apparaat dat u wilt aansluiten op de tv een Anynet
+
-markering bevat.
Direct aansluiten op de tv
Verbind de HDMI-kabel met de
aansluiting [HDMI 1], [HDMI 2]
of [HDMI 3] op de tv en met de
aansluiting HDMI OUT van het
betreffende Anynet
+
-apparaat.
Een thuisbioscoop aansluiten
1 Verbind de HDMI-kabel
met de aansluiting [HDMI
1], [HDMI 2] of [HDMI
3] op de tv en met de
aansluiting HDMI OUT van
het betreffende Anynet
+
-
apparaat.
2 Verbind de HDMI-kabel
op de aansluiting HDMI IN
van de thuisbioscoop en
de uitgang HDMI OUT van
het betreffende Anynet
+
-
apparaat.
➢
Sluit slechts één ontvanger aan.
➢
U kunt een Anynet
+
-apparaat aansluiten met een HDMI-kabel. Sommige HDMI-kabels ondersteunen
mogelijk geen Anynet
+
-functies.
➢
Anynet
+
werkt wanneer het AV-apparaat dat Anynet
+
ondersteunt, op stand-by staat of is
ingeschakeld.
➢
Anynet
+
ondersteunt in totaal twaalf AV-apparaten.
Tv
Anynet
+
-apparaat 1 Anynet
+
-apparaat 2
Anynet
+
-apparaat 3
HDMI-kabel
HDMI-kabel
HDMI-kabel
HDMI-kabel
Thuisbioscoop
English - 30
Anynet
+
-apparaat 1Anynet
+
-apparaat 2
Anynet
+
-apparaat 3
Tv
HDMI-kabel
HDMI-kabel
HDMI-kabel
English - 30
Nederlands - 32
BN68-01528A-00Dut.indd 32 2008-4-21 11:14:45

Anynet
+
instellen
De volgende instellingen zijn voor het gebruik van Anynet
+
-functies.
De functie Anynet
+
gebruiken
1 Druk op de toets MENU om het menu weer te geven.
Druk op de toets ▲ of ▼ om Invoer te selecteren en druk
vervolgens op de toets ENTER.
2 Druk op de toets ▲ of ▼ om Anynet
+
(HDMI-CEC) te selecteren en
druk vervolgens op de toets ENTER.
3 Druk op de toets ▲ or ▼ om Instellingen (Setup) te selecteren en
druk op de toets ENTER.
4 Druk op de toets ▲ of ▼ om Anynet
+
(HDMI-CEC) te selecteren en
druk vervolgens op de toets ENTER.
5 Druk op de toets ▲ of ▼ om Aan te selecteren en druk op de toets
ENTER.
➢
De functie Anynet
+
(HDMI-CEC) wordt ingeschakeld.
➢
Als u Uit selecteert, wordt Anynet
+
(HDMI-CEC) uitgeschakeld.
➢
Wanneer de functie Anynet
+
(HDMI-CEC) is uitgeschakeld, worden
alle bewerkingen in verband met Anynet
+
uitgeschakeld.
Een Anynet
+
-apparaat automatisch uitschakelen wanneer de tv
wordt uitgeschakeld Uitgeschakeld
4. Druk op de toets ▲ of ▼ om Automatisch uitschakelen te
selecteren en druk op de toets ENTER.
5 Druk op de toets ▲ of ▼ om Ja te selecteren en druk vervolgens op
de toets ENTER.
➢
De functie Automatisch uitschakelen wordt ingeschakeld.
➢
Als u Uit selecteert, wordt de functie Automatisch uitschakelen
geannuleerd.
Druk op de toets EXIT om het menu te verlaten.
➢
U moet de instelling Apparaat selecteren op de afstandsbediening
van de tv instellen op TV als u de functie Anynet
+
wilt gebruiken.
➢
Als u Automatisch uitschakelen instelt op Ja, worden aangesloten externe apparaten ook uitgeschakeld
wanneer de tv wordt uitgeschakeld. Als het apparaat echter opneemt, kan het niet worden uitgeschakeld.
Zoeken naar en schakelen tussen Anynet
+
-apparaten
1 Druk op de toets MENU om het menu weer te geven.
Druk op de toets ▲ of ▼ om Invoer te selecteren en druk
vervogens op de toets ENTER.
2 Druk op de toets ▲ of ▼ om Anynet
+
(HDMI-CEC) te selecteren en
druk vervolgens op de toets ENTER.
3 Druk op de toets ▲ of ▼ om Apparaat selecteren te selecteren en
druk vervolgens op de toets ENTER.
4 Druk op de toets ▲ of ▼ om een bepaald apparaat te selecteren en
druk op de toets ENTER.
U schakelt naar het geselecteerde apparaat.
5 Als u het gewenste apparaat niet kunt vinden, druk dan op de toets
▲ of ▼ om Searching Connections Zoeken naar verbonden
apparaten te selecteren en druk op de toets ENTER.
Het bericht Anynet
+
-verbinding wordt geconfigureerd... wordt
weergegeven. Wanneer het zoeken naar apparaten is voltooid,
worden de aangesloten apparaten weergegeven in het menu
Anynet
+
-menu.
➢
Het kan twee minuten voordat u naar de geselecteerde apparaten
hebt geschakeld. U kunt de bewerking in de tussentijd niet annuleren.
➢
De benodigde tijd voor het zoeken naar apparaten wordt bepaald door
het aantal aangesloten apparaten.
➢
Wanneer de zoekopdracht is voltooid, wordt niet het aantal gedetecteerde apparaten weergegeven.
➢
Hoewel automatisch wordt gezocht naar apparaten wanneer u de tv inschakelt met de AAN/UIT-toets,
worden apparaten die zijn aangesloten wanneer de tv is ingeschakeld of in een specifiek omstandigheid niet
weergegeven in de lijst met apparaten. Selecteer daarom Zoeken naar verbonden apparaten om te zoeken
naar apparaten.
➢
Als u een externe invoermodus hebt geselecteerd door op de toets SOURCE te drukken, kunt u de functie
Anynet
+
niet gebruiken. Schakel naar een Anynet
+
-apparaat met de toets TOOLS.
Wordt vervolgd...
Instellingen
Anynet
+
(HDMI-CEC)
: Off
Automatisch uitsch. : Off
Zoeken naar verbonden apparaten
Eingabe ZurückNavig.
Uit
Aan
Eingabe
Navig.
Tv weergeven
Apparaat selecteren
Opnemen
Apparaatmenu
Apparaatbediening
Receiver :Uit
Instellingen
TV P 1
Zurück
Eingabe
Navig.
Tv weergeven
Apparaat selecteren
Opnemen
Apparaatmenu
Apparaatbediening
Receiver :Uit
Instellingen
TV P 1
Zurück
DVDR1
DVDR2
DVD1
DVD2
Instellingen
Anynet+ (HDMI-CEC) :
Uit
Automatisch uitsch. : Off
Zoeken naar verbonden apparaten
Eingabe ZurückNavig.
Nee
Ja
Instellingen
Anynet
+
(HDMI-CEC)
: Aan
Automatisch uitsch.
: Ja
Zoeken naar verbonden apparaten
Eingabe ZurückNavig.
Nederlands - 33
BN68-01528A-00Dut.indd 33 2008-4-21 11:14:46

Anynet+-menu
Het menu Anynet
+
verandert overeenkomstig het type en de status van de Anynet
+
-apparaten die
op de tv zijn aangesloten.
Menu Anynet
+
Omschrijving
Tv weergeven Hiermee schakelt u van Anynet
+
naar de tv-uitzendmodus.
Apparaat selecteren De tv maakt verbinding met het betreffende apparaat.
Opnemen Starten van opname. (Dit menu werkt alleen bij een apparaat dat
opnemen ondersteunt.)
Menu op apparaat Hiermee geeft u het menu van het aangesloten apparaat weer.
Voorbeeld Als een dvd-recorder is aangesloten, wordt het titelmenu
van de dvd-recorder weergegeven.
Bediening apparaat Hiermee geeft u het menu met de afspeelfuncties voor het
aangesloten apparaat weer.
Voorbeeld Wanneer een dvd-recorder is aangesloten, wordt het
menu met de afspeelfuncties voor de dvd-recorder weergegeven.
Ontvanger Geluid wordt uitgevoerd via de ontvanger.
Instellingen U kunt de omgeving voor gebruik van Anynet
+
.
Beschikbare toetsen op afstandsbediening van tv in Anynet
+
-modus
Apparaattype Bedieningsstatus Beschikbare toetsen
Anynet
+
-apparaat
Nadat u naar het apparaat bent
geschakeld, wanneer het menu
van het betreffende apparaat
wordt weergegeven op het
scherm.
Numerieke toetsen
Toetsen ▲/▼/◄/►/ENTER
Gekleurde toetsen
Toets EXIT
Nadat u naar het apparaat bent
geschakeld, terwijl u een bestand
afspeelt
W.LINK
(terugspoelen)
W.LINK
(vooruitspoelen)
W.LINK
(stoppen)
W.LINK
W.LINK
(Play/Pause)
Apparaat met ingebouwde
tuner
Nadat u naar het apparaat bent
geschakeld, wanneer u tv kijkt
Toets P /
Audioapparaat
Wanneer ontvanger is
ingeschakeld
W.LINK
/
W.LINK
MUTE
➢
De functie Anynet
+
werkt alleen wanneer de afstandsbediening is ingesteld op TV.
➢
De toets REC werkt alleen wanneer opnamen mogelijk is.
➢
U kunt Anynet
+
-apparaten niet bedienen met de toetsen op het zijpaneel van de tv. U kunt Anynet
+
-
apparaten alleen bedienen met de afstandsbediening van de tv.
➢
De afstandsbediening van de tv werkt mogelijk niet in bepaalde omstandigheden. Selecteer in dat
geval opnieuw het Anynet
+
-apparaat.
➢
De Anynet
+
-functies werken niet voor de producten van andere fabrikanten.
➢
In de modus Anynet
+
werken de gekleurde toetsen mogelijk niet goed.
➢
De werking van de toetsen
W.LINK
,
W.LINK
kan enigszins afwijken. Dit is afhankelijk van het apparaat.
Opnemen
U kunt een tv-programma opnemen met een recorder.
Druk op de toets REC.
Het opnemen wordt gestart. (Alleen wanneer u een opnameapparaat hebt aangesloten dat ondersteuning
biedt voor Anynet
+
.)
➢
Het huidige tv-programma wordt opgenomen in de status Tv kijken. Als u video vanaf een ander
apparaat bekijkt, wordt de video van het apparaat opgenomen.
➢
U kunt ook de bronsignalen opnemen door Opnemen te selecteren nadat u op de toets TOOLS hebt
gedrukt.
➢
Controleer voor u begint met opnemen of de antenne correct is aangesloten op het apparaat voor opname.
Om deze verbinding te controleren, raadpleegt u de gebruikershandleiding.
Nederlands - 34
BN68-01528A-00Dut.indd 34 2008-4-21 11:14:50

Luisteren via een ontvanger
U kunt geluid beluisteren via een ontvanger in plaats van de luidsprekers van de tv.
1 Druk op de toets MENU om het menu weer te geven.
Druk op de toets ▲ of ▼ om Invoer te selecteren en druk vervolgens op de toets ENTER.
2 Druk op de toets ▲ of ▼ om Anynet
+
(HDMI-CEC) te selecteren en druk
vervolgens op de toets ENTER.
3 Druk op de toets ▲ of ▼ om Ontvanger en druk vervolgens op de toets ENTER.
4 Druk op de toets ◄ of ► om Aan te selecteren en druk op de toets ENTER.
U kunt nu het geluid via de ontvanger beluisteren.
5 Druk op de toets EXIT om het menu te verlaten.
➢
Wanneer de ontvanger is ingeschakeld, kunt u het tv-geluid beluisteren via de
ontvanger met twee kanalen.
➢
Als de ontvanger alleen is bedoeld voor een thuisbioscoop (die alleen audio ondersteunt), wordt de
ontvanger mogelijk niet weergegeven in de lijst met apparaten.
➢
Als inhoud auteursrechtelijk is beschermd, kunt u geluid mogelijk niet goed beluisteren via de ontvanger.
➢
Wanneer u via de ontvanger luistert, zijn er beperkingen voor het gebruik van het PIP- en het audiomenu.
Controleer het volgende voordat u om service verzoekt
Symptoom Oplossing
Anynet
+
werkt niet. ■ Controleer of het apparaat een Anynet
+
-apparaat is. Het Anynet
+
-
systeem ondersteunt alleen Anynet
+
-apparaten.
■ Sluit slechts één ontvanger aan.
■ Controleer of het netsnoer van het Anynet
+
-apparaat juist is aangesloten.
■
Controleer de video-/audio-/HDMI-kabelverbindingen van het Anynet
+
-
apparaat.
■ Controleer of Anynet+ (HDMI-CEC) is ingeschakeld in het
instellingenmenu van Anynet
+
.
■ Controleer of de afstandsbediening van de tv in de tv-stand staat.
■ Controleer of het de exclusieve afstandsbediening van Anynet
+
is.
■ In bepaalde toestanden werkt Anynet
+
niet. (Zoals kanalen zoeken)
■ Wanneer u de HDMI-kabel aansluit of verwijdert, moet u opnieuw naar
apparaten zoeken of uw televisie opnieuw inschakelen.
■ Controleer of de functie Anynet
+
van het Anynet
+
-apparaat is
geactiveerd.
Ik wil Anynet
+
starten. ■ Controleer of het Anynet
+
-apparaat op de juiste manier is aangesloten
op de tv en controleer of Anynet
+
(HDMI-CEC) is ingeschakeld in het
menu Setup (Instellingen) van Anynet
+
.
■ Druk op de toets
TV op de afstandsbediening van de tv om naar de
tv te schakelen. Druk vervolgens op de toets TOOLS om het menu
Anynet
+
te openen en selecteer de gewenste optie.
Ik wil Anynet
+
verlaten. ■ Selecteer Tv kijken in het menu Anynet
+
.
■ Druk op de toets
SOURCE op de afstandsbediening van de tv en
selecteer een ander apparaat dan een Anynet
+
-apparaat.
■ Druk op
P, CH LIST of PRE-CH om de tv-modus te wijzigen. (De
kanaaltoets werkt alleen wanneer er geen Anynet
+
-apparaat met een
ingebouwde tuner is aangesloten.)
Het bericht Verbinden
met Anynet
+
-apparaat…
(Connecting to Anynet+
device...) verschijnt op het
scherm.
■ U kunt tijdens het configureren van Anynet+ of het schakelen naar een
weergavemodus de afstandsbediening niet gebruiken.
■ Gebruik de afstandsbediening wanneer u Anynet
+
hebt ingesteld of
naar een weergavemodus hebt geschakeld.
Het Anynet
+
-apparaat speelt
niets af.
■ U kunt de functie Afspelen niet gebruiken wanneer Plug & Play is
geactiveerd.
Het aangesloten apparaat
wordt niet weergegeven.
■ Controleer of het apparaat ondersteuning biedt voor Anynet+-functies.
■ Controleer of de HDMI-kabel op de juiste manier is aangesloten.
■ Controleer of <Anynet
+
(HDMI-CEC) is ingeschakeld in het
instellingenmenu van Anynet
+
.
■ Zoek opnieuw naar Anynet
+
-apparaten.
■ U kunt een Anynet
+
-apparaat aansluiten met een HDMI-kabel. Sommige
HDMI-kabels ondersteunen mogelijk geen Anynet
+
-functies.
Het televisieprogramma kan
niet worden opgenomen.
■ Controleer of de antenneaansluiting op het apparaat voor opname
correct is aangesloten.
Enter
Move
View TV
Select Device
Record
Menu on Device
Device Operation
Receiver :On
Setup
TV P 1
Exit
Nederlands - 35
BN68-01528A-00Dut.indd 35 2008-4-21 11:14:51

Teletekstfunctie (afhankelijk van het model)
De meeste televisiekanalen bieden tekstinformatiediensten
via teletekst. Op de indexpagina van de teletekstdienst vindt
u informatie over het gebruik van de dienst. Ook kunt u naar
wens verschillende opties selecteren met de knoppen op de
afstandsbediening.
☛
Voor een juiste weergave van teletekstinformatie is een stabiele
kanaalontvangst vereist. Anders kan bepaalde informatie
ontbreken of worden bepaalde pagina’s niet weergegeven.
1
TV
Teletekstmodus verlaten (afhankelijk van het model)
2
(opslaan)
Druk op deze toets om teletekstpagina’s op te slaan.
3
(formaat)
Druk op deze toets om de tekst in de bovenste helft van het
scherm op dubbel formaat weer te geven. Druk nogmaals op
deze toets om de tekst in de onderste helft van het scherm op
dubbel formaat weer te geven.
Druk nogmaals op deze knop om terug te keren naar de
normale weergave.
4
(tonen)
Druk op deze toets om verborgen tekst weer te geven (zoals
antwoorden op quizvragen). Druk nogmaals op deze toets om
terug te keren naar de normale weergave.
5
Gekleurde toetsen (rood/groen/geel/blauw)
Als een zendstation gebruikmaakt van het FASTEXT-systeem,
worden de verschillende onderwerpen op een teletekstpagina
van een kleurcodering voorzien, die u kunt selecteren met
behulp van de gekleurde toetsen. Druk op de gewenste
knop. De pagina wordt weergegeven met aanvullende
kleurcodegegevens, die op dezelfde wijze kunnen worden
geselecteerd.
Om de vorige of volgende pagina weer te geven drukt u op de
knop met de overeenkomstige kleur.
6
(teletekst aan/mix)
Druk op deze toets om teletekst te activeren nadat u het
kanaal hebt geselecteerd dat de teletekstdienst aanbiedt. Druk
tweemaal op deze knop om het huidige televisiebeeld over de
teletekstpagina heen weer te geven.
7
(modus)
Druk op deze toets om de teletekstmodus (LIST/FLOF) te
selecteren.
Als u in de LIST-modus op deze knop drukt, schakelt u over
naar de modus Opslaan in lijst.
In deze modus kunt u met behulp van de knop (opslaan)
teletekstpagina’s in een lijst opslaan.
8
(subpagina)
Druk op deze toets om de beschikbare subpagina’s weer te geven.
9
(volgende pagina)
Druk op deze toets om de volgende teletekstpagina weer te geven.
0
(vorige pagina)
Druk op deze toets om de vorige teletekstpagina weer te geven.
!
(index)
Druk op deze toets voor weergave van de indexpagina
(inhoudspagina) tijdens het gebruik van teletekst.
@
(vastzetten)
Druk op deze toets als u de weergave wilt vasthouden van een
pagina die is gekoppeld aan meerdere subpagina’s die elkaar
automatisch opvolgen. Om verder te gaan drukt u nogmaals op
deze knop.
#
(annuleren)
Hiermee bekijkt u de uitzending wanneer u een pagina zoekt.
➢
U kunt teletekstpagina’s veranderen met de cijferknoppen op
de afstandsbediening.
Wordt vervolgd...
Nederlands - 36
BN68-01528A-00Dut.indd 36 2008-4-21 11:14:55

De teletekstpagina’s zijn in zes categorieën verdeeld:
Onderdeel Inhoud
A
B
C
D
E
F
Geselecteerd paginanummer.
Aanduiding zendstation.
Huidig paginanummer of zoekindicaties.
Datum en tijd.
Tekst.
Statusinformatie.
FASTEXT-informatie.
➢
Teletekstinformatie is vaak verdeeld over verschillende
pagina’s die achtereenvolgens worden weergegeven. U kunt
rechtstreeks naar deze pagina’s gaan door:
Het paginanummer in te voeren
Een titel in een lijst te selecteren
Een gekleurde kop te selecteren (FASTEXT-systeem)
➢
Druk op de knop TV om de teletekstweergave te verlaten.
Nederlands - 37
BN68-01528A-00Dut.indd 37 2008-4-21 11:14:56

Specificaties voor de muurbevestigingskit (VESA)
Monteer de muurbevestiging op een stevige, loodrechte muur.
Neem bij installatie op andere plekken contact op met uw leverancier. Bij montage op een plafond
of schuine muur kan het apparaat vallen en leiden tot persoonlijk letsel.
Productgroep inch VESA Spec. (A * B) Standaardschroeven Aantal
LCD-TV
23 ~ 26 200
*
100 M4
4
32 ~ 40 200
*
200 M6
46 ~ 52
400 * 400
600 * 400
M8
57
700 * 400
(Geen VESA)
57 ~ 70 800 * 4000
80 ~ 1400 * 800
PDP-TV
42 ~ 58
400 * 400
600 * 400
M8
4
63
676 * 407
Geen VESA
6
63 ~ 70 800 * 400 4
80 ~ 1400 * 800 4
➢
We leveren standaardafmetingen voor muurbevestigingskits, zoals geïllustreerd in de voorgaande tabel.
➢
Wanneer u onze muurbevestigingskit aanschaft, zijn een gedetailleerde installatiegids en alle vereiste
montageonderdelen daarbij inbegrepen.
➢
Gebruik geen schroeven die langer zijn dan de standaardafmetingen, omdat anders de binnenkant
van de tv beschadigd kan raken.
➢
Voor muurbevestigingen die niet aan de standaardspecificaties voor schroeven voldoen volgens de
VESA-norm, kan de lengte van de schroeven variëren afhankelijk van de specificaties.
➢
Gebruik geen schroeven die niet voldoen aan de standaardspecificaties voor schroeven volgens de
VESA-norm. Draai de schroeven niet te stevig vast, dit kan het product beschadigen en kan er toe
leiden dat het valt, resulterend in persoonlijk letsel. Samsung is niet aansprakelijk voor ongelukken
veroorzaakt hierdoor.
➢
Samsung is niet aansprakelijk voor productschade of persoonlijk letsel wanneer een muurbevestiging
wordt gebruikt die niet aan de VESA-norm voldoet of die niet gespecificeerd is, of wanneer de klant
de installatie-instructies van het product niet opvolgt.
➢
Onze modellen van 57 en 63 inch voldoen niet aan de VESA-specificaties. Gebruik daarom voor
deze modellen onze speciaal samengestelde wandbevestigingskit.
➢
Overschrijd de 15 graden niet bij bevestiging van deze tv aan de muur.
Monteer de muurbevestiging niet terwijl de tv is ingeschakeld.
Dit kan resulteren in persoonlijk letsel door elektrische schokken.
Nederlands - 38
BN68-01528A-00Dut.indd 38 2008-4-21 11:14:56

Aanpassen van de muurbevestiging (apart verkrijgbaar)
Wanneer de automatische wandsteun is geïnstalleerd, kan de positie van uw tv eenvoudig worden bijgesteld.
Het menu openen
1 Druk op ▲, ▼, ◄ of ► op uw afstandsbediening.
➢
Het scherm Aanpassen van muurbevestiging (Wall Mount
Adjustment) wordt weergegeven.
➢
Wanneer het scherm voor aanpassen van de
muurbevestiging niet wordt weergegeven door op een van
de richtingtoetsen te klikken, gaat u via het menu naar het
scherm.
• Druk op de toets MENU om het menu weer te geven.
Druk op de toets ▲ of ▼ om Instellingen te selecteren
en druk op de toets ENTER.
• Druk op ▲ of ▼ om Aanpassen van muurbevestiging
te selecteren, druk vervolgens op ENTER.
De positie opslaan
2 Stel de gewenste positie in met de toetsen ▲, ▼, ◄, ►.
➢
Als u op een pijltjestoets drukt wanneer het
schermmenu niet wordt weergegeven, verschijnt het
aanpassingsscherm.
➢
Druk op de toets INFO om de steun in de neutrale positie
te zetten. Druk op ◄ of ► om Ja te selecteren en druk
vervolgens op ENTER. De positie wordt teruggezet op de
standaard instelling.
3 Druk op de blauwe knop.
Druk op ▲ en ▼ om de positiegeheugens Positie 1, Positie 2
of Positie 3 te gebruiken om de huidige instelling op te slaan.
➢
Indien u de huidige positie niet wilt opslaan, drukt op
RETURN.
➢
Wanneer u positiegeheugen selecteert, kunt u de
kleurentoetsen niet gebruiken.
4 Druk op ENTER om op te slaan.
➢
Wanneer Positie 1 wordt geselecteerd, verschijnt het
bericht Huidige positie opgeslagen als Positie 1.
5 Druk op de toets ENTER.
➢
De opgeslagen positie verschijnt aan de linkerkant van het schermmenu.
Verpl.
Enter
Terug
Plug & Play
Taalkeuze :Nederlands
Tijd
Lichteffect
:
Kijkstand aan
Aanpassen van muurbevestiging
Melodie :Uit
Entertainment :Film
Spaarstand :Uit
Instellingen
T V
Seriële kabel (1P naar 1P)(niet bijgeleverd)
Achterpaneel Auto-muurbevestiging
Opslaan
Terug
Verpl.
Enter
Selecteer een positiegeheugen.
Positie 1
Positie 2
Positie 3
Aanpassen van muurbevestiging
Instellen
Opslaan Midden
►
►
►
►
►
►
►
►
321
Positie
Nederlands - 39
BN68-01528A-00Dut.indd 39 2008-4-21 11:14:59

De standaardvoet monteren (afhankelijk van het model)
Bevestig het beeldscherm stevig op de standaardvoet met de zes
schroeven om de standaardvoet aan het beeldscherm te bevestigen.
(Het uiterlijk van het scherm kan afwijken van het scherm in de
afbeelding.)
Als u de tv op een muur
aanbrengt, sluit u het deksel
(1) op het verbindingsstuk
van de standaardvoet met
twee schroeven.
Waarschuwing
Bevestig de voet stevig aan de tv
voordat u deze verplaatst, omdat de
standaard kan
vallen en ernstig letsel kan veroorzaken.
➢
De tv moet door twee of meer personen
getild worden. Leg de tv nooit op de grond
neer om eventuele beschadiging aan het
scherm te voorkomen.
Zet de tv altijd rechtop neer.
Een opgeslagen positie gebruiken
1 Voer stap 1 uit van Het menu openen.
2 Door op een kleur te drukken (rood, groen of geel), beweegt de
automatische wandsteun naar de opgeslagen positie.
➢
U kunt de muurbevestiging naar een van de drie vooraf
ingestelde posities bewegen door op de rode (Positie 1),
groene (Positie 2) of gele (Positie 3) knoppen te drukken.
➢
Het positiemenu verschijnt wanneer u de positie aanpast
nadat u naar een vooraf ingestelde positie bent gegaan.
➢
Kijk voor installatie-instructies in de Installatiehandleiding die bij de
wandsteun geleverd is.
➢
Raadpleeg een gespecialiseerd installatiebedrijf voor installatie en
verplaatsing van de muurbevestiging.
➢
De installatiehandleiding is bedoeld voor wanneer de
muurbevestiging aan een muur bevestigd wordt. Wanneer de
steun aan andere bouwmaterialen bevestigd moet worden, dient u
contact op te nemen met de dichtstbijzijnde leverancier.
➢
De auto-muurbevestiging werkt niet wanneer Anynet+ is
ingeschakeld.
➢
Het model van 107 cm is niet compatibel met het oudere
wandmodel (WMN5090A).
Aanpassen van muurbevestiging
Instellen
Opslaan Midden
►
►
►
►
►
►
►
►
321
Positie
Positie 1
Nederlands - 40
BN68-01528A-00Dut.indd 40 2008-4-21 11:15:02

De TV vastzetten aan de wand
Als u duwt of trekt aan de TV of op de TV klimt, kan deze vallen. Zie er met name op toe
dat uw kinderen niet aan de TV gaan hangen of deze uit balans brengen. De TV kan dan
omvallen, hetgeen verwondingen kan veroorzaken of zelfs fatale gevolgen kan hebben.
Neem alle voorzorgsmaatregelen die in de bijgesloten veiligheidsfolder worden genoemd. Om
veiligheidsredenen is het raadzaam de antivalvoorziening te installeren om de stabiliteit van
het toetsel te verhogen.
Voorkomen dat de TV valt:
1. Doe de schroeven in de beugels en bevestig deze stevig aan
de wand. Controleer of de schroeven stevig in de wand zijn
gedraaid.
➢
Afhankelijk van het wandtype hebt u mogelijk aanvullend
materiaal nodig om het geheel te verankeren.
➢
De benodigde beugels, schroeven en draad worden niet
meegeleverd. Deze moeten apart worden aangeschaft.
2. Verwijder de schroeven in het midden aan de achterkant
van de TV, steek de schroeven door de beugels en draai de
schroeven weer vast in de TV.
➢
Het is mogelijk dat de schroeven niet bij het product
worden meegeleverd. In dat geval moet u schroeven met
de volgende specicaties aanschaffen.
3. Verbind de beugels die aan de TV zijn bevestigd met een
sterke draad aan de beugels die aan de wand zijn bevestigd
en knoop de draad stevig vast.
➢
Plaats de TV dicht bij de wand zodat deze niet
achterover kan vallen.
➢
Het is veilig de draad zodanig aan te brengen dat de
beugels die aan de wand zijn bevestigd zich boven
de beugels op de TV of op gelijke hoogte daarmee
bevinden.
➢
Haal de draad los voordat u de TV verplaatst.
4. Controleer of alle bevestigingen goed zijn aangebracht.
Controleer de bevestigingspunten regelmatig op tekenen
van moeheid of verzwakking. Neem in geval van twijfel
over de veiligheid van de bevestiging contact op met een
professionele installateur.
Wand
Wand
Let op
BN68-01528A-00Dut.indd 41 2008-4-21 11:15:04

Problemen oplossen
Voer de onderstaande simpele controles uit voordat u de after-salesdienst van Samsung
inschakelt.
Als u het probleem niet kunt oplossen aan de hand van de onderstaande instructies, noteert u het
model en het serienummer van de televisie en neemt u contact op met uw lokale leverancier.
Geen geluid of beeld
Controleer of het netsnoer op een wandstopcontact is aangesloten.
Controleer of u op de knop (Power) (On/Off) op het voorpaneel hebt gedrukt of druk op de toets
POWER op de afstandsbediening.
Controleer de instellingen voor het contrast en de helderheid van het beeld.
Controleer het geluidsvolume.
Controleer of TV-luidspreker in de stand Uit staat.
Normaal beeld maar geen geluid
Controleer het geluidsvolume.
Controleer of de toets MUTE op de afstandsbediening is ingedrukt.
Geen beeld of zwart-witbeeld
Pas de kleurinstellingen aan.
Controleer of het geselecteerde uitzendsysteem correct is.
Geluid en beeld met storing
Probeer erachter te komen welk elektrisch apparaat de televisie stoort en plaats het apparaat uit de
buurt van de televisie.
Sluit de televisie op een ander stopcontact aan.
Vaag beeld of sneeuw, vervormd geluid
Controleer de richting, plaats en aansluitingen van de antenne.
Deze storing treedt vaak op bij het gebruik van een binnenantenne.
Afstandsbediening werkt niet goed
Vervang de batterijen van de afstandsbediening.
Reinig de bovenste rand van de afstandsbediening (transmissievenster).
Controleer of de “+” and “–” polen van de batterij correct geplaatst zijn.
Controleer of de batterijen leeg zijn.
Het scherm is zwart en het aan/uit-lampje knippert gestaag
Controleer of uw computer aanstaat en of de signaalkabel in orde is.
Het energiebeheersysteem van de TV is actief.
Beweeg de muis van de computer of druk op een willekeurige toets op het toetsenbord.
Controleer of het apparaat (STB, DVD, etc) aanstaat en of de signaalkabel in orde is.
Het energiebeheersysteem van de TV is actief.
Druk op de toets Source op het paneel of op de afstandsbediening.
Zet de TV uit en weer aan.
De beschadigde afbeelding wordt weergegeven in de hoek van het scherm.
Als Alleen scannen is geselecteerd in enkele externe apparaten, wordt de beschadigde afbeelding
mogelijk weergegeven in de hoek van het scherm. Dit wordt veroorzaakt door de externe apparaten,
niet door de tv.
De melding “Hiermee herstelt u alle fabrieksinstellingen” verschijnt.
Dit verschijnt als u de toets EXIT enige tijd ingedrukt houdt. De instellingen van het product worden
teruggezet naar de fabrieksinstellingen.
Nederlands - 42
BN68-01528A-00Dut.indd 42 2008-4-21 11:15:05

Specificaties
De beschrijvingen en kenmerken in dit boekje zijn alleen bedoeld ter informatie en kunnen zonder
kennisgeving worden gewijzigd.
Modelnaam PS50A470
Schermformaat
(diagonaal)
50 inch
Pc-resolutie 1360 x 768 bij 60 Hz
Geluidsuitgang 10 W + 10 W
Afmetingen
(BxHxD)
Behuizing
Met voet
1290 x 740 x 95 mm
1290 x 804 x 319 mm
Gewicht
Behuizing
Met voet
39 kg
41 kg
Omgevingsvereisten
Gebruikstemperatuur
Gebruiksvochtigheid
Opslagtemperatuur:
Opslagvochtigheid
10 °C to 40 °C (50 °F to 104 °F)
10% to 80%, niet-condenserend
-20 °C to 45 °C (-4 °F to 113 °F)
5% to 95%, niet-condenserend
➢
Dit is een digitaal apparaat van klasse B.
Vormgeving en specificaties kunnen zonder kennisgeving worden gewijzigd.
Zie het etiket op het product voor informatie over de stroomvoorziening en het energieverbruik.
Nederlands - 43
BN68-01528A-00Dut.indd 43 2008-4-21 11:15:05

Correcte verwijdering van dit product
(elektrische & elektronische afvalapparatuur)
(Applicable in the European Union and other European countries with
separate collection systems)
Dit merkteken op het product of het bijbehorende informatiemateriaal
duidt erop dat het niet met ander huishoudelijk afval verwijderd moet
worden aan het einde van zijn gebruiksduur. Om mogelijke schade
aan het milieu of de menselijke gezondheid door ongecontroleerde
afvalverwijdering te voorkomen, moet u dit product van andere soorten
afval scheiden en op een verantwoorde manier recyclen, zodat het
duurzame hergebruik van materiaalbronnen wordt bevorderd.
Huishoudelijke gebruikers moeten contact opnemen met de winkel
waar ze dit product hebben gekocht of met de gemeente waar ze
wonen om te vernemen waar en hoe ze dit product milieuvriendelijk
kunnen laten recyclen.
Zakelijke gebruikers moeten contact opnemen met hun leverancier
en de algemene voorwaarden van de koopovereenkomsten nalezen.
Dit product moet niet worden gemengd met ander bedrijfsafval voor
verwijdering.
BN68-01528A-00Dut.indd 44 2008-4-21 11:15:05

Italiano - 2
© 2008 Samsung Electronics Co., Ltd. All rights reserved.
Istruzioni per l’uso
Ritenzione dell’immagine a video
Non visualizzare un’immagine fissa (come ad esempio su un videogioco o collegando un PC a
questo PDP) per più di due ore poiché ciò può causare una ritenzione dell’immagine a video. Il
fenomeno di ritenzione dell’immagine è anche noto come “bruciatura dello schermo”. Per evitare
il fenomeno di ritenzione dell’immagine, ridurre il grado di luminosità e di contrasto dello schermo
quando si visualizza un’immagine fissa.
Altitudine
Generalmente, lo schermo PDP può operare solo a un’altitudine inferiore a 2000 m. Ad altitudini
superiori il display potrebbe non funzionare correttamente.
Riscaldamento del pannello superiore del televisore PDP
Dopo lunghi periodi di utilizzo, la parte superiore del prodotto potrebbe risultare calda, dato che il
calore si disperde attraverso il foro di ventilazione sul pannello superiore dello schermo. Questo
fenomeno è del tutto normale e non indica un difetto o un guasto. Tuttavia, è bene impedire ai
bambini di toccare la parte superiore del prodotto.
Il prodotto emette un suono improvviso e secco.
Questo fenomeno può verificarsi quando il prodotto si contrae o si espande a causa di una variazione
di temperatura o umidità ambiente. È una reazione normale e non indica un difetto dell’unità .
Difetti dei pixel
Il televisore PDP utilizza un pannello composto da 1.230.000 (livello SD) a 3.150.000 (livello HD)
pixel, la cui produzione richiede una tecnologia estremamente sofisticata. Tuttavia, alcuni pixel
potrebbero risultare più luminosi o più scuri. Questo fenomeno non ha alcun impatto sulle prestazioni
del prodotto.
Evitare di utilizzare il prodotto a una temperatura inferiore a 5°C(41°F).
La visualizzazione prolungata di un’immagine fissa potrebbe causare un danno permanente al
pannello PDP.
L’uso per un periodo prolungato del formato 4:3 può causare la visualizzazione
di tracce di bordi sulla parte sinistra, destra e centrale dello schermo a causa
delle differenti emissioni luminose dello schermo. La riproduzione di un DVD o
l’uso di una console per videogiochi può causare effetti analoghi. Questo tipo di
danni non è coperto dalla garanzia.
Immagine residua.
La visualizzazione prolungata di immagini fisse da videogiochi o PC può causare la visualizzazione
di immagini residue parziali. Per evitare questo problema, ridurre la luminosità e il contrasto mentre si
visualizzano le immagini fisse.
Garanzia
- La garanzia non copre eventuali danni causati dalla ritenzione dell’immagine.
- La bruciatura dello schermo non è coperta dalla garanzia.
Installazione
Se si installa il prodotto in un ambiente con molta polvere, temperature alte o basse, elevata umidità,
sostanze chimiche oppure se si prevede di utilizzare il prodotto 24 ore al giorno, come ad esempio
negli aeroporti, nelle stazioni ferroviarie, ecc., si raccomanda di contattare un centro di assistenza
autorizzato. La mancata osservanza di questa precauzione può causare gravi danni al prodotto.
Contatta SAMSUNG WORLDWIDE
In caso di domande o commenti relativi ai prodotti Samsung, contattare il centro assistenza clienti
SAMSUNG. (Vedere retro di copertina per maggiori informazioni.)
BN68-01528A-00Ita.indd 2 2008-4-21 15:45:39

Italiano - 3
Simboli
☛ ➢
Premere
Importante
Nota
Sommario
Italiano
Informazioni generali
Istruzioni per l’uso ........................................... 2
Controllo dei componenti ................................ 4
Uso del piedistallo ........................................... 4
Pannello di controllo ........................................ 5
Pannello dei collegamenti ............................... 6
Visualizzazione del telecomando .................... 8
Funzionamento
Accensione e spegnimento del televisore ....... 9
Visualizzazione dei menu ...............................9
Funzione Plug & Play .................................... 10
Uso del tasto TOOLS .................................... 12
Visualizzazione di una sorgente di segnale
esterna .......................................................... 12
Modica dei nomi dei dispositivi .................... 13
Controllo dei canali
Memorizzazione automatica dei canali ......... 13
Memorizzazione manuale dei canali ............. 14
Aggiunta / Blocco di canali ............................ 15
Ordinamento dei canali memorizzati ............. 16
Denominazione dei canali ............................. 16
Ricezione ne dei canali ............................... 17
Controllo dell’immagine
Modica dello standard dell’immagine .......... 18
Personalizzazione delle impostazioni
dell’immagine ................................................ 18
Congurazione delle impostazioni dettagliate
dell’immagine ................................................ 19
Opzioni immagine ......................................... 20
Uso della funzione 3D ................................... 22
Ripristino delle impostazioni predenite
dell'immagine ................................................ 24
Controllo dell’audio
Funzioni audio ............................................... 25
Selezione della modalità audio
(a seconda del modello) ................................ 26
Collegamento delle cufe
(vendute separatamente) .............................. 26
Descrizione delle funzioni
Funzioni orario .............................................. 27
Lingua / Melodia / Effetto luce /
Entertainment / Risp. energia / PIP ............... 28
Schermo del PC
Impostazione del software del PC
(basato su Windows XP) ............................... 29
Modalità di ingresso (PC) .............................. 30
Impostazione del PC ..................................... 31
Informazioni su Anynet+
Cos’è Anynet
+
? ............................................. 32
Collegamento dei dispositivi Anynet
+ ........... 32
Congurazione di Anynet
+ ............................ 33
Scansione e passaggio da un dispositivo
Anynet
+
all’altro ............................................ 33
Registrazione ................................................ 34
Ascolto tramite il ricevitore ............................ 35
Controlli da effettuare prima di contattare
l’assistenza tecnica ....................................... 35
Appendice
Funzione Teletext (a seconda del modello) .. 36
Speciche del kit di supporto a parete
(VESA) .......................................................... 38
Regolazione montaggio a parete
(kit venduto separatamente) ......................... 39
Assemblaggio del piedistallo
(a seconda del modello) ................................ 40
Fissaggio del televisore alla parete ............... 41
Risoluzione dei problemi ............................... 42
Speciche .....................................................43
Questo apparecchio è fabbricato in conformità al
D.M.28.08.95 n.548 ed in particolare a quanto specicato nell
Art.2, comma 1. Questo apparecchio è fabbricato nella U.E.
in conformità al D.M.28.08.95 n.548 Art.2, comma 1 ed al
D.M.26.03.92 Art.1
BN68-01528A-00Ita.indd 3 2008-4-21 15:45:40

Italiano - 4
Uso del piedistallo
➢
Il PDP deve essere trasportato da
due o più persone. Non appoggiare
mai il PDP sul pavimento perché
potrebbe danneggiarsi. Mantenere
sempre il PDP in posizione diritta.
Il PDP può ruotare di 20 gradi a
sinistra e a destra.
Controllo dei componenti
Manuale dell’utente Telecomando/
Batterie AAA
Cavo di alimentazione Panno di pulizia
Scheda di garanzia/
Guida alla sicurezza
(Non disponibile in tutti i
paesi)
Coperchio-Pannello inferiore /
Viti (2ea)
(vedere pagina 40).
Nucleo in ferrite per
cavo di alimentazione
Nucleo in ferrite per
S-Video
Acquistabile a parte
Cavo antenna Cavi Component Cavi audio Cavo PC
Cavo scart Cavo PC Audio Cavo HDMI Cavo HDMI/DVI
➢
Nucleo in ferrite (cavo di alimentazione, S-Video)
I nuclei in ferrite sono utilizzati per schermare i cavi dalle
interferenze.
Quando si collega un cavo, aprire il nucleo in ferrite e avvolgerlo
intorno al cavo vicino alla spina.
-20° ~ 20°
BN68-01528A-00Ita.indd 4 2008-4-21 15:45:42

Italiano - 5
1
SOURCE
Visualizza un menu con tutte le sorgenti
d’ingresso disponibili (TV, Est.1, Est.2, AV,
S-Video, Component, PC, HDMI1, HDMI2,
HDMI3
).
➢
Nel menu a video, utilizzare questo tasto
così come si usa il tasto ENTER del
telecomando.
2
MENU
Premere per visualizzare il menu a video con
le funzioni del televisore.
3
– +
Premere peraumentare odiminuire il volume.
Nel menu a video, utilizzare i pulsanti –
+ così come si utilizzano i tasti ◄ e ► del
telecomando.
4
C/P.
Premere per cambiare canale. Nel menu
a video, utilizzare i pulsanti C/P.
così come si utilizzano i tasti ▲ e ▼ del
telecomando.
5
Indicatore di alimentazione
Lampeggia e si spegne quando l’alimentazione
è attivata, e si accende in modalità standby.
6
Tasto di accensione
Premere per accendere e spegnere il
televisore.
7
Sensore del telecomando
Puntare il telecomando in direzione di questo
punto sul televisore.
8
Altoparlante
Pannello di controllo
Pannello frontale (o laterale)
➢
La forma e il colore del prodotto possono variare in base al modello.
BN68-01528A-00Ita.indd 5 2008-4-21 15:45:43

Italiano - 6
☛
Quando si collega un sistema audio o video al televisore, assicurarsi che tutti gli elementi siano spenti.
Quando si collega un dispositivo esterno, fare corrispondere il colore del terminale di
collegamento a quello del cavo.
Continua...
1
POWER IN
Collegare il cavo di alimentazione fornito in
dotazione.
2
COMPONENT IN
Ingressi (AUDIO L/R) e video (Y/P
B
/P
R
) per
Component.
3
PC IN / AUDIO
Collegare ai jack video e audio del PC.
4
EXT 1, EXT 2
Ingressi e uscite di dispositivi esterni quali
videoregistratori, DVD, periferiche di gioco o
lettori di dischi video.
Specifiche di I/O
Connettore
Ingresso Uscita
Video Audio (L/R) RGB
Video + Audio (L/R)
EXT 1 ✔ ✔ ✔
E’ disponibile solo
l’uscita TV
EXT 2 ✔ ✔ Uscita da scegliere.
5
3D SYNC OUT
Collegare a un trasmettitore IR 3D
6
Collegamento di dispositivi audio esterni
Collegare i segnali audio RCA provenienti dal
televisore a una sorgente esterna, come per
esempio un dispositivo audio.
7
SERVICE
− Connettore riservato all’assistenza.
− Per regolare con il telecomando l’angolo
di visuale del televisore, collegare il jack
seriale tra la staffa di montaggio a parete a
movimento elettronico e il televisore.
Pannello dei collegamenti
Pannello posteriore
➢
La forma e il colore del prodotto possono variare in base al modello.
1
432 6 8
9
7
o
5
Televisione via
cavo Rete
o
BN68-01528A-00Ita.indd 6 2008-4-21 15:45:46

Italiano - 7
8
HDMI IN 1,2
− Non è necessario un ulteriore collegamento
Audio per la connessione HDMI-HDMI.
− Quando si effettua una connessione
mediante cavo HDMI/DVI, è necessario
utilizzare il jack HDMI IN2.
➢
Che cosa significa HDMI?
− “High Definition Multimedia interface”
permette la trasmissione di dati video
digitali ad alta definizione e audio
digitale a canali multipli.
−
Il terminale HDMI/DVI supporta il
collegamento DVI a una periferica
estesa con un cavo appropriato (non
fornito). La differenza tra HDMI e DVI è
che il dispositivo HDMI è di dimensioni
più piccole, dispone della funzione di
codifica HDCP (High Bandwidth Digital
Copy Protection) installata, e supporta
audio digitale multicanale.
DVI IN (HDMI 2) AUDIO R/L
Uscite audio DVI per dispositivi esterni.
9
ANT IN
Connettore coassiale 75Ω per reti aeree/cavo.
Modalità supportate per HDMI/DVI e Component
480i 480p 576i 576p 720p 1080i
HDMI/DVI 50Hz X X X O O O
HDMI/DVI 60Hz X O X X O O
Component O O O O O O
1
HDMI IN 3
Collegare al jack HDMI di un dispositivo
predisposto per tale uscita.
2
S-VIDEO o VIDEO / AUDIO L/R
Ingressi video (S–Video o Video) e audio
per dispositivi esterni, come ad esempio una
videocamera o un videoregistratore.
3
Jack della cuffia
È possibile collegare le cuffie se si desidera
guardare un programma televisivo senza
disturbare le altre persone presenti nella
stanza.
➢
L‘uso prolungato delle cuffie ad alto
volume può provocare danni all’udito.
Pannello laterale
3
o
1
2
➢
La forma e il colore del prodotto possono variare in base al modello.
BN68-01528A-00Ita.indd 7 2008-4-21 15:45:48

Italiano - 8
Visualizzazione del telecomando
1
Tasto POWER
(accende e spegne il
televisore)
2
Seleziona direttamente la
modalità TV
3
Tasti numerici per
selezionare direttamente i
canali
4
Selezione dei canali con
una/due cifre
5
Disattivazione temporanea
dell’audio
6
Aumento del volume
Diminuzione del volume
7
Tasto di controllo dei canali
(vedere pag. 15)
8
Utile per selezionare
rapidamente le funzioni più
frequentemente utilizzate.
9
Controlla il cursore nel menu
0
Consente di vedere le
informazioni sull’emittente
corrente
#
Premere per selezionare le
opzioni Display (Schermo) e
Suono per le modalità Sport,
Cinema e Giochi.
$
Funzioni videoregistratore/
DVD (riavvolgimento,
arresto, riproduzione/pausa,
avanzamento rapido)
%
Selezione della sorgente
disponibile
^
Canale precedente
&
Canale successivo
Canale precedente
*
Visualizza il menu a video
principale
(
Tasto modalità TruSurround XT
)
Ritorna al menu precedente
a
Esce dal menu a video
b
Selezione del formato
dell’immagine
c
Utilizzarlo quando si
connette un dispositivo
Samsung DMA (Digital
Media Adapter) mediante
un’interfaccia HDMI e
passando alla modalità
DMA. (Il tasto DMA è
opzionale.)
Per ulteriori informazioni
sulle procedure operative,
consultare il Manuale
dell’utente del dispositivo
DMA. Questo tasto è
disponibile quando “Anynet+
(HDMI-CEC)” è “Acceso”
(vedere a pag. 33).
d
Selezione effetti immagine
(Vedere pagina 18)
e
Guarda i film o gioca con i
videogame tridimensionali
con gli occhiali 3D.
Funzioni Teletext
(Vedere pagina 36)
2
Uscita dal Teletext
(in base al modello)
7
Memorizzazione Teletext
8
Formato Teletext
0
Visualizzazione Teletext
!
Selezione dell’argomento
Fastext
@
Schermo Teletext/
visualizzazione
contemporanea delle
informazioni Teletext e della
trasmissione normale
%
Selezione della modalità
Teletext (LIST/FLOF)
^
Pagina secondaria Teletext
&
P : Pagina Teletext
successiva
P : Pagina Teletext
precedente
*
Indice del Teletext
)
Mantenimento Teletext
a
Annullamento Teletext
Continua...
BN68-01528A-00Ita.indd 8 2008-4-21 15:45:49

Italiano - 9
Installazione delle batterie nel telecomando
1 Sollevare il coperchio sul retro del telecomando come mostra
la figura.
2 Installare le due batterie AAA.
➢
Assicurarsi che le indicazioni “+” e “–” sulle batterie
corrispondano allo scherma all’interno del vano.
Non mischiare batterie diverse, ad esempio batterie
alcaline e al manganese.
3 Chiudere il coperchio come mostra la figura.
➢
Se si prevede di non utilizzare il telecomando per un
periodo di tempo prolungato, rimuovere le batterie e
riporle in un luogo asciutto e fresco. Il telecomando può
essere usato fino a una distanza di 7 metri dal televisore. (Considerando un uso tipico del
televisore, le batterie durano circa un anno).
➢
Se il telecomando non funziona! Verificare i seguenti punti:
1. Il televisore è acceso?
2. I poli - e + delle batterie sono invertiti?
3. Le batterie sono esaurite?
4. Si è verificata una interruzione di corrente, o il cavo di alimentazione è scollegato?
5. È presente una luce a fluorescenza speciale o un neon nelle vicinanze?
Accensione e spegnimento del televisore
Il cavo di alimentazione è collegato sul retro del televisore.
1 Inserire la spina in una presa appropriata.
➢
La tensione di corrente è indicata sul retro del televisore e la frequenza è 50 o 60Hz.
2
Premere il tasto di accensione (Acceso/Spento) sul pannello frontale del televisore o premere il
tasto POWER sul telecomando per accendere il televisore. All’accensione, l’ultimo canale che si stava
guardando prima di spegnere il televisore verrà riselezionato automaticamente. Se non è ancora
stato memorizzato alcun canale, non comparirà alcuna immagine chiara. Fare riferimento alle sezioni
“Memorizzazione automatica dei canali” a pagina 13 o “Memorizzazione manuale dei canali” a pagina 14.
➢
Se il televisore viene acceso per la prima volta, alcune impostazioni di base vengono
visualizzate automaticamente. Per informazioni, consultare “Funzioni Plug & Play” a pagina 10.
3 Premere il tasto di accensione (Acceso/Spento) sul pannello frontale del televisore o premere il
tasto POWER sul telecomando per spegnere il televisore.
4 Per accendere il televisore, premere il tasto di accensione (Acceso/Spento) sul pannello frontale
del televisore oppure premere il tasto POWER o i tasti numerici sul telecomando.
Visualizzazione dei menu
1 Premere il tasto MENU.
Viene visualizzato il menu principale.
Sulla sua sinistra sono presenti sei icone: Immagine, Suono,
Canale, Impostazione, Ingressi.
2 Premere il tasto ▲ o ▼ per selezionare un’icona.
Premere il tasto ENTER per accedere al sottomenu dell’icona.
3 Premere il tasto ▲ o ▼ per spostarsi sulle voci del menu.
Premere il tasto ENTER per accedere alle voci del menu.
4 Premere il tasto ▲/▼/◄/► per modificare le voci selezionate.
Premere il tasto RETURN per ritornare al menu precedente.
5 Premere il tasto EXIT per uscire dal menu.
Sposta
Conferma
Esci
Modalità : Standard
Luce cella 7
Contrasto 95
Luminosità 45
Nitidezza 50
Colore 55
Tinta V50 R50
Impostazioni dettaglio
Opzioni immagine
Réinitialiser : OK
Immagine
T V
BN68-01528A-00Ita.indd 9 2008-4-21 15:45:50

Italiano - 10
Funzione Plug & Play
Se il televisore viene acceso per la prima volta, alcune opzioni
di base vengono visualizzate automaticamente e in sequenza.
Sono disponibili le seguenti impostazioni.
☛
Se si seleziona per errore una nazione sbagliata, i caratteri
potrebbero essere visualizzati in modo errato.
1
Se il televisore è in modalità Standby, premere il tasto POWER sul
telecomando. Verrà visualizzato il messaggio il messaggio di avvio
della funzione Avvio Plug & Play. Premere il tasto ENTER.
2 Dopo alcuni secondi verrà visualizzato automaticamente il
menu Lingua.
3 Selezionare la lingua desiderata premendo il tasto ▲ o ▼.
Premere il tasto ENTER. Selezionare la modalità Selezionare
‘Uso domestico’ quando si installa il televisore a casa.
Verrà visualizzato.
4 Premere il tasto ◄ o ► per selezionare Demo Negozio o Uso
domestico, quindi premere ENTER. Viene visualizzato un
messaggio per ricordare di controllare lo stato dell’antenna.
➢
La selezione predefinita è Uso domestico.
➢
Si consiglia di impostare la modalità TV su Uso domestico
(Home Use) per ottenere la migliore qualità dell’immagine
in un ambiente domestico.
➢
La modalità Demo Negozio è da utilizzare solo nei punti
vendita.
➢
Se l’unità è stata accidentalmente impostata sulla modalità
Demo Negozio e si desidera tornare alla modalità Uso
domestico (Standard): Premere il tasto Volume. Quando
il menu OSD Volume viene visualizzato, tenere premuto il
tasto MENU per 5 secondi.
5 Assicurarsi che l’antenna sia collegata al televisore.
Premere il tasto ENTER. Verrà visualizzato il menu Nazione.
6 Selezionare la propria nazione o area desiderata premendo il
tasto ▲ o ▼. Premere il tasto ENTER.
Continua...
Plug & Play
Avvio Plug & Play
OK
Conferma
Plug & Play
Lingua
Sposta
Conferma
English
Deutsch
Français
Italiano
▼
Plug & Play
Controlla ingresso ant.
Conferma
Salta
OK
Plug & Play
Selezionare ‘Uso domestico’ quando
si installa il televisore a casa.
Sposta
Conferma
Uso domestico
Demo Negozio
Plug & Play
Nazione
Sposta
Conferma
Salta
Belgio
Francia
Germania
Italia
Altri paesi
Plug & Play
P 1 C -- 40 MHz
0 %
Conferma
Salta
Avvio
BN68-01528A-00Ita.indd 10 2008-4-21 15:45:51

Italiano - 11
7 Premere il tasto ENTER per iniziare la ricerca dei canali. La
ricerca dei canali inizia e termina in modo automatico. Dopo
aver memorizzato tutti i canali disponibili, viene visualizzato il
menu Imposta Ora. Premere il tasto ENTER.
➢
Per interrompere la ricerca, premere ENTER dopo avere
selezionato Arresta.
8 Premere il tasto ◄ o ► per selezionare Mese, Data, Anno,
Ora, o Minuto. Per impostarli premere il tasto ▲ o ▼.
➢
È possibile impostare le voci Mese, Data, Anno, Ora
o Minuto premendo direttamente i tasti numerici del
telecomando.
9 Premere ENTER per confermare le impostazioni. Viene
visualizzato il messaggio Buona visione. Al termine, premere il
tasto ENTER.
➢
Anche se non si preme il tasto ENTER, il messaggio
scompare automaticamente dopo alcuni secondi.
Per reimpostare questa funzione…
1 Premere il tasto MENU per visualizzare il menu.
2 Premere il tasto ▲ o ▼ per selezionare Impostazione, quindi
premere ENTER.
3 Premere nuovamente ENTER per selezionare Plug & Play.
Viene visualizzato il messaggio Avvio Plug & Play.
Plug & Play
Sposta
Regola
Conferma
01 01 2008 00 04
Imposta Ora
Mese Data Anno Ora
Minuto
OK
Buona visione
Sposta
Conferma
Ritorno
Plug & Play
Lingua : Italiano
Ora
Effetto luce
:
Mod visione ON
Regolazione montaggio a parete
Melodia
: Spento
Entertainment : Cinema
Risp. energia : Spento
PIP
Impostazione
T V
BN68-01528A-00Ita.indd 11 2008-4-21 15:45:52

Italiano - 12
Visualizzazione di una sorgente di segnale esterna
È possibile passare dalla visualizzazione di un segnale
proveniente da un dispositivo collegato, come ad esempio un
videoregistratore, DVD, Set-Top box, al televisore e viceversa
(via etere o via cavo).
1 Premere il tasto MENU per visualizzare il menu.
2 Premere il tasto ▲ o ▼ per selezionare Ingressi, quindi
premere ENTER.
3 Premere nuovamente ENTER per selezionare Elenco
sorgenti.
4 Premere il tasto ▲ o ▼ per selezionare la sorgente del
segnale, quindi premere ENTER.
Sorgenti del segnale disponibili:
TV, Est.1, Est.2, AV, S-Video,
Comp., PC, HDMI1, HDMI2, HDMI3
➢
E’ possibile scegliere solo i dispositivi esterni collegati al
televisore.
➢
È possibile selezionare queste opzioni semplicemente
premendo il tasto SOURCE sul telecomando.
➢
Per visualizzare nuovamente un programma televisivo, premere
il tasto TV e selezionare il numero di canale desiderato.
Uso del tasto TOOLS
Il tasto TOOLS consente di selezionare in modo semplice e rapido le funzioni utilizzate più di
frequente.
Il menu “Strumenti” cambia in base alla modalità di ingresso esterno che si sta visualizzando.
1 Premere il tasto TOOLS.
Verrà visualizzato il menu Strumenti.
2 Premere il tasto ▲ o ▼ per selezionare un menu, quindi
premere il tasto ENTER.
3 Per visualizzare, modificare o utilizzare le voci selezionate,
premere il tasto ▲/▼/◄/►/ENTER.
Per una descrizione più dettagliata di ogni funzione, consultare
la pagina corrispondente.
• Anynet+(HDMI-CEC), vedere pag. 32
• Modalità Immagine, vedere pag. 18
• Modalità Suono, vedere pag. 25
• Timer stand-by, vedere pag. 27
• TS XT SRS, vedere pag. 25
• Risp. energia, vedere pag. 29
• Dual I-II, vedere pag. 26
Sposta
Conferma
Ritorno
TV
Est.1 : −−−−
Est.2 : −−−−
AV : −−−−
S-Video : −−−−
Comp. : −−−−
PC : −−−−
HDMI1 : −−−−
HDMI2 : −−−−
HDMI3 :−−−−
Elenco sorgentiT V
Sposta
Conferma
Ritorno
Elenco sorgenti : TV
Modifica Nome
Anynet+ (HDMI-CEC)
Ingressi
T V
Strumenti
Anynet+ (HDMI-CEC)
Modalità Immagine : Standard
Modalità Suono : Personalizzata
Timer stand-by : Spento
TS XT SRS : Spento
Risp. energia : Spento
Dual I-II : Mono
t
Regola
EsciSposta
BN68-01528A-00Ita.indd 12 2008-4-21 15:45:53

Italiano - 13
Modifica dei nomi dei dispositivi
È possibile assegnare un nome alla sorgente esterna.
1 Premere il tasto MENU per visualizzare il menu.
2 Premere il tasto ▲ o ▼ per selezionare Ingressi, quindi
premere ENTER.
3 Premere il tasto ▲ o ▼ per selezionare Modifica Nome,
quindi premere ENTER.
4 Premere il tasto ▲ o ▼ per selezionare la sorgente esterna da
modificare, quindi premere ENTER.
5 Selezionare il dispositivo desiderato premendo il tasto ▲ o ▼,
quindi premere ENTER.
Nomi dei dispositivi disponibili:
VCR, DVD, STB cavo, STB
satellite, STB PVR, Ricevitore AV, Giochi, Videocamera,
PC, TV, IPTV, Blu-Ray, HD DVD, DMA.
6 Premere il tasto EXIT per uscire.
Memorizzazione automatica dei canali
È possibile effettuare la scansione delle gamme di frequenza
disponibili (la disponibilità dipende dalla nazione).
I numeri di programma assegnati automaticamente potrebbero
non corrispondere ai numeri di programma effettivi o
desiderati. Tuttavia, è possibile ordinare manualmente i numeri
ed eliminare i canali indesiderati.
1 Premere il tasto MENU per visualizzare il menu.
2 Premere il tasto ▲ o ▼ per selezionare Canale, quindi
premere ENTER.
3 Premere nuovamente il tasto ENTER. Vengono elencate le
nazioni disponibili.
4 Selezionare la nazione premendo il tasto ▲ o ▼, quindi
premere il tasto ENTER.
5 Premere il tasto ▲ o ▼ per selezionare Memorizzazione
automatica, quindi premere il tasto ENTER.
6 Premere nuovamente il tasto ENTER per avviare la ricerca.
La ricerca terminerà automaticamente.
➢
Per interrompere la ricerca prima del termine, premere il
tasto MENU o ENTER.
Memorizzazione automatica
P 1 C -- 40 MHz
0 %
Conferma
Ritorno
Avvio
Sposta
Conferma
Ritorno
Nazione : Italia
Memorizzazione automatica
Memorizzazione manuale
Gestore canale
Ordina
Nome
Sintonia fine
Canale
T V
Sposta
Conferma
Ritorno
Est.1 : −−−−
Est.2
: −−−−
AV :
S-Video :
Comp. : −−−−
PC : −−−−
HDMI1 : −−−−
HDMI2
:
HDMI2
:
Modifica Nome
T V
−−−−
VCR
DVD
STB cavo
STB satellite
STB PVR
Ricevitore AV
Giochi
▼
Sposta
Conferma
Ritorno
Elenco sorgenti : TV
Modifica Nome
Anynet+ (HDMI-CEC)
Ingressi
T V
T V
Sposta
Conferma
Ritorno
Nazione : Italia
Memorizzazione automatica
Memorizzazione manuale
Gestore canale
Ordina
Nome
Sintonia fine
Canale
Belgio
Francia
Germania
Italia
Olanda
Spagna
Svizzera
Regno Unito
▼
BN68-01528A-00Ita.indd 13 2008-4-21 15:45:54

Italiano - 14
Memorizzazione manuale dei canali
È possibile memorizzare i canali televisivi, compreso quelli
ricevuti via cavo.
Quando si memorizzano manualmente i canali, è possibile
scegliere:
Se memorizzare o meno ogni canale trovato.
Il numero di programma di ogni canale memorizzato che si
desidera identificare.
1 Premere il tasto MENU per visualizzare il menu.
2 Premere il tasto ▲ o ▼ per selezionare Canale, quindi
premere ENTER.
3 Premere il tasto ▲ o ▼ per selezionare Memorizzazione
manuale, quindi premere il tasto ENTER.
4 Selezionare l’opzione desiderata premendo il tasto ▲ o ▼,
quindi premere ENTER.
5 Una volta terminata l’impostazione, premere il tasto ENTER.
6 Premere il tasto EXIT per uscire.
Programma (Numero di programma da assegnare a un canale)
− Premere il tasto ▲ o ▼ fino a quando appare il numero corretto.
➢
È anche possibile selezionare direttamente il numero del canale premendo i tasti
numerici (0~9).
Sistema colore: Automatico/PAL/SECAM/NTSC4.43
− Premere il tasto ▲ o ▼ per selezionare lo standard del colore desiderato.
Sistema audio: BG/DK/I/L
− Premere il tasto ▲ o ▼ per selezionare lo standard audio desiderato.
Canale (Quando si conosce il numero del canale da memorizzare)
− Premere il tasto ▲ o ▼ per selezionare
C (canale via antenna) o S (canale via cavo).
− Premere il tasto ►, quindi premere il tasto ▲ o ▼ per selezionare il numero desiderato.
➢
È anche possibile selezionare direttamente il numero del canale premendo i tasti numerici (0~9).
➢
Se l’audio è anomalo o assente, riselezionare lo standard audio richiesto.
Ricerca (Quando non si conosce il numero del canale)
− Premere il tasto ▲ o ▼ per avviare la ricerca.
− Il sintonizzatore effettua la scansione della gamma di frequenza fino a quando appare il primo
canale o il canale selezionato.
Memorizza (Quando si memorizza il canale e il numero di programma corrispondente)
− Impostare su
OK premendo il tasto ENTER.
☛
Modalità del canale
P (Programma): Una volta completata la sintonizzazione, alle emittenti della propria area viene
assegnato un numero da P00 a P99. In questa modalità, è possibile selezionare un canale
digitando il numero corrispondente.
C (Antenna): È possibile selezionare un canale immettendo in questa modalità il numero
assegnato a ciascuna emittente.
S (Cavo): È possibile selezionare un canale immettendo in questa modalità il numero assegnato
a ciascun canale via cavo.
Sposta
Conferma
Ritorno
Programma : P 1
Sistema colore : Automatico
Sistema audio : BG
Canale : C --
Ricerca : 40 MHz
Memorizza : ?
Memorizzazione manuale
T V
Sposta
Conferma
Ritorno
Nazione : Italia
Memorizzazione automatica
Memorizzazione manuale
Gestore canale
Ordina
Nome
Sintonia fine
Canale
T V
BN68-01528A-00Ita.indd 14 2008-4-21 15:45:54

Italiano - 15
Aggiunta / Blocco di canali
Utilizzando la funzione Gestore canale è possibile bloccare o
aggiungere ulteriori canali.
1 Premere il tasto MENU per visualizzare il menu.
2 Premere il tasto ▲ o ▼ per selezionare Canale, quindi
premere ENTER.
3 Premere il tasto ▲ o ▼ per selezionare Gestore canale,
quindi premere ENTER.
Aggiunta di canali
Utilizzando l’Elenco canali è possibile aggiungere ulteriori canali.
4 Selezionare Elenco canali premendo il tasto ENTER.
5 Spostarsi nel campo ( ) premendo i tasti ▲/▼/◄/►,
selezionare il canale da aggiungere e premere ENTER per
aggiungere il canale.
➢
Se si preme di nuovo il tasto ENTER il simbolo
( ) accanto al canale scompare e il canale non
viene aggiunto.
Blocco di canali
Tramite questa funzione è possibile impedire agli utenti non
autorizzati, ad esempio i bambini, di guardare programmi non
adatti, annullando il video e azzerando l’audio.
6 Premere il tasto ▲ o ▼ per selezionare Blocco canali, quindi
premere ENTER.
7 Selezionare Acceso premendo il tasto ▲ o ▼, quindi premere
ENTER.
8 Premere il tasto ▲ o ▼ per selezionare Elenco canali, quindi
premere ENTER.
9 Spostarsi nel campo ( ) premendo i tasti ▲/▼/◄/►,
selezionare il canale da bloccare e premere ENTER.
➢
Se si preme di nuovo il tasto ENTER il simbolo ( )
accanto al canale scompare e il canale non viene bloccato.
➢
Una volta attivata la funzione Blocco canali viene visualizzata una pagina blu.
10 Premere il tasto EXIT per uscire.
➢
È possibile selezionare queste opzioni semplicemente
premendo il tasto CH LIST sul telecomando.
Elenco canali
P 1 C 6
1 / 10
▲
▼
Prog.
0
C --
1 C --
2 C --
3 C --
4 C --
5 C --
6 C --
7 C --
8 C --
9 C --
Aggiungi Blocco
Sposta Conferma
Pagina
Ritorno
Sposta
Conferma
Ritorno
Elenco canali
Blocco canali : Spento
Gestore canale
T V
Sposta
Conferma
Ritorno
Nazione : Italia
Memorizzazione automatica
Memorizzazione manuale
Gestore canale
Ordina
Nome
Sintonia fine
Canale
T V
BN68-01528A-00Ita.indd 15 2008-4-21 15:45:56

Italiano - 16
Ordinamento dei canali memorizzati
Questa operazione consente di modificare i numeri di
programma dei canali memorizzati.
È spesso necessaria dopo la memorizzazione automatica dei
canali.
1 Premere il tasto MENU per visualizzare il menu.
2 Premere il tasto ▲ o ▼ per selezionare Canale, quindi
premere ENTER.
3 Premere il tasto ▲ o ▼ per selezionare Ordina, quindi
premere il tasto ENTER.
4 Selezionare il canale che si desidera spostare premendo il
tasto ▲ o ▼, quindi premere ENTER.
5 Selezionare il numero del programma da assegnare al canale
premendo il tasto ▲ o ▼.
Premere ENTER. Il canale viene spostato nella sua nuova
posizione e tutti gli altri canali si spostano di conseguenza.
6 Ripetere i passaggi da 4 a 5 per assegnare i numeri di
programma ai canali.
7 Premere il tasto EXIT per uscire.
Denominazione dei canali
I nomi dei canali vengono assegnati automaticamente in base
alle informazioni trasmesse. È possibile tuttavia assegnare
nuovi nomi modificando quelli esistenti.
1 Premere il tasto MENU per visualizzare il menu.
2 Premere il tasto ▲ o ▼ per selezionare Canale, quindi
premere ENTER.
3 Premere il tasto ▲ o ▼ per selezionare Nome, quindi premere
ENTER.
4 Premere il tasto ▲ o ▼ per selezionare il canale al quale
assegnare il nuovo nome, quindi premere ENTER.
5 Premere il tasto ▲ o ▼ per selezionare una lettera, un numero
o un simbolo. La sequenza è: A~Z, 0~9, +, -, *, /, vuoto).
Per spostarsi sulla lettera precedente o successiva, premere il
tasto ◄ o ►, quindi premere ENTER.
6 Ripetere i passaggi da 4 a 5 per ogni canale al quale si
desidera assegnare un nuovo nome.
7 Premere il tasto EXIT per uscire.
Sposta
Conferma
Ritorno
Prog. Can Nome
▲
0 C01 −−−−−
1 C- - −−−−−
2 C-- −−−−−
3 C-- −−−−−
4 C-- −−−−−
5 C-- −−−−−
6 C-- −−−−−
7 C-- −−−−−
8 C-- −−−−−
9 C- - −−−−−
▼
Nome
T V
Sposta
Conferma
Ritorno
Nazione : Italia
Memorizzazione automatica
Memorizzazione manuale
Gestore canale
Ordina
Nome
Sintonia fine
Canale
T V
Sposta
Conferma
Ritorno
Prog. Can Nome
▲
0 C01 −−−−−
1 C-- −−−−−
2 C-- −−−−−
3 C-- −−−−−
4 C-- −−−−−
5 C-- −−−−−
6 C-- −−−−−
7 C-- −−−−−
8 C-- −−−−−
9 C-- −−−−−
▼
Ordina
T V
Nazione : Italia
Memorizzazione automatica
Memorizzazione manuale
Gestore canale
Ordina
Nome
Sintonia fine
Canale
T V
Sposta
Conferma
Ritorno
BN68-01528A-00Ita.indd 16 2008-4-21 15:45:57

Italiano - 17
Ricezione fine dei canali
Se la ricezione è chiara, non è necessario sintonizzare il canale
poiché questa operazione viene effettuata automaticamente
durante le operazioni di ricerca e memorizzazione.
Se tuttavia il segnale risulta debole o distorto, può essere
necessario sintonizzare il canale manualmente.
1 Premere il tasto MENU per visualizzare il menu.
2 Premere il tasto ▲ o ▼ per selezionare Canale, quindi
premere ENTER.
3 Premere il tasto ▲ o ▼ per selezionare Sintonia fine, quindi
premere ENTER.
4 Per ottenere un’immagine nitida e chiara e una buona
qualità dell’audio, premere il tasto ◄ o ► fino a raggiungere
l’impostazione ottimale. Premere il tasto ENTER.
➢
Premere il tasto INFO. L’opzione Memorizzazione sintonia
fine modifica il colore il colore dell’OSD (On Screen
Display) del canale da bianco a rosso, aggiungendo il
simbolo “*”
➢
Per reimpostare la sintonia fine su 0, selezionare Reset
premendo il tasto ▲ o ▼. Premere il tasto ENTER.
5 Premere il tasto EXIT per uscire.
P 1 *
Mono
Immagine : Standard
Suono : Personalizzata
TS XT SRS : Spento
−−
:
−−
Sposta
Conferma
Ritorno
Nazione : Italia
Memorizzazione automatica
Memorizzazione manuale
Gestore canale
Ordina
Nome
Sintonia fine
Canale
T V
Sintonia fine
P 1
0
Regola
Salva
Ritorno
Reset
BN68-01528A-00Ita.indd 17 2008-4-21 15:45:57

Italiano - 18
Personalizzazione delle impostazioni dell’immagine
Il televisore ha diverse opzioni che consentono di controllare
la qualità dell’immagine.
1 Premere il tasto MENU per visualizzare il menu.
2 Premere il tasto ENTER per selezionare Immagine.
3 Premere il tasto ENTER per selezionare Modalità.
4 Selezionare la modalità desiderata premendo il tasto ▲ o ▼,
quindi premere ENTER.
Modalità disponibili:
Dinamica, Standard, Film
5 Selezionare l’opzione desiderata premendo il tasto ▲ o ▼,
quindi premere ENTER.
6 Una volta terminata l’impostazione, premere il tasto ENTER.
7 Premere il tasto EXIT per uscire.
Luce cella – Contrasto – Luminosità – Nitidezza – Colore – Tinta
➢
In modalità Analog TV (TV analogica), Est., AV, S-Video del sistema PAL, non è possibile
utilizzare la funzione Tinta.
➢
In modalità PC, è possibile modificare solo i parametri Luce cella, Contrasto e Luminosità.
Premere il tasto ◄ o ► fino a raggiungere l’impostazione ottimale.
Modifica dello standard dell’immagine
È possibile selezionare il tipo di immagine che più corrisponde
alle proprie esigenze.
1 Premere il tasto MENU per visualizzare il menu.
2 Premere il tasto ENTER per selezionare Immagine.
3 Premere il tasto ENTER per selezionare Modalità.
4 Selezionare la modalità desiderata premendo il tasto ▲ o ▼,
quindi premere ENTER.
Modalità disponibili:
Dinamica, Standard, Film
➢
I parametri di impostazione possono variare in base alla
sorgente di ingresso.
5 Premere il tasto EXIT per uscire.
➢
Scegliere Dinamica per guardare i programmi televisivi
durante il giorno o quando la luce ambientale è molto
intensa.
Scegliere Standard per guardare la televisione in
condizioni normali.
Scegliere Film per guardare i film.
Sposta
Conferma
Ritorno
Immagine
T V
Modalità : Dinamica
Luce cella : 7
Contrasto 95
Luminosità 45
Nitidezza 50
Colore 50
Tinta V50 R50
Impostazioni dettaglio
Opzioni immagine
Reset : Spento
Impostazioni rapide
1 Premere il tasto TOOLS sul telecomando.
2
Premere il tasto
▲
o
▼
per selezionare la Modalità Immagine.
3 Per selezionare l’opzione desiderata, premere il tasto ◄ o ►
Sposta
Conferma
Ritorno
Immagine
T V
Modalità : Standard
Luce cella 7
Contrasto 95
Luminosità 45
Nitidezza 50
Colore 50
Tinta V50 R50
Impostazioni dettaglio
Opzioni immagine
Reset : OK
Sposta
Conferma
Ritorno
Immagine
T V
Modalità : Standard
Luce cella 7
Contrasto 95
Luminosità 45
Nitidezza 50
Colore 50
Tinta V50 R50
Impostazioni dettaglio
Opzioni immagine
Reset : Spento
Dinamica
Standard
Film
Strumenti
Anynet+ (HDMI-CEC)
Modalità Immagine ◄ Standard ►
Modalità Suono : Personalizzata
Timer stand-by : Spento
TS XT SRS : Spento
Risp. energia : Spento
Dual I-II : Mono
Sposta
Regola
Esci
BN68-01528A-00Ita.indd 18 2008-4-21 15:45:58

Italiano - 19
Configurazione delle impostazioni dettagliate dell’immagine
È possibile configurare le impostazioni dettagliate
dell’immagine.
1 Premere il tasto MENU per visualizzare il menu.
2 Premere il tasto ENTER per selezionare Immagine.
3 Premere il tasto ▲ o ▼ per selezionare Impostazioni dettaglio,
quindi premere ENTER.
4 Selezionare l’opzione desiderata premendo il tasto ▲ o ▼,
quindi premere ENTER.
Le opzioni disponibili sono:
Regolazione del nero, Contrasto
Dinamico, Gamma, Spazio colore, Bilan bianco, Incarnato,
Migliora imm bordi.
5 Una volta terminata l’impostazione, premere il tasto ENTER.
6 Premere il tasto EXIT per uscire.
➢
La modalità Impostazioni dettaglio è disponibile in modalità
Standard o Film.
➢
In modalità PC, è possibile modificare solo i parametri
“Contrasto Dinamico”, “Gamma” e “Bilan bianco” tra le
opzioni della voce “Impostazioni dettaglio”.
Regolazione del nero: Spento/Bassa/Media/Alto
Consente di selezionare direttamente il livello di nero sullo
schermo per regolarne la profondità.
Contrasto Dinamico: Spento/Bassa/Media/Alto
Consente regolare in modo ottimale il livello di contrasto il contrasto dello schermo.
Gamma: -3 ~ +3
Consente di regolare la luminosità media delle immagini.
Premere il tasto ◄ o ► fino a raggiungere l’impostazione ottimale.
Spazio colore: Automatico/Nativa/Personalizzata
Lo spazio colore è la matrice di colori composta dai colori rosso, verde e blu.
Per scoprire lo straordinario mondo dei colori naturali basta selezionare lo spazio colore preferito.
− Automatico: Lo Spazio colore Automatico regola automaticamente la tonalità più naturale dei colori
basata sulle sorgenti del programma.
− Nativa: Lo Spazio colore Nativa offre tonalità di colore ricche e profonde.
− Personalizzata: Regola la gamma colore per adattarla alle proprie preferenze. (vedere
“Personalizzazione dello Spazio colore”)
Personalizzazione dello Spazio colore
Colore: Rosso/Verde/Blu/Giallo/Ciano/Magenta
Regola la gamma colore per adattarla alle proprie preferenze.
La funzione Colore è disponibile quando l’opzione Spazio colore è impostata su Personalizzata.
Premere il tasto ▲ o ▼ per selezionare Rosso, Verde, Blu, Giallo, Ciano o Magenta.
Premere il tasto ENTER.
−
Rosso/Verde/Blu: Nella funzione Colore, è possibile regolare i valori RGB per i colori selezionati.
Premere il tasto ▲ o ▼ per selezionare Rosso, Verde o Blu e modificarne i valori. Premere il tasto ENTER.
Premere il tasto ◄ o ► per diminuire o aumentare il valore della voce desiderata.
Premere il tasto ENTER.
− Reset: Ripristina le impostazioni dello spazio colore ai valori predefiniti.
Bilan bianco: R-Offset/G-Offset/B-Offset/R-Gain/G-Gain/B-Gain/Reset
Consente di regolare la temperatura del colore per ottenere immagini più naturali.
R-Offset/G-Offset/B-Offset/R-Gain/G-Gain/B-Gain: Una volta modificato il valore, lo schermo viene
automaticamente aggiornato.
Selezionare l’opzione desiderata premendo il tasto ▲ o ▼, quindi premere ENTER. Premere il tasto
◄ o ► fino a raggiungere l’impostazione ottimale.
Reset: Consente di ripristinare i valori predefiniti di bilanciamento del bianco.
Incarnato: -15~+15
E’ possibile enfatizzare i toni rosa dell’immagine.
Premere il tasto ◄ o ► fino a raggiungere l’impostazione ottimale.
➢
Una volta modificato il valore, lo schermo viene automaticamente aggiornato.
Migliora imm bordi: Spento/Acceso
Consente di mettere in risalto i bordi degli oggetti.
Sposta
Conferma
Ritorno
Regolazione del nero
: Spento
Contrasto Dinamico
: Media
Gamma : 0
Spazio colore : Nativa
Bilan bianco
Incarnato : 0
Migliora imm bordi
: Spento
Impostazioni dettaglio
T V
Sposta
Conferma
Ritorno
Immagine
T V
Modalità : Standard
Luce cella 7
Contrasto 95
Luminosità 45
Nitidezza 50
Colore 50
Tinta V50 R50
Impostazioni dettaglio
Opzioni immagine
Reset : Spento
BN68-01528A-00Ita.indd 19 2008-4-21 15:45:59

Italiano - 20
Opzioni immagine
È possibile configurare le impostazioni dettagliate dell’immagine.
1 Premere il tasto MENU per visualizzare il menu.
2 Premere il tasto ENTER per selezionare Immagine.
3 Premere il tasto ▲ o ▼ per selezionare Opzioni immagine, quindi
premere il tasto ENTER.
4 Selezionare la modalità desiderata premendo il tasto ▲ o ▼, quindi
premere ENTER.
5 Una volta terminata l’impostazione, premere il tasto ENTER.
6 Premere il tasto EXIT per uscire.
➢
In modalità PC, è possibile modificare solo i parametri
Toni
colore, Formato e Sistema di protezione plasmi tra le opzioni
della voce Opzioni immagine.
Toni colore: Freddo2/Freddo1/Normale/Caldo1/Caldo2
➢
Se la modalità dell’immagine è impostata su Dinamica o
Standard, le opzioni Caldo1 e Caldo2 non sono disponibili.
Formato : Automatico/ 16:9/ Wide Zoom/ Zoom/ 4:3/ Solo
scansione
È possibile impostare il formato dell’immagine che più si adatta
alle proprie esigenze.
− Automatico: Espande e alza verticalmente l’immagine da
4:3 a 16:9.
− 16:9: Imposta l’immagine sul formato 16:9.
− Wide Zoom: Aumenta il formato dell’immagine a più di 4:3.
Dopo avere selezionato, è possibile spostare l’immagine in
alto o in basso utilizzando il tasto ▲ o ▼ premendo il tasto
► o ENTER.
− Zoom: Ingrandisce verticalmente la dimensione dell’immagine
sullo schermo.
− 4:3: Imposta il formato normale 4:3.
− Solo scansione: Utilizzare questa funzione per visualizzare
l'immagine completa con segnali HDMI (720p/1080i), Comp.
(1080i).
Dopo aver selezionata l’opzione “Solo scansione” in
modalità HDMI (1080i) o Comp. (1080i):
Premere il tasto ◄ o ► per selezionare , quindi premere
ENTER.
Premere il tasto ▲, ▼, ◄ o ► per spostare l'immagine verso
l'alto, il basso, a sinistra o a destra.
Reset: Premere il tasto ◄ o ► per selezionare Reset, quindi premere ENTER. E' possibile azzerare
le impostazioni.
➢
Con il formato immagine in modalità Solo scansione HDMI, in base al dispositivo AV collegato, lo
schermo può essere escluso oppure su di esso può comparire un colore specifico.
➢
Per una connessione HDMI (1080p) a 24, 25, 30, 50 e 60 Hz, e per una connessione Comp.
(1080p) a 50 e 60Hz, è supportata solo la sorgente di ingresso.
➢
È possibile modificare il formato dell’immagine semplicemente premendo il tasto P.SIZE del
telecomando.
➢
A seconda del tipo di sorgente di ingresso, le opzioni relative al formato dell’immagine possono variare.
➢
Le voci disponibili variano in base alla modalità selezionata.
➢
La funzione Automatico è disponibile solo in modalità “TV”,“Est.1”, “Est.2”, “AV” e “S-Video”.
➢
Le impostazioni possono essere regolate e memorizzate per ogni dispositivo esterno connesso a un
ingresso TV
➢
In modalità PC, è possibile regolare solo i formati “16:9” e “4:3”.
Posizionamento e ridimensionamento dello schermo tramite lo Zoom
L’uso della funzione
Zoom consente di posizionare lo schermo, ridimensionarlo verso l’alto e verso il
basso e modificarne il formato utilizzando il tasto ▲ o ▼.
Per spostare lo schermo verso l’alto e verso il basso, utilizzare il tasto ▲ o ▼ dopo avere selezionato l’
opzione tramite il tasto ◄ o ►.
Per modificare il formato verticale dello schermo, utilizzare il tasto ▲ o ▼ dopo avere selezionato l’
opzione tramite il tasto ◄ o ►.
Sposta
Conferma
Ritorno
Automatico
16:9
Wide Zoom
Zoom
4:3
Solo scansione
Formato
T V
Toni colore : Normal
Formato : Automatico
Mod schermo : 16:9
Digital NR : Automatico
Demo a 100Hz reali :
Spento
DNle :
Spento
Livello di nero HDMI
: Normale
Modalità Solo blu : Spento
Sistema di protezione plasmi
Opzioni immagine
T V
Sposta
Conferma
Ritorno
Continua...
Modalità : Standard
Luce cella : 7
Contrasto 95
Luminosità 45
Nitidezza 50
Colore 50
Tinta V50 R50
Impostazioni dettaglio
Opzioni immagine
Reset : Spento
Immagine
T V
Sposta
Conferma
Ritorno
BN68-01528A-00Ita.indd 20 2008-4-21 15:45:59

Italiano - 21
Screen Mode: 16:9
/ Wide Zoom/ Zoom/4:3
Quando si imposta il formato dell’immagine su Automatico
su un televisore con formato 16:9, è possibile determinare le
dimensioni dell’immagine da visualizzare nel formato 4:3 WSS
(Wide Screen Service). Ogni nazione europea richiede un
formato dell’immagine diverso e questa funzione deve essere
quindi selezionata dall’utente.
− 16:9
: Imposta l’immagine sul formato 16:9.
−
Wide Zoom: Aumenta le dimensioni dell’immagine a più di 4:3.
− Zoom: Ingrandisce verticalmente la dimensione dell’
immagine sullo schermo.
− 4:3: Imposta il formato normale 4:3.
➢
Questa funzione è disponibile in modalità Automatico.
➢
Questa funzione non è disponibile in modalità Comp. o HDMI.
Digital NR: Spento/Bassa/Media/Alto/Automatico
Se il segnale ricevuto dal televisore è debole, è possibile attivare questa funzione per ridurre i disturbi
statici e l’effetto “ghosting” sullo schermo.
➢
Se il segnale è debole, selezionare una delle altre opzioni disponibili fino a ottenere la migliore qualità visiva.
Demo a 100Hz reali : Spento/Acceso.
E’ possibile distinguere chiaramente la differenza tra "Real 100Hz" (100Hz reali) e 50Hz, specialmente
durante la visione di eventi sportivi. Infatti, quando si visualizzano scene caratterizzate da movimenti
lenti, non è possibile apprezzare la differenza tra una visione "Real 100Hz" (100Hz reali) e una a
50Hz." La modalità demo 100Hz funziona solo con segnale a 50Hz. La modalità demo Real 100Hz è
fornita per eseguire dimostrazioni presso il punto vendita utilizzando immagini speciali
.
DNIe: Spento/Demo/Acceso
Questo apparecchio televisivo include la funzione DNIe per offrire un’alta qualità visiva. Attivando
questa opzione, è possibile visualizzare l’immagine con la funzione DNIe attivata. Se si imposta la
funzione DNIe su Demo, è possibile visualizzare a scopo dimostrativo una immagine normale e una
immagine migliorata attraverso la funzione DNIe. Utilizzando questa funzione, è possibile rendersi
conto della differenza di qualità visiva.
➢
DNIe
TM
(Digital Natural Image engine)
Questa funzione consente di visualizzare immagini più dettagliate con riduzione dei disturbi
3D, miglioramento dei dettagli, del contrasto e del bianco. Il nuovo algoritmo di compensazione
dell’immagine permette di ottenere immagini più brillanti, chiare e dettagliate. La tecnologia
DNIe
TM
si adatta a ogni tipo di segnale.
➢
Questa funzione non è disponibile in modalità PC.
➢
DNIe è disponibile solo in modalità Dinamica.
Livello di nero HDMI: Normale/Bassa
Questa funzione consente di regolare la qualità dell’immagine (livello di nero, contrasto, colore, ecc.)
con una sorgente video HDMI nella gamma limitata RGB (da 16 a 235).
➢
Questa funzione è attiva solo quando l’ingresso esterno è collegato a HDMI (segnali RGB).
Modalità Solo blu: Spento/Acceso
Questa funzione è solo per gli utenti esperti in grado di regolare le misurazioni del dispositivo AV. Questa
funzione visualizza solo il segnale blu rimuovendo i segnali rosso e verde dal video, in modo da offrire
un effetto Blue Filter utile per regolare il Colore e la Tinta delle apparecchiature video quali lettori DVD,
impianti Home Theaters, ecc.
Questa funzione consente di regolare a livello di segnale
il Colore e la Tinta di qualsiasi dispositivo video che utilizzi
modelli di tipo Color Bar Pattern per i colori Rosso/Verde/Blu/
Ciano/Magenta/Giallo, senza l’uso di un ulteriore Blue Filter.
➢
La Modalità Solo blu è disponibile quando la modalità
Immagine è impostata su Film o Standard
Sistema di protezione plasmi
Per ridurre il rischio di incorrere nella bruciatura dello schermo,
questa unità è equipaggiata con una tecnologia che previene
questo fenomeno. Questa tecnologia permette di programmare
lo spostamento delle immagini su e giù (linee verticali) e
lateralmente (punti orizzontali). L’impostazione Ore consente di
programmare l’intervallo di movimento delle immagini in minuti.
− Spostam pixel: Utilizzando questa funzione, è possibile
ridurre al minimo la formazione di immagini persistenti sullo
schermo spostando i pixel sul PDP ogni minuto in direzione
orizzontale o verticale.
• Impostare
Spostam pixel su Acceso premendo il tasto
▲ o ▼, quindi premere ENTER.
• Selezionare l’opzione desiderata premendo il tasto
▲ o ▼, quindi premere ENTER.
Le opzioni disponibili sono: Punti Orizzontali, Linee Verticali, Ora
Spostam pixel
Schermo Bianco
Segnale Test
Grigio : Scuro
Sistema di protezione plasmi
T V
Sposta
Conferma
Ritorno
Continua...
Toni colore : Normal
Formato : Automatico
Mod schermo : 16:9
Digital NR : Automatico
Demo a 100Hz reali :Spento
DNle :
Spento
Livello di nero HDMI
: Normale
Modalità Solo blu : Spento
Sistema di protezione plasmi
Effetto 3D
Opzioni immagine
T V
Sposta
Conferma
Ritorno
Toni colore : Normal
Formato : Automatico
Mod schermo : 16:9
Digital NR : Automatico
Demo a 100Hz reali :
DNle : Acceso
Livello di nero HDMI
: Normal
Modalità Solo blu : Spento
Sistema di protezione plasmi
Effetto 3D
Opzioni immagine
T V
Sposta
Conferma
Ritorno
16:9
Wide Zoom
Zoom
4:3
BN68-01528A-00Ita.indd 21 2008-4-21 15:46:00

Italiano - 22
➢
Condizione ottimale per lo spostamento dei pixel;
PC TV/Ext/AV/Component/HDMI
Punti Orizzontali 1 2
Linee Verticali 1 2
Ora (minuti) 2 2 min
➢
Il valore Spostam pixel può variare in base alla dimensione del
monitor (pollici) e alla modalità.
➢
Questa funzione non è disponibile in modalità Solo scansione.
−
Bianco: Questa funzione consente di rimuovere le immagini persistenti sullo schermo cambiando il
colore dei pixel in bianco. Usare questa funzione in presenza di immagini persistenti o simboli sullo
schermo, specialmente quando è stata visualizzata per lungo tempo una immagine fissa.
−
Scorrimento: Questa funzione consente di rimuovere le immagini persistenti sullo schermo spostando
tutti i pixel sul PDP in base a una sequenza. Usare questa funzione in presenza di immagini persistenti o
simboli sullo schermo, specialmente quando è stata visualizzata per lungo tempo una immagine fissa.
−
Grigio: Quando si utilizza il formato 4:3, è possibile evitare il rischio di danni allo schermo regolando il
bilanciamento del bianco sull’estremità destra e sinistra.
Scuro: Con il formato 4:3, oscura i lati destro e sinistro.
Chiaro: Con il formato 4:3, schiarisce i lati destro e sinistro.
➢
Per rimuovere le immagini persistenti sullo schermo, utilizzare Bianco o Scorrimento. Sebbene
entrambe le funzioni possano essere utilizzate con successo per rimuovere le immagini persistenti
sullo schermo, Scorrimento la più efficace.
➢
Per rimuovere completamente le immagini persistenti sullo schermo, la funzione di rimozione
delle immagini persistenti deve essere eseguita per un periodo di tempo prolungato (circa 1 ora).
Qualora le immagini persistenti dovessero rimanere sullo schermo dopo aver eseguito la funzione di
rimozione, ripeter la nuovamente.
➢
Premere un tasto qualsiasi sul telecomando per annullare questa funzione.
Uso della funzione 3D
E’ possibile giocare e guardare film 3D sul proprio televisore. La funzione 3D consente di
visualizzare immagini 3D utilizzando degli occhiali speciali.
Cavo da 3,5 mm da spinotto stereo a RCA (non fornito)
Occhiali 3D
(Non forniti)
Trasmettitore IR 3D
(Non fornito)
PC
Cavo HDMI/DVI (non fornito)
Pannello posteriore TV
Connessioni
➢
L’aspetto degli occhiali 3D (trasmettitore incluso) può variare in base al modello.
Spostam pixel : Acceso
Punti Orizzontali : 2
Linee Verticali : 2
Ora : 2 min
Spostam pixel
T V
Sposta
Conferma
Ritorno
BN68-01528A-00Ita.indd 22 2008-4-21 15:46:02

Italiano - 23
1 Collegare un cavo HDMI/DVI tra il jack HDMI IN 2 del televisore e il jack PC output del computer.
2 Collegare un cavo da 3,5mm Stereo/2RCA tra il jack DVI IN (HDMI 2) [R-AUDIO-L] del televisore e il
jack Audio Out della scheda audio sul computer.
3 Collegare il trasmettitore alla porta 3D SYNC OUT sul pannello posteriore del televisore.
4 Ruotare il televisore e impostare la sorgente su HDMI2.
Per ulteriori informazioni sugli occhiali 3D (trasmettitore incluso), consultare i manuale dell’utente
fornito insieme agli occhiali.
Regolare la risoluzione del PC: PS50A470: 1024 x 768a 60Hz,1360 x 768 a 60Hz
La risoluzione ottimale per il PC per PS50A470 è 1360x768. Quando il segnale 1024x768 è
connesso in modalità 3D, l’immagine verrà visualizzata in formato 4:3 con le barre laterali grigie
Il trasmettitore IR 3D comunica con gli occhiali 3D.
Per questo motivo, il trasmettitore deve essere collocato nei pressi degli occhiali.
Si attiva quando il segnale in ingresso HDMI o DVI è RGB, e l’audio DVI è supportato.
Quando l’alimentazione è impostata su on o off, la modalità cambia passando a quella preimpostata
(Spento) e il Formato viene salvato.
L’Effetto 3D è impostato su on o off indipendentemente dalla Modalità immagine.
Quando l’opzione Effetto 3D è impostata su On, sono attivi solo i menu Contrasto, Luminosità,
Effetto 3D e Reset relativi all’immagine.
Per utilizzare l’Effetto 3D, è necessaria una scheda grafica in grado di supportare la funzione 3D o
software 3D.
Gli occhiali 3D e il trasmettitore devono essere della stessa marca.
Se si usano gli occhiali 3D per un lungo periodo di tempo, che si stia giocando o guardando un
programma TV, è possibile avvertire affaticamento visivo o mal di testa.
Occhiali 3D (trasmettitore incluso) non prodotti da Samsung potrebbero non essere supportati.
In caso di sfarfallio dello schermo durante l’uso della funzione 3D, abbassare l’illuminazione dell’
ambiente oppure spegnere la lampada a fluorescenza per ottenere un effetto ottimale.
Cambio di modalità
Il cambio di modalità scambierà le immagini percepite da ogni
occhio invertendo i segnali sinistro e destro.
1 Collegare il televisore, il PC e il trasmettitore IR 3D come
mostrato nella figura.
2 Premere il tasto SOURCE per selezionare la modalità HDMI.
3 Premere il tasto MENU per visualizzare il menu.
Premere il tasto ▲ o ▼ per selezionare Immagine, quindi
premere il tasto ENTER.
4 Premere il tasto ▲ o ▼ per selezionare Opzioni immagine,
quindi premere ENTER.
Premere il tasto ▲ o ▼ per selezionare Effetto 3D, quindi
premere ENTER.
5 Premere il tasto ▲ o ▼ per selezionare Modalità, quindi
premere ENTER.
Premere il tasto ▲ o ▼ per selezionare Spento, Modalità1,
Modalità2
o Conversione 2D, quindi premere ENTER.
• Spento: Disattiva la funzione Effetto 3D.
• Modalità1: funziona per prima cosa con la sincronizzazione destra.
• Modalità2:
funziona per prima cosa con la sincronizzazione sinistra.
• Conversione 2D: Converte le immagini 3D in 2D.
Se si avverte affaticamento o vertigini durante la visione di un
filmato 3D, è possibile convertire temporaneamente le immagini in
2D; tuttavia, se ciò dovesse accadere, è consigliabile selezionare
"Spento" per disattivare completamente la funzione 3D.
Se l’effetto 3D non funziona in modo adeguato, significa che la
sincronizzazione tra la modalità e gli occhiali 3D non è corretta.
Per sincronizzarli, passare alla seconda modalità.
Sposta
Conferma
Ritorno
Modalità : Standard
Luce cella 7
Contrasto 90
Luminosità 45
Nitidezza 50
Colore 50
Tinta G50 R50
Impostazioni dettaglio
Opzioni immagine
Reset : OK
Immagine
T V
Sposta
Conferma
Ritorno
Toni colore :
Normale
Formato :
Automatico
Mod schermo :
16:9
Digital NR :
Automatico
Demo a 100Hz reali: Spento
DNle : Spento
Livello di nero HDMI
: Normale
Modaita' schermo blu
: Spento
Sistema di protezione plasmi
Effetto 3D
Opzioni immagine
T V
Sposta
Conferma
Ritorno
Modalità :
Formato :
Effetto 3D
T V
Spento
Modalità1
Modalità2
Conversione 2D
BN68-01528A-00Ita.indd 23 2008-4-21 15:46:05

Italiano - 24
Ripristino delle impostazioni predefinite dell'immagine
È possibile configurare le impostazioni dettagliate
dell'immagine.
1 Premere il tasto MENU per visualizzare il menu.
2 Premere il tasto ENTER per selezionare Immagine.
3 Premere il tasto ▲ o ▼ per selezionare Reset, quindi premere
ENTER.
4 Premere il tasto ▲ o ▼ per selezionare OK o Cancella, quindi
premere ENTER.
➢
Ogni modalità può essere azzerata.
Sposta
Conferma
Ritorno
Modalità : Standard
Luce cella 7
Contrasto 95
Luminosità 45
Nitidezza 50
Colore 50
Tinta V50 R50
Impostazioni dettaglio
Opzioni immagine
Reset :
Immagine
T V
OK
Cancella
Cambio di formato
Selezionare il formato di ingresso ottimale per far corrispondere la
scheda grafica o il software 3D.
Vedere la precedente descrizione dal Passaggio 1 al Passaggio 4.
5 Premere il tasto ▲ o ▼ per selezionare Formato, quindi
premere ENTER.
6 Premere il tasto ▲ o ▼ per selezionare A scacchi, Orizzontale
o Verticale quindi premere ENTER.
A scacchi
Se il formato di uscita della scheda grafica o del
software 3D è di tipo "a scacchiera", selezionare
questo formato di ingresso.
Orizzontale
Se il formato di uscita della scheda grafica o del
software 3D è di tipo "orizzontale", selezionare
questo formato di ingresso.
Verticale
Se il formato di uscita della scheda grafica o
del software 3D è di tipo "verticale", selezionare
questo formato di ingresso.
➢
Premere ripetutamente il tasto 3D sul telecomando per
scegliere la modalità 3D desiderata.
Impostazioni rapide
1 Premere il tasto TOOLS sul telecomando.
2 Per selezionare Modalità 3D, premere il tasto ▲ o ▼.
3 Premere il tasto ENTER per avviare l’effetto 3D.
Strumenti
Modalità3D ◄ Spento ►
Anynet+ (HDMI-CEC)
Modalità immagine
: Dinamica
Modalità audio : Standard
Timer stand-by : Spento
TS XT SRS : Spento
Risp. energia : Spento
Regola
EsciSposta
Sposta
Conferma
Ritorno
Modalità : Modalità 1
Formato :
Modalità 3D Effect
T V
A scacchi
Orizzontale
Verticale
BN68-01528A-00Ita.indd 24 2008-4-21 15:46:07

Italiano - 25
Funzioni audio
1 Premere il tasto MENU per visualizzare il menu.
2 Premere il tasto ▲ o ▼ per selezionare Suono, quindi
premere il tasto ENTER.
3 Selezionare l’opzione desiderata premendo il tasto ▲ o ▼,
quindi premere ENTER.
Le opzioni disponibili sono:
Modalità, Equalizzatore, TS XT
SRS, Volume auto, Altoparlante TV, Selezione audio
4 Una volta terminata l’impostazione, premere il tasto ENTER.
5 Premere il tasto EXIT per uscire.
Modalità: Standard/Musica/Film/Dialoghi/Personalizzata
È possibile selezionare il tipo di effetto audio da utilizzare mentre
si guarda una trasmissione.
Impostazioni rapide
1 Premere il tasto TOOLS sul telecomando.
2 Premere il tasto ▲ o ▼ per selezionare la Modalità Suono.
3
Per selezionare l’opzione desiderata, premere il tasto◄ o ► .
Equalizzatore: Balance/100Hz/300Hz/1kHz/3kHz/10kHz
Il televisore dispone di varie impostazioni che consentono di
controllare la qualità dell’audio.
➢
Se si modificano queste impostazioni, la modalità audio
viene automaticamente impostata su Personalizzata.
TS XT SRS: Spento/Acceso
TruSurround XT è una tecnologia SRS brevettata che risolve
il problema della riproduzione di contenuti multicanale 5,1 su due altoparlanti. TruSurround offre
una straordinaria esperienza Surround Sound virtuale attraverso un sistema di riproduzione a due
altoparlanti, inclusi gli altoparlanti interni del televisore. È pienamente compatibile con tutti i formati
multicanale.
Impostazioni rapide
1 Premere il tasto TOOLS sul telecomando.
2 Per selezionare TS XT SRS premere il tasto ▲
o
▼.
3
Premere il tasto ◄ o ► per selezionare Acceso o Spento.
Volume auto: Spento/Acceso
Le condizioni del segnale variano a seconda dell’emittente,
ma non è pratico regolare il volume ogni volta che si cambia
canale. Questa funzione consente di regolare automaticamente il volume del canale desiderato
diminuendo il livello dell’uscita audio quando il segnale di modulazione è alto oppure aumentando il
livello dell’uscita audio quando il segnale di modulazione è basso.
Altoparlante TV: Spento/Acceso
Se si desidera ascoltare l’audio da altoparlanti separati, annullare l’amplificatore interno.
➢
I tasti
+,
- e MUTE non funzionano quando l’opzione Altoparlante TV è impostata su Off.
➢
Quando TV Speaker (Altoparlante TV) è impostato su Off (Spento), è possibile regolare solo
l’opzione Sound Select (Selezione audio) (in modalità PIP) nel menu Sound (Suono).
Selezione audio: Principale/Secondario
Durante l’uso della funzione PIP, è possibile ascoltare l’audio dell’immagine secondaria (PIP).
-
Principale: Consente di ascoltare l’audio dell’immagine principale.
-
Secondario: Consente di ascoltare l’audio dell’immagine secondaria.
TruSurround XT, SRS e il simbolo sono marchi di SRS Labs, Inc. La
tecnologia TruSurround XT è utilizzata su licenza di SRS Labs, Inc.
Sposta
Conferma
Ritorno
Modalità :
Personalizzata
Equalizzatore
TS XT SRS : Spento
Volume auto : Spento
Altoparlante TV : Spento
Selezione audio : Principale
Suono
T V
Strumenti
Anynet+ (HDMI-CEC)
Modalità Immagine : Standard
Modalità Suono ◄ Personalizzata►
Timer stand-by : Spento
TS XT SRS : Spento
Risp. energia : Spento
Dual I-II : Mono
Strumenti
Anynet+ (HDMI-CEC)
Modalità Immagine : Standard
Modalità Suono : Personalizzata
Timer stand-by : Spento
TS XT SRS ◄ Spento ►
Risp. en ergia : Spento
Dual I-II : Mono
Sposta
Regola
Ritorno
Equalizzatore
T V
Bilanc. 100Hz 300Hz 1kHz 3kHz 10kHz
+
0
-
R
L
+
0
-
Sposta
Regola
Esci
Sposta
Regola
Esci
BN68-01528A-00Ita.indd 25 2008-4-21 15:46:09

Italiano - 26
Selezione della modalità audio (a seconda del modello)
Il tasto DUAL I-II visualizza/gestisce l’elaborazione e l’output del segnale audio. Quando
l’apparecchiatura è accesa, la modalità viene automaticamente impostata su “Dual-I ” o “Stereo”,
a seconda della trasmissione corrente.
Impostazioni rapide
1 Premere il tasto TOOLS sul telecomando.
2 Premere il tasto ▲
o
▼ per selezionare Dual I-II.
3
Per selezionare l’opzione desiderata, premere il tasto ◄ o ►.
Tipo di trasmissione Indicazione a video
NICAM
Stereo
Trasmissione normale
(Audio standard)
Mono (Uso normale)
Normale + Mono NICAM NICAM
Mono
(Normale)
Stereo NICAM
NICAM
stereo
Mono
(Normale)
NICAM DUAL-I/II
NICAM
Dual-1
NICAM
Dual-2
Mono
(Normale)
A2
Stereo
Trasmissione normale
(Audio standard)
Mono (Uso normale)
Bilingue o Dual-I/II Dual I Dual II
Stereo Stereo
Mono
(Mono forzato)
➢
Se le condizioni di ricezione peggiorano, l’ascolto sarà più agevole in modalità Mono.
Se il segnale stereo è debole e si verifica un cambio automatico, passare alla modalità Mono.
Collegamento delle cuffie (vendute separatamente)
È possibile collegare le cuffie al televisore se si desidera guardare un programma
televisivo senza disturbare le persone presenti nella stanza.
➢
Quando si inserisce il jack della cuffia nella porta
corrispondente, nel menu Suono è disponibile solo l’opzione
Volume auto.
➢
L’uso prolungato delle cuffie ad alto volume può causare
danni all’udito.
➢
Quando si collega la cuffia al televisore, gli altoparlanti
vengono disattivati.
➢
Il volume delle cuffie e quello del televisore sono regolabili
indipendentemente.
Pannello laterale del televisore
Strumenti
Anynet+ (HDMI-CEC)
Modalità Immagine : Standard
Modalità Suono : Personalizzata
Timer stand-by : Spento
TS XT SRS : Spento
Risp. energia : Spento
Dual I-II ◄ Mono ►
Sposta
Regola
Esci
BN68-01528A-00Ita.indd 26 2008-4-21 15:46:09

Italiano - 27
Funzioni orario
1 Premere il tasto MENU per visualizzare il menu.
2 Premere il tasto ▲ o ▼ per selezionare Impostazione, quindi
premere ENTER.
3 Premere il tasto ▲ o ▼ per selezionare Ora, quindi premere
ENTER.
4 Selezionare l’opzione desiderata premendo il tasto ▲ o ▼, quindi
premere ENTER.
Le opzioni disponibili sono:
Imposta Ora, Timer stand-by,
Timer 1, Timer 2, Timer 3
5 Una volta terminata l’impostazione, premere il tasto ENTER.
6 Premere il tasto EXIT per uscire.
Imposta Ora
È possibile impostare l’orologio del televisore in modo che venga
visualizzata l’ora corrente quando si preme il tasto INFO del
telecomando. È necessario impostare l’ora anche per utilizzare il
timer di accensione o spegnimento automatico.
− Premere il tasto ◄ o ► per selezionare
Mese, Data, Anno, Ora
o Minuto. Per impostarli premere il tasto ▲ o ▼.
➢
È possibile impostare le voci Mese, Data, Anno, Ora o Minuto
premendo direttamente i tasti numerici del telecomando.
➢
Nel caso in cui si sia verificata una interruzione di corrente
oppure l’unità sia stata scollegata dall’alimentazione, le
impostazioni dell’orologio andranno perdute.
Timer stand-by
È possibile selezionare un intervallo di tempo compreso tra 30 e
180 minuti per impostare il passaggio automatico del televisore in
modalità Standby.
− Selezionare un tempo di accensione predefinito (
Spento, 30,
60, 90, 120, 150 o 180) premendo il tasto ▲ o ▼.
Impostazioni rapide
1 Premere il tasto TOOLS sul telecomando.
2 Premere il tasto ▲ o ▼ per selezionare Timer stand-by.
3 Premere il tasto ◄ o ► per selezionare i minuti, quindi
premere il tasto ENTER.
Timer 1 / Timer 2 / Timer 3
È possibile impostare i timer di accensione/spegnimento in modo
che il televisore si accenda o spenga automaticamente all’ora
selezionata.
☛
È prima necessario impostare l’orologio.
− Premere il tasto ◄ o ► per selezionare la voce desiderata.
Premere il tasto ▲ o ▼ per regolare l’impostazione.
Orario TV on: Selezionare l’ora e i minuti, quindi scegliere Spento/Acceso. Per attivare il timer,
scegliere Spento.
Orario TV off: Selezionare l’ora e i minuti, quindi scegliere Spento/Acceso. Per attivare il timer,
scegliere Spento.
Ripetizione: Selezionare Una volta, Ogni giorno, Lun~Ven, Lun~Sab o Sab~Dom.
Volume: Selezionare il volume desiderato.
➢
E’ possibile impostare l’ora e i minuti anche premendo i tasti numerici del telecomando.
☛
Spegnimento in assenza di operazioni
Quando si imposta il timer su “On”, il televisore si spegne automaticamente quando non viene eseguita
nessuna operazione entro tre ore dopo che il timer ha acceso l’apparecchio. Questa funzione è disponibile
solo se il timer è “On” e impedisce l’eventuale surriscaldamento del televisore dovuto a un periodo di
accensione troppo lungo.
Sposta
Conferma
Ritorno
Plug & Play
Lingua : Italiano
Ora
Effetto luce
:
Mod visione ON
Regolazione montaggio a parete
Melodia : Spento
Entertainment : Spento
Risp. energia : Spento
PIP
Impostazione
T V
Sposta
Conferma
Ritorno
Imposta Ora : 00 : 00
Timer stand-by : Spento
Timer 1 : Spento
Timer 2 : Spento
Timer 3 : Spento
Ora
T V
Sposta
Regola
Ritorno
Timer 1
T V
00 00 No
Orario TV on
:
Orario TV off
Ripetizione
Una volta
10
Volume
00 00 No
:
Strumenti
Anynet+ (HDMI-CEC)
Modalità Immagine : Standard
Modalità Suono : Personalizzata
Timer stand-by ◄ Spento ►
TS XT SRS : Spento
Risp. energia : Spento
Dual I-II : Mono
Sposta
Regola
Esci
BN68-01528A-00Ita.indd 27 2008-4-21 15:46:10

Italiano - 28
Lingua/Melodia/Effetto luce/Entertainment/Risp. energia/PIP
1 Premere il tasto MENU per visualizzare il menu.
2 Premere il tasto ▲ o ▼ per selezionare Impostazione, quindi
premere ENTER.
3 Selezionare l’opzione desiderata premendo il tasto ▲ o ▼,
quindi premere ENTER.
Le opzioni disponibili sono:
Lingua, Melodia, Effetto luce,
Entertainment, Risp. energia, PIP
4 Una volta terminata l’impostazione, premere il tasto ENTER.
5 Premere il tasto EXIT per uscire.
Lingua
Varia in base al modello. Quando si utilizza il televisore per la prima volta, è necessario selezionare
la lingua dei menu e degli indicatori.
Effetto luce: Spento/Modalità Stby ON/Mod visione ON/Acceso
Consente di attivare/disattivare il LED blu sul pannello frontale del televisore. Utilizzare questa
opzione per risparmiare energia oppure se il LED infastidisce gli occhi.
−
Spendo: Il LED blu è sempre spento.
−
Modalità Stby ON: Il LED blu si illumina in modalità Standby e si spegne quando il televisore è
acceso.
−
Mod visione ON: Il LED blu si attiva durante la visione di un programma e si spegne quando il
televisore è spento.
−
Acceso: Il LED blu è sempre acceso.
➢
Impostare Effetto luce su Off per ridurre il consumo di corrente.
Melodia: Spento/Bassa/Media/Alto
Consente di regolare l’effetto audio associato all’accensione/spegnimento del televisore.
Entertainment: Spento / Sport / Cinema / Giochi
La modalità Entertainment consente di selezionare la qualità video e audio ottimale per la
visualizzazione di eventi sportivi, film e videogiochi.
−
Spento: Disattiva la funzione Entertainment.
−
Sport: Offre la qualità video e audio ottimale per la visualizzazione di eventi sportivi.
−
Cinema: Offre la qualità video e audio ottimale per la visualizzazione di film.
Le immagini sono più dettagliate e l’audio è ancora più potente.
−
Giochi: Offre la qualità video e audio ottimale per i videogiochi. Questa modalità accelera la
velocità di gioco durante l’uso di una console esterna collegata al televisore.
➢
Impostando qualsiasi delle tre modalità Entertainment su Acceso, le impostazioni verranno
bloccate e non sarà possibile modificarle. Per regolare le modalità Immagine e Suono,
Entertainment deve essere impostata su Spento.
➢
Le impostazioni della modalità Entertainment vengono salvate per ogni sorgente di ingresso.
Continua...
Sposta
Conferma
Ritorno
Plug & Play
Lingua : Italiano
Ora
Effetto luce
:
Mod visione ON
Regolazione montaggio a parete
Melodia : Spento
Entertainment : Spento
Risp. energia : Spento
PIP
Impostazione
T V
BN68-01528A-00Ita.indd 28 2008-4-21 15:46:11

Italiano - 29
Impostazione del software del PC (basato su Windows XP)
Di seguito vengono illustrate le impostazioni di
visualizzazione di Windows per un PC tipico. Le schermate
visualizzate sul proprio PC possono differire in base alla
versione di Windows e alla scheda video installate. Nel caso
le schermate risultassero differenti, le stesse informazioni di
base per la configurazione sono applicabili praticamente in
ogni caso. (In caso contrario, contattare la casa costruttrice
del proprio computer oppure un rivenditore Samsung).
1 Fare clic con il tasto destro del mouse sul Desktop di
Windows, quindi selezionare Proprietà.
Verrà visualizzata la finestra Proprietà - Schermo.
2 Fare clic sulla scheda Impostazioni, quindi impostare la
modalità di visualizzazione facendo riferimento alla tabella
delle modalità di visualizzazione. Non è necessario modificare
le impostazioni dei colori.
3 Fare clic su Avanzate. Viene visualizzata una nuova finestra di dialogo delle impostazioni.
4 Fare clic su Monitor, quindi impostare la Frequenza di aggiornamento facendo riferimento
alla tabella delle modalità di visualizzazione. Se possibile, impostare la Frequenza verticale e la
Frequenza orizzontale al posto della Frequenza di aggiornamento.
5 Fare clic su OK per chiudere la finestra, quindi fare clic su OK nella finestra Proprietà - Schermo.
È possibile che il computer venga riavviato.
Risp. energia: Spento/Bassa/Media/Alto
Questa funzione regola la brillantezza dello schermo in base alla
luminosità dell’ambiente.
−
Spendo: Disattiva la modalità di risparmio energetico.
−
Bassa: Opera in modalità standard senza tenere conto della
luminosità dell’ambiente.
−
Media: Avvia la modalità media di risparmio energetico senza
tenere conto della luminosità dell’ambiente.
−
Alto: Avvia la massima modalità di risparmio energetico senza
tenere conto della luminosità dell’ambiente.
Impostazioni rapide
1 Premere il tasto TOOLS sul telecomando.
2 Premere il tasto ▲ o ▼ per selezionare Risp. energia.
3 Per selezionare l’opzione desiderata, premere il tasto ◄ o ►
PIP (Picture in Picture): PIP (Acceso/Spento)/Sorgente/
Formato/Posizione/Programma
All’interno dell’immagine principale è possibile visualizzare
un’immagine secondaria. In questo modo, è possibile guardare un
programma TV o controllare l'ingresso video da tutti i dispositivi
collegati.
− PIP: Acceso/Spento
È possibile attivare o disattivare la funzione PIP.
Tabella delle impostazioni PIP
Immagine principale Immagine secondaria
Comp.
HDMI1, 2, 3PC
Analog TV (TV
analogica) trasmette
solo Est1, Est2, AV
− Sorgente: TV/Est.1/Est.2/AV
È possibile selezionare la sorgente dell'immagine secondaria.
− Formato: / /
Consente di selezionare il formato dell'immagine secondaria.
➢
Se l'immagine principale è in modalità PC e Comp., l'opzione Formato non è disponibile.
− Posizione: / / /
Utilizzata per selezionare la posizione dell'immagine secondaria.
➢
In modalità Double (Doppia) ( , ), l'opzione Posizione non può essere selezionata.
− Programma
È possibile selezionare un canale per l'immagine secondaria solo quando l'opzione Sorgente è
impostata su TV.
Sposta
Conferma
Ritorno
PIP : Acceso
Sorgente : TV
Formato :
Posizione :
Programma : P 1
PIP
T V
Strumenti
Anynet+ (HDMI-CEC)
Modalità Immagine : Standard
Modalità Suono : Personalizzata
Timer stand-by : Spento
TS XT SRS : Spento
Risp. energia ◄ Spento ►
Dual I-II : Mono
Sposta
Regola
Esci
BN68-01528A-00Ita.indd 29 2008-4-21 15:46:11

Italiano - 30
Modalità di ingresso (PC)
La posizione e la dimensione dello schermo variano in base al tipo di schermo del PC e alla
relativa risoluzione
La tabella seguente mostra tutte le modalità di visualizzazione supportate:
D-Sub Inserisci
Modalità Risoluzione
Orizzontale
Frequenza
(kHz)
Verticale
Frequenza
(Hz)
Frequenza di
clock dei pixel
Frequenza (MHz)
Polarità sinc(H/
V)
PS50A470
IBM
640 x 350
720 x 400
31.469
31.469
70.086
70.087
25.175
28.322
+ / -
- / +
✔
✔
VESA
640 x 480
640 x 480
640 x 480
800 x 600
800 x 600
800 x 600
1024 x 768
1024 x 768
1024 x 768
1360 x 768
31.469
37.861
37.500
37.879
48.077
46.875
48.363
56.476
60.023
47.712
59.940
72.809
75.000
60.317
72.188
75.000
60.004
70.069
75.029
60.015
25.175
31.500
31.500
40.000
50.000
49.500
65.000
75.000
78.750
85.500
- / -
- / -
- / -
+ / +
+ / +
+ / +
- / -
- / -
+ / +
+ / +
✔
✔
✔
✔
✔
✔
✔
✔
✔
✔
HDMI/DVI Input
Modalità Risoluzione
Orizzontale
Frequenza
(kHz)
Verticale
Frequenza
(Hz)
Frequenza di
clock dei pixel
Frequenza (MHz)
Polarità sinc(H/
V)
PS50A470
VESA
640 x 480
800 x 600
1024 x 768
1360 x 768
31.469
37.879
48.363
47.712
59.940
60.317
60.004
60.015
25.175
40.000
65.000
85.500
- / -
+ / +
- / -
+ / +
✔
✔
✔
✔
Quando si effettua una connessione mediante cavo HDMI/DVI, è necessario utilizzare il jack
HDMI IN 2.
La modalità interlacciata non è supportata.
Questo dispositivo potrebbe non funzionare correttamente se si seleziona un formato video non
standard.
Le modalità Separata e Composite sono supportate. Il formato SOG non è supportato.
Con il modello PS50A470, la qualità testo del PC è ottimale in modalità VESA mode
BN68-01528A-00Ita.indd 30 2008-4-21 15:46:12

Italiano - 31
Impostazione del PC
➢
Impostare la modalità PC premendo il tasto SOURCE.
1 Premere il tasto MENU per visualizzare il menu.
2 Premere il tasto ▲ o ▼ per selezionare Immagine, quindi
premere ENTER.
3 Selezionare l’opzione desiderata premendo il tasto ▲ o ▼,
quindi premere ENTER.
4 Una volta terminata l’impostazione, premere il tasto ENTER.
5 Premere il tasto EXIT per uscire.
Regolazione auto
Questa funzione consente di regolare automaticamente lo
schermo del PC in base al segnale video in entrata.v
I valori di regolazione fine, grossa e posizione vengono
impostati automaticamente.
Impostazioni rapide
1 Premere il tasto TOOLS sul telecomando.
2 Premere il tasto ▲ o ▼ per selezionare Regolazione auto,
quindi premere il tasto ENTER.
Schermo: Grossa/Fine/Posizione/Reset immagine
Grossa/Fine
Lo scopo di questa funzione è di eliminare o ridurre i disturbi
dell’immagine.
Se i disturbi permangono anche dopo la regolazione fine,
regolare il meglio possibile la frequenza (regolazione grossa)
ed eseguire nuovamente la regolazione fine.
Una volta ridotti i disturbi, regolare nuovamente l’immagine per
allinearla al centro dello schermo.
1 Premere il tasto ▲ o ▼ per selezionare Grossa o Fine,
quindi premere ENTER.
2 Premere il tasto ◄ o ► per regolare la qualità
dell’immagine qualora appaiano righe verticali o l’immagine
risulti sfocata. Premere il tasto ENTER.
Posizione
Regolare la posizione dello schermo del PC se non si adatta
allo schermo del televisore. Edoardo
1 Regolare la posizione premendo il tasto ▲/▼/◄/►.
2 Premere il tasto ENTER.
Reset immagine
Consente di sostituire tutte le impostazioni dell’immagine
ripristinando i valori di fabbrica.
Sposta
Conferma
Ritorno
Posizione
T V
Regolazione automatica in corso
Attendere prego
Reset immag. completato
Sposta
Conferma
Ritorno
Modalità : Standard
Luce cella 7
Contrasto 95
Luminosità 45
Nitidezza 50
Regolazione auto
Regolazione Schermo
Impostazioni dettaglio
Opzioni immagine
Reset : OK
Immagine
T V
Strumenti
Anynet+ (HDMI-CEC)
Modalità Immagine : Standard
Modalità Suono : Personalizzata
Timer stand-by : Spento
TS XT SRS : Spento
Risp. energia : Spento
PIP
Regolazione auto
Conferma
EsciSposta
Sposta
Conferma
Ritorno
Coarse 50
Fine 11
Posizione
Reset immagine
Regolazione Schermo
T V
BN68-01528A-00Ita.indd 31 2008-4-21 15:46:12

Italiano - 32
Collegamento dei dispositivi Anynet
+
Il sistema Anynet
+
può essere utilizzato solo con dispositivi AV che supportano Anynet
+
.
Controllare che sul dispositivo AV da collegare al televisore sia presente il simbolo Anynet
+
.
Per collegare il dispositivo direttamente al televisore
Collegare il jack [HDMI 1],
[HDMI 2] o [HDMI 3] del
televisore al jack HDMI
OUT del dispositivo Anynet
+
corrispondente tramite un cavo
HDMI.
Per effettuare il collegamento al sistema Home Theatre
1 Collegare il jack [HDMI 1],
[HDMI 2] o [HDMI 3] del
televisore al jack HDMI
OUT del dispositivo Anynet
+
corrispondente tramite un
cavo HDMI.
2 Collegare il jack HDMI
IN del sistema Home
Theatre al jack HDMI OUT
del dispositivo Anynet
+
corrispondente tramite un
cavo HDMI.
➢
Collegare solo un ricevitore.
➢
E’ possibile collegare un dispositivo Anynet
+
tramite un cavo HDMI. Alcuni cavi HDMI potrebbero non
supportare le funzioni Anynet
+
.
➢
Anynet
+
si attiva solo quando il dispositivo AV che supporta Anynet
+
è acceso (On) o in modalità
Standby.
➢
Anynet
+
supporta fino a 8 dispositivi AV.
English - 30
English - 30
Cos’è Anynet
+
?
Anynet
+
è un sistema di rete AV che mette a disposizione degli utenti una semplice interfaccia AV
per controllare, tramite il menu Anynet
+
, tutti i dispositivi AV Samsung Electronics collegati.
Dispositivo
Anynet
+
1
Dispositivo
Anynet
+
2
Dispositivo
Anynet
+
3
TV
Cavo HDMI
Cavo HDMI
Cavo HDMI
TV
Dispositivo
Anynet
+
1
Dispositivo
Anynet
+
2
Dispositivo
Anynet
+
3
Cavo HDMI
Cavo HDMI
Cavo HDMI
Cavo HDMI
Home Theatre
BN68-01528A-00Ita.indd 32 2008-4-21 15:46:13

Italiano - 33
Configurazione di Anynet
+
Le seguenti impostazioni consentono di utilizzare le funzioni di Anynet
+
.
Uso della funzione Anynet
+
1 Premere il tasto MENU per visualizzare il menu.
Premere il tasto ▲ o ▼ per selezionare Ingressi (Input), quindi premere
ENTER.
2 Premere il tasto ▲ o ▼ per selezionare Anynet
+
(HDMI-CEC), quindi
premere ENTER.
3 Premere il tasto ▲ o ▼ per selezionare Impostazione (Setup), quindi
premere ENTER.
4 Premere il tasto ▲ o ▼ per selezionare Anynet
+
(HDMI-CEC), quindi
premere ENTER.
5 Premere il tasto ▲ o ▼ per selezionare Acceso (On), quindi premere
ENTER.
➢
La funzione Anynet
+
(HDMI-CEC) si attiva.
➢
Se si seleziona Spento (Off), Anynet+ (HDMI-CEC) si disattiva.
➢
Quando Anynet+ (HDMI-CEC) è disattivato, sono disattivate anche tutte le
relative funzioni Anynet+.
Disattivazione automatica di un dispositivo Anynet
+
quando il
televisore è spento
4 Premere il tasto ▲ o ▼ per selezionare Auto Turn Off (Spegnimento
automatico), quindi premere ENTER.
5 Premere il tasto ▲ o ▼ per selezionare Sì (Yes), quindi premere
ENTER.
➢
La funzione Auto Turn Off (Spegnimento automatico) si attiva.
➢
Selezionare No per disattivare la funzione Auto Turn Off (Spegnimento
automatico).
Premere EXIT per uscire.
➢
Sul telecomando TV, Select Device (Seleziona periferica) deve essere
impostato su TV per utilizzare la funzione Anynet+.
➢
Se si imposta Auto Turn Off (Spegnimento automatico) su Sì (Yes), i dispositivi esterni collegati al televisore si
spengono ogniqualvolta si spegne il televisore. Tuttavia, se il dispositivo è in fase di registrazione potrebbe non
spegnersi.
Scansione e passaggio da un dispositivo Anynet
+
all’altro
1 Premere il tasto MENU per visualizzare il menu.
Premere il tasto ▲ o ▼ per selezionare Ingressi (Input), quindi premere
ENTER.
2 Premere il tasto ▲ o ▼ per selezionare Anynet
+
(HDMI-CEC), quindi
premere ENTER.
3 Premere il tasto ▲ o ▼ per selezionare Select Device (Seleziona
periferica), quindi premere ENTER.
4 Premere il tasto ▲ o ▼ per selezionare il dispositivo desiderato, quindi
premere ENTER.
Il dispositivo viene attivato.
5 Se non si riesce a trovare il dispositivo desiderato, premere il tasto ▲ o ▼
per selezionare Searching Connections (Cerca collegamenti), quindi
premere ENTER.
Viene visualizzato il messaggio
Configuring Anynet
+
connection...
(Configurazione di Anynet+ in corso...). Una volta completata la ricerca,
nel menu Anynet
+
vengono elencati tutti i dispositivi collegati.
➢
Il passaggio al dispositivo selezionato può richiedere fino a 2 minuti. Non
è possibile annullare l’operazione durante il passaggio da un dispositivo
all’altro.
➢
Il tempo richiesto per la scansione dei dispositivi dipende dal numero di
dispositivi collegati al televisore.
➢
Al termine della scansione, il numero di dispositivi trovati non appare.
➢
Ogni volta che si accende il televisore tramite il tasto di accensione viene eseguita una scansione automatica di tutti
i dispositivi collegati. Tuttavia, i dispositivi collegati dopo avere acceso il televisore, o in altre circostanze particolari,
potrebbero non apparire in elenco. In questo caso, selezionare Searching Connections (Cerca collegamenti) nel menu.
➢
Se si è selezionata una modalità di ingresso esterna tramite il tasto SOURCE, non sarà possibile utilizzare la funzione
Anynet+. Passare a un dispositivo Anynet+ utilizzando il tasto TOOLS.
Continua...
Conferma
Sposta
Visualizza TV
Seleziona periferica
Registra
Menu periferica
Funz dispositivo
Ricevitore :Spento
Impostazione
TV P 1
Ritorno
Impostazione
Anynet+ (HDMI-CEC) : Off
Spegnimento auto : Off
Ricer disp con
Spento
Acceso
Impostazione
Anynet+ (HDMI-CEC)
:Acceso
Spegnimento auto :
: Off
Ricer disp con
No
Sì
Conferma
Sposta Ritorno
Conferma
Sposta Ritorno
Visualizza TV
Seleziona periferica
Registra
Menu periferica
Funz dispositivo
Ricevitore :Spento
Impostazione
TV P 1
DVDR1
DVDR2
DVD1
DVD2
Conferma
Sposta
Ritorno
Impostazione
Anynet+ (HDMI-CEC) : Acceso
Spegnimento auto : Sì
Ricer disp con
Conferma
Sposta Ritorno
BN68-01528A-00Ita.indd 33 2008-4-21 15:46:14

Italiano - 34
Menu Anynet
+
Il menu Anynet
+
varia a seconda del tipo e dello stato del dispositivo Anynet
+
collegato al televisore.
Menu Anynet
+
Descrizione
View TV (Visualizza TV) Passa da Anynet
+
alla modalità di trasmissione del televisore.
Select Device (Seleziona
periferica)
Mostra il dispositivo al quale è collegato il televisore.
Record (Registra) Avvia la registrazione. (Questo menu si attiva solo se il dispositivo
supporta la funzione di registrazione).
Menu on Device (Menu
periferica)
Mostra il menu del dispositivo collegato.
Esempio. Se si collega un registratore DVD, appare il menu del
Registratore DVD.
Device Operation
(Funzionamento dispositivo)
Mostra il menu di controllo riproduzione del dispositivo collegato.
Esempio. Se si collega un registratore DVD, viene visualizzato il menu
di controllo riproduzione del registratore DVD.
Receiver (Ricevitore) L’audio viene generato dal ricevitore.
Impostazione (Setup) È possibile impostare l’ambiente d’uso di Anynet
+
.
Tasti del telecomando disponibili in modalità Anynet
+
Tipo di dispositivo Stato operativo Tasti disponibili
Dispositivo Anynet
+
Una volta attivato il dispositivo,
quando il menu del dispositivo
corrispondente appare sullo
schermo.
Tasti numerici
Tasti ▲/▼/◄/►/ENTER
Tasti colorati
Tasto EXIT
Una volta attivato il dispositivo,
quando si riproduce un file
W.LINK
(Ricerca indietro)
W.LINK
(Ricerca in avanti)
W.LINK
(Arresta)
W.LINK
W.LINK
(Riproduzione/Pausa)
Dispositivo con sintonizzatore
incorporato
Una volta attivato il dispositivo,
durante la visione di un
programma televisivo
Tasto P /
Dispositivo audio Una volta attivato il ricevitore
Tasto
W.LINK
/
W.LINK
Tasto MUTE
➢
La funzione Anynet
+
è utilizzabile solo quando il telecomando è impostato su TV.
➢
Il tasto REC funziona solo in fase di registrazione.
➢
Non è possibile controllare i dispositivi Anynet
+
utilizzando i pulsanti sul lato del televisore. I dispositivi
Anynet
+
possono essere controllati solo tramite telecomando.
➢
In determinate condizioni, il telecomando del televisore potrebbe non funzionare. In questo caso,
riselezionare il dispositivo Anynet
+
.
➢
Le funzioni Anynet
+
non sono utilizzabili con prodotti di altre case costruttrici.
➢
In modalità Anynet
+
, i tasti colorati potrebbero non funzionare in modo adeguato.
➢
Il funzionamento
W.LINK
,
W.LINK
potrebbe differire in base al tipo di dispositivo.
Registrazione
E’ possibile effettuare la registrazione di un programma TV utilizzando un registratore.
Premere il tasto REC.
La registrazione inizia. (Solo quando è collegato un dispositivo di registrazione Anynet
+
.)
➢
Il programma televisivo corrente viene registrato in modalità Watching TV (Guarda TV). Se si sta
guardando l’immagine di un altro dispositivo, vengono registrate le immagini di quel dispositivo.
➢
E’ inoltre possibile registrare stream sorgente selezionando Record (Registra) dopo aver premuto il
tasto TOOLS.
➢
Prima di registrare, controllare che il jack dell’antenna sia correttamente collegato al dispositivo di
registrazione.
Per il collegamento dell’antenna al dispositivo di registrazione, consultare il manuale dell’utente.
BN68-01528A-00Ita.indd 34 2008-4-21 15:46:16

Italiano - 35
Ascolto tramite il ricevitore
È possibile ascoltare l’audio tramite un ricevitore anzichè dagli altoparlanti del televisore.
1 Premere il tasto MENU per visualizzare il menu.
Premere il tasto ▲ o ▼ per selezionare Ingressi (Input), quindi premere ENTER.
2 Premere il tasto ▲ o ▼ per selezionare Anynet
+
(HDMI-CEC), quindi premere
ENTER.
3 Premere il tasto ▲ o ▼ per selezionare Receiver (Ricevitore), quindi premere
ENTER.
4 Premere il tasto ◄ o ► per selezionare Acceso (On), quindi premere ENTER.
Ora è possibile ascoltare l’audio tramite il ricevitore.
5 Premere il tasto EXIT per uscire.
➢
Se il ricevitore è impostato su Acceso (On), l’audio del televisore viene trasmesso dal
ricevitore a 2 canali.
➢
Se il ricevitore è utilizzabile esclusivamente con il sistema Home Theater (solo audio),
potrebbe non apparire nell’elenco dei dispositivi.
➢
In caso di contenuti protetti da copyright, il ricevitore potrebbe non funzionare correttamente.
➢
Quando si ascolta l’audio attraverso il ricevitore, vi sono limitazioni per l’uso del menu relativo all’audio e alla
funzione PIP.
Controlli da effettuare prima di contattare l’assistenza tecnica
Sintomo Soluzione
Anynet
+
non funziona. ■ Verificare che si stia utilizzando un dispositivo Anynet
+
. Il sistema Anynet
+
può essere utilizzato solo con dispositivi AV che supportano Anynet
+
.
■ Collegare solo un ricevitore.
■ Controllare che il cavo di alimentazione di Anynet
+
sia collegato
correttamente.
■
Controllare i collegamenti dei cavi Video/Audio/HDMI del dispositivo Anynet
+
.
■ Verificare che Anynet+ (HDMI-CEC) sia impostato su Acceso (On) nel
menu di impostazione di Anynet
+
.
■ Verificare che il telecomando del televisore sia in modalità TV.
■ Verificare che il telecomando sia esclusivo per il dispositivo Anynet
+
.
■ In particolari condizioni, Anynet
+
non funziona. (Ricerca canali)
■ Quando si collega o si rimuove il cavo HDMI, eseguire una nuova ricerca
dei dispositivi oppure spegnere e riaccendere il televisore.
■ Controllare che la funzione Anynet
+
o il dispositivo Anynet
+
siano accesi.
Per avviare Anynet
+
. ■ Verificare che il dispositivo Anynet
+
sia collegato correttamente al
televisore e che Anynet
+
(HDMI-CEC) sia impostato su Acceso (On) nel
menu Impostazione (Setup) di Anynet
+
.
■ Premere il tasto TV sul telecomando per passare al controllo del
televisore. Premere il tasto TOOLS per visualizzare il menu Anynet
+
e
selezionare l’opzione desiderata.
Per uscire da Anynet
+
. ■ Selezionare View TV (Visualizza TV) nel menu Anynet
+
.
■ Premere il tasto SOURCE sul telecomando del televisore e selezionare un
dispositivo non Anynet
+
.
■ Premere uno qualsiasi dei tasti P, CH LIST, e PRE-CH per cambiare
modalità TV. (Notare che il tasto dei canali funziona solo se non è
collegato un dispositivo Anynet
+
con sintonizzatore incorporato.)
Viene visualizzato il
messaggio Connecting
to Anynet
+
device…
(Connessione a un dispositivo
Anynet+ in corso...).
■ Non è possibile utilizzare il telecomando durante la configurazione di
Anynet+ o il passaggio a un’altra modalità di visualizzazione.
■ Utilizzare il telecomando solo al termine dell’impostazione di Anynet
+
o del
passaggio alla nuova modalità di visualizzazione.
Impossibile avviare la
riproduzione sul dispositivo
Anynet
+
.
■ Non è possibile riprodurre contenuti mentre è in corso la funzione Plug &
Play.
Lo schermo del dispositivo
esterno non appare.
■ Verificare che il dispositivo supporti le funzioni Anynet+.
■ Verificare che il cavo HDMI sia collegato correttamente.
■ Verificare che Anynet
+
(HDMI-CEC) sia impostato su Acceso (On) nel
menu di impostazione di Anynet
+
.
■ Cerca altri dispositivi Anynet
+
.
■ E’ possibile collegare un dispositivo Anynet
+
solo tramite cavo HDMI.
Alcuni cavi HDMI potrebbero non supportare le funzioni Anynet
+
.
Il programma TV non può
essere registrato.
■ Verificare che il jack dell’antenna sul dispositivo di registrazione sia
correttamente collegato.
Visualizza TV
Seleziona periferica
Registra
Menu periferica
Funz dispositivo
Ricevitore :Spento
Impostazione
TV P 1
Conferma
Sposta
Ritorno
BN68-01528A-00Ita.indd 35 2008-4-21 15:46:16

Italiano - 36
Funzione Teletext (a seconda del modello)
La maggior parte delle emittenti televisive fornisce informazioni scritte tramite il servizio Teletext.
La pagina Indice del servizio Teletext spiega come utilizzare il servizio. Inoltre, è possibile
selezionare varie opzioni tramite i tasti del telecomando.
☛
Per ricevere correttamente le informazioni del servizio Teletext, è necessario che la ricezione del
canale sia stabile. In caso contrario, le informazioni potrebbero apparire incomplete e alcune pagine
potrebbero mancare del tutto.
1
TV
Esce dalla visualizzazione teletext (in base al modello)
2
(salva)
Utilizzato per memorizzare le pagine del servizio Teletext.
3
(formato)
Premere questo tasto per raddoppiare le dimensioni delle
lettere nella metà superiore dello schermo. Premerlo
nuovamente per applicare la modifica anche alla metà inferiore
dello schermo.
Premerlo una terza volta per tornare allo schermo normale.
4
(mostra)
Consente di visualizzare il testo nascosto (risposte a quiz, ad
esempio). Per tornare alla modalità di visualizzazione normale,
premere di nuovo il tasto.
5
Tasti colorati (rosso/verde/giallo/blu)
Se l’emittente utilizza un sistema FASTEXT, i diversi argomenti
presenti in una pagina sono indicati con colori diversi e possono
essere selezionati premendo i tasti colorati corrispondenti.
Premere il tasto il cui colore corrisponde a quello dell’
argomento desiderato. La pagina viene visualizzata con
altre informazioni colorate selezionabili in modo analogo.Per
visualizzare la pagina precedente o successiva, premere il tasto
colorato corrispondente.
6
(teletext attivo/mix)
Premere questo tasto per attivare la modalità Teletext dopo
avere selezionato un canale che fornisce questo tipo di servizio.
Premere di nuovo il tasto per sovrapporre le informazioni del
servizio Teletext alla trasmissione corrente.
7
(modo)
Premere questo tasto per selezionare la modalità Teletext
(LIST/FLOF).
Se si preme LIST, viene attivata la modalità di List save (Salva
elenco). Questa modalità permette di salvare le pagine Teletext
utilizzando il tasto (store) (salva).
8
(pagina secondaria)
Visualizza la pagina secondaria disponibile.
9
(pagina su)
Consente di visualizzare la pagina Teletext successiva.
0
(pagina giù)
Consente di visualizzare la pagina Teletext precedente.
!
(indice)
Premere questo tasto in qualsiasi momento per visualizzare la
pagina Indice.
@
(blocca)
Consente di mantenere visualizzata una pagina, se quella
pagina è collegata a più pagine secondarie che scorrono
automaticamente. Per scorrere le pagine, premere
nuovamente il tasto.
#
(annulla)
Utilizzato per visualizzare le stazioni trasmittenti quando si
cerca una pagina.
➢
È possibile cambiare le pagine Teletext premendo i tasti
numerici sul telecomando.
Continua...
BN68-01528A-00Ita.indd 36 2008-4-21 15:46:18

Italiano - 37
Le pagine teletext sono organizzate in base a sei categorie:
Parte Sommario
A
B
C
D
E
F
Numero della pagina selezionata.
Identità della stazione emittente.
Numero della pagina corrente o stato della ricerca.
Data e ora
Testo.
Informazioni sullo stato.
Informazioni FASTEXT.
➢
Le informazioni del Teletext sono spesso suddivise su più pagine
visualizzate in sequenza alle quali è possibile accedere come
segue:
Immettendo il numero di pagina
Selezionando un titolo in un elenco
Selezionando un’intestazione colorata (sistema FASTEXT)
➢
Premere il tasto TV per uscire dal Teletext.
BN68-01528A-00Ita.indd 37 2008-4-21 15:46:19

Italiano - 38
Specifiche del kit di supporto a parete (VESA)
Installare il supporto su una parete solida perpendicolare al pavimento.
Se il supporto deve essere fissato ad altri tipi di materiale, consultare il rivenditore di zona.
Una installazione a soffitto o su pareti inclinate può provocare la caduta dell’unità e lesioni
personali.
Famiglia di prodotti
poll. Spec. VESA (A * B) Vite standard Quantità
LCD-TV
23 ~ 26 200
*
100 M4
4
32 ~ 40 200
*
200 M6
46 ~ 52
400 * 400
600 * 400
M8
57
700 * 400
(No VESA)
57 ~ 70 800 * 4000
80 ~ 1400 * 800
PDP-TV
42 ~ 58
400 * 400
600 * 400
M8
4
63
676 * 407
(No VESA)
6
63 ~ 70 800 * 400 4
80 ~ 1400 * 800 4
➢
Sono disponibili kit di montaggio a parete per tutte le dimensioni standard, come mostra la tabella
precedente.
➢
Insieme al kit di montaggio a parete vengono forniti anche un manuale di istruzioni e tutti i
componenti necessari per l’assemblaggio.
➢
Non utilizzare viti più lunghe rispetto alle dimensioni standard, in quanto potrebbero danneggiare
l’interno del televisore.
➢
Per installazioni a parete con viti non conformi agli standard VESA, la lunghezza delle viti può variare
a seconda delle relative specifiche.
➢
Non utilizzare viti non conformi agli standard VESA. Non serrare eccessivamente le viti, in quanto
potrebbero danneggiare il prodotto o causarne la caduta con conseguente rischio di infortuni.
Samsung declina ogni responsabilità per questo tipo di incidenti.
➢
Samsung declina ogni responsabilità in caso di danni al prodotto o infortuni dovuti a un’installazione
non conforme agli standard VESA o alle specifiche indicate oppure alla mancata osservanza delle
istruzioni di installazione del prodotto.
➢
I modelli a 57” e a 63” non sono conformi alle specifiche VESA. Di conseguenza, con questo modello
è necessario utilizzare un kit di montaggio a parete apposito.
➢
Non superare i 15° di inclinazione quando si monta questo televisore.
Non installare il Supporto a parete mentre il televisore è acceso.
In caso contrario, potrebbero verificarsi incidenti con lesioni personali causate da scosse elettriche.
BN68-01528A-00Ita.indd 38 2008-4-21 15:46:19

Italiano - 39
Cavo seriale (da 1P a 1P) (Non fornito)
Pannello posteriore
Montaggio a parete
Regolazione montaggio a parete (kit venduto separatamente)
Una volta installato il supporto a parete, è possibile regolare facilmente la posizione del televisore.
Visualizzazione del menu
1 Premere il tasto ▲, ▼, ◄ o ► sul telecomando.
➢
Viene visualizzata la schermata Regolazione montaggio a
parete.
➢
Mentre si guarda la televisione, se premendo un tasto di
direzione la schermata Regolazione montaggio a parete non
appare, utilizzare il menu per visualizzare la schermata.
• Premere il tasto MENU per visualizzare il menu. Premere
il tasto ▲ o ▼ per selezionare Impostazione, quindi
premere ENTER.
• Premere il tasto ▲ o ▼ per selezionare
Regolazione
montaggio a parete, quindi premere ENTER.
Ritrovamento della posizione
2 Effettuare la regolazione fino a impostare la posizione
desiderata utilizzando i tasti ▲, ▼, ◄, ►.
➢
Quando sullo schermo del televisore non sono visualizzati
menu OSD, premendo un tasto freccia appare la
schermata di regolazione.
➢
Premere INFO per reimpostare i valori. Premere il tasto
◄ o ► per selezionare Sì, quindi premere ENTER. La
posizione viene inizializzata alle impostazioni predefinite.
3 Premere il tasto blu.
Per salvare la posizione corrente, premere i tasti ▲ e ▼
per selezionare una modalità di salvataggio tra Posizione1,
Posizione2 o Posizione3.
➢
Per non salvare la posizione corrente, premere il tasto
RETURN.
➢
Quando si seleziona una modalità di salvataggio, non è
possibile utilizzare i tasti Colore.
4 Premere ENTER per salvare.
➢
Quando è selezionata la modalità Posizione1, viene
visualizzato il messaggio Posizione corrente salvata
come Posizione1.
5 Premere il tasto ENTER.
➢
La posizione salvata viene visualizzata a sinistra del menu OSD.
Sposta
Conferma
Ritorno
Plug & Play
Lingua : Italiano
Ora
Effetto luce
:
Mod visione ON
Regolazione montaggio a parete
Melodia : Spento
Entertainment : Cinema
Risp. energia : Spento
Impostazione
T V
Regolazione montaggio a parete
Regola
Salva Centrale
►
►
►
►
►
►
►
►
321
Posizione
Salva
Ritorno
Sposta
Conferma
Selez modalità di salvataggio.
Posizione 1
Posizione 2
Posizione 3
BN68-01528A-00Ita.indd 39 2008-4-21 15:46:21

Italiano - 40
Spostamento sulla posizione memorizzata
1 Completare la Fase 1 di Entering the menu (Accesso al menu).
2 Premendo un tasto Colore (Rosso, Verde, Giallo) è possibile
spostare il supporto a parete nella posizione memorizzata.
➢
E’ possibile spostare il supporto a parete su una delle tre
posizioni preimpostate semplicemente premendo i tasti colore
Rosso (Posizione1), Verde (Posizione2) o Giallo (Posizione3).
➢
Se si regola la posizione dopo aver effettuato lo spostamento
su una posizione preimpostata, la visualizzazione della
posizione scompare.
➢
Per informazioni sull’installazione, consultare il Manuale di
installazione fornito insieme al supporto a parete.
➢
Per l’installazione del prodotto e l’installazione e lo spostamento
del supporto a parete, consultare un installatore specializzato.
➢
Utilizzare questo manuale di installazione quando è possibile
fissare il supporto a una parete. Se il supporto deve essere fissato
ad altri tipi di materiale, consultare il rivenditore di zona.
➢
L’Auto Wall Mount non funziona se Anynet+ è operativa.
➢
Il modello da 42 pollici non è compatibile con il supporto a parete
di vecchio tipo (WMN5090A).
Assemblaggio del piedistallo (a seconda del modello)
Utilizzare le 6 viti fornite in dotazione per fissare saldamente
la base del piedistallo al monitor.
L’aspetto dell’unità può variare rispetto all’immagine.
In caso di installazione a parete del
televisore, chiudere il coperchio
(1)
sul
raccordo del piedistallo utilizzando due viti.
Avvertenza
Fissare saldamente il televisore al
piedistallo prima di muoverlo.
In caso contrario, potrebbe cadere
causando gravi lesioni.
➢
Il televisore deve essere
trasportato da due o più persone.
Non appoggiare mai il televisore
sul pavimento perché lo schermo
potrebbe subire danni.
Appoggiare sempre il televisore il
posizione diritta.
Attenzione
Regolazione montaggio a parete
Regola
Salva Centrale
►
►
►
►
►
►
►
►
321Position
Posizione 1
BN68-01528A-00Ita.indd 40 2008-4-21 15:46:23

Italiano - 41
Fissaggio del televisore alla parete
Tirare, spingere o arrampicarsi sul televisore sono azioni che possono provocarne la caduta.
Si raccomanda di non far giocare i bambini con il televisore poiché potrebbero appendersi ad
esso destabilizzandolo; se ciò dovesse verificarsi, il televisore potrebbe cadere provocando
lesioni personali gravi e perfino mortali. Seguire tutte le precauzioni di sicurezza descritte della
documentazione allegata. Per una maggiore stabilità e sicurezza del prodotto, installare il
dispositivo anticaduta come segue.
Per evitare una eventuale caduta del televisore:
1. Avvitare saldamente i ganci alla parete. Vericare che le viti
di ssaggio siano ben serrate.
A seconda del tipo di parete, potrebbe essere necessario
utilizzare anche un sher.
Poiché i ganci, le viti e il cavo di sicurezza non sono
forniti in dotazione, è necessario acquistare tali materiali
separatamente.
2. Rimuovere le viti dal centro del pannello posteriore del
televisore, inserirle nei ganci e quindi avvitarle nuovamente al
televisore.
Le viti potrebbero non essere fornite insieme al prodotto.
In questo caso, acquistare le viti separatamente in base
alle speciche qui riportate.
3. Collegare i ganci ssati al televisore a quelli ssati alla parete
utilizzando un cavo resistente, quindi legarlo strettamente.
Installare il televisore il più possibile vicino alla parete in
modo che non possa cadere all’indietro.
Collegare il cavo in modo che i ganci ssati alla parete si
trovino allineati o leggermente più in basso di quelli ssati al
televisore.
Slegare il cavo prima di spostare il televisore.
4. Accertarsi che tutte le connessioni siano adeguatamente ssate. Controllare periodicamente le
connessioni per vericarne l’eventuale usura o rottura. Per qualsiasi dubbio relativo alla sicurezza
delle connessioni effettuate, contattare un installatore specializzato.
➣
➣
➣
➣
➣
➣
Parete
Parete
Attenzione
BN68-01528A-00Ita.indd 41 2008-4-21 15:46:24

Italiano - 42
Risoluzione dei problemi
Prima di contattare il servizio di assistenza Samsung, eseguire i seguenti semplici controlli.
Se il problema persiste, annotare il modello e il numero di serie del televisore e contattare il
proprio rivenditore.
Nessun audio o immagine
Controllare che il cavo di alimentazione sia collegato alla presa di corrente.
Controllare di avere premuto il tasto di accensione (Acceso/Spento) sul pannello frontale o il tasto
POWER sul telecomando
Controllare le impostazioni relative al contrasto e alla luminosità dell’immagine.
Controllare il volume.
Verificare se la funzione Altoparlante TV è impostata su Spento.
Immagine normale ma audio assente
Controllare il volume.
Controllare se si è premuto il tasto MUTE del telecomando.
Nessuna immagine oppure immagine in bianco e nero
Regolare le impostazioni del colore.
Controllare se la selezione del sistema di trasmissione è corretta.
Interferenze di audio e immagine
Provare a identificare l’apparecchiatura elettrica che causa le interferenze e spostarla più lontano.
Collegare il televisore a un’altra presa di corrente.
Immagini offuscate o poco nitide, audio distorto
Controllare la direzione e i collegamenti dell’antenna.
Le interferenze sono spesso dovute all’uso di un’antenna interna.
Telecomando non funzionante
Sostituire le batterie del telecomando.
Pulire il bordo superiore del telecomando (finestra di trasmissione).
Controllare che i terminali “+” e “-” delle batterie siano inseriti correttamente.
Controllare che le batterie non siano scariche.
Lo schermo è nero e l’indicatore di alimentazione lampeggia in modo continuo
Sul computer controllare l’alimentazione e il cavo segnale.
Il televisore sta utilizzando il proprio sistema di gestione alimentazione.
Muovere il mouse o premere un tasto qualsiasi sulla tastiera del computer.
Sul dispositivo (STB, DVD, ecc.) verificare l’alimentazione e il cavo segnale.
Il televisore sta utilizzando il proprio sistema di gestione alimentazione.
Premere il tasto Source sul pannello di controllo o sul telecomando.
Spegnere e riaccendere il televisore.
L’immagine danneggiata viene visualizzata nell’angolo dello schermo.
Se in alcune periferiche esterne è selezionata l’opzione Solo scansione, l’immagine danneggiata
può essere visibile nell’angolo dello schermo. Questa anomalia è causata dalle periferiche esterne,
non dal televisore.
Viene visualizzato il messaggio “Ripristina tutte le impostazione ai valori predefiniti”.
Ciò si verifica quando si tiene premuto il tasto EXIT per qualche istante. Le impostazioni del prodotto
vengono reimpostate ai valori di fabbrica.
BN68-01528A-00Ita.indd 42 2008-4-21 15:46:24

Italiano - 43
Specifiche
Le descrizioni e le caratteristiche riportate in questo manuale sono fornite unicamente a scopo
informativo e sono soggette a modifiche senza preavviso.
Nome del modello PS50A470
Dimensione schermo
(Diagonale)
50 pollici
Risoluzione PC 1360 x 768 @ 60 Hz
Uscita audio 10 W + 10 W
Dimensioni
(Lar.xAlt.xPro.)
Corpo
Con supporto
1290 x 740 x 95 mm
1290 x 804 x 319 mm
Peso
Corpo
Con supporto
39 kg
41 kg
Caratteristiche ambientali
Temperatura di esercizio
Umidità di esercizio
Temperatura di stoccaggio
Umidità di stoccaggio
10 °C to 40 °C (50 °F to 104 °F)
10% to 80%, non-condensing
-20 °C to 45 °C (-4 °F to 113 °F)
5% to 95%, non-condensing
➢
Questo prodotto è un dispositivo di Classe B.
Design e specifiche sono soggetti a modifiche senza preavviso.
Per l’alimentazione elettrica e il consumo di corrente, consultare l’etichetta apposta sul prodotto.
BN68-01528A-00Ita.indd 43 2008-4-21 15:46:24

Italiano - 44
Schema blocco
BN68-01528A-00Ita.indd 44 2008-4-21 15:46:32

Corretto Smaltimento del Prodotto
(Riuti Elettrici ed Elettronici)
(Applicabile in i paesi dell’Unione Europea e in quelli con sistema di
raccolta differenziata)
Il marchio riportato sul prodotto o sulla sua documentazione indica
che il prodotto non deve essere smaltito con altri rifiuti domestici al
termine del ciclo di vita. Per evitare eventuali danni all’ambiente o alla
salute causati dall’inopportuno smaltimento dei rifiuti, si invita l’utente
a separare questo prodotto da altri tipi di rifiuti e di riciclarlo in maniera
responsabile per favorire il riutilizzo sostenibile delle risorse materiali.
Gli utenti domestici sono invitati a contattare il rivenditore presso il
quale è stato acquistato il prodotto o l’ufficio locale preposto per tutte
le informazioni relative alla raccolta differenziata e al riciclaggio per
questo tipo di prodotto.
Gli utenti aziendali sono invitati a contattare il proprio fornitore
e verificare i termini e le condizioni del contratto di acquisto.
Questo prodotto non deve essere smaltito unitamente ad altri rifiuti
commerciali.
BN68-01528A-00Ita.indd 45 2008-4-21 15:46:33

Español - 2
© 2008 Samsung Electronics Co., Ltd. All rights reserved.
Instrucciones para el usuario
Retención de imágenes en la pantalla
No visualice una imagen fija (como las de un videojuego o cuando el PDP está conectado a un PC)
en el panel del monitor de plasma durante más de 2 horas porque podría causar la retención de
imagen en pantalla. Este fenómeno de retención de imágenes también se denomina “quemadura de
pantalla”. Para evitar que se produzca esa persistencia de la imagen, reduzca el nivel de luminosidad
y de contraste de la pantalla cuando muestre imágenes fijas.
Altura
La PDP puede funcionar normalmente hasta altitudes de 2.000 metros. No la instale ni utilice en
lugares que se encuentren a más de 2.000 metros de altitud porque el funcionamiento podría ser
irregular.
Calor en la parte superior del TV PDP
La parte superior del aparato puede calentarse tras un uso prolongado ya que el calor se disipa
desde el panel a través de los orificios de ventilación de la parte superior del aparato. Esto es normal
y no indica ningún defecto ni fallo de funcionamiento del aparato. No obstante, debe evitarse que los
niños toquen la parte superior del aparato.
El aparato emite una especie de ‘crujido’.
El ruido similar a un ‘crujido’ puede producirse cuando el aparato se contrae o se expande debido
a un cambio ambiental de temperatura o humedad. Este hecho es normal y no se trata de ningún
defecto en la unidad.
Defecto de celda
La PDP utiliza un panel compuesto de 1.230.000 (nivel SD) a 3.150.000 (nivel HD) píxeles que
requieren una sofisticada tecnología para su producción. No obstante, puede que existan unos
cuantos píxeles brillantes u oscuros en la pantalla. Estos píxeles no influirán en el rendimiento del
aparato.
Evite que el TV funcione a temperaturas por debajo de 5°C (41°F)
La imagen fija visualizada durante demasiado tiempo puede causar daños permanentes en el
panel de la PDP.
Ver el TV PDP en formato 4:3 durante un tiempo prolongado puede dejar
rastros de bordes en la izquierda, derecha o centro de la pantalla causados
por la diferencia de emisión de luz en la pantalla. Reproducir un DVD o una
videoconsola puede causar un efecto similar en la pantalla. La garantía no
cubre estos daños.
Restos de imágenes en pantalla.
Ver imágenes fijas de videojuegos y PC durante más tiempo del indicado puede producir restos
de imágenes parciales. Para evitar este efecto, reduzca el ‘brillo’ y el ‘contraste’ cuando vea
imágenes fijas.
Garantía
- La garantía no cubre los daños causados por la retención de imagen.
- La garantía no cubre el desgaste de la pantalla.
Instalación
Póngase en contacto con un centro de servicio técnico autorizado cuando instale el equipo en un
lugar expuesto a gran cantidad de polvo, temperaturas extremas, alto nivel de humedad y productos
químicos, y en lugares donde se vaya a utilizar continuamente, como aeropuertos, estaciones, etc.
Contactar con SAMSUNG WORLDWIDE
Si tiene cualquier comentario o pregunta referentes a los productos Samsung, póngase en contacto
con el Centro de atención al cliente de SAMSUNG. (Consulte la cubierta posterior para obtener más
información.)
BN68-01528A-00_SPA.indd 2 4/21/2008 3:18:39 PM

Español - 3
Símbolos
☛ ➢
Pulse
Importante
Nota
Índice
Información general
Instrucciones para el usuario .......................... 2
Comprobación de los componentes ............... 4
Uso del soporte ............................................... 4
Panel de control .............................................. 5
Panel de conexiones ....................................... 6
Aspecto general del mando a distancia .......... 8
Funcionamiento
Apagado y encendido del televisor ................. 9
Visualización de los menús ............................. 9
Función Plug & Play ...................................... 10
Uso del botón TOOLS ................................... 12
Visualización de las fuentes de señales
externas ........................................................ 12
Edición de los nombres de los dispositivos .. 13
Control de los canales
Memorización automática de canales ........... 13
Memorización manual de canales ................14
Adición y bloqueo de canales ....................... 15
Orden de los canales memorizados .............16
Asignación de nombres a los canales .......... 16
Sintonización precisa de la recepción de
canales .......................................................... 17
Control de la imagen
Cambio del formato de la imagen ................. 18
Personalización de la conguración de la
imagen .......................................................... 18
Conguración detallada de los valores de la
imagen .......................................................... 19
Opciones de imagen ..................................... 20
Uso de la función 3D ..................................... 22
Reajuste de los valores de la imagen a los
valores predenidos de fábrica ..................... 24
Control del sonido
Funciones de sonido ..................................... 25
Selección del modo de sonido (según modelo)
.. 26
Conexión de los auriculares
(se venden por separado) ............................. 26
Descripción de las funciones
Funciones de hora ........................................ 27
Idioma/Melodía/Efecto de luz/Ocio/
Ahorro energía/PIP ....................................... 28
Pantalla de PC
Conguración del software del PC
(basado en Windows XP) .............................29
Modo de entrada (PC) ..................................30
Conguración del ordenador PC ................... 31
Acerca de Anynet+
¿Qué es Anynet?+? ...................................... 32
Conexión de dispositivos Anynet+ ................ 32
Conguración de Anynet+ ............................. 33
Búsqueda y cambio de dispositivos
Anynet+ ......................................................... 33
Grabación .....................................................34
Escucha a través de un receptor .................. 35
Compruebe estos puntos antes
de solicitar servicio técnico ........................... 35
Apéndice
Función de teletexto (según el modelo) ........ 36
Especicaciones del equipo de montaje
mural (VESA) ................................................ 38
Ajuste de montaje mural
(se vende por separado) ............................... 39
Cómo montar la base del soporte
(según el modelo)
.......................................... 40
Fijación del televisor a la pared ....................
41
Solución de problemas .................................42
Especicaciones ........................................... 43
Español
BN68-01528A-00_SPA.indd 3 4/21/2008 3:18:39 PM

Español - 4
Uso del soporte
➢
La PDP la deben transportar dos
o más personas. Nunca deje la
PDP en el suelo ya que la pantalla
puede sufrir daños. Mantenga
siempre la PDP en posición
vertical.
La PDP se puede girar 20 grados a
derecha e izquierda.
Comprobación de los componentes
Manual del usuario Mando a distancia/
Pilas AAA
Cable de alimentación Paño de limpieza
Tarjeta de garantía/
Manual de seguridad (No
está disponible en todas
las ubicaciones.)
Tapa-Inferior/Dos tornillos
(Consulte la página 40)
Núcleo de ferrita para cable
de alimentación
Núcleo de ferrita para
S-Vídeo
Se venden por separado
Cable de la antena Cables de los
componentes
Cables de audio Cable de PC
Cable Scart (Euroconector) Cable de audio de PC Cable HDMI Cable HDMI/DVI
➢
Núcleo de ferrita (cable de alimentación, S-Vídeo)
Los núcleos de ferrita se utilizan para proteger los cables de las
interferencias.
Cuando conecte un cable, abra el núcleo de ferrita y fíjelo
alrededor del cable cerca del conector.
-20° ~ 20°
BN68-01528A-00_SPA.indd 4 4/21/2008 3:18:42 PM

Español - 5
1
SOURCE
Muestra un menú de todas las fuentes de
entrada disponibles (TV, Ext.1, Ext.2,
AV
,
S-Video
,
Componente
,
PC
,
HDMI1
,
HDMI2,
HDMI3
)
.
➢
En el menú en pantalla, utilice este botón
como lo haría con el botón ENTER del
mando a distancia.
2
MENU
Púlselo para ver el menú en pantalla con las
opciones del televisor.
3
– +
Púlselos para subir o bajar el volumen.
En el menú en pantalla, use los botones
– + del mismo modo que los botones
◄ y ► del mando a distancia.
4
C/P.
Permiten cambiar de canal. En el menú en
pantalla, use los botones C/P. del
mismo modo que los botones ▲ y ▼ del
mando a distancia.
5
Indicador de encendido
Parpadean y se apagan cuando se enciende
el aparato y se ilumina en el modo en espera.
6
El botón de encendido
Púlselo para encender o apagar el TV.
7
Sensor del mando a distancia
El mando a distancia debe dirigirse hacia este
punto del televisor.
8
Altavoz
Panel de control
Panel frontal (o lateral)
➢
El color y la forma del producto pueden variar según el modelo.
BN68-01528A-00_SPA.indd 5 4/21/2008 3:18:43 PM

Español - 6
Panel de conexiones
☛
Al conectar un sistema de audio o vídeo al aparato, asegúrese de que todos los elementos
estén apagados.
Cuando conecte un dispositivo externo, debe hacer coincidir los colores del terminal de conexión
y del cable.
Continúa…
1
POWER IN
Conexión para el cable de alimentación
suministrado.
2
COMPONENT IN
Entradas de audio (AUDIO L/R) y vídeo
(Y/PB/PR) para componentes.
3
PC IN / AUDIO
Se conecta a la toma de salida de audio y
vídeo del PC.
4
EXT 1, EXT 2
Tomas de entrada o salida para dispositivos
externos, como aparatos de vídeo,
reproductores de DVD, consolas de
videojuegos o reproductores de videodiscos.
Especificaciones de entrada/salida
Conector
Entrada Salida
Vídeo Audio(L/R) RGB Vídeo + Audio (L/R)
EXT 1 ✔ ✔ ✔
Sólo está disponible la
salida de TV.
EXT 2 ✔ ✔ La salida que puede elegir.
5
3D SYNC OUT
Conexión para un emisor de infrarrojos 3D
6
Conexión de dispositivos de audio
externos
Puede conectar las señales de audio desde el
televisor a una fuente externa, como un equipo
de audio.
7
SERVICE
− Conector para servicio.
− Conecte un terminal serie entre
el soporte del montaje mural ajustable
eléctricamente y el televisor cuando se
desee ajustar el ángulo de visualización del
televisor mediante el mando a distancia.
Panel posterior
➢
Barva in oblika izdelka sta odvisni od modela.
Red de televisión
por cable
1
432 6 8
9
7
o
o
5
BN68-01528A-00_SPA.indd 6 4/21/2008 3:18:46 PM

Español - 7
8
HDMI IN 1,2
− No se necesita conexión de audio adicional
para una conexión de HDMI a HDMI.
− Cuando se usa una conexión de cable
HDMI/DVI, se debe conectar en el terminal
HDMI IN 2.
➢
¿Qué es HDMI?
− “La interfaz multimedia de alta
definición” (HDMI) permite la
transmisión de los datos de vídeo digital
de alta definición y varios canales de
sonido digital.
− El terminal HDMI/DVI admite la
conexión DVI con un dispositivo
ampliado mediante el cable apropiado
(no suministrado). La diferencia entre
los dispositivos HDMI y DVI es que el
HDMI es más pequeño, tiene instalada la
función de codificación HDCP (protección
alta de la copia digital del ancho de
banda) y es compatible con el sonido
digital de varios canales.
DVI IN (HDMI 2) AUDIO R/L
Salidas de audio DVI para dispositivos
externos.
9
ANT IN
Conector coaxial de 75 Ω para antena o red
por cable.
Modos compatibles con HDMI/DVI y componentes
480i 480p 576i 576p 720p 1080i
HDMI/DVI 50 Hz X X X O O O
HDMI/DVI 60 Hz X O X X O O
Componente O O O O O O
1
HDMI IN 3
Conexión HDMI de un dispositivo que tenga
salida HDMI.
2
S-VIDEO o VIDEO/AUDIO L/R
Entradas de vídeo (S-Vídeo o Vídeo) y
audio para dispositivos externos, como una
videocámara o un reproductor de vídeo.
3
Conector de los auriculares
Puede conectar un equipo de auriculares
si desea ver un programa de televisión sin
molestar a otras personas que se encuentren
en la misma sala.
➢
El uso continuado de auriculares a
un volumen elevado puede dañar la
capacidad auditiva.
➢
El color y la forma del producto pueden variar según el modelo.
Panel lateral
o
3
1
2
BN68-01528A-00_SPA.indd 7 4/21/2008 3:18:48 PM

Español - 8
Continúa…
Aspecto general del mando a distancia
1
Botón POWER
(enciende y apaga el
televisor)
2
Selecciona directamente el
modo TV
3
Botones numéricos para
acceso directo a los canales
4
Selección de canal de uno/
dos dígitos
5
Interrupción momentánea
del sonido
6
Subir el volumen
Bajar el volumen
7
Botón de control del canal
(consulte la página 15)
8
Se usa para seleccionar
rápidamente las funciones
que se usan con mayor
frecuencia.
9
Control del cursor en el
menú
0
Se utiliza para ver
información sobre la emisión
actual
#
Pulse este botón
para seleccionar una
visualización y unos modos
de sonido opcionales en los
deportes, películas y juegos.
$
Funciones de VCR/DVD
(Rebobinar, Detener,
Reproducir/Pausa, Avance
Rápido)
%
Selección de fuente
disponible
^
Canal anterior
&
Canal siguiente
Canal anterior
*
Muestra el menú principal en
la pantalla
(
Botón del modo TruSurround XT
)
Vuelve al menú anterior
a
Salir del menú en pantalla
b
Selección del tamaño de la
imagen
c
Se usa cuando se conecta
un dispositivo SAMSUNG
DMA (Adaptador digital
multimedia) mediante una
interfaz HDMI y se cambia
al modo DMA. (El botón
DMA es opcional.) Para
obtener más información
sobre los procedimientos
de funcionamiento, consulte
el manual del usuario del
dispositivo DMA.
Este botón
está disponible cuando
“Anynet+ (HDMI-CEC)”
(Anynet+ (HDMI-CEC)) está
configurado como “Act.” (On).
(Consulte la página 33.)
d
Selección de efectos de
imagen (consulte la página 18)
e
Visualiza películas o juegos
3D dimensionalmente con las
gafas 3D.
Funciones del teletexto
(Consulte la página 36)
2
Sale del teletexto (según los
modelos)
7
Memorización de teletexto
8
Tamaño del teletexto
0
Mostrar el teletexto
!
Selección de tema de
Fastext
@
Visualización de teletexto/
mezclar información de
teletexto y emisión normal
%
Selección del modo del
teletexto (LIST/FLOF)
^
Página secundaria de
teletexto
&
P : Página siguiente del
teletexto
P : Página anterior del
teletexto
*
Índice del teletexto
)
Teletexto en espera
a
Cancelar teletexto
BN68-01528A-00_SPA.indd 8 4/21/2008 3:18:50 PM

Español - 9
Instalación de las pilas en el mando a distancia
1 Levante la tapa de la parte posterior del mando a distancia,
como se muestra en la ilustración.
2 Instale dos pilas de tamaño AAA.
➢
Asegúrese de que los extremos “+” y “–” de las
pilas concuerden con el diagrama del interior del
compartimiento.
No mezcle distintos tipos de pilas, por ejemplo
alcalinas y de manganeso.
3 Cierre la tapa, como se muestra en la ilustración.
➢
Si no va a utilizar el mando a distancia durante mucho tiempo, quite las pilas y guárdelas en un
lugar fresco y seco. El mando a distancia se puede utilizar hasta una distancia de 7 metros del
televisor. (Suponiendo un uso normal del TV, las pilas duran aproximadamente un año.)
➢
Si el mando a distancia no funciona. Efectúe estas comprobaciones.
1. Está encendido el televisor?
2. Están intercambiados los polos positivos y negativos de las pilas?
3. Se han agotado las pilas?
4. Ha habido un corte de energía o se ha desenchufado el cable?
5. Hay en las proximidades un fluorescente o un neón?
Apagado y encendido del televisor
El cable de alimentación se encuentra en la parte posterior del televisor.
1 Enchufe el cable de alimentación en una toma eléctrica adecuada.
➢
La tensión principal se indica en la parte posterior del televisor y la frecuencia es de 50 o 60 Hz.
2 Pulse el botón POWER (Encendido/Apagado) del frontal del televisor o el botón POWER
del mando a distancia para encender el televisor. El canal que veía por última vez se vuelve a
seleccionar automáticamente. Si aún no ha memorizado ningún canal, no aparecerá ninguna imagen
definida. Consulte “Memorización automática de canales” en la página 13 o “Memorización manual
de canales” en la página 14.
➢
Cuando el televisor se enciende por primera vez, algunos valores se establecen de forma
automática. Consulte “Función Plug & Play” en la página 10.
3 Para apagar el televisor, pulse el botón POWER (Encendido/Apagado) del frontal del televisor o el
botón POWER del mando a distancia.
4 Para encender el televisor, pulse el botón POWER (Encendido/Apagado) del frontal del televisor o
el botón POWER o los botones numéricos del mando a distancia.
Visualización de los menús
1 Pulse el botón MENU.
En la pantalla aparece el menú principal
Su parte izquierda tiene seis iconos:
Imagen, Sonido, Canal,
Configuración y Entrada.
2 Pulse los botones ▲ o ▼ para seleccionar uno de los iconos.
Pulse el botón
ENTER para acceder al submenú del icono.
3 Pulse los botones ▲ o ▼ para desplazarse a los elementos
del menú.
Pulse el botón
ENTER para aceptar los elementos del menú.
4 Pulse los botones ▲/▼/◄/► para cambiar los elementos
seleccionados.
Pulse el botón
RETURN para volver al menú anterior.
5 Pulse el botón EXIT para salir del menú.
Mover
Entrar
Salir
Modo :
Estándar
Iluminación de la celda
7
Contraste 95
Brillo 45
Nitidez 50
Color 50
Matiz V50 R50
Configuración detallada
Opciones de imagen
Restablecer : Aceptar
Imagen
T V
BN68-01528A-00_SPA.indd 9 4/21/2008 3:18:51 PM

Español - 10
Función Plug & Play
Cuando el televisor se enciende por primera vez, algunos
valores se establecen de forma automática y correlativa:
Están disponibles los ajustes siguientes.
☛
Si accidentalmente selecciona un país erróneo para su
televisor, los caracteres de la pantalla se puede ver de manera
incorrecta.
1 Si el televisor está en modo de espera, pulse el botón POWER
del mando a distancia. Aparece el mensaje Iniciar Plug &
Play. Pulse el botón ENTER.
2 El menú Idioma aparece automáticamente al cabo de unos
segundos.
3 Seleccione el idioma apropiado pulsando los botones ▲ o ▼.
Pulse el botón
ENTER. Aparece automáticamente el mensaje
Seleccione 'Uso doméstico' para instalar el TV en casa.
4 Pulse los botones ◄ o ► para seleccionar Demo tienda
o Uso doméstico, a continuación, pulse el botón ENTER.
Aparece el mensaje para comprobar si la antena está
conectada.
➢
La selección predeterminada es Uso doméstico.
➢
Es recomendable configurar el televisor en el modo Uso
doméstico para obtener la mejor imagen en un entorno
doméstico.
➢
El modo Demo tienda sólo es necesario en los entornos
comerciales.
➢
Si la unidad accidentalmente se configura en el modo
Demo tienda y se desea volver a Uso doméstico
(Estándar): Pulse el botón Volume. Cuando se muestra
la OSD del volumen, mantenga pulsado el botón MENU
durante 5 segundos.
5 Conecte la antena al televisor.
Pulse el botón
ENTER. Aparece el menú País.
6 Seleccione el país (o área) pulsando los botones ▲ o ▼.
Pulse el botón ENTER.
Continúa…
Plug & Play
P 1 C -- 40 MHz
0 %
Entrar
Omitir
Empezar
Plug & Play
Iniciar Plug & Play.
OK
Entrar
Plug & Play
Seleccione 'Uso doméstico' para
instalar el TV en casa.
Mover
Entrar
Demo tienda
Uso doméstico
Plug & Play
Comprobar la entrada de la antena
Entrar
Omitir
Aceptar
Plug & Play
País
Mover
Entrar
Omitir
▲
Holanda
España
Suiza
Otros
Plug & Play
Idioma
Mover
Entrar
España
Suiza
Reino Unido
Otros
▼
BN68-01528A-00_SPA.indd 10 4/21/2008 3:18:52 PM

Español - 11
7 Pulse el botón ENTER para iniciar la búsqueda de los
canales. La búsqueda de canales se iniciará y terminará
automáticamente. Después de memorizar todos los canales, se
muestra el menú Ajustar hora. Pulse el botón ENTER.
➢
Para detener la búsqueda antes de que finalice, pulse el botón
ENTER con Stop seleccionado.
8 Pulse los botones ◄ o ► para seleccionar Mes, Fecha, Año,
Hora o Minuto. Ajuste estos valores pulsando los botones ▲
o ▼.
➢
Puede ajustar directamente Mes, Fecha, Año, Hora o
Minuto con los botones numéricos del mando a distancia.
9 Pulse el botón ENTER para confirmar la selección. Aparecerá
el mensaje Disfrutar su visión. Cuando termine, pulse el botón
ENTER.
➢
Aunque no se pulse el botón ENTER el mensaje
desaparecerá automáticamente tras unos segundos.
Si desea reiniciar esta función...
1
Pulse el botón MENU para ver el menú.
2 Pulse los botones ▲ o ▼ para seleccionar Configuración y, a
continuación, pulse el botón ENTER.
3
Vuelva a pulsar el botón ENTER para seleccionar Plug & Play.
Aparece el mensaje Iniciar Plug & Play.
Plug & Play
Mover
Ajustar
Entrar
01 01
2008
00
04
Ajustar hora
Mes Fecha Año Hora
Minuto
Aceptar
Disfrutar su visión
Mover
Entrar
Volver
Plug & Play
Idioma : Español
Hora
Efecto de luz
:
Modo enc. act.
Ajuste del montaje mural
Melodía : Desactivado
Ocio
:
Desactivado
Ahorro energía : Desactivado
PIP
Configuración
T V
BN68-01528A-00_SPA.indd 11 4/21/2008 3:18:52 PM

Español - 12
Uso del botón TOOLS
Se puede usar el botón TOOLS para seleccionar rápida y fácilmente las funciones que se usan
con más frecuencia. El menú “ Herramientas” cambia según el modo de entrada externo que se
está viendo.
1 Pulse el botón TOOLS.
Aparece el menú Herramientas.
2 Pulse los botones ▲ o ▼ para seleccionar un menú y pulse el
botón ENTER.
3 Pulse los botones ▲/▼/◄/►/ENTER para ver, cambiar o usar
las opciones seleccionadas.
Para ver una descripción más detallada de cada función,
consulte la página correspondiente.
• Anynet+ (HDMI-CEC), página 32
• Modo de imagen, página 18
• Modo de sonido, página 25
• Temporizador de desconexión, página 27
• SRS TS XT, página 25
• Ahorro de energía, página 29
• Dual I-II, página 26
Visualización de las fuentes de señales externas
Puede cambiar entre las señales de imagen de los equipos
conectados (vídeo, DVD, decodificador) y la fuente del televisor
(emisión o cable).
1 Pulse el botón MENU para ver el menú.
2 Pulse los botones ▲ o ▼ para seleccionar Entrada y, a
continuación, pulse el botón ENTER.
3 Pulse de nuevo el botón ENTER para seleccionar Fuentes.
4 Pulse los botones ▲ o ▼ para seleccionar la fuente de la señal
y, a continuación, pulse el botón ENTER.
Fuentes de señal disponibles:
TV, Ext.1, Ext.2, AV, S-Vídeo,
Componente, PC, HDMI1, HDMI2 , HDMI3 .
➢
Puede elegir solamente los dispositivos externos que estén
conectados al televisor.
➢
Puede seleccionar estas opciones pulsando el botón SOURCE
del mando a distancia.
➢
Para volver a ver los programas de televisión, pulse el botón TV
y seleccione el número de canal que desee.
Herramientas
Anynet+ (HDMI-CEC)
Modo imagen : Estándar
Modo de sonido : Personal
Temp. de desc.
: Desactivado
SRS TS XT : Desactivado
Ahorro de energía : Desactivado
Dual I-II : Mono
t
Ajustar
SalirMover
Mover
Entrar
Volver
Fuentes :
TV
Editar nombre
Anynet+ (HDMI-CEC)
Entrada
T V
Mover
Entrar
Volver
TV
Ext.1 : −−−−
Ext.2 : −−−−
AV : −−−−
S-Vídeo : −−−−
Componente : −−−−
PC : −−−−
HDMI 1 : −−−−
HDMI 2 : −−−−
HDMI 3 : −−−−
Fuentes
T V
BN68-01528A-00_SPA.indd 12 4/21/2008 3:18:53 PM

Español - 13
Edición de los nombres de los dispositivos
Puede dar un nombre a la fuente externa.
1 Pulse el botón MENU para ver el menú.
2 Pulse los botones ▲ o ▼ para seleccionar Entrada y, a
continuación, pulse el botón ENTER.
3 Pulse los botones ▲ o ▼ para seleccionar Editar nombre y, a
continuación, pulse el botón ENTER.
4 Pulse los botones ▲ o ▼ para seleccionar la fuente externa
que desea editar y, a continuación, pulse el botón ENTER.
5 Seleccione lel dispositivo adecuado pulsando los botones ▲ o
▼ y, a continuación, pulse el botón ENTER.
Nombres de dispositivos disponibles:
Vídeo, DVD, Cable STB,
Satélite STB, PVR STB, Receptor AV, Juego, Videocámara,
PC, TV, IPTV, Blu-Ray, HD DVD, DMA.
6 Pulse el botón EXIT para salir.
Memorización automática de canales
Puede explorar los rangos de frecuencia disponibles
(la disponibilidad varía en función del país).
Puede que los números de programa asignados
automáticamente no correspondan a los números de programa
reales o deseados. Sin embargo, puede ordenar los números
de forma manual y borrar los canales que no desee ver.
1 Pulse el botón MENU para ver el menú.
2 Pulse los botones ▲ o ▼ para seleccionar Canal y, a
continuación, pulse el botón ENTER.
3 Pulse de nuevo el botón ENTER. Aparece una lista de los
países disponibles.
4 Seleccione el país pulsando los botones ▲ o ▼ y, a
continuación, pulse el botón ENTER.
5 Pulse los botones ▲ o ▼ para seleccionar Guardado
automático y pulse después ENTER.
6 Vuelva a pulsar el botón ENTER para iniciar la búsqueda.
La búsqueda finaliza de forma automática.
➢
Para detener la búsqueda antes de que termine, pulse los
botones MENU o ENTER.
Guardado automático
P 1 C -- 40 MHz
0 %
Entrar
Volver
Empezar
Mover
Entrar
Volver
Fuentes :
TV
Editar nombre
Anynet+ (HDMI-CEC)
Entrada
T V
Mover
Entrar
Volver
Ext.1 : −−−−
Ext.2 : −−−−
AV :
S-Vídeo :
Componente : −−−−
PC : −−−−
HDMI 1 : −−−−
HDMI 2 :
HDMI 3 :
Editar nombre
T V
−−−
Vídeo
DVD
Cable STB
Satélite STB
PVR STB
Receptor AV
Juego
▼
Mover
Entrar
Volver
País :
España
Guardado automático
Guardado manual
Gestor de canales
Ordenar
Nombre
Sintonización fina
Canal
T V
T V
Mover
Entrar
Volver
País : Bélgica
Guardado automático
Guardado manual
Gestor de canales
Ordenar
Nombre
Sintonización fina
Canal
Bélgica
Francia
Alemania
Italia
Holanda
España
Suiza
Reino Unido
▼
BN68-01528A-00_SPA.indd 13 4/21/2008 3:18:54 PM

Español - 14
Memorización manual de canales
Puede memorizar un gran número de canales de televisión,
incluidos aquellos que se reciben por cable.
Al almacenar canales de forma manual, puede elegir:
Si se memoriza o no cada canal que se encuentre.
El número con el que desea identificar cada canal memorizado.
1 Pulse el botón MENU para ver el menú.
2 Pulse los botones▲ o ▼ para seleccionar Canal y, a
continuación, pulse el botón ENTER.
3 Pulse los botones▲ o ▼ para seleccionar Guardado manual
y, a continuación, pulse el botón ENTER.
4 Seleccione la opción adecuada pulsando los botones ▲ o ▼ y,
a continuación, pulse el botón ENTER.
5 Cuando esté satisfecho con los ajustes, pulse el botón
ENTER.
6 Pulse el botón EXIT para salir.
Programa (número de programa que asignar a un canal)
− Pulse los botones ▲ o ▼ hasta que encuentre el número
correcto.
➢
También puede seleccionar el número de canal directamente, pulsando los botones
numéricos (0~9).
Sistema de color: Automático/PAL/SECAM/NTSC4.43
− Pulse los botones ▲ o ▼ para seleccionar el estándar de color adecuado.
Sistema de sonido: BG/DK/I/L
− Pulse los botones ▲ o ▼ para seleccionar el estándar de sonido adecuado.
Canal (si conoce el número de canal que desea guardar)
− Pulse los botones ▲ o ▼ para seleccionar
C (canal aéreo) o S (canal por cable).
− Pulse el botón ► y después ▲ o ▼ para seleccionar el número que desee.
➢
También puede seleccionar el número de canal directamente, pulsando los botones
numéricos (0~9).
➢
Si se produce un sonido anormal o no se produce sonido, vuelva a seleccionar el sistema de
sonido adecuado.
Buscar (si no conoce los números de los canales)
− Pulse los botones ▲ o ▼ para iniciar la búsqueda.
− El sintonizador explora el rango de frecuencia hasta que se recibe en la pantalla el primer canal o
el canal que se haya seleccionado.
Guardar (cuando guarde el canal y el número de programa asociado)
− Confirme
la acción pulsando el botón ENTER.
☛
Modo de canal
P (Modo de programa): Al finalizar la sintonización, las estaciones de emisión de su zona
se habrán asignado a los números de posición de P00 a P99. Puede seleccionar un canal
introduciendo el número de posición en este modo.
C (Modo de canal aéreo): Puede seleccionar un canal introduciendo el número asignado a cada
emisora aérea de este modo.
S (Modo de canal por cable): puede seleccionar un canal introduciendo el número asignado a
cada canal por cable de este modo.
Mover
Entrar
Volver
País :
España
Guardado automático
Guardado manual
Gestor de canales
Ordenar
Nombre
Sintonización fina
Canal
T V
Mover
Entrar
Volver
Programa :
P 1
Sistema de color : Automático
Sistema de sonido : BG
Canal : C --
Buscar : 40 MHz
Guardar : ?
Guardado manual
T V
BN68-01528A-00_SPA.indd 14 4/21/2008 3:18:54 PM

Español - 15
Adición y bloqueo de canales
Mediante el gestor de canales, se pueden agregar o bloquear
canales fácilmente.
1 Pulse el botón MENU para ver el menú.
2 Pulse los botones▲ o ▼ para seleccionar Canal y, a
continuación, pulse el botón ENTER.
3 Pulse los botones▲ o ▼ para seleccionar Gestor de
canales y, a continuación, pulse el botón ENTER.
Adición de canales
Mediante la lista de canales, se pueden añadir canales.
4 Seleccione Lista de canales con el botón ENTER.
5 Vaya al campo ( ) con los botones ▲/▼/◄/►, seleccione
el canal que desee añadir y, a continuación, pulse el botón
ENTER para añadir el canal.
➢
Si vuelve a pulsar el botón ENTER, el símbolo ( ) que
aparece junto al canal desaparece y éste no se añade.
Bloqueo de canales
Esta función permite bloquear el vídeo y el audio para evitar que
los usuarios no autorizados (por ejemplo, los niños) puedan ver
programas poco recomendables.
6 Pulse los botones ▲ o ▼ para seleccionar Seguridad para niños y, a
continuación, pulse el botón ENTER.
7 Seleccione Activado con los botones ▲ o ▼ y, a continuación, pulse
el botón ENTER.
8 Pulse los botones▲ o ▼ para seleccionar Lista de canales y, a
continuación, pulse el botón ENTER.
9 Vaya al campo ( ) con los botones ▲/▼/◄/►, seleccione el canal
que desee bloquear y, a continuación, pulse el botón ENTER.
➢
Si vuelve a pulsar el botón ENTER, el símbolo ( ) que
aparece junto al canal desaparece y el bloqueo del
canal se cancela.
➢
Aparece una pantalla azul cuando se activa la función
Seguridad para niños.
10 Pulse el botón EXIT para salir.
➢
Puede seleccionar estas opciones pulsando el botón CH LIST
del mando a distancia.
Mover
Entrar
Volver
País :
España
Guardado automático
Guardado manual
Gestor de canales
Ordenar
Nombre
Sintonización fina
Canal
T V
Mover
Entrar
Volver
Lista de canales
Seguridad para niños
:
Desactivado
Gestor de canales
T V
Lista de canales
P 1 C 6
1 / 10
▲
▼
Prog.
0
C
1
1 C 6
2 C 5
3 C 8
4 C 11
5 C 22
6 C 26
7 C 36
8 C 52
9 C 24
Añadir Bloquear
Mover Entrar
Página
Volver
BN68-01528A-00_SPA.indd 15 4/21/2008 3:18:56 PM

Español - 16
Orden de los canales memorizados
Esta operación permite cambiar los números de programa de
los canales memorizados.
Puede que sea necesario realizarla después de la
memorización automática.
1 Pulse el botón MENU para ver el menú.
2 Pulse los botones▲ o ▼ para seleccionar Canal y, a
continuación, pulse el botón ENTER.
3 Pulse los botones ▲ o ▼ para seleccionar Ordenar y, a
continuación, pulse el botón ENTER.
4 Seleccione el canal que desee mover con los botones ▲ o ▼ y,
a continuación, pulse el botón ENTER.
5 Seleccione el número del programa al que desea asignar el
canal con los botones ▲ o ▼.
Pulse el botón
ENTER. El canal cambiará a su nueva posición
y todos los demás canales se desplazarán consecuentemente.
6 Repita los pasos 4 y 5 hasta que haya asignado todos los
canales a los números de programa deseados.
7 Pulse el botón EXIT para salir.
Asignación de nombres a los canales
Los nombres de los canales se asignarán de forma automática
cuando éstos emitan dicha información. Estos nombres se
pueden cambiar, lo que le permite asignar otros nuevos.
1 Pulse el botón MENU para ver el menú.
2 Pulse los botones▲ o ▼ para seleccionar Canal y, a
continuación, pulse el botón ENTER.
3 Pulse los botones ▲ o ▼ para seleccionar Nombre y, a
continuación, pulse el botón ENTER.
4 Pulse los botones ▲ o ▼ para seleccionar el canal al que se va
a asignar un nuevo nombre y pulse el botón ENTER.
5 Pulse los botones ▲ o ▼ para seleccionar una letra, un
número o un símbolo. (Se produce esta secuencia: A~Z, 0~9,
+, -, *, /, espacio en blanco).
Desplácese a la letra siguiente o anterior pulsando los botones
◄ o ► y, a continuación, pulse el botón ENTER.
6 Repita los pasos 4 y 5 con cada canal al que vaya a asignar un
nuevo nombre.
7 Pulse el botón EXIT para salir.
Mover
Entrar
Volver
País :
España
Guardado automático
Guardado manual
Gestor de canales
Ordenar
Nombre
Sintonización fina
Canal
T V
Mover
Entrar
Volver
Prog. Canal Nombre
▲
0 C01 −−−−−
1 C- - −−−−−
2 C- - −−−−−
3 C- - −−−−−
4 C- - −−−−−
5 C- - −−−−−
6 C- - −−−−−
7 C- - −−−−−
8 C- - −−−−−
9 C- - −−−−−
▼
Ordenar
T V
Mover
Entrar
Volver
País :
España
Guardado automático
Guardado manual
Gestor de canales
Ordenar
Nombre
Sintonización fina
Canal
T V
Mover
Entrar
Volver
Prog. Canal Nombre
▲
0 C01 −−−−−
1 C- - −−−−−
2 C- - −−−−−
3 C- - −−−−−
4 C- - −−−−−
5 C- - −−−−−
6 C- - −−−−−
7 C- - −−−−−
8 C- - −−−−−
9 C- - −−−−−
▼
Nombre
T V
BN68-01528A-00_SPA.indd 16 4/21/2008 3:18:57 PM

Español - 17
Sintonización precisa de la recepción de canales
Si la recepción es clara, no tiene que realizar la sintonización
precisa del canal, ya que esta operación se hace de forma
automática durante la búsqueda y la memorización.
Si la señal es débil o está distorsionada, puede que deba
realizar la sintonización precisa del canal de forma manual.
1 Pulse el botón MENU para ver el menú.
2 Pulse los botones▲ o ▼ para seleccionar Canal y, a
continuación, pulse el botón ENTER.
3 Pulse los botones ▲ o ▼ para seleccionar Sintonización
fina y, a continuación, pulse el botón ENTER.
4 Para obtener una imagen nítida y clara y una buena calidad
de sonido, pulse los botones ◄ o ► hasta conseguir el mejor
ajuste. Pulse el botón ENTER.
➢
Pulse el botón INFO. El almacenamiento de la
sintonización fina cambiará el color del OSD (On Screen
Display) del canal del blanco al rojo y añadirá la marca “*”.
➢
Para restablecer la sintonización fina a 0, seleccione
Restablecer. con los botones ▲ o ▼. Pulse el botón ENTER.
5 Pulse el botón EXIT para salir.
P 1 *
Mono
Imagen : Estándar
Sonido : Personal
SRS TS XT : Desactivado
−−
:
−−
Mover
Entrar
Volver
País :
España
Guardado automático
Guardado manual
Gestor de canales
Ordenar
Nombre
Sintonización fina
Canal
T V
Sintonización fina
P 1
0
Ajustar
Guardar
Volver
Restablecer
BN68-01528A-00_SPA.indd 17 4/21/2008 3:18:57 PM

Español - 18
Personalización de la configuración de la imagen
El televisor tiene varias opciones de configuración que
permiten controlar la calidad de la imagen.
1
Pulse el botón MENU para ver el menú.
2 Pulse el botón ENTER para seleccionar Imagen.
3 Vuelva a pulsar el botón ENTER para seleccionar Modo.
4 Seleccione el modo que desee con los botones ▲ o ▼ y, a
continuación, pulse el botón ENTER.
Modos disponibles:
Dinámico, Estándar, Película.
5 Seleccione la opción adecuada pulsando los botones ▲ o ▼ y,
a continuación, pulse el botón ENTER.
6
Cuando esté satisfecho con los ajustes, pulse el botón ENTER.
7 Pulse el botón EXIT para salir.
Iluminación de la celda – Contraste – Brillo – Nitidez – Color – Matiz
➢ En los modos Analog TV, Ext, AV, S-Vídeo, del sistema PAL, no se puede usar la función Matiz.
➢ En el modo PC, sólo se pueden realizar cambios en las opciones Iluminación de la celda,
Contraste y Brillo
Pulse los botones ◄ o ► hasta que alcance la configuración óptima.
Cambio del formato de la imagen
Puede seleccionar el tipo de imagen que mejor cumpla sus
requisitos de visualización.
1 Pulse el botón MENU para ver el menú.
2 Pulse el botón ENTER para seleccionar Imagen.
3 Vuelva a pulsar el botón ENTER para seleccionar Modo.
4 Seleccione el modo que desee con los botones ▲ o ▼ y, a
continuación, pulse el botón ENTER.
Modos disponibles:
Dinámico, Estándar, Película
➢
Los valores de la configuración pueden variar según la
fuente de entrada.
5 Pulse el botón EXIT para salir.
➢
Elija Dinámico para ver la televisión durante el día o
cuando haya luz en la habitación.
Elija Estándar para el modo de visualización general del
televisor.
Elija Película para ver una película.
Configuración sencilla
1 Pulse el botón TOOLS del mando a distancia.
2 Pulse los botones ▲ o ▼ para seleccionar Modo de imagen.
3 Pulse los botones ◄ o ► para seleccionar la opción deseada
Mover
Entrar
Volver
Modo :
Estándar
Iluminación de la celda 7
Contraste 90
Brillo 45
Nitidez 50
Color 50
Matiz V50 R50
Configuración detallada
Opciones de imagen
Restablecer : Aceptar
Imagen
T V
T V
Mover
Entrar
Volver
Modo :
Estándar
Iluminación de la celda
7
Contraste 95
Brillo 45
Nitidez 50
Color 50
Matiz V50 R50
Configuración detallada
Opciones de imagen
Restablecer : Aceptar
Imagen
Herramientas
Anynet+ (HDMI-CEC)
Modo imagen
Estándar
Modo de sonido : Personal
Temporizador de desconexión
: Desactivado
SRS TS XT : Desactivado
Ahorro de energía : Desactivado
Dual I-II : Mono
SalirMover
Ajustar
Modo : Dinámico
Iluminación de la celda
7
Contraste 95
Brillo 45
Nitidez 50
Color 50
Matiz V50 R50
Configuración detallada
Opciones de imagen
Restablecer : Aceptar
Mover
Entrar
Volver
Imagen
T V
Dinámico
Estándar
Película
BN68-01528A-00_SPA.indd 18 4/21/2008 3:18:58 PM

Español - 19
Configuración detallada de los valores de la imagen
Puede realizar una configuración detallada de los valores de la imagen.
1 Pulse el botón MENU para ver el menú.
2 Pulse el botón ENTER para seleccionar Imagen.
3 Pulse los botones ▲ o ▼ para seleccionar Configuración detallada y, a
continuación, pulse el botón ENTER.
4 Seleccione la opción adecuada pulsando los botones ▲ o ▼ y, a
continuación, pulse el botón ENTER.
Opciones disponibles: Ajuste del negro, Contraste dinám., Gamma,
Gama de colores, Balance de blanco, Tono piel, Mejora del borde.
5 Cuando esté satisfecho con los ajustes, pulse el botón ENTER.
6 Pulse el botón EXIT para salir.
➢
Configuración detallada está disponible en los modos Estándar o
Película.
➢
En el modo PC, sólo se pueden cambiar Contraste dinám, Gamma y
Balance de blanco entre los elementos de Configuración detallada.
Ajuste del negro: Desactivado/Bajo/Medio/Alto
Se puede seleccionar directamente el nivel de negro en la pantalla para
ajustar la profundidad de ésta.
Contraste dinám.: Desactivado/Bajo/Medio/Alto
Se puede ajustar el contraste de la pantalla para conseguir un contraste
óptimo.
Gamma: -3 ~ +3
Se puede ajustar el brillo medio de las imágenes.
Pulse los botones ◄ o ► hasta que alcance la configuración óptima.
Gama de colores: Automático/Original/Personal
Gama de colores (Colour space) es una matriz compuesta por los colores rojo, verde y azul.
Seleccione su gama favorita de color y disfrute de unos colores auténticamente naturales.
− Automático: Ajusta automáticamente al tono de color más natural de acuerdo con las fuentes del programa.
−
Original: Proporciona tonos de color profundos y ricos.
−
Personal: Ajusta la gama del color según las preferencias del usuario. (vea “Personalización de la
gama de colores”)
Personalización de la gama de colores
Color: Rojo/Verde/Azul/Amarillo/Cián/Magenta
Ajusta la gama del color según las preferencias del usuario.
Color está disponible cuando Gama de colores configurado en Personal.
Pulse los botones ▲ o ▼ para seleccionar Rojo, Verde, Azul, Amarillo, Cián o Magenta.
Pulse el botón ENTER.
−
Rojo/Verde/Azul: En Color, se pueden ajustar los valores RGB del color seleccionado. Pulse los botones ▲ o ▼
para seleccionar Rojo, Verde o Azul a fin de cambiarlos. Pulse el botón ENTER.
Pulse los botones ◄ o ► para reducir o aumentar el valor de una opción concreta.
Pulse el botón ENTER.
− Restablecer: Restablece la gama de colores en los valores predeterminados.
Balance de blanco: Rojo -/Verde -/Azul - /Rojo +/Verde +/Azul +/Restablecer
Se puede ajustar la temperatura del color para conseguir colores más naturales.
Rojo -/Verde -/Azul -/Rojo +/Verde +/Azul + : El cambio del valor de ajuste renovará la pantalla ajustada.
Seleccione la opción adecuada pulsando los botones ▲ o ▼ y, a continuación, pulse el botón ENTER. Pulse los
botones ◄ o ► hasta que alcance la configuración óptima.
Restablecer: El balance de blanco anteriormente ajustado se restablecerá con los valores predefinidos de fábrica.
Tono piel: -15~+15
Permite acentuar el tono rosa en las imágenes.
Pulse los botones ◄ o ► hasta llegar al valor óptimo.
➢
Al cambiar el valor de ajuste se actualizará la pantalla ajustada
Mejora del borde: Desactivado/Activado
Permite acentuar los bordes de los objetos.
Mover
Entrar
Volver
Ajuste del negro :
Desactivado
Contraste dinám. : Medio
Gamma : 0
Gama de colores : Original
Balance de blanco
Tono piel : 0
Mejora del borde
:
Activado
Configuración detallada
T V
Mover
Entrar
Volver
Modo : Estándar
Iluminación de la celda
7
Contraste 95
Brillo 45
Nitidez 50
Color 50
Matiz V50 R50
Configuración detallada
Opciones de imagen
Restablecer : Aceptar
Imagen
T V
BN68-01528A-00_SPA.indd 19 4/21/2008 3:18:58 PM

Español - 20
Opciones de imagen
Puede realizar una configuración detallada de los valores de
la imagen.
1 Pulse el botón MENU para ver el menú.
2 Pulse el botón ENTER para seleccionar Imagen.
3 Pulse los botones ▲ o ▼ para seleccionar Opciones de
imagen y, a continuación, pulse el botón ENTER.
4 Seleccione la opción adecuada pulsando los botones ▲ o ▼ y,
a continuación, pulse el botón ENTER.
5 Cuando esté satisfecho con los ajustes, pulse el botón
ENTER.
6 Pulse el botón EXIT para salir.
➢
En el modo PC sólo se pueden hacer cambios en los elementos
Tono de color, Tamaño y Protección pantalla inactiva del menú
Opciones de imagen
.
Tono de color: Frío2/Frío1/Normal/Cálido1/Cálido2
➢
Cuando el modo de la imagen se ajusta en Dinámico o
Estándar, Cálido1 y Cálido2 no se pueden seleccionar.
Tamaño: 16:9/Zoom ancho/Zoom/4:3/Sólo exploración
Puede seleccionar el tamaño de imagen que mejor se adapte
a sus requisitos de visualización.
− Ancho automát.: Amplía y estira la imagen de la
proporción 4:3 a 16:9.
− 16:9: Ajusta la imagen al modo panorámico 16:9.
− Zoom ancho: Aumenta la imagen más que 4:3. Con los
botones ▲ o ▼ puede mover la imagen arriba y abajo
después de seleccionar con los botones► o ENTER.
−
Zoom: Aumenta el tamaño de la imagen verticalmente en la pantalla.
− 4:3: Ajusta la imagen al modo normal 4:3.
− Sólo exploración:
Use esta función para ver toda la imagen
sin recortes cuando se reciban señales de HDMI (720p/1080i), o
componente (1080i) .
Después de seleccionar “Sólo exploración” en los
modos HDMI (1080i) o Component (1080i):
Pulse los botones ◄ o ► para seleccionar y, a
continuación, pulse el botón ENTER.
Pulse los botones ▲, ▼, ◄ or ► para desplazar la imagen arriba, abajo, a derecha y a izquierda.
Restablecer: Pulse los botones ◄ or ► para seleccionar Restablecer y pulse el botón ENTER.
Puede inicializar la configuración.
➢
Cuando se selecciona el tamaño de la imagen en la opción Sólo explorar de HDMI, según el dispositivo
AV, la pantalla puede verse cortada o en ella pueden aparecer colores específicos.
➢
For an HDMI (1080p) connection of 24, 25, 30, 50, and 60 Hz, and for a Component (1080p)
connection of 50 and 60Hz, only the input source is supported
➢
Puede cambiar el tamaño de la imagen con sólo pulsar el botón P.SIZE en el mando a distancia.
➢
Según la fuente de entrada, las opciones de tamaño de la imagen pueden variar.
➢
Las opciones disponibles pueden diferir, según el modelo seleccionado.
➢
La función Ancho automát sólo está disponible en los modos TV, Ext.1, Ext.2, AV y S-Vídeo.
➢
La configuración de cada dispositivo externo conectado a la entrada del televisor se puede
ajustar y guardar.
➢
En el modo PC, sólo se pueden ajustar los modos “16:9” y “4:3”.
Cambio de posición y de tamaño de la pantalla mediante la función de ampliación
El cambio del tamaño de la pantalla mediante la función Zoom permite cambiar la posición y el
tamaño de la pantalla hacia arriba o hacia abajo mediante los botones ▲ o ▼.
Mueva la pantalla hacia arriba o hacia abajo mediante los botones ▲ o ▼ después de seleccionar
pulsando los botones ◄ o ►.
Cambie el tamaño de la pantalla verticalmente mediante los botones ▲ o ▼ después de seleccionar
pulsando los botones ◄ o ►.
Mover
Entrar
Volver
Ancho automát.
16:9
Zoom ancho
Zoom
4:3
Sólo exploración
Tamaño
T V
Continúa…
Mover
Entrar
Volver
Opciones de imagen
T V
Tono de color :Normal
Tamaño :
Ancho automát.
Modo Pantalla : 16:9
Digital NR : Auto
Demo de Real 100Hz
: Desactivado
DNle : Desactivado
N.neg HDMI : Normal
Sólo modo azul : Desactivado
Protección pantalla inactiva
Efecto 3D
Mover
Entrar
Volver
Modo :
Estándar
Iluminación de la celda
: 7
Contraste 95
Brillo 45
Nitidez 50
Color 50
Matiz V50 R50
Configuración detallada
Opciones de imagen
Restablecer : Aceptar
Imagen
T V
BN68-01528A-00_SPA.indd 20 4/21/2008 3:18:59 PM

Español - 21
Selección del modo de pantalla: 16:9/Zoom ancho/Zoom/4:3
Cuando se configura el tamaño de la imagen como Ancho automát.
en un televisor panorámico 16:9, se puede determinar el tamaño
de la imagen para ver una imagen en pantalla panorámica 4:3
WSS (Wide Screen Service) o ninguna. Cada país europeo exige
un tamaño de imagen diferente de modo que esta función está
concebida con la intención de que los usuarios la seleccionen.
− 16:9: Ajusta la imagen al modo panorámico 16:9.
− Zoom ancho: Aumenta el tamaño de la imagen más que 4:3.
−
Zoom: Aumenta el tamaño de la imagen verticalmente en la pantalla.
− 4:3: Ajusta la imagen al modo normal 4:3.
➢
Esta función está disponible en el modo Ancho automát.
➢
Esta función no está disponible en los modos Componente ni HDMI.
Digital NR: Desactivado/Bajo/Medio/Alto/Automático
Si la señal que recibe el televisor es débil, puede activar esta función para reducir las imágenes
superpuestas y el ruido que pueda aparecer en la pantalla.
➢
Cuando la señal sea débil, seleccione alguna de las otras opciones hasta que se vea una imagen de
mejor calidad.
Demo de Real 100Hz: Desactivado/Activado.
Se puede ver una distinción clara entre "Real 100Hz" y 50Hz, especialmente cuando se miran escenas
de acción. Por ello, cuando contemple escenas con escaso movimiento no podrá diferenciar "Real 100Hz
de 50Hz”. Demo 100Hz funciona sólo con la señal de 50Hz. El modo demo Real 100Hz se proporciona
para demostraciones en tiendas con imágenes especiales.
DNIe: Desactivado/Demo/Activado
Este televisor incluye la función DNIe con el fin de conseguir una gran calidad visual. Si ajusta DNIe en
Activado, podrá ver la pantalla con la función DNIe activada. Si ajusta DNIe en Demo, podrá ver en la
pantalla una imagen normal y con el modo DNIe aplicado para realizar la demostración. Mediante esta
función podrá ver la diferencia en la calidad visual.
➢
DNIe
TM
(Motor digital de imágenes naturales)
Esta función proporciona una imagen más detallada con reducción de interferencias 3D, ampliación
de los detalles, mejora del contraste y mejora de los blancos. El nuevo algoritmo de compensación de
imagen proporciona una imagen más detallada, más clara y con más brillo. La tecnología DNIe
TM
adapta
todas las señales al ojo humano.
➢
Esta función no está disponible en el modo PC.
➢
DNIe sólo está disponible en el modo Dinámico.
N.neg HDMI: Normal/Bajo
Mediante esta función, se puede ajustar la calidad de la imagen cuando el desgaste de la pantalla
(aspecto del nivel del negro, bajo contraste, color desvaído, etc.) ha de hacer frente a la entrada HDMI
para un rango RGB limitado (de 16 a 235).
➢
Esta función sólo está activa cuando se conecta una entrada
externa a HDMI (señales RGB)
Sólo modo azul: Desactivado/Activado.
Esta función es para expertos en la medición de dispositivos AV. Esta
función muestra sólo la señal azul ya que se eliminan las señales
rojas y verdes de la señal de vídeo a fin de proporcionar un efecto de
filtro azul que se usa para ajustar el color y el matiz de los equipos de
vídeo, como reproductores DVD, sistemas Home Cinema, etc.
Con esta función, se puede ajustar el color y el matiz de acuerdo
con los valores preferidos adecuados al nivel de la señal de cada
dispositivo de vídeo mediante los patrones de barras de colores rojo/
verde/azul/cián/magenta/amarillo, sin usar un filtro azul adicional.
➢
La función Sólo modo azul está disponible cuando el modo de
imagen está configurado como Película o Estándar.
Protección de pantalla inactiva
Esta pantalla está equipada con tecnología de prevención para reducir
la posibilidad de que se queme. Esta tecnología permite definir el
movimiento de la imagen arriba o abajo (línea vertical) y de lado a
lado (punto horizontal). La opción Hora permite programar intervalos
temporales entre los movimientos de la imagen en minutos.
−Cambio píxel: Con esta función podrá mover píxeles de forma
detallada en el PDP, en sentido horizontal o vertical, para minimizar restos de imágenes en la pantalla.
•
Establezca Cambio píxel en Activado con los botones ▲ o ▼ y, a continuación, pulse el botón ENTER.
• Seleccione la opción adecuada pulsando los botones ▲ o ▼ y, a continuación, pulse el botón ENTER.
Opciones disponibles:
Puntos Horiz., Líneas verticales, Hora.
Tono de color :Normal
Tamaño :
Ancho automát.
Modo Pantalla : 16:9
Digital NR : Auto
Demo de Real 100Hz
DNle : Activado
N.neg HDMI : Normal
Sólo modo azul : Desactivado
Protección pantalla inactiva
Efecto 3D
Mover
Entrar
Volver
Opciones de imagen
T V
Mover
Entrar
Volver
Cambio píxel
Blanco
Desplazamiento
Lateral gris :
Oscuro
Protección pantalla inactiva
T V
Mover
Entrar
Volver
Tono de color :Normal
Tamaño :
Ancho automát.
Modo Pantalla : 16:9
Digital NR : Auto
Demo de Real 100Hz
: Desactivado
DNle : Activado
N.neg HDMI : Normal
Sólo modo azul : Desactivado
Protección pantalla inactiva
Efecto 3D
Opciones de imagen
T V
Continúa…
16:9
Wide Zoom
Zoom
4:3
BN68-01528A-00_SPA.indd 21 4/21/2008 3:19:00 PM

Español - 22
➢
Condición óptima para el cambio de píxel:
PC TV/Ext/AV/Componente/HDMI
Puntos Horiz. 1 2
Líneas verticales 1 2
Hora en (minutos) 2 2 min
➢
El valor Cambio píxel puede variar según el tamaño (pulgadas) del
monitor y el modo.
➢
Esta función no está disponible en el modo Just Scan (Sólo buscar).
− Blanco: Esta función ayuda a suprimir los restos de imágenes en la pantalla cambiando el color de los
píxeles a blanco. Utilice esta función si hay restos de imágenes o símbolos en la pantalla, especialmente
después de haber mostrado una imagen fija en la pantalla durante un largo tiempo.
− Desplazamiento: Esta función ayuda a suprimir los restos de imágenes en la pantalla moviendo
todos los píxeles de la PDP de acuerdo con un patrón. Utilice esta función si hay restos de imágenes
o símbolos en la pantalla, especialmente después de haber mostrado una imagen fija en la pantalla
durante un largo tiempo.
− Lateral gris: Cuando se ve la televisión con una relación de pantalla de 4:3, ésta se puede proteger de
un posible daño si se ajusta el balance de blanco en ambos extremos, el izquierdo y el derecho.
Oscuro: Cuando se establece una relación de pantalla de 4:3, con esta opción se oscurecen ambos
extremos, el izquierdo y el derecho.
Claro: Cuando se establece una relación de pantalla de 4:3, con esta opción se aclaran ambos extremos,
el izquierdo y el derecho.
➢
Si desea suprimir los restos de imágenes de la pantalla, utilice las funciones Blanco o Desplazamiento.
Aunque ambas suprimen los restos de imágenes de la pantalla, la función Desplazamiento es más
efectiva.
➢
La función de borrado de restos de imágenes debe ser larga (aproximadamente 1 hora) para que la
supresión sea efectiva. Si los restos de imágenes no desaparecen después de ejecutar la función, repita
el proceso.
➢
Pulse cualquier botón del mando a distancia para cancelar esta función.
Uso de la función 3D
Se puede disfrutar de juegos y películas 3D en el televisor. La función de efecto 3D permite ver
imágenes 3D gracias a unas gafas 3D especiales.
Conector estéreo de 3,5 mm para el cable RCA (no suministrado)
Gafas 3D
(no suministradas)
Emisor de infrarrojos 3D
(no suministrado)
PC
Cable HDMI/DVI (no suministrado)
Panel posterior del TV
Conexiones
➢
El aspecto de las gafas 3D (incluido el emisor) puede variar según el modelo.
Mover
Entrar
Volver
Cambio píxel : Activado
Puntos Horiz. : 2
Lineas verticales : 2
Hora : 2 min
T V
Cambio píxel
BN68-01528A-00_SPA.indd 22 4/21/2008 3:19:02 PM

Español - 23
1 Conecte un cable HDMI/DVI entre el terminal HDMI IN 2 del televisor y el terminal de salida PC del
ordenador.
2 Conecte un cable estéreo de 3,5mm/2 RCA entre el terminal DVI IN (HDMI 2) [R-AUDIO-L] del
televisor y el terminal de salida de audio de la tarjeta de sonido del ordenador.
3 Conecte el emisor al puerto 3D SYNC OUT del panel posterior del televisor.
4 Encienda el televisor y ajuste la fuente del mismo en HDMI2.
Para obtener más información acerca de las gafas 3D (incluido el emisor), consulte el manual del
usuario de las gafas 3D.
Ajuste la resolución del ordenador: PS50A470: 1024 x 768 a 60Hz, 1360 x 768 a 60 Hz
La resolución de PC óptima para PS50A470 es 1360 x 768. Cuando se conecta la señal 1024 x 768
en el modo 3D, la imagen se mostrará en formato 4:3 con barras grises a ambos lados.
El emisor de infrarrojos 3D se comunica con las gafas 3D.
Por consiguiente, el emisor de infrarrojos 3D debe estar situado cerca de las gafas 3D.
Se activa cuando la señal de entrada HDMI o DVI es RGB, y admite el sonido DVI.
Cuando se enciende o se apaga, el modo cambia a predeterminado (Desativado) y Formato se guarda.
El Efecto 3D se enciende o se apaga independientemente del Modo imagen.
Cuando el Efecto 3D está encendido, sólo se activan los menús de imagen Contraste, Brillo,
Efecto 3D y Restablecer.
Para utilizar la función Efecto 3D se necesita una tarjeta gráfica que admita 3D o software 3D.
Las gafas 3D y el emisor deben ser del mismo fabricante.
Si juega o ve la televisión durante un tiempo prolongado llevando puestas las gafas 3D, puede
experimentar fatiga ocular o dolor de cabeza.
Las gafas 3D (incluido el emisor) que no hayan sido fabricadas por Samsung pueden no ser compatibles.
Si la pantalla parpadea cuando se usa la función 3D, se debe oscurecer la iluminación ambiental o
apagar la lámpara fluorescente para ver la pantalla en las mejores condiciones.
Cambio de modo
Al cambiar el modo se intercambian las señales de salida izquierda
y derecha y, con ello, las imágenes destinadas a cada ojo.
1 Conecte el televisor, el ordenador y el emisor de infrarrojos 3D
como se muestra en la ilustración.
2 Pulse el botón SOURCE para seleccionar HDMI.
3 Pulse el botón MENU para ver el menú.
Pulse los botones ▲ o ▼ para seleccionar Imagen y pulse el
botón ENTER.
4 Pulse los botones ▲ o ▼ para seleccionar Opciones de
imagen y, a continuación, pulse el botón ENTER.
Pulse los botones
▲ o ▼ para seleccionar Efecto 3D y pulse
el botón ENTER.
5 Pulse los botones ▲ o ▼ para seleccionar Modo y pulse el
botón ENTER.
Pulse los botones
▲ o ▼ para seleccionar Desactivado,
Modo1, Modo2 o Conversión a 2D y pulse el botón ENTER.
• Desactivado: Desactiva la función Efecto 3D.
• Modo1: En primer lugar actúa la sincronización derecha.
• Modo2:
En primer lugar actúa la sincronización izquierda.
• Conversión a 2D:
Proporciona una imagen convertida de 3D a 2D.
Puede elegir esta opción para ver una imagen en 2D temporalmente
si está mareado, pero deberá seleccionar “Desactivado” para
finalizar el efecto 3D por completo.
Si el efecto 3D no funciona correctamente, esto significa que
el modo y las gafas 3D no están bien sincronizados. Debe
cambiar de modo para sincronizarlos.
Continúa…
Mover
Entrar
Volver
Tono de color :Normal
Tamaño :
Ancho automát.
Modo Pantalla : 16:9
Digital NR : Auto
Demo de Real 100Hz
: Desactivado
DNle : Desactivado
N.neg HDMI : Normal
Sólo modo azul : Desactivado
Protección pantalla inactiva
Efecto 3D
Opciones de imagen
T V
Mover
Entrar
Volver
Modo :
Estándar
Iluminación de la celda
: 7
Contraste 90
Brillo 45
Nitidez 50
Color 50
Matiz V50 R50
Configuración detallada
Opciones de imagen
Restablecer : Aceptar
Imagen
T V
Mover
Entrar
Volver
Modo :
Format :
Efecto 3D
T V
Desactivado
Modo1
Modo2
Conversión a 2D
BN68-01528A-00_SPA.indd 23 4/21/2008 3:19:03 PM

Español - 24
Reajuste de los valores de la imagen a los valores
predefinidos de fábrica
Puede realizar una configuración detallada de los valores de la imagen.
1 Pulse el botón MENU para ver el menú.
2 Pulse el botón ENTER para seleccionar Imagen.
3 Pulse los botones ▲ o ▼ para seleccionar Restablecer y, a
continuación, pulse el botón ENTER.
4 Pulse los botones ▲ o ▼ para seleccionar Aceptar o
Cancelar y pulse el botón ENTER.
➢
Se puede reajustar cada modo.
Mover
Entrar
Volver
Modo : Estándar
Iluminación de la celda
7
Contraste 95
Brillo 45
Nitidez 50
Color 50
Matiz V50 R50
Configuración detallada
Opciones de imagen
Restablecer : OK
Imagen
T V
Aceptar
Cancelar
Herramientas
Modo 3D ◄ Desactivado
Anynet+ (HDMI-CEC)
Modo imagen : Dinámico
Modo de sonido : Estándar
Temp. de desc. : Desactivado
SRS TS XT :
Desactivado
Ahorro energía : Desactivado
SalirMover
Ajustar
Cambio de formato
Seleccione el formato de entrada óptimo para que se ajuste a las
tarjetas gráficas o al software 3D.
Vea la descripción en los pasos 1 a 4 anteriores.
5 Pulse los botones ▲ o ▼ para seleccionar Formato y, a
continuación, pulse el botón ENTER.
6 Pulse los botones ▲ o ▼ para seleccionar Tablero de
damas, Horizontal o Vertical y pulse el botón ENTER.
Tablero de
ajedrez
Si el formato de salida de la tarjeta gráfica o del
software 3D es Tablero de damas (Checkerboard),
seleccione este formato de entrada.
Horizontal
Si el formato de salida de la tarjeta gráfica o del
software 3D es Horizontal interleaved (Horizontal
intercalado), seleccione este formato de entrada.
Vertical
Si el formato de salida de la tarjeta gráfica o
del software 3D es Vertical interleaved (Vertical
intercalado), seleccione este formato de entrada.
Puede pulsar el botón 3D del mando a distancia varias veces
para cambiar el modo 3D.
Configuración sencilla
1 Pulse el botón TOOLS del mando a distancia.
2 Pulse los botones ▲ o ▼ para seleccionar Modo 3D.
3 Pulse el botón ENTER para iniciar el efecto 3D.
Mover
Entrar
Volver
Efecto 3D
T V
Modo : Modo 1
Formato :
Tablero de damas
Horizontal
Vertical
BN68-01528A-00_SPA.indd 24 4/21/2008 3:19:04 PM

Español - 25
Funciones de sonido
1 Pulse el botón MENU para ver el menú.
2 Pulse los botones ▲ o ▼ para seleccionar Sonido y, a
continuación, pulse el botón ENTER.
3 Seleccione la opción adecuada pulsando los botones ▲ o ▼ y,
a continuación, pulse el botón ENTER.
Opciones disponibles:
Modo, Ecualizador, SRS TS XT,
Volumen autom. Altavoz de TV, Selección de sonido
4 Cuando esté satisfecho con los ajustes, pulse el botón ENTER.
5 Pulse el botón EXIT para salir.
Modo: Estándar/Música/Película/Diálogo/Personal
Puede seleccionar el tipo de efecto de sonido especial que se
va a utilizar mientras ve una emisión determinada.
Configuración sencilla
1 Pulse el botón TOOLS del mando a distancia.
2 Pulse los botones ▲ o ▼ para seleccionar Modo de
sonido.
3 Pulse los botones ◄ o ► para seleccionar la opción
deseada.
Ecualizador: Balance/100 Hz/300 Hz/1 kHz/3 kHz/10 kHz
El televisor tiene varios valores que permiten controlar la calidad
del sonido.
➢
Si efectúa algún cambio en esta configuración, el estándar de
sonido cambiará automáticamente a Personal.
SRS TS XT: Desactivado/Activado
TruSurround XT es una tecnología SRS patentada que
solventa el problema de reproducir contenido multicanal 5.1
en dos altavoces. TruSurround proporciona una experiencia
de sonido virtual convincente a través de cualquier sistema
de reproducción con dos altavoces, incluso con los altavoces internos del televisor. Es totalmente
compatible con todos los formatos multicanal.
Configuración sencilla
1 Pulse el botón TOOLS del mando a distancia.
2 Pulse los botones ▲ o ▼ para seleccionar SRS TS XT.
3 Pulse los botones ◄ o ► para seleccionar Desactivado o
Activado
Volumen autom.: Desactivado/Activado
Cada emisora tiene sus propias condiciones de señal y resulta
incómodo ajustar el volumen cada vez que se cambia de canal.
Con esta función, el volumen del canal deseado se ajusta de forma automática ya que reduce la
salida de sonido cuando la señal de modulación es alta o la aumenta cuando es baja.
Altavoz de TV: Desactivado/Activado
Si desea usar unos altavoces independientes, cancele el amplificador interno.
➢
Los botones
+,
- y MUTE no funcionan si Altavoz de TV está establecido en
Desactivado.
➢
Cuando Altavoz de TV está establecido en Desactivado, en el menú Sonido sólo está activa la
opción Selección de sonido (en el modo PIP).
Selección de sonido: Principal/Sub
Cuando se activa la función PIP se puede escuchar el sonido de la imagen secundaria (PIP).
−
Principal: Se usa para escuchar el sonido de la imagen principal.
−
Sub: Se usa para escuchar el sonido de la imagen secundaria.
Herramientas
Anynet+ (HDMI-CEC)
Modo de imagen : Estándar
Modo de sonido : Personal
Temp. de desc.
: Desactivado
SRS TS XT
t Desactivado
Ahorro energía : Desactivado
Dual I-II : Mono
Herramientas
Anynet+ (HDMI-CEC)
Modo de imagen : Estándar
Modo de sonido
t Personal
Temp. de desc.
: Desactivado
SRS TS XT : Desactivado
Ahorro energía : Desactivado
Dual I-II : Mono
TruSurround XT, SRS y el símbolo son marcas registradas de SRS Labs, Inc.
La tecnología TruSurround XT está incorporada bajo licencia de SRS Labs, Inc.
Mover
Ajustar Salir
Mover
Ajustar Salir
Mover
Entrar
Volver
Modo :
Personal
Ecualizador
SRS TS XT :
Desactivado
Volumen autom. :
Desactivado
Altavoz de TV :
Desactivado
Selección de sonido
: Principal
Sonido
T V
Mover
Ajustar
Volver
Ecualizador
T V
Balance 100Hz 300Hz 1kHz 3kHz 10kHz
+
0
-
D
I
+
0
-
BN68-01528A-00_SPA.indd 25 4/21/2008 3:19:05 PM

Español - 26
Selección del modo de sonido (según modelo)
El botón DUAL I-II muestra y controla el procesamiento y la salida de la señal de audio. Cuando se
enciende la pantalla, el modo aparece prefijado de forma automática como “Dual-I” o “Estéreo”,
según la transmisión actual.
Configuración sencilla
1 Pulse el botón TOOLS del mando a distancia.
2 Pulse los botones ▲ o ▼ para seleccionar Dual I-II.
3 Pulse los botones ◄ o ► para seleccionar la opción deseada
Tipo de emisión
Indicación en pantalla
NICAM
Estéreo
Emisión normal
(Audio estándar)
Mono (Uso normal)
Normal + Mono NICAM NICAM
Mono
(Normal)
NICAM estéreo
NICAM
estéreo
Mono
(Normal)
NICAM DUAL-I/II
NICAM
Dual-1
NICAM
Dual-2
Mono
(Normal)
A2
Estéreo
Emisión normal
(Audio estándar)
Mono (Uso normal)
Bilingüe o Dual-I/II Dual-I Dual II
Estéreo Estéreo
Mono
(Monoaural forzado)
➢
Si las condiciones de recepción se deterioran, la audición mejorará si el modo se establece
en Mono.
Si la señal de estéreo es débil y el modo cambia de forma automática, cambie al modo Mono.
Panel lateral del televisor
15
Conexión de los auriculares (se venden por separado)
Puede conectar unos auriculares al equipo si desea ver un programa de televisión sin
molestar a las personas que están en la misma habitación.
➢
Cuando se inserta el terminal del conjunto del cabezal en
el puerto correspondiente, se puede trabajar sólo con las
opciones Volumen autom. del menú Sonido.
➢
El uso continuado de auriculares a un volumen elevado
puede dañar la capacidad auditiva.
➢
No recibirá sonido de los altavoces cuando conecte los
auriculares al sistema.
➢
El volumen de los auriculares y el del televisor se ajustan por
separado.
Herramientas
Anynet+ (HDMI-CEC)
Modo de imagen : Estándar
Modo de sonido : Personal
Temp. de desc.
: Desactivado
SRS TS XT : Desactivado
Ahorro energía : Desactivado
Dual I-II
t Mono
Mover
Ajustar Salir
BN68-01528A-00_SPA.indd 26 4/21/2008 3:19:05 PM

Español - 27
Funciones de hora
1 Pulse el botón MENU para ver el menú.
2 Pulse los botones ▲ o ▼ para seleccionar Configuración y, a
continuación, pulse el botón ENTER.
3 Pulse los botones ▲ o ▼ para seleccionarHora y, a
continuación, pulse el botón ENTER.
4 Seleccione la opción adecuada pulsando los botones ▲ o ▼ y,
a continuación, pulse el botón ENTER.
Opciones disponibles:
Ajustar hora, Temp. de desc.,
Temporizador 1, Temporizador 2, Temporizador 3.
5 Cuando esté satisfecho con los ajustes, pulse el botón
ENTER.
6 Pulse el botón EXIT para salir.
Ajustar hora
Se puede ajustar el reloj del televisor para que aparezca la
hora cuando pulse el botón INFO en el mando a distancia.
También debe establecer la hora si desea utilizar los
temporizadores de conexión y desconexión automáticas.
− Pulse los botones ◄ o ► para seleccionar Mes, Fecha,
Año, Hora o Minuto. Ajuste estos valores pulsando los
botones ▲ o ▼.
➢
Puede ajustar directamente Mes, Fecha, Año, Hora o
Minuto con los botones numéricos del mando a distancia.
➢
Si se produce una interrupción en la alimentación eléctrica
o se desconecta el aparato, se pierde la configuración del
reloj.
Temp. de desc.
Puede seleccionar un período de tiempo entre 30 y 180
minutos para que, cuando transcurran, el televisor pase
automáticamente al modo de espera.
− Seleccione el tiempo de intervalo preestablecido
(Desactivado, 30, 60, 90, 120, 150 o 180) que se
mantendrá encendido con los botones ▲ o ▼.
Configuración sencilla
1 Pulse el botón TOOLS del mando a distancia.
2 Pulse los botones ▲ o ▼ para seleccionar Temp. de desc.
3 Pulse los botones ◄ o ► para seleccionar los minutos y
pulse el botón ENTER.
Temporizador 1 / Temporizador 2 / Temporizador 3
Los temporizadores de encendido o apagado se pueden
configurar para que el televisor se encienda y se apague
automáticamente a la hora seleccionada.
☛
Debe ajustar el reloj en primer lugar.
− Pulse los botones ◄ o ► para seleccionar el elemento adecuado.
Pulse los botones ▲ o ▼ para ajustar el valor.
Hora encendido: Seleccione la hora, los minutos y Activado/Desactivado. (Para activar el
temporizador con la configuración deseada, establézcalo en Activado.)
Hora apagado: Seleccione la hora, los minutos y Activado/Desactivado. (Para activar el
temporizador con la configuración deseada, establézcalo en Activado.)
Repetir: Seleccione Una vez, Todos los días, Lun~Vie, Lun~Sáb o Sáb~Dom.
Volumen: Seleccione el nivel de volumen deseado.
➢
Puede ajustar la hora y los minutos directamente pulsando los botones numéricos del mando a
distancia.
☛
Apagado automático
Si el temporizador se ajusta en “Activado”, el televisor se apagará si no se pulsa ningún botón
durante 3 horas, después que el temporizador lo haya puesto en marcha. Esta función sólo está
disponible en el modo “Activado” del temporizador y evita el recalentamiento que se puede producir
si el televisor está encendido durante demasiado tiempo.
Herramientas
Anynet+ (HDMI-CEC)
Modo de imagen : Estándar
Modo de sonido : Personal
Temp. de desc.n
t Desactivado
SRS TS XT : Desactivado
Ahorro energía : Desactivado
Dual I-II : Mono
Mover
Ajustar Salir
Mover
Entrar
Volver
Plug & Play
Idioma : Español
Hora
Efecto de luz
:
Modo enc. act.
Ajuste del montaje mural
Melodía : Desactivado
Ocio
:
Desactivado
Ahorro energía : Desactivado
PIP
Configuración
T V
Mover
Entrar
Volver
Ajustar hora :
00 : 00
Temp. de desc. :
Desactivado
Temporizador 1 :
Desactivado
Temporizador 2 :
Desactivado
Temporizador 3 :
Desactivado
Hora
T V
Mover
Ajustar
Volver
Temporizador 1
T V
00 00 No
Hora encendido
:
Hora apagado
Repetir
Una vez
10
Volumen
00 00 No
:
BN68-01528A-00_SPA.indd 27 4/21/2008 3:19:06 PM

Español - 28
Idioma/Melodía/Efecto de luz/Ocio/Ahorro energía/PIP
1 Pulse el botón MENU para ver el menú.
2 Pulse los botones ▲ o ▼ para seleccionar Configuración y, a
continuación, pulse el botón ENTER.
3 Seleccione la opción adecuada pulsando los botones ▲ o ▼ y,
a continuación, pulse el botón ENTER.
Opciones disponibles:
Idioma, Melodía, Efecto de luz, Ocio,
Ahorro energía.
4 Cuando esté satisfecho con los ajustes, pulse el botón
ENTER.
5 Pulse el botón EXIT para salir.
Idioma
Variable según el modelo. Cuando el televisor se utiliza por primera vez, debe seleccionar el idioma
en el que desea que aparezcan los menús e indicaciones.
Efecto de luz: Desactivado/Modo apag. act./Modo enc. act./Activado
Se puede apagar o encender el LED azul del frontal del televisor según las circunstancias. Use esta
función para ahorrar energía o si el LED le molesta a la vista.
−
Desactivado: El LED azul siempre está apagado.
−
Modo apag. act.: El LED azul se ilumina mientras el televisor está en el modo de suspensión y se
apaga cuando el televisor se enciende.
−
Modo enc. act.: El LED azul se ilumina mientras se está viendo la televisión y se apaga cuando el
televisor se apaga.
−
Activado: El LED está siempre encendido.
➢
Para ahorrar energía establezca la opción Efecto de luz en Desactivado.
Melodía: Desactivado/Bajo/Medio/Alto
La melodía del encendido y apagado del televisor se puede configurar.
Ocio : Desactivado/Deportes/Cine/Juego.
El modo Ocio permite seleccionar una visualización y un sonido óptimos cuando se ven deportes,
películas y juegos.
-
Desactivado: Desactiva la función Ocio.
-
Deportes: Proporciona la mejor calidad de imagen y sonido para los deportes.
-
Cine: Proporciona la mejor calidad de imagen y sonido para ver películas.
Se obtienen mejores imágenes y se resalta el sonido.
-
Juego: Proporciona la mejor calidad de imagen y sonido para los juegos. Este modo acelera la
velocidad de reproducción de los juegos cuando se usa una consola de juegos externa conectada
al televisor
➢
Si configura cualquiera de los tres modos de Ocio como Activado, la configuración se bloquea y
no se puede ajustar. Si desea configurar los modos Imagen y Sonido, debe desactivar el modo
Ocio.
➢
La configuración de Ocio se guarda para cada fuente de entrada.
Mover
Entrar
Volver
Plug & Play
Idioma : Español
Hora
Efecto de luz
:
Modo enc. act.
Ajuste del montaje mural
Melodía : Desactivado
Ocio
:
Desactivado
Ahorro energía : Desactivado
PIP
Configuración
T V
Continúa…
BN68-01528A-00_SPA.indd 28 4/21/2008 3:19:06 PM

Español - 29
Configuración del software del PC (basado en Windows XP)
A continuación se muestra la configuración de visualización de Windows para un ordenador
típico. Probablemente la pantalla real de su PC sea distinta; dependerá de la versión concreta
de Windows y de la tarjeta de vídeo que tenga. Aunque
las pantallas reales sean diferentes, la información de
configuración básica que se aplica en casi todos los casos
es la misma. (En caso contrario, póngase en contacto con el
fabricante del ordenador o con el distribuidor de Samsung.)
1 Haga clic con el botón derecho del ratón sobre el escritorio de
Windows y después haga clic en Propiedades.
Aparece la ventana Propiedades de pantalla.
2 Haga clic en la ficha Configuración y defina Modo de
pantalla con referencia a la Tabla de modos de pantalla. No
necesita cambiar la configuración de los colores.
3 Haga clic en Avanzadas. Aparece un nuevo cuadro de
diálogo de ajustes.
4 Haga clic en la ficha Monitor y después configure Frecuencia de actualización de la pantalla en
relación con la tabla Modos de visualización. Si puede, configure las frecuencias vertical y horizontal
por separado, en lugar de la frecuencia de actualización de la pantalla.
5 Haga clic en Aceptar para cerrar la ventana y, a continuación, haga clic en el botón Aceptar en la
ventana Propiedades de pantalla. Es posible que comience un reinicio automático.
Ahorro energía: Desactivado/Bajo/Medio/Alto
Esta función ajusta el brillo de la pantalla según las condiciones de
iluminación ambiental.
−
Desactivado: Desactiva el modo de ahorro de energía.
−
Bajo: Funciona en el modo estándar sin tener en cuenta la
iluminación ambiental.
−
Medio: Entra en el modo de ahorro de energía Medio sin tener
en cuenta la iluminación ambiental.
−
Alto: Entra en el modo de máximo ahorro de energía sin tener en cuenta la iluminación ambiental.
Configuración sencilla
1 Pulse el botón TOOLS del mando a distancia.
2 Pulse los botones ▲ o ▼ para seleccionar Ahorro energía.
3 Pulse los botones ◄ o ► para seleccionar la opción deseada.
Herramientas
Anynet+ (HDMI-CEC)
Modo de imagen : Estándar
Modo de sonido : Personal
Temp. de desc.
: Desactivado
SRS TS XT : Desactivado
Ahorro energía
t Desactivado
Dual I-II : Mono
PIP (imagen sobre imagen): PIP (Activado/Desactivado)/Fuente/Tamaño/Posición/Programa
Existe la posibilidad de visualizar una imagen secundaria sobre la imagen principal. De esta manera
puede ver o supervisar el programa de televisión o la entrada de vídeo desde cualquier equipo conectado.
− PIP: Activado/Desactivado
Puede activar o desactivar la función PIP.
Tabla de configuración de PIP
Imagen principal Imagen secundaria
Componente
HDMI1, 2
PC
Emisiones de televisión
analógica sólo Ext.1,
Ext.2, AV
− Fuente: TV/Ext. 1/Ext. 2/AV
Puede seleccionar un origen para una imagen secundaria
−
Tamaño: / /
You can select a size of the sub-picture.
➢
Si la imagen principal está en los modos PC y Componente, Tamaño no está disponible.
−
Posición: / / /
Puede seleccionar una posición para una imagen secundaria.
➢
En el modo doble
( , )
Posición no se puede seleccionar.
−
Programa
Puede seleccionar un canal de la imagen secundaria sólo cuando la opción
Fuente está configurada
en TV.
Mover
Entrar
Volver
PIP :
Activado
Fuente : TV
Tamaño :
Posición :
Programa : P 1
PIP
T V
Mover
Ajustar Salir
BN68-01528A-00_SPA.indd 29 4/21/2008 3:19:07 PM

Español - 30
Modo de entrada (PC)
Tanto la posición en la pantalla como el tamaño varían dependiendo del tipo de monitor del PC y
de su resolución.
La tabla siguiente contiene una lista de los tipos de pantalla admitidos:
D-Sub Entrada
Modo Resolución
Horizontal
Frecuencia
(kHz)
Vertical
Frecuencia
(Hz)
Reloj de
píxeles
Frecuencia
(MHz)
Polaridad de
sincronización
(H/V)
PS50A470
IBM
640 x 350
720 x 400
31.469
31.469
70.086
70.087
25.175
28.322
+ / -
- / +
✔
✔
VESA
640 x 480
640 x 480
640 x 480
800 x 600
800 x 600
800 x 600
1024 x 768
1024 x 768
1024 x 768
1360 x 768
31.469
37.861
37.500
37.879
48.077
46.875
48.363
56.476
60.023
47.712
59.940
72.809
75.000
60.317
72.188
75.000
60.004
70.069
75.029
60.015
25.175
31.500
31.500
40.000
50.000
49.500
65.000
75.000
78.750
85.500
- / -
- / -
- / -
+ / +
+ / +
+ / +
- / -
- / -
+ / +
+ / +
✔
✔
✔
✔
✔
✔
✔
✔
✔
✔
HDMI/DVI Entrada
Modo Resolución
Horizontal
Frecuencia
(kHz)
Vertical
Frecuencia
(Hz)
Reloj de
píxeles
Frecuencia
(MHz)
Polaridad de
sincronización
(H/V)
PS50A470
VESA
640 x 480
800 x 600
1024 x 768
1360 x 768
31.469
37.879
48.363
47.712
59.940
60.317
60.004
60.015
25.175
40.000
65.000
85.500
- / -
+ / +
- / -
+ / +
✔
✔
✔
✔
Cuando se usa una conexión de cable HDMI/DVI, se debe conectar en el terminal HDMI IN 2.
No se admite el modo entrelazado.
El aparato puede funcionar incorrectamente si se selecciona un formato de vídeo que no sea
estándar.
Los modos Independiente y Compuesto no se admiten. SOG no se admite.
En el PS50A470, la calidad del texto en el PC es óptima en el modo VESA (1360 x 768 a 60 Hz).
BN68-01528A-00_SPA.indd 30 4/21/2008 3:19:07 PM

Español - 31
Configuración del ordenador PC
➢
Preseleccione el modo PC pulsando el botón SOURCE.
1 Pulse el botón MENU para ver el menú.
2 Pulse los botones ▲ o ▼ para seleccionar Imagen y, a
continuación, pulse el botón ENTER.
3 Seleccione la opción adecuada pulsando los botones ▲ o ▼ y,
a continuación, pulse el botón ENTER.
4 Cuando esté satisfecho con los ajustes, pulse el botón
ENTER.
5 Pulse el botón EXIT para salir.
Ajuste automático:
Esta función permite que la pantalla de PC del equipo se
ajuste automáticamente a la señal de vídeo del PC.
Los valores fino, grueso y posición se ajustan
automáticamente.
Configuración sencilla
1 Pulse el botón TOOLS del mando a distancia.
2 Pulse los botones ◄ o ► para seleccionar Ajuste
automático y pulse el botón ENTER.
Pantalla: Grueso/Fino/Posición/Restablecer imagen.
Grueso/Fino
El objetivo del ajuste de la calidad de imagen es eliminar o
reducir las interferencias.
Si éstas no se eliminan mediante la sintonización fina, ajuste
la frecuencia lo mejor que pueda (gruesa) y vuelva a realizar la
sintonización fina.
Cuando se hayan reducido las interferencias, vuelva a ajustar
la imagen de forma que esté centrada en la pantalla.
1 Pulse los botones ▲ o ▼ para seleccionar Grueso o Fino
y, a continuación, pulse el botón ENTER.
2 Pulse los botones ◄ o ► para ajustar la calidad de la
pantalla; pueden aparecer rayas verticales o la imagen
puede ser borrosa. Pulse el botón ENTER.
Posición
Ajuste la posición de la pantalla del PC si no se acopla a la
pantalla del TV.
1 Ajuste la posición con los botones ▲/▼/◄/►.
2 Pulse el botón ENTER.
Restablecer imagen
Puede recuperar todos los ajustes de imagen predeterminados
de fábrica.
Autoajuste en proceso
Espere por favor
Reinicio de Imagen Completado
Mover
Entrar
Volver
Posición
T V
Mover
Entrar
Volver
Modo :
Estándar
Iluminación de la celda
7
Contraste 95
Brillo 45
Nitidez 50
Ajuste automático
Ajuste Pantalla
Configuración detallada
Opciones de imagen
Restablecer : Aceptar
Imagen
T V
Mover
Entrar
Volver
Grueso 50
Fino 11
Posición
Restablecer imagen
Pantalla
T V
Herramientas
Anynet+ (HDMI-CEC)
Modo de imagen : Estándar
Modo de sonido : Personal
Temp. de desc.
: Desactivado
SRS TS XT : Desactivado
Ahorro energía : Desactivado
PIP
Ajuste automático
SalirMover
Entrar
BN68-01528A-00_SPA.indd 31 4/21/2008 3:19:08 PM

Español - 32
Conexión de dispositivos Anynet
+
El sistema Anynet
+
sólo admite dispositivos de AV compatibles con Anynet
+
.
Compruebe si el dispositivo de AV que va a conectar al televisor lleva la marca Anynet
+
.
Para conectar directamente al televisor
Conecte los terminales [HDMI
1], [HDMI 2] o [HDMI 3] del
televisor y el terminal HDMI
OUT del dispositivo Anynet
+
correspondiente mediante un
cable HDMI.
Para conectar al sistema Home Cinema
1
Conecte las tomas [HDMI
1], [HDMI 2] o [HDMI 3] del
televisor y la toma HDMI
OUT del dispositivo Anynet
+
correspondiente mediante el
cable HDMI.
2
Conecte la toma HDMI IN
del sistema Home Cinema
y la toma HDMI OUT
del dispositivo Anynet
+
correspondiente mediante el
cable HDMI.
➢
Conecte sólo un receptor.
➢
Puede conectar un dispositivo Anynet
+
mediante el cable HDMI. Algunos cables HDMI pueden no
admitir las funciones Anynet
+
.
➢
Anynet
+
funciona cuando el dispositivo de AV que admite Anynet
+
se encuentra en estado de espera
o de encendido.
➢
Anynet
+
admite hasta 8 dispositivos de AV en total.
English - 30
¿Qué es Anynet
+
?
Anynet
+
es un sistema de red de AV que proporciona a los usuarios una sencilla interfaz AV
mediante el control de los dispositivos de AV conectados a través del menú Anynet
+
cuando se
han conectado dispositivos de AV de Samsung Electronics.
Dispositivo 1
Anynet
+
Dispositivo 2
Anynet
+
Dispositivo 3
Anynet
+
TV
Cable HDMI
Cable HDMI
Cable HDMI
TV
Dispositivo 1 Anynet
+
Dispositivo 2 Anynet
+
Dispositivo 3 Anynet
+
Cable HDMI
Cable HDMI
Cable HDMI
Cable HDMI
Sistema Home Cinema
English - 30
BN68-01528A-00_SPA.indd 32 4/21/2008 3:19:09 PM

Español - 33
Configuración de Anynet
+
Parámetros para usar las funciones Anynet
+
.
Uso de la función Anynet
+
1
Pulse el botón MENU para mostrar el menú.
Pulse los botones ▲ o ▼ para seleccionar Entrada (Input); a
continuación pulse el botón ENTER.
2 Pulse los botones ▲ o ▼ para seleccionar Anynet
+
(HDMI-CEC)
y, a continuación, pulse el botón ENTER.
3 Pulse los botones ▲ o ▼ para seleccionar Configuración y, a
continuación, pulse el botón ENTER.
4 Pulse los botones ▲ o ▼ para seleccionar Anynet
+
(HDMI-CEC)
y, a continuación, pulse el botón ENTER.
5 Pulse los botones ▲ o ▼ para seleccionar Act. y, a continuación,
pulse el botón ENTER.
➢
La función Anynet
+
(HDMI-CEC) se activa.
➢
Si seleccionaDes. (Off), Anynet
+
(HDMI-CEC) se desactiva.
➢
Cuando la función Anynet
+
(HDMI-CEC) está desactivada, todas las
operaciones relacionadas con Anynet
+
se desactivan.
Apagado automático de un dispositivo Anynet
+
cuando el televisor está
apagado
4 Pulse los botones ▲ o ▼ para seleccionar Apagado automático
(Auto Turn Off) y, a continuación, pulse el botón ENTER.
5 Pulse los botones ▲ o ▼ para seleccionar Sí y, a continuación,
pulse el botón ENTER.
➢
La función Apagado automático se activa.
➢
Si selecciona No, se cancela la función de apagado automático.
Pulse el botón EXIT para salir.
➢
Para usar la función Anynet
+
, el valor Seleccionar dispositivo del
mando a distancia debe ajustarse en TV.
➢
Si establece Apagado automático como Sí, los dispositivos externos conectados también se desactivan
cuando se apaga el televisor. Sin embargo, si el dispositivo está grabando es posible que no se apague.
Búsqueda y cambio de dispositivos Anynet
+
1 Pulse el botón MENU para mostrar el menú.
Pulse los botones ▲ o ▼ para seleccionar Entrada y,a
continuación, pulse el botón ENTER.
2 Pulse los botones ▲ o ▼ para seleccionar Anynet
+
(HDMI-CEC)
y, a continuación, pulse el botón ENTER.
3
Pulse los botones ▲ o ▼ para seleccionar Seleccionar dispositivo y, a
continuación, pulse el botón ENTER.
4 Pulse los botones ▲ o ▼ para seleccionar el dispositivo que desee
y pulse el botón ENTER.Se cambia al dispositivo seleccionado.
5 Si no encuentra el dispositivo que desea, pulse los botones
▲ o ▼ para seleccionar Buscar dispositivos conectados y pulse
el botón ENTER.
Aparece el mensaje Configurando conexión Anynet...
+
Cuando
finaliza la búsqueda de dispositivos, los dispositivos conectados
aparecen en el menú Anynet
+
.
➢
El cambio a los dispositivos seleccionados puede tardar unos
2 minutos. No se puede cancelar la operación de cambio de
dispositivo mientras ésta se está efectuando.
➢
El tiempo necesario para la búsqueda de dispositivos depende de
la cantidad de dispositivos conectados.
➢
Cuando finaliza la búsqueda de dispositivos, no se muestra el
número de dispositivos encontrados.
➢
Aunque el televisor explora automáticamente los dispositivos cuando se enciende con el botón POWER,
los dispositivos conectados cuando el televisor está encendido o en algunas circunstancias determinadas
no aparecen en la lista de dispositivos. Por consiguiente, debe seleccionar el menú Buscar dispositivos
conectados (Searching Connections) para buscar los dispositivos.
➢
Si ha seleccionado el modo de entrada externa pulsando el botón SOURCE, no podrá usar la función
Anynet
+
. Asegúrese de cambiar a un dispositivo Anynet
+
mediante el botón TOOLS.
Configuración
Anynet
+
(HDMI-CEC)
: Off
Apagado automático
: Off
Buscar dispositvos conectados
Entrar VolverMover
Desactivado
Activado
Entrar
Mover
Ver la televisión
Seleccionar dispositivo
Grabar
Menú en el dispositivo
Funcionamiento disp
Receptor
:
Desactivado
Configuración
TV P 1
Volver
Entrar
Mover
Ver la televisión
Seleccionar dispositivo
Grabar
Menú en el dispositivo
Funcionamiento disp
Receptor
:
Desactivado
Configuración
TV P 1
Volver
DVDR1
DVDR2
DVD1
DVD2
Configuración
Anynet
+
(HDMI-CEC)
: Activado
Apagado automático :
: Off
Buscar dispositvos conectados
Entrar VolverMover
No
Sí
Configuración
Anynet
+
(HDMI-CEC)
: Activado
Apagado automático : Sí
Buscar dispositvos conectados
Entrar VolverMover
Continúa…
BN68-01528A-00_SPA.indd 33 4/21/2008 3:19:10 PM

Español - 34
Menú Anynet+
El menú Anynet
+
cambia según el tipo y el estado de los dispositivos Anynet
+
conectados al
televisor.
Menú Anynet
+
Descripción
Ver la televisión Cambia de Anynet
+
al modo de emisión de TV.
Seleccionar dispositivo El televisor está conectado al dispositivo correspondiente.
Grabar Comienza una grabación. (Este menú sólo funciona con dispositivos
que admiten grabación.)
Menú en el dispositivo Muestra el menú del dispositivo conectado.
Ejemplo: Cuando hay un grabador de DVD conectado, aparece el
menú de títulos del grabador de DVD.
Funcionamiento disp. Muestra el menú de control de reproducción del dispositivo
conectado.
Ejemplo: Cuando hay una grabadora de DVD conectada, aparece el
menú de control de reproducción de la grabadora de DVD.
Receptor La salida de sonido se efectúa a través del receptor.
Configuración Permite ajustar el entorno de uso de Anynet
+
.
Botones del mando a distancia del televisor disponibles en el modo Anynet
+
Tipo de dispositivo Estado de funcionamiento Botones disponibles
Dispositivo Anynet
+
Después de cambiar al
dispositivo, cuando el menú de
éste aparece en la pantalla.
Botones numéricos
Botones ▲/▼/◄/►/ENTER
Botones de colores
Botón EXIT
Después de cambiar al
dispositivo, mientras se
reproduce un archivo
W.LINK
(Búsqueda atrás)
W.LINK
(Búsqueda adelante)
W.LINK
(
Parar
)
W.LINK
W.LINK
(
Reproducir/pausa
)
Dispositivo con sintonizador
incorporado
Después de cambiar al
dispositivo, mientras se ve un
programa de TV
Botón P /
Dispositivo de audio
Cuando la opción Receptor está
activada
Botón
W.LINK
/
W.LINK
Botón
MUTE
➢
La función Anynet
+
sólo funciona cuando el mando a distancia está ajustado en TV.
➢
El botón REC funciona sólo cuando la grabación es posible.
➢
Los dispositivos Anynet
+
no se pueden controlar con los botones del lateral del TV. Los dispositivos
Anynet
+
sólo se pueden controlar mediante el mando a distancia del televisor.
➢
El mando a distancia del televisor puede no funcionar en determinadas circunstancias. En ese caso,
vuelva a seleccionar el dispositivo Anynet
+
.
➢
Las funciones de Anynet
+
no funcionan en los productos de otros fabricantes.
➢
En el modo Anynet
+
los botones de colores puede que no funcionen correctamente.
➢
El funcionamiento de
W.LINK
,
W.LINK
puede variar según el dispositivo.
Grabación
La grabadora permite efectuar una grabación de un programa de televisión.
Pulse el botón REC.
Recording begins. (Only when the Anynet
+
enabled recording device is connected.)
➢
El programa de TV actual se graba en el estado de visualización de la televisión. Si está viendo un
vídeo desde otro dispositivo, se graba el vídeo de éste.
➢
También se puede grabar las transmisiones de la fuente seleccionando Grabar después de pulsar el
botón TOOLS.
➢
Antes de grabar, compruebe si la toma de antena está conectada correctamente al dispositivo de grabación.
Para conectar la antena al dispositivo de grabación, consulte el correspondiente manual del usuario.
BN68-01528A-00_SPA.indd 34 4/21/2008 3:19:11 PM

Español - 35
Escucha a través de un receptor
Se puede escuchar sonido a través de un receptor en lugar de hacerlo mediante el altavoz del TV.
1 Pulse el botón MENU para mostrar el menú.
Pulse los botones ▲ o ▼ para seleccionar Entrada; a continuación pulse el botón
ENTER.
2 Pulse los botones ▲ o ▼ para seleccionar Anynet
+
(HDMI-CEC) y, a continuación,
pulse el botón ENTER.
3 Pulse los botones ▲ o ▼ para seleccionar Receptor y, a continuación, pulse el
botón ENTER.
4
Pulse los botones ◄ o ► para seleccionar Act. y, a continuación, pulse el botón ENTER.
Ahora podrá escuchar el sonido a través del receptor.
5 Pulse el botón EXIT para salir.
➢
Cuando la opción Receptor está establecida en Act., es posible escuchar el sonido
del TV a través del receptor de 2 canales.
➢
Si el receptor es exclusivamente para el sistema Home Cinema (que sólo admite audio), puede que no
aparezca en la lista de dispositivos.
➢
En caso de que el contenido presente algún problema de copyright, es posible que no se escuche
correctamente a través del receptor.
➢
Cuando se escucha a través del receptor, hay restricciones para el uso de los menús PIP y los relativos al audio.
Compruebe estos puntos antes de solicitar servicio técnico
Síntoma Solución
Anynet
+
no funciona. ■ Compruebe si el dispositivo es un dispositivo Anynet
+
. El sistema
Anynet
+
sólo admite dispositivos Anynet
+
.
■ Conecte sólo un receptor.
■
Compruebe si el cable de alimentación de Anynet
+
está debidamente conectado.
■
Compruebe las conexiones de los cables de Vídeo/Audio/HDMI del
dispositivo Anynet
+
.
■ Compruebe si Anynet+(HDMI-CEC) está establecido en Act. en el
menú de configuración de Anynet
+
.
■ Compruebe si el mando a distancia del televisor está en modo TV.
■ Compruebe si es un mando a distancia exclusivo para Anynet
+
.
■ Anynet
+
no funciona en algunas situaciones.
■ Cuando se conecta o se desconecta el cable HDMI se han de buscar
de nuevo los dispositivos o reiniciar el televisor.
■
Compruebe si la función Anynet
+
del dispositivo Anynet
+
está activada.
Deseo iniciar Anynet
+
. ■
Compruebe si el dispositivo Anynet
+
está debidamente conectado al
televisor y si la opción Anynet
+
(HDMI-CEC) está establecida en Act. en el
menú Configuración de Anynet
+
.
■ Pulse el botón TV del mando a distancia del televisor para cambiar
a TV. A continuación pulse el botón TOOLS para visualizar el menú
Anynet
+
y seleccionar el menú que desee.
Deseo salir de Anynet
+
. ■ Seleccione Ver la televisión en el menú de Anynet
+
.
■ Pulse el botón SOURCE del mando a distancia del televisor y
seleccione un dispositivo que no sea Anynet
+
.
■ Pulse P, CH LIST o PRE-CH para cambiar al modo TV. (Tenga en
cuenta que el botón de canal sólo funciona cuando no hay ningún
dispositivo Anynet
+
con sintonizador incorporado conectado.)
En la pantalla aparece el
mensaje Conectando a
un dispositivo Anynet
+
…
(Connecting to Anynet+
device...).
■ El mando a distancia no se puede utilizar cuando se está configurando
Anynet+ o cambiando a un modo de visualización.
■ Utilice el mando a distancia cuando haya terminado la configuración
de Anynet
+
o el cambio al modo de visualización.
El dispositivo Anynet
+
no
reproduce.
■ No se puede usar la función de reproducción mientras se efectúa una
conexión Plug & Play.
El dispositivo conectado no se
muestra.
■ Compruebe si el dispositivo admite las funciones Anynet+.
■ Compruebe si el cable HDMI está debidamente conectado.
■ Compruebe si Anynet
+
(HDMI-CEC) está establecido en Act. en el
menú de configuración de Anynet
+
.
■ Vuelva a efectuar una búsqueda de dispositivos Anynet
+
.
■ Sólo puede conectar un dispositivo Anynet
+
mediante el cable HDMI.
Algunos cables HDMI pueden no admitir las funciones Anynet
+
.
El programa de televisión no
se puede grabar.
■
Compruebe la conexión de la toma de antena del dispositivo de grabación.
Entrar
Mover
Ver la televisión (View TV)
Seleccionar dispositivo
Grabar
Menú en el dispositivo
Funcionamiento disp
Receptor :Act.
Configuración
TV P 1
Salir
BN68-01528A-00_SPA.indd 35 4/21/2008 3:19:11 PM

Español - 36
Función de teletexto (según el modelo)
La mayoría de los canales de televisión proporcionan servicios de información escrita mediante el
teletexto. La página de índice de dicho servicio proporciona información sobre el uso de éste. Asimismo,
se pueden seleccionar diversas opciones mediante el mando a distancia para ajustar el servicio a las
necesidades del usuario.
☛
Para que la información del teletexto se visualice correctamente, la recepción del canal debe ser
estable. En caso contrario, puede perderse información o algunas páginas pueden no visualizarse.
1
TV
Sale del teletexto (según los modelos)
2
(almacenar)
Se utiliza para guardar las páginas del teletexto.
3
(tamaño)
Se utiliza para mostrar caracteres de doble tamaño en la parte
superior de la pantalla. Si desea mostrarlos también en la parte
inferior, vuelva a pulsar el botón.
Púlselo de nuevo para volver a la presentación normal.
4
(mostrar)
Se usa para mostrar el texto oculto (respuestas a juegos,
por ejemplo). Púlselo de nuevo para volver a la presentación
normal.
5
Botones de colores (rojo/verde/amarillo/azul)
Si emisora utiliza el sistema FASTEXT, los distintos temas
cubiertos en una página de teletexto se codificarán en color
y podrá seleccionarlos pulsando los botones de color. Pulse
el correspondiente al tema deseado. La página muestra otra
información con código de color que se puede seleccionar
de la misma forma.
Pulse el botón del color correspondiente para ver la página
anterior o la siguiente.
6
(activar teletexto/mezcla)
Se utiliza para activar el modo de teletexto tras seleccionar
el canal que proporciona el servicio. Pulse dos veces para
superponer el teletexto a la pantalla de emisión actual.
7
(modo)
Se utiliza para seleccionar el modo de teletexto (LIST/FLOF).
Si lo pulsa en el modo LIST (lista), cambia al modo de guardar
lista.
En dicho modo se puede guardar la página de teletexto en la
lista mediante el botón (almacenar) .
8
(página secundaria)
Se utiliza para mostrar la página secundaria disponible.
9
(avanzar página)
Se utiliza para mostrar la siguiente página de teletexto.
0
(retroceder página)
Se utiliza para mostrar la página anterior de teletexto.
!
(índice)
Se utiliza para mostrar la página de índice (contenido) en
cualquier momento durante la visualización de teletexto.
@
(retener)
Se utiliza para retener la presentación en una página
determinada si ésta está enlazada con varias páginas
secundarias que se muestran automáticamente. Para reanudar
la presentación vuelva a pulsar el botón.
#
(cancelar)
Se utiliza para visualizar la emisión cuando se busca una
página.
➢
Puede cambiar páginas de teletexto pulsando los botones
numéricos del mando a distancia.
Continúa…
BN68-01528A-00_SPA.indd 36 4/21/2008 3:19:13 PM

Español - 37
Las páginas de teletexto se organizan en seis categorías:
Parte Contenido
A
B
C
D
E
F
Número de página seleccionado.
Identidad del canal.
Número de página actual o indicaciones de la
búsqueda.
Fecha y hora.
Texto.
Información de estado.
Información FASTEXT.
➢
La información de teletexto se suele dividir en varias páginas
que aparecen en secuencia y a las que se puede acceder:
Introduciendo el número de página.
Seleccionando un título de la lista.
Seleccionando un encabezado de color (sistema FASTEXT).
➢
Pulse el botón TV para salir de la visualización de teletexto.
BN68-01528A-00_SPA.indd 37 4/21/2008 3:19:14 PM

Español - 38
Especificaciones del equipo de montaje mural (VESA)
Instale el montaje mural en una pared sólida, perpendicular al suelo.
Para colocarlo en otros materiales de construcción, póngase en contacto con el distribuidor más
cercano. Si se instala en el techo o en una pared inclinada, puede caerse y causar graves lesiones
personales.
Familia de
producto
Pulgadas
Especificaciones
VESA (A * B)
Tornillo estándar Cantidad
LCD-TV
23 ~ 26 200
*
100 M4
4
32 ~ 40 200
*
200 M6
46 ~ 52
400 * 400
600 * 400
M8
57
700 * 400
(No VESA)
57 ~ 70 800 * 400
80 ~ 1400 * 800
PDP-TV
42 ~ 58
400 * 400
600 * 400
M8
4
63
676 * 407
(No VESA)
6
63 ~ 70 800 * 400 4
80 ~ 1400 * 800 4
➢
Se ofrecen las dimensiones estándar para los equipos de montaje mural, como se muestra en la
tabla anterior.
➢
Al adquirir el equipo de montaje mural, también se distribuye un manual de instalación detallado y
todas las piezas necesarias para el montaje.
➢
No use tornillos con un tamaño superior al estándar, ya que pueden causar daños en el interior del
televisor.
➢
Para montajes murales que no cumplen las especificaciones de tornillos estándar VESA, la longitud
de éstos puede variar dependiendo de las especificaciones.
➢
No use tornillos que no cumplan las especificaciones de tornillos estándar VESA
No apriete excesivamente los tornillos, ya que podría dañar el producto o provocar la caída de
éste con riesgo de causar lesiones personales. Samsung no se hace responsable de este tipo de
accidentes.
➢
Samsung no se hace responsable de daños o lesiones personales cuando se usa un montaje mural
que no es VESA o que no cumple las especificaciones, o si el cliente no sigue las instrucciones de
instalación del producto.
➢
Nuestros modelos de 57” y 63” no son compatibles con las especificaciones VESA. Por ello, debe
usar un equipo de montaje mural exclusivo para este modelo.
➢
No se deben superar los 15 grados de inclinación cuando se instala este televisor.
No instale el equipo de montaje mural mientras el televisor está encendido.
Se podría producir una descarga eléctrica con riesgo de causar lesiones personales.
BN68-01528A-00_SPA.indd 38 4/21/2008 3:19:14 PM

Español - 39
Ajuste de montaje mural (se vende por separado)
Una vez instalado el montaje mural automático, la posición del televisor se puede ajustar fácilmente.
Cable serie (1P a 1P) (no suministrado)
Panel posterior Montaje mural automático
Acceso al menú
1 Pulse los botones ▲, ▼, ◄ o ► en el mando a distancia.
➢
Se muestra la pantalla Ajuste del montaje mural.
➢
Si no se muestra la pantalla Ajuste del montaje mural
cuando se hace clic en un botón de dirección mientras
se está viendo la televisión, se puede usar el menú para
mostrar la pantalla.
• Pulse el botón
MENU para ver el menú. Pulse los
botones ▲ o ▼ para seleccionar Configuración, y, a
continuación, pulse el botón ENTER.
• Pulse los botones ▲ o ▼ para seleccionar
Ajustedel
montaje mural y, a continuación, pulse el botón
ENTER.
Memorización de la posición
2 Ajuste la posición deseada mediante los botones ▲, ▼, ◄, ►.
➢
Si pulsa un botón de flecha sin que haya aparecido un
OSD en la pantalla del televisor, aparece la pantalla de
ajuste.
➢
Pulse el botón INFO para reiniciar. Pulse los botones ◄
o ► para seleccionar Sí, y, a continuación, pulse el botón
ENTER. La posición se inicializa con la configuración
predeterminada.
3 Pulse el botón azul.
Pulse los botones ▲ y ▼ para seleccionar un modo de
guardar entre Posición 1, Posición 2 o Posición 3 en este
orden para guardar la posición actual.
➢
Si no desea guardar la posición actual, pulse el botón
RETURN.
➢
Cuando se selecciona un modo de guardar, no se pueden
usar los botones de colores.
4
Pulse el botón ENTER para guardar.
➢
Cuando se selecciona la Posición 1 se muestra el
mensaje Posición actual guardada como Posición1.
5
Pulse el botón ENTER.
➢
La posición guardada se muestra en la parte izquierda de la OSD.
Move
Enter
Return
Plug & Play
Idioma : Español
Time
Efecto de lu
: Modo enc. act.
Ajuste del montaje mural
Melodía : Desactivado
Ocio : Cine
Ahorro energía : Desactivado
Configuración
T V
Ajuste del montaje mural
Ajustar
Guardar
Central
►
►
►
►
►
►
►
►
321
Posición
Guardar
Volver
Mover
Entrar
Seleccione modo para guardar.
Posición 1
Posición 2
Posición 3
BN68-01528A-00_SPA.indd 39 4/21/2008 3:19:16 PM

Español - 40
Cómo montar la base del soporte (según el modelo)
Con los 6 tornillos de sujeción de la base del soporte y el
monitor, fije firmemente éste a la base del soporte.
(Es posible que el exterior del equipo sea diferente del que se
muestra en la imagen.)
Si va a instalar el televisor en la
pared, fije la tapa (1) en la zona
de conexión de la base del soporte
con los dos tornillos para ocultar la
ranura.
Advertencia
Antes de mover el televisor asegure
firmemente el soporte, para evitar que
se caiga y cause daños físicos.
➢
El televisor lo deben transportar
dos o más personas. Nunca deje
el televisor en el suelo ya que la
pantalla puede sufrir daños.
Mantenga siempre el televisor en
su posición vertical.
Desplazamiento a la posición memorizada
1
Complete el paso 1 de Acceso al menú.
2 Pulse un botón de color (rojo, verde, amarillo) para mover el
montaje mural a la posición guardada.
➢
Se puede mover el montaje mural a una de las tres
posiciones preconfiguradas con los botones rojo, verde o
amarillo.
➢
Si después de usar una posición preconfigurada se ajusta
ésta, la visualización de la posición desaparece.
➢
Para la instalación, consulte el manual de instalación
proporcionado con el equipo de montaje mural.
➢
Para la instalación del producto, así como la instalación y
movimiento del montaje en la pared, consulte a una empresa
especializada en instalaciones.
➢
La instalación manual se debe usar al colocar el equipo de
montaje en una pared. Para colocarlo en otros materiales de
construcción, póngase en contacto con el distribuidor más
cercano.
➢
El montaje mural no está operativo con Anynet+.
➢
El modelo de 42 pulgadas no es compatible con el anterior
modelo de montaje mural (WMN5090A).
Ajuste del montaje mural
Ajustar
Guardar
Central
►
►
►
►
►
►
►
►
321
Posición
Posición 1
BN68-01528A-00_SPA.indd 40 4/21/2008 3:19:18 PM

Español - 41
Fijación del televisor a la pared
Tirar del televisor, empujarlo o colgarse de él puede provocar su caída. En especial, procure
que los niños no se cuelguen del televisor ni lo desestabilicen; éste podría caerse sobre ellos
y causarles lesiones graves o incluso la muerte. Siga las precauciones de seguridad del
folleto de seguridad incluido con el producto. Para mejorar la estabilidad instale un dispositivo
antivuelco, como se explica a continuación.
Para impedir que el televisor se caiga:
1. Apriete rmemente las grapas sobre la pared con los
tornillos. Asegúrese de que los tornillos estén bien armados
en la pared.
Según el tipo de pared quizás necesite algún material
adicional para el anclaje.
Las grapas, los tornillos y la cadena no se suministran
con el producto; deberá adquirirlos por separado.
2. Quite los tornillos de la parte central posterior del televisor y
con ellos monte las grapas en el televisor.
Quizás con el televisor no vayan incluidos los tornillos.
En tal caso debe adquirirlos por separado con estas
especicaciones.
3. Monte una cadena fuerte entre las grapas del televisor y de
la pared de manera que quede bien tensada.
Instale el televisor cerca de la pared para evitar que caiga
hacia a atrás.
Las grapas de la pared han de estar a la misma o a menor
altura que las grapas del televisor.
Cuando se desee mover el televisor deberá aojar la
cadena.
4. Compruebe que todas las conexiones estén bien
aseguradas. Compruébelas periódicamente para detectar
cualquier signo de fatiga o de fallo. Si tiene dudas sobre la
seguridad de la instalación, póngase en contacto con un
instalador profesional.
➣
➣
➣
➣
➣
➣
Pared
Pared
Precaución
BN68-01528A-00_SPA.indd 41 4/21/2008 3:19:19 PM

Español - 42
Solución de problemas
Antes de ponerse en contacto con el Servicio posventa de Samsung, realice las comprobaciones
siguientes.
Si no puede resolver el problema con las instrucciones que aparecen a continuación, anote el
modelo y el número de serie del televisor y póngase en contacto con el distribuidor local.
No hay imagen ni sonido
Compruebe que el cable de alimentación esté conectado a la red eléctrica.
Compruebe que esté pulsado el botón de encendido (apagar/encender) del panel frontal o pulse
el botón POWER del mando a distancia.
Compruebe los valores de contraste y brillo de la imagen.
Compruebe el volumen.
Compruebe que Altavoz de TV esté establecido en Desactivado.
Hay imagen pero no sonido
Compruebe el volumen.
Compruebe si ha pulsado el botón de volumen MUTE del mando a distancia.
No aparece ninguna imagen o está en blanco y negro
Ajuste los valores del color.
Compruebe que el sistema de emisión seleccionado sea correcto.
Hay interferencias en el sonido o en la imagen
Trate de identificar el aparato eléctrico que afecta al televisor y aléjelo.
Enchufe el televisor en una toma eléctrica distinta.
La imagen está borrosa o presenta niebla y el sonido está distorsionado
Compruebe dirección, ubicación y conexiones de la antena.
Con frecuencia, este tipo de interferencias se deben al uso de una antena interior.
El mando a distancia no funciona correctamente
Sustituya las pilas del mando a distancia.
Limpie el borde superior del mando a distancia (ventana de transmisión).
Compruebe que los polos “+” y “-” de las pilas estén correctamente colocados.
Compruebe si las pilas están agotadas.
La pantalla está en blanco y el indicador de encendido parpadea constantemente
En el ordenador, compruebe los cables de señal y de alimentación.
El televisor está usando su sistema de gestión de energía.
Mueva el ratón del ordenador o pulse una tecla.
En el equipo (STB, DVD, etc.) compruebe el cable de señal y el de alimentación.
El televisor está usando su sistema de gestión de energía.
Pulse el botón Source del mando a distancia o del panel.
Encienda y apague el televisor.
La imagen dañada aparece en la esquina de la pantalla.
Si Sólo exploración está seleccionado en algún dispositivo externo, la imagen dañada puede aparecer
en la esquina de la pantalla. Este síntoma se origina en los dispositivos externos, no en el televisor.
Aparece el mensaje [Resets all settings to the default values
(Restablece todos los ajustes predeterminados de fábrica)].
Aparece cuando el botón EXIT se mantiene pulsado durante unos momentos. La configuración del
producto se restablece con los ajustes predeterminados de fábrica.
BN68-01528A-00_SPA.indd 42 4/21/2008 3:19:19 PM

Español - 43
Especificaciones
Las descripciones y características de este folleto se facilitan con fines informativos solamente y
están sujetas a modificación sin previo aviso.
Nombre del modelo PS50A470
Tamaño de pantalla
(diagonal)
50 inch
Resolución del PC 1360 x 768 @ 60 Hz
Salida de sonido 10 W + 10 W
Dimensiones (An x Al x P)
Cuerpo principal
Con soporte
1290 x 740 x 95 mm
1290 x 804 x 319 mm
Peso
Cuerpo principal
Con soporte
39 kg
41 kg
Consideraciones
medioambientales
Temperatura de funcionamiento
Humedad de funcionamiento
Temperatura de almacenamiento
Humedad en almacenamiento
10 °C to 40 °C (50 °F to 104 °F)
10% to 80%, non-condensing
-20 °C to 45 °C (-4 °F to 113 °F)
5% to 95%, non-condensing
➢
Este dispositivo es un aparato digital de la Clase B.
El diseño y las especificaciones pueden cambiar sin previo aviso.
Para conocer la fuente de alimentación y el consumo de energía, consulte la etiqueta adherida al
producto.
BN68-01528A-00_SPA.indd 43 4/21/2008 3:19:19 PM

Eliminación correcta de este producto
(Material Eléctrico y Electrónico de Descarte)
La presencia de esta marca en el producto o en el material
informativo que lo acompaña, indica que al finalizar su vida útil no
deberá eliminarse junto con otros residuos domésticos. Para evitar los
posibles daños al medio ambiente o a la salud humana que representa
la eliminación incontrolada de residuos, separe este producto de
otros tipos de residuos y recíclelo correctamente para promover la
reutilización sostenible de recursos materiales.
Los usuarios particulares pueden contactar con el establecimiento
donde adquirieron el producto, o con las autoridades locales
pertinentes, para informarse sobre cómo y dónde pueden llevarlo para
que sea sometido a un reciclaje ecológico y seguro.
Los usuarios comerciales pueden contactar con su proveedor y
consultar las condiciones del contrato de compra. Este producto no
debe eliminarse mezclado con otros residuos comerciales.
BN68-01528A-00_SPA.indd 44 4/21/2008 3:19:19 PM

Português - 2
© 2008 Samsung Electronics Co., Ltd. All rights reserved.
Instruções para o utilizador
Retenção de imagem no ecrã
Não visualize uma imagem fixa (como, por exemplo, um videojogo ou se ligar um PC a este plasma)
no ecrã de plasma durante mais de 2 horas porque pode provocar a retenção de imagem no ecrã.
Esta retenção de imagem também é conhecida como “queimadura de ecrã”. Para evitar a retenção
de imagem, diminua o grau de brilho e de contraste do ecrã quando visualizar uma imagem fixa.
Altitude
O plasma só pode funcionar normalmente a uma altitude inferior a 2000 m. Pode não funcionar
correctamente num local que esteja a uma altitude superior a 2000 m, não sendo aconselhável
instalá-lo nem utilizá-lo nesse local.
Calor na parte superior do televisor plasma
A parte superior do produto pode ficar quente, se o utilizar durante muito tempo, pois o calor dissipa-
se a partir do painel, através das aberturas de ventilação que estão em cima. Esta situação é
considerada normal e não indica que exista qualquer avaria ou defeito n o produto. No entanto, deve
evitar que as crianças toquem na parte superior do produto.
O televisor produz um estalido.
Os estalidos podem ocorrer quando o produto se contrair ou expandir devido a mudanças ambientais
no espaço circundante, como a nível de temperatura ou humidade. Isto é normal e não representa
um defeito no aparelho.
Defeitos nas células
O plasma utiliza um painel constituído por 1.230.000 (nível SD) a 3.150.000 (nível HD) pixels que
necessitam de uma tecnologia sofisticada para serem reproduzidos. No entanto, podem existir
alguns pixels claros ou escuros no ecrã. Estes pixels não afectam o desempenho do produto.
Evite utilizar o televisor com temperaturas inferiores a 5°C(41°F).
Uma imagem fixa durante um longo período de tempo pode danificar permanentemente o ecrã
de plasma.
Se utilizar o televisor plasma em formato 4:3 durante um longo período de tempo,
pode deixar vestígios de margens à esquerda, à direita e no centro do ecrã,
causadas pela diferença da emissão de luz no ecrã. Se reproduzir um DVD ou
um videojogo, pode causar efeitos semelhantes no ecrã. Os danos causados
pelo efeito acima mencionado não estão cobertos pela garantia.
Imagem residual no ecrã
A visualização prolongada de imagens fixas de videojogos ou de um PC pode produzir imagens
residuais parciais. Para evitar este efeito, reduza o ‘brilho’ e o ‘contraste’ quando visualizar
imagens fixas.
Garantia
- A garantia não cobre quaisquer danos provocados pela retenção de imagem.
- A “queimadura” não está coberta pela garantia.
Instalação
Contacte um centro de assistência autorizado quando instalar o aparelho num local sujeito a poeiras
excessivas, temperaturas elevadas ou reduzidas, elevados índices de humidade, substâncias
químicas, bem como em locais onde o produto seja utilizado continuamente como num aeroporto,
estação de comboios, etc. Se não o fizer, pode danificar seriamente o aparelho.
Contacte a SAMSUNG WORLDWIDE
Se tiver algum comentário ou dúvida relacionados com produtos da Samsung, contacte o
centro de assistência ao cliente da SAMSUNG. (Consulte a contracapa para obter mais
informações.)
BN68-01528A-00_Por.indd 2 2008-4-21 15:22:24

Português - 3
Símbolos
☛ ➢
Carregue
Importante
Nota
Índice
Informações gerais
Instruções para o utilizador ............................. 2
Vericar acessórios ......................................... 4
Utilizar a base ................................................ 4
Painel de controlo .......................................... 5
Painel de ligação ............................................. 6
Apresentação do telecomando ....................... 8
Funcionamento
Ligar e desligar o televisor .............................. 9
Ver os menus .................................................. 9
Função Plug & Play ......................................10
Utilizar o botão TOOLS ................................. 12
Ver uma fonte de sinal externa ..................... 12
Editar nomes de dispositivos ........................ 13
Controlo de canais
Memorizar canais automaticamente ............. 13
Memorizar canais manualmente ................... 14
Adicionar/Bloquear canais ............................ 15
Ordenar os canais memorizados .................. 16
Atribuir nomes a canais ................................16
Sintonização na da recepção de canais ..... 17
Controlo de imagem
Alterar o padrão de imagem ......................... 18
Personalizar as denições de imagem ......... 18
Congurar denições detalhadas na imagem
.. 19
Opções de imagem ....................................... 20
Utilizar a função 3D .......................................
22
Repor os valores de fábrica das
denições de imagem ................................... 24
Controlo de som
Funções de som ...........................................25
Seleccionar o modo de som
(consoante o modelo) ................................... 26
Ligar os Auscultadores (Vendidos em
separado) ...................................................... 26
Descrição das funções
Funções de tempo ........................................ 27
Idioma / Melodia / Efeito de luz /
Entretenimento / Poupança energ / PIP. ....... 28
Visualização do PC
Congurar o software do PC
(com base no Windows XP) .......................... 29
Modo de entrada (PC) ..................................30
Denir o PC ................................................... 31
Sobre o Anynet+
O que é o Anynet+? ...................................... 32
Ligar dispositivos Anynet+ ............................ 32
Congurar o Anynet+ .................................... 33
Procurar e Alternar entre dispositivos
Anynet+ ......................................................... 33
Gravar ........................................................... 34
Ouvir através de um receptor .......................35
Antes de solicitar assistência técnica, verique
os seguintes pontos ...................................... 35
Anexo
Função de teletexto (consoante o modelo) ... 36
Especicações do kit de montagem na
parede (VESA) .............................................. 38
Dispositivo de montagem na parede
(vendido em separado) ................................. 39
Como montar a base (consoante o modelo)
.. 40
Fixar o televisor à parede ............................... 41
Resolução de problemas .............................. 42
Características técnicas ................................ 43
Português
BN68-01528A-00_Por.indd 3 2008-4-21 15:22:24

Português - 4
Utilizar a base
➢
O plasma deve ser transportado
por duas ou mais pessoas. Nunca
deite o plasma no chão porque
pode danificar o ecrã. Mantenha
sempre o plasma na vertical.
O plasma pode rodar 20 graus
para a esquerda e para a direita.
Verificar acessórioss
Manual do utilizador Telecomando/
Pilhas AAA
Cabo de alimentação Pano de limpeza
Garantia/
Cartão de registo/
Manual de segurança
Protecção inferior / Parafusos
(2 de cada)
(Consulte a página 40)
Núcleo de ferrite para cabo
de alimentação
Núcleo de ferrite para
S-Video
Vendidos separadamente
Cabo de antena Cabos de componentes Cabos de áudio Cabo de PC
Cabo Scart Cabo de áudio para PC Cabo HDMI Cabo HDMI/DVI
➢
Núcleo de ferrite (Cabo de alimentação, S-Vídeo)
O núcleo de ferrite é utilizado para proteger o cabo de interferências.
Quando ligar um cabo, coloque o núcleo de ferrite à volta do cabo
junto da ficha.
-20° ~ 20°
BN68-01528A-00_Por.indd 4 2008-4-21 15:22:27

Português - 5
1
SOURCE
Mostra um menu de todas as fontes de
entrada disponíveis (TV, Ext.1, Ext.2, AV,
S-Vídeo, Componente, PC, HDMI1, HDMI2,
HDMI3).
➢
No menu no ecrã, utilize este botão
tal como utiliza o botão ENTER no
telecomando.
2
MENU
Carregue neste botão para ver o menu das
funções do televisor no ecrã.
3
– +
Carregue nestes botões para aumentar ou
diminuir o volume.
No menu no ecrã, utilize os botões
– + tal como utiliza os botões ◄ e ► do
telecomando.
4
C/P.
Carregue neste botão para mudar de canal.
No menu no ecrã, utilize os botões
C/P. tal como utiliza os botões ▲ e
▼ do telecomando.
5
Indicador de corrente
Pisca e apaga-se quando o televisor está
ligado; acende-se quando está no modo de
suspensão.
6
Botão
Carregue para ligar/desligar o televisor.
7
Sensor do telecomando
Aponte o telecomando para este ponto no
televisor.
8
Altifalante
Painel de controlo
Painel frontal (ou lateral)
➢
A cor e a forma do produto podem variar consoante o modelo.
BN68-01528A-00_Por.indd 5 2008-4-21 15:22:28

Português - 6
Painel de ligação
Continua...
☛
Sempre que ligar um sistema de áudio ou de vídeo ao aparelho, certifique-se de que todos os
elementos estão desligados.
Quando ligar um dispositivo externo, faça a correspondência de cores entre o terminal e o
respectivo cabo.
1
POWER IN
Ligue o cabo de alimentação fornecido.
2
COMPONENT IN
Entradas de áudio (AUDIO L/R) e de vídeo
(Y/PB/PR) para Componente.
3
PC IN / AUDIO
Ligue à tomada de saída de áudio e vídeo no
PC.
4
EXT 1, EXT 2
Entradas ou saídas para dispositivos externos,
tais como videogravadores, consolas de jogos
ou leitores de DVD.
Especificação de entradas/saídas
Conector
Entrada Saída
Vídeo Áudio (L/R) RGB
Vídeo + Áudio (L/R)
EXT 1 ✔ ✔ ✔
Só está disponível a
saída TV.
EXT 2 ✔ ✔
Saída que pode
escolher.
5
3D SYNC OUT
Ligar ao Emissor de IV 3D
6
Ligar dispositivos de áudio externos
Ligue sinais de áudio RCA entre o televisor
e uma fonte externa como, por exemplo, um
equipamento de áudio.
7
SERVICE
− Conector para assistência técnica.
− Ligue a tomada série entre o
suporte motorizado de montagem na
parede e o televisor quando quiser ajustar o
ângulo de visualização deste último com o
telecomando.
Painel posterior
➢
A cor e a forma do produto podem variar consoante o modelo.
Rede de televisão
por cabo
1
432 6 8
9
7
ou
ou
5
BN68-01528A-00_Por.indd 6 2008-4-21 15:22:31

Português - 7
8
HDMI IN 1,2
− Uma ligação HDMI a HDMI não precisa de
ligação áudio adicional.
−
Quando utilizar uma ligação de cabo HDMI/
DVI, tem de utilizar a tomada HDMI IN2.
➢
O que é HDMI?
− “Alto Definition Multimedia interface”
permite a transmissão de dados de
vídeo digital de alta definição e de som
digital multi-canais.
− O terminal HDMI/DVI suporta uma
ligação DVI a um dispositivo alargado,
com o cabo adequado (não fornecido).
A diferença entre HDMI e DVI é que o
dispositivo HDMI é mais pequeno, tem
a função de codificação HDCP (Alto
Bandwidth Digital Copy Protection)
instalada e suporta som digital multi-
canais.
DVI IN (HDMI 2) AUDIO R/L
Saídas de áudio DVI para dispositivos
externos.
9
ANT IN
Conector coaxial de 75Ω para rede de
televisão por cabo/antena.
Modos suportados para HDMI/DVI e Componente
480i 480p 576i 576p 720p 1080i
HDMI/DVI 50Hz X X X O O O
HDMI/DVI 60Hz X O X X O O
Componente O O O O O O
1
HDMI IN 3
Ligue à tomada HDMI de um dispositivo com
saída HDMI.
2
S-VIDEO ou VIDEO / AUDIO L/R
Entradas de vídeo (S-Vídeo ou Vídeo) e áudio
para dispositivos externos como, por exemplo,
uma câmara de vídeo ou um videogravador.
3
Tomada para auscultadores
Pode ligar uns auscultadores se quiser ver
um programa de televisão sem incomodar as
pessoas que o rodeiam.
➢
O uso prolongado dos auscultadores com
o volume muito alto pode provocar lesões
auditivas.
➢
A cor e a forma do produto podem variar consoante o modelo.
Painel lateral
3
ou
1
2
BN68-01528A-00_Por.indd 7 2008-4-21 15:22:33

Português - 8
Apresentação do telecomando
1
Botão POWER
(liga e desliga o televisor)
2
Seleccionar o modo TV
directamente
3
Botões numéricos para
acesso directo aos canais
4
Seleccção de canais de Um/
Dois dígitos
5
Desligar o som
temporariamente
6
Aumentar o volume
Diminuir o volume
7
Botão de controlo de canais
(Consulte a página 15)
8
Utilize este botão para
seleccionar rapidamente
funções frequentemente
utilizadas.
9
Controlar o cursor no menu
0
Utilize este botão para
ver informações sobre o
programa que está a ser
transmitido
#
Carregue neste botão para
seleccionar a visualização
opcional e modos de som para
desporto, cinema e jogos.
$
Função VCR/DVD
(Rebobinar, Parar, Play/
Reproduzir/Pausa, Fast/
Avançar/Rápido
%
Selecção de fonte disponível
^
Canal anterior
&
Canal seguinte
Canal anterior
*
Apresentar o menu no ecrã
principal
(
Botão do modo TruSurround XT
)
Voltar ao menu anterior
a
Sair do menu no ecrã
b
Selecção do tamanho de
imagem
c
Utilize quando ligar um
dispositivo SAMSUNG
DMA (Digital Media Adapter
– Adaptador Digital de
Multimédia) através de uma
interface HDMI e mudar
para o modo DMA. (O botão
DMA é opcional.) Para
obter mais informações
sobre os procedimentos de
funcionamento, consulte
o manual de utilizador
do DMA. Este botão está
disponível quando “Anynet+
(HDMI-CEC)” está “Lig.”
(consultar página 33).
d
Selecção de efeitos de imagem
(Consulte a página 18)
e
Visualiza filmes ou jogos em
3D em modo dimensional com
óculos 3D.
Funções do Teletexto
(Consulte a página 36)
2
Sair do ecrã do teletexto
(dependendo do modelo)
7
Memorizar teletexto
8
Tamanho da página de
teletexto
0
Mostrar teletexto
!
Selecção de tópicos Fastext
@
Visualização/mix de teletexto
mostra tanto informação
do teletexto como a
transmissão normal
%
Modo de selecção teletexto
(LIST/FLOF)
^
Página secundária do
teletexto
&
P : Página seguinte
teletexto
P : Página anterior
teletexto
*
Índice de teletexto
)
Modo de espera da página
de teletexto
a
Cancelar teletexto
Continua...
BN68-01528A-00_Por.indd 8 2008-4-21 15:22:34

Português - 9
Colocar pilhas no telecomando
1 Levante a tampa na parte de trás do telecomando como se
mostra na figura.
2 Coloque duas pilhas de tamanho AAA.
➢
Faça corresponder os pólos “+” e “–” das pilhas com o
diagrama existente no compartimento.
Não misture os tipos de bateria, ou seja, alcalina ou de
manganésio.
3 Feche a tampa como se mostra na figura.
➢
Se não tencionar utilizar o telecomando durante muito
tempo, retire as pilhas e guarde-as num local fresco e
seco. Pode utilizar o telecomando a uma distância máxima
de aproximadamente 7 metros do televisor. (Em circunstâncias normais de funcionamento, as
pilhas duram cerca de um ano.)
➢
Se o telecomando não funcionar! Verifique o seguinte:
1. O televisor está ligado?
2. Os pólos + e - das pilhas estão invertidos?
3. As pilhas estão gastas?
4. Houve um corte de energia ou o cabo de alimentação está desligado?
5. Há alguma lâmpada fluorescente especial ou luz de néon por perto?
Ligar e desligar o televisor
O cabo de alimentação está ligado à parte de trás do televisor.
1 Ligue o cabo de alimentação a uma tomada adequada.
➢
A tensão de corrente está indicada na parte de trás do televisor e a frequência é de 50 ou 60 Hz.
2 Carregue no botão (POWER) (Ligar/Desligar) existente na parte da frente do televisor ou no botão
POWER do telecomando para ligar o televisor. É reseleccionado automaticamente o último programa
a que assistiu. Se ainda não memorizou qualquer canal, não aparece nenhuma imagem nítida.
Consulte “Memorizar canais automaticamente” na página 13 ou “Memorizar canais manualmente”
na página 14.
➢
Quando ligar o televisor pela primeira vez, ocorrem automaticamente várias programações de
cliente básicas. Consulte “Função Plug & Play” na página 10.
3 Para desligar o televisor, carregue no botão (POWER) (Ligar/Desligar) existente na parte da frente
do televisor ou no botão POWER do telecomando.
4 Para ligar o televisor, carregue no botão (POWER) (Ligar/Desligar) existente na parte da frente do
televisor. Também pode carregar no botão POWER ou nos botões numéricos do telecomando.
Ver os menus
1 Carregue no botão MENU.
Aparece o menu principal no ecrã.
O lado esquerdo tem seis ícones: Imagem, Som, Canal,
Configurar, Entrada.
2 Carregue no botão ▲ ou ▼ para seleccionar um dos ícones.
Carregue no botão ENTER para aceder ao submenu do
ícone.
3 Carregue no botão ▲ ou ▼ para percorrer as opções do
menu.
Carregue no botão ENTER para aceder às opções do menu.
4 Carregue no botão ▲/▼/◄/► para alterar as opções
seleccionadas.
Carregue no botão RETURN para voltar para o menu anterior.
5 Carregue no botão EXIT para sair do menu.
Mover
Enter
Saída
Modo :
Standard
Luz da Célula
:
7
Contraste 95
Brilho 45
Nitidez 50
Cor 50
Matiz Vr 50 Vm50
Definições detalhadas
Opções de imagem
Reiniciar : OK
Imagem
T V
BN68-01528A-00_Por.indd 9 2008-4-21 15:22:35

Português - 10
Função Plug & Play
Quando ligar o televisor pela primeira vez, ocorrem
várias programações de cliente básicas, automática e
subsequentemente.
Estão disponíveis as seguintes definições.
☛
Se seleccionar acidentalmente o país errado para o televisor,
os caracteres podem aparecer de forma incorrecta no ecrã.
1 Se o televisor estiver no modo de espera, carregue no botão
POWER do telecomando. Aparece a mensagem Iniciar Plug
& Play. Carregue no botão ENTER.
2 O menu Idioma aparece automaticamente passados vários
segundos.
3 Seleccione o idioma pretendido, premindo o botao ▲ ou ▼.
Carregue no botão ENTER. Aparece a mensagem Seleccione
‘Uso Doméstico’ quando instalar este televisor em casa.
4 Carregue no botão ◄ ou ► para seleccionar Demo de Loja
ou Uso Doméstico e depois no botão ENTER. Aparece uma
mensagem para verificar o estado de ligação da antena.
➢
A selecção predefinida é Uso Doméstico.
➢
Recomendamos uma configuração do televisor para o
modo Uso Doméstico de modo a usufruir da melhor
imagem no seu ambiente de casa.
➢
O modo Demo de Loja destina-se a apenas aos locais de
venda a retalho.
➢
Se definir acidentalmente o aparelho para o modo
Demo de Loja e pretender voltar para Uso Doméstico
(Standard): Carregue no botão Volume. Quando é
apresentado o volume OSD, carregue sem soltar o botão
MENU durante 5 segundos.
5 Verifique se a antena está ligada ao televisor.
Carregue no botão ENTER. Aparece o menu País.
6 Seleccione o seu país ou região carregando no botão
▲ ou ▼. Carregue no botão ENTER.
Continua...
Plug & Play
País
▲
Reino Unido
Áustria
Europa do Leste
Outros
Mover
Enter
Saltar
Plug & Play
Idioma
Mover
Enter
▲
Português
Ελληνικά
Čeština
▼
Plug & Play
Iniciar Plug & Play
OK
Enter
Plug & Play
Seleccione ‘Uso Doméstico’ quando
instalar este televisor em casa.
Mover
Enter
Uso Doméstico
Demo de Loja
Plug & Play
Verific. entrada ant.
Enter
Saltar
OK
Plug & Play
P 1 C -- 40 MHz
0 %
Enter
Saltar
Iniciar
BN68-01528A-00_Por.indd 10 2008-4-21 15:22:36

Português - 11
7 Carregue no botão ENTER para iniciar a procura de canais. A
procura de canais começa e termina automaticamente. Depois
de todos os canais disponíveis terem sido memorizados,
aparece automaticamente o menu Ajuste o Relógio.
Carregue no botão ENTER.
8
Carregue no botão ◄ ou ► para seleccionar Mês, Data, Ano, Hora
ou Minuto. Programe estas opções carregando no botão ▲ ou ▼.
➢
Pode acertar directamente o Mês, Data, Ano, Hora ou
Minuto carregando nos botões numéricos do telecomando.
9 Carregue no botão ENTER para confirmar o acerto. Aparece
a mensagem Divirta-se! Quando terminar, carregue no botão
ENTER.
➢
Mesmo se não carregar no botão ENTER, a mensagem
desaparece automaticamente passados vários segundos.
Se quiser reiniciar esta função...
1
Carregue no botão MENU para aceder ao menu.
2 Carregue no botão ▲ ou ▼ para seleccionar Configurar e
depois no botão ENTER.
3 Carregue novamente no botão ENTER para seleccionar
Plug & Play. Aparece a mensagem Iniciar Plug & Play.
Plug & Play
Mover
Ajustar
Enter
01 01
2008
00
04
Ajuste o Relógio
Mês Data Ano Hora
Minuto
OK
Divirta-se!
Mover
Enter
Voltar
Plug & Play
Idioma : Português
Tempo
Efeito de luz
:
Modo visual. lig
Ajuste montagem na parede
Melodia : Deslig.
Entretenimento : Deslig.
Poupança energ. : Deslig.
PIP
Configurar
T V
BN68-01528A-00_Por.indd 11 2008-4-21 15:22:37

Português - 12
Ver uma fonte de sinal externa
Pode alternar entre a visualização de sinais de equipamento
ligado como, por exemplo, um videogravador, DVD, Set-Top
Box e da fonte do televisor (transmissão ou cabo).
1 Carregue no botão MENU para aceder ao menu.
2 Carregue no botão ▲ ou ▼ para seleccionar Entrada e depois
no botão ENTER.
3 Carregue novamente no botão ENTER para seleccionar Lista
de fontes.
4 Carregue no botão ▲ ou ▼ para seleccionar a fonte de sinais
e depois no botão ENTER.
Fontes de sinais disponíveis:
TV, Ext.1, Ext.2, AV, S-Video,
Componente, PC, HDMI1, HDMI2, HDMI3
➢
Pode escolher apenas os dispositivos externos que estão
ligados ao televisor.
➢
Para seleccionar estas opções, basta carregar no botão
SOURCE do telecomando.
➢
Para voltar a ver o programa de televisão, carregue no botão
TV e seleccione o número de canal pretendido.
Utilizar o botão TOOLS
Pode utilizar o botão TOOLS para seleccionar de modo rápido e fácil funções utilizadas
frequentemente.
O menu “Ferramentas” altera consoante o modo de entrada externa que está a visualizar.
1 Carregue no botão TOOLS.
Surge o menu
Ferramentas.
2 Prima o botão ▲ ou ▼ para seleccionar um menu e, depois,
prima o botão ENTER.
3 Prima os botões ▲/▼/◄/►/ENTER para apresentar, alterar
ou utilizar os itens seleccionados.
Para uma descrição mais detalhada de cada função, consulte
a página correspondente.
• Anynet+(HDMI-CEC), consulte a página 32
• Modo de Imagem, consulte a página 18
• Modo de Som, consulte a página 25
• Temporizador, consulte a página 27
• SRS TS XT, consulte a página 25
• Poupança energ. consulte a página 29
• Dual I-II, consulte a página 26
Ferramentas
Anynet+ (HDMI-CEC)
Modo de Imagem
Standard
Modo de Som : Personalizar
Temporizador : Deslig.
SRS TS XT : Deslig.
Poupança energ. : Deslig.
Dual I-II : Mono
Ajustar
SaídaMover
◄ ►
Mover
Enter
Voltar
TV
Ext.1 : −−−−
Ext.2 : −−−−
AV : −−−−
S-Video : −−−−
Componente : −−−−
PC : −−−−
HDMI1 : −−−−
HDMI2 : −−−−
HDMI3 : −−−−
Lista de fontes
T V
Mover
Enter
Voltar
Lista de fontes :
TV
Editar nome
Anynet+ (HDMI-CEC)
Entrada
T V
BN68-01528A-00_Por.indd 12 2008-4-21 15:22:38

Português - 13
Editar nomes de dispositivos
Pode atribuir um nome à fonte externa.
1 Carregue no botão MENU para aceder ao menu.
2 Carregue no botão ▲ ou ▼ para seleccionar Entrada e depois
no botão ENTER.
3 Carregue no botão ▲ ou ▼ para seleccionar Editar nome e
depois no botão ENTER.
4 Carregue no botão ▲ ou ▼ para seleccionar a fonte externa
cujo nome pretende editar e depois no botão ENTER.
5 Seleccione o dispositivo pretendido carregando em ▲ ou ▼ e
depois carregue no botão ENTER.
Nomes de dispositivos disponíveis:
VCR, DVD, STB Cabo,
Satélite STB, STB PVR, Receptor AV, Jogos, Câmara de
Vídeo, PC, TV, IPTV, Blu-Ray, HD DVD, DMA
6 Carregue no botão EXIT para sair.
Memorizar canais automaticamente
Pode procurar os intervalos de frequência disponíveis
(a disponibilidade depende do país em que se encontre).
Os números de programas atribuídos automaticamente podem
não corresponder aos números de programas existentes
ou pretendidos. No entanto, pode ordenar os números
manualmente e apagar todos os canais que não pretende ver.
1 Carregue no botão MENU para aceder ao menu.
2 Carregue no botão ▲ ou ▼ para seleccionar Canal e depois
no botão ENTER.
3 Volte a carregar no botão ENTER. Aparece uma lista com os
países disponíveis.
4 Seleccione o seu país carregando no botão ▲ ou ▼ , depois
carregue no botão ENTER.
5 Carregue no botão ▲ ou ▼ para seleccionar Memor. auto. e
depois carregue no botão ENTER.
6 Carregue novamente no botão ENTER para iniciar a procura.
A procura termina automaticamente.
➢
Para interromper a procura antes de terminar, carregue no
botão MENU ou ENTER.
Mover
Enter
Voltar
Lista de fontes :
TV
Editar nome
Anynet+ (HDMI-CEC)
Entrada
T V
Mover
Enter
Voltar
Ext.1 : −−−−
Ext.2 :
−−−−
AV :
S-Video :
Componente : −−−−
PC : −−−−
HDMI1 : −−−−
HDMI2 : ]
HDMI3 :
Editar nome
T V
−−−−
VCR
DVD
STB Cabo
Satélite STB
STB PVR
Receptor AV
Jogos
▼
Mover
Enter
Voltar
País :
Reino Unido
Memor. auto.
Memor. manual
Gestor canais
Ordenar
Nome
Sintonia fina
Canal
T V
Memor. auto.
P 1 C -- 40 MHz
0 %
Enter
Voltar
Iniciar
Mover
Enter
Voltar
País :
United Kingdom
Memor. auto.
Memor. manual
Gestor canais
Ordenar
Nome
Sintonia fina
Canal
Bélgica
França
Alemanha
Italia
Holanda
Espanha
Suíça
Reino Unido
▼
T V
BN68-01528A-00_Por.indd 13 2008-4-21 15:22:39

Português - 14
Memorizar canais manualmente
Pode memorizar canais de televisão, incluindo os canais
recebidos através de redes de televisão por cabo.
Quando memorizar canais manualmente, pode escolher:
Se pretende memorizar ou não os canais encontrados.
O número de programa de cada canal memorizado que
pretende identificar.
1 Carregue no botão MENU para aceder ao menu.
2 Carregue no botão ▲ ou ▼ para seleccionar Canal e depois
no botão ENTER.
3 Carregue no botão ▲ ou ▼ para seleccionar Memor. manual
e depois no botão ENTER.
4 Seleccione a opção pretendida carregando no botão ▲ ou ▼
e depois carregue no botão ENTER.
5 Quando estiver satisfeito com a definição, carregue no botão
ENTER.
6 Carregue no botão EXIT para sair.
Programa (Número do programa a ser atribuído a um canal)
− Carregue no botão ▲ ou ▼ até encontrar o número correcto.
➢
Também pode seleccionar directamente o número do canal carregando nos botões
numéricos (0 a 9).
Sistema cores: Automático/PAL/SECAM/NTSC4.43
− Carregue no botão ▲ ou ▼ para seleccionar o padrão de cor pretendido.
Sistema som: BG/DK/I/L
− Carregue no botão ▲ ou ▼ para seleccionar o padrão de som pretendido.
Canal (Se souber o número do canal a memorizar)
− Carregue no botão ▲ ou ▼ para seleccionar
C (canal de antena) ou S (canal de cabo).
− Carregue no botão ► e depois no botão ▲ ou ▼ para seleccionar o número pretendido.
➢
Também pode seleccionar directamente o número do canal carregando nos botões numéricos
(0 a 9).
➢
Se não ouvir o som ou se o ouvir em más condições, volte a seleccionar o padrão de som
pretendido.
Busca (Se não souber os números dos canais)
− Carregue no botão ▲ ou ▼ para iniciar a procura.
− O sintonizador procura o intervalo de frequência até aparecer o primeiro canal ou o canal
seleccionado no ecrã.
Memorizar (Quando memorizar o canal e o número do programa associado)
− Defina para
OK carregando no botão ENTER.
☛
Modo Canal
P (Modo de programa): Quando terminar a sintonização, já terão sido atribuídos números
de posição (P00 a P99) às estações emissoras da sua área. Pode seleccionar um canal,
introduzindo o número da posição neste modo.
C (Modo de canal de antena): Pode seleccionar um canal, introduzindo o número atribuído a
cada estação emissora neste modo.
S (Modo de canal de cabo): Pode seleccionar um canal, introduzindo o número atribuído a cada
estação de emissão por cabo neste modo.
Mover
Enter
Voltar
País :
Reino Unido
Memor. auto.
Memor. manual
Gestor canais
Ordenar
Nome
Sintonia fina
Canal
T V
Mover
Enter
Voltar
Programa :
P 1
Sistema cores : Automático
Sistema som : BG
Canal : C --
Busca : 40 MHz
Memorizar : ?
Memor. manual
T V
BN68-01528A-00_Por.indd 14 2008-4-21 15:22:40

Português - 15
Adicionar/Bloquear canais
O Gestor canais permite bloquear ou adicionar canais
facilmente.
1 Carregue no botão MENU para aceder ao menu.
2 Carregue no botão ▲ ou ▼ para seleccionar Canal e depois
no botão ENTER.
3 Carregue no botão ▲ ou ▼ para seleccionar Gestor canais e
depois no botão ENTER.
Adicionar canais
A Lista canais permite adicionar canais.
4 Seleccione Lista canais carregando no botão ENTER.
5 Vá para o campo ( ) carregando nos botões ▲/▼/◄/►,
seleccione um canal que pretende adicionar e carregue no
botão ENTER para adicionar o canal.
➢
Se carregar novamente no botão ENTER, o símbolo
( ) junto do canal desaparece e o canal não é
adicionado.
Bloquear canais
Esta função permite evitar que utilizadores não autorizados como,
por exemplo, crianças, assistam a programas inadequados, cortando
a imagem e o som.
6 Carregue no botão ▲ ou ▼ para seleccionar Bloqueio crianças e
depois no botão ENTER.
7 Seleccione Lig. carregando no botão ▲ ou ▼ e depois carregue no
botão ENTER.
8 Carregue no botão ▲ ou ▼ para seleccionar Lista canais e depois
no botão ENTER.
9 Vá para o campo ( ) carregando nos botões ▲/▼/◄/►, seleccione
um canal que pretende bloquear e carregue no botão ENTER.
➢
Se carregar novamente no botão ENTER, o símbolo
( ) junto do canal desaparece e o bloqueio do canal é cancelado.
➢
Quando se activa o Bloqueio crianças, aparece um ecrã azul.
10 Carregue no botão EXIT para sair.
➢
Para seleccionar estas opções, basta carregar no botão
CH LIST do telecomando.
Mover
Enter
Voltar
País :
Reino Unido
Memor. auto.
Memor. manual
Gestor canais
Ordenar
Nome
Sintonia fina
Canal
T V
Mover
Enter
Voltar
Lista canais
Bloqueio crianças : Deslig.
Gestor canais
T V
Lista canais
P 1 C 6
1 / 10
▲
▼
Prog.
0
C --
1 C --
2 C --
3 C --
4 C --
5 C --
6 C --
7 C --
8 C --
9 C --
Adicionar Bloquear
Mover Enter
Página
Voltar
BN68-01528A-00_Por.indd 15 2008-4-21 15:22:42

Português - 16
Ordenar os canais memorizados
Esta operação permite alterar os números de programa dos
canais memorizados.
Esta operação pode ser necessária depois de utilizar a
memorização automática.
1 Carregue no botão MENU para aceder ao menu.
2 Carregue no botão ▲ ou ▼ para seleccionar Canal e depois
no botão ENTER.
3 Carregue no botão ▲ ou ▼ para seleccionar Ordenar e
depois no botão ENTER.
4 Seleccione o canal que pretende mover carregando no botão
▲ ou ▼ e depois carregue no botão ENTER.
5 Seleccione o número do programa para o qual pretende mover
o canal, carregando no botão ▲ ou ▼.
Carregue no botão ENTER. O canal é transferido para a
sua nova posição e todos os outros canais são mudados
respectivamente.
6 Repita os passos 4 a 5 até mover todos os canais para os
números de programa pretendidos.
7 Carregue no botão EXIT para sair.
Mover
Enter
Voltar
País :
Reino Unido
Memor. auto.
Memor. manual
Gestor canais
Ordenar
Nome
Sintonia fina
Canal
T V
Mover
Enter
Voltar
Prog. Canal Nome
▲
0 C01 −−−−−
1 C- - −−−−−
2 C- - −−−−−
3 C- - −−−−−
4 C- - −−−−−
5 C- - −−−−−
6 C- - −−−−−
7 C- - −−−−−
8 C- - −−−−−
9 C- - −−−−−
▼
Ordenar
T V
Atribuir nomes a canais
Os canais recebem automaticamente nomes quando as
respectivas informações são transmitidas. Pode alterar estes
nomes e atribuir outros.
1 Carregue no botão MENU para aceder ao menu.
2 Carregue no botão ▲ ou ▼ para seleccionar Canal e depois
no botão ENTER.
3 Carregue no botão ▲ ou ▼ para seleccionar Nome e depois
no botão ENTER.
4 Carregue no botão ▲ ou ▼ para seleccionar o canal ao qual
pretende atribuir um novo nome e depois no botão ENTER.
5 Carregue no botão ▲ ou ▼ para seleccionar uma letra, um
número ou um símbolo (resulta nesta sequência: A a Z, 0 a 9,
+, -, *, /, espaço em branco).
Passe para a letra anterior ou seguinte carregando no botão
◄ ou ► e depois carregue no botão ENTER.
6 Repita os passos 4 a 5 para cada canal ao qual quer atribuir
um novo nome.
7 Carregue no botão EXIT para sair.
Mover
Enter
Voltar
Prog. Canal Nome
▲
0 C01 −−−−−
1 C- - −−−−−
2 C
- - −−−−−
3 C- - −−−−−
4 C- - −−−−−
5 C- - −−−−−
6 C- - −−−−−
7 C- - −−−−−
8 C- - −−−−−
9 C- - −−−−−
▼
Nome
T V
País : Reino Unido
Memor. auto.
Memor. manual
Gestor canais
Ordenar
Nome
Sintonia fina
Canal
T V
Mover
Enter
Voltar
BN68-01528A-00_Por.indd 16 2008-4-21 15:22:43

Português - 17
Sintonização fina da recepção de canais
Se a recepção estiver nítida, não precisa de fazer a
sintonização fina do canal, uma vez que isso é feito
automaticamente durante a procura e memorização.
Se, no entanto, o sinal estiver fraco ou distorcido, pode
ser necessário fazer uma sintonização fina de canais
manualmente.
1 Carregue no botão MENU para aceder ao menu.
2 Carregue no botão ▲ ou ▼ para seleccionar Canal e depois
no botão ENTER.
3 Carregue no botão ▲ ou ▼ para seleccionar Sintonia fina e
depois no botão ENTER.
4 Para obter uma imagem e som nítidos e de alta qualidade,
carregue no botão ◄ ou ► até obter a definição ideal.
Carregue no botão ENTER.
➢
Carregue no botão INFO. A memorização com Sintonia
fina muda a cor do menu no ecrã do canal de branco
para vermelho e adiciona a marca “*”.
➢
Para repor a sintonização fina a 0, seleccione
Reiniciar carregando no botão ▲ ou ▼. Carregue
no botão ENTER.
5 Carregue no botão EXIT para sair.
P 1 *
Mono
Imagem : Standard
Som : Personalizar
SRS TS XT : Deslig.
−−
:
−−
Mover
Enter
Voltar
País :
Reino Unido
Memor. auto.
Memor. manual
Gestor canais
Ordenar
Nome
Sintonia fina
Canal
T V
Sintonia fina
P 1
0
Ajustar
Salvar
Voltar
Reiniciar
BN68-01528A-00_Por.indd 17 2008-4-21 15:22:43

Português - 18
Personalizar as definições de imagem
O televisor tem várias opções de definição que permitem
controlar a qualidade da imagem.
1 Carregue no botão MENU para aceder ao menu.
2 Carregue no botão ENTER para seleccionar Imagem.
3 Carregue novamente no botão ENTER para seleccionar
Modo.
4 Seleccione o modo pretendido carregando no botão ▲ ou ▼
e depois carregue no botão ENTER.
Modos disponíveis:
Dinâmico, Standard, Filme.
5 Seleccione a opção pretendida carregando no botão ▲ ou ▼
e depois carregue no botão ENTER.
6 Quando estiver satisfeito com a definição, carregue no botão ENTER.
7 Carregue no botão EXIT para sair.
Luminosidade das células – Contraste – Brilho – Nitidez – Cor – Matiz
➢
Nos modos Televisor Analógico, Ext., AV, S-Vídeo do sistema PAL, não pode utilizar a Função
Matiz.
➢
Em modo PC, pode apenas efectuar alterações a Luminosidade das Células, Contraste,
e Brilho.
Carregue no botão ◄ ou ► até obter a definição ideal.
Alterar o padrão de imagem
Pode seleccionar o tipo de imagem que melhor corresponde
aos seus requisitos de visualização.
1 Carregue no botão MENU para aceder ao menu.
2 Carregue no botão ENTER para seleccionar Imagem.
3 Carregue novamente no botão ENTER para seleccionar
Modo.
4 Seleccione o modo pretendido carregando no botão ▲ ou ▼
e depois carregue no botão ENTER.
Modos disponíveis:
Dinâmico, Standard, Filme
➢
Os valores das definições podem variar consoante a fonte de
entrada.
5 Carregue no botão EXIT para sair.
➢
Seleccione Dinâmico para ver televisão durante o dia ou
quando houver bastante claridade na sala.
Seleccione Standard para ver televisão de um modo geral.
Seleccione Filme quando quiser ver um filme.
Configuração Fácil
1 Carregue no botão TOOLS no telecomando.
2 Carregue no botão ▲ ou ▼ para seleccionar Modo de
Imagem.
3 Carregue no botão ◄ ou ► para seleccionar a opção
pretendida.
Mover
Enter
Voltar
Modo :
Standard
Luminosidade das células
7
Contraste 95
Brilho 45
Nitidez 50
Cor 50
Matiz Vr 50 Vm50
Definições detalhadas
Opções de imagem
Reiniciar : OK
Imagem
T V
Mover
Enter
Voltar
Modo :
Standard
Luminosidade das células 7
Contraste 95
Brilho 45
Nitidez 50
Cor 50
Matiz Vr 50 Vm50
Definições detalhadas
Opções de imagem
Reiniciar : OK.
Imagem
T V
Ferramentas
Anynet+ (HDMI-CEC)
Modo de Imagem ◄ Standard ►
Modo de Som : Personalizar
Temporizador : Deslig.
SRS TS XT : Deslig.
Poupança energ. : Deslig.
Dual I-II : Mono
SaídaMover
Ajustar
Mover
Enter
Voltar
T V
Modo : Dinâmico
Luminosidade das células :
7
Contraste 95
Brilho 45
Nitidez 50
Cor 50
Matiz Vr 50 Vm50
Definições detalhadas
Opções de imagem
Reiniciar : OK
Imagem
Dinâmico
Standard
Filme
Mover
Enter
Voltar
BN68-01528A-00_Por.indd 18 2008-4-21 15:22:44

Português - 19
Configurar definições detalhadas na imagem
Pode especificar definições detalhadas da imagem.
1 Carregue no botão MENU para aceder ao menu.
2 Carregue no botão ENTER para seleccionar Imagem.
3 Carregue no botão ▲ ou ▼ para seleccionar Definições detalhadas
e depois no botão ENTER.
4 Seleccione a opção pretendida carregando no botão ▲ ou ▼ e
depois carregue no botão ENTER.
Opções disponíveis:
Ajustar preto, Contraste dinâm., Gama,
Matriz de cores, Equilíbrio do branco, Tom de pele, Melhor.
extremid.
5 Quando estiver satisfeito com a definição, carregue no botão ENTER.
6 Carregue no botão EXIT para sair.
➢
Definições detalhadas estão disponíveis no modo Standard ou
Filme.
➢
Em modo PC, pode apenas efectuar alterações ao “Contraste
Dinâm.”, “Gama” e “Equilíbrio do Branco” nos itens de “Definições
Detalhadas”
Ajustar preto: Deslig./Baixa/Médio/Alto
Pode seleccionar directamente o nível de preto no ecrã para ajustar a
intensidade do ecrã.
Contraste dinâm.: Deslig./Baixa/Médio/Alto
Pode ajustar o contraste do ecrã até obter o melhor.
Gama: -3 ~ +3
Pode ajustar a luminosidade intermédia das imagens.
Carregue no botão ◄ ou ► até obter a definição ideal.
Matriz de cores : Automático/Nativa/Personalizar
A matriz de cores é um esquema de cores composto por vermelho, verde e azul.
Seleccione a sua matriz de cores favorita para obter a cor mais natural.
−
Automático: A opção Automático da Matriz de Cores ajusta automaticamente o tom de cor mais natural com
base em fontes de programa.
−
Nativa: A Matriz de Cores Nativa fornece uma tonalidade mais rica e profunda.
−
Personalizar: Ajusta o intervalo de cores de acordo com a sua preferência. (consulte “Personalizar
a Matriz de Cores”)
Personalizar a Matriz de Cores
Cor: Vermelho/Verde/Azul/Amarelo/Ciano/Magenta
Ajusta o intervalo de Cores de acordo com a sua preferência.
A Cor está disponível quando a Matriz de Cores está definida para Personalizar (Custom).
Carregue no botão ▲ ou ▼ para seleccionar Vermelho, Verde, Azul, Amarelo, Ciano ou Magenta.
Carregue no botão ENTER.
− Vermelho/Verde/Azul: Em Cor, pode ajustar os valores de RGB
para a cor seleccionada.
Carregue no botão ▲ ou ▼ para seleccionar
Vermelho, Verde, ou Azul.
Carregue no botão
ENTER.
Carregue no botão ◄ or ► para diminuir ou aumentar o valor de um item em particular.
Carregue no botão
ENTER.
− Reiniciar: Repõe os valores predefinidos da matriz de cores.
Equilíbrio do branco: Vrm-Offset/Verde-Offset/Azul-Offset/Vrm-Gain/Verde-Gain/Azul-Gain/Reiniciar
Pode ajustar a temperatura da cor de modo a obter imagens com cores mais naturais.
Vrm-Offset/Verde-Offset/Azul-Offset/Vrm-Gain/Verde-Gain/Azul-Gain: Se alterar os valores ajustados
actualiza o ecrã.
Seleccione a opção pretendida carregando no botão ▲ ou ▼ e depois carregue no botão ENTER.
Carregue no botão ◄ ou ► até obter a definição ideal.
Reiniciar: O equilíbrio do branco ajustado anteriormente volta às predefinições.
Tom de pele : -15~+15
Pode realçar o tom cor-de-rosa da imagem.
Carregue no botão ◄ or ► até obter a programação ideal.
➢
Ao alterar os valores ajustados, o ecrã é actualizado.
Melhor. extremid.: Deslig./Lig.
Pode realçar os limites dos objectos.
Mover
Enter
Voltar
Ajustar preto :
Deslig.
Contraste dinâm. : Médio
Gama : 0
Matriz de cores : Nativa
Equilíbrio do branco
Tom de pele : 0
Melhor. extremid.
: Lig.
Definições detalhadas
T V
Modo : Standard
Luminosidade das células 7
Contraste 95
Brilho 45
Nitidez 50
Cor 50
Matiz Vr 50 Vm50
Definições detalhadas
Opções de imagem
Reiniciar : OK
Mover
Enter
Voltar
Imagem
T V
BN68-01528A-00_Por.indd 19 2008-4-21 15:22:45

Português - 20
Opções de imagem
Pode especificar definições detalhadas da imagem.
1 Carregue no botão MENU para aceder ao menu.
2 Carregue no botão ENTER para seleccionar Imagem.
3 Carregue no botão ▲ ou ▼ para seleccionar Opções de
imagem e depois no botão ENTER.
4 Seleccione a opção pretendida carregando no botão ▲ ou ▼
e depois carregue no botão ENTER.
5 Quando estiver satisfeito com a definição, carregue no botão
ENTER.
6 Carregue no botão EXIT para sair.
➢
Em modo PC, apenas pode efectuar alterações à
“Tonalidade”, “Tamanho” e Protecção de ecrã nos itens em
“Opções de Imagem”.
Tonalidade: Cores frias2/Cores frias1/Normal/Cores
quentes1/Cores quentes2
Tamanho: Wide Automático
/
16:9
/
Zoom 16:9
/
Zoom
/
4:3
/
Digitalização prec.
Pode seleccionar o tamanho de imagem que melhor
corresponde às suas necessidades de visualização.
− Wide Automático: expande e muda o tamanho da
imagem do modo 4:3 para o modo 16:9.
− 16:9: define a imagem para o modo panorâmico 16:9.
− Zoom 16:9: aumenta ainda mais o tamanho da imagem
do que 4:3. Percorra o ecrã para cima/baixo com o botão
▲ ou ▼ depois de seleccionar , carregando no botão
► ou ENTER.
− Zoom: aumenta o tamanho da imagem na vertical.
− 4:3: define a imagem para o modo normal 4:3.
− Digitalização prec.: Utilize a função para ver a imagem
inteira sem cortes durante a recepção dos sinais HDMI
(720p/1080i), Componente (1080i).
Depois de seleccionar “Digitalização prec” nos modos
HDMI (1080i) ou Componente (1080i):
Prima o botão ◄ ou ► para seleccionar , e, depois,
prima o botão ENTER.
Prima o botão ▲, ▼, ◄ ou ► para mover a imagem para cima, para baixo, para a esquerda e
para a direita.
Reiniciar: Prima o botão ◄ ou ► para seleccionar Reiniciar e, depois, prima o botão ENTER.
Pode inicializar a definição.
➢
Com o tamanho da imagem HDMI Digitalização prec., a imagem no ecrã pode aparecer
cortada ou apresentar apenas uma cor, dependo do dispositivo AV.
➢
Para uma ligação HDMI (1080p) de 24, 25, 30, 50, e 60 Hz, e para uma ligação Componente
(1080p) de 50 e 60Hz, só a fonte de entrada é suportada.
➢
Para mudar o tamanho da imagem, basta carregar no botão P.SIZE do telecomando.
➢
Consoante a fonte de entrada, as opções de tamanho da imagem podem variar.
➢
As opções disponíveis podem variar consoante o modo seleccionado.
➢
A função “Wide Automático” está disponível apenas em modo “TV”, “Ext.1”, “Ext.2”, “AV”, e
“S-Vídeo”
➢
As definições podem ser ajustadas e memorizadas para cada dispositivo externo ligado à
entrada do televisor
➢
No modo PC, apenas os modos “16:9” e “4:3” podem ser ajustados.
Posicionar e dimensionar o ecrã utilizando a opção Zoom
Se utilizar a opção Zoom para redimensionar o ecrã, pode posicionar e dimensionar o ecrã para
cima/baixo com o botão ▲ ou ▼, bem como o tamanho do ecrã.
Mova o ecrã para cima/baixo com o botão ▲ ou ▼ depois de seleccionar , carregando no botão
◄ ou ►.
Redimensione o ecrã na vertical com o botão ▲ ou ▼ depois de seleccionar , carregando no
botão ◄ ou ►.
Mover
Enter
Voltar
Tonalidade : Normal
Tamanho :
Wide Automático
Modo de ecrã : 16:9
NR Digital : Automático
100Hz Reais Demo : Deslig.
DNle : Deslig.
Nv.pr.HDMI : Normal
Apenas Modo Azul : Deslig.
Protecção de ecrã
Efeito 3D
Opções de imagem
T V
Continua...
Mover
Enter
Voltar
Wide Automático
16:9
Zoom 16:9
Zoom
4:3
Digitalização prec.
Tamanho
T V
Modo : Standard
Luminosidade das células
7
Contraste 95
Brilho 45
Nitidez 50
Cor 50
Matiz Vr 50 Vm50
Definições detalhadas
Opções de imagem
Reiniciar : OK
Mover
Enter
Voltar
Imagem
T V
BN68-01528A-00_Por.indd 20 2008-4-21 15:22:46

Português - 21
Seleccionar o tamanho da imagem: 16:9/ Zoom 16:9/ Zoom /4:3.
Este aparelho está equipado com tecnologia de prevenção contra
queimadura de ecrã, o que reduz a possibilidade de ocorrência deste
efeito. Esta tecnologia permite regular o movimento da imagem para
cima/baixo (Linha vertical) e lateralmente (Pt horizontal).
A definição Tempo permiteprogramar o tempo em minutos entre os
movimentos da imagem.
− 16:9: define a imagem para o modo panorâmico 16:9.
− Zoom 16:9: aumenta ainda mais o tamanho da imagem do que 4:3.
− Zoom: aumenta o tamanho da imagem na vertical.
− 4:3: define a imagem para o modo normal 4:3.
➢
Esta função está disponível no modo Wide Automático.
➢
Esta função não está disponível em modo Componente ou HDMI.
NR Digital: Deslig. /Baixa/Médio/Alto/Automático
Se o sinal recebido pelo televisor for fraco, pode activar esta função para reduzir estática ou o efeito de
fantasma que possa aparecer no ecrã.
➢
Se o sinal for fraco, seleccione uma das outras opções até que apareça no ecrã a melhor imagem.
100Hz Reais Demo : Deslig. /Lig.
É possível distinguir claramente entre "100Hz Reais" e 50Hz, especialmente quando vê cenas em movimento
rápido. Portanto, quando vir cenas em movimento lento, não é possível distinguir entre "100Hz Reais e 50Hz". A
demonstração 100Hz funciona apenas com sinal de 50Hz. O modo de demonstração 100Hz Reais é fornecido para
demonstrações em lojas e fotografias especiais.
DNIe: Deslig./Demo/Lig.
Este televisor inclui a função DNIe que proporciona uma qualidade de imagem excelente. Se definir DNIe
para Lig. (On), pode ver a imagem no ecrã com a função DNIe activada. Se definir DNIe para Demo,
pode ver a DNIe aplicada e imagens normais no ecrã, para fins de demonstração. Ao utilizar esta função,
pode ver a diferença na qualidade de imagem.
➢
DNIe
TM
(Digital Natural Image engine)
Esta função permite obter uma imagem com melhor definição graças à redução de ruído 3D,
melhoramento de detalhes, de contrastes e de brancos. O novo algoritmo de compensação de
imagem proporciona imagens mais claras, mais nítidas e com maior detalhe. Com a tecnologia
DNIe
TM
os seus olhos adaptam-se a todos os sinais.
➢
Esta função não está disponível no modo PC.
➢
O DNIe está apenas disponível em modo Dinâmico.
Nv.pr.HDMI: Normal/Baixa
Com esta função, pode regular a qualidade da imagem quando é detectada a queimadura de ecrã
(aparece o nível de preto, o contraste e a cor são reduzidos, etc.) pela entrada HDMI para a gama
limitada de sinais RGB (16 a 235).
➢
Esta função só está activa quando ligar a entrada externa a HDMI (sinais RGB).
Modo Apenas azul: Deslig. /Lig.
Esta função está disponível para especialistas de medição de dispositivos AV. Esta função apresenta o sinal azul
apenas através da remoção dos sinais vermelho e verde do sinal de vídeo, de modo a dar um efeito Filtro Azul que é
utilizado para ajustar a Cor e Matiz de equipamentos de vídeo, tais como leitores de DVD, Home Theaters, etc.
Através da utilização desta função, pode ajustar a Cor e Matiz para
valores preferenciais adequados ao nível de sinal de cada dispositivo de
vídeo que utilize Padrões da Barra de Cores Vermelho/Verde/Azul/Ciano/
Magenta/Amarelo, sem utilizar um Filtro Azul adicional.
➢
Modo Apenas azul está disponível quando o modo de
imagem está definido para Filme ou Standard.
Protecção de ecrã
Este aparelho está equipado com tecnologia de prevenção contra
queimadura de ecrã, o que reduz a possibilidade de ocorrência deste efeito.
Esta tecnologia permite regular o movimento da imagem para cima/baixo
(Linha vertical) e lateralmente (Pt horizontal). A definição Tempo permite
programar o tempo em minutos entre os movimentos da imagem.
− Mudar pixels: Esta função permite mover de minuto a minuto pixels
no plasma, na horizontal ou na vertical, para minimizar a imagem
residual no ecrã.
• Defina Mudar pixels para Lig. carregando no botão ▲ ou ▼ e
depois carregue no botão ENTER.
• Seleccione a opção pretendida carregando no botão ▲ ou ▼ e
depois carregue no botão ENTER.
Opções disponíveis: Pt horizontal, Linha vertical, Tempo
Continua...
Mudar pixels
Branco
Deslocamento
Cinzento lateral
: Escuro
Protecção de ecrã
T V
Tonalidade : Normal
Tamanho :
Wide Automático
Modo de ecrã : 16:9
NR Digital : Automático
100Hz Reais Demo : Deslig.
DNle : Lig.
Nv.pr.HDMI : Normal
Modo Apenas azul : Deslig.
Protecção de ecrã
Efeito 3D
Opções de imagem
T V
Mover
Enter
Voltar
Mover
Enter
Voltar
Tonalidade : Normal
Tamanho :
Wide Automático
Modo de ecrã : 16:9
NR Digital : Automático
100Hz Reais Demo :
DNle : Lig.
Nv.pr.HDMI : Normal
Modo Apenas azul : Deslig.
Protecção de ecrã
Efeito 3D
Opções de imagem
T V
Move
Enter
Voltar
16:9
Zoom 16:9
Zoom
4:3
BN68-01528A-00_Por.indd 21 2008-4-21 15:22:47

Português - 22
➢
Condição ideal para a mudança de pixels:
PC
TV/Ext/AV/Componente/
HDMI
Pt horizontal 1 2
Linha vertical 1 2
Tempo (minuto) 2 2 min
➢
O valor de Mudar pixels pode variar consoante o tamanho do
ecrã (polegadas) e o modo.
➢
Esta função não está disponível no modo Just Scan.
− Branco: Esta função permite remover as imagens residuais que aparecem no ecrã, mudando a cor dos
pixels para branco. Utilize esta função quando ainda houver imagens residuais ou símbolos no ecrã,
especialmente depois da visualização de uma imagem fixa no ecrã durante muito tempo.
− Deslocamento: Esta função permite remover as imagens residuais do ecrã, movendo todos os pixels no
plasma de acordo com um padrão. Utilize esta função quando ainda houver imagens residuais ou símbolos
no ecrã, especialmente depois da visualização de uma imagem fixa no ecrã durante muito tempo.
− Cinzento lateral: Quando vir televisão no formato 4:3, se regular o equilíbrio do branco nas extremidades
esquerda e direita, pode evitar danos no ecrã.
Escuro: Se definir o tamanho do ecrã para 4:3, escurece os lados esquerdo e direito.
Claro: Se definir o tamanho do ecrã para 4:3, aclara os lados esquerdo e direito.
➢
Para remover as imagens residuais do ecrã, utilize a função Branco ou Deslocamento. Embora ambas
as funções removam imagens residuais do ecrã, a função Deslocamento é mais eficaz.
➢
A função de remoção de imagens residuais demora muito tempo (cerca de 1 hora) a remover
eficazmente as imagens residuais do ecrã. Se a imagem residual não melhorar após a execução desta
função, volte a repetir este procedimento.
➢
Para cancelar esta função, carregue num botão qualquer do telecomando.
Utilizar a função 3D
Pode desfrutar de filmes 3D e jogos no seu televisor. A função de efeitos 3D permite-lhe ver
imagens 3D utilizando os óculos 3D especiais.
3.5 mm Stereo plug to RCA Cable (Not supplied)
3D Glasses
(Not supplied)
3D IR Emitter
(Not supplied)
PC
HDMI/DVI Cable (Not supplied)
TV Rear Panel
Ligações
➢
O aspecto dos óculos 3D (incluindo Emissor) pode ser diferente consoante o modelo dos seus óculos.
Mudar pixels : Lig.
Pt horizontal : 2
Linha vertical : 2
Tempo : 2 min
Mudar pixels
T V
Mover
Enter
Voltar
BN68-01528A-00_Por.indd 22 2008-4-21 15:22:49

Português - 23
1 Ligue um cabo HDMI/DVI entre a tomada HDMI IN 2 do televisor e a tomada de saída do
computador.
2 Ligue um cabo Estéreo/2RCA de 3,5mm entre a tomada DVI IN (HDMI 2) [R-AUDIO-L] do televisor e
a tomada Audio Out da placa de som do seu computador.
3 Ligue o Emissor à porta 3D SYNC OUT no painel posterior do televisor.
4 Ligue o televisor e defina a fonte do televisor para HDMI2.
Para obter mais informações sobre os óculos 3D (incluindo o Emissor), consulte o manual do
utilizador dos seus óculos 3D.
Ajuste a resolução do computador: PS50A470: 1024 x 768@60Hz,1360 x 768@60Hz
A resolução ideal do computador para o PS50A476 é 1360x768. Quando o sinal a 1024x768 está
ligado no modo 3D, a imagem é mostrada no formato 4:3 com barras cinzentas de ambos os lados
O Emissor de IV 3D comunica com os óculos 3D.
Por isso, o Emissor de IV 3D deve estar próximo dos óculos 3D.
É activado quando o sinal de entrada HDMI ou DVI é RGB e o som DVI é suportado.
Quando liga ou desliga o aparelho, o modo muda para a predefinição (Deslig. - Off) e o Formato é
guardado.
O Efeito 3D é ligado e desligado independentemente do Modo Imagem.
Quando o Efeito 3D está ligado, só os menus de imagem Contraste, Brilho, Efeito 3D e Reiniciar
estão activos.
Para utilizar a função Efeito 3D, é necessária uma placa gráfica que suporte 3D ou software 3D.
Os óculos 3D e o Emissor devem ser fabricados pela mesma empresa.
Se jogar um jogo ou estiver a ver TV com os óculos 3D durante muito tempo, pode sentir fadiga
ocular ou dor de cabeça.
Os óculos 3D (incluindo o Emissor) não fabricados pela Samsung podem não ser suportados.
Se o ecrã oscilar enquanto a função 3D é utilizada, utilize uma iluminação ambiente mais escura ou
desligue a lâmpada fluorescente para ver o ecrã com o máximo de qualidade.
Alterar o modo
Ao alterar o Modo irá trocar as imagens para cada olho através da
troca dos sinais de saída esquerdo e direito.
1 Ligue o televisor, o computador e o Emissor de IV 3D
conforme ilustrado na figura.
2 Prima o botão SOURCE para seleccionar HDMI.
3 Prima o botão MENU para ver o menu.
Prima o botão ▲ ou ▼ para seleccionar Imagem e, depois,
prima o botão ENTER.
4 Prima o botão ▲ ou ▼ para seleccionar Opções de imagem
e, depois, prima o botão ENTER.
Prima o botão ▲ ou ▼ para seleccionar Efeito 3D e, depois,
prima o botão ENTER.
5 Prima o botão ▲ ou ▼ para seleccionar Modo e, depois,
prima o botão ENTER.
Prima o botão ▲ ou ▼ para seleccionar Deslig., Modo 1,
Modo 2
ou Conversão 2D, depois, prima o botão ENTER.
• Deslig.: Desliga a função Efeito 3D.
•
Modo 1: O Modo 1 funciona primeiro com a sincronização direita.
• Modo 2:
O Modo 2 funciona primeiro com a sincronização esquerda.
• Conversão 2D:
Converte a imagem 3D para 2D.
Pode escolheresta opção quando tiver tonturas, para ver a
imagem em 2D temporariamente. Deve, no entanto, escolher
a opção “Deslig”. para que o Efeito 3D seja completamente
terminado.
Se o Efeito 3D não estiver a funcionar correctamente,
significa que o Modo e os óculos 3D podem não estar bem
sincronizados. Para os sincronizar, alterne para o outro modo.
Continua...
Mover
Enter
Voltar
Tonalidade : Normal
Tamanho :
Wide Automático
Modo de ecrã :
16:9
NR Digital :
Automático
100Hz Reais Demo : Deslig.
DNle : Deslig.
Nv.pr.HDMI : Normal
Apenas Modo Azul : Deslig.
Protecção de ecrã
Efeito 3D
Opções de imagem
T V
Modo : Standard
Luminosidade das células
7
Contraste 95
Brilho 45
Nitidez 50
Cor 50
Matiz Vr 50 Vm50
Definições detalhadas
Opções de imagem
Reiniciar : OK
Mover
Enter
Voltar
Imagem
T V
Modo :
Formato :
Efeito 3D
Deslig.
Modo 1
Modo 2
Conversão 2D
Mover
Enter
Voltar
BN68-01528A-00_Por.indd 23 2008-4-21 15:22:50

Português - 24
Repor os valores de fábrica das definições de imagem
Pode especificar definições detalhadas da imagem.
1 Carregue no botão MENU para aceder ao menu.
2 Carregue no botão ENTER para seleccionar Imagem.
3 Carregue no botão ▲ ou ▼ para seleccionar Reiniciar e
depois carregue no botão ENTER.
4 Carregue no botão ▲ ou ▼ para seleccionar OK ou Cancelar
e depois no botão ENTER.
➢
Cada modo pode ser reiniciado.
Mover
Enter
Voltar
Modo : Standard
Luminosidade das células
7
Contraste 95
Brilho 45
Nitidez 50
Cor 50
Matiz G50 R50
Definições detalhadas
Opções de imagem
Reiniciar :
Imagem
T V
OK
Cancelar
Alterar o formato
Seleccione o formato de entrada ideal para ser compatível com a
sua placa gráfica ou software 3D
Consulte as descrições dos Passos 1 a 4 acima.
5 Prima o botão ▲ ou ▼ para seleccionar Formato e, depois,
prima o botão ENTER.
6 Prima o botão ▲ ou ▼ para seleccionar Tabuleiro de damas ,
Horizontal ou Vertical e, depois, prima o botão ENTER.
Tabuleiro de
damas
Se o formato de saída da sua placa gráfica ou
software de 3D é o padrão Tabuleiro de damas,
seleccione este formato de entrada.
Horizontal
Se o formato de saída da sua placa gráfica
ou software de 3D é de orientação Horizontal,
seleccione este formato de entrada.
Vertical
Se o formato de saída da sua placa gráfica
ou software de 3D é de orientação Vertical,
seleccione este formato de entrada.
Pode carregar repetidamente no botão 3D do telecomando
para alterar o modo 3D.
Configuração Fácil
1 Prima o botão TOOLS no telecomando.
2 Prima o botão ▲ ou ▼ para seleccionar Modo 3D.
3 Prima o botão ENTER para iniciar o Efeito 3D.
Mover
Enter
Voltar
Efeito 3D
T V
Modo : Modo 1
Formato :
Tabuleiro de damas
Horizontal
Vertical
Ferramentas
Modo 3D ◄ Deslig. ►
Anynet+ (HDMI-CEC)
Modo de Imagem : Dinâmico
Modo de Som : Standard
Temporizador : Deslig.
SRS TS XT : Deslig.
Poupança energ. : Deslig.
Sair Mover
Ajustar
BN68-01528A-00_Por.indd 24 2008-4-21 15:22:50

Português - 25
Funções de som
1 Carregue no botão MENU para aceder ao menu.
2 Carregue no botão ▲ ou ▼ para seleccionar Som e depois no
botão ENTER.
3 Seleccione a opção pretendida carregando no botão ▲ ou ▼
e depois carregue no botão ENTER.
Opções disponíveis:
Modo, Equalizador, SRS TS XT, Volume
auto., Altifalante do televisor, Seleção do Som
4 Quando estiver satisfeito com a definição, carregue no botão
ENTER.
5 Carregue no botão EXIT para sair.
Modo: Standard/Música/Filme/Discurso/Personalizar
Pode seleccionar o tipo de efeitos sonoros especiais a utilizar,
quando estiver a ver um determinado programa.
Configuração Fácil
1 Carregue no botão TOOLS no telecomando.
2 Carregue no botão ▲ ou ▼ para seleccionar Modo
de Som.
3 Carregue no botão ◄ ou ► para seleccionar a opção
pretendida.
Equalizador: Balanço/100Hz/300Hz/1kHz/3kHz/10kHz
O televisor tem várias definições que permitem controlar a
qualidade do som.
➢
Se alterar estas definições, o modo de som muda
automaticamente para Personalizar.
SRS TS XT: Deslig./Lig.
TruSurround XT é uma tecnologia patenteada da SRS que permite reproduzir conteúdos 5.1 multi-canais
apenas com duas colunas. A tecnologia TruSurround proporciona um excelente som surround virtual,
através de qualquer sistema de reprodução com duas colunas, incluindo os altifalantes internos de
televisores. É totalmente compatível com todos os formatos multi-canais.
Configuração Fácil
1 Carregue no botão TOOLS no telecomando.
2 Carregue no botão ▲ ou ▼ para seleccionar SRS TS XT.
3 Carregue no botão◄ ou ► para seleccionar Deslig. ou Lig.
Volume auto.: Deslig./Lig.
Cada estação emissora tem condições de sinal específicas
e, por isso, não é fácil regular o volume sempre que muda de
canal. Esta função permite regular automaticamente o volume
do canal pretendido, baixando o som quando o sinal de modulação é alto ou aumentando o som
quando o sinal de modulação é baixo.
Altifalante do televisor: Deslig./Lig.
Se quiser ouvir som através de colunas separadas, cancele o amplificador interno.
➢
Os botões
+,
- e Sem som não funcionam se o Altifalante do televisor estiver definido
para Deslig.
➢
Quando o Altifalante do televisor (TV Speaker) está definido para “Deslig.” (Off), apenas pode
utilizar as opções “Seleção do Som” (Sound Select) (no modo PIP) no menu Som.
Selecção do Som: Principal/Sec
Se a função PIP estiver activada, pode ouvir o som da imagem secundária (PIP).
-
Principal: Utiliza-se para ouvir o som da imagem principal.
-
Sec: Utiliza-se para ouvir o som da imagem secundária.
Ferramentas
Anynet+ (HDMI-CEC)
Modo de Imagem : Standard
Modo de Som ◄ Personalizar ►
Temporizador : Deslig.
SRS TS XT : Deslig.
Poupança energ. : Deslig.
Dual I-II : Mono
Ferramentas
Anynet+ (HDMI-CEC)
Modo de Imagem : Standard
Modo de Som : Personalizar
Temporizador : Deslig.
SRS TS XT ◄ Deslig. ►
Poupança energ. : Deslig.
Dual I-II : Mono
TruSurround XT, SRS e o símbolo são marcas comerciais da SRS Labs, Inc.
A tecnologia TruSurround XT está incorporada sob licença da SRS Labs, Inc.
Mover
Ajustar
Sair
Mover
Ajustar
Sair
Mover
Enter
Voltar
Modo :
Personalizar
Equalizador
SRS TS XT : Deslig.
Volume auto. : Deslig.
Altifalante do televisor
: Deslig.
Seleção do Som : Principal
Som
T V
Mover
Ajustar
Voltar
Equalizador
T V
Balanço 100Hz 300Hz 1kHz 3kHz 10kHz
+
0
-
R
L
+
0
-
BN68-01528A-00_Por.indd 25 2008-4-21 15:22:51

Português - 26
Seleccionar o modo de som (consoante o modelo)
O botão DUAL I-II mostra/controla o processamento e a saída do sinal de áudio. Quando liga
o televisor, o modo é automaticamente programado para “DUAL-I ” ou “Estéreo” (Stereo),
consoante a transmissão actual.
Configuração Fácil
1 Carregue no botão TOOLS no telecomando.
2 Carregue no botão ▲ ou ▼ para seleccionar Dual I-II.
3 Carregue no botão ◄ ou ► para seleccionar opção
pretendida.
Tipo de transmissão
Indicação no ecrã
NICAM
Estéreo
Transmissão normal
(Som standard)
Mono (Utilização normal)
Normal + NICAM Mono NICAM
Mono
(Normal)
NICAM Estéreo
NICAM
Estéreo
Mono
(Normal)
NICAM DUAL-I/II
NICAM
Dual-1
NICAM
Dual-2
Mono
(Normal)
A2
Estéreo
Transmissão normal
(Som standard)
Mono (Utilização normal)
Bilingue ou DUAL-I/II Dual I Dual II
Estéreo Estéreo
Mono
(Mono forçado)
➢
Se as condições de recepção se deteriorarem, a audição será mais fácil se definir o modo para
Mono.
Se o sinal estéreo for fraco e ocorrer uma mudança automática, mude para Mono.
Ligar os Auscultadores (Vendidos em separado)
Pode ligar uns auscultadores se pretender ver um programa de televisão sem
incomodar as pessoas que o rodeiam.
➢
Quando introduz a ficha na porta correspondente, apenas pode
utilizar o Volume auto. no menu Som.
➢
O uso prolongado dos auscultadores com o volume muito alto
pode provocar lesões auditivas.
➢
Não sairá som dos altifalantes quando ligar os auscultadores ao
televisor.
➢
O volume dos auscultadores e o volume do televisor são
ajustáveis em separado.
Painel lateral do Televisor
Ferramentas
Anynet+ (HDMI-CEC)
Modo de Imagem : Standard
Modo de Som : Personalizar
Temporizador : Deslig.
SRS TS XT : Deslig.
Poupança energ. : Deslig.
Dual I-II ◄ Mono ►
Mover
Ajustar
Sair
BN68-01528A-00_Por.indd 26 2008-4-21 15:22:52

Português - 27
Funções de tempo
1 Carregue no botão MENU para aceder ao menu.
2 Carregue no botão ▲ ou ▼ para seleccionar Configurar e
depois no botão ENTER.
3 Carregue no botão ▲ ou ▼ para seleccionar Tempo e depois
no botão ENTER.
4 Seleccione a opção pretendida carregando no botão ▲ ou ▼
e depois carregue no botão ENTER.
Opções disponíveis:
Ajuste o Relógio, Temporizador,
Temporizador 1, Temporizador 2, Temporizador 3.
5 Quando estiver satisfeito com a definição, carregue no botão
ENTER.
6 Carregue no botão EXIT para sair.
Ajuste o Relógio
Pode acertar o relógio do televisor para que apareça a hora
actual quando carregar no botão INFO do telecomando.
Também tem de acertar a hora se quiser utilizar os
temporizadores automáticos para Ligar ou Desligar à hora
definida.
− Carregue no botão ◄ ou ► para seleccionar Mês, Data,
Ano, Hora ou Minuto. Programe estas opções carregando
no botão ▲ ou ▼.
➢
Pode acertar directamente o Mês, Data, Ano, Hora
ou Minuto carregando nos botões numéricos do
telecomando.
➢
Se houver um corte de corrente ou se desligar o televisor
da tomada, perde as definições do relógio.
Temporizador
Pode seleccionar um intervalo de tempo entre 30 e 180
minutos, após o qual o televisor muda automaticamente para o
modo de espera.
− Seleccione o intervalo de tempo predefinido (Deslig., 30,
60, 90, 120, 150 ou 180) para que o televisor fique ligado,
carregando no botão ▲ ou ▼.
Configuração Fácil
1 Carregue no botão TOOLS no telecomando.
2
Carregue no botão ▲ ou ▼ para seleccionar Temporizador
.
3 Carregue no botão ◄ ou ► para seleccionar o minuto e,
depois, carregue no botão ENTER.
Temporizador 1 / Temporizador 2 / Temporizador 3
Pode definir os temporizadores para Ligar/Desligar à hora
definida de modo a que o televisor se ligue ou desligue
automaticamente à hora que seleccionar.
☛
Primeiro, tem de acertar o relógio.
− Carregue no botão ◄ ou ► para seleccionar a opção pretendida abaixo.
Carregue no botão ▲ ou ▼ para seleccionar a definição pretendida.
Ligar à hora definida: Seleccione as horas, os minutos e Lig./Deslig.. (Para activar o
temporizador com a definição pretendida, seleccione Lig.)
Desligar à hora definida: Seleccione as horas, os minutos e Lig/Deslig. (Para activar o
temporizador com a definição pretendida, seleccione Lig.)
Repetir: Seleccione Uma vez, Todos os dias, Seg ~ Sex, Seg ~ Sáb ou Sáb ~ Dom.
Volume: Seleccione o nível de volume pretendido.
➢
Também pode acertar directamente as horas e os minutos carregando nos botões numéricos do
telecomando.
☛
Desligar automaticamente
Quando definir o temporizador para “Ligar à hora definida”, o televisor desliga-se eventualmente se
não carregar em nenhum comando no período de 3 horas após o temporizador ter ligado o televisor.
Esta função só está disponível no modo “Ligar à hora definida” do temporizador e permite evitar
sobreaquecimentos, que podem ocorrer se o televisor permanecer ligado durante muito tempo.
Ferramentas
Anynet+ (HDMI-CEC)
Modo de Imagem : Standard
Modo de Som : Personalizar
Temporizador ◄ Deslig. ►
SRS TS XT : Deslig.
Poupança energ. : Deslig.
Dual I-II : Mono
Mover
Ajustar
Sair
Mover
Enter
Voltar
Plug & Play
Idioma : Português
Tempo
Efeito de luz
:
Modo visual. lig
Ajuste montagem na parede
Melodia : Deslig.
Entretenimento : Deslig.
Poupança energ. : Deslig.
PIP
Configurar
T V
Mover
Enter
Voltar
Ajuste o Relógio :
00 : 00
Temporizador : Deslig.
Temporizador 1 : Deslig.
Temporizador 2 : Deslig.
Temporizador 3 : Deslig.
Tempo
T V
Mover
Ajustar
Voltar
Temporizador 1
T V
00 00 Não
Ligar à hora definida
:
Desligar à hora definida
Repetir
Uma vez
10
Volume
00 00 Não
:
BN68-01528A-00_Por.indd 27 2008-4-21 15:22:53

Português - 28
Idioma / Melodia / Efeito de luz / Entretenimento / Poupança energ. / PIP
1 Carregue no botão MENU para aceder ao menu.
2 Carregue no botão ▲ ou ▼ para seleccionar Configurar e
depois no botão ENTER.
3 Seleccione a opção pretendida carregando no botão ▲ ou ▼
e depois carregue no botão ENTER.
Opções disponíveis:
Idioma, Melodia, Efeito de luz,
Entretenimento, Poupança energ.
4 Quando estiver satisfeito com a definição, carregue no botão
ENTER.
5 Carregue no botão EXIT para sair.
Idioma
Varia consoante o modelo. Quando utilizar o televisor pela primeira vez, tem de seleccionar o idioma
em que quer ver os menus e as indicações.
Efeito de luz: Deslig./Modo Standby lig/Modo visual. lig/Lig.
Consoante a situação, pode acender/apagar o LED azul existente na parte da frente do televisor.
Utilize esta opção para poupar energia ou se o LED estiver a fazer reflexo.
−
Deslig.: O LED azul está sempre apagado.
−
Modo Standby lig: O LED azul acende-se no modo de espera e apaga-se quando ligar o
televisor.
−
Modo visual. lig: O LED azul acende-se quando estiver a ver televisão e apaga-se quando
desligar o televisor.
−
Lig.: O LED azul acende-se sempre.
➢
Para reduzir o consumo de energia, defina o Light Effect para Deslig.
Melodia: Deslig./Baixa/Médio/Alto
Pode regular a melodia que toca quando liga/desliga o televisor.
Entretenimento: Deslig./ Desporto/ Cinema/ Jogos
O modo Entretenimento permite-lhe seleccionar a imagem e som ideais para desporto, cinema e
jogos.
− Deslig.: Desactiva a função Entretenimento (Entertainment)
−
Desporto: Fornece a imagem ideal e qualidade de som para desporto.
−
Cinema: Fornece a imagem ideal e qualidade de som para visualização de filmes.
Pode obter uma imagem mais rica e um som melhorado.
−
Jogos: Fornece a imagem ideal e qualidade de som para jogos. Este modo aumenta a velocidade
de jogo quando utiliza uma consola de jogos externa ligada ao Televisor.
➢
Se definir qualquer um dos modos de Entretenimento para Lig. , as definições serão
bloqueadas e não podem ser ajustadas. Se pretende ajustar os modos Imagem ou Som, o modo
Entretenimento deve ser desligado.
➢
As definições de Entretenimento são guardadas para cada fonte de entrada.
Continua...
Mover
Enter
Voltar
Plug & Play
Idioma : Português
Tempo
Efeito de luz
:
Modo visual. lig
Ajuste montagem na parede
Melodia : Deslig.
Entretenimento : Deslig.
Poupança energ. : Deslig.
PIP
Configurar
T V
BN68-01528A-00_Por.indd 28 2008-4-21 15:22:53

Português - 29
Poupança energ.: Deslig./Baixa/Médio/Alto
Esta função regula a luminosidade do ecrã consoante as condições
de iluminação.
− Deslig.: Desactiva o modo Poupança energ.
− Baixa: Funciona no modo standard independentemente das
condições de iluminação.
− Médio: Acede ao modo de poupança média de energia
independentemente das condições de iluminação.
− Alto: Acede ao modo de poupança máxima de energia
independentemente das condições de iluminação.
Configuração Fácil
1 Carregue no botão TOOLS no telecomando.
2 Carregue no botão ▲ ou ▼ para seleccionar Poupança energ.
3 Carregue no botão ◄ ou ► para seleccionar a opção pretendida
Ferramentas
Anynet+ (HDMI-CEC)
Modo de Imagem : Standard
Modo de Som : Personalizar
Temporizador : Deslig.
SRS TS XT : Deslig.
Poupança energ. ◄ Deslig. ►
Dual I-II : Mono
Mover
Ajustar
Saída
Configurar o software do PC (com base no Windows XP)
As definições de visualização do Windows num computador
normal são apresentadas abaixo. No entanto, os ecrãs que
aparecem no monitor do PC são provavelmente diferentes
consoante a sua versão do Windows e a sua placa de
vídeo. Mas, mesmo que os ecrãs pareçam diferentes, são
aplicadas, em quase todos os casos, as mesmas informações
de configuração básicas. (Se tal não acontecer, contacte o
fabricante do computador ou um revendedor Samsung.)
1 Clique com o botão direito do rato no ambiente de trabalho do
Windows e depois clique em Propriedades.
Aparecem as Propriedades de visualização.
2 Clique no separador Definições e defina o modo de
visualização de acordo com a tabela dos modos de
visualização. Não precisa de mudar as definições de cores.
3 Clique em Avançadas. Aparece uma nova caixa de diálogo
de definições.
4 Clique no separador Monitor e depois defina a Frequência de actualização do ecrã de acordo
com a tabela dos modos de visualização. Se possível, defina a frequência vertical e a frequência
horizontal individualmente em vez de definir a Frequência de actualização do ecrã.
5 Clique em OK para fechar a janela e novamente no botão OK da janela Propriedades de
visualização. A reinicialização automática pode começar nesta altura.
PIP (Imagem em Imagem): PIP (Lig./Deslig.)/Fonte/Tamanho/Posição/Programa
Pode ver uma imagem secundária contida na imagem principal. Deste modo, pode assistir a programas
de televisão ou controlar a entrada de vídeo a partir de qualquer
dispositivo ligado.
−
PIP: Lig./Deslig.
Pode activar ou desactivar a função PIP.
Tabela de definições PIP
Imagem Principal Imagem Secundária
Componente
HDMI1, 2, 3
PC
Apenas emissões
Televisivas analógicas
Ext1, Ext2, AV
− Fonte: TV/Ext.1/Ext.2/AV
Pode seleccionar uma fonte da imagem secundária.
− Tamanho: / /
Pode seleccionar o tamanho da imagem secundária.
➢
Se a imagem principal estiver no modo PC e Componente, a opção Tamanho não está
disponível.
− Posição: / / /
Pode seleccionar a posição da imagem secundária.
➢
No modo( , ) Duplo, não é possível seleccionar Posição.
−
Programa
Só pode seleccionar um canal da imagem secundária quando a opção Fonte estiver definida para TV.
Mover
Enter
Voltar
PIP :
Lig.
Fonte : TV
Tamanho :
Posição :
Programa : P 1
PIP
T V
BN68-01528A-00_Por.indd 29 2008-4-21 15:22:54

Português - 30
Modo de entrada (PC)
A posição e o tamanho do ecrã variam de acordo com o tipo de monitor do PC e a respectiva
resolução.
A tabela abaixo mostra todos os modos de visualização suportados:
D-Sub Entrada
Modo
Resolução
(Pontos X
Linha)
Frequência
vertical
(Hz)
Frequência
horizontal
(kHz)
Frequência do
relógioem pixels
(MHz)
Polaridade de
sincronização
(H/V)
PS50A470
IBM
640 x 350
720 x 400
31.469
31.469
70.086
70.087
25.175
28.322
+ / -
- / +
✔
✔
VESA
640 x 480
640 x 480
640 x 480
800 x 600
800 x 600
800 x 600
1024 x 768
1024 x 768
1024 x 768
1360 x 768
31.469
37.861
37.500
37.879
48.077
46.875
48.363
56.476
60.023
47.712
59.940
72.809
75.000
60.317
72.188
75.000
60.004
70.069
75.029
60.015
25.175
31.500
31.500
40.000
50.000
49.500
65.000
75.000
78.750
85.500
- / -
- / -
- / -
+ / +
+ / +
+ / +
- / -
- / -
+ / +
+ / +
✔
✔
✔
✔
✔
✔
✔
✔
✔
✔
HDMI/DVI Entrada
Modo
Resolução
(Pontos X
Linha)
Frequência
vertical
(Hz)
Frequência
horizontal
(kHz)
Frequência do
relógioem pixels
(MHz)
Polaridade de
sincronização
(H/V)
PS50A470
VESA
640 x 480
800 x 600
1024 x 768
1360 x 768
31.469
37.879
48.363
47.712
59.940
60.317
60.004
60.015
25.175
40.000
65.000
85.500
- / -
+ / +
- / -
+ / +
✔
✔
✔
✔
Quando utilizar uma ligação de cabo HDMI/DVI, tem de utilizar a tomada HDMI IN 2.
O modo entrelaçado não é suportado.
O televisor pode não funcionar correctamente se seleccionar um formato de vídeo que não seja
padrão.
Os modos Separado e Composto são suportados. A tecnologia SOG não é suportada.
No caso do modelo PS50A470, a qualidade de texto de PC ideal é no modo VESA
(1360 x 768@60Hz).
BN68-01528A-00_Por.indd 30 2008-4-21 15:22:54

Português - 31
Definir o PC
➢
Seleccione o modo PC carregando no botão SOURCE.
1 Carregue no botão MENU para aceder ao menu.
2 Carregue no botão ▲ ou ▼ para seleccionar Imagem e depois
no botão ENTER.
3 Seleccione a opção pretendida carregando no botão ▲ ou ▼ e
depois carregue no botão ENTER.
4 Quando estiver satisfeito com a definição, carregue no botão
ENTER.
5 Carregue no botão EXIT para sair.
Ajuste auto.
O ajuste automático permite que o ecrã de PC no televisor se
ajuste automaticamente ao sinal de vídeo recebido de um PC.
Os valores de Fino, Grosso e Posição são ajustados
automaticamente.
Configuração Fácil
1 Carregue no botão TOOLS no telecomando.
2 Carregue no botão ▲ ou ▼ para seleccionar Ajuste auto. e,
depois, prima o botão ENTER.
Ecrã: Grosso/Fino/Posição/ Repor imagem.
Grosso/Fino
A regulação da qualidade da imagem permite remover ou
reduzir o ruído da imagem.
Se não conseguir remover o ruído apenas com a sintonização
fina, regule a frequência o melhor possível (grosso) e volte a
fazer a sintonização fina.
Depois de ter reduzido o ruído, volte a regular a imagem de
forma a ficar alinhada no centro do ecrã.
1 Carregue no botão ▲ ou ▼ para seleccionar Grosso ou
Fino e depois no botão ENTER.
2 Carregue no botão ◄ ou ► para regular a qualidade do
ecrã; podem aparecer riscas verticais ou a imagem pode
ficar pouco nítida. Carregue no botão ENTER.
Posição
Ajuste a posição do ecrã do PC se não aparecer por completo
no ecrã do televisor.
1 Ajuste a posição carregando no botão ▲/▼/◄/►.
2 Carregue no botão ENTER.
Repor imagem
Pode substituir todas as definições da imagem pelos valores
predefinidos.
Ferramentas
Anynet+ (HDMI-CEC)
Modo de Imagem : Standard
Modo de Som : Personalizar
Temporizador : Deslig.
SRS TS XT : Deslig.
Poupança energ. : Deslig.
PIP
Ajuste auto.
SaídaMover
Enter
Mover
Enter
Voltar
Posição
T V
Ajuste auto. em curso
Aguarde por favor
Repor imagem concluída.
Mover
Enter
Voltar
Grosso 50
Fino 11
Posição
Repor imagem
Ecrã
T V
Mover
Enter
Voltar
Modo :
Standard
Luminosidade das células
7
Contraste 95
Brilho 45
Nitidez 50
Ajuste auto.
Ecrã
Definições detalhadas
Opções de imagem
Reiniciar : OK
Imagem
T V
BN68-01528A-00_Por.indd 31 2008-4-21 15:22:55

Português - 32
O que é o Anynet
+
?
Anynet
+
é um sistema de rede AV que permite uma interface de utilizador AV fácil de utilizar,
controlando todos os dispositivos de AV ligados através do menu Anynet
+
se tiver dispositivos
Samsung Electronics AV ligados.
Ligar dispositivos Anynet
+
O sistema Anynet
+
só suporta dispositivos AV que suportem Anynet
+
.
Verifique se existe uma marca de Anynet
+
no dispositivo AV que vai ligar ao televisor.
Para ligar directamente ao televiso
Ligue a tomada [HDMI 1],
[HDMI 2] ou [HDMI 3] do
televisor e a tomada HDMI
OUT do dispositivo Anynet
+
correspondente, utilizando o
cabo HDMI
Ligar ao Home Theatre
1 Ligue a tomada [HDMI 1],
[HDMI 2] ou [HDMI 3] do
televisor e a tomada HDMI
OUT do dispositivo Anynet
+
correspondente, utilizando o
cabo HDMI.
2 Ligue a tomada HDMI IN do
home theatre e a tomada
HDMI OUT do dispositivo
Anynet
+
correspondente,
utilizando o cabo HDMI.
.
➢
Ligue apenas um receptor.
➢
Pode ligar um dispositivo Anynet+ utilizando o cabo HDMI. Alguns cabos HDMI podem não suportar
funções Anynet+ .
➢
O Anynet+ funciona quando o dispositivo AV que suporta Anynet+ está no estado de suspensão ou
ligado.
➢
O Anynet+ suporta até 8 dispositivos AV.
English - 30
TV
Dispositivo Anynet
+
1 Dispositivo Anynet
+
2
Dispositivo Anynet
+
3
Cabo HDMI
Cabo HDMI
Cabo HDMI
Cabo HDMI
Home Theatre
Dispositivo Anynet
+
1 Dispositivo Anynet
+
2
Dispositivo Anynet
+
3
TV
Cabo HDMI
Cabo HDMI
Cabo HDMI
BN68-01528A-00_Por.indd 32 2008-4-21 15:22:57

Português - 33
Configurar o Anynet
+
As seguintes definições são para utilizar as funções Anynet
+
.
Utilizar a função Anynet
+
1 Carregue no botão MENU para ver o menu.
Carregue no botão ▲ ou ▼ para seleccionar Entrada (Input), e depois
carregue no botão ENTER .
2 Carregue no botão ▲ ou ▼ para seleccionar Anynet
+
(HDMI-CEC), e
depois carregue no botão ENTER .
3 Carregue no botão ▲ ou ▼ para seleccionar Configurar (Setup), e
depois carregue no botão ENTER .
4 Carregue no botão ▲ ou ▼ para seleccionar Anynet
+
(HDMI-CEC), e
depois carregue no botão ENTER .
5 Carregue no botão ▲ ou ▼ para seleccionar Lig.(On), e depois carregue
no botão ENTER .
➢
Activa a função Anynet+ (HDMI-CEC)
.
➢
Se seleccionar Deslig. (Off), desactiva a função Anynet+ (HDMI-CEC).
➢
Quando a função Anynet+ (HDMI-CEC) está desactivada, todas as
operações relacionadas com o Anynet+ são igualmente desactivadas.
Desligar um dispositivo Anynet
+
automaticamente quando o televisor
estiver desligado
4
Carregue no botão ▲ ou ▼ para seleccionar Auto Turn Off (Desligar Automático), depois carregue no botão ENTER .
5 Carregue no botão ▲ ou ▼ para seleccionar Sim (Yes), depois carregue no botão ENTER .
➢
Activa a função Desligar automático.
➢
Se seleccionar Não (No), a função Desligar automático é
desactivada.
Carregue no botão EXIT para sair.
➢
Para poder utilizar a função Anynet+ a definição Seleccionar dispositivo
do telecomando do televisor tem de estar definida para televisor.
➢
Se definir a função Auto Turn Off (Desligar automático) para Sim
(Yes), os dispositivos externos ligados também são desligados quando
o televisor for desligado. Contudo, se o dispositivo estiver a gravar, pode
não se desligar.
Procurar e Alternar entre dispositivos Anynet
+
1 Carregue no botão MENU para ver o menu.
Carregue no botão ▲ ou ▼ para seleccionar Entrada (Input), e
depois carregue no botão ENTER .
2 Carregue no botão ▲ ou ▼ para seleccionar Anynet
+
(HDMI-CEC), e
depois carregue no botão ENTER .
3 Carregue no botão ▲ ou ▼ para seleccionar Select Device
(Seleccionar dispositivo), depois carregue no botão ENTER .
4 Carregue no botão ▲ ou ▼ para seleccionar um determinado
dispositivo e carregue no botão ENTER.
Comuta para o dispositivo seleccionado.
5 Se não encontra o dispositivo que quer, carregue no botão ▲ ou
▼ para seleccionar Searching Connections (Procurar ligações),
depois carregue no botão ENTER.
Aparece a mensagem Configuring Anynet
+
connection (A
configurar a ligação Anynet+)... . Quando a procura de dispositivos
estiver concluída, aparece uma lista dos dispositivos ligados no menu
Anynet
+
.
➢
A comutação para os dispositivos seleccionados pode demorar até
2 minutos. Não pode cancelar a operação durante o processo de
comutação.
➢
O tempo necessário para a procura de dispositivos é determinado pelo número de dispositivos ligados
.
➢
Quando a procura de dispositivos estiver concluída, não aparece o número de dispositivos encontrados.
➢
Embora o televisor procure dispositivos automaticamente quando o ligar no botão POWER, os dispositivos
ligados, quando o televisor estiver ligado ou numa outra circunstância, não aparecem na lista de dispositivos. Por
isso, seleccione o menu Procurar ligações para procurar os dispositivos.
➢
Se seleccionou o modo de entrada externa carregando no botão SOURCE não pode utilizar a função Anynet+ .
Comute para um dispositivo Anynet
+
utilizando o botão TOOLS
.
Continua...
Configurar
Anynet
+
(HDMI-CEC)
: Off
Desligar automat.
: Off
Proc. disp. lig.
Enter VoltarMover
Deslig.
Lig.
Enter
Mover
Ver televisão
Selec. dispositivo
Gravar
Menu no dispositivo
Func. do dispositivo
Receiver :Deslig.
Configurar
TV P 1
Sair
Enter
Mover
Ver televisão
Selec. dispositivo
Gravar
Menu no dispositivo
Func. do dispositivo
Receiver :Deslig.
Configurar
TV P 1
Voltar
DVDR1
DVDR2
DVD1
DVD2
Configurar
Anynet
+
(HDMI-CEC)
: Lig.
Desligar automat. :
: Off
Proc. disp. lig.
Enter VoltarMover
Não
Sim
Configurar
Anynet
+
(HDMI-CEC)
: Lig.
Desligar automat. : Sim
Proc. disp. lig.
Enter VoltarMover
BN68-01528A-00_Por.indd 33 2008-4-21 15:22:57

Português - 34
Menu Anynet
+
O menu Anynet
+
muda, dependendo do tipo e do estado dos dispositivos Anynet
+
ligados ao televisor.
Menu Anynet
+
Descrição
Ver televisão Passa do modo Anynet
+
para o modo de transmissão televisiva.
Seleccionar dispositivo O seu televisor liga-se ao dispositivo correspondente.
Gravação Inicia uma gravação. (Este menu só funciona com uma dispositivo
que suporte gravação.)
Menu do dispositivo Aparece o menu do dispositivo ligado.
Exemplo. Se tiver ligado um Gravador DVD, aparece o menu de
títulos do Gravador DVD.
Funcionamento do dispositivo Aparece o menu de controlo da reprodução do dispositivo ligado.
Exemplo. Se tiver ligado um Gravador DVD, aparece o menu de
controlo da reprodução do Gravador DVD.
Receptor O som sai através do receptor.
Configuração Pode configurar o ambiente para utilizar o Anynet
+
.
Botões do telecomando do televisor disponíveis no modo Anynet
+
Tipo Dispos. Estado de funcionamento Botões disponíveis
Dispositivo Anynet
+
Depois de comutar para o
dispositivo, quando aparecer
no ecrã o menu do dispositivo
correspondente.
Botões numéricos
botões ▲/▼/◄/►/ENTER
Botões coloridos
botão EXIT
De p oi s d e com u ta r par a o
dispositivo, enquanto reproduz
um ficheiro
W.LINK
(
Procura para trás)
W.LINK
(
Procura para a frente)
W.LINK
(
Parar)
W.LINK
W.LINK
(
Reproduzir/Pausa)
Dispositivo com sintonizador
incorporado
De p oi s d e com u ta r par a o
dispositivo, quando estiver a ver
um programa televisivo
botão P /
Dispositivo de Áudio
Quando um receptor estiver
activado
botão
W.LINK
/
W.LINK
botão MUTE
➢
A função Anynet+ só funciona quando o telecomando estiver definido para o televisor.
➢
O botão REC só funciona no estado de gravação.
➢
Não consegue controlar os dispositivos Anynet+ utilizando os botões existentes na parte lateral do
televisor. Só consegue controlar os dispositivos Anynet
+
utilizando o telecomando do televisor.
➢
O telecomando do televisor pode não funcionar sob determinadas condições. Neste caso, volte a
seleccionar o dispositivo Anynet
+
.
➢
As funções Anynet+ não funcionam para produtos de outros fabricantes.
➢
No modo Anynet+ os botões coloridos podem não funcionar correctamente.
➢
As operações
W.LINK
,
W.LINK
podem ser diferentes consoante o dispositivo.
Gravar
Pode gravar um programa televisivo utilizando um gravador.
Carregue no botão REC .
A gravação começa. (Só quando ligar o dispositivo Anynet
+
que permite a gravação.)
➢
O programa de televisão actual é gravado no estado Ver televisão. Se estiver a ver imagens através
de outro dispositivo, são essas imagens que são gravadas.
➢
Também pode gravar as transmissões da fonte seleccionando Record (Gravação) depois de
carregar no botão TOOLS .
➢
Antes de gravar, verifique se a tomada da antena está devidamente ligada ao dispositivo de
gravação.
Para obter mais informações sobre a ligação da antena ao dispositivo de ligação, consulte o manual
de utilizador respectivo.
BN68-01528A-00_Por.indd 34 2008-4-21 15:23:00

Português - 35
Ouvir através de um receptor
Pode ouvir o som através de um receptor e não pelo altifalante do televisor.
1 Carregue no botão MENU para ver o menu.
Carregue no botão ▲ ou ▼ para seleccionar Entrada (Input), e depois carregue no botão
ENTER .
2 Carregue no botão ▲ ou ▼ para seleccionar Anynet
+
(HDMI-CEC), e depois carregue no
botão ENTER .
3 Carregue no botão ▲ ou ▼ para seleccionar Lig.(On), e depois carregue no botão ENTER .
4 Carregue no botão ◄ ou ► para seleccionar Lig. (On), depois carregue no botão ENTER .
Agora pode ouvir o som através do receptor.
5 Carregue no botão EXIT para sair.
➢
Quando o receptor estiver definido para Ligado, pode ouvir o som do televisor através do
receptor de 2 canais.
➢
Se o receptor for exclusivo para home theater (só suporta áudio), pode não aparecer na lista
de dispositivos.
➢
Se um conteúdo tiver problemas de direitos de autor, pode não conseguir ouvir correctamente através do receptor.
➢
Quando estiver a ouvir através de um receptor, há restrições à utilização do PIP e do menu de áudio
.
Antes de solicitar assistência técnica, verifique os
seguintes pontos
Sintoma Solução
O Anynet
+
não funciona.
■ Verifique se o dispositivo é um dispositivo Anynet
+
. O sistema Anynet
+
só suporta dispositivos Anynet
+
.
■ Ligue apenas um receptor.
■ Verifique se o cabo de alimentação do dispositivo Anynet
+
está ligado
correctamente.
■ Verifique as ligações por cabo Video/Audio/HDMI do dispositivo Anynet
+
.
■ Verifique se Anynet+ (HDMI-CEC) está definido para Ligado no menu de
configuração Anynet
+
.
■ Verifique se o telecomando do televisor está no modo TV.
■ Verifique se é um telecomando exclusivo do Anynet
+
.
■ O Anynet
+
não funciona sob determinadas condições. (Pesquisar canais)
■ Quando ligar ou remover o cabo HDMI, certifique-se de que procura
dispositivos novamente ou de que reinicia o televisor.
■ Certifique-se de que a função Anynet
+
do dispositivo Anynet
+
está ligada.
Quero iniciar o Anynet
+
.
■ Verifique se o dispositivo Anynet
+
está correctamente ligado ao televisor
e se o Anynet
+
está definido para Ligado no menu de configuração
Anynet
+
.
■ Carregue no botão TV do telecomando do televisor para mudar para o
televisor. Depois carregue no botão TOOLS para que apareça o menu
Anynet
+
e seleccione um menu desejado.
Quero sair do Anynet
+
.
■ Seleccione Ver televisão no menu Anynet
+
.
■ Carregue no botão
SOURCE do telecomando do televisor e seleccione
um dispositivo que não seja Anynet
+
.
■ Carregue em qualquer dos botões
P, CH LIST, e PRE-CH para mudar
para o modo TV. (O botão de canal só funciona quando não estiver
ligado um dispositivo Anynet
+
com sintonizador incorporado.)
A mensagem A ligar a
dispositivo Anynet
+
…
aparece no ecrã.
■ Não pode utilizar o telecomando quando está a configurar o Anynet+ ou a
mudar para um modo de visualização.
■ Utilize o telecomando quando a configuração do Anynet
+
ou a
comutação para o modo de visualização estiverem concluídos.
O dispositivo Anynet
+
não
reproduz.
■ Não pode utilizar a função de reprodução quando o Plug & Play
está a decorrer.
Não aparece o dispositivo
ligado.
■ Verifique se o dispositivo suporta as funções Anynet+ .
■ Verifique se o cabo HDMI está correctamente ligado.
■ Verifique se o Anynet
+
(HDMI-CEC) está definido para Ligado no menu
de configuração Anynet
+
.
■ Procure novamente por dispositivos Anynet
+
.
■ Pode ligar um dispositivo Anynet
+
utilizando apenas o cabo HDMI.
Alguns cabos HDMI podem não suportar funções Anynet
+
.
Não consigo gravar o
programa de televisão.
■ Verifique se a tomada da antena do dispositivo de gravação está
ligada correctamente.
Enter
Mover
Ver televisão
Selec. dispositivo
Gravar
Menu do dispositivo
Func. do dispositivo
Receiver :Lig.
Configurar
TV P 1
Sair
BN68-01528A-00_Por.indd 35 2008-4-21 15:23:01

Português - 36
Função de teletexto (consoante o modelo)
A maioria das estações de televisão fornece serviços de informação por escrito através da função
de teletexto. A página de índice do serviço de teletexto fornece informações sobre como utilizar o
serviço. Além disso, pode seleccionar várias opções de acordo com os seus requisitos utilizando
os botões do telecomando.
☛
Para que as informações de teletexto sejam apresentadas correctamente, é preciso que a recepção
dos canais se processe em boas condições. Caso contrário, podem faltar informações ou podem
não aparecer algumas páginas.
1
TV
Sair do ecrã de teletexto (consoante o modelo)
2
(memorizar)
Utiliza-se para memorizar as páginas do teletexto.
3
(tamanho)
Carregue para ver as letras com o dobro do tamanho na
metade superior do ecrã. Para as ver na metade inferior do
ecrã, carregue novamente.Para ver o ecrã normal, carregue
mais uma vez.
4
(mostrar)
Utiliza-se para ver texto oculto (respostas a jogos de perguntas
e respostas, por exemplo) Para ver o ecrã normal, carregue
novamente no botão.
5
Botões coloridos (vermelho/verde/amarelo/azul)
Se a estação emissora utilizar o sistema FASTEXT, os
diferentes tópicos apresentados na página de teletexto
aparecem codificados com cores. Para os seleccionar,
carregue nos botões coloridos. Carregue num desses botões
correspondente à opção pretendida. A página é apresentada
com outras informações às cores que pode seleccionar da
mesma forma.Para aceder à página anterior ou seguinte,
carregue no botão colorido correspondente.
6
(teletexto activado/visualização mista)
Carregue para activar o modo de teletexto depois de
seleccionar o canal com o serviço de teletexto. Carregue duas
vezes para sobrepor o ecrã de transmissão actual ao teletexto.
7
(modo)
Carregue para seleccionar o modo de teletexto (LIST/FLOF).
Se carregar enquanto estiver no modo LIST, muda para o modo
de guardar em lista.No modo de guardar em lista, pode guardar
a página de teletexto numa lista com o botão (memorizar).
8
(página secundária)
Utiliza-se para ver a página secundária disponível.
9
(página para cima)
Utiliza-se para ver a próxima página do teletexto.
0
(página para baixo)
Utiliza-se para ver a página anterior do teletexto.
!
(índice)
Utiliza-se para ver a página de índice (conteúdo) a qualquer
momento em que está a visualizar o teletexto.
@
(modo de espera)
Utiliza-se para manter o ecrã numa determinada página,
se a página seleccionada estiver ligada a várias páginas
secundárias que aparecem automaticamente em sequência.
Para retomar, carregue novamente neste botão.
#
(cancelar)
Utiliza-se para ver a emissão enquanto procura uma página.
➢
Pode alterar páginas de teletexto com os botões numéricos do
telecomando.
Continua...
BN68-01528A-00_Por.indd 36 2008-4-21 15:23:03

Português - 37
As páginas do teletexto estão divididas em seis categorias:
Parte Conteúdo
A
B
C
D
E
F
Número da página seleccionada.
Nome da estação emissora.
Número da página actual ou indicações da
procura.
Data e hora.
Texto.
Informações sobre o estado.
Informações FASTEXT.
➢
As informações de teletexto são muitas vezes divididas em
várias páginas mostradas em sequência e às quais pode
aceder:
Introduzindo o número da página
Seleccionando um título numa lista
Seleccionando um título a cores (sistema FASTEXT)
➢
Carregue no botão TV para sair do teletexto.
BN68-01528A-00_Por.indd 37 2008-4-21 15:23:04

Português - 38
Especificações do kit de montagem na parede (VESA)
Instale o kit de montagem na parede numa parede sólida perpendicular ao chão.
Se montar noutros materiais, contacte o revendedor mais próximo.
Se instalar no tecto ou numa parede inclinada, pode cair e causar ferimentos graves.
Família de produtos
polegadas Espec. VESA (A * B) Parafuso normal Quantidade
Televisor LCD
23 ~ 26 200
*
100 M4
4
32 ~ 40 200
*
200 M6
46 ~ 52
400 * 400
600 * 400
M8
57
700 * 400
(Não conforme à VESA)
57 ~ 70 800 * 4000
80 ~ 1400 * 800
Televisor plasma
42 ~ 58
400 * 400
600 * 400
M8
4
63
676 * 407
(Não conforme à VESA)
6
63 ~ 70 800 * 400 4
80 ~ 1400 * 800 4
➢
Fornecemos as medidas standard para kits de montagem na parede como se mostra na tabela
acima.
➢
Na aquisição do nosso kit de montagem na parede, são fornecidos um manual de instalação
detalhada e todas as peças necessárias para a montagem.
➢
Não utilize parafusos com medida superior à standard porque podem danificar o interior do televisor.
➢
Para os kits de montagem na parede não conformes às especificações de parafusos da norma
VESA, o comprimento dos parafusos pode ser diferente, dependo das respectivas especificações.
➢
Não utilize parafusos não conformes às especificações de parafusos da norma VESA. Não aperte
demasiado os parafusos, pois pode danificar o produto ou fazê-lo cair, causando ferimentos
pessoais. A Samsung não se responsabiliza por este tipo de acidentes.
➢
A Samsung não se responsabiliza por danos nos produtos ou por ferimentos pessoais se for utilizado
um kit de montagem na parede não conforme à VESA ou não especificado ou se o consumidor não
seguir as instruções de instalação do produto.
➢
Os nossos modelos de 57” e 63” não estão em conformidade com as especificações da VESA.
Deste modo, deve utilizar o nosso kit de montagem na parede dedicado a este modelo.
➢
Não exceda uma inclinação superior a 15 graus quando montar este televisor.
Não instale o Kit de montagem na parede com o televisor ligado.
Pode resultar em ferimentos pessoais devido a choques eléctricos.
BN68-01528A-00_Por.indd 38 2008-4-21 15:23:04

Português - 39
Salvar
Voltar
Mover
Enter
Seleccione um modo para guardar.
Posição 1
Posição 2
Posição 3
Aceder ao menu
1
Carregue nos botões ▲, ▼, ◄ ou ► no telecomando.
➢
Aparece o ecrã Ajuste montagem na parede.
➢
Se o ecrã Ajuste montagem na parede não aparece
quando carrega num botão direccional enquanto vê
televisão, utilize o menu para aceder ao ecrã.
• Carregue no botão
MENU para ver o menu. Carregue
no botão ▲ ou ▼ para seleccionar Configurar e depois
no botão ENTER.
• Carregue no botão ▲ ou ▼ para seleccionar
Ajuste
montagem na parede e depois carregue no botão
ENTER.
Memorizar a posição
2 Ajuste a posição desejada com os botões ▲, ▼, ◄, ►.
➢
Quando carrega num botão de seta sem que esteja
presente no ecrã do televisor algum OSD, aparece o ecrã
de Ajuste.
➢
Carregue no botão INFO para repor as definições.
Carregue no botão ◄ ou ► para seleccionar Sim e depois
no botão ENTER. É reposta a predefinição da posição.
3 Carregue no botão azul.
Carregue no botão ▲ ou ▼ para seleccionar um modo para
guardar, de entre Posição1, Posição2 ou Posição3 para
guardar a posição actual.
➢
Para não guardar a posição actual, carregue no botão
RETURN.
➢
Na selecção do modo de guardar, não pode utilizar os
botões coloridos.
4
Carregue no botão ENTER para guardar.
➢
Quando é seleccionada a Posição1, aparece a
mensagem Guardou a posição actual como Posição1.
5
Carregue no botão ENTER.
➢
A posição guardada aparece no lado esquerdo do OSD.
Cabo série(1P a 1P)(não fornecido)
Painel posterior
Montagem na parede
Dispositivo de montagem na parede (vendido em separado)
Após instalar o dispositivo de montagem na parede, a posição do televisor é facilmente ajustada.
Mover
Enter
Voltar
Plug & Play
Idioma : Português
Tempo
Efeito de luz
:
Modo visual. lig
Ajuste montagem na parede
Melodia : Deslig.
Entretenimento : Cinema
Poupança energ. : Deslig.
Configurar
T V
Ajuste montagem na parede
Ajustar
Salvar
Central
►
►
►
►
►
►
►
►
321Posição
BN68-01528A-00_Por.indd 39 2008-4-21 15:23:05

Português - 40
Como montar a base (consoante o modelo)
Prenda bem o ecrã à base com os 6 parafusos fornecidos.
(A parte exterior do aparelho pode ser diferente da mostrada na
figura.)
Se quiser instalar o televisor na
parede, feche a tampa (1) na
parte de ligação da base com dois
parafusos para a ocultar.
Aviso
Prenda bem a base ao televisor
antes de a deslocar porque pode
cair e provocar graves ferimentos.
➢
O televisor deve ser transportado
por duas ou mais pessoas. Nunca
deite o televisor no chão porque
pode danificar o ecrã.
Guarde sempre o televisor na
vertical.
Mudar para a posição memorizada
1
Complete o passo 1 de Aceder ao menu.
2 Ao carregar num botão colorido (Vermelho, Verde, Amarelo) muda
a montagem na parede para a posição guardada.
➢
Pode mudar a montagem na parede para uma de 3 posições
previamente definidas, carregando no botão Vermelho
(Posição 1), Verde (Posição 2) ou Amarelo (Posição 3).
➢
Se ajustar a posição após ter mudar para uma posição
previamente definida, o ecrã de posição desaparece.
➢
Para instalar a montagem de parede, consulte o manual de
instruções fornecido.
➢
Para a montagem do produto e a montagem e mudança da
montagem de parede, certifique-se de que consulta uma empresa de
montagem especializada.
➢
Este manual de instalação é válido para montagens da montagem
de parede em paredes. Se montar noutros materiais, contacte o
revendedor mais próximo.
➢
A montagem na parede não funciona se a função Anynet+ estiver
activada.
➢
O modelo de 42 polegadas não é compatível com o modelo mais
antigo de montagem na parede (WMN5090A).
Ajuste montagem na parede
Ajustar
Salvar Central
►
►
►
►
►
►
►
►
321Posição
Posição1
BN68-01528A-00_Por.indd 40 2008-4-21 15:23:07

Português - 41
Fixar o televisor à parede
Puxar, empurrar, ou subir para cima do televisor pode provocar a queda do mesmo. Em
especial, certifique-se de que as crianças não se penduram ou desestabilizam o televisor, o
que poderia provocar a queda do mesmo e resultar em acidentes graves ou morte. Siga todas
as precauções de segurança fornecidas no Folheto de Segurança incluído. Para estabilidade
adicional, instale o dispositivo anti-queda por razões de segurança, como descrito em seguida.
Para evitar a queda do televisor:
1. Introduza os parafusos nos grampos e aparafuse-os
com rmeza à parede. Verique se os parafusos foram
aparafusados com rmeza à parede.
Pode necessitar de material adicional, tal como um
suporte, consoante o tipo de parede.
Uma vez que os grampos, parafusos e cordão não são
fornecidos, adquira-os em separado.
2. Remove the screws from the center back of the TV, put the
screws into the clamps, and then fasten the screws onto the
TV again.
Os parafusos podem não ser fornecidos com o produto.
Nesse caso, adquira os parafusos com as seguintes
especicações.
3. Ligue os grampos xados ao televisor e os grampos xados
à parede com um cordão forte, depois aperte muito bem o
cordão.
Instale o televisor perto da parede de forma a não cair para
trás.
É mais seguro ligar o cordão de modo a que os grampos
xados à parede estejam ao mesmo nível ou abaixo dos
grampos xados ao televisor.
Desaperte o cordão antes de transportar o televisor.
4. Verique se todas as ligações estão devidamente presas. Verique regularmente as ligações para
evitar qualquer sinal de gasto ou falha. Se tiver alguma dúvida sobre a segurança das suas ligações,
contacte um instalador prossional.
➣
➣
➣
➣
➣
➣
Parede
Parede
Atenção
BN68-01528A-00_Por.indd 41 2008-4-21 15:23:08

Português - 42
Resolução de problemas
Antes de contactar a assistência pós-venda da Samsung, faça as simples verificações indicadas
abaixo. Se não conseguir resolver o problema com as instruções abaixo, anote o modelo bem
como o número de série do televisor e contacte o revendedor local.
Não há som nem imagem
Verifique se o cabo de alimentação está ligado a uma tomada de parede.
Verifique se carregou no botão (POWER) (Ligar/Desligar) existente no painel frontal ou no botão
POWER do telecomando.
Verifique as definições de contraste e brilho da imagem.
Verifique o volume.
Verifique se o Altifalante do televisor está definido para Deslig..
A imagem está normal mas não se ouve o som
Verifique o volume.
Verifique se carregou ou não no botão MUTE do telecomando.
Não há imagem ou a imagem está a preto e branco
Regule as definições de cor.
Verifique se o sistema de transmissão seleccionado está correcto.
Interferências no som e na imagem
Tente identificar o aparelho eléctrico que está a provocar interferências no televisor e afaste-o.
Ligue o televisor a uma tomada diferente.
A imagem está esbatida ou tem chuva, o som tem distorções
Verifique a direcção, a localização e as ligações da antena.
Estas interferências ocorrem normalmente devido à utilização de uma antena interna.
O telecomando não funciona
Substitua as pilhas do telecomando.
Limpe a parte superior do telecomando (janela de transmissão).
Verifique se os terminais “+” e “–” das pilhas estão correctamente posicionados.
Verifique se as pilhas estão gastas.
O ecrã está preto e o indicador luminoso de corrente está a piscar
No computador, verifique: corrente, cabo de sinal.
O televisor está a utilizar o sistema de gestão de energia.
Mova o rato do computador ou carregue numa tecla do teclado.
No equipamento (STB, DVD, etc), verifique: corrente, cabo de sinal.
O televisor está a utilizar o sistema de gestão de energia.
Carregue no botão Source no painel ou no telecomando.
Desligue e volte a ligar o televisor.
A imagem danificada aparece no canto do ecrã.
Se Digitalização prec. estiver seleccionado em algum dispositivo externo, a imagem danificada
pode aparecer no canto do ecrã. O sintoma é causado por dispositivos externos, não pelo televisor.
Aparece a mensagem (Repõe os valores predefinidos).
Esta mensagem aparece quando carrega sem soltar o botão EXIT durante algum tempo. Os valores
de fábrica das definições do produto são repostos.
BN68-01528A-00_Por.indd 42 2008-4-21 15:23:09

Português - 43
Características técnicas
As descrições e características incluídas neste folheto destinam-se apenas a fins informativos e
estão sujeitas a alterações sem aviso prévio.
Nome do modelo PS50A470
Tamanho do ecrã
(na diagonal)
50 polegadas
Resolução de PC 1360 x 768 @ 60 Hz
Som (Saída) 10 W + 10 W
Dimensões (LxAxP)
Televisor apenas
Com base
1290 x 740 x 95 mm
1290 x 804 x 319 mm
Peso
Televisor apenas
Com base
39 kg
41 kg
Características ambientais
Temperatura de funcionamento
Humidade de funcionamento
Temperatura de armazenamento
Humidade de armazenamento
10 °C a 40 °C
10% a 80%, sem condensação
-20 °C a 45 °C
5% a 95%, sem condensação
➢
Este dispositivo é um aparelho digital de Classe B.
O design e as características técnicas estão sujeitos a alterações sem aviso prévio.
Para informações sobre a fonte de alimentação e o consumo de energia, veja a etiqueta colada ao
produto.
BN68-01528A-00_Por.indd 43 2008-4-21 15:23:09

Eliminação Correcta Deste Produto
(Resíduo de Equipamentos Eléctricos e Electrónicos)
Esta marca, apresentada no produto ou na sua literatura indica que
ele não deverá ser eliminado juntamente com os resíduos domésticos
indiferenciados no final do seu período de vida útil. Para impedir
danos ao ambiente e à saúde humana causados pela eliminação
incontrolada de resíduos deverá separar este equipamento de outros
tipos de resíduos e reciclá-lo de forma responsável, para promover
uma reutilização sustentável dos recursos materiais.
Os utilizadores domésticos deverão contactar ou o estabelecimento
onde adquiriram este produto ou as entidades oficiais locais para
obterem informações sobre onde e de que forma podem levar este
produto para permitir efectuar uma reciclagem segura em termos
ambientais.
Os utilizadores profissionais deverão contactar o seu fornecedor e
consultar os termos e condições do contrato de compra. Este produto
não deverá ser misturado com outros resíduos comerciais para
eliminação.
BN68-01528A-00_Por.indd 44 2008-4-21 15:23:09

Magyar - 2
Használati útmutató
Képernyőbeégés
Két óránál hosszabb ideig ne jelenítsen meg állóképet a plazmaképernyőn (pl. egy videojátékról vagy
a készülékhez csatlakoztatott számítógépről), mert ilyenkor a megjelenő képek tartósan a képernyőn
maradhatnak. Ezt a jelenséget „képernyőbeégésnek” is nevezik. A képernyőbeégés elkerülése
érdekében állókép megjelenítésekor csökkentse a kép fényerejét és kontrasztját.
Magasság
A Plazma TV csak 2000 méternél alacsonyabb területeken működtethető a megszokott módon. 2000
méter feletti területen a készülék működése eltérhet a normálistól, ezért ilyen helyen ne helyezze
üzembe, és ne működtesse azt.
A PDP TV-készülék felső részén keletkező hő
A készülék felső része huzamosabb használatot követően felmelegedhet, mivel a működés közben
keletkező hő a készülék felső részén kialakított szellőzőnyíláson keresztül távozik. Ez normális
jelenség, nem utal meghibásodásra vagy egyéb működési rendellenességre. Arra azonban ügyelni
kell, hogy gyermekek ne érinthessék meg a készülék felső részét.
A készülék kattogó hangot ad.
A kattogó hangot okozhatja a készüléknek a környezeti hőmérséklet-ingadozások és a
páratartalom-változások által előidézett tágulása vagy zsugorodása. Ez általános jelenség, nem utal
meghibásodásra vagy egyéb működési rendellenességre.
Cellahiba
A PDP-eljárást alkalmazó panel 1 230 000 (SD-szint) és 3 150 000 (HD-szint) közötti számú
képpontból áll. A panel előállításához a gyártó magas szintű műszaki felkészültséget és
felszereltséget alkalmaz. Előfordulhat azonban, hogy a képernyőn ennek ellenére néhány világos és
sötét képpont jelenik meg. Ezek a képpontok a készülék teljesítményét nem befolyásolják.
Ne üzemeltesse a televíziókészüléket 5 °C(41°F) alatti hőmérsékleten
A huzamosabb ideig megjelenített állóképek a PDP-paneljének maradandó károsodását
okozhatják
A PDP-készülék huzamosabb ideig tartó, 4:3 képarányú módban történő
használata esetén a kibocsátott fényerősség eltérése miatt a képernyő közepén,
valamint bal és jobb oldalán sávok alakulhatnak ki. A DVD-filmek lejátszása
és a játékprogramok is hasonló jelenséget okozhatnak. A garancia az ilyen
esetekben keletkezett károkra nem terjed ki.
A képernyőn megjelenő utókép
A PDP kialakításából eredően állóképek (pl. videojátékok) bizonyos időt meghaladó megjelenítését
követően a képernyőn ún. utókép jelenhet meg. A jelenség megelőzése érdekében állóképek
megjelenítése esetén csökkentse a fényerőt és kontrasztot.
Garancia
- A garancia nem vonatkozik a monitor képernyőbeégésére.
- A garancia nem vonatkozik a képbeégésre..
Felszerelés
Ha a készüléket szélsőséges hőmérsékleti körülmények között, kifejezetten poros, magas
páratartalmú vagy kémiai anyagoknak kitett környezetben használja, vagy folyamatosan üzemelteti
például repülőtéri vagy vasútállomási várótermekben, az üzembe helyezés előtt kérje hivatalos
szakember tanácsát. Ha ezt elmulasztja, azzal a készülék komoly károsodását okozhatja.
Kapcsolatfelvétel: SAMSUNG WORLDWIDE
Ha a Samsung termékekkel kapcsolatban kérdése vagy megjegyzése van, vegye fel a kapcsolatot a
SAMSUNG ügyfélszolgálatával. (További információ a hátoldalon)
© 2008 Samsung Electronics Co., Ltd. All rights reserved.
BN68-01528A-00Hun.indd 2 2008-4-21 15:23:21

Magyar - 3
Jelzések
☛ ➢
Gombnyomás
Fontos
Megjegyzés
Tartalom
Általános tudnivalók
Használati útmutató ........................................ 2
Tartozékok ellenőrzése ................................... 4
Az állvány használata ..................................... 4
Vezérlőpanel .................................................. 5
Csatlakoztató panel ........................................ 6
A távvezérlő áttekintése .................................. 8
Működtetés
A televízió be- és kikapcsolása ....................... 9
A menü megtekintése ..................................... 9
A Plug & Play funkció .................................... 10
A TOOLS gomb használata .......................... 12
Külső jelforrások megtekintése ..................... 12
Az eszközök nevének módosítása ................ 13
Csatornakezelés
Csatornák automatikus tárolása ................... 13
Csatornák kézi tárolása ................................14
Csatornák hozzáadása / zárolása ................. 15
Tárolt csatornák rendezése .......................... 16
Név hozzárendelése a csatornákhoz ............ 16
Csatornák nomhangolása ........................... 17
Képkezelés
Képnorma választása ................................... 18
A képbeállítások testreszabása .................... 18
A kép részletes beállításainak
kongurálása ................................................. 19
Képopciók (Picture Options) ......................... 20
A 3D funkció használata ...............................
22
Képbeállítások visszaállítása gyári
alapbeállításra ............................................... 24
Hangszabályzás
Hangbeállítások ............................................ 25
A Hang mód kiválasztása (típusfüggő) ......... 26
(Külön kapható) fejhallgató csatlakoztatása
.... 26
Funkcióleírás
A dátum és időpont beállításai ...................... 27
Nyelv / Dallam / Fényeffektus /
Szórakoztatás / Energiagazd / PIP. ............... 28
Számítógép képernyője
A (Windows XP alapú) számítógépes
szoftver beállítása ......................................... 29
Bemeneti mód (PC) ......................................30
A számítógép beállítása ................................ 31
Az Anynet+ névjegye
Az Anynet
+
fogalma ....................................... 32
Anynet
+
eszközök csatlakoztatása ............... 32
Az Anynet
+
beállítása ................................... 33
Anynet
+
eszközök keresése és váltás
közöttük ......................................................... 33
Felvétel .........................................................34
Hang hallgatása vevőkészüléken keresztül .. 35
Szerviz előtt ellenőrzendő ............................. 35
Függelék
A Teletext funkció (a típustól függően) .......... 36
A fali konzol tartozékainak szabványadatai
(VESA) .......................................................... 38
A (külön kapható) fali konzol állítása ............. 39
Az állvány összeszerelése
(modelltől függő) ........................................... 40
A TV falra rögzítése....................................... 41
Hibaelhárítás ................................................. 42
Műszaki leírás ............................................... 43
Magyar
Használati útmutató
Kérjük, hogy a készülék működtetése előtt
gondosan olvassa végig a kezelési útmutatót
és őrizze meg, mert később szüksége lehet rá.
BN68-01528A-00Hun.indd 3 2008-4-21 15:23:21

Magyar - 4
Tartozékok ellenőrzése
Használati utasítás Távvezérlő és
AAA méretű elemek
Tápkábel Törlőruha
Garanciakártya
Biztonsági útmutató
(Nem minden régióban
elérhető)
Takarólemez / Csavarok (2ea)
(Lásd az 40. oldalt)
Ferritgyűrű a
tápvezetékhez
Ferritgyűrű az S-video
csatlakoztatáshoz
Külön megvásárolható tartozékok
Antennakábel Kábel komponens
csatlakozóhoz
Audiokábel PC-kábel
Scart kábel PC-audiokábel HDMI-kábel HDMI/DVI-kábel
➢
Ferritgyűrű (tápvezeték, S-Video)
A ferritgyűrű célja, hogy megóvja a kábelt az interferenciától. A
kábel csatlakoztatásakor nyissa fel a ferritgyűrűt, és kapcsolja a
kábel köré, közel a csatlakozóhoz.
Az állvány használata
➢
A plazmaképernyő mozgatásához
legalább két ember szükséges.
Ne helyezze a plazmaképernyőt
a padlóra, mert ez a készülék
megrongálódásához vezethet.
A plazmaképernyőt mindig
függőlegesen kell tárolni.
A plazmaképernyő jobbra és balra
20 fokkal forgatható el.
-20° ~ 20°
BN68-01528A-00Hun.indd 4 2008-4-21 15:23:24

Magyar - 5
Vezérlőpanel
1
SOURCE
Megjeleníti az összes hozzáférhető beviteli
forrás menüjét (TV, 1. külső, 2. külső, AV,
S-Video, Komponens, PC, HDMI1, HDMI2,
HDMI3
).
➢
A képernyőmenüben ezt a gombot
használhatja a távvezérlő ENTER
gombjának megfelelő beviteli gombként.
2
MENU
Nyomja meg, ha a képernyőmenüt kívánja
megjeleníteni.
3
– +
Megnyomás ával növeli vagy csökkenti a
hangerőt.
A képernyőn úgy használja a – + gombot,
mint a távirányító ◄ és ► gombját használná.
4
C/P.
Csatornaváltáshoz használható. A képernyőn
úgy használja a C/P. gombot, mint a
távirányító ▲ és ▼ gombját használná.
5
Tápfeszültségjelző
Villog és elalszik, ha a készülék be van
kapcsolva, készenléti állapotban pedig
folyamatosan világít.
6
gomb
A televízió be- és kikapcsolására való.
7
Távirányító érzékelője
A távvezérlőt a TV-nek erre a pontjára kell
irányítani.
8
Hangszóró
➢
A termék színe és formája típusonként különbözhet.
Elülső (vagy oldalsó) kezelőpanel
BN68-01528A-00Hun.indd 5 2008-4-21 15:23:25

Magyar - 6
Folytatás…
☛
Ha audio- vagy videoeszközt csatlakoztat a készülékhez, győződjön meg arról, hogy minden
egység ki van-e kapcsolva.
Külső eszköz csatlakoztatása esetén ügyeljen a csatlakozó és a kábel színének egyeztetésére.
Csatlakoztató panel
1
ELEKTROMOS CSATLAKOZÓ
A készülék tápkábelének csatlakoztatásához.
2
COMPONENT IN
Csak (AUDIO L/R) és video (Y/PB/PR)
csatlakoztatható bemenetként.
3
PC IN / AUDIO
A számítógép video- és audiokimenetét lehet
rá csatlakoztatni.
4
EXT 1, EXT 2
Bemenetek és kimenetek külső berendezések,
például videomagnó, DVD-, videojáték- vagy
videolemez-lejátszó számára.
Bemenetek/kimenetek műszaki adatai
Csatlakozó
Bemenet Kimenet
Videó Audió(bal/jobb) RGB
Videó + Audió (bal/
jobb)
EXT 1
✔ ✔ ✔
Csak TV
csatlakoztatható.
EXT 2
✔ ✔
Választható
kimeneti eszköz.
5
3D SYNC OUT
Csatlakozás 3D infravörös jeladóhoz
6
Külső audiokészülékek csatlakoztatása
RCA-audiokábelek csatlakoztatása a
TV-készülékről külső forrásra, például
audioeszközre.
7
SERVICE
− Csak szervizeléshez.
− Ha a távvezérlővel akarja a TV rálátási
szögét változtatni, soros csatlakozással
kösse a készülékhez a fali tartószerkezet
elektromotorját.
Hátsó panel
➢
A termék színe és formája típusonként különbözhet.
Kábeltelevíziós
hálózat
1
432 6 8
9
7
vagy
vagy
5
BN68-01528A-00Hun.indd 6 2008-4-21 15:23:28

Magyar - 7
8
HDMI IN 1,2
− HDMI–HDMI összeköttetés esetén nincs
szükség kiegészítő hangkapcsolatra.
− HDMI/DVI csatlakoztatás esetén HDMI IN2
csatlakozót kell használni.
➢
Mi az a HDMI?
− A „High Definition Multimedia interface”
(nagy felbontású multimédiás interfész)
nagy felbontású digitális videoanyag és
digitális audiofelvételek többcsatornás
átvitelét teszi lehetővé.
− A HDMI/DVI-csatlakozó támogatja
a DVI-kapcsolatot egy kiterjesztett
eszközre, a megfelelő kábelen keresztül
(nincs mellékelve). A HDMI és a DVI
között az a különbség, hogy a HDMI-
eszköz mérete kisebb, telepítve van rá
a HDCP (Nagy sávszélességű digitális
másolásvédelem) kódolási funkció,
valamint támogatja a többcsatornás
digitális hangátvitelt.
DVI IN (HDMI 2) AUDIO R/L
DVI audiokimenetek külső eszközökhöz.
9
ANT IN
75 Ω-os koaxiális csatlakozó az antennához /
kábeltelevíziós hálózathoz.
A HDMI/DVI és a komponens csatlakoztató
támogatása
480i 480p 576i 576p 720p 1080i
HDMI/DVI 50Hz X X X O O O
HDMI/DVI 60Hz X O X X O O
Komponens
O O O O O O
1
HDMI IN 3
Csatlakoztatás HDMI-kimenettel rendelkező
eszköz HDMI-csatlakozójához.
2
S-VIDEO vagy VIDEO / AUDIO L/R
Video- (S-Video vagy Video) és
audiobemenetek külső készülékek, például
videokamera vagy videomagnó számára.
3
Fejhallgató-csatlakozó
A televízióhoz fejhallgatót csatlakoztathat, így
a helyiségben tartózkodók zavarása nélkül
nézheti a műsort.
➢
A nagy hangerővel és hosszantartóan
használt fejhallgató halláskárosodást
okozhat.
➢
A termék színe és formája típusonként különbözhet.
Oldallap
3
1
vagy
2
BN68-01528A-00Hun.indd 7 2008-4-21 15:23:30

Magyar - 8
A távvezérlő áttekintése
1
POWER gomb (A televízió
be- és kikapcsolása
2
A TV-üzemmód közvetlen
kiválasztása
3
Számgombok közvetlen
csatornaeléréshez
4
Egyjegyű/kétjegyű
csatornaválasztás
5
A hang ideiglenes
kikapcsolása
6
Hangerő növelése
Hangerő csökkentése
7
Csatornakezelő gomb
(lásd a 15. oldalt)
8
A gyakran használt
funkciók kiválasztásához
használható.
9
A menüben található kurzor
vezérlése
0
A sugárzott műsor
információinak
megtekintésére szolgál
#
Megnyomásával
kiválasztható a
kép- és hangmód a
sportközvetítésekhez, a
filmekhez és a játékokhoz.
$
Videomagnó/DVD
funkció (visszacsévélés,
leállítás, lejátszás/szünet,
előrecsévélés
%
Elérhető forrás kiválasztása
^
Előző csatorna
&
Következő csatorna
Előző csatorna
*
A fő képernyőmenü
megjelenítése
(
TruSurround XT mód
gombja
)
Visszatérés az előző
menühöz
a
Kilépés a képernyőmenüből
b
Képméret kiválasztása
c
Akkor használja, ha
SAMSUNG DMA (digitális
médiaadapter) eszközt
csatlakoztat HDMI-
interfészen keresztül,
és DMA-üzemmódra
vált. (DMA gomb nincs
minden készüléken.)
Működéséről további
információt talál a DMA
használati útmutatójában.
Ez a gomb akkor
használható, ha az „Anynet+
(HDMI-CEC)” állása „Be”
(lásd az 33. oldalt).
d
Képhatás kiválasztása (Lásd
a 18 oldalt)
e
3D-filmek és -játékok
megtekintése 3D-
szemüveggel.
Teletext funkciók
(Lásd a 36. oldalt)
2
Kilépés a teletext
képernyőről (típusfüggő)
7
Teletext tárolása
8
Teletext mérete
0
Teletext megjelenítése
!
Fastext témaválasztás
@
Teletext megjelenítése/a
normál adás és a teletext
együttese
%
Teletext mód kiválasztása
(LIST vagy FLOF)
^
Teletext aloldal
&
P :Teletext következő
oldala
P :Teletext előző oldala
*
Teletext tartalomjegyzék
)
Teletext kimerevítése
a
Teletext bezárása
Folytatás…
BN68-01528A-00Hun.indd 8 2008-4-21 15:23:31

Magyar - 9
Elemek behelyezése a távirányítóba
1 Az ábrán látható módon tolja felfelé a távvezérlő hátlapját.
2 Tegyen be két AAA méretű elemet.
➢
Az elemek „+” és „–” pólus helyzete az elemtartóban
lévő jelzésnek megfelelő legyen.
Ne használjon együtt különböző típusú elemeket, pl.
alkáli- és mangánelemeket.
3 Az ábrának megfelelően tegye vissza a hátlapot.
➢
Ha hosszabb ideig nem használja a távirányítót, vegye
ki az elemeket, és tárolja őket hűvös, száraz helyen. A
távvezérlő legfeljebb 7 m távolságra használható a TV-
készüléktől. (Átlagos TV-használat esetén az elemek
körülbelül egy évig használhatók.)
➢
Ha a távirányító nem működik, ellenőrizze a következőket:
1. Be van kapcsolva a TV?
2. Felcserélődött az elemek plusz és mínusz pólusa?
3. Kifogytak az elemek?
4. Áramkimaradás van vagy nincs csatlakoztatva a tápkábel?
5. Van a közelben fluoreszkáló fény vagy neonfényjel?
A televízió be- és kikapcsolása
A tápfeszültségvezeték a televízió hátoldalához van csatlakoztatva.
1 Dugja be a tápfeszültség csatlakozóját a megfelelő aljzatba.
➢
A tápfeszültség értéke a televízió hátoldalán van feltüntetve. A frekvencia 50 vagy 60 Hz.
2 A készülék bekapcsolásához nyomja meg a készülék elején található (Főkapcsoló) gombot (Be/Ki)
vagy a távvezérlő POWER gombját. A készülék automatikusan a legutoljára megtekintett csatornát
választja ki. Ha még nem tárolt csatornát, akkor nem jelenik meg tiszta kép. Tanulmányozza az „A
csatornák automatikus tárolása” című részt a 13. oldalon, vagy az „A csatornák kézi tárolása” című
részt a 14. oldalon.
➢
A televízió első bekapcsolásakor több alapvető felhasználói beállítás végezhető el egymás után
automatikusan. Lásd a „Plug & Play funkció” c. részt a 10. oldalon.
3 A készülék kikapcsolásához nyomja meg a készülék elején található (Főkapcsoló) gombot (Be/Ki)
vagy a távvezérlő POWER gombját.
4 A készülék bekapcsolásához nyomja meg a televízió elején található (Főkapcsoló) gombot (Be/Ki)
vagy a távvezérlő POWER gombját, illetve a számgombokat.
A menü megtekintése
1 Nyomja meg a MENU gombot.
A főmenü megjelenik a képernyőn.
A bal oldalon öt ikon látható: Kép, Hang, Csatorna, Beállítás
és
Bemenet.
2 A ▲ vagy a ▼ gombbal választhatja ki az ikont, majd az
ENTER gombbal léphet be az almenübe.
3 A ▲ vagy a ▼ gombbal léphet a kívánt menüpontra.
Az ENTER gomb lenyomásával választhatja ki a menüpontot.
4 A ▲, ▼, ◄, ► gomb megnyomása megváltoztatja a kijelölt
elemet. A RETURN gomb megnyomása pedig az előző menüre
léptet vissza.
5 A menüből történő kilépéshez az EXIT gombot kell megnyomni.
Mozgatás
Belépés
Kilépés
Üzemmód : Normál
Képpontok fényereje
7
Kontraszt 95
Fényerő 45
Élesség 50
Szín 50
Árnyalat Z50 V50
Részletbeállítások
Képopciók
Visszaállítás : OK
Kép
T V
BN68-01528A-00Hun.indd 9 2008-4-21 15:23:32

Magyar - 10
A Plug & Play funkció
A televízió első bekapcsolásakor több alapvető felhasználói
beállítás végezhető el egymás után automatikusan.
A lehetőségek az alábbiak:
☛
Ha véletlenül rosszul választja meg a készülékhez az országot,
a betűk a képernyőn esetleg rosszul jelennek meg.
1 Ha a televízió készenléti üzemmódban van, nyomja meg
a távirányító POWER gombját. Megjelenik a Plug & Play
indítása felirat. Nyomja meg az ENTER gombot.
2 A Nyelv menü néhány másodperc múlva automatikusan
megjelenik.
3 Válassza ki a megfelelő nyelvet a ▲ vagy ▼ gomb lenyomásával.
Nyomja meg az ENTER gombot. Megjelenik a. Az Otthon
beállítás a TV otthoni használatára szolgál. üzenet.
4 A ◄ vagy a ► gombbal válassza ki az Üzlet mód vagy az
Otthon gombot, majd nyomja meg az ENTER gombot. Az
antenna csatlakoztatásának ellenőrzésére felszólító üzenet
jelenik meg.
➢
Az alapbeállítás az Otthon.
➢
Azt javasoljuk, hogy TV-készülékét állítsa Otthon módra,
hogy a legkiválóbb képminőséget élvezhesse otthonában.
➢
Az Üzlet mód használata kereskedelmi környezetben
javasolt.
➢
Ha véletlenül Üzlet mód üzemmódra állította a készüléket,
nyomja meg a hangerő gombját. és tartsa lenyomva a
TV-készüléken a MENU gombot öt másodpercig, így a TV
visszatér a Normál (Otthon) módba.
5 Győződjön meg arról, hogy az antenna helyesen csatlakozik a
TV-készülékhez.Nyomja meg az ENTER gombot. Megjelenik az
Ország menü.
6 Válassza ki a megfelelő országot vagy térséget a ▲ vagy ▼
gombbal.
Nyomja meg az ENTER gombot. A csatorna-kiválasztás menü
jelenik meg.
Plug & Play
Plug & Play indítása
OK
Belépés
Plug & Play
Ellenőrizze az antennabemene
Belépés
Ugrás
OK
Plug & Play
P 1 C -- 40 MHz
0 %
Belépés
Ugrás
Start
Plug & Play
Nyelv
Mozgatás
Belépés
▲
Hrvatski
Română
Magyar
▼
Plug & Play
Az Otthon beállítás a TV otthoni
használatára szolgál.
Mozgatás
Belépés
Üzlet mód Otthon
Plug & Play
Ország
▲
Egyesült Kir.
Ausztria
Kelet-Európa
▼
Mozgatás
Belépés
Ugrás
BN68-01528A-00Hun.indd 10 2008-4-21 15:23:33

Magyar - 11
7 A csatornatárolás elindításához nyomja le az ENTER gombot.
A keresés automatikusan leáll. A televízió elkezdi az elérhető
csatornák letárolását.
Az óra beállításához nyomja meg az ENTER gombot.
8 A ◄ vagy ►/ENTER gombbal léptesse a Hónap, Nap, Év, Óra
és
Perc értékeit. Állítsa be az értékeket a ▲ vagy a ▼ gomb
megnyomásával.
➢
A távvezérlőn található számgombok segítségével
közvetlenül beállíthatja a Hónap, Nap, Év, Óra és a Perc.
9 Az ENTER gombbal hagyja jóvá választását.
Megjelenik az Jó szórakozást! üzenet.
Ha végzett, nyomja meg az ENTER gombot.
➢
Akkor is, ha nem nyomta meg az ENTER gombot, az
üzenet néhány másodperc múlva automatikusan eltűnik.
Ha vissza kívánja állítani ezt a funkciót ...
1
A menü megjelenítéséhez nyomja meg a MENU gombot.
2 A ▲ vagy a ▼ gombbal válassza ki a Beállítás menüpontot,
majd nyomja meg az
ENTER gombot.
3 A Plug & Play menüpont kiválasztásához nyomja meg ismét
az
ENTER gombot.
OK
Jó szórakozást!
Mozgatás
Belépés
Vissza
Plug & Play
Nyelv : Magyar
Idő
Fényeffektus
:
Használatkor be
Fali konzol állítása
Dallam : Ki
Szórakoztatás
: Ki
Energiagazd. :
Ki
PIP
Beállítás
T V
Plug & Play
Mozgatás Beállítás
Belépés
01 01 2008 00 04
Órabeállítás
Hónap Nap Év Óra
Perc
BN68-01528A-00Hun.indd 11 2008-4-21 15:23:34

Magyar - 12
Külső jelforrások megtekintése
Válthat a csatlakoztatott készülékek (videomagnó, DVD-egység,
beltéri egység) és a televíziós forrás (hagyományos adás vagy
kábel) között.
1
A menü megjelenítéséhez nyomja meg a MENU gombot.
2 A ▲ vagy a ▼ gombbal válassza ki a Bemenet menüpontot,
majd nyomja meg az
ENTER gombot.
3 A Forráslista menüpont kiválasztásához nyomja meg ismét az
ENTER gombot.
4 A ▲ vagy a ▼ gombbal válassza ki a jelforrást, majd nyomja
meg az
ENTER gombot.
Elérhető jelforrások:
TV, 1. külső, 2. külső, AV, S-Video,
Komponens, PC, HDMI1, HDMI2, HDMI3
➢
Csak a TV-készülékhez csatlakoztatott külsõ eszközök
választhatók.
➢
Ezeket az opciókat egyszerűen kiválaszthatja a távvezérlő
SOURCE gombjával is.
➢
Ha ismét a TV-műsort szeretné nézni, akkor a TV gomb
megnyomása után válassza ki a kívánt csatorna számát.
A TOOLS gomb használata
A TOOLS gombbal gyorsan és könnyen kiválaszthatja a leggyakrabban használt funkciókat. A
„Eszközök” menü a megtekintés külső bemeneti módjától függően változik.
1 Nyomja meg a TOOLS gombot.
Megnyílik a Eszközök menü.
2 A ▲ vagy a ▼ gombbal válasszon menüt, majd nyomja meg
az ENTER gombot.
3 A ▲/▼/◄/►/ENTER gombokkal jelenítheti meg, módosíthatja
és használhatja a kiválasztott elemeket.
Az egyes funkciók részletesebb ismertetését a megfelelő
oldalon találja.
• Anynet+(HDMI-CEC), lásd 32. oldalt
• Kép Üzemmód: lásd 18. oldal
• SHang üzemmód: lásd 25. oldal
• Auto kikapcs.: lásd 27. oldal
• SRS TS XT, lásd 25. oldal
• Energiagazd. lásd: 29. oldal
• Kettős I-II: lásd: 26. oldal
Eszközök
Anynet+ (HDMI-CEC)
Kép Üzemmód : Normál
Hang üzemmód : Egyedi
Auto kikapcs. : Ki
SRS TS XT : Ki
Energiagazd. : Ki
Kettős I/II : Mono
◄ ►
Beállítás KilépésMozgatás
Mozgatás
Belépés
Vissza
Forráslista :
TV
Névszerkesztés
Anynet+ (HDMI-CEC)
Bemenet
T V
Mozgatás
Belépés
Vissza
TV
1. Külső : −−−−
2. Külső : −−−−
AV : −−−−
S-Video : −−−−
Komponens : −−−−
PC : −−−−
HDMI1 : −−−−
HDMI2 : −−−−
HDMI3 : −−−−
Forráslista
T V
BN68-01528A-00Hun.indd 12 2008-4-21 15:23:34

Magyar - 13
Az eszközök nevének módosítása
A külső jelforrásokat névvel lehet ellátni.
1
A menü megjelenítéséhez nyomja meg a MENU gombot.
2 A ▲ vagy a ▼ gombbal válassza ki a Bemenet menüpontot,
majd nyomja meg az
ENTER gombot.
3 A ▲ vagy a ▼ gombbal válassza ki a Névszerkesztés
menüpontot, majd nyomja meg az ENTER gombot.
4 A ▲ vagy a ▼ gombbal válassza ki az átnevezni kívánt külső
jelforrást, majd nyomja meg az ENTER gombot.
5 Válassza ki a megfelelő eszközt a ▲ vagy a ▼ gombbal, majd
nyomja meg az
ENTER gombot.
Elérhető eszköznevek:
Videomagnó, DVD, Kábelvevő
egység, Műholdvevő, PVR-vevő, AV-vevő egység, Játék,
Videokamera, PC, TV, IPTV, Blu-Ray, HD DVD, DMA.
6 A menüből történő kilépéshez az EXIT gombot kell
megnyomni.
Csatornák automatikus tárolása
Végigpásztázhatja a rendelkezésre álló frekvenciatartományt
(a lehetőségek országonként különbözőek).
Elképzelhető, hogy a csatornákhoz automatikusan
hozzárendelt programszámok nem egyeznek az aktuális vagy
a kívánt programszámokkal. Azonban a számokat kézileg is
megadhatja, és bármely csatornát törölheti, amelyet nem kíván
nézni.
1
A menü megjelenítéséhez nyomja meg a MENU gombot.
2 A ▲ vagy a ▼ gombbal válassza ki a Csatorna menüpontot,
majd nyomja meg az
ENTER gombot.
3 Nyomja meg az ENTER gombot. A rendszer megjeleníti a
rendelkezésre álló országokat.
4
Válassza ki az országot a ▲ vagy a ▼ gombbal, majd nyomja
meg az
ENTER gombot.
5 A ▲ vagy a ▼ gombbal válassza ki az Automata tárolás
opciót, majd nyomja meg az ENTER gombot.
6 Az ENTER gombbal indítsa el a csatornakeresést.
A keresés automatikusan leáll.
➢
A keresést befejeződése előtt a MENU vagy az ENTER
gombbal leállíthatja.
Automata tárolás
P 1 C -- 40 MHz
0 %
Belépés
Vissza
Start
Mozgatás
Belépés
Vissza
Ország :
Egyesült Kir.
Automata tárolás
Kézi tárolás
Csatornakezelő
Sorrend
Név
Finomhangolás
Csatorna
T V
Mozgatás
Belépés
Vissza
Forráslista :
TV
Névszerkesztés
Anynet+ (HDMI-CEC)
Bemenet
T V
Mozgatás
Belépés
Vissza
1. Külső : −−−−
2. Külső :
−−−−
AV :
S-Video
:
PC : −−−−
HDMI1 : −−−−
HDMI2 :
HDMI3 :
Névszerkesztés
T V
−−−−
Videomagnó
DVD
Kábelvevő egység
Műholdvevő
PVR-vevő
AV-vevő egység
Játék
▼
Mozgatás
Belépés
Vissza
Ország :
Egyesült Kir.m
Automata tárolás
Kézi tárolás
Csatornakezelő
Sorrend
Név
Finomhangolás
Csatorna
Belgium
Franciaország
Németország
Olaszország
Hollandia
Spanyolország
Svájc
Egyesült Kir.
▼
T V
BN68-01528A-00Hun.indd 13 2008-4-21 15:23:35

Magyar - 14
Csatornák kézi tárolása
Tárolhatja a kívánt televíziós csatornákat, beleértve a
kábeltévés hálózaton fogadott csatornákat is.
A csatornák kézi tárolásakor:
Eldöntheti, hogy kívánja-e tárolni mindegyik talált csatornát.
Kiválaszthatja az egyes tárolt csatornák azonosítására szolgáló
programszámot.
1
A menü megjelenítéséhez nyomja meg a MENU gombot.
2 A ▲ vagy a ▼ gombbal válassza ki a Csatorna menüpontot,
majd nyomja meg az
ENTER gombot.
3 A ▲ vagy a ▼ gombbal válassza ki a Kézi tárolás menüpontot,
majd nyomja meg az
ENTER gombot.
4 Válassza ki a megfelelő beállítást a ▲ vagy a ▼ gombbal, majd
nyomja meg az
ENTER gombot.
5 Ha megfelelőnek találja a beállítást, nyomja meg az ENTER
gombot.
6 A menüből történő kilépéshez az EXIT gombot kell megnyomni.
Program (a csatornához rendelni kívánt program száma)
− A ▲ vagy a ▼ gombbal választható ki a megfelelő szám.
➢
A számot a távirányítón a (0~9) számgombbal közvetlenül is ki lehet választhatni.
Színrendszer: Auto/PAL/SECAM/NTSC4.43
− Válassza ki a kívánt színnormát a ▲ vagy a ▼ gombbal.
Hangrendszer: BG/DK/I/L
− Válassza ki a kívánt hangnormát a ▲ vagy a ▼ gombbal.
Csatorna (Ha tudja a tárolni kívánt csatorna számát)
− A ▲ vagy a ▼ gombbal válassza a
C (antenna) vagy az S (kábel) csatornatípust.
− Nyomja meg a ► gombot, majd a ▲ vagy ▼ gombbal válassza ki a kívánt számot.
➢
A számot a távirányítón a (0~9) számgombbal közvetlenül is ki lehet választhatni.
➢
Ha nincs vagy nem megfelelő a hang, válasszon ki másik hangnormát.
Keresés (Ha nem ismeri a csatorna számát)
− A ▲ vagy a ▼ gombbal indítsa el a keresést.
− A hangolóegység addig pásztázza a frekvenciatartományt, amíg az első csatorna vagy a
kiválasztott csatorna meg nem jelenik a képernyőn.
Tárolás (Store – a csatorna és a hozzá társított programszám tárolásakor)
− Válassza az
OK beállítást az ENTER gombbal.
☛
Csatorna mód
P (Program mód): A hangolás befejezésekor a térségben fogható műsorszóró állomásokat
a készülék a P00 és P99 pozíciószámhoz rendeli. A csatornát a pozíciószám megadásával
választhatja ki.
C (Antennás csatorna mód): Ha ebben az üzemmódban megadja az adott csatornához tartozó
számot, előhívhatja a kívánt (antennán keresztül sugárzott) csatornát.
S (Kábeltelevíziós mód): Ha ebben az üzemmódban megadja az adott csatornához tartozó
számot, előhívhatja a kívánt (kábel)csatornát.
Mozgatás
Belépés
Vissza
Program :
P 1
Színrendszer : Auto.
Hangrendszer : BG
Csatorna : C --
Keresés : 40 MHz
Tárolás : ?
Kézi tárolás
T V
Move
Enter
Return
Ország :
Egyesült Kir.
Automata tárolás
Kézi tárolás
Csatornakezelő
Sorrend
Név
Finomhangolás
Csatorna
T V
BN68-01528A-00Hun.indd 14 2008-4-21 15:23:36

Magyar - 15
Csatornák hozzáadása / zárolása
A Csatornakezelő elemmel kényelmesen zárolhat vagy
hozzáadhat csatornákat.
1 A menü megjelenítéséhez nyomja meg a MENU gombot.
2 A ▲ vagy a ▼ gombbal válassza ki a Csatorna menüpontot,
majd nyomja meg az
ENTER gombot.
3 A ▲ vagy a ▼ gombbal válassza ki a Csatornakezelő
menüpontot, majd nyomja meg az ENTER gombot.
Csatornák hozzáadása
A Csatornalista kényelmesen bővíthető csatornákkal.
4 A Csatornalista kiválasztásához nyomja meg az ENTER
gombot.
5 Lépjen a ( ) mezőre a ▲/▼/◄/► gombbal, válassza
ki a hozzáadni kívánt csatornát, és az ENTER gomb
megnyomásával adja hozzá.
➢
Ha újra megnyomja az ENTER gombot, a ( ) jelzés
eltűnik a csatorna mellől, és a csatorna nem adódik hozzá.
Csatornák zárolása
A kép eltüntetését és a hang némítását lehetővé tévő funkció
segítségével megakadályozhatja, hogy illetéktelen személyek,
például gyermekek nézhessék a számukra nem megfelelő
műsorokat.
6 A ▲ vagy a ▼ gombbal válassza ki a Gyermekzár
menüpontot, majd nyomja meg az ENTER gombot.
7 A ▲ vagy a ▼ gombbal válassza ki a Be beállítást, majd
nyomja meg az
ENTER gombot.
8 A ▲ vagy a ▼ gombbal válassza ki a Csatornalista
menüpontot, majd nyomja meg az ENTER gombot.
9 Lépjen a ( ) mezőre a ▲/▼/◄/► gombbal, válassza ki a
zárolni kívánt csatornát, és az ENTER gomb megnyomásával
zárolja.
➢
Ha újra megnyomja az ENTER gombot, a ( ) jelölés eltűnik a csatorna mellől, és a csatorna
nem lesz zárolt.
➢
Ha a Gyermekzár be van kapcsolva, egy kék képernyő jelenik meg.
10 A menüből történő kilépéshez az EXIT gombot kell megnyomni.
➢
Ezeket az opciókat egyszerűen kiválaszthatja a távvezérlő
CH LIST gombjával is.
Mozgatás
Belépés
Vissza
Csatornalista
Gyermekzár : Ki
Csatornakezelő
T V
Mozgatás
Belépés
Vissza
Ország :
Egyesült Kir.
Automata tárolás
Kézi tárolás
Csatornakezelő
Sorrend
Név
Finomhangolás
Csatorna
T V
Csatornalista
P 1 C 6
1 / 10
▲
▼
Prog.
0
C --
1 C --
2 C --
3 C --
4 C --
5 C --
6 C --
7 C --
8 C --
9 C --
Hozzáadás Zárol
Mozgatás
Belépés
Oldal
Vissza
BN68-01528A-00Hun.indd 15 2008-4-21 15:23:37

Magyar - 16
Tárolt csatornák rendezése
Ezzel a művelettel módosíthatja a tárolt csatornák
programszámát.
Erre a műveletre az automatikus mentés használata után lehet
szüksége.
1 A menü megjelenítéséhez nyomja meg a MENU gombot.
2 A ▲ vagy a ▼ gombbal válassza ki a Csatorna menüpontot,
majd nyomja meg az
ENTER gombot.
3 A ▲ vagy a ▼ gombbal válassza ki a Sorrend menüpontot,
majd nyomja meg az
ENTER gombot.
4 A ▲ vagy a ▼ gombbal válassza ki a kívánt csatornát, majd
nyomja meg az
ENTER gombot.
5 A ▲ vagy ▼ gombbal választhatja ki azt a programszámot,
amelyhez a csatornát hozzá szeretné rendelni.
Nyomja meg az ENTER gombot. A csatorna az új helyre kerül,
a többi csatorna pedig ennek megfelelően tolódik el.
6 A többi csatorna megfelelő programszámhoz rendeléséhez
ismételje meg a
4. és 5. lépést.
7 A menüből történő kilépéshez az EXIT gombot kell
megnyomni.
Név hozzárendelése a csatornákhoz
A csatornainformációk sugárzásakor a készülék a
csatornaneveket automatikusan hozzárendeli a csatornákhoz.
Ezek a nevek azonban módosíthatók, tehát a csatornákhoz új
neveket is hozzárendelhet.
1 A menü megjelenítéséhez nyomja meg a MENU gombot.
2 A ▲ vagy a ▼ gombbal válassza ki a Csatorna menüpontot,
majd nyomja meg az
ENTER gombot.
3 A ▲ vagy a ▼ gombbal válassza ki a Név menüpontot, majd
nyomja meg az
ENTER gombot.
4 A ▲ vagy a ▼ gombbal válassza ki az átnevezendő csatornát,
majd nyomja meg az
ENTER gombot.
5 Nyomja meg a ▲ vagy a ▼ gombot, hogy kiválassza a
megfelelő betűt (A-Z), a megfelelő számot (0-9), egyéb jelet
(+, -, *, /) vagy a szóközt.
Lépjen az előző vagy következő betűre a ◄ vagy ► gomb
megnyomásával, majd nyomja meg az ENTER gombot.
6 Valamennyi átnevezendő csatorna esetén ismételje meg a
4–5. lépést.
7 A menüből történő kilépéshez az EXIT gombot kell
megnyomni.
Mozgatás
Belépés
Vissza
Ország :
Egyesült Kir.
Automata tárolás
Kézi tárolás
Csatornakezelő
Sorrend
Név
Finomhangolás
Csatorna
T V
Mozgatás
Belépés
Vissza
Ország :
Egyesült Kir.
Automata tárolás
Kézi tárolás
Csatornakezelő
Sorrend
Név
Finomhangolás
Csatorna
T V
Mozgatás
Belépés
Vissza
Prog. Cs. Név
▲
0 C01 −−−−−
1 C- - −−−−−
2 C- - −−−−−
3 C- - −−−−−
4 C- - −−−−−
5 C- - −−−−−
6 C- - −−−−−
7 C- - −−−−−
8 C- - −−−−−
9 C- - −−−−−
▼
Sorrend
T V
Mozgatás
Belépés
Vissza
Prog. Cs. Név
▲
0 C01 −−−−−
1 C- - −−−−−
2 C- - −−−−−
3 C- - −−−−−
4 C- - −−−−−
5 C- - −−−−−
6 C- - −−−−−
7 C- - −−−−−
8 C- - −−−−−
9 C- - −−−−−
▼
Név
T V
BN68-01528A-00Hun.indd 16 2008-4-21 15:23:38

Magyar - 17
Csatornák finomhangolása
Ha a vétel teljesen tiszta, akkor nem kell a csatornát finomra
hangolni, mivel a készülék ezt a keresés és tárolás során
automatikusan elvégezte.
Ha gyenge a jel, akkor lehetséges, hogy kézileg kell csatornát
finomra hangolnia.
1 A menü megjelenítéséhez nyomja meg a MENU gombot.
2 A ▲ vagy a ▼ gombbal válassza ki a Csatorna menüpontot,
majd nyomja meg az
ENTER gombot.
3 A ▲ vagy a ▼ gombbal válassza ki a Finomhangolás
menüpontot, majd nyomja meg az ENTER gombot.
4 Éles és tiszta kép, valamint a jó hangminőség eléréséhez
nyomja a ◄ vagy a ► gombot addig, amíg meg nem találja az
optimális beállítást. Nyomja meg az ENTER gombot.
➢
Nyomja meg az INFO gombot. A finomhangolás
tárolásával a csatorna kijelzése a képernyőn fehér helyett
piros lesz, és mellette a „*” jel lesz látható.
➢
A ▲ vagy a ▼ gombbal válassza ki a Visszaállítás
gombot, hogy a finomhangolást a 0 értékre állítsa vissza.
Nyomja meg az ENTER gombot.
5 A menüből történő kilépéshez az EXIT gombot kell megnyomni.
P 1 *
Mono
Kép : Kiemelt
Hang : Egyedi
SRS TS XT : Ki
−−
:
−−
Mozgatás
Belépés
Vissza
Ország :
Egyesült Kir.
Automata tárolás
Kézi tárolás
Csatornakezelő
Sorrend
Név
Finomhangolás
Csatorna
T V
Finomhangolás
P 1
0
Beállítás
Mentés
Vissza
Vissza
BN68-01528A-00Hun.indd 17 2008-4-21 15:23:38

Magyar - 18
A képbeállítások testreszabása
A TV-készülék számos olyan beállítással rendelkezik,
amelyekkel szabályozni lehet a képminőséget.
1 A menü megjelenítéséhez nyomja meg a MENU gombot.
2 A Kép menüpont kiválasztásához nyomja meg az ENTER
gombot.
3 Az Üzemmód menüpont kiválasztásához nyomja meg ismét
az
ENTER gombot.
4 Válassza ki a megfelelő üzemmódot a ▲ vagy a ▼ gombbal,
majd nyomja meg az
ENTER gombot.
Választható üzemmódok:
Kiemelt, Normál, Film
5 Válassza ki a megfelelő beállítást a ▲ vagy a ▼ gombbal, majd nyomja meg az ENTER gombot.
6 Ha megfelelőnek találja a beállítást, nyomja meg az ENTER gombot.
7 A menüből történő kilépéshez az EXIT gombot kell megnyomni.
Képpontok fényereje – Kontraszt – Fényerő – Élesség – Szín – Árnyalat
➢
PAL rendszer használata esetén TV, EXT, AV és S-Video
üzemmódokban az Árnyalat funkció nem használható.
➢
PC módban csak a Képpontok fényereje, a Kontraszt és a Fényerő beállítás módosítható.
Nyomja az ◄ vagy a ► gombot, amíg el nem éri az optimális beállítást.
Képnorma választása
Kiválaszthatja az elvárásainak leginkább megfelelő képtípust.
1 A menü megjelenítéséhez nyomja meg a MENU gombot.
2 A Kép menüpont kiválasztásához nyomja meg az ENTER
gombot.
3 Az Üzemmód menüpont kiválasztásához nyomja meg ismét
az
ENTER gombot.
4 Válassza ki a megfelelő üzemmódot a ▲ vagy a ▼ gombbal,
majd nyomja meg az
ENTER gombot.
Választható üzemmódok:
Kiemelt, Normál, Film
➢
A beállítási értékek a bemeneti forrás jellegétől függenek.
5 A menüből történő kilépéshez az EXIT gombot kell megnyomni.
➢
A Kiemelt beállítást napközben vagy erősen kivilágított
szobában történő tévézéshez célszerű használni.
A Normál beállítást a szokásos körülmények közötti
tévézéshez célszerű használni.
Filmnézéshez a Film beállítást célszerű használni.
Egyszerű beállítás
1 Nyomja meg a távvezérlő TOOLS gombját.
2 A ▲ vagy a ▼gombbal válassza ki a Kép Üzemmód elemet.
3 A ◄ vagy a ► zvolte požadovanou možnost
Mozgatás
Belépés
Vissza
Üzemmód : Normál
Képpontok fényereje
7
Kontraszt 90
Fényerő 45
Élesség 50
Szín 50
Árnyalat Z50 V50
Részletbeállítások
Képopciók
Visszaállítás : OK
Kép
T V
Eszközök
Anynet+ (HDMI-CEC)
Kép Üzemmód ◄ Normál ►
Hang üzemmód : Egyedi
Auto kikapcs. : Ki
SRS TS XT : Ki
Energiagazd. : Ki
Kettős I/II : Mono
Mozgatás
Belépés
Vissza
Üzemmód : Normál
Képpontok fényereje
7
Kontraszt 90
Fényerő 45
Élesség 50
Szín 50
Árnyalat Z50 V50
Részletbeállítások
Képopciók
Visszaállítás : OK
Kép
T V
Üzemmód : Standard
Képpontok fényereje
7
Kontraszt 95
Fényerő 45
Élesség 50
Szín 50
Árnyalat
Z50 V50
Részletbeállítások
Képopciók
Visszaállítás : OK
Kép
Kiemelt
Normál
Film
Mozgatás
Belépés
Vissza
Mozgatás Beállítás Kilépés
T V
BN68-01528A-00Hun.indd 18 2008-4-21 15:23:39

Magyar - 19
A kép részletes beállításainak konfigurálása
A képbeállítások részletesen is konfigurálhatók.
1 A menü megjelenítéséhez nyomja meg a MENU gombot.
2 A Kép menüpont kiválasztásához nyomja meg az ENTER
gombot.
3 A ▲ vagy a ▼ gombbal válassza ki a Részletbeállítások
menüpontot, majd nyomja meg az ENTER gombot.
4 Válassza ki a megfelelő beállítást a ▲ vagy a ▼ gombbal, majd
nyomja meg az ENTER gombot.
A választható beállítások:
Fekete beállítás, Dinamikus kontraszt,
Gamma, Színköz, Fehéregyensúly, Bőrszín tónus, Éljavítás.
5 Ha megfelelőnek találja a beállítást, nyomja meg az ENTER
gombot.
6 A menüből történő kilépéshez az EXIT gombot kell megnyomni.
➢
A Részletbeállítások vagy Film módban használható.
➢
PC módban csak a Dinamikus kontraszt, a Gamma és a
Fehéregyensúly beállítás módosítható a Részletbeállítások
közül.
Fekete beállítás: Ki/Alacsony/Közepes/Magas
A feketeség szintje a képernyőn a képmélység szabályozása
érdekében közvetlenül is megválasztható.
Dinamikus kontraszt: Ki/Alacsony/Közepes/Magas
A képernyőn a kontraszt állítható, hogy a legjobb kiemelést biztosítsa.
Gamma: -3 ~ +3
Beszabályozható a képek közepes fényerőssége.
Nyomja az ◄ vagy a ► gombot, amíg el nem éri az optimális beállítást.
Színköz: Auto./Természetes/Egyedi
A színköz, színtér vörös, zöld és kék színekből álló mátrix.
Kedvenc színterének kiválasztásával fedezze fel a legtermészetesebb színeket.
− Auto.: Az Automatikus színskála automatikusan beállítja a természetes színtónust a programforrások
alapján.
− Természetes: A Természetes színskála mély és színgazdag tónust jelent.
− Egyedi:A színtartomány egyéni ízlésnek megfelelő beállítása. (lásd: „A színskála testreszabása”)
A színskála testreszabása
Szín: Vörös/Zöld/Kék/Sárga/Cián/Bíbor
A színtartományt egyéni ízlésének megfelelően állíthatja be.
A Szín menü csak akkor választható, ha a Színköz beállításnál az Egyedi érték van megadva.
A▲ vagy a ▼ gombbal válasszon a Vörös, a Zöld, a Kék, a Sárga, a Cián és a Bíbor beállítás közül.
Nyomja meg az ENTER gombot.
− Vörös/Zöld/Kék: A „Szín” menüben beállíthatja a kiválasztott szín RGB (vörös/zöld/kék) értékeit.
A módosításhoz a▲ vagy a ▼ gombbal válasszon a Vörös, a Zöld és a Kék beállítás közül. Nyomja
meg az ENTER gombot.
A ◄ és a ►gomb lenyomásával növelheti, illetve csökkentheti az egyes beállítások értékét.
Nyomja meg az ENTER gombot.
− Visszaállítás: A színtér visszaállítása az alapértelmezett értékekre.
Fehéregyensúly: P-eltolás, Z-eltolás, K-eltolás, P-nyereség, Z-nyereség, K-nyereség és
Visszaállítás
A természetesebb képszínezés érdekében a színhőmérséklet beállítható.
P-eltolás, Z-eltolás, K-eltolás, P-nyereség, Z-nyereség, K-nyereség A módosított értékek megjelennek
a módosított képernyőn.
Válassza ki a megfelelő beállítást a ▲ vagy a ▼ gombbal, majd nyomja meg az ENTER gombot. Nyomja
az ◄ vagy a ► gombot, amíg el nem éri az optimális beállítást.
Visszaállítás: A korábban beállított fehéregyensúly visszaáll a gyári alapértékre.
Flesh hang:-15~+15
Hangsúlyozhatja a képen a rózsaszín árnyalatát.
Nyomja addig a ◄ vagy a ► gombot, amíg el nem éri az optimális beállítást.
➢
A beállítóértékek hatása megjelenik a módosított képernyőn.
Éljavítás: Ki/Be
Az objektumok kontúrja kiemelhető.
Mozgatás
Belépés
Vissza
Fekete beállítás :
Ki
Dinamikus kontraszt
: Közepes
Gamma : 0
Színköz : Természetes
Fehéregyensúly
Flesh hang : 0
Éljavítás
: Ki
Részletbeállítások
T V
Mozgatás
Belépés
Vissza
Üzemmód :
Normál
Képpontok fényereje
7
Kontraszt 90
Fényerő 45
Élesség 50
Szín 50
Árnyalat Z50 V50
Részletbeállítások
Képopciók
Visszaállítás : OK
Kép
T V
BN68-01528A-00Hun.indd 19 2008-4-21 15:23:40

Magyar - 20
Képopciók (Picture Options)
Részletesen megadhatja a képbeállításokat.
1 A menü megjelenítéséhez nyomja meg a MENU gombot.
2 Az ENTER gombbal válassza ki a Kép elemet.
3 A ▲ vagy a ▼ gombbal válassza ki a Képopciók elemet, majd
nyomja meg az
ENTER gombot.
4 A ▲ vagy a ▼ gombbal válassza ki a kívánt lehetőséget, majd
nyomja meg az
ENTER gombot.
5 Ha megfelelőnek találja a beállításokat, nyomja meg az
ENTER gombot.
6 A menüből történő kilépéshez az EXIT gombot kell
megnyomni.
➢
PC üzemmódban csak a Színtónus, Méret és Képernyő
beégésvédelem módosítható a következő elemek közül:
Képopciók.
Színtónus: Hideg2 / Hideg1 / Normál / Meleg1 / Meleg2
➢
Ha a Kiemelt vagy a Normál képmód van megadva, akkor
a
Meleg1 és a Meleg2 színtónus nem választható ki.
Méret: Auto széles / 16:9 / Széles nagyítás / Nagyítás / 4:3 /
Csak pásztázás
Beállíthatja az igényeinek legjobban megfelelő képméretet.
−
Auto széles: A kép arányainak megváltoztatása 4:3-ról 16:9-re.
− 16:9: 16:9 arányú széles módba állítja a képet.
−
Széles nagyítás: A 4:3-as aránynál jobban felnagyítja a
képet. A ► vagy az ENTER gombbal a elem kiválasztása
után a ▲ és a ▼ gombbal helyezheti feljebb vagy lejjebb a
képernyőt.
−
Nagyítás: Függőlegesen felnagyítja a képet a képernyőn.
− 4:3
: 4:3 arányú normál módba állítja a képet.
−
Csak pásztázás: A HDMI (720p/1080i), komponens
(1080i) bemeneti jelek esetén ebben a beállításban teljes
terjedelmében jelenítheti meg a képet.
A Csak pásztázás HDMI (1080i) vagy komponens (1080i) üzemmódban való kiválasztását
követően:
A ◄ vagy a ► gombbal válassza ki a elemet, majd nyomja meg az ENTER gombot.
A képet a ▲, ▼, ◄ vagy ► gombbal mozgathatja fel, le, balra vagy jobbra.
Visszaállítás: A ◄ vagy a ► gombbal válassza ki a Visszaállítás elemet, majd nyomja meg az
ENTER gombot. A beállítás alaphelyzetbe állítható.
➢
HDMI üzemmódban a Csak pásztázás képméretnél – az AV-eszközöktől függően – a kép egy
része lemaradhat a képernyőről, illetve adott színek jelenhetnek meg a képernyőn.
➢
A 24, 25, 30, 50 és 60 Hz-es HDMI (1080p) és az 50 illetve 60 Hz-es komponens (1080p)
csatlakoztatások esetén csak a bemeneti forrás van támogatva.
➢
A kép méretét a távvezérlő P.SIZE gombjával módosíthatja.
➢
A bemenet forrásától függően a képméret beállítási lehetőségei különfélék lehetnek.
➢
Az elérhető elemek a kiválasztott módtól függően eltérőek lehetnek.
➢
Auto széles funkció csak TV, 1. Külső, 2. Külső, AV és S-Video módban használható.
➢
A TV bemenetéhez csatlakoztatott minden külső eszköz beállításai módosíthatók és tárolhatók.
➢
PC üzemmódban csak a „16:9” és a „4:3” mód állítható be.
A képernyő helyzetének és méretének beállítása a Nagyítás funkcióval
A képernyőt a Nagyítás funkcióval átméretezve a képernyõ helyzete és mérete fel/le irányba
módosítható a ▲ és a ▼ gombbal.
A ◄ vagy a ► gombbal a
elem kiválasztása után a ▲ és a ▼ gombbal fel/le mozgathatja a
képernyőt.
A ◄ vagy a ► gombbal a elem kiválasztása után a ▲ és a ▼ gombbal megváltoztathatja a
képernyő függőleges méretét.
Folytatás…
Mozgatás
Belépés
Vissza
Színtónus :
Normál
Méret : Auto széles
Képernyő mód : 16:9
Dig. Zajcsökk. : Auto.
Real 100 Hz Demo : Ki
DNle : Ki
HDMI feketeszint : Normál
Csak kék üzemmód
: Ki
Képernyő beégésvédelem
3D hatás
Képopciók
T V
Mozgatás
Belépés
Vissza
Auto széles
16:9
Széles nagyítás
Nagyítás
4:3
Csak pásztázás
Méret
T V
Mozgatás
Belépés
Vissza
Üzemmód : Normál
Képpontok fényereje
7
Kontraszt 90
Fényerő 45
Élesség 50
Szín 50
Árnyalat Z50 V50
Részletbeállítások
Képopciók
Visszaállítás : OK
Kép
T V
BN68-01528A-00Hun.indd 20 2008-4-21 15:23:41

Magyar - 21
Képernyő mód: 16:9 / Széles nagyítás / Nagyítás / 4:3
Ha egy 16:9 arányú, széles képernyőjű TV-készüléken Auto
széles képméretet ad meg, akkor meghatározhatja, hogy milyen
képméretben vagy sehogy se jelenjen meg a 4:3 WSS (Széles
képernyős jeladás). Az európai országok mindegyikében eltérő
képméret van használatban, ezért a felhasználóknak célszerű
ezt a beállítást választaniuk.
− 16:9: 16:9 arányú széles módba állítja a képet.
−
Széles nagyítás: A 4:3-as aránynál jobban felnagyítja képet.
− Nagyítás: Függőlegesen felnagyítja a képet a képernyőn.
− 4:3: 4:3 arányú normál módba állítja a képet.
➢
Ez a funkció Auto széles módban használható.
➢
A funkció Komponens és HDMI módban nem használható.
Dig. Zajcsökk.: Ki/Alacsony/Közepes/Magas/Auto.
Ha gyenge a készülék által fogott jel, akkor aktiválhatja ezt a funkciót, hogy csökkentse a statikus és
szellemképet, amely megjelenhet a képernyőn.
➢
Ha gyenge a jel, válasszon olyat a többi lehetőség közül, amellyel a legjobb minőségű képet lehet
megjeleníteni.
Valós 100Hz-es demó: Ki/Be
A valódi 100Hz és 50Hz között feltűnő a különbség, különösen gyorsan mozgó képek esetén. Lassan
mozgó képek esetén a különbség nem érzékelhető. A 100Hz-es bemutató csak 50Hz-es jellel működik.
A valódi 100Hz-es bemutató mód üzletek számára demonstrációs célra elérhető.
DNIe: Ki/Bemutató/Be
A kiváló képminőség érdekében a televízió DNIe-funkcióval rendelkezik. Ha bekapcsolja DNIe funkciót,
aktivált DNIe módban nézheti a képernyőn megjelenített képeket. Ha a DNIe Bemutató (DNIe Demo)
beállítást választja, akkor bemutató gyanánt megtekintheti a képernyőn a DNIe-funkcióval javított és a
normál képeket is. Így megláthatja a különbséget a kép minőségében.
➢
DNIe
TM
(Digital Natural Image engine)
Ez a szolgáltatás a 3D zajszűréssel, részletkiemeléssel, kontraszterősítéssel és fehérerősítéssel
még részletgazdagabb képet varázsol Ön elé. Az új képkompenzáló algoritmus világosabb, tisztább,
részletesebb képet biztosít. A DNIe
TM
technológia minden jelet a néző szeméhez igazít.
➢
Ez a funkció PC módban nem használható.
➢
A DNIe csak Kiemelt módban használható.
HDMI feketeszint: Normál/Alacsony
E funkció segítségével beállíthatja a képminőséget, ha a HDMI bemenetnél a korlátolt tartományú
(16–235) RGB képeknél képernyő beégést tapasztal (feketeszint megjelenése, alacsony kontraszt,
kevés szín).
➢
A funkció csak akkor aktív, ha a külső bemenet csatlakozón (RGB-jel) keresztül van csatlakoztatva.
Csak kék üzemmód: Ki/Be
Ez a funkció AV készülékek bemérésével foglalkozó szakemberek számára hasznos. Ez a funkció
csak a kék jelet jeleníti meg, eltávolítva a vörös és a zöld jeleket a videojelből, így kék szűrő hatást
biztosít, amely a videoberendezések (pl. DVD-lejátszók, házimozirendszerek stb.) Color (Szín) és
Tint (Színárnyalat) beállításának módosításához használatos.
E funkcióval a Color (Szín) és Tint (Színárnyalat) értékét az
egyes videoeszközök jelszintjének megfelelő értékre állíthatja
a vörös, zöld, kék, cián, bíbor és sárga színoszlop-mintával,
további kék szűrő használata nélkül.
➢
Csak kék üzemmód csak akkor használható, ha a
Film vagy a Normál képmód van kiválasztva.
Képernyő beégésvédelem
A „képernyőbeégés” lehetőségének csökkentése érdekében a
készüléket képernyőbeégés-védelmi technológiával látták el.
Ez az eljárás lehetővé teszi a kép fel/le (Függ. képsor ((Vertical
Line)) és oldaltól-oldalig (Vízsz. képpont ((Horizontal Dot))
történő mozgatását. Az Idő menüpont segítségével percekben
adhatja meg a kép mozgatása közötti időt.
−
Pixel-eltolódás: E funkció segítségével a képernyő
beégését minimalizálandó mozgathatja a képpontokat a
plazmaképernyőn függőleges vagy vízszintes irányban.
• A ▲ vagy a ▼ gombbal váltsa a
Pixel-eltolódás beállítást
Be értékre, majd nyomja meg az ENTER gombot.
• A ▲ vagy a ▼ gombbal válassza ki a kívánt lehetőséget,
majd nyomja meg az
ENTER gombot.A választható
lehetőségek: Vízsz. képpont, Függ. képsor, Idő
Folytatás…
Mozgatás
Belépés
Vissza
Színtónus :
Normál
Méret : Auto széles
Képernyő mód : 16:9
Dig. Zajcsökk. : Auto.
Valós 100 Hz-es demó :
DNle :
HDMI feketeszint : Normál
Csak kék üzemmód
: Ki
Képernyő beégésvédelem
3D hatás
Képopciók
T V
16:9
Széles nagyítás
Nagyítás
4:3
Mozgatás
Belépés
Vissza
Színtónus :
Normál
Méret : Auto széles
Képernyő mód : 16:9
Dig. Zajcsökk. : Auto.
Valós 100 Hz-es demó
: Ki
DNle : Ki
HDMI feketeszint : Normál
Csak kék üzemmód
: Ki
Képernyő beégésvédelem
3D hatás
Képopciók
T V
Mozgatás
Belépés
Vissza
Pixel-eltolódás
Fehér
Lapozás
Oldal szürkesége : Sötét
Képernyő beégésvédelem
T V
BN68-01528A-00Hun.indd 21 2008-4-21 15:23:41

Magyar - 22
➢
A Pixel-eltolódás optimális beállítása;
PC
TV/Külső/AV/Komponens/
HDMI
Vízsz. képpont 1 2
Függ. képsor 1 2
Idő 2 2 perc
➢
A Pixel-eltolódás értéke a monitor méretétől és üzemmódjától
függően változhat.
➢
Ez a funkció Csak pásztázás (Just Scan) módban nem használható.
− Fehér: Ez a funkció eltávolítja az utóképeket a képernyőről azáltal, hogy a képpontok színét fehérre
változtatja. Akkor használja ezt a funkciót, ha a képernyőn utóképek vagy szimbólumok maradtak,
főként állókép hosszabb idejű megtekintése után.
− Lapozás: Ez a funkció úgy távolítja el a beégett utóképet, hogy egy mintának megfelelően mozgatja
el a PDP-képernyőn a képpontokat. Akkor használja ezt a funkciót, ha a képernyőn utóképek vagy
szimbólumok maradtak, főként állókép hosszabb idejű megtekintése után.
− Oldal szürkesége: 4:3 oldalarányú megjelenítéskor a rendszer a fehéregyensúly jobb és bal oldalon
való módosításával védi a képernyőt a károsodástól.
Sötét: 4:3 oldalarány kiválasztásakor elsötétíti a képernyő jobb és bal oldalát.
Fényes: 4:3 oldalarány kiválasztásakor világossá alakítja a képernyő jobb és bal oldalát.
➢
A képernyő utóképeinek eltávolításához használja vagy a Fehér vagy a Lapozás funkciót. Bár
mindkét funkció a képernyőn beégett utókép eltávolítására szolgál, a Lapozás funkció hatékonyabb.
➢
Az utókép eltávolítása műveletet hosszú ideig (kb. 1 órán át) kell végeznie, hogy hatékonyan
eltávolítsa az utóképet a képernyőről. Ha az utókép minőségének javítása a művelet után sem
sikerül, ismételje meg újra a műveletet.
➢
A funkció törléséhez nyomja meg a távvezérlő bármelyik gombját.
Mozgatás
Belépés
Vissza
Pixel-eltolódás : Be
Vízsz. képpont : 2
Függ. képsor : 2
Idő : 2 perc
Pixel-eltolódás
T V
A 3D funkció használata
Televízióján 3D filmeket nézhet és játékokat játszhat. A 3D hatás funkcióval 3D képeket nézhet
speciális 3D szemüveggel.
3,5 mm-es sztereó dugasz RCA-kábelhez (külön megvásárolható)
3D szemüveg
(külön megvásárolható)
3D infravörös jeladó
(külön megvásárolható)
PC
HDMI/DVI kábel (külön megvásárolható)
A TV hátlapja
Csatlakozások
➢
A 3D szemüveg (és a jeladó) külseje a szemüveg típusától függően eltérő lehet.
BN68-01528A-00Hun.indd 22 2008-4-21 15:23:43

Magyar - 23
1 HDMI/DVI kábellel kösse össze a TV HDMI IN 2 aljzatát a számítógép PC kimeneti aljzatával.
2 3,5 mm-es dugaszú sztereó/2RCA kábellel kösse össze a TV DVI IN (HDMI 2) [R-AUDIO-L] aljzatát a
számítógép hangkártyájának hangkimeneti aljzatával.
3 Csatlakoztassa a jeladót a TV hátlapján lévő 3D SYNC OUT porthoz.
4 Kapcsolja be a TV-t, majd állítsa a TV forrását HDMI2-re.
A 3D szemüvegekről (és a jeladóról) bővebb tájékoztatást a 3D szemüveg használati utasításában talál.
A számítógép felbontásának beállítása: PS50A470: 1024 x 768 / 60 Hz,1360 x 768 / 60 Hz
A PS50A470-hoz az optimális PC felbontás 1360x768. 3D módban 1024x768 jel esetén a kép 4:3
formátumban jelenik meg, a jobb és a bal szélen szürke csíkkal.
A 3D infravörös jeladó kommunikál a 3D szemüveggel.
Ezért a 3D infravörös jeladót a 3D szemüveg közelébe kell helyezni.
Akkor kapcsol be, ha a HDMI vagy a DVI bemeneti jel RGB, és a DVI hang támogatott.
Ha a készüléket be- vagy kikapcsolják, az üzemmód az alapértelmezett (Ki) értékre vált, és a
Formátum mentve lesz.
A 3D hatás be- és kikapcsolása a Kép Üzemmód független.
Ha a 3D hatás be van kapcsolva, csak a Kontraszt, Fényerő, 3D hatás és a Visszaállítás képmenü
aktív.
A 3D hatás funkció használatához 3D-t támogató grafikus kártya vagy 3D szoftver szükséges.
A 3D szemüveg és a jeladó gyártójának meg kell egyeznie.
Ha a 3D szemüvegben hosszabb ideig játszik vagy néz televízióadást, szemfáradást vagy fejfájást
tapasztalhat.
Előfordulhat, hogy a nem a Samsung által gyártott 3D szemüveg (és jeladó) nem használható.
Ha a 3D funkció használatakor a képernyő vibrál, a jobb képminőség érdekében tompítsa, vagy
fénycső esetén kapcsolja le a környezeti világítást.
Az üzemmód megváltoztatása
Az üzemmód megváltoztatása a bal és jobb oldali kimeneti jelek
cseréjével megcseréli a bal és a jobb szemmel látható képet.
1 Csatlakoztassa a TV-t, a PC-t és a 3D infravörös jeladót az
ábrán látható módon.
2 A SOURCE gomb megnyomásával válassza ki a HDMI
beállítást.
3 A menü megjelenítéséhez nyomja meg a MENU gombot.
A ▲ vagy a ▼ gombbal válassza ki a Kép opciót, majd nyomja
meg az ENTER gombot.
4 A ▲ vagy a ▼ gombbal válassza ki a Képopciók lehetőséget,
majd nyomja meg az ENTER gombot.
A ▲ vagy a ▼ gombbal válassza ki a 3D hatás opciót, majd
nyomja meg az ENTER gombot.
5 A ▲ vagy a ▼ gombbal válassza ki az Üzemmód opciót, majd
nyomja meg az ENTER gombot.
A ▲ vagy a ▼ gombbal válassza ki a Ki, 1. mód, 2. mód vagy
2D konvertálás opciót, majd nyomja meg az ENTER gombot.
• Ki : A 3D hatás funkció kikapcsolása.
• 1. mód: Az 1. mód először a jobb oldalt szinkronizálja.
• 2. mód: A 2. mód először a bal oldalt szinkronizálja.
• 2D konvertálás:
A 3D képeket 2D képpé alakítja át.
Akkor válassza ezt a beállítást, ha ideiglenesen 2D képet szeretne
nézni (például mert a 3D képtől szédül). Ha teljesen ki szeretné
kapcsolni a 3D hatást, válassza az „Ki” beállítást.
Ha a 3D hatás nem működik megfelelően, ennek oka lehet,
hogy az üzemmód és a 3D szemüveg nincs megfelelően
szinkronizálva. A szinkronizáláshoz kapcsoljon a másik üzemmódba.
Folytatás…
Mozgatás
Belépés
Vissza
Üzemmód : Normál
Képpontok fényereje
7
Kontraszt 90
Fényerő 45
Élesség 50
Szín 50
Árnyalat G50 R50
Részletbeállítások
Képopciók
Visszaállítás : OK
Kép
T V
Mozgatás
Belépés
Vissza
Színtónus :
Normál
Méret : Auto széles
Képernyő mód : 16:9
Dig. Zajcsökk. : Auto.
Valós 100 Hz-es demó
: Ki
DNle : Ki
HDMI feketeszint : Normál
Csak kék üzemmód
: Ki
Képernyő beégésvédelem
3D hatás
Képopciók
T V
Mozgatás
Belépés
Vissza
Üzemmód :
Formátum :
3D hatás
T V
Ki
1. mód
2. mód
2D konvertálás
BN68-01528A-00Hun.indd 23 2008-4-21 15:23:44

Magyar - 24
Képbeállítások visszaállítása gyári alapbeállításra
Részletesen megadhatja a képbeállításokat.
1 A menü megjelenítéséhez nyomja meg a MENU gombot.
2 Az ENTER gombbal válassza ki a Kép elemet.
3 A ▲ vagy a ▼ gombbal válassza ki a Visszaállítás elemet,
majd nyomja meg az
ENTER gombot.
4 A ▲ vagy a ▼ gombbal válassza ki az OK vagy a Kilépés
gombot, majd nyomja meg az ENTER gombot.
➢
Valamennyi üzemmód visszaállítható.
Mozgatás
Belépés
Vissza
Üzemmód : Normál
Képpontok fényereje
7
Kontraszt 90
Fényerő 45
Élesség 50
Szín 50
Árnyalat Z50 V50
Részletbeállítások
Képopciók
Visszaállítás :
Kép
T V
OK
Kilépés
A formátum módosítása
Válassza ki a grafikai kártyához vagy a 3D szoftverhez legjobban illő
bemeneti formátumot.
Lásd a fenti 1–4. lépés ismertetését.
5 A ▲ vagy a ▼ gombbal válassza ki a Formátum opciót, majd
nyomja meg az
ENTER gombot.
6 A ▲ vagy a ▼ gombbal válassza ki a Tábla, Vízszintes
vagy Függőleges lehetőséget, majd nyomja meg az ENTER
gombot.
Tábla
Ha videokártyájának vagy 3D-szoftverének
kimeneti formátuma Tábla, válassza ezt a
bemeneti formátumot.
Vízszintes
Ha videokártyájának vagy 3D-szoftverének
kimeneti formátuma Vízszintes felosztás, válassza
ezt a bemeneti formátumot.
Függőleges
Ha videokártyájának vagy 3D-szoftverének
kimeneti formátuma Függőleges felosztás,
válassza ezt a bemeneti formátumot.
➢
A 3D mód módosításához többször nyomja meg a 3D gombot.
Egyszerű beállítás
1 Nyomja meg a távvezérlő TOOLS gombját.
2 A ▲ vagy a ▼ gombbal válassza ki a 3D mód lehetőséget.
3 Az ENTER gombbal indíthatja el a 3D hatást.
Eszközök
3D mód ◄ Ki ►
Anynet+ (HDMI-CEC)
Kép Üzemmód : Kiemelt
Hang üzemmód : Normál
Auto kikapcs. : Ki
SRS TS XT : Ki
Energiagazd. : Ki
Beállítás
KilépésMozgatás
Mozgatás
Belépés
Vissza
Üzemmód : 1. mód
Formátum :
3D hatás
T V
Tábla
Vízszintes
Függőleges
BN68-01528A-00Hun.indd 24 2008-4-21 15:23:45

Magyar - 25
Hangbeállítások
1 A menü megjelenítéséhez nyomja meg a MENU gombot.
2 A ▲ vagy a ▼ gombbal válassza ki a Hang menüpontot, majd
nyomja meg az
ENTER gombot.
3 Válassza ki a megfelelő beállítást a ▲ vagy a ▼ gombbal,
majd nyomja meg az
ENTER gombot.
A választható beállítások:
Üzemmód, Hangszínszabályzó,
SRS TS XT, Autom. hangerő, TV hangszóró, Hangválasztás
4
Ha megfelelőnek találja a beállítást, nyomja meg az ENTER gombot.
5 A menüből történő kilépéshez az EXIT gombot kell
megnyomni.
Üzemmód: Normál/Zene/Film/Beszéd/Egyedi
Kiválaszthatja az adott műsor megtekintéséhez használni
kívánt speciális hanghatásokat.
Egyszerű beállítás
1 Nyomja meg a távvezérlő TOOLS gombját.
2 A ▲ vagy a ▼ gombbal válassza ki a Hang üzemmód
elemet.
3 A ◄ vagy a ► gombbal válassza ki a kívánt opciót.
Hangszínszabályzó: Balansz/100Hz/300Hz/1kHz/3kHz/
10kHz
A TV-készülék számos olyan beállítással rendelkezik,
amelyekkel szabályozni lehet a hangminőséget.
➢
Ha ezeknek a beállításoknak valamelyikét módosítja, a
hangmód automatikusan az Egyedi beállításra vált.
SRS TS XT: Ki/Be
A TruSurround XT szabadalmaztatott SRS technológia, amely
megoldja az 5.1 többcsatornás tartalmak két hangsugárzón
keresztül történő lejátszásának problémáját. A TruSurround lenyűgöző virtuális térhatás élményét
kínálja bármely két hangszórós lejátszó rendszerrel, akár a televízió belső hangszóróin keresztül. A
rendszer teljesen kompatibilis az összes többcsatornás formátummal.
A TruSurround XT, az SRS és szimbólum az SRS Labs, Inc. védjegye.
A TruSurround XT technológia beépítését az SRS Labs, Inc. licenceli
Egyszerű beállítás
1 Nyomja meg a távvezérlő TOOLS gombját.
2 A ▲ vagy a ▼ gombbal válassza ki az SRS TS XT elemet.
3 A ◄ vagy a ► gombbal válasszon a Ki és a Be beállítás
közül.
Autom. hangerő: Ki/Be
Valamennyi műsorszóró állomás saját jelviszonyokkal
rendelkezik, ezért nem egyszerű és nem kényelmes, ha
minden egyes csatornaváltáskor be kell állítania a hangerőt. Ezzel a funkcióval automatikusan
beállíthatja a kívánt csatorna hangerejét: magas moduláló jel esetén a hangkimenet csökkentésével,
alacsony moduláló jel esetén pedig a hangkimenet növelésével.
TV hangszóró: Ki/Be
Ha külön hangszórókból szeretné hallgatni a hangokat, kapcsolja Be a belső erősítőt.
➢
A
+,
- és a MUTE gomb nem működik, ha a Belső némítás funkció aktiválva van.
➢
Ha a TV hangszóró beállítása Ki, a Hang menüből csak a Hangválasztás beállítás működik
(PIP üzemmódban).
Hangválasztás: Főkép/Alkép
Amíg a PIP funkció aktív, hallgathatja az alkép (PIP) műsorának hangját.
−
Főkép: A főkép hangjának hallgatására használható.
−
Alkép: Az alkép hangjának hallgatására használható.
Eszközök
Anynet+ (HDMI-CEC)
Kép Üzemmód : Normál
Hang üzemmód : Egyedi
Auto kikapcs. : Ki
SRS TS XT ◄ Ki ►
Energiagazd. : Ki
Kettős I/II : Mono
Mozgatás
Beállítás
Kilépés
Mozgatás
Belépés
Vissza
Üzemmód :
Egyedi
Hangszínszabályzó
SRS TS XT : Ki
Autom. hangerő : Ki
TV hangszóró : Ki
Hangválasztás : Főkép
Hang
T V
Mozgatás
Beállítás
Vissza
Hangszínszabályzó
T V
Balansz 100Hz 300Hz 1kHz 3kHz 10kHz
+
0
-
J
B
+
0
-
Eszközök
Anynet+ (HDMI-CEC)
Kép Üzemmód : Normál
Hang üzemmód ◄ Egyedi ►
Auto kikapcs. : Ki
SRS TS XT : Ki
Energiagazd. : Ki
Kettős I/II : Mono
Mozgatás
Beállítás
Kilépés
BN68-01528A-00Hun.indd 25 2008-4-21 15:23:46

Magyar - 26
A Hang mód kiválasztása (típusfüggő)
A DUAL I-II gombbal az audiojelek feldolgozását és kimenetét jelenítheti meg, illetve vezérelheti.
A készülék a bekapcsolásakor – az aktuális átviteltől függően – automatikusan a “DUAL-I” vagy a
„Stereo” módba vált.
Egyszerű beállítás
1 Nyomja meg a távvezérlő TOOLS gombját.
2 A ▲ vagy a ▼ gombbal válasszon a Kettős I/II beállítások
közül.
3 A ◄ vagy a ► gombbal válassza ki a kívánt opciót.
Műsorszórás típusa
Képernyőkijelzés
NICAM
Sztereó
Normál műsorszórás
(Szabványos audió)
Mono (Normál használat)
Általános + NICAM Mono NICAM
Monó
(Normál)
NICAM Stereo
NICAM
Stereo
Monó
(Normál)
NICAM DUAL-I/II
NICAM
Dual-1
NICAM
Dual-2
Monó
(Normál)
A2
Sztereó
Normál műsorszórás
(Szabványos audió)
Mono (Normál használat)
Kétnyelvű vagy DUAL-I/II Dual-I Dual-II
Sztereó Sztereó
Monó
(Mono saját választásként)
➢
Ha a vételi körülmények gyengülnek, akkor könnyebb a készüléket Mono üzemmódban
hallgatni.
Ha a sztereójel gyenge és automatikus váltás történik, kapcsoljon Mono módba.
(Külön kapható) fejhallgató csatlakoztatása
A készülékhez fejhallgatót csatlakoztathat, így a helyiségben tartózkodók zavarása
nélkül nézheti a TV-műsort.
➢
Ha csatlakoztatja a fejhallgató csatlakozóját a megfelelő
aljzatba, a Hang menüben csak az „Autom. hangerő”
beállítás módosítható.
➢
A nagy hangerővel és hosszantartóan használt fejhallgató
halláskárosodást okozhat.
➢
Amikor fejhallgatót csatlakoztat a rendszerhez, akkor a
hangszórók nem szólnak.
➢
Külön állítható a fejhallgató és a televízió hangereje.
A TV oldallapja
15
Eszközök
Anynet+ (HDMI-CEC)
Kép Üzemmód : Normál
Hang üzemmód : Egyedi
Auto kikapcs. : Ki
SRS TS XT : Ki
Energiagazd. : Ki
Kettős I/II ◄ Mono ►
Mozgatás Beállítás Kilépés
BN68-01528A-00Hun.indd 26 2008-4-21 15:23:46

Magyar - 27
A dátum és időpont beállításai
1 A menü megjelenítéséhez nyomja meg a MENU gombot.
2 A ▲ vagy a ▼ gombbal válassza ki a Beállítás menüpontot,
majd nyomja meg az ENTER gombot.
3 A ▲ vagy a ▼ gombbal válassza ki az Idő menüpontot, majd
nyomja meg az ENTER gombot.
4 Válassza ki a megfelelő beállítást a ▲ vagy a ▼ gombbal, majd
nyomja meg az ENTER gombot.
A választható beállítások:
Órabeállítás, Auto kikapcs.,
1. időzítő, 2. időzítő, 3. időzítő
5 Ha megfelelőnek találja a beállítást, nyomja meg az ENTER
gombot.
6 A menüből történő kilépéshez az EXIT gombot kell megnyomni.
Órabeállítás:
Beállíthatja a TV-készülék óráját úgy, hogy az INFO gomb
megnyomásakor megjelenjen az aktuális idő. Akkor is be kell
állítania az időt, amikor az automatikus be-/kikapcsolás időzítőt
szeretné használni.
− A ◄ vagy a ► gombbal válassza ki a Hónap, Nap, Év, Óra
vagy a Perc beállítását. Állítsa be ezeket a ▲ vagy a ▼
gomb lenyomásával.
➢
A Hónap, Nap, Év, Óra vagy Perc a távvezérlőn található
számgombokkal is beállítható.
➢
Ha áramkimaradás következik be, vagy a készülék
áramellátását lekapcsolják, az óra beállításai elvesznek.
Auto kikapcs.
Megadhat egy olyan – 30 és 180 perc közötti – időtartamot,
amelynek letelte után a televízió automatikusan készenléti
üzemmódba kapcsol.
− Válassza ki a ▲ vagy a ▼ gombbal, hogy milyen időtartamra
állítja be az időzítést (Ki, 30, 60, 90, 120, 150 vagy 180).
Egyszerű beállítás
1 Nyomja meg a távvezérlő TOOLS gombját.
2 A ▲ vagy a ▼ gombbal válassza ki az Auto kikapcs.
elemet.
3 A ◄ vagy a ►gombbal válassza ki a perc értékét, majd
nyomja meg az ENTER gombot.
1. időzítő, 2. időzítő, 3. időzítő
Beállíthatja a televízió óráját és a bekapcsolási, illetve
kikapcsolási időzítőt aszerint, hogy a készülék a kiválasztott
időpontban be- vagy kikapcsoljon.
☛
Először az órát kell beállítania.
− Válassza ki a beállítási mezőket a ◄ vagy a ► gombbal.
A beállítást végezze a ▲ vagy a ▼ gombbal.
Bekapcsolási idő: Állítsa be az órát, a percet és válasszon az Be/Ki beállítás közül. (Az
időzítésnek a megadott beállítással történő aktiválásához válassza ki az Be opciót.)
Kikapcsolási idő: Állítsa be az órát, a percet és válasszon az Be/Ki beállítás közül. (Az
időzítésnek a megadott beállítással történő aktiválásához válassza ki az Be opciót.)
Ismétlés: Választható az Egyszer, Minden nap, Hétfő ~ Péntek, Hétfő ~ Szombat, illetve a
Szombat ~ Vasárnap beállítás.
Hangerő: Válassza ki a kívánt hangerősségi szintet.
➢
A távvezérlőn található számgombok segítségével közvetlenül beállíthatja az órát és a percet.
☛
Automatikus kikapcsolás
Az időzítő bekapcsolt állapotában a TV végül kikapcsol, ha az időzítő kapcsolta be a készüléket, és
3 órán keresztül nem működtetik a kezelőszerveket. Ez a funkció kizárólag az időzítő bekapcsolt
állapotában működik és megakadályozza, hogy a TV a túlságosan hosszú használat során
felmelegedjen.
Mozgatás
Belépés
Vissza
Plug & Play
Nyelv : Magyar
Idő
Fényeffektus :
Használatkor be
Fali konzol állítása
Dallam : Ki
Szórakoztatás : Ki
Energiagazd. : Ki
PIP
Beállítás
T V
Mozgatás
Belépés
Vissza
Órabeállítás :
00 : 00
Auto kikapcs. : Ki
1. időzítő : Ki
2. időzítő : Ki
3. időzítő : Ki
Idő
T V
1. időzítő
T V
00 00 Ki
Bekapcsolási idő
:
Kikapcsolási idő
Ismétlés
Egyszer
10
Hangerő
00 00 Ki
:
Mozgatás
Beállítás
Vissza
Eszközök
Anynet+ (HDMI-CEC)
Kép Üzemmód : Normál
Hang üzemmód : Egyedi
Auto kikapcs. ◄ Ki ►
SRS TS XT : Ki
Energiagazd. : Ki
Kettős I/II : Mono
Mozgatás Beállítás Kilépés
BN68-01528A-00Hun.indd 27 2008-4-21 15:23:47

Magyar - 28
Nyelv/Dallam/Fényeffektus/Szórakoztatás/Energiagazd./PIP
1 A menü megjelenítéséhez nyomja meg a MENU gombot.
2 A ▲ vagy a ▼ gombbal válassza ki a Beállítás menüpontot,
majd nyomja meg az
ENTER gombot.
3 Válassza ki a megfelelő beállítást a ▲ vagy a ▼ gombbal,
majd nyomja meg az
ENTER gombot.
A választható beállítások: Nyelv, Dallam, Fényeffektus,
Szórakoztatás, Energiagazd., PIP
4 Ha megfelelőnek találja a beállítást, nyomja meg az ENTER
gombot.
5 A menüből történő kilépéshez az EXIT gombot kell megnyomni.
Nyelv
Készüléktípustól függően eltérő lehet. A készülék első használatakor meg kell adnia, hogy milyen
nyelven jelenjenek meg a menük és üzenetek.
Fényeffektus: Ki/Készenléti be/Használatkor be/Be
A TV előoldalán található kék jelzőfény a helyzetnek megfelelően kapcsolható BE/KI. Kikapcsolhatja
ha takarékoskodni akar az energiával vagy zavarja szemét a jelzőfény.
−
Ki: A kék LED mindig ki lesz kapcsolva.
−
Készenléti be: A kék LED készenléti állapotban világít, és a TV-készülék bekapcsolása után
kikapcsol.
−
Használatkor be: A kék LED a tévénézéskor világít, és a készülék kikapcsolása után kikapcsol.
−
Be: A kék LED mindig világít.
➢
Kapcsolja ki a fényjelzést, hogy az energiafelhasználás minimális legyen.
Dallam: Ki/Alacsony/Közepes/Magas
A TV be- és kikapcsolásakor hallható dallam beállítására szolgál.
Szórakoztatás: Ki/Sport/ Mozi/Játék
A Szórakoztatás módban kiválaszthatja a legjobb megjelenítést és hangot a sporthoz, filmhez,
játékhoz.
−
Ki: A Szórakoztatás funkció kikapcsolása.
−
Sport: Optimális kép- és hangminőség sportközvetítéshez.
−
Mozi: Optimális kép- és hangminőség filmekhez. Gazdagabb kép és tovább javított hang.
−
Játék: Optimális kép- és hangminőség játékokhoz. A TV-hez külső játékkonzol csatlakoztatásakor
ez a mód megnöveli a játék sebességét.
➢
Ha a három Szórakoztatás üzemmód bármelyikét bekapcsolja, a készülék lezárja a beállításokat,
és azok tovább nem módosíthatók. Ha szeretne további beállításokat végezni a kép- vagy a
hangmódban, akkor ki kell kapcsolnia a Szórakoztatás üzemmódot.
➢
A Szórakoztatás beállításait minden bemeneti forráshoz elmenti a készülék.
Folytatás…
Move
Enter
Return
Plug & Play
Nyelv : Magyar
Idő
Fényeffektus
:
Használatkor be
Fali konzol állítása
Dallam : Ki
Szórakoztatás : Ki
Energiagazd. : Ki
PIP
Beállítás
T V
BN68-01528A-00Hun.indd 28 2008-4-21 15:23:47

Magyar - 29
A (Windows XP alapú) számítógépes szoftver beállítása
Az alábbiakban a Windows képernyőbeállításait láthatja egy
szokványos számítógép esetében. A saját számítógépén
megjelenő képek azonban az adott Windows verziótól és
videokártyától függően az itt látottól valószínűleg eltérőek
lesznek. Ha a tényleges párbeszédpanelek különböznek
is, az esetek többségében ugyanazok az alapbeállítási
információk érvényesek. (Ellenkező esetben lépjen
kapcsolatba a számítógép gyártójával vagy a Samsung
márkakereskedőjével.)
1 Kattintson az egér jobb gombjával a Windows asztalra, majd a
Tulajdonságok menüpontra.
Ekkor megjelenik a Képernyőtulajdonságok párbeszédablak.
2 Kattintson a Beállítások lapfülre, majd állítsa be a Megjelenés
lehetőségeit a képernyőmódokat tartalmazó táblázatnak
megfelelően. A színek beállításait nem kell módosítania.
3 Kattintson a Speciális gombra. Új beállítási párbeszédablak jelenik meg.
4 Kattintson a Monitor fülre, majd állítsa be a Képernyő-frissítési gyakoriság értékét a
képernyőmódokat tartalmazó táblázatnak megfelelően. Ha van rá lehetőség, a Frissítési gyakoriság
értéke helyett állítsa be a Függőleges frekvencia és a Vízszintes frekvencia értékét külön-külön.
5 Az ablak bezárásához kattintson az OK gombra, majd kattintson a Képernyőtulajdonságok
párbeszédpanelen az OK gombra. Ekkor a számítógép automatikusan újraindulhat.
Energiagazd.: Ki/Alacsony/Közepes/Magas
Ez a funkció automatikusan beállítja a képernyő fényerejét a
környezeti fényviszonyoknak megfelelően.
− Ki: Az Energiagazdaságos mód kikapcsolása.
− Alacsony: Normál módban működik, a környező
megvilágítástól függetlenül.
− Közepes: A maximális energiatakarékossági módot használja
a környezeti megvilágítástól függetlenül.
− Magas: A maximális energiatakarékossági módot használja, a
környező megvilágítástól függetlenül.
Egyszerű beállítás
1 Nyomja meg a távvezérlő
TOOLS gombját.
2 A ▲ vagy a ▼ gombbal válasszon a Energiagazd. beállítások özül.
3 A ◄ vagy a ► gombbal válassza ki a kívánt opciót.
PIP (Kép a képben): PIP(Be/ Ki)/Forrás/Méret/Helyzet/Program
A főképen belül alkép megjelenítésére is lehetőség van. Így
bármilyen csatlakoztatott eszköz videobemenetén keresztül
nézheti a TV-műsort.
− PIP: Be/Ki
Aktiválhatja vagy kikapcsolhatja a PIP funkciót.
A PIP-beállítások táblázata
Főkép Alkép
Komponens
HDMI1, 2
PC
Csak analóg TV-adás:
1. külső, 2. külső, AV
− Forrás: TV/1. külső/2. külső/AV
Kiválaszthatja az alkép forrását.
−
Méret:
/
/
Kiválaszthatja az alkép méretét.
➢
Ha a főkép PC és Komponens módban van, a Méret lehetőség nem áll rendelkezésre.
− Helyzet:
/ / /
Kiválaszthatja az alkép helyzetét.
➢
A Double ( ,
) (Kettős) üzemmódban a Helyzet beállítás nem választható ki.
− Program
Csak akkor választhat csatornát az alképhez, ha a Forrás beállítása TV.
Mozgatás
Belépés
Vissza
PIP : Be
►
Forrás : TV
►
Méret :
►
Helyzet :
►
Program : P 1
►
PIP
TV
Eszközök
Anynet+ (HDMI-CEC)
Kép Üzemmód : Normál
Hang üzemmód : Egyedi
Auto kikapcs. : Ki
SRS TS XT : Ki
Energiagazd. ◄ Ki ►
Kettős I/II : Mono
Mozgatás
Beállítás Kilépés
BN68-01528A-00Hun.indd 29 2008-4-21 15:23:48

Magyar - 30
Bemeneti mód (PC)
A képernyő pozíciója és mérete a számítógép monitorától és annak felbontásától függően
egyaránt változik.
Az alábbi táblázat bemutatja az összes támogatott megjelenítés módot:
D-Sub Bemenet
Mód Felbontás
Vízszintes
frekvencia
(kHz)
Függőleges
frekvencia
(kHz)
Képpontfrissítés
gyakorisága (MHz)
Szink,
polaritás(V/F)
PS50A470
IBM
640 x 350
720 x 400
31.469
31.469
70.086
70.087
25.175
28.322
+ / -
- / +
✔
✔
VESA
640 x 480
640 x 480
640 x 480
800 x 600
800 x 600
800 x 600
1024 x 768
1024 x 768
1024 x 768
1360 x 768
31.469
37.861
37.500
37.879
48.077
46.875
48.363
56.476
60.023
47.712
59.940
72.809
75.000
60.317
72.188
75.000
60.004
70.069
75.029
60.015
25.175
31.500
31.500
40.000
50.000
49.500
65.000
75.000
78.750
85.500
- / -
- / -
- / -
+ / +
+ / +
+ / +
- / -
- / -
+ / +
+ / +
✔
✔
✔
✔
✔
✔
✔
✔
✔
✔
HDMI/DVI Bemenet
Mód Felbontás
Vízszintes
frekvencia
(kHz)
Függőleges
frekvencia
(kHz)
Képpontfrissítés
gyakorisága (MHz)
Szink,
polaritás(V/F)
PS50A470
VESA
640 x 480
800 x 600
1024 x 768
1360 x 768
31.469
37.879
48.363
47.712
59.940
60.317
60.004
60.015
25.175
40.000
65.000
85.500
- / -
+ / +
- / -
+ / +
✔
✔
✔
✔
HDMI/DVI csatlakoztatás esetén HDMI IN2 csatlakozót kell használni.
A sorváltós módot a rendszer nem támogatja.
Nem szabványos videoformátum kiválasztása esetén az egység működése rendellenes lehet.
Az önálló és az összetett módokat támogatja a készülék. Az SOG-módot nem támogatja.
A PS50A470, szövegminősége VESA üzemmódra van optimalizálva (1360 x 768, 60 Hz).
BN68-01528A-00Hun.indd 30 2008-4-21 15:23:48

Magyar - 31
A számítógép beállítása
➢
A SOURCE gomb megnyomásával állítsa be a PC
üzemmódot.
1 A menü megjelenítéséhez nyomja meg a MENU gombot.
2 A ▲ vagy a ▼ gombbal válassza ki a Kép elemet, majd
nyomja meg az
ENTER gombot.
3 A ▲ vagy a ▼ gombbal válassza ki a kívánt lehetőséget, majd
nyomja meg az
ENTER gombot.
4 Ha megfelelőnek találja a beállításokat, nyomja meg az
ENTER gombot.
5
A menüből történő kilépéshez az EXIT gombot kell megnyomni.
Autom. beállítás:
Az automatikus beállítás segítségével a készülék PC-
képernyője önmagát állítja be a bejövő videojel alapján.Ennek
során a finom, a durva és a helyzet (fine, coarse és position)
beállítás értékei lesznek automatikusan beállítva.
Egyszerű beállítás
1 Nyomja meg a távvezérlő TOOLS gombját.
2 A ▲ vagy a ▼ gombbal válassza ki az Autom. beállítás
elemet, majd nyomja meg az ENTER gombot.
Képernyő (Screen Adjustment): Durva /Finom /Helyzet
/Kép visszaáll.
Durva / Finom
A képminőség-szabályozás lényege, hogy megszüntesse
vagy csökkentse a zavaró képhatásokat.Ha a zavar
a finomhangolással nem szűnik meg, akkor a lehető
legmegfelelőbben (durva) állítsa be a frekvenciát, majd
végezzen ismét finomhangolást.A zavar csökkentése után
igazítsa újra a képet úgy, hogy az a képernyő közepére
illeszkedjen.
1
A ▲ vagy a ▼ gombbal válassza ki a Durva vagy a Finom
beállítást, majd nyomja meg az ENTER gombot.
2 A ◄ vagy a ► gombbal állítsa be a képminőséget, ekkor
függőleges csíkok jelenhetnek meg, vagy elhomályosodhat
a kép. Nyomja meg az ENTER gombot.
Helyzet
Módosítsa a PC-képernyő helyzetét, ha nem illeszkedik a TV-
képernyőre.
1 Állítsa be a pozíciót a ▲/▼/◄/► gombokkal.
2 Nyomja meg az ENTER gombot.
Kép visszaáll.
Valamennyi képbeállítást helyettesítheti a gyári alapbeállított
értékekkel.
Mozgatás
Belépés
Vissza
Durva 50
Finom 11
Helyzet
Kép visszaáll.
Képernyő
T V
Automata beállítás folyamatban.
Várjon!
Kép visszaállítás befejezve.
Mozgatás
Belépés
Vissza
Üzemmód :
Normál
Képpontok fényereje
7
Kontraszt 95
Fényerő 45
Élesség 50
Autom. beállítás
Képernyő
Részletbeállítások
Képopciók
Visszaállítás : OK
Kép
T V
Mozgatás
Belépés
Vissza
Helyzet
T V
Eszközök
Anynet+ (HDMI-CEC)
Kép Üzemmód : Normál
Hang üzemmód : Egyedi
Auto kikapcs. :
Ki
SRS TS XT :
Ki
Energiagazd. :
Ki
PIP
Autom. beállítás
KilépésMozgatás
Belépés
BN68-01528A-00Hun.indd 31 2008-4-21 15:23:49

Magyar - 32
Az Anynet
+
fogalma
Az Anynet
+
AV-hálózati rendszer, amely könnyen kezelhető AV-kezelőfelületet biztosít a
felhasználók számára: Samsung Electronics AV-eszközök csatlakoztatásakor az összes
csatlakoztatott AV-eszköz az Anynet
+
menüjén keresztül vezérelhető.
Anynet
+
eszközök csatlakoztatása
Az Anynet
+
rendszer csak olyan AV-eszközökkel használható, amelyek támogatják az Anynet
+
használatát.
Keresse az Anynet
+
jelet a TV-hez csatlakoztatott AV-eszközön.
Közvetlen csatlakozás TV-hez
HDMI-kábellel csatlakoztassa
a TV [HDMI 1], [HDMI 2] vagy
[HDMI 3] aljzatát a megfelelő
Anynet
+
eszköz HDMI OUT
aljzatához.
Csatlakoztatás házimozirendszerhez
1. HDMI-kábellel
csatlakoztassa a TV [HDMI
1], [HDMI 2] vagy [HDMI
3] aljzatát a megfelelő
Anynet
+
eszköz HDMI OUT
aljzatához.
2. HDMI-kábellel
csatlakoztassa a
házimozirendszer HDMI
IN aljzatát a megfelelő
Anynet
+
eszköz HDMI OUT
aljzatához.
➢
Csak egy vevőkészüléket csatlakoztasson.
➢
Anynet
+
eszköz csatlakoztatásához használja a HDMI-kábelt. Előfordulhat, hogy bizonyos HDMI-
kábelekkel az Anynet
+
funkciók nem használhatók.
➢
Az Anynet
+
akkor használható, ha az Anynet
+
használatát támogató AV-eszköz be van kapcsolva
vagy készenléti állapotban van.
➢
Az
Anynet
+
összesen 8 AV-eszköz használatát teszi lehetővé.
English - 30
1. Anynet
+
eszköz 2. Anynet
+
eszköz 3. Anynet
+
eszköz
TV
HDMI-kábel
HDMI-kábel
HDMI-kábel
TV
1. Anynet
+
eszköz 2. Anynet
+
eszköz
3. Anynet
+
eszköz
HDMI-kábel
HDMI-kábel
HDMI-kábel
HDMI-kábel
Házimozi
English - 30
BN68-01528A-00Hun.indd 32 2008-4-21 15:23:50

Magyar - 33
Az Anynet
+
beállítása
Az Anynet
+
funkciókhoz a következő beállítások használhatók.
Az Anynet
+
funkció használata
1 A menü megjelenítéséhez nyomja meg a MENU gombot.
A ▲ vagy a ▼ gombbal válassza ki a Bemenet elemet, majd
nyomja meg az ENTER gombot.
2 Az Anynet
+
(HDMI-CEC) kiválasztásához nyomja meg a ▲
vagy ▼ gombot, majd az ENTER gombot.
3 A ▲ vagy ▼ gombbal válassza ki a Beállítás lehetőséget,
majd nyomja meg az ENTER gombot.
4 Az Anynet
+
(HDMI-CEC) kiválasztásához nyomja meg a ▲
vagy ▼ gombot, majd az ENTER gombot.
5 A Be kiválasztásához nyomja meg a ▲ vagy ▼ gombot, majd
az ENTER gombot.
➢
Az Anynet
+
(HDMI-CEC) funkció most már használható.
➢
Ha a Ki beállítást választja, az Anynet
+
(HDMI-CEC) nem
használható.
➢
Ha az Anynet
+
(HDMI-CEC) funkció ki van kapcsolva, akkor
egyik Anynet
+
művelet sem használható.
Anynet
+
eszköz automatikus kikapcsolása a TV kikapcsolásakor
4 A ▲ vagy ▼ gombbal válassza az Autom. Kikapcsolás
lehetőséget, majd nyomja meg az ENTER gombot.
5 Az Igen kiválasztásához nyomja meg a ▲ vagy ▼ gombot,
majd az
ENTER gombot.
➢
Ezzel engedélyezte az automatikus kikapcsolás funkciót.
➢
Ha a Nem lehetőséget választja, az automatikus
kikapcsolás funkció nem használható.
A kilépéshez nyomja meg az EXIT gombot.
➢
A TV távvezérlőjének Eszközválasztás beállítását TV-re kell állítani az Anynet
+
funkció
használatához.
➢
Ha az Autom. Kikapcsolás beállítása Igen, akkor a TV kikapcsolásakor a csatlakoztatott külső
eszközök is kikapcsolnak. Az eszköz csak akkor nem kapcsol ki, ha éppen felvételt készít.
Anynet
+
eszközök keresése és váltás közöttük
1 A menü megjelenítéséhez nyomja meg a MENU gombot.
A ▲ vagy a ▼ gombbal válassza ki a Bemenet elemet, majd
nyomja meg az ENTER gombot.
2 Az Anynet
+
(HDMI-CEC) kiválasztásához nyomja meg a ▲
vagy ▼ gombot, majd az ENTER gombot.
3 A Eszközválasztás kiválasztásához nyomja meg a ▲ vagy ▼
gombot, majd az ENTER gombot.
4 A ▲ vagy ▼ gombbal válasszon ki egy eszközt, majd nyomja
meg az ENTER gombot.
A készülék a kiválasztott eszközre áll.
5 Ha nem találja a keresett eszközt, a ▲ vagy ▼ gombbal
válassza a Csatlakoztatott eszközök keresése elemet, majd
nyomja meg az ENTER gombot.
A Anynet+ konfigurálása... (Anynet
+
kapcsolat beállítása)
üzenet jelenik meg. Az eszközök keresésének befejezését
követően a csatlakoztatott eszközök listája az Anynet
+
menüben látható.
➢
A kiválasztott eszközre váltás legfeljebb 2 percig tart. A
kiválasztott eszközre váltás művelete nem szakítható meg.
➢
Az eszközök kereséséhez szükséges idő a csatlakoztatott
eszközök számától függ.
➢
Az eszközkeresés befejezésekor a talált eszközök száma nem jelenik meg.
➢
Habár a TV automatikusan keresi az eszközöket, ha be van kapcsolva a POWER gombbal, bizonyos
körülmények között a TV-hez csatlakoztatott eszközök nem szerepelnek az eszközök listáján.
Eszközkereséshez válassza a Csatlakoztatott eszközök keresése menüt.
➢
Ha külső bemeneti módot választott a SOURCE gomb megnyomásával, akkor az Anynet
+
funkció
nem használható. A TOOLS gombbal váltson Anynet
+
eszközre.
Folytatás…
Beállítás
Anynet+ (HDMI-CEC)
: Ki
Autom. Kikapcsolás
: Ki
Csatlakoztatott eszközök keresése
Belépés VisszaMozgatás
Ki
Be
Beállítás
Anynet+ (HDMI-CEC)
: Be
Autom. Kikapcsolás
: Ki
Csatlakoztatott eszközök keresése
Belépés VisszaMozgatás
Nem
Igen
Beállítás
Anynet+ (HDMI-CEC)
: Be
Autom. Kikapcsolás
: Igen
Csatlakoztatott eszközök keresése
Belépés VisszaMozgatás
Belépés
Mozgatás
TV-nézés
Eszközválasztás
Felvétel
Eszközmenü
Eszköz kezelése
Vevő :Ki
Beállítás
TV P 1
Vissza
Belépés
Mozgatás
TV-nézés
Eszközválasztás
Felvétel
Eszközmenü
Eszköz kezelése
Vevő :Ki
Beállítás
TV P 1
Vissza
DVDR1
DVDR2
DVD1
DVD2
BN68-01528A-00Hun.indd 33 2008-4-21 15:23:51

Magyar - 34
Anynet+ Menü
Az Anynet
+
menü a TV-hez csatlakoztatott Anynet
+
eszközök típusától és állapotától függően
változik.
Anynet
+
menü Leírás
TV-nézés Anynet
+
beállításról TV üzemmódra váltás.
Eszközválasztás A TV a megfelelő eszközhöz csatlakozik.
Felvétel Felvétel indítása. (Ez a menü csak felvételre alkalmas eszközöknél
működik.)
Eszközmenü A csatlakoztatott eszköz menüjét mutatja.
Például: DVD-felvevő csatlakoztatásakor a DVD-felvevő menüje
jelenik meg.
Eszköz kezelése A csatlakoztatott eszköz lejátszásvezérlési menüjét mutatja.
Például: DVD-felvevő csatlakoztatásakor a DVD-felvevő
lejátszásvezérlési menüje jelenik meg.
Vevő A vevőkészüléken keresztül érkező hang hallatszik.
Beállítás Beállíthatja az Anynet
+
használatának környezetét.
A TV távvezérlőjének Anynet
+
módban használható gombjai
Eszköz típusa Mikor működtethető Használható gombok
Anynet
+
eszköz
Az eszközre váltás után, amikor
az eszköz menüje megjelenik a
képernyőn.
Számgombok
▲/▼/◄/►/ENTER gomb
Színes gombok
EXIT gomb
Az eszközre váltás után, fájl
lejátszása közben
W.LINK
(keresés visszafelé)
W.LINK
(keresés előre)
W.LINK
(leállítás)
W.LINK
W.LINK
(lejátszás/szünet)
Beépített hangolóegységgel
rendelkező eszköz
Az eszközre váltás után,
TV-nézés közben
P / gomb
Audio eszköz Felvevőkészülék működtetésekor
W.LINK
/
W.LINK
gomb
MUTE gomb
➢
Az Anynet
+
funkció csak akkor működik, ha a távvezérlő beállítása TV.
➢
A REC gomb csak felvételre alkalmas állapotban működik.
➢
A TV gombjaival nem vezérelhet Anynet
+
eszközöket. Anynet
+
eszközök csak a TV távvezérlőjével
működtethetők.
➢
A TV távvezérlője bizonyos körülmények között nem működik. Ilyenkor szüntesse meg az Anynet
+
eszköz kijelölését.
➢
Az Anynet
+
funkciók más gyártó termékeinél nem működnek.
➢
Anynet
+
üzemmódban a színes gombok működése esetleg nem megfelelő.
➢
A
W.LINK
,
W.LINK
gombok működése a készüléktől függően eltérő lehet.
Felvétel
Felvevőkészülék segítségével felvételt készíthet a TV-műsorról.
Nyomja meg a REC gombot.
Megkezdődik a felvétel. (Csak akkor, ha az Anynet
+
funkció használatára alkalmas felvevőeszköz van
csatlakoztatva.)
➢
A készülék az éppen nézett TV-műsort rögzíti. Ha másik eszközről néz videofelvételt, akkor a
készülék a videofelvételt rögzíti.
➢
A TOOLS gomb megnyomása után a Felvétel kiválasztásával is rögzítheti a forrást.
➢
Felvételkészítés előtt ellenőrizze az antenna megfelelő csatlakozását a felvevőkészülékhez.
A felvevőkészülék antennacsatlakozásáról lásd annak használati utasítását.
BN68-01528A-00Hun.indd 34 2008-4-21 15:23:53

Magyar - 35
Hang hallgatása vevőkészüléken keresztül
A TV hangszórója helyett vevőkészüléken keresztül is hallgathatja a hangot.
1. A menü megjelenítéséhez nyomja meg a MENU gombot.
A ▲ vagy a ▼ gombbal válassza ki a Bemenet elemet, majd nyomja meg az
ENTER gombot.
2. Az Anynet
+
(HDMI-CEC) kiválasztásához nyomja meg a ▲ vagy ▼ gombot, majd
az
ENTER gombot.
3. A Vevő kiválasztásához nyomja meg a ▲ vagy ▼ gombot, majd az ENTER gombot.
4. Az Be kiválasztásához nyomja meg a ◄ vagy ► gombot, majd az ENTER gombot.
Most a vevőkészüléken keresztül hallgathatja a hangot.
5. Az EXIT gomb megnyomásával léphet ki.
➢
Ha a vevőkészülék be van kapcsolva, a kétcsatornás vevőkészüléken keresztül
hallgathatja a TV hangját.
➢
Ha a vevőkészülék csak házimozirendszerrel használható (csak hang), akkor nem feltétlenül jelenik meg az
eszközlistában.
➢
Előfordulhat, hogy szerzői jogi problémát felvető tartalom nem szól megfelelően a vevőkészüléken.
➢
Ha vevőkészüléken keresztül hallgatja a műsort, a PIP funkció és a hanggal kapcsolatos menü használata
korlátozott.
Szerviz előtt ellenőrzendő
Hiba Megoldás
Az Anynet
+
nem működik. ■ Ellenőrizze, hogy az eszköz alkalmas-e az Anynet
+
funkció használatára.
Az Anynet
+
rendszer csak Anynet
+
eszközökkel használható.
■ Csak egy vevőkészüléket csatlakoztasson.
■ Ellenőrizze az Anynet
+
eszköz tápkábelének megfelelő csatlakozását.
■
Ellenőrizze az Anynet
+
eszköz video-, audio- és HDMI-kábelének
csatlakozását.
■ Ellenőrizze, hogy az Anynet+ (HDMI-CEC) be van-e kapcsolva az Anynet
+
beállítási menüben.
■ Ellenőrizze, hogy a TV távvezérlője TV módban van-e.
■ Ellenőrizze, hogy a távvezérlő alkalmas-e az Anynet
+
használatára.
■ Az Anynet
+
bizonyos esetekben nem működik. (Csatornakeresés)
■ A HDMI-kábel csatlakoztatásakor és eltávolításakor keresse meg újra a
csatornákat, vagy kapcsolja ki, majd be a TV-t.
■ Ellenőrizze, hogy az Anynet
+
eszköz Anynet
+
funkciója be van-e kapcsolva.
El szeretném indítani az Anynet
+
funkciót.
■ Ellenőrizze, hogy az Anynet
+
eszköz megfelelően csatlakozik-e a TV-hez,
illetve az Anynet
+
(HDMI-CEC) be van kapcsolva az Anynet
+
beállítás
menüben.
■ A TV-re váltáshoz nyomja meg a TV távvezérlőjén a
TV gombot. Nyomja
meg a
TOOLS gombot az Anynet
+
menü megjelenítéséhez, és válassza ki
a megfelelő menüt.
Ki szeretnék lépni az Anynet
+
funkcióból.
■ Válassza a
TV-nézés lehetőséget az Anynet
+
menüben.
■ Nyomja meg a
SOURCE gombot a TV távvezérlőjén, és válasszon nem
Anynet
+
eszközt.
■
A TV üzemód megváltoztatásához nyomja meg a P, CH LIST vagy a PRE-
CH gombot. (Ne feledje, hogy a csatornagomb csak akkor működik, ha
hangolóegységbe épített Anynet
+
eszköz nincs csatlakoztatva.)
A „Connecting to Anynet
+
device…” (Csatlakozás Anynet
+
eszközhöz) üzenet jelenik meg a
képernyőn.
■ Nem használhatja a távvezérlőt Anynet+ beállításakor és megtekintési
módra váltáskor.
■ A távvezérlőt az Anynet
+
beállítás vagy a megtekintési módra váltás
befejezésekor használja.
Az Anynet
+
eszköz nem játszik
le.
■ Plug & Play funkció használata közben a lejátszás nem használható.
A csatlakoztatott eszköz nem
jelenik meg.
■ Ellenőrizze, hogy az eszköz támogatja-e az Anynet+ funkciót funkciók.
■ Ellenőrizze a HDMI-kábel megfelelő csatlakoztatását.
■ Ellenőrizze, hogy az Anynet
+
(HDMI-CEC) be van-e kapcsolva az Anynet
+
beállítási menüben.
■ Keressen újra Anynet
+
eszközöket.
■ Anynet
+
eszköz csatlakoztatásához használja a HDMI-kábelt. Előfordulhat,
hogy bizonyos HDMI-kábelekkel az Anynet
+
funkciók nem használhatók.
A TV-műsor nem rögzíthető. ■ Ellenőrizze a felvevőkészülék antennacsatlakozójának megfelelő
csatlakozását.
Belépés
Mozgatás
TV-nézés
Eszközválasztás
Felvétel
Eszközmenü
Eszköz kezelése
Vevő :Be
Beállítás
TV P 1
Vissza
BN68-01528A-00Hun.indd 35 2008-4-21 15:23:53

Magyar - 36
A Teletext funkció (a típustól függően)
A legtöbb televíziós csatorna teletexten keresztül írásos információt szolgáltat. A teletext
szolgáltatás tartalommutató oldala leírja, hogyan használhatja ezt a szolgáltatást. Továbbá tetszés
szerint választhat a különböző opciók közül a távvezérlő gombjainak segítségével.
☛
A teletext-információ pontos megjelenítéséhez megbízható vételre van szükség, különben információ
veszhet el, és nem mindegyik oldal jeleníthető meg.
1
TV
Kilépés a teletext képernyőről (típusfüggő)
2
(tárolás)
Teletext oldalak tárolására szolgál.
3
(méret)
Megnyomásával dupla méretben jelenítheti meg a betűket a
képernyő felső részén. A képernyő alsó részén ugyanehhez a
művelethez nyomja meg ismét a gombot.A normál képernyőhöz
a gomb ismételt megnyomásával térhet vissza.
4
(felfedés)
Rejtett szöveg (pl. fejtörők megfejtései) megjelenítése. A normál
képernyőhöz a gomb ismételt megnyomásával térhet vissza.
5
Színes gombok (vörös/zöld/sárga/kék)
Ha a műsorszolgáltató FASTEXT rendszert használ, a teletext
oldalon található, színkóddal jelölt különböző témák a színes
gombokkal is kiválaszthatók. A kívánt művelethez nyomja
meg a megfelelő színű gombot. Megjelenik egy további
színes információkat tartalmazó oldal, amelyben ugyanezzel
a módszerrel választhat.Az előző vagy a következő oldal
előhívásához nyomja meg a megfelelő színes gombot.
6
(teletext be/vegyes)
A teletext mód aktiválása egy teletext szolgáltatást tartalmazó
csatorna kiválasztását követően. Két alkalommal való
megnyomásával egyszerre jelenítheti meg, átfedésben, a
teletext oldalt és a csatornán vett képet.
7
(mód)
A teletext mód kiválasztásához nyomja meg (LIST/FLOF).
Ha LIST módban nyomja meg, a lista mentése módba vált.
A lista mentése módban a (tárolás) gombbal mentheti a
teletextoldalt.
8
(aloldal)
Az elérhető aloldal megjelenítése.
9
(következő oldalra)
A következő teletext oldalt jeleníti meg.
0
(előző oldalra)
Az előző teletext oldalt jeleníti meg.
!
(tartalomjegyzék)
A tartalomjegyzék oldal megjelenítése a teletext használata
közben bármikor.
@
(tartás)
A képernyő tartása egy adott oldalon, ha az oldalhoz még
további oldalak is tartoznak,
amelyek automatikusan töltődnek be. Az üzemmódból a gomb
ismételt lenyomásával léphet ki.
#
(mégse)
Oldal keresése közben látható a műsorszórás.
➢
A távvezérlőn található számozott gombok megnyomásával
közvetlenül válthat a teletext oldalak között.
Folytatás…
BN68-01528A-00Hun.indd 36 2008-4-21 15:23:55

Magyar - 37
A teletext oldalak hat kategóriába soroltak.
Betűjel Tartalom
A
B
C
D
E
F
A kiválasztott oldalszám.
A sugárzó csatorna azonosítója.
Aktuális oldalszám vagy kereséssel
kapcsolatos jelzések.
A dátum és az idő.
A szöveg.
Állapotinformáció.
FASTEXT információ.
➢
A teletext-információ gyakran több, egymás után megjelenő
oldalon jelenik meg, amelyek az alábbi módokon érhetők el:
Az oldalszám beírásával
Egy címnek a listából történő kiválasztásával
Egy színes címsor kiválasztásával (FASTEXT rendszer)
➢
A TV gomb megnyomásával léphet ki a teletext megjelenítési
módból.
BN68-01528A-00Hun.indd 37 2008-4-21 15:23:56

Magyar - 38
A fali konzol tartozékainak szabványadatai (VESA)
A fali konzolt szilárd falra, a padlóra merőlegesen szerelje fel.
Ha a fali konzolt más felületre szereli fel, lépjen kapcsolatba a legközelebbi márkakereskedővel.
A mennyezetre vagy ferde falra történő felszerelés súlyos személyi sérüléseket okozhat.
Termékcsalád hüvelyk VESA szabv. (A
*
B) Szabványos csavar Mennyiség
LCD-TV
23 ~ 26 200
*
100 M4
4
32 ~ 40 200
*
200 M6
46 ~ 52
400
*
400
600
*
400
M8
57
700
*
400
(Nincs szabvány)
57 ~ 70 800 * 400
80 ~ 1400 * 800
PDP-TV
42 ~ 58
400
*
400
600
*
400
M8
4
63
676
*
407
(Nincs szabvány)
6
63~70 800 * 400 4
80 ~ 1400 * 800 4
➢
Az általunk forgalmazott fali konzol tartozékainak méretei a fenti táblázatban bemutatott szabványnak
felelnek meg.
➢
Ha a mi fali konzolunkat vásárolja meg, a felszereléshez szükséges tartozékokat és a részletes
felszerelési útmutatót is megkapja.
➢
Ne használjon a szabványos méretnél hosszabb csavarokat, mert ezek károsíthatják a készülék
belsejét.
➢
A VESA csavarszabványnak nem megfelelő falikarok használata esetén a csavarok hossza a
specifikációtól függően változhat.
➢
Ne használjon a VESA csavarszabvány előírásainak nem megfelelő csavarokat.
Ne húzza meg túl erősen a csavarokat, mivel ez károsíthatja a terméket, vagy a termék földre esését
okozhatja, ami személyi sérüléshez vezethet. A Samsung semmilyen felelősséget nem vállal az ilyen
balesetekért.
➢
A Samsung nem felel azokért a károkért vagy sérülésekért, melyeket a nem VESA szabványnak
megfelelő falikar használata, vagy a termék szerelési utasításának figyelmen kívül hagyása okoz.
➢
Az 57 és 63 hüvelyk átmérőjű modelljeink nem felelnek meg egyik VESA szabványnak sem.
Ezért célszerű az ehhez a modellhez kialakított saját fali konzol használata.
➢
A TV felszerelésekor legfeljebb 15 fokban döntse meg a készüléket.
Ne szerelje fel a falikart, ha a TV be van kapcsolva.
Ez áramütés miatti sérülést okozhat.
BN68-01528A-00Hun.indd 38 2008-4-21 15:23:56

Magyar - 39
Belépés a menübe
1
Nyomja meg a távvezérlő ▲, ▼, ◄ vagy ► gombját.
➢ Megjelenik a falra szerelés képernyője.
➢ Ha a TV-nézés közben valamelyik iránygombra kattintva
nem jelenik meg a falra szerelés képernyője, a menüből
jelenítse meg azt.
• A menü megjelenítéséhez nyomja meg a MENU
gombot. A ▲ vagy a ▼ gombbal válassza ki a Beállítás
elemet, majd nyomja meg az ENTER gombot.
• A ▲vagy a ▼ gombbal válassza ki a Fali konzol
állítása elemet, majd nyomja meg az ENTER gombot.
A pozíció eltárolása
2 A ▲, ▼, ◄, ► gombokkal állítsa be a kívánt pozíciót.
➢ Ha akkor nyomja meg valamelyik nyílgombot, amikor
a TV-képernyőn nem látható képernyőmenü, akkor a
beállítási képernyő jelenik meg.
➢ A visszaállításhoz nyomja meg az INFO gombot. A ◄
vagy a ► gombbal válassza ki az Igen lehetőséget, majd
nyomja meg az ENTER gombot. A pozíció visszaáll az
alapértelmezett beállításra.
3 Nyomja meg a kék gombot.
A
jelenlegi pozíció mentéséhez a ▲ vagy a ▼ gombbal
válassza ki az 1. pozíció, 2. pozíció vagy 3. pozíció mentési
módok valamelyikét.
➢ Ha nem kívánja menteni a jelenlegi pozíciót, nyomja meg
a RETURN gombot.
➢ Mentési mód választásakor a színgombok nem
használhatók.
4 Nyomja meg az ENTER gombot.
➢ Az 1. pozíció kiválasztásakor a Jelnelegi, elmentett
helyzet neve: 1. pozíció üzenet jelenik meg.
5 Nyomja meg az ENTER gombot.
➢ A mentett pozíció a képernyőmenü bal oldalán jelenik
meg.
A (külön kapható) fali konzol állítása
A fali konzol felszerelését követően könnyen módosíthatja TV-je helyzetét.
A hátlap Falra szerelt
Soros kábel (1P–1P) (nem tartozék)
Mozgatás
Belépés
Vissza
Plug & Play
Nyelv : Magyar
Idő
Fényeffektus
:
Használatkor be
Fali konzol állítása
Dallam : Ki
Szórakoztatás : Mozi
Energiagazd. : Ki
PIP
Beállítás
T V
Fali konzol állítása
Beállítás
Mentés Középső
►
►
►
►
►
►
►
►
321Helyzet
Mentés
Vissza
Mozgatás
Belépés
Válassza ki a mentés módját.
Helyzet 1
Helyzet 2
Helyzet 3
BN68-01528A-00Hun.indd 39 2008-4-21 15:23:58

Magyar - 40
Az állvány összeszerelése (modelltől függő)
Helyezze a monitort az állványra, és szilárdan rögzítse monitort az
állványhoz a kapott 4 csavarral.
(A készülék kinézetében különbözhet az ábrán szereplőtől.)
Ha a készüléket a falra
szereli, takarja el az állvány
felszerelésére szolgáló nyílást
a borítóval (1), és rögzítse két
csavarral.
Figyelem
Az állványt szilárdan rögzítse a
készülékhez, mielőtt a helyére tenné,
mert az állvány kieshet, és súlyos
sérülést okozhat.
➢
A TV elhelyezéséhez legalább két
ember szükséges. Ne helyezze
a készüléket a padlóra, mert ez
a készülék megrongálódásához
vezethet.
A plazmaképernyőt mindig
függőlegesen kell tárolni.
A mentett pozícióba mozgatás
1
Hajtsa végre a Belépés a menübe rész 1. lépését.
2 Egy színgomb (vörös, zöld vagy sárga) megnyomásával a fali
konzol a mentett pozícióba áll.
➢
A fali konzolt a három előre megadott pozíció egyikébe
mozgathatja a vörös (1. pozíció), a zöld (2. pozíció) vagy
a sárga gomb (3. pozíció) megnyomásával.
➢
Ha az előre beállított pozícióba mozgatást követően
módosítja a pozíciót, a pozíció megjelenítése eltűnik.
➢
A felszereléshez lásd a fali konzolhoz kapott Szerelési
útmutatót.
➢
A termék felszereléséhez, illetve a fali konzol felszereléséhez
és mozgatásához forduljon szakemberhez.
➢
Ez a szerelési útmutató a fali konzol falra szereléséhez
használandó. Más építőanyagokhoz való rögzítés esetén
forduljon a legközelebbi márkakereskedőhöz.
➢
Az automatikus falra szerelés az Anynet+ mûködésekor nem
használható.
➢
A 42 hüvelykes típus nem használható a régebbi fali konzollal
(WMN5090A).
Fali konzol állítása
Beállítás
Mentés Középső
►
►
►
►
►
►
►
►
321Helyzet
Helyzet 1
BN68-01528A-00Hun.indd 40 2008-4-21 15:24:00

Magyar - 41
A TV falra rögzítése
A TV leeshet, ha elhúzzák, eltolják, vagy a tetejére másznak. Különösen arra ügyeljen, hogy
gyermekei ne borítsák fel a TV-t, mert az súlyos sérülést, sőt akár halált is okozhat. Tartsa
be a mellékelt biztonsági tájékoztatóban foglalt összes biztonsági előírást. A még nagyobb
stabilitás és biztonság érdekében az alábbiak szerint szerelje fel a leesés elleni eszközt:
A TV leesésének megakadályozása:
1. Illessze a csavarokat a kapcsokba, és szorosan rögzítse a
falhoz. Ellenőrizze a csavarok szoros illeszkedését a falhoz.
A fal típusától függően más anyag, például tipli
használata is szükséges lehet.
A szükséges kapcsok, csavarok és zsineg nincs
a készülékhez mellékelve, ezért azokat külön kell
beszerezni.
2. Távolítsa el a csavarokat a TV hátoldalának közepéről,
helyezze a csavarokat a kapcsokba, majd erősítse a
csavarokat ismét a TV-hez.
Előfordulhat, hogy a csavarok nincsenek mellékelve a
termékhez. Ebben az esetben az alábbiaknak megfelelő
csavarokat vásároljon.
3. A TV-hez és a falhoz rögzített kapcsokat kösse össze erős
zsineggel, majd húzza meg szorosan a zsineget.
Helyezze a TV-t a fal közelébe, nehogy hátraessen.
A zsineg akkor köthető meg biztonságosan, ha a falhoz
rögzített kapcsok a TV-hez rögzített kapcsokkal egyforma
magasságban vagy azoknál alacsonyabban vannak.
A TV elmozdítása előtt oldja ki a zsineget.
4. Ellenőrizze a csatlakozások biztonságosságát. Időnként
ellenőrizze a csatlakozások megfelelőségét. Ha kétsége
támad a csatlakozások biztonságát illetően, forduljon
szakemberhez.
➣
➣
➣
➣
➣
➣
Fal
Fal
Figyelmeztetés
BN68-01528A-00Hun.indd 41 2008-4-21 15:24:01

Magyar - 42
Hibaelhárítás
Mielőtt felvenné a kapcsolatot a Samsung ügyfélszolgálattal, tanulmányozza a következő
táblázatot. Ha az alábbi utasítások segítségével nem tudja megoldani a problémát, készítse elő
a TV-készülék modellszámát és sorozatszámát, majd vegye fel a kapcsolatot a helyi forgalmazóval.
Nincs kép vagy hang
Ellenőrizze, hogy a tápfeszültség vezetéke csatlakoztatva van-e a fali csatlakozóaljzatba.
Ellenőrizze, hogy a televízió előoldalán található (Power) (Be/Fi) fő kapcsolót megnyomta-e, vagy
nyomja meg a távvezérlő POWER gombját.
Ellenőrizze a kép kontraszt- és fényerő-beállítását.
Ellenőrizze a hangerőt.
Ellenőrizze, hogy a TV hangszóró Ki állásban van-e.
A kép normális, de nincs hang
Ellenőrizze a hangerőt.
Bizonyosodjon meg róla, hogy nem nyomta-e meg a távirányító MUTE gombját.
Nincs kép, vagy csak fekete-fehér kép van
Módosítsa a színbeállításokat.
Ellenőrizze, hogy a kiválasztott műsorszórórendszer megfelelően működik-e.
A hangot és a képet zavarja valami.
Próbálja megkeresni a televízió működését befolyásoló elektromos készüléket, és vigye azt a
készüléktől távolabb.
A televíziót csatlakoztassa egy másik tápfeszültség-aljzathoz.
Elmosódott vagy szemcsés kép, illetve torz hang tapasztalható.
Ellenőrizze az antenna irányát, elhelyezését és csatlakozásait.
Ezt az interferenciát gyakran beltéri antenna használata okozza.A távirányító nem megfelelően működik
Cserélje ki a távvezérlő elemeit.
Tisztítsa meg a távvezérlő felső szélét (az átviteli ablakot).
Ellenőrizze, hogy a megfelelő jelzéshez igazodik-e az elem „+” és „-” pólusa.
Ellenőrizze, hogy nem merültek-e le az elemek.
A képernyő sötét, a tápfeszültségjelző pedig folyamatosan világít.
A számítógépen ellenőrizze a következőket: tápellátás, jelkábel.
A TV-készülék a saját energiakezelő rendszerét használja.
Mozdítsa meg a számítógép egerét vagy nyomja meg a billentyűzet valamelyik billentyűjét.
Ellenőrizze a csatlakozó készüléken (STB-egységen, DVD-lejátszón stb.) a tápellátást, jelkábelt.
A TV-készülék a saját energiakezelő rendszerét használja.
Nyomja meg a panel vagy a távvezérlő Source gombját.
Kapcsolja ki, majd be a televíziót.
A sérült kép a képernyő sarkán jelenik meg.
Ha egyes külső eszközök esetében a Csak pásztázás lehetőséget választja, a sérült kép a képernyő
sarkán jelenhet meg. Ezt a jelenséget a külső eszköz okozza, nem a TV.
Megjelenik az „Alapértelmezett beállítások visszaállítása” üzenet.
Akkor jelenik meg, ha a EXIT gombot egy ideig lenyomva tartja. A készülék beállításai visszaállnak
az alapértelmezett beállításokra.
BN68-01528A-00Hun.indd 42 2008-4-21 15:24:01

Magyar - 43
Műszaki leírás
A SAMSUNG mindenkor termékei javítását, fejlesztését tartja szem elôtt.
Ezért a mûszaki adatok és a használati útmutató megváltoztatásának jogát fenntartja.
A 2/1984. (III. 10.) BkM–IpM számú együttes rendelet alapján tanúsítjuk, hogy a PS50A470 típusú
SAMSUNG gyártmányú színes televíziók megfelelnek az alábbi mûszaki jellemzôknek:
A modell neve PS50A470
Képernyő mérete (képátló) 50 inch
A PC felbontása 1360 x 768 @ 60 Hz
Hangkimenet 10 W + 10 W
Méretek (SzélesxMagasxMély):
Készülékház
Állvánnyal
1290 x 740 x 95 mm
1290 x 804 x 319 mm
Súly
Készülékház
Állvánnyal
39 kg
41 kg
Környezeti feltételek
Üzemelési hőmérséklet
Üzemelési páratartalom
Tárolási hőmérséklet
Tárolási páratartalom
10 °C – 40 °C (50°F – 104°F)
10% – 80%, nem kondenzáló
-20 °C – 45 °C (-4°F – 113°F)
5% – 95%, nem kondenzáló
➢
Ez a készülék a B osztályba tartozó digitális készülék.
A kivitel és a jellemzők előzetes értesítés nélkül változhatnak.
A tápellátásra és energiafogyasztásra vonatkozó előírásokat a termékre ragasztott címkén
tekintheti meg.
BN68-01528A-00Hun.indd 43 2008-4-21 15:24:01

A termék megfelelő leadása
(Elektromos és Elektronikus Készülékek Hulladékkezelése)
A terméken vagy a hozzá tartozó dokumentáción szereplő jelzés
arra utal, hogy hasznos élettartama végén a terméket nem szabad
háztartási hulladékkal együtt kidobni. Annak érdekében, hogy
megelőzhető legyen a szabálytalan hulladékleadás által okozott
környezet- és egészségkárosodás, különítse ezt el a többi hulladéktól,
és felelősségteljesen gondoskodjon a hulladék leadásáról, a
hulladékanyagok fenntartható szintű újrafelhasználása céljából.
A háztartási felhasználók a termék forgalmazójától vagy a helyi
önkormányzati szervektől kérjenek tanácsot arra vonatkozóan, hová
és hogyan vihetik el ez elhasznált terméket a környezetvédelmi
szempontból biztonságos hulladékleadás céljából.
Az üzleti felhasználók lépjenek kapcsolatba a forgalmazóval, és vizsgálják
meg az adásvételi szerződés feltételeit. A terméket nem szabad leadni
kereskedelmi forgalomból származó egyéb hulladékkal együtt.
BN68-01528A-00Hun.indd 44 2008-4-21 15:24:01

Polski - 2
Instrukcja obsługi
Utrwalanie obrazu
Na ekranie plazmowym nie należy wyświetlać nieruchomego obrazu (np. gry komputerowej, gdy
ekran podłączony jest do komputera PC) przez czas dłuższy niż 2 godziny, ponieważ może to
spowodować utrwalanie obrazu. Utrwalenie obrazu określa się także mianem „wypalania ekranu”.
Aby uniknąć tego zjawiska, w trakcie wyświetlania nieruchomego obrazu należy obniżyć jasność i
kontrast ekranu.
Wysokość
Telewizor plazmowy w zwykłych warunkach może działać tylko na wysokościach poniżej 2000 m.
Na wyższych wysokościach może działać wadliwie, a więc w takich miejscach nie należy urządzenia
instalować ani używać.
Nagrzewanie się górnej ścianki telewizora plazmowego
Przy dłuższym używaniu produktu górna ścianka może nagrzewać się do bardzo wysokiej
temperatury, ponieważ ciepło powstające w trakcie pracy urządzenia jest odprowadzane przez
otwór wentylacyjny na górze obudowy. Jest to normalny objaw i nie oznacza usterki lub uszkodzenia
produktu. Należy jednak uważać, aby dzieci nie dotykały górnej części urządzenia.
Odgłosy trzaskania
Przy zmianie warunków otoczenia, takich jak temperatura czy wilgotność, telewizor może
nieznacznie kurczyć się lub rozszerzać — efektom takim mogą towarzyszyć charakterystyczne
dźwięki. Jest to normalny objaw i nie oznacza uszkodzenia produktu.
Uszkodzone komórki
Telewizor plazmowy wyposażony jest w ekran zawierający od 1 230 000 (jakość SD) do 3 150 000
(jakość HD) pikseli, do wytworzenia których wymagane jest zastosowanie zaawansowanych
technologii. Mimo tego na ekranie może występować kilka jasnych lub ciemnych pikseli. Nie mają
one negatywnego wpływu na działanie urządzenia.
Nie korzystać z telewizora przy temperaturze poniżej 5°C(41°F)
Zbyt długie wyświetlanie nieruchomego obrazu może spowodować trwałe uszkodzenie panelu
plazmowego.
W wyniku długotrwałego wyświetlania na telewizorze plazmowym obrazu w
formacie 4:3 na środku ekranu, a także po jego lewej i prawej stronie, mogą
utrwalić się ślady ramki spowodowane różnicą w emisji światła na ekranie.
Podobny efekt może wystąpić przy odtwarzaniu filmów DVD lub używaniu
konsoli do gier. Uszkodzenia spowodowane tym efektem nie są objęte
gwarancją.
Efekt powidokowy
Wyświetlanie przez dłuższy czas nieruchomych obrazów z konsoli do gry lub komputera może być
przyczyną powstania efektu powidokowego. Aby uniknąć tego zjawiska, w trakcie wyświetlania
nieruchomego obrazu należy obniżyć jasność i kontrast wyświetlanego obrazu.
Gwarancja
- Gwarancja nie obejmuje uszkodzeń związanych z utrwalaniem obrazu.
- Gwarancja nie obejmuje wypalenia ekranu.
Montaż
W przypadku gdy produkt ma pracować w miejscu o dużym zapyleniu, w wysokiej lub niskiej
temperaturze, przy wysokiej wilgotności, gdy może być narażony na działanie substancji
chemicznych lub gdy ma pracować w trybie ciągłym (np. na lotniskach, stacjach kolejowych
itp.), należy skontaktować się z autoryzowanym serwisem. Niedopełnienie tego wymogu może
doprowadzić do poważnego uszkodzenia produktu.
Skontaktuj się z firmą SAMSUNG na całym świecie
Jeśli masz uwagi lub pytania w sprawie produktów marki Samsung, skontaktuj się z infolinią SAMSUNG.
(Dalsze informacje znajdują się na ostatniej stronie.)
© 2008 Samsung Electronics Co., Ltd. All rights reserved.
BN68-01528A-00Pol.indd 2 4/21/2008 3:17:04 PM

Polski - 3
Symbole
☛ ➢
Naciśnij przycisk
Ważne
Notatki
Spis treści
Informacje ogólne
Instrukcja obsługi ............................................ 2
Lista elementów .............................................. 4
Korzystanie z podstawy .................................. 4
Panel sterowania ...........................................5
Panel złączy .................................................... 6
Wygląd pilota .................................................8
Obsługa
Włączanie i wyłączanie telewizora .................. 9
Korzystanie z menu ........................................9
Funkcja „Plug and Play” ................................ 10
Używanie przycisku TOOLS .........................12
Wyświetlanie obrazu ze źródła zewnętrznego
.. 12
Edytowanie nazw urządzeń .......................... 13
Ustawianie kanałów
Automatyczne programowanie kanałów ....... 13
Ręczne programowanie kanałów .................. 14
Dodawanie i blokowanie kanałów ................. 15
Sortowanie zaprogramowanych kanałów ..... 16
Nadawanie nazw kanałom ............................ 16
Strojenie precyzyjne ...................................... 17
Ustawianie obrazu
Zmiana trybu wyświetlania obrazu ................ 18
Regulacja ustawień obrazu ........................... 18
Kongurowanie szczegółowych ustawień
obrazu ........................................................... 19
Opcje obrazu ................................................. 20
Korzystanie z funkcji obrazu
trójwymiarowego ........................................... 22
Wybieranie trybu ekranu ............................... 24
Ustawianie dźwięku
Funkcje dźwięku ...........................................25
Wybieranie trybu dźwięku
(w zależności od modelu) .............................26
Podłączanie słuchawek
(sprzedawane osobno) .................................26
Opis funkcji
Funkcje czasu ............................................... 27
Język / Melodia / Efekt świetlny / Rozrywka /
Oszcz. energii / PIP.......................................28
Tryb monitora komputerowego
Konguracja oprogramowania
komputerowego (w systemie Windows XP) .. 29
Tryb wejścia (PC) .......................................... 30
Kongurowanie komputera ........................... 31
O Anynet+
Czym jest Anynet+? ......................................
32
Podłączanie urządzeń Anynet+
..................... 32
Konguracja systemu Anynet+...................... 33
Wyszukiwanie i przełączanie pomiędzy
urządzeniami Anynet+................................... 33
Nagrywanie ................................................... 34
Odbiór dźwięku za pomocą odbiornika ......... 35
Czynności kontrolne. które warto wykonać
przed oddaniem urządzenia do serwisu ....... 35
Dodatek
Funkcja telegazety
(w zależności od modelu) .............................36
Dane techniczne zestawu wspornika do montażu
naściennego (VESA)
......................................... 38
Regulacja wspornika ściennego
(sprzedawany osobno) .................................. 39
Montaż podstawy
(w zależności od modelu) .............................40
Przymocowanie telewizora do ściany ...........
41
Rozwiązywanie problemów ........................... 42
Dane techniczne ........................................... 43
Polski
BN68-01528A-00Pol.indd 3 4/21/2008 3:17:05 PM

Polski - 4
Lista elementów
Instrukcja obsługi Pilot / Baterie AAA Kabel zasilający Szmatka do
czyszczenia
Gwarancja/
Podręcznik zasad bezpieczeństwa
(Dostępne w niektórych krajach)
Dolna pokrywa/Śruby (2ea)
(patrz str. 40)
Rdzeń ferrytowy do
kabla zasilania
Rdzeń ferrytowy do
przewodu S-Video
Do nabycia osobno
Kabel antenowy Kabel rozdzielonych
składowych sygnału
Kabel komputerowy Kabel audio
Kabel SCART Kabel do przekazywania
dźwięku z komputera
Kabel HDMI Kabel HDMI/DVI
➢
Rdzeń ferrytowy (kabel zasilania, S-Video)
Rdzenie ferrytowe służą do ekranowania przewodów przed
zakłóceniami.
Podczas podłączania należy przymocować jeden z rdzeni do
przewodu w pobliżu wtyku.
Korzystanie z podstawy
➢
Telewizor powinny przenosić co
najmniej dwie osoby. Nie wolno go
kłaść na podłodze, gdyż grozi to
uszkodzeniem ekranu. Telewizor
należy zawsze trzymać w pozycji
pionowej.
Telewizor można obracać o 20
stopni w lewo i w prawo.
-20° ~ 20°
BN68-01528A-00Pol.indd 4 4/21/2008 3:17:08 PM

Polski - 5
Panel sterowania
1
SOURCE
Wyświetlanie menu wyboru źródła sygnału
wejściowego (TV, Złącze1, Złącze2, AV, S-
Video, Moduł, PC, HDMI1, HDMI2, HDMI3).
➢
Podczas poruszania się po menu przycisk
ten pełni taką samą funkcję jak przycisk
ENTER na pilocie.
2
MENU
Wyświetlanie menu ekranowego z funkcjami
telewizora.
3
– +
Naciśnij, aby zwiększyć lub zmniejszyć
głośność.
W menu ekranowym przyciski – +
spełniają tę samą rolę co przyciski ◄ lub ►
na pilocie.
4
C/P.
Zmiana kanału. W menu ekranowym przyciski
C/P. spełniają tę samą rolę co
przyciski ▲ lub ▼ na pilocie.
5
Wskaźnik zasilania
Miga i gaśnie, gdy zasilanie jest włączone;
świeci w trybie gotowości.
6
Przycisk zasilania
Włączanie i wyłączanie telewizora.
7
Czujnik pilota
Pilot zdalnego sterowania należy skierować w
to miejsce w telewizorze.
8
Głośnik
➢
Kolor i kształt produktu mogą się różnić w zależności od modelu.
Panel przedni (lub boczny)
BN68-01528A-00Pol.indd 5 4/21/2008 3:17:09 PM

Polski - 6
Panel złączy
Ciąg dalszy...
☛
Przed podłączeniem dowolnego urządzenia audio lub wideo do telewizora należy się upewnić,
że wszystkie urządzenia są wyłączone.
Podczas podłączania urządzenia zewnętrznego należy uważać, aby złącza kabli były
podłączane do gniazd w tym samym kolorze.
1
WEJŚCIE ZASILANIA
Wejście do podłączenia dostarczonego kabla
zasilającego.
2
COMPONENT IN
Wejścia audio (AUDIO L/R) i wideo (Y/PB/PR)
dla sygnału o rozdzielonych składowych.
3
PC IN / AUDIO
Złącza wejść audio i wideo do podłączenia
komputera.
4
EXT 1, EXT 2
Wejścia i wyjścia do urządzeń zewnętrznych,
np. magnetowidu, odtwarzacza DVD,
urządzenia do gier wideo lub odtwarzacza płyt
wizyjnych.
Specyfikacja wejść/wyjść
Złącze
Sygnał wejściowy Sygnał wyjściowy
Wideo Audio (L/P) RGB
Wideo + Audio (L/P)
Złącze EXT
1
✔ ✔ ✔
Dostępny jest tylko
sygnał TV cyfrowej.
Złącze EXT
2
✔ ✔
Sygnał z wybranego
źródła.
5
Wyjście 3D SYNC OUT
Podłączanie nadajnika trójwymiarowego
obrazu w podczerwieni
6
Złącza do podłączania zewnętrznych
urządzeń dźwiękowych
Służą do podłączania sygnałów dźwiękowych
z gniazd RCA na telewizorze do gniazd źródeł
zewnętrznych, np. zestawu audio.
7
SERVICE
− Złącze do użytku serwisu.
− Podłącz złącze szeregowe
wspornika do montażu naściennego z
napędem elektrycznym w celu regulacji
kąta ustawienia telewizora przy użyciu
pilota.
Panel tylny
➢
Kolor i kształt produktu mogą się różnić w zależności od modelu.
Sieť káblovej
televízie
1
432 6 8
9
7
lub
lub
5
BN68-01528A-00Pol.indd 6 4/21/2008 3:17:12 PM

Polski - 7
8
HDMI IN 1,2
- Połączenie HDMI nie wymaga
dodatkowego połączenia
doprowadzającego sygnał dźwiękowy.
- Korzystając z połączenia kablowego HDMI/
DVI należy użyć gniazda HDMI IN 2.
➢ Co to jest HDMI?
- High Definition Multimedia interface”
(HDMI) to połączenie umożliwiające
przesyłanie cyfrowego obrazu
o wysokiej rozdzielczości oraz
wielokanałowego cyfrowego dźwięku.
- Interfejs HDMI/DVI służy do
doprowadzania sygnału DVI do
dodanego urządzenia za pomocą
odpowiedniego przewodu (dostępnego
oddzielnie). Różnica pomiędzy
interfejsem HDMI i DVI polega na tym,
że interfejs HDMI jest mniejszy, ma
zainstalowany mechanizm ochrony
praw autorskich HDCP oraz obsługuje
wielokanałowy dźwięk cyfrowy.
DVI IN (HDMI 2) AUDIO R/L
Złącza wyjść audio DVI do podłączenia
zewnętrznych urządzeń.
9
ANT IN
Złącze kabla koncentrycznego 75Ω do anteny
lub przewodu telewizji kablowej.
Obsługiwane tryby dla złączy HAMI/DVI i Component
480i 480p 576i 576p 720p 1080i
HDMI/DVI 50Hz X
X X
O
O O
HDMI/DVI 60Hz X O X X O O
Component O O O O O O
➢
Kolor i kształt produktu mogą się różnić w zależności od modelu.
Panel boczny
1
HDMI IN 3
Gniazdo HDMI służy do podłączania urządzeń
z wyjściem HDMI.
2
S-VIDEO lub VIDEO/AUDIO L/R
Złącza wejść wideo (S-Video lub Video) i audio
do podłączania urządzeń zewnętrznych, np.
kamery wideo lub magnetowidu.
3
Gniazdo słuchawek
Do telewizora można podłączyć słuchawki, aby
podczas oglądania telewizji nie przeszkadzać
innym osobom znajdującym się w pokoju.
➢
Długotrwałe korzystanie ze słuchawek
przy ustawionym wysokim poziomie
głośności może być szkodliwe dla słuchu.
3
1
lub
2
BN68-01528A-00Pol.indd 7 4/21/2008 3:17:14 PM

Polski - 8
Wygląd pilota
Ciąg dalszy...
1
Przycisk POWER (włącza i
wyłącza telewizor)
2
Służy do bezpośredniego
wybierania trybu telewizora
3
Przyciski numeryczne
umożliwiające bezpośrednie
wybieranie kanałów
4
Wybór kanałów o numerach
jedno-/dwucyfrowych
5
Chwilowe wyłączenie
dźwięku
6
Zwiększanie głośności
Zmniejszanie głośności
7
Przycisk kontroli kanałów
(patrz strona 15)
8
Do szybkiego wybierania
często używanych funkcji.
9
Sterowanie kursorem w
menu
0
Wyświetlanie informacji
o aktualnie oglądanym
programie
#
Naciśnij, aby wybrać
opcjonalne tryby
wyświetlania i dźwięku dla
zawodów sportowych, filmów
i gier.
$
Funkcje odtwarzacza wideo
i DVD (przewijanie do tyłu,
zatrzymywanie, odtwarzanie/
wstrzymywanie i przewijanie
do przodu)
%
Wybieranie źródła sygnału
wejściowego
^
Poprzedni kanał
&
Następny kanał
Poprzedni kanał
*
Wyświetlanie głównego
menu ekranowego
(
Przycisk trybu TruSurround
XT
)
Powrót do poprzedniego
menu
a
Zamknięcie menu
ekranowego
b
Wybór formatu obrazu
c
Należy zastosować w
przypadku podłączania
SAMSUNG DMA (Digital Media
Adapter) za pomocą interfejsu
HDMI i włączania trybu DMA.
(Przycisk DMA - opcjonalnie.)
Więcej informacji na temat
procedur obsługi znajduje
się w instrukcji użytkownika
dotyczącej urządzenia DMA.
Ten przycisk jest dostępny,
jeżeli dla opcji „Anynet+
(HDMI-CEC)” wybrano wartość
Wł. (Patrz str. 33).
d
Wybór trybu wyświetlania
obrazu (patrz strona 18)
e
Oglądanie filmów 3D lub
gier w trójwymiarze dzięki
okularom 3D.
Funkcje telegazety
(Patrz str. 36)
2
Zamknięcie ekranu
telegazety (w zależności od
modelu)
7
Zapisywanie stron telegazety
8
Wybór rozmiaru
wyświetlanego tekstu
telegazety
0
Wyświetlanie ukrytego tekstu
!
Wybieranie tematu Fastext
@
Wyświetlanie telegazety/
wyświetlanie jednocześnie
telegazety i normalnego
obrazu
%
Wybór trybu telegazety
(LIST/FLOF)
^
Podstrona telegazety
&
P : Następna strona
telegazety
P : Poprzednia strona
telegazety
*
Spis treści telegazety
)
Zatrzymanie telegazety
a
Wyjście z trybu telegazety
BN68-01528A-00Pol.indd 8 4/21/2008 3:17:15 PM

Polski - 9
Wkładanie baterii do pilota
1 Unieś do góry pokrywę z tyłu pilota w sposób przedstawiony
na rysunku.
2 Włóż dwie baterie o rozmiarze AAA (R03).
➢
Dopasuj bieguny „+” i „–” baterii do znaków wewnątrz
komory.
Nie instalować jednocześnie baterii różnych typów,
np. alkalicznych i manganowych.
3 Zamknij pokrywę w sposób przedstawiony na rysunku.
➢
Jeśli pilot nie będzie używany przez dłuższy czas,
wyjmij baterie i umieść je w suchym i chłodnym miejscu.
Zasięg pilota wynosi około 7 m. (W typowych warunkach
korzystania z telewizora baterie powinny starczyć na około jeden rok).
➢
Jeśli pilot nie działa! Sprawdź:
1. Czy włączone jest zasilanie telewizora?
2. Czy bieguny plus i minus baterii nie zostały zamienione?
3. Czy baterie nie są wyczerpane?
4. Czy kabel zasilający jest podłączony i jest prąd w sieci elektrycznej?
5. Czy w pobliżu nie ma żadnych specjalnych lamp jarzeniowych lub neonów?
Włączanie i wyłączanie telewizora
Kabel zasilający podłącza się z tyłu telewizora.
1 Podłącz kabel zasilający do właściwego gniazda.
➢
Wymagane napięcie sieci elektrycznej podano na tylnej ściance telewizora, a wymagana
częstotliwość to 50 lub 60 Hz.
2 Naciśnij przycisk (włącznik/wyłącznik zasilania) z przodu telewizora lub przycisk POWER na
pilocie, aby włączyć telewizor. Automatycznie zostanie wybrany kanał oglądany przed wyłączeniem
telewizora. Obraz nie pojawi się, jeśli żaden kanał nie został jeszcze zaprogramowany. Patrz
„Automatyczne programowanie kanałów” na stronie 13 lub „Ręczne programowanie kanałów” na
stronie 14.
➢
Po włączeniu telewizora po raz pierwszy następuje automatyczne ustawienie podstawowych
parametrów użytkowych. Patrz „Funkcja Plug & Play” na stronie 10.
3 Aby wyłączyć telewizor, naciśnij przycisk (włącznik/wyłącznik zasilania) z przodu telewizora lub
naciśnij przycisk POWER na pilocie zdalnego sterowania.
4 Aby włączyć telewizor, naciśnij przycisk (włącznik/wyłącznik zasilania) z przodu telewizora lub
naciśnij przycisk POWER na pilocie zdalnego sterowania.
Nawigacja
Wejdź
Wyjdź
Tryb : Standardowy
Podświetlenie komórki
7
Kontrast 95
Jasność 45
Ostrość 50
Kolor 50
Odcień Z50 C50
Ustawienia szczegółowe
Opcje obrazu
Zeruj : OK
Obraz
T V
Korzystanie z menu
1 Naciśnij przycisk MENU.
Na ekranie zostanie wyświetlone menu główne.
Po jego lewej stronie znajduje się pięć ikon: Obraz, Dźwięk,
Kanał, Ustawienia i Wejście.
2 Naciśnij przycisk ▲ lub ▼, aby wybrać jedną z ikon.
Naciśnij przycisk ENTER, aby przejść do podmenu
odpowiedniej ikony.
3 Naciśnij przycisk ▲ lub ▼, aby zaznaczyć poszczególne opcje
w menu. Naciśnij przycisk ENTER , aby przejść do podmenu
danej opcji.
4 Za pomocą przycisków ▲/▼/◄/► zmień wartość wybranych
elementów. Naciśnij przycisk RETURN, aby powrócić do
poprzedniego menu.
5 Naciśnij przycisk EXIT, aby zamknąć menu.
BN68-01528A-00Pol.indd 9 4/21/2008 3:17:16 PM

Polski - 10
Funkcja „Plug and Play”
Po włączeniu telewizora po raz pierwszy następuje
automatyczne ustawienie podstawowych parametrów
użytkowych.
Poniżej opisano dostępne ustawienia.
☛
Jeśli przypadkowo wybierzesz w ustawieniach telewizora
nieprawidłowy kraj, znaki mogą być niepoprawnie wyświetlane
na ekranie.
1 Jeśli telewizor działa w trybie gotowości, naciśnij przycisk
POWER na pilocie. Na ekranie zostanie wyświetlony komunikat
Inicjalizacja funkcji Plug&Play. Naciśnij przycisk ENTER.
2 Po kilku sekundach zostanie automatycznie wyświetlone menu
Język.
3
Wybierz odpowiedni język za pomocą przycisków ▲ lub ▼.
Naciśnij przycisk ENTER. Zostanie wyświetlony komunikat
Wybierz „Tryb domowy” jeśli telewizor ma być używany w
domu.
4 Za pomocą przycisków ◄ lub ► wybierz opcję Tryb sklep. lub
Tryb dom., a następnie naciśnij przycisk ENTER. Na ekranie
zostanie wyświetlony komunikat z żądaniem sprawdzenia stanu
podłączenia anteny.
➢
Domyślnym ustawieniem jest Tryb dom..
➢
Jeśli telewizor jest używany w domu, zalecamy włączenie
opcji Tryb domowy w celu uzyskania jak najlepszego obrazu.
➢
Tryb sklep. jest przez naczony tylko do użytku w sklepie.
➢
W razie przypadkowego włączenia trybu Sklep można
powrócić do trybu Tryb dom., naciskając przycisk głośności
i przytrzymując przez 5 sekund naciśnięty przycisk MENU
na panelu bocznym telewizora.
5 Upewnij się, że do telewizora jest podłączona antena.
Naciśnij przycisk ENTER. Zostanie wyświetlone menu Kraj.
6 Wybierz kraj, w którym mieszkasz, naciskając przycisk ▲ lub ▼.
Naciśnij przycisk ENTER. Zostanie wyświetlone menu wyboru
kanałów.
Ciąg dalszy...
Plug & Play
Inicjalizacja funkcji Plug&Play
OK
Wejdź
Wyjdź
Plug & Play
Wybierz „Tryb domowy” jeśli telewizor
ma być używany w domu.
Nawigacja
Wejdź
Pomiń
Tryb sklep.
Tryb dom.
Plug & Play
Sprawdź antenę.
Wejdź
Pomiń
OK
Plug & Play
Język
Nawigacja
Wejdź
▲
Polski
Русский
Български
▼
Plug & Play
Kraj
▲
Wlk. Brytania
Austria
Europa Wschodnia
Inne
Nawigacja
Wejdź
Pomiń
Plug & Play
P 1 C -- 40 MHz
0 %
Wejdź
Pomiń
Uruchom
BN68-01528A-00Pol.indd 10 4/21/2008 3:17:18 PM

Polski - 11
7 Aby rozpocząć programowanie kanałów, naciśnij przycisk
ENTER.
Wyszukiwanie zakończy się automatycznie. Telewizor
rozpocznie zapamiętywanie wszystkich dostępnych kanałów.
Naciśnij przycisk ENTER, aby Ust. zegara .
➢
To stop the search before it has finished, press the ENTER
button with Stop selected.
8 Naciskaj przyciski ◄/►/ENTER, aby ustawić opcje Mies,
Data, Rok, godz. lub Minuta. Ustaw wartości za pomocą
przycisku ▲ lub ▼.
➢
Mies, Data, rok, godz i Minuta można wprowadzić
bezpośrednio za pomocą przycisków numerycznych na
pilocie.
9 Naciśnij przycisk ENTER, aby potwierdzić ustawienie. Zostanie
wyświetlony komunikat Miłego oglądania. Po zakończeniu
naciśnij przycisk ENTER.
➢
Komunikat zniknie po kilku sekundach, nawet gdy nie
zostanie naciśnięty przycisk ENTER.
Ponowne uaktywnianie funkcji…
1
Naciśnij przycisk MENU, aby wyświetlić menu.
2 Za pomocą przycisków ▲ lub ▼ wybierz opcję Ustawienia,
a następnie naciśnij przycisk ENTER.
3 Naciśnij ponownie przycisk ENTER , aby wybrać opcję Plug & Play.
Zostanie wyświetlony komunikat Inicjalizacja funkcji Plug&Play.
OK
Miłego oglądania!
Nawigacja
Wejdź
Wróć
Plug & Play
Język : Polski
Time
Efekt świetlny
: Oglądanie wł.
Regulacja wspornika ściennego
Melodia :
Wył
Viihde
: Wył
Oszcz. energii :
Wył
PIP
Ustawienia
T V
Plug & Play
Nawigacja
Zmiana
Wejdź
Ust. zegara
Mies Data Rok godz.
Minuta
01 01 2008 00 04
BN68-01528A-00Pol.indd 11 4/21/2008 3:17:18 PM

Polski - 12
Wyświetlanie obrazu ze źródła zewnętrznego
Istnieje możliwość przełączenia pomiędzy wyświetlaniem
obrazu z dołączonego sprzętu, np. magnetowidu, odtwarzacza
DVD, dekodera telewizji cyfrowej, a obrazem telewizyjnym
(pochodzącym z anteny lub telewizji kablowej).
1
Naciśnij przycisk MENU, aby wyświetlić menu.
2 Za pomocą przycisków ▲ lub ▼ wybierz opcję Wejście, a
następnie naciśnij przycisk ENTER.
3 Naciśnij ponownie przycisk ENTER, aby wybrać opcję Wybierz
źródło.
4 Za pomocą przycisków ▲ lub ▼ wybierz źródło sygnału, a
następnie naciśnij przycisk ENTER.
Dostępne źródła sygnału:
TV, Złącze1, Złącze2, AV, S-Video,
Moduł, PC, HDMI1, HDMI2, HDMI3
➢
Można wybrać tylko te urządzenia zewnętrzne, które są
podłączone do telewizora.
➢
Opcje te można wybierać także za pomocą przycisku SOURCE
na pilocie.
➢
Aby ponownie włączyć program telewizyjny, naciśnij przycisk
TV i wybierz numer kanału.
Nawigacja
Wejdź
Powrót
Wybierz źródło :
TV
Edytuj nazwę
Anynet+ (HDMI-CEC)
Wejście
T V
Nawigacja
Wejdź
Powrót
TV
Złącze1 : −−−−
Złącze2 : −−−−
AV : −−−−
S-Video : −−−−
Moduł : −−−−
PC : −−−−
HDMI1 : −−−−
HDMI2 : −−−−
HDMI3 : −−−−
Wybierz źródło
T V
Używanie przycisku TOOLS
Przycisk TOOLS służy do szybkiego i łatwego wybierania często używanych funkcji. Zawartość
menu „Narzędzia” zależy od trybu pracy związanego z urządzeniem zewnętrznym.
1 Naciśnij przycisk TOOLS.
Zostanie wyświetlone menu Narzędzia.
2 Za pomocą przycisków ▲ lub ▼ wybierz menu, a następnie
naciśnij przycisk ENTER.
3 Naciśnij przyciski ▲/▼/◄/►/ENTER, aby wyświetlić, zmienić
lub użyć wybrane pozycje.Szczegółowy opis każdej funkcji
znajduje się w na odpowiedniej stronie.
• Anynet+(HDMI-CEC), patrz str. 32
• Tryb obrazu, patrz str. 18
• Tryb dźwięku, patrz str. 25
• Automatycz. wył., patrz str. 27
• SRS TS XT, patrz str. 25
• Oszcz. energii, patrz str. 29
• Dual I-II, patrz str. 26
Narzędzia
Anynet+ (HDMI-CEC)
Tryb obrazu : Standardowy
Tryb dźwięku : Użytkownika
Automatycz. wył. : Wył
SRS TS XT : Wył
Oszcz. energii : Wył
Dual I-II : Mono
◄ ► Zmiana
WyjdźNawigacja
BN68-01528A-00Pol.indd 12 4/21/2008 3:17:19 PM

Polski - 13
Edytowanie nazw urządzeń
Nazwę zewnętrznego źródła sygnału można zmienić na inną.
1
Naciśnij przycisk MENU, aby wyświetlić menu.
2 Za pomocą przycisków ▲ lub ▼ wybierz opcję Wejście, a
następnie naciśnij przycisk ENTER.
3 Za pomocą przycisków ▲ lub ▼ wybierz opcję Edytuj nazwę,
a następnie naciśnij przycisk ENTER.
4
Za pomocą przycisków ▲ lub ▼ wybierz źródło zewnętrzne, które
chcesz edytować, a następnie naciśnij przycisk ENTER.
5 Wybierz odpowiednie urządzenie, naciskając przycisk ▲ lub ▼,
a następnie naciśnij przycisk ENTER.
Dostępne nazwy urządzeń:
Magnetowid, DVD, Dekoder kabl.,
Dekoder sat., Przys. PVR, Odbiornik AV, Gra, Kamera, PC,
TV, IPTV, Blu-Ray, HD DVD, DMA.
6 Naciśnij przycisk EXIT, aby zamknąć menu.
Automatyczne programowanie kanałów
Telewizor sam wyszukuje częstotliwości, na których nadawane
są programy na danym obszarze (zależne od kraju).
Numery przypisywane programom automatycznie mogą
jednak nie odpowiadać numerom faktycznym lub wybranym
przez użytkownika. Dlatego istnieje możliwość ręcznego
przydzielenia numerów, a także kasowania kanałów, których
użytkownik nie chce oglądać.
1 Naciśnij przycisk MENU, aby wyświetlić menu.
2 Za pomocą przycisków ▲ lub ▼ wybierz opcję Kanał, a
następnie naciśnij przycisk ENTER.
3 Ponownie naciśnij przycisk ENTER, Na ekranie zostanie
wyświetlona lista dostępnych krajów.
4
Wybierz kraj, w którym mieszkasz, naciskając przycisk ▲ lub ▼,
a następnie naciśnij przycisk ENTER.
5
Za pomocą przycisków ▲ lub ▼ zaznacz opcję Automat.
zapam. a następnie naciśnij przycisk ENTER.
6 Naciśnij ponownie przycisk ENTER, aby rozpocząć
wyszukiwanie.
Wyszukiwanie zostanie zakończone automatycznie.
➢
Aby przerwać wyszukiwanie przed jego zakończeniem,
należy nacisnąć przycisk MENU lub ENTER.
Nawigacja
Wejdź
Powrót
Wybierz źródło :
TV
Edytuj nazwę
Anynet+ (HDMI-CEC)
Wejście
T V
Nawigacja
Wejdź
Powrót
Kraj :
Europa Wschodnia
Automat. zapam.
Wyszukiwanie ręczne
Menedżer kanałów
Sortuj
Nazwa
Dostrój
Kanał
T V
Automat. zapam.
P 1 C -- 40 MHz
0 %
Wejdź
Powrót
Uruchom
Nawigacja
Wejdź
Powrót
Złącze1 : −−−−
Złącze2 : −−−−
AV : −−−−
S-Video : −−−−
Moduł : −−−−
PC : −−−−
HDMI1 : −−−−
HDMI2 :
HDMI3 :
Edytuj nazwę
T V
----
Magnetowid
DVD
Dekoder kabl.
Dekoder sat.
Przys. PVR
Odbiornik AV
Gra
▼
Nawigacja
Wejdź Powrót
Kraj : Belgia
Automat. zapam.
Wyszukiwanie ręczne
Menedżer kanałów
Sortuj
Nazwa
Dostrój
Kanał
Belgia
Francja
Niemcy
Włochy
Holandia
Hiszpania
Szwajcaria
Wlk. Brytania
▼
T V
BN68-01528A-00Pol.indd 13 4/21/2008 3:17:20 PM

Polski - 14
Ręczne programowanie kanałów
W telewizorze można zaprogramować maksymalnie 100
kanałów, włącznie z odbieranymi przez sieć telewizji kablowej.
Podczas ręcznego programowania kanałów użytkownik może
od razu:
Zdecydować, czy zaprogramować poszczególne wyszukane
kanały.
Wskazać numer programu, pod którym ma się znaleźć dany
kanał.
1 Naciśnij przycisk MENU, aby wyświetlić menu.
2 Za pomocą przycisków ▲ lub ▼ wybierz opcję Kanał, a
następnie naciśnij przycisk ENTER.
3 Za pomocą przycisków ▲ lub ▼ wybierz opcję Wyszukiwanie
ręczne, a następnie naciśnij przycisk ENTER.
4 Wybierz odpowiednią opcję, naciskając przycisk ▲ lub ▼, a
następnie naciśnij przycisk ENTER.
5 Po zakończeniu regulacji ustawień naciśnij przycisk ENTER.
6 Naciśnij przycisk EXIT, aby zamknąć menu.
Program (Numer programu, który ma zostać przypisany
kanałowi)
− Naciskaj przycisk ▲ lub ▼ aż do momentu wyświetlenia właściwego numeru.
➢
Numer kanału można także wprowadzić, korzystając z przycisków numerycznych (0~9).
System obrazu: Auto/PAL/SECAM/NTSC4.43
− Za pomocą przycisków ▲ lub ▼ wybierz odpowiedni standard systemu obrazu.
System fonii: BG/DK/I/L
− Za pomocą przycisków ▲ lub ▼ wybierz odpowiedni standard systemu fonii.
Kanał (Jeśli znasz numer kanału, który ma zostać zapisany)
− Za pomocą przycisków ▲ lub ▼ wybierz opcję
C (kanał TV odbierany poprzez antenę) lub S
(kanał TV kablowej).
− Naciśnij przycisk ►, a następnie za pomocą przycisków ▲ lub ▼ wybierz odpowiedni numer.
➢
Numer kanału można także wprowadzić, korzystając z przycisków numerycznych (0~9).
➢
Jeśli występują zakłócenia lub nie słychać dźwięku, wybierz inny system dźwięku.
Szukaj (W przypadku braku znajomości numerów kanałów)
− Naciśnij przycisk ▲ lub ▼, aby rozpocząć wyszukiwanie.
− Tuner przeszukuje skalę częstotliwości, dopóki na ekranie nie pojawi się pierwszy kanał lub kanał,
którego numer został podany przez użytkownika.
Zapisz (W przypadku programowania numeru kanału oraz programu)
− Wybierz opcję
OK, naciskając przycisk ENTER.
☛
Tryb kanałów
P (tryb programowy): Po zakończeniu strojenia stacjom nadającym na danym obszarze
przypisane zostaną numery od P00 do P99. Następnie można wybrać kanał, wprowadzając jego
numer w tym trybie.
C (tryb kanałów antenowych): W tym trybie kanał wybiera się przez wprowadzenie wartości, na
której dana stacja nadaje program.
S (tryb kanałów kablowych): W tym trybie kanał wybiera się przez wprowadzenie numeru
przypisanego do kanału w sieci telewizji kablowej.
Nawigacja
Wejdź
Powrót
Kraj :
Europa Wschodnia
Automat. zapam.
Wyszukiwanie ręczne
Menedżer kanałów
Sortuj
Nazwa
Dostrój
Kanał
T V
Nawigacja
Wejdź
Powrót
Program :
P 1
System obrazu : Auto
System fonii : BG
Kanał : C --
Szukaj : 40 MHz
Zapisz : ?
Wyszukiwanie ręczne
T V
BN68-01528A-00Pol.indd 14 4/21/2008 3:17:20 PM

Polski - 15
Dodawanie i blokowanie kanałów
Za pomocą menedżera kanałów można wygodnie blokować lub
dodawać kanały.
1 Naciśnij przycisk MENU, aby wyświetlić menu.
2 Za pomocą przycisków ▲ lub ▼ wybierz opcję Kanał, a
następnie naciśnij przycisk ENTER.
3 Za pomocą przycisków ▲ lub ▼ wybierz opcję Menedżer
kanałów, a następnie naciśnij przycisk ENTER.
Dodawanie kanałów
Za pomocą Listy kanałów można dodawać kanały.
4 Wybierz opcję Lista kanałów, naciskając przycisk ENTER.
5 Przejdź do pola ( ) za pomocą przycisków ▲/▼/◄/►
i wybierz kanał, który ma zostać dodany, a następnie naciśnij
przycisk ENTER, aby dodać kanał.
➢
Po ponownym naciśnięciu przycisku ENTER symbol
( ) obok kanału znika, co oznacza, że kanał nie został
dodany.
Blokowanie kanałów
Funkcja umożliwia zablokowanie dostępu do programów
nieodpowiednich dla określonych grup odbiorców, np. dzieci,
przez wygaszenie obrazu i wyciszenie dźwięku.
6 Za pomocą przycisków ▲ lub ▼ wybierz opcję Blokada
rodzicielska, a następnie naciśnij przycisk ENTER.
7 Wybierz opcję Wł za pomocą przycisków ▲ lub ▼, a
następnie naciśnij przycisk ENTER.
8 Za pomocą przycisków ▲ lub ▼ wybierz opcję Lista kanałów,
a następnie naciśnij przycisk ENTER.
9 Przejdź do pola ( ) za pomocą przycisków ▲/▼/◄/► i
wybierz kanał, który ma zostać zablokowany, a następnie
naciśnij przycisk ENTER.
➢
Po ponownym naciśnięciu przycisku ENTER symbol
( ) obok kanału znika, co oznacza, że kanał został odblokowany.
➢
Po włączeniu opcji Blokada rodzicielska na ekranie zostanie wyświetlone niebieskie tło.
10 Naciśnij przycisk EXIT, aby zamknąć menu.
➢
Opcje te można wybierać także za pomocą przycisku CH LIST
na pilocie.
Nawigacja
Wejdź
Powrót
Kraj :
Europa Wschodnia
Automat. zapam.
Wyszukiwanie ręczne
Menedżer kanałów
Sortuj
Nazwa
Dostrój
Kanał
T V
Nawigacja
Wejdź
Powrót
Lista kanałów
Blokada rodzicielska
: Wył
Menedżer kanałów
T V
Lista kanałów
P 1 C 6
1 / 10
▲
▼
Prog.
0
C --
1 C --
2 C --
3 C --
4 C --
5 C --
6 C --
7 C --
8 C --
9 C --
Dodaj Zablokuj
Nawigacja
Wejdź
Strona
Powrót
BN68-01528A-00Pol.indd 15 4/21/2008 3:17:22 PM

Polski - 16
Sortowanie zaprogramowanych kanałów
Operacja ta umożliwia zmianę numerów przypisanych do
programów zapisanych w pamięci.
Na ogół jest to konieczne po użyciu funkcji automatycznego
programowania kanałów.
1 Naciśnij przycisk MENU, aby wyświetlić menu.
2 Za pomocą przycisków ▲ lub ▼ wybierz opcję Kanał, a
następnie naciśnij przycisk ENTER.
3 Za pomocą przycisków ▲ lub ▼ wybierz opcję Sortuj, a
następnie naciśnij przycisk ENTER.
4 Za pomocą przycisków ▲ lub ▼ wybierz kanał, który chcesz
przenieść, a następnie naciśnij przycisk ENTER.
5 Wybierz numer programu, do którego ma zostać przeniesiony
dany kanał, naciskając przycisk ▲ lub ▼.
Naciśnij przycisk ENTER. Kanał zostanie przeniesiony na nową
pozycję, a pozostałe kanały odpowiednio przesunięte.
6 Powtarzaj czynności od 4 do 5 do momentu nadania żądanych
numerów wszystkim kanałom.
7 Naciśnij przycisk EXIT, aby zamknąć menu.
Nadawanie nazw kanałom
Jeżeli wraz z sygnałem nadawca emituje informacje o kanale,
nazwa kanału zostaje przypisana automatycznie. Nazwę tę
można później zmienić na dowolną inną.
1 Naciśnij przycisk MENU, aby wyświetlić menu.
2 Za pomocą przycisków ▲ lub ▼ wybierz opcję Kanał, a
następnie naciśnij przycisk ENTER.
3 Za pomocą przycisków ▲ lub ▼ wybierz opcję Nazwa, a
następnie naciśnij przycisk ENTER.
4 Za pomocą przycisków ▲ lub ▼ wybierz kanał, któremu chcesz
nadać nową nazwę, a następnie naciśnij przycisk ENTER.
5 Za pomocą przycisków ▲ lub ▼ wybierz literę, cyfrę lub
symbol (w następującej kolejności: A~Z, 0~9, +, -, *, /, spacja).
Przejdź do poprzedniej lub następnej litery, naciskając przycisk
◄ lub ►, a następnie naciśnij przycisk ENTER.
6 Powtórz czynności opisane w punktach od 4 do 5, aby zmienić
nazwy innych kanałów.
7 Naciśnij przycisk EXIT, aby zamknąć menu.
Nawigacja
Wejdź
Powrót
Kraj :
Europa Wschodnia
Automat. zapam.
Wyszukiwanie ręczne
Menedżer kanałów
Sortuj
Nazwa
Dostrój
Kanał
T V
Nawigacja
Wejdź
Powrót
Kraj :
Europa Wschodnia
Automat. zapam.
Wyszukiwanie ręczne
Menedżer kanałów
Sortuj
Nazwa
Dostrój
Kanał
T V
Nawigacja
Wejdź
Powrót
Prog.
Kanał Nazwa
▲
0 C01 −−−−−
1 C- - −−−−−
2 C- - −−−−−
3 C- - −−−−−
4 C- - −−−−−
5 C- - −−−−−
6 C- - −−−−−
7 C- - −−−−−
8 C- - −−−−−
9 C- - −−−−−
▼
Sortuj
T V
Nawigacja
Wejdź Powrót
Prog. Kanał Nazwa
▲
0 C01 −−−−−
1 C- - −−−−−
2 C- - −−−−−
3 C- - −−−−−
4 C- - −−−−−
5 C- - −−−−−
6 C- - −−−−−
7 C- - −−−−−
8 C- - −−−−−
9 C- - −−−−−
▼
Nazwa
T V
BN68-01528A-00Pol.indd 16 4/21/2008 3:17:23 PM

Polski - 17
Strojenie precyzyjne
Jeśli obraz jest poprawny, nie ma potrzeby dostrajania kanału,
ponieważ odbywa się to automatycznie podczas wyszukiwania
i zapamiętywania kanałów.
Ręczne strojenie może być potrzebne, jeśli sygnał jest słaby
lub ulega zakłóceniom.
1 Naciśnij przycisk MENU, aby wyświetlić menu.
2 Za pomocą przycisków ▲ lub ▼ wybierz opcję Kanał, a
następnie naciśnij przycisk ENTER.
3 Za pomocą przycisków ▲ lub ▼ wybierz opcję Dostrój, a
następnie naciśnij przycisk ENTER.
4 Aby uzyskać ostry i wyraźny obraz oraz dobrej jakości
dźwięk, naciskaj przycisk ◄ lub ► do momentu uzyskania
optymalnego ustawienia. Naciśnij przycisk ENTER.
➢
Naciśnij przycisk INFO. Po zapisaniu ustawień dostrajania
obok kanału wyświetlanego w menu ekranowym pojawi się
symbol „*”,
a kolor kanału zmieni się z białego na czerwony.
➢
Aby przywrócić ustawienie dostrojenia do wartości 0, użyj
przycisków ▲ lub ▼, aby wybrać opcję Zeruj. Naciśnij
przycisk ENTER.
5 Naciśnij przycisk EXIT, aby zamknąć menu.
P 1 *
Mono
Obraz : Standardowy
Dźwięk : Użytkownika
SRS TS XT : Wył
−−
:
−−
Nawigacja
Wejdź
Powrót
Kraj :
Europa Wschodnia
Automat. zapam.
Wyszukiwanie ręczne
Menedżer kanałów
Sortuj
Nazwa
Dostrój
Kanał
T V
Dostrój
P 1
0
Zmiana
Zapisz
Powrót
Zeruj
BN68-01528A-00Pol.indd 17 4/21/2008 3:17:23 PM

Polski - 18
Regulacja ustawień obrazu
Telewizor dysponuje różnymi ustawieniami opcji
pozwalającymi na regulację jakości obrazu.
1 Naciśnij przycisk MENU, aby wyświetlić menu.
2 Naciśnij przycisk ENTER, aby wybrać opcję Obraz.
3 Naciśnij ponownie przycisk ENTER, aby wybrać opcję Tryb.
4 Wybierz odpowiedni tryb, naciskając przycisk ▲ lub ▼,
a następnie naciśnij przycisk ENTER.
Dostępne tryby:
Dynamiczne, Standardowy, Film
5 Wybierz odpowiednią opcję, naciskając przycisk ▲ lub ▼,
a następnie naciśnij przycisk ENTER.
6 Po zakończeniu regulacji ustawień naciśnij przycisk ENTER.
7 Naciśnij przycisk EXIT, aby zamknąć menu.
Podświetlenie komórki - Kontrast – Jasność – Ostrość – Kolor – Odcień
➢
W trybie telewizora pracującego w systemie PAL nie można korzystać z funkcji zabarwienia.
➢
W trybie PC można zmieniać tylko ustawienia Podświetlenie komórki, Kontrast i Jasność.
Za pomocą przycisków ◄ lub ► wybierz optymalne ustawienie.
Nawigacja
Wejdź
Powrót
Tryb : Standardowy
Podświetlenie komórki
7
Kontrast 90
Jasność 45
Ostrość 50
Kolor 50
Odcień Z50 C50
Ustawienia szczegółowe
Opcje obrazu
Zeruj : OK
Obraz
T V
Zmiana trybu wyświetlania obrazu
Tryb wyświetlania obrazu można dostosować do
indywidualnych upodobań.
1 Naciśnij przycisk MENU, aby wyświetlić menu.
2 Naciśnij przycisk ENTER, aby wybrać opcję Obraz.
3 Naciśnij ponownie przycisk ENTER, aby wybrać opcję Tryb.
4 Wybierz odpowiedni tryb, naciskając przycisk ▲ lub ▼,
a następnie naciśnij przycisk ENTER.
Dostępne tryby:
Dynamiczne, Standardowy, Film
➢
Dostępne opcje są zależne od źródła sygnału
wejściowego.
5 Naciśnij przycisk EXIT, aby zamknąć menu.
➢
Tryb Dynamiczne zapewnia optymalną jakość
obrazu telewizora w dzień lub w jasno oświetlonym
pomieszczeniu.
Tryb Standardowy jest ogólnym trybem służącym do
oglądania telewizji.
Tryb Film jest odpowiedni do oglądania filmów.
Łatwa konfiguracja
1 Naciśnij przycisk TOOLS na pilocie.
2 Za pomocą przycisków▲ lub ▼ wybierz opcję Tryb obrazu.
3 Naciśnij przyciski ◄ lub ► , aby wybrać odpowiednią opcję.
Narzędzia
Anynet+ (HDMI-CEC)
Tryb obrazu ◄
Standardowy
►
Tryb dźwięku : Użytkownika
Automatycz. wył. : Wył
SRS TS XT : Wył
Oszcz. energii : Wył
Dual I-II : Mono
Nawigacja
Wejdź
Powrót
Tryb : Standardowy
Podświetlenie komórki
7
Kontrast 90
Jasność 45
Ostrość 50
Kolor 50
Odcień Z50 C50
Ustawienia szczegółowe
Opcje obrazu
Zeruj : OK
Obraz
T V
Nawigacja
Zmiana
Wyjdź
Tryb : Standardowy
Podświetlenie komórki
7
Kontrast 95
Jasność 45
Ostrość 50
Kolor 50
Odcień Z50 C50
Ustawienia szczegółowe
Opcje obrazu
Zeruj : OK
Picture
Dynamiczne
Standardowy
Film
Nawigacja
Wejdź Powrót
T V
BN68-01528A-00Pol.indd 18 4/21/2008 3:17:24 PM

Polski - 19
Konfigurowanie szczegółowych ustawień obrazu
Możesz skonfiguro
wać szczegółowe ustawienia obrazu.
1 Naciśnij przycisk MENU, aby wyświetlić menu.
2 Naciśnij przycisk ENTER, aby wybrać opcję Obraz.
3 Za pomocą przycisków ▲ lub ▼ wybierz opcję Ustawienia
szczegółowe, a następnie naciśnij przycisk ENTER.
4 Wybierz odpowiednią opcję, naciskając przycisk ▲ lub ▼,
a następnie naciśnij przycisk ENTER.
Dostępne opcje:
Regulacja czerni, Kontrast dynamiczny,
Gamma, Przestrzeń kolorów, Balans bieli, Odcień skóry,
Uwydatn. krawędzi.
5 Po zakończeniu regulacji ustawień naciśnij przycisk ENTER.
6 Naciśnij przycisk EXIT, aby zamknąć menu.
➢
Opcja Ustawienia szczegółowe jest dostępna w trybie
Standardowy oraz Film.
➢
W trybie PC w menu Ustawienia szczegółowe można zmieniać
jedynie opcje Kontrast dynamiczny, Gamma i Balans bieli.
Regulacja czerni: Wył/Niski/Średni/Maks.
Użytkownik może wybrać poziomu czerni bezpośrednio na ekranie
w celu dopasowania głębi obrazu.
Kontrast dynamiczny: Wył/Niski/Średni/Maks.
Umożliwia wybranie optymalnego kontrastu obrazu.
Gamma: -3 ~ +3
Umożliwia regulację średniego poziomu jasności obrazu.
Za pomocą przycisków ◄ lub ► wybierz optymalne ustawienie.
Przestrzeń kolorów: Auto / Oryginalne / Użytkownika
Przestrzeń kolorów to wzorzec składający się z kolorów czerwonego, zielonego i niebieskiego.
Wybierz przestrzeń kolorów, która wydaje Ci się najbardziej naturalna.
−
Auto: Automatyczne dostosowanie przestrzeni kolorów do najbardziej naturalnych odcieni na podstawie
źródeł programu.
− Oryginalne: Oryginalna przestrzeń kolorów zapewnia głębokie i żywe odcienie.
−
Custom: Umożliwia dostosowanie skali kolorów do własnych preferencji. (patrz „Dostosowywanie
przestrzeni kolorów”)
Dostosowywanie przestrzeni kolorów
Kolor: Czerwonego / Zielony / Niebieski /Żółty / Cyjan / Purpurowy
Umożliwia dostosowanie skali kolorów do własnych preferencji.
Kolory można zmieniać, jeśli w menu Przestrzeń kolorów wybrano pozycję Użytkownika.
Naciśnij przyciski ▲ lub ▼, aby wybrać opcję do regulacji: Czerwonego, Zielony, Niebieski, Żółty,
Cyjan, Purpurowy.
Naciśnij przycisk ENTER.
−
Czerwonego / Zielony / Niebieski:W menu Kolor można zmienić wartości skali RGB dla wybranego
koloru.
Naciśnij przyciski ▲ lub ▼, aby wybrać opcję do regulacji: Czerwonego, Zielony, Niebieski.
Naciśnij przyciski ◄ lub ►, aby zmniejszyć lub zwiększyć konkretną wartość.
Naciśnij przycisk ENTER.
− Reset: Przywraca domyślne wartości ustawień przestrzeni kolorów.
Balans bieli: Przes.czer./Przes.ziel./Przes.nieb./Wzm. czer./Wzm. ziel./Wzm. nieb./Zeruj
Umożliwia regulację temperatury barwowej w celu uzyskania bardziej naturalnych kolorów.
Przes.czer./Przes.ziel./Przes.nieb./Wzm. czer./Wzm. ziel./Wzm. nieb.: Zmiana wartości regulacji
powoduje odświeżenie dostosowywanego ekranu.
Wybierz odpowiednią opcję, naciskając przycisk ▲ lub ▼, a następnie naciśnij przycisk ENTER. Za
pomocą przycisków ◄ lub ► wybierz optymalne ustawienie.
Zeruj: Uprzednio wybrane ustawienia balansu bieli zostają zastąpione domyślnymi ustawieniami fabrycznymi.
Odcień skóry: -15 – +15
Można podkreślić różowawy odcień skóry na wyświetlanym obrazie.
Za pomocą przycisków
◄
lub
►
wybierz optymalne ustawienie.
➢
Zmiana wartości regulacji powoduje odświeżenie dostosowywanego ekranu.
Uwydatn. krawędzi: Wył/Wł
Umożliwia uwydatnienie krawędzi obiektów.
Nawigacja
Wejdź
Powrót
Regulacja czerni : Wył
Kontrast dynamiczny
: Średni
Gamma : 0
Przestrzeń kolorów
: Oryginalne
Balans bieli
Odcień skóry : 0
Uwydatn. krawędzi
: Wył
Ustawienia szczegółowe
T V
Nawigacja
Wejdź
Powrót
Tryb : Standardowy
Podświetlenie komórki
7
Kontrast 90
Jasność 45
Ostrość 50
Kolor 50
Odcień Z50 C50
Ustawienia szczegółowe
Opcje obrazu
Zeruj : OK
Obraz
T V
BN68-01528A-00Pol.indd 19 4/21/2008 3:17:24 PM

Polski - 20
Opcje obrazu
Można określić szczegółowe ustawienia obrazu.
1 Naciśnij przycisk MENU, aby wyświetlić menu.
2 Naciśnij przycisk ENTER, aby wybrać opcję Obraz.
3 Za pomocą przycisków ▲ lub ▼ wybierz element Opcje obrazu, a
następnie naciśnij przycisk ENTER.
4 Wybierz odpowiednią opcję, naciskając przyciski ▲ lub ▼, a
następnie naciśnij przycisk ENTER.
5 Po zakończeniu wyboru ustawień naciśnij przycisk ENTER.
6 Naciśnij przycisk EXIT, aby wyjść z menu.
➢
W trybie PC spośród elementów menu Opcje obrazu można
zmieniać wyłącznie ustawienia, Ton kolorów oraz Ochrona przed
wypalaniem, Rozmiar.
Ton kolorów: Zimny2 / Zimny1 / Normalny / Ciep.1 / Ciep.2
➢
Jeśli tryb obrazu zostanie ustawiony na Dynamiczne lub
Standardowy, nie można wybrać ustawień Ciep.1 i Ciep.2.
Rozmiar: Auto szeroko. / 16:9 / Szer. powiększ / Powiększenie /
Bez overscanu
Rozmiar obrazu można dostosować do własnych wymagań.
−
Auto szeroko.: Rozszerzanie i zwężanie obrazu z proporcji 4:3
do 16:9.
−
16:9: Wyświetlanie obrazu w formacie 16:9.
−
Szer. powiększ: Powiększenie obrazu do formatu większego niż
4:3.Obraz wyświetlany na ekranie można przesuwać do góry/do
dołu, używając przycisków ▲ lub ▼ po wybraniu za pomocą
przycisku ► lub ENTER.
−
Powiększenie: Rozciągnięcie w pionie obrazu wyświetlanego na
ekranie.
−
4:3: Wyświetlanie obrazu w standardowym formacie 4:3.
−
Bez overscanu: Ta funkcja sprawia, że wyświetlany jest pełny
obraz (fragmenty nie są ucinane), jeśli sygnał wejściowy pochodzi
ze źródeł HDMI (720p/1080i), Component (1080i).
Po wybraniu opcji Bez overscanu (Just Scan) w trybach HDMI
(1080i) lub Component (1080i):
Naciśnij przyciski ◄ lub ►, aby wybrać ikonę
, a następnie naciśnij przycisk ENTER.
Naciśnij przyciski ▲, ▼, ◄ lub ►, aby przesunąć obraz do góry, do dołu, w lewo lub w prawo.
Zeruj: Za pomocą przycisków ◄ lub ► wybierz opcję Zeruj, a następnie naciśnij przycisk ENTER.
Ustawienie można potem ponownie włączyć.
➢
Zależnie od używanych urządzeń AV, przy ustawieniu źródła sygnału HDMI i rozmiaru Bez overscanu
obraz może zostać przycięty lub na ekranie zostanie wyświetlony określony kolor.
➢
W przypadku połączeń HDMI (1080p) przy częstotliwości 24, 25, 30, 50 i 60 Hz, a także połączeń
Component (1080p) przy częstotliwości 50 i 60 Hz obsługiwane jest tylko źródło sygnału wejściowego.
➢
Aby zmienić rozmiar obrazu, wystarczy nacisnąć przycisk P.SIZE na pilocie.
➢
W zależności od źródła sygnału opcje rozmiaru obrazu mogą się różnić.
➢
W zależności od wybranego trybu dostępne są różne elementy.
➢
Auto szeroko. to funkcja dostępna tylko w trybach TV, Złącze1, Złącze2, AV oraz S-Video.
➢
Ustawienia można dostosować i zapisać dla każdego z urządzeń zewnętrznych podłączonych do gniazd
wejściowych telewizora.
➢
W trybie PC (PC Mode) dostosować można wyłącznie ustawienia „16:9” i „4:3”.
Zmiana położenia i rozmiaru obrazu za pomocą funkcji Powiększenie
Opcja Powiększenie umożliwia zmianę położenia obrazu i rozciągnięcie go do góry i do dołu za pomocą
przycisków ▲ lub ▼.
Obraz można przesunąć do góry lub do dołu, używając przycisków ▲ lub ▼, po wybraniu ikony za
pomocą przycisków ◄ lub ►.
Można zmienić rozmiar obrazu w pionie, używając przycisków ▲ lub ▼, po wybraniu ikony za pomocą
przycisków ◄ lub ►.
Ciąg dalszy...
Nawigacja
Wejdź
Powrót
Ton kolorów :
Normalny
Rozmiar :
Auto szeroko.
Tryb ekranu : 16:9
Cyf. red. szumu : Auto
Demo Real 100 Hz : Wył
DNle : Wył
Czerń HDMI : Normalny
Tylko tryb nieb. : Wył
Ochrona przed wypalaniem
Efekt 3D
Opcje obrazu
T V
Nawigacja
Wejdź
Powrót
Auto szeroko.
16:9
Szer. powiększ
Powiększenie
4:3
Bez overscanu
Rozmiar
T V
Nawigacja
Wejdź
Powrót
Tryb : Standardowy
Podświetlenie komórki
7
Kontrast 95
Jasność 45
Ostrość 50
Kolor 50
Odcień Z50 C50
Ustawienia szczegółowe
Opcje obrazu
Zeruj : OK
Obraz
T V
BN68-01528A-00Pol.indd 20 4/21/2008 3:17:25 PM

Polski - 21
Tryb ekranu: 16:9 / Szer. powiększ / Powiększenie /4:3
Po wybraniu ustawienia rozmiaru Auto szeroko. w telewizorze
o formacie ekranu 16:9 można zmienić rozmiar wyświetlanego
obrazu na 4:3 WSS (Wide Screen Service) lub nie wybierać
żadnego ustawienia. W każdym z europejskich krajów są
przyjęte różne rozmiary obrazów, dlatego użytkownicy mają
możliwość dostosowania tej funkcji.
− 16:9: Wyświetlanie obrazu w formacie 16:9.
−
Szer. powiększ: Powiększenie obrazu do formatu większego
niż 4:3.
−
Powiększenie: Rozciągnięcie w pionie obrazu wyświetlanego
na ekranie.
− 4:3: Wyświetlanie obrazu w standardowym formacie 4:3.
➢
Funkcja jest dostępna w trybie Auto szeroko..
➢
Funkcja nie jest dostępna w trybie Moduł ani HDMI.
Cyf. red. szumu: Wył / Niski / Średni /Maks. / Auto
Funkcja ta, eliminująca zakłócenia atmosferyczne i odbicia, które mogą pojawić się na ekranie, jest
przydatna, gdy sygnał docierający do telewizora jest słaby.
➢
Kiedy sygnał jest słaby, należy wybierać kolejno opcje, aż wyświetlany będzie obraz dobrej jakości.
Demo Real 100Hz: Wył / Wł
Różnica między „Real 100Hz” i 50Hz widoczna jest wyraźnie zwłaszcza podczas oglądania szybkich
scen. Dlatego też, przy oglądaniu wolnych scen, nie będzie można rozróżnić pomiędzy „Real 100Hz i
50Hz”. Demo 100Hz działa tylko z sygnałem 50Hz. Tryb demonstracyjny Real 100Hz ze specjalnymi
obrazami jest dostępny do prezentacji w sklepach.
DNIe: Wył / Demo / Wł
Telewizor wyposażono w funkcję DNIe zapewniającą wysoką jakość wyświetlanego obrazu. Aby
oglądać obraz wysokiej jakości, należy włączyć funkcję DNIe. Jeśli ustawienie zostanie zmienione na
Demo, będzie można porównać obraz zoptymalizowany przez funkcję DNIe oraz zwykły. Funkcja ta
pozwala ocenić różnicę w jakości obrazu.
➢
DNIe
TM
(Digital Natural Image engine)
Ta funkcja umożliwia poprawę jakości obrazu poprzez trójwymiarową redukcję szumów, uwydatnienie
szczegółów, poprawę kontrastu i podwyższenie poziomu bieli. Nowy algorytm kompensacji obrazu
umożliwia uzyskanie jaśniejszego, bardziej klarownego obrazu o większym poziomie szczegółów.
Technologia DNIe
TM
zapewnia poprawę jakości obrazu niezależnie od sygnału.
➢
Funkcja jest niedostępna w trybie PC.
➢
Funkcja DNIe jest dostępna tylko w trybie Dynamiczne.
Czerń HDMI: Normalny / Niski
Za pomocą tej funkcji można dostosować jakość obrazu, kiedy podczas wyświetlania sygnału
wejściowego HDMI okaże się, że doszło do wypalenia obrazu (wygląd poziomu czerni, niski kontrast,
niewystarczające kolory itd.). Funkcja działa dla ograniczonego zakresu skali RGB (16–235).
➢
Funkcja jest aktywna tylko wtedy, gdy do gniazda HDMI (sygnał RGB) podłączone są urządzenia
zewnętrzne.
Tylko tryb niebieski: Wył / Wł
Ta funkcja jest przeznaczona dla specjalistów zajmujących się pomiarem parametrów urządzeń
audio-wideo. Eliminuje ona czerwoną i zieloną barwę z sygnału wideo, pozostawiając jedynie kolor
niebieski, tworząc w ten sposób efekt filtra, za pomocą którego regulowany jest koloru i odcienie
obrazu w urządzeniach wideo, takich jak odtwarzacze DVD,
zestawy kina domowego itp.
Za pomocą tej funkcji można ustawić preferowane wartości
kolorów i ich odcieni odpowiednio do poziomu sygnału
danego urządzenia wideo, używając wzorców paska kolorów
Czerwony/Zielony/Niebieski/Błękitny/Purpurowy/Żółty, bez
stosowania dodatkowego filtra koloru niebieskiego.
➢
Tylko tryb niebieski to funkcja dostępna, kiedy
ustawienia trybu obrazu to Film lub Standardowy.
Ochrona przed wypalaniem
Aby zmniejszyć prawdopodobieństwo wypalenia ekranu,
telewizor został wyposażony w technologię zapobiegania
wypaleniu ekranu. Pozwala ona ustawić ruch obrazu w górę
lub w dół (w pionie) oraz w prawo i w lewo (w poziomie).
Ustawienie czasu umożliwia zaprogramowanie odstępu czasu
w minutach pomiędzy kolejnymi ruchami obrazu.
− Skok pikseli: Funkcja umożliwia minimalne przesunięcie
pikseli na panelu plazmowym w poziomie lub pionie w celu
zminimalizowania powstawania obrazu szczątkowego.
• Zmień ustawienie opcji Skok pikseli na Wł, naciskając
przyciski ▲ lub ▼, a następnie naciśnij przycisk ENTER.
• Wybierz odpowiednią opcję, naciskając przyciski ▲ lub ▼,
a następnie naciśnij przycisk ENTER.Dostępne opcje: Poziomo, Pionowo, Czas
Nawigacja
Wejdź
Powrót
Skok pikseli
Biały
Przewijanie
Wyszarzenie boków
: Ciemny
Ochrona przed wypalaniem
T V
Nawigacja
Wejdź Powrót
Ton kolorów :
Normalny
Rozmiar : Auto szeroko.
Tryb ekranu : 16:9
Cyf. red. szumu :
Demo Real 100 Hz : Off
DNle :
Czerń HDMI : Normalny
Tylko tryb nieb. : Wył
Ochrona przed wypalaniem
Efekt 3D
Opcje obrazu
T V
16:9
Szer. powięks
Powiększenie
4:3
Nawigacja
Wejdź Powrót
Ton kolorów :
Normalny
Rozmiar :
Auto szeroko.
Tryb ekranu : 16:9
Cyf. red. szumu : Auto
Demo Real 100 Hz : Wył
DNle : Wł
Czerń HDMI : Normalny
Tylko tryb nieb. : Wył
Ochrona przed wypalaniem
Efekt 3D
Opcje obrazu
T V
ciąg dalszy...
BN68-01528A-00Pol.indd 21 4/21/2008 3:17:26 PM

Polski - 22
➢
Optymalne warunki do skoku pikseli:
PC TV/Złącze/AV/Moduł/HDMI
Poziomo 1 2
Pionowo 1 2
Czas (minuty) 2 2 min
➢
Wartość ustawienia Skok pikseli może być różna, zależnie od
rozmiaru ekranu i trybu.
➢
Diese Funktion ist im Modus "Nur Scan" nicht verfügbar.
− Biały: Funkcja wspomaga usuwanie obrazu szczątkowego z ekranu, zmieniając kolor pikseli na biały.
Tej funkcji należy użyć w celu usunięcia widocznego na ekranie obrazu szczątkowego, szczególnie po
długotrwałym wyświetlaniu nieruchomego obrazu.
− Przewijanie: Funkcja powoduje usunięcie obrazu szczątkowego przez przesuwanie wszystkich pikseli
na panelu plazmowym według specjalnego wzoru. Tej funkcji należy użyć w celu usunięcia widocznego
na ekranie obrazu szczątkowego, szczególnie po długotrwałym wyświetlaniu nieruchomego obrazu.
− Wyszarzenie boków: Podczas oglądania telewizji w formacie 4:3 ekran jest chroniony przed
uszkodzeniem dzięki dostosowaniu poziomu bieli przy prawej i lewej krawędzi.
Ciemny: Jeśli ustawiony zostanie format ekranu 4:3, krawędzie prawa i lewa są przyciemniane.
Jasny: Jeśli ustawiony zostanie format ekranu 4:3, krawędzie prawa i lewa są rozjaśniane.
➢
Aby usunąć obraz szczątkowy z ekranu, należy użyć funkcji Biały lub Przewijanie.
Chociaż obydwie funkcje powodują usunięcie obrazu szczątkowego widocznego na ekranie, to
funkcja Przewijanie jest bardziej skuteczna.
➢
W celu całkowitego usunięcia obrazu szczątkowego widocznego na ekranie należy pozostawić
włączoną funkcję usuwania takiego obrazu przez dłuższy czas (około 1 godziny). Jeśli obraz
szczątkowy po użyciu funkcji usuwania będzie dalej widoczny, to funkcję usuwania obrazu
szczątkowego należy włączyć ponownie.
➢
Naciśnij dowolny przycisk na pilocie, aby anulować tę funkcję.
Nawigacja
Wejdź
Powrót
Skok pikseli : Wł
Poziomo : 2
Pionowo : 2
Czas : 2 min
Skok pikseli
T V
Korzystanie z funkcji obrazu trójwymiarowego
Telewizor umożliwia oglądanie filmów i odtwarzanie gier w formacie trójwymiarowym. Funkcja
efektu 3D umożliwia oglądanie obrazów trójwymiarowych przez specjalne okulary.
Gniazdo 3,5 mm stereo kabla RCA (dostępny osobno)
Okulary 3D
(dostępne osobno)
Nadajnik trójwymiarowego
obrazu w podczerwieni
(dostępny osobno)
PC
Kabel HDMI/DVI (dostępny osobno)
Panel tylny telewizora
Połączenia
➢
Wygląd okularów 3D (i nadajnika) może się różnić w zależności od modelu.
BN68-01528A-00Pol.indd 22 4/21/2008 3:17:28 PM

Polski - 23
1 Podłącz kabel HDMI/DVI do wejścia HDMI IN 2 w telewizorze i gniazda wyjściowego w komputerze.
2 Podłącz kabel 3,5 mm stereo/2RCA do gniazda wejściowego DVI IN (HDMI 2) [R-AUDIO-L] w
telewizorze i gniazda wyjściowego Audio Out karty dźwiękowej w komputerze.
3 Podłącz nadajnik do gniazda wyjściowego 3D SYNC OUT na panelu tylnym telewizora.
4
Włącz telewizor i ustaw źródło sygnału na HDMI2.
Więcej informacji na temat okularów 3D (i nadajnika) można znaleźć w instrukcji obsługi okularów 3D.
Dostosowywanie rozdzielczości do sygnału z komputera: PS50A470: 1024 x 768 przy 60 Hz,
1360 x 768 przy 60 Hz
Optymalna rozdzielczość obrazu z komputera dla PS50A470 to 1360 x 768. Jeśli w trybie 3D
podłączony jest obraz o rozdzielczości 1024 x 768, obraz będzie wyświetlany w formacie 4:3 z
szarymi paskami po lewej i prawej stronie
Nadajnik trójwymiarowego obrazu w podczerwieni komunikuje się z okularami 3D.
W związku z tym nadajnik powinien być umieszczony blisko okularów 3D.
Jest on aktywowany, kiedy sygnałem wejściowym odbieranym przez gniazda HDMI lub DVI jest
sygnał RGB, a dźwięk DVI Sound jest obsługiwany.
Po wyłączeniu lub włączeniu tryb zmieniany jest na domyślny – Wył. – i zapisywane są ustawienia
elementu Format.
Opcja Efekt 3D jest włączona lub wyłączona niezależnie od ustawienia Tryb obrazu.
Kiedy funkcja Efekt 3D jest włączona, aktywne są tylko menu obrazu Kontrast, Jasność , Efekt 3D i
Zeruj .
Aby możliwe było używanie funkcji Efekt 3D , konieczne jest posiadanie karty graficznej z obsługą 3D
lub oprogramowania 3D.
Okulary 3D i nadajnik muszą być produktami tej samej firmy.
Używanie okularów 3D do oglądania telewizji lub grania przez dłuższy czas może wywołać
zmęczenie oczu lub ból głowy.
Okulary 3D (i nadajnik) innych firm niż firma Samsung mogą nie być obsługiwane.
Wenn Sie feststellen, dass der Bildschirm bei Verwendung der 3D-Funktion flackert, stellen Sie eine
dunklere Umgebungshelligkeit ein, oder schalten Sie die fluoreszierende Lampe aus, damit Sie den
Bildschirm in optimalem Zustand betrachten.
Zmiana trybu
Zmiana trybu spowoduje zamianę obrazów dla każdego oka przez
zamianę sygnałów wyjściowych lewego i prawego.
1 Połącz telewizor, komputer i nadajnik 3D, jak pokazano na
rysunku.
2 Naciśnij przycisk SOURCE, aby wybrać sygnał HDMI.
3 Naciśnij przycisk MENU, aby wyświetlić menu.
Za pomocą przycisków ▲ i ▼ zaznacz opcję
Obraz, a
następnie naciśnij przycisk ENTER.
4 Za pomocą przycisków ▲ i ▼ zaznacz Opcje obrazu, a
następnie naciśnij przycisk ENTER.
Za pomocą przycisków ▲ i ▼ zaznacz opcję Efekt 3D
, a
następnie naciśnij przycisk ENTER.
5 Za pomocą przycisków ▲ i ▼ zaznacz opcję Tryb, a następnie
naciśnij przycisk ENTER.
Za pomocą przycisków ▲ i ▼ wybierz opcje Wył., Tryb1 Tryb2
lub Konwersja 2D, a następnie naciśnij przycisk ENTER.
• Wył. : Wyłącza funkcję Efekt 3D (3D Effect).
• Tryb1 :
W tym trybie jako pierwsze synchronizowane jest prawe źródło sygnału.
• Tryb2 :
W tym trybie jako pierwsze synchronizowane jest lewe źródło sygnału.
• Konwersja 2D :
Umożliwia konwersję obrazu trójwymiarowego na dwuwymiarowy.
Jeżeli obraz 3D wywołuje zawroty głowy, można użyć tej opcji, aby
czasowo przełączyć obraz na tryb dwuwymiarowy. Do całkowitego
zakończenia efektu 3D należy wybrać opcję „Off” (Wył).
Jeśli funkcja efektu trójwymiarowego nie działa poprawnie,
oznacza to, że okulary 3D i Tryb nie są odpowiednio
synchronizowane. Aby je zsynchronizować, przełącz tryb.
ciąg dalszy...
Nawigacja Wejdź Wróć
Tryb : Standardowy
Podświetlenie komórki
7
Kontrast 90
Jasność 45
Ostrość 50
Kolor 50
Odcień Z50 C50
Ustawienia szczegółowe
Opcje obrazu
Zeruj : OK
Obraz
T V
Nawigacja Wejdź Wróć
Ton kolorów :
Normalny
Rozmiar : Auto szeroko.
Tryb ekranu : 16:9
Cyf. red. szumu : Auto
Demo Real 100 Hz : Off
DNle : Off
Czerń HDMI : Normal
Tylko tryb niebieski: Off
Ochrona przed wypalaniem
Efekt 3D
Opcje obrazu
T V
Nawigacja Wejdź Wróć
Tryb :
Format :
Efekt 3D
T V
Wył
Tryb1
Tryb2
Konwersja 2D
BN68-01528A-00Pol.indd 23 4/21/2008 3:17:29 PM

Polski - 24
Przywracanie domyślnych ustawień obrazu
Można określić szczegółowe ustawienia obrazu.
1 Naciśnij przycisk MENU, aby wyświetlić menu.
2 Naciśnij przycisk ENTER, aby wybrać opcję Obraz.
3 Za pomocą przycisków ▲ lub ▼ wybierz opcję Zeruj, a
następnie naciśnij przycisk ENTER.
4 Za
pomocą przycisków ▲ lub ▼ wybierz opcję OK lub Anuluj,
następnie
naciśnij przycisk ENTER.
➢
Wyzerować można ustawienia każdego trybu.
Nawigacja
Wejdź Powrót
Tryb : Standardowy
Podświetlenie komórki
7
Kontrast 90
Jasność 45
Ostrość 50
Kolor 50
Odcień Z50 C50
Ustawienia szczegółowe
Opcje obrazu
Zeruj : OK
Obraz
T V
OK
Anuluj
Zmiana formatu
Wybierz optymalny sygnał wejściowy, odpowiedni dla karty
graficznej i oprogramowania 3D.
Zobacz opisy kroków 1 do 4 powyżej.
5 Za pomocą przycisków ▲ i ▼ zaznacz opcję Format, a
następnie naciśnij przycisk ENTER.
6 Za pomocą przycisków ▲ i ▼ wybierz opcje Szachownica,
Poziomy lub Pionowy.
Szachownica
Jeśli format wyjściowy karty graficznej lub
oprogramowania 3D to Szachownica (Checker
Board), wybierz ten format sygnału wejściowego.
Poziomy
Jeśli format wyjściowy karty graficznej lub
oprogramowania 3D to Poziomy (Horizontal),
wybierz ten format sygnału wejściowego.
Pionowy
Jeśli format wyjściowy karty graficznej lub
oprogramowania 3D to Pionowy (Vertical), wybierz
ten format sygnału wejściowego.
Aby zmienić tryb 3D, należy kilkakrotnie nacisnąć przycisk 3D
na pilocie.
Łatwe konfigurowanie
1 Naciśnij przycisk TOOLS na pilocie.
2 Za pomocą przycisków ▲ i ▼ wybierz opcję Tryb 3D .
3 Naciśnij przycisk ENTER, aby włączyć funkcję Efekt 3D (3D
Effect).
Narzędzia
Tryb 3D ◄ Wył ►
Anynet+ (HDMI-CEC)
Tryb obrazu : Dynamiczne
Tryb dźwięku : Standardowy
Automatycz. wył. : Wył
SRS TS XT : Wył
Oszcz. energii : Wył
Zmiana
Wyjdź
Nawigacja
Nawigacja
Wejdź
Wróć
Efect 3D
T V
Tryb : Tryb 1
Format :
Szachownica
Poziomy
Pionowy
BN68-01528A-00Pol.indd 24 4/21/2008 3:17:30 PM

Polski - 25
Funkcje dźwięku
1 Naciśnij przycisk MENU, aby wyświetlić menu.
2 Za pomocą przycisków ▲ lub ▼ wybierz opcję Dźwięk, a
następnie naciśnij przycisk ENTER.
3 Wybierz odpowiednią opcję, naciskając przycisk ▲ lub ▼, a
następnie naciśnij przycisk ENTER.
Dostępne opcje:
Tryb, Korektor, SRS TS XT, Auto głośność,
Głośnik TV, Wybór Dźwięku.
4 Po zakończeniu regulacji ustawień naciśnij przycisk ENTER.
5 Naciśnij przycisk EXIT, aby zamknąć menu.
Tryb: Standardowy/Muzyka/Film/Mowa/Użytkownika
Profile dźwięku umożliwiają dostosowanie ustawień do danego
programu.
Łatwa konfiguracja
1 Naciśnij przycisk TOOLS na pilocie.
2 Naciśnij przyciski ▲ lub ▼, aby wybrać opcję Tryb
dźwięku.
3 Naciśnij przyciski ◄ lub ►, aby wybrać odpowiednią opcję.
Korektor: Balans/100Hz/300Hz/1kHz/3kHz/10kHz
Telewizor został wyposażony w szereg ustawień
pozwalających na regulację jakości dźwięku.
➢
Wprowadzenie jakichkolwiek zmian ustawień powoduje
automatyczne przełączenie trybu dźwięku w tryb Użytkownika.
SRS TS XT: Wył/Wł
TruSurround XT to opatentowana technologia firmy SRS,
która umożliwia odtwarzanie 5.1-kanałowego dźwięku przy
użyciu dwóch głośników. Technologia TruSurround zapewnia
realistyczne wrażenia symulujące dźwięk przestrzenny za pośrednictwem dowolnego zestawu
dwóch głośników, w tym głośników wbudowanych w telewizor. Funkcja ta jest całkowicie zgodna z
wszystkimi formatami wielokanałowymi.
Łatwa konfiguracja
1 Naciśnij przycisk TOOLS na pilocie.
2 Naciśnij przyciski ▲ lub ▼, aby wybrać opcję SRS TS XT.
3 Naciśnij przyciski ◄ lub ►, aby wybrać opcję Wył lub Wł.
Auto głośność: Wył/Wł
Ponieważ poszczególne stacje nadają sygnał o różnych
parametrach, prawie po każdej zmianie kanału konieczne
jest ponowne wyregulowanie głośności. Funkcja ta umożliwia
automatyczne dopasowanie głośności na odpowiednim kanale
przez obniżenie jej, gdy modulacja sygnału jest wysoka, lub podwyższenie, gdy jest ona niska.
Głośnik TV
: Wył/Wł
Jeśli dźwięk ma być odtwarzany przez oddzielne głośniki, należy wyłączyć wzmacniacz wewnętrzny.
➢
Przyciski
+,
- i MUTE nie działają po włączeniu funkcji Wył wycisz.
➢
Jeśli opcja Głośnik TV jest ustawiona na Wł, nie ma możliwości regulacji w menu dźwięku,
oprócz opcji Wybór Dźwięku (w trybie obrazu w obrazie (PIP)).
Wybór Dźwięku: Dźwięk Główny/Dźwięk PIP
Kiedy funkcja PIP jest aktywna, można odsłuchiwać dźwięk z okna podglądu.
−
Dźwięk Główny: Umożliwia słuchanie dźwięku z głównego okna.
−
Dźwięk PIP: Umożliwia słuchanie dźwięku z okienka.
TruSurround XT, SRS i symbol są znakami towarowymi firmy SRS Labs,
Inc. Technologia TruSurround XT jest używana na podstawie licencji firmy SRS
Labs, Inc.
Nawigacja
Wejdź
Powrót
Tryb :
Użytkownika
Korektor
SRS TS XT : Wył
Auto głośność : Wył
Głośnik TV : Wył
Wybór Dźwięku :
Dźwięk Główny
Dźwięk
T V
Nawigacja
Zmiana
Powrót
Korektor
T V
Balans 100Hz 300Hz 1kHz 3kHz 10kHz
+
0
-
P
L
+
0
-
Narzędzia
Anynet+ (HDMI-CEC)
Tryb obrazu : Standardowy
Tryb dźwięku ◄ Użytkownika ►
Automatycz. wył. : Wył
SRS TS XT : Wył
Oszcz. energii : Wył
Dual I-II : Mono
Nawigacja Zmiana
Wyjdź
Narzędzia
Anynet+ (HDMI-CEC)
Tryb obrazu : Standardowy
Tryb dźwięku : Użytkownika
Automatycz. wył. : Wył
SRS TS XT ◄ Wył ►
Oszcz. energii : Wył
Dual I-II : Mono
Nawigacja Zmiana
Wyjdź
BN68-01528A-00Pol.indd 25 4/21/2008 3:17:31 PM

Polski - 26
Wybieranie trybu dźwięku (w zależności od modelu)
Przycisk DUAL I-II służy do wyświetlania/regulacji formatu przetwarzania sygnału dźwiękowego.
Po włączeniu zasilania domyślnie wybierany jest format „DUAL-I” lub „Stereo”, w zależności od
sposobu nadawania.
Łatwa konfiguracja
1 Naciśnij przycisk TOOLS na pilocie.
2 Naciśnij przycisk ▲ lub ▼, aby wybrać opcję Dual I-II.
3 Naciśnij przycisk ◄ lub ►, aby wybrać odpowiednią opcję.
Typ sygnału Napis na ekranie
NICAM
Stereo
Zwykła transmisja
(zwykły dźwięk)
Mono (normalne zastosowanie)
Zwykła + NICAM Mono NICAM
Mono
(Zwykły)
NICAM Stereo
NICAM
Stereo
Mono
(Zwykły)
NICAM DUAL-I/II
NICAM
Dual-1
NICAM
Dual-2
Mono
(Zwykły)
A2
Stereo
Zwykła transmisja
(zwykły dźwięk)
Mono (normalne zastosowanie)
Dwujęzyczne lub Dual-I/II Dual I Dual II
Stereo Stereo
Mono
(wymuszone mono)
➢
W przypadku pogorszenia odbioru zaleca się wybranie trybu Mono.
Jeśli sygnał stereofoniczny jest słaby i przestawia się automatycznie, zaleca się ustawienie
trybu Mono.
Podłączanie słuchawek (sprzedawane osobno)
Aby oglądać telewizję, nie przeszkadzając zarazem innym osobom przebywającym w
pomieszczeniu, można podłączyć do telewizora słuchawki.
➢
Po włożeniu wtyczki słuchawek do odpowiedniego gniazda
w menu Dźwięk można wybrać tylko opcję „Auto głośność”.
➢
Długotrwałe korzystanie ze słuchawek przy ustawionym
wysokim poziomie głośności może być szkodliwe dla
słuchu.
➢
Dopóki do telewizora są podłączone słuchawki, z głośników nie
będzie wydobywał się żaden dźwięk.
➢
Głośność słuchawek i głośność telewizora są regulowane
osobno.
Panel boczny telewizora
15
Narzędzia
Anynet+ (HDMI-CEC)
Tryb obrazu : Standardowy
Tryb dźwięku : Użytkownika
Automatycz. wył. : Wył
SRS TS XT : Wył
Oszcz. energii : Wył
Dual I-II ◄ Mono ►
Nawigacja
Zmiana
Wyjdź
BN68-01528A-00Pol.indd 26 4/21/2008 3:17:31 PM

Polski - 27
Funkcje czasu
1 Naciśnij przycisk MENU, aby wyświetlić menu.
2 Za pomocą przycisków ▲ lub ▼ wybierz opcję Ustawienia, a
następnie naciśnij przycisk ENTER.
3 Za pomocą przycisków ▲ lub ▼ wybierz opcję Czas, a
następnie naciśnij przycisk ENTER.
4 Wybierz odpowiednią opcję, naciskając przycisk ▲ lub ▼, a
następnie naciśnij przycisk ENTER.
Dostępne opcje:
Ust. zegara,Automatycz. wył., Zegar 1,
Zegar 2, Zegar 3
5 Po zakończeniu regulacji ustawień naciśnij przycisk ENTER.
6 Naciśnij przycisk EXIT, aby zamknąć menu.
Ust. zegara
Zegar telewizora należy ustawić, tak aby po naciśnięciu
przycisku INFO pilota, na ekranie wyświetlany był prawidłowy
czas. Ustawienie zegara jest także niezbędne, jeśli użytkownik
chce korzystać z automatycznego włącznika/wyłącznika
czasowego.
− Naciśnij przycisk ◄ lub ►, aby wybrać opcję
Mies, Data,
Rok, godz. lub Minuta. Ustaw wartości, korzystając z
przycisków ▲ lub ▼.
➢
Wartości opcji Mies, Data, Rok, godz. i Minuta
można ustawić bezpośrednio przy użyciu przycisków
numerycznych na pilocie.
➢
W przypadku przerwy w zasilaniu lub wyjęciu wtyczki z
gniazda zasilania ustawienia zegara zostaną utracone.
Automatycz. wył.
Telewizor może przejść automatycznie w tryb gotowości po
upływie wybranego czasu (w przedziale od 30 do 180 minut).
− Wybierz czas działania urządzenia (
Wył, 30, 60, 90, 120,
150 lub 180), naciskając wielokrotnie przycisk ▲ lub ▼.
Łatwa konfiguracja
1 Naciśnij przycisk TOOLS na pilocie.
2 Naciśnij przyciski ▲ lub ▼, aby wybrać opcję Automatycz.
wył..
3 Naciśnij przyciski ◄ lub ►, aby wybrać czas w minutach, a
następnie naciśnij przycisk ENTER.
Zegar 1 / Zegar 2 / Zegar 3
Istnieje możliwość ustawienia włącznika / wyłącznika
czasowego, który pozwala na automatyczne włączenie /
wyłączenie telewizora o czasie wybranym przez użytkownika.
☛
Wymagane jest ustawienie zegara.
− Naciśnij przycisk ◄ lub ► i wybierz odpowiednią opcję.
Za pomocą przycisków ▲ lub ▼ zmień ustawienie.
Czas włączenia: Wybierz godzinę, minutę i opcję Nie/Tak. (Aby włączyć zegar z ustawionymi
wartościami, wybierz Nie).
Czas wyłączenia: Wybierz godzinę, minutę i opcję Nie/Tak. (Aby włączyć zegar z ustawionymi
wartościami, wybierz Nie).
Powtórz: Wybierz opcję Jednokrotnie, Codziennie, Pon. – pt., Pon. – sob. lub Sob. – niedz..
Głośność: Wybierz odpowiedni poziom głośności.
➢
Godzinę i minuty można wprowadzić bezpośrednio, korzystając z przycisków numerycznych na pilocie.
☛
Automatyczne wyłączenie zasilania
W przypadku ustawienia włącznika czasowego na tryb „Wł” telewizor wyłączy się automatycznie,
jeśli przez 3 godziny od chwili włączenia przez włącznik czasowy nie będą używane żadne elementy
sterujące. Funkcja ta jest dostępna tylko w przypadku ustawienia włącznika czasowego na tryb
włączony i zapobiega uszkodzeniu telewizora spowodowanemu przegrzaniem podzespołów w
przypadku pozostawienia odbiornika włączonego przez długi czas.
Nawigacja
Wejdź
Powrót
Ust. zegara :
00 : 00
Automatycz. wył. : Wył
Zegar 1 : Wył
Zegar 2 : Wył
Zegar 3 : Wył
Czas
T V
Nawigacja
Zmiana
Powrót
Zegar 1
T V
00 00 Nie
Czas włączenia
:
Czas wyłączenia
Powtórz
Jednokrotnie
10
Głośność
00 00 Nie
:
Narzędzia
Anynet+ (HDMI-CEC)
Tryb obrazu : Standardowy
Tryb dźwięku : Użytkownika
Automatycz. wył. ◄ Wył ►
SRS TS XT : Wył
Oszcz. energii : Wył
Dual I-II : Mono
Nawigacja Zmiana
Wyjdź
Nawigacja
Wejdź
Powrót
Plug & Play
Język : Polski
Czas
Efekt świetlny
: Oglądanie wł.
Regulacja wspornika ściennego
Melodia : Wył
Rozrywka : Wył
Oszcz. energii : Wył
PIP
Ustawienia
T V
BN68-01528A-00Pol.indd 27 4/21/2008 3:17:32 PM

Polski - 28
Język / Melodia / Efekt świetlny / Rozrywka /
Oszcz. energii / PIP
1 Naciśnij przycisk MENU, aby wyświetlić menu.
2 Za pomocą przycisków ▲ lub ▼ wybierz opcję Ustawienia,
a następnie naciśnij przycisk ENTER.
3 Wybierz odpowiednią opcję, naciskając przycisk ▲ lub ▼,
a następnie naciśnij przycisk ENTER.
Dostępne opcje:
Język, Melodia, Efekt świetlny, Rozrywka,
Oszcz. energii, PIP
4 Po zakończeniu regulacji ustawień naciśnij przycisk ENTER.
5 Naciśnij przycisk EXIT, aby zamknąć menu.
Język
Zależy od modelu. Po włączeniu telewizora plazmowego po raz pierwszy należy wybrać język, w
którym będą wyświetlane menu i komunikaty ekranowe.
Efekt świetlny: Wył/Czuwanie wł./Oglądanie wł./Wł
W zależności od sytuacji można włączyć/wyłączyć niebieską diodę LED z przodu telewizora. Służy to
oszczędzaniu energii i zapobiega rozpraszaniu wzroku przez diodę LED.
−
Wył: Niebieska dioda LED jest zawsze wyłączona.
−
Czuwanie wł.: Niebieska dioda LED świeci w trybie gotowości i wyłącza się po włączeniu
telewizora.
−
Oglądanie wł.: Niebieska dioda LED świeci podczas oglądania telewizji i wyłącza się po
wyłączeniu telewizora.
−
Wł: Niebieska dioda LED zawsze świeci.
➢
Dla funkcji Efekt świetlny można wybrać ustawienie Wył w celu oszczędzania energii.
Rozrywka: Wył / Sport / Kino / Gra
Tryb Rozrywka umożliwia wybieranie optymalnych ustawień wyświetlania i dźwięku dla zawodów
sportowych, filmów i gier.
− Wył: Powoduje wyłączenie funkcji Rozrywka.
−
Sport: Zapewnia optymalną jakość dźwięku i obrazu podczas oglądania zawodów sportowych.
−
Kino: Zapewnia optymalną jakość dźwięku i obrazu podczas oglądania filmów.
Po włączeniu tej opcji uzyskuje się lepszą jakość dźwięku i obrazu.
−
Gra: Zapewnia optymalną jakość dźwięku i obrazu podczas grania. Ustawienie tego trybu
powoduje przyspieszenie toku gry odtwarzanej na konsoli podłączonej do telewizora.
➢
Jeśli dowolny z trzech trybów funkcji Rozrywka zostanie włączony, ustawienia zostaną
zablokowane i nie będzie można ich zmieniać. Aby zmienić ustawienia obrazu i dźwięku, należy
wyłączyć tryb Rozrywka.
➢
Ustawienia trybu Rozrywka są zapisywane dla każdego źródła sygnału wejściowego osobno.
Nawigacja
Wejdź
Powrót
Plug & Play
Język : Polski
Czas
Efekt świetlny
: Oglądanie wł.
Regulacja wspornika ściennego
Melodia : Wył
Rozrywka : Wył
Oszcz. energii : Wył
PIP
Ustawienia
T V
ciąg dalszy...
BN68-01528A-00Pol.indd 28 4/21/2008 3:17:32 PM

Polski - 29
Oszcz. energii: Wył/Niski/Średni/Maks.
Funkcja ta umożliwia dopasowanie jasności ekranu w
zależności od warunków oświetleniowych otoczenia.
−
Wył: Wyłącza tryb Oszcz. energii.
−
Niski: Działanie w trybie standardowym, bez względu na
warunki oświetleniowe otoczenia.
−
Średni: Wybiera tryb średniej oszczędności energii bez
względu na warunki oświetleniowe otoczenia.
−
Maks.: Wybiera tryb maksymalnej oszczędności energii bez
względu na warunki oświetleniowe otoczenia.
Łatwa konfiguracja
1 Naciśnij przycisk TOOLS na pilocie.
2 Naciśnij przycisk ▲ lub ▼, aby wybrać opcję Oszcz. energii.
3 Naciśnij przycisk ◄ lub ►, aby wybrać odpowiednią opcję.
PIP (Obraz w obrazie): PIP (Wł/Wył) / Źródło / Rozmiar / Położenie / Program
W głównym ekranie można wyświetlić okno podglądu. Pozwala to na oglądanie wybranego
programu telewizyjnego i jednoczesny podgląd obrazu z urządzenia zewnętrznego.
− PIP: Wł/Wył.
Umożliwia bezpośrednie włączenie lub wyłączenie funkcji obrazu w obrazie.
Tabela ustawień funkcji PIP
Okno główne Okienko podglądu
Moduł
HDMI1, 2
PC
Wyłącznie przekaz
analogowy Złącze1,
Złącze2, AV
− Źródło: TV/Złącze1/Złącze2/AV
Służy do wybierania źródła obrazu widocznego w oknie
podglądu.
− Rozmiar:
/
/
Służy do wybierania rozmiaru okna podglądu.
➢
Jeżeli główny obraz jest w trybie PC lub Moduł, opcja Rozmiar jest niedostępna.
− Położenie: / / /
Służy do wybierania położenia okna podglądu na ekranie.
➢
W trybie Double( ,
) opcja Położenie jest niedostępna.
− Program
Kanał wyświetlany w oknie podglądu można wybrać tylko wtedy, gdy dla opcji Źródło
wybrano ustawienie TV.
Nawigacja
Wejdź
Powrót
PIP :
Wł
Źródło : TV
Rozmiar :
Położenie :
Program : P 1
PIP
T V
Konfiguracja oprogramowania komputerowego (w systemie
Windows XP)
Poniżej przedstawiono ustawienia ekranu w systemie
Windows w przypadku typowego zestawu komputerowego.
Wygląd ekranów na poszczególnych komputerach może się
różnić w zależności od wersji systemu Windows i typu karty
graficznej. Pomimo różnic w wyglądzie podstawowe opcje
konfiguracji są na ogół takie same. (w przeciwnym wypadku
należy skontaktować się z producentem komputera lub
sprzedawcą produktów firmy Samsung).
1 Kliknij prawym przyciskiem myszy Pulpit systemu Windows, a
następnie wybierz opcję Właściwości.
Zostanie wyświetlone okno Właściwości: Ekran.
2 Kliknij kartę Ustawienia, a następnie ustaw Tryb wyświetlania
w odniesieniu do tabeli trybów wyświetlania. Zmiana ustawień
kolorów nie jest potrzebna.
3 Kliknij przycisk Zaawansowane. Zostanie wyświetlone nowe
okno dialogowe.
4 Kliknij kartę Monitor, a następnie ustaw wartość opcji
Częstotliwość odświeżania ekranu zgodnie z tabelą trybów wyświetlania. Jeśli jest to możliwe,
zamiast korzystać z ustawienia Częstotliwość odświeżania ekranu ustaw osobno częstotliwość
pionową i częstotliwość poziomą.
5 Kliknij przycisk OK, aby zamknąć okno, a następnie kliknij przycisk OK w oknie Właściwości: Ekran.
W tym momencie może się rozpocząć automatyczne ponowne uruchamianie komputera.
Narzędzia
Anynet+ (HDMI-CEC)
Tryb obrazu : Standardowy
Tryb dźwięku : Custom
Automatycz. wył. : Wył
SRS TS XT : Wył
Oszcz. energii ◄ Wył ►
Dual I-II : Mono
Nawigacja Zmiana
Wyjdź
BN68-01528A-00Pol.indd 29 4/21/2008 3:17:33 PM

Polski - 30
Tryb wejścia (PC)
Położenie i rozmiar ekranu różnią się w zależności od typu monitora komputera i wybranej
rozdzielczości.
W poniższej tabeli przedstawiono wszystkie obsługiwane tryby ekranu.
D-Sub Wejście
Tryb Rozdzielczość
Częstotliwość
pozioma (kHz)
Częstotliwość
pionowa (Hz)
Częstotliwość
zegara
pikseli (MHz)
Polaryzacja
synchronizacji
(pozioma/
pionowa)
PS50A470
IBM
640 x 350
720 x 400
31.469
31.469
70.086
70.087
25.175
28.322
+ / -
- / +
✔
✔
VESA
640 x 480
640 x 480
640 x 480
800 x 600
800 x 600
800 x 600
1024 x 768
1024 x 768
1024 x 768
1360 x 768
31.469
37.861
37.500
37.879
48.077
46.875
48.363
56.476
60.023
47.712
59.940
72.809
75.000
60.317
72.188
75.000
60.004
70.069
75.029
60.015
25.175
31.500
31.500
40.000
50.000
49.500
65.000
75.000
78.750
85.500
- / -
- / -
- / -
+ / +
+ / +
+ / +
- / -
- / -
+ / +
+ / +
✔
✔
✔
✔
✔
✔
✔
✔
✔
✔
HDMI/DVI Wejście
Tryb Rozdzielczość
Częstotliwość
pozioma (kHz)
Częstotliwość
pionowa (Hz)
Częstotliwość
zegara
pikseli (MHz)
Polaryzacja
synchronizacji
(pozioma/
pionowa)
PS50A470
VESA
640 x 480
800 x 600
1024 x 768
1360 x 768
31.469
37.879
48.363
47.712
59.940
60.317
60.004
60.015
25.175
40.000
65.000
85.500
- / -
+ / +
- / -
+ / +
✔
✔
✔
✔
Korzystając z połączenia kablowego HDMI/DVI należy użyć gniazda HDMI IN2.
Tryb z przeplotem nie jest obsługiwany.
Telewizor może nie działać poprawnie, jeśli zostanie wybrany niestandardowy format wideo.
Obsługiwane są tryby sygnału rozdzielonego oraz złożonego (kompozytowego). Brak obsługi
synchronizacji SOG.
W modelu PS50A470, optymalną jakość wyświetlania tekstu komputerowego można uzyskać w
trybie VESA (1360 x 768 przy 60 Hz).
BN68-01528A-00Pol.indd 30 4/21/2008 3:17:33 PM

Polski - 31
Konfiguracja komputera
➢
Za pomocą przycisku SOURCE włącz tryb komputera PC.
1 Naciśnij przycisk MENU, aby wyświetlić menu.
2 Za pomocą przycisków ▲ lub ▼ wybierz opcję Obraz, a
następnie naciśnij przycisk ENTER.
3 Wybierz odpowiednią opcję, naciskając przyciski ▲ lub ▼, a
następnie naciśnij przycisk ENTER.
4 Jeśli ustawienia są poprawne, naciśnij przycisk ENTER.
5 Naciśnij przycisk EXIT, aby wyjść z menu.
Auto dopasowanie:
Funkcja umożliwia automatyczne dostosowywanie ustawień
ekranu do wejściowego sygnału wideo z komputera.
Urządzenie samoczynnie dostraja ziarnistość, dobiera
częstotliwość i położenie obrazu.
Łatwa konfiguracja
1 Naciśnij przycisk TOOLS na pilocie.
2 Za pomocą przycisków ▲ lub ▼ wybierz opcję Auto
dopasowanie, a następnie naciśnij przycisk ENTER.
Regulacja obrazu: Ziarnisty / Wygładzony / Położenie
/Reset obrazu
Ziarnisty / Wygładzony
Regulowanie jakości obrazu ma na celu wyeliminowanie lub
zredukowanie zakłóceń. Jeżeli dostrojenie nie wyeliminowało
ich całkowicie, należy zoptymalizować częstotliwość (opcja
Ziarnisty), a następnie jeszcze raz dostroić. Po zredukowaniu
zakłóceń należy jeszcze wyregulować obraz tak, aby
znajdował się dokładnie na środku ekranu.
1
Za pomocą przycisków ▲ lub ▼ wybierz opcję Ziarnisty
lub Wygładzony, a następnie naciśnij przycisk ENTER.
2 Naciśnij przycisk ◄ lub ►, aby wyregulować jakość obrazu.
Efektami towarzyszącymi regulacji mogą być pionowe pasy
lub brak ostrości obrazu. Naciśnij przycisk ENTER.
Położenie
Jeśli ekran komputera nie mieści się na ekranie telewizora,
należy dopasować jego położenie.
1 Dostosuj położenie, naciskając przyciski ▲/▼/◄/►.
2 Naciśnij przycisk ENTER.
Reset obrazu
Istnieje możliwość przywrócenia fabrycznych ustawień
wszystkich parametrów obrazu.
Nawigacja
Wejdź
Powrót
Ziarnisty 50
Wygładzony 11
Położenie
Reset obrazu
Regulacja obrazu
T V
Trwa samodostrajanie
Czekaj…
Zakończono reset. Obrazu.
Nawigacja
Wejdź
Powrót
Tryb :
Standardowy
Podświetlenie komórki
7
Kontrast 95
Jasność 45
Ostrość 50
Auto dopasowanie
Ekran
Ustawienia szczegółowe
Opcje obrazu
Zeruj : OK
Obraz
T V
Przenieś
Wejdź
Powrót
Położenie
T V
Narzędzia
Anynet+ (HDMI-CEC)
Tryb obrazu : Standardowy
Tryb dźwięku : Użytkownika
Automatycz. wył. : Wył
SRS TS XT : Wył
Oszcz. energii : Wył
PIP
Auto dopasowanie
Wyjdź
Przenieś
Wejdź
BN68-01528A-00Pol.indd 31 4/21/2008 3:17:34 PM

Polski - 32
English - 30
Czym jest Anynet
+
?
Anynet
+
jest systemem sieciowym AV udostępniającym łatwy w użyciu interfejs AV. Przez
menu Anynet
+
użytkownicy mogą kontrolować wszystkie podłączone urządzenia AV, jeśli są to
urządzenia AV firmy Samsung Electronics.
Podłączanie urządzeń Anynet
+
System Anynet
+
obsługuje wyłącznie urządzenia audio-wideo współpracujące z systemem
Anynet
+
.
Sprawdź, czy na urządzeniu audio-wideo przeznaczonym do podłączenia do telewizora znajduje
się znak Anynet
+
.
Bezpośrednie podłączenie urządzeń do telewizora
Połącz gniazdo [HDMI
1], [HDMI 2] lub [HDMI
3] telewizora z gniazdem
HDMI OUT odpowiedniego
urządzenia Anynet
+
za pomocą
kabla HDMI.
Podłączenie kina domowego
1 Połącz gniazdo [HDMI
1], [HDMI 2] lub [HDMI
3] telewizora z gniazdem
HDMI OUT odpowiedniego
urządzenia Anynet
+
za
pomocą kabla HDMI.
2 Połącz gniazdo HDMI IN
kina domowego z gniazdem
HDMI OUT odpowiedniego
urządzenia Anynet
+
za
pomocą kabla HDMI.
➢
Podłączaj tylko jeden odbiornik.
➢
Urządzenie Anynet
+
można podłączyć za pomocą kabla HDMI. Niektóre kable HDMI mogą nie
obsługiwać funkcji Anynet
+
.
➢
System Anynet
+
działa, gdy urządzenie AV obsługujące Anynet
+
znajduje się w stanie gotowości lub
jest włączone.
➢
System Anynet
+
obsługuje maksymalnie 8 urządzeń AV.
Urządzenie 1 Anynet+
Urządzenie 2 Anynet+ Urządzenie 3 Anynet+
TV
Kabel HDMI
Kabel HDMI
Kabel HDMI
English - 30
TV
Urządzenie 1 Anynet+ Urządzenie 2 Anynet+
Urządzenie 3 Anynet+
Kabel HDMI
Kabel HDMI
Kabel HDMI
Kabel HDMI
Kino domowe
BN68-01528A-00Pol.indd 32 4/21/2008 3:17:35 PM

Polski - 33
Konfiguracja systemu Anynet
+
Poniższe ustawienia są przeznaczone do używania z funkcjami Anynet
+
.
Korzystanie z funkcji Anynet
+
1 Naciśnij przycisk MENU, aby wyświetlić menu.
Naciśnij przycisk ▲ lub ▼, aby wybrać opcję Wejście, a następnie
naciśnij przycisk ENTER.
2 Naciśnij przycisk ▲ lub ▼, aby wybrać opcję Anynet
+
(HDMI-CEC), a
następnie naciśnij przycisk ENTER.
3 Za pomocą przycisków ▲ i ▼ wybierz opcję Ustawienia, a następnie
naciśnij przycisk ENTER.
4 Naciśnij przycisk ▲ lub ▼, aby wybrać opcję Anynet
+
(HDMI-CEC), a
następnie naciśnij przycisk ENTER.
5 Naciśnij przycisk ▲ lub ▼, aby wybrać opcję Wł, a następnie naciśnij
przycisk ENTER.
➢
Funkcja Anynet
+
(HDMI-CEC) jest włączona.
➢
Jeśli zostanie wybrana opcja Wył, funkcja Anynet
+
(HDMI-CEC)
zostanie wyłączona.
➢
Gdy funkcja Anynet
+
(HDMI-CEC) jest wyłączona, wszystkie operacje
związane z funkcją Anynet
+
są nieaktywne.
Automatyczne wyłączenie urządzenia Anynet
+
po wyłączeniu telewizora
4
Za pomocą przycisków ▲ lub ▼ zaznacz polecenie Automatyczne
wyłączanie, a następnie naciśnij przycisk ENTER.
5 Naciśnij przycisk ▲ lub ▼, aby wybrać opcję Tak, a następnie naciśnij
przycisk ENTER.
➢
Funkcja Wyłącz automatycznie jest włączona.
➢
Jeśli zostanie wybrana opcja Nie, funkcja Wyłącz automatycznie
zostanie anulowana.
Naciśnij przycisk EXIT, aby wyjść z opcji.
➢
Opcja pilota Wybór urządzenia powinna być ustawiona na pozycję TV, aby mogła być używana funkcja Anynet
+
.
➢
Jeśli opcja Wyłącz automatycznie zostanie ustawiona na pozycję Tak, podłączone urządzenia zewnętrzne zostaną
wyłączone po wyłączeniu telewizora. Jednakże urządzenie, które w tym czasie nagrywa program, może nie zostać
wyłączone.
Wyszukiwanie i przełączanie pomiędzy urządzeniami Anynet
+
1 Naciśnij przycisk MENU, aby wyświetlić menu.
Naciśnij przycisk ▲ lub ▼, aby wybrać opcję Wejście, a następnie
naciśnij przycisk ENTER.
2 Naciśnij przycisk ▲ lub ▼, aby wybrać opcję Anynet
+
(HDMI-CEC), a
następnie naciśnij przycisk ENTER.
3 Naciśnij przycisk ▲ lub ▼, aby wybrać opcję Wybór urządzenia, a
następnie naciśnij przycisk ENTER.
4
Za pomocą przycisków ▲ lub ▼ wybierz urządzenie i naciśnij przycisk ENTER.
Zostanie ono wybrane do dalszych operacji.
5 Jeśli nie możesz znaleźć żądanego urządzenia, za pomocą przycisków
▲ lub ▼ wybierz polecenie Szukanie połączeń, a następnie naciśnij
przycisk ENTER.
Zostanie wyświetlony komunikat Konfigurowanie połączenia
Anynet
+
... . Po zakończeniu wyszukiwania podłączone urządzenia
zostaną wyświetlone w menu Anynet
+
.
➢
Przełączanie do wybranych urządzeń może trwać do 2 minut. Nie
można przerwać procesu przełączania na urządzenie.
➢
Czas potrzebny do wyszukania urządzeń zależy od ilości podłączonych
urządzeń.
➢
Po zakończeniu wyszukiwania wyświetlana jest liczba znalezionych
urządzeń.
➢
Telewizor automatycznie wyszukuje urządzenia po włączeniu za pomocą przycisku POWER, jednak urządzenia
podłączone, gdy telewizor znajdował się w określonym stanie, nie są wyświetlane na liście urządzeń. Wtedy w celu
wyszukania urządzeń należy skorzystać z menu Szukanie połączeń.
➢
Jeśli został wybrany tryb wejścia zewnętrznego przez naciśnięcie przycisku SOURCE, nie można używać funkcji
Anynet
+
. Przełącz się do urządzenia Anynet
+
za pomocą przycisku TOOLS.
ciąg dalszy...
Ustawienia
Anynet
+
(HDMI-CEC)
: Off
Wył. automatycznie
: Off
Szuk.podł.urz.
Wejdź WróćNawigacja
Wył
Wł
Wejdź
Nawigacja
Oglądaj TV
Wybierz urządzenie
Nagrywanie
Menu urządzenia
Praca urządzenia
Odbiornik :Wył
Ustawienia
TV P 1
Wróć
Ustawienia
Anynet
+
(HDMI-CEC)
: Wł
Wył. automatycznie :
: Off
Szuk.podł.urz.
Wejdź WróćNawigacja
Nie
Tak
Wejdź
Nawigacja
Oglądaj TV
Wybierz urządzenie
Nagrywanie
Menu urządzenia
Praca urządzenia
Odbiornik :Wył
Ustawienia
TV P 1
Wróć
DVDR1
DVDR2
DVD1
DVD2
Ustawienia
Anynet+ (HDMI-CEC)
: Wł
Wył. automatycznie
: Tak
Szuk.podł.urz.
Wejdź WróćNawigacja
BN68-01528A-00Pol.indd 33 4/21/2008 3:17:36 PM

Polski - 34
Menu Anynet+
Elementy menu systemu Anynet
+
mogą zmieniać się w zależności od rodzaju i statusu urządzeń
połączonych z telewizorem w systemie Anynet
+
.
Menu Anynet
+
Opis
View TV (Oglądaj TV) Przełącza z trybu Anynet
+
do trybu odbioru programów telewizyjnych.
Select Device (Wybór urządzenia) Telewizor nawiązuje połączenie z odpowiednim urządzeniem.
Record (Nagrywanie) Rozpoczyna nagrywanie. (To menu działa tylko w przypadku urządzenia
obsługującego nagrywanie.)
Menu on Device (Menu urządzenia) Pokazuje menu podłączonego urządzenia.
Przykład. Jeśli jest podłączona nagrywarka DVD, wyświetlane jest menu
tytułowe nagrywarki DVD.
Device Operation (Praca
urządzenia)
Pokazuje menu kontroli odtwarzania podłączonego urządzenia.
Przykład. Jeśli jest podłączona nagrywarka DVD, wyświetlane jest menu
kontroli odtwarzania nagrywarki DVD.
Odbiornik (Receiver) Dźwięk wydobywa się z odbiornika.
Ustawienia (Setup)
Użytkownik może ustawić środowisko, w którym będzie używany system
Anynet
+
.
Przyciski pilota telewizora funkcjonujące w trybie Anynet
+
Typ urządzenia Stan urządzeń Dostępne przyciski
Urządzenie Anynet
+
Po przełączeniu się do urządzenia,
gdy menu odpowiedniego urządzenia
jest wyświetlane na ekranie.
Przyciski numeryczne
Przyciski ▲/▼/◄/►/ENTER
Przyciski koloru
Przycisk EXIT
Po przełączeniu się do urządzenia, w
trakcie odtwarzania pliku.
W.LINK
(Wyszukiwanie wstecz)
W.LINK
(Wyszukiwanie do przodu)
W.LINK
(Stop)
W.LINK
W.LINK
(Odtwarzanie/Pauza)
Urządzenie z wbudowanym
tunerem
Po przełączeniu się do urządzenia,
w trakcie oglądania programu
telewizyjnego.
Przycisk P /
Urządzenie audio Gdy odbiornik jest włączony.
Przycisk
W.LINK
/
W.LINK
Przycisk MUTE
➢
Funkcja Anynet
+
jest dostępna tylko w przypadku pilota ustawionego na obsługę telewizora.
➢
Przycisk REC działa tylko wtedy, gdy urządzenie znajduje się w stanie nagrywania.
➢
Urządzeniami Anynet
+
nie można sterować za pomocą przycisków z boku telewizora. Do obsługi
urządzeń systemu Anynet
+
konieczne jest posiadanie pilota do telewizora.
➢
W pewnych warunkach pilot telewizora może nie działać. Należy wtedy ponownie wybrać urządzenie Anynet
+
.
➢
Funkcje Anynet
+
nie działają w przypadku produktów innych producentów.
➢
W trybie Anynet
+
przyciski koloru mogą nie działać poprawnie.
➢
Operacje
W.LINK
,
W.LINK
mogą się różnić w zależności od urządzenia.
Nagrywanie
Program telewizyjny można nagrać za pomocą nagrywarki.
Naciśnij przycisk REC.
Rozpocznie się nagrywanie. (Tylko wtedy, gdy zostało podłączone urządzenie nagrywające, które
obsługuje funkcję Anynet
+
.)
➢
Bieżący program telewizyjny jest nagrywany tylko w trybie oglądania programu. Podczas oglądania
materiału wideo z innego urządzenia nagrywany jest materiał wideo z tego urządzenia.
➢
Aby nagrać strumień źródłowy, można także wybrać opcję Nagrywanie po naciśnięciu przycisku
TOOLS.
➢
Przed rozpoczęciem nagrania należy się upewnić, że gniazdo anteny jest poprawnie połączone z
urządzeniem nagrywającym.
Informacje dotyczące podłączenia anteny do urządzenia nagrywającego można znaleźć w instrukcji
obsługi urządzenia.
BN68-01528A-00Pol.indd 34 4/21/2008 3:17:37 PM

Polski - 35
Odbiór dźwięku za pomocą odbiornika
Zamiast przez głośniki telewizora, dźwięku można słuchać przez odbiornik.
1
Naciśnij przycisk MENU, aby wyświetlić menu.
Naciśnij przycisk ▲ lub ▼, aby wybrać opcję Wejście, a następnie naciśnij
przycisk ENTER.
2 Naciśnij przycisk ▲ lub ▼, aby wybrać opcję Anynet
+
(HDMI-CEC), a
następnie naciśnij przycisk ENTER.
3 Naciśnij przycisk ▲ lub ▼, aby wybrać opcję Odbiornik, a następnie naciśnij
przycisk ENTER.
4 Za pomocą przycisków ◄ lub ► wybierz polecenie Włącz, a następnie naciśnij
przycisk ENTER.
Od tej chwili dźwięk będzie emitowany przez odbiornik.
5 Naciśnij przycisk EXIT, aby wyjść z menu.
➢
Gdy odbiornik jest włączony (Wł), można słuchać dźwięku z telewizora przez dwukanałowy odbiornik.
➢
Jeśli odbiornik jest przeznaczony tylko do pracy z zestawem kina domowego (wyłącznie obsługa pasma
audio), może on nie zostać wyświetlony na liście urządzeń.
➢
W przypadku problemu z prawami autorskimi materiału audio odtwarzanie dźwięku przez odbiornik może
nie działać poprawnie.
➢
Podczas używania odbiornika funkcje PIP i związane z dźwiękiem są ograniczone.
Czynności kontrolne. które warto wykonać przed oddaniem
urządzenia do serwisu
Objaw Rozwiązanie
Funkcja Anynet
+
nie działa.
■ Sprawdź, czy urządzenie jest urządzeniem Anynet
+
. System Anynet
+
obsługuje tylko urządzenia Anynet
+
.
■ Podłącz tylko jeden odbiornik.
■ Sprawdź, czy kabel zasilający urządzenia Anynet
+
jest poprawnie podłączony.
■ Sprawdź połączenia kabli Video/Audio/HDMI urządzenia Anynet
+
.
■ Sprawdź, czy opcja Anynet+ (HDMI-CEC) jest ustawiona na pozycję Wł (On) w
menu ustawień funkcji Anynet
+
.
■ Sprawdź, czy pilot telewizora znajduje się w trybie TV.
■ Sprawdź, czy jest to pilot przeznaczony specjalnie do obsługi funkcji Anynet
+
.
■
Funkcja Anynet
+
nie działa w określonych warunkach. (Wyszukiwanie kanałów)
■ Po podłączeniu lub odłączeniu kabla HDMI 1.3 uruchom ponownie
wyszukiwanie urządzeń lub wyłącz i ponownie włącz telewizor.
■ Sprawdź, czy funkcja Anynet
+
w urządzeniu Anynet
+
jest włączona.
Chcę uruchomić urządzenie
Anynet
+
.
■ Sprawdź, czy urządzenie Anynet
+
jest poprawnie podłączone do telewizora
oraz czy opcja Anynet
+
(HDMI-CEC) jest ustawiona na pozycję Wł (On) w
menu Setup (Ustawienia) funkcji Anynet
+
.
■ Naciśnij przycisk
TV na pilocie telewizora, aby przełączyć się do telewizora.
Następnie naciśnij przycisk TOOLS, aby wyświetlić menu Anynet
+
i
wybierz żądane menu.
Chcę wyjść z funkcji Anynet
+
. ■ Wybierz opcję Oglądaj TV w menu Anynet
+
.
■ Naciśnij przycisk
SOURCE na pilocie telewizora i wybierz urządzenie inne
niż urządzenia systemu Anynet
+
.
■ Naciśnij przycisk
P, CH LIST lub PRE-CH, aby przejść do trybu
TV. (Należy pamiętać, że przycisk kanału działa tylko wtedy, gdy nie jest
podłączone urządzenie Anynet
+
z wbudowanym tunerem.)
Na ekranie jest wyświetlany
komunikat Podłączanie
urządzenia Anynet
+
...
■ Nie można uzywać pilota podczas konfigurowania funkcji Anynet+lub
przełączania do trybu oglądania.
■ Pilota można używać, gdy zakończono ustawianie funkcji Anynet
+
lub
przełączanie do trybu oglądania.
W urządzeniu Anynet
+
nie działa
funkcja odtwarzania.
■ Funkcji odtwarzania nie można używać, gdy jest wykonywana operacja Plug
& Play.
Podłączone urządzenie nie jest
wyświetlane.
■ Sprawdź, czy urządzenie obsługuje Anynet+. funkcje
■ Sprawdź, czy kabel HDMI został prawidłowo podłączony.
■ Sprawdź, czy opcja Anynet
+
(HDMI-CEC) jest ustawiona na pozycję Wł On w
menu ustawień funkcji Anynet
+
.
■ Wyszukaj ponownie urządzenia Anynet
+
.
■ Urządzenie Anynet
+
można podłączyć tylko za pomocą kabla HDMI. Niektóre
kable HDMI mogą nie obsługiwać funkcji Anynet
+
.
Nie można nagrać programu
telewizyjnego.
■ Sprawdź, czy gniazdo anteny urządzenia nagrywającego jest poprawnie
podłączone.
Wejdź
Nawigacja
Oglądaj TV
Wybierz urządzenie
Nagrywanie
Menu urządzenia
Praca urządzenia
Odbiornik :Wł
Ustawienia
TV P 1
Wyjdź
BN68-01528A-00Pol.indd 35 4/21/2008 3:17:37 PM

Polski - 36
Funkcja telegazety (w zależności od modelu)
Większość stacji telewizyjnych nadaje informacje tekstowe w formie telegazety. Informacje na
temat korzystania z telegazety znajdują się na stronie ze spisem treści telegazety. Wyboru opcji
pozwalających na dostosowanie funkcji telegazety do wymagań użytkownika dokonuje się za
pomocą przycisków pilota.
☛
Warunkiem prawidłowego wyświetlania telegazety jest stabilny odbiór kanału. W przeciwnym
wypadku pewne informacje lub niektóre strony mogą nie być wyświetlane.
1
TV
Zamknięcie ekranu telegazety (w zależności od modelu)
2
(zapisz)
Umożliwia zapisanie stron telegazety.
3
(rozmiar)
Powoduje dwukrotne powiększenie rozmiaru liter w górnej
połowie ekranu. Aby powiększyć litery w dolnej połowie ekranu,
przycisk należy nacisnąć ponownie.Kolejne naciśnięcie
przycisku spowoduje wyświetlanie normalnego ekranu.
4
(odsłona)
Służy do wyświetlania ukrytego tekstu (np. odpowiedzi na
pytania quizu). Ponowne naciśnięcie przycisku powoduje
wyświetlenie normalnego ekranu.
5
Kolorowe przyciski (czerwony/zielony/żółty/niebieski)
Jeśli stacja nadawcza używa systemu FASTEXT, poszczególne
tematy z telegazety są przypisane określonym kolorom;
można je wybierać, naciskając przyciski w odpowiednim
kolorze. Naciśnięcie jednego z nich powoduje wyświetlenie
odpowiadających mu informacji. Zostanie wyświetlona strona
z dodatkowymi informacjami, które można wybrać w ten sam
sposób.Aby wyświetlić poprzednią lub następną stronę, należy
nacisnąć przycisk w odpowiednim kolorze.
6
(włączanie telegazety/wyświetlanie telegazety i
obrazu telewizyjnego)
Przycisk ten służy do włączania trybu telegazety po wybraniu
kanału, który udostępnia taką usługę. Ponowne naciśnięcie
tego przycisku umożliwia wyświetlenie telegazety wraz z
obrazem telewizyjnym.
7
(tryb)
Naciśnij, aby wybrać tryb telegazety (LIST/FLOF) (LISTA/
FLOF).W przypadku wyboru trybu LIST istnieje możliwość
zapisu stron telegazety na liście.Można to zrobić, używając
przycisku (zapisz).
8
(podstrona)
Wyświetla podstronę, jeśli dostępna.
9
(strona w górę)
Wyświetla następną stronę telegazety.
0
(strona w dół)
Wyświetla poprzednią stronę telegazety.
!
(spis treści)
Umożliwia wyświetlenie strony ze spisem treści podczas
przeglądania telegazety.
@
(wstrzymanie)
Służy do zatrzymania przeglądanej strony na określonym
poziomie w przypadku, gdy jest ona powiązana z kolejnymi
stronami,
które wyświetlają się automatycznie. Ponowne naciśnięcie tego
przycisku powoduje wznowienie przeglądania.
#
(anuluj)
Umożliwia wyświetlenie programu podczas wyszukiwania strony.
➢
Strony telegazety można zmieniać, naciskając przyciski numeryczne na pilocie.
ciąg dalszy...
BN68-01528A-00Pol.indd 36 4/21/2008 3:17:39 PM

Polski - 37
Strony telegazety są uporządkowane według sześciu kategorii:
Część Zawartość
A
B
C
D
E
F
Numer wybranej strony.
Identyfikator kanału nadającego telegazetę.
Numer bieżącej strony lub stan wyszukiwania.
Data i godzina.
Tekst.
Informacje o stanie.
Informacje funkcji FASTEXT
➢
Informacje w telegazecie umieszczone są zazwyczaj na kilku
wyświetlanych kolejno po sobie stronach, które można otworzyć
w jeden z następujących sposobów:
wprowadzając numer strony,
wybierając tytuł z listy,
wybierając nagłówek w odpowiednim kolorze (system
FASTEXT).
➢
Naciśnij przycisk TV, aby wyłączyć telegazetę.
BN68-01528A-00Pol.indd 37 4/21/2008 3:17:40 PM

Polski - 38
Dane techniczne zestawu wspornika do montażu naściennego (VESA)
Zainstaluj wspornik na solidnej ścianie, prostopadle do podłogi.
W przypadku montażu na innych elementach i materiałach należy skontaktować się z najbliższym
punktem sprzedaży. Instalacja na dziurawej lub pochyłej ścianie może doprowadzić do upadku
urządzenia i spowodowania obrażeń ciała.
Rodzina produktów
cale Dane VESA (A
*
B) Standardowy wkręt Liczba
LCD-TV
23 ~ 26
200
*
100
M4
4
32 ~ 40
200
*
200
M6
46 ~ 52
400
*
400
600
*
400
M8
57
700
*
400
(Brak VESA)
57 ~ 70
800 * 400
80 ~
1400 * 800
PDP-TV
42 ~ 58
400
*
400
600
*
400
M8
4
63
676
*
407
(Brak VESA)
6
63~70
800 * 400
4
80 ~
1400 * 800
4
➢
Standardowe wymiary zestawów wspornika do montażu naściennego zostały przedstawione w
powyższej tabeli.
➢
W przypadku zakupienia zestawu wspornika do montażu naściennego naszej firmy dołączona jest do
niego szczegółowa instrukcja obsługi i wszystkie części niezbędne do montażu.
➢
Nie należy używać wkrętów dłuższych niż standardowe, ponieważ mogą one spowodować
uszkodzenie telewizora.
➢
W przypadku wkrętów, które nie spełniają standardowych wymagań VESA dotyczących śrub, długość
wkrętów może się różnić w zależności od ich parametrów.
➢
Nie należy używać wkrętów, które nie spełniają standardowych wymagań VESA dotyczących śrub. Nie
należy dokręcać śrub zbyt mocno, gdyż może to uszkodzić produkt lub doprowadzić do jego upadku i
spowodowania obrażeń ciała. Firma Samsung nie ponosi odpowiedzialności za tego typu wypadki.
➢
Firma Samsung nie ponosi odpowiedzialności za uszkodzenia produktu lub obrażenia ciała powstałe
w wyniku korzystania z mocowania niespełniającego standardów VESA lub nieokreślonego w
specyfikacjach, a także w wyniku niezastosowania się użytkownika do instrukcji instalacji produktu.
➢
Modele o przekątnej ekranu 57” i 63” nie są zgodne ze standardem VESA. Dlatego w przypadku tego
modelu należy użyć specjalnego zestawu wspornika do montażu naściennego naszej firmy.
➢
Nie odchylać telewizora w tył o więcej niż 15 stop
ni.
Nie należy instalować zestawu do montażu naściennego, kiedy telewizor jest włączony.
Może to spowodować obrażenia ciała powstałe w wyniku porażenia prądem.
BN68-01528A-00Pol.indd 38 4/21/2008 3:17:40 PM

Polski - 39
Otwieranie menu
1
Naciśnij przyciski ▲, ▼, ◄ lub ► na pilocie.
➢
Wyświetlony zostanie ekran Regulacja wspornika
ściennego.
➢
Jeśli ekran Regulacja wspornika ściennego nie zostanie
wyświetlony po naciśnięciu przycisku kierunkowego
podczas oglądania telewizji, aby wyświetlić ten ekran,
należy użyć menu.
• Naciśnij przycisk
MENU, aby wyświetlić menu.
Za pomocą przycisków ▲ lub ▼ wybierz opcję
Ustawienia, a następie naciśnij przycisk ENTER.
• Za pomocą przycisków ▲ lub ▼ wybierz opcję
Regulacja wspornika ściennego, a następnie naciśnij
przycisk ENTER.
Zapamiętywanie pozycji
2
Ustaw odpowiednią pozycję za pomocą przycisków ▲, ▼, ◄, ►.
➢
Jeśli naciśniesz przycisk strzałki, kiedy menu ekranowe
nie jest wyświetlane, zostanie wyświetlony ekran regulac
ji.
➢
Naciśnij przycisk INFO, aby wyzerować ustawienia.
Za pomocą przycisków ◄ lub ► wybierz opcję Tak, a
następnie naciśnij przycisk ENTER. Przywracane są
domyślne ustawienia pozycji.
3 Naciśnij niebieski przycisk.
Aby zapisać bieżące położenie, naciskając przyciski ▲ i ▼,
wybierz tryb zapisywania w menu: Położenie1, Położenie2
lub Położenie3.
➢
Aby nie zapisywać bieżącego położenia, naciśnij przycisk
RETURN.
➢
Po wybraniu trybu zapisywania nie można używać
kolorowych przycisków.
4
Aby zapisać, naciśnij przycisk ENTER.
➢
Po wybraniu opcji Położenie1 zostanie wyświetlony
komunikat Bieżące ustawienie zapisane jako
Położenie1 (Current position saved as Position1).
5
Naciśnij przycisk ENTER.
➢
Zapisane Położenie wyświetlane jest po lewej stronie
menu ekranowego.
Regulacja wspornika ściennego (sprzedawany osobno)
Po zainstalowaniu wspornika do montażu ściennego położenie telewizora można łatwo regulować.
Panel tylny Automatyczny wspornik do montażu ściennego
Kabel szeregowy (1P do 1P) (dostępny osobno)
Regulacja wspornika ściennego
Zmiana
Zapisz Środkowv
►
►
►
►
►
►
►
►
321
Położenie
Nawigacja
Wejdź
Powrót
Plug & Play
Język : Polski
Czas
Efekt świetlny
:Oglądanie wł.
Regulacja wspornika ściennego
Melodia : Wył
Rozrywka : Kino
Oszcz. energii : Wył
PIP
Ustawienia
T V
Zapisz
Powrót
Zmiana
Wejdź
Wybierz i zapisz ustawienie.
Położenie 1
Położenie 2
Położenie 3
BN68-01528A-00Pol.indd 39 4/21/2008 3:17:42 PM

Polski - 40
Montaż podstawy (w zależności od modelu)
Za pomocą 4 wkrętów przymocuj dokładnie monitor do
podstawy.
(Wygląd zewnętrzny telewizora może się różnić od
przedstawionego na ilustracji).
W przypadku instalowania telewizora na
ścianie zamknij pokrywę (1) w miejscu
podłączenia podstawy przy użyciu
dwóch wkrętów.
Ostrzeżenie
Podstawę należy dokładnie
przymocować do telewizora
przed jego przenoszeniem, ponieważ
może ona wysunąć się i spowodować
poważne obrażenia.
➢
Telewizor powinny przenosić dwie
osoby lub więcej. Nie wolno go
kłaść na podłodze, gdyż grozi to
uszkodzeniem ekranu.
Telewizor należy zawsze
przechowywać w pozycji pionowej.
Przesuwanie do zapisanego położenia
1
Przejdź do kroku 1 procedury Otwieranie menu.
2 Naciśnij kolorowy przycisk (czerwony, zielony, żółty).
Spowoduje to wczytanie zapisanego ustawienia położenia
wspornika.
➢
Wspornik można przesunąć do jednego z 3 wcześniej
zapisanych położeń, naciskając przyciski czerwony
(Położenie1), zielony (Położenie2) lub żółty (Położenie3).
➢
Jeśli położenie zostanie zmienione po przejściu do
zdefiniowanego położenia, informacje o tym położeniu nie
będą wyświetlane.
➢
Instrukcje instalacji znajdują się w instrukcji instalacji
dostarczonej z wspornikiem.
➢
Wskazówki na temat instalacji oraz instalacji i przenoszenia
wspornika ściennego można uzyskać w firmie specjalizującej
się w tej dziedzinie.
➢
Podczas montowania wspornika na ścianie należy korzystać
z podręcznika instalacji. Jeśli wspornik jest mocowany do
innych materiałów, należy skontaktować się z najbliższym
sprzedawcą w celu uzyskania dodatkowych informacji.
➢
Automatyczny wspornik do montażu ściennego nie będzie
działał, gdy funkcja Anynet
+
jest włączona.
➢ Model 42-calowy nie jest zgodny ze starszym modelem
wspornika do montażu ściennego (WMN5090A).
Regulacja wspornika ściennego
Zmiana
Zapisz
Środkowv
►
►
►
►
►
►
►
►
321
Położenie
Położenie 1
BN68-01528A-00Pol.indd 40 4/21/2008 3:17:44 PM

Polski - 41
Przymocowanie telewizora do ściany
Ciągnięcie czy pchanie telewizora lub wchodzenie na jego obudowę może doprowadzić do
zrzucenia telewizora. W szczególności należy upewnić się, że dzieci nie uwieszają się na
telewizorze i nie powodują utraty jego stabilności; niezastosowanie się do tego zalecenia może
grozić przewróceniem urządzenia i spowodować ryzyko obrażeń ciała, a nawet śmierci. Należy
postępować zgodnie z zasadami bezpieczeństwa zamieszczonymi w załączonej ulotce z
informacjami dotyczącymi bezpieczeństwa. W celu stabilnego i bezpiecznego przymocowania
telewizora należy użyć zestawu zabezpieczającego przed upadkiem urządzenia.
Aby zapobiec przewróceniu się telewizora:
1. Umieść wkręty w klamrach i przymocuj je silnie do ściany.
Upewnij się, że wkręty zostały przymocowane prawidłowo
W zależności od rodzaju ściany może być konieczne
użycie dodatkowych materiałów, np. kołków
rozporowych.
Wymagane klamry, wkręty i linka nie są dołączone do
zestawu i należy je zakupić osobno.
2. Wyjmij wkręty znajdujące się w tylnej, środkowej części
telewizora i umieść je w klamrach, a następnie przykręć je
ponownie do telewizora.
Wkręty mogą nie być dostarczone razem z produktem.
W takim przypadku należy zakupić wkręty odpowiadające
poniższej specykacji technicznej.
3. Połącz klamry zamocowane w telewizorze i w ścianie za
pomocą mocnej linki, a następnie silnie zwiąż jej końce.
Umieść telewizor w pobliżu ściany, aby zapobiec jego
przewróceniu się do tyłu.
W celu bezpiecznego zamocowania linki klamry
umieszczone w ścianie powinny znajdować się na równej
wysokości lub poniżej klamr przymocowanych do obudowy
telewizora.
Przed zmianą położenia telewizora odwiąż linkę.
4. Sprawdź, czy wszystkie połączenia zostały wykonane
poprawnie. Regularnie sprawdzaj połączenia pod kątem
uszkodzeń. W przypadku wątpliwości dotyczących jakości
połączeń skontaktuj się ze specjalistą.
➣
➣
➣
➣
➣
➣
Ściana
Ściana
Ostrzeżenie
BN68-01528A-00Pol.indd 41 4/21/2008 3:17:45 PM

Polski - 42
Rozwiązywanie problemów
Przed skontaktowaniem się z serwisem firmy Samsung należy samodzielnie wykonać proste czynności
kontrolne.
Jeżeli mimo zastosowania się o poniższych instrukcji problemu nie daje się rozwiązać, należy zapisać
numer modelu i numer seryjny telewizora oraz zwrócić się do sprzedawcy.
Brak dźwięku lub obrazu
Sprawdź, czy przewód sieciowy jest włożony do ściennego gniazda sieci elektrycznej.
Sprawdź, czy został naciśnięty przycisk (włącznik/wyłącznik zasilania) na panelu przednim lub naciśnij
przycisk POWER na pilocie.
Sprawdź, czy kontrast i jasność ekranu są dobrze ustawione.
Sprawdź głośność.
Sprawdź, czy funkcja Głośnik TV jest Wył.
Obraz jest dobry, ale nie ma dźwięku
Sprawdź głośność.
Sprawdź, czy nie został naciśnięty przycisk MUTE na pilocie.
Brak obrazu lub obraz jest czarno-biały
Sprawdź ustawienia kolorów.
Sprawdź, czy został ustawiony prawidłowy system nadawania.
Zakłócenia dźwięku i obrazu
Spróbuj ustalić, które urządzenie elektryczne zakłóca pracę telewizora i odsuń je na większą odległość.
Przyłącz telewizor do innego gniazda sieci elektrycznej.
Obraz nieostry lub z zakłóceniami, dźwięk zniekształcony
Sprawdź kierunek, ustawienie i połączenie anteny RTV.
Są to zakłócenia typowe dla anten pokojowych.
Nieprawidłowe działanie pilota
Wymień baterie w pilocie.
Wyczyść górny brzeg pilota (okienko nadawania).
Sprawdź, czy baterie zostały włożone prawidłowo: plus do plusa, minus do minusa.
Sprawdź, czy baterie nie są zużyte.
Ekran jest czarny, a wskaźnik zasilania świeci światłem ciągłym
Sprawdź połączenia komputera: kabel zasilania i kabel sygnału wideo.
Telewizor używa wewnętrznego systemu zarządzania energią.
Porusz mysz komputera lub naciśnij dowolny klawisz na klawiaturze.
Sprawdź połączenia urządzeń (przystawki, odtwarzacza DVD itp.): kabel zasilający i kabel sygnału wideo.
Telewizor używa wewnętrznego systemu zarządzania energią.
Naciśnij przycisk Source na telewizorze lub pilocie.
Wyłącz i ponownie włącz telewizor.
W rogu ekranu został wyświetlony uszkodzony obraz.
W przypadku wybrania funkcji Bez overscanu w niektórych urządzeniach zewnętrznych może nastąpić
wyświetlenie się uszkodzonego obrazu w rogu ekranu. Efekt ten powstaje pod wpływem działania
urządzenia zewnętrznego, a nie telewizora.
Wyświetlony zostaje komunikat „Przywracanie wszystkich ustawień do wartości domyślnych”.
Komunikat taki pojawia się, kiedy przycisk EXIT zostanie naciśnięty i przytrzymany. Przywracane są
ustawienia domyślne urządzenia.
BN68-01528A-00Pol.indd 42 4/21/2008 3:17:45 PM

Polski - 43
Dane techniczne
Opis i cechy charakterystyczne zawarte w tej instrukcji służą jedynie do celów informacyjnych i
mogą ulec zmianie bez uprzedzenia.
Nazwa modelu
PS50A470
Rozmiar ekranu
(przekątna)
50 cale
Rozdzielczość w trybie PC
1360 x 768 przy 60 Hz
Dźwięk (moc wyjściowa)
10 W + 10 W
Wymiary (S x W x G)
Korpus
Z podstawą
1290 x 740 x 95 mm
1290 x 804 x 319 mm
Waga
Korpus
Z podstawą
39 Kg
41 Kg
Środowisko pracy
Temperatura robocza
Wilgotność robocza
Temperatura składowania
Wilgotność składowania
10 °C to 40 °C (50 °F to 104 °F)
10% to 80%, non-condensing
-20 °C to 45 °C (-4 °F to 113 °F)
5% to 95%, non-condensing
➢
Niniejsze urządzenie jest urządzeniem cyfrowym klasy B.
Dane techniczne mogą ulec zmianie bez powiadomienia.
Informacje na temat zasilania i zużycia energii można znaleźć na tabliczce znamionowej
urządzenia.
BN68-01528A-00Pol.indd 43 4/21/2008 3:17:46 PM

Prawidłowe usuwanie produktu
(zużyty sprzęt elektryczny i elektroniczny)
Oznaczenie umieszczone na produkcie lub w odnoszących się do
niego tekstach wskazuje, że produktu po upływie okresu użytkowania
nie należy usuwać z innymi odpadami pochodzącymi z gospodarstw
domowych. Aby uniknąć szkodliwego wpływu na środowisko naturalne
i zdrowie ludzi wskutek niekontrolowanego usuwania odpadów,
prosimy o oddzielenie produktu od innego typu odpadów oraz
odpowiedzialny recykling w celu promowania ponownego użycia
zasobów materialnych jako stałej praktyki.
W celu uzyskania informacji na temat miejsca i sposobu
bezpiecznego dla środowiska recyklingu tego produktu użytkownicy
w gospodarstwach domowych powinni skontaktować się z punktem
sprzedaży detalicznej, w którym dokonali zakupu produktu, lub z
organem władz lokalnych.
Użytkownicy w firmach powinni skontaktować się ze swoim dostawcą i
sprawdzić warunki umowy zakupu. Produktu nie należy usuwać razem
z innymi odpadami komercyjnymi.
BN68-01528A-00Pol.indd 44 4/21/2008 3:17:46 PM

Česky -
Pokyny pro uživatele
Retence obrazu na obrazovce
Neponechejte na plazmové obrazovce statický obraz (například u videohry nebo při propojení
počítače s tímto televizorem PDP) po dobu delší než 2 hodiny, protože může dojít k retenci obrazu.
Tato retence obrazu se rovněž označuje jako „vypálení obrazovky“. Abyste se takové retenci obrazu
vyhnuli, snižte při zobrazování statických obrazů jas a kontrast obrazovky.
Výška
Obrazovka PDP může normálně fungovat pouze v nadmořské výšce do 2000 metrů nad mořem.
V nadmořské výšce nad 2000 metrů nad mořem nemusí fungovat správně, proto ji na takových
místech neinstalujte ani nepoužívejte.
Zahřívání horní části plazmového televizoru
Horní část výrobku se může při dlouhodobém používání zahřát, protože z panelu je přes ventilační
otvor v horní části výrobku vyzařováno teplo. Tento jev je normální a neznamená žádný problém ani
poruchu výrobku. Je ovšem třeba zabránit, aby se horní části výrobku dotýkaly děti.
Z výrobku se ozývá praskavý zvuk.
Praskání se může vyskytnout v případě, že se výrobek smrští nebo roztáhne z důvodu změn
podmínek okolního prostředí, jako jsou teplota nebo vlhkost. Tento jev je normální a nejedná se o
závadu přístroje.
Vadné obrazové body
Televizor PDP je vybaven panelem složeným z 1 230 000 (SD-hladina) na 3 150 000(HD-hladina)
obrazových bodů, jejichž výroba vyžaduje použití sofistikované technologie. Na obrazovce však může
být málo světlých nebo tmavých pixelů. Tyto pixely nebudou mít žádný dopad na výkon produktu.
Vyvarujte se použití televizoru při teplotách nižších než 5 °C (41°F).
Příliš dlouho zobrazovaný statický obraz může způsobit trvalé poškození plazmového
televizoru.
Dlouhodobé sledování plazmové televize ve formátu 4:3 může zanechat v levé,
pravé a střední části obrazovky stopy okrajů, způsobené rozdílem ve vyzařování
světla na obrazovce. Přehrávání DVD nebo herní konzola mohou na obrazovce
způsobit podobný jev. Na poškození způsobená výše uvedeným jevem se
nevztahuje záruka.
Paobraz na obrazovce
Zobrazování statických obrazů z videoher a počítače po delší dobu může způsobit vznik částečných
paobrazů. Abyste tomuto jevu zabránili, snižte při zobrazování statických obrazů jas a kontrast.
Záruka
- Záruka se nevztahuje na jakékoli poškození způsobené retencí obrazu.
- Záruka se nevztahuje na vypálení obrazu.
Instalace
Při instalaci televizoru na místo s vysokou prašností, vysokými nebo nízkými teplotami, vysokou
vlhkostí, chemickými látkami nebo na místa, kde bude trvale v provozu, jako například na letištích,
nádražích apod., kontaktujte servisní středisko. Pokud tak neučiníte, může dojít k vážnému
poškození přístroje.
Kontaktujte SAMSUNG WORLDWIDE (Samsung po celém světě)
Pokud máte dotazy nebo připomínky týkající se výrobků Samsung, kontaktujte středisko péče o
zákazníky společnosti SAMSUNG. (Více informací naleznete na zadní obálce.)
© 2008 Samsung Electronics Co., Ltd. All rights reserved.
BN68-01528A-00Cze_0312.indd 2 2008-4-21 15:31:53

Česky -
Symboly
☛ ➢
Stiskněte
Důležité
Poznámka
Obsah
Všeobecné informace
Pokyny pro uživatele ....................................... 2
Kontrola součástí ............................................ 4
Použití stojanu ................................................4
Ovládací panel ............................................... 5
Konektorový panel .......................................... 6
Popis dálkového ovladače ............................. 8
Provoz
Zapnutí a vypnutí televizoru ............................ 9
Zobrazení nabídek ........................................ 10
Funkce Plug & Play ....................................... 12
Zobrazení externích zdrojů signálu ............... 12
Úprava názvů zařízení .................................. 13
Ovládání kanálů
Automatické ukládání kanálů ........................ 13
Ruční ukládání kanálů .................................. 14
Přidání/uzamčení kanálů .............................. 15
Třídění uložených kanálů .............................. 16
Přiřazování názvů kanálům ........................... 16
Jemné ladění příjmu kanálů .......................... 17
Ovládání obrazu
Změna standardu obrazu .............................. 18
Přizpůsobení nastavení obrazu .................... 18
Kongurace podrobných nastavení obrazu
.... 19
Možnosti obrazu ............................................ 20
Použití funkce 3D .......................................... 22
Obnovení výchozího nastavení obrazu od
výrobce .........................................................24
Nastavení zvuku
Zvukové funkce ............................................. 25
Výběr zvukového režimu (podle modelu) ...... 26
Připojení sluchátek
(prodávaných samostatně) ...........................26
Popis funkcí
Časové funkce .............................................. 27
Jazyk / Melodie / Světelný efekt / Zábava /
Úspora energie / PIP .................................... 28
Počítačový monitor
Nastavení počítačového softwaru
(na základě systému Windows XP) ..............29
Režim vstupu (PC) ........................................
30
Nastavení počítače .......................................
31
O zařízení Anynet+
Co je Anynet+?
.............................................. 32
Připojení zařízení Anynet+ ............................
32
Nastavení systému Anynet+
............................. 33
Vyhledávání a přepínání mezi zařízeními
Anynet+
........................................................... 33
Nahrávání .....................................................
34
Poslech prostřednictvím přijímače ................
35
Kontrolní úkony před vyžádáním servisu ......
35
Dodatek
Funkce teletextu (v závislosti na modelu) ..... 36
Specikace sady pro upevnění na zeď
(VESA) .......................................................... 38
Montáž na stěnu (prodáváno samostatně)
......... 39
Montáž podstavce (podle modelu)
................. 40
Připevnění televizoru ke zdi .......................... 41
Odstraňování problémů ................................42
Specikace .................................................... 43
Česky
BN68-01528A-00Cze_0312.indd 3 2008-4-21 15:31:53

Česky - 4
Kontrola součástí
Návod k obsluze Dálkový ovladač/
baterie AAA
Napájecí kabel Čisticí hadřík
Záruční list/
Příručka s bezpečnostními
pokyny
(
Není k dispozici ve všech zemích)
Kryt-dolní část / šrouby
(2ea) (Informace najdete na
straně 40.)
Feritové jádro pro
napájecí kabel
Feritové jádro pro kabel
S-Video
K zakoupení samostatně
Anténní kabel Komponentní kabely Audio kabely Kabel PC
Kabel Scart Kabel PC Audio Kabel HDMI Kabel HDMI/DVI
➢
Feritové jádro (napájecí kabel, S-Video)
Feritová jádra slouží k ochraně kabelů proti rušení. Při připojování kabelu
otevřete feritové jádro a připněte ho ke kabelu blízko zásuvky.
Použití stojanu
➢ Plazmový televizor by měly
přenášet nejméně dvě osoby.
Plazmový televizor nikdy
nepokládejte na podlahu kvůli
možnému poškození obrazovky.
Televizor musí vždy stát.
➢ Plazmový televizor je možné otáčet
o 20 stupňů doprava a doleva.
-20° ~ 20°
BN68-01528A-00Cze_0312.indd 4 2008-4-21 15:31:56

Česky - 5
Ovládací panel
1
SOURCE
Slouží k zobrazení nabídky všech dostupných
vstupních zdrojů (TV, Ext.1, Ext., AV, S-
Video, Komponent,PC, HDMI1, HDMI,
HDMI
).
➢
Toto tlačítko používejte v nabídce na
obrazovce stejným způsobem, jako tlačítko
ENTER na dálkovém ovladači.
2
MENU
Stisknutím zobrazíte na obrazovce nabídku
s funkcemi televizoru.
3
– +
Stisknutím zvýšíte nebo snížíte hlasitost.
V nabídce na obrazovce fungují tlačítka
– + stejně jako tlačítka ◄ a ► na
dálkovém ovladači.
4
C/P.
Stisknutím můžete přepínat kanály. V nabídce
na obrazovce fungují tlačítka C/P.
stejně jako tlačítka ▲ a ▼ na dálkovém
ovladači.
5
Indikátor napájení
Zabliká a zhasne při zapnutí a rozsvítí se při
pohotovostním režimu.
6
Tlačítko (Power)
Stisknutím vypnete nebo zapnete televizor.
7
Čidlo dálkového ovládání
Zaměřte dálkový ovladač na tento bod na
televizoru.
8
Reproduktor
➢
Barva a tvar přístroje se může lišit podle modelu.
Přední (nebo boční) panel
BN68-01528A-00Cze_0312.indd 5 2008-4-21 15:31:57

Česky -
Konektorový panel
Pokračování...
☛
Při každém připojování audio nebo video systému k televizoru musí být všechny komponenty
vypnuté.
Při připojení externího zařízení dbejte na to, aby byla zdířka stejné barvy jako kabel.
1
POWER IN (Vstup napájení)
Slouží k připojení dodaného napájecího
kabelu.
2
COMPONENT IN
Vstupy pro audio (AUDIO L/R) a video (Y/PB/
PR) pro komponentní signál.
3
PC IN / AUDIO
Slouží pro připojení k výstupnímu konektoru
video a audio v počítači.
4
EXT 1, EXT
Vstupy a výstupy pro externí zařízení, jako
je videorekordér, zařízení DVD, zařízení pro
videohry nebo diskové videopřehrávače.
Specifikace vstupu/výstupu
Konektor
Vstup Výstup
Video Audio (L/R) RGB
Video + Audio (L/R)
EXT 1
✔ ✔ ✔
K dispozici je pouze
výstup TV
EXT 2
✔ ✔
Výstup je volitelný.
5
D SYNC OUT
Připojte k 3D infračervenému vysílači
6
Připojení externích audio zařízení
Slouží k připojení audio signálu RCA z
televizoru k externímu zdroji, jako audio
příslušenství.
7
SERVICE
− Konektor pro servisní operace.
− Slouží pro připojení sériového konektoru
mezi elektronicky ovládaný držák pro
upevnění na zeď a televizor, pokud chcete
nastavovat úhel sledování televizoru pomocí
dálkového ovladače.
Zadní panel
➢
Barva a tvar přístroje se může lišit podle modelu.
Síť kabelové
televize
1
432 6 8
9
7
nebo
nebo
5
BN68-01528A-00Cze_0312.indd 6 2008-4-21 15:32:00

Česky -
8
HDMI IN 1,
− Pro připojení HDMI k HDMI není nutné
žádné dodatečné připojení zvuku.
−
Pokud použijete propojení pomocí kabelu
HDMI/DVI, musíte použít konektor HDMI
IN 2.
➢
Co je HDMI?
− Rozhraní HDMI (High Definition
Multimedia Interface) umožňuje přenos
digitálního obrazu vysoké kvality a více
kanálů digitálního zvuku.
− Přípojka HDMI/DVI podporuje připojení
DVI k rozšířenému zařízení pomocí
příslušného kabelu (není součástí
balení). Rozdíl mezi HDMI a DVI je v
tom, že zařízení HDMI je menší a je
vybaveno kódovací funkcí HDCP (High
Bandwidth Digital Copy Protection) a
podporuje vícekanálový digitální zvuk.
DVI IN (HDMI ) AUDIO R/L
Výstupy audio DVI pro externí zařízení.
9
ANT IN
75Ω koaxiální konektor pro anténu/kabelovou síť.
Podporované režimy pro připojení HDMI/DVI a
Komponent
480i 480p 576i 576p 720p 1080i
HDMI/DVI 50Hz X X X O O O
HDMI/DVI 60Hz X O X X O O
Komponent O O O O O O
Boční Panel
1
HDMI IN
Slouží k připojení ke konektoru HDMI zařízení
s výstupem ve formátu HDMI.
2
S-VIDEO nebo VIDEO / AUDIO L/R
Vstupy video (S-Video nebo Video) a audio pro
externí zařízení, jako je například videokamera
nebo videorekordér.
3
Zdířka pro sluchátka
Pokud si přejete sledovat televizní program a
nerušit přitom další osoby v místnosti, můžete
k televizoru připojit sluchátka.
➢
Delší používání sluchátek s vysokou
úrovní hlasitosti může poškodit sluch.
➢
Barva a tvar přístroje se může lišit podle modelu.
3
1
nebo
2
BN68-01528A-00Cze_0312.indd 7 2008-4-21 15:32:01

Česky -
Pokračování...
Popis dálkového ovladače
1
Tlačítko POWER (zapíná a
vypíná televizor)
2
Slouží k přímému výběru
režimu televizoru
3
Číselná tlačítka pro přímý
přístup ke kanálům
4
Přepínání mezi
jednocifernými a
dvojcifernými kanály
5
Přechodné ztlumení zvuku
6
Zvýšení hlasitosti
Snížení hlasitosti
7
Tlačítko ovládání kanálů (viz
stránka 15)
8
Slouží k rychlému výběru
často používaných funkcí.
9
Ovládání kurzoru v nabídce
0
Zobrazení informací o
aktuálním vysílání
#
Stisknutím vyberete volitelné
režimy obrazu a zvuku pro
sport, filmy a hry.
$
Funkce pro videorekordér/
přehrávač DVD (zpět, stop,
přehrát/pozastavit, rychle
vpřed)
%
Výběr dostupného zdroje
^
Předchozí kanál
&
Další kanál
Předchozí kanál
*
Zobrazení hlavní nabídky na
obrazovce
(
Tlačítko režimu TruSurround XT
)
Slouží k návratu do
předchozí nabídky
a
Opuštění nabídky na
obrazovce
b
Výběr velikosti obrazu
c
Použijte toto při připojování
zařízení SAMSUNG DMA
(Digitální adaptér médií)
prostřednictvím rozhraní
HDMI a přepnutí do režimu
DMA. (Tlačítko DMA je
volitelné.)
Další informace o obsluze
naleznete v uživatelské
příručce k zařízení DMA.
Toto tlačítko je k dispozici,
pokud je možnost „Anynet+
(HDMI-CEC)“ nastavená na
hodnotu „Zapnuto“
(viz str. 33).
d
Výběr obrazového efektu
(viz stránka 18)
e
Sleduje 3D filmy a hry
prostorově s 3D brýlemi.
Funkce teletextu
(Viz stránka 36.)
2
Vypnutí zobrazení teletextu
(v závislosti na modelu)
7
Uložení teletextu
8
Velikost teletextu
0
Zobrazení skrytého textu
teletextu
!
Výběr tématu v systému
Fastext
@
Zobrazení teletextu/
zobrazení teletextu i
vysílaného obrazu
%
Výběr režimu teletextu
(Seznam/FLOF)
^
Podstránka teletextu
&
P : Další stránka teletextu
P : Předchozí stránka
teletextu
*
Index teletextu
)
Přidržení stránky teletextu
a
Vypnutí teletextu
BN68-01528A-00Cze_0312.indd 8 2008-4-21 15:32:02

Česky -
Vložení baterií do dálkového ovládání
1 Zvedněte kryt na zadní straně dálkového ovladače, jak je
znázorněno na obrázku.
Vložte dvě baterie velikosti AAA.
➢
Ujistěte se, že póly + a – baterií jsou instalovány
podle schématu uvnitř přihrádky.
Nekombinujte různé typy baterií, například alkalické a
manganové.
Zavřete kryt, jak je znázorněno na obrázku.
➢
Pokud nebudete dálkové ovládání dlouhou dobu používat,
baterie vyjměte a uložte je na chladném a suchém místě.
Dálkový ovladač lze používat ze vzdálenosti až 7 metrů od
televizoru. (Za předpokladu obvyklého využití televizoru vydrží baterie přibližně jeden rok.)
➢
Pokud dálkové ovládání nefunguje! Zkontrolujte následující:
1. Je televizor zapnut?
2. Nedošlo u baterií k záměně kladných a záporných pólů?
3. Nedošlo k vyčerpání baterií?
4. Nedošlo k přerušení napájení nebo není odpojen napájecí kabel?
5. Není v blízkosti speciální zářivkové světlo nebo neonová reklama?
Zobrazení nabídek
1 Stiskněte tlačítko MENU.
Na obrazovce se zobrazí hlavní nabídka.
Vlevo je pět ikon: Obraz, Zvuk, Kanál, Nastavení a Vstup.
Stisknutím tlačítka ▲ nebo ▼ vyberte jednu z ikon.
Stisknutím tlačítka ENTER vstupte do dílčí nabídky ikony.
Stisknutím tlačítka ▲ nebo ▼ procházejte položky v nabídce.
Stisknutím tlačítka ENTER položky nabídky použijte.
4 Stisknutím tlačítka ▲/▼/◄/► změníte vybrané položky.
Stisknutím tlačítka RETURN se vrátíte do předchozí nabídky.
5 Stisknutím tlačítka EXIT práci v nabídce ukončíte.
Zapnutí a vypnutí televizoru
Napájecí šňůra je připojená k zadní straně televizoru.
1 Zapojte napájecí šňůru do příslušné zásuvky.
➢
Napětí sítě je uvedeno na zadní straně televizoru a frekvence je 50 nebo 60 Hz.
Televizor zapnete stisknutím tlačítka (Napájení) (zapnuto/vypnuto) na přední straně televizoru
nebo stisknutím tlačítka POWER na dálkovém ovladači. Automaticky se zvolí naposledy sledovaný
program. Pokud jste dosud žádné kanály neuložili, neobjeví se jasný obraz. Vyhledejte kapitolu
Automatické ukládání kanálů na straně 13 nebo Ruční ukládání kanálů na straně 14.
➢
Při prvním zapnutí televizoru automaticky proběhne několik základních zákaznických nastavení.
Viz část Funkce Plug & Play na straně 10.
Televizor vypnete stisknutím tlačítka (Napájení) (zapnuto/vypnuto) na přední straně televizoru
nebo stisknutím tlačítka POWER na dálkovém ovladači.
4 Televizor zapnete stisknutím tlačítka (Napájení) (zapnuto/vypnuto) na přední straně televizoru
nebo stisknutím tlačítka POWER nebo číselných tlačítek na dálkovém ovladači.
Posunutí
Zadat
Konec
Režim : Standardní
Jas buněk
Kontrast 5
Jas 45
Ostrost 50
Barvy 50
Odstín
Z50 Č50
Podrobné nastavení
Obraz - možnosti
Obnovit : OK
Obraz
T V
BN68-01528A-00Cze_0312.indd 9 2008-4-21 15:32:03

Česky - 10
Funkce Plug & Play
Při prvním zapnutí televizoru automaticky proběhne postupně
několik základních zákaznických nastavení.
K dispozici jsou následující nastavení.
☛
Pokud pro televizor nechtěně vyberete nesprávnou zemi,
mohou se znaky na obrazovce zobrazovat chybně.
1 Pokud se televizor nachází v pohotovostním režimu, stiskněte
tlačítko POWER na dálkovém ovladači. Zobrazí se zpráva
Spustit Plug & Play. Stiskněte tlačítko ENTER.
Po několika sekundách se automaticky zobrazí nabídka Jazyk.
Požadovaný jazyk vyberte stisknutím tlačítka ▲ nebo ▼.
Stiskněte tlačítko ENTER. Zobrazí se zpráva Při instalaci
tohoto televizoru doma zvolte režim „Domácnost“.
4 Stisknutím tlačítka ◄ nebo ► vyberte možnost Prodejna nebo
Domácnost a stiskněte tlačítko ENTER. Zobrazí se zpráva
vyzývající ke kontrole stavu připojení antény.
➢
Výchozí volbou je Domácnost.
➢
Pro nejlepší obraz v domácím prostředí doporučujeme
nastavení televizoru na režim Domácnost.
➢
Režim Prodejna je určen pro použití v provozovně
maloobchodního prodejce.
➢
Pokud je přístroj neúmyslně nastaven na režim Obchod a
chcete-li obnovit režim Domácnost (Standardní), stiskněte
tlačítko Volume a poté po dobu pěti sekund podržte tlačítko
MENU na panelu televizoru.
5 Ujistěte se, že je k televizoru připojena anténa.
Stiskněte tlačítko ENTER. Zobrazí se nabídka Země.
Pomocí tlačítka ▲ nebo ▼ vyberte příslušnou zemi nebo
oblast. Stiskněte tlačítko ENTER. Zobrazí se nabídka k výběru
kanálů.
Pokračování...
Plug & Play
P 1 C -- 40 MHz
0 %
Zadat
Vynechat
Start
Plug & Play
Spustit Plug & Play
OK
Zadat
Konec
Plug & Play
Jazyk
Posunutí
Zadat
▲
Eλληvikά
Čeština
Srpski
▼
Plug & Play
Při instalaci tohoto televizoru doma
zvolte režim „Domácnost“.
Posunutí
Zadat
Prodejna
Domácnost
Plug & Play
Zkontrolujte anténní vstup.
Zadat
Vynechat
OK
Plug & Play
Země
▲
Velká Británie
Rakousko
Vých. Evropa
Jiné
Posunutí
Zadat
Vynechat
BN68-01528A-00Cze_0312.indd 10 2008-4-21 15:32:04

Česky - 11
Ukládání kanálů spustíte stisknutím tlačítka ENTER.
Vyhledávání se ukončí automaticky. Televizor začne do
paměti ukládat všechny dostupné kanály.
Stisknutím tlačítka ENTER nastavíte hodiny.
Stisknutím tlačítka ◄/►/ENTER vyberte Měsíc, Datum ,
Rok, Hod. nebo minuty. Nastavte jejich hodnoty pomocí
tlačítka ▲ nebo ▼.
➢
Měsíc, Datum , Rok, Hod. a minuty je možné zadat
přímo stisknutím číselných tlačítek na dálkovém ovladači.
Potvrzení nastavení proveďte stiskem tlačítka ENTER. Zobrazí
se zpráva Dobrou zábavu. Po dokončení stiskněte tlačítko
ENTER.
➢
I v případě, že tlačítko ENTER nestisknete, zpráva po
několika sekundách automaticky zmizí.
Chcete-li tuto funkci resetovat…
1
Stiskněte tlačítko MENU. Zobrazí se nabídka.
Stisknutím tlačítka ▲ nebo ▼ vyberte položku Nastavení a
potom stiskněte tlačítko ENTER.
Dalším stisknutím tlačítka ENTER vyberte možnost Plug & Play.
Zobrazí se zpráva Spustit Plug & Play.
OK
Dobrou zábavu
Posunutí
Zadat
Zpět
Plug & Play
Jazyk : Čeština
Čas
Světelný efekt
: TV zapnuta
Montáž na stěnu
Melodie : Vypnuto
Zábava
: Vypnuto
Úspora energie :
Vypnuto
PIP
Nastavení
T V
Posunutí
Nastavení
Zadat
Plug & Play
01 01 00 00 04
Nastavení hodin
Měsíc Datum Rok Hod.
minuty
BN68-01528A-00Cze_0312.indd 11 2008-4-21 15:32:05

Česky - 1
Zobrazení externích zdrojů signálu
Můžete přepínat mezi signálem z připojených zařízení, jako
například videorekordéru, přehrávače DVD či set-top boxu, a
signálem z televizního zdroje (běžné nebo kabelové vysílání).
1 Stiskněte tlačítko MENU. Zobrazí se nabídka.
Stisknutím tlačítka ▲ nebo ▼ vyberte možnost Vstup a potom
stiskněte tlačítko ENTER.
Dalším stisknutím tlačítka ENTER vyberte možnost Seznam
zdrojů.
4 Pomocí tlačítka ▲ nebo ▼ vyberte možnost zdroj signálu a
poté stiskněte tlačítko ENTER.
Dostupné zdroje signálu:
TV, Ext.1, Ext., AV, S-Video,
Komponent,PC, HDMI1, HDMI
➢
Můžete zvolit pouze externí zařízení připojená k televizoru.
➢
Tyto volby můžete snadno vybrat po stisknutí tlačítka SOURCE
na dálkovém ovladači.
➢
Chcete-li znovu sledovat televizní program, stiskněte tlačítko
TV a vyberte požadované číslo kanálu.
Posunutí
Zadat
Zpět
Seznam zdrojů :
TV
Upravit název
Anynet+ (HDMI-CEC)
Vstup
T V
Posunutí
Zadat
Zpět
TV
Ext.1 : −−−−
Ext. : −−−−
AV : −−−−
S-Video : −−−−
Komponent : −−−−
PC : −−−−
HDMI1 : −−−−
HDMI : −−−−
HDMI : −−−−
Seznam zdrojů
T V
Použití tlačítka TOOLS
Tlačítko TOOLS slouží k rychlému a snadnému výběru často používaných funkcí. Nabídka
Nástroje se mění v závislosti na tom, jaký externí vstupní režim je zobrazen.
1 Stiskněte tlačítko TOOLS.
Zobrazí se nabídka Nástroje.
Stisknutím tlačítka ▲ nebo ▼ vyberte nabídku a pak stiskněte
tlačítko ENTER.
Stisknutím tlačítek ▲/▼/◄/►/ENTER můžete zobrazit, změnit
nebo použít vybrané položky.
Podrobný popis jednotlivých funkcí najdete na odpovídajících
stránkách.
• Možnost Anynet+ (HDMI-CEC) viz stránka 32
• Režim obrazu viz stránka 18
• Zvukový režim viz stránka 25
• Časovač – spánek viz stránka 27
• Funkce SRS TS XT viz stránka 25
• Úspora energie viz stránka 29
• Režim Dual I-II viz stránka 26
Nástroje
Anynet+ (HDMI-CEC)
Režim obrazu : Standardní
Zvukový režim : Vlast.nastav.
Časovač – spánek : Vypnuto
SRS TS XT : Vypnuto
Úspora energie : Vypnuto
Duální I-II : Mono
◄ ►
Nastavení
KonecPosunutí
BN68-01528A-00Cze_0312.indd 12 2008-4-21 15:32:06

Česky - 1
Úprava názvů zařízení
K externímu zdroji můžete přiřadit název.
1 Stiskněte tlačítko MENU. Zobrazí se nabídka.
Stisknutím tlačítka ▲ nebo ▼ vyberte možnost Vstup a potom
stiskněte tlačítko ENTER.
Pomocí tlačítka ▲ nebo ▼ vyberte možnost Upravit název a
poté stiskněte tlačítko ENTER.
4 Pomocí tlačítka ▲ nebo ▼ vyberte externí zdroj, který chcete
upravit, a poté stiskněte tlačítko ENTER.
5 Stisknutím tlačítka ▲ nebo ▼ vyberte požadované zařízení a
potom stiskněte tlačítko ENTER.
Dostupné názvy zařízení:
Video, DVD, Kabel. receiver, Sat.
receiver, PVR STB, AV receiver, Hra, Videokamera, PC, TV,
IPTV, Blu-Ray, HD DVD, DMA.
Stisknutím tlačítka EXIT tento režim ukončete.
Automatické ukládání kanálů
Můžete procházet dostupné kmitočtové rozsahy
(dostupnost závisí na dané zemi).
Automaticky přidělená čísla programů nemusejí odpovídat
skutečným nebo požadovaným číslům. Čísla však lze seřadit
ručně a lze smazat všechny kanály, které nechcete sledovat.
1 Stiskněte tlačítko MENU. Zobrazí se nabídka.
Pomocí tlačítka ▲ nebo ▼ vyberte možnost Kanál a poté
stiskněte tlačítko ENTER.
Stiskněte znovu tlačítko ENTER. Objeví se seznam dostupných
zemí.
4
Stisknutím tlačítka ▲ nebo ▼ vyberte zemi a potom stiskněte
tlačítko ENTER.
5
Stisknutím tlačítka ▲ nebo ▼ vyberte Automatické ukládání a
potom stiskněte tlačítko ENTER.
Dalším stisknutím tlačítka ENTER spusťte vyhledávání.
Vyhledávání skončí automaticky.
➢
Chcete-li vyhledávání zastavit ještě před dokončením,
stiskněte tlačítko MENU nebo ENTER.
Posunutí
Zadat
Zpět
Země :
Vých. Evropa
Automatické ukládání
Ruční ukládání
Správce kanálů
Třídění
Jméno
Jemné ladění
Kanál
T V
▲
Švýcarsko
Velká Británie
Rakousko
Vých. Evropa
Jiné
▼
Posunutí
Zadat
Zpět
Seznam zdrojů :
TV
Upravit název
Anynet+ (HDMI-CEC)
Vstup
T V
Automatické ukládání
P 1 C -- 40 MHz
0 %
Zadat
Zpět
Start
Posunutí
Zadat
Zpět
Země :
Vých. Evropa
Automatické ukládání
Ruční ukládání
Správce kanálů
Třídění
Jméno
Jemné ladění
Kanál
T V
Posunutí
Zadat
Zpět
Ext.1 : −−−−
Ext. :
−−−−
AV :
S-Video :
Komponent : −−−−
PC :
−−−−
HDMI1 :
HDMI :
HDMI :
Upravit název
T V
−−−−
Video
DVD
Kabel. receiver
Sat. receiver
PVR STB
AV receiver
Hra
▼
BN68-01528A-00Cze_0312.indd 13 2008-4-21 15:32:07

Česky - 14
Ruční ukládání kanálů
Televizní kanály, včetně kanálů přijímaných přes kabelovou síť,
můžete uložit sami.
Při ručním ukládání kanálů můžete určit:
zda uložit či neuložit každý jednotlivý nalezený kanál,
číslo programu u každého uloženého kanálu, který chcete
označit.
1 Stiskněte tlačítko MENU. Zobrazí se nabídka.
Pomocí tlačítka ▲ nebo ▼ vyberte možnost Kanál a poté
stiskněte tlačítko ENTER.
Pomocí tlačítka ▲ nebo ▼ vyberte možnost Ruční ukládání a
poté stiskněte tlačítko ENTER.
4 Požadovanou možnost vyberte stisknutím tlačítka ▲ nebo ▼ a
poté stiskněte tlačítko ENTER.
5 Jakmile budete s nastavením spokojeni, stiskněte tlačítko
ENTER.
Stisknutím tlačítka EXIT tento režim ukončete.
Program (Číslo programu, které má být kanálu přiřazeno)
− Opakujte stisknutí tlačítka ▲ nebo ▼, dokud nenajdete
správné číslo.
➢
Číslo kanálu lze rovněž zadat přímo pomocí číselných tlačítek (0~9) na dálkovém ovladači.
Systém barev : Automatický/PAL/SECAM/NTSC4.4
− Stisknutím tlačítka ▲ nebo▼ vyberte požadovaný barevný standard.
Zvuk: BG/DK/I/L
− Stisknutím tlačítka ▲ nebo▼ vyberte požadovaný zvukový standard.
Kanál (Pokud znáte číslo kanálu, který má být uložen)
− Stisknutím tlačítka ▲ nebo ▼ vyberte položku
C (kanál s anténním příjmem) nebo S (kanál s
kabelovým příjmem).
− Stisknutím tlačítka ► a následným stisknutím tlačítka ▲ nebo ▼ vyberte požadované číslo.
➢
Číslo kanálu lze rovněž zadat přímo pomocí číselných tlačítek (0~9) na dálkovém ovladači.
➢
Pokud není slyšet žádný zvuk nebo je zvuk neobvyklý, znovu vyberte požadovaný zvukový
standard.
Vyhledávání (Pokud neznáte čísla kanálů)
− Stisknutím tlačítka ▲ nebo ▼ spusťte vyhledávání.
− Tuner prochází kmitočtový rozsah, dokud se na obrazovce neobjeví první nebo vámi vybraný
kanál.
Uložit (Pokud ukládáte kanál a přiřazené číslo programu)
− Nastavte hodnotu
OK stisknutím tlačítka ENTER.
☛
Režim kanálu
P (Režim Program): Po naladění byla stanicím, které vysílají ve vaší oblasti, přiřazena čísla
pozic od P00 do P99. V tomto režimu lze kanál vybrat zadáním čísla pozice.
C(Režim Kanál s anténním příjmem) V tomto režimu lze kanál zvolit zadáním čísla přiřazeného
každé stanici vysílající terestricky.
S (Režim Kanál s kabelovým příjmem): V tomto režimu lze kanál vybrat zadáním čísla
přiřazeného stanici přijímané přes kabel.
Posunutí
Zadat
Zpět
Program :
P 1
Systém barev :
Automatický
Zvuk : BG
Kanál : C --
Vyhledávání : 40 MHz
Uložit : ?
Ruční ukládání
T V
Posunutí
Zadat
Zpět
Země :
Vých. Evropa
Automatické ukládání
Ruční ukládání
Správce kanálů
Třídění
Jméno
Jemné ladění
Kanál
T V
BN68-01528A-00Cze_0312.indd 14 2008-4-21 15:32:07

Česky - 15
Přidání/uzamčení kanálů
Pomocí Správce kanálů můžete snadno uzamykat nebo
přidávat kanály.
1 Stiskněte tlačítko MENU. Zobrazí se nabídka.
Pomocí tlačítka ▲ nebo ▼ vyberte možnost Kanál a poté
stiskněte tlačítko ENTER.
Pomocí tlačítka ▲ nebo ▼ vyberte možnost Správce kanálů a
poté stiskněte tlačítko ENTER.
Přidání kanálů
Kanály je možné přidávat pomocí seznamu kanálů.
4
Vyberte možnost Seznam kanálů stisknutím tlačítka ENTER.
5 Stisknutím tlačítek ▲/▼/◄/► přejděte na pole ( ), vyberte
kanál, který má být přidán, a stisknutím tlačítka ENTER jej
přidejte.
➢
Pokud znovu stisknete tlačítko ENTER, symbol ( ) vedle
kanálu zmizí a kanál není přidán.
Uzamykání kanálů
Tato funkce umožňuje zabránit neoprávněným uživatelům,
například dětem, ve sledování nevhodných pořadů, a to
potlačením audio a video signálu.
Pomocí tlačítka ▲ nebo ▼ vyberte možnost Dětský zámek a poté
stiskněte tlačítko ENTER.
Pomocí tlačítka ▲ nebo ▼ vyberte možnost Zapnuto a poté stiskněte
tlačítko ENTER.
Pomocí tlačítka ▲ nebo ▼ vyberte možnost Seznam kanálů a poté
stiskněte tlačítko ENTER.
Stisknutím tlačítek ▲/▼/◄/► přejděte na pole ( ), vyberte kanál, který
chcete uzamknout, a stiskněte tlačítko ENTER.
➢
Pokud znovu stisknete tlačítko ENTER, symbol ( ) vedle kanálu
zmizí a zámek kanálu se zruší.
➢
Pokud je dětský zámek aktivován, zobrazí se modré pozadí.
10 Stisknutím tlačítka EXIT tento režim ukončete.
➢
Tyto volby můžete snadno vybrat po stisknutí tlačítka CH LIST
na dálkovém ovladači.
Posunutí
Zadat
Zpět
Seznam kanálů
Dětský zámek : Vypnuto
Správce kanálů
T V
Posunutí
Zadat
Zpět
Země :
Vých. Evropa
Automatické ukládání
Ruční ukládání
Správce kanálů
Třídění
Jméno
Jemné ladění
Kanál
T V
Seznam kanálů
P 1 C
1 / 10
▲
▼
Přidat Zámek
Posunutí
Zadat
Strana
Zpět
Prog.
0
C --
1 C --
C --
C --
4 C --
5 C --
C --
C --
C --
C --
BN68-01528A-00Cze_0312.indd 15 2008-4-21 15:32:09

Česky - 1
Třídění uložených kanálů
Tato operace umožňuje změnit čísla programů uložených
kanálů.
Tuto operaci bude pravděpodobně třeba provést po
automatickém uložení.
1 Stiskněte tlačítko MENU. Zobrazí se nabídka.
Pomocí tlačítka ▲ nebo ▼ vyberte možnost Kanál a poté
stiskněte tlačítko ENTER.
Pomocí tlačítka ▲ nebo ▼ vyberte možnost Třídění a poté
stiskněte tlačítko ENTER.
4 Stisknutím tlačítka ▲ nebo ▼ vyberte kanál, který chcete
přesunout, a potom stiskněte tlačítko ENTER.
5 Stisknutím tlačítka ▲ nebo ▼ vyberte číslo programu, na který
chcete kanál přesunout.
Stiskněte tlačítko ENTER. Kanál se přesune na novou pozici a
všechny ostatní kanály se patřičně posunou.
Opakujte kroky 4 až 5, dokud nepřesunete všechny kanály na
požadované číslo programu.
Stisknutím tlačítka EXIT tento režim ukončete.
Přiřazování názvů kanálům
Názvy jsou kanálům přiřazovány automaticky, pokud jsou
vysílány informace o kanálu. Tyto názvy lze změnit na nové
názvy.
1 Stiskněte tlačítko MENU. Zobrazí se nabídka.
Pomocí tlačítka ▲ nebo ▼ vyberte možnost Kanál a poté
stiskněte tlačítko ENTER.
Pomocí tlačítka ▲ nebo ▼ vyberte možnost Jméno a poté
stiskněte tlačítko ENTER.
4 Stisknutím tlačítka ▲ nebo ▼ vyberte kanál, kterému má být
nový název přiřazen, a potom stiskněte tlačítko ENTER.
5 Stisknutím tlačítka ▲ nebo ▼ vyberte písmeno, číslo nebo
symbol (platí toto pořadí: A~Z, 0~9, +, -, *, /, mezera).
Stisknutím tlačítka ◄ nebo ► přejděte na předchozí nebo další
písmeno a potom stiskněte tlačítko ENTER.
Opakujte kroky 4 až 5 pro každý kanál, kterému chcete přiřadit
nový název.
Stisknutím tlačítka EXIT tento režim ukončete.
Posunutí
Zadat
Zpět
Země :
Vých. Evropa
Automatické ukládání
Ruční ukládání
Správce kanálů
Třídění
Jméno
Jemné ladění
Kanál
T V
Posunutí
Zadat
Zpět
Země :
Vých. Evropa
Automatické ukládání
Ruční ukládání
Správce kanálů
Třídění
Jméno
Jemné ladění
Kanál
T V
Posunutí
Zadat
Zpět
Program K. Jméno
▲
0 C- - −−−−−
1 C04 −−−−−
C05 −−−−−
C0 −−−−−
4 C0 −−−−−
5 C11 −−−−−
C1 −−−−−
C15 −−−−−
C1 −−−−−
C1 −−−−−
▼
Třídění
T V
Posunutí
Zadat
Zpět
Jméno
T V
Program K. Jméno
▲
0 C01 −−−−−
1 C- - −−−−−
C- - −−−−−
C- - −−−−−
4 C- - −−−−−
5 C- - −−−−−
C- - −−−−−
C- - −−−−−
C- - −−−−−
C- - −−−−−
▼
BN68-01528A-00Cze_0312.indd 16 2008-4-21 15:32:10

Česky - 1
Jemné ladění příjmu kanálů
Je-li příjem kanálu čistý, není třeba provádět jemné ladění,
protože se provádí automaticky při vyhledávání a ukládání .
Je-li signál slabý nebo rušený, bude pravděpodobně třeba
kanál ručně doladit.
1 Stiskněte tlačítko MENU. Zobrazí se nabídka.
Pomocí tlačítka ▲ nebo ▼ vyberte možnost Kanál a poté
stiskněte tlačítko ENTER.
Pomocí tlačítka ▲ nebo ▼ vyberte možnost Jemné ladění a
poté stiskněte tlačítko ENTER.
4 Chcete-li dosáhnout ostrého a jasného obrazu a dobré
kvality zvuku, stiskněte tlačítko ◄ nebo ►, dokud nedocílíte
optimálního nastavení. Stiskněte tlačítko ENTER.
➢
Stiskněte tlačítko INFO.
Po uložení jemného ladění dojde
ke změně barvy
nabídky na obrazovce (OSD) příslušného
kanálu z bílé na červenou a k přidání označení *.
➢
Pokud chcete obnovit jemné ladění na 0, zvolte možnost
Obnovit pomocí tlačítka ▲ nebo ▼. Stiskněte tlačítko
ENTER.
5 Stisknutím tlačítka EXIT tento režim ukončete.
P 1 *
Mono
Obraz : Dynamický
Zvuk : Vlast.nastav.
SRS TS XT : Vypnuto
−−
:
−−
Jemné ladění
P 1
Nastavení
Uložit
Zpět
Obnovit
Posunutí
Zadat
Zpět
Země :
Vých. Evropa
Automatické ukládání
Ruční ukládání
Správce kanálů
Třídění
Jméno
Jemné ladění
Kanál
T V
BN68-01528A-00Cze_0312.indd 17 2008-4-21 15:32:10

Česky - 1
Přizpůsobení nastavení obrazu
Několik nastavení tohoto televizoru umožňuje ovládat kvalitu
obrazu.
1 Stiskněte tlačítko MENU. Zobrazí se nabídka.
Stisknutím tlačítka ENTER vyberte možnost Obraz.
Dalším stisknutím tlačítka ENTER vyberte možnost Režim.
4 Požadovaný režim vyberte stisknutím tlačítka ▲ nebo ▼ a poté
stiskněte tlačítko ENTER.
Dostupné režimy:
Dynamický, Standardní, Film
5 Požadovanou možnost vyberte stisknutím tlačítka ▲ nebo ▼ a
poté stiskněte tlačítko ENTER.
Jakmile budete s nastavením spokojeni, stiskněte tlačítko ENTER.
Stisknutím tlačítka EXIT tento režim ukončete.
Jas buněk – Kontrast – Jas – Ostrost – Barvy – Odstín
➢
V režimech TV, systému PAL nelze použít funkci Odstín.
➢
V režimu PC můžete provést pouze změny možností Jas buněk, Kontrast a Jas.
Stiskněte tlačítko ◄ nebo ►, dokud nedosáhnete optimálního nastavení.
Změna standardu obrazu
Můžete vybrat typ obrazu, který nejlépe vyhovuje vašim
požadavkům.
1 Stiskněte tlačítko MENU. Zobrazí se nabídka.
Stisknutím tlačítka ENTER vyberte možnost Obraz.
Dalším stisknutím tlačítka ENTER vyberte možnost Režim.
4 Požadovaný režim vyberte stisknutím tlačítka ▲ nebo ▼ a
poté stiskněte tlačítko ENTER.
Dostupné režimy:
Dynamický, Standardní, Film
➢
Hodnoty nastavení se mohou lišit v závislosti na vstupním
zdroji.
5 Stisknutím tlačítka EXIT tento režim ukončete.
➢
Režim Dynamický vyberte při sledování televize během
dne nebo pokud je v místnosti jasné světlo.
Režim Standardní vyberte pro běžné sledování televize.
Režim Film zvolte při sledování filmu.
Snadné nastavení
1 Stiskněte tlačítko TOOLS na dálkovém ovladači.
Stisknutím tlačítka ▲ nebo ▼ zvolte Režim obrazu.
Stisknutím tlačítka ◄ nebo ► zvolte požadovanou možnost.
Posunutí
Zadat
Zpět
Režim : Standardní
Jas buněk
Kontrast 0
Jas 45
Ostrost 50
Barvy 50
Odstín Z50 Č50
Podrobné nastavení
Obraz - možnosti
Obnovit : OK
Obraz
T V
Nástroje
Anynet+ (HDMI-CEC)
Režim obrazu ◄ Standardní ►
Zvukový režim : Vlast.nastav.
Časovač – spánek : Vypnuto
SRS TS XT : Vypnuto
Úspora energie : Vypnuto
Duální I-II : Mono
T V
Režim : Standard
Jas buněk
Kontrast 5
Jas 45
Ostrost 50
Barvy 50
Odstín 50 R50
Podrobné nastavení
Obraz - možnosti
Obnovit : OK
Obraz
Dynamický
Standardní
Film
Posunutí
Zadat
Zpět
Posunutí Nastavení Konec
Režim : Standardní
Jas buněk
Kontrast 0
Jas 45
Ostrost 50
Barvy 50
Odstín Z50 Č50
Podrobné nastavení
Obraz - možnosti
Obnovit : OK
Posunutí
Zadat
Zpět
Obraz
T V
BN68-01528A-00Cze_0312.indd 18 2008-4-21 15:32:11

Česky - 1
Konfigurace podrobných nastavení obrazu
Můžete zadat podrobná nastavení obrazu.
1 Stiskněte tlačítko MENU. Zobrazí se nabídka.
Stisknutím tlačítka ENTER vyberte možnost Obraz.
Pomocí tlačítka ▲ nebo ▼ vyberte možnost Podrobné
nastavení a poté stiskněte tlačítko ENTER.
4 Požadovanou možnost vyberte stisknutím tlačítka ▲ nebo ▼ a
poté stiskněte tlačítko ENTER.
Dostupné možnosti:
Nastavení černé, Dynamický kontrast,
Gamma, Kolorim. Prostor, Vyvážení bílé, Pleťové odstíny,
Zvýraznění okrajů.
5 Jakmile budete s nastavením spokojeni, stiskněte tlačítko ENTER.
Stisknutím tlačítka EXIT tento režim ukončete.
➢
Podrobné nastavení je k dispozici v režimu Standardním nebo
Film.
➢
Můžete provést pouze změny položek Dynamický kontrast,
Gamma a Vyvážení bílé z položek nabídky Podrobné nastavení.
Nastavení černé: Vypnuto/Nízká/Střední/Vysoké
Úroveň černé můžete vybrat přímo na obrazovce, čímž upravíte
hloubku obrazovky.
Dynamický kontrast: Vypnuto/Nízká/Střední/Vysoké
Kontrast obrazovky můžete upravit tak, abyste dosáhli optimálního nastavení.
Gamma: - ~ +
Můžete upravit střední jas obrazu.
Stiskněte tlačítko ◄ nebo ►, dokud nedosáhnete optimálního nastavení.
Kolorim. prostor: Automatický /Přirozený /Vlast.nastav.
Kolorimetrický prostor je barevná matice složená z červených, zelených a modrých barev.
Vyberte svůj oblíbený kolorimetrický prostor pro zobrazení nejpřirozenějších barev.
−
Automatický: Automatický kolorimetrický prostor automaticky nastavuje nejpřirozenější barevný tón na
základě zdrojů programu.
−
Přirozený: Přirozený kolorimetrický prostor nabízí hluboké a bohaté barevné tóny.
−
Vlast.nastav.: Umožňuje nastavit rozsah barev podle vašich představ. (Viz část Vlastní nastavení
kolorimetrického prostoru.)
Vlastní nastavení kolorimetrického prostoru
Barvy: Červená/Zelená/Modrá/Žlutá/Azurová /Purpur.
Umožňuje nastavit rozsah barev podle vašich představ.
Barva je k dispozici, pokud je možnost
Kolorim. Prostor nastaven na hodnotu Vlast.nastav.
Stisknutím tlačítka ▲ nebo ▼ zvolte možnost
Červená, Zelená, Modrá, Žlutá, Azurová nebo Purpur.
tiskněte tlačítko ENTER.
−
Červená/Zelená/Modrá: V nabídce Barva můžete nastavit hodnoty RGB pro vybranou barvu.
Stisknutím tlačítka ▲ nebo ▼ zvolte možnost Červená, Zelená, Modrá, kterou chcete změnit. Stiskněte
tlačítko ENTER.
Stisknutím tlačítka ◄ nebo ► snížíte nebo zvýšíte hodnotu konkrétní položky.
Stiskněte tlačítko ENTER.
− Obnovit: Obnoví výchozí hodnoty kolorimetrického prostoru.
Vyvážení bílé: Posun červené/Posun zelené/Posun modré/Více červené/Více zelené/Více modré
/Obnovit
Můžete upravit teplotu barev pro dosažení přirozenějšího obrazu.
Posun červené/Posun zelené/Posun modré/Více červené/Více zelené/Více modré: Po změně
hodnoty nastavení dojde k obnovení upravené obrazovky.
Požadovanou možnost vyberte stisknutím tlačítka ▲ nebo ▼ a poté stiskněte tlačítko ENTER. Stiskněte
tlačítko ◄ nebo ►, dokud nedosáhnete optimálního nastavení.
Obnovit: Dříve upravené vyvážení bílé se vrátí na výchozí nastavení od výrobce.
Pleťové odstíny:-15~+15
Můžete zvýraznit růžový tón v obrazu.
Pomocí tlačítek ◄ a ►vyhledejte optimální nastavení.
➢
Po změně hodnoty nastavení dojde k obnovení upravené obrazovky.
Zvýraznění okrajů: Vypnuto/Zapnuto
Lze zdůraznit ohraničení objektů.
Posunutí
Zadat
Zpět
Nastavení černé :
Vypnuto
Dynamický kontrast
: Střední
Gamma : 0
Kolorim. Prostor :
Přirozený
Vyvážení bílé
Pleťové odstíny 0
Zvýraznění okrajů : Vypnuto
Podrobné nastavení
T V
Posunutí
Zadat
Zpět
Obraz
T V
Režim : Standardní
Jas buněk
Kontrast 0
Jas 45
Ostrost 50
Barvy 50
Odstín Z50 Č50
Podrobné nastavení
Obraz - možnosti
Obnovit : OK
BN68-01528A-00Cze_0312.indd 19 2008-4-21 15:32:12

Česky - 0
Možnosti obrazu
Můžete zadat podrobná nastavení obrazu.
1 Stisknutím tlačítka MENU zobrazte nabídku.
Stisknutím tlačítka ENTER vyberte možnost Obraz.
Stisknutím tlačítka ▲ nebo ▼ vyberte možnost Obraz -
možnosti a pak stiskněte tlačítko ENTER.
4 Vyberte požadovanou možnost stisknutím tlačítka ▲ nebo ▼ a
pak stiskněte tlačítko ENTER.
5 Jakmile budete s nastavením spokojeni, stiskněte tlačítko
ENTER.
Stisknutím tlačítka EXIT ukončete tuto nabídku.
➢
V režimu PC můžete provést změny pouze u položek Teplota
barev, Formát a Ochrana proti vypál.obrazovky v nabídce
Obraz – možnosti.
Teplota barev: Studené barvy/Studené barvy1/ Normální /
Teplé barvy1 / Teplé barvy
➢
Je-li obrazový režim nastaven na hodnotu Dynamický
nebo
Standardní, nelze vybrat položku Teplé barvy1 a
Teplé barvy.
Formát: Automat. formát, 1:, Široký zoom, Zvětšení, 4:,
Pouze skenování
Můžete vybrat formát obrazu, který nejlépe vyhovuje vašim
požadavkům.
−
Automat. formát: Rozšíření a roztažení obrazu z formátu
4:3 na 16:9.
− 1:
: Nastavení obrazu na širokoúhlý režim 16:9.
−
Široký zoom: Zvětší formát obrazu na více než 4:3.
Obrazovku můžete posunout nahoru nebo dolů pomocí
tlačítka ▲ nebo ▼ po výběru položky stisknutím tlačítka
► nebo ENTER.
−
Zvětšení : Zvětšení formátu obrazu na obrazovce ve
svislém směru.
− 4:
: Nastavení obrazu na běžný režim 4:.
−
Pouze skenování: Pomocí této funkce zobrazíte úplný
obraz bez zkrácení při příjmu signálu HDMI (720p/1080i),
komponentního vstupu (1080i).
Po výběru možnosti Pouze skenování v režimu HDMI (100i) nebo Komponent (100i):
Stisknutím tlačítka ◄ nebo ► vyberte položku a pak stiskněte tlačítko ENTER.
Stisknutím tlačítek ▲, ▼, ◄ nebo ► posunete obraz nahoru, dolů, doleva nebo doprava.
Obnovit (Reset): Stisknutím tlačítka ◄ nebo ► zvolte možnost Obnovit, poté stiskněte tlačítko
ENTER. Můžete obnovit výchozí nastavení.
➢
Při velikosti obrazu HDMI Pouze skenování může být v závislosti na AV zařízeních obrazovka
oříznuta nebo může dojít k zobrazení zvláštní barvy.
➢
Pro připojení HDMI (1080p) o rychlosti 24, 25, 30, 50, a 60 Hz a pro připojení Komponentního
vstupu (1080p) o rychlosti 50 a 60 Hz je podporován pouze vstupní zdroj.
➢Velikost obrazu můžete snadno změnit po stisknutí tlačítka P.SIZE na dálkovém ovladači.
➢V závislosti na vstupním zdroji se mohou možnosti formátu obrazu lišit.
➢Dostupné položky se mohou lišit podle vybraného režimu.
➢F
unkce
Automat. formát je k dispozici pouze v režimu TV, Ext.1, Ext., AV a S-Video.
➢Nastavení lze upravit a uložit pro každé externí zařízení, které jste připojili ke vstupu televizoru.
➢V režimu PC lze upravit pouze režim “16:9” a “4:3”.
Úpravy umístění a formátu obrazu pomocí funkce Zvětšení
Při změně formátu obrazu pomocí funkce Zvětšení lze pomocí tlačítek ▲ nebo ▼ změnit také
umístění a velikost obrazu ve svislém směru.
Po výběru položky stisknutím tlačítka ◄ nebo ► můžete pomocí tlačítek ▲ nebo ▼ posouvat
obrazovku nahoru nebo dolů.
Po výběru položky stisknutím tlačítka ◄ nebo ► můžete pomocí tlačítek ▲ nebo ▼ měnit velikost
obrazovky ve svislém směru.
Pokračování...
Posunutí
Zadat
Zpět
Teplota barev :
Normální
Formát :
Automat. formát
Režim obrazu : 1:
Digitální NR :
Automatický
Režim Real 100Hz : Vypnuto
DNle : Vypnuto
Úroveň černé HDMI
: Normální
Režim pouze modrá
: Vypnuto
Ochrana proti vypál.obrazovky
D efekt
Obraz - možnosti
T V
Posunutí
Zadat
Zpět
Automat. formát
1:
Široký zoom
Zvětšení
4:
Pouze skenování
Formát
T V
Posunutí
Zadat
Zpět
Režim : Standardní
Jas buněk
Kontrast 0
Jas 45
Ostrost 50
Barvy 50
Tint G50 R50
Podrobné nastavení
Obraz - možnosti
Obnovit : OK
Obraz
T V
BN68-01528A-00Cze_0312.indd 20 2008-4-21 15:32:13

Česky - 1
Režim obrazu: 1:/Široký zoom/Zvětšení/4:
Při nastavení velikosti obrazu na možnost Automat. formát
v širokoúhlé televizi s úhlopříčkou 16:9, můžete nastavit velikost
obrazu na hodnotu 4:3 WSS (Wide Screen Service) nebo
nenastavovat žádnou hodnotu. Jednotlivé evropské země vyžadují
různé velikosti obrazu, takže tuto funkci vybírají uživatelé.
− 1:: Nastavení obrazu na širokoúhlý režim 16:9.
− Široký zoom: Zvětšení formátu obrazu na více než 4:3.
− Zvětšení: Zvětšení formátu obrazu na obrazovce ve svislém
směru.
− 4:: Nastavení obrazu na normální režim 4:3.
➢
Tato funkce je k dispozici pouze v režimu Automat. formát.
➢Tato funkce není k dispozici v režimu Komponent nebo HDMI.
Digitální NR: Vypnuto/Nízká/Střední/Vysoké/Automatický
Pokud je signál přijímaný televizorem slabý, omezí se po zapnutí této funkce veškeré statické šumy a
rušení, které se mohou objevit na obrazovce.
➢Pokud je signál slabý, vyberte jednu z následujících možností, dokud se nezobrazí optimální obraz.
Režim Real 100Hz: Vypnuto/Zapnuto
Můžete zobrazit zřetelný rozdíl mezi možnostmi „Real 100Hz“ a 50Hz, zejména záběrů s rychlým
pohybem. Proto při sledování pomalejších scén nebudete schopni mezi možnostmi „Real 100Hz“ a
50Hz najít rozdíl. Demo 100Hz pracuje pouze s 50Hz signálem. Režim Real 100Hz demo slouží k
předvádění produktu v obchodě pomocí speciálního videa.
DNIe: Vypnuto/Demo/Zapnuto
Tento televizor je vybaven funkcí DNIe, díky které nabízí vysokou obrazovou kvalitu. Nastavíte-li
funkci DNIe na hodnotu Zapnuto, bude aktivována při sledování obrazovky. Nastavíte-li funkci DNIe
na hodnotu Demo, můžete se na obrazovce podívat na obraz s použitím funkce DNIe i na normální
obraz, abyste získali názornou ukázku. Při použití této funkce uvidíte rozdíl ve vizuální kvalitě.
➢
DNIe
TM
(Technologie Digital Natural Image engine)
Tato funkce přináší uživateli ostřejší obraz s potlačením šumů 3D, vylepšeným zobrazením detailů,
vylepšením kontrastu a bílého světla. Nový algoritmus kompenzace obrazu poskytuje jasnější, čistší
a detailnější obraz. Technologie DNIe
TM
přizpůsobí vašim očím libovolný signál.
➢
Tato doplňující funkce není k dispozici v režimu PC.
➢
Funkce DNIe je k dispozici pouze v Dynamickém režimu.
Úroveň černé HDMI: Normální/Nízká
Pomocí této funkce můžete nastavit kvalitu obrazu v případě zjištění vypálení obrazovky (výskyt
úrovně černé, nízkého kontrastu, nízké úrovně barev atd.) při vstupu signálu HDMI pro omezený
rozsah RGB (16 až 235).
➢
Tato funkce je aktivní, pouze pokud je externí vstup připojen k rozhraní HDMI (signál RGB).
Režim pouze modrá: Vypnuto/Zapnuto
Tato funkce slouží odborníkům pro proměřování
audiovizuálních zařízení. Funkce zobrazuje pouze modrý signál
po odebrání červeného a zeleného signálu z videosignálu
za účelem poskytnutí efektu modrého filtru, který se používá
k nastavení možností Color a Tint videozařízení, např.
přehrávačů DVD, domácích kin atd.
Pomocí této funkce lze nastavit možnosti Color a Tint na
požadované hodnoty odpovídající úrovni signálu jednotlivých
videozařízení pomocí vzorů barevných pruhů pro barvy Red/
Green/Blue/Cyan/Magenta/Yellow, aniž by bylo nutné použít
další modrý filtr.
➢
Režim pouze modrá je k dispozici, pokud je režim obrazu
nastaven na hodnotu Film nebo Standardní.
Ochrana proti vypál.obrazovky
Ke snížení rizika vypálení obrazovky je tento přístroj vybaven
technologií prevence vypalování obrazovky. Tato technologie
umožňuje nastavit vertikální (vertikální řada) a horizontální
(horizontální tečka) pohyb obrazu. Nastavení času umožňuje
naprogramovat dobu mezi pohyby obrazu v minutách.
− Posunutí bodu: Pomocí této funkce můžete nepatrně
pohnout obrazovými body na plazmové obrazovce v horizontálním nebo vertikálním směru, abyste
minimalizovali vznik paobrazů na obrazovce.
• Pomocí tlačítka ▲ nebo ▼ nastavte možnost Posunutí bodu na hodnotu Zapnuto a pak
stiskněte tlačítko ENTER.
•
Vyberte požadovanou možnost stisknutím tlačítka ▲ nebo ▼ a pak stiskněte tlačítko ENTER.
Dostupné možnosti: Horizont. bod, Vertikální řada, Čas
Posunutí
Zadat
Zpět
Posunutí bodu
Bílý
Posouvání
Šedý okraj : Tmavý
Ochrana proti vypál.obrazovky
T V
Pokračování...
Posunutí
Zadat
Zpět
Teplota barev : Normální
Formát : Automat. formát
Režim obrazu : 1:
Digitální NR : Automatický
Režim Real 100Hz : Vypnuto
DNle : Zapnuto
Úroveň černé HDMI
: Normal
Režim pouze modrá
: Vypnuto
Ochrana proti vypál.obrazovky
D efekt
Obraz - možnosti
T V
Posunutí
Zadat
Zpět
Teplota barev :
Normální
Formát : Automat. formát
Režim obrazu : 1:
Digitální NR :
Režim Real 100Hz : Off
DNle :
Úroveň černé HDMI
: Normální
Režim pouze modrá
: Vypnuto
Ochrana proti vypál.obrazovky
D efekt
Obraz - možnosti
T V
1:
Široký zoom
Zvětšení
4:
BN68-01528A-00Cze_0312.indd 21 2008-4-21 15:32:14

Česky -
➢
Optimální stav pro posun obrazového bodu:
PC TV/Ext/AV/Komponent/HDMI
Horizont. bod 1 2
Vertikální řada 1 2
Čas (min.) 2 2 min
➢
Hodnota posunutí bodu se může lišit v závislosti na
velikosti monitoru (v palcích) a režimu.
➢
Tato funkce není k dispozici v režimu Just Scan (Pouze skenování).
− Bílý: Tato funkce pomáhá odstranit z obrazovky paobrazy změnou barvy obrazových bodů na bílou.
Použijte tuto funkci, pokud na obrazovce zůstávají paobrazy nebo symboly, a to zejména pokud jste na
obrazovce dlouhou dobu zobrazovali statický obraz.
− Posouvání: Tato funkce pomáhá odstranit z obrazovky paobrazy pohybováním obrazových bodů na
plazmové obrazovce podle určitého vzoru. Použijte tuto funkci, pokud na obrazovce zůstávají paobrazy
nebo symboly, a to zejména pokud jste na obrazovce dlouhou dobu zobrazovali statický obraz.
− Šedý okraj: Při sledování televize s poměrem obrazovky 4:3 je obrazovka chráněna před poškozením
nastavením vyvážení bílé zcela vpravo i zcela vlevo.
Tmavý: Pokud nastavíte poměr obrazovky na 4:3, pravá a levá strana se ztmaví.
Světlý: Pokud nastavíte poměr obrazovky na 4:3, pravá a levá strana se zesvětlí.
➢
K odstranění paobrazů z obrazovky použijte funkci Bílý nebo Posouvání .Přestože obě tyto funkce
odstraňují z obrazovky paobrazy, funkce Posouvání je účinnější.
➢
Abyste z obrazovky účinně odstranili paobrazy, funkci odstranění paobrazů je nutné aktivovat na
dlouhou dobu (přibližně 1 hodinu). Pokud paobrazy nezmizí ani po použití této funkce, použijte ji
znovu.
➢
Funkci zrušíte stisknutím libovolného tlačítka na dálkovém ovladači.
Posunutí
Zadat
Zpět
Posunutí bodu : Zapnuto
Horizont. bod :
Vertikální řada :
Čas : min
Posunutí bodu
T V
Použití funkce D
Na vašem televizoru si můžete vychutnat trojrozměrné filmy. Funkce D efekt vám umožňuje
prohlížet trojrozměrné snímky pomocí speciálních D brýlí.
➢
Vzhled 3D brýlí (včetně vysílače) se může lišit v závislosti na modelu brýlí.
Kabel RCA se stereo zástrčkou ,5 mm (není součástí dodávky)
D infračervený vysílač
(není součástí dodávky)
PC
Kabel HDMI/DVI (není součástí dodávky)
Zadní panel televizoru
Připojení
D brýle
(nejsou součástí dodávky)
BN68-01528A-00Cze_0312.indd 22 2008-4-21 15:32:16

Česky -
1 Kabelem HDMI/DVI propojte konektor HDMI IN 2 na televizoru a výstupní konektor PC na počítači.
Kabelem stereo/2RCA 3,5 mm propojte konektor DVI IN (HDMI 2) [R-AUDIO-L] na televizoru a
konektor audiovýstupu zvukové karty na počítači.
Připojte vysílač k portu 3D SYNC OUT na zadním panelu televizoru.
4 Zapněte televizor a nastavte zdroj televizoru na rozhraní HDMI2.
Více informací o 3D brýlích (včetně vysílače) najdete v uživatelské příručce k 3D brýlím.
Nastavte rozlišení počítače: PS50A470: 1024 x 768 při 60 Hz, 1360 x 768 při 60 Hz
Optimální PC rozlišení pro model PS50A470 je 1360 x 768. Pokud je k režimu 3D připojen signál
1024 x 768, video se zobrazí ve formátu 4:3 a na levé a pravé straně se objeví šedé pásy.
3D infračervený vysílač komunikuje s 3D brýlemi.
Proto by měl být 3D infračervený vysílač umístěn v blízkosti 3D brýlí.
Je aktivován, když vstupní signál rozhraní HDMI nebo DVI je signál RGB a když je podporován zvuk
DVI.
Ať již je napájení zapnuto nebo vypnuto, změní se režim na výchozí hodnotu (Vypnuto) a je uložen
Formát.
Funkce D efekt se zapne nebo vypne bez ohledu nsa Režim obrazu.
Pokud je zapnuta funkce D efekt, jsou aktivovány pouze nabídky obrazu Kontrast, Jas, D efekt a
Obnovit.
Pro použití funkce 3D efekt je třeba grafická karta, která podporuje 3D, nebo 3D software.
3D brýle a vysílač musí být od stejného výrobce.
Pokud hrajete hru nebo sledujete televizor a máte na sobě 3D brýle delší dobu, mohou vás začít
bolet oči nebo hlava.
3D brýle (včetně vysílače) od jiného výrobce než od společnosti Samsung nemusí být podporovány.
Pokud se vám bude zdát, že obrazovka při použití funkce 3D bliká, můžete zlepšit podmínky pro její
provoz tak, že ztlumíte okolní osvětlení nebo vypnete zářivky.
Změna režimu
Změna režimu změní obraz pro každé oko záměnou levého a
pravého výstupního signálu.
1 Připojte televizor, počítač a 3D infračervený vysílač tak, jak je
uvedeno na obrázku.
Stisknutím tlačítka SOURCE zvolte možnost HDMI.
Stisknutím tlačítka MENU zobrazíte nabídku.
Stisknutím tlačítka ▲ nebo ▼ vyberte možnost Obraz a potom
stiskněte tlačítko ENTER.
4 Stisknutím tlačítka ▲ nebo ▼ vyberte možnost Obraz –
možnosti a potom stiskněte tlačítko ENTER.
Stisknutím tlačítka ▲ nebo ▼ vyberte možnost D efekt a
potom stiskněte tlačítko ENTER.
5 Stisknutím tlačítka ▲ nebo ▼ vyberte možnost Režim a potom
stiskněte tlačítko ENTER.
Stisknutím tlačítka ▲ nebo ▼ vyberte možnost Vypnuto,
Režim1, Režim nebo Převod D. Da potom stiskněte tlačítko
ENTER.
• Vypnuto : Slouží k vypnutí funkce 3D efekt.
• Režim1 : Režim 1 spustí nejprve pravý výstup sync.
• Režim :
Režim 2 spustí nejprve levý výstup sync.
• Převod D:
Převádí 3D obraz na 2D obraz.
Tuto možnost můžete použít, chcete-li 2D obraz sledovat dočasně
(např. budete-li pociťovat závratě). Chcete-li 3D efekt ukončit
úplně, zvolte možnost „Off“ (Vypnuto).
Pokud funkce 3D nefunguje správně, znamená to, že režim a
3D brýle nejsou správně synchronizovány. Správné synchronizace dosáhnete přepnutím do jiného
režimu. Pokračování...
Posunutí
Zadat
Zpět
Režim : Standardní
Jas buněk
Kontrast 5
Jas 45
Ostrost 50
Barvy 50
Odstín G50 R50
Podrobné nastavení
Obraz - možnosti
Obnovit : OK
Obraz
T V
Posunutí
Zadat
Zpět
Teplota barev :
Normální
Formát :
Automat. formát
Režim obrazu : 1:
Digitální NR : Automatický
Režim Real 100Hz : Vypnuto
DNle : Vypnuto
Úroveň černé HDMI: Normální
Režim pouze modrá
:Vypnuto
Ochrana proti vypál.obrazovky
D efekt
Obraz - možnosti
T V
Posunutí
Zadat
Zpět
Režim :
Formát :
D Effect
T V
Vypnuto
Režim1
Režim
Převod D
BN68-01528A-00Cze_0312.indd 23 2008-4-21 15:32:17

Česky - 4
Obnovení výchozího nastavení obrazu od výrobce
Můžete zadat podrobná nastavení obrazu.
1 Stisknutím tlačítka MENU zobrazte nabídku.
Stisknutím tlačítka ENTER vyberte možnost Obraz.
Stisknutím tlačítka ▲ nebo ▼ vyberte položku Obnovit a
pak stiskněte tlačítko ENTER.
4 Pomocí tlačítka ▲ nebo ▼ vyberte možnost OK nebo Zrušit
a pak stiskněte tlačítko ENTER.
➢
Každý režim může být resetován.
OK
Zrušit
Posunutí
Zadat
Zpět
Režim : Standardní
Jas buněk
Kontrast 0
Jas 45
Ostrost 50
Barvy 50
Odstín Z50 Č50
Podrobné nastavení
Obraz - možnosti
Obnovit :
Obraz
T V
Změna formátu
Zvolte optimální vstupní formát, který odpovídá vaší grafické kartě
nebo 3D softwaru.
Viz výše uvedený popis kroků 1 až 4.
5 Stisknutím tlačítka ▲ nebo ▼ vyberte možnost Formát a
potom stiskněte tlačítko ENTER.
Stisknutím tlačítka ▲ nebo ▼ vyberte možnost Šachovnice,
Horizontální nebo Vertikální a potom stiskněte tlačítko
ENTER.
Šachovnice
Pokud je výstupní formát grafické karty nebo 3D
softwaru šachovnice, zvolte tento vstupní formát.
Horizontální
Pokud je výstupní formát grafické karty nebo 3D
softwaru horizontální prokládaný, zvolte tento
vstupní formát.
Vertikální
Pokud je výstupní formát grafické karty nebo 3D
softwaru vertikální prokládaný, zvolte tento vstupní
formát.
➢
Chcete-li změnit režim D, stiskněte opakovaně tlačítko 3D
na dálkovém ovládání.
Snadné nastavení
1 Stiskněte tlačítko TOOLS na dálkovém ovladači.
Stisknutím tlačítka ▲ nebo ▼ zvolte možnost Režim D.
Stisknutím tlačítka ENTER spustíte funkci 3D efekt.
Nástroje
Režim D ◄ Vypnuto ►
Anynet+ (HDMI-CEC)
Režim obrazu : Dynamický
Zvukový režim : Standardní
Časovač – spánek : Vypnuto
SRS TS XT : Vypnuto
Úspora energie
: Vypnuto
Nastavení
Konec
Posunutí
Posunutí
Zadat
Zpět
Režim : Režim 1
Formát :
D efekt
T V
Šachovnice
Horizontální
Vertikální
BN68-01528A-00Cze_0312.indd 24 2008-4-21 15:32:18

Česky - 5
Zvukové funkce
1 Stiskněte tlačítko MENU. Zobrazí se nabídka.
Pomocí tlačítka ▲ nebo ▼ vyberte možnost Zvuk a poté
stiskněte tlačítko ENTER.
Požadovanou možnost vyberte stisknutím tlačítka ▲ nebo ▼ a
poté stiskněte tlačítko ENTER.
Dostupné možnosti: Režim, Ekvalizér, SRS TS XT, Automat.
hlasitost, Reproduktoru TV, Výběr zvuku.
4 Jakmile budete s nastavením spokojeni, stiskněte tlačítko
ENTER.
5 Stisknutím tlačítka EXIT tento režim ukončete.
Režim: Standardní/Hudba/Film/Řeč/Vlast.nastav.
Je možné vybrat typ speciálního zvukového efektu, který se má
pro dané vysílání používat.
➢
Tyto možnosti lze snadno vybírat stisknutím tlačítka
S.MODE na dálkovém ovladači.
Snadné nastavení
1 Stiskněte tlačítko TOOLS na dálkovém ovladači.
Stisknutím tlačítka ▲ nebo ▼ zvolte Zvukový režim.
Stisknutím tlačítka ◄ nebo ► zvolte požadovanou možnost.
Ekvalizér: Stereováha/100 Hz/00 Hz/1 kHz/ kHz/10 kHz
Několik nastavení tohoto televizoru umožňuje ovládat kvalitu
zvuku.
➢
Jestliže změníte nastavení těchto položek, režim zvuku se
automaticky přepne na hodnotu Vlast.nastav.
SRS TS XT: Vypnuto Zapnuto
TruSurround XT je patentovaná technologie SRS, která
řeší problém s přehráváním vícekanálového (5,1) obsahu přes dva reproduktory. Technologie
TruSurround poskytuje skvělý virtuální zvukový zážitek při použití v jakémkoliv dvoureproduktorovém
přehrávacím systému, včetně vestavěných reproduktorů v televizoru. Je plně kompatibilní se všemi
vícekanálovými formáty.
Snadné nastavení
1 Stiskněte tlačítko TOOLS na dálkovém ovladači.
Stisknutím tlačítka ▲ nebo ▼ vyberte možnost SRS TS XT.
Stisknutím tlačítka ◄ nebo ► zvolte možnost Vypnuto nebo
Zapnuto.
Automat. hlasitost: Vypnuto /Zapnuto
Každá vysílající stanice používá vlastní nastavení signálu, proto
není snadné upravovat hlasitost s každou změnou kanálu. Tato
funkce umožňuje automaticky upravit hlasitost požadovaného kanálu tak, že sníží zvukový výstup v
případě vysokého modulačního signálu nebo zvýší zvukový výstup v případě nízkého modulačního
signálu.
Reproduktoru TV: Vypnuto/Zapnuto
Pokud chcete poslouchat zvuk přes samostatné reproduktory, vypněte interní zesilovač.
➢
Tlačítka
+,
- a MUTE nefungují, pokud je interní ztlumení Vypnuto.
➢
Pokud je možnost Reproduktor TV (TV Speaker) nastavena na hodnotu Vypnuto (Off), je
funkční pouze možnost Výběr zvuku (Sound Select) v režimu PIP v nabídce Zvuk (Sound)
.
Výběr zvuku: Hlavní obraz/Podobraz
Pokud je aktivní funkce PIP (Obraz v obraze), můžete poslouchat zvuk podobrazu.
−
Hlavní obraz: Slouží k poslechu zvuku hlavního obrazu.
−
Podobraz: Slouží k poslechu zvuku podobrazu.
Nástroje
Anynet+ (HDMI-CEC)
Režim obrazu : Standardní
Zvukový režim ◄ Vlast.nastav. ►
Časovač – spánek : Vypnuto
SRS TS XT : Vypnuto
Úspora energie : Vypnuto
Dual I-II : Mono
KonecPosunutí
Nastavení
TruSurround XT, SRS a symbol jsou ochranné známky společnosti
SRS Labs, Inc. Technologie TruSurround XT je použita na základě licence
udělené společností SRS Labs, Inc.
Posunutí
Zadat
Zpět
Režim :
Vlast.nastav.
Ekvalizér
SRS TS XT : Vypnuto
Automat. hlasitost : Vypnuto
Reproduktoru TV : Vypnuto
Výběr zvuku :
Hlavní obraz
Zvuk
T V
Ekvalizér
T V
Balance 100Hz 00Hz 1kHz kHz 10kHz
+
0
-
R
L
+
0
-
Posunutí
Nastavení
Zpět
Tools
Posunutí
Nastavení
Konec
Anynet+ (HDMI-CEC)
Režim obrazu : Standardní
Zvukový režim : Vlast.nastav.
Časovač – spánek : Vypnuto
SRS TS XT ◄ Vypnuto ►
Úspora energie : Vypnuto
Dual I-II : Mono
BN68-01528A-00Cze_0312.indd 25 2008-4-21 15:32:19

Česky -
Výběr zvukového režimu (podle modelu)
Tlačítko DUAL I-II slouží k zobrazení a řízení zpracování a výstupu zvukového signálu. Při zapnutí
přístroje je režim automaticky přednastavený buď na hodnotu DUÁL-I, nebo na hodnotu Stereo, a
to podle aktuálního přenosu.
Snadné nastavení
1 Stiskněte tlačítko TOOLS na dálkovém ovladači.
Stisknutím tlačítka ▲ nebo ▼ vyberte režim Duální I-II.
Stisknutím tlačítka ◄ nebo ► zvolte požadovanou možnost.
Typ vysílání
Indikace na obrazovce
NICAM
Stereo
Běžné vysílání
(standardní audio)
Mono (normální použití)
Běžné + NICAM Mono NICAM
Mono
(normální)
NICAM Stereo
NICAM
Stereo
Mono
(normální)
NICAM DUÁL-I/II
NICAM
Duál 1
NICAM
Duál
Mono
(normální)
A2
Stereo
Běžné vysílání
(standardní audio)
Mono (normální použití)
Dvojjazyčné nebo
DUÁL-I/II
Duál I Duál II
Stereo Stereo
Mono
(Vynucené
mono)
➢
Jestliže se podmínky příjmu zhorší, bude poslech snazší při nastavení na režim Mono.
Jestliže je signál stereo slabý a dochází k automatickému přepínání mezi oběma režimy,
přepněte na režim Mono.
Připojení sluchátek (prodávaných samostatně)
Pokud nechcete při sledování televizního programu rušit ostatní osoby v místnosti, připojte
k televizoru sluchátka.
➢
Pokud připojíte náhlavní soupravu do odpovídajícího portu,
můžete ovládat pouze položku Automat. hlasitost v nabídce
Zvuk.
➢
Delší používání sluchátek s nastavením vysoké hlasitosti
může poškodit sluch.
➢
Po připojení sluchátek k televizoru neuslyšíte zvuk z reproduktorů.
➢
Hlasitost ve sluchátkách a hlasitost televizoru se nastavují
samostatně.
Boční panel televizoru
Nástroje
Anynet+ (HDMI-CEC)
Obraz Režim : Standardní
Zvuk Režim : Vlast.nastav.
Časovač – spánek : Vypnuto
SRS TS XT : Vypnuto
Úspora energie : Vypnuto
Duální I-II ◄ Mono ►
KonecPosunutí
Nastavení
BN68-01528A-00Cze_0312.indd 26 2008-4-21 15:32:19

Česky -
Časové funkce
1 Stiskněte tlačítko MENU. Zobrazí se nabídka.
Pomocí tlačítka ▲ nebo ▼ vyberte možnost Nastavení a poté
stiskněte tlačítko ENTER.
Pomocí tlačítka ▲ nebo ▼ vyberte možnost Čas a poté
stiskněte tlačítko ENTER.
4 Požadovanou možnost vyberte stisknutím tlačítka ▲ nebo ▼ a
poté stiskněte tlačítko ENTER.
Dostupné možnosti:
Nastavení hodin, Časovač – spánek,
Časovač 1, Časovač , Časovač
5 Jakmile budete s nastavením spokojeni, stiskněte tlačítko
ENTER.
Stisknutím tlačítka EXIT tento režim ukončete.
Nastavení hodin
Hodiny televizoru lze nastavit tak, aby se při stisknutí tlačítka
INFO na dálkovém ovladači zobrazoval aktuální čas. Čas je
nutné nastavit rovněž v případě, že chcete používat časovače
automatického zapnutí nebo vypnutí.
− Stisknutím tlačítka ◄ nebo ► vyberte položku Měsíc,
Datum, Rok, Hod. nebo minuty. Nastavení proveďte
stisknutím tlačítka ▲ nebo▼.
➢
Hodnoty Měsíc, Datum, Rok, Hod. nebo minuty můžete
nastavit přímo stisknutím číselných tlačítek na dálkovém
ovladači.
➢
Pokud dojde k výpadku napájení přístroje nebo jeho
odpojení, bude nastavení hodin ztraceno.
Časovač - spánek
Je možné vybrat časové období mezi 30 a 180 minutami, po
kterém se televizor automaticky přepne do pohotovostního
režimu.
− Vyberte přednastavený časový interval (Vypnuto, 0, 0,
0
, 10, 150 nebo 10), po který bude televizor zapnutý,
stisknutím tlačítka ▲ nebo ▼.
Snadné nastavení
1 Stiskněte tlačítko TOOLS na dálkovém ovladači.
Stisknutím tlačítka ▲ nebo ▼ zvolte Časovač – spánek.
Stisknutím tlačítka ◄ nebo ► vyberte možnost a potom
stiskněte tlačítko ENTER.
Časovač 1 / Časovač / Časovač
Plánované zapnutí a vypnutí lze nastavit tak, aby se televizor
automaticky zapnul nebo vypnul v určenou dobu.
☛
Nejdříve musíte nastavit hodiny.
− Stisknutím tlačítka ◄ nebo ► vyberte požadovanou položku.
Stisknutím tlačítka ▲ nebo ▼ upravte nastavení na
požadovanou hodnotu.
Čas zapnutí : Vyberte hodinu, minutu a hodnotu Zapnuto/Vypnuto. (Chcete-li časovač aktivovat s
požadovaným nastavením, nastavte hodnotu Zapnuto)
Čas vypnutí: Vyberte hodinu, minutu a hodnotu Zapnuto/Zapnuto. (Chcete-li časovač aktivovat s
požadovaným nastavením, nastavte hodnotu Zapnuto)
Opakovat: Vybírat můžete z možností Jednou, Denně, Po - Pa, Po - So nebo So - Ne.
Hlasitost: Vyberte požadovanou úroveň hlasitosti.
➢
Hodiny a minuty je možné zadat přímo stisknutím číselných tlačítek na dálkovém ovladači.
☛
Automatické vypnutí
Pokud nastavíte časovač na hodnotu Zapnuto, televizor se nakonec po 3 hodinách vypne, pokud po tuto
dobu nepoužijete některý ovládací prvek. Tato funkce je k dispozici pouze v režimu časovače Zapnuto a
zabraňuje přehřátí, k němuž by mohlo dojít, pokud by byl přístroj v provozu po příliš dlouhou dobu.
Nástroje
Anynet+ (HDMI-CEC)
Režim obrazu : Standardní
Zvukový režim : Vlast.nastav.
Časovač – spánek ◄ Vypnuto ►
SRS TS XT : Vypnuto
Úspora energie : Vypnuto
Duální I-II : Mono
KonecPosunutí
Nastavení
Posunutí
Zadat
Zpět
Nastavení hodin :
00 : 00
Časovač–spánek : Vypnuto
Časovač 1 : Vypnuto
Časovač : Vypnuto
Časovač : Vypnuto
Čas
T V
Posunutí
Zadat
Zpět
Plug & Play
Jazyk : Čeština
Čas
Světelný efekt
: TV zapnuta
Montáž na stěnu
Melodie : Vypnuto
Zábava : Vypnuto
Úspora energie : Vypnuto
PIP
Nastavení
T V
Posunutí
Nastavení
Zpět
Časovač 1
T V
00 00 Vypnuto
Čas zapnutí
:
Čas vypnutí
Opakovat
Jednou
10
Hlasitost
00 00 Vypnuto
:
BN68-01528A-00Cze_0312.indd 27 2008-4-21 15:32:20

Česky -
Jazyk / Melodie / Světelný efekt / Zábava /
Úspora energie/PIP
1 Stiskněte tlačítko MENU. Zobrazí se nabídka.
Pomocí tlačítka ▲ nebo ▼ vyberte možnost Nastavení a poté
stiskněte tlačítko ENTER.
Požadovanou možnost vyberte stisknutím tlačítka ▲ nebo ▼
a poté stiskněte tlačítko ENTER.
Dostupné možnosti: Jazyk, Melodie, Světelný efekt, Zábava,
Úspora energie, PIP
4 Jakmile budete s nastavením spokojeni, stiskněte tlačítko
ENTER.
5 Stisknutím tlačítka EXIT tento režim ukončete.
Jazyk
Funkce se liší podle jednotlivých modelů. Při prvním použití televizoru je nutné vybrat jazyk
používaný pro zobrazování nabídek a informací.
Světelný efekt: Vypnuto/Standby zap./TV zapnuta/Zapnuto
Podle situace můžete zapnout nebo vypnout modrou kontrolku na přední straně televizoru. Tato
funkce zajišťuje úsporu energie nebo ji můžete použít, pokud vás kontrolka ruší.
−
Vypnuto: Modrá kontrolka je vždy vypnutá.
−
Standby zap.: Modrá kontrolka svítí, když je aktivní pohotovostní režim, a zhasne při zapnutí
televize.
−
TV zapnuta: Modrá kontrolka svítí, když sledujete televizi, a je zhasnutá, když je televize vypnutá.
−
Zapnuto: Modrá kontrolka svítí stále.
➢
Nastavením možnosti Light Effect na hodnotu Vypnuto snížíte spotřebu energie.
Melodie: Vypnuto /Nízká/Střední / Vysoké
Zvuk melodie při zapnutí nebo vypnutí televizoru lze upravit.
Zábava: Vypnuto/Sport/Kino/Hra
Režim Zábava umožňuje vybrat optimální obraz a zvuk pro sport, filmy a hry.
−
Vypnuto:Vypne funkci Zábava
−
Sport: Poskytuje optimální kvalitu obrazu a zvuku pro sport.
−
Kino: Poskytuje optimální kvalitu obrazu a zvuku pro sledování filmů.
Můžete si vychutnat bohatší obraz a zdokonalený zvuk.
−
Hra:Poskytuje optimální kvalitu obrazu a zvuku pro hry. Tento režim zvýší rychlost hraní při použití
externí herní konzoly připojené k televizoru.
➢
Pokud nastavíte kterýkoli ze tří režimů zábavy na hodnotu Zapnuto (On), bude nastavení
uzamčeno a nebude možné je změnit. Chcete-li provést úpravy režimu obrazu a zvuku, musí být
režim Zábava vypnut.
➢
Nastavení Zábava bude uloženo pro každý zdroj vstupu.
Posunutí
Zadat
Zpět
Plug & Play
Jazyk : Čeština
Čas
Světelný efekt
: TV zapnuta
Montáž na stěnu
Melodie : Vypnuto
Zábava : Vypnuto
Úspora energie : Vypnuto
PIP
Nastavení
T V
Pokračování...
BN68-01528A-00Cze_0312.indd 28 2008-4-21 15:32:21

Česky -
Nastavení počítačového softwaru (na základě systému
Windows XP)
Níže je uvedeno typické nastavení zobrazení v systému
Windows. Avšak skutečné obrazovky v počítači se mohou
lišit v závislosti na konkrétní verzi operačního systému
Windows a konkrétní grafické kartě. Ale i když se skutečné
obrazovky budou lišit, ve většině případů budou platit stejné
základní informace o nastavení. (Není-li tomu tak, obraťte
se na výrobce vašeho počítače nebo na prodejce výrobků
Samsung.)
1 Klepněte pravým tlačítkem myši na plochu systému Windows
a potom klepněte na příkaz Vlastnosti.
Zobrazí se dialogové okno Zobrazení – vlastnosti.
Klepněte na kartu Nastavení a potom nastavte režim
zobrazení podle tabulky režimů zobrazení. Nemusíte měnit
nastavení barev.
Klepněte na tlačítko Upřesnit. Zobrazí se další dialogové okno.
4 Klepněte na kartu Monitor, potom nastavte hodnotu Obnovovací frekvence podle tabulky režimů
zobrazení. Pokud je to možné, nastavte namísto hodnoty Obnovovací frekvence samostatně
vertikální frekvenci a horizontální frekvenci.
5 Klepnutím na tlačítko OK okno zavřete. Potom klepněte na tlačítko OK v dialogovém okně Zobrazení
– vlastnosti. V této chvíli může dojít k automatickému restartování systému.
Nástroje
Anynet+ (HDMI-CEC)
Režim obrazu : Standardní
Zvukový režim : Vlast.nastav.
Časovač – spánek : Vypnuto
SRS TS XT : Vypnuto
Úspora energie ◄ Vypnuto ►
Duální I-II : Mono
KonecPosunutí
Nastavení
Úspora energie: Vypnuto/Nízká/Střední/Vysoké
Tato funkce nastavuje jas obrazovky podle intenzity okolního
osvětlení.
− Vypnuto: Vypne režim Úspora energie.
− Nízká: Pracuje ve standardním režimu bez ohledu na okolní
osvětlení.
− Střední: Vstoupí do režimu střední úspory energie bez
ohledu na okolní osvětlení.
− Vysoké: Vstoupí do režimu maximální úspory energie bez
ohledu na okolní osvětlení.
Snadné nastavení
1 Stiskněte tlačítko TOOLS na dálkovém ovladači.
Stisknutím tlačítka ▲ nebo ▼ vyberte režim Úspora
energie.
Stisknutím tlačítka ◄ nebo ► zvolte požadovanou možnost.
PIP (Obraz v obraze): PIP(Zapnuto/Vypnuto/Zdroj /Formát /Pozice /Program
V hlavním obraze můžete zobrazit podobraz. Takto je možné sledovat televizní program nebo
kontrolovat obrazový vstup z jiného připojeného zařízení.
−
PIP: Zapnuto/Vypnuto
Můžete zapnout nebo vypnout funkci obrazu v obraze (PIP).
Tabulka nastavení režimu PIP
Hlavní obraz Podobraz
Komponent
HDMI1, 2
PC
Vysílání analogové
televize pouze ze zdrojů
Ext1, Ext2, AV
− Zdroj: TV/Ext.1/Ext./AV
Můžete zvolit zdroj pro podobraz.
− Formát: / /
Můžete zvolit formát pro podobraz.
➢
Pokud se hlavní obraz nachází v režimu PC and Komponent (Component), možnost Formát
(Size) není k dispozici.
− Pozice : / / /
Můžete zvolit pozici podobrazu.
➢
V režimu Dvojitý ( , ) nelze možnost Pozice zvolit.
− Program
Kanál podobrazu je možné vybrat, pouze pokud je položka Zdroj nastavena na hodnotu TV.
Posunutí
Zadat
Zpět
PIP :
Zapnuto
Zdroj : TV
Formát :
Pozice :
Program : P 1
PIP
T V
BN68-01528A-00Cze_0312.indd 29 2008-4-21 15:32:21

Česky - 0
Režim vstupu (PC)
Pozice i formát obrazovky se budou lišit v závislosti na typu počítačového monitoru a jeho
rozlišení.
Níže uvedená tabulka obsahuje všechny podporované obrazové režimy.
D-Sub Vstup
Režim Rozlišení
Horizontální
Frekvence
(kHz)
Vertikální
Frekvence
(Hz)
Takt pixelu
Frekvence
(mHz)
Synchronizační
polarita
(H/V)
PS50A40
IBM
640 x 350
720 x 400
31.469
31.469
70.086
70.087
25.175
28.322
+ / -
- / +
✔
✔
VESA
640 x 480
640 x 480
640 x 480
800 x 600
800 x 600
800 x 600
1024 x 768
1024 x 768
1024 x 768
1360 x 768
31.469
37.861
37.500
37.879
48.077
46.875
48.363
56.476
60.023
47.712
59.940
72.809
75.000
60.317
72.188
75.000
60.004
70.069
75.029
60.015
25.175
31.500
31.500
40.000
50.000
49.500
65.000
75.000
78.750
85.500
- / -
- / -
- / -
+ / +
+ / +
+ / +
- / -
- / -
+ / +
+ / +
✔
✔
✔
✔
✔
✔
✔
✔
✔
✔
HDMI/DVI Vstup
Režim Rozlišení
Horizontální
Frekvence
(kHz)
Vertikální
Frekvence
(Hz)
Takt pixelu
Frekvence
(mHz)
Synchronizační
polarita
(H/V)
PS50A40
VESA
640 x 480
800 x 600
1024 x 768
1360 x 768
31.469
37.879
48.363
47.712
59.940
60.317
60.004
60.015
25.175
40.000
65.000
85.500
- / -
+ / +
- / -
+ / +
✔
✔
✔
✔
Pokud použijete propojení pomocí kabelu HDMI/DVI, musíte použít konektor HDMI IN .
Prokládaný režim není podporován.
Pokud je zvolen nestandardní videoformát, nemusí přístroj fungovat správně.
Jsou podporovány režimy Separate a Composite. SOG není podporováno.
Kvalita textu PS50A470, je optimální v režimu VESA (1360 × 768 při 60 Hz).
BN68-01528A-00Cze_0312.indd 30 2008-4-21 15:32:22

Česky - 1
Nastavení počítače
➢
Režim PC lze předem nastavit stisknutím tlačítka SOURCE.
1 Stisknutím tlačítka MENU zobrazte nabídku.
Stisknutím tlačítka ▲ nebo ▼ vyberte možnost Obraz a pak
stiskněte tlačítko ENTER.
Vyberte požadovanou možnost stisknutím tlačítka ▲ nebo ▼
a pak stiskněte tlačítko ENTER.
4 Jakmile budete s nastavením spokojeni, stiskněte tlačítko
ENTER.
5 Stisknutím tlačítka EXIT tento režim ukončíte.
Automat. nastavení:
Automatické nastavení umožňuje obrazovce PC v přístroji
automatickou úpravu příchozího videosignálu z počítače.
Hodnoty jemného a hrubého nastavení a nastavení pozice
jsou seřizovány automaticky.
Snadné nastavení
1 Stiskněte tlačítko TOOLS na dálkovém ovladači.
Stisknutím tlačítka ▲ nebo ▼ vyberte možnost Automat.
nastavení a pak stiskněte tlačítko ENTER.
Obrazovka : Hrubý/Jemný/Pozice/Zruš zobrazení
Hrubý/Jemný
Účelem nastavení kvality obrazu je odstranění nebo omezení
šumu obrazu.Pokud se šum nepodaří odstranit pouze jemným
doladěním, upravte co možná nejlépe frekvenc a znovu
proveďte jemné ladění.Po omezení šumu znovu upravte obraz
tak, aby byl zarovnán na střed obrazovky.
1
Stisknutím tlačítka ▲ nebo ▼ vyberte možnost Hrubý nebo
Jemný a pak stiskněte tlačítko ENTER.
Stisknutím tlačítka ◄ nebo ► upravte kvalitu obrazovky:
mohou se zobrazovat svislé pruhy nebo může být obraz
rozmazaný. Stiskněte tlačítko ENTER.
Pozice
Upravte pozici obrazovky PC, pokud neodpovídá obrazovce
televizoru.
1 Nastavte pozici stisknutím tlačítka ▲/▼/◄/►.
Stiskněte tlačítko ENTER.
Zruš zobrazení
Uživatel může obnovit výchozí hodnoty všech nastavení
obrazu.
Posunutí
Zadat
Zpět
Hrubý 50
Jemný 11
Pozice
Zruv zobrazeni
Obrazovka
T V
Probíhá automatické nastavování.
Počkejte prosím...
Zobrazení bylo obnoveno.
Posunutí
Zadat
Zpět
Režim :
Standardní
Jas buněk
Kontrast 5
Jas 45
Ostrost 50
Automat. nastavení
Obrazovka
Podrobné nastavení
Obraz - možnosti
Obnovit : OK
Obraz
T V
Posunutí
Zadat
Zpět
Pozice
T V
Nástroje
Anynet+ (HDMI-CEC)
Režim obrazu : Standardní
Zvukový režim : Vlast.nastav.
Časovač – spánek : Vypnuto
SRS TS XT : Vypnuto
Úspora energie : Vypnuto
PIP
Automat. nastavení
Konec
Posunutí
Zadat
BN68-01528A-00Cze_0312.indd 31 2008-4-21 15:32:22

Česky -
Co je Anynet
+
?
Anynet
+
je AV síťový systém, který poskytuje uživatelům snadno použitelné AV rozhraní
ovládáním všech připojených AV zařízení pomocí nabídky Anynet
+
, pokud jsou připojena AV
zařízení od společnosti Samsung Electronics.
Připojení zařízení Anynet
+
Systém Anynet
+
podporuje pouze AV zařízení, která podporují systém Anynet
+
.
Zkontrolujte, zda je na AV zařízení, které má být připojeno k televizoru, označení Anynet
+
.
Přímé připojení k televizoru
Propojte konektor [HDMI 1],
[HDMI 2] nebo [HDMI 3] na
televizoru a konektor HDMI
OUT odpovídajícího zařízení
Anynet
+
pomocí kabelu HDMI.
Připojení k domácímu kinu
1 Propojte konektor [HDMI
1], [HDMI 2] nebo [HDMI
3] na televizoru a konektor
HDMI OUT odpovídajícího
zařízení Anynet
+
pomocí
kabelu HDMI.
Propojte konektor HDMI
IN domácího kina a
konektor HDMI OUT
odpovídajícího zařízení
Anynet
+
pomocí kabelu
HDMI.
➢
Připojte pouze jeden přijímač.
➢
Zařízení Anynet
+
lze připojit pomocí kabelu HDMI. Některé kabely HDMI nemusí podporovat funkce
zařízení Anynet
+
.
➢
Systém Anynet
+
je funkční, pokud je AV zařízení podporující systém Anynet
+
ve stavu
pohotovostního režimu nebo zapnuto.
➢
Systém Anynet
+
podporuje celkem až 8 AV zařízení.
Zařízení Anynet
+
1 Zařízení Anynet
+
Zařízení Anynet
+
TV
Kabel HDMI
Kabel HDMI
Kabel HDMI
English - 30
TV
Zařízení Anynet
+
1 Zařízení Anynet
+
Zařízení Anynet
+
Kabel HDMI
Kabel HDMI
Kabel HDMI
Kabel HDMI
Domácí kino
English - 30
BN68-01528A-00Cze_0312.indd 32 2008-4-21 15:32:23

Česky -
Nastavení systému Anynet
+
Pro použití funkcí systému Anynet
+
jsou k dispozici následující
nastavení.
Použití funkce Anynet
+
1 Zobrazte nabídku stisknutím tlačítka MENU.
Stisknutím tlačítka ▲ nebo ▼ vyberte možnost Vstup. Potom
stiskněte tlačítko ENTER.
Stisknutím tlačítka ▲ nebo ▼ vyberte možnost Anynet
+
(HDMI-CEC). Potom stiskněte tlačítko ENTER.
Stisknutím tlačítka ▲ nebo ▼ vyberte možnost Nastavení.
Potom stiskněte tlačítko ENTER.
4 Stisknutím tlačítka ▲ nebo ▼ vyberte možnost Anynet
+
(HDMI-CEC). Potom stiskněte tlačítko ENTER.
5 Stisknutím tlačítka ▲ nebo ▼ vyberte položku Zapnuto a pak
stiskněte tlačítko ENTER.
➢
Funkce Anynet
+
(HDMI-CEC) se aktivuje.
➢
Pokud vyberete položku Vypnuto, funkce Anynet
+
(HDMI-CEC)
se deaktivuje.
➢
Když je funkce Anynet
+
(HDMI-CEC) vypnutá, jsou zrušeny
všechny operace související se systémem Anynet
+
.
Automatické vypínání zařízení Anynet
+
povypnutí televizoru
4 Stisknutím tlačítka ▲ nebo ▼ vyberte položku Automatické
vypínání a pak stiskněte tlačítko ENTER.
5 Stisknutím tlačítka ▲ nebo ▼ vyberte položku Ano. Potom
stiskněte tlačítko ENTER.
➢
Funkce Automatické vypnutí se aktivuje.
➢
Pokud vyberete položku Ne, funkce Automatické vypnutí
se zruší.
Výběr ukončíte stisknutím tlačítka EXIT.
➢
Chcete-li používat funkci Anynet
+
, musí být možnost Zvolte
zařízení dálkového ovládání televizoru nastavena na televizor.
➢
Nastavíte-li pro funkci Automatické vypínání hodnotu Ano, při vypnutí televizoru se vypnou i
připojená externí zařízení. Pokud však zařízení nahrává, nesmí být vypnuto.
Vyhledávání a přepínání mezi zařízeními Anynet
+
1 Zobrazte nabídku stisknutím tlačítka MENU.
Stisknutím tlačítka ▲ nebo ▼ vyberte možnost Input. Potom
stiskněte tlačítko ENTER.
Stisknutím tlačítka ▲ nebo ▼ vyberte možnost Anynet
+
(HDMI-CEC). Potom stiskněte tlačítko ENTER.
Stisknutím tlačítka ▲ nebo ▼ vyberte položku Zvolte zařízení
. Potom stiskněte tlačítko ENTER.
4 Stisknutím tlačítka ▲ nebo ▼ vyberte konkrétní zařízení a
stiskněte tlačítko ENTER.
Tím přepnete na zvolené zařízení.
5 Nemůžete-li požadované zařízení nalézt, vyberte stisknutím
tlačítka ▲ nebo ▼ položku Vyhledávání připojených zařízení
a pak stiskněte tlačítko ENTER.
Zobrazí se hlášení
Probíhá konfigurace připojení Anynet+....
Když je hledání zařízení ukončeno, zobrazí se v nabídce
Anynet
+
seznam připojených zařízení.
➢
Přepínání na zvolená zařízení může trvat až 2 minuty.
Probíhající operaci přepínání nelze zrušit.
➢
Čas potřebný k vyhledání zařízení závisí na počtu připojených
zařízení.
➢
Po ukončení vyhledávání zařízení se nezobrazí počet nalezených zařízení.
➢
Ačkoliv televizor po zapnutí pomocí tlačítka POWER automaticky vyhledává zařízení, nemusí se
některá zařízení za určitých okolností v seznamu zobrazit, stejně jako zařízení připojená po zapnutí
televizoru. Chcete-li vyhledat zařízení, vyberte proto nabídku Vyhledávání připojených zařízení.
➢
Pokud jste stisknutím tlačítka SOURCE zvolili režim externího vstupu, nemůžete používat funkci
Anynet
+
. Přepnutí na zařízení Anynet
+
lze uskutečnit pomocí tlačítka TOOLS.
Nastavení
Anynet
+
(HDMI-CEC)
: Off
Automatické vypnutí : Off
Vyhledávání připojených zařízení
Zadat Zpět
Posunutí
Vypnuto
Zapnuto
Zadat
Posunutí
Zobrazení TV
Zvolte zařízení
Nahrávat
Nabídka na zařízení
Provoz zařízení
Přijímač :Vypnuto
Nastavení
TV P 1
Zpět
Zadat
Posunutí
Zobrazení TV
Zvolte zařízení
Nahrávat
Nabídka na zařízení
Provoz zařízení
Přijímač :Vypnuto
Nastavení
TV P 1
Zpět
DVDR1
DVDR
DVD1
DVD
Nastavení
Anynet
+
(HDMI-CEC)
: Zapnuto
Automatické vypnutí :
: Off
Vyhledávání připojených zařízení
Zadat Zpět
Posunutí
Ne
Ano
Setup
Anynet
+
(HDMI-CEC)
: Zapnuto
Auto Turn Off
: Ano
Vyhledávání připojených zařízení
Zadat Zpět
Posunutí
BN68-01528A-00Cze_0312.indd 33 2008-4-21 15:32:24

Česky - 4
Nabídka Anynet+
Nabídka Anynet
+
se mění v závislosti na typu a stavu zařízení Anynet
+
připojených k televizoru.
Nabídka Anynet
+
Popis
Zobrazení TV
Přepíná z libovolného zařízení Anynet
+
do režimu televizního
vysílání.
Zvolte zařízení Televizor se propojí s odpovídajícím zařízením.
Nahrávat Spustí nahrávání. (Tato nabídka platí pouze pro zařízení podporující
nahrávání.)
Nabídka na zařízení Zobrazuje nabídku připojeného zařízení.
Příklad: Když je připojen DVD rekordér, zobrazí se úvodní nabídka
DVD rekordéru.
Provoz zařízení Zobrazuje nabídku pro ovládání přehrávání připojeného zařízení.
Příklad: Když je připojen DVD rekordér, zobrazí se nabídka pro
ovládání přehrávání DVD rekordéru.
Přijímač Výstup zvuku bude zajišťován přes přijímač.
Nastavení
Můžete nastavit prostředí pro používání systému Anynet+.
+
.
Tlačítka dálkového ovládání televizoru použitelná v režimu Anynet
+
Typ zařízení Provozní stav Použitelná tlačítka
Zařízení Anynet
+
Po přepnutí na zařízení, když je
na obrazovce zobrazena nabídka
odpovídajícího zařízení.
Číselná tlačítka
Tlačítka ▲/▼/◄/►/ENTER
Barevná tlačítka
Tlačítko EXIT
Po přepnutí na zařízení, je-li
přehráván soubor
W.LINK
(Zpětné vyhledávání)
W.LINK
(Dopředné vyhledávání)
W.LINK
(Stop)
W.LINK
W.LINK
(Přehrát/Pozastavit)
Zařízení s vestavěným tunerem
Po přepnutí na zařízení, když
sledujete televizní program
Tlačítko P /
Audio zařízení Když je aktivován přijímač
Tlačítko
W.LINK
/
W.LINK
Tlačítko MUTE
➢
Funkci Anynet
+
lze použít pouze v případě, že je dálkové ovládání nastaveno na televizor.
➢
Tlačítko REC je funkční pouze ve stavu nahrávání.
➢
Zařízení Anynet
+
nelze ovládat tlačítky na boční straně televizoru. Zařízení Anynet
+
můžete ovládat
pouze dálkovým ovládáním televizoru.
➢
Za určitých podmínek nemusí být dálkové ovládání televizoru funkční. V takovém případě vyberte
znovu zařízení Anynet
+
.
➢
Funkce systému Anynet
+
nelze použít pro výrobky od jiných výrobců.
➢
V režimu Anynet
+
nemusí náležitě fungovat barevná tlačítka.
➢
Operace prováděné tlačítky
W.LINK
,
W.LINK
se mohou u jednotlivých zařízení lišit.
Nahrávání
Pomocí rekordéru můžete nahrávat televizní program.
Stiskněte tlačítko REC.
Spustí se nahrávání. (Pouze když je připojeno aktivované nahrávací zařízení Anynet
+
.)
➢
Aktuální televizní program je nahráván ve stavu sledování televizoru. Pokud sledujete videonahrávku
z jiného zařízení, nahraje se obraz z tohoto zařízení.
➢
Datový tok zdroje lze nahrávat také zvolením možnosti Nahrávání po stisknutí tlačítka TOOLS.
➢
Před zahájením nahrávání zkontrolujte, zda je konektor antény správně připojen k nahrávacímu
zařízení.
Informace o připojení antény k nahrávacímu zařízení naleznete v příslušné uživatelské příručce.
BN68-01528A-00Cze_0312.indd 34 2008-4-21 15:32:25

Česky - 5
Poslech prostřednictvím přijímače
Zvuk můžete poslouchat místo z reproduktoru televizoru prostřednictvím
přijímače.
1 Zobrazte nabídku stisknutím tlačítka MENU.
Stisknutím tlačítka ▲ nebo ▼ vyberte možnost Vstup. Potom stiskněte
tlačítko ENTER.
Stisknutím tlačítka ▲ nebo ▼ vyberte možnost Anynet
+
(HDMI-CEC). Potom
stiskněte tlačítko ENTER.
Stisknutím tlačítka ▲ nebo ▼ vyberte položku Přijímač. Potom stiskněte
tlačítko ENTER.
4 Stisknutím tlačítka ◄ nebo ► vyberte položku Zapnuto a pak stiskněte
tlačítko ENTER.
Nyní můžete poslouchat zvuk prostřednictvím přijímače.
5 Stisknutím tlačítka EXIT ukončete výběr.
➢
Pokud je pro přijímač nastavena hodnota On (Zapnuto), můžete poslouchat zvuk z televizoru
prostřednictvím dvoukanálového přijímače.
➢
Pokud je přijímač určen výhradně pro domácí kino (podporuje pouze zvuk), nemusí se objevit v seznamu zařízení.
➢
V případě problému s autorskými právy k obsahu nemusí poslech prostřednictvím přijímače řádně fungovat.
➢
Při poslechu prostřednictvím přijímače je používání nabídky související s funkcí PIP a se zvukem omezeno.
Kontrolní úkony před vyžádáním servisu
Příznak Řešení
Systém Anynet
+
není
funkční.
■ Zkontrolujte, zda se jedná o zařízení Anynet
+
. Systém Anynet
+
podporuje pouze zařízení Anynet
+
.
■ Připojte pouze jeden přijímač.
■ Zkontrolujte, zda je napájecí kabel zařízení Anynet
+
správně připojen.
■
Zkontrolujte připojení video/audio/HDMI kabelu zařízení Anynet
+
.
■ Zkontrolujte, zda je možnost Anynet+ (HDMI-CEC) v nabídce
nastavení Anynet
+
nastavena na hodnotu On (Zapnuto).
■ Zkontrolujte, zda je dálkové ovládání televizoru v režimu TV.
■ Zkontrolujte, zda se nejedná o zařízení Anynet
+
bez dálkového ovládání.
■ Zařízení Anynet
+
nefunguje za určitých podmínek. (Vyhledávání kanálů)
■ Při připojování nebo odpojování kabelu HDMI proveďte znovu
vyhledávání zařízení anebo restartujte televizor.
■ Zkontrolujte, zda je funkce Anynet
+
zařízení Anynet
+
nastavena
na hodnotu zapnuto.
Chci spustit systém
Anynet
+
.
■ Zkontrolujte, zda je zařízení Anynet
+
správně připojeno k televizoru
a zda je položka Anynet
+
(HDMI-CEC) v nabídce Setup (Nastavení)
systému Anynet
+
nastavena na hodnotu On (Zapnuto).
■ Stisknutím tlačítka TV na dálkovém ovládání televizoru přepněte
ovládání na televizor. Poté stisknutím tlačítka TOOLS zobrazte
nabídku Anynet
+
a vyberte požadovanou podnabídku.
Chci ukončit systém
Anynet
+
.
■ Vyberte možnost Zobrazení TV v nabídce Anynet
+
.
■ Stiskněte tlačítko SOURCE na dálkovém ovládání televizoru a
zvolte jiné zařízení než Anynet
+
.
■ Stisknutím libovolného z tlačítek P, CH LIST a PRE-CH přepněte
dorežimu TV. (Tlačítko pro výběr kanálu je funkční pouze v případě,
že není připojeno zařízení Anynet
+
s vestavěným tunerem.)
Na obrazovce se zobrazí
zpráva Connecting
to Anynet
+
device…
(Připojování k zařízení
Anynet +).
■ Dálkové ovládání nelze použít při konfiguraci systému Anynet+
nebo přepínání do režimu zobrazení.
■ Dálkové ovládání použijte po dokončení nastavení systému
Anynet
+
anebo po dokončení přechodu do režimu zobrazení.
Zařízení Anynet
+
nepřehrává.
■ Pokud probíhá funkce Plug & Play, nelze použít funkci pro přehrávání.
Připojené zařízení není
zobrazeno.
■ Zkontrolujte, zda zařízení podporuje nebo nepodporuje funkce
systému Anynet+.
■ Zkontrolujte, zda je nebo není kabel HDMI řádně připojen.
■ Zkontrolujte, zda je v nabídce Setup (Nastavení) nabídky Anynet
+
nastavena položka Anynet
+
(HDMI-CEC) na hodnotu On (Zapnuto).
■ Znovu vyhledejte zařízení Anynet
+
.
■ Zařízení Anynet
+
lze připojit pouze pomocí kabelu HDMI. Některé
kabely HDMI nemusí podporovat funkce zařízení
+
.
Nelze nahrát televizní
program.
■ Zkontrolujte, zda je správně připojena zdířka antény na
nahrávacím zařízení.
Zadat
Posunutí
Zobrazení TV
Zvolte zařízení
Nahrávat
Nabídka na zařízení
Provoz zařízení
Přijímač :Zapnuto
Nastavení
TV P 1
Konec
BN68-01528A-00Cze_0312.indd 35 2008-4-21 15:32:25

Česky -
Funkce teletextu (v závislosti na modelu)
Většina televizních stanic poskytuje prostřednictvím teletextu psané informace. Informace o
používání této služby najdete na indexové stránce teletextu. Pomocí tlačítek na dálkovém ovladači
můžete navíc vybrat různé volby, které vyhovují vašim požadavkům.
☛ Má-li se teletext zobrazit správně, musí být příjem kanálu stabilní. Jinak mohou některé informace
chybět, případně se některé stránky nemusí zobrazit vůbec.
1
TV
Vypnutí zobrazení teletextu (v závislosti na modelu)
2
(uložení)
Slouží k uložení stránek teletextu.
3
(velikost)
Stisknutím zobrazíte v horní polovině obrazovky dvakrát
zvětšený text. Pro dolní část obrazovky opakujte stisknutí.
Dalším stisknutím zobrazíte normální obrazovku.
4
(zobrazit)
Slouží k zobrazení skrytého textu (například odpovědi na
otázku kvizu). Chcete-li zobrazit normální obrazovku, stiskněte
znovu toto tlačítko.
5
Barevná tlačítka (červené/zelené/žluté/modré)
Pokud vysílací společnost používá systém FASTEXT, mají
různá témata na stránce teletextu barevné kódy. Výběr lze
provádět stisknutím barevných tlačítek. Podle požadovaného
tématu stiskněte příslušné tlačítko. Zobrazí se daná stránka
s dalšími barevnými odkazy, které lze vybírat stejným
způsobem.Chcete-li zobrazit předchozí nebo další stránku,
stiskněte odpovídající barevné tlačítko.
6
(teletext zapnutý/mix)
Stisknutím zapnete režim teletextu po výběru kanálu, který
poskytuje službu teletext. Po dalším stisknutí se teletext bude
zobrazovat přes vysílaný obraz.
7
(režim)
Stisknutím vyberete režim teletextu (SEZNAM/FLOF).Pokud
je stisknete v režimu seznamu, přepne se do režimu uložení
seznamu.V režimu uložení seznamu můžete stránku teletextu
uložit do seznamu pomocí tlačítka (uložit).
8
(podstránka)
Slouží k zobrazení dostupné podstránky.
9
(další stránka)
Slouží k zobrazení další stránky teletextu.
0
(předchozí stránka)
Slouží k zobrazení předchozí stránky teletextu.
!
(rejstřík)
Slouží k zobrazení rejstříku teletextu (obsahu) kdykoli během
prohlížení teletextu.
@
(podržení)
Slouží k podržení zobrazení dané stránky, která je propojena
s několika sekundárními stránkami, které automaticky
následují. Dalším stisknutím se funkce podržení vypne.
#
(zrušit)
Používá se k zobrazení vysílání při vyhledávání stránky.
➢
Mezi stránkami teletextu můžete procházet stisknutím
číselných tlačítek na dálkovém ovladači.
Pokračování...
BN68-01528A-00Cze_0312.indd 36 2008-4-21 15:32:28

Česky -
Teletextové stránky jsou uspořádány na základě šesti kategorií:
Část Obsah
A
B
C
D
E
F
Číslo vybrané stránky
Označení vysílacího kanálu
Číslo aktuální stránky nebo označení
vyhledávání
Datum a čas
Text
Informace o stavu
Informace FASTEXT
➢
Informace teletextu jsou často rozděleny na několik stránek,
které se zobrazují postupně. Stránku lze zobrazit:
zadáním čísla stránky,
výběrem názvu ze seznamu,
výběrem barevného záhlaví (systém FASTEXT).
➢
Stisknutím tlačítka TV vypnete zobrazení teletextu.
BN68-01528A-00Cze_0312.indd 37 2008-4-21 15:32:28

Česky -
Specifikace sady pro upevnění na zeď (VESA)
Sadu pro upevnění na zeď instalujte na pevnou zeď kolmou k podlaze.
Při montáži do jiných stavebních materiálů se obraťte na nejbližšího zástupce.
Pokud je sada namontována na strop nebo šikmou zeď, může dojít k jejímu uvolnění a pádu, což
může vést ke vzniku závažných poranění osob.
Produktová řada palce Spec. VESA (A
*
B) Standardní šroub Množství
LCD-TV
23 ~ 26 200
*
100 M4
4
32 ~ 40 200
*
200 M6
46 ~ 52
400
*
400
600
*
400
M8
57
700
*
400
(Bez specifikací VESA)
57 ~ 70 800
*
400
80 ~ 1400
*
800
PDP-TV
42 ~ 58
400
*
400
600
*
400
M8
4
63
676
*
407
(Bez specifikací VESA)
6
63~70 800
*
400 4
80 ~ 1400
*
800 4
➢
Poskytujeme standardní rozměry sad pro montáž na zeď, uvedené v tabulce výše.
➢
Pokud si zakoupíte naši sadu pro montáž na zeď, je s ní dodáván také podrobný návod k instalaci a
všechny nezbytné součásti.
➢
Nepoužívejte delší šrouby než standardního rozměru, mohlo by dojít k poškození vnitřní části
televizoru.
➢
V případě nástěnných sad, které neodpovídají specifikacím pro šrouby VESA, se může délka šroubů
lišit v závislosti na jejich specifikacích.
➢
Nepoužívejte šrouby, které neodpovídají standardním specifikacím pro šrouby VESA.
Vyvarujte se příliš silného utažení šroubů. Tento postup by mohl způsobit poškození produktu nebo
vést ke zranění osob způsobeným pádem produktu. Společnost Samsung není zodpovědná za tyto
nehody.
➢
Pokud je použita nástěnná sada nespecifikovaná nebo neodpovídající specifikacím VESA nebo
pokud spotřebitel nepostupoval podle pokynů k instalaci výrobku, společnost Samsung nepřebírá
odpovědnost za poškození produktu nebo zranění osob.
➢
Námi dodávané modely 57” a 63” neodpovídají specifikacím VESA. Proto byste u tohoto modelu měli
použít naši speciální sadu pro montáž na zeď.
➢
Při montáži tohoto televizoru nepřekračujte úhel náklonu 15 stupňů.
Sadu pro upevnění na zeď neinstalujte, když je televizor zapnutý.
Mohlo by dojít ke zranění osob elektrickým proudem.
BN68-01528A-00Cze_0312.indd 38 2008-4-21 15:32:29

Česky -
Vstup do nabídky
1
Stiskněte tlačítko ▲, ▼, ◄ nebo ► na dálkovém ovladači.
➢
Zobrazí se obrazovka Nastavení upevnění na zeď (Wall
Mount Adjustment).
➢
Pokud se obrazovka Nastavení upevnění na zeď (Wall
Mount Adjustment) nezobrazí po klepnutí na směrové
tlačítko při sledování televizoru, použijte k zobrazení
obrazovky nabídku.
• Nabídku zobrazíte stisknutím tlačítka
MENU. Stisknutím
tlačítka ▲ nebo ▼ vyberte možnost Nastavení a pak
stiskněte tlačítko ENTER.
• Pomocí tlačítka ▲ nebo ▼ vyberte možnost
Montáž na
stěnu a pak stiskněte tlačítko ENTER.
Zapamatování pozice
Nastavte požadovanou pozici pomocí tlačítek ▲, ▼, ◄, ►.
➢
Stisknete-li tlačítko se šipkou, pokud nejsou na
obrazovce zobrazeny žádné možnosti, zobrazí se
obrazovka Nastavení (Adjustment).
➢
Obrazovku obnovíte stisknutím tlačítka INFO. Stisknutím
tlačítka ◄ nebo ► vyberte možnost Ano a pak stiskněte
tlačítko ENTER. Pozice bude vrácena do výchozího
nastavení.
Stiskněte modré tlačítko
Stisknutím tlačítek ▲ a ▼ uložíte aktuální pozici výběrem
režimu uložení Pozice1, Pozice nebo Pozice.
➢
Pokud nechcete aktuální pozici uložit, stiskněte tlačítko
RETURN.
➢
Při výběru režimu uložení nelze použít barevná tlačítka.
4
Stisknutím tlačítka ENTER pozici uložte.
➢
Po výběru možnosti Poloha1 se zobrazí zpráva Aktuální
pozice uložena jako Pozice1.
5
Stiskněte tlačítko ENTER.
➢
Uložená pozice se zobrazí na levé straně nabídky na
obrazovce (OSD).
Montáž na stěnu (prodáváno samostatně)
Po instalaci motorizovaného držáku pro upevnění na zeď lze televizor snadno nastavit.
Zadní panel
Montáž na stěnu
Sériový kabel (1P – 1P) (není součástí dodávky)
Posunutí
Zadat
Zpět
Plug & Play
Jazyk : Čeština
Čas
Světelný efekt
: TV zapnuta
Montáž na stěnu
Melodie : Vypnuto
Zábava : Kino
Úspora energie : Vypnuto
PIP
Nastavení
T V
TV
CH LIST SRS
P.MODE HDMI
Uložit
Zpět
Posunutí
Zadat
Zvolte režim uložení.
Poloha 1
Poloha 2
Poloha 3
Montáž na stěnu
Nastavení
Uložit Středový
►
►
►
►
►
►
►
►
321Pozice
BN68-01528A-00Cze_0312.indd 39 2008-4-21 15:32:30

Česky - 40
Posunutí do zapamatované pozice
1 Proveďte Krok 1 v části
Vstup do nabídky.
Stisknutím barevných tlačítek (červeného, zeleného, žlutého)
posunete motorizovaný držák pro upevnění na zeď do uložené
pozice.
➢
Držák pro upevnění na zeď můžete posunout do jedné ze
tří přednastavených pozic stisknutím červeného (Poloha 1)
,
zeleného (Poloha 2) nebo žlutého (Poloha 3) tlačítka.
➢
Pokud pozici po posunutí do přednastavené pozice změníte,
zobrazení pozice zmizí.
➢
Informace o instalaci najdete v instalační příručce dodávané s
držákem pro upevnění na zeď.
➢
Při instalaci produktu a instalaci a posunutí držáku pro upevnění
na zeď je třeba požádat o radu specializovanou instalační
společnost.
➢
Při montáži upevnění na zeď použijte tuto instalační příručku. Při
montáži do jiných stavebních materiálů se obraťte na nejbližšího
prodejce.
➢
Motorizovaný držák pro upevnění na zeď nebude funkční, je-li
zapnuta funkce Anynet+.
➢
42 palcový model není kompatibilní se starším modelem držáku
na zeď (WMN5090A).
Montáž podstavce (podle modelu)
Pomocí 4 šroubů pro upevnění základny stojanu a monitoru
pevně připojte monitor k základně stojanu.
(Vnější vzhled vašeho přístroje se může oproti obrázku lišit).
V případě montáže televizoru na zeď
zavřete kryt (1) na části pro připojení
základny stojanu a připevněte jej
pomocí dvou šroubů. Tím tuto část
skryjete.
Varování
Před přesouváním televizoru k němu
stojan pevně připojte, jinak by mohl
spadnout
a způsobit vážné poranění.
➢
Televizor by měly přenášet
nejméně dvě osoby. Televizor
nikdy nepokládejte na podlahu
kvůli možného poškození
obrazovky.
Televizor ukládejte vždy postavený
nastojato.
Montáž na stěnu
Nastavení
Uložit Středový
►
►
►
►
►
►
►
►
321Pozice
Pozice 1
Upozornění
BN68-01528A-00Cze_0312.indd 40 2008-4-21 15:32:33

Česky - 41
Připevnění televizoru ke zdi
Posunovaní nebo tažení televizoru nebo lezení na něj může způsobit jeho pád. Zejména
dbejte na to, aby se na televizor nezavěšovaly a ani ho jinak nedestabilizovaly děti. Mohlo
by dojít k převrhnutí televizoru a vážným nebo i smrtelným zraněním. Dodržujte všechna
bezpečnostní opatření uvedená na dodaném bezpečnostním letáku. Pro zvýšení stability
namontujte z bezpečnostních důvodů následující opatření zabraňující pádu televizoru.
Postup pro zamezení pádu televizoru:
1. Vložte šrouby do svorek a pevně je připevněte ke zdi.
Zkontrolujte, zda jsou šrouby namontovány opravdu pevně.
V závislosti na typu zdi je možné, že budete potřeboval
další materiál, například hmoždinky.
Svorky, šrouby a lanko, které budete potřebovat, nejsou
součástí dodávky a je nutné je zakoupit samostatně.
. Ze středu zadní části televizoru vyjměte šrouby, vložte šrouby
do svorek a připevněte je zpět k televizoru.
Šrouby nemusí být dodány spolu s výrobkem. V takovém
případě zakupte šrouby s následující specikací:
. Pomocí silného lanka propojte svorky připevněné k
televizoru a svorky připevněné ke zdi a poté lanko pevně
zavažte.
Televizor namontujte v blízkosti zdi, aby nemohl spadnout
směrem dozadu.
Svorky je možné a bezpečné spojit takovým způsobem,
že svorky připevněné ke zdi jsou ve stejné nebo nižší
výšce než svorky připevněné k televizoru.
Chcete-li televizor přesunout, rozvažte lanko.
4. Zkontrolujte, zda jsou všechna připevnění dostatečně
zajištěna. Pravidelně kontrolujte, zda připevnění
nevykazují únavu nebo poškození materiálu. Máte-li
jakékoli pochybnosti o bezpečnosti připevnění svého
televizoru, obraťte se na kvalikovaného montážního pracovníka.
➣
➣
➣
➣
➣
➣
Zeď
Zeď
Upozornění
BN68-01528A-00Cze_0312.indd 41 2008-4-21 15:32:34

Česky - 4
Odstraňování problémů
Než se obrátíte na poprodejní servis společnosti Samsung, proveďte následující jednoduché
kontroly.
Pokud závadu nelze odstranit podle pokynů uvedených níže, poznamenejte si model a sériové
číslo televizoru a obraťte se na prodejce.
Žádný zvuk nebo obraz
Zkontrolujte, zda je napájecí kabel připojen do síťové zásuvky.
Zkontrolujte, zda jste stiskli tlačítko (Napájení) (Zapnuto/Vypnuto) na předním panelu nebo tlačítko
POWER na dálkovém ovladači.
Zkontrolujte nastavení kontrastu a jasu obrazu.
Zkontrolujte hlasitost.
Zkontrolujte, zda není Reproduktoru TV (Reproduktor TV) Vypnuto.
Normální obraz, ale žádný zvuk
Zkontrolujte hlasitost.
Zkontrolujte, zda nebylo stisknuto tlačítko MUTE na dálkovém ovladači.
Žádný obraz nebo černobílý obraz
Upravte nastavení barev.
Zkontrolujte, zda je vybraný systém vysílání správný.
Rušení zvuku nebo obrazu
Zkuste zjistit elektrické zařízení, které ruší televizor, a pak je přesuňte dále od televizoru.
Zapojte televizor do jiné zásuvky.
Rozmazaný nebo „zasněžený“ obraz, zkreslený zvuk
Zkontrolujte směr, umístění a připojení antény.
K tomuto rušení často dochází při použití pokojové antény.
Chybné fungování dálkového ovladače
Vyměňte baterie dálkového ovladače.
Očistěte horní okraj dálkového ovladače (přenosové okénko).
Zkontrolujte, zda jsou póly baterií „+“ a „-“ orientovány správně.
Zkontrolujte, zda nejsou baterie vyčerpané.
Obrazovka je černá a kontrolka napájení bliká
U počítače zkontrolujte napájení a kabel signálu.
Televizor využívá vlastní systém řízení spotřeby.
Pohněte myší počítače nebo stiskněte libovolnou klávesu na klávesnici.
U zařízení (STB, DVD atd.) zkontrolujte napájení a kabel signálu.
Televizor využívá vlastní systém řízení spotřeby.
Stiskněte tlačítko Source na panelu nebo dálkovém ovladači.
Vypněte a znovu zapněte televizor.
Poškozený obrázek se zobrazí v rohu obrazovky.
Pokud je v některých externích zařízeních vybrána možnost Pouze skenování, může se poškozený
obrázek zobrazit v rohu obrazovky. Tento příznak je způsoben externími zařízeními, nikoli
televizorem.
Zobrazí se zpráva Obnoví všechny hodnoty výchozích nastavení.
Tato zpráva se zobrazí, pokud stisknete a podržíte tlačítko EXIT. Budou obnoveny výchozí hodnoty
výrobku z výroby.
BN68-01528A-00Cze_0312.indd 42 2008-4-21 15:32:34

Česky - 4
Specifikace
Popisy a parametry uváděné v této brožuře jsou pouze informativní a mohou se změnit bez
předchozího upozornění.
Název modelu
PS50A40
Velikost obrazovky (úhlopříčka)
50 palců
Rozlišení počítače
1360 x 768 @ 60 Hz
Zvuk (výstup)
10 W + 10 W
Rozměry (š × v × h)
Skříň
S podstavcem
1290 x 740 x 95 mm
1290 x 804 x 319 mm
Hmotnost
Skříň
S podstavcem
39 Kg
41 Kg
Údaje týkající se prostředí
Provozní teplota
Provozní vlhkost
Skladovací teplota
Skladovací vlhkost
10 °C až 40 °C
10 % až 80 %, bez kondenzace
-20 °C až 45 °C
5 % až 95 %, bez kondenzace
➢
Tento výrobek je digitálním zařízením třídy B.
Provedení a specifikace mohou být změněny bez předchozího upozornění.
Údaje o napájení a spotřebě energie lze nalézt na štítku výrobku.
BN68-01528A-00Cze_0312.indd 43 2008-4-21 15:32:34

Správná likvidace tohoto produktu
(Zničení Elektrického a Elektronického Zařízení)
Tato značka zobrazená na produktu nebo v dokumentaci znamená,
že by neměl být používán s jinými domácími zařízeními po skončení
svého funkčního období. Aby se zabránilo možnému znečištění
životního prostředí nebo zranění člověka díky nekontrolovanému
zničení, oddělte je prosíme od dalších typů odpadů a recyklujte je
zodpovědně k podpoře opětovného využití hmotných zdrojů.
Členové domácnosti by měli kontaktovat jak prodejce, u něhož produkt
zakoupili, tak místní vládní kancelář, ohledně podrobností, kde a
jak můžete tento výrobek bezpečně vzhledem k životnímu prostředí
recyklovat.
Obchodníci by měli kontaktovat své dodavatele a zkontrolovat
všechny podmínky koupě. Tento výrobek by se neměl míchat s jinými
komerčními produkty, určenými k likvidaci.
BN68-01528A-00Cze_0312.indd 44 2008-4-21 15:32:34

Slovensky - 2
Pokyny pre používateľa
Retencia obrazu na obrazovke
Nenechajte statické obrázky (ako napr. v hrách alebo pri pripájaní PC k tomuto PZP) zobrazené na
plazmovom paneli dlhšie ako 2 hodiny, pretože by to mohlo spôsobiť retenciu obrazu na obrazovke.
Retencia obrazu je známa aj ako „vypálenie obrazovky“. Aby ste zabránili takejto retencii obrazu, pri
zobrazovaní statických obrázkov znížte stupeň jasu a kontrastu obrazovky.
Výška
PZP môžete normálne používať len vo výške pod 2000 m. Na miestach vyšších ako 2000 m nemusí
prístroj fungovať správne, preto ho na takýchto miestach neinštalujte a ani neprevádzkujte.
Teplo na vrchu PZP televízora
Po dlhšom čase používania môže byť vrchná strana prístroja horúca. Je to spôsobené únikom tepla
panelu cez odvetrávacie otvory na vrchnej časti prístroja. Je to normálne a neznačí to žiadnu poruchu
alebo chybnú prevádzku prístroja. Deťom by ste ale mali zabrániť dotýkať sa vrchnej časti prístroja.
Prístroj vydáva „praskajúci“ zvuk.
„Praskajúci“ zvuk môže vznikať pri rozťahovaní alebo sťahovaní prístroja, ktoré je spôsobené
zmenou okolitého prostredia, napr. zmena teploty alebo vlhkosti. Toto je bežné, nie je to chyba vo
vašom zariadení.
Poruchy políčok
PZP používa panel, ktorý pozostáva z 1 230 000 (úroveň SD) až 3 150 000 (úroveň HD) pixelov,
ktoré si vyžadujú na svoju výrobu komplikovanú technológiu. Preto sa môže na obrazovke vyskytnúť
pár svetlých alebo tmavých pixelov. Tieto pixely nemajú žiadny vplyv na výkon prístroja.
Zabráňte prevádzke TV pri teplotách nižších ako 5°C (41°F)
Príliš dlho zobrazené statické obrázky môžu spôsobiť poškodenie PZP panelu.
Sledovanie PZP TV vo formáte 4:3 po dlhšiu dobu môže zanechať vľavo, vpravo
a v strede obrazovky stopy po okrajoch, spôsobené rozdielnym vyžarovaním
svetla na obrazovke. Prehrávanie DVD alebo hranie hier môže na obrazovke
spôsobiť podobný efekt. Poškodenia, spôsobené vyššie uvedeným efektom, nie
sú chránené zárukou.
Pretrvávajúci obraz na obrazovke.
Zobrazenie statických obrázkov z videohier a PC dlhšie ako určitý čas, môže vytvárať čiastočné
pretrvávajúce obrazy. Aby ste predišli takémuto efektu, počas zobrazenia statických obrázkov znížte
„jas“ a „kontrast“.
Záruka
- Záruka nepokrýva poškodenia spôsobené retenciou obrazu.
- Vypálenie nie je chránené zárukou.
Inštalácia
Pri inštalácii zariadenia na miestach s vysokou prašnosťou, vysokou alebo nízkou teplotou, vysokou
vlhkosťou, chemickými látkami a na miestach s nepretržitou prevádzkou, ako napr. letiská, vlakové
stanice atď., vždy kontaktujte autorizované servisné stredisko. Ak tak neurobíte, môže to spôsobiť
vážne poškodenie vášho zariadenia.
Kontaktujte spoločnosť SAMSUNG Z CELÉHO SVETA
Ak máte akékoľvek otázky alebo komentáre týkajúce sa produktov značky Samsung, kontaktujte stredisko
starostlivosti o zákazníkov spoločnosti SAMSUNG. (Ďalšie informácie nájdete na zadnej strane.)
© 2008 Samsung Electronics Co., Ltd. All rights reserved.
BN68-01528A-00Slk.indd 2 2008-4-21 15:26:33

Slovensky - 3
Symboly
☛ ➢
Stlačte
Dôležité
Poznámka
Obsah
Všeobecné informácie
Pokyny pre používateľa .................................. 2
Kontrola dielov ................................................ 4
Používanie stojana .......................................... 4
Ovládací panel ................................................ 5
Pripojovací panel ............................................
6
Zobrazenie diaľkového ovládania ................... 8
Prevádzka
Zapnutie a vypnutie televízora ........................ 9
Prezeranie ponúk ............................................ 9
Funkcia Plug & Play ...................................... 10
Používanie tlačidla TOOLS ........................... 12
Zobrazenie externých zdrojov signálu .......... 12
Úprava názvov zariadení .............................. 13
Ovládanie kanálov
Automatické ukladanie kanálov .................... 13
Manuálne ukladanie kanálov ........................ 14
Pridávanie/uzamknutie kanálov .................... 15
Zoradenie uložených kanálov ....................... 16
Priradenie názvov kanálov ............................ 16
Vylaďovanie príjmu kanálu ............................ 17
Ovládanie obrazu
Zmena obrazovej normy ............................... 18
Prispôsobenie nastavení obrazu ................... 18
Kongurácia podrobných nastavení obrazu .. 19
Možnosti obrazu
(Možnosti obrazu) .............. 20
Používanie 3D funkcie ..................................
22
Obnovenie nastavení obrazu na pôvodné
nastavenia od výroby .................................... 24
Ovládanie zvuku
Funkcie zvuku ............................................... 25
Výber režimu zvuku
(v závislosti od modelu) ................................26
Pripojenie slúchadiel
(Predávajú sa samostatne) ........................... 26
Popis funkcií
Funkcie času ................................................. 27
Jazyk/Melódia/Svetelný efekt/Zábava/Úspora
energie/Obraz v obraze ................................
28
Počítačové zobrazenie
Nastavenie softvéru PC (Založené na
operačnom systéme Windows XP) ............... 29
Režim vstupu (PC) ........................................ 30
Nastavenie počítača ..................................... 31
Informácie o Anynet+
Čo je systém Anynet+? .................................
32
Pripojenie zariadení systému Anynet+ ..........
32
Nastavenie systému Anynet+
........................ 33
Vyhľadávanie a prepínanie medzi
zariadeniami so systémom Anynet+ .............
33
Nahrávanie .................................................... 34
Počúvanie cez prijímač .................................
35
Body, ktoré je potrebné skontrolovať pred
požadovaním servisu .................................... 35
Príloha
Funkcia teletextu
(v závislosti od modelu) .... 36
Technické údaje súpravy upevňovacej
konzoly (VESA) ............................................. 38
Montáž na stenu (Predáva sa samostatne) ..
39
Zloženie stojana (v závislosti od modelu) ..... 40
Zabezpečenie TV k stene .............................
41
Riešenie problémov ...................................... 42
Technické údaje ............................................ 43
Slovensky
BN68-01528A-00Slk.indd 3 2008-4-21 15:26:33

Slovensky - 4
Kontrola dielov
Používateľská príručka Diaľkové ovládanie/
Batérie typu AAA
Sieťový kábel Čistá handrička
Záručný list/
Manuál sprievodcu
bezpečnosťou
(Nie je všade dostupné)
Spodná strana krytu/
skrutky (2ea)
(Obráťte sa na stranu 40)
Feritové jadro pre
sieťový kábel
Feritové jadro pre S-Video
Predávané samostatne
Anténny kábel Komponentné káble Kábel PC Zvukové káble
Kábel Scart Kábel PC zvuku Kábel HDMI Kábel HDMI/DVI
➢
Feritové jadro (Napájací kábel, S-Video)
Feritové jadrá sa používajú, aby chránili káble pred rušením. Keď
pripojíte kábel, otvorte feritové jadro a zacvaknite ho okolo kábla v
blízkosti konektora.
Používanie stojana
➢ PZP by mali niesť dve alebo viac
osôb. Nikdy neukladajte PZP na
podlahu, pretože by to mohlo
spôsobiť poškodenie obrazovky.
Vždy uchovávajte kolmo.
PDP sa môže vytočiť o 20 stupňov
doprava a doľava.
-20° ~ 20°
BN68-01528A-00Slk.indd 4 2008-4-21 15:26:36

Slovensky - 5
Ovládací panel
1
SOURCE
Zobrazí ponuku všetkých dostupných vstupných
zdrojov
(TV, Ext.1, Ext.2, add AV, S-Video,
Komponent, PC, HDMI1, HDM2, HDMI3).
➢
V ponuke na obrazovke použite toto
tlačidlo rovnako, ako tlačidlo ENTER na
diaľkovom ovládaní.
2
MENU
Stlačte, aby sa na obrazovke zobrazila ponuka
s funkciami televízora.
3
– +
Stlačte na zvýšenie alebozníženie hlasitosti.
V ponuke na obrazovke použite tlačidlá
– + tak, ako používate tlačidlá◄ a ► na
diaľkovom ovládaní.
4
C/P.
Stlačte na zmenu kanálov. V ponuke na
obrazovke použite tlačidlá C/P. tak,
ako používate tlačidlá ▲ a▼ na diaľkovom
ovládaní.
5
Indikátor napájania
Zabliká a vypne sa, keď je napájanie zapnuté
a rozsvieti sa v pohotovostnom režime.
6
Tlačidlo (Power - Napájanie)
Stlačte na zapnutie a vypnutie televízora.
7
Snímač diaľkového ovládania
Diaľkový ovládač nastavte smerom na tento
bod na TV.
8
Reproduktor
➢
Farba a tvar produktu sa môže odlišovať v závislosti od modelu.
Predný (alebo bočný) panel
BN68-01528A-00Slk.indd 5 2008-4-21 15:26:37

Slovensky - 6
Pokračovanie...
☛
Pri každom pripojení audio alebo video zariadenia k televízoru skontrolujte, či sú všetky
komponenty vypnuté.
Keď pripájate externé zariadenie, podľa farby pripojte pripojovaciu koncovku ku káblu.
Pripojovací panel
1
KONEKTOR NAPÁJANIA
Pripojte priložený sieťový kábel.
2
COMPONENT IN (KOMPONENTNÝ VSTUP)
Audio (AUDIO L/R) a video (Y/PB/PR) vstupy
pre komponent.
Pripája sa do komponentu digitálneho zvuku.
3
PC IN / AUDIO (PC VSTUP/ZVUK)
Pripojte k výstupnému konektoru videa a
zvuku na PC.
4
EXT 1, EXT 2
Vstupy alebo výstupy pre externé zariadenia,
ako je napríklad videorekordér, DVD, herná
konzola alebo prehrávač videodiskov.
Technické údaje vstupu a výstupu
Konektor
Vstup Výstup
Video Audio (L/R) RGB
Video + Audio (L/R)
EXT 1 ✔ ✔ ✔
Dostupný je len TV
výstup.
EXT 2 ✔ ✔
Výstup si môžete
vybrať.
5
3D SYNC OUT
Pripojte k 3D infračervenému vysielaču
6
Pripojenie externých zvukových zariadení
Prepojte RCA audio signály z televízora
k externému zdroju, ako napríklad audio
vybavenie.
7
SERVICE
− Konektor pre servisné účely.
− Sériový konektor pripojte medzi nástennú
elektrickú konzolu elektrického pohybu, keď
chcete nastaviť zorný uhol TV s použitím
diaľkového ovládania.
Zadný panel
➢
Farba a tvar produktu sa môže odlišovať v závislosti od modelu.
Sieť káblovej
televízie
1
432 6 8
9
7
alebo
alebo
5
BN68-01528A-00Slk.indd 6 2008-4-21 15:26:39

Slovensky - 7
8
HDMI IN 1,2
- Pre prepojenie HDMI k HDMI nepotrebujete
žiadne dodatočné prepojenie zvuku.
- Keď používate pripojenie pomocou kábla
HDMI/DVI, musíte používať konektor HDMI IN 2.
➢
Čo je HDMI?
- „Multimediálne rozhranie s vysokým
rozlíšením (HDMI)“ umožňuje prenos
digitálnych videoúdajov s vysokým
rozlíšením a viackanálovým digitálnym
zvukom.
- Koncovka HDMI/DVI podporuje
pripojenie DVI k rozšírenému zariadeniu
pomocou vhodného kábla (nedodáva
sa). Rozdiel medzi HDMI a DVI je ten,
že HDMI zariadenie je menšie, má
nainštalovanú funkciu HDCP (High
Bandwidth Digital Copy Protection)
kódovania a podporuje viackanálový
digitálny zvuk.
DVI IN (HDMI 2) AUDIO R/L
Zvukové DVI výstupy pre externé zariadenia.
9
ANT IN
75Ω koaxiálny konektor na pripojenie antény
alebo rozvodu káblovej televízie.
Podporované režimy pre HAMI/DVI a komponent
480i 480p 576i 576p 720p 1080i
HDMI/DVI 50 Hz X X X O O O
HDMI/DVI 60 Hz X O X X O O
Komponent O O O O O O
1
HDMI IN 3
Pripojte HDMI konektor zariadenia k HDMI
výstupu.
2
S-VIDEO alebo VIDEO / AUDIO L/R
Video (S-Video alebo Video) a vstupy
zvuku pre externé zariadenia, ako napríklad
videokamera alebo videorekordér.
3
Konektor slúchadiel
K televízoru môžete pripojiť súpravu
slúchadiel, ak si želáte pozerať televízny
program bez vyrušovania iných ľudí v
miestnosti.
➢
Dlhotrvajúce používanie slúchadiel pri
vysokej hlasitosti môže poškodiť váš
sluch.
3
1
alebo
2
➢
Farba a tvar produktu sa môže odlišovať v závislosti od modelu.
Bočný panel
BN68-01528A-00Slk.indd 7 2008-4-21 15:26:41

Slovensky - 8
Pokračovanie...
Zobrazenie diaľkového ovládania
1
Tlačidlo POWER (zapne a
vypne televízor)
2
Priamo vyberie režim TV
3
Číselné tlačidlá pre priamy
prístup ku kanálu
4
Výber jednociferného/
dvojciferného kanála
5
Dočasné vypnutie zvuku
6
Zvýšenie hlasitosti
Zníženie hlasitosti
7
Tlačidlo ovládania kanálov
(pozrite stranu 15)
8
Použite na rýchly výber
často používaných funkcií.
9
Ovládanie kurzora v ponuke
0
Použite pre zobrazenie
informácií o aktuálnom
vysielaní
#
Stlačením vyberte voliteľné
režimy zobrazenia a zvuku
pre športy, kino a hry.
$
Funkcia videorekordér/
DVD (Pretáčania naspäť,
zastavenie, prehrávanie/
pozastavenie, rýchle/
pretáčanie dopredu)
%
Výber dostupných zdrojov
^
Predchádzajúci kanál
&
Nasledujúci kanál
Predchádzajúci kanál
*
Zobrazenie hlavnej ponuky
na obrazovke
(
Tlačidlo režimu Tru Surround
XT
)
Návrat do predchádzajúcej
ponuky
a
Opustenie ponuky na
obrazovke
b
Výber veľkosti obrazu
c
Použite to pri pripojení
SAMSUNG DMA (Digital
Media Adapter) device cez
rozhranie HDMI a prepnutí
do režimu DMA. (Tlačidlo
DMA je voliteľné.)
Toto tlačidlo je dostupné
vtedy, keď je „Anynet+
(HDMI-CEC)“ prepnutá na
možnosť Zap.“ (pozrite si
stranu 33)
d
Výber obrazových efektov
(pozrite stranu 18)
e
Sleduje 3D filmy alebo hry
priestorovo s 3D okuliarmi.
Funkcie teletextu
(Pozrite si stranu 36)
2
Opustenie zobrazovania
teletextu (v závislosti od
modelu)
7
Uloženie teletextu
8
Veľkosť teletextu
0
Zobrazenie teletextu
!
Výber témy fastext
@
Zobrazenie teletextu/
zmiešanie informácií
teletextu a normálneho
vysielania
%
Výber režimu teletextu
(LIST/FLOF)
^
Podstrana teletextu
&
P : Nasledujúca strana
teletextu
P
: Predchádzajúca strana
teletextu
*
Index teletextu
)
Podržanie teletextu
a
Zrušenie teletextu
BN68-01528A-00Slk.indd 8 2008-4-21 15:26:42

Slovensky - 9
Montáž batérií do diaľkového ovládača
1 Nadvihnite kryt na zadnej strane diaľkového ovládača podľa
zobrazenia na obrázku.
2 Vložte dve batérie veľkosti AAA.
➢
Uistite sa, že „+“ a „–“ koniec batérií zodpovedá
nákresu v priečinku.
Nekombinujte rôzne typy batérii, napr. alkalické s
magnéziovými.
3 Kryt zatvorte podľa zobrazenia na obrázku.
➢
Ak diaľkový ovládač nejdete dlhý čas používať, batérie
vyberte a uskladnite ich na chladnom suchom mieste.
Diaľkové ovládanie môžete používať až do vzdialenosti 23
stôp od televízora. (Pri typickom používaní televízora vydržia batérie asi jeden rok.)
➢
Ak nefunguje diaľkový ovládač! Skontrolujte nasledovné:
1. Je televízor zapnutý?
2. Nie je prevrátený kladný a záporný pól batérií?
3. Nie sú batérie vybité?
4. Vyskytol sa výpadok prúdu alebo je odpojený sieťový kábel?
5. Nachádza sa v blízkosti špeciálne žiarivkové alebo neónové svetlo?
Zapnutie a vypnutie televízora
Sieťový napájací kábel je pripojený k zadnej časti televízora.
1 Zastrčte sieťový napájací kábel do príslušnej zásuvky.
➢
Sieťové napätie je uvedené na zadnej strane televízora a frekvencia je 50 alebo 60 Hz.
2 Stlačte tlačidlo (Napájanie) (zapnutie/vypnutie) na prednej strane televízora alebo stlačte tlačidlo
POWER na diaľkovom ovládaní, aby ste zapli televízor. Automaticky sa zvolí naposledy sledovaný
program. Ak ste zatiaľ neuložili žiadne kanály, nezobrazí sa žiadny čistý obraz. Pozrite si časť
„Automatické ukladanie kanálov“ na strane 13 alebo „Manuálne ukladanie kanálov“ na strane 14.
➢
Pri úvodnom zapnutí televízora sa automaticky následne vykoná viacero základných
užívateľských nastavení. Pozrite si „Funkcia Plug & Play“ na strane 10.
3 Ak chcete televízor vypnúť, stlačte tlačidlo (Napájanie) (zapnutie/vypnutie) na prednej strane
televízora alebo stlačte tlačidlo POWER na diaľkovom ovládaní.
4 Ak chcete televízor zapnúť, stlačte tlačidlo (Napájanie) (zapnutie/vypnutie) na prednej strane
televízora alebo tlačidlo POWER, alebo číselné tlačidlá na diaľkovom ovládaní.
Prezeranie ponúk
1 Stlačte tlačidlo MENU.
Na obrazovke sa zobrazí hlavná ponuka.
Jej ľavá strana obsahuje päť ikon: Obraz, Zvuk, Kanál,
Nastavenie, Vstup.
2 Stlačením tlačidla ▲ alebo ▼ vyberte jednu z ikon.
Stlačením tlačidla ENTER získate prístup k podponukám ikon.
3 Stlačením tlačidla ▲ alebo ▼ prejdite k položkám v ponuke.
Stlačením tlačidla ENTER vstúpte do položiek v ponuke.
4 Stlačením tlačidiel ▲/▼/◄/► zmeňte zvolené položky.
Stlačením tlačidla RETURN sa vrátite do predchádzajúcej ponuky.
5 Stlačením tlačidla EXIT opustíte ponuku.
Premiestniť
Zadať
Ukončiť
Režim : Bežný
svietivosť bunky 7
Kontrast 95
Jas 45
Ostrosť 50
Farba 50
Odtieň Z50 Č50
Podrobné nastavenia
Možnosti obrazu
Vynulovať : OK
Obraz
T V
BN68-01528A-00Slk.indd 9 2008-4-21 15:26:43

Slovensky - 10
Funkcia Plug & Play
Pri úvodnom zapnutí televízora sa automaticky následne
vykoná viacero základných zákazníckych nastavení.
K dispozícii sú nasledovné nastavenia.
☛
Ak omylom zvolíte nesprávnu krajinu pre váš TV, znaky na
obrazovke sa môžu nesprávne zobraziť.
1 Ak je televízor v pohotovostnom režime, stlačte tlačidlo POWER
na diaľkovom ovládači. Zobrazí sa správa Spustiť Plug & Play.
Stlačte tlačidlo ENTER.
2 Po niekoľkých sekundách sa automaticky zobrazí ponuka
Jazyk.
3 Stlačením tlačidla ▲ alebo ▼ vyberte príslušný jazyk.
Stlačte tlačidlo ENTER. Zobrazí sa správa
Vyberte položku
„Domáce použitie“ vtedy, keď inštalujete tento TV u vás
doma.
4 Stlačením tlačidla ◄ alebo ► vyberte možnosť Ukážka v
obchode alebo Domáce použitie a potom stlačte tlačidlo
ENTER. Zobrazí sa správa o kontrole stavu pripojenia antény.
➢
Predvolené nastavenie je Domáce použitie.
➢
Odporúčame, aby ste TV nastavili do režimu Domáce
použitie na dosiahnutie najlepšieho obrazu vo vašom
domácom prostredí.
➢
Režim Ukážka v obchode je určený len pre používanie v
prostredí maloobchodnej predajne.
➢
Ak zariadenie omylom nastavíte do režimu Ukážka v
obchode a chcete ho prepnúť do Domáce použitie
režimu, stlačte tlačidlo hlasitosti a potom na päť sekúnd
podržte stlačené tlačidlo MENU na paneli TV.
5
Uistite sa, že k TV je pripojená anténa.
Stlačte tlačidlo ENTER. Zobrazí sa ponuka
Krajina
.
6 Stlačením tlačidla ▲ alebo ▼ vyberte krajinu alebo oblasť.
Stlačte tlačidlo ENTER. Zobrazí sa ponuka na výber kanálov.
Pokračovanie...
Plug & Play
Spustiť Plug & Play..
OK
Nastaviť
Plug & Play
Jazyk
Premiestniť
Zadať
English
Türkçe
Slovensky
Svenska
▼
Plug & Play
Vyberte položku „Domáce použitie“ vtedy,
keď inštalujete tento TV u vás doma.
Premiestniť
Zadať
Ukážka v obchode
Domáce použitie
Plug & Play
Skontrolujte vstup antény.
Zadať
Preskočiť
OK
Plug & Play
Krajina
Premiestniť
Zadať
Preskočiť
▲
Veľká Británia
Rakúsko
Východná Európa
Iné
Plug & Play
P 1 C -- 40 MHz
0 %
Zadať
Preskočiť
Spustiť
BN68-01528A-00Slk.indd 10 2008-4-21 15:26:44

Slovensky - 11
7 Ak chcete spustiť ukladanie kanála, stlačte tlačidlo ENTER.
Vyhľadávanie sa automaticky ukončí. Televízor začne zapamätávať
všetky dostupné kanály.
Stlačením tlačidla ENTER nastavíte hodiny.
8 Stlačením tlačidla ◄/► vyberte Mesiac, Deň, Rok, Hodina alebo
Minúta. Tieto položky nastavte stláčaním tlačidla ▲ alebo ▼.
➢
Položky Mesiac, Deň, Rok, Hodina alebo Minúta môžete
nastaviť priamo stlačením numerických tlačidiel na diaľkovom
ovládači.
9 Stlačením tlačidla ENTER potvrďte nastavenie.
Zobrazí sa správa “
Vychutnajte si pozeranie”.
Po dokončení stlačte tlačidlo ENTER.
➢
Aj v prípade, že nie je stlačené tlačidlo ENTER, sa správa
automaticky po niekoľkých sekundách vypne.
Ak chcete obnoviť nastavenie tejto funkcie...
1
Stlačením tlačidla MENU zobrazte ponuku.
2 Stlačením tlačidla ▲ alebo ▼ vyberte možnosť Nastavenie a potom
stlačte tlačidlo ENTER.
3 Opätovným stlačením tlačidla ENTER vyberte možnosť Plug &
Play.
Zobrazí sa správa
Spustiť Plug & Play.
OK
Vychutnajte si pozeranie
Plug & Play
Premiestniť
Nastaviť
Zadať
01 01 2008 00 04
Nastaviť hodiny
Mesiac Deň Rok Hodina
Minúta
Premiestniť
Zadať
Návrat
Plug & Play
Jazyk : English
Čas
Svetelný efekt
:
Pri sledovaní TV
Montáž na stenu
Melódia :
Vyp.
Zábava
: Vyp.
Úspora energie :
Vyp.
PIP
Nastavenie
T V
BN68-01528A-00Slk.indd 11 2008-4-21 15:26:45

Slovensky - 12
Zobrazenie externých zdrojov signálu
Môžete prepínať medzi jednotlivými zobrazeniami signálov
z pripojeného zariadenia, ako je videorekordér, DVD prehrávač,
satelitný prijímač a zdroj televízneho signálu (pozemné alebo
káblové vysielanie).
1
Stlačením tlačidla MENU zobrazte ponuku.
2 Stlačením tlačidla ▲ alebo ▼ vyberte možnosť Vstup a potom
stlačte tlačidlo ENTER.
3 Opätovným stlačením tlačidla ENTER vyberte možnosť
Zoznam zdrojov.
4 Stlačením tlačidla ▲ alebo ▼ vyberte zdroj signálu a potom
stlačte tlačidlo ENTER.
Dostupné zdroje signálu:
TV, Ext.1, Ext.2, AV, S-Video,
Komponent, PC, HDMI1, HDMI2 , HDMI3
➢
Môžete vybrať len tie externé zariadenia, ktoré sú pripojené k
TV.
➢
Tieto možnosti môžete vybrať jednoducho stlačením tlačidla
SOURCE na diaľkovom ovládaní.
➢
Na opätovné sledovanie televízneho programu stlačte tlačidlo
TV a vyberte požadované číslo kanálu.
Používanie tlačidla TOOLS
Tlačidlo TOOLS môžete použiť na rýchly a jednoduchý výber často používaných funkcií. Ponuka
„ Nástroje“ sa zmení v závislosti od toho, ktorý režim externého vstupu sledujete.
1 Stlačte tlačidlo TOOLS.
Zobrazí sa ponuka
Nástroje.
2 Stlačením tlačidla ▲ alebo ▼ vyberte ponuku a potom stlačte
tlačidlo ENTER.
3 Stlačením tlačidiel ▲/▼/◄/►/ENTER zobrazíte, zmeníte alebo
použijete zvolené položky.
Podrobnejší popis každej funkcie nájdete na nasledujúcej
strane.
• Anynet+ (HDMI-CEC), pozrite stranu 32
• Režim obrazu, pozrite stranu 18
• Režim zvuku, pozrite stranu 25
• Časovač režimu spánok, pozrite stranu 27
• SRS TS XT, pozrite stranu 25
• Úspora energie, pozrite stranu 29
• Dual I-II, pozrite stranu 26
Nástroje
Anynet+ (HDMI-CEC)
Režim obrazu : Bežný
Režim zvuku : Vlastný
Časovač režimu spánok : Vyp.
SRS TS XT : Vyp.
Úspora energie : Vyp.
Dual I-II : Monofónne
t
Nastaviť UkončiťPremiestniť
Premiestniť
Zadať
Návrat
Zoznam zdrojov :
TV
Upraviť názov
Anynet+ (HDMI-CEC)
Vstup
T V
Premiestniť
Zadať
Návrat
TV
Ext.1 : −−−−
Ext.2 : −−−−
AV : −−−−
S-Video : −−−−
Komponent : −−−−
PC : −−−−
HDMI1 : −−−−
HDMI2 : −−−−
HDMI3 : −−−−
Zoznam zdrojov
T V
BN68-01528A-00Slk.indd 12 2008-4-21 15:26:45

Slovensky - 13
Úprava názvov zariadení
Externý zdroj môžete pomenovať.
1
Stlačením tlačidla MENU zobrazte ponuku.
2 Stlačením tlačidla ▲ alebo ▼ vyberte možnosť Vstup a potom
stlačte tlačidlo ENTER.
3 Stlačením tlačidla ▲ alebo ▼ vyberte Upraviť názov a potom
stlačte tlačidlo ENTER.
4 Stlačením tlačidla ▲ alebo ▼ vyberte externý zdroj, ktorý
chcete upraviť a potom stlačte tlačidlo ENTER.
5 Stlačením tlačidla ▲ alebo ▼ vyberte požadované zariadenie
a potom stlačte tlačidlo ENTER.
Dostupné názvy zariadení:
Videorekordér, DVD, Prij.
kábl. TV, Prij. satel. TV, Prijímač PVR, Prijímač AV, Hra,
Videokamera, PC, TV, IPTV, Blu-Ray, HD DVD, DMA.
6 Stlačením tlačidla EXIT opustíte ponuku.
Automatické ukladanie kanálov
Môžete prehľadávať dostupné frekvenčné pásma (dostupnosť
závisí od vašej krajiny).
Automaticky priradené čísla programov nemusia zodpovedať
aktuálnym alebo požadovaným číslam programov. Čísla však
môžete zoradiť manuálne a vymazať ľubovoľné kanály, ktoré
nechcete sledovať.
1
Stlačením tlačidla MENU zobrazte ponuku.
2 Stlačením tlačidla ▲ alebo ▼ vyberte možnosť Kanál a potom
stlačte tlačidlo ENTER.
3 Opätovne stlačte tlačidlo ENTER. Zobrazia sa dostupné
krajiny.
4
Stlačením tlačidla ▲ alebo ▼ vyberte svoju krajinu a potom
stlačte tlačidlo ENTER.
5 Stlačením tlačidla ▲ alebo ▼ vyberte položku Automatické
uloženie a potom stlačte tlačidlo ENTER.
6 Opätovným stlačením tlačidla ENTER spustite vyhľadávanie.
Vyhľadávanie sa automaticky ukončí.
➢
Ak chcete zastaviť vyhľadávanie pred jeho dokončením,
stlačte tlačidlo MENU alebo ENTER.
Premiestniť
Zadať
Návrat
Zoznam zdrojov :
TV
Upraviť názov
Anynet+ (HDMI-CEC)
Vstup
T V
Premiestniť
Zadať
Návrat
Krajina :
Veľká Británia
Automatické uloženie
Manuálne uloženie
Správca kanálov
Zoradiť
Názov
Jemné doladenie
Kanál
T V
Automatické uloženie
P 1 C -- 40 MHz
0 %
Zadať
Návrat
Spustiť
Premiestniť
Zadať
Návrat
Ext.1 : −−−−
Ext.2 :
−−−−
AV :
S-Video :
Komponent : −−−−
PC :
−−−−
HDMI1 :
HDMI2 :
HDMI3 :
Upraviť názov
T V
----
Videorekordér
DVD
Prij. kábl. TV
Prij. satel. TV
Prijímač PVR
Prijímač AV
Hra
▼
Premiestniť
Zadať
Návrat
Krajina :
United Kingdom
Automatické uloženi
Manuálne uloženie
Správca kanálov
Zoradiť
Názov
Jemné doladenie
Kanál
T V
Belgicko
Francúzsko
Nemecko
Taliansko
Holandsko
Španielsko
Švajčiarsko
Veľká Británia
▼
BN68-01528A-00Slk.indd 13 2008-4-21 15:26:46

Slovensky - 14
Manuálne ukladanie kanálov
Môžete ukladať televízne kanály vrátane tých, ktoré prijímate
prostredníctvom káblových rozvodov.
Pri manuálnom ukladaní kanálov si môžete vybrať:
Či chcete alebo nechcete uložiť všetky nájdené kanály
Číslo programu každého uloženého kanála, ktorý chcete
označiť.
1
Stlačením tlačidla MENU zobrazte ponuku.
2 Stlačením tlačidla ▲ alebo ▼ vyberte možnosť Kanál a potom
stlačte tlačidlo ENTER.
3 Stlačením tlačidla ▲ alebo ▼ vyberte možnosť Manuálne
uloženie a potom stlačte tlačidlo ENTER.
4 Stlačením tlačidla ▲ alebo ▼ vyberte požadovanú možnosť a
potom stlačte tlačidlo ENTER.
5 Keď budete spokojní s vaším nastavením, stlačte tlačidlo
ENTER.
6 Stlačením tlačidla EXIT opustíte ponuku.
Program (Číslo programu, ktoré má byť priradené kanálu)
− Stláčajte tlačidlo ▲ alebo ▼, kým nenájdete správne číslo.
➢
Číslo kanálu môžete určiť tiež priamo, stlačením číselných tlačidiel (0-9).
Systém farieb: Automaticky/PAL/SECAM/NTSC4.43
− Stlačením tlačidla ▲ alebo ▼ vyberte požadovanú normu farieb.
Zvukový systém: BG/DK/I/L
− Stlačením tlačidla ▲ alebo ▼ vyberte požadovanú normu zvuku.
Kanál (Keď poznáte číslo kanálu, ktorý chcete uložiť)
− Stlačením tlačidla ▲ alebo ▼ vyberte položku C (kanál pozemného vysielania) alebo S (Kanál
káblovej televízie).
− Stlačte tlačidlo ►, potom stlačte tlačidlo ▲ alebo ▼, aby ste vybrali požadované číslo.
➢
Číslo kanálu môžete určiť tiež priamo, stlačením číselných tlačidiel (0-9).
➢
Ak zvuk nepočuť alebo je nezvyčajný, znova vyberte požadovanú normu zvuku.
Vyhľadať (Keď neviete čísla kanálov)
− Stlačením tlačidla ▲ alebo ▼ spustite vyhľadávanie.
− Tuner prehľadáva frekvenčné pásmo, až pokiaľ sa na obrazovke nezobrazí prvý kanál alebo vami
zvolený kanál.
Uložiť (Keď ukladáte kanál a priradené číslo programu)
− Nastavte na možnosť OK tak, že stlačíte tlačidlo ENTER.
☛
Channel mode
P (Režim programov): Po dokončení ladenia sa vysielajúcim staniciam vo vašej oblasti priradia
čísla pozícií od P00 po P99. V tomto režime môžete vybrať kanál zadaním čísla pozície.
C (Režim terestriálnych kanálov): V tomto režime môžete vybrať kanál zadaním priradeného
čísla pre každú stanicu pozemného vysielania.
S (Režim kanálov káblovej televízie): V tomto režime môžete vybrať kanál zadaním priradeného
čísla pre každý kanál káblovej televízie.
Premiestniť
Zadať
Návrat
Krajina :
Veľká Británia
Automatické uloženie
Manuálne uloženie
Správca kanálov
Zoradiť
Názov
Jemné doladenie
Kanál
T V
Premiestniť
Zadať
Návrat
Program :
P 1
Systém farieb :
Automaticky
Zvukový systém : BG
Kanál : C --
Vyhľadať : 40 MHz
Uložiť : ?
Manuálne uloženie
T V
BN68-01528A-00Slk.indd 14 2008-4-21 15:26:47

Slovensky - 15
Pridávanie/uzamknutie kanálov
Pomocou správca kanálov môžete pohodlne uzamknúť alebo
pridať kanály.
1
Stlačením tlačidla MENU zobrazte ponuku.
2 Stlačením tlačidla ▲ alebo ▼ vyberte možnosť Kanál a potom
stlačte tlačidlo ENTER.
3
Stlačením tlačidla ▲ alebo ▼ vyberte možnosť
Správca
kanálov
a potom stlačte tlačidlo ENTER.
Pridávanie kanálov
Pomocou zoznamu kanálov môžete pridať kanály.
4 Vyberte možnosť Zoznam kanálov tak, že stlačíte tlačidlo
ENTER.
5 Prejdite na políčko ( ) tak, že stlačíte tlačidlá ▲/▼/◄/►,
vyberte kanál na pridanie a stlačením tlačidla ENTER daný
kanál pridáte.
➢
Ak opätovne stlačíte tlačidlo ENTER, zmizne symbol
( ) vedľa kanálu a kanál sa nepridá.
Locking channels
Táto funkcia vám umožňuje zabrániť sledovaniu nevhodných
programov nepovolanými osobami, ako sú deti, a to tak, že na
zvolenom programe vypne obraz a zvuk.
6 Stlačením tlačidla ▲ alebo ▼ vyberte možnosť Detská zámka
a potom stlačte tlačidlo ENTER.
7 Stlačením tlačidla ▲ alebo ▼ vyberte možnosť Zap. a potom
stlačte tlačidlo ENTER.
8 Stlačením tlačidla ▲ alebo ▼ vyberte možnosť Zoznam
kanálov a potom stlačte tlačidlo ENTER.
9 Prejdite na políčko ( ) tak, že stlačíte tlačidlá ▲/▼/◄/►,
vyberte kanál na uzamknutie a stlačte tlačidlo ENTER.
➢
Ak opätovne stlačíte tlačidlo ENTER, zmizne symbol ( )
vedľa kanálu a uzamknutie kanálu sa nepridá.
➢
Keď je detská zámka aktívna, zobrazí sa modrá obrazovka.
10 Stlačením tlačidla EXIT opustíte ponuku.
➢
Tieto možnosti môžete vybrať jednoducho stlačením tlačidla
CH LIST na diaľkovom ovládaní.
Premiestniť
Zadať
Návrat
Krajina :
Veľká Británia
Automatické uloženie
Manuálne uloženie
Správca kanálov
Zoradiť
Názov
Jemné doladenie
Kanál
T V
Premiestniť
Zadať
Návrat
Zoznam kanálov
Detská zámka : Vyp.
Správca kanálov
T V
Zoznam kanálov
P 1 C 6
1 / 10
▲
▼
Prog.
0
C 1
1 C 6
2 C 5
3 C 8
4 C 11
5 C 22
6 C 26
7 C 36
8 C 52
9 C 24
Pridať Uzamknúť
Premiestniť
Zadať
Strana
Návrat
BN68-01528A-00Slk.indd 15 2008-4-21 15:26:48

Slovensky - 16
Zoradenie uložených kanálov
Táto činnosť vám umožňuje zmeniť čísla programov pre
uložené kanály.
Túto činnosť môže byť potrebné vykonať po automatickom
ukladaní.
1
Stlačením tlačidla MENU zobrazte ponuku.
2 Stlačením tlačidla ▲ alebo ▼ vyberte možnosť Kanál a potom
stlačte tlačidlo ENTER.
3 Stlačením tlačidla ▲ alebo ▼ vyberte možnosť Zoradiť a
potom stlačte tlačidlo ENTER.
4 Stlačením tlačidla ▲ alebo ▼ vyberte kanál, ktorý si želáte
premiestniť a potom stlačte tlačidlo ENTER.
5 Vyberte číslo programu, na ktoré sa má kanál premiestniť tak,
že stlačíte tlačidlo ▲ alebo ▼.
Stlačte tlačidlo ENTER. Kanál sa presunie na novú pozíciu
a všetky ostatné kanály sa príslušne posunú.
6 Opakovaním krokov 4 až 5 presuňte všetky kanály na
požadované čísla programov.
7 Stlačením tlačidla EXIT opustíte ponuku.
Priradenie názvov kanálov
Názvy kanálov sa priradia automaticky pri príjme vysielania
informácií o kanáli. Tieto názvy sa dajú zmeniť, čo vám
umožňuje priradiť nové názvy.
1
Stlačením tlačidla MENU zobrazte ponuku.
2 Stlačením tlačidla ▲ alebo ▼ vyberte možnosť Kanál a potom
stlačte tlačidlo ENTER.
3 Stlačením tlačidla ▲ alebo ▼ vyberte možnosť Názov a potom
stlačte tlačidlo ENTER.
4 Stlačením tlačidla ▲ alebo ▼ vyberte kanál, ktorému chcete
priradiť nový názov a potom stlačte tlačidlo ENTER.
5 Stlačením tlačidla ▲ alebo ▼ vyberte znak, číslo alebo
symbol (Výsledky v danom poradí: A až Z, 0 až 9, +, -, *, /,
medzera).
Stlačením tlačidla ◄ alebo ► sa presuňte na predchádzajúce
alebo nasledujúce písmeno a potom stlačte tlačidlo ENTER.
6 Kroky 4 až 5 zopakujte pre každý kanál, ktorému chcete
priradiť nový názov.
7 Stlačením tlačidla EXIT opustíte ponuku.
Premiestniť
Zadať
Návrat
Krajina :
Veľká Británia
Automatické uloženie
Manuálne uloženie
Správca kanálov
Zoradiť
Názov
Jemné doladenie
Kanál
T V
Premiestniť
Zadať
Návrat
Prog. Kanál. Názov
▲
0 C- - −−−−−
1 C04 −−−−−
2 C05 −−−−−
3 C08 −−−−−
4 C09 −−−−−
5 C11 −−−−−
6 C13 −−−−−
7 C15 −−−−−
8 C17 −−−−−
9 C18 −−−−−
▼
Zoradiť
T V
Premiestniť
Zadať
Návrat
Krajina :
Veľká Británia
Automatické uloženie
Manuálne uloženie
Správca kanálov
Zoradiť
Názov
Jemné doladenie
Kanál
T V
Premiestniť
Zadať
Návrat
Prog. Kanál. Názov
▲
0 C01 −−−−−
1 C- - −−−−−
2 C- - −−−−−
3 C- - −−−−−
4 C- - −−−−−
5 C- - −−−−−
6 C- - −−−−−
7 C- - −−−−−
8 C- - −−−−−
9 C- - −−−−−
▼
Name
T V
BN68-01528A-00Slk.indd 16 2008-4-21 15:26:49

Slovensky - 17
Vylaďovanie príjmu kanálu
Ak je k dispozícii čistý príjem, nemusíte kanál dolaďovať,
pretože sa tak stane automaticky počas funkcie vyhľadávania
a ukladania.
Ak je signál slabý alebo rušený, bude treba kanál vyladiť
ručne.
1
Stlačením tlačidla MENU zobrazte ponuku.
2 Stlačením tlačidla ▲ alebo ▼ vyberte možnosť Kanál a potom
stlačte tlačidlo ENTER.
3 Stlačením tlačidla ▲ alebo ▼ vyberte možnosť Jemné
doladenie a potom stlačte tlačidlo ENTER.
4 Ak chcete dosiahnuť ostrý a čistý obraz a dobrú kvalitu zvuku,
stlačte tlačidlo ◄ alebo ►, až kým nenájdete optimálne
nastavenie. Stlačte tlačidlo ENTER.
➢
Stlačte tlačidlo INFO.
Uloženie jemného doladenia zmení
farbu OSD (zobrazenia na obrazovke) kanála z bielej na
červenú a pridá značku „*“.
➢
Aby ste obnovili nastavenie jemného doladenia na 0, tak
stlačením tlačidla ▲ alebo ▼ vyberte možnosť Vynulovať
Stlačte tlačidlo ENTER.
5 Stlačením tlačidla EXIT opustíte ponuku.
P 1 *
Monofónne
Obraz : Bežný
Zvuk : Vlastný
SRS TS XT : Vyp.
−−
:
−−
Premiestniť
Zadať
Návrat
Krajina :
Veľká Británia
Automatické uloženie
Manuálne uloženie
Správca kanálov
Zoradiť
Názov
Jemné doladenie
Kanál
T V
Fine Tune
P 1
0
Nastaviť
Uložiť
Návrat
Vynulovať
BN68-01528A-00Slk.indd 17 2008-4-21 15:26:50

Slovensky - 18
Zmena obrazovej normy
Vybrať môžete typ obrazu, ktorý najlepšie zodpovedá vašim
požiadavkám na pozeranie.
1
Stlačením tlačidla MENU zobrazte ponuku.
2 Stlačením tlačidla ENTER vyberte možnosť Obraz.
3 Opätovným stlačením tlačidla ENTER vyberte možnosť Režim.
4 Stlačením tlačidla ▲ alebo ▼ vyberte požadovaný režim a
potom stlačte tlačidlo ENTER.
Dostupné režimy:
Dynamický, Bežný, Film.
➢
Hodnoty nastavenia sa môžu líšiť v závislosti od vstupného
zdroja.
5 Stlačením tlačidla EXIT opustíte ponuku.
➢
Vyberte možnosť Dynamický pre pozeranie TV počas dňa
alebo keď je v miestnosti jasné svetlo.
Vyberte možnosť Bežný pre režim všeobecného pozerania
TV.
Vyberte možnosť Film, keď pozeráte film.
Prispôsobenie nastavení obrazu
Váš televízor poskytuje niekoľko možností nastavenia, ktoré
umožňujú ovládať kvalitu obrazu.
1
Stlačením tlačidla MENU zobrazte ponuku.
2
Stlačením tlačidla ENTER vyberte možnosť
Obraz
.
3 Opätovným stlačením tlačidla ENTER vyberte možnosť Režim.
4 Stlačením tlačidla ▲ alebo ▼ vyberte požadovaný režim a
potom stlačte tlačidlo ENTER.
Dostupné režimy:
Dynamický, Bežný, Film
5 Stlačením tlačidla ▲ alebo ▼ vyberte požadovanú možnosť a
potom stlačte tlačidlo ENTER.
6 Keď budete spokojní s vaším nastavením, stlačte tlačidlo ENTER.
7 Stlačením tlačidla EXIT opustíte ponuku.
Svietivosť bunky - Kontrast – Jas – Ostrosť – Farba – Odtieň
➢
V režime TV systému PAL nemôžete použiť funkciu odtieň.
➢
V režime PC môžete vykonávať len zmeny v položkách svietivosť bunky, Kontrast a Jas.
Stláčajte tlačidlo ◄ alebo ►, kým nedosiahnete optimálne nastavenie.
Jednoduché nastavenie
1 Na diaľkovom ovládači stlačte tlačidlo TOOLS.
2 Stlačením tlačidla ▲ alebo ▼ vyberte Režim obrazu.
3 Stlačením tlačidla ◄ alebo ► vyberte požadovanú možnosť.
Premiestniť
Zábava
Návrat
Režim : Bežný
svietivosť bunky 7
Kontrast 95
Kontrast 45
Ostrosť 50
Farba 50
Odtieň G50 R50
Podrobné nastavenia
Možnosti obrazu
Vynulovať : OK
Obraz
T V
Nástroje
Anynet+ (HDMI-CEC)
Režim obrazu ◄ Bežný ►
Režim zvuku : Vlastný
Časovač režimu spánok : Vyp.
SRS TS XT : Vyp.
Úspora energie : Vyp.
Dual I-II : Monofónne
Premiestniť
Zadať
Ukončiť
Režim : Bežný
svietivosť bunky 7
Kontrast 90
Jas 45
Ostrosť 50
Farba 50
Odtieň Z50 Č50
Podrobné nastavenia
Možnosti obrazu
Vynulovať : OK
Obraz
T V
Premiestniť Nastaviť Ukončiť
Premiestniť
Zadať
Návrat
Režim : Standard
svietivosť bunky 7
Kontrast 95
Jas 45
Ostrosť 50
Farba 50
Odtieň Z50 Č50
Podrobné nastavenia
Možnosti obrazu
Vynulovať : OK
Obraz
T V
Dynamický
Bežný
Film
BN68-01528A-00Slk.indd 18 2008-4-21 15:26:50

Slovensky - 19
Konfigurácia podrobných nastavení obrazu
Môžete nastaviť podrobné nastavenia obrazu.
1
Stlačením tlačidla MENU zobrazte ponuku.
2 Stlačením tlačidla ENTER vyberte možnosť
Obraz
.
3 Stlačením tlačidla ▲ alebo ▼ vyberte možnosť
Podrobné
nastavenia
a potom stlačte tlačidlo ENTER.
4 Stlačením tlačidla ▲ alebo ▼ vyberte požadovanú možnosť a potom
stlačte tlačidlo ENTER.
Dostupné možnosti:
Nastavenie čiernej, Dynamický kontrast,
Gama, Farebný priestor, Vyváženie biele, Odtieň pleti,
Vylepšenie hrán.
5 Keď budete spokojní s vaším nastavením, stlačte tlačidlo ENTER.
6 Stlačením tlačidla EXIT opustíte ponuku.
➢
Podrobné nastavenia sú dostupné v režime Bežný alebo Film.
➢
V režime PC môžete vykonávať len zmeny v položkách
Dynamický
kontrast, Gama in Vyváženie bielej
.
Nastavenie čiernej: Vyp./Nízka/Stredná/Vysoká
Úroveň čiernej môžete priamo nastaviť na obrazovke, aby ste
nastavili hĺbku obrazovky.
Dynamický kontrast: Vyp./Nízka/Stredná/Vysoké
Kontrast obrazovky môžete nastaviť tak, aby sa dosiahol optimálny kontrast.
Gama
: -3 ~ +3
Môžete nastaviť stredový jas obrázkov.
Stláčajte tlačidlo ◄ alebo ►, kým nedosiahnete optimálne nastavenie.
Farebný priestor : Automaticky/ZákladnéVlastný/Vlastný
Farebný priestor predstavuje maticu farieb, ktorá sa skladá z červenej, zelenej a modrej farby.
Vyberte svoj obľúbený priestor farieb, aby ste zažili najprirodzenejšiu farbu.
−
Automaticky
: Automatický priestor farieb automaticky nastaví na najprirodzenejší odtieň farieb, a to na
základe zdrojov programu.
−
ZákladnéVlastný
:Základný priestor farieb ponúka hlboký a bohatý odtieň farieb.
−
Vlastný
: Nastaví rozsah farieb, aby vyhovovali vašim preferenciám. (pozrite si „Prispôsobovanie priestoru
farieb“)
Prispôsobovanie priestoru farieb
Farba: Červená/Zelená/Modrá/Žltá/Azúrová/Purpurová
Nastaví rozsah farieb, aby vyhovovali vašim preferenciám.
Farba je dostupná vtedy, keď sa položka
Farebný priestor
nastaví na možnosť Custom.
Stlačením tlačidla ▲alebo▼ vyberte možnosť Červená, Zelená, Modrá, Žltá, Azúrová, Purpurová alebo
Magenta.
Stlačte tlačidlo ENTER.
−
Červená/Zelená/Modrá
: V položke Colour môžete nastaviť hodnoty RGB pre zvolenú farbu.
Stlačením tlačidla ▲ alebo ▼ vyberte možnosť
Červená
,
Zelená ali Modrá
aby ste ju zmenili. Stlačte
tlačidlo ENTER.
Stlačením tlačidla◄ alebo ►znížite alebo zvýšite hodnotu určitej položky.
Stlačte tlačidlo ENTER.
−
Vynulovať
: Obnoví predvolené hodnoty priestoru farieb.
Vyváženie bielej: posun Č/posun Z/posun M/Zvýšenie Č/Zvýšenie Z/Zvýšenie M/Vynulovať
Môžete nastaviť teplotu farieb pre prirodzenejšie farby obrazu.
Č/posun Z/posun M/Zvýšenie Č/Zvýšenie Z/Zvýšenie M/Vynulovať
: Zmena hodnoty nastavenia obnoví
nastavenú obrazovku.
Stlačením tlačidla ▲ alebo ▼ vyberte požadovanú možnosť a potom stlačte tlačidlo ENTER. Stláčajte tlačidlo
◄ alebo ►, kým nedosiahnete optimálne nastavenie.
Vynulovať
: Vyváženie bielej, ktoré ste predtým prispôsobili, sa nastaví opätovne na pôvodné nastavenia od
výrobcu.
Odtieň pleti:-15~+15
Môžete zdôrazniť odtieň ružovej v obraze.
Stláčajte tlačidlo ◄ alebo ► až kým nedosiahnete optimálne nastavenie.
➢
Zmena hodnoty nastavenia obnoví nastavenú obrazovku.
Vylepšenie hrán: Vyp./Zap.
Môžete zdôrazniť hranice objektov.
Premiestniť
Zadať
Ukončiť
Režim : Bežný
svietivosť bunky 7
Kontrast 90
Jas 45
Ostrosť 50
Farba 50
Odtieň Z50 Č50
Podrobné nastavenia
Možnosti obrazu
Vynulovať : OK
Obraz
T V
Premiestniť
Zadať
Návrat
Nastavenie čiernej :
Vyp.
Dynamický kontrast
: stredná
Gama : 0
Farebný priestor : Základné
Vyváženie bielej
odtieň pleti : 0
Vylepšenie hrán
: Zap.
Podrobné nastavenia
T V
BN68-01528A-00Slk.indd 19 2008-4-21 15:26:51

Slovensky - 20
Možnosti obrazu
Môžete nastaviť podrobné nastavenia obrazu.
1 Stlačením tlačidla MENU zobrazte ponuku.
2 Stlačením tlačidla ENTER vyberte možnosť
Obraz
.
3 Stlačením tlačidla ▲ alebo ▼ vyberte možnosť Možnosti obrazu
a potom stlačte tlačidlo ENTER.
4 Stlačením tlačidla ▲ alebo ▼ vyberte požadovanú možnosť a
potom stlačte tlačidlo ENTER.
5 Keď budete spokojní s vaším nastavením, stlačte tlačidlo ENTER.
6 Stlačením tlačidla EXIT opustíte ponuku.
➢
V režime PC môžete vykonať len zmeny v položke Odtieň farby,
,
Veľkosť and Ochrana pred vypálením obrazu spomedzi položiek
v ponuke
Možnosti obrazu.
Odtieň farby: Studený 2/Studený 1/normálna/Teplý 1/Teplý 2
➢
Keď sa režim obrazu nastaví na možnosť
Dynamický
alebo
Bežný, nedá sa vybrať možnosť
Teplý1
a
Teplý2
.
Veľkosť: Autom. nast. Šírky
/
16:9
/Širokouhlé priblíženie
/Zväčšiť/
4:3
/
Len vyhľadať
Môžete si vybrať takú veľkosť obrazu, ktorá najlepšie zodpovedá
vašim nárokom na sledovanie.
−
Autom. nast. Šírky
: Rozšírenie a natiahnutie obrazu z pomeru
strán 4:3 na pomer strán 16:9.
−
16:9: Nastavuje obraz do širokouhlého režimu s pomerom strán
16:9.
−
Širokouhlé priblíženie(
: Zväčší rozmery obrazu viac ako
pri 4:3.Pomocou tlačidla ▲ alebo ▼ po výbere stlačením
tlačidla ► alebo ENTER
−
Zoom: Zväčšenie veľkosti obrazu na obrazovke v zvislom
smere.
−
4:3: Nastaví obraz do normálneho režimu s pomerom strán 4:3.
−
Len vyhľadať
: Použite túto funkciu na zobrazenie celého
obrazu bez akéhokoľvek orezania, keď je vstupom signál HDMI
(720p/1080i), komponent (1080i).
Ko izberete “Nespremenjeno” v načinu HDMI (1080i)
ali v
načinu komponente (1080i)
:
Stlačením tlačidla ◄ alebo ► vyberte možnosť a potom stlačte tlačidlo ENTER.
Stlačením tlačidla ▲, ▼, ◄ alebo ► pohybujte obraz nahor, nadol, doľava a doprava.
Reset (Vynulovať): Stlačením tlačidla ◄ alebo ► vyberte položku Vynulovať, potom stlačte tlačidlo
ENTER. Toto nastavenie môžete inicializovať.
➢
Pri veľkosti obrazu len vyhľadávania HDMI sa v závislosti od zariadení AV môže obraz orezať
alebo sa môžu na obrazovke zobraziť špecifické farby.
➢
Pri pripojení HDMI (1080p) s 24, 25, 30, 50 a 60 Hz a pre pripojenie Component (1080p) s 50 a 60
Hz sa podporuje len vstupný zdroj.
➢
Veľkosť obrazu môžete jednoducho zmeniť stlačením tlačidla P.SIZE na diaľkovom ovládaní.
➢
Možnosti veľkosti obrazu sa môžu líšiť v závislosti od vstupného zdroja.
➢
Dostupné položky sa môžu odlišovať v závislosti od vstupného zdroja.
➢
Autom. nast. Šírky
je dostupná len v režime TV, Ext.1, Ext.2, AV a S-Video.
➢
Nastavenia sa dajú upraviť a uložiť pre každé externé zariadenie, ktoré ste pripojili k vstupu TV.
➢
V režime PC môžete upraviť len režim „16:9“ a „4:3“.
Polohovanie a určovanie rozmeru obrazovky pomocou funkcie Zväčšenie
Zmena rozmeru obrazovky použitím funkcie Zväčšenie umožňuje polohovanie a zmenu rozmerov
obrazovky v smere nahor/nadol pomocou tlačidla ▲ alebo ▼ rovnako, ako určovanie veľkosti obrazovky
.
Obrazovku môžete posunúť smerom nadol/nahor pomocou tlačidla ▲ alebo ▼ potom, ako zvolíte
tlačením tlačidla ◄ alebo ►.
Veľkosť obrazovky môžete zmeniť vertikálne pomocou tlačidla ▲ alebo ▼ potom, ako zvolíte
stlačením tlačidla ◄ alebo ►.
Pokračovanie...
Premiestniť
Zadať
Návrat
Odtieň farby :
normálna
Veľkosť :
Autom. nast. Šírky
Režim obrazu : 16:9
Digitálna redukcia šumu
: Automaticky
Skutočná 100 Hz ukážka
: Vyp.
DNle : Vyp.
HDMI úroveň čiernej
: normálna
Režim len modrej : Vyp.
Ochrana pred vypálením obrazu
3D efekt
Možnosti obrazu
T V
Premiestniť
Zadať
Návrat
Autom. nast. Šírky
16:9
Širokouhlé priblíženie
Zväčšiť
4:3
Len vyhľadať
Veľkosť
T V
Premiestniť
Zadať
Ukončiť
Režim : Bežný
svietivosť bunky 7
Kontrast 90
Jas 45
Ostrosť 50
Farba 50
Odtieň Z50 Č50
Podrobné nastavenia
Možnosti obrazu
Vynulovať : OK
Obraz
T V
BN68-01528A-00Slk.indd 20 2008-4-21 15:26:52

Slovensky - 21
Režim obrazu : 16:9/Širokouhlé priblíženie/Zväčšiť/ 4:3
Keď nastavujete veľkosť obrazu na možnosť Auto Wide
(Automaticky širokouhlý) pri širokouhlom TV 16:9, môžete určiť
veľkosť obrazu, v ktorom chcete vidieť obraz 4:3 WSS (Wide
Screen Service) alebo nič. Každá jednotlivá európska krajina
vyžaduje odlišnú veľkosť obrazu, takže táto funkcia je určená na
to, aby ju používatelia vybrali.
−
16:9: Nastavuje obraz do širokouhlého režimu s pomerom strán 16:9.
−
Širokouhlé priblíženie(Širokouhlé pribl.)
: Zväčšenie
veľkosti obrazu viac ako pri možnosti 4:3.
−
Zväčšiť
: Zväčšenie veľkosti obrazu na obrazovke v zvislom
smere.
− 4:3: Nastaví obraz do normálneho režimu s pomerom strán 4:3.
➢
Táto funkcia je dostupná v režime Autom. nast. Šírky.
➢
Táto funkcia nie je dostupná v režime Komponent alebo HDMI.
Digitálna redukcia šumu: Vyp./nízka/stredná/vysoká/Automaticky
V prípade slabej úrovne signálu prijímaného televízorom môžete aktivovaním tejto funkcie obmedziť
poruchy a tiene, ktoré sa zjavujú na obrazovke.
➢
Keď je signál slabý, vyberte jednu z ostatných možností, kým sa nezobrazí najlepší obraz.
100Hz Demo: Vyp./Zap.
Môžete dosiahnuť jasné rozlíšenie medzi „Reálnymi 100Hz“ a 50Hz, a to hlavne vtedy, keď sledujete rýchlo
sa pohybujúce scény. Preto, keď sledujete pomaly sa pohybujúce scény, nebudete môcť rozlíšiť medzi
„Reálnymi 100Hz a 50Hz.“ Ukážkových 100Hz funguje len s 50Hz signálom. Režim ukážky reálnych 100Hz
sa poskytuje pre ukážky v obchode so špeciálnymi obrázkami.
DNIe: Vyp./Ukážka/Zap.
Tento televízor má aj funkciu DNIe na poskytovanie vysokej vizuálnej kvality. Ak funkciu DNIe zapnete,
môžete zobraziť obrazovku s aktivovanou funkciou DNIe. Ak nastavíte DNIe na možnosť Demo (Ukážka),
môžete si prezrieť na obrazovke obraz s aplikovanou funkciou DNIe a normálna obraz pre demonštračné
účely. S použitím tejto funkcie môžete vidieť rozdiel vo vizuálnej kvalite.
➢
DNIe
TM
(Digital Natural Image engine)
Táto funkcia poskytuje detailnejší obraz s trojrozmernou redukciou šumu, zlepšením detailov, kontrastu
a nastavenia bielej farby. Nový algoritmus kompenzácie obrazu vám poskytuje jasnejší, čistejší
a detailnejší obraz. Technológia DNIe
TM
upraví každý signál tak, aby vyhovoval zraku.
➢
Táto pomocná funkcia nie je dostupná v režime PC.
➢
DNIe je dostupné len v režime Dynamic.
HDMI úroveň čiernej: normálna/nízka
Pomocou tejto funkcie môžete nastaviť kvalitu obrazu, keď sa vyskytne vypálenie obrazovky (zobrazenie
úrovne čiernej, nízky kontrast, slabá farba atď.) pri HDMI vstupe pre obmedzený rozsah RGB (16 až 235).
➢
Táto funkcia je aktívna, keď sa externý vstup pripojí k HDMI (signály RGB)
.
Režim len modrej: Vyp./Zap.
Táto funkcia je určená pre expertov na merania pri AV zariadeniach. Táto funkcia zobrazí len modrý signál
odstránením červeného a zeleného signálu zo signálu videa, aby sa poskytol efekt modrého filtra, ktorý
sa používa na nastavenie farby a odtieňa videozariadenia, ako
napríklad DVD prehrávačov, domácich kín atď.
Pomocou tejto funkcie môžete nastaviť farbu a odtieň na
uprednostňované hodnoty, ktoré sú príslušné úrovni signálu
každého video zariadenia pomocou lišty vzorov farieb červená/
zelená/modrá/azúrová/purpurová/žltá, a to bez použitia
dodatočného modrého filtra.
➢
Režim len modre
je dostupný, keď sa režim
obrazu nastaví
na možnosť
Film
alebo
Bežný
.
Ochrana pred vypálením obrazu
Pre zníženie možnosti vypálenia obrazovky je tento prístroj
vybavený technológiou ochrany pred vypálením obrazovky.
Táto technológia vám umožňuje nastaviť pohyb obrazu smerom
nahor/nadol (vertikálna línia) a zo strany na stranu (horizontálny
bod). Nastavenie času vám umožňuje naprogramovať čas medzi
pohybmi obrazu v minútach.
−
Posun pixelov
: Použitím tejto funkcie môžete v minútových
intervaloch pohybovať pixely na PZP v horizontálnom alebo
vertikálnom smere, aby ste zminimalizovali pretrvávajúci obraz
na obrazovke.
•
Stlačením tlačidla ▲ alebo ▼ nastavte možnosť Posun pixelov
na
Zap. a potom stlačte tlačidlo ENTER.
• Stlačením tlačidla ▲ alebo ▼ vyberte požadovanú možnosť a
potom stlačte tlačidlo ENTER.Dostupné možnosti:
Horizontálny bod, Vertikálna čiara, Čas
Pokračovanie...
Premiestniť
Zadať
Návrat
Odtieň farby :
Normal
Veľkosť : Auto Wide
Režim obrazu :
Digitálna redukcia šumu
:
Skutočná 100 Hz ukážka :
DNle :
HDMI úroveň čiernej
: normálna
Režim len modrej : Vyp.
Ochrana pred vypálením obrazu
3D efekt
Možnosti obrazu
T V
16:9
Širokouhlé pribl
Zväčšiť
4:3
Premiestniť
Zadať
Návrat
Odtieň farby :
normálna
Veľkosť :
Autom. nast. Šírky
Režim obrazu : 16:9
Digitálna redukcia šumu
: Automaticky
Skutočná 100 Hz ukážka
: Vyp.
DNle : Zap.
H
DMI úroveň čiernej
: normálna
Režim len modrej : Vyp.
Ochrana pred vypálením obrazu
3D efekt
Možnosti obrazu
T V
Premiestniť
Zadať
Návrat
Posun pixelov
Biela
PosúvanieSide Gray
Bočná sivá : Tmavá
Ochrana pred vypálením obrazu
T V
BN68-01528A-00Slk.indd 21 2008-4-21 15:26:52

Slovensky - 22
➢
Optimálne podmienky pre posun pixelu;
PC TV/Ext/AV/Komponent/HDMI
Horizontálny bod
1 2
Vertikálna čiara
1 2
Čas (minúta) 2 2 min
➢
Hodnota posunu pixelu sa môže odlišovať v závislosti od
veľkosti monitora (palce) a režimu.
➢
Táto funkcia nie je dostupná v režime Just Scan (Len snímať).
− Biela: Táto funkcia pomáha odstrániť pretrvávajúci obraz z obrazovky pomocou zmeny farby pixelov
na bielu. Túto funkciu použite v prípade, že na obrazovke sa nachádza pretrvávajúci obraz alebo
symboly, hlavne po dlhšom zobrazovaní statického obrazu.
− Posúvanie: Táto funkcia pomáha odstraňovať pretrvávajúci obraz z obrazovky pomocou presunu
všetkých pixelov na PZP do schémy. Túto funkciu použite v prípade, že na obrazovke sa nachádza
pretrvávajúci obraz alebo symboly, hlavne po dlhšom zobrazovaní statického obrazu.
− Bočná sivá: Keď pozeráte TV s pomerom obrazu 4:3, zabránite v poškodeniu obrazovky tak, že
nastavíte vyváženie bielej na extrémne ľavej a pravej strane.
Tmavá: Keď nastavíte pomer obrazu na 4:3, stmavnú ľavé a pravé strany.
Svetlá: Keď nastavíte pomer obrazu na 4:3, zosvetlia sa ľavé a pravé strany.
➢
Pre odstránenie pretrvávajúceho obrazu z obrazovky použite buď funkciu Biela alebo Posúvanie.
Aj keď obe funkcie odstraňujú pretrvávajúci obraz z obrazovky, funkcia Posúvanie je efektívnejšia.
➢
Funkcia pre odstránenie pretrvávajúceho obrazu by sa mala spustiť na dlhší čas (cca 1 hodinu),
aby sa pretrvávajúci obraz efektívne odstránil z obrazovky. Ak sa pretrvávajúci obraz nevylepšil po
vykonaní odstraňovacej funkcie, zopakujte ju znovu.
➢
Na zrušenie tejto funkcie stlačte akékoľvek tlačidlo na diaľkovom ovládači.
Premiestniť
Zadať
Návrat
Posun pixelov : Zap.
Horizontálny bod : 2
Vertikálna čiara : 2
Čas : 2 min.
Posun pixelov
T V
Používanie 3D funkcie
Na TV si môžete vychutnať 3D filmy a hry. Funkcia 3D efektu vám umožní zobraziť 3D obrázky
pomocou špeciálnych 3D okuliarov.
3,5 mm stereofónny konektor pre kábel RCA (Nedodáva sa)
3D okuliare
(Nedodávajú sa)
3D infračervený vysielač
(Nedodáva sa)
PC
Kábel HDMI/DVI (Nedodáva sa)
Zadný panel TV
Pripojenia
➢
Vzhľad 3D okuliarov (vrátane vysielača) sa môže odlišovať v závislosti od modelu vašich okuliarov.
BN68-01528A-00Slk.indd 22 2008-4-21 15:26:54

Slovensky - 23
1 Pripojte kábel HDMI/DVI medzi konektor HDMI IN 2 na TV a výstupný konektor PC na počítači.
2 Pripojte 3,5 mm stereofónny/2RCA kábel medzi konektor DVI IN (HDMI 2) [R-AUDIO-L] na TV a
konektor zvukového výstupu zvukovej karty vášho počítača.
3 Pripojte vysielač k portu 3D SYNC OUT na zadnom paneli TV.
4 Zapnite TV a nastavte zdroj TV na HDMI2.
Ďalšie informácie o 3D okuliaroch (vrátane vysielača) nájdete v používateľskej príručke od 3D okuliarov.
Nastavte rozlíšenie PC: PS50A470: 1024 x 768 pri 60 Hz,1360 x 768 pri 60 Hz
Optimálne rozlíšenie PC pri modeli PS50A470 je 1360x768. Keď sa signál 1024x768 pripojí v režime
3D, obraz sa zobrazí vo formáte 4:3, pričom sa zobrazia sivé pásy na ľavej a pravej strane.
3D infračervený vysielač komunikuje s 3D okuliarmi.
Preto by sa mal 3D vysielač nachádzať v blízkosti 3D okuliarov.
Aktivuje sa, keď vstupný signál HDMI alebo DVI je RGB a podporuje sa zvuk DVI.
Keď sa napájanie zapne alebo vypne, režim sa zmení na predvolený (Vyp.) a uloží sa Formát.
3D efekt sa zapne alebo vypne bez ohľadu na Režim obrazu.
Keď je zapnutá funkcia 3D efekt, aktivujú sa len ponuky Kontrast, Jas, 3D efekt a Vynulovať
obrazu.
Aby ste použili funkciu 3D efektu, vyžaduje sa grafická karta s podporou 3D alebo 3D softvér.
3D okuliare a vysielač musí vyrábať rovnaká spoločnosť.
Ak hráte hru alebo sledujete TV, zatiaľ čo nosíte 3D okuliare počas dlhej doby, môžete sa stretnúť s
únavou očí alebo s bolesťou hlavy.
3D okuliare (vrátane vysielača), ktoré nevyrobila spoločnosť Samsung, sa nemusia podporovať.
Ak pri používaní 3D funkcie bliká obrazovka, zmeňte osvetlenie prostredia na tmavšie alebo vypnite
fluorescenčnú lampu, aby ste sledovali obrazovku v najlepšom stave.
Zmena režimu
Zmena režimu vymení obraz pre každé oko tak, že zamení ľavý a
pravý výstupný signál.
1 Pripojte TV, PC a 3D infračervený vysielač tak, ako je
zobrazené na obrázku.
2 Stlačením tlačidla SOURCE vyberte HDMI.
3 Stlačením tlačidla MENU zobrazíte ponuku.
Stlačením tlačidla ▲ alebo ▼ vyberte položku Obrázok,
potom stlačte tlačidlo ENTER.
4 Stlačením tlačidla ▲ alebo ▼ vyberte položku Možnosti
obrazu, potom stlačte tlačidlo ENTER.
Stlačením tlačidla ▲ alebo ▼ vyberte položku 3D efekt, potom
stlačte tlačidlo ENTER.
5 Stlačením tlačidla ▲ alebo ▼ vyberte položku Režim, potom
stlačte tlačidlo ENTER.
Stlačením tlačidla ▲ alebo ▼ vyberte položku Vyp., Režim 1,
Režim 2 alebo 2D konvert., potom stlačte tlačidlo ENTER.
• Vyp.: Vypne funkciu 3D efekt.
• Režim 1: Režim 1 funguje s prvou pravou synchronizáciou.
• Režim 2: Režim 2 funguje s prvou ľavou synchronizáciou.
• 2D konvert.:
Poskytuje obraz konvertovaný z 3D na 2D.
Môžete si ju vybrať na dočasné sledovanie 2D obrazu, keď máte
závrat, ale mali by ste vybrať možnosť „Vyp.“, aby ste úplne
ukončili 3D efekt.
Ak 3D efekt správne nefunguje, znamená to, že režim a 3D
okuliare nemusia byť správne zosynchronizované. Aby ste ich
zosynchronizovali, prepnite na druhý režim.
Pokračovanie...
Premiestniť
Zadať
Návrat
Režim : Bežný
Svietivosť bunky 7
Kontrast 90
Jas 45
Ostrosť 50
Farba 50
Odtieň G50 R50
Podrobné nastavenia
Možnosti obrazu
Vynulovať : OK
Obrázok
T V
Premiestniť
Zadať
Návrat
Odtieň farby :
Normálna
Veľkosť :
Autom. nast. Šírky
Režim obrazu : 16:9
Digitálna redukcia šumu
:
Automaticky
Skutočná 100 Hz ukážka
: Vyp.
DNIe : Vyp.
HDMI úroveň čierne
: Normálna
Režim len modrej : Vyp.
Ochrana pred vypálením obrazu
3D efekt
Možnosti obrazu
T V
Premiestniť
Zadať
Návrat
Režim :
Formát :
3D efekt
T V
Vyp.
Režim 1
Režim 2
2D konvert.
BN68-01528A-00Slk.indd 23 2008-4-21 15:26:55

Slovensky - 24
Obnovenie nastavení obrazu na pôvodné nastavenia od
výroby
Môžete nastaviť podrobné nastavenia obrazu.
1 Stlačením tlačidla MENU zobrazte ponuku.
2 Stlačením tlačidla ENTER vyberte možnosť Obraz.
3 Stlačením tlačidla ▲ alebo ▼ vyberte možnosť Vynulovať a
potom stlačte tlačidlo ENTER.
4 Stlačením tlačidla ▲ alebo ▼ vyberte možnosť OK alebo
Zrušiť a potom stlačte tlačidlo ENTER.
➢
Každý režim sa dá obnoviť.
Move
Enter
Return
Režim : Bežný
svietivosť bunky 7
Kontrast 90
Jas 45
Ostrosť 50
Farba 50
Odtieň Z50 Č50
Podrobné nastavenia
Možnosti obrazu
Vynulovať :
Obraz
T V
OK
Zrušiť
Zmena formátu
Vyberte optimálny formát vstupu, aby zodpovedal vašej grafickej
karte alebo 3D softvéru.
Pozrite si vyššie uvedené popisy pre kroky 1 až 4.
5 Stlačením tlačidla ▲ alebo ▼ vyberte položku Formát, potom
stlačte tlačidlo ENTER.
6 Stlačením tlačidla ▲ alebo ▼ vyberte položku Kontrolný spoj,
Horizontálne alebo Vertikálne, potom stlačte tlačidlo ENTER.
Kontrolný spoj
Ak je výstupný formát vašej grafickej karty alebo
3D softvéru mozaika, vyberte tento formát vstupu.
Horizontálne
Ak je výstupný formát vašej grafickej karty alebo
3D softvéru horizontálne prekladaný, vyberte tento
formát vstupu.
Vertikálne
Ak je výstupný formát vašej grafickej karty alebo
3D softvéru vertikálne prekladaný, vyberte tento
formát vstupu.
➢
Opakovane môžete stlačiť tlačidlo 3D na diaľkovom ovládaní, aby ste
zmenili režim 3D.
Jednoduché nastavenie
1 Na diaľkovom ovládači stlačte tlačidlo TOOLS.
2 Stlačením tlačidla ▲ alebo ▼ vyberte položku 3D režim.
3 Stlačením tlačidla ENTER spustite 3D efekt.
TOOLS
3D režim ◄ Vyp. ►
Anynet+ (HDMI-CEC)
Režim obrazu : Dynamický
Režim zvuku : Bežný
Časovač režimu spánok : Vyp.
SRS TS XT : Vyp.
Úspora energie : Vyp.
Premiestniť
Zadať
Návrat
Premiestniť
Zadať
Návrat
Režim : Režim 1
Formát :
3D efekt
T V
Kontrolný spoj
Horizontálne
Vertikálne
BN68-01528A-00Slk.indd 24 2008-4-21 15:26:56

Slovensky - 25
Funkcie zvuku
1 Stlačením tlačidla MENU zobrazte ponuku.
2 Stlačením tlačidla ▲ alebo ▼ vyberte možnosť Zvuk a potom
stlačte tlačidlo ENTER.
3 Stlačením tlačidla ▲ alebo ▼ vyberte požadovanú možnosť a
potom stlačte tlačidlo ENTER.
Dostupné možnosti:
Režim, Ekvalizér, SRS TS XT,
Automatická hlasitosť, Reproduktor TV, Výber zvuku
4
Keď budete spokojní s vaším nastavením, stlačte tlačidlo ENTER.
5 Stlačením tlačidla EXIT opustíte ponuku.
Režim: Bežný/Hudba/Film/Reč/Vlastný
Môžete vybrať typ špeciálneho zvukového efektu, ktorý sa použije
pri sledovaní daného vysielania.
Jednoduché nastavenie
1 Na diaľkovom ovládači stlačte tlačidlo TOOLS.
2 Stlačením tlačidla ▲ alebo ▼vyberte
Režim zvuku
.
3 Stlačením tlačidla ◄ alebo ► vyberte požadovanú možnosť.
Ekvalizér: Vyváženie/100 Hz/300 Hz/1 kHz/3 kHz/10 kHz
Televízor poskytuje niekoľko nastavení, ktoré umožňujú ovládať
kvalitu zvuku.
➢
Ak zmeníte niektoré z týchto nastavení, štandard zvuku sa
automaticky zmení na hodnotu
Vlastný .
SRS TS XT: Vyp./Zap.
Technológia TruSurround XT je patentovanou technológiou SRS,
ktorá rieši problém prehrávania viackanálového obsahu systému
5.1 prostredníctvom dvoch reproduktorov. Technológia TruSurround
poskytuje presvedčivý virtuálny zážitok z priestorového zvuku
prostredníctvom ľubovoľného systému prehrávania cez dva reproduktory, vrátane vnútorných reproduktorov
televízora. Technológia je úplne kompatibilná so všetkými viackanálovými formátmi.
TruSurround XT, SRS a symbol sú obchodné známky spoločnosti SRS Labs, Inc.
Technológia TruSurround XT predstavuje súčasť licencie od spoločnosti SRS Labs, Inc.
Jednoduché nastavenie
1 Na diaľkovom ovládači stlačte tlačidlo TOOLS.
2 Stlačením tlačidla ▲ alebo ▼ vyberte položku SRS TS XT.
3 Stlačením tlačidla ◄ alebo ► vyberte položku Vyp. alebo
Zap..
Automatická hlasitosť: Vyp./Zap.
Každá vysielacia stanica má svoje vlastné signálové podmienky,
takže pre vás nie je jednoduché upraviť hlasitosť pri každej zmene
kanálu. Táto funkcia vám umožňuje automaticky upraviť hlasitosť požadovaného kanála znížením úrovne
zvukového výstupu v prípade, ak je modulačný signál príliš vysoký alebo zvýšením úrovne zvukového
výstupu, ak je modulačný signál príliš nízky.
Reproduktor TV: Vyp./Zap.
Ak chcete zvuk počuť cez oddelené reproduktory, prerušte vnútorný zosilňovač.
➢
Tlačidlá
+,
- a MUTE nefungujú, keď je funkcia TV Speaker prepnutá na možnosť Off.
➢
Keď je položka „Reproduktor TV“ nastavená na možnosť „Vyp.“, môžete ovládať v ponuke zvuku len
položku Výber zvuku“ (v režime PIP).
Výber zvuku: Hlavný/Podradený
Keď je aktivovaná funkcia PIP, môžete počúvať zvuk vedľajšieho (PIP) obrazu.
−
Hlavný: Používa sa na počúvanie zvuku hlavného obrazu.
−
Podradený: Používa sa na počúvanie zvuku vedľajšieho obrazu.
Premiestniť
Zadať
Návrat
Režim :
Vlastný
Ekvalizér
SRS TS XT : Vyp.
Automatická hlasitosť
: Vyp.
Reproduktor TV : Vyp.
Výber zvuku : Hlavný
Zvuk
T V
Nástroje
Anynet+ (HDMI-CEC)
Režim obrazu : Bežný
Režim zvuku ◄ Vlastný ►
Časovač režimu spánok : Vyp.
SRS TS XT : Vyp.
Úspora energie : Vyp.
Dual I-II : Monofónne
UkončiťPremiestniť
Nastaviť
Nástroje
Anynet+ (HDMI-CEC)
Režim obrazu : Bežný
Režim zvuku : Vlastný
Časovač režimu spánok : Vyp.
SRS TS XT ◄ Vyp. ►
Úspora energie : Vyp.
Dual I-II : Monofónne
Premiestniť
Nastaviť
Ukončiť
Premiestniť Nastaviť
Návrat
Ekvalizér
T V
Vyváženie 100Hz 300Hz 1kHz 3kHz 10kHz
+
0
-
R
L
+
0
-
BN68-01528A-00Slk.indd 25 2008-4-21 15:26:57

Slovensky - 26
Výber režimu zvuku (v závislosti od modelu)
Tlačidlo DUAL I-II zobrazuje a ovláda spracovanie a výstup zvukového signálu. Pri zapnutom
napájaní sa režim automaticky nastaví na „DUAL-I“ alebo „Stereo“, a to v závislosti od aktuálneho
prenosu.
Jednoduché nastavenie
1 Na diaľkovom ovládači stlačte tlačidlo TOOLS.
2 Stlačením tlačidla ▲ alebo ▼ vyberte položku Dual I-II.
3 Stlačením tlačidla ◄ alebo ► vyberte požadovanú možnosť.
Typ vysielania
Indikácia na obrazovke
NICAM
Stereo
Bežné vysielanie
(štandardný zvuk)
Mono
Bežné + NICAM Mono NICAM Mono
NICAM Stereo
NICAM
stereo
Mono
NICAM DUAL-I/II
NICAM
dual-1
NICAM
dual-2
Mono
A2
Stereo
Bežné vysielanie
(štandardný zvuk)
Mono
Dvojjazyčne alebo DUAL-I/II Dual-I Dual II
Stereo Stereo Mono
➢
Ak sa zhoršia podmienky príjmu, počúvanie bude jednoduchšie pri nastavení režimu
Monofónne.
Ak je stereofónny signál slabý a dochádza k automatickému prepínaniu, nastavte režim
Monofónne.
Pripojenie slúchadiel (Predávajú sa samostatne)
K prijímaču môžete pripojiť súpravu slúchadiel, ak si želáte pozerať televízny program
bez vyrušovania iných ľudí v miestnosti.
➢
Keď zasuniete konektor slúchadiel do príslušného portu,
budete môcť ovládať len Automatická hlasitosť“ v ponuke
Samodejna gla snost.
➢
Dlhotrvajúce používanie slúchadiel pri vysokej hlasitosti
môže poškodiť váš sluch.
➢
Keď pripojíte slúchadlá k TV, nebudete počuť žiadny zvuk z
reproduktorov.
➢
Hlasitosť slúchadiel a hlasitosť TV sa nastavuje samostatne.
Bočný panel TV
Nástroje
Anynet+ (HDMI-CEC)
Režim obrazu : Bežný
Režim zvuku : Vlastný
Sleep Timer : vfp.
SRS TS XT : vfp.
Energy Saving : vfp.
Dual I-II ◄ Monofónne ►
Premiestniť
Nastaviť
Ukončiť
BN68-01528A-00Slk.indd 26 2008-4-21 15:26:57

Slovensky - 27
Premiestniť
Zadať
Návrat
Nastaviť hodiny :
00 : 00
Časovač režimu spánok
: Vyp.
Časovač 1 : Vyp.
Časovač 2 : Vyp.
Časovač 3 : Vyp.
Čas
T V
Premiestniť
Zadať
Návrat
Plug & Play
Jazyk : English
Čas
Svetelný efekt
:
Pri sledovaní TV
Montáž na stenu
Melódia : Vyp.
Zábava : Vyp.
Úspora energie : Vyp.
Obraz v obraze
Nastavenie
T V
Premiestniť
Nastaviť
Návrat
Časovač 1
T V
00 00 Off
Čas zapnutia
:
Čas vypnutia
Opakovať
Once
10
Hlasitosť
00 00 Off
:
Funkcie času
1 Stlačením tlačidla MENU zobrazte ponuku.
2 Stlačením tlačidla ▲ alebo ▼ vyberte možnosť Nastavenie a
potom stlačte tlačidlo ENTER.
3 Stlačením tlačidla ▲ alebo ▼ vyberte možnosť Čas a potom
stlačte tlačidlo ENTER.
4 Stlačením tlačidla ▲ alebo ▼ vyberte požadovanú možnosť a
potom stlačte tlačidlo ENTER.
Dostupné možnosti:
Nastaviť hodiny, Časovač režimu
spánok, Časovač 1, Časovač 2, Časovač 3.
5
Keď budete spokojní s vaším nastavením, stlačte tlačidlo ENTER.
6 Stlačením tlačidla EXIT opustíte ponuku.
Nastaviť hodiny
Na televízore môžete nastaviť hodiny, ktoré po stlačení
tlačidla INFO na diaľkovom ovládači zobrazia aktuálny čas.
Čas musíte nastaviť aj v prípade, ak chcete použiť časovače
automatického zapínania a vypínania.
− Stlačením tlačidla ◄ alebo ► vyberte možnosť
Mesiac,
Deň, Rok, Hodina alebo Minúta. Tieto položky nastavte
stlačením tlačidla ▲ alebo ▼.
➢
Možnosť Mesiac, Deň, Rok, Hodina alebo Minúta
môžete nastaviť priamo stlačením číselných tlačidiel na
diaľkovom ovládači.
➢
V prípade prerušenia napájania alebo vytiahnutia
prijímača z napájania sa nastavenia pre hodiny stratia.
Časovač režimu spánok
Nastaviť môžete dobu medzi 30 a 180 minútami, po ktorej sa
televízor automaticky prepne do pohotovostného režimu.
− Stlačením tlačidla ▲ alebo ▼ vyberte predvolený časový
interval (
Vyp., 30, 60, 90, 120, 150 alebo 180) pre
zostávajúci čas zapnutia.
Jednoduché nastavenie
1 Na diaľkovom ovládači stlačte tlačidlo TOOLS.
2 Stlačením tlačidla ▲ alebo ▼ vyberte položku Časovač
režimu spánok.
3 Stlačením tlačidla ◄ alebo ► vyberte minúty, potom stlačte
tlačidlo ENTER.
Časovač 1/Časovač 2/Časovač 3
Ak chcete, aby sa televízor automaticky zapol alebo vypol vo
vami nastavenom čase, je potrebné nastaviť časovače zapnutia/
vypnutia.
☛
Najskôr musíte nastaviť hodiny.
− Stlačením tlačidla ◄ alebo ► vyberte nižšie uvedenú požadovanú položku.
Stlačením tlačidla ▲ alebo ▼ nastavíte na požadované nastavenie.
Čas zapnutia
: Vyberte možnosť Hour, Minute a
Zap./Vyp.
(Aby ste aktivovali časovač, keď budete
spokojní s nastavením, stlačte možnosť Zap.)
Čas vypnutia
: Vyberte možnosť Hour, Minute a
Zap./Vyp.
(Aby ste aktivovali časovač, keď budete
spokojní s nastavením, stlačte možnosť Zap.)
Opakovať: Vyberte možnosť Raz, Každý deň, Po až Pia, Po až So alebo So až Ne.
Hlasitosť: Vyberte požadovanú úroveň hlasitosti.
➢
Hodiny a minúty môžete nastaviť priamo stlačením numerických tlačidiel na diaľkovom ovládači.
☛
Auto Power Off
Keď nastavíte časovač na možnosť On, TV sa prípadne vypne, ak 3 hodiny potom, čo sa TV zapol
časovačom, nestlačíte žiadne ovládacie tlačidlo. Táto funkcia je dostupná len v režime zapnutého
časovača a zabraňuje prehriatiu, ktoré sa môže vyskytnúť, ak je TV príliš dlho zapnutý.
Nástroje
Anynet+ (HDMI-CEC)
Režim obrazu : Bežný
Režim zvuku : Vlastný
Časovač režimu spánok ◄ Vyp. ►
SRS TS XT : Vyp.
Úspora energie : Vyp.
Dual I-II : Monofónne
Premiestniť
Nastaviť
Ukončiť
BN68-01528A-00Slk.indd 27 2008-4-21 15:26:58

Slovensky - 28
Jazyk/Melódia/Svetelný efekt/Zábava/Úspora energie/
Obraz v obraze
1 Stlačením tlačidla MENU zobrazte ponuku.
2 Stlačením tlačidla ▲ alebo ▼ vyberte možnosť Nastavenie a
potom stlačte tlačidlo ENTER.
3 Stlačením tlačidla ▲ alebo ▼ vyberte požadovanú možnosť a
potom stlačte tlačidlo ENTER.
Dostupné možnosti:
Jazyk, Melódia, Svetelný efekt, Zábava,
Úspora energie, Obraz v obraze
4 Keď budete spokojní s vaším nastavením, stlačte tlačidlo
ENTER.
5 Stlačením tlačidla EXIT opustíte ponuku.
Jazyk
Toto nastavenie sa líši v závislosti od modelu. Pri prvom použití televízora musíte zvoliť jazyk, ktorý
sa použije na zobrazenie ponúk a indikátorov.
Svetelný efekt: Vyp./V pohotovostnom režime (V pohot. režime)/V režime pozerania TV (Pri
sledovaní TV)/Vždy
Podľa situácie môžete zapnúť/vypnúť modrú LED kontrolku na prednej strane TV. Túto možnosť
používajte pre úsporu energie alebo v prípade, ak vás LED kontrolka oslňuje.
−
Vyp. : Modrá LED kontrolka je stále vypnutá.
−
V pohotovostnom režime (V pohot. režime): Modrá LED kontrolka svieti zatiaľ, čo je v
pohotovostnom režime a vypne sa pri zapnutí TV.
−
V režime pozerania TV (Pri sledovaní TV): Modrá LED kontrolka svieti, keď pozeráte TV a vypne
sa pri vypnutí TV.
−
Vždy: Modrá LED kontrolka stále svieti.
➢
Položku Light Effect nastavte na možnosť Off, aby ste znížili spotrebu napájania.
Melódia: Vyp./nízka/stredná/vysoká
Dá sa nastaviť zvuk melódie zapnutia/vypnutia TV.
Zábava: Vyp./Športy/Kino/Hra
Režim zábavy vám umožní vybrať optimálne zobrazenie a zvuk pre športy, kino a hry.
−
Vyp.: Vypne funkciu Entertainment.
−
Športy: Poskytuje optimálnu kvalitu obrazu a zvuku pre športy.
−
Kino: Poskytuje optimálnu kvalitu obrazu a zvuku pre sledovanie filmu.
Môžete zažiť bohatší obraz a zdokonalený zvuk.
−
Hra: Poskytuje optimálnu kvalitu obrazu a zvuku pre hry. Tento režim zvyšuje rýchlosť hrania, keď
používate externú hernú konzolu, ktorá je pripojená k TV.
➢Ak nastavíte ktorýkoľvek z troch režimov Entertainment na možnosť On, nastavenia sa uzamknú
a nedajú sa upravovať. Ak chcete vykonať úpravy režimu obrazu a zvuku, musí byť vypnutý
režim Entertainment.
➢Nastavenia zábavy sa uložia pre každý zdroj vstupu.
Pokračovanie...
Premiestniť
Nastaviť
Návrat
Plug & Play
Jazyk : English
Čas
Svetelný efekt
:
Pri sledovaní TV
Montáž na stenu
Melódia : Vyp.
Zábava : Vyp.
Úspora energie : Vyp.
Obraz v obraze
Nastavenie
T V
BN68-01528A-00Slk.indd 28 2008-4-21 15:26:59

Slovensky - 29
Nastavenie softvéru PC (Založené na operačnom systéme
Windows XP)
Nastavenia zobrazenia v systéme Windows pre typický počítač
sú zobrazené nižšie. Skutočné zobrazenia na vašom počítači
budú pravdepodobne odlišné v závislosti od konkrétnej
verzie systému Windows a konkrétnej grafickej karty. Ak aj
vaše aktuálne zobrazenia vyzerajú odlišne, rovnaké základné
inštalačné informácie budú platiť pre takmer všetky prípady.
(Ak nie, obráťte sa na výrobcu počítača alebo distribútora
produktov značky Samsung.)
1 Pravým tlačidlom myši kliknite na pracovnú plochu systému
Windows a potom kliknite na Vlastnosti.
Zobrazí sa
Display Properties.
2 Kliknite na Setting tab a potom nastavte režim displeja s
ohľadom na tabuľku režimov displeja. Nie je nutné meniť
nastavenie farieb.
3 Kliknite na Advanced. Zobrazí sa nové dialógové okno nastavenia.
4 Kliknite na kartu Monitor, potom nastavte Screen refresh rate s ohľadom na tabuľku režimov
displeja. Prípadne namiesto nastavenia
Screen refresh rate nastavte individuálnu vertikálnu a
horizontálnu frekvenciu.
5 Kliknutím na tlačidlo OK zatvoríte okno a potom kliknite na tlačidlo OK v okne Display Properties.
V tejto chvíli sa môže spustiť automatické reštartovanie.
Úspora energie: Vyp./nízka/stredná/vysoká
Táto funkcia nastavuje jas obrazovky v závislosti od okolitých
svetelných podmienok.
−
Vyp.: Vypne režim Energy Saving.
−
nízka
: Funguje v bežnom režime bez ohľadu na okolité
osvetlenie.
− stredná: Vstúpi do strednáho režimu úspory energie bez
ohľadu na okolité osvetlenie.
− vysoká: Vstúpi do maximálneho režimu úspory energie bez
ohľadu na okolité osvetlenie.
Jednoduché nastavenie
1 Na diaľkovom ovládači stlačte tlačidlo TOOLS.
2 Stlačením tlačidla ▲ alebo ▼ vyberte položku
Úspora energie
.
3 Stlačením tlačidla ◄ alebo ► vyberte požadovanú možnosť.
PIP (Obraz v obraze): Obraz v obraze (Zap./Vyp.)/Zdroj/Veľkosť/Pozícia/Program
V rámci hlavného obrazu môžete zobraziť vedľajší obraz. Týmto spôsobom môžete pozerať TV
program alebo sledovať videovstup z akýchkoľvek pripojených
zariadení.
− Obraz v obraze: Zap./Vyp.
Funkciu obrazu v obraze môžete zapnúť alebo vypnúť.
Tabuľka nastavení Obrazu v obraze
Hlavný obraz Vedľajší obraz
Komponent
HDMI1, 2, 3
PC
Samo analogno
televizijsko oddajanje
Ext1, Ext2, AV
−
Zdroj: TV/Ext.1/Ext.2/AV
Môžete vybrať zdroj vedľajšieho obrazu.
− Veľkosť: / /
Môžete vybrať veľkosť vedľajšieho obrazu.
➢
Ak je hlavný obraz v režime PC a
Komponent
,
Veľkosť
nie je dostupná.
−
Pozícia: / / /
Môžete vybrať polohu vedľajšieho obrazu.
➢
V režime Double (Dvojitý) ( , ) sa nedá vybrať možnosť Pozícia.
−
Program
Kanál vedľajšieho obrazu môžete vybrať len v prípade, ak je položka Zdroj nastavená na TV.
Premiestniť
Nastaviť
Návrat
Obraz v obraze : On
Zdroj : TV
Veľkosť :
Pozícia :
Program : P 1
PIP
T V
Nástroje
Anynet+ (HDMI-CEC)
Režim obrazu : Bežný
Režim zvuku : Vlastný
Časovač režimu spánok : Vyp.
SRS TS XT : Vyp.
Úspora energie ◄ Vyp. ►
Dual I-II : Monofónne
Premiestniť
Nastaviť
Ukončiť
BN68-01528A-00Slk.indd 29 2008-4-21 15:26:59

Slovensky - 30
Režim vstupu (PC)
Pozícia aj veľkosť obrazovky sa budú líšiť v závislosti od typu počítača a jeho rozlíšenia.
V tabuľke nižšie sú uvedené všetky podporované režimy zobrazenia:
D-Sub Input
Režim Rozlíšenie
Horizontálna
frekvencia
(kHz)
Vertikálna
frekvencia
(Hz)
Frekvencia
vzorkovania
(MmHz)
Synchronizačná
polarita
(Horizontálne/
vertikálne)
PS50A470
IBM
640 x 350
720 x 400
31,469
31,469
70,086
70,087
25,175
28,322
+ / -
- / +
✔
✔
VESA
640 x 480
640 x 480
640 x 480
800 x 600
800 x 600
800 x 600
1024 x 768
1024 x 768
1024 x 768
1360 x 768
31,469
37,861
37,500
37,879
48,077
46,875
48,363
56,476
60,023
47,712
59,940
72,809
75,000
60,317
72,188
75,000
60,004
70,069
75,029
60,015
25,175
31,500
31,500
40,000
50,000
49,500
65,000
75,000
78,750
85,500
- / -
- / -
- / -
+ / +
+ / +
+ / +
- / -
- / -
+ / +
+ / +
✔
✔
✔
✔
✔
✔
✔
✔
✔
✔
HDMI/DVI Input
Režim Rozlíšenie
Horizontálna
frekvencia
(kHz)
Vertikálna
frekvencia
(Hz)
Frekvencia
vzorkovania
(MmHz)
Synchronizačná
polarita
(Horizontálne/
vertikálne)
PS50A470
VESA
640 x 480
800 x 600
1024 x 768
1360 x 768
31,469
37,879
48,363
47,712
59,940
60,317
60,004
60,015
25,175
40,000
65,000
85,500
- / -
+ / +
- / -
+ / +
✔
✔
✔
✔
Keď používate pripojenie pomocou kábla HDMI/DVI, musíte používať konektor HDMI IN 2.
Režim prekladania nie je podporovaný.
V prípade zvolenia neštandardného formátu obrazu môže televízor pracovať nezvyčajne.
Podporujú sa oddelené a kompozitné režimy. SOG nie je podporované.
Kvalita počítačového textu pre model PS50A470, je optimálna v režime VESA (1360 x 768 pri 60 Hz).
BN68-01528A-00Slk.indd 30 2008-4-21 15:27:00

Slovensky - 31
Nastavenie počítača
➢
Predvoľte na režim PC stlačením tlačidla SOURCE.
1 Stlačením tlačidla MENU zobrazte ponuku.
2 Stlačením tlačidla ▲ alebo ▼ vyberte možnosť Obraz a potom
stlačte tlačidlo ENTER.
3 Stlačením tlačidla ▲ alebo ▼ vyberte požadovanú možnosť a
potom stlačte tlačidlo ENTER.
4 Keď budete spokojní s vaším nastavením, stlačte tlačidlo
ENTER.
5 Stlačením tlačidla EXIT opustíte ponuku.
Automatické nastavenie:
Automatické nastavenie umožňuje samočinné nastavenie
PC obrazovky televízora prichádzajúcemu PC videosignálu.
Hodnoty jemného, hrubého nastavenia a polohy sa nastavujú
automaticky.
Jednoduché nastavenie
1 Na diaľkovom ovládači stlačte tlačidlo TOOLS.
2 Stlačením tlačidla ▲ alebo ▼ vyberte možnosť Automatické
nastavenie a potom stlačte tlačidlo ENTER.
Obrazovka: hrubé/Jemné/Pozícia/Vynulovanie obrazu
hrubé/Jemné
Účelom nastavenia kvality obrazu je odstránenie alebo
obmedzenie šumu z obrazu.Ak sa šum neodstráni samotným
jemným doladením, tak potom opätovne čo najlepšie nastavte
frekvenciu (hrubé) a jemné doladenie.
Po znížení šumu obraz opätovne nastavte tak, aby bol
zarovnaný v strede obrazovky.
1
Stlačením tlačidla ▲ alebo ▼ vyberte možnosť hrubé alebo
Jemné, potom stlačte tlačidlo ENTER.
2 Stlačením tlačidla ◄ alebo ► nastavte kvalitu obrazu. Môžu
sa objaviť vertikálne pásy alebo môže byť rozmazaný obraz.
Stlačte tlačidlo ENTER.
Pozícia
Nastavte polohu PC vtedy, ak sa neprispôsobí TV obrazovke.
1 Stlačením tlačidla ▲/▼/◄/► nastavte polohu.
2 Stlačte tlačidlo ENTER.
Vynulovanie obrazu
Všetky nastavenia obrazu môžete nahradiť výrobnými
hodnotami.
Nástroje
Anynet+ (HDMI-CEC)
Režim obrazu : Bežný
Režim zvuku : Vlastný
Časovač režimu spáno : Vyp.
SRS TS XT : Vyp.
Úspora energie : Vyp.
PIP
Automatické nastavenie
Zadať UkončiťPremiestniť
Prebieha automatické nastavenie.
Čakajte, prosím.
Vynulovanie obrazu sa dokončilo.
Premiestniť
Nastaviť
Návrat
Pozícia
T V
Premiestniť
Nastaviť
Návrat
hrubé 50
Jemné 11
Pozícia
Vynulovanie obrazu
Obrazovka
T V
Premiestniť
Nastaviť
Návrat
Režim : Bežný
svietivosť bunky 7
Kontrast 95
Jas 45
Ostrosť 50
Automatické nastavenie
Obrazovka
Podrobné nastavenia
Možnosti obrazu
Vynulovať : OK
Obraz
T V
BN68-01528A-00Slk.indd 31 2008-4-21 15:27:00

Slovensky - 32
Pripojenie zariadení systému Anynet
+
Systém Anynet
+
podporuje AV zariadenia, ktoré výlučne podporujú len systém Anynet
+
.
Presvedčte sa, či sa na AV zariadení, ktoré idete pripojiť k TV, nachádza značka systému Anynet
+
.
Priame pripojenie k TV
Prepojte konektor [HDMI
1], [HDMI 2] alebo [HDMI
3] na bočnom paneli TV
s konektorom HDMI OUT
(HDMI VÝSTUP) príslušného
zariadenia so systémom
Anynet
+
pomocou HDMI kábla.
Pripojenie domáceho kina
1 Prepojte konektor [HDMI
1], [HDMI 2] alebo [HDMI
3] na bočnom paneli
TV s konektorom HDMI
OUT (HDMI VÝSTUP)
príslušného zariadenia
so systémom Anynet
+
pomocou HDMI kábla.
2 Prepojte konektor HDMI IN
(HDMI VSTUP) domáceho
kina a konektor HDMI
OUT (HDMI VÝSTUP)
príslušného zariadenia
so systémom Anynet
+
pomocou HDMI kábla.
➢
Pripojte iba jeden prijímač.
➢
Zariadenie so systémom Anynet+ môžete pripojiť pomocou HDMI kábla. Niektoré káble HDMI
nemusia podporovať funkcie systému Anynet
+
.
➢
Systém Anynet+ funguje, ak je zariadenie s podporou systému Anynet+ v pohotovostnom alebo
zapnutom režime.
➢
Systém Anynet+ podporuje celkovo až 8 AV zariadení.
English - 30
Čo je systém Anynet
+
?
Anynet
+
predstavuje sieťový AV systém, ktorý vytvára jednoducho použiteľné rozhranie pre
používateľov tak, že bude kontrolovať všetky pripojené AV zariadenia prostredníctvom ponuky
Anynet
+
vtedy, keď sú pripojené AV zariadenia od spoločnosti Samsung Electronics.
TV
English - 30
TV
Zariadenie 1 so
systémom Anynet
+
Zariadenie 2 so
systémom Anynet
+
Zariadenie 3 so
systémom Anynet
+
Kábel HDMI
Kábel HDMI
Kábel HDMI
Zariadenie 1 so
systémom Anynet
+
Zariadenie 2 so
systémom Anynet
+
Zariadenie 3 so
systémom Anynet
+
Kábel HDMI
Kábel HDMI
Kábel HDMI
Kábel HDMI
Domáce kino
BN68-01528A-00Slk.indd 32 2008-4-21 15:27:01

Slovensky - 33
Vyhľadávanie a prepínanie medzi zariadeniami so systémom
Anynet
+
1 Stlačením tlačidla MENU zobrazte ponuku.
Stlačením tlačidla ▲ alebo ▼ zvoľte Vstup a následne stlačte
tlačidlo ENTER.
2 Stlačením tlačidla ▲ alebo ▼ zvoľte Anynet
+
(HDMI-CEC) a
následne stlačte tlačidlo ENTER.
3 Stláčaním tlačidla ▲ alebo ▼ zvoľte Zvoliť zariadenie a
následne stlačte tlačidlo ENTER.
4 Stlačením tlačidla ▲ alebo ▼ vyberte konkrétne zariadenie a
stlačte tlačidlo ENTER.
Prepne sa na zvolené zariadenie.
5 Ak nemôžete nájsť vami požadované zariadenie, stlačením
tlačidla ▲ alebo ▼ vyberte možnosť Vyhľadávanie prepojení a
potom stlačte tlačidlo ENTER.
Zobrazí sa správa Konfigurácia pripojenia Anynet+.... Po ukončení
vyhľadávania zariadení, budú pripojené zariadenia uvedené v
zozname ponuky Anynet
+
.
➢
Prepnutie na zvolené zariadenia môže trvať až 2 minúty. Počas
procesu prepínania nie je možné danú operáciu zrušiť.
➢
Č
as potrebný na vyhľadanie zariadení určuje počet pripojených
zariadení.
➢
Keď sa dokončí vyhľadávanie zariadení, nezobrazí sa počet
nájdených zariadení.
➢
Aj napriek tomu, že TV automaticky vyhľadá zariadenia, keď
sa zapne pomocou tlačidla POWER,
v zozname zariadení sa nezobrazia zariadenia pripojené počas
doby, keď bol TV zapnutý alebo pri špecifických okolnostiach. Preto na vyhľadávanie zariadení
vyberte ponuku Vyhľadávanie pripojení.
➢
Ak ste zvolili režim externého vstupu stlačením tlačidla SOURCE, nemáte možnosť využívať funkciu
Anynet
+
. Uistite sa, že ste sa prepli na zariadenie so systémom Anynet
+
pomocou tlačidla TOOLS.
Nastavenie systému Anynet
+
Nasledujúce nastavenia sú určené pre používanie funkcií
systému Anynet
+
.
Používanie funkcie Anynet
+
1 Stlačením tlačidla MENU zobrazte ponuku.
Stlačením tlačidla ▲ alebo ▼ zvoľte Vstup a následne stlačte
tlačidlo ENTER.
2 Stlačením tlačidla ▲ alebo ▼ zvoľte Anynet
+
(HDMI-CEC) a
následne stlačte tlačidlo ENTER.
3 Stlačením tlačidla ▲ alebo ▼ vyberte možnosť Nastavenie a
následne stlačte tlačidlo ENTER.
4 Stlačením tlačidla ▲ alebo ▼ zvoľte Anynet
+
(HDMI-CEC) a
následne stlačte tlačidlo ENTER.
5 Stlačením tlačidla ▲ alebo ▼ zvoľte Zap. a následne stlačte
tlačidlo ENTER.
➢
Funkcia Anynet+ (HDMI-CEC) sa zapne.
➢
Ak vyberiete možnosť Vyp., Anynet+ (HDMI-CEC) sa vypne
.
➢
Keď je funkcia Anynet+ (HDMI-CEC) vypnutá, deaktivujú sa
všetky činnosti spojené so systémom Anynet
+
.
Automatické vypínanie zariadenia so systémom Anynet
+
pri
vypnutí televízora
4 Stlačením tlačidla ▲ alebo ▼ vyberte možnosť Automatické
vypínanie a potom stlačte tlačidlo ENTER.
5 Stlačením tlačidla ▲ alebo ▼ zvoľte Áno a následne stlačte
tlačidlo ENTER.
➢
Funkcia automatického vypnutia je zapnutá
.
➢
Ak vyberiete možnosť Nie, funkcia Automatické vypnutie sa zruší.
Stlačením tlačidla EXIT opustíte ponuku.
➢
Nastavenie Výber zariadenia diaľkového
ovládania TV sa musí
nastaviť na TV, aby bolo možné používať funkciu Anynet
+
.
➢
Ak nastavíte Automatické vypnutie na Áno, tak
pripojené externé zariadenia sa vypnú spolu s
vypnutím TV. Avšak, ak zariadenie nahráva, nie je ho možné vypnúť.
Nastavenie
Anynet+ (HDMI-CEC) : Vyp.
Automatické vypnutie
: Vyp.
Vyhľadávajú sa pripojenia
Zadať NávratPremiestniť
Vyp.
Zap.
Nastavenie
Anynet+ (HDMI-CEC) : On
Automatické vypnutie :
: Off
Automatické vypnutie
Zadať NávratPremiestniť
Nie
Áno
Nastavenie
Anynet
+
(HDMI-CEC)
: Zap.
Automatické vypnutie
: Áno
Vyhľadávajú sa pripojenia
Zadať NávratPremiestniť
Zobraziť TV
Vybrať zariadenie
Nahrávať
Ponuka v zariadení
Prevádzka zariadenia
Prijímač :Vyp.
Nastavenie
TV P 1
Návrat
Premiestniť
Zadať
Zobraziť TV
Vybrať zariadenie
Nahrávať
Ponuka v zariadení
Prevádzka zariadenia
Prijímač :Vyp.
Nastavenie
TV P 1
DVDR1
DVDR2
DVD1
DVD2
Premiestniť
Zadať
Návrat
Pokračovanie...
BN68-01528A-00Slk.indd 33 2008-4-21 15:27:02

Slovensky - 34
Ponuka Anynet+
Ponuka Anynet
+
sa zmení v závislosti od typu a stavu zariadení Anynet
+
pripojených k TV.
PonukaAnynet
+
Popis
Pozerať TV Prepne z Anynet
+
na režim TV vysielania.
Zvoliť zariadenie
Váš TV sa pripojí k príslušnému zariadeniu.
Nahrávať Spustí nahrávanie. (Táto ponuka funguje iba so zariadeniami s
podporou nahrávania.)
Ponuka na zariadení Zobrazí ponuku pripojeného zariadenia.
Príklad. Keď je pripojený DVD rekordér, zobrazí sa úvodná ponuka
DVD rekordéra.
Prevádzka zariadenia Zobrazí ponuku ovládania prehrávania pripojeného zariadenia.
Príklad. Keď je pripojený DVD rekordér, zobrazí sa ponuka
ovládania prehrávania DVD rekordéra.
Prijímač Výstup zvuku je cez prijímač.
Nastavenie Môžete nastaviť prostredie pre používanie systému Anynet
+
.
Tlačidlá diaľkového ovládania TV dostupné v režime Anynet
+
Typ zariadenia Prevádzkový stav Dostupné tlačidlá
Zariadenie so
systémomAnynet
+
Po prepnutí na zariadenie,
keď je na obrazovke
zobrazená ponuka
príslušného zariadenia.
Tlačidlá s číslami
Tlačidlá ▲/▼/◄/►/ENTER
Farebné tlačidlá
Tlačidlo EXIT
Po prepnutí na zariadenie
zatiaľ, čo sa prehráva súbor
W.LINK
(Vyhľadávanie smerom dozadu)
W.LINK
(Vyhľadávanie smerom dopredu)
W.LINK
(Zastavenie)
W.LINK
W.LINK
(Prehrávanie/Pozastavenie)
Zariadenie so vstavaným
tunerom
Po prepnutí na zariadenie,
keď pozeráte televízny
program
Tlačidlo P /
Zvukové zariadenie Keď je aktivovaný prijímač
Tlačidlo
W.LINK
/
W.LINK
Tlačidlo MUTE
➢
Funkcia Anynet+ funguje len v prípade, keď je diaľkové ovládanie nastavené na TV.
➢
Tlačidlo REC funguje len v stave nahrávania.
➢
Nie je možné ovládať zariadenia so systémom Anynet+ pomocou tlačidiel na bočnej strane TV.
Zariadenia so systémom Anynet
+
môžete ovládať len pomocou diaľkového ovládača.
➢
Diaľkový ovládač TV nemusí fungovať za určitých podmienok. V tomto prípade, opakovane zvoľte
zariadenie so systémom Anynet
+
.
➢
Funkcie Anynet+ nefungujú pri produktoch od iných výrobcov.
➢
V režime Anynet+ nemusia farebné tlačidlá fungovať správne.
➢
Činnosti
W.LINK
,
W.LINK
sa môžu líšiť v závislosti od konkrétneho zariadenia.
Nahrávanie
Pomocou rekordéra môžete uskutočniť nahrávku televízneho programu.
Stlačte tlačidlo REC.
Nahrávanie sa spustí. (Iba v prípade, ak je pripojené zariadenie s podporou systému Anynet
+
.
➢
Aktuálny televízny program sa nahráva v stave sledovania TV. Ak pozeráte video z iného zariadenia,
tak sa nahráva video z tohto zariadenia.
➢
Môžete nahrávať aj zdrojové toky zvolením Nahrať po stlačení tlačidla TOOLS.
➢
Pred nahrávaním skontrolujte, či je konektor antény správne pripojený k zariadeniu na nahrávanie.
Pre pripojenie a
ntény k zariadeniu na nahrávanie si pozrite používateľskú príručku.
BN68-01528A-00Slk.indd 34 2008-4-21 15:27:03

Slovensky - 35
TV P 1
Zobraziť TV
Vybrať zariadenie
Nahrávať
Ponuka v zariadení
Prevádzka zariadenia
Prijímač :Zap.
Nastavenie
Zadať
Premiestniť
Ukončiť
Počúvanie cez prijímač
Zvuk môžete počúvať cez prijímač namiesto reproduktorov TV.
1 Stlačením tlačidla MENU zobrazte ponuku.
Stlačením tlačidla ▲ alebo ▼ zvoľte Vstup a následne stlačte tlačidlo ENTER.
2 Stlačením tlačidla ▲ alebo ▼ zvoľte Anynet
+
(HDMI-CEC) a následne stlačte
tlačidlo ENTER.
3 Stlačením tlačidla ▲ alebo ▼ zvoľte Prijímač a následne stlačte tlačidlo ENTER.
4
Stlačením tlačidla ◄ alebo ► vyberte možnosť Zap. a potom stlačte tlačidlo ENTER.
Teraz môžete zvuk počúvať cez prijímač.
5 Stlačením tlačidla EXIT opustíte ponuku.
➢
Keď je prijímač prepnutý na možnosť Zap., môžete počúvať TV zvuk cez
2-kanálový prijímač.
➢
Ak je prijímač výslovne určený pre domáce kino, nemusí sa zobraziť v zozname
zariadení.
➢
V prípade obsahu s problémom s autorskými právami nemusí správne fungovať počúvanie cez prijímač.
➢
Keď počúvate cez prijímač, existujú obmedzenia pre používanie PIP a ponuky spojenej so zvukom.
Body, ktoré je potrebné skontrolovať pred požadovaním servisu
Príznak Riešenie
Systém Anynet
+
nefunguje. ■ Skontrolujte, či zariadenie spadá pod skupinu zariadení so
systémom Anynet
+
. Systém Anynet
+
podporuje výlučne
zariadenia so systémom Anynet
+
.
■ Pripojte iba jeden prijímač.
■ Skontrolujte, či je správne pripojený sieťový kábel zariadenia so
systémom Anynet
+
.
■
Skontrolujte káblové prepojenia videa/zvuku/HDMI zariadenia so
systémom Anynet
+
.
■ Skontrolujte, či je položka Anynet+ (HDMI-CEC) v ponuke
nastavenia systému Anynet
+
nastavená na možnosť Zap.
■ Skontrolujte, či je diaľkový ovládač TV nastavený do režimu TV.
■
Skontrolujte, či je výhradným diaľkovým ovládaním systému Anynet
+
.
■
Anynet
+
nefunguje za určitých podmienok. (Vyhľadávanie kanálov)
■ Po pripojení alebo odpojení kábla HDMI sa, prosím, uistite, že
opakovane vykonáte vyhľadávanie zariadení pri nasledujúcom
spustení vášho TV.
■ Skontrolujte, či funkcia Anynet
+
zariadenia so systémom Anynet
+
je zapnutá.
Chcem spustiť systém
Anynet
+
.
■ Skontrolujte, či je zariadenie Anynet
+
správne pripojené k TV a
skontrolujte, či je systém Anynet
+
(HDMI-CEC) nastavený na
možnosť Zap. v ponuke Nastavenie systému Anynet
+
.
■ Stlačte tlačidlo TV na diaľkovom ovládači TV, aby ste zapli TV.
Následne stlačte tlačidlo TOOLS a zobrazí sa ponuka Anynet
+
a
zvoľte si ponuku, ktorú chcete.
Chcem opustiť systém
Anynet
+
.
■ Zvoľte Pozerať TV v ponuke Anynet
+
.
■ Stlačte tlačidlo SOURCE na diaľkovom ovládaní TV a vyberte iné
zariadenie, ako zariadenia so systémom Anynet
+
.
■ Stlačením jedného z tlačidiel P, CH LIST alebo PRE-CH prepnete
na režim TV. (Berte na vedomie, že tlačidlo kanálu funguje, iba
ak zariadenie so systémom Anynet
+
vybavené tunerom nie je
pripojené.)
Na obrazovke sa zobrazí
správa Pripájanie k zariadeniu
Anynet
+
... (Connecting to
Anynet+ device...).
■ Diaľkové ovládanie nemôžete nastaviť, keď konfigurujete Anynet+
alebo prepínate do režimu zobrazenia.
■ Keď sa nastavenie systému Anynet
+
alebo prepínanie do režimu
zobrazenia ukončí, použite diaľkové ovládanie.
Na zariadení so systémom
Anynet
+
nefunguje prehrávanie.
■
Nemôžete používať funkciu prehrávania, keď prebieha proces Plug & Play.
Nezobrazí sa pripojené
zariadenie.
■ Skontrolujte, či zariadenie podporuje funkcie systému Anynet+.
■ Skontrolujte, či je alebo nie je správne pripojený HDMI kábel.
■ Skontrolujte, či Anynet
+
(HDMI-CEC) je nastavený na možnosť
Zap. (On) v ponuke Nastavenia systému Anynet
+
(Anynet+ setup).
■ Opakovane vyhľadajte zariadenia so systémom Anynet
+
.
■ Zariadenie so systémom Anynet
+
môžete pripojiť výlučne
pomocou kábla HDMI. Niektoré káble HDMI nemusia podporovať
funkcie systému Anynet
+
.
Televízny program nie je
možné nahrať.
■ Skontrolujte, či je konektor antény správne pripojený k zariadeniu
na nahrávanie.
BN68-01528A-00Slk.indd 35 2008-4-21 15:27:03

Slovensky - 36
Funkcia teletextu (v závislosti od modelu)
Väčšina televíznych kanálov poskytuje textové informačné služby prostredníctvom teletextu.
Strana s indexom služby teletextu vám poskytne informácie o jeho používaní. Použitím tlačidiel
diaľkového ovládania môžete využiť ďalšie nastavenia, ktoré vám pomôžu nastaviť službu podľa
vašich predstáv.
☛
Aby sa teletextové informácie zobrazovali správne, musí byť
príjem daného kanála stabilný. V opačnom prípade môžu
chýbať informácie alebo stránky nemusia byť zobrazené
správne.
1
TV
Opustenie zobrazovania teletextu (v závislosti od modelu)
2
(uložiť)
Používa sa na ukladanie teletextových stránok.
3
(veľkosť)
Stlačením zobrazíte v hornej polovici obrazovky dvojnásobne
veľké písmená. Ak chcete zobraziť spodnú polovicu obrazovky,
stlačte tlačidlo ešte raz.Ak sa chcete vrátiť na normálnu
obrazovku, stlačte tlačidlo ešte raz.
4
(zobrazenie)
Používa sa na zobrazenie skrytého textu (napríklad odpovede
na kvízové hry) Ak sa chcete vrátiť na normálnu obrazovku,
stlačte tlačidlo ešte raz.
5
Farebné tlačidlá (červené/zelené/žlté/modré)
Ak vysielacia spoločnosť používa systém FASTEXT, rozličné
témy v rámci teletextovej strany sú kódované farebne a dajú
sa vybrať stlačením farebných tlačidiel na diaľkovom ovládači.
Stlačte želanú farbu podľa toho, ktorú tému chcete zobraziť.
Strana sa zobrazuje s ďalšími farebne odlíšenými informáciami,
ktoré sa dajú vyberať rovnakým spôsobom.Ak chcete zobraziť
predchádzajúcu alebo nasledujúcu stranu, stlačte príslušné
farebné tlačidlo.
6
(zapnúť teletext/mix)
Stlačte toto tlačidlo ak chcete spustiť režim teletextu potom, čo
ste prepli na program, ktorý takúto službu poskytuje. Ak chcete
teletext prekryť zobrazením aktuálneho vysielania, stlačte
tlačidlo dvakrát.
7
(režim)
Stlačením vyberte režim teletextu (LIST/FLOF).Ak ho stlačíte
v režime LIST (ZOZNAM), prepne sa do režimu uloženia
zoznamu.V režime uloženia zoznamu môžete uložiť teletextovú
stránku do zoznamu s použitím tlačidla (uložiť).
8
(podstránka)
Používa sa na vedľajšiu stránku, ktorá je k dispozícii.
9
(nasledujúca strana)
Používa sa na zobrazenie nasledujúcej teletextovej stránky.
0
(predchádzajúca strana)
Používa sa na zobrazenie predchádzajúcej teletextovej stránky.
!
(index)
Používa sa, ak chcete zobraziť stránku so zoznamom
(obsahom) kedykoľvek počas prezerania teletextu.
@
(podržať)
Používa sa v prípade, že chcete podržať zobrazenie zadanej
stránky, ak je táto zvolená stránka spojená s viacerými
vedľajšími stránkami,
ktoré automaticky nasledujú. Ak chcete pokračovať, stlačte
opäť tlačidlo.
#
(zrušiť)
Používa sa na zobrazenie vysielania, keď sa vyhľadáva strana.
➢
Teletextové strany môžete meniť priamo stlačením numerických tlačidiel na diaľkovom ovládači.
Pokračovanie...
BN68-01528A-00Slk.indd 36 2008-4-21 15:27:05

Slovensky - 37
Strany teletextu sú zoradené do šiestich kategórií:
Časť Obsah
A
B
C
D
E
F
Číslo vybratej strany.
Identifikácia vysielacieho kanála.
Číslo aktuálnej strany alebo indikátor
vyhľadávania.
Dátum a čas.
Text.
Stavové informácie.
Informácie FASTEXT.
➢
Teletextové informácie sú často rozdelené na viacerých
stranách zobrazovaných postupne za sebou, ku ktorým môžete
pristupovať:
Zadaním čísla strany
Výberom názvu v zozname
Výberom farebného nadpisu (systém FASTEXT)
➢
Stlačte tlačidlo TV, ak chcete opustiť režim teletextu.
BN68-01528A-00Slk.indd 37 2008-4-21 15:27:06

Slovensky - 38
Technické údaje súpravy upevňovacej konzoly (VESA)
Nástenný držiak nainštalujte na pevnú stenu kolmú voči podlahe.
Pri montáži na iné stavebné materiály sa, prosím, kontaktujte s vaším najbližším predajcom.
Ak inštalujete na strop alebo šikmú stenu, môže padnúť a spôsobiť vážne fyzické zranenie.
Séria produktov palec Špec. VESA (A
*
B) Bežná skrutka Množstvo
LCD-TV
23 ~ 26 200
*
100 M4
4
32 ~ 40 200
*
200 M6
46 ~ 52
400
*
400
600
*
400
M8
57
700
*
400
(Bez VESA)
57 ~ 70 800 * 400
80 ~ 1400 * 800
PDP-TV
42 ~ 58
400
*
400
600
*
400
M8
4
63
676
*
407
(Bez VESA)
6
63~70 800 * 400 4
80 ~ 1400 * 800 4
➢
Poskytujeme bežné rozmery pre súpravy upevňovacích konzol podľa zobrazenia vo vyššie uvedenej
tabuľke.
➢
Pri zakúpení našej súpravy upevňovacej konzoly sa dodá aj podrobná príručka inštalácie a všetky
diely, potrebné na zloženie.
➢
Nepoužívajte skrutky, ktoré sú dlhšie ako bežné rozmery, pretože môžu spôsobiť poškodenie vnútra
TV prijímača.
➢
Pri upevneniach na stenu, ktoré nie sú v súlade s technickými údajmi pre skrutky podľa normy VESA,
sa môže dĺžka skrutiek odlišovať v závislosti od ich technických údajov.
➢
Nepoužívajte skrutky, ktoré nie sú v súlade s technickými údajmi pre skrutky podľa normy VESA.
Skrutky nadmerne nedoťahujte, pretože tým môžete poškodiť produkt alebo spôsobiť jeho pád, ktorý
by mal za následok fyzické zranenie. Spoločnosť Samsung nie je zodpovedná za tento typ nehôd.
➢
Spoločnosť Samsung nie je zodpovedná za poškodenie produktu alebo fyzické zranenie, keď sa
použije nástenný držiak, ktorý nie je v súlade s normou VESA alebo nie je uvedený, prípadne ak
spotrebiteľ nedodrží pokyny pre inštaláciu produktu.
➢
Naše 57” a 63” modely sú v súlade s technickými údajmi normy VESA. Preto by ste pre tento model
mali použiť našu určenú montážnu súpravu pre tento model.
➢
Pri montáži tohto TV neprekračujte sklon 15 stupňov.
Neinštalujte súpravu nástenného držiaka zatiaľ, čo máte zapnutý TV.
Mohlo by to zapríčiniť fyzické zranenie spôsobené zásahom elektrického prúdu.
BN68-01528A-00Slk.indd 38 2008-4-21 15:27:06

Slovensky - 39
Vstup do ponuky
1
Stlačte tlačidlo ▲, ▼, ◄ alebo ► na diaľkovom ovládaní.
➢
Zobrazí sa obrazovka nastavenia držiaka na stenu.
➢
Ak sa obrazovka nastavenia držiaka na stenu nezobrazí,
keď kliknete na smerové tlačidlo, zatiaľ čo pozeráte TV,
použite ponuku na zobrazenie danej obrazovky.
• Ponuku zobrazíte stlačením tlačidla
MENU. Stlačením
tlačidla ▲ alebo ▼ vyberte ponuku Nastavenie a potom
stlačte tlačidlo ENTER.
• Stlačením tlačidla ▲ alebo ▼ vyberte možnosť
Montáž
na stenu a potom stlačte tlačidlo ENTER.
Zapamätanie polohy
2 Pomocou tlačidiel ▲, ▼, ◄, ► nastavte na požadovanú
pozíciu.
➢
Ak stlačíte tlačidlo šípky, zatiaľ čo na obrazovke TV
nie je zobrazené žiadne OSD, zobrazí sa obrazovka s
nastaveniami.
➢
Obnovte nastavenia stlačením tlačidla INFO. Stlačením
tlačidla ◄ alebo ► vyberte ponuku Áno a potom stlačte
tlačidlo ENTER. Poloha sa inicializuje na predvolené
nastavenie.
3 Stlačte modré tlačidlo.
Stlačením tlačidiel ▲ a ▼ vyberte uložený režim spomedzi
Pozícia 1, Pozícia 2 alebo Pozícia 3, aby ste uložili aktuálnu
polohu.
➢
Ak nechcete uložiť aktuálnu polohu, stlačte tlačidlo
Návrat.
➢
Pri výbere uloženého režimu nemôžete použiť farebné
tlačidlá.
4
Uložte stlačením tlačidla ENTER.
➢
Keď sa vyberie Pozícia 1, zobrazí sa správa Current
position saved as Position1 (Aktuálna poloha sa
uložila ako Poloha 1).
5
Stlačte tlačidlo ENTER.
➢
Uložená poloha sa zobrazí na ľavej strane OSD.
Montáž na stenu (Predáva sa samostatne)
Po nainštalovaní automatického držiaka na stenu sa dá jednoducho upraviť poloha vášho TV.
Zadný panel Montáž na stenu
Sériový kábel (1P do 1P) (Nedodáva sa)
Premiestniť
Zadať
Návrat
Plug & Play
Jazyk : Slovensky
Čas
Svetelný efekt
:
Pri sledovaní TV
Montáž na stenu
Melódia : Vyp.
Zábava : Kino
Úspora energie : Vyp.
Nastavenie
T V
Montáž na stenu
Nastaviť
Uložiť Stred
►
►
►
►
►
►
►
►
321Pozícia
Uložiť
Návrat
Premiestniť
Zadať
Vyberte režim na uloženie.
Pozícia 1
Pozícia 2
Pozícia 3
BN68-01528A-00Slk.indd 39 2008-4-21 15:27:08

Slovensky - 40
Zloženie stojana (v závislosti od modelu)
Pomocou 4 skrutiek pre zabezpečenie stojana a monitora pevne upevnite
monitor k stojanu.
(Exteriér prijímača sa môže odlišovať od obrázka.)
V prípade inštalácie vášho
TV na stenu zatvorte kryt
(1) na pripojovacej časti
stojana s použitím dvoch
skrutiek pre skrytie.
Varovanie
Pevne pripojte stojan k TV
skôr, ako ho pohnete, pretože stojan môže
padnúť a môže spôsobiť vážne zranenie.
➢
TV by mali niesť dve alebo viac osôb.
Nikdy neukladajte TV na podlahu,
pretože by to mohlo spôsobiť
poškodenie obrazovky.
TV vždy skladujte vzpriamene.
A mentett pozícióba mozgatás
1
Hajtsa végre a Belépés a menübe rész 1. lépését.
2 Egy színgomb (vörös, zöld vagy sárga) megnyomásával a fali
konzol a mentett pozícióba áll.
➢
A fali konzolt a három előre megadott pozíció egyikébe
mozgathatja a vörös (1. pozíció), a zöld (2. pozíció) vagy
a sárga gomb (3. pozíció) megnyomásával.
➢
Ha az előre beállított pozícióba mozgatást követően
módosítja a pozíciót, a pozíció megjelenítése eltűnik.
➢
A felszereléshez lásd a fali konzolhoz kapott Szerelési
útmutatót.
➢
A termék felszereléséhez, illetve a fali konzol felszereléséhez
és mozgatásához forduljon szakemberhez.
➢
Ez a szerelési útmutató a fali konzol falra szereléséhez
használandó. Más építőanyagokhoz való rögzítés esetén
forduljon a legközelebbi márkakereskedőhöz.
➢
Automatický držiak na stenu nebude fungovať, keď je
spustená funkcia Anynet+.
➢
42-palcový model nie je kompatibilný so starším modelom
držiaka na stenu (WMN5090A).
Montáž na stenu
Nastaviť
Uložiť Stred
►
►
►
►
►
►
►
►
321Pozícia
Pozícia 1
BN68-01528A-00Slk.indd 40 2008-4-21 15:27:10

Slovensky - 41
Zabezpečenie TV k stene
Ťahanie, tlačenie alebo lezenie na TV môže spôsobiť, že TV spadne. Obzvlášť zaistite, aby sa
vaše deti nevešali na TV alebo ho nedestabilizovali. Takáto činnosť môže spôsobiť prevrátenie
TV, čo by mohlo spôsobiť vážne zranenia alebo smrť. Dodržujte všetky dodané bezpečnostné
opatrenia na pribalenom bezpečnostnom letáku. Na zaistenie dodatočnej stability nainštalujte
z bezpečnostných dôvodov zariadenie zabraňujúce v spadnutiu tak, ako je uvedené ďalej.
Zabránenie v spadnutí TV:
1. Vložte skrutky do svoriek a pevne ich dotiahnite k stene.
Overte, že sa skrutky pevne nainštalovali do steny.
V závislosti od typu steny možno budete potrebovať
dodatočný materiál, ako napríklad kotvu.
Pretože potrebné svorky, skrutky a šnúry sa nedodávajú,
zakúpte si ich samostatne.
2. Vyberte skrutky zo stredu zadnej časti TV, vložte ich do
svoriek a potom ich opätovne dotiahnite do TV.
Skrutky sa s produktom nemusia dodávať. V tomto
prípade si zakúpte skrutky s nasledujúcimi technickými
údajmi.
3. Pripevnite svorky upevnené k TV a svorky upevnené na
stene s dlhou šnúrou a potom šnúru pevne dotiahnite.
TV nainštalujte blízko pri stene, aby nemohol spadnúť
dozadu.
Šnúru je bezpečné pripojiť tak, aby boli svorky upevnené k
stene v rovnakej výške alebo nižšie ako svorky upevnené
na TV.
Pred premiestnením TV odviažte šnúru.
4. Overte, či sú všetky miesta dostatočne zabezpečené.
Pravidelne kontrolujte pripojenia, či nevykazujú žiadne
známky opotrebovania. Ak máte akékoľvek pochybnosti
o zabezpečení pripojení, kontaktujte profesionálneho
inštalatéra.
➣
➣
➣
➣
➣
➣
Stena
Stena
Upozornenie
BN68-01528A-00Slk.indd 41 2008-4-21 15:27:11

Slovensky - 42
Riešenie problémov
Pred kontaktovaním popredajného servisu spoločnosti Samsung vykonajte nasledujúce
jednoduché kontroly.
Ak nemôžete vyriešiť problém použitím pokynov uvedených nižšie, poznačte si model a sériové
číslo televízora a obráťte sa na miestneho predajcu.
Chýba zvuk alebo obraz
Skontrolujte, či je sieťový napájací kábel pripojený do zásuvky v stene.
Skontrolujte, či ste nestlačili tlačidlo (Napájanie) (zapnutie/vypnutie) na prednom paneli alebo
stlačte tlačidlo POWER na diaľkovom ovládaní.
Skontrolujte nastavenie kontrastu a jasu obrazu.
Skontrolujte hlasitosť.
Skontrolujte, či je Reproduktor TV nastavené na možnosť Vyp..
Normálna obraz bez zvuku
Skontrolujte hlasitosť.
Skontrolujte, či sa nestlačilo tlačidlo MUTE hlasitosti na diaľkovom ovládaní.
Chýba obraz alebo je čiernobiely
Upravte nastavenia farieb.
Skontrolujte správne nastavenie systému vysielania.
Rušenie zvuku a obrazu
Skúste zistiť, ktoré elektrické zariadenie ovplyvňuje televízor a potom ho presuňte ďalej.
Televízor zapojte do inej sieťovej zásuvky.
Neostrý alebo zasnežený obraz, skreslený zvuk
Skontrolujte smer, umiestnenie a pripojenie antény.
Toto rušenie sa často vyskytuje z dôvodu použitia vnútornej antény.
Poruchy diaľkového ovládača
Vymeňte batérie v diaľkovom ovládači.
Vyčistite horný okraj diaľkového ovládača (vysielacie okienko).
Skontrolujte, či sú správne zasunuté „+“ a „–“ konce batérií.
Skontrolujte, či nie sú batérie vybité.
Obrazovka je čierna a kontrolka indikátora napájania stále bliká
Na počítači skontrolujte napájanie a signálový kábel.
Televízor používa systém správy napájania.
Pohnite myšou počítača alebo stlačte akékoľvek tlačidlo na klávesnici.
Na príslušenstve (STB, DVD atď.) skontrolujte napájanie a signálový kábel.
Televízor používa systém správy napájania.
Na paneli alebo diaľkovom ovládači stlačte tlačidlo Source (Zdroj).
Zapnite a vypnite televízor.
Poškodený obraz sa zobrazí v rohu obrazovky.
Ak sa pri niektorých externých zariadeniach vyberie možnosť Len vyhľadať, poškodený obraz sa
môže
zobraziť v rohu obrazovky. Tento jav spôsobujú externé zariadenia a nie TV.
Zobrazí sa správa Všetky nastavenia sa obnovujú na predvolené hodnoty)“.
Zobrazí sa, keď stlačíte a nejaký čas podržíte stlačené tlačidlo EXIT. Nastavenia produktu sa obnovia
na predvolené výrobné nastavenia.
BN68-01528A-00Slk.indd 42 2008-4-21 15:27:11

Slovensky - 43
Technické údaje
Popisy a vlastnosti v tejto príručke sú uvedené iba na informačné účely a môžu sa zmeniť bez
upozornenia.
Názov modelu PS50A470
Veľkosť obrazovky
(Diagonálna)
50 palcov
Rozlíšenie PC 1360 x 768 pri 60 Hz
Zvuk (Výstup) 10 W + 10 W
Rozmery (Š x V x D)
Telo
So stojanom
1290 x 740 x 95 mm
1290 x 804 x 319 mm
Hmotnosť
Telo
So stojanom
39 kg
41 kg
Zváženia o životnom prostredí
Prevádzková teplota
Prevádzková vlhkosť
Teplota uskladnenia
Vlhkosť uskladnenia
10 °C až 40 °C (50 °F až 104 °F)
10% až 80%, nekondenzujúce
-20 °C až 45 °C (-4 °F až 113 °F)
5% až 95%, nekondenzujúce
➢
Toto zariadenie je digitálny prístroj triedy B.
Dizajn a technické údaje podliehajú zmenám bez predchádzajúceho upozornenia.
Ohľadom sieťového napájania a spotreby energie sa obráťte na štítok prilepený k produktu.
BN68-01528A-00Slk.indd 43 2008-4-21 15:27:11

Správna likvidácia tohoto výrobku
(Elektrotechnický a Elektronický Odpad)
Toto označenie na výrobku alebo v sprievodnej brožúre hovorí, že
po skončení jeho životnosti by nemal byť likvidovaný s ostatným
odpadom. Prípadnému poškodeniu životného prostredia alebo
ľudského zdravia môžete predísť tým, že budete takéto typy výrobkov
oddeľovať od ostatného odpadu a vrátite ich na recykláciu.
Používatelia v domácnostiach by pre podrobné informácie, ako
ekologicky bezpečne naložiť s týmto výrobkom, mali kontaktovať buď
predajcu, ktorý im výrobok predal, alebo príslušný úrad v okolí ich
bydliska.
Priemyselní používatelia by mali kontaktovať svojho dodávateľa a
preveriť si podmienky kúpnej zmluvy. Tento výrobok by nemal byť
likvidovaný spolu s ostatným priemyselným odpadom.
BN68-01528A-00Slk.indd 44 2008-4-21 15:27:11

Slovenščina -
© 2008 Samsung Electronics Co., Ltd. All rights reserved.
Navodila za uporabnike
Zadrževanje slike na zaslonu
Na plazma televizorju ne prikazujte dolgo mirujoče slike (kot je video igra ali zaslon pri priključitvi
računalnika), saj lahko to povzroči zadrževanje slike na zaslonu. Tako zadrževanje slike se imenuje
tudi »ožig zaslona«. Da bi se izognili takemu zadrževanju slike, pri prikazovanju mirujoče slike
zmanjšajte stopnjo svetlosti in kontrasta zaslona.
Višina
Zaslon PDP lahko normalno deluje na nadmorski višini pod 2000 m. Ne uporabljajte ga na
nadmorskih višinah nad 2000 m, ker lahko pride do motenj v delovanju.
Segrevanje zgornjega dela PDP-TV
Zgornji del izdelka se lahko pri dolgotrajni uporabi zelo segreje, ker se toplota iz izdelka odvaja skozi
odprtino v zgornjem delu. To je običajno in ni posledica okvare ali napake na izdelku. Vseeno pa
morate otrokom preprečiti dotikanje zgornjega dela izdelka.
Izdelek “prasketa”
Televizor se pri prilagajanju okolju (na primer temperaturi in vlažnosti zraka) lahko razširja ali krči in
ob tem “prasketa”. To je običajno in ni posledica napake na izdelku.
Poškodovane pike
Na zaslonu PDP je od 1.230.000 (standardna slika) do 3.150.000 (HD-slika) pik, ki so izdelane z
zelo napredno tehnologijo. Kljub temu je lahko na zaslonu nekaj svetlih ali temnih slikovnih pik. Te
svetlobne pike ne bodo vplivale na delovanje izdelka.
Televizorja ne uporabljajte pri temperaturah pod 5 °C(41°F)
Če je na PDP-zaslonu predolgo prikazana mirujoča slika, ga to lahko trajno poškoduje.
Dolgotrajno gledanje PDP-TV v formatu slike 4:3 lahko povzroči sledi okvirja
take slike na levi in desni strani ter na sredini zaslona. To se zgodi zaradi razlike
v oddajanju svetlobe na različnih delih zaslona. Predvajanje DVD-ja ali uporaba
igralne konzole lahko povzroči podobne učinke. Garancija ne vključuje poškodb,
ki so nastale na tak način.
Zakasnela slika na zaslonu.
Če je na zaslonu dolgo časa prikazana mirujoča računalniška slika ali slika iz video iger, lahko to
povzroči delni prikaz zakasnele slike na zaslonu. Ta učinek preprečite tako, da pri prikazu mirujočih
slih zmanjšate svetlost in kontrast.
Garancija
- Garancija ne vključuje škode, ki jo povzroči zadrževanje slike na zaslonu.
- Garancija ne vključuje poškodb zaradi vžgane slike.
Namestitev
Pri namestitvi izdelka v okolju z veliko prahu, visoko ali nizko temperaturo, visoko vlažnostjo,
kemičnimi snovmi ali v okoljih, kjer neprestano deluje (na primer letališče, železniška postaja), se
obrnite na pooblaščeni servisni center. Če tega ne storite, lahko pride do resne poškodbe naprave.
Obrnite se na SAMSUNG WORLDWIDE
Če imate kakršno koli vprašanje ali komentar glede Samsungovih izdelkov, se obrnite na SAMSUNGOV
center za pomoč strankam. (Za več informacij si oglejte hrbtno platnico.)
BN68-01528A-00Sln.indd 2 2008-4-21 15:47:17

Slovenščina -
Simboli
☛ ➢
Pritisnite
Pomembno
Opomba
Vsebina
Splošne informacije
Navodila za uporabnike ..................................2
Pregled delov .................................................. 4
Uporaba stojala .................................................
4
Nadzorna plošča ............................................. 5
Priključitvena plošča .......................................6
Ogled daljinskega upravljalnika .....................8
Delovanje
Vklop in izklop televizorja ................................ 9
Ogled menijev ................................................. 9
Funkcija Plug & Play ..................................... 10
Uporaba gumba TOOLS ............................... 12
Gledanje zunanjega signalnega vira ............. 12
Urejanje imen naprav .................................... 13
Upravljanje kanalov
Samodejno shranjevanje kanalov ................. 13
Ročno shranjevanje kanalov ......................... 14
Dodajanje/zaklepanje kanalov ...................... 15
Razvrščanje shranjenih kanalov ................... 16
Poimenovanje kanalov .................................. 16
Fina naravnava kanalov ................................ 17
Upravljanje slike
Sprememba slikovnega standarda ............... 18
Prilagajanje slikovnih nastavitev ................... 18
Konguracija podrobnih nastavitev slike ....... 19
Picture Options (Možnosti slike) ...................20
Uporaba funkcije 3D .....................................22
Ponastavitev nastavitev slike na tovarniške
vrednosti .......................................................24
Nadzor zvoka
Zvočne funkcije ............................................. 25
Izbira zvočnega načina
(odvisno od modela)
....................................... 26
Priključitev slušalk (naprodaj posebej) .......... 26
Opis funkcij
Čas.ovne funkcije .......................................... 27
Language/Melody/Light Effect/
Entertainment/Energy Saving/PIP ................ 28
Računalniški zaslon
Nastavitev programske opreme na
računalnik (Windows XP)
............................... 29
Način vhoda PC ............................................ 30
Nastavitev računalnika .................................. 31
O omrežnem sistemu Anynet+
Kaj je Anynet+? ............................................. 32
Povezava naprav, ki podpirajo Anynet+ ........ 32
Setting Up Anynet+ ....................................... 33
Iskanje naprav, ki podpirajo sistem
Anynet+, in preklapljanje med njimi .............. 33
Snemanje ...................................................... 34
Poslušanje prek sprejemnika ........................ 35
Kontrolni seznam, ki ga preglejte,
preden se obrnete na servis ......................... 35
Dodatek
Funkcija teleteksta (odvisno od modela) ....... 36
Specikacije kompleta za pritrditev na
steno (VESA) ................................................ 38
Prilagoditev stenskega nosilca
(naprodaj posebej) ........................................ 39
Navodila za sestavljanj stojala
(odvisno od modela) .....................................40
Pritrditev televizorja na steno ........................ 41
Odpravljanje težav ........................................ 42
Specikacije .................................................. 43
Slovenščina
BN68-01528A-00Sln.indd 3 2008-4-21 15:47:18

Slovenščina - 4
Uporaba stojala
➢
Priporočljivo je, da PDP nosi
več oseb. PDP nikoli ne
postavite tako, da je zaslon
obrnjen navzdol, ker lahko tako
poškodujete zaslon. PDP naj bo
vedno pokonci.
PDP je mogoče obračati v levo ali
v desno pod kotom 20 stopinj.
Pregled delov
Uporabniška navodila Daljinski upravljalnik/
baterije AAA
Napajalni kabel Čistilna krpica
Garancijska kartica/
varnostni priročnik
(Ni na voljo povsod)
Spodnji pokrov/vijaka (2ea)
(oglejte si stran 40)
Feritni obroč za
napajalni kabel
Feritni obroč za S-Video
Naprodaj posebej
Antenski kabel Komponentni kabel Avdio kabli Kabel PC
Kabel Scart PC-avdio kabel Kabel HDMI Kabel HDMI/DVI
➢
Feritni obroč (napajalni kabel, S-Video)
Feritni obroč ščiti kable pred motnjami.
Ko želite povezati kabel, odprite feritni obroč in ga namestite okoli kabla v
bližini vtiča.
-20° ~ 20°
BN68-01528A-00Sln.indd 4 2008-4-21 15:47:20

Slovenščina - 5
1
SOURCE
Prikaže meni vseh vhodnih virov, ki so
na voljo (TV, Ext.1, Ext., AV, S-Video,
Component,PC, HDMI1, HDMI, HDMI)
➢
Na meniju na zaslonu ta gumb
uporabljajte kot gumb ENTER na
daljinskem upravljalniku.
2
MENU
Pritisnite za ogled menija na zaslonu s
funkcijami televizorja.
3
– +
Pritisniteza povečanjeali zmanjšanje glasnosti.
V meniju na zaslonu uporabite gumba – +
na enak način, kot uporabljate gumba ◄ in ►
na daljinskem upravljalniku.
4
C/P.
Pritisnite za menjavo kanala. V meniju na
zaslonu uporabite gumba C/P. na
enak način, kot uporabljate gumba ▲ in▼ na
daljinskem upravljalniku.
5
Indikator napajanja
Utripa in se ugasne, ko je napajanje vklopljeno,
in zasveti v stanju pripravljenosti.
6
(Gumb za vklop)
Pritisnite za vklop in izklop televizorja.
7
Senzor daljinskega upravljalnika
Daljinski upravljalnik usmerite proti tej točki na
televizorju.
8
Zvočnik
Nadzorna plošča
Sprednja (ali stranska) plošča
➢
Barva in oblika izdelka sta odvisni od modela.
BN68-01528A-00Sln.indd 5 2008-4-21 15:47:21

Slovenščina -
5
se nadaljuje …
☛
Kadar na televizor priključujete avdio ali video sistem, poskrbite, da so vsi elementi izključeni.
Ko priključujete zunanjo napravo, mora biti barva priključka enaka barvi kabla.
1
POWER IN
Priključite priloženi napajalni kabel.
2
COMPONENT IN
Avdio (AUDIO L/R) in video (Y/PB/PR) vhodi za
komponente.
3
PC IN / AUDIO
Za povezavo z vtičem video in avdio izhoda na
računalniku.
4
EXT 1, EXT
Vhodi oziroma izhodi za zunanje naprave, na
primer videorekorder, DVD-predvajalnik, video
igralna naprava ali predvajalnik video plošč.
Specifikacije za vhod/izhod
Spojnik
Vhod Izhod
Video Avdio (L/R (L/D)) RGB
Video + Avdio
(L/R (L/D))
EXT 1 ✔ ✔ ✔
Na voljo je samo
izhod za TV
EXT 2 ✔ ✔ Izhod lahko izberete.
5
D SYNC OUT
Povežite s 3D-IR-oddajnikom
6
Priključitev zunanjih avdio naprav.
Zvočni signal RCA iz televizorja priklopite na
zunanji vir, na primer avdio sistem.
7
SERVICE
− Spojnik za servis.
− Če želite z daljinskim upravljalnikom
prilagoditi kot gledanja televizorja,
morate v serijski vtič televizorja priključiti
elektromotor stenskega nosilca.
Priključitvena plošča
Hrbtna plošča
➢
Barva in oblika izdelka sta odvisni od modela.
1
432 6 87
ali
Televizijsko kabelsko
omrežje
9
ali
BN68-01528A-00Sln.indd 6 2008-4-21 15:47:24

Slovenščina -
8
HDMI IN 1,
− Ta povezavo HDMI s HDMI ne potrebujete
dodatne avdio povezave.
− Ko uporabljate kabel HDMI/DVI, morate
uporabiti vtič HDMI IN2.
➢
Kaj je HDMI?
− “Večpredstavnostni vmesnik z visoko
razločljivostjo” omogoča prenos
digitalnih video podatkov z visoko
razločljivostjo in več kanalov digitalnega
avdia.
− Spojnik HDMI/DVI podpira DVI-
povezavo do razširjene naprave z
ustreznim kablom (ni priloženo). HDMI
in DVI se razlikujeta po tem, da je
naprava HDMI manjša, da ima vgrajeno
funkcijo kodiranja HDCP (zaščita pred
kopiranjem za širokopasovno digitalno
vsebino) in da podpira večkanalni
digitalni avdio.
DVI IN (HDMI ) AUDIO R/L
Avdio izhodi DVI za zunanje naprave.
9
ANT IN
Koaksialni spojnik z uporom 75 Ω za anteno/
kabelsko omrežje.
Podprti načini za HDMI/DVI in komponentno
1
HDMI IN
Za povezavo z vtičem HDMI naprave z
izhodom HDMI.
2
S-VIDEO ali VIDEO/AUDIO L/R
Video (S-Video ali Video) in avdio vhodi za
zunanje naprave, kot sta videokamera ali
videorekorder.
3
Vtič za slušalke
Slušalke lahko priključite na televizor, da
program, ki ga gledate, ne moti ostalih oseb
v sobi.
➢
Daljša uporaba slušalk pri večji glasnosti
lahko poškoduje sluh.
480i 480p 576i 576p 720p 1080i
HDMI/DVI, 50Hz X X X O O O
HDMI/DVI, 60Hz X O X X O O
Komponentno O O O O O O
➢
Barva in oblika izdelka sta odvisni od modela.
Stranska plošča
ali
3
1
2
BN68-01528A-00Sln.indd 7 2008-4-21 15:47:25

Slovenščina -
Ogled daljinskega upravljalnika
1
Gumb POWER
(za vklop in izklop
televizorja)
2
Neposredna izbira načina TV
3
Številski gumbi za neposreden
dostop do kanalov
4
Izbira med eno-/dvomestnimi
kanali
5
Začasen izklop zvoka
6
Povečanje glasnosti
Zmanjšanje glasnosti
7
Gumb za nadzor kanalov
(oglejte si 15. stran)
8
Za hitro izbiro pogosto
uporabljenih funkcij.
9
Nadzor kazalke v meniju
0
Za ogled informacije o
trenutnem programu
#
Pritisnite, da izberete dodatne
načine prikaza in zvoka za
športne oddaje, kino in igre.
$
Funkcije videorekorderja/
DVD-predvajalnika
(Previjanje Nazaj, Ustavitev,
Predvajanje/premor,
Previjanje Naprej)
%
Izbira razpoložljivih virov
^
Prejšnji kanal
&
Naslednji kanal
Prejšnji kanal
*
Prikaz glavnega menija na
zaslonu
(
Gumb za način TruSurround XT
)
Vrne na prejšnji meni
a
Izhod iz menija na zaslonu
b
Izbira velikosti slike
c
Uporabite pri preklopu
naprave SAMSUNG DMA
(Digital Media Adapter) prek
vmesnika HDMI in preklopu
v način DMA.
(Gumb DMA je izbiren.)
Za dodatne informacije
o postopkih uporabe si
oglejte uporabniški priročnik
naprave DMA. Ta gumb
je na voljo, ko je “Anynet
(HDMICEC)” nastavljeno na
“On”. (Oglejte si 33. stran.)
d
Izbira slikovnega učinka
(oglejte si 18. stran)
e
Za gledanje 3D-filmov in iger
s 3D-očali.
Funkcije teleteksta
(oglejte si stran 36)
2
Izhod iz teleteksta (odvisno
od modela)
7
Shranjevanje teleteksta
8
Shranjevanje teleteksta
0
Prikaz teleteksta
!
Izbira teme Fastext
@
Prikaz teleteksta/hkraten
prikaz teleteksta in
televizijskega programa
#
Izbira načina teleteksta
(LIST/FLOF)
^
Podstran teleteksta
&
P : Naslednja stran
teleteksta
P : Prejšnja stran
teleteksta
*
Kazalo teleteksta
)
Zadržanje strani teleteksta
a
Preklic teleteksta
se nadaljuje …
BN68-01528A-00Sln.indd 8 2008-4-21 15:47:26

Slovenščina -
Vstavljanje baterij v daljinski upravljalnik
1 Odprite pokrovček na hrbtni strani daljinskega
upravljalnika, kot je prikazano na sliki.
Vstavite dve bateriji AAA.
➢
Zagotovite, da sta “+” in “–” pola baterije
usmerjena skladno s prikazom znotraj ležišča za
baterije.
Ne mešajte baterij različnih tipov, na primer
alkalnih in manganovih.
Zaprite pokrovček, kot je prikazano na sliki.
➢
Če daljinskega upravljalnika dalj časa ne boste
uporabljali, odstranite baterije in jih shranite na hladnem in suhem mestu. Daljinski
upravljalnik lahko uporabljate na razdalji do približno 7 m od televizorja. (Pri običajni
uporabi televizorja baterije zdržijo približno eno leto.)
➢
Če daljinski upravljalnik ne deluje! Preverite naslednje:
1. Je televizor vklopljen?
2. Sta “plus” in “minus” pola baterije zamenjana?
3. So baterije prazne?
4. Je prišlo do izpada napajanja oziroma je napajalni kabel izključen?
5. Je v bližini posebna fluorescentna luč ali neonska tabla?
Vklop in izklop televizorja
Napajalni kabel je na zadnji strani televizorja.
1 Napajalni kabel vključite v ustrezno vtičnico.
➢
Napetost je navedena na hrbtni strani televizorja, frekvenca je 50 ali 60 Hz.
Za vklop televizorja pritisnite gumb za vklop ali izklop na sprednji strani televizorja ali
pritisnite gumb POWER na daljinskem upravljalniku. Nazadnje gledan program je znova
samodejno izbran. Če še niste shranili nobenega kanala, se ne bo prikazala čista slika.
Oglejte si “Samodejno shranjevanje kanalov” na strani 13 ali “Ročno shranjevanje kanalov”
na strani 14.
➢
Ob prvem vklopu televizorja se samodejno prikažejo nekatere osnovne nastavitve.
Oglejte si “Funkcija Plug & Play” na strani 10.
Za izklop televizorja pritisnite gumb za vklop ali izklop na sprednji strani televizorja ali
pritisnite gumb POWER na daljinskem upravljalniku.
4 Za vklop televizorja pritisnite gumb za vklop ali izklop na sprednji strani televizorja ali
pritisnite gumb POWER na daljinskem upravljalniku.
Ogled menijev
1 Pritisnite gumb MENU.
Na zaslonu se prikaže glavni meni.
Na levi strani je šest ikon: Picture, Sound, Channel, Setup,
Input.
Za izbiro želene ikone pritisnite gumb ▲ ali ▼.
Za dostop do podmenija ikone pritisnite gumb ENTER.
Za premikanje po elementih v meniju pritisnite gumb ▲ ali ▼.
Za potrditev elementov menija pritisnite gumb ENTER.
4 Za spreminjanje izbranih elementov pritisnite gumb ▲/▼ ali ◄/►.
Za vrnitev na prejšnji meni pritisnite gumb RETURN.
5 Pritisnite gumb EXIT za izhod iz menija.
Move
Enter
Exit
Mode : Standard
Cell Light
Contrast 5
Brightness 45
Sharpness 50
Colour 50
Tint G50 R50
Detailed Settings
Picture Options
Reset : OK
Picture
T V
BN68-01528A-00Sln.indd 9 2008-4-21 15:47:27

Slovenščina - 10
Funkcija Plug & Play
Pri prvem vklopu televizorja se samodejno prikaže več
osnovnih nastavitev.
Na voljo so naslednje nastavitve.
☛
Če pri nastavitvi države pomotoma izberete napačno, so lahko
znaki na zaslonu narobe prikazani.
1 Če je televizor v stanju pripravljenosti, pritisnite gumb POWER
na daljinskem upravljalniku. Prikaže se sporočilo Start Plug &
Play. Pritisnite gumb ENTER.
Meni Language se samodejno pojavi v nekaj sekundah.
S pritiskom na gumb ▲ ali ▼ izberite ustrezni jezik.
Pritisnite gumb ENTER. Prikaže se sporočilo Select ‘Home
Use’ when installing this TV in your home.
4 Pritisnite gumb ◄ ali ►, da izberete Store Demo ali Home
Use, nato pa pritisnite gumb ENTER. Prikaže se sporočilo, ki
vas pozove, da preverite stanje priključene antene.
➢
Home Use je privzeti izbor.
➢
Priporočamo, da TV nastavite na način Home Use, saj to
zagotavlja najboljšo sliko v domačem okolju.
➢
Način Store Demo je namenjen samo uporabi v trgovinah.
➢
Če je enota naključno nastavljena na način Store Demo
in se želite vrniti v način Home Use (Standard): Pritisnite
gumb Volume. Ko je na zaslonu prikaz glasnosti, pritisnite
gumb MENU in ga držite 5 sekund.
5 Zagotovite, da je antena priključena na televizor.
Pritisnite gumb ENTER. Prikaže se meni Country.
S pritiskom na gumb ▲ ali ▼ izberite državo ali območje.
Pritisnite gumb ENTER.
se nadaljuje …
Plug & Play
Start Plug & Play.
OK
Enter
Plug & Play
Language
Move
Enter
English
Deutsch
Français
Italiano
▼
Plug & Play
Select ‘Home Use’
when installing this TV in your home.
Move
Enter
Store Demo
Home Use
Plug & Play
Check antenna input.
Enter
Skip
OK
Plug & Play
Country
Move
Enter
Skip
▲
United Kingdom
Austria
Eastern Europe
Others
Plug & Play
P 1 C -- 40 MHz
0 %
Enter
Skip
Start
BN68-01528A-00Sln.indd 10 2008-4-21 15:47:29

Slovenščina - 11
Za začetek iskanja kanalov pritisnite gumb ENTER. Iskanje
kanalov se bo samodejno začelo in končalo. Ko so shranjeni
vsi kanali, ki so na voljo, se samodejno prikaže meni Clock
Set. Pritisnite gumb ENTER.
Pritisnite gumb ◄ ali ►, da izberete Month, Day, Year, Hour
ali Minute. Nastavite jih s pritiskom na gumb ▲ ali ▼.
➢
Nastavitve Month, Day, Year, Hour ali Minute lahko
nastavite neposredno s pritiskom na številske gumbe na
daljinskem upravljalniku.
Za potrditev nastavitve pritisnite gumb ENTER. Prikaže se
sporočilo Enjoy your viewing. Ko končate, pritisnite gumb
ENTER.
➢
Sporočilo bo samodejno izginilo čez nekaj sekund tudi, če
ne pritisnete gumba ENTER.
Za ponastavitev te funkcije ...
1
Pritisnite gumb MENU, da prikažete meni.
Pritisnite gumb ▲ ali ▼, da izberete Setup, nato pa pritisnite
gumb ENTER.
Znova pritisnite gumb ENTER, da izberete Plug & Play.
Prikaže se sporočilo Start Plug & Play.
OK
Enjoy your viewing
Move
Enter
Return
Plug & Play
Language : English
Time
Light Effect
: In Watching TV
Wall-Mount Adjustment
Melody : Off
Entertainment
: Off
Energy Saving :
Off
PIP
Setup
T V
Plug & Play
Move
Adjust
Enter
01 01 00 00 04
Clock Set
Month Day Year Hour
Minute
BN68-01528A-00Sln.indd 11 2008-4-21 15:47:29

Slovenščina - 1
Uporaba gumba TOOLS
Z gumbom TOOLS hitro in enostavno izberete funkcije, ki jih pogosto uporabljate.
Meni “Tools” se spreminja glede na uporabljeni način zunanjega vhoda.
1 PPritisnite gumb TOOLS.
Prikazal se bo meni Tools.
Pritisnite gumb ▲ ali ▼, da izberete meni, in pritisnite gumb
ENTER.
Pritisnite gumb ▲/▼/◄/►/ENTER, da prikažete, spremenite
ali uporabite izbrane elemente.
Za podrobnejši opis posamezne funkcije si oglejte ustrezno stran.
• Anynet+ HDMI-CEC), oglejte si 32. stran
• Picture Mode; oglejte si 18. stran
• Sound Mode; oglejte si 25. stran
• Sleep Timer; oglejte si 27. stran
• SRS TS XT; oglejte si 25. stran
• Energy Saving; oglejte si 29. stran
• Dual I-II; oglejte si 26. stran
Gledanje zunanjega signalnega vira
Preklapljajte lahko med gledanjem signala iz priključene
opreme, kot so videorekorder, DVD, sprejemnik in TV-vir
(oddajni ali kabelski).
1 Pritisnite gumb MENU, da prikažete meni.
S pritiskom gumba ▲ ali ▼ izberite Input, nato pa pritisnite
gumb ENTER.
Znova pritisnite ENTER, da izberete Source List.
4 S pritiskanjem gumba ▲ ali ▼ izberite vir signala, nato pa
pritisnite gumb ENTER.
Viri signalov, ki so na voljo: TV, Ext.1, Ext., AV, S-Video,
Component, PC, HDMI1, HDMI , HDMI
➢
Izberete lahko samo zunanje naprave, ki so povezane s TV.
➢
Te možnosti lahko izberete tudi s pritiskom na gumb SOURCE
na daljinskem upravljalniku.
➢
Za ponovno gledanje programa pritisnite gumb TV in izberite
želeno številko kanala.
Tools
Anynet+ (HDMI-CEC)
Picture Mode : Standard
Sound Mode : Custom
Sleep Timer : Off
SRS TS XT : Off
Energy Saving : Off
Dual I-II : Mono
t
Adjust ExitMove
Move
Enter
Return
Source List :
TV
Edit Name
Anynet+ (HDMI-CEC)
Input
T V
Move
Enter
Return
TV
Ext.1 : −−−−
Ext. : −−−−
AV : −−−−
S-Video : −−−−
Component : −−−−
PC : −−−−
HDMI1 : −−−−
HDMI : −−−−
HDMI : −−−−
Source List
T V
BN68-01528A-00Sln.indd 12 2008-4-21 15:47:30

Slovenščina - 1
Urejanje imen naprav
Zunanji vir lahko poimenujete.
1 Pritisnite gumb MENU, da prikažete meni.
S pritiskom gumba ▲ ali ▼ izberite Input, nato pa pritisnite
gumb ENTER.
S pritiskom gumba ▲ ali ▼ izberite Edit Name, nato pa
pritisnite gumb ENTER.
4 S pritiskanjem gumba ▲ ali ▼ izberite vir signala za urejanje,
nato pa pritisnite gumb ENTER.
5 Želeno napravo izberite s pritiski na gumb▲ ali ▼, nato pa
pritisnite gumb ENTER.
Imena naprav, ki so na voljo:
VCR, DVD, Cable STB, Satellite
STB, PVR STB, AV Receiver, Game, Camcorder, PC, TV,
IPTV, Blu-Ray, HD DVD, DMA.
Pritisnite gumb EXIT za izhod.
Samodejno shranjevanje kanalov
Iščete lahko v razpoložljivih frekvenčne razpone
(odvisno od države).
Samodejno dodeljene številke programov mogoče ne
ustrezajo dejanskim ali želenim številkam programov. Številke
lahko razvrstite ročno in izbrišete vse neželene kanale.
1 Pritisnite gumb MENU, da prikažete meni.
S pritiskom gumba ▲ ali ▼ izberite Channel, nato pa pritisnite
gumb ENTER.
Ponovno pritisnite gumb ENTER. Navedene so razpoložljive
države.
4
Če želite izbrati državo, pritisnite gumb ▲ ali ▼ in nato ENTER.
5 Če želite izbrati Auto Store, pritisnite gumb ▲ ali ▼ in nato
ENTER.
Za začetek iskanja znova pritisnite gumb ENTER.
Iskanje se samodejno zaključi.
➢
Za predčasno prekinitev iskanja pritisnite gumb MENU ali
ENTER.
Move
Enter
Return
Source List :
TV
Edit Name
Anynet+ (HDMI-CEC)
Input
T V
Move
Enter
Return
Country :
United Kingdom
Auto Store
Manual Store
Channel Manager
Sort
Name
Fine Tune
Channel
T V
Auto Store
P 1 C -- 40 MHz
0 %
Enter
Return
Start
Move
Enter
Return
Ext.1 : −−−−
Ext. :
−−−−
AV :
S-Video :
Component : −−−−
PC : −−−−
HDMI1 :
HDMI :
HDMI :
Edit Name
T V
----
VCR
DVD
Cable STB
Satellite STB
PVR STB
AV Receiver
Game
▼
Move
Enter
Return
Country :
United Kingdom
Auto Store
Manual Store
Channel Manager
Sort
Name
Fine Tune
Channel
Belgium
France
Germany
Italy
Netherlands
Spain
Switzerland
United Kingdom
▼
T V
BN68-01528A-00Sln.indd 13 2008-4-21 15:47:31

Slovenščina - 14
Ročno shranjevanje kanalov
Televizijske kanale lahko shranite, vključno s tistimi, ki jih
sprejemate prek kabelskih omrežij.
Pri ročnem shranjevanju kanalov lahko izberete:
Ali želite shraniti posamezne najdene kanale.
Številko programa vsakega shranjenega kanala, ki ga želite
identificirati.
1 Pritisnite gumb MENU, da prikažete meni.
S pritiskom gumba ▲ ali ▼ izberite Channel, nato pa pritisnite
gumb ENTER.
S pritiskom gumba ▲ ali ▼ izberite Manual Store, nato pa
pritisnite gumb ENTER.
4 S pritiskom gumba ▲ ali ▼ izberite želeno možnost, nato
pritisnite gumb ENTER.
5 Ko ste zadovoljni z nastavitvijo, pritisnite gumb ENTER.
Pritisnite gumb EXIT za izhod.
Programme (Številka programa, ki naj bo dodeljena kanalu)
− Gumb ▲ ali ▼ pritiskajte, dokler ne najdete prave številke.
➢
Številko kanala lahko izberete tudi neposredno s pritiskom na številčne gumbe (0–9).
Colour System: Auto/PAL/SECAM/NTSC4.4
− Za izbiro želenega barvnega standarda pritisnite gumb ▲ ali ▼.
Sound System: BG/DK/I/L
− Za izbiro želenega zvočnega standarda pritisnite gumb ▲ ali ▼.
Channel (ko poznate številko kanala za shranjevanje)
− Pritisnite gumb ▲ ali ▼, da izberete
C (običajna antena) ali S (kabelski kanal).
− Pritisnite gumb ► in nato pritisnite gumb ▲ ali ▼ za izbiro želene številke.
➢
Številko kanala lahko izberete tudi neposredno s pritiskom na številčne gumbe (0–9).
➢
Če zvok ni običajen ali ga ni, znova izberite zahtevani zvočni standard.
Search (ko ne poznate številk kanalov)
− Za začetek iskanja pritisnite gumb ▲ ali ▼.
− Kanalnik pregleda frekvenčni razpon, dokler se na zaslonu ne prikaže prvi kanal ali izbrani kanal.
Store (ko shranite kanal in povezano številko programa)
− Nastavite na
OK tako, da pritisnete gumb ENTER.
☛
Channel mode
P (Programski način): Po končani naravnavi so oddajnim postajam na vašem območju dodeljene
številke položajev od P00 do P99. Kanal lahko izberete z vnosom številke položaja v tem načinu.
C (način običajne antene): Kanal lahko izberete z vnosom določene številke za posamezno
oddajno postajo v tem načinu.
S (način kabelskega kanala): Kanal lahko izberete z vnosom določene številke za vsak kabelski
kanal v tem načinu.
Move
Enter
Return
Country :
United Kingdom
Auto Store
Manual Store
Channel Manager
Sort
Name
Fine Tune
Channel
T V
Move
Enter
Return
Programme :
P 1
Colour System : Auto
Sound System : BG
Channel : C --
Search : 40 MHz
Store : ?
Manual Store
T V
BN68-01528A-00Sln.indd 14 2008-4-21 15:47:31

Slovenščina - 15
Dodajanje/zaklepanje kanalov
Z upraviteljem kanalov lahko priročno zaklepate ali dodajate
kanale.
1 Pritisnite gumb MENU, da prikažete meni.
S pritiskom gumba ▲ ali ▼ izberite Channel, nato pa pritisnite
gumb ENTER.
S pritiskom gumba ▲ ali ▼ izberite Channel Manager, nato
pa pritisnite gumb ENTER.
Dodajanje kanalov
S seznamom kanalov lahko dodajate kanale.
4 Channel List izberite tako, da pritisnete gumb ENTER.
5 S pritiskom na tipke ▲/▼/◄/► se pomaknite na polje
( ), izberite kanal, ki bo dodan, in pritisnite ENTER,
da ga dodate.
➢
Če znova pritisnete gumb ENTER, znak ( ) poleg
kanala izgine in kanal ni dodan.
Zaklepanje kanalov
Ta funkcija preprečuje gledanje neprimernega programa
nepooblaščenim uporabnikom (na primer otrokom) tako, da
prepreči predvajanje slike in zvoka.
S pritiskom gumba ▲ ali ▼ izberite Child Lock, nato pa
pritisnite gumb ENTER.
S pritiskom gumba ▲ ali ▼ izberite On, nato pa pritisnite
gumb ENTER.
S pritiskom gumba ▲ ali ▼ izberite Channel List, nato pa
pritisnite gumb ENTER.
S pritiskom na tipke ▲/▼/◄/► se pomaknite na polje ( ),
izberite kanal, ki bo zaklenjen, in pritisnite ENTER, da ga
zaklenete.
➢
Če znova pritisnete gumb ENTER, znak ( ) poleg kanala izgine in zaklepanje kanala je
preklicano.
➢
Ko je vklopljena otroška ključavnica, je prikazan moder zaslon.
10 Pritisnite gumb EXIT za izhod.
➢
Te možnosti lahko izberete tudi s pritiskom na gumb CH LIST
na daljinskem upravljalniku.
Move
Enter
Return
Country :
United Kingdom
Auto Store
Manual Store
Channel Manager
Sort
Name
Fine Tune
Channel
T V
Move
Enter
Return
Channel List
Child Lock : Off
Channel Manager
T V
Channel List
P 1 C
1 / 10
▲
▼
Prog.
0
C --
1 C --
C --
C --
4 C --
5 C --
C --
C --
C --
C --
Add Lock
Move Enter
Page Return
BN68-01528A-00Sln.indd 15 2008-4-21 15:47:33

Slovenščina - 1
Razvrščanje shranjenih kanalov
Ta postopek omogoča spremembo številk programov
shranjenih kanalov.
To postopek boste mogoče morali izvesti po uporabi funkcije
samodejnega shranjevanja.
1 Pritisnite gumb MENU, da prikažete meni.
S pritiskom gumba ▲ ali ▼ izberite Channel, nato pa pritisnite
gumb ENTER.
S pritiskom gumba ▲ ali ▼ izberite Sort, nato pa pritisnite
gumb ENTER.
4 S pritiskom na gumb ▲ ali ▼ izberite kanal, ki ga želite
premakniti, nato pa pritisnite gumb ENTER.
5 Z gumbom ▲ ali ▼ izberite številko programa, na katero želite
premakniti kanal.
Pritisnite gumb ENTER. Kanal je premeščen na nov položaj,
skladno s tem pa so premeščeni tudi ostali kanali.
Koraka 4 in 5 ponavljajte, dokler niso vsi kanali premeščeni na
želene številke programov.
Pritisnite gumb EXIT za izhod.
Poimenovanje kanalov
Imena kanalov bodo dodeljena samodejno po sprejemu
informacij o kanalih. Ta imena lahko spreminjate in tako
dodeljujete nova imena.
1 Pritisnite gumb MENU, da prikažete meni.
S pritiskom gumba ▲ ali ▼ izberite Channel, nato pa pritisnite
gumb ENTER.
S pritiskom gumba ▲ ali ▼ izberite Name, nato pa pritisnite
gumb ENTER.
4 Z gumbom ▲ ali ▼ izberite kanal za preimenovanje, nato pa
pritisnite gumb ENTER.
5 Z gumbom ▲ ali ▼ izberite črko, številko ali simbol (v tem
zaporedju: A–Z, 0–9, +, -, *, /, prazno).
S pritiskom na gumb ◄ ali ► se premikajte na prejšnjo ali
naslednjo črko, nato pa pritisnite gumb ENTER.
Za vsak kanal, ki ga želite na novo poimenovati, ponovite
koraka 4 in 5.
Pritisnite gumb EXIT za izhod.
Move
Enter
Return
Country :
United Kingdom
Auto Store
Manual Store
Channel Manager
Sort
Name
Fine Tune
Channel
T V
Move
Enter
Return
Prog. Ch. Name
▲
0 C01 −−−−−
1 C- - −−−−−
C- - −−−−−
C- - −−−−−
4 C- - −−−−−
5 C- - −−−−−
C- - −−−−−
C- - −−−−−
C- - −−−−−
C- - −−−−−
▼
Sort
T V
Move
Enter
Return
Prog. Ch. Name
▲
0 C01 −−−−−
1 C- - −−−−−
C- - −−−−−
C- - −−−−−
4 C- - −−−−−
5 C- - −−−−−
C- - −−−−−
C- - −−−−−
C- - −−−−−
C- - −−−−−
▼
Name
T V
Move
Enter
Return
Country :
United Kingdom
Auto Store
Manual Store
Channel Manager
Sort
Name
Fine Tune
Channel
T V
BN68-01528A-00Sln.indd 16 2008-4-21 15:47:34

Slovenščina - 1
Fina naravnava kanalov
Če je sprejem jasen, fina naravnava ni potrebna, ker se
samodejno izvede med iskanjem in shranjevanjem.
Če je signal šibak ali popačen, boste kanal mogoče morali
ročno fino naravnati.
1 Pritisnite gumb MENU, da prikažete meni.
S pritiskom gumba ▲ ali ▼ izberite Channel, nato pa pritisnite
gumb ENTER.
S pritiskom gumba ▲ ali ▼ izberite Fine Tune, nato pa
pritisnite gumb ENTER.
4 Za dosego ostre in čiste slike ter dobre zvočne kakovosti
pritiskajte gumb ◄ ali ►, dokler ne dosežete optimalne
nastavitve. Pritisnite gumb ENTER.
➢
Pritisnite gumb INFO. Funkcija Fine Tune Store spremeni
barvo prikaza kanala na zaslonu z bele na rdečo in doda
oznako “*”.
➢
Za ponastavitev fine naravnave na 0 izberite Reset tako,
da pritisnete gumb ▲ ali ▼. Pritisnite gumb ENTER.
5 Pritisnite gumb EXIT za izhod.
Fine Tune
P 1
0
Adjust
Save
Return
Reset
P 1 *
Mono
Picture : Standard
Sound : Custom
SRS TS XT : Off
−−
:
−−
Move
Enter
Return
Country :
United Kingdom
Auto Store
Manual Store
Channel Manager
Sort
Name
Fine Tune
Channel
T V
BN68-01528A-00Sln.indd 17 2008-4-21 15:47:34

Slovenščina - 1
Prilagajanje slikovnih nastavitev
Televizor ima več možnosti nastavitev za nadzor kakovosti slike.
1 Pritisnite gumb MENU, da prikažete meni.
S pritiskom na gumb ENTER izberite Picture.
Znova pritisnite gumb ENTER, da izberete Mode.
4 S pritiskom gumba ▲ ali ▼ izberite želeni način, nato pa
pritisnite gumb ENTER.
Razpoložljivi načini:
Dynamic, Standard, Movie
5 S pritiskom gumba ▲ ali ▼ izberite želeno možnost, nato
pritisnite gumb ENTER.
Ko ste zadovoljni z nastavitvijo, pritisnite gumb ENTER.
Pritisnite gumb EXIT za izhod.
Cell Light - Contrast – Brightness – Sharpness – Colour – Tint
➢
V načinih Analogno, TV, Zun., AV in S-Video sistema PAL ni mogoče uporabljati funkcije
obarvanosti.
➢
V načinu PC lahko spreminjate samo možnosti Cell Light, Contrast in Brightness.
Pritiskajte gumb ◄ ali ►, da dosežete optimalno nastavitev.
Sprememba slikovnega standarda
Izberete lahko vrsto slike, ki najbolj ustreza vašim zahtevam.
1 Pritisnite gumb MENU, da prikažete meni.
S pritiskom na gumb ENTER izberite Picture.
Znova pritisnite gumb ENTER, da izberete Mode.
4 S pritiskom gumba ▲ ali ▼ izberite želeni način, nato pa
pritisnite gumb ENTER.
Razpoložljivi načini:
Dynamic, Standard, Movie
➢
Vrednosti nastavitev se lahko razlikujejo glede na vhodni
vir.
5 Pritisnite gumb EXIT za izhod.
➢
Izberite Dynamic za gledanje televizorja čez dan ali ob
močni svetlobi v prostoru.
Izberite Standard za običajno gledanje televizorja.
Izberite Movie za gledanje filma.
Enostavna nastavitev
1 Pritisnite gumb TOOLS na daljinskem upravljalniku.
Pritisnite gumb ▲ ali ▼, da izberete Picture Mode.
Pritisnite gumb ◄ ali ►, da izberete želeno možnost
Move
Enter
Exit
Mode : Standard
Cell Light
Contrast 0
Brightness 45
Sharpness 50
Colour 50
Tint G50 R50
Detailed Settings
Picture Options
Reset : OK
Picture
T V
Move
Enter
Return
Mode : Standard
Cell Light
Contrast 5
Brightness 45
Sharpness 50
Colour 50
Tint G50 R50
Detailed Settings
Picture Options
Reset : OK
Picture
T V
Dynamic
Standard
Movie
Move
Enter
Return
Mode : Standard
Cell Light
Contrast 5
Brightness 45
Sharpness 50
Colour 50
Tint G50 R50
Detailed Settings
Picture Options
Reset : OK
Picture
T V
Tools
Anynet+ (HDMI-CEC)
Picture Mode ◄ Standard ►
Sound Mode : Custom
Sleep Timer : Off
SRS TS XT : Off
Energy Saving : Off
Dual I-II : Mono
Nastaviť
ExitMove
BN68-01528A-00Sln.indd 18 2008-4-21 15:47:35

Slovenščina - 1
Konfiguracija podrobnih nastavitev slike
Nastavite lahko podrobne nastavitve slike.
1 Pritisnite gumb MENU, da prikažete meni.
S pritiskom na gumb ENTER izberite Picture.
S pritiskom gumba ▲ ali ▼ izberite Detailed Settings, nato pa
pritisnite gumb ENTER.
4 S pritiskom gumba ▲ ali ▼ izberite želeno možnost, nato
pritisnite gumb ENTER.
Možnosti, ki so na voljo:
Black Adjust, Dynamic Contrast,
Gamma, Colour Space, White Balance, Odtieň tela, Edge
Enhancement.
5 Ko ste zadovoljni z nastavitvijo, pritisnite gumb ENTER.
Pritisnite gumb EXIT za izhod.
➢
Možnost Detailed Settings je na voljo v načinih Standard in
Movie.
➢
V načinu PC je med elementi Detailed Settings mogoče
spreminjati samo Dynamic Contrast, Gamma in White Balance.
Black Adjust: Off/Low/Medium/High
Neposredno lahko na izberete raven črne na zaslonu, da
prilagodite globino zaslona.
Dynamic Contrast: Off/Low/Medium/High
Prilagodite lahko kontrast zaslona, tako da je za optimalen.
Gamma: - ~ +
Prilagodite lahko srednjo svetlost slik.
Pritiskajte gumb ◄ ali ►, da dosežete optimalno nastavitev.
Colour Space : Auto/Native/Custom
Barvni prostor je barvna matrika, ki je sestavljena iz rdeče, zelene in modre barve.
Izberite najljubši barvni prostor za prikaz najbolj naravnih barv..
− Auto (Samodejno): Samodejni barvni prostor se samodejno prilagodi na najnaravnejši barvni ton glede
na programske vire.
−
Native (Naravno): Nastavitev naravnega barvnega prostora omogoča globoke in bogate barvne tone.
−
Custom (Po meri):
Prilagodi barvni razpon po vaših željah. (Oglejte si “Prilagajanje barvnega prostora”.)
Prilagajanje barvnega prostora
Colour (Barva): Red (Rdeča)/Green (Zelena)/Blue (Modra)/Yellow (Rumena)/Cyan (Cijan)/
Magenta (Škrlatna)
Prilagodi barvni obseg po želji.
Možnost barve je na voljo, ko je Color Space (Barvni prostor) nastavljen na Custom (Po meri).
Z gumbom ◄ ali ► izberite Red (Rdeča), Green (Zelena), Blue (Modra), Yellow (Rumena),
Cyan (Cijan) ali Magenta (Škrlatna).
Pritisnite gumb ENTER.
−
Red (Rdeča)/Green (Zelena)/Blue (Modra): Pri možnosti barve lahko prilagodite vrednosti
RGB za izbrano barvo.
Pritisnite gumb ▲ ali ▼, da izberete
Red (Rdeča), Green (Zelena) ali Blue (Modra) ali da
spremenite barvo. Pritisnite gumb
ENTER.
S pritiskom gumba ◄ ali ► povečajte ali zmanjšajte vrednost določenega elementa.
Pritisnite gumb ENTER.
− Reset (Ponastavi): Ponastavi barvni prostor na privzete nastavitve.
➢
Spreminjate in shranjujete lahko nastavitve vseh zunanjih naprav, ki so povezane na vhod TV.
White Balance: R-Offset/G-Offset/B-Offset/R-Gain/G-Gain/B-Gain/Reset
Prilagodite lahko barvno temperaturo za naravnejše barve slik.
R-Offset/G-Offset/B-Offset/R-Gain/G-Gain/B-Gain: Sprememba vrednosti nastavitve osveži naravnani
zaslon.
S pritiskom gumba ▲ ali ▼ izberite želeno možnost, nato pritisnite gumb ENTER. Pritiskajte
gumb ◄ ali ►, da dosežete optimalno nastavitev.
Reset: Predhodno prilagojena izravnava belin bo ponastavljena na tovarniške vrednosti.
Flesh Tone: -15~+15
Poudarite lahko rožnati ton slike.
Pritiskajte gumb◄ ali ►, da dosežete optimalno nastavitev.
➢
Če spremenite vrednost nastavitve, se osveži prilagojeni zaslon.
Edge Enhancement: Off/On
Robove predmetov lahko poudarite.
Move
Enter
Return
Black Adjust :
Off
Dynamic Contrast : Medium
Gamma : 0
Colour Space : Native
White Balance
Flesh Tone : 0
Edge Enhancement
: On
Detailed Settings
T V
Move
Enter
Return
Mode : Standard
Cell Light
Contrast 0
Brightness 45
Sharpness 50
Colour 50
Tint G50 R50
Detailed Settings
Picture Options
Reset : OK
Picture
T V
BN68-01528A-00Sln.indd 19 2008-4-21 15:47:35

Slovenščina - 0
Picture Options (Možnosti slike)
Nastavite lahko podrobne nastavitve slike.
1 Pritisnite gumb MENU, da prikažete meni.
S pritiskom gumba ENTER izberite Picture.
S pritiskom gumba ▲ ali ▼ izberite Picture Options in
pritisnite gumb ENTER.
4 S pritiskom gumba ▲ ali ▼ izberite želeno možnost in pritisnite
gumb ENTER.
5 Ko ste zadovoljni z nastavitvijo, pritisnite gumb ENTER.
Za izhod pritisnite gumb EXIT.
➢
V načinu PC je mogoče med elementi Picture Options
spreminjati samo Colour Tone, Size in Screen Burn
Protection.
Colour Tone: Cool/Cool1/Normal/Warm1/Warm
➢
Če je slikovni način nastavljen na Dynamic ali Standard,
ni mogoče izbrati možnosti Warm1 in Warm.
Size: Auto Wide
/
1:
/
Wide Zoom
/
Zoom
/
4:
/
Just Scan
Izberete lahko velikost slike, ki najbolj ustreza vašim
zahtevam.
- Auto Wide: Širitev slike z razmerja 4:3 na 16:9.
- 1:: Nastavi sliko na široki način 16:9.
- Wide Zoom: Povečava slike nad 4:3. Sliko pomaknite
navzgor in navzdol z gumbom ▲ ali ▼, ko s pritiskom na
gumb ► ali ENTER izberete .
- Zoom: Navpična povečava slike na zaslonu.
- 4:: Sliko postavi v običajni način 4:.
- Just Scan: Funkcijo uporabite za ogled celotne slike brez
prirezovanja pri vhodnem signalu HDMI (720p/1080i),
komponente (1080i).
Ko izberete “Nespremenjeno” v načinu HDMI (100i)
ali v načinu komponente (100i):
S pritiskanjem gumba ◄ ali ► izberite , nato pritisnite gumb ENTER.
S pritskanjem gumba ▲, ▼, ◄ ali ► pomaknite sliko gor, dol, levo ali desno.
Ponastavi: S pritiskanjem gumba ◄ ali ► izberite Ponastavi, nato pritisnite gumb ENTER.
Nastavitev lahko inicializirate.
➢
Pri HDMI in nastavitvi velikosti slike Just Scan (Nespremenjeno) je lahko slika odrezana ali
je posebnih barv, odvisno od AV-naprav.
➢
Pri povezavi HDMI (1080p) s 24, 25, 30, 50 in 60 Hz in pri povezavi komponente (1080p)
s 50 in 60 Hz je podprt samo vhodni vir
➢
Velikost slike lahko spremenite s pritiskom na gumb P.SIZE na daljinskem upravljalniku.
➢
Možnosti velikosti slike se lahko razlikujejo glede na vhodni vir.
➢
Razpoložljivi elementi se lahko razlikujejo glede na izbrani način.
➢
Funkcija Auto Wide je na voljo samo v načinih TV, Ext.1, Ext., AV in S-Video.
➢
Spreminjate in shranjujete lahko nastavitve vseh zunanjih naprav, ki so povezane na vhod TV
➢
V načinu PC lahko prilagodite samo načina “16:9” in “4:3”.
Določanje položaja in velikosti zaslona z uporabo zooma
Spreminjanje velikosti zaslona z uporabo funkcije Zoom omogoča določanje položaja in velikosti
zaslona v smeri navzgor/navzdol z gumbom ▲ ali ▼.
Ko z gumbom ◄ ali ► izberete , pomaknite zaslon navzgor/navzdol z gumbom ▲ ali ▼.
Ko z gumbom ◄ ali ► izberete , spremenite velikost zaslona navpično z gumbom ▲ ali ▼.
Move
Enter
Return
Colour Tone :
Normal
Size : Auto Wide
Screen Mode : 1:
Digital NR : Auto
Real 100 Hz Demo : Off
DNle : Off
HDMI Black Level : Normal
Blue Only Mode : Off
Screen Burn Protection
D Effect
Picture Options
T V
Move
Enter
Return
Mode : Standard
Cell Light
Contrast 0
Brightness 45
Sharpness 50
Colour 50
Tint G50 R50
Detailed Settings
Picture Options
Reset : OK
Picture
T V
Move
Enter
Return
Auto Wide
1:
Wide Zoom
Zoom
4:
Just Scan
Size
T V
se nadaljuje …
BN68-01528A-00Sln.indd 20 2008-4-21 15:47:36

Slovenščina - 1
Screen Mode : 1:
/
Wide Zoom
/
Zoom
/
4:
Ko velikost nastavite velikost slike “Auto Wide” na
širokozaslonskem televizorju 16:9, lahko določite velikost slike
za sliko 4:3 WSS ali pa ne določite teh nastavitev. V posameznih
evropskih državah so zahtevane različne velikosti slike, zato to
funkcijo izbere uporabnik.
- 1::
Nastavi sliko na široki način 16:9.
- Wide Zoom: Povečava slike nad 4:3.
- Zoom: Navpična povečava slike na zaslonu.
- 4:: Sliko postavi v običajni način 4:.
➢
Funkcija je na voljo v načinu Auto Wide.
➢
Funkcija ni na voljo v načinih Component in HDMI.
Digital NR: Off/Low/Medium/High/Auto
Če je sprejeti TV-signal šibak, lahko vklopite to funkcijo za zmanjšanje statičnih motenj in odsevov na zaslonu.
➢
Če je signal šibak, izberite eno od ostalih možnosti, tako da je slika prikazana v največji kakovosti.
Real 100Hz Demo: Off/On
Razlika med "dejanskimi 100Hz" in 50Hz je očitna, posebej pri gledanju hitrih prizorov. Zato pri gledanju
počasnih prizorov ne boste opazili razlike med "dejanskimi100Hz" in 50Hz. Predstavitveni način s 100Hz
deluje samo pri 50Hz signalu. Predstavitveni način z dejanskimi 100Hz je na voljo za predstavitve v
trgovinah s posebnimi slikami.
DNIe: Off/Demo/On
Televizor pri zagotavljanju visoke kakovosti slike uporablja funkcijo DNIe. Če vklopite funkcijo DNIe, si lahko
ogledate zaslon z aktivirano funkcijo DNIe. Če DNIe nastavite na Demo, si lahko kot demonstracijo na
zaslonu ogledate sliko DNIe in običajno sliko. Z uporabo te funkcije lahko ocenite razliko v kakovosti slike.
➢
DNIe
TM
(Digital Natural Image engine)
Ta funkcija omogoča predvajanje natančnejše slike s 3D-zmanjševanjem šumov, izboljšavo podrobnosti,
kontrasta in belin. Nov algoritem poravnave slike omogoča svetlejšo, čistejšo in podrobnejšo sliko.
Tehnologija DNIe
TM
bo vsak signal prilagodila vašim očem.
➢
Funkcija ni na voljo v načinu PC.
➢
DNIe je na voljo samo v načinu Dynamic.
HDMI Black Level: Normal/Low
S to funkcijo lahko nastavitev kakovost slike, ko vhod HDMI zazna “ožig zaslona” (prikaz ravni črne,
slabega kontrasta, slabih barv ipd.) v omejenem razponu RGB (16 do 235).
➢
Funkcija je aktivna samo, kadar je zunanji vhod povezan s HDMI (signali RGB).
Blue Only Mode: Off/On
Ta funkcija je namenjena strokovnjakom za merjenje naprav AV. Ta funkcija prikazuje modri signal samo,
če iz video signala odstranita rdeč in zelen signal, da ustvarite učinek modrega filtra, ki se uporablja za
prilagajanje barve in obarvanosti video opreme, kot je predvajalnik DVD, domači kino, itd.
Z uporabo te funkcije lahko prilagodite barvo in obarvanost želenih
vrednosti, ki so primerne za stopnjo signala vsake video naprave,
ki uporablja vzorce rdeče/zelene/modre/turkizne/škrlatne/rumene
barvne lestvice brez uporabe dodatnega filtra za modro.
➢
Blue Only Mode je na voljo, ko je način slike nastavljen na
Movie ali Standard.
Screen Burn Protection
V napravo je vgrajena tehnologija za preprečevanje ožiga zaslona,
ki zmanjša možnost ožiga. Ta tehnologija omogoča nastavitev
premikanja slike v smeri navzgor/navzdol in od ene strani do druge.
Nastavitev časa omogoča določanje števila minut med premiki slike.
− Pixel Shift: Pri tej funkciji se slikovne pike na zaslonu PDP
neznatno premikajo v vodoravni ali navpični smeri, kar zelo
zmanjša možnost pojava zakasnele slike.
• S pritiskom gumba ▲ ali ▼ nastavite
Pixel Shift na On, nato
pa pritisnite gumb ENTER.
• S pritiskom gumba ▲ ali ▼ izberite želeno možnost, nato pa
pritisnite gumb ENTER.
Možnosti, ki so na voljo:
Horizontal Dot, Vertical Line, Time
se nadaljuje …
Move
Enter
Return
Colour Tone :
Normal
Size : Auto Wide
Screen Mode : 1:
Digital NR :
Real 100 Hz Demo : Off
DNle :
HDMI Black Level : Normal
Blue Only Mode : Off
Screen Burn Protection
D Effect
Picture Options
T V
1:
Wide Zoom
Zoom
4:
Move
Enter
Return
Colour Tone :
Normal
Size :
Auto Wide
Screen Mode :
1:
Digital NR :
Auto
Real 100 Hz Demo : Off
DNle : On
HDMI Black Level : Normal
Blue Only Mode : Off
Screen Burn Protection
D Effect
Picture Options
T V
Move
Enter
Return
Pixel Shift
White
Scrolling
Side Gray :
Dark
Screen Burn Protection
T V
BN68-01528A-00Sln.indd 21 2008-4-21 15:47:37

Slovenščina -
➢
Optimalni pogoji za pomikanje slikovnih pik;
PC TV/Ext/AV/Component/HDMI
Horizontal Dot 1 2
Vertical Line 1 2
Time (minute) 2 2 min
➢
Vrednost Pixel Shift slikovne pike je odvisna od velikosti monitorja
(palcev) in načina.
➢
Funkcija ni na voljo v načinu nespremenjenega prikaza.
− White: Ta funkcija pomaga pri odstranjevanju zakasnele slike z zaslona tako, da barvo slikovnih pik
spremeni v belo. Uporabite jo, ko so na ekranu prikazane zakasnele slike ali simboli. Še posebej je
uporabna, če je na zaslonu bila zelo dolgo prikazana mirujoča slika.
− Scrolling: Ta funkcija pomaga pri odstranjevanju zakasnele slike z zaslona, tako da vse slikovne pike na
zaslonu PDP premika po določenem vzorcu. Uporabite jo, ko so na ekranu prikazane zakasnele slike ali
simboli. Še posebej je uporabna, če je na zaslonu bila zelo dolgo prikazana mirujoča slika.
− Side gray: Ko televizor gledate v razmerju slike 4:3, se s prilagoditvijo izravnave belin na skrajnje levi in
skrajnje desni strani televizorja prepreči škoda.
Dark: Ko gledate televizor z razmerjem slike 4:3, potemni levo in desno stran.
Light: Ko gledate televizor z razmerjem slike 4:3, posvetli levo in desno stran.
➢
Za odstranjevanje zakasnele slike z zaslona uporabite funkcijo White ali Scrolling. Čeprav obe funkciji
odstranita zakasnelo sliko z zaslona, je funkcija Scrolling bolj učinkovita.
➢
Funkcijo za odstranjevanje zakasnele slike je treba izvajati dalj časa (približno eno uro), če želite
učinkovito odstraniti zakasnelo sliko. Če po izvajanju funkcije ni izboljšanja pri zakasneli sliki, ponovite
funkcijo.
➢
Za preklic te funkcije pritisnite katerikoli gumb na daljinskem upravljalniku.
Move
Enter
Return
Pixel Shift : On
Horizontal Dot :
Vertical Line :
Time : min
Pixel Shift
T V
Uporaba funkcije D
Uživate lahko v D-filmih in D-igrah na TV. Funkcija D-učinkov omogoča ogled D-slik s
posebnimi D-očali.
,5 mm stereo vtič za kabel RCA (ni priloženo)
D-očala
(Ni priloženo.)
D-IR-oddajnik
(Ni priloženo.)
PC
Kabel HDMI/DVI (ni priloženo)
Hrbtna plošča TV
Povezave
➢
3D-očala (vključno z oddajnikom) so lahko drugačna, odvisno od modela.
BN68-01528A-00Sln.indd 22 2008-4-21 15:47:39

Slovenščina -
1 S kablom HDMI/DVI povežite vtičnico HDMI IN 2 na TV in izhodno vtičnico računalnika.
S 3,5 mm stereo kablom/kablom 2RCA povežite vtičnico DVI IN (HDMI 2) [R-AUDIO-L] na TV in
izhodno vtičnico za zvok zvočne kartice v računalniku.
Povežite oddajnik z vrati 3D SYNC OUT na hrbtni plošči TV.
4 Vklopite TV in nastavite vir TV na HDMI2.
Za več informacij o 3D-očalih (vključno z oddajnikom) si oglejte uporabniški priročnik omenjenih očal.
Prilagoditev ločljivosti računalnika: PS50A470: 1024 x 768 pri 60 Hz,1360 x 768 pri 60Hz
Optimalna ločljivost računalnika za PS50A470 je 1360x768. Če je signal 1024x768 aktiven v načinu
3D, bo slika prikazana v formatu 4:3 z levim in desnim sivim robom.
3D-IR-oddajnik komunicira s 3D-očali.
Zato mora biti 3D-IR-oddajnik blizu 3D-očal.
Aktivira se, če je vhodni signal HDMI ali DVI RGB in če je podprt zvok DVI.
Ob vklopu in izklopu napajanja se izdelek preklopi v privzeti način (Off) in možnost Format se shrani.
Možnost D Effect se vklopi in izklopi ne glede na možnost Picture Mode.
Ko vklopite možnost D Effect, se aktivirajo samo Contrast, Brightness, D Effect in Reset picture
menus.
Za uporabo funkcije 3D-učinkov potrebujete grafično kartico, ki podpira 3D, ali 3D-programsko
opremo.
3D-očala in oddajnik mora izdelati isto podjetje.
Dolgotrajnejše igranje iger ali gledanje TV s 3D-očali lahko utrudi oči ali povzroči glavobol.
3D-očala (vključno z oddajnikom), ki jih ni izdelalo podjetje Samsung, morda niso podprta.
Če pri uporabi funkcije 3D zaslon miglja, zmanjšajte osvetlitev v prostoru ali izklopite fluorescentno
luč, da boste zaslon gledali v najboljših razmerah.
Preklop v drug način
Če preklopite način, bodo slike za obe očesi zamenjali levi in desni
izhodni signali.
1 Povežite TV, računalnik in 3D-IR-oddajnik, kot je prikazano na
sliki.
Pritiskajte gumb SOURCE, da izberete HDMI.
Pritisnite gumb MENU, da se prikaže meni.
S pritiskanjem gumba ▲ ali ▼izberite Picture, nato pritisnite
gumb ENTER.
4 S pritiskanjem gumba ▲ ali ▼ izberite Picture Option, nato
pritisnite gumb ENTER.
S pritiskanjem gumba ▲ ali ▼, da izberete D Effect, nato
pritisnite gumb ENTER.
5 S pritiskanjem gumba ▲ ali ▼izberite Mode, nato pritisnite
gumb ENTER.
S pritiskanjem gumba ▲ ali ▼izberite Off, Mode1, Mode ali
D Conversion
, nato pritisnite gumb ENTER.
• Off: Za izklop funkcije 3D-učinkov.
• Mode1: Pri Načinu 1 se najprej izvede desna sinhronizacija.
• Mode:
Pri Načinu 2 se najprej izvede leva sinhronizacija.
•
D Conversion: Za pretvorbo slik iz 3D- v 2D-način.
To izberite, če želite začasno gledati slike v 2D-načinu, ker ste
omotični. Če želite 3D-učinke dokončno izklopiti, pa izberite
“Izklopljeno”.
Če 3D-učinki ne delujejo pravilno, morda način in 3D-očala
nista ustrezno sinhronizirana. Da jih sinhronizirate, preklopite v drug način.
se nadaljuje …
Move
Enter
Return
Mode : Standard
Cell Light
Contrast 5
Brightness 45
Sharpness 50
Colour 50
Tint G50 R50
Detailed Settings
Picture Options
Reset : OK
Picture
T V
Move
Enter
Return
Colour Tone :
Normal
Size :
Auto Wide
Screen Mode :
1:
Digital NR :
Auto
Real 100 Hz Demo :
Off
DNle : Off
HDMI Black Level : Normal
Blue Only Mode : Off
Screen Burn Protection
D Effect
Picture Options
T V
Move
Enter
Return
Mode :
Format :
D Effect
T V
Off
Mode1
Mode
D Conversion
BN68-01528A-00Sln.indd 23 2008-4-21 15:47:41

Slovenščina - 4
Ponastavitev nastavitev slike na tovarniške vrednosti
Opravite lahko podrobne nastavitve slike.
1 Pritisnite gumb MENU; meni se nato prikaže na zaslonu.
Pritisnite gumb ENTER, če želite izbrati možnost Picture.
Pritisnite gumb ▲ ali ▼, če želite izbrati Reset
(Ponastavitev), nato pa pritisnite gumb ENTER.
4 Pritisnite gumb ▲ ali ▼ če želite izbrati OK ali Cancel, nato pa
pritisnite gumb ENTER.
➢
Vse načine je mogoče ponastaviti.
Move
Enter
Return
Mode : Standard
Cell Light
Contrast 0
Brightness 45
Sharpness 50
Colour 50
Tint G50 R50
Detailed Settings
Picture Options
Reset : OK
Picture
T V
OK
Cancel
Spreminjanje oblike zapisa
Izberite optimalno obliko zapisa vhoda, ki se bo ujemal z grafično
kartico in 3D-programsko opremo.
Zgoraj si oglejte korake od 1. do 4.
5 Pritiskajte gumb ▲ ali ▼, da izberete Format, nato pritisnite
gumb ENTER.
Pritiskajte gumb ▲ ali ▼, da izberete Checker Board,
Horizontal ali Vertical, nato pritisnite gumb ENTER.
Checker Board
To obliko zapisa vhoda izberite, če je oblika zapisa
izhoda grafične kartice ali 3D-programske opreme
možnost šahovnice.
Horizontal
To obliko zapisa vhoda izberite, če je oblika zapisa
izhoda grafične kartice ali 3D-programske opreme
možnost vodoravnega.
Vertical
To obliko zapisa vhoda izberite, če je oblika zapisa
izhoda grafične kartice ali 3D-programske opreme
možnost navpičnega.
➢
S pritiskanjem gumba D na daljinskem upravljalniku lahko
spreminjate nastavitev načina 3D.
Enostavna nastavitev
1 Pritisnite gumb TOOLS na daljinskem upravljalniku.
Pritiskajte gumb ◄ ali ►, da izberete D Mode.
Pritisnite gumb ENTER, da zaženete 3D-učinke.
Tools
D Mode ◄ Off ►
Anynet+ (HDMI-CEC)
Picture Mode : Dynamic
Sound Mode : Standard
Sleep Timer : Off
SRS TS XT : Off
Energy Saving : Off
Adjust
ExitMove
Move
Enter
Return
Mode : Mode 1
Format :
D Effect
T V
Checker Board
Horizontal
Vertical
BN68-01528A-00Sln.indd 24 2008-4-21 15:47:44

Slovenščina - 5
Zvočne funkcije
1 Pritisnite gumb MENU, da prikažete meni.
S pritiskom gumba ▲ ali ▼ izberite Sound, nato pa pritisnite
gumb ENTER.
S pritiskom gumba ▲ ali ▼ izberite želeno možnost, nato pa
pritisnite gumb ENTER.
Možnosti, ki so na voljo:
Mode, Equalizer, SRS TS XT,
Auto Volume, TV Speaker, Select Sound
4 Ko ste zadovoljni z nastavitvijo, pritisnite gumb ENTER.
5 Pritisnite gumb EXIT za izhod.
Mode: Standard/Music/Movie/Speech/Custom
Izberete lahko vrsto posebnih zvočnih učinkov ob gledanju
določene oddaje.
Enostavna nastavitev
1 Pritisnite gumb TOOLS na daljinskem upravljalniku.
Pritisnite gumb ▲ ali ▼, da izberete Sound Mode.
Pritisnite gumb ◄ ali ►, da izberete želeno možnost.
Equalizer: Balance/100Hz/00Hz/1kHz/kHz/10kHz
Televizor ima več nastavitev, s katerimi lahko nadzorujete
kakovost zvoka.
➢
Če spremenite te nastavitve, se zvočni način samodejno
nastavi na Custom.
SRS TS XT: Off/On
TruSurround XT je patentirana tehnologija SRS za predvajanje
5.1-večkanalne vsebine preko dveh zvočnikov. TruSurround proizvaja odličen, navidezni prostorski
na kateremkoli sistemu z dvema zvočnikoma, tudi preko notranjih zvočnikov televizorja. Tehnologija
je popolnoma združljiva z vsemi večkanalnimi formati.
Enostavna nastavitev
1 Pritisnite gumb TOOLS na daljinskem upravljalniku.
Pritisnite gumb
▲ ali ▼
, da izberete SRS TS XT.
Pritisnite gumb
◄ ali ►
, da izberete Off ali On.
Auto Volume: Off/On
Vsaka postaja ima svoje signalne pogoje, zato ni enostavno
regulirati glasnosti ob vsaki zamenjavi kanala. Ta funkcija
omogoča samodejno regulacijo glasnosti želenega kanala z
znižanjem glasnosti v primeru visokega modulacijskega signala ali zvišanjem glasnosti v primeru
nizkega modulacijskega signala.
TV Speaker: Off/On
Če želite slišati zvok iz ločenih zvočnikov, izklopite notranji ojačevalnik.
➢
Gumbi
+,
- in MUTE ne delujejo, ko je vklopljena funkcija “TV Speaker”.
➢
Ko je možnost Zvočnik TV nastavljena na Izklopljeno, lahko v meniju za zvok upravljate samo
možnost Izbira zvoka (v načinu PIP).
Sound Select: Main/Sub
Ko je aktivirana funkcija PIP, lahko poslušate zvok podslike (PIP).
-
Main: Za poslušanje zvoka glavne slike
-
Sub: Za poslušanje zvoka podslike
TruSurround XT, SRS in simbol so blagovne znamke podjetja SRS Labs, Inc.
Tehnologija TruSurround XT je vgrajena pod licenco podjetja SRS Labs, Inc.
Move
Enter
Return
Mode :
Custom
Equalizer
SRS TS XT :
Off
Auto Volume : Off
TV Speaker :
Off
Select Sound : Main
Sound
T V
Move
Adjust
Return
Equalizer
T V
Balance 100Hz 00Hz 1kHz kHz 10kHz
+
0
-
R
L
+
0
-
Tools
Anynet+ (HDMI-CEC)
Picture Mode : Standard
Sound Mode ◄ Custom ►
Sleep Timer : Off
SRS TS XT : Off
Energy Saving : Off
Dual I-II : Mono
Move
Adjust
Exit
Tools
Anynet+ (HDMI-CEC)
Picture Mode : Standard
Sound Mode : Custom
Sleep Timer : Off
SRS TS XT ◄ Off ►
Energy Saving : Off
Dual I-II : Mono
Move
Adjust
Exit
BN68-01528A-00Sln.indd 25 2008-4-21 15:47:45

Slovenščina -
Izbira zvočnega načina (odvisno od modela)
Gumb DUAL I-II prikazuje/regulira obdelavo in izhod zvočnega signala. Ob vklopu je način
samodejno prednastavljen na “DUAL-I ” ali “Stereo”, odvisno od trenutnega oddajanja.
Enostavna nastavitev
1 Pritisnite gumb TOOLS na daljinskem upravljalniku.
Pritisnite gumb ▲ ali ▼, da izberete Dual I-II.
Pritisnite gumb ◄ ali ►, da izberete želeno možnost.
Vrsta oddaje
Indikator na zaslonu
NICAM
Stereo
Običajna oddaja
(standardni avdio)
Mono (Normalna uporaba)
Običajno + NICAM Mono NICAM
Mono
(Običajno)
NICAM stereo
NICAM
Stereo
Mono
(Običajno)
NICAM DUAL-I/II
NICAM
Dual-1
NICAM
Dual-
Mono
(Običajno)
A2
Stereo
Običajna oddaja
(standardni avdio)
Mono (Normalna uporaba)
Dvojezično ali DUAL-I/II Dual-I Dual-II
Stereo Stereo
Mono
(Prisilni mono)
➢
V primeru slabega sprejema bo poslušanje lažje ob izbiri načina Mono.
Če je stereo signal šibak in pride do samodejnega preklopa, preklopite na Mono.
Priključitev slušalk (naprodaj posebej)
Da TV-program, ki ga gledate, ne bi motil ostalih oseb v prostoru, lahko na televizor
priključite slušalke.
➢
Ko vtič slušalk priključite na ustrezna vrata, lahko v meniju
zvoka uporabljate samo “Auto Volume” (Samodejna gla
snost).
➢
Daljša uporaba slušalk pri večji glasnosti lahko poškoduje
sluh.
➢
Ko na TV priključite slušalke, zvok ne bo prihajal iz zvočnikov.
➢
Glasnost slušalk se nastavlja ločeno od glasnosti televizorja.
Stranska plošča TV
Tools
Anynet+ (HDMI-CEC)
Picture Mode : Standard
Sound Mode : Custom
Sleep Timer : Off
SRS TS XT : Off
Energy Saving : Off
Dual I-II ◄ Mono ►
Move
Adjust
Exit
BN68-01528A-00Sln.indd 26 2008-4-21 15:47:45

Slovenščina -
Časovne funkcije
1 Pritisnite gumb MENU, da prikažete meni.
S pritiskom gumba ▲ ali ▼ izberite Setup, nato pa pritisnite
gumb ENTER.
S pritiskom gumba ▲ ali ▼ izberite Time, nato pa pritisnite
gumb ENTER.
4 S pritiskom gumba ▲ ali ▼ izberite želeno možnost, nato pa
pritisnite gumb ENTER.
Možnosti, ki so na voljo:
Clock Set, Sleep Timer, Timer 1,
Timer
, Timer
5 Ko ste zadovoljni z nastavitvijo, pritisnite gumb ENTER.
Pritisnite gumb EXIT za izhod.
Clock Set
Uro na televiziji lahko nastavite, tako da se bo ob pritisku na
gumb INFO na daljinskem upravljalniku izpisal tekoči čas. Če
želite uporabljati samodejni vklopni in izklopni časovnik, morate
nastaviti čas.
− Pritisnite gumb ◄ ali ►, da izberete
Month, Day, Year,
Hour ali Minute. Nastavite jih s pritiskom na gumb ▲ ali ▼.
➢
Nastavitve Month, Day, Year, Hour ali Minute lahko
nastavite neposredno s pritiskom na številske gumbe na
daljinskem upravljalniku.
➢
Če pride do prekinitve napajanja ali če je televizor izklopljen
iz napajanja, bodo nastavitve za uro izgubljene.
Sleep Timer
Izberete lahko časovno obdobje od 30 do 180 minut za
samodejni preklop televizorja v stanje pripravljenosti.
− Izberite prednastavljeni časovni interval (
Off, 0, 0, 0,
10
, 150 ali 10) s pritiskom na gumb ▲ ali ▼.
Enostavna nastavitev
1 Pritisnite gumb TOOLS na daljinskem upravljalniku.
Pritisnite gumb ▲ ali ▼ za izbiro Sleep Timer.
Pritisnite gumb ◄ ali ►, da nastavite minute, in pritisnite
gumb ENTER
Timer 1/Timer /Timer
Časovnik za vklop/izklop lahko nastavite, tako da se bo
televizor samodejno vklapljal ali izklapljal ob izbranem času.
☛
Najprej morate nastaviti uro.
− Za izbiro želenega elementa pritisnite gumb ◄ ali ►.
Z gumbom ▲ ali ▼ izberite želeno nastavitev.
On Time: Izberite ure, minute in On/Off (Za aktivacijo časovnika z izbrano nastavitvijo izberite On.)
Off Time: Izberite ure, minute in On/Off (Za aktivacijo časovnika z izbrano nastavitvijo izberite On.)
Repeat: Izberite Once, Everyday, Mon~Fri, Mon~Sat ali Sat~Sun.
Volume: Izberite želeno glasnost.
➢
Uro in minute lahko nastavite neposredno s pritiskom na številske gumbe na daljinskem
upravljalniku.
☛
Auto Power Off
Ko je časovnik nastavljen na “On”, se bo televizor izklopil, če ne pritisnete nobenega gumba tri ure
zatem, ko je časovnik vklopil televizor. Ta funkcija je na voljo samo, ko je časovnik nastavljen na “On”,
in preprečuje pregrevanje, do katerega lahko pride, če je televizor predolgo vklopljen.
Move
Enter
Return
Clock Set :
00 : 00
Sleep Timer :
Off
Timer 1 :
Off
Timer :
Off
Timer :
Off
Time
T V
Move
Enter
Return
Plug & Play
Language :
English
Time
Light Effect
: In Watching TV
Wall-Mount Adjustment
Melody :
Off
Entertainment :
Off
Energy Saving :
Off
PIP
Setup
T V
Tools
Anynet+ (HDMI-CEC)
Picture Mode : Standard
Sound Mode : Custom
Sleep Timer ◄ Off ►
SRS TS XT : Off
Energy Saving : Off
Dual I-II : Mono
Move
Adjust
Return
Timer 1
T V
00 00 Off
On Time
:
Off Time
Repeat
Once
10
Volume
00 00 Off
:
Move
Adjust
Exit
BN68-01528A-00Sln.indd 27 2008-4-21 15:47:46

Slovenščina -
Language/Melody/Light Effect/Entertainment/Energy Saving/PIP
1 Pritisnite gumb MENU, da prikažete meni.
S pritiskom gumba ▲ ali ▼ izberite Setup, nato pa pritisnite
gumb ENTER.
S pritiskom gumba ▲ ali ▼ izberite želeno možnost, nato pa
pritisnite gumb ENTER.
Možnosti, ki so na voljo:
Language, Melody, Light Effect,
Entertainment, Energy Saving ,PIP
4 Ko ste zadovoljni z nastavitvijo, pritisnite gumb ENTER.
5 Pritisnite gumb EXIT za izhod.
Language
Je različen, odvisno od modela. Ob prvi uporabi televizorja izberite jezik, v katerem bodo prikazani
meniji in njihove vrednosti.
Light Effect: Off/In Standby/In Watching TV/Always
Glede na okoliščine lahko vklopite ali izklopite modri LED-indikator na sprednji strani TV-ja. Uporabite
ga za varčevanje z energijo ali če LED-indikator utruja vaše oči.
−
Off: Modri LED-indikator je vedno izklopljen.
−
In Standby: Modri LED-indikator sveti v načinu pripravljenosti, ob vklopu televizorja pa je
izklopljen.
−
In Watching TV: Modri LED-indikator sveti pri gledanju televizorja, ob izklopu televizorja se
pa izklopi.
−
Always: Modri LED-indikator vedno sveti.
➢
Za zmanjšanje energijske porabe televizorja izklopite svetlobne učinke.
Melody: Off/Low/Medium/High
Prilagodite lahko melodijo ob vklopu ali izklopu televizorja.
Entertainment: Off/Sports/Cinema/Game
Način razvedrila vam omogoča, da izberete optimalni prikaz in zvok za športne oddaje, kino in igre.
– Off: Izklopi funkcijo Entertainment.
– Sports: Zagotavlja optimalno kakovost slike in zvoka za športne oddaje.
– Cinema: Zagotavlja optimalno kakovost slike in zvoka za filme.
Slika je bogatejša, zvok izboljšan.
– Game: Zagotavlja optimalno kakovost slike in zvoka za igre. Ta način pospeši hitrost igranja, če
uporabljate zunanjo igralno konzolo, povezano s TV
➢
Če nastavite katerega od treh načinov Entertainment na On, se nastavitve zaklenejo in jih ni
mogoče prilagajati. Če želite prilagoditi slikovni in zvočni način, izklopite način razvedrila.
➢
Nastavitve možnosti razvedrila se shranijo za vse vhodne vire.
se nadaljuje …
Move
Enter
Return
Plug & Play
Language : English
Time
Light Effect
: In Watching TV
Wall-Mount Adjustment
Melody : Off
Entertainment : Off
Energy Saving : Off
PIP
Setup
T V
BN68-01528A-00Sln.indd 28 2008-4-21 15:47:47

Slovenščina -
Nastavitev programske opreme na računalnik (Windows XP)
Spodaj so prikazane nastavitve zaslona v OS Windows za
tipični računalnik. Dejanski prikazi na zaslonu bodo najbrž
drugačni, odvisno od različice operacijskega sistema
Windows in grafične kartice. Četudi se dejanski prikazi na
zaslonu razlikujejo, v večini primerov veljajo iste osnovne
nastavitvene informacije. (Sicer se obrnite na proizvajalca
računalnika ali Samsungovega trgovca.)
1 Z desno miškino tipko kliknite na namizje programa Windows
Desktop, nato kliknite na Properties.
Prikaže se okno Display Properties.
Kliknite jeziček Settings in nato nastavite način prikaza v
skladu s tabelo načinov prikaza. Nastavitve Colours (Barve)
vam ni treba spreminjati.
Kliknite Advanced. Prikaže se novo pogovorno okno za nastavitve.
4 Kliknite na jeziček Monitor in glede na tabelo načinov prikaza nastavite Screen refresh rate. Če
je mogoče, ločeno nastavite Vertical Frequency (Navpično frekvenco) in Horizontal Frequency
(Vodoravno frekvenco) namesto nastavitve Screen Refresh Rate.
5 Kliknite OK, da zaprete okno, nato kliknite na gumb OK okna Display Properties. Takrat se lahko
začne samodejni ponovni zagon.
Energy Saving: Off/Low/Medium/High
S to funkcijo se svetlost zaslona prilagodi osvetlitvi okolja.
−
Off: Način z varčevanje z energijo je izklopljen.
−
Low: Deluje v standardnem načinu ne glede na osvetlitev okolja.
−
Medium: Vklopi način zmernega varčevanja z energijo ne glede
na osvetlitev okolja.
−
High: Vklopi način maksimalnega varčevanja z energijo ne glede
na osvetlitev okolja.
Enostavna nastavitev
1 Pritisnite gumb TOOLS na daljinskem upravljalniku.
Pritisnite gumb ▲ ali ▼, da izberete Energy Saving.
Pritisnite gumb
◄ ali ►
za izbiro zahtevane možnosti.
PIP (Slika v sliki): PIP (On/Off)/Source/Size/Position/Programme
V glavni sliki lahko prikažete podsliko. Tako lahko gledate program TV ali video s povezanih naprav.
−
PIP: On/Off
Funkcijo PIP lahko aktivirate ali deaktivirate.
Tabela nastavitev PIP
Glavna slika Podslika
Component
HDMI1, 2,3
PC
Samo analogno
televizijsko oddajanje
Ext1, Ext2, AV
− Source: TV/Ext.1/Ext./AV
Izberete lahko vir podslike.
−
Size: / /
Izberete lahko velikost podslike.
➢
Če je glavna slika v načinih PC in Component, možnost Size ni na voljo.
− Position: / / /
Izberete lahko položaj.
➢
V dvojnem načinu (
,
)
, možnosti Position ni mogoče izbrati.
− Programme
Kanal podslike lahko izberete samo, ko je Source nastavljen na TV.
Move
Enter
Return
PIP :
On
Source :
TV
Size :
Position :
Programme :
P 1
PIP
T V
Tools
Anynet+ (HDMI-CEC)
Picture Mode : Standard
Sound Mode : Custom
Sleep Timer : Off
SRS TS XT : Off
Energy Saving ◄ Off ►
Dual I-II : Mono
Move
Adjust
Exit
BN68-01528A-00Sln.indd 29 2008-4-21 15:47:47

Slovenščina - 0
Način vhoda PC
Položaj in velikost zaslona se razlikujeta glede na vrsto računalniškega monitorja in njegovo
ločljivost. V spodnji tabeli so prikazani podprti načini prikaza:
D-Sub Input
Način Ločljivost
Vodoravna
frekvenca
(kHz)
Navpična
frekvenca
(Hz)
Frekvenca
točkovne
ure (MHz)
Polariteta
sinhr.
(H/V)
PS50A40
IBM
640 x 350
720 x 400
31.469
31.469
70.086
70.087
25.175
28.322
+ / -
- / +
✔
✔
VESA
640 x 480
640 x 480
640 x 480
800 x 600
800 x 600
800 x 600
1024 x 768
1024 x 768
1024 x 768
1360 x 768
31.469
37.861
37.500
37.879
48.077
46.875
48.363
56.476
60.023
47.712
59.940
72.809
75.000
60.317
72.188
75.000
60.004
70.069
75.029
60.015
25.175
31.500
31.500
40.000
50.000
49.500
65.000
75.000
78.750
85.500
- / -
- / -
- / -
+ / +
+ / +
+ / +
- / -
- / -
+ / +
+ / +
✔
✔
✔
✔
✔
✔
✔
✔
✔
✔
HDMI/DVI Input
Način Ločljivost
Vodoravna
frekvenca
(kHz)
Navpična
frekvenca
(Hz)
Frekvenca
točkovne
ure (MHz)
Polariteta
sinhr.
(H/V)
PS50A40
VESA
640 x 480
800 x 600
1024 x 768
1360 x 768
31.469
37.879
48.363
47.712
59.940
60.317
60.004
60.015
25.175
40.000
65.000
85.500
- / -
+ / +
- / -
+ / +
✔
✔
✔
✔
Ko uporabljate kabel HDMI/DVI, morate uporabiti vtič HDMI IN .
Način prepletanja ni podprt.
Če izberete nestandardno obliko video zapisa, televizor mogoče ne bo deloval pravilno.
Podprta sta načina Separate (Ločeno) in Composite (Kompozitno). SOG ni podrt.
Pri modelu PS50A470, je kakovost besedila z računalnika optimalna v načinu VESA
(1360 x 768 pri 60 Hz).
BN68-01528A-00Sln.indd 30 2008-4-21 15:47:48

Slovenščina - 1
Nastavitev računalnika
➢
Način PC prednastavite tako, da pritisnete gumb SOURCE.
1 Pritisnite gumb MENU, da prikažete meni.
S pritiskom gumba ▲ ali ▼ izberite Picture, nato pa pritisnite
gumb ENTER.
S pritiskom gumba ▲ ali ▼ izberite želeno možnost, nato pa
pritisnite gumb ENTER.
4 Ko ste zadovoljni z nastavitvijo, pritisnite gumb ENTER.
5 Pritisnite gumb EXIT za izhod.
Auto Adjustment:
Samodejna nastavitev omogoča samodejno nastavitev vhodnega
računalniškega video signala na računalniškem zaslonu.
Vrednosti za fino, grobo in položaj so samodejno naravnane.
Easy Setting (Enostavna nastavitev)
1 Pritisnite gumb TOOLS na daljinskem upravljalniku.
Pritisnite gumb ▲ ali ▼ da izberete Auto Adjustment, in
pritisnite gumb ENTER.
Screen Adjustment: Coarse/Fine/Position/Image Reset
Coarse/Fine
Namen nastavitve kakovosti slike je odstraniti ali zmanjšati
šum slike.
Če šum ni odstranjen s fino naravnavo, čim bolje (grobo)
nastavite frekvenco in znova fino naravnajte.
Po zmanjšanju šumov znova nastavite sliko tako, da bo
poravnana na sredini zaslona.
1 S pritiskom gumba ▲ ali ▼ izberite Coarse ali Fine, nato
pa pritisnite gumb ENTER.
Za nastavitev kakovosti slike pritisnite gumb ◄ ali ►,
lahko se pojavijo navpične črte ali motna slika. Pritisnite
gumb ENTER.
Position
Nastavite položaj računalniškega zaslona, če se ta ne prilega
TV-zaslonu.
1 Položaj nastavite s pritiskom na gumbe ▲/▼/◄/►.
Pritisnite gumb ENTER.
Image Reset
Vse slikovne nastavitve lahko zamenjate s tovarniškimi
vrednostmi.
Tools
Anynet+ (HDMI-CEC)
Picture Mode : Standard
Sound Mode : Custom
Sleep Timer : Off
SRS TS XT : Off
Energy Saving : Off
PIP
Auto Adjustment
Enter ExitMove
Auto Adjustment in Progress
Please wait.
Image Reset is completed.
Move
Enter
Return
Position
T V
Move
Enter
Return
Coarse 50
Fine 11
Position
Image Reset
Screen Adjustment
T V
Move
Enter
Return
Mode :
Standard
Cell Light
Contrast 5
Brightness 45
Sharpness 50
Auto Adjustment
Screen Adjustment
Detailed Settings
Picture Options
Reset : OK
Picture
T V
BN68-01528A-00Sln.indd 31 2008-4-21 15:47:48

Slovenščina -
English - 30
Povezava naprav, ki podpirajo Anynet
+
Sistem Anynet
+
je združljiv samo z napravami AV, ki podpirajo Anynet
+
.
Preverite, ali je na napravi AV, ki jo želite priključiti na TV, oznaka Anynet
+
.
Neposredna povezava s TV
Vtičnico [HDMI 1], [HDMI 2]
ali [HDMI 3] na TV in vtičnico
HDMI OUT na ustrezni napravi,
ki podpira Anynet
+
, povežite s
kablom HDMI.
Povezava z domačim kinom
1 Vtičnico [HDMI 1], [HDMI
2] ali [HDMI 3] na TV in
vtičnico HDMI OUT na
ustrezni napravi, ki podpira
Anynet
+
, povežite s kablom
HDMI.
Vtičnico HDMI IN na
domačem kinu in vtičnico
HDMI OUT na ustrezni
napravi, ki podpira Anynet
+
,
povežite s kablom HDMI.
➢
Povežite samo en sprejemnik.
➢
Napravo, ki podpira Anynet
+
, lahko povežete s kablom HDMI. Nekateri kabli HDMI morda ne
podpirajo funkcij sistema Anynet
+
.
➢
Anynet
+
deluje, če je naprava AV, ki podpira Anynet
+
, v stanju pripravljenosti ali je vklopljena.
➢
Anynet
+
podpira skupno največ 8 naprav AV.
English - 30
Kaj je Anynet
+
?
Anynet
+
je omrežni sistem AV, ki uporabnikom omogoča enostavno uporabo vmesnika AV, saj
lahko vse priključene naprave AV upravljajo v meniju
+
, če so priključene naprave AV podjetja
Samsung Electronics.
Naprava, ki podpira Naprava, ki podpira Naprava, ki podpira
TV
Kabel HDMI
Kabel HDMI
Kabel HDMI
TV
Naprava, ki podpira Naprava, ki podpira
Naprava, ki podpira
Kabel HDMI
Kabel HDMI
Kabel HDMI
Kabel HDMI
Domači kino
BN68-01528A-00Sln.indd 32 2008-4-21 15:47:49

Slovenščina -
Setting Up Anynet
+
Z naslednjimi nastavitvami lahko prilagodite funkcije sistema Anynet
+
.
Uporaba funkcij sistema Anynet
+
1 Pritisnite gumb MENU, da prikažete meni.
S pritiskanjem gumba ▲ ali ▼ izberite Input in pritisnite gumb
ENTER.
S pritiskanjem gumba ▲ ali ▼ izberite Anynet
+
(HDMI-CEC),
nato pritisnite gumb ENTER.
S pritiskanjem gumba ▲ ali ▼ izberite Setup, nato pritisnite
gumb ENTER.
4 S pritiskanjem gumba ▲ ali ▼ izberite Anynet
+
(HDMI-CEC),
nato pritisnite gumb ENTER.
5 S pritiskanjem gumba ▲ ali ▼ izberite On, nato pritisnite gumb
ENTER.
➢
Funkcija sistema Anynet
+
(HDMI-CEC) je omogočena.
➢
Če izberete Off, se Anynet
+
(HDMI-CEC) onemogoči.
➢
Ko je funkcija sistema Anynet
+
(HDMI-CEC) onemogočena,
so deaktivirane vse operacije, ki so povezane s sistemom
Anynet
+
.
Samodejni izklop naprave, ki podpira sistem Anynet
+
, ob izklopu TV
4 S pritiskanjem gumba ▲ ali ▼ izberite Auto Turn Off, nato
pritisnite gumb ENTER.
5 S pritiskanjem gumba ▲ ali ▼ izberite Yes, nato pritisnite
gumb ENTER.
➢
Funkcija samodejnega izklopa je omogočena.
➢
Če izberete No, se funkcija samodejnega izklopa prekliče.
Pritisnite gumb EXIT za izhod.
➢
Če želite uporabljati funkcijo sistema Anynet
+
, nastavite Select
Device na daljinskem upravljalniku TV na TV.
➢
Če nastavite Auto Turn Off na Yes, se bodo ob izklopu TV izklopile tudi povezane zunanje naprave.
Če naprava snema, se morda ne bo izklopila.
Iskanje naprav, ki podpirajo sistem Anynet
+
, in preklapljanje med njimi
1 Pritisnite gumb MENU, da prikažete meni.
S pritiskanjem gumba ▲ ali ▼ izberite Input in pritisnite gumb
ENTER.
S pritiskanjem gumba ▲ ali ▼ izberite Anynet
+
(HDMI-CEC),
nato pritisnite gumb ENTER.
S pritiskanjem gumba ▲ ali ▼ izberite Select Device, nato
pritisnite gumb ENTER.
4 S pritiskanjem gumba ▲ ali ▼ izberite določeno napravo, nato
pritisnite gumb ENTER.
Izbrana je želena naprava.
5 Če ne najdete želene naprave, s pritiskanjem gumba ▲ ali ▼
izberite Searching Connections, nato pritisnite gumb ENTER.
Prikaže se sporočilo Configuring Anynet
+
connection... . Ko
je iskanje naprav dokončano, se v meniju Anynet
+
+ prikaže
seznam povezanih naprav.
➢
Preklop na izbrane naprave traja največ 2 minuti. Operacije
preklopa, ki poteka, ne morete preklicati.
➢
Čas iskanja naprav je odvisen od števila povezanih naprav.
➢
Ko je iskanje naprav dokončano, se ne prikaže število najdenih
naprav.
➢
Čeprav TV samodejno poišče naprave, ko ga vklopite z gumbom POWER, naprave, ki so povezane
ob vklopljenem TV ali ob določeni situaciji, niso prikazane na seznamu naprav. Če torej želite iskati
naprave, izberite Searching Connections.
➢
Če ste način zunanjega vhoda izbrali z gumbom SOURCE, ne morete uporabiti funkcije sistema
Anynet
+
. Ne pozabite preklopiti na napravo, ki podpira Anynet
+
, in pri tem uporabite gumb TOOLS.
Setup
Anynet
+
(HDMI-CEC)
: Off
Auto Turn Off
: Off
Searching Connections
Enter ReturnMove
Off
On
Enter
Move
View TV
Select Device
Record
Menu on Device
Device Operation
Receiver :Off
Setup
TV P 1
Return
Enter
Move
View TV
Select Device
Record
Menu on Device
Device Operation
Receiver :Off
Setup
TV P 1
Return
DVDR1
DVDR
DVD1
DVD
Setup
Anynet
+
(HDMI-CEC)
: On
Auto Turn Off :
: Off
Searching Connections
Enter ReturnMove
No
Yes
Setup
Anynet
+
(HDMI-CEC)
: On
Auto Turn Off
: Yes
Searching Connections
Enter ReturnMove
Se nadaljuje …
BN68-01528A-00Sln.indd 33 2008-4-21 15:47:50

Slovenščina - 4
Meni Anynet
+
Vsebina menija Anynet
+
je odvisna od vrste in stanja naprav, ki podpirajo Anynet
+
in ki so
priključene na TV.
Meni Anynet
+
Opis
View TV Preklopi iz sistema Anynet
+
v način televizijskega oddajanja.
Select Device TV se poveže z ustrezno napravo.
Record Začne takoj snemati. (Meni deluje samo pri napravah, ki podpirajo
snemanje.)
Menu on Device Prikaže meni povezane naprave.
Primer. Če je povezan snemalnik DVD, se prikaže meni z imenom
predvajalnika DVD.
Device Operation Prikaže meni za nadzor predvajanja povezane naprave.
Primer. Če je priključen snemalnik DVD, se prikaže nadzorni meni
predvajanja snemalnika DVD.
Receiver Izhod zvoka poteka prek sprejemnika.
Setup Nastavite lahko okolje uporabe funkcije sistema Anynet
+
.
Gumbi na televizijskem daljinskem upravljalniku, ki so na voljo v načinu Anynet
+
Vrsta naprave Stanje delovanja
Available Buttons
Naprava, ki podpira Anynet+
Po preklopu na napravo, ko
se na zaslonu prikaže meni
ustrezne naprave.
Številski gumbi
Gumbi ▲/▼/◄/►/ENTER
Barvni gumbi
Gumb EXIT
Po preklopu na napravo, medtem
ko se predvaja datoteka.
W.LINK
(
Iskanje nazaj)
W.LINK
(
Iskanje naprej)
W.LINK
(
Ustavi
)
W.LINK
W.LINK
(
Predvajanje/premor
)
Naprava z vgrajenim
kanalnikom
Po preklopu na napravo, ko
gledate TV-program
Gumb P /
Avdio naprava Ko je sprejemnik aktiviran
Gumb
W.LINK
/
W.LINK
Gumb
MUTE
➢
Funkcija Anynet
+
deluje samo, če je daljinski upravljalnik nastavljen na TV.
➢
Gumb REC deluje samo v stanju za snemanje.
➢
Naprav, ki podpirajo Anynet
+
, ne morete upravljati z gumbi na stranskem delu TV. Naprave, ki
podpirajo Anynet
+
, lahko upravljate samo s televizijskim daljinskim upravljalnikom.
➢
Televizijski daljinski upravljalnik v določenih razmerah ne deluje. V tem primeru znova izberite
napravo, ki podpira Anynet
+
.
➢
Funkcije sistema Anynet
+
niso združljive z izdelki drugih proizvajalcev.
➢
V načinu sistema Anynet
+
barvni gumbi morda ne bodo delovali pravilno.
➢
Delovanje
W.LINK
,
W.LINK
se lahko razlikuje, odvisno od naprave.
Snemanje
TV-program lahko posnamete s snemalnikom.
Pritisnite gumb REC.
Snemanje se začne. (Samo če je povezana snemalna naprava, ki je združljiva s sistemom Anynet
+
.)
➢
Trenutni TV-program se snema v načinu gledanja TV. Če gledate video vsebino iz druge naprave, se
snema ta vsebina.
➢
Tokove vira lahko posnamete tudi tako, da po pritisku gumba TOOLS izberete Record.
➢
Pred snemanjem preverite, ali je vtičnica za anteno ustrezno povezana s snemalno napravo.
Za informacije o povezavi antene s snemalno napravo si oglejte uporabniški priročnik le-te.
BN68-01528A-00Sln.indd 34 2008-4-21 15:47:51

Slovenščina - 5
Poslušanje prek sprejemnika
Zvok lahko namesto prek televizijskih zvočnikov poslušate prek sprejemnika.
1 Pritisnite gumb MENU, da prikažete meni.
S pritiskanjem gumba ▲ ali ▼ izberite Input in pritisnite gumb ENTER.
S pritiskanjem gumba ▲ ali ▼ izberite Anynet
+
(HDMI-CEC), nato pritisnite gumb ENTER.
S pritiskanjem gumba ▲ ali ▼ izberite Receiver, nato pritisnite gumb ENTER.
4 S pritiskanjem gumba ◄ ali ► izberite On, nato pritisnite gumb ENTER.
Zdaj lahko zvok poslušate prek sprejemnika.
5 Za izhod pritisnite gumb EXIT.
➢
Ko je sprejemnik vklopljen, lahko televizijski zvok poslušate prek 2-kanalnega
sprejemnika.
➢
Če je sprejemnik namenjen samo za domači kino (podpira samo avdio), morda ne
bo prikazan na seznamu naprav.
➢
Poslušanje avtorsko zaščitene vsebine prek sprejemnika bo morda moteno.
➢
Ko zvok poslušate prek sprejemnika, je uporaba menija PIP in menija za zvok omejena.
Kontrolni seznam, ki ga preglejte, preden se obrnete na servis
Težava Rešitev
Anynet
+
ne deluje. ■ Preverite, ali je naprava združljiva s sistemom Anynet
+
. Sistem
Anynet
+
podpira samo naprave, ki so združljive s sistemom Anynet
+
.
■ Povežite samo en sprejemnik.
■ Preverite, ali je napajalni kabel naprave, ki podpira Anynet
+
, pravilno
nameščen.
■
Preverite povezavo video/avdio kabla/kabla HDMI naprave, ki podpira
Anynet
+
.
■ Preverite, ali je vklopljena možnost Anynet+ (HDMI-CEC) v meniju
nastavitve sistema Anynet
+
.
■ Preverite, ali je daljinski upravljalnik TV nastavljen na način TV.
■ Preverite, ali daljinski upravljalnik podpira sistema Anynet
+
.
■ V določenih razmerah Anynet
+
ne deluje (iskanje kanalov).
■ Ko povezujete ali odstranjujete kabel HDMI, znova poiščite naprave ali
znova zaženite TV.
■ Preverite, ali je funkcija Anynet
+
naprave, ki podpira Anynet
+
,
vklopljena.
Želim zagnati Anynet
+
. ■ Preverite, ali sta naprava v sistemu Anynet
+
in TV pravilno povezana
in ali je vklopljena možnost Anynet
+
(HDMI-CEC) v meniju nastavitve
sistema Anynet
+
.
■ Če želite preklopiti na TV, na daljinskem upravljalniku TV pritisnite
gumb TV. Nato pritisnite gumb TOOLS, da prikažete meni Anynet
+
, in
izberite želeni meni.
Želim zapreti Anynet
+
. ■ V meniju Anynet
+
izberite View TV.
■ Pritisnite gumb SOURCE na daljinskem upravljalniku TV in izberite
napravo, ki ne podpira sistema Anynet
+
.
■ Če želite preklopiti v način TV, pritisnite P, CH LIST ali PRE-CH
. (Upoštevajte, da gumb za kanale deluje samo, če naprava, ki
podpira Anynet
+
in ki je vdelana v kanalnik, ni povezana.)
Na zaslonu se prikaže
sporočilo Connecting to
Anynet
+
device….
■ Med konfiguriranjem sistema Anynet+ in preklapljanjem v način
gledanja ne morete uporabljati daljinskega upravljalnika.
■ Daljinski upravljalnik lahko uporabite, potem ko nastavite sistem
Anynet
+
ali preklopite v način gledanja.
Naprava, ki podpira Anynet
+
,
ne predvaja.
■ Funkcije predvajanja ne morete uporabiti, ko se izvaja funkcija Plug
&Play.
Povezana naprava ni
prikazana.
■ Preverite, ali naprava podpira funkcije sistema Anynet+.
■ Preverite, ali je kabel HDMI pravilno nameščen.
■ Preverite, ali je vklopljena možnost Anynet
+
(HDMI-CEC) v meniju
nastavitve sistema Anynet
+
.
■ Ponovite iskanje naprav, ki podpirajo Anynet
+
.
■ Napravo, ki podpira Anynet
+
, lahko povežete samo s kablom HDMI.
Nekateri kabli HDMI morda ne podpirajo funkcij sistema Anynet
+
.
TV-programa ni mogoče
posneti.
■ Preverite, ali je vtičnica za anteno na snemalni napravi pravilno
povezana.
Enter
Move
View TV
Select Device
Record
Menu on Device
Device Operation
Receiver :On
Setup
TV P 1
Exit
BN68-01528A-00Sln.indd 35 2008-4-21 15:47:51

Slovenščina -
Funkcija teleteksta (odvisno od modela)
Večina TV-postaj prek teleteksta nudi informacije v pisni obliki. Na začetni stran teleteksta boste
dobili informacije o tem, kako uporabljati to storitev. Poleg tega lahko z gumbi na daljinskem
upravljalniku izbirate različne možnosti, ki bodo zadovoljile vaše potrebe.
☛
Za pravilen prikaz informacij teleteksta mora biti sprejem kanala stanoviten. Sicer lahko manjka
kakšna informacija ali pa nekatere strani ne morejo biti izpisane.
1
TV
Izhod iz teleteksta (odvisno od modela)
2
(shrani)
Uporabite za shranjevanje strani teleteksta.
3
(velikost)
Pritisnite za prikaz črk dvojne velikosti v zgornji polovici
zaslona. Za spodnjo polovico zaslona pritisnite še enkrat.
Za prikaz običajnega zaslona pritisnite še enkrat.
4
(razkrij)
Uporabite za odkrivanje skritega besedila (na primer odgovori
na vprašanja iz kviza). Za prikaz običajnega zaslona pritisnite
še enkrat.
5
Barvni gumbi (rdeči/zeleni/rumeni/modri)
Če televizijska postaja uporablja sistem FASTEXT, so različne
teme na strani teleteksta označene z različnimi barvami,
izberete pa jih lahko s pritiskom na obarvane gumbe. Pritisnite
na enega od njih, odvisno pač od zahtevanega. Prikaže se
stran z ostalimi obarvanimi informacijami, ki jih lahko izberete
na isti način.
Za prikaz prejšnje ali naslednje strani pritisnite ustrezni barvni
gumb.
6
(teletekst vklopljen/mešano)
Pritisnite, da boste aktivirali teletekst, potem ko ste izbrali kanal,
ki omogoča storitev teleteksta. Pritisnite dvakrat, da teletekst
prekrijete s trenutnim zaslonom.
7
(način)
Pritisnite za izbiro načina teleteksta (LIST/FLOF).
Če ga pritisnete v načinu LIST, bo preklopil v način List save.
V načinu List save lahko z gumbom (shrani) shranite stran
teleteksta na seznam.
8
(podstran)
Za prikaz podstrani, ki je na voljo.
9
(stran gor)
Za prikaz naslednje strani teleteksta.
0
(stran dol)
Za prikaz prejšnje strani teleteksta.
!
(kazalo)
Za izpis vsebine indeksa ob pregledovanju teleteksta.
@
(zadrži)
Uporabite zato, da boste zadržali prikazano stran, če je izbrana
stran povezana z več drugimi stranmi, ki sledijo samodejno. Za
nadaljevanje gumb ponovno pritisnite.
#
(prekliči)
Za prikaz oddaje med iskanjem strani.
➢
Strani teleteksta lahko spremenite s pritiskom na številčne
gumbe na daljinskem upravljalniku.
se nadaljuje …
BN68-01528A-00Sln.indd 36 2008-4-21 15:47:53

Slovenščina -
Strani teleteksta so organizirane v šestih kategorijah:
Del Vsebina
A
B
C
D
E
F
Številka izbrane strani.
Identiteta TV-kanala.
Številka trenutne strani ali indikatorji iskanja.
Datum in čas.
Besedilo.
Informacije o stanju.
Informacije FASTEXT.
➢
Informacije teleteksta so pogosto razdeljene na več zaporednih
strani, do katerih lahko dostopate z:
Vnosom številke strani
Izbiro naslova na seznamu
Izbiro obarvanega naslova (sistem FASTEXT)
➢
Pritisnite gumb TV za izhod iz prikaza teleteksta.
BN68-01528A-00Sln.indd 37 2008-4-21 15:47:54

Slovenščina -
Specifikacije kompleta za pritrditev na steno (VESA)
Opremo za pritrditev na steno namestite na trdno steno, pravokotno na tla.
Pri pritrjevanju na druge gradbene materiale se obrnite na najbližjega prodajalca.
Če ga namestite na strop ali poševno steno, lahko pade in povzroči hude telesne poškodbe.
Družina izdelkov Palci Spec. VESA (A * B) Standardni vijak Količina
LCD-TV
23 ~ 26 200
*
100 M4
4
32 ~ 40 200
*
200 M6
46 ~ 52
400 * 400
600 * 400
M8
57
700 * 400
(Ni VESA)
57 ~ 70 800 * 400
80 ~ 1400 * 800
PDP-TV
42 ~ 58
400 * 400
600 * 400
M8
4
63
676 * 407
(Ni VESA)
6
63 ~ 70 800 * 400 4
80 ~ 1400 * 800 4
➢
Zagotavljamo standardne dimenzije kompletov opreme za pritrditev na steno, kot je prikazano v
zgornji tabeli.
➢
Pri nakupu našega kompleta opreme za pritrditev na steno dobite podrobna navodila za namestitev
in vse dele, ki jih potrebujete pri tem.
➢
Ne uporabljajte vijakov, katerih dimenzije so daljše od standardnih, saj lahko poškodujejo notranjost
televizorja.
➢
Pri opremi za pritrditev na steno, ki ne ustreza specifikacijam za vijake standarda VESA, se lahko
dolžina vijakov razlikuje glede na njene specifikacije.
➢
Ne uporabljajte vijakov, ki ne ustrezajo specifikacijam za vijake standarda VESA. Vijakov ne privijajte
premočno, saj lahko poškodujete izdelek ali povzročite, da ta pade, in tako poškodujete sebe ali
druge. Samsung ni odgovoren za take nesreče.
➢
Samsung ni odgovoren za poškodovanje izdelka in telesne poškodbe, če stranka uporablja opremo
za pritrditev na steno, ki ni VESA ali ki ni odobrena, ali če ne upošteva navodil za namestitev izdelka.
➢
Naša modela velikosti 57 in 63 palcev ne ustrezata specifikacijam VESA. Zato morate za ta model
uporabiti naš namenski komplet opreme za pritrditev na steno.
➢
Ko pritrjujete TV, ga ne nagnite za več kot 15 stopinj.
Kompleta za pritrditev na steno ne nameščajte, ko je TV vklopljen.
To lahko povzroči telesne poškodbe zaradi električnega šoka.
BN68-01528A-00Sln.indd 38 2008-4-21 15:47:54

Slovenščina -
Serijski kabel (1P do 1P) (ni priloženo)
Hrbtna plošča
Samodejni stenski nosilec
Prilagoditev stenskega nosilca (naprodaj posebej)
Ko je samodejni stenski nosilec nameščen, lahko enostavno prilagodite položaj TV.
Odprtje menija
1
Pritisnite gumb ▲, ▼, ◄ ali ► na daljinskem upravljalniku.
➢
Prikaže se zaslon Wall Mount Adjustment.
➢
Če se zaslon Wall Mount Adjustment ne prikaže, ko med
gledanjem TV kliknete smerni gumb, zaslon prikažite s
pomočjo menija.
• Za prikaz menija pritisnite gumb
MENU. S pritiskom
gumba ▲ ali ▼ izberite Setup, nato pritisnite gumb
ENTER.
• S pritiskom gumba ▲ ali ▼ izberite
Wall-Mount
Adjustment, nato pritisnite gumb ENTER.
Shranjevanje položaja
Z gumbi ▲, ▼, ◄, ► prilagodite na želeni položaj.
➢
Če pritisnete puščični gumb, ko na zaslonu TV ni prikaza,
se prikaže zaslon Adjustment.
➢
Pritisnite gumb INFO za ponastavitev. S pritiskom gumba
◄ ali ► izberite Yes, nato pritisnite gumb ENTER. Položaj
se inicializira na privzeto nastavitev.
Pritisnite modri gumb.
S pritiskom gumbov ▲ in ▼ izberite, ali naj se shrani način
Position1, Position ali Position, da shranite trenutni
položaj.
➢
Če ne želite shraniti trenutnega položaja, pritisnite gumb
RETURN.
➢
Način shranjevanja ni mogoče izbirati z barvnimi gumbi.
4
Za shranitev pritisnite gumb ENTER.
➢
Če izberete Position1, se prikaže sporočilo Current
position saved as Position1.
5
Pritisnite gumb ENTER.
➢
Shranjeni položaj se prikaže na levi strani prikaza na
zaslonu.
Move
Enter
Return
Plug & Play
Language :
English
Time
Light Effect
: In Watching TV
Wall-Mount Adjustment
Melody :
Off
Entertainment : Cinema
Energy Saving :
Off
PIP
Setup
T V
Save
Return
Move
Enter
Select a mode to Save.
Position 1
Position 2
Position 3
Wall-Mount Adjustment
Adjust
Save Center
►
►
►
►
►
►
►
►
321Position
BN68-01528A-00Sln.indd 39 2008-4-21 15:47:56

Slovenščina - 40
Navodila za sestavljanj stojala (odvisno od modela)
S šestimi vijaki za pritrditev stojala in monitorja, trdno spojite
monitor s stojalom. (Zunanjost televizorja je morda drugačna
kot na sliki.)
Pri namestitvi televizorja na steno
zaprite pokrov (1) na delu za pritrditev
stojala.
Opozorilo
Stojalo mora biti dobro pritrjeno na
televizor, preden ga premaknete,
ker lahko pade in povzroči resno
poškodbo.
➢
Priporočljivo je, da več oseb nosi
zaslon PDP. Televizorja nikoli
ne postavite tako, da je zaslon
obrnjen navzdol, ker lahko tako
poškodujete zaslon.
Vedno ga shranite v pokončnem
položaju.
Premik v shranjeni položaj
1
Izvedite 1. korak razdelka Odprtje menija.
S pritiskom barvnega gumba (rdečega, zelenega, rumenega)
premaknete samodejni stenski nosilec v shranjeni položaj.
➢
Stenski nosilec lahko premaknete v enega od 3
prednastavljenih položajev s pritiskom rdečega (položaj 1),
zelenega (položaj 2) ali rumenega (položaj 3) gumba.
➢
Če položaj prilagajate po premiku v prednastavljeni položaj,
prikaz položaja izgine.
➢
Za namestitev si oglejte stenskemu nosilcu priloženi priročnik za
namestitev.
➢
O namestitvi izdelka ter namestitvi in premikanju stenskega nosilca
se posvetujte s specializiranim podjetjem za nameščanje.
➢
Ta priročnik za namestitev je namenjen uporabi pri pritrjevanju
stenskega nosilca na steno. Pri pritrjevanju na druge gradbene
materiale se obrnite na najbližjega prodajalca.
➢
Samodejni stenski nosilec ne bo deloval, če je aktivirana funkcija
Anynet+.
➢
42-palčni model ni združljiv s starejšim modelom za stensko
namestitev (WMN5090A).
Wall-Mount Adjustment
Adjust
Save Center
►
►
►
►
►
►
►
►
321Position
Position 1
BN68-01528A-00Sln.indd 40 2008-4-21 15:47:58

Slovenščina - 41
Pritrditev televizorja na steno
Televizorja ni dovoljeno vleči, potiskati ali nanj plezati, saj lahko pade. Posebno bodite pozorni
na to, da se na televizor ne nagibajo ali ga premikajo otroci, saj se lahko prevrne, kar lahko
povzroči težje poškodbe ali smrt. Upoštevajte varnostne ukrepe, navedene na priloženem
letaku z varnostnimi ukrepi. Da zagotovite več stabilnosti, namestite varnostni pripomoček za
preprečevanje padcev, kot je opisano v nadaljevanju.
Da preprečite padec televizorja:
1. Namestite vijaka v objemki in ju trdno privijte na steno.
Preverite, ali sta vijaka trdno privita na steno.
Morda boste potrebovali dodaten material, kot je sidrni
vložek, odvisno od vrste stene.
Ker vijaka, objemki in vrvica, ki so potrebni za to, niso
priloženi, jih kupite posebej.
. Odstranite vijaka iz osrednjega dela hrbtne strani televizorja,
namestite ju v objemki in privijte nazaj na televizor.
Vijaka morda nista priložena izdelku. V tem primeru
kupite vijaka z naslednjimi specikacijami.
. Objemki, nameščeni na televizorju, in objemki, pritrjeni na
steno, povežite z močno vrvico in jo zavežite.
Televizor namestite blizu stene, tako da ne more pasti nazaj.
Vrvico je varno privezati tako, da sta objemki na steni v višini
objemk na televizorju ali nižje.
Preden televizor premaknete, odvežite vrvico.
4. Preverite, ali so vsi spoji trdni. Redno preverjajte, ali so spoji
poškodovani. Če niste prepričani o varni namestitvi, se obrnite
na strokovnjaka za namestitev.
➣
➣
➣
➣
➣
➣
Stena
Stena
Pozor
BN68-01528A-00Sln.indd 41 2008-4-21 15:47:59

Slovenščina - 4
Odpravljanje težav
Preden se obrnete na Samsungovo poprodajno službo, preverite naslednje.
Če težave ne morete odpraviti s pomočjo spodnjih navodil, si zabeležite številko modela in
serijsko številko televizorja in se obrnite na lokalnega trgovca.
Ni zvoka ali slike
Preverite, ali je napajalni kabel priključen v stensko vtičnico.
Preverite, ali ste pritisnili gumb za vklop//izklop na sprednji plošči ali gumb POWER na daljinskem
upravljalniku.
Preverite nastavitev kontrasta in svetlosti slike.
Preverite glasnost.
Preverite, ali je funkcija TV Speaker nastavljena na Off.
Slika je normalna, vendar ni zvoka
Preverite glasnost.
Preverite, ali ste pritisnili gumb MUTE na daljinskem upravljalniku.
Ni slike oziroma slika je črno-bela
Prilagodite barvne nastavitve.
Preverite, ali je izbran ustrezen oddajni sistem.
Zvočne in slikovne motnje
Odkrijte, katera električna naprava moti delovanje televizorja, nato povečajte razdaljo med njima.
Televizor vključite v drugo stensko vtičnico.
Nejasna ali snežena slika, popačen zvok
Preverite usmerjenost, lokacijo in povezavo antene.
Do teh motenj pogosto pride zaradi uporabe sobne antene.
Nepravilno delovanje daljinskega upravljalnika
Zamenjajte baterije daljinskega upravljalnika.
Očistite zgornji rob daljinskega upravljalnika (oddajno okno).
Preverite, ali sta konca baterije “+” in “-” prav vstavljena.
Preverite, ali sta bateriji prazni.
Zaslon je črn in lučka indikatorja napajanja neprekinjeno utripa
Na računalniku preverite napajanje, signalni kabel.
TV uporablja njen sistem za upravljanje porabe.
Premaknite miško računalnika ali pritisnite katerokoli tipko na tipkovnici.
Na opremi (sprejemnik, DVD-predvajalnik itd.) preverite napajanje, signalni kabel.
TV uporablja njen sistem za upravljanje porabe.
Na plošči ali daljinskem upravljalniku pritisnite gumb Source.
Izklopite in vklopite televizor.
V kotu zaslona se prikaže poškodovana slika.
Če je v nekaterih zunanjih napravah izbrano Just Scan, se lahko v kotu zaslona prikaže
poškodovana slika. To težavo povzročajo zunanje naprave in ne TV.
Prikaže se sporočilo “Resets all settings to the default values” (Ponastavi vse nastavitve na
privzete vrednosti).
To se prikaže, če nekaj časa držite pritisnjen gumb EXIT. Za ponastavitev nastavitev izdelka na
tovarniške vrednosti.
BN68-01528A-00Sln.indd 42 2008-4-21 15:47:59

Slovenščina - 4
Specifikacije
Opisi in značilnosti v tej knjižici so zgolj informativne narave in se lahko spremenijo brez
predhodnega obvestila.
Ime modela PS50A40
Velikost zaslona
(diagonala)
50 palcev
Ločljivost PC-ja 1360 x 768 pri 60 Hz
Izhod zvoka 10 W + 10 W
Dimenzije (Š x V x G)
Osrednji del
S stojalom
1290 x 740 x 95 mm
1290 x 804 x 319 mm
Teža
Osrednji del
S stojalom
39 Kg
41 Kg
Okoljski vidiki
Delovna temperatura
Delovna vlažnost
Temperatura shranjevanja
Vlažnost pri shranjevanju
10 °C do 40 °C (50°F do 104°F)
10 % do 80 %, brez kondenzacije
-20 °C do 45 °C (-4°F do 113 °F)
5 % do 95 %, brez kondenzacije
➢
Naprava je digitalni aparat razreda B.
Zasnovo in specifikacije lahko spremenimo brez obvestila.
Za napajanje in porabo energije si oglejte nalepko na izdelku.
BN68-01528A-00Sln.indd 43 2008-4-21 15:47:59

Ustrezno Odstranjevanje tega Izdelka
(Odpadna Električna in Elektronska Oprema)
Oznaka na izdelku ali spremljevalni dokumentaciji pomeni, da ga
na koncu uporabne dobe ne smemo odstranjevati skupaj z drugimi
gospodinjskimi odpadki. Da bi preprečili morebitno tveganje za okolje
ali zdravje človeka zaradi nenadzorovanega odstranjevanja odpadkov,
izdelek ločite od drugih vrst odpadkov in ga odgovorno reciklirajte ter
tako spodbudite trajnostno ponovno uporabo materialnih virov.
Uporabniki v gospodinjstvih naj za podrobnosti o tem, kam in kako
lahko odnesejo ta izdelek na okolju varno recikliranje, pokličejo
trgovino, kjer so izdelek kupili, ali lokalni vladni urad.
Podjetja naj pokličejo dobavitelja in preverijo pogoje nabavne
pogodbe. Tega izdelka pri odstranjevanju ne smete mešati z drugimi
gospodarskimi odpadki.
BN68-01528A-00Sln.indd 44 2008-4-21 15:47:59
-
 1
1
-
 2
2
-
 3
3
-
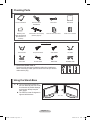 4
4
-
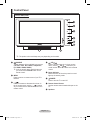 5
5
-
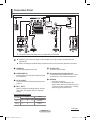 6
6
-
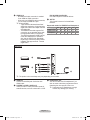 7
7
-
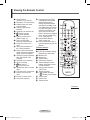 8
8
-
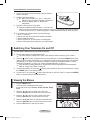 9
9
-
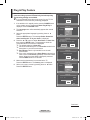 10
10
-
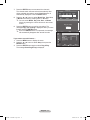 11
11
-
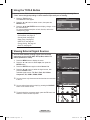 12
12
-
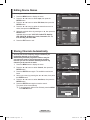 13
13
-
 14
14
-
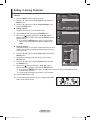 15
15
-
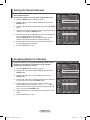 16
16
-
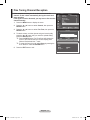 17
17
-
 18
18
-
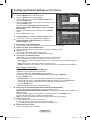 19
19
-
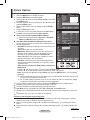 20
20
-
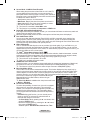 21
21
-
 22
22
-
 23
23
-
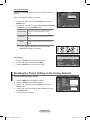 24
24
-
 25
25
-
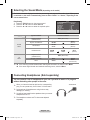 26
26
-
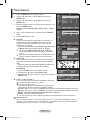 27
27
-
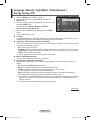 28
28
-
 29
29
-
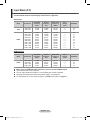 30
30
-
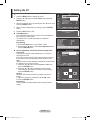 31
31
-
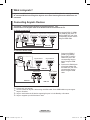 32
32
-
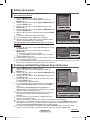 33
33
-
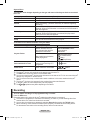 34
34
-
 35
35
-
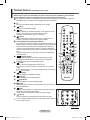 36
36
-
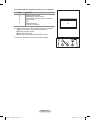 37
37
-
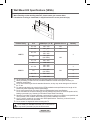 38
38
-
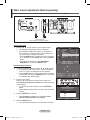 39
39
-
 40
40
-
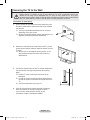 41
41
-
 42
42
-
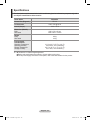 43
43
-
 44
44
-
 45
45
-
 46
46
-
 47
47
-
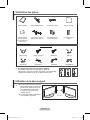 48
48
-
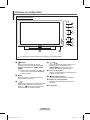 49
49
-
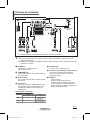 50
50
-
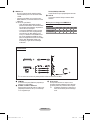 51
51
-
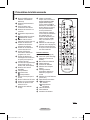 52
52
-
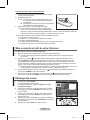 53
53
-
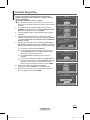 54
54
-
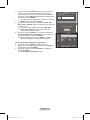 55
55
-
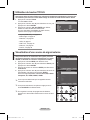 56
56
-
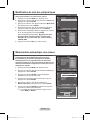 57
57
-
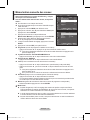 58
58
-
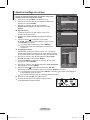 59
59
-
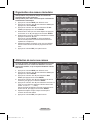 60
60
-
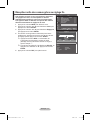 61
61
-
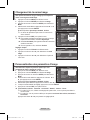 62
62
-
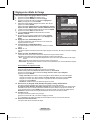 63
63
-
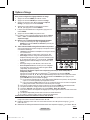 64
64
-
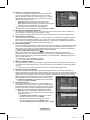 65
65
-
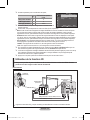 66
66
-
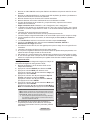 67
67
-
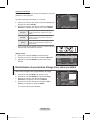 68
68
-
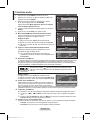 69
69
-
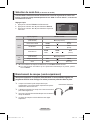 70
70
-
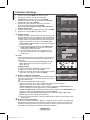 71
71
-
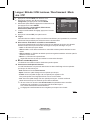 72
72
-
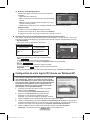 73
73
-
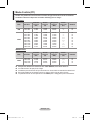 74
74
-
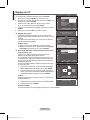 75
75
-
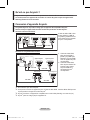 76
76
-
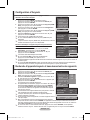 77
77
-
 78
78
-
 79
79
-
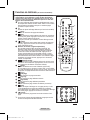 80
80
-
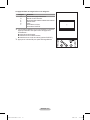 81
81
-
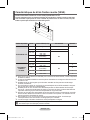 82
82
-
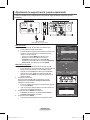 83
83
-
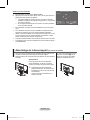 84
84
-
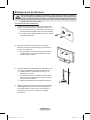 85
85
-
 86
86
-
 87
87
-
 88
88
-
 89
89
-
 90
90
-
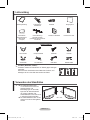 91
91
-
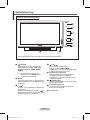 92
92
-
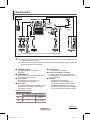 93
93
-
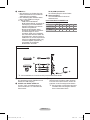 94
94
-
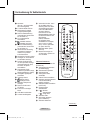 95
95
-
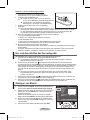 96
96
-
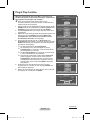 97
97
-
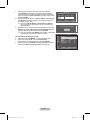 98
98
-
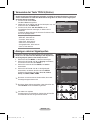 99
99
-
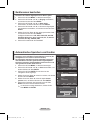 100
100
-
 101
101
-
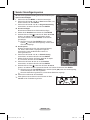 102
102
-
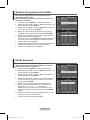 103
103
-
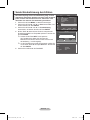 104
104
-
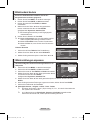 105
105
-
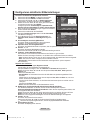 106
106
-
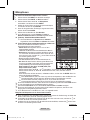 107
107
-
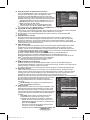 108
108
-
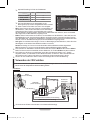 109
109
-
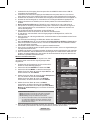 110
110
-
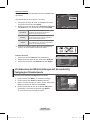 111
111
-
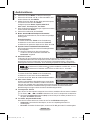 112
112
-
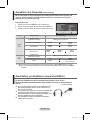 113
113
-
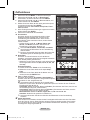 114
114
-
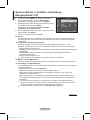 115
115
-
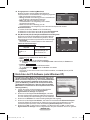 116
116
-
 117
117
-
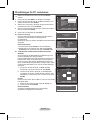 118
118
-
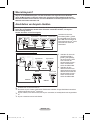 119
119
-
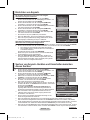 120
120
-
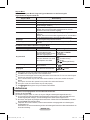 121
121
-
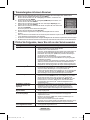 122
122
-
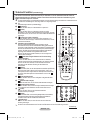 123
123
-
 124
124
-
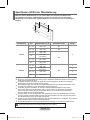 125
125
-
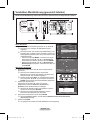 126
126
-
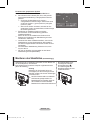 127
127
-
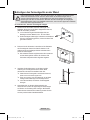 128
128
-
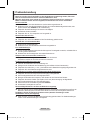 129
129
-
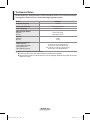 130
130
-
 131
131
-
 132
132
-
 133
133
-
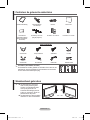 134
134
-
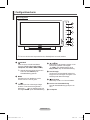 135
135
-
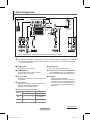 136
136
-
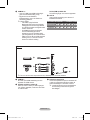 137
137
-
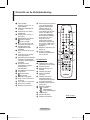 138
138
-
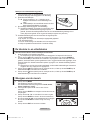 139
139
-
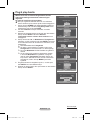 140
140
-
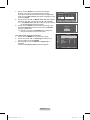 141
141
-
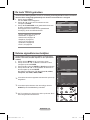 142
142
-
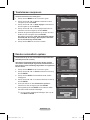 143
143
-
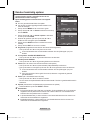 144
144
-
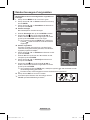 145
145
-
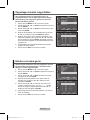 146
146
-
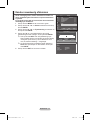 147
147
-
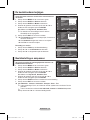 148
148
-
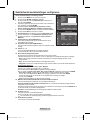 149
149
-
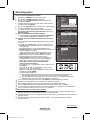 150
150
-
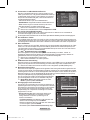 151
151
-
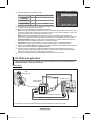 152
152
-
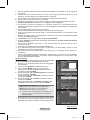 153
153
-
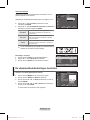 154
154
-
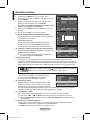 155
155
-
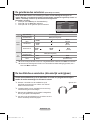 156
156
-
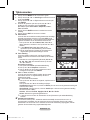 157
157
-
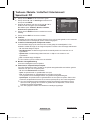 158
158
-
 159
159
-
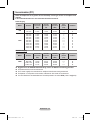 160
160
-
 161
161
-
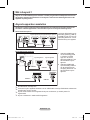 162
162
-
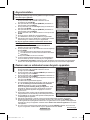 163
163
-
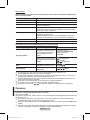 164
164
-
 165
165
-
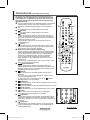 166
166
-
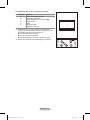 167
167
-
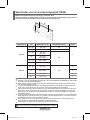 168
168
-
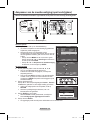 169
169
-
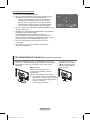 170
170
-
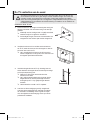 171
171
-
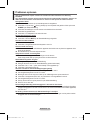 172
172
-
 173
173
-
 174
174
-
 175
175
-
 176
176
-
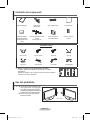 177
177
-
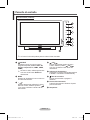 178
178
-
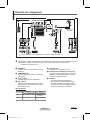 179
179
-
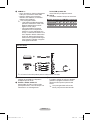 180
180
-
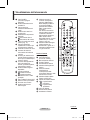 181
181
-
 182
182
-
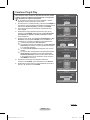 183
183
-
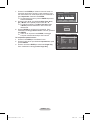 184
184
-
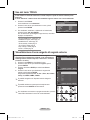 185
185
-
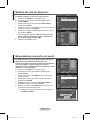 186
186
-
 187
187
-
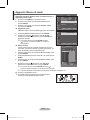 188
188
-
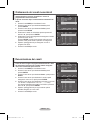 189
189
-
 190
190
-
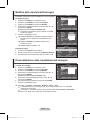 191
191
-
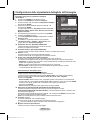 192
192
-
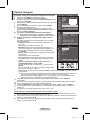 193
193
-
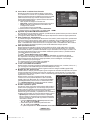 194
194
-
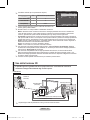 195
195
-
 196
196
-
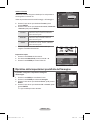 197
197
-
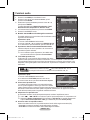 198
198
-
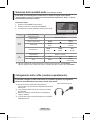 199
199
-
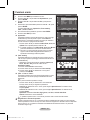 200
200
-
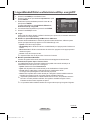 201
201
-
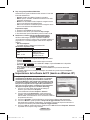 202
202
-
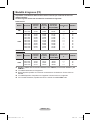 203
203
-
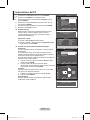 204
204
-
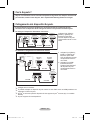 205
205
-
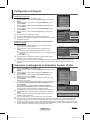 206
206
-
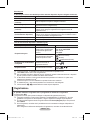 207
207
-
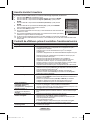 208
208
-
 209
209
-
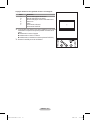 210
210
-
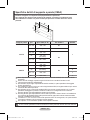 211
211
-
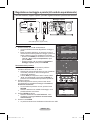 212
212
-
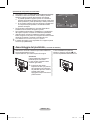 213
213
-
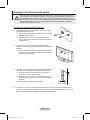 214
214
-
 215
215
-
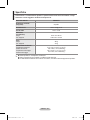 216
216
-
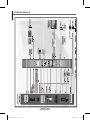 217
217
-
 218
218
-
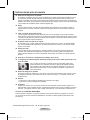 219
219
-
 220
220
-
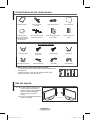 221
221
-
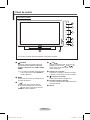 222
222
-
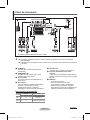 223
223
-
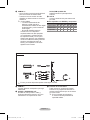 224
224
-
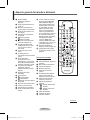 225
225
-
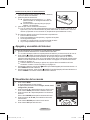 226
226
-
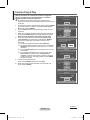 227
227
-
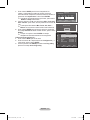 228
228
-
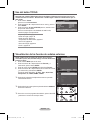 229
229
-
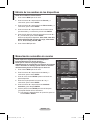 230
230
-
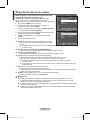 231
231
-
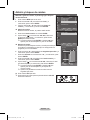 232
232
-
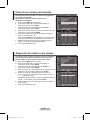 233
233
-
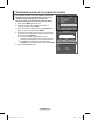 234
234
-
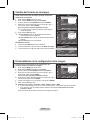 235
235
-
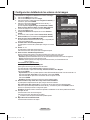 236
236
-
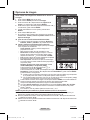 237
237
-
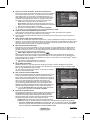 238
238
-
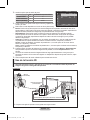 239
239
-
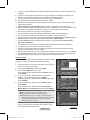 240
240
-
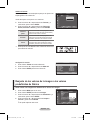 241
241
-
 242
242
-
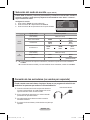 243
243
-
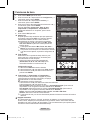 244
244
-
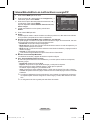 245
245
-
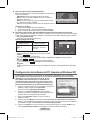 246
246
-
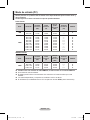 247
247
-
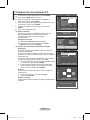 248
248
-
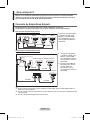 249
249
-
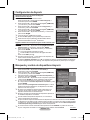 250
250
-
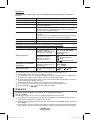 251
251
-
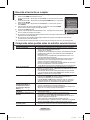 252
252
-
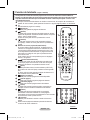 253
253
-
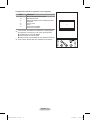 254
254
-
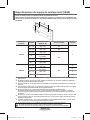 255
255
-
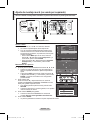 256
256
-
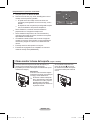 257
257
-
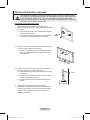 258
258
-
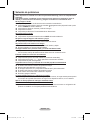 259
259
-
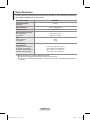 260
260
-
 261
261
-
 262
262
-
 263
263
-
 264
264
-
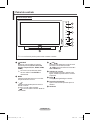 265
265
-
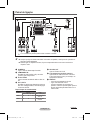 266
266
-
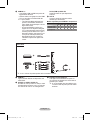 267
267
-
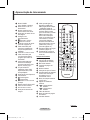 268
268
-
 269
269
-
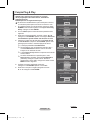 270
270
-
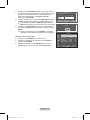 271
271
-
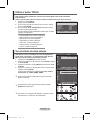 272
272
-
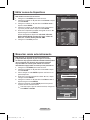 273
273
-
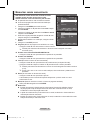 274
274
-
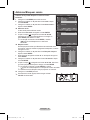 275
275
-
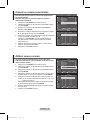 276
276
-
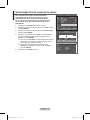 277
277
-
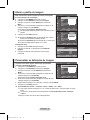 278
278
-
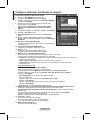 279
279
-
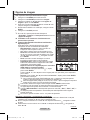 280
280
-
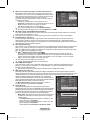 281
281
-
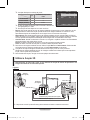 282
282
-
 283
283
-
 284
284
-
 285
285
-
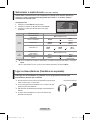 286
286
-
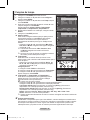 287
287
-
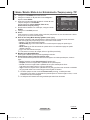 288
288
-
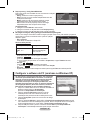 289
289
-
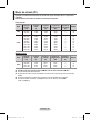 290
290
-
 291
291
-
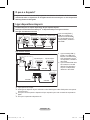 292
292
-
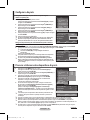 293
293
-
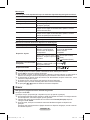 294
294
-
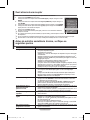 295
295
-
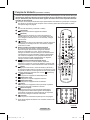 296
296
-
 297
297
-
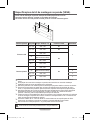 298
298
-
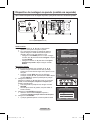 299
299
-
 300
300
-
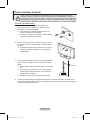 301
301
-
 302
302
-
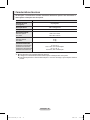 303
303
-
 304
304
-
 305
305
-
 306
306
-
 307
307
-
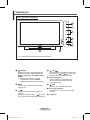 308
308
-
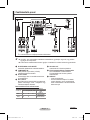 309
309
-
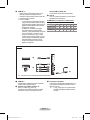 310
310
-
 311
311
-
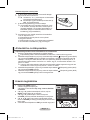 312
312
-
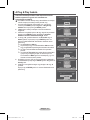 313
313
-
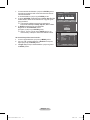 314
314
-
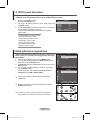 315
315
-
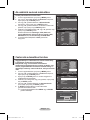 316
316
-
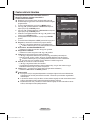 317
317
-
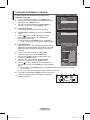 318
318
-
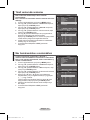 319
319
-
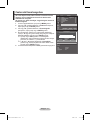 320
320
-
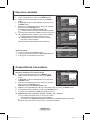 321
321
-
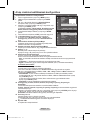 322
322
-
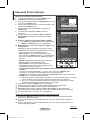 323
323
-
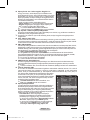 324
324
-
 325
325
-
 326
326
-
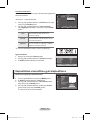 327
327
-
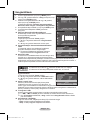 328
328
-
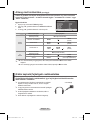 329
329
-
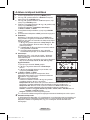 330
330
-
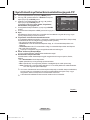 331
331
-
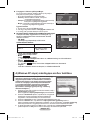 332
332
-
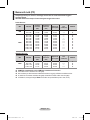 333
333
-
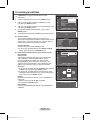 334
334
-
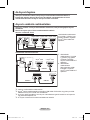 335
335
-
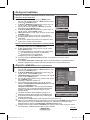 336
336
-
 337
337
-
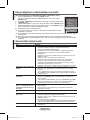 338
338
-
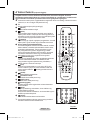 339
339
-
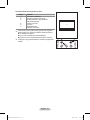 340
340
-
 341
341
-
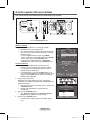 342
342
-
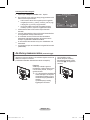 343
343
-
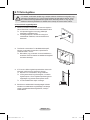 344
344
-
 345
345
-
 346
346
-
 347
347
-
 348
348
-
 349
349
-
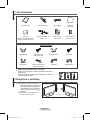 350
350
-
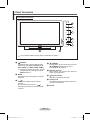 351
351
-
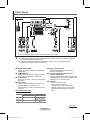 352
352
-
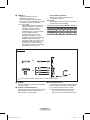 353
353
-
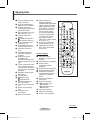 354
354
-
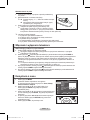 355
355
-
 356
356
-
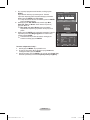 357
357
-
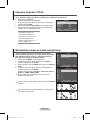 358
358
-
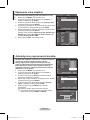 359
359
-
 360
360
-
 361
361
-
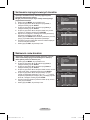 362
362
-
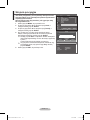 363
363
-
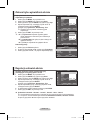 364
364
-
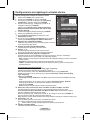 365
365
-
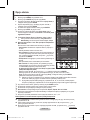 366
366
-
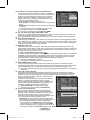 367
367
-
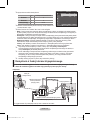 368
368
-
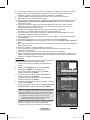 369
369
-
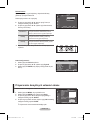 370
370
-
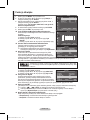 371
371
-
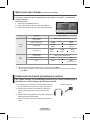 372
372
-
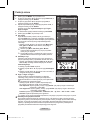 373
373
-
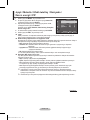 374
374
-
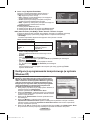 375
375
-
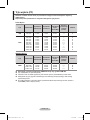 376
376
-
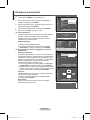 377
377
-
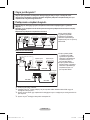 378
378
-
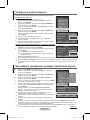 379
379
-
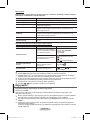 380
380
-
 381
381
-
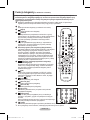 382
382
-
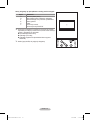 383
383
-
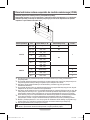 384
384
-
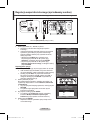 385
385
-
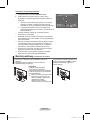 386
386
-
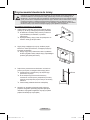 387
387
-
 388
388
-
 389
389
-
 390
390
-
 391
391
-
 392
392
-
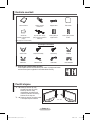 393
393
-
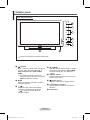 394
394
-
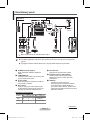 395
395
-
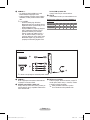 396
396
-
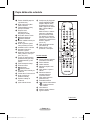 397
397
-
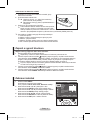 398
398
-
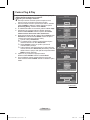 399
399
-
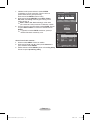 400
400
-
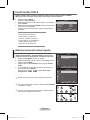 401
401
-
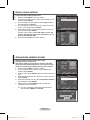 402
402
-
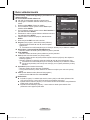 403
403
-
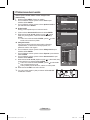 404
404
-
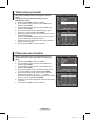 405
405
-
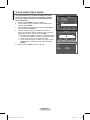 406
406
-
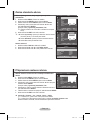 407
407
-
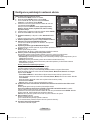 408
408
-
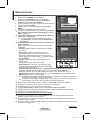 409
409
-
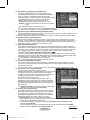 410
410
-
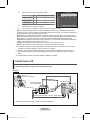 411
411
-
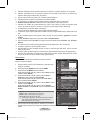 412
412
-
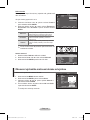 413
413
-
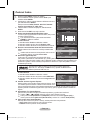 414
414
-
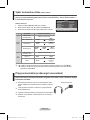 415
415
-
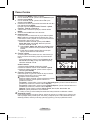 416
416
-
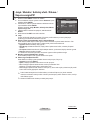 417
417
-
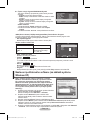 418
418
-
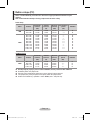 419
419
-
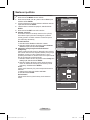 420
420
-
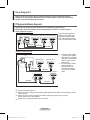 421
421
-
 422
422
-
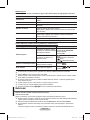 423
423
-
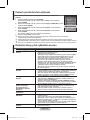 424
424
-
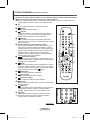 425
425
-
 426
426
-
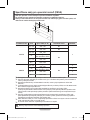 427
427
-
 428
428
-
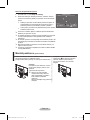 429
429
-
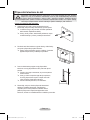 430
430
-
 431
431
-
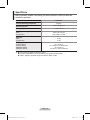 432
432
-
 433
433
-
 434
434
-
 435
435
-
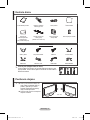 436
436
-
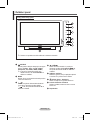 437
437
-
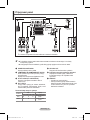 438
438
-
 439
439
-
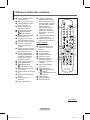 440
440
-
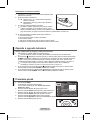 441
441
-
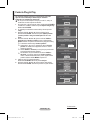 442
442
-
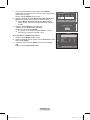 443
443
-
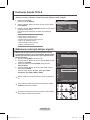 444
444
-
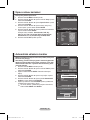 445
445
-
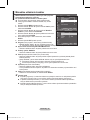 446
446
-
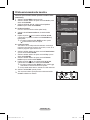 447
447
-
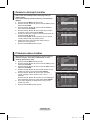 448
448
-
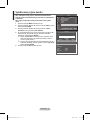 449
449
-
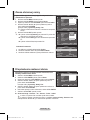 450
450
-
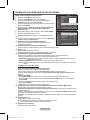 451
451
-
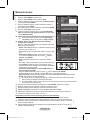 452
452
-
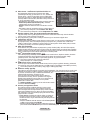 453
453
-
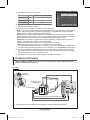 454
454
-
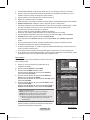 455
455
-
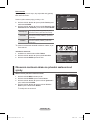 456
456
-
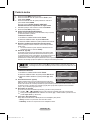 457
457
-
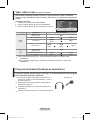 458
458
-
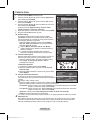 459
459
-
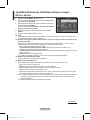 460
460
-
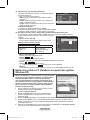 461
461
-
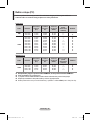 462
462
-
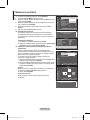 463
463
-
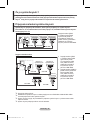 464
464
-
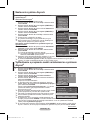 465
465
-
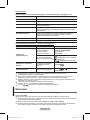 466
466
-
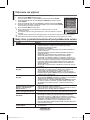 467
467
-
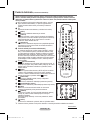 468
468
-
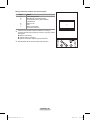 469
469
-
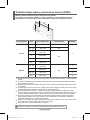 470
470
-
 471
471
-
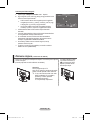 472
472
-
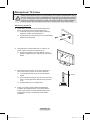 473
473
-
 474
474
-
 475
475
-
 476
476
-
 477
477
-
 478
478
-
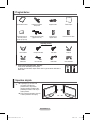 479
479
-
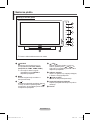 480
480
-
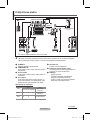 481
481
-
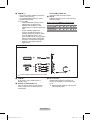 482
482
-
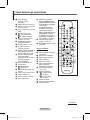 483
483
-
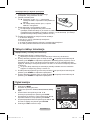 484
484
-
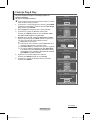 485
485
-
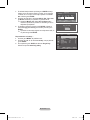 486
486
-
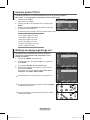 487
487
-
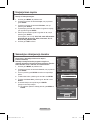 488
488
-
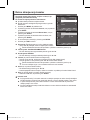 489
489
-
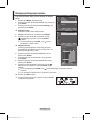 490
490
-
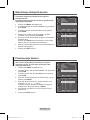 491
491
-
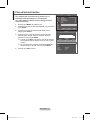 492
492
-
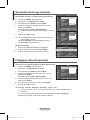 493
493
-
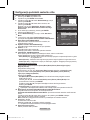 494
494
-
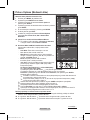 495
495
-
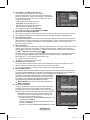 496
496
-
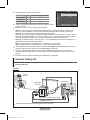 497
497
-
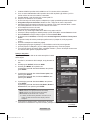 498
498
-
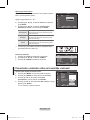 499
499
-
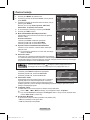 500
500
-
 501
501
-
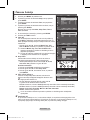 502
502
-
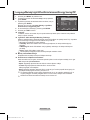 503
503
-
 504
504
-
 505
505
-
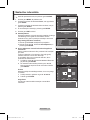 506
506
-
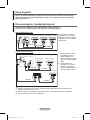 507
507
-
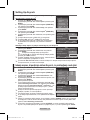 508
508
-
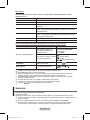 509
509
-
 510
510
-
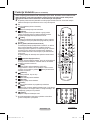 511
511
-
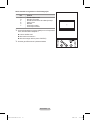 512
512
-
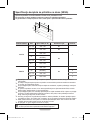 513
513
-
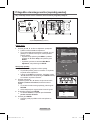 514
514
-
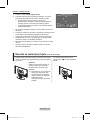 515
515
-
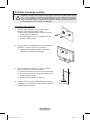 516
516
-
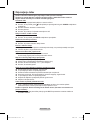 517
517
-
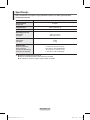 518
518
-
 519
519


Samsung PS50A40 Handleiding
- Categorie
- Lcd-tv's
- Type
- Handleiding
- Deze handleiding is ook geschikt voor
in andere talen
- italiano: Samsung PS50A40 Manuale utente
- français: Samsung PS50A40 Manuel utilisateur
- español: Samsung PS50A40 Manual de usuario
- Deutsch: Samsung PS50A40 Benutzerhandbuch
- português: Samsung PS50A40 Manual do usuário
- slovenčina: Samsung PS50A40 Používateľská príručka
- polski: Samsung PS50A40 Instrukcja obsługi
Gerelateerde papieren
-
Samsung PS42A411C2 Handleiding
-
Samsung PS50A551S3R Handleiding
-
Samsung PS50B551T3P Handleiding
-
Samsung PS50B451B2W Handleiding
-
-
Samsung PS50B610S2W Handleiding
-
Samsung PS50B430P2W Handleiding
-
Samsung LE46A756 Handleiding
-
Samsung LE46A956D1M Handleiding
-