
Broadway Ambience Back-Lit Arch and Pill Mirror
INSTALLATION INSTRUCTIONS
www.newtech.co.nz
Head Oce:
281 Heads Road, Wanganui
06 349 0194 or 0800 728 662
Auckland Concept Showroom:
525 Great South Road, Penrose, Auckland
Phone: 09 930 6200
Email: [email protected]
Please read these instructons carefully before installaton. Installaton should be carried out by
a qualified electrician.
• This product conforms to AS/NZS Safety Standards and must be installed in accordance with current IEE wiring regulations and
building regulations (part p). This product must be earthed, and should not be connected to an unearthed circuit.
• If there are only two wires coming from your power supply it means that this fitting can be wired to an unearthed circuit.
• Ensure that connections are turned o at the consumer unit or fuse board before installing or carrying out any maintenance.
• This product is for in door use only.
• This product is IP44 rated and can be installed in bathroom zone 2 (as defined by the IEE wiring regulations) and beyond.
See bathroom diagram below.
• Replace failed lamps immediately. Allow the glass, lamp and fitting to cool before replacing the lamp.
IEE Bathroom Zones
OUTSIDE ZONES
DO NOT strike mirror glass with hard or pointed items. It is recommended that the product is cleaned with a soft, dry, non abrasive cloth. DO
NOT use cleaning agents or abrasive materials on any type of finished surface. DO NOT allow moisture to come into contact with the electrical
components.
Compliance
This product complies with the following safety standards: AS/NZS 60598.2.1:2014 AS/NZS 60598.1:2013
Wiring
This product is manufactured to class 1 category and requires an earth connection
COLOUR CODING:
L - Live = Brown
- Neutral = Blue
- Earth = Green & Yellow
Demister Information
Typically, a mirror fogs up due to the dierence in temperature of the mirror and the temperature in the bathroom. The bathroom is warm from
the shower or bath whilst the mirror is cold and this dierence in temperature causes it to fog up. The mirror demister warms the mirror slowly
to reduce the dierence in temperature leading to the mirror to defog slowly. The rate at which it defogs will be dependant on the size of the
Mirror, the demister pad and the size and environment of the bathroom.
• When working at heights, please use a suitable platorm to work from.
• Please note: For new installations, check for any electrical cables or pipe work (gas/water) in the vicinity of the intended mounting
point before proceeding with the installation.
• Ensure that the fixing location is able to take the weight of the complete fixing. Wear suitable eye protection when drilling.
Be careful when using power tools near water.
IMPORTANT
GENERAL
zone
2
radius
zone
2
zone
2
225cm
zone
1
60CM
60CM
60CM
IMPORTANT
IEE Bathroom Zones Diagram
OUTSIDE ZONES
9408
9410
9400
9402
9404
THIS PRODUCT CONFORMS TO AS/NZS SAFETY STANDARDS AND MUST BE INSTALLED IN
IF THERE ARE ONLY TWO WIRES COMING FROM YOUR POWER SUPPLY IT MEANS THAT THIS FITTING
ENSURE THAT CONNECTIONS ARE TURNED OFF AT THE CONSUMER UNIT OR FUSE BOARD BEFORE
THIS PRODUCT IS IP44 RATED AND CAN BE INSTALLED IN BATHROOM ZONE 2 (AS DEFINED BY THE IEE
Compliance
Wiring
LED MIRROR INSTALLATION INSTRUCTIONS
SAA
V01.Dec.2021

www.newtech.co.nz
Head Oce:
281 Heads Road, Wanganui
06 349 0194 or 0800 728 662
Auckland Concept Showroom:
525 Great South Road, Penrose, Auckland
Phone: 09 930 6200
Email: [email protected]
Broadway Ambience Back-Lit Arch and Pill Mirror
INSTALLATION INSTRUCTIONS
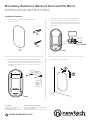
Installation Procedure
1. Open the carton and make sure all the parts listed
below are present.
2. Mark a desired height of the mirror. Drill the required holes
and insert the wall plugs. Note: Wall plugs supplied are only
suitable for solid stone/brick walls. Please ensure the screws
are fully tight. The mirror can be mounted either portrait or
landscape.
3. Make the electrical connections ensuring first that the
electrical supply has been turned o. This mirror is a
class 1 product and requires an earth connection. It
should be installed in accordance with the latest IEE
regulations.
4. Hang the mirror onto the wall.
1X
2X
2X
FLOOR
FROM
HEIGHT
DESIRED
CHOOSE
DISTANCE A BETWEEN
CENTERS OF BRACKETS
Connection
Earth Terminal
Live Terminal
Output Wires
Installa�on procedure
1.Open the carton and make sure all the parts listed below are present
3.Make the electrical connec�ons ensuring first that the electrical supply has been turned off.
This mirror is a class 1 product and requires an earth connec�on. It should be installed in
accordance with the latest IEE regula�ons.
2.Mark a desired height of the mirror. Drill the required holes and insert the wall plugs.
Note: Wall plugs supplied are only suitable for solid stone/brick walls. Please ensure
the screws are fully �ght. The mirror can be mounted either portrait or landscape.
Live Terminal
Connec�on
Earth Terminal
Connec�on
Output Wires
Neutral Terminal Connec�on
1X
2X
2X
FLOOR
FROM
HEIGHT
DESIRED
CHOOSE
DISTANCE
A
BETWEEN
CENTERS OF BRACKETS
4.Hang the mirror onto the wall.
LED MIRROR INSTALLATION INSTRUCTIONS
SAA
A
-
 1
1
-
 2
2


in andere talen
- English: Newtech 9408 User manual
Andere documenten
-
Outspot Elegante Handleiding
-
 Bauhaus 50×75 cm LED MIRROR Installatie gids
-
Panasonic NVVX54B Handleiding
-
Herschel XLS1000W-EU Handleiding
-
Abus TVHD51000 Handleiding
-
Philips ADR92BLX1 Handleiding
-
Eurom Sani 400 Mirror de handleiding
-
Danfoss 088L1600 Gebruikershandleiding
-
-
Burgbad Yumo Fitting Instruction
