Bluesound N230BLKUNV Gebruikershandleiding
- Categorie
- Luidsprekersets
- Type
- Gebruikershandleiding

bluesound.com
POWERNODE EDGE
QUICK SETUP GUIDE
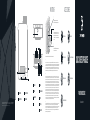
ACCESSORIESMOUNTING
STATUS INDICATOR PREVIOUS/NEXT TRACK
PLAY/PAUSE BUTTON VOLUME UP/DOWN
© Bluesound International. Bluesound, the stylized wordmark “B” logotype, the phrase “HiFi for a wireless generation”, POWERNODE EDGE and all
other Bluesound product names and taglines are trademarks or registered trademarks of Bluesound International, a division of Lenbrook Industries
Limited. All other logos and services are trademarks or service marks of their respective owners.
Mini Jack to Toslink Adaptor
120V AC Power Cord
230V AC Power Cord
Ethernet Cable
Metal Mounting Screw Metal Mounting Bracket
Rubber Mount Attachment
SPEAKERS
IR IN
SUBWOOFER OUT
HDMI eARC
OPTICAL/ANALOG IN
LAN PORT
USB (TYPE A)
AC MAINS INPUT
IR RECEIVER
1
Connect rubber mount attachment to bottom panel of
POWERNODE EDGE with supplied metal mounting screw.
2
Use supplied metal mounting bracket to mark the mounting
location. Ensure mounting location does not conceal electrical
wiring or plumbing. Pre-drill each hole for mounting screws
(recommended M4–0.7 x 3, 4 pieces, not supplied). Anchors may
be required.
3
Slide the POWERNODE EDGE with rubber mount attachment
onto the bracket. Push down to secure.
MONTAGE / MONTAJE / MONTAGE / INSTALLAZIONE / MONTAGE / MONTAGEM / МОНТАЖ
1
Connectez la fixation de montage en caoutchouc au panneau inférieur du POWERNODE EDGE à l'aide de la vis de montage métallique fournie. / Ensamble el
accesorio de montaje de goma al panel inferior del POWERNODE EDGE con el tornillo metálico de montaje suministrado. / Verbinden Sie die Gummihalterung mit der
mitgelieferten Metallschraube an der Unterseite der POWERNODE EDGE. / Collegare il supporto in gomma al pannello inferiore del POWERNODE EDGE utilizzando
la vite metallica fornita. / Maak de rubberen bevestiging aan het onderpaneel van de POWERNODE EDGE vast met de meegeleverde metalen montageschroef. /
Ligue o acessório de montagem de borracha ao painel inferior do POWERNODE EDGE com o parafuso de montagem de metal fornecido. / Установите резиновое
крепление на нижнюю панель устройства POWERNODE EDGE и зафиксируйте с помощью входящего в комплект металлического винта.
2
Utilisez le support de montage métallique fourni pour marquer l'emplacement de montage. Assurez-vous que l'emplacement de montage ne cache pas de câbles
électriques ou des tuyaux de plomberie. Pré-percez chaque trou pour les vis de montage (4 pièces de M4-0,7 x 3, recommandées, mais non fournies). Des chevilles
peuvent être nécessaires. / Utilice la abrazadera metálica de montaje suministrada para marcar el lugar de montaje. Asegúrese de que en el lugar de montaje no haya
cables eléctricos ni tuberías. Taladre los agujeros para los tornillos de montaje (se recomiendan 4 tornillos M4 de 0,7 x 3, no suministrados). Podrían requerirse
espiches. / Verwenden Sie die beiliegende Metallhalterung, um den Montageort zu markieren. Vergewissern Sie sich, dass an der Montagestelle keine elektrischen
Leitungen oder Rohre verdeckt liegen. Bohren Sie jedes Loch für die Montageschrauben vor (empfohlen: M4-0,7 x 3, 4 Stück, nicht mitgeliefert). Eventuell sind Dübel
erforderlich. / Utilizzare la piastra metallica fornita per contrassegnare la posizione di installazione. Verificare che nella posizione scelta per l’installazione non siano
presenti cavi elettrici o tubature. Realizzare i fori per le viti di montaggio (si consiglia l’utilizzo di 3 o 4 viti di tipo M4–0.7, non incluse). Potrebbe essere necessario
l’utilizzo di tasselli. / Gebruik de meegeleverde metalen montagebeugel om de montageplek te markeren. Zorg dat de montageplek geen elektrische bedrading of
leidingen bevat. Boor de gaten voor de montageschroeven (M4–0,7 x 3, 4 stuks aanbevolen, niet meegeleverd). Verankeringen kunnen noodzakelijk zijn. / Utilize o
suporte de montagem de metal fornecido para assinalar a localização da montagem. Garanta que a localização da montagem não tapa instalações elétricas ou
canalizações. Faça uma pré-furação de cada parafuso de montagem (recomendamos a utilização de 4 unidades M4–0,7 x 3, não fornecidas). Pode ser necessário
utilizar fixadores. / С помощью входящей в комплект металлической монтажной скобы отметьте место установки. Убедитесь, что в выбранном для
установки месте отсутствует скрытая электропроводка и трубы. Сделайте отверстия для монтажных винтов (рекомендуется использовать 4 винта M4 –
0,7 х 3, винты в комплект не входят). Для установки могут потребоваться монтажные анкеры.
3
Faites glisser le POWERNODE EDGE muni de la fixation en caoutchouc sur le support. Poussez le POWERNODE EDGE vers le bas pour le sécuriser. / Introduzca el
POWERNODE EDGE con el accesorio de montaje de goma en la abrazadera. Presione para asegurarlo. / Schieben Sie die POWERNODE EDGE mit der
Gummihalterung auf die Halterung. Zum Befestigen nach unten drücken. / Far scorrere il POWERNODE EDGE con il supporto in gomma sulla piastra. Spingere verso
il basso per bloccare. / Schuif de POWERNODE EDGE met de rubberen bevestiging op de beugel. Druk naar beneden om vast te zetten. / Faça deslizar o
POWERNODE EDGE com o acessório de montagem de borracha no suporte. Encaixe para fixar. / Насадите устройство POWERNODE EDGE с резиновым
креплением на скобу. Прижмите для плотной фиксации.

WELCOME TO #LIVINGHIFI
Go to bluesound.com/downloads to download the App.
The initial network setup is done using the BluOS App on your phone
or tablet. Make sure you have the App downloaded and installed, and
your phone or tablet nearby as you get started.
The POWERNODE EDGE online owners manual has even more
in-depth information, including troubleshooting tips and tricks.
Please visit bluesound.com/products/powernode-edge to
download the latest version of the manual.
The POWERNODE EDGE is a network music streaming smart amplifier that
conveniently brings the enjoyment of hi-resolution audio to everyday life. Simply add a
pair of loudspeakers to create the ultimate two-channel system, which can also be
grouped with other Bluesound players to create multi-room and home theater listening
experiences. The POWERNODE EDGE must be wired or connected wirelessly to your
home network for full functionality.
This Quick Setup Guide will take you through the basic steps to get your
POWERNODE EDGE positioned, plugged in, and connected to your network.
If you have any questions during setup please visit our support site at
support.bluesound.com
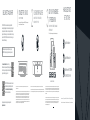
3ADD YOUR POWERNODE
TO THE NETWORK
USING YOUR PHONE OR TABLET, DOWNLOAD AND
OPEN THE BLUOS APP
bluesound.com/downloads
The ‘Add A Player’ wizard will guide you through the steps to complete your setup.
Ajoutez votre hub au réseau, utilisez votre smartphone ou votre tablette pour télécharger et ouvrir l’application bluos / Agregue su hub a la red, descargue y abra la aplicación
bluos en su teléfono o tableta / Fügen sie ihren hub zum netzwerk hinzu, laden sie die bluos-app mit ihrem handy oder tablet herunter und öffnen sie sie / Aggiungi il tuo hub
alla rete, usando il telefono o tablet, scarica e apri l'app bluos / De hub toevoegen aan het netwerk, gebruik uw telefoon of tablet om de bluos-app te downloaden en te openen
/ Adicione o seu hub à rede, utilizando o seu telemóvel ou tablet, transfira e abra a app bluos / добавьте станцию в сеть, на телефоне или планшете загрузите и откройте
приложение bluos
L’assistant « Ajouter un lecteur » vous guidera tout au long du processus de configuration / El configurador “Agregar un reproductor” lo guiará por los pasos para completar la
configuración / Der „Spieler hinzufügen“-Assistent führt Sie durch die einzelnen Schritte, um die Einrichtung abzuschließen / La procedura guidata "Aggiungi un player" ti
guiderà attraverso i passaggi per completare la confitgurazione / De wizard 'Een afspeelapparaat toevoegen' begeleidt u bij de rest van de stappen om de configuratie te
voltooien / O guia “Adicionar um Reprodutor” vai guiá-lo pelas etapas necessárias à conclusão da configuração / Мастер добавления проигрывателя подскажет
необходимые шаги для завершения установки
1CONNECT FOR SOUND
HOOK UP YOUR SPEAKERS
For source audio (like a TV or turntable), connect via HDMI eARC, Optical, or Analog inputs.
Use the supplied Toslink adaptor for Optical sources.
Branchez vos enceintes / Conecta tus altavoces / Schliessen sie ihre boxen an / Collegare gli altoparlanti / Sluit uw luidsprekers aan / Ligue as suas colunas
/ Подключите свои колонки
Pour une source audio (comme un téléviseur ou une platine), connectez via les entrées HDMI eARC, optique ou analogique. Utilisez l’adaptateur Toslink fourni pour les sources
optiques. / Para una fuente de audio (como una TV o un tocadiscos), conecta por entrada HDMI, eARC, óptica o analógica. Usa el adaptador Toslink proporcionado para las
fuentes ópticas. / Für die Audioquelle (z. TV oder Plattenspieler) schließen Sie über HDMI eARC, optische oder analoge Eingänge an. Verwenden Sie den mitgelieferten
Toslink-Adapter für optische Quellen / Per la sorgente audio (come una TV o un giradischi), effettua la connessione tramite gli ingressi HDMI eARC, ottico o analogico. Usa
l'adattatore Toslink in dotazione per le sorgenti ottiche. / Voor bronaudio (zoals een televisie of draaitafel) maakt u verbinding via HDMI eARC-, optische of analoge invoer.
Gebruik de meegeleverde Toslink-adapter voor optische bronnen. / Para fontes áudio (como uma TV ou um prato), ligue nas entradas HDMI eARC, Ótica ou Analógica. Use o
adaptador Toslink fornecido apra fontes Óticas. / Для источника аудио (такого как телевизор или проигрыватель) подключитесь через вход HDMI eARC, оптический
или аналоговый. Для оптических источников сигнала используйте прилагаемый адаптер Toslink
2PLUG IN YOUR PLAYER
WATCH FOR THE LED TO TURN SOLID GREEN,
INDICATING ‘HOTSPOT’ MODE
Branchez votre lectur / Conecta tu reproductor / Verbinden Sie Ihren Player / Collega il lettore / Sluit uw speler aan / Ligue o seu leitor / Подключите плеер
Attendez que la LED affiche un vert permanent / Espera a que el LED se ilumine en verde / Warten Sie, bis die LED durchgehend grün leuchtet / Attendi la luce LED verde e
fissa / Wacht tot het groene ledlampje blijft branden / Espere até que o LED fique constantemente / Дождитесь, чтобы индикатор непрерывно светился зеленым цветом
support.bluesound.com
support@bluesound.com
¿Tienes preguntas? / Noch Fragen? / Domande? / Hebt u vragen? / Tem perguntas? /
to / Kontaktieren Sie uns / Contattaci / Neem contact met ons op / Contacte-nos /
North America: 1 855 531 4666
EU: 00 800 53 14 66 66
Avez-vous des ques
Contacter / Ponte e
tions ? /
n contac
Есть вопросы?
Свяжитесь с нами
HAVE QUESTIONS?
GET IN TOUCH
-
 1
1
-
 2
2


Bluesound N230BLKUNV Gebruikershandleiding
- Categorie
- Luidsprekersets
- Type
- Gebruikershandleiding
in andere talen
- italiano: Bluesound N230BLKUNV Guida utente
- français: Bluesound N230BLKUNV Mode d'emploi
- español: Bluesound N230BLKUNV Guía del usuario
- português: Bluesound N230BLKUNV Guia de usuario