© Bluesound International. Bluesound, the stylized wordmark “B” logotype, the phrase “HiFi for a wireless generation”, HUB and all other Bluesound product
names and taglines are trademarks or registered trademarks of Bluesound International, a division of Lenbrook Industries Limited. All other logos and services
are trademarks or service marks of their respective owners.
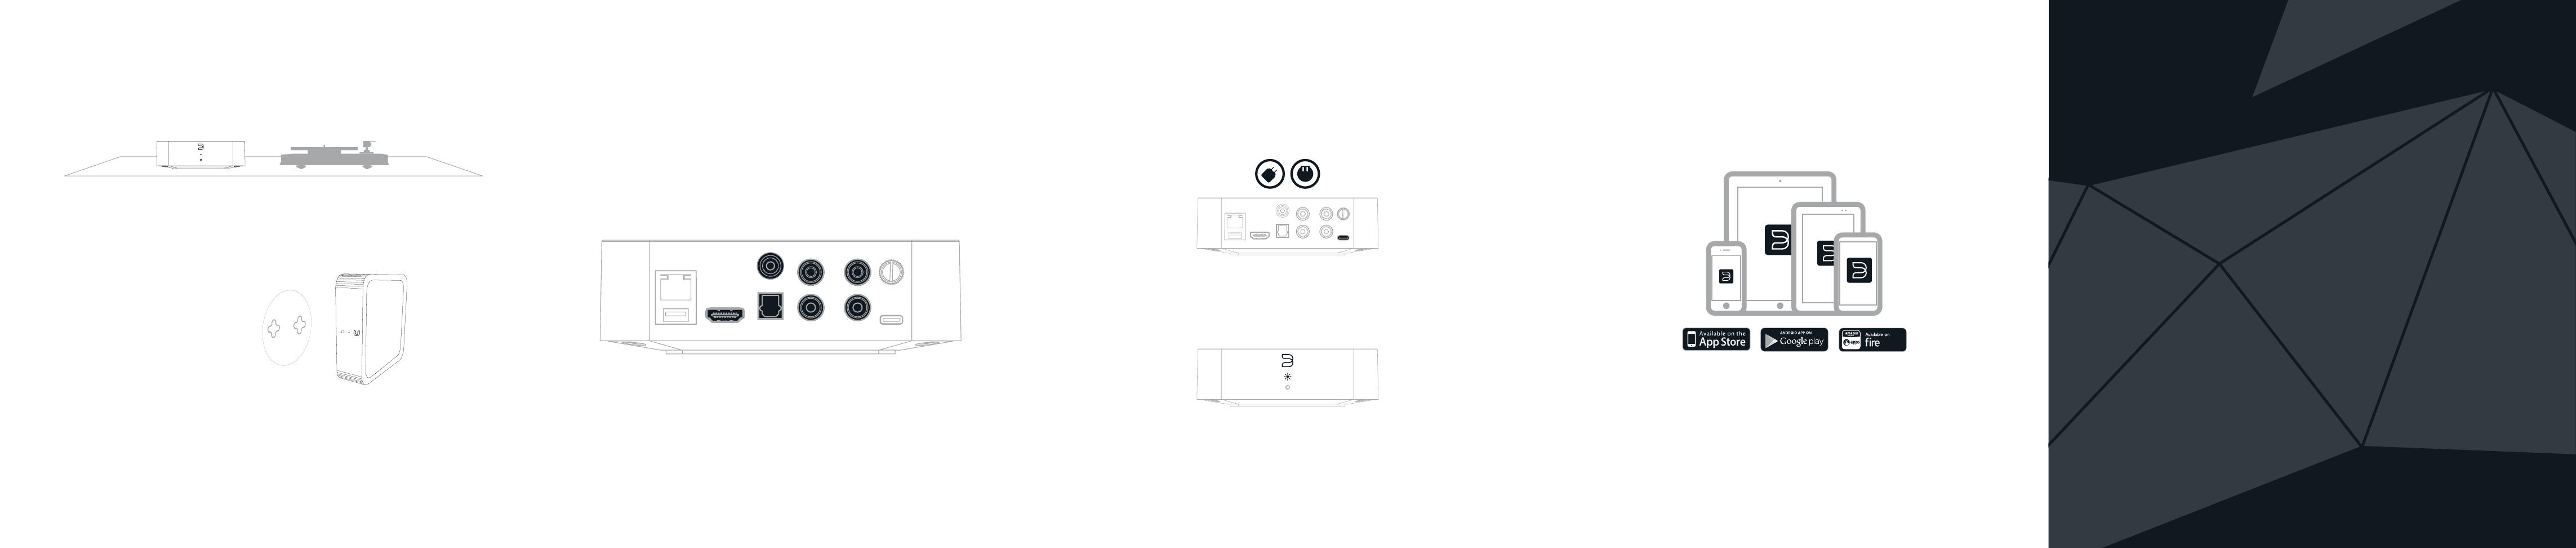
1CHOOSE PLACEMENT
TABLETOP OR AUDIO RACK
Place the Hub on a flat surface near your audio source.
2CONNECT FOR SOUND
PLUG YOUR AUDIO SOURCE INTO ONE OF THE
INPUTS ON THE BACK OF THE HUB
Audio cables are not included.
4ADD YOUR HUB TO THE
NETWORK
USING YOUR PHONE OR TABLET, DOWNLOAD AND
OPEN THE BLUOS APP
bluesound.com/downloads
The ‘Add A Player’ wizard will guide you through the steps to complete your setup.
3PLUG IN YOUR HUB
USE THE INCLUDED USB-C POWER ADAPTER,
AND THE CORRECT WALL-PLUG ADAPTER FOR
YOUR REGION
Watch for the LED to turn Solid Green, indicating ‘Hotspot’ mode. If connecting to
the network via Ethernet, the LED will turn Solid Blue, indicating Network readiness.
Connectez le son, branchez votre source audio dans l’un des ports d’entrée a l’arrière du hub. les câbles audios ne sont pas fournis / Conectar para
sonido, conecte su fuente de audio en una de las entradas en la parte posterior del hub. no se incluyen cables de audio / Verbindung für sound
herstellen, verbinden sie ihre audioquelle mit einem der eingänge an der rückseite des hubs. audiokabel nicht inbegriffen / Connetti per il suono, collega
la tua sorgente audio in uno degli ingressi sul retro dell'hub. i cavi audio non sono inclusi / Aansluiten voor geluid, sluit de audiobron aan op één van de
ingangen aan de achterkant van de hub. audiokabels zijn niet inbegrepen / Ligar para som, ligue a sua fonte de som numa das entradas na parte de trás
do hub. os cabos de áudio não estão incluídos / Подключите источник звука, подключите источник звука к одному из входов на задней части
станции. звуковые кабели не входят в комплект
Branchez votre hub, utilisez l’adaptateur d’alimentation usb-c inclus ainsi qu’un adaptateur de prise murale adapté à votre région / Conecte su hub, use el adaptador
eléctrico usb-c con el enchufe adaptador adecuado para su región / Schliessen sie ihren hub an, verwenden sie den beiliegenden usb-c -power adapter zusammen mit
dem für ihre region passenden adapter für die steckdose / Collega il tuo hub, utilizza l'adattatore di alimentazione usb-c incluso, insieme all'adattatore per presa a muro
corretto per la tua regione / De hub aansluiten, gebruik de bijgeleverde usb-c--stroomadapter, samen met de juiste stekkeradapter voor uw regio / Ligue o seu hub, utilize o
adaptador de energia usb-c juntamente com o adaptador de tomada adequado à sua região / Подключите станцию, используйте прилагаемый сетевой адаптер usb-c
с адаптером для розетки в соответствии с регионом
Lorsque la LED devient verte et reste fixe, le mode « borne » est activé. Si vous vous connectez au réseau via un port Ethernet, la LED devient bleue et reste fixe pour
indiquer que le réseau est prêt / Espere a que el LED se encienda en verde sólido, lo que indica el modo “hotspot”. Si se conecta a la red vía Ethernet, el LED se encenderá
en azul sólido, indicando que la red está lista / Schauen Sie, ob die LED durchgehend grün leuchtet, wodurch der „Hotspot“-Modus angezeigt wird. Wenn Sie sich über das
Ethernet mit dem Netzwerk verbinden, leuchtet die LED dauerhaft blau und zeigt damit an, dass eine Verbindung zum Netzwerk hergestellt werden kann / Attendi di
visualizzare la luce LED verde fissa, che sta ad indicare la modalità "hotspot". Se ti connetti alla rete tramite Ethernet, la luce LED diventa blu fissa, per indicare che la rete è
pronta / Wacht totdat de led continu groen brandt om aan te geven dat de 'hotspot'-modus actief is. Als er via Ethernet verbinding met het netwerk wordt gemaakt, brandt de
led continu blauw om aan te geven dat het netwerk gereed is / Observe para verificar se o LED acende, sem piscar, a Verde, indicando o modo de “hotspot”. Se se ligar à
rede por Ethernet, o LED vai acender, sem piscar, a Azul, indicando a disponibilidade da rede / Постоянное зеленое свечение светодиодного индикатора обозначает
режим беспроводной точки доступа. При подключении к сети через локальную сеть индикатор загорится синим, показывая готовность подключения
Chosissez l’emplacement, sur table ou étagère audio, placez votre hub sur une surface plate à proximité de la source audio / elija la ubicación, sobre una mesa o en el rack
de audio, coloque el hub en una superficie plana cerca de su fuente de audio / Platzierung wählen, tisch oder audio-rack, stellen sie den hub auf eine ebene fläche nahe
ihrer audioquelle / Scegli la collocazione, piano o scaffale, posiziona l'hub su una superficie piana vicino alla sorgente audio / Positie kiezen, tafelblad of audiorek, leg de
hub op een plat oppervlak in de buurt van de audiobron / Escolher instalação, cimo da mesa ou prateleira de áudio, coloque o hub numa superfície plana perto da sua fonte
de áudio / Выберите расположение, на столе или в аудиостойке, расположите станцию на плоской поверхности возле источника звука
Fixé au mur, utilisez le gabarit de montage fourni pour placer précisément les trous de fixation sur le panneau arrière de votre hub. laissez suffisamment de place pour
pouvoir brancher les câbles. les vis ne sont pas fournies / Montaje, use la plantilla de montaje suministrada para una colocación precisa en las ranuras del panel inferior del
hub. asegúrese de dejar suficiente espacio para conectar los cables. no se incluyen tornillos / Montiert, verwenden sie die beiliegende montagevorlage, um das gerät
mithilfe der schlüssellochförmigen schlitze an der unterseite des hubs präzise zu befestigen. achten sie darauf, dass noch ausreichend platz zum anschliessen der kabel
vorhanden ist. schrauben nicht inbegriffen / Montato, utilizza il modello di montaggio in dotazione per un posizionamento preciso nelle scanalature sul pannello inferiore
dell'hub. assicurati di lasciare spazio sufficiente per collegare i cavi. le viti non sono incluse / Bevestigd, gebruik het bijgeleverde montagesjabloon voor nauwkeurige
plaatsing in de sleuven op het onderste paneel van de hub. zorg dat er genoeg ruimte is om de kabels aan te sluiten. schroeven zijn niet inbegrepen / Montado, utilize o
modelo de montagem fornecido para fazer a instalação apropriada nas ranhuras adequadas do painel inferior do hub. garanta que deixa espaço suficiente para ligar os
cabos. os parafusos não estão incluídos / На креплении, используйте прилагаемый шаблон крепления для точного расположения относительно пазов на нижней
панели станции. оставьте достаточно места для присоединения кабелей. шурупы не входят в комплект
MOUNTED
Use the supplied mounting template for precise
placement of the keyhole slots on the Hub’s
bottom panel. Be sure to leave enough space to
plug in the cables. Mounting screws are not
included.
Ajoutez votre hub au réseau, utilisez votre smartphone ou votre tablette pour télécharger et ouvrir l’application bluos / Agregue su hub a la red,
descargue y abra la aplicación bluos en su teléfono o tableta / Fügen sie ihren hub zum netzwerk hinzu, laden sie die bluos-app mit ihrem handy oder
tablet herunter und öffnen sie sie / Aggiungi il tuo hub alla rete, usando il telefono o tablet, scarica e apri l'app bluos / De hub toevoegen aan het netwerk,
gebruik uw telefoon of tablet om de bluos-app te downloaden en te openen / Adicione o seu hub à rede, utilizando o seu telemóvel ou tablet, transfira e
abra a app bluos / Добавьте станцию в сеть, на телефоне или планшете загрузите и откройте приложение bluos
L’assistant « Ajouter un lecteur » vous guidera tout au long du processus de configuration / El configurador “Agregar un reproductor” lo guiará por los
pasos para completar la configuración / Der „Spieler hinzufügen“-Assistent führt Sie durch die einzelnen Schritte, um die Einrichtung abzuschließen /
La procedura guidata "Aggiungi un player" ti guiderà attraverso i passaggi per completare la confitgurazione / De wizard 'Een afspeelapparaat
toevoegen' begeleidt u bij de rest van de stappen om de configuratie te voltooien / O guia “Adicionar um Reprodutor” vai guiá-lo pelas etapas
necessárias à conclusão da configuração / Мастер добавления проигрывателя подскажет необходимые шаги для завершения установки

