
√
Instructions
Bring your life
thule.com2022-09-21
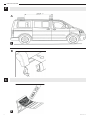
Adapter Wall TO 5102 - VW
T5/T6 Multivan
301982 - 301983
AD9012-00 | 3380075000
INSTALLATION


Safety
EN ADAPTER - USER INSTRUCTIONS
AD9012-00 3
DE Adapter - Bedienungsanleitung
NL Adapter - Gebruikershandleiding
FR Adaptateur - Instructions d'utilisation
IT Adattatore - Istruzioni per l'uso
ES Adaptador - Instrucciones de uso
SV Adapter - Användarmanual
FI Adapteri - Käyttöohje
DA Adapter - Brugervejledning
NO Adapter - Brukerinstruksjoner
PL Adapter - Instrukcja dla użytkownika
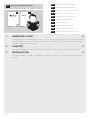
1 WARNINGS & INFO 4
Warnungen & Infos / Waarschuwingen & info / Avertissements & informations / Avvertenze & informazioni
/ Advertencias & información / Varningar & information / Varoituksia & tietoja / Advarsler & info / Advarsler &
information / Ostrzeżenia & informacje
2 CONTENT 5
Inhalt / Inhoudsopgave / Sommaire / Contenuto / Contenido / Innehåll / Sisällys / Indhold / Innhold / Treść
3 INSTALLATION 5
Montage / Installatie / Installation / Installazione / Instalación / Montering / Asennus / Montering / Montering /
Montaż

4AD9012-00
USER
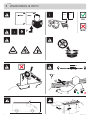
1 WARNINGS & INFO
SafetyInstructions
OK
NOK
?
Km

AD9012-00 5
USER
1
2
1
2
x4
M6 x 16 mm
DIN 603
x1 x3
x1
x4
M6
DIN 985
x4
Nut Cap
7
Thule NV, Kortrijkstraat 343 – BE 8930 Menen, BELGIUM infoRV@thule.com www.thule.com
1
2
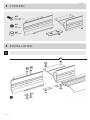
2 CONTENT
3 INSTALL ATION
1
1

6AD9012-00
INSTALLATION
7
Thule NV, Kortrijkstraat 343 – BE 8930 Menen, BELGIUM infoRV@thule.com www.thule.com
1
2
2
3
7
Thule NV, Kortrijkstraat 343 – BE 8930 Menen, BELGIUM infoRV@thule.com www.thule.com
1
2
7
Thule NV, Kortrijkstraat 343 – BE 8930 Menen, BELGIUM infoRV@thule.com www.thule.com
1
2
A
B
2
3

AD9012-00 7
INSTALLATION
4
7
Thule NV, Kortrijkstraat 343 – BE 8930 Menen, BELGIUM infoRV@thule.com www.thule.com
1
2
7
Thule NV, Kortrijkstraat 343 – BE 8930 Menen, BELGIUM infoRV@thule.com www.thule.com
1
2
7
Thule NV, Kortrijkstraat 343 – BE 8930 Menen, BELGIUM infoRV@thule.com www.thule.com
1
2
A
B
1
2
4
5
6 7

8AD9012-00
INSTALLATION
NL
A.0 Montage
A.1 Schuif de duo-boutplaatjes met de
slotbouten in de juiste volgorde in
de dakrail van de VW T5/T6 aan de
passagierszijde (fig.1) tot waar de adapters
zullen komen (fig.2).
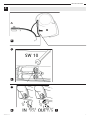
A.2 SIKA 252-lijm op het ribde vlak van de
adapter aanbrengen (fig3). Ontvet het dak
met SIKA activator daar waar de adapter
zal komen.
A.3 De adapter op de bouten plaatsen en
positioneren volgend fig. 2, de borgmoeren
aandraaien en voorzien van de moerkapjes.
A.4 De luifel in de adapter haken (fig.4), alle
deuren sluiten, en max. 30cm uitdraaien
(fig.6 en 7).
A.5 De luifel zodanig verschuiven dat het
voorste gat in de luifel correspondeert met
de moer in de voorste adapter. Bevestigen
met sluitring en bout. (fig.5)
A.6 Draai de luifel verder uit totdat ook de
achterste bout kan geplaatst worden.
A.7 Laat bij het drogen van de lijm de luifel
±5cm openstaan zodat de adapters niet op
torsie belast worden.
FR
A.0 Montage
A.1 Glissez les plaques de boulons duo
ensemble avec les boulons à bois dans le
bon ordre (fig.1) dans le rail de toit côté
passager jusqu'à l'endroit où viendront les
adaptateurs (fig.2).
A.2 Appliquez de la colle SIKA 252 sur les
surfaces rainurées (fig3). Dégraissez la
partie du toit où viendront les adaptateurs
à l'aide de SIKA activator.
A.3 Poses les adaptateurs sur les boulons,
positionnez-les suivant fig. 2, serrez les
écrous et mettez les caches-écrous.
A.4 Accrochez le store sur les adaptateurs
(fig.4), fermez toutes les portes et déroulez
le store de 30cm maximum (fig.6 en 7).
A.5 Glissez le store de façon à ce que le trou
percé dans la partie avant du boitier du
store correspond au trou de l'adaptateur
avant. Fixez avex le boulon et la rondelle.
(fig.5)
A.6 Déroulez le store jusqu'à ce que le trou
derrière le bras articulé gauche devient
visible et fixez le store à l'adaptateur
arrière avec boulon et rondelle.
A.7 Pendant que la colle sèche, laissez le
store ouvert de ±5cm afin d'éviter toutes
torsions du boîtier.

AD9012-00 9
INSTALLATION
D
A.0 Montage
A.1 Schieben Sie die Platten Doppelbolzen-
Platten mit die Vierkantseckkopfschraube
in der richtingen Reihenfolge in die
Dachschiene an die Fahrgastseite (fig.1) bis
der zukünftige Platz des Adaptern erreicht
ist (fig.2).
A.2 Bringen Sie auf den gerippten Flächen
Klebemasse SIKA 252 an (fig3). Entfetten
Sie die Montageflächen erst sorgfältig
mit SIKA activator, bevor Sie die Adapter
anbringen.
A.3 Befestigen Sie die Adaptern fest mit den
Muttern an der richtingen Position (fig. 2)
und platzieren Sie die Mutterkappen auf
den schrauben.
A.4 Hängen Sie die Markise an die Adaptern
(fig.4), schließen Sie alle Türen, und öffnen
Sie die Markise maximal 30cm (fig.6 en 7).
A.5 Verschieben Sie die Markise bis das Loch in
der Markise mit der Nietmutter im Adapter
übereinstimmt und befestigen Sie mit den
Bolzen und den Unterlegscheiben. (fig.5)
A.6 Befestigen Sie mit dem Bolzen und der
Unterlegscheibe.
A.7 Lassen Sie während des Austrocknens des
Klebers die Markise ±5cm offenstehen, um
einer möglichen Verdrehung des Gehäuses
verzubeugen.
EN
A.0 Installation
A.1 Slide the duo bolt plates with the wood
bolts in the correct order into the roof
rail on the passenger's side (fig.1) to the
position as shown (fig.2).
A.2 Apply SIKA 252 glue on the ribbed
surfaces (fig.3). Remove the grease from
the roof with SIKA activator.
A.3 Put the adapter in place (fig. 2), tighten
with the nuts and position the screw caps.
A.4 Hook the awning onto the adapters (fig.4),
close all the doorsn, and rotate the awning
outwards from 30cm (fig.6 en 7).
A.5 Slide the awning until the hole in the
awning is in accordance with the nut on the
first adapter. Tighten using the bolt and the
nylon washer (fig.5).
A.6 Unroll the awning until the second bold can
be positioned.
A.7 Whilst the glue is drying, leave the awning
open for ±5cm in order not to torsion the
adapters against each other.


© Thule Group 2022. All rights reserved. AD9012-00
-
 1
1
-
 2
2
-
 3
3
-
 4
4
-
 5
5
-
 6
6
-
 7
7
-
 8
8
-
 9
9
-
 10
10
-
 11
11
-
 12
12


in andere talen
- English: Thule 301982 Installation guide
- français: Thule 301982 Guide d'installation
- Deutsch: Thule 301982 Installationsanleitung
Gerelateerde artikelen
-
Thule 308073 Handleiding
-
-
-
-
Thule 307886 Handleiding
-
Thule POD 2.0 Handleiding
-
-
-
-