
Owner’s Manual
M.D.G., EMI Division, ©Yamaha Corporation 1995
VU37290 601CRIT15.2-02B0 Printed in Japan

FCC INFORMATION (U.S.A)
1. IMPORTANT NOTICE: DO NOT MODIFY THIS UNIT!
This product, when installed as indicated in the instructions contained in this manual, meets FCC
requirements. Modifications not expressly approved by Yamaha may void your authority, granted by
the FCC, to use the product.
2. IMPORTANT: When connecting this product to accessories and/or another product use only high
quality shielded cables. Cable/s supplied with this product MUST be used. Follow all installation
instructions. Failure to follow instructions could void your FCC authorization to use this product in
the USA.
3. NOTE: This product has been tested and found to comply with the requirements listed in FCC
Regulations, Part 15 for Class “B” digital devices. Compliance with these requirements provides a
reasonable level of assurance that your use of this product in a residential environment will not result
in harmful interference with other electronic devices. This equipment generates/uses radio frequen-
cies and, if not installed and used according to the instructions found in the user’s manual, may cause
interference harmful to the operation of other electronic devices. Compliance with FCC regulations
does not guarantee that interference will not occur in all installations. If this product is found to be the
source of interference, which can be determined by turning the unit “OFF” and “ON”, please try to
eliminate the problem by using one of the following measures:
Relocate either this product or the device that is being affected by the interference.
Utilize power outlets that are on different branch (circuit breaker or fuse) circuits or install AC line
filter/s.
In the case of radio or TV interference, relocate/reorient the antenna. If the antenna lead-in is 300
ohm ribbon lead, change the lead-in to co-axial type cable.
If these corrective measures do not produce satisfactory results, please contact the your local retailer
authorized to distribute this type of product.
If you can not locate the appropriate retailer, please contact Yamaha Corporation of America, Elec-
tronic Service Division, 6600 Orangethorpe Ave, Buena Park, CA 90620
* The above statements apply ONLY to those products distributed by Yamaha Corporation of America
or its subsidiaries.

SPECIAL MESSAGE SECTION (USA)
PLEASE KEEP THIS MANUAL
92-BP
This product utilizes batteries or an external power supply
(adapter). DO NOT connect this product to any power supply
or adapter other than one described in the manual, on the name
plate, or specifically recommended by Yamaha.
WARNING: Do not place this product in a position where
anyone could walk on, trip over, or roll anything over power
or connecting cords of any kind. The use of an extension cord
is not recommended! IF you must use an extension cord, the
minimum wire size for a 25' cord (or less) is 18 AWG. NOTE:
The smaller the AWG number, the larger the current handling
capacity. For longer extension cords, consult a local electri-
cian.
This Product should be used only with the components sup-
plied or; a cart, rack, or stand that is recommended by Yamaha.
If a cart, etc., is used, please observe all safety markings and
instructions that accompany the accessory product.
SPECIFICATIONS SUBJECT TO CHANGE: The infor-
mation contained in this manual is believed to be correct at
the time of printing. However, Yamaha reserves the right to
change or modify any of the specifications without notice or
obligation to update existing units.
This product, either alone or in combination with an ampli-
fier and headphones or speaker/s, may be capable of produc-
ing sound levels that could cause permanent hearing loss. DO
NOT operate for long periods of time at a high volume level
or at a level that is uncomfortable. If you experience any hear-
ing loss or ringing in the ears, you should consult an audiolo-
gist. IMPORTANT: The louder the sound, the shorter the
time period before damage occurs.
Some Yamaha products may have benches and/or accessory
mounting fixtures that are either supplied with the product or
as optional accessories. Some of these items are designed to
be dealer assembled or installed. Please make sure that
benches are stable and any optional fixtures (where appli-
cable) are well secured BEFORE using. Benches supplied by
Yamaha are designed for seating only. No other uses are rec-
ommended.
NOTICE: Service charges incurred due to lack of knowl-
edge relating to how a function or effect works (when the
unit is operating as designed) are not covered by the
manufacturer’s warranty, and are therefore the owners respon-
sibility. Please study this manual carefully and consult your
dealer before requesting service.
ENVIRONMENTAL ISSUES: Yamaha strives to produce
products that are both user safe and environmentally friendly.
We sincerely believe that our products and the production
methods used to produce them, meet these goals. In keeping
with both the letter and the spirit of the law, we want you to
be aware of the following:
Battery Notice: This product MAY contain a small non-re-
chargeable battery which (if applicable) is soldered in place.
The average life span of this type of battery is approximately
five years. When replacement becomes necessary, contact a
qualified service representative to perform the replacement.
This Product may also use “household” type batteries. Some
of these may be rechargeable. Make sure that the battery be-
ing charged is a rechargeable type and that the charger is in-
tended for the battery being charged.
When installing batteries, do not mix old batteries with new,
or with batteries of a different type. Batteries MUST be in-
stalled correctly. Mismatches or incorrect installation may
result in overheating and battery case rupture.
Warning: Do not attempt to disassemble, or incinerate any
battery. Keep all batteries away from children. Dispose of
used batteries promptly and as regulated by the laws in your
area.
Note: Check with any retailer of household type batteries in
your area for battery disposal information.
Disposal Notice: Should this Product become damaged be-
yond repair, or for some reason its useful life is considered to
be at an end, please observe all local, state, and federal regu-
lations that relate to the disposal of products that contain lead,
batteries, plastics, etc. If your dealer is unable to assist you,
please contact Yamaha directly.
NAME PLATE LOCATION: The name plate is located on
the bottom of the product. The model number, serial number,
power requirements, etc., are located on this plate. You should
record the model number, serial number, and the date of pur-
chase in the spaces provided below and retain this manual as
a permanent record of your purchase.
OUTPUT INPUT
LINE
OUT IN
MIDI
MIC INPUT
DC IN POWER
OFFON
Model
Serial No.
Purchase Date

i
●
Introduction
●
Introduction
The SU10 Stereo Digital Sampler is a compact, easy-to-use stereo phrase sampler
offering high sound quality, a unique ribbon controller, excellent loop capability,
and a host of other distinctive editing and performance features. The SU10 is ideal
for up-and-coming DJs, “desktop musicians,” and all others interested in experi-
encing the world of electronic digital sampling.
Sampling and playback features
■ Record up to 48 stereo samples within nonvolatile memory. Samples re-
main in memory even while power is off.
■ Excellent sound quality: Can record at a maximum sampling rate of 44.1kHz,
the same rate used by audio CDs.
■ Reverse play reproduces samples in reverse.
■ Scale play sets up a single sample at 12 different pitches along the pad
console.
■ Unique ribbon controller allows you to apply a dramatic filter or scratch
effect to your samples, or to crossfade your samples with realtime sound
from an external source.
■ Impressive editing features.
• Select any one of five loop patterns for each sample. Select arbitrary loop
start point and end point.
• Move or copy sample to a different location; split one sample into two;
trim off the leading and trailing parts of the sample.
• Select any one of three triggering modes for each sample.
■Create up to four
songs
, each consisting of any arbitrary sequence of sample
play.

●
Introduction
●
ii
Special “External” functions
■ Use your SU10 as an effects box for applying a realtime scratch or filter
effect to feed-through line input.
MIDI support
■ Drive your SU10 from a remote sequencer, keyboard, or computer; or use
your SU10 to drive a remote device.
■ Load selected samples to a synthesizer or other remote device using the
MIDI sample dump standard.
■ Back up all SU10 data to an external storage device, then reload at any
time.

Contents
1 About This Manual␣ ........................ 1
Notations .................................... 1
2 Precautions␣ .................................... 2
3 Basic Concepts␣ .............................. 3
What is the SU10? ...................... 3
Operating Modes ........................ 3
Samples ...................................... 4
How a Sample is Made .......... 4
Banks and Pads .......................... 5
External Modes .......................... 6
Songs .......................................... 6
MIDI ........................................... 6
4 Controls, Connectors, and LCD␣ .... 7
Top Panel .................................... 7
Rear Panel ................................ 10
Right Side ................................. 11
Screen Display.......................... 11
5 Supplying Power and Connecting
Up␣ ............................................... 13
Supplying Power ...................... 13
Using the adaptor ................. 13
Batteries ............................... 13
Connecting Up the SU10 ......... 14
6 Playback␣ ....................................... 16
Preparation............................... 16
Basic Sample Playback............. 17
Special Play Features I ............. 18
HOLD .................................. 18
REVERSE............................ 19
SCALE................................. 19
Special Features II:
Ribbon Controller .................. 21
Pitch Play ............................. 21
Filter Play............................. 22
Scratchpad............................ 24
Crossfade ............................. 25
Playing a Song ......................... 27
External Performance Modes .. 29
External Scratch................... 29
External Filter ...................... 30
7 Recording Samples, and Creating
Songs␣ ......................................... 31
Sample Recording Overview .... 31
Connecting the Input Source .. 31
Entering REC Mode and
Selecting the Pad ................... 31
Setting the Recording
Parameters ............................. 32
Starting/Stopping the
Recording ............................... 35
Creating Songs ......................... 35
Procedure ............................. 36
8 Editing␣ ......................................... 38
Introduction ............................. 38
Editing Functions................ 38
Basic Procedure ....................... 39
Edit Parameters and
Operations .............................. 41
LOOP MODE [LpMode]..... 41
SOUNDING MODE
[SdMode] ........................... 43
PAD VOLUME [PadVol] ..... 44
ALTERNATE GROUP
[AltGrp] ............................. 44
MIDI NOTE NUMBER
[Note#] ............................... 45
START POINT [StPnt] ........ 46
LOOP POINT [LpPnt]......... 47
END POINT [EdPnt] ........... 47
COPY [CopyTo ?].............. 48
MOVE [MoveTo ?] ............ 49
SPLIT [SpltTo ?]................ 50
COMPACT [Compct ?] ..... 52
DELETE [Delete ?] ........... 53

9 UTILITY Mode␣ ............................. 54
Introduction ............................. 54
General Procedure ................... 54
Recording Setup [Rec] ............. 55
MIDI Setup [MIDI] ................... 56
MIDI Channel [MIDICh] .... 56
MIDI Device Number
[DevNum] .......................... 56
Local Control [Local] .......... 57
Ribbon Number [RbnNum] . 57
Initialize Note Table
[NoteTbInit?] ..................... 57
Clear Note Table
[NoteTbClr?]...................... 58
Bulk Dump [Bulk] ................... 58
Receiving [Dump Rcv?] ...... 59
Sending [Dump Send?]........ 60
Interval [Intrvl] .................... 60
Sample Dump .......................... 62
Song Deletion [Song] .............. 63
Lock [Lock] .............................. 64
Initialize [Init] .......................... 64
Deleting data only
[Init Data?]......................... 65
Deleting data and resetting
the system [Init All?] ......... 65
0 Troubleshooting␣ .......................... 67
A Error and Warning Messages␣ ...... 71
Warning messages ................... 71
MIDI Errors .............................. 72
Memory-Related Errors ........... 73
B Specifications␣ ............................... 74
MIDI Implementation Chart␣ ............. 78
Index␣ .................................................. 80

●
About This Manual
●
1
1
About This Manual
The purpose of this manual is to help you quickly master the operation of your
SU10. Although compact, your SU10 offers a surprising array of playback, edit-
ing, and utility functions. You may need to refer to this manual fairly often in the
beginning, but the concepts and operating principles should soon become clear.
Before starting to use your SU10, please be certain to read through the precau-
tions on page 2 for information that will help you avoid data loss and equipment
damage.
Notations
Button names are enclosed in a rectangular frame, as in [HOLD] or [EXIT].
The 12 central buttons are called
pads
. Each pad has two functions. The lower
function is indicated by the word PAD followed by the button number: for
example, [PAD 1], [PAD 10]. The upper function is indicated by an expression
such as [SHIFT]+[SONG 2], which means “hold down the [SHIFT] key while pressing
the [SONG2] button.”
In general a + sign between two button names means that you must hold
down the first button while pressing the second. For example, [REV]+[PAD 1],
[SHIFT]+[EDIT].
SU10 editing and utility operations are semi-interactive, with the lower left
area of the LCD displaying the necessary messages, prompts, and parameters.
Messages and parameter names that appear in this area are shown in a special
font, as in: Delete A1?.
Normal boldface is sometimes used to call attention to important passages.
The following icons are also used.
This icon header denotes critical advice that may help prevent acci-
dental data loss or equipment damage. Please read these sections care-
fully.
This icon calls attention to significant supplemental information.
▼
This mark appears within procedures to indicate a supplemental ex-
planation that is not part of the procedure itself.

2
●
Precautions
●
2
Precautions
PLEASE READ ALL PRECAUTIONS BEFORE USING YOUR SU10.
1. NEVER switch power off while the LCD is displaying the Keep PwrOn mes-
sage. This message indicates that the SU10 is writing to nonvolatile memory.
Switching power off at this time may result in loss of all data in the SU10. In
some cases this message may last for more than 10 seconds: this does not
indicate a problem.
2. Use the correct power adaptor.
Use only a Yamaha PA-3B or PA-1B power adaptor. Use of a different adaptor
type may result in electric shock or device damage.
3. Use 1.5V AA batteries only. Never mix old and new batteries. Never mix
battery types: be sure that batteries are either all alkaline or else all manga-
nese. Alkaline batteries are recommended
To prevent potential damage from battery leakage, remove the batteries if
you plan to leave the SU10 unused for an extended period.
4. Use the correct cables. Handle cables with care.
• When disconnecting a cable, grip firmly at the connector area and pull
straight out.
• Use only high-quality MIDI cables for your MIDI connections. Cable perfor-
mance degrades as length increases: avoid cables that are longer than 15m.
5. Handle the SU10 with care.
• Do not drop it or otherwise subject it to severe physical impact.
• Do not leave the SU10 in a location where it may be exposed to high tem-
peratures, high humidity, extreme dust, or extreme vibration.
6. Do not open the casing or attempt repairs.
The SU10 contains no user-serviceable parts. Please refer all maintenance to
qualified technicians. Opening of the case will void the warranty.
7. Clean with soft dry cloth only.
Do not attempt to clean the SU10 with detergents or solvents, as these may
damage the casing.

●
Overview and Basic Concepts
●
3
This chapter presents a very brief overview of basic concepts relevant to under-
standing and operation of the SU10.
What is the SU10?
The SU10 combines the functions of a digital stereo phrase sampler with a variety
of add-on features that significantly enhance its effectiveness in a performance
environment. In addition to basic recording, edit, and playback capabilities, this
compact unit includes special play functions, a touch-driven ribbon controller,
and two “external” modes that apply filter or scratch effects to realtime line or
microphone input.
Operating Modes
The SU10 has four operating modes: PLAY, REC (Recording), EDIT, and UTIL (Util-
ity).
PLAY: Use this mode to play samples and songs, or to apply a scratch or filter
effect to a realtime signal as it passes through the SU10. The SU10 always
starts from PLAY mode when power is switched on. You can always return
to PLAY mode from any other mode by pressing [EXIT] once or, in some
cases, twice. For full information about PLAY mode, see Chapter 6.
REC: This is the mode you use to record samples and create songs. You enter this
mode from PLAY mode by pressing [REC]. For details, see Chapter 7.
EDIT: Use this mode to set playback parameters for each sample. You can enter
this mode from PLAY mode by pressing [SHIFT]+[EDIT]. Refer to Chapter 8.
UTIL: This mode consists of seven utilities that you use to set parameters or ex-
ecute operations that are not sample-specific. You can use this mode, for
example, to reinitialize the system, adjust the system-wide pitch offset, or
set overwrite protection for banks and songs. You can enter this mode from
PLAY mode by pressing [SHIFT]+[UTIL]. See Chapter 9.
3
Basic Concepts

4
●
Overview and Basic Concepts
●
Samples
The SU10 stores up to 48 samples. A
sample
is a digital recording of an acoustic
waveform (or two waveforms, if stereo), together with playback parameters that
determine how the sound is played: the type of loop applied, the direction of
playback, the start and end points, and so on. The following conceptual diagram
shows how a sample exists within a typical sampler.
LpMode
SdMode
AltGrp
MIDI NOTE#
StPnt
LpPnt
EdPnt
How a Sample is Made
A sample is created by taking digital “readings” of an acoustic analog signal at a
very rapid rate. The resulting binary values indicate the state of the acoustic wave
at each point of reading. The sample can be replayed by reconverting the values
to an analog wave.
0 0
Analog wave SAMPLING

●
Overview and Basic Concepts
●
5
Note that the quality of the recording improves as the rate of reading — called the
sampling frequency
— increases. Although higher sampling frequencies give bet-
ter quality, they also consume more memory and therefore reduce available re-
cording time. The maximum sampling rate available on the SU10 is 44.1kHz,
identical to the rate offered by a conventional CD.
Because samples require considerable memory per unit of time, they are generally
kept quite short. The replay time of a sample can be extended to an arbitrary
length by setting up a loop, so that the sample repeats indefinitely.
The term sample is also used in a technical sense (its original sense) to refer to each “reading” of
the acoustic signal, as described above. Within this manual, however, the term always refers to
the entire recorded waveform together with its related parameters.
Banks and Pads
You play the SU10 samples by pressing buttons, or
pads
. The SU10 has twelve
pads. Because the SU10 can store up to 48 samples, however, it also has four
banks. You choose a sample by selecting the appropriate bank, then pressing the
corresponding pad.
Pads
Banks
A A1 A2 A3 A12
B1 B2 B3 B12
C1 C2 C3 C12
D1 D2 D3 D12
123 12
B
C
D
Sample

6
●
Overview and Basic Concepts
●
External Modes
The SU10 also supports two “external” modes that are entirely independent of its
sampling capability. These modes are provided primarily for live performance
environments, and operate on an analog signal that passes through the SU10 in
real time.
Songs
The SU10 includes a sequencing feature that records and reproduces pad and
button sequences. You use this feature to create up to four “songs,” each consist-
ing of a series of pad operations that you have registered into memory.
Sample
Time
Sample
Sample
Sample
Sample
Sample
MIDI
The SU10 provides both MIDI IN and MIDI OUT capability. You can use these
features to back up or reload your data; to download selected samples to synthe-
sizers, computers, or other samplers in MIDI standard dump format; to drive the
SU10 from a remote device; or to drive a remote device from the SU10.

●
Controls, Connectors, and LCD
●
7
4
Controls, Connectors,
and LCD
Top Panel
SAMPLING UNIT
REC TOP BWD STOP PLAY FWD
HOLD EXIT
REV SCRATCH
SHIFT BANK
–1 +1
ENTER
SONG 1
EDIT
SONG 4SONG 3SONG 2 UTILITY
EXTERNAL
FILTER
EXTERNAL
SCRATCH
PITCHCROSS
FADER
FILTER
SCALE
1
5
4326
1211
10
987
1
3
F
G
H
0 C
A
D
B
E
2
4
5
67
8
9
1 LCD (Liquid Crystal Display)
You refer to the LCD for all information about current operating status, and
during interactive input of all editing and utility parameters. A description of
the various indications appears on page 11 and 12.
2 Ribbon Controller
During playback, you can run your finger over the ribbon to apply a dramatic
scratch or filter effect or to vary the pitch or line/pad crossfade. During
exter-
nal scratch
and
external filter
play, you use the ribbon to apply realtime scratch-
ing or filtering to a straight audio signal as it feeds through the SU10. Finally,
you can use the ribbon during EDIT operation to change pad volume and
start, loop, and end point settings.
Use light pressure when rubbing your finger over the controller. Excessive force can cause the
ribbon to heat up, reducing its life. Also note that the ribbon may lose sensitivity after prolonged
uninterrupted use; if this occurs, allow the ribbon some time to recover.
3 Pads
Use to start or stop playback of a sample, to change the operating mode, or to
select various functions. Pad operation depends on whether the [SHIFT] button
is ON (pressed) or OFF (not pressed).

8
●
Controls, Connectors, and LCD
●
If [SHIFT] is OFF:
The pad starts or stops replay of the corresponding sample, or selects
the sample for recording or editing.
If [SHIFT] is ON:
• SONG1,…,4 Selects a song for creation or replay.
• EDIT Sets the SU10 into EDIT mode.
• UTILITY Sets the SU10 into UTILITY mode.
• SCALE, FILTER, Sets playback function to SCALE, FILTER,
CROSSFADER or CROSSFADER.
• PITCH Enables ribbon to control the pitch.
• EXTERNAL SCRATCH, Selects EXTERNAL SCRATCH or
EXTERNAL FILTER EXTERNAL FILTER play.
4 [REC]
Press to enter RECORDING mode.
5 [TOP]
Normal play: Returns song to start position.
SCRATCH play: [SCRATCH]+[TOP] returns scratch section to top of sample.
EDIT mode: Jumps to START POINT edit function.
6 [BWD]
Normal play: Moves song back to previous event.
SCRATCH play: [SCRATCH]+[BWD] shifts the scratch section back.
EDIT mode: Jumps to LOOP POINT edit function.
7 [STOP]
PLAY mode: Stops playback of song.
REC mode: Stops recording of sample or song.
8 [PLAY]
PLAY mode: Starts playback of song.
REC mode: Starts recording of sample or song.
9 [FWD]
PLAY mode: Advances song to next event.
EDIT mode: Jumps to END POINT edit function
SCRATCH play: [SCRATCH]+[FWD] shifts the scratch section forward.
0 [HOLD]
Activates HOLD function for sample replay, or REPEAT function for song re-
play. To set this function ON, hold down the pad and press [HOLD].

●
Controls, Connectors, and LCD
●
9
A [REV] (Reverse switch)
Use to play samples in reverse. To operate, hold down [REV] and press the
appropriate pad.
B [SHIFT]
Shifts the pad function. Leave shift off if using the pad to select a sample for
replay or recording. Hold [SHIFT] down when using a pad to select a song or
change the mode.
C [EXIT]
Press this button to return to normal PLAY mode from EDIT mode, UTILITY
mode, ribbon-scratch play, or other special playback feature. You also use this
button when you need to answer “No” to a prompt message.
D [SCRATCH]
Assigns scratch effect to any one of the samples. To operate, hold down
[SCRATCH] and press the pad for the sample you want to scratch.
E [BANK]
The SU10 provides four pad banks (Banks A to D), each capable of storing up
to 12 samples. Press the [BANK] button to change the bank setting (A→
B→C→D→A...) The LCD always indicates the currently selected bank.
F [ENTER]
Press to respond “Yes” to a prompt and execute the corresponding operation,
or to select one of the utilities within UTILITY mode.
The LCD will display a confirmation message before executing certain editing operations.
Press [ENTER] to proceed, or [EXIT] to cancel.
G [+1], [–1]
Use these buttons to change the digital volume during playback, to change
the gain during recording, or to change a parameter value during editing.
Press briefly for a single-unit change, or hold down for continuous change.
H [<], [>]
Press to move through editing functions or utilities.

10
●
Controls, Connectors, and LCD
●
Rear Panel
OUTPUT INPUT
LINE
OUT IN
MIDI
MIC INPUT
DC IN POWER
OFFON
1
2
34
5
6
1 LINE OUTPUT miniphone jack
Outputs a stereo analog signal to powered speakers or other playback device.
2 LINE INPUT miniphone jack
Inputs an analog stereo signal from an external device such as a CD player.
3 MIDI IN/OUT
Standard MIDI connectors. You use these connectors to link your SU10 to
other MIDI devices.
4 MIC INPUT miniphone jack
Accepts input from a dynamic or powered condenser-type microphone.
5 DC IN power input
Receives power input from a PA-3B or PA-1B DC power adaptor.
CAUTION!
Use only a PA-3B or PA-1B adaptor. Use of a different adaptor type may result in
electric shock or device damage.
6 POWER switch
Switches the SU10 power ON or OFF.

●
Controls, Connectors, and LCD
●
11
Right Side
MIN VOLUME MAX PHONES
12
1 VOLUME slider
Adjusts the output volume to the PHONES and LINE OUTPUT connectors.
2 Headphone jack
Stereo miniphone jack; connects to stereo headphones.
Screen Display
The LCD consists of various compartments, each displaying a different type of
information.
1
3
0
A
B
2
4
56
7
8
9

12
●
Controls, Connectors, and LCD
●
1 Current sampling grade
2 Current operating mode
PLAY = Sample/song playback
EDIT = Sample edit
UTIL = Utility setup
3 Loop mode of currently selected pad
4 Indicates whether the selected sample is STEREO or MONO.
5 Currently selected input source
6 Ribbon value (during playback or editing), or input level (during recording
setup)
7 Currently selected bank of pads
8 Selected effect or special play function (if any)
PCH: Ribbon-controlled pitch
EFCT: Scale, Filter, Crossfade, External Filter
SCH: Scratch, External Scratch
9 Currently selected song, and song REPEAT arrow.
Arrow appears only if song is playing in REPEAT mode.
0 Message/parameter display area.
During editing, the upper line displays the parameter name and the bottom
line displays the value. At other times, this area displays input prompts, status
information, and error messages.
A Indicators
MIDI: ON when MIDI message is coming in.
TIME: ON during recording.
TEMPO: ON during loop editing.
REC: ON when SU10 is recording (or standing by to record) a sample
or song.
B Meter display
During sample record: Recordable time (to nearest 0.1 sec.)
During song play: Song location (to nearest 0.1 sec.)
During song creation: Remaining song memory (16-bit words)
During loop edit: Loop tempo (estimated beats per minute)

●
Supplying Power and Connecting Up
●
13
5
Supplying Power
and Connecting Up
Supplying Power
Your SU10 can run through an AC/DC adaptor or on batteries. If you connect up
both at the same time, the SU10 will run from the adaptor.
Using the adaptor
Please be sure to use a Yamaha PA-3B or PA-1B adaptor only. Use of a different
adaptor type may result in electric shock or device damage.
To connect
: First connect the DC end of the adaptor to the power connector on
the SU10, then plug the other end of the cable into an AC power socket.
When you have finished
using the SU10
: Switch off the power and then discon-
nect the plug from the wall socket.
Batteries
The SU10 accepts six 1.5V AA batteries (R6P or SUM-3). Yamaha recommends
the use of alkaline batteries.
Inserting Batteries
[1] Check that the POWER switch on the rear panel is OFF.
[2] Turn the unit upside down: you will see the battery cover on the lower right.
Press on the arrow with your thumb and slide in the indicated direction, then
lift off.
[3] Insert all six batteries. Refer to the diagram on the rear panel to make sure you
are inserting in the right direction.
[4] Replace the battery cover, making sure it snaps into place.

14
●
Supplying Power and Connecting Up
●
When to Replace Batteries
When batteries begin to go low, the SU10 disables EDIT, RECORD, and UTILITY
modes first. If you attempt to switch from PLAY mode into one of these other
modes at this time, the SU10 displays the Battry Low! message briefly and
remains in PLAY mode. If you are already working in EDIT, RECORD, or UTILITY
mode, the SU10 displays Battry Low!, then displays the Keep PwrOn mes-
sage while registering any new data, then changes to PLAY mode.
You can continue to use PLAY mode for some time after other modes are disabled.
Eventually the Battry Low! message will appear during normal playback. You
still have about five minutes of PLAY-mode operation left; the message will repeat
intermittently until batteries are exhausted. The message then changes to Battry
End!, and the SU10 shuts down until you replace the batteries or connect an AC
adapter.
• Do not reuse batteries that you have removed following a Battry Low! message.
• Do not switch off power or remove batteries while the Keep PwrOn message is on the screen.
Connecting Up the SU10
The following illustration shows how devices connect to the SU10. The drawings
on the next page show some typical MIDI configurations.
OUTPUT INPUT
LINE
OUT IN
MIDI
MIC INPUT
DC IN POWER
OFFON
Powered
speakers
CD/Cassette
Player
LINE IN
MIC IN DC IN
PA-3B
or
PA-1B
Adaptor
Microphone
Headphones
PHONES
LINE IN LINE IN
LINE OUT
YAM
AHA
SU10
LINE OUT

●
Supplying Power and Connecting Up
●
15
To control SU10 playback from an external keyboard:
Powered
speakers
LINE OUTMIDI INMIDI OUT
MIDI keyboard
(CBX-K1, etc.)
SU10
SAMPLING UNIT
To back up all SU10 data to an external data filer (bulk dump):
MIDI INMIDI OUT
SU10
MIDI Data Filer
(MDF2, etc.)
SAMPLING UNIT

16
●
Playback
●
6
Playback
This chapter takes you through the various sample and song play procedures, and
explains the use of the special “external” performance functions.
Note that replay of samples and songs is affected by each sample’s edit settings —
in particular, by the sounding mode and the loop settings. For information about
edit settings, refer to Chapter 8.
This chapter assumes that you have not made any changes to your SU10’s factory settings, and
that the demo samples and song are still in place. If you have made changes, playback operation
may be somewhat different than described.
You are advised to save the demo samples and song to an external disk by MIDI bulk dump
(see page 58), so that you can restore them in case of future need. If you have already deleted
the demos, however, then you will need to record some new samples so that you will have
something to play; refer to Chapter 7 for details.
Preparation
1. Connect an amplifier or powered speakers to the LINE OUT jack, or connect
headphones to the headphone jack. (See illustration, page 14.)
If you are going to try ribbon crossfade (page 25) or either of the realtime
features (pages 29 to 30), you will also need to supply a LINE IN or MIC
INPUT signal.
2. Switch on the power to the SU10, and to the speakers (if connected).
3. Make sure the SU10 is in PLAY mode.
For most of the procedures in this chapter you will want to be in PLAY mode. The top right of the
LCD always indicates the current mode: if at any time you notice that you have moved into a
different mode, you can return to PLAY mode by pressing [EXIT] one or more times.
4. Set the SU10’s VOLUME slider to about 1/4 maximum level. The slider sets
the signal level to the speakers or headphones.

●
Playback
●
17
5. Press [-1] or [+1] to set the digital volume to an appropriate value. This setting
determines the level at which the signal reproduces internally. You generally
want to set the level to just below the
clipping
level, as described in the box
below.
ABOUT CLIPPING
Setting the digital volume too high may cause clipping, resulting in distorted sound.
Clipping may also occur when you play many pads together, or when you change
filter values during FILTER or EXTERNAL FILTER playback. If you notice dis-
torted sound during playback, press [-1] to lower the digital volume. Note that reduc-
ing the level with the volume slider or on your external speakers will not eliminate
clipping.
Basic Sample Playback
Your SU10 stores up to 48 samples: four banks of 12 samples each. The following
procedure shows how to replay these samples.
1. Select the bank by pressing the [BANK] button.
Let’s begin with a pad from bank A. Under factory settings the SU10 starts up
in bank A, but try pressing [BANK] a few times anyway. Stop when you see an
A in the Bank Indicator area of the LCD.
Select bank A
BANK

18
●
Playback
●
2. Hold down [PAD 3] briefly to play sample A3, then release the button to stop
the sound. Try this several times. If necessary, adjust the volume using the
slider, the [-1] or [+1] button, or the volume controls on your external speakers
or amp.
▼ You will notice that the sample plays continuously while the button is held, then stops when the
button is released. This is because this sample’s sounding mode is set to “Note Driven” (ON
when pressed, OFF when released), and the loop mode is set to “Whole Loop.” See pages 41, 43.
3. Now tap [PAD 11] very briefly to start play of sample A11.
▼ Notice that playback does not stop when you release the pad, but continues to the end of the
sample. This is because the sample’s sounding mode is set to “Trigger.” (See page 44.)
4. Now try playing several samples at once.
▼ The number of samples that can be played together at one time is referred to as the polyphony.
The SU10 can play a maximum of four monaural samples at once, although the number drops if
you select HI sampling grade or use the scale, scratch, filter, or crossfade features. If you try
playing too many samples at once, certain samples drop out. For more information about po-
lyphony, see page 26 below.
Special Play Features I
Now let’s try some of the SU10’s special playback features.
HOLD
Use the HOLD feature when you want to force one or more samples to play as if
in “Toggle” sounding mode (see page 43). The held sample(s) will play through to
the end or, if looped, will play continuously.
The HOLD feature only operates on samples with sounding mode set to “Note Driven.”
1. To hear the effect most clearly, you should select a looping sample. Assuming
you have not yet changed the factory settings, you can try this with Pad A3. If
you are not now at BANK A, press [BANK] as necessary to get there.
2. Now press [PAD 3] to begin playback. With the pad still held down, press
[HOLD]. Then release both buttons. Sample A3 will continue to play in an
endless loop.
▼ Notice that an H appears at the lower left of the LCD to indicate that the sample is being held.

●
Playback
●
19
HOLD
SONG 1
1
3. Now try playing some other samples along with the held sample. You can play
from the same bank, or you can switch to some other bank.
▼ Remember that there is a limit to the number of samples you can play at one time. When you
attempt to play too many samples, the SU10 will always force off non-held samples before it
forces off held samples.
4. To shut off the held pad, press the pad again, or else press [HOLD] again.
REVERSE
Hold down [REV] and press a pad. The sample will play out backwards, producing
a sound similar to that of a cassette tape or vinyl disc playing in reverse.
SCALE
For this effect you first select a single sample for scale play. You can then play the
sample at any of 12 different pitches, with pitch increasing in semitone units as
you move from [PAD 1] to [PAD 12] (original pitch).
1. Press [SHIFT]+[SCALE]. The LCD then prompts you to select a pad, and the
EFCT indicator comes on.
SHIFT
SCALE
7

20
●
Playback
●
2. If necessary, press [BANK] to change the bank. Then press the pad correspond-
ing to the sample you want to play. A staircase-like icon appears in front of the
Vol indication at the lower left of the LCD.
▼ If you attempt to select an empty pad, the LCD returns a Pad Empty message; you can then
change the selection by pressing [BANK], a pad, or [-1] [+1].
3. Now try pressing the various pads. Each pad plays the same sample at a differ-
ent pitch: [PAD 12] plays the original pitch; [PAD 1] produces the lowest pitch.
4. To return to normal PLAY mode, press [EXIT].
• SCALE play is available only when the sampling grade is set to LONG or EXLG. If you try to
select this feature while the grade is HI or STD, the SU10 briefly displays the Change Grd!
message, then resumes normal PLAY mode. For information about sampling grades and how
to change them, see page 55.
• When using this feature, you can only produce sound from one pad at a time.
• Reverse playback is not possible during SCALE play. The [REV] button does not function. If
the selected sample has a reverse loop-mode setting, the setting automatically converts to its
forward-direction equivalent: Reverse Shot becomes One Shot, Reverse Loop becomes Whole
Loop. (For information about loop modes, see page 41.)
• MIDI Note Number assignments (see page 45) are ignored during SCALE play. For outgoing
MIDI Note-ON/Off messages, note numbers increase incrementally: [PAD 1] drives MIDI Note
C1, [PAD 2] drives MIDI Note C#1, and so on up the scale. Operation is slightly different for
incoming messages: [PAD 1] is driven by MIDI Note C of any octave, [PAD 2] by MIDI Note C#
of any octave, and so on.

●
Playback
●
21
Special Features II: Ribbon Controller
The SU10’s ribbon controller is probably its most distinctive feature. You can use
the ribbon to control pitch, filter, or crossfade during replay of samples and songs.
You can also use it to play a special “scratchpad” during sample play. Finally, you
use the ribbon as an effect controller for the SU10’s special “external” modes. (For
information about external modes, see pages 29 to 30.)
Pitch Play
1. Be sure that the SU10 is in PLAY mode.
2. Press [SHIFT]+[PITCH].
The LCD changes as shown to indicate that you have selected the pitch fea-
ture.
Current ribbon value
PITCH-play indicator
PITCH symbol
3. You can now change the pitch dynamically by touching or rubbing your fin-
ger over the ribbon: pitch decreases as you move to the left, and increases as
you move to the right. Try this now while playing some samples or a song.
Notice that the LCD displays the ribbon value in real time.
4. To return to normal PLAY mode, press [EXIT]. The pitch automatically returns
to its original value.
Ribbon operation changes the value of the Pitch parameter — a system-wide pitch offset
parameter that determines how much pitch varies from normal. You can access this setting di-
rectly from RECORDING or UTILITY mode; the allowable range is -20% to +10%. (See page
56.)

22
●
Playback
●
Filter Play
This feature applies a filter to samples and songs, with the ribbon providing dy-
namic control of the filter cutoff frequency. You select the filter type and reso-
nance directly from within the filter-play function: the SU10 will remember the
settings when you terminate filter play, then restore them when you return. The
selected settings apply to all samples and songs.
Selecting filter play
1. With the SU10 in PLAY mode, press [SHIFT]+[FILTER].
The LCD indicates the current filter type and resonance. The lower left of the
LCD shows a graphic image of the resulting filter effect.
Filter type Resonance
l: LPF f: Flat
b: BPF w: Weak
h: HPF s: Strong
Current ribbon value
Effect-play indicator
Filter type
"b" = Band-pass filter
Filter image
"Weak" resonance
2. You can now use the ribbon to control the filter. Try playing some samples or
songs and running your finger over the ribbon. Notice that the LCD displays
the ribbon value in real time.
The effect you get depends on the current filter settings. If you wish to change
the settings, proceed as described below.
3. To return to normal PLAY mode, press [EXIT].

●
Playback
●
23
Viewing/Changing the filter and resonance settings
1. Set the SU10 to filter-play operation as described above, then press
[SHIFT]+[EDIT]. The LCD indicates the currently selected filter type.
2. If you wish to change the filter type, press [-1] or [+1] as necessary. Available
types are LPF, BPF, and HPF. (See the FILTER SETTINGS box on the next page.)
3. If you wish to view or change the resonance setting, press [>] to move to the
resonance-select function. The LCD indicates the current resonance.
Press [-1] or [+1] to change the value as necessary. Available values are Flat,
Weak, and Strng (strong). (See FILTER SETTINGS box.)
4. Try playing some samples and working the ribbon to see how your new set-
tings sound. When you are satisfied with the settings, press [EXIT] once to
terminate filter setup and return to the regular filter-play level. Or else press
[EXIT] twice to return to normal PLAY mode.
• FILTER play is available only when the sampling grade is set to LONG or EXLG. If you try to
select this feature while the grade is HI or STD, the SU10 briefly displays the Change Grd!
message, then resumes normal PLAY mode. For information about sampling grades and how
to change them, see page 55.
• Changing the filter type or switching the resonance to “Strong” may sometimes cause output to
exceed the clipping level. If sound is distorted, press [-1] to reduce the volume.

24
●
Playback
●
FILTER SETTINGS
You can select from three filter types and three resonance values. The filter types are
LPF (low-pass filter), BPF (band-pass filter), and HPF (high-pass filter).
LPF: Removes frequencies above the cutoff value.
BPF: Removes frequencies outside the cutoff range.
HPF: Removes frequencies below the cutoff value.
The resonance setting determines the amount of emphasis applied in the area around
the cutoff frequency.
Flat: Almost no emphasis
Weak: Mild emphasis
Strong: Dramatic emphasis
The following drawings show how the resonance setting affects the frequency cut-
off characteristics of a low-pass filter.
Volume
FrequencyCutoff
flat weak strong
Volume
FrequencyCutoff
Volume
FrequencyCutoff
Scratchpad
You use this mode when you want to simulate the action of a DJ manually ma-
nipulating a turntable to produce a “scratch” effect. You begin by selecting the
source sample
that contains the sound section that you want to use for this effect.
The ribbon will then work as an independent pad; running your finger over it is
the same as pushing an analog disc back and forth on the turntable, with the
needle stationed over a selected section.
1. With the SU10 in PLAY mode, hold down [SCRATCH] and press the pad con-
taining the data section you want to use.
The LCD changes in three places to indicate that you have selected the scratch
effect.

●
Playback
●
25
Current ribbon value
SCRATCH indicator
SCRATCH symbol
2. Now try running your finger over the ribbon to scratch out the section.
The scratchpad does not operate on the entire source sample (unless it is very short), but only on
a small section, or “window.” You can adjust the position of the window by pressing buttons as
follows.
[SCRATCH]+[FWD]: Moves the window slightly toward the end of the sample.
[SCRATCH]+[BWD]: Moves the window slightly back toward the beginning of the sample.
[SCRATCH]+[TOP]: Moves the window to the top of the sample.
3. To return to normal play mode, press [EXIT].
Crossfade
This feature allows you to mix your sample and song output with a realtime acous-
tic signal received at the LINE INPUT or MIC INPUT jack. The SU10 outputs the
mixing result over LINE OUTPUT. Once you have selected crossfade play, you
can control the mix ratio dynamically by touching or rubbing the ribbon.
Please connect a playback device (such as a CD player) to the LINE INPUT jack,
or a microphone to the MIC INPUT jack, before trying this out. The MIC or LINE
indication on the third line of the LCD must match the input source you are using;
if necessary, refer to page 54 to 56 for instructions about how to change the set-
ting.
1. With the SU10 in PLAY mode, press [SHIFT]+[CROSSFADER].
The LCD changes as shown to indicate that you have selected crossfade play.
Current ribbon value
Effect-play indicator
CROSSFADE symbol

26
●
Playback
●
2. You can now change the mix dynamically by touching or rubbing your finger
over the ribbon. Try this now while playing back some samples or a song.
Notice that the LCD displays the ribbon value in real time.
3. To return to normal PLAY mode, press [EXIT].
The CROSSFADE feature is not available if the sampling grade is set to HI.
About Polyphony
The maximum number of monaural samples that a device can play at any one
time is referred to as its
polyphony
. During normal play at standard sampling
grade, the SU10 can play four monaural (or two stereo) samples at once. Po-
lyphony is lower, however, if you select HI sampling grade, or if you use the
scale, scratch, filter, or crossfade effect.
The following table shows the polyphonies for each combination of grade and
play type. A “-” entry denotes an impossible combination; if you attempt to set
such a combination, the LCD will return the Change Grd! message to indi-
cate that you should reduce the sampling grade.
Grade
PLAY
HI STD LONG EXLG
Normal 2 4 4 4
Scale - - 2* 2*
Filter - - 2 2
Crossfade - 2 4 4
Pitch - 2 4 4
Scratchpad - 2 2 2
* The SCALE function can play only one sample (stereo or monaural) at a time.
If you attempt to exceed the polyphony limit, the SU10 automatically forces
off a playing sample to accommodate your new pad input. Specifically, the
SU10 will switch off the oldest playing sample that is not in HOLD state; or, if
all samples are in HOLD, then the oldest of these.

●
Playback
●
27
Playing a Song
Your SU10 can memorize and replay up to four
songs
. Each song is an arbitrary
sample playback sequence that you have recorded into memory. The LCD always
indicates the number of the currently selected song.
When playing a song, you can choose to have the song play once only, or else
repeat indefinitely until stopped. You can start song playback from any position
within the song, interrupt the playback at any time, then resume from the interrupt
point or from any other point. During PLAY mode, the LCD always indicates the
current time position in the currently selected song.
The following procedure shows you how to use all of the song replay features. The
procedure assumes that you are using Demo Song 1. For information about how
to create songs, refer to Chapter 7, page 35. For general advice about song replay,
refer to “ABOUT SONG PLAY” on page 28.
1. Select the song.
Hold down [SHIFT] and press the appropriate song pad. In this case, please
select [SONG 1]. The selected song number appears on the display. (You can
omit this step if the song you want to play is already selected.)
2. Press [PLAY] to begin playback; or press [PLAY]+[HOLD] to begin REPEAT play-
back.
▼ In REPEAT playback, song play will continue to loop indefinitely until you press [STOP]. An
arrow indicator appears on the screen to indicate that REPEAT mode is selected.
▼ Notice that the meter keeps track of the song time. Time begins at 0 and advances in 1/10-second
increments as you move through the song.
SAMPLING UNIT
REC TOP BWD STOP PLAY FWD
Selected song
Song positioners
Press to stop song play.
Press to start song play.
min.
sec. 1/10-sec.
Current position
REPEAT indicator

28
●
Playback
●
3. Press [STOP] to interrupt the playback.
4. Press [PLAY] to resume playback from the point of interruption.
5. Press [STOP] to interrupt playback again.
6. Now try moving to different song locations. Press [FWD/>>] to move forward
through the song, [BWD/<<] to move back, or [TOP] to jump back to the top of
the song. (These operations are available only while song playback is stopped.)
The LCD meter always shows the current location in the song. You can begin
playing from any position by pressing [PLAY].
ABOUT SONG PLAY
Song playback operates exactly as if you were playing the pads at the console
in real time. The only exception is that song action is never transmitted over MIDI
OUT. In all other respects, playing a song is functionally equivalent to pressing and
releasing the corresponding pads.
• You are free to combine pad play with song play. But you should avoid pressing a
pad while the corresponding sample is being sounded from within a song, since
this will cause the song sample to shut off.
• Song playback is available with FILTER, CROSSFADE, and PITCH play. These
effects apply to song samples just as they do to pad-played samples.
• Avoid using [HOLD] while a song is sounding, as the HOLD action will apply to
the sounding samples. Since HOLD acts as a toggle switch, it may cause some
samples to stay on too long while shutting others off immediately.
• Stopping a song at midpoint switches off all currently playing song samples. If
you then restart from the same point, the interrupted samples do not resume. In
general, the sound at any given timepoint within the song (as indicated by the
time meter) may vary according to where you started the replay.
• The SU10’s polyphony determines the maximum number of sounds that can play
out at once. Playing a song with FILTER or SCRATCH, or at HI sampling grade,
may cause some of its sounds to drop out. Combining pad and song action may
also cause sounds to drop out.
• If you edit or delete any of the samples used by the song, the song’s sound changes
accordingly.

●
Playback
●
29
External Performance Modes
The external performance modes are an added feature that allow you to apply a
dynamic filter or a DJ-like scratch effect to a realtime signal as it feeds through the
SU10. Please keep in mind that these modes are not sampling modes, and have
nothing to do with samples and songs as described above.
Before trying the following procedures, connect a CD player or other playback
device to the LINE IN jack. Or if you like, you can use these effects with micro-
phone input instead. The MIC or LINE indication on the third line of the LCD
must match the source you want to use; refer to page 56.
External Scratch
Under this mode, you use the ribbon to apply a scratch to a segment of feed-
through audio signal. The effect is that of a DJ who suddenly puts a finger onto a
playing disc and begins moving it back and forth.
While the ribbon is untouched, the SU10 feeds the incoming audio signal through
without change, while at the same time holding the most recent portion of the
signal in an internal scratch buffer. When you touch the ribbon, the SU10 switches
off the feed-through; you can then move your finger across the ribbon to produce
scratch play of the buffered data. When you release the ribbon, realtime feed-
through resumes.
Procedure
1. Press [SHIFT]+[EXTERNAL SCRATCH] to enter the mode. The LCD changes as
shown below to indicate that you are in external scratch mode.
External-mode indicator
SCRATCH indicator
SCRATCH symbol
2. Feed a sound signal through the SU10. Use the [+1] or [-1] button to adjust the
volume as necessary; the LCD indicates the current volume.
3. Now try alternately scratching and then releasing the ribbon. Listen to the
type of effect you get. Notice also that the LCD’s RIBBON indicator displays
the ribbon value in real time.
4. To quit the mode, press [EXIT].

30
●
Playback
●
External Filter
This mode applies filtering to realtime input as it feeds through the SU10. You use
pads 1 to 4 to select or change the filter type, and pads 7 to 9 to select or change
the resonance. You use the ribbon to dynamically change the filter cutoff fre-
quency.
Procedure
1. Press [SHIFT]+[EXTERNAL FILTER]. The screen displays four special indicators:
external-mode indicator, filter-type indicator, resonance indicator, and graphic
image of the current filter effect.
Current ribbon valueEffect-play indicator
Filter image
"Weak" resonance
External-mode indicator
2. Press the pads corresponding to the filter and resonance you want to use. The
LCD indicators change to reflect the new selections. (For information about
filter types and resonance, see FILTER SETTINGS box on page 24.)
Filter Type Resonance
[PAD 1]: LPF l [PAD 7]: Flat f
[PAD 2]: BPF b [PAD 8]: Weak w
[PAD 3]: HPF h [PAD 9]: Strong s
[PAD 4]: Bypass *
3. Now feed some sound through the SU10 and listen to the filter effect. Poke
your finger at various points on the ribbon, then run your finger up and back:
the cutoff point will change with each touch. Try this with different filter types
and resonance settings. You will see that you can get some very interesting
sounds. You can use the [+1] or [–1] button to adjust the volume.
▼ Notice that the LCD’s RIBBON indicator displays the current ribbon value in real time.
4. To quit the mode, press [EXIT].

●
Recording Samples, and Creating Songs
●
31
7
Recording Samples,
and Creating Songs
This chapter explains how to record samples and how to create songs.
(Explanation of song creation begins on page 35.)
Sample Recording Overview
To record a sample, you must (1) connect up the input source, (2) enter REC mode
and select the destination pad, (3) set the recording parameters, (4) start the re-
cording, and (5) stop the recording. Each of these steps will be described in turn.
Connecting the Input Source
Connect a line input to the LINE IN jack, or a microphone to the MIC INPUT.
Entering REC Mode and Selecting
the Pad
1. Check that the SU10 is in PLAY mode, then press [REC] to enter RECORDING
mode. The LCD displays the REC indicator and prompts you to select the pad
to be recorded. The LCD’s meter area indicates the available recording time.
Remaining recording time
▼ Available recording time depends on (a) the amount of memory already used by other pads, and
(b) the current settings for the Grade, Pitch, and Format recording parameters.
▼ Once you have entered RECORDING mode, you can return to PLAY mode at any time by
pressing [EXIT].

32
●
Recording Samples, and Creating Songs
●
2. To select, press [BANK] to choose the desired bank, then press the appropriate
pad or press [+1] or [–1] as necessary. When you are sure that you have selected
the correct pad, press [ENTER]. The LCD displays the Gain parameter setting.
The GAIN indication on the third line of the LCD indicates the input level.
▼ If the bank you have selected is locked, the LCD displays the Locked Bank! message, then
automatically returns you to PLAY mode. (For instructions about how to unlock a bank, see page
64.)
▼ If the bank is unlocked but the pad is already occupied by an existing sample, the LCD will ask
whether you want to delete (overwrite) it: press [ENTER] to delete, or [EXIT] to return to PLAY
mode. If you delete the sample, the available recording time will increase accordingly.
Setting the Recording Parameters
The LCD now displays the Gain setting, the first of seven recording parameters.
Set each parameter to the appropriate value before beginning to record. To move
from one parameter to another, press [>] or [<]. To change the setting of a param-
eter, press [–1] or [+1]. The following diagram illustrates the structure. The RECORD-
ING PARAMETERS box describes each of the parameters in detail.
Gain [<][>] Grade [<][>] Pitch [<][>] Format [<][>] Input
[<][>] RecTrg [<][>] Defalt
You can also set these parameters (with the exception of the Gain parameter) from the UTIL-
ITY mode’s Recording Setup utility (see page 55). You will generally want to use UTILITY
mode when you need to set these parameters for purposes other than recording. For example, the
Grade setting also affects the playback pitch and polyphony, while the Input parameter
selects the input source used during CROSSFADE, EXTERNAL FILTER, and EXTERNAL
SCRATCH play.

●
Recording Samples, and Creating Songs
●
33
RECORDING PARAMETERS
Gain: Sets the gain applied to the input signal. Press [–1] or [+1] to adjust the
gain setting while inputting a signal similar to the signal you plan to
record. (You may first need to change the setting of the Input param-
eter to match your input source; see explanation below.) You can set the
gain to any value between 1 to 16; in general, you want to set the gain as
high as you can without causing clipping. If the setting is too high, a
∗
mark appears to the right of Gain. If you see this mark, reduce the set-
ting.
Gain is too high!
Grade: Selects the sampling grade at which the sample is recorded. You have
four choices: High, Standard, Long, and Extra Long (Hi, Std, Long,
Exlg). The tradeoff is between quality and recordable length: “High”
gives the best quality but is very memory-intensive and limits the avail-
able recording time. “Extra Long” provides much longer recording time
at a significant cost in quality.
• A sample recorded at a given sampling grade will change its pitch if played
at a different grade. You may therefore find it best to record all related samples
at the same grade.
• Playback at “High” grade reduces the available polyphony. If you plan to
play your recorded sample in combination with other samples, you may
want to avoid the “High” setting.
• Total maximum recording time (for all 48 samples) at High grade is limited
to approximately 19 seconds. A sampling grade of High combined with a
pitch setting of +10% will provide a true sampling rate of 44.1kHz — the
same as used on a conventional CD recording.

34
●
Recording Samples, and Creating Songs
●
Pitch: You can use this setting to add an offset to the system’s pitch; the avail-
able range is -20% to 10%, settable in 1% increments. The setting ap-
plies to all samples and songs, and controls the pitch during both record-
ing and playback. The adjustment is exactly analogous to applying a slight
change to the rotation speed of an analog tape recorder; the pitch change
applies both to tracks being recorded and to tracks being played back.
• In general, you will want to leave this setting at 0% for recording purposes.
But note that increasing the pitch value will improve the actual sampling
grade, while decreasing the value will provide slightly longer recording time.
• You can also use the pitch setting to match the length of the sample you are
about to record to the length of another phrase that has already been re-
corded. Recording the two samples at different pitches may make it pos-
sible for them to have equal replay lengths (tempos).
Format: Selects whether to record in stereo or mono (St or Mono). If you select
mono, the SU10 records the left input only. Note that a stereo sample
counts as two sounds in the polyphony calculation: you can never
play more than two stereo samples at once.
Input: Selects whether the SU10 takes its input from the LINE IN jack or the
MIC INPUT jack (Line or Mic). You cannot use both inputs together;
you must set this value to match the input you wish to use. The third line
of the LCD always indicates the currently selected source.
RecTrg: Selects the trigger that starts the actual recording. You can select one of
eight triggers.
Mnual: Manual trigger; recording will begin when you press [PLAY].
1,...,7: The SU10 will enter standby when you press [PLAY], then be-
gin recording when the input level reaches the trigger level.
Value “1” selects the lowest trigger level (hair trigger); value
“8” selects the highest level.
Defalt: Selects the default loop mode — the loop mode initially used for playing
back the recorded sample. This setting is not binding, since you can change
the value at any time by editing the sample. For information about loop
modes, see page 41.

●
Recording Samples, and Creating Songs
●
35
Starting/Stopping the Recording
To start recording, press [PLAY]. If the recording trigger (RecTrg) is set to “manual,”
the SU10 starts recording immediately; otherwise it displays the Waiting mes-
sage and waits for the input level to reach the trigger level. During recording, the
LCD displays the word Recording, and the meter decrements to indicate the
remaining recordable time. You can end recording at any time manually, or else
continue to record until you run out of memory.
To end recording manually
: Press [STOP]. The SU10 displays the Finished mes-
sage, then returns to PLAY mode.
If memory runs out
: The SU10 stops the recording, briefly displays the
Memory Full! message, then returns to PLAY mode.
Do not switch off the power while the Finished! or Memory Full! message is on the LCD
as this may in some cases cause destruction of all internal data.
Creating Songs
To record a song, you (1) enter RECORDING mode and select the destination
song, (2) press [PLAY] to begin the recording, (3) press the pad sequence you want
to record as a song, (4) press [STOP] to end the recording. The procedure is de-
scribed below. For hints about song creation, refer to the “Creating Effective Songs”
on page 37.
• The SU10 has 4000 words (8KB) of dedicated song memory, sufficient for about 1000 pad and
button on/off events. The LCD indicates the amount of remaining memory as recording pro-
ceeds.
• The song recording function recognizes both pad action and MIDI IN action. It is possible to
record from MIDI input in place of (or in addition to) local pad play.
• You cannot record to a locked song. For information about song locks, see page 64.

36
●
Recording Samples, and Creating Songs
●
Procedure
1. Check that the SU10 is in PLAY mode, then press [REC] to enter RECORDING
mode. The LCD appears as follows.
2. Hold down [SHIFT] and press the pad corresponding to the song you want to
record ([SONG 1] to [SONG 4]). The LCD will then ask for confirmation, and the
meter will indicate the remaining free song memory.
▼ If you wish to change to a different song, hold [SHIFT] and press the appropriate pad. If you wish
to cancel and return to PLAY mode, press [EXIT].
3. When you are ready to confirm, press [ENTER]. If the song you have selected is
recordable, the LCD displays the Press Play message.
▼ If the song you have selected is locked, the LCD displays the “Locked Song!” message, then
automatically returns you to PLAY mode. (For instructions about how to unlock the song, see
page 64.)
▼ If the song is unlocked but already contains a recorded sequence, the LCD will first ask whether
you want to delete (overwrite) it. If you wish to proceed, press [ENTER] and continue to the next
step. If you wish to cancel, press [EXIT] to return to the screen shown at Step 1 above.
4. Press [PLAY] to begin recording. But note that the SU10 will not start actual
recording until the moment you press a pad to begin the sequence.
5. Play the pad sequence you want to record.
▼ The song will record all BANK and PAD action, as well as HOLD and REVERSE action. Rib-
bon operation is not recorded.The LCD meter keeps track of remaining song memory.
▼ You can abort the recording and return to PLAY mode at any time by pressing [EXIT]. If you do
so, the previously existing song (if any) will “undelete” itself and be recovered.
6. To end the recording and return to PLAY mode, press [STOP].
▼ If you run out of song memory, the SU10 ends the recording automatically, displays the Memory
Full! message for about one second, then returns you to PLAY mode.

●
Recording Samples, and Creating Songs
●
37
Creating Effective Songs
Planning ahead will help you create more effective songs and avoid unanticipated
problems. Note the following general precautions.
■ Do not include samples that you intend to edit or delete later. The sound of the
song will change if you edit or delete any of the samples that it uses.
■ If you plan to accompany the song with normal pad play or MIDI-controlled pad
play:
• Remember that polyphony is limited. Don’t overload the song with simulta-
neous sounds. Consider leaving some unrecorded spaces to allow for free pad
play.
• Your song should not use pads that you intend to play yourself, since a conflict
will occur if you and the song try to control the same pad at the same time. A
good strategy is to record the song from one bank, then play along from an-
other bank. Or record using pads 1 to 6, and play along using pads 7 to 12.
■ If you plan to use SCRATCH or FILTER with your song:
• Remember that polyphony is significantly reduced during SCRATCH and FIL-
TER play (see page 26). A song that sounds fine during normal play may lose
important sounds when used with these features. Design your song for the
available polyphony: no more than two monaural or one stereo sample playing
at any given time.
■ If you plan to begin play at positions other than top-of-song:
• Do not include samples whose Sounding Mode is set to “Toggle” (see page 43),
since the pad trigger action changes according to the current replay state. If you
start a song from mid-position, you may find that sample replay begins where
you expected it to end, or ends where you wanted it to begin.
For additional information, refer to the ABOUT SONG PLAY box, page 28.

38
●
Editing
●
8
Editing
Introduction
This SU10 offers you a variety of ways to edit your samples to control the way they
play back. For example, you can choose:
• Which portion of the sample plays out
• The direction of play (forward or reverse)
• Whether the sample loops or plays one time only
• Whether playback continues when you release the pad
You edit a sample by entering EDIT mode, selecting the sample, then making the
desired changes at one or more of the various edit functions. It is possible to play
a sample during editing so that you can hear the effect of your changes. You are
also free to switch editing to a different sample without leaving EDIT mode.
A listing of the edit functions appears below. The first eight functions set parameter
values; the remaining five functions execute an operation. Keep in mind that the
parameter-setting functions and the COPY and MOVE operations
do not affect
the
sound-data content of the sample in any way, so that you can try out various
changes without fear of destroying your recorded phrase. The SPLIT, COMPACT
and DELETE operations, however, will alter or delete the recorded wave and should
therefore be handled with special care.
Editing Functions
(1)
Set the loop mode.
(2)
Set the sounding mode.
(3)
Set the volume.
(4)
Set the alternate group.
(5)
Set the MIDI note number.
(6)
Set the start point.
(7)
Set the loop point.
[Only if loop mode = PLoop]
(8)
Set the end point.
(9)
Copy sample to another pad.
(10)
Move sample to a different pad.
(11)
Split one sample into two.
(12)
Compact (trim) the sample.
(13)
Delete the sample.
Change wave content; not
reversible

●
Editing
●
39
Basic Procedure
1. Starting from PLAY mode, press [SHIFT]+[EDIT]. The LCD returns the message
Which pad?
▼ Once you have entered EDIT mode, you can return to PLAY mode at any time by pressing [EXIT]
once or (in some cases) twice.
2. Select the sample you want to edit. Press [BANK] to select the bank, then press
the pad corresponding to the sample.
The LCD displays the Edit xx? message (where xx identifies the selected
pad). If you like, you can change the selection by pressing [BANK], a different
pad, or [+1], [–1]. When you are satisfied with your selection, press [ENTER].
▼ If you press an empty pad, the LCD displays the Pad Empty message and waits for a different
selection.
▼ If you select a pad that is in a locked bank, the LCD briefly displays the Locked Bank!
message.
3. Move to the appropriate edit function.
The SU10 begins from the first edit parameter — the loop-mode setting. If
loop mode is currently set to “One-Shot,” for example, the LCD will look
something like this.
Edit mode
If you are satisfied with the current setting, you can proceed to the next edit
function by pressing [>]. In general, you can move from function to function
by pressing [>] or [<]. The sequence is as follows:

40
●
Editing
●
LOOP MODE [<][>] SOUNDING MODE [<][>] PAD VOLUME [<][>]
ALTERNATE GROUP [<][>] MIDI NOTE NUMBER [<][>] START POINT [<][>]
LOOP POINT* [<][>] END POINT [<][>] COPY [<][>] MOVE [<][>] SPLIT [<][>]
COMPACT [<][>] DELETE
* Loop Point setting appears only if LOOP MODE = PLoop.
As a shortcut, you can press any of the following buttons to jump directly to
the corresponding function.
[TOP] → START POINT setting
[BWD] → LOOP POINT setting (Available only if loop mode is set to
Partial Loop.)
[FWD] → END POINT setting
4. Change the value, or execute the operation.
To change a value
You can always change a value by pressing or holding [+1] or [–1]. For some
parameters you can also use the ribbon to change the value: you may find it
useful to select an approximate value with the ribbon, then adjust with [+1] or
[–1]. The MIDI Note Number parameter can be set via MIDI input. For more
information, refer to the individual parameter explanations below.
To execute an edit operation
COPY, MOVE, SPLIT: Select the destination by pressing [BANK], the appropri-
ate pad, or [–1], [+1] as necessary. Then press [ENTER] to execute.
COMPACT, DELETE: Check the pad selection, then press [ENTER]. Then press
[ENTER] once again to confirm, or [EXIT] to cancel.
5. Repeat steps 3 and 4 as necessary to edit the selected sample.
6. If you wish to edit a different sample, press [BANK] and/or the appropriate pad.
This will return you to Step 2 above.
7. When you have finished editing, press [EXIT] to return to PLAY mode.
▼ During editing, you can hear the current editing result by pressing the pad of the sample you are
working on. But you must be careful to press the correct pad. If you press a different pad, the
SU10 stops editing of the current sample and offers to switch to your new selection. Note that
the LCD does not indicate the sample that is currently being edited; you must remember
this yourself.
▼ If you switch from one sample to another during editing, the SU10 begins editing of the new
sample starting from the last selected edit function. This feature is convenient when you need to
change the same parameter on two or more samples: change the value on the first sample, then
press the pad for the next sample, then change the value again, and so on.

●
Editing
●
41
Edit Parameters and Operations
LOOP MODE [LpMode]
Purpose: Sets the playback direction and loop method.
Values: OShot, WLoop, Ploop, RShot, RLoop
To set: Press [+1], [–1]
Explanation
• OShot (One Shot)
The sample plays once through, from Start Point to End Point, then stops.
Actual wave start
Actual wave end
Start point
End point
• WLoop (Whole Loop)
Play begins from the Start Point, advances to the End Point, then jumps back
to the Start Point and repeats in a continuous loop.
Actual wave start
Actual wave end
Start point
End point

42
●
Editing
●
• PLoop (Partial Loop)
The sample plays one through from Start Point to End Point, then jumps back
to the Loop Point. The section from the Loop Point to the End Point then plays
out repeatedly.
Actual wave start
Actual wave end
Start point
End point
Loop point
Note that it is possible to set the Loop Point to an earlier position than the Start
Point.
Actual wave start
Actual wave end
Start point
End point
Loop point
• RShot (Reverse Shot)
The sample plays backwards once through, from End Point to Start Point.
• RLoop (Reverse Loop)
The sample plays backwards in a loop. Play starts from the End Point, moves
to the Start Point, then jumps back to the End Point and repeats.

●
Editing
●
43
Please note the following important points.
• The Loop Mode setting determines how playback proceeds while the sample
is ON, but the Sounding Mode setting determines the sample’s ON/OFF ac-
tion. If Sounding Mode is set to “Trigger,” the sample will not loop.
• The Start Point, Loop Point, and End Point can all be changed by editing, as
described below. The loop length must be at least 128; the SU10 will not
permit you to set loops shorter than this.
• If you use the [REV] effect on a sample that is set to a reverse loop mode, the
sample will play out in its original (forward) direction.
SOUNDING MODE [SdMode]
Purpose: Sets the pad’s ON/OFF action.
Values: Note, Toggl, Trggr
To set: Press [–1], [+1]
Explanation
• Note (Note-driven)
The sample plays only while the pad is held down. Play stops as soon as you
release the pad, unless you extend the play by pressing [HOLD].
Pad Press Pad Release
• Toggl (Toggle)
Play starts when you press the pad the first time. The sample then plays through
once (if One Shot or Reverse Shot) or else loops endlessly. To switch off the
playing sample, you must press the pad once again. Notice that under this
mode the release of the pad has no effect.
Pad Press Pad PressPad Release

44
●
Editing
●
• Trggr (Trigger-driven)
Pressing the pad (or sending a MIDI Note On) causes the sample to play once
through, from Start Point to End Point. The sample does not loop. (But if Loop
Mode is set to RLoop or RShot the sample will play in reverse.) Pressing the
pad again (or sending another MIDI Note On) while play is in progress causes
playback to start over.
Pad Press Pad Release
PAD VOLUME [PadVol]
Purpose: Sets the sample’s relative volume.
Values: 0,...,127
To set: Touch the ribbon; press or hold [–1] or [+1].
Explanation
Use this setting to adjust the sample volume relative to that of other samples. If
you find that the sample A3 is too loud when played together with sample A4, for
example, you can adjust by lowering the volume for A3 and/or increasing the
volume for A4.
If you play the sample while changing the value, you will be able to hear the level
going up or down.
ALTERNATE GROUP [AltGrp]
Purpose: Selects the sample’s alternate group.
Values: Off, 1, 2, 3
To set: Press [–1], [+1].
Explanation
You use this feature to identify samples that you do not want to have sounded
together. All samples in the same group become mutually exclusive; playing a
sample from a given group automatically forces off any other sample from that
same group. You can set each sample into any of three groups (1, 2, or 3), or you
can set the value to Off (no group).

●
Editing
●
45
This feature is useful for
• Preventing simultaneous play of clashing sounds.
• Reducing risk of accidental sound dropouts caused by too many samples play-
ing at once.
• Operational efficiency: You can use a single pad to simultaneously stop play
of one sample and start play of another. This operation would otherwise re-
quire two (carefully timed) button presses.
MIDI NOTE NUMBER [Note#]
Purpose: Selects the pad’s MIDI Note Number.
Values: Off; C-2,...,G8
To set: Press/hold [–1] or [+1], or input MIDI NOTE ON message.
Explanation
This function selects the MIDI Note Number assigned to the pad. You can drive
the pad’s play by inputting MIDI messages carrying the selected note number; or
you can use the pad to drive the corresponding note of an external MIDI device.
You can set the value in either of two ways:
• By pressing [+1] or [–1]
• By inputting a MIDI NOTE ON message from an external MIDI device. (The
setting will automatically change to match the message’s note number.)
Under default conditions, note numbers are assigned sequentially starting from
pad A1 (note “C1”) and ending with pad D12 (note “B4”).
▼ If you select a note number that is already in use on another pad, the setting on the other pad
automatically switches to Off.
▼ The assignments made here are not effective during SCALE play. For information about how
note numbers are handled during SCALE play, see page 20.
▼ The SU10 recognizes velocity values in MIDI Note-On messages, and varies the replay level
accordingly.
▼ It is possible to have a MIDI Note On message drive a sample in reverse. To use this feature, you
must first set the SU10’s “program” to 2 (by sending a MIDI Program Change message carrying
program number 01h). Once you have done this, any Note-On message with a velocity of 110 or
above will drive the corresponding sample in reverse — the same action you can get locally by
holding [REV] while pressing the pad.

46
●
Editing
●
START POINT [StPnt]
Purpose: Sets the playback start point.
Values: 0,...,(127 less than endpoint)
To set: Touch the ribbon; or press or hold [–1], [+1].
Explanation
This function sets the sample’s start point. The selected point determines where
sample replay starts (for forward-direction play) or ends (for reverse-direction play).
A setting of 0 corresponds to the wave start point.
Note that you can change this value by touching the ribbon. (The leftmost point of
the ribbon corresponds to a setting of 0.) You may find it convenient to touch the
ribbon to get an approximate value, then press [+1] or [–1] for fine tuning.
If loop mode is set to Whole Loop or Reverse Loop, you can hear how the loop
sound alters as the value changes. Simply hold down the pad while changing the
value; the sample will continue to loop as the Start Point changes.
Also if loop mode is Whole Loop or Reverse Loop, the SU10 will display the
TEMPO indicator and current tempo at the bottom right of the LCD. The tempo
value will change as you adjust the START point. Refer to the “About TEMPO” box
for information.
About TEMPO
When you edit the start point or end point of a loop, the lower right of the LCD
displays the word TEMPO, and the meter area indicates a tempo value. The value is
an estimation of the tempo of the looping segment (in beats per minute), and can be
used as a reference for matching the timing of loops on different samples. The value
always falls between 80.00 and 159.99; the calculation is based on the assumption
that the loop segment consists of a regular number of “beats” (1, 2, 4, 8, 16, or so
on).
Note that the value applies to the looped part only. For a “Whole Loop” or “Reverse
Loop” sample, this is the area between the Start Point and the Loop End point. For
a “Partial Loop” sample, however, this is the area between the Loop Point and the
End Point.
In most cases the tempo is shown to the nearest hundredth of a beat, with an under-
score for the decimal: 124_34, for example, means “124.34 beats per minute.” For
reverse loops and very long forward loops, the calculation is shown to the nearest
full beat only: 124_—. No tempo is displayed for loops that are shorter than 0.375
second.
Because tempo calculation is based on the loop’s time length, the result varies ac-
cording to the current Grade and Pitch settings.

●
Editing
●
47
LOOP POINT [LpPnt]
(Appears only if Loop Mode=PLoop)
Purpose: Sets the start point of the loop segment.
Values: 0,...,(127 less than endpoint)
To set: Touch the ribbon; or press or hold [–1], [+1].
Explanation
This parameter, which appears only if the sample’s loop mode is set to “Partial
Loop,” sets the start point for the loop segment. Recall that under Partial Loop
mode, the sample plays one time from Start Point to End Point, then plays subse-
quent iterations from Loop Point to End Point.
You can change this value by touching the ribbon. You may find it convenient to
touch the ribbon to get an approximate value, then press [+1] or [–1] for fine tuning.
You can hear how the loop sound alters as you change the value. Simply hold
down the pad while changing the value; the sample will continue to loop as the
value changes.
During editing, the SU10 displays the TEMPO indicator and current tempo at the
bottom right of the LCD. The tempo value will change as you adjust the setting.
Refer to the “About TEMPO” box on page 46 for details.
END POINT [EdPnt]
Purpose: Sets the playback end point.
Values: Start/loop point + 127,....,wave end
To set: Touch the ribbon; or press or hold [–1], [+1].
Explanation
This function sets the sample’s end point. The selected point determines where
sample replay ends (for forward-direction play) or starts (for reverse-direction play).
The maximum value is equal to the wave end point; the minimum value is 127
greater than the Start Point or Loop Point (whichever is greater).
Note that you can change this value by touching the ribbon. (The rightmost point
of the ribbon corresponds to the end location of the recorded wave.) You may find
it convenient to touch the ribbon to get an approximate value, then press [+1] or
[–1] for fine tuning.
If loop mode is set to Whole Loop, Partial Loop, or Reverse Loop, you can hear
how the loop sound alters as the value changes. Simply hold down the pad while
changing the value.

48
●
Editing
●
Also if loop mode is Whole Loop, Partial Loop, or Reverse Loop, the SU10 will
display the TEMPO indicator and current tempo at the bottom right of the LCD.
The tempo value will change as you adjust the setting. Refer to the “About TEMPO”
box on page 46 for details.
COPY [CopyTo ?]
Purpose
Use this function to copy the content of one pad into another. The destination pad
must be empty, and there must be enough free memory to accommodate the copy.
Following the copy, the source and destination pads will hold identical wave con-
tent and parameter settings, except that the MIDI Note Number for the destination
pad will remain unchanged.
Pad
Copy
Execute
Source
Sample
Pad
Destination
Pad
Sample
Pad
Sample
Procedure
1. When you enter this function, the LCD displays a message such as the follow-
ing:
CopyTo
x x
?
Change the destination selection as necessary. To change the bank, press [BANK].
To change to a different sample in the same bank, press the corresponding
pad, or else press [+1] or [–1].
▼ If you do not wish to execute the copy, press [>] or [<] to change to a different edit function, or
else press [EXIT] to return to PLAY mode.
2. Press [ENTER]. The LCD displays a confirmation prompt.
Cpy
x x
→
y y?

●
Editing
●
49
3. Press [ENTER] to execute the copy. If the copy is allowed, the SU10 begins
execution and displays the Keep PwrOn message.
Do not switch off power while this message is on the screen.
▼ If your destination pad is in a locked bank, the LCD briefly displays the Locked Bank!
message, then waits for you to select another destination.
▼ If the destination pad is already occupied, the LCD briefly displays the Cannot Copy! mes-
sage, then waits for another selection.
4. When execution is completed, the LCD briefly displays the Complete mes-
sage, then asks whether to begin editing of the destination pad. You can now
(
a
) press [ENTER] to start editing of the destination pad; (
b
) select a different pad
for editing; or (
c
) press [EXIT] to return to PLAY mode.
MOVE [MoveTo ?]
Purpose
Use this function to move a sample (wave content and all parameter settings other
than MIDI Note Number) from one pad to another. The destination pad must be
empty. Following the operation, the source pad will be empty, and the destination
pad will hold the sample.
Pad
Move
Execute
Source
Sample
Pad
Sample
Pad
Destination
Pad
Procedure
1. When you enter this function, the LCD displays a message such as the follow-
ing:
MoveTo
x x
?
Change the destination selection as necessary. To change the bank, press [BANK].
To change to a different sample in the same bank, press the corresponding
pad, or else press [+1] or [–1].

50
●
Editing
●
▼ If you do not wish to execute the move, press [>] or [<] to change to a different edit function, or
else press [EXIT] to return to PLAY mode.
2. Press [ENTER]. The LCD displays a confirmation Prompt.
Mov
x x
→
y y
?
3. Press [ENTER] to execute the move. If the move is possible, the SU10 begins
execution and displays the Keep PwrOn message.
Do not switch off power while this message is on the screen.
▼ If your destination pad is in a locked bank, the LCD briefly displays the Locked Bank!
message, then waits for you to select another destination.
▼ If the destination pad is already occupied, the LCD briefly displays the Cannot Move! mes-
sage, then waits for another selection.
4. When execution is completed, the LCD displays the Complete message,
then asks whether to begin editing of the destination pad. You can now (
a
)
press [ENTER] to start editing of the destination pad; (
b
) select a different pad
for editing; or (
c
) press [EXIT] to return to PLAY mode.
SPLIT [SpltTo ?]
Purpose
You use this function to split the sample you are editing into two parts. The split is
executed at the sample’s End Point. The initial portion of the wave content (from
wave start to End Point) remains in the original pad, while the final area (from End
Point to wave end) moves into the destination pad. This function is useful for
dividing up a long pad, or for breaking a pad into two or more pieces so that you
can play the pieces together.
Pad
StPnt StPntEdPnt
Execute
Original
Sample
Pad
EdPnt
Sample
Pad
Sample
Pad
Destination

●
Editing
●
51
You cannot execute a split unless the following two conditions hold:
1. The destination pad is empty.
2. The End Point value of the source pad is at least 128 units less than its maximum possible
value.
Procedure
1. When you enter this function, the LCD displays a message such as the follow-
ing:
SpltTo
x x
?
Change the destination selection as necessary. To change the bank, press [BANK].
To change to a different sample in the same bank, press the corresponding
pad, or else press [+1] or [–1].
▼ If you do not wish to execute the split, press [>] or [<] to change to a different edit function, or
else press [EXIT] to return to PLAY mode.
2. Press [ENTER]. The LCD displays a confirmation prompt.
Spl
x x
→
y y
?
3. Press [ENTER] to execute. If splitting is possible, the SU10 begins execution
and displays the Keep PwrOn message.
Do not switch off power while this message is on the screen.
▼ If your destination pad is in a locked bank, the LCD briefly displays the Locked Bank!
message, then waits for another destination selection.
▼ If the destination pad is already occupied, or if the pad’s End Point is within 128 units of the
wave end, the LCD will return the Cannot Splt message and prompt you for another pad
selection. If the problem is with the End Point setting, you will not be able to execute the
split no matter which pad you choose; you must press [<] or [>] to change the edit function, or
else press [EXIT] to return to PLAY mode.
4. Once the split is executed, the LCD asks whether to begin editing of the des-
tination pad. You can (
a
) press [ENTER] to start editing of the destination pad;
(
b
) select a different sample for editing; or (
c
) press [EXIT] to return to PLAY
mode.

52
●
Editing
●
COMPACT [Compct ?]
Purpose
To
compact
a sample means to remove all of its leading and trailing waveform
data — that is, all waveform data existing ahead of the Start Point or Loop Point
(whichever is first), as well as all data existing after the End Point. By clearing this
extraneous data, you free some memory for additional recording. This operation
does not affect the sample’s current sound, since leading and trailing data are not
reproduced during playback. But once you have deleted this data, it is lost for-
ever, and cannot be restored by editing.
Pad
StPnt EdPnt
Sample
Execute
Pad
StPnt EdPnt
Sample
Procedure
1. The LCD displays the following message, where
xx
identifies the currently
selected pad.
Compct
x x
?
You are free to change the selection. To change the bank, press [BANK]. To
change to a different sample within the same bank, press the corresponding
pad, or [+1] or [–1].
▼ If you do not wish to compact, press [>] or [<] to change to a different edit function, or else press
[EXIT] to return to PLAY mode.
2. Press [ENTER] to execute. The LCD displays a confirmation query.
Cpt
xx
Sure?
3. To execute, press [ENTER] again.
▼ If you do not want to execute, press [EXIT] instead. The SU10 returns to Step 1 above.
4. The SU10 begins execution and displays the Keep PwrOn message. Do not
switch off power while this message is on the screen. When execution is
completed, the LCD briefly displays the Complete message, then returns to
the same prompt display shown in Step 1 above.
5. To select another pad for compacting, repeat from Step 1 above. To return to
PLAY mode, press [EXIT].

●
Editing
●
53
▼ You may notice that the Start Point (or Loop Point) value may not return to exactly 0 following
compacting, but may be as high as 1 (for a stereo sample) or 3 (for a monaural sample). In the
same way, the End Point may be 1 to 3 units ahead of the actual wave end. This is because the
SU10 can only delete data in 2-unit (if stereo) or 4-unit (if monaural) segments.
DELETE [Delete ?]
Purpose
This procedure deletes the entire sample from memory. Recordable memory space
increases, and the emptied pad becomes free to accept new data.
Execute
Pad
Sample
Pad
Procedure
1. When you enter this function, the LCD displays the following message, where
xx
identifies the currently selected pad.
Delete
x x
?
2. Press [ENTER]. The LCD displays a confirmation query.
Del
xx
Sure?
3. To execute, press [ENTER] again.
▼ If you do not want to execute deletion, press [EXIT] instead. The SU10 returns to Step 1 above.
4. The SU10 begins execution and displays the Keep PwrOn message. Do not
switch off power while this message is on the screen. When execution is
finished, the LCD briefly displays the Complete message, then returns the
Which Pad? prompt.
5. Select another pad for editing, or else press [EXIT] to return to PLAY mode.

54
●
UTILITY Mode
●
9
UTILITY Mode
Introduction
You use UTILITY mode to make various system settings and to perform system
management and MIDI-related operations. The mode comprises seven utilities, as
follows.
Name Function Page
Rec Set recording parameters. 55
MIDI Set MIDI parameters. 56
Bulk Send/receive bulk dump. 58
MSDS Execute a sample dump. 62
Song Delete a selected song. 63
Lock Lock/unlock a bank or song. 64
Init Delete all data and initialize system. 64
General Procedure
1. Enter the UTILITY menu.
From PLAY mode, press [SHIFT]+[UTIL]. The LCD changes as follows. The word
Utilty indicates that you are at the menu level.
UTILITY mode

●
UTILITY Mode
●
55
2. Press [>] or [<] as necessary to select the utility you need to use.
Rec [<][>] MIDI [<][>] Bulk [<][>] MSDS [<][>] Song
[<][>] Lock [<][>] Init
3. Press [ENTER] to enter the utility.
4. Set the parameters or execute the operation within the utility you have se-
lected.
• To move to another parameter or
operation within the same utility … Press [>] or [<].
• To change a parameter setting … Press [+1] or [–1].
• To execute an operation … Press [ENTER].
5. Press [EXIT] once to return to the UTILITY menu. If you need to work at another
utility, return to Step 2 above.
6. Press [EXIT] again to return to PLAY mode.
Recording Setup [Rec]
You can use this utility to preset the parameters to be used for recording. You may
also use it to adjust the sampling grade, pitch, and input-source settings for pur-
poses of playback. The following diagram shows the utility structure.
Grade [<][>] Pitch [<][>] Format [<][>] Input [<][>]
RecTrg [<][>] Defalt
All of these parameters are accessible under RECORDING mode; for detailed in-
formation, refer to pages 32 to 34. The three parameters that apply also to play-
back are described briefly below.
• Grade: Selects the sampling grade at which the sample is replayed. You have
four choices: High, Standard, Long, and Extra Long (Hi, Std, Long,
Exlg). In general, you will want to use the same grade that was used at
recording, since use of a different grade will change the pitch.
Note that a setting of “Hi” reduces the SU10 polyphony and disables
use of FILTER, CROSSFADE, PITCH, SCALE, and SCRATCH features,
while a setting of “Std” disables use of FILTER and SCALE. If you at-
tempt to select a disabled play feature, the SU10 returns the Change
Grd! message. You can correct the problem by changing the Grade
setting at this utility.

56
●
UTILITY Mode
●
• Pitch: You can use this setting to add an offset to the system’s pitch; the avail-
able range is -20% to 10%, settable in 1% increments.
• Input: Selects whether the SU10 takes its input from the LINE IN jack or the
MIC INPUT jack (Line or Mic). You will need to set the appropriate
value if you are using the CROSSFADE, EXTERNAL FILTER, or EXTER-
NAL SCRATCH feature.
MIDI Setup [MIDI]
You use this utility to set the SU10’s MIDI parameters. The following diagram
shows the utility structure.
MIDICh [<][>] DevNum [<][>] Local [<][>] RbnNum [<][>]
NoteTbInit? [<][>] NoteTbClr?
MIDI Channel [MIDICh]
Purpose: Sets the MIDI channel.
Values: 1,...,16, Off
Explanation
Selects the channel for both incoming and outgoing MIDI channel messages.
The SU10 attaches the specified channel number to outgoing channel messages
(Note On, Note Off, and Control Change messages). It responds only to those
incoming channel messages (Note On, Note Off, and Channel Volume messages)
that carry the specified channel number.
If the setting is Off, the SU10 does not send or receive channel messages.
MIDI Device Number [DevNum]
Purpose: Sets the SU10 device number for System Exclusive messages.
Values: 1,...,16, All, Off
Explanation
This setting assigns the device number that the SU10 uses for incoming and outgo-
ing data dumps and other system exclusive messages.
1,...,16 The SU10 includes the selected device number in outgoing mes-
sages, and responds only to those incoming message that include
this device number.

●
UTILITY Mode
●
57
All The SU10 accepts dumps from any device, and transmits dumps to
Device 1.
Off The SU10 does not accept incoming dumps, and transmits dumps to
Device 1.
Local Control [Local]
Purpose: Sets local control on or off.
Values: On, Off
Explanation
This setting selects whether the SU10 pads control SU10 playback.
On You can use both the SU10 pads and remote MIDI messages to control
playback.
Off Local playback is controlled exclusively by MIDI messages received from
external devices.
Ribbon Number [RbnNum]
Purpose: Assigns the ribbon’s controller number.
Values: Off, P.Bnd, 0,...,120
Explanation
This setting assigns a controller number to the ribbon, so that you can use the
ribbon to drive an external controller.
Off The SU10 does not output Control Change messages.
P.Bnd When you change the ribbon value, the SU10 outputs a Pitch Bend
message indicating the new value.
0,...,120 When you change the ribbon value, the SU10 outputs a MIDI Control
Change message indicating the new value. The message carries the
controller number specified by this parameter.
Initialize Note Table [NoteTbInit?]
Purpose
Reinitializes MIDI note-number assignments.
Procedure
Press [ENTER] to execute. The LCD will return the Init Sure? confirmation
prompt. Press [ENTER] again to proceed, or press [EXIT] to cancel and return to the
UTILITY menu level.

58
●
UTILITY Mode
●
Explanation
This operation deletes current pad/note-number assignments, and reassigns note
numbers to pads sequentially, as follows.
Pad Number
A1 36 (C1)
A2 37 (C#1)
::
A11 46 (A#1)
A12 47 (B1)
B1 48 (C2)
::
D12 83 (B4)
• You can use the EDIT mode’s MIDI NOTE NUMBER function to select an arbitrary number
assignment for any pad; see page 45.
• The assignments made here are not effective during SCALE play. For information about how
note numbers are handled during SCALE play, refer to page 20.
Clear Note Table [NoteTbClr?]
Purpose:
Deletes all MIDI note-number assignments.
Procedure:
Press [ENTER] to execute. The LCD returns the Clear Sure? confirmation prompt.
Press [ENTER] again to confirm, or press [EXIT] to cancel and return to the UTILITY
menu level.
Explanation
This operation deletes all note-number assignments for all pads. Immediately fol-
lowing execution, you will not be able to use pads to drive an external device, nor
use an external device to drive SU10 playback. You can restore normal remote
operation by setting up new assignments using either the NoteTbInit operation
(described above) or the EDIT mode’s MIDI NOTE NUMBER function (page 45).
Bulk Dump [Bulk]
You use this utility to dump (save) all SU10 sample and song data to an external
device, or to reload data from an external device. The utility also lets you select
the packet interval for outgoing dumps.

●
UTILITY Mode
●
59
This is the utility you use to back up your SU10 data. To save all data to floppy
disk, for example, you would connect the MIDI OUT connector to the MIDI IN of
a Yamaha MDF2 MIDI Data Filer or equivalent, then dump from the SU10 to the
MDF2. You could then reload your data at any time by reversing this procedure.
For information about dumping to or from specific Yamaha devices, refer to page 61.
The following diagram shows the utility structure.
Dump Rcv? [<][>] Dump Send? [<][>] Intrvl
Receiving [Dump Rcv?]
Purpose
Receives a bulk dump from an external device. You can use this function to reload
SU10 data that you backed up to an external medium using the Dump Send func-
tion.
Procedure
1. Press [ENTER] in response to the Dump Rcv? query. The SU10 displays the
confirmation query Receiv OK? If you are ready to receive, press [ENTER]
again.
▼ If any bank or song is locked, the SU10 displays the message Locked Data! and returns you
to the UTILITY menu without receiving the dump.
2. The SU10 stands by for the start of data flow. The Waiting message appears
to indicate that data reception has not yet started. During this time you can
cancel the dump at any time by pressing [EXIT].
3. When data reception begins, the SU10 disables the [EXIT] button and displays
the Receiving message. The meter indicates the percentage of data received.
Do not switch power off while reception is in progress.
4. Upon receipt of all data, the SU10 briefly displays the Complete message,
then returns you to PLAY mode.
If the flow of incoming data stops unexpectedly for 30 seconds while dumping is in progress, the
LCD displays the Time Out! message to indicate that the dump has failed and all internal data
have been lost. If you see this message, press [EXIT] to return to the UTILITY menu, then try the
download again.
Some devices (such as the YAMAHA QY300 and QS300) store SU10 backup data in four sepa-
rate “songs” (song files), since this is the way they receive the data at time of backup. If you are
dumping from one of these devices, you will have to change the song three times during the
transfer. The Time Out! condition will not occur while you are between songs.

60
●
UTILITY Mode
●
Sending [Dump Send?]
Purpose
Sends a bulk dump to an external device. You can use this function to back up
your SU10 data, or to copy it into another SU10.
Procedure
1. Before selecting Dump Send?, move to the Intrvl setting (press [>]) and
select the appropriate value (see the explanation following this procedure).
Then press [<] to move back to the Dump Send query. Then press [ENTER].
2. The SU10 displays the confirmation query Send OK? Press [ENTER] to begin
sending.
3. The SU10 sends the first part of the dump, then pauses and displays the mes-
sage Next OK? When you are ready to proceed, press [ENTER]. The SU10 will
subsequently stop and display this message two more times. Press [ENTER]
each time to continue. When sending is finished, the SU10 briefly displays the
Complete message, then automatically returns you to the UTILITY menu.
▼ The SU10 breaks the transmission into four segments to allow for transfers to machines with
limited memory or reception capacity. Some receiving devices will be able to record all four
segments to a single file. With other devices you will have to set each segment into a separate
file.
▼ You can press [EXIT] at any time to abort the dump. The LCD displays the word Canceled, then
returns you to the UTILITY menu.
Interval [Intrvl]
Purpose
Assigns the bulk-dump packet interval.
Values:
Short, Mid, Long
Explanation
Selects the time interval that the SU10 interposes between adjacent packets when
transmitting a bulk dump.
Short Provides fastest dumping. Use this setting when dumping to another
SU10 or a YAMAHA MDF2 or QY300.
Mid About twice as long as the Short interval. Use this setting when
dumping to a YAMAHA QS300.
Long About eight times as long as the Short interval.

●
UTILITY Mode
●
61
▼ If you are not yet sure of the receiving capabilities of your destination device, use the Long
setting to ensure accurate transmission. After making a secure backup, you can test out shorter
intervals to see if the device supports them.
Dumping To or From a Yamaha MDF2, QY300, or QS300
To dump to an MDF2:
1. Set the MDF2 to Seq mode. (
Do not
set to MDR mode.) Set the SU10’s
Intrvl value to “Short”.
2. At the MDF2, press REC + START/STOP to begin recording.
3. At the SU10, move to the Dump Send? screen and press [ENTER] twice to
begin sending.
4. When the SU10 displays the message Next OK?, press [ENTER] to con-
tinue transmission. The message will appear three times.
5. When transfer is completed, move to the MDF2 and press START/STOP to
terminate recording. You can then remove the disk.
To dump to a QY300 or QS300:
1. If dumping to a QY300, set the SU10’s Intrvl value to “Short”. If dump-
ing to a QS300, set the value to “Mid”.
2. Begin song recording at the QY300/QS300.
3. At the SU10, move to the Dump Send? screen and press [ENTER] twice to
begin sending.
4. Each time the SU10 displays the message Next OK?, proceed as follows.
You will have to repeat this process three times. When you have finished,
your SU10 data will be stored in four separate song files on floppy disk.
4-1) Go to the QY300/QS300 and terminate the recording. Save the
data as a song into floppy disk, then clear the song data from main
memory.
4-2) Set the QY300/QS300 to begin recording of a new song.
▼ You will need to remember the order in which you record the songs, so that you can use the
same order when reloading the data to the SU10. Include sequential numbers or other identi-
fiers in the song names.
4-3) At the SU10, press [ENTER] to resume transmission.

62
●
UTILITY Mode
●
To load from an MDF2:
1. Set the MDF2 to Seq mode. (
Do not
set to MDR mode.)
2. At the SU10, move to the Dump Rcv? screen and press [ENTER] twice to
begin receiving.
3. At the MDF2, press the START/STOP button to begin playback.
To load from a QY300 or QS300:
1. Go the QY300/QS300 and load the first of your four backup song files.
(Remember that backed-up data is contained in four separate song files.)
2. At the SU10, move to the Dump Rcv? screen and press [ENTER] twice to
begin receiving.
3. Begin song playback at the QY300/QS300.
4. When transfer of the song is completed, load the next song file at the
QY300/QS300, and begin song playback again. Continue until all four
files have been sent.
Sample Dump
Use this utility to dump one or more selected samples in MIDI Sample Dump
Standard format, a standard format recognized by a wide variety of synthesizers,
samplers, and MIDI software packages. This utility makes it possible to send indi-
vidual samples to a remote device for replay or editing.
When you enter this utility, the SU10 displays a message such as the following:
MSDSTx
x x?
Procedure
1. Select the sample you want to dump by pressing [+1] or [–1], or by pressing
[BANK] (if necessary) and the appropriate pad. The displayed message changes
to indicate the selected sample. Press [ENTER] to begin transmission.
▼ If the selected pad is empty, the LCD displays the Pad Empty message and waits for you to
select a different pad. Select another sample as described above, or else press [EXIT] to return to
the UTILITY menu.

●
UTILITY Mode
●
63
2. The SU10 executes the dump. If the sample is monaural, the SU10 displays
the message Sending M to indicate that transmission is in progress.
If the sample is stereo, the SU10 sends the left part first, while displaying the
message Sending L. When finished, it asks whether to send the right part
(Send R OK?). Press [ENTER] to proceed, or [EXIT] to end.
▼ You can abort an ongoing dump at any time by pressing [EXIT]. The LCD will briefly display the
Canceled message, then offer to dump the next sample.
3. Upon completing the dump, the LCD briefly displays the Complete mes-
sage, then offers to dump the next sample. You can (
a
) press [ENTER] to dump
the indicated sample; (
b
) change the sample selection; or (
c
) press [EXIT] to
return to the UTILITY menu.
• The SU10 sends a sample identification along with the data. If the pad is monaural, the ID is
equal to the pad number: ID 1 identifies pad A1, ID 2 identifies pad A2, ID 48 identifies pad
D12. If the sample is stereo, the SU10 dumps it as two samples, using the pad number for the
left sample’s ID, and 50 plus the pad number for the right sample’s ID. If you dump stereo
sample A3, for example, the left sample gets ID 3, while the right sample gets ID 53.
• The SU10 always transmits the sample in forward direction (from start of wave to end of
wave), regardless of the sample’s loop-mode setting.
• Not all receiving devices will be able to reproduce the sample exactly as it sounds on the SU10.
In particular, loop operation and replay pitch may be slightly different.
Song Deletion [Song]
You use this utility to delete selected songs. When you enter this utility, the SU10
displays a message such as the following, offering to delete the currently selected
song.
Delete
Sg#1?
You have three choices:
1. Press [ENTER] to delete the indicated song.
2. Select a different song by pressing [+1] or [–1], or by holding down [SHIFT] and
pressing the appropriate SONG button. Then press [ENTER] to delete.
3. Press [EXIT] to return to the UTILITY menu.
• The SU10 does not return a confirmation query prior to deleting the song. Be careful to avoid
accidental erasure.
• After deleting a song, the SU10 offers to delete the next nonempty song (if any). Again, be
careful to avoid accidental deletion.

64
●
UTILITY Mode
●
If you attempt to delete an empty or locked song, the LCD briefly displays an appropriate mes-
sage, then returns to the original prompt. You must then change the song selection or else press
[EXIT].
Lock [Lock]
You use this utility to lock or unlock selected banks or songs. The lock feature
allows you to protect samples and songs from accidental editing or deletion. Spe-
cifically, the SU10 does not allow you to edit or delete any sample within a locked
bank, and will not allow you to overwrite a locked song.
When you first enter this utility, the LCD displays the lock setting for Bank A. If the
lock is Off, for example, the display will look like this:
Bank A
Off
Proceed as follows.
1. To move to the setting for a different bank or song, press [>] or [<]. The se-
quence is:
Bank A [<][>] Bank B [<][>] Bank C [<][>] Bank D [<][>]
Song 1 [<][>] Song 2 [<][>] Song 3 [<][>] Song 4
2. To change the lock setting to On, press [+1]. To change the setting to Off, press
[–1].
3. To return to the UTILITY menu, press [EXIT].
Initialize [Init]
You can use this utility to (
a
) delete all song and sample data, or (
b
) delete all song
and sample data while at the same time resetting all system parameters to their
defaults. The SU10 will refuse to execute this operation if any banks or songs are
locked.
The utility consists of two functions, as follows.
Init Data? [<][>] Init All?

●
UTILITY Mode
●
65
Deleting data only [Init Data?]
Purpose
Deletes all samples and all songs. Does not delete system settings.
Procedure
1. Press [ENTER] in response to the Init Data? query. The LCD returns the
Data Sure? confirmation prompt. To proceed, press [ENTER].
▼ If you do not want to proceed, press [EXIT] to return to the UTILITY menu.
▼ If you attempt to initialize while a bank or song is locked, the LCD briefly displays the Locked
Data! message, then returns you to the UTILITY menu.
2. The SU10 displays the Keep PwrOn message and begins deletion. Do not
switch off the power while this message is on the screen. When execution is
finished, the LCD displays the Complete message, then returns the UTILITY
menu.
Deleting data and resetting the system [Init All?]
Purpose
Deletes all samples and all songs, and returns all system settings to their defaults
(see below).
Procedure
1. Move to the Init All? query and press [ENTER]. The LCD returns the All
Sure? confirmation prompt. Press [ENTER] to proceed.
▼ If you do not want to proceed, press [EXIT] to return to the UTILITY menu.
▼ If you attempt to initialize while a bank or song is locked, the LCD displays the Locked Data!
message, then returns you to the UTILITY menu.
2. The SU10 displays the Keep PwrOn message and begins the operation. Do
not switch off power while this message is on the screen. When initialization
is finished, the SU10 displays the Complete message, then returns you to the
UTILITY menu.

66
●
UTILITY Mode
●
System default values are as follows.
Gain = 1
Grade = Long
Pitch = 0%
Format = Stereo
Input Source = Line
Recording Trigger = Manual
Default Loop Mode = Whole Loop
MIDI Channel = 1
Device Number = 1
Local Control = On
Ribbon No. = Off
MIDI Note Table = Pad A1:MIDI C1, Pad A2:MIDI C#1, ..., PAD
D12:MIDI B4
Bulk Interval = Short
Locks = All off
Volume = 8

●
Troubleshooting
●
67
10
Troubleshooting
This chapter offers some simple advice that may help you solve problems you
experience with your SU10. If the SU10 does not seem to operate properly and
the information in this chapter does not help, please consult your Yamaha dealer
or one of the Yamaha distributors listed at the back of this manual for assistance.
Problem Possible Cause
PLAY
Cannot play demos • You may have erased them. Unless you have stored
them to an external device via MIDI dump, they
are gone forever. But it is easy enough to create
your own samples and songs.
No sound • Check the LINE OUT connection. Is the SU10 cor-
rectly connected to external powered speakers or
amp? Are the external speakers/amp switched on?
• Check the volume settings.
(a) Check sample’s internally set volume (EDIT
mode; see page 44).
(b) Check the digital volume. Try pressing [+1] to
increase the level.
(c) Try adjusting the volume slider.
(d) Check the volume setting on your speakers or
amp.
• Are batteries or adaptor correctly connected? You
must use six AA batteries, or a PA-3B or PA-1B
adaptor.
• Are batteries fresh? Try again with new batteries
(alkaline batteries recommended), or check opera-
tion using a power adaptor.
• Check the Local setting in the MIDI utility. Pads
do not operate if this setting is Off. (→ page 57)
• Are you sure the selected pad contains sample
data?
• Check the sample’s loop mode, and the start-point,
loop-point, and end-point settings.
• Are you sure the bank selection is correct? Try
playing from a different bank.
• If using FILTER or EXTERNAL FILTER: Try changing
the cutoff frequency. Certain cutoff frequencies
may cause all sound to go off.
• If using CROSSFADER or EXTERNAL mode: Check
that the Input recording parameter matches the
actual input source. (→ page 56)

68
●
Troubleshooting
●
Problem Possible Cause
Sound is distorted • Is replay volume exceeding the clip level? Try
pressing [–1] to lower the digital volume. Note that
reducing the level with the volume slider will not
correct this problem. Clipping is most likely to oc-
cur when you play many pads together, or when
you change filter settings.
• Volume may have exceeded clip level at time of
recording. (→ page 33)
• Use of resonance during FILTER play may some-
times cause distortion. Try reducing the resonance
level.
• Batteries may be low. Replace batteries or con-
nect a PA-3B or PA-1B power adaptor.
• Polyphony may be too low. Use of HI grade or
SCALE, SCRATCH, FILTER, or other special play
features causes polyphony to drop. Remember also
that a stereo sample counts as two sounds. (→ page
26)
• Check samples’ alternate-group settings. Samples
in the same group cannot play together. (→ page
44)
• Certain play features are not available while sam-
pling grade is set to HI or STD. You can correct the
problem by going to the Rec utility and changing
the Grade setting accordingly. (→ page 26)
SONGS
• A song is a recorded sequence of pad play. Edit-
ing, deletion, or replacement of samples used by
the song will cause a change in the song sound.
(→ page 37)
• Song sound may vary according to the point from
which song is started. See page 28 and 37 for ad-
vice about song playback and recording.
• Song play is subject to the same polyphony restric-
tions as pad play. Using special play features
(SCALE, SCRATCH, etc.) or combining pad play
with song play may cause sounds to drop out.
Can’t play samples to-
gether
Change Grd! message
appears.
Song content has
changed.

●
Troubleshooting
●
69
Problem Possible Cause
RECORDING
Cannot record. • Is LINE IN or MIC INPUT connected correctly?
• Have you selected the correct input source? The
selected source (displayed on third line of the LCD)
must match the actual source — either microphone
or line. If necessary, go to RECORDING or UTIL-
ITY mode and change the Input recording pa-
rameter (see page 34 or 56).
• The Recording Trigger (RecTrg) setting may be
inappropriate. Check, and adjust as necessary.
(RecTrg is a recording parameter and can be set
from either REC or UTIL mode. See page 34 or 56.)
• You can increase recording in any of the follow-
ing ways.
• Reduce the sampling grade. (→ page 33.)
• Set Pitch lower. (→ page 34)
• Use mono recording instead of stereo. (→ page
34)
• Compact all pads. (→ page 52)
• Delete one or more pads. (→ page 53 or 64)
MIDI
• Check that the MIDI channel setting on the SU10
and the external device match. (→ page 56)
• Check the MIDI Note Number settings.
(a) If you have cleared the Note Table, all note num-
ber settings have been deleted. You must reas-
sign note numbers to enable pads to drive and
be driven. (→ pages 45, 57).
(b) Check that note number assignments corre-
spond to notes assignments on the external de-
vice.
(c) Remember that note numbers are different dur-
ing SCALE play. (→ page 20)
• Check the MIDI Device No. setting (the DevNum
parameter in the MIDI utility). (→ page 56)
• If the LCD displays the message Wrong Data!:
There is a problem with the data at the sending
side. Bulk receive is impossible in this case.
• Check that the receiving side is correctly set up,
and has sufficient memory to receive the data.
• The SU10 does not support reception of MSDS
sample dumps.
Recording begins too
soon or too late.
Available recording time
is too low.
SU10 cannot drive (or
be driven by) an exter-
nal device.
Cannot receive bulk
dump.
Cannot send MSDS
sample dump.
Cannot receive MSDS
sample dump.

70
●
Troubleshooting
●
Problem Possible Cause
• Check sounding-mode (SdMode) settings for each
sample. (→ page 43.)
• Check the MIDI Note Number settings.
MIDI input does not
drive SU10 sound as ex-
pected.

●
Error and Warning Messages
●
71
11
Error and Warning
Messages
This section describes the causes and responses for each of the SU10 error and
warning message.
Warning messages
Locked Data!
Locked Bank!
Locked Song!
[Cause]
You attempted to execute an operation that would delete data from a pro-
tected area.
[Response]
You can switch off locks using the LOCK utility. (See page 64.)
Be careful to avoid accidental deletion of data.
Change Grd! (Change Grade)
[Cause]
You attempted to select a PLAY feature that is not available at the currently
selected sampling grade.
[Response]
Go to the Recording Setup utility and reduce the Grade setting.
Memory Full!
[Cause]
Song/sample memory became full during recording of a sample or song. (All
data recorded prior to the appearance of this message remains registered in
memory.)
[Response]
If you need to record a longer sample, try deleting or compacting existing
samples, and/or reducing the sampling grade or pitch.
If you need to record a longer song, you can increase available memory by
deleting one or more existing songs.
Battry Low!
[Cause]
Batteries are low.
[Response]
Replace the batteries.

72
●
Error and Warning Messages
●
MIDI Errors
Time Out!
[Cause]
Data flow stopped during reception of bulk dump, so the SU10 terminated
the operation. All internal pad and song data are now lost.
[Response]
Try the dump again. If this fails, reinitialize the entire system (go to the INIT
utility and execute Init All).
Buffer Full!
[Cause]
MIDI input buffer became full: the amount of incoming MIDI data exceeded
the SU10’s processing capacity.
[Response]
Reduce the amount of MIDI data being sent to the SU10.
DevNum Off!
[Cause]
Attempted to receive bulk-dump with SU10’s DevNum parameter set to “Off”.
[Response]
To enable bulk-dump reception, set the SU10’s device number (DevNum
parameter, in the MIDI utility) either to “All” or else to match the device
number of the sending device.
Wrong Data!
[Cause]
The SU10 received an unrecognizable MIDI System Exclusive message.
[Response]
Check the machine type and data at the sending side.
ChkSum Err!
[Cause]
The received bulk-dump data failed checksum test.
[Response]
Check the machine type and data at the sending side.
MIDI Err1!
[Cause]
Overrun error occurred during MIDI reception.
[Response]
Check the settings at both sides. Check that cables are correctly attached.

●
Error and Warning Messages
●
73
MIDI Err2!
[Cause]
A framing error during MIDI reception
[Response]
Check the settings at both sides. Check that cables are correctly attached.
Memory-Related Errors
Bad Data!
[Cause]
The SU10 detected a problem with internal data at time of power-on. This
problem can occur if you switch the power off while a memory-write is in
progress.
[Response]
The SU10 does its best to repair the problem, but it is possible that you will
lose some songs or samples. If you find that the data loss is considerable, you
should clear all remaining data and reinitialize the system (go to the INIT
utility and execute Init All).

74
●
Specifications
●
12
Specifications
1. Main Specifications
Features
• Compact low-cost sampling module. (Same size as VHS cassette)
• Special playback features unprecedented for this price range: REVERSE, SCALE,
PITCH, others.
• Touch-driven ribbon controller controls any one of various effects; excellent for
realtime performance applications.
• Custom LCD indicates full status information (sampling grade, current song,
selected input source, and much more).
Maximum polyphony 4 samples (monaural)
Maximum number of samples 48
Play modes Sampler, Realtime Scratch,
Realtime Filter
Special effects Low-pass, band-pass, and high-pass filters (all
with resonance); crossfade; pitch
Songs Records up to 4 songs. (Each song is a recorded
sequence of pad and button operations.)
Interfaces MIDI IN, MIDI OUT: Connects to MIDI se-
quencer, MIDI keyboard, etc.
Can dump individual sample(s) in MSDS (MIDI
Sample Dump Standard) format to supporting
RAM-equipped devices (synthesizer, sampler,
computer, etc.)
LINE IN accepts input from CD player or other
audio device.
MIC INPUT accepts input from dynamic micro-
phone or powered condenser microphone.
Demo songs 1 demo song is included.
2. Memory capacity
Wave (sample) memory 384KB (Can record up to about 53 seconds of
monaural sound at Extra Long sampling grade.)
Song memory 8KB (Approx. 1000 events)

●
Specifications
●
75
3. Display
LCD Custom LCD
4. Panel
12 pads
Ribbon controller
[HOLD], [REV], [SHIFT], [EXIT], [SCRATCH], [BANK],[ENTER], [+1], [–1], [<], [>], [REC],
[TOP], [BWD], [STOP], [PLAY], [FWD]
Volume slider (for output volume)
Power switch
5. Connectors
MIDI IN
MIDI OUT
HEADPHONES (stereo mini jack)
LINE OUT L/R (stereo mini jack)
LINE IN L/R (stereo mini jack)
MIC IN L/R (stereo mini jack)
DC IN
6. Output level (Full-scale level)
LINE OUT +3.8dbm (typ) (10kΩ)
PHONES –4.0dbm (typ) (33Ω)
7. Input level
LINE +15.0dbm (typ)
MIC –31.8dbm (typ)
8. Power
AC adaptor (PA-1B or PA-3B)
Batteries (six 1.5V AA, R6P or SUM-3)

76
●
Specifications
●
9. Dimensions (W × D × H)
168 × 104 × 32.2 (mm) [6.61 × 4.09 × 1.27 (inches)]
10. Weight
0.4kg (0.88lb.)
11. Included accessories
Owner’s manual (this manual)
Two sample CDs
(Demo music features samples from Time+Space sample CDs. See the enclosed
Yamaha Soundshow CD for more information.)

YAMAHA [ Sampling Unit ] Date:25-OCT-1995
Model SU10 MIDI Implementation Chart Version : 1.0
+----------------------------------------------------------------------+
| | Transmitted | Recognized | Remarks |
| Function ... | | | |
|-------------------+----------------+----------------+----------------|
|Basic Default | 1 - 16 | 1 - 16 | Memorized |
|Channel Changed | 1 - 16 | 1 - 16 | |
|-------------------+----------------+----------------+----------------|
| Default | x | Mode 3 | |
|Mode Messages | x | x | |
| Altered | ************** | x | |
|-------------------+----------------+----------------+----------------|
|Note | 0 - 127 | 0 - 127 | |
|Number : True voice| ************** | 0 - 127 | |
|-------------------+----------------+----------------+----------------|
|Velocity Note ON | o 9nH,v=127 | o v=1-127 | |
| Note OFF | x 9nH,v=0 | x | |
|-------------------+----------------+----------------+----------------|
|After Key's | x | x | |
|Touch Ch's | x | x | |
|-------------------+----------------+----------------+----------------|
|Pitch Bender | o *1| x |7 bit resolution|
|-------------------+----------------+----------------+----------------|
| 7 | x | o |Volume |
| 0-120 | o Assignable *1| x | |
| | | | |
| | | | |
| Control | | | |
| | | | |
| Change | | | |
| | | | |
| | | | |
| | | | |
| | | | |
| | | | |
| | | | |
|-------------------+----------------+----------------+----------------|
|Prog | x | o 0 - 1 | |
|Change : True # | ************** | | |
|-------------------+----------------+----------------+----------------|
|System Exclusive | o | o | |
|-------------------+----------------+----------------+----------------|
|System : Song Pos. | x | x | |
| : Song Sel. | x | x | |
|Common : Tune | x | x | |
|-------------------+----------------+----------------+----------------|
|System :Clock | x | x | |
|Real Time :Commands| x | x | |
|-------------------+----------------+----------------+----------------|
|Aux :Local ON/OFF | x | x | |
| :All Notes OFF| x | x | |
|Mes- :Active Sense | x | x | |
|sages:Reset | x | x | |
+----------------------------------------------------------------------+
|Notes: *1 ; transmit if switch is on. |
| |
| |
| |
| |
+----------------------------------------------------------------------+
Mode 1 : OMNI ON, POLY Mode 2 : OMNI ON, MONO o : Yes
Mode 3 : OMNI OFF, POLY Mode 4 : OMNI OFF, MONO x : No

80
●
Index
●
Index
A
AC adaptor ................................... 13
AltGrp .......................................... 44
B
Backup ......................................... 60
Bank .............................................. 5
BANK key ...................................... 9
Battery ......................................... 13
BPF .............................................. 24
Bulk Dump .................................. 58
Receiving ................................. 59
Sending .................................... 60
BWD .............................................. 8
C
Compact ...................................... 52
Copy ............................................ 48
CROSSFADER .............................. 25
Cursor ............................................ 9
D
DC IN .......................................... 10
Defalt ........................................... 34
Delete .......................................... 53
Demo Song .................................. 27
Dump Rcv .................................... 59
Dump Send .................................. 60
E
EDIT............................................. 39
EDIT mode ................................... 39
EdPnt ........................................... 47
ENTER ............................................ 9
EXIT ............................................... 9
EXLG ............................................ 33
EXTERNAL FILTER ........................ 30
EXTERNAL SCRATCH ................... 29
F
FILTER .......................................... 22
Filter type ..................................... 22
Flat............................................... 24
Format ......................................... 34
FWD key ........................................ 8
G
Gain ............................................. 33
Grade ........................................... 33
H
Headphones ................................. 11
HI ................................................ 33
HPF.............................................. 24
HOLD .......................................... 18
HOLD key ..................................... 8
I
Init ............................................... 64
Input ............................................ 34
Intrvl ............................................ 60
L
LCD ............................................... 7
Line.............................................. 34
LINE INPUT ................................. 10
LINE OUTPUT ............................. 10
Local Control ............................... 57
Lock ............................................. 64
LONG .......................................... 33
Loop ............................................ 41
Loop Mode .................................. 41
LPF............................................... 24
LpPnt ........................................... 47

●
Index
●
81
M
Mic .............................................. 34
MIC INPUT .................................. 10
MIDI .............................................. 6
MIDI channel ............................... 56
MIDI device number .................... 56
MIDI note number........................ 45
MIDI note table ............................ 57
Mnual .......................................... 34
Mono ........................................... 34
Move ........................................... 49
N
Note............................................. 43
O
Oshot ........................................... 41
P
Pad ................................................ 5
PadVol ......................................... 44
PITCH .......................................... 21
Pitch ............................................ 34
PLAY key ........................................ 8
PLAY mode .................................. 16
Ploop ........................................... 42
Polyphony .................................... 26
POWER ........................................ 13
POWER switch ............................. 10
R
REC key ......................................... 8
Recording .................................... 32
RecTrg .......................................... 34
Resnce ......................................... 23
REV key ......................................... 9
Reverse ........................................ 19
Ribbon controller ........................... 7
Ribbon Number ........................... 57
Rloop ........................................... 42
Rshot ............................................ 42
S
Sample ........................................... 4
Sample Dump .............................. 62
Sample Playback .......................... 17
SCALE .......................................... 19
SCRATCH....................................... 9
SHIFT ............................................. 9
Song ............................................... 6
Song Creating ............................... 35
Song Deletion .............................. 63
Song Play ..................................... 27
Sounding Mode ............................ 43
Split ............................................. 50
STD.............................................. 33
Stereo ........................................... 34
STOP .............................................. 8
StPnt ............................................ 46
Strng ............................................ 24
T
Tempo .......................................... 46
Toggl ............................................ 43
TOP ............................................... 8
Trggr ............................................. 43
U
UTILITY mode .............................. 54
V
Volume slider ............................... 11
W
Weak ........................................... 24
Wloop .......................................... 41

For details of products, please contact your
nearest Yamaha or the authorized distributor
listed below.
Pour plus de détails sur les produits, veuillez-
vous adresser à Yamaha ou au distributeur le
plus proche de vous figurant dans la liste sui-
vante.
Die Einzelheiten zu Produkten sind bei Ihrer
unten aufgeführten Niederlassung und bei
Yamaha Vertragshändlern in den jeweiligen
Bestimmungsländern erhältlich.
Para detalles sobre productos, contacte su tien-
da Yamaha más cercana o el distribuidor auto-
rizado que se lista debajo.
GERMANY/SWITZERLAND
Yamaha Europa GmbH.
Siemensstraße 22-34, 25462 Rellingen, F.R. of
Germany
Tel: 04101-3030
AUSTRIA/HUNGARY/SLOVENIA/
ROMANIA/BULGARIA
Yamaha Music Austria Gesmb H.
Schleiergasse 20, A-1100 Wien Austria
Tel: 0222-60203900
THE NETHERLANDS
Yamaha Music Benelux B.V.,
Verkoop Administratie
Kanaalweg 18G, 3526KL, Utrecht, The Netherlands
Tel: 030-828411
BELGIUM/LUXEMBOURG
Yamaha Music Benelux B.V.,
Brussels-office
Keiberg Imperiastraat 8, 1930 Zaventem, Belgium
Tel: 02-7258220
FRANCE
Yamaha Musique France,
Division Professionnelle
BP 70-77312 Marne-la-Valée Cedex 2, France
Tel: 01-64-61-4000
ITALY
Yamaha Musica Italia S.P.A.,
Combo Division
Viale Italia 88, 20020 Lainate (Milano), Italy
Tel: 02-935-771
SPAIN
Yamaha-Hazen Electronica Musical, S.A.
Jorge Juan 30, 28001, Madrid, Spain
Tel: 91-577-7270
PORTUGAL
Valentim de Carvalho CI SA
Estrada de Porto Salvo, Paço de Arcos 2780 Oeiras,
Portugal
Tel: 01-443-3398/4030/1823
GREECE
Philippe Nakas S.A.
Navarinou Street 13, P.Code 10680, Athens, Greece
Tel: 01-364-7111
SWEDEN
Yamaha Scandinavia AB
J. A. Wettergrens Gata 1
Box 30053
S-400 43 Göteborg, Sweden
Tel: 031 89 34 00
NORTH AMERICA
CANADA
Yamaha Canada Music Ltd.
135 Milner Avenue, Scarborough, Ontario,
M1S 3R1, Canada
Tel: 416-298-1311
U.S.A.
Yamaha Corporation of America
6600 Orangethorpe Ave., Buena Park, Calif. 90620,
U.S.A.
Tel: 714-522-9011
MIDDLE & SOUTH AMERICA
MEXICO
Yamaha De Mexico S.A. De C.V.,
Departamento de ventas
Javier Rojo Gomez No.1149, Col. Gpe Del
Moral, Deleg. Iztapalapa, 09300 Mexico, D.F.
Tel: 686-00-33
BRASIL
Yamaha Musical Do Brasil LTDA.
Ave. Reboucas 2636, São Paulo, Brasil
Tel: 011-853-1377
PANAMA
Yamaha De Panama S.A.
Edificio Interseco, Calle Elvira Mendez no.10,
Piso 3, Oficina #105, Ciudad de Panama, Panama
Tel: 507-69-5311
OTHER LATIN AMERICAN COUNTRIES
AND CARIBBEAN COUNTRIES
Yamaha Music Latin America Corp.
6101 Blue Lagoon Drive, Miami, Florida 33126,
U.S.A.
Tel: 305-261-4111
EUROPE
THE UNITED KINGDOM
Yamaha-Kemble Music (U.K.) Ltd.
Sherbourne Drive, Tilbrook, Milton Keynes,
MK7 8BL, England
Tel: 01908-366700
IRELAND
Danfay Ltd.
61D, Sallynoggin Road, Dun Laoghaire, Co. Dublin
Tel: 01-2859177

DENMARK
YS Copenhagen Liaison Office
Generatorvej 8B
DK-2730 Herlev, Denmark
Tel: 44 92 49 00
FINLAND
Warner Music Finland OY/Fazer Music
Aleksanterinkatu 11, P.O. Box 260
SF-00101 Helsinki, Finland
Tel: 0435 011
NORWAY
Narud Yamaha AS
Grini Næringspark 17
N-1345 Østerås, Norway
Tel: 67 14 47 90
ICELAND
Skifan HF
Skeifan 17 P.O. Box 8120
IS-128 Reykjavik, Iceland
Tel: 525 5000
EAST EUROPEAN COUNTRIES
(Except HUNGARY)
Yamaha Europa GmbH.
Siemensstraße 22-34, D-2084 Rellingen, F.R. of
Germany
Tel: 04101-3030
KOREA
Cosmos Corporation
#131-31, Neung-Dong, Sungdong-Ku, Seoul
Korea
Tel: 02-466-0021~5
MALAYSIA
Yamaha Music Malaysia, Sdn., Bhd.
16-28, Jalan SS 2/72, Petaling Jaya, Selangor,
Malaysia
Tel: 3-717-8977
PHILIPPINES
Yupangco Music Corporation
339 Gil J. Puyat Avenue, P.O. Box 885 MCPO,
Makati, Metro Manila, Philippines
Tel: 819-7551
SINGAPORE
Yamaha Music Asia Pte., Ltd.
Blk 17A Toa Payoh #01-190 Lorong 7
Singapore 1231
Tel: 354-0133
TAIWAN
Kung Hsue She Trading Co., Ltd.
No. 322, Section 1, FuHsing S. Road,
Taipei 106, Taiwan. R.O.C.
Tel: 02-709-1266
THAILAND
Siam Music Yamaha Co., Ltd.
865 Phornprapha Building, Rama I Road,
Patumwan, Bangkok 10330, Thailand
Tel: 2-215-3443
THE PEOPLE’S REPUBLIC OF CHINA
AND OTHER ASIAN COUNTRIES
Yamaha Corporation,
International Marketing Division
Nakazawa-cho 10-1, Hamamatsu, Japan 430
Tel: 053-460-2317
OCEANIA
AUSTRALIA
Yamaha Music Australia Pty. Ltd.
17-33 Market Street, South Melbourne, Vic. 3205,
Australia
Tel: 3-699-2388
NEW ZEALAND
Music Houses of N.Z. Ltd.
146/148 Captain Springs Road, Te Papapa,
Auckland, New Zealand
Tel: 9-634-0099
COUNTRIES AND TRUST
TERRITORIES IN PACIFIC OCEAN
Yamaha Corporation,
International Marketing Division
Nakazawa-cho 10-1, Hamamatsu, Japan 430
Tel: 053-460-2317
AFRICA
Yamaha Corporation,
International Marketing Division
Nakazawa-cho 10-1, Hamamatsu, Japan 430
Tel: 053-460-2312
MIDDLE EAST
TURKEY/CYPRUS
Yamaha Musique France, Division Export
BP 70-77312 Marne-la-Valée Cedex 2, France
Tel: 01-64-61-4000
OTHER COUNTRIES
Yamaha Corporation,
International Marketing Division
Nakazawa-cho 10-1, Hamamatsu, Japan 430
Tel: 053-460-2312
ASIA
HONG KONG
Tom Lee Music Co., Ltd.
11/F., Silvercord Tower 1, 30 Canton Road,
Tsimshatsui, Kowloon, Hong Kong
Tel: 730-1098
INDONESIA
PT. Yamaha Music Indonesia (Distributor)
PT. Nusantik
Gedung Yamaha Music Center, Jalan Jend. Gatot
Subroto Kav. 4, Jakarta 12930, Indonesia
Tel: 21-520-2577
SY09
HEAD OFFICE Yamaha Corporation, Electronic Musical Instrument Division
Nakazawa-cho 10-1, Hamamatsu, Japan 430
Tel: 053-460-2445

Owner’s Manual
M.D.G., EMI Division, ©Yamaha Corporation 1995
VU37290 601CRIT15.2-02B0 Printed in Japan
Documenttranscriptie
Owner’s Manual M.D.G., EMI Division, ©Yamaha Corporation 1995 VU37290 601CRIT15.2-02B0 Printed in Japan FCC INFORMATION (U.S.A) 1. IMPORTANT NOTICE: DO NOT MODIFY THIS UNIT! This product, when installed as indicated in the instructions contained in this manual, meets FCC requirements. Modifications not expressly approved by Yamaha may void your authority, granted by the FCC, to use the product. 2. IMPORTANT: When connecting this product to accessories and/or another product use only high quality shielded cables. Cable/s supplied with this product MUST be used. Follow all installation instructions. Failure to follow instructions could void your FCC authorization to use this product in the USA. 3. NOTE: This product has been tested and found to comply with the requirements listed in FCC Regulations, Part 15 for Class “B” digital devices. Compliance with these requirements provides a reasonable level of assurance that your use of this product in a residential environment will not result in harmful interference with other electronic devices. This equipment generates/uses radio frequencies and, if not installed and used according to the instructions found in the user’s manual, may cause interference harmful to the operation of other electronic devices. Compliance with FCC regulations does not guarantee that interference will not occur in all installations. If this product is found to be the source of interference, which can be determined by turning the unit “OFF” and “ON”, please try to eliminate the problem by using one of the following measures: Relocate either this product or the device that is being affected by the interference. Utilize power outlets that are on different branch (circuit breaker or fuse) circuits or install AC line filter/s. In the case of radio or TV interference, relocate/reorient the antenna. If the antenna lead-in is 300 ohm ribbon lead, change the lead-in to co-axial type cable. If these corrective measures do not produce satisfactory results, please contact the your local retailer authorized to distribute this type of product. If you can not locate the appropriate retailer, please contact Yamaha Corporation of America, Electronic Service Division, 6600 Orangethorpe Ave, Buena Park, CA 90620 * The above statements apply ONLY to those products distributed by Yamaha Corporation of America or its subsidiaries. SPECIAL MESSAGE SECTION (USA) This product utilizes batteries or an external power supply (adapter). DO NOT connect this product to any power supply or adapter other than one described in the manual, on the name plate, or specifically recommended by Yamaha. WARNING: Do not place this product in a position where anyone could walk on, trip over, or roll anything over power or connecting cords of any kind. The use of an extension cord is not recommended! IF you must use an extension cord, the minimum wire size for a 25' cord (or less) is 18 AWG. NOTE: The smaller the AWG number, the larger the current handling capacity. For longer extension cords, consult a local electrician. This Product should be used only with the components supplied or; a cart, rack, or stand that is recommended by Yamaha. If a cart, etc., is used, please observe all safety markings and instructions that accompany the accessory product. SPECIFICATIONS SUBJECT TO CHANGE: The information contained in this manual is believed to be correct at the time of printing. However, Yamaha reserves the right to change or modify any of the specifications without notice or obligation to update existing units. This product, either alone or in combination with an amplifier and headphones or speaker/s, may be capable of producing sound levels that could cause permanent hearing loss. DO NOT operate for long periods of time at a high volume level or at a level that is uncomfortable. If you experience any hearing loss or ringing in the ears, you should consult an audiologist. IMPORTANT: The louder the sound, the shorter the time period before damage occurs. Some Yamaha products may have benches and/or accessory mounting fixtures that are either supplied with the product or as optional accessories. Some of these items are designed to be dealer assembled or installed. Please make sure that benches are stable and any optional fixtures (where applicable) are well secured BEFORE using. Benches supplied by Yamaha are designed for seating only. No other uses are recommended. NOTICE: Service charges incurred due to lack of knowledge relating to how a function or effect works (when the unit is operating as designed) are not covered by the manufacturer’s warranty, and are therefore the owners responsibility. Please study this manual carefully and consult your dealer before requesting service. Battery Notice: This product MAY contain a small non-rechargeable battery which (if applicable) is soldered in place. The average life span of this type of battery is approximately five years. When replacement becomes necessary, contact a qualified service representative to perform the replacement. This Product may also use “household” type batteries. Some of these may be rechargeable. Make sure that the battery being charged is a rechargeable type and that the charger is intended for the battery being charged. When installing batteries, do not mix old batteries with new, or with batteries of a different type. Batteries MUST be installed correctly. Mismatches or incorrect installation may result in overheating and battery case rupture. Warning: Do not attempt to disassemble, or incinerate any battery. Keep all batteries away from children. Dispose of used batteries promptly and as regulated by the laws in your area. Note: Check with any retailer of household type batteries in your area for battery disposal information. Disposal Notice: Should this Product become damaged beyond repair, or for some reason its useful life is considered to be at an end, please observe all local, state, and federal regulations that relate to the disposal of products that contain lead, batteries, plastics, etc. If your dealer is unable to assist you, please contact Yamaha directly. NAME PLATE LOCATION: The name plate is located on the bottom of the product. The model number, serial number, power requirements, etc., are located on this plate. You should record the model number, serial number, and the date of purchase in the spaces provided below and retain this manual as a permanent record of your purchase. LINE OUTPUT MIDI INPUT OUT IN MIC INPUT DC IN Model Serial No. ENVIRONMENTAL ISSUES: Yamaha strives to produce products that are both user safe and environmentally friendly. We sincerely believe that our products and the production methods used to produce them, meet these goals. In keeping with both the letter and the spirit of the law, we want you to be aware of the following: Purchase Date PLEASE KEEP THIS MANUAL 92-BP POWER ON OFF Introduction The SU10 Stereo Digital Sampler is a compact, easy-to-use stereo phrase sampler offering high sound quality, a unique ribbon controller, excellent loop capability, and a host of other distinctive editing and performance features. The SU10 is ideal for up-and-coming DJs, “desktop musicians,” and all others interested in experiencing the world of electronic digital sampling. Sampling and playback features ■ Record up to 48 stereo samples within nonvolatile memory. Samples remain in memory even while power is off. ■ Excellent sound quality: Can record at a maximum sampling rate of 44.1kHz, the same rate used by audio CDs. ■ Reverse play reproduces samples in reverse. ■ Scale play sets up a single sample at 12 different pitches along the pad console. ■ Unique ribbon controller allows you to apply a dramatic filter or scratch effect to your samples, or to crossfade your samples with realtime sound from an external source. ■ Impressive editing features. • Select any one of five loop patterns for each sample. Select arbitrary loop start point and end point. • Move or copy sample to a different location; split one sample into two; trim off the leading and trailing parts of the sample. • Select any one of three triggering modes for each sample. ■Create up to four songs, each consisting of any arbitrary sequence of sample play. i ● Introduction ● Special “External” functions ■ Use your SU10 as an effects box for applying a realtime scratch or filter effect to feed-through line input. MIDI support ■ Drive your SU10 from a remote sequencer, keyboard, or computer; or use your SU10 to drive a remote device. ■ Load selected samples to a synthesizer or other remote device using the MIDI sample dump standard. ■ Back up all SU10 data to an external storage device, then reload at any time. ● Introduction ● ii Contents 1 About This Manual␣ ........................ 1 Notations .................................... 1 2 Precautions␣ .................................... 2 3 Basic Concepts␣ .............................. What is the SU10? ...................... Operating Modes ........................ Samples ...................................... How a Sample is Made .......... Banks and Pads .......................... External Modes .......................... Songs .......................................... MIDI ........................................... 3 3 3 4 4 5 6 6 6 4 Controls, Connectors, and LCD␣ .... 7 Top Panel .................................... 7 Rear Panel ................................ 10 Right Side ................................. 11 Screen Display .......................... 11 5 Supplying Power and Connecting Up␣ ............................................... Supplying Power ...................... Using the adaptor ................. Batteries ............................... Connecting Up the SU10 ......... 6 Playback␣ ....................................... Preparation ............................... Basic Sample Playback ............. Special Play Features I ............. HOLD .................................. REVERSE ............................ SCALE ................................. Special Features II: Ribbon Controller .................. Pitch Play ............................. Filter Play ............................. Scratchpad ............................ Crossfade ............................. 13 13 13 13 14 16 16 17 18 18 19 19 21 21 22 24 25 Playing a Song ......................... External Performance Modes .. External Scratch ................... External Filter ...................... 7 Recording Samples, and Creating Songs␣ ......................................... Sample Recording Overview .... Connecting the Input Source .. Entering REC Mode and Selecting the Pad ................... Setting the Recording Parameters ............................. Starting/Stopping the Recording ............................... Creating Songs ......................... Procedure ............................. 8 Editing␣ ......................................... Introduction ............................. Editing Functions ................ Basic Procedure ....................... Edit Parameters and Operations .............................. LOOP MODE [LpMode] ..... SOUNDING MODE [SdMode] ........................... PAD VOLUME [PadVol] ..... ALTERNATE GROUP [AltGrp] ............................. MIDI NOTE NUMBER [Note#] ............................... START POINT [StPnt] ........ LOOP POINT [LpPnt] ......... END POINT [EdPnt] ........... COPY [CopyTo ?].............. MOVE [MoveTo ?] ............ SPLIT [SpltTo ?] ................ COMPACT [Compct ?] ..... DELETE [Delete ?] ........... 27 29 29 30 31 31 31 31 32 35 35 36 38 38 38 39 41 41 43 44 44 45 46 47 47 48 49 50 52 53 9 UTILITY Mode␣ ............................. Introduction ............................. General Procedure ................... Recording Setup [Rec] ............. MIDI Setup [MIDI] ................... MIDI Channel [MIDICh] .... MIDI Device Number [DevNum] .......................... Local Control [Local] .......... Ribbon Number [RbnNum] . Initialize Note Table [NoteTbInit?] ..................... Clear Note Table [NoteTbClr?] ...................... Bulk Dump [Bulk] ................... Receiving [Dump Rcv?] ...... Sending [Dump Send?] ........ Interval [Intrvl] .................... Sample Dump .......................... Song Deletion [Song] .............. Lock [Lock] .............................. Initialize [Init] .......................... Deleting data only [Init Data?] ......................... Deleting data and resetting the system [Init All?] ......... 54 54 54 55 56 56 56 57 57 57 58 58 59 60 60 62 63 64 64 65 65 0 Troubleshooting␣ .......................... 67 A Error and Warning Messages␣ ...... Warning messages ................... MIDI Errors .............................. Memory-Related Errors ........... 71 71 72 73 B Specifications␣ ............................... 74 MIDI Implementation Chart␣ ............. 78 Index␣ .................................................. 80 1 About This Manual The purpose of this manual is to help you quickly master the operation of your SU10. Although compact, your SU10 offers a surprising array of playback, editing, and utility functions. You may need to refer to this manual fairly often in the beginning, but the concepts and operating principles should soon become clear. Before starting to use your SU10, please be certain to read through the precautions on page 2 for information that will help you avoid data loss and equipment damage. Notations Button names are enclosed in a rectangular frame, as in [HOLD] or [EXIT]. The 12 central buttons are called pads. Each pad has two functions. The lower function is indicated by the word PAD followed by the button number: for example, [PAD 1], [PAD 10]. The upper function is indicated by an expression such as [SHIFT]+[SONG 2], which means “hold down the [SHIFT] key while pressing the [SONG2] button.” In general a + sign between two button names means that you must hold down the first button while pressing the second. For example, [REV]+[PAD 1], [SHIFT]+[EDIT]. SU10 editing and utility operations are semi-interactive, with the lower left area of the LCD displaying the necessary messages, prompts, and parameters. Messages and parameter names that appear in this area are shown in a special font, as in: Delete A1?. Normal boldface is sometimes used to call attention to important passages. The following icons are also used. This icon header denotes critical advice that may help prevent accidental data loss or equipment damage. Please read these sections carefully. This icon calls attention to significant supplemental information. ▼ This mark appears within procedures to indicate a supplemental explanation that is not part of the procedure itself. ● About This Manual ● 1 2 Precautions PLEASE READ ALL PRECAUTIONS BEFORE USING YOUR SU10. 1. NEVER switch power off while the LCD is displaying the Keep PwrOn message. This message indicates that the SU10 is writing to nonvolatile memory. Switching power off at this time may result in loss of all data in the SU10. In some cases this message may last for more than 10 seconds: this does not indicate a problem. 2. Use the correct power adaptor. Use only a Yamaha PA-3B or PA-1B power adaptor. Use of a different adaptor type may result in electric shock or device damage. 3. Use 1.5V AA batteries only. Never mix old and new batteries. Never mix battery types: be sure that batteries are either all alkaline or else all manganese. Alkaline batteries are recommended To prevent potential damage from battery leakage, remove the batteries if you plan to leave the SU10 unused for an extended period. 4. Use the correct cables. Handle cables with care. • When disconnecting a cable, grip firmly at the connector area and pull straight out. • Use only high-quality MIDI cables for your MIDI connections. Cable performance degrades as length increases: avoid cables that are longer than 15m. 5. Handle the SU10 with care. • Do not drop it or otherwise subject it to severe physical impact. • Do not leave the SU10 in a location where it may be exposed to high temperatures, high humidity, extreme dust, or extreme vibration. 6. Do not open the casing or attempt repairs. The SU10 contains no user-serviceable parts. Please refer all maintenance to qualified technicians. Opening of the case will void the warranty. 7. Clean with soft dry cloth only. Do not attempt to clean the SU10 with detergents or solvents, as these may damage the casing. 2 ● Precautions ● 3 Basic Concepts This chapter presents a very brief overview of basic concepts relevant to understanding and operation of the SU10. What is the SU10? The SU10 combines the functions of a digital stereo phrase sampler with a variety of add-on features that significantly enhance its effectiveness in a performance environment. In addition to basic recording, edit, and playback capabilities, this compact unit includes special play functions, a touch-driven ribbon controller, and two “external” modes that apply filter or scratch effects to realtime line or microphone input. Operating Modes The SU10 has four operating modes: PLAY, REC (Recording), EDIT, and UTIL (Utility). PLAY: Use this mode to play samples and songs, or to apply a scratch or filter effect to a realtime signal as it passes through the SU10. The SU10 always starts from PLAY mode when power is switched on. You can always return to PLAY mode from any other mode by pressing [EXIT] once or, in some cases, twice. For full information about PLAY mode, see Chapter 6. REC: This is the mode you use to record samples and create songs. You enter this mode from PLAY mode by pressing [REC]. For details, see Chapter 7. EDIT: Use this mode to set playback parameters for each sample. You can enter this mode from PLAY mode by pressing [SHIFT]+[EDIT]. Refer to Chapter 8. UTIL: This mode consists of seven utilities that you use to set parameters or execute operations that are not sample-specific. You can use this mode, for example, to reinitialize the system, adjust the system-wide pitch offset, or set overwrite protection for banks and songs. You can enter this mode from PLAY mode by pressing [SHIFT]+[UTIL]. See Chapter 9. ● Overview and Basic Concepts ● 3 Samples The SU10 stores up to 48 samples. A sample is a digital recording of an acoustic waveform (or two waveforms, if stereo), together with playback parameters that determine how the sound is played: the type of loop applied, the direction of playback, the start and end points, and so on. The following conceptual diagram shows how a sample exists within a typical sampler. LpMode AltGrp StPnt SdMode MIDI NOTE# LpPnt EdPnt How a Sample is Made A sample is created by taking digital “readings” of an acoustic analog signal at a very rapid rate. The resulting binary values indicate the state of the acoustic wave at each point of reading. The sample can be replayed by reconverting the values to an analog wave. 0 0 Analog wave 4 ● Overview and Basic Concepts ● SAMPLING Note that the quality of the recording improves as the rate of reading — called the sampling frequency — increases. Although higher sampling frequencies give better quality, they also consume more memory and therefore reduce available recording time. The maximum sampling rate available on the SU10 is 44.1kHz, identical to the rate offered by a conventional CD. Because samples require considerable memory per unit of time, they are generally kept quite short. The replay time of a sample can be extended to an arbitrary length by setting up a loop, so that the sample repeats indefinitely. The term sample is also used in a technical sense (its original sense) to refer to each “reading” of the acoustic signal, as described above. Within this manual, however, the term always refers to the entire recorded waveform together with its related parameters. Banks and Pads You play the SU10 samples by pressing buttons, or pads. The SU10 has twelve pads. Because the SU10 can store up to 48 samples, however, it also has four banks. You choose a sample by selecting the appropriate bank, then pressing the corresponding pad. Pads 1 2 3 12 A A1 A2 A3 A12 B B1 B2 B3 B12 C C1 C2 C3 C12 D D1 D2 D3 D12 Banks Sample ● Overview and Basic Concepts ● 5 External Modes The SU10 also supports two “external” modes that are entirely independent of its sampling capability. These modes are provided primarily for live performance environments, and operate on an analog signal that passes through the SU10 in real time. Songs The SU10 includes a sequencing feature that records and reproduces pad and button sequences. You use this feature to create up to four “songs,” each consisting of a series of pad operations that you have registered into memory. Sample Sample Sample Sample Sample Sample Time MIDI The SU10 provides both MIDI IN and MIDI OUT capability. You can use these features to back up or reload your data; to download selected samples to synthesizers, computers, or other samplers in MIDI standard dump format; to drive the SU10 from a remote device; or to drive a remote device from the SU10. 6 ● Overview and Basic Concepts ● Controls, Connectors, and LCD 4 Top Panel 2 1 SAMPLING UNIT HOLD 4 EXIT 0 C SONG 1 A D SONG 2 1 REV SCRATCH SHIFT REC SONG 3 2 TOP BWD STOP 5 6 7 SONG 4 3 8 5 FWD 9 ENTER UTILITY EDIT 4 PLAY –1 SCALE FILTER CROSS FADER BANK B E 7 8 PITCH 9 10 F 6 EXTERNAL SCRATCH EXTERNAL FILTER 11 12 +1 G H 3 1 LCD (Liquid Crystal Display) You refer to the LCD for all information about current operating status, and during interactive input of all editing and utility parameters. A description of the various indications appears on page 11 and 12. 2 Ribbon Controller During playback, you can run your finger over the ribbon to apply a dramatic scratch or filter effect or to vary the pitch or line/pad crossfade. During external scratch and external filter play, you use the ribbon to apply realtime scratching or filtering to a straight audio signal as it feeds through the SU10. Finally, you can use the ribbon during EDIT operation to change pad volume and start, loop, and end point settings. Use light pressure when rubbing your finger over the controller. Excessive force can cause the ribbon to heat up, reducing its life. Also note that the ribbon may lose sensitivity after prolonged uninterrupted use; if this occurs, allow the ribbon some time to recover. 3 Pads Use to start or stop playback of a sample, to change the operating mode, or to select various functions. Pad operation depends on whether the [SHIFT] button is ON (pressed) or OFF (not pressed). ● Controls, Connectors, and LCD ● 7 If [SHIFT] is OFF: The pad starts or stops replay of the corresponding sample, or selects the sample for recording or editing. If [SHIFT] is ON: • SONG1,…,4 • EDIT • UTILITY • SCALE, FILTER, CROSSFADER • PITCH • EXTERNAL SCRATCH, EXTERNAL FILTER Selects a song for creation or replay. Sets the SU10 into EDIT mode. Sets the SU10 into UTILITY mode. Sets playback function to SCALE, FILTER, or CROSSFADER. Enables ribbon to control the pitch. Selects EXTERNAL SCRATCH or EXTERNAL FILTER play. 4 [REC] Press to enter RECORDING mode. 5 [TOP] Normal play: Returns song to start position. SCRATCH play: [SCRATCH]+[TOP] returns scratch section to top of sample. EDIT mode: Jumps to START POINT edit function. 6 [BWD] Normal play: Moves song back to previous event. SCRATCH play: [SCRATCH]+[BWD] shifts the scratch section back. EDIT mode: Jumps to LOOP POINT edit function. 7 [STOP] PLAY mode: REC mode: Stops playback of song. Stops recording of sample or song. 8 [PLAY] PLAY mode: REC mode: Starts playback of song. Starts recording of sample or song. 9 [FWD] PLAY mode: Advances song to next event. EDIT mode: Jumps to END POINT edit function SCRATCH play: [SCRATCH]+[FWD] shifts the scratch section forward. 0 [HOLD] Activates HOLD function for sample replay, or REPEAT function for song replay. To set this function ON, hold down the pad and press [HOLD]. 8 ● Controls, Connectors, and LCD ● A [REV] (Reverse switch) Use to play samples in reverse. To operate, hold down [REV] and press the appropriate pad. B [SHIFT] Shifts the pad function. Leave shift off if using the pad to select a sample for replay or recording. Hold [SHIFT] down when using a pad to select a song or change the mode. C [EXIT] Press this button to return to normal PLAY mode from EDIT mode, UTILITY mode, ribbon-scratch play, or other special playback feature. You also use this button when you need to answer “No” to a prompt message. D [SCRATCH] Assigns scratch effect to any one of the samples. To operate, hold down [SCRATCH] and press the pad for the sample you want to scratch. E [BANK] The SU10 provides four pad banks (Banks A to D), each capable of storing up to 12 samples. Press the [BANK] button to change the bank setting (A→ B→C→D→A...) The LCD always indicates the currently selected bank. F [ENTER] Press to respond “Yes” to a prompt and execute the corresponding operation, or to select one of the utilities within UTILITY mode. The LCD will display a confirmation message before executing certain editing operations. Press [ENTER] to proceed, or [EXIT] to cancel. G [+1], [–1] Use these buttons to change the digital volume during playback, to change the gain during recording, or to change a parameter value during editing. Press briefly for a single-unit change, or hold down for continuous change. H [<], [>] Press to move through editing functions or utilities. ● Controls, Connectors, and LCD ● 9 Rear Panel LINE OUTPUT MIDI INPUT OUT IN MIC INPUT DC IN POWER ON OFF 1 2 3 4 5 6 1 LINE OUTPUT miniphone jack Outputs a stereo analog signal to powered speakers or other playback device. 2 LINE INPUT miniphone jack Inputs an analog stereo signal from an external device such as a CD player. 3 MIDI IN/OUT Standard MIDI connectors. You use these connectors to link your SU10 to other MIDI devices. 4 MIC INPUT miniphone jack Accepts input from a dynamic or powered condenser-type microphone. 5 DC IN power input Receives power input from a PA-3B or PA-1B DC power adaptor. CAUTION! Use only a PA-3B or PA-1B adaptor. Use of a different adaptor type may result in electric shock or device damage. 6 POWER switch Switches the SU10 power ON or OFF. 10 ● Controls, Connectors, and LCD ● Right Side MIN VOLUME 1 MAX PHONES 2 1 VOLUME slider Adjusts the output volume to the PHONES and LINE OUTPUT connectors. 2 Headphone jack Stereo miniphone jack; connects to stereo headphones. Screen Display The LCD consists of various compartments, each displaying a different type of information. 1 2 3 4 5 6 7 9 A 0 B 8 ● Controls, Connectors, and LCD ● 11 1 Current sampling grade 2 Current operating mode PLAY = Sample/song playback EDIT = Sample edit UTIL = Utility setup 3 Loop mode of currently selected pad 4 Indicates whether the selected sample is STEREO or MONO. 5 Currently selected input source 6 Ribbon value (during playback or editing), or input level (during recording setup) 7 Currently selected bank of pads 8 Selected effect or special play function (if any) PCH: Ribbon-controlled pitch EFCT: Scale, Filter, Crossfade, External Filter SCH: Scratch, External Scratch 9 Currently selected song, and song REPEAT arrow. Arrow appears only if song is playing in REPEAT mode. 0 Message/parameter display area. During editing, the upper line displays the parameter name and the bottom line displays the value. At other times, this area displays input prompts, status information, and error messages. A Indicators MIDI: TIME: TEMPO: REC: ON when MIDI message is coming in. ON during recording. ON during loop editing. ON when SU10 is recording (or standing by to record) a sample or song. B Meter display During sample record: Recordable time (to nearest 0.1 sec.) During song play: Song location (to nearest 0.1 sec.) During song creation: Remaining song memory (16-bit words) During loop edit: Loop tempo (estimated beats per minute) 12 ● Controls, Connectors, and LCD ● 5 Supplying Power and Connecting Up Supplying Power Your SU10 can run through an AC/DC adaptor or on batteries. If you connect up both at the same time, the SU10 will run from the adaptor. Using the adaptor Please be sure to use a Yamaha PA-3B or PA-1B adaptor only. Use of a different adaptor type may result in electric shock or device damage. To connect: First connect the DC end of the adaptor to the power connector on the SU10, then plug the other end of the cable into an AC power socket. When you have finished using the SU10: Switch off the power and then disconnect the plug from the wall socket. Batteries The SU10 accepts six 1.5V AA batteries (R6P or SUM-3). Yamaha recommends the use of alkaline batteries. Inserting Batteries [1] Check that the POWER switch on the rear panel is OFF. [2] Turn the unit upside down: you will see the battery cover on the lower right. Press on the arrow with your thumb and slide in the indicated direction, then lift off. [3] Insert all six batteries. Refer to the diagram on the rear panel to make sure you are inserting in the right direction. [4] Replace the battery cover, making sure it snaps into place. ● Supplying Power and Connecting Up ● 13 When to Replace Batteries When batteries begin to go low, the SU10 disables EDIT, RECORD, and UTILITY modes first. If you attempt to switch from PLAY mode into one of these other modes at this time, the SU10 displays the Battry Low! message briefly and remains in PLAY mode. If you are already working in EDIT, RECORD, or UTILITY mode, the SU10 displays Battry Low!, then displays the Keep PwrOn message while registering any new data, then changes to PLAY mode. You can continue to use PLAY mode for some time after other modes are disabled. Eventually the Battry Low! message will appear during normal playback. You still have about five minutes of PLAY-mode operation left; the message will repeat intermittently until batteries are exhausted. The message then changes to Battry End!, and the SU10 shuts down until you replace the batteries or connect an AC adapter. • Do not reuse batteries that you have removed following a Battry Low! message. • Do not switch off power or remove batteries while the Keep PwrOn message is on the screen. Connecting Up the SU10 The following illustration shows how devices connect to the SU10. The drawings on the next page show some typical MIDI configurations. PA-3B or PA-1B Adaptor Microphone Powered speakers LINE IN LINE IN MIC IN LINE OUT LINE OUTPUT MIDI INPUT OUT IN DC IN MIC INPUT DC IN YAMA HA Headphones LINE IN SU10 LINE OUT CD/Cassette Player 14 POWER ON OFF PHONES ● Supplying Power and Connecting Up ● To control SU10 playback from an external keyboard: Powered speakers MIDI OUT MIDI IN LINE OUT SAMPLING UNIT MIDI keyboard (CBX-K1, etc.) SU10 To back up all SU10 data to an external data filer (bulk dump): MIDI OUT MIDI IN SAMPLING UNIT SU10 MIDI Data Filer (MDF2, etc.) ● Supplying Power and Connecting Up ● 15 6 Playback This chapter takes you through the various sample and song play procedures, and explains the use of the special “external” performance functions. Note that replay of samples and songs is affected by each sample’s edit settings — in particular, by the sounding mode and the loop settings. For information about edit settings, refer to Chapter 8. This chapter assumes that you have not made any changes to your SU10’s factory settings, and that the demo samples and song are still in place. If you have made changes, playback operation may be somewhat different than described. You are advised to save the demo samples and song to an external disk by MIDI bulk dump (see page 58), so that you can restore them in case of future need. If you have already deleted the demos, however, then you will need to record some new samples so that you will have something to play; refer to Chapter 7 for details. Preparation 1. Connect an amplifier or powered speakers to the LINE OUT jack, or connect headphones to the headphone jack. (See illustration, page 14.) If you are going to try ribbon crossfade (page 25) or either of the realtime features (pages 29 to 30), you will also need to supply a LINE IN or MIC INPUT signal. 2. Switch on the power to the SU10, and to the speakers (if connected). 3. Make sure the SU10 is in PLAY mode. For most of the procedures in this chapter you will want to be in PLAY mode. The top right of the LCD always indicates the current mode: if at any time you notice that you have moved into a different mode, you can return to PLAY mode by pressing [EXIT] one or more times. 4. Set the SU10’s VOLUME slider to about 1/4 maximum level. The slider sets the signal level to the speakers or headphones. 16 ● Playback ● 5. Press [-1] or [+1] to set the digital volume to an appropriate value. This setting determines the level at which the signal reproduces internally. You generally want to set the level to just below the clipping level, as described in the box below. ABOUT CLIPPING Setting the digital volume too high may cause clipping, resulting in distorted sound. Clipping may also occur when you play many pads together, or when you change filter values during FILTER or EXTERNAL FILTER playback. If you notice distorted sound during playback, press [-1] to lower the digital volume. Note that reducing the level with the volume slider or on your external speakers will not eliminate clipping. Basic Sample Playback Your SU10 stores up to 48 samples: four banks of 12 samples each. The following procedure shows how to replay these samples. 1. Select the bank by pressing the [BANK] button. Let’s begin with a pad from bank A. Under factory settings the SU10 starts up in bank A, but try pressing [BANK] a few times anyway. Stop when you see an A in the Bank Indicator area of the LCD. Select bank A BANK ● Playback ● 17 2. Hold down [PAD 3] briefly to play sample A3, then release the button to stop the sound. Try this several times. If necessary, adjust the volume using the slider, the [-1] or [+1] button, or the volume controls on your external speakers or amp. ▼ You will notice that the sample plays continuously while the button is held, then stops when the button is released. This is because this sample’s sounding mode is set to “Note Driven” (ON when pressed, OFF when released), and the loop mode is set to “Whole Loop.” See pages 41, 43. 3. Now tap [PAD ▼ 11] very briefly to start play of sample A11. Notice that playback does not stop when you release the pad, but continues to the end of the sample. This is because the sample’s sounding mode is set to “Trigger.” (See page 44.) 4. Now try playing several samples at once. ▼ The number of samples that can be played together at one time is referred to as the polyphony. The SU10 can play a maximum of four monaural samples at once, although the number drops if you select HI sampling grade or use the scale, scratch, filter, or crossfade features. If you try playing too many samples at once, certain samples drop out. For more information about polyphony, see page 26 below. Special Play Features I Now let’s try some of the SU10’s special playback features. HOLD Use the HOLD feature when you want to force one or more samples to play as if in “Toggle” sounding mode (see page 43). The held sample(s) will play through to the end or, if looped, will play continuously. The HOLD feature only operates on samples with sounding mode set to “Note Driven.” 1. To hear the effect most clearly, you should select a looping sample. Assuming you have not yet changed the factory settings, you can try this with Pad A3. If you are not now at BANK A, press [BANK] as necessary to get there. 2. Now press [PAD 3] to begin playback. With the pad still held down, press [HOLD]. Then release both buttons. Sample A3 will continue to play in an endless loop. ▼ 18 Notice that an H appears at the lower left of the LCD to indicate that the sample is being held. ● Playback ● HOLD SONG 1 1 3. Now try playing some other samples along with the held sample. You can play from the same bank, or you can switch to some other bank. ▼ Remember that there is a limit to the number of samples you can play at one time. When you attempt to play too many samples, the SU10 will always force off non-held samples before it forces off held samples. 4. To shut off the held pad, press the pad again, or else press [HOLD] again. REVERSE Hold down [REV] and press a pad. The sample will play out backwards, producing a sound similar to that of a cassette tape or vinyl disc playing in reverse. SCALE For this effect you first select a single sample for scale play. You can then play the sample at any of 12 different pitches, with pitch increasing in semitone units as you move from [PAD 1] to [PAD 12] (original pitch). 1. Press [SHIFT]+[SCALE]. The LCD then prompts you to select a pad, and the EFCT indicator comes on. SHIFT SCALE 7 ● Playback ● 19 2. If necessary, press [BANK] to change the bank. Then press the pad corresponding to the sample you want to play. A staircase-like icon appears in front of the Vol indication at the lower left of the LCD. ▼ If you attempt to select an empty pad, the LCD returns a Pad Empty message; you can then change the selection by pressing [BANK], a pad, or [-1] [+1]. 3. Now try pressing the various pads. Each pad plays the same sample at a differ- ent pitch: [PAD 12] plays the original pitch; [PAD 1] produces the lowest pitch. 4. To return to normal PLAY mode, press [EXIT]. • SCALE play is available only when the sampling grade is set to LONG or EXLG. If you try to select this feature while the grade is HI or STD, the SU10 briefly displays the Change Grd! message, then resumes normal PLAY mode. For information about sampling grades and how to change them, see page 55. • When using this feature, you can only produce sound from one pad at a time. • Reverse playback is not possible during SCALE play. The [REV] button does not function. If the selected sample has a reverse loop-mode setting, the setting automatically converts to its forward-direction equivalent: Reverse Shot becomes One Shot, Reverse Loop becomes Whole Loop. (For information about loop modes, see page 41.) • MIDI Note Number assignments (see page 45) are ignored during SCALE play. For outgoing MIDI Note-ON/Off messages, note numbers increase incrementally: [PAD 1] drives MIDI Note C1, [PAD 2] drives MIDI Note C#1, and so on up the scale. Operation is slightly different for incoming messages: [PAD 1] is driven by MIDI Note C of any octave, [PAD 2] by MIDI Note C# of any octave, and so on. 20 ● Playback ● Special Features II: Ribbon Controller The SU10’s ribbon controller is probably its most distinctive feature. You can use the ribbon to control pitch, filter, or crossfade during replay of samples and songs. You can also use it to play a special “scratchpad” during sample play. Finally, you use the ribbon as an effect controller for the SU10’s special “external” modes. (For information about external modes, see pages 29 to 30.) Pitch Play 1. Be sure that the SU10 is in PLAY mode. 2. Press [SHIFT]+[PITCH]. The LCD changes as shown to indicate that you have selected the pitch feature. Current ribbon value PITCH-play indicator PITCH symbol 3. You can now change the pitch dynamically by touching or rubbing your finger over the ribbon: pitch decreases as you move to the left, and increases as you move to the right. Try this now while playing some samples or a song. Notice that the LCD displays the ribbon value in real time. 4. To return to normal PLAY mode, press [EXIT]. The pitch automatically returns to its original value. Ribbon operation changes the value of the Pitch parameter — a system-wide pitch offset parameter that determines how much pitch varies from normal. You can access this setting directly from RECORDING or UTILITY mode; the allowable range is -20% to +10%. (See page 56.) ● Playback ● 21 Filter Play This feature applies a filter to samples and songs, with the ribbon providing dynamic control of the filter cutoff frequency. You select the filter type and resonance directly from within the filter-play function: the SU10 will remember the settings when you terminate filter play, then restore them when you return. The selected settings apply to all samples and songs. Selecting filter play 1. With the SU10 in PLAY mode, press [SHIFT]+[FILTER]. The LCD indicates the current filter type and resonance. The lower left of the LCD shows a graphic image of the resulting filter effect. Filter type l: LPF b: BPF h: HPF Resonance f: Flat w: Weak s: Strong Effect-play indicator Current ribbon value Filter type "b" = Band-pass filter Filter image "Weak" resonance 2. You can now use the ribbon to control the filter. Try playing some samples or songs and running your finger over the ribbon. Notice that the LCD displays the ribbon value in real time. The effect you get depends on the current filter settings. If you wish to change the settings, proceed as described below. 3. To return to normal PLAY mode, press [EXIT]. 22 ● Playback ● Viewing/Changing the filter and resonance settings 1. Set the SU10 to filter-play operation as described above, then press [SHIFT]+[EDIT]. The LCD indicates the currently selected filter type. 2. If you wish to change the filter type, press [-1] or [+1] as necessary. Available types are LPF, BPF, and HPF. (See the FILTER SETTINGS box on the next page.) 3. If you wish to view or change the resonance setting, press [>] to move to the resonance-select function. The LCD indicates the current resonance. Press [-1] or [+1] to change the value as necessary. Available values are Flat, Weak, and Strng (strong). (See FILTER SETTINGS box.) 4. Try playing some samples and working the ribbon to see how your new settings sound. When you are satisfied with the settings, press [EXIT] once to terminate filter setup and return to the regular filter-play level. Or else press [EXIT] twice to return to normal PLAY mode. • FILTER play is available only when the sampling grade is set to LONG or EXLG. If you try to select this feature while the grade is HI or STD, the SU10 briefly displays the Change Grd! message, then resumes normal PLAY mode. For information about sampling grades and how to change them, see page 55. • Changing the filter type or switching the resonance to “Strong” may sometimes cause output to exceed the clipping level. If sound is distorted, press [-1] to reduce the volume. ● Playback ● 23 FILTER SETTINGS You can select from three filter types and three resonance values. The filter types are LPF (low-pass filter), BPF (band-pass filter), and HPF (high-pass filter). LPF: Removes frequencies above the cutoff value. BPF: Removes frequencies outside the cutoff range. HPF: Removes frequencies below the cutoff value. The resonance setting determines the amount of emphasis applied in the area around the cutoff frequency. Flat: Almost no emphasis Weak: Mild emphasis Strong: Dramatic emphasis The following drawings show how the resonance setting affects the frequency cutoff characteristics of a low-pass filter. Volume Volume Volume Cutoff flat Frequency Cutoff weak Frequency Cutoff Frequency strong Scratchpad You use this mode when you want to simulate the action of a DJ manually manipulating a turntable to produce a “scratch” effect. You begin by selecting the source sample that contains the sound section that you want to use for this effect. The ribbon will then work as an independent pad; running your finger over it is the same as pushing an analog disc back and forth on the turntable, with the needle stationed over a selected section. 1. With the SU10 in PLAY mode, hold down [SCRATCH] and press the pad containing the data section you want to use. The LCD changes in three places to indicate that you have selected the scratch effect. 24 ● Playback ● Current ribbon value SCRATCH indicator SCRATCH symbol 2. Now try running your finger over the ribbon to scratch out the section. The scratchpad does not operate on the entire source sample (unless it is very short), but only on a small section, or “window.” You can adjust the position of the window by pressing buttons as follows. [SCRATCH]+[FWD]: Moves the window slightly toward the end of the sample. [SCRATCH]+[BWD]: Moves the window slightly back toward the beginning of the sample. [SCRATCH]+[TOP]: Moves the window to the top of the sample. 3. To return to normal play mode, press [EXIT]. Crossfade This feature allows you to mix your sample and song output with a realtime acoustic signal received at the LINE INPUT or MIC INPUT jack. The SU10 outputs the mixing result over LINE OUTPUT. Once you have selected crossfade play, you can control the mix ratio dynamically by touching or rubbing the ribbon. Please connect a playback device (such as a CD player) to the LINE INPUT jack, or a microphone to the MIC INPUT jack, before trying this out. The MIC or LINE indication on the third line of the LCD must match the input source you are using; if necessary, refer to page 54 to 56 for instructions about how to change the setting. 1. With the SU10 in PLAY mode, press [SHIFT]+[CROSSFADER]. The LCD changes as shown to indicate that you have selected crossfade play. Effect-play indicator Current ribbon value CROSSFADE symbol ● Playback ● 25 2. You can now change the mix dynamically by touching or rubbing your finger over the ribbon. Try this now while playing back some samples or a song. Notice that the LCD displays the ribbon value in real time. 3. To return to normal PLAY mode, press [EXIT]. The CROSSFADE feature is not available if the sampling grade is set to HI. About Polyphony The maximum number of monaural samples that a device can play at any one time is referred to as its polyphony. During normal play at standard sampling grade, the SU10 can play four monaural (or two stereo) samples at once. Polyphony is lower, however, if you select HI sampling grade, or if you use the scale, scratch, filter, or crossfade effect. The following table shows the polyphonies for each combination of grade and play type. A “-” entry denotes an impossible combination; if you attempt to set such a combination, the LCD will return the Change Grd! message to indicate that you should reduce the sampling grade. Grade PLAY Normal Scale Filter Crossfade Pitch Scratchpad HI STD LONG EXLG 2 - 4 2 2 2 4 2* 2 4 4 2 4 2* 2 4 4 2 * The SCALE function can play only one sample (stereo or monaural) at a time. If you attempt to exceed the polyphony limit, the SU10 automatically forces off a playing sample to accommodate your new pad input. Specifically, the SU10 will switch off the oldest playing sample that is not in HOLD state; or, if all samples are in HOLD, then the oldest of these. 26 ● Playback ● Playing a Song Your SU10 can memorize and replay up to four songs. Each song is an arbitrary sample playback sequence that you have recorded into memory. The LCD always indicates the number of the currently selected song. When playing a song, you can choose to have the song play once only, or else repeat indefinitely until stopped. You can start song playback from any position within the song, interrupt the playback at any time, then resume from the interrupt point or from any other point. During PLAY mode, the LCD always indicates the current time position in the currently selected song. The following procedure shows you how to use all of the song replay features. The procedure assumes that you are using Demo Song 1. For information about how to create songs, refer to Chapter 7, page 35. For general advice about song replay, refer to “ABOUT SONG PLAY” on page 28. 1. Select the song. Hold down [SHIFT] and press the appropriate song pad. In this case, please select [SONG 1]. The selected song number appears on the display. (You can omit this step if the song you want to play is already selected.) 2. Press [PLAY] to begin playback; or press [PLAY]+[HOLD] to begin REPEAT playback. ▼ In REPEAT playback, song play will continue to loop indefinitely until you press [STOP]. An arrow indicator appears on the screen to indicate that REPEAT mode is selected. ▼ Notice that the meter keeps track of the song time. Time begins at 0 and advances in 1/10-second increments as you move through the song. Selected song SAMPLING UNIT min. REPEAT indicator REC TOP Song positioners BWD STOP PLAY FWD sec. 1/10-sec. Current position Press to stop song play. Press to start song play. ● Playback ● 27 3. Press [STOP] to interrupt the playback. 4. Press [PLAY] to resume playback from the point of interruption. 5. Press [STOP] to interrupt playback again. 6. Now try moving to different song locations. Press [FWD/>>] to move forward through the song, [BWD/<<] to move back, or [TOP] to jump back to the top of the song. (These operations are available only while song playback is stopped.) The LCD meter always shows the current location in the song. You can begin playing from any position by pressing [PLAY]. ABOUT SONG PLAY Song playback operates exactly as if you were playing the pads at the console in real time. The only exception is that song action is never transmitted over MIDI OUT. In all other respects, playing a song is functionally equivalent to pressing and releasing the corresponding pads. • You are free to combine pad play with song play. But you should avoid pressing a pad while the corresponding sample is being sounded from within a song, since this will cause the song sample to shut off. • Song playback is available with FILTER, CROSSFADE, and PITCH play. These effects apply to song samples just as they do to pad-played samples. • Avoid using [HOLD] while a song is sounding, as the HOLD action will apply to the sounding samples. Since HOLD acts as a toggle switch, it may cause some samples to stay on too long while shutting others off immediately. • Stopping a song at midpoint switches off all currently playing song samples. If you then restart from the same point, the interrupted samples do not resume. In general, the sound at any given timepoint within the song (as indicated by the time meter) may vary according to where you started the replay. • The SU10’s polyphony determines the maximum number of sounds that can play out at once. Playing a song with FILTER or SCRATCH, or at HI sampling grade, may cause some of its sounds to drop out. Combining pad and song action may also cause sounds to drop out. • If you edit or delete any of the samples used by the song, the song’s sound changes accordingly. 28 ● Playback ● External Performance Modes The external performance modes are an added feature that allow you to apply a dynamic filter or a DJ-like scratch effect to a realtime signal as it feeds through the SU10. Please keep in mind that these modes are not sampling modes, and have nothing to do with samples and songs as described above. Before trying the following procedures, connect a CD player or other playback device to the LINE IN jack. Or if you like, you can use these effects with microphone input instead. The MIC or LINE indication on the third line of the LCD must match the source you want to use; refer to page 56. External Scratch Under this mode, you use the ribbon to apply a scratch to a segment of feedthrough audio signal. The effect is that of a DJ who suddenly puts a finger onto a playing disc and begins moving it back and forth. While the ribbon is untouched, the SU10 feeds the incoming audio signal through without change, while at the same time holding the most recent portion of the signal in an internal scratch buffer. When you touch the ribbon, the SU10 switches off the feed-through; you can then move your finger across the ribbon to produce scratch play of the buffered data. When you release the ribbon, realtime feedthrough resumes. Procedure 1. Press [SHIFT]+[EXTERNAL SCRATCH] to enter the mode. The LCD changes as shown below to indicate that you are in external scratch mode. SCRATCH indicator External-mode indicator SCRATCH symbol 2. Feed a sound signal through the SU10. Use the [+1] or [-1] button to adjust the volume as necessary; the LCD indicates the current volume. 3. Now try alternately scratching and then releasing the ribbon. Listen to the type of effect you get. Notice also that the LCD’s RIBBON indicator displays the ribbon value in real time. 4. To quit the mode, press [EXIT]. ● Playback ● 29 External Filter This mode applies filtering to realtime input as it feeds through the SU10. You use pads 1 to 4 to select or change the filter type, and pads 7 to 9 to select or change the resonance. You use the ribbon to dynamically change the filter cutoff frequency. Procedure 1. Press [SHIFT]+[EXTERNAL FILTER]. The screen displays four special indicators: external-mode indicator, filter-type indicator, resonance indicator, and graphic image of the current filter effect. Effect-play indicator Current ribbon value External-mode indicator Filter image "Weak" resonance 2. Press the pads corresponding to the filter and resonance you want to use. The LCD indicators change to reflect the new selections. (For information about filter types and resonance, see FILTER SETTINGS box on page 24.) Filter Type [PAD [PAD [PAD [PAD 1]: 2]: 3]: 4]: LPF BPF HPF Bypass Resonance l b h * [PAD 7]: Flat [PAD 8]: Weak [PAD 9]: Strong f w s 3. Now feed some sound through the SU10 and listen to the filter effect. Poke your finger at various points on the ribbon, then run your finger up and back: the cutoff point will change with each touch. Try this with different filter types and resonance settings. You will see that you can get some very interesting sounds. You can use the [+1] or [–1] button to adjust the volume. ▼ Notice that the LCD’s RIBBON indicator displays the current ribbon value in real time. 4. To quit the mode, press [EXIT]. 30 ● Playback ● 7 Recording Samples, and Creating Songs This chapter explains how to record samples and how to create songs. (Explanation of song creation begins on page 35.) Sample Recording Overview To record a sample, you must (1) connect up the input source, (2) enter REC mode and select the destination pad, (3) set the recording parameters, (4) start the recording, and (5) stop the recording. Each of these steps will be described in turn. Connecting the Input Source Connect a line input to the LINE IN jack, or a microphone to the MIC INPUT. Entering REC Mode and Selecting the Pad 1. Check that the SU10 is in PLAY mode, then press [REC] to enter RECORDING mode. The LCD displays the REC indicator and prompts you to select the pad to be recorded. The LCD’s meter area indicates the available recording time. Remaining recording time ▼ Available recording time depends on (a) the amount of memory already used by other pads, and (b) the current settings for the Grade, Pitch, and Format recording parameters. ▼ Once you have entered RECORDING mode, you can return to PLAY mode at any time by pressing [EXIT]. ● Recording Samples, and Creating Songs ● 31 2. To select, press [BANK] to choose the desired bank, then press the appropriate pad or press [+1] or [–1] as necessary. When you are sure that you have selected the correct pad, press [ENTER]. The LCD displays the Gain parameter setting. The GAIN indication on the third line of the LCD indicates the input level. ▼ If the bank you have selected is locked, the LCD displays the Locked Bank! message, then automatically returns you to PLAY mode. (For instructions about how to unlock a bank, see page 64.) ▼ If the bank is unlocked but the pad is already occupied by an existing sample, the LCD will ask whether you want to delete (overwrite) it: press [ENTER] to delete, or [EXIT] to return to PLAY mode. If you delete the sample, the available recording time will increase accordingly. Setting the Recording Parameters The LCD now displays the Gain setting, the first of seven recording parameters. Set each parameter to the appropriate value before beginning to record. To move from one parameter to another, press [>] or [<]. To change the setting of a parameter, press [–1] or [+1]. The following diagram illustrates the structure. The RECORDING PARAMETERS box describes each of the parameters in detail. Gain [<][>] Grade [<][>] Pitch [<][>] Format [<][>] Input [<][>] RecTrg [<][>] Defalt You can also set these parameters (with the exception of the Gain parameter) from the UTILITY mode’s Recording Setup utility (see page 55). You will generally want to use UTILITY mode when you need to set these parameters for purposes other than recording. For example, the Grade setting also affects the playback pitch and polyphony, while the Input parameter selects the input source used during CROSSFADE, EXTERNAL FILTER, and EXTERNAL SCRATCH play. 32 ● Recording Samples, and Creating Songs ● RECORDING PARAMETERS Gain: Sets the gain applied to the input signal. Press [–1] or [+1] to adjust the gain setting while inputting a signal similar to the signal you plan to record. (You may first need to change the setting of the Input parameter to match your input source; see explanation below.) You can set the gain to any value between 1 to 16; in general, you want to set the gain as high as you can without causing clipping. If the setting is too high, a ∗ mark appears to the right of Gain. If you see this mark, reduce the setting. Gain is too high! Grade: Selects the sampling grade at which the sample is recorded. You have four choices: High, Standard, Long, and Extra Long (Hi, Std, Long, Exlg). The tradeoff is between quality and recordable length: “High” gives the best quality but is very memory-intensive and limits the available recording time. “Extra Long” provides much longer recording time at a significant cost in quality. • A sample recorded at a given sampling grade will change its pitch if played at a different grade. You may therefore find it best to record all related samples at the same grade. • Playback at “High” grade reduces the available polyphony. If you plan to play your recorded sample in combination with other samples, you may want to avoid the “High” setting. • Total maximum recording time (for all 48 samples) at High grade is limited to approximately 19 seconds. A sampling grade of High combined with a pitch setting of +10% will provide a true sampling rate of 44.1kHz — the same as used on a conventional CD recording. ● Recording Samples, and Creating Songs ● 33 Pitch: You can use this setting to add an offset to the system’s pitch; the available range is -20% to 10%, settable in 1% increments. The setting applies to all samples and songs, and controls the pitch during both recording and playback. The adjustment is exactly analogous to applying a slight change to the rotation speed of an analog tape recorder; the pitch change applies both to tracks being recorded and to tracks being played back. • In general, you will want to leave this setting at 0% for recording purposes. But note that increasing the pitch value will improve the actual sampling grade, while decreasing the value will provide slightly longer recording time. • You can also use the pitch setting to match the length of the sample you are about to record to the length of another phrase that has already been recorded. Recording the two samples at different pitches may make it possible for them to have equal replay lengths (tempos). Format: Selects whether to record in stereo or mono (St or Mono). If you select mono, the SU10 records the left input only. Note that a stereo sample counts as two sounds in the polyphony calculation: you can never play more than two stereo samples at once. Input: Selects whether the SU10 takes its input from the LINE IN jack or the MIC INPUT jack (Line or Mic). You cannot use both inputs together; you must set this value to match the input you wish to use. The third line of the LCD always indicates the currently selected source. RecTrg: Selects the trigger that starts the actual recording. You can select one of eight triggers. Mnual: Manual trigger; recording will begin when you press [PLAY]. 1,...,7: The SU10 will enter standby when you press [PLAY], then begin recording when the input level reaches the trigger level. Value “1” selects the lowest trigger level (hair trigger); value “8” selects the highest level. Defalt: Selects the default loop mode — the loop mode initially used for playing back the recorded sample. This setting is not binding, since you can change the value at any time by editing the sample. For information about loop modes, see page 41. 34 ● Recording Samples, and Creating Songs ● Starting/Stopping the Recording To start recording, press [PLAY]. If the recording trigger (RecTrg) is set to “manual,” the SU10 starts recording immediately; otherwise it displays the Waiting message and waits for the input level to reach the trigger level. During recording, the LCD displays the word Recording, and the meter decrements to indicate the remaining recordable time. You can end recording at any time manually, or else continue to record until you run out of memory. To end recording manually: Press [STOP]. The SU10 displays the Finished message, then returns to PLAY mode. If memory runs out: The SU10 stops the recording, briefly displays the Memory Full! message, then returns to PLAY mode. Do not switch off the power while the Finished! or Memory Full! message is on the LCD as this may in some cases cause destruction of all internal data. Creating Songs To record a song, you (1) enter RECORDING mode and select the destination song, (2) press [PLAY] to begin the recording, (3) press the pad sequence you want to record as a song, (4) press [STOP] to end the recording. The procedure is described below. For hints about song creation, refer to the “Creating Effective Songs” on page 37. • The SU10 has 4000 words (8KB) of dedicated song memory, sufficient for about 1000 pad and button on/off events. The LCD indicates the amount of remaining memory as recording proceeds. • The song recording function recognizes both pad action and MIDI IN action. It is possible to record from MIDI input in place of (or in addition to) local pad play. • You cannot record to a locked song. For information about song locks, see page 64. ● Recording Samples, and Creating Songs ● 35 Procedure 1. Check that the SU10 is in PLAY mode, then press [REC] to enter RECORDING mode. The LCD appears as follows. 2. Hold down [SHIFT] and press the pad corresponding to the song you want to record ([SONG 1] to [SONG 4]). The LCD will then ask for confirmation, and the meter will indicate the remaining free song memory. ▼ If you wish to change to a different song, hold [SHIFT] and press the appropriate pad. If you wish to cancel and return to PLAY mode, press [EXIT]. 3. When you are ready to confirm, press [ENTER]. If the song you have selected is recordable, the LCD displays the Press Play message. ▼ If the song you have selected is locked, the LCD displays the “Locked Song!” message, then automatically returns you to PLAY mode. (For instructions about how to unlock the song, see page 64.) ▼ If the song is unlocked but already contains a recorded sequence, the LCD will first ask whether you want to delete (overwrite) it. If you wish to proceed, press [ENTER] and continue to the next step. If you wish to cancel, press [EXIT] to return to the screen shown at Step 1 above. 4. Press [PLAY] to begin recording. But note that the SU10 will not start actual recording until the moment you press a pad to begin the sequence. 5. Play the pad sequence you want to record. ▼ The song will record all BANK and PAD action, as well as HOLD and REVERSE action. Ribbon operation is not recorded.The LCD meter keeps track of remaining song memory. ▼ You can abort the recording and return to PLAY mode at any time by pressing [EXIT]. If you do so, the previously existing song (if any) will “undelete” itself and be recovered. 6. To end the recording and return to PLAY mode, press [STOP]. ▼ 36 If you run out of song memory, the SU10 ends the recording automatically, displays the Memory Full! message for about one second, then returns you to PLAY mode. ● Recording Samples, and Creating Songs ● Creating Effective Songs Planning ahead will help you create more effective songs and avoid unanticipated problems. Note the following general precautions. ■ Do not include samples that you intend to edit or delete later. The sound of the song will change if you edit or delete any of the samples that it uses. ■ If you plan to accompany the song with normal pad play or MIDI-controlled pad play: • Remember that polyphony is limited. Don’t overload the song with simultaneous sounds. Consider leaving some unrecorded spaces to allow for free pad play. • Your song should not use pads that you intend to play yourself, since a conflict will occur if you and the song try to control the same pad at the same time. A good strategy is to record the song from one bank, then play along from another bank. Or record using pads 1 to 6, and play along using pads 7 to 12. ■ If you plan to use SCRATCH or FILTER with your song: • Remember that polyphony is significantly reduced during SCRATCH and FILTER play (see page 26). A song that sounds fine during normal play may lose important sounds when used with these features. Design your song for the available polyphony: no more than two monaural or one stereo sample playing at any given time. ■ If you plan to begin play at positions other than top-of-song: • Do not include samples whose Sounding Mode is set to “Toggle” (see page 43), since the pad trigger action changes according to the current replay state. If you start a song from mid-position, you may find that sample replay begins where you expected it to end, or ends where you wanted it to begin. For additional information, refer to the ABOUT SONG PLAY box, page 28. ● Recording Samples, and Creating Songs ● 37 8 Editing Introduction This SU10 offers you a variety of ways to edit your samples to control the way they play back. For example, you can choose: • Which portion of the sample plays out • The direction of play (forward or reverse) • Whether the sample loops or plays one time only • Whether playback continues when you release the pad You edit a sample by entering EDIT mode, selecting the sample, then making the desired changes at one or more of the various edit functions. It is possible to play a sample during editing so that you can hear the effect of your changes. You are also free to switch editing to a different sample without leaving EDIT mode. A listing of the edit functions appears below. The first eight functions set parameter values; the remaining five functions execute an operation. Keep in mind that the parameter-setting functions and the COPY and MOVE operations do not affect the sound-data content of the sample in any way, so that you can try out various changes without fear of destroying your recorded phrase. The SPLIT, COMPACT and DELETE operations, however, will alter or delete the recorded wave and should therefore be handled with special care. Editing Functions (1) (2) (3) (4) (5) (6) (7) (8) (9) (10) (11) (12) (13) 38 Set the loop mode. Set the sounding mode. Set the volume. Set the alternate group. Set the MIDI note number. Set the start point. Set the loop point. [Only if loop mode = PLoop] Set the end point. Copy sample to another pad. Move sample to a different pad. Split one sample into two. Compact (trim) the sample. Delete the sample. ● Editing ● Change wave content; not reversible Basic Procedure 1. Starting from PLAY mode, press [SHIFT]+[EDIT]. The LCD returns the message Which pad? ▼ Once you have entered EDIT mode, you can return to PLAY mode at any time by pressing [EXIT] once or (in some cases) twice. 2. Select the sample you want to edit. Press [BANK] to select the bank, then press the pad corresponding to the sample. The LCD displays the Edit xx? message (where xx identifies the selected pad). If you like, you can change the selection by pressing [BANK], a different pad, or [+1], [–1]. When you are satisfied with your selection, press [ENTER]. ▼ If you press an empty pad, the LCD displays the Pad Empty message and waits for a different selection. ▼ If you select a pad that is in a locked bank, the LCD briefly displays the Locked Bank! message. 3. Move to the appropriate edit function. The SU10 begins from the first edit parameter — the loop-mode setting. If loop mode is currently set to “One-Shot,” for example, the LCD will look something like this. Edit mode If you are satisfied with the current setting, you can proceed to the next edit function by pressing [>]. In general, you can move from function to function by pressing [>] or [<]. The sequence is as follows: ● Editing ● 39 LOOP MODE [<][>] SOUNDING MODE [<][>] PAD VOLUME [<][>] ALTERNATE GROUP [<][>] MIDI NOTE NUMBER [<][>] START POINT [<][>] LOOP POINT* [<][>] END POINT [<][>] COPY [<][>] MOVE [<][>] SPLIT [<][>] COMPACT [<][>] DELETE * Loop Point setting appears only if LOOP MODE = PLoop. As a shortcut, you can press any of the following buttons to jump directly to the corresponding function. [TOP] → START POINT setting [BWD] → LOOP POINT setting (Available only if loop mode is set to Partial Loop.) [FWD] → END POINT setting 4. Change the value, or execute the operation. To change a value You can always change a value by pressing or holding [+1] or [–1]. For some parameters you can also use the ribbon to change the value: you may find it useful to select an approximate value with the ribbon, then adjust with [+1] or [–1]. The MIDI Note Number parameter can be set via MIDI input. For more information, refer to the individual parameter explanations below. To execute an edit operation COPY, MOVE, SPLIT: Select the destination by pressing [BANK], the appropriate pad, or [–1], [+1] as necessary. Then press [ENTER] to execute. COMPACT, DELETE: Check the pad selection, then press [ENTER]. Then press [ENTER] once again to confirm, or [EXIT] to cancel. 5. Repeat steps 3 and 4 as necessary to edit the selected sample. 6. If you wish to edit a different sample, press [BANK] and/or the appropriate pad. This will return you to Step 2 above. 7. When you have finished editing, press [EXIT] to return to PLAY mode. 40 ▼ During editing, you can hear the current editing result by pressing the pad of the sample you are working on. But you must be careful to press the correct pad. If you press a different pad, the SU10 stops editing of the current sample and offers to switch to your new selection. Note that the LCD does not indicate the sample that is currently being edited; you must remember this yourself. ▼ If you switch from one sample to another during editing, the SU10 begins editing of the new sample starting from the last selected edit function. This feature is convenient when you need to change the same parameter on two or more samples: change the value on the first sample, then press the pad for the next sample, then change the value again, and so on. ● Editing ● Edit Parameters and Operations LOOP MODE [LpMode] Purpose: Sets the playback direction and loop method. Values: OShot, WLoop, Ploop, RShot, RLoop To set: Press [+1], [–1] Explanation • OShot (One Shot) The sample plays once through, from Start Point to End Point, then stops. Start point Actual wave start • End point Actual wave end WLoop (Whole Loop) Play begins from the Start Point, advances to the End Point, then jumps back to the Start Point and repeats in a continuous loop. Start point Actual wave start End point Actual wave end ● Editing ● 41 • PLoop (Partial Loop) The sample plays one through from Start Point to End Point, then jumps back to the Loop Point. The section from the Loop Point to the End Point then plays out repeatedly. Start point Loop point End point Actual wave end Actual wave start Note that it is possible to set the Loop Point to an earlier position than the Start Point. Start point Loop point End point Actual wave end Actual wave start • RShot (Reverse Shot) The sample plays backwards once through, from End Point to Start Point. • RLoop (Reverse Loop) The sample plays backwards in a loop. Play starts from the End Point, moves to the Start Point, then jumps back to the End Point and repeats. 42 ● Editing ● Please note the following important points. • The Loop Mode setting determines how playback proceeds while the sample is ON, but the Sounding Mode setting determines the sample’s ON/OFF action. If Sounding Mode is set to “Trigger,” the sample will not loop. • The Start Point, Loop Point, and End Point can all be changed by editing, as described below. The loop length must be at least 128; the SU10 will not permit you to set loops shorter than this. • If you use the [REV] effect on a sample that is set to a reverse loop mode, the sample will play out in its original (forward) direction. SOUNDING MODE [SdMode] Purpose: Sets the pad’s ON/OFF action. Values: Note, Toggl, Trggr To set: Press [–1], [+1] Explanation • Note (Note-driven) The sample plays only while the pad is held down. Play stops as soon as you release the pad, unless you extend the play by pressing [HOLD]. Pad Press • Pad Release Toggl (Toggle) Play starts when you press the pad the first time. The sample then plays through once (if One Shot or Reverse Shot) or else loops endlessly. To switch off the playing sample, you must press the pad once again. Notice that under this mode the release of the pad has no effect. Pad Press Pad Release Pad Press ● Editing ● 43 • Trggr (Trigger-driven) Pressing the pad (or sending a MIDI Note On) causes the sample to play once through, from Start Point to End Point. The sample does not loop. (But if Loop Mode is set to RLoop or RShot the sample will play in reverse.) Pressing the pad again (or sending another MIDI Note On) while play is in progress causes playback to start over. Pad Press PAD VOLUME Pad Release [PadVol] Purpose: Sets the sample’s relative volume. Values: 0,...,127 To set: Touch the ribbon; press or hold [–1] or [+1]. Explanation Use this setting to adjust the sample volume relative to that of other samples. If you find that the sample A3 is too loud when played together with sample A4, for example, you can adjust by lowering the volume for A3 and/or increasing the volume for A4. If you play the sample while changing the value, you will be able to hear the level going up or down. ALTERNATE GROUP [AltGrp] Purpose: Selects the sample’s alternate group. Values: Off, 1, 2, 3 To set: Press [–1], [+1]. Explanation You use this feature to identify samples that you do not want to have sounded together. All samples in the same group become mutually exclusive; playing a sample from a given group automatically forces off any other sample from that same group. You can set each sample into any of three groups (1, 2, or 3), or you can set the value to Off (no group). 44 ● Editing ● This feature is useful for • Preventing simultaneous play of clashing sounds. • Reducing risk of accidental sound dropouts caused by too many samples playing at once. • Operational efficiency: You can use a single pad to simultaneously stop play of one sample and start play of another. This operation would otherwise require two (carefully timed) button presses. MIDI NOTE NUMBER [Note#] Purpose: Selects the pad’s MIDI Note Number. Values: Off; C-2,...,G8 To set: Press/hold [–1] or [+1], or input MIDI NOTE ON message. Explanation This function selects the MIDI Note Number assigned to the pad. You can drive the pad’s play by inputting MIDI messages carrying the selected note number; or you can use the pad to drive the corresponding note of an external MIDI device. You can set the value in either of two ways: • By pressing [+1] or [–1] • By inputting a MIDI NOTE ON message from an external MIDI device. (The setting will automatically change to match the message’s note number.) Under default conditions, note numbers are assigned sequentially starting from pad A1 (note “C1”) and ending with pad D12 (note “B4”). ▼ If you select a note number that is already in use on another pad, the setting on the other pad automatically switches to Off. ▼ The assignments made here are not effective during SCALE play. For information about how note numbers are handled during SCALE play, see page 20. ▼ The SU10 recognizes velocity values in MIDI Note-On messages, and varies the replay level accordingly. ▼ It is possible to have a MIDI Note On message drive a sample in reverse. To use this feature, you must first set the SU10’s “program” to 2 (by sending a MIDI Program Change message carrying program number 01h). Once you have done this, any Note-On message with a velocity of 110 or above will drive the corresponding sample in reverse — the same action you can get locally by holding [REV] while pressing the pad. ● Editing ● 45 START POINT [StPnt] Purpose: Sets the playback start point. Values: 0,...,(127 less than endpoint) To set: Touch the ribbon; or press or hold [–1], [+1]. Explanation This function sets the sample’s start point. The selected point determines where sample replay starts (for forward-direction play) or ends (for reverse-direction play). A setting of 0 corresponds to the wave start point. Note that you can change this value by touching the ribbon. (The leftmost point of the ribbon corresponds to a setting of 0.) You may find it convenient to touch the ribbon to get an approximate value, then press [+1] or [–1] for fine tuning. If loop mode is set to Whole Loop or Reverse Loop, you can hear how the loop sound alters as the value changes. Simply hold down the pad while changing the value; the sample will continue to loop as the Start Point changes. Also if loop mode is Whole Loop or Reverse Loop, the SU10 will display the TEMPO indicator and current tempo at the bottom right of the LCD. The tempo value will change as you adjust the START point. Refer to the “About TEMPO” box for information. About TEMPO When you edit the start point or end point of a loop, the lower right of the LCD displays the word TEMPO, and the meter area indicates a tempo value. The value is an estimation of the tempo of the looping segment (in beats per minute), and can be used as a reference for matching the timing of loops on different samples. The value always falls between 80.00 and 159.99; the calculation is based on the assumption that the loop segment consists of a regular number of “beats” (1, 2, 4, 8, 16, or so on). Note that the value applies to the looped part only. For a “Whole Loop” or “Reverse Loop” sample, this is the area between the Start Point and the Loop End point. For a “Partial Loop” sample, however, this is the area between the Loop Point and the End Point. In most cases the tempo is shown to the nearest hundredth of a beat, with an underscore for the decimal: 124_34, for example, means “124.34 beats per minute.” For reverse loops and very long forward loops, the calculation is shown to the nearest full beat only: 124_—. No tempo is displayed for loops that are shorter than 0.375 second. Because tempo calculation is based on the loop’s time length, the result varies according to the current Grade and Pitch settings. 46 ● Editing ● LOOP POINT [LpPnt] (Appears only if Loop Mode=PLoop) Purpose: Sets the start point of the loop segment. Values: 0,...,(127 less than endpoint) To set: Touch the ribbon; or press or hold [–1], [+1]. Explanation This parameter, which appears only if the sample’s loop mode is set to “Partial Loop,” sets the start point for the loop segment. Recall that under Partial Loop mode, the sample plays one time from Start Point to End Point, then plays subsequent iterations from Loop Point to End Point. You can change this value by touching the ribbon. You may find it convenient to touch the ribbon to get an approximate value, then press [+1] or [–1] for fine tuning. You can hear how the loop sound alters as you change the value. Simply hold down the pad while changing the value; the sample will continue to loop as the value changes. During editing, the SU10 displays the TEMPO indicator and current tempo at the bottom right of the LCD. The tempo value will change as you adjust the setting. Refer to the “About TEMPO” box on page 46 for details. END POINT [EdPnt] Purpose: Sets the playback end point. Values: Start/loop point + 127,....,wave end To set: Touch the ribbon; or press or hold [–1], [+1]. Explanation This function sets the sample’s end point. The selected point determines where sample replay ends (for forward-direction play) or starts (for reverse-direction play). The maximum value is equal to the wave end point; the minimum value is 127 greater than the Start Point or Loop Point (whichever is greater). Note that you can change this value by touching the ribbon. (The rightmost point of the ribbon corresponds to the end location of the recorded wave.) You may find it convenient to touch the ribbon to get an approximate value, then press [+1] or [–1] for fine tuning. If loop mode is set to Whole Loop, Partial Loop, or Reverse Loop, you can hear how the loop sound alters as the value changes. Simply hold down the pad while changing the value. ● Editing ● 47 Also if loop mode is Whole Loop, Partial Loop, or Reverse Loop, the SU10 will display the TEMPO indicator and current tempo at the bottom right of the LCD. The tempo value will change as you adjust the setting. Refer to the “About TEMPO” box on page 46 for details. COPY [CopyTo ?] Purpose Use this function to copy the content of one pad into another. The destination pad must be empty, and there must be enough free memory to accommodate the copy. Following the copy, the source and destination pads will hold identical wave content and parameter settings, except that the MIDI Note Number for the destination pad will remain unchanged. Source Pad Pad Sample Sample Execute Copy Destination Pad Pad Sample Procedure 1. When you enter this function, the LCD displays a message such as the following: CopyTo x x? Change the destination selection as necessary. To change the bank, press [BANK]. To change to a different sample in the same bank, press the corresponding pad, or else press [+1] or [–1]. ▼ If you do not wish to execute the copy, press [>] or [<] to change to a different edit function, or else press [EXIT] to return to PLAY mode. 2. Press [ENTER]. The LCD displays a confirmation prompt. Cpyx x →y y? 48 ● Editing ● 3. Press [ENTER] to execute the copy. If the copy is allowed, the SU10 begins execution and displays the Keep PwrOn message. Do not switch off power while this message is on the screen. ▼ If your destination pad is in a locked bank, the LCD briefly displays the Locked Bank! message, then waits for you to select another destination. ▼ If the destination pad is already occupied, the LCD briefly displays the Cannot Copy! message, then waits for another selection. 4. When execution is completed, the LCD briefly displays the Complete message, then asks whether to begin editing of the destination pad. You can now (a) press [ENTER] to start editing of the destination pad; (b) select a different pad for editing; or (c) press [EXIT] to return to PLAY mode. MOVE [MoveTo ?] Purpose Use this function to move a sample (wave content and all parameter settings other than MIDI Note Number) from one pad to another. The destination pad must be empty. Following the operation, the source pad will be empty, and the destination pad will hold the sample. Source Pad Pad Sample Execute Move Destination Pad Pad Sample Procedure 1. When you enter this function, the LCD displays a message such as the following: MoveTo x x? Change the destination selection as necessary. To change the bank, press [BANK]. To change to a different sample in the same bank, press the corresponding pad, or else press [+1] or [–1]. ● Editing ● 49 ▼ If you do not wish to execute the move, press [>] or [<] to change to a different edit function, or else press [EXIT] to return to PLAY mode. 2. Press [ENTER]. The LCD displays a confirmation Prompt. Movx x →y y ? 3. Press [ENTER] to execute the move. If the move is possible, the SU10 begins execution and displays the Keep PwrOn message. Do not switch off power while this message is on the screen. ▼ If your destination pad is in a locked bank, the LCD briefly displays the Locked Bank! message, then waits for you to select another destination. ▼ If the destination pad is already occupied, the LCD briefly displays the Cannot Move! message, then waits for another selection. 4. When execution is completed, the LCD displays the Complete message, then asks whether to begin editing of the destination pad. You can now (a) press [ENTER] to start editing of the destination pad; (b) select a different pad for editing; or (c) press [EXIT] to return to PLAY mode. SPLIT [SpltTo ?] Purpose You use this function to split the sample you are editing into two parts. The split is executed at the sample’s End Point. The initial portion of the wave content (from wave start to End Point) remains in the original pad, while the final area (from End Point to wave end) moves into the destination pad. This function is useful for dividing up a long pad, or for breaking a pad into two or more pieces so that you can play the pieces together. Pad Original StPnt EdPnt Sample Pad StPnt EdPnt Sample Execute Destination Pad Pad Sample 50 ● Editing ● You cannot execute a split unless the following two conditions hold: 1. The destination pad is empty. 2. The End Point value of the source pad is at least 128 units less than its maximum possible value. Procedure 1. When you enter this function, the LCD displays a message such as the following: SpltTo x x? Change the destination selection as necessary. To change the bank, press [BANK]. To change to a different sample in the same bank, press the corresponding pad, or else press [+1] or [–1]. ▼ If you do not wish to execute the split, press [>] or [<] to change to a different edit function, or else press [EXIT] to return to PLAY mode. 2. Press [ENTER]. The LCD displays a confirmation prompt. Splx x →y y? 3. Press [ENTER] to execute. If splitting is possible, the SU10 begins execution and displays the Keep PwrOn message. Do not switch off power while this message is on the screen. ▼ If your destination pad is in a locked bank, the LCD briefly displays the Locked Bank! message, then waits for another destination selection. ▼ If the destination pad is already occupied, or if the pad’s End Point is within 128 units of the wave end, the LCD will return the Cannot Splt message and prompt you for another pad selection. If the problem is with the End Point setting, you will not be able to execute the split no matter which pad you choose; you must press [<] or [>] to change the edit function, or else press [EXIT] to return to PLAY mode. 4. Once the split is executed, the LCD asks whether to begin editing of the destination pad. You can (a) press [ENTER] to start editing of the destination pad; (b) select a different sample for editing; or (c) press [EXIT] to return to PLAY mode. ● Editing ● 51 COMPACT [Compct ?] Purpose To compact a sample means to remove all of its leading and trailing waveform data — that is, all waveform data existing ahead of the Start Point or Loop Point (whichever is first), as well as all data existing after the End Point. By clearing this extraneous data, you free some memory for additional recording. This operation does not affect the sample’s current sound, since leading and trailing data are not reproduced during playback. But once you have deleted this data, it is lost forever, and cannot be restored by editing. Execute Pad StPnt EdPnt Sample Pad StPnt EdPnt Sample Procedure 1. The LCD displays the following message, where xx identifies the currently selected pad. Compct x x? You are free to change the selection. To change the bank, press [BANK]. To change to a different sample within the same bank, press the corresponding pad, or [+1] or [–1]. ▼ If you do not wish to compact, press [>] or [<] to change to a different edit function, or else press [EXIT] to return to PLAY mode. 2. Press [ENTER] to execute. The LCD displays a confirmation query. Cpt xx Sure? 3. To execute, press [ENTER] again. ▼ If you do not want to execute, press [EXIT] instead. The SU10 returns to Step 1 above. 4. The SU10 begins execution and displays the Keep PwrOn message. Do not switch off power while this message is on the screen. When execution is completed, the LCD briefly displays the Complete message, then returns to the same prompt display shown in Step 1 above. 5. To select another pad for compacting, repeat from Step 1 above. To return to PLAY mode, press [EXIT]. 52 ● Editing ● ▼ You may notice that the Start Point (or Loop Point) value may not return to exactly 0 following compacting, but may be as high as 1 (for a stereo sample) or 3 (for a monaural sample). In the same way, the End Point may be 1 to 3 units ahead of the actual wave end. This is because the SU10 can only delete data in 2-unit (if stereo) or 4-unit (if monaural) segments. DELETE [Delete ?] Purpose This procedure deletes the entire sample from memory. Recordable memory space increases, and the emptied pad becomes free to accept new data. Pad Execute Pad Sample Procedure 1. When you enter this function, the LCD displays the following message, where xx identifies the currently selected pad. Delete x x? 2. Press [ENTER]. The LCD displays a confirmation query. Del xx Sure? 3. To execute, press [ENTER] again. ▼ If you do not want to execute deletion, press [EXIT] instead. The SU10 returns to Step 1 above. 4. The SU10 begins execution and displays the Keep PwrOn message. Do not switch off power while this message is on the screen. When execution is finished, the LCD briefly displays the Complete message, then returns the Which Pad? prompt. 5. Select another pad for editing, or else press [EXIT] to return to PLAY mode. ● Editing ● 53 9 UTILITY Mode Introduction You use UTILITY mode to make various system settings and to perform system management and MIDI-related operations. The mode comprises seven utilities, as follows. Name Function Page Rec MIDI Bulk MSDS Song Lock Init Set recording parameters. Set MIDI parameters. Send/receive bulk dump. Execute a sample dump. Delete a selected song. Lock/unlock a bank or song. Delete all data and initialize system. 55 56 58 62 63 64 64 General Procedure 1. Enter the UTILITY menu. From PLAY mode, press [SHIFT]+[UTIL]. The LCD changes as follows. The word Utilty indicates that you are at the menu level. UTILITY mode 54 ● UTILITY Mode ● 2. Press [>] or [<] as necessary to select the utility you need to use. Rec [<][>] MIDI [<][>] Bulk [<][>] MSDS [<][>] Song [<][>] Lock [<][>] Init 3. Press [ENTER] to enter the utility. 4. Set the parameters or execute the operation within the utility you have selected. • To move to another parameter or operation within the same utility … Press [>] or [<]. • To change a parameter setting … Press [+1] or [–1]. • To execute an operation … Press [ENTER]. 5. Press [EXIT] once to return to the UTILITY menu. If you need to work at another utility, return to Step 2 above. 6. Press [EXIT] again to return to PLAY mode. Recording Setup [Rec] You can use this utility to preset the parameters to be used for recording. You may also use it to adjust the sampling grade, pitch, and input-source settings for purposes of playback. The following diagram shows the utility structure. Grade [<][>] Pitch [<][>] Format [<][>] Input [<][>] RecTrg [<][>] Defalt All of these parameters are accessible under RECORDING mode; for detailed information, refer to pages 32 to 34. The three parameters that apply also to playback are described briefly below. • Grade: Selects the sampling grade at which the sample is replayed. You have four choices: High, Standard, Long, and Extra Long (Hi, Std, Long, Exlg). In general, you will want to use the same grade that was used at recording, since use of a different grade will change the pitch. Note that a setting of “Hi” reduces the SU10 polyphony and disables use of FILTER, CROSSFADE, PITCH, SCALE, and SCRATCH features, while a setting of “Std” disables use of FILTER and SCALE. If you attempt to select a disabled play feature, the SU10 returns the Change Grd! message. You can correct the problem by changing the Grade setting at this utility. ● UTILITY Mode ● 55 • Pitch: You can use this setting to add an offset to the system’s pitch; the available range is -20% to 10%, settable in 1% increments. • Input: Selects whether the SU10 takes its input from the LINE IN jack or the MIC INPUT jack (Line or Mic). You will need to set the appropriate value if you are using the CROSSFADE, EXTERNAL FILTER, or EXTERNAL SCRATCH feature. MIDI Setup [MIDI] You use this utility to set the SU10’s MIDI parameters. The following diagram shows the utility structure. MIDICh [<][>] DevNum [<][>] Local [<][>] RbnNum [<][>] NoteTbInit? [<][>] NoteTbClr? MIDI Channel [MIDICh] Purpose: Sets the MIDI channel. Values: 1,...,16, Off Explanation Selects the channel for both incoming and outgoing MIDI channel messages. The SU10 attaches the specified channel number to outgoing channel messages (Note On, Note Off, and Control Change messages). It responds only to those incoming channel messages (Note On, Note Off, and Channel Volume messages) that carry the specified channel number. If the setting is Off, the SU10 does not send or receive channel messages. MIDI Device Number [DevNum] Purpose: Sets the SU10 device number for System Exclusive messages. Values: 1,...,16, All, Off Explanation This setting assigns the device number that the SU10 uses for incoming and outgoing data dumps and other system exclusive messages. 1,...,16 The SU10 includes the selected device number in outgoing messages, and responds only to those incoming message that include this device number. 56 ● UTILITY Mode ● All Off The SU10 accepts dumps from any device, and transmits dumps to Device 1. The SU10 does not accept incoming dumps, and transmits dumps to Device 1. Local Control [Local] Purpose: Sets local control on or off. Values: On, Off Explanation This setting selects whether the SU10 pads control SU10 playback. On You can use both the SU10 pads and remote MIDI messages to control playback. Off Local playback is controlled exclusively by MIDI messages received from external devices. Ribbon Number [RbnNum] Purpose: Assigns the ribbon’s controller number. Values: Off, P.Bnd, 0,...,120 Explanation This setting assigns a controller number to the ribbon, so that you can use the ribbon to drive an external controller. Off The SU10 does not output Control Change messages. P.Bnd When you change the ribbon value, the SU10 outputs a Pitch Bend message indicating the new value. 0,...,120 When you change the ribbon value, the SU10 outputs a MIDI Control Change message indicating the new value. The message carries the controller number specified by this parameter. Initialize Note Table [NoteTbInit?] Purpose Reinitializes MIDI note-number assignments. Procedure Press [ENTER] to execute. The LCD will return the Init Sure? confirmation prompt. Press [ENTER] again to proceed, or press [EXIT] to cancel and return to the UTILITY menu level. ● UTILITY Mode ● 57 Explanation This operation deletes current pad/note-number assignments, and reassigns note numbers to pads sequentially, as follows. Pad A1 A2 : A11 A12 B1 : D12 Number 36 (C1) 37 (C#1) : 46 (A#1) 47 (B1) 48 (C2) : 83 (B4) • You can use the EDIT mode’s MIDI NOTE NUMBER function to select an arbitrary number assignment for any pad; see page 45. • The assignments made here are not effective during SCALE play. For information about how note numbers are handled during SCALE play, refer to page 20. Clear Note Table [NoteTbClr?] Purpose: Deletes all MIDI note-number assignments. Procedure: Press [ENTER] to execute. The LCD returns the Clear Sure? confirmation prompt. Press [ENTER] again to confirm, or press [EXIT] to cancel and return to the UTILITY menu level. Explanation This operation deletes all note-number assignments for all pads. Immediately following execution, you will not be able to use pads to drive an external device, nor use an external device to drive SU10 playback. You can restore normal remote operation by setting up new assignments using either the NoteTbInit operation (described above) or the EDIT mode’s MIDI NOTE NUMBER function (page 45). Bulk Dump [Bulk] You use this utility to dump (save) all SU10 sample and song data to an external device, or to reload data from an external device. The utility also lets you select the packet interval for outgoing dumps. 58 ● UTILITY Mode ● This is the utility you use to back up your SU10 data. To save all data to floppy disk, for example, you would connect the MIDI OUT connector to the MIDI IN of a Yamaha MDF2 MIDI Data Filer or equivalent, then dump from the SU10 to the MDF2. You could then reload your data at any time by reversing this procedure. For information about dumping to or from specific Yamaha devices, refer to page 61. The following diagram shows the utility structure. Dump Rcv? [<][>] Dump Send? [<][>] Intrvl Receiving [Dump Rcv?] Purpose Receives a bulk dump from an external device. You can use this function to reload SU10 data that you backed up to an external medium using the Dump Send function. Procedure 1. Press [ENTER] in response to the Dump Rcv? query. The SU10 displays the confirmation query Receiv OK? If you are ready to receive, press [ENTER] again. ▼ If any bank or song is locked, the SU10 displays the message Locked Data! and returns you to the UTILITY menu without receiving the dump. 2. The SU10 stands by for the start of data flow. The Waiting message appears to indicate that data reception has not yet started. During this time you can cancel the dump at any time by pressing [EXIT]. 3. When data reception begins, the SU10 disables the [EXIT] button and displays the Receiving message. The meter indicates the percentage of data received. Do not switch power off while reception is in progress. 4. Upon receipt of all data, the SU10 briefly displays the Complete message, then returns you to PLAY mode. If the flow of incoming data stops unexpectedly for 30 seconds while dumping is in progress, the LCD displays the Time Out! message to indicate that the dump has failed and all internal data have been lost. If you see this message, press [EXIT] to return to the UTILITY menu, then try the download again. Some devices (such as the YAMAHA QY300 and QS300) store SU10 backup data in four separate “songs” (song files), since this is the way they receive the data at time of backup. If you are dumping from one of these devices, you will have to change the song three times during the transfer. The Time Out! condition will not occur while you are between songs. ● UTILITY Mode ● 59 Sending [Dump Send?] Purpose Sends a bulk dump to an external device. You can use this function to back up your SU10 data, or to copy it into another SU10. Procedure 1. Before selecting Dump Send?, move to the Intrvl setting (press [>]) and select the appropriate value (see the explanation following this procedure). Then press [<] to move back to the Dump Send query. Then press [ENTER]. 2. The SU10 displays the confirmation query Send OK? Press [ENTER] to begin sending. 3. The SU10 sends the first part of the dump, then pauses and displays the mes- sage Next OK? When you are ready to proceed, press [ENTER]. The SU10 will subsequently stop and display this message two more times. Press [ENTER] each time to continue. When sending is finished, the SU10 briefly displays the Complete message, then automatically returns you to the UTILITY menu. ▼ The SU10 breaks the transmission into four segments to allow for transfers to machines with limited memory or reception capacity. Some receiving devices will be able to record all four segments to a single file. With other devices you will have to set each segment into a separate file. ▼ You can press [EXIT] at any time to abort the dump. The LCD displays the word Canceled, then returns you to the UTILITY menu. Interval [Intrvl] Purpose Assigns the bulk-dump packet interval. Values: Short, Mid, Long Explanation Selects the time interval that the SU10 interposes between adjacent packets when transmitting a bulk dump. Short Provides fastest dumping. Use this setting when dumping to another SU10 or a YAMAHA MDF2 or QY300. Mid About twice as long as the Short interval. Use this setting when dumping to a YAMAHA QS300. Long About eight times as long as the Short interval. 60 ● UTILITY Mode ● ▼ If you are not yet sure of the receiving capabilities of your destination device, use the Long setting to ensure accurate transmission. After making a secure backup, you can test out shorter intervals to see if the device supports them. Dumping To or From a Yamaha MDF2, QY300, or QS300 To dump to an MDF2: 1. Set the MDF2 to Seq mode. (Do not set to MDR mode.) Set the SU10’s Intrvl value to “Short”. 2. At the MDF2, press REC + START/STOP to begin recording. 3. At the SU10, move to the Dump Send? screen and press [ENTER] twice to begin sending. 4. When the SU10 displays the message Next OK?, press [ENTER] to continue transmission. The message will appear three times. 5. When transfer is completed, move to the MDF2 and press START/STOP to terminate recording. You can then remove the disk. To dump to a QY300 or QS300: 1. If dumping to a QY300, set the SU10’s Intrvl value to “Short”. If dumping to a QS300, set the value to “Mid”. 2. Begin song recording at the QY300/QS300. 3. At the SU10, move to the Dump Send? screen and press [ENTER] twice to begin sending. 4. Each time the SU10 displays the message Next OK?, proceed as follows. You will have to repeat this process three times. When you have finished, your SU10 data will be stored in four separate song files on floppy disk. 4-1) Go to the QY300/QS300 and terminate the recording. Save the data as a song into floppy disk, then clear the song data from main memory. 4-2) Set the QY300/QS300 to begin recording of a new song. ▼ You will need to remember the order in which you record the songs, so that you can use the same order when reloading the data to the SU10. Include sequential numbers or other identifiers in the song names. 4-3) At the SU10, press [ENTER] to resume transmission. ● UTILITY Mode ● 61 To load from an MDF2: 1. Set the MDF2 to Seq mode. (Do not set to MDR mode.) 2. At the SU10, move to the Dump Rcv? screen and press [ENTER] twice to begin receiving. 3. At the MDF2, press the START/STOP button to begin playback. To load from a QY300 or QS300: 1. Go the QY300/QS300 and load the first of your four backup song files. (Remember that backed-up data is contained in four separate song files.) 2. At the SU10, move to the Dump Rcv? screen and press [ENTER] twice to begin receiving. 3. Begin song playback at the QY300/QS300. 4. When transfer of the song is completed, load the next song file at the QY300/QS300, and begin song playback again. Continue until all four files have been sent. Sample Dump Use this utility to dump one or more selected samples in MIDI Sample Dump Standard format, a standard format recognized by a wide variety of synthesizers, samplers, and MIDI software packages. This utility makes it possible to send individual samples to a remote device for replay or editing. When you enter this utility, the SU10 displays a message such as the following: MSDSTx x x? Procedure 1. Select the sample you want to dump by pressing [+1] or [–1], or by pressing [BANK] (if necessary) and the appropriate pad. The displayed message changes to indicate the selected sample. Press [ENTER] to begin transmission. ▼ 62 If the selected pad is empty, the LCD displays the Pad Empty message and waits for you to select a different pad. Select another sample as described above, or else press [EXIT] to return to the UTILITY menu. ● UTILITY Mode ● 2. The SU10 executes the dump. If the sample is monaural, the SU10 displays the message Sending M to indicate that transmission is in progress. If the sample is stereo, the SU10 sends the left part first, while displaying the message Sending L. When finished, it asks whether to send the right part (Send R OK?). Press [ENTER] to proceed, or [EXIT] to end. ▼ You can abort an ongoing dump at any time by pressing [EXIT]. The LCD will briefly display the Canceled message, then offer to dump the next sample. 3. Upon completing the dump, the LCD briefly displays the Complete message, then offers to dump the next sample. You can (a) press [ENTER] to dump the indicated sample; (b) change the sample selection; or (c) press [EXIT] to return to the UTILITY menu. • The SU10 sends a sample identification along with the data. If the pad is monaural, the ID is equal to the pad number: ID 1 identifies pad A1, ID 2 identifies pad A2, ID 48 identifies pad D12. If the sample is stereo, the SU10 dumps it as two samples, using the pad number for the left sample’s ID, and 50 plus the pad number for the right sample’s ID. If you dump stereo sample A3, for example, the left sample gets ID 3, while the right sample gets ID 53. • The SU10 always transmits the sample in forward direction (from start of wave to end of wave), regardless of the sample’s loop-mode setting. • Not all receiving devices will be able to reproduce the sample exactly as it sounds on the SU10. In particular, loop operation and replay pitch may be slightly different. Song Deletion [Song] You use this utility to delete selected songs. When you enter this utility, the SU10 displays a message such as the following, offering to delete the currently selected song. Delete Sg#1? You have three choices: 1. Press [ENTER] to delete the indicated song. 2. Select a different song by pressing [+1] or [–1], or by holding down [SHIFT] and pressing the appropriate SONG button. Then press [ENTER] to delete. 3. Press [EXIT] to return to the UTILITY menu. • The SU10 does not return a confirmation query prior to deleting the song. Be careful to avoid accidental erasure. • After deleting a song, the SU10 offers to delete the next nonempty song (if any). Again, be careful to avoid accidental deletion. ● UTILITY Mode ● 63 If you attempt to delete an empty or locked song, the LCD briefly displays an appropriate message, then returns to the original prompt. You must then change the song selection or else press [EXIT]. Lock [Lock] You use this utility to lock or unlock selected banks or songs. The lock feature allows you to protect samples and songs from accidental editing or deletion. Specifically, the SU10 does not allow you to edit or delete any sample within a locked bank, and will not allow you to overwrite a locked song. When you first enter this utility, the LCD displays the lock setting for Bank A. If the lock is Off, for example, the display will look like this: Bank A Off Proceed as follows. 1. To move to the setting for a different bank or song, press [>] or [<]. The sequence is: Bank A [<][>] Bank B [<][>] Bank C [<][>] Bank D [<][>] Song 1 [<][>] Song 2 [<][>] Song 3 [<][>] Song 4 2. To change the lock setting to On, press [+1]. To change the setting to Off, press [–1]. 3. To return to the UTILITY menu, press [EXIT]. Initialize [Init] You can use this utility to (a) delete all song and sample data, or (b) delete all song and sample data while at the same time resetting all system parameters to their defaults. The SU10 will refuse to execute this operation if any banks or songs are locked. The utility consists of two functions, as follows. Init Data? [<][>] Init All? 64 ● UTILITY Mode ● Deleting data only [Init Data?] Purpose Deletes all samples and all songs. Does not delete system settings. Procedure 1. Press [ENTER] in response to the Init Data? query. The LCD returns the Data Sure? confirmation prompt. To proceed, press [ENTER]. ▼ ▼ If you do not want to proceed, press [EXIT] to return to the UTILITY menu. If you attempt to initialize while a bank or song is locked, the LCD briefly displays the Locked Data! message, then returns you to the UTILITY menu. 2. The SU10 displays the Keep PwrOn message and begins deletion. Do not switch off the power while this message is on the screen. When execution is finished, the LCD displays the Complete message, then returns the UTILITY menu. Deleting data and resetting the system [Init All?] Purpose Deletes all samples and all songs, and returns all system settings to their defaults (see below). Procedure 1. Move to the Init All? query and press [ENTER]. The LCD returns the All Sure? confirmation prompt. Press [ENTER] to proceed. ▼ ▼ If you do not want to proceed, press [EXIT] to return to the UTILITY menu. If you attempt to initialize while a bank or song is locked, the LCD displays the Locked Data! message, then returns you to the UTILITY menu. 2. The SU10 displays the Keep PwrOn message and begins the operation. Do not switch off power while this message is on the screen. When initialization is finished, the SU10 displays the Complete message, then returns you to the UTILITY menu. ● UTILITY Mode ● 65 System default values are as follows. Gain = 1 Grade = Long Pitch = 0% Format = Stereo Input Source = Line Recording Trigger = Manual Default Loop Mode = Whole Loop MIDI Channel = 1 Device Number = 1 Local Control = On Ribbon No. = Off MIDI Note Table = Pad A1:MIDI C1, Pad A2:MIDI C#1, ..., PAD D12:MIDI B4 Bulk Interval = Short Locks = All off Volume = 8 66 ● UTILITY Mode ● 10 Troubleshooting This chapter offers some simple advice that may help you solve problems you experience with your SU10. If the SU10 does not seem to operate properly and the information in this chapter does not help, please consult your Yamaha dealer or one of the Yamaha distributors listed at the back of this manual for assistance. Problem Possible Cause PLAY Cannot play demos • You may have erased them. Unless you have stored them to an external device via MIDI dump, they are gone forever. But it is easy enough to create your own samples and songs. No sound • Check the LINE OUT connection. Is the SU10 correctly connected to external powered speakers or amp? Are the external speakers/amp switched on? • Check the volume settings. (a) Check sample’s internally set volume (EDIT mode; see page 44). (b) Check the digital volume. Try pressing [+1] to increase the level. (c) Try adjusting the volume slider. (d) Check the volume setting on your speakers or amp. • Are batteries or adaptor correctly connected? You must use six AA batteries, or a PA-3B or PA-1B adaptor. • Are batteries fresh? Try again with new batteries (alkaline batteries recommended), or check operation using a power adaptor. • Check the Local setting in the MIDI utility. Pads do not operate if this setting is Off. (→ page 57) • Are you sure the selected pad contains sample data? • Check the sample’s loop mode, and the start-point, loop-point, and end-point settings. • Are you sure the bank selection is correct? Try playing from a different bank. • If using FILTER or EXTERNAL FILTER: Try changing the cutoff frequency. Certain cutoff frequencies may cause all sound to go off. • If using CROSSFADER or EXTERNAL mode: Check that the Input recording parameter matches the actual input source. (→ page 56) ● Troubleshooting ● 67 Problem Possible Cause Sound is distorted • Is replay volume exceeding the clip level? Try pressing [–1] to lower the digital volume. Note that reducing the level with the volume slider will not correct this problem. Clipping is most likely to occur when you play many pads together, or when you change filter settings. • Volume may have exceeded clip level at time of recording. (→ page 33) • Use of resonance during FILTER play may sometimes cause distortion. Try reducing the resonance level. • Batteries may be low. Replace batteries or connect a PA-3B or PA-1B power adaptor. Can’t play samples together • Polyphony may be too low. Use of HI grade or SCALE, SCRATCH, FILTER, or other special play features causes polyphony to drop. Remember also that a stereo sample counts as two sounds. (→ page 26) • Check samples’ alternate-group settings. Samples in the same group cannot play together. (→ page 44) Change Grd! message appears. • Certain play features are not available while sampling grade is set to HI or STD. You can correct the problem by going to the Rec utility and changing the Grade setting accordingly. (→ page 26) SONGS Song content has changed. 68 ● Troubleshooting ● • A song is a recorded sequence of pad play. Editing, deletion, or replacement of samples used by the song will cause a change in the song sound. (→ page 37) • Song sound may vary according to the point from which song is started. See page 28 and 37 for advice about song playback and recording. • Song play is subject to the same polyphony restrictions as pad play. Using special play features (SCALE, SCRATCH, etc.) or combining pad play with song play may cause sounds to drop out. Problem Possible Cause RECORDING Cannot record. • Is LINE IN or MIC INPUT connected correctly? • Have you selected the correct input source? The selected source (displayed on third line of the LCD) must match the actual source — either microphone or line. If necessary, go to RECORDING or UTILITY mode and change the Input recording parameter (see page 34 or 56). Recording begins too soon or too late. • The Recording Trigger (RecTrg) setting may be inappropriate. Check, and adjust as necessary. (RecTrg is a recording parameter and can be set from either REC or UTIL mode. See page 34 or 56.) Available recording time is too low. • You can increase recording in any of the following ways. • Reduce the sampling grade. (→ page 33.) • Set Pitch lower. (→ page 34) • Use mono recording instead of stereo. (→ page 34) • Compact all pads. (→ page 52) • Delete one or more pads. (→ page 53 or 64) MIDI SU10 cannot drive (or be driven by) an external device. • Check that the MIDI channel setting on the SU10 and the external device match. (→ page 56) • Check the MIDI Note Number settings. (a) If you have cleared the Note Table, all note number settings have been deleted. You must reassign note numbers to enable pads to drive and be driven. (→ pages 45, 57). (b) Check that note number assignments correspond to notes assignments on the external device. (c) Remember that note numbers are different during SCALE play. (→ page 20) Cannot receive bulk dump. • Check the MIDI Device No. setting (the DevNum parameter in the MIDI utility). (→ page 56) • If the LCD displays the message Wrong Data!: There is a problem with the data at the sending side. Bulk receive is impossible in this case. Cannot send MSDS sample dump. • Check that the receiving side is correctly set up, and has sufficient memory to receive the data. Cannot receive MSDS sample dump. • The SU10 does not support reception of MSDS sample dumps. ● Troubleshooting ● 69 70 Problem Possible Cause MIDI input does not drive SU10 sound as expected. • Check sounding-mode (SdMode) settings for each sample. (→ page 43.) • Check the MIDI Note Number settings. ● Troubleshooting ● 11 Error and Warning Messages This section describes the causes and responses for each of the SU10 error and warning message. Warning messages Locked Data! Locked Bank! Locked Song! [Cause] You attempted to execute an operation that would delete data from a protected area. [Response] You can switch off locks using the LOCK utility. (See page 64.) Be careful to avoid accidental deletion of data. Change Grd! (Change Grade) [Cause] You attempted to select a PLAY feature that is not available at the currently selected sampling grade. [Response] Go to the Recording Setup utility and reduce the Grade setting. Memory Full! [Cause] Song/sample memory became full during recording of a sample or song. (All data recorded prior to the appearance of this message remains registered in memory.) [Response] If you need to record a longer sample, try deleting or compacting existing samples, and/or reducing the sampling grade or pitch. If you need to record a longer song, you can increase available memory by deleting one or more existing songs. Battry Low! [Cause] Batteries are low. [Response] Replace the batteries. ● Error and Warning Messages ● 71 MIDI Errors Time Out! [Cause] Data flow stopped during reception of bulk dump, so the SU10 terminated the operation. All internal pad and song data are now lost. [Response] Try the dump again. If this fails, reinitialize the entire system (go to the INIT utility and execute Init All). Buffer Full! [Cause] MIDI input buffer became full: the amount of incoming MIDI data exceeded the SU10’s processing capacity. [Response] Reduce the amount of MIDI data being sent to the SU10. DevNum Off! [Cause] Attempted to receive bulk-dump with SU10’s DevNum parameter set to “Off”. [Response] To enable bulk-dump reception, set the SU10’s device number (DevNum parameter, in the MIDI utility) either to “All” or else to match the device number of the sending device. Wrong Data! [Cause] The SU10 received an unrecognizable MIDI System Exclusive message. [Response] Check the machine type and data at the sending side. ChkSum Err! [Cause] The received bulk-dump data failed checksum test. [Response] Check the machine type and data at the sending side. MIDI Err1! [Cause] Overrun error occurred during MIDI reception. [Response] Check the settings at both sides. Check that cables are correctly attached. 72 ● Error and Warning Messages ● MIDI Err2! [Cause] A framing error during MIDI reception [Response] Check the settings at both sides. Check that cables are correctly attached. Memory-Related Errors Bad Data! [Cause] The SU10 detected a problem with internal data at time of power-on. This problem can occur if you switch the power off while a memory-write is in progress. [Response] The SU10 does its best to repair the problem, but it is possible that you will lose some songs or samples. If you find that the data loss is considerable, you should clear all remaining data and reinitialize the system (go to the INIT utility and execute Init All). ● Error and Warning Messages ● 73 12 Specifications 1. Main Specifications Features • Compact low-cost sampling module. (Same size as VHS cassette) • Special playback features unprecedented for this price range: REVERSE, SCALE, PITCH, others. • Touch-driven ribbon controller controls any one of various effects; excellent for realtime performance applications. • Custom LCD indicates full status information (sampling grade, current song, selected input source, and much more). Maximum polyphony 4 samples (monaural) Maximum number of samples 48 Play modes Sampler, Realtime Scratch, Realtime Filter Special effects Low-pass, band-pass, and high-pass filters (all with resonance); crossfade; pitch Songs Records up to 4 songs. (Each song is a recorded sequence of pad and button operations.) Interfaces MIDI IN, MIDI OUT: Connects to MIDI sequencer, MIDI keyboard, etc. Can dump individual sample(s) in MSDS (MIDI Sample Dump Standard) format to supporting RAM-equipped devices (synthesizer, sampler, computer, etc.) LINE IN accepts input from CD player or other audio device. MIC INPUT accepts input from dynamic microphone or powered condenser microphone. Demo songs 1 demo song is included. 2. Memory capacity 74 Wave (sample) memory 384KB (Can record up to about 53 seconds of monaural sound at Extra Long sampling grade.) Song memory 8KB (Approx. 1000 events) ● Specifications ● 3. Display LCD Custom LCD 4. Panel 12 pads Ribbon controller [HOLD], [REV], [SHIFT], [EXIT], [SCRATCH], [BANK],[ENTER], [+1], [–1], [<], [>], [REC], [TOP], [BWD], [STOP], [PLAY], [FWD] Volume slider (for output volume) Power switch 5. Connectors MIDI IN MIDI OUT HEADPHONES (stereo mini jack) LINE OUT L/R (stereo mini jack) LINE IN L/R (stereo mini jack) MIC IN L/R (stereo mini jack) DC IN 6. Output level (Full-scale level) LINE OUT +3.8dbm (typ) (10kΩ) PHONES –4.0dbm (typ) (33Ω) 7. Input level LINE MIC +15.0dbm (typ) –31.8dbm (typ) 8. Power AC adaptor (PA-1B or PA-3B) Batteries (six 1.5V AA, R6P or SUM-3) ● Specifications ● 75 9. Dimensions (W × D × H) 168 × 104 × 32.2 (mm) [6.61 × 4.09 × 1.27 (inches)] 10. Weight 0.4kg (0.88lb.) 11. Included accessories Owner’s manual (this manual) Two sample CDs (Demo music features samples from Time+Space sample CDs. See the enclosed Yamaha Soundshow CD for more information.) 76 ● Specifications ● [ Sampling Unit ] Date:25-OCT-1995 Model SU10 MIDI Implementation Chart Version : 1.0 +----------------------------------------------------------------------+ | | Transmitted | Recognized | Remarks | | Function ... | | | | |-------------------+----------------+----------------+----------------| |Basic Default | 1 - 16 | 1 - 16 | Memorized | |Channel Changed | 1 - 16 | 1 - 16 | | |-------------------+----------------+----------------+----------------| | Default | x | Mode 3 | | |Mode Messages | x | x | | | Altered | ************** | x | | |-------------------+----------------+----------------+----------------| |Note | 0 - 127 | 0 - 127 | | |Number : True voice| ************** | 0 - 127 | | |-------------------+----------------+----------------+----------------| |Velocity Note ON | o 9nH,v=127 | o v=1-127 | | | Note OFF | x 9nH,v=0 | x | | |-------------------+----------------+----------------+----------------| |After Key's | x | x | | |Touch Ch's | x | x | | |-------------------+----------------+----------------+----------------| |Pitch Bender | o *1| x |7 bit resolution| |-------------------+----------------+----------------+----------------| | 7 | x | o |Volume | | 0-120 | o Assignable *1| x | | | | | | | | | | | | | Control | | | | | | | | | | Change | | | | | | | | | | | | | | | | | | | | | | | | | | | | | | | | | | |-------------------+----------------+----------------+----------------| |Prog | x | o 0 - 1 | | |Change : True # | ************** | | | |-------------------+----------------+----------------+----------------| |System Exclusive | o | o | | |-------------------+----------------+----------------+----------------| |System : Song Pos. | x | x | | | : Song Sel. | x | x | | |Common : Tune | x | x | | |-------------------+----------------+----------------+----------------| |System :Clock | x | x | | |Real Time :Commands| x | x | | |-------------------+----------------+----------------+----------------| |Aux :Local ON/OFF | x | x | | | :All Notes OFF| x | x | | |Mes- :Active Sense | x | x | | |sages:Reset | x | x | | +----------------------------------------------------------------------+ |Notes: *1 ; transmit if switch is on. | | | | | | | | | +----------------------------------------------------------------------+ Mode 1 : OMNI ON, POLY Mode 2 : OMNI ON, MONO o : Yes Mode 3 : OMNI OFF, POLY Mode 4 : OMNI OFF, MONO x : No YAMAHA Index A F AC adaptor ................................... 13 AltGrp .......................................... 44 FILTER .......................................... 22 Filter type ..................................... 22 Flat ............................................... 24 Format ......................................... 34 FWD key ........................................ 8 B Backup ......................................... 60 Bank .............................................. 5 BANK key ...................................... 9 Battery ......................................... 13 BPF .............................................. 24 Bulk Dump .................................. 58 Receiving ................................. 59 Sending .................................... 60 BWD .............................................. 8 C Compact ...................................... 52 Copy ............................................ 48 CROSSFADER .............................. 25 Cursor ............................................ 9 D DC IN .......................................... 10 Defalt ........................................... 34 Delete .......................................... 53 Demo Song .................................. 27 Dump Rcv .................................... 59 Dump Send .................................. 60 E EDIT ............................................. 39 EDIT mode ................................... 39 EdPnt ........................................... 47 ENTER ............................................ 9 EXIT ............................................... 9 EXLG ............................................ 33 EXTERNAL FILTER ........................ 30 EXTERNAL SCRATCH ................... 29 80 ● Index ● G Gain ............................................. 33 Grade ........................................... 33 H Headphones ................................. 11 HI ................................................ 33 HPF .............................................. 24 HOLD .......................................... 18 HOLD key ..................................... 8 I Init ............................................... 64 Input ............................................ 34 Intrvl ............................................ 60 L LCD ............................................... 7 Line .............................................. 34 LINE INPUT ................................. 10 LINE OUTPUT ............................. 10 Local Control ............................... 57 Lock ............................................. 64 LONG .......................................... 33 Loop ............................................ 41 Loop Mode .................................. 41 LPF ............................................... 24 LpPnt ........................................... 47 M S Mic .............................................. 34 MIC INPUT .................................. 10 MIDI .............................................. 6 MIDI channel ............................... 56 MIDI device number .................... 56 MIDI note number ........................ 45 MIDI note table ............................ 57 Mnual .......................................... 34 Mono ........................................... 34 Move ........................................... 49 Oshot ........................................... 41 Sample ........................................... 4 Sample Dump .............................. 62 Sample Playback .......................... 17 SCALE .......................................... 19 SCRATCH ....................................... 9 SHIFT ............................................. 9 Song ............................................... 6 Song Creating ............................... 35 Song Deletion .............................. 63 Song Play ..................................... 27 Sounding Mode ............................ 43 Split ............................................. 50 STD .............................................. 33 Stereo ........................................... 34 STOP .............................................. 8 StPnt ............................................ 46 Strng ............................................ 24 P T N Note ............................................. 43 O Pad ................................................ 5 PadVol ......................................... 44 PITCH .......................................... 21 Pitch ............................................ 34 PLAY key ........................................ 8 PLAY mode .................................. 16 Ploop ........................................... 42 Polyphony .................................... 26 POWER ........................................ 13 POWER switch ............................. 10 Tempo .......................................... 46 Toggl ............................................ 43 TOP ............................................... 8 Trggr ............................................. 43 U UTILITY mode .............................. 54 V Volume slider ............................... 11 R REC key ......................................... 8 Recording .................................... 32 RecTrg .......................................... 34 Resnce ......................................... 23 REV key ......................................... 9 Reverse ........................................ 19 Ribbon controller ........................... 7 Ribbon Number ........................... 57 Rloop ........................................... 42 Rshot ............................................ 42 W Weak ........................................... 24 Wloop .......................................... 41 ● Index ● 81 For details of products, please contact your nearest Yamaha or the authorized distributor listed below. Die Einzelheiten zu Produkten sind bei Ihrer unten aufgeführten Niederlassung und bei Yamaha Vertragshändlern in den jeweiligen Bestimmungsländern erhältlich. Pour plus de détails sur les produits, veuillezvous adresser à Yamaha ou au distributeur le plus proche de vous figurant dans la liste suivante. Para detalles sobre productos, contacte su tienda Yamaha más cercana o el distribuidor autorizado que se lista debajo. NORTH AMERICA CANADA Yamaha Canada Music Ltd. 135 Milner Avenue, Scarborough, Ontario, M1S 3R1, Canada Tel: 416-298-1311 U.S.A. Yamaha Corporation of America 6600 Orangethorpe Ave., Buena Park, Calif. 90620, U.S.A. Tel: 714-522-9011 MIDDLE & SOUTH AMERICA MEXICO Yamaha De Mexico S.A. De C.V., Departamento de ventas Javier Rojo Gomez No.1149, Col. Gpe Del Moral, Deleg. Iztapalapa, 09300 Mexico, D.F. Tel: 686-00-33 BRASIL Yamaha Musical Do Brasil LTDA. Ave. Reboucas 2636, São Paulo, Brasil Tel: 011-853-1377 PANAMA Yamaha De Panama S.A. Edificio Interseco, Calle Elvira Mendez no.10, Piso 3, Oficina #105, Ciudad de Panama, Panama Tel: 507-69-5311 OTHER LATIN AMERICAN COUNTRIES AND CARIBBEAN COUNTRIES Yamaha Music Latin America Corp. 6101 Blue Lagoon Drive, Miami, Florida 33126, U.S.A. Tel: 305-261-4111 EUROPE THE UNITED KINGDOM Yamaha-Kemble Music (U.K.) Ltd. Sherbourne Drive, Tilbrook, Milton Keynes, MK7 8BL, England Tel: 01908-366700 IRELAND Danfay Ltd. 61D, Sallynoggin Road, Dun Laoghaire, Co. Dublin Tel: 01-2859177 GERMANY/SWITZERLAND Yamaha Europa GmbH. Siemensstraße 22-34, 25462 Rellingen, F.R. of Germany Tel: 04101-3030 AUSTRIA/HUNGARY/SLOVENIA/ ROMANIA/BULGARIA Yamaha Music Austria Ges m b H. Schleiergasse 20, A-1100 Wien Austria Tel: 0222-60203900 THE NETHERLANDS Yamaha Music Benelux B.V., Verkoop Administratie Kanaalweg 18G, 3526KL, Utrecht, The Netherlands Tel: 030-828411 BELGIUM/LUXEMBOURG Yamaha Music Benelux B.V., Brussels-office Keiberg Imperiastraat 8, 1930 Zaventem, Belgium Tel: 02-7258220 FRANCE Yamaha Musique France, Division Professionnelle BP 70-77312 Marne-la-Valée Cedex 2, France Tel: 01-64-61-4000 ITALY Yamaha Musica Italia S.P.A., Combo Division Viale Italia 88, 20020 Lainate (Milano), Italy Tel: 02-935-771 SPAIN Yamaha-Hazen Electronica Musical, S.A. Jorge Juan 30, 28001, Madrid, Spain Tel: 91-577-7270 PORTUGAL Valentim de Carvalho CI SA Estrada de Porto Salvo, Paço de Arcos 2780 Oeiras, Portugal Tel: 01-443-3398/4030/1823 GREECE Philippe Nakas S.A. Navarinou Street 13, P.Code 10680, Athens, Greece Tel: 01-364-7111 SWEDEN Yamaha Scandinavia AB J. A. Wettergrens Gata 1 Box 30053 S-400 43 Göteborg, Sweden Tel: 031 89 34 00 DENMARK KOREA YS Copenhagen Liaison Office Generatorvej 8B DK-2730 Herlev, Denmark Tel: 44 92 49 00 Cosmos Corporation #131-31, Neung-Dong, Sungdong-Ku, Seoul Korea Tel: 02-466-0021~5 FINLAND MALAYSIA Warner Music Finland OY/Fazer Music Aleksanterinkatu 11, P.O. Box 260 SF-00101 Helsinki, Finland Tel: 0435 011 NORWAY PHILIPPINES Narud Yamaha AS Grini Næringspark 17 N-1345 Østerås, Norway Tel: 67 14 47 90 Yupangco Music Corporation 339 Gil J. Puyat Avenue, P.O. Box 885 MCPO, Makati, Metro Manila, Philippines Tel: 819-7551 ICELAND SINGAPORE Skifan HF Skeifan 17 P.O. Box 8120 IS-128 Reykjavik, Iceland Tel: 525 5000 Yamaha Music Asia Pte., Ltd. Blk 17A Toa Payoh #01-190 Lorong 7 Singapore 1231 Tel: 354-0133 EAST EUROPEAN COUNTRIES (Except HUNGARY) TAIWAN Yamaha Europa GmbH. Siemensstraße 22-34, D-2084 Rellingen, F.R. of Germany Tel: 04101-3030 AFRICA Yamaha Corporation, International Marketing Division Nakazawa-cho 10-1, Hamamatsu, Japan 430 Tel: 053-460-2312 MIDDLE EAST TURKEY/CYPRUS Yamaha Musique France, Division Export BP 70-77312 Marne-la-Valée Cedex 2, France Tel: 01-64-61-4000 OTHER COUNTRIES Yamaha Corporation, International Marketing Division Nakazawa-cho 10-1, Hamamatsu, Japan 430 Tel: 053-460-2312 ASIA Tom Lee Music Co., Ltd. 11/F., Silvercord Tower 1, 30 Canton Road, Tsimshatsui, Kowloon, Hong Kong Tel: 730-1098 INDONESIA PT. Yamaha Music Indonesia (Distributor) PT. Nusantik Gedung Yamaha Music Center, Jalan Jend. Gatot Subroto Kav. 4, Jakarta 12930, Indonesia Tel: 21-520-2577 HEAD OFFICE Kung Hsue She Trading Co., Ltd. No. 322, Section 1, Fu Hsing S. Road, Taipei 106, Taiwan. R.O.C. Tel: 02-709-1266 THAILAND Siam Music Yamaha Co., Ltd. 865 Phornprapha Building, Rama I Road, Patumwan, Bangkok 10330, Thailand Tel: 2-215-3443 THE PEOPLE’S REPUBLIC OF CHINA AND OTHER ASIAN COUNTRIES Yamaha Corporation, International Marketing Division Nakazawa-cho 10-1, Hamamatsu, Japan 430 Tel: 053-460-2317 OCEANIA AUSTRALIA Yamaha Music Australia Pty. Ltd. 17-33 Market Street, South Melbourne, Vic. 3205, Australia Tel: 3-699-2388 NEW ZEALAND HONG KONG SY09 Yamaha Music Malaysia, Sdn., Bhd. 16-28, Jalan SS 2/72, Petaling Jaya, Selangor, Malaysia Tel: 3-717-8977 Music Houses of N.Z. Ltd. 146/148 Captain Springs Road, Te Papapa, Auckland, New Zealand Tel: 9-634-0099 COUNTRIES AND TRUST TERRITORIES IN PACIFIC OCEAN Yamaha Corporation, International Marketing Division Nakazawa-cho 10-1, Hamamatsu, Japan 430 Tel: 053-460-2317 Yamaha Corporation, Electronic Musical Instrument Division Nakazawa-cho 10-1, Hamamatsu, Japan 430 Tel: 053-460-2445 Owner’s Manual M.D.G., EMI Division, ©Yamaha Corporation 1995 VU37290 601CRIT15.2-02B0 Printed in Japan-
 1
1
-
 2
2
-
 3
3
-
 4
4
-
 5
5
-
 6
6
-
 7
7
-
 8
8
-
 9
9
-
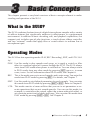 10
10
-
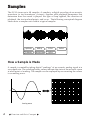 11
11
-
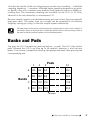 12
12
-
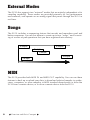 13
13
-
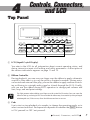 14
14
-
 15
15
-
 16
16
-
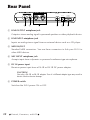 17
17
-
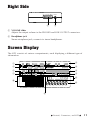 18
18
-
 19
19
-
 20
20
-
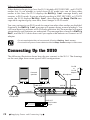 21
21
-
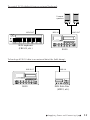 22
22
-
 23
23
-
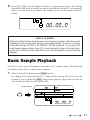 24
24
-
 25
25
-
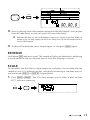 26
26
-
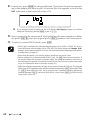 27
27
-
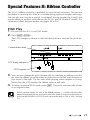 28
28
-
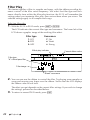 29
29
-
 30
30
-
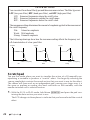 31
31
-
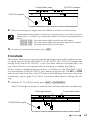 32
32
-
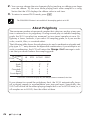 33
33
-
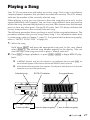 34
34
-
 35
35
-
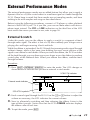 36
36
-
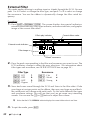 37
37
-
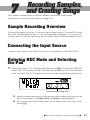 38
38
-
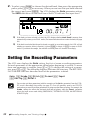 39
39
-
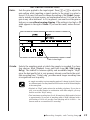 40
40
-
 41
41
-
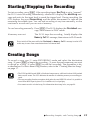 42
42
-
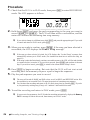 43
43
-
 44
44
-
 45
45
-
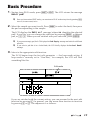 46
46
-
 47
47
-
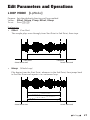 48
48
-
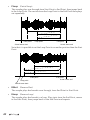 49
49
-
 50
50
-
 51
51
-
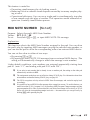 52
52
-
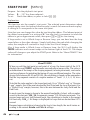 53
53
-
 54
54
-
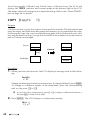 55
55
-
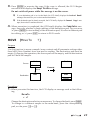 56
56
-
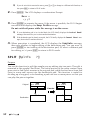 57
57
-
 58
58
-
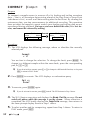 59
59
-
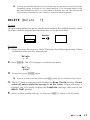 60
60
-
 61
61
-
 62
62
-
 63
63
-
 64
64
-
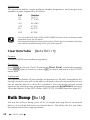 65
65
-
 66
66
-
 67
67
-
 68
68
-
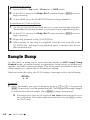 69
69
-
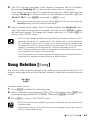 70
70
-
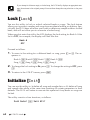 71
71
-
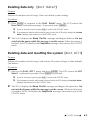 72
72
-
 73
73
-
 74
74
-
 75
75
-
 76
76
-
 77
77
-
 78
78
-
 79
79
-
 80
80
-
 81
81
-
 82
82
-
 83
83
-
 84
84
-
 85
85
-
 86
86
-
 87
87
-
 88
88
-
 89
89


in andere talen
- English: Yamaha SU10 Owner's manual
- italiano: Yamaha SU10 Manuale del proprietario
- русский: Yamaha SU10 Инструкция по применению
- français: Yamaha SU10 Le manuel du propriétaire
- español: Yamaha SU10 El manual del propietario
- Deutsch: Yamaha SU10 Bedienungsanleitung
- português: Yamaha SU10 Manual do proprietário
- dansk: Yamaha SU10 Brugervejledning
- suomi: Yamaha SU10 Omistajan opas
- čeština: Yamaha SU10 Návod k obsluze
- svenska: Yamaha SU10 Bruksanvisning
- Türkçe: Yamaha SU10 El kitabı
- polski: Yamaha SU10 Instrukcja obsługi
- română: Yamaha SU10 Manualul proprietarului
