
Bedienungsanleitung / Garantie
Gebruiksaanwijzing • Mode d’emploi • Manual de instrucciones
Istruzioni per l’uso • Instruction Manual • Instrukcja obsługi / Gwarancja
Használati utasítás • •
WIFI-KLIMAGERÄT
WiFi airconditioner • Climatiseur Wi-Fi • Unidad de aire acondicionado con Wi-Fi
Aria condizionata WiFi • WiFi Air Conditioning Unit • Klimatyzator WiFi • WiFi légkondicionáló
WiFi •
CL 3750
CL3750_IM_neu 18.12.2019

2
Bedienungsanleitung .........................................................................................................................Seite 5
Gebruiksaanwijzing .........................................................................................................................Pagina 13
Mode d’emploi ..................................................................................................................................... Page 20
Manual de instrucciones .................................................................................................................Página 27
Istruzioni per l’uso ...........................................................................................................................Pagina 34
Instruction Manual ..............................................................................................................................Page 41
Instrukcja obsługi ............................................................................................................................Strona 48
Használati utasítás ............................................................................................................................. Oldal 56
Руководство по эксплуатации .........................................................................................................стр. 63
76 ......................................................................................................................................................................
CL3750_IM_neu 18.12.2019

Übersicht der Bedienelemente
Overzicht van de bedieningselementen • Liste des différents éléments de commande
Indicación de los elementos de manejo • Elementi di comando • Overview of the Components
Przegląd elementów obsługi • A kezelőelemek áttekintése • Обзор деталей прибора •
3
CL3750_IM_neu 18.12.2019

Übersicht der Tasten, Symbole und Kontrollleuchten
Overzicht van de toetsen, pictogrammen en indicatielampjes • Description des boutons, des icônes et des voyants indicateurs
Resumen de botones, iconos y testigos • Panoramica dei tasti, icone e indicatori luminosi
Overview of Buttons, Icons and Indicator Lights • Rozmieszczenie przycisków, piktogramów i kontrolek
Gombok, ikonok és jelzőfények áttekintése • Обзор кнопок, иконок и индикаторных ламп •
4

5
CL3750_IM_neu 18.12.2019
Bedienungsanleitung
Vielen Dank, dass Sie sich für unser Produkt entschieden haben. Wir
wünschen Ihnen viel Freude mit dem Gerät.
Symbole in dieser Bedienungsanleitung
Wichtige Hinweise für Ihre Sicherheit sind besonders gekennzeichnet.
Beachten Sie diese Hinweise unbedingt, um Unfälle und Schäden am
Gerät zu vermeiden:
WARNUNG:
Warnt vor Gefahren für Ihre Gesundheit und zeigt mögliche Verlet-
zungsrisiken auf.
ACHTUNG:
Weist auf mögliche Gefährdungen für das Gerät oder andere Gegen-
stände hin.
HINWEIS: Hebt Tipps und Informationen für Sie hervor.
Inhalt
Übersicht der Bedienelemente .................................................................3
Übersicht der Tasten, Symbole und Kontrollleuchten ..........................4
Allgemeine Hinweise .................................................................................5
Spezielle Sicherheitshinweise für dieses Gerät .....................................5
Umgang mit Batterien ..............................................................................7
Auspacken des Gerätes ............................................................................7
Lieferumfang ..............................................................................................7
Übersicht der Bedienelemente .................................................................7
Übersicht der Tasten, Symbole und Kontrollleuchten ..........................7
Bedienfeld ................................................................................................7
Fernbedienung .........................................................................................7
Anwendungshinweise ...............................................................................8
Inbetriebnahme ..........................................................................................8
Standort ....................................................................................................8
Montage des Abluftschlauches ................................................................8
Fernbedienung .........................................................................................8
Netzkabel .................................................................................................8
Elektrischer Anschluss .............................................................................8
Ein- / Ausschalten .....................................................................................8
Kompressor Schutzvorrichtung................................................................8
Informationen zur App „Smart Life - Smart Living“ ..............................8
Informationen zur Bedienung mit der App ...............................................8
Systemanforderung für die Verwendung der App ...................................8
Inbetriebnahme mit der App .....................................................................9
Benutzung des Gerätes ............................................................................9
Betriebsarten ............................................................................................9
Einstellen des Ventilators .........................................................................9
Einstellen der Temperatur ........................................................................9
„Schlafmodus“ ..........................................................................................9
Einstellen des Luftauslasses ...................................................................9
Timer (Zeitschaltuhr) ................................................................................9
Taste MIRAGE .......................................................................................10
Entleeren des Wasserbehälters .............................................................10
Betrieb beenden .....................................................................................10
Aufwickelvorrichtung für Netzkabel........................................................10
Reinigung ..................................................................................................10
Filter ........................................................................................................10
Gehäuse .................................................................................................10
Saison-Reinigung und Aufbewahrung ..................................................10
Störungsbehebung .................................................................................. 11
Technische Daten ....................................................................................11
Hinweis zur Richtlinienkonformität .......................................................11
Garantie .....................................................................................................11
Garantiebedingungen ............................................................................11
Garantieabwicklung ...............................................................................12
Entsorgung ...............................................................................................12
Batterieentsorgung .................................................................................12
Bedeutung des Symbols „Mülltonne“.....................................................12
Allgemeine Hinweise
Lesen Sie vor Inbetriebnahme dieses Gerätes die Bedienungsanleitung
sehr sorgfältig durch und bewahren Sie diese inkl. Garantieschein, Kassen-
bon und nach Möglichkeit den Karton mit Innenverpackung gut auf. Falls
Sie das Gerät an Dritte weitergeben, geben Sie auch die Bedienungsanlei-
tung mit.
• Benutzen Sie das Gerät ausschließlich für den privaten und den dafür
vorgesehenen Zweck. Dieses Gerät ist nicht für den gewerblichen Ge-
brauch bestimmt.
• Benutzen Sie das Gerät nicht im Freien. Halten Sie es vor Hitze, direk-
ter Sonneneinstrahlung, Feuchtigkeit (auf keinen Fall in Flüssigkeiten
tauchen) und scharfen Kanten fern. Benutzen Sie das Gerät nicht mit
feuchten Händen. Bei feucht oder nass gewordenem Gerät sofort den
Netzstecker ziehen.
• Schalten Sie das Gerät aus und ziehen Sie immer den Netzstecker aus
der Steckdose (ziehen Sie am Netzstecker, nicht am Kabel), wenn Sie
das Gerät nicht benutzen, Zubehörteile anbringen, zur Reinigung oder
bei Störung.
• Das Gerät und das Netzkabel müssen regelmäßig auf Zeichen von Be-
schädigungen untersucht werden. Wird eine Beschädigung festgestellt,
darf das Gerät nicht mehr benutzt werden.
• Verwenden Sie nur Original-Zubehör.
• Zur Sicherheit Ihrer Kinder lassen Sie keine Verpackungsteile (Plastik-
beutel, Karton, Styropor, etc.) erreichbar liegen.
WARNUNG:
Lassen Sie kleine Kinder nicht mit Folie spielen. Es besteht
Erstickungsgefahr!
Spezielle Sicherheitshinweise für dieses Gerät
Anweisungen lesen!
WARNUNG: Brandgefahr!
Das Gerät enthält ein brennbares Kältemittel!

CL3750_IM_neu 18.12.2019
Die Service-Anleitung ist unter der folgenden Internetadresse verfügbar: www.sli24.de
Im Bereich „Downloads“ geben Sie bitte die Modell-Bezeichnung CL 3750 ein.
• Jede Person, die an dem Kältemittelkreislauf arbeitet, muss einen Befähigungsnachweis von einer Industrie-akkre-
ditierten Stelle, die ihre Kompetenz im sicheren Umgang mit Kältemitteln anhand eines in der Industrie bekannten
Verfahrens nachweist, vorweisen können.
• Servicearbeiten sollten nur gemäß den Herstellervorgaben durchgeführt werden. Ist für die Wartungs- und Repara-
turarbeiten die Unterstützung von weiteren Personen erforderlich, sollte die im Umgang mit brennbaren Kältemitteln
geschulte Person die Arbeiten ständig überwachen.
WARNUNG:
• Versuchen Sie nicht den Abtauprozess zu beschleunigen.
• Benutzen und lagern Sie das Gerät nicht an folgenden Orten:
- In der Nähe einer Feuerquelle.
- Einem Bereich, in dem Wasser oder Öl spritzen kann.
- Einem Bereich, der direktem Sonnenlicht ausgesetzt ist.
- Im Badezimmer, in der Waschküche oder an einem Swimmingpool.
• Das Gerät nicht anbohren oder anbrennen.
• Denken Sie daran, dass Kältemittel geruchslos sind.
• Das Gerät muss in einem Raum mit einer Grundäche größer als 15 m² aufgestellt, betrieben und gelagert werden.
ACHTUNG: Überhitzungsgefahr!
• Halten Sie die Lüftungsschlitze frei!
• Decken Sie das Gerät nicht ab!
• R 290 ist ein Kältemittel, das den europäischen Umweltrichtlinien entspricht.
• Beschädigen Sie nicht den Kältemittelkreislauf.
• Das Gerät ist nur für den Gebrauch in geschlossenen Räumen bestimmt.
• Das Gerät muss so gelagert werden, dass es nicht beschädigt werden kann.
• Beachten Sie die nationalen Anschlussvorschriften.
• Ziehen Sie bei merkwürdigen Geräuschen, Gerüchen und / oder bei Rauchentwicklung den Netzstecker aus der
Steckdose.
• Benutzen oder bewegen Sie das Gerät nur in aufrechter Position.
• Im Betrieb ist das Gerät so aufzustellen, dass der Abstand zu Wänden oder anderen Gegenständen mindestens
50 cm beträgt, um eine ausreichende Luftzirkulation zu gewährleisten.
• Verwenden Sie das Gerät niemals ohne den Filter.
• Lassen Sie das Gerät nicht über Stunden unbeaufsichtigt. Verlassen Sie während des Betriebs nicht das Haus.
• Dieses Gerät wurde konstruiert, um Wohnräume zu klimatisieren. Es darf nicht für andere Zwecke eingesetzt werden.
• Das Gerät unter keinen Umständen in Räumen nutzen, wo sich Gas, Benzin, Öl oder andere leicht brennbare Flüs-
sigkeiten benden. Verwenden Sie in dem Raum keine Sprühmittel wie Farbe, Pestizide oder andere entammbare
Materialien.
• Stecken Sie keine Gegenstände in Öffnungen des Gerätes.
• Setzen Sie das Gerät keinem Tropf- oder Spritzwasser aus und stellen Sie keine mit Flüssigkeiten gefüllten Gefäße,
wie z.B. Blumenvasen auf das Gerät.
• Bewegen Sie das Gerät nicht, wenn die Netzanschlussleitung mit der Steckdose verbunden ist.
• Schalten Sie das Gerät immer erst mit der Taste POWER
aus, bevor Sie den Netzstecker ziehen.
• Ist der Betrieb unterbrochen, warten Sie ca. 3 Minuten, bevor Sie das Gerät erneut einschalten, damit sich der Druck
im Kältekreislauf entspannen kann.
• Reparieren Sie das Gerät nicht selbst, sondern suchen Sie einen autorisierten Fachmann auf. Wenn die Netzan-
schlussleistung dieses Gerät beschädigt wird, muss sie durch den Hersteller oder seinen Kundendienst oder eine
ähnlich qualizierte Person ersetzt werden, um Gefährdungen zu vermeiden.
• Verhindern Sie, dass kleine Kinder das Gerät berühren.

7
CL3750_IM_neu 18.12.2019
• Dieses Gerät kann von Kindern ab 8 Jahren und darüber sowie von Personen mit verringerten physischen, senso-
rischen oder mentalen Fähigkeiten oder Mangel an Erfahrung und Wissen benutzt werden, wenn sie beaufsichtigt
oder bezüglich des sicheren Gebrauchs des Gerätes unterwiesen wurden und die daraus resultierenden Gefahren
verstehen.
• Kinder dürfen nicht mit dem Gerät spielen.
• Reinigung und Benutzer-Wartung dürfen nicht von Kindern ohne Beaufsichtigung durchgeführt werden.
• Beachten Sie die Anweisungen im Kapitel „Reinigung“.
• Angaben zum Typ und zu den technischen Daten der Sicherung: T, 250 V AC, 3,15 A
Umgang mit Batterien
WARNUNG:
• Setzen Sie Batterien keiner hohen Wärme, wie z. B. Sonnenschein,
Feuer oder ähnlichem aus. Es besteht Explosionsgefahr!
• Halten Sie Batterien von Kindern fern. Sie sind kein Spielzeug.
• Öffnen Sie Batterien nicht gewaltsam.
• Vermeiden Sie den Kontakt zu metallischen Gegenständen (Ringe,
Nägel, Schrauben usw.). Es besteht Kurzschlussgefahr!
• Durch einen Kurzschluss können sich Batterien stark erhitzen oder
evtl. sogar entzünden. Verbrennungen können die Folge sein.
• Zu Ihrer Sicherheit sollten die Batteriepole beim Transport mit Klebe-
streifen überdeckt werden.
• Falls eine Batterie ausläuft, die Flüssigkeit nicht in die Augen oder
Schleimhäute reiben. Bei Berührung die Hände waschen, die Augen
mit klarem Wasser spülen. Bei anhaltenden Beschwerden einen Arzt
aufsuchen.
ACHTUNG:
• Wird die Fernbedienung längere Zeit nicht benutzt, entnehmen Sie
die Batterien, um ein „Auslaufen“ von Batteriesäure zu vermeiden.
• Ungleiche Batterietypen oder neue und gebrauchte Batterien dürfen
nicht zusammen verwendet werden.
• Batterien gehören nicht in den Hausmüll. Geben Sie verbrauchte
Batterien bei zuständigen Sammelstellen oder beim Händler ab.
Auspacken des Gerätes
1. Nehmen Sie das Gerät aus seiner Verpackung.
2. Entfernen Sie sämtliches Verpackungsmaterial, wie Folien, Füllmate-
rial, Kabelhalter und Kartonverpackung.
3. Prüfen Sie den Lieferumfang auf Vollständigkeit.
Lieferumfang
1 Klimagerät
1 Fernbedienung
2 Batterien
1 Flexibler Abluftschlauch
1 Adapter für den Abluftschlauch (Anschluss am Gerät)
1 Fensterabluft-Kit, 2-teilig
1 Adapter für das Fensterabluft-Kit
1 Wasserschlauch
2 Stopfen (Ersatz)
Übersicht der Bedienelemente
1 Luftauslass (Schwenk-Klappe)
2 Bedienfeld mit Display
3 Gehäuse
4 Wasserabuss
5 Griff
6 Aufwickelvorrichtung für Netzkabel
7 Wasserabuss
8 Netzkabel
9 Halterung für Netzstecker
10 Adapter für den Abluftschlauch
11 Flexibler Abluftschlauch
12 Adapter für das Fensterabluft-Kit
13 Anschluss für den Abluftschlauch
14 Filtereinsatz
15 Gitter am Lufteinlass
16 Display an der Front
17 Fernbedienung
18 Fensterabluft-Kit, 2-teilig
Übersicht der Tasten, Symbole und Kontrollleuchten
Bedienfeld
1 Kontrollleuchte
FAN (Gebläse)
2 Kontrollleuchte COOL (Kühlen)
3 Kontrollleuchte DRY (Entfeuchten)
4 Display
5 Kontrollleuchte HIGH (hohe Geschwindigkeit des Ventilators)
6 Kontrollleuchte LOW (niedrige Geschwindigkeit des Ventilators)
7 Kontrollleuchte MEDIUM (mittlere Geschwindigkeit des Ventilators)
8 Kontrollleuchte POWER
9 Kontrollleuchte Wi-Fi (WLAN-Verbindung ist aktiviert)
10 Kontrollleuchte BUCKET FULL (Wasserbehälter ist voll)
11 Taste POWER (Gerät ein- / ausschalten)
12 Kontrollleuchte SWING (Schwenk-Klappe schwingt)
13 Taste (Luftauslass einstellen)
14 Taste FAN SPEED (Geschwindigkeit des Ventilators einstellen
und Wi-Fi einschalten)
15 Tasten und (Temperatur oder Stunden einstellen)
16 Kontrollleuchte SLEEP (Schlafmodus)
17 Taste SLEEP („Schlafmodus“ einstellen)
18 Taste MODE (Betriebsart einstellen)
19 Taste MIRAGE
(Hinzu- oder Abschalten des Displays an der Gerätefront)
20 Kontrollleuchte MIRAGE (Display an der Gerätefront)
21 Taste (Zeitschaltuhr einstellen)
22 Kontrollleuchte TIMER (Timer-Betrieb ist aktiviert)
Fernbedienung
1 Symbol
(WLAN-Verbindung ist aktiviert)
2 Anzeige Fan (Gebläse)
3 Batteriesymbol
4 Anzeige Dry (Entfeuchten)
5 Anzeige °C (gewählte Einheit der Temperatur)
6 Anzeige Hr (Stunden)
7 Anzeige °F (gewählte Einheit der Temperatur)
8 Anzeige Sleep (Schlafmodus)
9 Tasten (Temperatur oder Stunden einstellen)
10 Taste (Betriebsart einstellen)
11 Taste (Geschwindigkeit des Ventilators einstellen)
12 Taste (zwischen °Celsius und °Fahrenheit umschalten)
13 Taste („Schlafmodus“ einstellen)
14 Taste (Luftauslass einstellen, SWING-Modus)
15 Taste TIMER (Zeitschaltuhr einstellen)
16 Taste POWER (Gerät ein- / ausschalten)

CL3750_IM_neu 18.12.2019
17 Symbol Einstellung des Ventilators auf LOW
(niedrige Geschwindigkeit)
Symbol Einstellung des Ventilators auf MEDIUM
(mittlere Geschwindigkeit)
Symbol Einstellung des Ventilators auf HIGH
(hohe Geschwindigkeit)
18 Anzeige Swing (Schwenk-Klappe schwingt)
19 Anzeige der Temperatur (oder der Stunden bei Einstellung des Timers
oder der Betriebsart „Gebläse“ oder „Entfeuchten“)
20 Symbol (Timer-Betrieb ist aktiviert)
21 Anzeige Cool (Kühlen)
Anwendungshinweise
ACHTUNG: Wichtig bei der Erstinbetriebnahme oder nach
einem Transport!
Bevor das Gerät in Betrieb genommen wird, muss es mindestens für
3 Stunden in aufrechter Position stehen, damit sich das Kältemittel ab-
senken kann. Andernfalls wird der Kompressor beschädigt.
ACHTUNG:
• Wenn Sie den Betrieb mit der Taste POWER
unterbrechen,
warten Sie mindestens 3 Minuten, bevor Sie das Gerät erneut ein-
schalten.
• Möchten Sie das Gerät an einen anderen Ort transportieren, entlee-
ren Sie zuvor den Wasserbehälter!
• Das Gerät arbeitet am effektivsten bei einer Raumgröße bis zu 70 m³.
• Der exible Abluftschlauch und der Adapter sind speziell für dieses Ge-
rät angefertigt. Ersetzen Sie den Schlauch nicht durch einen anderen,
um Störungen zu vermeiden.
• Der Abluftschlauch kann bis auf 150 cm ausgedehnt werden. Verwen-
den Sie keine Verlängerung.
• Die Luft muss frei strömen können. Achten Sie darauf, dass der Abluft-
schlauch nicht geknickt oder verbogen wird. Jede Blockade kann zur
Überhitzung des Gerätes führen.
• Schließen Sie Fenster und Türen, damit keine Außenluft in den Raum
eindringen kann. Das Gerät arbeitet dadurch effektiver.
Inbetriebnahme
Standort
• Platzieren Sie das Gerät so, dass ein Abstand zu Wänden oder ande-
ren Gegenständen von mindestens 50 cm eingehalten wird.
• Die Fläche muss eben und trocken sein.
Montage des Abluftschlauches
HINWEIS:
Bei Schiebefenstern oder Außenrollläden können Sie das im Lieferum-
fang beiliegende Fensterabluft-Kit vertikal oder horizontal benutzen. Die
Länge der Dichtungsplatte ist individuell einstellbar.
1. Verbinden Sie den Adapter mit dem Abluftschlauch. Setzen Sie den
Abluftschlauch so an, dass die erste Rippe des Schlauches in der
Schiene liegt. Drehen Sie den Adapter im Uhrzeigersinn fest.
2. Verbinden Sie den Adapter mit dem Anschluss auf der Rückseite des
Geräts. Halten Sie dafür den Abluftschlauch mit dem Adapter so, dass
die Beschriftung am Adapter nach oben zeigt. Drehen Sie den Adapter
in Richtung LOCK bis zum Anschlag.
3. Ziehen Sie den Schlauch auf die benötigte Länge aus.
4. Drehen Sie den Adapter für das Fensterabluft-Kit auf das Ende des
Abluftschlauchs.
5. Klemmen Sie das freie Schlauchende in ein Fenster.
6. Schließen Sie das Fenster so weit wie möglich. Schließen Sie zusätz-
lich, sofern vorhanden, ein Außenrollo bis zum Schlauchende.
Fernbedienung
1. Öffnen Sie den Batteriefachdeckel auf der Rückseite der Fernbedie-
nung.
2. Legen Sie 2 Batterien des Typs R03 „AAA“ 1,5 V ein. Achten Sie auf
die richtige Polarität (siehe Batteriefachboden)!
3. Schließen Sie den Batteriefachdeckel.
Netzkabel
Wickeln Sie das Netzkabel von der Aufwickelvorrichtung ab.
Elektrischer Anschluss
1. Prüfen Sie, ob die Netzspannung, die Sie benutzen wollen, mit der des
Gerätes übereinstimmt. Die Angaben hierzu nden Sie auf dem Typen-
schild des Gerätes.
2. Schließen Sie das Gerät an eine vorschriftsmäßig installierte Schutz-
kontakt-Steckdose an. Ein Signalton bestätigt Ihnen die Betriebsbe-
reitschaft. Das Gerät bendet sich im Standby. Das Display zeigt die
aktuelle Raumtemperatur.
Ein- / Ausschalten
• Drücken Sie die Taste POWER
, um das Gerät einzuschalten. Die
Schwenk-Klappe wird automatisch geöffnet. Das Gerät ist vorein-
gestellt auf die Betriebsart „Kühlen“ und die Temperatur 22 °C. Haben
Sie den Betrieb nur unterbrochen, ohne den Netzstecker zu ziehen,
bleiben die zuvor eingestellte Betriebsart und Temperatur gespeichert.
Die Kontrollleuchten zeigen diese Einstellung an.
• Drücken Sie die Taste POWER erneut, um das Gerät wieder auszu-
schalten. Die Schwenk-Klappe wird automatisch geschlossen.
Kompressor Schutzvorrichtung
Wird der Betrieb unterbrochen, aktiviert sich die Schutzvorrichtung für
den Kompressor. Diese verhindert den Betrieb des Kompressors für ca.
3 Minuten, damit sich der Druck im Kältekreislauf entspannen kann. Dies
ist kein Defekt vom Gerät. Warten Sie daher mindestens 3 Minuten, bevor
Sie das Gerät erneut einschalten.
Informationen zur App „Smart Life - Smart Living“
Die Smart Life - Smart Living App ist für Android und für iOS verfügbar.
Scannen Sie den entsprechenden QR Code, um direkt zum Download zu
gelangen.
HINWEIS:
Anbieterbedingt können beim Download der App Kosten entstehen.
Google Play App Store
Informationen zur Bedienung mit der App
Dieses Gerät bieten Ihnen die Möglichkeit das Gerät über Ihr Heimnetz-
werk zu bedienen. Voraussetzung dafür ist eine dauerhafte WLAN Verbin-
dung mit Ihrem Router und die kostenlose App „Smart Life - Smart Living“.
Über die App können Sie komfortabel auf die ganzen Funktionen des Ge-
rätes zugreifen. Da die App stetig verbessert wird, können wir hier jedoch
keine genauere Beschreibung geben.
Um ein unbeabsichtigtes Einschalten von unterwegs vorzubeugen, emp-
fehlen wir das Gerät vom Stromnetz zu trennen, wenn Sie nicht zu Hause
sind!
Systemanforderung für die Verwendung der App
• iOs 8.0 oder höher
• Android 4.4 oder höher

9
CL3750_IM_neu 18.12.2019
Inbetriebnahme mit der App
1. Installieren Sie die App „Smart Life - Smart Living“. Erstellen Sie ein
Benutzerkonto.
2. Aktivieren Sie die WLAN Funktion in den Einstellungen Ihres Gerätes.
3. Stellen Sie das Klimagerät innerhalb von ca. 5 Metern zu Ihrem Router
auf.
4. Halten Sie die Taste FAN SPEED ca. 5 Sekunden gedrückt. Die Kont-
rollleuchte
Wi-Fi blinkt schnell.
5. Öffnen Sie die App und wählen Sie „ + “ aus.
6. Wählen Sie das Menü „Klimaanlage“ aus und folgen den Anweisungen
auf dem Display.
7. Nachdem das Gerät erfolgreich verbunden wurde, leuchtet die
Kontroll-
leuchte Wi-Fi
.
Jetzt können Sie das Gerät mittels App bedienen.
HINWEIS:
• Das Gerät arbeitet ausschließlich mit 2,4 GHz Routern zusammen.
5 GHz Router werden nicht unterstützt.
• Das Gerät verfügt nur über eine Netzwerkverbindung. Diese lässt
sich nicht ausschalten.
Benutzung des Gerätes
• Einstellungen, die Sie am Gerät vorgenommen haben, werden nicht an
die Fernbedienung übermittelt.
• Sobald Sie eine Taste an der Fernbedienung drücken, werden die ge-
wählten Einstellungen der Fernbedienung vom Gerät übernommen.
• Auf dem Display der Fernbedienung wird Ihre getroffene Auswahl sicht-
bar.
• Die Tasten und müssen mehrfach gedrückt werden, um die
einzelnen Funktionen auszuwählen.
Nachfolgend werden Ihnen die Tasten am Bedienfeld erklärt. Die Kontroll-
leuchten zeigen Ihre getroffene Auswahl an.
Betriebsarten
Mit der Taste MODE wählen Sie zwischen folgenden Betriebsarten:
• Kühlen
COOL
• Entfeuchten DRY
• Gebläse FAN
Betriebsart „Kühlen“
In dieser Betriebsart können Sie die Geschwindigkeit des Ventilators und
die Temperatur nach Ihren Wünschen einstellen.
HINWEIS:
Für einen Betrieb mit Kompressor, muss die eingestellte Temperatur
niedriger sein, als die aktuelle Raumtemperatur.
Betriebsart „Gebläse“
In dieser Betriebsart können Sie nur die Geschwindigkeit des Ventilators
einstellen.
Betriebsart „Entfeuchten“
• In dieser Betriebsart sind keine weiteren Einstellungen möglich.
• Die Geschwindigkeit des Ventilators ist auf die niedrigste Stufe LOW
voreingestellt.
• Der Raum wird gekühlt. Der Luft wird die Feuchtigkeit entzogen.
• Für einen längeren Betrieb in der Betriebsart „Entfeuchten“ empfehlen
wir, den mitgelieferten Wasserschlauch am oberen Wasserabuss
permanent anzuschließen (siehe Abbildung). Ziehen Sie zuvor den
oberen Stopfen ab. Legen Sie das Ende des Wasserschlauches in ein
größeres Gefäß (z. B. einen Eimer).
Einstellen des Ventilators
In den Betriebsarten „Kühlen“ und „Gebläse“ haben Sie die Möglichkeit,
die Geschwindigkeit des Ventilators in 3 Stufen einzustellen. Drücken Sie
dazu die Taste FAN SPEED.
• LOW (niedrig)
• MEDIUM (mittel)
• HIGH (hoch)
Einstellen der Temperatur
• Mit den Tasten
oder regeln Sie die Temperatur in der Betriebsart
„Kühlen“.
• Sie können eine Temperatur zwischen 16 °C (61 °F) und 31 °C (88 °F)
wählen.
HINWEIS:
Die Umschaltung zwischen °Celsius und °Fahrenheit können Sie nur
mit der Taste
an der Fernbedienung vornehmen.
„Schlafmodus“
• Wenn das Gerät eingeschaltet ist und sich in der Betriebsart „Kühlen“
bendet, drücken Sie die Taste SLEEP.
• Die Geschwindigkeit des Ventilators ist auf die niedrigste Stufe LOW
voreingestellt. Dies kann nicht verändert werden.
• Das Display wird nach 10 Sekunden ausgeschaltet.
• Nach einer Stunde Laufzeit im „Schlafmodus“ wird die eingestellte
Temperatur automatisch um 1° C erhöht, und eine Stunde später ein
weiteres Mal. So wird ein komfortables Raumklima erreicht.
Einstellen des Luftauslasses
Mit der Taste
können Sie die Richtung des Luftstroms, der ausgege-
ben wird, bestimmen.
• Drücken Sie die Taste
mehrmals, bis Sie die gewünschte Position
der Schwenk-Klappe eingestellt haben.
Timer (Zeitschaltuhr)
Mit der Timerfunktion haben Sie die Möglichkeit, die Ein- oder die
Ausschaltzeit des Gerätes zu bestimmen. Sie können zwischen 1 und
24 Stunden wählen.
Automatisches Einschalten mit der Timer-Funktion
1. Schalten Sie das Gerät mit der Taste POWER
ein.
2. Stellen Sie die Betriebsart, die Temperatur und die Geschwindigkeit
des Ventilators ein, in bzw. mit der das Gerät zur Einschaltzeit arbeiten
soll.
3. Schalten Sie das Gerät mit der Taste POWER aus.
4. Drücken Sie die Taste . Die Anzahl der Stunden blinken.
5. Mit den Tasten und können Sie die gewünschte Stundenzahl
einstellen. Der Einstell-Modus wird nach ca. 5 Sekunden automatisch
verlassen. Der Timer-Betrieb ist aktiviert und die Kontrollleuchte TIMER
leuchtet.
HINWEIS:
Drücken Sie nicht die Taste
, nachdem Sie die Stunden eingestellt
haben, da der Timer-Betrieb dadurch nicht gespeichert wird.

CL3750_IM_neu 18.12.2019
Automatisches Ausschalten mit der Timer-Funktion
1. Schalten Sie das Gerät mit der Taste POWER
ein.
2. Drücken Sie während des Betriebs die Taste . Die Anzahl der Stun-
den blinken.
3. Stellen Sie den Timer-Betrieb ein wie zuvor im Punkt 5 beschrieben.
HINWEIS:
• Möchten Sie den eingestellten Timer-Betrieb deaktivieren, drücken
Sie zweimal die Taste
. Die Kontrollleuchte TIMER erlischt.
• Sie können die Timer-Funktion auch jeder Zeit abbrechen, indem Sie
das Gerät mit der Taste POWER
ein- bzw. ausschalten.
Taste MIRAGE
Mit der Taste MIRAGE können Sie das Display an der Gerätefront hinzu-
oder abschalten.
Entleeren des Wasserbehälters
Im Inneren des Gerätes bendet sich ein Wasserbehälter, um das
Kondensat aufzufangen. Ist der Wasserbehälter voll, leuchtet die Kontroll-
leuchte
BUCKET FULL. Das Gerät schaltet sich aus.
ACHTUNG:
Transportieren Sie das Gerät nicht, wenn der Wasserbehälter voll ist.
Wasser könnte ins Innere des Gerätes gelangen.
Um den Betrieb fortsetzen zu können, müssen Sie den Wasserbehälter
leeren. Sie benötigen dafür ein Bodentuch, eine ache Schale, die ca.
0,5 Liter Wasser aufnehmen kann, und den im Lieferumfang enthaltenen
Wasserschlauch.
1. Ziehen Sie den Netzstecker aus der Steckdose.
2. Legen Sie ein Bodentuch und eine ache Schale unter den Wasserab-
uss. Wenn möglich, stellen Sie die Schale auf eine tiefere Ebene als
das Gerät.
3. Ziehen Sie den unteren Stopfen ab.
4. Befestigen Sie den Wasserschlauch am Wasserabuss des Gerätes.
Legen Sie das Ende des Wasserschlauches in die Schale.
5. Nach Ablauf des Wassers entfernen Sie den Wasserschlauch. Ver-
schließen Sie den Wasserabuss am Gerät wieder mit dem Stopfen.
Betrieb beenden
1. Schalten Sie das Gerät mit der Taste POWER
aus.
2. Ziehen Sie den Netzstecker aus der Steckdose.
Aufwickelvorrichtung für Netzkabel
Wickeln Sie das Netzkabel um die Aufwickelvorrichtung. Stecken Sie den
Netzstecker in die dafür vorgesehenen Löcher.
Reinigung
WARNUNG:
• Ziehen Sie vor der Reinigung immer den Netzstecker
aus der Steckdose!
• Achten Sie darauf, dass bei der Reinigung kein Was-
ser in die Öffnungen des Gerätes eindringt. Es könnte
zu einem elektrischen Schlag oder Brand führen.
ACHTUNG:
• Besprühen Sie das Gerät nicht mit Reinigungsmittel.
• Benutzen Sie keine Drahtbürste oder andere scheuernde Gegen-
stände.
• Benutzen Sie keine scharfen oder scheuernden Reinigungsmittel.
Filter
Reinigen Sie den Filter alle 2 Wochen, wenn das Gerät täglich im Einsatz
ist. Wenn Staub in dem Filter die Luftzirkulation blockiert, ist die Efzienz
des Gerätes nicht mehr gewährleistet.
1. Auf der Rückseite des Geräts, oberhalb des Anschlusses für den Ab-
luftschlauch, bendet sich ein Gitter mit innen liegendem Filter.
2. Entnehmen Sie das Gitter vom Gerät und den Filter aus dem Gitter.
3. Saugen Sie den Filter mit einem Staubsauger ab.
4. Reinigen Sie den Filter unter ießendem Wasser. Wenn nötig, können
Sie ein mildes Reinigungsmittel benutzen.
5. Lassen Sie den Filter an der Luft, an einem schattigen Ort trocknen.
6. Setzen Sie den Filter wieder in das Gitter, wenn er vollständig getrock-
net ist. Die Aussparungen zeigen nach oben.
7. Setzen Sie das Gitter wieder in das Gerät ein.
ACHTUNG:
Nehmen Sie das Gerät nicht ohne Filter in Betrieb!
Gehäuse
• Saugen Sie die Lüftungsschlitze mit einem Staub sauger ab.
• Das Gehäuse kann mit einem leicht angefeuchteten Tuch abgewischt
werden.
Saison-Reinigung und Aufbewahrung
Wenn Sie das Gerät längere Zeit nicht benutzen wollen, gehen Sie bitte
wie folgt vor:
1. Entleeren Sie den Wasserbehälter wie zuvor beschrieben.
2. Wiederholen Sie die Punkte 2 - 5 aus dem Kapitel „Entleeren des Was-
serbehälters“ mit dem oberen Wasserabuss (oberer Stopfen).
3. Betreiben Sie das Gerät für 2 Stunden in der Betriebsart „Gebläse“, um
das Gerät im Inneren zu trocknen.
4. Schalten Sie das Gerät mit der Taste POWER
aus. Ziehen Sie den
Netzstecker aus der Steckdose.
5. Entfernen Sie den exiblen Abluftschlauch vom Gerät.
6. Lassen Sie beide Wasserabüsse offen.
7. Reinigen Sie den Filter und das Gerät wie zuvor beschrieben.
8. Decken Sie das Gerät mit einer Folie ab.
9. Lagern Sie das Gerät immer außerhalb der Reichweite von Kindern an
einem gut belüfteten und trockenen Ort.

11
CL3750_IM_neu 18.12.2019
Störungsbehebung
Störung Mögliche Ursache Abhilfe
Das Gerät ist ohne Funktion. Keine Stromversorgung Überprüfen Sie den Netzanschluss.
Die Timer-Funktion ist aktiviert.
Schalten Sie das Gerät mit der Taste POWER
ein.
Die Umgebungstemperatur ist zu niedrig
oder zu hoch.
Es wird empfohlen, das Gerät bei einer Temperatur von 16 - 35 °C zu
verwenden.
Das Gerät ist defekt. Wenden Sie sich an unseren Service oder an einen Fachmann. Be-
achten Sie die beiliegende Service-Anleitung.
Das Gerät kühlt nicht ausreichend. Das Gerät steht direkt in der Sonne. Wählen Sie einen anderen Standort oder dunkeln Sie die Fenster ab.
Fenster oder Türen sind geöffnet. Schließen Sie die Fenster und Türen.
Es benden sich viele Personen oder
andere Heizquellen im Raum.
Entfernen Sie mobile Heizquellen oder schalten Sie sie aus.
Der Filter ist verschmutzt. Reinigen Sie den Filter.
Der Lufteinlass oder -auslass ist blockiert. Beseitigen Sie die Blockade. Halten Sie die Lüftungsschlitze frei.
Das Gerät arbeitet zu laut. Das Gerät steht schief. Stellen Sie das Gerät auf eine ebene Fläche. Vermeiden Sie Erschüt-
terungen.
Das Gerät schaltet sich während
des Betriebs aus. Die Kontroll-
leuchte
blinkt rot.
Der Wasserbehälter ist voll. Ziehen Sie den Netzstecker aus der Steckdose. Entleeren Sie den
Wasserbehälter am unteren Wasserabuss. Danach können Sie das
Gerät wieder benutzen.
Die Fernbedienung funktioniert
nicht.
Die Entfernung zum Gerät ist zu weit. Gehen Sie näher an das Gerät.
Sie halten die Fernbedienung nicht in
Richtung des Sensors.
Halten Sie die Fernbedienung so, dass diese auf den Sensor zeigt.
Achten Sie auf freie Sicht zwischen Fernbedienung und dem Sensor.
Die Batterien sind leer. Wechseln Sie die Batterien.
Display-Anzeige am Gerät: E1 Temperatursensor defekt. Wenden Sie sich an unseren Kundendienst oder an Ihren Händler.
Display-Anzeige am Gerät: E2
Wenn Probleme auftreten, die nicht in der Tabelle aufgeführt sind, oder die empfohlene Abhilfe der Störung nicht funktioniert, wenden Sie sich an unse-
ren Kundendienst oder an Ihren Händler.
Technische Daten
Modell: ..............................................................................................CL 3750
Nettogewicht: ............................................................................... ca. 30,8 kg
Spannungsversorgung: ...................................................220 - 240 V~, 50 Hz
Leistungsaufnahme: ......................................................................... 1345 W
Leistungsaufnahme im vernetzten Bereitschaftsbetrieb: .....................0,8 W
Schutzklasse: ...............................................................................................
Energieefzienzklasse: ............................................................................... A
Kälteleistung: ...............................................................12000 BTU (3,52 kW)
Kältemittel: ........................................................................................... R 290
Maximal zulässiger Betriebsdruck:
Druckseite: ................................................................................... 1,8 MPa
Saugseite: .................................................................................... 0,6 MPa
Maximal erlaubter Druck: ................................................................. 3,0 MPa
WLAN
Unterstütztes Netzwerk: .............................................................802.11 b/g/n
Maximale abgestrahlte Sendeleistung: ........................................... 100 mW
Frequenzbereich: ..............................................................................2,4 GHz
Kanäle: .................................................................................................. 1 - 13
Unterstützte WLAN Schlüssel: ................................................. WPA / WPA2
Technische und gestalterische Änderungen im Zuge stetiger Produktent-
wicklungen vorbehalten.
Hinweis zur Richtlinienkonformität
Hiermit erklärt die Firma Clatronic International GmbH, dass der Funkan-
lagen-Typ CL 3750 der Richtlinie 2014 / 53 / EU entspricht.
Außerdem bendet sich das Gerät in Übereinstimmung mit der RoHS-
Richtlinie 2011 / 65 / EG.
Der vollständige Text der EU-Konformitätserklärung ist unter der folgen-
den Internetadresse verfügbar: www.sli24.de
Im Bereich „Downloads“ geben Sie bitte die Modell-Bezeichnung CL 3750
ein.
Geprüft für den Betrieb in Deutschland.
Garantie
Garantiebedingungen
1. Gegenüber Verbrauchern gewähren wir bei privater Nutzung des Ge-
räts eine Garantie von 24 Monaten ab Kaufdatum.
Ist das Gerät zur gewerblichen Nutzung geeignet, gewähren wir beim
Kauf durch Unternehmer für das Gerät eine Garantie von 12 Monaten.
Die Garantiezeit für Verbraucher reduziert sich auf 12 Monate, sofern
sie ein zur gewerblichen Nutzung geeignetes Gerät – auch teilweise –
gewerblich nutzen.
2. Voraussetzung für unsere Garantieleistungen sind der Kauf des Geräts
in Deutschland bei einem unserer Vertragshändler sowie die Übersen-
dung einer Kopie des Kaufbelegs und dieses Garantie scheins an uns.
Bendet sich das Gerät zum Zeitpunkt des Garantiefalls im Ausland,
muss es auf Kosten des Käufers uns zur Erbringung der Garantie-
leistungen zur Verfügung gestellt werden.

CL3750_IM_neu 18.12.2019
3. Mängel müssen innerhalb von 14 Tagen nach Erkennbarkeit uns
gegenüber schriftlich angezeigt werden. Besteht der Garantieanspruch
zu Recht, entscheiden wir, auf welche Art der Schaden / Mangel be-
hoben werden soll, ob durch Reparatur oder durch Austausch eines
gleichwertigen Gerätes.
4. Garantieleistungen werden nicht für Mängel erbracht, die auf der Nicht-
beachtung der Gebrauchsanweisung, unsachgemäßer Behandlung
oder normaler Abnutzung des Geräts beruhen. Garantieansprüche sind
ferner ausgeschlossen für leicht zerbrechliche Teile, wie zum Beispiel
Glas oder Kunststoff. Schließlich sind Garantieansprüche ausgeschlos-
sen, wenn nicht von uns autorisierte Stellen Arbeiten an dem Gerät
vornehmen.
5. Durch Garantieleistungen wird die Garantiezeit nicht verlängert. Es be-
steht auch kein Anspruch auf neue Garantieleistungen. Diese Garantie-
erklärung ist eine freiwillige Leistung von uns als Hersteller des Geräts.
Die gesetzlichen Gewährleistungsrechte (Nacherfüllung, Rücktritt,
Schadensersatz und Minderung) werden durch diese Garantie nicht
berührt.
Stand 06 2012
Garantieabwicklung
24 Stunden am Tag, 7 Tage in der Woche
Sollte Ihr Gerät innerhalb der Garantiezeit einen Mangel aufweisen, steht
Ihnen die schnellste und komfortabelste Möglichkeit der Reklamations-
anmeldung über unser SLI – Internet-Serviceportal zur Verfügung.
www.sli24.de
Bitte melden Sie direkt den Servicevorgang auf unserem Online Service-
portal www.sli24.de an. Sie erhalten wenige Sekunden nach Abschluss
der Anmeldung ein kostenloses Versandticket per E-Mail übermittelt.
Zusätzlich erhalten Sie weitere Informationen zur Abwicklung Ihrer Rekla-
mation.
Mit Ihren persönlichen Zugangsdaten, die direkt nach Ihrer Anmeldung
per E-Mail an Sie übermittelt werden, können Sie den Status Ihres Vor-
gangs auf unserem Serviceportal www.sli24.de online verfolgen.
Sie brauchen das kostenlose Versandticket nur noch auf die Verpackung
Ihres gut verpackten Gerätes zu kleben und das Paket bei der nächsten
Annahmestelle der Deutschen Post / DHL abzugeben. Der Versand erfolgt
für Sie kostenlos an unser Servicecenter bzw. Servicepartner.
So einfach kann Service sein!
1. Anmelden
2. Einpacken
3. Ab zur Post damit
Fertig, so einfach geht es!
Bitte vergessen Sie nicht, dem Gerät eine Kopie Ihres Kaufbeleges
(Kassenbon, Rechnung, Lieferschein) als Garantienachweis beizulegen,
da wir sonst keine kostenlosen Garantieleistungen erbringen können.
Unser Serviceportal www.sli24.de bietet Ihnen weitere Leistungen an:
• Downloadbereich für Bedienungsanleitungen
• Downloadbereich für Firmwareupdates
• FAQ’s, die Ihnen Problemlösungen anbieten
• Kontaktformular
• Zugang zu unseren Zubehör- und Ersatzteile-Web shops
Auch nach der Garantie sind wir für Sie da! – Kostengünstige Repa-
raturen zum Festpreis!
Bitte nehmen Sie in keinem Fall eine unfreie Einsendung Ihres Gerätes
vor. Unfreie Lieferungen werden von uns nicht angenommen. Es entste-
hen Ihnen damit erhebliche Kosten.
Stand 06 2012
Entsorgung
Batterieentsorgung
Als Verbraucher sind Sie gesetzlich verpichtet, gebrauchte
Batterien / Akkus zurückzugeben.
Entfernen Sie die Batterien aus der Fernbedienung, bevor Sie
das Gerät entsorgen.
Sie können sie bei einer Sammelstelle für Altbatterien bzw. Sondermüll
abgeben. Informieren Sie sich bei Ihrer Gemeinde.
Bedeutung des Symbols „Mülltonne“
Schonen Sie unsere Umwelt, Elektrogeräte gehören nicht in
den Hausmüll.
Nutzen Sie die für die Entsorgung von Elektrogeräten vorge-
sehenen Sammelstellen und geben dort Ihre Elektrogeräte ab,
die Sie nicht mehr benutzen werden.
Sie helfen damit die potenziellen Auswirkungen, durch falsche Entsor-
gung, auf die Umwelt und die menschliche Gesundheit zu vermeiden.
Sie leisten damit Ihren Beitrag zur Wiederverwertung, zum Recycling
und zu anderen Formen der Verwertung von Elektro- und Elektronik-
Altgeräten.
Informationen, wo die Geräte zu entsorgen sind, erhalten Sie über Ihre
Kommunen oder die Gemeindeverwaltungen.

13
CL3750_IM_neu 18.12.2019
Gebruiksaanwijzing
Bedankt voor het uitkiezen van ons product. We hopen dat u veel plezier
van het apparaat heeft.
Symbolen in deze gebruiksaanwijzing
Belangrijke aanwijzingen voor uw veiligheid zijn speciaal gekenmerkt.
Neem deze aanwijzingen strikt in acht om ongevallen en schade aan het
apparaat te vermijden:
WAARSCHUWING:
Waarschuwt voor gevaren voor uw gezondheid en toont mogelijk letsel-
risico’s.
LET OP:
Wijst op mogelijke gevaren voor het apparaat of andere voorwerpen.
OPMERKING: Kenmerkt tips en informatie voor u.
Inhoud
Overzicht van de bedieningselementen ..................................................3
Overzicht van de toetsen, pictogrammen en indicatielampjes ............4
Algemene opmerkingen ..........................................................................13
Speciale veiligheidsvoorschriften voor dit apparaat...........................13
Omgaan met batterijen ..........................................................................15
Het apparaat uitpakken ...........................................................................15
Omvang van de levering .........................................................................15
Overzicht van de bedieningselementen ................................................15
Overzicht van de toetsen, pictogrammen en indicatielampjes ..........15
Bedieningspaneel ..................................................................................15
Afstandsbediening .................................................................................15
Opmerkingen voor het gebruik ..............................................................16
Inbedrijfstelling ........................................................................................16
Locatie ....................................................................................................16
Montage van de afvoerpijp ....................................................................16
Afstandsbediening .................................................................................16
Netsnoer .................................................................................................16
Elektrische aansluiting ...........................................................................16
Het apparaat aan- / uitschakelen ............................................................16
Compressor veiligheidssysteem ............................................................16
Informatie over de App “Smart Life - Smart Living” ............................16
Informatie over het gebruik van de app .................................................16
Systeemvereisten voor gebruik van de app ..........................................16
Ingebruikname via de app .....................................................................16
Bediening van het apparaat ....................................................................17
Werkingsmodi ........................................................................................17
Instellen van de ventilator ......................................................................17
Instellen van de temperatuur .................................................................17
“Slaapmodus” .........................................................................................17
Instellen van de luchtuitlaat ....................................................................17
Timer (automatische timer) ....................................................................17
MIRAGE toets ........................................................................................18
Het waterreservoir leegmaken ...............................................................18
Het apparaat uitschakelen .....................................................................18
Oprolapparaat voor netsnoer .................................................................18
Reiniging ...................................................................................................18
Filter ........................................................................................................18
Behuizing................................................................................................18
Seizoensgebonden reiniging en opslag ...............................................18
Verhelpen van storingen .........................................................................18
Technische gegevens .............................................................................. 19
Opmerking van de richtlijn conformiteit ...............................................19
Verwijdering ..............................................................................................19
Verwijdering van batterijen .....................................................................19
Betekenis van het symbool “vuilnisemmer” ...........................................19
Algemene opmerkingen
Lees vóór de ingebruikname van dit apparaat de handleiding uiterst
zorgvuldig door en bewaar deze goed, samen met het garantiebewijs, de
kassabon en zo mogelijk de doos met de binnenverpakking. Geef ook de
handleiding mee wanneer u de machine aan derden doorgeeft.
• Gebruik het apparaat uitsluitend privé en uitsluitend voor de voorge-
schreven toepassing. Dit apparaat is niet geschikt voor commercieel
gebruik.
• Gebruik het apparaat niet buiten. Bescherm het tegen hitte, directe
zonnestralen, vocht (in geen geval in vloeistoffen dompelen) en
scherpe randen. Gebruik het apparaat niet met vochtige handen.
Bij vochtig of nat geworden apparaat onmiddellijk de stroomtoevoer
onderbreken.
• Schakel het apparaat uit en onderbreek altijd de stroomtoevoer (trek
aan de stekker, niet aan de kabel) wanneer u het apparaat niet ge-
bruikt, hulpstukken aanbrengt, reinigt of wanneer storingen optreden.
• Het apparaat en de netkabel moeten regelmatig op zichtbare schade
worden gecontroleerd. Wanneer u schade vaststelt, mag het apparaat
niet meer worden gebruikt.
• Gebruik alleen originele reserveonderdelen.
• Laat om veiligheidsredenen geen verpakkingsdelen (plasticzak, doos,
piepschuim, enz.) binnen het bereik van uw kinderen liggen.
WAARSCHUWING:
Laat kleine kinderen niet met de folie spelen. Er bestaat gevaar
voor verstikking!
Speciale veiligheidsvoorschriften voor dit apparaat
Aanwijzingen doorlezen!
WAARSCHUWING: Brandgevaar!
Het apparaat bevat een ontvlambaar koelmiddel.

14
CL3750_IM_neu 18.12.2019
De servicehandleiding is verkrijgbaar op het volgende webadres: www.sli24.de
Voer in het “Downloads” gedeelte de modelnaam CL 3750 in.
• Iedereen die betrokken is bij het werken aan of inbreken in een koelmiddelcircuit, moet in het bezit zijn van een
geldig certicaat van een door de industrie geaccrediteerde beoordelingsautoriteit, die hun bevoegdheid om koel-
middelen veilig te behandelen overeenkomstig een door de branche erkende beoordelingsspecicatie goedkeurt.
• Onderhoud mag alleen worden uitgevoerd zoals aanbevolen door de fabrikant van de apparatuur. Onderhoud en
reparaties waarvoor de assistentie van ander bekwaam personeel vereist is, moeten worden uitgevoerd onder toe-
zicht van de persoon die bevoegd is voor het gebruik van ontvlambare koelmiddelen.
WAARSCHUWING:
• Probeer niet het ontdooiproces te versnellen.
• Gebruik en sla het apparaat niet op op de volgende locaties:
- Dichtbij een vuurbron.
- Een ruimte waar water of olie kan spetteren.
- Een ruimte die aan direct zonlicht is blootgesteld.
- In de badkamer, de wasruimte of naast een zwembad.
• Boor geen gaten in het apparaat en verbrand het ook niet.
• Onthoud dat koelmiddelen geurloos zijn.
• Het apparaat moet worden opgesteld, bediend en opgeslagen in een ruimte met een vloeroppervlak groter dan
15 m².
LET OP: Gevaar voor oververhitting!
• De ventilatieopeningen niet blokkeren!
• Bedek het apparaat niet!
• R 290 is een koelmiddel dat voldoet aan de Europese milieurichtlijnen.
• Voorkom dat het koelcircuit wordt beschadigd.
• Dit apparaat is alleen bedoeld voor gebruik binnenshuis.
• Het apparaat moet op zodanige wijze worden opgeslagen dat het niet beschadigd.
• Houd u aan de nationale aansluitvoorschriften.
• In het geval van vreemde geluiden, geurtjes en / of rookontwikkeling, haalt u de stekker uit het stopcontact.
• Gebruik of verplaats het apparaat alleen in een rechtopstaande positie.
• Zorg voor een afstand van ten minste 50 cm tussen het apparaat en de muren of andere objecten om voor voldoende
luchtcirculatie tijdens de werking te zorgen.
• Gebruik het apparaat nooit zonder de lter!
• Laat niet het apparaat niet zonder urenlang toezicht continu werken. Verlaat uw huis niet terwijl het apparaat in wer-
king is.
• Dit apparaat is ontworpen voor het koelen van kamers in woningen en mag niet voor andere doeleinden worden
gebruikt.
• Gebruik het apparaat niet in kamers waar gas, brandstof, olie of andere gemakkelijk brandbare vloeistoffen aanwezig
zijn. Gebruik geen sprays zoals verf, pesticiden of andere brandbare materialen in die kamer.
• Steek geen voorwerpen in de openingen van het apparaat.
• Bescherm het apparaat tegen druip- of spatwater en plaats geen vazen gevuld met water, zoals bloemenvazen op
het apparaat.
• Verplaats het apparaat niet als het netsnoer op het stopcontact is aangesloten.
• Schakel het apparaat altijd eerst met de POWER
toets uit voordat u het netsnoer loskoppelt.
• Als de werking is onderbroken, wacht ca. 3 minuten voordat u het apparaat opnieuw start om de druk in het koelcircuit
te laten dalen.
• Repareer het apparaat niet zelf. Neem altijd contact op met een erkende monteur. Als de stroomkabel is beschadigd,
moet deze door de fabrikant, zijn dealer of vergelijkbare, erkende personen vervangen worden om gevaar te vermijden.
• Voorkom dat kleine kinderen het apparaat aanraken.

15
CL3750_IM_neu 18.12.2019
• Dit apparaat kan alleen worden gebruikt door kinderen vanaf 8 jaar, personen met verminderde fysieke, zintuiglijke of
mentale vermogens, of personen met onvoldoende kennis en ervaring als zij begeleid worden of zijn geïnstrueerd in
het veilig gebruik van het apparaat en de gevaren begrijpen.
• Kinderen mogen niet met het apparaat spelen.
• Reinigen en gebruikersonderhoud mag niet door kinderen worden uitgevoerd zonder begeleiding.
• Volg de instructies in het hoofdstuk “Reiniging”.
• Details van het type en de classicatie van de zekeringen: T, 250 V AC, 3,15 A
Omgaan met batterijen
WAARSCHUWING:
• Stel de batterijen niet bloot aan een overmatige hitte, zoals direct
zonlicht, vuur, enz. Er bestaat een risico voor explosie!
• Batterijen zijn geen speelgoed. Houd uit de buurt van kinderen.
• Forceer de batterijen niet open.
• Vermijd contact met metalen voorwerpen (ringen, spijkers, schroe-
ven, enz.). Er bestaat een risico op kortsluiting!
• Een kortsluiting kan er toe leiden dat de batterij extreem heet worden
of zelfs in brand raken, wat tot letsel zal leiden.
• Voor uw eigen veiligheid, dek de batterijklemmen tijdens het vervoer
met plakband af.
• In het geval van lekkende batterijen, zorg ervoor geen vloeistof in uw
ogen of op de slijmvliezen te wrijven. In geval van contact, was uw
handen en spoel uw ogen met helder water. Zoek medische hulp als
irritatie aanhoudt.
LET OP:
• Wanneer u de afstandsbediening voor een lange tijd niet gebruikt,
verwijder de batterijen om “lekkage” van elektrolyt te voorkomen.
• Gebruik geen verschillende soorten batterijen door elkaar of nieuwe
met oude batterijen.
• Werp batterijen nooit met het normale huisvuil weg! Breng gebruikte
batterijen naar de relevante inzamelpunten of uw verkoper.
Het apparaat uitpakken
1. Verwijder het apparaat uit de verpakking.
2. Verwijder alle verpakkingsmaterialen zoals plastic zakken, vulstoffen,
kabelbinders en kartonnen verpakking.
3. Controleer of alle onderdelen aanwezig zijn in de verpakking.
Omvang van de levering
1 Airconditioning
1 Afstandsbediening
2 Batterijen
1 Flexibele luchtuitlaatslang
1 Adapter voor de luchtuitlaatslang (aansluiting op het apparaat)
1 Raamuitlaatluchtkit, 2-delig
1 Adapter voor de raamuitlaatluchtkit
1 Waterslang
2 Pluggen (reserveonderdelen)
Overzicht van de bedieningselementen
1 Luchtuitlaat (zwenk ap)
2 Bedieningspaneel met display
3 Behuizing
4 Waterafvoer
5 Handgreep
6 Oprolapparaat voor netsnoer
7 Waterafvoer
8 Netsnoer
9 Houder voor netstekker
10 Afvoerpijpadapter
11 Flexibele afvoerpijp
12 Adapter voor de vensterkit
13 Afvoerpijpkoppelstuk
14 Filterinzetstuk
15 Rooster op de luchtinlaat
16 Display aan de voorkant
17 Afstandsbediening
18 Vensterkit, 2-delig
Overzicht van de toetsen, pictogrammen en
indicatielampjes
Bedieningspaneel
1 Indicatielampje
FAN (ventilator)
2 Indicatielampje COOL (koelen)
3 Indicatielampje DRY (ontvochtiging)
4 Display
5 Indicatielampje HIGH (hoge ventilatorsnelheid)
6 Indicatielampje LOW (lage ventilatorsnelheid)
7 Indicatielampje MEDIUM (medium ventilatorsnelheid)
8 Indicatielampje POWER
9 Indicatielampje
Wi-Fi (Wi-Fi-verbinding ingeschakeld)
10 Indicatielampje BUCKET FULL (waterreservoir vol)
11 Toets POWER (apparaat in- / uitschakelen)
12 Indicatielampje SWING (zwenk ap oscillate)
13 Toets (luchtuitlaat instellen)
14 Toets FAN SPEED (ventilatorsnelheid instellen en Wi-Fi inschakelen)
15 Toetsen en (temperatuur of uur instellen)
16 Indicatielampje SLEEP (slaapmodus)
17 Toets SLEEP (“slaapmodus” instellen)
18 Toets MODE (werkingsmodus instellen)
19 Toets MIRAGE (display aan de voorkant in- of uitschakelen)
20 Indicatielampje MIRAGE (display aan de voorkant van het apparaat)
21 Toets (timer instellen)
22 Indicatielampje TIMER (timerwerking ingeschakeld)
Afstandsbediening
1 Symbool
(Wi-Fi-verbinding ingeschakeld)
2 Weergave Fan (ventilator)
3 Batterij-symbool
4 Weergave Dry (ontvochtiging)
5 Weergave °C (gekozen temperatuureenheid)
6 Weergave Hr (uren)
7 Weergave °F (gekozen temperatuureenheid)
8 Weergave Sleep (slaapmodus)
9 Toetsen (temperatuur of uur instellen)
10 Toets (werkingsmodus instellen)
11 Toets (ventilatorsnelheid instellen)
12 Toets (schakelen tussen °celsius en °fahrenheit)
13 Toets (“slaapmodus” instellen)
14 Toets (luchtuitlaat instellen, SWING-modus)
15 Toets TIMER (timer instellen)
16 Toets POWER (apparaat in- / uitschakelen)
17 Symbool de ventilator op LOW instellen (lage ventilatorsnelheid)
Symbool de ventilator op MEDIUM instellen (medium ventilator-
snelheid)
Symbool de ventilator op HIGH instellen (hoge ventilatorsnelheid)

16
CL3750_IM_neu 18.12.2019
18 Weergave Swing (zwenk ap oscillate)
19 Temperatuurweergave (of uuraanduiding tijdens instellen van de timer
of wanneer de “ventilator” of “ontvochtiging” werkingsmodus wordt
gebruikt)
20 Symbool (timerwerking ingeschakeld)
21 Weergave Cool (koelen)
Opmerkingen voor het gebruik
LET OP: Belangrijk voor het eerste gebruik of na het vervoer!
Voor de ingebruikname, moet het apparaat voor ten minste 3 uur in een
rechtopstaande stand blijven staan om het koelmiddel te laten zinken.
Anders zal de compressor beschadigd raken.
LET OP:
• Wanneer u de bediening met de POWER
toets onderbreekt,
wacht dan tenminste minuten voordat u het apparaat weer inscha-
kelt.
• Als u het apparaat ergens anders wilt neerzetten, maak dan eerst het
waterreservoir leeg!
• Het apparaat werkt het meest doeltreffend in een ruimte tot 70 m³.
• De exibele afvoerslang en de adapter zijn speciaal voor dit apparaat
vervaardigd. Om onjuiste werking te voorkomen, vervang de pijp niet
door een andere pijp.
• De afvoerpijp kan tot 150 cm worden uitgetrokken. Gebruik geen ver-
lengstukken.
• Zorg voor een ongehinderde luchtstroom. Zorg ervoor om de afvoerpijp
niet te knikken of te buigen. Een blokkering kan ertoe leiden dat het
apparaat oververhit raakt.
• Sluit alle vensters en deuren om te voorkomen dat buitenlucht de ka-
mer binnenkomt en een meer doeltreffende werking van het apparaat
mogelijk wordt.
Inbedrijfstelling
Locatie
• Zorg voor een afstand van ten minste 50 cm tussen het apparaat en de
muren of andere objecten bij het installeren van het apparaat.
• Het oppervlak moet vlak en droog zijn.
Montage van de afvoerpijp
OPMERKING:
Voor schuiframen of externe rolgordijnen kan de meegeleverde raamuit-
laatluchtkit in een verticale of horizontale stand worden gebruikt. Pas de
lengte van de afdichtplaat naar wens aan.
1. Sluit de adapter op de afvoerslang aan. Plaats de afvoerslang zodanig
dat de eerste vin van de slang in de rail ligt. Draai de adapter vast door
deze naar rechts te draaien.
2. Sluit de adapter aan op de connector aan de achterkant van het appa-
raat. Om dit te doen, plaats de luchtuitlaatslang met de adapter op een
dergelijke wijze zodat het label op de adapter omhoog is gericht. Draai
de adapter helemaal naar LOCK.
3. Trek de pijp tot de gewenste lengte uit.
4. Schuif de adapter van de raamuitlaatluchtkit op het uiteinde van de
luchtuitlaatslang.
5. Steek het open uiteinde van de pijp in een venster.
6. Sluit het venster zo ver als mogelijk. Laat ook eventuele buitenrollui-
ken, indien aanwezig, tot op het uiteinde van de pijp zakken.
Afstandsbediening
1. Open de klep van het batterijvak aan de achterzijde van de afstands-
bediening.
2. Plaats 2 batterijen van het type R03 “AAA” 1,5 V, volgens de juiste
polariteit (zie markeringen op de bodem van het batterijvak)!
3. Sluit de klep van het batterijvak.
Netsnoer
Ontrol het netsnoer van het oprolapparaat.
Elektrische aansluiting
1. Controleer of de netspanning die u wilt gebruiken overeenkomt met de
spanning van het apparaat. Controleer het typeplaatje voor gedetail-
leerde specicaties.
2. Sluit het apparaat aan op een correct geïnstalleerd geaard stopcontact.
Een signaal zal klinken om aan te geven dat het apparaat klaar voor
gebruik is. Het apparaat staat in stand-by. Het display geeft de huidige
kamertemperatuur weer.
Het apparaat aan- / uitschakelen
• Druk op de POWER
toets om het apparaat aan te schakelen. De
zwenk ap wordt automatisch geopend. Het apparaat is vooringesteld
op “Koelen” mode, met een temperatuur van 22 °C. Als de werking is
gestopt zonder de stekker uit het stopcontact te verwijderen, zullen alle
eerder ingestelde werkingsmodi en temperatuurinstellingen worden
bewaard. De controlelampjes geven deze instelling aan.
• Druk opnieuw op de POWER toets om het apparaat uit te schake-
len. De zwenk ap wordt automatisch gesloten.
Compressor veiligheidssysteem
Als de werking wordt onderbroken, wordt het veiligheidssysteem voor de
compressor geactiveerd. Hiermee wordt de werking van de compressor
ca. 3 minuten onderbroken om de druk in het koelcircuit te verminderen.
Dit is geen defect van het apparaat. Wacht daarom ten minste 3 minuten
alvorens het apparaat opnieuw in te schakelen.
Informatie over de App “Smart Life - Smart Living”
De Smart Life - Smart Living app is beschikbaar voor android en iOS.
Scan de overeenkomstige QR-code om direct over te gaan tot het down-
loaden.
OPMERKING:
Afhankelijk van de aanbieder, kunnen er kosten aan het downloaden
van de app verbonden zijn.
Google Play App Store
Informatie over het gebruik van de app
Dit apparaat stelt u in staat om het apparaat via uw thuisnetwerk te bedie-
nen. Een voorwaarde is een permanente wi-verbinding met uw router en
de gratis app “Smart Life - Smart Living”.
U krijgt eenvoudig toegang tot alle functies via de app. Gezien de app
continu wordt verbeterd, is het niet mogelijk om een meer gedetailleerde
beschrijving te geven.
We raden aan om de stekker van het apparaat uit het stopcontact te halen
wanneer u niet thuis bent om onopzettelijk inschakelen te voorkomen
terwijl u onderweg bent!
Systeemvereisten voor gebruik van de app
• iOs 8.0 of hoger
• Android 4.4 of hoger
Ingebruikname via de app
1. Installeer de app “Smart Life - Smart Living”. Maak een gebruikersac-
count aan.
2. Activeer de wi-functie in de instellingen van uw apparaat.
3. Plaats de airconditioner binnen een afstand van ongeveer 5 meter van
uw router.

17
CL3750_IM_neu 18.12.2019
4. Houd de toets FAN SPEED ongeveer 5 seconden ingedrukt. Het
Wi-Fi-indicatielampje knippert snel.
5. Start de app en selecteer “ + ” .
6. Selecteer het menu “airconditioner” en volg de instructies op het dis-
play.
7. Wanneer het apparaat met succes is verbonden, brandt het
Wi-Fi-indicatielampje continu. Nu kunt u het apparaat met behulp van
de app bedienen.
OPMERKING:
• Het apparaat kan alleen met 2.4 GHz routers werken. 5 GHz routers
worden niet ondersteund.
• Het apparaat is uitgerust met slechts één netwerkverbinding. Het kan
niet worden uitgeschakeld.
Bediening van het apparaat
• Instellingen die via het apparaat worden gemaakt worden niet naar de
afstandsbediening verstuurd.
• Zodra op een toets op de afstandsbediening wordt gedrukt, zal het
apparaat de overeenkomstige instellingen vanaf de afstandsbediening
toepassen.
• Uw selectie verschijnt op het display van de afstandsbediening.
• De toetsen en moeten verschillende keren worden ingedrukt om
de afzonderlijke functies te selecteren.
De toetsen op het bedieningspaneel worden hieronder uitgelegd. De
indicatielampjes tonen uw gekozen selectie.
Werkingsmodi
Gebruik de MODE toets om één van de volgende werkingsmodi te selec-
teren:
• Koelen
COOL
• Ontvochtiging DRY
• Ventilator FAN
Modus “Koelen”
In deze bedieningsmodus, kunt u de ventilatorsnelheid en de temperatuur
naar wens aanpassen.
OPMERKING:
Om het apparaat te bedienen met de compressor, moet de ingestelde
temperatuur lager zijn dan de huidige kamertemperatuur.
Modus “Ventilator”
In deze modus kunt u alleen de snelheid van de ventilator instellen.
Modus “Ontvochtigen”
• Deze werkingsmodus biedt geen ondersteuning voor eventuele ver-
dere instellingen.
• De ventilatorsnelheid is vooraf op de laagste snelheid LOW ingesteld.
• Het apparaat zal de kamer koelen en de vochtigheid uit de lucht ont-
rekken.
• Wanneer u de “Ontvochtigen” modus langdurig gebruikt, raden wij u
aan de meegeleverde waterslang permanent op de bovenste wateraf-
voer aan te sluiten. (zie guur) Verwijder eerst de bovenste plug. Plaats
het uiteinde van de waterslang in een voldoende grote bak (bijv. een
emmer).
Instellen van de ventilator
In de “Koelen” en “Ventilator” modus kunt u de snelheid van de ventilator
met 3 verschillende instellingen instellen. Druk dienovereenkomstig op de
FAN SPEED toets.
• LOW (laag)
• MEDIUM (medium)
• HIGH (hoog)
Instellen van de temperatuur
• Gebruik de
of toetsen in de “Koelen” modus om de temperatuur
in te stellen.
• Selecteer een temperatuur tussen 16 °C (61 °F) en 31 °C (88 °F).
OPMERKING:
Schakelen tussen °celsius en °fahrenheit is alleen mogelijk met behulp
van de
toets op de afstandsbediening.
“Slaapmodus”
• Druk op de SLEEP toets wanneer het apparaat is ingeschakeld en in
de werkingsmodus “Koelen” is ingesteld.
• De ventilatorsnelheid is vooraf op de laagste snelheid LOW ingesteld.
Dit kan niet gewijzigd worden.
• Het scherm wordt na 10 seconden uitgeschakeld.
• Na een werking van één uur in de “Slaapmodus” wordt de vooraf
ingestelde temperatuur automatisch met 1° C verhoogd. Dit wordt één
uur later opnieuw herhaald. Er wordt aldus een comfortabele kamer-
temperatuur bereikt.
Instellen van de luchtuitlaat
Gebruik de
toets om de richting van de luchtstroom in te stellen.
• Druk herhaaldelijk op de
toets totdat de zwenk ap op de gewenste
positie is ingesteld.
Timer (automatische timer)
Gebruik de timerfunctie om de inschakel- en uitschakeltijd van het appa-
raat in te stellen. Selecteer een tijd tussen 1 en 24 uur.
Met behulp van de timerfunctie voor automatisch inschakelen
1. Druk op de POWER
toets om het apparaat aan te schakelen.
2. Selecteer de werkingsmodus, temperatuur en ventilatorsnelheid voor
het apparaat om op het vooringestelde tijdstip te werken.
3. Druk op de POWER toets om het apparaat uit te schakelen.
4. Druk op de toets. Het aantal uren knippert.
5. U kunt het gewenste aantal uren met de toetsen en instellen. De
instellingsmodus wordt automatisch na ong. 5 seconden afgesloten. De
timerwerking is geactiveerd en het TIMER indicatielampje brandt.
OPMERKING:
Druk niet op de toets
nadat u de uren hebt ingesteld, omdat de
werking van de timer niet wordt opgeslagen.
Met behulp van de timerfunctie voor automatisch uitschakelen
1. Druk op de POWER
toets om het apparaat aan te schakelen.
2. Druk op de toets tijdens het bedrijf. Het aantal uren knippert.

18
CL3750_IM_neu 18.12.2019
3. Stel de timermodus in zoals eerder beschreven onder item 5.
OPMERKING:
• Druk tweemaal op de toets
als u de ingestelde werking van de
timer wilt deactiveren. Het TIMER indicatielampje dooft.
• U kunt ook de timer-functie op elk gewenst moment annuleren door
op de POWER
toets te drukken om het apparaat in / uit te scha-
kelen.
MIRAGE toets
Druk op de MIRAGE toets om het display aan de voorkant van het appa-
raat in of uit te schakelen.
Het waterreservoir leegmaken
Het apparaat bevat een waterreservoir voor het verzamelen van conden-
satie. Wanneer de watertank vol is, licht het controlelampje
BUCKET
FULL op. Het apparaat wordt uitgeschakeld.
LET OP:
Vervoer het apparaat niet terwijl de watertank vol is. Er zou water in het
apparaat kunnen lopen.
Om de werking te hervatten, leeg het waterreservoir. Hiervoor hebt u
een dweil, een platte teil met een capaciteit van ong. 0,5 liter water en de
bijgeleverde waterslang nodig.
1. Haal de stekker uit het stopcontact.
2. Plaats de dweil en de platte kom onder de waterafvoer. Indien mogelijk,
zet u de teil op een lager niveau dan het apparaat.
3. Verwijder de onderste plug.
4. Sluit de waterslang op de waterafvoer van het apparaat aan. Plaats het
uiteinde van de slang in de teil.
5. Verwijder de waterslang nadat het water is afgevoerd. Gebruik de stop
om de waterafvoer op het apparaat weer te sluiten.
Het apparaat uitschakelen
1. Druk op de POWER
toets om het apparaat uit te schakelen.
2. Haal de stekker uit het stopcontact.
Oprolapparaat voor netsnoer
Rol het netsnoer op het oprolapparaat. Steek de stekker in de daarvoor
verstrekte sleuven.
Reiniging
WAARSCHUWING:
• Verwijder altijd de stekker uit het stopcontact vóór het
schoonmaken!
• Zorg ervoor dat tijdens het reinigen geen water in de
openingen van het apparaat terecht komt. Dit zou tot
een elektrische schok of brand kunnen leiden.
LET OP:
• Spuit het apparaat niet met reinigingsmiddelen in.
• Gebruik geen draadborstel of andere schurende voorwerpen.
• Gebruik geen scherpe of schurende reinigingsmiddelen.
Filter
Reinig het lter elke 2 weken bij dagelijks gebruik van het apparaat.
Wanneer stof in het lter de ventilatie blokkeert, wordt de werking van het
apparaat niet langer gegarandeerd.
1. Er bevindt zich een rooster met een interne lter boven de aansluiting
voor de luchtuitlaatslang aan de achterkant van het apparaat.
2. Verwijder het rooster van het apparaat en verwijder de lter van het
rooster.
3. Zuig het lter met een stofzuiger.
4. Reinig het lter onder stromend water. Indien nodig, gebruik een mild
schoonmaakmiddel.
5. Laat de lter aan de lucht drogen in een schaduwrijke plaats.
6. Breng de lter opnieuw aan in het rooster wanneer volledig droog. De
inkepingen moeten omhoog zijn gericht.
7. Breng het rooster opnieuw aan in het apparaat.
LET OP:
Gebruik het apparaat niet zonder de lter!
Behuizing
• Maak de ventilatiegleuven schoon met behulp van een stofzuiger.
• Veeg de behuizing met een licht vochtige doek af.
Seizoensgebonden reiniging en opslag
Wanneer het apparaat voor een lange tijdsduur niet gebruikt wordt, ga als
volgt verder:
1. Maak het waterreservoir leeg zoals hierboven beschreven.
2. Herhaal stappen 2 tot 5 van de sectie “Het waterreservoir leegmaken”
met de bovenste wateruitlaat (bovenste plug).
3. Gebruik het apparaat voor 2 uur in de “Ventilator” modus om de bin-
nenkant van het apparaat te drogen.
4. Druk op de POWER
toets om het apparaat uit te schakelen. Haal de
stekker uit het stopcontact.
5. Ontkoppel de exibele afvoerpijp van het apparaat.
6. Laat beide wateruitlaten open.
7. Reinig zowel de lter als het apparaat zoals eerder beschreven.
8. Dek het apparaat met folie af.
9. Berg het apparaat altijd op buiten bereik van kinderen en op een droge,
goed geventileerde plek.
Verhelpen van storingen
Probleem Mogelijke oorzaak Oplossing
Het apparaat werkt niet. Geen stroom Controleer de stroomaansluiting.
De timer-functie is geactiveerd.
Druk op de POWER
toets om het apparaat aan te schakelen.
De omgevingstemperatuur is te laag of te hoog. Het wordt aanbevolen om het apparaat te gebruiken bij een
omgevingstemperatuur van 16 - 35 °C.
Het apparaat is defect. Neem contact op met onze klantenservice of met een specialist.
Houd rekening met de bijgevoegde onderhoudshandleiding.

19
CL3750_IM_neu 18.12.2019
Probleem Mogelijke oorzaak Oplossing
Het apparaat koelt niet vol-
doende.
Het apparaat is aan direct zonlicht blootgesteld. Kies een andere locatie of laat de zonwering van het venster
zakken.
Ramen of deuren staan open. Sluit alle ramen of deuren.
Er zijn teveel mensen of andere verwarmings-
bronnen in de kamer aanwezig.
Verwijder draagbare verwarmingsapparaat len of schakel ze uit.
De lter is verontreinigd. Reinig de lter.
De luchtinlaat of luchtuitlaat is geblokkeerd. Verwijder de verstopping. Houd de ventilatieopeningen vrij van
obstakels.
Het apparaat is te lawaaierig
tijdens de werking.
Het apparaat staat niet in een verticale stand. Plaats het apparaat op een vlakke ondergrond. Vermijd trillingen.
Het apparaat stopt tijdens
de werking. Het
indica-
tielampje knippert rood.
De watertank is vol. Trek de stekker uit het stopcontact. Maak het waterreservoir leeg
via de onderste wateruitlaat. U kunt het apparaat nu opnieuw
gebruiken.
De afstandsbediening werkt
niet.
De afstand tot het apparaat is te ver. Verplaats het dichter bij het apparaat.
U houdt de afstandsbediening niet in de richting
van de sensor.
Houd de afstandsbediening zodat deze naar de sensor wijst. Let
erop dat er geen obstakels tussen de afstandsbediening en de
sensor staan.
De batterijen zijn leeg. Vervang de batterijen.
Display op het apparaat: E1 Temperatuursensor defect. Neem contact op met onze klantenservice of uw leverancier.
Display op het apparaat: E2
Neem contact op met onze klantenservice of uw handelaar als er problemen optreden die niet in de tabel zijn vermeld of als de aanbevolen oplossing
niet werkt.
Technische gegevens
Model:...............................................................................................CL 3750
Nettogewicht: .............................................................................ong. 30,8 kg
Spanningstoevoer: .......................................................... 220 - 240 V~, 50 Hz
Opgenomen vermogen: .................................................................... 1345 W
Elektriciteitsverbruik in netwerkgebonden slaapstand: ........................0,8 W
Beschermingsklasse: ...................................................................................
Energie-efciëntie klasse: ...........................................................................A
Koelcapaciteit: .............................................................12000 BTU (3,52 kW)
Koelmiddel: .......................................................................................... R 290
Maximaal toegestane bedrijfsdruk:
Drukkant: ..................................................................................... 1,8 MPa
Zuigkant: ...................................................................................... 0,6 MPa
Maximaal toegestane druk:.............................................................. 3,0 MPa
WLAN
Ondersteund netwerk: ...............................................................802.11 b/g/n
Maximaal radiofrequent vermogen uitgezonden: ............................ 100 mW
Frequentiebereik: ..............................................................................2,4 GHz
Kanalen: ................................................................................................ 1 - 13
Ondersteunde wi-sleutels: ...................................................... WPA / WPA2
Het recht om technische en ontwerpaanpassingen te maken in de loop
van voortdurende productontwikkeling blijft voorbehouden.
Opmerking van de richtlijn conformiteit
Hierbij verklaar ik, Clatronic International GmbH, dat het type radioappara-
tuur CL 3750 conform is met Richtlijn 2014 / 53 / EU.
Het apparaat is bovendien in overeenkomst met de vereisten van de
RoHS-richtlijn 2011 / 65 / EU.
De volledige tekst van de EU-conformiteitsverklaring kan worden geraad-
pleegd op het volgende internetadres: www.sli24.de
Geef op de download-pagina de modelnaam CL 3750 in.
Getest voor gebruik in Nederland.
Verwijdering
Verwijdering van batterijen
Als consument bent u wettelijk verplicht om oude batterijen / ac-
cu’s terug te brengen.
Verwijder de batterijen uit de afstandsbediening vóór het weg-
werpen van het apparaat.
Breng de batterij naar een inzamelpunt voor de inzameling van oude bat-
terijen of gevaarlijk afval. Neem contact op met de plaatselijke overheid
voor informatie.
Betekenis van het symbool “vuilnisemmer”
Bescherm ons milieu, elektrische apparaten horen niet in het
huisafval.
Maak voor het afvoeren van elektrische apparaten gebruik van
de voorgeschreven verzamelpunten en geef daar de elektrische
apparaten af die u niet meer gebruikt.
Daardoor helpt u de potentiële effecten te voorkomen die een verkeerde
afvoer op het milieu en de menselijke gezondheid kunnen hebben.
Op deze wijze levert u uw bijdrage aan het hergebruik, de recycling en
andere verwerkingsvormen voor oude elektronische en elektrische appa-
raten.
Voor informatie over verzamelpunten voor uw apparaten kunt u contact
opnemen met uw gemeente of gemeenteadministratie.

20
CL3750_IM_neu 18.12.2019
Mode d’emploi
Nous vous remercions d’avoir choisi notre produit. Nous espérons qu’il
vous apportera satisfaction.
Symboles de ce mode d’emploi
Les informations importantes pour votre sécurité sont particulièrement
indiquées. Veillez à bien respecter ces indications an d’éviter tout risque
d’accident ou d’endommagement de l’appareil :
AVERTISSEMENT :
Prévient des risques pour votre santé et des risques éventuels de
blessure.
ATTENTION :
Indique les risques pour l’appareil ou tout autre appareil.
NOTE : Attire votre attention sur des conseils et informations.
Sommaire
Liste des différents éléments de commande .........................................3
Description des boutons, des icônes et des voyants indicateurs ......4
Notes générales .......................................................................................20
Conseils de sécurité spéciques à cet appareil ..................................20
Manipulation des piles ...........................................................................22
Déballer l’appareil ....................................................................................22
Contenu de la livraison ...........................................................................22
Liste des différents éléments de commande .......................................22
Description des boutons, des icônes et des voyants indicateurs ....22
Panneau de commande .........................................................................22
Télécommande ......................................................................................22
Notes d’utilisation ....................................................................................23
Mise en service ........................................................................................23
Emplacement .........................................................................................23
Montage de la conduite d’évacuation ....................................................23
Télécommande ......................................................................................23
Cordon d’alimentation ............................................................................23
Branchement électrique .........................................................................23
Allumer / éteindre l’appareil ....................................................................23
Dispositif de sécurité du compresseur ...................................................23
Information concernant l’application « Smart Life - Smart Living » ..23
Informations sur l’utilisation de l’application...........................................23
Exigences du système pour l’utilisation de l’application ........................24
Mise en service via l’application ............................................................24
Utilisation de l’appareil............................................................................24
Modes de fonctionnement .....................................................................24
Régler le ventilateur ...............................................................................24
Régler la température ............................................................................24
« Mode Sommeil » .................................................................................24
Régler la sortie d’air ...............................................................................24
Minuteur (Minuteur automatique)...........................................................24
Bouton MIRAGE ....................................................................................25
Vider le réservoir à eau ..........................................................................25
Mettre n à l’utilisation ............................................................................25
Dispositif d’enroulement pour le cordon d’alimentation .........................25
Nettoyage ..................................................................................................25
Filtre ........................................................................................................25
Boîtier .....................................................................................................25
Nettoyage et rangement saisonniers ....................................................25
Dépannage ................................................................................................25
Données techniques ................................................................................26
Note sur la déclaration de conformité ...................................................26
Élimination ................................................................................................26
Élimination des piles ..............................................................................26
Signication du symbole « Poubelle » ...................................................26
Notes générales
Lisez attentivement ce mode d’emploi avant de mettre l’appareil en
marche pour la première fois. Conservez le mode d’emploi ainsi que
le bon de garantie, votre ticket de caisse et si possible, le carton avec
l’emballage se trouvant à l’intérieur. Si vous remettez l’appareil à des tiers,
veuillez-le remettre avec son mode d’emploi.
• N’utilisez cet appareil que pour un usage privé et pour les taches aux-
quelles il est destiné. Cet appareil n’est pas prévu pour une utilisation
professionnelle.
• Ne l’utilisez pas en plein air. Protégez-le de la chaleur, des rayons
directs du soleil, de l’humidité (ne le plongez en aucun cas dans l’eau)
et des objets tranchants. N’utilisez pas cet appareil avec des mains
humides. S’il arrive que de l’humidité ou de l’eau atteignent l’appareil,
débranchez aussitôt le câble d’alimentation.
• Arrêtez l’appareil et débranchez toujours le câble d’alimentation de la
prise de courant (en tirant sur la che et non pas sur le câble) si vous
n’utilisez pas l’appareil, si vous installez les accessoires, pour le net-
toyage ou en cas de panne.
• Il y a lieu d’inspecter l’appareil et le bloc d’alimentation régulièrement
en vue d’éventuels signes d’endommagements. Lorsqu’un endomma-
gement est détecté, l’appareil ne doit plus être utilisé.
• N’utilisez que les accessoires d’origine.
• Par mesure de sécurité vis-à-vis des enfants, ne laissez pas les embal-
lages (sac en plastique, carton, polystyrène) à leur portée.
AVERTISSEMENT :
Ne pas laisser les jeunes enfants jouer avec le lm plastique. Il y a
risque d’étouffement !
Conseils de sécurité spéciques à cet appareil
Lisez les instructions !
AVERTISSEMENT : Risque d’incendie !
L’appareil contient un réfrigérant inammable !

21
CL3750_IM_neu 18.12.2019
Le manuel d’entretien est disponible à l’adresse suivante : www.sli24.de
Dans la zone « Downloads » (Téléchargements), veuillez saisir le nom du modèle CL 3750.
• Toute personne travaillant sur un circuit réfrigérant ou devant en ouvrir un doit posséder un certicat valide délivré
par un organisme d’évaluation de compétences certié par l’industrie, prouvant ses capacités à manipuler les réfri-
gérants en toute sécurité dans le respect des normes établies par l’industrie.
• L’entretien de l’appareil doit être effectué comme recommandé par le fabricant de l’équipement. L’entretien et les ré-
parations nécessitant l’aide d’une autre personne compétente doit être effectuée sous la supervision de la personne
faisant autorité concernant l’utilisation de réfrigérants inammables.
AVERTISSEMENT :
• Ne pas tenter d’accélérer le processus de dégivrage.
• Ne pas utiliser ni ranger l’appareil dans les lieux suivants :
- À proximité d’une source de amme nue.
- Un lieu susceptible de subir des éclaboussures d’eau ou d’huile.
- Un lieu exposé à la lumière directe du soleil.
- Dans une salle de bain, dans une buanderie ou à proximité d’une piscine.
• Ne pas percer ni brûler l’appareil.
• N’oubliez pas que les réfrigérants sont inodores.
• L’appareil doit être installé, utilisé et rangé dans une pièce dont la surface au sol est supérieure à 15 m².
ATTENTION : Risque de surchauffe !
• Dégagez les fentes de ventilation !
• Ne couvrez pas l’appareil !
• Le R 290 est un réfrigérant qui respecte les directives environnementales Européennes.
• N’endommagez pas le circuit de réfrigérant.
• Cet appareil est destiné à un usage en intérieur seulement.
• L’appareil doit être rangé de manière à ce qu’il ne puisse pas être endommagé.
• Respectez les réglementations de connexion nationales.
• Si vous remarquez l’émission de bruits anormaux, l’émission d’une odeur ou de fumée, débranchez la prise d’alimen-
tation de la prise murale.
• Utilisez et déplacez l’appareil en position verticale uniquement.
• Respectez une distance d’au moins 50 cm entre l’appareil et tout mur ou autre objet pour assurer une circulation d’air
sufsante pendant le fonctionnement.
• N’utilisez jamais l’appareil sans ltre.
• Ne laissez pas l’appareil sans surveillance pendant des heures. Ne quittez pas votre maison pendant que l’appareil
fonctionne.
• Cet appareil a été conçu pour la climatisation de pièces d’habitation et ne doit pas être utilisé à d’autres ns.
• N’utilisez pas l’appareil dans des pièces qui contiennent du gaz, du carburant, du pétrole ou tout autre liquide facile-
ment inammable. N’utilisez pas des aérosols tels que la peinture, les pesticides ou tout autre matériau inammable
dans cette pièce.
• N’insérez aucun objet dans les ouvertures de l’appareil.
• N’exposez pas l’appareil aux éclaboussures ou aux gouttes d’eau et ne placez aucun récipient rempli d’eau tel que,
p.ex. des vases remplis de eurs, sur l’appareil.
• Ne déplacez pas l’appareil lorsque le cordon électrique est connecté à la prise murale.
• Éteignez toujours l’appareil en utilisant d’abord le bouton POWER
avant de débrancher la che électrique.
• Si le fonctionnement est interrompu, attendez environ 3 minutes avant de redémarrer l’appareil pour que la pression
du circuit de refroidissement diminue.
• Ne réparez pas vous-même l’appareil. Contactez toujours un technicien agrée. Si le cordon d’alimentation est en-
dommagé, il doit être remplacé par le fabricant, son agent de service ou des personnes ayant qualité semblable an
d’éviter un risque.

22
CL3750_IM_neu 18.12.2019
• Empêchez les enfants en bas âge de toucher l’appareil.
• Cet appareil peut être utilisé par les enfants d’âge supérieur à 8 ans et par les personnes aux capacités sensorielles,
physiques ou mentales réduites, ainsi que par les personnes sans expérience ou connaissances, tant qu’elles sont
supervisées et instruites à l’utilisation de l’appareil en sécurité et tant qu’elles en comprennent les risques.
• Les enfants ne doivent pas jouer avec l’appareil.
• Le nettoyage et l’entretien utilisateur ne doivent pas être effectués par les enfants sans supervision.
• Reportez-vous aux instructions données dans le chapitre « Nettoyage ».
• Détails de type et de calibre des fusibles : T, 250 V AC, 3,15 A
Manipulation des piles
AVERTISSEMENT :
• N’exposez pas les piles à une source de chaleur excessive comme
les rayons du soleil, le feu ou toute source similaire. Il y a un risque
d’explosion !
• Les piles ne sont pas des jouets. Éloignez-les des enfants.
• N’ouvrez pas les piles de force.
• Évitez le contact avec les objets métalliques (bagues, clous, vis,
etc.). Il y a un risque de court-circuit !
• En cas de court-circuit, la pile peut devenir excessivement chaude ou
même prendre feu, ce qui provoque des blessures.
• Pour votre propre sécurité, couvrez les bornes de la pile avec du
ruban adhésif pendant le transport.
• Si la pile fuit, veillez à ne pas appliquer le liquide sur les yeux ou les
muqueuses. En cas de contact, lavez les mains et rincez les yeux
avec de l’eau claire. Consultez un médecin, si l’irritation persiste.
ATTENTION :
• Lorsque vous n’utilisez pas la télécommande pendant une longue
période, retirez les piles pour éviter que l’acide contenu dans la pile
ne fuie.
• Ne mélangez pas des piles de types différents ou des nouvelles piles
avec des piles usagées.
• Ne jetez pas les piles avec les déchets ménagers. Rapportez les
piles usagées à un point de collecte autorisé ou à votre revendeur.
Déballer l’appareil
1. Retirez l’appareil de son emballage.
2. Retirez tout le matériel d’emballage tel que les sacs plastiques, le ma-
tériel de remplissage, les colliers de serrage et le carton.
3. Vériez que toutes les pièces sont présentes dans l’emballage.
Contenu de la livraison
1 Climatiseur
1 Télécommande
2 Piles
1 Conduite d’évacuation exible
1 Adaptateur de la conduite d’évacuation (Connexion de l’appareil)
1 Ensemble d’installation pour fenêtre, 2 pièces
1 Adaptateur pour l’ensemble d’installation pour fenêtre
1 Flexible d’eau,
2 Bouchons (en rechange)
Liste des différents éléments de commande
1 Sortie d’air (volet pivotant)
2 Panneau de commande avec écran
3 Boîtier
4 Sortie d’eau
5 Poignée
6 Dispositif d’enroulement pour le cordon d’alimentation
7 Sortie d’eau
8 Câble d’alimentation
9 Support de che d’alimentation
10 Adaptateur de la conduite d’évacuation
11 Conduite d’évacuation exible
12 Adaptateur pour l’ensemble d’installation pour fenêtre
13 Connecteur de la conduite d’évacuation
14 Insert du ltre
15 Grille de l’entrée d’air
16 Afchage sur l’avant
17 Télécommande
18 Ensemble d’installation pour fenêtre, 2 pièces
Description des boutons,
des icônes et des voyants indicateurs
Panneau de commande
1 Voyant indicateur
FAN (ventilateur)
2 Voyant indicateur COOL (refroidissement)
3 Voyant indicateur DRY (déshumidication)
4 Écran
5 Voyant indicateur HIGH (haute vitesse du ventilateur)
6 Voyant indicateur LOW (basse vitesse du ventilateur)
7 Voyant indicateur MEDIUM (moyenne vitesse du ventilateur)
8 Voyant indicateur POWER
9 Voyant indicateur Wi-Fi (connexion Wi-Fi activée)
10 Voyant indicateur BUCKET FULL (réservoir d’eau plein)
11 Bouton POWER (allumer ou éteindre l’appareil)
12 Voyant indicateur SWING (volet pivotant oscillant)
13 Bouton (réglage de la sortie d’air)
14 Bouton FAN SPEED (régler la vitesse du ventilateur et activer le Wi-Fi)
15 Boutons et (régler la température et l’heure)
16 Voyant indicateur SLEEP (mode nuit)
17 Bouton SLEEP (activer le « mode nuit »)
18 Bouton MODE (sélectionner le mode de fonctionnement)
19 Bouton MIRAGE (allumer ou éteindre l’écran sur l’avant de l’appareil)
20 Voyant indicateur MIRAGE (écran sur l’avant de l’appareil)
21 Bouton (régler la minuterie)
22 Voyant indicateur TIMER (fonctionnement sur minuterie activé)
Télécommande
1 Icône
(WLAN-Verbindung ist aktiviert)
2 Indication Fan (ventilateur)
3 Icône de la batterie
4 Indication Dry (déshumidication)
5 Indication °C (unité de température sélectionnée)
6 Indication Hr (heures)
7 Indication °F (unité de température sélectionnée)
8 Indication Sleep (mode nuit)
9 Boutons (régler la température et l’heure)
10 Bouton (sélectionner le mode de fonctionnement)
11 Bouton (régler la vitesse du ventilateur)
12 Bouton (basculer entre °celsius et °fahrenheit)
13 Bouton (activer le « mode nuit »)
14 Bouton (réglage de la sortie d’air, mode SWING)
15 Bouton TIMER (régler la minuterie)
16 Bouton POWER (allumer ou éteindre l’appareil)

23
CL3750_IM_neu 18.12.2019
17 Icône Régler le ventilateur sur LOW (basse vitesse)
Icône Régler le ventilateur sur MEDIUM (moyenne vitesse)
Icône Régler le ventilateur sur HIGH (haute vitesse)
18 Indication Swing (volet pivotant oscillant)
19 Afchage de la température (ou indicateur des heures lorsque vous ré-
glez la minuterie, ou lorsque vous utilisez le « ventilateur » ou le mode
de fonctionnement « déshumidication »)
20 Icône (fonctionnement sur minuterie activé)
21 Indication Cool (refroidissement)
Notes d’utilisation
ATTENTION : Important pour la première utilisation ou après le
transport !
Avant la première utilisation, l’appareil doit rester en position verticale
pendant au moins 3 heures pour permettre à l’agent de refroidissement
de couler. Sinon, le compresseur sera endommagé.
ATTENTION :
• Après avoir interrompu l’opération avec le bouton POWER
, atten-
dez au moins 3 minutes avant de rallumer l’appareil.
• An de déplacer l’appareil dans un autre endroit, veuillez d’abord
vider le réservoir d’eau !
• L’appareil fonctionne au mieux de ses capacités dans une pièce n’ex-
cédant pas 70 m³.
• Le tuyau de purge et son adaptateur ont été conçu spéciquement par
le fabricant pour cet appareil. Pour éviter un mauvais fonctionnement,
ne remplacez pas la conduite par une autre conduite.
• La conduite d’évacuation peut être rallongée jusqu’à 150 cm. N’utilisez
aucune rallonge.
• Assurez-vous que l’air circule librement. Veillez à ne pas plier ni
courber la conduite d’évacuation. Toute obstruction peut entraîner une
surchauffe de l’appareil.
• Fermez toutes les fenêtres et portes pour empêcher l’air extérieur d’en-
trer dans la pièce et permettre ainsi un fonctionnement plus efcace de
l’appareil.
Mise en service
Emplacement
• Lors de l’installation de l’appareil, assurez-vous de garder une distance
d’au moins 50 cm entre l’appareil et tout mur ou autre objet.
• La surface doit être plane et sèche.
Montage de la conduite d’évacuation
NOTE :
Si vos fenêtres sont coulissantes ou que vous avez des volets roulants
à l’extérieur, vous pouvez utiliser le kit d’échappement d’air en orienta-
tion verticale ou horizontale. Réglez la longueur de la plaque de joint,
comme vous le souhaitez.
1. Branchez l’adaptateur au tuyau d’évacuation. Placez le tuyau d’éva-
cuation de façon à ce que la première ailette du tuyau repose dans le
rail. Fixez l’adaptateur en le tournant dans le sens des aiguilles d’une
montre.
2. Branchez l’adaptateur au connecteur à l’arrière de l’appareil. Pour
faire cela, positionnez le tuyau d’échappement d’air et l’adaptateur de
manière que l’étiquette soit orientée vers le haut. Faites tourner l’adap-
tateur complètement vers LOCK.
3. Rallongez la conduite à la longueur souhaitée.
4. Vissez l’adaptateur du kit d’échappement d’air à l’extrémité du tuyau
d’échappement.
5. Enfoncez l’extrémité ouverte de la conduite dans une fenêtre.
6. Fermez la fenêtre autant que possible. Baissez également le volet
roulant externe, si présent, jusqu’à l’extrémité de la conduite.
Télécommande
1. Ouvrez le couvercle du compartiment à piles situé à l’arrière de la
télécommande.
2. Insérez 2 piles de type R03 « AAA » 1,5 V, en respectant la bonne
polarité (voir les marques au fond du compartiment) !
3. Fermez le couvercle du compartiment à piles.
Cordon d’alimentation
Déroulez le cordon d’alimentation du dispositif d’enroulement.
Branchement électrique
1. Assurez-vous que la tension électrique que vous souhaitez utiliser
correspond à la tension de l’appareil. Veuillez vérier la plaque signalé-
tique pour les caractéristiques détaillées.
2. Branchez l’appareil à une prise avec mise à la terre et correctement
installée. Un signal retentira indiquant que l’appareil est prêt à être
utilisé. L’appareil est en veille. L’écran afche la température ambiante
actuelle.
Allumer / éteindre l’appareil
• Appuyez sur le bouton POWER
pour allumer l’appareil. Le volet
pivotant s’ouvre automatiquement. L’appareil est préprogrammé en
mode « Refroidissement » et la température est de 22 °C. En cas de
fonctionnement interrompu sans avoir déconnecté la che, tous les
réglages de la température et du mode de fonctionnement précédem-
ment dénis seront conservés. Les voyants lumineux indiquent ce
réglage.
• Appuyez à nouveau sur le bouton POWER pour éteindre l’appareil.
Le volet pivotant se ferme automatiquement.
Dispositif de sécurité du compresseur
Si le fonctionnement est interrompu, le dispositif de sécurité du com-
presseur est activé. Ceci empêche l’utilisation du compresseur pendant
environ 3 minutes, pour laisser s’évacuer la pression dans le circuit de
refroidissement. Ceci n’est pas un défaut de l’appareil. Patientez donc au
moins 3 minutes avant de remettre l’appareil en fonctionnement.
Information concernant l’application
« Smart Life - Smart Living »
L’application Smart Life - Smart Living est disponible sur android et
iOS. Analysez le code QR correspondant pour vous rendre immédiate-
ment sur la page de téléchargement.
NOTE :
En fonction du fournisseur, le téléchargement de l’application peut don-
ner lieu a des frais.
Google Play App Store
Informations sur l’utilisation de l’application
Cette application vous permet d’utiliser l’appareil via votre réseau domes-
tique. La condition préalable est une connexion Wi-Fi permanente à votre
routeur, et l’application gratuite « Smart Life - Smart Living ».
Vous pouvez contrôler aisément toutes les fonctions de l’appareil via l’ap-
plication. L’application est constamment améliorée, c’est pourquoi nous
ne pouvons pas en faire une description plus détaillée ici.
Nous vous recommandons de débrancher l’appareil de l’alimentation si
vous n’êtes pas à votre domicile pour empêcher toute mise en service
involontaire lorsque vous voyagez !

24
CL3750_IM_neu 18.12.2019
Exigences du système pour l’utilisation de l’application
• iOs 8.0 ou ultérieur
• Android 4.4 ou ultérieur
Mise en service via l’application
1. Installez l’application « Smart Life - Smart Living ». Créez un compte
utilisateur.
2. Activez la fonction Wi-Fi dans les paramètres de votre appareil.
3. Placez l’appareil de climatisation d’air à environ 5 mètres de votre
routeur.
4. Appuyez et maintenez le bouton FAN SPEED pendant 5 secondes. Le
voyant indicateur Wi-Fi
clignote rapidement.
5. Lancez l’application et sélectionnez « + ».
6. Sélectionnez le menu « climatiseur » et suivez les instructions af-
chées.
7. Une fois que l’appareil est correctement connecté, le voyant indicateur
Wi-Fi s’illumine en continu
.
Vous pouvez maintenant utiliser l’appa-
reil avec l’application.
NOTE :
• L’appareil peut seulement être utilisé avec un réseau de 2,4 GHz. Les
routeurs de 5 Ghz ne sont pas pris en charge.
• L’appareil est équipé de seulement une connexion réseau. Elle ne
peut pas être désactivée.
Utilisation de l’appareil
• Les réglages effectués sur l’appareil ne sont pas transmis à la télécom-
mande.
• L’appareil applique les réglages correspondants immédiatement
lorsque vous appuyez sur un bouton de la télécommande.
• Votre sélection apparaîtra sur l’écran de la télécommande.
• Les boutons et doivent être enfoncés plusieurs fois pour sélec-
tionner chaque fonction.
Les boutons du panneau de commande sont détaillés ci-dessous. Le
voyant indicateur s’illumine pour afcher votre sélection actuelle.
Modes de fonctionnement
Utilisez le bouton MODE pour sélectionner l’un des modes de fonctionne-
ment suivants :
• Refroidissement
COOL
• Déshumidication DRY
• Ventilateur FAN
Mode « Refroidissement »
Dans ce mode, vous pouvez sélectionner la vitesse du ventilateur et la
température.
NOTE :
Pour utiliser l’appareil avec le compresseur, la température réglée doit
être inférieure à la température de la pièce.
Mode « Ventilateur »
Ce mode vous permet uniquement de régler la vitesse du ventilateur.
Mode « Déshumidication »
• Ce mode de fonctionnement ne supporte aucun autre réglage.
• La vitesse du ventilateur est préréglée sur le plus faible niveau LOW.
• L’appareil refroidira la pièce et extraira l’humidité de l’air.
• Si vous utilisez le mode « déshumidication » sur une période prolon-
gée, nous vous recommandons de brancher le tuyau d’eau inclus au
point d’évacuation d’eau supérieur de manière permanente. (Voir la
gure). Retirez d’abord le bouchon du haut. Placez l’extrémité du tuyau
d’eau dans un conteneur d’eau de taille sufsante (par exemple un
seau).
Régler le ventilateur
Pour les modes « Refroidissement » et « Ventilateur » vous pouvez régler
la vitesse du ventilateur en choisissant parmi 3 réglages différents.
Appuyez sur le bouton FAN SPEED en conséquence.
• LOW (bas)
• MEDIUM (moyen)
• HIGH (haut)
Régler la température
• Utilisez le bouton
ou en mode « Refroidissement » pour régler la
température.
• Sélectionnez une température entre 16 °C (61 °F) et 31 °C (88 °F).
NOTE :
Vous ne pouvez basculer entre les unités °celsius et °fahrenheit que via
le bouton
sur la télécommande.
« Mode Sommeil »
• Appuyez sur le bouton SLEEP lorsque l’appareil est allumé et en mode
« Refroidissement ».
• La vitesse du ventilateur est préréglée sur le plus faible niveau LOW.
Cela ne peut être changé.
• L’écran s’éteindra après 10 secondes.
• La température réglée est automatiquement augmentée de 1 °C après
une heure de fonctionnement en mode « Sommeil ». La température
sera de nouveau augmentée une heure après cela. De cette manière,
l’appareil assure que la température de la pièce reste confortable.
Régler la sortie d’air
Appuyez sur le bouton
pour dénir la direction dans laquelle l’air est
expulsé.
• Appuyez sur le bouton
plusieurs fois jusqu’à que le volet pivotant
soit dans la position désirée.
Minuteur (Minuteur automatique)
Utilisez le minuteur pour régler les heures de mise en service et de mise
hors service de l’appareil. Sélectionnez une heure entre 1 et 24 heures.
Utilisation du minuteur pour une mise en service automatique
1. Appuyez sur le bouton POWER
pour allumer l’appareil.
2. Sélectionnez le mode de fonctionnement, la température et la vitesse
du ventilateur de l’appareil lors de sa mise en service ou l’heure à
laquelle il se mettra en service en fonction de l’heure dénie.
3. Appuyez sur le bouton POWER pour éteindre l’appareil.
4. Appuyez sur le bouton . Le chiffre des heures clignote.
5. Vous pouvez sélectionner le chiffre désiré des heures avec et .
Vous quittez automatiquement le mode de réglage après environ
5 secondes. Le fonctionnement sur minuterie est activé, et le voyant
indicateur TIMER s’illumine.
NOTE :
N’appuyez pas sur le bouton
après avoir déni les heures, car la
fonction de minuterie ne sera pas enregistrée.

25
CL3750_IM_neu 18.12.2019
Utilisation du minuteur pour une mise hors service automatique
1. Appuyez sur le bouton POWER
pour allumer l’appareil.
2. Appuyez sur le bouton pendant le fonctionnement. Le chiffre des
heures clignote.
3. Réglez le mode de minuterie comme décrit précédemment au
point 5.
NOTE :
• Pour désactiver la fonction de minuterie dénie, appuyez deux fois
sur le bouton
. Le voyant TIMER s’éteint.
• Vous pouvez également annuler le minuteur à tout moment en ap-
puyant sur le bouton POWER
pour allumer / éteindre l’appareil.
Bouton MIRAGE
Appuyez sur le bouton MIRAGE pour allumer ou éteindre l’écran situé sur
le devant de l’appareil.
Vider le réservoir à eau
L’appareil contient un réservoir à eau pour recueillir la condensation. Le
voyant
BUCKET FULL clignote lorsque le réservoir est plein. L’appareil
s’éteint.
ATTENTION :
Ne pas déplacer l’appareil lorsque le réservoir est plein. De l’eau pour-
rait s’inltrer dans l’appareil.
Pour continuer l’utilisation, videz le réservoir d’eau. Pour ce faire, mu-
nissez-vous d’une serpillère, d’un bac à fond plat d’une contenance de
0,5 litre environ et du tuyau livré avec l’appareil.
1. Débranchez la che électrique de la prise murale.
2. Placez la serpillère et la bassine sous la sortie d’eau. Si possible, posi-
tionnez le bac à un niveau moins élevé que l’appareil.
3. Retirez le bouchon du bas.
4. Branchez le tuyau à la sortie d’eau de l’appareil. Positionnez l’extrémité
du tuyau dans le bac.
5. Une fois toute l’eau vidée, retirez le tuyau. Utilisez le bouchon pour
refermer l’évacuation d’eau sur l’appareil.
Mettre n à l’utilisation
1. Appuyez sur le bouton POWER
pour éteindre l’appareil.
2. Débranchez la che électrique de la prise murale.
Dispositif d’enroulement pour le cordon d’alimentation
Enroulez le cordon d’alimentation autour du dispositif d’enroulement.
Insérez la che dans le logement présent.
Nettoyage
AVERTISSEMENT :
• Débranchez toujours la che électrique de la prise
murale avant de nettoyer !
AVERTISSEMENT :
• Assurez-vous que l’eau n’entre pas dans les ouver-
tures de l’appareil pendant le nettoyage. Vous risque-
riez de provoquer une électrocution ou un incendie.
ATTENTION :
• Ne pulvérisez pas d’agents nettoyants sur l’appareil.
• Ne pas utiliser de brosse en l de fer ou autres objets abrasifs.
• Ne pas utiliser de détergents agressifs ou abrasifs.
Filtre
Nettoyez le ltre une fois toutes les deux semaines, si l’appareil est en
fonctionnement tous les jours. Si la poussière contenue dans le ltre
bloque la ventilation, l’efcacité de l’appareil n’est plus garantie.
1. Une grille équipée d’un ltre interne se situe au-dessus du raccord du
tuyau d’évacuation à l’arrière de l’unité.
2. Retirez la grille de l’appareil, et le ltre de la grille.
3. Utilisez un aspirateur pour aspirer la poussière du ltre.
4. Nettoyez le ltre sous l’eau courante. Si nécessaire, utilisez un dé-
tergent doux.
5. Laissez le ltre sécher à l’ombre.
6. Réinsérez le ltre dans la grille lorsqu’il est complètement sec. L’en-
coche est tournée vers le haut.
7. Remettez la grille dans l’appareil.
ATTENTION :
N’utilisez pas l’appareil sans ltre !
Boîtier
• Nettoyez les ouvertures de ventilation à l’aide d’un aspirateur.
• Essuyez le boîtier à l’aide d’un chiffon légèrement humide.
Nettoyage et rangement saisonniers
Lorsque vous n’utilisez pas l’appareil pendant une longue période, procé-
dez comme suit :
1. Videz le réservoir à eau comme décrit ci-dessus.
2. Répétez les étapes 2 à 5 du chapitre « Vider le réservoir à eau » via
l’évacuation d’eau supérieure (bouchon du haut).
3. Utilisez l’appareil en mode « Ventilateur » pendant 2 heures pour sé-
cher l’intérieur de l’appareil.
4. Appuyez sur le bouton POWER
pour éteindre l’appareil. Débran-
chez la che électrique de la prise murale.
5. Débranchez la conduite d’évacuation exible de l’appareil.
6. Laissez les deux évacuations d’eau ouvertes.
7. Nettoyez le ltre ainsi que l’appareil comme décrit ci-dessus.
8. Couvrez l’appareil d’un papier aluminium.
9. Conservez toujours l’appareil hors de portée des enfants dans un
endroit sec et bien aéré.
Dépannage
Problème Cause possible Solution
L’appareil ne fonctionne pas. Aucune alimentation Vériez le branchement électrique.
Le minuteur est activé.
Appuyez sur le bouton POWER
pour allumer l’appareil.
La température ambiante est trop basse ou trop
haute.
Il est recommandé d’utiliser l’appareil à une température ambiante
de 16 - 35 °C.
L’appareil est défectueux. Contactez notre service après-vente ou un spécialiste. Consultez
le manuel d’entretien inclus.

26
CL3750_IM_neu 18.12.2019
Problème Cause possible Solution
L’appareil ne refroidit pas
sufsamment.
L’appareil est exposé aux rayons directs du soleil. Choisissez un autre emplacement ou ombragez les fenêtres.
Des fenêtres ou des portes sont ouvertes. Fermez toutes les fenêtres ou portes.
Trop de personnes ou autres sources de chauf-
fage dans la pièce.
Enlevez les radiateurs portatifs ou éteignez-les.
Le ltre est sale. Nettoyez le ltre.
L’arrivée ou la sortie d’air est obstruée. Enlevez l’obstruction. N’obstruez pas les orices de ventilation.
L’appareil est trop bruyant
pendant son fonctionnement.
L’appareil n’est pas en position verticale. Placez l’appareil sur une surface plane. Évitez les vibrations.
L’appareil s’éteint de lui-
même. Le voyant indicateur
clignote en rouge.
Le réservoir est plein. Débranchez la prise d’alimentation. Videz le réservoir d’eau via
l’évacuation d’eau inférieure. L’appareil sera prêt à fonctionner de
nouveau.
La télécommande ne fonc-
tionne pas.
L’appareil est trop éloigné. Rapprochez-vous de l’appareil.
Vous ne dirigez pas la télécommande vers le
capteur.
Dirigez la télécommande vers le capteur. Assurez-vous qu’aucun
obstacle ne se situe entre la télécommande et le capteur.
Les piles sont usées. Remplacez les piles.
Écran sur l’appareil : E1 Le capteur de température est défaillant. Prenez contact avec notre service client ou le revendeur.
Écran sur l’appareil : E2
Prenez contact avec notre service client ou votre revendeur si vous rencontrez des problèmes qui ne sont pas listés dans le tableau ou que les solutions
proposées ne fonctionnent pas.
Données techniques
Modèle : ...........................................................................................CL 3750
Poids net : .................................................................................. env. 30,8 kg
Alimentation : ..................................................................220 - 240 V~, 50 Hz
Consommation : ................................................................................ 1345 W
Consommation d’électricité
en veille avec maintien de la connexion au réseau : ............................0,8 W
Classe de protection : ..................................................................................
Classe d’efcacité énergétique : ................................................................. A
Capacité de refroidissement : .....................................12000 BTU (3,52 kW)
Fluide réfrigérant : ................................................................................ R 290
Pression maximum permise en fonctionnement :
Côté pression : ............................................................................ 1,8 MPa
Côté succion : .............................................................................. 0,6 MPa
Pression maximum permise : .......................................................... 3,0 MPa
WLAN
Réseau supporté : ......................................................................802.11 b/g/n
Puissance de radiofréquence maximale transmise : ...................... 100 mW
Portée de fréquence : .......................................................................2,4 GHz
Canaux : ................................................................................................ 1 - 13
Clés Wi-Fi supportées :............................................................. WPA / WPA2
Nous nous réservons le droit d’apporter des modications techniques
ainsi que des modications de conception dans le cadre du développe-
ment continu de nos produits.
Note sur la déclaration de conformité
Le soussigné, Clatronic International GmbH, déclare que l’équipement
radioélectrique du type CL 3750 est conforme à la directive 2014 / 53 / UE.
De plus, l’appareil est conforme aux exigences de la directive RoHS
2011 / 65 / CE.
Le texte complet de la déclaration UE de conformité est disponible à
l’adresse internet suivante : www.sli24.de
Dans la zone de téléchargements, veuillez saisir le nom du modèle
CL 3750.
Fonctionnement testé en France.
Élimination
Élimination des piles
En tant que consommateur, vous êtes tenu de rapporter les
piles / accumulateurs usagés.
Retirez les piles de la télécommande avant de jeter l’appareil.
Rapportez les piles à un point de collecte qui rassemble les
piles usagées ou les déchets dangereux. Contactez votre auto-
rité locale pour plus d’informations.
Signication du symbole « Poubelle »
Protégez votre environnement, ne jetez pas vos appareils élec-
triques avec les ordures ménagères.
Utilisez, pour l’élimination de vos appareils électriques, les
bornes de collecte prévues à cet effet où vous pouvez vous
débarrasser des appareils que vous n’utilisez plus.
Vous contribuez ainsi à éviter les impacts potentiels dans l’environnement
et sur la santé de chacun, causés par une mauvaise élimination de ces
déchets.
Vous contribuez aussi au recyclage sous toutes ses formes des appareils
électriques et électroniques usagés.
Vous trouverez toutes les informations sur les bornes d’élimination des
appareils auprès de votre commune ou de l’administration de votre com-
munauté.

27
CL3750_IM_neu 18.12.2019
Manual de instrucciones
Gracias por elegir nuestro producto. Esperamos que disfrute con el uso
de este aparato.
Símbolos en este manual de instrucciones
Advertencias importantes para su seguridad están señaladas en especial.
Siga estas advertencias incondicionalmente, para evitar accidentes y
daños en el aparato:
AVISO:
Advierte ante los peligros para su salud y demuestra posibles riesgos
de herida.
ATENCIÓN:
Indica los posibles riesgos para el aparato u otros objetos.
NOTA: Pone en relieve consejos e informaciones para usted.
Índice
Indicación de los elementos de manejo .................................................3
Resumen de botones, iconos y testigos ................................................4
Notas generales .......................................................................................27
Instrucciones especiales de seguridad para el aparato .....................27
Manipulación de las pilas .......................................................................29
Desembalaje del aparato ........................................................................29
Contenido en la entrega ..........................................................................29
Indicación de los elementos de manejo ...............................................29
Resumen de botones, iconos y testigos ..............................................29
Panel de control .....................................................................................29
Mando a distancia ..................................................................................29
Notas de uso ............................................................................................30
Puesta en marcha ....................................................................................30
Ubicación................................................................................................30
Montaje del tubo de escape de aire ......................................................30
Mando a distancia ..................................................................................30
Cable de alimentación ...........................................................................30
Conexión eléctrica..................................................................................30
Encendido / apagado de la unidad .........................................................30
Dispositivo de seguridad del compresor................................................30
Información sobre la aplicación “Smart Life - Smart Living” ............30
Información de uso de la app ................................................................30
Requisitos del sistema para el uso de la aplicación ..............................30
Puesta en funcionamiento mediante la app ..........................................30
Cómo usar el aparato ..............................................................................31
Modos de funcionamiento ......................................................................31
Ajustes del ventilador .............................................................................31
Ajuste de la temperatura ........................................................................31
Modo “Reposo” .....................................................................................31
Ajuste de la salida de aire ......................................................................31
Temporizador (Temporizador automático) .............................................31
Botón MIRAGE ......................................................................................32
Vaciado del depósito de agua ................................................................ 32
Apagar el aparato...................................................................................32
Dispositivo para enrollar el cable de alimentación ................................32
Limpieza ....................................................................................................32
Filtro ........................................................................................................32
Carcasa ..................................................................................................32
Limpieza y almacenamiento estacional ................................................32
Solución de problemas ...........................................................................32
Datos técnicos .........................................................................................33
Noticación de cumplimiento de directiva ...........................................33
Eliminación ...............................................................................................33
Eliminación de la batería ........................................................................33
Signicado del símbolo “Cubo de basura” ............................................33
Notas generales
Antes de la puesta en servicio de este aparato lea detenidamente el
manual de instrucciones y guarde éste bien incluido la garantía, el recibo
de pago y si es posible también el cartón de embalaje con el embalaje in-
terior. En caso de dejar el aparato a terceros, también entregue el manual
de instrucciones.
• Solamente utilice el aparato para el uso privado y para el n previsto.
Este aparato no está destinado para el uso profesional.
• No lo utilice al aire libre. No lo exponga al calor, a la entrada directa
de rayos de sol, a la humedad (en ningún caso sumerja el aparato
en agua) y a los cantos agudos. No utilice el aparato con las manos
húmedas. En caso de que el aparato esté húmedo o mojado retire de
momento la clavija de la caja de enchufe.
• Desconecte el aparato y siempre retire la clavija de la caja de enchufe
(por favor tire de la clavija y no del cable), cuando no quiera utilizar el
aparato, montar piezas o en caso de limpieza o defectos.
• El aparato y el cable de alimentación de red se deben controlar regu-
larmente para garantizar que no estén dañados. En caso de que se
comprobara un daño, no se podrá seguir utilizando el aparato.
• Solamente utilice accesorios originales.
• Para la seguridad de sus niños no deje material de embalaje (Bolsas
de plástico, cartón, poliestireno etc.) a su alcance.
AVISO:
No deje jugar a los niños con las láminas de plástico. ¡Existe peligro
de asxia!
Instrucciones especiales de seguridad para el aparato
¡Lea estas instrucciones!
AVISO: ¡Riesgo de fuego!
¡El aparato contiene un refrigerante inamable!
El manual de servicio está disponible en la siguiente dirección web: www.sli24.de
En la zona de “Downloads” (Descargas), introduzca el nombre de modelo CL 3750.
• Cualquier persona implicada en trabajos en un circuito de refrigerante o desarmado de estos debe poseer un cer-
ticado con validez en vigor de una autoridad de evaluación acreditada por industria, que autorice su competencia
para manejar con seguridad refrigerantes según una especicación de evaluación reconocida por la industria.

28
CL3750_IM_neu 18.12.2019
El manual de servicio está disponible en la siguiente dirección web: www.sli24.de
En la zona de “Downloads” (Descargas), introduzca el nombre de modelo CL 3750.
• La asistencia debe ser realizada únicamente según las recomendaciones del fabricante del equipo. El manteni-
miento y las reparaciones que requieran la ayuda de otro experto deben ser realizados bajo la supervisión de la
persona competente en el uso de refrigerantes inamables.
AVISO:
• No trate de acelerar el proceso de descongelación.
• No use ni almacene el aparato en los siguientes lugares:
- Cerca de una fuente de fuego.
- Una zona en la que pueda salpicar agua o aceite.
- Una zona expuesta a la luz solar directa.
- En el cuarto de baño, la habitación de lavandería o cerca de una piscina.
• No taladre ni queme el aparato.
• Recuerde que el refrigerante es inodoro.
• El aparato debe congurarse, manejarse y almacenarse en una sala con un área de suelo superior a 15 m².
ATENCIÓN: ¡Peligro de sobrecalentamiento!
• ¡Mantener libres las ranuras de ventilación!
• ¡No cubra el aparato!
• R 290 es un refrigerante que cumple las directivas medioambientales europeas.
• No dañe el circuito de refrigerante.
• Los aparatos están pensados para uso en interiores únicamente.
• El aparato debe ser almacenado de tal manera que no se dañe.
• Cumpla los reglamentos de conexión nacionales.
• En caso de ruidos extraños, olores y / o emisiones de humo, desenchufe de la toma.
• Use o mueva el aparato exclusivamente derecho.
• Mantenga una distancia de, al menos, 50 cm entre la unidad y las paredes u otros objetos para garantizar la circula-
ción suciente de aire durante el funcionamiento.
• No utilice la unidad sin el ltro.
• No deje la unidad desatendida durante horas en ningún momento. No abandone el hogar con la unidad en funciona-
miento.
• La unidad está diseñada únicamente para aire acondicionado de habitaciones residenciales y no se debe utilizar
para otros nes.
• No ponga en funcionamiento la unidad en habitaciones donde haya gas, combustible, aceite u otros líquidos inama-
bles. No utilice aerosoles como pintura, pesticidas u otros materiales inamables en dicha habitación.
• No inserte ningún objeto por las aberturas de la unidad.
• No exponga la unidad a goteo ni salpicaduras de agua, ni coloque objetos llenos de agua, como jarrones, sobre la
unidad.
• No mueva el aparato cuando el cable de alimentación de red está enchufado en la toma de corriente.
• Apague siempre la unidad primero con el botón de encendido POWER
antes de desenchufar de la red.
• Si se ha interrumpido el funcionamiento, espere aproximadamente 3 minutos antes de reiniciar la unidad de nuevo
con el n de enfriar y reducir la presión del circuito.
• No repare usted mismo el aparato. Póngase en contacto con un técnico autorizado. Si el cable de alimentación está
dañado, corresponde al fabricante, a su representante o persona de cualicación similar su reemplazo para evitar
peligros.
• Evite que los niños pequeños toquen la unidad.
• Pueden utilizar este aparato niños mayores de 8 años y personas con con minusvalías físicas, sensoriales o menta-
les, o sin experiencia ni conocimientos, siempre que se les someta a supervisión o se les instruya respecto a su uso
de forma segura y de manera que entiendan los peligros existentes.

29
CL3750_IM_neu 18.12.2019
• Los niños no deben jugar con el aparato.
• La limpieza y el mantenimiento no deben realizarlo niños sin supervisión.
• Siga las instrucciones en el capítulo “Limpieza”.
• Detalles de tipo y clasicación de fusibles: T, 250 V AC, 3,15 A
Manipulación de las pilas
AVISO:
• No exponga las pilas a excesivo calor como la luz solar, fuego o
similar. ¡Existe el riesgo de explosión!
• Las pilas no son juguetes. Manténgalas lejos de los niños.
• No abra las pilas ni las fuerce.
• Evite el contacto con objetos metálicos (anillos, clavos, tornillos, etc.)
¡Existe el riesgo de un cortocircuito!
• Un cortocircuito podría provocar que la batería se calentase de
manera excesiva o incluso que se prendiera fuego derivando en
lesiones físicas.
• Por su propia seguridad, cubra los terminales de la batería con cinta
adhesiva durante el transporte.
• En caso de una batería con fuga, asegúrese de no frotarse el líquido
en los ojos ni en las membranas mucosas. En caso de contacto,
lávese las manos y aclárese los ojos con agua limpia. Busque asis-
tencia médica si las molestias persisten.
ATENCIÓN:
• Cuando no utilice el mando a distancia durante un periodo largo de
tiempo, retire las pilas para evitar la “fuga” del ácido.
• No mezcle las pilas de diferentes tipos ni las pilas nuevas con viejas.
• No deseche las pilas junto con la basura doméstica. Lleve las pilas
gastadas al punto de recogida correspondiente o a su minorista.
Desembalaje del aparato
1. Sacar el aparato de su embalaje.
2. Retirar todo el embalaje como bolsas de plástico, material de relleno,
bridas y embalajes de cartón.
3. Comprobar que todas las piezas están contenidas en el embalaje.
Contenido en la entrega
1 Unidad de aire acondicionado
1 Mando a distancia
2 Pilas
1 Tubo exible de escape de aire
1 Adaptador del tubo de escape de aire (Conexión del aparato)
1 Kit de ventana de 2 piezas
1 Adaptador para el kit de ventana
1 Manguera de agua
2 Tapones (de repuesto)
Indicación de los elementos de manejo
1 Salida de aire (aleta pivotante)
2 Panel de control con pantalla
3 Carcasa
4 Salida de agua
5 Asa
6 Dispositivo para enrollar el cable de alimentación
7 Salida de agua
8 Cable de alimentación
9 Soporte de enchufe
10 Adaptador del tubo de escape de aire
11 Tubo exible de escape de aire
12 Adaptador para el kit de ventana
13 Conector del tubo de escape de aire
14 Elemento de ltro
15 Rejilla en la admisión de aire
16 Pantalla en la parte anterior
17 Mando a distancia
18 Kit de ventana de 2 piezas
Resumen de botones, iconos y testigos
Panel de control
1 Testigo
FAN (ventilador)
2 Testigo COOL (refrigeración)
3 Testigo DRY (deshumidicación)
4 Pantalla
5 Testigo HIGH (alta velocidad de ventilador)
6 Testigo LOW (baja velocidad de ventilador)
7 Testigo MEDIUM (velocidad de ventilador media)
8 Testigo POWER
9 Testigo Wi-Fi (conexión WiFi habilitada)
10 Testigo BUCKET FULL (depósito de agua lleno)
11 Testigo POWER (encender / apagar el aparato)
12 Testigo SWING (aleta pivotante oscilante)
13 Botón (ajuste de salida de aire)
14 Botón FAN SPEED (establecer velocidad de ventilador y activar WiFi)
15 Botones y (ajuste de temperatura u hora)
16 Testigo SLEEP (modo reposo)
17 Botón SLEEP (establecer “modo reposo”)
18 Botón MODE (establecer modo de funcionamiento)
19 Botón MIRAGE
(encender o apagar la pantalla en la parte anterior del aparato)
20 Testigo MIRAGE (pantalla en la parte anterior del aparato)
21 Botón (establecer temporizador)
22 Testigo TIMER (funcionamiento de temporizador activado)
Mando a distancia
1 Icono
(conexión WiFi habilitada)
2 Indicador Fan (ventilador)
3 Icono de batería
4 Icono Dry (deshumidicación)
5 Icono °C (unidad de temperatura seleccionada)
6 Icono Hr (horas)
7 Icono °F (unidad de temperatura seleccionada)
8 Icono Sleep (modo reposo)
9 Botones (ajuste de temperatura u hora)
10 Botón (establecer modo de funcionamiento)
11 Botón (establecer velocidad de ventilador)
12 Botón (Cambiar entre ºcelsius y ºfahrenheit)
13 Botón (establecer “modo reposo”)
14 Botón (ajuste de salida de aire), modo SWING)
15 Botón TIMER (establecer temporizador)
16 Botón POWER (encender / apagar el aparato)
17 Icono Ajustar el ventilador a LOW (baja velocidad)
Icono Ajustar el ventilador a MEDIUM (media velocidad)
Icono Ajustar el ventilador a HIGH (alta velocidad)
18 Testigo Swing (aleta pivotante oscilante)
19 Indicador de temperatura (o indicador de hora cuando se congura el
temporizador o cuando se usa el modo de funcionamiento “ventilador”
o “deshumidicador”)
20 Icono (funcionamiento de temporizador activado)
21 Testigo Cool (refrigeración)

30
CL3750_IM_neu 18.12.2019
Notas de uso
ATENCIÓN: ¡Importante para el primer uso o después del
transporte!
Antes del primer uso, se debe colocar la unidad en posición vertical
durante, al menos, 3 horas con el n de que el agente refrigerante se
asiente. Si no, el compresor resultará dañado.
ATENCIÓN:
• Cuando interrumpa el funcionamiento con el botón POWER
, es-
pere como mínimo 3 minutos antes de conectar de nuevo el aparato.
• ¡Si desea mover la unidad a otra ubicación, vacíe primero el depósito
de agua!
• El aparato funciona de manera más efectiva con un tamaño de espacio
de hasta 70 m³.
• La manguera de escape exible y el adaptador han sido fabricados
expresamente para este aparato. Para evitar un funcionamiento inco-
rrecto, no reemplace el tubo con otro tubo.
• El tubo de escape de aire se puede prolongar hasta 150 cm. No utilice
ninguna extensión.
• Asegúrese de que el caudal de aire uye libremente. No tuerza ni
curve el tubo de escape de aire. Cualquier bloqueo puede provocar
que la unidad se sobrecaliente.
• Cierre todas las ventanas y puertas para evitar que entre el aire
externo a la habitación, y sí permitir que el funcionamiento del aparato
sea más efectivo.
Puesta en marcha
Ubicación
• Al instalar el aparato, asegúrese de mantener una distancia de, al me-
nos, 50 cm de distancia entre la unidad y las paredes u objetos.
• La supercie debe ser horizontal y estar seca.
Montaje del tubo de escape de aire
NOTA:
Para ventanas correderas o persianas enrollables externas puede usar
el kit de aire de salida de ventana incluido con orientación vertical u
horizontal. Ajuste la longitud de la placa de sellado según lo desee.
1. Conecte el adaptador a la manguera de escape. Coloque la manguera
de escape de manera que la primera aleta de la manguera quede en el
riel. Apriete el adaptador girándolo en sentido horario.
2. Conecte el adaptador al conector en la parte posterior del aparato.
Para hacerlo, coloque el conducto de salida de aire con el adaptador
de modo que la etiqueta del adaptador quede orientada hacia arriba.
Gire el adaptador por completo hacia LOCK.
3. Extienda el tubo a la longitud deseada.
4. Enrosque el adaptador del kit de salida de ventana al extremo del
conducto de aire de salida.
5. Pegue el extremo abierto del tubo en la ventana.
6. Cierre la ventana el máximo posible. Baje también las persianas exte-
riores, si hubiera, hasta el extremo del tubo.
Mando a distancia
1. Abra la tapa del compartimento de la batería en la parte posterior del
mando a distancia.
2. Inserte 2 pilas del tipo “AAA” R03 de 1,5 V, teniendo en cuenta la
polaridad correcta (véase las marcas en la parte inferior del comparti-
mento).
3. Cierre la tapa del compartimento de la batería.
Cable de alimentación
Desenrolle el cable de alimentación del dispositivo destinado para ello.
Conexión eléctrica
1. Asegúrese de que la tensión de la red que quiere utilizarse corres-
ponde con la tensión de la unidad. Compruebe la etiqueta de especi-
caciones para más detalles.
2. Conecte la unidad a una toma de corriente con conexión a tierra
debidamente instalada. Sonará una señal indicando que la unidad está
lista para usarse. El aparato está en espera. La pantalla muestra la
temperatura actual de la sala.
Encendido / apagado de la unidad
• Pulse el botón de POWER
para poner en marcha la unidad. La
aleta pivotante se abre automáticamente. El dispositivo está precon-
gurado en modo “Refrigeración” con una temperatura de 22 °C. Si se
interrumpe el funcionamiento sin desconectar el enchufe, todo el modo
de funcionamiento previamente ajustado y los ajustes de temperatura
se mantendrán. Los testigos de control indican la conguración.
• Pulse el botón de POWER de nuevo para apagar el aparato. La
aleta pivotante se cierra automáticamente.
Dispositivo de seguridad del compresor
Si se interrumpe el funcionamiento, se activará el dispositivo de seguridad
del compresor. Esto impedirá durante unos 3 minutos que el compresor
se ponga en marcha, con el n de aliviar la presión del circuito refrigera-
dor. No es una avería del aparato. Por tanto, espere al menos 3 minutos
antes de volver a encender el aparato.
Información sobre la aplicación
“Smart Life - Smart Living”
La app Smart Life - Smart Living está disponible para Android e iOS.
Escanee el código QR correspondiente para acceder directamente a la
descarga.
NOTA:
Dependiendo del proveedor, puede haber costes implicados en la des-
carga de la aplicación.
Google Play App Store
Información de uso de la app
Este aparato permite usarlo mediante su red doméstica. Es imprescin-
dible una conexión WiFi permanente a su router y la app gratuita “Smart
Life – Smart Living”.
Puede acceder fácilmente a todas las funciones del aparato con la app.
Como la app se mejora continuamente, no podemos ofrecer una descrip-
ción más detallada en este momento.
Recomendamos desconectar el aparato de la corriente cuando no esté
en casa para evitar que se active accidentalmente cuando esté fuera.
Requisitos del sistema para el uso de la aplicación
• iOs 8.0 o superior
• Android 4.4 o superior
Puesta en funcionamiento mediante la app
1. Instale la app “Smart Life – Smart Living”. Cree una cuenta de usuario.
2. Active la función WiFi en la conguración de su aparato.
3. Ponga el aparato de aire acondicionado aproximadamente a 5 metros
de su router.
4. Mantenga pulsado el botón FAN SPEED durante aproximadamente
5 segundos. El testigo WiFi
parpadea rápidamente.
5. Ejecute la app y seleccione “ + ” .
6. Seleccione el menú “aire acondicionado” y siga las instrucciones en la
pantalla.

31
CL3750_IM_neu 18.12.2019
7. Cuando se haya conectado correctamente el aparato, el testigo WiFi
quedará jo.
Ahora podrá usar el aparato con la app.
NOTA:
• El aparato solamente puede usarse con routers de 2,4 GHz. Los
routers de 5 GHz no están soportados.
• El aparato está equipado solamente con una conexión de red. No
puede apagarse.
Cómo usar el aparato
• Las conguraciones realizadas mediante el aparato no se transmiten al
mando a distancia.
• En cuanto pulse un botón del mando a distancia, el aparato aplicará la
conguración correspondiente del mando.
• Su selección aparecerá en la pantalla del mando a distancia.
• Los botones y deben pulsarse varias veces para seleccionar las
diferentes funciones.
A continuación, se explican los botones del panel de control. Los testigos
mostrarán la selección realizada.
Modos de funcionamiento
Utilice el botón de MODE para seleccionar uno de los siguientes modos
de funcionamiento:
• Refrigeración
COOL
• Deshumidicación DRY
• Ventilador FAN
Modo “Refrigeración”
En este modo de funcionamiento, puede ajustar la velocidad y la tempe-
ratura del ventilador según desee.
NOTA:
Para utilizar el aparato con el compresor, la temperatura congurada
deberá ser más baja que la temperatura actual de la habitación.
Modo “Ventilador”
Este modo solo permite congurar la velocidad del ventilador.
Modo “Deshumidicación”
• Este modo de funcionamiento no es compatible con más ajustes.
• La velocidad del ventilador está preestablecida al nivel más bajo LOW.
• La unidad enfriará la habitación y absorberá la humedad del aire.
• Cuando use el modo “deshumidicador” durante un tiempo prolon-
gado, recomendamos conectar de forma permanente el conducto de
agua incluido al drenaje de agua superior. (consulte la ilustración).
Saque primero el tapón superior. Ponga el extremo del conducto de
agua en un recipiente de tamaño suciente (p. ej. un cubo).
Ajustes del ventilador
En los modos “Refrigeración” y “Ventilador” puede ajustar el ventilador
con 3 ajustes diferentes. Pulse el botón del FAN SPEED correspondiente.
• LOW (bajo)
• MEDIUM (medio)
• HIGH (alto)
Ajuste de la temperatura
• Utilice los botones de
o en modo “Refrigeración” para ajustar la
temperatura.
• Seleccione la temperatura entre 16 °C (61 °F) y 31 °C (88 °F).
NOTA:
Solamente puede cambiarse entre ºcelsius y ºfahrenheit usando el
botón
del mando a distancia.
Modo “Reposo”
• Pulse el botón SLEEP cuando el aparato esté encendido y en modo
operativo “Refrigeración”.
• La velocidad del ventilador está preestablecida al nivel más bajo LOW.
No puede cambiarse.
• La pantalla se apagará pasados 10 segundos.
• Tras funcionar una hora en modo “Reposo”, la temperatura estable-
cida aumentará automáticamente en 1° C. Se repetirá de nuevo una
hora más tarde. De este modo se logrará una temperatura ambiente
cómoda.
Ajuste de la salida de aire
Use el botón
para establecer la dirección del aire emitido.
• Pulse el botón
múltiples veces hasta que la aleta pivotante se
ponga en la posición deseada.
Temporizador (Temporizador automático)
Utilice la función temporizador para ajustar las veces de encendido y
apagado del aparato. Selecciona entre 1 a 24 horas.
Uso de la función del temporizador para conectar automáticamente
1. Pulse el botón de POWER
para encender la unidad.
2. Seleccione el modo de funcionamiento, la temperatura y la velocidad
del ventilador para que funcione la unidad cuando se haya conectado
a la hora predeterminada.
3. Pulse el botón de POWER para apagar la unidad.
4. Pulse el botón . El número de las horas parpadea.
5. Puede ajustar el número deseado de horas con los botones y .
El aparato sale automáticamente del modo de ajuste después de
aproximadamente 5 segundos. Se activa el funcionamiento del tempo-
rizador y el testigo TIMER se ilumina.
NOTA:
No pulse el botón
después de congurar las horas, ya que los
ajustes del temporizador no se guardarán.
Uso de la función del temporizador para apagar automáticamente
1. Pulse el botón de POWER
para encender la unidad.
2. Pulse el botón durante el funcionamiento. El número de horas
parpadea.
3. Congure el modo temporizador como se describe en el punto 5
anterior.
NOTA:
• Si desea desactivar el temporizador, pulse el botón
dos veces. El
testigo TIMER se apaga.
• También puede cancelar la función del temporizador en cualquier
momento pulsando el botón de POWER
para encender y apagar
la unidad.

32
CL3750_IM_neu 18.12.2019
Botón MIRAGE
Pulse el botón MIRAGE para encender o apagar la pantalla ubicada en la
parte anterior del aparato.
Vaciado del depósito de agua
La unidad lleva integrado un depósito de agua para recoger toda la
condensación. Cuando el depósito de agua esté lleno, la luz piloto
BUCKET FULL se ilumina. El aparato se apaga.
ATENCIÓN:
No transporte el aparato mientras el depósito de agua está lleno. Podría
entrar agua en el aparato.
Para continuar el funcionamiento deberá vaciar el depósito de agua. Para
ello, necesita un paño para suelo, una palangana con capacidad para
0,5 litro aproximadamente y la manguera de agua suministrada con el
aparato.
1. Desconecte el enchufe de la red desde la toma de corriente.
2. Coloque el trapo en el suelo y el recipiente plano debajo de la salida
del agua. Si es posible, coloque la palangana en un nivel inferior al
aparato.
3. Saque el tapón inferior.
4. Conecte la manguera de agua a la toma de salida del agua del apa-
rato. Coloque el extremo de la manguera en la palangana.
5. Después de haber descargado el agua, retire la manguera de agua.
Utilice el tapón para volver a cerrar el desagüe del aparato.
Apagar el aparato
1. Pulse el botón de POWER
para apagar la unidad.
2. Desenchufe de la red en la toma de corriente.
Dispositivo para enrollar el cable de alimentación
Enrolle el cable de alimentación en el dispositivo destinado para ello.
Introduzca las clavijas del enchufe en las ranuras provistas.
Limpieza
AVISO:
• Desenchufe siempre de la toma de corriente antes de
limpiar.
• Asegúrese de que no entra agua por las aberturas
de la unidad durante la limpieza. Podría causar un
electrochoque o un incendio.
ATENCIÓN:
• No utilice aerosoles para limpiar el aparato con agentes limpiadores.
• No utilice un cepillo de alambre u objetos abrasivos.
• No utilice detergentes agresivos o abrasivos.
Filtro
Limpie el ltro una vez cada 2 semanas, si usa el aparato diariamente.
Si el polvo en el ltro bloquea la ventilación, no se puede garantizar el
rendimiento del aparato.
1. Hay una rejilla con un ltro interno situada sobre la conexión para el
conducto de salida de aire en la parte posterior del aparato.
2. Retire la rejilla del aparato y el ltros de la rejillas.
3. Aspire el ltro con una aspiradora.
4. Limpie el ltro debajo del agua corriente. Si es necesario, utilice un
deter gente suave.
5. Deje secar el ltro en un lugar a la sombra.
6. Vuelva a introducir el ltro en la rejilla cuando se haya secado por
completo. Los recesos están orientados hacia arriba.
7. Vuelva a introducir la rejilla en el aparato.
ATENCIÓN:
No ponga en funcionamiento la unidad sin el ltro.
Carcasa
• Use una aspiradora para limpiar las ranuras de ventilación.
• Limpie la carcasa con un paño ligeramente húmedo.
Limpieza y almacenamiento estacional
Cuando no se utilice la unidad durante un largo periodo de tiempo, pro-
ceda conforme a lo siguiente:
1. Vacíe el depósito de agua según lo descrito anteriormente.
2. Repita los pasos 2 a 5 del capítulo “Vaciado del depósito de agua” con
lasalida de agua superior (tapón superior).
3. Ponga en funcionamiento la unidad en modo “Ventilador” durante 2 ho-
ras con el n de secar el interior de la unidad.
4. Pulse el botón de POWER
para apagar la unidad. Desenchufe de
la red eléctrica desde la toma de corriente.
5. Desconecte el tubo exible de escape de aire de la unidad.
6. Deje ambas salidas de agua abiertas.
7. Limpie el ltro así como el aparato como se ha descrito anteriormente.
8. Cubra la unidad con una película.
9. Mantenga siempre el aparato fuera del alcance de los niños en un
lugar seco y bien ventilado.
Solución de problemas
Problema Posibles causas Solución
La unidad no funciona. No hay suministro eléctrico Compruebe la conexión eléctrica.
La función temporizador está activada.
Pulse el botón de POWER
para encender la unidad.
La temperatura ambiente es demasiado baja
o demasiado alta.
Se recomienda utilizar el aparato a una temperatura ambiente entre
16 y 35 °C.
El aparato está defectuoso. Póngase en contacto con nuestro departamento de atención al
cliente o con un especialista. Tenga en cuenta el manual de servi-
cio adjunto.
La unidad no enfría lo suciente. La unidad está expuesta a la luz solar directa. Seleccione otra ubicación o baje las persianas.
Las ventanas o puertas están abiertas. Cierre todas las ventanas o puertas.
Hay demasiada gente u otras fuentes de
calor en la habitación.
Retire los calefactores portátiles o desconéctelos.
El ltro está sucio. Limpie el ltro.
La entrada de aire o la salida de aire están
bloqueadas.
Elimine el bloqueo. Mantenga las aberturas de ventilación sin
obstrucciones.

33
CL3750_IM_neu 18.12.2019
Problema Posibles causas Solución
La unidad mete demasido ruido
durante el funcionamiento.
La unidad no está en posición vertical. Coloque la unidad sobre una supercie plana. Evite las vibraciones.
El aparato se apaga durante el
funcionamiento. El testigo
parpadeará en rojo.
El depósito de agua está lleno. Desenchufe de la corriente. Vacíe el depósito de agua con la salida
de agua inferior. A continuación podrá usar de nuevo el aparato.
El mando a distancia no fun-
ciona.
El aparato está demasiado lejos. Acérquese al aparato.
El mando a distancia no apunta hacia el
sensor.
Coloque el mando de forma que apunte al sensor.
Compruebe si hay obstáculos entre el mando a distancia y el
sensor.
Las pilas están gastadas. Cambie las pilas.
Pantalla del aparato: E1 Sensor de temperatura defectuoso. Póngase en contacto con nuestro servicio de atención al cliente o
su proveedor.
Pantalla del aparato: E2
Contacte con nuestro servicio al cliente o su vendedor si encuentra cualquier problema que no se encuentre en la tabla o si la solución recomendada no
funciona.
Datos técnicos
Modelo: ............................................................................................CL 3750
Peso neto: ............................................................................... aprox. 30,8 kg
Suministro de tensión: ....................................................220 - 240 V~, 50 Hz
Consumo de energía: ....................................................................... 1345 W
Consumo de energía en modo de espera en red: ...............................0,8 W
Clase de protección: ....................................................................................
Clase de eciencia energética: ................................................................... A
Capacidad de refrigeración: ........................................12000 BTU (3,52 kW)
Refrigerante: ........................................................................................ R 290
Presión de trabajo máxima permisible:
Lado de presión: .......................................................................... 1,8 MPa
Lado de succión: ......................................................................... 0,6 MPa
Máxima presión permitida: ............................................................... 3,0 MPa
WLAN
Red soportada: ..........................................................................802.11 b/g/n
Potencia máxima de radiofrecuencia transmitida: .......................... 100 mW
Gama de frecuencia: ........................................................................2,4 GHz
Canales: ................................................................................................ 1 - 13
Claves WiFi soportadas: ........................................................... WPA / WPA2
El derecho de realizar modicaciones técnicas y de diseño en el curso del
desarrollo continuo del producto está reservado.
Noticación de cumplimiento de directiva
Por la presente, Clatronic International GmbH, declara que el tipo de
equipo radioeléctrico CL 3750 es conforme con la Directiva 2014 / 53 / UE.
Además, el aparato cumple los requisitos de la directiva RoHS
2011 / 65 / EC.
El texto completo de la declaración UE de conformidad está disponible en
la dirección Internet siguiente: www.sli24.de
En la zona de descargas, introduzca el nombre del modelo CL 3750.
Comprobado para su funcionamiento en España.
Eliminación
Eliminación de la batería
Como consumidor está obligado por la ley a recoger pilas / acu-
muladores gastados.
Retire las pilas del mando a distancia antes de desechar el
aparato.
Lleve las pilas a un punto de recogida de pilas gastadas o residuos peli-
grosos. Póngase en contacto con la autoridad local para más información.
Signicado del símbolo “Cubo de basura”
Proteja nuestro medio ambiente, aparatos eléctricos no forman
parte de la basura doméstica.
Haga uso de los centros de recogida previstos para la elimina-
ción de aparatos eléctricos y entregue allí sus aparatos eléctri-
cos que no vaya a utilizar más.
Ayudará en evitar las potenciales consecuencias, a causa de una errónea
eliminación de desechos, para el medio ambiente y la salud humana.
Con ello, contribuirá a la recuperación, al reciclado y a otras formas de
reutilización de los aparatos viejos eléctricos y electrónicos.
La información cómo se debe eliminar los aparatos, se obtiene en su
ayuntamiento o su administración municipal.

34
CL3750_IM_neu 18.12.2019
Istruzioni per l’uso
Grazie per aver scelto il nostro prodotto. Vi auguriamo buon divertimento
nell’uso dell’apparecchio.
Simboli per questo manuale di istruzioni per l’uso
Le indicazioni importanti per la propria sicurezza sono indicati appropriata-
mente. Osservare assolutamente queste indicazioni, per evitare incidenti
e danni all’apparecchio:
AVVISO:
Previene i rischi della propria salute ed indica possibili rischi di ferite.
ATTENZIONE:
Indica possibili pericoli per l’apparecchio o altri oggetti.
NOTA: Mette in risalto consigli ed informazioni.
Indice
Elementi di comando .................................................................................3
Panoramica dei tasti, icone e indicatori luminosi ..................................4
Note generali ............................................................................................34
Avvertenze speciali di sicurezza per questo apparecchio .................34
Movimentazione batterie ........................................................................36
Disimballaggio dell’apparecchio ...........................................................36
Nella fornitura ...........................................................................................36
Elementi di comando ...............................................................................36
Panoramica dei tasti, icone e indicatori luminosi ................................36
Pannello di comando .............................................................................36
Telecomando ..........................................................................................36
Note per l’uso ...........................................................................................37
Messa in funzione ....................................................................................37
Collocazione ...........................................................................................37
Montaggio del tubo di scarico ................................................................37
Telecomando ..........................................................................................37
Cavo di alimentazione ............................................................................37
Collegamento elettrico ...........................................................................37
Accensione / spegnimento ......................................................................37
Dispositivo di sicurezza del compressore..............................................37
Informazioni sull’applicazione “Smart Life - Smart Living” ...............37
Informazioni su come utilizzare l’applicazione ......................................37
Requisiti di sistema per l’uso dell’applicazione......................................37
Messa in servizio tramite l’applicazione ................................................37
Uso dell’apparecchio ...............................................................................38
Modi di esercizio ....................................................................................38
Impostazione della ventola ....................................................................38
Impostazione della temperatura ............................................................38
“Modalità riposo” ....................................................................................38
Impostazione uscita aria ........................................................................38
Timer (timer automatico) ........................................................................38
Tasto MIRAGE .......................................................................................39
Svuotamento serbatoio dell’acqua .......................................................39
Interruzione del funzionamento .............................................................39
Avvolgitore per cavo di alimentazione ...................................................39
Pulizia ........................................................................................................39
Filtro ........................................................................................................39
Alloggiamento ........................................................................................39
Pulizia e rimessaggio stagionale ...........................................................39
Ricerca dei guasti ....................................................................................39
Dati tecnici ................................................................................................40
Avviso sulla conformità alla direttiva ....................................................40
Smaltimento .............................................................................................40
Smaltimento batterie ..............................................................................40
Significato del simbolo “Eliminazione” ...................................................40
Note generali
Prima di mettere in funzione questo apparecchio, leggere molto attenta-
mente le istruzioni per l’uso e conservarle con cura unitamente al certifi-
cato di garanzia, allo scontrino e, se possibile, alla scatola di cartone con
la confezione interna. Se passate l’apparecchio a terzi, consegnate anche
le istruzioni per l’uso.
• Utilizzare l’apparecchio esclusivamente per scopi privati e conforme-
mente al tipo di applicazione previsto. Questo prodotto non è stato
concepito ai fini di un impiego in ambito industriale.
• Non utilizzarlo all’aperto. Proteggerlo dal calore, nonché dall’espo-
sizione diretta ai raggi solari e dall’umidità (non immergerlo mai in
sostanze liquide) e tenerlo a distanza da oggetti con spigoli affilati. Non
utilizzare l’apparecchio con le mani umide. Nel caso in cui si bagni o si
inumidisca l’apparecchio, staccare immediatamente la spina.
• Disattivare l’apparecchio e staccare sempre la spina dalla relativa
presa (prendendo in mano la spina, non tirando il cavo) allorché non si
utilizza l’apparecchio, quando si applicano degli accessori oppure nel
caso in cui lo si debba pulire o si siano manifestate anomalie.
• Controllare regolarmente che l’apparecchio e il cavo non presentino
tracce di danneggiamento. In tal caso l’apparecchio non deve più
essere utilizzato.
• Utilizzare esclusivamente accessori originali.
• Per sicurezza tenere l’imballaggio (sacchetto di plastica, scatola, poli-
stirolo, ecc.) fuori dalla portata dei bambini.
AVVISO:
Non lasciar giocare i bambini piccoli con la pellicola di plastica. Peri-
colo di soffocamento!
Avvertenze speciali di sicurezza per questo apparecchio
Leggere le istruzioni!
AVVISO: Pericolo d’incendio!
L’apparecchio contiene un refrigerante infiammabile!
Il manuale di assistenza è disponibile al seguente indirizzo web: www.sli24.de
Nell’area “Downloads”, inserire il nome del modello CL 3750.
• Chiunque sia addetto a intervenire su un circuito refrigerante o a interromperlo deve essere in possesso di un
certificato valido rilasciato da un’autorità di controllo accreditata nel settore che autorizza l’idoneità dell’addetto a
maneggiare i refrigeranti in sicurezza conformemente a specifiche di valutazione riconosciute dall’azienda.

35
CL3750_IM_neu 18.12.2019
Il manuale di assistenza è disponibile al seguente indirizzo web: www.sli24.de
Nell’area “Downloads”, inserire il nome del modello CL 3750.
• La manutenzione deve essere eseguita solo come raccomandato dal produttore dell’apparecchiatura. La manu-
tenzione e le riparazioni che richiedono l’assistenza di altro personale qualificato devono essere effettuate sotto la
supervisione della persona competente per l’utilizzo di refrigeranti infiammabili.
AVVISO:
• Non cercare di accelerare il processo di scongelamento.
• Non utilizzare e conservare l’apparecchio nei seguenti luoghi:
- Vicino a una sorgente di combustione.
- In aree dove si possono verificare schizzi di acqua o di oli.
- In aree esposte alla luce solare diretta.
- In bagno, in lavanderia o nei pressi di una piscina.
• Non perforare o bruciare l’apparecchio.
• Ricordate che i refrigeranti sono inodori.
• L’apparecchio deve essere installato, azionato e riposto in un locale di superficie superiore a 15 m².
ATTENZIONE: Pericolo di surriscaldamento!
• Non ostruire le aperture di ventilazione!
• Non coprire l’apparecchio!
• Il refrigerante R 290 è conforme alle direttive ambientali europee.
• Non danneggiare il circuito di refrigerazione.
• L’apparecchio è destinato esclusivamente per utilizzo interno.
• L’apparecchio deve essere conservato in modo che non venga danneggiato.
• Rispettare le norme nazionali di allacciamento.
• In caso di rumori strani, odori e / o fuoriuscite di fumo, scollegare la spina di alimentazione dalla presa.
• Utilizzare o spostare l’apparecchio solamente in posizione verticale.
• Mantenere una distanza minima di 50 cm tra apparecchio e pareti oppure oggetti per assicurare una sufficiente circo-
lazione d’aria quando l’apparecchio è in funzione.
• Non utilizzare mai l’apparecchio senza filtro.
• Non lasciare l’apparecchio senza sorveglianza per ore consecutive, Non uscire da casa lasciando l’apparecchio in
funzione.
• Questo apparecchio è destinato a stanze di abitazioni e non deve essere utilizzato per altri scopi.
• Non accendere l’apparecchio in stanze dove sono presenti gas, carburante, petrolio o altri liquidi infiammabili. Non
utilizzare spray come vernici, pesticidi o altri materiali infiammabili nella stanza in cui è in funzione l’apparecchio.
• Non inserire alcun oggetto nelle aperture dell’apparecchio.
• Non esporre l’unità a perdite o schizzi d’acqua e non mettere recipiente contenenti acqua, come vasi con fiori, sull’u-
nità.
• Non spostare l’apparecchio con il cavo di alimentazione collegato alla presa.
• Spegnere sempre l’apparecchio premendo per prima cosa il tasto POWER
(alimentazione) prima di scollegare
l’alimentazione.
• Se l’apparecchio viene spento, attendere circa 3 min, prima di riavviarlo, affinché la pressione del circuito di raffredda-
mento si riduca.
• Non riparare l’apparecchio da soli. Contattare sempre un tecnico autorizzato. Se il cavo di alimentazione è danneg-
giato, farlo sostituire dal produttore, dall’agente addetto all’assistenza oppure da personale qualificato per evitare
situazioni pericolose.
• Tenere l’apparecchio lontano dalla portata dei bambini.
• L’apparecchio può essere utilizzato dai bambini da 8 anni in su e dalle persone con ridotte abilità fisiche, sensoriali o
mentali o mancanza di esperienza e conoscenza sotto la diretta supervisione o dietro istruzioni sull’uso sicuro dell’ap-
parecchio e sui possibili pericoli derivanti dal suo utilizzo.

36
CL3750_IM_neu 18.12.2019
• I bambini non devono giocare con l’apparecchio.
• Pulizia e manutenzione non devono essere eseguiti da bambini senza supervisione.
• Seguire le istruzioni nel capitolo “Pulizia”.
• Dettagli del tipo e amperaggio dei fusibili: T, 250 V AC, 3,15 A
Movimentazione batterie
AVVISO:
• Non esporre le batterie a calore eccessivo come la luce diretta del
sole, fiamme o condizioni simili. Pericolo di esplosione!
• Le batterie non sono giocattoli. Tenere le batterie lontano dalla por-
tata dei bambini.
• Non aprire la batterie forzandole.
• Evitare il contatto con oggetti metallici (anelli, chiodi, cacciaviti ecc.).
Pericolo di cortocircuito!
• Un cortocircuito fa sì che la batteria si surriscaldi o addirittura si
incendi, con conseguenti lesioni.
• Per la vostra sicurezza, coprire i morsetti della batteria con nastro
adesivo durante il trasporto.
• In caso di perdite dalle batterie, evitare che il liquido entri in contatto
con gli occhi oppure con le mucosa. In caso di contatto, lavare le
mani e risciacquare gli occhi con acqua pulita. Contattare un medico
in caso il fastidio persista.
ATTENZIONE:
• Quando non si utilizza il telecomando per periodi prolungati, rimuo-
vere le batterie per prevenire perdite di acido.
• Non mescolare batterie di tipi diversi né batterie nuove e vecchie.
• Non gettare le batterie insieme ai rifiuti domestici. Restituire le bat-
terie usate a un punto di raccolta autorizzato oppure al rivenditore di
fiducia.
Disimballaggio dell’apparecchio
1. Estrarre l’apparecchio dall’imballaggio.
2. Rimuovere tutto il materiale d’imballaggio come borse di plastica, ma-
terial di riempimento, fascette e cartone.
3. Controllare che non manchi alcun componente.
Nella fornitura
1 Gruppo condizionatore
1 Telecomando
2 Batterie
1 Flessibile di scarico
1 Adattatore tubo di scarico (Collegamento sull’apparecchio)
1 Kit finestra, 2 pezzi
1 Adattatore per kit finestra
1 Flessibile acqua
2 Spine (parti di ricambio)
Elementi di comando
1 Uscita aria (aletta basculante)
2 Pannello di controllo con display
3 Alloggiamento
4 Uscita acquas
5 Manico
6 Avvolgitore per cavo di alimentazione
7 Uscita acquas
8 Cavo di rete
9 Supporto per spina di alimentazione
10 Adattatore tubo di scarico
11 Flessibile di scarico
12 Adattatore per kit finestra
13 Connettore tubo di scarico
14 Inserto filtro
15 Griglia sulla presa d’aria
16 Display sul lato anteriore
17 Telecomando
18 Kit finestra, 2 pezzi
Panoramica dei tasti, icone e indicatori luminosi
Pannello di comando
1 Indicatore
FAN (ventilazione)
2 Indicatore COOL (raffreddamento)
3 Indicatore DRY (deumidificazione)
4 Display
5 Indicatore HIGH (velocità di ventilazione alta)
6 Indicatore LOW (velocità di ventilazione bassa)
7 Indicatore MEDIUM (velocità di ventilazione media)
8 Indicatore POWER
9 Indicatore Wi-Fi (connessione Wi-Fi abilitata)
10 Indicatore BUCKET FULL (serbatoio dell’acqua pieno)
11 Tasto POWER (accensione / spegnimento dell’apparecchio)
12 Indicatore SWING (oscillazione dell’aletta basculante)
13 Tasto SWING (regolazione dell’uscita dell’aria)
14 Tasto FAN SPEED (impostazione della velocità della ventola e attiva-
zione Wi-Fi)
15 Tasti e (regolazione della temperatura e dell’ora)
16 Indicatore SLEEP (modalità riposo)
17 Tasto SLEEP (impostazione “modalità riposo”)
18 Tasto MODE (impostazione modalità di funzionamento)
19 Tasto MIRAGE (accensione o spegnimento del display sul lato ante-
riore dell’apparecchio)
20 Indicatore MIRAGE (display sul lato anteriore dell’apparecchio)
21 Tasto (impostazione timer)
22 Indicatore TIMER (funzionamento a timer abilitato)
Telecomando
1 Icona
(connessione Wi-Fi abilitata)
2 Indicatore Fan (ventilazione)
3 Icona batteria
4 Indicatore Dry (deumidificazione)
5 Indicatore °C (unità di misura selezionata della temperatura)
6 Indicatore Hr (ore)
7 Indicatore °F (unità di misura selezionata della temperatura)
8 Indicatore Sleep (modalità riposo)
9 Tasti (regolazione della temperatura e dell’ora)
10 Tasto (impostazione modalità di funzionamento)
11 Tasto (impostazione della velocità della ventola)
12 Tasto (selezione tra °Celsius e °Fahrenheit)
13 Tasto (impostazione “modalità riposo”)
14 Tasto (regolazione dell’uscita dell’aria, modalità SWING)
15 Tasto TIMER (impostazione timer)
16 Tasto POWER (accensione / spegnimento dell’apparecchio)
17 Icona Impostazione della ventola su LOW (bassa velocità)
Icona Impostazione della ventola su MEDIUM (media velocità)
Icona Impostazione della ventola su HIGH (alta velocità)
18 Indicatore Swing (oscillazione dell’aletta basculante)
19 Visualizzazione della temperatura (o indicatore dell’ora quando si
imposta il timer o quando si utilizza la modalità di funzionamento “ven-
tilazione” o “deumidificazione”)
20 Icona (funzionamento a timer abilitato)
21 Indicatore Cool (raffreddamento)

37
CL3750_IM_neu 18.12.2019
Note per l’uso
ATTENZIONE: Importante quando si accende l’apparecchio per
la prima volta o dopo il trasporto!
Prima di accendere l’apparecchio per la prima volta, lasciare l’apparec-
chio in posizione verticale per almeno 3 ore per far scendere il liquido
refrigerante e non danneggiare il compressore.
ATTENZIONE:
• Quando si interrompe il funzionamento con il tasto di POWER ,
aspettare almeno 3 minuti prima di accendere di nuovo l’apparecchio.
• Se si desidera spostare l’unità in un altro luogo, svuotare prima il
serbatoio dell’acqua!
• L’apparecchio funziona più efficacemente con una stanza grande fino a
70 metri cubi.
• Il gas di scarico flessibile e l’adattatore sono stati prodotti ad hoc per
questo apparecchio. Per evitare un funzionamento errato, non sostitu-
ire il tubo con un tubo di tipo diverso.
• Il tubo può essere esteso fino a 150 cm. Non utilizzare prolunghe.
• Assicurare una ventilazione sufficiente. Non calpestare o piegare il
tubo di scarico. Eventuali bloccaggi possono provocare il surriscalda-
mento dell’apparecchio.
• Chiudere tutte le finestre e le porte per impedire che l’aria esterna
entri nella stanza. In questo modo si garantisce un funzionamento più
efficace dell’apparecchio.
Messa in funzione
Collocazione
• Quando si installa l’apparecchio, mantenere una distanza di almeno
50 cm tra apparecchio e pareti o altri oggetti.
• La superficie deve essere piatta e asciutta.
Montaggio del tubo di scarico
NOTA:
Per finestre scorrevoli o tende a rullo esterne è possibile utilizzare il kit
di scarico dell’aria per finestre fornito in dotazione con orientamento
verticale o orizzontale. Regolare la lunghezza della piastra di tenuta
come desiderato.
1. Collegare l’adattatore al tubo di scarico. Collocare il tubo di scarico in
modo che la prima aletta del tubo si trovi nella guida. Stringere l’adatta-
tore ruotandolo in senso orario.
2. Collegare l’adattatore al connettore sul retro dell’apparecchio. A tale
scopo, posizionare il tubo di scarico dell’aria con l’adattatore in modo
che l’etichetta dell’adattatore sia rivolta verso l’alto. Ruotare l’adattatore
completamente verso LOCK.
3. Estendere il tubo alla lunghezza desiderata.
4. Avvitare l’adattatore del kit di scarico dell’aria per finestre sull’estremità
del tubo di scarico dell’aria.
5. Inserire l’estremità aperta del tubo in una finestra.
6. Chiudere il più possibile la finestra ed abbassare eventuali tapparelle
fino all’estremità del tubo.
Telecomando
1. Aprire il coperchio del vano batterie sulla parte posteriore del teleco-
mando.
2. Inserire 2 batterie del tipo R03 “AAA” 1,5 V, rispettando la polarità (ve-
dere I segni sulla parte inferiore del vano)!
3. Chiudere il coperchio del vano batterie.
Cavo di alimentazione
Srotolare il cavo di alimentazione dall’avvolgitore.
Collegamento elettrico
1. Controllare che la tensione dell’apparecchio corrisponda a quella dell’a-
limentazione di rete. Controllare la targhetta nominale per le relative
specifiche.
2. Collegare l’apparecchio a una presa con messa a terra. Un segnale
acustico indica che l’apparecchio é pronto all’uso. L’apparecchio si
trova in standby. Il display mostra la temperatura ambiente corrente.
Accensione / spegnimento
• Premere il tasto POWER
per accendere l’apparecchio. L’aletta
basculante viene aperta automaticamente. Il dispositivo è preimpostato
sul modo “Raffreddamento” e la temperatura a 22 °C. Se l’apparecchio
viene spento senza sfilare la spina, vengono mantenute tutte le impo-
stazioni di modo di funzionamento e temperature precedentemente
selezionate. Le spie di comando indicano questa impostazione.
• Premere nuovamente il tasto POWER per spegnere l’apparecchio.
L’aletta basculante viene chiusa automaticamente.
Dispositivo di sicurezza del compressore
Se il funzionamento viene interrotto, si attiva il dispositivo di sicurezza del
compressore. Il dispositivo impedisce che il compressore entri in funzione
per circa 3 minuti per rilevare la pressione nel circuito di raffreddamento.
Non si tratta di un’anomalia dell’apparecchio. Attendere tuttavia almeno
3 minuti prima di riaccendere l’apparecchio.
Informazioni sull’applicazione
“Smart Life - Smart Living”
L’app Smart Life - Smart Living disponibile per android e iOS. Scansio-
nare il codice QR corrispondente per accedere direttamente al download.
NOTA:
In base al provider possono essere applicati costi derivanti dal
download dell’applicazione.
Google Play App Store
Informazioni su come utilizzare l’applicazione
Questo apparecchio consente il suo utilizzo tramite la rete domestica. Un
prerequisito è una connessione Wi-Fi permanente al router e l’applica-
zione gratuita “Smart Life - Smart Living”.
È possibile accedere facilmente a tutte le funzioni dell’apparecchio tramite
l’applicazione. Dal momento che l’applicazione è costantemente miglio-
rata, non possiamo fornire una descrizione più dettagliata qui.
Si consiglia di scollegare l’apparecchio dalla rete elettrica quando si è
lontani da casa per evitare accensioni involontarie mentre si è in viaggio!
Requisiti di sistema per l’uso dell’applicazione
• iOs 8.0 o superiore
• Android 4.4 o superiore
Messa in servizio tramite l’applicazione
1. Installare l’applicazione “Smart Life - Smart Living”. Creare un account
utente.
2. Attivare la funzione Wi-Fi nelle impostazioni dell’apparecchio.
3. Posizionare l’apparecchio di climatizzazione ad una distanza di circa
5 metri dal router.
4. Premere e tenere premuto il tasto FAN SPEED per circa 5 secondi.
L’indicatore luminoso del
Wi-Fi lampeggia rapidamente.
5. Avviare l’applicazione e selezionare “ + ” .
6. Selezionare il menu “condizionatore d’aria” e seguire le istruzioni sul
display.

38
CL3750_IM_neu 18.12.2019
7. Una volta che l’apparecchio è stato collegato con successo, l’indicatore
luminoso del Wi-Fi rimane acceso in modo fisso.
Adesso è possi-
bile utilizzare l’apparecchio tramite l’app.
NOTA:
• L’apparecchio può essere utilizzato solo con router a 2,4 GHz. I rou-
ter a 5 GHz non sono supportati.
• L’apparecchio è dotato di una sola connessione di rete. Non può
essere disattivata.
Uso dell’apparecchio
• Le impostazioni effettuate tramite l’apparecchio non vengono tra-
smesse al telecomando.
• Non appena si preme un tasto sul telecomando, l’apparecchio applica
le impostazioni corrispondenti dal telecomando.
• La selezione apparirà sul display del telecomando.
• I tasti e devono essere premuti più volte per selezionare le
singole funzioni.
I tasti sul pannello di controllo vengono spiegati di seguito. Gli indicatori
luminosi mostrano la selezione scelta.
Modi di esercizio
Premere il tasto MODE per selezionare uno dei seguenti modi di eserci-
zio:
• Raffreddamento
COOL
• Deumidificazione DRY
• Ventilazione FAN
Modalità “Raffreddamento”
In questa modalità di funzionamento, potete regolare la velocità del venti-
latore e la temperatura come voluta.
NOTA:
Per fare funzionare l’apparecchio con il compressore, impostare una
temperatura inferiore alla temperatura ambiente.
Modalità “Ventilazione”
Questa modalità consente solamente di impostare la velocità di ventila-
zione.
Modalità “Deumidificazione”
• Questo modo di esercizio non supporta ulteriori regolazioni.
• La velocità di ventilazione è impostata al livello più basso LOW.
• L’apparecchio raffredda la stanza ed elimina l’umidità dall’aria.
• In caso di utilizzo prolungato della modalità “Deumidificazione”, si
consiglia di collegare permanentemente il tubo flessibile dell’acqua in
dotazione allo scarico dell’acqua superiore. (Vedere figura). Rimuovere
prima il tappo superiore. Collocare l’estremità del tubo flessibile dell’ac-
qua in un contenitore di dimensioni adeguate (ad es. un secchio).
Impostazione della ventola
Nei modi “Raffreddamento” e “Ventilazione” è possibile impostare la velo-
cità della ventola su 3 valori diversi. Premere quindi il tasto FAN SPEED.
• LOW (bassa)
• MEDIUM (media)
• HIGH (alta)
Impostazione della temperatura
• Premere I tasti
o nel modo “Raffreddamento” per impostare la
temperatura.
• Selezionare una temperatura tra 16 °C (61 °F) e 31 °C (88 °F).
NOTA:
La scelta tra °Celsius e °Fahrenheit è possibile solamente tramite il
tasto
sul telecomando.
“Modalità riposo”
• Premere il tasto SLEEP quando l’apparecchio è acceso e in modalità
operativa “Raffreddamento”.
• La velocità di ventilazione è impostata al livello più basso LOW. Ciò
non può essere modificato.
• Il display si spegnerà dopo 10 secondi.
• Trascorsa un’ora in modalità “Riposo”, la temperatura preimpostata
incrementerà automaticamente di 1°C. Questa operazione verrà
nuovamente ripetuta dopo un’ora. Si raggiungerà, in tal modo, una
temperatura ambiente confortevole.
Impostazione uscita aria
Utilizzare il tasto
per impostare la direzione di erogazione del flusso
d’aria.
• Premere più volte il tasto
finché l’aletta basculante non viene impo-
stata nella posizione desiderata.
Timer (timer automatico)
Utilizzare la funzione timer per impostare I tempi di accensione e spegni-
mento dell’apparecchio. Selezionare un orario tra 1 e 24 ore.
Utilizzo della funzione timer per l’accensione automatica
1. Premere il tasto POWER
per accendere l’apparecchio.
2. Selezionare il modo di funzionamento, la temperature e la velocità della
ventola per il funzionamento attuale o per quello preimpostato.
3. Premere il tasto POWER per spegnere l’apparecchio.
4. Premere il tasto . Il numero delle ore lampeggia.
5. Potete regolare il numero voluto di ore con i tasti e . La modalità
impostata termina automaticamente dopo circa 5 secondi. Il funziona-
mento a timer viene attivato e l’indicatore luminoso TIMER si accende.
NOTA:
Non premere il tasto
dopo aver impostato le ore, poiché il timer
non verrà salvato.
Utilizzo della funzione timer per lo spegnimento automatico
1. Premere il tasto POWER
per accendere l’apparecchio.
2. Premere il tasto durante il funzionamento. Il numero delle ore
lampeggia.
3. Impostare la modalità timer come descritto in precedenza al punto 5.
NOTA:
• Se si desidera disattivare il timer impostato, premere due volte il tasto
. L’indicatore luminoso TIMER si spegne.
• È inoltre possibile cancellare la funzione timer in qualunque momento
premendo il tasto POWER
per accendere e spegnere l’apparec-
chio.

39
CL3750_IM_neu 18.12.2019
Tasto MIRAGE
Premere il tasto MIRAGE per accendere o spegnere il display situato sul
lato anteriore dell’apparecchio.
Svuotamento serbatoio dell’acqua
L’apparecchio è dotato di un serbatoio dell’acqua per la raccolta della
condensa. Quando il serbatoio dell’acqua è pieno, la lampadina pilota
BUCKET FULL si illumina. L’apparecchio si spegne.
ATTENZIONE:
Non trasportare l’apparecchio mentre il serbatoio d’acqua è pieno. L’ac-
qua potrebbe entrare nell’apparecchio.
Per proseguire con l’utilizzo è necessario svuotare il serbatoio dell’acqua.
Per questo, avete bisogno di uno straccio, una ciotola con una capienza
approssimativamente di 0,5 litro di acqua e del tubo flessibile fornito con
l’apparecchio.
1. Scollegare l’apparecchio dall’alimentazione.
2. Collocare lo straccio e la ciotola sotto l’uscita dell’acqua. Se possibile,
regolare la ciotola su un livello più basso rispetto all’apparecchio.
3. Rimuovere il tappo inferiore.
4. Collegare il tubo flessibile dell’acqua alla presa dell’acqua dell’apparec-
chio. Posizionare l’estremità del tubo flessibile nella ciotola.
5. Dopo che l’acqua è stata scaricata, rimuovere il tubo flessibile. Utiliz-
zare il tappo per chiudere nuovamente lo scarico dell’acqua sull’appa-
recchio.
Interruzione del funzionamento
1. Premere il tasto POWER
per spegnere l’apparecchio.
2. Scollegare l’apparecchio dall’alimentazione.
Avvolgitore per cavo di alimentazione
Avvolgere il cavo di alimentazione intorno all’avvolgitore. Inserire la spina
negli appositi slot disponibili.
Pulizia
AVVISO:
• Scollegare sempre l’apparecchio dall’alimentazione
prima di effettuare la pulizia.
• Controllare che non penetri acqua nelle aperture
durante la pulizia. Ne potrebbe conseguire un corto
circuito o incendio.
ATTENZIONE:
• Non spruzzare detergenti sull’apparecchio.
• Non usare pagliette o altri oggetti abrasivi.
• Per la pulizia non usare detersivi forti o abrasivi.
Filtro
Pulire il filtro una volta ogni 2 settimane, se l’apparecchio è utilizzato
quotidianamente. Se la polvere nel filtro blocca la ventilazione, l’efficienza
dell’apparecchio non è più garantita.
1. È presente una griglia con un filtro interno situata sopra il collegamento
per il tubo flessibile di scarico dell’aria sul retro dell’apparecchio.
2. Rimuovere la griglia dall’apparecchio e il filtro dalla griglia.
3. Aspirare lo sporco dal filtro utilizzando un aspirapolvere.
4. Pulire il filtro sotto acqua corrente. All’occorrenza, utilizzare un deter-
gente neutro.
5. Lasciare asciugare il filtro all’aria o in luogo all’ombra.
6. Reinserire il filtro nella griglia una volta che si è asciugato del tutto. Gli
intagli sono rivolti verso l’alto.
7. Reinserire la griglia nell’apparecchio.
ATTENZIONE:
Non far funzionare l’apparecchio senza filtro.
Alloggiamento
• Utilizzare un aspirapolvere per pulire le fessure di ventilazione.
• Pulire l’alloggiamento con un panno leggermente umido.
Pulizia e rimessaggio stagionale
Quando non si utilizza l’apparecchio per un periodo prolungato, procedere
come indicato di seguito:
1. Svuotare il serbatoio dell’acqua come descritto sopra.
2. Ripetere i passaggi da 2 a 5 del capitolo “Svuotamento serbatoio
dell’acqua” tramite l’uscita dell’acqua superiore (tappo superiore).
3. Far funzionare l’apparecchio nel modo “Ventilazione” per 2 ore per
asciugare l’interno dell’apparecchio.
4. Premere il tasto POWER
per spegnere l’apparecchio. Scollegare
l’apparecchio dall’alimentazione.
5. Scollegare il flessibile di scarico dall’apparecchio.
6. Lasciare entrambe le uscite dell’acqua aperte.
7. Pulire il filtro e l’apparecchio come descritto in precedenza.
8. Coprire l’apparecchio con una protezione.
9. Tenere sempre l’apparecchio fuori dalla portata dei bambini in un luogo
asciutto e ben ventilato.
Ricerca dei guasti
Problema Possibile causa Soluzione
L’apparecchio non funziona. Nessuna alimentazione Controllare il collegamento all’alimentazione.
È attivata la funzione timer.
Premere il tasto POWER
per accendere l’apparecchio.
La temperatura ambiente è troppo bassa o
alta.
Si consiglia di utilizzare l’apparecchio ad una temperatura ambiente
di 16 - 35 °C.
L’apparecchio è difettoso. Contattare il reparto assistenza o un tecnico. Consultare il manuale
di manutenzione allegato.
L’apparecchio non raffredda a
sufficienza.
L’apparecchio è esposto alla luce diretta del
sole.
Scegliere un altro luogo o oscurare le finestre.
Finestre o porte aperte. Chiudere porte e finestre.
Presenza di troppe persone o altre sorgenti
di riscaldamento nella stanza.
Rimuovere termosifoni portatili o spegnerli.
Il filtro è sporco. Pulire il filtro.
Ingresso o uscita aria bloccati. Rimuovere il bloccaggio. Tenere le aperture di ventilazione libere da
ostruzioni.

40
CL3750_IM_neu 18.12.2019
Problema Possibile causa Soluzione
Apparecchio troppo rumoroso
quando esso è in funzione.
L’apparecchio non si trova in posizione
verticale.
Collocare l’apparecchio su una superficie piatta. Evitare le vibrazioni.
L’apparecchio si spegne durante
il funzionamento. L’indicatore
luminoso rosso
lampeggia
in rosso.
Il serbatoio dell’acqua è pieno. Staccare la spina dell’alimentazione. Svuotare il serbatoio dell’acqua
tramite l’uscita dell’acqua inferiore. A questo punto è possibile utiliz-
zare di nuovo l’apparecchio.
Il telecomando non funziona. La distanza dall’apparecchio è eccessiva. Avvicinarsi all’apparecchio.
Il telecomando non viene tenuto rivolto
verso il sensore.
Tenere il telecomando in modo tale che sia rivolto verso il sensore.
Accertarsi che non vi siano ostacoli tra il telecomando e il sensore.
Le batterie sono scariche. Sostituire le batterie.
Display sull’apparecchio: E1 Sensore di temperatura difettoso. Mettersi in contatto con il nostro servizio clienti o il vostro
commerciante.
Display sull’apparecchio: E2
Contattare il nostro servizio clienti o il rivenditore se si verificano problemi che non sono elencati nella tabella o se il rimedio consigliato non funziona.
Dati tecnici
Modello: ............................................................................................CL 3750
Peso netto: ................................................................................... ca. 30,8 kg
Alimentazione rete: .........................................................220 - 240 V~, 50 Hz
Consumo di energia: ......................................................................... 1345 W
Consumo di energia nel modo stand-by in rete: ..................................0,8 W
Classe di protezione: ...................................................................................
Classe efficienza energetica: ...................................................................... A
Capacità di raffreddamento: .......................................12000 BTU (3,52 kW)
Refrigerante: ........................................................................................ R 290
Pressione massima d’esercizio ammissibile:
Lato pressione: ............................................................................ 1,8 MPa
Lato aspirazione: ......................................................................... 0,6 MPa
Pressione massima consentita: ....................................................... 3,0 MPa
WLAN
Rete supportata: ........................................................................802.11 b/g/n
Massima potenza a radiofrequenza trasmessa: ............................. 100 mW
Gamma di frequenza: .......................................................................2,4 GHz
Canali: ................................................................................................... 1 - 13
Chiavi Wi-Fi supportate:............................................................ WPA / WPA2
Si riserva il diritto di apportare modifiche tecniche e di design nel corso
dello sviluppo del prodotto.
Avviso sulla conformità alla direttiva
Il fabbricante, Clatronic International GmbH, dichiara che il tipo di appa-
recchiatura radio CL 3750 è conforme alla direttiva 2014 / 53 / UE.
Inoltre, l’apparecchio è conforme ai requisiti della direttiva RoHS
2011 / 65 / CE.
Il testo completo della dichiarazione di conformità UE è disponibile al
seguente indirizzo Internet: www.sli24.de
Nell’area per i download, si prega di inserire il nome del modello CL 3750.
Testato per il funzionamento in Italia.
Smaltimento
Smaltimento batterie
I consumatori sono tenuti per legge a restituire batterie / accu-
mulatori scarichi.
Rimuovere le batterie dal telecomando prima di gettare l’appa-
recchio.
Restituire le batterie a un punto di raccolta autorizzato o di rifiuti pericolosi.
Contattare l’autorità locale per maggiori informazioni.
Significato del simbolo “Eliminazione”
Salvaguardare l’ambiente, gli elettrodomestici non vanno elimi-
nati come rifiuti domestici.
Per l’eliminazione degli elettrodomestici, fare uso dei posti di
raccolta previsti per questo tipo e porre quegli elettrodomestici
che non sono più in uso.
Si contribuisce così ad evitare un effetto potenziale sull’ambiente e sulla
salute, dovuto magari ad una eliminazione sbagliata.
Questo significa un contributo personale alla riutilizzazione, al riciclaggio
e altre forme di utilizzazione di elettrodomestici ed apparecchi elettronici
usati.
Si possono trovare le corrispondenti informazioni sugli appositi luoghi di
raccolta, nelle amministrazioni dei comuni.

41
CL3750_IM_neu 18.12.2019
Instruction Manual
Thank you for choosing our product. We hope you enjoy using the appli-
ance.
Symbols in this Instruction Manual
Important information for your safety is specially marked. It is essential
to comply with these instructions in order to avoid accidents and prevent
damage to the appliance:
WARNING:
This warns you of dangers to your health and indicates possible injury
risks.
CAUTION:
This refers to possible hazards to the appliance or other objects.
NOTE: This highlights tips and information.
Contents
Overview of the Components ...................................................................3
Overview of Buttons, Icons and Indicator Lights ..................................4
General Notes ...........................................................................................41
Special Safety Instructions for this Appliance .....................................41
Handling Batteries ..................................................................................43
Unpacking the Appliance ........................................................................43
Scope of Delivery .....................................................................................43
Overview of the Components .................................................................43
Overview of Buttons, Icons and Indicator Lights ................................43
Control Panel .........................................................................................43
Remote Control ......................................................................................43
Notes for Use ............................................................................................44
Putting into Service .................................................................................44
Location ..................................................................................................44
Assembly of Exhaust Pipe .....................................................................44
Remote Control ......................................................................................44
Power Cord ............................................................................................44
Electric Connection ................................................................................44
Turning Appliance On / Off ......................................................................44
Compressor Safety Appliance ...............................................................44
Information on the App “Smart Life - Smart Living” ...........................44
Information on How to Use the App .......................................................44
System Requirement for Use of the App ...............................................44
Commissioning via the App ...................................................................44
Using the Appliance ................................................................................45
Operating Modes ...................................................................................45
Setting the Fan .......................................................................................45
Setting the Temperature .........................................................................45
“Sleep Mode” ..........................................................................................45
Setting the Air Outlet ..............................................................................45
Timer (Automatic Timer) ........................................................................45
The MIRAGE button ...............................................................................45
Emptying the Water Tank .......................................................................45
Terminating Operation ............................................................................46
Winding Device for Power Cord.............................................................46
Cleaning ....................................................................................................46
Filter ........................................................................................................46
Housing ..................................................................................................46
Seasonal Cleaning and Storage .............................................................46
Troubleshooting .......................................................................................46
Technical Data ..........................................................................................47
Notice of Directive Conformity ...............................................................47
Disposal ....................................................................................................47
Battery Disposal .....................................................................................47
Meaning of the “Dustbin” Symbol ..........................................................47
General Notes
Read the operating instructions carefully before putting the appliance into
operation and keep the instructions including the warranty, the receipt
and, if possible, the box with the internal packing. If you give this appli-
ance to other people, please also pass on the operating instructions.
• The appliance is designed exclusively for private use and for the envis-
aged purpose. This is not t for commercial use.
• Do not use it outdoors. Keep it away from sources of heat, direct sun-
light, humidity (never dip it into any liquid) and sharp edges. Do not use
the appliance with wet hands. If the appliance is humid or wet, unplug
it immediately.
• When cleaning or putting it away, switch off the appliance and always
pull out the plug from the socket (pull the plug itself, not the lead) if the
appliance is not being used and remove the attached accessories.
• The appliance and the mains lead have to be checked regularly for
signs of damage. If damage is found the appliance must not be used.
• Use only original spare parts.
• In order to ensure your children’s safety, please keep all packaging
(plastic bags, boxes, polystyrene etc.) out of their reach.
WARNING:
Do not allow small children to play with the plastic foil. There is a
danger of suffocation!
Special Safety Instructions for this Appliance
Read the instructions!
WARNING: Fire hazard!
The appliance contains a ammable refrigerant!
The service manual is available at the following web address: www.sli24.de
In the “Downloads” area, please enter the model name CL 3750.
• Any person who is involved with working on or breaking into a refrigerant circuit should hold a current valid certi-
cate from an industry-accredited assessment authority, which authorises their competence to handle refrigerants
safely in accordance with an industry recognised assessment specication.

42
CL3750_IM_neu 18.12.2019
The service manual is available at the following web address: www.sli24.de
In the “Downloads” area, please enter the model name CL 3750.
• Servicing shall only be performed as recommended by the equipment manufacturer. Maintenance and repair requir-
ing the assistance of other skilled personnel shall be carried out under the supervision of the person competent in
the use of ammable refrigerants.
WARNING:
• Do not try to accelerate the defrost process.
• Do not use and store the appliance at the following locations:
- Near a re source.
- An area, where water or oil can splash.
- An area exposed to direct sunlight.
- In the bathroom, the laundry room or next to a swimming pool.
• Do not drill or burn the appliance.
• Remember that refrigerants are odourless.
• The appliance must be set up, operated and stored in a room with a oor area larger than 15 m².
CAUTION: Risk of overheating!
• Keep the ventilation slots free!
• Do not cover the appliance!
• R 290 is a refrigerant that complies with European environmental directives.
• Do not damage the refrigerant circuit.
• The appliance is intended for indoor use only.
• The appliance must be stored in such a way that it does not get damaged.
• Adhere to the national connection regulations.
• In the event of strange noises, smells and / or smoke emissions, unplug the power plug from the socket.
• Only operate or move the appliance in an upright position.
• Ensure a distance of at least 50 cm between the appliance and any walls or other objects to ensure sufcient air circu-
lation during operation.
• Never use the appliance without the lter.
• Do not leave the appliance unattended for hours at a time. Do not leave your home whilst the appliance is in opera-
tion.
• This appliance has been designed for the air-conditioning of residential rooms and must not be used for other pur-
poses.
• Do not operate the appliance in rooms where gas, fuel, oil or other easily ammable liquids are present. Do not use
sprays such as paint, pesticides or other ammable materials in that room.
• Do not insert any objects into the openings of the appliance.
• This appliance shall not be exposed to dripping or splashing water and that no object lled with liquids such as vases
shall be placed on apparatus.
• Do not move the appliance when the mains cable is connected to the wall socket.
• Always turn off the appliance rst using the POWER
button before disconnecting the mains plug.
• If operation has been interrupted, wait for approx. 3 minutes before restarting the appliance again, in order for the
cooling circuit pressure to decrease.
• Do not repair the appliance by yourself. Always contact an authorized technician. If the supply cord is damaged, it
must be replaced by the manufacturer, its service agent or similarly qualied persons in order to avoid a hazard.
• Prevent small children from touching the appliance.
• This appliance can be used by children aged from 8 years and above and persons with reduced physical, sensory or
mental capabilities or lack of experience and knowledge if they have been given supervision or instruction concerning
use of the appliance in a safe way and understand the hazards involved.
• Children shall not play with the appliance.

43
CL3750_IM_neu 18.12.2019
• Cleaning and user maintenance shall not be made by children without supervision.
• Please follow the instructions in the chapter “Cleaning”.
• Details of type and rating of fuses: T, 250 V AC, 3,15 A
Handling Batteries
WARNING:
• Do not expose batteries to excessive heat such as sunlight, re or
similar. There is a risk of explosion!
• Batteries are not toys. Keep away from children.
• Do not open batteries by force.
• Avoid contact with metal objects (rings, nails, screws, etc.). There is a
risk of short circuit!
• A short circuit could cause the battery to heat up excessively or even
to catch re, resulting in injuries.
• For your own safety, cover the battery terminals with adhesive tape
during transport.
• In case of battery leakage, make sure not to rub the liquid into your
eyes or mucous membranes. In case of contact, wash your hands
and rinse your eyes with clear water. Seek medical attention if any
discomfort persists.
CAUTION:
• When not using the remote control for a long period of time, remove
the batteries in order to prevent “leakage” of battery acid.
• Different battery types or new and used batteries must not be used
together.
• Do not dispose of batteries along with domestic waste. Return used
batteries to the relevant collection facilities or your retailer.
Unpacking the Appliance
1. Remove the appliance from its packaging.
2. Remove all the packaging material such as plastic bags, ller material,
cable ties and cardboard packaging.
3. Check that all parts are supplied in the package.
Scope of Delivery
1 Air conditioning appliance
1 Remote control
2 Batteries
1 Flexible exhaust pipe
1 Exhaust pipe adapter (Connection on the appliance)
1 Window kit, 2-piece
1 Adapter for the window exhaust kit
1 Water hose
2 Plugs (spares)
Overview of the Components
1 Air outlet (pivoting ap)
2 Control panel with display
3 Housing
4 Water outlet
5 Handle
6 Winding device for power cord
7 Water outlet
8 Mains cable
9 Power plug bracket
10 Exhaust pipe adapter
11 Flexible exhaust pipe
12 Adapter for the window exhaust kit
13 Exhaust pipe connector
14 Filter insert
15 Grid on the air intake
16 Display on the front
17 Remote control
18 Window kit, 2-piece
Overview of Buttons, Icons and Indicator Lights
Control Panel
1
FAN indicator light (fan)
2 COOL indicator light (cooling)
3 DRY indicator light (dehumidifying)
4 Display
5 HIGH indicator light (high fan speed)
6 LOW indicator light (low fan speed)
7 MEDIUM indicator light (medium fan speed)
8 POWER indicator light
9 Wi-Fi indicator light (Wi-Fi connection enabled)
10 BUCKET FULL indicator light (water tank full)
11 POWER button (switch appliance on / off)
12 SWING indicator light (oscillating pivoting ap)
13 button (air outlet adjust)
14 FAN SPEED button (set fan speed and turn Wi-Fi on)
15 and buttons (adjust temperature or hour)
16 SLEEP indicator light (sleep mode)
17 SLEEP button (set “sleep mode”)
18 MODE button (set operating mode)
19 MIRAGE button
(switch the display in the front of the appliance on or off)
20 MIRAGE indicator light (display at the front of the appliance)
21 button (set timer)
22 TIMER indicator light (timer operation enabled)
Remote Control
1
indicator (Wi-Fi connection enabled)
2 Fan indicator (fan)
3 Battery icon
4 Dry indicator (dehumidifying)
5 °C indicator (selected temperature unit)
6 Hr indicator (hours)
7 °F indicator (selected temperature unit)
8 Sleep indicator (sleep mode)
9 buttons (adjust temperature or hour)
10 button (set operating mode)
11 button (set fan speed)
12 button (switch between °celsius and °fahrenheit)
13 button (set “sleep mode”)
14 button (air outlet adjust, SWING-mode)
15 TIMER button (set timer)
16 POWER button (switch appliance on / off)
17 indicaror (adjust the fan to LOW (low fan speed))
indicaror (adjust the fan to MEDIUM (medium fan speed))
indicator (adjust the fan to HIGH (high fan speed))
18 Swing indicator (oscillating pivoting ap)
19 Temperature display (or hour indicator when setting the timer or when
using the “fan” or “dehumidifying” operating mode)
20 indicator (timer operation enabled)
21 Cool indicator (cooling)

44
CL3750_IM_neu 18.12.2019
Notes for Use
CAUTION: Important for initial operation or after transport!
Before initial operation, the appliance must stay in an upright position for
at least 3 hours in order for the cooling agent to sink. The compressor
will be damaged otherwise.
CAUTION:
• When you interrupt the operation with the POWER
button, wait for
at least 3 minutes before switching the appliance on again.
• If you want to move the appliance to another location, rst empty the
water tank!
• The appliance operates most effectively with a room size up to 70 m³.
• The exible exhaust hose and the adapter have been manufactured
especially for this appliance. In order to avoid incorrect operation, do
not replace the pipe with another pipe.
• The exhaust pipe can be extended up to 150 cm. Do not use any
extension.
• Ensure free airow. Make sure not to kink or bend the exhaust pipe.
Any blockage can cause the appliance to overheat.
• Close all windows and doors in order to prevent outside air from
entering the room and thus allowing a more effective operation of the
appliance.
Putting into Service
Location
• When installing the appliance, make sure to keep a distance of at least
50 cm between the appliance and any walls or other objects.
• The surface must be at and dry.
Assembly of Exhaust Pipe
NOTE:
For sliding windows or external roller blinds you may use the supplied
window exhaust air kit in a vertical or horizontal orientation. Adjust the
length of the seal plate as desired.
1. Connect the adapter to the exhaust hose. Place the exhaust hose in a
way that the rst n of the hose lays in the rail. Tighten the adapter by
turning it clockwise.
2. Connect the adapter to the connector on the back of the appliance. To
do this, position the exhaust air hose with the adapter in such a way
that the label on the adapter is facing up. Turn the adapter all the way
towards LOCK.
3. Extend the pipe to the desired length.
4. Screw the window exhaust air kit adapter onto the end of the exhaust
air hose.
5. Stick the open end of the pipe into a window.
6. Close the window as far as possible. Also lower any external roller
blinds, if present, to the end of the pipe.
Remote Control
1. Open the battery compartment cover on the back of the remote control.
2. Insert 2 batteries of type R03 “AAA” 1.5 V, observing the correct polarity
(see markings on the bottom of the compartment)!
3. Close the battery compartment cover.
Power Cord
Unwind the power cord from the winding appliance.
Electric Connection
1. Make sure the mains voltage you want to use corresponds to the
voltage of the appliance. Please check the rating label for detailed
specications.
2. Connect the appliance to a properly installed grounded socket. A signal
will sound indicating that the appliance is ready for use. The appliance
is in standby. The display shows the current room temperature.
Turning Appliance On / Off
• Press the POWER
button to turn on the appliance. The pivoting ap
is opened automatically. The appliance is pre-set to “Cooling” mode
and the temperature is 22 °C. If operation has been stopped without
disconnecting the plug, all previously set operating mode and tempera-
ture settings will be retained. The control lamps indicate this setting.
• Press the POWER button again to turn off the appliance. The pivot-
ing ap is closed automatically.
Compressor Safety Appliance
If operation is interrupted, the safety appliance for the compressor is acti-
vated. This prevents operation of the compressor for approx. 3 minutes, in
order to relieve the pressure in the cooling circuit. This is not a malfunc-
tion of the appliance. Therefore, wait at least 3 minutes, before switching
the appliance on again.
Information on the App “Smart Life - Smart Living”
The Smart Life - Smart Living app is available for android and iOS.
Scan the corresponding QR code to get directly to the download.
NOTE:
Depending on the provider, there may be costs involved in downloading
the app.
Google Play App Store
Information on How to Use the App
This appliance allows you to operate the appliance via your home net-
work. A prerequisite is a permanent Wi-Fi connection to your router and
the free app “Smart Life - Smart Living”.
You can easily access all functions of the appliance via the app. Since the
app constantly improved, we cannot provide a more detailed description
here.
We recommend disconnecting the appliance from the power supply when
you are away from home to prevent unintentional switching on while you
are on the road!
System Requirement for Use of the App
• iOs 8.0 or higher
• Android 4.4 or higher
Commissioning via the App
1. Install the “Smart Life - Smart Living” app. Create a user account.
2. Activate the Wi-Fi function in the settings of your appliance.
3. Place the air-conditioning appliance within a distance of around 5 me-
ters of your router.
4. Press and hold the FAN SPEED button for about 5 seconds. The
Wi-Fi indicator light ashes rapidly.
5. Launch the app and select “ + ” .
6. Select the “air conditioner” menu and follow the instructions on the
display.
7. Once the appliance has been connected successfully, the
Wi-Fi
indicator light will be solid. Now you can operate the appliance using
the app.
NOTE:
• The appliance can only be operated with 2.4 GHz routers. 5 GHz
routers are not supported.
• The appliance is equipped with only one network connection. It can-
not be turned off.

45
CL3750_IM_neu 18.12.2019
Using the Appliance
• Settings made via the appliance are not transmitted to the remote
control.
• As soon as you press a button on the remote control, the appliance will
apply the corresponding settings from the remote control.
• Your selection will appear on the display of the remote control.
• The and buttons must be pressed several times to select the
individual functions.
The buttons on the control panel are explained below. The indicator lights
show your chosen selection.
Operating Modes
Use the MODE button to select one of the following operating modes:
• Cooling
COOL
• Dehumidifying DRY
• Fan FAN
Operating Mode “Cooling”
In this operation mode, you can adjust the fan speed and the temperature
as desired.
NOTE:
To operate the appliance with the compressor, the set temperature must
be lower than the current room temperature.
Operating Mode “Fan”
This mode only allows you to set the speed of the fan.
Operating Mode “Dehumidifying”
• This operating mode does not support any further settings.
• The fan speed is preset to the lowest level LOW.
• The appliance will cool the room and extract the humidity from the air.
• When using the mode “Dehumidifying” over an extended period, we
recommend permanently connecting the supplied water hose to the
upper water drain (see gure). Remove the top plug rst. Place the end
of the water hose in a container of sufcient size (e. g. a bucket).
Setting the Fan
In “Cooling” and “Fan” modes you can set the fan speed with 3 different
settings. Press the FAN SPEED button accordingly.
• LOW (low)
• MEDIUM (medium)
• HIGH (high)
Setting the Temperature
• Use the
or buttons in “Cooling” mode to set the temperature.
• Select a temperature between 16 °C (61 °F) and 31 °C (88 °F).
NOTE:
Switching between °celsius and °fahrenheit is only possible using the
button on the remote control.
“Sleep Mode”
• Press the SLEEP button when the appliance is switched on and in the
“Cooling” operating mode.
• The fan speed is preset to the lowest level LOW. This cannot be
changed.
• The display will switch off after 10 seconds.
• After running for one hour in the “Sleep” mode, the preset temperature
will automatically increase by 1° C. This will be repeated one hour later
again. This way, a comfortable room temperature will be achieved.
Setting the Air Outlet
Use the
button to set the direction of the airow being emitted.
• Press the
button multiple times until the pivoting ap is set into the
desired position.
Timer (Automatic Timer)
Use the timer function to set the power-on and power-off times of the
appliance. Select a time between 1 and 24 hours.
Using the Timer Function for Automatic Power-On
1. Press the POWER
button to turn on the appliance.
2. Select the operating mode, temperature and fan speed for the appli-
ance to operate in or at when powered on at the pre-set time.
3. Press the POWER button to turn off the appliance.
4. Press the button. The number of hours ashes.
5. You can set the desired number of hours with the buttons and .
The setting mode is automatically exited after approx. 5 seconds. Timer
operation is activated and the TIMER indicator light illuminates.
NOTE:
Do not press the
button after setting the hours, as the timer
operation will not be saved.
Using the Timer Function for Automatic Power-Off
1. Press the POWER
button to turn on the appliance.
2. Press the button during operation. The number of hours ashes.
3. Set the timer as described in the above item 5.
NOTE:
• If you want to deactivate the set timer operation, press the
button
twice. The TIMER indicator light goes off.
• You may also cancel the timer function at any time by pressing the
POWER
button to turn the appliance on / off.
MIRAGE Button
Press the MIRAGE button to switch the display located in the front of the
appliance on or off.
Emptying the Water Tank
The appliance integrates a water tank for collecting condensation. When
the water tank is full, the pilot lamp
BUCKET FULL lights up. The appli-
ance switches off.
CAUTION:
Do not transport the appliance while the water tank is full. Water could
get into the appliance.
In order to continue operation, you need to empty the water tank. For this,
you need a oor cloth, a at bowl with a capacity for approx. 0.5 litre of
water and the water hose supplied with the appliance.
1. Disconnect the mains plug from the wall socket.
2. Place the oor towel and the at bowl underneath the water outlet. If
possible, set the bowl on a lower level than the appliance.
3. Remove the bottom plug.
4. Connect the water hose to the water outlet of the appliance. Place the
end of the hose in the bowl.
5. After the water has been discharged, remove the water hose. Use the
stopper to close the water drain on the appliance again.

46
CL3750_IM_neu 18.12.2019
Terminating Operation
1. Press the POWER
button to turn off the appliance.
2. Disconnect the mains plug from the wall socket.
Winding Device for Power Cord
Wind the power cord around the winding device. Insert the plug into the
slots provided.
Cleaning
WARNING:
• Always disconnect the mains plug from the wall
socket before cleaning!
• Make sure no water enters the openings of the appli-
ance during cleaning. Otherwise this might result in an
electric shock or re.
CAUTION:
• Do not spray the appliance with cleaning agents.
• Do not use a wire brush or any abrasive items.
• Do not use any acidic or abrasive detergents.
Filter
Clean the lter once every 2 weeks, if the appliance is in daily use. If dust
in the lter blocks the ventilation, the efciency of the appliance is no
longer guaranteed.
1. There is a grille with an internal lter located above the connection for
the exhaust air hose at the back of the appliance.
2. Remove the grille from the appliance and the lter from the grille.
3. Vacuum the lter with a vacuum cleaner.
4. Clean the lter under running water. If necessary, use a mild detergent.
5. Allow the lter to air dry in a shady place.
6. Reinsert the lter into the grille once it has dried thoroughly. The re-
cesses point upwards.
7. Reinsert the grille into the appliance.
CAUTION:
Do not operate the appliance without lter!
Housing
• Use a vacuum cleaner to clean the ventilation slots.
• Wipe the housing with a slightly damp cloth.
Seasonal Cleaning and Storage
When not using the appliance for a long period of time, proceed as fol-
lows:
1. Empty the water tank as described above.
2. Repeat the steps 2 to 5 from the chapter “Emptying the water tank”
with the upper water outlet (top plug).
3. Operate the appliance in “Fan” mode for 2 hours in order to dry the
inside of the appliance.
4. Press the POWER
button to turn off the appliance. Disconnect the
mains plug from the wall socket.
5. Disconnect the exible exhaust pipe from the appliance.
6. Leave both water outlets open.
7. Clean the lter and the appliance as described above.
8. Cover the appliance with foil.
9. Always store the appliance out of the reach of children in a dry, well
ventilated place.
Troubleshooting
Problem Possible cause Solution
Appliance does not function. No power supply Check the power connection.
Timer function is activated.
Press the POWER
button to turn on the appliance.
The ambient temperature is too low or too high. It is recommended to use the appliance at an ambient temperature
of 16 - 35 °C.
The appliance is defect. Contact our service department or a specialist. Please consider the
enclosed service manual.
Appliance does not cool suf-
ciently.
The appliance is exposed to direct sunshine. Choose another location or shade the windows.
Windows or doors are open. Close any windows or doors.
There are too many people or other heating
sources in the room.
Remove portable heaters or switch them off.
The lter is dirty. Clean the lter.
The air inlet or air outlet is blocked. Remove the blockage. Keep the ventilation openings free from
obstructions.
Appliance too noisy during
operation.
The appliance is not in an upright position. Place the appliance on a at surface. Avoid vibrations.
The appliance switches off
during operation. The
indi-
cator light ashes red.
The water tank is full. Pull the power plug. Empty the water tank via the lower water
outlet. Then you can use the appliance again.
The remote control does not
work.
The distance to the appliance is too far. Move closer to the appliance.
You are not holding the remote control towards
the sensor.
Hold the remote control so it points to the sensor. Make sure there
are no obstacles between the remote control and the sensor.
The batteries are dead. Replace the batteries.
Display on the appliance: E1 Temperature sensor defective. Contact our customer service or your dealer.
Display on the appliance: E2
Contact our customer service or your dealer if you encounter any problems that are not listed in the table or if the recommended remedy does not work.

47
CL3750_IM_neu 18.12.2019
Technical Data
Model:...............................................................................................CL 3750
Net weight: ............................................................................approx. 30.8 kg
Power supply:..................................................................220 - 240 V~, 50 Hz
Power consumption: ......................................................................... 1345 W
Networked standby power consumption: .............................................0.8 W
Protection class: ...........................................................................................
Energy efciency class: ..............................................................................A
Cooling capacity: .........................................................12000 BTU (3.52 kW)
Refrigerant: .......................................................................................... R 290
Maximum permissible operating pressure:
Pressure side: .............................................................................. 1.8 MPa
Suction side: ................................................................................ 0.6 MPa
Maximum pressure allowed: ............................................................ 3.0 MPa
WLAN
Supported network: ....................................................................802.11 b/g/n
Maximum radio-frequency power transmitted: ................................ 100 mW
Frequency range: ..............................................................................2.4 GHz
Channels: .............................................................................................. 1 - 13
Supported Wi-Fi keys:............................................................... WPA / WPA2
The right to make technical and design modications in the course of
continuous product development remains reserved.
Notice of Directive Conformity
Hereby, Clatronic International GmbH declares that the radio equipment
type CL 3750 is in compliance with Directive 2014 / 53 / EU.
Furthermore, the appliance is in compliance with the requirements of the
RoHS directive 2011 / 65 / EC.
The full text of the EU declaration of conformity is available at the follow-
ing internet address: www.sli24.de
In the “Download” area, please enter the model name CL 3750.
Tested for operation in Great Britain.
Disposal
Battery Disposal
As a consumer you are obliged by law to return old batteries /
accumulators.
Remove the batteries from the remote control before disposing
of the appliance.
Return the batteries to a collection facility for the collection of old batteries
or hazardous waste. Contact your local authority for more information.
Meaning of the “Dustbin” Symbol
Protect our environment: do not dispose of electrical equipment
in the domestic waste.
Please return any electrical equipment that you will no longer
use to the collection points provided for their disposal.
This helps avoid the potential effects of incorrect disposal on the
environment and human health.
This will contribute to the recycling and other forms of re-utilisation of
electrical and electronic equipment.
Information concerning where the equipment can be disposed of can be
obtained from your local authority.

48
CL3750_IM_neu 18.12.2019
Instrukcja obsługi
Dziękujemy za wybranie naszego produktu. Mamy nadzieję, że korzysta-
nie z niego sprawi Państwu przyjemność.
Symbole użyte w tej instrukcji obsługi
Ważne informacje dotyczące bezpieczeństwa użytkownika są specjalnie
wyróżnione. Koniecznie stosuj się do tych wskazówek, aby uniknąć wy-
padków i uszkodzenia urządzenia.
OSTRZEŻENIE:
Ostrzega przed zagrożeniami dla zdrowia i wskazuje na potencjalne
ryzyka obrażeń.
UWAGA:
Wskazuje na potencjalne zagrożenia dla urządzenia lub innych przed-
miotów.
WSKAZÓWKA:
Wyróżnia porady i informacje ważne dla użytkownika.
Spis treści
Przegląd elementów obsługi ....................................................................3
Rozmieszczenie przycisków, piktogramów i kontrolek ........................4
Ogólne uwagi ...........................................................................................48
Specjalne wskazówki bezpieczeństwa dla urządzenia .......................48
Posługiwanie się bateriami ....................................................................50
Wypakowanie urządzenia .......................................................................50
Zakres dostawy ........................................................................................50
Przegląd elementów obsługi ..................................................................50
Rozmieszczenie przycisków, piktogramów i kontrolek ......................50
Panel sterowania....................................................................................50
Pilot .........................................................................................................50
Wskazówki dotyczące użytkowania ......................................................51
Uruchomienie ...........................................................................................51
Lokalizacja..............................................................................................51
Montaż przewodu wydechowego ..........................................................51
Pilot .........................................................................................................51
Przewód zasilający ................................................................................51
Połączenie elektryczne ..........................................................................51
Włączanie / wyłączanie ...........................................................................51
Urządzenie zabezpieczające sprężarkę ................................................51
Informacja dotycząca aplikacji „Smart Life - Smart Living” ...............51
Informacje na temat korzystania z aplikacji ...........................................51
Wymagania systemowe do użytkowania aplikacji .................................52
Uruchomienie za pośrednictwem aplikacji ............................................52
Użytkowanie urządzenia .........................................................................52
Tryby operacyjne ....................................................................................52
Ustawianie wentylatora ..........................................................................52
Ustawianie temperatury .........................................................................52
„Tryb uśpienia” .......................................................................................52
Ustawianie wylotu powietrza ..................................................................52
Timer (Automatyczny timer) ...................................................................52
Przycisk MIRAGE ..................................................................................53
Opróżnianie zbiornika z wodą ................................................................53
Kończenie pracy.....................................................................................53
Urządzenie do nawijania przewodu zasilającego ..................................53
Czyszczenie ..............................................................................................53
Filtr ..........................................................................................................53
Obudowa ................................................................................................53
Okresowe czyszczenie i przechowywanie ............................................53
Usuwanie usterek ....................................................................................53
Dane techniczne .......................................................................................54
Ogłoszenie zgodności z dyrektywą .......................................................54
Warunki gwarancji ...................................................................................54
Usuwanie ..................................................................................................55
Usuwanie baterii .....................................................................................55
Znaczenie symbolu „Pojemnik na śmieci” .............................................55
Ogólne uwagi
Przed uruchomieniem urządzenia proszę bardzo dokładnie przeczytać
instrukcję obsługi. Proszę zachować ją wraz z kartą gwarancyjną, parago-
nem i w miarę możliwości również kartonem z opakowaniem wewnętrz-
nym. Przekazując urządzenie innej osobie, oddaj jej także instrukcję
obsługi.
• Proszę wykorzystywać urządzenie jedynie dla prywatnego celu, jaki
został przewidziany dla urządzenia. Urządzenie to nie zostało przewi-
dziane do użytku w ramach działalności gospodarczej.
• Proszę nie korzystać z urządzenia na zewnątrz. Proszę trzymać
urządzenie z daleka od ciepła, bezpośredniego promieniowania sło-
necznego, wilgoci (w żadnym wypadku nie zanurzać w substancjach
płynnych) oraz ostrych krawędzi. Proszę nie obsługiwać urządzenia
wilgotnymi dłońmi. Jeżeli urządzenie jest wilgotne lub mokre, proszę
natychmiast wyciągnąć wtyczkę.
• Jeżeli nie korzystacie Państwo z urządzenia, jeżeli chcecie Państwo
zamontować jakieś akcesoria, w celu wyczyszczenia lub w przypadku
jakichkolwiek zakłóceń, proszę zawsze wyłączyć urządzenie i wyjąć
wtyczkę z gniazdka (należy ciągnąć za wtyczkę, nie za przewód).
• Należy regularnie sprawdzać, czy urządzenie i kabel sieciowy nie są
uszkodzone. W razie uszkodzenia należy przestać korzystać z urzą-
dzenia.
• Proszę stosować tylko oryginalne akcesoria.
• Dla bezpieczeństwa dzieci proszę nie zostawiać swobodnie dostęp-
nych części opakowania (torby plastikowe, kartony, styropian itp.).
OSTRZEŻENIE:
Nie pozwalaj dzieciom bawić się folią. Niebezpieczeństwo udusze-
nia!
Specjalne wskazówki bezpieczeństwa dla urządzenia
Przeczytaj instrukcje!
OSTRZEŻENIE: Ryzyko pożaru!
Urządzenie zawiera łatwopalny czynnik chłodniczy!

49
CL3750_IM_neu 18.12.2019
Instrukcja serwisowa dostępna jest pod następującym adresem internetowym: www.sli24.de
W obszarze „Downloads” (Pliki do pobrania), wpisz nazwę modelu CL 3750.
• Każda osoba, która jest zaangażowana w pracę lub włącza się do układu obiegu czynnika chłodniczego, powinna
posiadać aktualny ważny certykat od akredytowanego w branży organu oceniającego, który potwierdza jej kompe-
tencje i upoważnia ją do bezpiecznej obsługi czynników chłodniczych, zgodnie z uznaną specykacją przemysłową.
• Serwisowanie odbywa się wyłącznie zgodnie z zaleceniami producenta urządzenia. Konserwacja i naprawy wyma-
gające pomocy innych wykwalikowanych pracowników przeprowadzane są pod nadzorem osoby kompetentnej
w zakresie stosowania łatwopalnych czynników chłodniczych.
OSTRZEŻENIE:
• Nie należy próbować przyspieszać procesu odszraniania.
• Nie używać i nie przechowywać urządzenia w następujących miejscach:
- w pobliżu źródła ognia.
- w obszarze, w którym może się rozlewać woda lub olej.
- w obszarze, który jest narażony na bezpośrednie działanie promieni słonecznych.
- w łazience, pralni lub przy basenie publicznym.
• Nie należy wiercić ani podpalać urządzenia.
• Należy pamiętać, że czynniki chłodnicze są bezwonne.
• Urządzenie musi być ustawione, eksploatowane i przechowywane w pomieszczeniu o powierzchni większej niż
15 m².
UWAGA: Niebezpieczeństwo przegrzania!
• Utrzymywać otwory wentylacyjne niezablokowane!
• Nie przykrywać urządzenia!
• R 290 to czynnik chłodniczy zgodny z europejskimi dyrektywami środowiskowymi.
• Nie uszkodzić obiegu chłodziwa.
• Urządzenie jest przeznaczone do użytkowania w pomieszczeniach zamkniętych.
• Urządzenie musi być przechowywane w taki sposób, aby nie uległo uszkodzeniu.
• Przestrzegać krajowych przepisów dotyczących połączeń.
• W przypadku wykrycia dziwnych odgłosów, zapachów i / lub emisji spalin, odłącz wtyczkę od gniazdka elektrycznego.
• Urządzenie należy przenosić i eksploatować po ustawieniu go w pozycji pionowej.
• Zapewnić odległość co najmniej 50 cm pomiędzy urządzeniem a każdą ścianą lub innymi obiektami, aby zapewnić
odpowiedni przepływ powietrza podczas operacji.
• Nigdy nie korzystać z urządzenia bez ltra.
• Nie pozostawiać urządzenia bez nadzoru na kilka godzin. Nie wychodzić z domu, kiedy urządzenie pracuje.
• To urządzenie przeznaczone jest do klimatyzowania pomieszczeń i nie wolno go używać w innych celach.
• Nie korzystać z urządzenia w pomieszczeniach, gdzie obecny jest gaz, paliwo, ropa i inne łatwopalne substancje. Nie
korzystać w tych pomieszczeniach z farb czy pestycydów w sprayach ani innych łatwopalnych materiałów.
• Nie wkładać żadnych przedmiotów w otwory urządzenia.
• Urządzenia nie należy wystawiać na działanie kapiącej ani rozchlapującej się wody, a także nie należy na nim stawiać
naczyń wypełnionych wodą, takich jak wazony z kwiatami.
• Nie przesuwać urządzenia, podczas gdy kabel sieciowy podłączony jest do gniazdka.
• Wyłączając urządzenie, najpierw użyć przycisku POWER
, a następnie wyjąć wtyczkę sieciową z gniazdka.
• Jeśli praca została przerwana, poczekać ok. 3 minut przed ponownym uruchomieniem urządzenia, aby spadło ciśnie-
nie w obwodzie chłodzenia.
• Nie naprawiać urządzenia samodzielnie. Skontaktować się z pracownikiem autoryzowanego serwisu. Jeśli przewód
zasilania jest uszkodzony, należy go wymienić u producenta, przedstawiciela serwisu lub podobnie wykwalikowanej
osoby, aby uniknąć zagrożenia.
• Uważać, aby małe dzieci nie dotykały urządzenia.

50
CL3750_IM_neu 18.12.2019
• Urządzenie to może być używane przez dzieci w wieku lat 8 lub starsze, osoby z obniżoną sprawnością zyczną,
zmysłową lub umysłową, osoby z brakiem doświadczenia i wiedzy, jeśli są one nadzorowane lub gdy je poinstru-
owano jak korzystać z tego urządzenia w bezpieczny sposób, i gdy zdają sobie sprawę z istniejących niebezpie-
czeństw.
• Dzieci nie powinny bawić się tym urządzeniem.
• Czyszczenie i konserwacja nie powinny być wykonywane przez dzieci bez nadzoru.
• Należy wykonać instrukcje z rozdziału „Czyszczeni”.
• Szczegółowe informacje o rodzajach i wartościach znamionowych bezpieczników: T, 250 V AC, 3,15 A
Posługiwanie się bateriami
OSTRZEŻENIE:
• Nie wystawiać baterii na działanie nadmiernego gorąca typu słońce,
ogień lub tym podobne. Pojawia się ryzyko wybuchu!
• Baterie nie są zabawkami. Trzymać je z dala od dzieci.
• Nie otwierać baterii z użyciem siły.
• Nie dopuszczać do styczności z metalowymi przedmiotami (pier-
ścionki, gwoździe, śruby, itp.). Pojawia się ryzyko zwarcia!
• Zwarcie może doprowadzić do nadmiernego nagrzania baterii lub
nawet pożaru i w efekcie do obrażeń ciała.
• Ze względu na własne bezpieczeństwo, podczas transportu zabez-
pieczać terminale baterii taśmą klejącą.
• W razie wycieku baterii, uważać, aby nie wetrzeć cieczy do oczu ani
na błony śluzowe. W razie kontaktu, umyć ręce i opłukać oczy czystą
wodą. W razie utrzymywania się jakiegokolwiek dyskomfortu, skon-
sultować się z lekarzem.
UWAGA:
• Kiedy przez dłuższy okres czasu nie korzystamy z pilota, wyjąć bate-
rie, aby zapobiegać „wyciekowi” kwasu z baterii.
• Nie mieszać baterii różnego rodzaju ani nowych baterii ze starymi.
• Nie wyrzucać baterii wraz z odpadami gospodarstwa domowego.
Zwrócić zużyte baterie do odpowiedniego punktu zbiórki lub do
sprzedawcy.
Wypakowanie urządzenia
1. Wyjąć urządzenie z opakowania.
2. Zdjąć cały materiał opakowaniowy taki jak plastikowe folie, wypełnia-
cze, zaciski do kabli oraz elementy kartonowe.
3. Sprawdzić, czy w opakowaniu znajdują się wszystkie części.
Zakres dostawy
1 Urządzenie klimatyzacyjne
1 Pilot
2 Baterie
1 Giętki przewód wydechowy
1 Adapter przewodu wydechowego (Połączenie na urządzeniu)
1 Zestaw na okno, 2-elementowy
1 Adapter do zestawu wywiewu okiennego
1 Przewód na wodę
2 Zatyczki (zapasowe)
Przegląd elementów obsługi
1 Wylot powietrza (klapka uchylna)
2 Panel sterowania w wyświetlaczem
3 Obudowa
4 Wylot wody
5 Uchwyt
6 Urządzenie do nawijania przewodu zasilającego
7 Wylot wody
8 Kabel zasilający
9 Wspornik wtyczki zasilacza
10 Adapter przewodu wydechowego
11 Giętki przewód wydechowy
12 Adapter do zestawu wywiewu okiennego
13 Złącze przewodu wydechowego
14 Filtr
15 Kratka wlotu powietrza
16 Wyświetlacz czołowy
17 Pilot
18 Zestaw na okno, 2-elementowy
Rozmieszczenie przycisków, piktogramów i kontrolek
Panel sterowania
1 Kontrolka
FAN (Wentylator)
2 Kontrolka COOL (Chłodzenie)
3 Kontrolka DRY (Osuszanie)
4 Wyświetlacz
5 Kontrolka HIGH (duża prędkość pracy wentylatora)
6 Kontrolka LOW (mała prędkość pracy wentylatora)
7 Kontrolka MEDIUM (średnia prędkość pracy wentylatora)
8 Kontrolka POWER
9 Kontrolka Wi-Fi (włączona łączność Wi-Fi)
10 Kontrolka BUCKET FULL (zbiornik na wodę pełny)
11 Przycisk POWER (włącznik / wyłącznik urządzenia)
12 Kontrolka SWING (wahliwa klapka uchylna)
13 Przycisk (regulacja powietrza wylotowego)
14 Przycisk FAN SPEED
(ustawienie prędkości pracy wentylatora oraz włączenie Wi-Fi)
15 Przyciski i (regulacja temperatury lub ustawienie czasu)
16 Kontrolka SLEEP (tryb uśpienia)
17 Przycisk SLEEP (ustawienie „trybu uśpienia”)
18 Przycisk MODE (ustawienie trybu roboczego)
19 Przycisk MIRAGE (włączenie lub wyłączenie wyświetlacza na przed-
niej ściance urządzenia)
20 Kontrolka MIRAGE (wyświetlacz na przedniej ściance urządzenia)
21 Przycisk (ustawienie regulatora czasowego)
22 Kontrolka TIMER (regulator czasowy włączony)
Pilot
1 Piktogram
(włączona łączność Wi-Fi)
2 Wskaźnik Fan (wentylator)
3 Piktogram baterii
4 Wskaźnik Dry (osuszanie)
5 Wskaźnik °C (wybrana jednostka pomiaru temperatury)
6 Wskaźnik Hr (godziny)
7 Wskaźnik °F (wybrana jednostka pomiaru temperatury)
8 Wskaźnik Sleep (tryb uśpienia)
9 Przyciski (regulacja temperatury lub ustawienie czasu)
10 Przycisk (ustawienie trybu roboczego)
11 Przycisk (ustawienie prędkości pracy wentylatora)
12 Przycisk (przełączenie pomiędzy °celsjusza a °fahrenheita)
13 Przycisk (ustawienie „trybu uśpienia”)
14 Przycisk (regulacja powietrza wylotowego, tryb SWING)
15 Przycisk TIMER (ustawienie regulatora czasowego)
16 Przycisk POWER (włącznik / wyłącznik urządzenia)

51
CL3750_IM_neu 18.12.2019
17 Piktogram Ustawienie małej prędkości pracy wentylatora LOW
(mała prędkość)
Piktogram Ustawienie małej prędkości pracy wentylatora MEDIUM
(średnia prędkość)
Piktogram Ustawienie małej prędkości pracy wentylatora HIGH
(duża prędkość)
18 Wskaźnik Swing (wahliwa klapka uchylna)
19 Wyświetlacz temperatury (lub wskaźnik czasu po ustawieniu regu-
latora czasowego lub uruchomieniu trybu roboczego „nadmuch” lub
„osuszanie”).
20 Piktogram (regulator czasowy włączony)
21 Wskaźnik Cool (chłodzenie)
Wskazówki dotyczące użytkowania
UWAGA: Ważne pod kątem pierwszego uruchomienia lub po
transporcie!
Przed pierwszym uruchomieniem, urządzenie musi pozostać w pozycji
pionowej przez około 3 godziny, aby środek chłodzący wsiąkł. W prze-
ciwnym razie kompresor ulegnie uszkodzeniu.
UWAGA:
• Po przerwaniu działania urządzenia za pomocą przycisku POWER
należy odczekać co najmniej 3 minuty przed jego ponownym włącze-
niem.
• Przed przeniesieniem urządzenia do innego miejsca należy najpierw
opróżnić zbiornik na wodę!
• Urządzenie działa z najwyższą wydajnością w pomieszczeniach nie
większych niż 70 m³.
• Giętki przewód odprowadzający oraz adapter zostały wyprodukowane
specjalnie dla tego urządzenia. Aby uniknąć nieprawidłowego działania,
nie wolno wymieniać go na inny.
• Przewód wydechowy można rozciągnąć aż do 150 cm. Nie korzystać
z żadnego przedłużacza.
• Zapewnić swobodny przepływ powietrza. Sprawdzić, czy przewód
wydechowy nie został skręcony ani wygięty. Wszelkie zapchania mogą
spowodować przegrzanie urządzenia.
• Zamknąć wszystkie okna i drzwi, aby powietrze z zewnątrz nie prze-
nikało do pomieszczenia, umożliwiając w ten sposób efektywniejsze
działanie urządzenia.
Uruchomienie
Lokalizacja
• Kiedy instalujemy urządzenie, należy zapewnić utrzymanie odległości
co najmniej 50 cm między urządzeniem a ścianami bądź innymi obiek-
tami.
• Powierzchnia musi być płaska i sucha.
Montaż przewodu wydechowego
WSKAZÓWKA:
W przypadku okien przesuwnych lub rolet zewnętrznych można użyć
pionowo lub poziomo ustawionego zestawu do odprowadzania po-
wietrza na zewnątrz. Dopasować długość płytki z uszczelką zgodnie
z wymogami.
1. Podłącz adapter do węża wylotowego. Umieść wąż wylotowy w taki
sposób, aby pierwsza płetwa węża została ułożona na szynie. Dokręć
adapter poprzez przekręcenie go w prawo.
2. Podłącz adapter do złącza znajdującego się z tyłu urządzenia. Rurę
wydechową powietrza z adapterem należy ustawić w taki sposób, by
oznaczenie na adapterze skierowane było ku górze. Adapter należy
przekręcić w kierunku oznaczenia LOCK.
3. Rozciągnąć przewód do żądanej długości.
4. Adapter zestawu do odprowadzania powietrza na zewnątrz należy
przykręcić do końcówki powietrznego węża wydechowego.
5. Przymocować otwartą końcówkę przewodu na oknie.
6. Zamknąć okno możliwie jak najdalej. Opuścić również zewnętrzne
rolety, o ile są, do końcówki przewodu.
Pilot
1. Otworzyć pokrywkę przedziału baterii w tylnej części pilota.
2. Włożyć 2 baterie typu R03 „AAA” 1,5 V, z uwzględnieniem prawidło-
wego ułożenia biegunów (patrz oznaczenia na dolnej części prze-
działu)!
3. Zamknąć pokrywkę przedziału baterii.
Przewód zasilający
Odkręcanie przewodu zasilającego z urządzenia nawijającego.
Połączenie elektryczne
1. Sprawdzić, czy napięcie sieciowe, jakiego chcemy użyć jest zgodne
z napięciem urządzenia. Proszę sprawdzić etykietkę znamionową pod
kątem szczegółowych specykacji.
2. Podłączyć urządzenie do prawidłowo zainstalowanego i uziemionego
gniazdka. Pojawi się sygnał wskazujący, że urządzenie jest gotowe do
użycia. Urządzenie pracuje w trybie czuwania. Na wyświetlaczu wska-
zywana jest temperatura aktualnie panująca w pomieszczeniu.
Włączanie / wyłączanie
• Nacisnąć przycisk POWER
, aby włączyć urządzenie. Klapka
uchylna otwiera się samoczynnie. W urządzeniu ustawiono wstępnie
tryb „Chłodzenie” i temperaturę 22 °C. Jeśli praca została zatrzymana
bez wyjmowania wtyczki, zachowane zostaną wszystkie wcześniej
ustawione tryby operacyjne oraz ustawienia temperatury. Ustawienia te
są wskazywane przez kontrolki.
• Nacisnąć przycisk POWER ponownie, aby wyłączyć urządzenie.
Klapka uchylna zamyka się samoczynnie.
Urządzenie zabezpieczające sprężarkę
Przerwanie działania urządzenia oznacza uaktywnienie urządzenia
zabezpieczającego sprężarkę. Wstrzymuje ono pracę sprężarki na ok.
3 minuty w celu obniżenia ciśnienia w układzie chłodzenia. Nie stanowi
to usterki urządzenia. W takim przypadku należy odczekać co najmniej
3 minuty przed ponownym włączeniem urządzenia.
Informacja dotycząca aplikacji
„Smart Life - Smart Living”
Smart Life - Smart Living aplikacja jest dostępna dla systemu Android
oraz iOS. Zeskanuj odpowiedni kod QR i pobierz ją bezpośrednio.
WSKAZÓWKA:
W zależności od dostawcy, mogą zaistnieć koszty związane z pobiera-
niem aplikacji.
Google Play App Store
Informacje na temat korzystania z aplikacji
To urządzenie można obsługiwać za pośrednictwem sieci domowej.
Warunkiem jest stałe połączenie Wi-Fi z routerem i bezpłatna aplikacja
„Smart Life - Smart Living”.
Możesz teraz w łatwy sposób uzyskać dostęp do wszystkich funkcji urzą-
dzenia za pomocą aplikacji. Ponieważ aplikacja wciąż jest doskonalona,
niemożliwe jest, aby zamieścić tutaj bardziej szczegółowy opis.
Zalecamy odłączenie urządzenia od źródła zasilania, gdy jesteś poza do-
mem, aby zapobiec niezamierzonemu włączeniu, gdy nie ma Cię w domu!

52
CL3750_IM_neu 18.12.2019
Wymagania systemowe do użytkowania aplikacji
• iOs 8.0 lub wyższy
• Android 4.4 lub wyższy
Uruchomienie za pośrednictwem aplikacji
1. Zainstaluj aplikację „Smart Life - Smart Living”. Utwórz konto użytkow-
nika.
2. Aktywuj funkcję Wi-Fi w ustawieniach urządzenia.
3. Klimatyzator należy ustawić w odległości nie większej, niż 5 metrów od
routera.
4. Naciśnij i przytrzymaj FAN SPEED przycisk przez około 5 sekund.
Kontrolka
Wi-Fi szybko miga.
5. Uruchom aplikację i wybierz „ + ” .
6. Wybierz „klimatyzatora”menu i wykonaj wyświetlone na ekranie pole-
cenia.
7. Po pomyślnym nawiązaniu połączenia kontrolka Wi-Fi świecić
będzie światłem ciągłym.
Możesz teraz obsługiwać urządzenie za
pomocą aplikacji.
WSKAZÓWKA:
• Urządzenie może współpracować wyłącznie z routerami 2,4 GHz. Nie
ma możliwości nawiązania łączności z routerami 5 GHz.
• Urządzenie może nawiązać tylko jedno połączenie sieciowe. Nie
można go wyłączyć.
Użytkowanie urządzenia
• Ustawienia dokonane na urządzeniu nie są przekazywane do pilota
zdalnego sterowania.
• W chwili naciśnięcia dowolnego przycisku na pilocie zdalnego stero-
wania zostaną zastosowane odpowiednie ustawienia z pilota zdalnego
sterowania.
• Informacje o dokonanym wyborze pojawią się na wyświetlaczu pilota
zdalnego sterowania.
• Te dwa przyciski i należy nacisnąć kilkakrotnie, aby wybrać
poszczególne funkcje.
Funkcje przycisków na panelu sterowania są wyjaśnione poniżej. Kontro-
lki wskażą dokonany wybór.
Tryby operacyjne
Użyć przycisku MODE aby wybrać jeden z poniższych trybów operacyj-
nych:
• Chłodzenie
COOL
• Osuszanie DRY
• Wentylator FAN
Tryb „Chłodzenie”
W tym trybie pracy można dostosować prędkość wentylatora i ustawienie
temperatury.
WSKAZÓWKA:
W celu zapewnienia pracy urządzenia wraz ze sprężarką należy ustawić
temperaturę niższą niż aktualna temperatura w pomieszczeniu.
Tryb „Wentylator”
Tryb „Wentylator” pozwala na ustawienie prędkości wentylatora.
Tryb „Osuszanie”
• Ten tryb operacyjny nie obsługuje żadnych dalszych ustawień.
• Domyślnym ustawieniem prędkości pracy wentylatora jest najniższy
poziom, tj. LOW.
• Urządzenie będzie chłodzić pomieszczenie i wyciągnie wilgoć z powie-
trza.
• W sytuacji, gdy korzystają Państwo z funkcji „Osuszania” przez dłuższy
czas, zalecamy, by dołączony do zestawu wężyk wodny połączyć na
stałe z górną rurką drenażową. (patrz ilustracja).W pierwszej kolejności
należy usunąć górną zaślepkę. Drugi koniec wężyka wodnego należy
umieścić w zbiorniku o odpowiedniej pojemności (np. wiaderku).
Ustawianie wentylatora
W trybach „Chłodzenie” oraz „Wentylator” można ustawić prędkość wen-
tylatora za pomocą 3 różnych ustawień. Nacisnąć odpowiednio przycisk
FAN SPEED.
• LOW (mała prędkość)
• MEDIUM (średnia prędkość)
• HIGH (duża prędkość)
Ustawianie temperatury
• Za pomocą przycisków
lub w trybie „Chłodzenie” ustawić tem-
peraturę.
• Wybrać temperaturę pomiędzy 16 °C (61 °F) a 31 °C (88 °F).
WSKAZÓWKA:
Przełączenie pomiędzy °celsjusza a °fahrenheita możliwe jest wyłącz-
nie za pomocą przycisku
na pilocie zdalnego sterowania.
„Tryb uśpienia”
• Naciskaj przycisk SLEEP, kiedy urządzenie jest włączone i działa
w trybie chłodzenia.
• Domyślnym ustawieniem prędkości pracy wentylatora jest najniższy
poziom, tj. LOW. Tego ustawienia nie można zmienić.
• Wyświetlacz zgaśnie po ok. 10 sekund.
• Po godzinie pracy w trybie „Sleep”, aktualna temperatura zostanie
automatycznie zwiększona o 1° C. Zostanie to powtórzone ponownie
o jedną godzinę później. W ten sposób komfortowa temperatura
w pokoju zostanie osiągnięta.
Ustawianie wylotu powietrza
Przyciskiem
można zmienić kierunek wydmuchiwanego powietrza.
• Kilkakrotnym naciśnięciem przycisku
można ustawić żądaną pozy-
cję klapki uchylnej.
Timer (Automatyczny timer)
Użyć funkcji timera do ustawiania godzin włączania i wyłączania urządze-
nia. Wybrać czas między 1 a 24 godziną.
Korzystanie z funkcji timera do automatycznego włączania
1. Nacisnąć przycisk POWER
, aby włączyć urządzenie.
2. Wybrać tryb operacyjny, temperaturę oraz prędkość wentylatora dla
urządzenia do pracy lub kiedy uruchamiane jest o ustalonej godzinie.
3. Nacisnąć przycisk POWER aby wyłączyć urządzenie.
4. Naciśnij przycisk . Zaświeci się kontrolka TIMER. Zacznie migać
liczba godzin.
5. Ustaw żądaną liczbę godzin za pomocą przycisku lub . Tryb
ustawiania zostanie automatycznie zakończony po około 5 sekundach.
Uruchamia się regulator czasowy, co sygnalizowane jest włączeniem
kontrolki TIMER.
WSKAZÓWKA:
Nie naciskaj
przycisku, po ustawieniu godzin, ponieważ operacja
timera (zegara) nie zostanie zapisana.

53
CL3750_IM_neu 18.12.2019
Korzystanie z funkcji timera do automatycznego wyłączania
1. Nacisnąć przycisk POWER
aby włączyć urządzenie.
2. Naciśnij przycisk podczas pracy urządzenia. Zacznie migać liczba
godzin.
3. Ustaw tryb timera (zegara) tak, jak to opisano wcześniej w pozycji 5.
WSKAZÓWKA:
• Jeśli chcesz dezaktywować operację ustawiania timera (zegara),
naciśnij przycisk
dwukrotnie. Kontrolka TIMER gaśnie.
• Można również anulować funkcje timera zawsze poprzez naciśnięcie
przycisku POWER
aby włączyć / wyłączyć urządzenie.
Przycisk MIRAGE
Naciśnięcie przycisku MIRAGE powoduje włączenie lub wyłączenie wy-
świetlacza znajdującego się na przedniej ściance urządzenia.
Opróżnianie zbiornika z wodą
Urządzenie posiada zbiornik na wodę celem gromadzenia skroplonej pary.
Po zapełnieniu zbiornika na wodę zaświeci się lampka kontrolna BUC-
KET FULL. Następuje wyłączenie urządzenia.
UWAGA:
Nie należy transportować urządzenia z pełnym zbiornikiem na wodę.
Woda mogłaby dostać się do urządzenia.
Celem dalszego korzystania z urządzenia należy opróżnić zbiornik wody.
Do wykonania tej czynności konieczna jest ścierka do podłóg, płaska mi-
ska o pojemności ok. 0,5 ℓ oraz dostarczony z urządzeniem wąż do wody.
1. Wyjąć wtyczkę sieciową z gniazda ściennego.
2. Ułożyć ścierkę do podłogi oraz płaską miskę pod wylotem wody. Jeśli
jest to możliwe, ustaw miskę na niższym poziomie niż urządzenie.
3. Należy zdemontować dolą zaślepkę.
4. Podłącz wąż do wody do wylotu wody w urządzeniu. Włóż koniec węża
do miski.
5. Po odprowadzeniu wody odłącz wąż do wody. Użyj korka, aby ponow-
nie zamknąć spust wody z urządzenia (klimatyzatora).
Kończenie pracy
1. Nacisnąć przycisk POWER
, aby wyłączyć urządzenie.
2. Wyjąć wtyczkę sieciową z gniazdka w ścianie.
Urządzenie do nawijania przewodu zasilającego
Nawinąć przewód zasilający wokół urządzenia zwijającego. Włożyć
wtyczkę do dostarczonego gniazda.
Czyszczenie
OSTRZEŻENIE:
• Zawsze wyjmować wtyczkę sieciową z gniazdka
przed rozpoczęciem czyszczenia!
OSTRZEŻENIE:
• Sprawdzić, aby woda nie przedostała się do otworów
urządzenia podczas czyszczenia. Może to doprowa-
dzić do porażenia elektrycznego lub pożaru.
UWAGA:
• Nie używać na urządzeniu żadnych środków czyszczących w sprayu.
• Nie używaj szczotki drucianej ani innych podobnych przedmiotów.
• Nie używaj ostrych lub ściernych środków czyszczących.
Filtr
Czyścić ltr co 2 tygodnie, jeśli urządzenie jest w codziennym użytkowa-
niu. Jeśli pył w ltrze blokuje wentylację, wydajność urządzenia nie jest już
gwarantowana.
1. Nad gniazdem do podłączenia rury wylotowej powietrza na tylnej
ściance urządzenia znajduje się kratka z wewnętrznym ltrem.
2. Kratkę należy wymontować z urządzenia, po czym wyjąć ltr z kratki.
3. Odkurzyć ltr odkurzaczem.
4. Oczyścić ltr pod bieżącą wodą. W razie konieczności użyć delikat-
nego detergentu.
5. Filtr należy pozostawić do wyschnięcia w zacienionym miejscu.
6. Po wysuszeniu ltr należy ponownie zamontować w kratce. Wgłębienia
powinny być skierowane ku górze.
7. Kratkę należy ponownie założyć na urządzenie.
UWAGA:
Nie korzystać z urządzenia bez ltra!
Obudowa
• Do czyszczenia otworów wentylacyjnych należy użyć odkurzacza.
• Wytrzeć obudowę delikatnie wilgotną szmatką.
Okresowe czyszczenie i przechowywanie
Kiedy nie korzystamy z urządzenia przez dłuższy czas, należy:
1. Opróżnić zbiornik wodny zgodnie z powyższym opisem.
2. W przypadku górnej rurki drenażowej (górnej zaślepki) należy po-
wtórzyć kroki od 2 do 5 opisane w rozdziale „Opróżnianie zbiornika
z wodą”.
3. Uruchomić urządzenie w trybie „Wentylatora” na 2 godziny, aby osu-
szyć wnętrze urządzenia.
4. Nacisnąć przycisk POWER
, aby wyłączyć urządzenie. Wyjąć
wtyczkę sieciową z gniazda ściennego.
5. Odłączyć giętki przewód wydechowy od urządzenia.
6. Obydwie rurki odpływowe należy pozostawić otwarte.
7. Oczyścić ltr i urządzenie zgodnie z powyższym opisem.
8. Przykryć urządzenie folią.
9. Zawsze trzymać urządzenie poza zasięgiem dzieci, w suchym i dobrze
wentylowanym miejscu.
Usuwanie usterek
Problem Prawdopodobna przyczyna Rozwiązanie
Urządzenie nie funkcjonuje. Brak zasilania Sprawdzić połączenie sieciowe.
Aktywna jest funkcja timera.
Nacisnąć przycisk POWER
, aby włączyć urządzenie.
Temperatura otoczenia jest zbyt niska lub
zbyt wysoka.
Zaleca się używanie urządzenia w temperaturze otoczenia 16 - 35 °C.
Urządzenie jest wadliwe. Skontaktuj się z działem sprzedaży lub specjalistą. Należy przeczytać
załączoną instrukcję obsługi.

54
CL3750_IM_neu 18.12.2019
Problem Prawdopodobna przyczyna Rozwiązanie
Urządzenie nie chłodzi
w sposób wystarczający.
Urządzenie narażone jest na bezpośrednie
działanie słońca.
Wybrać inną lokalizację lub zasłonić okna.
Okna lub drzwi są otwarte. Zamknąć okna lub drzwi.
Jest zbyt wielu ludzi lub inne źródła ogrze-
wania w pokoju.
Usunąć przenośne grzejniki lub je wyłączyć.
Filtr jest brudny. Oczyść ltr.
Zablokowany jest wlot lub wylot powietrza. Usunąć blokadę. Trzymać otwory wentylacyjne wolne od przeszkód.
Urządzenie jest zbyt głośne
podczas pracy.
Urządzenie nie stoi w pozycji pionowej. Ustawić urządzenie na płaskiej powierzchni. Unikać drgań.
Urządzenie wyłącza się pod-
czas pracy. Kontrolka
miga
czerwonym światłem.
Zbiornik na wodę został zapełniony. Odłącz wtyczkę zasilającą. Korzystając z dolnej rurki drenażowej
należy opróżnić zbiornik wody. Z urządzenia można następnie dalej
korzystać.
Pilot zdalnego sterowania nie
działa.
Odległość do urządzenia jest zbyt daleka. Przemieść je, aby zbliżyć się do urządzenia.
Pilot zdalnego sterowania nie jest
odpowiednio trzymany, w kierunku czujnika.
Trzymaj pilot zdalnego sterowania, tak aby wskazywał czujnik.
Sprawdzić, czy nie ma przeszkód między pilotem a czujnikiem.
Baterie są zużyte. Wymień baterie.
Wyświetlacz na urządzeniu: E1 Awaria czujnika temperatury. Skontaktuj się z działem obsługi klienta lub sprzedawcą.
Wyświetlacz na urządzeniu: E2
W sytuacji, gdyby natknęli się Państwo na problemy, których nie opisano w powyższej tabeli, lub gdyby zalecane działania naprawcze nie przyniosły
oczekiwanego rezultatu, prosimy o kontakt z naszym działem obsługi klienta lub sprzedawcą.
Dane techniczne
Model:...............................................................................................CL 3750
Masa netto: .................................................................................. ok. 30,8 kg
Napięcie zasilające: ........................................................220 - 240 V~, 50 Hz
Pobór mocy: ...................................................................................... 1345 W
Zużycie energii elektrycznej w trybie czuwania
przy podłączeniu do sieci: .....................................................................0,8 W
Stopień ochrony: ..........................................................................................
Klasa wydajności energetycznej: ................................................................A
Zdolność chłodzenia: .................................................. 12000 BTU (3,52 kW)
Chłodziwo: ............................................................................................ R 290
Maksymalne dopuszczalne ciśnienie robocze:
Strona ciśnieniowa: ..................................................................... 1,8 MPa
Strona ssąca: ............................................................................... 0,6 MPa
Maksymalne dopuszczalne ciśnienie: ............................................. 3,0 MPa
WLAN
Obsługiwana sieć: ......................................................................802.11 b/g/n
Maksymalnej mocy częstotliwości
radiowej emitowanej: ....................................................................... 100 mW
Zakres częstotliwości: .......................................................................2,4 GHz
Kanały: .................................................................................................. 1 - 13
Obsługiwane klucze Wi-Fi: ....................................................... WPA / WPA2
Zastrzegamy sobie prawo wprowadzania zmian technicznych i projekto-
wych w trakcie ciągłego rozwoju produktu.
Ogłoszenie zgodności z dyrektywą
Clatronic International GmbH niniejszym oświadcza, że typ urządzenia
radiowego CL 3750 jest zgodny z dyrektywą 2014 / 53 / UE.
Ponadto, urządzenie jest zgodne z wymaganiami dyrektywy RoHS
2011 / 65 / EC.
Pełny tekst deklaracji zgodności UE jest dostępny pod następującym
adresem internetowym: www.sli24.de
W obszarze pobierania należy wprowadzić nazwę modelu CL 3750.
Sprawdzono do działania w Polsce.
Warunki gwarancji
Przyznajemy 24 miesiące gwarancji na produkt licząc od daty zakupu.
W tym okresie będziemy bezpłatnie usuwać w terminie 14 dni od daty
dostarczenia wadliwego sprzętu z kartą gwarancyjną do miejsca zakupu
wszystkie uszkodzenia powstałe w tym urządzeniu na skutek wady mate-
riałów lub wadliwego wykonania, naprawiając oraz wymieniając wadliwe
części lub (jeśli uznamy za stosowne) wymieniając całe urządzenie na
nowe.
Sprzęt do naprawy powinien być dostarczony w komplecie wraz z dowo-
dem zakupu oraz z ważną kartą gwarancyjną do sprzedawcy w miarę
możliwości w oryginalnym opakowaniu lub innym odpowiednim dla zabez-
pieczenia przed uszkodzeniem. W razie braku kompletnego opakowania
fabrycznego, ryzyko uszkodzenia sprzętu podczas transportu do i z miej-
sca zakupu ponosi reklamujący.
Naprawa gwarancyjna nie dotyczy czynności przewidzianych w instrukcji
obsługi, do wykonania których zobowiązany jest użytkownik we własnym
zakresie i na własny koszt.
Gwarancja nie obejmuje:
• mechanicznych, termicznych, chemicznych uszkodzeń sprzętu i wywo-
łanych nimi wad,
• uszkodzeń powstałych w wyniku działania sił zewnętrznych takich
jak wyładowania atmosferyczne, zmiana napięcia zasilania i innych
zdarzeń losowych,
• nieprawidłowego ustawienia wartości napięcia elektrycznego, zasilanie
z nieodpowiedniego gniazda zasilania,
• sznurów połączeniowych, sieciowych, żarówek, baterii, akumulatorów,
• uszkodzeń wyrobu powstałych w wyniku niewłaściwego lub niezgod-
nego z instrukcją jego użytkowania, przechowywania, konserwacji,
samowolnego zrywania plomb oraz wszelkich przeróbek i zmian kon-
strukcyjnych dokonanych przez użytkownika lub osoby niepowołane,
• roszczeń z tytułu parametrów technicznych wyrobu, o ile są one
zgodne z podanymi przez producenta,
• prawidłowego zużycia i uszkodzeń, które mają nieistotny wpływ na
wartość lub działanie tego urządzenia.
Karta gwarancyjna bez pieczątki sklepu, daty sprzedaży, nie wypełniona,
źle wypełniona, ze śladami poprawek, nieczytelna wskutek zniszczenia,

55
CL3750_IM_neu 18.12.2019
bez możliwości ustalenia miejsca sprzedaży oraz dołączonego dowodu
zakupu jest nieważna.
Korzystanie z usług gwarancyjnych nie jest możliwe po upływie daty
ważności gwarancji. Gwarancja na części lub całe urządzenie, które są
wymieniane kończy się, wraz z końcem gwarancji na to urządzenie.
Wszystkie inne roszczenia, wliczając w to odszkodowania są wykluczone
chyba, że prawo przewiduje inaczej. Roszczenia wykraczające poza tą
umowę nie są uwzględniane przez tą gwarancję.
Gwarancja na sprzedany towar konsumpcyjny nie wyłącza, nie ogranicza
ani nie zawiesza uprawnień kupującego wynikających z niezgodności
towaru z umową.
Gwarancja oraz zawarte w niej warunki obowiązują na terenie Rzeczpo-
spolitej Polskiej.
Dystrybutor:
CTC Clatronic Sp. z o.o
Ul. Brzeska 1
45-960 Opole
Usuwanie
Usuwanie baterii
Jako użytkownicy mają Państwo zgodny z prawem obowiązek
do zwrotu zużytych baterii bądź akumulatorów.
Wyjąć baterie z pilota przed utylizacją urządzenia.
Zwrócić baterie do punktu zbiórki przeznaczonego do groma-
dzenia starych baterii lub niebezpiecznych odpadów. Skon-
taktować się z lokalnymi przedstawicielstwami władz w celu
pozyskania dalszych informacji.
Znaczenie symbolu „Pojemnik na śmieci”
Proszę oszczędzać nasze środowisko, sprzęt elektryczny nie
należy do śmieci domowych.
Proszę korzystać z punktów zbiorczych, przewidzianych do
zdawania sprzętu elektrycznego, i tam proszę oddawać sprzęt
elektryczny, którego już nie będą Państwo używać.
Tym sposobem pomagają Państwo unikać potencjalnych następstw nie-
właściwego usuwania odpadów, mających wpływ na środowisko i zdrowie
ludzi.
Tą drogą przyczyniają się Państwo do ponownego użycia, do recyklingu
i do innych form wykorzystania starego sprzętu elektrycznego i elektro-
nicznego.
Informacje, gdzie można zdać sprzęt, otrzymają Państwo w swoich urzę-
dach komunalnych lub w administracji gminy.

56
CL3750_IM_neu 18.12.2019
Használati utasítás
Köszönjük, hogy a termékünket választotta. Reméljük, élvezni fogja a
készülék használatát.
A használati útmutatóban található szimbólumok
Az Ön biztonságára vonatkozó utasítások kifejezetten meg vannak külön-
böztetve. Kérjük, mindenképpen ügyeljen ezekre annak érdekében, hogy
elkerülje a baleseteket és a készülék károsodását:
FIGYELMEZTETÉS:
Egészségét károsító veszélyforrásokra gyelmeztet és rámutat a lehet-
séges sérülési lehetőségekre.
VIGYÁZAT:
Lehetséges veszélyre utal, mely a készülékben vagy más tárgyakban
kárt tehet.
MEGJEGYZÉS: Tippeket és információkat emel ki.
Tartalom
A kezelőelemek áttekintése ......................................................................3
Gombok, ikonok és jelzőfények áttekintése ...........................................4
Általános megjegyzések .........................................................................56
A készülékre vonatkozó speciális biztonsági szabályok ....................56
Az elemek kezelése ...............................................................................58
A készülék kicsomagolása .....................................................................58
Szállított elemek .......................................................................................58
A kezelőelemek áttekintése ....................................................................58
Gombok, ikonok és jelzőfények áttekintése .........................................58
Kezelőpanel ...........................................................................................58
Távirányító..............................................................................................58
Megjegyzések használatra ......................................................................59
Üzembe helyezés .....................................................................................59
Elhelyezés ..............................................................................................59
A kifúvócső összeszerelése ...................................................................59
Távirányító..............................................................................................59
Hálózati kábel .........................................................................................59
Elektromos csatlakozás .........................................................................59
A készülék be- / kikapcsolása ................................................................. 59
Kompresszor védőberendezése ............................................................59
Információk a „Smart Life - Smart Living”
alkalmazással kapcsolatban ...................................................................59
Tájékoztató az applikáció használatáról ................................................59
Az alkalmazás használatához szükséges rendszerkövetelmények .....59
Működtetés applikáción keresztül ..........................................................59
A készülék használata .............................................................................60
Működési módok ....................................................................................60
A ventilátor beállítása .............................................................................60
A hőmérséklet beállítása ........................................................................60
„Alvó üzemmód” .....................................................................................60
A légkimenet beállítása ..........................................................................60
Időzítő (Automatikus időzítő) .................................................................60
MIRAGE gomb .......................................................................................60
A víztartály kiürítése ...............................................................................60
A használat befejezése ..........................................................................61
Feltekerő eszköz a hálózati kábel számára ..........................................61
Tisztogatás ...............................................................................................61
Szűrő ......................................................................................................61
Burkolat ..................................................................................................61
Szezonális tisztítás és tárolás ................................................................61
Hibaelhárítás.............................................................................................61
Műszaki adatok ........................................................................................62
Megfelelőségi nyilatkozat .......................................................................62
Hulladékkezelés .......................................................................................62
Az elemek ártalmatlanítása ...................................................................62
A „kuka” piktogram jelentése .................................................................62
Általános megjegyzések
A készülék használatba vétele előtt gondosan olvassa végig a használati
utasítást, és őrizze meg a garancialevéllel, a pénztári nyugtával és
lehetőleg a csomagolókartonnal, ill. az abban lévő bélésanyaggal együtt!
Amennyiben a készüléket harmadik személynek adja tovább, a használati
útmutatót is adja a készülékhez.
• Kizárólag személyi célra használja a készüléket, és csupán arra, amire
való! A készülék nem ipari jellegű használatra készült.
• Ne használja a szabadban! Ne tegye ki erős hőhatásnak, közvetlen
napsugárzásnak és nedvességnek (semmi esetre se mártsa folya-
dékba), és óvja az éles szélektől! Ne használja a készüléket vizes
kézzel! Ha a készülék vizes vagy nedves lett, azonnal húzza ki a
konnektorból!
• Kapcsolja ki a készüléket és mindig húzza ki a csatlakozót a dugaszoló
aljzatból (a csatlakozót, ne pedig a vezetéket húzza), ha nem használja
a készüléket, tartozékokat szerel fel rá, tisztítja vagy zavart észlel.
• A készüléket és a hálózati kábelt rendszeresen ellenőrizni kell, hogy
nincs-e rajta sérülés jele. Ha sérülést lát rajta, a készüléket nem sza-
bad használni.
• Csak eredeti tartozékokat használjon!
• Gyermekei biztonsága érdekében ne hagyja általuk elérhető helyen a
csomagolóelemeket (műanyag zacskó, karton, sztiropor stb.)!
FIGYELMEZTETÉS:
Kisgyermekeket ne engedjen a fóliával játszani. Fulladás veszélye
állhat fenn!
A készülékre vonatkozó speciális biztonsági szabályok
Olvassa el az utasításokat!
FIGYELMEZTETÉS: Tűzveszély!
A készülék gyúlékony hűtőközeget tartalmaz!

57
CL3750_IM_neu 18.12.2019
A szervizelési útmutató elérhető a következő címen: www.sli24.de
A „Downloads” (Letöltések) területen adja meg a „CL 3750” típuskódot.
• Bárki, aki hűtőkörrel dolgozik vagy hűtőkört felnyit, akkreditált vizsgálati hatóság által kiállított oklevéllel kell rendel-
keznie, amely igazolja az illető kompetenciáját a hűtőközegek biztonságos kezelése terén, az iparágban elismert
vizsgálati előírásokkal összhangban.
• A szervizelést csak a berendezés gyártója által ajánlott módon szabad végezni. A más képzett szakember segítsé-
get igénylő karbantartási és javítási munkálatokat a gyúlékony hűtőközegek kezelésében jártas személy felügyelete
alatt kell végezni.
FIGYELMEZTETÉS:
• Ne próbálja siettetni a leolvasztási folyamatot.
• Ne használja és ne tárolja a készüléket a következő helyeken:
- Tűzforrás közelében.
- Olyan helyen, ahol víz vagy olaj fröccsenhet rá.
- Közvetlen napfénynek kitett helyen.
- A fürdőszobában, mosókonyhában vagy úszómedence mellett.
• Ne fúrja meg és ne égesse meg a készüléket.
• Ne feledje, hogy a hűtőközegek szagtalanok.
• A készülék csak 15 m²-nél nagyobb alapterületű helyiségben helyezhető üzembe, működtethető és tárolható.
VIGYÁZAT: Túlmelegedés veszélye!
• Tartsa szabadon a szellőzőnyílásokat.
• Ne takarja le a készüléket!
• Az R 290 hűtőközeg megfelel az európai környezetvédelmi előírásoknak.
• Ügyeljen arra, nehogy megsérüljön a hűtőkör.
• Ne feledje, hogy a hűtőközegek szagtalanok.
• A készülék kizárólag beltéri használatra készült.
• A készüléket úgy tárolja, hogy ne sérülhessen meg.
• Furcsa zaj, szag és / vagy füst esetén húzza ki a tápcsatlakozót a konnektorból.
• A készüléket csak álló helyzetben működtesse vagy mozgassa.
• Biztosítson legalább 50 cm távolságot a készülék és a falak vagy más tárgyak között, hogy megfelelő legyen a leve-
gőkeringés a használat során.
• Soha ne használja szűrő nélkül a készüléket.
• Ne hagyja órákra felügyelet nélkül a készüléket. Ne menjen el otthonról, ha a készülék működik.
• A készülék lakóházak szobáinak légkondicionálására készült, és más célra nem használható.
• Ne működtesse a készüléket olyan szobákban, ahol gáz, üzemanyag, olaj vagy könnyen gyúlékony anyag található.
Ne használjon permetező akonokat, például festéket, rovarirtót vagy más gyúlékony anyagot abban a helyiségben.
• Ne helyezzen semmilyen tárgyat a készülék nyílásaiba.
• Ne tegye ki a készüléket csepegő vagy fröccsenő víznek, és ne helyezzen vízzel töltött edényeket, pl. virágvázákat a
készülékre.
• Ne mozgassa a készüléket, amikor a hálózati kábel csatlakoztatva van az elektromos hálózatba.
• Először mindig kapcsolja ki a készüléket a POWER
gombbal a hálózati kábel lecsatlakoztatása előtt.
• Ha a működés megszakadt, várjon kb. 3 percet a készülék újbóli beindítása előtt, hogy a hűtőkör nyomása csökkenjen.
• Ne javítsa saját kezűleg a készüléket. Mindig lépjen kapcsolatba szakképzett szerelővel. Ha a villanyvezeték meg-
sérül, a gyártónak, a szerviz ügynökségnek vagy más, hasonlóan képzett személynek kell a javítást végeznie, a
veszélyek elkerülése érdekében.
• Ne hagyja, hogy a kisgyerekek hozzáérjenek a készülékhez.
• A készüléket 8 éves és idősebb gyerekek és csökkent zikai, érzékszervi vagy értelmi képességű személyek és akik-
nek nincs meg a tapasztalatuk és tudásuk ehhez, csak akkor használhatják, ha felügyelet alatt állnak vagy a készülék
biztonságos használatára megtanították őket és megértették az érintett veszélyeket.

58
CL3750_IM_neu 18.12.2019
• A gyerekek nem játszhatnak a készülékkel.
• A tisztítást és karbantartást gyerekek felügyelet nélkül nem végezhetik.
• Gondosan kövesse a „Tisztogatás” részben található utasításokat.
• A típus részletei és biztosítékok besorolása: T, 250 V AC, 3,15 A
Az elemek kezelése
FIGYELMEZTETÉS:
• Ne tegye ki az elemeket túlzott hőnek, például napfény, tűz vagy
hasonló hatásának. Robbanásveszélyes!
• Az elem nem játék. Tartsa távol gyerekektől.
• Ne nyissa fel erővel az elemeket.
• Kerülje el a fém tárgyakkal való érintkezést (gyűrűk, szögek, csava-
rok stb.). Rövidzárlat léphet fel!
• A rövidzárlat az elemek túlzott felmelegedését vagy meggyulladását
okozhatja, ami sérülésekhez vezethet.
• A saját biztonsága érdekében a szállításhoz ragasztószalaggal
ragassza le az elemek érintkezőit.
• Az elem megfolyása esetén ügyeljen rá, hogy ne dörzsölje a folya-
dékot a szemébe vagy a nyálkahártyára. Érintkezés esetén mossa
meg a kezét, és tiszta vízzel öblítse ki a szemét. Ha a tünetek nem
múlnak, forduljon orvoshoz.
VIGYÁZAT:
• Ha a távirányítót hosszabb ideig nem használja, vegye ki az eleme-
ket az elemsav megfolyásának elkerülése érdekében.
• Ne keverje a különböző típusú, illetve régi és az új elemeket.
• Ne dobja ki az elemeket a normál háztartási szeméttel. Vigye vissza
a lemerült elemeket a megfelelő gyűjtőpontokra vagy kereskedőhöz.
A készülék kicsomagolása
1. Vegye ki a készüléket a csomagolásból.
2. Távolítsa el az összes csomagolóanyagot, úgymint a műanyag zsákot,
töltőanyagot, kábelrögzítőket és a kartondobozt.
3. Ellenőrizze, hogy az összes tartozék mellékelve van-e a csomagolás-
ban.
Szállított elemek
1 Légkondicionáló
1 Távirányító
2 Elemek
1 Rugalmas kifúvócső
1 Kifúvócső adapter (A készüléken lévő csatlakozó)
1 Ablak készlet, 2 darabos
1 Átalakító ablaki elvezető készlethez
1 Víztömlő
2 Dugó (tartalék)
A kezelőelemek áttekintése
1 Légkimenet (billenő fedél)
2 Vezérlőtábla kijelzővel
3 Burkolat
4 Vízkimenet
5 Fogantyú
6 Feltekerő eszköz a hálózati kábel számára
7 Vízkimenet
8 Áramkábel
9 Csatlakozó dugasz tartó
10 Kifúvócső adapter
11 Rugalmas kifúvócső
12 Átalakító ablaki elvezető készlethez
13 Kifúvócső csatlakozó
14 Szűrőbetét
15 Rács a légbeeresztőn
16 Elülső kijelző
17 Távirányító
18 Ablak készlet, 2 darabos
Gombok, ikonok és jelzőfények áttekintése
Kezelőpanel
1
jelzőfény FAN (ventilátor)
2 jelzőfény COOL (hűtési)
3 jelzőfény DRY (párátlanító)
4 Kijelző
5 HIGH jelzőfény (gyors ventilátor sebesség)
6 LOW jelzőfény (alacsony ventilátor sebesség)
7 MEDIUM jelzőfény (közepes ventilátor sebesség)
8 POWER jelzőfény
9 Wi-Fi jelzőfény (Wi-Fi csatlakozás aktív)
10 BUCKET FULL jelzőfény (víztartály tele)
11 POWER gomb (készülékkapcsoló be / ki)
12 SWING jelzőfény (oszcilláló billenő fedél)
13 gomb (légkimenet beállítás)
14 FAN SPEED gomb (ventilátor sebesség állítás és Wi-Fi bekapcsolás)
15 és gombok (hőmérséklet vagy óra állítása)
16 SLEEP jelzőfény (alvó mód)
17 SLEEP gomb („alvó mód” beállítása)
18 MODE gomb (működési mód beállítása)
19 MIRAGE gomb (az elöl lévő kijelzőt be- vagy kikapcsolja)
20 MIRAGE jelzőfény (kijelző a készülék elején)
21 gomb (időzítő beállítása)
22 TIMER jelzőfény (időzítő mód aktív)
Távirányító
1
ikon (Wi-Fi csatlakozás aktív)
2 Fan jelző (ventilátor)
3 Telep ikon
4 Dry jelző (párátlanító)
5 °C jelző (választott hőmérséklet mértékegység)
6 Hr jelző (órák)
7 °F jelző (választott hőmérséklet mértékegység)
8 Sleep jelző (alvó mód)
9 gombok (hőmérséklet vagy óra állítása)
10 gomb (működési mód beállítása)
11 gomb (ventilátor sebesség állítás)
12 gomb (kapcsolás °celsius és °fahrenheit között)
13 gomb („alvó mód” beállítása)
14 gomb (légkimenet beállítás, SWING mód)
15 TIMER gomb (időzítő beállítása)
16 POWER gomb (készülékkapcsoló be / ki)
17 ikon Ventilátor beállítása LOW állásba (alacsony sebesség)
ikon Ventilátor beállítása MEDIUM állásba (közepes sebesség)
ikon Ventilátor beállítása HIGH állásba (gyors sebesség)
18 Swing jelző (oszcilláló billenő fedél)
19 Hőmérséklet kijelző (vagy óra kijelző, amikor az időzítőt állítjuk, vagy a
„ventilátor” vagy „páramentesítő” működési módot használjuk)
20 ikon (időzítő mód aktív)
21 Cool jelző (hűtési)

59
CL3750_IM_neu 18.12.2019
Megjegyzések használatra
VIGYÁZAT: Fontos tudnivalók az első használattal vagy szállí-
tás utáni teendőkkel kapcsolatban!
Az első használat előtt a készüléknek függőleges pozícióban kell állnia
legalább 3 órán át, hogy a hűtőközeg leülepedjen. Máskülönben a káro-
sodik a kompresszor.
VIGYÁZAT:
• Amikor a működést leállítja az POWER
gombbal, akkor várjon
legalább 3 percet, mielőtt újra bekapcsolja a készüléket.
• Ha át szeretné helyezni a készüléket, először ürítse ki a víztartályt!
• A készülék leghatékonyabban egy legfeljebb 70 m³ térfogatú szobában
működik a legjobban.
• A készülékhez speciálisan készült a rugalmas kifúvási tömlő és az
adapter. A hibás működés elkerülése érdekében ne cserélje ki a csövet
más csőre.
• A kifúvócső egész 150 cm-re kihúzható. Ne használjon semmilyen
hosszabbítót.
• Biztosítson szabad légáramlást. Ügyeljen rá, hogy ne hajlítsa be vagy
törje meg a kifúvócsövet. Bármilyen elzáródás a készülék túlmelegedé-
sét okozhatja.
• Zárja be az összes ablakot és ajtót, hogy megakadályozza a külső
levegő bejutását a helyiségbe, így a készülék még hatékonyabban
működhet.
Üzembe helyezés
Elhelyezés
• A készülék üzembe helyezésekor biztosítson legalább 50 cm távolsá-
got a készülék és a falak vagy más tárgyak között.
• A felületnek laposnak és száraznak kell lennie.
A kifúvócső összeszerelése
MEGJEGYZÉS:
Tolóablakokhoz vagy külső napellenző rolettához a mellékelt levegőki-
fúvó készlet használható függőleges vagy vízszintes elrendezésben.
Szükség szerint állítsa be a tömítőlemez hosszát.
1. Csatlakoztassa az adaptert a kivezető csőhöz. Helyezze a kivezető
csövet úgy, hogy a cső első része a sínen legyen. Az óramutató járásá-
nak irányába forgatva rögzítse az adaptert.
2. Csatlakoztassa az adaptert az aljazatba a készülék hátoldalán. Ehhez
a levegőkifúvó tömlőt az adapterrel úgy kell elhelyezni, hogy az adapte-
ren lévő címke felül legyen. Fordítsa az adaptert teljesen a LOCK állás
felé.
3. Hosszabbítsa meg a csövet a kívánt hosszúságra.
4. Csavarozza a levegőkifúvó készlet adapterét a levegőkifúvó tömlő
végére.
5. Ragassza a cső nyitott végét egy ablakba.
6. Amennyire lehet, zárja be az ablakot. Ha van, engedje le a külső rolót
a cső végére.
Távirányító
1. Nyissa ki az elemtartó fedelét a távirányító hátoldalán.
2. Helyezzen be 2 darab R03 „AAA” 1,5 V típusú elemet, ügyeljen a meg-
felelő polaritásra (lásd a jelzéseket az elemtartó alján).
3. Zárja be az elemtartó fedelét.
Hálózati kábel
Húzza ki a hálózati kábelt a feltekercselőből.
Elektromos csatlakozás
1. Ellenőrizze, hogy a használni kívánt csatlakozóaljzat feszültsége
megfelel a készülék feszültségének. Részletes információkért lásd az
adattáblát.
2. Csatlakoztassa a készüléket egy megfelelően felszerelt földelt aljzat-
hoz. Egy hang jelzi, hogy a készülék használatra kész. A készülék ké-
szenléti módban van. A kijelzőn az aktuális szobahőmérséklet látható.
A készülék be- / kikapcsolása
• Nyomja meg a POWER
gombot a készülék bekapcsolásához. A
billenő fedél automatikusan kinyílik. A készülék a gyári beállítás szerint
„Hűtési” üzemmódban van, és 22 °C-os hőmérsékletre van beállítva.
Ha a készüléket a hálózati dugasz kihúzása nélkül állította le, az
összes előzőleg beállított működési mód és hőmérséklet-beállítás
megmarad. A jelzőfények jelzik ezt a beállítást.
• Nyomja meg újra a POWER gombot a készülék kikapcsolásához. A
billenő fedél automatikusan bezáródik.
Kompresszor védőberendezése
Ha a működés megszakad, aktiválódik a kompresszor védőberendezése.
Ez a hűtőkörben lévő nyomás csökkentése érdekében körülbelül 3 percig
letiltja a kompresszor működését. Ez nem hiba a készülékben. Ilyen eset-
ben várjon legalább 3 percet, mielőtt újra bekapcsolná a készüléket.
Információk a „Smart Life - Smart Living”
alkalmazással kapcsolatban
A Smart Life - Smart Living alkalmazás Android és iOS rendszerre
érhető el. Olvassa be a megfelelő QR-kódot, amivel közvetlenül a letöltési
oldalra juthat.
MEGJEGYZÉS:
Szolgáltatótól függően az alkalmazás letöltéséért költséget számolhat-
nak fel.
Google Play App Store
Tájékoztató az applikáció használatáról
Ez a készülék működtethető az otthoni hálózaton keresztül. Előfeltétel az
állandó Wi-Fi kapcsolat a rúterrel és a „Smart Life - Smart Living” ingye-
nes applikáció.
Az alkalmazással a készülék összes funkciójához könnyen hozzáférhet.
Mivel az alkalmazást folyamatosan fejlesztik, ennél több leírást nem
tudunk adni itt.
Javasolt a készülék áramtalanítása, ha nincs otthon, hogy megelőzze a
véletlen bekapcsolódást, míg ön úton van!
Az alkalmazás használatához szükséges rendszerkövetelmények
• iOs 8.0 vagy újabb
• Android 4.4 vagy újabb
Működtetés applikáción keresztül
1. Telepítse a „Smart Life - Smart Living” applikációt. Hozzon létre fel-
használói ókot.
2. Aktiválja a Wi-Fi funkciót a készülék beállításaiban.
3. Helyezze a légkondicionáló készüléket a rútertől 5 méteren belülre.
4. Nyomja meg és tartsa lenyomva a FAN SPEED gombot 5 másodper-
cig. A
Wi-Fi jelzőfény gyorsan villog.
5. Indítsa el az applikációt, és válassza a „ + ” jelet.
6. Válassza ki a „légkondicionáló” menüt és kövesse az utasításokat a
kijelzőn.
7. Amikor a készüléket sikeresen csatlakoztatta, a Wi-Fi jelzőfény
folyamatosan világít.
Most már működtetheti a készüléket az applikáci-
óval.

60
CL3750_IM_neu 18.12.2019
MEGJEGYZÉS:
• A készülék csak 2, GHz-es rúterekkel működtethető. 5 GHz-es rúte-
rek nem támogatottak.
• A készülék csak egy hálózati csatlakozóval rendelkezik. Nem lehet
kikapcsolni.
A készülék használata
• A készüléken végzett beállítások nem mennek át a távirányítóra.
• Amint megnyom egy gombot a távirányítón, a készülék a távirányító
adott beállításait alkalmazza.
• Választása megjelenik a távirányító kijelzőjén.
• A és gombokat többször meg kell nyomni, hogy kiválassza az
egyéni funkciókat.
A kezelőpanel gombjainak magyarázata alább található. A jelzőfények
mutatják a választott beállítást.
Működési módok
A MODE gombbal válasszon egyet a következő működési módokból:
• Hűtési
COOL
• Párátlanító DRY
• Ventilátor FAN
„Hűtési”
üzemmód
Ebben az üzemmódban a ventilátor sebessége és a hőmérséklet szükség
szerint módosítható.
MEGJEGYZÉS:
A készülék kompresszor nélküli működtetéséhez az előirányzott hőmér-
sékletnek az aktuális szobahőmérsékletnél alacsonyabbnak kell lennie.
„Ventilátor” üzemmód
Ez az üzemmód lehetővé teszi a ventilátor sebességének beállítását.
„Párátlanító”
üzemmód
• Ez a működési mód nem támogat semmilyen további beállítást.
• A ventilátor sebessége a legalacsonyabb LOW fokozatra van előre
beállítva.
• A készülék hűteni fogja a szobát és kivonja a párát a levegőből.
• Ha hosszabb ideig használja a „páramentesítőt”, javasoljuk, hogy állan-
dóan csatlakoztassa a mellékelt víztömlőt a felső vízkifolyóhoz (lásd az
ábrát). Először vegye le a dugót. Helyezze a víztömlő végét megfelelő
méretű tartályba (pl. vödör).
A ventilátor beállítása
„Hűtési” és „Ventilátor” módokban 3 különböző beállításra tudja beállítani
a ventilátor fordulatszámát. Eszerint nyomja be a FAN SPEED gombot.
• LOW (alacsony)
• MEDIUM (közepes)
• HIGH (magas)
A hőmérséklet beállítása
• Az
vagy gombokkal „Hűtés” módban állítsa be a hőmérsékletet.
• Válasszon egy hőmérsékletet 16 °C (61 °F) és 31 °C (88 °F) között.
MEGJEGYZÉS:
A °celsius és °fahrenheit közti váltás csak a távirányító
gomb-
jával lehetséges.
„Alvó üzemmód”
• Nyomja meg a SLEEP gombot, amikor a készülék be van kapcsolva és
„Hűtő” üzemmódban működik.
• A ventilátor sebessége a legalacsonyabb LOW fokozatra van előre
beállítva. Ez nem módosítható.
• A kijelző 10 másodperc után kikapcsol.
• Egy órás működés után „Alvás” módban az előre beállított hőmérséklet
automatikusan megemelkedik 1 °C-kal. Ez további egy óra elmúltával
megismétlődik. Ezen a módon kellemes szobahőmérséklet érhető el.
A légkimenet beállítása
Használja a
gombot a kibocsátott levegő áramlási irányának beállítá-
sára.
• Nyomja meg a
gombot többször, míg a billenő fedél a kívánt pozíci-
óba kerül.
Időzítő (Automatikus időzítő)
Az időzítő funkció segítségével állítsa be a készülék be- és kikapcsolási
időpontjait. Válasszon egy időt 1 és 24 óra között.
Az időzítő funkció használata az automatikus bekapcsoláshoz
1. Nyomja meg a POWER
gombot a készülék bekapcsolásához.
2. Válassza ki a működési módot, a hőmérsékletet és a ventilátor fordu-
latszámát, amelyen a készülék működjön az előre beállított időpontban
való bekapcsolásakor.
3. Nyomja meg a POWER gombot a készülék kikapcsolásához.
4. Nyomja le az gombot. Az órák száma villog.
5. A kívánt óraszámot a és gombokkal állíthatja be. A beállítási
üzemmódból automatikusan kilép kb. 5 másodperc után. Az időzítő
funkció aktív, és a TIMER jelzőfény világít.
MEGJEGYZÉS:
Ne nyomja meg a
gombot az óra beállítása után, mert akkor az
időzítő művelet nem lesz elmentve.
Az időzítő funkció használata az automatikus kikapcsoláshoz
1. Nyomja meg a POWER
gombot a készülék bekapcsolásához.
2. Nyomja le az gombot a működés alatt. Az órák száma villog.
3. Állítsa az időzítő üzemmódot az előző 5-ös pontnál leírtak szerint.
MEGJEGYZÉS:
• Ha szeretné deaktiválni a beállított időzítő működését, nyomja meg
a
gombot kétszer. A TIMER jelzőfény kialszik.
• Szintén bármikor kikapcsolhatja az időzítő funkciót a POWER
gomb megnyomásával a készülék be- / kikapcsolásához.
MIRAGE gomb
Nyomja meg a MIRAGE gombot az elöl lévő kijelző be- vagy kikapcsolá-
sához.
A víztartály kiürítése
A készülékbe egy víztartály van elhelyezve a lecsapódott pára össze-
gyűjtéséhez. Ha a víztartály tele van, a jelzőlámpa
BUCKET FULL
kigyullad. A készülék kikapcsol.
VIGYÁZAT:
A készüléket ne mozdítsa el, ha tele van a víztartály. Víz kerülhet a
készülékbe.

61
CL3750_IM_neu 18.12.2019
A további működtetéshez ki kell üríteni a víztartályt. Ehhez szükség van
felmosórongyra, egy kb. 0,5 liter víz kapacitású lapos tálra, valamint a
készülék víztömlőjére.
1. Húzza ki a dugaszt a fali aljzatból.
2. Helyezze a törölközőt és a tálat a vízkimenet alá. Ha lehet, a készülék-
nél alacsonyabb szintre helyezze el a tálat.
3. Vegye ki az alsó dugót.
4. A víztömlőt csatlakoztassa a készülék vízleeresztőjéhez. A víztömlő
végét tegye a tálba.
5. Ha a víz kifolyt, távolítsa el a víztömlőt. Használja a stoppert, hogy újra
bezárja a lefolyót a készüléken.
A használat befejezése
1. Nyomja meg a POWER
gombot a készülék kikapcsolásához.
2. Húzza ki a dugaszt a fali aljzatból.
Feltekerő eszköz a hálózati kábel számára
Tekerje a hálózati kábelt a feltekercselőre. Dugja be a csatlakozót a
nyílásba.
Tisztogatás
FIGYELMEZTETÉS:
• Tisztítás előtt mindig húzza ki a dugaszt a fali aljzatból!
• Ügyeljen arra, hogy tisztítás közben ne jusson be víz
a készülék nyílásaiba. Ez elektromos áramütést vagy
tüzet okozhat.
VIGYÁZAT:
• Ne permetezzen tisztítószert a készülékre.
• Ne használjon drótkefét vagy más súroló hatású tárgyat.
• Ne használjon agresszív vagy súroló hatású tisztítószert.
Szűrő
Ha naponta használja a készüléket, 2 hetente tisztítsa ki a szűrőt. Ha a
szűrőben felgyülemlett por akadályozza a szellőzést, a készülék hatékony
működése nem garantálható.
1. Belső szűrővel rendelkező rács van a készülék hátulján lévő levegőki-
fúvó tömlő csatlakozója felett.
2. Vegye le a rácsot a készülékről, és a szűrőt a rácsról.
3. Porszívózza ki a szűrőt.
4. Tisztítsa meg a szűrőt folyóvíz alatt. Ha szükséges, használjon enyhe
tisztítószert.
5. Szabad levegőn szárítsa meg a szűrőt árnyékos helyen.
6. Tegye vissza a szűrőt a rácsba, amikor az teljesen megszáradt. A
vájatok felfelé állnak.
7. Tegye vissza a rácsot a készülékre.
VIGYÁZAT:
Ne működtesse a készüléket szűrő nélkül!
Burkolat
• Porszívóval tisztítsa a szellőzős nyílásokat.
• Egy enyhén nedves ruhával törölje át a burkolatot.
Szezonális tisztítás és tárolás
Ha a készüléket hosszabb ideig nem használja, a következőképpen járjon
el:
1. Ürítse ki a víztartályt a fent leírt módon.
2. Ismételje meg a „A víztartály kiürítése” pont 2 - 5 lépéseit a felső vízkifo-
lyónál (felső dugó).
3. Működtesse a készüléket „Ventilátor” módban 2 órán át, hogy kiszá-
rítsa a készülék belsejét.
4. Nyomja meg a POWER
gombot a készülék kikapcsolásához.
Húzza ki a dugaszt a fali aljzatból.
5. Válassza le a rugalmas kifúvócsövet a készülékről.
6. Hagyja mindkét vízkifolyót nyitva.
7. Tisztítsa meg a szűrőt, valamint a készüléket is a korábban leírt mó-
don.
8. Takarja le a készüléket fóliával.
9. Mindig gyerekektől távol a tárolja a készüléket, egy jól szellőztetett
helyiségben.
Hibaelhárítás
Probléma Lehetséges ok Megoldás
A készülék nem
működik.
Nincs áramellátás Ellenőrizze a hálózati csatlakozást.
Az időzítő funkció be van kapcsolva.
Nyomja meg a POWER
gombot a készülék bekapcsolásához.
A környezeti hőmérséklet túl alacsony vagy túl
magas.
Javasolt a készüléket 16 - 35 °C közötti környezeti hőmérsékleten
használni.
A készülék elromlott. Lépjen kapcsolatba a szervizhálózatunkkal vagy egy szakemberrel.
Vegye gyelembe a mellékelt szervizelési útmutatóban leírtakat.
A készülék nem hűt
eléggé.
A készülék közvetlen napfénynek van kitéve. Válasszon egy másik helyet vagy árnyékolja be az ablakokat.
Nyitva vannak az ablakok vagy ajtók. Zárjon be minden ablakot vagy ajtót.
Túl sok személy vagy más hőforrás van a szobában. Távolítsa el a hordozható hőforrásokat vagy kapcsolja ki azokat.
A szűrő koszos. Tisztítsa meg a szűrőt.
A levegőbemenet vagy a levegőkimenet el van
záródva.
Szüntesse meg az elzáródást. A szellőzőnyílásokat tartsa akadály-
mentesen.
A készülék működés
közben túl hangos.
A készülék nincs függőleges helyzetben. Helyezze a készüléket egy lapos felületre. Kerülje a rezgéseket.
A készülék működés
közben kikapcsol. A
jelzőfény vörösen villog.
A tele van a víztartály. Húzza ki a tápcsatlakozót. Ürítse ki a víztartályt az alsó vízkifolyón
keresztül. Ezután újra használhatja a készüléket.

62
CL3750_IM_neu 18.12.2019
Probléma Lehetséges ok Megoldás
A távirányító nem
működik.
A távolság a készülékig túl nagy. Menjen közelebb a készülékhez.
Nem tartja a távirányítót a szenzor felé. Tartsa a távirányítót a szenzor irányába. Ügyeljen arra, hogy ne
legyen semmilyen akadály a távirányító és az érzékelő között.
Az elemek lemerültek. Cserélje ki az elemeket.
Kijelző a készüléken: E1 A hőmérséklet-érzékelő meghibásodott. Kérjük, keresse fel szervizünket vagy a forgalmazót.
Kijelző a készüléken: E2
Forduljon az ügyfélszolgálathoz vagy kereskedőjéhez, ha olyan problémákkal találkozik, amelyek nem szerepelnek a táblázatban, vagy ha a javasolt
megoldás nem működik.
Műszaki adatok
Modell: ..............................................................................................CL 3750
Nettó súly: .................................................................................... kb. 30,8 kg
Feszültségellátás: ...........................................................220 - 240 V~, 50 Hz
Teljesítményfelvétel: .......................................................................... 1345 W
Energiafogyasztás hálózatvezérelt készenléti üzemmódban: .............0,8 W
Védelmi osztály: ...........................................................................................
Energiahatékonysági osztály: .....................................................................A
Hűtési kapacitás: .........................................................12000 BTU (3,52 kW)
Hűtőközeg: ........................................................................................... R 290
Megengedett maximális üzemi nyomás:
Nyomásoldal: ............................................................................... 1,8 MPa
Szívóoldal: ................................................................................... 0,6 MPa
Megengedett maximális nyomás: .................................................... 3,0 MPa
WLAN
Támogatott hálózat: ...................................................................802.11 b/g/n
Továbbított maximális jelerősség: .................................................... 100 mW
Frekvenciatartomány: .......................................................................2,4 GHz
Csatornák: ............................................................................................. 1 - 13
Támogatott Wi-Fi kódolás: ........................................................ WPA / WPA2
A műszaki és kivitelezési módosítások jogát a folyamatos termékfejlesztés
miatt fenntartjuk.
Megfelelőségi nyilatkozat
Clatronic International GmbH igazolja, hogy a CL 3750 típusú rádióberen-
dezés megfelel a 2014 / 53 / EU irányelvnek.
A készülék továbbá megfelel az RoHS irányelv (2011 / 65 / EU) által előírt
követelményeknek.
Az EU-megfelelőségi nyilatkozat teljes szövege elérhető a következő
internetes címen: www.sli24.de
A letöltés szekcióban, kérjük, adja meg a CL 3750 modellnevet.
A készülék Magyarországon való működését tesztelték.
Hulladékkezelés
Az elemek ártalmatlanítása
Vásárlóként Önt törvény kötelezi a régi elemek / akkumulátorok
visszavitelére.
A készülék leselejtezése előtt vegye ki az elemeket a távirányí-
tóból.
Vigye az elemeket egy régi elemek vagy veszélyes hulladék átvételével
foglalkozó gyűjtőpontra. További információkért lépjen kapcsolatba a helyi
hatóságokkal.
A „kuka” piktogram jelentése
Kímélje környezetünket, az elektromos készülékek nem a ház-
tartási szemétbe valók!
Használja az elektromos készülékek ártalmatlanítására kijelölt
gyűjtőhelyeket, ott adja le azokat az elektromos készülékeit,
amelyeket többé már nem kíván használni!
Ezzel segítséget nyújt ahhoz, hogy elkerülhetők legyenek azok a hatások,
amelyeket a helytelen „szemétre dobás” gyakorolhat a környezetre és az
emberi egészségre.
Ezzel hozzájárul az újrahasznosításhoz, a recyclinghoz és a kiöregedett
elektromos és elektronikus készülékek értékesítésének egyéb formáihoz.
Az önkormányzatoknál vagy a polgármesteri hivatalokban tájékoztatást
kaphat arról, hogy hova viheti a kiselejtezett készülékeket.

63
CL3750_IM_neu 18.12.2019
Руководство по эксплуатации
Спасибо за выбор нашего продукта. Надеемся, вам понравится экс-
плуатировать устройство.
Символы применяемые в данном руководстве пользователя
Важные рекомендации для обеспечения вашей безопасности
обозначены по особенному. Обязательно следуйте этим рекоменда-
циям, чтобы предотвратить несчастный случай или поломку изделия:
ПРЕДУПРЕЖДЕНИЕ:
Предупреждает об опасности для здоровья и возможном риске
получения травмы.
ВНИМАНИЕ:
Указывает на возможную опасность для изделия и других окружаю-
щих предметов.
ПРИМЕЧАНИЯ: Дает советы и информацию.
Содержание
Обзор деталей прибора ..........................................................................3
Обзор кнопок, иконок и индикаторных ламп ....................................4
Общая информация ..............................................................................63
Специальные указания по безопасности для этого прибора .....63
Как обращаться с батарейками ..........................................................65
Вскрытие упаковки ................................................................................65
Комплект поставки ................................................................................65
Обзор деталей прибора ........................................................................65
Обзор кнопок, иконок и индикаторных ламп ..................................65
Панель управления ..............................................................................65
Дистанционное управление ................................................................65
Примечания по использования ..........................................................66
Подготовка прибора к работе .............................................................66
Размещение ..........................................................................................66
Сборка отводной трубы .......................................................................66
Дистанционное управление ................................................................66
Шнур питания .......................................................................................66
Электрическое подключение ..............................................................66
Включение / выключение .....................................................................66
Предохранительный механизм компрессора ...................................66
Информация в приложении «Smart Life - Smart Living» ................66
Информация об использовании приложения ...................................66
Системные требования для использования приложения ...............66
Начало эксплуатации приложения .....................................................67
Порядок работы с прибором ..............................................................67
Режимы работы ....................................................................................67
Настройка вентилятора .......................................................................67
Установка температуры ......................................................................67
«Спящий режим» .................................................................................67
Регулировка воздуха на выходе .........................................................67
Таймер (Автоматический таймер) ......................................................67
Кнопка MIRAGE ....................................................................................68
Опустошение резервуара для воды ..................................................68
Остановка работы ................................................................................68
Приспособление для намотки шнура питания ..................................68
Очистка.....................................................................................................68
Фильтр ...................................................................................................68
Корпус ....................................................................................................68
Сезонная чистка и хранение ................................................................68
Устранение проблем .............................................................................68
Технические данные .............................................................................69
Утилизация ..............................................................................................69
Утилизация использованной батарейки ............................................69
Значение символа «корзина» .............................................................69
Общая информация
Перед началом эксплуатации прибора внимательно прочитайте при-
лагаемую инструкцию по эксплуатации и сохраните ее в надежном
месте, вместе с гарантийным талоном, кассовым чеком и, по возмож-
ности, картонной коробкой с упаковочным материалом. Если даете
кому-либо попользоваться прибором, обязательно дайте в придачу
данную инструкцию по эксплуатации.
• Пользуйтесь прибором только частным образом и по назначению.
Прибор не предназначен для коммерческого использования.
• Не пользуйтесь прибором под открытым небом. Предохраняйте
прибор от жары, прямых солнечных лучей, влажности (ни в коем
случае не погружайте его в воду) и ударов об острые углы. Не при-
касайтесь к прибору влажными руками. Если прибор увлажнился
или намок, тут же выньте вилку из розетки.
• После эксплуатации, монтаже принадлежностей, чистке или
поломке прибора всегда вынимайте вилку из розетки (тяните за
вилку, а не за кабель).
• Прибор и кабель сетевого питания необходимо регулярно об-
следовать на наличие следов повреждения. При обнаружении
повреждения пользоваться прибором запрещается.
• Используйте только оригинальные запчасти.
• Из соображений безопасности для детей не оставляйте лежать
упаковку (пластиковые мешки, картон, пенопласт и т.д.) без при-
смотра.
ПРЕДУПРЕЖДЕНИЕ:
Не позволяйте детям играть с полиэтиленовой пленкой. Опас-
ность удушья!
Специальные указания по безопасности для этого прибора
Прочтите инструкцию по эксплуатации!
ПРЕДУПРЕЖДЕНИЕ: Опасность пожара!
Устройство содержит горючий хладагент!

64
CL3750_IM_neu 18.12.2019
Руководство по использованию доступно на веб-сайте: www.sli24.de
В разделе «Downloads» (Скачивание) введите название модели CL 3750.
• К работе с контуром охлаждения допускаются только специалисты с действующим сертификатом, выдан-
ным соответствующим отраслевым органом сертификации, который подтверждает уровень квалификации,
необходимый для безопасной работы с охлаждающими средствами.
• Использовать устройство следует в соответствии с рекомендациями производителя. Работы по обслужива-
нию и ремонту, требующие участия квалифицированных сотрудников, должны проводиться под контролем
специалиста по работе с горючими хладагентами.
ПРЕДУПРЕЖДЕНИЕ:
• Не следует ускорять процесс размораживания.
• Не следует использовать или хранить устройство в следующих местах:
- Рядом с источниками огня.
- В местах, где возможно разбрызгивание воды или масла.
- Под прямым солнечным светом.
- В ванных комнатах, в прачечных или рядом с плавательным бассейном.
• Запрещается сверлить в устройстве отверстия или воздействовать на него огнем.
• Помните, что хладагент не имеет запаха.
• Устройство необходимо настраивать, эксплуатировать и хранить в помещении площадью не менее 15 м².
ВНИМАНИЕ: Риск перегрева!
• Не закрывайте слоты вентиляции!
• Не накрывайте прибор!
• Хладагент «R 290» соответствует директивам ЕС по охране окружающей среды.
• Не повреждайте контур охлаждения.
• Прибор предназначен только для использования в помещениях.
• Устройство необходимо хранить так, чтобы исключить возможность повреждения.
• Соблюдайте национальные нормативы по подключению.
• В случае необычных звуков, запаха или дыма извлеките вилку сетевого шнура из розетки сети электропита-
ния.
• Используйте или перевозите данный прибор только в вертикальном положении
• Обеспечьте расстояние не менее 50 см между прибором и стенами помещения.
• Нельзя использовать прибор без фильтра.
• Не оставляйте прибор работающим без наблюдения на длительное время. Не уходите из дома, пока рабо-
тает кондиционер.
• Этот прибор разработан для кондиционирования жилых помещений и не должен быть использован для дру-
гих целей.
• Не используйте кондиционер в помещениях с газами, топливом, маслом и другими легко воспламеняющи-
мися веществами. Запрещается пользоваться спреями, как например, краски или пестициды в комнате.
• Не вставляйте предметы в отверстия в корпусе.
• Не допускайте воздействия на устройство пролитой или распыляемой воды, не ставьте на устройство сосуды
с водой, например вазы.
• Не двигайте прибор, если сетевая вилка включена в розетку.
• Всегда выключайте прибор, сначала нажав кнопку POWER
перед отключением вилки из розетки.
• Если работа кондиционера была прервана, подождите 3 минут перед повторным включением, чтобы давле-
ние в контуре снизилось.
• Не отремонтировать устройство самостоятельно. Обязательно свяжитесь с авторизованным мастером. При
повреждении сетевого шнура, во избежание опасности поражения электрическим током, шнур следует заме-
нить у изготовителя, сервисного представителя или других квалифицированных лиц.
• Следите за тем, чтобы маленькие дети не дотрагивались до прибора.

65
CL3750_IM_neu 18.12.2019
• Этим прибором могут пользоваться дети старше 8 лет и лица с ограниченными физическими, осязательными
и психическими способностями или не имеющие опыта или знаний, если они находятся под надзором или про-
инструктированы в отношении безопасного пользования прибором и знают о связанных с этим опасностях.
• Не позволяйте детям играть с прибором.
• Чистка и уход за прибором не должны проводиться детьми без надзора.
• Выполняйте, пожалуйста, инструкции, содержащиеся в главе «Очистка».
• Информация о типе и номинале предохранителей: T, 250 V AC, 3,15 A
Как обращаться с батарейками
ПРЕДУПРЕЖДЕНИЕ:
• Не подвергайте батарейки воздействию сильного тепла, как
например, солнечные лучи, огонь и т.д. Риск взрыва!
• Батарейки не игрушка. Держите их вдали от детей.
• Не разбирайте батарейки.
• Избегайте контакта с металлическими предметами (кольца,
гвозди, болты и т.д.). Риск короткого замыкания!
• Короткое замыкание может привести к перегреву и даже воспла-
менению батареек, что может привести к травмам.
• Для вашей безопасности закройте контакты батареи липкой
лентой при транспортировке.
• В случае вытекания электролита, остерегайтесь попадания
кислоты в глаза и на слизистые. В случае попадания, промойте
чистой водой. Обратитесь к враче в случае сохранения диском-
форта.
ВНИМАНИЕ:
• Когда пульт ДУ долгое время не используется, достаньте бата-
рейки во избежание вытекания кислоты.
• Не используйте батарейки разных типов или новые и старые
батарейки вместе.
• Не выбрасывайте использованные батарейки вместе с бытовым
мусором. Отдайте их в специальный пункт сбора.
Вскрытие упаковки
1. Освободите прибор от упаковочных материалов.
2. Удалите все материалы упаковки, включая пластиковые мешки,
наполнитель, зажимы и картон.
3. Убедитесь в целостности поставки.
Комплект поставки
1 Блок кондиционера воздуха
1 Дистанционное управление
2 Батарейки
1 Гибкая отводная труба
1 Переходник отводной трубы (Соединение на приборе)
1 Набор для окна, 2-предмета
1 Адаптер для отвода воздуха через окно
1 Водяной шланг
2 заглушки (запасные части)
Обзор деталей прибора
1 Выход воздуха (поворотная крышка)
2 Панель управления с дисплеем
3 Корпус
4 Отвод воды
5 Ручка
6 Приспособление для намотки шнура питания
7 Отвод воды
8 Сетевой шнур
9 Кронштейн вилки питания
10 Переходник отводной трубы
11 Гибкая отводная труба
12 Адаптер для отвода воздуха через окно
13 Разъем отводной трубы
14 Фильтрующий элемент
15 Сетка воздухозаборника
16 Передний дисплей
17 Дистанционное управление
18 Набор для окна, 2-предмета
Обзор кнопок, иконок и индикаторных ламп
Панель управления
1 Индикатор
FAN (Вентилятор)
2 Индикатор COOL (Охлаждение)
3 Индикатор DRY (Осушение)
4 Экран
5 Индикатор HIGH (высокая скорость вентилятора)
6 Индикатор LOW (низкая скорость вентилятора)
7 Индикатор MEDIUM (средняя скорость вентилятора)
8 Индикатор POWER
9 Индикатор Wi-Fi (соединение Wi-Fi включено)
10 Индикатор BUCKET FULL (резервуар для воды полный)
11 Кнопка POWER (выключатель прибора включен / выключен)
12 Индикатор SWING (качающаяся поворотная крышка)
13 Кнопка (регулировка воздушного выхода)
14 Кнопка FAN SPEED (установка скорости вентилятора и включение
Wi-Fi)
15 Кнопки и (установка температуры и часа)
16 Индикатор SLEEP (спящий режим)
17 Кнопка SLEEP (установить спящий режим)
18 Кнопка MODE (установка режима работы)
19 Кнопка MIRAGE
(включение или выключение переднего дисплея прибора)
20 Индикатор MIRAGE (передний дисплей прибора)
21 Кнопка (настройка таймера)
22 Индикатор TIMER (работа таймера отключена)
Дистанционное управление
1 Иконка
(соединение Wi-Fi включено)
2 Индикатор Fan (вентилятор)
3 Иконка аккумулятора
4 Индикатор Dry (осушение)
5 Индикатор °C (выбранная единица температуры)
6 Индикатор Hr (часы)
7 Индикатор °F (выбранная единица температуры)
8 Индикатор Sleep (спящий режим)
9 Кнопки (установка температуры и часа)
10 Кнопка (установка режима работы)
11 Кнопка (установка скорости вентилятора)
12 Кнопка (переключатель между градусами °цельсия и
°фаренгейта)
13 Кнопка (установить спящий режим)
14 Кнопка (регулировка воздушного выхода, режим SWING)
15 Кнопка TIMER (настройка таймера)
16 Кнопка POWER (выключатель прибора включен / выключен)
17 Иконка Настройка вентилятора на LOW (низкая скорость)
Иконка Настройка вентилятора на MEDIUM (средняя скорость)
Иконка Настройка вентилятора на HIGH (высокая скорость)
18 Индикатор Swing (качающаяся поворотная крышка)

66
CL3750_IM_neu 18.12.2019
19 Дисплей температуры (или индикатор часов при установке тай-
мера или при использовании рабочего режима «вентилятор» или
«обезвоживание»)
20 Иконка (работа таймера отключена)
21 Индикатор Cool (охлаждение)
Примечания по использования
ВНИМАНИЕ: Важно перед первым включением или после
транспортировки!
Перед первым включением прибор следует выдержать не менее
3 часов в вертикальном положении, чтобы хладагент стек вниз.
В противном случае существует риск повреждения компрессора.
ВНИМАНИЕ:
• При прерывании работы с помощью кнопки POWER
перед
повторным включением прибора подождите не менее 3 минут.
• Перед тем, как переместить устройство в другое место, слейте
воду из резервуара для воды!
• Эффективнее всего прибор работает в помещениях размером до
70 м³.
• Гибкий шланг для отработанного воздуха и переходник были изго-
товлены специально для этого прибора. Во избежание неверной
работы не заменяйте ее на другую.
• Отводная труба может вытягиваться на 150 см. Не используйте
удлинители.
• Обеспечьте свободный приток воздуха. Не пережимайте и не
перекручивайте трубу. Блокировка циркуляции может привести к
перегреву устройства.
• Закройте все окна и двери во избежание притока наружного воз-
духа в комнату, что снижает эффективность работы.
Подготовка прибора к работе
Размещение
• При установке прибора соблюдайте расстояние не менее 50 см
между прибором и стенами или другими предметами.
• Поверхность должна быть ровной и сухой.
Сборка отводной трубы
ПРИМЕЧАНИЯ:
Для скользящих окон или наружных роликовых штор вы можете
использовать поставляемый комплект для выпуска воздуха через
окна с вертикальной или горизонтальной ориентацией. Отрегули-
руйте размер уплотнительной пластины.
1. Подключите адаптер к выпускному шлангу. Проложите выпускной
шланг так, чтобы первое ребро шланга лежало на направляющей.
Затяните адаптер, повернув его по часовой стрелке.
2. Подключите адаптер к соединителю на задней стороне прибора.
Для этого установите шланг выпуска воздуха с адаптером в такое
положение, чтобы этикетка на адаптере была обращена вверх.
Всегда поворачивайте адаптер в сторону LOCK.
3. Вытяните трубу на нужную длину.
4. Прикрутите адаптер комплекта выпуска воздуха через окно к од-
ному концу шланга выпуска воздуха.
5. Высуньте свободный конец трубы в окно.
6. Закройте окно, насколько возможно. Также опустите жалюзи до
трубы, если есть.
Дистанционное управление
1. Откройте батарейный отсек снизу пульта ДУ.
2. Вставьте 2 батарейки типа R03 «AAA» 1,5 В, соблюдая полярность
(смотри обозначения на дне отсека)!
3. Закройте крышку батарейного отсека.
Шнур питания
Смотайте шнур питания с приспособления для намотки.
Электрическое подключение
1. Убедитесь, что параметры электрической сети соответствуют
требованиям к электропитанию прибора. Ознакомьтесь с инфор-
мационной табличкой.
2. Подключите прибор к правильно установленной и заземленной
розетке. Прозвучит звуковой сигнал, указывающий, что прибор
готов к работе. Прибор находится в дежурном режиме. Дисплей
показывает текущую температуру в комнате.
Включение / выключение
• Нажмите кнопку POWER
для включения прибора. Поворотная
крышка открывается автоматически. Предварительные настройки
устройства: режим «Охлаждение», температура 22 °C. Если ра-
бота была остановлена без отключения от сети, все настройки ра-
боты и температуры будут сохранены. Индикаторы соответствуют
данным настройкам.
• Нажмите кнопку POWER снова для выключения устройства.
Поворотная крышка зарывается автоматически.
Предохранительный механизм компрессора
Если работа прервана, активируется защитный механизм ком-
прессора. Это приостанавливает работу компрессора примерно на
3 минуты, чтобы уменьшить давление в контуре охлаждения. Это не
является сбоем в работе изделия. Поэтому, подождите в течение, по
крайней мере, 3 минут, перед тем, как включить его снова.
Информация в приложении
«Smart Life - Smart Living»
Приложение Smart Life - Smart Living доступно для android и iOS.
Сканируйте соответствующий код QR, чтобы сразу перейти к за-
грузке.
ПРИМЕЧАНИЯ:
В зависимости от провайдера связи при загрузке приложения мо-
жет взиматься плата.
Google Play App Store
Информация об использовании приложения
Этот прибор допускает управление по домашней сети. Условием для
этого станет постоянное подключение по Wi-Fi к маршрутизатору (ро-
утеру) и наличие бесплатного приложения «Smart Life - Smart Living».
С помощью приложения можно легко управлять всеми функциями
прибора. Поскольку приложение постоянно совершенствуется, здесь
невозможно более подробно описать его работу.
Мы рекомендуем отключить прибор от электропитания, когда никого
нет дома, чтобы предотвратить нежелательное включение без ва-
шего присутствия!
Системные требования для использования приложения
• iOs 8.0 и выше
• Android 4.4 и выше

67
CL3750_IM_neu 18.12.2019
Начало эксплуатации приложения
1. Установите приложение «Smart Life - Smart Living». Создайте учет-
ную запись (аккаунт) пользователя.
2. Активируйте функцию Wi-Fi в настройках прибора.
3. Устанавливайте прибор воздушного кондиционирования на рас-
стоянии 5 метров от роутера.
4. Нажмите и удерживайте кнопку FAN SPEED примерно 5 секунд.
Индикатор Wi-Fi
быстро мигает.
5. Запустите приложение и выберите « + » .
6. Выберите меню «воздушный кондиционер» и следуйте инструк-
циям на дисплее.
7. После успешного подключения прибора загорается индикатор
Wi-Fi.
Теперь можно управлять прибором из приложения.
ПРИМЕЧАНИЯ:
• Прибор может работать только с роуторами 2,4 ГГц. Работа с
роутерами 5 ГГц не поддерживается.
• Прибор оснащается только одним сетевым соединением. Он не
может быть выключен.
Порядок работы с прибором
• Выполняемые через прибор настройки не передаются на пульт
дистанционного управления.
• Как только вы нажмете кнопку на пульте дистанционного управ-
ления, прибор будет выполнять соответствующие настройки с
пульта дистанционного управления.
• Ваш выбор будет появляться на дисплее пульта дистанционного
управления.
• Кнопки и нужно нажать несколько раз для выбора опреде-
ленных функций.
Кнопки панели управления рассмотрены ниже. Индикаторы будут
показывать ваш выбор.
Режимы работы
Используйте кнопку MODE для выбора одного из следующих режи-
мов:
• Охлаждение
COOL
• Осушение DRY
• Вентилятор FAN
Режим «Охлаждение»
В данном режиме работы можно по мере необходимости отрегулиро-
вать скорость вентилятора и температуру.
ПРИМЕЧАНИЯ:
Для эксплуатации изделия с компрессором, установленная темпе-
ратура должна быть ниже текущей температуры в помещении.
Режим «Вентилятор»
Этот режим служит только для установки скорости вентилятора.
Режим «Осушение»
• В этом режиме нет дополнительных настроек.
• Скорость вентилятора устанавливается на самый низкий уровень
LOW.
• Кондиционер охладит комнату и извлечет влагу из воздуха.
• При длительном использовании режима обезвоживания мы
рекомендуем постоянное соединение шланга подачи воды с
верхним водостоком (см. иллюстрацию). Сначала снимите пробку.
Установите конец водяного шланга в контейнер соответствующего
размера (например, в ведро).
Настройка вентилятора
В режимах «Охлаждение» и «Вентилятор» вы можете установить
скорость вентилятора с 3 настройками. Нажмите кнопку FAN SPEED.
• LOW (низкий)
• MEDIUM (средний)
• HIGH (высокий)
Установка температуры
• Используйте кнопки
или в режиме «Охлаждение» для уста-
новки температуры.
• Выберите температуру между 16 °C (61 °F) и 31 °C (88 °F).
ПРИМЕЧАНИЯ:
Переключение градусов °цельсия и °фаренгейта возможно только
кнопкой
на пульте дистанционного управления.
«Спящий режим»
• Нажмите кнопку SLEEP, когда прибор включен и находится в ра-
бочем режиме «Охлаждение».
• Скорость вентилятора устанавливается на самый низкий уровень
LOW. Это нельзя изменять.
• Дисплей выключится через 10 секунд.
• После часа работы в режиме «Спящий» предустановленная
температура будет автоматически увеличена на 1° C. То же самое
будет сделано еще через час. Таким способом достигается ком-
фортная температура в комнате.
Регулировка воздуха на выходе
Используйте кнопку
, чтобы установит направление исходящего
потока воздуха.
• Нажимаете кнопку
несколько раз, пока поворотная крышка не
установится в нужное положение.
Таймер (Автоматический таймер)
Используйте функцию таймера для установки времени включения и
выключения прибора. Выберите время между 1 и 24 часами.
Использование таймера для автоматического включения
1. Нажмите кнопку POWER
для включения прибора.
2. Выберите режим работы, температуру и скорость вентилятора
для работы после включения в назначенное время.
3. Нажмите кнопку POWER для выключения прибора.
4. Нажмите на кнопку . Начнет мигать количество часов.
5. Необходимое количество часов можно задать с помощью кнопок
и . Режим настройки автоматически завершается прим. че-
рез 5 секунд. Включается работа таймера и загорается индикатор
TIMER.
ПРИМЕЧАНИЯ:
Не нажимайте кнопку
после настройки часов, иначе не будут
сохранены сведения о работе таймера.

68
CL3750_IM_neu 18.12.2019
Использование таймера для автоматического выключения
1. Нажмите кнопку POWER
для выключения прибора.
2. Нажмите на кнопку во время работы. Начнет мигать количество
часов.
3. Задайте режим таймера, как рассмотрено выше в пункте 5.
ПРИМЕЧАНИЯ:
• Если хотите деактивировать уже установленный таймер,
дважды нажмите кнопку
. Индикатор TIMER гаснет.
• Также вы можете отменить таймер нажав кнопку POWER
для
включения / выключения прибора.
Кнопка MIRAGE
Нажмите кнопку MIRAGE, чтобы включить или выключить передний
дисплей прибора.
Опустошение резервуара для воды
В прибор встроен резервуар для сбора конденсата. Когда бак с
водой заполнен, загорается контрольная лампа
BUCKET FULL.
Прибор выключается.
ВНИМАНИЕ:
Не перемещайте прибор с полным баком воды. Вода может по-
пасть в прибор.
Вы должны освободить резервуар от воды для продолжения работы
кондиционера. Для этого потребуется половая тряпка, миска с водой
емкостью примерно 0,5 литр и шланг для воды, поставляемый с
прибором.
1. Отключите вилку из розетки.
2. Поместите половую тряпку и таз под отводное отверстие. По воз-
можности поставьте миску ниже, чем прибор.
3. Снимите нижнюю пробку.
4. Подключите шланг для воды к водосливному отверстию прибора.
Опустите конец шланга в миску.
5. После слива воды удалите шланг для воды. Используйте эту
пробку снова, чтобы закрыть слив воды из прибора.
Остановка работы
1. Нажмите кнопку POWER
для выключения прибора.
2. Отсоедините вилку от розетки сети.
Приспособление для намотки шнура питания
Намотайте шнур питания на приспособление для намотки. Вставьте
вилку в соответствующие отверстия.
Очистка
ПРЕДУПРЕЖДЕНИЕ:
• Всегда отключайте прибор от сети электропита-
ния перед чисткой!
ПРЕДУПРЕЖДЕНИЕ:
• Следите за тем, чтобы в отверстия устройства во
время чистки не попадала вода. Это может быть
причиной электрического удара или пожара.
ВНИМАНИЕ:
• Не разбрызгивайте на устройство чистящие средства.
• Не используйте проволочные щётки или другие царапающие
предметы.
• Не используйте сильные или царапающие чистящие средства.
Фильтр
Если устройство используется ежедневно, очищайте фильтр раз в
2 недели. Если пыль блокирует вентиляцию, эффективность работы
прибора невозможно гарантировать.
1. Выше места подключения выпускного шланга на задней части
прибора находится решетка с внутренним фильтром.
2. Снимите решетку с прибора и фильтр с решетки.
3. Очистите фильтр с помощью пылесоса.
4. Промойте фильтр под проточной водой. При необходимости ис-
пользуйте мягкое чистящее средство.
5. Дайте фильтру просохнуть в затененном месте.
6. После полной просушки фильтра снова установите его в решетку.
Углубления должны быть обращены вверх.
7. Установите снова решетку в прибор.
ВНИМАНИЕ:
Не используйте устройство, не установив фильтры!
Корпус
• Для чистки вентиляционных щелей используйте пылесос.
• Протрите корпус влажной тканью.
Сезонная чистка и хранение
Если устройство не используется в течение длительного срока,
чистку необходимо проводить следующим образом:
1. Слейте воду из водного резервуара, как описано выше.
2. Повторите операции 2 - 5 из раздела «Опустошение резервуара
для воды» через пробку для воды (верхнюю пробку).
3. Запустите устройство в режиме «Вентилятор» на 2 часа, чтобы
просушить внутренние части устройства.
4. Нажмите кнопку POWER
, чтобы выключить устройство. Отклю-
чите его от сети электропитания, вытащив вилку из розетки.
5. Отсоедините от устройства гибкую отводную трубу.
6. Оставьте оба отверстия для воды открытыми.
7. Очистите фильтр, а также устройство описанным выше способом.
8. Накройте устройство фольгой.
9. Всегда храните устройство в сухом, хорошо вентилируемом ме-
сте, недоступном для детей.
Устранение проблем
Проблема Возможная причина Решение
Устройство не работает. Отсутствует электропитание. Проверьте подключение к сети.
Активирована функция таймера.
Нажмите кнопку POWER
, чтобы включить устройство.
Наружная температура слишком низкая или
высокая.
Рекомендуется использовать прибор при наружной температуре
16 - 35 °C.
Прибор неисправен. Свяжитесь с вашим сервисным центром и пригласите специалиста.
См. прилагаемое руководство по использованию.

69
CL3750_IM_neu 18.12.2019
Проблема Возможная причина Решение
Кондиционер
недостаточно хорошо
охлаждает.
Устройство находится под воздействием
прямых солнечных лучей.
Выберите другое место расположения устройства или закройте
окна шторами.
В помещении открыты окна или двери. Закройте все окна и двери.
В помещении слишком много людей или
источников тепла.
Уберите переносные источники тепла или отключите их.
Фильтр загрязнен. Очистите фильтр.
Заблокировано отверстие выхода или
притока воздуха.
Устраните причину блокировки отверстия. Следите за тем, чтобы
вентиляционные отверстия не перекрывались.
Устройство работает
слишком шумно.
Нарушено вертикальное положение
устройства.
Поставьте устройство на ровную поверхность. Избегайте
воздействия вибраций на устройство.
В ходе работы прибор
отключается. Горит
красный индикатор
.
Бак с водой полон. Извлеките вилку шнура питания. Опустошите резервуар для воды
через нижнее отверстие для воды. После этого вы снова можете
использовать прибор.
Не работает дистанци-
онное управление.
Слишком большое расстояние до прибора. Переместитесь ближе к прибору.
Дистанционное управление не направлено
на датчик.
Держите дистанционное управление так, чтобы оно было направ-
лено на датчик. Убедитесь, что между пультом ДУ и датчиком нет
никаких препятствий.
Батарейки разряжены. Замените батарейки.
Дисплей на приборе: E1 Неисправен датчик температуры. Обратитесь в наш отдел обслуживания клиентов или к местному
дилеру.
Дисплей на приборе: E2
Обращайтесь в нашу службы обслуживания покупателей или к вашему дилеру, если у вас будут проблемы, не перечисленные в данной та-
блице, или если рекомендуемый способ устранения неисправности не действует.
Технические данные
Модель: ...........................................................................................CL 3750
Вес нетто: ............................................................................... прибл. 30,8 кг
Электропитание: ........................................................... 220 - 240 B~, 50 Гц
Потребляемая мощность: ...........................................................1345 ватт
Класс защиты: ............................................................................................
Класс энергоэффективности: .................................................................. A
Охлаждающая способность: ....................................12000 БТЕ (3,52 кВт)
Хладагент: ........................................................................................... R 290
Максимально допустимое рабочее давление:
Сторона давления: .................................................................... 1,8 МПа
Сторона всасывания: ................................................................ 0,6 МПа
Максимальное допустимое давление: ........................................3,0 МПа
WLAN (беспроводная локальная сеть)
Поддерживаемые сети: ........................................................... 802.11 b/g/n
Максимальная излучаемая выходная мощность: ...................... 100 мВт
Частотный диапазон: ....................................................................... 2,4 ГГц
Каналы: ................................................................................................ 1 - 13
Поддерживаемые ключи Wi-Fi:.............................................. WPA / WPA2
Сохранено право на технические и конструкционные изменения в
рамках продолжающейся разработки продукта.
Данное устройство соответствует всем текущим директивам CE,
таким как электромагнитная совместимость и низкое напряжение;
оно произведено в соответствии с новейшими правилами техники
безопасности.
Утилизация
Утилизация использованной батарейки
Как покупатель, вы юридически обязаны возвращать ис-
пользованные батарейки / аккумуляторы.
Извлеките батарейку из пульта дистанционного управления
перед утилизацией прибора.
Верните батарейку на пункт сбора старых батареек или опасных
отходов. Обращайтесь к местным властям для получения более
подробной информации.
Значение символа «корзина»
Защита окружающей среды: не допускается утилизация
электроприборов вместе с бытовыми отходами.
Утилизация устаревшей техники и неисправных электро-
приборов производится в городских приёмных пунктах.
Не допускайте неправильной утилизации отходов. Это наносит вред
окружающей среде и оказывает негативное воздействие на здоровье
людей.
Оказывайте содействие программе утилизации и другим формам
переработки электронной и электрической техники.
Информацию о пунктах утилизации бытовой техники можно получить
в местных органах власти.

70
CL3750_IM_neu 18.12.2019
" "
. :
.
.
.
.

71
CL3750_IM_neu 18.12.2019
3 ..
4 .. .
5 ..
6 ..
.
7 ..
:
!
•.
•.
:
1 ..
2 . " " 5 2
.( )
3 .. ""
4 .. .
POWER
5 ..
6 ..
7 ..
8 ..
9 ..
.
.
POWER
.
.° 35-16 .
. . .
. . .
. .
. .
.
.
. . .
. . . .
. .
.
. .
.
. .
.
.
.
.
. .
.
E1 :
E2 :
.
CL 3750 ..........................................................................................................................:
30,8
........................................................................................................ :
50 ~ 240-220 ...................................................................................:
1345..............................................................................................................:
0,8 .................................................................. :
I ................................................................................................................................:
A ........................................................................................................................:
( 3,52) 12000 ........................................................:
R290.....................................................................................................................................:
:
1,8.................................................................................................:
0,6.................................................................................................:
3,0..........................................................................:
b/g/n802.11 .....................................................................................................:
100 ................................................................................... :
2,4 ............................................................................................................:
13-1 ............................................................................................................................... :
WPA2/WPA ...................................................................................:
.
CE
.
.
/
.
.
.
.

72
CL3750_IM_neu 18.12.2019
""
.
" "
•.
•.
LOW
•.
• " "
.
.( ) .
.( )
. "" ""
.
FAN SPEED
•() LOW
•
() MEDIUM
•
() HIGH
. ""
. (F°88) 31 (F°61) 16
:
.
" "
•.""
SLEEP
•. .LOW
•.
10
• 1
""
. .
.
.
•.
( )
.
. 24
1 ..
POWER
2 .
.
3 .. POWER
4 .. . .
5 . .
.
TIMER .
5
:
.
1 ..
POWER
2 .. .
3 ..5
:
•.TIMER .
•
POWER
.
MIRAGE
.
MIRAGE
.
. .
BUCKET FULL
:
. .
.
. 0,5
1 ..
2 . .
.
3 ..
4 .. .
5 . .
.
1 ..
POWER
2 ..
. .
:
•!
• .
.
:
•.
•.
•.
.
.
1 ..
2 ..

73
CL3750_IM_neu 18.12.2019
:
•!
!
•. 70
• .
.
•. . 150
• . .
.
•
.
• 50
.
•.
:
. .
1 . .
.
.
2 . .
.
LOCK .
3 ..
4 ..
5 ..
6 .
.
.
1 ..
2 . ) R03 "AAA" 1,5
!(
3 ..
.
1 .
.
.
2 . .
. . .
/
•
.
.
POWER
. .22 ""
.
.
•.
. POWER
3
3 . .
.
"Smart Life - Smart Living"
.iOS Smart Life - Smart Living
.
( )
:
.
App Store Google Play
.
."
"
Wi-Fi
.
.
!
• iOs 8.0
• Android 4.4
1 .. "Smart Life - Smart Living"
2 . . Wi-Fi
3 ..
5
4 ..
Wi-Fi .
5 FAN SPEED
5 .."+"
6 .. " "
7 . . Wi-Fi
.
:
• 5 . 2,4
.
•. .
•.
•
.
•.
•.
. .
:
MODE
•(
COOL)
•(
DRY)
•(FAN)
""
.
:
.

74
CL3750_IM_neu 18.12.2019
:
• .
!
•.
.
•.
• .( )
!
•
.
•.
• .
.
.
:
• ""
.
•.
• .
.
1 ..
2 .
.
3 ..
1
1
2
1
( ) 1
2 1
1
1
() 2
( ) 1
2
3
4
5
6
7
8
9
10
11
12
13
14
15
16
17
2 18
()
FAN 1
() COOL 2
( )
DRY 3
4
( )
HIGH 5
( ) LOW 6
( ) MEDIUM 7
POWER 8
(Wi-Fi )
Wi-Fi 9
( ) BUCKET FULL 10
( /) POWER 11
( ) SWING 12
( )
13
(Wi-Fi )
FAN SPEED 14
( ) 15
( ) SLEEP 16
(" " ) SLEEP 17
( )
MODE 18
( )
MIRAGE 19
( ) MIRAGE 20
( ) 21
( ) TIMER 22
(Wi-Fi )
1
() Fan 2
3
( ) Dry 4
( ) °C 5
() Hr 6
( ) °F 7
( ) Sleep 8
( ) 9
( ) 10
(Wi-Fi ) 11
(° ° ) 12
(" " ) 13
(SWING , ) 14
( ) TIMER 15
( /) POWER 16
( ) LOW 17
( ) MEDIUM
( ) HIGH
( ) Swing 18
) 19
(" " ""
( ) 20
() Cool 21
! :
3
. .
:
• 3 POWER
.

75
CL3750_IM_neu 18.12.2019
:
•.
•:
- .
- .
- .
- .
•.
•.
•. 15
! :
•!
•!
•. R290
•.
•.
• .
•.
•. /
•.
•. 50
•.
•. .
•.
• .
.
•.
•.
•.
•.
POWER
•.
3
•
. .
.
•.
• 8
,
.
•.
• .
•.""
•T, 250V AC, 3,15A :

76
CL3750_IM_neu 18.12.2019
. .
.
:
:
.
:
.
. :
3 ....................................................................................................
4 .......................................................................
76 ...............................................................................................................
76 ................................................................................
74 ..........................................................................................................
74 ....................................................................................................
74 .................................................................................................................
74 ..................................................................................................
74 .....................................................................
74 ..........................................................................................................................
74 ............................................................................................................
74 ......................................................................................................................
73 ................................................................................................................
73 ..................................................................................................................................
73 ............................................................................................................
73 ..........................................................................................................
73 .........................................................................................................................
73 ...................................................................................................................
73 ............................................................................................. /
73 ...............................................................................................................
73 ....................................................."Smart Life - Smart Living"
73 ...............................................................................
73 ............................................................................
73 .....................................................................................................
73 ..............................................................................................................
73 ....................................................................................................................
72 .......................................................................................................................
72 ..............................................................................................................
72 ....................................................................................................................." "
72 ...............................................................................................................
72 ......................................................................................................( )
72 ...................................................................................................................... MIRAGE
72 .................................................................................................................
72 .......................................................................................................................
72 ........................................................................................................
72 ........................................................................................................................
72 .............................................................................................................................
71 ..................................................................................................................................
71 .............................................................................................
71 ..................................................................................................
71 ............................................................................................................
71 ..........................................................................................................
71 ............................................................................................................
70 ................................................................................................" "
. .
.
• .
.
• .
. ( )
. .
•
( )
.
• .
.
• .
• )
. (
:
!
!
! :
!
www.sli24.de :
.() "Downloads" CL 3750
•
.
• .
.

CL3750_IM_neu 18.12.2019

CL3750_IM_neu 18.12.2019
Stand 11 / 2019
CL 3750
Internet: http://www.clatronic-germany.de
Made in P.R.C.
-
 1
1
-
 2
2
-
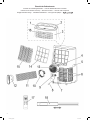 3
3
-
 4
4
-
 5
5
-
 6
6
-
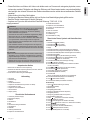 7
7
-
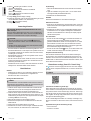 8
8
-
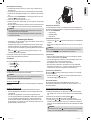 9
9
-
 10
10
-
 11
11
-
 12
12
-
 13
13
-
 14
14
-
 15
15
-
 16
16
-
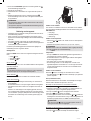 17
17
-
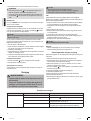 18
18
-
 19
19
-
 20
20
-
 21
21
-
 22
22
-
 23
23
-
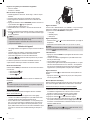 24
24
-
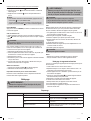 25
25
-
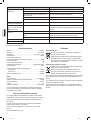 26
26
-
 27
27
-
 28
28
-
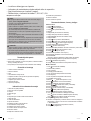 29
29
-
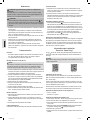 30
30
-
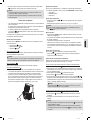 31
31
-
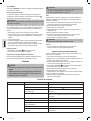 32
32
-
 33
33
-
 34
34
-
 35
35
-
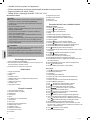 36
36
-
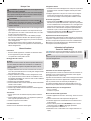 37
37
-
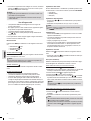 38
38
-
 39
39
-
 40
40
-
 41
41
-
 42
42
-
 43
43
-
 44
44
-
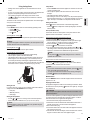 45
45
-
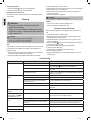 46
46
-
 47
47
-
 48
48
-
 49
49
-
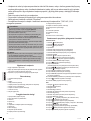 50
50
-
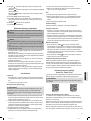 51
51
-
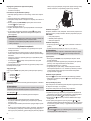 52
52
-
 53
53
-
 54
54
-
 55
55
-
 56
56
-
 57
57
-
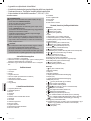 58
58
-
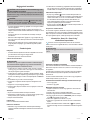 59
59
-
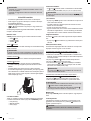 60
60
-
 61
61
-
 62
62
-
 63
63
-
 64
64
-
 65
65
-
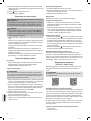 66
66
-
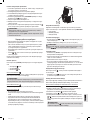 67
67
-
 68
68
-
 69
69
-
 70
70
-
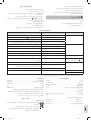 71
71
-
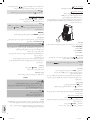 72
72
-
 73
73
-
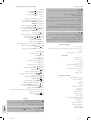 74
74
-
 75
75
-
 76
76
-
 77
77
-
 78
78


