
C3300
Gebruikershandleiding
C3300
Gebruikershandleiding
De inhoud van deze handleiding kan op bepaalde punten afwijken van
uw telefoon, afhankelijk van de software op de telefoon of uw service
provider.
Part No. MMBB0147408
Issue 1.0
Printed in Korea

C3300 Gebruikershandleiding
NEDERLANDS

[ 4 C3300 Gebruikershandleiding ]
C3300
Inhoudsopgave
Introductie . . . . . . . . . . . . . . . . . . . . 8
Richtlijnen voor juist
en veilig gebruik . . . . . . . . . . . . . . . 9
C3300 functies . . . . . . . . . . . . . . . . 14
Onderdelen van de telefoon . . . . . 14
Scherminformatie . . . . . . . . . . . . . 18
Toestel klaarmaken
voor gebruik . . . . . . . . . . . . . . . . . . 20
De SIM-kaart en
de batterij installeren . . . . . . . . . . . . .20
De batterij opladen . . . . . . . . . . . . . . 22
Oplader loskoppelen . . . . . . . . . . . . 23
Telefoon aan- en uitzetten . . . . . . . 24
Telefoon aanzetten . . . . . . . . . . . . . 24
Telefoon uitzetten . . . . . . . . . . . . . . 24
Toegangscodes . . . . . . . . . . . . . . . 24
PIN-code . . . . . . . . . . . . . . . . . . . . . 24
PIN2-code . . . . . . . . . . . . . . . . . . . . 25
PUK-code . . . . . . . . . . . . . . . . . . . . 25
PUK2-code . . . . . . . . . . . . . . . . . . . 25
Beveiligingscode . . . . . . . . . . . . . . . 25
Blokkeerwachtwoord . . . . . . . . . . . 25
Hoofdfuncties . . . . . . . . . . . . . . . . 26
Bellen en gebeld worden . . . . . . . . 26
Bellen . . . . . . . . . . . . . . . . . . . . . . . 26
Bellen via de verzendtoets . . . . . . . . 26
Internationaal bellen . . . . . . . . . . . . . 26
Een oproep beëindigen . . . . . . . . . . 27
Bellen via het Telefoonboek . . . . . . . 27
Volume aanpassen . . . . . . . . . . . . . 27
Een oproep beantwoorden . . . . . . . . 27
Snel overschakelen naar
Alleen trilfuntie . . . . . . . . . . . . . . . . . 28
Sterkte netwerksignaal . . . . . . . . . . . 28
Tekst invoeren . . . . . . . . . . . . . . . . . 28
Modus tekstinvoer veranderen . . . . . 29

[ 5 C3300 Gebruikershandleiding ]
Contacten . . . . . . . . . . . . . . . . . . . . 33
Menu inkomende oproepen . . . . . . 33
Tijdens een oproep . . . . . . . . . . . . . 33
Conferentiegesprekken . . . . . . . . . 35
Een tweede oproep verrichten . . . . . 35
Een conferentiegesprek
beëindigen . . . . . . . . . . . . . . . . . . . . 37
Menuoverzicht . . . . . . . . . . . . . . . . 38
Selecteren van
functies en opties . . . . . . . . . . . . . 40
Speciaal . . . . . . . . . . . . . . . . . . . . . 41
My Media . . . . . . . . . . . . . . . . . . . . 42
Foto's . . . . . . . . . . . . . . . . . . . . . . . 42
Afbeeldingen . . . . . . . . . . . . . . . . . 42
Geluiden . . . . . . . . . . . . . . . . . . . . . 42
Spelletjes & meer . . . . . . . . . . . . . . 42
Oproep-info . . . . . . . . . . . . . . . . . . 45
Gemiste oproepen . . . . . . . . . . . . . 45
Ontvangen oproepen . . . . . . . . . . . 45
Uitgaande oproepen . . . . . . . . . . . 46
Laatste oproepen verwijderen . . . . 46
Oproeptarieven . . . . . . . . . . . . . . . 46
Oproepduur . . . . . . . . . . . . . . . . . . . 46
Oproepkosten . . . . . . . . . . . . . . . . . 47
Instellingen . . . . . . . . . . . . . . . . . . . 47
GPRS info . . . . . . . . . . . . . . . . . . . 48
Oproepduur . . . . . . . . . . . . . . . . . . . 48
Gegevensvolumes . . . . . . . . . . . . . . 48
Berichten . . . . . . . . . . . . . . . . . . . . 49
Schrijf nieuw bericht . . . . . . . . . . . 49
Multimediabericht schrijven . . . . . 51
Inbox . . . . . . . . . . . . . . . . . . . . . . . 53
Outbox . . . . . . . . . . . . . . . . . . . . . . 54
Concepten . . . . . . . . . . . . . . . . . . . 56
Voicemail beluisteren . . . . . . . . . . 57
Info-bericht . . . . . . . . . . . . . . . . . . . 57
Lezen . . . . . . . . . . . . . . . . . . . . . . . 57
Onderwerpen . . . . . . . . . . . . . . . . . . 57
Sjablonen . . . . . . . . . . . . . . . . . . . . 58
Tekstsjabloon . . . . . . . . . . . . . . . . . 58
Multimediasjablonen . . . . . . . . . . . . 59
Handtekening . . . . . . . . . . . . . . . . . 60
Instellingen . . . . . . . . . . . . . . . . . . 60
Tekst bericht . . . . . . . . . . . . . . . . . . 60
Multimediabericht . . . . . . . . . . . . . . . 61
Voice mail centre . . . . . . . . . . . . . . . 62
Info-bericht . . . . . . . . . . . . . . . . . . . 62
Push bericht . . . . . . . . . . . . . . . . . . 63
t-zones . . . . . . . . . . . . . . . . . . . . . . 64
Contacten . . . . . . . . . . . . . . . . . . . . 65
Zoeken . . . . . . . . . . . . . . . . . . . . . . 65
Nieuw toevoegen . . . . . . . . . . . . . . 66
Bellergroepen . . . . . . . . . . . . . . . . 66
Snelkiezen . . . . . . . . . . . . . . . . . . . 67

[ 6 C3300 Gebruikershandleiding ]
Instellingen . . . . . . . . . . . . . . . . . . 67
Geheugen instellen . . . . . . . . . . . . . 67
Zoeken als . . . . . . . . . . . . . . . . . . . . 68
Weergave-opties . . . . . . . . . . . . . . . 68
Alles kopiëren . . . . . . . . . . . . . . . . 68
Alles wissen . . . . . . . . . . . . . . . . . . 68
Informatie . . . . . . . . . . . . . . . . . . . . 69
Organiser . . . . . . . . . . . . . . . . . . . . 70
Alarmklok . . . . . . . . . . . . . . . . . . . . 70
Planner . . . . . . . . . . . . . . . . . . . . . . 71
Calculator . . . . . . . . . . . . . . . . . . . . 72
Conversieprogr. . . . . . . . . . . . . . . . 72
Wereldtijd . . . . . . . . . . . . . . . . . . . . 73
Stemrecorder . . . . . . . . . . . . . . . . . 74
Opnemen . . . . . . . . . . . . . . . . . . . . 74
Lijst bekijken . . . . . . . . . . . . . . . . . . 74
Memory status . . . . . . . . . . . . . . . . 75
S/W version . . . . . . . . . . . . . . . . . . 75
Camera . . . . . . . . . . . . . . . . . . . . . . 76
Foto nemen . . . . . . . . . . . . . . . . . . 76
Camera mode . . . . . . . . . . . . . . . . . 78
Mijn foto's . . . . . . . . . . . . . . . . . . . 79
Instellingen . . . . . . . . . . . . . . . . . . 80
Status geheugen . . . . . . . . . . . . . . 80
Instellingen . . . . . . . . . . . . . . . . . . 81
Profielen . . . . . . . . . . . . . . . . . . . . . 81
Het profiel wijzigen . . . . . . . . . . . . . . 81
Aanpassen profiel
- personaliseren . . . . . . . . . . . . . . . . 81
Aanpassen profiel
- hernoemen . . . . . . . . . . . . . . . . . . 82
Datum & tijd . . . . . . . . . . . . . . . . . . 83
Datum instellen . . . . . . . . . . . . . . . . 83
Datumnotatie . . . . . . . . . . . . . . . . . . 83
Tijd instellen . . . . . . . . . . . . . . . . . . 83
Tijdnotatie . . . . . . . . . . . . . . . . . . . . 83
Telefooninstellingen . . . . . . . . . . . 84
Instellingen weergeven . . . . . . . . . . 84
Taal . . . . . . . . . . . . . . . . . . . . . . . . . 84
Oproepinstellingen . . . . . . . . . . . . 85
Oproepdoorschakelen . . . . . . . . . . . 85
Antwoordmodus . . . . . . . . . . . . . . . . 86
Mijn nummer meezenden . . . . . . . . . 86
Oproep in wacht . . . . . . . . . . . . . . . 86
Minuutmelder . . . . . . . . . . . . . . . . . . 86
Automatische nummerherhaling . . . . 87
Besloten gebruikersgroep . . . . . . . . 87
Beveiligingsinstellingen . . . . . . . . 88
PINcodeverzoek . . . . . . . . . . . . . . . 88
Telefoonblokkering . . . . . . . . . . . . . . 88
Oproep blokkeren . . . . . . . . . . . . . . 89
Vast oproepnummer . . . . . . . . . . . . . 90
Codes wijzigen . . . . . . . . . . . . . . . . 90

[ 7 C3300 Gebruikershandleiding ]
Netwerkinstellingen . . . . . . . . . . . . 91
Automatisch . . . . . . . . . . . . . . . . . . . 91
Handmatig . . . . . . . . . . . . . . . . . . . . 91
Favorieten . . . . . . . . . . . . . . . . . . . . 91
GPRS-instellingen . . . . . . . . . . . . . 92
Aanzetten . . . . . . . . . . . . . . . . . . . . 92
Wanneer nodig . . . . . . . . . . . . . . . . 92
Internet . . . . . . . . . . . . . . . . . . . . . . 93
Thuis . . . . . . . . . . . . . . . . . . . . . . . . 94
Favorieten . . . . . . . . . . . . . . . . . . . 94
Profielen . . . . . . . . . . . . . . . . . . . . . 95
Ga naar URL . . . . . . . . . . . . . . . . . . 97
Cache-instellingen . . . . . . . . . . . . . . 98
Cookies instellingen . . . . . . . . . . . . . 98
Veiligheidscertificaat . . . . . . . . . . . . 98
Profielen terugzetten . . . . . . . . . . . . 99
Browserversie . . . . . . . . . . . . . . . . . 99
Instellingen terugzetten . . . . . . . . . 99
V&A . . . . . . . . . . . . . . . . . . . . . . . 100
Accessoires . . . . . . . . . . . . . . . . . 103
Technische gegevens . . . . . . . . . 104

[ 8 C3300 Gebruikershandleiding ]
Gefeliciteerd met de aanschaf van de geavanceerde en compacte
mobiele telefoon C3300, met de laatste digitale mobiele
communicatietechnologie.
Deze gebruikershandleiding bevat belangrijke informatie over het
gebruik en de bediening van uw telefoon. Lees alle informatie
aandachtig door om het toestel optimaal te benutten en schade aan
of misbruik van de telefoon te voorkomen. Bij aanpassingen aan de
telefoon die niet uitdrukkelijk in deze gebruikershandleiding zijn
vermeld, kan de garantie op het toestel vervallen.
Introductie

[ 9 C3300 Gebruikershandleiding ]
Lees deze eenvoudige richtlijnen door. Het niet respecteren van de
voorschriften kan gevaarlijk of illegaal zijn. Meer informatie vindt u
in deze handleiding.
Blootstelling aan RF-energie
Informatie over blootstelling aan radiogolven en over SAR
(Specific Absorption Rate)
Deze mobiele telefoon, model C3300, is ontworpen in o
vereenstemming met de limiet voor blootstelling aan radiogolven.
Deze limiet is gebaseerd op wetenschappelijke richtlijnen waarbij
veiligheidsmarges zijn ingebouwd om de veiligheid van alle
personen te kunnen waarborgen, ongeacht hun leeftijd of
gezondheidstoestand.
• De richtlijnen voor blootstelling aan radiogolven worden uitgedrukt
in de maateenheid SAR (Specific Absorption Rate). SAR-testen
worden uitgevoerd volgens een standaardmethode, waarbij de
telefoon in alle frequentiebanden het hoogst toegestane
energieniveau gebruikt.
• Hoewel er verschillen kunnen zijn tussen de SAR-niveaus van
verschillende modellen LG-telefoons, voldoen deze allemaal aan
de eisen op het gebied van blootstelling aan radiogolven.
• De door de ICNIRP (International Commission on Non-Ionizing
Radiation Protection) geadviseerde SAR-limiet is gemiddeld 2
W/kg per tien (10) gram weefsel.
• De hoogst gemeten SAR-waarde voor dit type telefoon tijdens
tests tegen het oor is 1.05 W/kg (per 10 gram).
• Informatie over SAR-waarden voor inwoners van landen/regio’s
waar de SAR-limiet wordt gehanteerd zoals geadviseerd door het
IEEE (Institute of Electrical and Electronics Engineers), 1,6 W/kg
gemiddeld per één (1) gram weefsel (bijvoorbeeld VS, Canada,
Australië en Taiwan).
Richtlijnen voor juist en veilig gebruik

[ 10 C3300 Gebruikershandleiding ]
Onderhoud
Waarschuwing: gebruik uitsluitend batterijen, opladers en
accessoires die zijn goedgekeurd voor dit specifieke type
telefoon.
Het gebruik van andere types kan gevaarlijk zijn en kan de
garantie op het toestel doen vervallen.
• Haal het toestel niet uit elkaar. Raadpleeg voor reparaties een
erkend technicus.
• Houd het toestel uit de buurt van elektrische apparaten zoals tv,
radio en pc.
• Houd het toestel uit de buurt van warmtebronnen zoals radiators en
fornuizen.
• Laat het toestel niet vallen.
• Stel het toestel niet bloot aan mechanische trillingen of schokken.
• Het omhulsel van het toestel kan beschadigd raken als het wordt
verpakt in papier of vinylpapier.
• Gebruik een droge doek om de buitenkant van het toestel te
reinigen. (Gebruik geen oplosmiddelen zoals benzeen, thinner of
alcohol.)
• Stel het toestel niet bloot aan overmatige rook of stof.
• Houd het toestel uit de buurt van creditcards en andere pasjes;
dit kan de informatie op de magnetische strips beïnvloeden.
• Tik niet op het scherm met scherpe objecten, dit kan de telefoon
beschadigen.
• Stel het toestel niet bloot aan vocht.
• Gebruik de accessoires voorzichtig en volg de bijgeleverde
instructies op. Raak de antenne niet onnodig aan.
Richtlijnen

[ 11 C3300 Gebruikershandleiding ]
Efficiënt gebruik van de telefoon
Voor een optimale benutting met minimaal stroomverbruik:
• Houd de telefoon net zo vast als elke andere telefoon. Als u in de
microfoon spreekt, richt dan de antenne omhoog en boven uw
schouder. Als de antenne in- en uitgetrokken kan worden, dient
deze uitgetrokken te zijn tijdens een gesprek.
• Raak de antenne niet aan wanneer de telefoon in gebruik is.
Het aanraken van de antenne kan een nadelige invloed hebben
op de gesprekskwaliteit en kan ervoor zorgen dat de telefoon
meer stroom verbruikt dan noodzakelijk is.
• Als uw telefoon infrarood ondersteunt, richt de infraroodstraal dan
nooit op iemands oog.
Elektronische apparaten
Alle mobiele telefoons kunnen onderhevig zijn aan storingen die de
prestaties nadelig beïnvloeden.
• Gebruik uw telefoon niet in de buurt van medische apparatuur
zonder hiervoor vooraf toestemming te vragen. Houd de telefoon
op afstand van uw pacemaker, draag deze niet in een borstzak.
• Sommige gehoorapparaten kunnen storing ondervinden van
mobiele telefoons.
• De telefoon kan ook enige storing veroorzaken bij tv’s, radio’s,
pc’s, enz.
Veiligheid op de weg
Kijk de bestaande wetten en regels na over het gebruik van
mobiele telefoons in uw voertuig in de landen waar u rijdt.
• Houd de telefoon niet in de hand terwijl u aan het rijden bent.
• Houd uw aandacht bij de weg.
• Maak gebruik van een handsfree kit, indien beschikbaar.
Richtlijnen

[ 12 C3300 Gebruikershandleiding ]
• Als dit gezien de rijomstandigheden verstandiger is, verlaat dan
de weg en parkeer uw auto alvorens een telefoongesprek te gaan
voeren.
• RF-energie kan sommige elektronische systemen in uw
gemotoriseerde voertuig, zoals autoradio en
beveiligingsapparatuur, nadelig beïnvloeden.
• Als uw voertuig is voorzien van een airbag, plaats dan geen
geïnstalleerde of draadloze apparatuur in de ruimte boven de
airbag of waar de airbag wordt opgeblazen. Dit kan ernstige
verwondingen veroorzaken als de airbag wordt opgeblazen.
Explosiegebieden
Gebruik de telefoon niet op plaatsen waar met explosieven wordt
gewerkt. Houd u aan de geldende voorschiften en regels.
Mogelijk explosieve atmosfeer
• Gebruik de telefoon niet op tankstations. Gebruik hem niet in de
buurt van brandstof of chemicaliën.
• Vervoer of bewaar geen brandbaar gas, vloeistof of ander
materiaal op dezelfde plaats in uw voertuig als uw mobiele
telefoon en accessoires.
Vliegtuig
Draadloze apparatuur kan storingen veroorzaken in vliegtuigen.
• Schakel uw mobiele telefoon uit voordat u aan boord van een
vliegtuig gaat.
• Volg aan de grond de voorschriften van de luchtvaartmaatschappij
met betrekking tot gebruik van mobiele telefoons op.
Richtlijnen

[ 13 C3300 Gebruikershandleiding ]
Kinderen
Bewaar de telefoon op een veilige plaats buiten het bereik van
kleine kinderen. De telefoon bevat kleine afneembare onderdelen
die tot verstikking kunnen leiden.
Alarmnummers
Alarmnummers kunt u niet via alle GSM-netwerken bellen.
Zorg daarom dat u in noodsituaties nooit alleen afhankelijk bent
van de telefoon. Neem contact op met uw netwerkexploitant voor
meer informatie.
Informatie en onderhoud batterij
• U hoeft de batterij niet volledig te ontladen voor u deze oplaadt.
In tegenstelling tot andere batterijsystemen heeft dit systeem
geen geheugeneffect dat de capaciteit van de batterij beïnvloedt.
• Gebruik uitsluitend LG-batterijen en -laders. LG-laders zorgen
voor een maximale levensduur van de batterij.
• Haal de batterij niet uit elkaar en voorkom kortsluiting in de
batterij.
• Houd de metalen contactpunten van de batterij schoon.
• Vervang een bijna lege batterij. De batterij kan honderden malen
worden opgeladen voordat deze aan vervanging toe is.
• Laad de batterij opnieuw op als deze lange tijd niet is gebruikt,
voor een optimale betrouwbaarheid.
• Stel de batterijlader niet bloot aan direct zonlicht en gebruik deze
niet in vochtige ruimtes, zoals de badkamer.
• Bewaar de batterij niet op warme of koude plaatsen, omdat dit de
capaciteit van de batterij nadelig kan beïnvloeden.
• Neem bij het wegwerpen van batterijen de geldende voorschriften
in acht.
Richtlijnen

[ 14 C3300 Gebruikershandleiding ]
C3300 functies
Onderdelen van de telefoon
Voorkant
Headset aansluiting
Sub LCD-scherm
Cameralens
Zijtoetsen
omhoog/omlaag
- Als de klep gesloten is,
houdt u één van deze
toetsen ingedrukt om de
huidige tijd weer te
geven, de huidige datum
weer te geven en
weergave op het scherm
aan de buitenzijde
ongedaan te maken.
- Hiermee kunt u in de
standby-modus het
volume van het
toetsenbord aanpassen
als de klep open is.
- Tijdens een oproep kunt
u het volume van de
oortelefoon aanpassen.
n Opmerking
Als de cam-
eralens vies is,
kan dit van
invloed zijn op de
fotokwaliteit.

[ 15 C3300 Gebruikershandleiding ]
C3300 functies
Parts of the phone
Achterkant
Batterij
Opening voor een draagkoord
Ruimte voor SIM-kaart
Batterijcontacten
Opladeraansluiting /
Kabelaansluiting

[ 16 C3300 Gebruikershandleiding ]
C3300 functies
5. Alfanumerieke
toetsen
1. Oortelefoon
2. Linker softkey
6. LCD-scherm
8. Rechter softkey
7. Navigatietoetsen
9. Menu
/Bevestigingstoets
10. Cameratoets
11. Einde-
/Aan-uit-toets
13. Microfoon
12. Annuleertoets
3. T-zone toets
4. Verzendtoets
Menu Bericht
Klep open

[ 17 C3300 Gebruikershandleiding ]
C3300 functies
1. Oortelefoon
2, 8. Linker softkey/Rechter softkey: elk van deze toetsen
verricht de functie die erboven in het scherm wordt weergegeven.
3. t-zone toets: voor toegang tot de t-zone.
4. Verzendtoets: u kunt een telefoonnummer kiezen en een
oproep beantwoorden. In de standby-modus hebt u ook snel
toegang tot de laatste inkomende, uitgaande en gemiste
oproepen.
5. Alfanumerieke toetsen: u kunt cijfers, letters en speciale tekens
invoeren.
6. LCD-scherm: geeft icoontjes met telefoonstatus weer, evenals
menuopties, webinformatie, foto’s en meer, in kleur.
7. Navigatietoetsen: gebruik deze om de cursor naar boven,
beneden, links en rechts te verplaatsen. En in standby-modus
hebt u snel toegang tot de volgende functies.
• Bovenste navigatietoets ( ) : u kunt een contact zoeken
op naam door op deze toets te drukken in de standby-modus.
• Onderste navigatietoets ( ) : alle spraakmemo’s worden
weergegeven. Als u deze toets ingedrukt houdt, begint de
spraakopname direct.
• Linker navigatietoets ( ) : sneltoets naar het menu
profielen. Als u deze toets ingedrukt houdt, gaat u naar de
andere profiel-modus.
• Rechter navigatietoets ( ) : sneltoets naar de inbox voor
berichten.
9. Menu/Bevestigingstoets: opent het menu en bevestigt acties.
* Als u deze toets ingedrukt houdt in de standby-modus, wordt er
verbinding gemaakt met het internet.
10. Cameratoets: druk op deze toets om naar het menu Camera te
gaan in de standby-modus.

[ 18 C3300 Gebruikershandleiding ]
C3300 functies
11. Einde-/Aan-uit-toets: u kunt een oproep beëindigen of
weigeren met deze toets, en tevens teruggaan naar de
standby-modus. U houdt de toets ingedrukt om de telefoon aan
of uit te zetten.
12. Annuleertoets: om een teken links van de cursor te wissen,
drukt u kort op C. Als u de toets ingedrukt houdt worden alle
tekens op het scherm gewist. U kunt met deze toets ook
teruggaan naar het vorige scherm.
13. Microfoon: u kunt het geluid van de microfoon tijdens een
oproep uitschakelen. (Zie pagina 34.)
Scherminformatie
Op het scherm worden verschillende pictogrammen weergegeven.
Hieronder vindt u een beschrijving van elk pictogram of icoontje dat
op het scherm kan verschijnen.
Schermpictogrammen
Pictogram Beschrijving
Geeft aan hoe sterk het netwerksignaal is.
Geeft aan dat GPRS-diensten beschikbaar zijn.
Verschijnt wanneer er een gesprek wordt gevoerd.
Geeft aan dat u gebruik maakt van een roamingdienst.
Geeft aan dat de alarmklok is ingesteld en actief is.
Geeft de status van de batterij aan.
Geeft aan dat de trilfunctie is ingesteld.
Geeft aan dat het profiel Stil is geactiveerd.
Geeft aan dat het profiel Normaal is geactiveerd.
Geeft aan dat het profiel Luid is geactiveerd.

[ 19 C3300 Gebruikershandleiding ]
C3300 functies
Pictogram Beschrijving
Geeft aan dat het profiel Headset is geactiveerd.
Geeft aan dat het profiel Handsfree is geactiveerd.
Geeft aan dat een gesprek wordt doorgeschakeld.
Geeft aan dat de telefoon verbinding maakt met WAP.
Geeft aan dat u GPRS gebruikt.
Geeft aan dat u zich op de beveiligingspagina bevindt.
Geeft aan dat u een bericht hebt ontvangen.
Geeft aan dat u een voicemail hebt ontvangen.

[ 20 C3300 Gebruikershandleiding ]
Toestel klaarmaken voor gebruik
De SIM-kaart en de batterij installeren
1. Verwijder het batterijklepje.
Zorg ervoor dat de telefoon is uitgeschakeld voor u de batterij
verwijdert.
2. Verwijder de batterij.
Pak de batterij bij de bovenkant vast en haal deze uit het
batterijvak.
n Opmerking Verwijdering van de batterij als het toestel aanstaat,
kan tot storingen of defecten leiden.

[ 21 C3300 Gebruikershandleiding ]
Toestel klaarmaken voor gebruik
3. Plaats de SIM-kaart.
Schuif de SIM-kaart in de houder. Plaats de SIM-kaart in de SIM-
kaarthouder. Zorg ervoor dat de SIM-kaart juist is geplaatst en
dat de goudkleurige contactpunten naar beneden zijn gericht.
Druk licht en schuif de SIM-kaart in de tegenovergestelde
richting om de SIM-kaart te verwijderen.
4. Plaats de batterij.
Plaats de batterij met de onderkant onder
in het batterijvak. Druk vervolgens de
bovenkant van de batterij aan totdat deze
vastklikt.
5. Breng het batterijklepje weer op zijn plaats.
Plaats het batterijklepje weer op de
telefoon en verschuif het klepje totdat het
vastklikt.
n Let op Het metalen stukje in de SIM-kaart kan gemakkelijk worden
beschadigd door krassen. Behandel de SIM-kaart daarom
voorzichtig en volg de bij de kaart geleverde instructies op.
Plaatsen van de SIM-kaart Verwijderen van de SIM-kaart

[ 22 C3300 Gebruikershandleiding ]
Toestel klaarmaken voor gebruik
De batterij opladen
Om de reisadapter op de telefoon te kunnen aansluiten, moet er
een batterij zijn geplaatst.
1. Zorg dat de batterij volledig is opgeladen voordat u de telefoon
gaat gebruiken.
2. Druk de aansluiting van de batterijadapter (met de pijl naar
boven, zie diagram) in het aansluitpunt aan de onderkant van de
telefoon, totdat dit vastklikt.
3. Sluit het andere einde van de reisadapter aan op het stroomnet.
Gebruik alleen de meegeleverde oplader.
4. De balken van het batterijpictogram stoppen met bewegen als
het opladen is voltooid.
n Let op • Oefen niet te veel druk uit op de connector om beschadiging
van telefoon en/of reisadapter te voorkomen.
• Plaats de batterijoplader verticaal in de wandcontactdoos.
• Gebruikt u een batterijoplader uit uw eigen land, zorg er dan
voor dat u de juiste aansluitingsadapter hebt.
• Verwijder tijdens het opladen nooit de batterij of de SIM-kaart.
n Opmerking • Haal bij onweer het stroomsnoer en de oplader los, om
kortsluiting en brand te voorkomen.
• Zorg ervoor dat geen scherpe voorwerpen zoals tanden
en nagels van huisdieren in contact komen met de
batterij. Hierdoor zou brand kunnen ontstaan.
• Plaats of beantwoord geen oproepen met de telefoon tij-
dens het opladen. Dit kan leiden tot kortsluiting en/of elek-
trische schokken of brand.

[ 23 C3300 Gebruikershandleiding ]
Toestel klaarmaken voor gebruik
Oplader loskoppelen
1. Als de balkjes van het batterijpictogram niet meer bewegen en
‘Vol’ op het scherm verschijnt, is de batterij volledig opgeladen.
2. Haal de oplader uit het stopcontact. Koppel de oplader los van
de telefoon door op de grijze toetsen aan de zijkant van de
aansluiting te drukken terwijl u deze uit de telefoon trekt.
n Opmerking • Zorg ervoor dat de batterij volledig is opgeladen voor
u de telefoon voor het eerst gebruikt.
• Verwijder de batterij of de SIM-kaart nooit terwijl het
toestel aan het opladen is.
• Als de batterij niet voldoende is opgeladen, probeer
deze dan nogmaals op te laden nadat u de telefoon
uit en aan hebt gezet met de aan-/uit-toets. Verwijder
de batterij en plaats deze opnieuw, en probeer
vervolgens de batterij op te laden.

[ 24 C3300 Gebruikershandleiding ]
Toestel klaarmaken voor gebruik
Telefoon aan- en uitzetten
Telefoon aanzetten
1. Plaats de batterij in de telefoon en sluit de telefoon aan op
bijvoorbeeld de reisadapter, de aanstekeradapter of de
handsfree carkit. Of plaats een opgeladen batterij in de telefoon.
2. Druk enkele seconden op ( ) tot het LCD-scherm oplicht.
3. Afhankelijk van de PIN-code instellingen, dient u al dan niet de
PIN-code in te toetsen.
Telefoon uitzetten
1. Druk enkele seconden op ( ) tot het LCD-scherm wordt
uitgeschakeld.
Toegangscodes
Met de in dit hoofdstuk beschreven toegangscodes voorkomt u dat
er ongeoorloofd gebruik wordt gemaakt van uw telefoon.
De toegangscodes (met uitzondering van de PUK- en PUK2-codes)
kunnen worden gewijzigd via de functie Codes wijzigen
[Menu-9-5-5]. (Zie pagina 90.)
PIN-code
(4 tot 8 cijfers)
De PIN-code (Personal Identification Number) beveiligt de
SIM-kaart tegen onbevoegd gebruik. Gewoonlijk wordt deze code
samen met de SIM-kaart geleverd. Als u de optie Verzoek
PIN-code hebt geactiveerd, moet u telkens als u het toestel
aanzet deze code intoetsen. Is de optie Verzoek PIN-code
gedeactiveerd, dan maakt het toestel rechtstreeks verbinding met
het netwerk zonder om de PIN-code te vragen.
n Opmerking Vermijd net als bij andere radioapparatuur onnodig
contact met de antenne als uw telefoon is
ingeschakeld.

[ 25 C3300 Gebruikershandleiding ]
Toestel klaarmaken voor gebruik
PIN2-code
(4 tot 8 cijfers)
De PIN2-code, die bij sommige SIM-kaarten wordt geleverd, hebt u
nodig om toegang te krijgen tot bepaalde functies zoals Overzicht
telefoonrekening of Vast oproepnummer. Deze functies zijn
alleen beschikbaar als ze door uw SIM-kaart worden ondersteund.
PUK-code
(4 tot 8 cijfers)
De PUK-code (Personal Unblocking Key) is vereist om een
geblokkeerde PIN-code te wijzigen. Mogelijk zit de PUK-code al bij
de SIM-kaart. Is dat niet het geval, neem dan contact op met de
netwerkexploitant om de code aan te vragen. Neem ook bij verlies
van de PUK2-code contact op met uw netwerkexploitant.
PUK2-code
(4 tot 8 cijfers)
De PUK2-code, die bij sommige SIM-kaarten wordt geleverd, hebt
u nodig om een geblokkeerde PIN2-code te wijzigen. Neem ook bij
verlies van de PUK2-code contact op met uw netwerkexploitant.
Beveiligingscode
(4 tot 8 cijfers)
De beveiligingscode voorkomt dat onbevoegden gebruik kunnen
maken van uw telefoon. De code is standaard op ‘0000’ ingesteld
en u hebt de code nodig om alle ingevoerde telefoongegevens te
wissen en om het menu Instellingen resetten te activeren. U hebt
deze code tevens nodig om de telefoonbeveiliging te activeren en
deactiveren. Door de telefoonbeveiliging te activeren voorkomt u
ongeoorloofd gebruik van uw telefoon. U kunt de standaardcode
wijzigen in het menu Beveiligingsinstellingen.
Blokkeerwachtwoord
Het blokkeerwachtwoord hebt u nodig als u oproepen wilt
blokkeren. Het wachtwoord krijgt u van uw netwerkexploitant nadat
u zich op deze dienst hebt geabonneerd. Zie pagina 89 voor meer
informatie.

[ 26 C3300 Gebruikershandleiding ]
Hoofdfuncties
Bellen en gebeld worden
Bellen
1. Controleer of uw telefoon is ingeschakeld.
2. Toets het volledige telefoonnummer in, dus inclusief het
netnummer. Als u een onjuist nummer hebt ingetoetst, druk dan
op de annuleertoets ( ) om de cijfers een voor een te
wissen.
] Houd de annuleertoets ( ) enige tijd ingedrukt om het
volledige nummer te wissen.
3. Druk op de verzendtoets ( ) om het nummer dat wordt
weergegeven te bellen.
4. Om het gesprek te beëindigen drukt u op ( ) of de rechter
softkey ( ). U kunt de oproep ook beëindigen door de klep te
sluiten.
Bellen via de verzendtoets
1. Als u in de standby-modus op de verzendtoets ( ) drukt
worden de telefoonnummers van de laatste inkomende,
uitgaande en gemiste oproepen weergegeven.
2. Selecteer het gewenste nummer met de navigatietoetsen.
3. Druk op .
Internationaal bellen
1. Houd de toets ( ) ingedrukt om de internationale
toegangscode in te voeren. Het teken “+” selecteert automatisch
de internationale toegangscode.
2. Voer de landcode, het netnummer en het telefoonnummer in.
3. Druk op .

[ 27 C3300 Gebruikershandleiding ]
Hoofdfuncties
Een oproep beëindigen
Als u een oproep wilt beëindigen, drukt u op de toets ( ).
Bellen via het Telefoonboek
(Contacten)
U kunt namen en telefoonnummers die u regelmatig belt opslaan
op de SIM-kaart of in het telefoongeheugen, in Contacten.
U kunt een nummer bellen door simpelweg de bijbehorende naam
op te zoeken in Contacten. Meer informatie over Contacten vindt u
op pagina 65 t/m 69.
Volume aanpassen
U kunt tijdens een gesprek het volume aanpassen met behulp van
de zijtoetsen ( ). Druk op de bovenste zijtoets om het geluid
harder te zetten en op de onderste zijtoets om het geluid zachter te
zetten.
Een oproep beantwoorden
Als u wordt gebeld, gaat de telefoon over. Als de beller bekend is
wordt het telefoonnummer (of de naam als het nummer is
opgeslagen in Contacten) weergegeven.
1. Open de klep van de telefoon en druk op de verzendtoets om
een oproep aan te nemen. Kijk op pagina 86 voor andere
manieren om een oproep te beantwoorden.
n Opmerking In de standby-modus kunt u het volume van het
toetsenbord aanpassen met de zijtoetsen.
n Opmerking Als Willekeurige toets is ingesteld als antwoordmodus
(zie pagina 86) kunt u een inkomende oproep
beantwoorden door op een willekeurige toets te
drukken, behalve ( ) of de rechter softkey.

[ 28 C3300 Gebruikershandleiding ]
Hoofdfuncties
] U kunt een inkomende oproep weigeren door een van de
zijtoetsen aan de linkerkant van het toestel ingedrukt te houden
terwijl de klep gesloten is.
] U kunt een oproep beantwoorden terwijl u Contacten of een
ander menu geopend hebt.
2. Om het gesprek te beëindigen sluit u de klep of drukt u op
( ).
Snel overschakelen naar “Alleen trilfuntie”
Als de klep van de telefoon geopend is, kunt u de telefoon snel op
Alleen trilfuntie zetten door de linker navigatietoets ( )
ingedrukt te houden. Om terug te gaan naar het vorige profiel houdt
u opnieuw de linker navigatietoets ( ) ingedrukt.
Sterkte netwerksignaal
U kunt de sterkte van uw netwerksignaal aflezen aan de
signaalsterkte-indicator ( ) op het scherm van uw telefoon.
De signaalsterkte kan variëren, met name als u zich in een gebouw
bevindt. Het kan zijn dat u een betere ontvangst hebt als u bij een
raam staat.
Tekst invoeren
U kunt alfanumerieke tekens invoeren met behulp van het
toetsenbord. Om bijvoorbeeld namen op te slaan in Contacten,
een bericht te schrijven, een persoonlijke welkomsttekst op te
stellen of afspraken in de agenda te zetten, moet u tekst invoeren.
Op uw telefoon kunt u tekst op de volgende manieren invoeren:

[ 29 C3300 Gebruikershandleiding ]
Hoofdfuncties
Modus tekstinvoer veranderen
1. Al u in een veld staat waarin tekens ingevoerd kunnen worden,
ziet u rechtsboven in het scherm de huidige invoermodus.
- U kunt de taal voor de T9-invoermodus selecteren. Druk op de
linker softkey [Opties] en selecteer vervolgens T9-talen. U kunt
ook naar T9-talen gaan door de toets ingedrukt te
houden. Kies nu de gewenste taal voor de T9-invoermodus.
U kunt de T9-modus ook uitschakelen door T9 uit te
selecteren. De telefoon is standaard ingesteld op de
T9-invoermodus.
T9-invoermodus
In deze modus hoeft u maar één keer op de juiste toets te
drukken om een letter in te geven. Onder elke toets zitten
meerdere letters. In T9 worden uw toetsaanslagen automatisch
vergeleken met woorden in een ingebouwd woordenboek, waarin
wordt gezocht naar overeenkomende woorden. U kunt snel en
eenvoudig woorden invoeren, met een minimaal aantal
toetsaanslagen. Dit wordt ook wel de voorspellende invoermodus
genoemd.
ABC-invoermodus
In deze modus kunt u letters ingeven door de toets waar de
gewenste letter onder zit een, twee, drie of vier keer kort in te
drukken, tot de gewenste letter op het scherm verschijnt.
123-invoermodus (numerieke modus)
U kunt met behulp van het toetsenbord nummers invoeren. Om
de modus te wijzigen van een tekstmodus naar 123 drukt u op
de toets tot op het scherm 123-modus wordt weergegeven.

[ 30 C3300 Gebruikershandleiding ]
Hoofdfuncties
2. U kunt de modus voor
tekstinvoer veranderen door op
te drukken. Rechtsboven
in het scherm ziet u de huidige
invoermodus.
] T9-invoermodus
De T9-modus voor tekstinvoer met woordenlijst maakt het mogelijk
woorden snel en eenvoudig in te voeren, met een minimaal aantal
toetsaanslagen. Om een letter in te voeren, drukt u gewoon
eenmaal op de bijbehorende toets en het toestel kiest de letter die
hoort bij het woord dat het denkt dat u aan het ingeven bent,
gebaseerd op een ingebouwde woordenlijst. U kunt ook nieuwe
woorden aan de lijst toevoegen. Het woord verandert telkens als u
een letter toevoegt in het woord dat het toestel denkt dat u aan het
ingeven bent.
1. In de T9-modus voor tekstinvoer met woordenlijst kunt u
woorden invoeren met behulp van de toetsen tot
Druk eenmaal op een toets voor een letter.
- Het woord verandert naarmate u meer letters invoert. Negeer
wat op het scherm staat tot u het volledige woord hebt
ingegeven.
- Als daarna niet het juiste woord op het scherm staat, drukt u
een of meerdere keren op de navigatietoetsen om door de
andere mogelijke woorden te bladeren.
Voorbeeld: Toets om good in te voeren.
Toets en vervolgens
[onderste navigatietoets] om home in te voeren.
- Als het gewenste woord niet in de woordenlijst voorkomt, kunt
u het toevoegen in de ABC-modus.
tekstinvoer
modus
Opties Invoegen

[ 31 C3300 Gebruikershandleiding ]
Hoofdfuncties
2. Voer het volledige woord in voor u toetsaanslagen bewerkt of
wist.
3.Voer aan het einde van elk woord een spatie in door op
toets te drukken.
Druk op om letters te wissen. Houd de annuleertoets
enige tijd ingedrukt om volledige woorden te wissen.
] Gebruik ABC-modus
Voer woorden in met behulp van de toetsen tot .
1. Druk op de toets waarop de gewenste letter staat:
- een keer voor de eerste letter,
- twee keer voor de tweede letter,
- enzovoort
2. Druk eenmaal op om een spatie in te voegen. Druk op
om letters te wissen. Houd de annuleertoets enige tijd
ingedrukt om volledige woorden te wissen.
n Opmerking Om de modus voor tekstinvoer te verlaten zonder de
ingevoerde tekst op te slaan, drukt u op . U keert
terug naar de standby-modus.

[ 32 C3300 Gebruikershandleiding ]
Hoofdfuncties
n Opmerking
In de onderstaande tabel vindt u een beschrijving van
de beschikbare tekens onder de alfanumerieke
toetsen.
] Gebruik 123(nummer)-modus
In de 123-modus kunt u nummers invoeren in een tekstbericht
(bijvoorbeeld een telefoonnummer).
Druk op de gewenste nummertoetsen voor u handmatig teruggaat
naar de juiste modus voor tekstinvoer.
Beschrijving tekens
Toets
Hoofdletters
. , / ? ! - : ' '' 1
A B C 2 Ä À Á Â Ã Å Æ Ç
D E F 3 Ë È É Ê
G H I 4 Ï Ì Í Î ˝
J K L 5
M N O 6 Ñ Ö Ø Ò Ó Ô Õ Œ
P Q R S 7 ß Í
T U V 8 Ü Ù Ú Û
W X Y Z 9
Spatietoets,
0 (lang ingedrukt)
Kleine letters
. , / ? ! - : ' '' 1
a b c 2 ä à á â ã å æ ç
d e f 3 ë è é ê
g h i 4 ï ì í î ©
j k l 5
m n o 6 ñ ö ø ò ó ô õ œ
p q r s 7 ß ß
t u v 8 ü ù ú û
w x y z 9
Spatietoets,
0 (lang ingedrukt)

[ 33 C3300 Gebruikershandleiding ]
Hoofdfuncties
Contacten
U kunt namen en nummers opslaan in het geheugen van uw
SIM-kaart.
Bovendien kunt u tot 200 namen en nummers opslaan in het
telefoongeheugen.
De SIM-kaart en telefoon worden op dezelfde manier gebruikt in
het menu Contacten, het wordt alleen op andere plaatsten
opgeslagen.
(Zie pagina 65 t/m 69 voor meer informatie.)
Menu inkomende oproepen
Uw toestel biedt u toegang tot extra functies terwijl u een gesprek
voert. Voor toegang tot deze functies drukt u op de linker softkey
[Opties] tijdens het gesprek.
Tijdens een oproep
Het menu dat tijdens een oproep op het scherm wordt
weergegeven, verschilt van het standaard hoofdmenu in de
standby-modus. Hieronder vindt u een beschrijving van de opties.
Een tweede oproep verrichten
U kunt een nummer opvragen uit Contacten om een tweede
nummer te bellen. Druk op de rechter softkey en selecteer
vervolgens Zoeken. Om een nummer tijdens een oproep in
Contacten op te slaan, drukt u op de rechter softkey en selecteert u
Nieuw toevoegen.
Tussen twee oproepen wisselen
Om tussen twee oproepen te wisselen, drukt u op de linker softkey
[Opties] en selecteert u Wisselen, of u drukt u gewoon op de toets
( ). U kunt een van de twee oproepen selecteren met de
navigatietoetsen. Om een van beide oproepen te beëindigen
selecteert u het telefoonnummer met de navigatietoetsen en drukt u
op de toets ( ).

[ 34 C3300 Gebruikershandleiding ]
Hoofdfuncties
Een inkomende oproep beantwoorden
Om bij een belsignaal een inkomende oproep aan te nemen, drukt
u op de toets . U kunt ook worden gewaarschuwd als u een
oproep ontvangt wanneer u reeds in gesprek bent. Er klinkt dan
een geluid in de oortelefoon en op het scherm wordt aangegeven
dat er een tweede oproep in wacht staat. De functie Oproep in
wacht is alleen beschikbaar als het netwerk deze ondersteunt.
Zie Oproep in wacht op pagina 86 voor meer informatie over het
activeren en deactiveren van deze functie.
Als Oproep in wacht is geactiveerd, kunt u de eerste oproep in de
wachtstand zetten en de tweede oproep beantwoorden door op
te drukken of door op de linker softkey te drukken en
vervolgens In wacht & Beantwoorden te selecteren. U kunt de
huidige oproep beëindigen en de oproep in de wachtstand
beantwoorden door op de linker softkey te drukken en vervolgens
Einde & Beantwoorden.
Een inkomende oproep weigeren
U kunt een inkomende oproep weigeren zonder deze eerst te
beantwoorden door op de toets te drukken.
Wanneer u in gesprek bent, kunt u een inkomende oproep
weigeren door op de linker softkey [Menu] te drukken en
vervolgens Conferentie/Weigeren te selecteren of door op de
toets te drukken.
Microfoon uitschakelen
U kunt het geluid van de microfoon tijdens een oproep uitschakelen
door op de linker softkey [Opties] te drukken en vervolgens Geluid
uit te selecteren. Als het geluid op het toestel wordt uitgeschakeld,
kan de beller u niet horen, maar u hem of haar wel. U kunt het
geluid opnieuw aanzetten door te drukken op [Geluid aan].

[ 35 C3300 Gebruikershandleiding ]
Hoofdfuncties
DTMF-tonen aanzetten tijdens een oproep
Om tijdens een oproep DTMF-tonen in te schakelen, drukt u op de
linker softkey en vervolgens selecteert u DTMF aan. U kunt de
DTMF-tonen op dezelfde wijze uitschakelen. Met DTMF-tonen kan
uw telefoon gebruik maken van een automatische centrale.
Conferentiegesprekken
De ‘multiparty’- of conferentieservice biedt u de mogelijkheid om
tegelijkertijd met meer dan één beller te praten, mits uw
netwerkexploitant deze functie ondersteunt.
Een conferentiegesprek kan alleen worden opgezet als u reeds één
actieve oproep hebt en er een oproep in wacht staat en wanneer
beide oproepen zijn beantwoord. Als een conferentiegesprek is
opgezet, kunnen daar andere oproepen aan worden toegevoegd.
Ook kunnen er verbindingen worden verbroken of gescheiden
(d.w.z uit het conferentiegesprek worden gehaald maar nog steeds
in verbinding zijn) door de persoon die het conferentiegesprek heeft
opgezet. Deze opties zijn beschikbaar vanuit het menu Inkomende
oproepen. Er kunnen maximaal vijf personen deelnemen aan een
conferentiegesprek. Als u het conferentiegesprek hebt opgezet,
hebt u de leiding over het gesprek en kunt alleen u oproepen aan
het conferentiegesprek toevoegen.
Een tweede oproep verrichten
U kunt een tweede oproep verrichten terwijl u reeds in gesprek
bent. Geef het telefoonnummer in en druk op de toets .
Wanneer de verbinding tot stand is gebracht, wordt de eerste
oproep automatisch in wacht gezet. U kunt tussen de twee
oproepen wisselen door op de linker softkey te drukken en
vervolgens Wisselen te selecteren.
Een conferentiegesprek opzetten
U kunt een nummer bellen en een actieve oproep in wacht plaatsen
om een conferentiegesprek op te zetten door de linker softkey in te
toetsen en vervolgens Conferentie/Allen deelnemen te kiezen.

[ 36 C3300 Gebruikershandleiding ]
Hoofdfuncties
Een conferentiegesprek in wacht zetten
Druk op de linker softkey en selecteer vervolgens
Conferentie/Allen in wacht.
Een conferentiegesprek in wacht terugnemen
Druk op de linker softkey en selecteer vervolgens
Conferentie/Allen deelnemen.
Oproepen aan een conferentiegesprek toevoegen
U kunt deelnemers aan een conferentiegesprek toevoegen door op
de linker softkey te drukken en vervolgens Conferentie/Allen
deelnemen te selecteren.
Een deelnemer aan een conferentiegesprek in wacht zetten
Om een geselecteerde deelnemer (wiens nummer op het scherm
wordt weergegeven) buiten het conferentiegesprek te zetten, drukt
u op de linker softkey en selecteert u vervolgens
Conferentie/Uitsluiten.
Deelnemers aan een conferentiegesprek weergeven
U kunt op het toestel bladeren door de nummers van de
deelnemers aan een conferentiegesprek met behulp van de
navigatietoetsen.
Een privé-gesprek in een conferentiegesprek
Voor een privé-gesprek met een van de deelnemers aan een
conferentiegesprek laat u het nummer van de persoon waarmee u
apart wilt spreken op het scherm verschijnen, waarna u op de linker
softkey drukt. Vervolgens kiest u Conferentie/Privé om alle andere
deelnemers in wacht te zetten.

[ 37 C3300 Gebruikershandleiding ]
Hoofdfuncties
Een conferentiegesprek beëindigen
U kunt de verbinding met de deelnemer die op het scherm wordt
weergegeven verbreken door op de toets te drukken.
Om een conferentiegesprek te beëindigen, drukt u op de linker
softkey en selecteert u vervolgens Conferentiegesprek/Einde
conferentiegesprek. Als u, nadat u de linker softkey hebt
ingetoetst, de optie Conferentiegesprek/Einde allen kiest, worden
alle actieve oproepen en oproepen in de wachtstand beëindigd.

[ 38 C3300 Gebruikershandleiding ]
Menuoverzicht
Het onderstaande overzicht laat alle beschikbare menu’s zien en:
] het nummer dat bij elk menuonderdeel hoort;
] de pagina waar u een beschrijving van de menu’s en submenu’s
kunt vinden.
U gaat naar het gewenste menu door op de linker softkey [Menu] te
drukken, met behulp van de navigatietoetsen het juiste menu te
selecteren en vervolgens op [OK] te drukken.
1 Speciaal
Deze functie is afhankelijk van de
SIM- en netwerkdiensten.
2 My Media
1 Foto's
2 Afbeeldingen
3 Geluiden
4 Spelletjes & meer
3 Oproep-info
1 Gemiste oproepen
2 Ontvangen oproepen
3 Uitgaande oproepen
4 Laatste oproepen verwijderen
5 Oproeptarieven
6 GPRS info
Dit menu wordt alleen
ondersteund door SAT (SIM
Application Tool kit) SIM-kaarten.
Dit menu wordt ondersteund
door SIM-kaarten zonder SAT.
Speciaal 16:35
Kies Terug
Profielen 16:35
Kies Terug

[ 39 C3300 Gebruikershandleiding ]
Menuoverzicht
4 Berichten
1 Schrijf nieuw bericht
2 Multimediabericht schrijven
3 Inbox
4 Outbox
5 Concepten
6 Voicemail beluisteren
7 Info-bericht
8 Sjablonen
9 Instellingen
5 t-zones
6 Contacten
1 Zoeken
2 Nieuw toevoegen
3 Bellergroepen
4 Snelkiezen
5 Instellingen
6 Alles kopiëren
7 Alles wissen
8 Informatie
7 Organiser
1 Alarmklok
2 Planner
3 Calculator
4 Conversieprogr.
5 Wereldtijd
6 Stemrecorder
7 Memory status
8 S/W version
8 Camera
1 Foto nemen
2 Camera mode
3 Mijn foto's
4 Instellingen
5 Status geheugen
9 Instellingen
1 Profielen
2 Datum & tijd
3 Telefooninstellingen
4 Oproepinstellingen
5 Beveiligingsinstellingen
6 Netwerkinstellingen
7 GPRS-instellingen
8 Internet
9 Instellingen terugzetten

[ 40 C3300 Gebruikershandleiding ]
Selecteren van functies en opties
Uw telefoon biedt tal van functies waarmee u het toestel kunt
afstemmen op uw wensen. Deze functies zijn ondergebracht in
menu’s en submenu’s die toegankelijk zijn via de twee
softkeys en . In elk menu en submenu kunt u de
instellingen van een bepaalde functie bekijken en aanpassen.
De functie van de softkeys is afhankelijk van het menu of submenu
waarin u zich bevindt, direct boven de toetsen ziet u in het scherm
de huidige functie van de toetsen.
Menu Bericht
Druk op de linker
softkey om het
geselecteerde menu
te openen.
Druk op de rechter
softkey om de
gewenste optie te
activeren.
(bijv.)

[ 41 C3300 Gebruikershandleiding ]
Speciaal
Menu-1
Via de SIM-kaart kan uw serviceprovider speciale toepassingen
leveren, zoals die voor thuisbankieren, handelen in aandelen enz.
Als u op een van deze services bent geabonneerd, is de naam
ervan aan het einde van het hoofdmenu zichtbaar.
Met het SIM Services-menu gaat uw telefoon met de tijd mee en
worden toepassingen van uw serviceprovider ondersteund. Neem
contact op met uw serviceprovider voor meer informatie.

[ 42 C3300 Gebruikershandleiding ]
U kunt beltonen, geluiden, games, foto’s en achtergronden
downloaden met WAP.
Foto's
Menu-2-1
Opent het menu Mijn foto’s. Hier worden de foto’s die zijn
genomen met de C3300 opgeslagen. (Kijk op pagina 79 voor meer
informatie.)
Afbeeldingen
Menu-2-2
• Mijn afbeeldingen: selecteer een foto uit het overzicht door op
de linker softkey [Bekijken] te drukken. Vervolgens kunt u de foto
als achtergrond instellen of versturen via een multimediabericht
als u op de linker softkey [Opties] drukt.
Geluiden
Menu-2-3
• t-music: maakt verbinding met de t-zones. U kunt verschillende
beltonen en bellertonen downloaden met behulp van WAP. Deze
worden opgeslagen in Mijn geluiden.
• Mijn geluiden: u kunt een geluid uit de lijst selecteren. Als u het
gewenste geluid hebt geselecteerd, kunt u dit instellen als beltoon
of versturen via SMS of MMS met de linker softkey [Opties].
Spelletjes & meer
Menu-2-4
• t-games: maakt verbinding met de t-games. U kunt games
downloaden met behulp van WAP. Deze worden opgeslagen in
Mijn games & meer.
• Mijn Spelletjes & meer: In dit menu kunt u de geïnstalleerde
Java-applicaties op uw telefoon beheren. U kunt gedownloade
applicaties afspelen of verwijderen, of de verbinding instellen.
De gedownloade toepassingen worden bewaard in mappen.
My Media
Menu-2

Druk op de linker softkey [Kies] om de geselecteerde map te
openen of de geselecteerde midlet op te starten.
Gebruik de rechter softkey [Menu] om toegang te krijgen tot de
volgende menu’s.
] Nieuwe map: een nieuwe map maken.
] Verplaatsen: het opgeslagen spelletje verplaatsen naar een
andere map.
] Opstarten: Opstarten spelletjes.
] Verplaatsen: het spelletje of de map verwijderen.
] Hernoemen: u kunt de map of toepassing hernoemen.
My Media
[ 43 C3300 Gebruikershandleiding ]
n Opmerking U kunt de voorgeïnstalleerde map of games in deze
map niet verwijderen of hernoemen.

[ 44 C3300 Gebruikershandleiding ]
My Media
Java™ is een door Sun Microsystems ontwikkelde technologie.
Net zoals u een Java-applet kunt downloaden via de Netscape
of MS Internet Explorer browsers, kunt u Java MIDlet
downloaden via een telefoon die WAP ondersteunt. Afhankelijk
van de service provider kunnen alle Java-programma’s zoals
spelletjes worden gedownload naar een telefoon en worden
opgestart. Eenmaal gedownload hebt u toegang tot het Java-
programma via Mijn games & meer, waar u programma’s kunt
selecteren, uitvoeren of wissen. De Java-programma’s worden
opgeslagen in de telefoon als JAD- en JAR-bestanden.
n Opmerking Het JAR-bestand is een gecomprimeerd formaat van
het Java-programma en het JAD-bestand is een
beschrijvingsbestand dat alle gedetailleerde informatie
bevat. Voor het downloaden kunt u via het netwerk alle
bestandsbeschrijvingen uit het JAD-bestand bekijken.
n Let op Alleen op J2ME (Java 2 Micro Edition) gebaseerde
programma’s kunnen gebruikt worden in de camera-modus.
De op J2SE (Java 2 Standard Edition) gebaseerde
programma’s kunnen alleen gebruikt worden in de pc-modus.

Als uw netwerkexploitant Caller Line Identification (CLI)
ondersteunt, kunt u een overzicht opvragen van gemiste,
ontvangen en uitgaande oproepen.
Het nummer en (indien bekend) de naam van de beller worden
weergegeven. U kunt ook de gespreksduur en -kosten bekijken.
Druk op de Menu-toets ( ) en selecteer Oproep-info met
behulp van de navigatietoetsen.
Gemiste oproepen
Menu-3-1
U kunt de onbeantwoorde oproepen bekijken.
Als u op de linker softkey [Opties] drukt, kunt u ook:
• De datum en het tijdstip van de oproep bekijken.
• Het nummer opslaan in Contacten. Voer een naam in bij het
nummer en sla beide op in Contacten.
• Een bericht verzenden naar dit nummer.
• Het nummer uit het overzicht verwijderen.
Ontvangen oproepen
Menu-3-2
U kunt de inkomende oproepen bekijken. Als u op de linker softkey
[Opties] drukt, kunt u ook:
• De datum en het tijdstip van de oproep bekijken.
• Het nummer opslaan in Contacten. Voer een naam in bij het
nummer en sla beide op in Contacten.
• Een bericht verzenden naar dit nummer.
• Het nummer uit het overzicht verwijderen.
[ 45 C3300 Gebruikershandleiding ]
Oproep-info (Afhankelijk van de netwerkaanbieder)
Menu-3
n Opmerking U kunt alle gespreksgegevens uit de lijst verwijderen via
het menu Laatste oproepen verwijderen.
(Zie pagina 46.)
n Opmerking U kunt alle gespreksgegevens uit de lijst verwijderen via
het menu Laatste oproepen verwijderen.
(Zie pagina 46.)

Uitgaande oproepen
Menu-3-3
U kunt de nummers bekijken die u hebt gebeld of hebt geprobeerd
te bellen. Met de [Opties]-toets kunt u tevens:
• De datum en het tijdstip van de oproep bekijken.
• Het nummer opslaan in Contacten. Voer een naam in bij het
nummer en sla beide op in Contacten.
• Een bericht verzenden naar dit nummer.
• Het nummer uit het overzicht verwijderen.
Laatste oproepen verwijderen
Menu-3-4
U kunt de overzichten van Gemiste, Ontvangen en Uitgaande
oproepen wissen. U kunt ook alle overzichten tegelijkertijd wissen
met behulp van Alle oproepen.
Oproeptarieven
Menu-3-5
Oproepduur
(Menu-3-5-1)
U kunt de duur van inkomende en uitgaande oproepen bekijken.
De duur van elk gesprek wordt weergegeven onder in het scherm
terwijl u bladert met behulp van de navigatietoetsen. U kunt de
tijdsduurteller opnieuw instellen door Alles opnieuw instellen te
selecteren. Om per ongeluk resetten te voorkomen, wordt u
gevraagd de PIN2-code in te voeren.
Oproep-info
[ 46 C3300 Gebruikershandleiding ]
n Opmerking U kunt alle gespreksgegevens uit de lijst verwijderen via
het menu Laatste oproepen verwijderen.
(Zie pagina 46.)

[ 47 C3300 Gebruikershandleiding ]
Oproep-info
• Laatste oproep: duur van de laatste oproep.
• Alle oproepen: totale duur van alle inkomende en uitgaande
oproepen sinds de timer opnieuw is ingesteld.
• Ontvangen oproepen: duur van de inkomende oproepen.
• Uitgaande oproepen: duur van de uitgaande oproepen.
• Alles opnieuw instellen: hiermee kunt u alle tijdsduurtellers
opnieuw instellen.
Oproepkosten
(Menu-3-5-2)
Met deze netwerkdienst kunt u nagaan wat de Gesprekskosten zijn
van uw Laatste oproep of van Alle oproepen, en uw beltegoed
opvragen. De gesprekskosten worden onder in het scherm
weergegeven. U kunt de gesprekskosten opnieuw instellen door
Alles opnieuw instellen te selecteren. U wordt gevraagd de
PIN2-code in te voeren.
Instellingen
(Menu-3-5-3)
• Tarief instellen: U kunt de naam van de munteenheid en de
eenheidsprijs instellen. Neem contact op met uw netwerkexploitant
voor de geldende eenheidsprijzen. Om de munteenheid of
eenheidsprijs in dit menu te selecteren, hebt u de PIN2-code nodig.
Als u een van de symbolen @, £ of $ wilt invoeren, wis dan alle
valutatekens en druk op de toets ( ). Als u een symbool wilt
wijzigen, drukt u nogmaals op de toets ( ).
n Opmerking De werkelijke gesprekskosten die door uw
netwerkexploitant worden gefactureerd, kunnen
afwijken vanwege de netwerkeigenschappen, het al
dan niet afronden bij het factureren, belastingen,
enzovoort.
n Opmerking De werkelijke gesprekstijd die door uw
netwerkexploitant worden gefactureerd, kan afwijken
vanwege de netwerkeigenschappen, het al dan niet
afronden bij het factureren, enzovoort.

[ 48 C3300 Gebruikershandleiding ]
Oproep-info
• Tegoed instellen: Met deze netwerkdienst kunt u de kosten van
uw oproepen beperken tot een bepaald aantal
gesprekseenheden. U kunt bellen of gebeld worden tot de gespeci-
ficeerde kostenlimiet.
] Lezen: u kunt controleren hoeveel eenheden u nog hebt.
] Veranderen: u kunt uw limiet aanpassen.
• Auto display: Met deze netwerkdienst kunnen de gesprekskosten
van uw laatste oproep automatisch worden weergegeven. Als u Ja
selecteert, verschijnen de kosten van het laatste gesprek op het
scherm na beëindiging van het gesprek.
GPRS info
Menu-3-6
U kunt de hoeveelheid verzonden en ontvangen data over het
netwerk via GPRS controleren. Daarnaast kunt u zien hoeveel tijd u
online bent. (GPRS staat voor General Packet Radio Service.)
Oproepduur
(Menu-3-6-1)
U kunt de gespreksduur van uw Laatste oproep en Alle oproepen
bekijken. U kunt tevens de tijdsduurtellers opnieuw instellen door
Alles opnieuw instellen te selecteren.
Gegevensvolumes
(Menu-3-6-2)
U kunt het volume van de Verzonden, Ontvangen en Alle
datavolumes controleren. U kunt tevens de teller opnieuw instellen
door Alles opnieuw instellen te selecteren.
n Opmerking Als alle eenheden zijn verbruikt, kunt u alleen nog
alarmnummers bellen. Afhankelijk van de SIM-kaart
hebt u de PIN2-code nodig om een oproepkostenlimiet
in te stellen.

Druk op de Menu-toets ( ) en selecteer Berichten met de
navigatietoetsen.
Schrijf nieuw bericht
Menu-4-1
U kunt met uw toestel meldingsberichten voor voicemail en short
message service (SMS)-berichten ontvangen.
Voicemail en SMS zijn netwerkdiensten. Neem voor meer
informatie contact op met uw netwerkexploitant.
Als het -pictogram verschijnt, hebt u een voicemail ontvan-
gen. Als het -pictogram verschijnt, hebt u een nieuw tekst-
bericht
ontvangen. Als het berichtengeheugen vol is verschijnt een bericht
op het scherm, het -pictogram knippert en u kunt geen nieuwe
berichten meer ontvangen. Wis oude berichten met behulp van de
optie Wissen in de Inbox. Als er ruimte is vrijgemaakt in het
berichtengeheugen ontvangt u deze berichten alsnog
(op voorwaarde dat het vrijgemaakte geheugen voldoende ruimte
biedt).
U kunt een tekst van maximaal 10 pagina’s intypen en bewerken
(ongeveer 1530 tekens).
1. Geef de tekst in. Kijk voor meer informatie over tekst invoeren op
pagina 28 t/m 32 (Tekst invoeren).
2. Als u de volledige tekst hebt ingegeven, drukt u op de linker
softkey [Opties]. De onderstaande opties verschijnen op het
scherm.
] Verzenden: voer het telefoonnummer in. Of kies het nummer
uit de recente nummers of Contacten nadat u op de linker
softkey [Opties] hebt gedrukt.
U kunt een bericht aan maximaal zes personen in een keer
versturen. Voor u het bericht verstuurt, hebt u toegang tot de
volgende opties via de rechter softkey [Instellingen].
[ 49 C3300 Gebruikershandleiding ]
Berichten
Menu-4

1) Geldigheidsperiode: bepaal hoe lang uw tekstberichten in
de SMS-centrale moeten worden bewaard als ze niet
verzonden kunnen worden. Mogelijkheden zijn 1 uur, 12
uur, 1 dag, 1 week en de door uw netwerkexploitant
maximaal toegestane tijd.
2) Ontvangstrapport: activeer of deactiveer het genereren
van een rapport. Als deze functie is geactiveerd, informeert
het netwerk u of uw bericht al dan niet verzonden is.
3) Antwoord aan het laden: ontvangers van uw
tekstberichten kunnen een bericht terugsturen via uw
berichtencentrale, mits deze dienst wordt ondersteund door
het netwerk.
] Opslaan: bewaar het bericht om later te verzenden.
] Lettertype: selecteer de gewenste grootte en stijl lettertype
voor het bericht met de navigatietoetsen.
] Kleur: selecteer de gewenste voorgrondkleur met de
navigatietoetsen. Druk vervolgens op de onderste
navigatietoets en selecteer de achtergrondkleur met de linker
en rechter navigatietoets.
] Uitlijning: selecteer hoe u de tekst uit wilt lijnen.
] T9-woordenboek toevoegen: als een door u gezocht woord
niet voorkomt in de T9-modus voor tekstinvoer kunt u een
woord invoeren met behulp van deze optie in het
T9-woordenboek. Typ het woord en druk op de linker softkey
[Opslaan].
] T9 talen: selecteer de gewenste taal voor de T9-invoermodus.
U kunt de T9-modus ook uitschakelen door T9 uit te
selecteren.
] Afsluiten: u verlaat het menu Tekstbericht schrijven.
Berichten
[ 50 C3300 Gebruikershandleiding ]

[ 51 C3300 Gebruikershandleiding ]
Berichten
3. U kunt ook bijlagen met het bericht meesturen door op de
rechter softkey Invoegen te drukken als u in het bericht zit.
] Afbeelding: verstuur en ontvang tekstberichten met
afbeeldingen, zogenaamde ‘beeldberichten’. Er staan
verschillende standaardafbeeldingen in de telefoon, deze kunt
u vervangen door nieuwe die u bijvoorbeeld download of
ontvangt.
] Geluid: indien beschikbaar kunt u geluid toevoegen aan een
kort bericht.
] Tekstsjablonen: gebruik een tekstsjabloon die al in de
telefoon opgeslagen is.
] Telefoonboek: u kunt telefoonnummers aan het bericht
toevoegen.
] Handtekening: u kunt uw naamkaartje toevoegen.
] Symbool: u kunt speciale tekens invoegen.
Multimediabericht schrijven
Menu-4-2
Een multimediabericht kan tekst, afbeeldingen en/of soundclips
bevatten. U kunt deze functie alleen gebruiken als deze wordt
ondersteund door uw netwerkexploitant. Alleen apparaten met
compatibele functionaliteit voor multimediaberichten of e-mail
kunnen multimediaberichten ontvangen en versturen.
U kunt een multimediabericht van maximaal 10 dia’s opstellen
(ongeveer 100kB).
1. Voer het onderwerp van het bericht in en druk op de OK-toets.
2. Geef de tekst in. Met behulp van de rechter softkey Invoegen
kunt u een symbool, afbeelding, geluid of spraakmemo,
tekstsjablonen en telefoonnummers die zijn opgeslagen in het
telefoonboek toevoegen, evenals uw naamkaartje.
3. Druk op de linker softkey [Opties]. De onderstaande opties
verschijnen op het scherm.
] Verzenden: u kunt het multimediabericht aan maximaal zes
personen in een keer versturen.

[ 52 C3300 Gebruikershandleiding ]
Berichten
1) Voer het telefoonnummer in. U kunt het nummer ook kiezen
uit het overzicht van recente nummers of het telefoonboek
met behulp van de linker softkey [Opties].
2) Druk op de rechter softkey [Instellingen]. U krijgt toegang
tot de volgende submenu’s.
- Prioriteit: ken prioriteit toe aan de MMS.
- Geldigheidsperiode: bepaal hoe lang de
multimediaberichten op de netwerkserver moeten worden
bewaard. Mogelijkheden zijn 1 uur, 12 uur, 1 dag, 1 week
en de door uw netwerkexploitant maximaal toegestane tijd.
- Afleveringsrapport: selecteer Ja om het genereren van
een rapport te activeren. Als deze functie is geactiveerd,
informeert het netwerk u of uw bericht al dan niet
verzonden is.
3) Druk op de linker softkey [Verzenden].
] Preview: bekijk het door u opgestelde multimediabericht.
Alle dia’s worden opeenvolgend automatisch teruggespeeld.
U kunt naar een andere dia gaan met de navigatietoetsen.
Druk op de linker softkey [Opnieuw afspelen] om het bericht
opnieuw te bekijken.
] Opslaan: sla het bericht op als concept of sjabloon.
] Dia toevoegen: voeg een dia toe voor of na de geselecteerde
dia.
] Ga naar dia: selecteer deze optie om naar een andere dia te
gaan.
] Dia verwijderen: verwijder de huidige dia.
] Dia-indeling instellen: u kunt de opmaak van de volgende
dia instellen.
- Timer instellen: voer de timer in elk veld in met behulp van
de numerieke toetsen.
- Tekst en foto verwisselen: wissel de tekst en afbeelding.

[ 53 C3300 Gebruikershandleiding ]
Berichten
] T9-woordenboek toevoegen: als een door u gezocht woord
niet voorkomt in de T9-modus voor tekstinvoer kunt u een
woord invoeren met behulp van deze optie in het
T9-woordenboek. Typ het woord en druk op de linker softkey
[Opslaan].
] T9 talen: selecteer de gewenste taal voor de T9-invoermodus.
U kunt de T9-modus ook uitschakelen door T9 uit te
selecteren.
] Afsluiten: u verlaat het menu Multimediabericht schrijven.
Inbox
Menu-4-3
Wanneer u berichten ontvangt wordt er een symbool op het scherm
weergegeven. De berichten worden opgeslagen in de Inbox.
Druk op de linker softkey [Menu] en selecteer → Inbox.
U kunt ook via een sneltoets naar het gewenste menu gaan door
op de rechter navigatietoets ( ) te drukken in de standby-modus.
U kunt de verschillende berichten in de Inbox onderscheiden door
pictogrammen. Zie de toelichting op pictogrammen hieronder voor
meer informatie.
Voor elk ontvangen bericht hebt u de volgende opties. Druk op de
linker softkey [Opties].
] Bekijken: u kunt het geselecteerde bericht bekijken.
] Beantwoorden: u kunt de afzender antwoorden met een
tekstbericht of een multimediabericht.
Pictogram Beschrijving
Multimediabericht
Kort bericht
SIM-bericht
Lezen
Gemeld multimediabericht

[ 54 C3300 Gebruikershandleiding ]
Berichten
] Doorsturen: u kunt het geselecteerde bericht doorsturen naar
andere telefoonnummers.
] Naar media-album verzenden: u kunt het geselecteerde bericht
opslaan in het servergeheugen (uitsluitend voor
multimediaberichten).
] Terugbellen: u kunt terugbellen naar de persoon die het bericht
stuurde.
] Wissen: wis het geselecteerde bericht uit de Inbox.
] Ophalen: u kunt een afbeelding, geluid, telefoonnummer, URL
of e-mailadres uit een bericht ophalen. Dit wordt opgeslagen in
Mijn map, Contacten of Favorieten.
] Informatie weergeven: u kunt tevens informatie over ontvangen
berichten bekijken; adres verzender, onderwerp (alleen bij
multimediabericht), datum en tijd bericht, berichttype en -grootte,
en de prioriteit (alleen bij multimediabericht).
] Opnieuw afspelen: u kunt het geselecteerde multimediabericht
opnieuw afspelen (uitsluitend voor multimediaberichten).
] Alles wissen: wis alle berichten uit de Inbox.
] Ontvangen: Als u een meldingsbericht voor een
multimediabericht krijgt, selecteert u deze optie om het
multimediabericht te downloaden (uitsluitend voor
multimediaberichten).
] Annuleren: u kunt het downloaden van het multimediabericht
annuleren (uitsluitend voor multimediaberichten).
Outbox
Menu-4-4
Alle door u verzonden berichten worden opgeslagen in de Outbox.
U kunt een overzicht en de inhoud van de berichten bekijken. In het
berichtenoverzicht kunt u controleren of de berichten goed zijn
verzonden. Als het verzenden niet is gelukt, staat voor de
ontvanger “(Mislukt)”. U kunt ook controleren of u een
verzendrapport hebt ontvangen door de onderstaande
pictogrammen.

[ 55 C3300 Gebruikershandleiding ]
Berichten
Voor elk bericht zijn de volgende opties beschikbaar als u op de
linker softkey [Opties] drukt.
De berichten die verzonden zijn, hebben de volgende
submenu’s.
] Bekijken: u kunt het geselecteerde bericht bekijken.
] Doorsturen: u kunt het geselecteerde bericht doorsturen naar
andere telefoonnummers.
] Wissen: wis het geselecteerde bericht uit de Outbox.
] Informatie weergeven: u kunt tevens informatie over het
geselecteerde bericht bekijken; onderwerp (alleen bij
multimediabericht), datum en tijd verzenden bericht, berichttype
en -grootte, de prioriteit (alleen bij multimediabericht) en
ontvangers.
] Alles wissen: wis alle berichten uit de Outbox.
De berichten die worden verzonden, hebben de volgende
submenu’s.
] Bekijken: u kunt het geselecteerde bericht bekijken.
] Verzenden: selecteer deze optie om het bericht nogmaals te
verzenden.
] Annuleren: annuleer het verzenden van het bericht.
] Wissen: annuleer het verzenden van het bericht en wis het
bericht.
Pictogram Beschrijving
Verzonden
Niet verzonden
Ontvangstbevestiging

[ 56 C3300 Gebruikershandleiding ]
Berichten
] Informatie weergeven: u kunt tevens informatie over het
geselecteerde bericht bekijken; onderwerp (alleen bij multim
ediabericht), datum en tijd verzenden bericht, berichttype
en -grootte, de prioriteit (alleen bij multimediabericht) en
ontvangers.
] Alles verzenden: verzend alle berichten die worden verzonden
opnieuw.
] Alles annuleren: annuleer het verzenden van alle berichten.
] Alles wissen: annuleer het verzenden van alle berichten en wis
alle berichten.
Concepten
Menu-4-5
U kunt de berichten die u hebt opgeslagen als concept bekijken. De
concepten staan in een overzicht met de datum en tijd wanneer ze
werden opgeslagen. Blader door de lijst met de navigatietoetsen.
Voor elk bericht hebt u de volgende opties. Druk op de linker
softkey [Opties].
] Bekijken: u kunt het geselecteerde bericht bekijken.
] Bewerken: u kunt het geselecteerde bericht bewerken.
] Wissen: wis het geselecteerde bericht uit de map concepten.
] Informatie weergeven: u kunt tevens informatie over het
geselecteerde bericht bekijken; onderwerp (alleen bij
multimediabericht), datum en tijd bericht wanneer opgeslagen,
berichttype en -grootte, en de prioriteit (alleen bij
multimediabericht).
] Alles wissen: wis alle berichten uit de map concepten.
Pictogram Beschrijving
Multimediabericht
Tekstbericht

[ 57 C3300 Gebruikershandleiding ]
Berichten
Voicemail beluisteren
Menu-4-6
Via dit menu hebt u snel toegang tot uw voicemailbox (indien
ondersteund door uw netwerkexploitant). Voor u van deze dienst
gebruik kunt maken, moet u het servernummer invoeren. Dit kunt u
aanvragen bij uw netwerkaanbieder.
Bij ontvangst van een nieuw voicemailbericht verschijnt het
symbool op het scherm. Neem contact op met uw
netwerkexploitant voor meer informatie over deze dienst, zodat u
uw toestel correct kunt configureren.
Info-bericht
(afhankelijk van netwerk)
Menu-4-7
Informatieberichten zijn tekstberichten die door het netwerk worden
verzonden aan GSM-gebruikers. Deze berichten bevatten
algemene informatie over bijvoorbeeld weer en verkeer. Elk soort
informatie heeft een eigen nummer. Hiervoor kunt u contact
opnemen met de netwerkexploitant. Wanneer u een
informatiebericht hebt ontvangen verschijnt een melding op het
scherm dat u een nieuw bericht hebt ontvangen, of het bericht
verschijnt direct op het scherm. De volgende opties zijn
beschikbaar voor informatieberichten.
Lezen
(Menu-4-7-1)
1. Selecteer Lezen en het bericht wordt op het scherm
weergegeven.
2. Het bericht wordt weergegeven tot u een ander bericht ontvangt.
Onderwerpen
(afhankelijk van netwerk)
(Menu-4-7-2)
• Nieuw toevoegen: u kunt een nieuwe informatieberichtcategorie
met bijnaam toevoegen aan het telefoon- of SIM-geheugen
(als de SIM beschikbaar is).
• Lijst bekijken: u kunt een overzicht van alle berichtcategorieën
bekijken. Druk op de linker softkey [Opties] om een
berichtcategorie te bewerken of wissen.

[ 58 C3300 Gebruikershandleiding ]
Berichten
• Actieve lijst: u kunt instellen of u de verschillende
informatieberichten al dan niet wilt ontvangen met de linker
softkey [Aan/Uit] in deze lijst.
Sjablonen
Menu-4-8
U hebt een lijst met kant-en-klare berichten. Deze berichten kunt u
bekijken en bewerken of u kunt nieuwe berichten creëren. Er zijn
twee types sjablonen beschikbaar: Tekst en Multimedia.
Tekstsjabloon
(Menu-4-8-1)
• Bel me aub terug.
• Ik ben laat. Ik ben er om...
• Waar ben je nu?
• Ik ben onderweg.
• Dringend. Bel me.
• Ik hou van je.
De onderstaande opties verschijnen op het scherm.
] Bekijken: u kunt de geselecteerde sjabloon bekijken.
] Bewerken: u kunt een nieuw bericht schrijven of het
geselecteerde standaardbericht uit de lijst bewerken.
] Schrijf nieuw bericht: u kunt de geselecteerde tekstsjabloon
via SMS versturen.
] Multimediabericht schrijven: u kunt het geselecteerde
tekstbericht via MMS versturen.
] Nieuw toevoegen: u kunt nieuwe standaardberichten maken.
] Wissen: wis de geselecteerde tekstsjabloon.
] Alles wissen: wis alle tekstsjablonen.

[ 59 C3300 Gebruikershandleiding ]
Berichten
Multimediasjablonen
(Menu-4-8-2)
U kunt een multimediasjabloon aanmaken als u op de linker softkey
[Nieuw toevoegen] drukt. En u kunt multimediaberichten opslaan
als sjabloon terwijl u een multimediabericht opstelt in
Multimediabericht schrijven.
] Preview: bekijk het door u opgestelde multimediabericht.
Alle dia’s worden opeenvolgend automatisch teruggespeeld.
U kunt naar een andere dia gaan met de navigatietoetsen.
Druk op de linker softkey [Opnieuw afspelen] om het bericht
opnieuw te bekijken.
] Opslaan: sla het bericht op als concept of sjabloon.
] Dia toevoegen: voeg een dia toe voor of na de geselecteerde
dia.
] Ga naar dia: selecteer deze optie om naar een andere dia te
gaan.
] Dia verwijderen: verwijder de huidige dia.
] Dia-indeling instellen: u kunt de opmaak van de volgende
dia instellen.
- Timer instellen: voer de timer in elk veld in met behulp van
de numerieke toetsen.
- Tekst en foto verwisselen: wissel de tekst en afbeelding.
] T9-woordenboek toevoegen: als een door u gezocht woord
niet voorkomt in de T9-modus voor tekstinvoer kunt u een
woord invoeren met behulp van deze optie in het
T9-woordenboek. Typ het woord en druk op de linker softkey
[Opslaan].
] T9 talen: selecteer de gewenste taal voor de T9-invoermodus.
U kunt de T9-modus ook uitschakelen door T9 uit te
selecteren.
] Afsluiten: u verlaat het menu Multimediabericht schrijven.

[ 60 C3300 Gebruikershandleiding ]
Berichten
Handtekening
(Menu-4-8-3)
In dit menu kunt u uw eigen naamkaartje maken. Voer uw naam,
mobiele nummer, thuisnummer, kantoornummer, faxnummer en
e-mailadres in. Als u het naamkaartje hebt gecreëerd, hebt u
toegang tot de volgende opties als u op de linker softkey drukt
[Opties].
] Bewerken: u kunt uw naamkaartje bewerken.
] Schrijf nieuw bericht: u kunt het naamkaartje via SMS
versturen.
] Multimediabericht schrijven: u kunt het naamkaartje via MMS
versturen.
] Wissen: wis het naamkaartje.
Instellingen
Menu-4-9
Tekst bericht
(Menu-4-9-1)
In dit menu kunt u standaarden voor uw SMS-berichten instellen.
] Berichttypen: stel het standaard berichttype in (Tekst, Spraak,
Fax, Nat. Oppiepen, X.400, E-mail, ERMES). Het netwerk kan
de berichten converteren naar de geselecteerde opmaak.
] Geldigheids periode: bepaal hoe lang uw tekstberichten in de
SMS-centrale moeten worden bewaard als ze niet verzonden
kunnen worden. Mogelijkheden zijn 30 minuten, 1 uur, 6 uur, 12
uur, 1 dag, 1 week en de door uw netwerkexploitant maximaal
toegestane tijd.
] Ontvangst rapport: activeer of deactiveer het genereren van
een rapport. Als deze functie is geactiveerd, informeert het
netwerk u of uw bericht al dan niet verzonden is.
] Antwoord wordt geladen: de ontvanger van uw SMS-bericht
kan een bericht terugsturen via uw berichtencentrale, mits deze
dienst wordt ondersteund door het netwerk.

[ 61 C3300 Gebruikershandleiding ]
Berichten
] SMS-centrale: bewaar of verander het nummer van uw
SMS-centrale voor het verzenden van tekstberichten. Dit num-
mer wordt verstrekt door de aanbieder van de dienst.
Multimediabericht
(Menu-4-9-2)
In dit menu kunt u standaarden voor uw multimediaberichten
instellen.
De onderstaande opties verschijnen op het scherm.
] Prioriteit: ken prioriteit toe aan de multimediaberichten die u wilt
verzenden.
] Geldigheids periode: bepaal hoe lang uw multimediaberichten
op de netwerkserver moeten worden bewaard als ze niet
verzonden kunnen worden. Mogelijkheden zijn 1 uur, 12 uur,
1 dag, 1 week en de door uw netwerkexploitant maximaal
toegestane tijd.
] Afleverings rapport: activeer of deactiveer het genereren van
een rapport. Als deze functie is geactiveerd, informeert het
netwerk u of uw bericht al dan niet verzonden is.
] Automatisch downloaden
- Aan: als u deze optie selecteert, worden berichten automatisch
gedownload.
- Uit: u wordt gevraagd te bevestigen dat u het bericht wilt
downloaden.
- Alleen thuisnetwerk: als u deze optie selecteert, worden
berichten automatisch gedownload door uw eigen netwerk.
Buiten bereik van uw eigen netwerk wordt u gevraagd te
bevestigen dat u het bericht wilt downloaden.
- Afwijzen: als u deze optie selecteert, wordt elk bericht
geweigerd.
] Netwerkinstellingen: als u de multimediaserver selecteert, kunt
u de URL van de server instellen.
] Toegestane typen: stel het toegestane type in. Mogelijkheden
zijn Persoonlijk, Advertenties en Informatie.

[ 62 C3300 Gebruikershandleiding ]
Berichten
Voice mail centre
(Menu-4-9-3)
Het opvragen van uw voicemail is mogelijk als uw
netwerkexploitant deze functie ondersteunt. Bij ontvangst van een
nieuw voicemailbericht verschijnt het bijbehorende symbool op het
scherm. Neem contact op met uw netwerkexploitant voor meer
informatie over deze dienst, zodat u uw toestel correct kunt
configureren.
1. Houd in stand-bymodus de -toets ingedrukt.
2. De volgende submenu's kunnen worden weergegeven.
• Thuis: U kunt uw voicemailberichten beluisteren door Thuis te
selecteren.
• Roaming: Als u in het buitenland bent, kunt u uw voicemails
beluisteren als deze dienst wordt ondersteund.
Info-bericht
(Menu-4-9-4)
Informatieberichten zijn tekstberichten die door het netwerk worden
verzonden aan GSM-gebruikers. Deze berichten bevatten
algemene informatie over weer, verkeer, taxi’s, apothekers,
beurskoersen, enz. Elk soort informatie heeft een eigen nummer.
Hiervoor kunt u contact opnemen met de netwerkexploitant.
Wanneer u een informatiebericht hebt ontvangen verschijnt een
melding op het scherm dat u een bericht hebt ontvangen, of het
bericht verschijnt direct op het scherm. De onderstaande opties
verschijnen op het scherm.
] Ontvangen: als u Ja selecteert, kan uw telefoon
informatieberichten ontvangen. Anders kunt u geen
informatieberichten ontvangen.
] Signaaltoon: als u Ja selecteert, laat uw toestel een pieptoon
horen wanneer u informatieberichten ontvangt. Anders laat uw
toestel laat geen pieptoon horen wanneer u informatieberichten
ontvangt.
] Talen: u kunt de gewenste taal selecteren door op [Aan/Uit] te
drukken. Vervolgens verschijnen de informatieberichten in de
door u gekozen taal op het scherm.

[ 63 C3300 Gebruikershandleiding ]
Berichten
Push bericht
(Menu-4-9-5)
U kunt WAP-dienstberichten (push-berichten) aanvragen bij
aanbieders van WAP-diensten. WAP-dienstberichten maken
bijvoorbeeld melding van nieuwsberichten en kunnen een
tekstbericht of een WAP-dienstadres bevatten. Informeer bij uw
WAP-aanbieder naar de beschikbaarheid van WAP-diensten.
In dit menu kunt u instellen of u push-berichten wilt ontvangen.
] Ontvangen aan/uit: als u deze functie selecteert, kunt u alle
push-berichten ontvangen, ongeacht de verzender.
] Automatisch downloaden: als u deze optie selecteert, kunt u
alle push-berichten van TMO.
Als u een push-bericht selecteert, zijn de volgende submenu’s
beschikbaar.
• Informatie: toont de informatie van het geselecteerde
push-bericht.
• Laden: u kunt naar een specifieke site gaan met behulp van de
informatie in het geselecteerde push-bericht.
• Wissen: wis het geselecteerde push-bericht.
• Alles wissen: wis alle berichten uit de Inbox (o.a. SMS, MMS,
enz.).
n Opmerking
• Aanbieders kunnen in een bestaand
WAPdienstbericht steeds nieuwe informatie
verwerken.
(Oude bericht wordt vervangen door nieuw bericht.)
• Zodra push berichten zijn verstreken, worden ze
automatisch verwijderd.
Pictogram Beschrijving
gelezen push-bericht
ongelezen push-bericht

[ 64 C3300 Gebruikershandleiding ]
Toegang tot t-zone
U kunt uw telefoon voor zoveel gebruiken dan alleen sms en
bellen. t-zones biedt handige informatie zoals algemeen nieuws,
sportnieuws en verkeers- en weerberichten. Daarnaast biedt
t-zones uitstekende multimediaservices, zoals de nieuwste
beltonen, achtergronden en spelletjes.
Druk op de Menu-toets ( ) en selecteer t-zones met de
navigatietoetsen. U kunt ook rechtstreeks naar t-zones gaan door
in de standby-modus op de toets ( ) te drukken.
t-zones
Menu-5
n Opmerking Afhankelijk van het netwerk kunnen er voor services
extra kosten worden berekend.

[ 65 C3300 Gebruikershandleiding ]
Contacten
Menu-6
U kunt namen en nummers opslaan in het geheugen van uw SIM-
kaart. Bovendien kunt u tot 200 namen en nummers opslaan in het
telefoongeheugen.
Druk op de linker softkey [Menu] in de standby-modus en selecteer
Contacten.
Zoeken
Menu-6-1
1. Kies Zoeken. U wordt gevraagd een naam in te geven.
2. Voer de eerste letters in van de naam die u zoekt en druk op de
linker softkey [Zoeken].
] U kunt direct naar Contacten gaan door in de standby-modus op
de bovenste navigatietoets ( ) te drukken.
3. Nadat u de gewenste naam hebt gevonden kunt u het
bijbehorende nummer bellen door op de toets te drukken.
U kunt ook op de linker softkey [Opties] drukken. De volgende
opties verschijnen op het scherm.
] Bewerken: u kunt de naam en het nummer bewerken. Om het
contact te bewerken, hebt u de PIN2-code nodig.
] Schrijf nieuw bericht: schrijf een tekstbericht aan de
geselecteerde persoon.
] Multimediabericht schrijven: schrijf een multimediabericht aan
de geselecteerde persoon.
] Kopiëren: u kunt contactgegevens kopiëren van het
SIM-geheugen naar het telefoongeheugen en vice versa.
] Hoofdnummer: selecteer welk nummer het hoofdnummer is.
Het hoofdnummer wordt als eerste getoond.
] Wissen: wis de geselecteerde persoon.
n Opmerking U kunt ook door de Contacten bladeren vanaf het
begin door direct op de linker softkey [Lijst] te
drukken.

[ 66 C3300 Gebruikershandleiding ]
Contacten
Nieuw toevoegen
Menu-6-2
Met deze functie kunt u een nieuw persoon aan Contacten
toevoegen.
Het toestel beschikt over twee aparte geheugens:
het telefoongeheugen en het SIM-geheugen. Ga naar Geheugen
instellen [Menu-6-5-1] om het gewenste geheugen te selecteren.
In het telefoongeheugen kunnen maximaal 200 items worden opges-
lagen. Elke naam in het telefoongeheugen mag uit maximaal 20
tekens bestaan. De capaciteit van het SIM-geheugen is afhankelijk
van de SIM-kaart.
1. Open eerst het menu Contacten door in de standby-modus op de
rechter softkey [Contacten] te drukken.
2. Blader naar Nieuw Toevoegen en druk op [Kies].
3. U kunt nieuwe items toevoegen aan het SIM- of
telefoongeheugen. Ga naar Geheugen instellen [Menu-6-5-1] om
het gewenste geheugen te selecteren. (Zie pagina 67.)
• Nieuwe items toevoegen aan het SIM-geheugen
Voor elk item kunt u een naam en nummer invoeren en de
gewenste groep selecteren (afhankelijk van SIM-kaart).
• Nieuwe items toevoegen aan het telefoongeheugen
Voor elk item kunt u een naam, nummers, e-mailadres en memo
invoeren en de gewenste groep selecteren. Selecteer welk
nummer het hoofdnummer is.
Bellergroepen
Menu-6-3
U kunt 20 leden in een groep opslaan. Er zijn zeven standaard
groepen waarvoor u lijsten kunt maken.
1. Selecteer Bellergroepen. De lijst met groepen verschijnt:
Familie, Vriend, Collega's, VIP, Groep 1, Groep 2 en Overige.
2. Selecteer de groep die u wilt beheren door op de linker softkey
[Opties] te drukken. De onderstaande submenu’s worden
weergegeven, behalve voor Overige.

[ 67 C3300 Gebruikershandleiding ]
Contacten
] Ledenlijst: de leden van de geselecteerde groep worden
weergegeven.
] Beltonen groeperen: u kunt een beltoon voor elke groep
instellen. Als iemand uit deze bellergroep u belt, kunt u dat horen.
] Bellergroep icoon: u kunt een pictogram voor elke groep
instellen. Als iemand uit deze bellergroep u belt, kunt u dat zien
op het scherm.
] Lid toevoegen: u kunt leden aan de belgroep toevoegen. U kunt
20 leden in een groep opslaan.
] Verwijderen lid: u kunt een lid uit een belgroep verwijderen.
Deze persoon blijft staan in Contacten.
] Hernoemen: u kunt de groepsnaam wijzigen.
Snelkiezen
Menu-6-4
Aan een in de naamlijst ingevoerd item kunt u een willekeurige toets
van t/m toekennen. U kunt het nummer rechtstreeks
bellen door deze toets 2 tot 3 seconden ingedrukt te houden.
1. Blader naar Snelkiezen en druk op [Kies].
2. Als u een snelkeuzetoets wilt toevoegen, selecteert u [Leeg].
Vervolgens kunt u in Contacten de naam opzoeken.
3. U kunt een snelkeuzenummer wijzigen of wissen, een oproep
verrichten of een bericht versturen als u op de linker softkey
[Opties] drukt.
Instellingen
Menu-6-5
Geheugen instellen
(Menu-6-5-1)
U kunt nieuwe items toevoegen aan het SIM- of telefoongeheugen.
Als u Variabel selecteert, wordt u gevraagd waar het nummer moet
worden opgeslagen.

[ 68 C3300 Gebruikershandleiding ]
Contacten
Zoeken als
(Menu-6-5-2)
U kunt zoeken in Contacten zoeken op naam of nummer. Als u
Variabel selecteert, wordt u gevraagd hoe het item moet worden
gezocht.
Weergave-opties
(Menu-6-5-3)
U kunt instellen hoe de contacten worden weergegeven.
] Alleen naam: wanneer u in door Contacten bladert, worden
alleen de namen weergegeven.
] Met foto’s: wanneer u in door Contacten bladert, worden de
namen en bijbehorende foto’s weergegeven.
] Naam & nummer: wanneer u in door Contacten bladert, worden
de namen en nummers weergegeven.
Alles kopiëren
Menu-6-6
U kunt items kopiëren of verplaatsen van het SIM-geheugen naar
het telefoongeheugen en vice versa.
] SIM naar telefoon: u kunt het item van het SIM-geheugen naar
het telefoongeheugen kopiëren.
] Telefoon naar SIM: u kunt het item van het telefoongeheugen
naar het SIM-geheugen kopiëren.
De onderstaande opties verschijnen op het scherm.
• Origineel houden: als u een nummer kopieert, blijft het originele
nummer bewaard.
• Origineel wissen: als u een nummer kopieert, wordt het originele
nummer gewist.

[ 69 C3300 Gebruikershandleiding ]
Contacten
Alles wissen
Menu-6-7
Alle items in het SIM- en/of telefoongeheugen worden gewist.
Voor deze functie hebt u de Beveiligingscode nodig.
Druk op om terug te keren naar de standby-modus.
Informatie
Menu-6-8
] Servicenummer (afhankelijk van SIM-kaart): met deze functie
krijgt u toegang tot een lijst van servicenummers
(SDN-nummers) die uw netwerkexploitant ter beschikking stelt
(mits deze door de SIM-kaart worden ondersteund). De lijst
omvat onder andere noodnummers en voicemailnummers.
1. Ga naar Servicenummer en open dit menu.
2. De namen van de beschikbare diensten verschijnen op het
scherm.
3. Selecteer met behulp van de navigatietoetsen een dienst.
Druk op .
] Controleer geheugen: u kunt de huidige status van het SIM- en
telefoongeheugen controleren.
] Eigen nummerlijst: op de SIM-kaart kunt u nagaan wat uw
eigen nummer is.

[ 70 C3300 Gebruikershandleiding ]
Organiser
Menu-7
Druk op de Menu-toets ( ) en selecteer Organiser.
Alarmklok
Menu-7-1
U kunt vijf alarmen instellen. Stel het alarm in voor een bepaald
tijdstip.
Druk op de linker softkey [Kies].
1. Aan/ Uit: selecteer Aan met behulp van de rechter en linker
navigatietoets. Selecteer Uit om het alarmfunctie uit te
schakelen.
2. Tijd: voer de alarmtijd in met behulp van de numerieke
toetsen.
3. Herhaal: maak een keuze uit Eenmaal, Ma~Vrij, Ma~Zat, en
Elke dag met behulp van de navigatietoetsen.
4. Alarm: selecteer het gewenste alarmsignaal met de navigati-
etoetsen.
5. Druk op de linker softkey [OK].
6. U kunt de naam van de alarmklok bewerken. Voer de naam in en
druk op de linker softkey [OK].
Als een alarm is geactiveerd, ziet u “ ” op het scherm in de
standby-modus.
Als het alarm afloopt, klinkt het alarmsignaal.
] Druk op de rechter softkey [Stop] om het alarm uit te zetten.

[ 71 C3300 Gebruikershandleiding ]
Organiser
Planner
Menu-7-2
Als u dit menu opent, verschijnt een kalender op het scherm.
De dag wordt aangegeven via een vierkante cursor. U kunt de
cursor verplaatsen naar een andere datum met de
navigatietoetsen. In de kalender kunt u de volgende toetsen
gebruiken.
Om een afspraak of memo in de agenda te zetten drukt u op de
linker softkey [Opties].
] Nieuw toevoegen: u kunt een nieuwe afspraak of memo
invoeren. Nadat u een afspraak of memo hebt ingevoerd, krijgt
de betreffende datum een andere kleur en verschijnt “ ”
(afspraak) of “ ” (memo) rechtsonder in het scherm. Dit is
een goed geheugensteuntje voor uw geplande activiteiten.
Indien u dat instelt, klinkt een alarmtoon bij de notitie.
] Bekijken: de notities voor de gekozen dag worden
weergegeven. Druk op de linker softkey [Opties] om een
geselecteerde notitie te bewerken of wissen.
] Alles bekijken: alle ingevoerde notities worden weergeven,
ongeacht de dag. Blader met behulp van de navigatietoetsen
door de notities.
] Wissen laatste: u kunt de notities wissen nadat deze u zijn
meegedeeld. U wordt gevraagd deze keuze te bevestigen.
] Alles wissen: u kunt alle afspraken en memo’s wissen. U wordt
gevraagd deze keuze te bevestigen.
gaat een jaar terug.
gaat een jaar vooruit.
gaat een maand terug.
Elke druk op
gaat een maand vooruit.

[ 72 C3300 Gebruikershandleiding ]
Organiser
Druk op de Menu-toets ( ) en selecteer Extra met de
navigatietoetsen.
Calculator
Menu-7-3
Met deze functie kunt u uw telefoon gebruiken als rekenmachine.
De calculator kan eenvoudige berekeningen uitvoeren: optellen,
aftrekken, vermenigvuldigen en delen. U kunt getallen met
maximaal twee decimalen invoeren.
Calculator gebruiken
1. Voer het eerste getal in met de numerieke toetsen.
2. Druk op de bijbehorende navigatietoets om een rekenteken te
selecteren.
3. Druk op de linker softkey of de OK-toets om het resultaat te
berekenen [Resul].
4. Na de berekening kunt u terugkeren naar het beginscherm als u
op de linker softkey [Opnieuw instellen] drukt.
Conversieprogr.
Menu-7-4
Met deze functie converteert u een willekeurige eenheidsmaat in
een andere eenheidsmaat naar keuze.
Er kunnen vier soorten eenheidsmaten worden omgerekend:
Lengte, Gebied, Gewicht en Volume.
1. Selecteer een van de vier soorten eenheidsmaten door op de
linker softkey [Eenheid] te drukken.
2. Ga naar de eenheid voor de beginwaarde met de onderste
navigatietoets.
n Opmerking Druk op de toets om fouten te wissen en het
scherm leeg te maken.
Druk op om een decimaal getal in te voeren.
Druk op om een negatief getal in te voeren.

[ 73 C3300 Gebruikershandleiding ]
Organiser
3. Selecteer de gewenste eenheid met behulp van de linker en
rechter navigatietoets.
4. Druk op de onderste navigatietoets om naar de eenheid voor de
eindwaarde te gaan.
5. Selecteer de eenheid waarnaar u wilt converteren met de linker
en rechter navigatietoets.
6. Voer de getallen in met behulp van de numerieke toetsen.
Het ingevoerde getal wordt automatisch geconverteerd.
Wereldtijd
Menu-7-5
U kunt de huidige GMT-tijd bekijken en u kunt zien hoe laat het is
in grote steden over de hele wereld, met behulp van de linker en
rechter navigatietoets.
Op het scherm verschijnen de naam van de stad en de huidige
datum en tijd.
Om de tijdzone waarin u zich bevindt te selecteren gaat u als volgt
te werk:
1. Selecteer de stad in uw tijdzone met de linker en rechter
navigatietoets. De plaatselijke datum en tijd worden
weergegeven.
2. Om de geselecteerde tijd in te stellen als de tijd die op het
scherm wordt weergegeven in de standby-modus, drukt u op de
linker softkey [Opties].
n Opmerking De tijdzone-instelling van elke stad in het menu
Wereldtijd kan worden beïnvloed door de
netwerkomstandigheden.
n Opmerking U kunt ook een decimaal getal invoeren als u op de
toets drukt.

[ 74 C3300 Gebruikershandleiding ]
Organiser
Stemrecorder
Menu-7-6
In dit menu kunt u een memo opnemen. U kunt maximaal 10
spraakmemo’s opnemen, elk van maximaal 20 seconden.
Als u op de linker softkey [Opties] drukt kunt u de opgenomen
memo afspelen of wissen en nieuwe spraakmemo’s opnemen.
Opnemen
1. Houd de toets ingedrukt in de standby-modus.
2. Als de opname gestart is, wordt het bericht ‘Opnemen…’ en de
resterende tijd op het scherm weergegeven.
3. Als u de opname wilt beëindigen, drukt u op de linker softkey
[Opslaan].
Lijst bekijken
Als u op drukt in de standby-modus verschijnt op het scherm
de titel van de spraakmemo die u hebt opgenomen. U kunt de
spraakmemo afspelen of wissen.
] Weergave: u kunt alle opgenomen spraakmemo’s beluisteren,
te beginnen met de meest recente.
] Multimediabericht schrijven: u kunt multimediaberichten
schrijven met behulp van de spraakmemo.
] Wissen: u kunt de spraakmemo wissen.
] Alles wissen: u kunt alle memo’s wissen. Druk op de linker
softkey [Ja] om dit te bevestigen.
n Opmerking U kunt het Spraakopname-menu ook rechtstreeks
openen door in de standby-modus op de onderste
navigatietoets te drukken.
n Opmerking Als u het maximale aantal memo’s hebt opgenomen
moet u eerst een oude memo wissen voor u een
nieuwe kunt opnemen.

[ 75 C3300 Gebruikershandleiding ]
Organiser
Memory status
Menu-7-7
U kunt de huidige status van de verschillende geheugens
controleren: beschikbaar geheugen, tekstbericht, multimediabericht,
inbox, outbox, concepten, multimediasjablonen, berichten in SIM en
spraakmemo, push-bericht, spraakmemo, foto’s, afbeeldingen,
geluiden, games & meer.
Daarnaast kunt u de geheugens beheren.
S/W version
Menu-7-8
U kunt de huidige model- en landcode, softwareversie en
netwerkcode van uw telefoon controleren.

[ 76 C3300 Gebruikershandleiding ]
Camera
Menu-8
Met de C3300-telefoon kunt u foto’s nemen en opslaan. Nadat u
een foto hebt genomen, kunt u deze ook direct versturen via MMS
(Multimedia Messaging Service).
Foto nemen
Menu-8-1
Druk op de Menu-toets en selecteer Camera → Foto nemen met
behulp van de navigatietoetsen. U kunt ook direct naar de
camera gaan door in de standby-modus op de Cameratoets te
drukken. U ziet dan het beeld dat wordt vastgelegd.
Voordat u afdrukt kunt u de volgende opties instellen:
n Opmerking Als de batterij bijna leeg is, kunt u de camerafunctie
niet gebruiken.
1. Digitale zoom (): x1, x2, x4
2. Toon (): Kleur ( ) / Sepia ( ) /
Zwart-wit ( )
3. Helderheid (): -2, -1, 0, +1, +2
4. Timer (): uit, 3 sec, 5 sec.
5. Geheugen (): toont de huidige
geheugenstatus.
n Opmerking Hoever u maximaal kunt
inzoomen is afhankelijk van de
resolutie.
48 x 48 unavailable
1x, 2x, 4x
1x, 2x
1x
128 x 160
320 x 240
640 x 480
vooraf bekijken
menuopties
Terug
n Opmerking Als het geheugen vol is,
verschijnt “Geheugen vol” op
het scherm en kunt u geen
foto’s opslaan. Maak
geheugen vrij door oude foto’s
in Mijn foto’s te wissen.

[ 77 C3300 Gebruikershandleiding ]
Camera
1. Selecteer het gewenste optiemenu met de rechts/links
navigatietoetsen.
2. Selecteer de gewenste resolutie met de omhoog/omlaag
navigatietoetsen.
3. Nadat alles juist is ingesteld, richt u de camera op het onderwerp
dat u op foto wilt vastleggen en drukt u op de Cameratoets of de
OK-toets. Met een klik wordt de foto vastgelegd en de volgende
menuoptie verschijnt.
4. Om de foto op te slaan, selecteer ( ) en druk op ( ). Als u
de foto niet wilt bewaren, selecteer dan ( ) en druk op ( ).
U kunt direct naar Mijn foto’s gaan door op de linker softkey
[Mijn foto’s] te drukken.
U kunt de foto ook versturen via een multimediabericht door
( ) te selecteren. Kijk op pagina 51 voor meer informatie over
het schrijven van een multimediabericht.
6. Flash ()
7. Resolutie (): 48x48 (voor telefoon-
boek), 128x160, 320x240, 640x480
8. Beeldkwaliteit (): Norm/ Fine/ Basic
n Opmerking Als Automatisch bewaren [Menu-8-4-1] is ingeschakeld,
wordt de vastgelegde foto automatisch opgeslagen
zonder dat deze menuoptie verschijnt. (Zie pagina 80.)
Opslaan
Wissen
MMS-bericht
n Opmerking Om de foto te gebruiken in het
telefoonboek, kies 48x48 (voor
telefoonboek).

[ 78 C3300 Gebruikershandleiding ]
Camera
Camera mode
Menu-8-2
U kunt foto’s nemen in verschillende standaard opnamemodi. Er
zijn zeven frames beschikbaar. Druk op de Menu-toets en selecteer
Camera → Camera mode met behulp van de navigatietoetsen.
Voordat u afdrukt, kunt u de volgende opties instellen:
1. Selecteer het gewenste optiemenu met de links/rechts
navigatietoetsen.
2. Selecteer de gewenste resolutie met de omhoog/omlaag
navigatietoetsen.
3. Nadat alles juist is ingesteld richt u de camera op het onderwerp
dat u op foto wilt vastleggen en drukt u op de Cameratoets of de
OK-toets. Met een klik wordt de foto vastgelegd en de volgende
menuoptie verschijnt.
1. Frame ( ): selecteer het gewenste frame
uit de lijst met zeven standaard frames.
2. Beeldkwaliteit ( ): scherp / normaal /
basic
3. Digitale zoom ( ): x1, x2, x4
4. Toon ( ): Kleur ( ) / Sepia ( ) /
Zwart-wit ( )
5. Helderheid ( ): -2, -1, 0, +1, +2
6. Timer (): uit, 3 sec, 5 sec.
7. Geheugen (): toont de huidige
geheugenstatus.
8. Flash ()
vooraf bekijken
menuopties
Terug
n Opmerking Als het geheugen vol is,
verschijnt “Geheugen vol” op
het scherm en kunt u geen
foto’s opslaan. Maak
geheugen vrij door oude foto’s
in Mijn foto’s te wissen.

[ 79 C3300 Gebruikershandleiding ]
Camera
4. Om de foto op te slaan, selecteer ( ) en druk op ( ). Als u
de foto niet wilt bewaren, selecteer dan ( ) en druk op ( ).
U kunt de foto ook versturen via een multimediabericht door
( ) te selecteren.
Mijn foto's
Menu-8-3
Druk op de Menu-toets en selecteer Camera → Mijn foto’s met
behulp van de navigatietoetsen.
Alle foto’s die zijn genomen in Foto nemen en Cameramodi worden
in dit menu opgeslagen. De laatstgenomen foto staat bovenaan.
De foto’s zijn onderverdeeld in Algemene foto’s, Foto modus en
Telefoonboek foto’s. In Alle foto’s kunt u alle foto’s bekijken.
Via de linker softkey [Opties] hebt u de volgende mogelijkheden:
] Wissen: wis de geselecteerde foto.
] Versturen via MMS: u kunt de geselecteerde foto versturen via
MMS. (Zie pagina 51 voor het schrijven van
multimediaberichten.)
] Achtergrond instellen: u kunt de foto als achtergrond instellen.
] Hernoemen: u kunt de naam van de geselecteerde foto
wijzigen.
] Informatie: u kunt de naam, resolutie, datum, tijd en het formaat
van de geselecteerde foto controleren
n Opmerking
Als Automatisch bewaren [Menu-8-4-1] is ingeschakeld,
wordt de vastgelegde foto automatisch opgeslagen
zonder dat deze menuoptie verschijnt. (Zie pagina 80.)
n Opmerking Om Mijn foto’s op te schonen, gaat u naar Camera →
Instellingen → Alle foto’s verwijderen [Menu-8-4-2].
Opslaan
Wissen
MMS-bericht

[ 80 C3300 Gebruikershandleiding ]
Camera
Instellingen
Menu-8-4
Druk op de Menu-toets en selecteer Camera → Instellingen met
de navigatietoetsen.
Automatisch bewaren: als Automatisch bewaren is ingeschakeld,
worden de vastgelegde foto’s automatisch opgeslagen zonder dat
de menuoptie Opslaan verschijnt.
Alle foto’s verwijderen: in dit menu kunt u alle foto’s wissen.
U wordt gevraagd deze keuze te bevestigen
Status geheugen
Menu-8-5
Druk op de Menu-toets en selecteer Camera → Geheugen met de
navigatietoetsen.
U kunt de huidige status van het geheugen voor de camerafunctie
controleren

[ 81 C3300 Gebruikershandleiding ]
Instellingen
Menu-9
Profielen
Menu-9-1
In Profielen kunt u beltonen instellen voor verschillende
gebeurtenissen, omgevingen en bellergroepen.
Er zijn zes standaardprofielen: Alleen trilfunctie, Stil, Normaal,
Luid, Headset en Auto. Elk profiel kunt u aan uw persoonlijke
wensen aanpassen.
Druk op de Menu-toets en selecteer Profielen met de
navigatietoetsen.
Het profiel wijzigen
(Menu-9-1-1)
1. Er verschijnt een lijst met profielen.
2. Blader in de lijst met Profielen naar het profiel dat u wilt activ-
eren en druk op de linker softkey [Kies] of de OK-toets ( ).
3. Selecteer vervolgens Activeren.
Aanpassen profiel
- personaliseren
(Menu-9-1-2)
Blader naar het gewenste profiel in de profielenlijst en selecteer
personaliseren. Er verschijnt een lijst met profielinstellingen.
Selecteer de gewenste optie.
1. Type oproepsignaal: type oproepsignaal voor inkomende
gesprekken instellen.
2. Beltoon: selecteer de gewenste beltoon uit de lijst. Blader door
de lijst met de navigatietoetsen. U hoort de gewenste beltoon
voor u een keuze maakt.
3. Belvolume: volume van de beltoon instellen.
4. Type berichtsignaal: type oproepsignaal voor ontvangen
berichten instellen.
5. Berichttoon: selecteer de gewenste beltoon voor ontvangen
berichten.

6. Toetsentoon: selecteer de gewenste toetsenbordtoon.
7. Toetsenvolume: volume van de toetsenbordtonen instellen.
8. Volume effectgeluid: volume van het effectgeluid instellen.
9. Aan/Uit-volume: volume van de toon instellen als het toestel
aan- of uitgezet wordt.
10. Automatisch beantwoorden: u kunt de functie automatisch
beantwoorden activeren (alleen in de profielen Headset en
Handsfree). Geef aan wanneer u de oproep automatisch wilt
aannemen.
] Uit: de functie Automatisch beantwoorden wordt
uitgeschakeld.
] Na 5 sec: na 5 seconden wordt het gesprek automatisch
aangenomen.
] Na 10 sec: na 10 seconden wordt het gesprek automatisch
aangenomen.
Aanpassen profiel
– hernoemen
(Menu-9-1-3)
U kunt de naam van het profiel wijzigen in wat u maar wilt.
De profielen Alleen trilfunctie, Headset en Auto kunnen niet
worden hernoemd.
1. Ga naar het profiel dat u wilt aanpassen en kies hernoemen.
2. Voer de gewenste naam in en druk op de OK-toets of de linker
softkey [OK].
Instellingen
[ 82 C3300 Gebruikershandleiding ]

Druk op de Menu-toets ( ) en selecteer Instellingen met de
navigatietoetsen.
Datum & tijd
Menu-9-2
In dit menu kunt u de huidige datum en tijd wijzigen.
De onderstaande opties verschijnen op het scherm.
Datum instellen
(Menu-9-2-1)
U kunt dag, maand en jaar instellen. U kunt ook de Datumnotatie
wijzigen.
Datumnotatie
(Menu-9-2-2)
DD/MM/JJJJ (dag/maand/jaar)
MM/DD/JJJJ (maand/dag/jaar)
JJJJ/MM/DD (jaar/maand/dag)
Tijd instellen
(Menu-9-2-3)
U kunt de juiste tijd ingeven. U kunt tevens de gewenste notatie
selecteren onder Tijdnotatie.
Tijdnotatie
(Menu-9-2-4)
24-uurs
12-uurs
Instellingen
[ 83 C3300 Gebruikershandleiding ]

[ 84 C3300 Gebruikershandleiding ]
Instellingen
Telefooninstellingen
Menu-9-3
Veel functies op uw telefoon kunt u aan uw eigen voorkeur
aanpassen. U hebt toegang tot deze functies via het menu
Telefooninstellingen.
Instellingen weergeven
(Menu-9-3-1)
] Achtergrond: u kunt instellen wat op het scherm moet worden
weergegeven in de standby-modus.
] Menukleur: uw toestel biedt u de keuze uit vier mogelijke
menukleuren. U kunt de menukleur instellen door te bladeren en
op de linker softkey [Kies] te drukken.
] Tekst display: Als u Aan selecteert, kunt u de tekst die wordt
weergegeven in de standby-modus bewerken.
] Backlight: u kunt de schermverlichting in- of uitschakelen.
Als u de verlichting uitschakelt wordt de standby- en gesprekstijd
enigszins verlengd.
] LCD contrast: pas het schermcontrast (lichter of donkerder)
aan met de linker en rechter navigatietoets.
] Informatiescherm: u kunt de huidige instellingen van het
geselecteerde menu bekijken voor u het menu opent.
Deze worden onder in het scherm weergegeven.
Taal
(Menu-9-3-2)
U kunt de taal voor het scherm selecteren. Als deze optie is
ingesteld op Automatisch wordt dezelfde taal als op de SIM-kaart
geselecteerd. Als de taal op de SIM-kaart niet wordt ondersteund
door de telefoon wordt de taal op Engels ingesteld.

[ 85 C3300 Gebruikershandleiding ]
Instellingen
Oproepinstellingen
Menu-9-4
In dit menu kunt u de instellingen voor doorschakelen wijzigen.
Oproepdoorschakelen
(Menu-9-4-1)
Als deze netwerkdienst actief is, kunt u inkomende oproepen
doorschakelen naar een ander nummer, bijvoorbeeld dat van uw voice-
mailbox. Neem voor meer informatie contact op met uw netwerkex-
ploitant. Selecteer een van de doorschakelopties, zo kunt u met Indien
bezet spraakoproepen doorschakelen als uw nummer bezet is of als u
inkomende oproepen weigert.
De onderstaande opties verschijnen op het scherm.
Alle oproepen: spraakoproepen onvoorwaardelijk doorschakelen.
Indien bezet: spraakoproepen doorschakelen wanneer de telefoon in
gesprek is.
Bij geen gehoor: oproepen doorschakelen als u niet opneemt.
Indien geen bereik: oproepen doorschakelen als het toestel uitstaat of
als u buiten bereik van het netwerk bent.
Alle dataoproepen: onvoorwaardelijk doorschakelen naar een
nummer met een pc-verbinding.
Alle faxoproepen: onvoorwaardelijk doorschakelen naar een
nummer met een faxverbinding.
Voor elke optie verschijnt het volgende menu:
] Activeren: de bijbehorende dienst activeren.
- Naar berichtencentrale: het bericht doorsturen naar de
berichtencentrale. Deze functie is niet beschikbaar in de menu’s
Alle dataoproepen en Alle faxoproepen.
- Naar ander nummer: Het nummer invoeren waarnaar de oproep
moet worden doorgeschakeld.
- Naar favoriete nummer: u kunt maximaal vijf veelgebruikte
telefoonnummers invoeren waarnaar u oproepen kunt doorschake-
len.

[ 86 C3300 Gebruikershandleiding ]
Instellingen
] Annuleren: de geselecteerde doorschakeldienst annuleren.
] Status weergeven: u kunt de status van de dienst controleren.
Alles annuleren: alle doorschakeldiensten annuleren.
Antwoordmodus
(Menu-9-4-2)
Selecteer de gewenste modus om een oproep aan te nemen.
] Openen: als de telefoon overgaat, kunt u een oproep
beantwoorden door simpelweg de klep te openen.
] Druk op willekeurige toets: als de telefoon overgaat, kunt u
een oproep beantwoorden door op een willekeurige toets te
drukken, behalve de toets en de rechter softkey ( ).
] Alleen verzenden: u kunt een inkomende oproep alleen
beantwoorden door op de verzendtoets te drukken.
Mijn nummer meezenden
(Menu-9-4-3)
Met deze netwerkdienst kunt u bepalen of uw eigen
telefoonnummer wordt weergegeven (Aan) of verborgen (Uit) op
het telefoontoestel van degene die u belt. Selecteer Via netwerk
instellen om terug te gaan naar de instelling die u met uw service
provider bent overeengekomen.
Oproep in wacht
(netwerkdienst)
(Menu-9-4-4)
U wordt gewaarschuwd als u een oproep ontvangt terwijl u aan het
bellen bent. Selecteer Activeren als u de functie Oproep in wacht
wilt activeren, Annuleren als u deze functie wilt uitschakelen of
Status weergeven als u wilt nagaan of de functie actief is.
Minuutmelder
(Menu-9-4-5)
Als u Aan selecteert laat de telefoon elke minuut een pieptoon
horen tijdens een uitgaande oproep, om u op de hoogte te houden
van de duur van het gesprek.

[ 87 C3300 Gebruikershandleiding ]
Instellingen
Automatische nummerherhaling
(Menu-9-4-6)
Als u Aan selecteert, worden maximaal vier pogingen gedaan om
de verbinding tot stand te brengen na een mislukte oproeppoging.
Besloten gebruikersgroep
(afhankelijk van netwerk)
(Menu-9-4-7)
Met deze functie kunt u het gebruik van de telefoon voor het bellen
van nummers beperken tot bepaalde gebruikersgroepen. Als deze
functie wordt ingeschakeld, wordt elke uitgaande oproep
vergeleken met een groepsindex. Als er een groepsindex is
bepaald, wordt deze gebruikt voor alle uitgaande oproepen. Als er
geen groepsindex is bepaald, gebruikt het netwerk de
voorkeursindex (een bepaalde index die in het netwerk is
vastgelegd).
] Standaard: activeer de standaardgroep zoals overeengekomen
met de netwerkexploitant.
] Instellen: u kunt de geselecteerde groepsindex activeren.
] Bewerken: u kunt de groepsnaam en groepsindex bewerken.
] Wissen: de geselecteerde groep verwijderen.
] Alles wissen: alle gebruikersgroepen wissen.

[ 88 C3300 Gebruikershandleiding ]
Instellingen
Beveiligingsinstellingen
Menu-9-5
Verschillende wachtwoorden worden gebruikt om de functies van
uw telefoon te beschermen. Zie pagina 24 en 25 voor de
verschillende wachtwoorden.
PINcodeverzoek
(Menu-9-5-1)
Als u Verzoek PIN-code hebt geactiveerd, moet u telkens als u het
toestel aanzet deze code intoetsen. Zo kunnen personen die niet
over uw PIN-code beschikken de telefoon niet zonder uw
goedkeuring gebruiken.
U hebt de volgende mogelijkheden:
• Aan: na het inschakelen van het toestel wordt u om de PIN-code
gevraagd.
• Uit: het toestel maakt rechtstreeks verbinding met het netwerk
zonder om de PIN-code te vragen.
Telefoonblokkering
(Menu-9-5-2)
Als u de telefoonbeveiliging activeert, wordt altijd om de
beveiligingscode gevraagd als u het toestel aanzet.
Het wachtwoord is standaard op 0000 ingesteld. Ga naar het menu
Codes wijzigen - Beveiligingscode (menu-9-5-5-1) om het
wachtwoord te wijzigen. Als het juiste wachtwoord is ingevoerd kunt
u het toestel blijven gebruiken tot u het uitschakelt.
U hebt de volgende mogelijkheden:
1 Aanzetten
] Aan: u wordt gevraagd het wachtwoord in te voeren als u het
toestel aanzet.
] Uit: u hoeft het wachtwoord niet in te voeren als u het toestel
aanzet.
n Opmerking U moet uw PIN-code intoetsen voor u Verzoek
PIN-code kunt deactiveren.

[ 89 C3300 Gebruikershandleiding ]
Instellingen
] Automatisch: u wordt alleen om de beveiligingscode gevraagd
als u de SIM-kaart verwisselt.
2 Onmiddellijk
] Als u de juiste beveiligingscode hebt ingevoerd wordt de
telefoon direct vergrendeld zodra deze niet gebruikt wordt.
Als u deze directe telefoonbeveiliging wilt uitschakelen moet u
de beveiligingscode invoeren nadat u eerst op de rechter softkey
hebt gedrukt. Als de telefoon wordt uitgezet als deze
vergrendeld is, is het toestel nog steeds vergrendeld als het
weer wordt aangezet.
Oproep blokkeren
(afhankelijk van netwerk)
(Menu-9-5-3)
Door oproepen te blokkeren kunt u het verrichten en ontvangen
van oproepen met de telefoon beperken. Voor deze functie hebt u
het blokkeringswachtwoord nodig, dat u kunt aanvragen bij uw
service provider.
U hebt de volgende mogelijkheden:
] Alle uitgaande oproepen: u kunt geen oproepen verrichten.
] Internationaal: internationale oproepen kunnen niet verricht
worden.
] Internationaal bij roam: in het buitenland kunt u uitsluitend
lokale oproepen en oproepen naar het thuisnetwerk verrichten.
] Alle inkomende oproepen: u kunt geen oproepen ontvangen.
] Inkomend bij roam: u kunt geen oproepen ontvangen als u zich
buiten het bereik van uw eigen netwerk bevindt.
] Alles annuleren: alle blokkeringen worden geannuleerd, u kunt
weer alle oproepen verrichten en ontvangen.
] Wachtwoord wijzigen: u kunt het door uw service provider
verstrekte wachtwoord voor gespreksblokkering instellen en
wijzigen. U moet eerst de huidige code invoeren om deze te
kunnen wijzigen. Als u een nieuw wachtwoord hebt ingevoerd,
wordt u gevraagd dit nogmaals in te voeren ter bevestiging.

[ 90 C3300 Gebruikershandleiding ]
Instellingen
Vast oproepnummer
(afhankelijk van SIM)
(Menu-9-5-4)
U kunt uitgaande oproepen beperken tot geselecteerde
telefoonnummers, als dit door uw SIM-kaart wordt ondersteund.
Hiervoor hebt u de PIN2-code nodig.
U hebt de volgende mogelijkheden:
] Activeren: u kunt alleen oproepen verrichten naar in het
telefoonboek opgeslagen telefoonnummers. U moet uw
PIN2-code invoeren.
] Annuleren: u kunt alle telefoonnummers bellen, zonder
restricties.
] FDN-lijst : u kunt de lijst met nummers bekijken waarnaar u
oproepen kunt verrichten.
Codes wijzigen
(Menu-9-5-5)
In het menu Codes wijzigen kunt u uw huidige wachtwoord of
code wijzigen. U moet eerst de huidige code invoeren om deze te
kunnen wijzigen.
U kunt de volgende toegangscodes wijzigen: PIN2-code en
beveiligingscode.
n Opmerking Om oproepen te blokkeren moet u het netwerkw
achtwoord ingeven. Wanneer oproepen zijn
geblokkeerd, kunnen bij sommige netwerken nog wel
bepaalde alarmnummers gekozen worden.
n Opmerking Niet alle SIM-kaarten hebben een PIN2-code. Indien
uw SIM-kaart deze code niet heeft, wordt deze optie
ook niet weergegeven in het menu.
n Opmerking PIN: Personal Identification Number

[ 91 C3300 Gebruikershandleiding ]
Instellingen
Netwerkinstellingen
Menu-9-6
Als u zich buiten het bereik van uw eigen netwerk bevindt kunt u in
dit menu aangeven of u automatisch, handmatig of naar voorkeur
een netwerk wilt selecteren.
Automatisch
(Menu-9-6-1)
Kies Automatisch als u wilt dat de telefoon automatisch een mobiel
netwerk in uw gebied selecteert.
Als de telefoon wordt uitgeschakeld verandert de instelling van de
telefoon naar Automatisch.
Handmatig
(Menu-9-6-2)
Kies Handmatig als u zelf het gewenste netwerk wilt selecteren uit
een lijst met netwerken. Als de verbinding met het handmatig
geselecteerde netwerk verloren gaat, hoort u een fouttoon en wordt
u gevraagd opnieuw een netwerk te selecteren. Tussen het
geselecteerde netwerk en uw eigen netwerk (de aanbieder van uw
SIM-kaart) moet een roaming-overeenkomst bestaan. Als de
telefoon geen verbinding kan maken met het geselecteerde
netwerk kunt u een ander netwerk selecteren. Als u de telefoon
uitschakelt verandert de instelling van de telefoon naar
Automatisch.
Favorieten
(Menu-9-6-3)
U kunt een lijst met voorkeursnetwerken instellen waarmee het
toestel eerst verbinding moet trachten te maken, voor er een
verbinding met andere netwerken tot stand wordt gebracht.
Deze lijst wordt opgemaakt aan de hand van de in het toestel
aanwezige lijst van bekende netwerken.
n Opmerking U kunt alleen netwerken selecteren die een
roaming-overeenkomst met uw eigen netwerk hebben
afgesloten.

[ 92 C3300 Gebruikershandleiding ]
Instellingen
GPRS-instellingen
Menu-9-7
GPRS (General Packet Radio Service) is een technologie waarmee
mobiele telefoons kunnen worden gebruikt voor het verzenden en
ontvangen van gegevens via het mobiele netwerk. GPRS is een
gegevensdrager voor draadloze toegang tot gegevensnetwerken
zoals het internet.
Voordat u GPRS-technologie kunt gebruiken:
- moet u geabonneerd zijn op de GPRS-dienst. Neem contact op
met uw netwerkexploitant of service provider voor de
beschikbaarheid van en het abonneren op de GPRS-dienst;
- moet u eerst de GPRS-instellingen opslaan voor alle
toepassingen die u via GPRS gebruikt.
Aanzetten
(Menu-9-7-1)
Als u Aan kiest en het netwerk GPRS ondersteunt, wordt de
telefoon automatisch bij het GPRS-netwerk aangemeld en worden
SMS-berichten verstuurd via GPRS. Ook het starten van een
actieve pakketdataverbinding verloopt sneller, bijvoorbeeld voor het
versturen en ontvangen van e-mail.
Wanneer nodig
(Menu-9-7-2)
Als u Wanneer nodig kiest, wordt GPRS alleen gebruikt als u een
toepassing of bewerking start waarvoor een GPRS-verbinding
nodig is. De GPRS-verbinding wordt na gebruik automatisch
gesloten.
n Opmerking Als er geen GPRS-dekking is en u hebt Automatisch
gekozen, wordt regelmatig geprobeerd een
pakketdataverbinding tot stand te brengen.

[ 93 C3300 Gebruikershandleiding ]
Instellingen
Internet
Menu-9-8
U hebt toegang tot verschillende WAP-diensten (Wireless
Application Protocol), zoals bankdiensten, nieuws, weerberichten
en vluchtgegevens. Deze diensten zijn speciaal voor mobiele
telefoons en worden onderhouden door aanbieders van WAP-
diensten.
Neem contact op met de netwerkexploitant en/of service provider
van de dienst die u wilt gebruiken voor de beschikbaarheid, prijzen
en tarieven van WAP-diensten. De aanbieder kan u ook instructies
geven voor het gebruik van deze diensten.
Om de browser op te starten in de standby-modus drukt u op de
t-zone toets ( ) of houdt u de toets ( ) ingedrukt.
Als de verbinding tot stand is gebracht verschijnt de homepage op
het scherm. De inhoud is afhankelijk van uw service provider.
Om internet af te sluiten drukt u op de toets ( ). U keert terug
naar de standby-modus.
Navigeren met de WAP-browser
U kunt over het internet surfen met behulp van het toetsenbord of
het menu WAP-browser.
Met het toetsenbord
Als u over het internet surft hebben de toetsen een andere functie
dan wanneer u oproepen verricht.
Toets Beschrijving
Blader naar de vorige of volgende
regel op de pagina
Bovenste / Onderste
navigatietoets
C-toets
OK-toets
Terug naar de vorige pagina
Selecteert opties en bevestigt acties

[ 94 C3300 Gebruikershandleiding ]
Instellingen
Met het menu WAP-browser
Er zijn verschillende menuopties als u draadloos over het internet
surft.
Thuis
(Menu-9-8-1)
Hiermee gaat u naar de geconfigureerde startpagina die in het
actieve profiel is opgegeven. Als u het actieve profiel niet instelt,
wordt de startpagina door de netwerkexploitant geconfigureerd.
Favorieten
(Menu-9-8-2)
In dit menu kunt u de URL van uw favoriete websites opslaan voor
eenvoudige toegang op een later tijdstip.
Een favoriet opslaan
1. Druk op de linker softkey [Opties].
2. Selecteer Nieuw toevoegen en druk op de OK-toets.
3. Voer de gewenste URL en naam in en druk op de OK-toets.
✽
Tip: Gebruik de toetsen ( ) en ( ) om symbolen in te voeren.
Om “.” in te voeren, druk op ( ).
Nadat de gewenste favoriet geselecteerd is, zijn de volgende opties
beschikbaar,
] Verbinden: maakt verbinding met de gekozen favoriet.
] Nieuw toevoegen: selecteer deze optie om een nieuwe favoriet
toe te voegen.
] Bewerken: u kunt de URL en/of de titel van de geselecteerde
favoriet bewerken.
] Alles wissen: alle favorieten worden verwijderd.
n Opmerking De WAP-browser menu’s kunnen verschillen,
afhankelijk van uw browserversie.

[ 95 C3300 Gebruikershandleiding ]
Instellingen
Profielen
(Menu-9-8-3)
Een profiel omvat de netwerkinformatie die wordt gebruikt om verbind-
ing te maken met het internet. T-mobile ondersteunt drie profielen.
1. t-zones
Als u verbinding met de server wilt maken via WAP 2.0 activeert u
dit profiel.
2. t-zones business
3. t-zones GPRS
Als u verbinding met de WAP-server wilt maken via GPRS
activeert u dit profiel.
4. t-zones CSD
Als u verbinding met de WAP-server wilt maken via CSD activeert u
dit profiel.
Neem voor meer informatie contact op met T-mobile.
Elk profiel heeft de volgende submenu’s:
] Activeren: het gekozen profiel activeren.
] Instellingen: u kunt de WAP-instellingen van het geselecteerde
profiel bewerken en wijzigen.
- Homepage: hier kunt u het adres (URL) opgeven van de
website die u als startpagina wilt gebruiken. U hoeft niet voor elke
URL “http://” te typen, deze aanduiding wordt automatisch
toegevoegd.
- Drager: u kunt de dragende dienst instellen.
1 GSM
2 GPRS
- Gegevensinstellingen: verschijnt alleen als u
Gegevensinstellingen hebt geselecteerd als dragerdienst.
IP-adres: geef het IP-adres in van de WAP-gateway waarmee u
verbinding wilt maken. Nummer kiezen: geef het
telefoonnummer in waarmee u toegang krijgt tot uw
WAP-gateway.

[ 96 C3300 Gebruikershandleiding ]
Instellingen
Nummer kiezen
User ID: de gebruikersidentiteit voor uw inbelservice (NIET
voor de WAP-gateway).
Wachtwoord: het wachtwoord dat u nodig hebt om u bij uw
inbelservice (NIET bij de WAP-gateway) te identificeren.
Soort oproep: selecteer het type dataoproep; Analoog of
Digitaal (ISDN).
Gesprekssnelheid: de snelheid van uw dataverbinding is 9600
of 14400. u moet een time-outperiode invoeren. WAP zal niet
beschikbaar zijn als gedurende deze tijd geen gegevens zijn
ingevoerd of overgebracht.
- GPRS-instellingen: de onderstaande dienstinstellingen zijn
alleen beschikbaar als GPRS is geselecteerd als dragerdienst.
IP-adres: geef het IP-adres in van de WAP-gateway waarmee
u verbinding wilt maken.
APN: geef de APN van de GPRS in.
User ID: de gebruikersidentiteit voor uw APN-server.
Wachtwoord: het wachtwoord dat u nodig hebt om u te
identificeren bij uw APN-server.
- Soort verbinding: de opties voor het type verbinding zijn
Tijdelijk en Continu. Ze zijn afhankelijk van de gebruikte
gateway.
Continu
Een veelgebruikte verbindingsmethode die echter resulteert in
meer netwerkverkeer.
Tijdelijk
Een weinig gebruikte (draadloze) service.
Http
Rechtstreekse verbinding met server in http.

[ 97 C3300 Gebruikershandleiding ]
Instellingen
- Proxy-instellingen
IP-adres: geef het IP-adres in van de proxy-server waarmee u
verbinding wilt maken.
Poort: geef de proxy-poort in.
- DNS-instellingen
Eerste server: geef het IP-adres in van de eerste DNS-server
waarmee u verbinding wilt maken.
Tweede server: geef het IP-adres in van de tweede
DNS-server waarmee u verbinding wilt maken.
- Beveiligingsinstellingen: afhankelijk van de gateway die u
gebruikt kunt u deze optie inschakelen (Aan) of uitschakelen
(Uit).
- Toon afbeeldingen: u kunt kiezen of er afbeeldingen worden
weergegeven op de WAP-kaarten.
- Hernoemen: u kunt de profielnaam wijzigen.
- Wissen: u kunt het profiel wissen
] Hernoemen: U kunt de naam van het profiel.
] Nieuw toevoegen: u kunt handmatig een nieuw profiel
toevoegen.
Ga naar URL
(Menu-9-8-4)
U kunt direct naar de gewenste website gaan. Daarvoor moet u de
specifieke URL invoeren. Nadat u deze hebt ingevoerd, drukt u op
de OK-toets.

[ 98 C3300 Gebruikershandleiding ]
Instellingen
Cache-instellingen
(Menu-9-8-5)
De opgevraagde gegevens of diensten worden opgeslagen in het
cachegeheugen van de telefoon.
Cache legen
Het cachegeheugen wordt geleegd.
Cache controleren
Stel in of een verbindingspoging via het cachegeheugen wordt
gemaakt of niet.
Cookies instellingen
(Menu-9-8-6)
De opgevraagde gegevens of diensten worden opgeslagen in het
cachegeheugen van de telefoon.
Verwijderen cookies
Alle cookies worden verwijderd.
Cookies controleren
Controleer of een cookie is ingeschakeld of niet.
Veiligheidscertificaat
(Menu-9-8-7)
Er wordt een lijst van de beschikbare certificaten weergegeven.
] Autoriteit: u ziet een overzicht van de autorisatiecertificaten die
in uw telefoon zijn opgeslagen.
] Persoonlijk: u ziet een overzicht van de persoonlijke certificaten
die in uw telefoon zijn opgeslagen.
n Opmerking Een cache is een buffergeheugen waarin gegevens
tijdelijk worden opgeslagen.

[ 99 C3300 Gebruikershandleiding ]
Instellingen
Profielen terugzetten
(Menu-9-8-8)
U kunt de standaard profielinstellingen herstellen.
Browserversie
(Menu-9-8-9)
The WAP-browserversie wordt weergegeven.
Instellingen terugzetten
Menu-9-9
U kunt de standaardinstellingen van de telefoon herstellen.
Dat gaat als volgt:
1. Ga naar het menu Instellingen terugzetten.
2. U wordt gevraagd de viercijferige beveiligingscode in te voeren.
n Opmerking De beveiligingscode is standaard op 0000 ingesteld.
Kijk op pagina 90 om deze code te wijzigen.

[ 100 C3300 Gebruikershandleiding ]
V&A
Kijk als u een probleem hebt met uw telefoon of het hieronder
wordt beschreven, voor u het toestel wegbrengt voor onderhoud.
V Hoe krijg ik toegang tot het overzicht van uitgaande, inkomende
en gemiste oproepen?
A Druk op .
V Hoe wis ik het volledige belgeheugen?
A Druk op de linker softkey en vervolgens op .
V Hoe kom ik in het overzicht van alle nummers die zijn
opgeslagen in het geheugen?
A Druk op de rechter softkey en vervolgens op .
V Wat als niet van het scherm verdwijnt?
A Kijk eerst of u bereik hebt. Als niet van het scherm
verdwijnt, schakel de telefoon dan uit en wacht ongeveer twee
minuten voor u deze weer inschakelt. Als dit niet helpt,
controleer het scherm dan nogmaals vanaf een andere locatie.
V Wat als de verbinding slecht is op bepaalde locaties?
A De signaalsterkte kan variëren op verschillende locaties.
Het kan zijn dat u een betere ontvangst hebt op een andere
locatie. Veel netwerkverkeer kan ervoor zorgen dat een
verbinding moeilijk tot stand komt of verbroken wordt.

[ 101 C3300 Gebruikershandleiding ]
V&A
V Wat als de verbinding niet goed tot stand komt of plotseling
wordt verbroken?
A De signaalsterkte kan variëren op verschillende locaties.
Het kan zijn dat u een betere ontvangst hebt op een andere
locatie. Veel netwerkverkeer kan ervoor zorgen dat een
verbinding moeilijk tot stand komt of verbroken wordt.
V Wat als het scherm niet oplicht?
A Verwijder de batterij en zet het toestel aan nadat de batterij
weer is teruggeplaatst. Als het scherm nog steeds niet oplicht,
laad dan de batterij volledig op en probeer het nogmaals.
V Wat als de telefoon echoot terwijl verbinding wordt gemaakt
met een ander toestel?
A Dit wordt het echo-fenomeen genoemd. De echo kan ontstaan
als het volumeniveau te hoog is ingesteld of door specifieke
eigenschappen (semi-elektronisch telefoonverkeer) van het
toestel aan de andere kant van de lijn.
V Wat als de telefoon warm wordt?
A Als u de telefoon langdurig achter elkaar gebruikt, om te bellen,
games te spelen of op het internet te surfen, dan kan de
telefoon erg warm worden. Dit is heel normaal en heeft geen
invloed op de levensduur of prestaties van het product.
V Wat als de telefoon niet overgaat, of als het scherm enkel
knippert?
A De telefoon kan zijn ingesteld op het audioprofiel ‘Trilfunctie’ of
‘Stil’. Selecteer het profiel ‘Normaal’ of ‘Luid’.

[ 102 C3300 Gebruikershandleiding ]
V&A
V In standby-modus moet de telefoon steeds vaker opgeladen
worden.
A Batterijen hebben een beperkte levensduur. Als de levensduur
met meer dan de helft verminderd is vergeleken met het
moment van aankoop, dient u een nieuwe batterij aan te
schaffen. Gebruik uitsluitende goedgekeurde onderdelen.
V De gebruiksduur van de batterij wordt steeds korter.
A Dat de gebruiksduur van de batterij kort is, kan veroorzaakt
worden door de omgeving, een zwak netwerksignaal of de
hoge gebruiksintensiteit.
V Het is niet mogelijk een oproep te verrichten naar een item uit
de contactenlijst.
A Controleer of het nummer goed is opgeslagen met behulp van
de zoekfunctie in Contacten. Sla het nummer indien nodig
opnieuw op.
V Iemand kan u niet bereiken.
A Staat uw telefoon aan? ( langer dan drie seconden
ingedrukt)? Hebt u toegang tot het juiste mobiele netwerk?
Hebt u bepaalde inkomende oproepen geblokkeerd?
V Ik kan het wachtwoord of de beveiligings-, PIN- of PUK-code
niet vinden.
A De standaard beveiligingscode is ‘0000’. Neem contact op met
uw leverancier als u deze code niet meer weet of bent verloren.
Als u de PIN- of PUK-code niet (meer) weet of als u deze
code(s) niet hebt ontvangen, neemt u contact op met uw
service provider.

[ 103 C3300 Gebruikershandleiding ]
Accessoires
Er zijn verschillende accessoires verkrijgbaar voor uw mobiele
telefoon. U kunt een keuze maken uit deze opties, afgestemd op
uw persoonlijke communicatiebehoeften. Vraag uw leverancier naar
de beschikbare accessoires.
Oplader
Met deze oplader kunt u de batterij thuis
of op kantoor opladen.
Batterij
Standaardbatterij is verkrijgbaar.
Headset
Hiermee kunt u handsfree bellen.
Inclusief oortelefoon en microfoon.
n Opmerking • Gebruik altijd originele LG-accessoires. Anders kan
uw garantie op het toestel vervallen.
• Accessoires kunnen per regio verschillen; gelieve
contact op te nemen met ons regionale servicebedrijf
of onze vertegenwoordiging voor meer informatie.

[ 104 C3300 Gebruikershandleiding ]
Technische gegevens
Algemeen
Productnaam : C3300
Systeem : GSM900 / DCS1800
Omgevingstemperaturen
Max : +55°C
Min : -10°C

C3300 User Guide
English
English

C3300
Table of Contents
Introduction . . . . . . . . . . . . . . . . . . . 8
Guidelines for safe and
efficient use . . . . . . . . . . . . . . . . . . . 9
C3300 features . . . . . . . . . . . . . . . . 14
Parts of the phone . . . . . . . . . . . . . 14
Display information . . . . . . . . . . . . 19
Getting started . . . . . . . . . . . . . . . . 20
Installing the SIM card and
the handset battery . . . . . . . . . . . . . 20
Charging the battery . . . . . . . . . . . . 22
Disconnecting the adapter . . . . . . . . 23
Turning your phone on and off . . . 24
Turning your phone ON . . . . . . . . . . 24
Turning your phone OFF . . . . . . . . . 24
Access codes . . . . . . . . . . . . . . . . . 24
PIN code . . . . . . . . . . . . . . . . . . . . . 24
PIN2 code . . . . . . . . . . . . . . . . . . . . 25
PUK code . . . . . . . . . . . . . . . . . . . . 25
PUK2 code . . . . . . . . . . . . . . . . . . . 25
Security code . . . . . . . . . . . . . . . . . . 25
Barring password . . . . . . . . . . . . . 25
General functions . . . . . . . . . . . . . 26
Making and answering calls . . . . . 26
Making a call . . . . . . . . . . . . . . . . . . 26
Making a call using the send key . . . 26
Making an international call . . . . . . . 26
Ending a call . . . . . . . . . . . . . . . . . . 26
Making a call from the phonebook . . 27
Adjusting the volume . . . . . . . . . . . . 27
Answering a call . . . . . . . . . . . . . . . 27
Switching quickly to
Vibrate only mode . . . . . . . . . . . . . . 28
Signal strength . . . . . . . . . . . . . . . . . 28
Entering text . . . . . . . . . . . . . . . . . . 28
Changing the text input mode . . . . . 29
Contacts . . . . . . . . . . . . . . . . . . . . . 32
[ 4 C3300 User Guide ]

In call menu . . . . . . . . . . . . . . . . . . 32
During a call . . . . . . . . . . . . . . . . . . 32
Multiparty or conference calls . . . . 34
Making a second call . . . . . . . . . . . . 34
Ending a multiparty call . . . . . . . . . . 35
Menu tree . . . . . . . . . . . . . . . . . . . . 36
Selecting functions and options . . 38
Special . . . . . . . . . . . . . . . . . . . . . . 39
My Media . . . . . . . . . . . . . . . . . . . . 40
Photos . . . . . . . . . . . . . . . . . . . . . . 40
Pictures . . . . . . . . . . . . . . . . . . . . . 40
Sounds . . . . . . . . . . . . . . . . . . . . . . 40
Games & more . . . . . . . . . . . . . . . . 40
Call register . . . . . . . . . . . . . . . . . . 43
Missed calls . . . . . . . . . . . . . . . . . . 43
Received calls . . . . . . . . . . . . . . . . 43
Dialled calls . . . . . . . . . . . . . . . . . . 44
Delete recent calls . . . . . . . . . . . . . 44
Call charges . . . . . . . . . . . . . . . . . . 44
Call duration . . . . . . . . . . . . . . . . . . 44
Call costs . . . . . . . . . . . . . . . . . . . . . 45
Settings . . . . . . . . . . . . . . . . . . . . . . 45
GPRS information . . . . . . . . . . . . . 46
Call duration . . . . . . . . . . . . . . . . . . 46
Data volumes . . . . . . . . . . . . . . . . . 46
Messages . . . . . . . . . . . . . . . . . . . . 47
Write text message . . . . . . . . . . . . 47
Write Multimedia messages . . . . . 49
Inbox . . . . . . . . . . . . . . . . . . . . . . . 51
Outbox . . . . . . . . . . . . . . . . . . . . . . 52
Drafts . . . . . . . . . . . . . . . . . . . . . . . 53
Listen to voice mail . . . . . . . . . . . . 54
Info message . . . . . . . . . . . . . . . . . 54
Read . . . . . . . . . . . . . . . . . . . . . . . . 54
Topics . . . . . . . . . . . . . . . . . . . . . . . 55
Templates . . . . . . . . . . . . . . . . . . . . 55
Text templates . . . . . . . . . . . . . . . . . 55
Multimedia templates . . . . . . . . . . . . 56
Signature . . . . . . . . . . . . . . . . . . . . . 57
Settings . . . . . . . . . . . . . . . . . . . . . 57
Text message . . . . . . . . . . . . . . . . . 57
Multimeadia message . . . . . . . . . . . 58
Voice mail centre . . . . . . . . . . . . . . . 59
Info message . . . . . . . . . . . . . . . . . . 59
Push message . . . . . . . . . . . . . . . . . 60
t-zones . . . . . . . . . . . . . . . . . . . . . . 61
Contacts . . . . . . . . . . . . . . . . . . . . . 62
Search . . . . . . . . . . . . . . . . . . . . . . 62
Add new . . . . . . . . . . . . . . . . . . . . . 63
Caller groups . . . . . . . . . . . . . . . . . 64
Speed dial . . . . . . . . . . . . . . . . . . . 64
Settings . . . . . . . . . . . . . . . . . . . . . 65
Set memory . . . . . . . . . . . . . . . . . . . 65
Search by . . . . . . . . . . . . . . . . . . . . 65
[ 5 C3300 User Guide ]

[ 6 C3300 User Guide ]
View options . . . . . . . . . . . . . . . . . . 65
Copy all . . . . . . . . . . . . . . . . . . . . . 65
Delete all . . . . . . . . . . . . . . . . . . . . 66
Information . . . . . . . . . . . . . . . . . . . 66
Organiser . . . . . . . . . . . . . . . . . . . . 67
Alarm clock . . . . . . . . . . . . . . . . . . 67
Scheduler . . . . . . . . . . . . . . . . . . . . 68
Calculator . . . . . . . . . . . . . . . . . . . . 69
Unit converter . . . . . . . . . . . . . . . . .69
World time . . . . . . . . . . . . . . . . . . . 70
Voice recorder . . . . . . . . . . . . . . . . 70
Record . . . . . . . . . . . . . . . . . . . . . . 70
View list . . . . . . . . . . . . . . . . . . . . . . 71
Memory status . . . . . . . . . . . . . . . . 71
S/W version . . . . . . . . . . . . . . . . . . 71
Camera . . . . . . . . . . . . . . . . . . . . . . 72
Take photo . . . . . . . . . . . . . . . . . . . 72
Take in modes . . . . . . . . . . . . . . . . 74
My photos . . . . . . . . . . . . . . . . . . . 75
Settings . . . . . . . . . . . . . . . . . . . . . 76
Memory status . . . . . . . . . . . . . . . . 76
Settings . . . . . . . . . . . . . . . . . . . . . 77
Profiles . . . . . . . . . . . . . . . . . . . . . . 77
Changing the profile . . . . . . . . . . . . . 77
Customising profiles
- Personalise . . . . . . . . . . . . . . . . . . 77
Customising profiles
- Rename . . . . . . . . . . . . . . . . . . . . 78
Date & Time . . . . . . . . . . . . . . . . . . 79
Set date . . . . . . . . . . . . . . . . . . . . . . 79
Date format . . . . . . . . . . . . . . . . . . 79
Set time . . . . . . . . . . . . . . . . . . . . . . 79
Time format . . . . . . . . . . . . . . . . . . . 79
Phone settings . . . . . . . . . . . . . . . . 80
Display settings . . . . . . . . . . . . . . . . 80
Language . . . . . . . . . . . . . . . . . . . . 80
Call settings . . . . . . . . . . . . . . . . . . 81
Call divert . . . . . . . . . . . . . . . . . . . . 81
Answer mode . . . . . . . . . . . . . . . . . 82
Send my number . . . . . . . . . . . . . . . 82
Call waiting . . . . . . . . . . . . . . . . . . . 82
Minute minder . . . . . . . . . . . . . . . . . 82
Auto redial . . . . . . . . . . . . . . . . . . . . 82
Closed user group . . . . . . . . . . . . . . 83
Security settings . . . . . . . . . . . . . . 84
PIN code request . . . . . . . . . . . . . . . 84
Phone lock . . . . . . . . . . . . . . . . . . . 84
Call barring . . . . . . . . . . . . . . . . . . . 85
Fixed dial number . . . . . . . . . . . . . . 86
Change codes . . . . . . . . . . . . . . . . . 86
Network settings . . . . . . . . . . . . . . 87
Automatic . . . . . . . . . . . . . . . . . . . . 87

Manual . . . . . . . . . . . . . . . . . . . . . . 87
Preferred . . . . . . . . . . . . . . . . . . . . . 87
GPRS setting . . . . . . . . . . . . . . . . . 88
Power on . . . . . . . . . . . . . . . . . . . . . 88
When needed . . . . . . . . . . . . . . . . . 88
Internet . . . . . . . . . . . . . . . . . . . . . . 89
Home . . . . . . . . . . . . . . . . . . . . . . . 90
Bookmarks . . . . . . . . . . . . . . . . . . . 90
Profiles . . . . . . . . . . . . . . . . . . . . . . 91
Go to URL . . . . . . . . . . . . . . . . . . . . 93
Cache settings . . . . . . . . . . . . . . . . . 93
Cookies settings . . . . . . . . . . . . . . . 94
Security certification . . . . . . . . . . . . . 94
Reset profiles . . . . . . . . . . . . . . . . . 94
Browser version . . . . . . . . . . . . . . . . 94
Reset settings . . . . . . . . . . . . . . . . 94
Q&A . . . . . . . . . . . . . . . . . . . . . . . . 95
Accessories . . . . . . . . . . . . . . . . . . 98
Technical data . . . . . . . . . . . . . . . . 99
[ 7 C3300 User Guide ]

[ 8 C3300 User Guide ]
Congratulations on your purchase of the advanced and compact
C3300 mobile phone, designed to operate with the latest digital
mobile communication technology.
This user guide contains important information on the use and
operation of this phone. Please read all the information carefully for
optimal performance and to prevent any damage to or misuse of
the phone. Any changes or modifications not expressly approved in
this user’s guide could void your warranty for this equipment.
Introduction

Read these simple guidelines. Breaking the rules may be
dangerous or illegal. Further detailed information is given in this
manual.
Exposure to radio frequency energy
Radio wave exposure and Specific Absorption Rate (SAR)
information
This mobile phone model C3300 has been designed to comply with
applicable safety requirement for exposure to radio waves.
This requirement is based on scientific guidelines that include
safety margins designed to assure this safety of all persons,
regardless of age and health.
• The radio wave exposure guidelines employ a unit of
measurement known as the Specific Absorption Rate, or SAR.
Tests for SAR are conducted using standardized method with the
phone transmitting at its highest certified power level in all used
frequency bands.
• While there may be differences between the SAR levels of various
LG phone models, they are all designed to meet the relevant
guidelines for exposure to radio waves.
• The SAR limit recommended by the international Commission on
Non-Ionizing Radiation Protection (ICNIRP), which is 2W/kg
averaged over ten (10) gram of tissue.
• The highest SAR value for this model phone tested by DASY4 for
use at the ear is 1.05W/kg (10g).
• SAR data information for residents in countries/regions that have
adopted the SAR limit recommended by the Institute of Electrical
and Electronics Engineers (IEEE), which is 1.6 W/kg averaged
over one (1) gram of tissue (for example USA, Canada, Australia
and Taiwan).
[ 9 C3300 User Guide ]
Guidelines for safe and efficient use

[ 10 C3300 User Guide ]
Product care and maintenance
Warning: Use only batteries, charger and accessories
approved for use with this particular phone model.
The use of any other types may invalidate any approval or
warranty applying to the phone, and may be dangerous.
• Do not disassemble this unit. Take it to a qualified service
technician when repair work is required.
• Keep away from electrical appliance such as a TV, radio or
personal computer.
• The unit should be kept away from heat sources such as radiators
or cookers.
• Do not drop.
• Do not subject this unit to mechanical vibration or shock.
• The coating of the phone may be damaged if covered with wrap
or vinyl wrapper.
• Use dry cloth to clean the exterior of the unit.
(Do not use solvent such as benzene, thinner or alcohol.)
• Do not subject this unit to excessive smoke or dust.
• Do not keep the phone next to credit cards or transport tickets;
it can affect the information on the magnetic strips.
• Do not tap the screen with a sharp object; otherwise, it may
damage the phone.
• Do not expose the phone to liquid or moisture.
• Use the accessories with caution and follow relevant instructions.
• Do not touch the antenna unnecessarily.
Guidelines

Efficient phone operation
To enjoy optimum performance with minimum power consumption
please:
• Hold the phone as you speak to any other telephone. While
speaking directly into the microphone, angle the antenna in a
direction up and over your shoulder. If the antenna is extendable/
retractable, it should be extended during a call.
• Do not hold the antenna when the phone is in use. If you hold it,
it can affect call quality. It also may cause the phone to operate as
a higher power level that needed and shorten talk and standby
times.
• If your mobile phone supports infrared, never direct the infrared
ray at anyone’s eye.
Electronics devices
All mobile phones may get interference, which could affect
performance.
• Do not use your mobile phone near medical equipment without
requesting permission. Avoid placing the phone over the
pacemaker, i.e. in your breast pocket.
• Some hearing aids might be disturbed by mobile phones.
• Minor interference may affect TVs, radios, PCs, etc.
[ 11 C3300 User Guide ]
Guidelines

[ 12 C3300 User Guide ]
Road safety
Check the laws and regulations on the use of mobile phones in the
areas when you drive.
• Do not use a hand-held phone while driving.
• Give full attention to driving.
• Use a hands-free kit, if available.
• Pull off the road and park before making or answering a call if
driving conditions so require.
• RF energy may affect some electronic systems in your motor
vehicle such as car stereo, safety equipment.
• When your vehicle is equipped with an air bag, do not obstruct
with installed or portable wireless equipment. It can cause serious
injury due to improper performance.
Blasting area
Do not use the phone where blasting is in progress.
Observe restrictions, and follow any regulations or rules.
Potentially explosive atmospheres
• Do not use the phone at a refueling point. Don’t use near fuel or
chemicals.
• Do not transport or store flammable gas, liquid, or explosives in
the compartment of your vehicle, which contains your mobile
phone and accessories.
In aircraft
Wireless devices can cause interference in aircraft.
• Turn off your mobile phone before boarding any aircraft.
• On the ground, follow airline instructions regarding use of mobile
phones.
Guidelines

Children
Keep the phone in a safe place out of small children’s reach.
It includes small parts which if detached may cause a choking
hazard.
Emergency calls
Emergency calls may not be available under all cellular networks.
Therefore, you should never depend solely on the phone for
emergency calls. Check with your local service provider.
Battery information and care
• You do not need to completely discharge the battery before
recharging. Unlike other battery systems, there is no memory
effect that could compromise the battery’s performance.
• Use only LG batteries and chargers. LG chargers are designed to
maximize the battery life.
• Do not disassemble or short-circuit the battery pack.
• Keep the metal contacts of the battery pack clean.
• Replace the battery when it no longer provides acceptable
performance. The battery pack may be recharged hundreds of
times until it needs replacing.
• Recharge the battery if it has not been used for a long time to
maximize usability.
• Do not expose the battery charger to direct sunlight or use it in
high humidity, such as the bathroom.
• Do not leave the battery in hot or cold places, this may deteriorate
the battery performance.
• Dispose of used batteries in accordance with local legislation.
[ 13 C3300 User Guide ]
Guidelines

[ 14 C3300 User Guide ]
C3300 features
Parts of the phone
Front view
Headset jack
Sub LCD screen
Camera lens
Up/down side keys
- When the phone is
closed, press and hold
down one of these keys
to display the current
time, to change the
display to the current
date, and to dismiss the
display on the outer
screen.
- Controls the volume of
keypad tone in standby
mode with the phone
open.
- Controls the earpiece
volume during a phone
call.
n Note
If there is dirt on
the camera lens,
it could affect the
image quality.

[ 15 C3300 User Guide ]
C3300 features
Battery
Holes for a carrying strap
SIM card socket
Battery terminals
Charger connector
/Cable connector
Parts of the phone
Rear view

[ 16 C3300 User Guide ]
C3300 features
1. Earpiece
2. Left soft key
6. LCD Screen
8. Right soft key
7. Navigation keys
9. Menu/Confirm
key
10. Camera key
11. End / Power key
13. Microphone
12. Clear key
3. t-zone key
4. Send key
5. Alphanumeric
keys
Menu Message
Open view

1. Earpiece
2, 8. Left soft key/Right soft key: Each of these keys performs
the function indicated by the text on the screen immediately
above it.
3. t-zone key: Accesses the t-zones.
4. Send key: Dials a phone number and answers incoming calls.
You can also quickly access the latest incoming, outgoing and
missed calls, by pressing the key in standby mode.
5. Alphanumeric keys: Enter numbers, letters and some special
characters.
6. LCD screen: Displays phone status icons, menu items, Web
information, pictures and more in full colour.
7. Navigation keys: Use to move the cursor up/down/left/right. And
you can quickly access the following features in standby mode.
• Up navigation key ( ) : You can search the contact by
name by pressing this key in standby mode.
• Down navigation key ( ) : Opens the voice memo list.
Holding this key down directly starts voice memo recording.
• Left navigation key ( ) : A shortcut key to the profile menu.
Holding this key down changes into the manner mode.
• Right navigation key ( ) : A shortcut key to the message
inbox.
9. Menu/Confirm key: Opens the menu and confirms actions.
* In standby mode, holding this key down connects to the
Internet.
10. Camera key: Press this key to go to the Camera menu in
standby mode.
11. End/Power key: Used to end a call or reject a call and also to
go back to standby mode. Hold this key down to turn the phone
on/off.
[ 17 C3300 User Guide ]
C3300 features

[ 18 C3300 User Guide ]
12. Clear key: Deletes a character by each press. Hold the key
down to clear all input. Also use this key to go back to the
previous screen.
13. Microphone: Can be muted during a call for privacy.
C3300 features

Display information
The table below describes various display indicators or icons that
appear on the phone’s display screen.
On-Screen Icons
[ 19 C3300 User Guide ]
C3300 features
Icon Description
ndicates the strength of the network signal.
Indicates that GPRS service is available.
Indicates a call is in progress.
Indicates that you are roaming on another network.
Indicates the alarm has been set and is on.
Indicates the status of the battery charge.
Indicates that the vibration ringer has been set.
Indicates the Silent profile is activated.
Indicates the General profile is activated.
Indicates the Loud profile is activated.
Indicates the Headset profile is activated.
Indicates the Car profile is activated.
Indicates a call is diverted.
Indicates that the phone is accessing the WAP.
Indicates that you are using GPRS.
Indicates that you entered the security page.
Indicates the receipt of a message.
Indicates the receipt of a voice mail.

[ 20 C3300 User Guide ]
Installing the SIM card and the handset battery
1. Remove the battery cover
Make sure the power is off before you remove the battery.
Press down on the rear cover in indicated position and slide
downwards to remove, prize the battery by inserting finger nail in
to indicated slots and levering the battery out.
2. Remove the battery.
Hold the top edge of the battery and lift the battery from the
battery compartment.
Getting started
n Note Removing the battery from the phone when the power is on
may cause the phone to malfunction.

3. Install the SIM card
Insert the SIM card into the holder. Slide the SIM card into the
SIM card holder. Make sure that the SIM card is inserted
properly by ensuring that the gold contact area on the card is
facing downwards. To remove the SIM card, press down lightly
and pull it in the reverse direction.
4. Install the battery.
Insert the bottom of the battery first into
the bottom edge of the battery compart-
ment. Push down the top of the battery
until it snaps into space.
5. Replace the battery cover.
Lay the battery cover in place of the
phone and slide it until the latch clicks.
[ 21 C3300 User Guide ]
Getting started
n Caution
The metal contact of the SIM card can be easily damaged
by scratches. Pay special attention to the SIM card while
handling. Follow the instructions supplied with the SIM
card.
To insert the SIM card To remove the SIM card

[ 22 C3300 User Guide ]
Charging the battery
To connect the travel adapter to the phone, you must have installed
the battery.
1. Ensure the battery is fully charged before using the phone.
2. With the arrow facing you as shown in the diagram push the plug
on the battery adapter into the socket on the bottom of the phone
until it clicks into place.
3. Connect the other end of the travel adapter to the mains socket.
Use only the included packing charger.
4. The moving bars of battery icon will stop after charging is
complete.
Getting started
n Caution • Do not force the connector as this may damage the phone
and/or the travel adapter.
• Insert the battery pack charger vertically to wall power outlet.
• If you use the battery pack charger out of your own country,
use an attachment plug adaptor for the proper configuration.
• Do not remove your battery or the SIM card while charging.
n Warning • Unplug the power cord and charger during lightning storms
to avoid electric shock or fire.
• Make sure that no sharp-edged items such as animal teeth,
nails, come into contact with the battery. There is a risk of
this causing a fire.
• Do not place or answer calls while charging the phone as it
may short-circuit the phone and/or cause electric shock or
fire.

Disconnecting the adapter
1. When charging is finished, the moving bars of the battery icon
stop and ‘Full’ is displayed on the screen.
2. Unplug the adapter from the power outlet. Disconnect the
adapter from the phone by pressing the grey tabs on both sides
of the connector and pull the connector out.
[ 23 C3300 User Guide ]
Getting started
n Note • Ensure the battery is fully charged before first using the
phone.
• Do not remove the battery or SIM card while charging.
• In the case the battery is not properly charged, please turn
the phone off and on using the power key, then recharge the
battery. After detaching and reattaching the battery, please
recharge the battery.

[ 24 C3300 User Guide ]
Turning your phone on and off
Turning your phone ON
1. Install a battery to the handset and connect the phone to an
external power source such as the travel adapter, cigarette
lighter adapter or hands-free car kit. Or install a charged battery
pack to the handset.
2. Press for a few seconds until the LCD screen is turned on.
3. Depending on the status of the PIN code request setting you
may need to enter your PIN code.
Turning your phone OFF
1. Press for a few seconds until the LCD screen is turned off.
Access codes
You can use the access codes described in this section to avoid
unauthorised use of your phone. The access codes (except PUK
and PUK2 codes) can be changed by using the Change codes
feature [Menu-9-5-5]. See page 86.
PIN code
(4 to 8 digits)
The PIN (Personal Identification Number) code protects your SIM
card against unauthorised use. The PIN code is usually supplied
with the SIM card. When the PIN code request is set to On, your
phone will request the PIN code every time the phone is switched
on. When the PIN code request is set to Off, your phone connects
to the network directly without the PIN code.
Getting started
n Notice Like any other radio devices, avoid any unnecessary contact
with the antenna while your phone is on.

PIN2 code
(4 to 8 digits)
The PIN2 code, supplied with some SIM cards, is required to
access functions such as Advice of Call Charge and Fixed Dial
Number. These functions are only available if supported by your
SIM card.
PUK code
(4 to 8 digits)
The PUK (PIN Unblocking Key) code is required to change a
blocked PIN code. The PUK code may be supplied with the SIM
card. If not, contact your network operator for the code. If you lose
the code, also contact your network operator.
PUK2 code
(4 to 8 digits)
The PUK2 code, supplied with some SIM cards, is required to
change a blocked PIN2 code. If you lose the code, also contact
your network operator.
Security code
(4 to 8 digits)
The security code protects the unauthorised use of your phone.
The default security code is set to ‘0000’ and the security code is
required to delete all phone entries and to activate the Reset
Settings menu. Also, the security code is required to enable or
disable the phone lock function to prevent unauthorised use of the
phone. The security code default setting can be modified from the
Security Settings menu.
Barring password
The barring password is required when you use the Call Barring
function. You obtain the password from your network operator when
you subscribe to this function. See [Menu-9-5-3] page 85 for further
details.
[ 25 C3300 User Guide ]
Getting started

[ 26 C3300 User Guide ]
Making and answering calls
Making a call
1. Make sure your phone is switched on.
2. Enter a phone number, including the area code. When you
entered a wrong number, press the clear key ( ) to erase
one digit at a time.
] Press and hold the clear key ( ) to erase the digits in
succession.
3. Press the send key ( ) to call the number.
4. To end the call, press the end key ( ) or the right soft key
( ). You can also end the call by closing the folder.
Making a call using the send key
1. In standby mode, press the send key ( ), and the latest
incoming, outgoing and missed phone numbers will be displayed.
2. Select the desired number by using the up/down navigation key.
3. Press .
Making an international call
1. Press and hold the key for the international prefix. The ‘+’
character automatically selects the international access code.
2. Enter the country code, area code, and the phone number.
3. Press .
Ending a call
When you have finished your call, press the end ( )key.
General functions

Making a call from the phonebook
(Contacts)
You can save the names and phone numbers dialled regularly in
the SIM card and/or phone memory, which is called Contacts.
You can dial a number by simply looking up the desired name in
Contacts. For further details on the Contacts feature, please refer
to page 62 through 66.
Adjusting the volume
If you want to adjust the earpiece volume during a call, use the side
keys ( ). Press the up side key to increase and down side key to
decrease the volume.
Answering a call
When you receive a call, the phone rings. If the caller can be
identified, the caller’s phone number (or name if saved in the
Contacts) is displayed.
1. To answer an incoming call, open the phone and press the send
key. Alternatively, please see page 82 for other answer modes.
] To reject an incoming call, press and hold one of the side keys
on the left side of the phone without opening the folder.
] You can answer a call while using the Contacts or other menu
features.
2. To end the call, close the folder or press the key.
[ 27 C3300 User Guide ]
General functions
n Note In standby mode pressing the side keys adjusts the key tone
volume.
n Note If Press any key has been set as the answer mode (see page
82), any key press will answer a call except for the or the
right soft key.

[ 28 C3300 User Guide ]
Switching quickly to Vibrate only mode
You can switch your phone quickly to the Vibrate only mode by
pressing and holding down the left navigation key ( ) after
opening the phone. To go back to the previous profile, press and
hold down the left navigation key ( ) again.
Signal strength
You can check the strength of your signal by the signal indicator
( ) on the LCD screen of your phone. Signal strength can vary,
particularly inside buildings. Moving near to a window may improve
reception.
Entering text
You can enter alphanumeric characters by using the phone’s
keypad. For example, storing names in the Contacts, writing a
message, creating a personal greeting or scheduling events in the
calendar all require entering text.
The following text input methods are available in the phone.
General functions
T9 mode
This mode lets you enter words with only one keystroke per
letter. Each key on the keypad has more than one letter. The T9
mode automatically compares your keystrokes with an internal
dictionary to determine the correct word, thus requiring far fewer
keystrokes than the traditional ABC mode. This is sometimes
known as predictive text.
ABC mode
This mode lets you enter letters by pressing the key labelled with
the required letter once, twice, three or four times until the letter
is displayed.

Changing the text input mode
1. When you are in a field that allows characters to be entered, you
will notice the text input mode indicator in the upper right corner
of the LCD screen.
- You can select the language of the T9 mode. Press the left soft
key [Options], then select T9 languages. You can also go to
T9 languages menu by holding down the key. Select the
desired language of T9 mode. You can also turn off the T9
mode by selecting T9 off. The default setting on the phone is
T9 enabled mode.
2. Change the text input mode by
pressing . You can check the
current text input mode in the
upper right corner of the LCD
screen.
] Using the T9 mode
The T9 predictive text input mode lets you enter words easily with a
minimum number of key presses. As you press each key, the
phone begins to display the characters that it thinks you are typing
based on the built-in dictionary. You can also add new words in the
dictionary. As new words are added, the word changes to reflect
the most likely candidate from the dictionary.
1. When you are in the T9 predictive text input mode, start entering
a word by pressing keys to . Press one key per letter.
- The word changes as letters are typed. Ignore what’s on the
screen until the word is typed completely.
[ 29 C3300 User Guide ]
General functions
123 mode (Number mode)
Type numbers using one keystroke per number. To change to
123 mode in a text entry field, press the key until 123 mode
is displayed.
text input
mode
Options Insert

[ 30 C3300 User Guide ]
- If the word is still incorrect after typing completely, press the
up/down navigation key once or more to cycle through the
other word options.
Example: Press to type Good
Press [Down navigation key] to
type Home
- If the desired word is missing from the word choice list, add it
using the ABC mode.
2. Enter the whole word before editing or deleting any keystrokes.
3. Complete each word with a space by pressing the key.
To delete letters, press the key. Press and hold down the
key to erase entire words in succession.
] Using the ABC mode
Use the to keys to enter your text.
1. Press the key labelled with the required letter:
- Once for the first letter
- Twice for the second letter
- And so on
2. To insert a space, press the key once. To delete letters,
press the key. Press and hold down the key to erase
the entire words in succession.
General functions
n Notice To exit from the text input mode without saving your input,
press . The phone goes back to standby mode.

] Using the 123(Number) mode
The 123 mode enables you to enter numbers in a text message
(a telephone number, for example).
Press the keys corresponding to the required digits before manually
switching back to the appropriate text entry mode.
[ 31 C3300 User Guide ]
General functions
n Notice
Refer to the table below for more information on the
characters available using the alphanumeric keys.
Characters in the order display
Key
Upper case
. , / ? ! - : ' '' 1
A B C 2 Ä À Á Â Ã Å Æ Ç
D E F 3 Ë È É Ê
G H I 4 Ï Ì Í Î ˝
J K L Ω L ¸ £ 5
M N O 6 Ñ Ö Ø Ò Ó Ô Õ Œ
Space key,
0 (Press twice)
Lower case
. , / ? ! - : ' '' 1
a b c 2 ä à á â ã å æ ç
d e f 3 ë è é ê
g h i 4 ï ì í î ©
j k l Í º ∏ £5
m n o 6 ñ ö ø ò ó ô õ œ
Space key,
0 (Press twice)
,

[ 32 C3300 User Guide ]
Contacts
You can save phone numbers and their corresponding names in
the memory of your SIM card.
In addition, you can save up to 200 numbers and names in the
phone memory.
The SIM card and phone are both used in the same way in the
Contacts menu.
(Refer to page 62 through 66 for details.)
In call menu
Your phone provides a number of control functions that you can
use during a call. To access these functions during a call, press the
left soft key [Options].
During a call
The menu displayed on the handset screen during a call is different
to the default main menu displayed when in standby mode, and the
options are described below.
Making a second call
You can get a number you wish to dial from Contacts to make a
second call. Press the right soft key then select Search. To save
the dialled number into Contacts during a call, press the right soft
key then select Add new.
Switching between two calls
To switch between two calls, press the left soft key [Options], then
select Swap or just press the key. You can select one of two
calls using up/down navigation keys. To end a call, highlight the
phone number using up/down navigation keys then press the
key.
General functions

Answering an incoming call
To answer an incoming call when the handset is ringing, simply
press the key. The handset is also able to warn you of an
incoming call while you are already on a call. A tone sounds in the
earpiece, and the display will show that a second call is waiting.
This feature, known as Call waiting, is only available if your
network supports it. For details of how to activate and deactivate it
see Call waiting on page 82.
If Call waiting is activated, you can put the first call on hold and
answer the second, by pressing or by selecting left soft key,
then Hold & Answer. You can end the current call and answer the
waiting call by selecting left soft key and then End & Answer.
Rejecting an incoming call
You can reject an incoming call without answering by simply
pressing the key.
During a call, you can reject an incoming call by pressing the left
soft key [Menu] and selecting the Multiparty/Reject or by pressing
the key.
Muting the microphone
You can mute the microphone during a call by pressing the left soft
key [Options], then selecting Mute. When the handset is muted, the
caller cannot hear you, but you can still hear them. The handset
can be unmuted by pressing the [Unmute].
Switching DTMF tones on during a call
To turn DTMF tones on during a call, press the left soft key, and
then select DTMF on. DTMF tones can be turned off the same way.
DTMF tones allow your phone to make use of an automated
switchboard.
[ 33 C3300 User Guide ]
General functions

[ 34 C3300 User Guide ]
Multiparty or conference calls
The multiparty or conference service provides you with the ability to
have a simultaneous conversation with more than one caller, if your
network operator supports this feature. A multiparty call can only be
set up when you have one active call and one call on hold, both
calls having been answered. Once a multiparty call is set up, calls
can be added, disconnected or separated (that is, removed from
the multiparty call but still connected to you) by the person who set
up the multiparty call. These options are all available from the
In-Call menu. The maximum callers in a multiparty call are five.
Once started, you are in control of the multiparty call, and only you
can add callers to the multiparty call.
Making a second call
You can make a second call while currently on a call. Enter the
phone number and press the key. When the second call is
connected, the first call is automatically placed on hold. You can
swap between two calls by pressing the left soft key then selecting
Swap.
Setting up a multiparty call
Place one call on hold and while the active call is on, press the
leftsoft key and then select Multiparty/Join all.
Putting a multiparty call on hold
Press the left soft key, then select Multiparty/Hold all.
Activate the multiparty call on hold
Press the left soft key, then select Multiparty/Join all.
Adding calls to the multiparty call
To add a call to an existing multiparty call, press the left soft key,
then select Multiparty/Join all.
General functions

Putting a member of a multiparty call on hold
To place one selected caller (whose number is currently displayed
on the screen) of a multiparty call on hold, press the left soft key,
then select Multiparty/Exclude.
Displaying callers in a multiparty call
Using up/down navigation keys, you can scroll through the phone
numbers of the callers in a multiparty call.
Having a private call during a multiparty call
To have a private call with one caller from a multiparty call, display
the number of the caller you wish to talk to on the screen, then
press the left soft key. Select Multiparty/Private to put all the other
callers on hold.
Ending a multiparty call
The currently displayed caller from a multiparty call can be
disconnected by pressing the key. To end a multiparty call,
press the left soft key, then select Multiparty/End multiparty.
After pressing the left soft key, selecting Multiparty/End all will end
all the active and on-hold calls.
[ 35 C3300 User Guide ]
General functions

[ 36 C3300 User Guide ]
Menu tree
The following illustration shows the available menu structure and
indicates the:
] Number assigned to each menu option.
] Page where you can find the feature description.
You can go to the desired menu using the left soft key [Menu],
navigation keys and the [OK] key.
1 Special
This menu depends on SIM and
network service. If your SIM card
supports SIM tool kit,
it is only shown “Special” menu.
2 My Media
1 Photos
2 Pictures
3 Sounds
4 Games & more
3 Call register
1 Missed calls
2 Received calls
3 Dialled calls
4 Delete recent calls
5 Call charges
6 GPRS information
This menu is supported by only SAT
(SIM Appplication Tool kit) SIM.
This menu is supported by
non-SAT SIM.
Special 16:35
Select Back
Profiles 16:35
Select Back

[ 37 C3300 User Guide ]
Menu tree
4 Messages
1 Write text messages
2 Write multimedia message
3 Inbox
4 Outbox
5 Drafts
6 Listen to voice mail
7 Info message
8 Templates
9 Settings
5 t-zones
6 Contacts
1 Search
2 Add new
3 Caller groups
4 Speed dial
5 Settings
6 Copy all
7 Delete all
8 Information
7 Organiser
1 Alarm clock
2 Scheduler
3 Calculator
4 Unit converter
5 World time
6 Voice recorder
7 Memory status
8 S/W version
8 Camera
1 Take photo
2 Take in modes
3 My photos
4 Settings
5 Memory status
9 Settings
1 Profiles
2 Date & Time
3 Phone settings
4 Call settings
5 Security settings
6 Network settings
7 GPRS setting
8 Internet
9 Reset settings

Your phone offers a range of functions that allow you to customise
it. These functions are arranged in menus and sub-menus,
accessed via the two soft keys marked and . Each menu
and sub-menu lets you view and alter the settings of a particular
function.
The roles of the soft keys vary according to the current context;
the label on the bottom line of the screen just above each key
indicates its current function.
[ 38 C3300 User Guide ]
Selecting functions and options
Menu Message
Press the left soft key
to access the
available menu.
Press the right soft key
to activate the
corresponding action.
(e.g.)

Your service provider can offer special application through SIM
card, such as home banking, stock market, etc.
If you are registered for one of these services, the service name
will appear at the end of the Main Menu. With the SIM Services
menu your phone is future-proof and will support additions to your
service provider’s service.
For more information contact your service provider.
[ 39 C3300 User Guide ]
Special
Menu-1

[ 40 C3300 User Guide ]
You can download ringtones, sounds, games, pictures, and
wallpaper WAP portals such as t-zones.
Photos
Menu-2-1
Opens the My photos. The photos taken with C3300 are stored in
here. (For more details, refer to page 75.)
Pictures
Menu-2-2
• My pictures: Selects a picture from the list by pressing the left
soft key [View]. Then, you can set it as the wallpaper or send the
multimedia message with it by pressing the left soft key [Options].
Sounds
Menu-2-3
• t-music: Connects to the t-zones. You can download various
ringtones and caller tunes using the WAP. And they are stored in
My sounds.
• My sounds: You can select a sound from the list. After selecting
the desired sound, you can set it as the ring tone, send the sound
via SMS or MMS, using the left soft key [Options].
Games & more
Menu-2-4
• t-games: Connects to the t-games. You can download games
using the WAP. And they are stored in My games & more.
• My games & more: In this menu, you can manage the Java
applications installed in your phone. You can play or delete
downloaded applications, or set the connecting option.
The downloaded applications are stored in folders.
My Media
Menu-2

Press the left soft key [Select] to open the selected folder or
launch the selected midlet.
Using the right soft key [Menu], the following menus are available.
] New folder: Creates a new folder.
] Move: Moves the selected folder or application to a destination
folder.
] Launch: Starts new game.
] Remove: Removes a folder or an application.
]Rename: You can rename the folder or the application.
[ 41 C3300 User Guide ]
My Media
n Note You cannot remove or rename the preinstalled folder or a game
in the folder.

[ 42 C3300 User Guide ]
My Media
Java™ is a technology developed by Sun Microsystems.
Similar to the way you would download the Java Applet using
the standard Netscape or MS Internet Explorer browsers, Java
MIDlet can be downloaded using the WAP enabled phone.
Depending on the service provider, all Java based programs
such as Java games can be downloaded and run on a phone.
Once downloaded, the Java program can be viewed in the My
games & more menu where you can select, execute, or delete.
The Java program files saved in the phone are in .JAD or .JAR
format.
n Note The JAR file is a compressed format of the Java program and
the JAD file is a description file that includes all detailed
information. From the network, prior to download, you can view
all detailed file descriptions from the JAD file.
n Caution Only J2ME (Java 2 Micro Edition) based programs will run
in a phone environment. The J2SE (Java 2 Standard
Edition) based programs will only run in a PC environment.
n Option Some Java applications may require a data connection to be
made. Select this to set the connecting options.

You can check the record of missed, received, and dialled calls only
if the network supports Calling Line Identification (CLI) within the
service area.
The number and name (if available) are displayed together.
You can also view call times and costs.
Press the menu key ( ) and select Call register using
navigation keys.
Missed calls
Menu-3-1
This option lets you view unanswered calls.
After pressing the left soft key [Options], you can also:
• View the date and time at which the call was made.
• Save the number in Contacts. Enter a name for the number and
save it in Contacts.
• Send a message to this number.
• Delete the call from the list.
Received calls
Menu-3-2
This option lets you view incoming calls. After pressing the left soft
key [Options], you can also:
• View the date and time at which the call was made.
• Save the number in Contacts. Enter a name for the number and
save it in Contacts.
• Send a message to this number.
• Delete the call from the list.
[ 43 C3300 User Guide ]
Call register (Dependent on the network service)
Menu-3
n Note You can delete all the call records from the list using the Delete
recent calls menu. (See page 44.)
n Note You can delete all the call records from the list using the Delete
recent calls menu. (See page 44.)

[ 44 C3300 User Guide ]
Dialled calls
Menu-3-3
This option lets you view outgoing calls (called or attempted).
Using the [Options] key, you can also:
• View the date and time at which the call was made.
• Save the number in Contacts. Enter a name for the number and
save it in Contacts.
• Send a message to this number.
• Delete the call from the list.
Delete recent calls
Menu-3-4
Use this to delete the missed call list, received call list, or dialled call
list. You can also delete all call lists at a time selecting All calls.
Call charges
Menu-3-5
Call duration
(Menu-3-5-1)
Use this to view the duration of your incoming and outgoing calls.
You can check each call duration at the bottom of screen while
scrolling using the up/down navigation keys. You can reset the call
timer by selecting Reset all. To prevent accidental reset, you are
requested to enter the PIN2 code.
• Last call: Length of the last call.
• All calls: Total length of all calls made or received calls since the
timer was last reset.
• Received calls: Length of the incoming calls.
• Dialled calls: Length of the outgoing calls.
• Reset all: Select this to reset all the call duration.
Call register
n Note You can delete all the call records from the list using Delete
recent calls menu. (See page 44.)
n Note The actual time invoiced for calls by your service provider may
vary, depending on network features, rounding-off for billing, etc.

Call costs
(Menu-3-5-2)
This network service allows you to check the last call cost, the total
call cost and the remaining call cost. The call cost is displayed on
the bottom of the LCD screen. To reset the call cost, select Reset
all. You are requested to enter the PIN2 code.
Settings
(Menu-3-5-3)
• Set tariff: You can set the currency type and the unit price.
Contact your service provider to obtain charging unit prices.
To select the currency or unit in this menu, you need the PIN2
code. If you want to input @, £, $ symbol, clear all currency
strings and then press key. If you want to change the symbol,
press key again.
• Set credit: This network service allows you to limit the cost of
your calls to the selected charging units. You can make or receive
a call up to the specified cost limit.
] Read: You can check the remaining units.
] Change: You can change your charging limit.
• Auto display: This network service allows you to see
automatically the cost of your last call. If you select On, you can
see the cost of the last call when the call is released.
[ 45 C3300 User Guide ]
Call register
n Note The actual cost invoiced for calls by your service provider may
vary, depending on network features, rounding-off for billing,
taxes, etc.
n Note When all units have been used, no calls can be made except
emergency calls. Depending on the SIM card, you need the
PIN2 code to set a call cost limit.

[ 46 C3300 User Guide ]
GPRS information
Menu-3-6
You can check the amount of data transferred over the network
through the GPRS information option. In addition, you can also
view how much time you are online. (GPRS stands for General
Packet Radio Service.)
Call duration
(Menu-3-6-1)
You can check the duration of the last call and all calls. You can
also reset the call timers by selecting Reset all.
Data volumes
(Menu-3-6-2)
You can check the sent data volume, received data volume, and all
data volume. You can also reset the counter by selecting Reset all.
Call register

Press the menu key ( ) and select Messages using navigation
keys.
Write text message
Menu-4-1
Your phone receives voice mail notification messages, and Short
Message Service (SMS) messages.
Voice mail and SMS are network services. Please contact your
network operator for more information.
When the icon appears, you have received voice mail. When
the icon appears, you have received a new text message. If the
message memory is full, a message is displayed, the icon
flashes and you cannot receive any new messages. Use the Delete
option in the Inbox menu to delete obsolete messages. Once there
is space in the message memory, any undelivered SMS messages
will be received (provided sufficient space is available).
You can write and edit text messages up to 10 pages.
(approximately 1530 characters)
1. Key in your message. For details on how to enter text, refer to
pages 28 through 31 (Entering Text).
2. After you complete the message, to select the required option,
press the left soft key [Options]. The following options are
available.
] Send: Enter the phone number. Or select the number from the
recent numbers or the Contacts after pressing the left soft key
[Options].
You can send a message up to 6 phone numbers at a time.
Before sending the message, you can set the following options
by pressing the right soft key [Settings].
1) Validity period: Set the length of time for which your text
messages will be saved at the SMS center while attempts
are made to deliver them to the recipient. Possible values
are 1 hour, 12 hours, 1 day, 1 week and the maximum
authorized by your network operator.
2) Delivery report: Select whether activate or deactivate the
report function. When this function is activated, the network
[ 47 C3300 User Guide ]
Messages
Menu-4

[ 48 C3300 User Guide ]
informs you whether your message has been delivered or
not.
3) Reply charging: Allows the recipients of your text message
to send you a reply via your message centre, if the service is
provided by the network.
] Save: Saves the message so that it can be sent later.
] Font: Select the desired font size and style for the message
using the left/right navigation keys.
] Colour: Select the desired foreground colour using the left/right
navigation key. Then, press the down navigation key and select
the background colour using the left/right navigation key.
] Alignment: Select where to align text.
] Add T9 dictionary: When you didn't find a desired word in the
T9 text input mode, you can add a word using this option in the
T9 dictionary. After typing a word, press the left soft key [Save].
] T9 languages: Select the language for T9 input mode.
You can also deactivate T9 input mode by selecting T9 off.
] Exit: Exits from the Write text message menu.
3. You can also send attachments with the message by pressing the
right soft key [Insert], while you’re entering a message.
] Picture: Sends and receives text messages that contain
pictures, known as ‘picture messages’. Several preset pictures
are available in the phone and they can be replaced with new
ones received from other sources.
] Sound: If available, you can attach a sound to a short
message.
] Text templates: You can select a text template already set in
the phone.
] Phonebook: You can add phone numbers to the message.
] Signature: You can attach your name card.
] Symbol: You can attach special characters.
Messages

Write multimedia messages
Menu-4-2
A multimedia message can contain text, images, and/or sound clips.
This feature can be used only if it is supported by your
network operator or service provider. Only the devices that offer
compatible multimedia message or e-mail features can receive and
send multimedia messages.
You can create a multimedia message up to 10 slides.
(approximately 100 KB)
1. After entering the subject of the message, press the OK key.
2. Key in the text message. Using the right soft key [Insert], you can
insert a symbol, a picture, a sound, a voice memo, text
templates, phone numbers stored in the phonebook or a
signature.
3. Press the left soft key [Options]. The following options are
available.
] Send: You can send the multimedia message up to 6
recipients at the same time.
1) Key in the phone number. You can also search the phone
number from the recent number list or the phonebook using
the left soft key [Options].
2) Press the right soft key [Settings]. You can set the following
options:
- Priority: Set the priority of the MMS.
- Validity period: Set the duration for keeping the
multimedia messages on the network server. Possible
values are 1 hour, 12 hours, 1 day, 1 week and the
maximum authorized by the network operator.
- Delivery report: Select Yes to activate the report function.
When this function is activated, the network informs you
whether or not your message has been delivered.
3) Press the left soft key [Send].
[ 49 C3300 User Guide ]
Messages

[ 50 C3300 User Guide ]
] Preview: Select this option to check out the multimedia
message you've created. Each slide is sequentially played
back automatically. You can also move to another slide from
the currently played slide using the left/right navigation keys.
To replay the message, press the left soft key [Replay].
] Save: Saves the message in drafts or as a template.
] Add slide: Add a slide before or after the current slide.
] Move to slide: Select this option to move to another slide
from the current slide.
] Delete slide: Deletes the current slide.
] Set slide format: You can set the following slide format.
- Set timer: Enter the timer in each field using the numeric
keypad.
- Swap text and picture: Swaps the text and picture.
] Add T9 dictionary: When you didn’t find a desired word in the
T9 text input mode, you can add a word in the T9 dictionary
using this option. After typing a word, press the left soft key
[Save].
] T9 languages: Select the T9 language for T9 input mode.
You can also deactivate the T9 input mode by selecting T9 off.
] Exit: Exits from the Write multimedia message menu.
Messages

Inbox
Menu-4-3
You will be alerted when you have received messages. And they will
be stored in the Inbox.
Press the left soft key [Menu] and select → Inbox.
Or, you can take a shortcut by pressing the right navigation key
( ) in standby mode.
In the Inbox, you can identify each message by icons. For detail, see
the icon description below.
Each received message has the following options available.
Press the left soft key [Options].
] View: You can view the selected message.
] Reply: You can reply to the sender with a text message or a
multimedia message.
] Forward: You can forward the selected message to other
recipients.
] Return call: You can call back to the sender.
] Delete: Deletes the selected message from inbox.
] Extract: You can extract picture, sound, sender’s number, URL,
email address and so on from the message. They will be saved in
My folder, Contacts, or Bookmarks.
] View information: You can view the information of the message:
the sender's address, subject (only for multimedia message), the
date and time when the message has arrived, message type and
size, and the priority (only for multimedia message).
[ 51 C3300 User Guide ]
Messages
Icon Description
Multimedia message
Short message
SIM message
Read
Notified multimedia message

[ 52 C3300 User Guide ]
] Replay: You can replay the selected multimedia message.
(Only for multimedia message)
] Delete all: Deletes all the messages in the inbox folder.
] Receive: When you receive a multimedia notification message,
you need to select this option to download the multimedia
message. (Only for multimedia notification message)
] Cancel: You can cancel downloading the multimedia message.
(Only for multimedia notification message)
Outbox
Menu-4-4
All the messages you have sent are stored in the Outbox folder.
You can view the list and contents of messages.
In the outbox message list, you can verify if the transmission was
successful. If the transmission was failed, “(Failed)” is displayed
before the recipient. You can also check whether you have received
the delivery report through the following icons.
In each message, the following options are available by pressing
the left soft key [Options].
The messages of which transmission was completed has
the following options.
] View: You can view the selected message.
] Forward: You can forward the selected message to other
recipients.
] Delete: Deletes the selected message from outbox.
] View information: You can view the information of selected
message: subject (only for multimedia message), the date and
time when you sent it, message type and size, the priority (only
for multimedia message), and recipients.
Messages
Icon Description
Multimedia message
Short message
Delivery reported message

] Delete all : Deletes all the messages in the outbox folder.
The messages of which transmission is in progress has
the following options.
] View : You can view the selected message.
] Send: Select this to send it again.
] Delete: Cancels transmitting the message and deletes the
message.
] View information: You can view the information of selected
message: subject (only for multimedia message), the date and
time when you sent it, message type and size, the priority
(only for multimedia message), and recipients.
] Send all: Sends all the messages of which transmission is in
progress again.
] Cancel all: Cancels all the message transmission.
] Delete all: Cancels all the message transmission and deletes all
of them.
Drafts
Menu-4-5
You can view the messages saved as a draft. The draft messages
are listed with the date and time when they were saved.
Scroll through the list using up/down navigation keys.
Each draft has the following options.
Press the left soft key [Options].
] View: You can view the selected message.
] Edit: You can edit the selected message.
] Delete: Deletes the selected message from the drafts folder.
[ 53 C3300 User Guide ]
Messages
Icon Description
Multimedia message
Text message

[ 54 C3300 User Guide ]
] View information: You can view the information of selected
message: subject (only for multimedia message), the date and
time when saved, message type and size and the priority
(only for multimedia message).
] Delete all: Deletes all the messages from drafts folder.
Listen to voice mail
Menu-4-6
This menu provides you with a quick way of accessing your voice
mailbox (if provided by your network).
Before using this feature, you must enter the voice centre number
obtained from your network operator.
When new voice message is received, the symbol will be
displayed on the screen. Please check with your network provider
for details of their service in order to configure the handset
correctly.
Info message
(Network dependent)
Menu-4-7
Info service messages are text messages sent by the network to
mobile phone users. They provide general information such as
weather reports or traffic conditions. Each type of information has
the number; therefore, you can contact the service provider as long
as you have input the certain number for the information. When you
receive an info service message, a popup message will indicate a
new message receipt or the info service message will be displayed
directly. The following options are available when viewing info
service messages.
Read
(Menu-4-7-1)
1. Select Read to view the message, it will be displayed on the
screen.
2. The message will be shown until another message is reached.
Messages

Topics
(Network dependent)
(Menu-4-7-2)
• Add new: You can add a new info service message number with
its nickname in the phone or in the SIM (if the SIM is available).
• View list: You can view the list of all the info service message
numbers. Press the left soft key [Options] to edit or delete the info
message category.
• Active list: You can set whether you will receive each info service
message or not using the left soft key [On/Off] in this list.
Templates
Menu-4-8
There are pre-defined messages in the list. You can view and edit
the template messages or create new messages. Two types of
templates are available: Text and Multimedia.
Text templates
(Menu-4-8-1)
• Please call me back.
• I’m late. I will be there at...
• Where are you now?
• I am on the way.
• Top urgent. Please contact.
• I love you.
The following options are available.
] View: You can view the selected template.
] Edit: Use this to write a new message or edit the selected
template message from the text template list.
] Write text message: Use this to send the selected template
message by SMS.
] Write multimedia message: Use this to send the selected
template message by MMS.
] Add new: Use this to create new template.
] Delete: Deletes the selected template.
] Delete all: Deletes all the text templates.
[ 55 C3300 User Guide ]
Messages

[ 56 C3300 User Guide ]
Multimedia templates
(Menu-4-8-2)
You can create a multimedia template after pressing the left soft
key [Add new]. And the multimedia templates you saved as a
template while creating a multimedia message in the Write
multimedia message.
] Preview: Select this option to check out the multimedia
message you've created. Each slide is sequentially played
back automatically. You can also move to another slide from
the currently played slide using the left/right navigation keys.
To replay the message, press the left soft key [Replay].
] Save: Saves the message in drafts or as a template.
] Add slide: Add a slide before or after the current slide.
] Move to slide: Select this option to move to another slide
from the current slide.
] Delete slide: Deletes the current slide.
] Set slide format: You can set the following slide format.
- Set timer: Enter the timer in each field using the numeric
keypad.
- Swap text and picture: Swaps the text and picture.
] Add T9 dictionary: When you didn’t find a desired word in the
T9 text input mode, you can add a word in the T9 dictionary
using this option. After typing a word, press the left soft key
[Save].
] T9 languages: Select the T9 language for T9 input mode.
You can also deactivate the T9 input mode by selecting T9 off.
] Exit: Exits from the Write multimedia message menu.
Messages

Signature
(Menu-4-8-3)
This option helps you to make your own name card. Key in the
name, mobile phone number, home number, office number, Fax
number, and E-mail address. After creating the name card, you can
access the following options using the left soft key [Options].
] Edit: You can edit the name card.
] Write text message: Use this to send the name card by SMS.
] Write multimedia message: Use this to send the name card by
MMS.
] Delete: Deletes the name card.
Settings
Menu-4-9
Text message
(Menu-4-9-1)
This menu lets you set up default SMS information.
] Message types: Set the default message type (Text, Voice, Fax,
Natl. paging, X.400, E-mail, ERMES). The network can convert
the messages into the selected format.
] Validity period: Set the length of time for which your text
messages will be saved at the SMS center while attempts are
made to deliver them to the recipient. Possible values are 30
minutes, 1 hour, 6 hours, 12 hours, 1 day, 1 week and the
maximum authorised by your network operator.
] Delivery report: Select whether to activate or deactivate the
report function. When this function is activated, the network
informs you whether or not your message has been delivered.
] Reply charging: Allows the recipient of your SMS message to
send you a reply via your message centre, if the service is
provided by the network.
] SMS centre: Saves or changes the number of your SMS centre
when sending text messages. You must obtain this number from
your service provider.
[ 57 C3300 User Guide ]
Messages

[ 58 C3300 User Guide ]
Multimedia message
(Menu-4-9-2)
Via this menu, you can set up the default multimedia message
information.
The following options are available.
] Priority: Set the priority for the multimedia messages you will
send.
] Validity period: Set the length of time for which your multimedia
messages will be saved in the network server while attempts are
made to deliver them to the recipient. Possible values are
1 hour, 12 hours, 1 day, 1 week and the maximum authorised by
your network operator.
] Delivery report: Select whether to activate or deactivate the
report function. When this function is activated, the network
informs you whether or not your message has been delivered.
] Auto download
- On: If you select this, messages are downloaded automatically
on receipt.
- Off: Requires you to confirm you want to download the
message.
- Home network only: If you select this, messages are
downloaded automatically on receipt in your home network
area. And outside your home service area, it requires you to
confirm you to download the message.
- Reject: If you select this, every message will be rejected on
receipt.
] Network settings: If you select the multimedia message server,
you can set the URL for multimedia message server.
] Permitted types: Set the permitted type. Possible values are
Personal, Advertisements and Information.
Messages

Voice mail centre
(Menu-4-9-3)
You can receive the voicemail if this feature is supported by your
network service provider. When a new voicemail is arrived, the
symbol will be displayed on the screen. Please check with your
network service provider for details of their service in order to
configure the phone accordingly.
1. Hold down key in standby mode.
2. You can check the following submenus.
• Home: You can listen to voice mails by selecting Home.
• Roaming: Even when you are in abroad, you can listen to voice
mails if roaming service is supported.
Info message
(Menu-4-9-4)
Info service messages are text messages delivered by the network
to GSM. They provide general information such as weather reports,
traffic news, taxis, pharmacies, and stock prices. Each type of
information has the number; therefore, you can contact service
provider as long as you have input the certain number for the
information. When you have received an info service message, you
can see the popup message to show you that you have received a
message or the info service message is directly displayed.
The following options are available.
] Receive: If you select YES, your phone will receive Info service
messages. Otherwise, it will not receive Info service messages
any more.
] Alert: If you select YES, Your phone will beep when you have
received Info service message numbers. Otherwise, it will not
beep even though you have received info service messages.
] Languages: You can select the language you want by pressing
[On/Off]. Then, the info service message will be shown in the
language that you selected.
[ 59 C3300 User Guide ]
Messages

[ 60 C3300 User Guide ]
Push message
(Menu-4-9-5)
You can order push messages from WAP service providers. Push
messages are notifications of, for example, news headlines and
they can contain a text message or the address of a WAP service.
For availability and subscription, contact your WAP service
provider.
In this menu, you can set the push message receive option.
] Receive on/off: If you select Receive on, all push messages
will be
accepted irrespective of the origination.
] Auto download: Will only accept the push messages from
T-Mobile.
After selecting a push message, the following menus are available.
• Information: Shows the information of the current push message.
• Load: Connects to a specific site using the information in the
current push message.
• Delete: Deletes the current push message.
• Delete All: Deletes all the messages in inbox (including SMS,
MMS, etc.).
Messages
n Note • Service providers can update an existing push message with
a new incoming push message.
(Old one will be replaced with new one.)
• When push messages expire, they are deleted automatically.
Icon Description
Read Push Message
Unread Push Message

How to access t-zones
You can use your phone for so much more than just texting and
talking. t-zones provides information you need such as news,
weather forecast, information on sports or traffic when you need it.
In addition, t-zones provides superior multimedia services such as
the latest ring tones, wallpapers or games for your interest.
Press the menu key ( ) and select t-zones using navigation
keys. You can also access t-zones by pressing key in
standby mode.
[ 61 C3300 User Guide ]
t-zones
Menu-5
n Note The additional cost for services may be dependent on the
network.

[ 62 C3300 User Guide ]
You can save phone numbers and their corresponding names in
the memory of your SIM card. In addition, you can save up to 200
numbers and names in the phone memory.
Press the left soft key [Menu] in standby mode, then select
Contacts.
Search
Menu-6-1
1. Select Search. You are asked to enter a name.
2. Enter the start of the name that you wish to find and press left
soft key [Search].
] You can access the Contacts directly by pressing the up
navigation key ( ) in standby mode.
3. After finding the desired contact, you can make a call to the
number by pressing the key. Or press the left soft key
[Option] to use the following options.
] Edit: You can edit the name and number.
] Write text message: Use this to write a text message to the
contact.
] Write multimedia message: Use this to write a multimedia
message to the contact.
] Copy: Use this to copy the contact entry from SIM to the phone
memory or vice versa.
] Main number: Select which number will be the main number.
The main number will be displayed first
] Delete: Deletes the contact.
Contacts
Menu-6
n Note You can also scroll through the Contacts from the beginning,
by pressing the left soft key [List] directly.

Add new
Menu-6-2
You can add a contact entry using this function.
There are 2 memories: Phone memory and SIM memory. To select
the memory, go to Set memory [Menu-6-5-1]. The phone memory
capacity is 200 entries. You can enter up to 20 characters in each
name in the phone memory. The SIM card memory capacity
depends on the SIM card.
1. Press the Menu key and select Contacts → Add new.
2. You can add new contact entries to the SIM memory or the
phone memory. To select the memory, go to Set memory
[Menu-6-5-1]. (Refer to page 65.)
• Adding new entries into SIM memory
You can enter a name and number, and select the required group.
(Depends on the SIM)
• Adding new entries into the phone memory
You can enter a name, numbers, E-mail address and memo, and
select the required group. And select which number will be the
main number.
[ 63 C3300 User Guide ]
Contacts

[ 64 C3300 User Guide ]
Caller groups
Menu-6-3
You can list up to 20 contacts per group. There are 7 pre-defined
groups, where you can create lists.
1. Select Caller groups. All group lists will be displayed: Family,
Friend, Colleague, VIP, Group 1, Group 2, and Others.
2. Select the group name that you want to manage by pressing the
left soft key [Option]. The following submenus will be displayed.
] Member list: Displays the member list in the group.
] Group ringtone: Use this to select the ring tone to be used
when you receive a voice phone call from a person in the group.
] Group icon: Use this to select the graphic icon to be displayed
when you receive a call from a person in the group.
] Add member: Add a member to the group. You can add up to
20 members per group.
] Remove member: Removes the member from the group
member list. The contact entry still remains in Contacts.
] Rename: Assigns a new name to the group.
Speed dial
Menu-6-4
You can assign any of the keys to with a name list entry.
You can call directly by pressing this key for 2-3 seconds.
1. Open Contacts first bypressing the right soft key [Contacts] in
standby mode.
2. Scroll to Speed dial, then press [Select].
3. To add a number to Speed dial, select (Empty). Then, you can
search the name through Contacts.
4. You can change or delete a speed dial number, make a call or
send a message by pressing the left soft key [Option].
Contacts

Settings
Menu-6-5
Set memory
(Menu-6-5-1)
You can select the memory for the Contacts feature between the
SIM and the phone. If you select Variable, when adding entry, the
phone will ask where to save the number.
Search by
(Menu-6-5-2)
You can set the phone to search by name or number, when you
search Contacts. If you select Variable, the phone will ask how to
search when you search Contacts.
View options
(Menu-6-5-3)
You can set the Contact display option.
] Name only: When you search Contacts, the list displays only
names.
] With pictures: When you search Contacts, the list displays
names and corresponding pictures.
] Name & number: When you search Contacts, the list
displays names and numbers.
Copy all
Menu-6-6
You can copy/move entries from the SIM card memory to the phone
memory and vice versa.
] SIM to Phone: Use this to copy the entry from the SIM Card to
the Phone memory.
] Phone to SIM: Use this to copy the entry from the Phone
memory to the SIM Card.
The following options are available.
• Keep original: When copying, the original dial numbers are kept.
• Delete original: When copying, the original dial numbers will be
erased.
[ 65 C3300 User Guide ]
Contacts

[ 66 C3300 User Guide ]
Delete all
Menu-6-7
You can delete all entries in the SIM and/or phone. This function
requires the security code.
Press to return to standby mode.
Information
Menu-6-8
] Service dial number (SIM dependent): Use this to view the list
of Service Dialling Numbers (SDN) assigned by your network
operator (if supported by the SIM card). Such numbers include
the emergency, directory enquiries and voice mail numbers.
1. Select the Service dial number option.
2. The names of the available services will be shown.
3. Use the up/down navigation keys to select a service. Press .
] Memory status: You can check the current memory status of
the SIM card or the phone memory.
] Own number (SIM dependent): Use this to display your phone
number in the SIM card.
Contacts

Press the menu key ( ) and select Organiser.
Alarm clock
Menu-7-1
There are 5 alarm clocks available. Set the alarm to ring at a
specific time.
After selecting an alarm clock using the left soft key [Select],
1. Alarm on/off: Select On using the left/right navigation key.
To deactivate the alarm function, select Off.
2. Alarm time: Enter the alarm time using the numeric keys
3. Repeat: Select the desired one from Once, Mon~Fri,
Mon~Sat, and Everyday using the left/right navigation key.
4. Alarm melody: Select the desired alarm melody using the
left/right navigation key.
5. Press the left soft key [OK].
6. You can edit the alarm clock name. After keying in the name,
press the left soft key [OK].
When an alarm function is activated, “ ” is shown in standby
mode.
When the alarm time is reached, it sounds the alarm melody.
] To turn off the alarm, press the right soft key [Quit].
[ 67 C3300 User Guide ]
Organiser
Menu-7

[ 68 C3300 User Guide ]
Scheduler
Menu-7-2
When you enter this menu, a calendar appears. A square cursor is
located on the current date. You can move the cursor to another
date using navigation keys. On the calendar, you can use the
following keys.
You can enter a schedule or memo in the scheduler by pressing the
left soft key [Options].
] Add new: Select this to enter a new schedule or a memo.
After a schedule note or memo is entered on a date, the date is
shown in a different colour and “ ” (schedule), “ ”
(memo) appears on the right bottom of the screen. This function
reminds you of your schedule. And the phone will sound an
alarm tone if you set the phone to do so.
] View: Shows the schedule note or memo for the chosen day.
Press the left soft key [Options] to edit or delete the note you
selected.
] View all: Shows all the notes that are entered in the phone.
Use the up/down navigation keys to browse through the note
lists.
] Delete past: Select this to delete the expired schedule notes
that have already been notified. You are asked to confirm this
action.
] Delete all: Select this to delete all the schedule notes and
memos. You are asked to confirm this action.
Organiser
skips back a year.
skips forward a year.
skips back a month.
Each press of
skips forward a month.

Press the menu key ( ) and select Tools using the navigation
keys.
Calculator
Menu-7-3
Using this feature, you can use the phone as a calculator.
The calculator provides the basic arithmetic functions: addition,
subtraction, multiplication and division. (You can enter numbers up
to the second decimal place).
Using the Calculator
1. Enter the first number using the numeric keys.
2. Press the corresponding navigation key to select a mathematical
function.
3. To calculate the result, press the left soft key [Result] or OK key.
4. After calculation, press the left soft key [Reset] to return to the
menu.
Unit converter
Menu-7-4
This converts any measurement from one unit to another.
There are 4 types that can be converted into units: Length, Area,
Weight and Volume.
1. Select one of four unit types by pressing the left soft key [Unit].
2. Move to the current unit section by pressing the down navigation
key.
3. Select the unit you want to convert using the left/right navigation
keys.
4. Move to the Convert unit section by pressing the down
navigation key.
[ 69 C3300 User Guide ]
Organiser
n Note To erase any mistakes or clear the display, press the key.
To include a decimal point, press the key.
To include a minus sign, press the key.

[ 70 C3300 User Guide ]
5. Select the unit you want to convert to, using the left/right
navigation keys.
6. Input numbers using the numeric keys. Conversion is calculated
automatically.
World time
Menu-7-5
You can check the current time of Greenwich Mean Time (GMT)
and 65 major cities around the world, using the left/right navigation
keys.
The screen shows the city name, current date and time.
To select the time zone in which you are located, proceed as
follows:
1. Select the city corresponding to your time zone by pressing the
left/right navigation keys. The local date and time are displayed.
2. If you want to change the time display in standby mode to the
selected time, press the left soft key [Set].
Voice recorder
Menu-7-6
You can record a memo. You can record up to 10 voice memos up
to a maximum of 20 seconds each.
You can play or delete the recorded memo or record new voice
memo using the left soft key [Options] key.
Record
1. Press and hold down key in standby mode.
2. Once recording is started, the message ‘Recording...’ and the
remaining time is displayed.
Organiser
n Note You can input a decimal number by pressing the key.
n Note The time zone setting of each city in World time menu may be
affected by network condition.
n Note In standby mode, you can go directly to the Voice recorder menu
by pressing the down navigation key.

3. When you finish recording, press left soft key [Save].
View list
The phone shows the voice memo title which you have recorded by
pressing in standby mode. You can play back or delete the
recorded voice memo.
] Playback: Allows you to play back all memos recorded, starting
with the most recent memo.
] Write multimedia message: You can write multimedia
messages using the voice memo.
] Delete: Deletes the voice memo.
] Delete all: Allows you to delete all the memos. Press the left
soft key[Yes] to confirm.
Memory status
Menu-7-7
You can check the current memory status of each repository:
Free memory, Text message, Multimedia message, Inbox, Outbox,
Drafts, Multimedia templates, Messages in SIM, Push message,
Voice memo, Photos, Pictures, Sounds, Games & more.
And you can go to each repository to manage it.
S/W version
Menu-7-8
You can check the current Model code, Country code, software
version, and network code of your phone.
[ 71 C3300 User Guide ]
Organiser
n Note If all memo locations are full, you must delete an old memo
before recording a new one.

[ 72 C3300 User Guide ]
With the C3300 phone, you can takes pictures and save them.
After taking a picture, you can also send it via MMS(Multimedia
Messaging Service) right away.
Take photo
Menu-8-1
Press the Menu key and select Camera → Take photo using
navigation keys. Or, you can directly open the camera module by a
press of the Camera key in standby mode. The camera module
opens and you’ll see the view to be captured.
Before shooting, you can set the following options.
Camera
Menu-8
n Note If the battery is too low, you may not be able tot use
the Camera feature.
1. Digital zoom (): x1, x2, x4
2. Tone (): Colour( )/ Sepia( )/
Black and white ( )
3. Brightness (): -2, -1, 0, +1, +2
4. Timer (): Off, 3 sec, 5 sec
5. Memory (): Shows the current
memory status.
6. Flash ()
n Note The maximum zoom scale depends on
the resolution as follows.
n Note If the memory is full, “Memory full”
message is popped up and you
cannot save a photo. Create space
by deleting old photos in My photos.
48 x 48 unavailable
1x, 2x, 4x
1x, 2x
1x
128 x 160
320 x 240
640 x 480
preview option
menu bar
Back

1. Center the desired option menu using the left/right navigation
keys.
2. Select the desired value with the up/down navigation keys.
3. After finishing all the setting, focus on the subject to capture and
press the Camera key or OK key. With a click, the image is
captured and the following menu bar appears.
4. To save the image, center the ( ) and press . If you don’t
want to save the image, center the ( ) and press
. You can immediately access My photos by pressing the left
soft key [My photos].
You can also send the image via multimedia message by
selecting ( ). For further information regarding multimedia
message writing, refer to page 49.
[ 73 C3300 User Guide ]
Camera
n Note If Auto save [Menu-8-4-1] is set to On, the captured image is
automatically saved without displaying this menu bar.
(Refer to page 76.)
Save
MMS message
Delete
7. Resolution (): 48x48 (for phonebook),
128x160, 320x240, 640x480
8. Image quality (): Fine/ Normal/ Basic.
n Note For the picture to be used in the
phonebook, select 48x48
(for phonebook).

[ 74 C3300 User Guide ]
Take in modes
Menu-8-2
You can enjoy taking pictures in diverse preset frames. 7 preset
frames are available. Press the Menu key and select Camera →
Take in modes using navigation keys.
Before shooting, you can set the following options.
1. Center the desired option menu using the left/right navigation
keys.
2. Select the desired value with the up/down navigation keys.
3. After finishing all the setting, focus on the subject to capture and
press the Camera key or OK key. With a click, the image is
captured and the following menu bar appears.
Camera
1. Frame ( ): Select the desired one from 7
preset frames.
2. Image quality ( ): Fine/ Normal/ Basic.
3. Digital zoom ( ): x1, x2, x4
4. Tone ( ): Colour( )/ Sepia( )/
Black and white ( )
5. Brightness ( ): -2, -1, 0, +1, +2
6. Timer (): Off, 3 sec, 5 sec
7. Memory (): Shows the current
memory status.
8. Flash ()
preview option
menu bar
Back
n Note If the memory is full, “Memory full”
message is popped up and you
cannot save a photo. Create space
by deleting old photos in My photos.

4. To save the image, center the ( ) and press . If you don’t
want to save the image, center the ( ) and press .
You can also send the image via multimedia message by
selecting ( ).
My photos
Menu-8-3
Press the Menu key and select Camera → My photos using
navigation keys.
All the photos taken in the Take photo and Take in modes are
stored in this menu. The latest taken picture comes first.
The photos are classified into General photos, Mode photos, and
Phonebook photos. And in All photos, you can view all the photos.
With pictures, you can do the following by pressing the left soft key
[Options].
] Delete: Deletes the selected photo.
] Send via MMS: You can also send the image via multimedia
message by selecting this menu . For further information regard-
ing multimedia message writing, refer to page 49.
] Set as wallpaper: You can set the photo as wallpaper.
] Rename: You can change the name of the selected photo.
] Information: You can check the name, resolution, size, and date
and time of the selected photo.
[ 75 C3300 User Guide ]
Camera
Save
MMS message
Delete
n Note If Auto save [Menu-8-4-1] is set to On, the captured image is
automatically saved without displaying this menu bar.
(Refer to page 76.)
n Note To clear up the My photos, go to Camera → Settings → Delete
all photos [Menu-8-4-2].

[ 76 C3300 User Guide ]
Settings
Menu-8-4
Press the Menu key and select Camera → Settings using
navigation keys.
Auto save: If you set this On, the captured images are
automatically saved without displaying the Save menu bar.
Delete all photos: Use this menu to delete all the photos.
You are asked to confirm this action.
Memory status
Menu-8-5
Press the Menu key and select Camera → Memory status using
navigation keys.
Camera

Profiles
Menu-9-1
In Profiles, you can adjust and customise the phone tones for
different events, environments, or caller groups.
There are six preset profiles: Vibrate Only, Silent, General, Loud,
Headset and Car. Each profile can be personalised.
Press the menu key ( ) and select Profiles using navigation
keys.
Changing the profile
(Menu-9-1-1)
1. A list of profiles is displayed.
2. In the Profile list, scroll to the profile you want to activate and
press the left soft key [Select] or OK key ( ).
3. Then, select Activate.
Customising profiles
- Personalise
(Menu-9-1-2)
Scroll to the desired profile in the Profile list and select
Personalise. The profile setting option opens. Set the option as
required.
1. Call alert type: Set the alert type for incoming calls.
2. Ring tone: Select the desired ring tone from the list. Scroll
through the list using up/down navigation keys. You can hear the
desired tone prior to making a selection.
3. Ring volume: Set the volume of the ringing tone.
4. Message alert type: Select the alert type for receiving a
message.
5. Message tone: Select the alert tone for receiving a message.
6. Keypad tone: Select the desired keypad tone.
7. Keypad volume: Set the volume of keypad tone.
8. Effect sound volume: Set the volume of effect sound.
[ 77 C3300 User Guide ]
Settings
Menu-9

[ 78 C3300 User Guide ]
9. Power on/off volume: Set the volume of the ringing tone when
switching the phone on/off.
10. Auto answer: (only in Headset profile and Car profile) You can
activate the automatic answer feature. Select when the phone
answers automatically.
] Off: Deactivates the Auto answer feature.
] After 5 secs: After 5 seconds, the phone will answer
automatically.
] After 10 secs: After 10 seconds, the phone will answer
automatically.
Customising profiles
- Rename
(Menu-9-1-3)
You can rename a profile and give it any name you want.
Vibrate only, Headset and Car profiles cannot be renamed.
1. To change the name of a profile, scroll to the profile in the profile
list and select Rename.
2. Key in the desired name and press the OK key or the left soft
key [OK].
Settings

Press the menu key ( ) and select Settings using the
navigation keys.
Date & Time
Menu-9-2
This option lets you change the current time and date displayed.
The following options are available.
Set date
(Menu-9-2-1)
Use this to enter the day, month and year. You can change the date
format via the Date format menu option.
Date format
(Menu-9-2-2)
DD/MM/YYYY (day/month/year)
MM/DD/YYYY (month/day/year)
YYYY/MM/DD (year/month/day)
Set time
(Menu-9-2-3)
Use this to enter the current time. You can choose the time format
via the Time format menu option.
Time format
(Menu-9-2-4)
24-hours
12-hours
[ 79 C3300 User Guide ]
Settings

[ 80 C3300 User Guide ]
Phone settings
Menu-9-3
Many features of your phone can be customised to suit your
preferences. All of these features are accessed via the Phone
settings menu.
Display settings
(Menu-9-3-1)
] Wallpaper: Use this to set up the display on the LCD screen in
standby mode.
] Menu colour: Your phone provides you with 4 menu colour
themes. Set the menu colour by scrolling and pressing the left
soft key [Select].
] Greeting note: If you select On, you can edit the text which will
be displayed in standby mode
] Backlight: Use this to select whether or not the phone uses the
backlight. A small increase in standby/talk time can be achieved
by turning the backlight off.
] LCD contrast: You can set the brightness of LCD by pressing
, .
] Information window: You can preview the current state of the
selected menu before opening the menu. The state is shown on
the bottom of the screen.
Language
(Menu-9-3-2)
You can select the display language. When the language option is
set to Automatic, the language is automatically selected according
to the language of the SIM card used. English will be set if the
language on the SIM card is not supported by the phone.
Settings

Call settings
Menu-9-4
To change the settings for call diverting.
Call divert
(Menu-9-4-1)
When this network service is activated, you can direct your
incoming calls to another number, for example, to your voice
mailbox number. For details, contact your network operator. Select
one of the divert options, for example, select If busy to divert voice
calls when your number is busy or when you reject incoming calls.
The following options are available.
All voice calls: Diverts all voice calls unconditionally.
If busy: Diverts voice calls when the phone is in use.
If no reply: Diverts voice calls which you do not answer.
If out of reach: Diverts voice calls when the phone is switched off
or out of coverage.
All data calls: Diverts to a number with a PC connection
unconditionally.
All fax calls: Diverts to a number with a fax connection
unconditionally.
Each option has the following menu:
] Activate: Activates the corresponding service.
- To voice mail centre: Forwards to message centre.
This function does not apply to All data calls and All fax calls
menus.
- To other number: Input the number for call diverting.
- To favourite number: After entering up to 5 frequently used
phone numbers, you can divert calls to them.
] Cancel: Cancels the selected call divert.
] View status: You can check the status of the service.
Cancel all: Cancels all call divert settings.
[ 81 C3300 User Guide ]
Settings

[ 82 C3300 User Guide ]
Answer mode
(Menu-9-4-2)
Select the desired mode to answer a call.
] Flip open: When the phone rings, you can answer a call simply
by opening the folder.
] Press any key: When the phone rings, you can answer a call by
pressing any key except the key and the right soft key
( ).
] Send only: You can answer a call only by pressing the send
key.
Send my number
(Menu-9-4-3)
This network service lets you decide whether your phone number is
displayed (On) or hidden (Off) from the person you are calling.
Select Set by network to reset the phone to the setting that you
have agreed upon with your service provider.
Call waiting
(Menu-9-4-4)
The network will notify you of a new incoming call while you have a
call in progress. Select Activate to request the network to activate
call waiting, Cancel to request the network to deactivate call
waiting, or View status, to check if the function is active or not.
Minute minder
(Menu-9-4-5)
When set to On, the phone will beep every minute during an
outgoing call to keep you informed of the length of the call.
Auto redial
(Menu-9-4-6)
Select On, and your phone will make a maximum of four attempts
to connect the call after an unsuccessful call attempt.
Settings

Closed user group
(Network dependent)
(Menu-9-4-7)
Restricts usage of the phone with numbers that belong to certain
user groups. When this function is used, every outgoing call is
associated with a group index. If a group index is specified, it is
used for all outgoing calls. If no group index is specified, the
network will use the preferential index (a specific index that is
stored in the network).
] Default: Activates the default group agreed on with the network
operator.
] Set: Select this to activate the selected CUG Index.
] Edit: You can edit the CUG name and CUG Index.
] Delete: Delets the selected CUG.
] Delete all: Delets all CUG.
[ 83 C3300 User Guide ]
Settings

[ 84 C3300 User Guide ]
Security settings
Menu-9-5
Various passwords are used to protect certain features of your
phone. Refer to page 24-25 for the various passwords.
PIN code request
(Menu-9-5-1)
When the PIN code request feature is enabled, you must enter
your PIN each time you switch the phone on. Consequently, any
person who does not have your PIN cannot use your phone without
your approval.
The following options are available:
• On: You must enter the PIN each time the phone is switched on.
• Off: The phone connects directly to the network when you switch
it on.
Phone lock
(Menu-9-5-2)
When the Phone lock feature is enabled, the phone is locked and
you must enter the phone password each time the phone is
switched on.
The password is factory set to 0000. To change the phone
password, refer to the Change codes–Security code menu option
(Menu-9-5-5-1). Once the correct password has been entered, you
can use the phone until you switch it off.
The following options are available:
1 Power on
] On: You are required to enter the phone password when you
switch the phone on.
] Off: You do not need to enter the phone password when you
switch the phone on.
Settings
n Note Before disabling the PIN code request feature, you must enter
your PIN.

] Automatic: Your phone will request security code only when you
change your SIM card.
2 Immediately
] After entering the correct security code, the phone will lock after
going into the idle state. If you want to disable this phone lock,
you should enter the right security code after pressing the right
soft key. If you power off in the phone lock state, when the
phone is next powered on, the phone is in the lock state.
Call barring
(Network dependent)
(Menu-9-5-3)
Call barring lets you restrict the making and receiving of calls with
your phone. For this function, you need the barring password,
which you can obtain from your service provider.
The following options are available:
] All outgoing: No call can be made.
] International: International calls cannot be made.
] International when roam: When abroad, calls can be made
only to numbers within the current country and to your home
country, the country where your home network provider is
located.
] All incoming: No call can be received.
] Incoming when roam: Calls cannot be received when you are
using your phone outside your home service area.
] Cancel all: All call barring settings are deactivated; calls can be
made and received normally.
] Change password: Use this to set and change the call barring
password obtained from your service provider using this option.
You must enter the current password before you can specify a
new one. Once you have entered a new password, you are
asked to confirm it by entering it again.
[ 85 C3300 User Guide ]
Settings

[ 86 C3300 User Guide ]
Fixed dial number (FDN)
(SIM dependent)
(Menu-9-5-4)
Use this to restrict your outgoing calls to selected phone numbers,
if this function is supported by your SIM card. The PIN2 code is
required.
The following options are available:
] Activate: Use this to only call phone numbers saved in the
phonebook. You must enter your PIN2 code.
] Cancel: Allows you to call any number.
] Number list: Use this to view the numbers saved as fixed dial
numbers.
Change codes
(Menu-9-5-5)
The Change codes feature lets you change your current password
to a new one. You must enter the current password before you can
specify a new one.
Use this to change the access codes: Security code, PIN2 code
Settings
n Note To use Call barring service, you must input the network
password. When calls are barred, calls may be possible to
certain emergency numbers on some networks.
n Note Not all SIM cards have a PIN2. If your SIM card does not, this
menu option is not displayed.
n Note PIN: Personal Identification Number

Network settings
Menu-9-6
The Network settings feature enables you to indicate whether the
network used when roaming (outside your home area) is selected
automatically, manually or preferably.
Automatic
(Menu-9-6-1)
Use this to set the phone to automatically search for and select one
of the cellular networks available in your area.
The phone will default back to Automatic if it is switched off.
Manual
(Menu-9-6-2)
If you want to select the desired network manually from a list of
network. If the connection to the manually selected network is lost,
the phone will sound an error tone and ask you to select a network
again. The selected network must have a roaming agreement with
your home network, that is, the operator whose SIM card is in your
phone. The phone will let you select another network if the phone
fails to access the selected network. If you switch off the phone, the
phone will be reset to Automatic.
Preferred
(Menu-9-6-3)
You can set a list of preferred networks the handset should attempt
to register with first, before attempting to register to any other
networks. This list is created from the handset’s predefined list of
known networks.
[ 87 C3300 User Guide ]
Settings
n Note You can select a network other than your home network only if
it has a valid roaming agreement with your home network.

[ 88 C3300 User Guide ]
GPRS setting
Menu-9-7
GPRS(General Packet Radio Service) is a technology that allows
mobile phones to be used for sending and receiving data over the
mobile network. GPRS is a data bearer that enables wireless
access to data network such as the Internet.
Before you can use GPRS technology
- You need to subscribe to the GPRS service. For availability and
subscription to GPRS service, contact your network operator or
service provider.
- You need to save the GPRS settings for the applications used
over GPRS.
Power on
(Menu-9-7-1)
If you select Power on and you are in a network that supports
GPRS, the phone registers to the GPRS network and sending short
messages will be done via GPRS. Also, starting an active packet
data connection, for example, to send and receive e-mail, is
quicker.
When needed
(Menu-9-7-2)
If you select When needed, the phone will use a GPRS connection
only if you start an application or action that needs it. The GPRS
connection is closed after it is no longer required by any
application.
Settings
n Note If there is no GPRS coverage and you have chosen Automatic,
the phone will periodically try to establish a connection.

Internet
Menu-9-8
You can access various WAP (Wireless Application Protocol)
services such as banking, news, weather reports and flight
information. These services are specially designed for mobile
phones and they are maintained by WAP service providers.
Check the availability of WAP services, pricing and tariffs with your
network operator and/or the service provider whose service you
wish to use. Service providers will also give you instructions on how
to use their services.
To launch the browser in standby mode, press either the t-zone key
( ) or press and hold the key.
Once connected, the homepage is displayed. The content depends
on the service provider.
To exit the browser at any time, press the ( ) key. The phone
will return to the standby mode.
Navigating with the WAP browser
You can surf the Internet using either the phone keys or the WAP
browser menu.
Using the phone keys
When surfing the Internet, the phone keys function differently to
phone mode.
[ 89 C3300 User Guide ]
Settings
Key Description
Scrolls each line of the content areaup/down navigation keys
C key
OK key
Returns to the previous page
Selects options and confirms actions

[ 90 C3300 User Guide ]
Using the WAP browser menu
There are various menu options available when surfing the Mobile
Web.
Home
(Menu-9-8-1)
Connects to a homepage. The homepage will be the site which is
defined in the activated profile. It will be defined by the service
provider if you have not defined it in the activated profile.
Bookmarks
(Menu-9-8-2)
This menu allows you to store the URL of favourite web pages for
easy access at a later time.
To create a bookmark
1. Press the left soft key [Options].
2. Select Add new and press the OK key.
3. After entering the desired URL and title, press the OK key.
✽
Tip: Use the key and key to enter symbols. To enter “.”,
press .
After selecting a desired bookmark, the following options are
available.
] Connect: Connects to the selected bookmark.
] Add new: Select this to create a new bookmark.
] Edit: You can edit the URL and/or the title of the selected
bookmark.
] Delete all: Deletes all the bookmarks.
Settings
n Note The WAP browser menus may vary, depending on your
browser version.

Profiles
(Menu-9-8-3)
A profile is the network information used to connect to the Internet.
T-mobile supports three kinds of profile.
1. t-zones
If you want to connect the server via WAP 2.0, activate this profile.
2. t-zones business
3. t-zones GPRS
If you want to connect the WAP server over GPRS, activate this
profile.
4. t-zones CSD
If you want to connect the WAP server over CSD, activate this
profile. For more information, consult T-mobile.
Each profile has submenus as follows:
] Activate: Activates the selected profile.
] Settings: Use this to edit and change WAP settings for the
selected profile.
- Homepage: This setting allows you to enter the address (URL)
of a site you want to use as homepage. You do not need to type
http:// at the front of each URL as the WAP Browser will
automatically add it.
- Bearer: You can set the bearer data service.
1 Data
2 GPRS
- Data settings: Appears only if you select Data Settings as a
Bearer / service.
IP address: Enter the IP address of the WAP gateway you want.
Dial number: Enter the telephone number to dial to access your
WAP gateway.
[ 91 C3300 User Guide ]
Settings

[ 92 C3300 User Guide ]
User ID: The users identity for your dial-up server (and NOT
the WAP gateway).
Password: The password required by your dial-up server (and
NOT the WAP gateway) to identify you.
Call type: Select the type of data call : Analogue of Digital
(ISDN)
Call speed: The speed of your data connection ; 9600 or
14400
Linger time: You need to enter timeout period. After entering
that, the WAP navigation service will be unavailable if any data
is not input or transferred.
- GPRS settings: The service settings are only available when
GPRS is chosen as a bearer service.
IP address: Input the IP address of the WAP gateway you
access.
APN: Input the APN of the GPRS.
User ID: The users identify for your APN server.
Password: The password required by your APN server.
- Connection Type: The options for connection type are
Temporary or Continuous and depend on the gateway you are
using.
Continuous
A confirmed delivery mechanism but generates more network
traffic.
Temporary
A non-confirmed (connectionless) service.
HTTP
Connecting Clients to Server directly in HTTP
Settings

- Proxy settings
IP address: Input the IP address of the Proxy server you
access.
Port: Input the Proxy Port
- DNS settings
Primary server: Input the IP address of the primary DNS
server you access
Secondary server: Input the IP address of the secondary DNS
server you access
- Secure settings: According to the used gateway port, you can
choose this option as On or Off.
- Display image: You can select whether images on WAP cards
are displayed or not.
] Rename: You can change the profile name.
] Add new: You can add a new profile.
Go to URL
(Menu-9-8-4)
You can connect directly to the site you want. After entering a
specific URL, press the OK key.
Cache settings
(Menu-9-8-5)
The information or services you have accessed are saved in the
cache memory of the phone.
Clear cache
Removes all context saved in cache.
Check cache
Set a value whether a connection attempt is made through cache
or not.
[ 93 C3300 User Guide ]
Settings
n Note A cache is a buffer memory, which is used to save data
temporarily.

[ 94 C3300 User Guide ]
Cookies settings
(Menu-9-8-6)
The information or services you have accessed are saved in the
cache memory of the phone.
Clear cookies
Removes all context saved in Cookies.
Check cookies
Check whether a cookie is used or not.
Security certification
(Menu-9-8-7)
A list of the available certification is shown.
] Authority: You can see the list of authority certificates that have
been stored in your phone.
] Personal: You can see the list of personal certificates that have
been stored in your phone.
Reset profiles
(Menu-9-8-8)
You can reset profiles to return to original settings.
Browser version
(Menu-9-8-9)
The WAP browser version is displayed.
Reset settings
Menu-9-9
You can reset your phone to its default configuration. To do so,
proceed, as follows.
1. Select the Reset settings menu option.
2. You are requested to enter the 4-digit security code.
Settings
n Note The security code is preset to 0000. To change this, refer to
page 86.

Please check to see if any problem which you may have with your
phone is described here before taking it for service or calling a
service engineer.
Q How do I view the list of outgoing calls, incoming calls and
missed calls?
A Press .
Q How do I clear all call history?
A Press the left soft key and then .
Q How do I view all numbers saved in the memory?
A Press the up navigation key .
Q does not disappear from the screen.
A Check whether you are in a service area. If you continue to see
, turn off the power and wait for approximately 2 minutes
before turning it back on. If there is no change, relocate to
another area and check again.
Q Connection is poor or is not audible in certain areas.
A In certain areas, signal strength can vary dramatically.
Try moving to a different location. Heavy network traffic may
affect the ability to connect, or the stability of the call.
Q Connection is poor even when established.
A In certain areas, signal strength can vary dramatically.
Try moving to a different location. Heavy network traffic my
affect the ability to connect, or the stability of the call.
[ 95 C3300 User Guide ]
Q&A

[ 96 C3300 User Guide ]
Q LCD does not turn on.
A Remove and replace the battery and turn on the power.
If the phone still does not turn on, charge the battery and try
again.
Q An echo can be heard during connection with a certain
telephone in a certain area.
A It is called ‘Echo Phenomenon’. It occurs if the volume is too
high or caused by special properties (semi electronic telephone
exchange) of the machine on the other end.
Q The phone gets warm.
A During long calls, or if games/Internet are used for a long time,
the phone may become hot. This is perfectly normal and has
no effect upon the life of the product or performance.
Q The bell does not ring, or lamp or LCD blinks only.
A The phone is set to ‘Vibrate only’ or ‘Silent’ in the Profiles
menu. Please select ‘General’ or ‘Loud’
Q Standby duration of the phone gradually becomes shorter.
A Batteries have a limited life. When the battery lasts for half its
original time, it requires replacement. Only use authorised
replacement parts.
Q Usage time of battery becomes shorter.
A If the battery time is short, it may be due to the user
environment, or large volume of calls, or weak signals.
Q&A

Q No number is dialled when you recall a contact entry.
A Check that the numbers have been saved correctly, by using
the Contact Search feature. Resave them, if necessary.
Q You cannot be contacted.
A Is your phone switched on ( pressed for more than three
seconds)? Are you accessing the right cellular network?
Have you set an incoming call barring option?
Q I cannot find the lock, PIN, or PUK code, or password?
A The default lock code is ‘0000’. If you forget or lose the lock
code, contact your phone dealer. If you forget or lose a PIN or
PUK code, or if you have not received such a code, contact
your network service provider.
[ 97 C3300 User Guide ]
Q&A

[ 98 C3300 User Guide ]
There are a variety of accessories available for your mobile phone.
You can select these according to your personal communication
requirements. Consult your local dealer for availability.
Supplied adapter
This adapter lets you charge the battery
while at home or in the office.
Battery
Standard battery is available.
Headset
Allows hands-free operation. Includes
earpiece and microphone.
Accessories
n Note • Always use genuine LG accessories. Failure to do this may
invalidate your warranty.
• Accessories may be different in different regions; please
check with our regional service company or agent for further
enquiries.

General
Product name : C3300
System : GSM900 / DCS1800
Ambient temperatures
Max : +55°C
Min : -10°C
[ 99 C3300 User Guide ]
Technical data

-
 1
1
-
 2
2
-
 3
3
-
 4
4
-
 5
5
-
 6
6
-
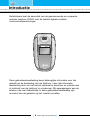 7
7
-
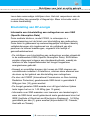 8
8
-
 9
9
-
 10
10
-
 11
11
-
 12
12
-
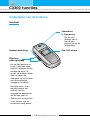 13
13
-
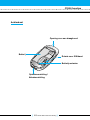 14
14
-
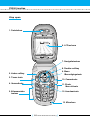 15
15
-
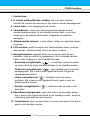 16
16
-
 17
17
-
 18
18
-
 19
19
-
 20
20
-
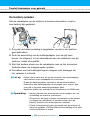 21
21
-
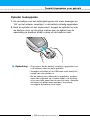 22
22
-
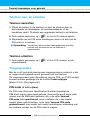 23
23
-
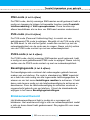 24
24
-
 25
25
-
 26
26
-
 27
27
-
 28
28
-
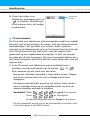 29
29
-
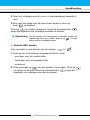 30
30
-
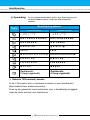 31
31
-
 32
32
-
 33
33
-
 34
34
-
 35
35
-
 36
36
-
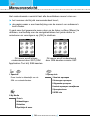 37
37
-
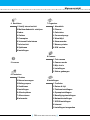 38
38
-
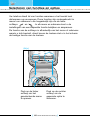 39
39
-
 40
40
-
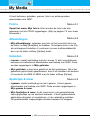 41
41
-
 42
42
-
 43
43
-
 44
44
-
 45
45
-
 46
46
-
 47
47
-
 48
48
-
 49
49
-
 50
50
-
 51
51
-
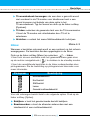 52
52
-
 53
53
-
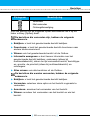 54
54
-
 55
55
-
 56
56
-
 57
57
-
 58
58
-
 59
59
-
 60
60
-
 61
61
-
 62
62
-
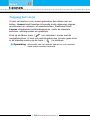 63
63
-
 64
64
-
 65
65
-
 66
66
-
 67
67
-
 68
68
-
 69
69
-
 70
70
-
 71
71
-
 72
72
-
 73
73
-
 74
74
-
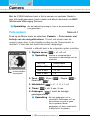 75
75
-
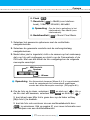 76
76
-
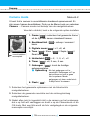 77
77
-
 78
78
-
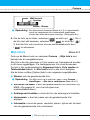 79
79
-
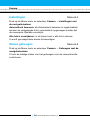 80
80
-
 81
81
-
 82
82
-
 83
83
-
 84
84
-
 85
85
-
 86
86
-
 87
87
-
 88
88
-
 89
89
-
 90
90
-
 91
91
-
 92
92
-
 93
93
-
 94
94
-
 95
95
-
 96
96
-
 97
97
-
 98
98
-
 99
99
-
 100
100
-
 101
101
-
 102
102
-
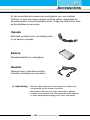 103
103
-
 104
104
-
 105
105
-
 106
106
-
 107
107
-
 108
108
-
 109
109
-
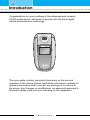 110
110
-
 111
111
-
 112
112
-
 113
113
-
 114
114
-
 115
115
-
 116
116
-
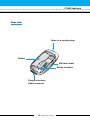 117
117
-
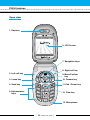 118
118
-
 119
119
-
 120
120
-
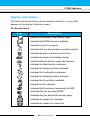 121
121
-
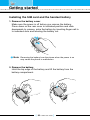 122
122
-
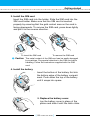 123
123
-
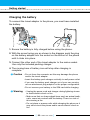 124
124
-
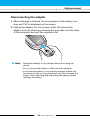 125
125
-
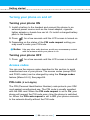 126
126
-
 127
127
-
 128
128
-
 129
129
-
 130
130
-
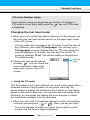 131
131
-
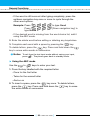 132
132
-
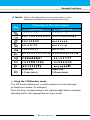 133
133
-
 134
134
-
 135
135
-
 136
136
-
 137
137
-
 138
138
-
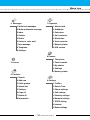 139
139
-
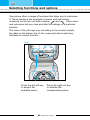 140
140
-
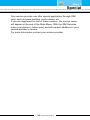 141
141
-
 142
142
-
 143
143
-
 144
144
-
 145
145
-
 146
146
-
 147
147
-
 148
148
-
 149
149
-
 150
150
-
 151
151
-
 152
152
-
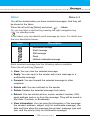 153
153
-
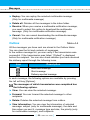 154
154
-
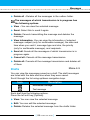 155
155
-
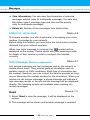 156
156
-
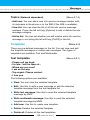 157
157
-
 158
158
-
 159
159
-
 160
160
-
 161
161
-
 162
162
-
 163
163
-
 164
164
-
 165
165
-
 166
166
-
 167
167
-
 168
168
-
 169
169
-
 170
170
-
 171
171
-
 172
172
-
 173
173
-
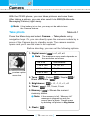 174
174
-
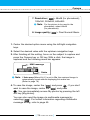 175
175
-
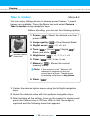 176
176
-
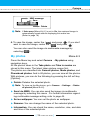 177
177
-
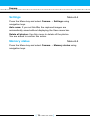 178
178
-
 179
179
-
 180
180
-
 181
181
-
 182
182
-
 183
183
-
 184
184
-
 185
185
-
 186
186
-
 187
187
-
 188
188
-
 189
189
-
 190
190
-
 191
191
-
 192
192
-
 193
193
-
 194
194
-
 195
195
-
 196
196
-
 197
197
-
 198
198
-
 199
199
-
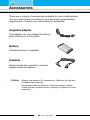 200
200
-
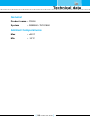 201
201
-
 202
202


in andere talen
- English: LG C3300 User manual
Gerelateerde artikelen
Andere documenten
-
Motorola Micro T-A-C International 5000 Series Handleiding
-
Samsung SGH-C100 Handleiding
-
-
Sony GC75 Handleiding
-
-
Roam-ON Roam-ON R10 MiFi 4G LTE WiFi Mobile Hotspot Router Handleiding
-
-