Philips PPX520 Gebruikershandleiding
- Categorie
- Projectoren
- Type
- Gebruikershandleiding

EN User Manual
FR Manuel utilisateur
DE Bedienungsanleitung
ES Manual de usuario
IT Manuale d’uso
NL Gebruiksaanwijzing
RU Руководство пользователя
TR Kullanım Kılavuzu
Register your product and get support at
www.philips.com/support
PPX520
PicoPix Max One
Portable projector

User Manual
Register your product and get support at
www.philips.com/support
PPX520
PicoPix Max One
Portable projector

Introduction �������������������������������������������������3
Dear customer ...............................................................3
About this user manual ..............................................3
What’s in the box ..........................................................3
Customer service centre ............................................3
1 General safety information ��������������� 4
Setting up the product .............................................. 4
Repairs ............................................................................ 4
Power supply .................................................................5
2 Overview ������������������������������������������������5
Top view ...........................................................................5
Front view ........................................................................5
Rear view ........................................................................ 6
Remote control............................................................. 6
3 Connect ��������������������������������������������������7
HDMI connection for image projection ................7
USB-C connection for image projection ..............7
4 Operation ���������������������������������������������� 8
Place the projector...................................................... 8
Connect power supply .............................................. 8
Prepare the remote control ..................................... 8
Power on and set up .................................................. 9
Placement options .....................................................10
5 Other features ��������������������������������������11
Listen through external speakers or
headphones ..................................................................11
Charge a USB device .................................................12
Use easy link ................................................................12
6 Change settings ���������������������������������� 13
Language settings ...................................................... 13
Input source selection ..............................................13
Picture settings ............................................................13
Power control settings .............................................. 14
Restore default settings ........................................... 14
Other settings ..............................................................14
7 Service ��������������������������������������������������15
Built-in battery care ..................................................15
Cleaning ......................................................................... 15
Update software .........................................................15
Troubleshooting .......................................................... 16
8 Appendix ����������������������������������������������18
Technical data .............................................................18
CE statement ...............................................................19
FCC statement .............................................................19
Canada regulatory compliance .............................19
Other notice .................................................................. 19
Table of contents

Introduction 3
Introduction
Dear customer
Thank you for purchasing this projector.
We hope you enjoy this product and the many
functions it offers!
About this user manual
The quick start guide supplied with this product
allows you to start using this product quickly
and easily. Detailed descriptions can be found
in the following sections of this user manual.
Read the entire user manual carefully. Follow
all safety instructions in order to ensure proper
operation of this product (see General safety
information, page 4). The manufacturer
accepts no liability if these instructions are not
followed.
Symbols used
Notice
Troubleshooting
This symbol indicates tips that will help
you in using this product more effectively
and easily.
DANGER!
Danger of personal injury!
This symbol gives warning of danger
of personal injury. Physical injury or
damage can result from improper
handling.
CAUTION!
Damage to the product or loss of data!
This symbol gives warning of damage
to the product and possible loss of
data. Damage can result from improper
handling.
What’s in the box
a Quick Start Guide
b PicoPix Max One projector (PPX520/INT)
c Transport bag
d 2x power plug adapter (UK, US)
e 2x AAA batteries
f 1x power adapter
g Remote control
d
c
e
f
g
b
a
Quick Start
Guide
Customer service centre
You can find the support hotline in the warranty
card or online:
Web: www.philips.com/support
Mail: philips.projector.eu@screeneo.com
International Phone: +41 215 391 665
Please ask your provider for international call
costs!
Access the electronic user manual at
https://support.philipsprojection.com
Access the community forum at
https://community.philipsprojection.com

4 Philips · PicoPix Max One
1 General safety
information
Take note of all warning and safety notes
indicated. Do not make any changes or settings
that are not described in this user manual.
Incorrect operation, and improper handling can
lead to physical injury, damage to the product
or loss of data.
Setting up the product
This product is for indoor use only. Place the
product securely on a stable, flat surface.
To help avoid possible injuries to persons or
damage to the product itself, position all cables
in such a way that no one will trip over them.
Do not operate the product in damp rooms.
Never touch the mains cable or the mains
connection with wet hands.
The product must have sufficient ventilation
and must not be covered. Do not put the
product in closed cabinets, boxes, or other
enclosures when in use. Do not cover the lens
during operation.
Protect the product from direct sunlight,
heat, intense temperature fluctuations and
moisture. Do not place the product in the
vicinity of heaters or air conditioners. Observe
the information on temperature listed in the
technical data (see Technical data, page 18).
Prolonged operation of the product causes
the surface to become warm hot. In case of
overheating, the product automatically switches
to standby mode.
Do not allow liquids to leak into the product.
Turn off the product and disconnect it from the
mains supply if liquids or foreign substances
leaked into the product. Have the product
inspected by an authorised service centre.
Always handle the product with care. Avoid
touching the lens. Never place heavy or sharp
objects on the product or on the power cable.
If the product gets too hot or emits smoke,
shut it down immediately and unplug the
power cable. Have your product checked by
an authorised service centre. Keep the product
away from open flames (e.g. candles).
The product has built-in battery. Do not
dissemble and modify. The built-in battery
should be replaced by qualified service staff
only.
Do not try to replace the built-in battery
yourself. Incorrect handling of the battery or
using the wrong type of battery can cause
damage to the product or cause injury.
DANGER!
Risk of explosion with incorrect type
of batteries!
There is a risk of explosion if the wrong
battery type is used.
Do not expose the batteries (battery pack or
embedded batteries) to excessive heat such as
sunshine, or open fire.
Under the following conditions, a layer of
moisture can appear inside the product which
can lead to malfunctions:
• if the product is moved from a cold to a
warm area;
• after a cold room is heated;
• when the product is placed in a damp
room.
Proceed as follows to avoid any moisture
buildup:
1 Seal the product in a plastic bag before
moving it to another room, in order for it to
adapt to room conditions.
2 Wait one to two hours before you take the
product out of the plastic bag.
The product should not be used in a very dusty
environment. Dust particles and other foreign
objects may damage the product.
Do not expose the product to extreme
vibrations. This may damage the internal
components.
Do not allow children to handle the product
without supervision. The packing materials
should be kept out of the hands of children.
For your own safety, do not use the product
during thunderstorms with lightning.
Repairs
Do not repair the product yourself. Improper
maintenance can result in injuries or damage to
the product. The product must be repaired by
an authorised service centre.
Please find the details of authorised service
centres on the warranty card supplied with this
product.
Do not remove the type label from this product,
as this will void the warranty.

Overview 5
Power supply
Use only a power adapter which is certified for
this product (see Technical data, page 18).
Check whether the mains voltage of the power
supply matches the mains voltage available at
the setup location. This product complies with
the voltage type specified on the product.
The power outlet shall be installed near the
product and shall be easily accessible.
The capacity of the built-in battery diminishes
with time. If the product functions only with AC
power supply, the built-in battery is defective.
Contact an authorised service centre to replace
the built-in battery.
CAUTION!
Always use the button to turn the
projector off.
Turn off the product and unplug from the
power outlet before cleaning the surface
(see Cleaning, page 15). Use a soft, lint-
free cloth. Never use liquid, gaseous or easily
flammable cleaners (sprays, abrasives, polishes,
alcohol). Do not allow any moisture to reach
the interior of the product.
DANGER!
Risk of eye irritation!
This product is equipped with a high
power LED (Light Emitting Diode),
which emits very bright light. Do not
look directly into the projector lens
during operation. This could cause eye
irritation or damage.
2 Overview
Top view
a b c d d
Max One
OK
a LED indication
b
Return to a previous menu screen.
c
• Navigate menu options�
• Decrease volume.
d
• Navigate menu options�
• Increase volume.
e
• Access the settings menu.
• Confirm a selection or entry.
Front view
a
b
a Projection lens
b Focus camera
Adjust image sharpness.

6 Philips · PicoPix Max One
Rear view
HDMI USB DC
a b c d e f g
a
• Press and hold for one second to switch
the projector on or off.
• When the projector is switched on, the
LED turns white. When the projector is
switched off, the LED turns off.
• When charging the projector, the LED
turns red regardless of the projector
switching on or off.
b IR sensor
c HDMI port
Connect to the HDMI output on a playback
device.
d
3.5 mm audio output; connect to external
speakers or headphones.
e USB-A port
Connect to power USB devices like Amazon
Fire TV stick®, Roku® streaming stick (not
for mass storage or media player).
f USB-C
• Connect to the USB-C video output on
a playback device.
• Charge a USB-C device like a
smartphone.
g DC
Connect to the power supply.
Remote control
OK
a
d
e
b
c
f
g
h
a
• Quick access and select an input
source.
• Access the settings menu.
b
Confirm a selection or entry.
c
Activate focus adjustment.
d
Access the settings menu.
e Volume control
Increase, decrease or mute volume.
f
Return to a previous menu screen.
g Navigation buttons
Navigate menu options.
h
Press and hold for one second to switch the
projector on or off.

Connect 7
3 Connect
Notice
You need to connect the projector to
an HDMI or USB-C device, so that the
projection screen can show images.
Make sure all devices are disconnected
from the power outlet before establishing
or changing any connections.
HDMI connection for image
projection
Connect a playback device (e.g. a Blu-ray
player, gaming console, camcorder, digital
camera or PC) to the projector through HDMI
connection. With this connection, images are
shown on the projection screen, and audio is
played on the projector.
1 Using an HDMI cable, connect the HDMI
connector on the projector to the HDMI
output on the playback device.
HDMI USB DC
2 The projector automatically switches to
HDMI input when HDMI connection is
made. The projection screen shows images.
• If the projection screen does not show
images, select HDMI input manually. Press
on the remote control to access input
source list, then select HDMI.
USB-C connection for
image projection
Connect a USB-C device (e.g. a mobile phone,
tablet or laptop) to the projector through USB-C
connection. With this connection, images are
shown on the projection screen, and audio is
played on the projector.
1 Using a USB-C cable, connect the
connector on the projector to the USB-C
port on the playback device.
HDMI USB DC
2 The projector automatically switches to
USB-C input when USB-C connection is
made. The projection screen shows images.
• If the projection screen does not show
images, select USB-C input manually. Press
on the remote control to access input
source list, then select USB-C.
Notice
The projector supports stereo audio
format only. If no audio from the
playback device is heard on the
projector, check that the audio output
format is set to stereo on the playback
device.

8 Philips · PicoPix Max One
4 Operation
Notice
You need to connect the projector to
an HDMI or USB-C device, so that the
projection screen can show images (see
Connect, page 7).
Place the projector
Place the projector on a flat surface in front of
the projection surface.
You can also install the projector in different
configurations (see Placement options, page
10).
Connect power supply
The projector can be operated by either
external power or built-in battery.
CAUTION!
Always use the button to turn the
projector on and off.
Operation by external power
• Connect the supplied power adapter to the
socket on the projector, and then to the
wall outlet.
HDMI USB DC
a
b
If needed, select an appropriate power plug
for connecting to the wall outlet.
To attach a supplied power plug to the
power adapter, align the slots on the
power plug with the two pins of the power
adapter, then slide the power plug in.
Operation by built-in battery
The projector can be also operated on built-in
battery for portability.
Charge the projector
Charge the projector for 1.5 hours before first
use.
Charge the projector when the low battery icon
appears in the projection screen.
• To charge the projector, connect the
projector to an external power supply as
described in the section of “Operation by
external power”.
• When charging, the LED on the projector
turns red. When fully charged, the red LED
turns off.
• When powered on, the external power
will be used first to run the projector and
unused power will charge the battery.
• For faster charging, charge while the
projector is powered off.
Notice
The capacity of the built-in battery
diminishes with time. If the projector
functions only with external power
supply, the built-in battery is defective.
Contact an authorised service centre to
replace the built-in battery.
Prepare the remote control
CAUTION!
The improper use of batteries can lead
to overheating, explosion, risk of fire and
injury. Leaking batteries can possibly
damage the remote control.
Never expose the remote control to
direct sunlight.
Avoid deforming, dismantling or charging
the batteries.
Avoid exposure to open fire and water.
Replace empty batteries immediately.
Remove the batteries from the remote
control if not in use for long periods of
time.
1 Press and hold the battery compartment
cover, and simultaneously slide it open to
access the battery compartment.
2 Insert the supplied batteries (type AAA)
with correct polarity (+/- ) indicated.
3 Close the battery compartment.
Notice

Operation 9
When using the remote control, point the
remote control at the IR sensor located
on the back of the projector, and make
sure there is no obstacle between the
remote control and the IR sensor.
Power on and set up
1 Press and hold on the projector (or on
the remote control) for 1 second to switch
the projector on or off.
• When the projector is switched on, the
LED on the projector turns white if the
projector is not being charged.
• When charging, the LED on the
projector turns red regardless of the
projector switching on or off.
Set up the language
1 Press on the remote control to access
the settings menu, then navigate to select
Language, and press OK.
2 Press / to select a language.
Change screen size
The projection screen size (or size of images) is
determined by the distance between the lens
of the projector and the projection surface.
• The projection distance needs to be 1.2 times
the width of your desired screen size.
• You can also use the digital zoom to reduce
the screen size up to 50%. Press on the
remote control to access the settings menu,
then navigate to select Digital Zoom, and
press OK. Then press / to adjust image
size.
Image focus adjustment
Press on the remote control to turn focus
adjustment on, then press / on the remote
control to adjust image clearness. After
adjusting image clearness, press to turn
focus adjustment off.
Image shape correction
Auto correction (vertical keystone)
The projector can automatically correct the
image to be rectangular when you tilt the
projector upwards or downwards.
To enable auto vertical keystone correction,
press on remote control to access the
settings menu, then navigate to select Auto
Keystone - On.
Manual keystone (4-corner correction)
You can manually adjust the image shape by
re-positioning four corners of the projection
image. This also lets you correct for left or right
position of the projector.
1 Make sure you have selected Auto Keystone
- Off to enable this function. Press on
the remote control to access the settings
menu, then navigate to select Manual
Keystone.
2 In the 4-corner correction interface, press
OK to select an image corner, then press
and hold / on the remote control to
adjust the horizontal positioning values,
and / on the remote control to adjust
the vertical positioning values. Repeat the
same step to adjust positioning values of
the other image corners if desired.

10 Philips · PicoPix Max One
Manual horizontal correction
You can manually correct keystone or distorted
images in the horizontal orientation.
1 Make sure you have selected Auto Keystone
- Off to enable this function. Press on
the remote control to access the settings
menu, then navigate to select Manual
Horiz. Keyst.
2 Press / to adjust the image shape.
Calibration
Correct the image to be rectangular when the
projector is placed level, or if the auto keystone
correction does not correct the image ideally.
Perform image shape calibration as follows.
1 Make sure you have selected Auto Keystone
- Off to enable this function. Place the
projector on the floor, or a straight (level)
surface.
2 Press on the remote control to access
the settings menu, then navigate to select
Keystone Calibration.
Placement options
You can install the projector in the following
configurations. Follow the guidelines below for
different projector placement.
Notice
For overhead mounting on ceiling,
purchase a projector mount
recommended by an installation
professional and follow the instructions
that come with the mount.
Before mounting on the ceiling, make
sure the ceiling can support the weight
of the projector and mounting kit.
For ceiling installation, this product
must be securely attached to the ceiling
in accordance with the installation
instructions. An improper ceiling
installation may result in accident, injury
or damage.
Front table
1 Place the projector on a table in front of the
projection screen. This is the most common
way to position the projector for quick
setup and portability.
2 To adjust projection to the correct position,
press on remote control to access the
settings menu, then navigate to select Proj.
Direc. - Front proj., then press OK.
Front ceiling
1 Mount the projector on the ceiling with
upside up in front of the projection screen.
A projector mount is required to mount the
projector on ceiling.

Other features 11
2 To adjust projection to the correct position,
press on remote control to access the
settings menu, then navigate to select Proj.
Direc. - Rev. front proj., then press OK.
Rear table
1 Place the projector on a table behind the
projection screen. A special rear projection
screen is required.
2 To adjust projection to the correct position,
press on remote control to access the
settings menu, then navigate to select Proj.
Direc. - Rear proj., then press OK.
Rear ceiling
1 Mount the projector on ceiling with upside
up behind the projection screen. To mount
the projector on ceiling behind the screen,
a projector mount and a special rear
projection screen is required.
2 To adjust projection to the correct position,
press on remote control to access the
settings menu, then navigate to select Proj.
Direc. - Rev. rear proj., then press OK.
5
Other features
Listen through external
speakers or headphones
Connect external speakers or headphones to
the projector. With this connection, audio from
the projector is played through the external
speakers or headphones.
DANGER!
Danger of hearing damage!
Before connecting the headphones,
turn down the volume on the projector.
Do not use the projector over a longer
time at high volume – especially when
using headphones. This could lead to
hearing damage.
1 Using a 3.5 mm audio cable, connect the
connector on the projector to the analogue
audio input (3.5 mm jack, or red and white
jacks) on the external speakers.
Or connect the connector on the
projector to your headphones.
• The speakers of the projector are
deactivated automatically when the
external speakers or headphones are
connected to the projector.
HDMI USB DC
When connecting to the headphones, use the
volume control on the remote control (or on the
projector) to adjust the volume to a comfortable
level.

12 Philips · PicoPix Max One
Charge a USB device
You can charge a USB device (e.g. smartphone,
MP3 player or other mobile device).
Charge via USB-A port
1 Using a USB-A cable, connect your USB
device to the USB port on the projector.
2 Turn on the projector. The USB device starts
to charge automatically.
• USB-A connection can also power a
USB device like Amazon Fire TV stick®,
Roku®streaming stick (not for mass storage
or media player).
Charge via USB-C port
1 Using a USB-C cable, connect your USB-C
device to the USB-C port on the projector.
2 Turn on the projector. Make sure USB-C
device charing function is activated. Press
on remote control to access the settings
menu, then navigate to select USB-C
Charger - On.
The USB-C device starts to charge
automatically.
To deactivate charging of a USB-C device,
select USB-C Charger - Off.
Use easy link
This projector supports easy link which uses
the HDMI CEC (Consumer Electronics Control)
protocol. You can use a single remote control
to turn on or off the easy link compliant
devices that are connected through HDMI.
The manufacturer does not guarantee 100%
interoperability with all HDMI CEC devices.
1 Make sure the projector is connected to an
HDMI device which supports HDMI CEC
function (see HDMI connection for image
projection, page 7).
2 To activate easy link function on this
projector, press on remote control to
access the settings menu, then navigate to
select CEC - On.

Change settings 13
6 Change settings
This section helps you change the settings of
the projector.
1 When the projector is turned on, press
or on the remote control (or on the
projector) to access the settings menu.
2 Use the Navigation buttons and OK to
select and change settings.
Language settings
Select your desired language for on-screen
menu.
• Navigate to Language, and press OK, then
press / to select a language.
Input source selection
Navigate to Input Source to access the
following settings.
• Auto: Automatically switch to the correct
input source when an HDMI or USB-C
device is connected.
• HDMI: Select it when an HDMI device is
connected.
• USB-C: Select it when a USB-C device is
connected.
You need to select a correct input source,
so that the projection screen can show
images.
Picture settings
You can access the following picture settings.
• Keystone Correction: Select an option to
correct keystone or distorted images to be
rectangular or square.
• Auto Keystone: Enable or disable
auto correction of the image shape
when tilting the projector upwards or
downwards. When Auto Keystone is
activated, all the other image correction
options will be deactivated.
• Manual Keystone: Manually adjust four
corners of the image.
• Manual Horiz. Keyst.: Manually correct
keystone or distorted images in the
horizontal orientation.
• Keystone Calibration: Perform this
function if the auto keystone correction
does not correct the image shape
ideally.
• Proj. Direc.: Adjust the projection to
the correct position based on different
installation of the projector.
• Digital Zoom: Scale the projection image
within the range from 50% to 100%.
• Picture Preset: Select a predefined color
brightness setting for picture and video
display.
• Picture Adj.: Adjust Brightness/Contrast/
Saturation/Toneburst/Sharpness with the
values from 0 to 100.

14 Philips · PicoPix Max One
• Color Temp.: Set to Warm to enhance hotter
colors such as red; set to Cool to make
picture bluish; set to User to customize
color values in RGB mode.
Power control settings
Go to the following menu options to control
power consumption.
• Sleep Timer: Select a time option which
enables the projector to automatically turn
off at a specified period of time.
• Brightness Mode: Select a screen brightness
mode.
Restore default settings
If the projector does not function normally,
reset the projector to the default settings. It will
delete all the current settings.
• Navigate to Full Reset, and press OK, then
follow on-screen instructions to complete
resetting.
Other settings
You can also access the following options.
• Volume: Adjust volume of the projector.
• CEC: Activate or deactivate easy link
between the devices through HDMI
connection (see Use easy link, page 12).
• USB-C Charger: Enable or disable charging
of the connected USB-C device.
• Position: Re-position the settings menu on
the projection screen when it appears.
• SW Version: Display the current software
version of the projector.
• Soft. Update: Upgrade system software via
a USB device (see Update software, page
15).

Service 15
7 Service
Built-in battery care
The capacity of the built-in battery diminishes
with time. You can prolong the life of the
battery if you observe the following points:
• Without a power supply, the projector
operates on the built-in battery. When the
battery does not have sufficient power, the
projector turns off. In this case connect the
projector to the power supply.
• Charge the battery regularly. Don’t store
the projector with a completely discharged
battery.
• If the projector is not used for several
weeks, discharge the battery a little by
using the projector before storing it.
• Keep the projector and the battery away
from sources of heat.
• If the projector cannot be charged after
connecting to the power supply, use a small
pin to press the reset key (a small hole)
located on the side panel of the projector.
Note about deep discharge of battery
When the built-in battery is in deep discharge,
it may take longer for the actual charging
process to start. In this case, charge the
projector for at least five hours before using it.
DANGER!
Risk of explosion with incorrect type
of batteries!
Do not try to replace the built-in
battery yourself.
Cleaning
DANGER!
Instructions for cleaning!
Use a soft, lint-free cloth. Never use
liquid or easily flammable cleansers
(sprays, abrasives, polishes, alcohol,
etc.). Do not allow any moisture to
reach the interior of the projector.
Do not spray the projector with any
cleaning fluids.
Wipe over the surfaces gently. Be
careful that you do not scratch the
surfaces.
Cleaning the lens
Use a soft brush or lens cleaning paper for
cleaning the lens of the projector.
DANGER!
Do not use any liquid cleaning agents!
Do not use any liquid cleaning
agents for cleaning the lens, to avoid
damaging the coating film on the lens.
Update software
The latest software of the projector can be
found on www.philips.com/support for you
to get the best features and support from the
projector.
Before you update the software of the
projector, check the current software version:
• Press on the remote control to access the
settings menu then navigate to SW Version.
CAUTION!
Do not turn off the projector or remove
the USB flash drive during the update.
Update software through USB
1 Check the latest software version on www.
philips.com/support. Find your product
(model number: PPX520/INT), and locate
‘Software and drivers’.
2 Download the zipped software file and
save it in the root directory of the USB flash
drive.
3 Connect the USB flash drive to the USB
port on the projector.
• Recommend to use an external power
for software update to ensure enough
power supply.
4 Press on the remote control to access
the settings menu and navigate to Soft.
Update, then press OK.
5 Follow the on-screen instructions to
complete the update.

16 Philips · PicoPix Max One
Troubleshooting
Power cycling
If a problem occurs that cannot be corrected
with the instructions in this user manual, follow
the steps given here.
1 Turn the projector off by holding down
for 1 second.
2 Wait at least ten seconds.
3 Turn the projector on again by holding
down for 1 second.
4 If the problem persists, please contact our
technical service centre or your dealer.
Problems Solutions
The projector cannot be turned on or
powered.
• Disconnect and reconnect the power cable, and
try to turn the projector on again.
• Low battery power. Connect the projector to an
external power supply.
• Use the original power adapter.
The projection screen does not show
images.
• You need to connect the projector to an HDMI
device or USB-C device, so that the projection
screen can show images
(see Connect, page 7).
• Select the correct input source. Press on the
remote control to access the input source list for
input source selection.
• Check if the video output of the external device is
turned on.
The projector is charged slowly. • When powered on, the external power will be
used first to run the projector and unused power
will charge the battery.
• For faster charging, charge while the projector is
powered off.
The projector turns itself off. • Low battery power.
• When the projector is running for a long period
of time, the surface becomes hot. Ventilate the
projector properly, with at least 30 cm clearness
around all the sides of the projector.
• Check that the power cable is connected correctly.
The projector cannot be turned off. • Press and hold longer than 30 seconds.
No image from the external HDMI device. • Disconnect the HDMI cable or switch off the
HDMI device.
• Wait three seconds.
• Reconnect the HDMI cable or switch on the HDMI
device again.
No sound from the external connected
device.
• Check the cables to the external device.
• Check that the sound is activated on the external
device.
• Only the original cables from the device
manufacturer may function.
No sound from external HDMI output
device.
• On the HDMI output device, set the audio setting
to Stereo (PCM).

Service 17
Problems Solutions
No sound when you connect your
computer via HDMI cable.
• Check that the sound is activated on the computer
and set to output to the projector.
The projector does not react to remote
control commands.
• Check the batteries of the remote control.
The temperature of the projector’s surface
is warm.
• For this projector it is normal to generate
moderate heat during operation.
What to do if the projector does not work
when connecting to a notebook PC?
• Check that the HDMI cable is plugged in correctly.
• Make sure that the notebook PC has been
switched to projector display.

18 Philips · PicoPix Max One
Package content
PicoPix Max One projector, remote control with
2 AAA batteries, AC adapter, power plugs (UK,
US), travel pouch, Quick Start Guide
8 Appendix
Technical data
Technology/optical
Display technology ..............................................DLP
Light source ................ LED RGB 4 LED Channels
Resolution ....................................1920 x 1080 pixel
Resolution supported ................................. 4K pixel
LED lifetime ...................... last over 30,000 hours
Contrast ratio ................................................. 10,000:1
Aspect ratio ............................................16:9 and 4:3
Throw ratio .............................................................. 1.2:1
Screen size (diagonal)..................................................
............................................. 75cm-305cm / 30”-120”
Screen distance ...............78cm-320cm / 31”-126”
Projection modes ...........front, back, ceiling, back
ceiling
Keystone correction ......................... auto (vertical)
Focus adjustment ........................................ electrical
4-corner correction ................................................ yes
Digital zoom ............................................................. yes
Touch keys ................................................................ yes
Operating system ............................................... Linux
Sound
Internal speaker ......................................................4 W
Connection
HDMI ........................................ x1 with ARC and CEC
USB-C ............................................................. x1 (video)
USB-A 2.0 ................................................x1 (charging)
Analog audio output (3.5mm) .............................. x1
DC jack ............... x1 (power supply and charging)
Power source
Power supply ..................................... power adapter
.............. Input: 100-240V~, 50-60Hz, 1.5 A (max)
...................................Output: DC 20 V, 3.25 A, 65 W
Built-in battery .................................... , mAh
.................................................... last up to 5 hours
Product details
Dimensions (W × D × H) ...........134 x 136 x 47 mm
....................................... 5.28 x 5.35 x 1.85 inches
Weight ..................................................850g / 1.87 lbs
Operating temperature.......................... 5 °C - 35 °C
Storage temperature ...................................... < 60 °C

Appendix 19
• Reorient or relocate the receiving antenna.
• Increase the separation between the
equipment and receiver.
• Connect the equipment into an outlet on
a circuit dierent from that to which the
receiver is connected.
• Consult the dealer or an experienced radio/
TV technician for help.
FCC ID: 2ASRT-PPX520/INT
Canada regulatory
compliance
This device complies with Industry Canada CAN
ICES-3 (B)/NMB-3(B)
RSS-Gen & RSS-247 statement: This device
complies with Industry Canada RSS standard(s).
Operation is subject to the following two
conditions:
1 This device may not cause interference, and
2 This device must accept any interference,
including interference that may cause
undesired operation of the device.
Other notice
Preservation of the environment as part
of a sustainable development plan is an
essential concern of Screeneo Innovation SA.
The desire of Screeneo Innovation SA is to
operate systems respecting the environment
and consequently it has decided to integrate
environmental performances in the life cycle
of these products, from manufacturing to
commissioning use and elimination.
Packaging: The presence of the logo (green
dot) means that a contribution is paid to an
approved national organisation to improve
package recovery and recycling infrastructures.
Please respect the sorting rules set up locally
for this kind of waste.
Batteries: If your product contains batteries,
they must be disposed of at an appropriate
collection point.
CE statement
• The product shall only be connected to a
USB interface of version USB 2.0 or higher.
• Adapter shall be installed near the
equipment and shall be easily accessible.
• The operating temperature of the EUT can’t
exceed 35°C and shouldn’t be lower than
5°C.
• The plug is considered as disconnect device
of adapter.
The Declaration of Compliance can be
consulted on the site www.philips.com.
FCC statement
15�19 Labeling requirements�
This device complies with part 15 of the FCC
Rules. Operation is subject to the following
two conditions: (1) This device may not cause
harmful interference, and (2) this device must
accept any interference received, including
interference that may cause undesired
operation.
15�21 Information to the user�
Any changes or modications not expressly
approved by the party responsible for
compliance could void the user’s authority to
operate the equipment.
15�105 Information to user�
This equipment has been tested and found
to comply with the limits for a Class B digital
device, pursuant to Part 15 of the FCC Rules.
These limits are designed to provide reasonable
protection against harmful interference in
a residential installation. This equipment
generates, uses and can radiate radio
frequency energy and, if not installed and used
in accordance with the instructions, may cause
harmful interference to radio communications.
However, there is no guarantee that interference
will not occur in a particular installation. If this
equipment does cause harmful interference
to radio or television reception, which can be
determined by turning the equipment o and
on, the user is encouraged to try to correct the
interference by one or more of the following
measures:

20 Philips · PicoPix Max One
Product: The crossed-out waste bin symbol on
the product means that the product belongs
to the family of electrical and electronic
equipment. In this respect, the European
regulations ask you to dispose of it selectively:
• At sales points in the event of the
purchase of similar equipment.
• At the collection points made available
to you locally (drop-off centre, selective
collection, etc.).
In this way you can participate in the reuse
and upgrading of Electrical and Electronic
Equipment Waste, which can have an effect on
the environment and human health.
The paper and cardboard packaging used can
be disposed of as recyclable paper. Have the
plastic wrapping recycled or dispose of it in
the non-recyclable waste, depending on the
requirements in your country.
Trademarks: The mentioned references in
this manual are trademarks of the respective
companies. The lack of the trademarks ®
and ™ does not justify the assumption that
these dedicated terminologies are free
trademarks. Other product names used herein
are for identification purposes only and may
be trademarks of their respective owners.
Screeneo Innovation SA disclaims any and all
rights in those marks.
Neither Screeneo Innovation SA nor its affiliates
shall be liable to the purchaser of this product
or third parties for damages, losses, costs, or
expense s incurred by the purchaser or third
parties as a result of accident, misuse, or abuse
of this product or unauthorised modifications,
repairs, or alterations to this product, or failure
to strictly comply with Screeneo Innovation SA
operating and maintenance instructions.
Screeneo Innovation SA shall not be liable for
any damages or problems arising from the use
of any options or any consumable materials
other than those designated as original
Screeneo Innovation SA/PHILIPS products or
Screeneo Innovation SA/PHILIPS approved
products.
Screeneo Innovation SA shall not be held liable
for any damage resulting from electromagnetic
interference that occurs from the use of any
interface cables other than those designated as
Screeneo Innovation SA/PHILIPS products.
All rights reserved. No part of this publication
may be reproduced, stored in a retrieval
system or transmitted in any form or by any
means, electronic, mechanical, photocopying,
recording, or otherwise, without the prior
written permission of Screeneo Innovation SA.
The information contained herein is designed
only for use with this product. Screeneo
Innovation SA. is not responsible for any use of
this information as applied to other devices.
This user manual is a document that does not
represent a contract.
Errors, printing errors and changes are reserved.
Copyright © 2020 Screeneo Innovation SA.

Screeneo Innovation SA
Route de Lully 5c - 1131 Tolochenaz - Switzerland
Philips and the Philips Shield Emblem are registered trademarks of Koninklijke Philips N.V. used
under license. Screeneo Innovation SA is the warrantor in relation to the product with which this
booklet was packaged.
2020 © Screeneo Innovation SA. All rights reserved.
PicoPix Max One
EN

Manuel
utilisateur
Enregistrez votre produit et obtenez de l’aide sur
www.philips.com/support
PPX520
PicoPix Max One
Portable projector

Introduction �������������������������������������������������3
Cher client .......................................................................3
À propos du manuel utilisateur ...............................3
Contenu de la boîte .....................................................3
Service clientèle ............................................................3
1 Informations générales sur la
sécurité �������������������������������������������������� 4
Installation de l’appareil ........................................... 4
Réparations ....................................................................5
Alimentation électrique .............................................5
2 Aperçu ��������������������������������������������������� 6
Vue de dessus .............................................................. 6
Vue de face .................................................................... 6
Vue arrière ...................................................................... 6
Télécommande .............................................................7
3 Connecter ����������������������������������������������� 7
Branchement HDMI pour la projection d’images
.............................................................................................7
Branchement USB-C pour la projection
d’images ......................................................................... 8
4 Fonctionnement ���������������������������������� 8
Installation du projecteur ......................................... 8
Connexion de l’alimentation électrique .............. 8
Préparation de la télécommande ......................... 9
Mise en marche et installation ............................... 9
Options d’installation .................................................11
5 Autres fonctions ���������������������������������13
Écouter via des haut-parleurs externes ou
des écouteurs ..............................................................13
Recharger un dispositif USB ................................... 13
Utiliser easy link ..........................................................13
6 Modification des paramètres ����������14
Paramètres de langue ..............................................14
Sélection de la source d’entrée ............................14
Réglages de l’image ..................................................15
Paramètres de contrôle d’alimentation .............15
Restauration des paramètres par défaut ...........16
Autres paramètres ...................................................... 16
7 Service �������������������������������������������������� 17
Prendre soin de la batterie intégrée .................... 17
Nettoyage ...................................................................... 17
Mise à jour du micrologiciel .................................... 17
Dépannage ...................................................................19
8 Annexe ��������������������������������������������������21
Caractéristiques techniques ...................................21
Déclarations CE.......................................................... 22
Déclarations FCC ....................................................... 22
Conformité réglementaire pour le Canada ...... 22
Autres avis .................................................................... 22
Table des matières

Introduction 3
Introduction
Cher client
Nous vous remercions d’avoir choisi ce
projecteur.
Nous espérons que vous apprécierez ce produit
et les nombreuses fonctions qu’il offre !
À propos du manuel
utilisateur
Le guide de démarrage rapide fourni avec
votre appareil vous permet de mettre votre
appareil en service rapidement et facilement.
Vous trouverez des descriptions détaillées aux
chapitres suivants de ce manuel utilisateur.
Lisez attentivement le présent manuel
utilisateur. Veillez surtout aux consignes
de sécurité afin d’assurer un parfait
fonctionnement de votre appareil (voir
Informations générales sur la sécurité,
page 4). Le fabricant n’assume aucune
responsabilité en cas de non-respect de ces
consignes.
Symboles utilisés
Avis
Dépannage
Ce symbole désigne les astuces qui
vous aident à utiliser votre appareil de
manière plus efficace et plus simple.
DANGER !
Danger pour les personnes !
Ce symbole met en garde contre
le danger aux personnes. Une
manipulation inadéquate peut
entraîner des blessures corporelles ou
des dommages.
ATTENTION !
Dommage de l’appareil ou perte de
données !
Ce symbole met en garde contre des
dommages sur l’appareil ainsi que sur
des pertes de données possibles. Des
dommages peuvent résulter d’une
manipulation inadéquate.
Contenu de la boîte
a Guide de démarrage rapide
b Projecteur PicoPix Max One (PPX520/INT)
c Sac de transport
d 2 adaptateurs de fiches d’alimentation (UK
et US)
e 2 piles AAA
f 1 adaptateur secteur
g Télécommande
d
c
e
f
g
b
a
Quick Start
Guide
Service clientèle
Vous trouverez le numéro de l’assistance
téléphonique dans la carte de garantie ou sur
Internet :
Web : www.philips.com/support
Courriel : philips.projector.eu@screeneo.com
Numéro de téléphone international :
+41 215 391 665
Veuillez consulter votre opérateur téléphonique
pour le coût des appels internationaux.
Accédez à la version électronique du manuel
d’utilisation à l’adresse :
https://support.philipsprojection.com
Accédez au forum de la communauté à
l’adresse :
https://community.philipsprojection.com

4 Philips · PicoPix Max One
1 Informations
générales sur la
sécurité
Respectez toutes les indications de prévention
et de sécurité prescrites. Ne procédez à aucun
réglage ou changement qui n’est pas décrit
dans le présent mode d’emploi. Une opération
incorrecte et une manipulation inadéquate
peuvent entraîner des blessures corporelles,
des dommages matériels ou des pertes de
données.
Installation de l’appareil
L’appareil est exclusivement destiné à un
usage à l’intérieur. L’appareil doit reposer sur
une surface stable et plane. Posez tous les
câbles de manière à ce que personne ne puisse
trébucher ni se blesser ou que l’appareil ne soit
pas endommagé.
N’installez pas l’appareil dans des pièces
humides. Ne touchez jamais les fiches/prises
secteur avec les mains humides.
L’appareil doit être suffisamment ventilé et ne
doit pas être recouvert. Ne déposez pas votre
appareil dans des armoires ou coffres fermés
lorsqu’il est en cours d’utilisation. Ne couvrez
pas la lentille durant le fonctionnement.
Protégez l’appareil contre le rayonnement
solaire direct, la chaleur, les grandes variations
de température et l’humidité. Ne placez pas
l’appareil à proximité d’un chauffage ou
d’une climatisation. Veillez aux indications
données concernant la température
dans les caractéristiques techniques (voir
Caractéristiques techniques, page 21).
Un fonctionnement prolongé du produit peut
provoquer un réchauffement de ses surfaces.
L’appareil passe automatiquement en mode
veille quand il devient trop chaud.
Aucun liquide ne doit entrer dans l’appareil.
Éteignez l’appareil et débranchez-le du secteur
si des liquides ou des corps étrangers y ont
pénétré. Faites vérifier l’appareil par un centre
de maintenance agréé.
Prenez toujours soin de l’appareil. Évitez de
toucher l’objectif. Ne posez jamais d’objets
lourds ou à extrémité tranchante sur l’appareil
ou le câble d’alimentation.
Si l’appareil est trop chaud ou que de la fumée
s’en échappe, éteignez-le immédiatement et
débranchez-le de l’alimentation. Faites vérifier
l’appareil par un centre de maintenance agréé.
Tenez l’appareil éloigné des flammes (p. ex. des
bougies).
L’appareil est équipé d’une batterie embarquée.
Ne le désassemblez pas et ne le modifiez pas.
La batterie embarquée doit être remplacée
exclusivement par un personnel qualifié.
N’essayez pas de remplacer vous-même
la batterie embarquée. Une manipulation
incorrecte ou l’utilisation d’une batterie d’un
type inapproprié peut causer des dommages
matériels ou des blessures corporelles.
DANGER !
Risque d’explosion en cas d’utilisation
d’un type de batterie inapproprié !
Si un type de batterie inapproprié est
utilisé, des risques d’explosion sont
possibles.
N’exposez pas les batteries (bloc de piles ou
batteries intégrées) à une chaleur excessive (p.
ex. en plein soleil) ou à une flamme nue.
De la condensation peut se former à
l’intérieur de l’appareil et entraîner des
dysfonctionnements dans les conditions
suivantes :
• lorsque cet appareil est directement
déplacé d’une pièce froide vers une
pièce chaude ;
• après le réchauffement d’une pièce
froide ;
• lorsque cet appareil est placé dans une
pièce humide.
Afin d’éviter toute condensation, nous vous
recommandons de suivre la procédure
suivante :
1 Enfermez l’appareil dans un sac en
plastique avant de le transporter dans
une autre pièce pour qu’il s’adapte aux
conditions de la pièce.
2 Attendez 1 à 2 heures avant de sortir
l’appareil du sac.
Évitez d’utiliser l’appareil dans un
environnement poussiéreux. Les particules de
poussière et d’autres corps étrangers peuvent
endommager l’appareil.
N’exposez pas l’appareil à de fortes vibrations.
Cela pourrait endommager les composants
internes.

Informations générales sur la sécurité 5
Ne laissez pas les enfants manipuler l’appareil
sans surveillance. Ne laissez pas les emballages
à portée des enfants.
Pour votre propre sécurité, n’utilisez pas
l’appareil pendant des orages accompagnés
d’éclairs.
Réparations
Ne réparez pas vous-même l’appareil. Une
maintenance non conforme peut occasionner
des dommages corporels et matériels. Faites
examiner votre appareil exclusivement par un
centre de maintenance agréé.
La carte de garantie contient les coordonnées
des centres de maintenance agréés.
N’enlevez pas la plaque signalétique de
votre appareil, car cela pourrait annuler toute
garantie.
Alimentation électrique
Utilisez uniquement un adaptateur certifié pour
cet appareil (voir Caractéristiques techniques,
page 21).
Vérifiez si la tension de réseau du bloc
d’alimentation correspond à la tension de
réseau du lieu d’installation. Cet appareil est
conforme au type de tension spécifié sur
l’appareil.
Le produit doit être installé près d’une prise
électrique facilement accessible.
La capacité de la batterie diminue avec le
temps. Si l’appareil ne fonctionne qu’avec
l’alimentation secteur, la batterie embarquée
est défectueuse. Contactez un centre de
réparation agréé pour remplacer la batterie
embarquée.
ATTENTION !
Utilisez toujours le bouton pour
éteindre le projecteur.
Éteignez votre appareil et débranchez-le de la
prise électrique avant de nettoyer la surface du
boîtier (voir Nettoyage, page 17). Utilisez
un chiffon doux et non pelucheux. N’utilisez
en aucun cas des produits de nettoyage
liquides, gazeux ou facilement inflammables
(vaporisateurs, produits abrasifs, vernis brillants,
alcool). Veillez à ce qu’aucune humidité ne
pénètre à l’intérieur de l’appareil.
DANGER !
Risque d’irritation oculaire !
Cet appareil est équipé d’une
LED (Light Emitting Diode) haute
performance qui émet une lumière très
claire. Ne regardez pas directement
l’objectif du projecteur au cours de
son fonctionnement. Vous risquez une
irritation ou des lésions oculaires.

6 Philips · PicoPix Max One
2 Aperçu
Vue de dessus
a b c d d
Max One
OK
a Indicateur lumineux
b
Pour revenir à l’écran de menu précédent.
c
• Pour parcourir les options du menu.
• Pour diminuer le volume.
d
• Pour parcourir les options du menu.
• Pour augmenter le volume.
e
• Pour accéder au menu des réglages.
• Pour confirmer une sélection ou une
entrée.
Vue de face
a
b
a Lentille de projection
b Caméra à mise au point
Pour améliorer la netteté de l’image.
Vue arrière
HDMI USB DC
a b c d e f g
a
• Appuyez et maintenez le bouton
enfoncé pendant 1 seconde pour
allumer ou éteindre le projecteur.
• Si vous allumez le projecteur, la LED
deviendra blanche. Si vous éteignez le
projecteur, la LED s’éteindra.
• Au cours de la charge du projecteur,
la LED est rouge que le projecteur soit
allumé ou éteint.
b Capteur infrarouge
c Port HDMI
Connectez la sortie HDMI à un dispositif de
lecture.
d
Sortie audio 3,5 mm : pour brancher des
haut-parleurs externes ou des écouteurs.
e Port USB-A
Connectez-vous à des périphériques USB
alimentés comme la clé TV Amazon Fire®,
la clé de diffusion en continu Roku® (pas
pour le stockage de masse ou le lecteur
multimédia).
f USB-C
• Branchez ici la sortie vidéo USB-C d’un
dispositif de lecture.
• Chargez un dispositif USB-C comme un
smartphone.
g CC
Branchez ici l’alimentation électrique.

Connecter 7
Télécommande
OK
a
d
e
b
c
f
g
h
a
• Pour accéder rapidement et
sélectionner une source d’entrée.
• Pour accéder au menu des réglages.
b
Pour confirmer une sélection ou une entrée.
c
Activez le réglage de la mise au point.
d
Pour accéder au menu des réglages.
e Commande du volume
Augmentez, baissez le volume ou coupez le
son.
f
Pour revenir à l’écran de menu précédent.
g Touches de navigation
Pour parcourir les options du menu.
h
Appuyez et maintenez le bouton enfoncé
pendant 1 seconde pour allumer ou
éteindre le projecteur.
3 Connecter
Avis
Vous devez connecter le projecteur à un
appareil HDMI ou USB-C de sorte que
l’écran de projection puisse afficher des
images.
Veillez à ce que tous les appareils soient
déconnectés de la prise électrique
avant d’effectuer ou de modifier un
branchement.
Branchement HDMI pour la
projection d’images
Branchez un appareil de lecture (p. ex. un
lecteur Blu-ray, une console de jeu, un
caméscope, un appareil photo numérique ou
un ordinateur) au projecteur en utilisant un
câble HDMI. Ce branchement permet d’afficher
les images sur l’écran de projection et de
reproduire le son sur le projecteur.
1 Branchez un câble HDMI au connecteur
HDMI du projecteur et à la sortie HDMI de
l’appareil de lecture.
HDMI USB DC
2 Le projecteur commute automatiquement
sur l’entrée HDMI quand la connexion HDMI
est établie. L’écran de projection affiche
des images.
• Si l’écran de projection n’affiche pas
d’images, sélectionnez manuellement
l’entrée HDMI. Appuyez sur la touche
de la télécommande pour accéder à la liste
des sources d’entrée, puis sélectionnez
HDMI.

8 Philips · PicoPix Max One
Branchement USB-C pour
la projection d’images
Branchez un dispositif USB-C (p. ex. téléphone
mobile, tablette ou ordinateur) au projecteur via
une connexion USB-C. Ce branchement permet
d’afficher les images sur l’écran de projection et
de reproduire le son sur le projecteur.
1 Branchez un câble USB-C au connecteur
du projecteur et au port USB-C de
l’appareil de lecture.
HDMI USB DC
2 Le projecteur commute automatiquement
sur l’entrée USB-C quand la
connexion USB-C est établie. L’écran de
projection affiche des images.
• Si l’écran de projection n’affiche pas
d’images, sélectionnez manuellement
l’entrée USB-C. Appuyez sur la touche
de la télécommande pour accéder à la liste
des sources d’entrée, puis sélectionnez
USB-C.
Avis
Le projecteur prend en charge le format
audio stéréo uniquement. Si vous
n’entendez aucun son en provenance
du projecteur, vérifiez que le format de
sortie audio est défini en mode stéréo
sur l’appareil de lecture.
4 Fonctionnement
Avis
Vous devez connecter le projecteur à un
appareil HDMI ou doté d’un port USB-C
de sorte que l’écran de projection puisse
afficher des images (voir Connecter,
page 7).
Installation du projecteur
Placez le projecteur sur une surface plane
devant la paroi de projection.
Vous pouvez également installer le projecteur
dans différentes configurations (voir Options
d’installation, page 11).
Connexion de l’alimentation
électrique
Le projecteur peut être alimenté soit par
l’alimentation externe, soit par la batterie
intégrée.
ATTENTION !
Utilisez toujours le bouton pour
allumer et éteindre le projecteur.
Utilisation d’une alimentation
externe
• Branchez l’adaptateur d’alimentation fourni
à la prise du projecteur puis à la prise
murale.
HDMI USB DC
a
b
Si nécessaire, sélectionnez la bonne fiche
d’alimentation pour le branchement à la
prise murale.
Pour fixer une fiche à l’adaptateur
d’alimentation, alignez les encoches de la
fiche sur les deux broches de l’adaptateur
d’alimentation, puis faites glisser la fiche.
Utilisation de la batterie intégrée
Le projecteur peut être également alimenté par
la batterie intégrée pour plus de mobilité.

Fonctionnement 9
Chargement du projecteur
Avant la première utilisation, chargez le
projecteur pendant 1,5 heure.
Mettez en charge le projecteur dès que l’icône
de batterie faible apparaît sur l’écran de
projection.
• Pour charger le projecteur, branchez le
projecteur à une alimentation externe,
comme décrit dans le paragraphe
« Utilisation d’une batterie externe ».
• Lors de la charge, la LED du projecteur
s’allume en rouge. Une fois le projecteur
chargé, la LED s’éteint.
• Une fois allumée, l’alimentation externe
permettra de faire fonctionner le projecteur
et de recharger la batterie.
• Pour accélérer la charge, n’utilisez pas le
projecteur.
Avis
La capacité de la batterie diminue avec
le temps. Si le projecteur ne fonctionne
qu’avec l’alimentation externe, la
batterie intégrée est défectueuse.
Contactez un centre de réparation agréé
pour remplacer la batterie embarquée.
Préparation de la
télécommande
ATTENTION !
Une utilisation incorrecte des piles peut
entraîner une surchauffe, une explosion,
un risque d’incendie ou des blessures
corporelles. Des piles présentant
des fuites peuvent potentiellement
endommager la télécommande.
N’exposez jamais la télécommande au
rayonnement solaire direct.
Évitez de déformer, désassembler ou de
charger les piles.
Évitez les contacts avec une flamme nue
et l’eau.
Remplacez immédiatement les piles
usées.
Retirez les piles de la télécommande
si vous ne prévoyez pas de l’utiliser
pendant une période prolongée.
1 Appuyez et maintenez le couvercle
du compartiment à piles, et faites-le
glisser simultanément pour accéder au
compartiment à piles.
2 Insérez les piles fournies (type AAA) en
respectant les marques de polarité (+/-).
3 Fermez le compartiment des piles.
Avis
Quand vous utilisez la télécommande,
orientez-la vers le capteur infrarouge
situé à l’arrière du projecteur et vérifiez
qu’aucun obstacle ne se trouve entre la
télécommande et le capteur infrarouge.
Mise en marche et
installation
1 Appuyez et maintenez enfoncé le bouton
du projecteur (ou la touche de la
télécommande) pendant 1 seconde pour
allumer ou éteindre le projecteur.
• Une fois le projecteur allumé, la LED
devient blanche si le projecteur n’est
pas en charge.
• Au cours de la charge, la LED du
projecteur est rouge que le projecteur
soit allumé ou éteint.
Configuration de la langue
1 Appuyez sur la touche de la
télécommande pour accéder au menu des
réglages, puis naviguez pour sélectionner
Language (Langue), et appuyez sur OK.
2 Appuyez sur / pour sélectionner une
langue.

10 Philips · PicoPix Max One
Modification de la taille de
l’écran
La taille de l’écran de projection (ou la taille des
images) est déterminée par la distance entre la
lentille de projection et la surface de projection.
• La distance de projection doit être
supérieure à 1,2 fois la largeur de la taille de
l’écran que vous désirez.
• Vous pouvez également utiliser le zoom
numérique pour réduire la taille de l’écran
à 50 %. Appuyez sur la touche de la
télécommande pour accéder au menu des
réglages, puis naviguez pour sélectionner
Digital Zoom (Zoom numérique), et
appuyez sur OK. Ensuite appuyez sur la
touche / pour ajuster la taille de l’image.
Réglage de la mise au point de
l’image
Appuyez sur de la télécommande pour
activer la mise au point, puis appuyez sur /
de la télécommande pour régler la netteté de
l’image. Une fois la netteté de l’image réglée,
appuyez sur pour désactiver la mise au
point.
Correction de la forme de l’image
Correction automatique (verticale du trapèze)
Le projecteur peut automatiquement corriger
l’image pour qu’elle soit rectangulaire lorsque
vous inclinez le projecteur vers le haut ou le
bas.
Pour activer la correction automatique verticale
du trapèze, appuyez sur la touche de la
télécommande pour accéder au menu des
réglages, puis naviguez pour sélectionner Auto
Keystone - On (Trapeze Auto - En Ligne).
Trapeze Manuel (Correction des 4 coins)
Vous pouvez régler manuellement la forme
de l’image en repositionnant les quatre coins
de l’image projetée. Vous corrigerez ainsi la
position à gauche ou à droite du projecteur.
1 Assurez-vous que vous avez sélectionné
Auto Keystone - Off (Trapeze Auto - Hors
Ligne) pour activer cette fonction. Appuyez
sur la touche de la télécommande
pour accéder au menu des réglages,
puis naviguez pour sélectionner Manual
Keystone (Trapeze Manuel).
2 Dans l’interface de correction des 4 coins,
appuyez sur la touche OK pour sélectionner
un coin de l’image, puis appuyez
longuement sur la touche / de la
télécommande pour ajuster les valeurs de
positionnement horizontal et sur la touche
/ de la télécommande pour ajuster les
valeurs de positionnement vertical. Répétez
cette étape pour ajuster les valeurs de
positionnement des autres coins de l’image,
le cas échéant.

Fonctionnement 11
Correction horizontale manuelle
Vous pouvez corriger manuellement le trapèze
ou les images déformées dans une orientation
horizontale.
1 Assurez-vous que vous avez sélectionné
Auto Keystone - Off (Trapeze Auto - Hors
Ligne) pour activer cette fonction. Appuyez
sur la touche de la télécommande
pour accéder au menu des réglages, puis
naviguez pour sélectionner Manual Horiz.
Keyst. (Trapeze Horiz. Manuel).
2 Appuyez sur les touches / pour ajuster
la forme de l’image.
Calibrage
Corrigez l’image à une forme rectangulaire
lorsque le projecteur est à niveau ou si la
correction automatique du trapèze ne corrige
pas idéalement l’image. Effectuez le calibrage
de la forme de l’image, comme suit.
1 Assurez-vous que vous avez sélectionné
Auto Keystone - Off (Trapeze Auto - Hors
Ligne) pour activer cette fonction. Placez
le projecteur sur le sol ou sur une surface
plane (à niveau).
2 Appuyez sur la touche de la
télécommande pour accéder au menu des
réglages, puis naviguez pour sélectionner
Keystone Calibration (Étalonnage du
trapèze).
Options d’installation
Vous pouvez installer le projecteur dans les
configurations suivantes. Suivez les instructions
ci-dessous pour les différentes installations du
projecteur.
Avis
Pour suspendre l’appareil au plafond,
achetez un support de fixation de
projecteur recommandé par un
installateur professionnel et suivez les
instructions fournies avec le support.
Avant de suspendre l’appareil au
plafond, vérifiez que le plafond peut
prendre en charge le poids du projecteur
et du kit de montage.
Pour un montage au plafond, cet
appareil doit être solidement fixé au
plafond conformément aux instructions
d’installation. Une mauvaise installation
au plafond peut causer un accident, des
blessures corporelles ou des dommages
matériels.
Table devant l’écran de projection
1 Placez le projecteur sur une table devant
l’écran de projection. C’est la position du
projecteur la plus commune pour une
installation rapide et une grande portabilité.
2 Pour ajuster la projection à la bonne
position, appuyez sur la touche de la
télécommande pour accéder au menu des
réglages, puis naviguez pour sélectionner
Proj. Direc. - Front proj. (Dir. De Proj. - Proj.
Frontale), puis appuyez sur OK.

12 Philips · PicoPix Max One
Montage au plafond devant l’écran de
projection
1 Montez le projecteur au plafond à l’envers
devant l’écran de projection. Un support de
projecteur est nécessaire pour monter le
projecteur au plafond.
2 Pour ajuster la projection à la bonne
position, appuyez sur la touche de la
télécommande pour accéder au menu des
réglages, puis naviguez pour sélectionner
Proj. Direc. - Rev. front proj. (Dir. De Proj. -
Proj. Front. Inv), puis appuyez sur OK.
Table derrière l’écran de projection
1 Placez le projecteur sur une table derrière
l’écran de projection. Un écran de projection
par l’arrière spécial est nécessaire.
2 Pour ajuster la projection à la bonne
position, appuyez sur la touche de la
télécommande pour accéder au menu des
réglages, puis naviguez pour sélectionner
Proj. Direc. - Rear proj. (Dir. De Proj. - Proj.
Arrière), puis appuyez sur OK.
Montage au plafond derrière l’écran
1 Montez le projecteur au plafond à l’envers
derrière l’écran de projection. Pour monter
le projecteur au plafond derrière l’écran,
un support de projecteur et un écran
de projection par l’arrière spécial sont
nécessaires.
2 Pour ajuster la projection à la bonne
position, appuyez sur la touche de la
télécommande pour accéder au menu des
réglages, puis naviguez pour sélectionner
Proj. Direc. - Rev. rear proj. (Dir. De Proj. -
Proj. Arriere. Inv), puis appuyez sur OK.

Autres fonctions 13
5 Autres fonctions
Écouter via des haut-
parleurs externes ou des
écouteurs
Branchez des haut-parleurs externes ou des
écouteurs au projecteur. Ce branchement
permet de reproduire le son sur le projecteur
par le biais des haut-parleurs externes ou des
écouteurs.
DANGER !
Risque de lésions auditives !
Avant de brancher les écouteurs,
baissez le volume du projecteur.
N’utilisez pas le projecteur pendant
une période prolongée à un volume
élevé, notamment lorsque vous utilisez
des écouteurs. Vous risquez des
lésions auditives.
1 Branchez un câble audio de 3,5 mm au
connecteur du projecteur et à la sortie
audio analogique (prise 3,5 mm, ou prises
rouge et blanche) des haut-parleurs
externes.
Autrement, branchez vos écouteurs au
connecteur du projecteur.
• Les haut-parleurs du projecteur se
désactivent automatiquement lors du
branchement des écouteurs ou des
haut-parleurs externes.
HDMI USB DC
Quand vous branchez des écouteurs, utilisez
le contrôle de volume de la télécommande (ou
sur le projecteur) pour régler le volume à un
niveau confortable.
Recharger un dispositif USB
Vous pouvez charger un dispositif USB (par
exemple un smartphone, un lecteur MP3 ou un
autre appareil mobile).
Charger via le port USB-A
1 À l’aide d’un câble USB-A, connectez votre
appareil USB au port USB du projecteur.
2 Allumez le projecteur. Le dispositif
USB commence à se recharger
automatiquement.
• La connexion USB-A peut également
alimenter un périphérique USB comme la
clé TV Amazon Fire®, la clé Roku®streaming
(pas pour le stockage de masse ou le
lecteur multimédia).
Charger via le port USB-C
1 À l’aide d’un câble USB-C, connectez
votre appareil USB-C au port USB-C du
projecteur.
2 Allumez le projecteur. Assurez-vous que la
fonction de chargement des périphériques
USB-C est activée. Appuyez sur de la
télécommande pour accéder au menu des
réglages, puis naviguez pour sélectionner
USB-C Charger - On (Chargeur USB-C - En
Ligne).
Le dispositif USB-C commence à se charger
automatiquement.
Pour désactiver la charge d’un dispositif
USB-C, sélectionnez USB-C Charger - Off
(Chargeur USB-C - Hors Ligne).
Utiliser easy link
Ce projecteur prend en charge easy link qui
utilise le protocole HDMI CEC (Consumer
Electronics Control). Vous pouvez utiliser une
seule télécommande pour allumer ou éteindre
les appareils compatibles easy link qui sont
connectés via HDMI. Le fabricant ne garantit
pas une interopérabilité à 100 % avec tous les
appareils HDMI CEC.

14 Philips · PicoPix Max One
1 Assurez-vous que le projecteur est
connecté à un appareil HDMI qui prend
en charge la fonction HDMI CEC (voir
Branchement HDMI pour la projection
d’images, page 7).
2 Pour activer la fonction easy link sur le
projecteur, appuyez sur la touche de la
télécommande pour accéder au menu des
réglages, puis naviguez pour sélectionner
CEC - On (CEC - En Ligne).
6 Modification des
paramètres
Ce chapitre vous permettra de modifier les
paramètres du projecteur.
1 Lorsque le projecteur est allumé, appuyez
sur ou sur de la télécommande (ou
du projecteur) pour accéder au menu des
réglages.
2 À l’aide des Touches de navigation et OK,
sélectionnez et modifiez les réglages.
Paramètres de langue
Sélectionnez la langue que vous souhaitez
pour l’affichage des menus à l’écran.
• Utilisez les touches de navigation pour
accéder à Language (Langue), puis
appuyez sur OK pour confirmer, enfin
appuyez sur / pour sélectionner une
langue.
Sélection de la source
d’entrée
Allez à Input Source (Sources) pour accéder aux
options suivantes.

Modification des paramètres 15
• Auto (Automatique) : Passez
automatiquement à la source d’entrée
appropriée lorsqu’un appareil HDMI ou
USB-C est connecté.
• HDMI : Sélectionnez-le lorsqu’un appareil
HDMI est connecté.
• USB-C : Sélectionnez-le lorsqu’un appareil
USB-C est connecté.
Vous devez sélectionner une source
d’entrée correcte, afin que l’écran de
projection puisse afficher des images.
Réglages de l’image
Les réglages d’image suivants sont accessibles.
• Keystone Correction (Correction du
trapèze) : Sélectionnez une option pour
corriger le trapèze ou les images déformées
à une forme rectangulaire ou carrée.
• Auto Keystone (Trapeze Auto) : pour
activer ou désactiver la correction
automatique de la forme de l’image
lorsque le projecteur est incliné vers le
haut ou vers le bas. Lorsque la fonction
Auto Keystone (Trapeze Auto) est
activée, toutes les autres options de
correction d’image seront désactivées.
• Manual Keystone (Trapeze Manuel) :
Ajustez manuellement les quatre coins
de l’image.
• Manual Horiz. Keyst. (Trapeze Horiz.
Manuel) : Corrigez manuellement le
trapèze ou les images déformées dans
une orientation horizontale.
• Keystone Calibration (Étalonnage du
trapèze) : exécutez cette fonction si la
correction automatique du trapèze ne
corrige pas parfaitement la forme de
l’image.
• Proj. Direc. (Dir. De Proj.) : pour ajuster
correctement la position de l’image
projetée en fonction des différentes
possibilités d’installation du projecteur.
• Digital Zoom (Zoom numérique) : pour
mettre à l’échelle l’image de projection
dans une plage comprise entre 50 % et
100 %.
• Picture Preset (Préréglage Image) :
sélectionnez un paramètre de couleur
prédéfini pour l’affichage de l’image et de
la vidéo.
• Picture Adj. (Aj. Image) : ce paramètre
permet de régler les options Brightness/
Contrast/Saturation/Toneburst/Sharpness
(Luminosité/Contraste/Saturation/
Toneburst/Netteté) dans une plage
comprise entre 0 et 100.
• Color Temp. (Temp. de couleur) : réglez
l’option sur Warm (Chaud) pour accentuer
les couleurs chaudes comme le rouge.
Réglez l’option sur Cool (Froid) pour rendre
l’image bleuâtre. Réglez l’option sur User
(Utilisateur) pour personnaliser les valeurs
de couleur en mode RVB.
Paramètres de contrôle
d’alimentation
Accédez aux options de menu suivantes pour
contrôler la consommation d’énergie.
• Sleep Timer (Program. Arret) : pour
sélectionner un délai avant arrêt
automatique du projecteur.

16 Philips · PicoPix Max One
• Brightness Mode (Mode Luminosité) :
Sélectionnez un mode de luminosité de
l’écran.
Restauration des
paramètres par défaut
Si le projecteur ne fonctionne pas normalement,
réinitialisez le projecteur aux paramètres
par défaut. Tous les réglages actuels seront
supprimés.
• Accédez à l’option Full Reset (Remise a
Zero), puis appuyez sur OK, enfin suivez
les instructions à l’écran pour terminer la
réinitialisation.
Autres paramètres
Vous pouvez également accéder aux options
suivantes :
• Volume : pour régler le volume du
projecteur.
• CEC : Activez ou désactivez easy link entre
les appareils grâce à la connexion HDMI
(voir Utiliser easy link, page 13).
• USB-C Charger (Chargeur USB-C) : Activez
ou désactivez le chargement du dispositif
USB-C connecté.
• Position : pour déplacer l’endroit où le
menu des paramètres s’affiche sur l’écran
de projection.
• SW Version : pour afficher la version
actuelle du logiciel du projecteur.
• Soft. Update (MAJ Software) : pour mettre
à niveau le logiciel du système à partir
d’un dispositif USB (voir Mise à jour du
micrologiciel, page 17).

Service 17
7 Service
Prendre soin de la batterie
intégrée
La capacité de la batterie diminue avec le
temps. Vous pourrez prolonger la durée de
vie de la batterie si vous respectez les points
suivants :
• Sans l’adaptateur d’alimentation, le
projecteur est alimenté par la batterie
intégrée. Si la charge de la batterie est
faible, le projecteur s’éteindra. Dans ce
cas, connectez le projecteur à l’adaptateur
d’alimentation.
• Chargez régulièrement la batterie. Ne
rangez pas le projecteur en laissant la
batterie complètement déchargée.
• Si le projecteur n’est pas utilisé pendant
plusieurs semaines, déchargez un peu la
batterie en utilisant le projecteur avant de
le ranger.
• Gardez le projecteur et la batterie à l’écart
des sources de chaleur.
• Si le projecteur ne se charge pas
après l’avoir connecté à l’adaptateur
d’alimentation, utilisez une petite
broche pour appuyer sur le bouton de
réinitialisation (petit orifice) situé le
panneau latéral du projecteur.
Remarque sur la décharge profonde de la
batterie
Si la charge de la batterie intégrée est
très faible, le démarrage du processus de
chargement peut durer plus longtemps. Dans
ce cas, chargez le projecteur pendant au moins
5 heures avant de l’utiliser.
DANGER !
Risque d’explosion en cas d’utilisation
d’un type de batterie inapproprié !
N’essayez pas de remplacer vous-
même la batterie embarquée.
Nettoyage
DANGER !
Instructions de nettoyage !
Utilisez un chiffon doux et non
pelucheux. N’utilisez en aucun
cas des produits de nettoyage
liquides ou facilement inflammables
(vaporisateurs, produits abrasifs, vernis
brillants, alcool). Veillez à ce qu’aucune
humidité ne pénètre à l’intérieur du
projecteur. N’utilisez en aucun cas
des nettoyants liquides en spray pour
nettoyer le projecteur.
Essuyez doucement les surfaces. Faites
attention à ne pas rayer les surfaces.
Nettoyage de l’objectif
Utilisez une brosse souple ou un papier de
nettoyage pour nettoyer l’objectif du projecteur.
DANGER !
N’utilisez pas d’agents de nettoyage
liquides !
N’utilisez pas d’agents de nettoyage
liquides pour nettoyer l’objectif afin
d’éviter d’endommager le revêtement
sur l’objectif.
Mise à jour du micrologiciel
La version la plus récente du logiciel du
projecteur est disponible sur www.philips.com/
support afin que vous obteniez les meilleures
fonctionnalités et la meilleure assistance pour
le projecteur.
Avant de mettre à jour le logiciel du projecteur,
contrôlez la version actuelle du logiciel :
• Appuyez sur la touche de la
télécommande pour accéder au menu des
réglages, puis naviguez vers SW Version.

18 Philips · PicoPix Max One
ATTENTION !
N’éteignez pas le projecteur ni ne retirez
le lecteur flash USB pendant la mise à
jour.
Mise à jour du logiciel via USB
1 Vérifiez la disponibilité d’une version plus
récente du logiciel sur www.philips.com/
support. Recherchez votre produit (numéro
de modèle : PPX520/INT) et accédez à
« Logiciel et pilotes ».
2 Téléchargez le fichier du logiciel compressé
et enregistrez-le dans le dossier racine du
lecteur flash USB.
3 Branchez un lecteur flash USB au port USB
du projecteur.
• Il est fortement recommandé d’utiliser
une alimentation externe pendant la
mise à jour du logiciel pour garantir une
correcte alimentation de l’appareil.
4 Appuyez sur la touche de la
télécommande pour accéder au menu des
réglages et naviguez vers Soft. Update (MAJ
Software), puis appuyez sur OK.
5 Suivez les instructions qui s’affichent à
l’écran pour effectuer ou annuler la mise à
jour.

Service 19
Dépannage
Mise sous tension
S’il se produit un problème ne pouvant être
corrigé à l’aide des instructions de ce manuel
utilisateur, suivez les étapes indiquées ici.
1 Éteignez le projecteur en appuyant
longuement sur pendant 1 seconde.
2 Attendez au moins dix secondes.
3 Rallumez le projecteur en appuyant
longuement sur pendant 1 seconde.
4 Si le problème persiste, veuillez contacter
notre centre de maintenance technique ou
votre revendeur.
Problèmes Solutions
Le projecteur ne s’allume pas ou n’est pas
alimenté.
• Débranchez et rebranchez le câble d’alimentation,
puis réessayez de rallumer le projecteur.
• Charge de la batterie faible. Branchez le
projecteur à une alimentation externe.
• Utilisez l’adaptateur d’alimentation d’origine.
L’écran de projection n’affiche aucune
image.
• Vous devez connecter le projecteur à un
appareil HDMI ou doté d’un port USB-C de sorte
que l’écran de projection puisse afficher des
images (voir Connecter, page 7).
• Sélectionnez la source d’entrée correcte. Appuyez
sur la touche de la télécommande pour
accéder à la liste des sources d’entrée pour la
sélection des sources d’entrée.
• Vérifiez si la sortie vidéo de l’appareil externe est
activée.
Le projecteur se charge lentement. • Une fois allumée, l’alimentation externe permettra
de faire fonctionner le projecteur et de recharger
la batterie.
• Pour accélérer la charge, n’utilisez pas le
projecteur.
Le projecteur s’éteint automatiquement. • Charge de la batterie faible.
• Si le projecteur fonctionne pendant une période
prolongée, la surface chauffe. Assurez une
ventilation adéquate du projecteur, en laissant au
moins 30 cm d’espace autour du projecteur.
• Vérifiez que le câble d’alimentation est bien
branché.
Le projecteur ne s’éteint pas. • Appuyez longuement sur pendant plus de
30 secondes.
L’image de l’appareil HDMI externe
n’apparaît pas.
• Débranchez le câble HDMI ou éteignez
l’appareil HDMI.
• Attendez trois secondes.
• Rebranchez le câble HDMI ou rallumez
l’appareil HDMI.

20 Philips · PicoPix Max One
Problèmes Solutions
Le son de l’appareil externe connecté n’est
pas reproduit.
• Vérifiez les câbles vers l’appareil externe.
• Vérifiez que le son est activé sur l’appareil
externe.
• Il est possible que seuls les câbles d’origine
fournis par le fabricant de l’appareil permettent
de le faire fonctionner.
Le son de l’appareil de la sortie HDMI
externe n’est pas reproduit.
• Sur l’appareil de la sortie HDMI, réglez les
paramètres audio sur « Stéréo » (PCM).
Le son de votre ordinateur connecté via un
câble HDMI n’est pas reproduit.
• Vérifiez que le son est activé sur l’ordinateur et
que la sortie vers le projecteur est activée.
Le projecteur ne réagit pas aux
commandes de la télécommande.
• Vérifiez les piles de la télécommande.
La température de la surface du projecteur
est chaude.
• Pour ce projecteur, il est normal de générer une
chaleur modérée pendant le fonctionnement.
Que faire si le projecteur ne fonctionne
pas lorsqu’il est connecté à un ordinateur
portable ?
• Vérifiez que le câble HDMI est branché
correctement.
• Assurez-vous que l’ordinateur portable a été
commuté sur l’écran du projecteur.

Annexe 21
8 Annexe
Caractéristiques techniques
Technologie/Optique
Technologie d’affichage ....................................DLP
Source lumineuse ..........LED RGB 4 canaux LED
Résolution ................................ 1 920 × 1 080 pixels
Résolution prise en charge .................. 4K (pixels)
Durée de vie LED ............durée de vie de plus de
30 000 heures
Rapport de contraste .................................. 10 000:1
Rapport d'aspect ...................................... 16:9 et 4:3
Rapport de projection ........................................ 1,2:1
Taille de l’écran (diagonale) ........75 cm-305 cm /
30”-120”
Distance de l’écran ......................78 à 320 cm/31 à
126 pouces
Modes de projection ......... avant, arrière, plafond
devant, plafond derrière
Correction du trapèze ...................... auto (vertical)
Réglage de mise au point.. données électriques
Correction des 4 coins ...........................................oui
Zoom numérique .....................................................oui
Touches numériques .............................................. oui
Système d’exploitation..................................... Linux
Son
Haut-parleur interne .............................................4 W
Connexion
HDMI ........................................... x1 avec ARC et CEC
USB-C ............................................................. x1 (vidéo)
USB-A 2.0 .................................................... x1 (charge)
sortie audio analogique (3,5 mm) ..................... x 1
Prise CC .. x1 (alimentation électrique et charge)
Source d’alimentation
Alimentation électrique ........................ adaptateur
d’alimentation
......Entrée : 100 à 240 V~, 50-60 Hz, 1,5 A (max)
......................................Sortie : 20 V CC 3,25 A, 65 W
Batterie intégrée ................................ mAh
.............................. autonomie de 5 heures max.
Détails du produit
Dimensions (L × P × H) ............. 134 × 136 × 47 mm
........................................ 5,28 × 5,35 × 1,85 pouce
Poids ..................................................... 850 g / 1,87 lb
Température de fonctionnement ........... 5 à 35 °C
Température de stockage.............................< 60 °C
Contenu de l’emballage
Projecteur PicoPix Max One, télécommande
avec 2 piles AAA, adaptateur CA, fiches
secteur (UK, US), pochette de voyage, guide de
démarrage rapide

22 Philips · PicoPix Max One
Déclarations CE
• L’appareil doit être connecté uniquement à
l’interface USB de version 2.0 ou supérieure.
• L’adaptateur doit être installé près de
l’équipement et doit être facilement
accessible.
• La température de fonctionnement de
l’ASE (appareil sous essai) ne doit pas être
supérieure à 35 °C et inférieure à 5 °C.
• La fiche est considérée comme dispositif de
déconnexion de l’adaptateur.
La déclaration de conformité peut être
consultée sur le site www.philips.com.
Déclarations FCC
15�19 Exigences en matière d’étiquetage�
Cet appareil est conforme à la partie 15 des
règles de la FCC. Son fonctionnement est
soumis aux deux conditions suivantes : (1) Cet
appareil ne doit pas causer d’interférences
nuisibles, et (2) cet appareil doit accepter
toute autre interférence reçue, y compris
les interférences pouvant entraîner un
fonctionnement non désiré.
15�21 Informations à l’utilisateur�
Les changements ou les modifications
apportés non expressément approuvés
par la partie responsable de la conformité
pourraient annuler le droit de l’utilisateur à faire
fonctionner l’équipement.
15�105 Informations à l’utilisateur�
Cet appareil a été testé et reconnu conforme
aux limites prescrites pour un appareil
numérique de classe B, conformément à la
partie 15 de la réglementation FCC. Ces limites
visent à garantir une protection raisonnable
contre les interférences nuisibles dans une
installation résidentielle. Cet appareil génère,
utilise et émet de l’énergie radioélectrique, et s’il
n’est pas installé ou utilisé conformément aux
instructions, il est susceptible de causer des
interférences nuisibles aux communications
radio. Toutefois, il n’y a pas de garantie que
des interférences ne puissent se produire dans
une installation particulière. Si cet équipement
provoque des interférences nuisibles à la
réception de télévision ou de radio, ce qui
peut être déterminé en mettant l’équipement
successivement hors tension puis sous tension,
l’utilisateur est invité à essayer de corriger les
interférences en adoptant une des mesures
suivantes :
• Réorienter ou déplacer l’antenne de
réception.
• Augmenter la distance de séparation entre
l’équipement et le récepteur.
• Brancher l’équipement dans une prise sur
un circuit différent de celui sur lequel est
branché le récepteur.
• Consulter le revendeur ou un technicien
radio/télévision expérimenté qui vous
apportera l’aide nécessaire.
ID FCC : 2ASRT-PPX520/INT
Conformité réglementaire
pour le Canada
Cet appareil est conforme à la norme CAN
ICES-3 (B)/NmB-3(B) d’Industrie Canada
Déclaration RSS-Gen et RSS-247 : Cet appareil
est conformé aux normes RSS d’Industrie
Canada.
Son fonctionnement est soumis aux deux
conditions suivantes :
1 cet appareil ne doit pas causer des
interférences nuisibles, et
2 Cet appareil doit accepter toute
interférence, y compris des interférences
qui peuvent provoquer un fonctionnement
non désiré de l’appareil.
Autres avis
La préservation de l’environnement dans
le cadre d’un concept de développement
durable est une préoccupation essentielle
de Screeneo Innovation SA. C’est pourquoi
Screeneo Innovation SA met tout en œuvre
pour développer des systèmes écologiques
et a décidé d’accorder une grande valeur à
la performance écologique dans toutes les
phases du produit, de la fabrication à la mise
en service, et de l’utilisation à l’élimination.

Annexe 23
Emballage : la présence du logo (point
vert) signifie qu’une organisation nationale
reconnue paie une cotisation pour améliorer
le mode d’emballage et les infrastructures de
recyclage. Veuillez respecter les procédures de
tri de déchets en vigueur dans votre pays pour
l’élimination de cet emballage.
Batteries : si votre produit contient des
batteries, ces dernières doivent être éliminées
au dépôt prévu à cet effet.
Produit : Le symbole poubelle barrée sur le
produit signifie que ce produit est un appareil
électrique ou électronique. La législation
européenne prescrit donc une élimination
séparée :
• Sur les lieux de vente, si vous achetez
un appareil similaire.
• Aux dépôts locaux (déchetterie, service
déchets spécial, etc.).
Ainsi, vous pouvez également contribuer à la
réutilisation et au recyclage de vieux appareils
électroniques et électriques et avoir un impact
sur l’environnement et la santé des personnes.
Les emballages utilisés en papier et carton
peuvent être éliminés comme du papier usagé.
Les emballages en plastique peuvent être
recyclés ou déposés dans les déchets non
recyclables, selon les spécifications de votre
pays.
Marques déposées : les références citées dans
le présent manuel sont des marques déposées
des entreprises respectives. L’absence des
symboles ® et ™ ne signifie pas que les termes
utilisés sont des marques libres. Les autres
noms de produits utilisés dans le présent
document servent uniquement à des fins de
désignation et peuvent être des marques des
propriétaires respectifs. Screeneo Innovation
SA rejette tous droits sur ces marques.
Ni Screeneo Innovation SA ni les sociétés
affiliées ne sont responsables vis-à-vis de
l’acheteur de ce produit ou de tiers en rapport
aux demandes de dommages et intérêts,
pertes, frais ou dépenses qui incombent à
l’acheteur ou à des tiers à la suite d’un accident,
d’un usage erroné ou abusif de ce produit ou à
des modifications et réparations du produit non
autorisées ou au non-respect des instructions
de service et de maintenance de Screeneo
Innovation SA.
Screeneo Innovation SA n’assume aucune
responsabilité pour les demandes de
dommages et intérêts ou les problèmes
à la suite de l’utilisation d’options ou de
consommables qui ne sont pas des produits
originaux de Screeneo Innovation SA ou
PHILIPS ou des produits agréés par Screeneo
Innovation SA ou PHILIPS.
Screeneo Innovation SA n’assume aucune
responsabilité pour les demandes de
dommages et intérêts à la suite d’interférences
électromagnétiques dues à l’emploi de câbles
de connexion qui ne sont pas des produits de
Screeneo Innovation SA ou PHILIPS.
Tous droits réservés. Aucune partie de la
présente publication n’est autorisée à être
reproduite, enregistrée dans un système
d’archive ou sous quelque forme que ce soit
ou bien transmise par n’importe quel moyen
électronique, mécanique, par photocopie,
enregistrement ou autre sans l’accord écrit
préalable de Screeneo Innovation SA. Les
informations contenues dans le présent
document sont destinées exclusivement
à l’utilisation du produit décrit. Screeneo
Innovation SA n’assume aucune responsabilité
si ces informations sont appliquées à d’autres
appareils.
Ce manuel utilisateur est un document n’ayant
pas un caractère contractuel.
Sous réserve d’erreurs, de fautes d’impression
et de modifications. Copyright © 2020
Screeneo Innovation SA.

PicoPix Max One
FR
Screeneo Innovation SA
Route de Lully 5c - 1131 Tolochenaz - Switzerland
Philips and the Philips Shield Emblem are registered trademarks of Koninklijke Philips N.V. used
under license. Screeneo Innovation SA is the warrantor in relation to the product with which this
booklet was packaged.
2020 © Screeneo Innovation SA. All rights reserved.

Bedienungsanleitung
Registrieren Sie Ihr Produkt und erhalten Sie Support unter
www.philips.com/support
PPX520
PicoPix Max One
Portable projector

Einleitung �����������������������������������������������������3
Sehr geehrter Kunde, ..................................................3
Information zu dieser Bedienungsanleitung ......3
Lieferumfang ..................................................................3
Kundendienstzentrum ................................................3
1 Allgemeine Sicherheit-shinweise ���� 4
Einrichten des Produkts ............................................ 4
Reparaturen....................................................................5
Stromversorgung ..........................................................5
2 Übersicht ����������������������������������������������� 6
Ansicht von oben ......................................................... 6
Vorderansicht ................................................................ 6
Rückansicht ................................................................... 6
Fernbedienung .............................................................. 7
3 Verbinden ����������������������������������������������� 7
Anschließen eines HDMI-Geräts für die
Bildprojektion ................................................................7
USB-C-Anschluss für Bildprojektion .................... 8
4 Betrieb ��������������������������������������������������� 9
Aufstellen/Anbringen des Projektors ................... 9
Anschließen der Stromversorgung ........................ 9
Inbetriebnahme der Fernbedienung ...................10
Einschalten und Einrichten .....................................10
Möglichkeiten zur Aufstellung/Montage ...........12
5 Sonstige Funktionen ��������������������������14
Wiedergabe über externe Lautsprecher oder
Kopfhörer ......................................................................14
Aufladen eines USB-Gerätes ................................. 14
Einsatz von Easy Link ...............................................15
6 Ändern der Einstellungen �����������������16
Spracheinstellungen .................................................16
Auswählen der Eingangsquelle .............................16
Bildeinstellungen ........................................................16
Einstellungen der Energieverwaltung ................. 17
Wiederherstellen der Werkseinstellungen ........ 17
Weitere Einstellungen ............................................... 17
7 Wartung und Pflege ��������������������������� 18
Pflege des verbauten Akkus ................................... 18
Reinigung ......................................................................19
Aktualisieren der Software ...................................... 19
Fehlerbehebung ........................................................20
8 Anhang ������������������������������������������������ 22
Technische Daten ...................................................... 22
CE-Konformitätserklärung ..................................... 23
FCC-Konformitätserklärung .................................. 23
Konformität mit den Richtlinien in Kanada ..... 23
Sonstige Hinweise ..................................................... 23
Inhaltsverzeichnis

Einleitung 3
Einleitung
Sehr geehrter Kunde,
vielen Dank, dass Sie sich für diesen Projektor
entschieden haben.
Wir hoffen, Sie genießen dieses Produkt und
die vielen Funktionen, die es Ihnen bietet!
Information zu dieser
Bedienungsanleitung
Mit der diesem Produkt beiliegenden
Kurzanleitung sind Sie in der Lage, dieses
Produkt schnell und einfach in Betrieb
nehmen. Ausführliche Beschreibungen dazu
finden Sie in den folgenden Kapiteln dieser
Bedienungsanleitung.
Lesen Sie sich die vollständige
Bedienungsanleitung aufmerksam
durch. Beachten Sie stets sämtliche
Sicherheitshinweise, um den ordnungsgemäßen
Betrieb dieses Produkts zu gewährleisten (siehe
Allgemeine Sicherheit-shinweise, Seite 4).
Bei Nichtbeachtung dieser Anleitung übernimmt
der Hersteller keine Haftung für entstehende
Schäden.
Verwendete Symbole
Hinweis
Fehlerbehebung
Dieses Symbol weist auf Ratschläge
hin, die Ihnen helfen, dieses Produkt
effektiver und einfacher zu verwenden.
GEFAHR!
Verletzungsgefahr!
Dieses Symbol warnt vor der
Gefahr von Verletzungen für den
Nutzer und umstehende Personen.
Die unsachgemäße Handhabung
kann sowohl Personen- als auch
Sachschäden nach sich ziehen.
VORSICHT!
Beschädigung des Produkts oder
Datenverlust!
Dieses Symbol warnt Sie vor möglichen
Produktschäden und Datenverlusten.
Diese Schäden können in Folge
einer unsachgemäßen Handhabung
entstehen.
Lieferumfang
a Kurzanleitung
b PicoPix Max One Projektor (PPX520/INT)
c Aufbewahrungstasche
d 2 × Netzteiladapter (GB, US)
e 2 × AAA-Batterien
f 1 × Netzadapter
g Fernbedienung
d
c
e
f
g
b
a
Quick Start
Guide
Kundendienstzentrum
Die Support-Hotline finden Sie in der
Garantiekarte oder online:
Web: www.philips.com/support
E-Mail: philips.projector.eu@screeneo.com
Internationale Telefonnummer: +41 215 391 665
Für Informationen bezüglich etwaiger
Auslandsgebühren wenden Sie sich bitte an
Ihren Anbieter.
Zugang zur elektronischen
Bedienungsanleitung erhalten Sie unter
https://support.philipsprojection.com
Das Community-Forum finden Sie unter
https://community.philipsprojection.com

4 Philips · PicoPix Max One
1 Allgemeine
Sicherheit-
shinweise
Nehmen Sie sämtliche der aufgeführten Warn-
und Sicherheitshinweise zur Kenntnis. Nehmen
Sie nur solche Änderungen oder Einstellungen
vor, die in dieser Bedienungsanleitung
beschrieben sind. Eine falsche Bedienung
und unsachgemäße Handhabung kann
zu Personen- und Sachschäden oder
Datenverlusten führen.
Einrichten des Produkts
Dieses Produkt ist ausschließlich zur
Verwendung in Innenräumen vorgesehen.
Stellen Sie das Produkt auf eine stabile, ebene
Oberfläche. Um mögliche Verletzungen oder
Schäden am Produkt zu vermeiden, sind
sämtliche Kabel so zu verlegen, dass niemand
darüber stolpern kann.
Die Inbetriebnahme des Produkts in Räumen
mit hoher Luftfeuchtigkeit ist nicht gestattet.
Berühren Sie weder Netzstecker noch
Netzanschluss mit nassen Händen.
Sorgen Sie dafür, dass das Produkt an einem
ausreichend belüfteten Ort aufgestellt ist und
achten Sie darauf, dass es nicht abgedeckt
wird. Bringen Sie das Produkt also während
des Betriebs nicht in geschlossenen Schränken,
Kisten oder sonstigen eingefassten Räumen
unter. Die Linse des Projektors darf während
des Betriebs nicht abgedeckt werden.
Schützen Sie das Produkt stets vor direkter
Sonneneinstrahlung, Hitze, starken
Temperaturschwankungen und Feuchtigkeit.
Stellen Sie das Produkt nicht in unmittelbarer
Nähe eines Heizgeräts oder einer Klimaanlage
auf. Beachten Sie die hierzu die zur Betriebs-
und Umgebungstemperatur gelisteten Angaben
in den technischen Daten (siehe Technische
Daten, Seite 22).
Durch den Betrieb des Produkts über einen
längeren Zeitraum erwärmt sich die Oberfläche
des Gehäuses. Bei Überhitzung versetzt
sich das Produkt jedoch automatisch in den
Standby-Modus.
Achten Sie darauf, dass keine Flüssigkeiten ins
Innere des Produkts gelangen. Sollten doch
einmal Flüssigkeiten oder Fremdkörper in das
Produkt eingedrungen sein, dann nehmen Sie
es unverzüglich außer Betrieb und trennen
es von der Stromversorgung. Lassen Sie das
Produkt anschließend von einem autorisierten
Kundendienstzentrum überprüfen.
Lassen Sie im Umgang mit dem Produkt stets
Vorsicht walten. Vermeiden Sie Berührungen
der Projektorlinse. Platzieren Sie niemals
schwere oder scharfkantige Gegenstände auf
dem Produkt oder dem Netzkabel.
Sollte das Produkt zu heiß werden oder Rauch
entwickeln, nehmen Sie es unverzüglich
außer Betrieb und trennen Sie es von der
Stromversorgung. Lassen Sie das Produkt
anschließend von einem autorisierten
Kundendienstzentrum überprüfen. Halten
Sie das Produkt von offenen Flammen (z. B.
Kerzen) fern.
Das Produkt verfügt über einen integrierten
Akku. Das Zerlegen und Modifizieren des Akkus
ist nicht gestattet. Der eingebaute Akku darf
ausschließlich von qualifizierten Mitarbeitern
unseres Kundendienstes ausgetauscht werden.
Versuchen Sie nicht, den verbauten Akku
auf eigene Faust auszutauschen. Der
unsachgemäße Umgang mit dem Akku oder
die Verwendung eines falschen Akkutyps kann
zu Schäden am Produkt führen und ernsthafte
Verletzungen verursachen.
GEFAHR!
Explosionsgefahr bei Verwendung von
Batterien des falschen Typs!
Bei Verwendung des falschen
Batterietyps besteht Explosionsgefahr.
Setzen Sie die für die Fernbedienung
vorgesehenen Batterien (ggf. auch Akkus) keiner
übermäßigen Hitze durch Sonneneinstrahlung
oder offenen Flammen aus.
Unter folgenden Bedingungen kann sich im
Inneren des Produkts eine Feuchtigkeitsfilm
bilden, der Fehlfunktionen hervorrufen kann:
• wenn das Produkt von einer kalten in
eine warme Umgebung gebracht wird;
• nach dem Aufheizen eines kühlen
Raumes;
• wenn das Produkt in einem Raum
aufgestellt wird, der eine hohe
Luftfeuchte aufweist.
Gehen Sie wie folgt vor, um etwaigen
Feuchtigkeitsbeschlag zu vermeiden:
1 Stecken Sie das Produkt stets in eine dicht
verschließbare Plastiktüte, bevor Sie es in
einen anderen Raum bringen. So kann es

Allgemeine Sicherheit-shinweise 5
sich den Raumbedingungen allmählich
anpassen.
2 Warten Sie nun ein bis zwei Stunden, bevor
Sie das Produkt wieder aus der Plastiktüte
nehmen.
Von einer Inbetriebnahme des Produkts in
einer sehr staubigen Umgebung ist abzusehen.
Staubpartikel und andere Fremdkörper können
andernfalls zu ernsthaften Schäden am Produkt
führen.
Setzen Sie das Produkt keinen starken
Erschütterungen und Vibrationen aus. Dies
kann andernfalls zu Schäden an den im Inneren
verbauten Komponenten führen.
Lassen Sie Kinder das Produkt nicht
unbeaufsichtigt benutzen. Das
Verpackungsmaterial darf nicht in die Hände
von Kindern gelangen.
Nehmen Sie das Produkt zu Ihrer eigenen
Sicherheit nicht während eines Gewitters in
Betrieb.
Reparaturen
Nehmen Sie keine eigenständigen
Reparaturarbeiten an dem Produkt vor. Eine
unsachgemäße Wartung kann zu ernsthaften
Verletzungen oder Schäden am Produkt führen.
Lassen Sie das Produkt daher ausschließlich
von einem autorisierten Kundendienstzentrum
in Stand setzen.
Informationen zu autorisierten
Kundendienstzentren finden Sie auf der diesem
Produkt beiliegenden Garantiekarte.
Entfernen Sie nicht das Typenschild von
diesem Produkt, da andernfalls sämtliche
Garantieansprüche erlöschen.
Stromversorgung
Verwenden Sie ausschließlich Netzteile, die
für dieses Produkt zugelassen wurden (siehe
Technische Daten, Seite 22).
Prüfen Sie, ob die Netzspannung des
Netzteils mit der vorhandenen Netzspannung
am Aufstellungsort übereinstimmt. Dieses
Produkt entspricht dem daran vermerkten
Spannungstyp.
Die Steckdose muss sich in der Nähe des
Produkts befinden und sollte jederzeit leicht
zugänglich sein.
Die Kapazität des verbauten Akkus lässt mit
der Zeit nach. Sollte sich das Produkt nur noch
mit dem Netzteil in Betrieb nehmen lassen,
dann ist der verbaute Akku defekt. Wenden Sie
sich an ein autorisiertes Kundendienstzentrum,
um den Austausch des verbauten Akkus in die
Wege zu leiten.
VORSICHT!
Verwenden Sie zum Ausschalten des
Projektors stets die Taste .
Nehmen Sie das Produkt vor der Durchführung
etwaiger Reinigungsarbeiten stets außer Betrieb
und trennen Sie es von der Stromversorgung
(siehe Reinigung, Seite 19). Verwenden Sie
ein weiches, fusselfreies Tuch. Verwenden Sie
unter keinen Umständen flüssige, gasförmige
oder leicht entflammbare Reinigungsmittel wie
Sprays, Scheuermittel, Polituren oder Alkohol.
Achten Sie während der Reinigung darauf,
dass keine Flüssigkeiten ins Innere des Geräts
gelangen.
GEFAHR!
Gefahr von Augenreizungen!
Dieses Produkt ist mit einer
sehr leistungsstarken LED (Licht
emittierende Diode) ausgestattet, die
äußerst helles Licht ausstrahlt. Blicken
Sie deshalb während des Betriebs nie
direkt in die Projektorlinse. Andernfalls
können Reizungen oder Schäden der
Augen die Folge sein.

6 Philips · PicoPix Max One
2 Übersicht
Ansicht von oben
a b c d d
Max One
OK
a LED-Betriebsanzeige
b
Kehren Sie zum vorherigen Menübildschirm
zurück.
c
• Mit diesen Tasten navigieren Sie durch
die verschiedenen Menüpunkte.
• Lautstärkepegel verringern.
d
• Mit diesen Tasten navigieren Sie durch
die verschiedenen Menüpunkte.
• Lautstärkepegel erhöhen.
e
• Erhalten Sie Zugang zum
Einstellungsmenü.
• Bestätigen Sie eine vorgenommene
Auswahl oder Eingabe.
Vorderansicht
a
b
a Projektorlinse
b Fokus der Kamera
Passen Sie die Bildschärfe an.
Rückansicht
HDMI USB DC
a b c d e f g
a
• Halten Sie die Ein/Aus-Taste eine
Sekunde lang gedrückt, um den
Projektor ein- bzw. auszuschalten.
• Bei eingeschaltetem Projektor, leuchtet
die LED-Betriebsanzeige weiß. Wird
der Projektor ausgeschaltet, erlischt die
LED-Betriebsanzeige.
• Beim Laden des Projektors leuchtet
die LED-Betriebsanzeige rot, und zwar
unabhängig davon, ob sich dieser im
ein- oder ausgeschalteten Zustand
befindet.
b IR-Sensor
c HDMI-Anschluss
Stellen Sie eine Verbindung zum HDMI-
Ausgang eines Wiedergabegeräts her.
d
3,5-mm-Audioausgang zum Anschließen
externer Lautsprecher oder Kopfhörer.
e USB-A-Anschluss
Anschluss zum Betrieb von USB-Geräten
wie Amazon Fire TV-Stick®, Roku®-
Streaming-Stick (nicht für Massenspeicher
oder Media-Player).
f USB-C
• Stellen Sie hierüber eine Verbindung
zu dem USB-C-Videoausgang eines
Wiedergabegeräts her.
• Lädt ein USB-C-Gerät wie
beispielsweise ein Smartphone auf.
g DC
Schließen Sie hier das Netzteil an.

Verbinden 7
Fernbedienung
OK
a
d
e
b
c
f
g
h
a
• Schnellzugriff und Auswahl einer
Eingangsquelle.
• Erhalten Sie Zugang zum
Einstellungsmenü.
b
Bestätigen Sie eine vorgenommene
Auswahl oder Eingabe.
c
Aktiviert die Anpassung der Scharfstellung.
d
Erhalten Sie Zugang zum Einstellungsmenü.
e Lautstärkeregler
Erhöht, verringert oder schaltet die
Lautstärke stumm.
f
Kehren Sie zum vorherigen Menübildschirm
zurück.
g Navigationstasten
Mit diesen Tasten navigieren Sie durch die
verschiedenen Menüpunkte.
h
Halten Sie die Ein/Aus-Taste eine Sekunde
lang gedrückt, um den Projektor ein- bzw.
auszuschalten.
3 Verbinden
Hinweis
Um Bilder auf die Projektionsfläche
werfen zu können, müssen Sie den
Projektor an ein HDMI-USB-C-Gerät
anschließen.
Stellen Sie zunächst einmal sicher, dass
alle Geräte von der Stromversorgung
getrennt sind, bevor Sie Verbindungen
zu diesen herstellen oder bestehende
Verbindungen ändern.
Anschließen eines
HDMI-Geräts für die
Bildprojektion
Schließen Sie ein Wiedergabegerät (z. B.
einen Blu-ray-Player, eine Spielekonsole, eine
Videokamera, eine Digitalkamera oder einen
PC) an den HDMI-Anschluss des Projektors
an. Bei dieser Verbindung wird das Bild auf der
Projektionsfläche angezeigt und der Ton über
den Projektor wiedergegeben.
1 Nehmen Sie ein HDMI-Kabel zur Hand und
verbinden Sie es mit dem HDMI-Anschluss
des Projektors und dem HDMI-Ausgang am
Wiedergabegerät.
HDMI USB DC
2 Der Projektor schaltet bei erfolgreicher
Herstellung einer Verbindung zum HDMI-
Anschluss automatisch auf den HDMI-
Eingang um. Auf der Projektionsfläche
erscheint das Bild.

8 Philips · PicoPix Max One
• Wenn auf der Projektionsfläche kein
Bild erscheint, wählen Sie den HDMI-
Eingang manuell aus. Drücken Sie
auf der Fernbedienung, um die
Eingangsquellenliste aufzurufen und
wählen Sie dann HDMI aus.
USB-C-Anschluss für
Bildprojektion
Über den USB-C-Anschluss können Sie ein
USB-C-Gerät (z. B. ein Mobiltelefon, Tablet
oder Laptop) an den Projektor anschließen.
Bei dieser Verbindung wird das Bild auf der
Projektionsfläche angezeigt und der Ton über
den Projektor wiedergegeben.
1 Nehmen Sie ein USB-C-Kabel zur Hand
und schließen Sie ein Ende an den
-Anschluss des Projektors und das andere
Ende an den USB-C-Anschluss des
Wiedergabegeräts an.
HDMI USB DC
2 Der Projektor schaltet bei erfolgreicher
Herstellung einer Verbindung zum USB-
C-Anschluss automatisch auf den USB-
C-Eingang um. Auf der Projektionsfläche
erscheint das Bild.
• Wenn auf der Projektionsfläche kein
Bild erscheint, wählen Sie den USB-
C-Eingang manuell aus. Drücken Sie
auf der Fernbedienung, um die
Eingangsquellenliste aufzurufen und
wählen Sie dann USB-C aus.
Hinweis
Der Projektor unterstützt lediglich
Audioinhalte im Stereo-Format. Sollte
der Projektor kein hörbares Tonsignal
vom Wiedergabegerät ausgeben,
überprüfen Sie, ob das Format für die
Tonausgabe in den Einstellungen des
Wiedergabegeräts auf Stereo eingestellt
ist.

Betrieb 9
4 Betrieb
Hinweis
Um Bilder auf die Projektionsfläche
werfen zu können, müssen Sie ein
HDMI- oder ein USB-C-Gerät an den
Projektor anschließen (siehe Verbinden,
Seite 7).
Aufstellen/Anbringen des
Projektors
Stellen Sie den Projektor auf einen stabilen,
ebenen, sich vor der Projektionsfläche
befindlichen Untergrund.
Alternativ können Sie auch eine der
verschiedenen Möglichkeiten zur Montage des
Projektors anwenden (siehe Möglichkeiten zur
Aufstellung/Montage, Seite 12).
Anschließen der
Stromversorgung
Der Projektor kann entweder über das externe
Netzteil oder den eingebauten Akku mit Strom
versorgt werden.
VORSICHT!
Verwenden Sie zum Ein- und
Ausschalten des Projektors stets die
Taste .
Netzbetrieb
• Schließen Sie nun das mitgelieferte Netzteil
an den Netzeingang des Projektors und
anschließend an eine Steckdose in der
Nähe an.
HDMI USB DC
a
b
Verwenden Sie bei Bedarf einen der im
Lieferumfang enthaltenen Netzteiladapter
für den Anschluss an die Netzsteckdose.
Um einen dieser Adapter an das
Netzteil anzuschließen, richten Sie die
Aussparungen am Adapter auf die beiden
Kontaktstifte des Netzteils aus und
schieben dann den Adapter hinein.
Akkubetrieb
Der Projektor kann zu Mobilitätszwecken auch
über den verbauten Akku betrieben werden.
Aufladen des Projektors
Laden Sie den Projektor vor der ersten
Inbetriebnahme mindestens 1,5 Stunden lang
auf.
Laden Sie den Projektor anschließend
immer dann wieder auf, sobald auf der
Projektionsfläche das Symbol für eine geringe
Akkukapazität eingeblendet wird.
• Schließen Sie den Projektor zum Laden
des verbauten Akkus wie im Abschnitt
„Netzbetrieb“ beschrieben an ein externes
Netzteil an.
• Die LED-Betriebsanzeige am Projektor
leuchtet während des Ladevorgangs rot. Ist
der Akku im Projektor vollständig geladen,
erlischt die LED-Betriebsanzeige wieder.
• Wenn der Projektor eingeschaltet ist, wird
zuerst die externe Stromversorgung zum
Betrieb des Projektors verwendet. Strom,
der dazu nicht benötigt wird, sorgt für die
Aufladung des Akkus.
• Möchten Sie den Ladevorgang
beschleunigen, schalten Sie den Projektor
währenddessen aus.
Hinweis
Die Kapazität des verbauten Akkus
lässt mit der Zeit nach. Sollte sich der
Projektor nur noch mit dem externen
Netzteil in Betrieb nehmen lassen,
dann ist der eingebaute Akku defekt.
Wenden Sie sich an ein autorisiertes
Kundendienstzentrum, um den
Austausch des verbauten Akkus in die
Wege zu leiten.

10 Philips · PicoPix Max One
Inbetriebnahme der
Fernbedienung
VORSICHT!
Die unsachgemäße Verwendung
der Batterien kann zu Überhitzung,
Explosion, Brandgefahr und
Verletzungen führen. Auslaufende
Batterien können die Fernbedienung
beschädigen.
Setzen Sie die Fernbedienung keiner
direkten Sonneneinstrahlung aus.
Sehen Sie davon ab, die Batterien zu
verformen, zu zerlegen oder aufzuladen.
Vermeiden Sie den Kontakt mit offenen
Flammen und Wasser.
Aufgebrauchte Batterien sind
unverzüglich zu ersetzen.
Nehmen Sie die Batterien bei
längerem Nichtgebrauch stets aus der
Fernbedienung.
1 Halten Sie die Abdeckung des Batteriefachs
gedrückt und schieben Sie sie gleichzeitig,
um das Batteriefach zu öffnen.
2 Legen Sie nun die im Lieferumfang
enthaltenen Batterien (Typ AAA) unter
Berücksichtigung der angegebenen
Polarität (+/-) ein.
3 Verschließen Sie das Batteriefach
anschließend wieder.
Hinweis
Richten Sie die Fernbedienung bei
der Verwendung auf den sich an der
Rückseite des Projektors befindlichen
IR-Sensor und vergewissern Sie sich,
dass sich zwischen ihr und dem IR-
Sensor keine Gegenstände befinden, die
den Empfang beeinträchtigen könnten.
Einschalten und Einrichten
1 Halten Sie die Taste am Projektor (oder
die Taste auf der Fernbedienung) eine
Sekunde lang gedrückt, um das Gerät ein-
bzw. auszuschalten.
• Befindet sich der Projektor im
eingeschalteten Betriebszustand und
wird der darin verbaute Akku nicht
aufgeladen, dann beginnt die LED-
Betriebsanzeige weiß zu leuchten.
• Beim Laden des Projektors leuchtet
die LED-Betriebsanzeige stets rot, und
zwar unabhängig davon, ob sich dieser
im ein- oder ausgeschalteten Zustand
befindet.
Einstellen der Sprache
1 Drücken Sie die Taste auf der
Fernbedienung, um das Einstellmenü
aufzurufen. Navigieren Sie dann zum
Menüpunkt Language (Sprache) und
drücken Sie OK.
2 Legen Sie anschließend mit den Tasten
/ die gewünschte Sprache fest.
Ändern der
Projektionsflächengröße
Die Größe der Projektionsfläche (bzw. des
projizierten Bildes) wird durch den Abstand
zwischen der Linse des Projektors und der
Projektionsfläche bestimmt.
• Der Abstand zur Projektionsfläche muss
das 1,2-fache der gewünschten Diagonale
Ihres Projektionsbildes betragen.
• Mit der digitalen Zoomfunktion haben Sie
zudem die Möglichkeit, das Projektionsbild
auf 50 % der ursprünglichen Größe
zu verkleinern. Drücken Sie auf der
Fernbedienung, um das Einstellmenü
aufzurufen. Navigieren Sie dann zum
Menüpunkt Digital Zoom (Digitaler Zoom)
und drücken Sie OK. Verwenden Sie
anschließend die Tasten / , um die
Bildgröße anzupassen.

Betrieb 11
Einstellen der Bildschärfe
Drücken Sie die Taste auf der
Fernbedienung, um die Fokuseinstellung
aufzurufen, und verwenden Sie dann die sich
ebenfalls auf der Fernbedienung befindlichen
Tasten / zur Anpassung der Bildschärfe. Sind
Sie mit der Bildschärfe zufrieden, drücken Sie
die Taste , um die Fokuseinstellung wieder
auszublenden.
Korrektur des Projektionsbildes
Automatische Bildkorrektur (Trapezkorrektur)
Der Projektor kann das Projektionsbild
automatisch korrigieren und so anpassen, dass
es bei einer Bewegung des Projektors nach
oben oder unten wieder eine rechteckige Form
annimmt.
Um die automatische vertikale Trapezkorrektur
zu aktivieren, drücken Sie auf der
Fernbedienung, um das Einstellmenü
aufzurufen und navigieren Sie dann
zum Menüpunkt Auto Keystone - On
(Auto Schlussstein - Ein).
Manueller Schlussstein (4-Ecken-Korrektur)
Sie können die Bildform durch eine
Neuausrichtung der vier Ecken des
Projektionsbildes auch manuell anpassen. Auf
diese Weise können Sie auch eine eventuelle
rechts- oder linkslastige Lage des Projektors
ausgleichen.
1 Achten Sie darauf, dass Sie den Menüpunkt
Auto Keystone - Off (Auto Schlussstein -
Aus) gewählt haben, um diese Funktion
zu aktivieren. Drücken Sie auf der
Fernbedienung, um das Einstellmenü
aufzurufen und navigieren Sie dann zum
Menüpunkt Manual Keystone (Manueller
Schlussstein).
2 Wenn Sie die Benutzeroberfläche der
4-Ecken-Korrektur aufgerufen haben,
halten Sie dann auf der Fernbedienung /
gedrückt, um die Werte für die horizontale
Position bzw. / , um die Werte für die
vertikale Position anzupassen. Wiederholen
Sie diese Schritte bei Bedarf, um auch
die Positionen der anderen Bildecken
anzupassen.
Manuelle horizontale Korrektur
Sie können Trapezverzerrungen oder ein
verzerrtes Bild in der horizontalen Ausrichtung
manuell korrigieren.
1 Achten Sie darauf, dass Sie den Menüpunkt
Auto Keystone - Off (Auto Schlussstein -
Aus) gewählt haben, um diese Funktion
zu aktivieren. Drücken Sie auf der
Fernbedienung, um das Einstellmenü
aufzurufen. Navigieren Sie dann zum
Menüpunkt Manual Horiz. Keyst. (Manueller
horizontaler Schlussstein).

12 Philips · PicoPix Max One
2 Verwenden Sie anschließend die Tasten
/ , um das Projektionsbild in die
gewünschte Form zu bringen.
Kalibrierung
Sollte die automatische Trapezkorrektur das
Bild nicht in eine optimale, rechteckige Form
gebracht haben, können Sie zusätzlich eine
Bildkalibrierung vornehmen. Achten Sie dabei
darauf, dass der Projektor absolut waagerecht
ausgerichtet ist. Die Kalibrierung zur Korrektur
der Bildform erfordert die Ausführung der
nachstehend aufgeführten Schritte.
1 Achten Sie darauf, dass Sie den Menüpunkt
Auto Keystone - Off (Auto Schlussstein -
Aus) gewählt haben, um diese Funktion zu
aktivieren. Stellen Sie den Projektor auf den
Boden oder auf eine andere gerade (ebene)
Oberfläche.
2 Drücken Sie auf der Fernbedienung, um
das Einstellmenü aufzurufen. Navigieren Sie
dann zum Menüpunkt Keystone Calibration
(Kalibrierung der Trapezkorrektur).
Möglichkeiten zur
Aufstellung/Montage
Zur Aufstellung bzw. Montage des
Projektors stehen Ihnen die folgenden
Konfigurationsmöglichkeiten zur Auswahl.
Befolgen Sie die nachstehend aufgeführten
Anweisungen, um den Projektor
ordnungsgemäß zu positionieren.
Hinweis
Erwerben Sie für die Deckenmontage
eine von einem Fachmann für
Montagearbeiten empfohlene
Projektorhalterung und befolgen Sie die
beiliegenden Anweisungen.
Vergewissern Sie sich vor dem Befestigen
an der Decke, dass das Deckenmaterial
für das Gewicht des Projektors und der
Halterung ausgelegt ist.
Das Produkt ist hierbei stets
unter sorgfältiger Einhaltung der
Montageanweisungen an der Decke
anzubringen und sicher zu befestigen.
Eine unsachgemäße Deckenmontage
kann zu Unfällen, ernsthaften
Verletzungen oder Sachschäden führen.
Tisch (Projektion von vorne)
1 Stellen Sie den Projektor auf einen vor
der Projektionsfläche positionierten
Tisch. Hierbei handelt es sich um die
gebräuchlichste Methode, mit der sich der
Projektor schnell aufstellen und bei Bedarf
einfach transportieren lässt.
2 Drücken Sie zur ordnungsgemäßen
Ausrichtung des Projektionsbildes auf
der Fernbedienung die Taste , um das
Einstellmenü aufzurufen. Navigieren Sie
dann zum Menüpunkt Proj. Direc. - Front
proj. (Projektionsr. - Frontproj.) und drücken
Sie OK.

Betrieb 13
Decke (Projektion nach vorne)
1 Bringen Sie den Projektor mit der Oberseite
nach oben so an der Decke an, dass dieser
sich vor der Projektionsfläche befindet.
Für die Deckenmontage ist eine separat
erhältliche Halterung für den Projektor
erforderlich.
2 Drücken Sie zur ordnungsgemäßen
Ausrichtung des Projektionsbildes auf
der Fernbedienung die Taste , um das
Einstellmenü aufzurufen. Navigieren Sie
dann zum Menüpunkt Proj. Direc. - Rev.
front proj. (Projektionsr. - Umgek. Frontproj.)
und drücken Sie OK.
Tisch (Projektion von hinten)
1 Stellen Sie den Projektor auf einen hinter
der Projektionsfläche positionierten
Tisch. Hierzu wird eine separat erhältliche
Rückprojektionswand benötigt.
2 Drücken Sie zur ordnungsgemäßen
Ausrichtung des Projektionsbildes auf
der Fernbedienung die Taste , um das
Einstellmenü aufzurufen. Navigieren Sie
zum Menüpunkt Proj. Direc. - Rear proj.
(Projektionsr. - Rückproj.) und drücken Sie
OK.
Decke (Projektion von hinten)
1 Bringen Sie den Projektor mit der Oberseite
nach oben so an der Decke an, dass
dieser sich hinter der Projektionsfläche
befindet. Für die Deckenmontage hinter
der Projektionsfläche ist eine separat
erhältliche Halterung für den Projektor
und eine spezielle Rückprojektionswand
erforderlich.
2 Drücken Sie zur ordnungsgemäßen
Ausrichtung des Projektionsbildes auf
der Fernbedienung die Taste , um das
Einstellmenü aufzurufen. Navigieren Sie
dann zum Menüpunkt Proj. Direc. - Rev.
rear proj., (Projektionsr. - Umgek. Rückproj.)
und drücken Sie OK.

14 Philips · PicoPix Max One
5 Sonstige
Funktionen
Wiedergabe über externe
Lautsprecher oder
Kopfhörer
Schließen Sie externe Lautsprecher
oder einen Kopfhörer an den Projektor
an. Bei dieser Verbindung wird der vom
Projektor ausgegebene Ton über die
externen Lautsprecher oder den Kopfhörer
wiedergegeben.
GEFAHR!
Gefahr von Hörschäden!
Verringern Sie vor dem Anschließen der
Kopfhörer stets zuerst die Lautstärke
am Projektor.
Verwenden Sie den Projektor nicht
über einen längeren Zeitraum bei hoher
Lautstärke. Dies gilt insbesondere
bei der Verwendung von Kopfhörern.
Andernfalls können Hörschäden
entstehen.
1 Nehmen Sie ein 3,5-mm-Audiokabel zur
Hand und schließen Sie das eine Ende
an den -Anschluss des Projektors
und das andere Ende an den analogen
Audioeingang (3,5-mm-Buchse oder
rote und weiße Buchse) des externen
Lautsprechers.
Sie können aber natürlich auch nur einfach
Ihren Kopfhörer an den -Anschluss des
Projektors anschließen.
• Die Lautsprecher des Projektors werden
automatisch deaktiviert, sobald externe
Lautsprecher oder Kopfhörer an den
Projektor angeschlossen werden.
HDMI USB DC
Verwenden Sie nach dem Anschließen
der Kopfhörer die zur Anpassung des
Lautstärkepegels vorgesehenen Tasten auf
der Fernbedienung (oder am Projektor), um
die Lautstärke auf einen angenehmen Pegel
einzustellen.
Aufladen eines USB-
Gerätes
Sie können ein USB-Gerät (z. B. Smartphone,
MP3-Player oder ein anderes mobiles Gerät)
aufladen.
Über USB-A-Anschluss aufladen
1 Schließen Sie zunächst einen USB-
Datenträger über ein USB-A-Kabel an den
USB-Anschluss des Projektors an.
2 Schalten Sie den Projektor zunächst einmal
ein. Das USB-Gerät wird automatisch
aufgeladen.
• USB-A-Anschluss zum Aufladen von USB-
Geräten wie Amazon Fire TV-Stick®, Roku®-
Streaming-Stick (nicht für Massenspeicher
oder Media-Player).
Über USB-C-Anschluss aufladen
1 Nehmen Sie ein USB-C-Kabel zur Hand
und schließen Sie ein Ende an den USB-C-
Anschluss des Projektors und das andere
Ende an das USB-C-Gerät an.

Sonstige Funktionen 15
2 Schalten Sie den Projektor zunächst
einmal ein. Achten Sie darauf, dass die
Ladefunktion für USB-C-Geräte aktiviert ist.
Drücken Sie auf Fernbedienung, um das
Einstellmenü aufzurufen. Navigieren Sie
dann zum Menüpunkt USB-C Charger - On
(USB-C-Ladegerät - Ein).
Das USB-C-Gerät wird automatisch
aufgeladen.
Um das Laden eines USB-C-Geräts zu
deaktivieren, wählen Sie USB-C Charger -
Off (USB-C-Ladegerät - Aus).
Einsatz von Easy Link
Dieser Projektor unterstützt Easy Link,
dass das HDMI-CEC-Protokoll (Consumer
Electronics Control) verwendet. Sie können
eine einzige Fernbedienung verwenden, um
Easy-Link-kompatible Geräte, die über HDMI
angeschlossen sind, ein- oder auszuschalten.
Der Hersteller garantiert keine 100%ige
Interoperabilität mit allen HDMI-CEC-Geräten.
1 Stellen Sie sicher, dass der Projektor an
ein HDMI-Gerät angeschlossen ist, das die
HDMI-CEC-Funktion unterstützt (siehe
Anschließen eines HDMI-Geräts für die
Bildprojektion, Seite 7).
2 Um die Easy-Link-Funktion dieses
Projektors zu aktivieren, drücken Sie auf
der Fernbedienung, um das Einstellmenü
aufzurufen. Navigieren Sie dann zum
Menüpunkt CEC - On (CEC - Ein).

16 Philips · PicoPix Max One
6 Ändern der
Einstellungen
In diesem Abschnitt erfahren Sie, wie Sie
Änderungen an den Einstellungen des
Projektors vornehmen können.
1 Drücken Sie während des Betriebs des
Projektors die Taste oder auf der
Fernbedienung (oder am Projektor), um
das Einstellmenü aufzurufen.
2 Verwenden Sie nun die Navigationstasten
und die OK-Taste, um die gewünschte
Einstelloption auszuwählen und
anzupassen.
Spracheinstellungen
Wählen Sie hier die gewünschte Sprache für die
Bildschirmmenüs aus.
• Navigieren Sie dazu zum Menüpunkt
Language (Sprache), drücken Sie OK
Wählen Sie dann mit den Tasten / die
gewünschte Sprache aus.
Auswählen der
Eingangsquelle
Navigieren Sie zum Menüpunkt Input
Source (Eingabequelle), um die folgenden
Einstelloptionen anzupassen.
• Auto: Wechselt automatisch zur richtigen
Eingangsquelle, wenn ein HDMI- oder
USB-C-Gerät angeschlossen wurde.
• HDMI: Wählen Sie diese Option, wenn ein
HDMI-Gerät angeschlossen ist.
• USB-C: Wählen Sie diese Option, wenn ein
USB-C-Gerät angeschlossen ist.
Um Bilder auf die Projektionsfläche
werfen zu können, müssen Sie die
richtige Eingangsquelle auswählen.
Bildeinstellungen
Die folgenden Bildeinstellungen stehen Ihnen
hierbei zur Verfügung.
• Keystone Correction (Trapezkorrektur):
Wählen Sie eine Option, um die
Trapezkorrektur vornehmen oder das
verzerrte Bild in eine rechteckige oder
quadratische Form bringen.
• Auto Keystone (Auto Schlussstein):
Hier können Sie die Funktion, die die
Form des Projektionsbildes nach einer
Neigung des Projektors nach oben
oder unten automatisch korrigiert,
aktivieren oder deaktivieren. Wenn
die Auto Keystone (Auto Schlussstein)
aktiviert ist, werden alle anderen
Bildkorrekturoptionen deaktiviert.
• Manual Keystone (Manueller
Schlussstein): Passt die vier Ecken des
Bildes manuell an.
• Manual Horiz. Keyst. (Manueller
horizontaler Schlussstein): Manuelle
Korrektur von Trapezverzerrungen oder
verzerrten Bildern in der horizontalen
Ausrichtung.
• Keystone Calibration (Kalibrierung
der Trapezkorrektur): Sollte die
automatische Trapezkorrektur das Bild
nicht in eine optimale, rechteckige Form
gebracht haben, können Sie zusätzlich
diese Funktion verwenden.

Ändern der Einstellungen 17
• Proj. Direc. (Projektionsr.): Bringen Sie die
Projektion unter Berücksichtigung der
jeweiligen für den Projektor gewählten
Montage- bzw. Aufstellungsart in die
richtige Position.
• Digital Zoom (Digitaler Zoom): Hierüber
können Sie das Projektionsbild auf einen
Wert zwischen 50 % und 100 % der
ursprünglichen Größe skalieren.
• Picture Preset (Bildvoreinstellung): Wählen
Sie zwischen einer der für die Farbhelligkeit
der Bild- und Videoanzeige vordefinierten
Einstellungen.
• Picture Adj. (Bildanp.): Für die
Einstellungsoptionen Brightness/
Contrast/Saturation/Toneburst/Sharpness
(Helligkeit/Kontrast/Sättigung/Toneburst/
Schärfe) können Sie jeweils einen Wert
zwischen 0 und 100 festlegen.
• Color Temp. (Farbtemp.): Wählen Sie die
Option Warm, um die wärmeren Farben
(z. B. Rot) zu verstärken, die Option Cool
(Kühl), um das Bild verstärkt in Blautöne zu
tauchen, oder die Option User (Benutzer),
um im RGB-Modus die Farbwerte ganz
Ihren eigenen Vorstellungen anzupassen.
Einstellungen der
Energieverwaltung
Möchten Sie die Leistungsaufnahme bzw. den
Stromverbrauch des Projektors reduzieren,
navigieren Sie zu einem der nachstehend
aufgeführten Menüpunkte.
• Sleep Timer (Sleep-Timer): Wählen Sie eine
Zeitspanne aus, nach deren Ablauf sich der
Projektor automatisch ausschaltet.
• Brightness mode (Helligkeits-Modus):
Auswahl eines Bildschirmhelligkeitsmodus.
Wiederherstellen der
Werkseinstellungen
Sollte der Projektor nicht ordnungsgemäß
funktionieren, können Sie ihn jederzeit wieder
auf die Werkseinstellungen zurücksetzen.
Beachten Sie, dass dadurch sämtliche aktuellen
Einstellungen gelöscht werden.
• Navigieren Sie zum Menüpunkt Full Reset
(Vollständiger Reset) Drücken Sie dann
OK und befolgen Sie die Anweisungen auf
der Projektionsfläche, um die Rücksetzung
erfolgreich abzuschließen.
Weitere Einstellungen
Zur Auswahl stehen Ihnen auch die folgenden
Optionen.
• Volume (Lautstärke): Stellen Sie die
Lautstärke des Projektors auf den
gewünschten Pegel ein.

18 Philips · PicoPix Max One
7 Wartung und
Pflege
Pflege des verbauten Akkus
Die Kapazität des verbauten Akkus lässt
mit der Zeit nach. Indem Sie die folgenden
Punkte beachten, können Sie jedoch die
Nutzungsdauer des Akkus deutlich verlängern:
• Seien Sie sich dessen bewusst, dass
der Projektor immer im Akkubetrieb
arbeitet, wenn er nicht an eine geeignete
Stromquelle angeschlossen ist. Kann der
Akku keine ausreichend große Leistung
mehr aufrechterhalten, schaltet sich der
Projektor aus. Schließen Sie den Projektor
in einem solchen Fall wieder an das Netzteil
oder eine andere geeignete Stromquelle
an.
• Laden Sie den Akku in regelmäßigen
Abständen wieder auf. Achten Sie darauf,
den Projektor nicht mit vollständig
entladenem Akku aufzubewahren.
• Soll der Projektor über mehrere Wochen
nicht verwendet werden, so nehmen Sie
diesen noch einmal in Betrieb, um den Akku
ein wenig zu entladen.
• Halten Sie sowohl den Projektor als auch
den Akku stets von Wärmequellen fern.
• Sollte sich der Projektor nach dem
Anschließen an das Netzteil nicht mehr
aufladen lassen, nehmen Sie einen
dünnen Stift zur Hand und drücken Sie die
Rücksetztaste (eine kleine Öffnung), die
sich auf der Seitenwand des Projektors
befindet.
Hinweis zur Tiefentladung des Akkus
War der verbaute Akku einer vollständigen
Tiefentladung ausgesetzt, kann der eigentliche
Ladevorgang etwas mehr Zeit in Anspruch
nehmen. Laden Sie den Projektor in einem
solchen Fall mindestens fünf Stunden lang auf,
bevor Sie ihn erneut in Betrieb nehmen.
GEFAHR!
Explosionsgefahr bei Verwendung von
Batterien des falschen Typs!
Versuchen Sie nicht, den verbauten
Akku auf eigene Faust auszutauschen.
• CEC: Aktiviert oder deaktiviert Easy Link
zwischen den Geräten über die HDMI-
Verbindung (siehe Einsatz von Easy Link,
Seite 15).
• USB-C Charger (USB-C-Ladegerät):
Aktiviert oder deaktiviert das Aufladen des
angeschlossenen USB-C-Geräts.
• Position: Legen Sie fest, in welchem Bereich
auf der Projektionsfläche das Einstellmenü
eingeblendet werden soll.
• SW Version (SW-Version): Lassen Sie sich
die aktuell auf dem Projektor installierte
Softwareversion anzeigen.
• Soft. Update (SW-Update): Über diesen
Menüpunkt können Sie mit Hilfe eines
USB-Datenträgers die Systemsoftware
aktualisieren (siehe Aktualisieren der
Software, Seite 19).

Wartung und Pflege 19
VORSICHT!
Schalten Sie den Projektor während des
Aktualisierungsvorgangs nicht aus und
entfernen Sie unter keinen Umständen
den USB-Datenträger.
Aktualisieren der Software über
USB
1 Besuchen Sie unsere Webseite www.philips.
com/support und schauen Sie nach der
aktuellsten Softwareversion. Suchen Sie
nun nach Ihrem Produkt (Modellnummer:
PPX520/INT) und navigieren Sie zur Rubrik
„Software und Treiber“.
2 Laden Sie die komprimierte Softwaredatei
herunter und speichern Sie sie
anschließend im Stammverzeichnis des
USB-Datenträgers.
3 Schließen Sie nun den USB-Datenträger an
den USB-Anschluss des Projektors an.
• Es wird empfohlen, für die
Aktualisierung der Software eine
externe Stromversorgung zu verwenden,
um sicherzustellen, dass das Gerät mit
ausreichend Strom versorgt wird.
4 Drücken Sie auf der Fernbedienung, um
das Einstellmenü aufzurufen. Navigieren Sie
zum Menüpunkt Soft. Update (SW-Update)
und drücken Sie dann OK.
5 Befolgen Sie die Anweisungen
auf der Projektionsfläche, um den
Aktualisierungsvorgang erfolgreich
abzuschließen.
Reinigung
GEFAHR!
Hinweise zur Reinigung!
Verwenden Sie ein weiches, fusselfreies
Tuch. Verwenden Sie unter keinen
Umständen flüssige, gasförmige oder
leicht entflammbare Reinigungsmittel
(Sprays, Scheuermittel, Polituren
oder Alkohol). Achten Sie während
der Reinigung darauf, dass keine
Feuchtigkeit ins Innere des Projektors
gelangt. Besonders vom Aufsprühen
von Reinigungsflüssigkeiten auf den
Projektor ist dringend abzusehen.
Wischen Sie sanft über die Oberflächen
des Projektorgehäuses. Lassen Sie
dabei stets Vorsicht walten, um die
Oberflächen nicht versehentlich zu
zerkratzen.
Reinigung der Projektorlinse
Verwenden Sie zur Reinigung der Linse des
Projektors ausschließlich einen weichen Pinsel
oder ein speziell für Linsen vorgesehenes
Reinigungstuch.
GEFAHR!
Verwenden Sie keine flüssigen
Reinigungsmittel!
Verwenden Sie zum Reinigen der Linse
keine flüssigen Reinigungsmittel, um
Beschädigungen an der Beschichtung
zu vermeiden.
Aktualisieren der Software
Die aktuellste Softwareversion des Projektors
finden Sie unter www.philips.com/support.
Damit stehen Ihnen stets die besten
Funktionen und die größtmögliche Anzahl der
vom Projektor unterstützten Dateiformate zur
Verfügung.
Überprüfen Sie zunächst einmal die aktuell auf
Ihrem Projektor installierte Softwareversion,
bevor Sie mit der Softwareaktualisierung
beginnen:
• Drücken Sie die Taste auf der
Fernbedienung, um das Einstellmenü
aufzurufen. Navigieren Sie dann zum
Menüpunkt SW Version (SW-Version).

20 Philips · PicoPix Max One
Fehlerbehebung
Schnellhilfe
Sollte ein Problem auftreten, das sich mit
den in der Bedienungsanleitung aufgeführten
Anweisungen nicht beheben lässt, dann führen
Sie die folgenden Schritte aus.
1 Schalten Sie zunächst den Projektor
aus, indem Sie die Ein/Aus-Taste eine
Sekunde lang gedrückt halten.
2 Warten Sie nun mindestens 10 Sekunden
lang.
3 Schalten Sie den Projektor wieder ein,
indem Sie die Ein/Aus-Taste erneut eine
Sekunde lang gedrückt halten.
4 Sollte das Problem weiterhin bestehen,
wenden Sie sich an unseren technischen
Kundendienst oder Ihren Fachhändler.
Probleme Ursachen und Lösungen
Der Projektor lässt sich nicht in Betrieb
nehmen bzw. wird nicht mit Strom versorgt.
• Ziehen Sie das Netzkabel ab, schließen Sie es
wieder an und versuchen Sie, den Projektor
erneut einzuschalten.
• Die verbleibende Akkukapazität ist zu gering.
Schließen Sie den Projektor an das Netzteil oder
eine andere externe Stromversorgung an.
• Verwenden Sie das Original-Netzteil.
Auf der Projektionsfläche erscheint kein
Bild.
• Um Bilder auf die Projektionsfläche werfen zu
können, müssen Sie ein HDMI- oder ein USB-
C-Gerät an den Projektor anschließen (siehe
Verbinden, Seite 7).
• Wählen Sie die richtige Eingangsquelle.
Drücken Sie auf der Fernbedienung, um
die Eingangsquellenliste zur Auswahl der
Eingangsquelle aufzurufen.
• Überprüfen Sie, ob der Videoausgang des
externen Geräts aktiviert ist.
Der Akku des Projektors lädt sich nur
langsam auf.
• Wenn der Projektor eingeschaltet ist, wird zuerst
die externe Stromversorgung zum Betrieb des
Projektors verwendet. Strom, der dazu nicht
benötigt wird, sorgt für die Aufladung des Akkus.
• Möchten Sie den Ladevorgang beschleunigen,
schalten Sie den Projektor währenddessen aus.
Der Projektor schaltet sich selbstständig
aus.
• Die verbleibende Akkukapazität ist zu gering.
• Wenn der Projektor über einen längeren Zeitraum
in Betrieb ist, wird die Oberfläche des Gehäuses
heiß. Sorgen Sie dafür, dass sich der Projektor an
einem Ort mit ausreichender Belüftung befindet
und ein Abstand von 30 cm zu allen Seiten
gewährleistet ist.
• Überprüfen Sie, ob das Netzkabel ordnungsgemäß
angeschlossen ist.
Der Projektor lässt sich nicht außer Betrieb
nehmen.
• Halten Sie die Ein/Aus-Taste mindestens 30
Sekunden lang gedrückt.

Wartung und Pflege 21
Probleme Ursachen und Lösungen
Kein Bild vom externen HDMI-Gerät. • Ziehen Sie das HDMI-Kabel ab oder nehmen Sie
das HDMI-Gerät außer Betrieb.
• Warten Sie nun drei Sekunden lang.
• Stecken Sie das HDMI-Kabel wieder ein oder
nehmen Sie das HDMI-Gerät wieder in Betrieb.
Kein Ton vom extern angeschlossenen
Gerät.
• Überprüfen Sie die Kabelverbindung zum
externen Gerät.
• Überprüfen Sie, ob der Ton am externen Gerät
aktiviert ist.
• Möglicherweise funktionieren nur die
Originalkabel des Geräteherstellers.
Kein Ton vom externen HDMI-
Ausgabegerät.
• Stellen Sie am HDMI-Ausgabegerät die
Toneinstellung auf Stereo (PCM) ein.
Kein Ton bei Anschluss Ihres Computers
über ein HDMI-Kabel.
• Überprüfen Sie, ob der Ton am Computer aktiviert
ist und an den Projektor ausgegeben wird.
Der Projektor reagiert nicht auf die Befehle
der Fernbedienung.
• Überprüfen Sie die Batterien der Fernbedienung.
Die Oberfläche des Projektorgehäuses
weist eine hohe Temperatur auf.
• Es ist normal, dass es bei diesem Projektor zu
einer gewissen Wärmeentwicklung kommt.
Der Projektor zeigt nichts an, wenn ein
Notebook angeschlossen ist.
• Prüfen Sie, ob das HDMI-Kabel richtig eingesteckt
worden ist.
• Stellen Sie sicher, dass das Notebook auf
Projektoranzeige geschaltet ist.

22 Philips · PicoPix Max One
8 Anhang
Technische Daten
Technologie / Anzeige
Anzeigetechnologie .............................................DLP
Lichtquelle ....................4 LED-RGB-LED-Kanäle
Auflösung ..................................... 1920 × 1080 Pixel
Unterstützte Auflösung ..............................4K Pixel
Lebensdauer der LED .......................... leisten eine
Betriebsdauer von mehr als 30.000 Stunden
Kontrastverhältnis ........................................ 10.000:1
Seitenverhältnis ....................................16:9 und 4:3
Projektionsverhältnis .......................................... 1,2:1
Projektionsflächengröße (diagonal) .......................
..............................................................75 cm – 305 cm
Abstand zur Projektionsfläche ........ 78 – 320 cm
Projektionsmodi .............. Nach vorne; von hinten;
Decke nach vorne; Decke von hinten
Trapezkorrektur ..............................autom. (vertikal)
Scharfstellung .............................................. elektrisch
4-Ecken-Korrektur .....................................................ja
Digitaler Zoom .............................................................ja
Sensortasten ................................................................ja
Betriebssystem ....................................................Linux
Ton
Integrierte Lautsprecher ......................................4 W
Verbindung
HDMI ......................................... 1 × mit ARC und CEC
USB-C ............................................................1 × (Video)
USB-A 2.0 .............................................. 1 × (aufladen)
Analoger Audioausgang (3,5 mm) ..................... × 1
DC-Buchse ................. 1 × (Netzteil und Aufladen)
Stromquelle
Stromversorgung ............................................Netzteil
... Eingang: 100 – 240 V-, 50-60 Hz, 1,5 A (MAX)
............................... Ausgang: 20 V DC, 3,25 A, 65 W
Eingebauter Akku ............................... . mAh
................ Betriebsdauer von bis zu 5 Stunden
Produktinformationen
Abmessungen (B × T × H) ........ 134 × 136 × 47 mm
.......................................................................................
Gewicht ................................................................. 850 g
Betriebstemperatur.............................. +5 bis +35 °C
Lagertemperatur .............................................. < 60 °C
Verpackungsinhalt
PicoPix Max One Projektor, Fernbedienung
mit 2 Batterien (Typ AAA), Netzteil,
Netzadapterstecker (GB, US),
Objektivabdeckung, Kurzanleitung

Anhang 23
CE-Konformitätserklärung
• Das Produkt darf nur an eine USB-
Schnittstelle der Version USB 2.0 oder
höher angeschlossen werden.
• Das Netzteil muss sich in der Nähe des
Produkts befinden und jederzeit leicht
zugänglich sein.
• Die Betriebstemperatur des zu prüfenden
Geräts (EUT) darf +35 °C nicht überschreiten
und +5 °C nicht unterschreiten.
• Der Stecker gilt als Trennvorrichtung des
Netzteils.
Den vollständigen Text der
Konformitätserklärung können Sie auf der
Webseite www.philips.com einsehen.
FCC-Konformitätserklärung
15�19 Vorschriften bei der Kennzeichnung�
Dieses Produkt entspricht Abschnitt 15 der
FCC-Bestimmungen. Der Betrieb unterliegt
den beiden folgenden Bedingungen: (1) Dieses
Gerät darf keine schädlichen Interferenzen
verursachen und (2) muss alle empfangenen
Interferenzen akzeptieren, einschließlich
Störungen, die einen unerwünschten Betrieb
verursachen.
15�21 Informationen für den Anwender�
Änderungen oder Modifikationen, die nicht
ausdrücklich von der für die Einhaltung der
Bestimmungen zuständigen Partei genehmigt
wurden, können dazu führen, dass der Benutzer
nicht mehr zum Betrieb des Produkts berechtigt
ist.
15�105 Informationen für den Anwender�
Diese Vorrichtung wurde hinreichend geprüft
und entspricht und entspricht, gemäß
Abschnitt 15 der FCC-Bestimmungen, den
Grenzwerten für digitale Geräte der Klasse B.
Diese Grenzwerte sind dazu bestimmt, einen
angemessenen Schutz vor funktechnischen
Interferenzen in Wohngebieten zu
gewährleisten. Dieses Produkt erzeugt und
verwendet Hochfrequenzenergie, bzw. kann
diese ausstrahlen, und kann, sollte es nicht
entsprechend der Anleitung aufgestellt werden,
Störungen im Funkverkehr bewirken. Dennoch
kann nicht garantiert werden, dass bei einer
bestimmten Art der Aufstellung keinerlei
Interferenzen auftreten. Sollte dieses Gerät
den Radio- oder Fernsehempfang stören, was
sich leicht durch Aus- und Einschalten des
Geräts überprüfen lässt, wird dem Benutzer
nahegelegt, die funktechnischen Störungen
durch eine oder mehrere der nachstehend
aufgeführten Maßnahmen zu beheben:
• Verändern Sie die Ausrichtung oder den
Standort der Empfangsantenne.
• Vergrößern Sie den Abstand zwischen dem
Gerät und dem Empfänger.
• Schließen Sie das Gerät an eine Steckdose
an, deren Stromkreis sich von dem des
Empfängers unterscheidet.
• Holen Sie sich Rat beim Händler oder einem
erfahrenen Radio- und Fernsehtechniker
ein.
FCC-ID: 2ASRT-PPX520/INT
Konformität mit den
Richtlinien in Kanada
Dieses Gerät entspricht der kanadischen
Industrierichtlinie CAN ICES-3 (B)/NMB-3(B)
RSS-Gen & RSS-247-Hinweis: Dieses
Gerät entspricht der/den kanadischen RSS-
Industrienorm(en).
Der Betrieb unterliegt den beiden folgenden
Bedingungen:
1 Dieses Gerät darf keine den Funkverkehr
gefährdenden Interferenzen verursachen.
2 Dieses Gerät muss sämtliche empfangenen
Störungen akzeptieren, einschließlich
solcher, die zu einem unerwünschten
Betrieb führen könnten.
Sonstige Hinweise
Die Erhaltung der Umwelt im Rahmen eines
nachhaltigen Entwicklungsplans ist ein
wesentliches Anliegen von Screeneo Innovation
SA. Screeneo Innovation SA ist bestrebt,
umweltfreundliche Systeme zu betreiben.
Daher hat sich Screeneo Innovation SA dazu
entschlossen, der Umweltverträglichkeit
im Lebenszyklus dieser Produkte, von der
Herstellung über die Inbetriebnahme bis hin
zur Entsorgung, einen hohen Stellenwert
beizumessen.

24 Philips · PicoPix Max One
Verpackung: Das Logo (Grüner Punkt)
drückt aus, dass eine anerkannte nationale
Organisation eine Beitragszahlung erhält,
um die Infrastruktur für die Rückgewinnung
und Wiederverwertung von Verpackungen
zu verbessern. Bitte halten Sie sich bei der
Entsorgung der Verpackungsmaterialien an
die für Sie vor Ort geltenden Vorschriften zur
Mülltrennung.
Batterien: Sollte Ihr Produkt Batterien
enthalten, sind diese stets an den dafür
vorgesehenen Sammelstellen zu entsorgen.
Produkt: Der durchgestrichene Mülleimer auf
dem Produkt bedeutet, dass dieses Produkt
nicht im gewöhnlichen Hausmüll entsorgt
werden darf. Unter diesem Gesichtspunkt
werden Sie in den europäischen Vorschriften
dazu aufgefordert, die Entsorgung an eine
der folgenden dafür vorgesehenen Stellen
vorzunehmen:
• An Verkaufsstellen beim Erwerb eines
ähnlichen Geräts.
• An den örtlichen Sammelstellen
(Wertstoffhof, Sonderabholdienste etc.).
So können auch Sie Ihren Beitrag zu
Wiederverwendung und Recycling von
elektronischen und elektrischen Altgeräten
leisten, der dabei helfen kann, die negativen
Auswirkungen für die Umwelt und die
menschliche Gesundheit zu minimieren.
Die verwendeten Papier- und
Kartonverpackungen können dem Altpapier
zugeführt werden. Die Plastikfolien geben Sie
je nach Vorschrift Ihres Landes zum Recycling
oder entsorgen sie im Restmüll.
Warenzeichen: Die in der vorliegenden
Bedienungsanleitung genannten Verweise sind
Warenzeichen der jeweiligen Unternehmen.
Das Fehlen der Symbole ® und ™ rechtfertigt
nicht die Annahme, dass es sich bei den
entsprechenden Begriffen um frei verfügbare
Warenzeichen handelt. Andere hierin
aufgeführte Produktnamen dienen lediglich
zu Zwecken der Kennzeichnung und können
Warenzeichen der jeweiligen Inhaber sein.
Screeneo Innovation SA lehnt jegliche Rechte
an diesen Marken ab.
Weder Screeneo Innovation SA noch seine
verbundenen Unternehmen haften für Schäden,
Verluste, Kosten oder sonstige Aufwendungen,
die dem Käufer oder Dritten aufgrund
von Unfällen, der unsachgemäßen oder
missbräuchlichen Verwendung dieses Produkts
entstehen. Dies gilt auch für nicht genehmigte
Umbauten, Reparaturen oder Änderungen an
diesem Produkt sowie für Fälle, in denen die
von Screeneo Innovation SA bereitgestellten
Betriebs- und Wartungsanweisungen nicht
beachtet wurden.
Screeneo Innovation SA übernimmt keine
Haftung für Schadensersatzansprüche oder
Probleme, die sich aus der Verwendung von
etwaiger Optionen oder Verbrauchsmaterialien
ergeben, die nicht als Originalprodukte von
Screeneo Innovation SA bzw. PHILIPS oder
von Screeneo Innovation SA bzw. PHILIPS
zugelassene Produkte gekennzeichnet sind.
Screeneo Innovation SA haftet auch nicht
für Schäden aufgrund elektromagnetischer
Störungen, die durch die Verwendung anderer
Schnittstellenkabel als jene, die als Produkte
von Screeneo Innovation SA oder PHILIPS
gekennzeichnet sind, verursacht werden.
Alle Rechte vorbehalten. Kein Teil dieser
Publikation darf ohne vorherige schriftliche
Zustimmung von Screeneo Innovation SA
in irgendeiner Form oder auf irgendeine
Weise, elektronisch, mechanisch, mit einem
Fotokopierer, durch Aufzeichnung oder
mit anderen Mitteln vervielfältigt, in einem
Abrufsystem gespeichert oder übertragen
werden. Die hierin enthaltenen Informationen
sind ausschließlich zur Verwendung mit diesem
Produkt vorgesehen. Screeneo Innovation SA
übernimmt keinerlei Verantwortung, sollten
diese Informationen auf andere Geräte
angewendet werden.
Bei dieser Bedienungsanleitung handelt es sich
um ein Dokument ohne Vertragscharakter.
Etwaige Irrtümer, Druckfehler und Änderungen
vorbehalten. Copyright © 2020 Screeneo
Innovation SA.

PicoPix Max One
DE
Screeneo Innovation SA
Route de Lully 5c - 1131 Tolochenaz - Switzerland
Philips and the Philips Shield Emblem are registered trademarks of Koninklijke Philips N.V. used
under license. Screeneo Innovation SA is the warrantor in relation to the product with which this
booklet was packaged.
2020 © Screeneo Innovation SA. All rights reserved.

Manual de
usuario
Registre su producto y reciba asistencia en
www.philips.com/support
PPX520
PicoPix Max One
Portable projector

Introducción ������������������������������������������������3
Estimado cliente ...........................................................3
Sobre este manual de usuario .................................3
Contenido de la caja ...................................................3
Centro de atención al cliente ...................................3
1 Información general de seguridad �� 4
Configuración del producto ..................................... 4
Reparación ......................................................................5
Alimentación eléctrica ................................................5
2 Descripción general ���������������������������� 6
Vista superior ................................................................ 6
Vista frontal ................................................................... 6
Vista posterior ............................................................... 6
Mando a distancia .......................................................7
3 Conectar �������������������������������������������������7
Conexión HDMI para la proyección de
imágenes .........................................................................7
Conexión USB-C para la proyección de
imágenes ........................................................................ 8
4 Operación ��������������������������������������������� 9
Colocación del proyector ......................................... 9
Conexión a la alimentación eléctrica ................... 9
Preparación del mando a distancia ..................... 9
Encender y configurar el proyector......................10
Opciones de colocación .......................................... 11
5 Otras funciones ����������������������������������13
Escuchar usando los altavoces externos o los
auriculares .....................................................................13
Cargar un dispositivo USB ....................................... 14
Usar la conexión fácil ................................................ 14
6 Modificación de los ajustes �������������15
Ajustes de idioma .......................................................15
Selección de la fuente de entrada .......................15
Ajustes de imagen ......................................................15
Ajustes de control de encendido .........................16
Restauración de los ajustes predeterminados 16
Otros ajustes ................................................................16
7 Mantenimiento ����������������������������������� 17
Cuidado de la batería integrada ........................... 17
Limpieza ........................................................................18
Actualización del software ...................................... 18
Solución de problemas ............................................19
8 Anexos �������������������������������������������������� 21
Datos técnicos ............................................................. 21
Declaración CE ........................................................... 22
Declaración FCC ........................................................ 22
Conformidad reglamentaria de Canadá ........... 22
Otras indicaciones .................................................... 22
Índice

Introducción 3
Introducción
Estimado cliente
Gracias por comprar este proyector.
¡Esperamos que disfrute de este producto y de
las múltiples funciones que ofrece!
Sobre este manual de
usuario
La guía de inicio rápido suministrada con este
producto le permitirá empezar a utilizarlo
rápida y fácilmente. Puede encontrar
descripciones detalladas en las siguientes
secciones de este manual de usuario.
Lea atentamente todo el manual de usuario.
Siga todas las instrucciones de seguridad para
garantizar un funcionamiento apropiado de
este producto (consulte Información general
de seguridad, página 4). El fabricante
no asumirá ninguna responsabilidad si no se
siguen estas instrucciones.
Símbolos utilizados
Aviso
Solución de problemas
Este símbolo hace referencia a
recomendaciones que le ayudarán a
utilizar este producto de forma más
eficaz y sencilla.
¡PELIGRO!
¡Peligro de lesiones personales!
Este símbolo advierte del riesgo de
lesiones personales. Una manipulación
inadecuada puede dar lugar a lesiones
corporales o daños materiales.
¡ATENCIÓN!
¡Daños en el producto o pérdida de
datos!
Este símbolo advierte del riesgo
de daños en el producto y de una
posible pérdida de datos. Pueden
producirse daños si no se maneja
adecuadamente.
Contenido de la caja
a Guía de inicio rápido
b Proyector PicoPix Max One (PPX520/INT)
c Bolsa de transporte
d 2 adaptadores de enchufe (UK, US)
e 2 pilas AAA
f 1 adaptador de corriente
g Mando a distancia
d
c
e
f
g
b
a
Quick Start
Guide
Centro de atención al
cliente
Puede encontrar el número de la línea directa
de asistencia en la tarjeta de garantía o en
internet:
Página web: www.philips.com/support
Dirección de correo electrónico:philips.
projector.eu@screeneo.com
Teléfono internacional: +41 215 391 665
¡Consulte el coste de las llamadas
internacionales con su operador telefónico!
Puede acceder al manual electrónico de
usuario en
https://support.philipsprojection.com
Puede acceder al foro de la comunidad en
https://community.philipsprojection.com

4 Philips · PicoPix Max One
1 Información
general de
seguridad
Tenga en cuenta la totalidad de advertencias y
avisos de seguridad. No realice ningún cambio
ni ajuste no recogido en este manual. Un
funcionamiento incorrecto y una manipulación
inadecuada podrían producir lesiones
corporales, daños en el producto o pérdida de
datos.
Configuración del producto
Este producto está previsto únicamente para
su uso en interiores. Coloque el producto de
forma segura sobre una superficie estable y
plana. Para evitar posibles lesiones a personas
o daños en el propio producto, coloque todos
los cables de tal modo que nadie pueda
tropezar con ellos.
No ponga en funcionamiento el producto en
habitaciones húmedas. Nunca toque el cable
o el enchufe conectado a la red con las manos
mojadas.
Durante el funcionamiento, no tape el
producto y asegúrese de que la ventilación
a su alrededor sea apropiada. No coloque el
producto dentro de armarios, cajas u otros
lugares cerrados cuando lo esté utilizando. No
cubras la lente durante el funcionamiento.
Proteja el producto de la luz directa del
sol, el calor, las variaciones importantes
de temperatura y la humedad. No
coloque el producto cerca de radiadores o
acondicionadores de aire. Tenga en cuenta la
información sobre la temperatura indicada en
las especificaciones técnicas (consulte Datos
técnicos, página 21).
El funcionamiento prolongado del producto
provoca el calentamiento de las superficies.
En caso de sobrecalentamiento, el producto
cambia automáticamente al modo de espera.
No permita que se filtre ningún líquido en el
interior del producto. Apague el aparato y
desconéctelo de la red eléctrica si se introduce
en él algún líquido o alguna sustancia extraña.
Acuda a un centro de reparación autorizado
para su inspección.
Siempre manipule cuidadosamente el aparato.
Evite tocar la lente. No coloque objetos
pesados o punzantes sobre el producto ni
sobre el cable de alimentación.
Si el aparato se calienta demasiado o empieza
a emitir humo, apáguelo inmediatamente y
desenchufe el cable de alimentación. Acuda
a un centro de reparación autorizado para su
revisión. Mantenga el producto alejado de
cualquier llama viva (por ejemplo, la de una
vela).
Este producto tiene una batería integrada. No
la desmonte ni modifique. La batería integrada
solo debe ser reemplazada por personal
especializado del servicio técnico.
No intente cambiar usted mismo la batería
integrada. El manejo incorrecto de la batería
o el uso de una batería incorrecta puede
ocasionar daños al producto o lesiones
personales.
¡PELIGRO!
¡Riesgo de explosión debido al uso de
un tipo de pilas incorrecto!
El uso de un tipo de pilas incorrecto
entraña un peligro de explosión.
No exponga las pilas (conjunto de baterías o
baterías integradas) a temperaturas elevadas,
como sería el caso de la exposición a la luz
directa del sol o a una fogata.
En las siguientes condiciones, puede aparecer
una capa de humedad en el interior del
producto que puede dar lugar a un mal
funcionamiento:
• Si se traslada el producto de una zona
fría a otra caliente.
• Tras poner en marcha la calefacción en
una habitación fría.
• Al colocar el producto en una
habitación húmeda.
Para evitar la formación de humedad, proceda
de la siguiente manera:
1 Coloque el producto en una bolsa de
plástico y selle la bolsa antes de trasladarlo
a otra habitación, de manera que se adapte
a las condiciones de la nueva habitación.
2 Espere una o dos horas antes de sacar el
producto de la bolsa de plástico.
El producto no debe utilizarse en ambientes
polvorientos. Las partículas de polvo y otros
objetos extraños pueden dañar el producto.
No exponga el producto a vibraciones
extremas. Podrían dañar los componentes
internos.

Información general de seguridad 5
No deje que los niños manejen el producto sin
supervisión. Los materiales de embalaje deben
mantenerse fuera del alcance de los niños.
Por su propia seguridad, no utilice el producto
durante una tormenta eléctrica.
Reparación
No repare el producto por su cuenta. Un
mantenimiento inadecuado puede dar lugar
a lesiones corporales o daños en el producto.
El producto debe repararse en un centro de
reparación autorizado.
En la tarjeta de garantía suministrada
con el producto, encontrará información
pormenorizada sobre los centros de reparación
autorizados.
No retire el rótulo de modelo del producto, ya
que esto anularía la garantía.
Alimentación eléctrica
Utilice únicamente un adaptador de corriente
que esté homologado para este producto
(consulte Datos técnicos, página 21).
Compruebe si la tensión de red de la unidad de
alimentación se corresponde con la tensión de
red disponible en el lugar donde conectará el
aparato. En el producto se indica su tensión de
funcionamiento.
La toma de corriente debe estar situada cerca
del producto y ser fácilmente accesible.
La capacidad de la batería disminuye con el
tiempo. Si el producto solo funciona conectado
a la alimentación de corriente alterna, significa
que la batería no funciona bien. Contacte con
un servicio técnico autorizado para sustituir la
batería integrada.
¡ATENCIÓN!
Siempre utilice el botón para apagar
el proyector.
Apague el proyector y desenchúfelo de la
corriente antes de limpiar la superficie (consulte
Limpieza, página 18). Utilice un paño
suave que no se deshilache. No utilice nunca
limpiadores líquidos, gaseosos o fácilmente
inflamables (sprays, abrasivos, pulidores,
alcohol). No permita que entre humedad en el
interior del producto.
¡PELIGRO!
¡Riesgo de irritación ocular!
Este producto está equipado con un
led de alta potencia que emite una luz
muy brillante. No mire directamente
a la lente del proyector durante su
funcionamiento. Podría causarle una
irritación en los ojos o daños oculares.

6 Philips · PicoPix Max One
2 Descripción
general
Vista superior
a b c d d
Max One
OK
a Indicador LED
b
Permite volver a la pantalla de menú
anterior.
c
• Permite navegar por las opciones de
menú.
• Para bajar el volumen.
d
• Permite navegar por las opciones de
menú.
• Para subir el volumen.
e
• Para acceder al menú de ajustes.
• Permite confirmar una selección o una
entrada.
Vista frontal
a
b
a Lente de proyección
b Cámara de enfoque
Permite ajustar la nitidez de las imágenes.
Vista posterior
HDMI USB DC
a b c d e f g
a
• Mantenga pulsado un segundo para
encender o apagar el proyector.
• Cuando el proyector está encendido, el
led se ilumina de color blanco. Cuando
el proyector está apagado, el LED se
apaga.
• Cuando el proyector está cargando,
el LED se ilumina en rojo,
independientemente de si el proyector
está encendido o apagado.
b Sensor IR
c Puerto HDMI
Posibilita la conexión a la salida HDMI de
un dispositivo reproductor.
d
Salida de audio de 3,5 mm; para conectar
altavoces externos o auriculares.
e Puerto USB-A
Úselo para dar alimentación a dispositivos
USB cómo el Amazon Fire TV stick® o la
llave USB de transmisión multimedia Roku®
(no es para unidades de almacenamiento
masivo ni para reproductores multimedia).
f USB-C
• Para conectar a la salida de vídeo
USB-C de un dispositivo reproductor.
• Carga un dispositivo USB-C como un
smartphone.
g Toma de CC
Permite la conexión a la alimentación
eléctrica.

Conectar 7
Mando a distancia
OK
a
d
e
b
c
f
g
h
a
• Permite acceso rápido a una fuente de
entrada y seleccionarla.
• Para acceder al menú de ajustes.
b
Permite confirmar una selección o una
entrada.
c
Para activar el ajuste del enfoque.
d
Para acceder al menú de ajustes.
e Control de volumen
Para subir, bajar o silenciar el volumen.
f
Permite volver a la pantalla de menú
anterior.
g Botones de navegación
Permite navegar por las opciones de menú.
h
Mantenga pulsado un segundo para
encender o apagar el proyector.
3 Conectar
Aviso
Debe conectar el proyector a un
dispositivo HDMI o USB-C para poder
visualizar las imágenes en la pantalla de
proyección.
Asegúrese de que todos los dispositivos
estén desconectados de la toma de
corriente antes de realizar o cambiar
alguna conexión.
Conexión HDMI para la
proyección de imágenes
Conecte un dispositivo reproductor (por
ejemplo, un reproductor de Blu-ray, una
consola de juegos, una videocámara, una
cámara digital o un PC) al proyector mediante
la conexión HDMI. Con esta conexión, las
imágenes se verán en la pantalla de proyección
y el audio se reproducirá en el proyector.
1 Conecte la toma HDMI del proyector a la
salida HDMI del dispositivo reproductor con
un cable HDMI.
HDMI USB DC
2 El proyector cambia automáticamente
a la entrada HDMI cuando se realiza la
conexión mediante HDMI. La pantalla de
proyección muestra las imágenes.
• Si no aparece ninguna imagen en la
pantalla de proyección, seleccione
manualmente la entrada HDMI. Pulse en
el mando a distancia para acceder a la lista
de fuentes de entrada y, a continuación,
seleccione HDMI.

8 Philips · PicoPix Max One
Conexión USB-C para la
proyección de imágenes
Conecte un dispositivo USB-C (por ejemplo,
un teléfono móvil, una tableta o un portátil)
al proyector mediante la conexión USB-C.
Con esta conexión, las imágenes se verán
en la pantalla de proyección y el audio se
reproducirá en el proyector.
1 Conecte la toma del proyector al
puerto USB-C del dispositivo reproductor
con un cable USB-C.
HDMI USB DC
2 El proyector cambia automáticamente
a la entrada USB-C cuando se realiza la
conexión mediante USB-C. La pantalla de
proyección muestra las imágenes.
• Si no aparece ninguna imagen en la
pantalla de proyección, seleccione
manualmente la entrada USB-C. Pulse
en el mando a distancia para acceder
a la lista de fuentes de entrada y, a
continuación, seleccione USB-C.
Aviso
El proyector solo es compatible con
el formato de audio estéreo. Si en el
proyector no se escucha el audio del
dispositivo de reproducción, compruebe
que el formato de salida de audio esté
seleccionado en estéreo en el dispositivo
de reproducción.

Operación 9
4 Operación
Aviso
Debe conectar el proyector a un
dispositivo HDMI o USB-C para poder
visualizar las imágenes en la pantalla
de proyección (consulte Conectar,
página 7).
Colocación del proyector
Coloque el proyector en una superficie plana
frente a la superficie de proyección.
También puede colocar el proyector de
diferentes maneras (consulte Opciones de
colocación, página 11).
Conexión a la alimentación
eléctrica
El proyector puede funcionar conectado a la
corriente o mediante la batería integrada.
¡ATENCIÓN!
Siempre utilice el botón para
encender y apagar el proyector.
Funcionamiento mediante
alimentación externa
• Conecte el adaptador de corriente
incluido a la toma del proyector y, a
continuación, a la toma de corriente.
HDMI USB DC
a
b
Si fuera necesario, seleccione un adaptador
de enchufe apropiado para conectarlo.
Para conectar un enchufe de
alimentación suministrado al adaptador
de alimentación, alinee las ranuras del
enchufe de alimentación con las dos
patillas del adaptador de alimentación y,
a continuación, deslice el enchufe hacia
adentro.
Funcionamiento con la batería
integrada
Para una mayor portabilidad, el proyector
puede funcionar también con la batería
integrada.
Carga del proyector
Cargue el proyector durante 1,5 horas antes de
utilizarlo por primera vez.
Cargue el proyector cuando aparezca el icono
de batería baja en la pantalla de proyección.
• Para cargar el proyector, conéctelo a una
fuente externa de alimentación, tal y como
se describe en la sección "Funcionamiento
mediante alimentación externa".
• Mientras se está cargando, el LED del
proyector se ilumina en rojo. Una vez
cargado totalmente, el LED rojo se apaga.
• Cuando se enciende el proyector, la
alimentación externa se utilizará primero
para su funcionamiento y la energía no
utilizada cargará la batería.
• Para una carga más rápida, cárguelo
mientras el proyector está apagado.
Aviso
La capacidad de la batería disminuye
con el tiempo. Si el proyector solo
funciona con alimentación de corriente
externa, significa que la batería no
funciona bien. Contacte con un servicio
técnico autorizado para sustituir la
batería integrada.
Preparación del mando a
distancia
¡ATENCIÓN!
El uso inadecuado de las pilas puede
provocar sobrecalentamiento, explosión
y lesiones personales. Además, puede
entrañar un riesgo de incendio. Las fugas
de las pilas pueden dañar el mando a
distancia.
Nunca exponga el mando a distancia a
la luz solar directa.
No deforme, desarme ni recargue las
pilas.
Evite exponerlas a una llama viva o al
agua.
Cambie inmediatamente las pilas
gastadas.
Retire las pilas del mando a distancia
si no va a utilizarlo durante un periodo
prolongado.

10 Philips · PicoPix Max One
1 Mantenga pulsada la tapa del
compartimiento de la batería, y mientras
lo hace, deslícela para abrirla y acceder al
compartimiento.
2 Coloque las pilas suministradas (tipo
AAA) siguiendo la polaridad correcta (+/-)
indicada.
3 Cierre el compartimento para las pilas.
Aviso
Cuando utilice el mando a distancia,
diríjalo hacia el sensor IR situado en la
parte trasera del proyector y asegúrese
de que no haya obstáculos entre el
sensor y el mando a distancia.
Encender y configurar el
proyector
1 Para encender o apagar el proyector,
mantenga pulsado durante 1 segundo en
el proyector (o en el mando a distancia).
• Cuando esté encendido, el LED del
proyector se ilumina en blanco si no se
está cargando.
• Cuando está cargando, el LED
del proyector se ilumina en rojo,
independientemente de si el proyector
está encendido o apagado.
Selección del idioma
1 Pulse en el mando a distancia
para acceder al menú de ajustes y, a
continuación, navegue hasta seleccionar
Language (Idioma), y pulse OK.
2 Pulse / para seleccionar el idioma.
Cambiar el tamaño de la pantalla
El tamaño de la pantalla de proyección (o el
tamaño de las imágenes) está determinado
por la distancia entre la lente del proyector y la
superficie de proyección.
• La distancia de proyección debe ser
1,2 veces la anchura del tamaño de pantalla
deseado.
• También puede utilizar el zoom digital para
reducir el tamaño de la pantalla hasta un
50 %. Pulse en el mando a distancia
para acceder al menú de ajustes y, a
continuación, navegue hasta seleccionar
Digital Zoom (Zoom digital), y pulse OK.
Entonces pulse / para ajustar el tamaño
de la imagen.
Enfoque de la imagen
Pulse en el mando a distancia para activar el
ajuste de enfoque y, a continuación, pulse /
en el mando a distancia para ajustar la nitidez
de la imagen. Después de ajustar la nitidez de
la imagen, pulse para desactivar el ajuste de
enfoque.
Corrección de la forma de la
imagen
Corrección automática (distorsión trapezoidal
vertical)
El proyector puede corregir automáticamente
la imagen para que sea rectangular al inclinar
el proyector hacia arriba o hacia abajo.
Para habilitar la corrección trapezoidal
vertical automática, pulse en el mando a
distancia para acceder al menú de ajustes y, a
continuación, navegue para seleccionar Auto
Keystone - On (Trap. Auto. - En).

Operación 11
Trap� Manual (corrección de las 4 esquinas)
Puede ajustar manualmente la forma de la
imagen recolocando las cuatro esquinas de la
imagen de proyección. Esto también le permite
corregir la posición izquierda o derecha del
proyector.
1 Para activar esta función, asegúrese de
seleccionar Auto Keystone - Off (Trap.
Auto. - Fuera de). Pulse en el mando a
distancia para acceder al menú de ajustes y,
a continuación, navegue hasta seleccionar
Manual Keystone (Trap. Manual).
2 En la interfaz de corrección de las 4
esquinas, pulsa OK para seleccionar una
esquina de la imagen y, a continuación,
mantén pulsado en el mando a distancia
/ para ajustar los valores de la posición
horizontal y / para ajustar los valores
de la posición vertical. Si lo desea, repite
el mismo paso para ajustar los valores de
posicionamiento de las otras esquinas de
la imagen.
Corrección horizontal manual
Es posible corregir manualmente la distorsión
trapezoidal o las imágenes distorsionadas en
su eje horizontal.
1 Para activar esta función, asegúrese de
seleccionar Auto Keystone - Off (Trap.
Auto. - Fuera de). Pulse en el mando a
distancia para acceder al menú de ajustes y,
a continuación, navegue hasta seleccionar
Manual Horiz. Keyst. (Trap. Horiz. Manual).
2 A continuación, pulse / para ajustar la
forma de la imagen.
Calibración
Corrija la imagen para que sea rectangular
cuando el proyector esté nivelado, o si la
corrección trapezoidal automática no corrige la
imagen idealmente. Realice la calibración de la
forma de la imagen del siguiente modo.
1 Para activar esta función, asegúrese de
seleccionar Auto Keystone - Off (Trap. Auto.
- Fuera de). Coloque el proyector en el
suelo o en una superficie recta (nivelada).
2 Pulse en el mando a distancia
para acceder al menú de ajustes y, a
continuación, navegue hasta seleccionar
Keystone Calibración (Calibración Trap.).
Opciones de colocación
Puede instalar el proyector en las siguientes
configuraciones. Siga las pautas siguientes
en función de las diferentes colocaciones del
proyector.

12 Philips · PicoPix Max One
Aviso
Para el montaje suspendido en un
techo, compre un soporte para proyector
recomendado por un profesional
cualificado y siga las instrucciones que
acompañan al soporte.
Antes de instalarlo en el techo,
asegúrese de que el techo pueda
soportar el peso del proyector y del kit
de montaje.
La instalación del producto en un techo
debe hacerse de conformidad con
las instrucciones de instalación para
garantizar la seguridad. Una instalación
incorrecta en el techo puede provocar
accidentes, lesiones o daños.
Mesa frontal
1 Coloque el proyector sobre una mesa frente
a la superficie de proyección. Esta es la
forma más común de colocar el proyector,
ya que es rápida y facilita su portabilidad.
2 Para establecer la posición correcta
de proyección, pulse en el mando
a distancia para acceder al menú de
configuración. A continuación, seleccione
Proj. Direc. - Front proj. (Dir. Pro. - Proy.
frontal) y después, pulse OK.
Techo frontal
1 Monte el proyector en el techo de frente
a la pantalla de proyección. Para montar
el proyector en el techo es necesario un
soporte.
2 Para establecer la posición correcta
de proyección, pulse en el mando a
distancia para acceder al menú de ajustes.
A continuación, seleccione Proj. Direc. -
Rev. front proj. (Dir. Pro. - Rev. proy. frontal)
y después, pulse OK.
Mesa trasera
1 Coloque el proyector sobre una mesa
detrás de la pantalla de proyección.
Hace falta una pantalla especial de
retroproyección.
2 Para establecer la posición correcta
de proyección, pulse en el mando a
distancia para acceder al menú de ajustes.
A continuación, seleccione Proj. Direc.
- Rear proj. (Dir. Pro. - Proy. trasera) y
después, pulse OK.
Techo trasera
1 Monte el proyector en el techo, detrás de
la pantalla de proyección. Para montar el
proyector en el techo detrás de la pantalla
se necesitan un soporte de proyector y una
pantalla especial de retroproyección.

Otras funciones 13
2 Para establecer la posición correcta
de proyección, pulse en el mando a
distancia para acceder al menú de ajustes.
A continuación, seleccione Proj. Direc. -
Rev. rear proj. (Dir. Pro. - Rev. proy. trasera)
y después, pulse OK.
5 Otras funciones
Escuchar usando los
altavoces externos o los
auriculares
Conecte altavoces externos o auriculares al
proyector. Con esta conexión, el audio del
proyector se reproduce a través de altavoces
externos o auriculares.
¡PELIGRO!
¡Peligro de daños auditivos!
Baje el volumen del proyector antes de
conectar los auriculares.
No utilice el proyector con un
volumen alto durante mucho tiempo,
especialmente cuando utilice
auriculares. Podría provocarle lesiones
auditivas.
1 Conecte la toma del proyector a la
entrada analógica de audio (conector de
3,5 mm o conectores rojo y blanco) de los
altavoces externos con un cable de audio
de 3,5 mm.
O conecte la toma del proyector a unos
auriculares.
• Los altavoces del proyector se
desconectan automáticamente
cuando se conectan los altavoces o los
auriculares al proyector.
HDMI USB DC
Al conectar los auriculares, utilice el control
de volumen del mando a distancia (o el del
proyector) para ajustar el volumen a un nivel
agradable.

14 Philips · PicoPix Max One
Cargar un dispositivo USB
Es posible cargar un dispositivo USB (p. ej.
un smartphone, reproductor MP3 u otro
dispositivo móvil).
Cargar a través del puerto USB-A
1 Usando un cable USB-A, conecte su
dispositivo USB al puerto USB del
proyector.
2 Encienda el proyector. El dispositivo USB se
empieza a cargar automáticamente.
• La conexión USB-A también puede dar
alimentación a dispositivos USB cómo el
Amazon Fire TV stick® o la llave USB de
transmisión multimedia Roku® (no es para
unidades de almacenamiento masivo ni
para reproductores multimedia).
Cargar a través del puerto USB-C
1 Usando un cable USB-C, conecte su
dispositivo USB-C al puerto USB-C del
proyector.
2 Encienda el proyector. Asegúrese de que
se activa la función de carga del dispositivo
USB-C. Pulse en el mando a distancia
para acceder al menú de ajustes y, a
continuación, navegue hasta seleccionar
USB-C Charger - On (Cargador USB-C -
En).
El dispositivo USB-C se empieza a cargar
automáticamente.
Para desactivar la carga de un dispositivo
USB-C, seleccione USB-C Charger - Off
(Cargador USB-C - Fuera de).
Usar la conexión fácil
Este proyector permite la conexión fácil que
utiliza el protocolo CEC (Control de productos
Electrónicos de Consumo) del HDMI. Puede
utilizar un único mando a distancia para
encender o apagar cualquier dispositivo
conectado a través del HDMI compatible con
la conexión fácil. El fabricante no garantiza
una interoperabilidad del 100% con todos los
dispositivos HDMI CEC.
1 Asegúrese de que el proyector esté
conectado a un dispositivo HDMI a
través de la función HDMI CEC (consulte
Conexión HDMI para la proyección de
imágenes, página 7).
2 Para activar la función de conexión fácil
en este proyector, pulse en el mando a
distancia para acceder al menú de ajustes
y, a continuación, navegue para seleccionar
CEC - On (CEC - En).

Modificación de los ajustes 15
6 Modificación de
los ajustes
Esta sección te ayudará a cambiar los ajustes
del proyector.
1 Con el proyector encendido, pulse o
en el mando a distancia (o en el
proyector) para acceder al menú de ajustes.
2 Utilice los Botones de navegación y pulse
OK para seleccionar y cambiar los ajustes.
Ajustes de idioma
Seleccione el idioma deseado en el menú en
pantalla.
• Seleccione Language (Idioma) y pulse OK.
A continuación, pulse / para seleccionar
el idioma.
Selección de la fuente de
entrada
Navegue hasta Input Source (Entrada) para
acceder a los ajustes siguientes.
• Auto: Cambia automáticamente a la fuente
de entrada correcta cuando se conecta un
dispositivo HDMI o USB-C.
• HDMI: Selecciónelo cuando tenga un
dispositivo HDMI conectado.
• USB-C: Selecciónelo cuando tenga un
dispositivo USB-C conectado.
Debe seleccionar una fuente de entrada
correcta para que la pantalla de
proyección pueda mostrar imágenes.
Ajustes de imagen
Es posible acceder a las siguientes funciones
de imagen.
• Keystone Correction (Corrección
trapezoidal): Seleccione una de las
opciones para corregir las imágenes
trapezoidales o distorsionadas para que
sean rectangulares o cuadradas.
• Auto Keystone (Trap. Auto.): Activa o
desactiva la corrección automática
de la forma de la imagen al inclinar
el proyector hacia arriba o hacia
abajo. Cuando se active la opción
Auto Keystone (Trap. Auto.), las otras
opciones de corrección de imagen
serán desactivadas.
• Manual Keystone (Trap. Manual):
Permite el ajuste manual de las cuatro
esquinas de la imagen.
• Manual Horiz. Keyst. (Trap. Horiz.
Manual): Es posible corregir
manualmente la distorsión trapezoidal
o las imágenes distorsionadas en su eje
horizontal.
• Keystone Calibration (Calib. Trap.):
Ejecute esta función si la corrección
trapezoidal automática no corrige bien
la forma de la imagen.
• Proj. Direc. (Dir. Pro.): Permite ajustar
la proyección a la posición correcta en
función de las distintas colocaciones del
proyector.
• Digital Zoom (Zoom digital): Permite
cambiar la escala de la imagen proyectada
en un intervalo que oscila del 50 % al 100 %.
• Picture Preset (Imagen preestablecida):
Permite seleccionar un ajuste predefinido
de la luminosidad del color para la
visualización de las imágenes y los vídeos.

16 Philips · PicoPix Max One
• Picture Adj. (Aj. imagen): Es posible ajustar
Brightness/Contrast/Saturation/Toneburst/
Sharpness (Brillo/Contraste/Saturación/
Toneburst/Nitidez) estableciendo un valor
en 0 y 100.
• Color Temp. (Temp. color): Seleccione
Warm (Caliente) para mejorar los colores
más cálidos como el rojo; seleccione
Cool (Genial) para conseguir una imagen
azulada, y seleccione User (Usuario) para
personalizar los valores de color en modo
RVA.
Ajustes de control de
encendido
Para controlar el consumo de energía, acceda a
las siguientes opciones de menú.
• Sleep Timer (Temp. apagado): Seleccione
Temporizador de suspensión para
establecer una opción de tiempo, de
manera que el proyector se apague
automáticamente transcurrido un lapso
determinado.
• Brightness Mode (Modo de brillo):
Seleccione un modo de brillo de la pantalla.
Restauración de los ajustes
predeterminados
Restablezca la configuración predeterminada
del proyector si este no funciona normalmente.
Los ajustes actuales se borrarán.
• Seleccione Full Reset (Reiniciar todo)
y pulse OK. Seguidamente, siga las
instrucciones en pantalla para completar el
restablecimiento.
Otros ajustes
También es posible acceder a las siguientes
opciones.
• Volume (Volumen): Permite ajustar el
volumen del proyector.
• CEC: Active o desactive la conexión fácil
entre los dispositivos a a través de la
conexión HDMI (consulte Usar la conexión
fácil, página 14).
• USB-C Charger (Cargador USB-C): Activa
o desactiva la carga del dispositivo USB-C
conectado.

Mantenimiento 17
• Position (Posición): Permite reposicionar el
menú de configuración en la pantalla de
proyección cuando aparece.
• SW Version: Muestra la versión actual del
software del proyector.
• Soft. Update (Act. Soft.): Permite actualizar
el software del sistema mediante un
dispositivo USB (consulte Actualización del
software, página 18).
7 Mantenimiento
Cuidado de la batería
integrada
La capacidad de la batería disminuye con el
tiempo. Puede prolongar la vida de la batería si
sigue las siguientes recomendaciones:
• Sin alimentación de corriente, el proyector
funciona con la batería integrada. Cuando
la batería no tiene suficiente carga, el
proyector se apaga. Conecte en este caso
el proyector a la alimentación de corriente.
• Cargue de la batería regularmente.
No guarde el proyector con la batería
totalmente descargada.
• Si el proyector no va a utilizarse durante
varias semanas, use el proyector para
descargar un poco la batería antes de
guardarlo.
• Mantenga el proyector y la batería alejados
de las fuentes de calor.
• Si el proyector no se carga después de
conectarlo a la alimentación de corriente,
utilice un objeto con punta para pulsar
el botón de reinicio (un pequeño orificio)
situado en el panel lateral del proyector.
Nota sobre la descarga total de la batería
Cuando la batería integrada está totalmente
descargada, puede tardar más tiempo del
habitual en comenzar el proceso de carga.
En este caso, cargue el proyector durante al
menos cinco horas antes de usarlo.
¡PELIGRO!
¡Riesgo de explosión debido al uso de
un tipo de pilas incorrecto!
No intente cambiar usted mismo la
batería integrada.

18 Philips · PicoPix Max One
¡ATENCIÓN!
No apague el proyector ni extraiga
el dispositivo flash USB durante la
actualización.
Actualización de software
mediante USB
1 Compruebe la última versión del software
en www.philips.com/support. Busque su
producto (modelo: PPX520/INT) y localice
«Programas y controladores».
2 Descargue el archivo de software
comprimido y guárdelo en el directorio raíz
del dispositivo flash USB.
3 Conecte el dispositivo de almacenamiento
USB al puerto USB del proyector.
• Se recomienda utilizar una fuente de
alimentación externa al actualizar el
software para que no se interrumpa la
alimentación.
4 Pulse en el mando a distancia para
acceder al menú de ajustes y navegue
hasta seleccionar Soft. Upgrade (Act. Soft.)
y, a continuación, pulse OK.
5 Siga las instrucciones en la pantalla para
realizar la actualización.
Limpieza
¡PELIGRO!
¡Instrucciones de limpieza!
Utilice un paño suave que no se
deshilache. Nunca utilice limpiadores
líquidos ni fácilmente inflamables
(sprays, abrasivos, pulidores, alcohol).
No permita que entre humedad en
el interior del proyector. No rocíe el
proyector con líquidos limpiadores.
Limpie cuidadosamente las superficies
con un paño. Tenga cuidado de no
rayar las superficies.
Limpieza de la lente
Utilice una brocha suave o toallitas limpia
lentes para limpiar la lente del proyector.
¡PELIGRO!
¡No utilice agentes limpiadores
líquidos!
No utilice ningún agente limpiador
líquido para limpiar la lente a fin de
evitar dañar su película protectora.
Actualización del software
Puede encontrar el software más reciente
del proyector en www.philips.com/support
para contar con las mejores funciones y una
asistencia superior en lo que concierne a su
proyector.
Compruebe la versión actual del software antes
de actualizarlo:
• Pulse en el mando a distancia
para acceder al menú de ajustes y, a
continuación, navegue hasta seleccionar
SW Version.

Mantenimiento 19
Solución de problemas
Reinicio
Si se presenta un problema que no se puede
corregir con las instrucciones de este manual
de usuario, realice el siguiente procedimiento.
1 Apague el proyector manteniendo pulsado
durante 1 segundo.
2 Espere al menos diez segundos.
3 Vuelva a encender el proyector
manteniendo pulsado durante 1 segundo.
4 Si el problema persiste, póngase en
contacto con nuestro centro de servicio
técnico o con su distribuidor.
Problemas Soluciones
El proyector no puede encenderse o no
recibe alimentación.
• Desconecte y reconecte el cable de alimentación,
y vuelva a intentar encender el proyector.
• Carga de batería baja. Conecte el proyector a una
fuente de alimentación externa.
• Utilice únicamente el adaptador de alimentación
incluido.
No aparece ninguna imagen en la pantalla
de proyección.
• Debe conectar el proyector a un dispositivo HDMI
o USB-C para poder visualizar las imágenes en
la pantalla de proyección (consulte Conectar,
página 7).
• Seleccione la fuente de entrada correcta. Pulse
en el mando a distancia para acceder a la lista
de fuentes de entrada para seleccionar la fuente
de entrada.
• Compruebe que la salida de vídeo del dispositivo
externo esté activada.
El proyector se carga lentamente. • Cuando se enciende el proyector, la
alimentación externa se utilizará primero para su
funcionamiento y la energía no utilizada cargará
la batería.
• Para una carga más rápida, cárguelo mientras el
proyector está apagado.
El proyector se apaga solo. • Carga de batería baja.
• Cuando el proyector funciona durante mucho
tiempo, la superficie se calienta. Ventile
adecuadamente el proyector, con al menos 30
cm de distancia alrededor de todos los lados del
proyector.
• Compruebe que el cable de alimentación esté
conectado correctamente.
No se puede apagar el proyector. • Mantenga pulsado más de 30 segundos.
No se visualiza la imagen procedente del
dispositivo HDMI externo.
• Desconecte el cable HDMI o apague el dispositivo
HDMI.
• Espere tres segundos.
• Vuelva a conectar el cable HDMI o vuelva a
encender el dispositivo HDMI.

20 Philips · PicoPix Max One
Problemas Soluciones
No se reproduce el sonido del dispositivo
externo conectado.
• Revise los cables del dispositivo externo.
• Compruebe que el sonido esté activado en el
dispositivo externo.
• Es posible que solo funcione con los cables
originales del fabricante del dispositivo.
No se reproduce el sonido del dispositivo
de salida HDMI externo.
• En el dispositivo de salida HDMI, seleccione los
ajustes de audio en estéreo (PCM).
No se reproduce el sonido cuando se
conecta el ordenador a través del cable
HDMI.
• Compruebe que el sonido esté activado en
el ordenador y seleccione la salida hacia el
proyector.
El proyector no reacciona a los comandos
del mando a distancia.
• Revise las pilas del mando a distancia.
La superficie del proyector está caliente. • Es normal que el proyector genere un calor
moderado durante su funcionamiento.
¿Qué hacer si el proyector no funciona al
conectarse a un ordenador portátil?
• Compruebe que el cable HDMI esté conectado
correctamente.
• Asegúrese de haber activado la visualización
mediante proyector en el ordenador portátil.

Anexos 21
8 Anexos
Datos técnicos
Tecnológicos/ópticos
Tecnología de visualización ..............................DLP
Fuente luminosa ........... LED RGB 4 canales LED
Resolución ...............................1920 × 1080 píxeles
Resolución compatible ......................... Píxeles 4K
Vida útil de la fuente led ............................................
..........................................Duran hasta 30.000 horas
Relación de contraste ................................. 10.000:1
Ratio de aspecto ....................................... 16:9 y 4:3
Índice de alcance ................................................. 1,2:1
Tamaño de la proyección (diagonal)......................
.........................................75 cm - 305 cm / 30"-120"
Distancia de proyección ............78 cm - 320 cm /
31"-126"
Modos de proyección ................Frontal, posterior,
techo, techo posterior
Corrección trapezoidal ...... Automático (vertical)
Enfoque ...........................................................eléctrico
Corrección de las 4 esquinas ................................ Sí
Zoom digital ................................................................ Sí
Teclas táctiles.............................................................. Sí
Sistema operativo .............................................. Linux
Sonido
Altavoces internos ..................................................4 W
Conexión
HDMI ............................................... ×1 con ARC y CEC
USB-C ............................................................. ×1 (vídeo)
USB-A 2.0 ...................................................... ×1 (carga)
Salida de audio analógico (3,5 mm) ................... ×1
Conector CC ....................×1 (alimentación y carga)
Fuente de alimentación
Alimentación eléctrica ...adaptador de corriente
........Entrada: 100-240 V a 50-60 Hz, 1,5 A (max)
......................................Salida: 20 VCC, 3,25 A, 65 W
Batería integrada ................................ . mAh
................................................. Dura hasta 5 horas
Datos del producto
Dimensiones ............................... 134 × 136 × 47 mm
.................................. 5,28 × 5,35 × 1,85 pulgadas
Peso ............................................... 850 g / 1,87 libras
Temperatura de funcionamiento ..........5 °C-35 °C
Temperatura de almacenamiento ............. < 60 °C
Contenido del embalaje
Proyector PicoPix Max One, mando a distancia
con 2 pilas AAA, adaptador CA, clavijas de
conexión (UK, US), bolsa de viaje, guía de inicio
rápido

22 Philips · PicoPix Max One
Declaración CE
• Este producto solo debe conectarse a un
puerto USB 2.0 o superior.
• El adaptador debe instalarse cerca del
equipo y ser fácilmente accesible.
• La temperatura de funcionamiento del
equipo sometido a prueba (ESP) no puede
exceder los 35 ºC ni ser inferior a 5 ºC.
• El enchufe se considera el dispositivo de
desconexión del adaptador.
La declaración de conformidad puede
consultarse en la página web www.philips.com.
Declaración FCC
15�19 Requisitos de etiquetado�
Este aparato cumple con el artículo 15 de la
normativa de la FCC. Su funcionamiento está
sujeto a las dos condiciones siguientes: (1)
este aparato no puede causar interferencias
perjudiciales y (2) este aparato debe aceptar
las interferencias recibidas, incluidas
las interferencias que puedan causar un
funcionamiento no deseado.
15�21 Información al usuario�
Cualquier cambio o modificación que no haya
sido aprobado expresamente por la parte
responsable del cumplimiento podría anular la
autorización del usuario para utilizar el equipo.
15�105 Información al usuario�
Este equipo ha sido probado y se ha verificado
que cumple con los límites de los dispositivos
digitales de clase B, de conformidad con lo
dispuesto en el artículo 15 de las normas de
la FCC. Estos límites se han establecido para
proporcionar una protección razonable frente a
las interferencias negativas en una instalación
residencial. Este equipo genera, utiliza y puede
radiar energía en forma de radiofrecuencia
y, si no se instala y utiliza conforme a las
instrucciones, puede causar interferencias
negativas en las comunicaciones de radio.
No obstante, no se garantiza que no vayan a
producirse interferencias en una instalación
específica. Si el equipo ocasiona interferencias
negativas para la recepción de radio o
televisión, que puedan confirmarse apagando y
encendiendo el equipo, se aconseja al usuario
que intente corregir las interferencias mediante
una o más de las siguientes medidas:
• Reorientar o recolocar la antena receptora.
• Aumentar la separación entre el equipo y el
receptor.
• Conectar el equipo a una toma de un
circuito diferente al que está conectado el
receptor.
• Consultar con el distribuidor o un técnico
especializado en radio y TV.
FCC ID: 2ASRT-PPX520/INT
Conformidad reglamentaria
de Canadá
Este dispositivo cumple con la normativa
CAN ICES-3 (B)/NMB-3(B) de la industria de
Canadá.
Declaración RSS-Gen y RSS-247: Este
dispositivo cumple con las normas RSS de la
industria de Canadá.
Su funcionamiento está sujeto a las dos
condiciones siguientes:
1 este aparato no debe causar interferencias
perjudiciales, y
2 este aparato debe aceptar cualquier
interferencia que reciba, incluidas las
interferencias que puedan causar un
funcionamiento no deseado del aparato.
Otras indicaciones
Es una preocupación esencial de Screeneo
Innovation SA la conservación del
medioambiente como parte de un plan de
desarrollo sostenible. Es el deseo de Screeneo
Innovation SA operar los sistemas respetando
el medioambiente, por lo que ha decidido
integrar el rendimiento ambiental en el ciclo de
vida de estos productos, desde la fabricación
hasta la puesta en servicio y la eliminación.
Embalaje: La presencia del logotipo (punto
verde) significa que se ha pagado una
contribución a una organización nacional
autorizada para mejorar la infraestructura
de recuperación de embalajes y de reciclaje.
Le rogamos que respete las normas de

Anexos 23
clasificación de residuos establecidas
localmente para este tipo de residuo.
Pilas: Si su producto utiliza pilas, estas se
deben eliminar en los puntos de recogida
apropiados.
Producto: El símbolo de una papelera tachada
que aparece en el producto significa que el
producto pertenece a la familia de equipos
eléctricos o electrónicos. A este respecto, las
normativas europeas disponen que se deseche
de forma selectiva:
• En el punto de venta al comprar un
aparato similar.
• En los puntos de recogida disponibles
localmente (centro de recogida,
recogida selectiva, etc.).
De este modo, puede participar en la
reutilización y renovación de los residuos de
equipos eléctricos y electrónicos, lo que puede
tener un efecto positivo en el medioambiente y
en la salud humana.
El embalaje de papel y de cartón puede
eliminarse como papel reciclable. El envoltorio
de plástico puede reciclarse o depositarse
en el contenedor de residuos no reciclables,
dependiendo de lo dispuesto en su país.
Marcas comerciales: Las referencias
mencionadas en este manual son marcas
comerciales de las empresas respectivas.
La ausencia de los símbolos de marcas
comerciales registradas —® y ™— no justifica
la asunción de que estas terminologías
específicas no correspondan a marcas
registradas. Otros nombres de productos
utilizados en este manual tienen un fin
exclusivamente informativo y pueden ser
marcas registradas de sus respectivos
propietarios. Screeneo Innovation SA declina
cualquier derecho en dichas marcas.
Ni Screeneo Innovation SA ni sus entidades
asociadas se harán responsables frente al
comprador ni a terceros de este producto en
lo que concierne a daños, pérdidas, costes
o gastos que involucren al comprador o un
tercero como resultado de accidentes, uso
incorrecto o uso indebido de este producto
o debido a modificaciones, reparaciones
o alteraciones no autorizadas de este
producto, o por no cumplir estrictamente
con las instrucciones de funcionamiento y
mantenimiento de Screeneo Innovation SA.
Screeneo Innovation SA no se responsabiliza
de daños ni problemas originados como
consecuencia del uso de opciones o
consumibles que no estén identificados como
productos originales de Screeneo Innovation
SA/PHILIPS o como productos autorizados por
Screeneo Innovation SA/PHILIPS.
Screeneo Innovation SA no se responsabiliza
de daños producidos por interferencias
electromagnéticas como consecuencia del uso
de cables de conexión no identificados como
productos de Screeneo Innovation SA/PHILIPS.
Todos los derechos reservados. Ninguna parte
de esta publicación puede ser reproducida,
almacenada en un sistema de recuperación
ni transmitida de ninguna forma ni por ningún
medio electrónico o mecánico; fotocopias;
grabaciones ni de cualquier otro tipo sin la
autorización previa por escrito de Screeneo
Innovation SA. La información contenida en
este manual está destinada únicamente al uso
con este producto. Screeneo Innovation SA
no se responsabiliza de la aplicación de esta
información a otros productos.
Este manual de usuario no es un documento
vinculante.
Sin perjuicio de errores, errores de imprenta
y cambios. Copyright © 2020 Screeneo
Innovation SA.

PicoPix Max One
ES
Screeneo Innovation SA
Route de Lully 5c - 1131 Tolochenaz - Switzerland
Philips and the Philips Shield Emblem are registered trademarks of Koninklijke Philips N.V. used
under license. Screeneo Innovation SA is the warrantor in relation to the product with which this
booklet was packaged.
2020 © Screeneo Innovation SA. All rights reserved.

Manuale
d’uso
Registrare il prodotto e ricevere assistenza su
www.philips.com/support
PPX520
PicoPix Max One
Portable projector

Introduzione ������������������������������������������������3
Gentile cliente ................................................................3
Informazioni sul manuale d’uso ..............................3
Contenuto della confezione .....................................3
Centro di assistenza clienti .......................................3
1 Informazioni generali sulla sicurezza
����������������������������������������������������������������� 4
Configurazione del prodotto ................................... 4
Riparazioni ......................................................................5
Alimentazione ................................................................5
2 Panoramica��������������������������������������������5
Vista dall’alto .................................................................5
Vista frontale ..................................................................5
Vista posteriore ............................................................ 6
Telecomando ................................................................ 6
3 Collega ���������������������������������������������������� 7
Collegamento HDMI per la proiezione delle
immagini ..........................................................................7
Collegamento USB-C per la proiezione di
immagini ..........................................................................7
4 Funzionamento ������������������������������������ 8
Collocazione del proiettore ..................................... 8
Collegamento dell’alimentazione ......................... 8
Preparazione del telecomando ............................. 8
Accensione e configurazione .................................. 9
Opzioni di collocazione ............................................10
5 Altre funzionalità ��������������������������������12
Ascolto tramite altoparlanti esterni o cuffie ..... 12
Ricarica di un dispositivo USB ...............................13
Utilizzo della funzione easy link ...........................13
6 Modifica delle impostazioni ������������14
Impostazioni della lingua ........................................14
Scelta di una sorgente di ingresso .......................14
Impostazioni dell'immagine ...................................14
Impostazioni del controllo dell'alimentazione 15
Ripristino delle impostazioni di fabbrica ...........15
Altre impostazioni ......................................................15
7 Manutenzione �������������������������������������16
Cura della batteria integrata ..................................16
Pulizia ............................................................................. 17
Aggiornamento del software ................................. 17
Risoluzione dei problemi .........................................18
8 Appendice �������������������������������������������20
Dati tecnici ...................................................................20
Dichiarazione CE ........................................................21
Dichiarazione FCC ......................................................21
Conformità normativa per il Canada ................... 21
Altre note .......................................................................21
Tabella dei contenuti

Introduzione 3
Introduzione
Gentile cliente
Grazie per aver acquistato questo proiettore.
Vi auguriamo buon divertimento con questo
prodotto e le numerose funzioni che offre!
Informazioni sul manuale
d’uso
La guida rapida fornita con il prodotto consente
di iniziare a utilizzarlo in modo semplice e
veloce. Le descrizioni dettagliate si trovano
nelle seguenti sezioni del presente manuale
d’uso.
Leggere attentamente l’intero manuale d’uso.
Seguire tutte le istruzioni sulla sicurezza in
modo tale da garantire l'utilizzo corretto del
prodotto (vedere Informazioni generali sulla
sicurezza, pagina 4). Il produttore non
si assume alcuna responsabilità in caso di
mancata osservanza delle presenti istruzioni.
Simboli utilizzati
Nota
Risoluzione dei problemi
Questo simbolo indica suggerimenti
che vi aiuteranno ad utilizzare questo
prodotto in modo più efficace e
semplice.
PERICOLO!
Pericolo di lesioni personali�
Questo simbolo avverte di eventuali
pericoli di lesioni personali. L’uso
improprio può provocare lesioni fisiche
o danni.
ATTENZIONE!
Danni al prodotto o perdita dei dati�
Questo simbolo avverte di eventuali
danni al prodotto e possibile perdita
di dati. L’uso improprio può provocare
danni.
Contenuto della confezione
a Guida di avvio rapida
b Proiettore PicoPix Max One (PPX520/INT)
c Borsa per il trasporto
d 2 adattatori di alimentazione a spina (Regno
Unito, Stati Uniti)
e 2 batterie AAA
f 1 alimentatore
g Telecomando
d
c
e
f
g
b
a
Quick Start
Guide
Centro di assistenza clienti
È possibile trovare la linea telefonica di
assistenza nelle scheda di garanzia oppure
online:
Web: www.philips.com/support
E-mail: philips.projector.eu@screeneo.com
Numero internazionale: +41 215 391 665
Chiedere informazioni sui costi delle chiamate
internazionali al proprio operatore.
Accedere al manuale d'uso elettronico
all'indirizzo
https://support.philipsprojection.com
Accedere al forum della community all'indirizzo
https://community.philipsprojection.com

4 Philips · PicoPix Max One
1 Informazioni
generali sulla
sicurezza
Osservare tutte le avvertenze e le note di
sicurezza indicate. Non apportare modifiche
o impostazioni che non sono descritte nel
presente manuale d’uso. Un utilizzo non corretto
e un uso improprio possono causare lesioni
fisiche, danni al prodotto o perdita di dati.
Configurazione del
prodotto
Il prodotto è destinato esclusivamente all’uso in
ambienti interni. Posizionare il prodotto in modo
sicuro su una superficie stabile e piana. Per
evitare possibili lesioni alle persone o danni al
prodotto stesso, posizionare tutti i cavi in modo
che nessuno possa inciampare sopra di essi.
Non utilizzare il prodotto in ambienti umidi.
Non toccare mai il cavo di alimentazione o il
collegamento alla rete con le mani bagnate.
Il prodotto deve avere una ventilazione
adeguata e non deve essere coperto. Non
porre il prodotto in armadi chiusi, scatole o altri
contenitori durante l’uso. Non coprire l’obiettivo
durante il funzionamento.
Proteggere il prodotto dalla luce solare
diretta, dal calore, da forti escursioni termiche
e dall’umidità. Non collocare il prodotto in
prossimità di termosifoni o condizionatori d’aria.
Osservare le informazioni sulla temperatura
elencate nei dati tecnici (vedere Dati tecnici,
pagina 20).
L’utilizzo prolungato del prodotto può
causare il surriscaldamento della superficie.
In caso di surriscaldamento, il prodotto passa
automaticamente in modalità standby.
Non lasciare che liquidi penetrino all’interno
del prodotto. Spegnere il prodotto e scollegarlo
dalla rete elettrica in caso di perdite di
liquidi o di sostanze estranee nel prodotto.
Far controllare il prodotto da un centro di
assistenza autorizzato.
Maneggiare sempre il prodotto con cura.
Evitare di toccare l’obiettivo. Non appoggiare
mai oggetti pesanti o appuntiti sul prodotto o
sul cavo di alimentazione.
Se il prodotto si scalda troppo o emette fumo,
spegnerlo immediatamente e scollegare il cavo
di alimentazione. Far controllare il prodotto
da un centro di assistenza autorizzato. Tenere
il prodotto lontano da fiamme libere (ad es.
candele).
Il prodotto è dotato di una batteria integrata.
Non smontarla o modificarla. La batteria
integrata deve essere sostituita solo da
personale di assistenza qualificato.
Non tentare di sostituire la batteria integrata
per conto proprio. L'uso scorretto della batteria
o l'utilizzo di un tipo di batteria errato può
causare danni al prodotto o causare lesioni.
PERICOLO!
Pericolo di esplosione con batterie di
tipo non appropriato�
Se viene utilizzato un tipo di batteria
errato sussiste un pericolo di
esplosione.
Non esporre le batterie (la confezione o le
batterie inserire) a calore eccessivo, come luce
solare o fiamme libere.
Nelle seguenti condizioni, all’interno del
prodotto può formarsi uno strato di umidità che
può portare a malfunzionamenti:
• se il prodotto viene spostato da un
luogo freddo a uno caldo;
• dopo che una stanza fredda è stata
riscaldata;
• quando il prodotto viene collocato in
ambienti umidi.
Per evitare l’accumulo di umidità, procedere
come segue:
1 Sigillare il prodotto in un sacchetto di
plastica prima di spostarlo in un altro
luogo, in modo che si adatti alle condizioni
dell’ambiente.
2 Attendere una o due ore prima di estrarre il
prodotto dal sacchetto di plastica.
Il prodotto non deve essere utilizzato in
ambienti molto polverosi. Particelle di polvere
e altri oggetti estranei possono danneggiare il
prodotto.
Non esporre il prodotto a forti vibrazioni. Ciò
potrebbe danneggiare i componenti interni.
Non lasciare che i bambini maneggino il
prodotto senza supervisione. Tenere le pellicole
utilizzate per l’imballo lontano dalla portata dei
bambini.
Per la propria sicurezza, non utilizzare il
prodotto durante i temporali con fulmini.

Panoramica 5
Riparazioni
Non riparare il prodotto in maniera autonoma.
La manutenzione impropria può causare lesioni
o danni al prodotto. Il prodotto deve essere
riparato da parte di un centro di assistenza
autorizzato.
I dettagli dei centri di assistenza autorizzati
sono riportati sulla scheda di garanzia fornita
con il presente prodotto.
Non rimuovere la targhetta identificativa
del prodotto, in quanto ciò comporta
l’annullamento della garanzia.
Alimentazione
Utilizzare esclusivamente un alimentatore
certificato per questo prodotto (vedere Dati
tecnici, pagina 20).
Controllare se la tensione di rete
dell’alimentatore corrisponde alla tensione
di rete disponibile nel luogo di installazione.
Questo prodotto è conforme al tipo di tensione
specificato sul prodotto.
La presa di corrente deve essere installata
vicino al prodotto e deve essere facilmente
accessibile.
La capacità della batteria diminuisce con il
tempo. Se il prodotto funziona solo attraverso
l'alimentazione CA, la batteria integrata è
difettosa. Contattare un centro di assistenza
autorizzato per sostituire la batteria integrata.
ATTENZIONE!
Utilizzare sempre il pulsante per
spegnere il proiettore.
Spegnere il prodotto e scollegarlo dalla
presa di corrente prima di pulire la superficie
(vedere Pulizia, pagina 17). Utilizzare un
panno morbido, non sfilacciato. Non utilizzare
detergenti liquidi, gassosi o facilmente
infiammabili, quali spray, abrasivi, lucidanti,
alcool. Non lasciare che l’umidità raggiunga
l’interno del prodotto.
PERICOLO!
Pericolo di irritazione agli occhi�
Questo prodotto è dotato di un LED
(Light Emitting Diode) ad alta potenza,
che emette una luce molto luminosa.
Non guardare direttamente nell’obiettivo
del proiettore durante il funzionamento.
Ciò potrebbe causare l’irritazione degli
occhi o il loro danneggiamento.
2 Panoramica
Vista dall’alto
a b c d d
Max One
OK
a Indicatore LED
b
Consente di ritornare a una schermata di
menu precedente.
c
• Consente di navigare le opzioni di
menu.
• Diminuzione del volume.
d
• Consente di navigare le opzioni di
menu.
• Aumento del volume.
e
• Consente di accedere al menu
impostazioni.
• Consente di confermare una selezione
o un inserimento.
Vista frontale
a
b
a Obiettivo di proiezione
b Telecamera con messa a fuoco
Consente di regolare la nitidezza
dell’immagine.

6 Philips · PicoPix Max One
Vista posteriore
HDMI USB DC
a b c d e f g
a
• Premere e tenere premuto per un
secondo per accendere o spegnere il
proiettore.
• Quando il proiettore si accende, il LED
diventa bianco. Quando il proiettore
viene spento, il LED si spegne.
• Durante la carica del proiettore, il LED
diventa rosso indipendentemente
dal fatto che il proiettore sia acceso o
spento.
b Sensore RI
c Porta HDMI
Consente il collegamento all’uscita HDMI di
un dispositivo di riproduzione.
d
Uscita audio da 3,5 mm; per il collegamento
ad altoparlanti esterni o cuffie.
e Porta USB-A
Consente il collegamento di dispositivi
dotati di alimentazione USB come Amazon
Fire TV stick®, Roku® streaming stick (non
per l'archiviazione di massa o il lettore
multimediale).
f USB-C
• Consente il collegamento all’uscita
video USB-C di un dispositivo di
riproduzione.
• Ricarica di un dispositivo USB-C come
ad es. uno smartphone.
g CC
Consente il collegamento all’alimentazione.
Telecomando
OK
a
d
e
b
c
f
g
h
a
• Accesso rapido e selezione di una
sorgente di ingresso.
• Consente di accedere al menu
impostazioni.
b
Consente di confermare una selezione o un
inserimento.
c
Attivazione della regolazione della messa a
fuoco.
d
Consente di accedere al menu impostazioni.
e Controllo del volume
Aumento, diminuzione o disattivazione del
volume.
f
Consente di ritornare a una schermata di
menu precedente.
g Pulsanti di navigazione
Consente di navigare le opzioni di menu.
h
Premere e tenere premuto per un secondo
per accendere o spegnere il proiettore.

Collega 7
3 Collega
Nota
Affinché lo schermo di proiezione possa
mostrare le immagini, è necessario
collegare il proiettore a un dispositivo
HDMI o USB-C.
Assicurarsi che tutti i dispositivi siano
scollegati dalla presa di corrente
prima di stabilire o cambiare qualsiasi
collegamento.
Collegamento HDMI per la
proiezione delle immagini
Collegare un dispositivo di riproduzione (ad
esempio un lettore Blu-ray, una console di
gioco, una videocamera, una fotocamera
digitale o un PC) al proiettore tramite il
collegamento HDMI. Con questo collegamento,
le immagini vengono visualizzate sullo schermo
di proiezione e l’audio viene riprodotto sul
proiettore.
1 Utilizzando un cavo HDMI, collegare il
connettore HDMI del proiettore all'uscita
HDMI del dispositivo di riproduzione.
HDMI USB DC
2 Il proiettore passa automaticamente
all'ingresso HDMI quando viene effettuato
il collegamento HDMI. Lo schermo di
proiezione mostra le immagini.
• Se lo schermo di proiezione non mostra
le immagini, selezionare l’ingresso HDMI
manualmente. Premere sul telecomando
per accedere all’elenco delle sorgenti di
ingresso, quindi selezionare HDMI.
Collegamento USB-C per la
proiezione di immagini
Collegare un dispositivo USB-C (ad es.,
telefoni cellulari, tablet o portatili) al proiettore
attraverso il collegamento USB-C. Con questo
collegamento, le immagini vengono visualizzate
sullo schermo di proiezione e l’audio viene
riprodotto sul proiettore.
1 Tramite un cavo USB-C, collegare il
connettore del proiettore alla porta
USB-C del dispositivo di riproduzione.
HDMI USB DC
2 Il proiettore passa automaticamente
all'ingresso USB-C quando viene effettuato
il collegamento USB-C. Lo schermo di
proiezione mostra le immagini.
• Se lo schermo di proiezione non mostra
le immagini, selezionare l’ingresso USB-C
manualmente. Premere sul telecomando
per accedere al menu impostazioni, quindi
selezionare USB-C.
Nota
Il proiettore supporta esclusivamente il
formato audio stereo. Se sul proiettore
non viene riprodotto l'audio proveniente
dal dispositivo di riproduzione, controllare
se sul dispositivo di riproduzione il formato
di uscita audio è impostato su stereo.

8 Philips · PicoPix Max One
4 Funzionamento
Nota
Affinché lo schermo di proiezione possa
mostrare le immagini, è necessario
collegare il proiettore a un dispositivo
HDMI o USB-C (vedere Collega,
pagina 7).
Collocazione del proiettore
Collocare il proiettore su un piano davanti alla
superficie di proiezione.
È possibile installare il proiettore secondo
diverse configurazioni (vedere Opzioni di
collocazione, pagina 10).
Collegamento
dell’alimentazione
Il proiettore può essere utilizzato sia con
l'alimentazione esterna che con la batteria
integrata.
ATTENZIONE!
Utilizzare sempre il pulsante per
accendere e spegnere il proiettore.
Funzionamento tramite
alimentazione esterna
• Collegare l’alimentatore in dotazione alla
presa del proiettore, e successivamente
alla presa a muro.
HDMI USB DC
a
b
Se necessario, scegliere un adattatore
per spina di alimentazione adatto per il
collegamento alla presa a muro.
Per collegare la spina di alimentazione
in dotazione all'alimentatore, allineare le
fessure della spina di alimentazione con i
due perni dell'adattatore di alimentazione,
quindi far scorrere la spina di alimentazione.
Funzionamento tramite batterie
integrata
Il proiettore può anche essere azionato a
batteria integrata per l'uso portatile.
Messa in carica del proiettore
Caricare il proiettore per 1,5 ore prima del primo
utilizzo.
Ricaricare il proiettore quando l'icona della
batteria scarica appare sullo schermo di
proiezione.
• Per caricare il proiettore, collegare il
proiettore ad una fonte di alimentazione
esterna come descritto nella sezione
"Funzionamento tramite alimentazione
esterna".
• Durante la carica il LED sul proiettore
diventa rosso. Una volta terminata la carica
il LED rosso si spegne.
• All'accensione, l'alimentazione esterna
verrà utilizzata per far funzionare il
proiettore mentre l'energia non utilizzata
ricaricherà la batteria.
• Per ricaricare rapidamente il proiettore,
metterlo in carica mentre è spento.
Nota
La capacità della batteria diminuisce con
il tempo. Se il prodotto funziona solo
attraverso l'alimentazione esterna, la
batteria integrata è difettosa. Contattare
un centro di assistenza autorizzato per
sostituire la batteria integrata.
Preparazione del
telecomando
ATTENZIONE!
L’uso improprio delle batterie può
portare a surriscaldamento, esplosione,
pericolo d’incendio e lesioni. Le batterie
che presentano perdite potrebbero
danneggiare il telecomando.
Non esporre il telecomando alla luce
solare diretta.
Evitare di deformare, smontare o
caricare le batterie.
Evitare l’esposizione a fiamme libere o
all’acqua.
Sostituire le batterie scariche
immediatamente.
Rimuovere le batterie dal telecomando
se non viene utilizzato per un periodo
prolungato.

Funzionamento 9
1 Tenere premuto il coperchio del
vano batterie, facendolo scorrere
contemporaneamente per aprirlo e
accedere al vano.
2 Inserire le batterie in dotazione (tipo AAA)
con la polarità corretta (+/-) indicata.
3 Chiudere il vano batterie.
Nota
Quando si utilizza il telecomando,
puntare il telecomando verso il sensore
IR situato sul retro del proiettore e
assicurarsi che non vi siano ostacoli tra il
telecomando e il sensore IR.
Accensione e
configurazione
1 Tenere premuto sul proiettore (o sul
telecomando per 1 secondo) per accendere
o spegnere il proiettore.
• Quando il proiettore si accende, il
LED sul proiettore diventa bianco se
quest'ultimo non è in carica.
• Durante la ricarica, il LED sul proiettore
diventa rosso indipendentemente
dal fatto che il proiettore sia acceso o
spento.
impostazione della lingua
1 Premere sul telecomando per accedere
al menu impostazioni, quindi navigare per
selezionare Language (Lingua), e premere
OK.
2 Premere / per selezionare una lingua.
Modifica delle dimensioni dello
schermo
La dimensione dello schermo di proiezione
(o dimensione delle immagini) è determinata
dalla distanza tra l’obiettivo del proiettore e la
superficie di proiezione.
• La distanza di proiezione deve essere
1,2 volte più ampia della larghezza dello
schermo desiderato.
• È possibile utilizzare anche lo zoom digitale
per ridurre le dimensioni dello schermo
fino al 50%. Premere sul telecomando
per accedere al menu impostazioni,
quindi navigare per selezionare Digital
Zoom (Zoom digitale) e premere OK.
Successivamente, premere / per
regolare la dimensione dell’immagine.
Regolazione della messa a fuoco
dell’immagine
Premere sul telecomando per attivare
la regolazione della messa a fuoco, quindi
premere / sul telecomando per regolare la
nitidezza dell'immagine. Una volta regolata
la nitidezza dell’immagine, premere per
disattivare la regolazione della messa a fuoco.
Correzione della forma
dell’immagine
Correzione automatica (trapezoidale verticale)
Il proiettore è in grado di correggere
automaticamente l'immagine in modo che
sia rettangolare quando si inclina il proiettore
verso l'alto o verso il basso.
Per abilitare la correzione trapezoidale verticale
automatica, premere sul telecomando per
accedere al menu impostazioni, quindi navigare
per selezionare Auto Keystone - On (Trapezio
Automatico - On).

10 Philips · PicoPix Max One
Trapezio Manuale (correzione su 4 angoli)
È possibile regolare manualmente la forma
dell'immagine modificando la posizione dei
quattro angoli dell'immagine di proiezione. Ciò
consente anche di correggere la posizione del
proiettore a sinistra e a destra.
1 Assicurarsi di aver selezionato Auto
Keystone - Off (Trapezio Automatico -
Off) per abilitare tale funzione. Premere
sul telecomando per accedere al
menu impostazioni, quindi navigare per
selezionare Manual Keystone (Trapezio
Manuale).
2 Nell’interfaccia della correzione su 4 angoli,
premere OK per selezionare un angolo
dell’immagine, quindi tenere premuto /
sul telecomando per regolare i valori del
posizionamento orizzontale e /
sul telecomando per regolare i valori
del posizionamento verticale. Ripetere
la stessa procedura per regolare i valori
di posizionamento degli altri angoli
dell’immagine desiderati.
Correzione orizzontale manuale
È possibile correggere manualmente le
immagini trapezoidali o le immagini distorte in
senso orizzontale.
1 Assicurarsi di aver selezionato Auto
Keystone - Off (Trapezio Automatico -
Off) per abilitare tale funzione. Premere
sul telecomando, quindi navigare per
selezionare Manual Horiz. Keyst. (Trapezio
Orr. Manuale).
2 Premere / per regolare la forma
dell'immagine.
Calibrazione
Correggere l'immagine in modo che sia
rettangolare quando il proiettore è posizionato
in piano, o se la correzione trapezoidale
automatica non corregge l'immagine in modo
ottimale. Eseguire la calibrazione della forma
dell'immagine come segue.
1 Assicurarsi di aver selezionato Auto
Keystone - Off (Trapezio Automatico -
Off) per abilitare tale funzione. Collocare il
proiettore sul pavimento o su una superficie
orizzontale (piana).
2 Premere sul telecomando per accedere
al menu impostazioni, quindi navigare per
selezionare Keystone Calibration (Taratura
trapezio).
Opzioni di collocazione
È possibile installare il proiettore secondo
le seguenti configurazioni. Seguire le linee
guida di seguito per collocazioni del proiettore
differenti.

Funzionamento 11
Nota
Per il montaggio a soffitto, acquistare un
supporto per proiettori consigliato da un
professionista dell’installazione e seguire
le istruzioni fornite con il supporto.
Prima del montaggio a soffitto,
assicurarsi che il soffitto sia in grado di
sostenere il peso del proiettore e del kit
di montaggio.
Per l’installazione a soffitto, questo
prodotto deve essere saldamente
fissato al soffitto secondo le istruzioni
di installazione. Un’errata installazione a
soffitto può causare incidenti, lesioni o
danni.
Piano frontale
1 Collocare il proiettore su un piano davanti
allo schermo di proiezione. Questo è
il modo più comune per posizionare il
proiettore per una rapida installazione e
portabilità.
2 Per regolare la proiezione alla posizione
corretta, premere sul telecomando per
accedere al menu impostazioni, quindi
navigare per selezionare Proj. Direc. - Front
proj. (Dir. di proiezione - Proiezione front.) e
premere OK.
Frontale a soffitto
1 Montare il proiettore a soffitto rivolto verso
l’alto davanti allo schermo di proiezione.
Per montare il proiettore a soffitto è
necessario un supporto per proiettore.
2 Per regolare la proiezione alla posizione
corretta, premere sul telecomando per
accedere al menu impostazioni, quindi
navigare per selezionare Proj. Direc. - Rev.
front proj. (Dir. di proiezione - Proiezione
front. inv.) e premere OK.
Piano posteriore
1 Collocare il proiettore su un piano dietro
allo schermo di proiezione. È necessario
uno schermo di proiezione posteriore
specifico.
2 Per regolare la proiezione alla posizione
corretta, premere sul telecomando per
accedere al menu impostazioni, quindi
navigare per selezionare Proj. Direc. - Rear
proj. (Dir. di proiezione - Proiezione post.) e
premere OK.
Posteriore a soffitto
1 Montare il proiettore a soffitto rivolto verso
l’alto dietro allo schermo di proiezione.
Per montare il proiettore a soffitto dietro
lo schermo, è necessario un supporto
per proiettore e uno speciale schermo di
retroproiezione.

12 Philips · PicoPix Max One
2 Per regolare la proiezione alla posizione
corretta, premere sul telecomando
per accedere al menu impostazioni,
quindi navigare per selezionare Proj.
Direc. - Rev. rear proj. (Dir. di proiezione -
Retroproiezione inv.) e premere OK.
5 Altre funzionalità
Ascolto tramite altoparlanti
esterni o cuffie
Collegare gli altoparlanti esterni o le cuffie al
proiettore. Con questo collegamento, l'audio
del proiettore viene riprodotto dagli altoparlanti
esterni o dalle cuffie.
PERICOLO!
Pericolo di danni all’udito!
Prima di collegare le cuffie, abbassare
il volume del proiettore.
Non utilizzare il proiettore per un
periodo di tempo prolungato ad
alto volume, specialmente quando
si utilizzano le cuffie. Ciò potrebbe
causare dei danni all’udito.
1 Usando un cavo audio da 3,5 mm, collegare
il connettore del proiettore all'ingresso
audio analogico (jack da 3,5 mm, o jack
rosso e bianco) degli altoparlanti esterni.
Oppure collegare il connettore del
proiettore alle proprie cuffie.
• Gli altoparlanti del proiettore si
disattivano automaticamente quando
gli altoparlanti esterni o le cuffie
vengono collegati al proiettore.
HDMI USB DC
Quando si esegue il collegamento alle
cuffie, utilizzare il controllo del volume sul
telecomando (o sul proiettore) per regolare il
volume ad un livello confortevole.

Altre funzionalità 13
Ricarica di un dispositivo
USB
È possibile ricaricare un dispositivo USB (ad
es. smartphone, lettori MP3 o altri dispositivi
mobili).
Ricarica tramite porta USB-A
1 Tramite un cavo USB-A, collegare il
proprio dispositivo USB alla porta USB del
proiettore.
2 Accendere il proiettore. La ricarica del
dispositivo USB si avvia automaticamente.
• Il collegamento USB-A consente anche
di alimentare un dispositivo dotati di
alimentazione USB come Amazon Fire
TV stick®, Roku® streaming stick (non
per archiviazione di massa o lettore
multimediale).
Ricarica tramite porta USB-C
1 Tramite un cavo USB-C, collegare il proprio
dispositivo USB-C alla porta USB-C del
proiettore.
2 Accendere il proiettore. Assicurarsi che sia
attivata la funzione di ricarica per dispositivi
USB-C. Premere sul telecomando per
accedere al menu impostazioni, quindi
navigare per selezionare USB-C Charger -
On (Ricarica USB-C - On).
La ricarica del dispositivo USB-C si avvia
automaticamente.
Per disattivare la ricarica di un dispositivo
USB-C, selezionare USB-C Charger - Off
(Ricarica USB-C - Off).
Utilizzo della funzione easy
link
Questo proiettore supporta la funzione
easy link che utilizza il protocollo HDMI CEC
(Controllo dell’elettronica di consumo). È
possibile utilizzare un singolo telecomando
per accendere o spegnere i dispositivi che
supportano la funzione easy link collegati
tramite HDMI. Il produttore non garantisce
l'interoperabilità al 100% con tutti i dispositivi
HDMI CEC.
1 Assicurarsi che il proiettore sia collegato
a un dispositivo HDMI che supporti la
funzione HDMI CEC (vedere Collegamento
HDMI per la proiezione delle immagini,
pagina 7).
2 Per attivare la funzione easy link sul
proiettore, premere sul telecomando
per accedere al menu impostazioni, quindi
navigare per selezionare CEC - On.

14 Philips · PicoPix Max One
6 Modifica delle
impostazioni
Questa sezione consente di modificare le
impostazioni del proiettore.
1 Quando il proiettore viene acceso,
premere o sul telecomando (o
sul proiettore) per accedere al menu
impostazioni.
2 Utilizzare i Pulsanti di navigazione e il
pulsante OK per selezionare e modificare le
impostazioni.
Impostazioni della lingua
Selezionare la lingua desiderata per i menu su
schermo.
• Andare su Language (Lingua), premere OK,
dopodiché premere / per selezionare
una lingua.
Scelta di una sorgente di
ingresso
Andare su Input Source (Sorgenti) per accedere
alle seguenti impostazioni.
• Auto: consente il passaggio automatico alla
sorgente di ingresso corretta quando viene
collegato un dispositivo HDMI o USB-C.
• HDMI: selezionare l’opzione quando viene
collegato un dispositivo HDMI.
• USB-C: selezionare l’opzione quando viene
collegato un dispositivo USB-C.
Affinché lo schermo di proiezione possa
mostrare le immagini, è necessario
selezionare una sorgente di ingresso
corretta.
Impostazioni dell'immagine
È possibile accedere alle seguenti impostazioni
dell'immagine.
• Keystone Correction (Correzione
trapezoidale): consente di selezionare
un’opzione per correggere le immagini
trapezoidali o distorte in modo che siano
rettangolari o quadrate.
• Auto Keystone (Trapezio Automatico):
consente di attivare o disattivare la
correzione automatica della forma
dell'immagine quando si inclina il
proiettore verso l'alto o verso il basso.
Quando la funzione Auto Keystone
(Trapezio Automatico) è attivata,
tutte le altre opzioni per la correzione
dell’immagine verranno disattivate.
• Manual Keystone (Trapezio Manuale):
consente la regolazione manuale dei
quattro angoli dell’immagine.
• Manual Horiz. Keyst. (Trapezio Orr.
Manuale): consente di correggere
manualmente le immagini trapezoidali
o le immagini distorte in senso
orizzontale.
• Keystone Calibration (Taratura trapezio):
eseguire la funzione se la correzione
trapezoidale automatica non corregge
l'immagine in modo ottimale.

Modifica delle impostazioni 15
• Proj. Direc. (Dir. di proiezione): regolare la
proiezione nella corretta posizione in base
all'installazione del proiettore.
• Digital Zoom (Zoom digitale): consente di
ridimensionare l’immagine di proiezione
secondo l’intervallo compreso tra l’50 e il
100%.
• Picture Preset (Preimpostazione immagine):
Consente di selezionare un'impostazione
predefinita di luminosità del colore per le
immagini e per visualizzare video.
• Picture Adj. (Regolazione immagine):
consente di regolare Brightness/Contrast/
Saturation/Toneburst/Sharpness
(Luminosità/Contrasto/Saturazione/
Toneburst/Nitidezza) in base ai valori
compresi tra 0 e 100.
• Color Temp. (Temp. di colore): impostare
su Warm (Caldo) per ottimizzare i colori
più caldi come il rosso; impostare su
Cool (Freddo) per rendere le immagini
bluastre; impostare su User (Utente) per
personalizzare i valori del colore in modalità
RGB.
Impostazioni del controllo
dell'alimentazione
Accedere alle seguenti opzioni di menu per
gestire il consumo di energia.
• Sleep Timer (Sveglia): selezionare una
durata che consente al proiettore di
spegnersi automaticamente al termine del
tempo indicato.
• Brightness Mode (Modalità luminosità):
consente di selezionare una modalità di
luminosità.
Ripristino delle
impostazioni di fabbrica
Se il proiettore non funziona come dovrebbe,
riportare il proiettore alle impostazioni di
fabbrica. Tutte le impostazioni correnti verranno
eliminate.
• Andare su Full Reset (Ripristino completo) e
premere OK, in seguito seguire le istruzioni
su schermo per completare il ripristino.
Altre impostazioni
È anche possibile accedere alle seguenti
opzioni.
• Volume: consente di regolare il volume del
proiettore.
• CEC: consente di attivare la funzione easy
link tra dispositivi mediante collegamento
HDMI (vedere Utilizzo della funzione easy
link, pagina 13).
• USB-C Charger (Ricarica USB-C): consente
di abilitare o disabilitare la ricarica di un
dispositivo USB-C collegato.

16 Philips · PicoPix Max One
• Position (Posizione): consente di modificare
la posizione del menu delle impostazioni
sullo schermo di proiezione quando questo
viene visualizzato.
• SW Version: consente di visualizzare la
versione software corrente del proiettore.
• Soft. Update (Aggior. del SW): consente di
aggiornare il software di sistema tramite un
dispositivo USB (vedereAggiornamento del
software, pagina 17).
7 Manutenzione
Cura della batteria
integrata
La capacità della batteria diminuisce con il
tempo. È possibile prolungare la durata della
batteria se si osservano i seguenti punti:
• Senza alimentazione, il proiettore funziona
con la batteria integrata. Quando la batteria
non è sufficientemente carica, il proiettore
si spegne. In questo caso collegare il
proiettore all'alimentazione.
• Caricare la batteria regolarmente. Non
riporre il proiettore con la batteria
completamente scarica.
• Se il proiettore non viene utilizzato per
diverse settimane, scaricare leggermente
la batteria utilizzando il proiettore prima di
riporlo.
• Tenere il proiettore e la batteria lontani da
fonti di calore.
• Se il proiettore non può essere ricaricato
dopo il collegamento all'alimentazione,
utilizzare uno spillo di piccole dimensioni
per premere il tasto di ripristino (un piccolo
foro) situato sul pannello laterale del
proiettore.
Nota sulla scarica profonda della batteria
Quando la batteria integrata è in fase di
scarica profonda, potrebbe essere necessario
più tempo per avviare l'effettivo processo di
ricarica. In questo caso, ricaricare il proiettore
per almeno cinque ore prima di utilizzarlo.
PERICOLO!
Pericolo di esplosione con batterie di
tipo non appropriato�
Non tentare di sostituire la batteria
integrata per conto proprio.

Manutenzione 17
Pulizia
PERICOLO!
Istruzioni per la pulizia!
Utilizzare un panno morbido, non
sfilacciato. Non utilizzare detergenti
liquidi o facilmente infiammabili,
quali spray, abrasivi, lucidanti, alcool.
Non lasciare che l'umidità raggiunga
l'interno del proiettore. Non spruzzare
il proiettore con alcun liquido per la
pulizia.
Pulire sulle superfici delicatamente.
Prestare attenzione a non graffiare le
superfici.
Pulizia dell’obiettivo
Per la pulizia dell'obiettivo del proiettore
utilizzare un pennello morbido o dell'apposita
carta.
PERICOLO!
Non utilizzare detergenti liquidi!
Non utilizzare detergenti liquidi per
la pulizia dell'obiettivo, per evitare di
danneggiare la pellicola di rivestimento
dell'obiettivo.
Aggiornamento del
software
Il software più recente del proiettore è
disponibile su www.philips.com/support per
ottenere le migliori funzionalità e supporto dal
proiettore.
Prima di aggiornare il software del proiettore,
controllare la versione corrente del software:
• Premere sul telecomando per accedere
al menu impostazioni quindi navigare fino a
SW Version.
ATTENZIONE!
Non spegnere il proiettore o rimuovere la
chiavetta USB durante l'aggiornamento.
Aggiornamento del software
tramite USB
1 Controllare l'ultima versione del software su
www.philips.com/support Cercare il proprio
prodotto (numero di modello: PPX520/
INT), e individuare "Software and drivers
(Software e driver)".
2 Scaricare il file del software compresso
e salvarlo nella directory principale della
chiavetta USB.
3 Collegare la chiavetta USB alla porta USB
del proiettore.
• Si consiglia di utilizzare
un'alimentazione esterna per
l'aggiornamento del software per
garantire un'alimentazione adeguata.
4 Premere sul telecomando per accedere
al menu impostazioni, poi navigare fino
alla voce Soft. Update (Aggior. del SW),
dopodiché premere OK.
5 Seguire le istruzioni su schermo per
completare l’aggiornamento.

18 Philips · PicoPix Max One
Risoluzione dei problemi
Accensione o spegnimento
dell'alimentazione
Se si verifica un problema che non può essere
risolto con le istruzioni contenute nel presente
manuale d'uso, seguire le istruzioni riportate di
seguito.
1 Spegnere il proiettore tenendo premuto
per 1 secondo.
2 Attendere almeno dieci secondi.
3 Riaccendere il proiettore tenendo premuto
per 1 secondo.
4 Se il problema persiste, contattare il nostro
centro di assistenza tecnica o il proprio
rivenditore.
Problemi Soluzioni
Il proiettore non si accende o non viene
alimentato.
• Scollegare e ricollegare il cavo di alimentazione, e
provare a riaccendere il proiettore.
• Livello di carica della batteria basso. Collegare il
proiettore a una fonte di alimentazione esterna.
• Utilizzare l’alimentatore originale.
Lo schermo di proiezione non mostra le
immagini.
• Affinché lo schermo di proiezione possa mostrare
le immagini, è necessario collegare il proiettore
a un dispositivo HDMI o USB-C (vedere Collega,
pagina 7).
• Selezionare la sorgente di ingresso corretta.
Premere sul telecomando per accedere
all’elenco delle sorgenti di ingresso per la
selezione della sorgente di ingresso.
• Controllare che l'uscita video del dispositivo
esterno sia attivata.
Il proiettore si ricarica lentamente. • All'accensione, l'alimentazione esterna verrà
utilizzata per far funzionare il proiettore mentre
l'energia non utilizzata ricaricherà la batteria.
• Per ricaricare rapidamente il proiettore, metterlo
in carica mentre è spento.
Il proiettore si spegne da solo. • Livello di carica della batteria basso.
• Quando il proiettore è in funzione per un lungo
periodo di tempo, la superficie si riscalda. Aerare il
proiettore in modo adeguato, con una distanza di
almeno 30 cm intorno a tutti i lati del proiettore.
• Controllare che il cavo di alimentazione sia
collegato in modo corretto.
Il proiettore non si spegne. • Tenere premuto per più di 30 secondi.
Immagine assente dal dispositivo HDMI
esterno.
• Scollegare il cavo HDMI o spegnere il dispositivo
HDMI.
• Attendere tre secondi.
• Ricollegare il cavo HDMI o riaccendere il
dispositivo HDMI.

Manutenzione 19
Problemi Soluzioni
Audio assente dal dispositivo esterno
collegato.
• Controllare i cavi collegati al dispositivo esterno.
• Controllare che l’audio sia attivato sul dispositivo
esterno.
• Possono funzionare solamente i cavi originali del
costruttore del dispositivo.
Audio assente dal dispositivo esterno di
uscita HDMI collegato.
• Sul dispositivo di uscita HDMI, impostare
l'impostazione audio su Stereo (PCM).
Audio assente quando si collega il
computer tramite il cavo HDMI.
• Controllare che l'audio sul computer sia attivato e
che sia impostato per l'uscita sul proiettore.
Il proiettore non risponde ai comandi del
telecomando.
• Controllare le batterie del telecomando.
La temperatura della superficie del
proiettore è calda.
• Per questo proiettore è normale generare
una quantità moderata di calore durante il
funzionamento.
Cosa fare se il proiettore non funziona
quando è collegato a un notebook?
• Controllare che il cavo HDMI sia inserito
correttamente.
• Assicurarsi che sul notebook sia stata attivata la
visualizzazione tramite proiettore.

20 Philips · PicoPix Max One
8 Appendice
Dati tecnici
Tecnologia/ottica
Tecnologia display ...............................................DLP
Sorgente luminosa .................... LED 4 canali RGB
Risoluzione .................................. 1920 × 1080 pixel
Risoluzione supportata .............................. Pixel 4K
Durata LED .....................durano oltre 30.000 ore
Rapporto di contrasto................................. 10.000:1
Formato ........................................................ 16:9 e 4:3
Rapporto di proiezione ...................................... 1,2:1
Dimensioni dello schermo (diagonalmente) .......
....................................................75-305 cm / 30-120”
Distanza per lo schermo .......78-320 cm/31-126”
Modalità di proiezione ......frontale, posteriore, a
soffitto, posteriore a soffitto
Correzione trapezoidale ..automatica (verticale)
Regolazione della messa a fuoco ...........elettrica
Correzione su 4 angoli .............................................. si
Zoom digitale ............................................................... si
Tasti a sfioramento ....................................................si
Sistema operativo .............................................. Linux
Audio
Speaker interno .......................................................4 W
Collegamento
HDMI ...............................................×1 con ARC e CEC
USB-C ............................................................. ×1 (video)
USB-A 2.0 ...................................................×1 (ricarica)
Uscita audio analogica (3,5 mm) ........................ ×1
Jack CC ...................... ×1 (alimentazione e ricarica)
Sorgente di alimentazione
Alimentazione ........................................alimentatore
......Ingresso: 100-240 V~, 50-60 Hz, 1,5 A (max)
..................................... Uscita: CC 20 V, 3,25 A, 65 W
Batteria integrata ................................ . mAh
.................................................. durata fino a 5 ore
Informazioni dettagliate sul prodotto
Dimensioni (L × P × A) .............. 134 × 136 × 47 mm
........................................ 5,28 × 5,35 × 1,85 pollici
Peso ...................................................... 850 g / 1,87 lb
Temperatura di esercizio ............................5 - 35 °C
Temperatura di stoccaggio ..........................< 60 °C
Contenuto della confezione
Proiettore PicoPix Max One, telecomando
con 2 batterie AAA, adattatore CA, spine di
alimentazione (UK, US), borsa per il trasporto,
guida di avvio rapida

Appendice 21
Dichiarazione CE
• Il prodotto deve essere collegato solo ad
un'interfaccia USB di versione USB 2.0 o
superiore.
• L'adattatore deve essere installato vicino
all'apparecchio e deve essere facilmente
accessibile.
• La temperatura di esercizio dell'EUT non
può superare i 35 °C e non deve essere
inferiore a 5 °C.
• La spina è considerata come dispositivo di
scollegamento dell'adattatore.
La dichiarazione di conformità può essere
consultata sul sito www.philips.com.
Dichiarazione FCC
15�19 Requisiti di etichettatura�
Questo apparecchio è conforme alla Parte
15 delle normative FCC. Il funzionamento è
soggetto alle due condizioni seguenti: (1) Il
dispositivo non deve causare interferenze
dannose e (2) deve accettare qualsiasi
interferenza ricevuta, comprese le interferenze
che possono causare un funzionamento
indesiderato.
15�21 Informazioni per l'utente�
Qualsiasi alterazione o modifica non
espressamente approvata dalla parte
responsabile della conformità può
invalidare il diritto dell'utente ad utilizzare
l'apparecchiatura.
15�105 Informazioni per l'utente�
Questa apparecchiatura è stata testata e
dichiarata conforme ai limiti per i dispositivi
digitali di Classe B, in conformità alla Parte 15
delle norme FCC. Questi limiti sono stati definiti
per fornire una protezione adeguata contro
le interferenze dannose in un'installazione
residenziale. Questo apparecchio genera,
utilizza e può irradiare energia a radiofrequenza
e, se non installato e utilizzato secondo le
istruzioni, può causare interferenze dannose
alle comunicazioni radio. Tuttavia, non vi
è alcuna garanzia che non si verifichino
interferenze in una particolare installazione.
Se questo apparecchio causa interferenze
dannose alla ricezione radio o televisiva, che
possono essere determinate accendendo e
spegnendo l'apparecchio, l'utente è invitato a
tentare di correggere l'interferenza con una o
più delle seguenti misure:
• Riorientare o riposizionare l'antenna di
ricezione.
• Aumentare la distanza tra l'apparecchio e il
ricevitore.
• Collegare l'apparecchio ad una presa su
un circuito differente da quello a cui è
collegato il ricevitore.
• Consultare il rivenditore o un tecnico radio/
TV esperto per ricevere assistenza.
FCC ID: 2ASRT-PPX520/INT
Conformità normativa per il
Canada
Questo apparecchio è conforme alla norma
CAN ICES-3 (B)/NMB-3(B) di Industry Canada
Dichiarazione RSS-Gen & RSS-247: Questo
apparecchio è conforme allo/agli standard RSS
di Industry Canada.
Il funzionamento è soggetto alle due condizioni
seguenti:
1 questo apparecchio non può provocare
interferenze dannose e
2 questo apparecchio deve accettare
qualsiasi interferenza ricevuta, comprese le
interferenze che possono causare problemi
di funzionamento.
Altre note
La salvaguardia dell'ambiente come parte di un
piano di sviluppo sostenibile è una prerogativa
essenziale di Screeneo Innovation SA. La tutela
dell'ambiente come parte di un processo
di sviluppo sostenibile è di importanza
fondamentale per Screeneo Innovation SA si
impegna a utilizzare sistemi che rispettano
l'ambiente e ha pertanto deciso di attribuire
grande valore all'ecologia dei processi in
tutte le fasi di lavorazione, dalla produzione
fino alla messa in funzione, all'utilizzo e allo
smaltimento.

22 Philips · PicoPix Max One
Imballaggio: La presenza del logo (punto
verde) significa che viene versato un contributo
ad un'organizzazione nazionale riconosciuta
per migliorare le infrastrutture di recupero e
riciclaggio degli imballaggi. Rispettare le norme
locali sullo smaltimento differenziato per
questo tipo di rifiuti.
Batterie: Se il prodotto contiene batterie,
queste devono essere smaltite in un apposito
punto di raccolta.
Prodotto: Il simbolo del bidone barrato
da una croce indica che questo prodotto
appartiene alla categoria delle apparecchiature
elettriche ed elettroniche. A tale proposito le
normative europee richiedono lo smaltimento
differenziato;
• Presso i punti vendita dove ci si reca per
acquistare apparecchiature analoghe.
• Presso i punti di raccolta più vicini
(centri di smaltimento rifiuti, raccolta
differenziata, ecc.).
In questo modo è possibile partecipare al
riutilizzo e alla valorizzazione dei rifiuti di
apparecchiature elettriche ed elettroniche, che
possono avere un impatto sull'ambiente e sulla
salute umana.
Gli imballaggi di carta e cartone possono essere
smaltiti come carta riciclabile. Le pellicole di
plastica possono essere destinate al riciclaggio
o smaltite con i rifiuti, secondo le indicazioni
del rispettivo paese.
Marchi registrati: I riferimenti contenuti in
questo manuale di istruzioni si riferiscono
a marchi registrati delle rispettive aziende.
L'assenza dei simboli ® e ™ non giustifica
il presupposto che le tecnologie dedicate
interessate non rappresentino marchi registrati
di diritto. Gli altri nomi di prodotti qui utilizzati
sono solo a scopo identificativo e possono
essere marchi registrati dei rispettivi proprietari.
Screeneo Innovation SA declina ogni diritto su
tali marchi.
Né Screeneo Innovation SA né le sue
filiali saranno responsabili nei confronti
dell'acquirente di questo prodotto o di terzi
per danni, perdite, costi o spese sostenute
dall'acquirente o da terzi a seguito di incidenti,
uso improprio o abuso di questo prodotto
o modifiche, riparazioni o alterazioni non
autorizzate di quest'ultimo, o alla mancata
osservanza rigorosa delle istruzioni di utilizzo e
manutenzione di Screeneo Innovation SA.
Screeneo Innovation SA non è responsabile per
danni o problemi derivanti dall'uso di opzioni o
materiali di consumo diversi da quelli designati
come prodotti originali Screeneo Innovation
SA/PHILIPS o prodotti approvati Screeneo
Innovation SA/PHILIPS.
Screeneo Innovation SA esclude qualsiasi
risarcimento per danni derivanti da interferenze
elettromagnetiche connesse all'uso di cavi non
originali e non contrassegnati come prodotti
Screeneo Innovation SA / PHILIPS.
Tutti i diritti riservati. Senza il consenso
scritto di Screeneo Innovation SA, sono
vietate la duplicazione di qualunque parte
di questa pubblicazione, la memorizzazione
in un archivio o in qualunque forma o altro
mezzo di trasmissione, sia esso elettronico,
meccanico, ottenuto per fotocopiatura,
registrazione o altro. Le informazioni contenute
nel presente documento sono destinate
esclusivamente all'uso con questo prodotto.
Screeneo Innovation SA non si assume
alcuna responsabilità nel caso in cui queste
informazioni vengano applicate ad altri
apparecchi.
Il presente manuale d'uso è un documento che
non rappresenta un contratto.
Gli errori, gli errori di stampa e le modifiche
sono riservati.Copyright © 2020 Screeneo
Innovation SA.

PicoPix Max One
IT
Screeneo Innovation SA
Route de Lully 5c - 1131 Tolochenaz - Switzerland
Philips and the Philips Shield Emblem are registered trademarks of Koninklijke Philips N.V. used
under license. Screeneo Innovation SA is the warrantor in relation to the product with which this
booklet was packaged.
2020 © Screeneo Innovation SA. All rights reserved.

Gebruiksaanwijzing
Registreer uw product en krijg ondersteuning op
www.philips.com/support
PPX520
PicoPix Max One
Portable projector

Inleiding........................................................3
Geachte klant .................................................................3
Over deze gebruiksaanwijzing .................................3
Wat zit er in de doos ...................................................3
Klantenservicecentrum ..............................................3
1 Algemene veiligheids-informatie .... 4
Installatie van het product ....................................... 4
Reparaties .......................................................................5
Stroomvoorziening .......................................................5
2 Overzicht ................................................5
Bovenaanzicht ...............................................................5
Vooraanzicht ..................................................................5
Achteraanzicht ............................................................. 6
Afstandsbediening ...................................................... 6
3 Verbinden ............................................... 7
HDMI-aansluiting voor beeldprojectie .................7
USB-C-aansluiting voor beeldprojectie ...............7
4 Gebruik .................................................. 8
De projector plaatsen ................................................ 8
Stroomvoorziening aansluiten................................ 8
Voorbereiding van de afstandsbediening .......... 8
Inschakelen en instellen ........................................... 9
Plaatsingsmogelijkheden ........................................10
5 Andere functies ..................................12
Via externe luidsprekers of hoofdtelefoons
luisteren .........................................................................12
Een USB-apparaat opladen ...................................13
Easy link gebruiken .................................................... 13
6 Instellingen wijzigen .......................... 14
Taalinstellingen ...........................................................14
Invoerbronselectie .....................................................14
Beeldinstellingen ........................................................14
Uitschakelopties .........................................................15
Standaardinstellingen herstellen ..........................15
Overige instellingen ................................................... 15
7 Onderhoud ........................................... 16
Zorg voor ingebouwde batterij ..............................16
Reinigen .........................................................................16
Software bijwerken ....................................................16
Probleemoplossing ....................................................18
8 Aanhangsel .........................................20
Technische gegevens ...............................................20
CE-verklaring ...............................................................21
FCC-verklaring ............................................................. 21
Canadese naleving van wet- en regelgeving ... 21
Overige opmerking .................................................... 21
Inhoudsopgave

Inleiding 3
Inleiding
Geachte klant
Dank u voor het aanschaffen van deze
projector.
Wij hopen dat u veel plezier hebt van dit
product en de vele functies die het biedt!
Over deze
gebruiksaanwijzing
Met de snelstartgids die bij dit product is
geleverd, kunt u snel en gemakkelijk met dit
product aan de slag. U vindt in de volgende
secties van deze gebruiksaanwijzing
gedetailleerde omschrijvingen.
Lees de hele gebruiksaanwijzing zorgvuldig
door. Volg alle veiligheidsinstructies om een
juiste werking van dit product te garanderen
(zie Algemene veiligheids-informatie,
pagina 4). De fabrikant accepteert geen
aansprakelijkheid als deze instructies niet
worden gevolgd.
Gebruikte symbolen
Mededeling
Probleemoplossing
Dit symbool geeft tips aan die u
helpen om dit product effectiever en
gemakkelijker te gebruiken.
GEVAAR!
Gevaar voor persoonlijk letsel!
Dit symbool geeft een waarschuwing
voor gevaar voor persoonlijk letsel.
Onjuiste behandeling kan leiden tot
lichamelijk letsel of schade.
VOORZICHTIG!
Schade aan het product of
gegevensverlies!
Dit symbool waarschuwt voor
schade aan het product en mogelijk
gegevensverlies. Onjuiste behandeling
kan leiden tot schade.
Wat zit er in de doos
a Snelstartgids
b PicoPix Max One projector (PPX520/INT)
c Transporttas
d 2x netvoedingsadapter (VK, VS)
e 2x AAA-batterijen
f 1x netvoedingadapter
g Afstandsbediening
d
c
e
f
g
b
a
Quick Start
Guide
Klantenservicecentrum
U kunt de ondersteuningshotline vinden op het
garantiebewijs of online:
Web: www.philips.com/support
E-mail: philips.projector.eu@screeneo.com
Internationaal telefoonnummer:
+41 215 391 665
Vraag uw leverancier om kosten voor
internationale gesprekken!
Ga naar de elektronische gebruikershandleiding
op
https://support.philipsprojection.com
Ga naar het communityforum op
https://community.philipsprojection.com

4 Philips · PicoPix Max One
1 Algemene
veiligheids-
informatie
Schenk aandacht aan alle vermelde
waarschuwings- en veiligheidsaanwijzingen.
Breng geen wijzigingen aan en maak geen
instellingen die niet in deze gebruiksaanwijzing
zijn beschreven. Onjuiste werking en
verkeerde behandeling kunnen leiden tot
lichamelijk letsel, schade aan het product of
gegevensverlies.
Installatie van het product
Dit product is uitsluitend voor gebruik
binnenshuis. Plaats het product stevig op een
stabiele, vlakke ondergrond. Leg alle kabels
zodanig neer dat niemand erover kan struikelen
om mogelijk letsel aan personen of schade aan
het product zelf te voorkomen.
Gebruik het product niet in vochtige
ruimtes. Raak nooit het netsnoer of de
lichtnetaansluiting met natte handen aan.
Het product moet voldoende ventilatie hebben
en mag niet worden afgedekt. Zet het product
als het in gebruik is niet in een gesloten kast,
kist of andere afgesloten ruimtes. Bedek de
lens niet tijdens gebruik.
Bescherm het product tegen direct zonlicht,
warmte, sterke temperatuurschommelingen
en vocht. Zet het product niet in de buurt van
verwarmingen of airconditioners. Neem de
informatie over de temperatuur, vermeld in de
technische gegevens, in acht (zie Technische
gegevens, pagina 20).
De oppervlakte wordt warm door langdurige
werking van het product. Het product schakelt
in geval van oververhitting automatisch naar de
stand-bymodus.
Laat geen vloeistoffen in het product lekken.
Schakel het product uit en ontkoppel het van
het lichtnet als er vloeistoffen of vreemde
stoffen in het product zijn gelekt. Laat het
product door een bevoegd servicecentrum
inspecteren.
Behandel het product altijd met zorg. Raak
de lens niet aan. Zet nooit zware of scherpe
voorwerpen op het product of op het netsnoer.
Als het product te heet wordt of er komt rook
uit, schakel het dan onmiddellijk uit en haal de
stekker van het netsnoer uit het stopcontact.
Laat het product door een bevoegd
servicecentrum controleren. Houd het product
uit de buurt van open vuur (bijv. kaarsen).
Het product heeft een ingebouwde batterij. Niet
uit elkaar halen of modificeren. De ingebouwde
batterij mag alleen worden vervangen door
bevoegd onderhoudspersoneel.
Vervang de ingebouwde batterij niet zelf.
Onjuist gebruik van de batterij of het gebruik
van het verkeerde type batterij kan het product
beschadigen of letsel veroorzaken.
GEVAAR!
Explosiegevaar bij batterijen van een
verkeerde soort!
Er bestaat explosiegevaar als er een
verkeerde soort batterij wordt gebruikt.
Stel de batterijen (batterijpakket of
geïntegreerde batterijen) niet bloot aan
overmatige warmte zoals zonneschijn of open
vuur.
Er kan onder de volgende omstandigheden een
laag vocht in het product verschijnen, die tot
storingen kan leiden:
• als het product van een koude naar een
warme ruimte wordt verplaatst;
• nadat een koude ruimte wordt
verwarmd;
• als het product in een vochtige ruimte
wordt gezet.
Ga als volgt te werk om het opbouwen van
vocht te voorkomen:
1 Plaats het product in een plastic zak
voordat het naar een andere ruimte
wordt verplaatst, zodat het zich aan
de omstandigheden in de ruimte kan
aanpassen.
2 Wacht een tot twee uur voordat u het
product uit de plastic zak haalt.
Het product mag niet in een zeer stoffige
omgeving worden gebruikt. Stofdeeltjes en
andere vreemde voorwerpen kunnen het
product beschadigen.
Stel het product niet bloot aan extreme
trillingen. Dit kan de inwendige componenten
beschadigen.
Laat kinderen het product niet zonder toezicht
behandelen. De verpakkingsmaterialen moeten
uit de handen van kinderen worden gehouden.
Gebruik het product voor uw eigen veiligheid
niet tijdens onweersbuien met bliksem.

Overzicht 5
Reparaties
Repareer het product niet zelf. Verkeerd
onderhoud kan leiden tot letsel of schade
aan het product. Het product moet door een
bevoegd servicecentrum worden gerepareerd.
U treft de details van bevoegde servicecentra
aan op het garantiebewijs bij dit product.
Verwijder het typeplaatje niet van dit product,
omdat hierdoor de garantie ongeldig wordt.
Stroomvoorziening
Gebruik uitsluitend een voedingsadapter die is
gecertificeerd voor dit product (zie Technische
gegevens, pagina 20).
Controleer of de lichtnetspanning van de
stroomvoorziening overeenkomt met de
lichtnetspanning die op de installatielocatie
beschikbaar is. Dit product voldoet aan de soort
spanning die op het product is gespecificeerd.
Het stopcontact moet in de buurt van het
product zijn geïnstalleerd en moet gemakkelijk
toegankelijk zijn.
De capaciteit van de ingebouwde batterij
neemt geleidelijk af. Als het product alleen
werkt op netvoeding, is de ingebouwde batterij
defect. Neem contact op met een erkend
onderhoudscentrum om de ingebouwde
batterij te vervangen.
VOORZICHTIG!
Gebruik altijd de toets om de
projector uit te schakelen.
Schakel het product uit en haal de stekker
uit het stopcontact voordat u het oppervlak
reinigt (zie Reinigen, pagina 16). Gebruik
een zachte, pluisvrije doek. Gebruik nooit
vloeibare, gasvormige of gemakkelijk
brandbare reinigingsmiddelen (spuitbussen,
schuurmiddelen, poetsmiddelen, alcohol). Laat
geen vocht in het product terechtkomen.
GEVAAR!
Risico op oogirritatie!
Dit product is uitgerust met een
krachtige led die zeer helder licht
uitstraalt. Kijk tijdens de werking niet
direct in de lens van de projector. Dit
kan irritatie van of beschadiging aan
de ogen veroorzaken.
2 Overzicht
Bovenaanzicht
a b c d d
Max One
OK
a Ledlampje
b
Keer terug naar een vorig menuscherm.
c
• Navigeer menu-opties.
• Verlaag volume.
d
• Navigeer menu-opties.
• Verhoog volume.
e
• Het instellingenmenu openen.
• Een selectie of invoer bevestigen.
Vooraanzicht
a
b
a Projectielens
b Camera scherpstellen
Beeldscherpte aanpassen.

6 Philips · PicoPix Max One
Achteraanzicht
HDMI USB DC
a b c d e f g
a
• Houd één seconde ingedrukt om de
projector in of uit te schakelen.
• Als de projector wordt ingeschakeld,
wordt de led wit. Wanneer de projector
wordt uitgeschakeld, gaat de led uit.
• Tijdens het opladen van de projector
wordt de led rood, ongeacht of de
projector in- of uitgeschakeld is.
b IR-sensor
c HDMI-poort
Sluit aan op de HDMI-uitgang op een
afspeelapparaat.
d
3,5 mm audio-uitgang; sluit aan op externe
luidsprekers of hoofdtelefoon.
e USB-A-poort
Aansluiten op USB-apparaten zoals
Amazon Fire TV stick®, Roku® Streaming
stick (niet voor massaopslag of
mediaspeler).
f USB-C
• Sluit aan op de USB-C-video-uitgang
op een afspeelapparaat.
• Een USB-C-apparaat zoals een
smartphone opladen.
g DC
Aansluiten op de stroomvoorziening.
Afstandsbediening
OK
a
d
e
b
c
f
g
h
a
• Snel toegang tot een invoerbron en
deze selecteren.
• Het instellingenmenu openen.
b
Een selectie of invoer bevestigen.
c
De focusinstelling activeren.
d
Het instellingenmenu openen.
e Volumeregeling
Het volume verhogen, verlagen of dempen.
f
Keer terug naar een vorig menuscherm.
g Navigatietoetsen
Navigeer menu-opties.
h
Houd één seconde ingedrukt om de
projector in of uit te schakelen.

Verbinden 7
3 Verbinden
Mededeling
U moet de projector aansluiten op een
HDMI- of USB-C-apparaat, zodat het
projectiescherm beelden kan weergeven.
Zorg dat alle apparaten zijn losgehaald
van het stopcontact voordat u
verbindingen tot stand brengt of wijzigt.
HDMI-aansluiting voor
beeldprojectie
Sluit een afspeelapparaat (bijv. een Blu-
rayspeler, gaming console, camcorder, digitale
camera of pc) via de HDMI-aansluiting aan
op de projector. Via deze aansluiting worden
beelden op het projectiescherm getoond en
wordt audio op de projector afgespeeld.
1 Sluit met een HDMI-kabel de HDMI-
aansluiting op de projector aan op de
HDMI-uitgang op het afspeelapparaat.
HDMI USB DC
2 De projector schakelt automatisch over
naar HDMI-invoer wanneer verbinding met
HDMI is gemaakt. Het projectiescherm
toont beelden.
• Als het projectiescherm geen
beelden weergeeft, dan selecteert
u handmatig HDMI-invoer. Druk op
op de afstandsbediening om de
ingangsbronnenlijst te openen en selecteer
vervolgens HDMI.
USB-C-aansluiting voor
beeldprojectie
Sluit een USB-C-apparaat (bijv. mobiele
telefoon, tablet of laptop) aan op de projector
via een USB-C-verbinding. Via deze aansluiting
worden beelden op het projectiescherm getoond
en wordt audio op de projector afgespeeld.
1 Sluit met een USB-C-kabel de
-aansluiting op de projector aan op de
USB-C-poort op het afspeelapparaat.
HDMI USB DC
2 De projector schakelt automatisch over
naar USB-C-invoer wanneer verbinding met
USB-C is gemaakt. Het projectiescherm
toont beelden.
• Als het projectiescherm geen
beelden weergeeft, dan selecteert
u handmatig USB-C-invoer. Druk op
op de afstandsbediening om de
ingangsbronnenlijst te openen en selecteer
vervolgens USB-C.
Mededeling
De projector ondersteunt alleen stereo-
geluidsformaat. Als er geen geluid
van het afspeelapparaat te horen is
op de projector, controleer dan of
het uitgaande geluidsformaat op het
afspeelapparaat is ingesteld op stereo.

8 Philips · PicoPix Max One
4 Gebruik
Mededeling
U moet de projector op een HDMI- of
USB-C-apparaat aansluiten, zodat het
projectiescherm beelden kan weergeven
(zie Verbinden, pagina 7).
De projector plaatsen
Plaats de projector op een vlak oppervlak vóór
het projectie-oppervlak.
U kunt de projector ook in verschillende
configuraties installeren (zie
Plaatsingsmogelijkheden, pagina 10).
Stroomvoorziening
aansluiten
De projector kan zowel met externe voeding als
met de ingebouwde batterij worden gebruikt.
VOORZICHTIG!
Gebruik altijd de -knop om de
projector aan en uit te zetten.
Gebruik met externe voeding
• Sluit de meegeleverde netstroomadapter
aan op de -aansluiting van de
projector en steek deze vervolgens in het
stopcontact.
HDMI USB DC
a
b
Gebruik indien nodig een geschikte stekker
om op het stopcontact aan te sluiten.
Om een meegeleverde stekker aan de
voedingsadapter te bevestigen, lijnt u de
sleuven op de stekker uit met de twee
pinnen van de voedingsadapter en schuift
u de stekker erin.
Gebruik met ingebouwde batterij
De projector kan ook worden gebruikt op de
ingebouwde batterij voor draagbaarheid.
De projector opladen
Laad de projector 1,5 uur op vóór het eerste
gebruik.
Laad de projector op wanneer het
pictogram voor een bijna lege batterij in het
projectiescherm verschijnt.
• Om de projector op te laden, sluit u de
projector aan op een externe voeding, zoals
beschreven in het gedeelte “Gebruik met
externe voeding”.
• Tijdens het opladen, is de led op
de projector rood. Wanneer volledig
opgeladen, gaat de rode led uit.
• Wanneer ingeschakeld, wordt de externe
voeding eerst gebruikt om de projector te
laten werken en de reststroom gebruikt om
de batterij op te laden.
• De projector wordt sneller opgeladen
wanneer deze is uitgeschakeld.
Mededeling
De capaciteit van de ingebouwde
batterij neemt geleidelijk af. Als de
projector alleen werkt op externe
voeding, is de ingebouwde batterij
defect. Neem contact op met een erkend
onderhoudscentrum om de ingebouwde
batterij te vervangen.
Voorbereiding van de
afstandsbediening
VOORZICHTIG!
Verkeerd gebruik van batterijen kan
leiden tot oververhitting, explosies,
risico op brand en letsel. Lekkende
batterijen kunnen de afstandsbediening
beschadigen.
Stel de afstandsbediening nooit bloot
aan direct zonlicht.
Vermijd vervormen, ontmantelen of
opladen van de batterijen.
Vermijd blootstelling aan open vuur en
water.
Vervang lege batterijen onmiddellijk.
Verwijder de batterijen uit de
afstandsbediening als deze gedurende
langere periodes niet wordt gebruikt.
1 Houd het klepje van het batterijvak
ingedrukt en schuif het tegelijkertijd open
om het batterijencompartiment te openen.
2 Plaats de meegeleverde batterijen (type
AAA) volgens de juiste polariteit (+/-), zoals
aangegeven.

Gebruik 9
3 Sluit het batterijvak.
Mededeling
Wanneer u de afstandsbediening
gebruikt, richt u deze op de IR-sensor
aan de achterkant van de projector. Zorg
hierbij dat er zich geen obstakels tussen
de afstandsbediening en de IR-sensor
bevinden.
Inschakelen en instellen
1 Houd 1 seconden ingedrukt op de
projector (of op de afstandsbediening)
om de projector in of uit te schakelen.
• Wanneer de projector wordt
ingeschakeld, wordt het lampje op de
projector wit als de projector niet wordt
opgeladen.
• Tijdens het opladen wordt de led op de
projector rood, ongeacht of de projector
in- of uitgeschakeld is.
De taal instellen
1 Druk op op de afstandsbediening om
het instellingenmenu te openen. Navigeer
vervolgens naar Language (Taal) en druk
op OK.
2 Druk op / om een taal te selecteren.
Schermgrootte wijzigen
De maat van het projectiescherm (of
afmetingen van het beeld) wordt bepaald door
de afstand tussen de lens van de projector en
het projectieoppervlak.
• De projectieafstand moet 1,2 keer de breedte
van de gewenste schermgrootte zijn.
• U kunt ook de digitale zoom gebruiken om
de schermgrootte tot 50% te verkleinen.
Druk op op de afstandsbediening om
het instellingenmenu te openen. Navigeer
vervolgens naar Digital Zoom (Digitale
zoom), en drukt op OK. Druk vervolgens op
/ om beeldformaat aan te passen.
Scherpstellen van het beeld
Druk op op de afstandsbediening om
scherpstelling in te schakelen en druk
vervolgens op / op de afstandsbediening
om de beeldhelderheid aan te passen. Druk na
het aanpassen van de beeldhelderheid op
om scherpstelling uit te schakelen.
Correctie van de vorm van het
beeld
Automatische correctie (verticale keystone)
De projector kan het beeld automatisch
rechthoekig corrigeren wanneer u de projector
omhoog of omlaag kantelt.
Als u de auto verticale trapeziumcorrectie
wilt activeren, dan drukt u op op de
afstandsbediening om het instellingenmenu
te openen. Navigeer vervolgens naar Auto
Keystone - On (Trapezium automatisch - Aan).
Trapezium handmatig (4-hoekencorrectie)
U kunt de beeldvorm handmatig aanpassen
door vier hoeken van het projectiebeeld te
verplaatsen. Hiermee kunt u ook de linker- of
rechterpositie van de projector corrigeren.

10 Philips · PicoPix Max One
1 Zorg ervoor dat u Auto Keystone -
Off (Trapezium automatisch - Uit)
hebt geselecteerd om deze functie
in te schakelen. Druk op op de
afstandsbediening om het instellingenmenu
te openen. Navigeer vervolgens naar
Manual Keystone (Trapezium handmatig).
2 Druk in de 4-hoekencorrectie-
interface op OK om een beeldhoek te
selecteren, houd vervolgens / op
de afstandsbediening ingedrukt om de
horizontale positioneringswaarden aan te
passen en / op de afstandsbediening
om de verticale positioneringswaarden
aan te passen. Herhaal dezelfde stap om
desgewenst de positioneringswaarden van
de andere beeldhoeken aan te passen.
Handmatige horizontale correctie
U kunt handmatig trapezium- of vervormde
beelden in de horizontale oriëntatie corrigeren.
1 Zorg ervoor dat u Auto Keystone -
Off (Trapezium automatisch - Uit)
hebt geselecteerd om deze functie
in te schakelen. Druk op op de
afstandsbediening om het instellingenmenu
te openen. Navigeer vervolgens naar
Manual Horiz. Keyst. (Trapezium handmatig
horiz.).
2 Druk op / om de vorm van het beeld
aan te passen.
Kalibratie
Corrigeer het beeld om rechthoekig te zijn
wanneer de projector waterpas wordt geplaatst
of als de automatische keystone-correctie
het beeld niet ideaal corrigeert. Voer de
beeldvormkalibratie als volgt uit.
1 Zorg ervoor dat u Auto Keystone - Off
(Trapezium automatisch - Uit) hebt
geselecteerd om deze functie in te
schakelen. Plaats de projector op de vloer
of op een plat (waterpas) oppervlak.
2 Druk op op de afstandsbediening om
het instellingenmenu te openen. Navigeer
vervolgens naar Keystone Calibration
(Trapeziumkalibratie).
Plaatsingsmogelijkheden
U kunt de projector in de volgende configuraties
installeren. Volg onderstaande richtlijnen voor
verschillende plaatsingsmogelijkheden van de
projector.

Gebruik 11
Mededeling
Schaf voor hoge montage aan een
plafond een door een installateur
aanbevolen projectorsteun aan en volg
de instructies meegeleverd met de steun.
Verzeker vóór montage aan het plafond
dat het plafond het gewicht van de
projector en de steun kan dragen.
Dit product moet bij plafondmontage
stevig in overeenstemming met de
installatie-instructies aan het plafond
worden bevestigd. Een verkeerde
plafondmontage kan leiden tot
ongevallen, letsel of schade.
Voorkant tafel
1 Zet de projector op een tafel vóór
het projectiescherm. Dit is de meest
gebruikelijke manier voor het plaatsen
van de projector voor snelle installatie en
draagbaarheid.
2 Druk, om de projectie op de juiste positie in
te stellen, op op de afstandsbediening
om het instellingenmenu te openen.
Navigeer vervolgens naar Proj. Direc. -
Front proj. (Proj. richt. - Opz.proj.), en druk
vervolgens op OK.
Voorkant plafond
1 Monteer de projector vóór het
projectiescherm aan het plafond met de
bovenkant omhoog. Er is een projectorsteun
vereist om de projector aan het plafond te
bevestigen.
2 Druk, om de projectie op de juiste positie in
te stellen, op op de afstandsbediening
om het instellingenmenu te openen.
Navigeer vervolgens naar Proj. Direc. - Rev.
front proj. (Proj. richt. - Omgek.opz.proj.), en
druk vervolgens op OK.
Achterkant tafel
1 Zet de projector op een tafel achter
het projectiescherm. Er is een speciaal
achterprojectiescherm vereist.
2 Druk, om de projectie op de juiste positie in
te stellen, op op de afstandsbediening
om het instellingenmenu te openen.
Navigeer vervolgens naar Proj. Direc. - Rear
proj. (Proj. richt. - Doorz.proj.), en druk
vervolgens op OK.
Plafond achter
1 Monteer de projector achter het
projectiescherm aan het plafond met de
bovenkant naar boven. Om de projector
achter het scherm aan het plafond te
bevestigen, zijn een projectorsteun en een
speciaal achterprojectiescherm vereist.

12 Philips · PicoPix Max One
2 Druk, om de projectie op de juiste positie in
te stellen, op op de afstandsbediening
om het instellingenmenu te openen.
Navigeer vervolgens naar Proj. Direc. - Rev.
rear proj. (Proj. richt. - Omgek.doorz.proj.),
en druk vervolgens op OK.
5 Andere functies
Via externe luidsprekers of
hoofdtelefoons luisteren
Verbind externe luidsprekers of hoofdtelefoon
met de projector. Met deze aansluiting wordt
audio van de projector afgespeeld via de
externe luidsprekers of hoofdtelefoon.
GEVAAR!
Gevaar voor gehoorbeschadiging!
Zet het volume van de projector lager
voordat u de hoofdtelefoon aansluit.
Gebruik de projector niet voor langere
tijd op een hoog volume – vooral als
u een hoofdtelefoon gebruikt. Dit kan
leiden tot gehoorbeschadiging.
1 Gebruik een 3,5 mm audiokabel om de
-connector op de projector aan te sluiten
op de analoge audio-ingang (3,5 mm jack
of rode en witte jacks) van de externe
luidsprekers.
U kunt ook de -aansluiting op de
projector aansluiten op uw hoofdtelefoon.
• De luidsprekers van de projector
worden automatisch gedeactiveerd
wanneer externe luidsprekers of
hoofdtelefoon op de projector worden/
wordt aangesloten.
HDMI USB DC
Gebruik, als u de hoofdtelefoon aansluit, de
volumeregeling op de afstandsbediening
(of op de projector) om het volume op een
comfortabel niveau in te stellen.

Andere functies 13
Een USB-apparaat opladen
U kunt een USB-apparaat opladen (bijv.
smartphone, MP3-speler of ander mobiel
apparaat).
Opladen via USB-A-poort
1 Sluit uw USB-apparaat met een USB-
A-kabel aan op de USB-poort van de
projector.
2 Schakel de projector in. Het USB-apparaat
begint automatisch met opladen.
• De USB-A-aansluiting kan ook een USB-
apparaat zoals Amazon Fire TV stick®,
Roku®streaming stick van stroom voorzien
(niet voor massaopslag of mediaspeler).
Opladen via USB-C-poort
1 Sluit uw USB-C-apparaat met een USB-
C-kabel aan op de USB-C-poort van de
projector.
2 Schakel de projector in. Zorg ervoor dat
de functie voor het opladen van USB-C-
apparaten is geactiveerd. Druk op op
afstandsbediening om het instellingenmenu
te openen. Navigeer vervolgens naar USB-C
Charger - On (USB-C-oplader - Aan).
Het USB-C-apparaat begint automatisch
met opladen.
Als u het opladen van een USB-C-apparaat
wilt deactiveren, dan selecteert u USB-C
Charger - Off (USB-C-oplader - Uit).
Easy link gebruiken
Deze projector ondersteunt easy link, waarbij
gebruik wordt gemaakt van het HDMI CEC-
protocol (Consumer Electronics Control). U
kunt met één afstandsbediening de easy-
link-compatibele apparaten die via HDMI zijn
aangesloten in- of uitschakelen. De fabrikant
garandeert geen 100% interoperabiliteit met
alle HDMI CEC-apparaten.
1 Zorg ervoor dat de projector wordt
aangesloten op een HDMI-apparaat dat
de HDMI CEC-functie ondersteunt (zie
HDMI-aansluiting voor beeldprojectie,
pagina 7).
2 Als u de easy-linkfunctie op deze projector
wilt activeren, dan drukt u op op de
afstandsbediening om het instellingenmenu
te openen. Navigeert vervolgens naar CEC -
On (CEC - Aan).

14 Philips · PicoPix Max One
6 Instellingen
wijzigen
Deze sectie helpt u bij het wijzigen van de
instellingen van de projector.
1 Druk, wanneer de projector wordt
ingeschakeld, op of op de
afstandsbediening (of op de projector)
om het instellingenmenu te openen.
2 Gebruik de Navigatietoetsen en OK om
instellingen te selecteren en te wijzigen.
Taalinstellingen
Selecteer uw gewenste taal voor het on-
screenmenu.
• Navigeer naar Language (Taal) en druk op
OK en druk vervolgens op / om een taal
te selecteren.
Invoerbronselectie
Navigeer naar Input Source
(Ingangssignaaloorsprong) om de volgende
instellingen te openen.
• Auto: Automatisch overschakelen naar de
juiste ingangsbron wanneer een HDMI- of
USB-C-apparaat wordt aangesloten.
• HDMI: Selecteer dit als een HDMI-apparaat
wordt aangesloten.
• USB-C: Selecteer dit als een USB-C-
apparaat wordt aangesloten.
U moet een correcte invoerbron
selecteren, zodat het projectiescherm
beelden kan weergeven.
Beeldinstellingen
U kunt de onderstaande beeldinstellingen
openen.
• Keystone Correction (Keystone-correctie):
Selecteer een optie om trapeziumvormige
of vervormde beelden te corrigeren zodat
ze rechthoekig of vierkant worden.
• Auto Keystone (Trapezium
automatisch): Schakel automatische
correctie van de beeldvorm in of
uit wanneer u de projector omhoog
of omlaag kantelt. Wanneer Auto
Keystone (Trapezium automatisch)
wordt geactiveerd, dan worden alle
andere opties voor beeldcorrectie
gedeactiveerd.
• Manual Keystone (Trapezium
handmatig): Handmatig de vier hoeken
van het beeld aanpassen.
• Manual Horiz. Keyst. (Trapezium
handmatig horiz.): Handmatige
trapezium- of vervormde
beeldencorrectie in de horizontale
oriëntatie.
• Keystone Calibration
(Trapeziumkalibratie): Gebruik deze
functie als de automatische keystone-
correctie de beeldvorm niet ideaal
corrigeert.
• Proj. Direc. (Proj. richt.): De projectie op de
juiste positie afstellen op basis van een
andere installatie van de projector.
• Digital Zoom (Digitale zoom): Schaal het
projectiebeeld binnen het bereik van 50%
tot 100%.
• Picture Preset (Vooraf ingestelde foto):
Selecteer een vooraf gedefinieerde kleur-
helderheidsinstelling voor weergave van
foto's en video.

Instellingen wijzigen 15
• Picture Adj. (Beeld inst.): Pas Brightness/
Contrast/Saturation/Toneburst/Sharpness
(Helderheid/Contrast/Verzadiging/
Toneburst/Scherpte) aan met de waarden
van 0 tot 100.
• Color Temp. (Kleur temp.): Stel in op
Warm om warmere kleuren zoals rood te
versterken; stel in op Cool (Koel) om het
beeld blauwachtig te maken; stel in op User
(Gebruiker) om de kleurenwaarden in de
RGB-modus aan te passen.
Uitschakelopties
Ga naar de volgende menuopties om het
stroomverbruik te regelen.
• Sleep Timer (Timer slaapst.): Selecteer
een tijd-optie waarmee de projector
automatisch op een bepaalde tijd wordt
uitgeschakeld.
• Brightness Mode (Helderheidsmodus): Een
schermhelderheidsmodus selecteren.
Standaardinstellingen
herstellen
Als de projector niet normaal werkt, zet dan de
projector terug naar de standaardinstellingen.
Hierdoor worden alle huidige instellingen
verwijderd.
• Navigeer naar Full Reset (Volledig reset) en
druk op OK. Volg vervolgens de instructies
op het scherm om het resetten te voltooien.
Overige instellingen
U kunt de volgende opties eveneens openen.
• Volume: Het volume van de projector
aanpassen.
• CEC: Easy-link tussen de apparaten via een
HDMI-verbinding activeren of deactiveren
(zie Easy link gebruiken, pagina 13).
• USB-C Charger (USB-C-oplader): Het
opladen van het aangesloten USB-C-
apparaat in- of uitschakelen.
• Position (Positie): Herpositioneer het
instellingenmenu op het projectiescherm
wanneer het verschijnt.
• SW Version (SW-versie): Toont de huidige
softwareversie van de projector.
• Soft. Update (SW update): Systeemsoftware
upgraden via een USB-apparaat (zie
Software bijwerken, pagina 16).

16 Philips · PicoPix Max One
7 Onderhoud
Zorg voor ingebouwde
batterij
De capaciteit van de ingebouwde batterij
neemt geleidelijk af. U kunt de levensduur van
de batterij verlengen door het volgende in acht
te nemen:
• Zonder netvoeding werkt de projector op
de ingebouwde batterij. Wanneer de batterij
onvoldoende vermogen heeft, wordt de
projector uitgeschakeld. Sluit in dit geval de
projector aan op de netvoeding.
• Laad de batterij regelmatig op. Berg de
projector niet op met een volledig lege
batterij.
• Als de projector enkele weken niet wordt
gebruikt, ontlaad dan de batterij een beetje
door de projector te gebruiken voordat u
deze opbergt.
• Houd de projector en de batterij uit de
buurt van warmtebronnen.
• Als de projector niet kan worden opgeladen
nadat deze op het stopcontact is
aangesloten, druk dan met een kleine pin
op de resettoets (een klein gaatje) op het
zijpaneel van de projector.
Opmerking over diepe ontlading van de
batterij
Wanneer de ingebouwde batterij diep ontladen
is, kan het langer duren voordat het eigenlijke
laadproces begint. Laad de projector in dit
geval minimaal vijf uur op voordat u deze
gebruikt.
GEVAAR!
Explosiegevaar bij batterijen van een
verkeerde soort!
Vervang de ingebouwde batterij niet
zelf.
Reinigen
GEVAAR!
Instructies voor reiniging!
Gebruik een zachte, pluisvrije doek.
Gebruik nooit vloeibare of gemakkelijk
brandbare reinigingsmiddelen
(spuitbussen, schuurmiddelen,
poetsmiddelen, alcohol enz.). Laat
geen vocht binnenin de projector
terechtkomen. Spuit de projector niet
met reinigingsvloeistoffen.
Veeg voorzichtig over de oppervlakken.
Wees voorzichtig, zodat u de
oppervlakken niet krast.
De lens reinigen
Gebruik een zachte kwast of lenspapier om de
lens van de projector te reinigen.
GEVAAR!
Gebruik geen vloeibare
reinigingsmiddelen!
Gebruik geen vloeibare
reinigingsmiddelen voor het reinigen
van de lens, om schade aan de coating
op de lens te vermijden.
Software bijwerken
De meest recente software van de projector
kan worden gevonden op www.philips.com/
support, zodat u de beste eigenschappen en
ondersteuning voor de projector krijgt.
Controleer de huidige softwareversie, voordat u
de software van de projector bijwerkt:
• Druk op op de afstandsbediening om
het instellingenmenu te openen. Navigeer
vervolgens naar SW Version (SW-versie).

Onderhoud 17
VOORZICHTIG!
Schakel de projector tijdens het
bijwerken niet uit en verwijder de USB-
flashdrive niet.
Software bijwerken via USB
1 Controleer de meest recente softwareversie
op www.philips.com/support. Zoek uw
product op (modelnummer: PPX520/INT),
en ga naar 'Software en drivers'.
2 Download het gecomprimeerde
softwarebestand en sla het op in de
hoofdmap van de USB-stick.
3 Sluit de USB-stick aan op de USB-poort op
de projector.
• Het wordt aanbevolen om een externe
voeding te gebruiken voor software-
update om te zorgen dat er voldoende
stroom is.
4 Druk op op de afstandsbediening om
het instellingenmenu te openen. Navigeer
vervolgens naar Soft. Update (SW update),
en druk vervolgens op OK.
5 Volg de instructies op het scherm om de
update te voltooien.

18 Philips · PicoPix Max One
Probleemoplossing
Uit- en weer inschakelen
Als er zich een probleem voordoet dat niet kan
worden gecorrigeerd met de instructies in deze
gebruiksaanwijzing, volg dan de hier gegeven
stappen.
1 Schakel de projector uit door 1 seconde
ingedrukt te houden.
2 Wacht ten minste tien seconden.
3 Schakel de projector weer in door
1 seconde ingedrukt te houden.
4 Als het probleem aanhoudt, neem
dan contact op met ons technisch
servicecentrum of uw dealer.
Problemen Oplossingen
De projector kan niet worden ingeschakeld. • Ontkoppel het netsnoer, sluit het weer aan en
probeer om de projector weer in te schakelen.
• Batterij bijna leeg. Sluit de projector aan op een
externe voeding.
• Gebruik de originele voedingsadapter.
Het projectiescherm toont geen beelden. • U moet de projector op een HDMI- of USB-C-
apparaat aansluiten, zodat het projectiescherm
beelden kan weergeven (zie Verbinden,
pagina 7).
• De juiste invoerbron selecteren. Druk op op de
afstandsbediening om de ingangsbronnenlijst te
openen voor invoerbronselectie.
• Controleer of de video-uitgang van het externe
apparaat is ingeschakeld.
De projector laadt langzaam op. • Wanneer ingeschakeld, wordt de externe voeding
eerst gebruikt om de projector te laten werken en
de reststroom gebruikt om de batterij op te laden.
• De projector wordt sneller opgeladen wanneer
deze is uitgeschakeld.
De projector schakelt zichzelf uit. • Batterij bijna leeg.
• Als de projector gedurende een langere periode
draait, wordt de oppervlakte warm. Zorg voor
fatsoenlijke ventilatie, met minstens 30 cm lege
ruimte rondom de projector.
• Controleer of het netsnoer juist is aangesloten.
De projector kan niet worden
uitgeschakeld.
• Houd langer dan 30 seconden ingedrukt.
Geen beeld van het externe HDMI-
apparaat.
• Ontkoppel de HDMI-kabel of schakel het HDMI-
apparaat uit.
• Wacht drie seconden.
• Sluit de HDMI-kabel weer aan of schakel het
HDMI-apparaat weer in.
Geen geluid van het extern aangesloten
apparaat.
• Controleer de kabels die naar het externe
apparaat gaan.
• Controleer of het geluid op het externe apparaat
aan staat.
• Mogelijk werken alleen de originele kabels van de
fabrikant van het apparaat.

Onderhoud 19
Problemen Oplossingen
Geen geluid van het externe HDMI-
uitvoerapparaat.
• Stel de audio-instelling op het HDMI-
uitvoerapparaat in op Stereo (PCM).
Geen geluid als u de computer via een
HDMI-kabel aansluit.
• Controleer of het geluid op de computer is
geactiveerd en stel in om uit te voeren naar de
projector.
De projector reageert niet op commando's
van de afstandsbediening.
• Controleer de batterijen van de
afstandsbediening.
De temperatuur van de oppervlakte van de
projector is hoog.
• Het is voor deze projector normaal om tijdens het
gebruik matige warmte te genereren.
Wat te doen als de projector niet werkt
wanneer aangesloten op een laptop?
• Controleer of de HDMI-kabel correct is
aangesloten.
• Zorg dat de laptop is ingesteld om weer te geven
via de projector.

20 Philips · PicoPix Max One
8 Aanhangsel
Technische gegevens
Technologie/optisch
Schermtechnologie .............................................DLP
Lichtbron ....................... LED RGB 4 LED-kanalen
Resolutie .......................1920 × 1080 beeldpunten
Ondersteunde resolutie ........................... 4K pixels
Levensduur led .................................gaan meer dan
30.000 uur mee
Contrastverhouding ...................................10.000 : 1
Beeldverhouding .....................................16:9 en 4:3
Projectieverhouding ............................................ 1,2:1
Schermgrootte (diagonaal) ........................................
............................................. 75 cm-305 cm/30”-120”
Schermafstand ........... 78 cm - 320 cm/31” - 126”
Projectiemodi.........................voor, achter, plafond,
plafond achter
Keystone-correctie ......................... auto (verticaal)
Aanpassen scherpstellen ........................elektrisch
4-hoeks correctie .......................................................ja
Digitale zoom ...............................................................ja
Aanraaktoetsen ...........................................................ja
Besturingssysteem .............................................Linux
Geluid
Interne luidspreker .................................................4 W
Aansluiting
HDMI ............................................x1 met ARC en CEC
USB-C ............................................................. x1 (video)
USB-A 2.0 .................................................x1 (opladen)
Analoge audio-uitgang (3,5mm)......................... x1
DC-aansluiting .............. x1 (voeding en opladen)
Stroombron
Stroomvoorziening ..........................lichtnetadapter
.......Ingang: 100 - 240 V - 50-60 Hz; 1,5 A (max.)
..................................Uitgang: DC 20 V, 3,25 A, 65 W
Ingebouwde batterij .......................... . mAh
........................................gaat tot max. 5 uur mee
Productinformatie
Afmetingen (B × D × H) ............ 134 × 136 × 47 mm
............................................ 5,28 × 5,35 × 1,85 inch
Gewicht .................................................850 g/1,87 lbs
Bedrijfstemperatuur ............................... 5 °C - 35 °C
Opslagtemperatuur ........................................ < 60 °C
Inhoud van de verpakking
PicoPix Max One-projector, afstandsbediening
met 2 AAA-batterijen, AC-adapter, stekkers (VK,
VS), reisetui, snelstartgids

Aanhangsel 21
CE-verklaring
• Het product mag uitsluitend worden
aangesloten op een USB-interface met
versie USB 2.0 of hoger.
• De adapter moet in de buurt van de
apparatuur worden geïnstalleerd en moet
gemakkelijk toegankelijk zijn.
• De bedrijfstemperatuur van de EUT mag
niet hoger zijn dan 35°C en niet lager dan
5°C.
• De stekker wordt beschouwd als apparaat
voor het ontkoppelen van de adapter.
De conformiteitsverklaring kan worden
geraadpleegd op de site www.philips.com.
FCC-verklaring
15,19 Eisen voor labeling.
Dit apparaat voldoet aan deel 15 van de
FCC-regels. Gebruik is onderworpen aan de
volgende twee voorwaarden: (1) Dit apparaat
mag geen schadelijke storing veroorzaken, en
(2) dit apparaat moet elke ontvangen storing
aanvaarden, inclusief storing die ongewenste
werking kan veroorzaken.
15.21 Informatie voor de gebruiker.
Door wijzigingen of modificaties aan dit
apparaat die niet uitdrukkelijk zijn goedgekeurd
door de partij die verantwoordelijk is voor de
naleving, kan de bevoegdheid van de gebruiker
om het apparaat te gebruiken vervallen.
15.105 Informatie voor de gebruiker.
Deze apparatuur is getest en in
overeenstemming bevonden met de
beperkingen voor een digitaal apparaat van
Klasse B, conform Deel 15 van de FCC-regels.
Deze limieten zijn ontworpen om een redelijke
bescherming te verschaffen tegen schadelijke
interferentie in thuisinstallaties. Deze
apparatuur genereert, gebruikt radiofrequentie-
energie, kan deze uitstralen en kan schadelijke
storing aan radiocommunicatie veroorzaken,
indien deze niet in overeenstemming met de
instructies wordt geïnstalleerd en gebruikt.
Er is echter geen garantie dat er zich in
een bepaalde installatie geen interferentie
voordoet. Als deze apparatuur wel schadelijke
interferentie aan radio- of televisieontvangst
veroorzaakt, wat kan worden vastgesteld door
de apparatuur in en uit te schakelen, dan wordt
de gebruiker aangemoedigd om de interferentie
door één of meer van de volgende maatregelen
te corrigeren:
• Heroriënteer of verplaats de
ontvangstantenne.
• Vergroot de scheiding tussen de apparatuur
en de ontvanger.
• Sluit de apparatuur aan op een stopcontact
op een ander circuit dan dat waarop de
ontvanger is aangesloten.
• Raadpleeg de dealer of een ervaren radio/
tv-monteur voor hulp.
FCC ID: 2ASRT-PPX520/INT
Canadese naleving van
wet- en regelgeving
Dit apparaat voldoet aan de normen van
Industry Canada CAN ICES-3 (B)/NMB-3(B)
RSS-Gen & RSS-247-verklaring: Dit apparaat
voldoet aan de norm(en) van Industry Canada
RSS.
Gebruik is onderworpen aan de volgende twee
voorwaarden:
1 Dit apparaat mag geen interferentie
veroorzaken, en
2 Dit apparaat zal alle interferentie
accepteren, inclusief interferentie die een
ongewenste werking van het apparaat kan
veroorzaken.
Overige opmerking
Instandhouding van het milieu als onderdeel
van een duurzaam ontwikkelingsplan is een
essentieel belang van Screeneo Innovation
SA. Screeneo Innovation SA wil gebruikmaken
van systemen die het milieu ontzien en
heeft daarom besloten om milieuprestaties
te integreren in de levenscyclus van deze
producten, van productie tot ingebruikstelling,
gebruik en verwijdering.
Verpakking: De aanwezigheid van het logo
(groene punt) betekent dat er een bijdrage
is betaald aan een goedgekeurde nationale
organisatie ter verbetering van infrastructuur

22 Philips · PicoPix Max One
Innovation SA.
Screeneo Innovation SA is niet aansprakelijk
voor enige schade of problemen die
voortvloeien uit het gebruik van enige opties of
verbruiksgoederen, anders dan die aangewezen
als originele producten van Screeneo
Innovation SA/PHILIPS of door Screeneo
Innovation SA/PHILIPS goedgekeurde
producten.
Screeneo Innovation SA mag niet aansprakelijk
worden gesteld voor enige schade als gevolg
van elektromagnetische interferentie die
zich voordoet door het gebruik van enige
aansluitkabels anders dan die zijn aangewezen
als producten van Screeneo Innovation SA/
PHILIPS.
Alle rechten voorbehouden. Geen enkel
deel van deze publicatie mag worden
vermenigvuldigd, opgeslagen op een
opvraagsysteem of in enige vorm worden
uitgezonden door enig middel, hetzij
elektronisch, mechanisch, fotokopiëren,
opnemen of anderszins, zonder voorafgaande
schriftelijke toestemming van Screeneo
Innovation SA. De hierin opgenomen informatie
is uitsluitend ontworpen voor gebruik met
dit product. Screeneo Innovation SA. is niet
verantwoordelijk voor het gebruik van deze
informatie als deze op andere apparaten wordt
toegepast.
Deze gebruiksaanwijzing is een document dat
geen contract vertegenwoordigt.
Fouten, drukfouten en wijzigingen zijn
voorbehouden. Copyright © 2020 Screeneo
Innovation SA.
voor het terugwinnen en recyclen van
verpakkingen. Respecteer de plaatselijke regels
voor het scheiden van dit soort afval.
Batterijen: Als het product batterijen bevat,
moeten deze op een geschikt verzamelpunt
worden ingeleverd.
Product: Het symbool met de doorkruiste
vuilnisbak op het product betekent dat het
product deel uitmaakt van de groep elektrische
en elektronische apparatuur. In dit opzicht
vraagt de Europese regelgeving u om deze
gescheiden af te voeren:
• Bij verkooppunten in geval van aanschaf
van vergelijkbare apparatuur.
• Bij de verzamelpunten die lokaal ter
beschikking zijn gesteld (afgiftepunt,
gescheiden inzameling enz.).
Op deze manier kunt u deelnemen aan het
hergebruiken en opwaarderen van afval van
elektrische en elektronische apparatuur,
die invloed kan hebben op het milieu en de
menselijke gezondheid.
De gebruikte papieren en kartonnen
verpakking kunnen als recyclebaar papier
worden afgevoerd. Laat het kunststof
verpakkingsmateriaal recyclen of voer het af
met niet-recyclebaar afval, afhankelijk van de
eisen in uw land.
Handelsmerken: De genoemde referenties in
deze gebruiksaanwijzing zijn handelsmerken
van de respectieve ondernemingen. Door
ontbreken van de handelsmerken ® en ™ mag
niet worden aangenomen dat deze specifieke
terminologieën vrij zijn van handelsmerken.
Overige hierin gebruikte productnamen
zijn uitsluitend voor identificatiedoeleinden
en kunnen handelsmerken zijn van hun
respectieve eigenaars. Screeneo Innovation SA
wijst enige en alle rechten op deze merken af.
Noch Screeneo Innovation SA, noch haar
aangesloten bedrijven zijn ten opzichte van de
koper van dit product of derden aansprakelijk
voor schade, verliezen, door de koper of
derden opgelopen kosten of uitgaven, als
gevolg van ongevallen, verkeerd gebruik
of misbruik van dit product of onbevoegde
modificaties, reparaties of wijzigingen aan dit
product of bij niet-nakoming van de gebruiks-
en onderhoudsaanwijzingen van Screeneo

PicoPix Max One
NL
Screeneo Innovation SA
Route de Lully 5c - 1131 Tolochenaz - Switzerland
Philips and the Philips Shield Emblem are registered trademarks of Koninklijke Philips N.V. used
under license. Screeneo Innovation SA is the warrantor in relation to the product with which this
booklet was packaged.
2020 © Screeneo Innovation SA. All rights reserved.

www.philips.com/support
PPX520
PicoPix Max One

Введение ������������������������������������������������������� 3
3
3
3
...................................3
1 Общаяинформацияпотехнике
безопасности �������������������������������������������4
4
5
5
2 Общиесведения �������������������������������������6
6
6
......................................................................6
7
3 Подключение ������������������������������������������7
7
8
4 Использование ����������������������������������������9
9
9
9
10
11
5 Дополнительныефункции �������������������13
13
13
13
6 Изменениенастроек ����������������������������� 14
14
14
15
.............................15
16
......................................................16
7 Обслуживание �������������������������������������� 16
..............16
17
17
18
8 Приложение ������������������������������������������ 20
20
21
21
21
21
Содержание

Введение
Уважаемыйклиент!
Обэтомруководстве
см.Общая
информацияпотехникебезопасности,стр.4
Используемыесимволы
Примечание
Устранениенеполадок
ОПАСНОСТЬ!
Опасностьполучениятравм!
ПРЕДУПРЕЖДЕНИЕ!
Повреждениеизделияилипотеря
данных!
Комплектпоставки
a
b
c
d
e
f
g
d
c
e
f
g
b
a
Quick Start
Guide
Центробслуживанияклиентов
Веб-сайт:
Эл.почта:
Номертелефонадлямеждународныхзвонков:

1 Общая
информация
потехнике
безопасности
Настройкаизделия
см.Технические
данные,стр.20
ОПАСНОСТЬ!
Прииспользованиибатарей
несоответствующеготипасуществуетриск
взрыва!

Ремонт
Электропитание
см.
Техническиеданные,стр.20
ПРЕДУПРЕЖДЕНИЕ!
.
см.Очистка,стр.17
ОПАСНОСТЬ!
Опасностьраздраженияглаз!

2 Общиесведения
Видсверху
a b c d d
Max One
OK
a Светодиоднаяиндикация
b
c
d
e
Видспереди
a
b
a Проекционныйобъектив
b Фокусировкакамеры
Видсзади
HDMI USB DC
a b c d e f g
a
b ИК-датчик
c Порт HDMI
d
e ПортUSB-A
f USB-C
g DC

ПультДУ
OK
a
d
e
b
c
f
g
h
a
b
c
d
e Регулировкагромкости
f
g Кнопкинавигации
h
3 Подключение
Примечание
Подключениеустройства
HDMIдляпроецирования
изображения
HDMI
HDMI USB DC
HDMI.

Подключениеустройства
USB-Сдляпроецирования
изображения
HDMI USB DC
USB-C.
Примечание

4 Использование
Примечание
см.Подключение,стр.7
Установкапроектора
см.Вариантыустановки,стр.11
Подключениеэлектропитания
ПРЕДУПРЕЖДЕНИЕ!
.
Работаотвнешнегоисточника
питания
HDMI USB DC
a
b
Работаотвстроенногоаккумулятора
Зарядкапроектора
Примечание
Подготовкапульта
дистанционногоуправления
ПРЕДУПРЕЖДЕНИЕ!

10
Примечание
Включениеинастройка
Выборязыка
Language
OK.
/
Изменениеразмераэкрана
Digital Zoom
OK
/ .
Фокусировкаизображения
/
Коррекцияформыизображения
Автокоррекция(вертикальныетрапецеидальные
искажения)
Auto Keystone - On

Ручнаякоррекциятрапецеидальныхискажений
(4-угловаякоррекция)
Auto Keystone - Off
Manual Keystone
OK
/
/
Ручнаякоррекцияизображенияпогоризонтали
Auto Keystone - Off
Manual Horiz. Keyst.
/ .
Калибровка
Auto Keystone - Off
Keystone Calibration
Вариантыустановки

12
Примечание
Спереди на столе
Proj. Direc. - Front proj.
OK.
Спереди на потолке
Proj. Direc. - Rev. front proj.
OK.
Сзади на столе
Proj. Direc. - Rear proj.
OK.
Сзади на потолке
Proj. Direc. - Rev. rear proj.
OK.

5 Дополнительные
функции
Прослушиваниечерез
внешниединамикиили
наушники
ОПАСНОСТЬ!
Опасностьповрежденияслуха!
HDMI USB DC
ЗарядкаUSB-устройств
ЗарядкачерезпортUSB-A
USB
ЗарядкачерезпортUSB-C
USB-C
USB-C Charger - On
USB-C Charger - Off
Использованиефункции
легкогосопряжения

14
см.ПодключениеустройстваHDMI
дляпроецированияизображения,стр.7
CEC -
On
6 Изменение
настроек
КнопкинавигацииOK
Настройкиязыка
Language
OK / .
Выбористочникавходного
сигнала
Input Source

• Auto
• HDMI
• USB-C
Изменениепараметров
изображения
• Keystone Correction
• Auto Keystone
Auto
Keystone
• Manual Keystone
• Manual Horiz. Keyst.
• Keystone Calibration
• Proj. Direc.
• Digital Zoom
• Picture Preset
• Picture Adj.
Brightness/Contrast/Saturation/Toneburst/
Sharpness
• Color Temp.
Warm
Cool
User
Настройкиуправления
питанием
• Sleep Timer

16
• Brightness Mode
Восстановлениенастроекпо
умолчанию
Full Reset
OK
Прочиенастройки
• Volume
• CEC
см.Использованиефункции
легкогосопряжения,стр.13
• USB-C Charger
• Position
• SW Version
• Soft. Update
см.Обновление
программногообеспечения,стр.17
7 Обслуживание
Обслуживаниевстроенного
аккумулятора
Примечаниеоглубокомразрядеаккумулятора
ОПАСНОСТЬ!
Прииспользованиибатарей
несоответствующеготипасуществуетриск
взрыва!

Очистка
ОПАСНОСТЬ!
Инструкциипоочистке!
Очисткаобъектива
ОПАСНОСТЬ!
Неиспользуйтежидкиечистящие
средства!
Обновлениепрограммного
обеспечения
philips.com/support.
SW Version
ПРЕДУПРЕЖДЕНИЕ!
ОбновлениеПОчерезUSB
Soft. Update
OK.

18
Устранениенеполадок
Выключениеиповторное
включениепитания
Неисправности Методыустранения
см.Подключение,
стр.7
три

Неисправности Методыустранения

20
Комплектпоставки
8 Приложение
Техническиеданные
Технология/оптическиепараметры
....................
....................................
........................................
Звук
Подключения
Питание
.. перем. тока
............................
Общиесведенияобизделии

ЗаявлениеСЕ
ЗаявлениеФедеральной
комиссиисвязиСША(ФКС)
15.19Требованиякмаркировке.
15.21Информациядляпользователя.
15.105Информациядляпользователя.
Соответствиенормативным
требованиямКанады
ЗаявлениеосоответствиитребованиямRSS-
GenиRSS-247:
Прочиеуведомления
Упаковка:

22
Батареи:
Изделие:
Торговыемарки:

PicoPix Max One
RU
ScreeneoInnovationSA

Kullanım
Kılavuzu
Ürününüzü kaydedin ve şu adresten destek alın
www.philips.com/support
PPX520
PicoPix Max One
Portable projector

Giriş ���������������������������������������������������������������3
Sayın müşterimiz ..........................................................3
Bu kullanım kılavuzu hakkında ................................3
Kutu içeriği ......................................................................3
Müşteri hizmetleri merkezi ........................................3
1 Genel güvenlik bilgileri ���������������������� 4
Ürünün kurulması ........................................................ 4
Onarımlar ........................................................................ 4
Güç kaynağı ....................................................................5
2 Genel Görünüm �������������������������������������5
Üstten görünüm ............................................................5
Önden görünüm............................................................5
Arkadan görünüm ....................................................... 6
Uzaktan kumanda ....................................................... 6
3 Bağlan �����������������������������������������������������7
Projeksiyon görüntüsü için HDMI bağlantısı ......7
Görüntü projeksiyonu için USB-C bağlantısı ...... 7
4 Çalıştırma ���������������������������������������������� 8
Projeksiyon cihazını yerleştirme ............................ 8
Güç kaynağı bağlantısı .............................................. 8
Uzaktan kumandayı hazırlama ............................... 8
Gücün açılması ve kurulum ...................................... 9
Yerleştirme seçenekleri ............................................10
5 Diğer özellikler ������������������������������������ 12
Harici hoparlörlerle veya kulaklıklarla
dinleme ..........................................................................12
USB cihazının şarj edilmesi .....................................13
Kolay bağlantının kullanılması ...............................13
6 Ayarları değiştirme ����������������������������14
Dil ayarları .....................................................................14
Giriş kaynağı seçimi ...................................................14
Resim ayarları ..............................................................14
Güç kontrolü ayarları .................................................15
Ayarları varsayılana geri yükleme .........................15
Diğer ayarlar ................................................................. 15
7 Servis ����������������������������������������������������16
Yerleşik batarya bakımı ............................................16
Temizlik ..........................................................................16
Yazılım güncellemesi ................................................. 16
Sorun Giderme ............................................................18
8 Ek ���������������������������������������������������������� 20
Teknik veriler................................................................20
CE beyanı ...................................................................... 21
FCC beyanı ....................................................................21
Kanada mevzuatına uygunluk ...............................21
Diğer açıklamalar ........................................................ 21
İçindekiler

Giriş 3
Giriş
Sayın müşterimiz
Bu projeksiyon cihazını satın aldığınız için
teşekkür ederiz.
Bu ürünü ve sunduğu birçok işlevi
beğeneceğinizi umuyoruz!
Bu kullanım kılavuzu
hakkında
Bu ürünle birlikte verilen hızlı başlangıç
kılavuzu, bu ürünü hızlı ve kolay bir şekilde
kullanmanızı sağlar. Ayrıntılı açıklamalar bu
kullanım kılavuzunun ileriki bölümlerinde
bulunabilir.
Kullanım kılavuzunun tamamını dikkatlice
okuyun. Bu ürünün düzgün çalışması için
tüm güvenlik talimatlarına uyun (bkz� Genel
güvenlik bilgileri, sayfa 4). Üretici, bu
talimatlara uyulmaması durumunda sorumluluk
kabul etmez.
Kullanılan semboller
Not
Sorun Giderme
Bu simge, bu ürünü daha etkin ve kolay
bir şekilde kullanmanıza yardımcı olacak
ipuçlarını belirtir.
TEHLİKE!
Fiziksel yaralanma tehlikesi!
Bu sembol, fiziksel yaralanma tehlikesi
konusunda uyarır. Yanlış kullanım
nedeniyle fiziksel yaralanma veya
hasar meydana gelebilir.
DİKKAT!
Üründe hasar veya veri kaybı!
Bu sembol, üründe hasar ve olası veri
kaybı konusunda uyarır. Yanlış kullanım
nedeniyle hasar meydana gelebilir.
Kutu içeriği
a Hızlı Başlangıç Kılavuzu
b PicoPix Max One projeksiyon cihazı
(PPX520/INT)
c Taşıma çantası
d 2× güç adaptörü fişi (İngiltere, ABD)
e 2x AAA pil
f 1x güç adaptörü
g Uzaktan kumanda
d
c
e
f
g
b
a
Quick Start
Guide
Müşteri hizmetleri merkezi
Destek yardım hattını garanti belgesinde veya
çevrim içi olarak bulabilirsiniz:
Web sitesi: www.philips.com/support
E-Posta: philips.projector.eu@screeneo.com
Uluslararası Telefon: +41 215 391 665
Lütfen servis sağlayıcınıza uluslararası arama
ücretlerini sorun!
Elektronik kullanım kılavuzuna şu adresten
erişin:
https://support.philipsprojection.com
Topluluk forumuna şu adresten erişin:
https://community.philipsprojection.com

4 Philips · PicoPix Max One
1 Genel güvenlik
bilgileri
Belirtilen tüm uyarı ve güvenlik notlarına dikkat
edin. Bu kullanım kılavuzunda açıklanmayan
herhangi bir değişiklik veya ayar yapmayın.
Yanlış çalıştırma ve yanlış kullanım fiziksel
yaralanmaya, üründe hasara veya veri kaybına
neden olabilir.
Ürünün kurulması
Bu ürün sadece kapalı alanda kullanım
için tasarlanmıştır. Ürünü sağlam ve düz bir
yüzeye güvenli bir şekilde yerleştirin. Fiziksel
yaralanmayı veya ürün hasarını önlemek için
tüm kabloları kimsenin takılıp düşmeyeceği
şekilde yerleştirin.
Ürünü nemli odalarda çalıştırmayın. Şebeke
kablosuna veya şebeke bağlantısına asla ıslak
elle dokunmayın.
Ürün yeterli olarak havalandırılmalı ve üzeri
örtülmemelidir. Ürünü kullanımdayken kapalı
dolaplara, kutulara veya diğer muhafazalara
koymayın. Ürün çalışırken lensi kapatmayın.
Ürünü doğrudan güneş ışığından, ısıdan,
yoğun sıcaklık dalgalanmalarından ve nemden
koruyun. Ürünü ısıtıcıların veya klimaların
yakınına yerleştirmeyin. Teknik verilerde
listelenen sıcaklık bilgilerine uyun (bkz� Teknik
veriler, sayfa 20).
Ürünün uzun süre çalışması yüzeyin ısınmasına
neden olur. Aşırı ısınma durumunda ürün
otomatik olarak bekleme moduna geçer.
Ürünün içine sıvı sızmasını engelleyin. Ürünün
içine sıvı veya yabancı cisimler girerse ürünü
kapatın ve elektrik şebekesiyle bağlantısını
kesin. Ürünü yetkili servis merkezine kontrol
ettirin.
Ürünü her zaman dikkatli taşıyın. Lense
dokunmayın. Ürünün veya güç kablosunun
üzerine asla ağır veya keskin nesneler
koymayın.
Ürün çok ısınırsa veya duman çıkarırsa hemen
kapatıp güç kablosunu çıkarın. Ürününüzü
yetkili servis merkezine kontrol ettirin. Ürünü
açık alevlerden (ör. mum) uzak tutun.
Üründe yerleşik batarya vardır. Sökmeyin ve
değiştirmeyin. Yerleşik batarya sadece uzman
servis personeli tarafından değiştirilebilir.
Yerleşik bataryayı kendi başınıza değiştirmeye
çalışmayın. Bataryanın yanlış kullanılması veya
yanlış batarya tipi kullanılması, ürüne zarar
verebilir veya yaralanmaya neden olabilir.
TEHLİKE!
Yanlış tipte bataryalarda patlama
riski!
Yanlış batarya tipinin kullanılması
halinde patlama riski vardır.
Bataryaları (batarya paketi veya yerleşik
bataryalar) güneş ışığı veya açık ateş gibi aşırı
sıcağa maruz bırakmayın.
Aşağıdaki koşullarda, ürünün içinde arızalara
yol açabilecek bir nem tabakası oluşabilir:
• ürün soğuktan sıcak bir alana taşınırsa;
• soğuk bir oda ısıtıldıktan sonra;
• ürün nemli bir odaya yerleştirildiğinde.
Herhangi bir nem oluşumunu önlemek için
aşağıdaki gibi hareket edin:
1 Oda koşullarına uyum sağlaması için ürünü
başka bir odaya taşımadan önce plastik bir
torbaya koyun.
2 Ürünü plastik torbadan çıkarmadan önce
bir ila iki saat bekleyin.
Ürün çok tozlu bir ortamda kullanılmamalıdır.
Toz parçacıkları ve diğer yabancı nesneler ürüne
zarar verebilir.
Ürünü aşırı titreşimlere maruz bırakmayın. Bu
durum, iç bileşenlere zarar verebilir.
Çocukların gözetimsiz olarak ürünü
kullanmasına izin vermeyin. Ambalaj
malzemeleri çocuklardan uzak tutulmalıdır.
Kendi güvenliğiniz için ürünü yıldırımlı fırtına
sırasında kullanmayın.
Onarımlar
Ürünü kendi başınıza onarmayın. Yanlış bakım
yaralanmalara veya ürünün hasar görmesine
neden olabilir. Ürün yetkili servis merkezi
tarafından onarılmalıdır.
Lütfen bu ürünle birlikte verilen garanti
belgesinde yetkili servis merkezlerinin
ayrıntılarını bulun.
Garantiyi geçersiz kılacağından bu üründen tip
etiketini çıkarmayın.

Genel Görünüm 5
Güç kaynağı
Yalnızca bu ürün için onaylanmış güç
adaptörünü kullanın (bkz� Teknik veriler,
sayfa 20).
Güç kaynağının şebeke geriliminin, kurulum
konumunda mevcut olan şebeke gerilimiyle
eşleşip eşleşmediğini kontrol edin. Bu ürün,
ürün üzerinde belirtilen gerilim tipine uygundur.
Priz ürünün yakınında olmalı ve kolayca
erişilebilir olmalıdır.
Yerleşik bataryanın kapasitesi zamanla azalır.
Ürün sadece AC güç kaynağıyla çalışıyorsa
yerleşik batarya arızalı demektir. Yerleşik
bataryayı değiştirmek için yetkili servis merkezi
ile iletişime geçin.
DİKKAT!
Projeksiyon cihazını kapatmak için her
zaman düğmesini kullanın.
Yüzeyi temizlemeden önce ürünü kapatın ve
prizden çıkarın (bkz� Temizlik, sayfa 16).
Yumuşak, tüy bırakmayan bir bez kullanın.
Asla sıvı, gazlı veya kolay tutuşan temizleyiciler
(spreyler, aşındırıcılar, cilalar, alkol) kullanmayın.
Ürünün içine nem girmesini engelleyin.
TEHLİKE!
Göz tahrişi riski!
Bu ürün, çok parlak ışık yayan
yüksek güçlü LED (Işık Yayan Diyot)
ile donatılmıştır. Çalışma sırasında
doğrudan projeksiyon cihazı lensine
bakmayın. Bu durum, göz tahrişine
veya hasarına neden olabilir.
2 Genel Görünüm
Üstten görünüm
a b c d d
Max One
OK
a LED göstergesi
b
Bir önceki menü ekranına döner.
c
• Menü seçeneklerinde gezinin.
• Ses seviyesini azaltın.
d
• Menü seçeneklerinde gezinin.
• Ses seviyesini artırın.
e
• Ayarlar menüsüne girin.
• Seçimi veya girişi onaylar.
Önden görünüm
a
b
a Projeksiyon lensi
b Odak kamerası
Görüntü netliğini ayarlayın.

6 Philips · PicoPix Max One
Arkadan görünüm
HDMI USB DC
a b c d e f g
a
• Projeksiyon cihazını açmak veya
kapatmak için bir saniye basılı tutun.
• Projeksiyon cihazı açıldığında LED
beyaza döner. Projeksiyon cihazı
kapatıldığında LED söner.
• Projeksiyon cihazını şarj ederken,
cihazın açık veya kapalı olmasından
bağımsız olarak LED kırmızıya döner.
b İnfrared sensörü
c HDMI portu
Oynatma cihazındaki HDMI çıkışına
bağlayın.
d
3,5 mm ses çıkışı; harici hoparlörlere veya
kulaklıklara bağlayın.
e USB-A portu
Amazon Fire TV stick®, Roku® akış çubuğu
(yığın depolama veya medya oynatıcı için
değil) gibi güçlü USB cihazlarına bağlayın.
f USB-C
• Oynatma cihazındaki USB-C video
çıkışına bağlayın.
• Akıllı telefon gibi bir USB-C cihazını şarj
edin.
g DC
Güç kaynağına bağlayın.
Uzaktan kumanda
OK
a
d
e
b
c
f
g
h
a
• Hızlı erişin ve giriş kaynağı seçin.
• Ayarlar menüsüne girin.
b
Seçimi veya girişi onaylar.
c
Odak ayarını etkinleştirin.
d
Ayarlar menüsüne girin.
e Ses kontrolü
Sesi artırın, azaltın veya sessize alın.
f
Bir önceki menü ekranına döner.
g Gezinme düğmeleri
Menü seçeneklerinde gezinin.
h
Projeksiyon cihazını açmak veya kapatmak
için bir saniye basılı tutun.

Bağlan 7
3 Bağlan
Not
Projeksiyon ekranının görüntüleri
gösterebilmesi için projeksiyon cihazını
HDMI veya USB-C cihazına bağlamanız
gerekir.
Herhangi bir bağlantı kurmadan veya
değiştirmeden önce tüm cihazların
prizden çıkarıldığından emin olun.
Projeksiyon görüntüsü için
HDMI bağlantısı
HDMI bağlantısı üzerinden projeksiyon cihazına
oynatma cihazı (ör. Blu-ray oynatıcı, oyun
konsolu, video kamera, dijital kamera veya
bilgisayar) bağlayın. Bu bağlantı ile birlikte,
görüntüler projeksiyon ekranında gösterilir ve
ses projeksiyonda çalar.
1 HDMI kablosu kullanarak, projeksiyon
cihazı üzerindeki veya HDMI konnektörünü
oynatma cihazındaki HDMI çıkışına
bağlayın.
HDMI USB DC
2 HDMI bağlantısı yapıldığında projeksiyon
cihazı otomatik olarak HDMI girişine geçer.
Projeksiyon ekranı görüntüleri gösterir.
• Projeksiyon ekranı görüntüleri
göstermiyorsa, HDMI girişini manuel olarak
seçin. Giriş kaynağına erişmek için uzaktan
kumanda üzerindeki düğmesine basın,
ardından HDMI'ı seçin.
Görüntü projeksiyonu için
USB-C bağlantısı
USB-C bağlantısı üzerinden projeksiyon
cihazına USB-C cihazı (örneğin cep telefonu,
tablet veya dizüstü bilgisayar) bağlayın. Bu
bağlantı ile birlikte, görüntüler projeksiyon
ekranında gösterilir ve ses projeksiyonda çalar.
1 USB-C kablosu kullanarak, projeksiyon
cihazı üzerindeki konnektörünü
oynatma cihazındaki USB-C portuna
bağlayın.
HDMI USB DC
2 USB-C bağlantısı yapıldığında projeksiyon
cihazı otomatik olarak USB-C girişine geçer.
Projeksiyon ekranı görüntüleri gösterir.
• Projeksiyon ekranı görüntüleri
göstermiyorsa, USB-C girişini manuel olarak
seçin. Giriş kaynağına erişmek için uzaktan
kumanda üzerindeki düğmesine basın,
ardından USB-C'yi seçin.
Not
Projeksiyon cihazı yalnızca stereo
ses formatını destekler. Projeksiyon
cihazında oynatma cihazından gelen ses
duyulmuyorsa, oynatma cihazında ses
çıkış formatının stereo olarak ayarlanıp
ayarlanmadığını kontrol edin.

8 Philips · PicoPix Max One
4 Çalıştırma
Not
Projeksiyon ekranının görüntüleri
gösterebilmesi için projeksiyon cihazını
HDMI veya USB-C cihazına bağlamanız
gerekir (bkz� Bağlan, sayfa 7).
Projeksiyon cihazını
yerleştirme
Projeksiyon cihazını, projeksiyon yüzeyinin
önünde düz bir yüzeye yerleştirin.
Projeksiyon cihazını farklı yapılandırmalarda
da kurabilirsiniz (bkz� Yerleştirme seçenekleri,
sayfa 10).
Güç kaynağı bağlantısı
Projeksiyon cihazı harici güç kaynağı veya
yerleşik batarya ile çalıştırılabilir.
DİKKAT!
Projeksiyon cihazını açmak ve
kapatmak için her zaman düğmesini
kullanın.
Harici güç kaynağı ile çalıştırma
• Verilen güç adaptörünü projeksiyon
cihazındaki soketine ve ardından duvar
prizine bağlayın.
HDMI USB DC
a
b
Gerekirse, prize bağlamak için uygun bir
elektrik fişi seçin.
Verilen elektrik fişini güç adaptörüne
takmak için, güç fişi üzerindeki yuvaları güç
adaptörünün iki pimi ile hizalayın, ardından
güç fişini takın.
Yerleşik batarya ile çalıştırma
Projeksiyon cihazı ayrıca taşınabilirlik açısından
yerleşik batarya ile çalıştırılabilir.
Projeksiyon cihazının şarj edilmesi
İlk kullanımdan önce projeksiyon cihazını
1,5 saat şarj edin.
Projeksiyon ekranında düşük pil simgesi
göründüğünde projeksiyon cihazını şarj edin.
• Projeksiyon cihazını şarj etmek için
cihazı "Harici güç kaynağı ile çalıştırma"
bölümünde açıklandığı gibi harici bir güç
kaynağına bağlayın.
• Şarj ederken projeksiyon cihazı üzerindeki
LED kırmızıya döner. Tamamen şarj
olduğunda kırmızı LED söner.
• Açıldığında, harici güç kaynağı ilk olarak
projeksiyon cihazını çalıştırmak için
kullanılacak ve kullanılmayan güç kaynağı
bataryayı şarj edecektir.
• Daha hızlı şarj için, projeksiyon cihazı
kapalıyken şarj edin.
Not
Yerleşik bataryanın kapasitesi zamanla
azalır. Projeksiyon cihazı sadece harici
güç kaynağıyla çalışıyorsa yerleşik
batarya arızalı demektir. Yerleşik
bataryayı değiştirmek için yetkili servis
merkezi ile iletişime geçin.
Uzaktan kumandayı
hazırlama
DİKKAT!
Bataryaların yanlış kullanımı aşırı
ısınmaya, patlamaya, yangın riskine ve
yaralanmaya neden olabilir. Sızıntı yapan
bataryalar uzaktan kumandaya zarar
verebilir.
Uzaktan kumandayı asla doğrudan
güneş ışığına maruz bırakmayın.
Pillerin deforme olmasını, sökülmesini
veya şarj edilmesini önleyin.
Açık ateşe ve suya maruz bırakmayın.
Boş pilleri hemen değiştirin.
Uzun süre kullanılmayacaksa pilleri
uzaktan kumandadan çıkarın.
1 Batarya bölmesi kapağını basılı tutun ve
aynı anda batarya bölmesine erişmek için
kaydırarak açın.
2 Verilen pilleri (AAA tipi) doğru kutupları (+/-)
gösterilen şekilde takın.
3 Pil bölmesini kapatın.

Çalıştırma 9
Not
Uzaktan kumandayı kullanırken, uzaktan
kumandayı projeksiyon cihazının
arkasında bulunan infrared sensörüne
yöneltin ve uzaktan kumanda ile infrared
sensörü arasında herhangi bir engel
olmadığından emin olun.
Gücün açılması ve kurulum
1 Projeksiyon cihazını açmak veya kapatmak
için projeksiyon cihazı üzerindeki (veya
uzaktan kumanda üzerindeki ) düğmesini
1 saniye basılı tutun.
• Projeksiyon cihazı açıldığında,
projeksiyon cihazı şarj edilmiyorsa
projeksiyon cihazı üzerindeki LED beyaz
olur.
• Projeksiyon cihazını şarj ederken,
cihazın açık veya kapalı olmasından
bağımsız olarak cihaz üzerindeki LED
kırmızıya döner.
Dil ayarı
1 Ayarlar menüsüne erişmek için uzaktan
kumanda üzerindeki düğmesine basın,
ardından Language (Dil)'i seçmek için gidin
ve OK’a basın.
2 Dili seçmek için / düğmelerine basın.
Ekran boyutunun değiştirilmesi
Projeksiyon ekranı boyutu (veya görüntülerin
boyutu), projeksiyon cihazının lensi ile
projeksiyon yüzeyi arasındaki mesafeye göre
belirlenir.
• Projeksiyon mesafesinin, istediğiniz ekran
boyutunun 1,2 katı genişliğinde olması
gerekir.
• Ayrıca, ekran boyutunu %50'ye kadar
küçültmek için dijital zumu kullanabilirsiniz.
Ayarlar menüsüne erişmek için uzaktan
kumanda üzerindeki düğmesine basın,
ardından Digital Zoom (Dijital Zum)'u seçin
ve OK’a basın. Ardından görüntü boyutunu
ayarlamak için / düğmelerine basın.
Görüntü odak ayarı
Odak ayarını açmak için uzaktan kumanda
üzerindeki düğmesine basın, ardından
görüntü netliğini ayarlamak için uzaktan
kumanda üzerindeki / düğmelerine basın.
Görüntü netliğini ayarladıktan sonra, odak
ayarını kapatmak için düğmesine basın.
Görüntü şeklini düzeltme
Otomatik düzeltme (dikey keystone)
Projeksiyon cihazını yukarı veya aşağı
eğdiğinizde projeksiyon cihazı görüntüyü
otomatik olarak dikdörtgen olacak şekilde
düzeltebilir.
Otomatik dikey keystone düzeltmeyi
etkinleştirmek için, ayarlar menüsüne erişmek
üzere uzaktan kumanda üzerindeki
düğmesine basın, ardından Auto Keystone - On
(Otomatik Keystone - Açık) seçeneğine gidin.

10 Philips · PicoPix Max One
Manuel keystone (4 köşe düzeltme)
Projeksiyon görüntüsünün dört köşesini yeniden
konumlandırarak görüntü şeklini manuel olarak
ayarlayabilirsiniz. Bu aynı zamanda projeksiyon
cihazının sol veya sağ konumunu düzeltmenize
de izin verir.
1 Bu işlevi etkinleştirmek için Auto Keystone
- Off (Otomatik Keystone - Kapalı) olarak
seçtiğinizden emin olun. Ayarlar menüsüne
erişmek için uzaktan kumanda üzerindeki
düğmesine basın, ardından Manual
Keystone (Manuel Keystone)'a gidin.
2 4 köşe düzeltme arayüzünde, bir görüntü
köşesi seçmek için OK'a basın, ardından
yatay konumlandırma değerlerini ayarlamak
için uzaktan kumanda üzerindeki /
düğmelerini ve dikey konumlandırma
değerlerini ayarlamak için uzaktan
kumanda üzerindeki / düğmelerini basılı
tutun. İsterseniz diğer görüntü köşelerinin
konumlandırma değerlerini ayarlamak için
aynı adımı tekrarlayın.
Manuel yatay düzeltme
Keystone veya bozuk görüntüleri manuel olarak
yatay yönde düzeltebilirsiniz.
1 Bu işlevi etkinleştirmek için Auto Keystone
- Off (Otomatik Keystone - Kapalı) olarak
seçtiğinizden emin olun. Ayarlar menüsüne
erişmek için uzaktan kumanda üzerindeki
düğmesine basın, ardından Manual
Horiz. Keyst. (Manuel Yatay Keyst.)'a gidin.
2 Görüntü şeklini ayarlamak için /
düğmesine basın.
Kalibrasyon
Projeksiyon cihazı düz yerleştirildiğinde veya
otomatik keystone düzeltmesi görüntüyü ideal
olarak düzeltmezse görüntüyü dikdörtgen
olacak şekilde düzeltin. Aşağıdaki şekilde
görüntü şekli kalibrasyonunu gerçekleştirin.
1 Bu işlevi etkinleştirmek için Auto Keystone
- Off (Otomatik Keystone - Kapalı) olarak
seçtiğinizden emin olun. Projeksiyon
cihazını yere veya pürüzsüz (düz) bir yüzeye
yerleştirin.
2 Ayarlar menüsüne erişmek için uzaktan
kumanda üzerindeki düğmesine basın,
ardından Keystone Calibration (Keystone
Kalibrasyonu)'na gidin.
Yerleştirme seçenekleri
Projeksiyon cihazını aşağıdaki
yapılandırmalarda kurabilirsiniz. Farklı
projeksiyon cihazı yerleşimleri için aşağıdaki
yönergeleri izleyin.

Çalıştırma 11
Not
Tavana tepeden montaj için, kurulum
uzmanı tarafından önerilen projeksiyon
cihazı bağlantı parçası satın alın ve
bağlantı parçasıyla birlikte gelen
talimatları izleyin.
Tavana monte etmeden önce, tavanın
projeksiyon cihazının ve montaj kitinin
ağırlığını taşıyabileceğinden emin olun.
Tavana montaj için, bu ürün montaj
talimatlarına uygun olarak tavana
sağlam bir şekilde takılmalıdır. Yanlış bir
tavan montajı kazaya, yaralanmaya veya
hasara neden olabilir.
Ön masa
1 Projeksiyon cihazını, projeksiyon ekranının
önündeki bir masaya yerleştirin. Bu
seçenek, hızlı kurulum ve taşınabilirlik için
projeksiyon cihazını yerleştirmenin en genel
yoludur.
2 Projeksiyonu doğru konuma ayarlamak için
ayarlar menüsüne erişmek üzere uzaktan
kumanda üzerindeki düğmesine basın,
ardından Proj. Direc. - Front proj. (Proj. Yön.
- Ön proj.)’u seçme ayarına gidin ve OK’a
basın.
Ön tavan
1 Projeksiyon cihazını, projeksiyon ekranının
önünde baş yukarı bakacak şekilde tavana
monte edin. Projeksiyon cihazını tavana
monte etmek için projeksiyon cihazı
bağlantı parçası gereklidir.
2 Projeksiyonu doğru konuma ayarlamak için
ayarlar menüsüne erişmek üzere uzaktan
kumanda üzerindeki düğmesine basın.
ardından Proj. Direc. - Rev. front proj. (Proj.
Yön. - Trs. ön proj.)’u seçme ayarına gidin ve
OK’a basın.
Arka masa
1 Projeksiyon cihazını, projeksiyon ekranının
arkasındaki bir masaya yerleştirin. Özel bir
arkadan projeksiyon ekranı gereklidir.
2 Projeksiyonu doğru konuma ayarlamak
için ayarlar menüsüne erişmek için uzaktan
kumanda üzerindeki düğmesine basın,
ardından Proj. Direc. - Rear proj. (Proj. Yön.
- Arka proj.)’u seçme ayarına gidin ve OK’a
basın.
Arka tavan
1 Projeksiyon cihazını, projeksiyon ekranının
arkasında baş yukarı bakacak şekilde
tavana monte edin. Projeksiyon cihazını
ekranın arkasındaki tavana monte etmek
için projeksiyon cihazı bağlantı parçası ve
özel arkadan projeksiyon ekranı gereklidir.

12 Philips · PicoPix Max One
2 Projeksiyonu doğru konuma ayarlamak için
ayarlar menüsüne erişmek üzere uzaktan
kumanda üzerindeki düğmesine basın,
ardından Proj. Direc. - Rev. rear proj. (Proj.
Yön. - Trs. arka proj.)’u seçme ayarına gidin
ve OK’a basın.
5 Diğer özellikler
Harici hoparlörlerle veya
kulaklıklarla dinleme
Projeksiyon cihazına harici hoparlör veya
kulaklık bağlayın. Bu bağlantı ile birlikte
projeksiyon cihazından gelen ses harici
hoparlörlerden veya kulaklıklardan çalınır.
TEHLİKE!
İşitme hasarı tehlikesi!
Kulaklıkları bağlamadan önce
projeksiyon cihazının sesini kısın.
Projeksiyon cihazını (özellikle kulaklık
kullanırken) yüksek seste uzun süre
kullanmayın. Bu durum, işitme hasarına
neden olabilir.
1 3,5 mm ses kablosu kullanarak, projeksiyon
cihazı üzerindeki konnektörünü harici
hoparlörlerdeki analog ses girişine (3,5 mm
jaka veya kırmızı ve beyaz jaklara) bağlayın.
Veya projeksiyon cihazı üzerindeki
konnektörünü kulaklığınıza bağlayın.
• Projeksiyon cihazına harici hoparlör
veya kulaklık bağlandığında,
projeksiyon cihazının hoparlörleri
otomatik olarak devre dışı bırakılır.
HDMI USB DC
Kulaklığa bağlanırken, ses seviyesini uygun bir
seviyeye ayarlamak için uzaktan kumanda (veya
projeksiyon cihazı) üzerindeki ses kontrolünü
kullanın.

Diğer özellikler 13
USB cihazının şarj edilmesi
USB cihazını (ör. akıllı telefon, MP3 çalar veya
başka bir mobil cihaz) şarj edebilirsiniz.
USB-A bağlantı noktası ile şarj
1 USB-A kablosu kullanarak, USB cihazınızı
projeksiyon cihazındaki USB bağlantı
noktasına bağlayın.
2 Projeksiyon cihazını açın. USB cihazı
otomatik olarak şarj olmaya başlar.
• USB-A bağlantısı, Amazon Fire TV stick®,
Roku® akış çubuğu gibi bir USB cihazına
da güç sağlayabilir (yığın depolama veya
medya oynatıcı için değil).
USB-C bağlantı noktası ile şarj
1 USB-C kablosu kullanarak, USB-C cihazınızı
projeksiyon cihazındaki USB-C bağlantı
noktasına bağlayın.
2 Projeksiyon cihazını açın. USB-C cihaz şarj
işlevinin etkinleştirildiğinden emin olun.
Ayarlar menüsüne erişmek için uzaktan
kumanda üzerindeki düğmesine basın,
ardından USB-C Charger - On (USB-C Şarj
Cihazı - Açık)'a gidin.
USB-C cihazı otomatik olarak şarj olmaya
başlar.
USB-C cihazının şarj edilmesini devre dışı
bırakmak için, USB-C Charger - Off (USB-C
Şarj Cihazı - Kapalı)’yı seçin.
Kolay bağlantının
kullanılması
Bu projeksiyon cihazı, HDMI CEC (Tüketici
Elektroniği Kontrolü) protokolünü kullanan
kolay bağlantıyı destekler. HDMI ile bağlanan
kolay bağlantı uyumlu cihazları açmak veya
kapatmak için tek bir uzaktan kumanda
kullanabilirsiniz. Üretici, tüm HDMI CEC
cihazlarıyla %100 birlikte çalışabilirliği garanti
etmez.
1 Projeksiyon cihazının HDMI CEC işlevini
destekleyen HDMI cihazına bağlı
olduğundan emin olun (bkz� Projeksiyon
görüntüsü için HDMI bağlantısı,
sayfa 7).
2 Kolay bağlantı işlevini bu projeksiyon
cihazı üzerinde etkinleştirmek için ayarlar
menüsüne erişmek üzere uzaktan kumanda
üzerindeki düğmesine basın, ardından
CEC - On (CEC - Açık) seçeneğine gidin.

14 Philips · PicoPix Max One
6 Ayarları
değiştirme
Bu bölüm, projeksiyon cihazının ayarlarını
değiştirmenize yardımcı olur.
1 Projeksiyon cihazı açıldığında, ayarlar
menüsüne erişmek için uzaktan kumanda
üzerindeki veya (veya projeksiyon
cihazı üzerindeki ) düğmesine basın.
2 Ayarları seçmek ve değiştirmek için
Gezinme düğmeleri ve OK’ı kullanın.
Dil ayarları
Ekrandaki menü için istediğiniz dili seçin.
• Language (Dil) menüsünde gezinin ve
OK’a basıp ardından dil seçmek için /
düğmelerine basın.
Giriş kaynağı seçimi
Aşağıdaki ayarlara erişmek için Input Source
(Giriş Kaynağı) seçeneğine gidin.
• Auto (Otomatik): HDMI veya USB-C cihazı
bağlandığında otomatik olarak doğru giriş
kaynağına geçin.
• HDMI: HDMI cihazı bağlandığında seçin.
• USB-C: USB-C cihazı bağlandığında seçin.
Projeksiyon ekranının görüntüleri
gösterebilmesi için doğru bir giriş kaynağı
seçmeniz gerekir.
Resim ayarları
Aşağıdaki resim ayarlarına erişebilirsiniz.
• Keystone Correction (Keystone Düzeltme):
Keystone veya bozuk görüntüleri dikdörtgen
veya kare olacak şekilde düzeltmek için
seçenek belirleyebilirsiniz.
• Auto Keystone (Otomatik Keystone):
Projeksiyon cihazını yukarı veya
aşağı doğru eğerken görüntü şeklinin
otomatik düzeltmesini etkinleştirin
veya devre dışı bırakın. Auto Keystone
(Otomatik Keystone) etkinleştirildiğinde,
diğer tüm görüntü düzeltme seçenekleri
devre dışı bırakılır.
• Manual Keystone (Manuel Keystone):
Görüntünün dört köşesini manuel
olarak ayarlayın.
• Manual Horiz. Keyst. (Manuel
Yatay Keyst.): Keystone veya bozuk
görüntüleri manuel olarak dikey yönde
düzeltin.
• Keystone Calibration (Keystone
Kalibrasyonu): Otomatik keystone
düzeltme görüntü şeklini ideal olarak
düzeltmezse bu işlevi gerçekleştirin.
• Proj. Direc. (Proj. Yön.): Projeksiyon cihazının
farklı kurulumuna bağlı olarak projeksiyonu
doğru konuma ayarlayın.
• Digital Zoom (Dijital Zum): Projeksiyon
görüntüsünü %50 ile %100 aralığında
ayarlayın.
• Picture Preset (Resim Ön Ayarı): Resim ve
video gösterimi için önceden tanımlanmış
renk parlaklığı ayarı seçin.

Ayarları değiştirme 15
• Picture Adj. (Resim Ayr.): Brightness/
Contrast/Saturation/Toneburst/Sharpness
(Parlaklık/Kontrast/Satürasyon/Toneburst/
Keskinlik) değerlerini 0 ile 100 arasında
ayarlayın.
• Color Temp. (Renk Sıc.): Kırmızı gibi daha
sıcak renkleri artırmak için Warm (Sıcak)
olarak ayarlayın; resmi mavimsi yapmak
için Cool (Soğuk) olarak ayarlayın; RGB
modunda renk değerlerini özelleştirmek için
User (Kullanıcı) olarak ayarlayın.
Güç kontrolü ayarları
Güç tüketimini kontrol etmek için aşağıdaki
menü seçeneklerine gidin.
• Sleep Timer (Uyku Zamanlayıcı): Projeksiyon
cihazının belirli bir zamanda otomatik olarak
kapanmasını sağlayan zaman seçeneği
belirleyin.
• Brightness Mode (Parlaklık Modu): Ekran
parlaklık modu seçin.
Ayarları varsayılana geri
yükleme
Projeksiyon cihazı normal şekilde çalışmıyorsa,
projeksiyon cihazını varsayılan ayarlara
sıfırlayın. Mevcut tüm ayarlar silinir.
• Full Reset (Tam Sıfırlama) menüsüne
gidin ve OK’a basın, ardından sıfırlamayı
tamamlamak için ekrandaki talimatları
izleyin.
Diğer ayarlar
Aşağıdaki seçeneklere de erişebilirsiniz.
• Volume (Ses Seviyesi): Projeksiyon cihazının
ses seviyesini ayarlayın.
• CEC: HDMI bağlantısı aracılığıyla cihazlar
arasında kolay bağlantıyı etkinleştirin veya
devre dışı bırakın (bkz� Kolay bağlantının
kullanılması, sayfa 13).
• USB-C Charger (USB-C Şarj Cihazı): Bağlı
USB-C cihazının şarj edilmesini etkinleştirin
veya devre dışı bırakın.
• Position (Konum): Görüntülendiğinde
projeksiyon ekranında ayarlar menüsünü
yeniden konumlandırın.
• SW Version (Yzlm Sürümü): Projeksiyon
cihazının mevcut yazılım sürümünü
görüntüleyin.
• Soft. Update (Yzlm. Güncelleme): USB cihaz
üzerinden sistem yazılımını güncelleyin
(bkz� Yazılım güncellemesi, sayfa 16).

16 Philips · PicoPix Max One
7 Servis
Yerleşik batarya bakımı
Yerleşik bataryanın kapasitesi zamanla azalır.
Aşağıdaki noktalara dikkat ederseniz batarya
ömrünü uzatabilirsiniz:
• Güç kaynağı olmadan projeksiyon cihazı
yerleşik batarya ile çalışır. Batarya yeterli
güce sahip olmadığında, projeksiyon cihazı
kapanır. Bu durumda projeksiyon cihazını
güç kaynağına bağlayın.
• Bataryayı düzenli olarak şarj edin.
Projeksiyon cihazını batarya tamamen
boşken saklamayın.
• Projeksiyon cihazı birkaç hafta
kullanılmayacaksa, saklamadan önce
projeksiyon cihazını kullanarak bataryayı
biraz boşaltın.
• Projeksiyon cihazını ve bataryayı ısı
kaynaklarından uzak tutun.
• Güç kaynağına bağladıktan sonra
projeksiyon cihazı şarj edilmezse, küçük bir
iğne kullanarak projeksiyon cihazının yan
panelinde bulunan sıfırlama tuşuna (küçük
bir delik) basın.
Bataryanın tamamen boşalması hakkında not
Yerleşik batarya tamamen boşaldığında, şarj
işleminin başlaması daha uzun sürebilir. Bu
durumda, kullanmadan önce projeksiyon
cihazını en az beş saat şarj edin.
TEHLİKE!
Yanlış tipte bataryalarda patlama
riski!
Yerleşik bataryayı kendi başınıza
değiştirmeye çalışmayın.
Temizlik
TEHLİKE!
Temizlik talimatları!
Yumuşak, tüy bırakmayan bir bez
kullanın. Asla sıvı veya kolay tutuşan
temizleyiciler (spreyler, aşındırıcılar,
cilalar, alkol, vb.) kullanmayın.
Projeksiyon cihazının içine nem
girmesini engelleyin. Projeksiyon
cihazına herhangi bir temizleme sıvısı
püskürtmeyin.
Yüzeyleri nazikçe silin. Yüzeyleri
çizmemeye dikkat edin.
Lens temizliği
Projeksiyon cihazının lensini temizlemek için
yumuşak bir fırça veya lens temizleme kağıdı
kullanın.
TEHLİKE!
Herhangi bir sıvı temizlik maddesi
kullanmayın!
Lensin kaplama tabakasına zarar
vermemek için lensi temizlerken
herhangi bir sıvı temizleme maddesi
kullanmayın.
Yazılım güncellemesi
Projeksiyon cihazından en iyi özellikleri ve
desteği almanız için projeksiyon cihazının
en son yazılımına www.philips.com/support
adresinden ulaşılabilir.
Projeksiyon cihazının yazılımını güncellemeden
önce, mevcut yazılım sürümünü kontrol edin:
• Ayarlar menüsüne erişmek için uzaktan
kumanda üzerindeki düğmesine basın
ardından SW Version (Yzlm Sürümü)'ne
gidin.

Servis 17
DİKKAT!
Güncelleme sırasında projeksiyon
cihazını kapatmayın veya USB flash
sürücüsünü çıkarmayın.
USB üzerinden yazılım
güncelleme
1 En son yazılım sürümünü www.philips.com/
support adresinden kontrol edin. Ürününüzü
bulun (model numarası: PPX520/INT) ve
‘Yazılım ve sürücüler’i bulun.
2 Sıkıştırılan yazılım dosyasını indirin ve USB
flash sürücünün kök dizinine kaydedin.
3 Projeksiyon cihazındaki USB portuna USB
flash sürücüye bağlayın.
• Yeterli güç kaynağını sağlamak üzere
yazılım güncellemesi için harici bir güç
kullanılması önerilir.
4 Ayarlar menüsüne erişmek için uzaktan
kumanda üzerindeki düğmesine basın ve
Soft. Update (Yzlm. Güncelleme)'yi seçmek
için gidin ve OK’a basın.
5 Güncellemeyi tamamlamak için ekrandaki
talimatları izleyin.

18 Philips · PicoPix Max One
Sorun Giderme
Güç döngüsü
Bu kullanım kılavuzundaki talimatlarla
düzeltilemeyen bir sorun meydana gelirse,
burada verilen adımları izleyin.
1 düğmesine 1 saniye basılı tutarak
projeksiyon cihazını kapatın.
2 En az on saniye bekleyin.
3 düğmesine 1 saniye basılı tutarak
projeksiyon cihazını tekrar açın.
4 Sorun devam ederse, lütfen teknik servis
merkezimizle veya satıcınızla iletişime
geçin.
Sorun Çözüm
Projeksiyon cihazı açılmıyor veya güç
gelmiyor.
• Güç kablosunu çıkarıp yeniden takın ve
projeksiyon cihazını yeniden açmayı deneyin.
• Batarya gücü düşük. Projeksiyon cihazını harici bir
güç kaynağına bağlayın.
• Orijinal güç adaptörünü kullanın.
Projeksiyon ekranı görüntüleri göstermiyor. • Projeksiyon ekranının görüntüleri gösterebilmesi
için projeksiyon cihazını HDMI cihazına veya
USB-C cihazına bağlamanız gerekir (bkz� Bağlan,
sayfa 7).
• Doğru giriş kaynağını seçin. Giriş kaynağı seçimi
için giriş kaynağına erişmek üzere uzaktan
kumanda üzerindeki düğmesine basın.
• Harici cihaz video çıkışının açık olup olmadığını
kontrol edin.
Projeksiyon cihazı yavaş şarj oluyor. • Açıldığında, harici güç kaynağı ilk olarak
projeksiyon cihazını çalıştırmak için kullanılacak
ve kullanılmayan güç kaynağı bataryayı şarj
edecektir.
• Daha hızlı şarj için, projeksiyon cihazı kapalıyken
şarj edin.
Projeksiyon cihazı kendi kendine kapanıyor. • Batarya gücü düşük.
• Projeksiyon cihazı uzun bir süre çalıştığında yüzeyi
ısınır. Projeksiyon cihazının her tarafında en az 30
cm boşluk kalacak şekilde projeksiyon cihazını
düzgün şekilde havalandırın.
• Güç kablosunun doğru şekilde bağlanıp
bağlanmadığını kontrol edin.
Projeksiyon cihazı kapanmıyor. • düğmesini 30 saniyeden uzun basılı tutun.
Harici HDMI cihazından görüntü gelmiyor. • HDMI kablosunu çıkarın veya HDMI cihazını
kapatın.
• Üç saniye bekleyin.
• HDMI kablosunu yeniden takın veya HDMI
cihazını tekrar açın.
Harici bağlı cihazdan ses gelmiyor. • Harici cihaza giden kabloları kontrol edin.
• Harici cihazda sesin etkinleştirildiğini kontrol edin.
• Yalnızca cihaz üreticisinin orijinal kabloları
kullanılabilir.

Servis 19
Sorun Çözüm
Harici HDMI çıkış cihazından ses gelmiyor. • HDMI çıkış cihazında, ses ayarını Stereo (PCM)
olarak ayarlayın.
Bilgisayarı HDMI kablosuyla bağladığınızda
ses gelmiyor.
• Bilgisayarda sesin etkinleştirildiğini ve projeksiyon
cihazından çıkacak şekilde ayarlandığını kontrol
edin.
Projeksiyon cihazı uzaktan kumanda
komutlarına tepki vermiyor.
• Uzaktan kumandanın pillerini kontrol edin.
Projeksiyon cihazının yüzeyi ılık. • Bu projeksiyon cihazının çalışma sırasında orta
derecede ısı üretmesi normaldir.
Dizüstü bilgisayara bağlanırken projeksiyon
cihazı çalışmazsa ne yapılmalı?
• HDMI kablosunun doğru takılıp takılmadığını
kontrol edin.
• Dizüstü bilgisayarın projeksiyon cihazı ekranına
geçirildiğinden emin olun.

20 Philips · PicoPix Max One
Paket içeriği
PicoPix Max One projeksiyon cihazı, 2 AAA
pilli uzaktan kumanda, AC adaptörü, güç fişleri
(İngiltere, ABD), seyahat çantası, Hızlı Başlangıç
Kılavuzu
8 Ek
Teknik veriler
Teknoloji/optik
Ekran teknolojisi ...................................................DLP
Işık kaynağı ........................LED RGB 4 LED Kanalı
Çözünürlük ................................. 1920 × 1080 piksel
Desteklenen çözünürlük .......................... 4K piksel
LED kullanım ömrü .............30.000 saatten fazla
dayanır
Kontrast oranı ................................................ 10.000:1
En boy oranı .............................................. 16:9 ve 4:3
Yansıtma açısı oranı ............................................. 1,2:1
Ekran boyutu (çapraz) .................................................
........................................... 75 cm-305 cm / 30”-120”
Ekran mesafesi ..............78 cm-320 cm / 31”-126”
Projeksiyon modları ..ön, arka, tavan, arka tavan
Keystone düzeltme ....................... otomatik (dikey)
Odak ayarı ....................................................... elektrikli
4 köşe düzeltme .................................................... evet
Dijital Zum ............................................................... evet
Dokunmatik tuşlar ................................................ evet
İşletim sistemi ...................................................... Linux
Ses
Dahili Hoparlör ........................................................4 W
Bağlantı
HDMI ................................................×1 ARC ve CEC ile
USB-C ............................................................. ×1 (video)
USB-A 2.0 .......................................................... ×1 (şarj)
Analog ses çıkışı (3,5 mm) ..................................... ×1
DC jakı ................................ ×1 (güç kaynağı ve şarj)
Güç kaynağı
Güç kaynağı ...........................................güç adaptörü
............Giriş: 100-240 V~, 50-60 Hz, 1,5 A (maks)
........................................Çıkış: DC 20 V, 3,25 A, 65 W
Yerleşik batarya ................................... . mAh
............................................5 saate kadar dayanır
Ürün ayrıntıları
Boyutlar (G × D × Y) ................... 134 × 136 × 47 mm
...............................................5,28 × 5,35 × 1,85 inç
Ağırlık .................................................. 850 g / 1,87 lbs
Çalışma sıcaklığı ..........................................5°C - 35°C
Depolama sıcaklığı ........................................60°C altı

Ek 21
CE beyanı
• Ürün yalnızca USB 2.0 veya üzeri sürüm
USB arayüzüne bağlanmalıdır.
• Adaptör ekipmanın yakınında olmalı ve
kolayca erişilebilir olmalıdır.
• EUT'nin çalışma sıcaklığı 35°C'yi geçemez
ve 5°C'den düşük olmamalıdır.
• Fiş, adaptörün bağlantı kesme cihazı olarak
kabul edilir.
Uygunluk Beyanına www.philips.com sitesinden
bakılabilir.
FCC beyanı
15�19 Etiketleme gereksinimleri�
Bu cihaz, FCC Kurallarının 15. bölümüne
uygundur. Çalıştırma, aşağıdaki iki koşula
tabidir: (1) Bu cihaz zararlı parazite neden
olmamalıdır ve (2) bu cihaz, istenmeyen
çalışmaya neden olabilecek parazit dahil olmak
üzere alınan her türlü girişimi kabul etmelidir.
15�21 Kullanıcı için bilgiler�
Uyumluluktan sorumlu tarafça açıkça
onaylanmayan herhangi bir değişiklik veya
modifikasyon, kullanıcının ekipmanı çalıştırma
yetkisini geçersiz kılabilir.
15�105 Kullanıcı için bilgiler�
Bu ekipman test edilmiş ve FCC Kurallarının 15.
Kısmına göre B Sınıfı dijital cihaz sınırlamalarına
uygun olduğu görülmüştür. Bu sınırlar, konut
kurulumunda zararlı parazitlere karşı makul
koruma sağlamak için tasarlanmıştır. Bu
ekipman, telsiz frekansı enerjisi üretir, kullanır ve
yayabilir ve talimatlara uygun olarak kurulmaz
ve kullanılmazsa telsiz iletişimlerinde zararlı
parazitlere neden olabilir. Ancak, belirli bir
kurulumda parazit olmayacağına dair bir garanti
yoktur. Bu ekipman, radyo veya televizyon
alımında zararlı parazite neden olursa (bu,
ekipmanı kapatıp açarak belirlenebilir),
kullanıcının aşağıdaki önlemlerden bir veya
daha fazlasını alarak paraziti gidermeye
çalışması önerilir:
• Alıcı antenin yönünü veya konumunu
değiştirin.
• Ekipman ile alıcı arasındaki mesafeyi artırın.
• Ekipmanı, alıcının bağlı olduğundan farklı
bir devre üzerindeki bir prize bağlayın.
• Yardım için satıcınıza veya deneyimli bir
radyo/TV teknisyenine danışın.
FCC Kimliği: 2ASRT-PPX520/INT
Kanada mevzuatına
uygunluk
Bu cihaz Industry Canada CAN ICES-3 (B)/
NMB-3(B) ile uyumludur
RSS-Gen ve RSS-247 beyanı: Bu cihaz Industry
Canada RSS standartları ile uyumludur.
Çalıştırma, aşağıdaki iki koşula tabidir:
1 Bu cihaz parazite neden olmamalıdır ve
2 Bu cihaz, cihazın istenmeyen şekilde
çalışmasına neden olabilen girişim dahil her
türlü girişimi kabul etmelidir.
Diğer açıklamalar
Sürdürülebilir kalkınma planının bir parçası
olarak çevrenin korunması, Screeneo
Innovation SA için temel bir husustur.
Screeneo Innovation SA'nın hedefi, çevreye
duyarlı sistemler oluşturmaktır. Sonuç olarak,
şirketimiz üretimden devreye almaya ve
ortadan kaldırmaya kadar bu ürünlerin yaşam
döngüsüne çevresel performansları entegre
etmeye karar vermiştir.
Paketleme: Logonun (yeşil nokta) varlığı,
paket kurtarma ve geri dönüşüm alt yapılarını
iyileştirmek için onaylanmış bir ulusal kuruluşa
katkı ödendiği anlamına gelir. Lütfen bu tür
atıklar için yerel olarak belirlenen ayırma
kurallarına uyun.
Piller: Ürününüzde pil varsa, uygun bir toplama
noktasında imha edilmelidir.
Ürün: Ürün üzerindeki çarpı işaretli çöp kutusu
simgesi, ürünün elektrikli ve elektronik ekipman
ailesine ait olduğu anlamına gelir. Bu bağlamda,
Avrupa yönetmelikleri sizden şu seçenekler
doğrultusunda imha etmenizi istemektedir:

22 Philips · PicoPix Max One
• Benzer ekipmanların satın alınması
durumunda satış noktalarında.
• Yerel olarak kullanımınıza sunulan
toplama noktalarında (bırakma merkezi,
seçici toplama vb.).
Böylelikle çevre ve insan sağlığına etki
edebilecek Elektrikli ve Elektronik Ekipman
Atıklarının yeniden kullanımına ve
iyileştirilmesine katkı sağlayabilirsiniz.
Kullanılan kağıt ve karton ambalajlar geri
dönüştürülebilir kağıt olarak imha edilebilir.
Ülkenizdeki gereksinimlere bağlı olarak plastik
ambalajı geri dönüşüme gönderin veya geri
dönüştürülemeyen atıklarla birlikte atın.
Ticari markalar: Bu kılavuzda belirtilen
referanslar, ilgili şirketlerin ticari markalarıdır.
® ve ™ ticari markalarının olmaması, bu özel
ifadelerin kullanımı serbest ticari markalar
olduğu varsayımına sebep olamaz. Burada
kullanılan diğer ürün adları yalnızca tanımlama
amaçlıdır ve ilgili sahiplerinin ticari markaları
olabilir. Screeneo Innovation SA, bu markalarla
ilgili her türlü hakkı reddeder.
Screeneo Innovation SA ve bağlı kuruluşları, bu
ürünün alıcısına veya üçüncü şahıslara, kaza, bu
ürünün yanlış kullanımı veya kötüye kullanılması
veya bu üründe yetkisiz modifikasyonlar,
onarımlar veya değişiklikler veya Screeneo
Innovation SA işletim ve bakım talimatlarına
tam olarak uyulmaması sonucunda alıcı veya
üçüncü şahıslar tarafından maruz kalınan
zararlardan, kayıplardan, maliyetlerden veya
masraflardan sorumlu olmayacaktır.
Screeneo Innovation SA, orijinal Screeneo
Innovation SA/PHILIPS ürünleri veya Screeneo
Innovation SA/PHILIPS onaylı ürünler olarak
belirtilenler dışında herhangi bir opsiyonun
veya herhangi bir sarf malzemesinin
kullanılmasından kaynaklanan hasar veya
sorunlardan sorumlu olmayacaktır.
Screeneo Innovation SA, Screeneo Innovation
SA/PHILIPS ürünleri olarak belirtilenler
dışındaki herhangi bir arayüz kablosunun
kullanımı sonucu ortaya çıkan, elektromanyetik
parazitten kaynaklanan herhangi bir hasardan
sorumlu tutulamaz.
Tüm hakları saklıdır. Bu yayının hiçbir bölümü,
Screeneo Innovation SA'nın önceden yazılı
izni olmaksızın çoğaltılamaz, erişim sisteminde
saklanamaz veya elektronik, mekanik, fotokopi,
kayıt veya başka bir şekilde herhangi bir şekilde
iletilemez. Burada yer alan bilgiler yalnızca
bu ürünle kullanılmak üzere tasarlanmıştır.
Screeneo Innovation SA. bu bilgilerin başka
cihazlara uygulanmasından sorumlu değildir.
Bu kullanım kılavuzu, sözleşme anlamına
gelmeyen bir belgedir.
Hatalar, baskı hataları ve değişiklikler olabilir.
Telif Hakkı © 2020 Screeneo Innovation SA.

PicoPix Max One
TR
Screeneo Innovation SA
Route de Lully 5c - 1131 Tolochenaz - Switzerland
Philips and the Philips Shield Emblem are registered trademarks of Koninklijke Philips N.V. used
under license. Screeneo Innovation SA is the warrantor in relation to the product with which this
booklet was packaged.
2020 © Screeneo Innovation SA. All rights reserved.
-
 1
1
-
 2
2
-
 3
3
-
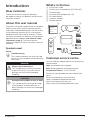 4
4
-
 5
5
-
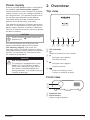 6
6
-
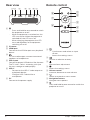 7
7
-
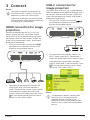 8
8
-
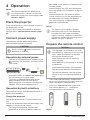 9
9
-
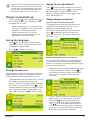 10
10
-
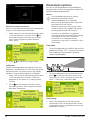 11
11
-
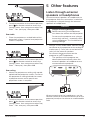 12
12
-
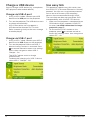 13
13
-
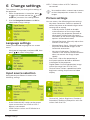 14
14
-
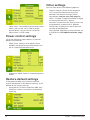 15
15
-
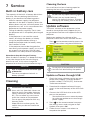 16
16
-
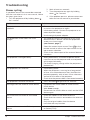 17
17
-
 18
18
-
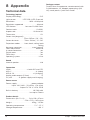 19
19
-
 20
20
-
 21
21
-
 22
22
-
 23
23
-
 24
24
-
 25
25
-
 26
26
-
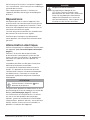 27
27
-
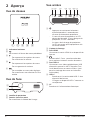 28
28
-
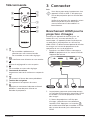 29
29
-
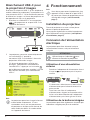 30
30
-
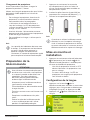 31
31
-
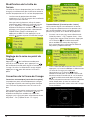 32
32
-
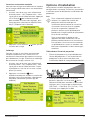 33
33
-
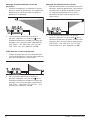 34
34
-
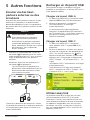 35
35
-
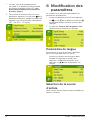 36
36
-
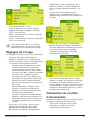 37
37
-
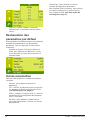 38
38
-
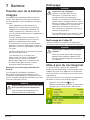 39
39
-
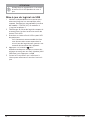 40
40
-
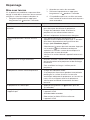 41
41
-
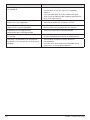 42
42
-
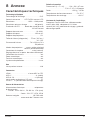 43
43
-
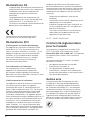 44
44
-
 45
45
-
 46
46
-
 47
47
-
 48
48
-
 49
49
-
 50
50
-
 51
51
-
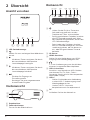 52
52
-
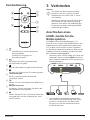 53
53
-
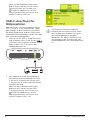 54
54
-
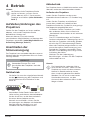 55
55
-
 56
56
-
 57
57
-
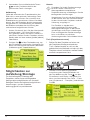 58
58
-
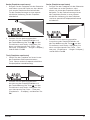 59
59
-
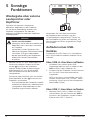 60
60
-
 61
61
-
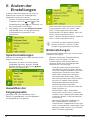 62
62
-
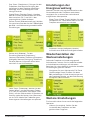 63
63
-
 64
64
-
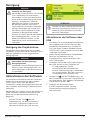 65
65
-
 66
66
-
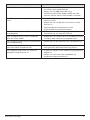 67
67
-
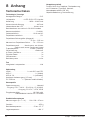 68
68
-
 69
69
-
 70
70
-
 71
71
-
 72
72
-
 73
73
-
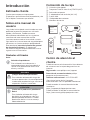 74
74
-
 75
75
-
 76
76
-
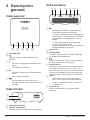 77
77
-
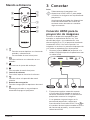 78
78
-
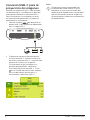 79
79
-
 80
80
-
 81
81
-
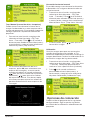 82
82
-
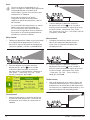 83
83
-
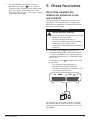 84
84
-
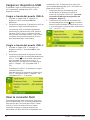 85
85
-
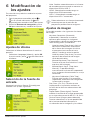 86
86
-
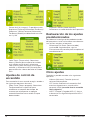 87
87
-
 88
88
-
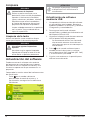 89
89
-
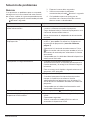 90
90
-
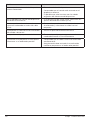 91
91
-
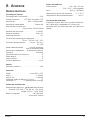 92
92
-
 93
93
-
 94
94
-
 95
95
-
 96
96
-
 97
97
-
 98
98
-
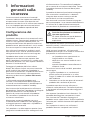 99
99
-
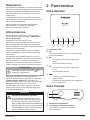 100
100
-
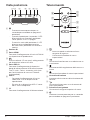 101
101
-
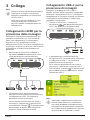 102
102
-
 103
103
-
 104
104
-
 105
105
-
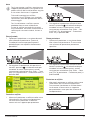 106
106
-
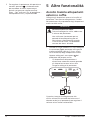 107
107
-
 108
108
-
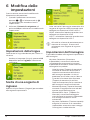 109
109
-
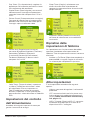 110
110
-
 111
111
-
 112
112
-
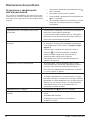 113
113
-
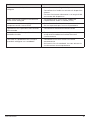 114
114
-
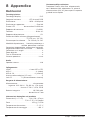 115
115
-
 116
116
-
 117
117
-
 118
118
-
 119
119
-
 120
120
-
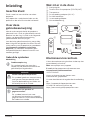 121
121
-
 122
122
-
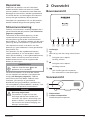 123
123
-
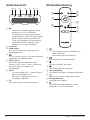 124
124
-
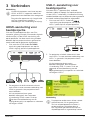 125
125
-
 126
126
-
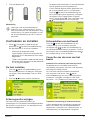 127
127
-
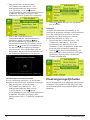 128
128
-
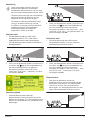 129
129
-
 130
130
-
 131
131
-
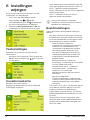 132
132
-
 133
133
-
 134
134
-
 135
135
-
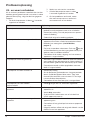 136
136
-
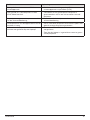 137
137
-
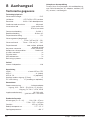 138
138
-
 139
139
-
 140
140
-
 141
141
-
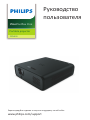 142
142
-
 143
143
-
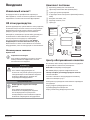 144
144
-
 145
145
-
 146
146
-
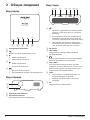 147
147
-
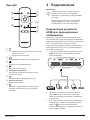 148
148
-
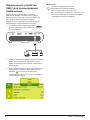 149
149
-
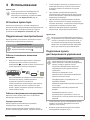 150
150
-
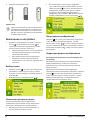 151
151
-
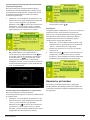 152
152
-
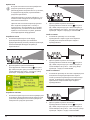 153
153
-
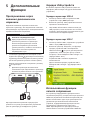 154
154
-
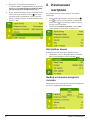 155
155
-
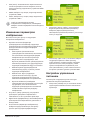 156
156
-
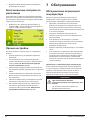 157
157
-
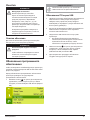 158
158
-
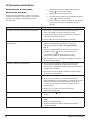 159
159
-
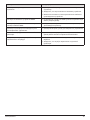 160
160
-
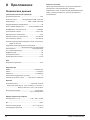 161
161
-
 162
162
-
 163
163
-
 164
164
-
 165
165
-
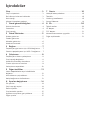 166
166
-
 167
167
-
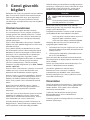 168
168
-
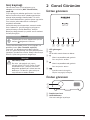 169
169
-
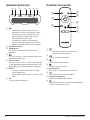 170
170
-
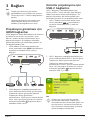 171
171
-
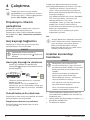 172
172
-
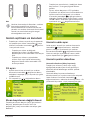 173
173
-
 174
174
-
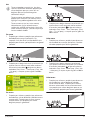 175
175
-
 176
176
-
 177
177
-
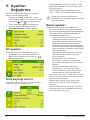 178
178
-
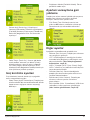 179
179
-
 180
180
-
 181
181
-
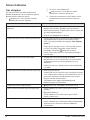 182
182
-
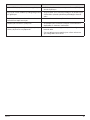 183
183
-
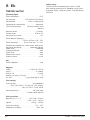 184
184
-
 185
185
-
 186
186
-
 187
187


Philips PPX520 Gebruikershandleiding
- Categorie
- Projectoren
- Type
- Gebruikershandleiding
in andere talen
- English: Philips PPX520 User guide
- italiano: Philips PPX520 Guida utente
- français: Philips PPX520 Mode d'emploi
- español: Philips PPX520 Guía del usuario
- Deutsch: Philips PPX520 Benutzerhandbuch
- Türkçe: Philips PPX520 Kullanici rehberi
Gerelateerde papieren
Andere documenten
-
Lenco LPJ-300WH de handleiding
-
-
-
OK. OPR100 Handleiding
-
Yamaha DPX-1100 de handleiding
-
Salora 58BHD2500 de handleiding
-
-
-
Yamaha DPX-1200 Handleiding
-
XGIMI MoGo 2 Handleiding