Pioneer MVH-S120UB Handleiding
- Categorie
- Auto media-ontvangers
- Type
- Handleiding

English Français Italiano Español Deutsch Nederlands
DIGITAL MEDIA RECEIVER
RÉCEPTEUR NUMÉRIQUE MULTIMÉDIA
RICEVITORE MULTIMEDIALE DIGITALE
RECEPTOR DE MEDIOS DIGITALES
DIGITALER MEDIA RECEIVER
DIGITALE MEDIA-RECEIVER
MVH-S120UI
MVH-S120UIG
MVH-S12UI
MVH-S120UB
MVH-S120UBG
MVH-S120UBA
MVH-S120UBW
Operation Manual
Mode d’emploi
Manuale d’istruzioni
Manual de instrucciones
Bedienungsanleitung
Bedieningshandleiding

- 2 -
English
Getting Started........................................................................................ 3
Radio.......................................................................................................... 6
USB/iPod/AUX .......................................................................................... 8
App Mode .............................................................................................. 11
Spotify® .................................................................................................. 12
Using Pioneer ARC APP ....................................................................... 13
Settings .................................................................................................. 15
FUNCTION settings ............................................................................... 15
AUDIO settings ...................................................................................... 17
SYSTEM settings.................................................................................... 18
ILLUMINATION settings........................................................................ 20
Additional Information ....................................................................... 21
About this manual:
• In the following instructions, a USB memory or USB audio player are referred to as
“USB device”.
• In this manual, iPod and iPhone are referred to as “iPod”.
Table of Contents

- 3 -- 3 -
English
MVH-S120UI/S120UIG/S12UI/S120UB/S120UBG/S120UBA/
S120UBW
Frequently used operations
Getting Started
Basic operation
Purpose Operation
Turn on the power* Press SRC/OFF to turn on the power.
Press and hold SRC/OFF to turn off the
power.
Adjust the volume Turn the M.C. dial.
Select a source Press SRC/OFF repeatedly.
Change the display information Press DISP repeatedly.
Return to the previous display/list Press BAND/.
Return to the normal display from the menu Press and hold BAND/.
Boost the bass level Press BASS.
• You can select the bass level in [BASS
BOOST] (page 18).
SRC (source)/OFF
Detach button
Display window
M.C. (multi-control) dial
BAND/
USB port
AUX input jack (3.5 mm stereo jack)
DISP (display)
BASS

- 4 -
English
* When this unit’s blue/white lead is connected to the vehicle’s auto-antenna relay control terminal,
the vehicle’s antenna extends when this unit’s source is turned on. To retract the antenna, turn the
source off.
Display indication
Detach the front panel to prevent theft. Remove any cables and devices attached to the
front panel and turn off the unit before detaching it.
Important
• Avoid subjecting the front panel to excessive shock.
• Keep the front panel out of direct sunlight and high temperatures.
• Always store the detached front panel in a protective case or bag.
When you turn the ignition switch to ON after installation, [SET UP :YES] appears in the
display.
1 Press the M.C. dial.
Indication Description
Appears when a lower tier of the menu or folder exists.
Appears when the BASS button is pressed and held.
Appears when the local seek tuning function is set (page 16).
Appears when a traffic program is received.
Appears when the TA (traffic announcements) function is set (page 16).
Appears when the sound retriever function is set (page 17).
Appears when the iPod control function is set (page 10).
Detaching the front panel
Setup menu
Detach Attach

- 5 -- 5 -
English
The setup menu disappears after 30 seconds of no operation. If you prefer not to set
at this time, turn the M.C. dial to select [NO], then press to confirm.
2 Turn the M.C. dial to select the options, then press to confirm.
To proceed to the next menu option, you need to confirm your selection.
3 [QUIT :YES] appears when all the settings have been made.
To return to the first item of the setup menu, turn the M.C. dial to select [QUIT :NO],
then press to confirm.
4 Press the M.C. dial to confirm the settings.
NOTES
• You can cancel the menu setting by pressing SRC/OFF.
• These settings can be made at any time from the SYSTEM settings (page 18) and INITIAL settings
(page 5).
1 Press the M.C. dial to display the main menu.
2 Turn the M.C. dial to select [SYSTEM], then press to confirm.
3 Turn the M.C. dial to select [DEMO OFF], then press to confirm.
4 Turn the M.C. dial to select [YES], then press to confirm.
1 Press and hold SRC/OFF until the unit turns off.
2 Press and hold SRC/OFF to display the main menu.
3 Turn the M.C. dial to select [INITIAL], then press to confirm.
4 Turn the M.C. dial to select an option, then press to confirm.
Menu Item Description
LANGUAGE Select the language to display the text information from a
compressed audio file.
[ENG](English),
[РУС](Russian),
[TUR](Turkish)
CLOCK SET Set the clock.
FM STEP Select the FM tuning step from 100 kHz or 50 kHz.
[100], [50]
Canceling the demonstration display (DEMO OFF)
INITIAL settings

- 6 -
English
NOTE
The options vary depending on the unit.
The tuner frequencies on this unit are allocated for use in Western Europe, Asia, the
Middle East, Africa and Oceania. Use in other areas may result in poor reception. The RDS
(radio data system) function only works in areas that broadcast RDS signals for FM
stations.
1 Press SRC/OFF to select [RADIO].
2 Press BAND/ to select the band from [FM1], [FM2], [FM3], [MW] or [LW].
Menu Item Description
FM STEP Select the FM tuning step from 100 kHz or 50 kHz.
[100], [50]
SP-P/O MODE Select when there is a full-range speaker connected to the rear
speaker output leads and there is a subwoofer connected to the
RCA output.
[REAR/SUB.W]
[SUB.W/SUB.W] Select when there is a passive subwoofer connected directly to
the rear speaker output leads and there is a subwoofer
connected to the RCA output.
[REAR/REAR] Select when there are full-range speakers connected to the rear
speaker output leads and RCA output. If there is a full-range
speaker connected to the rear speaker output leads, and the
RCA output is not used, you may select either [REAR/SUB.W] or
[REAR/REAR].
S/W UPDATE Select to confirm the latest system information on the unit.
[SYSTEM INFO]
[SYSTEM UPDATE] Select to update the unit to the latest software and initialize the
unit settings. For details on the latest software and updating,
visit our website.
SYSTEM RESET Select [YES] to initialize the unit settings. The unit will be
restarted automatically.
(Some of the settings may be retained even after resetting the
unit.)
[YES], [NO]
Radio
Receiving preset stations

- 7 -- 7 -
English
3 Press a number button (1/ to 6/).
TIP
The / buttons can be also used to select a preset station when [SEEK] is set to [PCH] in the
FUNCTION settings (page 16).
The six strongest stations are stored on the number buttons (1/ to 6/).
1 After selecting the band, press the M.C. dial to display the main menu.
2 Turn the M.C. dial to select [FUNCTION], then press to confirm.
3 Turn the M.C. dial to select [BSM], then press to confirm.
To seek a station manually
1
After selecting the band, press / to select a station.
Press and hold / then release to seek an available station. Scanning stops
when the unit receives a station. To cancel seek tuning, press / .
NOTE
[SEEK] needs to be set to [MAN] in the FUNCTION settings (page 16).
To store stations manually
1
While receiving the station you want to store, press and hold one of the number
buttons (1/ to 6/ ) until it stops flashing.
The unit searches for a station by PTY (program type) information.
1 Press and hold BASS during FM reception.
2 Turn the M.C. dial to select a program type from [NEWS/INFO], [POPULAR],
[CLASSICS] or [OTHERS].
3 Press the M.C. dial.
The unit begins to search for a station. When it is found, its program service name is
displayed.
NOTES
• To cancel the search, press the M.C. dial.
• The program of some stations may differ from that indicated by the transmitted PTY.
Best stations memory (BSM)
Using PTY functions

- 8 -
English
• If no station is broadcasting the type of program you searched for, [NOT FOUND] is displayed for
about two seconds and then the tuner returns to the original station.
NOTE
iPod function is not available for MVH-S120UB/S120UBG/S120UBA/S120UBW.
Disconnect headphones from the device before connecting it to the unit.
USB devices (including Android™)/iPod
1
Open the USB port cover.
2 Plug in the USB device/iPod using an appropriate cable.
NOTE
To automatically switch to [USB] source when a USB device/iPod is connected to the unit, set [USB
AUTO] to [ON] in the SYSTEM settings (page 19).
CAUTION
Use a USB cable (sold separately) to connect the USB device as any device connected directly to the
unit will protrude out from the unit, which could be dangerous.
Before removing the device, stop playback.
AOA connections
For details on AOA connection, see page 14.
MTP connection
A device installed with Android OS 4.0 or most of later versions can be connected to the unit via MTP,
using the cable supplied with the device. However, depending on the connected device, OS version or
the numbers of the files in the device, audio files/songs may not be able to be played back via MTP.
Note that MTP connection is not compatible with WAV and FLAC file formats.
NOTE
If you use an MTP connection, [ANDROID WIRED] needs to be set to [MEMORY] in the SYSTEM settings
(page 19).
AUX
1
Insert the stereo mini plug into the AUX input jack.
2 Press SRC/OFF to select [AUX] as the source.
USB/iPod/AUX
Playing back

- 9 -- 9 -
English
NOTE
If [AUX] is set to [OFF] in the SYSTEM settings, [AUX] cannot be selected as a source (page 19).
You can make various adjustments in the FUNCTION settings (page 15).
Note that the following operations do not work for an AUX device. To operate an AUX
device, use the device itself.
Operations
Purpose Operation
Select a folder/album*1 Press 1/ or 2/.
Select a track/song (chapter) Press or .
Fast forward or reverse*2 Press and hold or .
Search for a file from a list 1 Press and hold BASS to display the list.
2 Turn the M.C. dial to select the desired
file (folder) name or category, then press
to confirm.
3 Turn the M.C. dial to select the desired
file, then press to confirm.
Playback starts.
View a list of the files in the selected folder/
category*1
Press the M.C. dial when a folder/category
is selected.
Play a song in the selected folder/
category*1
Press and hold the M.C. dial when a folder/
category is selected.
Alphabetical search (iPod only) 1 Press and hold BASS to display the list.
2 Turn the M.C. dial to select the desired
category list, then press and hold BASS
to enter the alphabetical search mode.
(Turning the M.C. dial twice also enters
the alphabetical search mode.)
3 Turn the M.C. dial to select a letter, then
press to display the alphabetical list.
To cancel alphabetical search, press BAND/
.
Repeat play Press 6/.
Random/shuffle play Press 5/.
Shuffle all play (iPod only) Press and hold 5/.
Pause/resume playback Press 4/PAUSE.

- 10 -
English
*1 Compressed audio files only
*2 When you use the fast forward or reverse function while playing a VBR file, the playback time may
be not correct.
Link play mode
You can access songs based on the artist, album, or genre currently playing.
1 While listening to a song, press and hold 4/PAUSE to enter the link play mode.
2 Turn the M.C. dial to select the mode ([ARTIST], [ALBUM], [GENRE]), then press to
confirm.
The selected song/album will be played after the currently playing song.
NOTE
The selected song/album may be canceled if you use functions other than those from the link play
mode (e.g. fast forward and reverse).
iPod control
You can control the unit via a connected iPod.
The following iPod models are not compatible with this function.
– iPod nano 1st generation, iPod with video
1 Press BAND/ during playback, then select the control mode.
[CONTROL iPod]: The unit’s iPod function can be operated from the connected iPod.
[CONTROL AUDIO]: The unit’s iPod function can only be operated by the buttons on
the unit or supplied remote control. In this mode, the connected iPod cannot be
turned on or off.
NOTES
• Pressing iPod can also switch the control mode (only for MVH-S120UI/S120UIG/S12UI).
• Switching the control mode to [CONTROL iPod] pauses song playback. Use the connected iPod to
resume playback.
• The following operations are still accessible from the unit, even if the control mode is set to
[CONTROL iPod].
Sound retriever Press 3/S.Rtrv.
[1]: Effective for low compression rates
[2]: Effective for high compression rates
Return to root folder (USB only)*1 Press and hold 1/.
Change drives in USB device
(Devices that support the USB mass storage
device class protocol only)
Press BAND/.
Useful functions for iPod
Purpose Operation

- 11 -- 11 -
English
– Pause, fast forward/reverse, song/chapter selection
• The volume can only be adjusted from the unit.
(APP mode is not available for MVH-S120UB/S120UBG/S120UBA/S120UBW.)
You can enjoy listening to an application on an iPhone via the unit. In some cases, you
can control an application by using the unit.
For details on compatible devices, visit our website.
Important
Use of third party apps may involve or require the provision of personally identifiable information,
whether through the creation of a user account or otherwise, and for certain applications, the provision
of geolocation data.
ALL THIRD PARTY APPS ARE THE SOLE RESPONSIBILITY OF THE PROVIDERS, INCLUDING WITHOUT
LIMITATION COLLECTION AND SECURITY OF USER DATA AND PRIVACY PRACTICES. BY ACCESSING
THIRD PARTY APPS, YOU AGREE TO REVIEW THE TERMS OF SERVICE AND PRIVACY POLICIES OF THE
PROVIDERS. IF YOU DO NOT AGREE WITH THE TERMS OR POLICIES OF ANY PROVIDER OR DO NOT
CONSENT TO THE USE OF GEOLOCATION DATA WHERE APPLICABLE, DO NOT USE THAT THIRD PARTY
APP.
For iPhone users
This function is compatible with iPhone and iPod touch installed with iOS 5.0 or later.
NOTE
PIONEER IS NOT LIABLE FOR ANY THIRD PARTY APPS OR CONTENT, INCLUDING WITHOUT LIMITATION
THEIR ACCURACY OR COMPLETENESS. THE CONTENT AND FUNCTIONALITY OF SUCH APPS ARE THE
SOLE RESPONSIBILITY OF THE APP PROVIDER.
1 Connect this unit with the mobile device.
• iPhone via USB (page 8)
2 Press SRC/OFF to select [APP].
3 Operate the mobile device to start up the application.
Basic operations
You can make various adjustments in the FUNCTION settings (page 15).
App Mode
Playback of an application via the unit
Purpose Operation
Select a track Press or .
Fast forward or reverse Press and hold or .

- 12 -
English
(MVH-S120UI/S120UIG/S12UI is only compatible with Spotify installed on iPhone.)
Spotify is a music streaming distribution service not affiliated with Pioneer. More
information is available at http://www.spotify.com.
The Spotify application is available for compatible smartphones, please visit https://
support.spotify.com/ for the latest compatibility information.
To enjoy Spotify as you drive, first download the Spotify app to your iPhone. You can
download it on the iTunes App Store. Choose a free account or a paid Premium account,
either in the app or at spotify.com. A Premium account gives you more features, like
offline listening.
Important
• This product incorporates Spotify software which is subject to 3rd party licenses found here:
www.spotify.com/connect/third-party-licenses.
• For information on the countries and regions where Spotify can be used, take a look at https://
spotify.com/us/select-your-country/.
Update the firmware of the Spotify application to the latest version before use.
1 Connect this unit with the mobile device.
• iPhone via USB (page 8)
2 Press SRC/OFF to select [SPOTIFY].
3 Launch the Spotify application on the mobile device and start playback.
Basic operations
You can make various adjustments in the FUNCTION settings (page 15).
NOTE
The available operations may vary according to the type of contents (track/album/artist/playlist/radio)
you want to play.
Pause/resume playback Press BAND/.
Spotify®
Listening to Spotify
Purpose Operation
Skip a track Press or .
Purpose Operation

- 13 -- 13 -
English
NOTE
Some functions of Spotify may not be operated from the unit.
(Pioneer ARC APP for iPhone is not available for MVH-S120UB/S120UBG/S120UBA/
S120UBW.)
You can operate the unit from Pioneer ARC APP installed on an iPhone/Android device.
In some cases, you can control aspects of the application, such as source selection,
pause, etc., by using the unit.
For details on what operations are available on the application, see the application’s help
section.
WARNING
Do not attempt to operate the application while driving. Make sure to pull off the road and park your
vehicle in a safe location before attempting to use the controls on the application.
Search for a track from a list 1 Press and hold BASS to display the list.
2 Turn the M.C. dial to select the desired
category, then press to confirm.
3 Turn the M.C. dial to select the desired
file, then press to confirm.
Playback starts.
Pause/resume playback Press 4/PAUSE.
Thumbs Up (Only for radio) Press 1/.
Thumbs Down (Only for radio) Press 2/.
Random play (Only for track/album/artist/
playlist)
Press 5/.
Repeat play (Only for track/album/artist/
playlist)
Press 6/.
Start a radio channel based on the song
currently being played.
1 Press and hold 5/ to start a radio.
2 Press the M.C. dial.
• This function may not be available
depending on the selected song.
Store the information about the song
currently being played.
Remove the song information stored.
1 Press and hold 3/S.Rtrv.
[SAVE]/[UNSAVE] appears.
2 Press the M.C. dial.
Using Pioneer ARC APP
Purpose Operation

- 14 -
English
For iPhone users
This function is compatible with iPhones (iPhone 5 or later) and iPod touches installed
with iOS 8.0 or later.
You can download Pioneer ARC APP on iTunes App Store.
For Android device users
This function is compatible with a phone that runs Android 4.1 up to 7.1.2 and also
supports AOA (Android Open Accessory) 2.0, but the compatibility depends on the
smartphone.
You can download Pioneer ARC APP on Google Play™.
NOTE
Some Android devices connected via AOA 2.0 may not work properly or emit sounds due to their own
software design, regardless of the OS version.
When making a connection with an Android device
1
Press the M.C. dial to display the main menu.
2 Turn the M.C. dial to select [SYSTEM], then press to confirm.
3 Turn the M.C. dial to select [ANDROID WIRED], then press to confirm.
4 Turn the M.C. dial to select [APP CONTROL], then press to confirm.
5 Turn the M.C. dial to select [P.APP AUTO ON], then press to confirm.
6 Turn the M.C. dial to select [ON], then press to confirm.
7 Connect this unit with the Android device via USB.
Pioneer ARC APP on the Android device starts automatically.
NOTE
If Pioneer ARC APP has not been installed on your Android device yet, a message that prompts you
to install the application will appear on your Android device. Select [OFF] in [P.APP AUTO ON] to
clear the message (page 19).
When making a connection with an iPhone
1
Connect this unit with the iPhone via USB.
2 Press SRC/OFF to select any source.
3 Press and hold the M.C. dial.
Pioneer ARC APP on the iPhone starts.
NOTE
If the connection fails, launch Pioneer ARC APP on the iPhone.
Making a connection with Pioneer ARC APP

- 15 -- 15 -
English
1 Press SRC/OFF to select [ANDROID].
Basic operations
You can adjust various settings in the main menu.
1 Press the M.C. dial to display the main menu.
2 Turn the M.C. dial to select one of the categories below, then press to confirm.
• FUNCTION settings (page 15)
• AUDIO settings (page 17)
• SYSTEM settings (page 18)
• ILLUMINATION settings (page 20)
3 Turn the M.C. dial to select the options, then press to confirm.
NOTES
• iPod-related menu items in the following tables are not available for MVH-S120UB/S120UBG/
S120UBA/S120UBW.
• APP mode-related menu items in the following tables are not available for MVH-S120UB/S120UBG/
S120UBA/S120UBW.
The menu items vary according to the source.
Listening to music on Android
Purpose Operation
Select a track Press or .
Fast forward or reverse Press and hold or .
Pause/resume playback Press 4/PAUSE.
Sound retriever Press 3/S.Rtrv.
[1]: Effective for low compression rates
[2]: Effective for high compression rates
Settings
FUNCTION settings

- 16 -
English
Menu Item Description
FM SETTING
[TALK], [STANDARD], [MUSIC] Match the sound quality level with the broadcast
signal conditions of the FM band signal.
(Available only when FM band is selected.)
BSM
Store the six strongest stations on the number
buttons (1/ to 6/ ) automatically.
REGIONAL
[ON], [OFF] Limit the reception to the specific regional
programs when AF (alternative frequencies
search) is selected. (Available only when FM
band is selected.)
LOCAL
FM: [OFF], [LV1], [LV2], [LV3], [LV4]
MW/LW: [OFF], [LV1], [LV2]
Restrict the tuning station according to the
signal strength.
TA
[ON], [OFF] Receive current traffic information if available.
(Available only when FM band is selected.)
AF
[ON], [OFF] Allow the unit to retune to a different frequency
providing the same station. (Available only when
FM band is selected.)
NEWS
[ON], [OFF] Interrupt the currently selected source with
news programs. (Available only when FM band is
selected.)
SEEK
[MAN], [PCH] Assign or buttons to seek the stations
one by one (manual tuning) or select a station
from the preset channels.
SAVE
Store the information about the song currently
being played to your music list on Spotify.
UNSAVE
Remove the song information stored in [SAVE].

- 17 -- 17 -
English
S.RTRV
[1] (effective for low compression
rates),
[2] (effective for high
compression rates),
[OFF]
Enhance compressed audio and restore rich
sound.
Not available when the FLAC file is played back.
AUDIO BOOK
[FASTER], [NORMAL], [SLOWER] Change the playback speed. (Not available when
[CONTROL iPod] is selected in the control mode.)
PAUSE
Pause or resume playback.
AUDIO settings
Menu Item Description
FADER*1
Adjust the front and rear speaker balance.
BALANCE
Adjust the left and right speaker balance.
EQ SETTING
[SUPER BASS], [POWERFUL],
[DYNAMIC], [NATURAL], [VOCAL],
[VIVID], [CUSTOM1], [CUSTOM2],
[FLAT]
Select an equalizer band and
level for further customising.
Equalizer band: [80HZ], [250HZ],
[800HZ], [2.5KHZ], [8KHZ]
Equalizer level: [+6] to [–6]
Select or customise the equalizer curve.
[CUSTOM1] can be set separately for each source.
However, each of the below combinations are set
to the same setting automatically.
• USB, iPod, ANDROID, SPOTIFY, and APP
(iPhone)
[CUSTOM2] is a shared setting used for all
sources.
You can also switch the equalizer by pressing
repeatedly (Only for MVH-S120UB/
S120UBG/S120UBA/S120UBW).
LOUDNESS
[OFF], [LOW], [MID], [HI] Compensate for clear sound at low volume.
SUB.W*2
[NOR], [REV], [OFF] Select the subwoofer phase.
Menu Item Description
USB
iPod
iPod

- 18 -
English
*1 Not available when [SUB.W/SUB.W] is selected in [SP-P/O MODE] in the INITIAL settings (page 6).
*2 Not available when [REAR/REAR] is selected in [SP-P/O MODE] in the INITIAL settings (page 6).
*3 Not available when [OFF] is selected in [SUB.W].
You can also access to these menus when the unit is turned off.
SUB.W CTRL*2*3
Cut-off frequency: [50HZ],
[63HZ], [80HZ], [100HZ], [125HZ],
[160HZ], [200HZ]
Output level: [–24] to [+6]
Slope level: [–12], [–24]
Only frequencies lower than those in the
selected range are output from the subwoofer.
BASS BOOST
[0] to [+6] Select the bass boost level.
HPF SETTING
Cut-off frequency: [OFF], [50HZ],
[63HZ], [80HZ], [100HZ], [125HZ],
[160HZ], [200HZ]
Slope level: [–12], [–24]
Only frequencies higher than the high-pass filter
(HPF) cutoff are output from the speakers.
SLA
[+4] to [–4] Adjust the volume level for each source except
FM.
Each of the below combinations are set to the
same setting automatically.
• USB, iPod, ANDROID, SPOTIFY, and APP
(iPhone)
SYSTEM settings
Menu Item Description
LANGUAGE
[ENG](English), [РУС](Russian),
[TUR](Turkish)
Select the language to display the text
information from a compressed audio file.
CLOCK SET
Set the clock (page 5).
12H/24H
[12H], [24H] Select the time notation.
Menu Item Description

- 19 -- 19 -
English
* [PW SAVE] is canceled if the vehicle battery is disconnected and will need to be turned back on once
the battery is reconnected. When [PW SAVE] is off, depending on connection methods, the unit may
continue to draw power from the battery if your vehicle’s ignition does not have an ACC (accessory)
position.
SCROLL SET
[ONCE], [LOOP], [OFF] Select the way to scroll the text in the display
window.
AUTO PI
[ON], [OFF] Search for a different station with the same
programming, even if using a preset station.
AUX
[ON], [OFF] Set to [ON] when using an auxiliary device
connected to the unit.
SPOTIFY
[ON], [OFF] Set to [ON] when using the Spotify function.
MUTE MODE (Only for MVH-S120UI/S120UIG/S12UI)
[MUTE], [20dB ATT], [10dB ATT] Mute or attenuate sound automatically when a
signal from equipment with a mute function is
received.
PW SAVE*
[ON], [OFF] Reduce the battery power consumption.
Turning on the source is the only operation
allowed when this function is on.
ANDROID WIRED
[MEMORY], [APP CONTROL] Select the appropriate connection method for an
Android device.
P. AP P AU TO O N
[ON], [OFF]
Select [ON] to automatically launch Pioneer ARC
APP when an Android device is connected to the
unit via AOA. (Not available when [MEMORY] is
selected in [ANDROID WIRED].)
USB AUTO
[ON], [OFF] Select [ON] to automatically switch to [USB]
source when a USB device/iPod is connected to
the unit.
Select [OFF] when a USB device/iPod is being
connected to the unit just for charging.
Menu Item Description

- 20 -
English
ILLUMINATION settings
Menu Item Description
DIM SETTING
[SYNC CLOCK], [MANUAL] Select the way to change the display brightness.
BRIGHTNESS
[1] to [10] Change the display brightness.
The available setting ranges differ depending on
[DIM SETTING].

- 21 -
English
The display automatically returns to the
normal display.
→ No operations have been made for
about 30 seconds.
–Perform an operation.
The repeat play range changes
unexpectedly.
→ Depending on the repeat play range,
the selected range may change when
another folder or track is being selected
or during fast forwarding/reversing.
–Select the repeat play range again.
A subfolder is not played back.
→ Subfolders cannot be played when
[FLD] (folder repeat) is selected.
–Select another repeat play range.
The sound is intermittent.
→ You are using a device, such as a cellular
phone, that may cause audible
interference.
–Move electrical devices that may be
causing the interference away from
the unit.
Common
AMP ERROR
→ This unit fails to operate or the speaker
connection is incorrect.
→ The protective circuit is activated.
–Check the speaker connection.
–Turn the ignition switch OFF and back
to ON again. If the message remains,
contact your dealer or an authorized
Pioneer Service Station for assistance.
NO XXXX (NO TITLE, for example)
→ There is no embedded text information.
– Switch the display or play another
track/file.
USB device/iPod
FORMAT READ
→ Sometimes there is a delay between the
start of playback and when you start to
hear any sound.
–Wait until the message disappears and
you hear sound.
NO AUDIO
→ There are no songs.
–Transfer the audio files to the USB
device and connect.
→ The connected USB device has security
enabled.
–Follow the USB device instructions to
disable the security.
SKIPPED
→ The connected USB device contains
DRM protected files.
–The protected files are skipped.
PROTECT
→ All the files on the connected USB
device are embedded with DRM.
–Replace the USB device.
N/A USB
→ The connected USB device is not
supported by this unit.
–Disconnect your device and replace it
with a compatible USB device.
HUB ERROR
→ The USB device connected via a USB
hub is not supported by this unit.
–Connect the USB device directly to this
unit using a USB cable.
Additional Information
Troubleshooting
Error messages

- 22 -
English
CHECK USB
→ The USB connector or USB cable has
short-circuited.
–Check that the USB connector or USB
cable is not caught in something or
damaged.
→ The connected USB device consumes
more than maximum allowable current.
– Disconnect the USB device and do not
use it. Turn the ignition switch OFF
and back to ACC or ON. Connect only
compliant USB devices.
ERROR-19
→ Communication failed.
–Perform one of the following
operations, then return to the USB
source.
• Disconnect the USB device.
• Change to a different source.
→ iPod failure.
–Disconnect the cable from the iPod.
Once the iPod’s main menu is
displayed, reconnect the iPod and
reset it.
ERROR-23
→ USB device was not formatted properly.
–Format the USB device with FAT12,
FAT16 or FAT32.
ERROR-16
→ The iPod firmware version is old.
–Update the iPod version.
→ iPod failure.
–Disconnect the cable from the iPod.
Once the iPod’s main menu is
displayed, reconnect the iPod and
reset it.
STOP
→ There are no songs in the current list.
–Select a list that contains songs.
NOT FOUND
→ No related songs.
–Transfer songs to the iPod.
APP
START UP APP
→ The application has not started running
yet.
–Operate the mobile device to start up
the application.
Spotify
CHECK APP
→ Connection to the Spotify application
failed.
–Follow the instructions that appear on
the screen.
USB storage device
• Connections via USB hubs are not
supported.
• Firmly secure the USB storage device
before driving. Do not let the USB storage
device fall onto the floor, where it may
become jammed under the brake or
accelerator pedal.
• Depending on the USB storage device,
the following problems may occur.
–Operations may vary.
–The storage device may not be
recognized.
– Files may not be played back properly.
– The device may cause audible
interference when you are listening to
the radio.
iPod
• Do not leave the iPod in places with high
temperatures.
• Firmly secure the iPod when driving. Do
not let the iPod fall onto the floor, where
it may become jammed under the brake
or accelerator pedal.
• The settings of the iPod such as the
equalizer and repeat play are changed
Handling guidelines

- 23 -
English
automatically when the iPod is
connected to the unit. Once the iPod is
disconnected, those settings will return
to the original settings.
• Incompatible text saved on the iPod will
not be displayed by the unit.
• Only the first 32 characters can be
displayed as a file name (including the file
extension) or a folder name.
• The unit may not work properly
depending on the application used to
encode WMA files.
• There may be a slight delay at the start of
the playback of audio files embedded
with image data, or audio files stored on a
USB device with numerous folder
hierarchies.
• Russian text to be displayed on this unit
should be encoded in one of the
following character sets:
– Unicode (UTF-8, UTF-16)
– A character set other than Unicode that
is used in a Windows environment and
is set to Russian in the multi-language
setting
CAUTION
• Pioneer cannot guarantee compatibility
with all USB mass storage devices, and
assumes no responsibility for any loss of
data on media players, smartphones, or
other devices while using this product.
• Do not leave discs or a USB storage
device in any place that is subject to high
temperatures.
WMA files
MP3 files
WAV files
• WAV file formats cannot be connected via
MTP.
FLAC files
• FLAC file formats cannot be connected
via MTP.
• FLAC files may not be playable,
depending on the encoder.
Compressed audio
compatibility
File extension .wma
Bit rate 48 kbps to 320 kbps
(CBR), 48 kbps to 384
kbps (VBR)
Sampling frequency 32 kHz, 44.1 kHz, 48
kHz
Windows Media™
Audio Professional,
Lossless, Voice/DRM
Stream/Stream with
video
Not compatible
File extension .mp3
Bit rate 8 kbps to 320 kbps
(CBR), VBR
Sampling frequency 8 kHz to 48 kHz (32
kHz, 44.1 kHz, 48 kHz
for emphasis)
Compatible ID3 tag
version
1.0, 1.1, 2.2, 2.3, 2.4
(ID3 tag Version 2.x is
given priority over
Version 1.x.)
M3u playlist Not compatible
MP3i (MP3
interactive), mp3 PRO
Not compatible
File extension .wav
Quantization bits 8 and 16 (LPCM)
Sampling frequency 16 kHz to 48 kHz
(LPCM)
File extension .flac
Sampling frequency 8/11.025/12/16/22.05/
24/32/44.1/48 kHz
Quantization bit rate 16 bit

- 24 -
English
USB device
• There may be a slight delay when starting
playback of audio files on a USB storage
device with numerous folder hierarchies.
This unit supports only the following iPod
models. Older versions may not be supported.
Made for
–iPod touch (1st through 6th generation)
–iPod classic
–iPod nano (3rd through 7th generation)
–iPhone 6s
–iPhone 6s Plus
–iPhone 6
–iPhone 6 Plus
–iPhone 5s
–iPhone 5c
–iPhone 5
–iPhone4s
–iPhone4
–iPhone3GS
–iPhone3G
–iPhone
• Operations may vary depending on the
generation and/or software version of
the iPod.
• Users of iPod with the Lightning
Connector should use the Lightning to
USB Cable (supplied with iPod).
• Users of iPod with the Dock Connector
should use the CD-IU51. For details,
consult your dealer.
• Refer to the iPod manuals for information
about the file/format compatibility.
• Audiobook, Podcast: Compatible
CAUTION
Pioneer accepts no responsibility for data
lost on the iPod, even if that data is lost
while this unit is used.
The user cannot assign folder numbers and
specify playback sequences with this unit.
Sequence of audio file depends on the
connected device.
Note that the hidden files in a USB device
cannot be played back.
Example of a hierarchy
Channel mode 1/2 ch
Playable folder
hierarchy
Up to eight tiers (A
practical hierarchy is
less than two tiers.)
Playable folders Up to 500
Playable files Up to 15 000
Playback of copyright-
protected files
Not compatible
Partitioned USB
device
Only the first partition
can be played.
iPod compatibility
Sequence of audio files
Folder
Compressed
audio file
to : Playback sequence
01 to 05: Folder number

- 25 -
English
iTunes
Apple and iTunes are trademarks of Apple
Inc., registered in the U.S. and other
countries.
WMA
Windows Media is either a registered
trademark or trademark of Microsoft
Corporation in the United States and/or
other countries.
This product includes technology owned
by Microsoft Corporation and cannot be
used or distributed without a license from
Microsoft Licensing, Inc.
FLAC
Copyright © 2000-2009 Josh Coalson
Copyright © 2011-2013 Xiph.Org
Foundation
Redistribution and use in source and
binary forms, with or without modification,
are permitted provided that the following
conditions are met:
–Redistributions of source code must
retain the above copyright notice, this list
of conditions and the following
disclaimer.
–Redistributions in binary form must
reproduce the above copyright notice,
this list of conditions and the following
disclaimer in the documentation and/or
other materials provided with the
distribution.
–Neither the name of the Xiph.org
Foundation nor the names of its
contributors may be used to endorse or
promote products derived from this
software without specific prior written
permission.
THIS SOFTWARE IS PROVIDED BY THE
COPYRIGHT HOLDERS AND
CONTRIBUTORS “AS IS” AND ANY EXPRESS
OR IMPLIED WARRANTIES, INCLUDING, BUT
NOT LIMITED TO, THE IMPLIED
WARRANTIES OF MERCHANTABILITY AND
FITNESS FOR A PARTICULAR PURPOSE ARE
DISCLAIMED. IN NO EVENT SHALL THE
FOUNDATION OR CONTRIBUTORS BE
LIABLE FOR ANY DIRECT, INDIRECT,
INCIDENTAL, SPECIAL, EXEMPLARY, OR
CONSEQUENTIAL DAMAGES (INCLUDING,
BUT NOT LIMITED TO, PROCUREMENT OF
SUBSTITUTE GOODS OR SERVICES; LOSS OF
USE, DATA, OR PROFITS; OR BUSINESS
INTERRUPTION) HOWEVER CAUSED AND
ON ANY THEORY OF LIABILITY, WHETHER
IN CONTRACT, STRICT LIABILITY, OR TORT
(INCLUDING NEGLIGENCE OR OTHERWISE)
ARISING IN ANY WAY OUT OF THE USE OF
THIS SOFTWARE, EVEN IF ADVISED OF THE
POSSIBILITY OF SUCH DAMAGE.
Russian character chart
Copyright and trademark
D: Display C: Character

- 26 -
English
iPhone, iPod and Lightning
Use of the Made for Apple badge means
that an accessory has been designed to
connect specifically to the Apple
product(s) identified in the badge, and has
been certified by the developer to meet
Apple performance standards. Apple is not
responsible for the operation of this device
or its compliance with safety and
regulatory standards.
Please note that the use of this accessory
with an Apple product may affect wireless
performance.
iPhone, iPod, iPod classic, iPod nano, iPod
touch and Lightning are trademarks of
Apple Inc., registered in the U.S. and other
countries.
Google™, Google Play, Android
Google, Google Play and Android are
trademarks of Google LLC.
Spotify®
SPOTIFY and the Spotify logo are among
the registered trademarks of Spotify AB.
Compatible mobile digital devices and
premium subscription required, where
available, see https://www.spotify.com.
General
Power source: 14.4 V DC (10.8 V to 15.1 V
allowable)
Grounding system: Negative type
Maximum current consumption: 10.0 A
Dimensions (W × H × D):
DIN
Chassis: 178 mm × 50 mm × 97 mm
Nose: 188 mm × 58 mm × 17 mm
D
Chassis: 178 mm × 50 mm × 97 mm
Nose: 170 mm × 46 mm × 17 mm
Weight: 0.5 kg
Audio
Maximum power output:
• 50 W × 4 ch/4 Ω (for no subwoofer)
• 50 W × 2 ch/4 Ω + 70 W × 1 ch/2 Ω
(for subwoofer)
Continuous power output:
22 W × 4 (50 Hz to 15 000 Hz, 5 %
THD, 4 Ω load, both channels driven)
Load impedance: 4 Ω (4 Ω to 8 Ω allowable)
Preout maximum output level: 2.0 V
Loudness contour: +10 dB (100 Hz), +6.5
dB (10 kHz) (volume: –30 dB)
Equalizer (5-Band Graphic Equalizer):
Frequency: 80 Hz/250 Hz/800 Hz/2.5
kHz/8 kHz
Equalization range: ±12 dB (2 dB step)
Subwoofer (mono):
Frequency: 50 Hz/63 Hz/80 Hz/100
Hz/125 Hz/160 Hz/200 Hz
Slope: –12 dB/oct, –24 dB/oct
Gain: +6 dB to –24 dB
Phase: Normal/Reverse
USB
USB standard specification: USB 2.0 full
speed
Maximum current supply: 1 A
USB Protocol:
MSC (Mass Storage Class)
MTP (Media Transfer Protocol)
AOA (Android Open Accessory) 2.0
File system: FAT12, FAT16, FAT32
MP3 decoding format: MPEG-1 & 2 Audio
Layer 3
WMA decoding format: Ver. 7, 8, 9, 9.1, 9.2
(2 ch audio)
FLAC decoding format: v1.3.0 (Free
Lossless Audio Codec)
WAV signal format: Linear PCM (Non-
compressed)
FM tuner
Frequency range: 87.5 MHz to 108.0 MHz
Usable sensitivity: 11 dBf (1.0 μV/75 Ω,
mono, S/N: 30 dB)
Signal-to-noise ratio: 72 dB (IEC-A network)
Specifications

- 27 -
English
MW tuner
Frequency range: 531 kHz to 1 602 kHz
Usable sensitivity: 25 μV (S/N: 20 dB)
Signal-to-noise ratio: 62 dB (IEC-A network)
LW tuner
Frequency range: 153 kHz to 281 kHz
Usable sensitivity: 28 μV (S/N: 20 dB)
Signal-to-noise ratio: 62 dB (IEC-A network)
NOTE
Specifications and the design are subject
to modifications without notice.

- 2 -
Français
Mise en route............................................................................................ 3
Radio.......................................................................................................... 7
USB/iPod/AUX .......................................................................................... 8
Mode d’application.............................................................................. 12
Spotify® .................................................................................................. 13
Utilisation de Pioneer ARC APP ......................................................... 15
Réglages................................................................................................. 17
Réglages FUNCTION ............................................................................. 17
Réglages AUDIO .................................................................................... 19
Réglages SYSTEM.................................................................................. 21
Réglages ILLUMINATION...................................................................... 22
Informations complémentaires......................................................... 24
À propos de ce mode d’emploi :
• Parmi les instructions suivantes, les clés USB ou les lecteurs audio USB sont
collectivement désignés sous le nom de « périphérique USB ».
• Dans ce mode d’emploi, les iPod et les iPhone sont collectivement désignés sous le
nom d’« iPod ».
Table des matières

- 3 -- 3 -
Français
MVH-S120UI/S120UIG/S12UI/S120UB/S120UBG/S120UBA/
S120UBW
Opérations fréquemment utilisées
Mise en route
Fonctionnement de base
Objectif Opération
Mettre l’appareil sous tension* Appuyez sur SRC/OFF pour mettre
l’appareil sous tension.
Appuyez longuement sur SRC/OFF pour
mettre l’appareil hors tension.
Régler le volume Tournez la molette M.C..
Sélectionner une source Appuyez plusieurs fois sur SRC/OFF.
Modifier les informations d’affichage Appuyez plusieurs fois sur DISP.
Revenir à l’affichage/la liste précédent(e) Appuyez sur BAND/.
Revenir à l’affichage normal à partir du
menu
Appuyez longuement sur BAND/.
Augmentez le niveau des basses Appuyez sur BASS.
• Vous pouvez sélectionner le niveau des
basse dans [BASS BOOST] (page 20).
SRC (source)/OFF
Touche de retrait
Fenêtre d’affichage
Molette M.C. (multi-contrôle)
BAND/
Port USB
Prise d’entrée AUX (prise stéréo 3,5 mm)
DISP (affichage)
BASS

- 4 -
Français
* Si le fil bleu/blanc de l’appareil est relié à la borne de commande du relais d’antenne automatique du
véhicule, l’antenne se déploie lorsque la source de cet appareil est mise en service. Pour rétracter
l’antenne, mettez la source hors service.
Indication de l’affichage
Retirez la face avant pour empêcher tout vol. Débranchez tous les câbles et les
périphériques branchés à la face avant et mettez l’appareil hors tension avant de le
retirer.
Important
• Évitez de soumettre la face avant à des chocs excessifs.
• Tenez la face avant à l’abri du soleil et des températures élevées.
• Stockez toujours la face avant détachée, dans un étui de protection ou un sac.
Indication Description
Apparaît lorsqu’il existe un niveau inférieur de menu ou de dossier.
Apparaît lorsque vous appuyez longuement sur le bouton BASS.
Apparaît lorsque la fonction d’accord sur une station locale est en service
(page 18).
Apparaît lorsqu’un programme d’informations routières est capté.
Apparaît lorsque la fonction TA (informations routières) est activée
(page 18).
Apparaît lorsque le sound retriever (correcteur de son compressé) est en
service (page 19).
Apparaît lorsque la fonction de commande d’iPod est en service (page 11).
Retrait de la face avant
Retirer Fixer

- 5 -- 5 -
Français
Lorsque vous mettez le contact sur ON après avoir installé l’appareil, [SET UP :YES]
s’affiche.
1 Appuyez sur la molette M.C..
Si vous n’utilisez pas l’appareil dans les 30 secondes qui suivent, le menu de
configuration disparaît. Si vous préférez ne pas effectuer la configuration pour
l’instant, tournez la molette M.C. pour sélectionner [NO], puis appuyez pour valider.
2 Tournez la molette M.C. pour sélectionner les options, puis appuyez pour valider.
Pour passer à l’option de menu suivante, vous devez valider votre sélection.
3 [QUIT :YES] apparaît lorsque tous les réglages sont terminés.
Pour revenir au premier élément du menu de configuration, tournez la molette M.C.
pour sélectionner [QUIT :NO], puis appuyez pour valider.
4 Appuyez sur la molette M.C. pour valider les réglages.
REMARQUES
• Vous pouvez annuler le réglage du menu en appuyant sur SRC/OFF.
• Ces paramètres peuvent être ajustés à tout moment à partir des réglages SYSTEM (page 21) et des
réglages INITIAL (page 6).
1 Appuyez sur la molette M.C. pour afficher le menu principal.
2 Tournez la molette M.C. pour sélectionner [SYSTEM], puis appuyez pour valider.
3 Tournez la molette M.C. pour sélectionner [DEMO OFF], puis appuyez pour
valider.
Menu de configuration
Élément de menu Description
LANGUAGE Sélectionnez la langue d’affichage des informations textuelles à
partir d’un fichier audio compressé.
[ENG] (anglais),
[РУС] (russe),
[TUR] (turc)
CLOCK SET Réglez l’horloge.
FM STEP Sélectionnez l’incrément d’accord FM à partir de 100 kHz ou de
50 kHz.
[100], [50]
Annulation de l’affichage de démonstration (DEMO
OFF)

- 6 -
Français
4 Tournez la molette M.C. pour sélectionner [YES], puis appuyez pour valider.
1 Appuyez longuement sur SRC/OFF jusqu’à ce que l’appareil se mette hors
tension.
2 Appuyez longuement sur SRC/OFF pour afficher le menu principal.
3 Tournez la molette M.C. pour sélectionner [INITIAL], puis appuyez pour valider.
4 Tournez la molette M.C. pour sélectionner une option, puis appuyez pour valider.
REMARQUE
Les options varient selon les appareils.
Réglages INITIAL
Élément de menu Description
FM STEP Sélectionnez l’incrément d’accord FM à partir de 100 kHz ou de
50 kHz.
[100], [50]
SP-P/O MODE À sélectionner lorsqu’un haut-parleur à gamme étendue est
relié aux fils de sortie du haut-parleur arrière et qu’un haut-
parleur d’extrêmes graves est branché à la sortie RCA.
[REAR/SUB.W]
[SUB.W/SUB.W] À sélectionner lorsqu’un haut-parleur d’extrêmes graves passif
est directement relié aux fils de sortie du haut-parleur arrière et
qu’un haut-parleur d’extrêmes graves est branché à la sortie
RCA.
[REAR/REAR] À sélectionner lorsque des haut-parleurs à gamme étendue sont
reliés aux fils de sortie du haut-parleur arrière et à la sortie RCA.
Si un haut-parleur à gamme étendue est relié aux fils de sortie
du haut-parleur arrière et que la sortie RCA n’est pas utilisée,
vous pouvez sélectionner [REAR/SUB.W] ou [REAR/REAR].
S/W UPDATE À sélectionner pour valider les dernières informations relatives
au système de l’appareil.
[SYSTEM INFO]
[SYSTEM UPDATE] À sélectionner pour effectuer la dernière mise à jour des
logiciels de l’appareil et réinitialiser ses réglages. Pour obtenir de
plus amples informations sur les derniers logiciels et mises à
jour, veuillez vous rendre sur notre site Web.
SYSTEM RESET Sélectionnez [YES] pour réinitialiser les réglages de l’appareil.
L’appareil redémarre automatiquement.
(Certains réglages sont conservés même après la réinitialisation
de l’appareil.)
[YES], [NO]

- 7 -- 7 -
Français
Les fréquences du syntoniseur de cet appareil sont destinées à une utilisation en Europe
de l’Ouest, Asie, Moyen-Orient, Afrique et Océanie. Son utilisation dans d’autres régions
peut se traduire par une réception de mauvaise qualité. La fonction RDS (Radio Data
System) n’est opérationnelle que dans les régions où des signaux RDS sont diffusés pour
les stations FM.
1 Appuyez sur SRC/OFF pour sélectionner [RADIO].
2 Appuyez sur BAND/ pour sélectionner la bande [FM1], [FM2], [FM3], [MW] ou
[LW].
3 Appuyez sur l’une des touches numériques (1/ à 6/).
CONSEIL
Les touches / peuvent également servir à sélectionner une station préréglée lorsque [SEEK]
est réglé sur [PCH] dans les réglages FUNCTION (page 18).
Les six stations les plus puissantes sont mémorisées sur les touches numériques (1/ à
6/).
1 Après avoir sélectionné la bande, appuyez sur la molette M.C. pour afficher le
menu principal.
2 Tournez la molette M.C. pour sélectionner [FUNCTION], puis appuyez pour
valider.
3 Tournez la molette M.C. pour sélectionner [BSM], puis appuyez pour valider.
Pour rechercher une station manuellement
1
Après avoir sélectionné la bande, appuyez sur / pour sélectionner une
station.
Appuyez longuement sur / , puis relâchez pour rechercher une station
disponible. Le balayage s’arrête lorsque l’appareil capte une station. Pour annuler
l’accord par recherche, appuyez sur / .
REMARQUE
[SEEK] doit être réglé sur [MAN] dans les réglages FUNCTION (page 18).
Radio
Réception des stations présélectionnées
Mémoire des meilleures stations (BSM)

- 8 -
Français
Pour mémoriser des stations manuellement
1
Lorsque vous captez la station que vous souhaitez mémoriser, appuyez
longuement sur l’une des touches numériques (1/ à 6/ ) jusqu’à ce qu’elle
cesse de clignoter.
L’appareil recherche une station diffusant des informations PTY (type de programme).
1 Appuyez longuement sur BASS pendant la réception FM.
2 Tournez la molette M.C. pour sélectionner le type de programme [NEWS/INFO],
[POPULAR], [CLASSICS] ou [OTHERS].
3 Appuyez sur la molette M.C..
L’appareil continue à rechercher une station. Lorsqu’il en trouve une, son nom de
service de programme s’affiche.
REMARQUES
• Pour annuler la recherche, appuyez sur la molette M.C..
• Le programme de certaines stations peut différer de celui qu’indique le PTY transmis.
• Si aucune station ne diffuse le type de programme que vous recherchez, [NOT FOUND] s’affiche
pendant environ deux secondes, puis le syntoniseur revient à la station de départ.
REMARQUE
La fonction iPod n’est pas disponible pour le MVH-S120UB/S120UBG/S120UBA/S120UBW.
Débranchez le casque ou les écouteurs du périphérique avant de raccorder ce dernier à
l’appareil.
Périphériques USB (y compris Android™)/iPod
1
Ouvrez le cache du port USB.
2 Raccordez le périphérique USB/l’iPod à l’aide d’un câble approprié.
REMARQUE
Pour basculer automatiquement sur une source [USB] lorsqu’un périphérique USB/iPod est connecté à
l’appareil, réglez [USB AUTO] sur [ON] dans les paramètres SYSTEM (page 22).
Utilisation des fonctions PTY
USB/iPod/AUX
Lecture

- 9 -- 9 -
Français
PRÉCAUTION
Utilisez un câble USB (vendu séparément) pour raccorder le périphérique USB, car tout périphérique
raccordé directement à l’appareil dépassant ce dernier pourrait être dangereux.
Avant de retirer le périphérique, arrêtez la lecture.
Connexions AOA
Pour plus de détails sur la connexion AOA, voir page 15.
Connexion MTP
Il est possible de connecter un périphérique Android utilisant le système d’exploitation Android 4.0 ou
la plupart des versions supérieures via MTP, à l’aide du câble fourni avec le périphérique. Toutefois,
selon le périphérique connecté, la version du système d’exploitation et les numéros des fichiers qu’il
contient, il se peut que la lecture de fichiers audio / morceaux soit impossible via MTP. Notez que la
connexion MTP n’est pas compatible avec les formats de fichiers WAV et FLAC.
REMARQUE
Si vous utilisez une connexion MTP, vous devez régler [ANDROID WIRED] sur [MEMORY] dans les
paramètres SYSTEM (page 22).
AUX
1
Insérez la mini-fiche stéréo dans la prise d’entrée AUX.
2 Appuyez sur SRC/OFF pour sélectionner la source [AUX].
REMARQUE
Si [AUX] est réglé sur [OFF] dans les réglages SYSTEM, il est impossible de sélectionner [AUX] en tant
que source (page 21).
Vous pouvez procéder à différents ajustements dans les réglages FUNCTION (page 17).
Notez que les opérations suivantes ne fonctionnent pas pour un périphérique AUX. Pour
utiliser un périphérique AUX, utilisez le périphérique proprement dit.
Opérations
Objectif Opération
Sélectionner un dossier/album*1 Appuyez sur 1/ ou 2/.
Sélectionner une piste/un morceau
(chapitre)
Appuyez sur ou .
Avance ou retour rapide*2 Appuyez longuement sur ou .

- 10 -
Français
Rechercher un fichier dans une liste 1 Appuyez longuement sur BASS pour
afficher la liste.
2 Tournez la molette M.C. pour
sélectionner la catégorie ou le nom de
fichier (dossier) de votre choix, puis
appuyez pour valider.
3 Tournez la molette M.C. pour
sélectionner le fichier de votre choix, puis
appuyez pour valider.
La lecture commence.
Afficher une liste de fichiers dans la
catégorie/le dossier sélectionné(e)*1
Appuyez sur la molette M.C. lorsqu’une
catégorie/un dossier est sélectionné(e).
Lire un morceau de la catégorie/du dossier
sélectionné(e)*1
Appuyez longuement sur la molette M.C.
lorsqu’une catégorie/un dossier est
sélectionné(e).
Recherche alphabétique (iPod uniquement) 1 Appuyez longuement sur BASS pour
afficher la liste.
2 Tournez la molette M.C. pour
sélectionner la liste de catégories de
votre choix, puis appuyez longuement
sur BASS pour accéder au mode de
recherche alphabétique.
(Pour accéder au mode de recherche
alphabétique, vous pouvez également
tourner deux fois la molette M.C..)
3 Tournez la molette M.C. pour
sélectionner une lettre, puis appuyez
pour afficher la liste alphabétique.
Pour annuler la recherche alphabétique,
appuyez sur BAND/.
Lecture répétée Appuyez sur 6/.
Lecture aléatoire Appuyez sur 5/.
Lecture aléatoire de toutes les pistes (iPod
uniquement)
Appuyez longuement sur 5/.
Pause/Reprise de la lecture Appuyez sur 4/PAUSE.
Objectif Opération

- 11 -- 11 -
Français
*1 Fichiers d’audio compressé uniquement
*2 Si vous utilisez la fonction avance ou retour rapide au moment de la lecture d’un fichier VBR, la
durée de lecture peut ne pas être correcte.
Mode de lecture en lien
Vous pouvez accéder à des morceaux en vous basant sur l’artiste, l’album ou le genre en
cours de lecture.
1 Pendant l’écoute d’un morceau, appuyez longuement sur 4/PAU SE pour entrer en
mode de lecture en lien.
2 Tournez la molette M.C. pour sélectionner le mode ([ARTIST], [ALBUM], [GENRE]),
puis appuyez pour valider.
Le morceau/l’album sélectionné est lu après le morceau en cours de lecture.
REMARQUE
Le morceau/l’album sélectionné peut être annulé si vous utilisez d’autres fonctions que le mode de
lecture en lien (ex. : avance et retour rapides).
Commande d’un iPod
Vous pouvez commander l’appareil via un iPod raccordé.
Les modèles d’iPod suivants ne sont pas compatibles avec cette fonction.
– iPod nano 1e génération, iPod avec vidéo
1 Appuyez sur BAND/ en cours de lecture, puis sélectionnez le mode de
commande.
[CONTROL iPod] : la fonction iPod de l’appareil peut être activée à partir de l’iPod
raccordé.
Sound retriever (correcteur de son
compressé)
Appuyez sur 3/S.Rtrv.
[1]: efficace pour les taux de compression
faibles
[2]: efficace pour les taux de compression
élevés
Retour au dossier racine (USB
uniquement)*1
Appuyez longuement sur 1/.
Changer de lecteur sur le périphérique USB
(périphériques prenant en charge le
protocole de classe de périphérique de
stockage de masse USB uniquement)
Appuyez sur BAND/.
Fonctions utiles pour iPod
Objectif Opération

- 12 -
Français
[CONTROL AUDIO] : la fonction iPod de l’appareil ne peut être activée que par les
touches situées sur l’appareil ou par la télécommande fournie. Dans ce mode, il est
impossible de mettre l’iPod raccordé sous ou hors tension.
REMARQUES
• Vous pouvez également commuter le mode de commande en appuyant sur iPod (uniquement pour
le modèle MVH-S120UI/S120UIG/S12UI).
• La commutation du mode de commande sur [CONTROL iPod] met en pause la lecture d’un morceau.
Utilisez l’iPod raccordé pour reprendre la lecture.
• Les opérations suivantes sont toujours accessibles à partir de l’appareil, même si le mode de
commande est réglé sur [CONTROL iPod].
– Pause, avance/retour rapide, sélection d’un morceau/chapitre
• Le volume ne peut être réglé qu’à partir de cet appareil.
(Le mode APP n’est pas disponible pour le modèle MVH-S120UB/S120UBG/S120UBA/
S120UBW.)
Vous pouvez écouter une application sur un iPhone via cet appareil. Dans certains cas,
vous pouvez commander une application en utilisant cet appareil.
Pour plus de détails sur les périphériques compatibles, visitez notre site Web.
Important
L’utilisation d’applications tierces peut impliquer ou nécessiter la fourniture d’informations
personnelles, que ce soit en créant un compte d’utilisateur ou une autre méthode ainsi que, pour
certaines applications, la fourniture de données de géolocalisation.
TOUTES LES APPLICATIONS TIERCES RELÈVENT DE L’ENTIÈRE RESPONSABILITÉ DES FOURNISSEURS,
NOTAMMENT MAIS SANS S’Y LIMITER, LA COLLECTE ET LA PROTECTION DES DONNÉES UTILISATEUR ET
LES BONNES PRATIQUES DE CONFIDENTIALITÉ. EN ACCÉDANT À UNE APPLICATION TIERCE, VOUS
ACCEPTEZ DE PRENDRE CONNAISSANCE DES CONDITIONS DE SERVICE ET DES RÈGLES DE
CONFIDENTIALITÉ DES FOURNISSEURS. SI VOUS N’ACCEPTEZ PAS LES CONDITIONS OU RÈGLES D’UN
FOURNISSEUR OU SI VOUS N’ACCEPTEZ PAS L’UTILISATION DES DONNÉES DE GÉOLOCALISATION, LE
CAS ÉCHÉANT, N’UTILISEZ PAS CETTE APPLICATION TIERCE.
Pour les utilisateurs d’iPhone
Cette fonction est compatible avec iPhone et iPod touch installés avec iOS 5.0 ou une version
supérieure.
REMARQUE
PIONEER DÉCLINE TOUTE RESPONSABILITÉ QUANT AUX APPLICATIONS OU AUX CONTENUS TIERS, Y
COMPRIS, SANS S’Y LIMITER, QUANT À LEUR EXACTITUDE OU À LEUR EXHAUSTIVITÉ. LE CONTENU ET
LA FONCTIONNALITÉ DE CES APPLICATIONS RELÈVENT DE LA SEULE RESPONSABILITÉ DU
FOURNISSEUR DE L’APPLICATION.
Mode d’application

- 13 -- 13 -
Français
1 Connectez cet appareil au périphérique mobile.
• iPhone via USB (page 8)
2 Appuyez sur SRC/OFF pour sélectionner [APP].
3 Activez le périphérique mobile pour lancer l’application.
Opérations de base
Vous pouvez procéder à différents ajustements dans les réglages FUNCTION (page 17).
(MVH-S120UI/S120UIG/S12UI est compatible uniquement avec les iPhone sur lesquels
Spotify est installé.)
Spotify est un service de diffusion de musique en continu non affilié à Pioneer. Des
informations complémentaires sont disponibles sur http://www.spotify.com.
L’application Spotify est disponible pour les smartphones compatibles ; veuillez
consulter https://support.spotify.com/ afin d’obtenir les dernières informations sur la
compatibilité.
Pour profiter de Spotify pendant que vous conduisez, téléchargez d’abord l’application
Spotify sur votre iPhone. Vous pouvez la télécharger sur iTunes App Store. Optez pour un
compte gratuit ou payant Premium, sur l’application ou sur spotify.com. Un compte
Premium vous permet d’accéder à davantage de fonctionnalités, comme l’écoute hors-
ligne.
Important
• Ce produit contient le logiciel Spotify qui fait l’objet de licences tierces que vous trouverez ici :
www.spotify.com/connect/third-party-licenses.
• Pour obtenir de plus amples informations sur les pays et les régions où Spotify peut être utilisé,
consultez https://spotify.com/us/select-your-country/.
Lecture d’une application via cet appareil
Objectif Opération
Sélectionner une piste Appuyez sur ou .
Avance ou retour rapide Appuyez longuement sur ou .
Pause/Reprise de la lecture Appuyez sur BAND/.
Spotify®

- 14 -
Français
Mettez à jour le microprogramme de l’application Spotify à sa dernière version avant de
l’utiliser.
1 Connectez cet appareil au périphérique mobile.
• iPhone via USB (page 8)
2 Appuyez sur SRC/OFF pour sélectionner [SPOTIFY].
3 Lancez l’application Spotify sur le périphérique mobile, puis lancez la lecture.
Opérations de base
Vous pouvez procéder à différents ajustements dans les réglages FUNCTION (page 17).
REMARQUE
Les opérations disponibles peuvent varier selon le type de contenus (titres/albums/artistes/listes de
lecture/radios) que vous souhaitez lire.
Écoute de Spotify
Objectif Opération
Sauter une piste Appuyez sur ou .
Rechercher un titre dans une liste 1 Appuyez longuement sur BASS pour
afficher la liste.
2 Tournez la molette M.C. pour
sélectionner la catégorie de votre choix,
puis appuyez pour valider.
3 Tournez la molette M.C. pour
sélectionner le fichier de votre choix, puis
appuyez pour valider.
La lecture commence.
Pause/Reprise de la lecture Appuyez sur 4/PAUSE.
Pouces levés (uniquement pour la radio) Appuyez sur 1/.
Pouces baissés (uniquement pour la radio) Appuyez sur 2/.
Lecture aléatoire (uniquement pour les
titres/albums/artistes/listes de lecture)
Appuyez sur 5/.
Lecture répétée (uniquement pour les
titres/albums/artistes/listes de lecture)
Appuyez sur 6/.
Lancez une station de radio en fonction de
la chanson en cours de lecture.
1 Appuyez longuement sur 5/ pour
lancer une radio.
2 Appuyez sur la molette M.C..
• Cette fonction peut ne pas être disponible
selon la chanson sélectionnée.

- 15 -- 15 -
Français
REMARQUE
Certaines fonctions de Spotify ne peuvent pas être activées à partir de cet appareil.
(Pioneer ARC APP pour iPhone n’est pas disponible pour MVH-S120UB/S120UBG/
S120UBA/S120UBW.)
Vous pouvez faire fonctionner l’appareil à partir de Pioneer ARC APP installé sur un
périphérique iPhone/Android. Dans certains cas, vous pouvez commander des aspects
de l’application, par exemple, la sélection de la source, la mise en pause, etc. à l’aide de
l’appareil.
Pour plus de détails sur les opérations disponibles sur l’application, consultez la section
d’aide de l’application.
ATTENTION
N’essayez pas d’utiliser l’application tout en conduisant. Veillez à quitter la route et à garer votre
véhicule en lieu sûr avant d’essayer d’utiliser les commandes de l’application.
Pour les utilisateurs d’iPhone
Cette fonction est compatible avec les iPhone (iPhone 5 ou ultérieur) et les iPod touch
sur lesquels iOS 8.0 ou ultérieur est installé.
Vous pouvez télécharger Pioneer ARC APP sur iTunes App Store.
Pour les utilisateurs de périphérique Android
Cette fonction est compatible avec un téléphone sur lequel est installée la version
Android 4.1 jusqu’à la version 7.1.2, et prend également en charge le système
d’exploitation 2.0 AOA (Android Open Accessory). Toutefois, la compatibilité dépend du
smartphone.
Vous pouvez télécharger Pioneer ARC APP sur Google Play™.
REMARQUE
Certains périphériques Android connectés via AOA 2.0 risquent de ne pas fonctionner correctement ou
d’émettre des sons en raison de leur conception logicielle propre, indépendamment de la version du
système d’exploitation.
Enregistrez les informations concernant la
chanson en cours de lecture.
Supprimez les informations relatives à la
chanson enregistrées.
1 Appuyez longuement sur 3/S.Rtrv.
[SAVE]/[UNSAVE] apparaît.
2 Appuyez sur la molette M.C..
Utilisation de Pioneer ARC APP
Objectif Opération

- 16 -
Français
Lorsque vous vous connectez à un périphérique Android
1
Appuyez sur la molette M.C. pour afficher le menu principal.
2 Tournez la molette M.C. pour sélectionner [SYSTEM], puis appuyez pour valider.
3 Tournez la molette M.C. pour sélectionner [ANDROID WIRED], puis appuyez pour
valider.
4 Tournez la molette M.C. pour sélectionner [APP CONTROL], puis appuyez pour
valider.
5 Tournez la molette M.C. pour sélectionner [P.APP AUTO ON], puis appuyez pour
valider.
6 Tournez la molette M.C. pour sélectionner [ON], puis appuyez pour valider.
7 Connectez cet appareil au périphérique Android via USB.
Pioneer ARC APP sur le périphérique Android démarre automatiquement.
REMARQUE
Si Pioneer ARC APP n’a pas encore été installée sur votre appareil Android, un message vous
invitant à l’installer apparaîtra sur votre appareil Android. Sélectionnez [OFF] dans [P.APP AUTO
ON] pour effacer le message (page 22).
Lorsque vous vous connectez à un iPhone
1
Connectez cet appareil au iPhone via USB.
2 Appuyez sur SRC/OFF pour sélectionner une source.
3 Appuyez longuement sur la molette M.C..
Pioneer ARC APP sur le iPhone démarre.
REMARQUE
En cas d’échec de la connexion, lancez Pioneer ARC APP sur le iPhone.
1 Appuyez sur SRC/OFF pour sélectionner [ANDROID].
Opérations de base
Connectez-vous à Pioneer ARC APP
Écoute de musique sur Android
Objectif Opération
Sélectionner une piste Appuyez sur ou .
Avance ou retour rapide Appuyez longuement sur ou .

- 17 -- 17 -
Français
Vous pouvez régler divers paramètres dans le menu principal.
1 Appuyez sur la molette M.C. pour afficher le menu principal.
2 Tournez la molette M.C. pour sélectionner l’une des catégories suivantes, puis
appuyez pour valider.
• Réglages FUNCTION (page 17)
• Réglages AUDIO (page 19)
• Réglages SYSTEM (page 21)
• Réglages ILLUMINATION (page 22)
3 Tournez la molette M.C. pour sélectionner les options, puis appuyez pour valider.
REMARQUES
• Les éléments de menu liés à l’iPod dans les tableaux suivants ne sont pas disponibles pour le modèle
MVH-S120UB/S120UBG/S120UBA/S120UBW.
• Les éléments de menu liés au mode APP dans les tableaux suivants ne sont pas disponibles pour le
modèle MVH-S120UB/S120UBG/S120UBA/S120UBW.
Les éléments de menu varient selon la source.
Pause/Reprise de la lecture Appuyez sur 4/PAUSE.
Sound retriever (correcteur de son
compressé)
Appuyez sur 3/S.Rtrv.
[1] : efficace pour les taux de compression
faibles
[2] : efficace pour les taux de compression
élevés
Réglages
Réglages FUNCTION
Élément de menu Description
FM SETTING
[TALK], [STANDARD], [MUSIC] Adaptez le niveau de qualité sonore aux
conditions de signal de radiodiffusion du signal
de la bande FM. (Disponible uniquement lorsque
la bande FM est sélectionnée.)
Objectif Opération

- 18 -
Français
BSM
Mémorisez automatiquement les six stations les
plus puissantes sur les touches numériques (1/
à 6/).
REGIONAL
[ON], [OFF] Limitez la réception des programmes régionaux
spécifiques lorsque AF (recherche des autres
fréquences) est sélectionné. (Disponible
uniquement lorsque la bande FM est
sélectionnée.)
LOCAL
FM : [OFF], [LV1], [LV2], [LV3],
[LV4]
MW/LW : [OFF], [LV1], [LV2]
Restreignez la station d’accord suivant la
puissance du signal.
TA
[ON], [OFF] Recevez des programmes d’informations
routières, le cas échéant. (Disponible
uniquement lorsque la bande FM est
sélectionnée.)
AF
[ON], [OFF] Laissez l’appareil s’accorder sur une autre
fréquence fournissant la même station.
(Disponible uniquement lorsque la bande FM est
sélectionnée.)
NEWS
[ON], [OFF] Interrompez la source actuellement sélectionnée
avec des bulletins d’informations. (Disponible
uniquement lorsque la bande FM est
sélectionnée.)
SEEK
[MAN], [PCH] Attribuez aux touches ou la
recherche de stations une par une (accord
manuel) ou sélectionnez une station à partir des
canaux préréglés.
Élément de menu Description

- 19 -- 19 -
Français
SAVE
Enregistrez les informations concernant la
chanson en cours de lecture sur votre liste de
lecture sur Spotify.
UNSAVE
Supprimez les informations relatives à la
chanson enregistrées dans [SAVE].
S.RTRV
[1] (efficace pour les taux de
compression faibles),
[2] (efficace pour les taux de
compression élevés),
[OFF]
Améliorez l’audio compressé et restaurez un son
riche.
Indisponible lors de la lecture du fichier FLAC.
AUDIO BOOK
[FASTER], [NORMAL], [SLOWER] Modifiez la vitesse de lecture. (Indisponible
lorsque [CONTROL iPod] est sélectionné en
mode de commande.)
PAUSE
Mettez sur pause ou reprenez la lecture.
Réglages AUDIO
Élément de menu Description
FADER*1
Réglez l’équilibre sonore entre les haut-parleurs
avant et arrière.
BALANCE
Réglez l’équilibre sonore entre les haut-parleurs
gauche et droite.
Élément de menu Description
USB
iPod
iPod

- 20 -
Français
EQ SETTING
[SUPER BASS], [POWERFUL],
[DYNAMIC], [NATURAL], [VOCAL],
[VIVID], [CUSTOM1], [CUSTOM2],
[FLAT]
Sélectionnez la bande et le
niveau de l’égaliseur pour une
personnalisation approfondie.
Bande de l’égaliseur : [80HZ],
[250HZ], [800HZ], [2.5KHZ],
[8KHZ]
Niveau de l’égaliseur : [+6] à [–6]
Sélectionnez ou personnalisez la courbe de
l’égaliseur.
[CUSTOM1] peut être défini séparément pour
chaque source. Cependant, chacune des
combinaisons ci-dessous est définie
automatiquement sur le même réglage.
• USB, iPod, ANDROID, SPOTIFY et APP (iPhone)
[CUSTOM2] est un réglage partagé et commun à
toutes les sources.
Vous pouvez également commuter l’égaliseur en
appuyant plusieurs fois sur
(Uniquement pour le modèle MVH-S120UB/
S120UBG/S120UBA/S120UBW).
LOUDNESS
[OFF], [LOW], [MID], [HI] Compensez pour obtenir un son net à faible
volume.
SUB.W*2
[NOR], [REV], [OFF] Sélectionnez la phase du haut-parleur
d’extrêmes graves.
SUB.W CTRL*2*3
Fréquence de coupure : [50HZ],
[63HZ], [80HZ], [100HZ], [125HZ],
[160HZ], [200HZ]
Niveau de sortie : [–24] à [+6]
Niveau de la pente : [–12], [–24]
Seules les fréquences inférieures à celles de la
gamme sélectionnée sont émises par le haut-
parleur d’extrêmes graves.
BASS BOOST
[0] à [+6] Sélectionnez le niveau d’accentuation des
graves.
HPF SETTING
Fréquence de coupure : [OFF],
[50HZ], [63HZ], [80HZ], [100HZ],
[125HZ], [160HZ], [200HZ]
Niveau de la pente : [–12], [–24]
Seules les fréquences supérieures à la coupure
du filtre passe-haut (HPF) sont émises en sortie
via les haut-parleurs.
Élément de menu Description

- 21 -- 21 -
Français
*1 Indisponible lorsque [SUB.W/SUB.W] est sélectionné sous [SP-P/O MODE] dans les réglages INITIAL
(page 6).
*2 Indisponible lorsque [REAR/REAR] est sélectionné sous [SP-P/O MODE] dans les réglages INITIAL
(page 6).
*3 Indisponible lorsque [OFF] est sélectionné sous [SUB.W].
Vous pouvez également accéder à ces menus lorsque l’appareil est hors tension.
SLA
[+4] à [–4] Réglez le niveau de volume de chaque source,
sauf celui de la FM.
Chacune des combinaisons ci-dessous est
définie automatiquement sur le même réglage.
• USB, iPod, ANDROID, SPOTIFY et APP (iPhone)
Réglages SYSTEM
Élément de menu Description
LANGUAGE
[ENG] (anglais), [РУС] (russe),
[TUR] (turc)
Sélectionnez la langue d’affichage des
informations textuelles à partir d’un fichier audio
compressé.
CLOCK SET
Réglez l’horloge (page 5).
12H/24H
[12H], [24H] Sélectionnez la notation de l’heure.
SCROLL SET
[ONCE], [LOOP], [OFF] Sélectionnez la manière de dérouler le texte
dans la fenêtre d’affichage.
AUTO PI
[ON], [OFF] Recherchez une autre station avec la même
programmation, même si vous utilisez une
station présélectionnée.
AUX
[ON], [OFF] Sélectionnez [ON] lors de l’utilisation d’un
périphérique auxiliaire connecté à l’appareil.
SPOTIFY
[ON], [OFF] Sélectionnez [ON] lorsque vous utilisez la
fonction Spotify.
Élément de menu Description

- 22 -
Français
* [PW SAVE] s’annule si la batterie du véhicule est débranchée, et il doit être réactivé une fois la batterie
rebranchée. Lorsque [PW SAVE] est désactivé, selon les méthodes de connexion, l’appareil peut
continuer à consommer l’énergie de la batterie s’il n’y a pas de position ACC (accessoire) sur le
contact de votre véhicule.
MUTE MODE (uniquement pour le modèle MVH-S120UI/S120UIG/S12UI)
[MUTE], [20dB ATT], [10dB ATT] Coupez ou atténuez le son automatiquement
lorsque le signal d’un appareil équipé d’une
fonction de sourdine est reçu.
PW SAVE*
[ON], [OFF] Réduisez la consommation d’énergie de la
batterie.
L’activation de la source est la seule opération
autorisée lorsque cette fonction est activée.
ANDROID WIRED
[MEMORY], [APP CONTROL] Sélectionnez la méthode de connexion adaptée
à un périphérique Android.
P. AP P AU TO O N
[ON], [OFF]
Sélectionnez [ON] pour lancer automatiquement
Pioneer ARC APP lorsqu’un périphérique Android
est connecté à l’appareil via AOA. (Indisponible
lorsque [MEMORY] est sélectionné sous [ANDROID
WIRED].)
USB AUTO
[ON], [OFF] Sélectionnez [ON] pour basculer
automatiquement sur la source [USB] lorsqu’un
périphérique USB/iPod est connecté à l’appareil.
Sélectionnez [OFF] lorsqu’un périphérique USB/
iPod est connecté à l’appareil uniquement à des
fins de charge.
Réglages ILLUMINATION
Élément de menu Description
DIM SETTING
[SYNC CLOCK], [MANUAL] Sélectionnez le mode pour modifier la
luminosité de l’affichage.
Élément de menu Description

- 23 -- 23 -
Français
BRIGHTNESS
[1] à [10] Changez la luminosité de l’affichage.
Les plages de réglage disponibles varient selon
le paramètre [DIM SETTING].
Élément de menu Description

- 24 -
Français
L’affichage redevient automatiquement
ordinaire.
→ Vous n’avez exécuté aucune opération
pendant environ 30 secondes.
–Exécutez une opération.
L’étendue de lecture répétée change de
manière inattendue.
→ En fonction de l’étendue de lecture
répétée, l’étendue sélectionnée peut
changer lors de la sélection d’un autre
dossier ou d’une autre piste ou pendant
l’avance ou le retour rapide.
–Sélectionnez à nouveau l’étendue de
lecture répétée.
Un sous-dossier n’est pas lu.
→ Il est impossible de lire les sous-dossiers
lorsque [FLD] (répétition du dossier) est
sélectionné.
–Sélectionnez une autre étendue de
lecture répétée.
Le son est intermittent.
→ Vous utilisez un périphérique, un
téléphone portable par exemple, qui
peut générer des interférences sonores.
–Éloignez de l’appareil tous les
périphériques électriques susceptibles
de provoquer des interférences.
Commun
AMP ERROR
→ Un dysfonctionnement de l’appareil
s’est produit ou le raccordement des
haut-parleurs est incorrect.
→ Le circuit de protection est activé.
–Vérifiez le raccordement des haut-
parleurs.
–Tournez la clé de contact sur OFF, puis
de nouveau sur ON. Si le message ne
disparaît pas, demandez de l’aide à
votre revendeur ou à un centre
d’entretien agréé par Pioneer.
NO XXXX (ex. : NO TITLE)
→ Aucune information textuelle n’est
intégrée.
–Commutez l’affichage ou la lecture sur
une autre piste ou un autre fichier.
Périphérique USB/iPod
FORMAT READ
→ Le début de la lecture et le début de
l’émission des sons sont parfois décalés.
–Attendez que le message disparaisse
pour entendre les sons.
NO AUDIO
→ Il n’y a aucun morceau.
–Transférez les fichiers audio vers le
périphérique USB et procédez à la
connexion.
→ La sécurité est activée sur le
périphérique USB connecté.
–Suivez les instructions du
périphérique USB pour désactiver la
sécurité.
SKIPPED
→ Le périphérique USB connecté contient
des fichiers protégés par DRM.
–Les fichiers protégés sont sautés.
PROTECT
→ Tous les fichiers sur le périphérique USB
connecté intègrent la protection par
DRM.
–Utilisez un autre périphérique USB.
Informations complémentaires
Dépannage
Messages d’erreur

- 25 -
Français
N/A USB
→ Le périphérique USB connecté n’est pas
pris en charge par cet appareil.
–Déconnectez votre périphérique et
remplacez-le par un périphérique USB
compatible.
HUB ERROR
→ Le périphérique USB connecté via un
concentrateur USB n’est pas pris en
charge par cet appareil.
–Connectez le périphérique USB
directement à cet appareil à l’aide
d’un câble USB.
CHECK USB
→ Le connecteur USB ou le câble USB est
en court-circuit.
–Vérifiez que le connecteur USB ou le
câble USB n’est pas coincé ou
endommagé.
→ Le périphérique USB connecté
consomme plus que le courant maximal
autorisé.
–Déconnectez le périphérique USB et
ne l’utilisez pas. Mettez le contact sur
OFF, puis de nouveau sur ACC ou ON.
Ne connectez que des périphériques
USB conformes.
ERROR-19
→ Panne de communication.
–Effectuez l’une des opérations
suivantes, puis revenez à la source
USB.
• Déconnectez le périphérique USB.
• Changez de source.
→ Panne de l’iPod.
–Débranchez le câble de l’iPod. Une fois
le menu principal de l’iPod affiché,
reconnectez et réinitialisez l’iPod.
ERROR-23
→ Le périphérique USB n’a pas été formaté
correctement.
–Formatez le périphérique USB avec
FAT12, FAT16 ou FAT32.
ERROR-16
→ La version du microprogramme de
l’iPod est désuète.
–Mettez à jour la version de l’iPod.
→ Panne de l’iPod.
–Débranchez le câble de l’iPod. Une fois
le menu principal de l’iPod affiché,
reconnectez et réinitialisez l’iPod.
STOP
→ La liste en cours ne comporte aucun
morceau.
–Sélectionnez une liste contenant des
morceaux.
NOT FOUND
→ Aucun morceau connexe.
–Transférez des morceaux sur l’iPod.
APP
START UP APP
→ L’application n’a pas encore commencé
à s’exécuter.
–Activez le périphérique mobile pour
lancer l’application.
Spotify
CHECK APP
→ Échec de la connexion à l’application
Spotify.
–Suivez les instructions qui s’affichent à
l’écran.
Périphérique de stockage USB
• Les connexions via un concentrateur USB
ne sont pas prises en charge.
• Attachez fermement le périphérique de
stockage USB avant de conduire. Ne
laissez pas le périphérique de stockage
USB tomber au sol, où il pourrait rester
Conseils sur la
manipulation

- 26 -
Français
coincé sous la pédale de frein ou
d’accélérateur.
• Selon le périphérique de stockage USB,
les problèmes suivants peuvent survenir.
– Le fonctionnement peut varier.
– Le périphérique de stockage peut ne
pas être reconnu.
– Les fichiers peuvent ne pas être lus
correctement.
– Le périphérique peut générer des
interférences sonores lorsque vous
écoutez la radio.
iPod
• Ne laissez pas l’iPod dans un endroit
soumis à une température élevée.
• Attachez fermement l’iPod pendant que
vous conduisez. Ne laissez pas l’iPod
tomber au sol, où il pourrait gêner le bon
fonctionnement de la pédale de frein ou
d’accélérateur.
• Les réglages de l’iPod, comme l’égaliseur
et la lecture répétée, changent
automatiquement lorsque l’iPod est
connecté à l’appareil. Une fois l’iPod
déconnecté, les réglages d’origine sont
rétablis.
• Aucun texte incompatible enregistré sur
l’iPod ne sera affiché par cet appareil.
• Seuls les 32 premiers caractères peuvent
s’afficher en tant que nom de fichier
(extension de fichier comprise) ou nom
de dossier.
• L’appareil risque de ne pas fonctionner
correctement selon l’application utilisée
pour encoder les fichiers WMA.
• Il peut se produire un léger retard au
début de la lecture de fichiers audio
intégrés avec des données d’image, ou de
fichiers audio stockés sur un périphérique
USB avec de nombreuses hiérarchies de
dossiers.
• Les textes russes à afficher sur cet
appareil doivent être codés avec l’un des
jeux de caractères suivants :
– Unicode (UTF-8, UTF-16)
– Jeu de caractères autre que l’Unicode
qui est utilisé dans un environnement
Windows et est paramétré sur Russe
dans le réglage multilingue
PRÉCAUTION
• Pioneer ne garantit pas la compatibilité
avec tous les périphériques de stockage
de masse USB et décline toute
responsabilité en cas de perte de
données sur des lecteurs multimédia,
smartphones ou autres périphériques
lors de l’utilisation de ce produit.
• Ne laissez pas de disques ou un
périphérique de stockage USB dans un
lieu où les températures sont élevées.
Fichiers WMA
Fichiers MP3
Compatibilité avec
l’audio compressé
Extension de fichier .wma
Débit binaire 48 kbps à 320 kbps
(CBR), 48 kbps à
384 kbps (VBR)
Fréquence
d’échantillonnage
32 kHz, 44,1 kHz,
48 kHz
Windows Media™
Audio Professional,
Lossless, Voice/DRM
Stream/Stream avec
vidéo
Incompatible
Extension de fichier .mp3
Débit binaire 8 kbps à 320 kbps
(CBR), VBR
Fréquence
d’échantillonnage
8 kHz à 48 kHz
(32 kHz, 44,1 kHz,
48 kHz pour
accentuation)

- 27 -
Français
Fichiers WAV
• Il est impossible de connecter les formats
de fichier WAV via MTP.
Fichiers FLAC
• Il est impossible de connecter les formats
de fichier FLAC via MTP.
• Selon l’encodeur, les fichiers FLAC
risquent d’être illisibles.
Périphérique USB
• Il peut se produire un léger retard au
début de la lecture de fichiers audio
stockés sur un périphérique de stockage
USB avec de nombreuses hiérarchies de
dossiers.
Cet appareil prend en charge uniquement les
modèles d’iPod suivants. Les versions
antérieures ne sont pas prises en charge.
Made for (Conçu pour)
–iPod touch (de la 1e à la 6e génération)
–iPod classic
–iPod nano (de la 3e à la 7e génération)
–iPhone 6s
– iPhone 6s Plus
–iPhone 6
–iPhone 6 Plus
–iPhone 5s
–iPhone 5c
–iPhone 5
–iPhone4s
–iPhone4
–iPhone3GS
–iPhone3G
–iPhone
• Les opérations peuvent varier selon la
génération et/ou la version de l’iPod.
• Les utilisateurs d’un iPod avec le
connecteur Lightning doivent utiliser le
Lightning vers le câble USB (fourni avec
iPod).
• Les utilisateurs d’un iPod avec
connecteur pour station d’accueil
doivent utiliser le câble CD-IU51. Pour
plus de détails, consultez votre
revendeur.
• Pour en savoir plus sur la compatibilité
fichier/format, reportez-vous aux
manuels de l’iPod.
• Livre audio, podcast : compatible
Version étiquette ID3
compatible
1.0, 1.1, 2.2, 2.3, 2.4 (la
version 2.x de
l’étiquette ID3 a
priorité sur la
version 1.x.)
Liste de lecture M3u Incompatible
MP3i (MP3 interactif),
mp3 PRO
Incompatible
Extension de fichier .wav
Bits de quantification 8 et 16 (LPCM)
Fréquence
d’échantillonnage
16 kHz à 48 kHz
(LPCM)
Extension de fichier .flac
Fréquence
d’échantillonnage
8/11,025/12/16/22,05/
24/32/44,1/48 kHz
Débit binaire de
quantification
16 bits
Mode de canal 1/2 canaux
Hiérarchie des
dossiers lisibles
Jusqu’à huit niveaux
(dans la pratique, la
hiérarchie compte
moins de
deux niveaux)
Dossiers lisibles Jusqu’à 500
Fichiers lisibles Jusqu’à 15 000
Lecture des fichiers
protégés par des
droits d’auteur
Incompatible
Périphérique USB
partitionné
Seule la première
partition est lisible.
Compatibilité avec un
iPod

- 28 -
Français
PRÉCAUTION
Pioneer n’accepte aucune responsabilité
en cas de perte de données sur l’iPod,
même si la perte de données se produit
pendant l’utilisation de cet appareil.
Sur cet appareil, l’utilisateur ne peut pas
affecter de numéros de dossier ni spécifier
les séquences de lecture. La séquence de
fichier audio dépend du périphérique
raccordé.
Notez que la lecture des fichiers masqués
d’un périphérique USB est impossible.
Exemple de hiérarchie
iTunes
Apple et iTunes sont des marques
commerciales d’Apple Inc., enregistrées
aux États-Unis et dans d’autres pays.
WMA
Windows Media est une marque déposée
ou une marque commerciale de Microsoft
Corporation aux États-Unis et/ou dans
d’autres pays.
Ce produit intègre une technologie
détenue par Microsoft Corporation, qui ne
peut être utilisée et distribuée que sous
licence de Microsoft Licensing, Inc.
Séquence des fichiers
audio
Dossier
Fichier d’audio
compressé
à : séquence de lecture
01 à 05 : numéro de dossier
Tableau des caractères
cyrilliques
Droits d’auteur et
marques commerciales
D : Affichage C : Caractère

- 29 -
Français
FLAC
Copyright © 2000-2009 Josh Coalson
Copyright © 2011-2013 Xiph.Org
Foundation
La redistribution et l’utilisation sous la
forme de source et sous forme binaire, avec
ou sans modification, sont autorisées pour
autant que les conditions suivantes soient
remplies :
–Les redistributions de code source
doivent mentionner l’avis de droit
d’auteur ci-dessus, la présente liste de
conditions et l’avis de non-responsabilité
suivant.
–Les redistributions sous forme binaire
doivent mentionner l’avis de droit
d’auteur ci-dessus, la présente liste de
conditions et l’avis de non-responsabilité
suivant dans la documentation et/ou les
autres éléments fournis avec la
distribution.
–Ni le nom de la Xiph.org Foundation, ni
les noms de ses contributeurs ne peuvent
être utilisés en vue d’approuver ou de
promouvoir des produits dérivés de ce
logiciel sans autorisation écrite préalable.
LE PRÉSENT LOGICIEL EST FOURNI PAR LES
TITULAIRES DE DROIT D’AUTEUR ET LES
CONTRIBUTEURS « EN L’ÉTAT », ET AUCUNE
GARANTIE, EXPLICITE OU IMPLICITE, N’EST
OFFERTE, Y COMPRIS ET SANS S’Y LIMITER,
LES GARANTIES IMPLICITES DE QUALITÉ
MARCHANDE ET D’ADÉQUATION À UNE
UTILISATION PARTICULIÈRE. EN AUCUN
CAS, LA FONDATION OU SES
CONTRIBUTEURS NE POURRONT ÊTRE
TENUS POUR RESPONSABLES DES
DOMMAGES DIRECTS, INDIRECTS,
ACCESSOIRES, SPÉCIAUX, DES DOMMAGES
ET INTÉRÊTS PUNITIFS OU DES DOMMAGES
CONSÉCUTIFS (NOTAMMENT, MAIS SANS
S’Y LIMITER, LE REMPLACEMENT DE
PRODUITS OU DE SERVICES, LA PERTE DE
JOUISSANCE, DE DONNÉES OU DE
BÉNÉFICES OU ENCORE L’INTERRUPTION
D’UNE ACTIVITÉ COMMERCIALE) QUELLES
QU’EN SOIENT LES CAUSES ET QUEL QUE
SOIT LE TYPE DE RESPONSABILITÉ,
CONTRACTUELLE, STRICTE OU FONDÉE
SUR UN DÉLIT CIVIL (Y COMPRIS PAR
NÉGLIGENCE OU POUR UNE AUTRE CAUSE)
RÉSULTANT D’UNE MANIÈRE OU D’UNE
AUTRE DE L’UTILISATION DE CE LOGICIEL,
MÊME SI MENTION A ÉTÉ FAITE DE LA
POSSIBILITÉ DE TELS DOMMAGES.
iPhone, iPod et Lightning
L’usage du badge Made for Apple signifie
qu’un accessoire a été conçu pour se
connecter spécialement au(x) produit(s)
Apple identifié(s) sur le badge, et qu’il a été
certifié conforme aux normes de
performance Apple par son concepteur.
Apple n’est pas responsable du
fonctionnement de cet appareil ou de sa
conformité avec les normes de sécurité et
de réglementation.
Veuillez noter que l’utilisation de cet
accessoire avec un produit Apple peut
affecter les performances de
communication sans fil.
iPhone, iPod, iPod classic, iPod nano, iPod
touch et Lightning sont des marques
commerciales d’Apple Inc., déposées aux
États-Unis et dans d’autres pays.
Google™, Google Play, Android
Google, Google Play et Android sont des
marques de commerce de Google LLC.
Spotify®
SPOTIFY et le logo Spotify font partie des
marques déposées de Spotify AB. Des
appareils numériques mobiles compatibles
et un abonnement premium sont
nécessaires, le cas échéant, consultez le
site https://www.spotify.com.

- 30 -
Français
Généralités
Tension d’alimentation : 14,4 V CC (10,8 V à
15,1 V admissible)
Mise à la masse : pôle négatif
Consommation maximale : 10,0 A
Dimensions (L × H × P) :
DIN
Châssis: 178 mm × 50 mm × 97 mm
Panneau avant : 188 mm × 58 mm ×
17 mm
D
Châssis: 178 mm × 50 mm × 97 mm
Panneau avant : 170 mm × 46 mm ×
17 mm
Poids : 0,5 kg
Audio
Puissance de sortie maximale :
• 50 W × 4 canaux/4 Ω (sans haut-
parleur d’extrêmes graves)
• 50 W × 2 canaux/4 Ω + 70 W ×
1 canal/2 Ω (pour haut-parleur
d’extrêmes graves)
Puissance de sortie continue :
22 W × 4 (50 Hz à 15 000 Hz, THD 5 %,
impédance de charge 4 Ω, avec les
deux canaux entraînés)
Impédance de charge : 4 Ω (4 Ω à 8 Ω
admissible)
Niveau de sortie maximum de la sortie
préamp. : 2,0 V
Correction physiologique : +10 dB
(100 Hz), +6,5 dB (10 kHz)
(volume : –30 dB)
Égaliseur (égaliseur graphique à
5bandes):
Fréquence : 80 Hz/250 Hz/800 Hz/
2,5 kHz/8 kHz
Plage d’égalisation : ±12 dB (par pas
de 2 dB)
Haut-parleur d’extrêmes graves (mono) :
Fréquence : 50 Hz/63 Hz/80 Hz/
100 Hz/125 Hz/160 Hz/200 Hz
Pente : –12 dB/oct, –24 dB/oct
Gain : +6 dB à –24 dB
Phase : normale/inverse
USB
Spécification standard USB : USB 2.0 vitesse
pleine
Alimentation maximale : 1 A
Protocole USB :
MSC (Mass Storage Class)
MTP (Media Transfer Protocol)
AOA (Android Open Accessory) 2.0
Système de fichiers : FAT12, FAT16, FAT32
Format de décodage MP3 : MPEG-1 et 2
Couche Audio 3
Format de décodage WMA : Ver. 7, 8, 9, 9.1,
9.2 (2 canaux audio)
Format de décodage FLAC : v1.3.0 (Free
Lossless Audio Codec)
Format de signal WAV : PCM linéaire (non
compressé)
Syntoniseur FM
Gamme de fréquences : 87,5 MHz à
108,0 MHz
Sensibilité utile : 11 dBf (1,0 μV/75 Ω,
mono, S/B : 30 dB)
Rapport signal/bruit : 72 dB (réseau IEC-A)
Syntoniseur MW
Gamme de fréquences : 531 kHz à
1 602 kHz
Sensibilité utile : 25 μV (S/B : 20 dB)
Rapport signal/bruit : 62 dB (réseau IEC-A)
Syntoniseur LW
Gamme de fréquences : 153 kHz à 281 kHz
Sensibilité utile : 28 μV (S/B : 20 dB)
Rapport signal/bruit : 62 dB (réseau IEC-A)
REMARQUE
Les caractéristiques et la présentation
peuvent être modifiées sans avis préalable.
Caractéristiques
techniques

- 2 -
Italiano
Operazioni preliminari ........................................................................... 3
Radio.......................................................................................................... 7
USB/iPod/AUX .......................................................................................... 8
Modalità app ......................................................................................... 12
Spotify® .................................................................................................. 13
Utilizzare Pioneer ARC APP................................................................. 14
Impostazioni.......................................................................................... 16
Impostazioni FUNCTION...................................................................... 17
Impostazioni AUDIO............................................................................. 18
Impostazioni SYSTEM........................................................................... 20
Impostazioni ILLUMINATION .............................................................. 21
Informazioni aggiuntive ..................................................................... 22
Informazioni sul manuale:
• Nelle seguenti istruzioni, una memoria USB o un lettore audio USB viene denominato
“dispositivo USB”.
• In questo manuale, iPod e iPhone vengono denominati “iPod”.
Sommario

- 3 -- 3 -
Italiano
MVH-S120UI/S120UIG/S12UI/S120UB/S120UBG/S120UBA/
S120UBW
Operazioni frequenti
Operazioni preliminari
Funzionamento di base
Scopo Operazione
Accendere l’alimentazione* Premere SRC/OFF per accendere
l’alimentazione.
Tenere premuto SRC/OFF per spegnere
l’alimentazione.
Regolare il volume Ruotare la ghiera M.C..
Selezionare una sorgente Premere ripetutamente SRC/OFF.
Cambiare la visualizzazione delle
informazioni
Premere ripetutamente DISP.
Tornare alla precedente visualizzazione/
elenco
Premere BAND/.
Tornare alla visualizzazione normale dal
menu
Tenere premuto BAND/.
SRC (sorgente)/OFF
Pulsante di sgancio
Finestra di visualizzazione
Ghiera M.C. (multi-controllo)
BAND/
Porta USB
Jack di ingresso AUX (jack stereo da 3,5 mm)
DISP (display)
BASS

- 4 -
Italiano
* Quando l’interlinea blu/bianca dell’unità è collegata al terminale di controllo relè dell’antenna
automatica del veicolo, l’antenna del veicolo si estende quando la sorgente dell’unità è attivata. Per
ritirare l’antenna, disattivare la sorgente.
Indicazione del display
Staccare il frontalino per evitarne il furto. Rimuovere tutti i cavi e i dispositivi collegati al
frontalino e spegnere l’unità prima di staccarla.
Importante
• Evitare di sottoporre il frontalino a forti urti.
• Mantenere il frontalino lontano da luce diretta del sole e alte temperature.
Potenziare il livello dei bassi Premere BASS.
• Il livello dei bassi è selezionabile in [BASS
BOOST] (pagina 19).
Indicazione
Descrizione
Viene visualizzata quando esiste un livello inferiore del menu o della
cartella.
Viene visualizzato quando si tiene premuto il pulsante BASS.
Viene visualizzata quando è impostata la funzione di sintonizzazione
automatica locale (pagina 17).
Viene visualizzata quando viene ricevuto un programma sul traffico.
Viene visualizzata quando è impostata la funzione TA (annunci sul traffico)
(pagina 17).
Viene visualizzata quando è impostata la funzione sound retriever
(pagina 18).
Viene visualizzata quando è impostata la funzione di controllo dell’iPod
(pagina 11).
Rimozione del frontalino
Scopo Operazione
Stacca Attacca

- 5 -- 5 -
Italiano
• Conservare sempre il frontalino staccato in una custodia protettiva o in borsa.
Quando, dopo l’installazione, si imposta l’interruttore di accensione su ON, sul display
viene visualizzato [SET UP :YES].
1 Premere la ghiera M.C..
Il menu di configurazione scompare dopo 30 secondi di attività. Se si desidera
effettuare l’impostazione in seguito, ruotare la ghiera M.C. per selezionare [NO],
quindi premere per confermare.
2 Ruotare la ghiera M.C. per selezionare le opzioni, quindi premere per confermare.
Per passare all’opzione di menu successiva, confermare la selezione.
3 [QUIT :YES] viene visualizzato quando sono state effettuate tutte le impostazioni.
Per tornare alla prima voce del menu di configurazione, ruotare la ghiera M.C. per
selezionare [QUIT :NO], quindi premere per confermare.
4 Premere la ghiera M.C. per confermare le impostazioni.
NOTE
• È possibile annullare l’impostazione del menu premendo SRC/OFF.
• Tali impostazioni possono essere effettuate in qualsiasi momento dalle impostazioni SYSTEM
(pagina 20) e dalle impostazioni INITIAL (pagina 6).
1 Premere la ghiera M.C. per visualizzare il menu principale.
2 Ruotare la ghiera M.C. per selezionare [SYSTEM], quindi premere per confermare.
Menu di configurazione
Voce del menu Descrizione
LANGUAGE Selezionare la lingua per visualizzare le informazioni di testo di
un file audio compresso.
[ENG](Inglese),
[РУС](Russo),
[TUR](Turco)
CLOCK SET Impostare l’orologio.
FM STEP Selezionare il passo di frequenza FM tra 100 kHz o 50 kHz.
[100], [50]
Annullamento della visualizzazione di
dimostrazione (DEMO OFF)

- 6 -
Italiano
3 Ruotare la ghiera M.C. per selezionare [DEMO OFF], quindi premere per
confermare.
4 Ruotare la ghiera M.C. per selezionare [YES], quindi premere per confermare.
1 Tenere premuto SRC/OFF finché l’unità si spegne.
2 Tenere premuto SRC/OFF per visualizzare il menu principale.
3 Ruotare la ghiera M.C. per selezionare [INITIAL], quindi premere per confermare.
4 Ruotare la ghiera M.C. per selezionare un’opzione, quindi premere per
confermare.
NOTA
Le opzioni variano in base all’unità.
Impostazioni INITIAL
Voce del menu Descrizione
FM STEP Selezionare il passo di frequenza FM tra 100 kHz o 50 kHz.
[100], [50]
SP-P/O MODE Selezionare in presenza di un altoparlante full-range collegato
alle interlinee di uscita dell’altoparlante posteriore e di un
subwoofer collegato a un’uscita RCA.
[REAR/SUB.W]
[SUB.W/SUB.W] Selezionare in presenza di un subwoofer passivo collegato
direttamente alle interlinee di uscita dell’altoparlante posteriore
e di un subwoofer collegato all’uscita RCA.
[REAR/REAR] Selezionare in presenza di altoparlanti full-range collegati alle
interlinee di uscita dell’altoparlante posteriore e all’uscita RCA.
In presenza di un altoparlante full-range collegato alle interlinee
di uscita dell’altoparlante posteriore e l’uscita RCA non viene
utilizzata, è possibile selezionare [REAR/SUB.W] o [REAR/REAR].
S/W UPDATE Selezionare per confermare le più recenti informazioni di
sistema sull’unità.
[SYSTEM INFO]
[SYSTEM UPDATE] Selezionare per aggiornare l’unità al software più recente e
avviare le impostazioni dell’unità. Per dettagli sul software più
recente e sull’aggiornamento, visitare il nostro sito Web.
SYSTEM RESET Selezionare [YES] per avviare le impostazioni dell’unità. L'unità
verrà riavviata automaticamente.
(Alcune impostazioni possono essere mantenute anche dopo la
reimpostazione dell’unità.)
[YES], [NO]

- 7 -- 7 -
Italiano
Le frequenze del tuner sull’unità sono distribuite per l’utilizzo in Europa occidentale,
Asia, Medio oriente, Africa e Oceania. L’utilizzo in altre aree può provocare una scarsa
ricezione. La funzione RDS (radio data system) funziona solo nelle aree di trasmissione
dei segnali RDS per le stazioni FM.
1 Premere SRC/OFF per selezionare [RADIO].
2 Premere BAND/ per selezionare la banda [FM1], [FM2], [FM3], [MW] o [LW].
3 Premere un pulsante numerico (da 1/ a 6/).
TIP
I pulsanti / possono anche essere utilizzati per selezionare una stazione preimpostata
quando [SEEK] è impostato su [PCH] nelle impostazioni FUNCTION (pagina 18).
Le sei stazioni più forti vengono memorizzate sui pulsanti numerici (da 1/ a 6/).
1 Una volta selezionata la banda, premere la ghiera M.C. per visualizzare il menu
principale.
2 Ruotare la ghiera M.C. per selezionare [FUNCTION], quindi premere per
confermare.
3 Ruotare la ghiera M.C. per selezionare [BSM], quindi premere per confermare.
Per cercare manualmente una stazione
1
Una volta selezionata la banda, premere / per selezionare una stazione.
Tenere premuto / , quindi rilasciarlo per cercare una stazione disponibile. La
scansione termina quando l’unità riceve una stazione. Per annullare la
sintonizzazione, premere / .
NOTA
[SEEK] deve essere impostato su [MAN] nelle impostazioni FUNCTION (pagina 18).
Radio
Ricezione delle stazioni preimpostate
Best stations memory (BSM)

- 8 -
Italiano
Per memorizzare manualmente le stazioni
1
Durante la ricezione della stazione che si desidera memorizzare, tenere premuto
uno dei pulsanti numerici (da 1/ a 6/ ) fino a quando non smette di
lampeggiare.
L’unità cerca una stazione per informazione PTY (tipo di programma).
1 Tenere premuto BASS durante la ricezione FM.
2 Ruotare la ghiera M.C. per selezionare un tipo di programma da [NEWS/INFO],
[POPULAR], [CLASSICS] o [OTHERS].
3 Premere la ghiera M.C..
L’unità inizia a cercare una stazione. Una volta trovata, viene visualizzato il relativo
nome di servizio del programma.
NOTE
• Per annullare la ricerca, premere la ghiera M.C..
• Il programma di alcune stazioni può differire da quanto indicato dal PTY trasmesso.
• Se non viene trasmessa alcuna stazione per il tipo di programma che si sta cercando, viene
visualizzato [NOT FOUND] per circa due secondi, quindi il tuner torna alla stazione originale.
NOTA
La funzione iPod non è disponibile per MVH-S120UB/S120UBG/S120UBA/S120UBW.
Scollegare le cuffie dal dispositivo prima di collegarlo all’unità.
Dispositivi USB (incluso Android™)/iPod
1
Aprire il coperchio della porta USB.
2 Collegare il dispositivo USB/iPod utilizzando un cavo idoneo.
NOTA
Per passare automaticamente alla sorgente [USB] quando un dispositivo USB/iPod è collegato all’unità,
impostare [USB AUTO] su [ON] nelle impostazioni SYSTEM (pagina 21).
Utilizzo delle funzioni PTY
USB/iPod/AUX
Riproduzione

- 9 -- 9 -
Italiano
ATTENZIONE
Utilizzare un cavo USB (venduto separatamente) per collegare il dispositivo USB in quanto ogni
dispositivo collegato direttamente all’unità sporge e può risultare pericoloso.
Prima di rimuovere il dispositivo, interrompere la riproduzione.
Connessioni AOA
Per dettagli sulla connessione AOA, consultare pagina 15.
Connessione MTP
Un dispositivo installato con Android OS 4.0 o la maggior parte delle versioni successive, può essere
collegato all’unità via MTP, utilizzando il cavo in dotazione con il dispositivo. Tuttavia, in base al
dispositivo collegato, alla versione OS o al numero di file nel dispositivo, i brani/file audio potrebbero
non essere riprodotti via MTP. Si prega di notare che il collegamento MTP non è compatibile con i
formati file WAV e FLAC.
NOTA
Se si utilizza una connessione MTP, impostare [ANDROID WIRED] su [MEMORY] nelle impostazioni
SYSTEM (pagina 21).
AUX
1
Inserire la spina mini stereo nel jack di ingresso AUX.
2 Premere SRC/OFF per selezionare [AUX] come sorgente.
NOTA
Se [AUX] è impostato su [OFF] nelle impostazioni SYSTEM, non è possibile selezionare [AUX] come
sorgente (pagina 20).
È possibile effettuare diverse regolazioni nelle impostazioni FUNCTION (pagina 17).
Si prega di notare che le seguenti operazioni non funzionano su un dispositivo AUX. Per
utilizzare un dispositivo AUX, utilizzare il dispositivo stesso.
Operazioni
Scopo Operazione
Selezionare una cartella/album*1 Premere 1/ o 2/.
Selezionare una traccia/brano (capitolo) Premere o .
Avanzamento o avvolgimento rapido*2 Tenere premuto o .

- 10 -
Italiano
Cercare un file da un elenco 1 Tenere premuto BASS per visualizzare
l’elenco.
2 Ruotare la ghiera M.C. per selezionare il
nome file desiderato (cartella) o la
categoria, quindi premere per
confermare.
3 Ruotare la ghiera M.C. per selezionare il
file desiderato, quindi premere per
confermare.
La riproduzione si avvia.
Visualizzare un elenco di file nella cartella/
categoria selezionata*1
Premere la ghiera M.C. quando viene
selezionata una cartella/categoria.
Riprodurre un brano nella cartella/categoria
selezionata*1
Tenere premuto la ghiera M.C. quando
viene selezionata una cartella/categoria.
Ricerca alfabetica (solo iPod) 1 Tenere premuto BASS per visualizzare
l’elenco.
2 Ruotare la ghiera M.C. per selezionare
l’elenco di categoria desiderato, quindi
tenere premuto BASS per inserire la
modalità di ricerca alfabetica.
(Anche ruotando la ghiera M.C. due volte
è possibile inserire la modalità di ricerca
alfabetica.)
3 Ruotare la ghiera M.C. per selezionare
una lettera, quindi premere per
visualizzare l’elenco alfabetico.
Per annullare la ricerca alfabetica, premere
BAND/.
Ripetere la riproduzione Premere 6/.
Riproduzione casuale/shuffle Premere 5/.
Riproduzione shuffle di tutti i brani (solo
iPod)
Tenere premuto 5/.
Sospendere/riprendere la riproduzione Premere 4/PAUSE.
Sound retriever Premere 3/S.Rtrv.
[1]: efficace per velocità di compressione
basse
[2]: efficace per velocità di compressione
alte
Tornare alla cartella principale (solo USB)*1 Tenere premuto 1/.
Scopo Operazione

- 11 -- 11 -
Italiano
*1 Solo file audio compressi
*2 Quando si utilizza la funzione di avanzamento o avvolgimento rapido durante la riproduzione di un
file VBR, la durata della riproduzione indicata potrebbe non essere corretta.
Modalità di riproduzione collegamento
È possibile accedere ai brani in base ad artista, album o genere attualmente in
riproduzione.
1 Mentre si ascolta un brano, tenere premuto 4/PAUSE per inserire la modalità di
riproduzione collegamento.
2 Ruotare la ghiera M.C. per selezionare la modalità ([ARTIST], [ALBUM], [GENRE]),
quindi premere per confermare.
Il brano/album selezionato verrà riprodotto dopo il brano attualmente in
riproduzione.
NOTA
È possibile annullare il brano/album selezionato se si utilizzano funzioni diverse dalla modalità di
ricerca collegamento (ad esempio avanzamento e riavvolgimento rapidi).
Controllo iPod
È possibile controllare l’unità mediante un iPod connesso.
I seguenti modelli di iPod non sono compatibili con questa funzione.
– iPod nano 1° generazione, iPod con video
1 Premere BAND/ durante la riproduzione, quindi selezionare la modalità di
controllo.
[CONTROL iPod]: la funzione iPod dell’unità può essere utilizzata dall’iPod collegato.
[CONTROL AUDIO]: la funzione iPod dell’unità può essere utilizzata solo mediante i
pulsanti dell’unità o del telecomando in dotazione. In questa modalità, l’iPod
collegato non può essere acceso o spento.
NOTE
• Premendo iPod è anche possibile cambiare la modalità di controllo (solo per MVH-S120UI/S120UIG/
S12UI).
• Il passaggio dalla modalità di controllo a [CONTROL iPod] sospende la riproduzione del brano.
Utilizzare l’iPod collegato per riprendere la riproduzione.
Cambiare le unità nel dispositivo USB
(dispositivi che supportano solo il
protocollo di classe dispositivo di
archiviazione di massa USB)
Premere BAND/.
Funzioni utili per iPod
Scopo Operazione

- 12 -
Italiano
• Le seguenti operazioni continuano a essere accessibili dall’unità anche se la modalità di controllo è
impostata su [CONTROL iPod].
– Pausa, avanzamento/riavvolgimento rapido, selezione brano/capitolo
• Il volume può essere regolato solo dall’unità.
(La modalità APP non è disponibile per MVH-S120UB/S120UBG/S120UBA/S120UBW.)
È possibile ascoltare un’applicazione su un iPhone attraverso l’unità. In alcuni casi, è
possibile controllare un’applicazione utilizzando l’unità.
Per dettagli sui dispositivi compatibili, visitare il nostro sito Web.
Importante
L’utilizzo di applicazioni di terze parti potrebbe comportare o richiedere di fornire informazioni
personali di identificazione attraverso la creazione di un account utente o in altro modo e, per alcune
applicazioni, attraverso l’invio di dati di geolocalizzazione.
TUTTE LE APPLICAZIONI DI TERZE PARTI SONO DI RESPONSABILITÀ ESCLUSIVA DEI RISPETTIVI
FORNITORI, INCLUSI MA NON LIMITATAMENTE ALLA GESTIONE E SICUREZZA DEI DATI UTENTE E ALLE
PROCEDURE DI TUTELA DELLA PRIVACY. ACCEDENDO AD APPLICAZIONI DI TERZE PARTI, SI ACCETTA DI
ESAMINARE I TERMINI DEL SERVIZIO E I CRITERI SULLA PRIVACY DEI FORNITORI. SE NON SI ACCETTANO
I TERMINI O I CRITERI DI QUALSIASI FORNITORE O NON SI ACCONSENTE, DOVE SIA APPLICABILE,
ALL’USO DEI DATI DI GEOLOCALIZZAZIONE, NON UTILIZZARE TALI APPLICAZIONI DI TERZE PARTI.
Per gli utenti iPhone
Questa funzione è compatibile con iPhone e iPod touch installati con iOS 5.0 o versioni successive.
NOTA
PIONEER NON È RESPONSABILE DELLE APP DI TERZE PARTI O DEI RELATIVI CONTENUTI, SENZA ALCUNA
LIMITAZIONE ALL’ACCURATEZZA O ALLA COMPLETEZZA. IL CONTENUTO E LA FUNZIONALITÀ DI TALI
APPLICAZIONI SONO DI SOLA RESPONSABILITÀ DEL FORNITORE DELLA APP.
1 Connettere l’unità con un dispositivo mobile.
• iPhone via USB (pagina 8)
2 Premere SRC/OFF per selezionare [APP].
3 Utilizzare il dispositivo mobile per avviare l’applicazione.
Operazioni di base
È possibile effettuare diverse regolazioni nelle impostazioni FUNCTION (pagina 17).
Modalità app
Riproduzione di un’applicazione attraverso l’unità
Scopo Operazione
Selezionare una traccia Premere o .

- 13 -- 13 -
Italiano
(MVH-S120UI/S120UIG/S12UI è compatibile solo con Spotify installato su iPhone.)
Spotify è un servizio di distribuzione musicale in streaming non affiliato con Pioneer.
Maggiori informazioni sono disponibili alla pagina http://www.spotify.com.
L’applicazione Spotify è disponibile per gli smartphone compatibili. Per informazioni
aggiornate sulla compatibilità, visitare la pagina https://support.spotify.com/.
Per utilizzare Spotify durante la guida, per prima cosa scaricare la app Spotify
sull’iPhone. È possibile effettuare il download da iTunes App Store. Scegliere un account
gratuito o Premium a pagamento, all’interno della app o su spotify.com. Un account
Premium offre molte più funzioni, come ad esempio l’ascolto offline.
Importante
• Questo prodotto include il software Spotify soggetto a licenze di terze parti consultabili qui:
www.spotify.com/connect/third-party-licenses.
• Per informazioni sui Paesi e sulle regioni in cui è possibile utilizzare Spotify, dare un’occhiata a https://
spotify.com/us/select-your-country/.
Prima dell’uso, aggiornare il firmware dell’applicazione Spotify alla versione più recente.
1 Connettere l’unità con un dispositivo mobile.
• iPhone via USB (pagina 8)
2 Premere SRC/OFF per selezionare [SPOTIFY].
3 Avviare l’applicazione Spotify sul dispositivo mobile e avviare la riproduzione.
Operazioni di base
È possibile effettuare diverse regolazioni nelle impostazioni FUNCTION (pagina 17).
NOTA
Le operazioni disponibili variano in base al tipo di contenuti (brano/album/artista/playlist/radio) che si
desidera riprodurre.
Avanzamento o avvolgimento rapido Tenere premuto o .
Sospendere/riprendere la riproduzione Premere BAND/.
Spotify®
Ascoltare Spotify
Scopo Operazione
Saltare una traccia Premere o .
Scopo Operazione

- 14 -
Italiano
NOTA
Alcune funzioni di Spotify potrebbero non funzionare dall’unità.
(Pioneer ARC APP per iPhone non è disponibile per MVH-S120UB/S120UBG/S120UBA/
S120UBW.)
È possibile utilizzare l’unità dall’applicazione Pioneer ARC APP installata su un
dispositivo iPhone/Android. In alcuni casi, è possibile controllare aspetti
dell’applicazione utilizzando l’unità, quali selezione della sorgente, pausa e così via.
Per dettagli sulle operazioni disponibili nell’applicazione, consultare la sezione di
supporto dell’applicazione.
Cercare un brano da un elenco 1 Tenere premuto BASS per visualizzare
l’elenco.
2 Ruotare la ghiera M.C. per selezionare la
categoria desiderata, quindi premere per
confermare.
3 Ruotare la ghiera M.C. per selezionare il
file desiderato, quindi premere per
confermare.
La riproduzione si avvia.
Sospendere/riprendere la riproduzione Premere 4/PAUSE.
Pollice in su (solo per la radio) Premere 1/.
Pollice in giù (solo per la radio) Premere 2/.
Riproduzione casuale (solo per brano/
album/artista/playlist)
Premere 5/.
Riproduzione ripetuta (solo per brano/
album/artista/playlist)
Premere 6/.
Avviare un canale radio in base al brano
attualmente riprodotto.
1 Tenere premuto 5/ per avviare una
radio.
2 Premere la ghiera M.C..
• Questa funzione potrebbe non essere
disponibile in base al brano selezionato.
Memorizzare le informazioni sul brano
attualmente riprodotto.
Rimuovere le informazioni memorizzate.
1 Tenere premuto 3/S.Rtrv.
Viene visualizzato [SAVE]/[UNSAVE].
2 Premere la ghiera M.C..
Utilizzare Pioneer ARC APP
Scopo Operazione

- 15 -- 15 -
Italiano
AVVERTENZA
Non tentare di utilizzare l’applicazione durante la guida. Assicurarsi di uscire dalla strada e
parcheggiare il veicolo in un luogo sicuro prima di tentare di utilizzare i comandi sull’applicazione.
Per gli utenti iPhone
Questa funzione è compatibile con iPhone (iPhone 5 o successivo) e iPod touch installati
con iOS 8.0 o versioni successive.
È possibile scaricare Pioneer ARC APP da iTunes App Store.
Per gli utenti di dispositivi Android
Questa funzione è compatibile con un telefono che esegue Android 4.1 fino a 7.1.2 e che
supporta anche AOA (Android Open Accessory) 2.0. Tuttavia, la compatibilità dipende
dallo smartphone.
È possibile scaricare Pioneer ARC APP su Google Play™.
NOTA
Alcuni dispositivi Android collegati via AOA 2.0 potrebbero non funzionare correttamente o emettere
suoni a causa del proprio software, indipendentemente dalla versione del sistema operativo.
Quando si effettua un collegamento con un dispositivo Android
1
Premere la ghiera M.C. per visualizzare il menu principale.
2 Ruotare la ghiera M.C. per selezionare [SYSTEM], quindi premere per confermare.
3 Ruotare la ghiera M.C. per selezionare [ANDROID WIRED], quindi premere per
confermare.
4 Ruotare la ghiera M.C. per selezionare [APP CONTROL], quindi premere per
confermare.
5 Ruotare la ghiera M.C. per selezionare [P.APP AUTO ON], quindi premere per
confermare.
6 Ruotare la ghiera M.C. per selezionare [ON], quindi premere per confermare.
7 Collegare l’unità con il dispositivo Android via USB.
Pioneer ARC APP sul dispositivo Android si avvia automaticamente.
NOTA
Nel caso in cui l’applicazione Pioneer ARC APP non sia ancora stata installata sul dispositivo
Android, viene visualizzato un messaggio che richiede di installare l’applicazione sul dispositivo
Android. Selezionare [OFF] in [P.APP AUTO ON] per annullare il messaggio (pagina 21).
Quando si effettua un collegamento con un iPhone
1
Collegare l’unità con l’iPhone via USB.
Effettuare una connessione con Pioneer ARC APP

- 16 -
Italiano
2 Premere SRC/OFF per selezionare qualsiasi sorgente.
3 Tenere premuta la ghiera M.C..
Pioneer ARC APP sull’ iPhone viene avviata.
NOTA
Se il collegamento non riesce, avviare Pioneer ARC APP sull’iPhone.
1 Premere SRC/OFF per selezionare [ANDROID].
Operazioni di base
È possibile regolare diverse impostazioni nel menu principale.
1 Premere la ghiera M.C. per visualizzare il menu principale.
2 Ruotare la ghiera M.C. per selezionare una delle seguenti categorie, quindi
premere per confermare.
• Impostazioni FUNCTION (pagina 17)
• Impostazioni AUDIO (pagina 18)
• Impostazioni SYSTEM (pagina 20)
• Impostazioni ILLUMINATION (pagina 21)
3 Ruotare la ghiera M.C. per selezionare le opzioni, quindi premere per confermare.
NOTE
• Le voci di menu relative a iPod elencate nelle seguenti tabelle non sono disponibili per MVH-S120UB/
S120UBG/S120UBA/S120UBW.
Ascoltare musica su Android
Scopo Operazione
Selezionare una traccia Premere o .
Avanzamento o avvolgimento rapido Tenere premuto o .
Sospendere/riprendere la riproduzione Premere 4/PAUSE.
Sound retriever Premere 3/S.Rtrv.
[1]: efficace per velocità di compressione
basse
[2]: efficace per velocità di compressione
alte
Impostazioni

- 17 -- 17 -
Italiano
• Le voci di menu relative alla modalità APP elencate nelle seguenti tabelle non sono disponibili per
MVH-S120UB/S120UBG/S120UBA/S120UBW.
Le voci del menu variano a seconda della sorgente.
Impostazioni FUNCTION
Voce del menu Descrizione
FM SETTING
[TALK], [STANDARD], [MUSIC] Corrispondenza del livello della qualità audio
con le condizioni del segnale di trasmissione del
segnale di banda FM. (Disponibile solo con
banda FM selezionata.)
BSM
Memorizzare automaticamente le sei stazioni più
forti sui pulsanti numerici (da 1/ a 6/).
REGIONAL
[ON], [OFF] Limitare la ricezione ai programmi regionali
specifici quando è selezionato AF (ricerca
frequenze alternative). (Disponibile solo con
banda FM selezionata.)
LOCAL
FM: [OFF], [LV1], [LV2], [LV3], [LV4]
MW/LW: [OFF], [LV1], [LV2]
Limitare la stazione di sintonizzazione in base
alla potenza del segnale.
TA
[ON], [OFF] Ricevere le informazioni correnti sul traffico, se
disponibili. (Disponibile solo con banda FM
selezionata.)
AF
[ON], [OFF] Consentire all’unità di risintonizzarsi su una
frequenza differente fornendo la medesima
stazione. (Disponibile solo con banda FM
selezionata.)
NEWS
[ON], [OFF] Interrompere la sorgente attualmente
selezionata con nuovi programmi. (Disponibile
solo con banda FM selezionata.)

- 18 -
Italiano
SEEK
[MAN], [PCH] Assegnare i pulsanti o per cercare le
stazioni una a una (sintonizzazione manuale) o
selezionare una stazione dai canali preimpostati.
SAVE
Memorizzare le informazioni sul brano
attualmente riprodotto nell’elenco musicale in
Spotify.
UNSAVE
Rimuovere le informazioni memorizzate in
[SAVE].
S.RTRV
[1] (efficace per velocità di
compressione basse),
[2] (efficace per velocità di
compressione alte),
[OFF]
Potenziare l’audio compresso e ripristinare il
suono completo.
Non disponibile quando viene riprodotto un file
FLAC.
AUDIO BOOK
[FASTER], [NORMAL], [SLOWER] Modificare la velocità di riproduzione. (Non
disponibile quando [CONTROL iPod] è
selezionato nella modalità di controllo.)
PAUSE
Sospendere o riprendere la riproduzione.
Impostazioni AUDIO
Voce del menu Descrizione
FADER*1
Regolare il bilanciamento dell’altoparlante
anteriore e posteriore.
BALANCE
Regolare il bilanciamento dell’altoparlante
destro e sinistro.
Voce del menu Descrizione
USB
iPod
iPod

- 19 -- 19 -
Italiano
EQ SETTING
[SUPER BASS], [POWERFUL],
[DYNAMIC], [NATURAL], [VOCAL],
[VIVID], [CUSTOM1], [CUSTOM2],
[FLAT]
Selezionare una banda
equalizzatore e il livello per
un’ulteriore personalizzazione.
Banda equalizzatore: [80HZ],
[250HZ], [800HZ], [2.5KHZ],
[8KHZ]
Livello equalizzatore: da [+6] a
[–6]
Selezionare o personalizzare la curva di
equalizzazione.
[CUSTOM1] può essere importato
separatamente per ogni sorgente. Tuttavia,
ognuna delle seguenti combinazioni viene
impostata automaticamente sulla stessa
impostazione.
• USB, iPod, ANDROID, SPOTIFY e APP (iPhone)
[CUSTOM2] è un’impostazione condivisa
utilizzata per tutte le origini.
È possibile commutare l’equalizzatore anche
premendo ripetutamente (solo per
MVH-S120UB/S120UBG/S120UBA/S120UBW).
LOUDNESS
[OFF], [LOW], [MID], [HI] Compensare il suono chiaro a basso volume.
SUB.W*2
[NOR], [REV], [OFF] Selezionare la fase del subwoofer.
SUB.W CTRL*2*3
Frequenza di cutoff: [50HZ],
[63HZ], [80HZ], [100HZ], [125HZ],
[160HZ], [200HZ]
Livello di output: da [–24] a [+6]
Livello di pendenza: [–12], [–24]
Il subwoofer emette solo le frequenze inferiori a
quelle presenti nell’intervallo selezionato.
BASS BOOST
Da [0] a [+6] Selezionare il livello di incremento dei bassi.
HPF SETTING
Frequenza di cutoff: [OFF],
[50HZ], [63HZ], [80HZ], [100HZ],
[125HZ], [160HZ], [200HZ]
Livello di pendenza: [–12], [–24]
Dagli altoparlanti vengono emesse solo le
frequenze superiori al cutoff del filtro passa alto
(HPF).
SLA
Da [+4] a [–4] Regolare il volume del livello per ogni sorgente,
fatta eccezione per FM.
Ognuna delle seguenti combinazioni viene
impostata automaticamente sulla stessa
impostazione.
• USB, iPod, ANDROID, SPOTIFY e APP (iPhone)
Voce del menu Descrizione

- 20 -
Italiano
*1 Non disponibile quando [SUB.W/SUB.W] è selezionato in [SP-P/O MODE] nelle impostazioni INITIAL
(pagina 6).
*2 Non disponibile quando [REAR/REAR] è selezionato in [SP-P/O MODE] nelle impostazioni INITIAL
(pagina 6).
*3 Non disponibile quando [OFF] è selezionato in [SUB.W].
È anche possibile accedere a questi menu quando l’unità è spenta.
Impostazioni SYSTEM
Voce del menu Descrizione
LANGUAGE
[ENG](Inglese), [РУС](Russo),
[TUR](Turco)
Selezionare la lingua per visualizzare le
informazioni di testo di un file audio compresso.
CLOCK SET
Impostare l’orologio (pagina 5).
12H/24H
[12H], [24H] Selezionare la notazione temporale.
SCROLL SET
[ONCE], [LOOP], [OFF] Selezionare il modo di scorrimento del testo
nella finestra di visualizzazione.
AUTO PI
[ON], [OFF] Cercare una stazione differente con la medesima
programmazione, anche se si utilizza una
stazione preimpostata.
AUX
[ON], [OFF] Impostare su [ON] quando si utilizza un
dispositivo ausiliario connesso all’unità.
SPOTIFY
[ON], [OFF] Impostare su [ON] quando si utilizza la funzione
Spotify.
MUTE MODE (solo per MVH-S120UI/S120UIG/S12UI)
[MUTE], [20dB ATT], [10dB ATT] Disattivare o attenuare automaticamente l’audio
quando dall’apparecchiatura con funzione Mute
viene ricevuto un segnale.
PW SAVE*
[ON], [OFF] Ridurre il consumo della batteria.
L’attivazione della sorgente è consentita solo se
questa funzione è attiva.

- 21 -- 21 -
Italiano
* [PW SAVE] è annullato se la batteria del veicolo è scollegata e dovrà essere riattivato una volta
ricollegata la batteria. Quando [PW SAVE] è disattivato, in base ai metodi di connessione, l’unità può
continuare a ricavare energia dalla batteria se l’interruttore di accensione del veicolo non dispone di
una posizione ACC (accessorio).
ANDROID WIRED
[MEMORY], [APP CONTROL] Selezionare il metodo di connessione idoneo in
base al dispositivo Android.
P. AP P AU TO O N
[ON], [OFF]
Selezionare [ON] per avviare automaticamente
Pioneer ARC APP quando all’unità è collegato un
dispositivo Android mediante AOA. (Non
disponibile quando [MEMORY] è selezionato in
[ANDROID WIRED].)
USB AUTO
[ON], [OFF] Selezionare [ON] per passare automaticamente
alla sorgente [USB] quando un dispositivo USB/
iPod è collegato all’unità.
Selezionare [OFF] quando un dispositivo USB/
iPod è stato collegato all’unità solo per essere
caricato.
Impostazioni ILLUMINATION
Voce del menu Descrizione
DIM SETTING
[SYNC CLOCK], [MANUAL] Selezionare il modo con cui cambiare la
luminosità del display.
BRIGHTNESS
Da [1] a [10] Cambiare la luminosità del display.
La gamma di impostazioni disponibili varia in
base a [DIM SETTING].
Voce del menu Descrizione

- 22 -
Italiano
Il display torna automaticamente alla
visualizzazione normale.
→ Non è stata effettuata alcuna
operazione per circa 30 secondi.
–Eseguire un’operazione.
Il range della riproduzione ripetuta
cambia in maniera inattesa.
→ In base al range di riproduzione
ripetuta, il range selezionato può
cambiare quando viene selezionata
un’altra cartella o traccia o durante
l’avanzamento/riavvolgimento rapido.
–Selezionare nuovamente il range di
riproduzione ripetuta.
Una cartella secondaria non viene
riprodotta.
→ Non è possibile riprodurre le cartelle
secondarie quando è selezionato [FLD]
(ripetizione cartella).
–Selezionare un altro range di
riproduzione ripetuta.
Il suono è intermittente.
→ Si sta utilizzando un dispositivo, come
ad esempio un cellulare, che può
provocare interferenze audio.
–Allontanare dall’unità i dispositivi
elettronici che possono causare
interferenze.
Comuni
AMP ERROR
→ Unità non funzionante o collegamento
altoparlante errato.
→ Il circuito protettivo è attivato.
–Verificare il collegamento degli
altoparlanti.
–Posizionare l’interruttore di
accensione su OFF e nuovamente su
ON. Se il messaggio rimane, contattare
il rivenditore o una Stazione di servizio
Pioneer per ottenere assistenza.
NO XXXX (NO TITLE, a esempio)
→ Non sono presenti informazioni di testo
incorporate.
–Accendere il display o riprodurre un
altro file o traccia.
Dispositivo USB/iPod
FORMAT READ
→ Può verificarsi un ritardo tra l’inizio della
riproduzione e il momento in cui si
inizia a udire il suono.
–Attendere che il messaggio scompaia
e ascoltare l’audio.
NO AUDIO
→ Non sono presenti brani.
–Trasferire i file audio al dispositivo USB
ed effettuare la connessione.
→ Il dispositivo USB connesso ha la
sicurezza abilitata.
–Attenersi alle istruzioni del dispositivo
USB per disattivare la sicurezza.
SKIPPED
→ Il dispositivo USB connesso contiene file
protetti da DRM.
–I file protetti vengono ignorati.
PROTECT
→ Tutti i file sul dispositivo USB connesso
hanno il DRM incorporato.
–Sostituire il dispositivo USB.
Informazioni aggiuntive
Risoluzione dei problemi
Messaggi di errore

- 23 -
Italiano
N/A USB
→ Il dispositivo USB connesso non è
supportato dall’unità.
–Scollegare il dispositivo e sostituirlo
con un dispositivo USB compatibile.
HUB ERROR
→ Il dispositivo USB connesso mediante
un hub USB non è supportato dall’unità.
–Collegare il dispositivo USB
direttamente all’unità utilizzando un
cavo USB.
CHECK USB
→ Il connettore USB o il cavo USB ha
subito un corto circuito.
–Verificare che il connettore USB o il
cavo USB non siano impigliati in
qualcosa o danneggiati.
→ Il dispositivo USB collegato consuma
più della quantità di energia massima
consentita.
–Scollegare il dispositivo USB e non
utilizzarlo. Posizionare l’interruttore di
accensione su OFF e nuovamente su
ACC o ON. Collegare solo dispositivi
USB conformi.
ERROR-19
→ Comunicazione non riuscita.
–Effettuare una delle seguenti
operazioni, quindi tornare alla
sorgente USB.
• Scollegare il dispositivo USB.
• Passare a una sorgente diversa.
→ Errore iPod.
–Scollegare il cavo dall’iPod. Una volta
visualizzato il menu principale dell’iPod,
ricollegare e reimpostare l’iPod.
ERROR-23
→ Il dispositivo USB non è formattato
correttamente.
–Formattare il dispositivo USB con
FAT12, FAT16 o FAT32.
ERROR-16
→ La versione firmware dell’iPod è
obsoleta.
–Aggiornare la versione iPod.
→ Errore iPod.
–Scollegare il cavo dall’iPod. Una volta
visualizzato il menu principale
dell’iPod, ricollegare e reimpostare
l’iPod.
STOP
→ Nell’elenco corrente non sono presenti
brani.
–Selezionare un elenco che contenga
dei brani.
NOT FOUND
→ Nessun brano correlato.
–Trasferire i brani all’iPod.
APP
START UP APP
→ L’applicazione non è ancora in
esecuzione.
–Utilizzare il dispositivo mobile per
avviare l’applicazione.
Spotify
CHECK APP
→ Connessione all’applicazione Spotify
non riuscita.
–Attenersi alle istruzioni visualizzate
sullo schermo.
Dispositivo di archiviazione
USB
• Le connessioni via hub USB non sono
supportate.
• Fissare saldamente il dispositivo di
archiviazione USB prima di guidare. Non
lasciar cadere il dispositivo di
Linee guida di gestione

- 24 -
Italiano
archiviazione USB sul pavimento, in
quanto potrebbe incastrarsi sotto il
pedale del freno o dell’acceleratore.
• In base al dispositivo di archiviazione
USB, potrebbero verificarsi i seguenti
problemi.
– Le operazioni possono variare.
– Il dispositivo di archiviazione potrebbe
non essere riconosciuto.
– I file potrebbero non essere riprodotti
correttamente.
– Il dispositivo può causare interferenze
audio durante l’ascolto della radio.
iPod
• Non lasciare l’iPod in luoghi con
temperature elevate.
• Fissare saldamente l’iPod durante la
guida. Non lasciar cadere l’iPod sul
pavimento, in quanto potrebbe
incastrarsi sotto il pedale del freno o
dell’acceleratore.
• Le impostazioni dell’iPod, come ad
esempio equalizzatore e ripetizione della
riproduzione, cambiano
automaticamente quando l’iPod è
collegato all’unità. Una volta scollegato
l’iPod, tali impostazioni tornano alle
impostazioni originali.
• Il testo incompatibile salvato sull’iPod
non verrà visualizzato dall’unità.
• Per il nome cartella o per il nome file, è
possibile visualizzare solo i primi 32
caratteri (inclusa l’estensione del file).
• L’unità potrebbe non funzionare
correttamente in base all’applicazione
utilizzata per decodificare i file WMA.
• Potrebbe verificarsi un leggero ritardo
all’avvio della riproduzione dei file audio
incorporati con i dati immagine o dei file
audio memorizzati su un dispositivo USB
con numerose gerarchie di cartelle.
• Il testo con caratteri russi da visualizzare
sull’unità deve essere codificato con uno
dei seguenti gruppi di caratteri:
– Unicode (UTF-8, UTF-16)
– Un gruppo di caratteri diverso da
Unicode utilizzato in un ambiente
Windows e impostato su Russo
nell’impostazione multilingue
ATTENZIONE
• Pioneer non può garantire la
compatibilità con tutti i dispositivi di
archiviazione di massa USB e non si
assume alcuna responsabilità per
eventuali perdite di dati su lettori
multimediali, smartphone o altri
dispositivi durante l’utilizzo del prodotto.
• Non lasciare i dischi o un dispositivo di
archiviazione USB in luoghi soggetti a
temperature elevate.
File WMA
File MP3
Compatibilità audio
compresso
Estensione file .wma
Velocità di
trasmissione
Da 48 kbps a 320 kbps
(CBR), da 48 kbps a
384 kbps (VBR)
Frequenza di
campionamento
32 kHz, 44,1 kHz, 48
kHz
Windows Media™
Audio Professional,
Compressione dati
senza perdita, Voce/
Streaming DRM/
Streaming con video
Non compatibile
Estensione file .mp3
Velocità di
trasmissione
Da 8 kbps a 320 kbps
(CBR), VBR
Frequenza di
campionamento
Da 8 kHz a 48 kHz (32
kHz, 44,1 kHz, 48 kHz
per enfasi)

- 25 -
Italiano
File WAV
• I formati file WAV non possono essere
collegati via MTP.
File FLAC
• I formati file FLAC non possono essere
collegati via MTP.
• In base al codificatore, i file FLAC
potrebbero non essere riproducibili.
Dispositivo USB
• Potrebbe verificarsi un leggero ritardo
all’avvio della riproduzione dei file audio
su un dispositivo di archiviazione USB
con numerose gerarchie di cartelle.
L’unità supporta solo i seguenti modelli di iPod.
Le versioni precedenti potrebbero non essere
supportate.
Realizzato per
–iPod touch (dalla 1° alla 6° generazione)
–iPod classic
–iPod nano (dalla 3° alla 7° generazione)
–iPhone 6s
– iPhone 6s Plus
–iPhone 6
–iPhone 6 Plus
–iPhone 5s
–iPhone 5c
–iPhone 5
–iPhone4s
–iPhone4
–iPhone3GS
–iPhone3G
–iPhone
• Le operazioni possono variare in base alla
generazione e/o alla versione del
software dell’iPod.
• Gli utenti iPod con connettore Lightning
devono utilizzare il cavo da Lightning a
USB (in dotazione con l’iPod).
• Gli utenti dell’iPod con Dock Connector
devono utilizzare CD-IU51. Per dettagli,
consultare il rivenditore.
• Fare riferimento ai manuali dell’iPod per
ottenere informazioni sulla compatibilità
di file/formato.
• Audiolibri, Podcast: compatibile
ATTENZIONE
Pioneer declina ogni responsabilità per la
perdita di dati sull’iPod, anche se i dati
vengono persi durante l’utilizzo dell’unità.
Versione tag ID3
compatibile
1.0, 1.1, 2.2, 2.3, 2.4 (la
versione tag ID3 2.x ha
la priorità sulla
versione 1.x.)
Playlist M3u Non compatibile
MP3i (MP3
interattivo), mp3 PRO
Non compatibile
Estensione file .wav
Bit di quantizzazione 8 e 16 (LPCM)
Frequenza di
campionamento
Da 16 kHz a 48 kHz
(LPCM)
Estensione file .flac
Frequenza di
campionamento
8/11,025/12/16/22,05/
24/32/44,1/48 kHz
Bit rate di
quantizzazione
16 bit
Modalità canale 1/2 ch
Gerarchia cartella
riproducibile
Fino a otto livelli (una
gerarchia pratica
presenta meno di due
livelli).
Cartelle riproducibili Fino a 500
File riproducibili Fino a 15 000
Riproduzione di file
protetti da copyright
Non compatibile
Dispositivo USB
partizionato
È possibile riprodurre
solo la prima
partizione.
Compatibilità iPod

- 26 -
Italiano
Con questa unità, l’utente non può
assegnare numeri di cartella e specificare le
sequenze di riproduzione. La sequenza di
file audio dipende dal dispositivo
collegato.
Notare che i file nascosti in un dispositivo
USB non possono essere riprodotti.
Esempio di gerarchia
iTunes
Apple ed iTunes sono marchi di fabbrica di
Apple Inc., registrati negli Stati Uniti ed in
altri Paesi.
WMA
Windows Media è un marchio di fabbrica o
marchio di fabbrica depositato della
Microsoft Corporation negli Stati Uniti ed
in altri paesi.
Questo prodotto include tecnologie di
proprietà della Microsoft Corporation e
non è utilizzabile senza licenza della
Microsoft Licensing, Inc.
FLAC
Copyright © 2000-2009 Josh Coalson
Sequenza di file audio
Cartella
File audio
compresso
a : sequenza di riproduzione
Da 01 a 05: numero cartella
Grafico caratteri russi
Copyright e marchio
D: visualizzazione C: carattere

- 27 -
Italiano
Copyright © 2011-2013 Xiph.Org
Foundation
La ridistribuzione e l’utilizzo in formato
binario e sorgente, con o senza modifiche,
sono consentite solo alle seguenti
condizioni:
–Eventuali ridistribuzioni del codice
sorgente devono contenere suddette
informazioni relative ai diritti d’autore,
questo elenco di condizioni e la seguente
rinuncia.
–Eventuali ridistribuzioni in formato
binario devono riprodurre suddette
informazioni relative ai diritti d’autore,
questo elenco di condizioni e la seguente
rinuncia nella documentazione e/o altro
materiale fornito con la distribuzione.
–Né il nome Xiph.org Foundation né i
nomi di chi ha prestato il suo contributo
devono essere utilizzati allo scopo di
sostenere o promuovere prodotti derivati
dal presente software senza previa
specifica autorizzazione scritta.
QUESTO SOFTWARE VIENE FORNITO DAI
TITOLARI DEL COPYRIGHT E
COLLABORATORI “COSÌ COM’È” SENZA
ALCUNA GARANZIA ESPLICITA O
IMPLICITA, COMPRESE, A MERO TITOLO
ESEMPLIFICATIVO MA NON LIMITATIVO, LE
GARANZIE IMPLICITE DI COMMERCIABILITÀ
E DI IDONEITÀ PER UNO SCOPO
PARTICOLARE. IN NESSUN CASO LA
FONDAZIONE O ALTRI SOGGETTI CHE
HANNO PRESTATO IL LORO CONTRIBUTO
SARANNO RESPONSABILI PER EVENTUALI
DANNI DIRETTI, INDIRETTI, ACCIDENTALI O
CONSEQUENZIALI, (COMPRESI, A TITOLO
ESEMPLIFICATIVO, RIFORNIMENTI DI BENI
O SERVIZI SOSTITUTIVI; MANCATO
UTILIZZO O PERDITA DI DATI O PROFITTI;
INTERRUZIONE DELL’ATTIVITÀ) IN
QUALSIASI MODO CAUSATI PER OGNI
IPOTESI DI RESPONSABILITÀ SIA PER
CONTRATTO, PRECISA RESPONSABILITÀ O
ILLECITO (COMPRESI GRAVI
INADEMPIMENTI), FATTI SALVI I LIMITI
INDEROGABILI DI LEGGE, CHE
POTREBBERO VERIFICARSI QUANDO SI
UTILIZZA QUESTO SOFTWARE; ANCHE SE SI
ERA STATI MESSI A CONOSCENZA DELLA
POSSIBILITÀ DEL VERIFICARSI DI TALI
DANNI.
iPhone, iPod e Lightning
L’uso del logo Made for Apple indica che
un accessorio è stato progettato per essere
collegato specificatamente al prodotto
Apple identificato dal logo ed è stato
certificato dallo sviluppatore per
soddisfare gli standard di prestazioni
Apple. Apple non è responsabile per il
funzionamento del dispositivo o della sua
conformità con gli standard normativi e di
sicurezza.
Nota: l’uso di questo accessorio con un
prodotto Apple può interessare le
prestazioni wireless.
iPhone, iPod, iPod classic, iPod nano, iPod
touch e Lightning sono marchi di Apple
Inc., registrati negli USA e in altri paesi.
Google™, Google Play, Android
Google, Google Play e Android sono
marchi di Google LLC.
Spotify®
SPOTIFY e il logo Spotify sono marchi
registrati di Spotify AB. Sono necessari
dispositivi digitali mobili compatibili e
abbonamento premium, ove disponibili,
vedere https://www.spotify.com.
Generali
Alimentazione: 14,4 V CC (da 10,8 V a 15,1 V
consentiti)
Sistema di messa a terra: tipo negativo
Consumo di corrente massimo: 10,0 A
Dimensioni (L × A × P):
DIN
Telaio: 178 mm × 50 mm × 97 mm
Testata: 188 mm × 58 mm × 17 mm
Specifiche

- 28 -
Italiano
D
Telaio: 178 mm × 50 mm × 97 mm
Testata: 170 mm × 46 mm × 17 mm
Peso: 0,5 kg
Audio
Potenza massima:
• 50 W × 4 canali/4 Ω (senza
subwoofer)
• 50 W × 2 canali/4 Ω + 70 W × 1
canale/2 Ω (per il subwoofer)
Potenza continua:
22 W × 4 (da 50 Hz a 15 000 Hz, 5 %
THD, 4 Ω di carico, entrambi i canali
pilotati)
Impedenza di carico: 4 Ω (da 4 Ω a 8 Ω
consentiti)
Livello di output massimo tensione preout:
2,0 V
Profilo loudness: +10 dB (100 Hz), +6,5 dB
(10 kHz) (volume: –30 dB)
Equalizzatore (equalizzatore grafico a
5bande):
Frequenza: 80 Hz/250 Hz/800 Hz/
2,5 kHz/8 kHz
Campo di equalizzazione: ±12 dB
(passo 2 dB)
Subwoofer (mono):
Frequenza: 50 Hz/63 Hz/80 Hz/
100 Hz/125 Hz/160 Hz/200 Hz
Pendenza: –12 dB/oct, –24 dB/oct
Guadagno: da +6 dB a –24 dB
Fase: normale/inversa
USB
Specifica standard USB: USB 2.0 full speed
Alimentazione massima: 1 A
USB Protocollo:
MSC (Mass Storage Class)
MTP (Media Transfer Protocol)
AOA (Android Open Accessory) 2.0
File system: FAT12, FAT16, FAT32
Formato di decodifica MP3: MPEG-1 e 2
Audio Layer 3
Formato di decodifica WMA: ver. 7, 8, 9, 9.1,
9.2 (audio a 2 canali)
Formato di decodifica FLAC: v1.3.0 (Free
Lossless Audio Codec)
Formato segnale WAV: PCM lineare (non
compresso)
Tuner FM
Intervallo di frequenza: da 87,5 MHz a
108,0 MHz
Sensibilità utilizzabile: 11 dBf (1,0 μV/75 Ω,
mono, S/N: 30 dB)
Rapporto segnale-rumore: 72 dB (rete
IEC-A)
Tuner MW
Intervallo di frequenza: da 531 kHz a
1 602 kHz
Sensibilità utilizzabile: 25 μV (S/N: 20 dB)
Rapporto segnale-rumore: 62 dB (rete
IEC-A)
Tuner LW
Intervallo di frequenza: da 153 kHz a
281 kHz
Sensibilità utilizzabile: 28 μV (S/N: 20 dB)
Rapporto segnale-rumore: 62 dB (rete
IEC-A)
NOTA
Caratteristiche tecniche e design sono
soggetti a eventuali modifiche senza
preavviso.

- 2 -
Español
Procedimientos iniciales........................................................................ 3
Radio.......................................................................................................... 7
USB/iPod/AUX .......................................................................................... 8
Modo app............................................................................................... 12
Spotify® .................................................................................................. 13
Uso de Pioneer ARC APP ..................................................................... 14
Ajustes.................................................................................................... 16
Ajustes de FUNCTION........................................................................... 17
Ajustes de AUDIO.................................................................................. 19
Ajustes de SYSTEM................................................................................ 20
Ajustes de ILLUMINATION ................................................................... 22
Información complementaria ............................................................ 23
Acerca de este manual:
• En las siguientes instrucciones, la designación “dispositivo USB” hace referencia tanto
a dispositivos de memoria USB como a reproductores de audio USB.
• En este manual, la designación “iPod” hace referencia tanto a un iPod como a un
iPhone.
Índice

- 3 -- 3 -
Español
MVH-S120UI/S120UIG/S12UI/S120UB/S120UBG/S120UBA/
S120UBW
Operaciones más frecuentes
Procedimientos iniciales
Funcionamiento básico
Función Operación
Encendido* Pulse SRC/OFF para encender la unidad.
Mantenga pulsado SRC/OFF para apagar la
unidad.
Ajustar el volumen Gire el selector M.C..
Seleccionar una fuente Pulse SRC/OFF varias veces.
Cambiar la información mostrada Pulse DISP varias veces.
Volver a la visualización/lista anterior Pulse BAND/.
Volver a la visualización normal desde el
menú principal
Mantenga pulsado BAND/.
Intensificación del nivel de graves Pulse BASS.
• Puede seleccionar el nivel de graves en
[BASS BOOST] (página 19).
SRC (fuente)/OFF
Botón de extracción
Visor
Selector M.C. (control múltiple)
BAND/
Puerto USB
Toma de entrada AUX (toma estéreo de 3,5 mm)
DISP (visualización)
BASS

- 4 -
Español
* Si el cable azul/blanco de esta unidad está conectado al terminal de control de relé de antena de
automóvil, la antena del vehículo se extiende cuando se activa la fuente de esta unidad. Para
replegar la antena, apague la fuente.
Indicaciones en pantalla
Extraiga el frontal para evitar robos. Desconecte todos los cables y dispositivos
conectados al frontal y apague la unidad antes de extraerlo.
Importante
• Evite la exposición del frontal a impactos violentos.
• Guarde el frontal protegido de la luz solar directa y de las temperaturas elevadas.
• Guarde siempre el frontal desmontado en un estuche de protección o una bolsa.
Al situar el contacto en ON después de la instalación, aparece [SET UP :YES] en el visor.
1 Presione el selector M.C..
Indicación Descripción
Aparece si existe un nivel inferior para un menú o una carpeta.
Aparece al mantener pulsado el botón BASS.
Aparece si se ha ajustado la función de exploración local (página 17).
Aparece si se está recibiendo un programa de tráfico.
Aparece si se ha ajustado la función TA (anuncios de tráfico) (página 17).
Aparece si se ha ajustado la función de recuperación del sonido
(página 18).
Aparece si se ha ajustado la función de control de iPod (página 11).
Extracción del frontal
Menú de configuración
Extracción Colocación

- 5 -- 5 -
Español
El menú de configuración desaparece después de 30 segundos sin realizar
operaciones. Si prefiere realizar la configuración en otro momento, gire el selector
M.C. para seleccionar [NO] y presione para confirmar.
2 Gire el selector M.C. para seleccionar las opciones y, a continuación, presione
para confirmar.
Para pasar a la siguiente opción del menú, tiene que confirmar la selección.
3 [QUIT :YES] aparece una vez realizados todos los ajustes.
Para volver a la primera opción del menú de configuración, gire el selector M.C. para
seleccionar [QUIT :NO] y, a continuación, presione para confirmar.
4 Presione el selector M.C. para confirmar los ajustes.
NOTAS
• Puede cancelar la configuración de los menús pulsando SRC/OFF.
• La configuración puede realizarse en cualquier momento desde los ajustes de SYSTEM (página 20) y
los ajustes de INITIAL (página 6).
1 Presione el selector M.C. para que aparezca el menú principal.
2 Gire el selector M.C. para seleccionar [SYSTEM] y, a continuación, presione para
confirmar.
3 Gire el selector M.C. para seleccionar [DEMO OFF] y, a continuación, presione para
confirmar.
4 Gire el selector M.C. para seleccionar [YES] y, a continuación, presione para
confirmar.
Opción del menú Descripción
LANGUAGE Seleccione el idioma en el que debe aparecer la información de
texto de un archivo de audio comprimido.
[ENG](inglés),
[РУС](ruso),
[TUR](turco)
CLOCK SET Ajuste el reloj.
FM STEP Seleccione los pasos de la sintonización FM entre 100 kHz y 50
kHz.
[100], [50]
Cancelación de la pantalla de demostración (DEMO
OFF)

- 6 -
Español
1 Mantenga pulsado SRC/OFF hasta que se apague la unidad.
2 Mantenga pulsado SRC/OFF para mostrar el menú principal.
3 Gire el selector M.C. para seleccionar [INITIAL] y, a continuación, presione para
confirmar.
4 Gire el selector M.C. para seleccionar una opción y, a continuación, presione para
confirmar.
NOTA
Las opciones varían en función de la unidad.
Ajustes de INITIAL
Opción del menú Descripción
FM STEP Seleccione los pasos de la sintonización FM entre 100 kHz y
50 kHz.
[100], [50]
SP-P/O MODE Seleccione esta opción si hay un altavoz de gama completa
conectado a los cables de salida de los altavoces traseros y un
subwoofer conectado a la salida RCA.
[REAR/SUB.W]
[SUB.W/SUB.W] Seleccione esta opción si hay un subwoofer pasivo conectado
directamente a los cables de salida de los altavoces traseros y un
subwoofer conectado a la salida RCA.
[REAR/REAR] Seleccione esta opción si hay altavoces de gama completa
conectados a los cables de salida de los altavoces traseros y a la
salida RCA. Si hay un altavoz de gama completa conectado a los
cables de salida de los altavoces traseros y no se utiliza la salida
RCA, puede seleccionar [REAR/SUB.W] o [REAR/REAR].
S/W UPDATE Seleccione para confirmar la información más reciente del
sistema en la unidad.
[SYSTEM INFO]
[SYSTEM UPDATE] Seleccione esta opción para actualizar la unidad con el software
más reciente e inicializar los ajustes de la unidad. Para obtener
más información sobre el software y las actualizaciones más
recientes, visite nuestro sitio web.
SYSTEM RESET Seleccione [YES] para inicializar los ajustes de la unidad. La
unidad se reiniciará automáticamente.
(Algunos de los ajustes se mantendrán incluso después de
reiniciar la unidad.)
[YES], [NO]

- 7 -- 7 -
Español
Las frecuencias del sintonizador de esta unidad están pensadas para su utilización en
Europa Occidental, Asia, Oriente Medio, África y Oceanía. Si se utiliza en otras áreas es
posible que la recepción no sea correcta. La función RDS (Radio Data System) solo
funciona en áreas en las que se emiten señales RDS correspondientes a emisoras FM.
1 Pulse SRC/OFF para seleccionar [RADIO].
2 Pulse BAND/ para seleccionar la banda entre las opciones [FM1], [FM2], [FM3],
[MW] o [LW].
3 Pulse un botón numérico (de 1/ a 6/).
SUGERENCIA
Los botones / también pueden utilizarse para seleccionar una emisora memorizada cuando
[SEEK] está ajustado en [PCH] en los ajustes de FUNCTION (página 18).
Las seis emisoras con mejor señal se guardan en los botones numéricos (de 1/ a 6/
).
1 Después de seleccionar la banda, presione el selector M.C. para que aparezca el
menú principal.
2 Gire el selector M.C. para seleccionar [FUNCTION] y, a continuación, presione para
confirmar.
3 Gire el selector M.C. para seleccionar [BSM] y, a continuación, presione para
confirmar.
Para buscar una emisora manualmente
1
Después de seleccionar la banda, pulse / para seleccionar una emisora.
Mantenga pulsado / y suéltelo para buscar una emisora disponible. La
exploración se detiene cuando la unidad recibe una emisora. Para cancelar la
búsqueda local, pulse / .
NOTA
[SEEK] debe estar ajustado en [MAN] en los ajustes de FUNCTION (página 18).
Radio
Recepción de emisoras memorizadas
Memoria de mejores emisoras (BSM)

- 8 -
Español
Para almacenar las emisoras manualmente
1
Mientras recibe la emisora que desea guardar, mantenga pulsado uno de los
botones numéricos (de 1/ a 6/ ) hasta que deje de parpadear.
La unidad busca una emisora según la información de PTY (tipo de programa).
1 Mantenga pulsado BASS durante la recepción de FM.
2 Gire el selector M.C. para seleccionar un tipo de programa entre las opciones
[NEWS/INFO], [POPULAR], [CLASSICS] y [OTHERS].
3 Presione el selector M.C..
La unidad empieza a buscar una emisora. Cuando la encuentra, muestra el nombre
de su servicio de programas.
NOTAS
• Para cancelar la búsqueda, presione el selector M.C..
• El programa de algunas emisoras puede no coincidir con la indicación del PTY transmitido.
• Si ninguna emisora emite el tipo de programa que ha buscado, aparecerá [NOT FOUND] durante
aproximadamente dos segundos y el sintonizador volverá a la emisora original.
NOTA
La función iPod no está disponible para MVH-S120UB/S120UBG/S120UBA/S120UBW.
Desconecte los auriculares del dispositivo antes de conectarlo a la unidad.
USB dispositivos (incluyendo Android™)/iPod
1
Abra la tapa del puerto USB.
2 Conecte el dispositivo USB/iPod utilizando un cable adecuado.
NOTA
Para cambiar automáticamente a la fuente [USB] cuando el dispositivo USB/iPod está conectado a la
unidad, ajuste [USB AUTO] en [ON] en los ajustes SYSTEM (página 21).
Utilización de las funciones de PTY
USB/iPod/AUX
Reproducción

- 9 -- 9 -
Español
PRECAUCIÓN
Utilice un cable USB (vendido por separado) para conectar el dispositivo USB, ya que cualquier
dispositivo conectado directamente a la unidad sobresaldrá y podría resultar peligroso.
Antes de extraer el dispositivo, detenga la reproducción.
Conexiones AOA
Para obtener más información sobre la conexión AOA, consulte la página 15.
Conexión MTP
Puede conectar a la unidad un dispositivo con Android OS 4.0 o la mayoría de las versiones posteriores
a través de MTP, utilizando el cable suministrado con el dispositivo. Sin embargo, en función del
dispositivo conectado. la versión del SO o el número de archivos en el dispositivo, es posible que no
puedan reproducirse archivos de audio/canciones a través de MTP. Tenga en cuenta que la conexión
MTP no es compatible con los formatos de archivo WAV y FLAC.
NOTA
Si utiliza una conexión MTP, [ANDROID WIRED] debe estar ajustado en [MEMORY] en los ajustes de
SYSTEM (página 21).
AUX
1
Inserte el miniconector estéreo en la toma de entrada AUX.
2 Pulse SRC/OFF para seleccionar [AUX] como fuente.
NOTA
Si [AUX] está ajustado en [OFF] en los ajustes de SYSTEM, [AUX] no puede seleccionarse como fuente
(página 21).
Puede realizar varios ajustes en los ajustes de FUNCTION (página 17).
Tenga en cuenta que las siguientes operaciones no pueden realizarse en un dispositivo
AUX. Para controlar un dispositivo AUX, utilice el propio dispositivo.
Operaciones
Función Operación
Seleccionar una carpeta/álbum*1 Pulse 1/ o 2/.
Seleccionar una pista/canción (capítulo) Pulse o .
Avanzar o retroceder rápidamente*2 Mantenga pulsado o .

- 10 -
Español
Buscar un archivo en una lista 1 Mantenga pulsado BASS para mostrar el
menú de conexión.
2 Gire el selector M.C. para seleccionar el
nombre del archivo (o carpeta) o la
categoría que busca y, a continuación,
presione para confirmar.
3 Gire el selector M.C. para seleccionar el
archivo que desee y, a continuación,
presione para confirmar.
Empieza la reproducción.
Ver una lista de los archivos de la carpeta/
categoría seleccionada*1
Presione el selector M.C. después de
seleccionar una carpeta/categoría.
Reproducir una canción de la carpeta/
categoría seleccionada*1
Mantenga presionado el selector M.C.
después de seleccionar una carpeta/
categoría.
Búsqueda alfabética (solo iPod) 1 Mantenga pulsado BASS para mostrar el
menú de conexión.
2 Gire el selector M.C. para seleccionar la
lista de categorías deseadas y, a
continuación, mantenga pulsado BASS
para pasar al modo de búsqueda
alfabética.
(Girar el selector M.C. dos veces también
pasa al modo de búsqueda alfabética.)
3 Gire el selector M.C. para elegir una letra
y, a continuación, presione para ver la
lista alfabética.
Para cancelar la búsqueda alfabética, pulse
BAND/.
Reproducción repetida Pulse 6/.
Reproducción aleatoria Pulse 5/.
Reproducción aleatoria de todo (solo iPod) Mantenga pulsado 5/.
Poner en pausa/reanudar la reproducción Pulse 4/PAUSE.
Recuperación de sonido Pulse 3/S.Rtrv.
[1]: funciona con índices de compresión
bajos
[2]: funciona con índices de compresión
altos
Volver a la carpeta raíz (solo USB)*1 Mantenga pulsado 1/.
Función Operación

- 11 -- 11 -
Español
*1 Solo archivos de audio comprimido
*2 Cuando utilice la función de avance/retroceso rápido durante la reproducción de un archivo VBR, es
posible que el tiempo de reproducción no sea correcto.
Modo de reproducción por asociación
Puede acceder a canciones a partir del artista, el álbum o el género que se está
reproduciendo en cada momento.
1 Mientras escucha una canción, mantenga pulsado 4/PAUS E para pasar al modo de
reproducción por asociación.
2 Gire el selector M.C. para seleccionar el modo ([ARTIST], [ALBUM], [GENRE]) y, a
continuación, presione para confirmar.
La canción o álbum seleccionado se reproducirá después de la canción que está
sonando.
NOTA
Puede cancelar la reproducción de la canción o el álbum seleccionado si utiliza funciones no
relacionadas con el modo de reproducción por asociación (como el avance o retroceso rápido).
Control de iPod
Puede controlar la unidad a través de un iPod conectado.
Los siguientes modelos de iPod no son compatibles con esta función.
– iPod nano 1.ª generación, iPod con vídeo
1 Pulse BAND/ durante la reproducción y, a continuación, seleccione el modo de
control.
[CONTROL iPod]: la función de iPod de la unidad puede controlarse desde el iPod
conectado.
[CONTROL AUDIO]: la función de iPod de la unidad solo puede controlarse desde los
botones de la unidad o el mando a distancia suministrado. En este modo, no es
posible encender ni apagar el iPod conectado.
NOTAS
• Al pulsar iPod también es posible cambiar el modo de control (solo para MVH-S120UI/S120UIG/
S12UI).
Cambiar de unidades en el dispositivo USB
(Solo dispositivos compatibles con el
protocolo de la clase de dispositivo de
almacenamiento masivo USB)
Pulse BAND/.
Funciones útiles para iPod
Función Operación

- 12 -
Español
• Si selecciona [CONTROL iPod] como modo de control la reproducción de las canciones se pone en
pausa. Utilice el iPod conectado para reanudar la reproducción.
• Es posible acceder a las siguientes operaciones desde la unidad, aunque el modo de control esté
ajustado en [CONTROL iPod].
– Pausa, avance/retroceso rápido, selección de canción/capítulo
• El volumen solo puede ajustarse desde la unidad.
(El modo APP no está disponible para MVH-S120UB/S120UBG/S120UBA/S120UBW.)
Puede escuchar el audio de una aplicación de un iPhone a través de la unidad. En
algunos casos, puede incluso controlar la aplicación utilizando la unidad.
Para obtener más información sobre los dispositivos compatibles, visite nuestro sitio
web.
Importante
El uso de aplicaciones de terceros puede implicar o necesitar la puesta a disposición de información de
identificación personal, bien mediante la creación de una cuenta de usuario o de algún otro modo, y,
para ciertas aplicaciones, la puesta a disposición de datos de geoubicación.
TODAS LAS APLICACIONES DE TERCEROS SON RESPONSABILIDAD EXCLUSIVA DE LOS PROVEEDORES,
INCLUIDAS SIN LIMITACIÓN LA RECOPILACIÓN Y LA SEGURIDAD DE LOS DATOS DE USUARIO Y LAS
PRÁCTICAS DE PRIVACIDAD. AL ACCEDER A APLICACIONES DE TERCEROS, USTED SE MANIFIESTA DE
ACUERDO EN REVISAR LOS TÉRMINOS DE SERVICIO Y LAS POLÍTICAS DE PRIVACIDAD DE LOS
PROVEEDORES. SI NO ESTÁ DE ACUERDO CON LOS TÉRMINOS O LAS POLÍTICAS DE ALGÚN PROVEEDOR
O NO CONSIENTE EL USO DE DATOS DE GEOUBICACIÓN DONDE SEA APLICABLE, NO UTILICE ESTAS
APLICACIONES DE TERCEROS.
Para usuarios de iPhone
Esta función es compatible con dispositivos iPhone y iPod touch con iOS 5.0 o una versión posterior.
NOTA
PIONEER NO SE HACE RESPONSABLE DE APPS O CONTENIDOS DE OTROS PROVEEDORES, EN RELACIÓN
CON ASPECTOS COMO SU PRECISIÓN, SU EXACTITUD Y OTROS ASPECTOS. EL CONTENIDO Y LAS
FUNCIONALIDADES DE DICHAS APPS SON RESPONSABILIDAD EXCLUSIVA DEL PROVEEDOR DE CADA
APP.
1 Conecte el dispositivo móvil a esta unidad.
• iPhone a través de USB (página 8)
2 Pulse SRC/OFF para seleccionar [APP].
3 Utilice el dispositivo móvil para iniciar la aplicación.
Modo app
Reproducción de una aplicación a través de la
unidad

- 13 -- 13 -
Español
Funcionamiento básico
Puede realizar varios ajustes en los ajustes de FUNCTION (página 17).
(MVH-S120UI/S120UIG/S12UI solo es compatible con Spotify instalado en iPhone.)
Spotify es un servicio de distribución de música en streaming que no está afiliado a
Pioneer. Más información disponible en http://www.spotify.com.
La aplicación de Spotify está disponible para teléfonos compatibles. Visite https://
support.spotify.com/ para consultar la información sobre compatibilidad más reciente.
Para disfrutar de Spotify durante la conducción, primero descargue la aplicación Spotify
en su iPhone. Puede descargarla en iTunes App Store. Seleccione una cuenta gratis o una
cuenta Premium de pago, tanto en la aplicación como en spotify.com. Una cuenta
Premium le ofrece más funciones, como escuchar música offline.
Importante
• Este producto incorpora el software Spotify, que está sujeto a licencias de terceros que puede
consultar aquí: www.spotify.com/connect/third-party-licenses.
• Para obtener información acerca de los países y regiones donde se puede utilizar Spotify, consulte
https://spotify.com/us/select-your-country/.
Actualice el firmware de la aplicación Spotify a la última versión antes de utilizarla.
1 Conecte el dispositivo móvil a esta unidad.
• iPhone a través de USB (página 8)
2 Pulse SRC/OFF para seleccionar [SPOTIFY].
3 Abra la aplicación Spotify en el dispositivo móvil e inicie la reproducción.
Funcionamiento básico
Puede realizar varios ajustes en los ajustes de FUNCTION (página 17).
Función Operación
Seleccionar una pista Pulse o .
Avanzar o retroceder rápidamente Mantenga pulsado o .
Poner en pausa/reanudar la reproducción Pulse BAND/.
Spotify®
Escuchar Spotify

- 14 -
Español
NOTA
Las operaciones disponibles pueden variar en función del tipo de contenidos (pista/álbum/artista/lista
de reproducción/radio) que desee reproducir.
NOTA
Algunas funciones de Spotify no pueden controlarse desde esta unidad.
(Pioneer ARC APP para iPhone no está disponible para MVH-S120UB/S120UBG/
S120UBA/S120UBW.)
Función Operación
Saltar una pista Pulse o .
Buscar una pista en una lista 1 Mantenga pulsado BASS para mostrar el
menú de conexión.
2 Gire el selector M.C. para seleccionar la
categoría que desee y, a continuación,
presione para confirmar.
3 Gire el selector M.C. para seleccionar el
archivo que desee y, a continuación,
presione para confirmar.
Empieza la reproducción.
Poner en pausa/reanudar la reproducción Pulse 4/PAUSE.
Pulgar arriba (solo para radio) Pulse 1/.
Pulgar abajo (solo para radio) Pulse 2/.
Reproducción aleatoria (solo para pista/
álbum/artista/lista de reproducción)
Pulse 5/.
Reproducción repetida (solo para pista/
álbum/artista/lista de reproducción)
Pulse 6/.
Iniciar un canal de radio en función de la
canción que se reproduce en ese momento.
1 Mantenga pulsado 5/ para iniciar la
radio.
2 Presione el selector M.C..
• Es posible que esta función no esté
disponible en función de la canción
seleccionada.
Almacenar la información sobre la canción
que se está reproduciendo en ese
momento.
Borrar la información de la canción
almacenada.
1 Mantenga pulsado 3/S.Rtrv.
Aparece [SAVE]/[UNSAVE].
2 Presione el selector M.C..
Uso de Pioneer ARC APP

- 15 -- 15 -
Español
Puede utilizar la unidad desde la Pioneer ARC APP instalada en un dispositivo iPhone/
Android. En algunos casos, puede controlar aspectos de la aplicación, como por ejemplo
selección de fuente, pausa, etc., al utilizar la unidad.
Para obtener más información sobre las operaciones que están disponibles en la
aplicación, consulte la sección de ayuda de la aplicación.
ADVERTENCIA
No trate de controlar la aplicación mientras conduce. Detenga y aparque el vehículo en un lugar seguro
antes de intentar usar los controles de la aplicación.
Para usuarios de iPhone
Esta función es compatible con dispositivos iPhone (iPhone 5 o una versión posterior) y
iPod touch con iOS 8.0 o una versión posterior.
Puede descargar Pioneer ARC APP en iTunes App Store.
Para usuarios de dispositivos Android
Esta función es compatible con un teléfono que tenga instalado Android 4.1 o una
versión posterior hasta la 7.1.2 y también sea compatible con AOA (Android Open
Accessory) 2.0, aunque la compatibilidad dependa del smartphone.
Puede descargar Pioneer ARC APP en Google Play™.
NOTA
Es posible que algunos dispositivos Android conectados vía AOA 2.0 no funcionen correctamente o
emitan sonidos debido a su propio diseño de software, independientemente de la versión del SO.
Al establecer una conexión con un dispositivo Android
1
Presione el selector M.C. para que aparezca el menú principal.
2 Gire el selector M.C. para seleccionar [SYSTEM] y, a continuación, presione para
confirmar.
3 Gire el selector M.C. para seleccionar [ANDROID WIRED] y, a continuación,
presione para confirmar.
4 Gire el selector M.C. para seleccionar [APP CONTROL] y, a continuación, presione
para confirmar.
5 Gire el selector M.C. para seleccionar [P.APP AUTO ON] y, a continuación, presione
para confirmar.
6 Gire el selector M.C. para seleccionar [ON] y, a continuación, presione para
confirmar.
7 Conecte esta unidad con el dispositivo Android a través de USB.
Se inicia automáticamente Pioneer ARC APP en el dispositivo Android.
Cómo realizar una conexión con Pioneer ARC APP

- 16 -
Español
NOTA
Si la Pioneer ARC APP no está instalada en su dispositivo Android, aparece un mensaje que le pide
que instale la aplicación en su dispositivo Android. Seleccione [OFF] en [P.APP AUTO ON] para
borrar el mensaje (página 21).
Al establecer una conexión con un iPhone
1
Conecte esta unidad con el iPhone a través de USB.
2 Pulse SRC/OFF para seleccionar una fuente.
3 Mantenga pulsado el selector M.C..
Se inicia Pioneer ARC APP en el iPhone.
NOTA
Si la conexión falla, inicie Pioneer ARC APP en el iPhone.
1 Pulse SRC/OFF para seleccionar [ANDROID].
Funcionamiento básico
Puede ajustar diferentes valores en el menú principal.
1 Presione el selector M.C. para que aparezca el menú principal.
2 Gire el selector M.C. para seleccionar una de las categorías siguientes y, a
continuación, presione para confirmar.
• Ajustes de FUNCTION (página 17)
• Ajustes de AUDIO (página 19)
Cómo escuchar música en Android
Función Operación
Seleccionar una pista Pulse o .
Avanzar o retroceder rápidamente Mantenga pulsado o .
Poner en pausa/reanudar la reproducción Pulse 4/PAUSE.
Recuperación de sonido Pulse 3/S.Rtrv.
[1]: funciona con índices de compresión
bajos
[2]: funciona con índices de compresión
altos
Ajustes

- 17 -- 17 -
Español
• Ajustes de SYSTEM (página 20)
• Ajustes de ILLUMINATION (página 22)
3 Gire el selector M.C. para seleccionar las opciones y, a continuación, presione
para confirmar.
NOTAS
• Las opciones del menú asociadas a iPod de las tablas siguientes no están disponibles para MVH-
S120UB/S120UBG/S120UBA/S120UBW.
• Las opciones del menú asociadas a APP de las tablas siguientes no están disponibles para MVH-
S120UB/S120UBG/S120UBA/S120UBW.
Los elementos de los menús varían en función de la fuente.
Ajustes de FUNCTION
Opción del menú Descripción
FM SETTING
[TALK], [STANDARD], [MUSIC] Ajusta el nivel de calidad del sonido a las
condiciones de señal de la emisión de la banda
FM. (Disponible solo si se selecciona la banda
FM.)
BSM
Las seis emisoras con mejor señal se guardan en
los botones numéricos (de 1/ a 6/)
automáticamente.
REGIONAL
[ON], [OFF] Limita la recepción a los programas regionales
específicos cuando se selecciona AF (búsqueda
de frecuencias alternativas). (Disponible solo si
se selecciona la banda FM.)
LOCAL
FM: [OFF], [LV1], [LV2], [LV3], [LV4]
MW/LW: [OFF], [LV1], [LV2]
Limita las emisoras sintonizadas en función de la
intensidad de la señal.
TA
[ON], [OFF] Recibe la información de tráfico actual, si está
disponible. (Disponible solo si se selecciona la
banda FM.)

- 18 -
Español
AF
[ON], [OFF] Permite a la unidad volver a sintonizar una
frecuencia diferente que ofrezca la misma
emisora. (Disponible solo si se selecciona la
banda FM.)
NEWS
[ON], [OFF] Interrumpe la fuente activa con programas de
noticias. (Disponible solo si se selecciona la
banda FM.)
SEEK
[MAN], [PCH] Permite utilizar los botones o para
buscar emisoras una a una (sintonización
manual) o seleccionar una emisora a partir de los
canales memorizados.
SAVE
Almacena la información sobre la canción que se
está reproduciendo en su lista de música en
Spotify.
UNSAVE
Borra la información de la canción almacenada
en [SAVE].
S.RTRV
[1] (funciona con índices de
compresión bajos),
[2] (funciona con índices de
compresión altos),
[OFF]
Mejora el audio comprimido y recupera un
sonido de calidad.
No disponible durante la reproducción de
archivos FLAC.
AUDIO BOOK
[FASTER], [NORMAL], [SLOWER] Cambia la velocidad de reproducción. (No está
disponible si [CONTROL iPod] está seleccionado
en el modo de control.)
PAUSE
Pone en pausa o reanuda la reproducción.
Opción del menú Descripción
USB
iPod
iPod

- 19 -- 19 -
Español
Ajustes de AUDIO
Opción del menú Descripción
FADER*1
Ajuste el balance de los altavoces delanteros y
traseros.
BALANCE
Ajuste el balance de los altavoces derechos e
izquierdos.
EQ SETTING
[SUPER BASS], [POWERFUL],
[DYNAMIC], [NATURAL], [VOCAL],
[VIVID], [CUSTOM1], [CUSTOM2],
[FLAT]
Seleccione la banda y el nivel del
ecualizador para personalizar
todavía más la configuración.
Banda del ecualizador: [80HZ],
[250HZ], [800HZ], [2.5KHZ],
[8KHZ]
Nivel del ecualizador: de [+6] a
[–6]
Seleccione o personalice la curva del ecualizador.
[CUSTOM1] puede ajustarse por separado para
cada fuente. Sin embargo, cada una de las
siguientes combinaciones presenta
automáticamente el mismo ajuste.
• USB, iPod, ANDROID, SPOTIFY y APP (iPhone)
[CUSTOM2] es un ajuste compartido utilizado
para todas las fuentes.
También puede cambiar el ecualizador
presionando repetidamente (solo para
MVH-S120UB/S120UBG/S120UBA/S120UBW).
LOUDNESS
[OFF], [LOW], [MID], [HI] Permite aplicar compensación para disfrutar de
un sonido nítido con el volumen más bajo.
SUB.W*2
[NOR], [REV], [OFF] Seleccione la fase del subwoofer.
SUB.W CTRL*2*3
Frecuencia de corte: [50HZ],
[63HZ], [80HZ], [100HZ], [125HZ],
[160HZ], [200HZ]
Nivel de salida: de [–24] a [+6]
Nivel de curva: [–12], [–24]
El subwoofer solo emite las frecuencias por
debajo del intervalo seleccionado.
BASS BOOST
De [0] a [+6] Seleccione el nivel de intensificación de graves.

- 20 -
Español
*1 No está disponible si [SUB.W/SUB.W] está seleccionado en [SP-P/O MODE], en los ajustes de INITIAL
(página 6).
*2 No está disponible si [REAR/REAR] está seleccionado en [SP-P/O MODE], en los ajustes de INITIAL
(página 6).
*3 No está disponible si [OFF] está seleccionado en [SUB.W].
También puede acceder a estos menús cuando la unidad está apagada.
HPF SETTING
Frecuencia de corte: [OFF],
[50HZ], [63HZ], [80HZ], [100HZ],
[125HZ], [160HZ], [200HZ]
Nivel de curva: [–12], [–24]
Los altavoces solo emiten frecuencias por
encima del punto de corte del filtro de paso alto
(HPF).
SLA
De [+4] a [–4] Ajusta el nivel de volumen de cada fuente
excepto FM.
Cada una de las siguientes combinaciones
presenta automáticamente el mismo ajuste.
• USB, iPod, ANDROID, SPOTIFY y APP (iPhone)
Ajustes de SYSTEM
Opción del menú Descripción
LANGUAGE
[ENG](inglés), [РУС](ruso),
[TUR](turco)
Seleccione el idioma en el que debe aparecer la
información de texto de un archivo de audio
comprimido.
CLOCK SET
Ajuste el reloj (página 5).
12H/24H
[12H], [24H] Seleccione el formato de la hora.
SCROLL SET
[ONCE], [LOOP], [OFF] Seleccione la forma de moverse por el texto en el
visor.
AUTO PI
[ON], [OFF] Busca una emisora diferente con la misma
programación, aunque se haya seleccionado una
emisora memorizada.
Opción del menú Descripción

- 21 -- 21 -
Español
* [PW SAVE] se cancela y se desconecta la batería del vehículo, por lo que tendrá que volver a
encenderse una vez conectada de nuevo la batería. Si [PW SAVE] está desactivado, en función de los
métodos de conexión, es posible que la unidad continúe consumiendo energía de la batería si el
contacto del vehículo no incorpora una posición ACC (accesorio).
AUX
[ON], [OFF] Ajuste esta opción en [ON] si utiliza un
dispositivo auxiliar conectado a la unidad.
SPOTIFY
[ON], [OFF] Seleccione [ON] cuando utilice la función Spotify.
MUTE MODE (Solo para MVH-S120UI/S120UIG/S12UI)
[MUTE], [20dB ATT], [10dB ATT] Silencia o atenúa el sonido automáticamente
cuando se recibe una señal de un equipo con
una función de silenciamiento.
PW SAVE*
[ON], [OFF] Reduce el consumo de la batería.
La activación de la fuente es la única operación
permitida cuando esta función está activada.
ANDROID WIRED
[MEMORY], [APP CONTROL] Seleccione el método de conexión adecuado en
función de su dispositivo Android.
P. AP P AU TO O N
[ON], [OFF]
Seleccione [ON] para iniciar Pioneer ARC APP
automáticamente si se conecta un dispositivo
Android a la unidad a través de AOA. (No está
disponible si [MEMORY] está seleccionado en
[ANDROID WIRED].)
USB AUTO
[ON], [OFF] Seleccione [ON] para cambiar automáticamente
a la fuente [USB] cuando un dispositivo USB/iPod
está conectado a la unidad.
Seleccione [OFF] cuando se está conectando un
dispositivoUSB/iPod a la unidad solo para carga.
Opción del menú Descripción

- 22 -
Español
Ajustes de ILLUMINATION
Opción del menú Descripción
DIM SETTING
[SYNC CLOCK], [MANUAL] Seleccione la forma de modificar el brillo de la
pantalla.
BRIGHTNESS
De [1] a [10] Modifica el brillo del visor.
Los intervalos de ajuste disponibles varían en
función de [DIM SETTING].

- 23 -
Español
El visor vuelve automáticamente a la
visualización normal.
→ No se han realizado operaciones en
aproximadamente 30 segundos.
–Realice una operación.
El intervalo de la reproducción repetida
cambia de forma imprevista.
→ En función del intervalo de la
reproducción repetida, es posible que el
intervalo seleccionado se modifique
cuando se selecciona otra carpeta o
pista o durante el avance o retroceso
rápido.
–Seleccione de nuevo el intervalo de la
reproducción repetida.
No se reproduce una subcarpeta.
→ Las subcarpetas no pueden
reproducirse si se ha seleccionado la
opción [FLD] (repetición de carpeta).
–Seleccione otro intervalo de la
reproducción repetida.
El sonido es intermitente.
→ Utiliza un dispositivo, como un teléfono
móvil, que puede provocar
interferencias audibles.
–Aleje de la unidad los dispositivos que
puedan provocar las interferencias.
Generales
AMP ERROR
→ La unidad no funciona o la conexión del
altavoz es incorrecta.
→ El circuito de protección está activado.
–Compruebe la conexión del altavoz.
–Sitúe la llave de contacto en la
posición OFF y de nuevo en la
posición ON. Si el mensaje continúa
apareciendo, póngase en contacto
con su distribuidor o con un centro de
asistencia Pioneer autorizado para
obtener ayuda.
NO XXXX (NO TITLE, por ejemplo)
→ No hay información de texto asociada.
–Cambie de pantalla o reproduzca otra
pista o archivo.
Dispositivo USB/iPod
FORMAT READ
→ A veces transcurre un tiempo entre el
inicio de la reproducción y el instante
en que empieza a escuchar sonido.
–Espere hasta que el mensaje
desaparezca y empiece a escuchar
sonido.
NO AUDIO
→ No hay canciones.
–Transfiera archivos de audio al
dispositivo USB y conéctelo.
→ El dispositivo USB conectado tiene la
protección activada.
–Siga las instrucciones de seguridad del
dispositivo USB para desactivar la
protección.
SKIPPED
→ El dispositivo USB conectado contiene
archivos con protección DRM.
–Se saltarán los archivos protegidos.
PROTECT
→ Todos los archivos del dispositivo USB
conectado tienen incorporada
información DRM.
–Cambie el dispositivo USB.
Información complementaria
Solución de problemas
Mensajes de error

- 24 -
Español
N/A USB
→ El dispositivo USB conectado no es
compatible con esta unidad.
–Desconecte el dispositivo y cámbielo
por un dispositivo USB compatible.
HUB ERROR
→ Esta unidad no permite utilizar el
dispositivo USB conectado a través de
un concentrador USB.
–Conecte el dispositivo USB
directamente a esta unidad utilizando
un cable USB.
CHECK USB
→ El conector USB o el cable USB presenta
un cortocircuito.
–Compruebe si el conector USB o el
cable USB está atrapado o dañado.
→ El dispositivo USB conectado consume
una cantidad de corriente superior al
máximo permitido.
–Desconecte el dispositivo USB y no
vuelva a utilizarlo. Sitúe la llave de
contacto en la posición OFF y de
nuevo en la posición ACC u ON.
Conecte solo dispositivos USB
compatibles.
ERROR-19
→ Error en la comunicación.
–Realice una de las operaciones
siguientes y, a continuación, vuelva a
la fuente USB.
• Desconecte el dispositivo USB.
• Seleccione una fuente diferente.
→ Error del iPod.
–Desconecte el cable del iPod. Cuando
aparezca el menú principal del iPod,
vuelva a conectar el iPod y reinícielo.
ERROR-23
→ El dispositivo USB no se ha formateado
correctamente.
–Formatee el dispositivo USB con los
formatos FAT12, FAT16 o FAT32.
ERROR-16
→ La versión del firmware del iPod es
antigua.
–Actualice la versión del iPod.
→ Error del iPod.
–Desconecte el cable del iPod. Cuando
aparezca el menú principal del iPod,
vuelva a conectar el iPod y reinícielo.
STOP
→ No hay canciones en la lista actual.
–Seleccione una lista que contenga
canciones.
NOT FOUND
→ No hay canciones asociadas.
–Transfiera canciones al iPod.
APP
START UP APP
→ La aplicación todavía no se ha iniciado.
–Utilice el dispositivo móvil para iniciar
la aplicación.
Spotify
CHECK APP
→ Error en la conexión con la aplicación
Spotify.
–Siga las instrucciones que aparecen en
pantalla.
Dispositivo de almacenamiento
USB
• No están permitidas las conexiones a
través de concentradores USB.
• Asegure correctamente el dispositivo de
almacenamiento USB antes de arrancar.
No permita que el dispositivo de
almacenamiento USB se caiga al suelo, ya
que podría interferir con el
Instrucciones de
manipulación

- 25 -
Español
funcionamiento del pedal de freno o de
aceleración.
• En función del dispositivo de
almacenamiento USB, pueden producirse
los siguientes problemas.
– Las operaciones pueden variar.
–Es posible que no se reconozca el
dispositivo de almacenamiento.
–Es posible que los archivos no se
reproduzcan correctamente.
– El dispositivo puede provocar
interferencias audibles mientras
escucha la radio.
iPod
• No deje el iPod en lugares expuestos a
temperaturas elevadas.
• Asegure correctamente el iPod mientras
conduce. No permita que el iPod se caiga
al suelo, ya que podría interferir con el
funcionamiento del pedal de freno o de
aceleración.
• Determinados ajustes del iPod, como el
ecualizador y la reproducción repetida,
cambian automáticamente cuando se
conecta el iPod a la unidad. Una vez
desconectado el iPod, estos ajustes
recuperan los parámetros normales.
• El texto no compatible guardado en el
iPod no se visualizará tampoco en la
unidad.
• Solo se mostrarán los primeros
32 caracteres de un nombre de archivo
(incluyendo la extensión del archivo) o un
nombre de carpeta.
• Es posible que la unidad no funcione
correctamente, en función de la
aplicación utilizada para codificar los
archivos WMA.
• La reproducción de archivos de audio con
datos de imagen asociados o archivos de
audio almacenados en un dispositivo USB
con una jerarquía de carpetas compleja
podría tardar un poco en empezar.
• Para poder visualizar texto en ruso en
esta unidad, debe estar codificado en
alguno de los conjuntos de caracteres
siguientes:
– Unicode (UTF-8, UTF-16)
– Un conjunto de caracteres diferente de
Unicode utilizado en un entorno
Windows y definido como ruso en la
configuración de múltiples idiomas
PRECAUCIÓN
• Pioneer no garantiza la compatibilidad
con todos los dispositivos de
almacenamiento masivo USB y no asume
responsabilidad alguna en caso de
pérdida de datos en reproductores
multimedia, smartphones u otros
dispositivos al utilizar este producto.
• No deje discos ni dispositivos de
almacenamiento USB en lugares
expuestos a temperaturas elevadas.
Archivos WMA
Archivos MP3
Compatibilidad con
formatos de audio
comprimido
Extensión del archivo .wma
Tasa de bits De 48 kbps a 320 kbps
(CBR), de 48 kbps a
384 kbps (VBR)
Frecuencia de
muestreo
32 kHz, 44,1 kHz,
48 kHz
Windows Media™
Audio Professional,
Lossless, Voice/DRM
Stream/Stream con
vídeo
No compatible
Extensión del archivo .mp3
Tasa de bits De 8 kbps a 320 kbps
(CBR), VBR

- 26 -
Español
Archivos WAV
• Los formatos de archivo WAV no pueden
conectarse a través de MTP.
Archivos FLAC
• Los formatos de archivo FLAC no pueden
conectarse a través de MTP.
• En función del codificador, es posible que
los archivos FLAC no puedan
reproducirse.
Dispositivo USB
• La reproducción de archivos de audio
almacenados en un dispositivo USB con
una jerarquía de carpetas compleja
podría tardar un poco en empezar.
Esta unidad es compatible únicamente con los
siguientes modelos de iPod. Es posible que la
unidad no sea compatible con versiones
anteriores.
Diseñado para
–iPod touch (generaciones de 1.ª a 6.ª)
–iPod classic
–iPod nano (generaciones de 3.ª a 7.ª)
–iPhone 6s
– iPhone 6s Plus
–iPhone 6
–iPhone 6 Plus
–iPhone 5s
–iPhone 5c
–iPhone 5
–iPhone4s
–iPhone4
–iPhone3GS
–iPhone3G
–iPhone
• Las operaciones pueden variar en función
de la generación y/o la versión del
software del iPod.
• Los usuarios de un iPod con conector
Lightning deben utilizar el cable de
Lightning a USB (suministrado con el
iPod).
• Los usuarios de un iPod con conector
Dock deben utilizar el CD-IU51. Para
Frecuencia de
muestreo
De 8 kHz a 48 kHz
(32 kHz, 44,1 kHz,
48 kHz para énfasis)
Versión de etiqueta
ID3 compatible
1.0, 1.1, 2.2, 2.3, 2.4 (la
versión de etiqueta
ID3 2.x tiene prioridad
sobre la versión 1.x.)
Lista de reproducción
M3u
No compatible
MP3i (MP3
interactivo), mp3 PRO
No compatible
Extensión del archivo .wav
Bits de cuantificación 8 y 16 (LPCM)
Frecuencia de
muestreo
De 16 kHz a 48 kHz
(LPCM)
Extensión del archivo .flac
Frecuencia de
muestreo
8/11,025/12/16/22,05/
24/32/44,1/48 kHz
Tasa de bits de
cuantificación
16 bits
Modo de canal 1/2 canales
Jerarquía de carpetas
reproducibles
Hasta ocho niveles
(una jerarquía práctica
debe tener menos de
dos niveles)
Carpetas
reproducibles
Hasta 500
Archivos
reproducibles
Hasta 15 000
Reproducción de
archivos protegidos
por derechos de autor
No compatible
Dispositivo USB con
particiones
Solo es posible
reproducir la primera
partición.
Compatibilidad de
modelos de iPod

- 27 -
Español
obtener más información, consulte a su
distribuidor.
• Consulte los manuales del iPod para
obtener información sobre la
compatibilidad de archivos y formatos.
• Audiolibro, podcast: compatible
PRECAUCIÓN
Pioneer declina toda responsabilidad por
la pérdida de datos del iPod, aunque la
pérdida se produzca durante la utilización
de esta unidad.
El usuario no puede asignar números de
carpeta ni especificar secuencias de
reproducción con esta unidad. La
secuencia de los archivos de audio
depende del dispositivo conectado.
Tenga en cuenta que los archivos ocultos
de un dispositivo USB no podrán
reproducirse.
Ejemplo de una jerarquía
iTunes
Apple e iTunes son marcas comerciales de
Apple Inc., registradas en los EE.UU. y en
otros países.
WMA
Windows Media es una marca registrada o
una marca de fábrica de Microsoft
Corporation en los Estados Unidos y/u
otros países.
Este producto incluye tecnología
propiedad de Microsoft Corporation, y no
se puede usar ni distribuir sin una licencia
de Microsoft Licensing, Inc.
Secuencia de archivos de
audio
Carpeta
Archivo de audio
comprimido
a : secuencia de reproducción
De 01 a 05: número de carpeta
Tabla de caracteres de
ruso
Copyright y marcas
registradas
D: visor C: carácter

- 28 -
Español
FLAC
Copyright © 2000-2009 Josh Coalson
Copyright © 2011-2013 Xiph.Org
Foundation
La redistribución y la utilización del
formato binario y del código fuente, con o
sin modificaciones, están permitidas
siempre y cuando se cumplan las
siguientes condiciones:
–Las redistribuciones del código fuente
deben incorporar la siguiente mención
de derechos de autor, la lista de
condiciones y la siguiente exención de
responsabilidad.
–Las redistribuciones del formato binario
deben incorporar el siguiente aviso de
derechos de autor, la lista de condiciones
y la siguiente exención de
responsabilidad en la documentación y/o
los materiales utilizados en la
distribución.
–El nombre de Xiph.org Foundation y los
nombres de sus colaboradores no
pueden utilizarse para recomendar o
promocionar productos derivados de
este software sin una autorización previa
por escrito.
LOS TITULARES DE LOS DERECHOS DE
AUTOR Y LOS COLABORADORES
PROPORCIONAN ESTE SOFTWARE “TAL
CUAL” Y NO OFRECEN NINGÚN TIPO DE
GARANTÍA, IMPLÍCITA O EXPLÍCITA, COMO
POR EJEMPLO GARANTÍAS IMPLÍCITAS DE
COMERCIABILIDAD O DE ADECUACIÓN A
UNA FINALIDAD CONCRETA. NI LA
FUNDACIÓN NI SUS COLABORADORES
PUEDEN CONSIDERARSE RESPONSABLES
EN NINGÚN CASO POR DAÑOS DIRECTOS,
INDIRECTOS, ACCIDENTALES, ESPECIALES,
PUNITIVOS O CONSECUENTES (LO QUE
INCLUYE, A TÍTULO MERAMENTE
ENUNCIATIVO, LA PRESTACIÓN DE
PRODUCTOS O SERVICIOS DE
SUSTITUCIÓN, LA PÉRDIDA DE DATOS,
BENEFICIOS O POSIBILIDADES DE
UTILIZACIÓN O LA INTERRUPCIÓN DE LA
ACTIVIDAD), INDEPENDIENTEMENTE DE LA
CAUSA Y EN NINGÚN NIVEL DE
RESPONSABILIDAD, TANTO POR
RESPONSABILIDAD CONTRACTUAL COMO
DIRECTA O DELICTIVA (POR NEGLIGENCIA
U OTRO TIPO DE RESPONSABILIDAD),
DERIVADA DE LA UTILIZACIÓN DE ESTE
SOFTWARE, AUNQUE LA POSIBILIDAD DE
ESTOS DAÑOS SE HUBIERA ADVERTIDO
PREVIAMENTE.
iPhone, iPod y Lightning
La utilización del distintivo Made for Apple
indica que un accesorio está diseñado para
conectarse específicamente a los
productos Apple identificados en el
distintivo y que su desarrollador ha
certificado su conformidad con los criterios
de rendimiento de Apple. Apple no asume
responsabilidad alguna sobre el
funcionamiento de este dispositivo o su
conformidad con los requisitos
normativos.
Tenga en cuenta que la utilización de este
accesorio con un producto Apple puede
perjudicar el correcto funcionamiento de la
conectividad inalámbrica.
iPhone, iPod, iPod classic, iPod nano, iPod
touch y Lightning son marcas comerciales
de Apple, Inc. registradas en Estados
Unidos y otros países.
Google™, Google Play, Android
Google, Google Play y Android son marcas
comerciales de Google LLC.
Spotify®
SPOTIFY y el logotipo de Spotify se
encuentran entre las marcas registradas de
Spotify AB. Se requieren dispositivos
digitales móviles y una suscripción
Premium, si está disponible; consulte
https://www.spotify.com.

- 29 -
Español
General
Fuente de alimentación: 14,4 V CC (de
10,8 V a 15,1 V permisible)
Sistema de conexión a tierra: tipo negativo
Consumo máximo de corriente: 10,0 A
Dimensiones (An × Al × Pr):
DIN
Bastidor: 178 mm × 50 mm × 97 mm
Cara anterior: 188 mm × 58 mm ×
17 mm
D
Bastidor: 178 mm × 50 mm × 97 mm
Cara anterior: 170 mm × 46 mm ×
17 mm
Peso: 0,5 kg
Audio
Salida de potencia máxima:
• 50 W × 4 canales/4 Ω (sin
subwoofer)
• 50 W × 2 canales/4 Ω + 70 W × 1
canal/2 Ω (con subwoofer)
Salida de potencia continua:
22 W × 4 (de 50 Hz a 15 000 Hz, 5%
THD, 4 Ω carga, ambos canales
activados)
Impedancia de carga: 4 Ω (de 4 Ω a 8 Ω
permisible)
Nivel de salida máxima del
preamplificador: 2,0 V
Contorno de sonoridad: +10 dB (100 Hz),
+6,5 dB (10 kHz) (volumen: –30 dB)
Ecualizador (ecualizador gráfico de
5bandas):
Frecuencia: 80 Hz/250 Hz/800 Hz/2,5
kHz/8 kHz
Intervalo de ecualización: ±12 dB
(pasos de 2 dB)
Subwoofer (mono):
Frecuencia: 50 Hz/63 Hz/80 Hz/
100 Hz/125 Hz/160 Hz/200 Hz
Curva: –12 dB/oct, –24 dB/oct
Ganancia: +6 dB a –24 dB
Fase: normal/inversa
USB
Especificación estándar USB: USB 2.0 de
alta velocidad
Corriente máxima: 1 A
USB Protocolo:
MSC (Clase de almacenamiento
masivo)
MTP (Protocolo de transferencia
multimedia)
AOA (Open Accessory de Android) 2.0
Sistema de archivos: FAT12, FAT16, FAT32
Formato de decodificación MP3: MPEG-1 &
2 Audio Layer 3
Formato de descodificación WMA: ver. 7, 8,
9, 9.1, 9.2 (audio de 2 canales)
Formato de decodificación FLAC: v1.3.0
(Free Lossless Audio Codec)
Formato de señal WAV: PCM lineal (sin
comprimir)
Sintonizador FM
Intervalo de frecuencias: de 87,5 MHz a
108,0 MHz
Sensibilidad utilizable: 11 dBf (1,0 μV/75 Ω,
mono, señal/ruido: 30 dB)
Relación señal/ruido: 72 dB (red IEC-A)
Sintonizador MW
Intervalo de frecuencias: de 531 kHz a
1 602 kHz
Sensibilidad utilizable: 25 μV (señal/ruido:
20 dB)
Relación señal/ruido: 62 dB (red IEC-A)
Sintonizador LW
Intervalo de frecuencias: de 153 kHz a
281 kHz
Sensibilidad utilizable: 28 μV (señal/ruido:
20 dB)
Relación señal/ruido: 62 dB (red IEC-A)
NOTA
Las especificaciones y el diseño están
sujetos a modificaciones sin previo aviso.
Especificaciones

- 2 -
Deutsch
Erste Schritte ............................................................................................ 3
Radio.......................................................................................................... 7
USB/iPod/AUX .......................................................................................... 9
App-Modus............................................................................................ 12
Spotify® .................................................................................................. 13
Verwenden von Pioneer ARC APP..................................................... 15
Einstellungen ........................................................................................ 17
FUNCTION-Einstellungen .................................................................... 18
AUDIO-Einstellungen ........................................................................... 19
SYSTEM-Einstellungen......................................................................... 21
ILLUMINATION-Einstellungen............................................................. 23
Zusätzliche Informationen ................................................................. 24
Über dieses Handbuch:
• In den folgenden Anweisungen werden ein USB-Stick oder USB-Audioplayer als „USB-
Gerät” bezeichnet.
• iPod und iPhone werden in diesem Handbuch als „iPod” bezeichnet.
Inhaltsverzeichnis

- 3 -- 3 -
Deutsch
MVH-S120UI/S120UIG/S12UI/S120UB/S120UBG/S120UBA/
S120UBW
Häufig verwendete Bedienvorgänge
Erste Schritte
Grundlagen der Bedienung
Zweck Bedienung
Gerät einschalten* Drücken Sie SRC/OFF, um das Gerät
einzuschalten.
Halten Sie SRC/OFF gedrückt, um das Gerät
auszuschalten.
Lautstärke einstellen Drehen Sie den M.C.-Regler.
Quelle auswählen Drücken Sie mehrmals SRC/OFF.
Anzeigeinformationen umschalten Drücken Sie mehrmals DISP.
Zur vorhergehenden Anzeige/Liste
zurückkehren
Drücken Sie BAND/.
Vom Menü zur normalen Anzeige
zurückkehren
Halten Sie BAND/ gedrückt.
SRC (Quelle)/OFF
Entriegelungstaste
Anzeigefenster
M.C.-(Mehrfunktions-)Regler
BAND/
USB-Anschluss
AUX-Eingangsbuchse (3,5-mm-Stereobuchse)
DISP (Display)
BASS

- 4 -
Deutsch
* Wenn das blauweiße Kabel dieses Geräts an der Steuerklemme des Automatikantennenrelais des
Fahrzeugs angeschlossen ist, fährt die Fahrzeugantenne aus, wenn die Quelle dieses Geräts
eingeschaltet wird. Um die Antenne einzuziehen, schalten Sie die Quelle aus.
Anzeige im Display
Nehmen Sie das Bedienfeld ab, um einen Diebstahl zu verhindern. Ziehen Sie am
Bedienfeld befestigte Kabel und Geräte ab und schalten Sie das Gerät aus, bevor Sie das
Bedienfeld abnehmen.
Wichtig
• Setzen Sie das Bedienfeld keinen starken Erschütterungen aus.
• Halten Sie das Bedienfeld von direktem Sonnenlicht und hohen Temperaturen fern.
• Bewahren Sie das abgenommene Bedienfeld immer in einer Schutzhülle oder Tasche auf.
Steigern des Basspegels Drücken Sie BASS.
• Sie können den Basspegel unter [BASS
BOOST] auswählen (Seite 20).
Anzeige Beschreibung
Erscheint, wenn eine untere Ebene des Menüs oder Ordners existiert.
Erscheint, wenn die BASS-Taste gedrückt gehalten wird.
Erscheint, wenn der Lokalsender-Suchlauf eingeschaltet ist (Seite 18).
Erscheint, wenn ein Verkehrsfunkprogramm empfangen wird.
Erscheint, wenn die TA-Funktion (Verkehrsdurchsagen) eingeschaltet ist
(Seite 18).
Erscheint, wenn die Sound Retriever-Funktion eingeschaltet ist (Seite 19).
Erscheint, wenn die iPod-Steuerung eingeschaltet ist (Seite 12).
Abnehmen des Bedienfelds
Zweck Bedienung
Abnehmen Anbringen

- 5 -- 5 -
Deutsch
Wenn Sie nach dem Einbau die Zündung einschalten, erscheint [SET UP :YES] im Display.
1 Drücken Sie den M.C.-Regler.
Das Einrichtungsmenü verschwindet, wenn 30 Sekunden lang kein Bedienvorgang
ausgeführt wird. Wenn Sie die Einrichtung im Moment nicht durchführen möchten,
drehen Sie den M.C.-Regler, um [NO] auszuwählen, und drücken Sie ihn dann, um
den Vorgang zu bestätigen.
2 Drehen Sie den M.C.-Regler, um die Optionen auszuwählen, und drücken Sie ihn
dann, um den Vorgang zu bestätigen.
Um mit der nächsten Menüoption fortzufahren, müssen Sie Ihre Auswahl
bestätigen.
3 [QUIT :YES] erscheint, wenn sämtliche Einstellungen vorgenommen wurden.
Um zum ersten Eintrag des Einrichtungsmenüs zurückzukehren, drehen Sie den
M.C.-Regler, um [QUIT :NO] auszuwählen, und drücken Sie ihn dann, um den
Vorgang zu bestätigen.
4 Drehen Sie den M.C.-Regler, um die Einstellungen zu bestätigen.
HINWEISE
• Sie können die Menüeinstellung durch Drücken von SRC/OFF abbrechen.
• Diese Einstellungen können jederzeit über die SYSTEM- (Seite 21) und INITIAL-Einstellungen (Seite 6)
vorgenommen werden.
1 Drehen Sie den M.C.-Regler, um das Hauptmenü anzuzeigen.
2 Drehen Sie den M.C.-Regler, um [SYSTEM] auszuwählen, und drücken Sie ihn
dann, um den Vorgang zu bestätigen.
Einrichtungsmenü
Menüpunkt Beschreibung
LANGUAGE Auswahl der Sprache, in der die Textinformationen
komprimierter Audiodateien angezeigt werden sollen.
[ENG] (Englisch),
[РУС] (Russisch),
[TUR] (Türkisch)
CLOCK SET Einstellung der Uhr.
FM STEP Auswahl der FM-Schrittweite: 100 kHz oder 50 kHz.
[100], [50]
Abbrechen der Demoanzeige (DEMO OFF)

- 6 -
Deutsch
3 Drehen Sie den M.C.-Regler, um [DEMO OFF] auszuwählen, und drücken Sie ihn
dann, um den Vorgang zu bestätigen.
4 Drehen Sie den M.C.-Regler, um [YES] auszuwählen, und drücken Sie ihn dann,
um den Vorgang zu bestätigen.
1 Halten Sie SRC/OFF gedrückt, bis sich das Gerät ausschaltet.
2 Halten Sie SRC/OFF gedrückt, um das Hauptmenü anzuzeigen.
3 Drehen Sie den M.C.-Regler, um [INITIAL] auszuwählen, und drücken Sie ihn
dann, um den Vorgang zu bestätigen.
4 Drehen Sie den M.C.-Regler, um eine Option auszuwählen, und drücken Sie ihn
dann, um den Vorgang zu bestätigen.
HINWEIS
Welche Optionen verfügbar sind, unterscheidet sich je nach Gerät.
INITIAL-Einstellungen
Menüpunkt Beschreibung
FM STEP Auswahl der FM-Schrittweite: 100 kHz oder 50 kHz.
[100], [50]
SP-P/O MODE Wählen Sie diese Option, wenn an den Ausgangsdrähten für die
Hecklautsprecher ein Breitbandlautsprecher und am Cinch-
Ausgang ein Subwoofer angeschlossen ist.
[REAR/SUB.W]
[SUB.W/SUB.W] Wählen Sie diese Option, wenn an den Ausgangsdrähten für die
Hecklautsprecher ein passiver Subwoofer direkt angeschlossen
und am Cinch-Ausgang ein Subwoofer angeschlossen ist.
[REAR/REAR] Wählen Sie diese Option, wenn an den Ausgangsdrähten für die
Hecklautsprecher Breitbandlautsprecher angeschlossen sind.
Wenn an den Ausgangsdrähten für die Hecklautsprecher ein
Breitbandlautsprecher angeschlossen ist und der Cinch-
Ausgang nicht verwendet wird, können Sie entweder [REAR/
SUB.W] oder [REAR/REAR] auswählen.

- 7 -- 7 -
Deutsch
Die Empfangsfrequenzen dieses Geräts sind für die Nutzung in Westeuropa, Asien, dem
Nahen Osten, Afrika und Ozeanien vorgesehen. Eine Nutzung in anderen Regionen kann
zu schlechtem Empfang führen. Die RDS-Funktion (Radio Data System:
Datenfunksystem) funktioniert nur in Regionen, die RDS-Signale für FM-Sender
übertragen.
1 Drücken Sie SRC/OFF, um [RADIO] auszuwählen.
2 Drücken Sie BAND/ , um das Band auszuwählen: [FM1], [FM2], [FM3], [MW]
oder [LW].
3 Drücke Sie eine Zifferntaste (1/ bis 6/).
TIPP
Die / -Tasten können auch verwendet werden, um einen voreingestellten Sender
auszuwählen, wenn [SEEK] in den FUNCTION-Einstellungen auf [PCH] eingestellt ist (Seite 19).
Die sechs stärksten Sender werden auf den Zifferntasten (1/ bis 6/ ) gespeichert.
1 Drücken Sie, nachdem Sie das Band ausgewählt haben, den M.C.-Regler, um das
Hauptmenü anzuzeigen.
S/W UPDATE Wählen Sie diese Option, um die neuesten
Systeminformationen des Geräts zu bestätigen.
[SYSTEM INFO]
[SYSTEM UPDATE] Wählen Sie diese Option, um das Gerät auf die neueste Software
zu aktualisieren und die Einstellungen des Geräts zu
initialisieren. Einzelheiten zur neuesten Software und zur
Aktualisierung finden Sie auf unserer Website.
SYSTEM RESET Wählen Sie [YES], um die Geräteeinstellungen zu initialisieren.
Das Gerät wird automatisch neu gestartet.
(Einige der Einstellungen können auch nach dem Zurücksetzen
des Geräts erhalten bleiben.)
[YES], [NO]
Radio
Empfangen von voreingestellten Sendern
Speicher der besten Sender (BSM: Best Stations
Memory)
Menüpunkt Beschreibung

- 8 -
Deutsch
2 Drehen Sie den M.C.-Regler, um [FUNCTION] auszuwählen, und drücken Sie ihn
dann, um den Vorgang zu bestätigen.
3 Drehen Sie den M.C.-Regler, um [BSM] auszuwählen, und drücken Sie ihn dann,
um den Vorgang zu bestätigen.
Sender manuell suchen
1
Drücken Sie, nachdem Sie das Band ausgewählt haben, / , um einen
Sender auszuwählen.
Halten Sie / gedrückt und lassen Sie dann die Taste los, um nach einem
verfügbaren Sender zu suchen. Der Suchlauf hält an, wenn das Gerät einen Sender
empfängt. Um den Suchlauf abzubrechen, drücken Sie / .
HINWEIS
[SEEK] muss in den FUNCTION-Einstellungen auf [MAN] eingestellt sein (Seite 19).
Sender manuell speichern
1
Halten Sie, während Sie den zu speichernden Sender empfangen, eine der
Zifferntasten (1/ bis 6/ ) gedrückt, bis sie zu blinken aufhört.
Das Gerät sucht anhand von PTY-Informationen (Programmtyp) nach einem Sender.
1 Halten Sie während des FM-Empfangs BASS gedrückt.
2 Drehen Sie den M.C.-Regler, um einen Programmtyp auszuwählen: [NEWS/INFO],
[POPULAR], [CLASSICS] oder [OTHERS].
3 Drücken Sie den M.C.-Regler.
Das Gerät beginnt, nach einem Sender zu suchen. Wenn ein Sender gefunden
wurde, wird der Sendername angezeigt.
HINWEISE
• Um die Suche abzubrechen, drücken Sie den M.C.-Regler.
• Das Sendeprogramm einiger Sender kann von der übertragenen PTY-Klassifizierung abweichen.
• Wenn kein Sender den Programmtyp überträgt, nach dem Sie suchen, wird etwa zwei Sekunden lang
[NOT FOUND] angezeigt, und der Tuner kehrt dann zum ursprünglichen Sender zurück.
Verwenden von PTY-Funktionen

- 9 -- 9 -
Deutsch
HINWEIS
Die iPod-Funktion ist für MVH-S120UB/S120UBG/S120UBA/S120UBW nicht verfügbar.
Ziehen Sie den Kopfhörer des externen Geräts ab, bevor Sie es an dieses Gerät
anschließen.
USB-Geräte (einschließlich Android™)/iPod
1
Öffnen Sie die Abdeckung des USB-Anschlusses.
2 Schließen Sie mit einem geeigneten Kabel das USB-Gerät/den iPod an.
HINWEIS
Um automatisch zur [USB]-Quelle zu wechseln, wenn ein USB-Gerät/iPod an diesem Gerät
angeschlossen ist, stellen Sie [USB AUTO] in den SYSTEM-Einstellungen auf [ON] (Seite 22).
VORSICHT
Verwenden Sie ein USB-Kabel (separat erhältlich), um das USB-Gerät anzuschließen, da jedes direkt am
Gerät angeschlossene externe Gerät aus dem Gerät herausragen wird, was gefährlich sein könnte.
Beenden Sie, bevor Sie das andere Gerät von diesem Gerät trennen, die Wiedergabe.
AOA-Verbindungen
Einzelheiten zur AOA-Verbindung finden Sie auf Seite 16.
MTP-Verbindung
Ein Gerät mit Android-Version 4.0 bzw. mit den meisten höheren Versionen kann mit Hilfe des mit dem
betreffenden Gerät gelieferten Kabels über MTP an dieses Gerät angeschlossen werden. Je nach
angeschlossenem Gerät, der Betriebssystemversion und der Anzahl der Dateien auf dem Gerät kann es
sein, dass Audiodateien/Musiktitel nicht über MTP wiedergegeben werden können. Beachten Sie, dass
die MTP-Verbindung nicht kompatibel mit den WAV- und FLAC-Dateiformaten ist.
HINWEIS
Wenn Sie eine MTP-Verbindung verwenden, muss [ANDROID WIRED] in den SYSTEM-Einstellungen auf
[MEMORY] eingestellt sein (Seite 22).
AUX
1
Schließen Sie den Stereo-Mini-Stecker an der AUX-Eingangsbuchse an.
2 Drücken Sie SRC/OFF, um [AUX] als Quelle auszuwählen.
USB/iPod/AUX
Wiedergabe

- 10 -
Deutsch
HINWEIS
Wenn in den SYSTEM-Einstellungen [AUX] auf [OFF] eingestellt ist, lässt sich [AUX] nicht als Quelle
auswählen (Seite 21).
In den FUNCTION-Einstellungen können Sie verschiedene Anpassungen vornehmen
(Seite 18).
Beachten Sie, dass die folgenden Bedienvorgänge nicht bei einem AUX-Gerät
funktionieren. Um ein AUX-Gerät zu bedienen, führen Sie die Vorgänge an dem Gerät
selbst aus.
Bedienvorgänge
Zweck Bedienung
Ordner/Album auswählen*1 Drücken Sie 1/ bzw. 2/.
Track/Titel (Kapitel) auswählen Drücken Sie bzw. .
Vor- oder zurückspulen*2 Halten Sie bzw. gedrückt.
In einer Liste nach einer Datei suchen 1 Halten Sie BASS gedrückt, um die Liste
anzuzeigen.
2 Drehen Sie den M.C.-Regler, um den
Namen oder die Kategorie der/des
gewünschten Datei/Ordners
auszuwählen, und drücken Sie dann den
Regler, um den Vorgang zu bestätigen.
3 Drehen Sie den M.C.-Regler, um die
gewünschte Datei auszuwählen, und
drücken Sie ihn dann, um den Vorgang
zu bestätigen.
Die Wiedergabe startet.
Eine Liste der Dateien im ausgewählten
Ordner/in der ausgewählten Kategorie
ansehen*1
Drücken Sie, wenn ein Ordner/eine
Kategorie ausgewählt ist, den M.C.-Regler.
Einen Musiktitel aus dem/der ausgewählten
Ordner/Kategorie abspielen*1
Halten Sie, wenn ein Ordner/eine Kategorie
ausgewählt ist, den M.C.-Regler gedrückt.

- 11 -- 11 -
Deutsch
*1 Nur komprimierte Audiodateien
*2 Wenn Sie während der Wiedergabe einer VBR-Datei die Vor- oder Rückspulfunktion verwenden,
kann es sein, dass die Wiedergabezeit nicht richtig angezeigt wird.
Modus der verknüpften Wiedergabe
Sie können auf Musiktitel zugreifen, die einen Bezug zu dem momentan
wiedergegebenen Interpreten, Album oder Genre haben.
Alphabetische Suche (nur iPod) 1 Halten Sie BASS gedrückt, um die Liste
anzuzeigen.
2 Drehen Sie den M.C.-Regler, um die
gewünschte Kategorieliste auszuwählen,
und halten Sie dann BASS gedrückt, um
den alphabetischen Suchmodus
aufzurufen.
(Zweimaliges Drehen des M.C.-Reglers
ruft ebenfalls den alphabetischen
Suchmodus auf.)
3 Drehen Sie den M.C.-Regler, um einen
Buchstaben auszuwählen, und drücken
Sie dann den Regler, um die
alphabetische Liste anzuzeigen.
Um die alphabetische Suche abzubrechen,
drücken Sie BAND/.
Wiedergabewiederholung Drücken Sie 6/.
Zufalls-/Shuffle-Wiedergabe Drücken Sie 5/.
Shuffle-Wiedergabe aller Titel (nur iPod) Halten Sie 5/ gedrückt.
Wiedergabe pausieren/fortsetzen Drücken Sie 4/PAUSE.
Sound Retriever Drücken Sie 3/S.Rtrv.
[1]: Effektiv bei niedrigen
Kompressionsraten
[2]: Effektiv bei hohen Kompressionsraten
Rückkehr zum Stammordner (nur USB)*1 Drücken und halten Sie 1/.
Wechsel des Laufwerks im USB-Gerät
(Nur Geräte, die das USB-
Massenspeicherklasse-Protokoll
unterstützen)
Drücken Sie BAND/.
Nützliche Funktionen für iPods
Zweck Bedienung

- 12 -
Deutsch
1 Halten Sie, während Sie einen Titel anhören, 4/PAUSE gedrückt, um in den Modus
der verknüpften Wiedergabe zu wechseln.
2 Drehen Sie den M.C.-Regler, um den Modus auszuwählen ([ARTIST], [ALBUM],
[GENRE]), und drücken Sie dann den Regler, um den Vorgang zu bestätigen.
Der ausgewählte Titel/das ausgewählte Album wird nach dem momentan
wiedergegebenen Titel gespielt.
HINWEIS
Der ausgewählte Titel/das ausgewählte Album kann abgebrochen werden, wenn Sie Funktionen
verwenden, die nicht zum Modus der verknüpften Wiedergabe gehören (z. B. Vor- und Zurückspulen).
Steuerung über iPod
Sie können das Gerät über einen angeschlossenen iPod steuern.
Die folgenden iPod-Modelle sind nicht mit dieser Funktion kompatibel.
– iPod nano der 1. Generation, iPod mit Videofunktion
1 Drücken Sie während der Wiedergabe BAND/ , und wählen Sie dann den
Steuerungsmodus aus.
[CONTROL iPod]: Die iPod-Funktion des Geräts kann nur über den angeschlossenen
iPod bedient werden.
[CONTROL AUDIO]: Die iPod-Funktion des Geräts kann nur mit den Tasten des Geräts
oder der mitgelieferten Fernbedienung bedient werden. In diesem Modus lässt sich
der angeschlossene iPod nicht ein- oder ausschalten.
HINWEISE
• Durch Drücken von iPod kann auch der Steuerungsmodus umgeschaltet werden (nur für MVH-
S120UI/S120UIG/S12UI).
• Wenn Sie den Steuerungsmodus auf [CONTROL iPod] umschalten, pausiert die Musikwiedergabe.
Verwenden Sie den angeschlossenen iPod, um die Wiedergabe fortzusetzen.
• Die folgenden Bedienvorgänge sind weiterhin mit dem Gerät möglich, auch wenn der
Steuerungsmodus auf [CONTROL iPod] eingestellt ist.
– Pause, Vor-/Zurückspulen, Titel-/Kapitelauswahl
• Die Lautstärke kann nur am Gerät eingestellt werden.
(Der APP-Modus ist für MVH-S120UB/S120UBG/S120UBA/S120UBW nicht verfügbar.)
Sie können sich über dieses Gerät den Ton einer Anwendung auf einem iPhone anhören.
In einigen Fällen können Sie eine Anwendung mit diesem Gerät steuern.
Einzelheiten zu kompatiblen Geräten finden Sie auf unserer Website.
App-Modus

- 13 -- 13 -
Deutsch
Wichtig
Die Verwendung von Apps von Dritten kann eventuell die Angabe personenbezogener Daten nach
sich ziehen oder notwendig machen entweder durch das Eröffnen eines Benutzerkontos o. Ä. und für
bestimmte Anwendungen die Angabe von Geolokationsdaten.
ALLE APPS VON DRITTEN UNTERLIEGEN DER ALLEINIGEN VERANTWORTUNG DER ANBIETER
EINSCHLIESSLICH UND OHNE EINSCHRÄNKUNG DEM SAMMELN UND SICHERN DER ANWENDERDATEN
UND DATENSCHUTZMASSNAHMEN. DURCH ZUGRIFF AUF APPS VON DRITTEN ERKLÄREN SIE SICH MIT
DEN NUTZUNGSBEDINGUNGEN UND DATENSCHUTZRICHTLINIEN DER JEWEILIGEN ANBIETER
EINVERSTANDEN. WENN SIE DEN NUTZUNGSBEDINGUNGEN UND RICHTLINIEN EINES ANBIETERS ODER
DER VERWENDUNG VON GEOLOKATIONSDATEN, WO ZUTREFFEND, NICHT ZUSTIMMEN, DANN SEHEN
SIE VON DER VERWENDUNG VON APPS VON DRITTEN AB.
Für iPhone-Benutzer
Diese Funktion ist mit iPhone- und iPod touch-Geräten mit iOS 5.0 oder höher kompatibel.
HINWEIS
PIONEER IST NICHT FÜR DRITTANBIETER-APPS ODER -INHALTE VERANTWORTLICH, EINSCHLIESSLICH
OHNE BESCHRÄNKUNG DEREN RICHTIGKEIT ODER VOLLSTÄNDIGKEIT. DIE ALLEINIGE
VERANTWORTUNG FÜR INHALT UND FUNKTIONALITÄT SOLCHER APPS TRÄGT DER ANBIETER DER APP.
1 Verbinden Sie dieses Gerät mit dem mobilen Gerät.
• iPhone über USB (Seite 9)
2 Drücken Sie SRC/OFF, um [APP] auszuwählen.
3 Bedienen Sie das mobile Gerät, um die Anwendung zu starten.
Grundlegende Bedienvorgänge
In den FUNCTION-Einstellungen können Sie verschiedene Anpassungen vornehmen
(Seite 18).
(MVH-S120UI/S120UIG/S12UI ist nur kompatibel mit Spotify bei Installation auf iPhone.)
Spotify ist ein Musikstreaming-Dienst, der nicht mit Pioneer verbunden ist. Weitere
Informationen sind unter http://www.spotify.com verfügbar.
Wiedergabe einer Anwendung über das Gerät
Zweck Bedienung
Track auswählen Drücken Sie bzw. .
Vor- oder zurückspulen Halten Sie bzw. gedrückt.
Wiedergabe pausieren/fortsetzen Drücken Sie BAND/.
Spotify®

- 14 -
Deutsch
Die Spotify-Anwendung ist für kompatible Smartphones verfügbar, bitte besuchen Sie
https://support.spotify.com/, um die neuesten Kompatibilitätsinformationen zu
erhalten.
Um Spotify während der Fahrt zu nutzen, müssen Sie zunächst die Spotify-App auf Ihr
iPhone herunterladen. Sie können sie über den iTunes App Store herunterladen. Wählen
Sie ein kostenloses Konto oder ein kostenpflichtiges Premium-Konto, entweder in der
App oder auf spotify.com. Mit einem Premium-Konto erhalten Sie mehr Funktionen wie
beispielsweise Musikhören offline.
Wichtig
• Dieses Produkt enthält Spotify-Software, die Drittlizenzen unterliegt, die Sie hier lesen können:
www.spotify.com/connect/third-party-licenses.
• Informationen über die Länder und Regionen, in denen Spotify verwendet werden kann, finden Sie
unter https://spotify.com/us/select-your-country/.
Aktualisieren Sie vor der Verwendung die Firmware der Spotify-Anwendung auf die
neueste Version.
1 Verbinden Sie dieses Gerät mit dem mobilen Gerät.
• iPhone über USB (Seite 9)
2 Drücken Sie SRC/OFF, um [SPOTIFY] auszuwählen.
3 Starten Sie auf dem mobilen Gerät die Spotify-Anwendung und starten Sie die
Wiedergabe.
Grundlegende Bedienvorgänge
In den FUNCTION-Einstellungen können Sie verschiedene Anpassungen vornehmen
(Seite 18).
HINWEIS
Welche Vorgänge verfügbar sein, kann je nach der Art des abzuspielenden Inhalts (Titel/Album/
Interpret/Playlist/Radio) variieren.
Spotify hören
Zweck Bedienung
Track überspringen Drücken Sie bzw. .

- 15 -- 15 -
Deutsch
HINWEIS
Einige Funktionen von Spotify lassen sich möglicherweise nicht mit dem Gerät bedienen.
(Pioneer ARC APP für iPhone ist für MVH-S120UB/S120UBG/S120UBA/S120UBW nicht
verfügbar.)
Sie können das Gerät von der auf einem iPhone/Android-Gerät installierten Pioneer ARC
APP aus bedienen. In einigen Fällen können Sie mit dem Gerät Aspekte der Anwendung
steuern wie beispielsweise Quellenauswahl, Pause usw.
In einer Liste nach einem Titel suchen 1 Halten Sie BASS gedrückt, um die Liste
anzuzeigen.
2 Drehen Sie den M.C.-Regler, um die
gewünschte Kategorie auszuwählen, und
drücken Sie ihn dann, um den Vorgang
zu bestätigen.
3 Drehen Sie den M.C.-Regler, um die
gewünschte Datei auszuwählen, und
drücken Sie ihn dann, um den Vorgang
zu bestätigen.
Die Wiedergabe startet.
Wiedergabe pausieren/fortsetzen Drücken Sie 4/PAUSE.
Daumen hoch (Nur für Radio) Drücken Sie 1/.
Daumen runter (Nur für Radio) Drücken Sie 2/.
Zufallswiedergabe (Nur für Titel/Album/
Interpret/Playlist)
Drücken Sie 5/.
Wiedergabewiederholung (Nur für Titel/
Album/Interpret/Playlist)
Drücken Sie 6/.
Anhand des aktuell wiedergegebenen
Songs einen Radiosender starten.
1 Drücken und halten Sie 5/ , um einen
Radiokanal zu starten.
2 Drücken Sie den M.C.-Regler.
• Diese Funktion ist je nach ausgewähltem
Song möglicherweise nicht verfügbar.
Die Informationen über den aktuell
gespielten Song speichern.
Die gespeicherten Song-Informationen
löschen.
1 Halten Sie 3/S.Rtrv gedrückt.
[SAVE]/[UNSAVE] wird angezeigt.
2 Drücken Sie den M.C.-Regler.
Verwenden von Pioneer ARC APP
Zweck Bedienung

- 16 -
Deutsch
Einzelheiten zu den in der Anwendung zur Verfügung stehenden Bedienvorgängen
finden Sie im Hilfe-Abschnitt der Anwendung.
WARNUNG
Versuchen Sie nicht, die Anwendung zu bedienen, während Sie fahren. Achten Sie darauf, die Straße zu
verlassen und Ihr Fahrzeug an einem sicheren Ort abzustellen, bevor Sie versuchen, die
Bedienelemente der Anwendung zu benutzen.
Für iPhone-Benutzer
Diese Funktion ist mit iPhones (iPhone 5 oder höher) und iPod touch-Geräten mit iOS 8.0
oder höher kompatibel.
Sie können Pioneer ARC APP von iTunes App Store herunterladen.
Für Benutzer von Android-Geräten
Diese Funktion ist mit einem Telefon kompatibel, das mit Android 4.1 bis 7.1.2 läuft und
auch AOA (Android Open Accessory) 2.0 unterstützt. Die Kompatibilität hängt aber vom
Smartphone ab.
Sie können Pioneer ARC APP von Google Play™ herunterladen.
HINWEIS
Es kann sein, dass einige über AOA 2.0 angeschlossene Android-Geräte aufgrund ihres eigenen
Softwaredesigns unabhängig von der Version des Betriebssystems Geräusche erzeugen oder nicht
richtig funktionieren.
Wenn eine Verbindung mit einem Android-Gerät hergestellt
wird
1 Drehen Sie den M.C.-Regler, um das Hauptmenü anzuzeigen.
2 Drehen Sie den M.C.-Regler, um [SYSTEM] auszuwählen, und drücken Sie ihn dann,
um den Vorgang zu bestätigen.
3 Drehen Sie den M.C.-Regler, um [ANDROID WIRED] auszuwählen, und drücken Sie
ihn dann, um den Vorgang zu bestätigen.
4 Drehen Sie den M.C.-Regler, um [APP CONTROL] auszuwählen, und drücken Sie
ihn dann, um den Vorgang zu bestätigen.
5 Drehen Sie den M.C.-Regler, um [P.APP AUTO ON] auszuwählen, und drücken Sie
ihn dann, um den Vorgang zu bestätigen.
6 Drehen Sie den M.C.-Regler, um [ON] auszuwählen, und drücken Sie ihn dann, um
den Vorgang zu bestätigen.
7 Verbinden Sie dieses Gerät über USB mit dem Android-Gerät.
Pioneer ARC APP wird auf dem Android-Gerät automatisch gestartet.
Herstellen einer Verbindung mit Pioneer ARC APP

- 17 -- 17 -
Deutsch
HINWEIS
Wenn Pioneer ARC APP noch nicht auf Ihrem Android-Gerät installiert wurde, erscheint eine
Meldung, die Sie auffordert, die Anwendung auf Ihrem Android-Gerät zu installieren. Wählen Sie
[OFF] unter [P.APP AUTO ON] zum Löschen der Meldung (Seite 22).
Wenn eine Verbindung mit einem iPhone hergestellt wird
1
Verbinden Sie dieses Gerät über USB mit dem iPhone.
2 Drücken Sie SRC/OFF, um eine beliebige Quelle auszuwählen.
3 Halten Sie den M.C.-Regler gedrückt.
Pioneer ARC APP wird auf dem iPhone gestartet.
HINWEIS
Wenn die Verbindung fehlschlägt, starten Sie Pioneer ARC APP auf dem iPhone.
1 Drücken Sie SRC/OFF, um [ANDROID] auszuwählen.
Grundlegende Bedienvorgänge
Sie können im Hauptmenü verschiedene Einstellungen vornehmen.
1 Drehen Sie den M.C.-Regler, um das Hauptmenü anzuzeigen.
2 Drehen Sie den M.C.-Regler, um eine der nachstehenden Kategorien
auszuwählen, und drücken Sie ihn dann, um den Vorgang zu bestätigen.
• FUNCTION-Einstellungen (Seite 18)
• AUDIO-Einstellungen (Seite 19)
• SYSTEM-Einstellungen (Seite 21)
Musik hören auf Android
Zweck Bedienung
Track auswählen Drücken Sie bzw. .
Vor- oder zurückspulen Halten Sie bzw. gedrückt.
Wiedergabe pausieren/fortsetzen Drücken Sie 4/PAUSE.
Sound Retriever Drücken Sie 3/S.Rtrv.
[1]: Effektiv bei niedrigen
Kompressionsraten
[2]: Effektiv bei hohen Kompressionsraten
Einstellungen

- 18 -
Deutsch
• ILLUMINATION-Einstellungen (Seite 23)
3 Drehen Sie den M.C.-Regler, um die Optionen auszuwählen, und drücken Sie ihn
dann, um den Vorgang zu bestätigen.
HINWEISE
• Die iPod-zugehörigen Menüelemente in den folgenden Tabellen stehen für MVH-S120UB/S120UBG/
S120UBA/S120UBW nicht zur Verfügung.
• Die zum APP-Modus gehörigen Menüelemente in den folgenden Tabellen stehen für MVH-S120UB/
S120UBG/S120UBA/S120UBW nicht zur Verfügung.
Die Menüpunkte können sich je nach Quelle unterscheiden.
FUNCTION-Einstellungen
Menüpunkt Beschreibung
FM SETTING
[TALK], [STANDARD], [MUSIC] Die Klangqualität auf die
Sendesignalbedingungen des FM-Band-Signals
abstimmen. (Nur verfügbar, wenn das FM-Band
ausgewählt ist).
BSM
Die sechs stärksten Sender automatisch auf den
Zifferntasten (1/ bis 6/) speichern.
REGIONAL
[ON], [OFF] Den Empfang auf bestimmte
Regionalprogramme beschränken, wenn AF
(alternative Frequenzsuche) ausgewählt ist. (Nur
verfügbar, wenn das FM-Band ausgewählt ist).
LOCAL
FM: [OFF], [LV1], [LV2], [LV3], [LV4]
MW/LW: [OFF], [LV1], [LV2]
Die Suche auf Sender mit ausreichender
Signalstärke beschränken.
TA
[ON], [OFF] Aktuelle Verkehrsinformationen empfangen,
wenn verfügbar. (Nur verfügbar, wenn das FM-
Band ausgewählt ist).
AF
[ON], [OFF] Dem Gerät erlauben, auf eine andere Frequenz
umzuschalten, die den gleichen Sender
überträgt. (Nur verfügbar, wenn das FM-Band
ausgewählt ist).

- 19 -- 19 -
Deutsch
NEWS
[ON], [OFF] Die momentan ausgewählte Quelle mit
Nachrichtenprogrammen unterbrechen. (Nur
verfügbar, wenn das FM-Band ausgewählt ist).
SEEK
[MAN], [PCH] Zuweisung der - bzw. -Taste, um einen
Sender nach dem anderen zu suchen (manuelle
Abstimmung), oder Auswahl eines Senders aus
den voreingestellten Kanälen.
SAVE
Die Informationen über den aktuell gespielten
Song auf Ihrer Musikliste auf Spotify speichern.
UNSAVE
Die in [SAVE] gespeicherten Song-Informationen
löschen.
S.RTRV
[1] (effektiv bei niedrigen
Kompressionsraten),
[2] (effektiv bei hohen
Kompressionsraten),
[OFF]
Die Qualität komprimierter Audiosignale
verbessern und einen satten Klang
wiederherstellen.
Nicht verfügbar, wenn die FLAC-Datei
wiedergegeben wird.
AUDIO BOOK
[FASTER], [NORMAL], [SLOWER] Wiedergabegeschwindigkeit ändern. (Nicht
verfügbar, wenn im Steuerungsmodus
[CONTROL iPod] ausgewählt ist.)
PAUSE
Wiedergabe pausieren oder fortsetzen.
AUDIO-Einstellungen
Menüpunkt Beschreibung
FADER*1
Balance der Front- und Hecklautsprecher
einstellen.
Menüpunkt Beschreibung
USB
iPod
iPod

- 20 -
Deutsch
BALANCE
Balance der linken und rechten Lautsprecher
einstellen.
EQ SETTING
[SUPER BASS], [POWERFUL],
[DYNAMIC], [NATURAL], [VOCAL],
[VIVID], [CUSTOM1], [CUSTOM2],
[FLAT]
Wählen Sie ein Equalizer-Band
und einen Pegel aus, um weitere
Anpassungen vorzunehmen.
Equalizer-Band: [80HZ], [250HZ],
[800HZ], [2.5KHZ], [8KHZ]
Equalizer-Pegel: [+6] bis [–6]
Equalizer-Kurve auswählen oder anpassen.
[CUSTOM1] kann für jede Quelle separat
eingestellt werden. Jede der nachstehenden
Kombinationen wird jedoch automatisch auf
dieselbe Einstellung gesetzt.
• USB, iPod, ANDROID, SPOTIFY und APP
(iPhone)
[CUSTOM2] ist eine für alle Quellen gemeinsam
verwendete Einstellung.
Sie können auch den Equalizer umschalten,
indem Sie wiederholt drücken (nur bei
MVH-S120UB/S120UBG/S120UBA/S120UBW).
LOUDNESS
[OFF], [LOW], [MID], [HI] Kompensieren, um bei niedriger Lautstärke
einen klaren Klang zu erhalten.
SUB.W*2
[NOR], [REV], [OFF] Auswahl der Subwoofer-Phase.
SUB.W CTRL*2*3
Grenzfrequenz: [50HZ], [63HZ],
[80HZ], [100HZ], [125HZ],
[160HZ], [200HZ]
Ausgabepegel: [–24] bis [+6]
Steilheit: [–12], [–24]
Der Subwoofer gibt nur Signale unterhalb des
ausgewählten Bereichs aus.
BASS BOOST
[0] bis [+6] Auswahl des Bassverstärkungspegels.
HPF SETTING
Grenzfrequenz: [OFF], [50HZ],
[63HZ], [80HZ], [100HZ], [125HZ],
[160HZ], [200HZ]
Steilheit: [–12], [–24]
Die Lautsprecher geben nur Signale oberhalb
der Grenzfrequenz des Hochpassfilters (HPF) aus.
Menüpunkt Beschreibung

- 21 -- 21 -
Deutsch
*1 Nicht verfügbar, wenn [SUB.W/SUB.W] bei [SP-P/O MODE] in den INITIAL-Einstellungen ausgewählt
ist (Seite 6).
*2 Nicht verfügbar, wenn [REAR/REAR] bei [SP-P/O MODE] in den INITIAL-Einstellungen ausgewählt ist
(Seite 6).
*3 Nicht verfügbar, wenn [OFF] bei [SUB.W] ausgewählt ist .
Sie können auch bei ausgeschaltetem Gerät auf diese Menüs zugreifen.
SLA
[+4] bis [–4] Den Lautstärkepegel für alle Quellen außer FM
einstellen.
Jede der nachstehenden Kombinationen wird
automatisch auf dieselbe Einstellung gesetzt.
• USB, iPod, ANDROID, SPOTIFY und APP
(iPhone)
SYSTEM-Einstellungen
Menüpunkt Beschreibung
LANGUAGE
[ENG] (Englisch), [РУС] (Russisch),
[TUR] (Türkisch)
Auswahl der Sprache, in der die
Textinformationen komprimierter Audiodateien
angezeigt werden sollen.
CLOCK SET
Einstellung der Uhr (Seite 5).
12H/24H
[12H], [24H] Auswahl des Zeitdarstellungsformats.
SCROLL SET
[ONCE], [LOOP], [OFF] Legen Sie fest, wie der Text im Anzeigefenster
durchlaufen soll.
AUTO PI
[ON], [OFF] Auch bei Verwendung eines voreingestellten
Senders nach einem anderen Sender mit
demselben Programm suchen.
AUX
[ON], [OFF] Wählen Sie [ON], wenn Sie ein am Gerät
angeschlossenes Zusatzgerät verwenden.
Menüpunkt Beschreibung

- 22 -
Deutsch
* [PW SAVE] wird abgebrochen, wenn die Fahrzeugbatterie getrennt wird, und muss nach erneutem
Anschließen der Batterie wieder eingeschaltet werden. Wenn [PW SAVE] ausgeschaltet ist, kann es
abhängig von den Verbindungsmethoden sein, dass das Gerät weiterhin Strom von der Batterie
bezieht, wenn die Zündung Ihres Fahrzeugs keine ACC-Stellung (Stromversorgung über
Starterbatterie) hat.
SPOTIFY
[ON], [OFF] Wählen Sie [ON], wenn Sie die Spotify-Funktion
verwenden.
MUTE MODE (Nur für MVH-S120UI/S120UIG/S12UI)
[MUTE], [20dB ATT], [10dB ATT] Ton automatisch stummschalten oder
abschwächen, wenn ein Signal von einem Gerät
mit Stummschaltungsfunktion empfangen wird.
PW SAVE*
[ON], [OFF] Batterieverbrauch verringern.
Das Einschalten der Quelle ist der einzige
Vorgang, der erlaubt ist, wenn diese Funktion
eingeschaltet ist.
ANDROID WIRED
[MEMORY], [APP CONTROL] Wählen Sie die für ein Android-Gerät geeignete
Verbindungsmethode.
P. AP P AU TO O N
[ON], [OFF]
Wählen Sie [ON], um automatisch Pioneer ARC
APP zu starten, wenn ein Android-Gerät über AOA
mit dem Gerät verbunden ist. (Nicht verfügbar,
wenn [MEMORY] unter [ANDROID WIRED]
ausgewählt ist.)
USB AUTO
[ON], [OFF] Wählen Sie [ON], um automatisch auf die [USB]-
Quelle umzuschalten, wenn ein USB-Gerät/iPod
an diesem Gerät angeschlossen ist.
Wählen Sie [OFF], wenn ein USB-Gerät/iPod nur
zum Aufladen an diesem Gerät angeschlossen
wird.
Menüpunkt Beschreibung

- 23 -- 23 -
Deutsch
ILLUMINATION-Einstellungen
Menüpunkt Beschreibung
DIM SETTING
[SYNC CLOCK], [MANUAL] Wählen Sie eine Methode zur Änderung der
Displayhelligkeit.
BRIGHTNESS
[1] bis [10] Displayhelligkeit ändern.
Welche Einstellbereiche verfügbar sind, richtet
sich nach [DIM SETTING].

- 24 -
Deutsch
Das Display kehrt automatisch zur
normalen Anzeige zurück.
→ Es wurden etwa 30 Sekunden lang
keine Bedienvorgänge ausgeführt.
–Führen Sie einen Bedienvorgang aus.
Der Wiederholbereich ändert sich
unerwartet.
→ Je nach Wiederholbereich kann sich der
ausgewählte Bereich bei Auswahl eines
anderen Ordners oder Tracks oder
während des Vor-/Zurückspulens
ändern.
–Wählen Sie den Wiederholbereich
erneut aus.
Ein Unterordner wird nicht
wiedergegeben.
→ Unterordner können nicht
wiedergegeben werden, wenn [FLD]
(Ordnerwiederholung) ausgewählt ist.
–Wählen Sie einen anderen
Wiederholbereich aus.
Der Ton wird unterbrochen.
→ Sie verwenden ein Gerät wie z. B. ein
Mobiltelefon, das hörbare Störungen
verursachen kann.
–Vergrößern Sie den Abstand
elektrischer Geräten, die
möglicherweise die Störung
verursachen, zum Gerät.
Allgemeines
AMP ERROR
→ Betriebsstörung des Geräts oder falsche
Lautsprecherverbindung.
→ Die Schutzschaltung ist aktiviert.
–Überprüfen Sie die
Lautsprecherverbindung.
–Schalten Sie die Zündung OFF und
dann wieder ON. Sollte die Meldung
weiter angezeigt werden, wenden Sie
sich zur Unterstützung an Ihren
Händler oder eine Pioneer-
Kundendienststelle.
NO XXXX (beispielsweise NO TITLE)
→ Es gibt keine eingebetteten
Textinformationen.
–Schalten Sie die Anzeige um oder
spielen Sie einen anderen Track/eine
andere Datei.
USB-Gerät/iPod
FORMAT READ
→ Nach dem Wiedergabestart ist der Ton
manchmal erst nach einer Verzögerung
zu hören.
–Warten Sie, bis die Meldung erlischt
und Sie den Ton hören.
NO AUDIO
→ Es sind keine Musiktitel vorhanden.
–Übertragen Sie die Audiodateien an
das USB-Gerät und schließen Sie es an.
→ Auf dem angeschlossenen USB-Gerät ist
die Sicherheitsfunktion aktiviert.
–Folgen Sie den Anweisungen des USB-
Geräts, um die Sicherheitsfunktion zu
deaktivieren.
SKIPPED
→ Das angeschlossene USB-Gerät enthält
DRM-geschützte Dateien (digitale
Rechteverwaltung).
–Die geschützten Dateien werden
übersprungen.
Zusätzliche Informationen
Fehlerbehebung
Fehlermeldungen

- 25 -
Deutsch
PROTECT
→ Sämtliche Dateien auf dem
angeschlossenen USB-Gerät sind DRM-
geschützt (digitale Rechteverwaltung).
–Wechseln Sie das USB-Gerät aus.
N/A USB
→ Das angeschlossene USB-Gerät wird
von diesem Gerät nicht unterstützt.
–Trennen Sie Ihr Gerät ab und ersetzen
Sie es durch ein kompatibles USB-
Gerät.
HUB ERROR
→ Das über einen USB-Hub
angeschlossene USB-Gerät wird von
diesem Gerät nicht unterstützt.
–Schließen Sie das USBGerät über ein
USB-Kabel an diesem Gerät an.
CHECK USB
→ Der USB-Anschluss oder das USB-Kabel
wurde kurzgeschlossen.
–Vergewissern Sie sich, dass der USB-
Anschluss oder das USB-Kabel nicht
eingeklemmt oder beschädigt ist.
→ Das angeschlossene USB-Gerät hat
einen höheren als den maximal
zulässigen Stromverbrauch.
–Trennen Sie das USB-Gerät ab und
verwenden Sie es nicht. Schalten Sie
die Zündung AUS und dann wieder
auf ACC oder EIN. Schließen Sie nur
kompatible USB-Geräte an.
ERROR-19
→ Kommunikation fehlgeschlagen.
–Führen Sie einen der folgenden
Bedienvorgänge aus, und kehren Sie
dann zur USB-Quelle zurück.
• Trennen Sie das USB-Gerät ab.
• Schalten Sie auf eine andere Quelle
um.
→ iPod-Störung.
–Trennen Sie das Kabel vom iPod.
Schließen Sie, sobald auf dem iPod das
Hauptmenü angezeigt wird, den iPod
erneut an und setzen Sie ihn zurück.
ERROR-23
→ Das USB-Gerät wurde nicht
ordnungsgemäß formatiert.
–Formatieren Sie das USB-Gerät mit
FAT12, FAT16 oder FAT32.
ERROR-16
→ Die iPod-Firmware ist veraltet.
–Aktualisieren Sie die iPod-Version.
→ iPod-Störung.
–Trennen Sie das Kabel vom iPod.
Schließen Sie, sobald auf dem iPod das
Hauptmenü angezeigt wird, den iPod
erneut an und setzen Sie ihn zurück.
STOP
→ Auf der aktuellen Liste befinden sich
keine Musiktitel.
–Wählen Sie eine Liste aus, die
Musiktitel enthält.
NOT FOUND
→ Keine entsprechenden Musiktitel
gefunden.
–Übertragen Sie Musiktitel an den iPod.
APP
START UP APP
→ Die Anwendung wird noch nicht
ausgeführt.
–Bedienen Sie das mobile Gerät, um die
Anwendung zu starten.
Spotify
CHECK APP
→ Die Verbindung mit der Spotify-
Anwendung ist fehlgeschlagen.
–Folgen Sie den auf dem Bildschirm
gezeigten Anweisungen.

- 26 -
Deutsch
USB-Speichergerät
• Verbindungen über USB-Hubs werden
nicht unterstützt.
• Sorgen Sie vor der Fahrt für eine sichere
Befestigung des USB-Speichergeräts.
Lassen Sie das USB-Speichergerät nicht
auf den Boden fallen, wo es unter dem
Brems- oder Gaspedal eingeklemmt
werden könnte.
• Je nach USB-Speichergerät können die
folgenden Probleme auftreten.
– Die Bedienung kann unterschiedlich
sein.
– Möglicherweise wird das Speichergerät
nicht erkannt.
– Möglicherweise werden Dateien nicht
richtig wiedergegeben.
– Das Gerät kann Störgeräusche
verursachen, wenn Sie Radio hören.
iPod
• Bewahren Sie den iPod nicht an Orten mit
hohen Temperaturen auf.
• Sorgen Sie für eine sichere Befestigung
des iPods während er Fahrt. Lassen Sie
den iPod nicht auf den Boden fallen, wo
er unter dem Brems- oder Gaspedal
eingeklemmt werden könnte.
• Die Einstellungen des iPods, z. B.
Equalizer und Wiedergabewiederholung,
ändern sich beim Anschließen des iPods
an das Gerät automatisch. Wenn der iPod
vom Gerät getrennt wird, kehren diese
Einstellungen wieder in ihren
ursprünglichen Zustand zurück.
• Auf dem iPod gespeicherter
inkompatibler Text wird vom Gerät nicht
angezeigt.
• Nur die ersten 32 Zeichen können als
Dateiname (einschließlich
Dateierweiterung) oder Ordnername
angezeigt werden.
• Je nach der zur Codierung von WMA-
Dateien verwendeten Anwendung kann
es sein, dass das Gerät nicht richtig
arbeitet.
• Bei Audiodateien mit eingebetteten
Bilddaten oder bei auf einem USB-Gerät
mit komplexer Ordnerstruktur
gespeicherten Audiodateien kann sich
geringfügig der Beginn der Wiedergabe
verzögern.
• Zur Anzeige auf diesem Gerät sollte
russischer Text in einem der folgenden
Zeichensätze codiert sein:
– Unicode (UTF-8, UTF-16)
– Ein anderer Zeichensatz als Unicode,
der in einer Windows-Umgebung
verwendet wird und in den
Sprachoptionen auf Russisch eingestellt
ist
VORSICHT
• Pioneer kann nicht die Kompatibilität mit
allen USB-Massenspeichergeräten
gewährleisten und übernimmt keine
Verantwortung für eventuelle
Datenverluste auf Media-Playern,
Smartphones oder anderen Geräten, die
zusammen mit diesem Produkt
verwendet werden.
• Bewahren Sie Discs oder USB-
Speichergeräte nicht an Orten auf, an
denen hohe Temperaturen herrschen
können.
WMA-Dateien
Handhabungsrichtlinien Kompatibilität
komprimierter
Audioformate
Dateierweiterung .wma

- 27 -
Deutsch
MP3-Dateien
WAV-Dateien
• WAV-Datenformate können nicht über
MTP verbunden werden.
FLAC-Dateien
• FLAC-Datenformate können nicht über
MTP verbunden werden.
• Je nach Codierer kann es sein, dass FLAC-
Dateien nicht abspielbar sind.
USB-Gerät
• Der Beginn der Wiedergabe von auf
einem USB-Gerät mit komplexer
Ordnerstruktur gespeicherten
Audiodateien kann sich geringfügig
verzögern.
Dieses Gerät unterstützt nur die folgenden iPod-
Modelle. Ältere Versionen werden ggf. nicht
unterstützt.
Hergestellt für
–iPod touch (1. bis 6. Generation)
–iPod classic
–iPod nano (3. bis 7. Generation)
–iPhone 6s
– iPhone 6s Plus
–iPhone 6
–iPhone 6 Plus
–iPhone 5s
–iPhone 5c
–iPhone 5
–iPhone4s
–iPhone4
–iPhone3GS
–iPhone3G
–iPhone
Bitrate 48 Kbit/s bis 320 Kbit/s
(CBR), 48 Kbit/s bis
384 Kbit/s (VBR)
Abtastfrequenz 32 kHz, 44,1 kHz,
48 kHz
Windows Media™
Audio Professional,
Lossless, Voice/DRM
Stream/Stream mit
Video
Nicht kompatibel
Dateierweiterung .mp3
Bitrate 8 Kbit/s bis 320 Kbit/s
(CBR), VBR
Abtastfrequenz 8 kHz bis 48 kHz
(32 kHz, 44,1 kHz,
48 kHz zur Emphase)
Kompatible ID3-Tag-
Version
1.0, 1.1, 2.2, 2.3, 2.4
(ID3-Tag-Version 2.x
erhält Vorrang vor
Version 1.x.)
M3u-Wiedergabeliste Nicht kompatibel
MP3i (MP3 interaktiv),
mp3 PRO
Nicht kompatibel
Dateierweiterung .wav
Quantisierungsbits 8 und 16 (LPCM)
Abtastfrequenz 16 kHz bis 48 kHz
(LPCM)
Dateierweiterung .flac
Abtastfrequenz 8/11,025/12/16/22,05/
24/32/44,1/48 kHz
Quantisierungsbitrate 16-Bit
Kanalmodus 1/2-Kanal
Abspielbare
Ordnerstruktur
Bis zu acht Ebenen
(Praktikabel sind
weniger als zwei
Ebenen.)
Abspielbare Ordner Bis zu 500
Abspielbare Dateien Bis zu 15 000
Wiedergabe von
urheberrechtlich
geschützten Dateien
Nicht kompatibel
Partitioniertes USB-
Gerät
Es kann nur die erste
Partition
wiedergegeben
werden.
iPod-Kompatibilität

- 28 -
Deutsch
• Die Bedienung kann sich je nach
Generation und/oder Softwareversion
des iPods unterscheiden.
• Benutzer eines iPod mit Lightning-
Anschluss sollten das Lightning-auf-USB-
Kabel verwenden (im Lieferumfang des
iPod enthalten).
• Benutzer eines iPods mit Dock-Anschluss
sollten das CD-IU51 verwenden.
Einzelheiten erfahren Sie bei Ihrem
Fachhändler.
• Informationen zur Datei-/
Formatkompatibilität finden Sie in den
iPod-Handbüchern.
• Hörbücher, Podcast: Kompatibel
VORSICHT
Pioneer übernimmt keine Haftung für den
Verlust von iPod-Daten, auch dann nicht,
wenn der Verlust der betreffenden Daten
während der Verwendung dieses Geräts
aufgetreten ist.
Der Benutzer kann mit diesem Gerät keine
Ordnernummern zuweisen und auch nicht
die Wiedergabereihenfolge festlegen. Die
Reihenfolge der Audiodateien richtet sich
nach dem angeschlossenen Gerät.
Beachten Sie, dass sich auf einem USB-
Gerät befindliche versteckte Dateien nicht
abspielen lassen.
Beispielstruktur
Reihenfolge von
Audiodateien
Russische Zeichentabelle
Ordner
Komprimierte
Audiodatei
bis : Wiedergabereihenfolge
01 bis 05: Ordnernummer
D: Anzeige C: Zeichen

- 29 -
Deutsch
iTunes
Apple und iTunes sind Marken von Apple
Inc., eingetragen in den USA und anderen
Ländern.
WMA
Windows Media ist eine eingetragene
Marke oder eine Marke der Microsoft
Corporation in den USA und/oder anderen
Ländern.
Dieses Produkt enthält Technologie, die
Eigentum der Microsoft Corporation ist
und nicht ohne Lizenz von Microsoft
Licensing, Inc. vertrieben werden darf.
FLAC
Urheberrecht © 2000-2009 Josh Coalson
Urheberrecht © 2011-2013 Xiph.Org
Foundation
Weitergabe und Nutzung in Quell- und
Binärform, mit oder ohne Änderungen,
sind erlaubt, sofern die folgenden
Bedingungen erfüllt sind:
–Bei der Weitergabe von Quellcode muss
dieser den vorstehenden
Urheberrechtshinweis, diese Liste der
Bedingungen und den folgenden
Haftungsausschluss enthalten.
–Bei der Weitergabe in Binärform müssen
der vorstehende Urheberrechtshinweis,
diese Liste der Bedingungen und der
folgende Haftungsausschluss in der
Dokumentation und/oder andere mit der
Ausgabe zur Verfügung gestellte
Materialien angegeben werden.
–Ohne besondere schriftliche
Genehmigung dürfen weder der Name
der Xiph.org Foundation noch die Namen
ihrer Mitwirkenden verwendet werden,
um von dieser Software abgeleitete
Produkte befürwortend zu unterstützen
oder zu bewerben.
DIESE SOFTWARE WIRD VON DEN
URHEBERRECHTSINHABERN UND
MITWIRKENDEN IN IHRER VORLIEGENDEN
FORM UND OHNE JEGLICHE
AUSDRÜCKLICHE ODER KONKLUDENTE
GEWÄHRLEISTUNG ZUR VERFÜGUNG
GESTELLT, EINSCHLIESSLICH OHNE
BESCHRÄNKUNG DIE KONKLUDENTE
GEWÄHRLEISTUNG DER
MARKTGÄNGIGKEIT UND DER
VERWENDBARKEIT FÜR EINEN
BESTIMMTEN ZWECK. DIE FOUNDATION
ODER DIE MITWIRKENDEN HAFTEN
KEINESFALLS FÜR DIREKTE, INDIREKTE,
BEILÄUFIG ENTSTANDENE, BESONDERE,
STRAFRECHTLICHE ODER FOLGESCHÄDEN
(EINSCHLIESSLICH OHNE BESCHRÄNKUNG
VERSCHAFFEN VON ERSATZGÜTERN ODER
-DIENSTLEISTUNGEN, VERLUST DER
NUTZUNGSFÄHIGKEIT, DATEN- ODER
GEWINNVERLUST ODER
BETRIEBSUNTERBRECHUNG),
GLEICHGÜLTIG, WIE DIESE VERURSACHT
WURDEN UND WELCHER
HAFTUNGSTHEORIE SIE UNTERLIEGEN, OB
BEI VERTRAGS-, BEI
VERSCHULDENSUNABHÄNGIGER
HAFTUNG ODER DURCH UNERLAUBTE
HANDLUNG (EINSCHLIESSLICH
FAHRLÄSSIGKEIT ODER AUF ANDEREM
WEGE), GLEICHGÜLTIG, WIE SIE DURCH DIE
BENUTZUNG DIESER SOFTWARE
ENTSTANDEN SEIN MÖGEN. DIES GILT
AUCH DANN, WENN AUF DIE MÖGLICHKEIT
EINES SOLCHEN SCHADENS HINGEWIESEN
WURDE.
iPhone, iPod und Lightning
Die Verwendung des Aufdrucks Made for
Apple bedeutet, dass ein Zusatzgerät
speziell für den Anschluss an die Apple-
Produkte konstruiert ist, die durch den
Aufdruck identifiziert werden, und vom
Entwickler dahingehend zertifiziert wurde,
dass es den Apple-Leistungsnormen
entspricht. Apple ist nicht verantwortlich
für den Betrieb dieses Geräts oder die
Urheberrechte und
Marken

- 30 -
Deutsch
Einhaltung von Sicherheitsrichtlinien und
Standards.
Bitte beachten Sie, dass die Verwendung
dieses Zusatzgeräts mit einem Apple-
Produkt die drahtlose Leistung
beeinträchtigen kann.
iPhone, iPod, iPod classic, iPod nano, iPod
touch und Lightning sind in den USA und
anderen Ländern eingetragene Marken
von Apple Inc.
Google™, Google Play, Android
Google, Google Play und Android sind
Markenzeichen der Google LLC.
Spotify®
SPOTIFY und das Spotify-Logo sind
eingetragene Warenzeichen von Spotify
AB. Soweit vorhanden, sind kompatible
digitale Mobilgeräte und ein Premium-
Abonnement erforderlich; Informationen
dazu finden Sie unter https://
www.spotify.com.
Allgemeines
Stromspannung: 14,4 V Gleichspannung
(Toleranz 10,8 V bis 15,1 V)
Erdungssystem: Negativ
Maximale Leistungsaufnahme: 10,0 A
Abmessungen (B × H × T):
DIN
Gehäuse: 178 mm × 50 mm × 97 mm
Frontfläche: 188 mm × 58 mm ×
17 mm
D
Gehäuse: 178 mm × 50 mm × 97 mm
Frontfläche: 170 mm × 46 mm ×
17 mm
Gewicht: 0,5 kg
Audio
Maximale Ausgangsleistung:
• 50 W × 4 ch/4 Ω (wenn ohne
Subwoofer)
• 50 W × 2 ch/4 Ω + 70 W × 1 ch/2 Ω
(für Subwoofer)
Dauer-Ausgangsleistung:
22 W × 4 (50 Hz bis 15 000 Hz, 5 %
THD, bei 4-Ω-Last, beide Kanäle
betrieben)
Lastimpedanz: 4 Ω (4 Ω bis 8 Ω zulässig)
Maximaler Preout-Ausgangspegel: 2,0 V
Loudness-Kontur: +10 dB (100 Hz), +6,5 dB
(10 kHz) (Lautstärke: –30 dB)
Equalizer (Grafischer 5-Band-Equalizer):
Frequenz: 80 Hz/250 Hz/800 Hz/
2,5 kHz/8 kHz
Entzerrungsbereich: ±12 dB
(Inkrement 2 dB)
Subwoofer (Mono):
Frequenz: 50 Hz/63 Hz/80 Hz/100 Hz/
125 Hz/160 Hz/200 Hz
Steilheit: –12 dB/Okt., –24 dB/Okt.
Verstärkung: +6 dB bis –24 dB
Phase: Normal/Gegen
USB
USB-Standard-Spezifikation: USB 2.0 Full
Speed
Maximale Leistungsaufnahme: 1 A
USB Protokoll:
MSC (Massenspeicher-Klasse)
MTP (Media Transfer Protocol)
AOA (Android Open Accessory) 2.0
Dateisystem: FAT12, FAT16, FAT32
MP3-Decodierformat: MPEG-1 & 2 Audio
Layer 3
WMA-Decodierformat: Version 7, 8, 9, 9.1,
9.2 (2-Kanal-Audio)
FLAC-Decodierformat: Vers. 1.3.0 (Free
Lossless Audio Codec)
WAV-Signalformat: Lineares PCM (nicht
komprimiert)
FM-Tuner
Frequenzbereich: 87,5 MHz bis 108,0 MHz
Nutzempfindlichkeit: 11 dBf (1,0 μV/75 Ω,
Mono, Signal-Rauschabstand: 30 dB)
Signal-Rauschabstand: 72 dB (IEC-A-Netz)
Technische Daten

- 31 -
Deutsch
MW-Tuner
Frequenzbereich: 531 kHz bis 1 602 kHz
Nutzempfindlichkeit: 25 μV (Signal-
Rauschabstand: 20 dB)
Signal-Rauschabstand: 62 dB (IEC-A-Netz)
LW-Tuner
Frequenzbereich: 153 kHz bis 281 kHz
Nutzempfindlichkeit: 28 μV (Signal-
Rauschabstand: 20 dB)
Signal-Rauschabstand: 62 dB (IEC-A-Netz)
HINWEIS
Änderungen der technischen Daten und
des Designs vorbehalten.

- 2 -
Nederlands
Aan de slag ............................................................................................... 3
Radio.......................................................................................................... 7
USB/iPod/AUX .......................................................................................... 8
App-modus............................................................................................ 12
Spotify® .................................................................................................. 13
Pioneer ARC APP gebruiken............................................................... 14
Instellingen............................................................................................ 16
FUNCTION-instellingen........................................................................ 17
AUDIO-instellingen............................................................................... 18
SYSTEM-instellingen............................................................................. 20
ILLUMINATION-instellingen ................................................................ 21
Aanvullende informatie ...................................................................... 22
Over deze handleiding:
• In de volgende instructies worden een USB-geheugen of USB-audiospeler een “USB-
apparaat” genoemd.
• In deze handleiding wordt naar iPod en iPhone verwezen als “iPod”.
Inhoud

- 3 -- 3 -
Nederlands
MVH-S120UI/S120UIG/S12UI/S120UB/S120UBG/S120UBA/
S120UBW
Vaak gebruikte functies
Aan de slag
Basisbediening
Actie Bediening
Toestel inschakelen* Druk op SRC/OFF om het toestel in te
schakelen.
Hou SRC/OFF ingedrukt om het toestel uit
te schakelen.
Het volume regelen Draai de M.C.-knop.
Een bron selecteren Druk herhaaldelijk op SRC/OFF.
De display-informatie wijzigen Druk herhaaldelijk op DISP.
Terugkeren naar de vorige weergave/lijst Druk op BAND/.
Terugkeren naar de normale weergave
vanuit het menu
Houd BAND/ ingedrukt.
Versterk de bastonen Druk op BASS.
• U kan het basniveau selecteren bij [BASS
BOOST] (pagina 19).
SRC (bron)/OFF
Ontkoppelknop
Display
M.C.-knop (multicontrole)
BAND/
USB-poort
AUX-ingang (3,5mm-stereoaansluiting)
DISP (display)
BASS

- 4 -
Nederlands
* Wanneer de blauw/witte draad van het toestel verbonden is met het relaiscontact voor de
automatische antenne van de auto, schuift de antenne uit wanneer de bron van het toestel wordt
ingeschakeld. Om de antenne weer in te trekken, schakelt u de bron uit.
Display-indicatie
Verwijder het voorpaneel om diefstal te voorkomen. Verwijder alle kabels en apparaten
die verbonden zijn met het voorpaneel en schakel het toestel uit voor u het voorpaneel
verwijdert.
Belangrijk
• Stel het voorpaneel niet bloot aan te grote schokken.
• Stel het voorpaneel niet bloot aan direct zonlicht en hoge temperaturen.
• Bewaar het verwijderde voorpaneel altijd in een beschermtas of zak.
Wanneer u de contactschakelaar inschakelt na de installatie, verschijnt [SET UP :YES] op
het display.
Indicatie Beschrijving
Verschijnt wanneer er een lager niveau van het menu of de map bestaat.
Verschijnt wanneer de BASS knop wordt ingedrukt en vastgehouden.
Verschijnt wanneer de functie afstemmen op lokale zenders is ingesteld
(pagina 17).
Verschijnt wanneer een verkeersprogramma wordt ontvangen.
Verschijnt wanneer de functie TA (verkeersberichten) is ingesteld
(pagina 17).
Verschijnt wanneer de functie sound retriever ingesteld is (pagina 18).
Verschijnt wanneer de iPod-bedieningsfunctie is ingesteld (pagina 11).
Het voorpaneel verwijderen
Instellingenmenu
Ontkoppelen Bevestigen

- 5 -- 5 -
Nederlands
1 Druk op de M.C.-knop.
Het instellingenmenu verdwijnt als u het toestel niet binnen 30 seconden bedient.
Als u de instelling later wilt maken, draait u de M.C.-knop om [NO] te selecteren,
druk daarna op de knop om te bevestigen.
2 Draai de M.C.-knop om de opties te selecteren, druk daarna op de knop om te
bevestigen.
Om naar de volgende menuoptie te gaan, dient u uw selectie te bevestigen.
3 [QUIT :YES] verschijnt als alle instellingen uitgevoerd zijn.
Om terug te keren naar het eerste item van het instellingenmenu, draait u de M.C.-
knop om [QUIT :NO] te selecteren, druk daarna op de knop om te bevestigen.
4 Druk op de M.C.-knop om de instellingen te bevestigen.
OPMERKINGEN
• U kunt de menu-instelling annuleren door op SRC/OFF te drukken.
• U kunt deze instellingen gelijk wanneer uitvoeren bij de SYSTEM-instellingen (pagina 20) en INITIAL-
instellingen (pagina 6).
1 Druk op de M.C.-knop om het hoofdmenu weer te geven.
2 Draai aan de M.C.-knop om [SYSTEM] te selecteren, druk daarna op de knop om
te bevestigen.
3 Draai aan de M.C.-knop om [DEMO OFF] te selecteren, druk daarna op de knop
om te bevestigen.
4 Draai aan de M.C.-knop om [YES] te selecteren, druk daarna op de knop om te
bevestigen.
Menu-item Beschrijving
LANGUAGE Selecteer de taal om tekstinformatie van een gecomprimeerd
audiobestand weer te geven.
[ENG](Engels),
[РУС](Russisch),
[TUR](Turks)
CLOCK SET Stel de klok in.
FM STEP Selecteer de FM-afstemstap uit 100 kHz of 50 kHz.
[100], [50]
De demonstratieweergave annuleren (DEMO OFF)

- 6 -
Nederlands
1 Hou SRC/OFF ingedrukt tot het toestel uitschakelt.
2 Hou SRC/OFF ingedrukt om het hoofdmenu weer te geven.
3 Draai aan de M.C.-knop om [INITIAL] te selecteren, druk daarna op de knop om te
bevestigen.
4 Draai de M.C.-knop om een optie te selecteren, druk daarna op de knop om te
bevestigen.
OPMERKING
De opties zijn afhankelijk van het toestel.
INITIAL-instellingen
Menu-item Beschrijving
FM STEP Selecteer de FM-afstemstap uit 100 kHz of 50 kHz.
[100], [50]
SP-P/O MODE Selecteer deze optie als een fullrange-luidspreker aangesloten is
op de draden voor de achterluidspreker en een subwoofer
aangesloten is op de RCA-uitgang.
[REAR/SUB.W]
[SUB.W/SUB.W] Selecteer deze optie als een passieve subwoofer direct
aangesloten is op de draden voor de achterluidspreker en een
subwoofer aangesloten is op de RCA-uitgang.
[REAR/REAR] Selecteer deze optie als fullrange-luidsprekers aangesloten zijn
op de draden voor de achterluidspreker en op de RCA-uitgang.
Als een fullrange-luidspreker aangesloten is op de draden voor
de achterluidspreker en de RCA-uitgang niet wordt gebruikt,
kunt u [REAR/SUB.W] of [REAR/REAR] selecteren.
S/W UPDATE Selecteer dit om de recentste systeeminformatie op het toestel
te bevestigen.
[SYSTEM INFO]
[SYSTEM UPDATE] Selecteer dit om het toestel bij te werken naar de recentste
software en de instellingen van het toestel te initialiseren. Voor
meer informatie over de recentste software en het updaten van
deze software kunt u terecht op onze website.
SYSTEM RESET Selecteer [YES] om de instellingen van het toestel te initialiseren.
Het toestel wordt automatisch opnieuw gestart.
(Sommige instellingen blijven behouden zelfs nadat een reset
van het toestel werd uitgevoerd.)
[YES], [NO]

- 7 -- 7 -
Nederlands
De tunerfrequenties van dit toestel zijn bedoeld voor gebruik in West-Europa, Azië, het
Midden-Oosten, Afrika en Oceanië. Bij gebruik in andere regio's kan de ontvangst zwak
zijn. De functie RDS (Radio Data System) werkt alleen in regio's die RDS-signalen voor
FM-zenders uitzenden.
1 Druk op SRC/OFF om [RADIO] te selecteren.
2 Druk op BAND/ om de band te selecteren uit [FM1], [FM2], [FM3], [MW] of
[LW].
3 Druk op een cijfertoets (1/ tot 6/).
TIP
De / -knoppen kunnen ook worden gebruikt om een voorkeuzezender te selecteren
wanneer [SEEK] is ingesteld op [PCH] in de FUNCTION-instellingen (pagina 18).
De zes sterkste zenders worden opgeslagen onder de cijfertoetsen (1/ tot 6/).
1 Druk, nadat u een band heeft geselecteerd, op de M.C.-knop om het hoofdmenu
weer te geven.
2 Draai aan de M.C.-knop om [FUNCTION] te selecteren, druk daarna op de knop
om te bevestigen.
3 Draai aan de M.C.-knop om [BSM] te selecteren, druk daarna op de knop om te
bevestigen.
Een zender handmatig zoeken
1
Als u de band heeft geselecteerd, drukt u op / om een zender te
selecteren.
Hou vervolgens / ingedrukt en laat los om een beschikbare zender te
zoeken. Het scannen stopt wanneer het toestel een zender ontvangt. Druk op /
om de zoekafstemming te annuleren.
OPMERKING
[SEEK] moet ingesteld zijn op [MAN] in de FUNCTION-instellingen (pagina 18).
Radio
Voorkeuzezenders ontvangen
Best stations memory (BSM)

- 8 -
Nederlands
Zenders handmatig opslaan
1
Terwijl u de zender ontvangt die u wilt opslaan, houdt u een van de cijfertoetsen
(1/ tot 6/ ) ingedrukt tot hij niet meer knippert.
Het toestel zoekt naar een zender op basis van de PTY (programmatype)-informatie.
1 Houd BASS ingedrukt tijdens FM ontvangst.
2 Draai de M.C.-knop om een programmatype te selecteren uit [NEWS/INFO],
[POPULAR], [CLASSICS] of [OTHERS].
3 Druk op de M.C.-knop.
Het toestel begint naar een zender te zoeken. Als een zender gevonden is, wordt de
servicenaam van het programma weergegeven.
OPMERKINGEN
• Om het zoeken te annuleren, drukt u op de M.C.-knop.
• Het programma van bepaalde zenders kan afwijken van de doorgestuurde PTY.
• Als geen enkele zender het gewenste programmatype uitzendt, wordt gedurende ongeveer twee
seconden [NOT FOUND] weergegeven en keert de tuner terug naar de oorspronkelijke zender.
OPMERKING
De iPod-functie is niet beschikbaar voor de MVH-S120UB/S120UBG/S120UBA/S120UBW.
Koppel de hoofdtelefoon los van het apparaat voor u het aansluit op het toestel.
USB-apparaten (inclusief Android™)/iPod
1
Open het deksel van de USB-poort.
2 Sluit het USB-apparaat/de iPod aan met behulp van een geschikte kabel.
OPMERKING
Om automatisch over te schakelen naar de bron [USB] wanneer er een USB-apparaat/iPod verbonden
wordt met het toestel, stelt u [USB AUTO] in op [ON] bij de SYSTEM-instellingen (pagina 21).
PTY-functies gebruiken
USB/iPod/AUX
Weergave

- 9 -- 9 -
Nederlands
LET OP
Gebruik een USB-kabel (apart verkrijgbaar) om het USB-apparaat aan te sluiten, omdat elk apparaat dat
rechtstreeks op het toestel aangesloten wordt, uitsteekt uit het toestel, wat gevaarlijk kan zijn.
Voor u het apparaat loskoppelt, dient u de weergave te stoppen.
AOA-verbindingen
Raapleeg pagina 15 voor meer informatie over AOA-verbindingen.
MTP-verbinding
Een apparaat waarop Android OS 4.0 of recenter geïnstalleerd is, kan via MTP worden verbonden met
het toestel met behulp van de bij het apparaat geleverde kabel. Afhankelijk van het aangesloten
apparaat en het aantal bestanden op het apparaat kunnen audiobestanden/songs echter mogelijk niet
via MTP worden afgespeeld. Merk op dat de MTP-verbinding niet compatibel is met de WAV- en FLAC-
bestandsindelingen.
OPMERKING
Als u een MTP-verbinding gebruikt, moet [ANDROID WIRED] ingesteld zijn op [MEMORY] in de SYSTEM-
instellingen (pagina 21).
AUX
1
Steek de stereo-miniplug in de AUX-ingangsaansluiting.
2 Druk op SRC/OFF om [AUX] als bron te selecteren.
OPMERKING
Als [AUX] is ingesteld op [OFF] in de SYSTEM-instellingen, kan [AUX] niet worden geselecteerd als bron
(pagina 20).
U kunt diverse instellingen uitvoeren in de FUNCTION-instellingen (pagina 17).
Merk op dat de volgende bedieningen niet werken voor een AUX-apparaat. Om een
AUX-apparaat te bedienen, dient u het apparaat zelf te gebruiken.
Bedieningen
Actie Bediening
Een map/album selecteren*1 Druk op 1/ of 2/.
Een fragment/song (hoofdstuk) selecteren Druk op of .
Snel vooruit- of achteruitspoelen*2 Houd of ingedrukt.

- 10 -
Nederlands
Een bestand in een lijst zoeken 1 Hou BASS ingedrukt om de lijst weer te
geven.
2 Draai de M.C.-knop om de naam van het
gewenste bestand (de gewenste map) of
categorie te selecteren, druk daarna op
de knop om te bevestigen.
3 Draai de M.C.-knop om het gewenste
bestand te selecteren, druk daarna op de
knop om te bevestigen.
De weergave start.
Een lijst met bestanden in de geselecteerde
map/categorie weergeven*1
Druk op de M.C.-knop wanneer een map/
categorie geselecteerd is.
Een song in de geselecteerde map/
categorie weergeven*1
Hou de M.C.-knop ingedrukt wanneer een
map/categorie geselecteerd is.
Alfabetisch zoeken (alleen voor een iPod) 1 Hou BASS ingedrukt om de lijst weer te
geven.
2 Draai aan de M.C.-knop om de gewenste
categorielijst te selecteren en druk
vervolgens op BASS om de alfabetische
zoekmodus te activeren.
(U kunt de alfabetische zoekmodus ook
activeren door de M.C.-knop twee keer
te verdraaien.)
3 Draai aan de M.C.-knop om een letter te
selecteren en druk vervolgens op de
knop om de alfabetische lijst weer te
geven.
Om alfabetisch zoeken te annuleren, drukt
u op BAND/.
Weergave herhalen Druk op 6/.
Willekeurige weergave/shuffle Druk op 5/.
Alles in shuffle weergeven (alleen iPod) Hou 5/ ingedrukt.
Weergave pauzeren/hervatten Druk op 4/PAUSE .
Sound retriever Druk op 3/S.Rtrv.
[1]: Geschikt voor lage compressiewaarden
[2]: Geschikt voor hoge compressiewaarden
Terug naar de rootmap (alleen voor USB)*1 Houd 1/ ingedrukt.
Stations wisselen op een USB-apparaat
(alleen apparaten die het protocol USB
mass storage device ondersteunen)
Druk op BAND/.
Actie Bediening

- 11 -- 11 -
Nederlands
*1 Alleen gecomprimeerde audiobestanden
*2 Wanneer u de functie snel vooruit- of achteruitspoelen gebruikt terwijl een VBR-bestand wordt
afgespeeld, is de weergaveduur mogelijk niet correct.
Link-weergavemodus
U kunt songs oproepen op basis van de momenteel weergegeven artiest, album of
genre.
1 Terwijl u naar een lied luistert, houdt u ingedrukt 4/PAUSE om naar de link-
weergavemodus te gaan.
2 Draai de M.C.-knop om de modus ([ARTIST], [ALBUM], [GENRE]) te selecteren, druk
daarna op de knop om te bevestigen.
De geselecteerde song/het geselecteerde album wordt weergegeven na de
momenteel weergegeven song.
OPMERKING
De geselecteerde song/het geselecteerde album kan worden geannuleerd als u andere functies
gebruikt dan functies uit de link-weergavemodus (bijv. snel vooruit en achteruit).
iPod-bediening
U kunt het toestel bedienen via een aangesloten iPod.
De volgende iPod-modellen zijn niet compatibel met deze functie.
– iPod nano 1e generatie, iPod met video
1 Druk op BAND/ tijdens het afspelen en selecteer vervolgens de
bedieningsmodus.
[CONTROL iPod]: De iPod-functie van het toestel kan bediend worden op de
aangesloten iPod.
[CONTROL AUDIO]: De iPod-functie van het toestel kan alleen bediend worden met
de knoppen op het toestel of met de bijgeleverde afstandsbediening. In deze modus
kan de aangesloten iPod niet worden in- of uitgeschakeld.
OPMERKINGEN
• De bedieningsmodus kan ook geschakeld worden door op iPod te drukken (alleen voor de MVH-
S120UI/S120UIG/S12UI).
• Als u overschakelt naar de bedieningsmodus [CONTROL iPod] wordt het afspelen van de song
gepauzeerd. Gebruik de aangesloten iPod om het afspelen te hervatten.
• De volgende bedieningen zijn nog steeds mogelijk op het toestel, zelfs als de bedieningsmodus
ingesteld is op [CONTROL iPod].
– Pauze, snel vooruit/achteruit, song/hoofdstuk selecteren
• Het volume kan alleen worden geregeld op het toestel.
Nuttige functies voor iPod

- 12 -
Nederlands
(De APP-modus is niet beschikbaar voor de MVH-S120UB/S120UBG/S120UBA/
S120UBW.)
U kunt via dit toestel luisteren naar een applicatie op een iPhone. In sommige gevallen
kunt u een applicatie bedienen met het toestel.
Meer informatie over compatibele apparaten vindt u op onze website.
Belangrijk
Voor gebruik van applicaties van derden worden mogelijk persoonsgegevens gebruikt of moet u zulke
gegevens verstrekken, bijvoorbeeld door het opzetten van een gebruikersaccount of op andere wijze,
en voor sommige applicaties worden mogelijk geolocatiegegevens gebruikt.
ALLE APPLICATIES VAN DERDEN VALLEN UITSLUITEND ONDER VERANTWOORDELIJKHEID VAN HUN
UITGEVER, INCLUSIEF MAAR NIET BEPERKT TOT HET VERZAMELEN EN BEVEILIGEN VAN
GEBRUIKERSGEGEVENS EN HET PRIVACYBELEID. DOOR EEN APPLICATIE VAN DERDEN TE GEBRUIKEN,
GAAT U ERMEE AKKOORD OM U TE INFORMEREN OVER DE GEBRUIKSVOORWAARDEN EN HET
PRIVACYBELEID VAN DE UITGEVER ERVAN. ALS U NIET AKKOORD GAAT MET DE
GEBRUIKSVOORWAARDEN OF HET BELEID VAN EEN UITGEVER OF GEEN TOESTEMMING GEEFT VOOR
HET GEBRUIK VAN GEOLOCATIEGEGEVENS (INDIEN VAN TOEPASSING), MOET U DE APPLICATIE NIET
GEBRUIKEN.
Voor iPhone-gebruikers
Deze functie is compatibel met iPhone en iPod touch waarop iOS 5.0 of recenter geïnstalleerd is.
OPMERKING
PIONEER IS NIET AANSPRAKELIJK VOOR APPLICATIES VAN DERDEN OF HUN INHOUD, INCLUSIEF MAAR
NIET BEPERKT TOT HUN NAUWKEURIGHEID OF VOLLEDIGHEID. DE INHOUD EN DE FUNCTIONALITEIT
VAN DERGELIJKE APPLICATIES ZIJN UITSLUITEND DE VERANTWOORDELIJKHEID VAN DE LEVERANCIER
VAN DE APPLICATIE.
1 Verbind dit toestel met het mobiele apparaat.
• iPhone via USB (pagina 8)
2 Druk op SRC/OFF om [APP] te selecteren.
3 Bedien het mobiele apparaat om de applicatie te starten.
Basisbedieningen
U kunt diverse instellingen uitvoeren in de FUNCTION-instellingen (pagina 17).
App-modus
Een applicatie weergeven via het toestel
Actie Bediening
Een track selecteren Druk op of .
Snel vooruit- of achteruitspoelen Houd of ingedrukt.

- 13 -- 13 -
Nederlands
(MVH-S120UI/S120UIG/S12UI is alleen compatibel met Spotify geïnstalleerd op iPhone.)
Spotify is een verspreidingsservice voor muziekstreaming die niet aangesloten is bij
Pioneer. Meer informatie vindt u op http://www.spotify.com.
De Spotify-toepassing is beschikbaar voor compatibele telefoons. Raadpleeg https://
support.spotify.com/ voor de recentste informatie over compatibiliteit.
Om van Spotify te genieten terwijl u rijdt, downloadt u eerst de Spotify-app op uw
iPhone. U kunt deze downloaden van de iTunes App Store. Kies een gratis account of
een betaalde Premium account, ofwel in de app of op spotify.com. Een Premium
account geeft u meer functies, zoals offline luisteren.
Belangrijk
• Dit product omvat Spotify-software, die onderworpen is aan licenties van derden, die u hier kunt
vinden: www.spotify.com/connect/third-party-licenses.
• Voor informatie over de landen en regio's waar Spotify kan worden gebruikt, gaat u naar https://
spotify.com/us/select-your-country/.
Update de firmware van Spotify naar de recentste versie voor u de applicatie gebruikt.
1 Verbind dit toestel met het mobiele apparaat.
• iPhone via USB (pagina 8)
2 Druk op SRC/OFF om [SPOTIFY] te selecteren.
3 Open de applicatie Spotify op het mobiele apparaat en start de weergave.
Basisbedieningen
U kunt diverse instellingen uitvoeren in de FUNCTION-instellingen (pagina 17).
OPMERKING
De beschikbare functies zijn afhankelijk van het soort inhoud (track/album/artiest/afspeellijst/radio)
dat u wilt afspelen.
Het afspelen pauzeren/hervatten Druk op BAND/.
Spotify®
Luisteren naar Spotify
Actie Bediening
Een fragment overspringen Druk op of .
Actie Bediening

- 14 -
Nederlands
OPMERKING
Sommige functies van Spotify kunnen niet op het toestel worden bediend.
(De Pioneer ARC APP voor iPhone is niet beschikbaar voor de MVH-S120UB/S120UBG/
S120UBA/S120UBW.)
U kunt het toestel bedienen via een Pioneer ARC APP die geïnstalleerd is op een iPhone/
Android-apparaat. In sommige gevallen kunt u via het toestel bepaalde functies van de
toepassing gebruiken, zoals bronselectie, pauzeren enz.
Raadpleeg de helpfunctie van de toepassing voor meer informatie over welke functies
er beschikbaar zijn in de toepassing.
Een track in een lijst zoeken 1 Hou BASS ingedrukt om de lijst weer te
geven.
2 Draai de M.C.-knop om de gewenste
categorie te selecteren, druk daarna op
de knop om te bevestigen.
3 Draai de M.C.-knop om het gewenste
bestand te selecteren, druk daarna op de
knop om te bevestigen.
De weergave start.
Het afspelen pauzeren/hervatten Druk op 4/PAUSE.
Duim omhoog (alleen voor radio) Druk op 1/.
Duim omlaag (alleen voor radio) Druk op 2/.
Willekeurige weergave (alleen voor track/
album/artiest/afspeellijst)
Druk op 5/.
Weergave herhalen (alleen voor track/
album/artiest/afspeellijst)
Druk op 6/.
Start een radiokanaal op basis van de song
die momenteel wordt afgespeeld.
1 Houd 5/ ingedrukt om een radio te
starten.
2 Druk op de M.C.-knop.
• Deze functie is mogelijk niet beschikbaar,
afhankelijk van de geselecteerde song.
Sla de informatie op van de song die
momenteel wordt afgespeeld.
Verwijder de songinformatie die
opgeslagen is.
1 Houd 3/S.Rtrv ingedrukt.
[SAVE]/[UNSAVE] verschijnt.
2 Druk op de M.C.-knop.
Pioneer ARC APP gebruiken
Actie Bediening

- 15 -- 15 -
Nederlands
WAARSCHUWING
Bedien de toepassing niet terwijl u rijdt. Parkeer uw wagen op een veilige plaats voor u de
bedieningselementen van de toepassing gebruikt.
Voor iPhone-gebruikers
Deze functie is compatibel met iPhones (iPhone 5 of later) en iPod touches waarop iOS
8.0 of later geïnstalleerd is.
U kunt Pioneer ARC APP downloaden op iTunes App Store.
Voor gebruikers van Android-apparaten
Deze functie is compatibel met een telefoon met daarop Android 4.1 tot 7.1.2 die ook
AOA (Android Open Accessory) 2.0 ondersteunt, maar de compatibiliteit is afhankelijk
van de smartphone.
U kunt de Pioneer ARC APP downloaden op Google Play™.
OPMERKING
Sommige Android-apparaten die via AOA 2.0 verbonden zijn, werken mogelijk niet goed of
produceren geluiden ten gevolge van hun eigen softwareontwerp, ongeacht de OS-versie.
Bij het maken van een verbinding met een Android apparaat
1
Druk op de M.C.-knop om het hoofdmenu weer te geven.
2 Draai aan de M.C.-knop om [SYSTEM] te selecteren, en druk vervolgens op de
knop om te bevestigen.
3 Draai aan de M.C.-knop om [ANDROID WIRED] te selecteren, en druk vervolgens
op de knop om te bevestigen.
4 Draai aan de M.C.-knop om [APP CONTROL] te selecteren, en druk vervolgens op
de knop om te bevestigen.
5 Draai aan de M.C.-knop om [P.APP AUTO ON] te selecteren, en druk vervolgens op
de knop om te bevestigen.
6 Draai aan de M.C.-knop om [ON] te selecteren, en druk vervolgens op de knop om
te bevestigen.
7 Verbind dit toestel met het Android apparaat via USB.
Pioneer ARC APP op het Android apparaat start automatisch.
OPMERKING
Als Pioneer ARC APP niet op uw Android-apparaat werd geïnstalleerd, verschijnt een bericht op uw
Android-apparaat om u te vragen de applicatie te installeren. Selecteer [OFF] in [P.APP AUTO ON]
om het bericht te verwijderen (pagina 21).
Een verbinding tot stand brengen met Pioneer ARC
APP

- 16 -
Nederlands
Wanneer u een verbinding met iPhone maakt
1
Verbind dit toestel met iPhone via USB.
2 Druk op SRC/OFF om een bron te selecteren.
3 Houd de M.C.-knop ingedrukt.
Pioneer ARC APP op de iPhone start.
OPMERKING
Wanneer de verbinding mislukt, start Pioneer ARC APP op de iPhone.
1 Druk op SRC/OFF om [ANDROID] te selecteren.
Basisbedieningen
U kunt diverse instellingen aanpassen in het hoofdmenu.
1 Druk op de M.C.-knop om het hoofdmenu weer te geven.
2 Draai vervolgens aan de M.C.-knop om een van de volgende categorieën te
selecteren, druk daarna op de knop om te bevestigen.
• FUNCTION-instellingen (pagina 17)
• AUDIO-instellingen (pagina 18)
• SYSTEM-instellingen (pagina 20)
• ILLUMINATION-instellingen (pagina 21)
3 Draai de M.C.-knop om de opties te selecteren, druk daarna op de knop om te
bevestigen.
Muziek beluisteren op een Android-apparaat
Actie Bediening
Een track selecteren Druk op of .
Snel vooruit- of achteruitspoelen Houd of ingedrukt.
Het afspelen pauzeren/hervatten Druk op 4/PAUSE.
Sound retriever Druk op 3/S.Rtrv.
[1]: Geschikt voor lage compressiewaarden
[2]: Geschikt voor hoge compressiewaarden
Instellingen

- 17 -- 17 -
Nederlands
OPMERKINGEN
• De iPod-menu-items in de volgende tabellen zijn niet beschikbaar voor de MVH-S120UB/S120UBG/
S120UBA/S120UBW.
• De menu-items voor de APP-modus in de volgende tabellen zijn niet beschikbaar voor de MVH-
S120UB/S120UBG/S120UBA/S120UBW.
De menu-items zijn afhankelijk van de bron.
FUNCTION-instellingen
Menu-item Beschrijving
FM SETTING
[TALK], [STANDARD], [MUSIC] Pas de geluidskwaliteit aan aan het zendsignaal
van de FM-band. (Alleen beschikbaar wanneer
FM-band is geselecteerd.)
BSM
Sla de zes sterkste zenders automatisch op onder
de cijfertoetsen (1/ tot 6/).
REGIONAL
[ON], [OFF] Beperk de ontvangst tot de specifieke regionale
programma's wanneer AF (alternatieve
frequenties zoeken) geselecteerd is. (Alleen
beschikbaar wanneer FM-band is geselecteerd.)
LOCAL
FM: [OFF], [LV1], [LV2], [LV3], [LV4]
MW/LW: [OFF], [LV1], [LV2]
Beperk de zenders automatisch volgens de
signaalsterkte.
TA
[ON], [OFF] Ontvang actuele verkeersinformatie indien
beschikbaar. (Alleen beschikbaar wanneer FM-
band is geselecteerd.)
AF
[ON], [OFF] Laat het toestel opnieuw afstemmen op een
andere frequentie van dezelfde zender. (Alleen
beschikbaar wanneer FM-band is geselecteerd.)
NEWS
[ON], [OFF] Onderbreek de momenteel geselecteerde bron
met nieuwsberichten. (Alleen beschikbaar
wanneer FM-band is geselecteerd.)

- 18 -
Nederlands
SEEK
[MAN], [PCH] Wijs de knoppen of toe om zenders
een voor een te zoeken (handmatige
afstemming) of selecteer een zender uit de
voorgeprogrammeerde kanalen.
SAVE
Sla de informatie van de momenteel afgespeelde
song op in uw muzieklijst op Spotify.
UNSAVE
Verwijder de songinformatie die opgeslagen is in
[SAVE].
S.RTRV
[1] (geschikt voor lage
compressiewaarden),
[2] (geschikt voor hoge
compressiewaarden),
[OFF]
Verbeter gecomprimeerde audio en zorg voor
een rijk geluid.
Niet beschikbaar wanneer het FLAC-bestand
wordt weergegeven.
AUDIO BOOK
[FASTER], [NORMAL], [SLOWER] Wijzig de weergavesnelheid. (Niet beschikbaar
wanneer [CONTROL iPod] geselecteerd is in de
bedieningsmodus.)
PAUSE
Pauzeer of hervat de weergave.
AUDIO-instellingen
Menu-item Beschrijving
FADER*1
Pas de balans aan tussen de voor- en
achterluidspreker.
BALANCE
Pas de balans aan tussen de linker en rechter
luidspreker.
Menu-item Beschrijving
USB
iPod
iPod

- 19 -- 19 -
Nederlands
*1 Niet beschikbaar wanneer [SUB.W/SUB.W] is geselecteerd in [SP-P/O MODE] in de INITIAL-
instellingen (pagina 6).
EQ SETTING
[SUPER BASS], [POWERFUL],
[DYNAMIC], [NATURAL], [VOCAL],
[VIVID], [CUSTOM1], [CUSTOM2],
[FLAT]
Selecteer een equalizerband en -
niveau voor verdere aanpassing.
Equalizerband: [80HZ], [250HZ],
[800HZ], [2.5KHZ], [8KHZ]
Equalizerniveau: [+6] tot [–6]
Selecteer de equalizercurve of pas deze aan.
[CUSTOM1] kan voor elke bron afzonderlijk
worden ingesteld. Alle hierna vermelde
combinaties worden echter automatisch
ingesteld op dezelfde instelling.
• USB, iPod, ANDROID, SPOTIFY en APP (iPhone)
[CUSTOM2] is een gedeelde instelling die voor
alle bronnen wordt gebruikt.
U kunt de equalizer ook wijzigen door
herhaaldelijk op te drukken (alleen
voor de MVH-S120UB/S120UBG/S120UBA/
S120UBW).
LOUDNESS
[OFF], [LOW], [MID], [HI] Compenseer voor een helder geluid bij laag
volume.
SUB.W*2
[NOR], [REV], [OFF] Selecteer de subwooferfase.
SUB.W CTRL*2*3
Drempelfrequentie: [50HZ],
[63HZ], [80HZ], [100HZ], [125HZ],
[160HZ], [200HZ]
Uitgangsniveau: [–24] tot [+6]
Hellingsniveau: [–12], [–24]
Alleen frequenties die lager zijn dan de
frequenties in het geselecteerde bereik, worden
weergegeven door de subwoofer.
BASS BOOST
[0] tot [+6] Selecteer het bass boost-niveau.
HPF SETTING
Drempelfrequentie: [OFF],
[50HZ], [63HZ], [80HZ], [100HZ],
[125HZ], [160HZ], [200HZ]
Hellingsniveau: [–12], [–24]
Alleen frequenties boven de drempelfrequentie
van het hoog-doorlaatfilter (HPF) worden
weergegeven.
SLA
[+4] tot [–4] Pas het volume aan voor elke bron behalve FM.
Alle hierna vermelde combinaties worden
automatisch ingesteld op dezelfde instelling.
• USB, iPod, ANDROID, SPOTIFY en APP (iPhone)
Menu-item Beschrijving

- 20 -
Nederlands
*2 Niet beschikbaar wanneer [REAR/REAR] is geselecteerd in [SP-P/O MODE] in de INITIAL-instellingen
(pagina 6).
*3 Niet beschikbaar wanneer [OFF] is geselecteerd in [SUB.W].
U kunt deze menu's ook oproepen wanneer het toestel uitgeschakeld is.
SYSTEM-instellingen
Menu-item Beschrijving
LANGUAGE
[ENG](Engels), [РУС](Russisch),
[TUR](Turks)
Selecteer de taal om tekstinformatie van een
gecomprimeerd audiobestand weer te geven.
CLOCK SET
Stel de klok in (pagina 5).
12H/24H
[12H], [24H] Selecteer de tijdnotatie.
SCROLL SET
[ONCE], [LOOP], [OFF] Selecteer de manier waarop u door de tekst in
het weergavevenster wilt bladeren.
AUTO PI
[ON], [OFF] Zoek naar een andere zender met dezelfde
programmering, zelfs als u een voorkeuzezender
gebruikt.
AUX
[ON], [OFF] Stel in op [ON] wanneer een hulpapparaat wordt
gebruikt dat verbonden is met het toestel.
SPOTIFY
[ON], [OFF] Stel in op [ON] wanneer u de Spotify-functie
gebruikt.
MUTE MODE (alleen voor de MVH-S120UI/S120UIG/S12UI)
[MUTE], [20dB ATT], [10dB ATT] Schakel het geluid automatisch uit of onderdruk
het geluid wanneer een signaal wordt
ontvangen van een apparatuur met
stilschakelfunctie.
PW SAVE*
[ON], [OFF] Verminder het verbruik van batterijvermogen.
Het inschakelen van de bron is de enige
handeling die met deze functie mogelijk is.

- 21 -- 21 -
Nederlands
* [PW SAVE] wordt geannuleerd als de accu losgekoppeld wordt, en moet weer worden ingeschakeld
als de accu weer wordt aangesloten. Wanneer [PW SAVE] uitgeschakeld is, kan het toestel, afhankelijk
van de verbindingsmethode, stroom van de accu blijven trekken als de ontsteking van uw wagen
geen positie ACC (accessoire) heeft.
ANDROID WIRED
[MEMORY], [APP CONTROL] Selecteer de geschikte verbindingsmethode
voor een Android-apparaat.
P. AP P AU TO O N
[ON], [OFF]
Selecteer [ON] om Pioneer ARC APP automatisch
te starten wanneer een Android-apparaat wordt
verbonden aan het toestel via AOA. (Niet
beschikbaar wanneer [MEMORY] is geselecteerd in
[ANDROID WIRED].)
USB AUTO
[ON], [OFF] Selecteer [ON] om automatisch over te
schakelen naar de bron [USB] wanneer er een
USB-apparaat/iPod verbonden wordt met het
toestel.
Selecteer [OFF] wanneer een USB-apparaat/iPod
alleen aangesloten wordt om opgeladen te
worden.
ILLUMINATION-instellingen
Menu-item Beschrijving
DIM SETTING
[SYNC CLOCK], [MANUAL] Selecteer de manier om de helderheid van het
scherm te wijzigen.
BRIGHTNESS
[1] tot [10] De display-helderheid wijzigen.
De beschikbare instelbereiken zijn verschillend
afhankelijk van [DIM SETTING].
Menu-item Beschrijving

- 22 -
Nederlands
Het display keert automatisch terug naar
het gewone display.
→ U hebt gedurende ongeveer 30
seconden geen handeling uitgevoerd.
–Voer een handeling uit.
Het bereik voor weergave herhalen wordt
onverwacht gewijzigd.
→ Afhankelijk van het bereik voor
weergave herhalen kan het
geselecteerde bereik gewijzigd worden
wanneer u een andere map of een
ander fragment selecteert of vooruit of
achteruit spoelt.
–Selecteer het gewenste bereik voor
weergave herhalen opnieuw.
Een onderliggende map wordt niet
afgespeeld.
→ Onderliggende mappen worden niet
afgespeeld wanneer [FLD] (map
herhalen) is geselecteerd.
–Selecteer een ander bereik voor
weergave herhalen.
Het geluid is onderbroken.
→ U gebruikt een apparaat, zoals een
mobiele telefoon, die hoorbare
storingen veroorzaakt.
–Plaats elektrische apparaten die de
storing kunnen veroorzaken, verder
weg van het toestel.
Algemeen
AMP ERROR
→ Dit toestel werkt niet of er is een
probleem met de
luidsprekeraansluiting.
→ Het beveiligingscircuit is geactiveerd.
–Controleer de luidsprekeraansluiting.
–Draai de contactschakelaar naar OFF
en weer naar ON. Als het bericht nog
wordt weergegeven, neemt u contact
op met uw leverancier of een erkend
Pioneer Servicecentrum.
NO XXXX (bijvoorbeeld NO TITLE)
→ Er is geen ingebedde tekstinformatie.
–Schakel het display om of speel een
ander fragment/bestand af.
USB-apparaat/iPod
FORMAT READ
→ Soms is er een vertraging tussen het
begin van de weergave en wanneer u
het geluid begint te horen.
– Wacht tot het bericht verdwijnt en u
het geluid hoort.
NO AUDIO
→ Er zijn geen songs.
–Zet de audiobestanden over naar het
USB-apparaat en maak verbinding.
→ De inhoud van het USB-apparaat is
beveiligd.
–Raadpleeg de instructies bij het USB-
apparaat om de beveiliging uit te
schakelen.
SKIPPED
→ Het aangesloten USB-apparaat bevat
bestanden die met DRM zijn beveiligd.
Aanvullende informatie
Problemen verhelpen Foutmeldingen

- 23 -
Nederlands
–Beveiligde bestanden worden
overgeslagen.
PROTECT
→ Alle bestanden op het aangesloten
USB-apparaat zijn beveiligd met DRM.
–Gebruik een ander USB-apparaat.
N/A USB
→ Het aangesloten USB-apparaat wordt
niet ondersteund door dit toestel.
–Gebruik een apparaat dat compatibel
is met USB.
HUB ERROR
→ USB-apparaten die aangesloten zijn via
een USB-hub worden niet ondersteund
door dit toestel.
–Sluit het USB-apparaat rechtstreeks
aan op dit toestel met behulp van een
USB-kabel.
CHECK USB
→ Er is kortsluiting opgetreden in de USB-
stekker of de USB-kabel.
–Controleer of de USB-stekker en de
USB-kabel niet ergens ingeklemd of
beschadigd zijn.
→ Het aangesloten USB-apparaat
verbruikt meer stroom dan de maximaal
toelaatbare waarde.
–Ontkoppel het USB-apparaat en
gebruik het niet meer. Zet de
contactschakelaar op UIT en daarna
op ACC of AAN. Sluit alleen
compatibele USB-apparaten aan.
ERROR-19
→ Communicatiefout.
–Probeer een van de volgende
mogelijkheden en keer dan terug naar
de USB-bron.
• Ontkoppel het USB-apparaat.
• Schakel over naar een andere
signaalbron.
→ iPod-fout.
– Verwijder de kabel uit de iPod. Sluit de
kabel weer aan als het hoofdmenu van
de iPod wordt weergegeven en stel de
iPod opnieuw in.
ERROR-23
→ Het USB-apparaat was niet goed
geformatteerd.
–Formatteer het USB-apparaat met
FAT12, FAT16 of FAT32.
ERROR-16
→ De versie van de iPod-firmware is
verouderd.
–Werk de versie van de iPod bij.
→ iPod-fout.
– Verwijder de kabel uit de iPod. Sluit de
kabel weer aan als het hoofdmenu van
de iPod wordt weergegeven en stel de
iPod opnieuw in.
STOP
→ De huidige lijst bevat geen songs.
–Selecteer een lijst die wel songs bevat.
NOT FOUND
→ Geen verwante songs.
–Zet songs over naar de iPod.
APP
START UP APP
→ De applicatie is nog niet gestart.
–Bedien het mobiele apparaat om de
applicatie te starten.
Spotify
CHECK APP
→ Verbinding met de applicatie Spotify
mislukt.
–Volg de instructies op het scherm.

- 24 -
Nederlands
USB-opslagapparaat
• Het maken van verbindingen via een
USB-hub wordt niet ondersteund.
• Maak het USB-apparaat stevig vast
voordat u gaat rijden. Zorg dat het USB-
apparaat niet op de vloer valt omdat het
dan onder het rem- of gaspedaal terecht
kan komen.
• Afhankelijk van het USB-apparaat kunnen
de volgende problemen voorkomen.
– De bediening kan verschillend zijn.
– Het opslagapparaat wordt niet herkend.
–Bestanden worden niet correct
afgespeeld.
– Het apparaat kan hoorbare interferentie
veroorzaken wanneer u naar de radio
luistert.
iPod
• Stel de iPod niet bloot aan hoge
temperaturen.
• Maak de iPod stevig vast voordat u gaat
rijden. Zorg dat de iPod niet op de vloer
kan vallen omdat hij dan onder het rem-
of gaspedaal terecht kan komen.
• De instellingen van de iPod, zoals de
equalizer en weergave herhalen, worden
automatisch gewijzigd wanneer de iPod
wordt aangesloten op het toestel. Als de
iPod wordt losgekoppeld, keren deze
instellingen terug naar de
oorspronkelijke instellingen.
• Tekst op de iPod die niet compatibel is
met de specificaties van dit toestel, kan
niet worden weergegeven.
• Alleen de eerste 32 tekens van de
bestandsnaam (inclusief de extensie) of
mapnaam worden weergegeven.
• Een juiste werking van dit toestel is
afhankelijk van de toepassing waarmee
de WMA-bestanden zijn gecodeerd.
• Er kan een beetje vertraging optreden bij
het beginnen met afspelen van
audiobestanden met beeldgegevens of
audiobestanden op een USB-apparaat
met een uitgebreide mappenstructuur.
• Russische tekst kan alleen op dit toestel
worden weergegeven als die met een van
de volgende tekensets is gecodeerd:
– Unicode (UTF-8, UTF-16)
– Andere tekensets dan Unicode die in
een Windows-omgeving worden
gebruikt en op Russisch zijn ingesteld
bij de taalinstellingen
LET OP
• Pioneer garandeert geen compatibiliteit
met alle USB-opslagapparaten en kan
niet verantwoordelijk worden gesteld
voor eventueel gegevensverlies op
mediaspelers, smartphones of andere
apparaten tijdens het gebruik van dit
product.
• Laat discs en USB-opslagapparaten niet
achter op plaatsen waar de temperatuur
hoog kan oplopen.
WMA-bestanden
Aanwijzingen voor het
gebruik
Compatibiliteit met
gecomprimeerde audio
Bestandsextensie .wma
Bitsnelheid 48 kbps tot 320 kbps
(CBR), 48 kbps tot 384
kbps (VBR)
Bemonsteringsfrequentie
32 kHz, 44,1 kHz, 48
kHz

- 25 -
Nederlands
MP3-bestanden
WAV-bestanden
• WAV-bestandsindelingen kunnen niet
worden gebruikt via MTP.
FLAC-bestanden
• FLAC-bestandsindelingen kunnen niet
worden gebruikt via MTP.
• FLAC-bestanden kunnen, afhankelijk van
de codeerinrichting, mogelijk niet
worden afgespeeld.
USB-apparaat
• Er kan een beetje vertraging optreden bij
het beginnen met afspelen van
audiobestanden op een USB-
opslagapparaat met een uitgebreide
mappenstructuur.
Alleen de volgende iPod-modellen kunnen met
dit toestel gebruikt worden. Oudere versies
worden wellicht niet ondersteund.
Gemaakt voor
–iPod touch (1e tot 6e generatie)
–iPod classic
–iPod nano (3e tot 7e generatie)
–iPhone 6s
– iPhone 6s Plus
–iPhone 6
–iPhone 6 Plus
–iPhone 5s
–iPhone 5c
–iPhone 5
–iPhone4s
–iPhone4
–iPhone3GS
–iPhone3G
–iPhone
Windows Media™
Audio Professional,
Lossless, Voice/DRM
Stream/Stream met
video
Niet compatibel
Bestandsextensie .mp3
Bitsnelheid 8 kbps tot 320 kbps
(CBR), VBR
Bemonsteringsfrequentie
8 kHz tot 48 kHz (32
kHz, 44,1 kHz, 48 kHz
voor de beste
kwaliteit)
Compatibele ID3-tag-
versie
1.0, 1.1, 2.2, 2.3, 2.4
(ID3-tag versie 2.x
krijgt prioriteit boven
versie 1.x.)
M3u-afspeellijst Niet compatibel
MP3i (MP3
interactive), mp3 PRO
Niet compatibel
Bestandsextensie .wav
Kwantisatiebits 8 en 16 (LPCM)
Bemonsteringsfreque
ntie
16 kHz tot 48 kHz
(LPCM)
Bestandsextensie .flac
Bemonsteringsfreque
ntie
8 / 11,025 / 12 / 16 /
22,05 / 24 / 32 / 44,1 /
48 kHz
Kwantisatiebitsnelhei
d
16 bits
Kanaalmodus 1/2 kanalen
Hiërarchie afspeelbare
mappen
Tot acht niveaus (voor
praktisch gebruik kunt
u beter niet meer dan
twee niveaus
gebruiken)
Afspeelbare mappen Maximaal 500
Afspeelbare
bestanden
Maximaal 15 000
Afspelen van
auteursrechtelijk
beschermde
bestanden
Niet compatibel
Gepartitioneerd USB-
apparaat
Alleen de eerste
partitie kan worden
afgespeeld.
Compatibiliteit met
iPod

- 26 -
Nederlands
• Afhankelijk van de generatie en de versie
van de iPod zijn sommige functies
mogelijk niet beschikbaar.
• Gebruikers van iPod met de Lightning
Connector moeten de Lightning naar
USB Cable gebruiken (bij de iPod
geleverd).
• Gebruikers van een iPod met Dock
Connector moeten CD-IU51 gebruiken.
Raadpleeg uw leverancier voor meer
informatie.
• Raadpleeg de handleiding van de iPod
voor meer informatie over ondersteunde
bestandsindelingen.
• Audiobook, Podcast: Compatibel
LET OP
Pioneer is niet verantwoordelijk voor
verlies van gegevens op de iPod, ook niet
tijdens het gebruik van dit toestel.
De gebruiker kan met dit toestel geen
mapnummers toewijzen of de
afspeelvolgorde wijzigen. De volgorde van
de audiobestanden is afhankelijk van het
aangesloten apparaat.
Merk op dat verborgen bestanden op een
USB-apparaat niet kunnen worden
weergegeven.
Voorbeeld van een boomstructuur
Volgorde van
audiobestanden
Lijst van Russische tekens
Map
Gecomprimeerd
audiobestand
tot : Afspeelvolgorde
01 tot 05: Mapnummer
D: Display C: Teken

- 27 -
Nederlands
iTunes
Apple en iTunes zijn handelsmerken van
Apple Inc., geregistreerd in de V.S. en
andere landen.
WMA
Windows Media is een gedeponeerd
handelsmerk of een handelsmerk van
Microsoft Corporation in de Verenigde
Staten en/of in andere landen.
Dit product bevat technologie die het
eigendom is van Microsoft Corporation en
die niet gebruikt of gedistribueerd mag
worden zonder toestemming van
Microsoft Licensing, Inc.
FLAC
Copyright © 2000-2009 Josh Coalson
Copyright © 2011-2013 Xiph.Org
Foundation
Verspreiding en gebruik in bron- en binaire
vorm, met of zonder wijziging, is
toegestaan mits aan de volgende
voorwaarden is voldaan:
–Elke verspreiding van broncode moet de
hierboven vermelde auteursrechtelijke
mededeling omvatten, alsook deze lijst
met voorwaarden en de volgende
disclaimer.
–Verspreidingen in binaire vorm moeten
de hierboven vermelde
auteursrechtelijke mededeling, alsook
deze lijst met voorwaarden en de
volgende disclaimer opnemen in de
documentatie en/of andere materialen
die bij de verspreiding worden geleverd.
–De naam van Xiph.org Foundation noch
de naam van zijn bijdragers mogen
worden gebruikt om producten die van
deze software afgeleid zijn, te
onderschrijven of te promoten zonder
specifieke, voorafgaande en schriftelijke
toestemming.
DEZE SOFTWARE WORDT DOOR DE
HOUDERS VAN HET AUTEURSRECHT EN
DOOR DE BIJDRAGERS “ZONDER MEER”
GELEVERD, EN ER WORDT GEEN ENKELE
UITDRUKKELIJKE OF IMPLICIETE GARANTIE
VERLEEND, INCLUSIEF MAAR NIET BEPERKT
TOT IMPLICIETE GARANTIES VAN
VERKOOPBAARHEID EN GESCHIKTHEID
VOOR EEN BEPAALD DOEL. IN GEEN GEVAL
KUNNEN DE STICHTING OF HAAR
BIJDRAGERS AANSPRAKELIJK WORDEN
GESTELD VOOR DIRECTE, INDIRECTE,
INCIDENTELE, SPECIALE, EXEMPLARISCHE
OF GEVOLGSCHADE (INCLUSIEF MAAR
NIET BEPERKT TOT AANKOOP VAN
VERVANGGOEDEREN OF -DIENSTEN;
VERLIES VAN GEBRUIK, GEGEVENS OF
WINST; OF BEDRIJFSONDERBREKING)
ONGEACHT DE MANIER WAAROP DEZE
WERD VEROORZAAKT EN ONGEACHT ELKE
AANSPRAKELIJKHEIDSTHEORIE, ZOWEL IN
CONTRACT, STRIKTE AANSPRAKELIJKHEID
OF TORT (INCLUSIEF VERWAARLOZING OF
ANDERSZINS) OP ENIGERLEI WIJZE
RESULTEREND UIT HET GEBRUIK VAN DEZE
SOFTWARE, ZELFS INDIEN DE
MOGELIJKHEID VAN DEZE SCHADE WERD
GEMELD.
iPhone, iPod en Lightning
Gebruik van het Made for Apple label
betekent dat de accessoire speciaal voor
het Apple product(en) op het label is
gemaakt en volgens de ontwikkelaar
voldoet aan de prestatiestandaarden van
Apple. Apple is niet verantwoordelijk voor
de werking van dit apparaat of de naleving
ervan ten aanzien van veiligheid en
wettelijke normen.
Het gebruik van deze accessoire met een
Apple product kan de prestaties van de
draadloze netwerkverbinding negatief
beïnvloeden.
iPhone, iPod, iPod classic, iPod nano, iPod
touch en Lightning zijn handelsmerken
van Apple Inc., geregistreerd in de V.S. en
andere landen.
Copyright en
handelsmerken

- 28 -
Nederlands
Google™, Google Play, Android
Google, Google Play en Android zijn
handelsmerken van Google LLC.
Spotify®
SPOTIFY en het Spotify-logo zijn
gedeponeerde handelsmerken van Spotify
AB. Compatibel mobiel digitaal apparaat
en premium-abonnement vereist indien
beschikbaar; zie https://www.spotify.com.
Algemeen
Spanningsbron: 14,4 V gelijkstroom (10,8 V
tot 15,1 V toelaatbaar)
Aardingsysteem: negatief
Maximaal stroomverbruik: 10,0 A
Afmetingen (B × H × D):
DIN
Chassis: 178 mm × 50 mm × 97 mm
Voorkant: 188 mm × 58 mm × 17 mm
D
Chassis: 178 mm × 50 mm × 97 mm
Voorkant: 170 mm × 46 mm × 17 mm
Gewicht: 0,5 kg
Audio
Maximaal uitgangsvermogen:
• 50 W × 4 kan./4 Ω (zonder
subwoofer)
• 50 W × 2 kan./4 Ω + 70 W × 1 kan./2
Ω (met subwoofer)
Doorlopend uitgangsvermogen:
22 W × 4 (50 Hz tot 15 000 Hz, 5%
THD, 4-Ω-belasting, beide kanalen)
Belastingsimpedantie: 4 Ω (4 Ω tot 8 Ω
toegestaan)
Preout maximaal uitgangsniveau: 2,0 V
Contouren loudness: +10 dB (100 Hz),
+6,5 dB (10 kHz) (volume: –30 dB)
Equalizer (grafische equalizer met 5
banden):
Frequentie: 80 Hz/250 Hz/800 Hz/
2,5 kHz/8 kHz
Bereik equalizer: ±12 dB (in stappen
van 2 dB)
Subwoofer (mono):
Frequentie: 50 Hz/63 Hz/80 Hz/
100 Hz/125 Hz/160 Hz/200 Hz
Helling: –12 dB/oct, –24 dB/oct
Gain: +6 dB tot –24 dB
Fase: Normaal/tegengesteld
USB
USB-standaardspecificatie: USB 2.0
volledige snelheid
Maximaal stroomverbruik: 1 A
USB-protocol:
MSC (Mass Storage Class)
MTP (Media Transfer Protocol)
AOA (Android Open Accessory) 2.0
Bestandsysteem: FAT12, FAT16, FAT32
MP3-decoderingsformaat: MPEG-1 & 2
Audio Layer 3
WMA decodeerformaat: Ver. 7, 8, 9, 9.1, 9.2
(2 kanaals geluid)
FLAC-decoderingsformaat: v1.3.0 (Free
Lossless Audio Codec)
WAV-signaalformaat: lineaire PCM (niet
gecomprimeerd)
FM-tuner
Frequentiebereik: 87,5 MHz tot 108,0 MHz
Bruikbare gevoeligheid: 11 dBf (1,0 μV/
75 Ω, mono, S/R: 30 dB)
Signaal-ruisverhouding: 72 dB (IEC-A-
netwerk)
MW-tuner
Frequentiebereik: 531 kHz tot 1 602 kHz
Bruikbare gevoeligheid: 25 μV (S/R: 20 dB)
Signaal-ruisverhouding: 62 dB (IEC-A-
netwerk)
LW-tuner
Frequentiebereik: 153 kHz tot 281 kHz
Bruikbare gevoeligheid: 28 μV (S/R: 20 dB)
Signaal-ruisverhouding: 62 dB (IEC-A-
netwerk)
Technische gegevens

- 29 -
Nederlands
OPMERKING
Technische gegevens en ontwerp kunnen
zonder voorafgaande kennisgeving
worden gewijzigd.

© 2019 PIONEER CORPORATION. All rights reserved.
© 2019 PIONEER CORPORATION. Tous droits de reproduction et de traduction réservés.
<OPM_MVHS120UIEW5_6L_B> EW
Documenttranscriptie
Italiano Operation Manual Mode d’emploi Manuale d’istruzioni Manual de instrucciones Bedienungsanleitung Bedieningshandleiding Français Español Deutsch Nederlands MVH-S120UI MVH-S120UIG MVH-S12UI MVH-S120UB MVH-S120UBG MVH-S120UBA MVH-S120UBW English DIGITAL MEDIA RECEIVER RÉCEPTEUR NUMÉRIQUE MULTIMÉDIA RICEVITORE MULTIMEDIALE DIGITALE RECEPTOR DE MEDIOS DIGITALES DIGITALER MEDIA RECEIVER DIGITALE MEDIA-RECEIVER Table of Contents Getting Started ........................................................................................ 3 Radio .......................................................................................................... 6 App Mode .............................................................................................. 11 Spotify® .................................................................................................. 12 Using Pioneer ARC APP ....................................................................... 13 Settings .................................................................................................. 15 FUNCTION settings ............................................................................... 15 AUDIO settings ...................................................................................... 17 SYSTEM settings .................................................................................... 18 ILLUMINATION settings........................................................................ 20 Additional Information ....................................................................... 21 About this manual: • In the following instructions, a USB memory or USB audio player are referred to as “USB device”. • In this manual, iPod and iPhone are referred to as “iPod”. -2- English USB/iPod/AUX .......................................................................................... 8 Getting Started Basic operation BASS USB port M.C. (multi-control) dial SRC (source)/OFF DISP (display) BAND/ Detach button Display window AUX input jack (3.5 mm stereo jack) Frequently used operations Purpose Operation Turn on the power* Press SRC/OFF to turn on the power. Press and hold SRC/OFF to turn off the power. Adjust the volume Turn the M.C. dial. Select a source Press SRC/OFF repeatedly. Change the display information Press DISP repeatedly. Return to the previous display/list Press BAND/ . Return to the normal display from the menu Press and hold BAND/ Boost the bass level . Press BASS. • You can select the bass level in [BASS BOOST] (page 18). -3- English MVH-S120UI/S120UIG/S12UI/S120UB/S120UBG/S120UBA/ S120UBW * When this unit’s blue/white lead is connected to the vehicle’s auto-antenna relay control terminal, the vehicle’s antenna extends when this unit’s source is turned on. To retract the antenna, turn the source off. Display indication Indication Description Appears when the BASS button is pressed and held. Appears when the local seek tuning function is set (page 16). Appears when a traffic program is received. Appears when the TA (traffic announcements) function is set (page 16). Appears when the sound retriever function is set (page 17). Appears when the iPod control function is set (page 10). Detaching the front panel Detach the front panel to prevent theft. Remove any cables and devices attached to the front panel and turn off the unit before detaching it. Detach Attach Important • Avoid subjecting the front panel to excessive shock. • Keep the front panel out of direct sunlight and high temperatures. • Always store the detached front panel in a protective case or bag. Setup menu When you turn the ignition switch to ON after installation, [SET UP :YES] appears in the display. 1 Press the M.C. dial. -4- English Appears when a lower tier of the menu or folder exists. The setup menu disappears after 30 seconds of no operation. If you prefer not to set at this time, turn the M.C. dial to select [NO], then press to confirm. 2 Turn the M.C. dial to select the options, then press to confirm. To proceed to the next menu option, you need to confirm your selection. Description Select the language to display the text information from a compressed audio file. [ENG](English), [РУС](Russian), [TUR](Turkish) CLOCK SET Set the clock. FM STEP Select the FM tuning step from 100 kHz or 50 kHz. [100], [50] 3 4 [QUIT :YES] appears when all the settings have been made. To return to the first item of the setup menu, turn the M.C. dial to select [QUIT :NO], then press to confirm. Press the M.C. dial to confirm the settings. NOTES • You can cancel the menu setting by pressing SRC/OFF. • These settings can be made at any time from the SYSTEM settings (page 18) and INITIAL settings (page 5). Canceling the demonstration display (DEMO OFF) 1 2 3 4 Press the M.C. dial to display the main menu. Turn the M.C. dial to select [SYSTEM], then press to confirm. Turn the M.C. dial to select [DEMO OFF], then press to confirm. Turn the M.C. dial to select [YES], then press to confirm. INITIAL settings 1 2 3 4 Press and hold SRC/OFF until the unit turns off. Press and hold SRC/OFF to display the main menu. Turn the M.C. dial to select [INITIAL], then press to confirm. Turn the M.C. dial to select an option, then press to confirm. -5- English Menu Item LANGUAGE NOTE The options vary depending on the unit. Menu Item Description FM STEP Select the FM tuning step from 100 kHz or 50 kHz. [100], [50] [REAR/SUB.W] Select when there is a full-range speaker connected to the rear speaker output leads and there is a subwoofer connected to the RCA output. [SUB.W/SUB.W] Select when there is a passive subwoofer connected directly to the rear speaker output leads and there is a subwoofer connected to the RCA output. [REAR/REAR] Select when there are full-range speakers connected to the rear speaker output leads and RCA output. If there is a full-range speaker connected to the rear speaker output leads, and the RCA output is not used, you may select either [REAR/SUB.W] or [REAR/REAR]. S/W UPDATE Select to confirm the latest system information on the unit. [SYSTEM INFO] [SYSTEM UPDATE] Select to update the unit to the latest software and initialize the unit settings. For details on the latest software and updating, visit our website. SYSTEM RESET [YES], [NO] Select [YES] to initialize the unit settings. The unit will be restarted automatically. (Some of the settings may be retained even after resetting the unit.) Radio The tuner frequencies on this unit are allocated for use in Western Europe, Asia, the Middle East, Africa and Oceania. Use in other areas may result in poor reception. The RDS (radio data system) function only works in areas that broadcast RDS signals for FM stations. Receiving preset stations 1 2 Press SRC/OFF to select [RADIO]. Press BAND/ to select the band from [FM1], [FM2], [FM3], [MW] or [LW]. -6- English SP-P/O MODE 3 Press a number button (1/ to 6/ ). TIP The / buttons can be also used to select a preset station when [SEEK] is set to [PCH] in the FUNCTION settings (page 16). The six strongest stations are stored on the number buttons (1/ 1 2 3 to 6/ ). After selecting the band, press the M.C. dial to display the main menu. Turn the M.C. dial to select [FUNCTION], then press to confirm. Turn the M.C. dial to select [BSM], then press to confirm. To seek a station manually 1 After selecting the band, press / to select a station. Press and hold / then release to seek an available station. Scanning stops when the unit receives a station. To cancel seek tuning, press / . NOTE [SEEK] needs to be set to [MAN] in the FUNCTION settings (page 16). To store stations manually 1 While receiving the station you want to store, press and hold one of the number buttons (1/ to 6/ ) until it stops flashing. Using PTY functions The unit searches for a station by PTY (program type) information. 1 2 3 Press and hold BASS during FM reception. Turn the M.C. dial to select a program type from [NEWS/INFO], [POPULAR], [CLASSICS] or [OTHERS]. Press the M.C. dial. The unit begins to search for a station. When it is found, its program service name is displayed. NOTES • To cancel the search, press the M.C. dial. • The program of some stations may differ from that indicated by the transmitted PTY. -7- English Best stations memory (BSM) • If no station is broadcasting the type of program you searched for, [NOT FOUND] is displayed for about two seconds and then the tuner returns to the original station. USB/iPod/AUX iPod function is not available for MVH-S120UB/S120UBG/S120UBA/S120UBW. Playing back Disconnect headphones from the device before connecting it to the unit. USB devices (including Android™)/iPod 1 Open the USB port cover. 2 Plug in the USB device/iPod using an appropriate cable. NOTE To automatically switch to [USB] source when a USB device/iPod is connected to the unit, set [USB AUTO] to [ON] in the SYSTEM settings (page 19). CAUTION Use a USB cable (sold separately) to connect the USB device as any device connected directly to the unit will protrude out from the unit, which could be dangerous. Before removing the device, stop playback. AOA connections For details on AOA connection, see page 14. MTP connection A device installed with Android OS 4.0 or most of later versions can be connected to the unit via MTP, using the cable supplied with the device. However, depending on the connected device, OS version or the numbers of the files in the device, audio files/songs may not be able to be played back via MTP. Note that MTP connection is not compatible with WAV and FLAC file formats. NOTE If you use an MTP connection, [ANDROID WIRED] needs to be set to [MEMORY] in the SYSTEM settings (page 19). AUX 1 Insert the stereo mini plug into the AUX input jack. 2 Press SRC/OFF to select [AUX] as the source. -8- English NOTE NOTE If [AUX] is set to [OFF] in the SYSTEM settings, [AUX] cannot be selected as a source (page 19). Operations Purpose Operation Select a folder/album*1 Press 1/ or 2/ Select a track/song (chapter) Press or . . Fast forward or reverse*2 Press and hold Search for a file from a list 1 Press and hold BASS to display the list. 2 Turn the M.C. dial to select the desired file (folder) name or category, then press to confirm. 3 Turn the M.C. dial to select the desired file, then press to confirm. Playback starts. or . View a list of the files in the selected folder/ Press the M.C. dial when a folder/category category*1 is selected. Play a song in the selected folder/ category*1 Press and hold the M.C. dial when a folder/ category is selected. Alphabetical search (iPod only) 1 Press and hold BASS to display the list. 2 Turn the M.C. dial to select the desired category list, then press and hold BASS to enter the alphabetical search mode. (Turning the M.C. dial twice also enters the alphabetical search mode.) 3 Turn the M.C. dial to select a letter, then press to display the alphabetical list. To cancel alphabetical search, press BAND/ . Repeat play Press 6/ . Random/shuffle play Press 5/ . Shuffle all play (iPod only) Press and hold 5/ Pause/resume playback Press 4/PAUSE. -9- . English You can make various adjustments in the FUNCTION settings (page 15). Note that the following operations do not work for an AUX device. To operate an AUX device, use the device itself. Purpose Operation Sound retriever Press 3/S.Rtrv. [1]: Effective for low compression rates [2]: Effective for high compression rates Return to root folder (USB only)*1 Press and hold 1/ . . *1 Compressed audio files only *2 When you use the fast forward or reverse function while playing a VBR file, the playback time may be not correct. Useful functions for iPod Link play mode You can access songs based on the artist, album, or genre currently playing. 1 While listening to a song, press and hold 4/PAUSE to enter the link play mode. 2 Turn the M.C. dial to select the mode ([ARTIST], [ALBUM], [GENRE]), then press to confirm. The selected song/album will be played after the currently playing song. NOTE The selected song/album may be canceled if you use functions other than those from the link play mode (e.g. fast forward and reverse). iPod control You can control the unit via a connected iPod. The following iPod models are not compatible with this function. – iPod nano 1st generation, iPod with video 1 Press BAND/ during playback, then select the control mode. [CONTROL iPod]: The unit’s iPod function can be operated from the connected iPod. [CONTROL AUDIO]: The unit’s iPod function can only be operated by the buttons on the unit or supplied remote control. In this mode, the connected iPod cannot be turned on or off. NOTES • Pressing iPod can also switch the control mode (only for MVH-S120UI/S120UIG/S12UI). • Switching the control mode to [CONTROL iPod] pauses song playback. Use the connected iPod to resume playback. • The following operations are still accessible from the unit, even if the control mode is set to [CONTROL iPod]. - 10 - English Change drives in USB device Press BAND/ (Devices that support the USB mass storage device class protocol only) – Pause, fast forward/reverse, song/chapter selection • The volume can only be adjusted from the unit. App Mode Important Use of third party apps may involve or require the provision of personally identifiable information, whether through the creation of a user account or otherwise, and for certain applications, the provision of geolocation data. ALL THIRD PARTY APPS ARE THE SOLE RESPONSIBILITY OF THE PROVIDERS, INCLUDING WITHOUT LIMITATION COLLECTION AND SECURITY OF USER DATA AND PRIVACY PRACTICES. BY ACCESSING THIRD PARTY APPS, YOU AGREE TO REVIEW THE TERMS OF SERVICE AND PRIVACY POLICIES OF THE PROVIDERS. IF YOU DO NOT AGREE WITH THE TERMS OR POLICIES OF ANY PROVIDER OR DO NOT CONSENT TO THE USE OF GEOLOCATION DATA WHERE APPLICABLE, DO NOT USE THAT THIRD PARTY APP. For iPhone users This function is compatible with iPhone and iPod touch installed with iOS 5.0 or later. NOTE PIONEER IS NOT LIABLE FOR ANY THIRD PARTY APPS OR CONTENT, INCLUDING WITHOUT LIMITATION THEIR ACCURACY OR COMPLETENESS. THE CONTENT AND FUNCTIONALITY OF SUCH APPS ARE THE SOLE RESPONSIBILITY OF THE APP PROVIDER. Playback of an application via the unit 1 2 3 Connect this unit with the mobile device. • iPhone via USB (page 8) Press SRC/OFF to select [APP]. Operate the mobile device to start up the application. Basic operations You can make various adjustments in the FUNCTION settings (page 15). Purpose Operation Select a track Press Fast forward or reverse Press and hold - 11 - or . or . English (APP mode is not available for MVH-S120UB/S120UBG/S120UBA/S120UBW.) You can enjoy listening to an application on an iPhone via the unit. In some cases, you can control an application by using the unit. For details on compatible devices, visit our website. Purpose Operation Pause/resume playback Press BAND/ . (MVH-S120UI/S120UIG/S12UI is only compatible with Spotify installed on iPhone.) Spotify is a music streaming distribution service not affiliated with Pioneer. More information is available at http://www.spotify.com. The Spotify application is available for compatible smartphones, please visit https:// support.spotify.com/ for the latest compatibility information. To enjoy Spotify as you drive, first download the Spotify app to your iPhone. You can download it on the iTunes App Store. Choose a free account or a paid Premium account, either in the app or at spotify.com. A Premium account gives you more features, like offline listening. Important • This product incorporates Spotify software which is subject to 3rd party licenses found here: www.spotify.com/connect/third-party-licenses. • For information on the countries and regions where Spotify can be used, take a look at https:// spotify.com/us/select-your-country/. Listening to Spotify Update the firmware of the Spotify application to the latest version before use. 1 2 3 Connect this unit with the mobile device. • iPhone via USB (page 8) Press SRC/OFF to select [SPOTIFY]. Launch the Spotify application on the mobile device and start playback. Basic operations You can make various adjustments in the FUNCTION settings (page 15). NOTE The available operations may vary according to the type of contents (track/album/artist/playlist/radio) you want to play. Purpose Operation Skip a track Press - 12 - or . English Spotify® Operation Search for a track from a list 1 Press and hold BASS to display the list. 2 Turn the M.C. dial to select the desired category, then press to confirm. 3 Turn the M.C. dial to select the desired file, then press to confirm. Playback starts. Pause/resume playback Press 4/PAUSE. Thumbs Up (Only for radio) Press 1/ . Thumbs Down (Only for radio) Press 2/ . Random play (Only for track/album/artist/ playlist) Press 5/ . Repeat play (Only for track/album/artist/ playlist) Press 6/ . Start a radio channel based on the song currently being played. 1 Press and hold 5/ to start a radio. 2 Press the M.C. dial. • This function may not be available depending on the selected song. Store the information about the song currently being played. Remove the song information stored. 1 Press and hold 3/S.Rtrv. [SAVE]/[UNSAVE] appears. 2 Press the M.C. dial. NOTE Some functions of Spotify may not be operated from the unit. Using Pioneer ARC APP (Pioneer ARC APP for iPhone is not available for MVH-S120UB/S120UBG/S120UBA/ S120UBW.) You can operate the unit from Pioneer ARC APP installed on an iPhone/Android device. In some cases, you can control aspects of the application, such as source selection, pause, etc., by using the unit. For details on what operations are available on the application, see the application’s help section. WARNING Do not attempt to operate the application while driving. Make sure to pull off the road and park your vehicle in a safe location before attempting to use the controls on the application. - 13 - English Purpose For iPhone users This function is compatible with iPhones (iPhone 5 or later) and iPod touches installed with iOS 8.0 or later. You can download Pioneer ARC APP on iTunes App Store. NOTE Some Android devices connected via AOA 2.0 may not work properly or emit sounds due to their own software design, regardless of the OS version. Making a connection with Pioneer ARC APP When making a connection with an Android device 1 Press the M.C. dial to display the main menu. 2 Turn the M.C. dial to select [SYSTEM], then press to confirm. 3 Turn the M.C. dial to select [ANDROID WIRED], then press to confirm. 4 Turn the M.C. dial to select [APP CONTROL], then press to confirm. 5 Turn the M.C. dial to select [P.APP AUTO ON], then press to confirm. 6 Turn the M.C. dial to select [ON], then press to confirm. 7 Connect this unit with the Android device via USB. Pioneer ARC APP on the Android device starts automatically. NOTE If Pioneer ARC APP has not been installed on your Android device yet, a message that prompts you to install the application will appear on your Android device. Select [OFF] in [P.APP AUTO ON] to clear the message (page 19). When making a connection with an iPhone 1 Connect this unit with the iPhone via USB. 2 Press SRC/OFF to select any source. 3 Press and hold the M.C. dial. Pioneer ARC APP on the iPhone starts. NOTE If the connection fails, launch Pioneer ARC APP on the iPhone. - 14 - English For Android device users This function is compatible with a phone that runs Android 4.1 up to 7.1.2 and also supports AOA (Android Open Accessory) 2.0, but the compatibility depends on the smartphone. You can download Pioneer ARC APP on Google Play™. Listening to music on Android 1 Press SRC/OFF to select [ANDROID]. Basic operations English Purpose Operation Select a track Press Fast forward or reverse Press and hold or . Pause/resume playback Press 4/PAUSE. Sound retriever Press 3/S.Rtrv. [1]: Effective for low compression rates [2]: Effective for high compression rates or . Settings You can adjust various settings in the main menu. 1 2 3 Press the M.C. dial to display the main menu. Turn the M.C. dial to select one of the categories below, then press to confirm. • FUNCTION settings (page 15) • AUDIO settings (page 17) • SYSTEM settings (page 18) • ILLUMINATION settings (page 20) Turn the M.C. dial to select the options, then press to confirm. NOTES • iPod-related menu items in the following tables are not available for MVH-S120UB/S120UBG/ S120UBA/S120UBW. • APP mode-related menu items in the following tables are not available for MVH-S120UB/S120UBG/ S120UBA/S120UBW. FUNCTION settings The menu items vary according to the source. - 15 - Menu Item Description FM SETTING [TALK], [STANDARD], [MUSIC] Match the sound quality level with the broadcast signal conditions of the FM band signal. (Available only when FM band is selected.) Store the six strongest stations on the number buttons (1/ to 6/ ) automatically. REGIONAL [ON], [OFF] Limit the reception to the specific regional programs when AF (alternative frequencies search) is selected. (Available only when FM band is selected.) LOCAL FM: [OFF], [LV1], [LV2], [LV3], [LV4] Restrict the tuning station according to the MW/LW: [OFF], [LV1], [LV2] signal strength. TA [ON], [OFF] Receive current traffic information if available. (Available only when FM band is selected.) [ON], [OFF] Allow the unit to retune to a different frequency providing the same station. (Available only when FM band is selected.) AF NEWS [ON], [OFF] Interrupt the currently selected source with news programs. (Available only when FM band is selected.) SEEK [MAN], [PCH] Assign or buttons to seek the stations one by one (manual tuning) or select a station from the preset channels. SAVE Store the information about the song currently being played to your music list on Spotify. UNSAVE Remove the song information stored in [SAVE]. - 16 - English BSM Menu Item S.RTRV USB Description iPod AUDIO BOOK iPod [FASTER], [NORMAL], [SLOWER] Change the playback speed. (Not available when [CONTROL iPod] is selected in the control mode.) PAUSE Pause or resume playback. AUDIO settings Menu Item Description FADER*1 Adjust the front and rear speaker balance. BALANCE Adjust the left and right speaker balance. EQ SETTING [SUPER BASS], [POWERFUL], [DYNAMIC], [NATURAL], [VOCAL], [VIVID], [CUSTOM1], [CUSTOM2], [FLAT] Select or customise the equalizer curve. [CUSTOM1] can be set separately for each source. However, each of the below combinations are set to the same setting automatically. • USB, iPod, ANDROID, SPOTIFY, and APP Select an equalizer band and (iPhone) level for further customising. [CUSTOM2] is a shared setting used for all Equalizer band: [80HZ], [250HZ], sources. [800HZ], [2.5KHZ], [8KHZ] You can also switch the equalizer by pressing Equalizer level: [+6] to [–6] repeatedly (Only for MVH-S120UB/ S120UBG/S120UBA/S120UBW). LOUDNESS [OFF], [LOW], [MID], [HI] Compensate for clear sound at low volume. SUB.W*2 [NOR], [REV], [OFF] Select the subwoofer phase. - 17 - English [1] (effective for low compression Enhance compressed audio and restore rich rates), sound. [2] (effective for high Not available when the FLAC file is played back. compression rates), [OFF] Menu Item Description SUB.W CTRL*2*3 Only frequencies lower than those in the selected range are output from the subwoofer. English Cut-off frequency: [50HZ], [63HZ], [80HZ], [100HZ], [125HZ], [160HZ], [200HZ] Output level: [–24] to [+6] Slope level: [–12], [–24] BASS BOOST [0] to [+6] Select the bass boost level. HPF SETTING Cut-off frequency: [OFF], [50HZ], Only frequencies higher than the high-pass filter [63HZ], [80HZ], [100HZ], [125HZ], (HPF) cutoff are output from the speakers. [160HZ], [200HZ] Slope level: [–12], [–24] SLA [+4] to [–4] Adjust the volume level for each source except FM. Each of the below combinations are set to the same setting automatically. • USB, iPod, ANDROID, SPOTIFY, and APP (iPhone) *1 Not available when [SUB.W/SUB.W] is selected in [SP-P/O MODE] in the INITIAL settings (page 6). *2 Not available when [REAR/REAR] is selected in [SP-P/O MODE] in the INITIAL settings (page 6). *3 Not available when [OFF] is selected in [SUB.W]. SYSTEM settings You can also access to these menus when the unit is turned off. Menu Item Description LANGUAGE [ENG](English), [РУС](Russian), [TUR](Turkish) Select the language to display the text information from a compressed audio file. CLOCK SET Set the clock (page 5). 12H/24H [12H], [24H] Select the time notation. - 18 - Menu Item Description SCROLL SET [ONCE], [LOOP], [OFF] Select the way to scroll the text in the display window. AUTO PI Search for a different station with the same programming, even if using a preset station. [ON], [OFF] Set to [ON] when using an auxiliary device connected to the unit. AUX SPOTIFY [ON], [OFF] Set to [ON] when using the Spotify function. MUTE MODE (Only for MVH-S120UI/S120UIG/S12UI) [MUTE], [20dB ATT], [10dB ATT] Mute or attenuate sound automatically when a signal from equipment with a mute function is received. PW SAVE* [ON], [OFF] Reduce the battery power consumption. Turning on the source is the only operation allowed when this function is on. ANDROID WIRED [MEMORY], [APP CONTROL] Select the appropriate connection method for an Android device. P.APP AUTO ON [ON], [OFF] Select [ON] to automatically launch Pioneer ARC APP when an Android device is connected to the unit via AOA. (Not available when [MEMORY] is selected in [ANDROID WIRED].) USB AUTO [ON], [OFF] Select [ON] to automatically switch to [USB] source when a USB device/iPod is connected to the unit. Select [OFF] when a USB device/iPod is being connected to the unit just for charging. * [PW SAVE] is canceled if the vehicle battery is disconnected and will need to be turned back on once the battery is reconnected. When [PW SAVE] is off, depending on connection methods, the unit may continue to draw power from the battery if your vehicle’s ignition does not have an ACC (accessory) position. - 19 - English [ON], [OFF] ILLUMINATION settings Menu Item Description DIM SETTING [SYNC CLOCK], [MANUAL] Select the way to change the display brightness. [1] to [10] Change the display brightness. The available setting ranges differ depending on [DIM SETTING]. - 20 - English BRIGHTNESS Additional Information Troubleshooting The display automatically returns to the normal display. → No operations have been made for about 30 seconds. – Perform an operation. USB device/iPod The repeat play range changes unexpectedly. → Depending on the repeat play range, the selected range may change when another folder or track is being selected or during fast forwarding/reversing. – Select the repeat play range again. A subfolder is not played back. → Subfolders cannot be played when [FLD] (folder repeat) is selected. – Select another repeat play range. The sound is intermittent. → You are using a device, such as a cellular phone, that may cause audible interference. – Move electrical devices that may be causing the interference away from the unit. Error messages Common AMP ERROR → This unit fails to operate or the speaker connection is incorrect. → The protective circuit is activated. – Check the speaker connection. – Turn the ignition switch OFF and back to ON again. If the message remains, contact your dealer or an authorized Pioneer Service Station for assistance. FORMAT READ → Sometimes there is a delay between the start of playback and when you start to hear any sound. – Wait until the message disappears and you hear sound. NO AUDIO → There are no songs. – Transfer the audio files to the USB device and connect. → The connected USB device has security enabled. – Follow the USB device instructions to disable the security. SKIPPED → The connected USB device contains DRM protected files. – The protected files are skipped. PROTECT → All the files on the connected USB device are embedded with DRM. – Replace the USB device. N/A USB → The connected USB device is not supported by this unit. – Disconnect your device and replace it with a compatible USB device. HUB ERROR → The USB device connected via a USB hub is not supported by this unit. – Connect the USB device directly to this unit using a USB cable. - 21 - English NO XXXX (NO TITLE, for example) → There is no embedded text information. – Switch the display or play another track/file. ERROR-19 → Communication failed. – Perform one of the following operations, then return to the USB source. • Disconnect the USB device. • Change to a different source. → iPod failure. – Disconnect the cable from the iPod. Once the iPod’s main menu is displayed, reconnect the iPod and reset it. STOP → There are no songs in the current list. – Select a list that contains songs. NOT FOUND → No related songs. – Transfer songs to the iPod. START UP APP → The application has not started running yet. – Operate the mobile device to start up the application. Spotify CHECK APP → Connection to the Spotify application failed. – Follow the instructions that appear on the screen. Handling guidelines USB storage device ERROR-23 → USB device was not formatted properly. – Format the USB device with FAT12, FAT16 or FAT32. ERROR-16 → The iPod firmware version is old. – Update the iPod version. → iPod failure. – Disconnect the cable from the iPod. Once the iPod’s main menu is displayed, reconnect the iPod and reset it. APP • Connections via USB hubs are not supported. • Firmly secure the USB storage device before driving. Do not let the USB storage device fall onto the floor, where it may become jammed under the brake or accelerator pedal. • Depending on the USB storage device, the following problems may occur. – Operations may vary. – The storage device may not be recognized. – Files may not be played back properly. – The device may cause audible interference when you are listening to the radio. iPod • Do not leave the iPod in places with high temperatures. • Firmly secure the iPod when driving. Do not let the iPod fall onto the floor, where it may become jammed under the brake or accelerator pedal. • The settings of the iPod such as the equalizer and repeat play are changed - 22 - English CHECK USB → The USB connector or USB cable has short-circuited. – Check that the USB connector or USB cable is not caught in something or damaged. → The connected USB device consumes more than maximum allowable current. – Disconnect the USB device and do not use it. Turn the ignition switch OFF and back to ACC or ON. Connect only compliant USB devices. automatically when the iPod is connected to the unit. Once the iPod is disconnected, those settings will return to the original settings. • Incompatible text saved on the iPod will not be displayed by the unit. Bit rate Sampling frequency Compressed audio compatibility • Only the first 32 characters can be displayed as a file name (including the file extension) or a folder name. • The unit may not work properly depending on the application used to encode WMA files. • There may be a slight delay at the start of the playback of audio files embedded with image data, or audio files stored on a USB device with numerous folder hierarchies. • Russian text to be displayed on this unit should be encoded in one of the following character sets: – Unicode (UTF-8, UTF-16) – A character set other than Unicode that is used in a Windows environment and is set to Russian in the multi-language setting CAUTION • Pioneer cannot guarantee compatibility with all USB mass storage devices, and assumes no responsibility for any loss of data on media players, smartphones, or other devices while using this product. • Do not leave discs or a USB storage device in any place that is subject to high temperatures. WMA files File extension .wma English Windows Media™ Audio Professional, Lossless, Voice/DRM Stream/Stream with video 48 kbps to 320 kbps (CBR), 48 kbps to 384 kbps (VBR) 32 kHz, 44.1 kHz, 48 kHz Not compatible MP3 files File extension Bit rate Sampling frequency Compatible ID3 tag version M3u playlist MP3i (MP3 interactive), mp3 PRO .mp3 8 kbps to 320 kbps (CBR), VBR 8 kHz to 48 kHz (32 kHz, 44.1 kHz, 48 kHz for emphasis) 1.0, 1.1, 2.2, 2.3, 2.4 (ID3 tag Version 2.x is given priority over Version 1.x.) Not compatible Not compatible WAV files • WAV file formats cannot be connected via MTP. File extension Quantization bits Sampling frequency .wav 8 and 16 (LPCM) 16 kHz to 48 kHz (LPCM) FLAC files • FLAC file formats cannot be connected via MTP. • FLAC files may not be playable, depending on the encoder. File extension Sampling frequency Quantization bit rate - 23 - .flac 8/11.025/12/16/22.05/ 24/32/44.1/48 kHz 16 bit Channel mode 1/2 ch USB device • There may be a slight delay when starting playback of audio files on a USB storage device with numerous folder hierarchies. Up to eight tiers (A practical hierarchy is less than two tiers.) Up to 500 Up to 15 000 Playable folders Playable files Playback of copyright- Not compatible protected files Partitioned USB Only the first partition device can be played. iPod compatibility This unit supports only the following iPod models. Older versions may not be supported. Made for – iPod touch (1st through 6th generation) – iPod classic – iPod nano (3rd through 7th generation) – iPhone 6s – iPhone 6s Plus – iPhone 6 – iPhone 6 Plus – iPhone 5s – iPhone 5c – iPhone 5 – iPhone 4s – iPhone 4 – iPhone 3GS – iPhone 3G – iPhone CAUTION Pioneer accepts no responsibility for data lost on the iPod, even if that data is lost while this unit is used. Sequence of audio files The user cannot assign folder numbers and specify playback sequences with this unit. Sequence of audio file depends on the connected device. Note that the hidden files in a USB device cannot be played back. Example of a hierarchy Folder Compressed audio file 01 to 05: Folder number to : Playback sequence • Operations may vary depending on the generation and/or software version of the iPod. • Users of iPod with the Lightning Connector should use the Lightning to USB Cable (supplied with iPod). - 24 - English Playable folder hierarchy • Users of iPod with the Dock Connector should use the CD-IU51. For details, consult your dealer. • Refer to the iPod manuals for information about the file/format compatibility. • Audiobook, Podcast: Compatible Russian character chart Copyright and trademark iTunes Apple and iTunes are trademarks of Apple Inc., registered in the U.S. and other countries. WMA Windows Media is either a registered trademark or trademark of Microsoft Corporation in the United States and/or other countries. This product includes technology owned by Microsoft Corporation and cannot be used or distributed without a license from Microsoft Licensing, Inc. FLAC Copyright © 2000-2009 Josh Coalson - 25 - English D: Display C: Character Copyright © 2011-2013 Xiph.Org Foundation Redistribution and use in source and binary forms, with or without modification, are permitted provided that the following conditions are met: – Redistributions of source code must retain the above copyright notice, this list of conditions and the following disclaimer. – Redistributions in binary form must reproduce the above copyright notice, this list of conditions and the following disclaimer in the documentation and/or other materials provided with the distribution. – Neither the name of the Xiph.org Foundation nor the names of its contributors may be used to endorse or promote products derived from this software without specific prior written permission. THIS SOFTWARE IS PROVIDED BY THE COPYRIGHT HOLDERS AND CONTRIBUTORS “AS IS” AND ANY EXPRESS OR IMPLIED WARRANTIES, INCLUDING, BUT NOT LIMITED TO, THE IMPLIED WARRANTIES OF MERCHANTABILITY AND FITNESS FOR A PARTICULAR PURPOSE ARE DISCLAIMED. IN NO EVENT SHALL THE FOUNDATION OR CONTRIBUTORS BE LIABLE FOR ANY DIRECT, INDIRECT, INCIDENTAL, SPECIAL, EXEMPLARY, OR CONSEQUENTIAL DAMAGES (INCLUDING, BUT NOT LIMITED TO, PROCUREMENT OF SUBSTITUTE GOODS OR SERVICES; LOSS OF USE, DATA, OR PROFITS; OR BUSINESS INTERRUPTION) HOWEVER CAUSED AND ON ANY THEORY OF LIABILITY, WHETHER IN CONTRACT, STRICT LIABILITY, OR TORT (INCLUDING NEGLIGENCE OR OTHERWISE) ARISING IN ANY WAY OUT OF THE USE OF THIS SOFTWARE, EVEN IF ADVISED OF THE POSSIBILITY OF SUCH DAMAGE. Google™, Google Play, Android Google, Google Play and Android are trademarks of Google LLC. Spotify® SPOTIFY and the Spotify logo are among the registered trademarks of Spotify AB. Compatible mobile digital devices and premium subscription required, where available, see https://www.spotify.com. Specifications General Power source: 14.4 V DC (10.8 V to 15.1 V allowable) Grounding system: Negative type Maximum current consumption: 10.0 A Dimensions (W × H × D): DIN Chassis: 178 mm × 50 mm × 97 mm Nose: 188 mm × 58 mm × 17 mm D Chassis: 178 mm × 50 mm × 97 mm Nose: 170 mm × 46 mm × 17 mm Weight: 0.5 kg • 50 W × 4 ch/4 Ω (for no subwoofer) • 50 W × 2 ch/4 Ω + 70 W × 1 ch/2 Ω (for subwoofer) Continuous power output: 22 W × 4 (50 Hz to 15 000 Hz, 5 % THD, 4 Ω load, both channels driven) Load impedance: 4 Ω (4 Ω to 8 Ω allowable) Preout maximum output level: 2.0 V Loudness contour: +10 dB (100 Hz), +6.5 dB (10 kHz) (volume: –30 dB) Equalizer (5-Band Graphic Equalizer): Frequency: 80 Hz/250 Hz/800 Hz/2.5 kHz/8 kHz Equalization range: ±12 dB (2 dB step) Subwoofer (mono): Frequency: 50 Hz/63 Hz/80 Hz/100 Hz/125 Hz/160 Hz/200 Hz Slope: –12 dB/oct, –24 dB/oct Gain: +6 dB to –24 dB Phase: Normal/Reverse USB USB standard specification: USB 2.0 full speed Maximum current supply: 1 A USB Protocol: MSC (Mass Storage Class) MTP (Media Transfer Protocol) AOA (Android Open Accessory) 2.0 File system: FAT12, FAT16, FAT32 MP3 decoding format: MPEG-1 & 2 Audio Layer 3 WMA decoding format: Ver. 7, 8, 9, 9.1, 9.2 (2 ch audio) FLAC decoding format: v1.3.0 (Free Lossless Audio Codec) WAV signal format: Linear PCM (Noncompressed) FM tuner Frequency range: 87.5 MHz to 108.0 MHz Usable sensitivity: 11 dBf (1.0 μV/75 Ω, mono, S/N: 30 dB) Signal-to-noise ratio: 72 dB (IEC-A network) Audio Maximum power output: - 26 - English iPhone, iPod and Lightning Use of the Made for Apple badge means that an accessory has been designed to connect specifically to the Apple product(s) identified in the badge, and has been certified by the developer to meet Apple performance standards. Apple is not responsible for the operation of this device or its compliance with safety and regulatory standards. Please note that the use of this accessory with an Apple product may affect wireless performance. iPhone, iPod, iPod classic, iPod nano, iPod touch and Lightning are trademarks of Apple Inc., registered in the U.S. and other countries. MW tuner Frequency range: 531 kHz to 1 602 kHz Usable sensitivity: 25 μV (S/N: 20 dB) Signal-to-noise ratio: 62 dB (IEC-A network) LW tuner NOTE Specifications and the design are subject to modifications without notice. - 27 - English Frequency range: 153 kHz to 281 kHz Usable sensitivity: 28 μV (S/N: 20 dB) Signal-to-noise ratio: 62 dB (IEC-A network) Table des matières Mise en route............................................................................................ 3 Radio .......................................................................................................... 7 USB/iPod/AUX .......................................................................................... 8 Mode d’application .............................................................................. 12 Spotify® .................................................................................................. 13 Réglages................................................................................................. 17 Réglages FUNCTION ............................................................................. 17 Réglages AUDIO .................................................................................... 19 Réglages SYSTEM .................................................................................. 21 Réglages ILLUMINATION...................................................................... 22 Informations complémentaires ......................................................... 24 À propos de ce mode d’emploi : • Parmi les instructions suivantes, les clés USB ou les lecteurs audio USB sont collectivement désignés sous le nom de « périphérique USB ». • Dans ce mode d’emploi, les iPod et les iPhone sont collectivement désignés sous le nom d’« iPod ». -2- Français Utilisation de Pioneer ARC APP ......................................................... 15 Mise en route Fonctionnement de base MVH-S120UI/S120UIG/S12UI/S120UB/S120UBG/S120UBA/ S120UBW BASS Port USB DISP (affichage) BAND/ Français Molette M.C. (multi-contrôle) SRC (source)/OFF Touche de retrait Fenêtre d’affichage Prise d’entrée AUX (prise stéréo 3,5 mm) Opérations fréquemment utilisées Objectif Opération Mettre l’appareil sous tension* Appuyez sur SRC/OFF pour mettre l’appareil sous tension. Appuyez longuement sur SRC/OFF pour mettre l’appareil hors tension. Régler le volume Tournez la molette M.C.. Sélectionner une source Appuyez plusieurs fois sur SRC/OFF. Modifier les informations d’affichage Appuyez plusieurs fois sur DISP. Revenir à l’affichage/la liste précédent(e) Appuyez sur BAND/ Revenir à l’affichage normal à partir du menu Appuyez longuement sur BAND/ Augmentez le niveau des basses Appuyez sur BASS. • Vous pouvez sélectionner le niveau des basse dans [BASS BOOST] (page 20). -3- . . * Si le fil bleu/blanc de l’appareil est relié à la borne de commande du relais d’antenne automatique du véhicule, l’antenne se déploie lorsque la source de cet appareil est mise en service. Pour rétracter l’antenne, mettez la source hors service. Indication de l’affichage Indication Description Apparaît lorsqu’il existe un niveau inférieur de menu ou de dossier. Apparaît lorsque vous appuyez longuement sur le bouton BASS. Apparaît lorsque la fonction d’accord sur une station locale est en service (page 18). Apparaît lorsque la fonction TA (informations routières) est activée (page 18). Apparaît lorsque le sound retriever (correcteur de son compressé) est en service (page 19). Apparaît lorsque la fonction de commande d’iPod est en service (page 11). Retrait de la face avant Retirez la face avant pour empêcher tout vol. Débranchez tous les câbles et les périphériques branchés à la face avant et mettez l’appareil hors tension avant de le retirer. Retirer Fixer Important • Évitez de soumettre la face avant à des chocs excessifs. • Tenez la face avant à l’abri du soleil et des températures élevées. • Stockez toujours la face avant détachée, dans un étui de protection ou un sac. -4- Français Apparaît lorsqu’un programme d’informations routières est capté. Menu de configuration Lorsque vous mettez le contact sur ON après avoir installé l’appareil, [SET UP :YES] s’affiche. 1 2 Appuyez sur la molette M.C.. Si vous n’utilisez pas l’appareil dans les 30 secondes qui suivent, le menu de configuration disparaît. Si vous préférez ne pas effectuer la configuration pour l’instant, tournez la molette M.C. pour sélectionner [NO], puis appuyez pour valider. Tournez la molette M.C. pour sélectionner les options, puis appuyez pour valider. Pour passer à l’option de menu suivante, vous devez valider votre sélection. Description Sélectionnez la langue d’affichage des informations textuelles à partir d’un fichier audio compressé. [ENG] (anglais), [РУС] (russe), [TUR] (turc) CLOCK SET Réglez l’horloge. FM STEP Sélectionnez l’incrément d’accord FM à partir de 100 kHz ou de 50 kHz. [100], [50] 3 4 [QUIT :YES] apparaît lorsque tous les réglages sont terminés. Pour revenir au premier élément du menu de configuration, tournez la molette M.C. pour sélectionner [QUIT :NO], puis appuyez pour valider. Appuyez sur la molette M.C. pour valider les réglages. REMARQUES • Vous pouvez annuler le réglage du menu en appuyant sur SRC/OFF. • Ces paramètres peuvent être ajustés à tout moment à partir des réglages SYSTEM (page 21) et des réglages INITIAL (page 6). Annulation de l’affichage de démonstration (DEMO OFF) 1 2 3 Appuyez sur la molette M.C. pour afficher le menu principal. Tournez la molette M.C. pour sélectionner [SYSTEM], puis appuyez pour valider. Tournez la molette M.C. pour sélectionner [DEMO OFF], puis appuyez pour valider. -5- Français Élément de menu LANGUAGE 4 Tournez la molette M.C. pour sélectionner [YES], puis appuyez pour valider. Réglages INITIAL 1 Appuyez longuement sur SRC/OFF pour afficher le menu principal. Tournez la molette M.C. pour sélectionner [INITIAL], puis appuyez pour valider. Tournez la molette M.C. pour sélectionner une option, puis appuyez pour valider. Français 2 3 4 Appuyez longuement sur SRC/OFF jusqu’à ce que l’appareil se mette hors tension. REMARQUE Les options varient selon les appareils. Élément de menu Description FM STEP Sélectionnez l’incrément d’accord FM à partir de 100 kHz ou de 50 kHz. [100], [50] SP-P/O MODE [REAR/SUB.W] À sélectionner lorsqu’un haut-parleur à gamme étendue est relié aux fils de sortie du haut-parleur arrière et qu’un hautparleur d’extrêmes graves est branché à la sortie RCA. [SUB.W/SUB.W] À sélectionner lorsqu’un haut-parleur d’extrêmes graves passif est directement relié aux fils de sortie du haut-parleur arrière et qu’un haut-parleur d’extrêmes graves est branché à la sortie RCA. [REAR/REAR] À sélectionner lorsque des haut-parleurs à gamme étendue sont reliés aux fils de sortie du haut-parleur arrière et à la sortie RCA. Si un haut-parleur à gamme étendue est relié aux fils de sortie du haut-parleur arrière et que la sortie RCA n’est pas utilisée, vous pouvez sélectionner [REAR/SUB.W] ou [REAR/REAR]. S/W UPDATE [SYSTEM INFO] À sélectionner pour valider les dernières informations relatives au système de l’appareil. [SYSTEM UPDATE] À sélectionner pour effectuer la dernière mise à jour des logiciels de l’appareil et réinitialiser ses réglages. Pour obtenir de plus amples informations sur les derniers logiciels et mises à jour, veuillez vous rendre sur notre site Web. SYSTEM RESET [YES], [NO] Sélectionnez [YES] pour réinitialiser les réglages de l’appareil. L’appareil redémarre automatiquement. (Certains réglages sont conservés même après la réinitialisation de l’appareil.) -6- Radio Les fréquences du syntoniseur de cet appareil sont destinées à une utilisation en Europe de l’Ouest, Asie, Moyen-Orient, Afrique et Océanie. Son utilisation dans d’autres régions peut se traduire par une réception de mauvaise qualité. La fonction RDS (Radio Data System) n’est opérationnelle que dans les régions où des signaux RDS sont diffusés pour les stations FM. Réception des stations présélectionnées 3 Appuyez sur SRC/OFF pour sélectionner [RADIO]. Appuyez sur BAND/ [LW]. pour sélectionner la bande [FM1], [FM2], [FM3], [MW] ou Appuyez sur l’une des touches numériques (1/ à 6/ ). CONSEIL Les touches / peuvent également servir à sélectionner une station préréglée lorsque [SEEK] est réglé sur [PCH] dans les réglages FUNCTION (page 18). Mémoire des meilleures stations (BSM) Les six stations les plus puissantes sont mémorisées sur les touches numériques (1/ 6/ ). 1 2 3 Après avoir sélectionné la bande, appuyez sur la molette M.C. pour afficher le menu principal. Tournez la molette M.C. pour sélectionner [FUNCTION], puis appuyez pour valider. Tournez la molette M.C. pour sélectionner [BSM], puis appuyez pour valider. Pour rechercher une station manuellement 1 Après avoir sélectionné la bande, appuyez sur / pour sélectionner une station. Appuyez longuement sur / , puis relâchez pour rechercher une station disponible. Le balayage s’arrête lorsque l’appareil capte une station. Pour annuler l’accord par recherche, appuyez sur / . REMARQUE [SEEK] doit être réglé sur [MAN] dans les réglages FUNCTION (page 18). -7- à Français 1 2 Pour mémoriser des stations manuellement 1 Lorsque vous captez la station que vous souhaitez mémoriser, appuyez longuement sur l’une des touches numériques (1/ cesse de clignoter. à 6/ ) jusqu’à ce qu’elle Utilisation des fonctions PTY L’appareil recherche une station diffusant des informations PTY (type de programme). 3 Appuyez longuement sur BASS pendant la réception FM. Tournez la molette M.C. pour sélectionner le type de programme [NEWS/INFO], [POPULAR], [CLASSICS] ou [OTHERS]. Appuyez sur la molette M.C.. L’appareil continue à rechercher une station. Lorsqu’il en trouve une, son nom de service de programme s’affiche. REMARQUES • Pour annuler la recherche, appuyez sur la molette M.C.. • Le programme de certaines stations peut différer de celui qu’indique le PTY transmis. • Si aucune station ne diffuse le type de programme que vous recherchez, [NOT FOUND] s’affiche pendant environ deux secondes, puis le syntoniseur revient à la station de départ. USB/iPod/AUX REMARQUE La fonction iPod n’est pas disponible pour le MVH-S120UB/S120UBG/S120UBA/S120UBW. Lecture Débranchez le casque ou les écouteurs du périphérique avant de raccorder ce dernier à l’appareil. Périphériques USB (y compris Android™)/iPod 1 Ouvrez le cache du port USB. 2 Raccordez le périphérique USB/l’iPod à l’aide d’un câble approprié. REMARQUE Pour basculer automatiquement sur une source [USB] lorsqu’un périphérique USB/iPod est connecté à l’appareil, réglez [USB AUTO] sur [ON] dans les paramètres SYSTEM (page 22). -8- Français 1 2 PRÉCAUTION Utilisez un câble USB (vendu séparément) pour raccorder le périphérique USB, car tout périphérique raccordé directement à l’appareil dépassant ce dernier pourrait être dangereux. Avant de retirer le périphérique, arrêtez la lecture. Connexions AOA Pour plus de détails sur la connexion AOA, voir page 15. Connexion MTP REMARQUE Si vous utilisez une connexion MTP, vous devez régler [ANDROID WIRED] sur [MEMORY] dans les paramètres SYSTEM (page 22). AUX 1 Insérez la mini-fiche stéréo dans la prise d’entrée AUX. 2 Appuyez sur SRC/OFF pour sélectionner la source [AUX]. REMARQUE Si [AUX] est réglé sur [OFF] dans les réglages SYSTEM, il est impossible de sélectionner [AUX] en tant que source (page 21). Opérations Vous pouvez procéder à différents ajustements dans les réglages FUNCTION (page 17). Notez que les opérations suivantes ne fonctionnent pas pour un périphérique AUX. Pour utiliser un périphérique AUX, utilisez le périphérique proprement dit. Objectif Opération Sélectionner un dossier/album*1 Appuyez sur 1/ ou 2/ Sélectionner une piste/un morceau (chapitre) Appuyez sur ou Avance ou retour rapide*2 Appuyez longuement sur -9- . . ou . Français Il est possible de connecter un périphérique Android utilisant le système d’exploitation Android 4.0 ou la plupart des versions supérieures via MTP, à l’aide du câble fourni avec le périphérique. Toutefois, selon le périphérique connecté, la version du système d’exploitation et les numéros des fichiers qu’il contient, il se peut que la lecture de fichiers audio / morceaux soit impossible via MTP. Notez que la connexion MTP n’est pas compatible avec les formats de fichiers WAV et FLAC. Opération Rechercher un fichier dans une liste 1 Appuyez longuement sur BASS pour afficher la liste. 2 Tournez la molette M.C. pour sélectionner la catégorie ou le nom de fichier (dossier) de votre choix, puis appuyez pour valider. 3 Tournez la molette M.C. pour sélectionner le fichier de votre choix, puis appuyez pour valider. La lecture commence. Afficher une liste de fichiers dans la catégorie/le dossier sélectionné(e)*1 Appuyez sur la molette M.C. lorsqu’une catégorie/un dossier est sélectionné(e). Lire un morceau de la catégorie/du dossier sélectionné(e)*1 Appuyez longuement sur la molette M.C. lorsqu’une catégorie/un dossier est sélectionné(e). Recherche alphabétique (iPod uniquement) 1 Appuyez longuement sur BASS pour afficher la liste. 2 Tournez la molette M.C. pour sélectionner la liste de catégories de votre choix, puis appuyez longuement sur BASS pour accéder au mode de recherche alphabétique. (Pour accéder au mode de recherche alphabétique, vous pouvez également tourner deux fois la molette M.C..) 3 Tournez la molette M.C. pour sélectionner une lettre, puis appuyez pour afficher la liste alphabétique. Pour annuler la recherche alphabétique, appuyez sur BAND/ . Lecture répétée Appuyez sur 6/ . Lecture aléatoire Appuyez sur 5/ . Lecture aléatoire de toutes les pistes (iPod uniquement) Appuyez longuement sur 5/ Pause/Reprise de la lecture Appuyez sur 4/PAUSE. - 10 - . Français Objectif Objectif Opération Sound retriever (correcteur de son compressé) Appuyez sur 3/S.Rtrv. [1]: efficace pour les taux de compression faibles [2]: efficace pour les taux de compression élevés Retour au dossier racine (USB uniquement)*1 Appuyez longuement sur 1/ . *1 Fichiers d’audio compressé uniquement *2 Si vous utilisez la fonction avance ou retour rapide au moment de la lecture d’un fichier VBR, la durée de lecture peut ne pas être correcte. Fonctions utiles pour iPod Mode de lecture en lien Vous pouvez accéder à des morceaux en vous basant sur l’artiste, l’album ou le genre en cours de lecture. 1 Pendant l’écoute d’un morceau, appuyez longuement sur 4/PAUSE pour entrer en mode de lecture en lien. 2 Tournez la molette M.C. pour sélectionner le mode ([ARTIST], [ALBUM], [GENRE]), puis appuyez pour valider. Le morceau/l’album sélectionné est lu après le morceau en cours de lecture. REMARQUE Le morceau/l’album sélectionné peut être annulé si vous utilisez d’autres fonctions que le mode de lecture en lien (ex. : avance et retour rapides). Commande d’un iPod Vous pouvez commander l’appareil via un iPod raccordé. Les modèles d’iPod suivants ne sont pas compatibles avec cette fonction. – iPod nano 1e génération, iPod avec vidéo 1 Appuyez sur BAND/ en cours de lecture, puis sélectionnez le mode de commande. [CONTROL iPod] : la fonction iPod de l’appareil peut être activée à partir de l’iPod raccordé. - 11 - Français Changer de lecteur sur le périphérique USB Appuyez sur BAND/ (périphériques prenant en charge le protocole de classe de périphérique de stockage de masse USB uniquement) . [CONTROL AUDIO] : la fonction iPod de l’appareil ne peut être activée que par les touches situées sur l’appareil ou par la télécommande fournie. Dans ce mode, il est impossible de mettre l’iPod raccordé sous ou hors tension. REMARQUES • Vous pouvez également commuter le mode de commande en appuyant sur iPod (uniquement pour le modèle MVH-S120UI/S120UIG/S12UI). • La commutation du mode de commande sur [CONTROL iPod] met en pause la lecture d’un morceau. Utilisez l’iPod raccordé pour reprendre la lecture. • Les opérations suivantes sont toujours accessibles à partir de l’appareil, même si le mode de commande est réglé sur [CONTROL iPod]. – Pause, avance/retour rapide, sélection d’un morceau/chapitre • Le volume ne peut être réglé qu’à partir de cet appareil. (Le mode APP n’est pas disponible pour le modèle MVH-S120UB/S120UBG/S120UBA/ S120UBW.) Vous pouvez écouter une application sur un iPhone via cet appareil. Dans certains cas, vous pouvez commander une application en utilisant cet appareil. Pour plus de détails sur les périphériques compatibles, visitez notre site Web. Important L’utilisation d’applications tierces peut impliquer ou nécessiter la fourniture d’informations personnelles, que ce soit en créant un compte d’utilisateur ou une autre méthode ainsi que, pour certaines applications, la fourniture de données de géolocalisation. TOUTES LES APPLICATIONS TIERCES RELÈVENT DE L’ENTIÈRE RESPONSABILITÉ DES FOURNISSEURS, NOTAMMENT MAIS SANS S’Y LIMITER, LA COLLECTE ET LA PROTECTION DES DONNÉES UTILISATEUR ET LES BONNES PRATIQUES DE CONFIDENTIALITÉ. EN ACCÉDANT À UNE APPLICATION TIERCE, VOUS ACCEPTEZ DE PRENDRE CONNAISSANCE DES CONDITIONS DE SERVICE ET DES RÈGLES DE CONFIDENTIALITÉ DES FOURNISSEURS. SI VOUS N’ACCEPTEZ PAS LES CONDITIONS OU RÈGLES D’UN FOURNISSEUR OU SI VOUS N’ACCEPTEZ PAS L’UTILISATION DES DONNÉES DE GÉOLOCALISATION, LE CAS ÉCHÉANT, N’UTILISEZ PAS CETTE APPLICATION TIERCE. Pour les utilisateurs d’iPhone Cette fonction est compatible avec iPhone et iPod touch installés avec iOS 5.0 ou une version supérieure. REMARQUE PIONEER DÉCLINE TOUTE RESPONSABILITÉ QUANT AUX APPLICATIONS OU AUX CONTENUS TIERS, Y COMPRIS, SANS S’Y LIMITER, QUANT À LEUR EXACTITUDE OU À LEUR EXHAUSTIVITÉ. LE CONTENU ET LA FONCTIONNALITÉ DE CES APPLICATIONS RELÈVENT DE LA SEULE RESPONSABILITÉ DU FOURNISSEUR DE L’APPLICATION. - 12 - Français Mode d’application Lecture d’une application via cet appareil 1 2 3 Connectez cet appareil au périphérique mobile. • iPhone via USB (page 8) Appuyez sur SRC/OFF pour sélectionner [APP]. Activez le périphérique mobile pour lancer l’application. Opérations de base Vous pouvez procéder à différents ajustements dans les réglages FUNCTION (page 17). Français Objectif Opération Sélectionner une piste Appuyez sur Avance ou retour rapide Appuyez longuement sur ou . Pause/Reprise de la lecture Appuyez sur BAND/ ou . . Spotify® (MVH-S120UI/S120UIG/S12UI est compatible uniquement avec les iPhone sur lesquels Spotify est installé.) Spotify est un service de diffusion de musique en continu non affilié à Pioneer. Des informations complémentaires sont disponibles sur http://www.spotify.com. L’application Spotify est disponible pour les smartphones compatibles ; veuillez consulter https://support.spotify.com/ afin d’obtenir les dernières informations sur la compatibilité. Pour profiter de Spotify pendant que vous conduisez, téléchargez d’abord l’application Spotify sur votre iPhone. Vous pouvez la télécharger sur iTunes App Store. Optez pour un compte gratuit ou payant Premium, sur l’application ou sur spotify.com. Un compte Premium vous permet d’accéder à davantage de fonctionnalités, comme l’écoute horsligne. Important • Ce produit contient le logiciel Spotify qui fait l’objet de licences tierces que vous trouverez ici : www.spotify.com/connect/third-party-licenses. • Pour obtenir de plus amples informations sur les pays et les régions où Spotify peut être utilisé, consultez https://spotify.com/us/select-your-country/. - 13 - Écoute de Spotify Mettez à jour le microprogramme de l’application Spotify à sa dernière version avant de l’utiliser. 1 2 3 Connectez cet appareil au périphérique mobile. • iPhone via USB (page 8) Appuyez sur SRC/OFF pour sélectionner [SPOTIFY]. Lancez l’application Spotify sur le périphérique mobile, puis lancez la lecture. Vous pouvez procéder à différents ajustements dans les réglages FUNCTION (page 17). REMARQUE Les opérations disponibles peuvent varier selon le type de contenus (titres/albums/artistes/listes de lecture/radios) que vous souhaitez lire. Objectif Opération Sauter une piste Appuyez sur Rechercher un titre dans une liste 1 Appuyez longuement sur BASS pour afficher la liste. 2 Tournez la molette M.C. pour sélectionner la catégorie de votre choix, puis appuyez pour valider. 3 Tournez la molette M.C. pour sélectionner le fichier de votre choix, puis appuyez pour valider. La lecture commence. ou . Pause/Reprise de la lecture Appuyez sur 4/PAUSE. Pouces levés (uniquement pour la radio) Appuyez sur 1/ . Pouces baissés (uniquement pour la radio) Appuyez sur 2/ . Lecture aléatoire (uniquement pour les titres/albums/artistes/listes de lecture) Appuyez sur 5/ . Lecture répétée (uniquement pour les titres/albums/artistes/listes de lecture) Appuyez sur 6/ . Lancez une station de radio en fonction de la chanson en cours de lecture. 1 Appuyez longuement sur 5/ pour lancer une radio. 2 Appuyez sur la molette M.C.. • Cette fonction peut ne pas être disponible selon la chanson sélectionnée. - 14 - Français Opérations de base Objectif Opération Enregistrez les informations concernant la chanson en cours de lecture. Supprimez les informations relatives à la chanson enregistrées. 1 Appuyez longuement sur 3/S.Rtrv. [SAVE]/[UNSAVE] apparaît. 2 Appuyez sur la molette M.C.. REMARQUE Certaines fonctions de Spotify ne peuvent pas être activées à partir de cet appareil. Utilisation de Pioneer ARC APP ATTENTION N’essayez pas d’utiliser l’application tout en conduisant. Veillez à quitter la route et à garer votre véhicule en lieu sûr avant d’essayer d’utiliser les commandes de l’application. Pour les utilisateurs d’iPhone Cette fonction est compatible avec les iPhone (iPhone 5 ou ultérieur) et les iPod touch sur lesquels iOS 8.0 ou ultérieur est installé. Vous pouvez télécharger Pioneer ARC APP sur iTunes App Store. Pour les utilisateurs de périphérique Android Cette fonction est compatible avec un téléphone sur lequel est installée la version Android 4.1 jusqu’à la version 7.1.2, et prend également en charge le système d’exploitation 2.0 AOA (Android Open Accessory). Toutefois, la compatibilité dépend du smartphone. Vous pouvez télécharger Pioneer ARC APP sur Google Play™. REMARQUE Certains périphériques Android connectés via AOA 2.0 risquent de ne pas fonctionner correctement ou d’émettre des sons en raison de leur conception logicielle propre, indépendamment de la version du système d’exploitation. - 15 - Français (Pioneer ARC APP pour iPhone n’est pas disponible pour MVH-S120UB/S120UBG/ S120UBA/S120UBW.) Vous pouvez faire fonctionner l’appareil à partir de Pioneer ARC APP installé sur un périphérique iPhone/Android. Dans certains cas, vous pouvez commander des aspects de l’application, par exemple, la sélection de la source, la mise en pause, etc. à l’aide de l’appareil. Pour plus de détails sur les opérations disponibles sur l’application, consultez la section d’aide de l’application. Connectez-vous à Pioneer ARC APP Lorsque vous vous connectez à un périphérique Android 1 Appuyez sur la molette M.C. pour afficher le menu principal. 2 Tournez la molette M.C. pour sélectionner [SYSTEM], puis appuyez pour valider. 3 Tournez la molette M.C. pour sélectionner [ANDROID WIRED], puis appuyez pour 4 6 7 REMARQUE Si Pioneer ARC APP n’a pas encore été installée sur votre appareil Android, un message vous invitant à l’installer apparaîtra sur votre appareil Android. Sélectionnez [OFF] dans [P.APP AUTO ON] pour effacer le message (page 22). Lorsque vous vous connectez à un iPhone 1 Connectez cet appareil au iPhone via USB. 2 Appuyez sur SRC/OFF pour sélectionner une source. 3 Appuyez longuement sur la molette M.C.. Pioneer ARC APP sur le iPhone démarre. REMARQUE En cas d’échec de la connexion, lancez Pioneer ARC APP sur le iPhone. Écoute de musique sur Android 1 Appuyez sur SRC/OFF pour sélectionner [ANDROID]. Opérations de base Objectif Opération Sélectionner une piste Appuyez sur Avance ou retour rapide Appuyez longuement sur - 16 - ou . ou . Français 5 valider. Tournez la molette M.C. pour sélectionner [APP CONTROL], puis appuyez pour valider. Tournez la molette M.C. pour sélectionner [P.APP AUTO ON], puis appuyez pour valider. Tournez la molette M.C. pour sélectionner [ON], puis appuyez pour valider. Connectez cet appareil au périphérique Android via USB. Pioneer ARC APP sur le périphérique Android démarre automatiquement. Objectif Opération Pause/Reprise de la lecture Appuyez sur 4/PAUSE. Sound retriever (correcteur de son compressé) Appuyez sur 3/S.Rtrv. [1] : efficace pour les taux de compression faibles [2] : efficace pour les taux de compression élevés Réglages 1 2 3 Appuyez sur la molette M.C. pour afficher le menu principal. Tournez la molette M.C. pour sélectionner l’une des catégories suivantes, puis appuyez pour valider. • Réglages FUNCTION (page 17) • Réglages AUDIO (page 19) • Réglages SYSTEM (page 21) • Réglages ILLUMINATION (page 22) Tournez la molette M.C. pour sélectionner les options, puis appuyez pour valider. REMARQUES • Les éléments de menu liés à l’iPod dans les tableaux suivants ne sont pas disponibles pour le modèle MVH-S120UB/S120UBG/S120UBA/S120UBW. • Les éléments de menu liés au mode APP dans les tableaux suivants ne sont pas disponibles pour le modèle MVH-S120UB/S120UBG/S120UBA/S120UBW. Réglages FUNCTION Les éléments de menu varient selon la source. Élément de menu Description FM SETTING [TALK], [STANDARD], [MUSIC] Adaptez le niveau de qualité sonore aux conditions de signal de radiodiffusion du signal de la bande FM. (Disponible uniquement lorsque la bande FM est sélectionnée.) - 17 - Français Vous pouvez régler divers paramètres dans le menu principal. Élément de menu Description BSM Mémorisez automatiquement les six stations les plus puissantes sur les touches numériques (1/ à 6/ ). REGIONAL [ON], [OFF] LOCAL FM : [OFF], [LV1], [LV2], [LV3], [LV4] MW/LW : [OFF], [LV1], [LV2] Restreignez la station d’accord suivant la puissance du signal. [ON], [OFF] Recevez des programmes d’informations routières, le cas échéant. (Disponible uniquement lorsque la bande FM est sélectionnée.) [ON], [OFF] Laissez l’appareil s’accorder sur une autre fréquence fournissant la même station. (Disponible uniquement lorsque la bande FM est sélectionnée.) TA AF NEWS [ON], [OFF] Interrompez la source actuellement sélectionnée avec des bulletins d’informations. (Disponible uniquement lorsque la bande FM est sélectionnée.) SEEK [MAN], [PCH] Attribuez aux touches ou la recherche de stations une par une (accord manuel) ou sélectionnez une station à partir des canaux préréglés. - 18 - Français Limitez la réception des programmes régionaux spécifiques lorsque AF (recherche des autres fréquences) est sélectionné. (Disponible uniquement lorsque la bande FM est sélectionnée.) Élément de menu Description SAVE Enregistrez les informations concernant la chanson en cours de lecture sur votre liste de lecture sur Spotify. UNSAVE Supprimez les informations relatives à la chanson enregistrées dans [SAVE]. S.RTRV USB iPod AUDIO BOOK Améliorez l’audio compressé et restaurez un son riche. Indisponible lors de la lecture du fichier FLAC. iPod [FASTER], [NORMAL], [SLOWER] Modifiez la vitesse de lecture. (Indisponible lorsque [CONTROL iPod] est sélectionné en mode de commande.) PAUSE Mettez sur pause ou reprenez la lecture. Réglages AUDIO Élément de menu Description FADER*1 Réglez l’équilibre sonore entre les haut-parleurs avant et arrière. BALANCE Réglez l’équilibre sonore entre les haut-parleurs gauche et droite. - 19 - Français [1] (efficace pour les taux de compression faibles), [2] (efficace pour les taux de compression élevés), [OFF] Élément de menu Description EQ SETTING [SUPER BASS], [POWERFUL], [DYNAMIC], [NATURAL], [VOCAL], [VIVID], [CUSTOM1], [CUSTOM2], [FLAT] LOUDNESS [OFF], [LOW], [MID], [HI] Compensez pour obtenir un son net à faible volume. SUB.W*2 [NOR], [REV], [OFF] Sélectionnez la phase du haut-parleur d’extrêmes graves. SUB.W CTRL*2*3 Fréquence de coupure : [50HZ], [63HZ], [80HZ], [100HZ], [125HZ], [160HZ], [200HZ] Niveau de sortie : [–24] à [+6] Niveau de la pente : [–12], [–24] Seules les fréquences inférieures à celles de la gamme sélectionnée sont émises par le hautparleur d’extrêmes graves. BASS BOOST [0] à [+6] Sélectionnez le niveau d’accentuation des graves. HPF SETTING Fréquence de coupure : [OFF], [50HZ], [63HZ], [80HZ], [100HZ], [125HZ], [160HZ], [200HZ] Niveau de la pente : [–12], [–24] Seules les fréquences supérieures à la coupure du filtre passe-haut (HPF) sont émises en sortie via les haut-parleurs. - 20 - Français Sélectionnez ou personnalisez la courbe de l’égaliseur. [CUSTOM1] peut être défini séparément pour chaque source. Cependant, chacune des combinaisons ci-dessous est définie Sélectionnez la bande et le automatiquement sur le même réglage. niveau de l’égaliseur pour une • USB, iPod, ANDROID, SPOTIFY et APP (iPhone) personnalisation approfondie. [CUSTOM2] est un réglage partagé et commun à Bande de l’égaliseur : [80HZ], toutes les sources. [250HZ], [800HZ], [2.5KHZ], Vous pouvez également commuter l’égaliseur en [8KHZ] appuyant plusieurs fois sur Niveau de l’égaliseur : [+6] à [–6] (Uniquement pour le modèle MVH-S120UB/ S120UBG/S120UBA/S120UBW). Élément de menu Description SLA [+4] à [–4] Réglez le niveau de volume de chaque source, sauf celui de la FM. Chacune des combinaisons ci-dessous est définie automatiquement sur le même réglage. • USB, iPod, ANDROID, SPOTIFY et APP (iPhone) Réglages SYSTEM Vous pouvez également accéder à ces menus lorsque l’appareil est hors tension. Élément de menu Description LANGUAGE [ENG] (anglais), [РУС] (russe), [TUR] (turc) Sélectionnez la langue d’affichage des informations textuelles à partir d’un fichier audio compressé. CLOCK SET Réglez l’horloge (page 5). 12H/24H [12H], [24H] Sélectionnez la notation de l’heure. SCROLL SET [ONCE], [LOOP], [OFF] Sélectionnez la manière de dérouler le texte dans la fenêtre d’affichage. AUTO PI [ON], [OFF] Recherchez une autre station avec la même programmation, même si vous utilisez une station présélectionnée. [ON], [OFF] Sélectionnez [ON] lors de l’utilisation d’un périphérique auxiliaire connecté à l’appareil. AUX SPOTIFY [ON], [OFF] Sélectionnez [ON] lorsque vous utilisez la fonction Spotify. - 21 - Français *1 Indisponible lorsque [SUB.W/SUB.W] est sélectionné sous [SP-P/O MODE] dans les réglages INITIAL (page 6). *2 Indisponible lorsque [REAR/REAR] est sélectionné sous [SP-P/O MODE] dans les réglages INITIAL (page 6). *3 Indisponible lorsque [OFF] est sélectionné sous [SUB.W]. Élément de menu Description MUTE MODE (uniquement pour le modèle MVH-S120UI/S120UIG/S12UI) [MUTE], [20dB ATT], [10dB ATT] Coupez ou atténuez le son automatiquement lorsque le signal d’un appareil équipé d’une fonction de sourdine est reçu. PW SAVE* [ON], [OFF] Réduisez la consommation d’énergie de la batterie. L’activation de la source est la seule opération autorisée lorsque cette fonction est activée. [MEMORY], [APP CONTROL] Sélectionnez la méthode de connexion adaptée à un périphérique Android. P.APP AUTO ON [ON], [OFF] Sélectionnez [ON] pour lancer automatiquement Pioneer ARC APP lorsqu’un périphérique Android est connecté à l’appareil via AOA. (Indisponible lorsque [MEMORY] est sélectionné sous [ANDROID WIRED].) USB AUTO [ON], [OFF] Sélectionnez [ON] pour basculer automatiquement sur la source [USB] lorsqu’un périphérique USB/iPod est connecté à l’appareil. Sélectionnez [OFF] lorsqu’un périphérique USB/ iPod est connecté à l’appareil uniquement à des fins de charge. * [PW SAVE] s’annule si la batterie du véhicule est débranchée, et il doit être réactivé une fois la batterie rebranchée. Lorsque [PW SAVE] est désactivé, selon les méthodes de connexion, l’appareil peut continuer à consommer l’énergie de la batterie s’il n’y a pas de position ACC (accessoire) sur le contact de votre véhicule. Réglages ILLUMINATION Élément de menu Description DIM SETTING [SYNC CLOCK], [MANUAL] Sélectionnez le mode pour modifier la luminosité de l’affichage. - 22 - Français ANDROID WIRED Élément de menu Description BRIGHTNESS [1] à [10] Changez la luminosité de l’affichage. Les plages de réglage disponibles varient selon le paramètre [DIM SETTING]. Français - 23 - Informations complémentaires – Vérifiez le raccordement des hautparleurs. – Tournez la clé de contact sur OFF, puis de nouveau sur ON. Si le message ne disparaît pas, demandez de l’aide à votre revendeur ou à un centre d’entretien agréé par Pioneer. Dépannage L’affichage redevient automatiquement ordinaire. → Vous n’avez exécuté aucune opération pendant environ 30 secondes. – Exécutez une opération. Un sous-dossier n’est pas lu. → Il est impossible de lire les sous-dossiers lorsque [FLD] (répétition du dossier) est sélectionné. – Sélectionnez une autre étendue de lecture répétée. Le son est intermittent. → Vous utilisez un périphérique, un téléphone portable par exemple, qui peut générer des interférences sonores. – Éloignez de l’appareil tous les périphériques électriques susceptibles de provoquer des interférences. Messages d’erreur Commun AMP ERROR → Un dysfonctionnement de l’appareil s’est produit ou le raccordement des haut-parleurs est incorrect. → Le circuit de protection est activé. NO XXXX (ex. : NO TITLE) → Aucune information textuelle n’est intégrée. – Commutez l’affichage ou la lecture sur une autre piste ou un autre fichier. Périphérique USB/iPod FORMAT READ → Le début de la lecture et le début de l’émission des sons sont parfois décalés. – Attendez que le message disparaisse pour entendre les sons. NO AUDIO → Il n’y a aucun morceau. – Transférez les fichiers audio vers le périphérique USB et procédez à la connexion. → La sécurité est activée sur le périphérique USB connecté. – Suivez les instructions du périphérique USB pour désactiver la sécurité. SKIPPED → Le périphérique USB connecté contient des fichiers protégés par DRM. – Les fichiers protégés sont sautés. PROTECT → Tous les fichiers sur le périphérique USB connecté intègrent la protection par DRM. – Utilisez un autre périphérique USB. - 24 - Français L’étendue de lecture répétée change de manière inattendue. → En fonction de l’étendue de lecture répétée, l’étendue sélectionnée peut changer lors de la sélection d’un autre dossier ou d’une autre piste ou pendant l’avance ou le retour rapide. – Sélectionnez à nouveau l’étendue de lecture répétée. N/A USB → Le périphérique USB connecté n’est pas pris en charge par cet appareil. – Déconnectez votre périphérique et remplacez-le par un périphérique USB compatible. STOP → La liste en cours ne comporte aucun morceau. – Sélectionnez une liste contenant des morceaux. CHECK USB → Le connecteur USB ou le câble USB est en court-circuit. – Vérifiez que le connecteur USB ou le câble USB n’est pas coincé ou endommagé. → Le périphérique USB connecté consomme plus que le courant maximal autorisé. – Déconnectez le périphérique USB et ne l’utilisez pas. Mettez le contact sur OFF, puis de nouveau sur ACC ou ON. Ne connectez que des périphériques USB conformes. ERROR-19 → Panne de communication. – Effectuez l’une des opérations suivantes, puis revenez à la source USB. • Déconnectez le périphérique USB. • Changez de source. → Panne de l’iPod. – Débranchez le câble de l’iPod. Une fois le menu principal de l’iPod affiché, reconnectez et réinitialisez l’iPod. ERROR-23 → Le périphérique USB n’a pas été formaté correctement. – Formatez le périphérique USB avec FAT12, FAT16 ou FAT32. NOT FOUND → Aucun morceau connexe. – Transférez des morceaux sur l’iPod. APP START UP APP → L’application n’a pas encore commencé à s’exécuter. – Activez le périphérique mobile pour lancer l’application. Spotify CHECK APP → Échec de la connexion à l’application Spotify. – Suivez les instructions qui s’affichent à l’écran. Conseils sur la manipulation Périphérique de stockage USB • Les connexions via un concentrateur USB ne sont pas prises en charge. • Attachez fermement le périphérique de stockage USB avant de conduire. Ne laissez pas le périphérique de stockage USB tomber au sol, où il pourrait rester - 25 - Français HUB ERROR → Le périphérique USB connecté via un concentrateur USB n’est pas pris en charge par cet appareil. – Connectez le périphérique USB directement à cet appareil à l’aide d’un câble USB. ERROR-16 → La version du microprogramme de l’iPod est désuète. – Mettez à jour la version de l’iPod. → Panne de l’iPod. – Débranchez le câble de l’iPod. Une fois le menu principal de l’iPod affiché, reconnectez et réinitialisez l’iPod. coincé sous la pédale de frein ou d’accélérateur. • Selon le périphérique de stockage USB, les problèmes suivants peuvent survenir. – Le fonctionnement peut varier. – Le périphérique de stockage peut ne pas être reconnu. – Les fichiers peuvent ne pas être lus correctement. – Le périphérique peut générer des interférences sonores lorsque vous écoutez la radio. USB avec de nombreuses hiérarchies de dossiers. • Les textes russes à afficher sur cet appareil doivent être codés avec l’un des jeux de caractères suivants : – Unicode (UTF-8, UTF-16) – Jeu de caractères autre que l’Unicode qui est utilisé dans un environnement Windows et est paramétré sur Russe dans le réglage multilingue • Ne laissez pas l’iPod dans un endroit soumis à une température élevée. • Attachez fermement l’iPod pendant que vous conduisez. Ne laissez pas l’iPod tomber au sol, où il pourrait gêner le bon fonctionnement de la pédale de frein ou d’accélérateur. • Les réglages de l’iPod, comme l’égaliseur et la lecture répétée, changent automatiquement lorsque l’iPod est connecté à l’appareil. Une fois l’iPod déconnecté, les réglages d’origine sont rétablis. • Aucun texte incompatible enregistré sur l’iPod ne sera affiché par cet appareil. Compatibilité avec l’audio compressé • Seuls les 32 premiers caractères peuvent s’afficher en tant que nom de fichier (extension de fichier comprise) ou nom de dossier. • L’appareil risque de ne pas fonctionner correctement selon l’application utilisée pour encoder les fichiers WMA. • Il peut se produire un léger retard au début de la lecture de fichiers audio intégrés avec des données d’image, ou de fichiers audio stockés sur un périphérique Fichiers WMA Extension de fichier Débit binaire Fréquence d’échantillonnage Windows Media™ Audio Professional, Lossless, Voice/DRM Stream/Stream avec vidéo .wma 48 kbps à 320 kbps (CBR), 48 kbps à 384 kbps (VBR) 32 kHz, 44,1 kHz, 48 kHz Incompatible Fichiers MP3 Extension de fichier Débit binaire Fréquence d’échantillonnage - 26 - .mp3 8 kbps à 320 kbps (CBR), VBR 8 kHz à 48 kHz (32 kHz, 44,1 kHz, 48 kHz pour accentuation) Français iPod PRÉCAUTION • Pioneer ne garantit pas la compatibilité avec tous les périphériques de stockage de masse USB et décline toute responsabilité en cas de perte de données sur des lecteurs multimédia, smartphones ou autres périphériques lors de l’utilisation de ce produit. • Ne laissez pas de disques ou un périphérique de stockage USB dans un lieu où les températures sont élevées. Version étiquette ID3 compatible Liste de lecture M3u MP3i (MP3 interactif ), mp3 PRO 1.0, 1.1, 2.2, 2.3, 2.4 (la version 2.x de l’étiquette ID3 a priorité sur la version 1.x.) Incompatible Incompatible Lecture des fichiers protégés par des droits d’auteur Périphérique USB partitionné • Il est impossible de connecter les formats de fichier WAV via MTP. Fichiers FLAC • Il est impossible de connecter les formats de fichier FLAC via MTP. • Selon l’encodeur, les fichiers FLAC risquent d’être illisibles. .flac Fréquence d’échantillonnage Débit binaire de quantification Mode de canal 8/11,025/12/16/22,05/ 24/32/44,1/48 kHz 16 bits 1/2 canaux Périphérique USB • Il peut se produire un léger retard au début de la lecture de fichiers audio stockés sur un périphérique de stockage USB avec de nombreuses hiérarchies de dossiers. Hiérarchie des dossiers lisibles Dossiers lisibles Fichiers lisibles Jusqu’à huit niveaux (dans la pratique, la hiérarchie compte moins de deux niveaux) Jusqu’à 500 Jusqu’à 15 000 Cet appareil prend en charge uniquement les modèles d’iPod suivants. Les versions antérieures ne sont pas prises en charge. Made for (Conçu pour) – iPod touch (de la 1e à la 6e génération) – iPod classic – iPod nano (de la 3e à la 7e génération) – iPhone 6s – iPhone 6s Plus – iPhone 6 – iPhone 6 Plus – iPhone 5s – iPhone 5c – iPhone 5 – iPhone 4s – iPhone 4 – iPhone 3GS – iPhone 3G – iPhone • Les opérations peuvent varier selon la génération et/ou la version de l’iPod. • Les utilisateurs d’un iPod avec le connecteur Lightning doivent utiliser le Lightning vers le câble USB (fourni avec iPod). • Les utilisateurs d’un iPod avec connecteur pour station d’accueil doivent utiliser le câble CD-IU51. Pour plus de détails, consultez votre revendeur. • Pour en savoir plus sur la compatibilité fichier/format, reportez-vous aux manuels de l’iPod. • Livre audio, podcast : compatible - 27 - Français .wav 8 et 16 (LPCM) 16 kHz à 48 kHz (LPCM) Extension de fichier Seule la première partition est lisible. Compatibilité avec un iPod Fichiers WAV Extension de fichier Bits de quantification Fréquence d’échantillonnage Incompatible Tableau des caractères cyrilliques PRÉCAUTION Pioneer n’accepte aucune responsabilité en cas de perte de données sur l’iPod, même si la perte de données se produit pendant l’utilisation de cet appareil. Séquence des fichiers audio Français Sur cet appareil, l’utilisateur ne peut pas affecter de numéros de dossier ni spécifier les séquences de lecture. La séquence de fichier audio dépend du périphérique raccordé. Notez que la lecture des fichiers masqués d’un périphérique USB est impossible. Exemple de hiérarchie Dossier Fichier d’audio compressé D : Affichage C : Caractère Droits d’auteur et marques commerciales 01 à 05 : numéro de dossier à : séquence de lecture iTunes Apple et iTunes sont des marques commerciales d’Apple Inc., enregistrées aux États-Unis et dans d’autres pays. WMA Windows Media est une marque déposée ou une marque commerciale de Microsoft Corporation aux États-Unis et/ou dans d’autres pays. Ce produit intègre une technologie détenue par Microsoft Corporation, qui ne peut être utilisée et distribuée que sous licence de Microsoft Licensing, Inc. - 28 - QU’EN SOIENT LES CAUSES ET QUEL QUE SOIT LE TYPE DE RESPONSABILITÉ, CONTRACTUELLE, STRICTE OU FONDÉE SUR UN DÉLIT CIVIL (Y COMPRIS PAR NÉGLIGENCE OU POUR UNE AUTRE CAUSE) RÉSULTANT D’UNE MANIÈRE OU D’UNE AUTRE DE L’UTILISATION DE CE LOGICIEL, MÊME SI MENTION A ÉTÉ FAITE DE LA POSSIBILITÉ DE TELS DOMMAGES. iPhone, iPod et Lightning L’usage du badge Made for Apple signifie qu’un accessoire a été conçu pour se connecter spécialement au(x) produit(s) Apple identifié(s) sur le badge, et qu’il a été certifié conforme aux normes de performance Apple par son concepteur. Apple n’est pas responsable du fonctionnement de cet appareil ou de sa conformité avec les normes de sécurité et de réglementation. Veuillez noter que l’utilisation de cet accessoire avec un produit Apple peut affecter les performances de communication sans fil. iPhone, iPod, iPod classic, iPod nano, iPod touch et Lightning sont des marques commerciales d’Apple Inc., déposées aux États-Unis et dans d’autres pays. Google™, Google Play, Android Google, Google Play et Android sont des marques de commerce de Google LLC. Spotify® SPOTIFY et le logo Spotify font partie des marques déposées de Spotify AB. Des appareils numériques mobiles compatibles et un abonnement premium sont nécessaires, le cas échéant, consultez le site https://www.spotify.com. - 29 - Français FLAC Copyright © 2000-2009 Josh Coalson Copyright © 2011-2013 Xiph.Org Foundation La redistribution et l’utilisation sous la forme de source et sous forme binaire, avec ou sans modification, sont autorisées pour autant que les conditions suivantes soient remplies : – Les redistributions de code source doivent mentionner l’avis de droit d’auteur ci-dessus, la présente liste de conditions et l’avis de non-responsabilité suivant. – Les redistributions sous forme binaire doivent mentionner l’avis de droit d’auteur ci-dessus, la présente liste de conditions et l’avis de non-responsabilité suivant dans la documentation et/ou les autres éléments fournis avec la distribution. – Ni le nom de la Xiph.org Foundation, ni les noms de ses contributeurs ne peuvent être utilisés en vue d’approuver ou de promouvoir des produits dérivés de ce logiciel sans autorisation écrite préalable. LE PRÉSENT LOGICIEL EST FOURNI PAR LES TITULAIRES DE DROIT D’AUTEUR ET LES CONTRIBUTEURS « EN L’ÉTAT », ET AUCUNE GARANTIE, EXPLICITE OU IMPLICITE, N’EST OFFERTE, Y COMPRIS ET SANS S’Y LIMITER, LES GARANTIES IMPLICITES DE QUALITÉ MARCHANDE ET D’ADÉQUATION À UNE UTILISATION PARTICULIÈRE. EN AUCUN CAS, LA FONDATION OU SES CONTRIBUTEURS NE POURRONT ÊTRE TENUS POUR RESPONSABLES DES DOMMAGES DIRECTS, INDIRECTS, ACCESSOIRES, SPÉCIAUX, DES DOMMAGES ET INTÉRÊTS PUNITIFS OU DES DOMMAGES CONSÉCUTIFS (NOTAMMENT, MAIS SANS S’Y LIMITER, LE REMPLACEMENT DE PRODUITS OU DE SERVICES, LA PERTE DE JOUISSANCE, DE DONNÉES OU DE BÉNÉFICES OU ENCORE L’INTERRUPTION D’UNE ACTIVITÉ COMMERCIALE) QUELLES Fréquence : 50 Hz/63 Hz/80 Hz/ 100 Hz/125 Hz/160 Hz/200 Hz Pente : –12 dB/oct, –24 dB/oct Gain : +6 dB à –24 dB Phase : normale/inverse Caractéristiques techniques Généralités Audio Puissance de sortie maximale : • 50 W × 4 canaux/4 Ω (sans hautparleur d’extrêmes graves) • 50 W × 2 canaux/4 Ω + 70 W × 1 canal/2 Ω (pour haut-parleur d’extrêmes graves) Puissance de sortie continue : 22 W × 4 (50 Hz à 15 000 Hz, THD 5 %, impédance de charge 4 Ω, avec les deux canaux entraînés) Impédance de charge : 4 Ω (4 Ω à 8 Ω admissible) Niveau de sortie maximum de la sortie préamp. : 2,0 V Correction physiologique : +10 dB (100 Hz), +6,5 dB (10 kHz) (volume : –30 dB) Égaliseur (égaliseur graphique à 5 bandes) : Fréquence : 80 Hz/250 Hz/800 Hz/ 2,5 kHz/8 kHz Plage d’égalisation : ±12 dB (par pas de 2 dB) Haut-parleur d’extrêmes graves (mono) : USB Spécification standard USB : USB 2.0 vitesse pleine Alimentation maximale : 1 A Protocole USB : MSC (Mass Storage Class) MTP (Media Transfer Protocol) AOA (Android Open Accessory) 2.0 Système de fichiers : FAT12, FAT16, FAT32 Format de décodage MP3 : MPEG-1 et 2 Couche Audio 3 Format de décodage WMA : Ver. 7, 8, 9, 9.1, 9.2 (2 canaux audio) Format de décodage FLAC : v1.3.0 (Free Lossless Audio Codec) Format de signal WAV : PCM linéaire (non compressé) Syntoniseur FM Gamme de fréquences : 87,5 MHz à 108,0 MHz Sensibilité utile : 11 dBf (1,0 μV/75 Ω, mono, S/B : 30 dB) Rapport signal/bruit : 72 dB (réseau IEC-A) Syntoniseur MW Gamme de fréquences : 531 kHz à 1 602 kHz Sensibilité utile : 25 μV (S/B : 20 dB) Rapport signal/bruit : 62 dB (réseau IEC-A) Syntoniseur LW Gamme de fréquences : 153 kHz à 281 kHz Sensibilité utile : 28 μV (S/B : 20 dB) Rapport signal/bruit : 62 dB (réseau IEC-A) REMARQUE Les caractéristiques et la présentation peuvent être modifiées sans avis préalable. - 30 - Français Tension d’alimentation : 14,4 V CC (10,8 V à 15,1 V admissible) Mise à la masse : pôle négatif Consommation maximale : 10,0 A Dimensions (L × H × P) : DIN Châssis: 178 mm × 50 mm × 97 mm Panneau avant : 188 mm × 58 mm × 17 mm D Châssis: 178 mm × 50 mm × 97 mm Panneau avant : 170 mm × 46 mm × 17 mm Poids : 0,5 kg Sommario Operazioni preliminari ........................................................................... 3 Radio .......................................................................................................... 7 USB/iPod/AUX .......................................................................................... 8 Modalità app ......................................................................................... 12 Spotify® .................................................................................................. 13 Utilizzare Pioneer ARC APP................................................................. 14 Impostazioni.......................................................................................... 16 Informazioni aggiuntive ..................................................................... 22 Informazioni sul manuale: • Nelle seguenti istruzioni, una memoria USB o un lettore audio USB viene denominato “dispositivo USB”. • In questo manuale, iPod e iPhone vengono denominati “iPod”. -2- Italiano Impostazioni FUNCTION...................................................................... 17 Impostazioni AUDIO ............................................................................. 18 Impostazioni SYSTEM........................................................................... 20 Impostazioni ILLUMINATION .............................................................. 21 Operazioni preliminari Funzionamento di base MVH-S120UI/S120UIG/S12UI/S120UB/S120UBG/S120UBA/ S120UBW BASS Porta USB Ghiera M.C. (multi-controllo) SRC (sorgente)/OFF Italiano BAND/ Pulsante di sgancio DISP (display) Finestra di visualizzazione Jack di ingresso AUX (jack stereo da 3,5 mm) Operazioni frequenti Scopo Operazione Accendere l’alimentazione* Premere SRC/OFF per accendere l’alimentazione. Tenere premuto SRC/OFF per spegnere l’alimentazione. Regolare il volume Ruotare la ghiera M.C.. Selezionare una sorgente Premere ripetutamente SRC/OFF. Cambiare la visualizzazione delle informazioni Premere ripetutamente DISP. Tornare alla precedente visualizzazione/ elenco Premere BAND/ Tornare alla visualizzazione normale dal menu Tenere premuto BAND/ -3- . . Scopo Operazione Potenziare il livello dei bassi Premere BASS. • Il livello dei bassi è selezionabile in [BASS BOOST] (pagina 19). * Quando l’interlinea blu/bianca dell’unità è collegata al terminale di controllo relè dell’antenna automatica del veicolo, l’antenna del veicolo si estende quando la sorgente dell’unità è attivata. Per ritirare l’antenna, disattivare la sorgente. Indicazione del display Indicazione Descrizione Viene visualizzata quando esiste un livello inferiore del menu o della cartella. Viene visualizzato quando si tiene premuto il pulsante BASS. Viene visualizzata quando è impostata la funzione di sintonizzazione automatica locale (pagina 17). Viene visualizzata quando è impostata la funzione TA (annunci sul traffico) (pagina 17). Viene visualizzata quando è impostata la funzione sound retriever (pagina 18). Viene visualizzata quando è impostata la funzione di controllo dell’iPod (pagina 11). Rimozione del frontalino Staccare il frontalino per evitarne il furto. Rimuovere tutti i cavi e i dispositivi collegati al frontalino e spegnere l’unità prima di staccarla. Stacca Attacca Importante • Evitare di sottoporre il frontalino a forti urti. • Mantenere il frontalino lontano da luce diretta del sole e alte temperature. -4- Italiano Viene visualizzata quando viene ricevuto un programma sul traffico. • Conservare sempre il frontalino staccato in una custodia protettiva o in borsa. Menu di configurazione Quando, dopo l’installazione, si imposta l’interruttore di accensione su ON, sul display viene visualizzato [SET UP :YES]. 1 2 Premere la ghiera M.C.. Il menu di configurazione scompare dopo 30 secondi di attività. Se si desidera effettuare l’impostazione in seguito, ruotare la ghiera M.C. per selezionare [NO], quindi premere per confermare. Ruotare la ghiera M.C. per selezionare le opzioni, quindi premere per confermare. Per passare all’opzione di menu successiva, confermare la selezione. Voce del menu Descrizione LANGUAGE Selezionare la lingua per visualizzare le informazioni di testo di un file audio compresso. CLOCK SET Impostare l’orologio. FM STEP Selezionare il passo di frequenza FM tra 100 kHz o 50 kHz. [100], [50] 3 4 [QUIT :YES] viene visualizzato quando sono state effettuate tutte le impostazioni. Per tornare alla prima voce del menu di configurazione, ruotare la ghiera M.C. per selezionare [QUIT :NO], quindi premere per confermare. Premere la ghiera M.C. per confermare le impostazioni. NOTE • È possibile annullare l’impostazione del menu premendo SRC/OFF. • Tali impostazioni possono essere effettuate in qualsiasi momento dalle impostazioni SYSTEM (pagina 20) e dalle impostazioni INITIAL (pagina 6). Annullamento della visualizzazione di dimostrazione (DEMO OFF) 1 2 Premere la ghiera M.C. per visualizzare il menu principale. Ruotare la ghiera M.C. per selezionare [SYSTEM], quindi premere per confermare. -5- Italiano [ENG](Inglese), [РУС](Russo), [TUR](Turco) 3 4 Ruotare la ghiera M.C. per selezionare [DEMO OFF], quindi premere per confermare. Ruotare la ghiera M.C. per selezionare [YES], quindi premere per confermare. Impostazioni INITIAL 1 2 3 4 Tenere premuto SRC/OFF finché l’unità si spegne. Tenere premuto SRC/OFF per visualizzare il menu principale. Ruotare la ghiera M.C. per selezionare [INITIAL], quindi premere per confermare. Ruotare la ghiera M.C. per selezionare un’opzione, quindi premere per confermare. NOTA Le opzioni variano in base all’unità. Descrizione Selezionare il passo di frequenza FM tra 100 kHz o 50 kHz. [100], [50] SP-P/O MODE [REAR/SUB.W] Selezionare in presenza di un altoparlante full-range collegato alle interlinee di uscita dell’altoparlante posteriore e di un subwoofer collegato a un’uscita RCA. [SUB.W/SUB.W] Selezionare in presenza di un subwoofer passivo collegato direttamente alle interlinee di uscita dell’altoparlante posteriore e di un subwoofer collegato all’uscita RCA. [REAR/REAR] Selezionare in presenza di altoparlanti full-range collegati alle interlinee di uscita dell’altoparlante posteriore e all’uscita RCA. In presenza di un altoparlante full-range collegato alle interlinee di uscita dell’altoparlante posteriore e l’uscita RCA non viene utilizzata, è possibile selezionare [REAR/SUB.W] o [REAR/REAR]. S/W UPDATE [SYSTEM INFO] Selezionare per confermare le più recenti informazioni di sistema sull’unità. [SYSTEM UPDATE] Selezionare per aggiornare l’unità al software più recente e avviare le impostazioni dell’unità. Per dettagli sul software più recente e sull’aggiornamento, visitare il nostro sito Web. SYSTEM RESET [YES], [NO] Selezionare [YES] per avviare le impostazioni dell’unità. L'unità verrà riavviata automaticamente. (Alcune impostazioni possono essere mantenute anche dopo la reimpostazione dell’unità.) -6- Italiano Voce del menu FM STEP Radio Le frequenze del tuner sull’unità sono distribuite per l’utilizzo in Europa occidentale, Asia, Medio oriente, Africa e Oceania. L’utilizzo in altre aree può provocare una scarsa ricezione. La funzione RDS (radio data system) funziona solo nelle aree di trasmissione dei segnali RDS per le stazioni FM. Ricezione delle stazioni preimpostate 1 2 3 Premere SRC/OFF per selezionare [RADIO]. Premere BAND/ per selezionare la banda [FM1], [FM2], [FM3], [MW] o [LW]. Premere un pulsante numerico (da 1/ a 6/ ). TIP Italiano I pulsanti / possono anche essere utilizzati per selezionare una stazione preimpostata quando [SEEK] è impostato su [PCH] nelle impostazioni FUNCTION (pagina 18). Best stations memory (BSM) Le sei stazioni più forti vengono memorizzate sui pulsanti numerici (da 1/ 1 2 3 a 6/ ). Una volta selezionata la banda, premere la ghiera M.C. per visualizzare il menu principale. Ruotare la ghiera M.C. per selezionare [FUNCTION], quindi premere per confermare. Ruotare la ghiera M.C. per selezionare [BSM], quindi premere per confermare. Per cercare manualmente una stazione 1 Una volta selezionata la banda, premere / per selezionare una stazione. Tenere premuto / , quindi rilasciarlo per cercare una stazione disponibile. La scansione termina quando l’unità riceve una stazione. Per annullare la sintonizzazione, premere / . NOTA [SEEK] deve essere impostato su [MAN] nelle impostazioni FUNCTION (pagina 18). -7- Per memorizzare manualmente le stazioni 1 Durante la ricezione della stazione che si desidera memorizzare, tenere premuto uno dei pulsanti numerici (da 1/ lampeggiare. a 6/ ) fino a quando non smette di Utilizzo delle funzioni PTY L’unità cerca una stazione per informazione PTY (tipo di programma). 1 2 3 Tenere premuto BASS durante la ricezione FM. Ruotare la ghiera M.C. per selezionare un tipo di programma da [NEWS/INFO], [POPULAR], [CLASSICS] o [OTHERS]. Premere la ghiera M.C.. L’unità inizia a cercare una stazione. Una volta trovata, viene visualizzato il relativo nome di servizio del programma. • Per annullare la ricerca, premere la ghiera M.C.. • Il programma di alcune stazioni può differire da quanto indicato dal PTY trasmesso. • Se non viene trasmessa alcuna stazione per il tipo di programma che si sta cercando, viene visualizzato [NOT FOUND] per circa due secondi, quindi il tuner torna alla stazione originale. USB/iPod/AUX NOTA La funzione iPod non è disponibile per MVH-S120UB/S120UBG/S120UBA/S120UBW. Riproduzione Scollegare le cuffie dal dispositivo prima di collegarlo all’unità. Dispositivi USB (incluso Android™)/iPod 1 Aprire il coperchio della porta USB. 2 Collegare il dispositivo USB/iPod utilizzando un cavo idoneo. NOTA Per passare automaticamente alla sorgente [USB] quando un dispositivo USB/iPod è collegato all’unità, impostare [USB AUTO] su [ON] nelle impostazioni SYSTEM (pagina 21). -8- Italiano NOTE ATTENZIONE Utilizzare un cavo USB (venduto separatamente) per collegare il dispositivo USB in quanto ogni dispositivo collegato direttamente all’unità sporge e può risultare pericoloso. Prima di rimuovere il dispositivo, interrompere la riproduzione. Connessioni AOA Per dettagli sulla connessione AOA, consultare pagina 15. Connessione MTP Un dispositivo installato con Android OS 4.0 o la maggior parte delle versioni successive, può essere collegato all’unità via MTP, utilizzando il cavo in dotazione con il dispositivo. Tuttavia, in base al dispositivo collegato, alla versione OS o al numero di file nel dispositivo, i brani/file audio potrebbero non essere riprodotti via MTP. Si prega di notare che il collegamento MTP non è compatibile con i formati file WAV e FLAC. NOTA Se si utilizza una connessione MTP, impostare [ANDROID WIRED] su [MEMORY] nelle impostazioni SYSTEM (pagina 21). Italiano AUX 1 Inserire la spina mini stereo nel jack di ingresso AUX. 2 Premere SRC/OFF per selezionare [AUX] come sorgente. NOTA Se [AUX] è impostato su [OFF] nelle impostazioni SYSTEM, non è possibile selezionare [AUX] come sorgente (pagina 20). Operazioni È possibile effettuare diverse regolazioni nelle impostazioni FUNCTION (pagina 17). Si prega di notare che le seguenti operazioni non funzionano su un dispositivo AUX. Per utilizzare un dispositivo AUX, utilizzare il dispositivo stesso. Scopo Operazione Selezionare una cartella/album*1 Premere 1/ o 2/ Selezionare una traccia/brano (capitolo) Premere o Avanzamento o avvolgimento rapido*2 Tenere premuto -9- . . o . Scopo Operazione Cercare un file da un elenco 1 Tenere premuto BASS per visualizzare l’elenco. 2 Ruotare la ghiera M.C. per selezionare il nome file desiderato (cartella) o la categoria, quindi premere per confermare. 3 Ruotare la ghiera M.C. per selezionare il file desiderato, quindi premere per confermare. La riproduzione si avvia. Visualizzare un elenco di file nella cartella/ categoria selezionata*1 Premere la ghiera M.C. quando viene selezionata una cartella/categoria. Riprodurre un brano nella cartella/categoria Tenere premuto la ghiera M.C. quando selezionata*1 viene selezionata una cartella/categoria. Ripetere la riproduzione Premere 6/ . Riproduzione casuale/shuffle Premere 5/ . Riproduzione shuffle di tutti i brani (solo iPod) Tenere premuto 5/ . Sospendere/riprendere la riproduzione Premere 4/PAUSE. Sound retriever Premere 3/S.Rtrv. [1]: efficace per velocità di compressione basse [2]: efficace per velocità di compressione alte Tornare alla cartella principale (solo USB)*1 Tenere premuto 1/ - 10 - . Italiano 1 Tenere premuto BASS per visualizzare l’elenco. 2 Ruotare la ghiera M.C. per selezionare l’elenco di categoria desiderato, quindi tenere premuto BASS per inserire la modalità di ricerca alfabetica. (Anche ruotando la ghiera M.C. due volte è possibile inserire la modalità di ricerca alfabetica.) 3 Ruotare la ghiera M.C. per selezionare una lettera, quindi premere per visualizzare l’elenco alfabetico. Per annullare la ricerca alfabetica, premere BAND/ . Ricerca alfabetica (solo iPod) Scopo Operazione Cambiare le unità nel dispositivo USB (dispositivi che supportano solo il protocollo di classe dispositivo di archiviazione di massa USB) Premere BAND/ . *1 Solo file audio compressi *2 Quando si utilizza la funzione di avanzamento o avvolgimento rapido durante la riproduzione di un file VBR, la durata della riproduzione indicata potrebbe non essere corretta. Funzioni utili per iPod Modalità di riproduzione collegamento NOTA È possibile annullare il brano/album selezionato se si utilizzano funzioni diverse dalla modalità di ricerca collegamento (ad esempio avanzamento e riavvolgimento rapidi). Controllo iPod È possibile controllare l’unità mediante un iPod connesso. I seguenti modelli di iPod non sono compatibili con questa funzione. – iPod nano 1° generazione, iPod con video 1 Premere BAND/ durante la riproduzione, quindi selezionare la modalità di controllo. [CONTROL iPod]: la funzione iPod dell’unità può essere utilizzata dall’iPod collegato. [CONTROL AUDIO]: la funzione iPod dell’unità può essere utilizzata solo mediante i pulsanti dell’unità o del telecomando in dotazione. In questa modalità, l’iPod collegato non può essere acceso o spento. NOTE • Premendo iPod è anche possibile cambiare la modalità di controllo (solo per MVH-S120UI/S120UIG/ S12UI). • Il passaggio dalla modalità di controllo a [CONTROL iPod] sospende la riproduzione del brano. Utilizzare l’iPod collegato per riprendere la riproduzione. - 11 - Italiano È possibile accedere ai brani in base ad artista, album o genere attualmente in riproduzione. 1 Mentre si ascolta un brano, tenere premuto 4/PAUSE per inserire la modalità di riproduzione collegamento. 2 Ruotare la ghiera M.C. per selezionare la modalità ([ARTIST], [ALBUM], [GENRE]), quindi premere per confermare. Il brano/album selezionato verrà riprodotto dopo il brano attualmente in riproduzione. • Le seguenti operazioni continuano a essere accessibili dall’unità anche se la modalità di controllo è impostata su [CONTROL iPod]. – Pausa, avanzamento/riavvolgimento rapido, selezione brano/capitolo • Il volume può essere regolato solo dall’unità. Modalità app (La modalità APP non è disponibile per MVH-S120UB/S120UBG/S120UBA/S120UBW.) È possibile ascoltare un’applicazione su un iPhone attraverso l’unità. In alcuni casi, è possibile controllare un’applicazione utilizzando l’unità. Per dettagli sui dispositivi compatibili, visitare il nostro sito Web. Importante Per gli utenti iPhone Questa funzione è compatibile con iPhone e iPod touch installati con iOS 5.0 o versioni successive. NOTA PIONEER NON È RESPONSABILE DELLE APP DI TERZE PARTI O DEI RELATIVI CONTENUTI, SENZA ALCUNA LIMITAZIONE ALL’ACCURATEZZA O ALLA COMPLETEZZA. IL CONTENUTO E LA FUNZIONALITÀ DI TALI APPLICAZIONI SONO DI SOLA RESPONSABILITÀ DEL FORNITORE DELLA APP. Riproduzione di un’applicazione attraverso l’unità 1 2 3 Connettere l’unità con un dispositivo mobile. • iPhone via USB (pagina 8) Premere SRC/OFF per selezionare [APP]. Utilizzare il dispositivo mobile per avviare l’applicazione. Operazioni di base È possibile effettuare diverse regolazioni nelle impostazioni FUNCTION (pagina 17). Scopo Operazione Selezionare una traccia Premere - 12 - o . Italiano L’utilizzo di applicazioni di terze parti potrebbe comportare o richiedere di fornire informazioni personali di identificazione attraverso la creazione di un account utente o in altro modo e, per alcune applicazioni, attraverso l’invio di dati di geolocalizzazione. TUTTE LE APPLICAZIONI DI TERZE PARTI SONO DI RESPONSABILITÀ ESCLUSIVA DEI RISPETTIVI FORNITORI, INCLUSI MA NON LIMITATAMENTE ALLA GESTIONE E SICUREZZA DEI DATI UTENTE E ALLE PROCEDURE DI TUTELA DELLA PRIVACY. ACCEDENDO AD APPLICAZIONI DI TERZE PARTI, SI ACCETTA DI ESAMINARE I TERMINI DEL SERVIZIO E I CRITERI SULLA PRIVACY DEI FORNITORI. SE NON SI ACCETTANO I TERMINI O I CRITERI DI QUALSIASI FORNITORE O NON SI ACCONSENTE, DOVE SIA APPLICABILE, ALL’USO DEI DATI DI GEOLOCALIZZAZIONE, NON UTILIZZARE TALI APPLICAZIONI DI TERZE PARTI. Scopo Operazione Avanzamento o avvolgimento rapido Tenere premuto Sospendere/riprendere la riproduzione Premere BAND/ o . . Spotify® Importante • Questo prodotto include il software Spotify soggetto a licenze di terze parti consultabili qui: www.spotify.com/connect/third-party-licenses. • Per informazioni sui Paesi e sulle regioni in cui è possibile utilizzare Spotify, dare un’occhiata a https:// spotify.com/us/select-your-country/. Ascoltare Spotify Prima dell’uso, aggiornare il firmware dell’applicazione Spotify alla versione più recente. 1 2 3 Connettere l’unità con un dispositivo mobile. • iPhone via USB (pagina 8) Premere SRC/OFF per selezionare [SPOTIFY]. Avviare l’applicazione Spotify sul dispositivo mobile e avviare la riproduzione. Operazioni di base È possibile effettuare diverse regolazioni nelle impostazioni FUNCTION (pagina 17). NOTA Le operazioni disponibili variano in base al tipo di contenuti (brano/album/artista/playlist/radio) che si desidera riprodurre. Scopo Operazione Saltare una traccia Premere - 13 - o . Italiano (MVH-S120UI/S120UIG/S12UI è compatibile solo con Spotify installato su iPhone.) Spotify è un servizio di distribuzione musicale in streaming non affiliato con Pioneer. Maggiori informazioni sono disponibili alla pagina http://www.spotify.com. L’applicazione Spotify è disponibile per gli smartphone compatibili. Per informazioni aggiornate sulla compatibilità, visitare la pagina https://support.spotify.com/. Per utilizzare Spotify durante la guida, per prima cosa scaricare la app Spotify sull’iPhone. È possibile effettuare il download da iTunes App Store. Scegliere un account gratuito o Premium a pagamento, all’interno della app o su spotify.com. Un account Premium offre molte più funzioni, come ad esempio l’ascolto offline. Operazione Cercare un brano da un elenco 1 Tenere premuto BASS per visualizzare l’elenco. 2 Ruotare la ghiera M.C. per selezionare la categoria desiderata, quindi premere per confermare. 3 Ruotare la ghiera M.C. per selezionare il file desiderato, quindi premere per confermare. La riproduzione si avvia. Sospendere/riprendere la riproduzione Premere 4/PAUSE. Pollice in su (solo per la radio) Premere 1/ . Pollice in giù (solo per la radio) Premere 2/ . Riproduzione casuale (solo per brano/ album/artista/playlist) Premere 5/ . Riproduzione ripetuta (solo per brano/ album/artista/playlist) Premere 6/ . Avviare un canale radio in base al brano attualmente riprodotto. 1 Tenere premuto 5/ per avviare una radio. 2 Premere la ghiera M.C.. • Questa funzione potrebbe non essere disponibile in base al brano selezionato. Memorizzare le informazioni sul brano attualmente riprodotto. Rimuovere le informazioni memorizzate. 1 Tenere premuto 3/S.Rtrv. Viene visualizzato [SAVE]/[UNSAVE]. 2 Premere la ghiera M.C.. NOTA Alcune funzioni di Spotify potrebbero non funzionare dall’unità. Utilizzare Pioneer ARC APP (Pioneer ARC APP per iPhone non è disponibile per MVH-S120UB/S120UBG/S120UBA/ S120UBW.) È possibile utilizzare l’unità dall’applicazione Pioneer ARC APP installata su un dispositivo iPhone/Android. In alcuni casi, è possibile controllare aspetti dell’applicazione utilizzando l’unità, quali selezione della sorgente, pausa e così via. Per dettagli sulle operazioni disponibili nell’applicazione, consultare la sezione di supporto dell’applicazione. - 14 - Italiano Scopo AVVERTENZA Non tentare di utilizzare l’applicazione durante la guida. Assicurarsi di uscire dalla strada e parcheggiare il veicolo in un luogo sicuro prima di tentare di utilizzare i comandi sull’applicazione. Per gli utenti iPhone Questa funzione è compatibile con iPhone (iPhone 5 o successivo) e iPod touch installati con iOS 8.0 o versioni successive. È possibile scaricare Pioneer ARC APP da iTunes App Store. Per gli utenti di dispositivi Android Questa funzione è compatibile con un telefono che esegue Android 4.1 fino a 7.1.2 e che supporta anche AOA (Android Open Accessory) 2.0. Tuttavia, la compatibilità dipende dallo smartphone. È possibile scaricare Pioneer ARC APP su Google Play™. NOTA Alcuni dispositivi Android collegati via AOA 2.0 potrebbero non funzionare correttamente o emettere suoni a causa del proprio software, indipendentemente dalla versione del sistema operativo. Quando si effettua un collegamento con un dispositivo Android 1 Premere la ghiera M.C. per visualizzare il menu principale. 2 Ruotare la ghiera M.C. per selezionare [SYSTEM], quindi premere per confermare. 3 Ruotare la ghiera M.C. per selezionare [ANDROID WIRED], quindi premere per 4 5 6 7 confermare. Ruotare la ghiera M.C. per selezionare [APP CONTROL], quindi premere per confermare. Ruotare la ghiera M.C. per selezionare [P.APP AUTO ON], quindi premere per confermare. Ruotare la ghiera M.C. per selezionare [ON], quindi premere per confermare. Collegare l’unità con il dispositivo Android via USB. Pioneer ARC APP sul dispositivo Android si avvia automaticamente. NOTA Nel caso in cui l’applicazione Pioneer ARC APP non sia ancora stata installata sul dispositivo Android, viene visualizzato un messaggio che richiede di installare l’applicazione sul dispositivo Android. Selezionare [OFF] in [P.APP AUTO ON] per annullare il messaggio (pagina 21). Quando si effettua un collegamento con un iPhone 1 Collegare l’unità con l’iPhone via USB. - 15 - Italiano Effettuare una connessione con Pioneer ARC APP 2 3 Premere SRC/OFF per selezionare qualsiasi sorgente. Tenere premuta la ghiera M.C.. Pioneer ARC APP sull’ iPhone viene avviata. NOTA Se il collegamento non riesce, avviare Pioneer ARC APP sull’iPhone. Ascoltare musica su Android 1 Premere SRC/OFF per selezionare [ANDROID]. Operazioni di base Scopo Operazione Selezionare una traccia Premere Avanzamento o avvolgimento rapido Tenere premuto o . Sospendere/riprendere la riproduzione Premere 4/PAUSE. Sound retriever Premere 3/S.Rtrv. [1]: efficace per velocità di compressione basse [2]: efficace per velocità di compressione alte o . È possibile regolare diverse impostazioni nel menu principale. 1 2 3 Premere la ghiera M.C. per visualizzare il menu principale. Ruotare la ghiera M.C. per selezionare una delle seguenti categorie, quindi premere per confermare. • Impostazioni FUNCTION (pagina 17) • Impostazioni AUDIO (pagina 18) • Impostazioni SYSTEM (pagina 20) • Impostazioni ILLUMINATION (pagina 21) Ruotare la ghiera M.C. per selezionare le opzioni, quindi premere per confermare. NOTE • Le voci di menu relative a iPod elencate nelle seguenti tabelle non sono disponibili per MVH-S120UB/ S120UBG/S120UBA/S120UBW. - 16 - Italiano Impostazioni • Le voci di menu relative alla modalità APP elencate nelle seguenti tabelle non sono disponibili per MVH-S120UB/S120UBG/S120UBA/S120UBW. Impostazioni FUNCTION Le voci del menu variano a seconda della sorgente. Voce del menu Descrizione FM SETTING [TALK], [STANDARD], [MUSIC] Corrispondenza del livello della qualità audio con le condizioni del segnale di trasmissione del segnale di banda FM. (Disponibile solo con banda FM selezionata.) BSM Memorizzare automaticamente le sei stazioni più forti sui pulsanti numerici (da 1/ a 6/ ). [ON], [OFF] Limitare la ricezione ai programmi regionali specifici quando è selezionato AF (ricerca frequenze alternative). (Disponibile solo con banda FM selezionata.) LOCAL FM: [OFF], [LV1], [LV2], [LV3], [LV4] Limitare la stazione di sintonizzazione in base MW/LW: [OFF], [LV1], [LV2] alla potenza del segnale. TA [ON], [OFF] Ricevere le informazioni correnti sul traffico, se disponibili. (Disponibile solo con banda FM selezionata.) [ON], [OFF] Consentire all’unità di risintonizzarsi su una frequenza differente fornendo la medesima stazione. (Disponibile solo con banda FM selezionata.) AF NEWS [ON], [OFF] Interrompere la sorgente attualmente selezionata con nuovi programmi. (Disponibile solo con banda FM selezionata.) - 17 - Italiano REGIONAL Voce del menu Descrizione SEEK [MAN], [PCH] Assegnare i pulsanti o per cercare le stazioni una a una (sintonizzazione manuale) o selezionare una stazione dai canali preimpostati. SAVE Memorizzare le informazioni sul brano attualmente riprodotto nell’elenco musicale in Spotify. UNSAVE Rimuovere le informazioni memorizzate in [SAVE]. S.RTRV USB iPod AUDIO BOOK Potenziare l’audio compresso e ripristinare il suono completo. Non disponibile quando viene riprodotto un file FLAC. iPod [FASTER], [NORMAL], [SLOWER] Modificare la velocità di riproduzione. (Non disponibile quando [CONTROL iPod] è selezionato nella modalità di controllo.) PAUSE Sospendere o riprendere la riproduzione. Impostazioni AUDIO Voce del menu Descrizione FADER*1 Regolare il bilanciamento dell’altoparlante anteriore e posteriore. BALANCE Regolare il bilanciamento dell’altoparlante destro e sinistro. - 18 - Italiano [1] (efficace per velocità di compressione basse), [2] (efficace per velocità di compressione alte), [OFF] Voce del menu Descrizione EQ SETTING [SUPER BASS], [POWERFUL], [DYNAMIC], [NATURAL], [VOCAL], [VIVID], [CUSTOM1], [CUSTOM2], [FLAT] Selezionare una banda equalizzatore e il livello per un’ulteriore personalizzazione. Banda equalizzatore: [80HZ], [250HZ], [800HZ], [2.5KHZ], [8KHZ] Livello equalizzatore: da [+6] a [–6] Selezionare o personalizzare la curva di equalizzazione. [CUSTOM1] può essere importato separatamente per ogni sorgente. Tuttavia, ognuna delle seguenti combinazioni viene impostata automaticamente sulla stessa impostazione. • USB, iPod, ANDROID, SPOTIFY e APP (iPhone) [CUSTOM2] è un’impostazione condivisa utilizzata per tutte le origini. È possibile commutare l’equalizzatore anche premendo ripetutamente (solo per MVH-S120UB/S120UBG/S120UBA/S120UBW). LOUDNESS Compensare il suono chiaro a basso volume. [NOR], [REV], [OFF] Selezionare la fase del subwoofer. SUB.W CTRL*2*3 Frequenza di cutoff: [50HZ], Il subwoofer emette solo le frequenze inferiori a [63HZ], [80HZ], [100HZ], [125HZ], quelle presenti nell’intervallo selezionato. [160HZ], [200HZ] Livello di output: da [–24] a [+6] Livello di pendenza: [–12], [–24] BASS BOOST Da [0] a [+6] Selezionare il livello di incremento dei bassi. HPF SETTING Frequenza di cutoff: [OFF], Dagli altoparlanti vengono emesse solo le [50HZ], [63HZ], [80HZ], [100HZ], frequenze superiori al cutoff del filtro passa alto [125HZ], [160HZ], [200HZ] (HPF). Livello di pendenza: [–12], [–24] SLA Da [+4] a [–4] Regolare il volume del livello per ogni sorgente, fatta eccezione per FM. Ognuna delle seguenti combinazioni viene impostata automaticamente sulla stessa impostazione. • USB, iPod, ANDROID, SPOTIFY e APP (iPhone) - 19 - Italiano [OFF], [LOW], [MID], [HI] SUB.W*2 *1 Non disponibile quando [SUB.W/SUB.W] è selezionato in [SP-P/O MODE] nelle impostazioni INITIAL (pagina 6). *2 Non disponibile quando [REAR/REAR] è selezionato in [SP-P/O MODE] nelle impostazioni INITIAL (pagina 6). *3 Non disponibile quando [OFF] è selezionato in [SUB.W]. Impostazioni SYSTEM È anche possibile accedere a questi menu quando l’unità è spenta. Voce del menu Descrizione LANGUAGE [ENG](Inglese), [РУС](Russo), [TUR](Turco) Selezionare la lingua per visualizzare le informazioni di testo di un file audio compresso. CLOCK SET Impostare l’orologio (pagina 5). 12H/24H Selezionare la notazione temporale. [ONCE], [LOOP], [OFF] Selezionare il modo di scorrimento del testo nella finestra di visualizzazione. AUTO PI [ON], [OFF] Cercare una stazione differente con la medesima programmazione, anche se si utilizza una stazione preimpostata. [ON], [OFF] Impostare su [ON] quando si utilizza un dispositivo ausiliario connesso all’unità. AUX SPOTIFY [ON], [OFF] Impostare su [ON] quando si utilizza la funzione Spotify. MUTE MODE (solo per MVH-S120UI/S120UIG/S12UI) [MUTE], [20dB ATT], [10dB ATT] Disattivare o attenuare automaticamente l’audio quando dall’apparecchiatura con funzione Mute viene ricevuto un segnale. PW SAVE* [ON], [OFF] Ridurre il consumo della batteria. L’attivazione della sorgente è consentita solo se questa funzione è attiva. - 20 - Italiano [12H], [24H] SCROLL SET Voce del menu Descrizione ANDROID WIRED [MEMORY], [APP CONTROL] Selezionare il metodo di connessione idoneo in base al dispositivo Android. P.APP AUTO ON [ON], [OFF] Selezionare [ON] per avviare automaticamente Pioneer ARC APP quando all’unità è collegato un dispositivo Android mediante AOA. (Non disponibile quando [MEMORY] è selezionato in [ANDROID WIRED].) USB AUTO [ON], [OFF] * [PW SAVE] è annullato se la batteria del veicolo è scollegata e dovrà essere riattivato una volta ricollegata la batteria. Quando [PW SAVE] è disattivato, in base ai metodi di connessione, l’unità può continuare a ricavare energia dalla batteria se l’interruttore di accensione del veicolo non dispone di una posizione ACC (accessorio). Impostazioni ILLUMINATION Voce del menu Descrizione DIM SETTING [SYNC CLOCK], [MANUAL] Selezionare il modo con cui cambiare la luminosità del display. BRIGHTNESS Da [1] a [10] Cambiare la luminosità del display. La gamma di impostazioni disponibili varia in base a [DIM SETTING]. - 21 - Italiano Selezionare [ON] per passare automaticamente alla sorgente [USB] quando un dispositivo USB/ iPod è collegato all’unità. Selezionare [OFF] quando un dispositivo USB/ iPod è stato collegato all’unità solo per essere caricato. Informazioni aggiuntive – Verificare il collegamento degli altoparlanti. – Posizionare l’interruttore di accensione su OFF e nuovamente su ON. Se il messaggio rimane, contattare il rivenditore o una Stazione di servizio Pioneer per ottenere assistenza. Risoluzione dei problemi Il display torna automaticamente alla visualizzazione normale. → Non è stata effettuata alcuna operazione per circa 30 secondi. – Eseguire un’operazione. Una cartella secondaria non viene riprodotta. → Non è possibile riprodurre le cartelle secondarie quando è selezionato [FLD] (ripetizione cartella). – Selezionare un altro range di riproduzione ripetuta. Il suono è intermittente. → Si sta utilizzando un dispositivo, come ad esempio un cellulare, che può provocare interferenze audio. – Allontanare dall’unità i dispositivi elettronici che possono causare interferenze. Messaggi di errore Comuni AMP ERROR → Unità non funzionante o collegamento altoparlante errato. → Il circuito protettivo è attivato. NO XXXX (NO TITLE, a esempio) → Non sono presenti informazioni di testo incorporate. – Accendere il display o riprodurre un altro file o traccia. Dispositivo USB/iPod FORMAT READ → Può verificarsi un ritardo tra l’inizio della riproduzione e il momento in cui si inizia a udire il suono. – Attendere che il messaggio scompaia e ascoltare l’audio. NO AUDIO → Non sono presenti brani. – Trasferire i file audio al dispositivo USB ed effettuare la connessione. → Il dispositivo USB connesso ha la sicurezza abilitata. – Attenersi alle istruzioni del dispositivo USB per disattivare la sicurezza. SKIPPED → Il dispositivo USB connesso contiene file protetti da DRM. – I file protetti vengono ignorati. PROTECT → Tutti i file sul dispositivo USB connesso hanno il DRM incorporato. – Sostituire il dispositivo USB. - 22 - Italiano Il range della riproduzione ripetuta cambia in maniera inattesa. → In base al range di riproduzione ripetuta, il range selezionato può cambiare quando viene selezionata un’altra cartella o traccia o durante l’avanzamento/riavvolgimento rapido. – Selezionare nuovamente il range di riproduzione ripetuta. N/A USB → Il dispositivo USB connesso non è supportato dall’unità. – Scollegare il dispositivo e sostituirlo con un dispositivo USB compatibile. HUB ERROR → Il dispositivo USB connesso mediante un hub USB non è supportato dall’unità. – Collegare il dispositivo USB direttamente all’unità utilizzando un cavo USB. ERROR-19 → Comunicazione non riuscita. – Effettuare una delle seguenti operazioni, quindi tornare alla sorgente USB. • Scollegare il dispositivo USB. • Passare a una sorgente diversa. → Errore iPod. – Scollegare il cavo dall’iPod. Una volta visualizzato il menu principale dell’iPod, ricollegare e reimpostare l’iPod. ERROR-23 → Il dispositivo USB non è formattato correttamente. – Formattare il dispositivo USB con FAT12, FAT16 o FAT32. STOP → Nell’elenco corrente non sono presenti brani. – Selezionare un elenco che contenga dei brani. NOT FOUND → Nessun brano correlato. – Trasferire i brani all’iPod. APP START UP APP → L’applicazione non è ancora in esecuzione. – Utilizzare il dispositivo mobile per avviare l’applicazione. Spotify CHECK APP → Connessione all’applicazione Spotify non riuscita. – Attenersi alle istruzioni visualizzate sullo schermo. Linee guida di gestione Dispositivo di archiviazione USB • Le connessioni via hub USB non sono supportate. • Fissare saldamente il dispositivo di archiviazione USB prima di guidare. Non lasciar cadere il dispositivo di - 23 - Italiano CHECK USB → Il connettore USB o il cavo USB ha subito un corto circuito. – Verificare che il connettore USB o il cavo USB non siano impigliati in qualcosa o danneggiati. → Il dispositivo USB collegato consuma più della quantità di energia massima consentita. – Scollegare il dispositivo USB e non utilizzarlo. Posizionare l’interruttore di accensione su OFF e nuovamente su ACC o ON. Collegare solo dispositivi USB conformi. ERROR-16 → La versione firmware dell’iPod è obsoleta. – Aggiornare la versione iPod. → Errore iPod. – Scollegare il cavo dall’iPod. Una volta visualizzato il menu principale dell’iPod, ricollegare e reimpostare l’iPod. archiviazione USB sul pavimento, in quanto potrebbe incastrarsi sotto il pedale del freno o dell’acceleratore. • In base al dispositivo di archiviazione USB, potrebbero verificarsi i seguenti problemi. – Le operazioni possono variare. – Il dispositivo di archiviazione potrebbe non essere riconosciuto. – I file potrebbero non essere riprodotti correttamente. – Il dispositivo può causare interferenze audio durante l’ascolto della radio. audio memorizzati su un dispositivo USB con numerose gerarchie di cartelle. • Il testo con caratteri russi da visualizzare sull’unità deve essere codificato con uno dei seguenti gruppi di caratteri: – Unicode (UTF-8, UTF-16) – Un gruppo di caratteri diverso da Unicode utilizzato in un ambiente Windows e impostato su Russo nell’impostazione multilingue iPod Compatibilità audio compresso • Per il nome cartella o per il nome file, è possibile visualizzare solo i primi 32 caratteri (inclusa l’estensione del file). • L’unità potrebbe non funzionare correttamente in base all’applicazione utilizzata per decodificare i file WMA. • Potrebbe verificarsi un leggero ritardo all’avvio della riproduzione dei file audio incorporati con i dati immagine o dei file File WMA Estensione file Velocità di trasmissione Frequenza di campionamento Windows Media™ Audio Professional, Compressione dati senza perdita, Voce/ Streaming DRM/ Streaming con video .wma Da 48 kbps a 320 kbps (CBR), da 48 kbps a 384 kbps (VBR) 32 kHz, 44,1 kHz, 48 kHz Non compatibile File MP3 Estensione file Velocità di trasmissione Frequenza di campionamento - 24 - .mp3 Da 8 kbps a 320 kbps (CBR), VBR Da 8 kHz a 48 kHz (32 kHz, 44,1 kHz, 48 kHz per enfasi) Italiano • Non lasciare l’iPod in luoghi con temperature elevate. • Fissare saldamente l’iPod durante la guida. Non lasciar cadere l’iPod sul pavimento, in quanto potrebbe incastrarsi sotto il pedale del freno o dell’acceleratore. • Le impostazioni dell’iPod, come ad esempio equalizzatore e ripetizione della riproduzione, cambiano automaticamente quando l’iPod è collegato all’unità. Una volta scollegato l’iPod, tali impostazioni tornano alle impostazioni originali. • Il testo incompatibile salvato sull’iPod non verrà visualizzato dall’unità. ATTENZIONE • Pioneer non può garantire la compatibilità con tutti i dispositivi di archiviazione di massa USB e non si assume alcuna responsabilità per eventuali perdite di dati su lettori multimediali, smartphone o altri dispositivi durante l’utilizzo del prodotto. • Non lasciare i dischi o un dispositivo di archiviazione USB in luoghi soggetti a temperature elevate. Versione tag ID3 compatibile Playlist M3u MP3i (MP3 interattivo), mp3 PRO 1.0, 1.1, 2.2, 2.3, 2.4 (la versione tag ID3 2.x ha la priorità sulla versione 1.x.) Non compatibile Non compatibile File WAV • I formati file WAV non possono essere collegati via MTP. Estensione file Bit di quantizzazione Frequenza di campionamento .wav 8 e 16 (LPCM) Da 16 kHz a 48 kHz (LPCM) File FLAC Estensione file Frequenza di campionamento Bit rate di quantizzazione Modalità canale .flac 8/11,025/12/16/22,05/ 24/32/44,1/48 kHz 16 bit 1/2 ch Dispositivo USB • Potrebbe verificarsi un leggero ritardo all’avvio della riproduzione dei file audio su un dispositivo di archiviazione USB con numerose gerarchie di cartelle. Gerarchia cartella riproducibile Cartelle riproducibili File riproducibili Riproduzione di file protetti da copyright Fino a otto livelli (una gerarchia pratica presenta meno di due livelli). Fino a 500 Fino a 15 000 Non compatibile È possibile riprodurre solo la prima partizione. Compatibilità iPod L’unità supporta solo i seguenti modelli di iPod. Le versioni precedenti potrebbero non essere supportate. Realizzato per – iPod touch (dalla 1° alla 6° generazione) – iPod classic – iPod nano (dalla 3° alla 7° generazione) – iPhone 6s – iPhone 6s Plus – iPhone 6 – iPhone 6 Plus – iPhone 5s – iPhone 5c – iPhone 5 – iPhone 4s – iPhone 4 – iPhone 3GS – iPhone 3G – iPhone • Le operazioni possono variare in base alla generazione e/o alla versione del software dell’iPod. • Gli utenti iPod con connettore Lightning devono utilizzare il cavo da Lightning a USB (in dotazione con l’iPod). • Gli utenti dell’iPod con Dock Connector devono utilizzare CD-IU51. Per dettagli, consultare il rivenditore. • Fare riferimento ai manuali dell’iPod per ottenere informazioni sulla compatibilità di file/formato. • Audiolibri, Podcast: compatibile ATTENZIONE Pioneer declina ogni responsabilità per la perdita di dati sull’iPod, anche se i dati vengono persi durante l’utilizzo dell’unità. - 25 - Italiano • I formati file FLAC non possono essere collegati via MTP. • In base al codificatore, i file FLAC potrebbero non essere riproducibili. Dispositivo USB partizionato Sequenza di file audio Grafico caratteri russi Con questa unità, l’utente non può assegnare numeri di cartella e specificare le sequenze di riproduzione. La sequenza di file audio dipende dal dispositivo collegato. Notare che i file nascosti in un dispositivo USB non possono essere riprodotti. Esempio di gerarchia Cartella File audio compresso Italiano Da 01 a 05: numero cartella a : sequenza di riproduzione D: visualizzazione C: carattere Copyright e marchio iTunes Apple ed iTunes sono marchi di fabbrica di Apple Inc., registrati negli Stati Uniti ed in altri Paesi. WMA Windows Media è un marchio di fabbrica o marchio di fabbrica depositato della Microsoft Corporation negli Stati Uniti ed in altri paesi. Questo prodotto include tecnologie di proprietà della Microsoft Corporation e non è utilizzabile senza licenza della Microsoft Licensing, Inc. FLAC Copyright © 2000-2009 Josh Coalson - 26 - INDEROGABILI DI LEGGE, CHE POTREBBERO VERIFICARSI QUANDO SI UTILIZZA QUESTO SOFTWARE; ANCHE SE SI ERA STATI MESSI A CONOSCENZA DELLA POSSIBILITÀ DEL VERIFICARSI DI TALI DANNI. iPhone, iPod e Lightning L’uso del logo Made for Apple indica che un accessorio è stato progettato per essere collegato specificatamente al prodotto Apple identificato dal logo ed è stato certificato dallo sviluppatore per soddisfare gli standard di prestazioni Apple. Apple non è responsabile per il funzionamento del dispositivo o della sua conformità con gli standard normativi e di sicurezza. Nota: l’uso di questo accessorio con un prodotto Apple può interessare le prestazioni wireless. iPhone, iPod, iPod classic, iPod nano, iPod touch e Lightning sono marchi di Apple Inc., registrati negli USA e in altri paesi. Google™, Google Play, Android Google, Google Play e Android sono marchi di Google LLC. Spotify® SPOTIFY e il logo Spotify sono marchi registrati di Spotify AB. Sono necessari dispositivi digitali mobili compatibili e abbonamento premium, ove disponibili, vedere https://www.spotify.com. Specifiche Generali Alimentazione: 14,4 V CC (da 10,8 V a 15,1 V consentiti) Sistema di messa a terra: tipo negativo Consumo di corrente massimo: 10,0 A Dimensioni (L × A × P): DIN Telaio: 178 mm × 50 mm × 97 mm Testata: 188 mm × 58 mm × 17 mm - 27 - Italiano Copyright © 2011-2013 Xiph.Org Foundation La ridistribuzione e l’utilizzo in formato binario e sorgente, con o senza modifiche, sono consentite solo alle seguenti condizioni: – Eventuali ridistribuzioni del codice sorgente devono contenere suddette informazioni relative ai diritti d’autore, questo elenco di condizioni e la seguente rinuncia. – Eventuali ridistribuzioni in formato binario devono riprodurre suddette informazioni relative ai diritti d’autore, questo elenco di condizioni e la seguente rinuncia nella documentazione e/o altro materiale fornito con la distribuzione. – Né il nome Xiph.org Foundation né i nomi di chi ha prestato il suo contributo devono essere utilizzati allo scopo di sostenere o promuovere prodotti derivati dal presente software senza previa specifica autorizzazione scritta. QUESTO SOFTWARE VIENE FORNITO DAI TITOLARI DEL COPYRIGHT E COLLABORATORI “COSÌ COM’È” SENZA ALCUNA GARANZIA ESPLICITA O IMPLICITA, COMPRESE, A MERO TITOLO ESEMPLIFICATIVO MA NON LIMITATIVO, LE GARANZIE IMPLICITE DI COMMERCIABILITÀ E DI IDONEITÀ PER UNO SCOPO PARTICOLARE. IN NESSUN CASO LA FONDAZIONE O ALTRI SOGGETTI CHE HANNO PRESTATO IL LORO CONTRIBUTO SARANNO RESPONSABILI PER EVENTUALI DANNI DIRETTI, INDIRETTI, ACCIDENTALI O CONSEQUENZIALI, (COMPRESI, A TITOLO ESEMPLIFICATIVO, RIFORNIMENTI DI BENI O SERVIZI SOSTITUTIVI; MANCATO UTILIZZO O PERDITA DI DATI O PROFITTI; INTERRUZIONE DELL’ATTIVITÀ) IN QUALSIASI MODO CAUSATI PER OGNI IPOTESI DI RESPONSABILITÀ SIA PER CONTRATTO, PRECISA RESPONSABILITÀ O ILLECITO (COMPRESI GRAVI INADEMPIMENTI), FATTI SALVI I LIMITI D Telaio: 178 mm × 50 mm × 97 mm Testata: 170 mm × 46 mm × 17 mm Peso: 0,5 kg Formato di decodifica FLAC: v1.3.0 (Free Lossless Audio Codec) Formato segnale WAV: PCM lineare (non compresso) Audio Tuner FM Potenza massima: • 50 W × 4 canali/4 Ω (senza subwoofer) • 50 W × 2 canali/4 Ω + 70 W × 1 canale/2 Ω (per il subwoofer) Potenza continua: 22 W × 4 (da 50 Hz a 15 000 Hz, 5 % THD, 4 Ω di carico, entrambi i canali pilotati) Impedenza di carico: 4 Ω (da 4 Ω a 8 Ω consentiti) Livello di output massimo tensione preout: 2,0 V Profilo loudness: +10 dB (100 Hz), +6,5 dB (10 kHz) (volume: –30 dB) Equalizzatore (equalizzatore grafico a 5 bande): Frequenza: 80 Hz/250 Hz/800 Hz/ 2,5 kHz/8 kHz Campo di equalizzazione: ±12 dB (passo 2 dB) Subwoofer (mono): Frequenza: 50 Hz/63 Hz/80 Hz/ 100 Hz/125 Hz/160 Hz/200 Hz Pendenza: –12 dB/oct, –24 dB/oct Guadagno: da +6 dB a –24 dB Fase: normale/inversa Intervallo di frequenza: da 87,5 MHz a 108,0 MHz Sensibilità utilizzabile: 11 dBf (1,0 μV/75 Ω, mono, S/N: 30 dB) Rapporto segnale-rumore: 72 dB (rete IEC-A) Tuner MW Tuner LW Intervallo di frequenza: da 153 kHz a 281 kHz Sensibilità utilizzabile: 28 μV (S/N: 20 dB) Rapporto segnale-rumore: 62 dB (rete IEC-A) NOTA Caratteristiche tecniche e design sono soggetti a eventuali modifiche senza preavviso. USB Specifica standard USB: USB 2.0 full speed Alimentazione massima: 1 A USB Protocollo: MSC (Mass Storage Class) MTP (Media Transfer Protocol) AOA (Android Open Accessory) 2.0 File system: FAT12, FAT16, FAT32 Formato di decodifica MP3: MPEG-1 e 2 Audio Layer 3 Formato di decodifica WMA: ver. 7, 8, 9, 9.1, 9.2 (audio a 2 canali) - 28 - Italiano Intervallo di frequenza: da 531 kHz a 1 602 kHz Sensibilità utilizzabile: 25 μV (S/N: 20 dB) Rapporto segnale-rumore: 62 dB (rete IEC-A) Índice Procedimientos iniciales ........................................................................ 3 Radio .......................................................................................................... 7 USB/iPod/AUX .......................................................................................... 8 Modo app............................................................................................... 12 Spotify® .................................................................................................. 13 Uso de Pioneer ARC APP ..................................................................... 14 Ajustes .................................................................................................... 16 Ajustes de FUNCTION........................................................................... 17 Ajustes de AUDIO .................................................................................. 19 Ajustes de SYSTEM................................................................................ 20 Ajustes de ILLUMINATION ................................................................... 22 Información complementaria ............................................................ 23 • En las siguientes instrucciones, la designación “dispositivo USB” hace referencia tanto a dispositivos de memoria USB como a reproductores de audio USB. • En este manual, la designación “iPod” hace referencia tanto a un iPod como a un iPhone. -2- Español Acerca de este manual: Procedimientos iniciales Funcionamiento básico MVH-S120UI/S120UIG/S12UI/S120UB/S120UBG/S120UBA/ S120UBW BASS Puerto USB Selector M.C. (control múltiple) SRC (fuente)/OFF Botón de extracción Visor Toma de entrada AUX (toma estéreo de 3,5 mm) DISP (visualización) Operaciones más frecuentes Función Operación Encendido* Pulse SRC/OFF para encender la unidad. Mantenga pulsado SRC/OFF para apagar la unidad. Ajustar el volumen Gire el selector M.C.. Seleccionar una fuente Pulse SRC/OFF varias veces. Cambiar la información mostrada Pulse DISP varias veces. Volver a la visualización/lista anterior Pulse BAND/ Volver a la visualización normal desde el menú principal Mantenga pulsado BAND/ Intensificación del nivel de graves Pulse BASS. • Puede seleccionar el nivel de graves en [BASS BOOST] (página 19). -3- . . Español BAND/ * Si el cable azul/blanco de esta unidad está conectado al terminal de control de relé de antena de automóvil, la antena del vehículo se extiende cuando se activa la fuente de esta unidad. Para replegar la antena, apague la fuente. Indicaciones en pantalla Indicación Descripción Aparece si existe un nivel inferior para un menú o una carpeta. Aparece al mantener pulsado el botón BASS. Aparece si se ha ajustado la función de exploración local (página 17). Aparece si se está recibiendo un programa de tráfico. Aparece si se ha ajustado la función TA (anuncios de tráfico) (página 17). Aparece si se ha ajustado la función de recuperación del sonido (página 18). Aparece si se ha ajustado la función de control de iPod (página 11). Extracción del frontal Extraiga el frontal para evitar robos. Desconecte todos los cables y dispositivos conectados al frontal y apague la unidad antes de extraerlo. Colocación Importante • Evite la exposición del frontal a impactos violentos. • Guarde el frontal protegido de la luz solar directa y de las temperaturas elevadas. • Guarde siempre el frontal desmontado en un estuche de protección o una bolsa. Menú de configuración Al situar el contacto en ON después de la instalación, aparece [SET UP :YES] en el visor. 1 Presione el selector M.C.. -4- Español Extracción El menú de configuración desaparece después de 30 segundos sin realizar operaciones. Si prefiere realizar la configuración en otro momento, gire el selector M.C. para seleccionar [NO] y presione para confirmar. 2 Gire el selector M.C. para seleccionar las opciones y, a continuación, presione para confirmar. Para pasar a la siguiente opción del menú, tiene que confirmar la selección. Opción del menú Descripción LANGUAGE Seleccione el idioma en el que debe aparecer la información de texto de un archivo de audio comprimido. [ENG](inglés), [РУС](ruso), [TUR](turco) CLOCK SET Ajuste el reloj. FM STEP Seleccione los pasos de la sintonización FM entre 100 kHz y 50 kHz. [100], [50] 3 4 [QUIT :YES] aparece una vez realizados todos los ajustes. Para volver a la primera opción del menú de configuración, gire el selector M.C. para seleccionar [QUIT :NO] y, a continuación, presione para confirmar. Presione el selector M.C. para confirmar los ajustes. • Puede cancelar la configuración de los menús pulsando SRC/OFF. • La configuración puede realizarse en cualquier momento desde los ajustes de SYSTEM (página 20) y los ajustes de INITIAL (página 6). Cancelación de la pantalla de demostración (DEMO OFF) 1 2 3 4 Presione el selector M.C. para que aparezca el menú principal. Gire el selector M.C. para seleccionar [SYSTEM] y, a continuación, presione para confirmar. Gire el selector M.C. para seleccionar [DEMO OFF] y, a continuación, presione para confirmar. Gire el selector M.C. para seleccionar [YES] y, a continuación, presione para confirmar. -5- Español NOTAS Ajustes de INITIAL 1 2 3 4 Mantenga pulsado SRC/OFF hasta que se apague la unidad. Mantenga pulsado SRC/OFF para mostrar el menú principal. Gire el selector M.C. para seleccionar [INITIAL] y, a continuación, presione para confirmar. Gire el selector M.C. para seleccionar una opción y, a continuación, presione para confirmar. NOTA Las opciones varían en función de la unidad. Opción del menú Descripción FM STEP Seleccione los pasos de la sintonización FM entre 100 kHz y 50 kHz. [100], [50] SP-P/O MODE [REAR/SUB.W] Seleccione esta opción si hay un altavoz de gama completa conectado a los cables de salida de los altavoces traseros y un subwoofer conectado a la salida RCA. Seleccione esta opción si hay un subwoofer pasivo conectado directamente a los cables de salida de los altavoces traseros y un subwoofer conectado a la salida RCA. [REAR/REAR] Seleccione esta opción si hay altavoces de gama completa conectados a los cables de salida de los altavoces traseros y a la salida RCA. Si hay un altavoz de gama completa conectado a los cables de salida de los altavoces traseros y no se utiliza la salida RCA, puede seleccionar [REAR/SUB.W] o [REAR/REAR]. S/W UPDATE [SYSTEM INFO] Seleccione para confirmar la información más reciente del sistema en la unidad. [SYSTEM UPDATE] Seleccione esta opción para actualizar la unidad con el software más reciente e inicializar los ajustes de la unidad. Para obtener más información sobre el software y las actualizaciones más recientes, visite nuestro sitio web. SYSTEM RESET [YES], [NO] Seleccione [YES] para inicializar los ajustes de la unidad. La unidad se reiniciará automáticamente. (Algunos de los ajustes se mantendrán incluso después de reiniciar la unidad.) -6- Español [SUB.W/SUB.W] Radio Las frecuencias del sintonizador de esta unidad están pensadas para su utilización en Europa Occidental, Asia, Oriente Medio, África y Oceanía. Si se utiliza en otras áreas es posible que la recepción no sea correcta. La función RDS (Radio Data System) solo funciona en áreas en las que se emiten señales RDS correspondientes a emisoras FM. Recepción de emisoras memorizadas 1 2 3 Pulse SRC/OFF para seleccionar [RADIO]. Pulse BAND/ [MW] o [LW]. para seleccionar la banda entre las opciones [FM1], [FM2], [FM3], Pulse un botón numérico (de 1/ a 6/ ). SUGERENCIA Los botones / también pueden utilizarse para seleccionar una emisora memorizada cuando [SEEK] está ajustado en [PCH] en los ajustes de FUNCTION (página 18). Memoria de mejores emisoras (BSM) 1 2 3 a 6/ Después de seleccionar la banda, presione el selector M.C. para que aparezca el menú principal. Gire el selector M.C. para seleccionar [FUNCTION] y, a continuación, presione para confirmar. Gire el selector M.C. para seleccionar [BSM] y, a continuación, presione para confirmar. Para buscar una emisora manualmente 1 Después de seleccionar la banda, pulse / para seleccionar una emisora. Mantenga pulsado / y suéltelo para buscar una emisora disponible. La exploración se detiene cuando la unidad recibe una emisora. Para cancelar la búsqueda local, pulse / . NOTA [SEEK] debe estar ajustado en [MAN] en los ajustes de FUNCTION (página 18). -7- Español Las seis emisoras con mejor señal se guardan en los botones numéricos (de 1/ ). Para almacenar las emisoras manualmente 1 Mientras recibe la emisora que desea guardar, mantenga pulsado uno de los botones numéricos (de 1/ a 6/ ) hasta que deje de parpadear. Utilización de las funciones de PTY La unidad busca una emisora según la información de PTY (tipo de programa). 1 2 3 Mantenga pulsado BASS durante la recepción de FM. Gire el selector M.C. para seleccionar un tipo de programa entre las opciones [NEWS/INFO], [POPULAR], [CLASSICS] y [OTHERS]. Presione el selector M.C.. La unidad empieza a buscar una emisora. Cuando la encuentra, muestra el nombre de su servicio de programas. NOTAS • Para cancelar la búsqueda, presione el selector M.C.. • El programa de algunas emisoras puede no coincidir con la indicación del PTY transmitido. • Si ninguna emisora emite el tipo de programa que ha buscado, aparecerá [NOT FOUND] durante aproximadamente dos segundos y el sintonizador volverá a la emisora original. Español USB/iPod/AUX NOTA La función iPod no está disponible para MVH-S120UB/S120UBG/S120UBA/S120UBW. Reproducción Desconecte los auriculares del dispositivo antes de conectarlo a la unidad. USB dispositivos (incluyendo Android™)/iPod 1 Abra la tapa del puerto USB. 2 Conecte el dispositivo USB/iPod utilizando un cable adecuado. NOTA Para cambiar automáticamente a la fuente [USB] cuando el dispositivo USB/iPod está conectado a la unidad, ajuste [USB AUTO] en [ON] en los ajustes SYSTEM (página 21). -8- PRECAUCIÓN Utilice un cable USB (vendido por separado) para conectar el dispositivo USB, ya que cualquier dispositivo conectado directamente a la unidad sobresaldrá y podría resultar peligroso. Antes de extraer el dispositivo, detenga la reproducción. Conexiones AOA Para obtener más información sobre la conexión AOA, consulte la página 15. Conexión MTP Puede conectar a la unidad un dispositivo con Android OS 4.0 o la mayoría de las versiones posteriores a través de MTP, utilizando el cable suministrado con el dispositivo. Sin embargo, en función del dispositivo conectado. la versión del SO o el número de archivos en el dispositivo, es posible que no puedan reproducirse archivos de audio/canciones a través de MTP. Tenga en cuenta que la conexión MTP no es compatible con los formatos de archivo WAV y FLAC. NOTA Si utiliza una conexión MTP, [ANDROID WIRED] debe estar ajustado en [MEMORY] en los ajustes de SYSTEM (página 21). AUX 1 Inserte el miniconector estéreo en la toma de entrada AUX. 2 Pulse SRC/OFF para seleccionar [AUX] como fuente. NOTA Operaciones Puede realizar varios ajustes en los ajustes de FUNCTION (página 17). Tenga en cuenta que las siguientes operaciones no pueden realizarse en un dispositivo AUX. Para controlar un dispositivo AUX, utilice el propio dispositivo. Función Operación Seleccionar una carpeta/álbum*1 Pulse 1/ o 2/ Seleccionar una pista/canción (capítulo) Pulse o Avanzar o retroceder rápidamente*2 Mantenga pulsado -9- . . o . Español Si [AUX] está ajustado en [OFF] en los ajustes de SYSTEM, [AUX] no puede seleccionarse como fuente (página 21). Operación Buscar un archivo en una lista 1 Mantenga pulsado BASS para mostrar el menú de conexión. 2 Gire el selector M.C. para seleccionar el nombre del archivo (o carpeta) o la categoría que busca y, a continuación, presione para confirmar. 3 Gire el selector M.C. para seleccionar el archivo que desee y, a continuación, presione para confirmar. Empieza la reproducción. Ver una lista de los archivos de la carpeta/ categoría seleccionada*1 Presione el selector M.C. después de seleccionar una carpeta/categoría. Reproducir una canción de la carpeta/ categoría seleccionada*1 Mantenga presionado el selector M.C. después de seleccionar una carpeta/ categoría. Búsqueda alfabética (solo iPod) 1 Mantenga pulsado BASS para mostrar el menú de conexión. 2 Gire el selector M.C. para seleccionar la lista de categorías deseadas y, a continuación, mantenga pulsado BASS para pasar al modo de búsqueda alfabética. (Girar el selector M.C. dos veces también pasa al modo de búsqueda alfabética.) 3 Gire el selector M.C. para elegir una letra y, a continuación, presione para ver la lista alfabética. Para cancelar la búsqueda alfabética, pulse BAND/ . Reproducción repetida Pulse 6/ . Reproducción aleatoria Pulse 5/ . Reproducción aleatoria de todo (solo iPod) Mantenga pulsado 5/ Poner en pausa/reanudar la reproducción Pulse 4/PAUSE. Recuperación de sonido Pulse 3/S.Rtrv. [1]: funciona con índices de compresión bajos [2]: funciona con índices de compresión altos Volver a la carpeta raíz (solo USB)*1 Mantenga pulsado 1/ - 10 - . . Español Función Función Operación Cambiar de unidades en el dispositivo USB (Solo dispositivos compatibles con el protocolo de la clase de dispositivo de almacenamiento masivo USB) Pulse BAND/ . *1 Solo archivos de audio comprimido *2 Cuando utilice la función de avance/retroceso rápido durante la reproducción de un archivo VBR, es posible que el tiempo de reproducción no sea correcto. Funciones útiles para iPod Modo de reproducción por asociación Puede acceder a canciones a partir del artista, el álbum o el género que se está reproduciendo en cada momento. 1 Mientras escucha una canción, mantenga pulsado 4/PAUSE para pasar al modo de reproducción por asociación. 2 Gire el selector M.C. para seleccionar el modo ([ARTIST], [ALBUM], [GENRE]) y, a continuación, presione para confirmar. La canción o álbum seleccionado se reproducirá después de la canción que está sonando. Puede cancelar la reproducción de la canción o el álbum seleccionado si utiliza funciones no relacionadas con el modo de reproducción por asociación (como el avance o retroceso rápido). Control de iPod Puede controlar la unidad a través de un iPod conectado. Los siguientes modelos de iPod no son compatibles con esta función. – iPod nano 1.ª generación, iPod con vídeo 1 Pulse BAND/ durante la reproducción y, a continuación, seleccione el modo de control. [CONTROL iPod]: la función de iPod de la unidad puede controlarse desde el iPod conectado. [CONTROL AUDIO]: la función de iPod de la unidad solo puede controlarse desde los botones de la unidad o el mando a distancia suministrado. En este modo, no es posible encender ni apagar el iPod conectado. NOTAS • Al pulsar iPod también es posible cambiar el modo de control (solo para MVH-S120UI/S120UIG/ S12UI). - 11 - Español NOTA • Si selecciona [CONTROL iPod] como modo de control la reproducción de las canciones se pone en pausa. Utilice el iPod conectado para reanudar la reproducción. • Es posible acceder a las siguientes operaciones desde la unidad, aunque el modo de control esté ajustado en [CONTROL iPod]. – Pausa, avance/retroceso rápido, selección de canción/capítulo • El volumen solo puede ajustarse desde la unidad. Modo app (El modo APP no está disponible para MVH-S120UB/S120UBG/S120UBA/S120UBW.) Puede escuchar el audio de una aplicación de un iPhone a través de la unidad. En algunos casos, puede incluso controlar la aplicación utilizando la unidad. Para obtener más información sobre los dispositivos compatibles, visite nuestro sitio web. Importante Para usuarios de iPhone Esta función es compatible con dispositivos iPhone y iPod touch con iOS 5.0 o una versión posterior. NOTA PIONEER NO SE HACE RESPONSABLE DE APPS O CONTENIDOS DE OTROS PROVEEDORES, EN RELACIÓN CON ASPECTOS COMO SU PRECISIÓN, SU EXACTITUD Y OTROS ASPECTOS. EL CONTENIDO Y LAS FUNCIONALIDADES DE DICHAS APPS SON RESPONSABILIDAD EXCLUSIVA DEL PROVEEDOR DE CADA APP. Reproducción de una aplicación a través de la unidad 1 2 3 Conecte el dispositivo móvil a esta unidad. • iPhone a través de USB (página 8) Pulse SRC/OFF para seleccionar [APP]. Utilice el dispositivo móvil para iniciar la aplicación. - 12 - Español El uso de aplicaciones de terceros puede implicar o necesitar la puesta a disposición de información de identificación personal, bien mediante la creación de una cuenta de usuario o de algún otro modo, y, para ciertas aplicaciones, la puesta a disposición de datos de geoubicación. TODAS LAS APLICACIONES DE TERCEROS SON RESPONSABILIDAD EXCLUSIVA DE LOS PROVEEDORES, INCLUIDAS SIN LIMITACIÓN LA RECOPILACIÓN Y LA SEGURIDAD DE LOS DATOS DE USUARIO Y LAS PRÁCTICAS DE PRIVACIDAD. AL ACCEDER A APLICACIONES DE TERCEROS, USTED SE MANIFIESTA DE ACUERDO EN REVISAR LOS TÉRMINOS DE SERVICIO Y LAS POLÍTICAS DE PRIVACIDAD DE LOS PROVEEDORES. SI NO ESTÁ DE ACUERDO CON LOS TÉRMINOS O LAS POLÍTICAS DE ALGÚN PROVEEDOR O NO CONSIENTE EL USO DE DATOS DE GEOUBICACIÓN DONDE SEA APLICABLE, NO UTILICE ESTAS APLICACIONES DE TERCEROS. Funcionamiento básico Puede realizar varios ajustes en los ajustes de FUNCTION (página 17). Función Operación Seleccionar una pista Pulse Avanzar o retroceder rápidamente Mantenga pulsado o . Poner en pausa/reanudar la reproducción Pulse BAND/ o . . Spotify® (MVH-S120UI/S120UIG/S12UI solo es compatible con Spotify instalado en iPhone.) Spotify es un servicio de distribución de música en streaming que no está afiliado a Pioneer. Más información disponible en http://www.spotify.com. La aplicación de Spotify está disponible para teléfonos compatibles. Visite https:// support.spotify.com/ para consultar la información sobre compatibilidad más reciente. Para disfrutar de Spotify durante la conducción, primero descargue la aplicación Spotify en su iPhone. Puede descargarla en iTunes App Store. Seleccione una cuenta gratis o una cuenta Premium de pago, tanto en la aplicación como en spotify.com. Una cuenta Premium le ofrece más funciones, como escuchar música offline. Escuchar Spotify Actualice el firmware de la aplicación Spotify a la última versión antes de utilizarla. 1 2 3 Conecte el dispositivo móvil a esta unidad. • iPhone a través de USB (página 8) Pulse SRC/OFF para seleccionar [SPOTIFY]. Abra la aplicación Spotify en el dispositivo móvil e inicie la reproducción. Funcionamiento básico Puede realizar varios ajustes en los ajustes de FUNCTION (página 17). - 13 - Español Importante • Este producto incorpora el software Spotify, que está sujeto a licencias de terceros que puede consultar aquí: www.spotify.com/connect/third-party-licenses. • Para obtener información acerca de los países y regiones donde se puede utilizar Spotify, consulte https://spotify.com/us/select-your-country/. NOTA Las operaciones disponibles pueden variar en función del tipo de contenidos (pista/álbum/artista/lista de reproducción/radio) que desee reproducir. Función Operación Saltar una pista Pulse Buscar una pista en una lista 1 Mantenga pulsado BASS para mostrar el menú de conexión. 2 Gire el selector M.C. para seleccionar la categoría que desee y, a continuación, presione para confirmar. 3 Gire el selector M.C. para seleccionar el archivo que desee y, a continuación, presione para confirmar. Empieza la reproducción. o Poner en pausa/reanudar la reproducción Pulse 4/PAUSE. Pulgar arriba (solo para radio) Pulse 1/ . Pulgar abajo (solo para radio) Pulse 2/ . Reproducción aleatoria (solo para pista/ álbum/artista/lista de reproducción) Pulse 5/ . Reproducción repetida (solo para pista/ álbum/artista/lista de reproducción) Pulse 6/ . . Almacenar la información sobre la canción que se está reproduciendo en ese momento. Borrar la información de la canción almacenada. 1 Mantenga pulsado 3/S.Rtrv. Aparece [SAVE]/[UNSAVE]. 2 Presione el selector M.C.. NOTA Algunas funciones de Spotify no pueden controlarse desde esta unidad. Uso de Pioneer ARC APP (Pioneer ARC APP para iPhone no está disponible para MVH-S120UB/S120UBG/ S120UBA/S120UBW.) - 14 - Español Iniciar un canal de radio en función de la 1 Mantenga pulsado 5/ para iniciar la canción que se reproduce en ese momento. radio. 2 Presione el selector M.C.. • Es posible que esta función no esté disponible en función de la canción seleccionada. Puede utilizar la unidad desde la Pioneer ARC APP instalada en un dispositivo iPhone/ Android. En algunos casos, puede controlar aspectos de la aplicación, como por ejemplo selección de fuente, pausa, etc., al utilizar la unidad. Para obtener más información sobre las operaciones que están disponibles en la aplicación, consulte la sección de ayuda de la aplicación. ADVERTENCIA No trate de controlar la aplicación mientras conduce. Detenga y aparque el vehículo en un lugar seguro antes de intentar usar los controles de la aplicación. Para usuarios de iPhone Esta función es compatible con dispositivos iPhone (iPhone 5 o una versión posterior) y iPod touch con iOS 8.0 o una versión posterior. Puede descargar Pioneer ARC APP en iTunes App Store. Para usuarios de dispositivos Android Esta función es compatible con un teléfono que tenga instalado Android 4.1 o una versión posterior hasta la 7.1.2 y también sea compatible con AOA (Android Open Accessory) 2.0, aunque la compatibilidad dependa del smartphone. Puede descargar Pioneer ARC APP en Google Play™. NOTA Es posible que algunos dispositivos Android conectados vía AOA 2.0 no funcionen correctamente o emitan sonidos debido a su propio diseño de software, independientemente de la versión del SO. Al establecer una conexión con un dispositivo Android 1 Presione el selector M.C. para que aparezca el menú principal. 2 Gire el selector M.C. para seleccionar [SYSTEM] y, a continuación, presione para 3 4 5 6 7 confirmar. Gire el selector M.C. para seleccionar [ANDROID WIRED] y, a continuación, presione para confirmar. Gire el selector M.C. para seleccionar [APP CONTROL] y, a continuación, presione para confirmar. Gire el selector M.C. para seleccionar [P.APP AUTO ON] y, a continuación, presione para confirmar. Gire el selector M.C. para seleccionar [ON] y, a continuación, presione para confirmar. Conecte esta unidad con el dispositivo Android a través de USB. Se inicia automáticamente Pioneer ARC APP en el dispositivo Android. - 15 - Español Cómo realizar una conexión con Pioneer ARC APP NOTA Si la Pioneer ARC APP no está instalada en su dispositivo Android, aparece un mensaje que le pide que instale la aplicación en su dispositivo Android. Seleccione [OFF] en [P.APP AUTO ON] para borrar el mensaje (página 21). Al establecer una conexión con un iPhone 1 Conecte esta unidad con el iPhone a través de USB. 2 Pulse SRC/OFF para seleccionar una fuente. 3 Mantenga pulsado el selector M.C.. Se inicia Pioneer ARC APP en el iPhone. NOTA Si la conexión falla, inicie Pioneer ARC APP en el iPhone. Cómo escuchar música en Android 1 Pulse SRC/OFF para seleccionar [ANDROID]. Funcionamiento básico Función Operación Pulse Avanzar o retroceder rápidamente Mantenga pulsado o . Poner en pausa/reanudar la reproducción Pulse 4/PAUSE. Recuperación de sonido Pulse 3/S.Rtrv. [1]: funciona con índices de compresión bajos [2]: funciona con índices de compresión altos o . Ajustes Puede ajustar diferentes valores en el menú principal. 1 2 Presione el selector M.C. para que aparezca el menú principal. Gire el selector M.C. para seleccionar una de las categorías siguientes y, a continuación, presione para confirmar. • Ajustes de FUNCTION (página 17) • Ajustes de AUDIO (página 19) - 16 - Español Seleccionar una pista 3 • Ajustes de SYSTEM (página 20) • Ajustes de ILLUMINATION (página 22) Gire el selector M.C. para seleccionar las opciones y, a continuación, presione para confirmar. NOTAS • Las opciones del menú asociadas a iPod de las tablas siguientes no están disponibles para MVHS120UB/S120UBG/S120UBA/S120UBW. • Las opciones del menú asociadas a APP de las tablas siguientes no están disponibles para MVHS120UB/S120UBG/S120UBA/S120UBW. Ajustes de FUNCTION Los elementos de los menús varían en función de la fuente. Opción del menú Descripción FM SETTING [TALK], [STANDARD], [MUSIC] Ajusta el nivel de calidad del sonido a las condiciones de señal de la emisión de la banda FM. (Disponible solo si se selecciona la banda FM.) BSM REGIONAL [ON], [OFF] Limita la recepción a los programas regionales específicos cuando se selecciona AF (búsqueda de frecuencias alternativas). (Disponible solo si se selecciona la banda FM.) LOCAL FM: [OFF], [LV1], [LV2], [LV3], [LV4] Limita las emisoras sintonizadas en función de la MW/LW: [OFF], [LV1], [LV2] intensidad de la señal. TA [ON], [OFF] Recibe la información de tráfico actual, si está disponible. (Disponible solo si se selecciona la banda FM.) - 17 - Español Las seis emisoras con mejor señal se guardan en los botones numéricos (de 1/ a 6/ ) automáticamente. Opción del menú Descripción AF [ON], [OFF] Permite a la unidad volver a sintonizar una frecuencia diferente que ofrezca la misma emisora. (Disponible solo si se selecciona la banda FM.) NEWS [ON], [OFF] Interrumpe la fuente activa con programas de noticias. (Disponible solo si se selecciona la banda FM.) SEEK [MAN], [PCH] Permite utilizar los botones o para buscar emisoras una a una (sintonización manual) o seleccionar una emisora a partir de los canales memorizados. SAVE Almacena la información sobre la canción que se está reproduciendo en su lista de música en Spotify. UNSAVE S.RTRV USB iPod [1] (funciona con índices de compresión bajos), [2] (funciona con índices de compresión altos), [OFF] AUDIO BOOK Mejora el audio comprimido y recupera un sonido de calidad. No disponible durante la reproducción de archivos FLAC. iPod [FASTER], [NORMAL], [SLOWER] Cambia la velocidad de reproducción. (No está disponible si [CONTROL iPod] está seleccionado en el modo de control.) PAUSE Pone en pausa o reanuda la reproducción. - 18 - Español Borra la información de la canción almacenada en [SAVE]. Ajustes de AUDIO Opción del menú Descripción FADER*1 Ajuste el balance de los altavoces delanteros y traseros. BALANCE Ajuste el balance de los altavoces derechos e izquierdos. EQ SETTING [SUPER BASS], [POWERFUL], [DYNAMIC], [NATURAL], [VOCAL], [VIVID], [CUSTOM1], [CUSTOM2], [FLAT] Español Seleccione la banda y el nivel del ecualizador para personalizar todavía más la configuración. Banda del ecualizador: [80HZ], [250HZ], [800HZ], [2.5KHZ], [8KHZ] Nivel del ecualizador: de [+6] a [–6] Seleccione o personalice la curva del ecualizador. [CUSTOM1] puede ajustarse por separado para cada fuente. Sin embargo, cada una de las siguientes combinaciones presenta automáticamente el mismo ajuste. • USB, iPod, ANDROID, SPOTIFY y APP (iPhone) [CUSTOM2] es un ajuste compartido utilizado para todas las fuentes. También puede cambiar el ecualizador presionando repetidamente (solo para MVH-S120UB/S120UBG/S120UBA/S120UBW). LOUDNESS [OFF], [LOW], [MID], [HI] Permite aplicar compensación para disfrutar de un sonido nítido con el volumen más bajo. SUB.W*2 [NOR], [REV], [OFF] Seleccione la fase del subwoofer. SUB.W CTRL*2*3 Frecuencia de corte: [50HZ], [63HZ], [80HZ], [100HZ], [125HZ], [160HZ], [200HZ] Nivel de salida: de [–24] a [+6] Nivel de curva: [–12], [–24] El subwoofer solo emite las frecuencias por debajo del intervalo seleccionado. BASS BOOST De [0] a [+6] Seleccione el nivel de intensificación de graves. - 19 - Opción del menú Descripción HPF SETTING Frecuencia de corte: [OFF], [50HZ], [63HZ], [80HZ], [100HZ], [125HZ], [160HZ], [200HZ] Nivel de curva: [–12], [–24] Los altavoces solo emiten frecuencias por encima del punto de corte del filtro de paso alto (HPF). De [+4] a [–4] Ajusta el nivel de volumen de cada fuente excepto FM. Cada una de las siguientes combinaciones presenta automáticamente el mismo ajuste. • USB, iPod, ANDROID, SPOTIFY y APP (iPhone) SLA *1 No está disponible si [SUB.W/SUB.W] está seleccionado en [SP-P/O MODE], en los ajustes de INITIAL (página 6). *2 No está disponible si [REAR/REAR] está seleccionado en [SP-P/O MODE], en los ajustes de INITIAL (página 6). *3 No está disponible si [OFF] está seleccionado en [SUB.W]. Ajustes de SYSTEM También puede acceder a estos menús cuando la unidad está apagada. Descripción LANGUAGE [ENG](inglés), [РУС](ruso), [TUR](turco) Seleccione el idioma en el que debe aparecer la información de texto de un archivo de audio comprimido. CLOCK SET Ajuste el reloj (página 5). 12H/24H [12H], [24H] Seleccione el formato de la hora. SCROLL SET [ONCE], [LOOP], [OFF] Seleccione la forma de moverse por el texto en el visor. AUTO PI [ON], [OFF] Busca una emisora diferente con la misma programación, aunque se haya seleccionado una emisora memorizada. - 20 - Español Opción del menú Opción del menú Descripción AUX [ON], [OFF] Ajuste esta opción en [ON] si utiliza un dispositivo auxiliar conectado a la unidad. SPOTIFY [ON], [OFF] Seleccione [ON] cuando utilice la función Spotify. MUTE MODE (Solo para MVH-S120UI/S120UIG/S12UI) [MUTE], [20dB ATT], [10dB ATT] Silencia o atenúa el sonido automáticamente cuando se recibe una señal de un equipo con una función de silenciamiento. PW SAVE* [ON], [OFF] Reduce el consumo de la batería. La activación de la fuente es la única operación permitida cuando esta función está activada. ANDROID WIRED [MEMORY], [APP CONTROL] Seleccione el método de conexión adecuado en función de su dispositivo Android. P.APP AUTO ON [ON], [OFF] USB AUTO [ON], [OFF] Seleccione [ON] para cambiar automáticamente a la fuente [USB] cuando un dispositivo USB/iPod está conectado a la unidad. Seleccione [OFF] cuando se está conectando un dispositivoUSB/iPod a la unidad solo para carga. * [PW SAVE] se cancela y se desconecta la batería del vehículo, por lo que tendrá que volver a encenderse una vez conectada de nuevo la batería. Si [PW SAVE] está desactivado, en función de los métodos de conexión, es posible que la unidad continúe consumiendo energía de la batería si el contacto del vehículo no incorpora una posición ACC (accesorio). - 21 - Español Seleccione [ON] para iniciar Pioneer ARC APP automáticamente si se conecta un dispositivo Android a la unidad a través de AOA. (No está disponible si [MEMORY] está seleccionado en [ANDROID WIRED].) Ajustes de ILLUMINATION Opción del menú Descripción DIM SETTING [SYNC CLOCK], [MANUAL] Seleccione la forma de modificar el brillo de la pantalla. BRIGHTNESS De [1] a [10] Modifica el brillo del visor. Los intervalos de ajuste disponibles varían en función de [DIM SETTING]. Español - 22 - Información complementaria – Sitúe la llave de contacto en la posición OFF y de nuevo en la posición ON. Si el mensaje continúa apareciendo, póngase en contacto con su distribuidor o con un centro de asistencia Pioneer autorizado para obtener ayuda. Solución de problemas El visor vuelve automáticamente a la visualización normal. → No se han realizado operaciones en aproximadamente 30 segundos. – Realice una operación. El intervalo de la reproducción repetida cambia de forma imprevista. → En función del intervalo de la reproducción repetida, es posible que el intervalo seleccionado se modifique cuando se selecciona otra carpeta o pista o durante el avance o retroceso rápido. – Seleccione de nuevo el intervalo de la reproducción repetida. El sonido es intermitente. → Utiliza un dispositivo, como un teléfono móvil, que puede provocar interferencias audibles. – Aleje de la unidad los dispositivos que puedan provocar las interferencias. Mensajes de error Generales AMP ERROR → La unidad no funciona o la conexión del altavoz es incorrecta. → El circuito de protección está activado. – Compruebe la conexión del altavoz. Dispositivo USB/iPod FORMAT READ → A veces transcurre un tiempo entre el inicio de la reproducción y el instante en que empieza a escuchar sonido. – Espere hasta que el mensaje desaparezca y empiece a escuchar sonido. NO AUDIO → No hay canciones. – Transfiera archivos de audio al dispositivo USB y conéctelo. → El dispositivo USB conectado tiene la protección activada. – Siga las instrucciones de seguridad del dispositivo USB para desactivar la protección. SKIPPED → El dispositivo USB conectado contiene archivos con protección DRM. – Se saltarán los archivos protegidos. PROTECT → Todos los archivos del dispositivo USB conectado tienen incorporada información DRM. – Cambie el dispositivo USB. - 23 - Español No se reproduce una subcarpeta. → Las subcarpetas no pueden reproducirse si se ha seleccionado la opción [FLD] (repetición de carpeta). – Seleccione otro intervalo de la reproducción repetida. NO XXXX (NO TITLE, por ejemplo) → No hay información de texto asociada. – Cambie de pantalla o reproduzca otra pista o archivo. N/A USB → El dispositivo USB conectado no es compatible con esta unidad. – Desconecte el dispositivo y cámbielo por un dispositivo USB compatible. HUB ERROR → Esta unidad no permite utilizar el dispositivo USB conectado a través de un concentrador USB. – Conecte el dispositivo USB directamente a esta unidad utilizando un cable USB. ERROR-19 → Error en la comunicación. – Realice una de las operaciones siguientes y, a continuación, vuelva a la fuente USB. • Desconecte el dispositivo USB. • Seleccione una fuente diferente. → Error del iPod. – Desconecte el cable del iPod. Cuando aparezca el menú principal del iPod, vuelva a conectar el iPod y reinícielo. ERROR-23 → El dispositivo USB no se ha formateado correctamente. – Formatee el dispositivo USB con los formatos FAT12, FAT16 o FAT32. STOP → No hay canciones en la lista actual. – Seleccione una lista que contenga canciones. NOT FOUND → No hay canciones asociadas. – Transfiera canciones al iPod. APP START UP APP → La aplicación todavía no se ha iniciado. – Utilice el dispositivo móvil para iniciar la aplicación. Spotify CHECK APP → Error en la conexión con la aplicación Spotify. – Siga las instrucciones que aparecen en pantalla. Instrucciones de manipulación Dispositivo de almacenamiento USB • No están permitidas las conexiones a través de concentradores USB. • Asegure correctamente el dispositivo de almacenamiento USB antes de arrancar. No permita que el dispositivo de almacenamiento USB se caiga al suelo, ya que podría interferir con el - 24 - Español CHECK USB → El conector USB o el cable USB presenta un cortocircuito. – Compruebe si el conector USB o el cable USB está atrapado o dañado. → El dispositivo USB conectado consume una cantidad de corriente superior al máximo permitido. – Desconecte el dispositivo USB y no vuelva a utilizarlo. Sitúe la llave de contacto en la posición OFF y de nuevo en la posición ACC u ON. Conecte solo dispositivos USB compatibles. ERROR-16 → La versión del firmware del iPod es antigua. – Actualice la versión del iPod. → Error del iPod. – Desconecte el cable del iPod. Cuando aparezca el menú principal del iPod, vuelva a conectar el iPod y reinícielo. funcionamiento del pedal de freno o de aceleración. • En función del dispositivo de almacenamiento USB, pueden producirse los siguientes problemas. – Las operaciones pueden variar. – Es posible que no se reconozca el dispositivo de almacenamiento. – Es posible que los archivos no se reproduzcan correctamente. – El dispositivo puede provocar interferencias audibles mientras escucha la radio. iPod Compatibilidad con formatos de audio comprimido • Solo se mostrarán los primeros 32 caracteres de un nombre de archivo (incluyendo la extensión del archivo) o un nombre de carpeta. • Es posible que la unidad no funcione correctamente, en función de la aplicación utilizada para codificar los archivos WMA. PRECAUCIÓN • Pioneer no garantiza la compatibilidad con todos los dispositivos de almacenamiento masivo USB y no asume responsabilidad alguna en caso de pérdida de datos en reproductores multimedia, smartphones u otros dispositivos al utilizar este producto. • No deje discos ni dispositivos de almacenamiento USB en lugares expuestos a temperaturas elevadas. Archivos WMA Extensión del archivo Tasa de bits Frecuencia de muestreo Windows Media™ Audio Professional, Lossless, Voice/DRM Stream/Stream con vídeo .wma De 48 kbps a 320 kbps (CBR), de 48 kbps a 384 kbps (VBR) 32 kHz, 44,1 kHz, 48 kHz No compatible Archivos MP3 Extensión del archivo Tasa de bits - 25 - .mp3 De 8 kbps a 320 kbps (CBR), VBR Español • No deje el iPod en lugares expuestos a temperaturas elevadas. • Asegure correctamente el iPod mientras conduce. No permita que el iPod se caiga al suelo, ya que podría interferir con el funcionamiento del pedal de freno o de aceleración. • Determinados ajustes del iPod, como el ecualizador y la reproducción repetida, cambian automáticamente cuando se conecta el iPod a la unidad. Una vez desconectado el iPod, estos ajustes recuperan los parámetros normales. • El texto no compatible guardado en el iPod no se visualizará tampoco en la unidad. • La reproducción de archivos de audio con datos de imagen asociados o archivos de audio almacenados en un dispositivo USB con una jerarquía de carpetas compleja podría tardar un poco en empezar. • Para poder visualizar texto en ruso en esta unidad, debe estar codificado en alguno de los conjuntos de caracteres siguientes: – Unicode (UTF-8, UTF-16) – Un conjunto de caracteres diferente de Unicode utilizado en un entorno Windows y definido como ruso en la configuración de múltiples idiomas Frecuencia de muestreo Versión de etiqueta ID3 compatible Lista de reproducción M3u MP3i (MP3 interactivo), mp3 PRO De 8 kHz a 48 kHz (32 kHz, 44,1 kHz, 48 kHz para énfasis) 1.0, 1.1, 2.2, 2.3, 2.4 (la versión de etiqueta ID3 2.x tiene prioridad sobre la versión 1.x.) No compatible Carpetas reproducibles Archivos reproducibles Reproducción de archivos protegidos por derechos de autor Dispositivo USB con particiones No compatible • Los formatos de archivo WAV no pueden conectarse a través de MTP. 16 bits 1/2 canales Dispositivo USB • La reproducción de archivos de audio almacenados en un dispositivo USB con una jerarquía de carpetas compleja podría tardar un poco en empezar. Jerarquía de carpetas reproducibles Hasta ocho niveles (una jerarquía práctica debe tener menos de dos niveles) Solo es posible reproducir la primera partición. – iPod touch (generaciones de 1.ª a 6.ª) – iPod classic – iPod nano (generaciones de 3.ª a 7.ª) – iPhone 6s – iPhone 6s Plus – iPhone 6 – iPhone 6 Plus – iPhone 5s – iPhone 5c – iPhone 5 – iPhone 4s – iPhone 4 – iPhone 3GS – iPhone 3G – iPhone • Las operaciones pueden variar en función de la generación y/o la versión del software del iPod. • Los usuarios de un iPod con conector Lightning deben utilizar el cable de Lightning a USB (suministrado con el iPod). • Los usuarios de un iPod con conector Dock deben utilizar el CD-IU51. Para - 26 - Español • Los formatos de archivo FLAC no pueden conectarse a través de MTP. • En función del codificador, es posible que los archivos FLAC no puedan reproducirse. .flac 8/11,025/12/16/22,05/ 24/32/44,1/48 kHz No compatible Esta unidad es compatible únicamente con los siguientes modelos de iPod. Es posible que la unidad no sea compatible con versiones anteriores. Diseñado para .wav 8 y 16 (LPCM) De 16 kHz a 48 kHz (LPCM) Archivos FLAC Extensión del archivo Frecuencia de muestreo Tasa de bits de cuantificación Modo de canal Hasta 15 000 Compatibilidad de modelos de iPod Archivos WAV Extensión del archivo Bits de cuantificación Frecuencia de muestreo Hasta 500 obtener más información, consulte a su distribuidor. • Consulte los manuales del iPod para obtener información sobre la compatibilidad de archivos y formatos. • Audiolibro, podcast: compatible Tabla de caracteres de ruso PRECAUCIÓN Pioneer declina toda responsabilidad por la pérdida de datos del iPod, aunque la pérdida se produzca durante la utilización de esta unidad. Secuencia de archivos de audio Ejemplo de una jerarquía D: visor C: carácter Carpeta Archivo de audio comprimido Copyright y marcas registradas iTunes Apple e iTunes son marcas comerciales de Apple Inc., registradas en los EE.UU. y en otros países. De 01 a 05: número de carpeta a : secuencia de reproducción WMA Windows Media es una marca registrada o una marca de fábrica de Microsoft Corporation en los Estados Unidos y/u otros países. Este producto incluye tecnología propiedad de Microsoft Corporation, y no se puede usar ni distribuir sin una licencia de Microsoft Licensing, Inc. - 27 - Español El usuario no puede asignar números de carpeta ni especificar secuencias de reproducción con esta unidad. La secuencia de los archivos de audio depende del dispositivo conectado. Tenga en cuenta que los archivos ocultos de un dispositivo USB no podrán reproducirse. ACTIVIDAD), INDEPENDIENTEMENTE DE LA CAUSA Y EN NINGÚN NIVEL DE RESPONSABILIDAD, TANTO POR RESPONSABILIDAD CONTRACTUAL COMO DIRECTA O DELICTIVA (POR NEGLIGENCIA U OTRO TIPO DE RESPONSABILIDAD), DERIVADA DE LA UTILIZACIÓN DE ESTE SOFTWARE, AUNQUE LA POSIBILIDAD DE ESTOS DAÑOS SE HUBIERA ADVERTIDO PREVIAMENTE. iPhone, iPod y Lightning La utilización del distintivo Made for Apple indica que un accesorio está diseñado para conectarse específicamente a los productos Apple identificados en el distintivo y que su desarrollador ha certificado su conformidad con los criterios de rendimiento de Apple. Apple no asume responsabilidad alguna sobre el funcionamiento de este dispositivo o su conformidad con los requisitos normativos. Tenga en cuenta que la utilización de este accesorio con un producto Apple puede perjudicar el correcto funcionamiento de la conectividad inalámbrica. iPhone, iPod, iPod classic, iPod nano, iPod touch y Lightning son marcas comerciales de Apple, Inc. registradas en Estados Unidos y otros países. Google™, Google Play, Android Google, Google Play y Android son marcas comerciales de Google LLC. Spotify® SPOTIFY y el logotipo de Spotify se encuentran entre las marcas registradas de Spotify AB. Se requieren dispositivos digitales móviles y una suscripción Premium, si está disponible; consulte https://www.spotify.com. - 28 - Español FLAC Copyright © 2000-2009 Josh Coalson Copyright © 2011-2013 Xiph.Org Foundation La redistribución y la utilización del formato binario y del código fuente, con o sin modificaciones, están permitidas siempre y cuando se cumplan las siguientes condiciones: – Las redistribuciones del código fuente deben incorporar la siguiente mención de derechos de autor, la lista de condiciones y la siguiente exención de responsabilidad. – Las redistribuciones del formato binario deben incorporar el siguiente aviso de derechos de autor, la lista de condiciones y la siguiente exención de responsabilidad en la documentación y/o los materiales utilizados en la distribución. – El nombre de Xiph.org Foundation y los nombres de sus colaboradores no pueden utilizarse para recomendar o promocionar productos derivados de este software sin una autorización previa por escrito. LOS TITULARES DE LOS DERECHOS DE AUTOR Y LOS COLABORADORES PROPORCIONAN ESTE SOFTWARE “TAL CUAL” Y NO OFRECEN NINGÚN TIPO DE GARANTÍA, IMPLÍCITA O EXPLÍCITA, COMO POR EJEMPLO GARANTÍAS IMPLÍCITAS DE COMERCIABILIDAD O DE ADECUACIÓN A UNA FINALIDAD CONCRETA. NI LA FUNDACIÓN NI SUS COLABORADORES PUEDEN CONSIDERARSE RESPONSABLES EN NINGÚN CASO POR DAÑOS DIRECTOS, INDIRECTOS, ACCIDENTALES, ESPECIALES, PUNITIVOS O CONSECUENTES (LO QUE INCLUYE, A TÍTULO MERAMENTE ENUNCIATIVO, LA PRESTACIÓN DE PRODUCTOS O SERVICIOS DE SUSTITUCIÓN, LA PÉRDIDA DE DATOS, BENEFICIOS O POSIBILIDADES DE UTILIZACIÓN O LA INTERRUPCIÓN DE LA Fase: normal/inversa Especificaciones USB General Fuente de alimentación: 14,4 V CC (de 10,8 V a 15,1 V permisible) Sistema de conexión a tierra: tipo negativo Consumo máximo de corriente: 10,0 A Dimensiones (An × Al × Pr): DIN Bastidor: 178 mm × 50 mm × 97 mm Cara anterior: 188 mm × 58 mm × 17 mm D Bastidor: 178 mm × 50 mm × 97 mm Cara anterior: 170 mm × 46 mm × 17 mm Peso: 0,5 kg Audio Sintonizador FM Intervalo de frecuencias: de 87,5 MHz a 108,0 MHz Sensibilidad utilizable: 11 dBf (1,0 μV/75 Ω, mono, señal/ruido: 30 dB) Relación señal/ruido: 72 dB (red IEC-A) Sintonizador MW Intervalo de frecuencias: de 531 kHz a 1 602 kHz Sensibilidad utilizable: 25 μV (señal/ruido: 20 dB) Relación señal/ruido: 62 dB (red IEC-A) Sintonizador LW Intervalo de frecuencias: de 153 kHz a 281 kHz Sensibilidad utilizable: 28 μV (señal/ruido: 20 dB) Relación señal/ruido: 62 dB (red IEC-A) NOTA Las especificaciones y el diseño están sujetos a modificaciones sin previo aviso. - 29 - Español Salida de potencia máxima: • 50 W × 4 canales/4 Ω (sin subwoofer) • 50 W × 2 canales/4 Ω + 70 W × 1 canal/2 Ω (con subwoofer) Salida de potencia continua: 22 W × 4 (de 50 Hz a 15 000 Hz, 5% THD, 4 Ω carga, ambos canales activados) Impedancia de carga: 4 Ω (de 4 Ω a 8 Ω permisible) Nivel de salida máxima del preamplificador: 2,0 V Contorno de sonoridad: +10 dB (100 Hz), +6,5 dB (10 kHz) (volumen: –30 dB) Ecualizador (ecualizador gráfico de 5 bandas): Frecuencia: 80 Hz/250 Hz/800 Hz/2,5 kHz/8 kHz Intervalo de ecualización: ±12 dB (pasos de 2 dB) Subwoofer (mono): Frecuencia: 50 Hz/63 Hz/80 Hz/ 100 Hz/125 Hz/160 Hz/200 Hz Curva: –12 dB/oct, –24 dB/oct Ganancia: +6 dB a –24 dB Especificación estándar USB: USB 2.0 de alta velocidad Corriente máxima: 1 A USB Protocolo: MSC (Clase de almacenamiento masivo) MTP (Protocolo de transferencia multimedia) AOA (Open Accessory de Android) 2.0 Sistema de archivos: FAT12, FAT16, FAT32 Formato de decodificación MP3: MPEG-1 & 2 Audio Layer 3 Formato de descodificación WMA: ver. 7, 8, 9, 9.1, 9.2 (audio de 2 canales) Formato de decodificación FLAC: v1.3.0 (Free Lossless Audio Codec) Formato de señal WAV: PCM lineal (sin comprimir) Inhaltsverzeichnis Erste Schritte ............................................................................................ 3 Radio .......................................................................................................... 7 USB/iPod/AUX .......................................................................................... 9 App-Modus............................................................................................ 12 Spotify® .................................................................................................. 13 Verwenden von Pioneer ARC APP ..................................................... 15 Einstellungen ........................................................................................ 17 FUNCTION-Einstellungen .................................................................... 18 AUDIO-Einstellungen ........................................................................... 19 SYSTEM-Einstellungen ......................................................................... 21 ILLUMINATION-Einstellungen............................................................. 23 Zusätzliche Informationen ................................................................. 24 Über dieses Handbuch: • In den folgenden Anweisungen werden ein USB-Stick oder USB-Audioplayer als „USBGerät” bezeichnet. • iPod und iPhone werden in diesem Handbuch als „iPod” bezeichnet. Deutsch -2- Erste Schritte Grundlagen der Bedienung MVH-S120UI/S120UIG/S12UI/S120UB/S120UBG/S120UBA/ S120UBW BASS USB-Anschluss M.C.-(Mehrfunktions-)Regler SRC (Quelle)/OFF Entriegelungstaste Anzeigefenster AUX-Eingangsbuchse (3,5-mm-Stereobuchse) DISP (Display) BAND/ Häufig verwendete Bedienvorgänge Bedienung Gerät einschalten* Drücken Sie SRC/OFF, um das Gerät einzuschalten. Halten Sie SRC/OFF gedrückt, um das Gerät auszuschalten. Lautstärke einstellen Drehen Sie den M.C.-Regler. Quelle auswählen Drücken Sie mehrmals SRC/OFF. Anzeigeinformationen umschalten Drücken Sie mehrmals DISP. Zur vorhergehenden Anzeige/Liste zurückkehren Drücken Sie BAND/ Vom Menü zur normalen Anzeige zurückkehren Halten Sie BAND/ -3- . gedrückt. Deutsch Zweck Zweck Bedienung Steigern des Basspegels Drücken Sie BASS. • Sie können den Basspegel unter [BASS BOOST] auswählen (Seite 20). * Wenn das blauweiße Kabel dieses Geräts an der Steuerklemme des Automatikantennenrelais des Fahrzeugs angeschlossen ist, fährt die Fahrzeugantenne aus, wenn die Quelle dieses Geräts eingeschaltet wird. Um die Antenne einzuziehen, schalten Sie die Quelle aus. Anzeige im Display Anzeige Beschreibung Erscheint, wenn eine untere Ebene des Menüs oder Ordners existiert. Erscheint, wenn die BASS-Taste gedrückt gehalten wird. Erscheint, wenn der Lokalsender-Suchlauf eingeschaltet ist (Seite 18). Erscheint, wenn ein Verkehrsfunkprogramm empfangen wird. Erscheint, wenn die TA-Funktion (Verkehrsdurchsagen) eingeschaltet ist (Seite 18). Erscheint, wenn die Sound Retriever-Funktion eingeschaltet ist (Seite 19). Erscheint, wenn die iPod-Steuerung eingeschaltet ist (Seite 12). Abnehmen des Bedienfelds Nehmen Sie das Bedienfeld ab, um einen Diebstahl zu verhindern. Ziehen Sie am Bedienfeld befestigte Kabel und Geräte ab und schalten Sie das Gerät aus, bevor Sie das Bedienfeld abnehmen. Anbringen Wichtig • Setzen Sie das Bedienfeld keinen starken Erschütterungen aus. • Halten Sie das Bedienfeld von direktem Sonnenlicht und hohen Temperaturen fern. • Bewahren Sie das abgenommene Bedienfeld immer in einer Schutzhülle oder Tasche auf. -4- Deutsch Abnehmen Einrichtungsmenü Wenn Sie nach dem Einbau die Zündung einschalten, erscheint [SET UP :YES] im Display. 1 2 Drücken Sie den M.C.-Regler. Das Einrichtungsmenü verschwindet, wenn 30 Sekunden lang kein Bedienvorgang ausgeführt wird. Wenn Sie die Einrichtung im Moment nicht durchführen möchten, drehen Sie den M.C.-Regler, um [NO] auszuwählen, und drücken Sie ihn dann, um den Vorgang zu bestätigen. Drehen Sie den M.C.-Regler, um die Optionen auszuwählen, und drücken Sie ihn dann, um den Vorgang zu bestätigen. Um mit der nächsten Menüoption fortzufahren, müssen Sie Ihre Auswahl bestätigen. Menüpunkt Beschreibung LANGUAGE Auswahl der Sprache, in der die Textinformationen komprimierter Audiodateien angezeigt werden sollen. [ENG] (Englisch), [РУС] (Russisch), [TUR] (Türkisch) CLOCK SET Einstellung der Uhr. FM STEP Auswahl der FM-Schrittweite: 100 kHz oder 50 kHz. [100], [50] 3 Drehen Sie den M.C.-Regler, um die Einstellungen zu bestätigen. HINWEISE • Sie können die Menüeinstellung durch Drücken von SRC/OFF abbrechen. • Diese Einstellungen können jederzeit über die SYSTEM- (Seite 21) und INITIAL-Einstellungen (Seite 6) vorgenommen werden. Abbrechen der Demoanzeige (DEMO OFF) 1 2 Drehen Sie den M.C.-Regler, um das Hauptmenü anzuzeigen. Drehen Sie den M.C.-Regler, um [SYSTEM] auszuwählen, und drücken Sie ihn dann, um den Vorgang zu bestätigen. -5- Deutsch 4 [QUIT :YES] erscheint, wenn sämtliche Einstellungen vorgenommen wurden. Um zum ersten Eintrag des Einrichtungsmenüs zurückzukehren, drehen Sie den M.C.-Regler, um [QUIT :NO] auszuwählen, und drücken Sie ihn dann, um den Vorgang zu bestätigen. 3 4 Drehen Sie den M.C.-Regler, um [DEMO OFF] auszuwählen, und drücken Sie ihn dann, um den Vorgang zu bestätigen. Drehen Sie den M.C.-Regler, um [YES] auszuwählen, und drücken Sie ihn dann, um den Vorgang zu bestätigen. INITIAL-Einstellungen 1 2 3 4 Halten Sie SRC/OFF gedrückt, bis sich das Gerät ausschaltet. Halten Sie SRC/OFF gedrückt, um das Hauptmenü anzuzeigen. Drehen Sie den M.C.-Regler, um [INITIAL] auszuwählen, und drücken Sie ihn dann, um den Vorgang zu bestätigen. Drehen Sie den M.C.-Regler, um eine Option auszuwählen, und drücken Sie ihn dann, um den Vorgang zu bestätigen. HINWEIS Welche Optionen verfügbar sind, unterscheidet sich je nach Gerät. Menüpunkt Beschreibung FM STEP Auswahl der FM-Schrittweite: 100 kHz oder 50 kHz. [100], [50] SP-P/O MODE [REAR/SUB.W] Wählen Sie diese Option, wenn an den Ausgangsdrähten für die Hecklautsprecher ein Breitbandlautsprecher und am CinchAusgang ein Subwoofer angeschlossen ist. Wählen Sie diese Option, wenn an den Ausgangsdrähten für die Hecklautsprecher ein passiver Subwoofer direkt angeschlossen und am Cinch-Ausgang ein Subwoofer angeschlossen ist. [REAR/REAR] Wählen Sie diese Option, wenn an den Ausgangsdrähten für die Hecklautsprecher Breitbandlautsprecher angeschlossen sind. Wenn an den Ausgangsdrähten für die Hecklautsprecher ein Breitbandlautsprecher angeschlossen ist und der CinchAusgang nicht verwendet wird, können Sie entweder [REAR/ SUB.W] oder [REAR/REAR] auswählen. -6- Deutsch [SUB.W/SUB.W] Menüpunkt Beschreibung S/W UPDATE Wählen Sie diese Option, um die neuesten Systeminformationen des Geräts zu bestätigen. [SYSTEM INFO] [SYSTEM UPDATE] Wählen Sie diese Option, um das Gerät auf die neueste Software zu aktualisieren und die Einstellungen des Geräts zu initialisieren. Einzelheiten zur neuesten Software und zur Aktualisierung finden Sie auf unserer Website. SYSTEM RESET [YES], [NO] Wählen Sie [YES], um die Geräteeinstellungen zu initialisieren. Das Gerät wird automatisch neu gestartet. (Einige der Einstellungen können auch nach dem Zurücksetzen des Geräts erhalten bleiben.) Radio Die Empfangsfrequenzen dieses Geräts sind für die Nutzung in Westeuropa, Asien, dem Nahen Osten, Afrika und Ozeanien vorgesehen. Eine Nutzung in anderen Regionen kann zu schlechtem Empfang führen. Die RDS-Funktion (Radio Data System: Datenfunksystem) funktioniert nur in Regionen, die RDS-Signale für FM-Sender übertragen. Empfangen von voreingestellten Sendern 1 2 Drücken Sie BAND/ oder [LW]. , um das Band auszuwählen: [FM1], [FM2], [FM3], [MW] Drücke Sie eine Zifferntaste (1/ bis 6/ Deutsch 3 Drücken Sie SRC/OFF, um [RADIO] auszuwählen. ). TIPP Die / -Tasten können auch verwendet werden, um einen voreingestellten Sender auszuwählen, wenn [SEEK] in den FUNCTION-Einstellungen auf [PCH] eingestellt ist (Seite 19). Speicher der besten Sender (BSM: Best Stations Memory) Die sechs stärksten Sender werden auf den Zifferntasten (1/ 1 bis 6/ ) gespeichert. Drücken Sie, nachdem Sie das Band ausgewählt haben, den M.C.-Regler, um das Hauptmenü anzuzeigen. -7- 2 3 Drehen Sie den M.C.-Regler, um [FUNCTION] auszuwählen, und drücken Sie ihn dann, um den Vorgang zu bestätigen. Drehen Sie den M.C.-Regler, um [BSM] auszuwählen, und drücken Sie ihn dann, um den Vorgang zu bestätigen. Sender manuell suchen 1 Drücken Sie, nachdem Sie das Band ausgewählt haben, / , um einen Sender auszuwählen. Halten Sie / gedrückt und lassen Sie dann die Taste los, um nach einem verfügbaren Sender zu suchen. Der Suchlauf hält an, wenn das Gerät einen Sender empfängt. Um den Suchlauf abzubrechen, drücken Sie / . HINWEIS [SEEK] muss in den FUNCTION-Einstellungen auf [MAN] eingestellt sein (Seite 19). Sender manuell speichern 1 Halten Sie, während Sie den zu speichernden Sender empfangen, eine der Zifferntasten (1/ bis 6/ ) gedrückt, bis sie zu blinken aufhört. Verwenden von PTY-Funktionen Das Gerät sucht anhand von PTY-Informationen (Programmtyp) nach einem Sender. 1 2 Drehen Sie den M.C.-Regler, um einen Programmtyp auszuwählen: [NEWS/INFO], [POPULAR], [CLASSICS] oder [OTHERS]. Drücken Sie den M.C.-Regler. Das Gerät beginnt, nach einem Sender zu suchen. Wenn ein Sender gefunden wurde, wird der Sendername angezeigt. HINWEISE • Um die Suche abzubrechen, drücken Sie den M.C.-Regler. • Das Sendeprogramm einiger Sender kann von der übertragenen PTY-Klassifizierung abweichen. • Wenn kein Sender den Programmtyp überträgt, nach dem Sie suchen, wird etwa zwei Sekunden lang [NOT FOUND] angezeigt, und der Tuner kehrt dann zum ursprünglichen Sender zurück. -8- Deutsch 3 Halten Sie während des FM-Empfangs BASS gedrückt. USB/iPod/AUX HINWEIS Die iPod-Funktion ist für MVH-S120UB/S120UBG/S120UBA/S120UBW nicht verfügbar. Wiedergabe Ziehen Sie den Kopfhörer des externen Geräts ab, bevor Sie es an dieses Gerät anschließen. USB-Geräte (einschließlich Android™)/iPod 1 Öffnen Sie die Abdeckung des USB-Anschlusses. 2 Schließen Sie mit einem geeigneten Kabel das USB-Gerät/den iPod an. HINWEIS Um automatisch zur [USB]-Quelle zu wechseln, wenn ein USB-Gerät/iPod an diesem Gerät angeschlossen ist, stellen Sie [USB AUTO] in den SYSTEM-Einstellungen auf [ON] (Seite 22). VORSICHT Verwenden Sie ein USB-Kabel (separat erhältlich), um das USB-Gerät anzuschließen, da jedes direkt am Gerät angeschlossene externe Gerät aus dem Gerät herausragen wird, was gefährlich sein könnte. Beenden Sie, bevor Sie das andere Gerät von diesem Gerät trennen, die Wiedergabe. AOA-Verbindungen Einzelheiten zur AOA-Verbindung finden Sie auf Seite 16. MTP-Verbindung HINWEIS Wenn Sie eine MTP-Verbindung verwenden, muss [ANDROID WIRED] in den SYSTEM-Einstellungen auf [MEMORY] eingestellt sein (Seite 22). AUX 1 Schließen Sie den Stereo-Mini-Stecker an der AUX-Eingangsbuchse an. 2 Drücken Sie SRC/OFF, um [AUX] als Quelle auszuwählen. -9- Deutsch Ein Gerät mit Android-Version 4.0 bzw. mit den meisten höheren Versionen kann mit Hilfe des mit dem betreffenden Gerät gelieferten Kabels über MTP an dieses Gerät angeschlossen werden. Je nach angeschlossenem Gerät, der Betriebssystemversion und der Anzahl der Dateien auf dem Gerät kann es sein, dass Audiodateien/Musiktitel nicht über MTP wiedergegeben werden können. Beachten Sie, dass die MTP-Verbindung nicht kompatibel mit den WAV- und FLAC-Dateiformaten ist. HINWEIS Wenn in den SYSTEM-Einstellungen [AUX] auf [OFF] eingestellt ist, lässt sich [AUX] nicht als Quelle auswählen (Seite 21). Bedienvorgänge In den FUNCTION-Einstellungen können Sie verschiedene Anpassungen vornehmen (Seite 18). Beachten Sie, dass die folgenden Bedienvorgänge nicht bei einem AUX-Gerät funktionieren. Um ein AUX-Gerät zu bedienen, führen Sie die Vorgänge an dem Gerät selbst aus. Zweck Bedienung Ordner/Album auswählen*1 Drücken Sie 1/ bzw. 2/ Track/Titel (Kapitel) auswählen Drücken Sie bzw. bzw. . . Halten Sie In einer Liste nach einer Datei suchen 1 Halten Sie BASS gedrückt, um die Liste anzuzeigen. 2 Drehen Sie den M.C.-Regler, um den Namen oder die Kategorie der/des gewünschten Datei/Ordners auszuwählen, und drücken Sie dann den Regler, um den Vorgang zu bestätigen. 3 Drehen Sie den M.C.-Regler, um die gewünschte Datei auszuwählen, und drücken Sie ihn dann, um den Vorgang zu bestätigen. Die Wiedergabe startet. gedrückt. Eine Liste der Dateien im ausgewählten Ordner/in der ausgewählten Kategorie ansehen*1 Drücken Sie, wenn ein Ordner/eine Kategorie ausgewählt ist, den M.C.-Regler. Einen Musiktitel aus dem/der ausgewählten Halten Sie, wenn ein Ordner/eine Kategorie Ordner/Kategorie abspielen*1 ausgewählt ist, den M.C.-Regler gedrückt. - 10 - Deutsch Vor- oder zurückspulen*2 Zweck Bedienung Alphabetische Suche (nur iPod) 1 Halten Sie BASS gedrückt, um die Liste anzuzeigen. 2 Drehen Sie den M.C.-Regler, um die gewünschte Kategorieliste auszuwählen, und halten Sie dann BASS gedrückt, um den alphabetischen Suchmodus aufzurufen. (Zweimaliges Drehen des M.C.-Reglers ruft ebenfalls den alphabetischen Suchmodus auf.) 3 Drehen Sie den M.C.-Regler, um einen Buchstaben auszuwählen, und drücken Sie dann den Regler, um die alphabetische Liste anzuzeigen. Um die alphabetische Suche abzubrechen, drücken Sie BAND/ . Wiedergabewiederholung Drücken Sie 6/ Zufalls-/Shuffle-Wiedergabe Drücken Sie 5/ . Shuffle-Wiedergabe aller Titel (nur iPod) Halten Sie 5/ Wiedergabe pausieren/fortsetzen Drücken Sie 4/PAUSE. Sound Retriever Drücken Sie 3/S.Rtrv. [1]: Effektiv bei niedrigen Kompressionsraten [2]: Effektiv bei hohen Kompressionsraten . gedrückt. Rückkehr zum Stammordner (nur USB)*1 Drücken und halten Sie 1/ Wechsel des Laufwerks im USB-Gerät (Nur Geräte, die das USBMassenspeicherklasse-Protokoll unterstützen) Drücken Sie BAND/ . . Deutsch *1 Nur komprimierte Audiodateien *2 Wenn Sie während der Wiedergabe einer VBR-Datei die Vor- oder Rückspulfunktion verwenden, kann es sein, dass die Wiedergabezeit nicht richtig angezeigt wird. Nützliche Funktionen für iPods Modus der verknüpften Wiedergabe Sie können auf Musiktitel zugreifen, die einen Bezug zu dem momentan wiedergegebenen Interpreten, Album oder Genre haben. - 11 - 1 2 Halten Sie, während Sie einen Titel anhören, 4/PAUSE gedrückt, um in den Modus der verknüpften Wiedergabe zu wechseln. Drehen Sie den M.C.-Regler, um den Modus auszuwählen ([ARTIST], [ALBUM], [GENRE]), und drücken Sie dann den Regler, um den Vorgang zu bestätigen. Der ausgewählte Titel/das ausgewählte Album wird nach dem momentan wiedergegebenen Titel gespielt. HINWEIS Der ausgewählte Titel/das ausgewählte Album kann abgebrochen werden, wenn Sie Funktionen verwenden, die nicht zum Modus der verknüpften Wiedergabe gehören (z. B. Vor- und Zurückspulen). Steuerung über iPod Sie können das Gerät über einen angeschlossenen iPod steuern. Die folgenden iPod-Modelle sind nicht mit dieser Funktion kompatibel. – iPod nano der 1. Generation, iPod mit Videofunktion 1 Drücken Sie während der Wiedergabe BAND/ , und wählen Sie dann den Steuerungsmodus aus. [CONTROL iPod]: Die iPod-Funktion des Geräts kann nur über den angeschlossenen iPod bedient werden. [CONTROL AUDIO]: Die iPod-Funktion des Geräts kann nur mit den Tasten des Geräts oder der mitgelieferten Fernbedienung bedient werden. In diesem Modus lässt sich der angeschlossene iPod nicht ein- oder ausschalten. HINWEISE App-Modus (Der APP-Modus ist für MVH-S120UB/S120UBG/S120UBA/S120UBW nicht verfügbar.) Sie können sich über dieses Gerät den Ton einer Anwendung auf einem iPhone anhören. In einigen Fällen können Sie eine Anwendung mit diesem Gerät steuern. Einzelheiten zu kompatiblen Geräten finden Sie auf unserer Website. - 12 - Deutsch • Durch Drücken von iPod kann auch der Steuerungsmodus umgeschaltet werden (nur für MVHS120UI/S120UIG/S12UI). • Wenn Sie den Steuerungsmodus auf [CONTROL iPod] umschalten, pausiert die Musikwiedergabe. Verwenden Sie den angeschlossenen iPod, um die Wiedergabe fortzusetzen. • Die folgenden Bedienvorgänge sind weiterhin mit dem Gerät möglich, auch wenn der Steuerungsmodus auf [CONTROL iPod] eingestellt ist. – Pause, Vor-/Zurückspulen, Titel-/Kapitelauswahl • Die Lautstärke kann nur am Gerät eingestellt werden. Wichtig Die Verwendung von Apps von Dritten kann eventuell die Angabe personenbezogener Daten nach sich ziehen oder notwendig machen entweder durch das Eröffnen eines Benutzerkontos o. Ä. und für bestimmte Anwendungen die Angabe von Geolokationsdaten. ALLE APPS VON DRITTEN UNTERLIEGEN DER ALLEINIGEN VERANTWORTUNG DER ANBIETER EINSCHLIESSLICH UND OHNE EINSCHRÄNKUNG DEM SAMMELN UND SICHERN DER ANWENDERDATEN UND DATENSCHUTZMASSNAHMEN. DURCH ZUGRIFF AUF APPS VON DRITTEN ERKLÄREN SIE SICH MIT DEN NUTZUNGSBEDINGUNGEN UND DATENSCHUTZRICHTLINIEN DER JEWEILIGEN ANBIETER EINVERSTANDEN. WENN SIE DEN NUTZUNGSBEDINGUNGEN UND RICHTLINIEN EINES ANBIETERS ODER DER VERWENDUNG VON GEOLOKATIONSDATEN, WO ZUTREFFEND, NICHT ZUSTIMMEN, DANN SEHEN SIE VON DER VERWENDUNG VON APPS VON DRITTEN AB. Für iPhone-Benutzer Diese Funktion ist mit iPhone- und iPod touch-Geräten mit iOS 5.0 oder höher kompatibel. HINWEIS PIONEER IST NICHT FÜR DRITTANBIETER-APPS ODER -INHALTE VERANTWORTLICH, EINSCHLIESSLICH OHNE BESCHRÄNKUNG DEREN RICHTIGKEIT ODER VOLLSTÄNDIGKEIT. DIE ALLEINIGE VERANTWORTUNG FÜR INHALT UND FUNKTIONALITÄT SOLCHER APPS TRÄGT DER ANBIETER DER APP. Wiedergabe einer Anwendung über das Gerät 1 2 3 Verbinden Sie dieses Gerät mit dem mobilen Gerät. • iPhone über USB (Seite 9) Drücken Sie SRC/OFF, um [APP] auszuwählen. Bedienen Sie das mobile Gerät, um die Anwendung zu starten. Grundlegende Bedienvorgänge Zweck Bedienung Track auswählen Drücken Sie Vor- oder zurückspulen Halten Sie Wiedergabe pausieren/fortsetzen Drücken Sie BAND/ bzw. . bzw. gedrückt. . Spotify® (MVH-S120UI/S120UIG/S12UI ist nur kompatibel mit Spotify bei Installation auf iPhone.) Spotify ist ein Musikstreaming-Dienst, der nicht mit Pioneer verbunden ist. Weitere Informationen sind unter http://www.spotify.com verfügbar. - 13 - Deutsch In den FUNCTION-Einstellungen können Sie verschiedene Anpassungen vornehmen (Seite 18). Die Spotify-Anwendung ist für kompatible Smartphones verfügbar, bitte besuchen Sie https://support.spotify.com/, um die neuesten Kompatibilitätsinformationen zu erhalten. Um Spotify während der Fahrt zu nutzen, müssen Sie zunächst die Spotify-App auf Ihr iPhone herunterladen. Sie können sie über den iTunes App Store herunterladen. Wählen Sie ein kostenloses Konto oder ein kostenpflichtiges Premium-Konto, entweder in der App oder auf spotify.com. Mit einem Premium-Konto erhalten Sie mehr Funktionen wie beispielsweise Musikhören offline. Wichtig • Dieses Produkt enthält Spotify-Software, die Drittlizenzen unterliegt, die Sie hier lesen können: www.spotify.com/connect/third-party-licenses. • Informationen über die Länder und Regionen, in denen Spotify verwendet werden kann, finden Sie unter https://spotify.com/us/select-your-country/. Spotify hören Aktualisieren Sie vor der Verwendung die Firmware der Spotify-Anwendung auf die neueste Version. 1 2 3 Verbinden Sie dieses Gerät mit dem mobilen Gerät. • iPhone über USB (Seite 9) Drücken Sie SRC/OFF, um [SPOTIFY] auszuwählen. Starten Sie auf dem mobilen Gerät die Spotify-Anwendung und starten Sie die Wiedergabe. Grundlegende Bedienvorgänge HINWEIS Welche Vorgänge verfügbar sein, kann je nach der Art des abzuspielenden Inhalts (Titel/Album/ Interpret/Playlist/Radio) variieren. Zweck Bedienung Track überspringen Drücken Sie - 14 - bzw. . Deutsch In den FUNCTION-Einstellungen können Sie verschiedene Anpassungen vornehmen (Seite 18). Zweck Bedienung In einer Liste nach einem Titel suchen 1 Halten Sie BASS gedrückt, um die Liste anzuzeigen. 2 Drehen Sie den M.C.-Regler, um die gewünschte Kategorie auszuwählen, und drücken Sie ihn dann, um den Vorgang zu bestätigen. 3 Drehen Sie den M.C.-Regler, um die gewünschte Datei auszuwählen, und drücken Sie ihn dann, um den Vorgang zu bestätigen. Die Wiedergabe startet. Drücken Sie 4/PAUSE. Daumen hoch (Nur für Radio) Drücken Sie 1/ . Daumen runter (Nur für Radio) Drücken Sie 2/ . Zufallswiedergabe (Nur für Titel/Album/ Interpret/Playlist) Drücken Sie 5/ . Wiedergabewiederholung (Nur für Titel/ Album/Interpret/Playlist) Drücken Sie 6/ . Anhand des aktuell wiedergegebenen Songs einen Radiosender starten. 1 Drücken und halten Sie 5/ , um einen Radiokanal zu starten. 2 Drücken Sie den M.C.-Regler. • Diese Funktion ist je nach ausgewähltem Song möglicherweise nicht verfügbar. Die Informationen über den aktuell gespielten Song speichern. Die gespeicherten Song-Informationen löschen. 1 Halten Sie 3/S.Rtrv gedrückt. [SAVE]/[UNSAVE] wird angezeigt. 2 Drücken Sie den M.C.-Regler. HINWEIS Einige Funktionen von Spotify lassen sich möglicherweise nicht mit dem Gerät bedienen. Verwenden von Pioneer ARC APP (Pioneer ARC APP für iPhone ist für MVH-S120UB/S120UBG/S120UBA/S120UBW nicht verfügbar.) Sie können das Gerät von der auf einem iPhone/Android-Gerät installierten Pioneer ARC APP aus bedienen. In einigen Fällen können Sie mit dem Gerät Aspekte der Anwendung steuern wie beispielsweise Quellenauswahl, Pause usw. - 15 - Deutsch Wiedergabe pausieren/fortsetzen Einzelheiten zu den in der Anwendung zur Verfügung stehenden Bedienvorgängen finden Sie im Hilfe-Abschnitt der Anwendung. WARNUNG Versuchen Sie nicht, die Anwendung zu bedienen, während Sie fahren. Achten Sie darauf, die Straße zu verlassen und Ihr Fahrzeug an einem sicheren Ort abzustellen, bevor Sie versuchen, die Bedienelemente der Anwendung zu benutzen. Für iPhone-Benutzer Diese Funktion ist mit iPhones (iPhone 5 oder höher) und iPod touch-Geräten mit iOS 8.0 oder höher kompatibel. Sie können Pioneer ARC APP von iTunes App Store herunterladen. Für Benutzer von Android-Geräten Diese Funktion ist mit einem Telefon kompatibel, das mit Android 4.1 bis 7.1.2 läuft und auch AOA (Android Open Accessory) 2.0 unterstützt. Die Kompatibilität hängt aber vom Smartphone ab. Sie können Pioneer ARC APP von Google Play™ herunterladen. HINWEIS Es kann sein, dass einige über AOA 2.0 angeschlossene Android-Geräte aufgrund ihres eigenen Softwaredesigns unabhängig von der Version des Betriebssystems Geräusche erzeugen oder nicht richtig funktionieren. Herstellen einer Verbindung mit Pioneer ARC APP 3 4 5 6 7 um den Vorgang zu bestätigen. Drehen Sie den M.C.-Regler, um [ANDROID WIRED] auszuwählen, und drücken Sie ihn dann, um den Vorgang zu bestätigen. Drehen Sie den M.C.-Regler, um [APP CONTROL] auszuwählen, und drücken Sie ihn dann, um den Vorgang zu bestätigen. Drehen Sie den M.C.-Regler, um [P.APP AUTO ON] auszuwählen, und drücken Sie ihn dann, um den Vorgang zu bestätigen. Drehen Sie den M.C.-Regler, um [ON] auszuwählen, und drücken Sie ihn dann, um den Vorgang zu bestätigen. Verbinden Sie dieses Gerät über USB mit dem Android-Gerät. Pioneer ARC APP wird auf dem Android-Gerät automatisch gestartet. - 16 - Deutsch Wenn eine Verbindung mit einem Android-Gerät hergestellt wird 1 Drehen Sie den M.C.-Regler, um das Hauptmenü anzuzeigen. 2 Drehen Sie den M.C.-Regler, um [SYSTEM] auszuwählen, und drücken Sie ihn dann, HINWEIS Wenn Pioneer ARC APP noch nicht auf Ihrem Android-Gerät installiert wurde, erscheint eine Meldung, die Sie auffordert, die Anwendung auf Ihrem Android-Gerät zu installieren. Wählen Sie [OFF] unter [P.APP AUTO ON] zum Löschen der Meldung (Seite 22). Wenn eine Verbindung mit einem iPhone hergestellt wird 1 Verbinden Sie dieses Gerät über USB mit dem iPhone. 2 Drücken Sie SRC/OFF, um eine beliebige Quelle auszuwählen. 3 Halten Sie den M.C.-Regler gedrückt. Pioneer ARC APP wird auf dem iPhone gestartet. HINWEIS Wenn die Verbindung fehlschlägt, starten Sie Pioneer ARC APP auf dem iPhone. Musik hören auf Android 1 Drücken Sie SRC/OFF, um [ANDROID] auszuwählen. Grundlegende Bedienvorgänge Zweck Bedienung Track auswählen Drücken Sie Vor- oder zurückspulen Halten Sie Wiedergabe pausieren/fortsetzen Drücken Sie 4/PAUSE. Sound Retriever Drücken Sie 3/S.Rtrv. [1]: Effektiv bei niedrigen Kompressionsraten [2]: Effektiv bei hohen Kompressionsraten bzw. bzw. . gedrückt. Sie können im Hauptmenü verschiedene Einstellungen vornehmen. 1 2 Drehen Sie den M.C.-Regler, um das Hauptmenü anzuzeigen. Drehen Sie den M.C.-Regler, um eine der nachstehenden Kategorien auszuwählen, und drücken Sie ihn dann, um den Vorgang zu bestätigen. • FUNCTION-Einstellungen (Seite 18) • AUDIO-Einstellungen (Seite 19) • SYSTEM-Einstellungen (Seite 21) - 17 - Deutsch Einstellungen 3 • ILLUMINATION-Einstellungen (Seite 23) Drehen Sie den M.C.-Regler, um die Optionen auszuwählen, und drücken Sie ihn dann, um den Vorgang zu bestätigen. HINWEISE • Die iPod-zugehörigen Menüelemente in den folgenden Tabellen stehen für MVH-S120UB/S120UBG/ S120UBA/S120UBW nicht zur Verfügung. • Die zum APP-Modus gehörigen Menüelemente in den folgenden Tabellen stehen für MVH-S120UB/ S120UBG/S120UBA/S120UBW nicht zur Verfügung. FUNCTION-Einstellungen Die Menüpunkte können sich je nach Quelle unterscheiden. Menüpunkt Beschreibung FM SETTING [TALK], [STANDARD], [MUSIC] Die Klangqualität auf die Sendesignalbedingungen des FM-Band-Signals abstimmen. (Nur verfügbar, wenn das FM-Band ausgewählt ist). BSM Die sechs stärksten Sender automatisch auf den Zifferntasten (1/ bis 6/ ) speichern. REGIONAL [ON], [OFF] LOCAL FM: [OFF], [LV1], [LV2], [LV3], [LV4] Die Suche auf Sender mit ausreichender MW/LW: [OFF], [LV1], [LV2] Signalstärke beschränken. TA [ON], [OFF] Aktuelle Verkehrsinformationen empfangen, wenn verfügbar. (Nur verfügbar, wenn das FMBand ausgewählt ist). [ON], [OFF] Dem Gerät erlauben, auf eine andere Frequenz umzuschalten, die den gleichen Sender überträgt. (Nur verfügbar, wenn das FM-Band ausgewählt ist). AF - 18 - Deutsch Den Empfang auf bestimmte Regionalprogramme beschränken, wenn AF (alternative Frequenzsuche) ausgewählt ist. (Nur verfügbar, wenn das FM-Band ausgewählt ist). Menüpunkt Beschreibung NEWS [ON], [OFF] Die momentan ausgewählte Quelle mit Nachrichtenprogrammen unterbrechen. (Nur verfügbar, wenn das FM-Band ausgewählt ist). SEEK [MAN], [PCH] Zuweisung der - bzw. -Taste, um einen Sender nach dem anderen zu suchen (manuelle Abstimmung), oder Auswahl eines Senders aus den voreingestellten Kanälen. SAVE Die Informationen über den aktuell gespielten Song auf Ihrer Musikliste auf Spotify speichern. UNSAVE Die in [SAVE] gespeicherten Song-Informationen löschen. S.RTRV USB iPod [1] (effektiv bei niedrigen Kompressionsraten), [2] (effektiv bei hohen Kompressionsraten), [OFF] AUDIO BOOK Die Qualität komprimierter Audiosignale verbessern und einen satten Klang wiederherstellen. Nicht verfügbar, wenn die FLAC-Datei wiedergegeben wird. iPod [FASTER], [NORMAL], [SLOWER] PAUSE Wiedergabe pausieren oder fortsetzen. AUDIO-Einstellungen Menüpunkt Beschreibung FADER*1 Balance der Front- und Hecklautsprecher einstellen. - 19 - Deutsch Wiedergabegeschwindigkeit ändern. (Nicht verfügbar, wenn im Steuerungsmodus [CONTROL iPod] ausgewählt ist.) Menüpunkt Beschreibung BALANCE Balance der linken und rechten Lautsprecher einstellen. EQ SETTING [SUPER BASS], [POWERFUL], [DYNAMIC], [NATURAL], [VOCAL], [VIVID], [CUSTOM1], [CUSTOM2], [FLAT] Equalizer-Kurve auswählen oder anpassen. [CUSTOM1] kann für jede Quelle separat eingestellt werden. Jede der nachstehenden Kombinationen wird jedoch automatisch auf dieselbe Einstellung gesetzt. Wählen Sie ein Equalizer-Band • USB, iPod, ANDROID, SPOTIFY und APP und einen Pegel aus, um weitere (iPhone) Anpassungen vorzunehmen. [CUSTOM2] ist eine für alle Quellen gemeinsam Equalizer-Band: [80HZ], [250HZ], verwendete Einstellung. [800HZ], [2.5KHZ], [8KHZ] Sie können auch den Equalizer umschalten, Equalizer-Pegel: [+6] bis [–6] indem Sie wiederholt drücken (nur bei MVH-S120UB/S120UBG/S120UBA/S120UBW). LOUDNESS [OFF], [LOW], [MID], [HI] Kompensieren, um bei niedriger Lautstärke einen klaren Klang zu erhalten. SUB.W*2 [NOR], [REV], [OFF] Auswahl der Subwoofer-Phase. SUB.W CTRL*2*3 Der Subwoofer gibt nur Signale unterhalb des ausgewählten Bereichs aus. Deutsch Grenzfrequenz: [50HZ], [63HZ], [80HZ], [100HZ], [125HZ], [160HZ], [200HZ] Ausgabepegel: [–24] bis [+6] Steilheit: [–12], [–24] BASS BOOST [0] bis [+6] Auswahl des Bassverstärkungspegels. HPF SETTING Grenzfrequenz: [OFF], [50HZ], [63HZ], [80HZ], [100HZ], [125HZ], [160HZ], [200HZ] Steilheit: [–12], [–24] Die Lautsprecher geben nur Signale oberhalb der Grenzfrequenz des Hochpassfilters (HPF) aus. - 20 - Menüpunkt Beschreibung SLA [+4] bis [–4] Den Lautstärkepegel für alle Quellen außer FM einstellen. Jede der nachstehenden Kombinationen wird automatisch auf dieselbe Einstellung gesetzt. • USB, iPod, ANDROID, SPOTIFY und APP (iPhone) *1 Nicht verfügbar, wenn [SUB.W/SUB.W] bei [SP-P/O MODE] in den INITIAL-Einstellungen ausgewählt ist (Seite 6). *2 Nicht verfügbar, wenn [REAR/REAR] bei [SP-P/O MODE] in den INITIAL-Einstellungen ausgewählt ist (Seite 6). *3 Nicht verfügbar, wenn [OFF] bei [SUB.W] ausgewählt ist . SYSTEM-Einstellungen Sie können auch bei ausgeschaltetem Gerät auf diese Menüs zugreifen. Menüpunkt Beschreibung LANGUAGE [ENG] (Englisch), [РУС] (Russisch), Auswahl der Sprache, in der die [TUR] (Türkisch) Textinformationen komprimierter Audiodateien angezeigt werden sollen. CLOCK SET Einstellung der Uhr (Seite 5). 12H/24H Auswahl des Zeitdarstellungsformats. [ONCE], [LOOP], [OFF] Legen Sie fest, wie der Text im Anzeigefenster durchlaufen soll. AUTO PI [ON], [OFF] Auch bei Verwendung eines voreingestellten Senders nach einem anderen Sender mit demselben Programm suchen. [ON], [OFF] Wählen Sie [ON], wenn Sie ein am Gerät angeschlossenes Zusatzgerät verwenden. AUX - 21 - Deutsch [12H], [24H] SCROLL SET Menüpunkt Beschreibung SPOTIFY [ON], [OFF] Wählen Sie [ON], wenn Sie die Spotify-Funktion verwenden. MUTE MODE (Nur für MVH-S120UI/S120UIG/S12UI) [MUTE], [20dB ATT], [10dB ATT] Ton automatisch stummschalten oder abschwächen, wenn ein Signal von einem Gerät mit Stummschaltungsfunktion empfangen wird. PW SAVE* [ON], [OFF] Batterieverbrauch verringern. Das Einschalten der Quelle ist der einzige Vorgang, der erlaubt ist, wenn diese Funktion eingeschaltet ist. ANDROID WIRED [MEMORY], [APP CONTROL] Wählen Sie die für ein Android-Gerät geeignete Verbindungsmethode. P.APP AUTO ON [ON], [OFF] Wählen Sie [ON], um automatisch Pioneer ARC APP zu starten, wenn ein Android-Gerät über AOA mit dem Gerät verbunden ist. (Nicht verfügbar, wenn [MEMORY] unter [ANDROID WIRED] ausgewählt ist.) USB AUTO [ON], [OFF] * [PW SAVE] wird abgebrochen, wenn die Fahrzeugbatterie getrennt wird, und muss nach erneutem Anschließen der Batterie wieder eingeschaltet werden. Wenn [PW SAVE] ausgeschaltet ist, kann es abhängig von den Verbindungsmethoden sein, dass das Gerät weiterhin Strom von der Batterie bezieht, wenn die Zündung Ihres Fahrzeugs keine ACC-Stellung (Stromversorgung über Starterbatterie) hat. - 22 - Deutsch Wählen Sie [ON], um automatisch auf die [USB]Quelle umzuschalten, wenn ein USB-Gerät/iPod an diesem Gerät angeschlossen ist. Wählen Sie [OFF], wenn ein USB-Gerät/iPod nur zum Aufladen an diesem Gerät angeschlossen wird. ILLUMINATION-Einstellungen Menüpunkt Beschreibung DIM SETTING [SYNC CLOCK], [MANUAL] Wählen Sie eine Methode zur Änderung der Displayhelligkeit. BRIGHTNESS [1] bis [10] Displayhelligkeit ändern. Welche Einstellbereiche verfügbar sind, richtet sich nach [DIM SETTING]. Deutsch - 23 - Zusätzliche Informationen → Die Schutzschaltung ist aktiviert. – Überprüfen Sie die Lautsprecherverbindung. – Schalten Sie die Zündung OFF und dann wieder ON. Sollte die Meldung weiter angezeigt werden, wenden Sie sich zur Unterstützung an Ihren Händler oder eine PioneerKundendienststelle. Fehlerbehebung Das Display kehrt automatisch zur normalen Anzeige zurück. → Es wurden etwa 30 Sekunden lang keine Bedienvorgänge ausgeführt. – Führen Sie einen Bedienvorgang aus. Der Wiederholbereich ändert sich unerwartet. → Je nach Wiederholbereich kann sich der ausgewählte Bereich bei Auswahl eines anderen Ordners oder Tracks oder während des Vor-/Zurückspulens ändern. – Wählen Sie den Wiederholbereich erneut aus. NO XXXX (beispielsweise NO TITLE) → Es gibt keine eingebetteten Textinformationen. – Schalten Sie die Anzeige um oder spielen Sie einen anderen Track/eine andere Datei. USB-Gerät/iPod FORMAT READ → Nach dem Wiedergabestart ist der Ton manchmal erst nach einer Verzögerung zu hören. – Warten Sie, bis die Meldung erlischt und Sie den Ton hören. Ein Unterordner wird nicht wiedergegeben. → Unterordner können nicht wiedergegeben werden, wenn [FLD] (Ordnerwiederholung) ausgewählt ist. – Wählen Sie einen anderen Wiederholbereich aus. Fehlermeldungen Allgemeines AMP ERROR → Betriebsstörung des Geräts oder falsche Lautsprecherverbindung. SKIPPED → Das angeschlossene USB-Gerät enthält DRM-geschützte Dateien (digitale Rechteverwaltung). – Die geschützten Dateien werden übersprungen. - 24 - Deutsch NO AUDIO → Es sind keine Musiktitel vorhanden. – Übertragen Sie die Audiodateien an das USB-Gerät und schließen Sie es an. → Auf dem angeschlossenen USB-Gerät ist die Sicherheitsfunktion aktiviert. – Folgen Sie den Anweisungen des USBGeräts, um die Sicherheitsfunktion zu deaktivieren. Der Ton wird unterbrochen. → Sie verwenden ein Gerät wie z. B. ein Mobiltelefon, das hörbare Störungen verursachen kann. – Vergrößern Sie den Abstand elektrischer Geräten, die möglicherweise die Störung verursachen, zum Gerät. Hauptmenü angezeigt wird, den iPod erneut an und setzen Sie ihn zurück. PROTECT → Sämtliche Dateien auf dem angeschlossenen USB-Gerät sind DRMgeschützt (digitale Rechteverwaltung). – Wechseln Sie das USB-Gerät aus. ERROR-23 → Das USB-Gerät wurde nicht ordnungsgemäß formatiert. – Formatieren Sie das USB-Gerät mit FAT12, FAT16 oder FAT32. N/A USB → Das angeschlossene USB-Gerät wird von diesem Gerät nicht unterstützt. – Trennen Sie Ihr Gerät ab und ersetzen Sie es durch ein kompatibles USBGerät. ERROR-16 → Die iPod-Firmware ist veraltet. – Aktualisieren Sie die iPod-Version. → iPod-Störung. – Trennen Sie das Kabel vom iPod. Schließen Sie, sobald auf dem iPod das Hauptmenü angezeigt wird, den iPod erneut an und setzen Sie ihn zurück. HUB ERROR → Das über einen USB-Hub angeschlossene USB-Gerät wird von diesem Gerät nicht unterstützt. – Schließen Sie das USBGerät über ein USB-Kabel an diesem Gerät an. STOP → Auf der aktuellen Liste befinden sich keine Musiktitel. – Wählen Sie eine Liste aus, die Musiktitel enthält. CHECK USB → Der USB-Anschluss oder das USB-Kabel wurde kurzgeschlossen. – Vergewissern Sie sich, dass der USBAnschluss oder das USB-Kabel nicht eingeklemmt oder beschädigt ist. → Das angeschlossene USB-Gerät hat einen höheren als den maximal zulässigen Stromverbrauch. – Trennen Sie das USB-Gerät ab und verwenden Sie es nicht. Schalten Sie die Zündung AUS und dann wieder auf ACC oder EIN. Schließen Sie nur kompatible USB-Geräte an. NOT FOUND → Keine entsprechenden Musiktitel gefunden. – Übertragen Sie Musiktitel an den iPod. APP Spotify CHECK APP → Die Verbindung mit der SpotifyAnwendung ist fehlgeschlagen. – Folgen Sie den auf dem Bildschirm gezeigten Anweisungen. - 25 - Deutsch ERROR-19 → Kommunikation fehlgeschlagen. – Führen Sie einen der folgenden Bedienvorgänge aus, und kehren Sie dann zur USB-Quelle zurück. • Trennen Sie das USB-Gerät ab. • Schalten Sie auf eine andere Quelle um. → iPod-Störung. – Trennen Sie das Kabel vom iPod. Schließen Sie, sobald auf dem iPod das START UP APP → Die Anwendung wird noch nicht ausgeführt. – Bedienen Sie das mobile Gerät, um die Anwendung zu starten. Handhabungsrichtlinien Kompatibilität komprimierter Audioformate USB-Speichergerät • Verbindungen über USB-Hubs werden nicht unterstützt. • Sorgen Sie vor der Fahrt für eine sichere Befestigung des USB-Speichergeräts. Lassen Sie das USB-Speichergerät nicht auf den Boden fallen, wo es unter dem Brems- oder Gaspedal eingeklemmt werden könnte. • Je nach USB-Speichergerät können die folgenden Probleme auftreten. – Die Bedienung kann unterschiedlich sein. – Möglicherweise wird das Speichergerät nicht erkannt. – Möglicherweise werden Dateien nicht richtig wiedergegeben. – Das Gerät kann Störgeräusche verursachen, wenn Sie Radio hören. iPod VORSICHT • Pioneer kann nicht die Kompatibilität mit allen USB-Massenspeichergeräten gewährleisten und übernimmt keine Verantwortung für eventuelle Datenverluste auf Media-Playern, Smartphones oder anderen Geräten, die zusammen mit diesem Produkt verwendet werden. • Bewahren Sie Discs oder USBSpeichergeräte nicht an Orten auf, an denen hohe Temperaturen herrschen können. WMA-Dateien Dateierweiterung - 26 - .wma Deutsch • Bewahren Sie den iPod nicht an Orten mit hohen Temperaturen auf. • Sorgen Sie für eine sichere Befestigung des iPods während er Fahrt. Lassen Sie den iPod nicht auf den Boden fallen, wo er unter dem Brems- oder Gaspedal eingeklemmt werden könnte. • Die Einstellungen des iPods, z. B. Equalizer und Wiedergabewiederholung, ändern sich beim Anschließen des iPods an das Gerät automatisch. Wenn der iPod vom Gerät getrennt wird, kehren diese Einstellungen wieder in ihren ursprünglichen Zustand zurück. • Auf dem iPod gespeicherter inkompatibler Text wird vom Gerät nicht angezeigt. • Nur die ersten 32 Zeichen können als Dateiname (einschließlich Dateierweiterung) oder Ordnername angezeigt werden. • Je nach der zur Codierung von WMADateien verwendeten Anwendung kann es sein, dass das Gerät nicht richtig arbeitet. • Bei Audiodateien mit eingebetteten Bilddaten oder bei auf einem USB-Gerät mit komplexer Ordnerstruktur gespeicherten Audiodateien kann sich geringfügig der Beginn der Wiedergabe verzögern. • Zur Anzeige auf diesem Gerät sollte russischer Text in einem der folgenden Zeichensätze codiert sein: – Unicode (UTF-8, UTF-16) – Ein anderer Zeichensatz als Unicode, der in einer Windows-Umgebung verwendet wird und in den Sprachoptionen auf Russisch eingestellt ist Bitrate Abtastfrequenz Windows Media™ Audio Professional, Lossless, Voice/DRM Stream/Stream mit Video 48 Kbit/s bis 320 Kbit/s (CBR), 48 Kbit/s bis 384 Kbit/s (VBR) 32 kHz, 44,1 kHz, 48 kHz Nicht kompatibel Kanalmodus USB-Gerät • Der Beginn der Wiedergabe von auf einem USB-Gerät mit komplexer Ordnerstruktur gespeicherten Audiodateien kann sich geringfügig verzögern. Abspielbare Ordnerstruktur MP3-Dateien Dateierweiterung Bitrate .mp3 8 Kbit/s bis 320 Kbit/s (CBR), VBR Abtastfrequenz 8 kHz bis 48 kHz (32 kHz, 44,1 kHz, 48 kHz zur Emphase) Kompatible ID3-Tag1.0, 1.1, 2.2, 2.3, 2.4 Version (ID3-Tag-Version 2.x erhält Vorrang vor Version 1.x.) M3u-Wiedergabeliste Nicht kompatibel MP3i (MP3 interaktiv), Nicht kompatibel mp3 PRO Abspielbare Ordner Abspielbare Dateien Wiedergabe von urheberrechtlich geschützten Dateien Partitioniertes USBGerät FLAC-Dateien • FLAC-Datenformate können nicht über MTP verbunden werden. • Je nach Codierer kann es sein, dass FLACDateien nicht abspielbar sind. – iPod touch (1. bis 6. Generation) – iPod classic – iPod nano (3. bis 7. Generation) – iPhone 6s – iPhone 6s Plus – iPhone 6 – iPhone 6 Plus – iPhone 5s – iPhone 5c – iPhone 5 – iPhone 4s – iPhone 4 – iPhone 3GS – iPhone 3G – iPhone - 27 - Deutsch .wav 8 und 16 (LPCM) 16 kHz bis 48 kHz (LPCM) .flac 8/11,025/12/16/22,05/ 24/32/44,1/48 kHz Quantisierungsbitrate 16-Bit Es kann nur die erste Partition wiedergegeben werden. Dieses Gerät unterstützt nur die folgenden iPodModelle. Ältere Versionen werden ggf. nicht unterstützt. Hergestellt für • WAV-Datenformate können nicht über MTP verbunden werden. Dateierweiterung Abtastfrequenz Bis zu acht Ebenen (Praktikabel sind weniger als zwei Ebenen.) Bis zu 500 Bis zu 15 000 Nicht kompatibel iPod-Kompatibilität WAV-Dateien Dateierweiterung Quantisierungsbits Abtastfrequenz 1/2-Kanal • Die Bedienung kann sich je nach Generation und/oder Softwareversion des iPods unterscheiden. • Benutzer eines iPod mit LightningAnschluss sollten das Lightning-auf-USBKabel verwenden (im Lieferumfang des iPod enthalten). • Benutzer eines iPods mit Dock-Anschluss sollten das CD-IU51 verwenden. Einzelheiten erfahren Sie bei Ihrem Fachhändler. • Informationen zur Datei-/ Formatkompatibilität finden Sie in den iPod-Handbüchern. • Hörbücher, Podcast: Kompatibel Beispielstruktur Ordner Komprimierte Audiodatei 01 bis 05: Ordnernummer bis : Wiedergabereihenfolge VORSICHT Pioneer übernimmt keine Haftung für den Verlust von iPod-Daten, auch dann nicht, wenn der Verlust der betreffenden Daten während der Verwendung dieses Geräts aufgetreten ist. Russische Zeichentabelle Reihenfolge von Audiodateien Deutsch Der Benutzer kann mit diesem Gerät keine Ordnernummern zuweisen und auch nicht die Wiedergabereihenfolge festlegen. Die Reihenfolge der Audiodateien richtet sich nach dem angeschlossenen Gerät. Beachten Sie, dass sich auf einem USBGerät befindliche versteckte Dateien nicht abspielen lassen. D: Anzeige C: Zeichen - 28 - Urheberrechte und Marken iTunes Apple und iTunes sind Marken von Apple Inc., eingetragen in den USA und anderen Ländern. WMA Windows Media ist eine eingetragene Marke oder eine Marke der Microsoft Corporation in den USA und/oder anderen Ländern. Dieses Produkt enthält Technologie, die Eigentum der Microsoft Corporation ist und nicht ohne Lizenz von Microsoft Licensing, Inc. vertrieben werden darf. iPhone, iPod und Lightning Die Verwendung des Aufdrucks Made for Apple bedeutet, dass ein Zusatzgerät speziell für den Anschluss an die AppleProdukte konstruiert ist, die durch den Aufdruck identifiziert werden, und vom Entwickler dahingehend zertifiziert wurde, dass es den Apple-Leistungsnormen entspricht. Apple ist nicht verantwortlich für den Betrieb dieses Geräts oder die - 29 - Deutsch FLAC Urheberrecht © 2000-2009 Josh Coalson Urheberrecht © 2011-2013 Xiph.Org Foundation Weitergabe und Nutzung in Quell- und Binärform, mit oder ohne Änderungen, sind erlaubt, sofern die folgenden Bedingungen erfüllt sind: – Bei der Weitergabe von Quellcode muss dieser den vorstehenden Urheberrechtshinweis, diese Liste der Bedingungen und den folgenden Haftungsausschluss enthalten. – Bei der Weitergabe in Binärform müssen der vorstehende Urheberrechtshinweis, diese Liste der Bedingungen und der folgende Haftungsausschluss in der Dokumentation und/oder andere mit der Ausgabe zur Verfügung gestellte Materialien angegeben werden. – Ohne besondere schriftliche Genehmigung dürfen weder der Name der Xiph.org Foundation noch die Namen ihrer Mitwirkenden verwendet werden, um von dieser Software abgeleitete Produkte befürwortend zu unterstützen oder zu bewerben. DIESE SOFTWARE WIRD VON DEN URHEBERRECHTSINHABERN UND MITWIRKENDEN IN IHRER VORLIEGENDEN FORM UND OHNE JEGLICHE AUSDRÜCKLICHE ODER KONKLUDENTE GEWÄHRLEISTUNG ZUR VERFÜGUNG GESTELLT, EINSCHLIESSLICH OHNE BESCHRÄNKUNG DIE KONKLUDENTE GEWÄHRLEISTUNG DER MARKTGÄNGIGKEIT UND DER VERWENDBARKEIT FÜR EINEN BESTIMMTEN ZWECK. DIE FOUNDATION ODER DIE MITWIRKENDEN HAFTEN KEINESFALLS FÜR DIREKTE, INDIREKTE, BEILÄUFIG ENTSTANDENE, BESONDERE, STRAFRECHTLICHE ODER FOLGESCHÄDEN (EINSCHLIESSLICH OHNE BESCHRÄNKUNG VERSCHAFFEN VON ERSATZGÜTERN ODER -DIENSTLEISTUNGEN, VERLUST DER NUTZUNGSFÄHIGKEIT, DATEN- ODER GEWINNVERLUST ODER BETRIEBSUNTERBRECHUNG), GLEICHGÜLTIG, WIE DIESE VERURSACHT WURDEN UND WELCHER HAFTUNGSTHEORIE SIE UNTERLIEGEN, OB BEI VERTRAGS-, BEI VERSCHULDENSUNABHÄNGIGER HAFTUNG ODER DURCH UNERLAUBTE HANDLUNG (EINSCHLIESSLICH FAHRLÄSSIGKEIT ODER AUF ANDEREM WEGE), GLEICHGÜLTIG, WIE SIE DURCH DIE BENUTZUNG DIESER SOFTWARE ENTSTANDEN SEIN MÖGEN. DIES GILT AUCH DANN, WENN AUF DIE MÖGLICHKEIT EINES SOLCHEN SCHADENS HINGEWIESEN WURDE. Einhaltung von Sicherheitsrichtlinien und Standards. Bitte beachten Sie, dass die Verwendung dieses Zusatzgeräts mit einem AppleProdukt die drahtlose Leistung beeinträchtigen kann. iPhone, iPod, iPod classic, iPod nano, iPod touch und Lightning sind in den USA und anderen Ländern eingetragene Marken von Apple Inc. • 50 W × 2 ch/4 Ω + 70 W × 1 ch/2 Ω (für Subwoofer) Dauer-Ausgangsleistung: 22 W × 4 (50 Hz bis 15 000 Hz, 5 % THD, bei 4-Ω-Last, beide Kanäle betrieben) Lastimpedanz: 4 Ω (4 Ω bis 8 Ω zulässig) Maximaler Preout-Ausgangspegel: 2,0 V Loudness-Kontur: +10 dB (100 Hz), +6,5 dB (10 kHz) (Lautstärke: –30 dB) Equalizer (Grafischer 5-Band-Equalizer): Frequenz: 80 Hz/250 Hz/800 Hz/ 2,5 kHz/8 kHz Entzerrungsbereich: ±12 dB (Inkrement 2 dB) Subwoofer (Mono): Frequenz: 50 Hz/63 Hz/80 Hz/100 Hz/ 125 Hz/160 Hz/200 Hz Steilheit: –12 dB/Okt., –24 dB/Okt. Verstärkung: +6 dB bis –24 dB Phase: Normal/Gegen Google™, Google Play, Android Google, Google Play und Android sind Markenzeichen der Google LLC. Spotify® SPOTIFY und das Spotify-Logo sind eingetragene Warenzeichen von Spotify AB. Soweit vorhanden, sind kompatible digitale Mobilgeräte und ein PremiumAbonnement erforderlich; Informationen dazu finden Sie unter https:// www.spotify.com. USB Technische Daten Allgemeines Audio Maximale Ausgangsleistung: • 50 W × 4 ch/4 Ω (wenn ohne Subwoofer) FM-Tuner Frequenzbereich: 87,5 MHz bis 108,0 MHz Nutzempfindlichkeit: 11 dBf (1,0 μV/75 Ω, Mono, Signal-Rauschabstand: 30 dB) Signal-Rauschabstand: 72 dB (IEC-A-Netz) - 30 - Deutsch Stromspannung: 14,4 V Gleichspannung (Toleranz 10,8 V bis 15,1 V) Erdungssystem: Negativ Maximale Leistungsaufnahme: 10,0 A Abmessungen (B × H × T): DIN Gehäuse: 178 mm × 50 mm × 97 mm Frontfläche: 188 mm × 58 mm × 17 mm D Gehäuse: 178 mm × 50 mm × 97 mm Frontfläche: 170 mm × 46 mm × 17 mm Gewicht: 0,5 kg USB-Standard-Spezifikation: USB 2.0 Full Speed Maximale Leistungsaufnahme: 1 A USB Protokoll: MSC (Massenspeicher-Klasse) MTP (Media Transfer Protocol) AOA (Android Open Accessory) 2.0 Dateisystem: FAT12, FAT16, FAT32 MP3-Decodierformat: MPEG-1 & 2 Audio Layer 3 WMA-Decodierformat: Version 7, 8, 9, 9.1, 9.2 (2-Kanal-Audio) FLAC-Decodierformat: Vers. 1.3.0 (Free Lossless Audio Codec) WAV-Signalformat: Lineares PCM (nicht komprimiert) MW-Tuner Frequenzbereich: 531 kHz bis 1 602 kHz Nutzempfindlichkeit: 25 μV (SignalRauschabstand: 20 dB) Signal-Rauschabstand: 62 dB (IEC-A-Netz) LW-Tuner Frequenzbereich: 153 kHz bis 281 kHz Nutzempfindlichkeit: 28 μV (SignalRauschabstand: 20 dB) Signal-Rauschabstand: 62 dB (IEC-A-Netz) HINWEIS Änderungen der technischen Daten und des Designs vorbehalten. Deutsch - 31 - Inhoud Aan de slag ............................................................................................... 3 Radio .......................................................................................................... 7 USB/iPod/AUX .......................................................................................... 8 App-modus............................................................................................ 12 Spotify® .................................................................................................. 13 Pioneer ARC APP gebruiken............................................................... 14 Instellingen............................................................................................ 16 FUNCTION-instellingen........................................................................ 17 AUDIO-instellingen............................................................................... 18 SYSTEM-instellingen............................................................................. 20 ILLUMINATION-instellingen ................................................................ 21 Aanvullende informatie ...................................................................... 22 Over deze handleiding: • In de volgende instructies worden een USB-geheugen of USB-audiospeler een “USBapparaat” genoemd. • In deze handleiding wordt naar iPod en iPhone verwezen als “iPod”. Nederlands -2- Aan de slag Basisbediening MVH-S120UI/S120UIG/S12UI/S120UB/S120UBG/S120UBA/ S120UBW BASS USB-poort M.C.-knop (multicontrole) SRC (bron)/OFF DISP (display) BAND/ Ontkoppelknop Display AUX-ingang (3,5mm-stereoaansluiting) Vaak gebruikte functies Actie Bediening Toestel inschakelen* Druk op SRC/OFF om het toestel in te schakelen. Hou SRC/OFF ingedrukt om het toestel uit te schakelen. Draai de M.C.-knop. Druk herhaaldelijk op SRC/OFF. De display-informatie wijzigen Druk herhaaldelijk op DISP. Terugkeren naar de vorige weergave/lijst Druk op BAND/ Terugkeren naar de normale weergave vanuit het menu Houd BAND/ Versterk de bastonen Druk op BASS. • U kan het basniveau selecteren bij [BASS BOOST] (pagina 19). -3- . ingedrukt. Nederlands Het volume regelen Een bron selecteren * Wanneer de blauw/witte draad van het toestel verbonden is met het relaiscontact voor de automatische antenne van de auto, schuift de antenne uit wanneer de bron van het toestel wordt ingeschakeld. Om de antenne weer in te trekken, schakelt u de bron uit. Display-indicatie Indicatie Beschrijving Verschijnt wanneer er een lager niveau van het menu of de map bestaat. Verschijnt wanneer de BASS knop wordt ingedrukt en vastgehouden. Verschijnt wanneer de functie afstemmen op lokale zenders is ingesteld (pagina 17). Verschijnt wanneer een verkeersprogramma wordt ontvangen. Verschijnt wanneer de functie TA (verkeersberichten) is ingesteld (pagina 17). Verschijnt wanneer de functie sound retriever ingesteld is (pagina 18). Verschijnt wanneer de iPod-bedieningsfunctie is ingesteld (pagina 11). Het voorpaneel verwijderen Verwijder het voorpaneel om diefstal te voorkomen. Verwijder alle kabels en apparaten die verbonden zijn met het voorpaneel en schakel het toestel uit voor u het voorpaneel verwijdert. Ontkoppelen Bevestigen Instellingenmenu Wanneer u de contactschakelaar inschakelt na de installatie, verschijnt [SET UP :YES] op het display. -4- Nederlands Belangrijk • Stel het voorpaneel niet bloot aan te grote schokken. • Stel het voorpaneel niet bloot aan direct zonlicht en hoge temperaturen. • Bewaar het verwijderde voorpaneel altijd in een beschermtas of zak. 1 2 Druk op de M.C.-knop. Het instellingenmenu verdwijnt als u het toestel niet binnen 30 seconden bedient. Als u de instelling later wilt maken, draait u de M.C.-knop om [NO] te selecteren, druk daarna op de knop om te bevestigen. Draai de M.C.-knop om de opties te selecteren, druk daarna op de knop om te bevestigen. Om naar de volgende menuoptie te gaan, dient u uw selectie te bevestigen. Menu-item Beschrijving LANGUAGE Selecteer de taal om tekstinformatie van een gecomprimeerd audiobestand weer te geven. [ENG](Engels), [РУС](Russisch), [TUR](Turks) CLOCK SET Stel de klok in. FM STEP Selecteer de FM-afstemstap uit 100 kHz of 50 kHz. [100], [50] 3 4 [QUIT :YES] verschijnt als alle instellingen uitgevoerd zijn. Om terug te keren naar het eerste item van het instellingenmenu, draait u de M.C.knop om [QUIT :NO] te selecteren, druk daarna op de knop om te bevestigen. Druk op de M.C.-knop om de instellingen te bevestigen. OPMERKINGEN • U kunt de menu-instelling annuleren door op SRC/OFF te drukken. • U kunt deze instellingen gelijk wanneer uitvoeren bij de SYSTEM-instellingen (pagina 20) en INITIALinstellingen (pagina 6). De demonstratieweergave annuleren (DEMO OFF) 3 4 Druk op de M.C.-knop om het hoofdmenu weer te geven. Draai aan de M.C.-knop om [SYSTEM] te selecteren, druk daarna op de knop om te bevestigen. Draai aan de M.C.-knop om [DEMO OFF] te selecteren, druk daarna op de knop om te bevestigen. Draai aan de M.C.-knop om [YES] te selecteren, druk daarna op de knop om te bevestigen. -5- Nederlands 1 2 INITIAL-instellingen 1 2 3 4 Hou SRC/OFF ingedrukt tot het toestel uitschakelt. Hou SRC/OFF ingedrukt om het hoofdmenu weer te geven. Draai aan de M.C.-knop om [INITIAL] te selecteren, druk daarna op de knop om te bevestigen. Draai de M.C.-knop om een optie te selecteren, druk daarna op de knop om te bevestigen. OPMERKING De opties zijn afhankelijk van het toestel. Menu-item Beschrijving FM STEP Selecteer de FM-afstemstap uit 100 kHz of 50 kHz. [100], [50] SP-P/O MODE [REAR/SUB.W] Selecteer deze optie als een fullrange-luidspreker aangesloten is op de draden voor de achterluidspreker en een subwoofer aangesloten is op de RCA-uitgang. [SUB.W/SUB.W] Selecteer deze optie als een passieve subwoofer direct aangesloten is op de draden voor de achterluidspreker en een subwoofer aangesloten is op de RCA-uitgang. [REAR/REAR] Selecteer deze optie als fullrange-luidsprekers aangesloten zijn op de draden voor de achterluidspreker en op de RCA-uitgang. Als een fullrange-luidspreker aangesloten is op de draden voor de achterluidspreker en de RCA-uitgang niet wordt gebruikt, kunt u [REAR/SUB.W] of [REAR/REAR] selecteren. S/W UPDATE [SYSTEM INFO] Selecteer dit om de recentste systeeminformatie op het toestel te bevestigen. SYSTEM RESET [YES], [NO] Selecteer [YES] om de instellingen van het toestel te initialiseren. Het toestel wordt automatisch opnieuw gestart. (Sommige instellingen blijven behouden zelfs nadat een reset van het toestel werd uitgevoerd.) -6- Nederlands [SYSTEM UPDATE] Selecteer dit om het toestel bij te werken naar de recentste software en de instellingen van het toestel te initialiseren. Voor meer informatie over de recentste software en het updaten van deze software kunt u terecht op onze website. Radio De tunerfrequenties van dit toestel zijn bedoeld voor gebruik in West-Europa, Azië, het Midden-Oosten, Afrika en Oceanië. Bij gebruik in andere regio's kan de ontvangst zwak zijn. De functie RDS (Radio Data System) werkt alleen in regio's die RDS-signalen voor FM-zenders uitzenden. Voorkeuzezenders ontvangen 1 2 Druk op SRC/OFF om [RADIO] te selecteren. Druk op BAND/ [LW]. 3 om de band te selecteren uit [FM1], [FM2], [FM3], [MW] of Druk op een cijfertoets (1/ tot 6/ ). TIP De / -knoppen kunnen ook worden gebruikt om een voorkeuzezender te selecteren wanneer [SEEK] is ingesteld op [PCH] in de FUNCTION-instellingen (pagina 18). Best stations memory (BSM) De zes sterkste zenders worden opgeslagen onder de cijfertoetsen (1/ 1 2 3 tot 6/ ). Druk, nadat u een band heeft geselecteerd, op de M.C.-knop om het hoofdmenu weer te geven. Draai aan de M.C.-knop om [FUNCTION] te selecteren, druk daarna op de knop om te bevestigen. Draai aan de M.C.-knop om [BSM] te selecteren, druk daarna op de knop om te bevestigen. / om een zender te selecteren. Hou vervolgens / ingedrukt en laat los om een beschikbare zender te zoeken. Het scannen stopt wanneer het toestel een zender ontvangt. Druk op om de zoekafstemming te annuleren. OPMERKING [SEEK] moet ingesteld zijn op [MAN] in de FUNCTION-instellingen (pagina 18). -7- Nederlands Een zender handmatig zoeken 1 Als u de band heeft geselecteerd, drukt u op / Zenders handmatig opslaan 1 Terwijl u de zender ontvangt die u wilt opslaan, houdt u een van de cijfertoetsen (1/ tot 6/ ) ingedrukt tot hij niet meer knippert. PTY-functies gebruiken Het toestel zoekt naar een zender op basis van de PTY (programmatype)-informatie. 1 2 3 Houd BASS ingedrukt tijdens FM ontvangst. Draai de M.C.-knop om een programmatype te selecteren uit [NEWS/INFO], [POPULAR], [CLASSICS] of [OTHERS]. Druk op de M.C.-knop. Het toestel begint naar een zender te zoeken. Als een zender gevonden is, wordt de servicenaam van het programma weergegeven. OPMERKINGEN • Om het zoeken te annuleren, drukt u op de M.C.-knop. • Het programma van bepaalde zenders kan afwijken van de doorgestuurde PTY. • Als geen enkele zender het gewenste programmatype uitzendt, wordt gedurende ongeveer twee seconden [NOT FOUND] weergegeven en keert de tuner terug naar de oorspronkelijke zender. USB/iPod/AUX OPMERKING De iPod-functie is niet beschikbaar voor de MVH-S120UB/S120UBG/S120UBA/S120UBW. Weergave Koppel de hoofdtelefoon los van het apparaat voor u het aansluit op het toestel. OPMERKING Om automatisch over te schakelen naar de bron [USB] wanneer er een USB-apparaat/iPod verbonden wordt met het toestel, stelt u [USB AUTO] in op [ON] bij de SYSTEM-instellingen (pagina 21). -8- Nederlands USB-apparaten (inclusief Android™)/iPod 1 Open het deksel van de USB-poort. 2 Sluit het USB-apparaat/de iPod aan met behulp van een geschikte kabel. LET OP Gebruik een USB-kabel (apart verkrijgbaar) om het USB-apparaat aan te sluiten, omdat elk apparaat dat rechtstreeks op het toestel aangesloten wordt, uitsteekt uit het toestel, wat gevaarlijk kan zijn. Voor u het apparaat loskoppelt, dient u de weergave te stoppen. AOA-verbindingen Raapleeg pagina 15 voor meer informatie over AOA-verbindingen. MTP-verbinding Een apparaat waarop Android OS 4.0 of recenter geïnstalleerd is, kan via MTP worden verbonden met het toestel met behulp van de bij het apparaat geleverde kabel. Afhankelijk van het aangesloten apparaat en het aantal bestanden op het apparaat kunnen audiobestanden/songs echter mogelijk niet via MTP worden afgespeeld. Merk op dat de MTP-verbinding niet compatibel is met de WAV- en FLACbestandsindelingen. OPMERKING Als u een MTP-verbinding gebruikt, moet [ANDROID WIRED] ingesteld zijn op [MEMORY] in de SYSTEMinstellingen (pagina 21). AUX 1 Steek de stereo-miniplug in de AUX-ingangsaansluiting. 2 Druk op SRC/OFF om [AUX] als bron te selecteren. OPMERKING Als [AUX] is ingesteld op [OFF] in de SYSTEM-instellingen, kan [AUX] niet worden geselecteerd als bron (pagina 20). Bedieningen U kunt diverse instellingen uitvoeren in de FUNCTION-instellingen (pagina 17). Merk op dat de volgende bedieningen niet werken voor een AUX-apparaat. Om een AUX-apparaat te bedienen, dient u het apparaat zelf te gebruiken. Actie Bediening Druk op 1/ of 2/ Een fragment/song (hoofdstuk) selecteren Druk op of Snel vooruit- of achteruitspoelen*2 Houd -9- of . . ingedrukt. Nederlands Een map/album selecteren*1 Actie Bediening Een bestand in een lijst zoeken 1 Hou BASS ingedrukt om de lijst weer te geven. 2 Draai de M.C.-knop om de naam van het gewenste bestand (de gewenste map) of categorie te selecteren, druk daarna op de knop om te bevestigen. 3 Draai de M.C.-knop om het gewenste bestand te selecteren, druk daarna op de knop om te bevestigen. De weergave start. Een lijst met bestanden in de geselecteerde Druk op de M.C.-knop wanneer een map/ map/categorie weergeven*1 categorie geselecteerd is. Een song in de geselecteerde map/ categorie weergeven*1 Hou de M.C.-knop ingedrukt wanneer een map/categorie geselecteerd is. Alfabetisch zoeken (alleen voor een iPod) 1 Hou BASS ingedrukt om de lijst weer te geven. 2 Draai aan de M.C.-knop om de gewenste categorielijst te selecteren en druk vervolgens op BASS om de alfabetische zoekmodus te activeren. (U kunt de alfabetische zoekmodus ook activeren door de M.C.-knop twee keer te verdraaien.) 3 Draai aan de M.C.-knop om een letter te selecteren en druk vervolgens op de knop om de alfabetische lijst weer te geven. Om alfabetisch zoeken te annuleren, drukt u op BAND/ . Weergave herhalen Druk op 6/ Willekeurige weergave/shuffle Druk op 5/ Alles in shuffle weergeven (alleen iPod) Hou 5/ . . ingedrukt. Druk op 4/PAUSE. Sound retriever Druk op 3/S.Rtrv. [1]: Geschikt voor lage compressiewaarden [2]: Geschikt voor hoge compressiewaarden Terug naar de rootmap (alleen voor USB)*1 Houd 1/ Stations wisselen op een USB-apparaat (alleen apparaten die het protocol USB mass storage device ondersteunen) Druk op BAND/ - 10 - ingedrukt. . Nederlands Weergave pauzeren/hervatten *1 Alleen gecomprimeerde audiobestanden *2 Wanneer u de functie snel vooruit- of achteruitspoelen gebruikt terwijl een VBR-bestand wordt afgespeeld, is de weergaveduur mogelijk niet correct. Nuttige functies voor iPod Link-weergavemodus U kunt songs oproepen op basis van de momenteel weergegeven artiest, album of genre. 1 Terwijl u naar een lied luistert, houdt u ingedrukt 4/PAUSE om naar de linkweergavemodus te gaan. 2 Draai de M.C.-knop om de modus ([ARTIST], [ALBUM], [GENRE]) te selecteren, druk daarna op de knop om te bevestigen. De geselecteerde song/het geselecteerde album wordt weergegeven na de momenteel weergegeven song. OPMERKING De geselecteerde song/het geselecteerde album kan worden geannuleerd als u andere functies gebruikt dan functies uit de link-weergavemodus (bijv. snel vooruit en achteruit). iPod-bediening U kunt het toestel bedienen via een aangesloten iPod. De volgende iPod-modellen zijn niet compatibel met deze functie. – iPod nano 1e generatie, iPod met video 1 Druk op BAND/ tijdens het afspelen en selecteer vervolgens de bedieningsmodus. [CONTROL iPod]: De iPod-functie van het toestel kan bediend worden op de aangesloten iPod. [CONTROL AUDIO]: De iPod-functie van het toestel kan alleen bediend worden met de knoppen op het toestel of met de bijgeleverde afstandsbediening. In deze modus kan de aangesloten iPod niet worden in- of uitgeschakeld. • De bedieningsmodus kan ook geschakeld worden door op iPod te drukken (alleen voor de MVHS120UI/S120UIG/S12UI). • Als u overschakelt naar de bedieningsmodus [CONTROL iPod] wordt het afspelen van de song gepauzeerd. Gebruik de aangesloten iPod om het afspelen te hervatten. • De volgende bedieningen zijn nog steeds mogelijk op het toestel, zelfs als de bedieningsmodus ingesteld is op [CONTROL iPod]. – Pauze, snel vooruit/achteruit, song/hoofdstuk selecteren • Het volume kan alleen worden geregeld op het toestel. - 11 - Nederlands OPMERKINGEN App-modus (De APP-modus is niet beschikbaar voor de MVH-S120UB/S120UBG/S120UBA/ S120UBW.) U kunt via dit toestel luisteren naar een applicatie op een iPhone. In sommige gevallen kunt u een applicatie bedienen met het toestel. Meer informatie over compatibele apparaten vindt u op onze website. Belangrijk Voor gebruik van applicaties van derden worden mogelijk persoonsgegevens gebruikt of moet u zulke gegevens verstrekken, bijvoorbeeld door het opzetten van een gebruikersaccount of op andere wijze, en voor sommige applicaties worden mogelijk geolocatiegegevens gebruikt. ALLE APPLICATIES VAN DERDEN VALLEN UITSLUITEND ONDER VERANTWOORDELIJKHEID VAN HUN UITGEVER, INCLUSIEF MAAR NIET BEPERKT TOT HET VERZAMELEN EN BEVEILIGEN VAN GEBRUIKERSGEGEVENS EN HET PRIVACYBELEID. DOOR EEN APPLICATIE VAN DERDEN TE GEBRUIKEN, GAAT U ERMEE AKKOORD OM U TE INFORMEREN OVER DE GEBRUIKSVOORWAARDEN EN HET PRIVACYBELEID VAN DE UITGEVER ERVAN. ALS U NIET AKKOORD GAAT MET DE GEBRUIKSVOORWAARDEN OF HET BELEID VAN EEN UITGEVER OF GEEN TOESTEMMING GEEFT VOOR HET GEBRUIK VAN GEOLOCATIEGEGEVENS (INDIEN VAN TOEPASSING), MOET U DE APPLICATIE NIET GEBRUIKEN. Voor iPhone-gebruikers Deze functie is compatibel met iPhone en iPod touch waarop iOS 5.0 of recenter geïnstalleerd is. OPMERKING PIONEER IS NIET AANSPRAKELIJK VOOR APPLICATIES VAN DERDEN OF HUN INHOUD, INCLUSIEF MAAR NIET BEPERKT TOT HUN NAUWKEURIGHEID OF VOLLEDIGHEID. DE INHOUD EN DE FUNCTIONALITEIT VAN DERGELIJKE APPLICATIES ZIJN UITSLUITEND DE VERANTWOORDELIJKHEID VAN DE LEVERANCIER VAN DE APPLICATIE. Een applicatie weergeven via het toestel 1 Druk op SRC/OFF om [APP] te selecteren. Nederlands 2 3 Verbind dit toestel met het mobiele apparaat. • iPhone via USB (pagina 8) Bedien het mobiele apparaat om de applicatie te starten. Basisbedieningen U kunt diverse instellingen uitvoeren in de FUNCTION-instellingen (pagina 17). Actie Bediening Een track selecteren Druk op Snel vooruit- of achteruitspoelen Houd - 12 - of of . ingedrukt. Actie Bediening Het afspelen pauzeren/hervatten Druk op BAND/ . Spotify® (MVH-S120UI/S120UIG/S12UI is alleen compatibel met Spotify geïnstalleerd op iPhone.) Spotify is een verspreidingsservice voor muziekstreaming die niet aangesloten is bij Pioneer. Meer informatie vindt u op http://www.spotify.com. De Spotify-toepassing is beschikbaar voor compatibele telefoons. Raadpleeg https:// support.spotify.com/ voor de recentste informatie over compatibiliteit. Om van Spotify te genieten terwijl u rijdt, downloadt u eerst de Spotify-app op uw iPhone. U kunt deze downloaden van de iTunes App Store. Kies een gratis account of een betaalde Premium account, ofwel in de app of op spotify.com. Een Premium account geeft u meer functies, zoals offline luisteren. Belangrijk • Dit product omvat Spotify-software, die onderworpen is aan licenties van derden, die u hier kunt vinden: www.spotify.com/connect/third-party-licenses. • Voor informatie over de landen en regio's waar Spotify kan worden gebruikt, gaat u naar https:// spotify.com/us/select-your-country/. Luisteren naar Spotify Update de firmware van Spotify naar de recentste versie voor u de applicatie gebruikt. 1 2 3 Verbind dit toestel met het mobiele apparaat. • iPhone via USB (pagina 8) Druk op SRC/OFF om [SPOTIFY] te selecteren. Open de applicatie Spotify op het mobiele apparaat en start de weergave. Basisbedieningen OPMERKING De beschikbare functies zijn afhankelijk van het soort inhoud (track/album/artiest/afspeellijst/radio) dat u wilt afspelen. Actie Bediening Een fragment overspringen Druk op - 13 - of . Nederlands U kunt diverse instellingen uitvoeren in de FUNCTION-instellingen (pagina 17). Actie Bediening Een track in een lijst zoeken 1 Hou BASS ingedrukt om de lijst weer te geven. 2 Draai de M.C.-knop om de gewenste categorie te selecteren, druk daarna op de knop om te bevestigen. 3 Draai de M.C.-knop om het gewenste bestand te selecteren, druk daarna op de knop om te bevestigen. De weergave start. Het afspelen pauzeren/hervatten Druk op 4/PAUSE. Duim omhoog (alleen voor radio) Druk op 1/ . Duim omlaag (alleen voor radio) Druk op 2/ . Willekeurige weergave (alleen voor track/ album/artiest/afspeellijst) Druk op 5/ . Weergave herhalen (alleen voor track/ album/artiest/afspeellijst) Druk op 6/ . Start een radiokanaal op basis van de song die momenteel wordt afgespeeld. 1 Houd 5/ ingedrukt om een radio te starten. 2 Druk op de M.C.-knop. • Deze functie is mogelijk niet beschikbaar, afhankelijk van de geselecteerde song. Sla de informatie op van de song die momenteel wordt afgespeeld. Verwijder de songinformatie die opgeslagen is. 1 Houd 3/S.Rtrv ingedrukt. [SAVE]/[UNSAVE] verschijnt. 2 Druk op de M.C.-knop. OPMERKING Sommige functies van Spotify kunnen niet op het toestel worden bediend. (De Pioneer ARC APP voor iPhone is niet beschikbaar voor de MVH-S120UB/S120UBG/ S120UBA/S120UBW.) U kunt het toestel bedienen via een Pioneer ARC APP die geïnstalleerd is op een iPhone/ Android-apparaat. In sommige gevallen kunt u via het toestel bepaalde functies van de toepassing gebruiken, zoals bronselectie, pauzeren enz. Raadpleeg de helpfunctie van de toepassing voor meer informatie over welke functies er beschikbaar zijn in de toepassing. - 14 - Nederlands Pioneer ARC APP gebruiken WAARSCHUWING Bedien de toepassing niet terwijl u rijdt. Parkeer uw wagen op een veilige plaats voor u de bedieningselementen van de toepassing gebruikt. Voor iPhone-gebruikers Deze functie is compatibel met iPhones (iPhone 5 of later) en iPod touches waarop iOS 8.0 of later geïnstalleerd is. U kunt Pioneer ARC APP downloaden op iTunes App Store. Voor gebruikers van Android-apparaten Deze functie is compatibel met een telefoon met daarop Android 4.1 tot 7.1.2 die ook AOA (Android Open Accessory) 2.0 ondersteunt, maar de compatibiliteit is afhankelijk van de smartphone. U kunt de Pioneer ARC APP downloaden op Google Play™. OPMERKING Sommige Android-apparaten die via AOA 2.0 verbonden zijn, werken mogelijk niet goed of produceren geluiden ten gevolge van hun eigen softwareontwerp, ongeacht de OS-versie. Een verbinding tot stand brengen met Pioneer ARC APP Bij het maken van een verbinding met een Android apparaat 1 Druk op de M.C.-knop om het hoofdmenu weer te geven. 2 Draai aan de M.C.-knop om [SYSTEM] te selecteren, en druk vervolgens op de 3 4 5 7 OPMERKING Als Pioneer ARC APP niet op uw Android-apparaat werd geïnstalleerd, verschijnt een bericht op uw Android-apparaat om u te vragen de applicatie te installeren. Selecteer [OFF] in [P.APP AUTO ON] om het bericht te verwijderen (pagina 21). - 15 - Nederlands 6 knop om te bevestigen. Draai aan de M.C.-knop om [ANDROID WIRED] te selecteren, en druk vervolgens op de knop om te bevestigen. Draai aan de M.C.-knop om [APP CONTROL] te selecteren, en druk vervolgens op de knop om te bevestigen. Draai aan de M.C.-knop om [P.APP AUTO ON] te selecteren, en druk vervolgens op de knop om te bevestigen. Draai aan de M.C.-knop om [ON] te selecteren, en druk vervolgens op de knop om te bevestigen. Verbind dit toestel met het Android apparaat via USB. Pioneer ARC APP op het Android apparaat start automatisch. Wanneer u een verbinding met iPhone maakt 1 Verbind dit toestel met iPhone via USB. 2 Druk op SRC/OFF om een bron te selecteren. 3 Houd de M.C.-knop ingedrukt. Pioneer ARC APP op de iPhone start. OPMERKING Wanneer de verbinding mislukt, start Pioneer ARC APP op de iPhone. Muziek beluisteren op een Android-apparaat 1 Druk op SRC/OFF om [ANDROID] te selecteren. Basisbedieningen Actie Bediening Een track selecteren Druk op Snel vooruit- of achteruitspoelen Houd Het afspelen pauzeren/hervatten Druk op 4/PAUSE. Sound retriever Druk op 3/S.Rtrv. [1]: Geschikt voor lage compressiewaarden [2]: Geschikt voor hoge compressiewaarden of of . ingedrukt. Instellingen U kunt diverse instellingen aanpassen in het hoofdmenu. 3 Druk op de M.C.-knop om het hoofdmenu weer te geven. Draai vervolgens aan de M.C.-knop om een van de volgende categorieën te selecteren, druk daarna op de knop om te bevestigen. • FUNCTION-instellingen (pagina 17) • AUDIO-instellingen (pagina 18) • SYSTEM-instellingen (pagina 20) • ILLUMINATION-instellingen (pagina 21) Draai de M.C.-knop om de opties te selecteren, druk daarna op de knop om te bevestigen. - 16 - Nederlands 1 2 OPMERKINGEN • De iPod-menu-items in de volgende tabellen zijn niet beschikbaar voor de MVH-S120UB/S120UBG/ S120UBA/S120UBW. • De menu-items voor de APP-modus in de volgende tabellen zijn niet beschikbaar voor de MVHS120UB/S120UBG/S120UBA/S120UBW. FUNCTION-instellingen De menu-items zijn afhankelijk van de bron. Menu-item Beschrijving FM SETTING [TALK], [STANDARD], [MUSIC] Pas de geluidskwaliteit aan aan het zendsignaal van de FM-band. (Alleen beschikbaar wanneer FM-band is geselecteerd.) BSM Sla de zes sterkste zenders automatisch op onder de cijfertoetsen (1/ tot 6/ ). REGIONAL [ON], [OFF] Beperk de ontvangst tot de specifieke regionale programma's wanneer AF (alternatieve frequenties zoeken) geselecteerd is. (Alleen beschikbaar wanneer FM-band is geselecteerd.) LOCAL FM: [OFF], [LV1], [LV2], [LV3], [LV4] Beperk de zenders automatisch volgens de MW/LW: [OFF], [LV1], [LV2] signaalsterkte. TA [ON], [OFF] Ontvang actuele verkeersinformatie indien beschikbaar. (Alleen beschikbaar wanneer FMband is geselecteerd.) [ON], [OFF] Laat het toestel opnieuw afstemmen op een andere frequentie van dezelfde zender. (Alleen beschikbaar wanneer FM-band is geselecteerd.) AF [ON], [OFF] Onderbreek de momenteel geselecteerde bron met nieuwsberichten. (Alleen beschikbaar wanneer FM-band is geselecteerd.) - 17 - Nederlands NEWS Menu-item Beschrijving SEEK [MAN], [PCH] Wijs de knoppen of toe om zenders een voor een te zoeken (handmatige afstemming) of selecteer een zender uit de voorgeprogrammeerde kanalen. SAVE Sla de informatie van de momenteel afgespeelde song op in uw muzieklijst op Spotify. UNSAVE Verwijder de songinformatie die opgeslagen is in [SAVE]. S.RTRV USB iPod [1] (geschikt voor lage compressiewaarden), [2] (geschikt voor hoge compressiewaarden), [OFF] AUDIO BOOK Verbeter gecomprimeerde audio en zorg voor een rijk geluid. Niet beschikbaar wanneer het FLAC-bestand wordt weergegeven. iPod [FASTER], [NORMAL], [SLOWER] Wijzig de weergavesnelheid. (Niet beschikbaar wanneer [CONTROL iPod] geselecteerd is in de bedieningsmodus.) PAUSE Pauzeer of hervat de weergave. AUDIO-instellingen Menu-item Beschrijving FADER*1 BALANCE Pas de balans aan tussen de linker en rechter luidspreker. - 18 - Nederlands Pas de balans aan tussen de voor- en achterluidspreker. Menu-item Beschrijving EQ SETTING [SUPER BASS], [POWERFUL], [DYNAMIC], [NATURAL], [VOCAL], [VIVID], [CUSTOM1], [CUSTOM2], [FLAT] Selecteer een equalizerband en niveau voor verdere aanpassing. Equalizerband: [80HZ], [250HZ], [800HZ], [2.5KHZ], [8KHZ] Equalizerniveau: [+6] tot [–6] Selecteer de equalizercurve of pas deze aan. [CUSTOM1] kan voor elke bron afzonderlijk worden ingesteld. Alle hierna vermelde combinaties worden echter automatisch ingesteld op dezelfde instelling. • USB, iPod, ANDROID, SPOTIFY en APP (iPhone) [CUSTOM2] is een gedeelde instelling die voor alle bronnen wordt gebruikt. U kunt de equalizer ook wijzigen door herhaaldelijk op te drukken (alleen voor de MVH-S120UB/S120UBG/S120UBA/ S120UBW). LOUDNESS [OFF], [LOW], [MID], [HI] Compenseer voor een helder geluid bij laag volume. SUB.W*2 [NOR], [REV], [OFF] Selecteer de subwooferfase. SUB.W CTRL*2*3 Drempelfrequentie: [50HZ], [63HZ], [80HZ], [100HZ], [125HZ], [160HZ], [200HZ] Uitgangsniveau: [–24] tot [+6] Hellingsniveau: [–12], [–24] Alleen frequenties die lager zijn dan de frequenties in het geselecteerde bereik, worden weergegeven door de subwoofer. BASS BOOST [0] tot [+6] Selecteer het bass boost-niveau. HPF SETTING Alleen frequenties boven de drempelfrequentie van het hoog-doorlaatfilter (HPF) worden weergegeven. [+4] tot [–4] Pas het volume aan voor elke bron behalve FM. Alle hierna vermelde combinaties worden automatisch ingesteld op dezelfde instelling. • USB, iPod, ANDROID, SPOTIFY en APP (iPhone) SLA *1 Niet beschikbaar wanneer [SUB.W/SUB.W] is geselecteerd in [SP-P/O MODE] in de INITIALinstellingen (pagina 6). - 19 - Nederlands Drempelfrequentie: [OFF], [50HZ], [63HZ], [80HZ], [100HZ], [125HZ], [160HZ], [200HZ] Hellingsniveau: [–12], [–24] *2 Niet beschikbaar wanneer [REAR/REAR] is geselecteerd in [SP-P/O MODE] in de INITIAL-instellingen (pagina 6). *3 Niet beschikbaar wanneer [OFF] is geselecteerd in [SUB.W]. SYSTEM-instellingen U kunt deze menu's ook oproepen wanneer het toestel uitgeschakeld is. Menu-item Beschrijving LANGUAGE [ENG](Engels), [РУС](Russisch), [TUR](Turks) Selecteer de taal om tekstinformatie van een gecomprimeerd audiobestand weer te geven. CLOCK SET Stel de klok in (pagina 5). 12H/24H [12H], [24H] Selecteer de tijdnotatie. SCROLL SET [ONCE], [LOOP], [OFF] Selecteer de manier waarop u door de tekst in het weergavevenster wilt bladeren. AUTO PI [ON], [OFF] Zoek naar een andere zender met dezelfde programmering, zelfs als u een voorkeuzezender gebruikt. [ON], [OFF] Stel in op [ON] wanneer een hulpapparaat wordt gebruikt dat verbonden is met het toestel. AUX SPOTIFY [ON], [OFF] Stel in op [ON] wanneer u de Spotify-functie gebruikt. MUTE MODE (alleen voor de MVH-S120UI/S120UIG/S12UI) Schakel het geluid automatisch uit of onderdruk het geluid wanneer een signaal wordt ontvangen van een apparatuur met stilschakelfunctie. PW SAVE* [ON], [OFF] Verminder het verbruik van batterijvermogen. Het inschakelen van de bron is de enige handeling die met deze functie mogelijk is. - 20 - Nederlands [MUTE], [20dB ATT], [10dB ATT] Menu-item Beschrijving ANDROID WIRED [MEMORY], [APP CONTROL] Selecteer de geschikte verbindingsmethode voor een Android-apparaat. P.APP AUTO ON [ON], [OFF] Selecteer [ON] om Pioneer ARC APP automatisch te starten wanneer een Android-apparaat wordt verbonden aan het toestel via AOA. (Niet beschikbaar wanneer [MEMORY] is geselecteerd in [ANDROID WIRED].) USB AUTO [ON], [OFF] Selecteer [ON] om automatisch over te schakelen naar de bron [USB] wanneer er een USB-apparaat/iPod verbonden wordt met het toestel. Selecteer [OFF] wanneer een USB-apparaat/iPod alleen aangesloten wordt om opgeladen te worden. * [PW SAVE] wordt geannuleerd als de accu losgekoppeld wordt, en moet weer worden ingeschakeld als de accu weer wordt aangesloten. Wanneer [PW SAVE] uitgeschakeld is, kan het toestel, afhankelijk van de verbindingsmethode, stroom van de accu blijven trekken als de ontsteking van uw wagen geen positie ACC (accessoire) heeft. ILLUMINATION-instellingen Menu-item Beschrijving DIM SETTING [SYNC CLOCK], [MANUAL] Selecteer de manier om de helderheid van het scherm te wijzigen. BRIGHTNESS [1] tot [10] - 21 - Nederlands De display-helderheid wijzigen. De beschikbare instelbereiken zijn verschillend afhankelijk van [DIM SETTING]. Aanvullende informatie Problemen verhelpen Foutmeldingen Het display keert automatisch terug naar het gewone display. → U hebt gedurende ongeveer 30 seconden geen handeling uitgevoerd. – Voer een handeling uit. Het bereik voor weergave herhalen wordt onverwacht gewijzigd. → Afhankelijk van het bereik voor weergave herhalen kan het geselecteerde bereik gewijzigd worden wanneer u een andere map of een ander fragment selecteert of vooruit of achteruit spoelt. – Selecteer het gewenste bereik voor weergave herhalen opnieuw. Een onderliggende map wordt niet afgespeeld. → Onderliggende mappen worden niet afgespeeld wanneer [FLD] (map herhalen) is geselecteerd. – Selecteer een ander bereik voor weergave herhalen. AMP ERROR → Dit toestel werkt niet of er is een probleem met de luidsprekeraansluiting. → Het beveiligingscircuit is geactiveerd. – Controleer de luidsprekeraansluiting. – Draai de contactschakelaar naar OFF en weer naar ON. Als het bericht nog wordt weergegeven, neemt u contact op met uw leverancier of een erkend Pioneer Servicecentrum. NO XXXX (bijvoorbeeld NO TITLE) → Er is geen ingebedde tekstinformatie. – Schakel het display om of speel een ander fragment/bestand af. USB-apparaat/iPod FORMAT READ → Soms is er een vertraging tussen het begin van de weergave en wanneer u het geluid begint te horen. – Wacht tot het bericht verdwijnt en u het geluid hoort. NO AUDIO → Er zijn geen songs. – Zet de audiobestanden over naar het USB-apparaat en maak verbinding. → De inhoud van het USB-apparaat is beveiligd. – Raadpleeg de instructies bij het USBapparaat om de beveiliging uit te schakelen. SKIPPED → Het aangesloten USB-apparaat bevat bestanden die met DRM zijn beveiligd. - 22 - Nederlands Het geluid is onderbroken. → U gebruikt een apparaat, zoals een mobiele telefoon, die hoorbare storingen veroorzaakt. – Plaats elektrische apparaten die de storing kunnen veroorzaken, verder weg van het toestel. Algemeen – Beveiligde bestanden worden overgeslagen. de iPod wordt weergegeven en stel de iPod opnieuw in. PROTECT → Alle bestanden op het aangesloten USB-apparaat zijn beveiligd met DRM. – Gebruik een ander USB-apparaat. ERROR-23 → Het USB-apparaat was niet goed geformatteerd. – Formatteer het USB-apparaat met FAT12, FAT16 of FAT32. N/A USB → Het aangesloten USB-apparaat wordt niet ondersteund door dit toestel. – Gebruik een apparaat dat compatibel is met USB. HUB ERROR → USB-apparaten die aangesloten zijn via een USB-hub worden niet ondersteund door dit toestel. – Sluit het USB-apparaat rechtstreeks aan op dit toestel met behulp van een USB-kabel. CHECK USB → Er is kortsluiting opgetreden in de USBstekker of de USB-kabel. – Controleer of de USB-stekker en de USB-kabel niet ergens ingeklemd of beschadigd zijn. → Het aangesloten USB-apparaat verbruikt meer stroom dan de maximaal toelaatbare waarde. – Ontkoppel het USB-apparaat en gebruik het niet meer. Zet de contactschakelaar op UIT en daarna op ACC of AAN. Sluit alleen compatibele USB-apparaten aan. STOP → De huidige lijst bevat geen songs. – Selecteer een lijst die wel songs bevat. NOT FOUND → Geen verwante songs. – Zet songs over naar de iPod. APP START UP APP → De applicatie is nog niet gestart. – Bedien het mobiele apparaat om de applicatie te starten. Spotify CHECK APP → Verbinding met de applicatie Spotify mislukt. – Volg de instructies op het scherm. - 23 - Nederlands ERROR-19 → Communicatiefout. – Probeer een van de volgende mogelijkheden en keer dan terug naar de USB-bron. • Ontkoppel het USB-apparaat. • Schakel over naar een andere signaalbron. → iPod-fout. – Verwijder de kabel uit de iPod. Sluit de kabel weer aan als het hoofdmenu van ERROR-16 → De versie van de iPod-firmware is verouderd. – Werk de versie van de iPod bij. → iPod-fout. – Verwijder de kabel uit de iPod. Sluit de kabel weer aan als het hoofdmenu van de iPod wordt weergegeven en stel de iPod opnieuw in. Aanwijzingen voor het gebruik Compatibiliteit met gecomprimeerde audio USB-opslagapparaat • Het maken van verbindingen via een USB-hub wordt niet ondersteund. • Maak het USB-apparaat stevig vast voordat u gaat rijden. Zorg dat het USBapparaat niet op de vloer valt omdat het dan onder het rem- of gaspedaal terecht kan komen. • Afhankelijk van het USB-apparaat kunnen de volgende problemen voorkomen. – De bediening kan verschillend zijn. – Het opslagapparaat wordt niet herkend. – Bestanden worden niet correct afgespeeld. – Het apparaat kan hoorbare interferentie veroorzaken wanneer u naar de radio luistert. iPod LET OP • Pioneer garandeert geen compatibiliteit met alle USB-opslagapparaten en kan niet verantwoordelijk worden gesteld voor eventueel gegevensverlies op mediaspelers, smartphones of andere apparaten tijdens het gebruik van dit product. • Laat discs en USB-opslagapparaten niet achter op plaatsen waar de temperatuur hoog kan oplopen. WMA-bestanden Bestandsextensie Bitsnelheid .wma 48 kbps tot 320 kbps (CBR), 48 kbps tot 384 kbps (VBR) Bemonsteringsfrequentie 32 kHz, 44,1 kHz, 48 kHz - 24 - Nederlands • Stel de iPod niet bloot aan hoge temperaturen. • Maak de iPod stevig vast voordat u gaat rijden. Zorg dat de iPod niet op de vloer kan vallen omdat hij dan onder het remof gaspedaal terecht kan komen. • De instellingen van de iPod, zoals de equalizer en weergave herhalen, worden automatisch gewijzigd wanneer de iPod wordt aangesloten op het toestel. Als de iPod wordt losgekoppeld, keren deze instellingen terug naar de oorspronkelijke instellingen. • Tekst op de iPod die niet compatibel is met de specificaties van dit toestel, kan niet worden weergegeven. • Alleen de eerste 32 tekens van de bestandsnaam (inclusief de extensie) of mapnaam worden weergegeven. • Een juiste werking van dit toestel is afhankelijk van de toepassing waarmee de WMA-bestanden zijn gecodeerd. • Er kan een beetje vertraging optreden bij het beginnen met afspelen van audiobestanden met beeldgegevens of audiobestanden op een USB-apparaat met een uitgebreide mappenstructuur. • Russische tekst kan alleen op dit toestel worden weergegeven als die met een van de volgende tekensets is gecodeerd: – Unicode (UTF-8, UTF-16) – Andere tekensets dan Unicode die in een Windows-omgeving worden gebruikt en op Russisch zijn ingesteld bij de taalinstellingen Windows Media™ Audio Professional, Lossless, Voice/DRM Stream/Stream met video Niet compatibel USB-apparaat • Er kan een beetje vertraging optreden bij het beginnen met afspelen van audiobestanden op een USBopslagapparaat met een uitgebreide mappenstructuur. MP3-bestanden Bestandsextensie Bitsnelheid .mp3 8 kbps tot 320 kbps (CBR), VBR Bemonsteringsfrequentie 8 kHz tot 48 kHz (32 kHz, 44,1 kHz, 48 kHz voor de beste kwaliteit) 1.0, 1.1, 2.2, 2.3, 2.4 (ID3-tag versie 2.x krijgt prioriteit boven versie 1.x.) Niet compatibel Niet compatibel Compatibele ID3-tagversie M3u-afspeellijst MP3i (MP3 interactive), mp3 PRO Hiërarchie afspeelbare Tot acht niveaus (voor mappen praktisch gebruik kunt u beter niet meer dan twee niveaus gebruiken) Afspeelbare mappen Maximaal 500 Afspeelbare Maximaal 15 000 bestanden Afspelen van Niet compatibel auteursrechtelijk beschermde bestanden Gepartitioneerd USB- Alleen de eerste apparaat partitie kan worden afgespeeld. WAV-bestanden Compatibiliteit met iPod • WAV-bestandsindelingen kunnen niet worden gebruikt via MTP. Bestandsextensie Kwantisatiebits Bemonsteringsfreque ntie .wav 8 en 16 (LPCM) 16 kHz tot 48 kHz (LPCM) Alleen de volgende iPod-modellen kunnen met dit toestel gebruikt worden. Oudere versies worden wellicht niet ondersteund. Gemaakt voor FLAC-bestanden Bestandsextensie Bemonsteringsfreque ntie Kwantisatiebitsnelhei d Kanaalmodus .flac 8 / 11,025 / 12 / 16 / 22,05 / 24 / 32 / 44,1 / 48 kHz 16 bits 1/2 kanalen - 25 - Nederlands • FLAC-bestandsindelingen kunnen niet worden gebruikt via MTP. • FLAC-bestanden kunnen, afhankelijk van de codeerinrichting, mogelijk niet worden afgespeeld. – iPod touch (1e tot 6e generatie) – iPod classic – iPod nano (3e tot 7e generatie) – iPhone 6s – iPhone 6s Plus – iPhone 6 – iPhone 6 Plus – iPhone 5s – iPhone 5c – iPhone 5 – iPhone 4s – iPhone 4 – iPhone 3GS – iPhone 3G – iPhone • Afhankelijk van de generatie en de versie van de iPod zijn sommige functies mogelijk niet beschikbaar. • Gebruikers van iPod met de Lightning Connector moeten de Lightning naar USB Cable gebruiken (bij de iPod geleverd). • Gebruikers van een iPod met Dock Connector moeten CD-IU51 gebruiken. Raadpleeg uw leverancier voor meer informatie. • Raadpleeg de handleiding van de iPod voor meer informatie over ondersteunde bestandsindelingen. • Audiobook, Podcast: Compatibel Voorbeeld van een boomstructuur Map Gecomprimeerd audiobestand 01 tot 05: Mapnummer tot : Afspeelvolgorde LET OP Pioneer is niet verantwoordelijk voor verlies van gegevens op de iPod, ook niet tijdens het gebruik van dit toestel. Lijst van Russische tekens Volgorde van audiobestanden De gebruiker kan met dit toestel geen mapnummers toewijzen of de afspeelvolgorde wijzigen. De volgorde van de audiobestanden is afhankelijk van het aangesloten apparaat. Merk op dat verborgen bestanden op een USB-apparaat niet kunnen worden weergegeven. Nederlands D: Display C: Teken - 26 - Copyright en handelsmerken iTunes Apple en iTunes zijn handelsmerken van Apple Inc., geregistreerd in de V.S. en andere landen. WMA Windows Media is een gedeponeerd handelsmerk of een handelsmerk van Microsoft Corporation in de Verenigde Staten en/of in andere landen. Dit product bevat technologie die het eigendom is van Microsoft Corporation en die niet gebruikt of gedistribueerd mag worden zonder toestemming van Microsoft Licensing, Inc. iPhone, iPod en Lightning Gebruik van het Made for Apple label betekent dat de accessoire speciaal voor het Apple product(en) op het label is gemaakt en volgens de ontwikkelaar voldoet aan de prestatiestandaarden van Apple. Apple is niet verantwoordelijk voor de werking van dit apparaat of de naleving ervan ten aanzien van veiligheid en wettelijke normen. Het gebruik van deze accessoire met een Apple product kan de prestaties van de draadloze netwerkverbinding negatief beïnvloeden. iPhone, iPod, iPod classic, iPod nano, iPod touch en Lightning zijn handelsmerken van Apple Inc., geregistreerd in de V.S. en andere landen. - 27 - Nederlands FLAC Copyright © 2000-2009 Josh Coalson Copyright © 2011-2013 Xiph.Org Foundation Verspreiding en gebruik in bron- en binaire vorm, met of zonder wijziging, is toegestaan mits aan de volgende voorwaarden is voldaan: – Elke verspreiding van broncode moet de hierboven vermelde auteursrechtelijke mededeling omvatten, alsook deze lijst met voorwaarden en de volgende disclaimer. – Verspreidingen in binaire vorm moeten de hierboven vermelde auteursrechtelijke mededeling, alsook deze lijst met voorwaarden en de volgende disclaimer opnemen in de documentatie en/of andere materialen die bij de verspreiding worden geleverd. – De naam van Xiph.org Foundation noch de naam van zijn bijdragers mogen worden gebruikt om producten die van deze software afgeleid zijn, te onderschrijven of te promoten zonder specifieke, voorafgaande en schriftelijke toestemming. DEZE SOFTWARE WORDT DOOR DE HOUDERS VAN HET AUTEURSRECHT EN DOOR DE BIJDRAGERS “ZONDER MEER” GELEVERD, EN ER WORDT GEEN ENKELE UITDRUKKELIJKE OF IMPLICIETE GARANTIE VERLEEND, INCLUSIEF MAAR NIET BEPERKT TOT IMPLICIETE GARANTIES VAN VERKOOPBAARHEID EN GESCHIKTHEID VOOR EEN BEPAALD DOEL. IN GEEN GEVAL KUNNEN DE STICHTING OF HAAR BIJDRAGERS AANSPRAKELIJK WORDEN GESTELD VOOR DIRECTE, INDIRECTE, INCIDENTELE, SPECIALE, EXEMPLARISCHE OF GEVOLGSCHADE (INCLUSIEF MAAR NIET BEPERKT TOT AANKOOP VAN VERVANGGOEDEREN OF -DIENSTEN; VERLIES VAN GEBRUIK, GEGEVENS OF WINST; OF BEDRIJFSONDERBREKING) ONGEACHT DE MANIER WAAROP DEZE WERD VEROORZAAKT EN ONGEACHT ELKE AANSPRAKELIJKHEIDSTHEORIE, ZOWEL IN CONTRACT, STRIKTE AANSPRAKELIJKHEID OF TORT (INCLUSIEF VERWAARLOZING OF ANDERSZINS) OP ENIGERLEI WIJZE RESULTEREND UIT HET GEBRUIK VAN DEZE SOFTWARE, ZELFS INDIEN DE MOGELIJKHEID VAN DEZE SCHADE WERD GEMELD. Google™, Google Play, Android Google, Google Play en Android zijn handelsmerken van Google LLC. Spotify® SPOTIFY en het Spotify-logo zijn gedeponeerde handelsmerken van Spotify AB. Compatibel mobiel digitaal apparaat en premium-abonnement vereist indien beschikbaar; zie https://www.spotify.com. Bereik equalizer: ±12 dB (in stappen van 2 dB) Subwoofer (mono): Frequentie: 50 Hz/63 Hz/80 Hz/ 100 Hz/125 Hz/160 Hz/200 Hz Helling: –12 dB/oct, –24 dB/oct Gain: +6 dB tot –24 dB Fase: Normaal/tegengesteld USB Spanningsbron: 14,4 V gelijkstroom (10,8 V tot 15,1 V toelaatbaar) Aardingsysteem: negatief Maximaal stroomverbruik: 10,0 A Afmetingen (B × H × D): DIN Chassis: 178 mm × 50 mm × 97 mm Voorkant: 188 mm × 58 mm × 17 mm D Chassis: 178 mm × 50 mm × 97 mm Voorkant: 170 mm × 46 mm × 17 mm Gewicht: 0,5 kg USB-standaardspecificatie: USB 2.0 volledige snelheid Maximaal stroomverbruik: 1 A USB-protocol: MSC (Mass Storage Class) MTP (Media Transfer Protocol) AOA (Android Open Accessory) 2.0 Bestandsysteem: FAT12, FAT16, FAT32 MP3-decoderingsformaat: MPEG-1 & 2 Audio Layer 3 WMA decodeerformaat: Ver. 7, 8, 9, 9.1, 9.2 (2 kanaals geluid) FLAC-decoderingsformaat: v1.3.0 (Free Lossless Audio Codec) WAV-signaalformaat: lineaire PCM (niet gecomprimeerd) Audio FM-tuner Maximaal uitgangsvermogen: • 50 W × 4 kan./4 Ω (zonder subwoofer) • 50 W × 2 kan./4 Ω + 70 W × 1 kan./2 Ω (met subwoofer) Doorlopend uitgangsvermogen: 22 W × 4 (50 Hz tot 15 000 Hz, 5% THD, 4-Ω-belasting, beide kanalen) Belastingsimpedantie: 4 Ω (4 Ω tot 8 Ω toegestaan) Preout maximaal uitgangsniveau: 2,0 V Contouren loudness: +10 dB (100 Hz), +6,5 dB (10 kHz) (volume: –30 dB) Equalizer (grafische equalizer met 5 banden): Frequentie: 80 Hz/250 Hz/800 Hz/ 2,5 kHz/8 kHz Frequentiebereik: 87,5 MHz tot 108,0 MHz Bruikbare gevoeligheid: 11 dBf (1,0 μV/ 75 Ω, mono, S/R: 30 dB) Signaal-ruisverhouding: 72 dB (IEC-Anetwerk) Technische gegevens Algemeen MW-tuner LW-tuner Frequentiebereik: 153 kHz tot 281 kHz Bruikbare gevoeligheid: 28 μV (S/R: 20 dB) Signaal-ruisverhouding: 62 dB (IEC-Anetwerk) - 28 - Nederlands Frequentiebereik: 531 kHz tot 1 602 kHz Bruikbare gevoeligheid: 25 μV (S/R: 20 dB) Signaal-ruisverhouding: 62 dB (IEC-Anetwerk) OPMERKING Technische gegevens en ontwerp kunnen zonder voorafgaande kennisgeving worden gewijzigd. Nederlands - 29 - © 2019 PIONEER CORPORATION. All rights reserved. © 2019 PIONEER CORPORATION. Tous droits de reproduction et de traduction réservés. <OPM_MVHS120UIEW5_6L_B> EW-
 1
1
-
 2
2
-
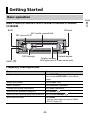 3
3
-
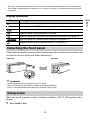 4
4
-
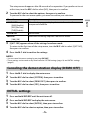 5
5
-
 6
6
-
 7
7
-
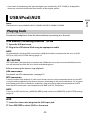 8
8
-
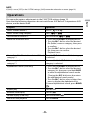 9
9
-
 10
10
-
 11
11
-
 12
12
-
 13
13
-
 14
14
-
 15
15
-
 16
16
-
 17
17
-
 18
18
-
 19
19
-
 20
20
-
 21
21
-
 22
22
-
 23
23
-
 24
24
-
 25
25
-
 26
26
-
 27
27
-
 28
28
-
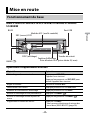 29
29
-
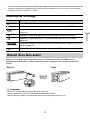 30
30
-
 31
31
-
 32
32
-
 33
33
-
 34
34
-
 35
35
-
 36
36
-
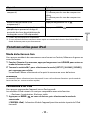 37
37
-
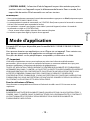 38
38
-
 39
39
-
 40
40
-
 41
41
-
 42
42
-
 43
43
-
 44
44
-
 45
45
-
 46
46
-
 47
47
-
 48
48
-
 49
49
-
 50
50
-
 51
51
-
 52
52
-
 53
53
-
 54
54
-
 55
55
-
 56
56
-
 57
57
-
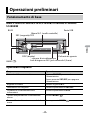 58
58
-
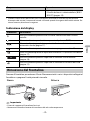 59
59
-
 60
60
-
 61
61
-
 62
62
-
 63
63
-
 64
64
-
 65
65
-
 66
66
-
 67
67
-
 68
68
-
 69
69
-
 70
70
-
 71
71
-
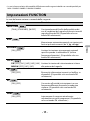 72
72
-
 73
73
-
 74
74
-
 75
75
-
 76
76
-
 77
77
-
 78
78
-
 79
79
-
 80
80
-
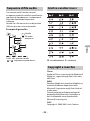 81
81
-
 82
82
-
 83
83
-
 84
84
-
 85
85
-
 86
86
-
 87
87
-
 88
88
-
 89
89
-
 90
90
-
 91
91
-
 92
92
-
 93
93
-
 94
94
-
 95
95
-
 96
96
-
 97
97
-
 98
98
-
 99
99
-
 100
100
-
 101
101
-
 102
102
-
 103
103
-
 104
104
-
 105
105
-
 106
106
-
 107
107
-
 108
108
-
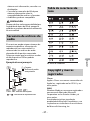 109
109
-
 110
110
-
 111
111
-
 112
112
-
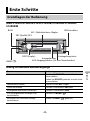 113
113
-
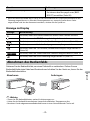 114
114
-
 115
115
-
 116
116
-
 117
117
-
 118
118
-
 119
119
-
 120
120
-
 121
121
-
 122
122
-
 123
123
-
 124
124
-
 125
125
-
 126
126
-
 127
127
-
 128
128
-
 129
129
-
 130
130
-
 131
131
-
 132
132
-
 133
133
-
 134
134
-
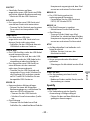 135
135
-
 136
136
-
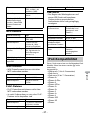 137
137
-
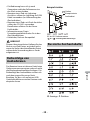 138
138
-
 139
139
-
 140
140
-
 141
141
-
 142
142
-
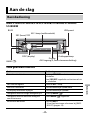 143
143
-
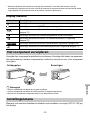 144
144
-
 145
145
-
 146
146
-
 147
147
-
 148
148
-
 149
149
-
 150
150
-
 151
151
-
 152
152
-
 153
153
-
 154
154
-
 155
155
-
 156
156
-
 157
157
-
 158
158
-
 159
159
-
 160
160
-
 161
161
-
 162
162
-
 163
163
-
 164
164
-
 165
165
-
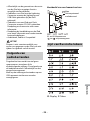 166
166
-
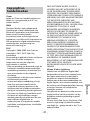 167
167
-
 168
168
-
 169
169
-
 170
170


Pioneer MVH-S120UB Handleiding
- Categorie
- Auto media-ontvangers
- Type
- Handleiding
in andere talen
- English: Pioneer MVH-S120UB User manual
- italiano: Pioneer MVH-S120UB Manuale utente
- français: Pioneer MVH-S120UB Manuel utilisateur
- español: Pioneer MVH-S120UB Manual de usuario
- Deutsch: Pioneer MVH-S120UB Benutzerhandbuch
Gerelateerde papieren
-
Pioneer MVH-390BT Handleiding
-
Pioneer MVH-S200DAB Handleiding
-
Pioneer MVH-350BT Handleiding
-
Pioneer MVH-150UI Handleiding
-
Pioneer DEH-4900DAB Handleiding
-
Pioneer MVH-290DAB Handleiding
-
Pioneer MVH-S220DAB Handleiding
-
Pioneer MVH-S030BT Handleiding
-
Pioneer DEH-4800FD Handleiding
-
Pioneer MVH-280FD de handleiding