
© Copyright Lotronic – 2017 MEK61128 Manual 1
61-KEY ELECTRONIC PRACTICE KEYBOARD
CLAVIER ELECTRONIQUE D’APPRENTISSAGE A 61 TOUCHES
ELEKTRONISCHES ÜBUNGSKEYBOARD MIT 61 TASTEN
ELEKTRONISCH OEFENTOETSENBORD MET 61 TOETSEN
TECLADO ELETRÓNICO PRÁTICO COM 61 TECLAS
CLAVIATURA ELECTRONICA PENTRU INVATARE CU 61 CLAPE
TECLADO ELECTRONICO DE APRENDIZAJE DE 61 TECLAS
MEK 61128 (15-5007) / MEK61128-PACK (15-5008)
USER MANUAL
MANUEL DE L’UTILISATEUR
BEDIENUNGSANLEITUNG
GEBRUIKERSHANDLEIDING
MANUAL DE INSTRUÇÕES
MANUAL DE INSTRUCTIUNI
MANUAL DE INSTRUCCIONES
Electric products must not be put into household waste. Please bring them to a recycling centre. Ask your local authorities or your
dealer about the way to proceed.
NOTE IMPORTANTE : Les produits électriques ne doivent pas être mis au rebut avec les ordures ménagères. Veuillez les faire recycler à
un point de collecte spécialisé. Consultez les autorités locales ou votre revendeur sur la façon de les recycler.
WICHTIGER HINWEIS: Elektrogeräte gehören nicht in den Hausmüll. Sie müssen in speziellen Betrieben recycelt werden. Wenden Sie sich hierzu
an die örtlichen Behörden oder Ihren Fachhändler!
De elektrische producten mogen niet naast het huisvuil geplaatst worden. Gelieve deze te laten recycleren daar waar er centra’s hiervoor
voorzien is. Raadpleeg de plaatselijke autoriteiten of uw verkoper ivm de manier van recycleren.
Produtos eléctricos não deverão ser postos em contentores de lixo caseiros. Por favor, deposite-os em contentores para reciclagem. Questione
as autoridades locais ou onde adquiriu o produto sobre como deverá proceder.
NOTA IMPORTANTA: produsele electronice nu trebuie aruncate la gunoiul menajer. Acestea trebuie reciclate selectiv, la centrele speciale de
colectare. Pentru informatii contactati autoritatile locale pentru informatii privind procedura de reciclare selectiva.
Los productos eléctricos, no pueden ser tirados a los contenedores normales. Por favor, cuando desee desacerse del equipo, llévelo a un centro
de reciclado. Pregunte a las autoridades locales, como proceder en este caso.

© Copyright Lotronic – 2017 MEK61128 Manual 2
Precautions
Read it carefully before proceeding
Only use the supplied mains adaptor. Change it whenever it shows any wear and tear, or goes wrong.
Don’t disassemble the instrument nor make any change inside of it. In case of any anomalous function, stop using
immediately and have it repaired by the qualified maintenance personnel.
Make sure that the both are power off when connecting the instrument with other amplifiers.
Don’t leave the volume working in maximum or in uncomfortable stage for long time.
Keep the instrument away from the heat, which may damage the components.
Stop any liquid or other particles from getting into the instrument, which may corrode the body or result in short
circuit.
Unplug the instrument before cleaning it. Don’t plug or unplug the unit wet hands.
Clean the instrument with a piece of dry and soft cloth without detergent, alcohol or other chemical products.
Turn off and unplug the instrument after performance or for a long time of leaving it unused.
Warning ! Don’t put your ears close to the speaker. High volumes might damage your hearing.
Don’t short-circuit the power supply contacts.
Keep the packing material as it contains important information.
Controls
1. Speaker
10. Single Chord key
19. Percussions
28. Tone
2. ON/OFF switch
11. Program
20. Demo All
29. Rhythm
3. Master volume
12. Chord function OFF
21. Demo One
30. Intro/End
4. Rhythm volume
13. LED display
22. Memory keys
31. Start/Stop
5. Chords Volume
14. Metronome
23.Memory Access key
32. Vibrato
6. Record
15. Transpo +
24. Percussion keyboard
33. Sustain
7. Sync
16. Transpo -
25. Tempo +
34. Fill-in
8. Play
17. Teaching 1
26. Tempo -
35. Chord keyboard
9. Fingered Chord
18. Teaching 2
27. Number keys
GB

© Copyright Lotronic – 2017 MEK61128 Manual 3
Rear panel connectors:
Connecting an external keyboard amplifier or stereo system
Connect the "L OUT R" jacks to the "LINE IN" or "AUX IN' jack on the
audio device or amplifier.
Connecting headphones
Plug in the headphones (not included) with a stereo mini-jack 6.35mm plug to the "STEREO" jack for private
listening.
Using MIC
Insert the supplied microphone into the MIC jack, then you can sing along with the music.
Using AC/DC Power Supply Adaptor
The AC/DC power supply adaptor must be the one designated for the instrument. Before connecting the AC/DC
adaptor to the wall outlet, ensure that all other connections have been made. Insert the small round plug firmly into
the "DC 9V IN" jack on rear of instrument and then insert the other end into an available AC wall outlet (Please
notice the input voltage should be the same as that of the power network).
Notes :
A. When headphones or an external audio device are connected, the main speakers will be automatically turned off.
B. Be sure that the instrument is set at a low volume level before connecting.
C. Increase the volume gradually for comfortable listening.
E. Always refer to the instruction manual of the amplifier for complete connection and usage details.
• Affix the music stand on keyboard
Insertion of batteries
The player will not operate on battery power when the AC/DC adaptor is connected.
Remove the cover of the battery compartment on the underside of the keyboard and insert six pieces of 1.5V "D"
size batteries (not included) into the battery compartment following the indications (+/-) inside the compartment.
Replace the cover.
Note: When the voltage of the batteries drops down and the instrument cannot perform naturally, the batteries
should be replaced in time. If the instrument is left unused for a long time, the batteries should be taken out to
avoid causing damage.
Do not mix up new and old or different types of batteries together. Keep batteries out of children's reach. Please
observe the local regulations regarding the disposal of exhausted batteries.
LED DISPLAY
X= 1 digit; XX= 2 digits; XXX= 3 digits
CXX: Volume +/- chord
SuS: Sustain
Syn: Synchronize
AXX: Accompaniment volume +/-
Uib: Vibrato
Sin: Chords
0X / -X: Transpose +/-
tnE: Tone
Fin: Fingered
000: Default mode = Piano sound
rhy: Rhythm
Prg: Programming mode
0o: Activate a function
dXX: Song number
rEC: recording mode
OFF: Leave a function
XXX: Rhythm number
Ply: Playback
X-4: Number of beats
XXX: Tone number
Len: Teaching 1/2
When you switch the keyboard on, the display shows the default value of 000 which is piano sound. The rhythm is
set by default to 000.
Select rhythm, tone or song. The LED display will show the current rhythm, tone or song number. When playing
rhythm or a song, the dots on the display will flash to the rhythm of the beats.
Push the POWER switch (2) to the ON position to turn the keyboard on.
Press the MASTER volume buttons (3) to adjust the volume to the desired level.
Set the accompaniment volume RHYTHM (4) to the desired level between 1 and 16.
Set the chord volume CHORD (5) to the desired level between 1 and 16.

© Copyright Lotronic – 2017 MEK61128 Manual 4
TONE SELECTION
Choose among 128 realistic sounds from 000 to 127. Before selecting the tone, press the TONE button (28) and then
the number of the desired tone via the number buttons. Or browse through the tones via the + and – keys of the
number pad.
VIBRATO Function (32)
Press this button to add a jitter effect to the sound. Press again to leave the function.
SUSTAIN Function (33)
Press the SUSTAIN key to lengthen the sound. Press again to cancel the effect.
KEYBOARD PERCUSSION (24)
If you press this button, all 61 keys of the keyboard become percussions. Press again to go back to normal keyboard.
PERCUSSION / ANIMAL keys (19)
The keyboard offers 4 percussion keys. Press any of the keys any time to add percussion to your piece of music.
Press the KEYS DRUMS button (24) to activate the animal sounds.
TRANSPOSE (15 & 16)
This function raises or lowers the tone of the song. At every press on the TRANSPOSE + or TRANSPOSE – button, the
tone will change by a half tone within a range of -6 to 6. The value is displayed on the digital screen. Press both
buttons together to return to the original setting of 00.
METRONOME (14)
Press the METRONOME button to cycle through 1/4->2/4->3/4->4/4->OFF. The default speed is 120.
DEMO ALL (20)
Press DEMO ALL button to access to the demo songs. The display shows 000 and the first song of the list is played.
You can select another song by typing the desired number on the numeric key pad or via the + and – buttons on the
numeric keypad. To stop demo songs, press START/STOP button (31).
DEMO ONE (21)
Press DEMO ONE button and select the number of a song that you want to listen to. The song stops at the end.
LEARNING FUNCTION 1
Press TEACHING 1 button (17) to enter into one-touch mode. Press one of the white keys on the left side of the
keyboard to select a melody. The accompaniment will start automatically. Press any key on the right side to play the
melody. This function allows learning the rhythm of a song.
LEARNING FUNCTION 2
Press TEACHING 2 button (18) to enter into follow mode. Press one of the white keys on the left-hand side of the
keyboard. The accompaniment will start but this time, the user has to press the correct key to play the melody.
Press TEACHING 2 or START/STOP button to leave the learning function.
AUTOMATIC CHORD FUNCTION
1. Start the rhythm:
Press START/STOP button (31) and the rhythm accompaniment starts immediately. The dot on the display flashes
regularly. Press START/STOP again to turn off rhythm accompaniment.
2. INTRO / ENDING (30):
When no rhythm is selected, press the INTRO/ENDING button and play a short prelude. During rhythm play, press
the INTRO/ENDING button. The rhythm stops, your prelude is played and the rhythm play resumes.
3. Select the rhythm:
The instrument offers 128 rhythms from 000 to 127. Press the RHYTHM button first and select the rhythm you want
to play by pressing the number keys.

© Copyright Lotronic – 2017 MEK61128 Manual 5
4. Start rhythm synchronization
Press SYNC button and the digital dot starts flashing on the display. Press one of the 19 keys from the left to start
the rhythm play. You can also press first SYNC and then MULTI- or SINGLE FINGER and then press one of the left-
hand 19 keys so that rhythm chords and play are synchronized.
5. SINGLE Finger automatic chord
When rhythm or sync play are activated, press the SINGLE key. Now you can play the chords with 1 finger as on the
figure below:
6. MULTI-FINGERED CHORDS
When rhythm or sync play are activated, press FINGER key. Press the keys as shown hereafter:
To stop the accompaniment, press CHORD OFF button. If you want to stop the accompaniment and rhythm
together, press START/STOP button.
7. INSERT
During the rhythm play, if you want to insert some intermezzo, press the FILL IN button before continuing the
rhythm accompaniment.
8. TEMPO adjustment
The default speed is set to 120 beats/minute. Press the TEMPO FAST or TEMPO SLOW key to speed up or slow down
the tempo between 30 and 240 beats/minute. Hold down both buttons at the same time to go back to 120
beats/minute. Please note: This feature also works in programming and recording mode.

© Copyright Lotronic – 2017 MEK61128 Manual 6
RECORDING & PROGRAMMING
1. Programming
Press the PROGRAM button and the programming features are displayed. Press the panel percussion button and
play the percussions on the piano keys. You can record up to 32 percussion sounds. When your record is finished,
press the PLAY button. Now you can listen to the percussion sounds that you just recorded. During playback you can
adjust the tempo via the TEMPO FAST AND TEMPO SLOW buttons. To cancel programming, press PROGRAM or the
START/STOP button.
2. RECORD & PLAYBACK
Press the REC button and play a melody. You can record up to 92 notes. Press the PLAY button to play the recorded
song. To cancel the recording and playback function, press REC or START/STOP button.
MEMORY FUNCTION
If you want to record special settings such as speed, tone, rhythm, chords and other information, press the settings
button (23) and one of the MEMORY buttons (22). Enter the required settings.
Please note: When the power is switched off, the memories will be erased.
Electric products must not be put into household waste. Please bring them to a recycling centre. Ask your local authorities or your
dealer about the way to proceed.
Mises en Garde
Lire attentivement avant la mise en service
Changez l’adaptateur secteur dès qu’il présente des signes d’usure ou de dysfonctionnement.
Ne jamais démonter l’instrument, ni modifier des parties internes. En cas de dysfonctionnement, faire appel à un
technicien qualifié.
Eteindre l’instrument et l’amplificateur avant de les connecter.
Ne pas mettre le volume au maximum pendant une durée prolongée.
Tenir à l’abri de la chaleur.
Empêcher toute pénétration de poussières, de liquides ou autres particules dans l’instrument. Elles peuvent
provoquer une corrosion et des courts-circuits.
Débranchez l’instrument avant le nettoyage. Ne pas brancher ou débrancher l’instrument avec des mains
mouillées.
Nettoyer l’instrument avec un chiffon sec et doux sans utiliser d’alcool ou autres nettoyants ménagers.
Eteindre et débrancher l’instrument en cas de non-utilisation prolongée.
Attention ! Ne pas approcher votre oreille du haut-parleur. Un volume trop élevé peut endommager votre ouïe.
Ne pas court-circuiter les fiches d’alimentation.
Conservez l’emballage car il contient des informations importantes.
F

© Copyright Lotronic – 2017 MEK61128 Manual 7
Contrôles
1. Haut-parleur
10. Accord à 1 doigt
19. Percussions
28. Sonorité
2. Interrupteur M/A
11. Programmation
20. Toutes les chansons démo
29. Rythme
3. Volume général
12. Arrêt des accords
21. Une chanson démo
30. Intro/End
4. Volume du rythme
13. Afficheur à LED
22. Touches de mémoire
31. Start/Stop
5. Volume des accords
14. Métronome
23. Activation de la mémoire
32. Vibrato
6. Enregistrement
15. Transposer +
24. Percussions clavier
33. Sustain
7. Sync
16. Transposer -
25. Tempo +
34. Fill-in (insertion)
8. Lecture
17. Apprentissage 1
26. Tempo -
35. Clavier pour les accords
9. Accord doigté
18. Apprentissage 2
27. Touches numériques
Connecteurs à l’arrière
• Utilisation d’un adaptateur secteur
L’adaptateur utilisé doit correspondre aux caractéristiques techniques
spécifiées pour cet instrument. Avant de brancher l’adaptateur AC/DC
sur la prise murale, assurez-vous que tous les autres branchements
ont été effectués. Branchez un côté de l’adaptateur sur la fiche
d’alimentation 9VDC au dos de l’instrument et l’autre sur une prise
secteur.
• Utilisation du microphone
Branchez le microphone fourni sur la fiche MIC et vous pouvez vous accompagner en chantant.
• Branchement d’un casque ou d’un amplificateur externe
Branchez la fiche mini-Jack stéréo 6.35mm de votre casque (non fourni) sur la fiche STEREO pour une écoute privée.
Notes :
A. Lorsqu’un casque ou un amplificateur sont branchés, les haut-parleurs intégrés seront automatiquement coupés.
B. Baissez complètement le volume de l’instrument avant d’effectuer le branchement
C. Augmentez le volume progressivement jusqu’à u niveau d’écoute confortable
D. Un casque, un amplificateur ou un équipement stéréo peuvent être branchés sur cette fiche. Lorsque cette fiche
est utilisée, les haut-parleurs intégrés sont automatiquement coupés et le son arrive uniquement par le matériel
branché.
E. Reportez-vous au manuel d’utilisation de l’amplificateur pour les branchements complets et l’utilisation.
• Fixez le support de partitions sur le clavier

© Copyright Lotronic – 2017 MEK61128 Manual 8
Préparatifs
• Mise en place des piles
Le clavier ne fonctionnera pas sur piles lorsqu’un adaptateur secteur est branché. Retirez le capot du compartiment
à piles en-dessous du clavier et insérez six piles LR20 de 1.5V (non incluses) dans le compartiment en suivant les
indications (+/-) à l’intérieur du compartiment. Remettez le capot en place.
Note : Lorsque la tension des piles chute et l’instrument ne peut plus fonctionner normalement, le moment est venu
de remplacer les piles. En cas de non-utilisation prolongée de l’instrument, retirez les piles afin d’éviter des
dommages dues à des fuites. Ne pas mélanger des piles neuves et usagées, ni différents types de piles. Tenir les piles
hors de la portée des enfants. Respectez la législation en vigueur concernant la mise aux déchets des piles.
AFFICHEUR A LED
X= 1 digit; XX= 2 digits; XXX= 3 digits
CXX: Volume des accords +/-
SuS: Sustain
Syn: Synchroniser
AXX: Volume de l’accompagnement +/-
Uib: Vibrato
Sin: Accords
0X / -X: Transpose +/-
tnE: Sonorité
Fin: Doigté
000
: Mode par défaut = Piano
rhy
: Rythme
Prg
: Mode de programmation
0o
: Active rune fonction
d
XX: Numéro de la chanson
rEC
: Enregistrement
OFF: Quitter une fonction
XXX: Numéro du rythme
Ply: Lecture
X-4: Nombre de battements
XXX: Numéro de la sonorité
Len: Apprentissage 1/2
Lorsque vous mettez le clavier sous tension, la valeur par défaut 000 s’affiche qui est le son du piano. Le rythme est
réglé par défaut sur 000.
Sélectionnez le rythme, la tonalité ou la chanson. La valeur actuelle de la fonction s’affiche. Pendant la lecture d’un
rythme ou d’une chanson, les points sur l’afficheur clignotent au rythme des battements.
Poussez le commutateur POWER (2) sur la position ON pour mettre le clavier sous tension.
Appuyez sur les contrôles de volume MASTER (3) pour régler le volume sur le niveau désiré.
Réglez le volume de l’accompagnement RHYTHM (4) au niveau désiré entre 1 et 16.
Réglez le volume des accords CHORD (5) au niveau désiré entre 1 et 16.
SELECTION DE LA SONORITE
Choisissez parmi 128 sonorités réalistes entre 000 et 127. Avant de sélectionner une sonorité, appuyez sur la touche
TONE (28) et ensuite sur le numéro de la sonorité souhaitée au moyen des touches numériques. Ou bien parcourez
les sonorités avec les touches + et – du pavé numérique.
VIBRATO (32)
Appuyez sur cette touche pour ajouter un effet de vibration au son. Appuyez à nouveau pour quitter cette fonction.
SUSTAIN (33)
Appuyez sur la touche SUSTAIN et « Sus » s’affiche. Le son du clavier est maintenu. Appuyé à nouveau sur la touche
et cet effet disparaît.
PERCUSSIONS CLAVIER (24)
Lorsque vous appuyez sur cette touche, les 61 touches du clavier deviennent des percussions. Appuyez à nouveau
pour revenir au clavier normal.
Touches de PERCUSSION / ANIMAL (19)
Le clavier possède 4 touches de percussion. Appuyez sur la percussion désirée pour ajouter le son au morceau de
musique. Appuyez sur la touche KEYS DRUMS (24) pour convertir les sons des percussions en sons d’animaux.
TRANSPOSE (15 & 16)
Ces touches augmentent ou baissent la tonalité de la musique d’une demie note dans une plage de réglage de -6 à
06. La valeur s’affiche sur l’écran. Appuyez sur les deux boutons en même temps pour revenir au réglage par défaut
00.

© Copyright Lotronic – 2017 MEK61128 Manual 9
METRONOME (14)
L’instrument offre 4 battements de métronome : ¼, 2/4, ¾ et 4/4. Appuyez plusieurs fois sur la touche METRONOME
pour régler dans l’ordre ¼, 2/4, ¾ et 4/4. A la 5
ème
pression, la fonction quitte. Le réglage par défaut est 120.
DEMO ALL (20)
L’instrument offre 30 morceaux de démonstration allant de « 000 » à « 029 ». Si vous appuyez sur la touche DEMO
ALL, vous pouvez ensuite sélectionner le morceau cible avec les touches numériques ou les touches +/-.
Pour arrêter la lecture, appuyez sur la touche START/STOP (31).
DEMO ONE (21)
Appuyez sur la touche DEMO ONE et l’instrument passe la chanson de démo présélectionnée et arrête la lecture à la
fin de la chanson.
APPRENTISSAGE 1
Appuyez sur la touche TEACHING 1 (17). Appuyez sur une des touches blanches sur la gauche du clavier pour
sélectionner une mélodie. L’accompagnement commence automatiquement. Maintenant vous pouvez vous
entraîner à jouer la mélodie de la chanson choisie. Même si vous jouez une fausse note, la mélodie continue.
Pendant l’exercice, les bonnes touches à jouer apparaissent sur l’afficheur ainsi que la portée. Appuyez sur la touche
START/STOP pour quitter la fonction. Lorsqu’une chanson est terminée, une autre suivra automatiquement.
APPRENTISSAGE 2
Appuyez sur la touche TEACHING 2 (18). Appuyez sur une des touches blanches sur la gauche du clavier pour
sélectionner une mélodie. L’accompagnement commence automatiquement mais cette fois-ci, l’élève doit jouer les
bonnes notes. Des repères lumineux sur l’écran indiquent à l’élève les bonnes touches à frapper. En cas d’erreur, la
mélodie s’arrête jusqu’à ce que la bonne note soit jouée. Appuyez sur TEACHING 2 ou START/STOP pour quitter la
fonction.
ACCORDS AUTOMATIQUES
1. Démarrer le rythme:
Appuyez sur la touche START/STOP (31) pour démarrer immédiatement le rythme d’accompagnement. Un point
clignote régulièrement sur l’afficheur. Pour arrêter le rythme, appuyez à nouveau sur START/STOP.
2. INTRO / END (30):
Lorsqu’aucun rythme n’est sélectionnez, appuyez sur la touche INTRO/END et joué un petit morceau. Pendant la
lecture du rythme, appuyez sur la touche INTRO/END. Le rythme s’arrête, votre morceau est joué et le rythme
reprend.
3. Sélection du rythme:
L’instrument offre 128 rythmes de 000 à 127. Appuyez d’abord sur la touche RYHTM et sélectionnez le rythme
désiré avec le pavé numérique.
4. Commencer la synchronisation du rythme
Appuyez sur la touche SYNC et les points sur l’afficheur clignotent. Appuyez sur une des 19 premières touches en
partant de la gauche et le rythme et l’accompagnement sont joués en même temps.
Vous pouvez également appuyer d’abord sur la touche SYNC, ensuite sur MULTI (10) ou SINGLE (9) et ensuite sur
une des 19 touches de la gauche du clavier afin que le jeu et les accords soient synchrones.
5. SINGLE – Accord à 1 doigt
Lorsque le rythme est activé, appuyez sur la touche SINGLE (9). « SIN » s’affiche et l’accord à 1 doigt se fait sur le
clavier d’accords (35) selon le tableau ci-dessous.

© Copyright Lotronic – 2017 MEK61128 Manual 10
6. ACCORDS A PLUSIEURS DOIGTS
Lorsque le rythme est activé, appuyez sur la touche FINGERED. « Fin » s’affiche. L’accord doigté se fait sur le clavier
d’accord selon le tableau ci-après :
Pour arrêter l’accompagnement, appuyez sur la touche CHORD OFF. Si vous voulez arrêter l’accompagnement et le
rythme, appuyez sur la touche START/STOP.
7. INSERT
Pendant le rythme, appuyez sur la touche FILL-IN pour insérer un intermède avant de continuer l’accompagnement.
8. REGLAGE DU TEMPO
La vitesse par défaut des battements est de 120 battements/minute. Appuyez sur les touches TEMPO FAST or
TEMPO SLOW pour accélérer ou ralentir le tempo entre 30 et 240 battements/minute. Maintenez les deux touches
enfoncées simultanément pour revenir au réglage par défaut de 120 battements/minute. Veuillez noter que cette
fonction est également disponible en mode programmation et enregistrement.
ENREGISTREMENT & PROGRAMMATION
1. Programmation
Appuyez sur la touche PROG. « PRG » s’affiche, les battements automatiques et la percussion clavier sont activés.
Dans ce mode, vous pouvez choisir une parmi les 4 percussions directes ou la percussion clavier pour éditer un
morceau de rythme. Le nouveau rythme édité remplacera le précédent. Vous pouvez enregistrer jusqu’à 32 notes.
Lorsque votre morceau est terminé, appuyez sur la touche PLAY pour écouter les percussions que vous venez
d’enregistrer. Pendant la lecture, vous pouvez ajuster le tempo au moyen des touches TEMPO FAST et TEMPO
SLOW. Pour arrêter la programmation, appuyez sur les touches PROGRAM ou START/STOP.

© Copyright Lotronic – 2017 MEK61128 Manual 11
2. ENREGISTREMENT & LECTURE
Appuyez sur la touche REC et jouez une mélodie. Vous pouvez enregistrer jusqu’à 92 notes. Appuyez sur la touche
PLAY pour écouter l’enregistrement. Pour quitter la fonction d’enregistrement et lecture, appuyez sur les touches
REC ou START/STOP.
MEMOIRE
Si vous souhaitez enregistrer un réglage spécial concernant le tempo, la sonorité, le rythme, les accords ou toute
autre information, appuyez sur la touche (23) et une des touches de mémoire (22). Entrez les réglages. Attention :
les données ne sont pas conservées après l’extinction de l’instrument.
Sicherheitshinweise
Vor Inbetriebnahme sorgfältig durchlesen!
Netzteil wechseln, sobald es Abnutzungserscheinungen oder Betriebsstörungen aufweist.
Das Instrument weder auseinanderbauen noch irgendwelche Veränderungen vornehmen. Bei Störungen sofort
ausschalten und in einer Werkstatt reparieren lassen.
Bei Anschluss des Instruments an einen Verstärker müssen beide Geräte ausgeschaltet sein.
Nicht über einen längeren Zeitraum bei hoher Lautstärke benutzen.
Vor Hitze schützen.
Keinen Staub, Flüssigkeiten oder andere Fremdkörper ins Gehäuse dringen lassen. Sie können Rost und
Kurzschluss verursachen.
Netzstecker vor der Reinigung abziehen. Netzstecker nie mit nassen Händen anfassen.
Das Gerät nur mit einem weichen, trockenen Tuch abwischen. Keine chemischen Reinigungsmittel verwenden.
Bei längerem Nichtgebrauch Gerät vom Netz trennen.
Vorsicht ! Halten Sie nie Ihr Ohr dicht an die Lautsprecher. Hohe Lautstärken können Ihr Gehör dauerhaft
beschädigen.
Niemals die Netzbuchse kurzschließen.
Verpackung aufbewahren, da sie wichtige Informationen enthält.
Bedienelemente
D

© Copyright Lotronic – 2017 MEK61128 Manual 12
1. Lautsprecher
10.Ein-Finger-Akkord
19. Schlaginstrument
28. Klangfarbe
2. EIN/AUS Schalter
11. Programmieren
20. Demo All
29. Rhythmus
3. Hauptlautstärke
12. Akkorde AUS
21. Demo One
30. Intro/End
4. Rhythmusmlautstärke
13. LED Display
22. Speichertasten
31. Start/Stopp
5. Akkordlautstärke
14. Metronom
23. Speicherzugang
32. Vibrato
6. Aufnahme
15. Transpo +
24. Schalginstrumentkeyboard
33. Sustain
7. Sync
16. Transpo -
25. Tempo +
34. Fill-in
8. Abspielen
17. Lernen 1
26. Tempo -
35. Keyboardakkorde
9. Fingerakkord
18. Lernen 2
27. Nummerntasten
Verbinder auf der Rückseite
Anschluss eines externen Verstärkers oder einer Stereoanlage
Die "L OUT R" Buchsen an die "LINE IN" oder "AUX IN' Buchse der
Stereoanlage oder des Verstärkers anschließen.
Anschluss eines Kopfhörers
Kopfhörer (nicht enthalten) mit einem 6,35mm Stereo
Klinkenstecker an die STEREO Buchse anschließen.
MIKROFON
Das mitgelieferte Mikrofon (nur MEK61128-PACK) in die MIC Buchse stecken, um zur Musik zu singen.
• Netzadapter
Der verwendete Adapter muss den technischen Daten des Instruments entsprechen. Den DC Stecker in die 9V DC
Buchse auf der Rückseite des Keyboards und den Netzstecker in eine Wandsteckdose stecken.
Hinweise:
A. Wenn ein Kopfhörer oder Verstärker angeschlossen ist, sind die eingebauten Lautsprecher automatisch
abgeschaltet.
B. Die Lautstärke des Instruments ganz herunterfahren, bevor Sie es einschalten.
C. Die Lautstärke allmählich zum gewünschten Pegel hochfahren.
D. An die LINE OUT Buchse kann ein Kopfhörer, ein Verstärker oder eine Stereoanlage angeschlossen werden.
Sobald ein Gerät an diese Buchse angeschlossen wird, sind die eingebauten Lautsprecher ausgeschaltet und der Ton
kommt durch das angeschossene Gerät.
E. Für alle weiteren Anschlüsse s. die Anleitung des Verstärkers.
• Den Notenständer auf dem Keyboard befestigen.
Batterieversorgung
Wenn ein Netzteil angeschlossen ist, verbraucht das Instrument keine Batterieleistung.
Die Abdeckung vom Batteriefach auf der Unterseite des Geräts entfernen und sechs 1.5V ‚D‘ Batterien
polungsrichtig einlegen (nicht enthalten). Batteriefach wieder schließen.
Hinweis: Wenn die Batteriespannung fällt und das Instrument nicht mehr normal arbeitet, müssen die Batterien
ausgewechselt werden. Bei längerem Nichtgebrauch ebenfalls die Batterien entfernen, um Schäden durch Auslaufen
zu vermeiden. Niemals alte und neue oder Batterien unterschiedlicher Typen vermischen. Batterien von Kindern
unzugänglich aufbewahren. Bitte beachten Sie die geltenden Vorschriften für das Entsorgen von Batterien.
LED DISPLAY
X= 1 digit; XX= 2 digits; XXX= 3 digits
C
XX: Akkordlautstärke +/-
SuS
: Sustain
Syn
: Synchronisieren
AXX: Lautstärke der Begleitung +/-
Uib: Vibrato
Sin: Akkorde
0X / -X: Transponieren +/-
tnE: Klangfarbe
Fin: Mehrfingerakkorde
000: Werkseinstellung: Klavier
rhy: Rhythmus
Prg: Programmierbetrieb
0o: Funktion aktivieren
dXX: Songnummer
rEC: Aufnahme
OFF: Funktion verlassen
XXX: Rhythmusnummer
Ply: Playback
X-4: Anzahl der Takte
XXX: Nummer der Klangfarbe
Len: Lernen 1/2

© Copyright Lotronic – 2017 MEK61128 Manual 13
Beim Einschalten des Keyboards erscheint der Wert 000, d.h. Klavierklang. Der Rhythmus ist ab Werk auf 000
eingestellt.
Rhythmus, Klangfarbe oder Song wählen. Auf dem LED Display erscheint der eingestellte Rhythmus, Klangfarbe oder
Songnummer. Beim Abspielen eines Rhythmus oder Songs blinkt ein Punkt auf dem Display im Takt.
POWER Schalter (2) auf ON schieben, um das Keyboard einzuschalten.
MASTER Lautstärketasten (3) auf den gewünschten Pegel einstellen.
Begleitlautstärke RHYTHM (4) auf den gewünschten Pegel zwischen 1 und 16 einstellen.
Akkordlautstärke CHORD (5) auf den gewünschten Pegel zwischen 1 und 16 einstellen.
WAHL DER KLANGFARBE
Der Benutzer kann unter 128 realistischen Klangfarben von 000 bis 127 wählen. TONE Taste (28) drücken und die
Nummer der gewünschten Klangfarbe mit den Nummerntasten oder mit den +/- Tasten einstellen.
VIBRATO Funktion (32)
Gibt dem Klang einen vibrierenden Effekt. Erneut die Taste drücken, um die Funktion zu verlassen.
SUSTAIN Funktion (33)
SUSTAIN Taste drücken, um den Klang zu verlängern. Erneut die Taste drücken, um die Funktion zu verlassen.
KEYBOARD SCHLAGINSTRUMENTE (24)
Beim Druck auf diese Taste werden alle 61 Tasten des Keyboards zu Schlaginstrumenten. Erneut die Taste drücken,
um wieder das normale Keyboard einzustellen.
SCHLAGZEUG / TIERGERÄUSCHE (19)
Das Keyboard besitzt 4 Tasten für Schlagzeuginstrumente, die jederzeit in Ihr Musikstück eingefügt werden können.
Drücken Sie die KEY DRUM Taste (24), um die Schlagzeugtasten in Tiergeräuschtasten zu verwandeln.
TRANSPOSE (15 & 16)
Diese Tasten verändern die Tonlage jeweils um eine halbe Note innerhalb eines Bereichs von -6 bis 06. Der
eingestellte Wert erscheint auf dem Display. Beide Tasten gleichzeitig drücken, um zum Normalwert zurück zu
schalten.
METRONOM (14)
Das eingebaute Metronom verfügt über 4 Takte: ¼, 2/4, ¾ und 4/4 Takt. Bei jedem Druck auf die Taste METRONOM
schaltet das Metronom eine Taktart weiter. Beim fünften Drücken wird diese Funktion beendet. Sie können diese
Funktion auch durch Drücken der START/STOP Taste verlassen. Werksseitig ist das Metronom auf 120 Schläge/
Minute eingestellt.
DEMO ALL (20)
Das Instrument bietet 30 Demosongs von „000“ bis „029“. Die Taste DEMO ALL drücken. Sie können den
gewünschten Song auch mit den Nummerntasten bzw. +/- wählen. Um die Funktion zu beenden auf die START/STOP
Taste (31) drücken.
DEMO ONE (21)
DEMO ONE Taste drücken und die Nummer des gewünschten Songs eingeben. Der Song stoppt am Ende.
LERNFUNKTION 1
TEACHING 1 Taste (17) und eine der weißen Tasten auf der linken Seite des Keyboards drücken, um eine Melodie zu
wählen. Die Begleitung startet automatisch. Irgendeine Taste auf der rechten Seite drücken, um die Melodie zu
spielen. Mit dieser Funktion wird der Rhythmus gelernt.
LERNFUNKTION 2
TEACHING 2 Taste (18) und eine der weißen Tasten auf der linken Seite des Keyboards drücken, um eine Melodie zu
wählen. Die Begleitung startet automatisch, aber diesmal muss der Spieler die richtigen Tasten anschlagen, um die
Melodie zu spielen. TEACHING 2 oder START/STOP Taste drücken, um die Funktion zu verlassen.

© Copyright Lotronic – 2017 MEK61128 Manual 14
AUTOMATISCHE AKKORDE
1. Rhythmus starten:
START/STOP Taste (31) drücken und die Rhythmusbegleitung startet sofort. Der Punkt auf dem Display blinkt
regelmäßig. Erneut die START/STOP Taste drücken, um die Rhythmusbegleitung auszuschalten.
2. INTRO / ENDG (30):
Wenn kein Rhythmus gewählt ist, die INTRO/ENDING Taste drücken und ein kurzes Stück spielen. Während des
Rhythmus die ENTRO/END Taste drücken. Der Rhythmus stoppt, Ihr Musikstück wird eingefügt und der Rhythmus
wird fortgesetzt.
3. Rhythmus wählen:
Das Instrument bietet 128 Rhythmen von 000 bis 127. Zuerst die RHTYHM Taste drücken und dann die Nummer des
gewünschten Rhythmus.
4. Synchronisierter Rhythmus
SYNC Taste drücken. Der Punkt blinkt auf dem Display. Eine der 19 linken Tasten drücken, um einen Rhythmus
abzuspielen. Sie können auch erst die SYNC Taste, dann die MULTI oder SINGLE Finger Taste und dann eine der 19
linken Tasten drücken, damit der Rhythmus und die Akkorde synchron abgespielt werden.
5. EIN-FINGER-AKKORDE
Wenn der Rhythmus oder SYNC aktiviert sind, die SINGLE Taste drücken. Sie können jetzt auf den Akkordtasten laut
nachstehender Tabelle die Akkorde mit einem Finger spielen.
6. Mehr-Finger-Akkord
Wenn der Rhythmus aktiviert ist, auf die Taste FINGERED drücken. „Fin“ erscheint auf dem Display. Sie können jetzt
auf den Akkordtasten laut nachstehender Tabelle die Akkorde mit einem Finger spielen.

© Copyright Lotronic – 2017 MEK61128 Manual 15
Die Taste CHORD OFF drücken, um die Begleitung zu beenden. Wenn Sie die Begleitung und den Rhythmus
zusammen beenden wollen, die START/STOP Taste drücken.
7. INSERT
Im Rhythmusbetrieb auf die Taste FILL-IN drücken. Ein Intermezzo wird automatisch eingeschleift.
8. TEMPO Einstellung
Das Tempo ist ab Werk auf 120 Schläge/Min. eingestellt. Auf die Tasten TEMPO FAST oder TEMPO SLOW drücken,
um das Tempo bis zu 240 Schläge beschleunigen oder auf 30 Schläge zu verlangsamen. Auf beide Tasten gleichzeitig
drücken, um die Werkseinstellungen einzustellen.
AUFNAHME & PROGRAMMIEREN
1. Programmieren
PROGRAM Taste drücken und die Programmierfunktionen erscheinen. Taste (24) drücken und alle Tasten des
Keyboards klingen wie Schlaginstrumente. Sie können bis zu 32 Noten aufnehmen. Am Ende der Aufnahme die PLAY
Taste drücken und die soeben aufgenommenen Klänge abspielen. Während des Abspielens können Sie das Tempo
mit den TEMPO FAST und TEMPO SLOW Tasten verändern. Zum Verlassen des Programmierbetriebs die PROGRAM
oder die START/STOP Taste drücken.
2. AUFNAHME & ABSPIELEN
REC Taste drücken und eine Melodie spielen. Sie können bis zu 92 Noten aufnehmen. Am Ende der Aufnahme die
PLAY Taste drücken und die soeben aufgenommenen Klänge abspielen. Zum Verlassen der Betriebsart die REC oder
die START/STOP Taste drücken.
SPEICHERFUNKTION
Wenn Sie besondere Einstellungen wie Tempo, Rhythmus, Akkorde oder andere Informationen speichern möchten,
drücken Sie die Taste (23) und dann eine der Speichertasten M1 bis M3 (22) und geben Sie die gewünschten
Einstellungen ein. Achtung: Beim Ausschalten des Geräts werden die Speicher gelöscht.
WICHTIGER HINWEIS: Elektrogeräte gehören nicht in den Hausmüll. Sie müssen in speziellen Betrieben recycelt werden. Bringen Sie sie zu einer
speziellen Entsorgungsstelle für Elektrokleingeräte (Wertstoffhof)!

© Copyright Lotronic – 2017 MEK61128 Manual 16
Waarschuwingen
Aandachtig te lezen alvorens in gebruik te nemen
- Vervang de stroomadapter zodra hij sporen van slijtage of gebrek begint te vertonen
- Het instrument nooit demonteren, noch de interne delen veranderen. Bij gebrekkige werking steeds een
gekwalificeerde technieker raadplegen.
- Het instrument en de versterker steeds uitschakelen alvorens ze aan te sluiten.
- Het volume niet gedurende langere periodes op maximum laten staan.
- Het toestel niet aan te hoge warmte blootstellen.
- Vermijd het indringen van stof, vocht of andere delen in het instrument. Zij kunnen immers corrosie of
kortsluiting veroorzaken.
- Schakel het toestel uit en koppel het af alvorens te reinigen. Nooit het toestel manipuleren met vochtige
handen.
- Reinig het toestel met een zachte, droge doek zonder gebruik van alcohol noch reinigingsproducten.
- Schakel het toestel uit en ontkoppel het bij langere tijd zonder gebruik.
- Opgelet! Hou voldoende afstand tussen uw oor en de luidspreker. Uw gehoor kan schade oplopen bij een te
hoge geluidssterkte.
- De voedingsfiches niet kortsluiten.
- Hou de verpakking bij want zij bevat belangrijke informatie.
Controles
1. Luidspreker
10. Single accoord
19. Percussies
28. Klankkleur
2. Aan/uit schakelaar
11. Programma
20. Demo All
29. Ritme
3. Algemeen volume
12. Accoord functie uit
21. Demo One
30. Intro/End
4. Achtergrondvolume
13. LED display
22. Geheugen toetsen
31. Start/Stop
5. Accoord Volume
14. Metronoom
23. Geheugentoegang
32. Vibrato
6. Opname
15. Transpo +
24. Percussie klavier
33. Sustain
7. Sync
16. Transpo -
25. Tempo +
34. Fill-in
8. Play
17. Teaching 1
26. Tempo -
35. Akkoordenklavier
9. Fingered accoord
18. Teaching 2
27. Numeriek klavier
NL

© Copyright Lotronic – 2017 MEK61128 Manual 17
Connectors op de achterkant:
Aansluiting op een versterker of een audiosysteem
Ondanks de aanwezigheid van een interne luidspreker, kan u ook opteren
om het toetsenbord aan te sluiten op een versterker of externe
luidsprekers. Schakel eerst alle betrokken toestellen uit. Sluit de
stereokabel aan op de L/R Uitgang op de achterzijde en op de LINE IN of
de AUX IN van de externe uitrusting.
Aansluiting van een hoofdtelefoon
U kunt een hoofdtelefoon aansluiten d.m.v. een stereo jack 6.35mm plug op de achterzijde van het toestel. Dit
onderbreekt automatisch de interne luidspreker waardoor u in alle stilte kan oefenen zonder overlast voor uw
omgeving.
Aansluiting van een microfoon
Sluit de meegeleverde microfoon (alléén model MEK61128-PACK) op de MIC ingang aan.
Gebruik van de stroomadapter
De gebruikte adapter moet voldoen aan de specifieke technische karakteristieken van dit instrument. Sluit de
adapter aan op de DC stroomconnectie in de achterzijde van het toestel en op de netstroom.
Opmerkingen:
A. Wees zeker dat het instrument op een laag volume ingesteld is alvorens u de aansluitingen maakt.
B. Verhoog het volume totdat het gewenste niveau bereikt is.
C. Zie de handleiding van de versterker voor de juiste aansluiting en instructies.
Plaatsen van de batterijen
Indien een netadapter op het toetsenbord aangesloten is worden de batterijen niet gebruikt.
Open het batterij vak op de onderzijde van het instrument en plaats zes 1,5Vdc ‘D’ batterijen met de juiste polariteit
in het vak. Sluit het vak.
Opmerking: Als de spanning van de batterijen te lag wordt en het instrument niet goed werkt, vervang de batterijen.
Verwijder de batterijen indien u het instrument voor een lagere periode niet gebruikt.
Nooit nieuwe en oude batterijen of verschillende types mengen. Buiten het bereik van kinderen houden. Nooit oude
batterijen in het huisvuil gooien.
LED DISPLAY
X= 1 digit; XX= 2 digits; XXX= 3 digits
CXX: Accoord Volume +/-
SuS: Sustain
Syn: Synchronize
AXX: Achtergrondvolume +/-
Uib: Vibrato
Sin: Accoord
0X / -X: Transpose +/-
tnE: Klankkleur
Fin: Fingered accoord
000
: Default mode = Piano
rhy
: Ritme
Prg
: Programmering
0o
: Functie activeren
d
XX: Song nummer
rEC
: Opname
OFF
: Functie deactiveren
XXX: Ritme nummer
Ply
: Playback
X-4: Aantal van slagen
XXX: Klankkleur nummer
Len: Leren 1/2
Als u het toetsenboard aanschakelt toont de display de fabrieksinstelling 000 zijnde piano. De fabrieksinstelling van
het ritme is 000. Kies het ritme, de klankkleur of de song. De display toont het ingestelde ritme, klankkleur of song
nummer. Als een ritme of song afgespeeld wordt flitsen de punten op de display volgens het ritme van de slagen.
Schuif de POWER schakelaar (2) op de ON positive om het keyboard in te schakelen.
Druk de MASTER volume toetsen (3) om het volume op het gewenste niveau in te stellen.
Stel het achtergrondvolume RHYTHM (4) op het gewenste niveau tussen 1 en 16.
Stel het accoordvolume CHORD (5) op het gewenste niveau tussen 1 en 16.
Selectie van de klankkleur
Het instrument biedt 128 verschillende klankkleuren aan van “000” tot en met “127”. Eens het toestel in werking
wordt gezet, begint het automatisch met de klankkleurselectie en wordt “TONE” weergegeven. Indien dit niet het
geval is, kan u deze functie aanspreken door op de klankkleur toets te drukken (28).

© Copyright Lotronic – 2017 MEK61128 Manual 18
De vooraf ingestelde klankkleur is “000” en reproduceert een pianogeluid. De gewenste klankkleur kan ingesteld
worden door de numerieke toetsen of de +/- toetsen.
VIBRATO (32)
Druk op de “VIBRATO” toets om de aangeslagen toetsen een vibrato effect te geven. Druk nogmaals op de toets om
het effect te verlaten.
SUSTAIN (33)
Druk op de “SUSTAIN” toets om de geluid van het toestel te behouden. “Sus” wordt weergegeven. Druk nogmaals
op de toets om het effect te verlaten.
KEYBOARD PERCUSSIES (24)
Druk op de KEYBOARD PERCUSSION toets en de zwarte en witte toetsen van het klavier geven een bepaald type
percussie weer. Druk opnieuw om deze functie te verlaten.
PERCUSSIE / DIERENGELUID (19)
Het instrument biedt 4 directe percussies. Druk één van de toetsen om een percussie naar uw muziekstuk toe te
voegen. Druk de KEYS DRUMS toets (24) om de dierenklanken weer te geven.
TRANSPOSE (15 & 16)
Druk op de “TRANSPOSE” toetsen om de tonaliteit van het klavier om te zetten. De omzetting gaat van “-6” tot “+6”.
Druk gelijktijdig op beide toetsen om naar de fabrieksinstelling “0” terug te keren.
METRONOOM (14)
Het instrument biedt 4 metronoomslagen aan : ¼, 2/4, ¾, en 4/4. Druk verscheidene keren op de “METRONOME”
toets om in de bovenstaande volgorde de metronoom af te stellen. Bij een vijfde druk op de toets, wordt de functie
afgesloten. De fabriekinstelling is 120.
DEMO ALL (20)
Druk op de “DEMO ALL” toets om het toestel alle voorbeeldstukken achter elkaar af te spelen. Druk nogmaals op de
toets om het afspelen te stoppen.
DEMO ONE (21)
Druk op de “DEMO ONE” toets om het toestel het gekozen voorbeeldstuk in continu te laten afspelen. Druk
nogmaals op de toets om het lied te stoppen.
LEERFUNCTIE 1
Druk op de TEACHING 1 toets (17). Druk één van de witte toetsen op de linkerzijde van het toetsenbord om een
muziekstuk te kiezen. De begeleiding begint automatisch. Nu kan u zich trainen om de melodie van het gekozen stuk
te spelen. Zelfs al speelt u een valse noot, toch blijft de melodie doorgaan. De juiste, te spelen, toetsen en hun
hoogte worden tijdens de oefening weergegeven.
LEERFUNCTIE 2
Druk op de TEACHING 2 toets (18) Druk één van de witte toetsen op de linkerzijde van het toetsenbord om een
muziekstuk te kiezen. Eens deze functie geactiveerd worden de aan te slagen toetsen weergegeven zodat de leerling
juist kan spelen. Nu wordt de melodie echter gestopt bij het aanslaan van een foute toets en gewacht tot de juiste
toets gespeeld wordt. Druk op TEACHING 2 of START/STOP om de functie te verlaten.
AUTOMATISCHE BASAKKOORDEN
1. Start het ritme:
Druk op START/STOP (31) en de begeleiding start direct. Het punt op de display flitst regelmatig. Druk opnieuw
START/STOP om de begeleiding uit te schakelen.

© Copyright Lotronic – 2017 MEK61128 Manual 19
2. INTRO / ENDING (30):
Als geen ritme geselecteerd is, druk op de INTRO/ENDING toets en speel een kort stuk. Druk op de INTRO/ENDING
toets tijdens het ritme. Het ritme stopt, het stuk wordt gespeelt en het ritme wordt verder afgespeeld.
3. Kies het ritme:
Het instrument biedt 128 ritmes aan, gaande van “000” tot en met “127”. Druk op de “RYTHME” toets en “Rythm”
wordt weergegeven op de display. U kunt het gewenste ritme selecteren door middel van de numerieke toetsen of
de +/- toetsen.
4. Opstarten van het ritme
Druk op de “START/STOP” toets om het begeleidingsritme op te starten. Vooraleer het ritme te starten, druk op de
“SYNC” toets en “Sync” wordt weergegeven op het scherm. Als u een toets op het akkoordenklavier aanslaat (de 19
toetsen op het linkerdeel van het klavier) wordt het akkoord op het begeleidingsritme gespeeld.
5. Eén-vinger akkoorden
Als het ritme geactiveerd werd, drukt u op de “SINGLE” toets (10). “SIN” wordt weergegeven en het één-vinger
akkoord kan gespeeld worden op het akkoordenklavier (35) volgens het hieronder weergegeven schema.
6. Meer-vinger akkoorden
Als het ritme geactiveerd werd, drukt u op de “FINGERED” toets. “Fin” wordt weergegeven. De akkoorden kunnen
gespeeld worden op het akkoordenklavier volgens bijgevoegd schema.:
Druk op de “CHORD OFF” toets om deze functie te stoppen. Als U wilt de begeleiding en het ritme samen stoppen,
druk op de START/STOP toets.

© Copyright Lotronic – 2017 MEK61128 Manual 20
7. INSERT
Druk tijdens het ritme modus op de “FILL IN” toets. Een tussenspel wordt automatisch ingevoegd.
8. Regeling van het tempo
Het vooraf geregelde tempo is 120 slagen per minuut. Druk op de “TEMPO FAST” of “TEMPO SLOW” toets om het
ritme te versnellen tot 240 of te vertragen tot 30. Druk gelijktijdig op beide toetsen om naar de fabrieksinstellingen
terug te keren.
OPNAME & PROGRAMMATIE
1. Programmatie
Druk op de “PROG” toets en de keyboard percussie toets (24) en het percussieklavier wordt geactiveerd. In deze
modus worden de 61 toetsen percussies. U kunt tot 32 klanken opnemen. Als de opname beëindigd is, druk de PLAY
toets om naar de percussies te luisteren. Tijdens het afspelen kunt U het tempo d.m.v. de TEMPO FAST en TEMPO
SLOW toetsen veranderen. Druk op PROGRAM of START/STOP om de programmeermodus te verlaten.
2. OPNAME & AFSPELEN
Druk op de REC toets en speel een melodie. U kunt t/m 92 toetsen opslaan. Druk de PLAY toets om het muziekstuk
af te spelen. Druk de REC of START/STOP toets om de functie te verlaten.
GEHEUGENFUNCTIE
Als u bepaalde instellingen zoals tempo, klankkleur, akkoorden en andere informaties wilt opslagen, druk de toets
(23) en één van de drie MEMORY toetsen (22) M1 tot M3. Maak de instellingen.
Let op: De geheugens worden gewist als het instrument wordt uitgeschakeld.
Precauções
Leia atentamente o manual de instruções antes de utilizar este equipamento
Utilize apenas o alimentador incluído. Não o use caso este esteja danificado.
Não desmonte o instrumento nem faça qualquer alteração técnica. Em caso de qualquer função anómala,
interrompa o uso imediatamente e informe o seu distribuidor ou um técnico qualificado.
Para conectar o teclado com outros amplificadores, certifique-se de que ambos estão desligados.
Não deixe o volume trabalhar no máximo ou num nível elevado por muito tempo.
Mantenha o instrumento afastado do calor para prevenir de eventuais danos nos componentes.
Evite a entrada de líquidos ou objetos no interior do instrumento. Poderão ocorrer danos.
Desligue o teclado da tomada antes de proceder a qualquer tipo de manutenção. Não manuseie o aparelho com
as mãos molhadas ou húmidas.
Limpe o instrumento com um pano seco e macio sem detergente, álcool ou outros produtos químicos.
Desligue e desconecte o instrumento caso não o esteja a utilizar.
Atenção! Não coloque os ouvidos perto da coluna. Os níveis elevados podem causar danos auditivos.
Não provoque curto-circuito nos contactos.
Guarde a caixa de transporte e o manual de instruções para referência futura.
PT

© Copyright Lotronic – 2017 MEK61128 Manual 21
CONTROLOS
1. Coluna
10. Acorde simples
19. Percussão
28. Tom
2. ON/OFF
11. Programa
20. Demonstração total
29. RHYTHM
3. Volume geral
12. Desativar acordes
21. Demonstração única
30. Entrada / Fim
4. Volume RHYTHM
13. Visor LED
22. Botões de memória
31. Iniciar / Parar
5. Volume dos acordes
14. Metrónomo
23. Acesso ao banco de memória
32. VIBRATO
6. Gravação
15. TRANSPO +
24. Teclado de percussão
33. SUSTAIN
7. SYNC
16. TRANSPO -
25. TEMPO +
34. FILL-IN
8. Reprodução
17. Aprendizagem 1
26. TEMPO -
35. Teclas de acordes
9. Acompanhamento automático
18. Aprendizagem 2
27. Teclado numérico
LIGAÇÕES DO PAINEL TRASEIRO
LIGAR UM TECLADO EXTERNO OU SISTEMA DE SOM EXTERNO
Ligue as fichas "L OUT R" à entrada "LINE IN" ou "AUX IN” no dispositivo de áudio ou amplificador.
LIGAR OS AUSCULTADORES
Ligue os auscultadores (não incluídos) com uma ficha Jack stereo
6.35mm à entrada "STEREO".
USAR O MICROFONE
Insira o microfone (incluído) na entrada MIC.
UTILIZAR O ALIMENTADOR
O adaptador de alimentação AC/DC deve ser o designado para o instrumento. Antes de conectar o adaptador AC/DC
à tomada, verifique se todas as outras conexões foram feitas. Insira firmemente o conector na entrada "DC 9V IN"
na parte traseira do instrumento e insira a outra extremidade na tomada de parede AC disponível (Observe que a
tensão de entrada deve ser a mesma da rede elétrica).
NOTAS:
A. Quando os fones de ouvido ou um dispositivo de áudio externo estão conectados, os altifalantes principais
desligam automaticamente.
B. Certifique-se que o nível geral do volume do instrumento está num nível baixo antes de ligar.
C. Aumente o volume gradualmente para o nível pretendido.
E. Consulte sempre o manual de instruções do amplificador para obter detalhes completos de conexão e uso.
• Coloque o suporte de música no teclado

© Copyright Lotronic – 2017 MEK61128 Manual 22
COLOCAR AS PILHAS
O leitor não é alimentado com a energia da bateria enquanto o adaptador de corrente estiver ligado.
Remova a tampa do compartimento da bateria na parte inferior do teclado e insira seis pilhas LR20 "D" com 1.5V
(não incluídas) no compartimento da bateria seguindo as indicações de polaridade (+/-) descritas no
compartimento. Recoloque a tampa.
NOTA: quando a tensão das pilhas descer e o instrumento não puder funcionar normalmente, as baterias devem ser
substituídas de imediato para não prejudicar o desempenho operacional. Se o instrumento não for utilizado durante
muito tempo, as pilhas devem ser retiradas para evitar danos.
Não misture tipos de pilhas novas com usadas. Mantenha as pilhas fora do alcance das crianças. Observe as
regulamentações locais relativas à eliminação de pilhas gastas.
VISOR LED
X= 1 dígito; XX= 2 dígitos; XXX= 3 dígitos
CXX: volume do acorde +/-
SuS: SUSTAIN
Syn: sincroniza
AXX: volume acompanhamento +/-
Uib: VIBRATO
Sin: acordes
0X / -X: TRANSPOSE +/-
tnE: tom
Fin: acompanhamento automático
000
: modo padrão = som do Piano
rhy
: ritmo
Prg
: modo de programação
0o
: ativa a função
d
XX: número da faixa
rEC
: modo de gravação
OFF: abandona a função
XXX: número do ritmo
Ply: reprodução
X-4: número de batidas
XXX: número do tom
Len: aprendizagem 1/2
Quando você liga o teclado, o visor mostra o valor padrão 000, que corresponde ao som do piano. O ritmo é
definido como padrão no valor 000.
Selecione ritmo, tom ou música. O visor LED mostrará o ritmo, o tom ou o número da música atual. Ao reproduzir
um ritmo ou uma música, os pontos no visor piscarão ao ritmo das batidas.
Coloque o interruptor de potência (2) na posição ON para ligar o teclado.
Regule o nível geral do volume no botão 3.
Ajuste o volume de acompanhamento RHYTHM (4) para o nível desejado entre 1 e 16.
Ajuste o volume de acorde (5) para o nível desejado entre 1 e 16.
SELECIONAR TOM
Escolha entre 128 sons realistas de 000 a 127. Antes de selecionar o tom, prima TONE (28) e o número do tom
desejado através das teclas numéricas. Pode também percorrer os tons através as teclas + e - do teclado numérico.
VIBRATO (32)
Prima este botão para adicionar um efeito de JITTER ao som. Prima novamente para sair da função.
SUSTAIN (33)
Prima SUSTAIN para prolongar o som. Prima novamente para cancelar o efeito.
TECLADO DE PERCUSSÃO (24)
Premindo este botão, todas as 61 teclas do teclado se tornam percussões. Prima novamente para voltar ao teclado
normal.
BOTÕES DE PERCUSSÃO / SONS DE ANIMAIS (19)
O teclado oferece 4 teclas de percussão. Prima qualquer uma delas para adicionar uma percussão à sua música.
Prima KEYS DRUMS (24) para ativar os sons dos animais.
TRANSPOSE (15 & 16)
Esta função aumenta ou diminui o tom da música. Cada vez que premir o botão TRANSPOSE + ou TRANSPOSE -, o
tom mudará por meio-tom dentro de um intervalo de -6 a 6. O valor é exibido no ecrã digital. Prima ambos os
botões para voltar ao ajuste original de 00.
METRÓNOMO (14)
Prima este botão para alternar entre 1/4->2/4->3/4->4/4->OFF. A velocidade padrão é 120.

© Copyright Lotronic – 2017 MEK61128 Manual 23
DEMO DE TODOS OS SONS (20)
Prima DEMO ALL para aceder às músicas de demonstração. O visor mostra 000 e a primeira música da lista é
reproduzida. Você pode selecionar outra música digitando o número desejado no teclado numérico ou através dos
botões + e - no teclado numérico. Para interromper as músicas demo, prima START/STOP (31).
DEMO DE UM SOM (21)
Prima DEMO ONE e selecione o número da música que deseja ouvir.
APRENDIZAGEM 1
Prima TEACHING 1 (17) para entrar no modo de um toque. Prima uma das teclas brancas no lado esquerdo do
teclado para selecionar uma melodia. O acompanhamento inicia automaticamente. Prima uma das teclas do lado
direito para reproduzir a melodia. Esta função permite aprender o ritmo de uma música.
APRENDIZAGEM 2
Prima o botão TEACHING 2 (18) para entrar no modo de seguimento. Prima uma das teclas brancas no lado
esquerdo do teclado. O acompanhamento inicia automaticamente, mas desta vez, o usuário tem que premir a tecla
correta para reproduzir a melodia. Prima TEACHING 2 ou o botão START/STOP para sair abandonar o modo de
aprendizagem.
ACORDES AUTOMÁTICOS
1. INICIAR O RITMO
Prima START/STOP (31) e o acompanhamento do ritmo começa imediatamente. O ponto no visor pisca
regularmente. Prima START/STOP novamente para desligar o acompanhamento do ritmo.
2. ENTRADA / FIM (30):
Quando nenhum ritmo for selecionado, prima INTRO/ENDING e toque um pequeno prelúdio. Durante a reprodução
rítmica, prima INTRO/ENDING. O prelúdio é reproduzido e a reprodução rítmica retoma no fim do ritmo.
3. ESCOLHER O RITMO
O instrumento oferece 128 ritmos de 000 a 127. Pressione o botão RHYTHM primeiro e selecione o ritmo que deseja
tocar pressionando as teclas numéricas.
4. SINCRONIZAR O RITMO
Prima SYNC e o ponto digital começa a piscar no visor. Prima uma das 19 teclas da esquerda para iniciar a
reprodução rítmica. Também pode premir primeiro SYNC seguido de MULTI- ou SINGLE FINGER. Prima uma das 19
teclas à esquerda para que os acordes de ritmo e reprodução sejam sincronizados.
5. ACOMPANHAMENTO AUTOMÁTICO DOS ACORDES PARA 1 DEDO
Quando o ritmo ou a reprodução sincronizada estiverem ativados, prima SINGLE. Agora você pode tocar os acordes
com um dedo como na figura abaixo:

© Copyright Lotronic – 2017 MEK61128 Manual 24
6. ACORDES MÚLTIPLOS COM ACOMPANHAMENTO AUTOMÁTICO
Quando o ritmo ou a reprodução sincronizada estiverem ativados, prima FINGER como indicado abaixo:
Para interromper o acompanhamento, prima CHORD OFF. Se quiser interromper o acompanhamento e o ritmo
simultaneamente, prima START/STOP.
7. INSERT
Durante a reprodução rítmica, se desejar inserir algum interlúdio, prima FILL IN antes de continuar o
acompanhamento rítmico.
8. AJUSTE DE TEMPO
A velocidade padrão é definida como 120 batidas/min. Prima TEMPO FAST ou TEMPO SLOW para acelerar ou
diminuir o tempo entre 30 e 240 batidas/min. Mantenha ambos os botões premidos em simultâneo para voltar a
120 batidas/min. NOTA: Esta função também funciona no modo de programação e gravação.

© Copyright Lotronic – 2017 MEK61128 Manual 25
GRAVAR E PROGRAMAR
1. PROGRAMAR
Pressione o botão PROGRAM e os recursos de programação são exibidos. Pressione o botão de percussão do painel
e reproduza as percussões nas teclas do piano. Você pode gravar até 32 sons de percussão. Quando o registro
estiver concluído, pressione o botão PLAY. Agora você pode ouvir os sons de percussão que acabou de gravar.
Durante a reprodução, pode ajustar o tempo através dos botões TEMPO FAST e TEMPO SLOW. Para cancelar a
programação, prima PROGRAM ou o botão START/STOP.
2. GRAVAR E REPRODUZIR
Prima o botão REC para reproduzir uma melodia. Você pode gravar até 92 notas. Pressione o botão PLAY para
reproduzir a música gravada. Para cancelar a função de gravação e reprodução, prima REC ou o botão START/STOP.
BANCO DE MEMÓRIA
Se pretender gravar definições especiais como velocidade, tom, ritmo, acordes e outras informações, prima o botão
de definições (23) e um dos botões MEMORY (22). Introduza as definições necessárias.
NOTA: Quando a alimentação é desligada, as memórias serão apagadas.
Electric products must not be put into household waste. Please bring them to a recycling centre. Ask your local authorities or your
dealer about the way to proceed.
Precautii
Cititi cu atentie inainte de utilizare
Utilizati doar alimentatorul furnizat. Incarcati imediat ce se descarca sau prezinta semne de functionare
necorespunzatoare.
Nu dezasamblati instrumentul si nu faceti schimbari asupra lui. In caz de defectare, apelati la un centru de service
autorizat.
Verificati sa fie deconectat inainte de a conecta instrumentul la un amplificator.
NU lasati volumul la un nivel prea mare sau la maxim un timp indelungat.
Pastrati instrumentul departe de caldura, care poate deteriora compomentele.
Nu lasati lichide sa patrunda in interiorul instrumentului, deoarece il pot deteriora sau pot provoca un scurt-
circuit.
Deconectati instrumentul de la sursa de alimentare inainte de curatare. Nu manevrati instrumentul cand aveti
mainile umede.
Curatati instrumentul cu un material textil moale si uscat, fara a utiliza detergent, alcool sau alti agenti chimici.
Opriti si deconectati instrumentul dupa utilizare sau daca nu este utilizat o perioada mai lunga de timp.
Atentie : nu puneti urechea aproape de difuzor ! Volumul prea mare va poate dauna auzului.
Nu scurtcircuitati contactele alimentatorului.
Pastrati ambalajul produsului deoarece contine informatii importante inscrise pe el.
RO

© Copyright Lotronic – 2017 MEK61128 Manual 26
Control
1. Difuzor
10. Tasta coarda single
19. Percussions
28. Ton
2. Comutator ON/OFF
11. Program
20. Demo All
29. Ritm
3. Volum master
12. Functie OFF corzi
21. Demo One
30. Intro/End
4. Volum ritm
13. Afisaj LED
22. Memory keys
31. Start/Stop
5. Volum corzi
14. Metronom
23.Memory Access key
32. Vibrato
6. Inregistrare
15. Transpo +
24. Percussion keyboard
33. Sustain
7. Sincronizare
16. Transpo -
25. Tempo +
34. Fill-in
8. Redare
17. Invatare 1
26. Tempo -
35. Claviatura
9. Corzi ciupite
18. Invatare 2
27. Taste numerice
Panoul din spate
• Utilizarea alimentatorului
Alimentatorul utilizat trebuie sa corespunda caracteristicilor tehnice
specificate pentru acest instrument. Inainte de conectarea
alimentatorului la retea, verificati ca acesta sa fie conectat la mufa de
alimentare a instrumentului.
• Utilizarea microfonului
Conectati microfonul furnizat la mufa MIC si puteti sa va acompaniati cu vocea.
• Conectarea unei casti sau a unui amplificator extern
Conectati mufa jack de 6.35 mm a castilor (nu sunt furnizate) la muha STEREO pentru a asculta muzica in casti.
Puteti sa utilizati aceeasi mufa STEREO ca semnal de iesire pentru a conecta un amplificator. Conectati mufa STEREO
cu ajutorul unui cablu audio (nu este furnizat) la intrarea LINE IN sau AUX IN la sistemul audio auxiliar.
Note :
A.Cand sunt conectate castile sau amplificatorul, difuzoarele integrate ale instrumentului sunt deconectate.
B. Reduceti complet volumul instrumentului inainte de efectuarea unei conexiuni.
C. Cresteti volumul treptat pana cand ajunge la un nivel confortabil.
D. Puteti conecta o casca, un amplificator sau un echipament stereo la aceasta mufa. Atunci cand aceasta mufa este
utilizata, difuzoarele integrate sunt automat decuplate si sunetul va fi transmis catre echipamentul conectat.
E. Consultati manualul de utilizare al amplificatorului pentru efectuarea acestei conexiuni.
• Fixati suportul portativului de tastatura.

© Copyright Lotronic – 2017 MEK61128 Manual 27
Pragatiri
• Conectarea bateriilor
Tastatura nu va functiona pe baterii cand este conectat si alimentatorul.
Deschideti capacul bateriilor si introduceti 6 baterii LR20 de 1.5 v (nu sunt incluse) in compartimentul bateriilor,
respectand polaritatea corecta. Inchideti capacul compartimentului bateriilor.
Nota : Atunci cand tensiunea pe baterii scade, instrumentul nu mai poate functiona normal si bateriile trebuie
schimbate. In cazul in care instrumentul nu este utilizat o perioada mai mare de timp, scoateti bateriilr pentru a
preveni scurgerea acestora. Nu amestecati baterii noi cu baterii vechi, nici marci diferite de baterii. Nu lasati
bateriile la indemana copiilor. Respectati legislatia in vigoare cu privire la reciclarea bateriilor uzate.
AFISAJ CU LED
X= 1 digit; XX= 2 digiti; XXX= 3 digiti
CXX: volum acorduri +/-
SuS: sustain
Syn: sincronizare
AXX: volum acompaniament +/-
Uib: vibrato
Sin: acorduri
0X / -X: transpus +/-
tnE: ton
Fin: ciupit
000
: mod implicit = pian
rhy
: ritm
Prg
: mod programare
0o
: activarea unei functie
d
XX: numar melodie
rEC
: inregistrare
OFF: parasirea unei functii
XXX: nmar ritm
Ply: redare
X-4: numar batai
XXX: numar ton
Len: invatare 1/2
Cand porniti instrumentul, pe afisaj apare valoarea implicita 000 (functionare ca si pian). Ritmul este setat si el
implicit la valoarea 000.
Selectati ritmul, tonul sau melodia. Afisajul cu LED va arata ritmul curent, tonul si numarul melodiei. Cand redati un
ritm, punctele de pe ecran vor palpi in ritmul batailor.
Comutati butonul POWER (2) pe pozitia ON pentru a porni instrumentul.
Apasati butoanele de volum MASTER (3) pentru a regla volumul la nivelul dorit.
Setati volumul acompaniamentului RHYTHM (4) la nivelul dorit – intre 1 si 16.
Setati volumul acordurilor CHORD (5) la nivelul dorit – intre 1 si 16.
SELECTARE TON
Alegeti dintre 129 tonuri, de la 000 la 127. Inainte de a selecta tonul dorit, apasati butonul TONE (28) si apoi
numarul tonului pe care doriti sa-l alegeti sau defilati printre tonuri cu ajutorul butoanelor + si – keys sau il
introduceti direct de la tastatura numerica.
Functia VIBRATO (32)
Apasati acest buton pentru a adauga un efect de vibrato sunetului. Apasati din nou pentru a parasi aceasta functie.
Functia SUSTAIN (33)
Apasati butonul SUSTAIN pentru a prelungi durata sunetului. Apasati din nou pentru a parasi aceasta functie.
KEYBOARD PERCUSSION (24)
Daca apasati acest buton, toate cele 61 clape ale instrumentului se tansforma in percutii. Apasati din nou pentru a
parasi aceasta functie si pentru a reveni la functionarea normala.
PERCUSSION / ANIMAL (19)
Claviatura are 4 taste pentru percutie. Apasati pricare dintre taste si oricand pentru a adauga percutie melodiei dvs.
Apasati butoanele KEYS DRUMS (24) pentru a activa sunete de animale.
TRANSPOSE (15 & 16)
Aceasta functie creste sau scade tonul melodiei. La oricare apasare pe butoanele TRANSPOSE + sau TRANSPOSE –,
melodia se va schimba cu o jumatate de ton – domeniul de reglaj este intre -6 si +6. Valoarea este afisata pe ecran.
Apasati ambele butoane pentru a va reintoarce la tonul initial (setarea 00).

© Copyright Lotronic – 2017 MEK61128 Manual 28
METRONOM (14)
Apasati butonul METRONOME pentru a parcurge ciclic urmatoarea secventa: 1/4->2/4->3/4->4/4->OFF. Valoarea
implicita este 120.
DEMO ALL (20)
Apasati butopnul DEMO ALL pentru a accesa melodiile demo. Afisajul va arata 000 si prima melodie va fi redata.
Puteti selecta o alta melodie prin introducerea numarului melodiei de la tastatura numerica sau puteti parcurge
melodiile prin apasarea pe butoanele + si –. Pentri a iesi din modul demo apasati butonul START/STOP (31).
DEMO ONE (21)
Apasati butonul DEMO ONE pentru a selecta numarul melodiei pe care doriti sa o redati. Redarea se opreste la
afarsitul melodiei.
FUNCTIA INVATARE 1
Apasati butonul TEACHING 1 (17) pentru a intra in modul de invatare 1. Apasati una dintre tastele albe din partea
stanga a claviaturii pentru a selecta o melodie. Acompaniamentul va incepe automat. Apasati orice tasta din partea
dreapta pentru a reda melodia. Aceasta functie va ajuta sa deprindeti ritmul unei melodii.
FUNCTIA INVATARE 2
Apasati butonul TEACHING 2 (18). Apasati una dintre tastele albe din partea stanga a claviaturii. Acompaniamentul
va incepe dar de aceasta data, utilizatorul trebuie sa apese clapele corecte pentru a reda melodia. Apasati butonul
TEACHING 2 sau START/STOP pentru a iesi din aceasta functie.
FUNCTIA ACORDURI AUTOMATE
1. Pornire ritm:
Apasati butonul START/STOP (31) si ritmul acompaniamentului incepe imediat. Punctul de pe ecran palpaie regulat.
Apasati butonul /STOP din nou pentru a iesi din aceasta functie.
2. INTRO / END (30):
Daca nu este selectat nici un ritm, apasati butonul INTRO/ENDING pentru a reda un scurt preludiu al melodiei. Pe
durata redarii ritmului, apasati butonul INTRO/ENDING. Ritmul se opreste, preludiul melodiei este redat si ritmul se
reia.
3. Selectare ritm:
Instrumentul are 128 ritmuri, numerotate de la 000 la 127. Apasati mai intai butonul RHYTHM si selectati ritmul
dorit prin introducerea numarului ritmului de la tastatura numerica.
4. Sincronizare ritm
Apasati butonul SYNC si punctele de pe afisaj incep sa palpaie. Apasati una dintre cele 19 taste din stanga pentru a
incepe redarea unui ritm. Puteti de asemenea sa apasati intai butonul SYNC si apoi MULTI- sau SINGLE FINGER si
apasati apoi una dintre cele 19 taste pentru sincronizarea ritmului cu acordurile.
5. SINGLE acord cu 1 deget
Cand sunt activate ritmul sau redarea sincronizata, apasati butonul SINGLE. Acuma puteti sa redati acordurile
apasand o singura tasta, dupa cum se arata in figura de mai jos:

© Copyright Lotronic – 2017 MEK61128 Manual 29
6. ACORDURI CU MAI MULTE DEGETE
Cand sunt activate ritmul sau redarea sincronizata, apasati butonul FINGER. Apasati clapele asa cum se arata in
figura de mai jos:
Pentru a opri acompaniamentul, apasati butonul CHORD OFF. Daca doriti sa opriti simultan acompaniamentul si
ritmul, apasati butonul START/STOP.
7. INSERT
Pe durarat redarii ritmului, apasati butonul FILL IN button pentru a introduce o portiune intermediara inainte de a
continua acompaniamentul.
8. Reglare TEMPO
Viteza implicita este de 120 batai/minut. Apasati butoanele TEMPO FAST sau TEMPO SLOW pentru a mari sau
micsora ritmul, in limitele 30 - 240 batai/minut. Tineti apasate ambele butoane pentru a reveni la ritmul initial de
120 batai/minut. Va rugam sa retineti ca aceasta procedura functioneaza si in modul redare si in modul inregistrare.
INREGISTRARE SI PROGRAMARE
1. Programare
Apasati butonul PROGRAM si caracteristicile de programare sunt afisate. Apasati nutonul de percutie si redati
percutiile la clape. Puteti inregistra pana la 32 sunete de percutie. Cand inregistrarea este terminata, apasati butonul
PLAY. Acum puteti asculta percutiile pe care le-ati inregistrat. Pe durata inregistrarii puteti regla tempo-ul cu ajutorul
butoanelor TEMPO FAST si TEMPO SLOW. Pentru a anula programarea, apasati butonul PROGRAM sau START/STOP.

© Copyright Lotronic – 2017 MEK61128 Manual 30
2. INREGISTRARE SI REDARE
Apasati butonul REC si redati o melodie. Puteti inregistra pana la 92 note. Apasati butonul PLAY pentru a reda
inregistrarea. Pentru a opri inregistrarea si redarea, apasati butonul REC sau START/STOP.
MEMORIE
Daca doriti sa inregistrati setari speciale cum ar fi viteza, tonul, ritmul, acorduri sau alte informatii, apasati butonul
de setare (23) si unul din butoanele MEMORY (22). Introduceti setarile cerute.
Va rugam sa retineti memoria se sterge dupa oprirea instrumentului.
Advertencias
Lea atentamente antes de poner en marcha
Cambie el adaptador de corriente si presenta daños o mal funcionamiento.
Jamás desmonte el instrumento, ni modifique las partes internas. En caso de malfuncionamiento, llame a un
técnico cualificado.
Apague el instrumento y el amplificador antes de conectar.
No poner el volumen al máximo.
Mantener protegido del calor.
Evite la entrada de polvo, líquidos u otras partículas en el instrumento. Pueden causar la corrosión y
cortocircuitos.
Desenchufe el equipo antes de limpiarlo. No conecte o desconecte el aparato con las manos mojadas.
Limpiar el aparato con un paño suave y seco sin usar alcohol u otros productos de limpieza domésticos.
Apagar y desenchufar el instrumento en caso de no utilizarlo.
Atención! No acerque la oreja al altavoz. Un volumen muy elevado puede dañar su oído.
No cortocircuite las clavijas de alimentación.
Conserve el embalaje.
Controles
1. Altavoz
10. Acorde a 1 dedo
19. Percusiones
28. Sonoridad
2. Interruptor ON/OFF
11. Programación
20. Teclas de canciones demo
29. Ritmo
3. Volumen general
12. Parada de acordes
21. Una canción demo
30. Intro/End
4. Volumen del ritmo
13. Display de LED
22. Teclas de memoria
31. Start/Stop
ES

© Copyright Lotronic – 2017 MEK61128 Manual 31
5. Volumen de los acordes
14. Metrónomo
23. Activación de la memoria
32. Vibrato
6. Grabación
15. Transposer +
24. Percusión teclado
33. Sustain
7. Sync
16. Transposer -
25. Tempo +
34. Fill-in (inserción)
8. Lectura
17. Aprendizaje 1
26. Tempo -
35. Teclado para los acordes
9. Acorde dedos
18. Aprendizaje 2
27. Tecas numéricas
Conectores traseros
• Uso del adaptador de corriente
El adaptador utilizado debe ser el original o uno idéntico a las características técnicas especificadas para este
instrumento. Antes de conectar el adaptador AC/DC en el enchufe de la pared, asegúrese que todas las otras
conexiones están efectuadas. Conecte un lado del alimentador a la clavija de alimentación 9VDC en la parte trasera
del instrumento y la otra en la toma de corriente.
• Uso del micrófono
Conecte el micrófono suministrado en la clavija MIC y usted podrá
acompañar cantando.
• Conexión de un casco o un amplificador externo
Conecte la clavija Jack estéreo 6.35mm de sus auriculares (no incluido)
en la clavija STEREO para una escucha privada.
Podrá igualmente utilizar esta clavija para conectar la señal de audio del instrumento a un sistema de audio
amplificado. Conecte la clavija STEREO en la clavija LINE IN o AUX IN del sistema de audio por medio un cable que
tenga por un lado una clavija Jack estéreo 6,35mm y por el otro lado 2 clavijas RCA (no incluido).
Notas:
A. Cuando los auriculares o un amplificador están conectados, los altavoces integrados se silencian
automáticamente.
B. Baje el volumen del instrumento antes de realizar la conexión
C. Aumentar progresivamente el volumen hasta un nivel que le sea cómodo
D. Un casco, un amplificador o un equipo estéreo pueden conectarse a esta clavija. Cuándo esta clavija es utilizada,
los altavoces integrados automáticamente se cortan y el sonido únicamente es reproducido por el producto
conectado.
E. Consulte el manual de usuario para el amplificador para conexiones completas y uso.
Fije el soporte de partituras al teclado
Preparativos
Colocación de las pilas
El teclado no funcionará a pilas si el adaptador está conectado. Retire la tapa del compartimento de las pilas en la
parte inferior del teclado e inserte seis pilas LR20 de 1.5V (no incluidas) en el compartimento siguiendo las
indicaciones de polaridad (+/-) en el interior del compartimento. Vuelva a colocar la tapa en su lugar.
Nota: Cuándo la tensión de las pilas baja, el instrumento no puede funcionar normalmente, es el momento de
cambiar las pilas. En caso de no utilizar el equipo de una manera prolongada, retire las pilas para evitar daños por
fugas de las mismas. No mezclar pilas nuevas y usadas, ni diferentes tipos de pilas. Mantener las pilas fuera del
alcance de los niños. Respete la legislación en vigor concerniente a la manera de reciclar las pilas usadas.
DISPLAY DE LED
X= 1 digito; XX= 2 dígitos; XXX= 3 dígitos
CXX: Volumen de los acordes +/-
SuS: Sustain
Syn: Sincronizar
AXX: Volumen del acompañamiento
+/-
Uib: Vibrato
Sin: Acordes
0X / -X: Transpose +/-
tnE: Sonoridad
Fin: A dedo
000: Modo por defecto= Piano
rhy: Ryitmo
Prg: Modo de programación
0o: Activa una función
dXX: Numero de canción
rEC: Grabación
OFF: Quitar una función
XXX: Numero de ritmo
Ply: Lectura
X-4: Numero de golpes
XXX: Numero de la sonoridad
Len: Aprendizaje 1/2

© Copyright Lotronic – 2017 MEK61128 Manual 32
Cuándo enciende el teclado, el valor por defecto que se muestra es 000 que es el sonido del piano. El ritmo está
ajustado por defecto en 000.
Seleccione el ritmo, la tonalidad o la canción. Se muestra el valor actual de la función. Durante la lectura de un ritmo
o de una canción, los puntos en el display parpadean al ritmo de los golpes.
Ponga el conmutador POWER (2) en la posición ON para encender el teclado.
Apriete los controles de volumen MASTER (3) para ajustar el volumen al nivel deseado.
Ajuste el volumen del acompañamiento RHYTHM (4) al ritmo deseado entre 1 y 16.
Ajuste el volumen de los acordes CHORD (5) al nivel deseado entre 1 et 16.
SELECCION DE LA SONORIDAD
Seleccione entre 128 sonoridades realistas entre 000 y 127. Antes de seleccionar la sonoridad, apriete en la tecla
OTNE (28) seguido del número de sonoridad deseado por medio de las teclas numéricas. O bien navegue por las
sonoridades con las teclas + y – del teclado numérico.
VIBRATO (32)
Apriete esta tecla para añadir en efecto de vibración al sonido. Apriete de nuevo para quitar esta función.
SUSTAIN (33)
Apriete la tecla SUSTAIN y se mostrara « Sus ». EL sonido del teclado es mantenido. Apriete de nuevo esta tecla par
que desaparezca este efecto.
PERCUSSIONS CLAVIER (24)
Cuándo apriete en esta tecla, las 61 teclas del teclado se convierten en percusiones. Apriete de nuevo para volver al
teclado normal.
Teclas de PERCUSION / ANIMAL (19)
El teclado cuenta con 4 teclas de percusión. Apriete en la percusión deseada para adjuntar a su tema musical..
Apriete la tecla KEYS DRUMS (24) para convertir los sonidos de percusión en sonido de animales.
TRANSPOSE (15 & 16)
Estas teclas aumentan o bajan la tonalidad de la música en una media nota dentro de un rango de -6 à 06. El valor se
muestra en la pantalla. Apriete en las dos teclas a la vez para volver al ajuste original de 00.
METRONOMO (14)
El instrumento ofrece 4 golpes de metrónomo: ¼, 2/4, ¾ y 4/4. Apriete diferentes veces sobre la tecla METRONOME
para ajustar en el orden siguiente ¼, 2/4, ¾ y 4/4. A la 5ª presión, la función se quita. El ajuste por defecto, es 120.
DEMO ALL (20)
El instrumento ofrece 30 temas de demostración que van desde « 000 » a « 029 ». Si aprieta la tecla DEMO ALL,
podrá seleccionar el tema deseado con las teclas numéricas o las teclas +/-.
Para parar la lectura, apriete en la tecla START/STOP (31).
DEMO ONE (21)
Apriete en la tecla DEMO ONE y el instrumento pasará la canción de demo preseleccionada y se parará al final de la
canción.
APRENDIZAJE 1
Apriete en las teclas TEACHING 1 (17). Apriete en una de las teclas blancas de la izquierda del teclado para
seleccionar una melodía. EL acompañamiento comienza automáticamente. Ahora usted puede entrenarse para
tocar la melodía de la canción seleccionada. Incluso si toca una nota equivocada, la melodía continúa. Durante el
ejercicio, las teclas a tocar aparecen en el display así como el alcance. Apriete la tecla START/STOP para salir de la
función. Cuándo acaba una canción, otra seguirá automáticamente.
APPRENDIZAJE 2
Apriete en la tecla TEACHING 2 (18). Apriete en una de las teclas blancas del lado izquierdo del teclado para
seleccionar una melodía. El acompañamiento comenzará automáticamente pero de la siguiente manera,
el

© Copyright Lotronic – 2017 MEK61128 Manual 33
estudiante debe tocar las notas correctas. Las manchas pequeñas en la pantalla indican al estudiante para golpear
las teclas. En caso de error, la melodía se detendrá hasta que se toca la nota correcta. Apriete en la tecla TEACHING
2 o START/STOP para quitar la función.
ACORDES AUTOMATICOS
1. Arrancar el ritmo:
Apriete en la tecla START/STOP (31) para arrancar inmediatamente el ritmo de acompañamiento. Un punto
parpadea regularmente en el display. Para parar el ritmo, apriete de nuevo en START/STOP.
2. INTRO / END (30):
Cuando no se seleccione ningún ritmo, apriete en la tecla INTRO/END y reproducirá un pequeño trozo. Durante la
lectura del ritmo, apriete en la tecla INTRO/END. EL ritmo se para, su tema se reproduce y el ritmo se reemprende.
3. Selección del ritmo:
El instrumento ofrece 128 ritmos de 000 a 127. Primero, pulse la tecla RYHTM y seleccionar el ritmo deseado con el
teclado.
4. Comenzar la sincronización del ritmo
Apriete en la tecla SYNC y los puntos en el display parpadean. Apriete en una de las primeras 19 teclas partiendo de
la izquierda y el ritmo y el acompañamiento serán reproducidos a la vez.
Puede igualmente apretar primero la tecla SYNC, seguidamente en MULTI (10) o SINGLE (9) y después en una de las
19 teclas de la izquierda del teclado para que el juego y los acordes sean sincronizados.
5. SINGLE – Acorde a 1 dedo
Cuándo el ritmo está activado, apriete en la tecla SINGLE (9). Se mostrará « SIN » y se hará el acorde a un dedo en el
teclado de acordes (35) según la tabla de abajo.
6. ACORDES A DIFERENTES DEDOS
Cuándo el ritmo está activado, apriete en la tecla FINGERED. Se mostrará « Fin ». El acorde a dedos se hará en el
teclado de acordes, según la tabla siguiente:

© Copyright Lotronic – 2017 MEK61128 Manual 34
Para parar el acompañamiento, apriete en la tecla CHORD OFF. Si usted desea parar el acompañamiento y el ritmo,
apriete en la tecla START/STOP.
7. INSERT
Durante el ritmo, apriete en la tecla FILL-IN para insertar un intermedio antes de continuar el acompañamiento.
8. AJUSTE DEL TEMPO
La velocidad por defecto de los golpes, es de 120 golpes/minuto. Apriete en las teclas TEMPO FAST o TEMPO SLOW
para acelerar o ralentizar en tempo 30 y 240 golpes/minuto. Mantengas las dos teclas apretadas simultáneamente
para volver al ajuste por defecto de 120 golpes/minuto. Tenga en cuenta que esta función esta igualmente
disponible en modo programación y grabación.
GRABACION Y PROGRAMACION
1. Programación
Apriete en la tecla PROG. Se mostrará « PRG », los golpes automáticos y la percusión del teclado están activados.
Dentro de este modo, puede seleccionar entre las 4 percusiones directas o la percusión teclado para editar una
pieza de ritmo. El nuevo ritmo editado reemplazará al anterior. Podrá grabar hasta 32 notas. Cuándo su pieza esté
acabada, presione sobre PLAY para escuchar las percusiones que haya grabado. Durante la lectura, podrá ajustar el
tempo mediante las teclas TEMPO FAST y TEMPO SLOW. Para parar la programación, apriete las teclas PROGRAM o
START/STOP.
2. GRABACION Y LECTURA
Apriete en la tecla REC y reproduzca una melodía. Podrá grabar hasta 92 notas. Apriete en la tecla PLAY para
escuchar la grabación. Para quitar la función de grabación y lectura, apriete las teclas REC o START/STOP.
MEMORIA
Si desea grabar un ajuste especial concerniente al tempo, la sonoridad, el ritmo, los acordes o cualquier otra
información, apriete en la tecla (23) y un de las teclas de memoria (22). Entre los ajustes. Atención: los datos no
quedan guardados después de apagar el instrumento.
Imported from China by LOTRONIC SA Avenue Zénobe Gramme 9 B – 1480 SAINTES
-
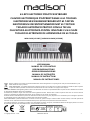 1
1
-
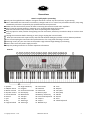 2
2
-
 3
3
-
 4
4
-
 5
5
-
 6
6
-
 7
7
-
 8
8
-
 9
9
-
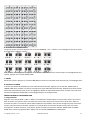 10
10
-
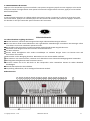 11
11
-
 12
12
-
 13
13
-
 14
14
-
 15
15
-
 16
16
-
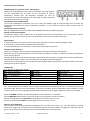 17
17
-
 18
18
-
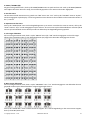 19
19
-
 20
20
-
 21
21
-
 22
22
-
 23
23
-
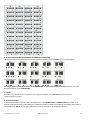 24
24
-
 25
25
-
 26
26
-
 27
27
-
 28
28
-
 29
29
-
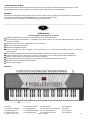 30
30
-
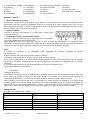 31
31
-
 32
32
-
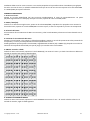 33
33
-
 34
34


MADISON MEK61128 PACK de handleiding
- Type
- de handleiding
- Deze handleiding is ook geschikt voor
in andere talen
Andere documenten
-
NOVISTAR PACK CLAVIER ST54 de handleiding
-
Yamaha PSR-70 de handleiding
-
-
-
-
-
 MaxMusic KB12P de handleiding
-
-
-
