Brandt BDF10B_01_ de handleiding
- Categorie
- Strijkijzers
- Type
- de handleiding
Deze handleiding is ook geschikt voor

1
MANUEL D’INSTRUCTION FR
INSTRUCTION MANUAL EN
MANUAL DE INSTRUCCCIONES ES
INSTRUCTIEHANDLEIDING NL
DEFROISSEUR
CLOTHES STEAMER
VAPORIZADOR DE ROPA
KLEDINGSTOMER
BDF10V/BDF10B/BDF10N

2
Chère Cliente, Cher Client,
BRANDT et nous vous remercions de la confiance
que vous nous accordez.
Nous avons conçu et fabriqué ce produit en pensant à vous, à votre mode de vie, à
vos besoins,
savoir-
de 60 ans.
Dans un souci permanent de toujours mieux satisfaire vos exigences, notre service
consommateurs est à votre disposition et à votre écoute pour répondre à toutes vos
questions ou suggestions.
Connectez-vous aussi sur notre site www.brandt.com où vous trouverez nos
dernières innovations, ainsi que des informations utiles et complémentaires.
BRANDT est heureux de vous accompagner au quotidien et vous souhaite de profiter
pleinement de votre achat.
Important : Avant de mettre votre appareil en marche, veuillez lire
attentivement ce guide d’installation et d’utilisation afin de vous
familiariser plus rapidement avec son fonctionnement.

3
SOMMAIRE
1) À L’ATTENTION DE L’UTILISATEUR ...................................................................................... 4
a) Consignes de sécurité.................................................................................................................................... 4
b) Données Techniques ..................................................................................................................................... 6
c) Protection de l’environnement........................................................................................................................ 6
2) INSTALLATION DE VOTRE APPAREIL .................................................................................... 7
a) Description ................................................................................................................................................... 7
b) Avant la première utilisation .......................................................................................................................... 9
c) Remplissage du réservoir d’eau ...................................................................................................................... 9
3) UTILISATION DE VOTRE APPAREIL ...................................................................................... 9
a) Installation ................................................................................................................................................... 9
b) Fonction Vapeur .......................................................................................................................................... 10
c) Fonction Arrêt automatique ......................................................................................................................... 10
d) Fonction Vapeur continue ............................................................................................................................ 10
e) Accessoires ................................................................................................................................................. 12
4) NETTOYAGE ET STOCKAGE ................................................................................................ 12
5) RELATIONS CONSOMMATEURS FRANCE ............................................................................. 14

4
1) À L’ATTENTION DE L’UTILISATEUR
INSTRUCTIONS DE SÉCURITÉ IMPORTANTES LIRE AVEC
ATTENTION ET GARDER POUR DE FUTURES UTILISATIONS
Cet appareil est destiné à être utilisé dans des applications
domestiques et analogues telles que :
▪ les coins cuisines réservés au personnel des magasins, bureaux et
autres environnements professionnels ;
▪ les fermes ;
▪
environnements à caractère résidentiel ;
▪ s.
▪
ou de cession de cet appareil à une autre personne, assurez-vous
a) Consignes de sécurité
Installation
▪
te à la
chaleur.
Utilisation
▪ Cet appareil peut être utilisé par des enfants âgés d'au moins 8 ans
et par des personnes ayant des capacités physiques, sensorielles
s'ils sont correctement surveillés ou si des instructions relatives à
l'utilisation de l'appareil en toute sécurité leur ont été données et si
les risques encourus ont été appréhendés.
▪
moins de 8 ans.
▪ Les enfants ne d
▪ Maintenir le fer et son cordon hors de portée des enfants de moins

5
de 8 ans lorsqu'il est alimenté ou en train de refroidir.
▪ L'utilisateur ne doit pas laisser le fer sans surveillance lorsqu'il est
raccordé à l'alimentation.
▪ La fiche de prise de courant doit être retirée du socle de prise de
courant avant de remplir le réservoir d'eau.
▪ L'orifice de remplissage ne doit pas être ouvert pendant le
fonctionnement.
▪ Le fer à repasser ne doit pas être utilisé s'il a subi une chute, s'il y a
des signes visibles de dommages ou s'il fuit.
Attention, surface chaude. Des surfaces sont susceptibles de
devenir très chaudes au cours de l'utilisation .
▪ La vapeur est très chaude : ne jamais tenter de défroisser un
Entretien
▪ Le nettoyage et l'entretien par l'usager ne doivent pas être effectués
par des enfants sans surveillance.
▪ La fiche de prise de courant du câble d'alimentation doit être
enlevée du socle avant de nettoyer l'appareil ou d'entreprendre les
opérations d'entretien.
▪ Si le câble d'alimentation est endommagé, il doit être remplacé par
le fabricant, son service après-vente ou des personnes de
qualification similaire afin d'éviter un danger.
▪ S'il est nécessaire de prendre des précautions lors de l'entretien par
l'usager, les détails appropriés doivent être donnés.
Utilisation non conforme
▪
non conformes.

6
b) Données Techniques
Modèle
BDF10V/ BDF10B/BDF10N
Alimentation électrique
220-240 V~, 50-60 Hz
Paramètres nominaux
2 200 W
Dimension du produit
292*107*135
c) Protection de l’environnement
Participez à leur recyclage et contribuez ainsi à la protection de
prévus à cet effet.
Votre appareil contient également de nombreux matériaux recyclables. Il
est donc marqué de ce logo afin de vous indiquer que les appareils
dans les meilleures conditions, conformément à la directive européenne
Adressez-vous à votre mairie ou à votre revendeur pour connaître les
points de collecte des appareils usagés les plus proches de votre
domicile.
Nous vous remercions pour votre collaboration à la protection de

7
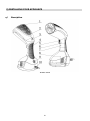
2) INSTALLATION DE VOTRE APPAREIL
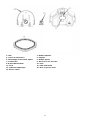
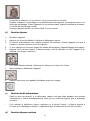
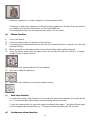
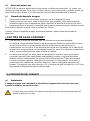
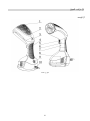
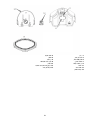
a) Description
Réservoir d'eau

8
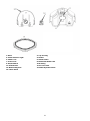
1 : Tête
2 : Boîtier supérieur
3 : Témoin d’alimentation
4 : Poignée
5 : Verrouillage de la fonction vapeur
6 : Bouton Vapeur
7 : Cache avant
8 : Réservoir d’eau amovible
9 : Bouton Marche/Arrêt
10 : Prise
11 : Socle
12 : Filtre anticalcaire
13 : Orifice de remplissage
14 : Buse d’injection d’eau
15 : Brosse à tissu

9
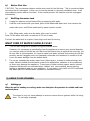
b) Avant la première utilisation
ATTENTION ! Le défroisseur vapeur dégage de la fumée lors de sa première utilisation. C'est
normal et cela ne signifie pas qu'il est abîmé. Le cas échéant, il convient de le placer dans une
pièce correctement aérée. Il cessera de dégager de la fumée après un bref moment. Si la fumée
persiste, débrancher immédiatement le défroisseur vapeur.
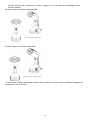
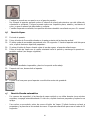
c) Remplissage du réservoir d’eau
1.
2. eau amovible, puis retirer le
3. Après avoir rempli le réservoir, vérifier que le cache de l'admission d'eau est hermétiquement
fermé.
Remarque : Remplir le rés mL.
défroissage.
QUEL TYPE D’EAU UTILISER ?
1. Ce défroisseur
minéraux. Il est possible de changer le filtre anticalcaire : faire pivoter le filtre pour le retirer
du so
socle.
2. -
issue de réfrigérateurs, de batteries ou de climatiseurs, car cela pourrait endommager
re prématurée de votre appareil. Si votre eau est très
magasin de bricolage).
3) UTILISATION DE VOTRE APPAREIL
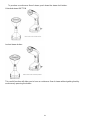
a) Installation
Lorsque l’appareil est en cours de chauffage ou de refroidissement, veiller à ce qu’il soit
placé sur une surface stable qui résiste à la chaleur.
porté.

10
- Suspendre le vêtement sur un cintre ou sur le crochet prévu à cet effet.
- -ci sur
car la tête de défroissage chauffe.
- auffe, sa surface tiédit. Ceci est normal.
b) Fonction Vapeur
1.
2.
3.
lumineux cesse de clignoter.
4. Si vous appuyez sur le bouton Vapeur au-
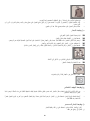
5.
verticale (voir image ci-dessous).
6. Pour une utilisation optimale, défroisser les vêtements du haut vers le bas.
7.
8.
c) Fonction Arrêt automatique
-
est éteint.
- Pour rallumer le défroisseur vapeur, rappuyer sur le bouton Vapeur. Le témoin clignote à
secondes.
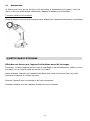
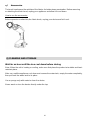
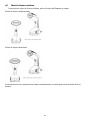
d) Fonction Vapeur continue

11
Afin de produire de la vapeur en continu, appuyer sur le bouton de verrouillage de la
fonction vapeur.
Bouton Vapeur en position déverrouillée
Bouton Vapeur en position verrouillée
Cette fonction pratique permet de produire de la vapeur en continu sans se fatiguer à appuyer en
permanence sur le bouton.

12
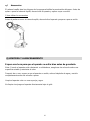
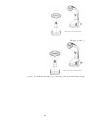
e) Accessoires
La tête-brosse ouvre les plis des tissus afin de faciliter la pénétration de la vapeur. Avant de
retirer ou de fixer la tête-
Comment utiliser les accessoires
4) NETTOYAGE ET STOCKAGE
Attendre une heure que l’appareil refroidisse avant de le ranger.
Remarque
soit placé sur une surface stable qui résiste à la chaleur.
entièrement avant de le remettre en place.

13
B) Stockage
entièrement avant de le remettre en place.
Après avoir éliminé les dépôts calcaires, débrancher l'appareil, attendre que le produit refroidisse
pendant au moins 5

14
5) RELATIONS CONSOMMATEURS FRANCE
Pour en savoir plus sur nos produits ou nous contacter, vous pouvez :
Consulter notre site : www.brandt.fr
Nous écrire à l’adresse postale suivante :
Service Consommateurs BRANDT
5 avenue des Béthunes
CS69526 SAINT OUEN L’AUMONE
95060 CERGY PONTOISE CEDEX
Nous appeler du lundi au vendredi de 8h30 à 18h00 au :

15
Dear Customer,
Thank you for purchasing and placing your trust in a BRANDT product.
We have designed and made this product with you, your lifestyle and your
requirements in mind so that it meets your expectations. It comes packed with more
than 60 years of expertise, innovative spirit and passion.
In a continuous effort to better satisfy your needs, our customer service department
is available to listen and answer all your questions and receive any suggestions you
may have.
Visit our website at www.brandt.com where you will find our latest innovations, as
well as useful and complementary information.
BRANDT is pleased to be on hand to offer daily support and to help you make the
most of your purchase.
Important: Before using your appliance, read this user guide carefully
to familiarise yourself more quickly with its operation.

16
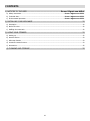
CONTENTS
1) NOTICES TO THE USER .............................................................. Erreur ! Signet non défini.
a) Safety instructions ............................................................................................... Erreur ! Signet non défini.
b) Technical data ..................................................................................................... Erreur ! Signet non défini.
c) Environmental protection ...................................................................................... Erreur ! Signet non défini.
2) INSTALLING YOUR APPLIANCE ........................................................................................... 20
a) Description ................................................................................................................................................. 20
b) Before First Use .......................................................................................................................................... 22
c) Refilling the water tank ............................................................................................................................... 22
3) USING YOUR STEAMER ...................................................................................................... 22
a) Setting up .................................................................................................................................................. 22
b) Steam Function ........................................................................................................................................... 23
c) Safe stop function ....................................................................................................................................... 23
d) Continuous steam function .......................................................................................................................... 23
e) Accessories ................................................................................................................................................. 25
4) CLEANING AND STORAGE ................................................................................................ 25

17
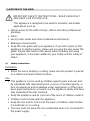
1) NOTICES TO THE USER
IMPORTANT SAFETY INSTRUCTIONS - READ CAREFULLY
AND KEEP FOR FUTURE USE
This appliance is designed to be used for domestic and similar
applications such as:
▪ kitchen areas for the staff of shops, offices and other professional
premises;
▪ farms;
▪ use by hotel, motel and other residential environments;
▪ B&B-type environments.
▪ Keep this user guide with your appliance. If you sell or pass on this
appliance to another person, make sure you give the new owner this
guide. Please take heed of this advice when installing and using
your appliance. It has been written for your safety and the safety of
others.
a) Safety instructions
Installation
▪ When the unit is heating or cooling, make sure the product is placed
on a stable and heat-resistant surface.
Use
▪ This appliance can be used by children aged 8 years and over and
by individuals with reduced physical, sensory or mental capacity, or
lack of experience and knowledge under supervision or if they have
been given instructions on how to use the appliance safely and have
fully understood the risks involved.
▪ Keep the appliance and its cord out of the reach of children under 8.
▪ Children must not play with the appliance.
▪ Keep the iron and its cord out of the reach of children under 8 when
it is switched on or cooling.
▪ The user must not leave the iron unattended when it is connected to
the power supply.

18
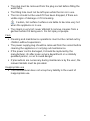
▪ The plug must be removed from the plug socket before filling the
water tank.
▪ The filling hole must not be left open while the iron is in use.
▪ The iron should not be used if it has been dropped, if there are
visible signs of damage or if it is leaking.
Caution, hot surface Surfaces are liable to become very hot
when the appliance is in use.
▪ The steam is very hot: never attempt to remove creases from a
garment while it is being worn. Do not spray at people.
Care
▪ Cleaning and maintenance operations must not be carried out by
children without supervision.
▪ The power supply plug should be removed from the socket before
cleaning the appliance or carrying out maintenance.
▪ If the power cord is damaged, it should be replaced by the
manufacturer, its after-sales service department or a similarly
qualified person, so as to avoid danger.
▪ If precautions are necessary during maintenance by the user, the
relevant details must be provided.
Inappropriate use
▪ The manufacturer does not accept any liability in the event of
inappropriate use.

19
b) Technical data
Model
BDF10V/ BDF10B/BDF10N
Power supply
220-240 V~, 50-60 Hz
Nominal settings
2,200 W
Product dimensions
292*107*135
c) Environmental protection
The packaging material of this appliance is recyclable. Please
recycle it and help protect the environment by depositing it in
municipal containers provided for this purpose.
Your appliance also contains many recyclable materials. It is
therefore marked with this logo to indicate that used appliances should
not be mixed with other waste. Recycling of appliances organised by your
manufacturer is carried out under the best conditions, in accordance with
the European regulation in force on waste disposal of electronic and
electrical equipment. Contact your local authority or retailer for
information on used appliance collection points close to your home.
We thank you for your help in protecting the environment.

20
2) INSTALLING YOUR APPLIANCE
a) Description
Water tank

21
1: Head
2: Top Housing
3: Power Indicator Light
4: Handle
5: Steam Lock
6: Steam Switch
7: Front Cover
8: Detachabel Water Tank
9: On/Off Switch
10: Bushing
11: Bottom Base
12: De-Calc Filter
13: Water Filling hole
14: Water Injection Nozzle
15: Fabric Brush

22
b) Before First Use
CAUTION! The iron steamer release smoke when used for the first time. This is normal and does
not mean that it is damaged. In this case, it must be placed in a properly ventilated room. It will
stop releasing smoke after a short time. If the smoke persists, the steamer must be unplugged
immediately.
c) Refilling the water tank
1. Unplug the steamer socket before filling or emptying with water.
2. Hold the main handle with your hand, pull out the detachable water tank, then remove the
water inlet cover, and fill the water tank by water injection nozzle.
3. After filling water, make sure the water inlet cover is sealed.
Note: Fill the water tank with a maximum of 250 ml of water.
Put back the water tank to its place, then plug in and wait for ironing.
WHAT KIND OF WATER SHOULD I USE?
1. This iron was designed to operate using pure distilled water.
However, it is necessary to periodically clean the appliance to remove any mineral deposits,
you can turn and pull out the de-calc filter from the bottom base to replace the new ones, the
de-calc filter is exchangeable, it is used to make hard water soft and thus prolong the life the
-calc treatment is needed or it will
cause the water leakage from the bottom base.
2. Do not use untreated tap water, water from clothes dryers, scented or softened water, rain
water, filtered, bottled or boiled water, water from refrigerators, batteries or air conditioners
as these may damage the appliance. These types of water contain organic waste, mineral
elements that become concentrated when heated and cause spitting, brown staining,
leaking or premature wear on your appliance. If your water is very hard, mix 50% untreated
tap water with 50% distilled water (available in hardware stores).
3) USING YOUR STEAMER
a) Setting up
When the unit is heating or cooling, make sure that place the product at a stable and heat-
resistant place.
The steam is very hot: never attempt to remove creases from a garment while it is being
worn. Do not spray at people.

23
- Hang your garment on a clothes hanger or on the dedicated hook.
- During use or while unit is heating or cooling do not rest appliance on its head. Place the product
on a stable, heat resistant, flat surface, as the head will be hot.
- As the appliance heats, the housing becomes warm. This is normal.
b) Steam Function
9. Plug in the device
10. Press the power switch, on the back of the steamer.
11. The green power indicator will flash for 30 seconds. When the device is ready for use, the light
will stop flashing.
12. When you press on the steam button on top of the handle, steam will be released.
13. Press the steam switch with the steam brush facing with the cloth and hold it in a vertical
position (Refer to below Picture).
14. For optimal use, ironing clothes from up to bottom.
15. After use, unplug the appliance.
16. Wait for an hour until the iron cool down before storing
c) Safe stop function
- For maximum safety, if the steamer is not used for five consecutive minutes, the power will be
cut. The indicator light will then flash and the heating will be turned off.
- To turn the steamer back on, press the power the steam button again. The light will flash again
and the heating will be turned back on. The device will be functional after 30 seconds.
d) Continuous steam function

24
To produce a continuous flow of steam, push down the steam lock button.
Unlocked steam BUTTON
Locked steam button
This useful function will allow you to have a continuous flow of steam without getting tired by
continuously pressing the button.

25
e) Accessories
The brush head opens the wrinkles of the fabrics for better steam penetration. Before removing
or attaching the brush head, unplug your appliance and allow it to cool down.
How to use the accessories
Before removing or attaching the fabric brush, unplug your device and let it cool.
4) CLEANING AND STORAGE
Wait for an hour until the iron cool down before storing
Note: When the unit is heating or cooling, make sure that place the product at a stable and heat-
resistant place.
After use, wait the appliance cool down and remove the water tank, empty the water completely,
then put back the water tank to its place.
Use a sponge only with water to clean the device
Never wash or rinse the device directly under the tap

26
B) Storing
After use, wait the appliance cool down and remove the water tank, empty the water completely,
then put back the water tank to its place.
After calcifications remove, unplug the product, after cooling the product for at least 5 minutes, wipe
the scale off the steam panel with a soft cloth.

27
Estimado/a cliente/a:
Le agradecemos la confianza que ha depositado en nosotros al adquirir este producto
BRANDT.
Hemos diseñado y fabricado este producto pensando en usted, en su modo de vida
y en sus necesidades para poder satisfacer mejor sus expectativas. En él hemos
puesto toda nuestra experiencia, nuestro espíritu innovador y la pasión que nos
caracteriza desde hace más de 60 años.
Para responder a todas sus necesidades, tenemos un servicio de atención al cliente
a su disposición que atenderá todas sus preguntas y sugerencias.
También puede visitar nuestro sitio web www.brandt.com, donde encontrará
nuestras últimas novedades, así como información útil y complementaria.
En BRANDT nos sentimos orgullosos de acompañarle en su día a día y le deseamos
que disfrute plenamente de su compra.
Importante: antes de utilizar el aparato por primera vez, lea
atentamente este manual para familiarizarse más rápidamente con su
funcionamiento.

28
ÍNDICE
1) A LA ATENCIÓN DEL USUARIO .................................................... Erreur ! Signet non défini.
a) Normas de seguridad ............................................................................................. Erreur ! Signet non défini.
b) Características técnicas .......................................................................................... Erreur ! Signet non défini.
c) Protección del medio ambiente ............................................................................... Erreur ! Signet non défini.
2) INSTALACIÓN DEL APARATO .............................................................................................. 32
a) Descripción ................................................................................................................................................. 32
b) Antes del primer uso ................................................................................................................................... 34
c) Llenado del depósito de agua ...................................................................................................................... 34
3) UTILIZACIÓN DEL APARATO .............................................................................................. 34
a) Instalación .................................................................................................................................................. 34
b) Función Vapor ............................................................................................................................................ 35
c) Función Parada automática .......................................................................................................................... 35
d) Función Vapor continuo ............................................................................................................................... 36
e) Accesorios .................................................................................................................................................. 37
4) LIMPIEZA Y ALMACENAMIENTO .......................................................................................... 37

29
1) A LA ATENCIÓN DEL USUARIO
INSTRUCCIONES DE SEGURIDAD IMPORTANTES LÉALAS
CON ATENCIÓN Y CONSÉRVELAS PARA CONSULTARLAS
EN EL FUTURO
Este aparato está destinado para ser utilizado en aplicaciones
domésticas y análogas como:
▪ Los rincones de cocinas reservadas al personal de los almacenes,
oficinas y otros entornos profesionales
▪ Las granjas
▪ El uso por parte de los clientes de los hoteles, moteles y otros
entornos residenciales
▪ Los entornos de tipo habitación de huéspedes
▪ Conserve este manual de uso junto con el aparato. En caso de
vender o ceder este aparato a terceras personas, entregue este
manual al nuevo propietario. Por favor, lea estos consejos antes de
instalar y utilizar el aparato. Han sido redactados para su seguridad
y la de los demás.
a) Normas de seguridad
Instalación
▪ Cuando el aparato está calentando o enfriándose, asegúrese de
colocarlo sobre una superficie estable y resistente al calor.
Utilización
▪ Este aparato puede ser utilizado por niños de, al menos, 8 años y
por personas que tengan capacidades físicas, sensoriales o
mentales reducidas o personas sin experiencia o conocimientos
previos siempre y cuando sean supervisadas o si se les
proporcionan instrucciones relativas a la utilización del aparato
completamente seguras habiendo entendido los peligro a los que se
expone el usuario.
▪ Mantenga el aparato y su cable de alimentación fuera del alcance
de niños menores de 8 años.
▪ Los niños no deben jugar con el aparato.

30
▪ Mantenga el aparato y su cable de alimentación fuera del alcance
de niños menores de 8 años cuando se esté utilizando o mientras
se enfría.
▪ No deje nunca el aparato sin vigilancia cuando esté conectado a la
red eléctrica.
▪ Antes de llenar el depósito de agua hay que retirar el enchufe de la
toma de corriente.
▪ El orificio de llenado no debe abrirse durante el funcionamiento.
▪ La plancha no debe utilizarse si se ha caído, si hay signos visibles
de daños o si tiene fugas.
Atención: superficie caliente. Las superficies se pueden calentar
mucho durante el uso del aparato.
▪ El vapor está muy caliente: no intente nunca planchar una prenda
puesta encima. No apunte a nadie con el vapor.
Mantenimiento
▪ La limpieza y el mantenimiento por el usuario no deben ser
efectuados por los niños sin supervisión.
▪ El enchufe del cable de alimentación se debe retirar de la toma de
corriente antes de limpiar o reparar el aparato.
▪ Si el cable de alimentación está deteriorado, para evitar cualquier
peligro, deberá ser sustituido por el fabricante, su servicio técnico o
una persona cualificada.
▪ En caso de que el usuario deba tomar precauciones durante el
mantenimiento, se deberá proporcionar la información apropiada.
Uso indebido
▪ El fabricante no se hace responsable si no se utilizara para este fin.
b) Características técnicas
Modelo
BDF10V/BDF10B/BDF10N
Alimentación eléctrica
220-240 V~, 50-60 Hz
Parámetros nominales
2 200 W
Dimensiones del aparato
292*107*135
c) Protección del medio ambiente

31
Los materiales de embalaje de este aparato son reciclables.
Participe en su reciclaje y contribuya así a la protección del medio
ambiente depositándolos en los contenedores municipales
previstos a tal efecto.
Su aparato también contiene numerosos materiales reciclables. Por ello
ha sido marcado con este logotipo que indica que los aparatos viejos no
se deben mezclar con los demás residuos. De este modo, el reciclaje de
los aparatos que organiza el fabricante se efectuará en óptimas
condiciones, de acuerdo con la directiva europea en vigor sobre los
residuos de equipos eléctricos y electrónicos. Contacte con su
ayuntamiento o el distribuidor para conocer los puntos de recogida de
aparatos usados más cercanos a su domicilio.
Le agradecemos su colaboración con la protección del medio ambiente.

32
2) INSTALACIÓN DEL APARATO
a) Descripción
Depósito de agua

33
1: Cabezal
2: Caja superior
3: Piloto de encendido
4: Empuñadura
5: Bloqueo de vapor
6: Botón vapor
7: Tapa delantera
8: Depósito de agua extraíble
9: Botón de Encendido/Apagado
10: Enchufe
11: Base
12: Filtro antical
13: Orificio de llenado
14: Toma de inyección de agua
15: Cepillo para ropa

34
b) Antes del primer uso
¡ATENCIÓN! La plancha vertical echa humo cuando se utiliza por primera vez. Es normal y no
significa que esté dañada. En tal caso, se debe utilizar en una estancia bien ventilada. Dejará de
sacar humo al poco tiempo. Si el humo persiste, desenchufe inmediatamente el aparato.
c) Llenado del depósito de agua
1. Desenchufe la plancha vertical antes de llenar o vaciar el depósito de agua.
2. Sujete el asa con una mano, retire el depósito de agua extraíble, luego quite la tapa de
entrada de agua y llene el depósito de agua a través de la boquilla de inyección de agua.
3. Después de llenar el depósito, compruebe que la tapa de entrada de agua esté bien cerrada.
Nota: llene el depósito de agua hasta un máximo de 250 mL.
Vuelva a colocar el depósito de agua, encienda el aparato y espere antes de proceder al
planchado.
¿QUÉ TIPO DE AGUA CONVIENE?
1. Esta plancha vertical está diseñada para ser utilizada con agua pura destilada.
No obstante, el aparato debe limpiarse regularmente para eliminar los eventuales residuos
de cal. El filtro antical se puede cambiar girando el filtro para sacarlo de la base y
sustituyéndolo por uno nuevo. Este filtro ablanda el agua dura y prolonga así la vida útil del
aparato. No conviene quitarlo con demasiada frecuencia, salvo si se necesita un tratamiento
antical, ya que puede ocasionar fugas de agua en la base.
2. No utilice agua del grifo sin tratar, agua recuperada de la secadora, agua perfumada o
suavizada, agua de lluvia, agua filtrada, embotellada o hervida, ni agua de frigoríficos,
baterías o aires acondicionados, ya que se podría dañar el aparato. Estos tipos de agua
contienen residuos orgánicos, minerales que aumentan su concentración con el calor y
pueden provocar salpicaduras, manchas marrones, fugas o el desgaste prematuro del
aparato. Si el agua es muy dura, mezcle un 50 % de agua del grifo sin tratar con un 50 % de
agua destilada (disponible en tiendas de bricolaje).
3) UTILIZACIÓN DEL APARATO
a) Instalación
Cuando el aparato está calentando o enfriándose, asegúrese de colocarlo sobre una
superficie estable y resistente al calor.
El vapor está muy caliente: no intente nunca planchar una prenda puesta encima. No
apunte a nadie con el vapor.

35
- Cuelgue la prenda en una percha o en el gancho previsto.
- No coloque el aparato apoyado sobre el cabezal de planchado mientras se esté utilizando,
calentando o enfriando. Ponga el aparato sobre una superficie plana, estable y resistente al
calor, ya que el cabezal de planchado se calienta.
- Cuando el aparato se calienta, la superficie del mismo también se calienta un poco. Es normal.
b) Función Vapor
17. Enchufe el aparato.
18. Pulse el botón de Encendido situado en la parte posterior de la plancha vertical.
19. El piloto verde de encendido parpadeará unos 30 segundos. Cuando el aparato esté listo para
usar, el piloto luminoso dejará de parpadear.
20. Si pulsa el botón de Vapor situado sobre el asa de agarre, el aparato soltará vapor.
21. Pulse el botón de Vapor con el cepillo orientado hacia la prenda y mantenga el aparato en
posición vertical (ver imagen siguiente).
22. Para unos resultados impecables, planche la ropa de arriba abajo.
23. Después del uso, desenchufe el aparato.
24. Espere una hora para que el aparato se enfríe bien antes de guardarlo.
c) Función Parada automática
- Por razones de seguridad, si la plancha de vapor vertical no se utiliza durante cinco minutos
seguidos, se apaga automáticamente. En tal caso, el piloto luminoso parpadea y la plancha se
apaga.
- Para volver a encenderla, pulse de nuevo el botón de Vapor. El piloto luminoso volverá a
parpadear y la plancha se encenderá de nuevo. El aparato estará listo para usar al cabo de 30
segundos.

36
d) Función Vapor continuo
Para producir vapor de forma continua, pulse el botón de Bloqueo de vapor.
Botón de Vapor desbloqueado
Botón de Vapor bloqueado
Esta práctica función permite sacar vapor continuamente sin tener que pulsar el botón todo el
tiempo.

37
e) Accesorios
El cabezal cepillo abre los pliegues de la ropa para facilitar la penetración del vapor. Antes de
quitar o poner el cabezal cepillo, desenchufe el aparato y espere a que se enfríe.
Cómo utilizar los accesorios
Antes de quitar o poner el cabezal cepillo, desenchufe el aparato y espere a que se enfríe.
4) LIMPIEZA Y ALMACENAMIENTO
Espere una hora para que el aparato se enfríe bien antes de guardarlo.
Nota: Cuando el aparato está calentando o enfriándose, asegúrese de colocarlo sobre una
superficie estable y resistente al calor.
Después de su uso, espere a que el aparato se enfríe, retire el depósito de agua y vacíelo
completamente antes de volverlo a poner.
Limpie el aparato solo con una esponja y agua.
No limpie ni enjuague el aparato directamente bajo el grifo.

38
B) Almacenamiento
Después de su uso, espere a que el aparato se enfríe, retire el depósito de agua y vacíelo
completamente antes de volverlo a poner.
Tras eliminar los restos de cal, desenchufe el aparato, espere a que el producto se enfríe durante
al menos 5 minutos y limpie la cal con un paño suave.

39
Geachte klant,
U heeft zojuist een BRANDT-product gekocht. We danken u voor uw vertrouwen in
onze producten.
We hebben dit product ontworpen en geproduceerd met uzelf, uw levenswijze en uw
behoeften in gedachten om ervoor te zorgen dat het zo goed mogelijk aan uw
verwachtingen voldoet. U vindt er onze knowhow, onze innoveringsgeest en alle
passie in terug die ons al meer dan 60 jaar drijft.
Aangezien we er voortdurend naar streven zo goed mogelijk aan uw eisen te
beantwoorden, staat onze klantenservice geheel tot uw beschikking voor al uw vragen
of suggesties.
Kijk ook op onze site www.brandt.com, daar vindt u al onze nieuwste producten en
nuttige en aanvullende informatie.
BRANDT is blij deel uit te maken van uw dagelijks leven en wenst u heel veel plezier
met uw aankoop.
Belangrijk: voordat u uw apparaat inschakelt, moet u deze installatie-
en gebruikshandleiding aandachtig doorlezen zodat u sneller
vertrouwd bent met de werking ervan.

40
INHOUD
1) VOOR DE GEBRUIKER ................................................................. Erreur ! Signet non défini.
a) Veiligheidsvoorschriften ...................................................................................... Erreur ! Signet non défini.
b) Technische gegevens ................................................................................................................................. 44
c) Milieubescherming ..................................................................................................................................... 44
2 / INSTALLATIE VAN UW APPARAAT ..................................................................................... 45
a) Beschrijving .............................................................................................................................................. 45
b) Voor het eerste gebruik ............................................................................................................................. 47
c) Het waterreservoir vullen ........................................................................................................................... 47
3) GEBRUIK VAN UW APPARAAT ............................................................................................. 47
a) Installatie .................................................................................................................................................. 47
b) Stoomfunctie ............................................................................................................................................. 48
c) Functie automatisch uitschakelen ............................................................................................................... 48
d) Functie ononderbroken stoom .................................................................................................................... 48
e) Accessoires ............................................................................................................................................... 50
4) REINIGEN EN OPSLAG ..................................................................................................... 50

41
1) VOOR DE GEBRUIKER
BELANGRIJKE VEILIGHEIDSINSTRUCTIES. LEES DEZE
ZORGVULDIG EN BEWAAR ZE VOOR TOEKOMSTIG
GEBRUIK
Dit apparaat is bestemd voor gebruik in huishoudelijke of
vergelijkbare situaties, zoals:
▪ keukenhoeken voor winkelpersoneel, kantoren en andere
werkomgevingen;
▪ boerderijen;
▪ gebruik door de klanten van hotels, motels en andere omgevingen
met residentieel karakter;
▪ omgevingen van het type Bed & Breakfast.
▪ Bewaar deze handleiding bij het apparaat Bij verkoop of overdracht
van dit apparaat aan een andere persoon moet u deze handleiding
aan de nieuwe eigenaar overhandigen. Lees deze instructies vóór
installatie en gebruik van het apparaat. Ze zijn geschreven voor uw
veiligheid en die van anderen.
a) Veiligheidsvoorschriften
Installatie
▪ Indien uw apparaat aan het opwarmen of afkoelen is, moet u erop
letten dat het op een stabiele, hittebestendige ondergrond staat.
Gebruik
▪ Dit apparaat kan worden gebruikt door kinderen van minstens 8 jaar
en mensen met een lichamelijke, zintuiglijke of verstandelijke
handicap of gebrek aan ervaring of kennis, indien deze goed onder
toezicht staan of duidelijke instructies hebben ontvangen voor het
veilig gebruik van het apparaat en zich bewust zijn van de risico's.
▪ Houd het apparaat en het netsnoer buiten het bereik van kinderen
jonger dan 8 jaar.
▪ Kinderen mogen niet met het apparaat spelen.
▪ Houd het strijkijzer en het netsnoer buiten het bereik van kinderen
jonger dan 8 jaar zolang de stekker in het stopcontact zit of het af

42
aan het koelen is.
▪ De gebruiker mag het strijkijzer niet zonder toezicht laten zolang de
stekker in het stopcontact zit.
▪ De stekker moet uit het stopcontact gehaald worden voordat het
waterreservoir gevuld wordt.
▪ De vulopening mag niet open zijn tijdens gebruik.
▪ Het strijkijzer mag niet gebruikt worden als het gevallen is, als het
zichtbare schade vertoont of als het lekt.
Let op, heet oppervlak. Tijdens het gebruik van het apparaat
kunnen de oppervlakken zeer heet worden.
▪ De stoom is zeer heet: probeer een kledingstuk nooit te stomen
terwijl u dit draagt. Richt de stoom niet op iemand.
Onderhoud
▪ Het apparaat mag niet zonder toezicht worden gereinigd en
onderhouden door kinderen.
▪ De stekker van het netsnoer moet uit het stopcontact gehaald
worden voordat het apparaat wordt schoongemaakt of er onderhoud
aan wordt verricht.
▪ Als het netsnoer beschadigd is, moet dit veiligheidshalve door de
fabrikant, de serviceafdeling van de fabrikant of een ander
gekwalificeerd persoon worden vervangen.
▪ Als voorzorgsmaatregelen noodzakelijk zijn bij onderhoud door de
gebruiker, dan moet de benodigde informatie verstrekt worden.
Niet-conform gebruik
▪ De fabrikant wijst alle aansprakelijkheid af bij niet-conform gebruik.
b) Technische gegevens
Model
BDF10V/ BDF10B/BDF10N
Elektrische voeding
220-240 V~, 50-60 Hz
Nominale parameters
2200 W
Productafmetingen
292*107*135

43
c) Milieubescherming
Het verpakkingsmateriaal van dit apparaat is recyclebaar. Doe
mee aan de recycling ervan en draag bij aan de bescherming van
het milieu door dit materiaal in de hiervoor bestemde
gemeentecontainers te deponeren.
Uw apparaat bevat eveneens tal van recyclebare materialen. Daarom is
het voorzien van dit logo, wat aangeeft dat de gebruikte apparaten van
ander afval dienen te worden gescheiden. De recycling van de apparaten
die door uw fabrikant wordt georganiseerd, wordt op deze manier onder
de beste omstandigheden uitgevoerd, overeenkomstig de Europese
richtlijn betreffende elektrisch en elektronisch afval. Informeer bij uw
gemeente of bij uw verkoper naar de dichtstbijzijnde inzamelplaats voor
uw oude apparaten.
Wij danken u voor uw bijdrage aan de bescherming van het milieu.

44
b) Technische gegevens
Model
BDF10V/BDF10B/BDF10N
Elektrische voeding
220-240 V~, 50-60 Hz
Nominale parameters
2200 W
Productafmetingen
292*107*135
c) Milieubescherming
Het verpakkingsmateriaal van dit apparaat is recyclebaar. Doe
mee aan de recycling ervan en draag bij aan de bescherming van
het milieu door dit materiaal in de hiervoor bestemde
gemeentecontainers te deponeren.
Uw apparaat bevat eveneens tal van recyclebare materialen. Daarom is
het voorzien van dit logo, wat aangeeft dat de gebruikte apparaten van
ander afval dienen te worden gescheiden. De recycling van de apparaten
die door uw fabrikant wordt georganiseerd, wordt op deze manier onder
de beste omstandigheden uitgevoerd, overeenkomstig de Europese
richtlijn betreffende elektrisch en elektronisch afval. Informeer bij uw
gemeente of bij uw verkoper naar de dichtstbijzijnde inzamelplaats voor
uw oude apparaten.
Wij danken u voor uw bijdrage aan de bescherming van het milieu.

45
2 / INSTALLATIE VAN UW APPARAAT
a) Beschrijving
Waterreservoir

46
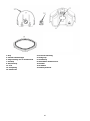
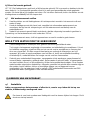
1: Kop
2: Bovenste behuizing
3: Stroomcontrolelampje
4: Handgreep
5: Vergrendeling van de stoomfunctie
6: Stoomknop
7: Voorkap
8: Afneembaar waterreservoir
9: Aan/Uit-knop
10: Stekker
11: Voet
12: Kalkfilter
13: Vulopening
14: Waterspuitmond
15: Stofborstel

47
b) Voor het eerste gebruik
LET OP! De kledingstomer geeft rook af bij het eerste gebruik. Dit is normaal en betekent niet dat
deze defect is. In voorkomende gevallen moet hij in een goed geventileerde ruimte geplaatst
worden. Na korte tijd zal hij stoppen met roken. Als het roken aanhoudt, trekt u de stekker van de
kledingstomer onmiddellijk uit het stopcontact.
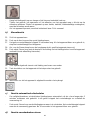
c) Het waterreservoir vullen
1. Haal de stekker van de kledingstomer uit het stopcontact voordat u het reservoir vult met
water of leegt.
2. Houd de handgreep met één hand vast, verwijder het afneembare waterreservoir en
vervolgens de dop van de vulopening en vul het waterreservoir met behulp van de
waterspuitmond.
3. Nadat u het reservoir gevuld hebt, controleert u dat de vulopening hermetisch gesloten is.
Opmerking: vul het waterreservoir niet verder dan 250 ml.
Plaats het waterreservoir weer, sluit het apparaat aan en wacht voordat u gaat stomen.
WELK TYPE WATER MOET IK GEBRUIKEN?
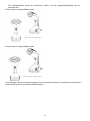
1. Deze kledingstomer is ontworpen voor gebruik met zuiver gedistilleerd water.
Toch moet u het apparaat regelmatig schoonmaken om kalkafzetting te verwijderen. U kunt
het kalkfilter vervangen: draai het filter om het van de voet te verwijderen en vervang het
door een nieuw filter. Dit filter verzacht hard water en verlengt de levensduur van het
apparaat. Wij raden te vaak verwijderen van het filter af, tenzij een antikalkbehandeling
noodzakelijk is, omdat dit lekken ter hoogte van de voet kan veroorzaken.
2. Gebruik geen onbehandeld kraanwater, opvangwater uit de wasdroger, geparfumeerd of
verzacht water, regenwater, gefilterd water, flessenwater of gekookt water, of opvangwater
van een koelkast, accu's of airconditioning, dit kan het apparaat beschadigen. Deze soorten
water bevatten organische afvalstoffen, mineralen waarvan het gehalte door warmte stijgt en
die spatten, bruine vlekken, lekken of voortijdige slijtage van uw apparaat kunnen
veroorzaken. Als uw water zeer hard is, mengt u 50% onbehandeld kraanwater met 50%
gedistilleerd water (verkrijgbaar in doe-het-zelf-winkels).
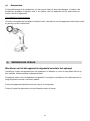
3) GEBRUIK VAN UW APPARAAT
a) Installatie
Indien uw apparaat aan het opwarmen of afkoelen is, moet u erop letten dat het op een
stabiele, hittebestendige ondergrond staat.
De stoom is zeer heet: probeer een kledingstuk nooit te stomen tijdens het dragen. Richt
de stoom niet op iemand.

48
- Hang het kledingstuk op een hanger of de hiervoor bedoelde haak op.
- Tijdens het gebruik, het opwarmen of het afkoelen van het apparaat mag u dit niet op de
stoomkop plaatsen. Plaats het apparaat op een vlakke, stabiele, hittebestendige ondergrond,
want de stoomkop wordt warm.
- Als het apparaat opwarmt, wordt de buitenkant lauw. Dit is normaal.
b) Stoomfunctie
25. Sluit het apparaat aan.
26. Druk op de Aan-knop achter op de kledingstomer.
27. Het groene controlelampje knippert 30 seconden lang. Als het apparaat klaar voor gebruik is,
stopt het controlelampje met knipperen.
28. Als u op de Stoom-knop boven de handgreep drukt, geeft het apparaat stoom vrij.
29. Druk op de Stoom-knop met de borstel in de richting van het kledingstuk en houd het apparaat
verticaal (zie de afbeelding hieronder).
30. Voor optimaal gebruik stoomt u de kleding van boven naar onder.
31. Trek de stekker van het apparaat uit het stopcontact na gebruik.
32. Wacht een uur tot het apparaat is afgekoeld voordat u het opbergt.
c) Functie automatisch uitschakelen
- Om veiligheidsredenen schakelt deze kledingstomer automatisch uit als u hem langer dan 5
minuten achtereen niet gebruikt. In dit geval knippert het controlelampje en schakelt de
verwarming uit.
- Druk op de Stoom-knop om de kledingstomer weer in te schakelen. Het controlelampje knippert
weer en de verwarming gaat aan. Na 30 seconden is het apparaat klaar voor gebruik.
d) Functie ononderbroken stoom

49
Om ononderbroken stoom te produceren, drukt u op de vergrendelingsknop van de
stoomfunctie.
Stoom-knop in ontgrendelde positie
Stoom-knop in vergrendelde positie
Deze handige functie maakt het mogelijk om ononderbroken stoom te produceren zonder dat u
voortdurend op de knop hoeft te blijven drukken.

50
e) Accessoires
De borstelkop opent de stofplooien om de stroom beter te laten doordringen. Voordat u de
borstelkop verwijdert of plaatst, trekt u de stekker van het apparaat uit het stopcontact en
wacht u tot dit is afgekoeld.
Hoe gebruikt u de accessoires
Voordat u de stofborstel verwijdert of plaatst, trekt u de stekker van het apparaat uit het stopcontact
en wacht u tot dit is afgekoeld.
4) REINIGEN EN OPSLAG
Wacht een uur tot het apparaat is afgekoeld voordat u het opbergt.
Opmerking: Indien uw apparaat aan het opwarmen of afkoelen is, moet u erop letten dat het op
een stabiele, hittebestendige ondergrond staat.
Na gebruik wacht u tot het apparaat is afgekoeld. Vervolgens verwijdert u het waterreservoir en
leegt dit geheel voordat u het weer plaatst.
Reinig het apparaat uitsluitend met een spons en zeepwater.
Reinig of spoel het apparaat nooit rechtstreeks onder de kraan.

51
B) Opslag
Na gebruik wacht u tot het apparaat is afgekoeld. Vervolgens verwijdert u het waterreservoir en
leegt dit geheel voordat u het weer plaatst.
Nadat u de kalkaanslag hebt verwijderd, trekt u de stekker van het apparaat uit het stopcontact,
wacht ten minste 5 minuten tot het product is afgekoeld en veegt de kledingstomer met een zachte
doek af.

52
BRANDT
www.brandt.com
BRANDT

53
1 ................................................................................................................... 54
.......................................................................................................................................................... 54
............................................................................................................................................................. 56
............................................................................................................................................................... 56
2 .......................................................................................................................... 57
.......................................................................................................................................................................... 57
................................................................................................................................................... 59
............................................................................................................................................................... 59
3 ................................................................................................................ 59
.......................................................................................................................................................................... 59
................................................................................................................................................................. 60
...................................................................................................................................................... 60
....................................................................................................................................................... 60
..................................................................................................................................................................... 62
4 ..................................................................................................................... 62

54
▪
▪
▪
▪
▪
▪
▪
▪
▪
▪
▪
▪
▪
▪
▪

55
▪
▪
▪
▪
▪

56
BDF10V/ BDF10B/BDF10N

57

58

59

60
33
34
35
36
37
38
39
40

61

62

63
-
 1
1
-
 2
2
-
 3
3
-
 4
4
-
 5
5
-
 6
6
-
 7
7
-
 8
8
-
 9
9
-
 10
10
-
 11
11
-
 12
12
-
 13
13
-
 14
14
-
 15
15
-
 16
16
-
 17
17
-
 18
18
-
 19
19
-
 20
20
-
 21
21
-
 22
22
-
 23
23
-
 24
24
-
 25
25
-
 26
26
-
 27
27
-
 28
28
-
 29
29
-
 30
30
-
 31
31
-
 32
32
-
 33
33
-
 34
34
-
 35
35
-
 36
36
-
 37
37
-
 38
38
-
 39
39
-
 40
40
-
 41
41
-
 42
42
-
 43
43
-
 44
44
-
 45
45
-
 46
46
-
 47
47
-
 48
48
-
 49
49
-
 50
50
-
 51
51
-
 52
52
-
 53
53
-
 54
54
-
 55
55
-
 56
56
-
 57
57
-
 58
58
-
 59
59
-
 60
60
-
 61
61
-
 62
62
-
 63
63


Brandt BDF10B_01_ de handleiding
- Categorie
- Strijkijzers
- Type
- de handleiding
- Deze handleiding is ook geschikt voor
in andere talen
- English: Brandt BDF10B_01_ Owner's manual
- français: Brandt BDF10B_01_ Le manuel du propriétaire
- español: Brandt BDF10B_01_ El manual del propietario