Yamaha CLAVINOVA C L P - 3 8 de handleiding
- Categorie
- Digitale piano's
- Type
- de handleiding
Deze handleiding is ook geschikt voor

1
CLP
-
156
Introduction
Thank you for choosing a Yamaha CLP-156 Clavinova. Your Clavinova is a fine musical instru-
ment that employs advanced Yamaha music technology. With the proper care, your Clavinova
will give you many years of musical pleasure.
● Stereo sampling of the acoustic piano voices offers unmatched realism and expressive power, while
the AWM (Advanced Wave Memory) tone generator system offers rich, realistic reproductions of all
other voices.
● Piano-like touch response — adjustable in 4 stages — provides extensive expressive control and out-
standing playability.
● Dual play mode allows 2 voices to be played simultaneously.
● Unique Clavinova Tone voice provides a fresh sound for new musical expression.
● Damper pedal includes natural resonance effect for the piano voices, simulating the string and sound-
board resonance of acoustic pianos.
● Metronome feature with variable tempo facilitates practice.
● 2-track digital recorder lets you record and play back anything you play on the keyboard.
● Internal 3.5" floppy disk drive provides extended Recorder capacity and Disklavier PianoSoft™ play-
back capability – one blank floppy disk for recording and one PianoSoft demonstration disk (excerpts
from the Disklavier PianoSoft disks) are provided.
● MIDI compatibility and a range of MIDI functions make the Clavinova useful in a range of advanced
MIDI music systems.
In order to make the most of your Clavinova’s performance potential and features, we urge you
to read this Owner’s Manual thoroughly, and keep it in a safe place for later reference.

2
Your Clavinova is a fine musical instrument, and deserves the most careful treatment.
Observe the following points and your Clavinova will sound and look great for many years.
Taking Care Of Your Clavinova
1. Never Tamper With the Internal Circuitry
Never open the case and touch or tamper with the internal
circuitry.
2. Turn Off After Use
Always turn the POWER switch OFF after use, and close the
key cover to protect the keyboard.
3. Clean Carefully
Clean the cabinet and keys of your Clavinova only with a
clean, slightly damp cloth. A neutral cleanser may be used if
desired. Never use abrasive cleansers, waxes, solvents or
chemical dust cloths since these can dull or damage the fin-
ish.
4. Avoid Vinyl
Never place any vinyl products on your Clavinova. Contact
with vinyl can cause irreversible damage to the finish.
5. Avoid Humidity & Heat
Install your Clavinova in a place that is away from direct sun-
light, excessive humidity or heat.
6. Handle With Care
Never apply excessive force to the controls, connectors or
other parts of your Clavinova, and avoid scratching or bump-
ing it with hard objects.
7. Name Plate Location
The CLP-156 name plate is located on the bottom panel.
8. Handling Floppy Disks
Yamaha Disklavier PianoSoft disk is write-protected, and
therefore cannot be used to save songs. To save Recorder
songs from the Recorder, a blank floppy disk should be
used (one blank disk is supplied with the Clavinova).
Taking Care of Your Floppy Disks
■ Do NOT eject the disk during recording or playback, or at
any time when the disk drive lamp is lit. Doing so may
damage both the disk and the FDD.
■ Do NOT turn the Clavinova on or off while the disk is in
the drive.
■ Always eject the disk before turning the Clavinova off.
■ When ejecting a floppy disk from the disk drive:
■ Never open or close the key cover while a disk is extend-
ing from the drive (i.e. in the ejected position). The key
cover may contact the disk, possibly damaging the disk or
even the disk drive.
■ Do not insert anything but floppy disks into the disk drive.
Other objects may cause damage to the disk drive or
floppy disk.
■ Use only double-sided double density (2DD) 3.5-inch
floppy disks with the Clavinova.
Write protect tab
open (locked —
write protected)
Write protect tab
closed (unlocked —
write enabled)
Precautions Regarding Floppy Disk Use
■ Never open the disk’s shutter. Dirt or dust on the Internal
magnetic surface will cause data errors.
■ Never leave disks near a speaker, TV, or other device that
emits a strong magnetic field.
■ Do not store disks in places exposed to direct sunlight or
sources of high temperature.
■ Do not place heavy objects such as books on top of a
disk.
■ Avoid getting the disks wet.
■ Be sure to store the disks in environmental conditions as
specified below:
• Storage temperature: 4
°
to 53
°
C (39
°
to 127
°
F).
• Storage humidity: 8 to 90% relative humidity.
• Store in an area free from dust, sand, smoke, etc.
■ Be sure to apply the disk label at the proper position.
When changing the label never cover the old label with a
new label; always remove the old label first.
Head Cleaning
The head of the disk drive unit will get dirty as you use it
eventually causing data errors. If this occurs, clean the head
with a 3.5 inch head cleaning disk (available from most
computer supply stores).
Data Backup
It is recommended that you copy your recorded songs to
another disk for backup (see page 25). If the original disk is
damaged or your song is deleted, the backup disk can be
used instead of the original.
Protecting Your Data (Write Protect Tab)
Disk drive lamp
• To eject a floppy disk, press the eject button slowly as far as it will
go. Then when the disk Is fully ejected, remove it by hand.
• The disk may not be ejected properly if the eject button is pressed
too quickly or if it is not pressed in far enough. (The eject button
may become stuck halfway with the disk extending from the slot
by only a few millimeters). If this is the case, do not attempt to pull
out the partially ejected disk. Doing so may damage the disk drive
mechanism and/or the floppy disk. To remove a partially ejected
disk, try pressing the eject button once again or push the disk
back into the slot, then repeat the eject procedure carefully.

3
Contents
The Control Panel............................................................4
Connections......................................................................6
Selecting & Playing Voices ...........................................7
■ Playing the Demonstration Tunes................................8
The Dual Mode..................................................................9
● Adjusting the Balance Between the Dual-mode
Voices......................................................................9
● Shifting a Dual-mode Voice Up One Octave ...........9
● Slow-attack Strings..................................................9
● Memorizing the Balance, Strings Type, & Octave
Shift Settings .........................................................10
Brilliance ..........................................................................10
● Memorizing the Brilliance Setting ..........................10
Reverb...............................................................................11
● Adjusting Reverb Depth ........................................11
● Memorizing the Reverb Type & Depth Settings ....11
Touch Sensitivity ...........................................................12
● Memorizing the Touch Sensitivity Setting .............12
The Pedals .......................................................................12
● Soft (Left) Pedal ....................................................12
● Sostenuto (Center) Pedal ......................................12
● Damper (Right) Pedal............................................12
Transposition..................................................................13
Pitch Control ...................................................................14
● Tuning Up ..............................................................14
● Tuning Down .........................................................14
● To Restore Standard Pitch ....................................14
● The Pitch Display ..................................................14
● Memorizing the Pitch Control Setting ....................14
The Metronome & Tempo Control.............................15
■ The Metronome..........................................................15
● Metronome Volume ...............................................15
● Metronome Time Signature ...................................15
■ Tempo Control ...........................................................15
Disk Playback .................................................................16
● Adjusting the Playback Tempo ..............................17
● Fast Reverse and Forward ....................................17
● Playing Back only One Track ................................17
● Repeat Playback ...................................................17
● Playing Other Types of Music Data .......................17
Using the Recorder .......................................................18
■ Recording...................................................................18
● Changing the Initial Settings..................................19
● Erasing a Single Track ..........................................20
● If You Record Without First Inserting a Disk … ...20
■ Playback ....................................................................20
Utility Functions.............................................................21
■ Utility 1: Individual key Tuning ...................................21
● To Lower the Pitch of a Single Key .......................21
● To Raise the Pitch of a Single Key ........................21
●
To Turn the Individual Key Tune Mode OFF or ON...
22
■ Utility 2: Save Individual Key Tuning..........................23
■ Utility 3: Load Individual Key Tuning..........................23
■ Utility 4: Floppy Disk Format ......................................24
■ Utility 5: Song Copy ...................................................25
● Copying to a Different Disk....................................26
■ Utility 6: Song Delete .................................................26
● Deleting a Single Track .........................................26
■ Utility 7: Disk Playback Track Selection.....................27
● Selecting the Playback Track for CLP-156
Track 1/R or 2/L.....................................................27
■ Utility 8: Convert to SMF ............................................27
■ Utility 9: All-song Random Repeat .............................28
■ Utility 10: Standard MIDI File Voice Mode .................29
MIDI Functions ...............................................................30
● A Brief Introduction to MIDI ...................................30
● MIDI “Messages” Transmitted & Received by the
Clavinova...............................................................30
● MIDI Transmit & Receive Channel Selection ........31
● MIDI Transmit Transpose ......................................31
■ Other MIDI Functions.................................................32
● Local Control ON/OFF...........................................32
● Program Change ON/OFF ....................................32
● Control Change ON/OFF.......................................33
● The Multi-Timbre Mode .........................................33
● The MIDI Split & Left Local OFF Mode .................33
● The MIDI Split & Right Local OFF Mode ...............34
● Transmitting the Panel Settings ............................34
Factory Preset Recall ...................................................34
Error Messages ..............................................................35
Troubleshooting.............................................................35
Options .............................................................................35
Keyboard Stand Assembly .........................................36
MIDI Data Format ...........................................................38
MIDI Implementation Chart.............................................40
Specifications .................................................................41

4
The Control Panel
1 [POWER] Switch
Press the [POWER] switch once to turn the power ON,
a second time to turn the power OFF. When the power
is initially turned ON, the [PIANO 1] voice selector
LED will light, and the power indicator located below
the left end of the keyboard will light.
2 [MASTER VOLUME] Control
The [MASTER VOLUME] control adjusts the volume
(level) of sound produced by the Clavinova’s internal
stereo sound system. The [MASTER VOLUME] con-
trol also adjusts headphone volume when a pair of
headphones is plugged into the PHONES jack (page 6).
3 [BRILLIANCE] Button
This button can be used to change the tonality or “tim-
bre” of the selected voice. See page 10 for details.
4 [REVERB] Button
The [REVERB] button selects a number of digital
reverb effects that you can use for extra depth and ex-
pressive power. See page 11 for details.
● The Music Stand
If you will be using sheet music with your
Clavinova, raise the music stand built into its top
panel by lifting the rear edge of the music stand, then
flip down the music stand braces and engage them
with the corresponding recesses.
The music stand can be lowered after slightly lift-
ing it and folding the two brackets which support it
against the back of the stand.
%
Soft pedal
Sostenuto pedal Damper pedal
C1 D1 E1 F1 G1 A1 B1 C2 D2 E2 F2 G2 A2 B2 C3 D3 E3 F3 G3 A3 B3 C4 D4 E4 F4 G4 A4
B0A0G0F0E0D0C0B-1A-1
POWER
1
PHONES Jacks
(Bottom Panel)
Left voice shift up key
(See page 9)
Pitch control keys
(See page 14)
Transpose keys
(See page 13)
Balance/Depth keys (See page 9, 11)
4
6
578032
MASTER VOLUME
MIN MAX
MIDI/
TRANSPOSE
REVERB
ROOM
HALL 1
HALL 2
COSMIC
PIANO 1
PIANO 2
CLAVINOVA
TONE
E. PIANO
HARPSI-
CHORD
BRILLIANCE
MELLOW
NORMAL
BRIGHT
STRINGS
VIBES
ORGAN
METRONOME
TEMPO
RECORDER
1/R
2/L
PLAY
REC DEMO
▲
▼
SONG
f
r
MASTER VOLUME
MIN MAX
MIDI/
TRANSPOSE
REVERB
ROOM
HALL 1
HALL 2
COSMIC
PIANO 1
PIANO 2
CLAVINOVA
TONE
E. PIANO
HARPSI-
CHORD
BRILLIANCE
MELLOW
NORMAL
BRIGHT
STRINGS
VIBES
ORGAN
METRONOME
TEMPO
▲
▼
SONG
f
r
9
120

5
5 [MIDI/TRANSPOSE] Button
The [MIDI/TRANSPOSE] button allows access to the
Clavinova’s TRANSPOSE function (to shift the pitch
of the entire keyboard up or down), keyboard touch
sensitivity adjustment, Utility functions (to enhance the
versatility and flexibility of the Clavinova), and MIDI
functions. For details refer to “Transposition” on page
13, “Touch Sensitivity” on page 12, “Utility Functions”
on page 21, and “MIDI Functions” on page 30.
6 Voice Selectors
The CLP-156 has eight voice selectors. Simply press
any of the voice selectors to select the corresponding
voice. The voice selector LED will light to indicate
which voice is currently selected.
The CLP-156 also has a DUAL mode in which two
voices can be played simultaneously across the full
range of the keyboard — see page 9 for details.
NOTE
• The PIANO 1 voice is automatically selected
whenever the [POWER] switch is initially turned
ON.
7 [METRONOME] Button
Turns the metronome sound on and off. The TEMPO
[s] and [t] buttons, below, are used to set the tempo
of the metronome sound — see page 15 for details.
8 TEMPO [t] and [s] Buttons
These buttons adjust the tempo of the CLP-156 metro-
nome function as well as the recording and playback
functions. The tempo range is from 32 to 280 quarter-
note beats per minute.
9 TEMPO Display
This 3-digit LED display normally shows the current
tempo in quarter-note beats per minute. When the met-
ronome, recording, or playback is in operation, it dis-
plays the current measure number. It also displays the
selected song number when a disk is in the disk drive,
and various parameters of functions while they are in
operation.
0 SONG [r] and [f] Buttons
Select a song number on a floppy disk for recording or
playback. See page 18 or16 for details.
! RECORDER [PLAY] and [REC] Buttons
These buttons control the CLP-156 2-track recorder,
letting you record and play back just about anything
you play on the keyboard — the music data that you
record is stored on a 3.5" floppy disk loaded into the
Clavinova’s disk drive unit. See page 18 for details.
@ RECORDER [1/R] and [2/L] Buttons
Select the track for recording or playback. See page 18
or 16 for details.
# [DEMO] Button
Activates the demo playback mode in which you can
select playback of different demonstration sequences
for each of the Clavinova’s voices. See page 8 for de-
tails.
$ 3.5" Floppy Disk Drive
A floppy disk for recording and playback is inserted
into the 3.5" floppy disk drive. See page 2 for precau-
tions about handling the floppy disk and the disk drive.
% Pedals
The CLP-156’s soft (left), sostenuto (center), and
damper (right) pedals provide a range of expressive
control capabilities similar to the pedal functions on an
acoustic piano. See page 12 for details.
B4 C5 D5 E5 F5 G5 A5 B5 C6
D6 E6 F6 G6 A6 B6 C7
Right voice shift up key
(See page 9)
#
Memory key
(See page 10, 11, 12, 14)
RECORDER
1/R
2/L
PLAY
REC DEMO
!
@
$

6
Connections
Two pairs of standard pair of stereo headphones can be plugged in here
for private practice or late-night playing. The internal speaker system is
automatically shut off when a pair of headphones is plugged into either of
the PHONES jacks.
● PHONES Jacks (Bottom Panel)
AUX IN
AUX OUT
RL
R L/L+R
IN
OUT
THRU
MIDI
312
These jacks are intended primarily for use with external synthesizers or
tone generator modules.
For example, the outputs of the synthesizer/tone generator can be to the
Clavinova AUX IN jacks, allowing the sound of the synthesizer/tone gen-
erator to be reproduced via the Clavinova’s internal amplifier and speaker
system.
NOTE
• The input signal from the AUX IN jacks is delivered to the AUX OUT
jacks, but is not affected by the Clavinova’s volume control or reverb
effect.
The AUX OUT L/L+R and R jacks deliver the output of the Clavinova
for connection to an instrument amplifier, mixing console, PA system, or
recording equipment. If you will be connecting the Clavinova to a monaural
sound system, use only the L/L+R jack. When a plug is inserted into the L/
L+R jack only, the left- and right-channel signals are combined and deliv-
ered via the L/L+R jack so you don’t lose any of the Clavinova’s sound.
The Internal Amplifier & Speaker System
The CLP-156 features a powerful stereo amplifier delivering 30 watts per channel,
driving a speaker system that puts out exceptionally rich sound with natural re-
sponse from powerful lows to shimmering highs. The speaker system features a
bass-reflex type enclosure with two 13-centimeter and two 5-centimeter speaker
units.
NOTE
• The AUX OUT jack signal must never be returned to the AUX IN jacks,
either directly or through external equipment.
The MIDI IN connector receives MIDI data from an external MIDI de-
vice (such as a synthesizer, sequencer, music computer, etc.) which can be
used to control the Clavinova. The MIDI THRU connector re-transmits any
data received at the MIDI IN connector, allowing “chaining” of several
MIDI instruments or other devices. The MIDI OUT connector transmits
MIDI data generated by the Clavinova (e.g. note and velocity data produced
by playing the Clavinova keyboard).
More details on MIDI are given in “MIDI Functions” on page 30.
1 AUX IN L and R Jacks
AUX IN
RL
Tone
Generator
AUX OUT
L/L+RR
2 AUX OUT L/L+R and R Jacks
Stereo System
3 MIDI IN, THRU and OUT
Connectors
MIDI
IN OUT THRU
MIDI
Sequencer
Tone Generator

7
ZTurn Power On
After making sure that the Clavinova’s AC plug is properly inserted into
a convenient AC wall outlet, press the [POWER] switch located to the left
of the keyboard to turn the power ON.
When the power is turned ON, the [PIANO 1] voice selector LED will
light (the PIANO 1 voice is automatically selected whenever the power is
turned ON).
Initially set the [MASTER VOLUME] control about half way between
the “MIN” and “MAX” settings. Then, when you start playing, re-adjust the
[MASTER VOLUME] control for the most comfortable listening level.
Select the desired voice by pressing one of the voice selectors.
The Clavinova also offers keyboard touch response, so the volume and
timbre of notes played can be controlled according to how “hard” you play
the keys. The amount of variation available depends on the selected voice.
You can also change the overall tone or add reverb and/or effects as de-
sired by using the [REVERB] and [BRILLIANCE] buttons (see page 10
for [BRILLIANCE] button operation, “Reverb” on page 11).
XSet the Volume
CSelect a Voice
VPlay
BAdjust Tone & Add Effects
As Required
Selecting & Playing Voices
POWER
MASTER VOLUME
MIN MAX
REVERB
ROOM
HALL 1
HALL 2
COSMIC
BRILLIANCE
MELLOW
NORMAL
BRIGHT
PIANO 1
PIANO 2
CLAVINOVA
TONE
E. PIANO
HARPSI-
CHORD
STRINGS
VIBES
ORGAN

8
Playing the Demonstration Tunes
The CLP-156 features 8 demonstration tunes that effectively demonstrate its sound
capabilities. Here’s how you can select and play the demo tunes.
Press the [DEMO] button to engage the demo mode — the voice selec-
tors will flash in sequence.
The 8 demo tunes are selected via the voice selectors. Press a selector to
start playback of the corresponding tune, featuring the voice normally se-
lected by that voice selector button. The demo tunes will play in sequence
until stopped, starting with the selected tune. The voice selector indicator
will flash during demo playback.
Use the [MASTER VOLUME] control to adjust the volume.
NOTE
• The TEMPO buttons do not affect demo playback (“_ _ _” appears on
the TEMPO display).
You can start playback of any other demo tune during playback by sim-
ply pressing the corresponding voice selector. Playback will stop and the
playback-ready mode described in step 2, above, will be re-engaged if you
press the voice selector of the demo that is currently playing.
Press the [DEMO] button when you want to stop demo playback and
return to the normal play mode.
ZEngage the Demo Mode
Selecting & Playing Voices
X
Select a Demo Tune
DEMO
DEMO
MASTER VOLUME
MIN MAX
VPlay a Different Demo
B Stop the Demo
CSet the Volume
PIANO 1
PIANO 2
CLAVINOVA
TONE
E. PIANO
HARPSI-
CHORD
STRINGS
VIBES
ORGAN
The Demo Tunes
[PIANO 1] button: Etude op. 10-5 “Black Keys” by F. F. Chopin
[PIANO 2] button: “Le Rhône” by K. Hattori
[CLAVINOVA TONE] button: “Pavane pour une infante défunte” by M. J. Ravel
[HARPSICHORD] button: “Le Coucou” by L. C. Daquin
[VIBES] button: “Schmetterling (Papilions)” op. 43 by E. H. Grieg
[STRINGS] button: “Charmaine” by L. Polladk
[ORGAN] button:
“Jesu, Joy Of Man’s Desiring” (Chorale from Cantata No. 147) by J. S. Bach
• The demonstration pieces listed above are short excerpts from the original compositions.
The other demo song is original (© 1994 by YAMAHA CORPORATION).
NOTE
• One PianoSoft demonstration disk is also provided with the CLP-156. It
contains several excerpts from the Disklavier PianoSoft disks. Refer to
the “Disk Playback” section on page 16 for how to playback the Demon-
stration disk.

9
Left voice
shift up.
Right voice
shift up.
C
1
C
5
V
A
E. PIANO
HARPSI-
CHORD
The Dual Mode
The DUAL mode makes it possible to play two voices simultaneously across the entire range of the key-
board. To activate the DUAL mode simply press two voice selectors at the same time (or press one voice
selector while holding another). The voice indicators of both selected voices will light when the DUAL mode
is active. To return to the normal single-voice play mode, press any single voice selector.
● Adjusting the Balance Be-
tween the Dual-mode Voices
The volume levels of the two voices combined in the DUAL mode are
normally set automatically to produce a pleasing balance (see “Default Set-
tings” below). The balance can be adjusted manually by using the C2
through C4 keys on the keyboard or the TEMPO [s] and [t] buttons
while pressing the two voice selectors corresponding to the voices to be
combined in the DUAL mode. The selected balance value (1 … 15) will be
shown on the TEMPO display until the voice selectors are released.
When using the keyboard, the C3 keys produces equal balance between
the two voices (a setting of “8”), while keys to the left of C3 increase the
volume of the left voice in relation to the right voice, and keys to the right
of C3 increase the volume of the right voice in relation to the left voice. By
“left” and “right” voices we refer to the relative positions of the voice selec-
tors — i.e. in a STRINGS/ORGAN combination STRINGS is the left voice
and ORGAN is the right voice.
When using the TEMPO buttons the first time either button is pressed
the current balance appears on the TEMPO display, then pressing the [t]
button increases the volume of the left voice in relation to the right while
the [s] button has the opposite effect. Press both the [s] and [t] buttons
simultaneously to instantly recall the equal-volume (“8”) setting.
■ A setting of “1” sets the volume of the left voice to maximum and the
volume of the right voice to minimum.
■ A setting of “8” sets both voices to the same volume.
■ A setting of “15” sets the volume of the right voice to maximum and the
volume of the left voice to minimum.
NOTE
• Hold either the TEMPO [
s
] or [
t
] button for continuous scrolling in the
specified direction.
Depending on which voices you combine using the DUAL mode, the
combination may sound better if one of the voices is shifted up an octave.
To shift the right voice, press the C5 key while pressing the two voice se-
lectors corresponding to the voices to be combined in the DUAL mode.
Press C5 again to shift the voice back to its normal range. Use the C1 key
in the same way to shift the left voice.
Default octave settings are provided for all voice combinations, as listed
in the “Default Settings” chart, below.
TEMPO
▲
▼
8
● Slow-attack Strings
In a DUAL mode voice combination using STRINGS and any other
voice, it is possible to switch the STRINGS voice to a slow-attack variation
when initially selecting the voices by pressing the [STRINGS] selector
twice while holding the other voice selector. Repeat this operation to return
to the normal STRINGS voice attack.
● Shifting a Dual-mode Voice
Up One Octave
Equal
balance.
Left voice
maximum.
Right voice
maximum.
C
3
C
2
C
4
V
INOVA
O
NE
E. PIANO
HARPSI-
CHORD
PIANO 1
PIANO 2
CLA
V
T
O
STRINGS
E
S
ORGAN

10
The Dual Mode
● Memorizing the Balance,
Strings Type, & Octave Shift
Settings
Press the C7 key while holding any two voice selectors to memorize all
balance, STRINGS voice attack variation, and octave shift settings made
since the power was turned on. The memorized settings will be retained in
memory for about one week after the power is turned off, then the default
settings will be restored. To keep the memorized settings for longer periods,
turn the power on briefly at least once a week.
If these settings are not memorized as described above, they are retained
in memory only until the Clavinova is turned off.
The [BRILLIANCE] button makes it possible to change the tonality or “timbre” of the selected
voice to suit your musical requirements. Three settings are provided: MELLOW, NORMAL, and
BRIGHT. To select one of these settings, press the [BRILLIANCE] button a few times until the
indicator corresponding to the desired setting lights.
NORMAL .....This setting produces the “normal” tone of the selected voice.
BRIGHT .......This setting creates a brighter, sharper tone.
MELLOW.....The MELLOW setting produces a rounder, softer tone.
● Memorizing the Brilliance
Setting
Press the C7 key while holding the [BRILLIANCE] button to memorize
the current brilliance setting. The memorized setting will be retained in
memory for about one week after the power is turned off, then the default
setting (NORMAL) will be restored. To keep the memorized setting for
longer periods, turn the power on briefly at least once a week.
If this setting is not memorized as described above, it is retained in
memory only until the Clavinova is turned off.
C
7
BRILLIANCE
MELLOW
NORMAL
BRIGHT
Brilliance
C
7
V
A
E. PIANO
HARPSI-
CHORD
PIANO 1 PIANO 2
CLAVINOVA
E. PIANO
HARPSI- VIBES STRINGS
ORGAN
TONE
CHORD
PIANO 1 8 (C3) 8 (C3) 8 (C3) 8 (C3) 8 (C3) 4 (F2) 3 (E2)
PIANO 2 0 8 (C3) 8 (C3) 8 (C3) 8 (C3) 4 (F2) 3 (E2)
CLAVINOVA TONE
0 0 8 (C3) 8 (C3) 8 (C3) 4 (F2) 4 (F2)
E. PIANO 0 0 0
8 (C3) 8 (C3) 4 (F2) 3 (E2)
HARPSICHORD 0 0 0 0 8 (C3) 4 (F2) 5 (G2)
VIBES R R R R R 7 (B2) 7 (B2)
STRINGS 0 0 0 0 0 L 8 (C3)
ORGAN 0 0 0 0 0 L 0
Default Settings
Octave Shift
C2 … C4: Balance keys 0: Normal octave L: Left voice up one octave R: Right voice up one octave
Balance

11
Reverb
The [REVERB] button selects a number of digital reverb effects that you can use for
extra depth and expressive power.
To select a reverb type press the [REVERB] button a few times until the indicator
corresponding to the desired type lights (the indicators light in sequence each time the
[REVERB] button is pressed). No reverb is produced when all indicators are off.
OFF............When no reverb effect is selected (no REVERB indicator is lit), a special natural
damper effect is applied to the piano voices. This simulates the natural resonance of
an acoustic piano’s strings and sound board when the damper pedal is pressed.
ROOM........This setting add a continuous reverb effect to the sound that is similar to the type of
acoustic reverberation you would hear in a medium-size room.
HALL 1 ......For a “bigger” reverb sound, use the HALL 1 setting. This effect simulates the natu-
ral reverberation of a medium-size concert hall.
HALL 2 ......For a really spacious reverb sound, use the HALL 2 setting. This effect simulates the
natural reverberation of a large concert hall.
COSMIC ....The COSMIC reverb effect produces an echo-plus-reverb sound that can add life and
animation to your music.
Press the C7 key while holding the [REVERB] button to memorize the
current effect type and all depth settings made since the power was turned
on. The memorized settings will be retained in memory for about one week
after the power is turned off, then the default settings will be restored. To
keep the memorized settings for longer periods, turn the power on briefly at
least once a week.
If these settings are not memorized as described above, they are retained
in memory only until the Clavinova is turned off.
● Memorizing the Reverb
Type & Depth Settings
C
7
REVERB
ROOM
HALL 1
HALL 2
COSMIC
The depth of the selected reverb effect can be adjusted for the current
voice (separate settings can be made for each voice and reverb type) by
using the C2 through C4 keys on the keyboard or the TEMPO [s] and [t]
buttons while holding the [REVERB] button. The selected reverb depth
value (0 … 15) will be shown on the TEMPO display until the [REVERB]
button is released. The default reverb depth settings are given in the “De-
fault Settings” chart below.
When using the keyboard, the C3 keys sets the “normal” depth (a setting
of “8”). Keys to the left of C3 decrease the reverb depth, and keys to the
right of C3 increase the reverb depth.
When using the TEMPO buttons the first time either button is pressed
the current depth setting appears on the TEMPO display, then pressing the
[
ss
ss
s] button increases the reverb depth while the [
tt
tt
t] button decreases the
reverb depth. Press both the [s] and [t] buttons simultaneously to in-
stantly recall the normal (“8”) setting.
■ A setting of “0” sets the minimum reverb depth (no reverb).
■ A setting of “8” sets medium “normal” reverb depth.
■ A setting of “15” sets the maximum reverb depth.
NOTE
• Hold either the TEMPO [
s
] or [
t
] button for continuous scrolling in the
specified direction.
• A setting of “1” cannot be entered via the keyboard.
● Adjusting Reverb Depth
Normal
depth.
Decrease
depth.
Increase
depth.
C
3
C
2
C
4
REVERB
ROOM
HALL 1
HALL 2
COSMIC
0 2 3 4 5 6 7 8 9 10 11 12 13 14 15
TEMPO
▲
▼
8
ROOM HALL 1 HALL 2
COSMIC
STRINGS, ORGAN 8 (C3) 8 (C3) 11 (F3) 10 (E3)
Default Settings
* All effect types set to 8 (C3) for all other voices.
* The default reverb type is ROOM.

12
Touch Sensitivity
Four different types of keyboard touch sensitivity — HARD, MEDIUM, SOFT or FIXED —
can be selected to match different playing styles and preferences. The different touch sen-
sitivity settings are selected by using the [MIDI/TRANSPOSE] and [REVERB] buttons.
To select a touch sensitivity setting press the [REVERB] button a few times
while holding the [MIDI/TRANSPOSE] button until the indicator correspond-
ing to the desired setting lights.
MIDI/
TRANSPOSE
REVERB
ROOM
HALL 1
HALL 2
COSMIC
● Memorizing the Touch
Sensitivity Setting
Press the C7 key while holding the [MIDI/TRANSPOSE] and [REVERB]
button to memorize the current touch sensitivity setting. The memorized setting
will be retained in memory for about one week after the power is turned off,
then the default setting (MEDIUM) will be restored. To keep the memorized
setting for longer periods, turn the power on briefly at least once a week.
If this setting is not memorized as described above, it is retained in memory
only until the Clavinova is turned off.
Pressing the soft pedal reduces the volume and slightly changes the timbre of
notes played.
If you play a note or chord on the keyboard and press the sostenuto pedal while
the note(s) are held, those notes will be sustained as long as the pedal is held (as if
the damper pedal had been pressed) but all subsequently played notes will not be
sustained. This makes it possible to sustain a chord, for example, while other notes
are played “staccato.”
The damper pedal functions in the same way as a damper pedal on an acoustic
piano. When the damper pedal is pressed notes played have a long sustain. When
no REVERB effect is selected and a piano voice is selected, the damper pedal also
produces a special “resonance” that simulates the ring of the strings and the sound
board of an acoustic piano. Releasing the pedal immediately stops (damps) any
sustained notes. The CLP-156 damper pedal additionally features continuous
damping. This allows you to create shorter effects by pressing the damper pedal
down only part of the way.
The CLP-156 has three foot pedals that produce a range of expressive effects similar to
those produced by the pedals on an acoustic piano.
● Soft (Left) Pedal
The Pedals
● Sostenuto (Center) Pedal
● Damper (Right) Pedal
C
7
MIDI/
TRANSPOSE
REVERB
ROOM
HALL 1
HALL 2
COSMIC
HARD (ROOM indicator) ...........The HARD setting requires the keys to be played quite hard to produce maxi-
mum loudness.
MEDIUM (HALL 1 indicator)......The MEDIUM setting produces a fairly “standard” keyboard response. This is
the initial factory default setting.
SOFT (HALL 2 indicator) ...........The SOFT setting allows maximum loudness to be produced with relatively
light key pressure.
FIXED (No indicator lit)..............All notes are produced at the same volume no matter how hard the keyboard is
played. This is an ideal setting for voices which normally have no keyboard
sensitivity (i.e. harpsichord and organ).

13
The Clavinova’s TRANSPOSE function makes it possible to shift the pitch of the entire key-
board up or down in semitone intervals up to a maximum of six semitones. “Transposing” the
pitch of the Clavinova keyboard facilitates playing in difficult key signatures, and you can easily
match the pitch of the keyboard to the range of a singer or other instrumentalist.
Transposition
The [MIDI/TRANSPOSE] button and keys F#2 through F#3 on the keyboard, or the TEMPO [s] and [t] buttons, are
used for transposition.
ZPress and hold the [MIDI/TRANSPOSE] button. The current transpose
setting will appear on the TEMPO display (“-6” semitones through “0”
through “6” semitones).
XPress a key between F#2 and F#3 according to the desired amount of
transposition*, or use the TEMPO [s] and [t] buttons to set the re-
quired transposition value. The “0” default setting can be instantly re-
called by simultaneously pressing the TEMPO [s] and [t] buttons.
CRelease the [MIDI/TRANSPOSE] button.
* Pressing the C3 key produces normal keyboard pitch. Pressing the key to
the left of C3 (B2) transposes the pitch of the keyboard down a semitone,
the next key to the left (Bb2) transposes down a whole tone (two semi-
tones), etc., down to the F#2 key which transposes down 6 semitones.
Upward transposition is accomplished in the same way using the keys to
the right of C3, up to F#3 which transposes up 6 semitones.
NOTE
• Hold either the TEMPO [
s
] or [
t
] button for continuous scrolling in the
specified direction.
• Notes below and above the A-1 — C7 of the Clavinova sound one octave
higher and lower, respectively.
C
3
F#
2
Normal
pitch.
Transpose
down.
Transpose
up.
F#
3
MIDI/
TRANSPOSE
-5 -3 -1 0 +2 +4 +5
-6 -4 -2 +1
+3 +6
TEMPO
▲
▼
-1

14
Pitch control makes it possible to tune the Clavinova over a ±50-cent range (approximate) in ap-
proximately 1.2-cent or 1-hertz intervals. A hundred “cents” equals one semitone, so the tuning range
provided allows fine tuning of overall pitch over a range of approximately a semitone. Pitch control is
useful for tuning the Clavinova to match other instruments or recorded music.
C
3
B
3
A
-1
B
-1
Pitch Control
TEMPO
▲
▼
● Tuning Up
Z To tune up (raise pitch), hold the A-1 and B-1 keys simultaneously
(A-1 and B-1 are the two lowest white keys on the keyboard) and press
any key between C3 and B3. Each time a key in this range is pressed the
pitch is raised by approximately 1.2 cents, up to a maximum of about 50
cents above standard pitch. To raise the pitch in 1-hertz increments press
the TEMPO [s] button instead of the C3-B3 keys. The TEMPO [t]
button can also be used to tune down while the A-1 and B-1 keys are held.
X Release the A-1 and B-1 keys.
Z To tune down (lower pitch), hold the A-1 and A#-1 keys simultane-
ously and press any key between C3 and B3. Each time a key in this range
is pressed the pitch is lowered by approximately 1.2 cents, up to a maxi-
mum of about 50 cents below standard pitch. To lower the pitch in 1-hertz
increments press the TEMPO [t] button instead of the C3-B3 keys. The
TEMPO [s] button can also be used to tune up while the A-1 and A#-1
keys are held.
XRelease the A-1 and A#-1 keys.
ZTo restore the default pitch (A3 = 440 Hz), hold the A-1, A#-1, and B-1
keys simultaneously and press any key between C3 and B3, or simultane-
ously press the TEMPO [s] and [t] buttons.
XRelease the A-1, A#-1 and B-1 keys.
NOTE
• Hold either the TEMPO [
s
] or [
t
] button for continuous scrolling in the
specified direction.
• The PITCH CONTROL function has no effect when LOCAL OFF is active
(see “MIDI FUNCTIONS,” page 32).
● The Pitch Display The approximate pitch of A3 is shown on the TEMPO display in Hertz
while the pitch control function is in operation. The total display range is from
approximately 427 hertz (-50 cents) to 453 hertz (+50 cents).
The dots to the right of each figure in the display are used to provide a
general idea of fractional pitches.
442 442.0 .........442.24
4.42 442.25 .......442.49
44.2 442.5 .........442.74
442. 442.75 .......442.99
Example:
Press the C7 key while holding the A-1/B-1, A-1/A#-1, or A-1/A#-1/B-1 key
combination to memorize the current pitch control setting. The memorized
setting will be retained in memory for about one week after the power is
turned off, then the standard pitch will be restored. To keep the memorized
setting for longer periods, turn the power on briefly at least once a week.
If this setting is not memorized as described above, it is retained in memory
only until the Clavinova is turned off.
● Memorizing the Pitch Con-
trol Setting
C
7
TEMPO
▲
▼
● Tuning Down
A
-1
A#
-1
C
3
B
3
A
-1
B
-1
A#
-1
C
3
B
3
● To Restore Standard Pitch
TEMPO
▲
▼

15
The Metronome & Tempo Control
The CLP-156 built-in metronome is a convenient feature for practice, and it can also provide
a solid rhythmic guide when recording using the Recorder feature, described below.
The metronome sound is turned on and off via the [METRONOME] button. Press the
[METRONOME] button so that its indicator lights to turn the metronome on and then
again so that the indicator goes out to turn the metronome off. When the metronome is on
the current measure number is shown on the TEMPO display.
NOTE
• The metronome will not function when the supplied PianoSoft demonstration disk or a
Disklavier PianoSoft disk is in the disk drive.
The volume of the metronome sound can be independently adjusted by using the
TEMPO [s] and [t] buttons while holding the [METRONOME] button. The first time
either button is pressed the current volume setting appears on the TEMPO display, then
pressing the [s] button increases the volume while the [t] button decreases the volume.
Press both the [s] and [t] buttons simultaneously to instantly recall the default (“8”)
setting.
■ A setting of “1” sets the minimum metronome volume.
■ A setting of “8” sets the default metronome volume.
■ A setting of “15” sets the maximum metronome volume.
NOTE
• Hold either the TEMPO [
s
] or [
t
] button for continuous scrolling in the specified direc-
tion.
The time signature of the metronome sound can be set by pressing the appropriate
voice selector button while holding the [METRONOME] button, as follows:
METRONOME
The Metronome
● Metronome Volume
METRONOME
TEMPO
▲
▼
8
● Metronome Time
Signature
Tempo Control
The tempo of the Metronome as well as the song recording and playback functions can be
adjusted from 32 to 280 quarter-note beats per minute via the TEMPO [s] and [t] but-
tons. The current tempo normally appears on the TEMPO display. Although the TEMPO
display shows the current measure number during Metronome, song recording or play-
back operation, the tempo value is displayed when either of the TEMPO buttons are
pressed, and remains on the display for about one second after the TEMPO buttons are
released. “_ _ _” is displayed for any tempo value during playback of the supplied
PianoSoft demonstration disk or optional Disklavier PianoSoft disks.
The default tempo of 120 beats per minute is automatically set when the power is ini-
tially turned on. Press the TEMPO [s] and [t] buttons simultaneously to instantly re-
call the default tempo (120) at any time. The tempo value of the selected song is recalled
if the TEMPO [s] and [t] buttons are pressed simultaneously when a song which con-
tains data is selected.
NOTE
• Hold either the TEMPO [
s
] or [
t
] button for continuous scrolling in the specified direc-
tion.
1.20
Beat Indicator
PIANO 1
PIANO 2
CLAVINOVA
TONE
E. PIANO
METRONOME
No accent/
4 time 2 time 3 time
1st Beat
2nd Beat
3rd Beat
4th Beat
[METRONOME] + [PIANO 1] No accent (default)
[METRONOME] + [PIANO 2] 2 time
[METRONOME] + [CLAVINOVA TONE] 3 time
[METRONOME] + [E. PIANO] 4 time
The dots on the TEMPO display flash to indicate the current beat within
the current measure, as shown to the left.
TEMPO
▲
▼
120

16
Disk Playback
Performance data on the supplied PianoSoft demonstration disk (others are available from Yamaha), as
well as original performances you record using the Clavinova’s Recorder function (page 18) can be played
back as described below.
Insert the disk containing the data to be played back into the disk
drive, with the sliding door facing the drive slot and the label side facing
upward. The disk should click into place and the disk lamp will light
briefly while the Clavinova reads and identifies the disk. Song number
“1” will also appear on the display.
NOTE
• Any recorded data in the CLP-156 memory (i.e. data recorded with-
out first inserting a disk) will be erased when:
(1)the supplied PianoSoft demonstration disk or an optional
PianoSoft disk is inserted.
(2)a disk containing original performance data is inserted and the
“Select a Song Number” operation, below, is carried out.
If you want to keep the data that is in the instrument’s memory, copy
it to a recordable disk as described on page 20 before doing any of
the above.
Use the SONG [r] and [f] buttons to select the song number you
want to play. Select “ALL” if you want all songs on the disk to be played
back in sequence. When the desired song number is selected the [1/R]
and [2/L] track button indicators will glow green if the corresponding
tracks contain performance data.
NOTE
• The songs can be made to play back and repeat either in sequence
or in random order when “ALL” is selected, depending on the setting
of the “All-song Random Repeat” function (page 28).
Start playback of the selected song by pressing the [PLAY] button.
Unless “ALL” is selected, the selected song will play through to the end
and playback will stop automatically. The current measure number will
be shown on the display during playback. It is also possible to play along
on the keyboard during playback.
NOTE
• The measure number display may not be accurate with some songs.
• It is possible to change the playback voice by using the panel voice
selectors during playback of the supplied PianoSoft demonstration
disk or an optional Disklavier PianoSoft disk. In this case the play-
back voice will become the same as the voice played via the key-
board. The playback voice cannot be changed when playing back
other types of disks (the keyboard voice can be changed).
Adjust the playback volume as required via the [MASTER VOL-
UME] control.
Although playback will stop automatically at the end of the song, it
can be stopped at any time by pressing the [PLAY] button.
When you’ve finished with the currently loaded disk, simply press the
disk drive EJECT button to remove it.
CAUTION
• NEVER eject a disk or turn the power off while the disk drive lamp is
on or a disk is playing back.
Z Insert a Disk
1
NEject the Disk When Done
X Select a Song Number
2
RECORDER
1/R
2/L
PLAY
REC
SONG
f
r
C Start Playback
1
RECORDER
1/R
2/L
PLAY
REC
V Adjust the Volume
BStop Playback
MASTER VOLUME
MIN MAX
PLAY
REC
Song Number
Measure Number

17
The playback tempo can be adjusted either before or during playback by
using the TEMPO [▲] and [▼] buttons. Press the TEMPO [▲] and [▼]
buttons simultaneously to recall the original tempo. The tempo value in
beats per minute will appear on the display during adjustment. “_ _ _” is
displayed for any tempo value during playback of the supplied PianoSoft
demonstration disk or optional Disklavier PianoSoft disks.
● Adjusting the Playback Tempo
● Repeat Playback
● Playing Other Types of
Music Data
As mentioned in step 2 of the playback procedure described above, you can
select “ALL” instead of an individual song number if you want to hear all the
songs on the disk played back in sequence. It is also possible to automatically play
all songs from the currently selected song repeatedly by pressing the [PLAY]
button while holding the [MIDI/TRANSPOSE] button. Press the [PLAY] button
to stop repeat playback at any time.
In addition to the supplied PianoSoft demonstration disk and disks containing
performances you record yourself using the CLP-156 recorder function, the
Clavinova can play back optional Yamaha Disklavier PianoSoft™ disks available
from your Yamaha dealer, and disks containing songs recorded in Standard MIDI
File format (format 0 only).
When playing Standard MIDI Files, approximate panel voices will automati-
cally be selected for the voices specified by the song data.
In most cases pre-recorded Standard MIDI File disks will include data for more
tracks than the two available on the CLP-156. Only track-1 and track-2 data will
be played by the CLP-156, while the data for other tracks will be transmitted via
the CLP-156 MIDI OUT terminal (see page 6). The data for tracks 1 and 2 will
not be transmitted via MIDI OUT. It is possible, however, to re-assign the data for
other tracks to playback via tracks 1 and 2 by using the “Disk Playback Track
Selection” function described on page 27. In this case the data for all tracks other
than those assigned to be played by the CLP-156 will be transmitted via the MIDI
OUT terminal.
122
TEMPO
▲
▼
During playback the SONG [r] and [f] buttons function as fast reverse and
forward controls:
■ Fast reverse: Press the SONG [r] button during playback to move back-
ward rapidly through the song. The current measure number
will appear on the display. No sound is produced during fast
reverse.
■ Fast forward: Press the SONG [f] button during playback to move rapidly
forward through the song. The current measure number will
appear on the display, and the fast-forward sound can be heard.
If both the [1/R] and [2/L] track button indicators light green, both tracks con-
tain data which will be played back. If you only want to play back one track, how-
ever, you can turn either track off by pressing its track button so the indicator goes
out. Press the same track button again so the indicator lights to turn the track back
on. Both tracks can be turned on or off either before or during playback in this
way.
5
SONG
f
r
● Playing Back only One
Track
RECORDER
1/R
2/L
● Fast Reverse and Forward
PLAY
REC
MIDI/
TRANSPOSE
Measure Number

18
Using the Recorder
The CLP-156 features a two-track recorder that lets you record what you play on the keyboard and then
play it back. Since you have two tracks, you can “overdub” one part on top of another, using a different
voice if you like, to create complex, rich-sounding recordings. The recorder feature is a useful adjunct to
any keyboard study program, since it lets you hear exactly how you sound from the listener’s perspective.
It can also be just plain fun.
Each individual recording made using this function is known as a “song”, and up to 60 songs can be
recorded on a single floppy disk (less if the recorded songs contain a large amount of data).
Recording
Insert a properly formatted disk into the disk drive, with the sliding
door facing the drive slot and the label side facing upward. The disk
should click into place and the disk lamp will light briefly while the
Clavinova reads and identifies the disk. Song number “1” will also ap-
pear on the display.
NOTE
• If an unformatted disk or a disk that was not formatted by the CLP-
156 is inserted, “For” will appear flashing on the display and recording
will not be possible. Be sure to format the disk using the “Floppy Disk
Format” function described on page 24 before recording.
Use the SONG [r] and [f] buttons to select the song number you
want to record to.
NOTE
• When a song number is selected the [1/R] and [2/L] track button
indicators will light green if the corresponding tracks already contain
performance data. If you record to a song number that contains data,
the old data will be erased and replaced by the newly-recorded data.
Select an “empty” song if you don’t want to erase the existing data.
Use the voice selectors to select the voice you want to record with. In
addition to the notes played, the CLP-156 also records the data listed in
the charts below. “Initial Value” refers to settings that can be made be-
fore actually beginning recording — e.g. selecting a voice or brilliance
type. “During Recording” refers to parameter changes that will be re-
corded while recording. The initial settings can be changed after record-
ing as described in “Changing the Initial Settings” on page 20.
Z Insert a Disk
● Data Recorded Independently for Each Track ● Data Common to Both Tracks
Data Initial Value During Recording
Reverb type Yes Yes
Reverb depth Yes Yes
Tempo Yes No
Data Initial Value During Recording
Notes played No Yes
Voice Yes Yes
Damper pedal Yes Yes
Soft pedal Yes Yes
Sostenuto pedal No Yes
Brilliance type Yes Yes
Dual voice Yes Yes
Dual balance Yes Yes
X Select a Song Number
2
RECORDER
1/R
2/L
PLAY
REC
SONG
f
r
Song Number
1
C
Select a Voice & Other Initial
Settings As Required
PIANO 1
PIANO 2
CLAVINOVA
TONE
E. PIANO
HARPSI-
CHORD
VIBE
S

19
Press the RECORDER [REC] button to engage the record ready mode (re-
cording does not actually start yet). The [REC] button indicator will light red.
When the [REC] button is released the amount of space available on the cur-
rently loaded floppy disk will be shown on the display in kilobytes (approxi-
mate). Also, a dot on the right side of the display will flash at the current tempo.
The record ready mode can be disengaged before recording by simply press-
ing the [REC] button again.
NOTE
• It is not possible to record to a song which contains data recorded on an in-
strument other than the CLP-156 — “no” will appear on the display when you
press the [REC] button.
When the record mode is engaged in the previous step, the last-recorded track
will automatically be selected for recording and its indicator — i.e. the [1/R] or
[2/L] button indicator — will glow red. If you want to record on a different
track, press the appropriate track button so that its indicator glows red.
NOTE
• The track button indicators of tracks which contain previously recorded data
will glow green. The previously-recorded data on the non-record track will
normally be played back as you record, so you can play along with a previ-
ously-recorded track. If you don’t want to hear the previously recorded track as
you record, press the playback track button before pressing the [REC] button
(step 4, above) so that its indicator goes out.
• Recording on a track which already contains data will erase all previous data
on that track.
If you want to use the metronome while recording, press the [METRO-
NOME] button and adjust the tempo and volume as described on page 15. The
metronome sound will not be recorded.
Recording will begin automatically as soon as you play a note on the key-
board or press the [PLAY] button. The current measure number will appear on
the display during recording.
NOTE
• You can record up to a maximum of about 57,000 notes on a single floppy
disk (approximately 700 kilobytes disk capacity), depending on pedal usage
and other factors. If the disk becomes full while recording, “FUL” will appear
on the display and recording will stop automatically.
Press either the [REC] or [PLAY] button to stop recording. “rEc” will appear
on the display while the data is being written to the floppy disk, then the indica-
tor of the recorded track will glow green to indicate that it now contains data,
and the display will revert to the normal song number display.
V
Engage the Record Ready
Mode
700
.
RECORDER
1/R
2/L
PLAY
REC
RECORDER
1/R
2/L
PLAY
REC
BSelect the Record Track
METRONOME
N
Start the Metronome,
If Required
M Start Recording
< Stop Recording
RECORDER
1/R
2/L
PLAY
REC
● Changing the Initial Settings
The initial settings (see the chart in step 3, above) recorded by the CLP-156
can be changed after the recording is finished by pressing the [REC] button to
engage the record ready mode, pressing the appropriate track button, making the
required changes, and then pressing the [REC] button again to exit from the
record ready mode and register the changes. If you do this, be careful not to
press the [PLAY] button or a key on the keyboard, either of which will start
recording and erase all previous recorded data on the selected track. If you start
this procedure but decide to cancel, simply select a different track then press the
[REC] button a second time.

20
All data can be erased from either of the recorder’s tracks by engaging the
record mode, selecting the track you want to erase, and then pressing the
[PLAY] button twice without recording any data.
If you forget to insert a properly formatted floppy disk before recording, it is
possible to record up to approximately 600 notes before the 8-kilobyte internal
memory becomes full. If you want to keep this data, it is possible to copy it to
disk by following the procedure outlined below.
CAUTION
• Any of the following operations will erase all data in the internal memory. Be
sure to copy the data in memory to disk before:
1: Turning the power switch OFF.
2: Loading a PianoSoft disk (including the supplied disk).
3: Inserting any disk and selecting a song number.
Z While holding the [MIDI/TRANSPOSE] button, press either the SONG
[r] and [f] button several times until “cPy” appears on the display.
Release the [MIDI/TRANSPOSE] button when “c_ _” appears on the
display.
X Use the TEMPO [▲] or [▼] button to select the song number to which
you want to copy the data.
C Insert the disk you want to copy the data to.
V Press the [PLAY] button. If no previous data exists in the specified song
number “cPy” will appear on the display and the data in the CLP-156
memory will be copied to the disk. If the specified song number already
contains data, “n y” will appear on the display. In this case press the
TEMPO [▲] button (yes) if you want to go ahead with the copy operation,
thereby erasing the previous data, or the TEMPO [▼] button (no) if you
want to cancel the copy operation and leave the existing data intact. In the
latter case repeat the procedure, selecting an empty song number.
Using the Recorder
c3
TEMPO
▲
▼
PLAY
REC
SONG
f
r
MIDI/
TRANSPOSE
cpY c__
● Erasing a Single Track
● If You Record Without First
Inserting a Disk …
Playback
To play back what you’ve recorded, simply press the RECORDER [PLAY]
button. Playback starts from the beginning of the recorded data, and will stop
automatically at the end of the recorded data. You can also stop playback at
any time by pressing the [PLAY] button. To mute a track so that it doesn’t play
back, press the corresponding track button so that its indicator goes out.
Also refer to the “Disk Playback” section (page 16) for other playback func-
tions.
NOTE
• If the metronome is being used during playback, the metronome will stop
when playback is stopped.
• The playback data is not transmitted via the MIDI OUT terminal.
PLAY
REC

21
d
TEMPO
▲
▼
MIDI/
TRANSPOSE
Utility Functions
Utility 1: Individual key Tuning
Z
Select the Individual Key
Tuning Function
The individual key tuning feature makes it possible to individually tune each key on the CLP-156 keyboard in order to
match different tuning standards. The pitch of each key can be raised or lowered by a maximum of 50 cents (approximately)
from the standard pitch.
Hold the [MIDI/TRANSPOSE] button and press the SONG [r] or
[f] button as many times as necessary until “tun” appears on the display
— don’t release the [MIDI/TRANSPOSE] button yet.
Press the TEMPO [▼] button. “d” will appear on the TEMPO display.
While still holding the [MIDI/TRANSPOSE] button, press the desired
key as many times as necessary to lower its pitch by the required amount
(each press lowers pitch by approximately 1.2 cents). The ±50-cent tuning
range is shown on the TEMPO display in steps ranging from “-44” to “44”.
● To Lower the Pitch of a Single Key
● To Raise the Pitch of a Single Key
Z
Select the Individual Key
Tuning Function
Hold the [MIDI/TRANSPOSE] button and press the SONG [r] or
[f] button as many times as necessary until “tun” appears on the display
— don’t release the [MIDI/TRANSPOSE] button yet.
SONG
f
r
MIDI/
TRANSPOSE
tun
X
Select the “Down-tuning”
Mode
C Tune the Required Key(s)
MIDI/
TRANSPOSE
V
Release the [MIDI/TRANSPOSE] button.
SONG
f
r
MIDI/
TRANSPOSE
tun

22
Press the TEMPO [▲] button. “U” will appear on the TEMPO display.
While still holding the [MIDI/TRANSPOSE] button, press the desired key
as many times as necessary to raise its pitch by the required amount (each
press raises pitch by approximately 1.2 cents). The ±50-cent tuning range is
shown on the TEMPO display in steps ranging from “-44” to “44”.
X
Select the “Up-tuning”
Mode
Utility Functions
U
TEMPO
▲
▼
MIDI/
TRANSPOSE
C Tune the Required Key(s)
V
Release the [MIDI/TRANSPOSE] button.
MIDI/
TRANSPOSE
● To Turn the Individual Key Tune Mode OFF or ON
The individual key tuning settings described above can be turned off (normal tuning) while retaining the settings in
memory. Individual key tuning is always turned off when the power is initially turned on, but any previous settings are
retained in memory and can be recalled if the power has not been off for longer than about a week. To keep the memo-
rized settings for longer periods, turn the power on briefly at least once a week. Complete tunings can also be saved to
and loaded from disk as described in “Utility 2: Save Individual Key Tuning” and “Utility 3: Load Individual Key Tun-
ing”, below.
Z
Select the Individual Key
Tuning Function
Hold the [MIDI/TRANSPOSE] button and press the SONG [r] or
[f] button as many times as necessary until “tun” appears on the display
— don’t release the [MIDI/TRANSPOSE] button yet.
Press the TEMPO [▲] and [▼] buttons simultaneously. “F” will appear
on the TEMPO display indicating that the individual key tuning mode is
OFF.
NOTE
• You can turn the individual key tuning mode back on by carrying out
steps 1 and 2 in either the “To Lower The Pitch Of a Single Key” or “To
Raise the Pitch Of a Single Key” procedure, above, so that “d” or “U”
appears on the display.
SONG
f
r
MIDI/
TRANSPOSE
tun
X
Turn Individual Key Tuning
OFF
F
TEMPO
▲
▼
MIDI/
TRANSPOSE
C
Release the [MIDI/TRANS-
POSE] button.

23
Utility 2: Save Individual Key Tuning
Insert a properly formatted disk into the Clavinova disk drive.
Individual key tuning data can be saved to a blank song number or one
that already contains recorder data. Use the SONG [r] and [f] buttons
to select the song number to which you want to save the individual key
tuning data.
Hold the [MIDI/TRANSPOSE] button and press the SONG [r] or
[f] button as many times as necessary until “tun” and “SAV” flash alter-
nately on the display — don’t release the [MIDI/TRANSPOSE] button yet.
While still holding the [MIDI/TRANSPOSE] button, press the [PLAY]
button to actually begin saving the data. Simply release the [MIDI/
TRANSPOSE] button before pressing the [PLAY] button if you want to
cancel the function. “SAV” will appear on the display while the data is
being saved, then “End” will appear briefly when the save operation has
been completed.
NOTE
• The tuning settings are saved to one song file on the disk. The Save
Individual Key Tuning function will automatically be exited when the data
has been saved.
• Individual key tuning data saved as described above is not erased by the
“Song Delete” function described on page 26. Further, the individual key
tuning data will only be copied when the “Song Copy” function described
on page 25 is executed if the song also contains performance data.
Z Insert a Disk
XSelect a Song Number
C
Select the Save Individual
Key Tuning Function
This function saves the current individual key tuning data set up via the “Individual Key Tuning” function to disk. The
data can then be reloaded at any time by using the Load Individual Key Tuning function, described next.
SONG
f
r
SONG
f
r
MIDI/
TRANSPOSE
tun SAU
V
Execute the Save Individual
Key Tuning Function
PLAY
REC
MIDI/
TRANSPOSE
SAU End
Insert the disk containing the individual key tuning data you want to load
into the Clavinova disk drive.
Use the SONG [r] and [f] buttons to select the song number contain-
ing the individual key tuning data you want to load.
Z Insert a Disk
Utility 3: Load Individual Key Tuning
This function reloads the individual key tuning data saved to disk by the Save Individual Key Tuning function, described
above.
X Select a Song Number
SONG
f
r

24
Utility Functions
C
Select the Load Individual
Key Tuning Function
Hold the [MIDI/TRANSPOSE] button and press the SONG [r] or
[f] button as many times as necessary until “tun” and “Lod” flash alter-
nately on the display — don’t release the [MIDI/TRANSPOSE] button yet.
While still holding the [MIDI/TRANSPOSE] button, press the [PLAY]
button to actually begin loading the data. Simply release the [MIDI/
TRANSPOSE] button before pressing the [PLAY] button if you want to
cancel the function. “Lod” will appear on the display while the data is being
loaded, then “End” will appear briefly when the load operation has been
completed.
NOTE
• The Individual Key Tuning mode will automatically be turned ON when
the data has been loaded.
• If no individual key tuning data exists in the selected song number, “no”
will appear on the display. If this occurs, try again from step 2, above.
Utility 4: Floppy Disk Format
The Clavinova uses only 3.5" 2DD floppy disks. We recommend that you use Yamaha 2DD disks. Before you can use a
new disk for recording, the disk must be “formatted” so that the Clavinova can recognize it and correctly write the music data
onto it.
SONG
f
r
MIDI/
TRANSPOSE
tun Lod
V
Execute the Load Individual
Key Tuning Function
PLAY
REC
MIDI/
TRANSPOSE
Lod End
Insert a new blank disk. Make sure that the disk’s write protect tab is set
to the “write” position (tab closed), and insert the new disk into the disk
drive unit with the sliding door facing the drive slot and the label side of the
disk facing upward. The disk should click securely into place, and the disk
drive lamp should light briefly.
NOTE
•“For” will flash on the display to indicate that a blank (unformatted) disk
or one with a format not recognizable by the CLP-156 is loaded in the
drive. In this case you can go directly to the next step. If an already-
formatted disk that you want to re-format is loaded (i.e. to completely
erase all data from the disk in one operation), you’ll have to select the
format function by pressing the SONG [
r
] or [
f
] button as many times
as necessary until “For” appears on the display while holding the [MIDI
TRANSPOSE] button, then release the [MIDI/TRANSPOSE] button
when “n y” appears flashing on the display and proceed to step 3.
•“Pro” will appear on the display if a protected disk that cannot be format-
ted is loaded in the drive: a write-protected disk or a Disklavier PianoSoft
disk.
Press the TEMPO [▲] or [▼] button. “n y” will flash on the display.
Z
Insert the Disk To Be
Formatted
X Engage the Format Function
TEMPO
▲
▼
nY
For

25
C
Confirm & Start the Format
Operation
Use the TEMPO [▲] (YES) and [▼] (NO) buttons to confirm and con-
tinue or cancel the operation. “YES” if you intend to execute the format
operation or “NO” if you wish to cancel the operation. This step is neces-
sary because formatting completely erases any data that is already on the
disk — make sure that the disk you’re about to format does not contain any
important data!
Formatting will begin the instant you select “YES”. The number of each
“track” on the disk will be shown on the display as the format process con-
tinues (“F80” through “F 0”). When formatting is complete “End” will ap-
pear briefly then the display will revert to the normal song number display.
F80 F0
Z
Insert a Disk & Select the
Source Song
Insert the disk containing the song you want to copy, and use the SONG
[r] and [f] buttons to select the number of the song you wish to copy.
Hold the [MIDI/TRANSPOSE] button and press the SONG [r] or
[f] button as many times as necessary until “cPy” appears on the display
— then release the [MIDI/TRANSPOSE] button when “c_ _” appears
flashing on the display (“c_ _” will not appear if the selected song number
contains no data).
Use the TEMPO [▲] and [▼] buttons to select the song number you
wish to copy to (i.e. the destination song number — “c 1” through “c60”). If
you select a song number that already contains data, that data will be
overwritten by the new song data. If you select a song number greater than
“c60” a bar will appear above the “c” in the song number, indicating that
the copy will be made to a different disk.
NOTE
• You can cancel the copy function before actually starting the copy opera-
tion (next step) by pressing either the SONG [
r
] or [
f
] button.
Press the [PLAY] button to begin the actual copy operation. “cPy” will
appear on the display during the copy operation, then the destination song
number will appear when the copy operation has finished.
NOTE
•“n y” will flash on the display when you attempt to start copying if you
have selected a destination song number that already contains data.
Press the TEMPO [
s
] (YES) button if it is OK to go ahead with the copy
operation and erase the existing data in the destination song. Press
TEMPO [
t
] to cancel the copy operation.
X
Select the Song Copy
Function
SONG
f
r
MIDI/
TRANSPOSE
cpY c__
C
Select the Destination
Song
c1 c60
~
%1
%60
~
TEMPO
▲
▼
Copy to same disk
Copy to different disk
Utility 5: Song Copy
Recorder song data — including any existing individual key tuning data — can be “backed up” by copying to a new song
number or a different disk, as follows:
V Start Copying
PLAY
REC
cPY

26
Utility Functions
If you chose to copy to a different disk, you may have to exchange the
source and destination disks a few times if the song being copied is long and
complex. In this case, the Clavinova will prompt you to insert the source and
destination disks with the displays shown to the left. While the data is being
copied the number of times the disks will have to be exchanged to complete the
copy operation will be shown on the display. When it is no longer necessary to
change disks “cPy” will appear on the display.
The destination song number will appear when the copy operation has finished.
NOTE
• Data cannot be copied from Disklavier PianoSoft disks (including the sup-
plied disk) or Standard MIDI File disks. Data cannot be copied to Disklavier
PianoSoft disks (including the supplied disk) or any write protected disk.
● Copying to a Different Disk
d1
d2
Insert source disk.
Insert destination disk.
Insert the disk containing the song you want to delete.
Hold the [MIDI/TRANSPOSE] button and press the SONG [r] or [f]
button as many times as necessary until “dEL” appears on the display — then
release the [MIDI/TRANSPOSE] button when “d” and the currently selected
song number appears on the display.
Use the TEMPO [▲] and [▼] buttons to select the song number you wish to
delete.
NOTE
• You can cancel the delete function before actually starting the delete opera-
tion (next step) by pressing either the SONG [
r
] or [
f
] button.
Press the [PLAY] button — “n y” will flash on the display. Use the TEMPO
[▲] (YES) and [▼] (NO) buttons to select either (YES) or (NO). (YES) to
immediately delete the selected song, or (NO) if you wish to cancel the opera-
tion. If the selected song contains no data the “n y” prompt will not appear and
the Song Delete mode will be automatically exited.
The song number will appear on the display when the delete operation has
been successfully completed.
NOTE
• Data cannot be deleted from any write protected disk, the supplied PianoSoft
Disk or optional Disklavier PianoSoft disks.
To delete just one track of a song:
Z Insert the disk and select the song number containing the track you want to
delete.
X Set the track you want to delete to the record ready mode.
C Press the [PLAY] button twice without recording anything in between.
Z
Insert a Disk & Select the
Delete Function
X
Select the Song Delete
Function
SONG
f
r
MIDI/
TRANSPOSE
dEL
C Select the Song to Delete
d3
TEMPO
▲
▼
V
Confirm & Execute the
Delete Operation
TEMPO
▲
▼
nY
PLAY
● Deleting a Single Track
You can delete any Recorder song data (not including any existing individual key tuning data) from a loaded disk as follows:
Utility 6: Song Delete

27
Utility 7: Disk Playback Track Selection
Normally the CLP-156 plays the track-1 and track-2 data on a disk. Some pre-recorded MIDI Standard File disks as well
as those recorded on sequencers or similar equipment have performance data on other tracks as well. This function lets you
select any two tracks for playback from among the 16 that may possibly be available.
Z
Select the Disk Playback
Track Selection Function
Hold the [MIDI/TRANSPOSE] button and press the SONG [r] or
[f] button as many times as necessary until “1 2” appears on the display
— don’t release the [MIDI/TRANSPOSE] button yet.
Still holding the [MIDI/TRANSPOSE] button, press either the [1/R] or
[2/L] track button, depending on which track you want to assign playback
of a disk track to.
Still holding the [MIDI/TRANSPOSE] button, use the TEMPO [▲] and
[▼] buttons to specify the disk track number you want played back via the
CLP-156 track selected in the previous step. You can select tracks 1
through 16, or “_ _” to turn playback off. The currently selected values will
appear on the display as long as the [MIDI/TRANSPOSE] button is held.
NOTE
• The disk playback track selection settings are cancelled as soon as you
remove the floppy disk from the disk drive.
MIDI/
TRANSPOSE
RECORDER
1/R
2/L
SONG
f
r
MIDI/
TRANSPOSE
12
X Select a CLP-156 Track
● Selecting the Playback Track for CLP-156 Track 1/R or 2/L
C Select a Disk Track
1.16
Track 1/R.
Disk track 16 is assigned for play-
back via CLP-156 track 1/R.
TEMPO
▲
▼
MIDI/
TRANSPOSE
Utility 8: Convert to SMF
This function can be used to convert the performance data recorded by the CLP-156 (Yamaha ESEQ format) to Standard
MIDI File (SMF) format (format 0) so songs recorded on the CLP-156 can be played back on SMF-compatible devices.
CAUTION
• Data converted to SMF format cannot be re-converted to the CLP-156
format or re-recorded on the CLP-156 — “no” will appear on the display
when you press the [REC] button. It may therefore be a good idea to
make a copy of important data using the Song Copy function (page 25)
before converting it.
Insert the disk containing the data to be converted into the Clavinova
disk drive, then use the SONG [r] and [f] buttons to select the song
number you want to convert.
Z
Insert a Disk & Select a
Song Number

28
Utility Functions
Hold the [MIDI/TRANSPOSE] button and press the SONG [r] or
[f] button as many times as necessary until “E-S” appears on the display
— don’t release the [MIDI/TRANSPOSE] button yet.
Still holding the [MIDI/TRANSPOSE] button, press the [PLAY] button
to begin conversion. The number of the measure being processed will ap-
pear on the display, then the normal song number display will reappear
when the conversion has finished.
NOTE
• This function cannot be executed if the selected song number contains
no data.
• This function cannot be used to convert the data on the supplied
PianoSoft demonstration disk, optional Disklavier PianoSoft disks, write-
protected disks, or already-converted disks.
X
Select the Convert to SMF
Function
SONG
f
r
MIDI/
TRANSPOSE
E-5
C
Execute the Convert to
SMF Function
PLAY
REC
MIDI/
TRANSPOSE
1
Utility 9: All-song Random Repeat
When the repeat playback function described on page 17 is used, the songs on the currently loaded disk are normally
played back in the sequence that they appear on the disk. This function makes it possible to have the songs played back in
random order.
Hold the [MIDI/TRANSPOSE] button and press the SONG [r] or
[f] button as many times as necessary until “SEq” or “rAn” appears on
the display — don’t release the [MIDI/TRANSPOSE] button yet.
Still holding the [MIDI/TRANSPOSE] button, use the TEMPO [▲] and
[▼] buttons to select “rAn” if you want random playback (or “SEq” if you
want normal sequence playback).
Z
Select the All-song Ran-
dom Repeat Function
SONG
f
r
MIDI/
TRANSPOSE
SEq
X
Select the Random Play-
back Mode
rAn
TEMPO
▲
▼
MIDI/
TRANSPOSE

29
C
Release the [MIDI/TRANSPOSE] Button
Engage the disk playback repeat function described on page 17 to hear
the playback mode you’ve selected.
V
Use the Disk Playback Re-
peat Function
Utility 10: Standard MIDI File Voice Mode
Most pre-programmed Standard MIDI File disks use General MIDI voice assignments. When such disks are played on the
CLP-156, appropriate voices are automatically selected in response to the voice numbers included in the playback data. With
this function, however, it is possible to set the CLP-156 so that it will use the normal panel voice assignments instead of au-
tomatically conforming to the General MIDI assignments. This can be convenient when playing back data you’ve created for
the CLP-156 on an external sequencer or music computer.
This function cannot be used unless an appropriate disk is inserted in the disk drive.
Hold the [MIDI/TRANSPOSE] button and press the SONG [r] or
[f] button as many times as necessary until “SF.1” or “SF.2” appears on
the display — don’t release the [MIDI/TRANSPOSE] button yet.
Still holding the [MIDI/TRANSPOSE] button, use the TEMPO [▲] and
[▼] buttons to select “SF.1” or “SF.2” (refer to the chart, below).
SONG
f
r
MIDI/
TRANSPOSE
SF.1
X Select the Voice Mode
SF.2
TEMPO
▲
▼
MIDI/
TRANSPOSE
SF.1 GM Assignment. When a Standard MIDI File is playback on the
CLP-156, the closest possible voices to the GM voices specified
by the voice numbers in the playback data will be automatically
selected.
SF.2 Normal Assignment. If a “GM on” message is received playback
will proceed in the same way as for the “SF.1” mode, but if no “GM
on” message is received the normal panel voices will be used for
playback (i.e. the voices will not conform to the General MIDI voice
assignments).
Z
Select the Standard MIDI
File Voice Mode Function
NOTE
• The SF.1 mode is always selected when the power is initially turned ON.
• The General MIDI standard specifies voice assignments that are essen-
tially the same on any device from any manufacturer so that any per-
formance data that conforms to the General MIDI standard can be
played back on any General MIDI compatible device. There are, how-
ever, slight differences in the voices provided by each manufacturer.
• Only the track-1 and track-2 data in any Standard MIDI File will be nor-
mally played back directly by the CLP-156 (unless the “Disk Playback
Track Selection” function is used — page 27). The data for all other
tracks will be transmitted via the MIDI OUT terminal.
C
Release the [MIDI/TRANS-
POSE] Button

30
● A Brief Introduction to MIDI
MIDI, the Musical Instrument Digital Interface, is a world-standard com-
munication interface that allows MIDI-compatible musical instruments and
equipment to share musical information and control one another. This
makes it possible to create “systems” of MIDI instruments and equipment
that offer far greater versatility and control than is available with isolated
instruments. For example, most MIDI keyboards (including the Clavinova,
of course) transmit note and velocity (touch response) information via the
MIDI OUT connector whenever a note is played on the keyboard. If the
MIDI OUT connector is connected to the MIDI IN connector of a second
keyboard (synthesizer, etc.) or a tone generator (essentially a synthesizer
with no keyboard), the second keyboard or tone generator will respond
precisely to notes played on the original transmitting keyboard. The result is
that you can effectively play two instruments at once, providing thick multi-
instrument sounds.
Although the CLP-156 features a built-in “sequencer” (the Recorder is a
type of sequencer), the same type of musical information transfer described
above can be used for more sophisticated MIDI sequence recording using
an external sequencer or music computer. A MIDI sequence recorder or
music computer can be used to “record” MIDI data received from a CLP-
156, for example. When the recorded data is played back, the CLP-156
automatically “plays” the recorded performance in precise detail.
The examples given above really only scratch the surface. MIDI can do
much, much more. The CLP-156 offers a number of MIDI functions that
allows it to be used in fairly sophisticated MIDI systems.
NOTE
• Always use a high-quality MIDI cable to connect MIDI OUT to MIDI IN
terminals. Never use MIDI cables longer than about 15 feet, since cables
longer than this can pick up noise which can cause data errors.
● MIDI “Messages” Transmitted
& Received by the Clavinova
Note and Velocity Data
This information tells the receiving keyboard or tone generator to play a certain note (specified by the MIDI
note number) at a certain dynamic level (specified by the MIDI velocity value). Note and velocity data is trans-
mitted by the Clavinova whenever a key is pressed, and the Clavinova’s internal AWM tone generator will
“play” the corresponding note(s) whenever note and velocity data is received from an external MIDI device.
Program Change Numbers
The CLP-156 transmits a MIDI program change number between 0 and 7 when one of its voice selectors is
pressed. This normally causes the correspondingly numbered voice to be selected on a receiving MIDI device.
The Clavinova will respond in the same way, automatically selecting the appropriate voice when a MIDI pro-
gram change number is received. See “Program Change ON/OFF” on page 32 for information on turning pro-
gram change number reception and transmission ON or OFF.
Control Change Numbers
Control Change data representing Damper pedal operation is transmitted by the Clavinova whenever one of
these pedals is used. If the receiving device is a tone generator or another keyboard, it will respond in the same
way as the Clavinova’s internal tone generator when one of the pedals is used. The Clavinova also receives and
responds to the appropriate control change data. See “Control Change ON/OFF” on page 33 for information on
turning control change number reception and transmission ON or OFF.
The MIDI information (messages) transmitted and received by the CLP-
156 Clavinova are as follows:
Clavinova
MIDI Functions
Clavinova
MIDI Cable
MIDI INMIDI OUT
Tone
Generator
Data Being Recorded
Playback Data
MIDI IN MIDI INMIDI OUTMIDI OUT
Sequence
Recorder

31
Tone Generator
MIDI IN
MIDI IN
MIDI OUT
MIDI THRU
Sequence
Recorder
MIDI/
TRANSPOSE
C
1
D#
2
C
4
D#
5
1356810121315
2 4 7 9 11 14 16
1356810121315
2 4 7 9 11 14 16
E
5
● MIDI Transmit & Receive
Channel Selection
The MIDI system allows transmission and reception of MIDI data on 16
different channels. Multiple channels have been implemented to allow se-
lective control of certain instruments or devices connected in series. For
example, a single MIDI sequence recorder could be used to “play” two
different instruments or tone generators. One of the instruments or tone
generators could be set to receive only on channel 1, while the other is set
to receive on channel 2. In this situation the first instrument or tone genera-
tor will respond only to channel-1 information transmitted by the sequence
recorder, while the second instrument or tone generator will respond only to
channel-2 information. This allows the sequence recorder to “play” two
completely different parts on the receiving instruments or tone generators.
In any MIDI control setup, the MIDI channels of the transmitting and
receiving equipment must be matched for proper data transfer. An “OMNI”
receive mode is also available, which allows reception on all 16 MIDI chan-
nels. In the OMNI mode it is not necessary to match the receive channel of
the receiving device to the transmit channel of the transmitting device (ex-
cept when receiving mode messages).
Setting the Clavinova MIDI Channels
ZPress and hold the [MIDI/TRANSPOSE] button.
XPress the key on the keyboard corresponding to the desired MIDI trans-
mit or receive channel.* (the selected channel number is shown on the
TEMPO display — the OMNI ON receive mode is indicated by
“ALL” on the display).
CRelease the [MIDI/TRANSPOSE] button.
* Keys C1 through D#2 on the keyboard are used to set the MIDI transmit
channel, and keys C4 through D#5 are used to turn the OMNI mode OFF
and set the MIDI receive channel as shown in the illustration to the left.
The E5 key sets the OMNI receive mode and basic receive channel 1.
NOTE
• When the power is initially turned ON, MIDI receive is set to the OMNI
mode, the basic receive channel is set to 1, and the transmit channel is
set to 1.
This function allows the MIDI note data transmitted by the Clavinova to
be transposed up or down in semitone increments by up to plus or minus 6
semitones. The pitch of the Clavinova itself is not affected.
Setting the MIDI Transpose Function
ZPress and hold the [MIDI/TRANSPOSE] button.
XPress the key on the keyboard corresponding to the desired degree of
transposition.* The amount of transposition selected is shown on the
TEMPO display.
CRelease the [MIDI/TRANSPOSE] button.
* Keys F#5 through F#6 on the keyboard are used to set the MIDI transmit
transpose function as shown in the illustration to the left.
NOTE
• When the power is turned ON, MIDI transmit transpose is set to 0 (no
transposition).
Display Transposition
t-6 -6 semitones
t-5 -5 semitones
t-4 -4 semitones
t-3 -3 semitones
t-2 -2 semitones
t-1 -1 semitone
t 0 Normal
t 1 +1 semitone
t 2 +2 semitones
t 3 +3 semitones
t 4 +4 semitones
t 5 +5 semitones
t 6 +6 semitones
● MIDI Transmit Transpose
For setting the transmit
channel. (C1 ~ D#2)
For setting the receive
channel. (C4 ~ D#5)
For OMNI mode
S1......... S16
Send channel
r1......... r16
Receive channel
ALL
OMNI ON
MIDI/
TRANSPOSE
C
6
F#
5
F#
6
-6 -4 -2 +1
+3 +6
+5+4+20-1-3-5
(Set to receive on MIDI
channel 2)
Clavinova
(Set to receive on MIDI channel 1)

32
MIDI/
TRANSPOSE
PIANO 2
PIANO 2
PIANO 1
PIANO 2
CLAVIN
O
TON
E
MIDI/
TRANSPOSE
PIANO 1
PIANO 1
PIANO 1
PIANO 2
CLAVIN
O
TON
E
MIDI Functions
MIDI FUNCTION CHART
Function CLP-156 Voice Selector
Local Control ON/OFF [PIANO 1]
Program Change ON/OFF [PIANO 2]
Control Change ON/OFF [CLAVINOVA TONE]
Multi-Timbre Mode [E.PIANO ]
MIDI Split & Left Local OFF [HARPSICHORD]
MIDI Split & Right Local OFF [VIBES]
Panel Data Transmit [STRINGS]
Other MIDI Functions
The MIDI functions listed to the right are engaged by
holding down the [MIDI/TRANSPOSE] button and press-
ing the corresponding voice selector. Full details are given
in the following pages.
Normally the Clavinova will respond to MIDI program change numbers received from an external keyboard
or other MIDI device, causing the correspondingly numbered Clavinova voice to be selected. The Clavinova
will normally also send a MIDI program change number whenever one of its voices is selected, causing the
correspondingly numbered voice or program to be selected on the external MIDI device if the device is set up to
receive and respond to MIDI program change numbers.
This function makes it possible to cancel program change number reception and transmission so that voices
can be selected on the Clavinova without affecting the external MIDI device, and vice versa.
ZHold down the [MIDI/TRANSPOSE] button.
XPress the [PIANO 2] voice selector. If the PIANO 2 LED is lit when
the [PIANO 2] voice selector is pressed, you have turned program
change reception/transmission OFF. If the PIANO 2 LED is not lit
when the [PIANO 2] voice selector is pressed, you have turned pro-
gram change reception/transmission ON.
CRelease the [MIDI/TRANSPOSE] button.
● Local Control ON/OFF
● Program Change ON/OFF
= Local Control OFF
= Local Control ON
= Program Change OFF
= Program Change ON
“Local Control” refers to the fact that, normally, the Clavinova keyboard
controls its internal tone generator, allowing the internal voices to be played
directly from the keyboard. This situation is “Local Control ON” since the
internal tone generator is controlled locally by its own keyboard.
Local control can be turned OFF, however, so that the Clavinova key-
board does not play the internal voices, but the appropriate MIDI informa-
tion is still transmitted via the MIDI OUT connector when notes are played
on the keyboard. At the same time, the internal tone generator responds to
MIDI information received via the MIDI IN connector. This means that
while an external MIDI sequence recorder, for example, plays the Clavino-
va’s internal voices, an external tone generator can be played from the
Clavinova keyboard.
ZHold down the [MIDI/TRANSPOSE] button.
XPress the [PIANO 1] voice selector. If the PIANO 1 LED is lit when
the [PIANO 1] voice selector is pressed, you have turned local control
OFF. If the PIANO 1 LED is not lit when the [PIANO 1] voice selector
is pressed, you have turned local control ON.
CRelease the [MIDI/TRANSPOSE] button.
Tone Generator
MIDI INMIDI OUT
Sequence
Recorder
MIDI IN MIDI OUT
Played from Clavinova
keyboard.
Clavinova
Local control OFF. Played from
MIDI Sequencer.

33
MIDI/
TRANSPOSE
A
NO 2
CLAVINOVA
TONE
E. PIANO
CLAVINOVA
TONE
CLAVINOVA
TONE
MIDI/
TRANSPOSE
A
NO 2
CLAVINOVA
TONE
E. PIANO
E. PIANO
E. PIANO
Normally the Clavinova will respond to MIDI control change data received from an external MIDI device or
keyboard, causing the selected Clavinova voice to be affected by pedal and other “control” settings received
from the controlling device. The Clavinova also transmits MIDI control change information when one of its
pedals are operated.
This function makes it possible to cancel control change data reception and transmission if you do not want
the Clavinova voices to be affected by control change data received from an external device or vice versa.
● Control Change ON/OFF
ZHold down the [MIDI/TRANSPOSE] button.
XPress the [CLAVINOVA TONE] voice selector. If the CLAVINOVA
TONE LED is lit when the [CLAVINOVA TONE] voice selector is
pressed, you have turned control change reception/transmission OFF. If
the CLAVINOVA TONE LED is not lit when the [CLAVINOVA
TONE] voice selector is pressed, you have turned control change re-
ception/transmission ON.
CRelease the [MIDI/TRANSPOSE] button.
The Multi-Timbre mode is a special mode in which the Clavinova voices
can be independently controlled on different MIDI channel numbers by an
external MIDI device. The Multi-Timbre mode can be activated as follows:
ZHold down the [MIDI/TRANSPOSE] button.
XPress the [E.PIANO] voice selector. If the E.PIANO LED is lit when
the [E.PIANO] voice selector is pressed, you have turned the Multi-
Timbre mode ON. If the E.PIANO LED is not lit when the [E.PIANO]
voice selector is pressed, you have turned the Multi-Timbre mode OFF.
CRelease the [MIDI/TRANSPOSE] button.
● The Multi-Timbre Mode
= Multi-Timbre Mode ON
= Multi-Timbre Mode OFF
In the MIDI split mode one section of the Clavinova keyboard is used to play a Clavinova voice in the normal
way, while the remaining section is used to play a second MIDI keyboard or tone generator. In this mode the
right-hand section of the keyboard is used to play an internal Clavinova voice, while the left-hand section of the
keyboard plays the external keyboard or tone generator. Playing the left-hand section of the keyboard produces
no sound from the Clavinova. The “split point,” or the key that divides the left- and right-hand sections of the
keyboard can be set at any desired key.
● The MIDI Split & Left Local OFF Mode
The MIDI split mode is useful if, for example, you want to play a piano
(Clavinova) voice with the right hand while playing a synthesizer bass line
or string section with the left hand.
When the MIDI split mode is activated, notes played on the left-hand
section are transmitted via the Clavinova MIDI OUT connector on MIDI
channel 2. Notes played on the right-hand section are transmitted on the
“basic channel” (i.e. the channel set using the MIDI channel selection func-
tion described previously).
= Control Change OFF
= Control Change ON
Clavinova
MIDI OUT
MIDI IN
Tone
Generator
(Set to receive on
MIDI channel 2)

34
MIDI/
TRANSPOSE
INOVA
O
NE
E. PIANO
HARPSI-
CHORD
MIDI Functions
▼
Left-hand section plays
a Tone Generator bass
voice.
Right-hand section plays a
Clavinova piano voice.
SPLIT POINT
ZPress the [HARPSICHORD] voice selector while holding down the
[MIDI/TRANSPOSE] button. The HARPSICHORD LED will flash.
XWhile still holding the [MIDI/TRANSPOSE] button, press the key on
the keyboard at which you want to set the split point. The HARPSI-
CHORD LED will light continuously. The split-point becomes the first
key of the left-hand section.
CRelease the [MIDI/TRANSPOSE] button.
VTo return to the normal full-keyboard mode, hold the [MIDI/TRANS-
POSE] button and press the [HARPSICHORD] voice selector, then
release both buttons.
NOTE
• When the power is turned ON the default split point key — F
#
2 — will be
automatically selected. If a new split point is selected it remains active
until the power is turned OFF or a different split point is selected.
● The MIDI Split & Right Local OFF Mode
In the CLP-156 either the right- or left-hand section of the keyboard can be assigned to control an external
keyboard or tone generator. Assigning the left-hand section to external tone generator control was described in
the previous section. To assign the right-hand section to external tone generator control while playing the
Clavinova voices with the left hand, press the [VIBES] voice selector instead of the [HARPSICHORD] voice
selector when activating the Split mode (see the preceding section). All other operations are exactly the same as
described in the previous section.
MIDI/
TRANSPOSE
STRINGS
B
ES
ORGAN
● Transmitting the Panel Settings
This function causes all the current Clavinova control settings (selected voice, etc) to be transmitted via the
MIDI OUT terminal. This is particularly useful if you will be recording performances to a MIDI sequence re-
corder which will be used to control the Clavinova on playback. By transmitting the Clavinova panel settings
and recording them on the MIDI sequence recorder prior to the actual performance data, the Clavinova will be
automatically restored to the same settings when the performance is played back.
ZHold down the [MIDI/TRANSPOSE] button.
XPress the [STRINGS] voice selector.
CRelease the [MIDI/TRANSPOSE] button.
NOTE
• See page 39 for list of the panel settings transmitted by this function.
Factory Preset Recall
POWER
C
7
All dual mode, reverb, brilliance, touch sensitivity, pitch control, and
individual key tune settings can be restored to their original factory preset
(default) values by holding the C7 key while turning the [POWER] switch
ON.

35
Error Messages
The loaded disk is not formatted for use with the Clavinova. After making sure that the disk does not con-
tain any important data (for another device, for example), format the disk as described on page 24.
You have attempted to format, write to, copy to/from, or delete data from a write-protected disk. Use a
disk that is not write protected (set the disk’s write-protect tab to the write-enable position).
An error occurred while writing to or reading from the disk.
Try the operation again; if the error occurs a second time the disk or drive may be faulty. If the drive has
been in use for some time the heads may be dirty. Clean the heads with a commercially-available floppy
disk head cleaner. If the error still occurs with one disk and not others the disk should be considered
faulty and should be discarded. If the error occurs with all disks the drive may be faulty. Refer the prob-
lem to your Yamaha dealer.
A disk read or write operation was attempted but no disk is present in the disk drive, or the song contains
no appropriate data.
Make sure an appropriate disk is inserted in the disk drive, or the song contains appropriate data before
performing any operation that involves disk access.
You have attempted to record or edit data that is not recognized by the CLP-156. Refer to the notes on
pages 19, and 27.
For
(format)
Pro
(protected)
dEr
(disk error)
no
(no disk/no data)
Options
BC-8 Bench
A comfortable bench styled to match your Yamaha Clavinova.
HPE-160 Stereo Headphones
High-performance lightweight dynamic headphones with extra-soft ear pads.
Is the AC plug properly connected to an AC wall outlet? Check the AC connection carefully. Is the MAS-
TER VOLUME control turned up to a reasonable listening level?
This can occur if there is a high-power transmitter in your vicinity. Contact your Yamaha dealer.
This is usually due to turning ON or OFF a household appliance or other electronic equipment which is
fed by the same AC mains line as your Clavinova.
The Clavinova contains digital circuitry which can generate radio-frequency noise. The solution is to
move the Clavinova further away from the affected equipment, or vice versa.
If the Clavinova is connected to a stereo system or instrument amplifier and the sound is distorted, reduce
the setting of the Clavinova volume control to a level at which the distortion ceases.
Troubleshooting
If you encounter what appears to be a malfunction, please check the following
points before assuming that your Clavinova is faulty.
1. No Sound When the Power is Turned ON
2. The Clavinova Reproduces Radio or TV Sound
3. Intermittent Static Noise
4. Interference Appears On Radio or TV Sets Located Near the Clavinova
5. Distorted Sound When the Clavinova is Connected to An External Amplifier/Speaker System

36
Keyboard Stand Assembly
1
2
3
4
NOTE
• We do not recommend attempting to as-
semble the Clavinova alone. The job can be
easily accomplished, however, with only
two people.
• Use only the screws provided or replace-
ments of exactly the specified size. Using
screws of the wrong size can result in dam-
age to the instrument.
Z Open the box and
remove all the parts.
On opening the box you should find
the parts shown in the illustration.
Check to make sure that all the re-
quired parts are provided.
X
Assemble the side
panels (D) and feet (E).
Secure the feet (E) to the side panels
(D) with the 5 x 40 millimeter long
gold-colored screws 1 (3 each), mak-
ing sure that the cutouts on the feet
face the bracket side of the side panels.
C
Attach the side panels
(D) to the pedal box (C).
Before installing the pedal box, untie
and straighten out the bundled pedal
cord attached to the bottom of the
pedal box.
Place the pedal box on top of the
brackets attached to the side panels
(D), and attach using the four 6 x 18
millimeter round-head screws 2 —
two screws on each side. Make sure the
pedals extend in the same direction as
the feet.
V Attach the rear panel (B).
With the black surface of the rear
panel facing outward and the panel
angled slightly as shown in the illustra-
tion, lower it onto the screws protrud-
ing from the rear of the pedal box so
that the screws fit into the correspond-
ing slots in the lower edge of the rear
panel. Then, while eliminating any
gaps between the rear and side panels,
secure the top of the rear panel to the
side panel brackets using the two 4 x
16 millimeter round-head screws 3.
Finally, tighten the screws holding the
rear panel to the pedal box.
6 x 18 mm round-head screws x 4 2
5 x 40 mm long gold screws x 6 1
4 x 16 mm round-head screws x 2 3
Cord clamps x 2
6 x 14 mm flat-head screws x 6
4
D
D
B
A
C
E
E
Bundled pedal cord inside
5 x 40 mm long gold screws 1
6 x 18 mm round-head screws 2
4 x 16 mm round-head screws 3
Black surface outward
B
C
L
R
D
B
C
E
E
D
D
D
D

37
B Install the main unit (A).
Rest the rear edge of the main unit
(A) on the front edges of the cutouts in
the side panels (D), then slide the main
unit backward firmly until it stops (so
that there is no clearance between the
main unit side panels and the stand, as
shown in the illustration “a”).
WATCH YOUR FINGERS WHILE
DOING THIS!! Also be sure to place
your hands at least 10 centimeters from
either end of the main unit when posi-
tioning it.
There is slight horizontal play be-
tween the main unit and side panels, so
center the main unit, as shown in the
illustration “b”, then attach the rear of
the main unit with two 6 x 14
millimeter flat-head screws 4, and the
front of the main unit with four more 6
x 14 millimeter flat-head screws 4 as
shown in the illustration.
N Connect the pedal cord.
The pedal cord from the pedal box
must be plugged into the corresponding
connectors in the main unit. The plug
only goes in one way (the lug on the
connector should face the rear of the
unit, as shown in the illustration), so
don’t try to force it in the wrong way
around. Once connected, attach the
cord clamps to the rear panel as shown,
then clip the cord into the clamps.
M Be sure to set the
adjuster.
For stability, an adjuster is provided
on the bottom of the pedal box (C).
Rotate the adjuster until it comes in
firm contact with the floor surface. The
adjuster ensures stable pedal operation
and facilitates pedal effect control. If
the adjuster is not in firm contact with
the floor surface, distorted sound may
result.
IMPORTANT
• After assembling the Clavinova, check once
more to make sure that all screws have
been securely fastened.
• If the stand leans to the side, makes unu-
sual noises, or otherwise seems unstable
during use, check and tighten all screws
while following the assembly instructions
given above.
5
D
7
6
C
B
6 x 14 mm flat-head screws 4
B
A
D
Cord clamps
A
D
D
D
A
D
A
(b)
(a)

38
If you’re already very familiar with MIDI, or are using a computer to control your music hardware with compu-
ter-generated MIDI messages, the data provided in this section can help you to control the Clavinova.
MIDI Data Format
3. PROGRAM CHANGE
Data format: [CnH] -> [pp]
CnH = program event (n = channel number)
pp = Program number
pp VOICE NAME
00 PIANO 1
01 PIANO 2
02 CLAVINOVA TONE
03 E. PIANO
04 HARPSICHORD
05 VIBES
06 STRINGS
07 ORGAN
08 STRINGS SLOW ATTACK (reception only)
4. SYSTEM REALTIME MESSAGES
[rrH]
F8H: Timing clock
FAH: Start
FCH: Stop
FEH: Active sensing
Data Transmission Reception
F8H Transmitted every Received as 96-clock tempo timing
96 clocks when MIDI clock is set to External
FAH Recorder start Recorder start
FCH Recorder stop Recorder stop
FEH Transmitted every All notes are turned off if no data is
200 milliseconds received for more than 400
milliseconds
* Caution: If an overrun framing error occurs the Damper, Sostenuto, and
Soft effects for all channels are turned off and an All Note Off occurs.
5. SYSTEM EXCLUSIVE MESSAGES
(1) YAMAHA MIDI Format
Data format: [F0H] -> [43H] -> [xn] -> [ff] . . . [F7H]
43H : Yamaha
xn : Substatus + channel number.
ff : Format number.
x ff Information
0 7CH Panel data receive.
2 7CH Panel Data Send occurs when this data received.
2 7DH Name Data Send occurs when this data received.
(2) Clavinova MIDI Format
Data format: [F0H] -> [43H] -> [73H] -> [38H] -> [yy] ->
[F7H]
43H : Yamaha ID
73H : Clavinova ID
38H : CLP-156 ID
yy : Substatus
1. NOTE ON/OFF
Data format: [9nH] -> [kk] -> [vv]
9nH = Note ON/OFF event (n = channel number)
kk = Note number (Transmit: 15 ~ 114 = D#-1 ~ F#7 /
Receive: 21 ~ 108 = A-1 ~ C7)
vv = Velocity (Key ON = 1 ~ 127. Key OFF = 0)
Data format: [8nH] -> [kk] -> [vv]
8nH = Note OFF event (n = channel number)
kk = Note number (Transmit: 15 ~ 114 = D#-1 ~ F#7 /
Receive: 21 ~ 108 = A-1 ~ C7)
vv = Velocity (Key OFF = 0 ~ 127)
* 8nH (note off) is receive only.
9nH (vvH=00H) used for transmission.
2. CONTROL CHANGE & MODE MESSAGES
Data format: [BnH] -> [cc] -> [vv]
BnH = Control event (n = channel number)
cc = Control number
vv = Control value
cc CONTROL VALUE [vv]
07H Volume 00000000 : -∞
(reception only) 01101111 : -3dB
01111111 : ±0dB
0AH Pan Pot 00H ~ 17H LEFT 6
(reception only) 18H ~ 1FH 5
20H ~ 27H 4
28H ~ 2FH 3
30H ~ 37H 2
38H ~ 3FH 1
40H ~ 47H CENTER
48H ~ 4FH SCALING PAN
50H ~ 57H RIGHT 1
58H ~ 5FH 2
60H ~ 67H 3
68H ~ 6FH 4
70H ~ 77H 5
78H ~ 7FH 6
0BH Expression 00000000 : -∞
(reception only) 01101111 : -3dB
01111111 : ±0dB
40H Damper Pedal 00H ~ 7FH : eight levels
42H Sostenuto Pedal 00H ~ 3FH : OFF
40H ~ 7FH : ON
43H Soft Pedal 00H ~ 3FH : OFF
40H ~ 7FH : ON
5BH Reverb Depth 00H ~ 7FH : sixteen levels
78H All Sound OFF 00H
(reception only)
79H Reset All Controller 00H
(reception only)
7AH Local Control ON/OFF 00H : OFF
(reception only) 7FH : ON
7BH All Notes OFF 00H
(reception only)
7CH Omni OFF/All Notes OFF 00H
(reception only)
7DH Omni ON/All Notes OFF 00H
(reception only)

39
yy Information
02H Internal MIDI clock
03H External MIDI clock
13H Multi-timbre mode OFF.
14H Clavinova Common Voice multi-timbre mode ON.
15H Multi-timbre mode ON.
61H MIDI FA cancel ON.
62H MIDI FA cancel OFF.
7cH All notes OFF; receive channel = c+1; omni OFF.
* When yy=2, 3, 13, 14, 15 or 7c, Clavinova common ID (01H) is
recognized as well as 38H.
* All Control Change values are reset when [13H], [14H] or [15H]
is received. All voices and other parameters are also reset
when [14H] or [15H] is received in order to ensure the same
initial settings.
(3) Special Control
Data format: [F0H] -> [43H] -> [73H] -> [38H] -> [11H] ->
[0nH] -> [cc] -> [vv] -> [F7H]
43H : Yamaha ID
73H : Clavinova ID
38H : CLP-156 ID
11H : Clavinova special control
0nH : Control MIDI change + channel number
cc : Control number
vv : Value
cc Control Value [vv]
08H Dual Balance 00H : Left Voice Max.
7FH :Right Voice Max.
1BH Metronome Mode 00H : Off
(reception only) 01H : On
26H Touch Sensitivity 00H : Medium
01H : Soft
02H : Hard
03H : Off
58H Brilliance 00H : Normal
01H : Mellow
02H : Bright
59H Reverb 00H : Off
01H : Room
02H : Hall-1
03H : Hall-2
04H : Cosmic
5AH Dual Mode 00H : Dual Off
01H : Dual On (Normal)
02H : Dual On (Left voice 1 octave up)
03H : Dual On
(Right voice 1 octave up)
5CH Dual Voice [vv] : Dual Voice
5EH Individual Key Pitch [vv] : Key number
vv = 0: All keys set to normal pitch
vv = 1: Individual key tune mode off
vv = 2: Individual key tune mode on
5FH Individual Key Pitch [vv] : Pitch Data
vv = 40H: 0
vv = 41H: +1
vv = 3FH: -1
* When cc=58 (Brilliance) or 59 (Reverb), Clavinova common ID
(01H) is recognized in addition to 38H.
(4) Absolute Tempo
Data format: [F0H] -> [43H] -> [73H] -> [xx]
-> [11H] -> [1nH] -> [cc] -> [dd] -> [F7H]
43H : Yamaha ID
73H : Clavinova ID
xx : 38H (CLP-156 ID)
11H : Clavinova special control
1nH : Control MIDI change
(Transmit: n=control channel number)
(Receive: any channel OK)
ccH : Absolute tempo low byte
ddH : Absolute tempo hight byte Tempo=dd*128+cc
(5) Beat, Tempo, LED ON/OFF
Data format: [F0H] -> [43H] -> [73H] -> [xx]
-> [11H] -> [4FH] -> [cc] -> [dd] -> [F7H]
43H : Yamaha ID
73H : Clavinova ID
xx : 38H (CLP-156 ID) or common 01H
11H : Clavinova special control
4FH : Control MIDI change
ccH : 00H= Beat lamp
ddH= 00H: On
7FH: Off
ccH : 01H= Tempo lamp
ddH= 00H: On
7FH: Off
PANEL DATA FORMAT
F0H, 43H, 0nH, 7CH, 00H, 1BH
(n: channel number)
53H, 4BH, 20H, 20H (SK)
43H, 4CH, 50H, 27H, 39H, 34H
(CLP ’94)
3xH, 3yH (x, y: version number)
[PANEL DATA]
[CHECK SUM (1byte)] = 0-(53H+4BH+20H+......+Data end)
F7H
• Panel Data Contents
(1) VOICE
(2) DUAL VOICE
(3) DUAL ON/OFF
(4) DUAL BALANCE
(5) BRILLIANCE
(6) 0
(7) 0
(8) REVERB NUMBER
(9) REVERB DEPTH
(10) TOUCH SENSITIVITY
(11) 0
(12) SPLIT POINT
(13) INDIVIDUAL KEY TUNE MODE ON/OFF
(14) Absolute tempo low byte
(15) Absolute tempo high byte
INDIVIDUAL KEY TUNING DATA BULK DUMP FORMAT
F0H, 43H, 73H
38H (CLP-156 ID)
06H (Bulk ID)
00H (Bulk number)
00H, 00H, 0BH, 00H: (Data length= wxyzH 88*2 bytes)
[BULK DATA] (low:A-1, high:A-1.........low:C7, high:C7)
[CHECK SUM (1byte)] = 0-sum (Bulk data)
F7H
NAME DATA SEND FORMAT
F0H, 43H, 0nH, 7DH, 00H, 10H (n: channel number)
53H, 4BH, 20H, 20H (SK)
43H, 4CH, 50H, 27H, 39H, 34H (CLP ’94)
3xH, 3yH, 20H, 20H, 20H, 20H (x, y: version number)
[CHECK SUM (1byte)] = 0-(53H+4BH+20H+......+20H)
F7H

40
MIDI Implementation Chart
Not available.

41
CLP-156
KEYBOARD 88 KEYS (A-1 ~ C7)
POLYPHONY 32 NOTES MAX.
VOICE SELECTORS PIANO 1, PIANO 2, CLAVINOVA TONE, E. PIANO, HARPSICHORD,
VIBES, STRINGS, ORGAN
BRILLIANCE MELLOW, NORMAL, BRIGHT
REVERB ROOM, HALL 1, HALL 2, COSMIC
TOUCH SENSITIVITY HARD, MEDIUM, SOFT, FIXED
RECORDER SONG [r]/[f], 1/R, 2/L, PLAY, REC
DISK DRIVE 3.5" 2DD Micro Floppy Disk Drive
PEDAL CONTROLS SOFT, SOSTENUTO, DAMPER
OTHER CONTROLS MASTER VOLUME, MIDI/TRANSPOSE, METRONOME, TEMPO [s]/[t],
TEMPO Display, DEMO
JACKS/CONNECTORS PHONES x 2, AUX OUT R & L/L+R, AUX IN R & L, MIDI IN/OUT/THRU
INPUT & OUTPUT AUX OUT: Output impedance 600 Ω
LEVEL/IMPEDANCE AUX IN: Input impedance 10 kΩ / Input sensitivity -10 dBm
MAIN AMPLIFIERS 30W x 2
SPEAKERS 13 cm x 2, 5 cm x 2
DIMENTIONS
Music stand down
1439.8 x 513.0 x 899.7 mm (56-5/8" x 20-1/4" x 35-3/8")
(W x D x H)
Music stand up 1439.8 x 513.0 x 1070.8 mm (56-5/8" x 20-1/4" x 42-1/8")
WEIGHT 68.5 kg (151.0 lbs.)
Specifications
* Specifications subject to change without notice.

92-469 1
ENVIRONMENTAL ISSUES: Yamaha strives to pro-
duce products that are both user safe and environmentally
friendly. We sincerely believe that our products and the
production methods used to produce them, meet these
goals. In keeping with both the letter and the spirit of the
law, we want you to be aware of the following:
Battery Notice: This product MAY contain a small non-
rechargable battery which (if applicable) is soldered in
place. The average life span of this type of battery is ap-
proximately five years. When replacement becomes nec-
essary, contact a qualified service representative to per-
form the replacement.
Warning: Do not attempt to recharge, disassemble, or
incinerate this type of battery. Keep all batteries away
from children. Dispose of used batteries promptly and as
regulated by applicable laws. Note: In some areas, the
servicer is required by law to return the defective parts.
However, you do have the option of having the servicer
dispose of these parts for you.
Disposal Notice: Should this product become damaged
beyond repair, or for some reason its useful life is consid-
ered to be at an end, please observe all local, state, and
federal regulations that relate to the disposal of products
that contain lead, batteries, plastics, etc.
NOTICE: Service charges incurred due to lack of knowl-
edge relating to how a function or effect works (when the
unit is operating as designed) are not covered by the
manufacturer’s warranty, and are therefore the owners
responsibility. Please study this manual carefully and con-
sult your dealer before requesting service.
NAME PLATE LOCATION: The graphic below indi-
cates the location of the name plate. The model number,
serial number, power requirements, etc., are located on
this plate. You should record the model number, serial
number, and the date of purchase in the spaces provided
below and retain this manual as a permanent record of
your purchase.
CAUTION
RISK OF ELECTRIC SHOCK
DO NOT OPEN
CAUTION: TO REDUCE THE RISK OF ELECTRIC SHOCK.
DO NOT REMOVE COVER (OR BACK).
NO USER-SERVICEABLE PARTS INSIDE.
REFER SERVICING TO QUALIFIED SERVICE PERSONNEL.
PRODUCT SAFETY MARKINGS: Yamaha electronic
products may have either labels similar to the graphics
shown below or molded/stamped facsimiles of these
graphics on the enclosure. The explanation of these graph-
ics appears on this page. Please observe all cautions indi-
cated on this page and those indicated in the safety in-
struction section.
See bottom of Keyboard enclosure for graphic symbol markings
The exclamation point within the equi-
lateral triangle is intended to alert the
user to the presence of important oper-
ating and maintenance (servicing) in-
structions in the literature accompany-
ing the product.
The lightning flash with arrowhead
symbol, within the equilateral triangle,
is intended to alert the user to the pres-
ence of uninsulated “dangerous volt-
age” within the product’s enclosure that
may be of sufficient magnitude to con-
stitute a risk of electrical shock.
IMPORTANT NOTICE: All Yamaha electronic prod-
ucts are tested and approved by an independent safety
testing laboratory in order that you may be sure that when
it is properly installed and used in its normal and custom-
ary manner, all foreseeable risks have been eliminated.
DO NOT modify this unit or commission others to do so
unless specifically authorized by Yamaha. Product per-
formance and/or safety standards may be diminished.
Claims filed under the expressed warranty may be denied
if the unit is/has been modified. Implied warranties may
also be affected.
SPECIFICATIONS SUBJECT TO CHANGE: The
information contained in this manual is believed to be
correct at the time of printing. However, Yamaha reserves
the right to change or modify any of the specifications
without notice or obligation to update existing units.
Model _____________________________________
Serial No. __________________________________
Purchase Date ______________________________
SPECIAL MESSAGE SECTION

WARNING- When using any electrical or electronic prod-
uct, basic precautions should always be followed. These pre-
cautions include, but are not limited to, the following:
1. Read all Safety Instructions, Installation Instructions,
Special Message Section items, and any Assembly Instructions
found in this manual BEFORE marking any connections, in-
cluding connection to the main supply.
2. Main Power Supply Verification: Yamaha products are
manufactured specifically for the supply voltage in the area
where they are to be sold. If you should move, or if any doubt
exists about the supply voltage in your area, please contact
your dealer for supply voltage verification and (if applicable)
instructions. The required supply voltage is printed on the
name plate. For name plate location, please refer to the graphic
found in the Special Message Section of this manual.
3. This product may be equipped with a polarized plug
(one blade wider than the other). If you are unable to insert the
plug into the outlet, turn the plug over and try again. If the
problem persists, contact an electrician to have the obsolete
outlet replaced. Do NOT defeat the safety purpose of the plug.
4. Some electronic products utilize external power sup-
plies or adapters. Do NOT connect this type of product to any
power supply or adapter other than one described in the owners
manual, on the name plate, or specifically recommended by
Yamaha.
5. WARNING: Do not place this product or any other
objects on the power cord or place it in a position where any-
one could walk on, trip over, or roll anything over power or
connecting cords of any kind. The use of an extension cord is
not recommended! If you must use an extension cord, the
minimum wire size for a 25' cord (or less) is 18 AWG. NOTE:
The smaller the AWG number, the larger the current handling
capacity. For longer extension cords, consult a local electri-
cian.
6. Ventilation: Electronic products, unless specifically
designed for enclosed installations, should be placed in loca-
tions that do not interfere with proper ventilation. If instruc-
tions for enclosed installations are not provided, it must be
assumed that unobstructed ventilation is required.
7. Temperature considerations: Electronic products
should be installed in locations that do not significantly con-
tribute to their operating temperature. Placement of this prod-
uct close to heat sources such as; radiators, heat registers and
other devices that produce heat should be avoided.
8. This product was NOT designed for use in wet/damp loca-
tions and should not be used near water or exposed to rain. Exam-
ples of wet/damp locations are; near a swimming pool, spa, tub,
sink, or wet basement.
9. This product should be used only with the components
supplied or; a cart, rack, or stand that is recommended by the
manufacturer. If a cart, rack, or stand is used, please observe all
safety markings and instructions that accompany the accessory
product.
10. The power supply cord (plug) should be disconnected from
the outlet when electronic products are to be left unused for ex-
tended periods of time. Cords should also be disconnected when
there is a high probability of lightening and/or electrical storm
activity.
11. Care should be taken that objects do not fall and liquids are
not spilled into the enclosure through any openings that may exist.
12. Electrical/electronic products should be serviced by a
qualified service person when:
a. The power supply cord has been damaged; or
b. Objects have fallen, been inserted, or liquids have been
spilled into the enclosure through openings; or
c. The product has been exposed to rain: or
d. The product dose not operate, exhibits a marked change
in performance; or
e. The product has been dropped, or the enclosure of the
product has been damaged.
13. Do not attempt to service this product beyond that de-
scribed in the user-maintenance instructions. All other servicing
should be referred to qualified service personnel.
14. This product, either alone or in combination with an ampli-
fier and headphones or speaker/s, may be capable of producing
sound levels that could cause permanent hearing loss. DO NOT
operate for a long period of time at a high volume level or at a
level that is uncomfortable. If you experience any hearing loss or
ringing in the ears, you should consult an audiologist.
IMPORTANT: The louder the sound, the shorter the time period
before damage occurs.
15. Some Yamaha products may have benches and/or acces-
sory mounting fixtures that are either supplied as a part of the
product or as optional accessories. Some of these items are de-
signed to be dealer assembled or installed Please make sure that
benches are stable and any optional fixtures (where applicable) are
well secured BEFORE using. Benches supplied by Yamaha are
designed for seating only. No other uses are recommended.
INFORMATION RELATING TO PERSONAL INJURY, ELECTRICAL SHOCK,
AND FIRE HAZARD POSSIBILITIES HAS BEEN INCLUDED IN THIS LIST.
IMPORTANT SAFETY INSTRUCTIONS
PLEASE KEEP THIS MANUAL
92-469-2

FCC INFORMATION (U.S.A.)
1. IMPORTANT NOTICE: DO NOT MODIFY THIS UNIT!
This product, when installed as indicated in the instructions con-
tained in this manual, meets FCC requirements. Modifications not
expressly approved by Yamaha may void your authority, granted
by the FCC, to use the product.
2. IMPORTANT: When connecting this product to accessories and/
or another product use only high quality shielded cables. Cable/s
supplied with this product MUST be used. Follow all installation
instructions. Failure to follow instructions could void your FCC
authorization to use this product in the USA.
3. NOTE: This product has been tested and found to comply with
the requirements listed in FCC Regulations, Part 15 for Class “B”
digital devices. Compliance with these requirements provides a
reasonable level of assurance that your use of this product in a
residential environment will not result in harmful interference with
other electronic devices. This equipment generates/uses radio
frequencies and, if not installed and used according to the
instructions found in the users manual, may cause interference
harmful to the operation of other electronic devices. Compliance
with FCC regulations does not guarantee that interference will not
occur in all installations. If this product is found to be the source
of interference, which can be determined by turning the unit
“OFF” and “ON”, please try to eliminate the problem by using one
of the following measures:
Relocate either this product or the device that is being affected by
the interference.
Utilize power outlets that are on different branch (circuit breaker
or fuse) circuits or install AC line filter/s.
In the case of radio or TV interference, relocate/reorient the an-
tenna. If the antenna lead-in is 300 ohm ribbon lead, change the
lead-in to co-axial type cable.
If these corrective measures do not produce satisfactory results,
please contact the local retailer authorized to distribute this type
of product. If you can not locate the appropriate retailer, please
contact Yamaha Corporation of America, Electronic Service
Division, 6600 Orangethorpe Ave, Buena Park, CA90620
The above statements apply ONLY to those products distributed
by Yamaha Corporation of America or its subsidiaries.
* This applies only to products distributed by YAMAHA CORPORATION OF AMERICA.
• This applies only to products distributed by Yamaha-Kemble Music (U.K.) Ltd.
IMPORTANT NOTICE FOR THE UNITED KINGDOM
Connecting the Plug and Cord
IMPORTANT. The wires in this mains lead are coloured in accor-
dance with the following code:
BLUE : NEUTRAL
BROWN : LIVE
As the colours of the wires in the mains lead of this apparatus may
not correspond with the coloured makings identifying the terminals
in your plug proceed as follows:
The wire which is coloured BLUE must be connected to the termi-
nal which is marked with the letter N or coloured BLACK.
The wire which is coloured BROWN must be connected to the
terminal which is marked with the letter L or coloured RED.
Making sure that neither core is connected to the earth terminal of
the three pin plug.
Dit produkt is gefabriceerd in overeenstemming met de
radiostoringsvoorschriften van de Richtlijn van de Raad (82/499/
EEG).
ΑΥΤΗ Η ΣΥΣΚΕΥΗ ΑΝΤΑΠΟΚΡΙΝΕΤΑΙ ΣΤΙΣ ΑΠΑΙΤΗΣΕΙΣ ΤΩΝ
Ο∆ΗΓΙΩΝ ΤΗΣ ΕΥΡΩΠΑΙΚΗΣ ΟΙΚΟΝΟΜΙΚΗΣ ΚΟΙΝΟΤΗΤΑΣ 82/
499/Ε.Ο.Κ..
Este produto está de acordo com o radio de interferencia frequente
requiridos do Conselho Diretivo 82/499/EEC.
Dette apparat overholder det gaeldende EF-direktiv vedrørende
radiostøj.
Cet appareil est conforme aux prescriptions de la directive
communautaire 87/308/CEE.
Diese Geräte entsprechen der EG-Richtlinie 82/499/EWG und/oder
87/308/EWG.
This product complies with the radio frequency interference require-
ments of the Council Directive 82/499/EEC and/or 87/308/EEC.
Questo apparecchio è conforme al D.M.13 aprile 1989 (Direttiva
CEE/87/308) sulla soppressione dei radiodisturbi.
Este producto está de acuerdo con los requisitos sobre
interferencias de radio frequencia fijados por el Consejo Directivo
87/308/CEE.
YAMAHA CORPORATION

M.D.G., EMI Division © Yamaha Corporation 1994
VS94350 412POCP5.2-01A0 Printed in Japan
Documenttranscriptie
CLP-156 Introduction Thank you for choosing a Yamaha CLP-156 Clavinova. Your Clavinova is a fine musical instrument that employs advanced Yamaha music technology. With the proper care, your Clavinova will give you many years of musical pleasure. ● Stereo sampling of the acoustic piano voices offers unmatched realism and expressive power, while the AWM (Advanced Wave Memory) tone generator system offers rich, realistic reproductions of all other voices. ● Piano-like touch response — adjustable in 4 stages — provides extensive expressive control and outstanding playability. ● Dual play mode allows 2 voices to be played simultaneously. ● Unique Clavinova Tone voice provides a fresh sound for new musical expression. ● Damper pedal includes natural resonance effect for the piano voices, simulating the string and soundboard resonance of acoustic pianos. ● Metronome feature with variable tempo facilitates practice. ● 2-track digital recorder lets you record and play back anything you play on the keyboard. ● Internal 3.5" floppy disk drive provides extended Recorder capacity and Disklavier PianoSoft™ playback capability – one blank floppy disk for recording and one PianoSoft demonstration disk (excerpts from the Disklavier PianoSoft disks) are provided. ● MIDI compatibility and a range of MIDI functions make the Clavinova useful in a range of advanced MIDI music systems. In order to make the most of your Clavinova’s performance potential and features, we urge you to read this Owner’s Manual thoroughly, and keep it in a safe place for later reference. 1 Taking Care Of Your Clavinova Your Clavinova is a fine musical instrument, and deserves the most careful treatment. Observe the following points and your Clavinova will sound and look great for many years. 1. Never Tamper With the Internal Circuitry Never open the case and touch or tamper with the internal circuitry. 2. Turn Off After Use Always turn the POWER switch OFF after use, and close the key cover to protect the keyboard. 3. Clean Carefully ■ Never open or close the key cover while a disk is extending from the drive (i.e. in the ejected position). The key cover may contact the disk, possibly damaging the disk or even the disk drive. ■ Do not insert anything but floppy disks into the disk drive. Other objects may cause damage to the disk drive or floppy disk. ■ Use only double-sided double density (2DD) 3.5-inch floppy disks with the Clavinova. Clean the cabinet and keys of your Clavinova only with a clean, slightly damp cloth. A neutral cleanser may be used if desired. Never use abrasive cleansers, waxes, solvents or chemical dust cloths since these can dull or damage the finish. 4. Avoid Vinyl Never place any vinyl products on your Clavinova. Contact with vinyl can cause irreversible damage to the finish. 5. Avoid Humidity & Heat Install your Clavinova in a place that is away from direct sunlight, excessive humidity or heat. 6. Handle With Care Never apply excessive force to the controls, connectors or other parts of your Clavinova, and avoid scratching or bumping it with hard objects. 7. Name Plate Location The CLP-156 name plate is located on the bottom panel. 8. Handling Floppy Disks Yamaha Disklavier PianoSoft disk is write-protected, and therefore cannot be used to save songs. To save Recorder songs from the Recorder, a blank floppy disk should be used (one blank disk is supplied with the Clavinova). Taking Care of Your Floppy Disks ■ Do NOT eject the disk during recording or playback, or at any time when the disk drive lamp is lit. Doing so may damage both the disk and the FDD. ■ Do NOT turn the Clavinova on or off while the disk is in the drive. ■ Always eject the disk before turning the Clavinova off. ■ When ejecting a floppy disk from the disk drive: Precautions Regarding Floppy Disk Use ■ Never open the disk’s shutter. Dirt or dust on the Internal magnetic surface will cause data errors. ■ Never leave disks near a speaker, TV, or other device that emits a strong magnetic field. ■ Do not store disks in places exposed to direct sunlight or sources of high temperature. ■ Do not place heavy objects such as books on top of a disk. ■ Avoid getting the disks wet. ■ Be sure to store the disks in environmental conditions as specified below: • Storage temperature: 4° to 53°C (39° to 127°F). • Storage humidity: 8 to 90% relative humidity. • Store in an area free from dust, sand, smoke, etc. ■ Be sure to apply the disk label at the proper position. When changing the label never cover the old label with a new label; always remove the old label first. Head Cleaning The head of the disk drive unit will get dirty as you use it eventually causing data errors. If this occurs, clean the head with a 3.5 inch head cleaning disk (available from most computer supply stores). Data Backup Disk drive lamp It is recommended that you copy your recorded songs to another disk for backup (see page 25). If the original disk is damaged or your song is deleted, the backup disk can be used instead of the original. Protecting Your Data (Write Protect Tab) • To eject a floppy disk, press the eject button slowly as far as it will go. Then when the disk Is fully ejected, remove it by hand. • The disk may not be ejected properly if the eject button is pressed too quickly or if it is not pressed in far enough. (The eject button may become stuck halfway with the disk extending from the slot by only a few millimeters). If this is the case, do not attempt to pull out the partially ejected disk. Doing so may damage the disk drive mechanism and/or the floppy disk. To remove a partially ejected disk, try pressing the eject button once again or push the disk back into the slot, then repeat the eject procedure carefully. 2 Write protect tab open (locked — write protected) Write protect tab closed (unlocked — write enabled) Contents The Control Panel ............................................................ 4 Connections ...................................................................... 6 Using the Recorder ....................................................... 18 ■ Recording ................................................................... 18 ● Changing the Initial Settings .................................. 19 Selecting & Playing Voices ........................................... 7 ● Erasing a Single Track .......................................... 20 ■ Playing the Demonstration Tunes ................................ 8 ● If You Record Without First Inserting a Disk … ... 20 The Dual Mode .................................................................. 9 ■ Playback .................................................................... 20 ● Adjusting the Balance Between the Dual-mode Voices ...................................................................... 9 Utility Functions ............................................................. 21 ● Shifting a Dual-mode Voice Up One Octave ........... 9 ● Slow-attack Strings .................................................. 9 ● Memorizing the Balance, Strings Type, & Octave Shift Settings ......................................................... 10 Brilliance .......................................................................... 10 ● Memorizing the Brilliance Setting .......................... 10 ■ Utility 1: Individual key Tuning ................................... 21 ● To Lower the Pitch of a Single Key ....................... 21 ● To Raise the Pitch of a Single Key ........................ 21 ● To Turn the Individual Key Tune Mode OFF or ON ... 22 ■ Utility 2: Save Individual Key Tuning .......................... 23 ■ Utility 3: Load Individual Key Tuning .......................... 23 ■ Utility 4: Floppy Disk Format ...................................... 24 Reverb ............................................................................... 11 ■ Utility 5: Song Copy ................................................... 25 ● Adjusting Reverb Depth ........................................ 11 ● Copying to a Different Disk .................................... 26 ● Memorizing the Reverb Type & Depth Settings .... 11 ■ Utility 6: Song Delete ................................................. 26 Touch Sensitivity ........................................................... 12 ● Memorizing the Touch Sensitivity Setting ............. 12 ● Deleting a Single Track ......................................... 26 ■ Utility 7: Disk Playback Track Selection ..................... 27 The Pedals ....................................................................... 12 ● Selecting the Playback Track for CLP-156 Track 1/R or 2/L ..................................................... 27 ● Soft (Left) Pedal .................................................... 12 ■ Utility 8: Convert to SMF ............................................ 27 ● Sostenuto (Center) Pedal ...................................... 12 ■ Utility 9: All-song Random Repeat ............................. 28 ● Damper (Right) Pedal ............................................ 12 ■ Utility 10: Standard MIDI File Voice Mode ................. 29 Transposition .................................................................. 13 MIDI Functions ............................................................... 30 Pitch Control ................................................................... 14 ● A Brief Introduction to MIDI ................................... 30 ● Tuning Up .............................................................. 14 ● MIDI “Messages” Transmitted & Received by the Clavinova ............................................................... 30 ● Tuning Down ......................................................... 14 ● MIDI Transmit & Receive Channel Selection ........ 31 ● To Restore Standard Pitch .................................... 14 ● MIDI Transmit Transpose ...................................... 31 ● The Pitch Display .................................................. 14 ■ Other MIDI Functions ................................................. 32 ● Memorizing the Pitch Control Setting .................... 14 ● Local Control ON/OFF ........................................... 32 The Metronome & Tempo Control ............................. 15 ● Program Change ON/OFF .................................... 32 ■ The Metronome .......................................................... 15 ● Control Change ON/OFF ....................................... 33 ● Metronome Volume ............................................... 15 ● The Multi-Timbre Mode ......................................... 33 ● Metronome Time Signature ................................... 15 ● The MIDI Split & Left Local OFF Mode ................. 33 ■ Tempo Control ........................................................... 15 ● The MIDI Split & Right Local OFF Mode ............... 34 Disk Playback ................................................................. 16 ● Transmitting the Panel Settings ............................ 34 ● Adjusting the Playback Tempo .............................. 17 Factory Preset Recall ................................................... 34 ● Fast Reverse and Forward .................................... 17 Error Messages .............................................................. 35 ● Playing Back only One Track ................................ 17 ● Repeat Playback ................................................... 17 ● Playing Other Types of Music Data ....................... 17 Troubleshooting ............................................................. 35 Options ............................................................................. 35 Keyboard Stand Assembly ......................................... 36 MIDI Data Format ........................................................... 38 MIDI Implementation Chart ............................................. 40 Specifications ................................................................. 41 3 The Control Panel MASTER VOLUME MIN MAX 2 BRILLIANCE REVERB MELLOW NORMAL BRIGHT ROOM HALL 1 HALL 2 COSMIC 3 4 120 9 MIDI/ TRANSPOSE PIANO 1 PIANO 2 CLAVINOVA E. PIANO TONE HARPSICHORD STRINGS VIBES METRONOME ORGAN 6 5 ▼ 7 TEMPO ▲ SONG r 8 f 0 1 MASTER VOLUME MIN MAX BRILLIANCE REVERB MELLOW NORMAL BRIGHT ROOM HALL 1 HALL 2 COSMIC D2 E2 RECORDER 1/R 2/L MIDI/ TRANSPOSE PIANO 1 PIANO 2 HARPSICHORD CLAVINOVA E. PIANO TONE VIBES STRINGS METRONOME ORGAN ▼ TEMPO ▲ r SONG f PLAY REC DEMO POWER A-1 B-1 C0 D0 E0 F0 G0 A0 B0 C1 D1 E1 F1 Pitch control keys (See page 14) PHONES Jacks (Bottom Panel) Left voice shift up key (See page 9) A1 B1 C2 F2 G2 A2 B2 C3 D3 E3 F3 G3 A3 B3 C4 D4 E4 Transpose keys (See page 13) Balance/Depth keys (See page 9, 11) 1 [POWER] Switch % Press the [POWER] switch once to turn the power ON, a second time to turn the power OFF. When the power is initially turned ON, the [PIANO 1] voice selector LED will light, and the power indicator located below the left end of the keyboard will light. Soft pedal Sostenuto pedal G1 Damper pedal 2 [MASTER VOLUME] Control ● The Music Stand The [MASTER VOLUME] control adjusts the volume (level) of sound produced by the Clavinova’s internal stereo sound system. The [MASTER VOLUME] control also adjusts headphone volume when a pair of headphones is plugged into the PHONES jack (page 6). 3 [BRILLIANCE] Button This button can be used to change the tonality or “timbre” of the selected voice. See page 10 for details. If you will be using sheet music with your Clavinova, raise the music stand built into its top panel by lifting the rear edge of the music stand, then flip down the music stand braces and engage them with the corresponding recesses. The music stand can be lowered after slightly lifting it and folding the two brackets which support it against the back of the stand. 4 4 [REVERB] Button The [REVERB] button selects a number of digital reverb effects that you can use for extra depth and expressive power. See page 11 for details. F4 G4 A4 7 [METRONOME] Button Turns the metronome sound on and off. The TEMPO [s] and [t] buttons, below, are used to set the tempo of the metronome sound — see page 15 for details. RECORDER 1/R 2/L PLAY @ REC 8 TEMPO [t] and [s] Buttons DEMO ! These buttons adjust the tempo of the CLP-156 metronome function as well as the recording and playback functions. The tempo range is from 32 to 280 quarternote beats per minute. # 9 TEMPO Display This 3-digit LED display normally shows the current tempo in quarter-note beats per minute. When the metronome, recording, or playback is in operation, it displays the current measure number. It also displays the selected song number when a disk is in the disk drive, and various parameters of functions while they are in operation. $ 0 SONG [r] and [f] Buttons B4 C5 D5 E5 F5 G5 A5 B5 C6 D6 E6 F6 G6 A6 B6 C7 Select a song number on a floppy disk for recording or playback. See page 18 or16 for details. ! RECORDER [PLAY] and [REC] Buttons Right voice shift up key (See page 9) Memory key (See page 10, 11, 12, 14) 5 [MIDI/TRANSPOSE] Button The [MIDI/TRANSPOSE] button allows access to the Clavinova’s TRANSPOSE function (to shift the pitch of the entire keyboard up or down), keyboard touch sensitivity adjustment, Utility functions (to enhance the versatility and flexibility of the Clavinova), and MIDI functions. For details refer to “Transposition” on page 13, “Touch Sensitivity” on page 12, “Utility Functions” on page 21, and “MIDI Functions” on page 30. 6 Voice Selectors The CLP-156 has eight voice selectors. Simply press any of the voice selectors to select the corresponding voice. The voice selector LED will light to indicate which voice is currently selected. The CLP-156 also has a DUAL mode in which two voices can be played simultaneously across the full range of the keyboard — see page 9 for details. NOTE • The PIANO 1 voice is automatically selected whenever the [POWER] switch is initially turned ON. These buttons control the CLP-156 2-track recorder, letting you record and play back just about anything you play on the keyboard — the music data that you record is stored on a 3.5" floppy disk loaded into the Clavinova’s disk drive unit. See page 18 for details. @ RECORDER [1/R] and [2/L] Buttons Select the track for recording or playback. See page 18 or 16 for details. # [DEMO] Button Activates the demo playback mode in which you can select playback of different demonstration sequences for each of the Clavinova’s voices. See page 8 for details. $ 3.5" Floppy Disk Drive A floppy disk for recording and playback is inserted into the 3.5" floppy disk drive. See page 2 for precautions about handling the floppy disk and the disk drive. % Pedals The CLP-156’s soft (left), sostenuto (center), and damper (right) pedals provide a range of expressive control capabilities similar to the pedal functions on an acoustic piano. See page 12 for details. 5 Connections 3 12 MIDI IN OUT THRU AUX IN R AUX OUT L R L/L+R 1 AUX IN L and R Jacks AUX IN R L Tone Generator These jacks are intended primarily for use with external synthesizers or tone generator modules. For example, the outputs of the synthesizer/tone generator can be to the Clavinova AUX IN jacks, allowing the sound of the synthesizer/tone generator to be reproduced via the Clavinova’s internal amplifier and speaker system. NOTE 2 AUX OUT L/L+R and R Jacks R AUX OUT L/L+R Stereo System The AUX OUT L/L+R and R jacks deliver the output of the Clavinova for connection to an instrument amplifier, mixing console, PA system, or recording equipment. If you will be connecting the Clavinova to a monaural sound system, use only the L/L+R jack. When a plug is inserted into the L/ L+R jack only, the left- and right-channel signals are combined and delivered via the L/L+R jack so you don’t lose any of the Clavinova’s sound. The Internal Amplifier & Speaker System The CLP-156 features a powerful stereo amplifier delivering 30 watts per channel, driving a speaker system that puts out exceptionally rich sound with natural response from powerful lows to shimmering highs. The speaker system features a bass-reflex type enclosure with two 13-centimeter and two 5-centimeter speaker units. NOTE 3 MIDI IN, THRU and OUT Connectors IN MIDI OUT THRU • The input signal from the AUX IN jacks is delivered to the AUX OUT jacks, but is not affected by the Clavinova’s volume control or reverb effect. • The AUX OUT jack signal must never be returned to the AUX IN jacks, either directly or through external equipment. The MIDI IN connector receives MIDI data from an external MIDI device (such as a synthesizer, sequencer, music computer, etc.) which can be used to control the Clavinova. The MIDI THRU connector re-transmits any data received at the MIDI IN connector, allowing “chaining” of several MIDI instruments or other devices. The MIDI OUT connector transmits MIDI data generated by the Clavinova (e.g. note and velocity data produced by playing the Clavinova keyboard). More details on MIDI are given in “MIDI Functions” on page 30. Tone Generator MIDI Sequencer ● PHONES Jacks (Bottom Panel) 6 Two pairs of standard pair of stereo headphones can be plugged in here for private practice or late-night playing. The internal speaker system is automatically shut off when a pair of headphones is plugged into either of the PHONES jacks. Selecting & Playing Voices ZTurn Power On After making sure that the Clavinova’s AC plug is properly inserted into a convenient AC wall outlet, press the [POWER] switch located to the left of the keyboard to turn the power ON. When the power is turned ON, the [PIANO 1] voice selector LED will light (the PIANO 1 voice is automatically selected whenever the power is turned ON). POWER XSet the Volume Initially set the [MASTER VOLUME] control about half way between the “MIN” and “MAX” settings. Then, when you start playing, re-adjust the [MASTER VOLUME] control for the most comfortable listening level. MASTER VOLUME MIN MAX CSelect a Voice PIANO 1 PIANO 2 Select the desired voice by pressing one of the voice selectors. CLAVINOVA E. PIANO TONE HARPSICHORD VPlay VIBES STRINGS ORGAN The Clavinova also offers keyboard touch response, so the volume and timbre of notes played can be controlled according to how “hard” you play the keys. The amount of variation available depends on the selected voice. BAdjust Tone & Add Effects As Required BRILLIANCE REVERB MELLOW NORMAL BRIGHT ROOM HALL 1 HALL 2 COSMIC You can also change the overall tone or add reverb and/or effects as desired by using the [REVERB] and [BRILLIANCE] buttons (see page 10 for [BRILLIANCE] button operation, “Reverb” on page 11). 7 Selecting & Playing Voices Playing the Demonstration Tunes The CLP-156 features 8 demonstration tunes that effectively demonstrate its sound capabilities. Here’s how you can select and play the demo tunes. ZEngage the Demo Mode Press the [DEMO] button to engage the demo mode — the voice selectors will flash in sequence. DEMO XSelect a Demo Tune PIANO 1 PIANO 2 CLAVINOVA E. PIANO TONE CSet the Volume The 8 demo tunes are selected via the voice selectors. Press a selector to start playback of the corresponding tune, featuring the voice normally selected by that voice selector button. The demo tunes will play in sequence until stopped, starting with the selected tune. The voice selector indicator will flash during demo playback. HARPSICHORD VIBES STRINGS Use the [MASTER VOLUME] control to adjust the volume. MASTER VOLUME MIN MAX VPlay a Different Demo B Stop the Demo DEMO ORGAN NOTE • The TEMPO buttons do not affect demo playback (“_ _ _” appears on the TEMPO display). You can start playback of any other demo tune during playback by simply pressing the corresponding voice selector. Playback will stop and the playback-ready mode described in step 2, above, will be re-engaged if you press the voice selector of the demo that is currently playing. Press the [DEMO] button when you want to stop demo playback and return to the normal play mode. The Demo Tunes [PIANO 1] button: Etude op. 10-5 “Black Keys” by F. F. Chopin [PIANO 2] button: “Le Rhône” by K. Hattori [CLAVINOVA TONE] button: “Pavane pour une infante défunte” by M. J. Ravel [HARPSICHORD] button: “Le Coucou” by L. C. Daquin [VIBES] button: “Schmetterling (Papilions)” op. 43 by E. H. Grieg [STRINGS] button: “Charmaine” by L. Polladk [ORGAN] button: “Jesu, Joy Of Man’s Desiring” (Chorale from Cantata No. 147) by J. S. Bach • The demonstration pieces listed above are short excerpts from the original compositions. The other demo song is original (© 1994 by YAMAHA CORPORATION). NOTE 8 • One PianoSoft demonstration disk is also provided with the CLP-156. It contains several excerpts from the Disklavier PianoSoft disks. Refer to the “Disk Playback” section on page 16 for how to playback the Demonstration disk. The Dual Mode The DUAL mode makes it possible to play two voices simultaneously across the entire range of the keyboard. To activate the DUAL mode simply press two voice selectors at the same time (or press one voice selector while holding another). The voice indicators of both selected voices will light when the DUAL mode is active. To return to the normal single-voice play mode, press any single voice selector. ● Adjusting the Balance Between the Dual-mode Voices HARPSICHORD VINOVA E. PIANO ONE C2 C3 Left voice maximum. C4 Equal balance. Right voice maximum. 8 ▼ TEMPO ▲ The volume levels of the two voices combined in the DUAL mode are normally set automatically to produce a pleasing balance (see “Default Settings” below). The balance can be adjusted manually by using the C2 through C4 keys on the keyboard or the TEMPO [s] and [t] buttons while pressing the two voice selectors corresponding to the voices to be combined in the DUAL mode. The selected balance value (1 … 15) will be shown on the TEMPO display until the voice selectors are released. When using the keyboard, the C3 keys produces equal balance between the two voices (a setting of “8”), while keys to the left of C3 increase the volume of the left voice in relation to the right voice, and keys to the right of C3 increase the volume of the right voice in relation to the left voice. By “left” and “right” voices we refer to the relative positions of the voice selectors — i.e. in a STRINGS/ORGAN combination STRINGS is the left voice and ORGAN is the right voice. When using the TEMPO buttons the first time either button is pressed the current balance appears on the TEMPO display, then pressing the [t] button increases the volume of the left voice in relation to the right while the [s] button has the opposite effect. Press both the [s] and [t] buttons simultaneously to instantly recall the equal-volume (“8”) setting. ■ A setting of “1” sets the volume of the left voice to maximum and the volume of the right voice to minimum. ■ A setting of “8” sets both voices to the same volume. ■ A setting of “15” sets the volume of the right voice to maximum and the volume of the left voice to minimum. NOTE ● Shifting a Dual-mode Voice Up One Octave VA E. PIANO HARPSICHORD C1 C5 Left voice shift up. PIANO 2 CLAV TO Depending on which voices you combine using the DUAL mode, the combination may sound better if one of the voices is shifted up an octave. To shift the right voice, press the C5 key while pressing the two voice selectors corresponding to the voices to be combined in the DUAL mode. Press C5 again to shift the voice back to its normal range. Use the C1 key in the same way to shift the left voice. Default octave settings are provided for all voice combinations, as listed in the “Default Settings” chart, below. Right voice shift up. ● Slow-attack Strings PIANO 1 • Hold either the TEMPO [s] or [t] button for continuous scrolling in the specified direction. ES STRINGS ORGAN In a DUAL mode voice combination using STRINGS and any other voice, it is possible to switch the STRINGS voice to a slow-attack variation when initially selecting the voices by pressing the [STRINGS] selector twice while holding the other voice selector. Repeat this operation to return to the normal STRINGS voice attack. 9 The Dual Mode ● Memorizing the Balance, Strings Type, & Octave Shift Settings C7 VA E. PIANO HARPSICHORD Press the C7 key while holding any two voice selectors to memorize all balance, STRINGS voice attack variation, and octave shift settings made since the power was turned on. The memorized settings will be retained in memory for about one week after the power is turned off, then the default settings will be restored. To keep the memorized settings for longer periods, turn the power on briefly at least once a week. If these settings are not memorized as described above, they are retained in memory only until the Clavinova is turned off. Default Settings Balance PIANO 1 Octave Shift PIANO 1 PIANO 2 CLAVINOVA TONE E. PIANO HARPSICHORD VIBES STRINGS ORGAN C2 … C4: Balance keys PIANO 2 8 (C3) 0 0 0 0 R 0 0 0 0 0 R 0 0 0: Normal octave CLAVINOVA TONE 8 (C3) 8 (C3) E. PIANO 8 (C3) 8 (C3) 8 (C3) 0 0 R 0 0 L: Left voice up one octave HARPSICHORD 8 (C3) 8 (C3) 8 (C3) 8 (C3) 0 R 0 0 R 0 0 VIBES STRINGS ORGAN 8 (C3) 8 (C3) 8 (C3) 8 (C3) 8 (C3) 4 (F2) 4 (F2) 4 (F2) 4 (F2) 4 (F2) 7 (B2) 3 (E2) 3 (E2) 4 (F2) 3 (E2) 5 (G2) 7 (B2) 8 (C3) L L 0 R: Right voice up one octave Brilliance The [BRILLIANCE] button makes it possible to change the tonality or “timbre” of the selected voice to suit your musical requirements. Three settings are provided: MELLOW, NORMAL, and BRIGHT. To select one of these settings, press the [BRILLIANCE] button a few times until the indicator corresponding to the desired setting lights. NORMAL ..... This setting produces the “normal” tone of the selected voice. BRIGHT ....... This setting creates a brighter, sharper tone. MELLOW ..... The MELLOW setting produces a rounder, softer tone. ● Memorizing the Brilliance Setting BRILLIANCE MELLOW NORMAL BRIGHT 10 C7 Press the C7 key while holding the [BRILLIANCE] button to memorize the current brilliance setting. The memorized setting will be retained in memory for about one week after the power is turned off, then the default setting (NORMAL) will be restored. To keep the memorized setting for longer periods, turn the power on briefly at least once a week. If this setting is not memorized as described above, it is retained in memory only until the Clavinova is turned off. Reverb The [REVERB] button selects a number of digital reverb effects that you can use for extra depth and expressive power. To select a reverb type press the [REVERB] button a few times until the indicator corresponding to the desired type lights (the indicators light in sequence each time the [REVERB] button is pressed). No reverb is produced when all indicators are off. OFF ............ When no reverb effect is selected (no REVERB indicator is lit), a special natural damper effect is applied to the piano voices. This simulates the natural resonance of an acoustic piano’s strings and sound board when the damper pedal is pressed. ROOM ........ This setting add a continuous reverb effect to the sound that is similar to the type of acoustic reverberation you would hear in a medium-size room. HALL 1 ...... For a “bigger” reverb sound, use the HALL 1 setting. This effect simulates the natural reverberation of a medium-size concert hall. HALL 2 ...... For a really spacious reverb sound, use the HALL 2 setting. This effect simulates the natural reverberation of a large concert hall. COSMIC .... The COSMIC reverb effect produces an echo-plus-reverb sound that can add life and animation to your music. ● Adjusting Reverb Depth REVERB ROOM HALL 1 HALL 2 COSMIC C2 C3 C4 0 2 3 4 5 6 7 8 9 10 11 12 13 14 15 Decrease depth. Normal depth. Increase depth. 8 ▼ TEMPO The depth of the selected reverb effect can be adjusted for the current voice (separate settings can be made for each voice and reverb type) by using the C2 through C4 keys on the keyboard or the TEMPO [s] and [t] buttons while holding the [REVERB] button. The selected reverb depth value (0 … 15) will be shown on the TEMPO display until the [REVERB] button is released. The default reverb depth settings are given in the “Default Settings” chart below. When using the keyboard, the C3 keys sets the “normal” depth (a setting of “8”). Keys to the left of C3 decrease the reverb depth, and keys to the right of C3 increase the reverb depth. When using the TEMPO buttons the first time either button is pressed the current depth setting appears on the TEMPO display, then pressing the s] button increases the reverb depth while the [t t ] button decreases the [s reverb depth. Press both the [s] and [t] buttons simultaneously to instantly recall the normal (“8”) setting. ■ A setting of “0” sets the minimum reverb depth (no reverb). ■ A setting of “8” sets medium “normal” reverb depth. ▲ ■ A setting of “15” sets the maximum reverb depth. NOTE • Hold either the TEMPO [s] or [t] button for continuous scrolling in the specified direction. • A setting of “1” cannot be entered via the keyboard. Default Settings STRINGS, ORGAN ROOM HALL 1 HALL 2 COSMIC 8 (C3) 8 (C3) 11 (F3) 10 (E3) * All effect types set to 8 (C3) for all other voices. * The default reverb type is ROOM. ● Memorizing the Reverb Type & Depth Settings REVERB ROOM HALL 1 HALL 2 COSMIC C7 Press the C7 key while holding the [REVERB] button to memorize the current effect type and all depth settings made since the power was turned on. The memorized settings will be retained in memory for about one week after the power is turned off, then the default settings will be restored. To keep the memorized settings for longer periods, turn the power on briefly at least once a week. If these settings are not memorized as described above, they are retained in memory only until the Clavinova is turned off. 11 Touch Sensitivity Four different types of keyboard touch sensitivity — HARD, MEDIUM, SOFT or FIXED — can be selected to match different playing styles and preferences. The different touch sensitivity settings are selected by using the [MIDI/TRANSPOSE] and [REVERB] buttons. HARD (ROOM indicator) ........... The HARD setting requires the keys to be played quite hard to produce maximum loudness. MEDIUM (HALL 1 indicator) ...... The MEDIUM setting produces a fairly “standard” keyboard response. This is the initial factory default setting. SOFT (HALL 2 indicator) ........... The SOFT setting allows maximum loudness to be produced with relatively light key pressure. FIXED (No indicator lit) .............. All notes are produced at the same volume no matter how hard the keyboard is played. This is an ideal setting for voices which normally have no keyboard REVERB ROOM sensitivity (i.e. harpsichord and organ). HALL 1 HALL 2 COSMIC MIDI/ TRANSPOSE To select a touch sensitivity setting press the [REVERB] button a few times while holding the [MIDI/TRANSPOSE] button until the indicator corresponding to the desired setting lights. ● Memorizing the Touch Sensitivity Setting C7 REVERB ROOM HALL 1 HALL 2 COSMIC MIDI/ TRANSPOSE Press the C7 key while holding the [MIDI/TRANSPOSE] and [REVERB] button to memorize the current touch sensitivity setting. The memorized setting will be retained in memory for about one week after the power is turned off, then the default setting (MEDIUM) will be restored. To keep the memorized setting for longer periods, turn the power on briefly at least once a week. If this setting is not memorized as described above, it is retained in memory only until the Clavinova is turned off. The Pedals The CLP-156 has three foot pedals that produce a range of expressive effects similar to those produced by the pedals on an acoustic piano. ● Soft (Left) Pedal Pressing the soft pedal reduces the volume and slightly changes the timbre of notes played. ● Sostenuto (Center) Pedal If you play a note or chord on the keyboard and press the sostenuto pedal while the note(s) are held, those notes will be sustained as long as the pedal is held (as if the damper pedal had been pressed) but all subsequently played notes will not be sustained. This makes it possible to sustain a chord, for example, while other notes are played “staccato.” ● Damper (Right) Pedal The damper pedal functions in the same way as a damper pedal on an acoustic piano. When the damper pedal is pressed notes played have a long sustain. When no REVERB effect is selected and a piano voice is selected, the damper pedal also produces a special “resonance” that simulates the ring of the strings and the sound board of an acoustic piano. Releasing the pedal immediately stops (damps) any sustained notes. The CLP-156 damper pedal additionally features continuous damping. This allows you to create shorter effects by pressing the damper pedal down only part of the way. 12 Transposition The Clavinova’s TRANSPOSE function makes it possible to shift the pitch of the entire keyboard up or down in semitone intervals up to a maximum of six semitones. “Transposing” the pitch of the Clavinova keyboard facilitates playing in difficult key signatures, and you can easily match the pitch of the keyboard to the range of a singer or other instrumentalist. The [MIDI/TRANSPOSE] button and keys F#2 through F#3 on the keyboard, or the TEMPO [s] and [t] buttons, are used for transposition. Z Press and hold the [MIDI/TRANSPOSE] button. The current transpose C3 F# 2 F# 3 MIDI/ TRANSPOSE -6 -4 -2 +1 +3 +6 -5 -3 -1 0 +2 +4 +5 Transpose Transpose down. up. Normal pitch. -1 ▼ TEMPO ▲ setting will appear on the TEMPO display (“-6” semitones through “0” through “6” semitones). X Press a key between F#2 and F#3 according to the desired amount of transposition*, or use the TEMPO [s] and [t] buttons to set the required transposition value. The “0” default setting can be instantly recalled by simultaneously pressing the TEMPO [s] and [t] buttons. C Release the [MIDI/TRANSPOSE] button. * Pressing the C3 key produces normal keyboard pitch. Pressing the key to the left of C3 (B2) transposes the pitch of the keyboard down a semitone, the next key to the left (Bb2) transposes down a whole tone (two semitones), etc., down to the F#2 key which transposes down 6 semitones. Upward transposition is accomplished in the same way using the keys to the right of C3, up to F#3 which transposes up 6 semitones. NOTE • Hold either the TEMPO [s] or [t] button for continuous scrolling in the specified direction. • Notes below and above the A-1 — C7 of the Clavinova sound one octave higher and lower, respectively. 13 Pitch Control Pitch control makes it possible to tune the Clavinova over a ±50-cent range (approximate) in approximately 1.2-cent or 1-hertz intervals. A hundred “cents” equals one semitone, so the tuning range provided allows fine tuning of overall pitch over a range of approximately a semitone. Pitch control is useful for tuning the Clavinova to match other instruments or recorded music. Z ● Tuning Up A -1 B -1 C3 ▼ TEMPO B3 ▲ X Z ● Tuning Down A# -1 A -1 C3 ▼ TEMPO B3 ▲ Release the A-1 and B-1 keys. To tune down (lower pitch), hold the A-1 and A#-1 keys simultaneously and press any key between C3 and B3. Each time a key in this range is pressed the pitch is lowered by approximately 1.2 cents, up to a maximum of about 50 cents below standard pitch. To lower the pitch in 1-hertz increments press the TEMPO [t] button instead of the C3-B3 keys. The TEMPO [s] button can also be used to tune up while the A-1 and A#-1 keys are held. X Release the A-1 and A#-1 keys. ● To Restore Standard Pitch A# -1 A -1 B -1 To tune up (raise pitch), hold the A-1 and B-1 keys simultaneously (A-1 and B-1 are the two lowest white keys on the keyboard) and press any key between C3 and B3. Each time a key in this range is pressed the pitch is raised by approximately 1.2 cents, up to a maximum of about 50 cents above standard pitch. To raise the pitch in 1-hertz increments press the TEMPO [s] button instead of the C3-B3 keys. The TEMPO [t] button can also be used to tune down while the A-1 and B-1 keys are held. C3 B3 ZTo restore the default pitch (A3 = 440 Hz), hold the A-1, A#-1, and B-1 keys simultaneously and press any key between C3 and B3, or simultaneously press the TEMPO [s] and [t] buttons. X Release the A-1, A#-1 and B-1 keys. NOTE ▼ TEMPO ▲ • The PITCH CONTROL function has no effect when LOCAL OFF is active (see “MIDI FUNCTIONS,” page 32). ● The Pitch Display Example: 442 4.42 44.2 442. 442.0 ......... 442.24 442.25 ....... 442.49 The approximate pitch of A3 is shown on the TEMPO display in Hertz while the pitch control function is in operation. The total display range is from approximately 427 hertz (-50 cents) to 453 hertz (+50 cents). The dots to the right of each figure in the display are used to provide a general idea of fractional pitches. 442.5 ......... 442.74 442.75 ....... 442.99 ● Memorizing the Pitch Control Setting C7 14 • Hold either the TEMPO [s] or [t] button for continuous scrolling in the specified direction. Press the C7 key while holding the A-1/B-1, A-1/A#-1, or A-1/A#-1/B-1 key combination to memorize the current pitch control setting. The memorized setting will be retained in memory for about one week after the power is turned off, then the standard pitch will be restored. To keep the memorized setting for longer periods, turn the power on briefly at least once a week. If this setting is not memorized as described above, it is retained in memory only until the Clavinova is turned off. The Metronome & Tempo Control The CLP-156 built-in metronome is a convenient feature for practice, and it can also provide a solid rhythmic guide when recording using the Recorder feature, described below. The Metronome The metronome sound is turned on and off via the [METRONOME] button. Press the [METRONOME] button so that its indicator lights to turn the metronome on and then again so that the indicator goes out to turn the metronome off. When the metronome is on the current measure number is shown on the TEMPO display. METRONOME NOTE ● Metronome Volume 8 METRONOME ▼ TEMPO ▲ • The metronome will not function when the supplied PianoSoft demonstration disk or a Disklavier PianoSoft disk is in the disk drive. The volume of the metronome sound can be independently adjusted by using the TEMPO [s] and [t] buttons while holding the [METRONOME] button. The first time either button is pressed the current volume setting appears on the TEMPO display, then pressing the [s] button increases the volume while the [t] button decreases the volume. Press both the [s] and [t] buttons simultaneously to instantly recall the default (“8”) setting. ■ A setting of “1” sets the minimum metronome volume. ■ A setting of “8” sets the default metronome volume. ■ A setting of “15” sets the maximum metronome volume. NOTE ● Metronome Time Signature PIANO 1 PIANO 2 METRONOME 1.20 No accent/ 4 time 1st 2nd 3rd 4th The time signature of the metronome sound can be set by pressing the appropriate voice selector button while holding the [METRONOME] button, as follows: CLAVINOVA E. PIANO TONE Beat Indicator • Hold either the TEMPO [s] or [t] button for continuous scrolling in the specified direction. 2 time [METRONOME] + [PIANO 1] [METRONOME] + [PIANO 2] [METRONOME] + [CLAVINOVA TONE] [METRONOME] + [E. PIANO] No accent (default) 2 time 3 time 4 time The dots on the TEMPO display flash to indicate the current beat within the current measure, as shown to the left. 3 time Beat Beat Beat Beat Tempo Control 120 ▼ TEMPO ▲ The tempo of the Metronome as well as the song recording and playback functions can be adjusted from 32 to 280 quarter-note beats per minute via the TEMPO [s] and [t] buttons. The current tempo normally appears on the TEMPO display. Although the TEMPO display shows the current measure number during Metronome, song recording or playback operation, the tempo value is displayed when either of the TEMPO buttons are pressed, and remains on the display for about one second after the TEMPO buttons are released. “_ _ _” is displayed for any tempo value during playback of the supplied PianoSoft demonstration disk or optional Disklavier PianoSoft disks. The default tempo of 120 beats per minute is automatically set when the power is initially turned on. Press the TEMPO [s] and [t] buttons simultaneously to instantly recall the default tempo (120) at any time. The tempo value of the selected song is recalled if the TEMPO [s] and [t] buttons are pressed simultaneously when a song which contains data is selected. NOTE • Hold either the TEMPO [s] or [t] button for continuous scrolling in the specified direction. 15 Disk Playback Performance data on the supplied PianoSoft demonstration disk (others are available from Yamaha), as well as original performances you record using the Clavinova’s Recorder function (page 18) can be played back as described below. Z Insert a Disk Insert the disk containing the data to be played back into the disk drive, with the sliding door facing the drive slot and the label side facing upward. The disk should click into place and the disk lamp will light briefly while the Clavinova reads and identifies the disk. Song number “1” will also appear on the display. NOTE 1 X Select a Song Number RECORDER 1/R 2/L 2 r SONG f PLAY Use the SONG [r] and [f] buttons to select the song number you want to play. Select “ALL” if you want all songs on the disk to be played back in sequence. When the desired song number is selected the [1/R] and [2/L] track button indicators will glow green if the corresponding tracks contain performance data. REC NOTE Song Number C Start Playback RECORDER 1/R 2/L 1 PLAY REC NOTE MASTER VOLUME MAX BStop Playback REC NEject the Disk When Done Adjust the playback volume as required via the [MASTER VOLUME] control. Although playback will stop automatically at the end of the song, it can be stopped at any time by pressing the [PLAY] button. When you’ve finished with the currently loaded disk, simply press the disk drive EJECT button to remove it. CAUTION 16 • The measure number display may not be accurate with some songs. • It is possible to change the playback voice by using the panel voice selectors during playback of the supplied PianoSoft demonstration disk or an optional Disklavier PianoSoft disk. In this case the playback voice will become the same as the voice played via the keyboard. The playback voice cannot be changed when playing back other types of disks (the keyboard voice can be changed). V Adjust the Volume PLAY • The songs can be made to play back and repeat either in sequence or in random order when “ALL” is selected, depending on the setting of the “All-song Random Repeat” function (page 28). Start playback of the selected song by pressing the [PLAY] button. Unless “ALL” is selected, the selected song will play through to the end and playback will stop automatically. The current measure number will be shown on the display during playback. It is also possible to play along on the keyboard during playback. Measure Number MIN • Any recorded data in the CLP-156 memory (i.e. data recorded without first inserting a disk) will be erased when: (1) the supplied PianoSoft demonstration disk or an optional PianoSoft disk is inserted. (2) a disk containing original performance data is inserted and the “Select a Song Number” operation, below, is carried out. If you want to keep the data that is in the instrument’s memory, copy it to a recordable disk as described on page 20 before doing any of the above. • NEVER eject a disk or turn the power off while the disk drive lamp is on or a disk is playing back. ● Adjusting the Playback Tempo 122 ▼ TEMPO ▲ ● Fast Reverse and Forward 5 r SONG f During playback the SONG [r] and [f] buttons function as fast reverse and forward controls: ■ Fast reverse: Press the SONG [r] button during playback to move backward rapidly through the song. The current measure number will appear on the display. No sound is produced during fast reverse. ■ Fast forward: Press the SONG [f] button during playback to move rapidly forward through the song. The current measure number will appear on the display, and the fast-forward sound can be heard. Measure Number ● Playing Back only One Track RECORDER 1/R 2/L ● Repeat Playback MIDI/ TRANSPOSE The playback tempo can be adjusted either before or during playback by using the TEMPO [▲] and [▼] buttons. Press the TEMPO [▲] and [▼] buttons simultaneously to recall the original tempo. The tempo value in beats per minute will appear on the display during adjustment. “_ _ _” is displayed for any tempo value during playback of the supplied PianoSoft demonstration disk or optional Disklavier PianoSoft disks. PLAY REC ● Playing Other Types of Music Data If both the [1/R] and [2/L] track button indicators light green, both tracks contain data which will be played back. If you only want to play back one track, however, you can turn either track off by pressing its track button so the indicator goes out. Press the same track button again so the indicator lights to turn the track back on. Both tracks can be turned on or off either before or during playback in this way. As mentioned in step 2 of the playback procedure described above, you can select “ALL” instead of an individual song number if you want to hear all the songs on the disk played back in sequence. It is also possible to automatically play all songs from the currently selected song repeatedly by pressing the [PLAY] button while holding the [MIDI/TRANSPOSE] button. Press the [PLAY] button to stop repeat playback at any time. In addition to the supplied PianoSoft demonstration disk and disks containing performances you record yourself using the CLP-156 recorder function, the Clavinova can play back optional Yamaha Disklavier PianoSoft™ disks available from your Yamaha dealer, and disks containing songs recorded in Standard MIDI File format (format 0 only). When playing Standard MIDI Files, approximate panel voices will automatically be selected for the voices specified by the song data. In most cases pre-recorded Standard MIDI File disks will include data for more tracks than the two available on the CLP-156. Only track-1 and track-2 data will be played by the CLP-156, while the data for other tracks will be transmitted via the CLP-156 MIDI OUT terminal (see page 6). The data for tracks 1 and 2 will not be transmitted via MIDI OUT. It is possible, however, to re-assign the data for other tracks to playback via tracks 1 and 2 by using the “Disk Playback Track Selection” function described on page 27. In this case the data for all tracks other than those assigned to be played by the CLP-156 will be transmitted via the MIDI OUT terminal. 17 Using the Recorder The CLP-156 features a two-track recorder that lets you record what you play on the keyboard and then play it back. Since you have two tracks, you can “overdub” one part on top of another, using a different voice if you like, to create complex, rich-sounding recordings. The recorder feature is a useful adjunct to any keyboard study program, since it lets you hear exactly how you sound from the listener’s perspective. It can also be just plain fun. Each individual recording made using this function is known as a “song”, and up to 60 songs can be recorded on a single floppy disk (less if the recorded songs contain a large amount of data). Recording Z Insert a Disk Insert a properly formatted disk into the disk drive, with the sliding door facing the drive slot and the label side facing upward. The disk should click into place and the disk lamp will light briefly while the Clavinova reads and identifies the disk. Song number “1” will also appear on the display. NOTE 1 X Select a Song Number Use the SONG [r] and [f] buttons to select the song number you want to record to. RECORDER 1/R 2/L 2 r SONG f • If an unformatted disk or a disk that was not formatted by the CLP156 is inserted, “For” will appear flashing on the display and recording will not be possible. Be sure to format the disk using the “Floppy Disk Format” function described on page 24 before recording. PLAY NOTE REC • When a song number is selected the [1/R] and [2/L] track button indicators will light green if the corresponding tracks already contain performance data. If you record to a song number that contains data, the old data will be erased and replaced by the newly-recorded data. Select an “empty” song if you don’t want to erase the existing data. Song Number Select a Voice & Other Initial C Settings As Required PIANO 1 PIANO 2 CLAVINOVA E. PIANO TONE HARPSICHORD VIBES Use the voice selectors to select the voice you want to record with. In addition to the notes played, the CLP-156 also records the data listed in the charts below. “Initial Value” refers to settings that can be made before actually beginning recording — e.g. selecting a voice or brilliance type. “During Recording” refers to parameter changes that will be recorded while recording. The initial settings can be changed after recording as described in “Changing the Initial Settings” on page 20. ● Data Recorded Independently for Each Track Data Notes played Voice Damper pedal Soft pedal Sostenuto pedal Brilliance type Dual voice Dual balance 18 Initial Value No Yes Yes Yes No Yes Yes Yes During Recording Yes Yes Yes Yes Yes Yes Yes Yes ● Data Common to Both Tracks Data Reverb type Reverb depth Tempo Initial Value Yes Yes Yes During Recording Yes Yes No the Record Ready V Engage Mode RECORDER 1/R 2/L 700. PLAY REC Press the RECORDER [REC] button to engage the record ready mode (recording does not actually start yet). The [REC] button indicator will light red. When the [REC] button is released the amount of space available on the currently loaded floppy disk will be shown on the display in kilobytes (approximate). Also, a dot on the right side of the display will flash at the current tempo. The record ready mode can be disengaged before recording by simply pressing the [REC] button again. NOTE BSelect the Record Track RECORDER 1/R 2/L PLAY REC the Metronome, N Start If Required METRONOME M Start Recording When the record mode is engaged in the previous step, the last-recorded track will automatically be selected for recording and its indicator — i.e. the [1/R] or [2/L] button indicator — will glow red. If you want to record on a different track, press the appropriate track button so that its indicator glows red. NOTE RECORDER 1/R 2/L PLAY • The track button indicators of tracks which contain previously recorded data will glow green. The previously-recorded data on the non-record track will normally be played back as you record, so you can play along with a previously-recorded track. If you don’t want to hear the previously recorded track as you record, press the playback track button before pressing the [REC] button (step 4, above) so that its indicator goes out. • Recording on a track which already contains data will erase all previous data on that track. If you want to use the metronome while recording, press the [METRONOME] button and adjust the tempo and volume as described on page 15. The metronome sound will not be recorded. Recording will begin automatically as soon as you play a note on the keyboard or press the [PLAY] button. The current measure number will appear on the display during recording. NOTE < Stop Recording • It is not possible to record to a song which contains data recorded on an instrument other than the CLP-156 — “no” will appear on the display when you press the [REC] button. • You can record up to a maximum of about 57,000 notes on a single floppy disk (approximately 700 kilobytes disk capacity), depending on pedal usage and other factors. If the disk becomes full while recording, “FUL” will appear on the display and recording will stop automatically. Press either the [REC] or [PLAY] button to stop recording. “rEc” will appear on the display while the data is being written to the floppy disk, then the indicator of the recorded track will glow green to indicate that it now contains data, and the display will revert to the normal song number display. REC ● Changing the Initial Settings The initial settings (see the chart in step 3, above) recorded by the CLP-156 can be changed after the recording is finished by pressing the [REC] button to engage the record ready mode, pressing the appropriate track button, making the required changes, and then pressing the [REC] button again to exit from the record ready mode and register the changes. If you do this, be careful not to press the [PLAY] button or a key on the keyboard, either of which will start recording and erase all previous recorded data on the selected track. If you start this procedure but decide to cancel, simply select a different track then press the [REC] button a second time. 19 Using the Recorder ● Erasing a Single Track All data can be erased from either of the recorder’s tracks by engaging the record mode, selecting the track you want to erase, and then pressing the [PLAY] button twice without recording any data. ● If You Record Without First Inserting a Disk … If you forget to insert a properly formatted floppy disk before recording, it is possible to record up to approximately 600 notes before the 8-kilobyte internal memory becomes full. If you want to keep this data, it is possible to copy it to disk by following the procedure outlined below. CAUTION cpY c__ • Any of the following operations will erase all data in the internal memory. Be sure to copy the data in memory to disk before: 1: Turning the power switch OFF. 2: Loading a PianoSoft disk (including the supplied disk). 3: Inserting any disk and selecting a song number. Z While holding the [MIDI/TRANSPOSE] button, press either the SONG MIDI/ TRANSPOSE r SONG c3 ▼ TEMPO ▲ f [r] and [f] button several times until “cPy” appears on the display. Release the [MIDI/TRANSPOSE] button when “c_ _” appears on the display. X Use the TEMPO [▲] or [▼] button to select the song number to which you want to copy the data. C Insert the disk you want to copy the data to. V Press the [PLAY] button. If no previous data exists in the specified song PLAY REC number “cPy” will appear on the display and the data in the CLP-156 memory will be copied to the disk. If the specified song number already contains data, “n y” will appear on the display. In this case press the TEMPO [▲] button (yes) if you want to go ahead with the copy operation, thereby erasing the previous data, or the TEMPO [▼] button (no) if you want to cancel the copy operation and leave the existing data intact. In the latter case repeat the procedure, selecting an empty song number. Playback PLAY REC To play back what you’ve recorded, simply press the RECORDER [PLAY] button. Playback starts from the beginning of the recorded data, and will stop automatically at the end of the recorded data. You can also stop playback at any time by pressing the [PLAY] button. To mute a track so that it doesn’t play back, press the corresponding track button so that its indicator goes out. Also refer to the “Disk Playback” section (page 16) for other playback functions. NOTE • If the metronome is being used during playback, the metronome will stop when playback is stopped. • The playback data is not transmitted via the MIDI OUT terminal. 20 Utility Functions Utility 1: Individual key Tuning The individual key tuning feature makes it possible to individually tune each key on the CLP-156 keyboard in order to match different tuning standards. The pitch of each key can be raised or lowered by a maximum of 50 cents (approximately) from the standard pitch. ● To Lower the Pitch of a Single Key the Individual Key Z Select Tuning Function Hold the [MIDI/TRANSPOSE] button and press the SONG [r] or [f] button as many times as necessary until “tun” appears on the display — don’t release the [MIDI/TRANSPOSE] button yet. tun MIDI/ TRANSPOSE r SONG f the “Down-tuning” X Select Mode Press the TEMPO [▼] button. “d” will appear on the TEMPO display. d MIDI/ TRANSPOSE ▼ TEMPO ▲ C Tune the Required Key(s) MIDI/ TRANSPOSE While still holding the [MIDI/TRANSPOSE] button, press the desired key as many times as necessary to lower its pitch by the required amount (each press lowers pitch by approximately 1.2 cents). The ±50-cent tuning range is shown on the TEMPO display in steps ranging from “-44” to “44”. V Release the [MIDI/TRANSPOSE] button. ● To Raise the Pitch of a Single Key the Individual Key Z Select Tuning Function tun MIDI/ TRANSPOSE r SONG Hold the [MIDI/TRANSPOSE] button and press the SONG [r] or [f] button as many times as necessary until “tun” appears on the display — don’t release the [MIDI/TRANSPOSE] button yet. f 21 Utility Functions the “Up-tuning” X Select Mode Press the TEMPO [▲] button. “U” will appear on the TEMPO display. U MIDI/ TRANSPOSE ▼ TEMPO ▲ C Tune the Required Key(s) MIDI/ TRANSPOSE While still holding the [MIDI/TRANSPOSE] button, press the desired key as many times as necessary to raise its pitch by the required amount (each press raises pitch by approximately 1.2 cents). The ±50-cent tuning range is shown on the TEMPO display in steps ranging from “-44” to “44”. V Release the [MIDI/TRANSPOSE] button. ● To Turn the Individual Key Tune Mode OFF or ON The individual key tuning settings described above can be turned off (normal tuning) while retaining the settings in memory. Individual key tuning is always turned off when the power is initially turned on, but any previous settings are retained in memory and can be recalled if the power has not been off for longer than about a week. To keep the memorized settings for longer periods, turn the power on briefly at least once a week. Complete tunings can also be saved to and loaded from disk as described in “Utility 2: Save Individual Key Tuning” and “Utility 3: Load Individual Key Tuning”, below. Select the Individual Key Z Tuning Function Hold the [MIDI/TRANSPOSE] button and press the SONG [r] or [f] button as many times as necessary until “tun” appears on the display — don’t release the [MIDI/TRANSPOSE] button yet. tun MIDI/ TRANSPOSE r SONG f Individual Key Tuning X Turn OFF F MIDI/ TRANSPOSE ▼ TEMPO ▲ the [MIDI/TRANSC Release POSE] button. 22 Press the TEMPO [▲] and [▼] buttons simultaneously. “F” will appear on the TEMPO display indicating that the individual key tuning mode is OFF. NOTE • You can turn the individual key tuning mode back on by carrying out steps 1 and 2 in either the “To Lower The Pitch Of a Single Key” or “To Raise the Pitch Of a Single Key” procedure, above, so that “d” or “U” appears on the display. Utility 2: Save Individual Key Tuning This function saves the current individual key tuning data set up via the “Individual Key Tuning” function to disk. The data can then be reloaded at any time by using the Load Individual Key Tuning function, described next. Z Insert a Disk Insert a properly formatted disk into the Clavinova disk drive. XSelect a Song Number r SONG f the Save Individual C Select Key Tuning Function tun Individual key tuning data can be saved to a blank song number or one that already contains recorder data. Use the SONG [r] and [f] buttons to select the song number to which you want to save the individual key tuning data. Hold the [MIDI/TRANSPOSE] button and press the SONG [r] or [f] button as many times as necessary until “tun” and “SAV” flash alternately on the display — don’t release the [MIDI/TRANSPOSE] button yet. SAU MIDI/ TRANSPOSE r SONG f the Save Individual V Execute Key Tuning Function SAU End MIDI/ TRANSPOSE PLAY While still holding the [MIDI/TRANSPOSE] button, press the [PLAY] button to actually begin saving the data. Simply release the [MIDI/ TRANSPOSE] button before pressing the [PLAY] button if you want to cancel the function. “SAV” will appear on the display while the data is being saved, then “End” will appear briefly when the save operation has been completed. REC NOTE • The tuning settings are saved to one song file on the disk. The Save Individual Key Tuning function will automatically be exited when the data has been saved. • Individual key tuning data saved as described above is not erased by the “Song Delete” function described on page 26. Further, the individual key tuning data will only be copied when the “Song Copy” function described on page 25 is executed if the song also contains performance data. Utility 3: Load Individual Key Tuning This function reloads the individual key tuning data saved to disk by the Save Individual Key Tuning function, described above. Z Insert a Disk Insert the disk containing the individual key tuning data you want to load into the Clavinova disk drive. X Select a Song Number r SONG Use the SONG [r] and [f] buttons to select the song number containing the individual key tuning data you want to load. f 23 Utility Functions the Load Individual C Select Key Tuning Function tun Hold the [MIDI/TRANSPOSE] button and press the SONG [r] or [f] button as many times as necessary until “tun” and “Lod” flash alternately on the display — don’t release the [MIDI/TRANSPOSE] button yet. Lod MIDI/ TRANSPOSE r SONG f Execute the Load Individual V Key Tuning Function Lod End MIDI/ TRANSPOSE PLAY REC While still holding the [MIDI/TRANSPOSE] button, press the [PLAY] button to actually begin loading the data. Simply release the [MIDI/ TRANSPOSE] button before pressing the [PLAY] button if you want to cancel the function. “Lod” will appear on the display while the data is being loaded, then “End” will appear briefly when the load operation has been completed. NOTE • The Individual Key Tuning mode will automatically be turned ON when the data has been loaded. • If no individual key tuning data exists in the selected song number, “no” will appear on the display. If this occurs, try again from step 2, above. Utility 4: Floppy Disk Format The Clavinova uses only 3.5" 2DD floppy disks. We recommend that you use Yamaha 2DD disks. Before you can use a new disk for recording, the disk must be “formatted” so that the Clavinova can recognize it and correctly write the music data onto it. Insert the Disk To Be Z Formatted Insert a new blank disk. Make sure that the disk’s write protect tab is set to the “write” position (tab closed), and insert the new disk into the disk drive unit with the sliding door facing the drive slot and the label side of the disk facing upward. The disk should click securely into place, and the disk drive lamp should light briefly. NOTE For • “For” will flash on the display to indicate that a blank (unformatted) disk or one with a format not recognizable by the CLP-156 is loaded in the drive. In this case you can go directly to the next step. If an alreadyformatted disk that you want to re-format is loaded (i.e. to completely erase all data from the disk in one operation), you’ll have to select the format function by pressing the SONG [r] or [f] button as many times as necessary until “For” appears on the display while holding the [MIDI TRANSPOSE] button, then release the [MIDI/TRANSPOSE] button when “n y” appears flashing on the display and proceed to step 3. • “Pro” will appear on the display if a protected disk that cannot be formatted is loaded in the drive: a write-protected disk or a Disklavier PianoSoft disk. X Engage the Format Function n Y ▼ 24 TEMPO ▲ Press the TEMPO [▲] or [▼] button. “n y” will flash on the display. & Start the Format C Confirm Operation F80 F 0 Use the TEMPO [▲] (YES) and [▼] (NO) buttons to confirm and continue or cancel the operation. “YES” if you intend to execute the format operation or “NO” if you wish to cancel the operation. This step is necessary because formatting completely erases any data that is already on the disk — make sure that the disk you’re about to format does not contain any important data! Formatting will begin the instant you select “YES”. The number of each “track” on the disk will be shown on the display as the format process continues (“F80” through “F 0”). When formatting is complete “End” will appear briefly then the display will revert to the normal song number display. Utility 5: Song Copy Recorder song data — including any existing individual key tuning data — can be “backed up” by copying to a new song number or a different disk, as follows: a Disk & Select the Z Insert Source Song Insert the disk containing the song you want to copy, and use the SONG [r] and [f] buttons to select the number of the song you wish to copy. the Song Copy X Select Function Hold the [MIDI/TRANSPOSE] button and press the SONG [r] or [f] button as many times as necessary until “cPy” appears on the display — then release the [MIDI/TRANSPOSE] button when “c_ _” appears flashing on the display (“c_ _” will not appear if the selected song number contains no data). cpY c__ MIDI/ TRANSPOSE r SONG f the Destination C Select Song c 1 ~ c60 Copy to same disk % 1 ~ %60 Use the TEMPO [▲] and [▼] buttons to select the song number you wish to copy to (i.e. the destination song number — “c 1” through “c60”). If you select a song number that already contains data, that data will be overwritten by the new song data. If you select a song number greater than “c60” a bar will appear above the “c” in the song number, indicating that the copy will be made to a different disk. NOTE • You can cancel the copy function before actually starting the copy operation (next step) by pressing either the SONG [r] or [f] button. Copy to different disk ▼ TEMPO ▲ V Start Copying cPY PLAY REC Press the [PLAY] button to begin the actual copy operation. “cPy” will appear on the display during the copy operation, then the destination song number will appear when the copy operation has finished. NOTE • “n y” will flash on the display when you attempt to start copying if you have selected a destination song number that already contains data. Press the TEMPO [s] (YES) button if it is OK to go ahead with the copy operation and erase the existing data in the destination song. Press TEMPO [t] to cancel the copy operation. 25 Utility Functions ● Copying to a Different Disk d 1 Insert source disk. d 2 Insert destination disk. If you chose to copy to a different disk, you may have to exchange the source and destination disks a few times if the song being copied is long and complex. In this case, the Clavinova will prompt you to insert the source and destination disks with the displays shown to the left. While the data is being copied the number of times the disks will have to be exchanged to complete the copy operation will be shown on the display. When it is no longer necessary to change disks “cPy” will appear on the display. The destination song number will appear when the copy operation has finished. NOTE • Data cannot be copied from Disklavier PianoSoft disks (including the supplied disk) or Standard MIDI File disks. Data cannot be copied to Disklavier PianoSoft disks (including the supplied disk) or any write protected disk. Utility 6: Song Delete You can delete any Recorder song data (not including any existing individual key tuning data) from a loaded disk as follows: Insert a Disk & Select the Z Delete Function Select the Song Delete X Function dEL MIDI/ TRANSPOSE r SONG d 3 TEMPO • You can cancel the delete function before actually starting the delete operation (next step) by pressing either the SONG [r] or [f] button. ▲ n Y ▼ Use the TEMPO [▲] and [▼] buttons to select the song number you wish to delete. NOTE Confirm & Execute the V Delete Operation PLAY Hold the [MIDI/TRANSPOSE] button and press the SONG [r] or [f] button as many times as necessary until “dEL” appears on the display — then release the [MIDI/TRANSPOSE] button when “d” and the currently selected song number appears on the display. f C Select the Song to Delete ▼ Insert the disk containing the song you want to delete. TEMPO Press the [PLAY] button — “n y” will flash on the display. Use the TEMPO [▲] (YES) and [▼] (NO) buttons to select either (YES) or (NO). (YES) to immediately delete the selected song, or (NO) if you wish to cancel the operation. If the selected song contains no data the “n y” prompt will not appear and the Song Delete mode will be automatically exited. The song number will appear on the display when the delete operation has been successfully completed. ▲ NOTE ● Deleting a Single Track • Data cannot be deleted from any write protected disk, the supplied PianoSoft Disk or optional Disklavier PianoSoft disks. To delete just one track of a song: Z Insert the disk and select the song number containing the track you want to delete. X Set the track you want to delete to the record ready mode. C Press the [PLAY] button twice without recording anything in between. 26 Utility 7: Disk Playback Track Selection Normally the CLP-156 plays the track-1 and track-2 data on a disk. Some pre-recorded MIDI Standard File disks as well as those recorded on sequencers or similar equipment have performance data on other tracks as well. This function lets you select any two tracks for playback from among the 16 that may possibly be available. ● Selecting the Playback Track for CLP-156 Track 1/R or 2/L the Disk Playback Z Select Track Selection Function 1 2 MIDI/ TRANSPOSE r SONG f X Select a CLP-156 Track MIDI/ TRANSPOSE Hold the [MIDI/TRANSPOSE] button and press the SONG [r] or [f] button as many times as necessary until “1 2” appears on the display — don’t release the [MIDI/TRANSPOSE] button yet. RECORDER 1/R 2/L C Select a Disk Track Still holding the [MIDI/TRANSPOSE] button, press either the [1/R] or [2/L] track button, depending on which track you want to assign playback of a disk track to. Still holding the [MIDI/TRANSPOSE] button, use the TEMPO [▲] and [▼] buttons to specify the disk track number you want played back via the CLP-156 track selected in the previous step. You can select tracks 1 through 16, or “_ _” to turn playback off. The currently selected values will appear on the display as long as the [MIDI/TRANSPOSE] button is held. Track 1/R. 1.16 NOTE Disk track 16 is assigned for playback via CLP-156 track 1/R. MIDI/ TRANSPOSE ▼ TEMPO • The disk playback track selection settings are cancelled as soon as you remove the floppy disk from the disk drive. ▲ Utility 8: Convert to SMF This function can be used to convert the performance data recorded by the CLP-156 (Yamaha ESEQ format) to Standard MIDI File (SMF) format (format 0) so songs recorded on the CLP-156 can be played back on SMF-compatible devices. CAUTION a Disk & Select a Z Insert Song Number • Data converted to SMF format cannot be re-converted to the CLP-156 format or re-recorded on the CLP-156 — “no” will appear on the display when you press the [REC] button. It may therefore be a good idea to make a copy of important data using the Song Copy function (page 25) before converting it. Insert the disk containing the data to be converted into the Clavinova disk drive, then use the SONG [r] and [f] buttons to select the song number you want to convert. 27 Utility Functions Select the Convert to SMF X Function E-5 MIDI/ TRANSPOSE r SONG f Execute the Convert to C SMF Function 1 MIDI/ TRANSPOSE Hold the [MIDI/TRANSPOSE] button and press the SONG [r] or [f] button as many times as necessary until “E-S” appears on the display — don’t release the [MIDI/TRANSPOSE] button yet. Still holding the [MIDI/TRANSPOSE] button, press the [PLAY] button to begin conversion. The number of the measure being processed will appear on the display, then the normal song number display will reappear when the conversion has finished. NOTE PLAY • This function cannot be executed if the selected song number contains no data. • This function cannot be used to convert the data on the supplied PianoSoft demonstration disk, optional Disklavier PianoSoft disks, writeprotected disks, or already-converted disks. REC Utility 9: All-song Random Repeat When the repeat playback function described on page 17 is used, the songs on the currently loaded disk are normally played back in the sequence that they appear on the disk. This function makes it possible to have the songs played back in random order. Select the All-song RanZ dom Repeat Function Hold the [MIDI/TRANSPOSE] button and press the SONG [r] or [f] button as many times as necessary until “SEq” or “rAn” appears on the display — don’t release the [MIDI/TRANSPOSE] button yet. SEq MIDI/ TRANSPOSE r SONG f Select the Random PlayX back Mode rAn MIDI/ TRANSPOSE 28 ▼ TEMPO ▲ Still holding the [MIDI/TRANSPOSE] button, use the TEMPO [▲] and [▼] buttons to select “rAn” if you want random playback (or “SEq” if you want normal sequence playback). C Release the [MIDI/TRANSPOSE] Button the Disk Playback ReV Use peat Function Engage the disk playback repeat function described on page 17 to hear the playback mode you’ve selected. Utility 10: Standard MIDI File Voice Mode Most pre-programmed Standard MIDI File disks use General MIDI voice assignments. When such disks are played on the CLP-156, appropriate voices are automatically selected in response to the voice numbers included in the playback data. With this function, however, it is possible to set the CLP-156 so that it will use the normal panel voice assignments instead of automatically conforming to the General MIDI assignments. This can be convenient when playing back data you’ve created for the CLP-156 on an external sequencer or music computer. This function cannot be used unless an appropriate disk is inserted in the disk drive. the Standard MIDI Z Select File Voice Mode Function Hold the [MIDI/TRANSPOSE] button and press the SONG [r] or [f] button as many times as necessary until “SF.1” or “SF.2” appears on the display — don’t release the [MIDI/TRANSPOSE] button yet. SF.1 MIDI/ TRANSPOSE r SONG f X Select the Voice Mode SF.2 MIDI/ TRANSPOSE ▼ TEMPO Still holding the [MIDI/TRANSPOSE] button, use the TEMPO [▲] and [▼] buttons to select “SF.1” or “SF.2” (refer to the chart, below). SF.1 GM Assignment. When a Standard MIDI File is playback on the CLP-156, the closest possible voices to the GM voices specified by the voice numbers in the playback data will be automatically selected. SF.2 Normal Assignment. If a “GM on” message is received playback will proceed in the same way as for the “SF.1” mode, but if no “GM on” message is received the normal panel voices will be used for playback (i.e. the voices will not conform to the General MIDI voice assignments). ▲ Release the [MIDI/TRANSC POSE] Button NOTE • The SF.1 mode is always selected when the power is initially turned ON. • The General MIDI standard specifies voice assignments that are essentially the same on any device from any manufacturer so that any performance data that conforms to the General MIDI standard can be played back on any General MIDI compatible device. There are, however, slight differences in the voices provided by each manufacturer. • Only the track-1 and track-2 data in any Standard MIDI File will be normally played back directly by the CLP-156 (unless the “Disk Playback Track Selection” function is used — page 27). The data for all other tracks will be transmitted via the MIDI OUT terminal. 29 MIDI Functions ● A Brief Introduction to MIDI MIDI Cable MIDI OUT MIDI IN Tone Generator Clavinova Data Being Recorded Playback Data MIDI OUT MIDI IN MIDI OUT MIDI IN Sequence Recorder Clavinova MIDI, the Musical Instrument Digital Interface, is a world-standard communication interface that allows MIDI-compatible musical instruments and equipment to share musical information and control one another. This makes it possible to create “systems” of MIDI instruments and equipment that offer far greater versatility and control than is available with isolated instruments. For example, most MIDI keyboards (including the Clavinova, of course) transmit note and velocity (touch response) information via the MIDI OUT connector whenever a note is played on the keyboard. If the MIDI OUT connector is connected to the MIDI IN connector of a second keyboard (synthesizer, etc.) or a tone generator (essentially a synthesizer with no keyboard), the second keyboard or tone generator will respond precisely to notes played on the original transmitting keyboard. The result is that you can effectively play two instruments at once, providing thick multiinstrument sounds. Although the CLP-156 features a built-in “sequencer” (the Recorder is a type of sequencer), the same type of musical information transfer described above can be used for more sophisticated MIDI sequence recording using an external sequencer or music computer. A MIDI sequence recorder or music computer can be used to “record” MIDI data received from a CLP156, for example. When the recorded data is played back, the CLP-156 automatically “plays” the recorded performance in precise detail. The examples given above really only scratch the surface. MIDI can do much, much more. The CLP-156 offers a number of MIDI functions that allows it to be used in fairly sophisticated MIDI systems. NOTE ● MIDI “Messages” Transmitted & Received by the Clavinova • Always use a high-quality MIDI cable to connect MIDI OUT to MIDI IN terminals. Never use MIDI cables longer than about 15 feet, since cables longer than this can pick up noise which can cause data errors. The MIDI information (messages) transmitted and received by the CLP156 Clavinova are as follows: Note and Velocity Data This information tells the receiving keyboard or tone generator to play a certain note (specified by the MIDI note number) at a certain dynamic level (specified by the MIDI velocity value). Note and velocity data is transmitted by the Clavinova whenever a key is pressed, and the Clavinova’s internal AWM tone generator will “play” the corresponding note(s) whenever note and velocity data is received from an external MIDI device. Program Change Numbers The CLP-156 transmits a MIDI program change number between 0 and 7 when one of its voice selectors is pressed. This normally causes the correspondingly numbered voice to be selected on a receiving MIDI device. The Clavinova will respond in the same way, automatically selecting the appropriate voice when a MIDI program change number is received. See “Program Change ON/OFF” on page 32 for information on turning program change number reception and transmission ON or OFF. Control Change Numbers Control Change data representing Damper pedal operation is transmitted by the Clavinova whenever one of these pedals is used. If the receiving device is a tone generator or another keyboard, it will respond in the same way as the Clavinova’s internal tone generator when one of the pedals is used. The Clavinova also receives and responds to the appropriate control change data. See “Control Change ON/OFF” on page 33 for information on turning control change number reception and transmission ON or OFF. 30 ● MIDI Transmit & Receive Channel Selection MIDI OUT MIDI IN Tone Generator Sequence Recorder MIDI THRU (Set to receive on MIDI channel 2) MIDI IN The MIDI system allows transmission and reception of MIDI data on 16 different channels. Multiple channels have been implemented to allow selective control of certain instruments or devices connected in series. For example, a single MIDI sequence recorder could be used to “play” two different instruments or tone generators. One of the instruments or tone generators could be set to receive only on channel 1, while the other is set to receive on channel 2. In this situation the first instrument or tone generator will respond only to channel-1 information transmitted by the sequence recorder, while the second instrument or tone generator will respond only to channel-2 information. This allows the sequence recorder to “play” two completely different parts on the receiving instruments or tone generators. Clavinova (Set to receive on MIDI channel 1) In any MIDI control setup, the MIDI channels of the transmitting and receiving equipment must be matched for proper data transfer. An “OMNI” receive mode is also available, which allows reception on all 16 MIDI channels. In the OMNI mode it is not necessary to match the receive channel of the receiving device to the transmit channel of the transmitting device (except when receiving mode messages). MIDI/ TRANSPOSE Setting the Clavinova MIDI Channels C1 E5 D# 5 D# 2 C 4 2 4 7 9 11 14 16 2 4 1 3 5 6 8 10 12 13 15 7 9 11 14 16 1 3 5 6 8 10 12 13 15 For setting the transmit channel. (C1 ~ D#2) For setting the receive channel. (C4 ~ D#5) For OMNI mode S 1 ......... S16 Send channel r 1 ......... r16 Z Press and hold the [MIDI/TRANSPOSE] button. X Press the key on the keyboard corresponding to the desired MIDI transmit or receive channel.* (the selected channel number is shown on the TEMPO display — the OMNI ON receive mode is indicated by “ALL” on the display). C Release the [MIDI/TRANSPOSE] button. * Keys C1 through D#2 on the keyboard are used to set the MIDI transmit channel, and keys C4 through D#5 are used to turn the OMNI mode OFF and set the MIDI receive channel as shown in the illustration to the left. The E5 key sets the OMNI receive mode and basic receive channel 1. NOTE Receive channel • When the power is initially turned ON, MIDI receive is set to the OMNI mode, the basic receive channel is set to 1, and the transmit channel is set to 1. ALL OMNI ON ● MIDI Transmit Transpose F# 5 C6 F# 6 MIDI/ TRANSPOSE -6 -4 -2 +1 +3 +6 -5 -3 -1 0 +2 +4 +5 Display t-6 t-5 t-4 t-3 t-2 t-1 t0 t1 t2 t3 t4 t5 t6 Transposition -6 semitones -5 semitones -4 semitones -3 semitones -2 semitones -1 semitone Normal +1 semitone +2 semitones +3 semitones +4 semitones +5 semitones +6 semitones This function allows the MIDI note data transmitted by the Clavinova to be transposed up or down in semitone increments by up to plus or minus 6 semitones. The pitch of the Clavinova itself is not affected. Setting the MIDI Transpose Function Z Press and hold the [MIDI/TRANSPOSE] button. X Press the key on the keyboard corresponding to the desired degree of transposition.* The amount of transposition selected is shown on the TEMPO display. C Release the [MIDI/TRANSPOSE] button. * Keys F#5 through F#6 on the keyboard are used to set the MIDI transmit transpose function as shown in the illustration to the left. NOTE • When the power is turned ON, MIDI transmit transpose is set to 0 (no transposition). 31 MIDI Functions Other MIDI Functions The MIDI functions listed to the right are engaged by holding down the [MIDI/TRANSPOSE] button and pressing the corresponding voice selector. Full details are given in the following pages. ● Local Control ON/OFF MIDI OUT MIDI IN Tone Generator Sequence Recorder Played from Clavinova keyboard. MIDI IN MIDI OUT Clavinova Local control OFF. Played from MIDI Sequencer. MIDI/ TRANSPOSE PIANO 1 PIANO 2 CLAVINO TONE MIDI FUNCTION CHART Function Local Control ON/OFF CLP-156 Voice Selector [PIANO 1] Program Change ON/OFF [PIANO 2] Control Change ON/OFF [CLAVINOVA TONE] Multi-Timbre Mode [E.PIANO ] MIDI Split & Left Local OFF [HARPSICHORD] MIDI Split & Right Local OFF [VIBES] Panel Data Transmit [STRINGS] “Local Control” refers to the fact that, normally, the Clavinova keyboard controls its internal tone generator, allowing the internal voices to be played directly from the keyboard. This situation is “Local Control ON” since the internal tone generator is controlled locally by its own keyboard. Local control can be turned OFF, however, so that the Clavinova keyboard does not play the internal voices, but the appropriate MIDI information is still transmitted via the MIDI OUT connector when notes are played on the keyboard. At the same time, the internal tone generator responds to MIDI information received via the MIDI IN connector. This means that while an external MIDI sequence recorder, for example, plays the Clavinova’s internal voices, an external tone generator can be played from the Clavinova keyboard. Z Hold down the [MIDI/TRANSPOSE] button. X Press the [PIANO 1] voice selector. If the PIANO 1 LED is lit when the [PIANO 1] voice selector is pressed, you have turned local control OFF. If the PIANO 1 LED is not lit when the [PIANO 1] voice selector is pressed, you have turned local control ON. PIANO 1 = Local Control OFF PIANO 1 C Release the [MIDI/TRANSPOSE] button. = Local Control ON ● Program Change ON/OFF Normally the Clavinova will respond to MIDI program change numbers received from an external keyboard or other MIDI device, causing the correspondingly numbered Clavinova voice to be selected. The Clavinova will normally also send a MIDI program change number whenever one of its voices is selected, causing the correspondingly numbered voice or program to be selected on the external MIDI device if the device is set up to receive and respond to MIDI program change numbers. This function makes it possible to cancel program change number reception and transmission so that voices can be selected on the Clavinova without affecting the external MIDI device, and vice versa. MIDI/ TRANSPOSE PIANO 1 PIANO 2 CLAVINO TONE PIANO 2 = Program Change OFF PIANO 2 = Program Change ON 32 Z Hold down the [MIDI/TRANSPOSE] button. X Press the [PIANO 2] voice selector. If the PIANO 2 LED is lit when the [PIANO 2] voice selector is pressed, you have turned program change reception/transmission OFF. If the PIANO 2 LED is not lit when the [PIANO 2] voice selector is pressed, you have turned program change reception/transmission ON. C Release the [MIDI/TRANSPOSE] button. ● Control Change ON/OFF Normally the Clavinova will respond to MIDI control change data received from an external MIDI device or keyboard, causing the selected Clavinova voice to be affected by pedal and other “control” settings received from the controlling device. The Clavinova also transmits MIDI control change information when one of its pedals are operated. This function makes it possible to cancel control change data reception and transmission if you do not want the Clavinova voices to be affected by control change data received from an external device or vice versa. MIDI/ TRANSPOSE ANO 2 CLAVINOVA E. PIANO TONE CLAVINOVA TONE = Control Change OFF CLAVINOVA TONE = Control Change ON Z Hold down the [MIDI/TRANSPOSE] button. X Press the [CLAVINOVA TONE] voice selector. If the CLAVINOVA TONE LED is lit when the [CLAVINOVA TONE] voice selector is pressed, you have turned control change reception/transmission OFF. If the CLAVINOVA TONE LED is not lit when the [CLAVINOVA TONE] voice selector is pressed, you have turned control change reception/transmission ON. C Release the [MIDI/TRANSPOSE] button. ● The Multi-Timbre Mode The Multi-Timbre mode is a special mode in which the Clavinova voices can be independently controlled on different MIDI channel numbers by an external MIDI device. The Multi-Timbre mode can be activated as follows: MIDI/ TRANSPOSE ANO 2 CLAVINOVA E. PIANO TONE Z Hold down the [MIDI/TRANSPOSE] button. X Press the [E.PIANO] voice selector. If the E.PIANO LED is lit when the [E.PIANO] voice selector is pressed, you have turned the MultiTimbre mode ON. If the E.PIANO LED is not lit when the [E.PIANO] voice selector is pressed, you have turned the Multi-Timbre mode OFF. E. PIANO = Multi-Timbre Mode ON E. PIANO C Release the [MIDI/TRANSPOSE] button. = Multi-Timbre Mode OFF ● The MIDI Split & Left Local OFF Mode In the MIDI split mode one section of the Clavinova keyboard is used to play a Clavinova voice in the normal way, while the remaining section is used to play a second MIDI keyboard or tone generator. In this mode the right-hand section of the keyboard is used to play an internal Clavinova voice, while the left-hand section of the keyboard plays the external keyboard or tone generator. Playing the left-hand section of the keyboard produces no sound from the Clavinova. The “split point,” or the key that divides the left- and right-hand sections of the keyboard can be set at any desired key. MIDI OUT MIDI IN Tone Generator Clavinova (Set to receive on MIDI channel 2) The MIDI split mode is useful if, for example, you want to play a piano (Clavinova) voice with the right hand while playing a synthesizer bass line or string section with the left hand. When the MIDI split mode is activated, notes played on the left-hand section are transmitted via the Clavinova MIDI OUT connector on MIDI channel 2. Notes played on the right-hand section are transmitted on the “basic channel” (i.e. the channel set using the MIDI channel selection function described previously). 33 MIDI Functions Z Press the [HARPSICHORD] voice selector while holding down the HARPSICHORD INOVA E. PIANO ONE [MIDI/TRANSPOSE] button. The HARPSICHORD LED will flash. X While still holding the [MIDI/TRANSPOSE] button, press the key on MIDI/ TRANSPOSE the keyboard at which you want to set the split point. The HARPSICHORD LED will light continuously. The split-point becomes the first key of the left-hand section. C Release the [MIDI/TRANSPOSE] button. V To return to the normal full-keyboard mode, hold the [MIDI/TRANSPOSE] button and press the [HARPSICHORD] voice selector, then release both buttons. SPLIT POINT ▼ NOTE Left-hand section plays a Tone Generator bass voice. • When the power is turned ON the default split point key — F#2 — will be automatically selected. If a new split point is selected it remains active until the power is turned OFF or a different split point is selected. Right-hand section plays a Clavinova piano voice. ● The MIDI Split & Right Local OFF Mode In the CLP-156 either the right- or left-hand section of the keyboard can be assigned to control an external keyboard or tone generator. Assigning the left-hand section to external tone generator control was described in the previous section. To assign the right-hand section to external tone generator control while playing the Clavinova voices with the left hand, press the [VIBES] voice selector instead of the [HARPSICHORD] voice selector when activating the Split mode (see the preceding section). All other operations are exactly the same as described in the previous section. ● Transmitting the Panel Settings This function causes all the current Clavinova control settings (selected voice, etc) to be transmitted via the MIDI OUT terminal. This is particularly useful if you will be recording performances to a MIDI sequence recorder which will be used to control the Clavinova on playback. By transmitting the Clavinova panel settings and recording them on the MIDI sequence recorder prior to the actual performance data, the Clavinova will be automatically restored to the same settings when the performance is played back. MIDI/ TRANSPOSE BES STRINGS ORGAN Z Hold down the [MIDI/TRANSPOSE] button. X Press the [STRINGS] voice selector. C Release the [MIDI/TRANSPOSE] button. NOTE • See page 39 for list of the panel settings transmitted by this function. Factory Preset Recall C7 POWER 34 All dual mode, reverb, brilliance, touch sensitivity, pitch control, and individual key tune settings can be restored to their original factory preset (default) values by holding the C7 key while turning the [POWER] switch ON. Error Messages For (format) Pro (protected) dEr (disk error) no (no disk/no data) The loaded disk is not formatted for use with the Clavinova. After making sure that the disk does not contain any important data (for another device, for example), format the disk as described on page 24. You have attempted to format, write to, copy to/from, or delete data from a write-protected disk. Use a disk that is not write protected (set the disk’s write-protect tab to the write-enable position). An error occurred while writing to or reading from the disk. Try the operation again; if the error occurs a second time the disk or drive may be faulty. If the drive has been in use for some time the heads may be dirty. Clean the heads with a commercially-available floppy disk head cleaner. If the error still occurs with one disk and not others the disk should be considered faulty and should be discarded. If the error occurs with all disks the drive may be faulty. Refer the problem to your Yamaha dealer. A disk read or write operation was attempted but no disk is present in the disk drive, or the song contains no appropriate data. Make sure an appropriate disk is inserted in the disk drive, or the song contains appropriate data before performing any operation that involves disk access. You have attempted to record or edit data that is not recognized by the CLP-156. Refer to the notes on pages 19, and 27. Troubleshooting If you encounter what appears to be a malfunction, please check the following points before assuming that your Clavinova is faulty. 1. No Sound When the Power is Turned ON Is the AC plug properly connected to an AC wall outlet? Check the AC connection carefully. Is the MASTER VOLUME control turned up to a reasonable listening level? 2. The Clavinova Reproduces Radio or TV Sound This can occur if there is a high-power transmitter in your vicinity. Contact your Yamaha dealer. 3. Intermittent Static Noise This is usually due to turning ON or OFF a household appliance or other electronic equipment which is fed by the same AC mains line as your Clavinova. 4. Interference Appears On Radio or TV Sets Located Near the Clavinova The Clavinova contains digital circuitry which can generate radio-frequency noise. The solution is to move the Clavinova further away from the affected equipment, or vice versa. 5. Distorted Sound When the Clavinova is Connected to An External Amplifier/Speaker System If the Clavinova is connected to a stereo system or instrument amplifier and the sound is distorted, reduce the setting of the Clavinova volume control to a level at which the distortion ceases. Options BC-8 Bench A comfortable bench styled to match your Yamaha Clavinova. HPE-160 Stereo Headphones High-performance lightweight dynamic headphones with extra-soft ear pads. 35 Keyboard Stand Assembly NOTE 1 • We do not recommend attempting to assemble the Clavinova alone. The job can be easily accomplished, however, with only two people. 5 x 40 mm long gold screws x 6 1 A 6 x 18 mm round-head screws x 4 2 • Use only the screws provided or replacements of exactly the specified size. Using screws of the wrong size can result in damage to the instrument. Z Open the box and remove all the parts. B D L D 4 x 16 mm round-head screws x 2 3 6 x 14 mm flat-head screws x 6 4 R C the side X Assemble panels (D) and feet (E). E E Bundled pedal cord inside Cord clamps x 2 3 2 6 x 18 mm round-head screws 2 D D D E E On opening the box you should find the parts shown in the illustration. Check to make sure that all the required parts are provided. C 5 x 40 mm long gold screws 1 D Secure the feet (E) to the side panels (D) with the 5 x 40 millimeter long gold-colored screws 1 (3 each), making sure that the cutouts on the feet face the bracket side of the side panels. the side panels C Attach (D) to the pedal box (C). Before installing the pedal box, untie and straighten out the bundled pedal cord attached to the bottom of the pedal box. Place the pedal box on top of the brackets attached to the side panels (D), and attach using the four 6 x 18 millimeter round-head screws 2 — two screws on each side. Make sure the pedals extend in the same direction as the feet. V Attach the rear panel (B). 4 4 x 16 mm round-head screws 3 B B C Black surface outward 36 D With the black surface of the rear panel facing outward and the panel angled slightly as shown in the illustration, lower it onto the screws protruding from the rear of the pedal box so that the screws fit into the corresponding slots in the lower edge of the rear panel. Then, while eliminating any gaps between the rear and side panels, secure the top of the rear panel to the side panel brackets using the two 4 x 16 millimeter round-head screws 3. Finally, tighten the screws holding the rear panel to the pedal box. B Install the main unit (A). 5 (a) A D A (b) D A D D Rest the rear edge of the main unit (A) on the front edges of the cutouts in the side panels (D), then slide the main unit backward firmly until it stops (so that there is no clearance between the main unit side panels and the stand, as shown in the illustration “a”). WATCH YOUR FINGERS WHILE DOING THIS!! Also be sure to place your hands at least 10 centimeters from either end of the main unit when positioning it. There is slight horizontal play between the main unit and side panels, so center the main unit, as shown in the illustration “b”, then attach the rear of the main unit with two 6 x 14 millimeter flat-head screws 4, and the front of the main unit with four more 6 x 14 millimeter flat-head screws 4 as shown in the illustration. N Connect the pedal cord. D A B B D 6 x 14 mm flat-head screws 4 6 The pedal cord from the pedal box must be plugged into the corresponding connectors in the main unit. The plug only goes in one way (the lug on the connector should face the rear of the unit, as shown in the illustration), so don’t try to force it in the wrong way around. Once connected, attach the cord clamps to the rear panel as shown, then clip the cord into the clamps. M Be sure to set the adjuster. For stability, an adjuster is provided on the bottom of the pedal box (C). Rotate the adjuster until it comes in firm contact with the floor surface. The adjuster ensures stable pedal operation and facilitates pedal effect control. If the adjuster is not in firm contact with the floor surface, distorted sound may result. Cord clamps 7 IMPORTANT C • After assembling the Clavinova, check once more to make sure that all screws have been securely fastened. • If the stand leans to the side, makes unusual noises, or otherwise seems unstable during use, check and tighten all screws while following the assembly instructions given above. 37 MIDI Data Format If you’re already very familiar with MIDI, or are using a computer to control your music hardware with computer-generated MIDI messages, the data provided in this section can help you to control the Clavinova. 1. NOTE ON/OFF Data format: [9nH] -> [kk] -> [vv] 9nH = Note ON/OFF event (n = channel number) kk = Note number (Transmit: 15 ~ 114 = D#-1 ~ F#7 / Receive: 21 ~ 108 = A-1 ~ C7) vv = Velocity (Key ON = 1 ~ 127. Key OFF = 0) Data format: [8nH] -> [kk] -> [vv] 8nH = Note OFF event (n = channel number) kk = Note number (Transmit: 15 ~ 114 = D#-1 ~ F#7 / Receive: 21 ~ 108 = A-1 ~ C7) vv = Velocity (Key OFF = 0 ~ 127) * 8nH (note off) is receive only. 9nH (vvH=00H) used for transmission. 2. CONTROL CHANGE & MODE MESSAGES Data format: [BnH] -> [cc] -> [vv] BnH = Control event (n = channel number) cc = Control number vv = Control value cc 07H 0AH Pan Pot (reception only) 0BH Expression (reception only) 40H 42H Damper Pedal Sostenuto Pedal 43H Soft Pedal 5BH 78H Reverb Depth All Sound OFF (reception only) Reset All Controller (reception only) Local Control ON/OFF (reception only) All Notes OFF (reception only) Omni OFF/All Notes OFF (reception only) Omni ON/All Notes OFF (reception only) 79H 7AH 7BH 7CH 7DH 38 CONTROL Volume (reception only) VALUE [vv] 00000000 : -∞ 01101111 : -3dB 01111111 : ±0dB 00H ~ 17H LEFT 6 18H ~ 1FH 5 20H ~ 27H 4 28H ~ 2FH 3 30H ~ 37H 2 38H ~ 3FH 1 40H ~ 47H CENTER 48H ~ 4FH SCALING PAN 50H ~ 57H RIGHT 1 58H ~ 5FH 2 60H ~ 67H 3 68H ~ 6FH 4 70H ~ 77H 5 78H ~ 7FH 6 00000000 : -∞ 01101111 : -3dB 01111111 : ±0dB 00H ~ 7FH : eight levels 00H ~ 3FH : OFF 40H ~ 7FH : ON 00H ~ 3FH : OFF 40H ~ 7FH : ON 00H ~ 7FH : sixteen levels 00H 00H 00H : OFF 7FH : ON 00H 00H 00H 3. PROGRAM CHANGE Data format: [CnH] -> [pp] CnH = program event (n = channel number) pp = Program number pp 00 01 02 03 04 05 06 07 08 VOICE NAME PIANO 1 PIANO 2 CLAVINOVA TONE E. PIANO HARPSICHORD VIBES STRINGS ORGAN STRINGS SLOW ATTACK (reception only) 4. SYSTEM REALTIME MESSAGES [rrH] F8H: Timing clock FAH: Start FCH: Stop FEH: Active sensing Data Transmission Reception F8H Transmitted every 96 clocks Received as 96-clock tempo timing when MIDI clock is set to External FAH Recorder start Recorder start FCH Recorder stop Recorder stop FEH Transmitted every 200 milliseconds All notes are turned off if no data is received for more than 400 milliseconds * Caution: If an overrun framing error occurs the Damper, Sostenuto, and Soft effects for all channels are turned off and an All Note Off occurs. 5. SYSTEM EXCLUSIVE MESSAGES (1) YAMAHA MIDI Format Data format: [F0H] -> [43H] -> [xn] -> [ff] . . . [F7H] 43H : Yamaha xn : Substatus + channel number. ff : Format number. x 0 2 2 ff 7CH 7CH 7DH Information Panel data receive. Panel Data Send occurs when this data received. Name Data Send occurs when this data received. (2) Clavinova MIDI Format Data format: [F0H] -> [43H] -> [73H] -> [38H] -> [yy] -> [F7H] 43H : Yamaha ID 73H : Clavinova ID 38H : CLP-156 ID yy : Substatus yy 02H 03H 13H 14H 15H 61H 62H 7cH Information Internal MIDI clock External MIDI clock Multi-timbre mode OFF. Clavinova Common Voice multi-timbre mode ON. Multi-timbre mode ON. MIDI FA cancel ON. MIDI FA cancel OFF. All notes OFF; receive channel = c+1; omni OFF. * When yy=2, 3, 13, 14, 15 or 7c, Clavinova common ID (01H) is recognized as well as 38H. * All Control Change values are reset when [13H], [14H] or [15H] is received. All voices and other parameters are also reset when [14H] or [15H] is received in order to ensure the same initial settings. (3) Special Control Data format: [F0H] -> [43H] -> [73H] -> [38H] -> [11H] -> [0nH] -> [cc] -> [vv] -> [F7H] 43H : 73H : 38H : 11H : 0nH : cc : vv : Yamaha ID Clavinova ID CLP-156 ID Clavinova special control Control MIDI change + channel number Control number Value cc Control 08H Dual Balance 1BH 26H 58H 59H 5AH 5CH 5EH 5FH Value [vv] 00H : Left Voice Max. 7FH : Right Voice Max. Metronome Mode 00H : Off (reception only) 01H : On Touch Sensitivity 00H : Medium 01H : Soft 02H : Hard 03H : Off Brilliance 00H : Normal 01H : Mellow 02H : Bright Reverb 00H : Off 01H : Room 02H : Hall-1 03H : Hall-2 04H : Cosmic Dual Mode 00H : Dual Off 01H : Dual On (Normal) 02H : Dual On (Left voice 1 octave up) 03H : Dual On (Right voice 1 octave up) Dual Voice [vv] : Dual Voice Individual Key Pitch [vv] : Key number vv = 0: All keys set to normal pitch vv = 1: Individual key tune mode off vv = 2: Individual key tune mode on Individual Key Pitch [vv] : Pitch Data vv = 40H: 0 vv = 41H: +1 vv = 3FH: -1 * When cc=58 (Brilliance) or 59 (Reverb), Clavinova common ID (01H) is recognized in addition to 38H. (5) Beat, Tempo, LED ON/OFF Data format: [F0H] -> [43H] -> [73H] -> [xx] -> [11H] -> [4FH] -> [cc] -> [dd] -> [F7H] 43H : Yamaha ID 73H : Clavinova ID xx : 38H (CLP-156 ID) or common 01H 11H : Clavinova special control 4FH : Control MIDI change ccH : 00H= Beat lamp ddH= 00H: On 7FH: Off ccH : 01H= Tempo lamp ddH= 00H: On 7FH: Off PANEL DATA FORMAT F0H, 43H, 0nH, 7CH, 00H, 1BH (n: channel number) 53H, 4BH, 20H, 20H (SK) 43H, 4CH, 50H, 27H, 39H, 34H (CLP ’94) 3xH, 3yH (x, y: version number) [PANEL DATA] [CHECK SUM (1byte)] = 0-(53H+4BH+20H+......+Data end) F7H • Panel Data Contents (1) VOICE (2) DUAL VOICE (3) DUAL ON/OFF (4) DUAL BALANCE (5) BRILLIANCE (6) 0 (7) 0 (8) REVERB NUMBER (9) REVERB DEPTH (10) TOUCH SENSITIVITY (11) 0 (12) SPLIT POINT (13) INDIVIDUAL KEY TUNE MODE ON/OFF (14) Absolute tempo low byte (15) Absolute tempo high byte INDIVIDUAL KEY TUNING DATA BULK DUMP FORMAT F0H, 43H, 73H 38H (CLP-156 ID) 06H (Bulk ID) 00H (Bulk number) 00H, 00H, 0BH, 00H: (Data length= wxyzH 88*2 bytes) [BULK DATA] (low:A-1, high:A-1.........low:C7, high:C7) [CHECK SUM (1byte)] = 0-sum (Bulk data) F7H NAME DATA SEND FORMAT F0H, 43H, 0nH, 7DH, 00H, 10H (n: channel number) 53H, 4BH, 20H, 20H (SK) 43H, 4CH, 50H, 27H, 39H, 34H (CLP ’94) 3xH, 3yH, 20H, 20H, 20H, 20H (x, y: version number) [CHECK SUM (1byte)] = 0-(53H+4BH+20H+......+20H) F7H (4) Absolute Tempo Data format: [F0H] -> [43H] -> [73H] -> [xx] -> [11H] -> [1nH] -> [cc] -> [dd] -> [F7H] 43H : Yamaha ID 73H : Clavinova ID xx : 38H (CLP-156 ID) 11H : Clavinova special control 1nH : Control MIDI change (Transmit: n=control channel number) (Receive: any channel OK) ccH : Absolute tempo low byte ddH : Absolute tempo hight byte Tempo=dd*128+cc 39 MIDI Implementation Chart Not available. 40 Specifications CLP-156 KEYBOARD 88 KEYS (A-1 ~ C7) POLYPHONY 32 NOTES MAX. VOICE SELECTORS PIANO 1, PIANO 2, CLAVINOVA TONE, E. PIANO, HARPSICHORD, VIBES, STRINGS, ORGAN BRILLIANCE MELLOW, NORMAL, BRIGHT REVERB ROOM, HALL 1, HALL 2, COSMIC TOUCH SENSITIVITY HARD, MEDIUM, SOFT, FIXED RECORDER SONG [r]/[f], 1/R, 2/L, PLAY, REC DISK DRIVE 3.5" 2DD Micro Floppy Disk Drive PEDAL CONTROLS SOFT, SOSTENUTO, DAMPER OTHER CONTROLS MASTER VOLUME, MIDI/TRANSPOSE, METRONOME, TEMPO [s]/[t], TEMPO Display, DEMO JACKS/CONNECTORS PHONES x 2, AUX OUT R & L/L+R, AUX IN R & L, MIDI IN/OUT/THRU INPUT & OUTPUT LEVEL/IMPEDANCE AUX OUT: Output impedance 600 Ω AUX IN: Input impedance 10 kΩ / Input sensitivity -10 dBm MAIN AMPLIFIERS 30W x 2 SPEAKERS 13 cm x 2, DIMENTIONS (W x D x H) WEIGHT 5 cm x 2 Music stand down 1439.8 x 513.0 x 899.7 mm (56-5/8" x 20-1/4" x 35-3/8") Music stand up 1439.8 x 513.0 x 1070.8 mm (56-5/8" x 20-1/4" x 42-1/8") 68.5 kg (151.0 lbs.) * Specifications subject to change without notice. 41 SPECIAL MESSAGE SECTION PRODUCT SAFETY MARKINGS: Yamaha electronic products may have either labels similar to the graphics shown below or molded/stamped facsimiles of these graphics on the enclosure. The explanation of these graphics appears on this page. Please observe all cautions indicated on this page and those indicated in the safety instruction section. CAUTION RISK OF ELECTRIC SHOCK DO NOT OPEN CAUTION: TO REDUCE THE RISK OF ELECTRIC SHOCK. DO NOT REMOVE COVER (OR BACK). NO USER-SERVICEABLE PARTS INSIDE. REFER SERVICING TO QUALIFIED SERVICE PERSONNEL. See bottom of Keyboard enclosure for graphic symbol markings The exclamation point within the equilateral triangle is intended to alert the user to the presence of important operating and maintenance (servicing) instructions in the literature accompanying the product. The lightning flash with arrowhead symbol, within the equilateral triangle, is intended to alert the user to the presence of uninsulated “dangerous voltage” within the product’s enclosure that may be of sufficient magnitude to constitute a risk of electrical shock. IMPORTANT NOTICE: All Yamaha electronic products are tested and approved by an independent safety testing laboratory in order that you may be sure that when it is properly installed and used in its normal and customary manner, all foreseeable risks have been eliminated. DO NOT modify this unit or commission others to do so unless specifically authorized by Yamaha. Product performance and/or safety standards may be diminished. Claims filed under the expressed warranty may be denied if the unit is/has been modified. Implied warranties may also be affected. SPECIFICATIONS SUBJECT TO CHANGE: The information contained in this manual is believed to be correct at the time of printing. However, Yamaha reserves the right to change or modify any of the specifications without notice or obligation to update existing units. ENVIRONMENTAL ISSUES: Yamaha strives to produce products that are both user safe and environmentally friendly. We sincerely believe that our products and the production methods used to produce them, meet these goals. In keeping with both the letter and the spirit of the law, we want you to be aware of the following: Battery Notice: This product MAY contain a small nonrechargable battery which (if applicable) is soldered in place. The average life span of this type of battery is approximately five years. When replacement becomes necessary, contact a qualified service representative to perform the replacement. Warning: Do not attempt to recharge, disassemble, or incinerate this type of battery. Keep all batteries away from children. Dispose of used batteries promptly and as regulated by applicable laws. Note: In some areas, the servicer is required by law to return the defective parts. However, you do have the option of having the servicer dispose of these parts for you. Disposal Notice: Should this product become damaged beyond repair, or for some reason its useful life is considered to be at an end, please observe all local, state, and federal regulations that relate to the disposal of products that contain lead, batteries, plastics, etc. NOTICE: Service charges incurred due to lack of knowledge relating to how a function or effect works (when the unit is operating as designed) are not covered by the manufacturer’s warranty, and are therefore the owners responsibility. Please study this manual carefully and consult your dealer before requesting service. NAME PLATE LOCATION: The graphic below indicates the location of the name plate. The model number, serial number, power requirements, etc., are located on this plate. You should record the model number, serial number, and the date of purchase in the spaces provided below and retain this manual as a permanent record of your purchase. Model _____________________________________ Serial No. __________________________________ Purchase Date ______________________________ 92-469 1 IMPORTANT SAFETY INSTRUCTIONS INFORMATION RELATING TO PERSONAL INJURY, ELECTRICAL SHOCK, AND FIRE HAZARD POSSIBILITIES HAS BEEN INCLUDED IN THIS LIST. WARNING- When using any electrical or electronic product, basic precautions should always be followed. These precautions include, but are not limited to, the following: 1. Read all Safety Instructions, Installation Instructions, Special Message Section items, and any Assembly Instructions found in this manual BEFORE marking any connections, including connection to the main supply. 2. Main Power Supply Verification: Yamaha products are manufactured specifically for the supply voltage in the area where they are to be sold. If you should move, or if any doubt exists about the supply voltage in your area, please contact your dealer for supply voltage verification and (if applicable) instructions. The required supply voltage is printed on the name plate. For name plate location, please refer to the graphic found in the Special Message Section of this manual. 3. This product may be equipped with a polarized plug (one blade wider than the other). If you are unable to insert the plug into the outlet, turn the plug over and try again. If the problem persists, contact an electrician to have the obsolete outlet replaced. Do NOT defeat the safety purpose of the plug. 4. Some electronic products utilize external power supplies or adapters. Do NOT connect this type of product to any power supply or adapter other than one described in the owners manual, on the name plate, or specifically recommended by Yamaha. 5. WARNING: Do not place this product or any other objects on the power cord or place it in a position where anyone could walk on, trip over, or roll anything over power or connecting cords of any kind. The use of an extension cord is not recommended! If you must use an extension cord, the minimum wire size for a 25' cord (or less) is 18 AWG. NOTE: The smaller the AWG number, the larger the current handling capacity. For longer extension cords, consult a local electrician. 6. Ventilation: Electronic products, unless specifically designed for enclosed installations, should be placed in locations that do not interfere with proper ventilation. If instructions for enclosed installations are not provided, it must be assumed that unobstructed ventilation is required. 7. Temperature considerations: Electronic products should be installed in locations that do not significantly contribute to their operating temperature. Placement of this product close to heat sources such as; radiators, heat registers and other devices that produce heat should be avoided. 8. This product was NOT designed for use in wet/damp locations and should not be used near water or exposed to rain. Examples of wet/damp locations are; near a swimming pool, spa, tub, sink, or wet basement. 9. This product should be used only with the components supplied or; a cart, rack, or stand that is recommended by the manufacturer. If a cart, rack, or stand is used, please observe all safety markings and instructions that accompany the accessory product. 10. The power supply cord (plug) should be disconnected from the outlet when electronic products are to be left unused for extended periods of time. Cords should also be disconnected when there is a high probability of lightening and/or electrical storm activity. 11. Care should be taken that objects do not fall and liquids are not spilled into the enclosure through any openings that may exist. 12. Electrical/electronic products should be serviced by a qualified service person when: a. The power supply cord has been damaged; or b. Objects have fallen, been inserted, or liquids have been spilled into the enclosure through openings; or c. The product has been exposed to rain: or d. The product dose not operate, exhibits a marked change in performance; or e. The product has been dropped, or the enclosure of the product has been damaged. 13. Do not attempt to service this product beyond that described in the user-maintenance instructions. All other servicing should be referred to qualified service personnel. 14. This product, either alone or in combination with an amplifier and headphones or speaker/s, may be capable of producing sound levels that could cause permanent hearing loss. DO NOT operate for a long period of time at a high volume level or at a level that is uncomfortable. If you experience any hearing loss or ringing in the ears, you should consult an audiologist. IMPORTANT: The louder the sound, the shorter the time period before damage occurs. 15. Some Yamaha products may have benches and/or accessory mounting fixtures that are either supplied as a part of the product or as optional accessories. Some of these items are designed to be dealer assembled or installed Please make sure that benches are stable and any optional fixtures (where applicable) are well secured BEFORE using. Benches supplied by Yamaha are designed for seating only. No other uses are recommended. PLEASE KEEP THIS MANUAL 92-469-2 FCC INFORMATION (U.S.A.) 1. IMPORTANT NOTICE: DO NOT MODIFY THIS UNIT! This product, when installed as indicated in the instructions contained in this manual, meets FCC requirements. Modifications not expressly approved by Yamaha may void your authority, granted by the FCC, to use the product. 2. IMPORTANT: When connecting this product to accessories and/ or another product use only high quality shielded cables. Cable/s supplied with this product MUST be used. Follow all installation instructions. Failure to follow instructions could void your FCC authorization to use this product in the USA. 3. NOTE: This product has been tested and found to comply with the requirements listed in FCC Regulations, Part 15 for Class “B” digital devices. Compliance with these requirements provides a reasonable level of assurance that your use of this product in a residential environment will not result in harmful interference with other electronic devices. This equipment generates/uses radio frequencies and, if not installed and used according to the instructions found in the users manual, may cause interference harmful to the operation of other electronic devices. Compliance with FCC regulations does not guarantee that interference will not occur in all installations. If this product is found to be the source of interference, which can be determined by turning the unit “OFF” and “ON”, please try to eliminate the problem by using one of the following measures: Relocate either this product or the device that is being affected by the interference. Utilize power outlets that are on different branch (circuit breaker or fuse) circuits or install AC line filter/s. In the case of radio or TV interference, relocate/reorient the antenna. If the antenna lead-in is 300 ohm ribbon lead, change the lead-in to co-axial type cable. If these corrective measures do not produce satisfactory results, please contact the local retailer authorized to distribute this type of product. If you can not locate the appropriate retailer, please contact Yamaha Corporation of America, Electronic Service Division, 6600 Orangethorpe Ave, Buena Park, CA90620 The above statements apply ONLY to those products distributed by Yamaha Corporation of America or its subsidiaries. * This applies only to products distributed by YAMAHA CORPORATION OF AMERICA. IMPORTANT NOTICE FOR THE UNITED KINGDOM Connecting the Plug and Cord IMPORTANT. The wires in this mains lead are coloured in accordance with the following code: BLUE : NEUTRAL BROWN : LIVE As the colours of the wires in the mains lead of this apparatus may not correspond with the coloured makings identifying the terminals in your plug proceed as follows: The wire which is coloured BLUE must be connected to the terminal which is marked with the letter N or coloured BLACK. The wire which is coloured BROWN must be connected to the terminal which is marked with the letter L or coloured RED. Making sure that neither core is connected to the earth terminal of the three pin plug. • This applies only to products distributed by Yamaha-Kemble Music (U.K.) Ltd. Dit produkt is gefabriceerd in overeenstemming met de radiostoringsvoorschriften van de Richtlijn van de Raad (82/499/ EEG). ΑΥΤΗ Η ΣΥΣΚΕΥΗ ΑΝΤΑΠΟΚΡΙΝΕΤΑΙ ΣΤΙΣ ΑΠΑΙΤΗΣΕΙΣ ΤΩΝ Ο∆ΗΓΙΩΝ ΤΗΣ ΕΥΡΩΠΑΙΚΗΣ ΟΙΚΟΝΟΜΙΚΗΣ ΚΟΙΝΟΤΗΤΑΣ 82/ 499/Ε.Ο.Κ.. Este produto está de acordo com o radio de interferencia frequente requiridos do Conselho Diretivo 82/499/EEC. Dette apparat overholder det gaeldende EF-direktiv vedrørende radiostøj. Cet appareil est conforme aux prescriptions de la directive communautaire 87/308/CEE. Diese Geräte entsprechen der EG-Richtlinie 82/499/EWG und/oder 87/308/EWG. This product complies with the radio frequency interference requirements of the Council Directive 82/499/EEC and/or 87/308/EEC. Questo apparecchio è conforme al D.M.13 aprile 1989 (Direttiva CEE/87/308) sulla soppressione dei radiodisturbi. Este producto está de acuerdo con los requisitos sobre interferencias de radio frequencia fijados por el Consejo Directivo 87/308/CEE. YAMAHA CORPORATION M.D.G., EMI Division © Yamaha Corporation 1994 VS94350 412POCP5.2-01A0 Printed in Japan-
 1
1
-
 2
2
-
 3
3
-
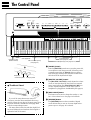 4
4
-
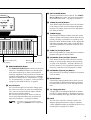 5
5
-
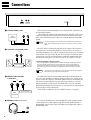 6
6
-
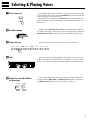 7
7
-
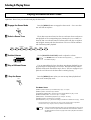 8
8
-
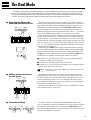 9
9
-
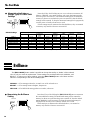 10
10
-
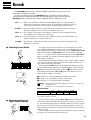 11
11
-
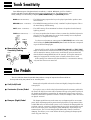 12
12
-
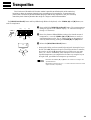 13
13
-
 14
14
-
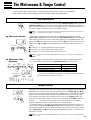 15
15
-
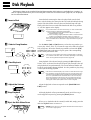 16
16
-
 17
17
-
 18
18
-
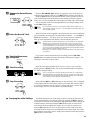 19
19
-
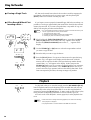 20
20
-
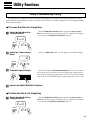 21
21
-
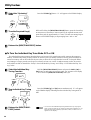 22
22
-
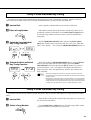 23
23
-
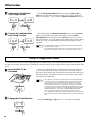 24
24
-
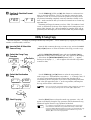 25
25
-
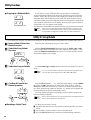 26
26
-
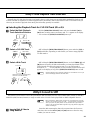 27
27
-
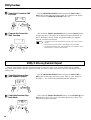 28
28
-
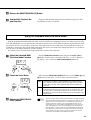 29
29
-
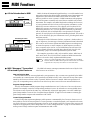 30
30
-
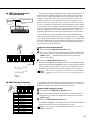 31
31
-
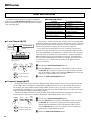 32
32
-
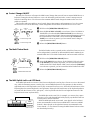 33
33
-
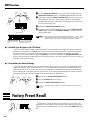 34
34
-
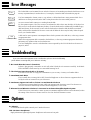 35
35
-
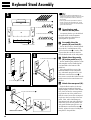 36
36
-
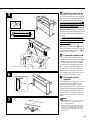 37
37
-
 38
38
-
 39
39
-
 40
40
-
 41
41
-
 42
42
-
 43
43
-
 44
44
-
 45
45


Yamaha CLAVINOVA C L P - 3 8 de handleiding
- Categorie
- Digitale piano's
- Type
- de handleiding
- Deze handleiding is ook geschikt voor
in andere talen
- English: Yamaha CLAVINOVA C L P - 3 8 Owner's manual
- italiano: Yamaha CLAVINOVA C L P - 3 8 Manuale del proprietario
- русский: Yamaha CLAVINOVA C L P - 3 8 Инструкция по применению
- français: Yamaha CLAVINOVA C L P - 3 8 Le manuel du propriétaire
- español: Yamaha CLAVINOVA C L P - 3 8 El manual del propietario
- Deutsch: Yamaha CLAVINOVA C L P - 3 8 Bedienungsanleitung
- português: Yamaha CLAVINOVA C L P - 3 8 Manual do proprietário
- dansk: Yamaha CLAVINOVA C L P - 3 8 Brugervejledning
- suomi: Yamaha CLAVINOVA C L P - 3 8 Omistajan opas
- čeština: Yamaha CLAVINOVA C L P - 3 8 Návod k obsluze
- svenska: Yamaha CLAVINOVA C L P - 3 8 Bruksanvisning
- Türkçe: Yamaha CLAVINOVA C L P - 3 8 El kitabı
- polski: Yamaha CLAVINOVA C L P - 3 8 Instrukcja obsługi
- română: Yamaha CLAVINOVA C L P - 3 8 Manualul proprietarului