
Printed in Malaysia WV33240-2© 2010 Yamaha Corporation
G
Network Player
Lecteur Réseau
OWNER’S MANUAL
MODE D’EMPLOI
BEDIENUNGSANLEITUNG
BRUKSANVISNING
MANUALE DI ISTRUZIONI
MANUAL DE INSTRUCCIONES
GEBRNUIKSAANWIJZIG
ИНСТРУКЦИЯ ПО ЭКСПЛУАТАЦИИ
NP-S2000_OM_G_cv1_4.fm Page 1 Wednesday, June 22, 2011 5:03 PM

i En
HiFi Began with Yamaha
Yamaha’s involvement with and passion for music goes back
more than a century, to when we built our first reed organ in
1887. Now we are the world’s leading producer of pianos and
other musical instruments, and are involved with music in many
other ways as well. We manufacture professional recording
equipment, we design concert halls and we assist artists at
concerts with set up and sound tuning.
This knowledge and experience benefits our production of
audio components in many ways. We introduced our first HiFi
(High Fidelity) turntable in 1955. Thereafter we were one of the first
to offer mass-produced, high quality audio equipment,
and introduced many legendary stereo components.
We hope you enjoy the genuine HiFi experience of
Yamaha Natural Sound.

ii En
English
CA-1000NS-20
NS-1000M
NS-10M
GT-2000
C-2
NS-690
B-1
B-6
GT-CD1AX-2000
Soavo-2Soavo-1
PX-1
Excellence in Audio Achievement
1922: We introduced a high-quality hand-
wound phonograph.
Since 1955, we have released many HiFi
components, including turntables, tuners,
integrated amplifiers, control amplifiers,
power amplifiers and speakers.
NS-20 Monitor Speaker
CA-1000 Integrated Amplifier
Featuring A-Class operation, the CA-1000 set
the standard for integrated amplifiers.
NS-690 Monitor Speaker
NS-1000M Monitor Speaker
A truly legendary speaker still revered by HiFi enthusiasts
B-1 Power Amplifier
An innovative power amp that used FETs in all stages
C-2 Control Amplifier
Received top prize at the Milan International Music
and HiFi Show.
NS-10M Studio Monitor Speaker
Became of the most popular studio monitors in the world.
A-1 Integrated Amplifier
PX-1 Turntable
Yamaha’s first linear tracking turntable
B-6 Power Amplifier
Pyramid-shaped power amplifier with X power supply and
X amplifier
GT-2000/L Turntable
Ultra-precise heavyweight player embodying GT concept
CD-1 CD Player
First CD Player introduced in 1983
B-2x Power Amplifier
MX-10000 Power Amplifier and
CX-10000 Control Amplifier
Amplifier that redefined the capabilities of separate
components
100th anniversary model
AX-2000 Integrated Amplifier
High S/N ratio (128 dB), digital direct function equipped
GT-CD1 CD Player
Top-loading type player with integrated separate structure
MX-1 Power Amplifier and CX-1 Control
Amplifier
Soavo-1 and Soavo-2 Natural Sound
Speaker Systems
A-S2000 Stereo Amplifier and
CD-S2000 Super Audio CD Player
A-S1000 Stereo Amplifier and
CD-S1000 Super Audio CD Player

iii En
1 To assure the finest performance, please read this manual
carefully. Keep it in a safe place for future reference.
2 Install this sound system in a well ventilated, cool, dry,
clean place - away from direct sunlight, heat sources,
vibration, dust, moisture, and/or cold. For proper
ventilation, allow the following minimum clearances
around this unit.
Top: 10 cm (4 in)
Rear: 10 cm (4 in)
Sides: 10 cm (4 in)
3 Locate this unit away from other electrical appliances,
motors, or transformers to avoid humming sounds.
4 Do not expose this unit to sudden temperature changes
from cold to hot, and do not locate this unit in an
environment with high humidity (i.e. a room with a
humidifier) to prevent condensation inside this unit,
which may cause an electrical shock, fire, damage to this
unit, and/or personal injury.
5 Avoid installing this unit where foreign object may fall
onto this unit and/or this unit may be exposed to liquid
dripping or splashing. On the top of this unit, do not
place:
– Other components, as they may cause damage and/or
discoloration on the surface of this unit.
– Burning objects (i.e. candles), as they may cause fire,
damage to this unit, and/or personal injury.
– Containers with liquid in them, as they may fall and
liquid may cause electrical shock to the user and/or
damage to this unit.
6 Do not cover this unit with a newspaper, tablecloth,
curtain, etc. in order not to obstruct heat radiation. If the
temperature inside this unit rises, it may cause fire,
damage to this unit, and/or personal injury.
7 Do not plug in this unit to a wall outlet until all
connections are complete.
8 Do not operate this unit upside-down. It may overheat,
possibly causing damage.
9 Do not use force on switches, knobs and/or cords.
10 When disconnecting the power cable from the wall outlet,
grasp the plug; do not pull the cable.
11 Do not clean this unit with chemical solvents; this might
damage the finish. Use a clean, dry cloth.
12 Only voltage specified on this unit must be used. Using
this unit with a higher voltage than specified is dangerous
and may cause fire, damage to this unit, and/or personal
injury. Yamaha will not be held responsible for any
damage resulting from use of this unit with a voltage
other than specified.
13 To prevent damage by lightning, keep the power cable
and outdoor antennas disconnected from a wall outlet or
this unit during a lightning storm.
14 Do not attempt to modify or fix this unit. Contact
qualified Yamaha service personnel when any service is
needed. The cabinet should never be opened for any
reasons.
15 When not planning to use this unit for long periods of
time (i.e. vacation), disconnect the AC power plug from
the wall outlet.
16 Be sure to read the “Troubleshooting” section on
common operating errors before concluding that this unit
is faulty.
17 Before moving this unit, press the power switch (on the
main unit) downward to turn off this unit and then
disconnect the AC power plug from the AC wall outlet.
18 Condensation will form when the surrounding
temperature changes suddenly. Disconnect the power
cable from the outlet, then leave this unit alone.
19 When using this unit for a long time, this unit may
become warm. Turn the power off, then leave this unit
alone for cooling.
20 Install this unit near the AC outlet and where the AC
power plug can be reached easily.
21 The batteries shall not be exposed to excessive heat such
as sunshine, fire or the like. When you dispose of
batteries, follow your regional regulations.
CAUTION: READ THIS BEFORE OPERATING YOUR UNIT.
As long as this unit is connected to the AC wall outlet, it is not
disconnected from the AC power source even if you turn off this
unit by the power switch (on the main unit).
WARNING
TO REDUCE THE RISK OF FIRE OR ELECTRIC SHOCK, DO
NOT EXPOSE THIS UNIT TO RAIN OR MOISTURE.
WARNING
THE POWER SUPPLY CABLE OF THIS UNIT MUST BE
CONNECTED TO THE MAIN SOCKET OUTLET VIA A
PROTECTIVE EARTHING CONNECTION.

1 En
English
SUPPLIED ACCESSORIES.............................................................................................................. 2
GENERAL FLOWCHART ...............................................................................................................3
SYSTEM STRUCTURES................................................................................................................... 4
Basic system.........................................................................................................................................................4
Full system ...........................................................................................................................................................5
Roles of each component .....................................................................................................................................6
Supported audio files............................................................................................................................................6
PREPARATIONS ............................................................................................................................... 7
Connections..........................................................................................................................................................7
Downloading the dedicated applications .............................................................................................................8
Turning on this unit..............................................................................................................................................9
COMMUNICATION SETUP .......................................................................................................... 10
Media sharing setup ...........................................................................................................................................10
Media controller setup........................................................................................................................................10
CONTENT BROWSING AND PLAYBACK................................................................................. 12
Operations from PC browser..............................................................................................................................12
Operations from mobile device .........................................................................................................................13
Operations from main unit or remote control ....................................................................................................14
Presetting favorite contents................................................................................................................................15
SETUP MENU................................................................................................................................... 17
Setup menu operations .......................................................................................................................................17
Setup menu list...................................................................................................................................................18
Advanced setup menu ........................................................................................................................................19
CONTROLS AND FUNCTIONS .................................................................................................... 20
Front panel .........................................................................................................................................................20
Remote control...................................................................................................................................................21
ADDITIONAL INFORMATION .................................................................................................... 22
Basic information on this unit............................................................................................................................22
Troubleshooting .................................................................................................................................................24
Front panel display messages.............................................................................................................................26
Taking care of this unit ......................................................................................................................................26
SPECIFICATIONS........................................................................................................................... 27
CONTENTS
About this manual
• This manual is produced prior to production. Design and specifications are subject to change in part as a result of
improvements, etc. In case of differences between the manual and product, the product has priority.
• Pictures and illustrations (screen display, etc.) used in this manual may be different from actual products
depending on use environments.
• Notes contain important information about safety and operating instructions. y indicates a tip for your operation.
Thank you for purchasing Yamaha Network Player NP-S2000. By connecting this unit to your home network and audio
system, you can enjoy Internet radio (vTuner) or music files stored on your music servers (PCs and NAS) in the same
network.
Also, you can select a playback source or operate this unit not only from the supplied remote control but also from an
external media controller such as PC browsers and mobile devices.
y
• If you are not familiar with “DLNA” or “Internet radio”, please read “Basic information on this unit” ( P.22) at the beginning.
• For details on compatible mobile devices, see “Mobile device” ( P.6).
Introduction

2 En
Check that you have received all of the following items.
• Remote control
• Batteries (AA, R6, UM-3) x 2
• Power cable
• RCA stereo cable
• TwonkyMedia server License Key brochure
■ Note on transport tape
Upon shipment from the factory, magnet feet are fixed
with transport tape to this unit’s feet. Remove the
transport tape before placing this unit.
■ Installing the batteries
1 Press the part and slide the battery cover off.
2 Insert two supplied AA batteries according to the
polarity markings (+ and –).
3 Slide the cover back until it snaps into place.
Notes on remote controls and batteries
• Do not spill water or other liquids on the remote control.
• Do not drop the remote control.
• Do not leave or store the remote control in the following
conditions:
– places of high humidity, such as near a bath
– places of high temperatures, such as near a heater or
stove
– places of extremely low temperatures
– dusty places
• Insert the battery according to the polarity markings
(+ and –).
• Change all batteries if the operation range of the remote
control narrows.
• If the batteries run out, immediately remove them from
the remote control to prevent an explosion or acid leak.
• If you find leaking batteries, discard the batteries
immediately, taking care not to touch the leaked
material. If the leaked material comes into contact with
your skin or gets into your eyes or mouth, rinse it away
immediately and consult a doctor. Clean the battery
compartment thoroughly before installing new batteries.
• Do not use old batteries together with new ones. This
may shorten the life of the new batteries or cause old
batteries to leak.
• Do not use different types of batteries (such as alkaline
and manganese batteries) together. Specification of
batteries may be different even though they look the
same.
• Before inserting new batteries, wipe the compartment
clean.
• Dispose of batteries according to your regional
regulations.
SUPPLIED ACCESSORIES
RETURN
PUSH
SELECT
ENTER
SOURCE
OFF
LINK
1
3
2

3 En
English
The following flowchart explains general setup procedures required to enjoy streaming music or Internet radio using this
unit.
GENERAL FLOWCHART
Step 1: Deciding the system structure P.4
Decide the system to establish and check the requirements.
Step 2: Connections P.7
Connect this unit to your PC system and audio system.
Step 3: Downloading the dedicated applications P.8
From the website, download the dedicated applications required for your system.
Step 4: Turning on this unit P.9
Power on this unit and other system components.
Step 5: Media sharing setup P.10
Configure the media sharing settings of your digital media server.
Step 6: Media controller setup P.10
Search the network players in your home network and establish a connection between an external media
controller (PC) and this unit.
Step 7: Playback P.12
Select music or Internet radio station to listen to.

4 En
This section describes two major system structure examples and what you can do with each system.
The following figure shows a minimum configuration to utilize the basic functions of this unit.
With this system structure, you can do...
• Easily establishing a communication between your PC and this unit using the dedicated PC setup application.
• Selecting playback source from a browser on any PC in the same network or remote control
– Browsing music stored on your PC
– Selecting Internet radio stations
■ Requirements
To establish the “basic system”, all of the following requirements should be met.
Audio system
Your amplifier has an audio input jack.
A speaker set is connected to your amplifier.
y
For details on a connection between your audio system and this unit, see “Connections” ( P.7). Please also refer to the manual of your
audio devices.
PC network system
Your PC is connected to the Internet via the broadband router.
Your PC has a disc drive capable of ripping CDs and enough hard drive space to store audio files.
y
• For details on Internet connection, please refer to the manual of your network devices.
• For details on a connection and communication setup between your PC and this unit, see “Connections” ( P.7) and
“COMMUNICATION SETUP” ( P.10).
SYSTEM STRUCTURES
Basic system
RETURN
PUSH
SELECT
ENTER
SOURCE
OFF
LINK
S
O
U
R
C
E
D
I
M
M
E
R
R
E
P
E
A
T
R
E
T
U
R
N
N
O
W
P
L
A
Y
I
N
G
A
M
P
V
O
L
U
M
E
S
E
T
U
P
M
U
T
E
P
R
E
S
E
T
M
E
M
O
R
Y
D
I
S
P
L
A
Y
S
H
U
F
F
L
E
H
O
M
E
I
N
P
U
T
E
N
T
E
R
Your audio system Your PC network system
Speakers
Amplifier
Balanced, digital audio
(optical or coaxial), or
analog stereo cable
To AC outlet
This unit (NP-S2000)
PC
Broadband
router
Modem
Internet
Remote control
Network cable

SYSTEM STRUCTURES
5 En
English
The following figure shows a recommended configuration to take full advantage of the functions of this unit.
With this system structure, you can do...
• All features listed in “Basic system” ( P.4)
• Delivering music stored on your NAS (without starting your PC)
• Selecting playback source from your mobile device
– Browsing music stored on your PC and NAS
– Selecting Internet radio stations
■ Requirements
To establish the “full system”, all of the following requirements should be met.
Audio system
Your amplifier has an audio input jack.
A speaker set is connected to your amplifier.
y
For details on a connection between your audio system and this unit, see “Connections” ( P.7). Please also refer to the manual of your
audio devices.
PC network system
Your PC is connected to the Internet via the WiFi broadband router.
Your PC has a disc drive capable of ripping CDs and enough hard drive space to store audio files.
Your NAS is compatible with DLNA and works with your PC and WiFi broadband router properly.
y
• For details on Internet connection, please refer to the manual of your network devices.
• For details on a connection and communication setup between your PC and this unit, see “Connections” ( P.7) and
“COMMUNICATION SETUP” ( P.10).
Mobile device
Your mobile device ( P.6) is wirelessly connected to the WiFi broadband router.
Full system
RETURN
PUSH
SELECT
ENTER
SOURCE
OFF
LINK
S
O
U
R
C
E
D
I
M
M
E
R
R
E
P
E
A
T
R
E
T
U
R
N
N
O
W
P
L
A
Y
I
N
G
A
M
P
V
O
L
U
M
E
S
E
T
U
P
M
U
T
E
P
R
E
S
E
T
M
E
M
O
R
Y
D
I
S
P
L
A
Y
S
H
U
F
F
L
E
H
O
M
E
I
N
P
U
T
E
N
T
E
R
Your audio system
Your PC network system
Speakers Amplifier
Balanced, digital audio
(optical or coaxial), or
analog stereo cable
This unit (NP-S2000)
PC
Modem
Internet
Mobile
device
NAS
WiFi
broadband
router
Network cable
To AC outlet
Remote control

SYSTEM STRUCTURES
6 En
This section describes rolls of each component in the
system.
This unit (NP-S2000)
Decodes digital audio signals received from your PC
network system and sends the signals to your audio
system so that you can enjoy digital music stored on a PC
or NAS, or Internet radio in high-quality sounds.
Remote control
With the remote control, you can select a playback source
or operate this unit while viewing information on the front
panel display of this unit.
Amplifier and speakers
Receive audio signals from this unit and produce sounds.
PC
• Stores music files ripped from CDs or downloaded and
works as a DLNA digital media server.
• By installing the dedicated PC setup application on your
PC, you can configure the communication setup
between your PC and this unit.
• With a browser (Internet Explorer 6.0 or later), you can
select a playback source or operate this unit.
Broadband router (WiFi broadband router)
Connects your PC and this unit to the Internet. A WiFi
broadband router also works as a bridge between your
mobile device and this unit in the network.
NAS (Network attached storage)
Stores music files ripped from CDs or downloaded and
works as a DLNA digital media server, enabling you to
enjoy music without starting your PC.
Mobile device
By installing the dedicated application on your mobile
device, you can use it as an external controller. You can
select playback source or operate this unit while viewing
the screen of the mobile device.
Compatible mobile devices (as of June 2011)
– iPhone, iPod touch, iPad
(iOS 4.0 or later)
– Android™ devices
(Android OS 2.1 or later, ready for WiFi connection)
You may not be able to use the dedicated application depending
on the operating system version of the mobile device
This unit supports the following audio files stored on a PC
or a NAS.
Audio format:
WAV, FLAC, MP3, AAC, WMA
y
• Playable audio formats vary depending on the media server.
For example:
– Windows Media Player 12 supports WAV, MP3, AAC and
WMA.
– Windows Media Player 11 supports WAV, MP3 and WMA.
– TwonkyMedia server (supplied) supports all audio formats
listed above.
For details, visit “http://download.yamaha.com/file/45350”.
• We recommend WAV and FLAC as audio formats producing
high-quality sounds.
Sample rate:
96, 88.2, 64, 48, 44.1, 32, 24, 22.05, 16, 12, 11.025, 8
(kHz)
Bit depth:
16, 24 (bit)
Roles of each component
Note
Supported audio files

7 En
English
This section describes preparations required before operating this unit.
Depending on the system structure you want to establish, make cable connections of the system components.
1 Connect this unit to your amplifier with an XLR
balanced cable, RCA stereo cable, coaxial digital
audio cable or optical cable.
y
Select one of the audio connections shown above. If your
amplifier is equipped with XLR balanced input jacks, we
recommend a balanced connection for optimum audio
performance.
2 Connect this unit to your broadband router with an
STP (shielded twisted pair) network cable (CAT-5 or
higher straight cable).
3 Connect the power cable to AC IN and then plug
into an AC outlet.
When using a digital connection, audio output may be
interrupted at the beginning of a track depending on the
audio system (amplifier, etc).
■ About the spike feet
The feet of this unit include built-in spikes that can reduce
the effect of vibrations on the set. To use the spikes,
remove the magnet foot by pulling it. Also, you can adjust
the height of each foot by rotating it if this unit is unstable.
PREPARATIONS
Connections
BALANCED OUT BALANCED OUT
NETWORK
SYSTEM CONNECTOR
DIGITAL OUT
OPTICAL COAXIAL
AC INR
ANALOG OUT
OUTPUT
R L L
LAN
WAN
2
3
1
Speakers Amplifier
XLR balanced
cable
RCA
stereo cable
(supplied)
Optical cable
Coaxial digital
audio cable
PC
Internet
Modem
Broadband
router
This unit (NP-S2000)
Power cable (supplied)
To AC outlet
NAS
(for full system only)
* Used for product inspection service
Note
Caution
The spikes may scratch the shelf or floor. We recommend you use
a support when placing this unit on expensive furniture, etc.
Spike
Magnet foot

PREPARATIONS
8 En
■ About the BALANCED OUT jacks
The pin assignments for the BALANCED OUT jacks of
this unit are shown below. Before connecting an XLR
balanced cable, refer to the manual of your amplifier and
verify that its XLR balanced input jacks are compatible
with the pin assignments.
When connecting to this unit, be sure to match the pins
and insert the connector of the “female” XLR balanced
cable until you hear a click. When disconnecting, hold
down the lever of the connector and then pull it out.
Visit the following website for information about
downloading the dedicated applications.
http://download.yamaha.com/file/45350
y
The latest information on this unit (owner’s manual, FAQ, etc.) is
also available in the download file.
■ Network Player Search
This application enables you to easily search the network
players in your home network from your PC and start the
browser to select playback source or operate this unit.
Please read “License agreement” ( P.28) before using this
application.
■ Network Player Controller
An application for mobile devices ( P.6). This
application enables you to select playback source or
operate this unit from your mobile device.
■ TwonkyMedia server
For details, refer to “TwonkyMedia server License Key
brochure” supplied with this unit.
2: hot1: ground
3: cold
“Female” XLR connector
“Male” XLR connector
Downloading the dedicated
applications
Note
Full System

PREPARATIONS
9 En
English
If you have established all cable connections, turn on this unit and other system components.
y
When the power switch on main unit is set to STANDBY/ON, you can switch this unit between on and standby by pressing the power
button on the remote control ( P.21).
Turning on this unit
RETURN
PUSH
SELECT
ENTER
SOURCE
OFF
LINK
Set the power switch to STANDBY/ON

10 En
This section describes the setup required on digital media
servers (PC or NAS) and controllers (PC).
To enable a sharing of PC/NAS music contents over the
network, configure the sharing setting of the media server.
■ Sharing setup on PC
When using Windows Media Player 12
(on Windows 7)
1 In “Control Panel”, select “Choose
homegroup and sharing options”
under “Network and Internet”.
2 Check the “Stream my pictures,
music, and videos to all devices on
my home network” box and then
select “Choose media streaming
options”.
3 Select “Allowed” from the drop-
down menu next to “NP-S2000”.
4 In the same way, select “Allowed”
from the drop-down menu next to
“Media programs on this PC and
remote connections”.
5 Click “OK” to exit.
y
Since this unit supports Windows 7, you can directly control
playback of this unit from Windows Media Player 12.
When using Windows Media Player 11
1 Start Windows Media Player 11 on
your PC.
2 Select “Library” and then “Media
Sharing”.
3 Check the “Share my media to” box,
select the “NP-S2000” icon and then
click “Allow”.
4 In the same way, select the icons for
devices to be used as external media
controllers (other PCs and mobile
devices) and then click “Allow”.
5 Click “OK” to exit.
When using TwonkyMedia server
If you have saved music files on your PC with iTunes
(Non-DRM AAC/MP3 files), you can enable music
streaming by using TwonkyMedia server. For details,
refer to “TwonkyMedia server License Key brochure”
supplied with this unit.
Change the media receiver setting on TwonkyMedia
server to allow this unit and devices to be used as external
media controllers (other PCs and mobile devices) to
access TwonkyMedia server.
■ Sharing setup on NAS
Refer to the manual of your NAS and change the media
sharing setting on the NAS to allow this unit and devices
to be used as external media controllers (other PCs and
mobile devices) to access the NAS.
To select a playback source or operate this unit from
external media controllers, first you need specify the IP
address of this unit on a browser (Internet Explorer 6.0 or
later). By using the dedicated application “Network Player
Search”, you can easily search the network players in your
home network from your PC and establish a connection.
y
• For details on the download of the dedicated applications, see
“Downloading the dedicated applications” ( P.8).
• To use your mobile devices as an external media controller, see
“Operations from mobile device” ( P.13).
COMMUNICATION SETUP
Media sharing setup
Media controller setup
Full System

COMMUNICATION SETUP
11 En
English
■ Controller setup on PC
In this section, Windows 7 is used as an example.
1 Click the “NP Search.exe” in the
download folder to start “Network
Player Search”.
The “NETWORK PLAYER SEARCH” screen
appears.
y
The menu language is automatically selected according to the
language setting on the operating system. When using Windows,
you can also select a language from “Language” under the “Tool”
menu.
2 From the “Network Adapter” drop-
down menu, select the network
adapter connected to the network
which this unit is being connected.
3 Click “Search” to search the network
players in the network.
4 Select the model from the list and
then click “Connect”.
The network player control screen appears in the
browser.
Now you are ready to select a playback source or
operate this unit. For details, see “CONTENT
BROWSING AND PLAYBACK” ( P.12).
y
By adding the URL of the network player control screen (IP
address of this unit) to the bookmark of the browser, you will be
able to open it without using “Network Player Search” from the
next time. However, the IP address of this unit may change if you
are using a DHCP server.
Select
Click
Select
Click

12 En
This section describes how to browse contents and start
playback from the PC browser (Internet Explorer 6.0 or
later), mobile device or front panel/remote control of this
unit.
1 In the “Source” screen, select a
source type.
y
• The “Source” screen is displayed after following the procedure
in “Controller setup on PC” ( P.11).
• Select “Setup” to configure the settings of this unit ( P.17).
2 Select a menu item until you find a
desired content and then start
playback.
Menu screen
1 Return
Move to the previous menu screen.
2 Now Playing
Move to the playback information screen.
3 Menu items
4 Source
Move to the “Source” screen.
5 Home
Move to the top menu screen.
6 Page Up/Page Down
Switch the pages of the menu list.
CONTENT BROWSING AND PLAYBACK
Operations from PC browser
1
3
2
45 6

CONTENT BROWSING AND PLAYBACK
13 En
English
Playback information screen
1 Return
Move to the previous screen.
2 Album art or station icon (if available)
3 Playback information
Shows the information on the playback content.
4 Playback functions
DLNA:
(play), (pause), (skip backward),
(skip forward)
Internet Radio:
(play), (stop)
5 Source
Move to the “Source” screen.
6 Home
Move to the top menu screen.
7 Shuffle (for “DLNA” only)
Switch the shuffle mode (on, off).
8 Repeat (for “DLNA” only)
Switch the repeat mode (repeat all, repeat single, off).
y
You can register your favorite Internet Radio stations by
accessing the “vTuner Radio Guide” website with a PC browser.
To use this feature, you need the MAC address of this unit
( P.18) and your e-mail address to create your personal
account. For details, visit “http://yradio.vtuner.com/”.
By using the dedicated application “Network Player
Controller” ( P.8), you can browse contents and start
playback from your mobile device.
1 Tap the “NP Controller” icon on your
mobile device to start “Network
Player Controller”.
2 In the “Player Select” screen, select
a network player to connect to.
y
• This screen is skipped when only one network player has been
detected.
• To search the network players again, tap “Search”.
3 Follow the procedure in “Operations
from PC browser” ( P.12).
y
• To update the media server list, tap “Search”.
• To reload the content list of the selected media server, tap
“Load”. Reload the content list when you have added or deleted
any content on the media server.
1
2
3
4
5678
Operations from mobile device
Full System

CONTENT BROWSING AND PLAYBACK
14 En
y
For details on the controls on the front panel/remote control, see
“CONTROLS AND FUNCTIONS” ( P.20).
1 Press SOURCE repeatedly to select
a source type.
2 Use the following controls to select a
menu item until you find a desired
content.
Main unit
Jog dial
Rotate to select a menu item and press to confirm the
selection.
RETURN
Show the upper-level menu in the front panel display.
Remote control
Cursor buttons/ ENTER
Press / to select a menu item (or press /
repeatedly to select from the gauge) and press
ENTER to confirm the selection.
RETURN
Show the upper-level menu in the front panel display.
HOME
Show the top-level menu in the front panel display.
NOW PLAYING
Show the playback information in the front panel
display.
3 If playback starts, use the following
controls to operate desired
functions.
Main unit
Jog dial
Rotate left to skip backward and right to skip
forward. Press to start or pause playback.
RETURN
Show the previous menu in the front panel display.
Operations from main unit or
remote control
RETURN
PUSH
SELECT
ENTER
SOURCE
DIMMER
REPEAT
MEMORY
DISPLAY
SHUFFLE
SOURCE
SOURCE
SOURCE
D L N A
Internet Radio
Symphony #9-4
RETURN
PUSH
SELECT
ENTER
SOURCE
RETURN
Jog dial
RETURN
NOW PLAYING HOME
ENTER
RETURN
Cursor buttons/
ENTER
HOME
NOW PLAYING
Symphony #9-4
RETURN
PUSH
SELECT
ENTER
SOURCE
RETURN
Jog dial

CONTENT BROWSING AND PLAYBACK
15 En
English
Remote control
Playback buttons
DLNA: (play), (pause), (skip
backward), (skip forward)
Internet Radio: (play), (stop)
SHUFFLE (for “DLNA” only)
Switch the shuffle mode (on, off).
REPEAT (for “DLNA” only)
Switch the repeat mode (repeat all, repeat single, off).
DISPLAY
Switch the playback information shown in the front
panel display.
RETURN
Show the previous menu in the front panel display.
y
You can register your favorite Internet Radio stations by
accessing the “vTuner Radio Guide” website with a PC browser.
To use this feature, you need the MAC address of this unit
( P.18) and your e-mail address to create your personal
account. For details, visit “http://yradio.vtuner.com/”.
The preset function enables to make a quick access to your
favorite contents (up to 20 contents) with the remote
control.
y
For details on the controls on the front panel/remote control, see
“CONTROLS AND FUNCTIONS” ( P.20).
■ Registering a favorite content as a preset
You can preset music files or Internet radio stations.
1 Start playback of the content you
want to preset.
2 Press MEMORY to enter the preset
mode.
The empty preset number is automatically selected.
3 To change the preset location, press
PRESET or / repeatedly.
To switch between “1 to 10” and “11 to 20”, press
/.
y
Preset locations already used are displayed without numbers. If
one of these locations is selected, it will be replaced with new
content.
4 Press MEMORY again to confirm the
selection.
RETURN
NOW PLAYING HOME
ENTER
DIMMER
REPEAT
DISPLAY
SHUFFLE
REPEAT
RETURN
Playback
buttons
SHUFFLE
DISPLAY
Presetting favorite contents
RETURN
NOW PLAYING
SETUP
PRESET
MEMORY
HOME
ENTER
PRESET
MEMORY
Cursor buttons
Memory: 2
2 468910
14151617 20
Memory:13
13

CONTENT BROWSING AND PLAYBACK
16 En
■ Playing back a preset content
1 Press PRESET or / repeatedly to
select a desired preset number.
To switch between “1 to 10” and “11 to 20”, press
/.
y
Preset locations not in use are displayed without numbers.
2 Within five seconds, press .
y
To clear all preset settings, execute “Initialize” in the advanced
setup menu ( P.17). Make sure that this operation will reset all
the settings of this unit to factory default.
• This unit does not recall the preset content in the following
cases:
– the PC which stores the selected content is turned off or
disconnected from the network.
– the selected Internet radio station is temporary unavailable or
out of service.
– the directory of the selected content has been changed.
• This unit memorizes the relative position of the preset contents
in a directory. If you have added or deleted any music files to or
from the directory, this unit may not recall the preset content
correctly. In such cases, preset the contents again.
Notes
Select: 3
1 2 5 73
ENTER

17 En
English
You can configure the various settings of this unit using
the setup menu.
■ Operations from PC browser or mobile
device
1 In the “Source” screen, select
“Setup”.
2 Select a menu item to configure.
3 Select a parameter to be set.
y
You need to enter text for some menu items. In this case, select
the entry field, use the keyboard to enter text and the Enter key to
confirm it.
■ Operations from remote control
y
For details on the controls on the front panel/remote control, see
“CONTROLS AND FUNCTIONS” ( P.20).
1 Press SETUP to enter the setup
menu ( P.18).
To make the advanced setup menu
items ( P.19) selectable, press
SETUP while holding down RETURN
(on the main unit).
2 Press / to select a menu item to
configure and then press ENTER.
For some menu items, repeat step 2 to select a
submenu item.
3 Press / to select a parameter and
then press ENTER.
y
You need to enter a numerical address for some menu items. In
this case, press / to move the target, / to select a number
and ENTER to confirm it.
SETUP MENU
Setup menu operations
Setup
RETURN
NOW PLAYING
SETUP
HOME
ENTER
SETUP
Cursor buttons/
ENTER
RETURN
PUSH
SELECT
ENTER
SOURCE
RETURN
NETWORK
Configuration
Firmware Update

SETUP MENU
18 En
Available setup menus vary depending on the controller.
*1: When “DHCP” is “On”, you can check the values (IP address, etc.) assigned by the DHCP server.
Setup menu list
Menu Submenu
Settings
(Bold:
default)
Function
Controller
Mobile
device
Remote
control
NETWORK
Configuration
DHCP On, Off
Select “On” to use the DHCP server to
automatically configure the network settings
of this unit or “Off” to configure manually.
IP Address
Specify the IP address when “DHCP” is
“Off”.
*1
Subnet Mask
Specify the subnet mask when “DHCP” is
“Off”.
*1
Default
Gateway
Specify the default gateway when “DHCP” is
“Off”.
*1
DNS Server
(P)
Specify the primary DNS server when
“DHCP” is “Off”.
*1
DNS Server
(S)
Specify the secondary DNS server when
“DHCP” is “Off”.
*1
NETWORK
Information
MAC
Address
The MAC address of this unit is shown. The
MAC address is also used as a vTuner ID.
Status The network status of this unit is shown.
System The serial number of this unit is shown.
MAC Address Filter
Specify the MAC addresses (up to 5) of the
network components that will be permitted
access to this unit when “MAC Address Filter
On/Off” is “On”.
Firmware Version
(NP-S2000 Information)
The firmware version of this unit is shown.
Firmware Update
Update the firmware of this unit.
– If “Firmware Update?” appears, press ENTER to
start firmware update. Do not operate this unit
until “Update OK” appears.
– If the firmware is already the latest, “Update OK”
appears.
Friendly Name
Specify the friendly name of this unit for
Windows 7.

SETUP MENU
19 En
English
The following menu items are available only when you enter the setup menu by pressing SETUP (on the remote control)
while holding down RETURN (on the main unit).
Advanced setup menu
Menu
Settings
(Bold:
default)
Function
MAC Address Filter On/Off On, Off
Select “On” to permit access to this unit only from the network
components with the MAC addresses specified in the “MAC Address
Filter” list. Select “Off” to disable the MAC address filter function.
Gapless Playback On, Off
Select “On” to skip silence between each track and enable seamless
playback. Select “Off” to disable the gapless playback function. This
function works on “DLNA” content only.
y
When
“Gapless Playback” is “On”, this unit starts to read data of the
next track at the end of the current track. Some playback operations
(skip, repeat, etc.) will work on the next track during this process.
vTuner Account Reset Yes, No
Select “Yes” to reset the vTuner account. If “Please Power Off!”
appears, turn off this unit. The reset operation will be reflected the next
time you turn on this unit.
y
To create a new account, access “http://yradio.vtuner.com/”. You need the
MAC address of this unit and your e-mail address.
Initialize Yes, No
Select “Yes” to reset the settings of this unit to factory default. If
“Please Power Off!” appears, turn off this unit. The reset operation will
be reflected the next time you turn on this unit.

20 En
1 Power indicator
Lights up: This unit is turned on.
Lights up dimly: This unit is standby.
Off: This unit is turned off.
2 Power switch ( P.9)
Switches this unit between on/standby and off.
3 Foot ( P.7)
Remove the magnet foot to use the spikes. Also, you can
adjust the height of each foot by rotating it.
4 Remote control sensor ( P.21)
Receives infrared signals from the remote control.
5 LINK indicator
Lights up: This unit is connected to the network and an IP
address has been assigned.
Blinks: This unit is connected to the network but an IP
address has not been assigned.
Off: This unit is not connected to the network.
6 Front panel display
Shows menu items or playback information.
y
For details on display messages, see “Front panel display
messages” ( P.26).
7 SOURCE ( P.14)
Selects a source type.
8 RETURN ( P.14)
Shows the upper-level menu in the front panel display.
9 Jog dial ( P.14)
Rotate to select an item and press to confirm the selection.
CONTROLS AND FUNCTIONS
Front panel
RETURN
PUSH
SELECT
ENTER
SOURCE
OFF
LINK
1
23 5467839

CONTROLS AND FUNCTIONS
21 En
English
1 Remote control signal transmitter
Transmits infrared signals.
2 SOURCE ( P.14)
Selects a source type.
3 DIMMER
Adjusts the brightness of the front panel display.
4 REPEAT ( P.15)
Switches the repeat mode (repeat all, repeat single, off).
5 MEMORY ( P.15)
Turns this unit to the preset mode.
6 PRESET ( P.15)
Selects a preset number.
7 SETUP ( P.17)
Shows the setup menu in the front panel display.
8 RETURN ( P.14)
Shows the upper-level menu in the front panel display.
9 Cursor buttons/ENTER ( P.14 and 17)
Use the cursor buttons to select an item and ENTER to
confirm the selection, or control the playback functions.
0 (power) ( P.9)
Switches this unit between on and standby.
A DISPLAY ( P.15)
Switch the playback information shown in the front panel
display.
B SHUFFLE ( P.15)
Switches the shuffle mode (on, off).
C HOME ( P.14)
Shows the top-level menu in the front panel display.
D NOW PLAYING ( P.14)
Shows the playback information in the front panel display.
E Amplifier control buttons
Control the corresponding functions of Yamaha amplifier.
For details, refer to the manual of your amplifier.
y
These buttons may not work on some Yamaha amplifiers.
■ Using the remote control
Aim the remote control directly at the remote control sensor on this unit during operation.
Remote control
RETURN
NOW PLAYING
AMP
VOLUME
SETUP
MUTE
PRESET
MEMORY
HOME
INPUT
ENTER
1
2
3
6
7
8
9
0
A
5
SOURCE
DIMMER
REPEAT
DISPLAY
SHUFFLE
4B
C
D
E
OFF
LINK
30 30
SOURCE
DIMMER
REPEAT
RETURN
NOW PLAYING
AMP
VOLUME
SETUP
MUTE
PRESET
MEMORY
DISPLAY
SHUFFLE
HOME
INPUT
ENTER
Remote control sensor
Within 6 m (20 ft)

22 En
■ General
What is “Yamaha Network Player NP-S2000”?
NP-S2000 can play back the following audio sources:
• DLNA-compatible server (music files stored on a PC or
a NAS)
For details, see “DLNA” below.
• Internet radio (vTuner)
For details, see “Internet radio” ( P.23).
Also, you can select a playback source or operate this unit
from the remote control or an external media controller
(PC browser or dedicated mobile device application).
Tell me about the network feature
By connecting this unit to your home network with an
STP (shielded twisted pair) network cable (CAT-5 or
higher straight cable), you can enjoy Internet radio or
music files stored in the specified folder (directory) on the
server in the same network. For information about the
network devices and settings required to establish a home
network, please consult your Internet service provider.
Can I preset favorite contents?
Yes you can. This unit has the preset function that enables
you to make a quick access to your favorite contents (up to
20 contents) with the remote control. For details, see
“Presetting favorite contents” ( P.15).
You can also register your favorite Internet Radio stations
by accessing the “vTuner Radio Guide” website with a PC
browser. To use this feature, you need the MAC address
of this unit ( P.18) and your e-mail address to create
your personal account. For details, access “http://
yradio.vtuner.com/”.
Does this unit support multi-language display?
Yes, it does. The front panel display of this unit can
display English, French, German, Spanish, Russian and
Japanese used in track names, etc.
■ DLNA
What is “DLNA”?
It stands for Digital Living Network Alliance, and is a
guideline to promote standardization of interconnection of
home network devices such as digital consumer
electronics.
DLNA components are separated into four types: Digital
Media Server (DMS), Digital Media Renderer (DMR),
Digital Media Player (DMP) and Digital Media Controller
(DMC).
“DMS” is a device that is used to store or distribute digital
contents such as music files. For this unit, PCs and NAS
are regarded as “DMS”. “DMR” is a device to receive
instructions from “DMC” and play back digital contents
such as this unit. Similarly, “DMP” is a device to play
back digital contents. “DMC” is a device to control digital
contents. PC browsers and the mobile device application
correspond to “DMC” for this unit.
What types of servers can I use to browse or play
back music files with DLNA?
Use a DLNA-compatible server, such as one of the
following devices.
PC compatible with Windows Media Player 12 or
Windows Media Player 11
To browse folders (directories) on your PC from this
unit, you need to change the media sharing setting of
Windows Media Player 12 or Windows Media Player
11 to make those folders accessible from this unit. For
details on Windows Media Player, please ask Microsoft
Corporation.
PC with TwonkyMedia server installed
With a license key shown on the front cover of the
“TwonkyMedia server License Key” brochure, you can
download TwonkyMedia server for free.
It enables playback of FLAC files or music in the
iTunes library on this unit.
How many servers can I connect to the network?
You can connect up to 16 servers.
ADDITIONAL INFORMATION
Basic information on this unit

ADDITIONAL INFORMATION
23 En
English
What types of audio formats can I play back on
this unit?
This unit supports monaural or stereo sounds of WAV,
FLAC, MP3, AAC and WMA files.
For example, the following audio formats are not
supported.
• Audio files with DRM (Digital Rights Management)
such as music you purchased on iTunes Store
• ATRAC, multi-channel sounds of WAV and WMA
files
Can I play back music in the iTunes library on
this unit?
You can play back MP3, AAC and WMA files by
installing TwonkyMedia server on your PC or using a
NAS that supports playback of the iTunes library.
■ Internet radio
Tell me about the Internet radio
If this unit is connected to the Internet via your home
network, you can listen to Internet radio stations using the
vTuner Internet Radio station database service, providing
a database of over 2000 radio stations around the world.
To enjoy Internet radio in a good condition, we
recommend that you use a fast broadband connection to
the Internet. For information about the broadband
connection speed, please consult your Internet service
provider.
Can I add other Internet radio stations to the list?
If you have found an Internet radio station that is not in the
list, you can add it by accessing the “vTuner Radio Guide”
website with a PC browser. To use this feature, you need
the MAC address of this unit ( P.18) and your e-mail
address to create your personal account. For details,
access “http://yradio.vtuner.com/”.
Can I delete Internet radio stations that I do not
listen to from the list?
No, you cannot delete Internet radio stations from the list.

ADDITIONAL INFORMATION
24 En
Refer to the tables below if the unit does not function properly. If the problem you are experiencing is not listed below, or
if the instruction below does not help, download the FAQ file from “http://download.yamaha.com/file/45350” and check
it. Still, if you cannot find information you are looking for, contact the nearest authorized Yamaha dealer or service
center.
■ General
Troubleshooting
Problem Cause Remedy See page
This unit fails to turn on.
The power cable is not
connected to AC IN on the main
unit or not plugged into an AC
outlet.
Connect the power cable firmly. 7
This unit has been exposed to a
strong external electric shock
(such as lightning or strong
static electricity).
Turn off this unit, disconnect
the power cable, plug it back in
after 30 seconds and then use it
normally.
—
The power indicator on the front
panel flashes.
There is a problem with the
internal circuitries of this unit.
Turn off this unit, disconnect
the power cable, and then
contact the nearest authorized
Yamaha dealer or service
center.
—
No sound.
The audio cable connection
between this unit and amplifier
is improper.
Connect the audio cable firmly.
If the problem persists, the
audio cable may be defective.
7
The input setting on the
amplifier is incorrect.
Select the correct input (from
this unit) on the amplifier.
—
Hum noise is heard.
The audio cable connection
between this unit and amplifier
is improper.
Connect the audio cable firmly.
If the problem persists, the
audio cable may be defective.
7
The remote control does not
work or function properly.
Wrong distance or angle.
The remote control functions
within a maximum range of 6 m
(20 ft) and no more than 30
degrees off-axis from the front
panel.
21
Direct sunlight or lighting (from
an inverter type of fluorescent
lamp, etc.) is striking the remote
control sensor of this unit.
Adjust the lighting angle, or
reposition this unit.
—
The batteries are weak. Replace all batteries. 2
PRESET on the remote control
does not work.
The digital media server that
stores your preset content is
turned off.
Turn on the digital media server
and try again.
—
The preset Internet Radio
station is no longer in service.
Preset another favorite content. 15
The amplifier control buttons on
the remote control do not work
on the amplifier.
Your amplifier is not one of
Yamaha amplifiers. (These
buttons may not work on some
Yamaha amplifiers.)
Use the remote control of your
amplifier.
—

ADDITIONAL INFORMATION
25 En
English
■ DLNA
■ Internet radio
Problem Cause Remedy See page
This unit does not detect the
digital media server (PC).
No server application is
installed on the PC.
Install a DLNA-compatible
server application such as
Windows Media Player 11,
Windows Media Player 12 or
TwonkyMedia server.
—
Windows Media Player 11 or
Windows Media Player 12 is
not started on the PC.
Start Windows Media Player 11
or Windows Media Player 12 on
the PC.
—
The sharing setting of Windows
Media Player 11 or Windows
Media Player 12 is incorrect.
Change the media sharing
setting of it to allow this unit to
access the PC folder.
10
Access to the PC is blocked by
the Antivirus software installed
on the PC.
Check the Antivirus software
settings (firewall setting, etc.).
—
Some audio files cannot be
played back on this unit.
You are trying to play back
DRM audio files you purchased
on iTunes Store.
You cannot play back DRM
audio files you purchased on
iTunes Store.
—
You are trying to play back
FLAC files stored on a PC
without TwonkyMedia server.
Install TwonkyMedia server on
the PC, or use a NAS that
supports playback of FLAC files.
—
Problem Cause Remedy See page
Some Internet radio stations
cannot be played back.
The selected Internet radio
station is currently not
available.
It may not be available to listen
because there might be a
network problem, or the station
might be broadcasting in limited
hour. Also, the list may include
the station that is already
obsolete, because it takes time
to update the list. Please try
another station available.
—
There is a station with no sound
even after playback starts.
The selected Internet radio
station broadcasts audio silence
currently.
Some Internet radio stations
broadcast audio silence during
particular periods of time in a
day. Try the station later or
select another station.
—

ADDITIONAL INFORMATION
26 En
When you wipe this unit, do not use chemical solvents (alcohol, thinner, etc.). This may damage the finish. Use a clean,
dry cloth. For heavy dirt, dampen a soft cloth in detergent diluted with the water, wring it out, and then clean this unit up
with the cloth.
■ For the polish-finished side panels
Clean the side panels with a soft, dry cloth, such as a Yamaha Unicon cloth. For heavy dirt, use a Yamaha Piano Unicon.
Be careful not to bump the side panels with metal, porcelain, or other hard objects, as this may damage the finish.
The sound from the Internet
radio breaks sometimes.
Intermittent audio occurs
depending on the network
condition between your local
network and the Internet station.
Try the station later or select
another station.
If the problem happens with any
stations, your network itself may
have a problem. To enjoy
Internet radio in a good
condition, we recommend that
you use a fast broadband
connection to the Internet. For
information about the broadband
connection speed, please consult
your Internet service provider.
—
Front panel display messages
Message Status
<Access Denied> Access to the media server has been denied.
<Access Error> This unit cannot connect to the media server.
List Update The content list of the media server has been updated.
<No Content> This unit cannot find any content.
<No DLNA Server Found> This unit cannot find any DLNA server.
<No Link> This unit is not connected to the network.
<No Preset Memory> No preset contents are registered.
<Not Available> The operation you have performed is not available.
Please Wait The specified file is being loaded.
<Preset Memory Error> The content cannot be preset.
Preset No.XX is not Found.
The music file or Internet radio station registered to the selected preset
number (XX) cannot be found.
<Unable to Play> This unit cannot play back the specified file.
Taking care of this unit
Problem Cause Remedy See page

27 En
English
INPUT/OUTPUT
• NETWORK
Ethernet connection .................................100Base-TX/10Base-T
DLNA version ................................. 1.5 (DMP/DMR supported)
Audio format (DLNA)........... WAV, FLAC, MP3, AAC, WMA
Audio format (Internet radio) ...................................MP3, WMA
Audio sample rate (DLNA)
.....96, 88.2, 64, 48, 44.1, 32, 24, 22.05, 16, 12, 11.025, 8 kHz
Bit depth (DLNA)......................................................... 16, 24 bit
• BALANCED OUT .......................................................... 2ch (L/R)
• ANALOG OUT ............................................................... 2ch (L/R)
• DIGITAL OUT
Optical 1
Coaxial 1
• SYSTEM CONNECTOR (for product inspection service) 1
AUDIO SECTION
• Output level
1 kHz, 0 dB, fs 44.1 kHz ............................................2.0 ± 0.3 V
• Signal to noise ratio (IHF-A network)
1 kHz, 0 dB, fs 44.1 kHz .................................... 116 dB or more
• Dynamic range
1 kHz, 0 dB, fs 44.1 kHz .................................... 100 dB or more
• Harmonic distortion
1 kHz, 0 dB, fs 44.1 kHz ...................................... 0.002% or less
• Frequency response
fs 44.1 kHz................................................2 Hz to 20 kHz, –3 dB
fs 48 kHz...................................................2 Hz to 24 kHz, –3 dB
fs 96 kHz...................................................2 Hz to 48 kHz, –3 dB
GENERAL
• Power supply
[U.S.A. and Canada models] ........... AC 110 to 120 V, 50/60 Hz
[Other models]................................. AC 220 to 240 V, 50/60 Hz
• Power consumption ................................................................30 W
• Standby power consumption (reference data) .......................0.3 W
• Dimensions (W H D)................................. 435 69 440 mm
()
• Weight......................................................................12 kg (26.5 lb)
* Please note that all specifications are subject to change without
notice.
SPECIFICATIONS
iPod touch, iPhone, iPad
Macintosh, Mac OS, iPod touch and iTunes are
trademarks of Apple Inc., registered in the U.S. and
other countries. iPhone and iPad are trademarks of
Apple Inc.
Android™ is a trademark of Google Inc.
Microsoft, Windows, Windows 7, Windows Vista,
Windows XP, Windows Media Audio, Windows
Media Player and Internet Explorer are either
registered trademarks or trademarks of Microsoft
Corporation in the United States and/or other countries.
TwonkyMedia is a registered trademark of
PacketVideo Corporation.
MPEG Layer-3 audio coding technology licensed from
Fraunhofer IIS and Thomson.

28 En
■ License agreement
ATTENTION
PLEASE READ THIS SOFTWARE LICENSE AGREEMENT (“AGREEMENT”)
CAREFULLY BEFORE USING THIS SOFTWARE. YOU ARE ONLY
PERMITTED TO USE THIS SOFTWARE PURSUANT TO THE TERMS AND
CONDITIONS OF THIS AGREEMENT. THIS AGREEMENT IS BETWEEN YOU
(AS AN INDIVIDUAL OR LEGAL ENTITY) AND YAMAHA CORPORATION
(“YAMAHA”).
BY DOWNLOADING, INSTALLING, COPYING, OR OTHERWISE USING THIS
SOFTWARE YOU ARE AGREEING TO BE BOUND BY THE TERMS OF THIS
LICENSE. IF YOU DO NOT AGREE WITH THE TERMS, DO NOT DOWNLOAD,
INSTALL, COPY, OR OTHERWISE USE THIS SOFTWARE. IF YOU HAVE
DOWNLOADED OR INSTALLED THE SOFTWARE AND DO NOT AGREE TO
THE TERMS, PROMPTLY DELETE THE SOFTWARE.
GRANT OF LICENSE AND COPYRIGHT
Yamaha hereby grants you the right to use one copy of the software program(s) and
data (“SOFTWARE”) accompanying this Agreement. The term SOFTWARE shall
encompass any updates to the accompanying software and data. The SOFTWARE is
owned by Yamaha and/or Yamaha’s licensor(s), and is protected by relevant copyright
laws and all applicable treaty provisions. While you are entitled to claim ownership of
the data created with the use of SOFTWARE, the SOFTWARE will continue to be
protected under relevant copyrights.
• You may use the SOFTWARE on a single computer.
• You may make one copy of the SOFTWARE in machine-readable form for backup
purposes only, if the SOFTWARE is on media where such backup copy is permitted.
On the backup copy, you must reproduce Yamaha’s copyright notice and any other
proprietary legends that were on the original copy of the SOFTWARE.
• You may permanently transfer to a third party all your rights in the SOFTWARE,
provided that you do not retain any copies and the recipient reads and agrees to the
terms of this Agreement.
RESTRICTIONS
• You may not engage in reverse engineering, disassembly, decompilation or otherwise
deriving a source code form of the SOFTWARE by any method whatsoever.
• You may not reproduce, modify, change, rent, lease, or distribute the SOFTWARE in
whole or in part, or create derivative works of the SOFTWARE.
• You may not electronically transmit the SOFTWARE from one computer to another
or share the SOFTWARE in a network with other computers.
• You may not use the SOFTWARE to distribute illegal data or data that violates public
policy.
• You may not initiate services based on the use of the SOFTWARE without
permission by Yamaha Corporation.
Copyrighted data, including but not limited to MIDI data for songs, obtained by means
of the SOFTWARE, are subject to the following restrictions which you must observe.
• Data received by means of the SOFTWARE may not be used for any commercial
purposes without permission of the copyright owner.
• Data received by means of the SOFTWARE may not be duplicated, transferred, or
distributed, or played back or performed for listeners in public without permission of
the copyright owner.
• The encryption of data received by means of the SOFTWARE may not be removed
nor may the electronic watermark be modified without permission of the copyright
owner.
TERMINATION
This Agreement becomes effective on the day that you receive the SOFTWARE and
remains effective until terminated. If any copyright law or provisions of this Agreement
is violated, the Agreement shall terminate automatically and immediately without
notice from Yamaha. Upon such termination, you must immediately destroy the
licensed SOFTWARE, any accompanying written documents and all copies thereof.
DOWNLOADED SOFTWARE
If you believe that the downloading process was faulty, you may contact Yamaha, and
Yamaha shall permit you to re-download the SOFTWARE, provided that you first
destroy any copies or partial copies of the SOFTWARE that you obtained through your
previous download attempt. This permission to re-download shall not limit in any
manner the disclaimer of warranty set forth in Section 5 below.
DISCLAIMER OF WARRANTY ON SOFTWARE
You expressly acknowledge and agree that use of the SOFTWARE is at your sole risk.
The SOFTWARE and related documentation are provided “AS IS” and without
warranty of any kind. NOTWITHSTANDING ANY OTHER PROVISION OF THIS
AGREEMENT, YAMAHA EXPRESSLY DISCLAIMS ALL WARRANTIES AS TO
THE SOFTWARE, EXPRESS, AND IMPLIED, INCLUDING BUT NOT LIMITED
TO THE IMPLIED WARRANTIES OF MERCHANTABILITY, FITNESS FOR A
PARTICULAR PURPOSE AND NON-INFRINGEMENT OF THIRD PARTY
RIGHTS. SPECIFICALLY, BUT WITHOUT LIMITING THE FOREGOING,
YAMAHA DOES NOT WARRANT THAT THE SOFTWARE WILL MEET YOUR
REQUIREMENTS, THAT THE OPERATION OF THE SOFTWARE WILL BE
UNINTERRUPTED OR ERROR-FREE, OR THAT DEFECTS IN THE SOFTWARE
WILL BE CORRECTED.
LIMITATION OF LIABILITY
YAMAHA’S ENTIRE OBLIGATION HEREUNDER SHALL BE TO PERMIT USE
OF THE SOFTWARE UNDER THE TERMS HEREOF. IN NO EVENT SHALL
YAMAHA BE LIABLE TO YOU OR ANY OTHER PERSON FOR ANY
DAMAGES, INCLUDING, WITHOUT LIMITATION, ANY DIRECT, INDIRECT,
INCIDENTAL OR CONSEQUENTIAL DAMAGES, EXPENSES, LOST PROFITS,
LOST DATA OR OTHER DAMAGES ARISING OUT OF THE USE, MISUSE OR
INABILITY TO USE THE SOFTWARE, EVEN IF YAMAHA OR AN
AUTHORIZED DEALER HAS BEEN ADVISED OF THE POSSIBILITY OF SUCH
DAMAGES. In no event shall Yamaha’s total liability to you for all damages, losses
and causes of action (whether in contract, tort or otherwise) exceed the amount paid for
the SOFTWARE.
THIRD PARTY SOFTWARE
Third party software and data (“THIRD PARTY SOFTWARE”) may be attached to the
SOFTWARE. If, in the written materials or the electronic data accompanying the
Software, Yamaha identifies any software and data as THIRD PARTY SOFTWARE,
you acknowledge and agree that you must abide by the provisions of any Agreement
provided with the THIRD PARTY SOFTWARE and that the party providing the
THIRD PARTY SOFTWARE is responsible for any warranty or liability related to or
arising from the THIRD PARTY SOFTWARE. Yamaha is not responsible in any way
for the THIRD PARTY SOFTWARE or your use thereof.
• Yamaha provides no express warranties as to the THIRD PARTY SOFTWARE. IN
ADDITION, YAMAHA EXPRESSLY DISCLAIMS ALL IMPLIED
WARRANTIES, INCLUDING BUT NOT LIMITED TO THE IMPLIED
WARRANTIES OF MERCHANTABILITY AND FITNESS FOR A PARTICULAR
PURPOSE, as to the THIRD PARTY SOFTWARE.
• Yamaha shall not provide you with any service or maintenance as to the THIRD
PARTY SOFTWARE.
• Yamaha is not liable to you or any other person for any damages, including, without
limitation, any direct, indirect, incidental or consequential damages, expenses, lost
profits, lost data or other damages arising out of the use, misuse or inability to use the
THIRD PARTY SOFTWARE.
GENERAL
This Agreement shall be interpreted according to and governed by Japanese law
without reference to principles of conflict of laws. Any dispute or procedure shall be
heard before the Tokyo District Court in Japan. If for any reason a court of competent
jurisdiction finds any portion of this Agreement to be unenforceable, the remainder of
this Agreement shall continue in full force and effect.
COMPLETE AGREEMENT
This Agreement constitutes the entire agreement between the parties with respect to use
of the SOFTWARE and any accompanying written materials and supersedes all prior or
contemporaneous understandings or agreements, written or oral, regarding the subject
matter of this Agreement. No amendment or revision of this Agreement will be binding
unless in writing and signed by a fully authorized representative of Yamaha.

29 En
English
Limited Guarantee for European Economic Area (EEA) and Switzerland
Thank you for having chosen a Yamaha product. In the unlikely event that your Yamaha product needs guarantee service, please contact the dealer from
whom it was purchased. If you experience any difficulty, please contact Yamaha representative office in your country. You can find full details on our
website (http://www.yamaha-hifi.com/ or http://www.yamaha-uk.com/ for U.K. resident).
The product is guaranteed to be free from defects in workmanship or materials for a period of two years from the date of the original purchase. Yamaha
undertakes, subject to the conditions listed below, to have the faulty product or any part(s) repaired, or replaced at Yamaha’s discretion, without any charge
for parts or labour. Yamaha reserves the right to replace a product with that of a similar kind and/or value and condition, where a model has been
discontinued or is considered uneconomic to repair.
Conditions
1. The original invoice or sales receipt (showing date of purchase, product code and dealer’s name) MUST accompany the defective product, along with a
statement detailing the fault. In the absence of this clear proof of purchase, Yamaha reserves the right to refuse to provide free of charge service and the
product may be returned at the customer’s expense.
2. The product MUST have been purchased from an AUTHORISED Yamaha dealer within the European Economic Area (EEA) or Switzerland.
3. The product must not have been the subject of any modifications or alterations, unless authorised in writing by Yamaha.
4. The following are excluded from this guarantee:
a. Periodic maintenance and repair or replacement of parts due to normal wear and tear.
b. Damage resulting from:
(1) Repairs performed by the customer himself or by an unauthorised third party.
(2) Inadequate packaging or mishandling, when the product is in transit from the customer. Please note that it is the customer’s responsibility to
ensure the product is adequately packaged when returning the product for repair.
(3) Misuse, including but not limited to (a) failure to use the product for its normal purpose or in accordance with Yamaha’s instructions on the
proper use, maintenance and storage, and (b) installation or use of the product in a manner inconsistent with the technical or safety standards in
force in the country where it is used.
(4) Accidents, lightning, water, fire, improper ventilation, battery leakage or any cause beyond Yamaha’s control.
(5) Defects of the system into which this product is incorporated and/or incompatibility with third party products.
(6) Use of a product imported into the EEA and/or Switzerland, not by Yamaha, where that product does not conform to the technical or safety
standards of the country of use and/or to the standard specification of a product sold by Yamaha in the EEA and/or Switzerland.
5. Where the guarantee differs between the country of purchase and the country of use of the product, the guarantee of the country of use shall apply.
6. Yamaha may not be held responsible for any losses or damages, whether direct, consequential or otherwise, save for the repair or replacement of the
product.
7. Please backup any custom settings or data, as Yamaha may not be held responsible for any alteration or loss to such settings or data.
8. This guarantee does not affect the consumer’s statutory rights under applicable national laws in force or the consumer’s rights against the dealer arising
from their sales/purchase contract.
Information for Users on Collection and Disposal of Old Equipment and
Used Batteries
These symbols on the products, packaging, and/or accompanying documents mean that used electrical and
electronic products and batteries should not be mixed with general household waste.
For proper treatment, recovery and recycling of old products and used batteries, please take them to
applicable collection points, in accordance with your national legislation and the Directives 2002/96/EC
and 2006/66/EC.
By disposing of these products and batteries correctly, you will help to save valuable resources and prevent
any potential negative effects on human health and the environment which could otherwise arise from
inappropriate waste handling.
For more information about collection and recycling of old products and batteries, please contact your
local municipality, your waste disposal service or the point of sale where you purchased the items.
[Information on Disposal in other Countries outside the European Union]
These symbols are only valid in the European Union. If you wish to discard these items, please contact
your local authorities or dealer and ask for the correct method of disposal.
Note for the battery symbol (bottom two symbol examples):
This symbol might be used in combination with a chemical symbol. In this case it complies with the
requirement set by the Directive for the chemical involved.

■ Information about software
■ Information sur le logiciel
■ Information uber Software
■ Information om programvara
■ Informazioni sul software
■ Información sobre el software
■ Informatie over software
■ Информация о программном обеспечении
This product uses the following free software.
For information (copyright, etc) about each software, read the original sentences stated
below.
About zlib Library
Copyright notice:
©1995-2010 Jean-loup Gailly and Mark Adler
This software is provided ‘as-is’, without any express or implied warranty. In no event
will the authors be held liable for any damages arising from the use of this software.
Permission is granted to anyone to use this software for any purpose, including
commercial applications, and to alter it and?redistribute it freely, subject to the
following restrictions:
1. The origin of this software must not be misrepresented; you must not claim that you
wrote the original software. If you use this software in a product, an acknowledgment
in the product documentation would be appreciated but is not required.
2. Altered source versions must be plainly marked as such, and must not be
misrepresented as being the original software.
3. This notice may not be removed or altered from any source distribution.
Jean-loup Gailly Mark Adler
If you use the zlib library in a product, we would appreciate *not* receiving lengthy
legal documents to sign. The sources are provided for free but without warranty of any
kind. The library has been entirely written by Jean-loup Gailly and Mark Adler; it does
not include third-party code.
If you redistribute modified sources, we would appreciate that you include in the file
ChangeLog history information documenting your changes. Please read the FAQ for
more information on the distribution of modified source versions.
About FLAC codec Library
Copyright ©2000,2001,2002,2003,2004,2005,2006,2007, 2008,2009 Josh Coalson
Redistribution and use in source and binary forms, with or without modification, are
permitted provided that the following conditions are met:
– Redistributions of source code must retain the above copyright notice, this list of
conditions and the following disclaimer.
– Redistributions in binary form must reproduce the above copyright notice, this list of
conditions and the following disclaimer in the documentation and/or other materials
provided with the distribution.
– Neither the name of the Xiph.org Foundation nor the names of its contributors may
be used to endorse or promote products derived from this software without specific
prior written permission.
THIS SOFTWARE IS PROVIDED BY THE COPYRIGHT HOLDERS AND
CONTRIBUTORS “AS IS” AND ANY EXPRESS OR IMPLIED WARRANTIES,
INCLUDING, BUT NOT LIMITED TO, THE IMPLIED WARRANTIES OF
MERCHANTABILITY AND FITNESS FOR A PARTICULAR PURPOSE ARE
DISCLAIMED. IN NO EVENT SHALL THE FOUNDATION OR CONTRIBUTORS
BE LIABLE FOR ANY DIRECT, INDIRECT, INCIDENTAL, SPECIAL,
EXEMPLARY, OR CONSEQUENTIAL DAMAGES (INCLUDING, BUT NOT
LIMITED TO, PROCUREMENT OF SUBSTITUTE GOODS OR SERVICES; LOSS
OF USE, DATA, OR PROFITS; OR BUSINESS INTERRUPTION) HOWEVER
CAUSED AND ON ANY THEORY OF LIABILITY, WHETHER IN CONTRACT,
STRICT LIABILITY, OR TORT (INCLUDING NEGLIGENCE OR OTHERWISE)
ARISING IN ANY WAY OUT OF THE USE OF THIS SOFTWARE, EVEN IF
ADVISED OF THE POSSIBILITY OF SUCH DAMAGE.
Notice for Windows Media DRM
This product is protected by certain intellectual property rights of Microsoft. Use
or distribution of such technology outside of this product is prohibited without a
license from Microsoft. Content owners use Windows Media digital rights
management technology (WMDRM) to protect their intellectual property,
including copyrights. This device uses WMDRM software to access WMDRM
protected content. If the WMDRM software fails to protect the content, content
owners may ask Microsoft to revoke the software’s ability to use WMDRM to
play or copy protected content. Revocation does not affect unprotected content.
When you download licenses for protected content, you agree that Microsoft may
include a revocation list with the licenses. Content owners may require you to
upgrade WMDRM to access their content. If you decline an upgrade, you will not
be able to access content that requires the upgrade.
30

NP-S2000
JUTBG
© 2012 Yamaha Corporation
Printed in Malaysia ZD38610
Additional information English
The additional feature on this product supports Apple Lossless audio format.
For detailed information about the Copyright and License, please see the opposite
side of this page.
Complément d’informations Français
La fonction ajoutée à ce produit est compatible avec le format de fichier audio
Apple Lossless.
Pour plus de détails sur les droits d’auteur et la licence, voyez le verso de ce
document.
Zusätzliche Informationen Deutsch
Das Gerät unterstützt jetzt außerdem den Audio-Codec Apple Lossless.
Detaillierte Urheberrechts- und Lizenzinformationen finden Sie auf der nächsten
Seite.
Ytterligare information Svenska
Extrafunktionen på denna produkt stödjer ljudfilsformatet Apple Lossless.
För detaljerad information om upphovsrätten och licensen, vänligen se andra
sidan av detta blad.
Información adicional Español
La función adicional de este producto admite formato de archivo de audio Apple
Lossless
Para obtener información detallada sobre la propiedad intelectual y la licencia,
consulte la otra cara de esta página.
Informazioni addizionali Italiano
La funzione aggiuntiva del prodotto supporta il formato audio Apple Lossless.
Le informazioni dettagliate su copyright e licenza si trovano sul retro di questa
pagina.
Aanvullende informatie Nederlands
De aanvullende functie van dit product ondersteunt de Apple Lossless-
geluidsbestandsindeling.
Raadpleeg de andere kant van deze pagina voor gedetailleerde informatie over de
copyright en licentie.
Дополнительная информация Pусский
Дополнительная функция данного устройства поддерживает аудиоформат
Apple Lossless.
Для получения подробной информации об Авторских правах и Лицензиях
см. следующую страницу.
中⽂
本产品上的附加功能可支持 Apple Lossless 音频文件格式。
如需关于版权和许可证的详细信息,请参看本页背面上的内容。

Copyright © 2011 Apple Inc. All rights reserved.
Licensed under the Apache License, Version 2.0 (the “License”);
you may not use this file except in compliance with the License.
You may obtain a copy of the License at
http://www.apache.org/licenses/LICENSE-2.0
Unless required by applicable law or agreed to in writing, software
distributed under the License is distributed on an "AS IS" BASIS,
WITHOUT WARRANTIES OR CONDITIONS OF ANY KIND, either express
or implied.
See the License for the specific language governing permissions and
limitations under the License.
Copyright English
Droits d’auteur © 2011 Apple Inc. Tous droits réservés.
Sous licence Apache, Version 2.0 (la «Licence»);
Le fichier peut être utilisé uniquement selon les termes de la Licence.
Vous pouvez vous procurer une copie de la Licence sous
http://www.apache.org/licenses/LICENSE-2.0
Sauf dans le cas d’obligations légales ou d’accords écrits, le logiciel distribué
sous cette Licence est distribué «EN L’ÉTAT», SANS GARANTIE NI
CONDITION DE QUELQUE NATURE, explicite ou tacite.
Voyez la Licence pour les permissions et restrictions liées à la Licence dans votre
langue.
Droits d’auteur Français
Le texte authentique est en anglais. Cette traduction sert à titre de référence
seulement.

Printed in Malaysia WV33240-2© 2010 Yamaha Corporation
G
Network Player
Lecteur Réseau
OWNER’S MANUAL
MODE D’EMPLOI
BEDIENUNGSANLEITUNG
BRUKSANVISNING
MANUALE DI ISTRUZIONI
MANUAL DE INSTRUCCIONES
GEBRNUIKSAANWIJZIG
ИНСТРУКЦИЯ ПО ЭКСПЛУАТАЦИИ
NP-S2000_OM_G_cv1_4.fm Page 1 Wednesday, June 22, 2011 5:03 PM
Documenttranscriptie
NP-S2000_OM_G_cv1_4.fm Page 1 Wednesday, June 22, 2011 5:03 PM G Network Player Lecteur Réseau © 2010 Yamaha Corporation Printed in Malaysia WV33240-2 OWNER’S MANUAL MODE D’EMPLOI BEDIENUNGSANLEITUNG BRUKSANVISNING MANUALE DI ISTRUZIONI MANUAL DE INSTRUCCIONES GEBRNUIKSAANWIJZIG ИНСТРУКЦИЯ ПО ЭКСПЛУАТАЦИИ HiFi Began with Yamaha Yamaha’s involvement with and passion for music goes back more than a century, to when we built our first reed organ in 1887. Now we are the world’s leading producer of pianos and other musical instruments, and are involved with music in many other ways as well. We manufacture professional recording equipment, we design concert halls and we assist artists at concerts with set up and sound tuning. This knowledge and experience benefits our production of audio components in many ways. We introduced our first HiFi (High Fidelity) turntable in 1955. Thereafter we were one of the first to offer mass-produced, high quality audio equipment, and introduced many legendary stereo components. We hope you enjoy the genuine HiFi experience of Yamaha Natural Sound. i En Excellence in Audio Achievement 1922: We introduced a high-quality handwound phonograph. Since 1955, we have released many HiFi components, including turntables, tuners, integrated amplifiers, control amplifiers, power amplifiers and speakers. NS-20 CA-1000 NS-690 NS-1000M B-1 C-2 PX-1 NS-10M NS-20 Monitor Speaker CA-1000 Integrated Amplifier Featuring A-Class operation, the CA-1000 set the standard for integrated amplifiers. NS-690 Monitor Speaker NS-1000M Monitor Speaker A truly legendary speaker still revered by HiFi enthusiasts B-1 Power Amplifier An innovative power amp that used FETs in all stages C-2 Control Amplifier Received top prize at the Milan International Music and HiFi Show. NS-10M Studio Monitor Speaker Became of the most popular studio monitors in the world. A-1 Integrated Amplifier PX-1 Turntable Yamaha’s first linear tracking turntable B-6 Power Amplifier Pyramid-shaped power amplifier with X power supply and X amplifier GT-2000/L Turntable Ultra-precise heavyweight player embodying GT concept CD-1 CD Player First CD Player introduced in 1983 B-6 GT-2000 B-2x Power Amplifier MX-10000 Power Amplifier and CX-10000 Control Amplifier Amplifier that redefined the capabilities of separate components 100th anniversary model AX-2000 GT-CD1 Soavo-1 Soavo-2 AX-2000 Integrated Amplifier High S/N ratio (128 dB), digital direct function equipped GT-CD1 CD Player Top-loading type player with integrated separate structure MX-1 Power Amplifier and CX-1 Control Amplifier Soavo-1 and Soavo-2 Natural Sound Speaker Systems A-S1000 Stereo Amplifier and CD-S1000 Super Audio CD Player English A-S2000 Stereo Amplifier and CD-S2000 Super Audio CD Player ii En CAUTION: READ THIS BEFORE OPERATING YOUR UNIT. 1 2 3 4 5 6 7 8 9 10 11 12 13 14 15 To assure the finest performance, please read this manual carefully. Keep it in a safe place for future reference. Install this sound system in a well ventilated, cool, dry, clean place - away from direct sunlight, heat sources, vibration, dust, moisture, and/or cold. For proper ventilation, allow the following minimum clearances around this unit. Top: 10 cm (4 in) Rear: 10 cm (4 in) Sides: 10 cm (4 in) Locate this unit away from other electrical appliances, motors, or transformers to avoid humming sounds. Do not expose this unit to sudden temperature changes from cold to hot, and do not locate this unit in an environment with high humidity (i.e. a room with a humidifier) to prevent condensation inside this unit, which may cause an electrical shock, fire, damage to this unit, and/or personal injury. Avoid installing this unit where foreign object may fall onto this unit and/or this unit may be exposed to liquid dripping or splashing. On the top of this unit, do not place: – Other components, as they may cause damage and/or discoloration on the surface of this unit. – Burning objects (i.e. candles), as they may cause fire, damage to this unit, and/or personal injury. – Containers with liquid in them, as they may fall and liquid may cause electrical shock to the user and/or damage to this unit. Do not cover this unit with a newspaper, tablecloth, curtain, etc. in order not to obstruct heat radiation. If the temperature inside this unit rises, it may cause fire, damage to this unit, and/or personal injury. Do not plug in this unit to a wall outlet until all connections are complete. Do not operate this unit upside-down. It may overheat, possibly causing damage. Do not use force on switches, knobs and/or cords. When disconnecting the power cable from the wall outlet, grasp the plug; do not pull the cable. Do not clean this unit with chemical solvents; this might damage the finish. Use a clean, dry cloth. Only voltage specified on this unit must be used. Using this unit with a higher voltage than specified is dangerous and may cause fire, damage to this unit, and/or personal injury. Yamaha will not be held responsible for any damage resulting from use of this unit with a voltage other than specified. To prevent damage by lightning, keep the power cable and outdoor antennas disconnected from a wall outlet or this unit during a lightning storm. Do not attempt to modify or fix this unit. Contact qualified Yamaha service personnel when any service is needed. The cabinet should never be opened for any reasons. When not planning to use this unit for long periods of time (i.e. vacation), disconnect the AC power plug from the wall outlet. iii En 16 Be sure to read the “Troubleshooting” section on common operating errors before concluding that this unit is faulty. 17 Before moving this unit, press the power switch (on the main unit) downward to turn off this unit and then disconnect the AC power plug from the AC wall outlet. 18 Condensation will form when the surrounding temperature changes suddenly. Disconnect the power cable from the outlet, then leave this unit alone. 19 When using this unit for a long time, this unit may become warm. Turn the power off, then leave this unit alone for cooling. 20 Install this unit near the AC outlet and where the AC power plug can be reached easily. 21 The batteries shall not be exposed to excessive heat such as sunshine, fire or the like. When you dispose of batteries, follow your regional regulations. As long as this unit is connected to the AC wall outlet, it is not disconnected from the AC power source even if you turn off this unit by the power switch (on the main unit). WARNING TO REDUCE THE RISK OF FIRE OR ELECTRIC SHOCK, DO NOT EXPOSE THIS UNIT TO RAIN OR MOISTURE. WARNING THE POWER SUPPLY CABLE OF THIS UNIT MUST BE CONNECTED TO THE MAIN SOCKET OUTLET VIA A PROTECTIVE EARTHING CONNECTION. CONTENTS SUPPLIED ACCESSORIES .............................................................................................................. 2 GENERAL FLOWCHART ............................................................................................................... 3 SYSTEM STRUCTURES................................................................................................................... 4 Basic system.........................................................................................................................................................4 Full system ...........................................................................................................................................................5 Roles of each component .....................................................................................................................................6 Supported audio files............................................................................................................................................6 PREPARATIONS ............................................................................................................................... 7 Connections..........................................................................................................................................................7 Downloading the dedicated applications ............................................................................................................. 8 Turning on this unit..............................................................................................................................................9 COMMUNICATION SETUP .......................................................................................................... 10 Media sharing setup ...........................................................................................................................................10 Media controller setup........................................................................................................................................10 CONTENT BROWSING AND PLAYBACK................................................................................. 12 Operations from PC browser..............................................................................................................................12 Operations from mobile device .........................................................................................................................13 Operations from main unit or remote control ....................................................................................................14 Presetting favorite contents ................................................................................................................................15 SETUP MENU................................................................................................................................... 17 Setup menu operations .......................................................................................................................................17 Setup menu list...................................................................................................................................................18 Advanced setup menu ........................................................................................................................................19 CONTROLS AND FUNCTIONS .................................................................................................... 20 Front panel .........................................................................................................................................................20 Remote control ...................................................................................................................................................21 ADDITIONAL INFORMATION .................................................................................................... 22 Basic information on this unit ............................................................................................................................22 Troubleshooting .................................................................................................................................................24 Front panel display messages.............................................................................................................................26 Taking care of this unit ......................................................................................................................................26 SPECIFICATIONS ........................................................................................................................... 27 About this manual • This manual is produced prior to production. Design and specifications are subject to change in part as a result of improvements, etc. In case of differences between the manual and product, the product has priority. • Pictures and illustrations (screen display, etc.) used in this manual may be different from actual products depending on use environments. • Notes contain important information about safety and operating instructions. y indicates a tip for your operation. Introduction y • If you are not familiar with “DLNA” or “Internet radio”, please read “Basic information on this unit” ( P.22) at the beginning. • For details on compatible mobile devices, see “Mobile device” ( P.6). 1 En English Thank you for purchasing Yamaha Network Player NP-S2000. By connecting this unit to your home network and audio system, you can enjoy Internet radio (vTuner) or music files stored on your music servers (PCs and NAS) in the same network. Also, you can select a playback source or operate this unit not only from the supplied remote control but also from an external media controller such as PC browsers and mobile devices. SUPPLIED ACCESSORIES Check that you have received all of the following items. • Remote control • Batteries (AA, R6, UM-3) x 2 • Power cable • RCA stereo cable • TwonkyMedia server License Key brochure ■ Installing the batteries 1 3 2 ■ Note on transport tape Upon shipment from the factory, magnet feet are fixed with transport tape to this unit’s feet. Remove the transport tape before placing this unit. 1 Press the SELECT ENTER SOURCE LINK RETURN PUSH part and slide the battery cover off. 2 Insert two supplied AA batteries according to the polarity markings (+ and –). OFF 3 Slide the cover back until it snaps into place. Notes on remote controls and batteries • Do not spill water or other liquids on the remote control. • Do not drop the remote control. • Do not leave or store the remote control in the following conditions: – places of high humidity, such as near a bath – places of high temperatures, such as near a heater or stove – places of extremely low temperatures – dusty places • Insert the battery according to the polarity markings (+ and –). • Change all batteries if the operation range of the remote control narrows. • If the batteries run out, immediately remove them from the remote control to prevent an explosion or acid leak. • If you find leaking batteries, discard the batteries immediately, taking care not to touch the leaked material. If the leaked material comes into contact with your skin or gets into your eyes or mouth, rinse it away immediately and consult a doctor. Clean the battery compartment thoroughly before installing new batteries. • Do not use old batteries together with new ones. This may shorten the life of the new batteries or cause old batteries to leak. • Do not use different types of batteries (such as alkaline and manganese batteries) together. Specification of batteries may be different even though they look the same. • Before inserting new batteries, wipe the compartment clean. • Dispose of batteries according to your regional regulations. 2 En GENERAL FLOWCHART The following flowchart explains general setup procedures required to enjoy streaming music or Internet radio using this unit. Step 1: Deciding the system structure P.4 Decide the system to establish and check the requirements. Step 2: Connections P.7 Connect this unit to your PC system and audio system. Step 3: Downloading the dedicated applications P.8 From the website, download the dedicated applications required for your system. Step 4: Turning on this unit P.9 Power on this unit and other system components. Step 5: Media sharing setup P.10 Configure the media sharing settings of your digital media server. Step 6: Media controller setup P.10 Search the network players in your home network and establish a connection between an external media controller (PC) and this unit. Step 7: Playback P.12 Select music or Internet radio station to listen to. English 3 En SYSTEM STRUCTURES This section describes two major system structure examples and what you can do with each system. Basic system The following figure shows a minimum configuration to utilize the basic functions of this unit. With this system structure, you can do... • Easily establishing a communication between your PC and this unit using the dedicated PC setup application. • Selecting playback source from a browser on any PC in the same network or remote control – Browsing music stored on your PC – Selecting Internet radio stations Your audio system Your PC network system Internet Speakers Amplifier Broadband router PC Balanced, digital audio (optical or coaxial), or analog stereo cable Modem Network cable SELECT ENTER SOURCE PUSH RETURN LINK OFF SHUFF R DIMME T REPEA To AC outlet Remote control AY DISPL E SOURC This unit (NP-S2000) LE RY MEMO PRESE T SETUP RETUR N NOW G PLAYIN HOME ENTER AMP ME VOLU MUTE INPUT ■ Requirements To establish the “basic system”, all of the following requirements should be met. Audio system Your amplifier has an audio input jack. A speaker set is connected to your amplifier. y For details on a connection between your audio system and this unit, see “Connections” ( P.7). Please also refer to the manual of your audio devices. PC network system Your PC is connected to the Internet via the broadband router. Your PC has a disc drive capable of ripping CDs and enough hard drive space to store audio files. y • For details on Internet connection, please refer to the manual of your network devices. • For details on a connection and communication setup between your PC and this unit, see “Connections” ( P.7) and “COMMUNICATION SETUP” ( P.10). 4 En SYSTEM STRUCTURES Full system The following figure shows a recommended configuration to take full advantage of the functions of this unit. With this system structure, you can do... • All features listed in “Basic system” ( P.4) • Delivering music stored on your NAS (without starting your PC) • Selecting playback source from your mobile device – Browsing music stored on your PC and NAS – Selecting Internet radio stations Your PC network system PC Internet Your audio system Modem Speakers WiFi broadband router Amplifier NAS Balanced, digital audio (optical or coaxial), or analog stereo cable Network cable SELECT ENTER SOURCE PUSH RETURN LINK Mobile device OFF AY DISPL E SOURC SHUFF R DIMME T REPEA To AC outlet This unit (NP-S2000) MEMO LE RY PRESE T SETUP RETUR N NOW G PLAYIN HOME ENTER Remote control AMP ME VOLU MUTE INPUT ■ Requirements To establish the “full system”, all of the following requirements should be met. Audio system Your amplifier has an audio input jack. A speaker set is connected to your amplifier. y For details on a connection between your audio system and this unit, see “Connections” ( P.7). Please also refer to the manual of your audio devices. PC network system Your PC is connected to the Internet via the WiFi broadband router. Your PC has a disc drive capable of ripping CDs and enough hard drive space to store audio files. Your NAS is compatible with DLNA and works with your PC and WiFi broadband router properly. y • For details on Internet connection, please refer to the manual of your network devices. • For details on a connection and communication setup between your PC and this unit, see “Connections” ( P.7) and “COMMUNICATION SETUP” ( P.10). English Mobile device Your mobile device ( P.6) is wirelessly connected to the WiFi broadband router. 5 En SYSTEM STRUCTURES Roles of each component Supported audio files This section describes rolls of each component in the system. This unit supports the following audio files stored on a PC or a NAS. This unit (NP-S2000) Decodes digital audio signals received from your PC network system and sends the signals to your audio system so that you can enjoy digital music stored on a PC or NAS, or Internet radio in high-quality sounds. Audio format: WAV, FLAC, MP3, AAC, WMA Remote control With the remote control, you can select a playback source or operate this unit while viewing information on the front panel display of this unit. Amplifier and speakers Receive audio signals from this unit and produce sounds. PC • Stores music files ripped from CDs or downloaded and works as a DLNA digital media server. • By installing the dedicated PC setup application on your PC, you can configure the communication setup between your PC and this unit. • With a browser (Internet Explorer 6.0 or later), you can select a playback source or operate this unit. Broadband router (WiFi broadband router) Connects your PC and this unit to the Internet. A WiFi broadband router also works as a bridge between your mobile device and this unit in the network. NAS (Network attached storage) Stores music files ripped from CDs or downloaded and works as a DLNA digital media server, enabling you to enjoy music without starting your PC. Mobile device By installing the dedicated application on your mobile device, you can use it as an external controller. You can select playback source or operate this unit while viewing the screen of the mobile device. Compatible mobile devices (as of June 2011) – iPhone, iPod touch, iPad (iOS 4.0 or later) – Android™ devices (Android OS 2.1 or later, ready for WiFi connection) Note You may not be able to use the dedicated application depending on the operating system version of the mobile device 6 En y • Playable audio formats vary depending on the media server. For example: – Windows Media Player 12 supports WAV, MP3, AAC and WMA. – Windows Media Player 11 supports WAV, MP3 and WMA. – TwonkyMedia server (supplied) supports all audio formats listed above. For details, visit “http://download.yamaha.com/file/45350”. • We recommend WAV and FLAC as audio formats producing high-quality sounds. Sample rate: 96, 88.2, 64, 48, 44.1, 32, 24, 22.05, 16, 12, 11.025, 8 (kHz) Bit depth: 16, 24 (bit) PREPARATIONS This section describes preparations required before operating this unit. Connections Depending on the system structure you want to establish, make cable connections of the system components. Speakers Amplifier PC Internet XLR balanced cable WAN Coaxial digital audio cable Optical cable RCA stereo cable (supplied) Modem LAN Broadband router 1 NAS (for full system only) 2 OUTPUT NETWORK R BALANCED OUT R ANALOG OUT L BALANCED OUT L OPTICAL COAXIAL SYSTEM CONNECTOR AC IN DIGITAL OUT This unit (NP-S2000) * Used for product inspection service 3 Power cable (supplied) To AC outlet 1 Connect this unit to your amplifier with an XLR balanced cable, RCA stereo cable, coaxial digital audio cable or optical cable. y Select one of the audio connections shown above. If your amplifier is equipped with XLR balanced input jacks, we recommend a balanced connection for optimum audio performance. ■ About the spike feet The feet of this unit include built-in spikes that can reduce the effect of vibrations on the set. To use the spikes, remove the magnet foot by pulling it. Also, you can adjust the height of each foot by rotating it if this unit is unstable. 2 Connect this unit to your broadband router with an STP (shielded twisted pair) network cable (CAT-5 or higher straight cable). Spike 3 Connect the power cable to AC IN and then plug into an AC outlet. Magnet foot When using a digital connection, audio output may be interrupted at the beginning of a track depending on the audio system (amplifier, etc). The spikes may scratch the shelf or floor. We recommend you use a support when placing this unit on expensive furniture, etc. 7 En English Caution Note PREPARATIONS ■ About the BALANCED OUT jacks The pin assignments for the BALANCED OUT jacks of this unit are shown below. Before connecting an XLR balanced cable, refer to the manual of your amplifier and verify that its XLR balanced input jacks are compatible with the pin assignments. Downloading the dedicated applications Visit the following website for information about downloading the dedicated applications. http://download.yamaha.com/file/45350 y 1: ground 2: hot The latest information on this unit (owner’s manual, FAQ, etc.) is also available in the download file. ■ Network Player Search 3: cold When connecting to this unit, be sure to match the pins and insert the connector of the “female” XLR balanced cable until you hear a click. When disconnecting, hold down the lever of the connector and then pull it out. “Female” XLR connector This application enables you to easily search the network players in your home network from your PC and start the browser to select playback source or operate this unit. Note Please read “License agreement” ( P.28) before using this application. ■ Network Player Controller Full System An application for mobile devices ( P.6). This application enables you to select playback source or operate this unit from your mobile device. ■ TwonkyMedia server “Male” XLR connector 8 En For details, refer to “TwonkyMedia server License Key brochure” supplied with this unit. PREPARATIONS Turning on this unit If you have established all cable connections, turn on this unit and other system components. SELECT ENTER SOURCE PUSH RETURN LINK OFF Set the power switch to STANDBY/ON y When the power switch on main unit is set to STANDBY/ON, you can switch this unit between on and standby by pressing the power button on the remote control ( P.21). English 9 En COMMUNICATION SETUP This section describes the setup required on digital media servers (PC or NAS) and controllers (PC). 3 Check the “Share my media to” box, select the “NP-S2000” icon and then click “Allow”. 4 In the same way, select the icons for devices to be used as external media controllers (other PCs and mobile devices) and then click “Allow”. 5 Click “OK” to exit. Media sharing setup To enable a sharing of PC/NAS music contents over the network, configure the sharing setting of the media server. ■ Sharing setup on PC When using Windows Media Player 12 (on Windows 7) 1 In “Control Panel”, select “Choose homegroup and sharing options” under “Network and Internet”. 2 Check the “Stream my pictures, music, and videos to all devices on my home network” box and then select “Choose media streaming options”. 3 Select “Allowed” from the dropdown menu next to “NP-S2000”. 4 5 In the same way, select “Allowed” from the drop-down menu next to “Media programs on this PC and remote connections”. Click “OK” to exit. y Since this unit supports Windows 7, you can directly control playback of this unit from Windows Media Player 12. When using TwonkyMedia server If you have saved music files on your PC with iTunes (Non-DRM AAC/MP3 files), you can enable music streaming by using TwonkyMedia server. For details, refer to “TwonkyMedia server License Key brochure” supplied with this unit. Change the media receiver setting on TwonkyMedia server to allow this unit and devices to be used as external media controllers (other PCs and mobile devices) to access TwonkyMedia server. ■ Sharing setup on NAS Full System Refer to the manual of your NAS and change the media sharing setting on the NAS to allow this unit and devices to be used as external media controllers (other PCs and mobile devices) to access the NAS. Media controller setup To select a playback source or operate this unit from external media controllers, first you need specify the IP address of this unit on a browser (Internet Explorer 6.0 or later). By using the dedicated application “Network Player Search”, you can easily search the network players in your home network from your PC and establish a connection. y When using Windows Media Player 11 1 Start Windows Media Player 11 on your PC. 2 Select “Library” and then “Media Sharing”. 10 En • For details on the download of the dedicated applications, see “Downloading the dedicated applications” ( P.8). • To use your mobile devices as an external media controller, see “Operations from mobile device” ( P.13). COMMUNICATION SETUP ■ Controller setup on PC 3 In this section, Windows 7 is used as an example. 1 Click “Search” to search the network players in the network. Click the “NP Search.exe” in the download folder to start “Network Player Search”. The “NETWORK PLAYER SEARCH” screen appears. Click 4 Select the model from the list and then click “Connect”. y The menu language is automatically selected according to the language setting on the operating system. When using Windows, you can also select a language from “Language” under the “Tool” menu. Select 2 From the “Network Adapter” dropdown menu, select the network adapter connected to the network which this unit is being connected. Click The network player control screen appears in the browser. Now you are ready to select a playback source or operate this unit. For details, see “CONTENT BROWSING AND PLAYBACK” ( P.12). Select y By adding the URL of the network player control screen (IP address of this unit) to the bookmark of the browser, you will be able to open it without using “Network Player Search” from the next time. However, the IP address of this unit may change if you are using a DHCP server. English 11 En CONTENT BROWSING AND PLAYBACK This section describes how to browse contents and start playback from the PC browser (Internet Explorer 6.0 or later), mobile device or front panel/remote control of this unit. 2 Select a menu item until you find a desired content and then start playback. Operations from PC browser Menu screen 1 In the “Source” screen, select a source type. 1 2 y • The “Source” screen is displayed after following the procedure in “Controller setup on PC” ( P.11). • Select “Setup” to configure the settings of this unit ( P.17). 3 4 5 6 1 Return Move to the previous menu screen. 2 Now Playing Move to the playback information screen. 3 Menu items 4 Source Move to the “Source” screen. 5 Home Move to the top menu screen. 6 Page Up/Page Down Switch the pages of the menu list. 12 En CONTENT BROWSING AND PLAYBACK Playback information screen Operations from mobile device 1 Full System By using the dedicated application “Network Player Controller” ( P.8), you can browse contents and start playback from your mobile device. 2 1 Tap the “NP Controller” icon on your mobile device to start “Network Player Controller”. 2 In the “Player Select” screen, select a network player to connect to. 3 4 5 6 7 8 1 Return Move to the previous screen. 2 Album art or station icon (if available) 3 Playback information Shows the information on the playback content. 4 Playback functions (skip backward), DLNA: (play), (pause), (skip forward) Internet Radio: (play), (stop) 5 Source Move to the “Source” screen. 6 Home Move to the top menu screen. 7 Shuffle (for “DLNA” only) Switch the shuffle mode (on, off). 8 Repeat (for “DLNA” only) Switch the repeat mode (repeat all, repeat single, off). y You can register your favorite Internet Radio stations by accessing the “vTuner Radio Guide” website with a PC browser. To use this feature, you need the MAC address of this unit ( P.18) and your e-mail address to create your personal account. For details, visit “http://yradio.vtuner.com/”. y • This screen is skipped when only one network player has been detected. • To search the network players again, tap “Search”. 3 Follow the procedure in “Operations from PC browser” ( P.12). y 13 En English • To update the media server list, tap “Search”. • To reload the content list of the selected media server, tap “Load”. Reload the content list when you have added or deleted any content on the media server. CONTENT BROWSING AND PLAYBACK Remote control Operations from main unit or remote control RETURN NOW PLAYING HOME RETURN HOME NOW PLAYING y For details on the controls on the front panel/remote control, see “CONTROLS AND FUNCTIONS” ( P.20). 1 Cursor buttons/ ENTER Press SOURCE repeatedly to select a source type. SOURCE ENTER Cursor buttons/ ENTER Press / to select a menu item (or press / repeatedly to select from the gauge) and press ENTER to confirm the selection. RETURN SOURCE Show the upper-level menu in the front panel display. SELECT ENTER SOURCE HOME PUSH DIMMER DISPLAY REPEAT SHUFFLE RETURN Show the top-level menu in the front panel display. NOW PLAYING Show the playback information in the front panel display. MEMORY SOURCE 3 D L N A If playback starts, use the following controls to operate desired functions. Symphony # 9 - 4 Internet Radio Main unit 2 Use the following controls to select a menu item until you find a desired content. SELECT ENTER SOURCE Sym phony # 9 - 4 RETURN Jog dial Jog dial Main unit Rotate left to skip backward and right to skip forward. Press to start or pause playback. SELECT ENTER SOURCE PUSH RETURN RETURN Jog dial Jog dial Rotate to select a menu item and press to confirm the selection. RETURN Show the upper-level menu in the front panel display. 14 En PUSH RETURN RETURN Show the previous menu in the front panel display. CONTENT BROWSING AND PLAYBACK Remote control REPEAT Presetting favorite contents DIMMER DISPLAY REPEAT SHUFFLE RETURN NOW PLAYING DISPLAY SHUFFLE y HOME For details on the controls on the front panel/remote control, see “CONTROLS AND FUNCTIONS” ( P.20). RETURN Playback buttons The preset function enables to make a quick access to your favorite contents (up to 20 contents) with the remote control. ■ Registering a favorite content as a preset ENTER You can preset music files or Internet radio stations. Playback buttons DLNA: (play), (pause), backward), (skip forward) Internet Radio: (play), (stop) (skip SHUFFLE (for “DLNA” only) 1 Start playback of the content you want to preset. 2 Press MEMORY to enter the preset mode. Switch the shuffle mode (on, off). REPEAT (for “DLNA” only) Switch the repeat mode (repeat all, repeat single, off). MEMORY MEMORY DISPLAY PRESET Switch the playback information shown in the front panel display. PRESET SETUP RETURN RETURN NOW PLAYING HOME Show the previous menu in the front panel display. y You can register your favorite Internet Radio stations by accessing the “vTuner Radio Guide” website with a PC browser. To use this feature, you need the MAC address of this unit ( P.18) and your e-mail address to create your personal account. For details, visit “http://yradio.vtuner.com/”. Cursor buttons ENTER The empty preset number is automatically selected. Memory: 2 3 2 4 6 8 9 10 To change the preset location, press PRESET or / repeatedly. To switch between “1 to 10” and “11 to 20”, press /. Memory:13 13 14151617 20 y Preset locations already used are displayed without numbers. If one of these locations is selected, it will be replaced with new content. 4 Press MEMORY again to confirm the selection. English 15 En CONTENT BROWSING AND PLAYBACK ■ Playing back a preset content 1 Press PRESET or / repeatedly to select a desired preset number. To switch between “1 to 10” and “11 to 20”, press /. Select: 3 1 2 3 5 7 y Preset locations not in use are displayed without numbers. 2 Within five seconds, press . ENTER y To clear all preset settings, execute “Initialize” in the advanced setup menu ( P.17). Make sure that this operation will reset all the settings of this unit to factory default. Notes • This unit does not recall the preset content in the following cases: – the PC which stores the selected content is turned off or disconnected from the network. – the selected Internet radio station is temporary unavailable or out of service. – the directory of the selected content has been changed. • This unit memorizes the relative position of the preset contents in a directory. If you have added or deleted any music files to or from the directory, this unit may not recall the preset content correctly. In such cases, preset the contents again. 16 En SETUP MENU You can configure the various settings of this unit using the setup menu. y For details on the controls on the front panel/remote control, see “CONTROLS AND FUNCTIONS” ( P.20). Setup menu operations ■ Operations from PC browser or mobile device 1 ■ Operations from remote control 1 In the “Source” screen, select “Setup”. Press SETUP to enter the setup menu ( P.18). To make the advanced setup menu items ( P.19) selectable, press SETUP while holding down RETURN (on the main unit). SETUP SETUP RETURN NOW PLAYING Cursor buttons/ ENTER HOME ENTER SELECT ENTER SOURCE PUSH RETURN Setup RETURN 2 Select a menu item to configure. NETWORK C o n f i g u r a t i o n 2 Press / to select a menu item to configure and then press ENTER. For some menu items, repeat step 2 to select a submenu item. Firmware Update 3 Press / to select a parameter and then press ENTER. y You need to enter a numerical address for some menu items. In this case, press / to move the target, / to select a number and ENTER to confirm it. Select a parameter to be set. English 3 y You need to enter text for some menu items. In this case, select the entry field, use the keyboard to enter text and the Enter key to confirm it. 17 En SETUP MENU Setup menu list Available setup menus vary depending on the controller. Menu Submenu DHCP NETWORK Configuration NETWORK Information Settings (Bold: default) On, Off Controller Function Mobile device Remote control Select “On” to use the DHCP server to automatically configure the network settings of this unit or “Off” to configure manually. IP Address Specify the IP address when “DHCP” is “Off”. *1 Subnet Mask Specify the subnet mask when “DHCP” is “Off”. *1 Default Gateway Specify the default gateway when “DHCP” is “Off”. *1 DNS Server (P) Specify the primary DNS server when “DHCP” is “Off”. *1 DNS Server (S) Specify the secondary DNS server when “DHCP” is “Off”. *1 MAC Address The MAC address of this unit is shown. The MAC address is also used as a vTuner ID. Status The network status of this unit is shown. System The serial number of this unit is shown. MAC Address Filter Specify the MAC addresses (up to 5) of the network components that will be permitted access to this unit when “MAC Address Filter On/Off” is “On”. Firmware Version (NP-S2000 Information) The firmware version of this unit is shown. Update the firmware of this unit. Firmware Update Friendly Name – If “Firmware Update?” appears, press ENTER to start firmware update. Do not operate this unit until “Update OK” appears. – If the firmware is already the latest, “Update OK” appears. Specify the friendly name of this unit for Windows 7. *1: When “DHCP” is “On”, you can check the values (IP address, etc.) assigned by the DHCP server. 18 En SETUP MENU Advanced setup menu The following menu items are available only when you enter the setup menu by pressing SETUP (on the remote control) while holding down RETURN (on the main unit). Menu MAC Address Filter On/Off Settings (Bold: default) On, Off Function Select “On” to permit access to this unit only from the network components with the MAC addresses specified in the “MAC Address Filter” list. Select “Off” to disable the MAC address filter function. Select “On” to skip silence between each track and enable seamless playback. Select “Off” to disable the gapless playback function. This function works on “DLNA” content only. Gapless Playback vTuner Account Reset On, Off Yes, No y When “Gapless Playback” is “On”, this unit starts to read data of the next track at the end of the current track. Some playback operations (skip, repeat, etc.) will work on the next track during this process. Select “Yes” to reset the vTuner account. If “Please Power Off!” appears, turn off this unit. The reset operation will be reflected the next time you turn on this unit. y To create a new account, access “http://yradio.vtuner.com/”. You need the MAC address of this unit and your e-mail address. Initialize Yes, No Select “Yes” to reset the settings of this unit to factory default. If “Please Power Off!” appears, turn off this unit. The reset operation will be reflected the next time you turn on this unit. English 19 En CONTROLS AND FUNCTIONS Front panel 1 SELECT ENTER SOURCE RETURN 7 8 PUSH LINK OFF 2 3 4 5 1 Power indicator Lights up: This unit is turned on. Lights up dimly: This unit is standby. Off: This unit is turned off. 2 Power switch ( P.9) Switches this unit between on/standby and off. 3 Foot ( P.7) Remove the magnet foot to use the spikes. Also, you can adjust the height of each foot by rotating it. 4 Remote control sensor ( P.21) Receives infrared signals from the remote control. 5 LINK indicator Lights up: This unit is connected to the network and an IP address has been assigned. Blinks: This unit is connected to the network but an IP address has not been assigned. Off: This unit is not connected to the network. 20 En 6 3 9 6 Front panel display Shows menu items or playback information. y For details on display messages, see “Front panel display messages” ( P.26). 7 SOURCE ( P.14) Selects a source type. 8 RETURN ( P.14) Shows the upper-level menu in the front panel display. 9 Jog dial ( P.14) Rotate to select an item and press to confirm the selection. CONTROLS AND FUNCTIONS Remote control 1 Remote control signal transmitter Transmits infrared signals. 1 2 3 4 DIMMER DISPLAY REPEAT SHUFFLE 3 DIMMER Adjusts the brightness of the front panel display. 4 REPEAT ( P.15) Switches the repeat mode (repeat all, repeat single, off). A B 5 MEMORY ( P.15) Turns this unit to the preset mode. MEMORY 6 6 PRESET ( P.15) Selects a preset number. PRESET 7 SETUP ( P.17) Shows the setup menu in the front panel display. SETUP 7 9 0 SOURCE 5 8 2 SOURCE ( P.14) Selects a source type. RETURN NOW PLAYING HOME C D 8 RETURN ( P.14) Shows the upper-level menu in the front panel display. 9 Cursor buttons/ENTER ( P.14 and 17) Use the cursor buttons to select an item and ENTER to confirm the selection, or control the playback functions. ENTER 0 AMP A DISPLAY ( P.15) Switch the playback information shown in the front panel display. VOLUME MUTE (power) ( P.9) Switches this unit between on and standby. E B SHUFFLE ( P.15) Switches the shuffle mode (on, off). C HOME ( P.14) Shows the top-level menu in the front panel display. INPUT D NOW PLAYING ( P.14) Shows the playback information in the front panel display. E Amplifier control buttons Control the corresponding functions of Yamaha amplifier. For details, refer to the manual of your amplifier. y These buttons may not work on some Yamaha amplifiers. ■ Using the remote control Aim the remote control directly at the remote control sensor on this unit during operation. Remote control sensor LINK OFF 30 30 Within 6 m (20 ft) SOURCE DIMMER DISPLAY REPEAT SHUFFLE MEMORY PRESET SETUP NOW PLAYING English RETURN HOME ENTER AMP VOLUME MUTE INPUT 21 En ADDITIONAL INFORMATION Basic information on this unit ■ General ■ DLNA What is “Yamaha Network Player NP-S2000”? NP-S2000 can play back the following audio sources: • DLNA-compatible server (music files stored on a PC or a NAS) For details, see “DLNA” below. • Internet radio (vTuner) For details, see “Internet radio” ( P.23). Also, you can select a playback source or operate this unit from the remote control or an external media controller (PC browser or dedicated mobile device application). What is “DLNA”? It stands for Digital Living Network Alliance, and is a guideline to promote standardization of interconnection of home network devices such as digital consumer electronics. DLNA components are separated into four types: Digital Media Server (DMS), Digital Media Renderer (DMR), Digital Media Player (DMP) and Digital Media Controller (DMC). “DMS” is a device that is used to store or distribute digital contents such as music files. For this unit, PCs and NAS are regarded as “DMS”. “DMR” is a device to receive instructions from “DMC” and play back digital contents such as this unit. Similarly, “DMP” is a device to play back digital contents. “DMC” is a device to control digital contents. PC browsers and the mobile device application correspond to “DMC” for this unit. Tell me about the network feature By connecting this unit to your home network with an STP (shielded twisted pair) network cable (CAT-5 or higher straight cable), you can enjoy Internet radio or music files stored in the specified folder (directory) on the server in the same network. For information about the network devices and settings required to establish a home network, please consult your Internet service provider. Can I preset favorite contents? Yes you can. This unit has the preset function that enables you to make a quick access to your favorite contents (up to 20 contents) with the remote control. For details, see “Presetting favorite contents” ( P.15). You can also register your favorite Internet Radio stations by accessing the “vTuner Radio Guide” website with a PC browser. To use this feature, you need the MAC address of this unit ( P.18) and your e-mail address to create your personal account. For details, access “http:// yradio.vtuner.com/”. Does this unit support multi-language display? Yes, it does. The front panel display of this unit can display English, French, German, Spanish, Russian and Japanese used in track names, etc. What types of servers can I use to browse or play back music files with DLNA? Use a DLNA-compatible server, such as one of the following devices. PC compatible with Windows Media Player 12 or Windows Media Player 11 To browse folders (directories) on your PC from this unit, you need to change the media sharing setting of Windows Media Player 12 or Windows Media Player 11 to make those folders accessible from this unit. For details on Windows Media Player, please ask Microsoft Corporation. PC with TwonkyMedia server installed With a license key shown on the front cover of the “TwonkyMedia server License Key” brochure, you can download TwonkyMedia server for free. It enables playback of FLAC files or music in the iTunes library on this unit. How many servers can I connect to the network? You can connect up to 16 servers. 22 En ADDITIONAL INFORMATION What types of audio formats can I play back on this unit? This unit supports monaural or stereo sounds of WAV, FLAC, MP3, AAC and WMA files. For example, the following audio formats are not supported. • Audio files with DRM (Digital Rights Management) such as music you purchased on iTunes Store • ATRAC, multi-channel sounds of WAV and WMA files Can I play back music in the iTunes library on this unit? You can play back MP3, AAC and WMA files by installing TwonkyMedia server on your PC or using a NAS that supports playback of the iTunes library. ■ Internet radio Tell me about the Internet radio If this unit is connected to the Internet via your home network, you can listen to Internet radio stations using the vTuner Internet Radio station database service, providing a database of over 2000 radio stations around the world. To enjoy Internet radio in a good condition, we recommend that you use a fast broadband connection to the Internet. For information about the broadband connection speed, please consult your Internet service provider. Can I add other Internet radio stations to the list? If you have found an Internet radio station that is not in the list, you can add it by accessing the “vTuner Radio Guide” website with a PC browser. To use this feature, you need the MAC address of this unit ( P.18) and your e-mail address to create your personal account. For details, access “http://yradio.vtuner.com/”. Can I delete Internet radio stations that I do not listen to from the list? No, you cannot delete Internet radio stations from the list. English 23 En ADDITIONAL INFORMATION Troubleshooting Refer to the tables below if the unit does not function properly. If the problem you are experiencing is not listed below, or if the instruction below does not help, download the FAQ file from “http://download.yamaha.com/file/45350” and check it. Still, if you cannot find information you are looking for, contact the nearest authorized Yamaha dealer or service center. ■ General Problem Cause Remedy See page The power cable is not connected to AC IN on the main unit or not plugged into an AC outlet. Connect the power cable firmly. 7 This unit has been exposed to a strong external electric shock (such as lightning or strong static electricity). Turn off this unit, disconnect the power cable, plug it back in after 30 seconds and then use it normally. — The power indicator on the front panel flashes. There is a problem with the internal circuitries of this unit. Turn off this unit, disconnect the power cable, and then contact the nearest authorized Yamaha dealer or service center. — Connect the audio cable firmly. If the problem persists, the audio cable may be defective. 7 No sound. The audio cable connection between this unit and amplifier is improper. The input setting on the amplifier is incorrect. Select the correct input (from this unit) on the amplifier. — The audio cable connection between this unit and amplifier is improper. Connect the audio cable firmly. If the problem persists, the audio cable may be defective. 7 Wrong distance or angle. The remote control functions within a maximum range of 6 m (20 ft) and no more than 30 degrees off-axis from the front panel. 21 Direct sunlight or lighting (from an inverter type of fluorescent lamp, etc.) is striking the remote control sensor of this unit. Adjust the lighting angle, or reposition this unit. — The batteries are weak. Replace all batteries. 2 The digital media server that stores your preset content is turned off. Turn on the digital media server and try again. — The preset Internet Radio station is no longer in service. Preset another favorite content. 15 Your amplifier is not one of Yamaha amplifiers. (These buttons may not work on some Yamaha amplifiers.) Use the remote control of your amplifier. — This unit fails to turn on. Hum noise is heard. The remote control does not work or function properly. PRESET on the remote control does not work. The amplifier control buttons on the remote control do not work on the amplifier. 24 En ADDITIONAL INFORMATION ■ DLNA Problem This unit does not detect the digital media server (PC). Some audio files cannot be played back on this unit. Cause Remedy See page No server application is installed on the PC. Install a DLNA-compatible server application such as Windows Media Player 11, Windows Media Player 12 or TwonkyMedia server. — Windows Media Player 11 or Windows Media Player 12 is not started on the PC. Start Windows Media Player 11 or Windows Media Player 12 on the PC. — The sharing setting of Windows Media Player 11 or Windows Media Player 12 is incorrect. Change the media sharing setting of it to allow this unit to access the PC folder. 10 Access to the PC is blocked by the Antivirus software installed on the PC. Check the Antivirus software settings (firewall setting, etc.). — You are trying to play back DRM audio files you purchased on iTunes Store. You cannot play back DRM audio files you purchased on iTunes Store. — You are trying to play back FLAC files stored on a PC without TwonkyMedia server. Install TwonkyMedia server on the PC, or use a NAS that supports playback of FLAC files. — Remedy See page — — ■ Internet radio Problem Cause Some Internet radio stations cannot be played back. The selected Internet radio station is currently not available. It may not be available to listen because there might be a network problem, or the station might be broadcasting in limited hour. Also, the list may include the station that is already obsolete, because it takes time to update the list. Please try another station available. There is a station with no sound even after playback starts. The selected Internet radio station broadcasts audio silence currently. Some Internet radio stations broadcast audio silence during particular periods of time in a day. Try the station later or select another station. English 25 En ADDITIONAL INFORMATION Problem The sound from the Internet radio breaks sometimes. Cause Remedy See page Intermittent audio occurs depending on the network condition between your local network and the Internet station. Try the station later or select another station. If the problem happens with any stations, your network itself may have a problem. To enjoy Internet radio in a good condition, we recommend that you use a fast broadband connection to the Internet. For information about the broadband connection speed, please consult your Internet service provider. — Front panel display messages Message Status <Access Denied> Access to the media server has been denied. <Access Error> This unit cannot connect to the media server. List Update The content list of the media server has been updated. <No Content> This unit cannot find any content. <No DLNA Server Found> This unit cannot find any DLNA server. <No Link> This unit is not connected to the network. <No Preset Memory> No preset contents are registered. <Not Available> The operation you have performed is not available. Please Wait The specified file is being loaded. <Preset Memory Error> The content cannot be preset. Preset No.XX is not Found. The music file or Internet radio station registered to the selected preset number (XX) cannot be found. <Unable to Play> This unit cannot play back the specified file. Taking care of this unit When you wipe this unit, do not use chemical solvents (alcohol, thinner, etc.). This may damage the finish. Use a clean, dry cloth. For heavy dirt, dampen a soft cloth in detergent diluted with the water, wring it out, and then clean this unit up with the cloth. ■ For the polish-finished side panels Clean the side panels with a soft, dry cloth, such as a Yamaha Unicon cloth. For heavy dirt, use a Yamaha Piano Unicon. Be careful not to bump the side panels with metal, porcelain, or other hard objects, as this may damage the finish. 26 En SPECIFICATIONS INPUT/OUTPUT • NETWORK Ethernet connection .................................100Base-TX/10Base-T DLNA version ................................. 1.5 (DMP/DMR supported) Audio format (DLNA)........... WAV, FLAC, MP3, AAC, WMA Audio format (Internet radio) ...................................MP3, WMA Audio sample rate (DLNA) ..... 96, 88.2, 64, 48, 44.1, 32, 24, 22.05, 16, 12, 11.025, 8 kHz Bit depth (DLNA)......................................................... 16, 24 bit • BALANCED OUT .......................................................... 2ch (L/R) • ANALOG OUT ............................................................... 2ch (L/R) • DIGITAL OUT Optical 1 Coaxial 1 • SYSTEM CONNECTOR (for product inspection service) 1 AUDIO SECTION • Output level 1 kHz, 0 dB, fs 44.1 kHz ............................................2.0 ± 0.3 V • Signal to noise ratio (IHF-A network) 1 kHz, 0 dB, fs 44.1 kHz .................................... 116 dB or more • Dynamic range 1 kHz, 0 dB, fs 44.1 kHz .................................... 100 dB or more • Harmonic distortion 1 kHz, 0 dB, fs 44.1 kHz ...................................... 0.002% or less • Frequency response fs 44.1 kHz................................................2 Hz to 20 kHz, –3 dB fs 48 kHz...................................................2 Hz to 24 kHz, –3 dB fs 96 kHz...................................................2 Hz to 48 kHz, –3 dB iPod touch, iPhone, iPad Macintosh, Mac OS, iPod touch and iTunes are trademarks of Apple Inc., registered in the U.S. and other countries. iPhone and iPad are trademarks of Apple Inc. Android™ is a trademark of Google Inc. Microsoft, Windows, Windows 7, Windows Vista, Windows XP, Windows Media Audio, Windows Media Player and Internet Explorer are either registered trademarks or trademarks of Microsoft Corporation in the United States and/or other countries. TwonkyMedia is a registered trademark of PacketVideo Corporation. MPEG Layer-3 audio coding technology licensed from Fraunhofer IIS and Thomson. GENERAL • Power supply [U.S.A. and Canada models] ........... AC 110 to 120 V, 50/60 Hz [Other models] ................................. AC 220 to 240 V, 50/60 Hz • Power consumption ................................................................30 W • Standby power consumption (reference data) .......................0.3 W • Dimensions (W H D)................................. 435 69 440 mm () • Weight...................................................................... 12 kg (26.5 lb) * Please note that all specifications are subject to change without notice. English 27 En ■ License agreement ATTENTION PLEASE READ THIS SOFTWARE LICENSE AGREEMENT (“AGREEMENT”) CAREFULLY BEFORE USING THIS SOFTWARE. YOU ARE ONLY PERMITTED TO USE THIS SOFTWARE PURSUANT TO THE TERMS AND CONDITIONS OF THIS AGREEMENT. THIS AGREEMENT IS BETWEEN YOU (AS AN INDIVIDUAL OR LEGAL ENTITY) AND YAMAHA CORPORATION (“YAMAHA”). BY DOWNLOADING, INSTALLING, COPYING, OR OTHERWISE USING THIS SOFTWARE YOU ARE AGREEING TO BE BOUND BY THE TERMS OF THIS LICENSE. IF YOU DO NOT AGREE WITH THE TERMS, DO NOT DOWNLOAD, INSTALL, COPY, OR OTHERWISE USE THIS SOFTWARE. IF YOU HAVE DOWNLOADED OR INSTALLED THE SOFTWARE AND DO NOT AGREE TO THE TERMS, PROMPTLY DELETE THE SOFTWARE. GRANT OF LICENSE AND COPYRIGHT Yamaha hereby grants you the right to use one copy of the software program(s) and data (“SOFTWARE”) accompanying this Agreement. The term SOFTWARE shall encompass any updates to the accompanying software and data. The SOFTWARE is owned by Yamaha and/or Yamaha’s licensor(s), and is protected by relevant copyright laws and all applicable treaty provisions. While you are entitled to claim ownership of the data created with the use of SOFTWARE, the SOFTWARE will continue to be protected under relevant copyrights. • You may use the SOFTWARE on a single computer. • You may make one copy of the SOFTWARE in machine-readable form for backup purposes only, if the SOFTWARE is on media where such backup copy is permitted. On the backup copy, you must reproduce Yamaha’s copyright notice and any other proprietary legends that were on the original copy of the SOFTWARE. • You may permanently transfer to a third party all your rights in the SOFTWARE, provided that you do not retain any copies and the recipient reads and agrees to the terms of this Agreement. RESTRICTIONS • You may not engage in reverse engineering, disassembly, decompilation or otherwise deriving a source code form of the SOFTWARE by any method whatsoever. • You may not reproduce, modify, change, rent, lease, or distribute the SOFTWARE in whole or in part, or create derivative works of the SOFTWARE. • You may not electronically transmit the SOFTWARE from one computer to another or share the SOFTWARE in a network with other computers. • You may not use the SOFTWARE to distribute illegal data or data that violates public policy. • You may not initiate services based on the use of the SOFTWARE without permission by Yamaha Corporation. Copyrighted data, including but not limited to MIDI data for songs, obtained by means of the SOFTWARE, are subject to the following restrictions which you must observe. • Data received by means of the SOFTWARE may not be used for any commercial purposes without permission of the copyright owner. • Data received by means of the SOFTWARE may not be duplicated, transferred, or distributed, or played back or performed for listeners in public without permission of the copyright owner. • The encryption of data received by means of the SOFTWARE may not be removed nor may the electronic watermark be modified without permission of the copyright owner. DISCLAIMER OF WARRANTY ON SOFTWARE You expressly acknowledge and agree that use of the SOFTWARE is at your sole risk. The SOFTWARE and related documentation are provided “AS IS” and without warranty of any kind. NOTWITHSTANDING ANY OTHER PROVISION OF THIS AGREEMENT, YAMAHA EXPRESSLY DISCLAIMS ALL WARRANTIES AS TO THE SOFTWARE, EXPRESS, AND IMPLIED, INCLUDING BUT NOT LIMITED TO THE IMPLIED WARRANTIES OF MERCHANTABILITY, FITNESS FOR A PARTICULAR PURPOSE AND NON-INFRINGEMENT OF THIRD PARTY RIGHTS. SPECIFICALLY, BUT WITHOUT LIMITING THE FOREGOING, YAMAHA DOES NOT WARRANT THAT THE SOFTWARE WILL MEET YOUR REQUIREMENTS, THAT THE OPERATION OF THE SOFTWARE WILL BE UNINTERRUPTED OR ERROR-FREE, OR THAT DEFECTS IN THE SOFTWARE WILL BE CORRECTED. LIMITATION OF LIABILITY YAMAHA’S ENTIRE OBLIGATION HEREUNDER SHALL BE TO PERMIT USE OF THE SOFTWARE UNDER THE TERMS HEREOF. IN NO EVENT SHALL YAMAHA BE LIABLE TO YOU OR ANY OTHER PERSON FOR ANY DAMAGES, INCLUDING, WITHOUT LIMITATION, ANY DIRECT, INDIRECT, INCIDENTAL OR CONSEQUENTIAL DAMAGES, EXPENSES, LOST PROFITS, LOST DATA OR OTHER DAMAGES ARISING OUT OF THE USE, MISUSE OR INABILITY TO USE THE SOFTWARE, EVEN IF YAMAHA OR AN AUTHORIZED DEALER HAS BEEN ADVISED OF THE POSSIBILITY OF SUCH DAMAGES. In no event shall Yamaha’s total liability to you for all damages, losses and causes of action (whether in contract, tort or otherwise) exceed the amount paid for the SOFTWARE. THIRD PARTY SOFTWARE Third party software and data (“THIRD PARTY SOFTWARE”) may be attached to the SOFTWARE. If, in the written materials or the electronic data accompanying the Software, Yamaha identifies any software and data as THIRD PARTY SOFTWARE, you acknowledge and agree that you must abide by the provisions of any Agreement provided with the THIRD PARTY SOFTWARE and that the party providing the THIRD PARTY SOFTWARE is responsible for any warranty or liability related to or arising from the THIRD PARTY SOFTWARE. Yamaha is not responsible in any way for the THIRD PARTY SOFTWARE or your use thereof. • Yamaha provides no express warranties as to the THIRD PARTY SOFTWARE. IN ADDITION, YAMAHA EXPRESSLY DISCLAIMS ALL IMPLIED WARRANTIES, INCLUDING BUT NOT LIMITED TO THE IMPLIED WARRANTIES OF MERCHANTABILITY AND FITNESS FOR A PARTICULAR PURPOSE, as to the THIRD PARTY SOFTWARE. • Yamaha shall not provide you with any service or maintenance as to the THIRD PARTY SOFTWARE. • Yamaha is not liable to you or any other person for any damages, including, without limitation, any direct, indirect, incidental or consequential damages, expenses, lost profits, lost data or other damages arising out of the use, misuse or inability to use the THIRD PARTY SOFTWARE. GENERAL This Agreement shall be interpreted according to and governed by Japanese law without reference to principles of conflict of laws. Any dispute or procedure shall be heard before the Tokyo District Court in Japan. If for any reason a court of competent jurisdiction finds any portion of this Agreement to be unenforceable, the remainder of this Agreement shall continue in full force and effect. TERMINATION COMPLETE AGREEMENT This Agreement becomes effective on the day that you receive the SOFTWARE and remains effective until terminated. If any copyright law or provisions of this Agreement is violated, the Agreement shall terminate automatically and immediately without notice from Yamaha. Upon such termination, you must immediately destroy the licensed SOFTWARE, any accompanying written documents and all copies thereof. This Agreement constitutes the entire agreement between the parties with respect to use of the SOFTWARE and any accompanying written materials and supersedes all prior or contemporaneous understandings or agreements, written or oral, regarding the subject matter of this Agreement. No amendment or revision of this Agreement will be binding unless in writing and signed by a fully authorized representative of Yamaha. DOWNLOADED SOFTWARE If you believe that the downloading process was faulty, you may contact Yamaha, and Yamaha shall permit you to re-download the SOFTWARE, provided that you first destroy any copies or partial copies of the SOFTWARE that you obtained through your previous download attempt. This permission to re-download shall not limit in any manner the disclaimer of warranty set forth in Section 5 below. 28 En Limited Guarantee for European Economic Area (EEA) and Switzerland Thank you for having chosen a Yamaha product. In the unlikely event that your Yamaha product needs guarantee service, please contact the dealer from whom it was purchased. If you experience any difficulty, please contact Yamaha representative office in your country. You can find full details on our website (http://www.yamaha-hifi.com/ or http://www.yamaha-uk.com/ for U.K. resident). The product is guaranteed to be free from defects in workmanship or materials for a period of two years from the date of the original purchase. Yamaha undertakes, subject to the conditions listed below, to have the faulty product or any part(s) repaired, or replaced at Yamaha’s discretion, without any charge for parts or labour. Yamaha reserves the right to replace a product with that of a similar kind and/or value and condition, where a model has been discontinued or is considered uneconomic to repair. Conditions 1. The original invoice or sales receipt (showing date of purchase, product code and dealer’s name) MUST accompany the defective product, along with a statement detailing the fault. In the absence of this clear proof of purchase, Yamaha reserves the right to refuse to provide free of charge service and the product may be returned at the customer’s expense. 2. The product MUST have been purchased from an AUTHORISED Yamaha dealer within the European Economic Area (EEA) or Switzerland. 3. The product must not have been the subject of any modifications or alterations, unless authorised in writing by Yamaha. 4. The following are excluded from this guarantee: a. Periodic maintenance and repair or replacement of parts due to normal wear and tear. b. Damage resulting from: (1) Repairs performed by the customer himself or by an unauthorised third party. (2) Inadequate packaging or mishandling, when the product is in transit from the customer. Please note that it is the customer’s responsibility to ensure the product is adequately packaged when returning the product for repair. (3) Misuse, including but not limited to (a) failure to use the product for its normal purpose or in accordance with Yamaha’s instructions on the proper use, maintenance and storage, and (b) installation or use of the product in a manner inconsistent with the technical or safety standards in force in the country where it is used. (4) Accidents, lightning, water, fire, improper ventilation, battery leakage or any cause beyond Yamaha’s control. (5) Defects of the system into which this product is incorporated and/or incompatibility with third party products. (6) Use of a product imported into the EEA and/or Switzerland, not by Yamaha, where that product does not conform to the technical or safety standards of the country of use and/or to the standard specification of a product sold by Yamaha in the EEA and/or Switzerland. 5. Where the guarantee differs between the country of purchase and the country of use of the product, the guarantee of the country of use shall apply. 6. Yamaha may not be held responsible for any losses or damages, whether direct, consequential or otherwise, save for the repair or replacement of the product. 7. Please backup any custom settings or data, as Yamaha may not be held responsible for any alteration or loss to such settings or data. 8. This guarantee does not affect the consumer’s statutory rights under applicable national laws in force or the consumer’s rights against the dealer arising from their sales/purchase contract. Information for Users on Collection and Disposal of Old Equipment and Used Batteries These symbols on the products, packaging, and/or accompanying documents mean that used electrical and electronic products and batteries should not be mixed with general household waste. For proper treatment, recovery and recycling of old products and used batteries, please take them to applicable collection points, in accordance with your national legislation and the Directives 2002/96/EC and 2006/66/EC. By disposing of these products and batteries correctly, you will help to save valuable resources and prevent any potential negative effects on human health and the environment which could otherwise arise from inappropriate waste handling. For more information about collection and recycling of old products and batteries, please contact your local municipality, your waste disposal service or the point of sale where you purchased the items. [Information on Disposal in other Countries outside the European Union] These symbols are only valid in the European Union. If you wish to discard these items, please contact your local authorities or dealer and ask for the correct method of disposal. Note for the battery symbol (bottom two symbol examples): This symbol might be used in combination with a chemical symbol. In this case it complies with the requirement set by the Directive for the chemical involved. English 29 En ■ ■ ■ ■ ■ ■ ■ ■ Information about software Information sur le logiciel Information uber Software Information om programvara Informazioni sul software Información sobre el software Informatie over software Информация о программном обеспечении This product uses the following free software. For information (copyright, etc) about each software, read the original sentences stated below. About zlib Library Copyright notice: ©1995-2010 Jean-loup Gailly and Mark Adler This software is provided ‘as-is’, without any express or implied warranty. In no event will the authors be held liable for any damages arising from the use of this software. Permission is granted to anyone to use this software for any purpose, including commercial applications, and to alter it and?redistribute it freely, subject to the following restrictions: 1. The origin of this software must not be misrepresented; you must not claim that you wrote the original software. If you use this software in a product, an acknowledgment in the product documentation would be appreciated but is not required. 2. Altered source versions must be plainly marked as such, and must not be misrepresented as being the original software. 3. This notice may not be removed or altered from any source distribution. Jean-loup Gailly Mark Adler [email protected] [email protected] If you use the zlib library in a product, we would appreciate *not* receiving lengthy legal documents to sign. The sources are provided for free but without warranty of any kind. The library has been entirely written by Jean-loup Gailly and Mark Adler; it does not include third-party code. If you redistribute modified sources, we would appreciate that you include in the file ChangeLog history information documenting your changes. Please read the FAQ for more information on the distribution of modified source versions. About FLAC codec Library Copyright ©2000,2001,2002,2003,2004,2005,2006,2007, 2008,2009 Josh Coalson Redistribution and use in source and binary forms, with or without modification, are permitted provided that the following conditions are met: – Redistributions of source code must retain the above copyright notice, this list of conditions and the following disclaimer. – Redistributions in binary form must reproduce the above copyright notice, this list of conditions and the following disclaimer in the documentation and/or other materials provided with the distribution. – Neither the name of the Xiph.org Foundation nor the names of its contributors may be used to endorse or promote products derived from this software without specific prior written permission. THIS SOFTWARE IS PROVIDED BY THE COPYRIGHT HOLDERS AND CONTRIBUTORS “AS IS” AND ANY EXPRESS OR IMPLIED WARRANTIES, INCLUDING, BUT NOT LIMITED TO, THE IMPLIED WARRANTIES OF MERCHANTABILITY AND FITNESS FOR A PARTICULAR PURPOSE ARE DISCLAIMED. IN NO EVENT SHALL THE FOUNDATION OR CONTRIBUTORS BE LIABLE FOR ANY DIRECT, INDIRECT, INCIDENTAL, SPECIAL, EXEMPLARY, OR CONSEQUENTIAL DAMAGES (INCLUDING, BUT NOT LIMITED TO, PROCUREMENT OF SUBSTITUTE GOODS OR SERVICES; LOSS OF USE, DATA, OR PROFITS; OR BUSINESS INTERRUPTION) HOWEVER CAUSED AND ON ANY THEORY OF LIABILITY, WHETHER IN CONTRACT, STRICT LIABILITY, OR TORT (INCLUDING NEGLIGENCE OR OTHERWISE) ARISING IN ANY WAY OUT OF THE USE OF THIS SOFTWARE, EVEN IF ADVISED OF THE POSSIBILITY OF SUCH DAMAGE. Notice for Windows Media DRM This product is protected by certain intellectual property rights of Microsoft. Use or distribution of such technology outside of this product is prohibited without a license from Microsoft. Content owners use Windows Media digital rights management technology (WMDRM) to protect their intellectual property, including copyrights. This device uses WMDRM software to access WMDRM protected content. If the WMDRM software fails to protect the content, content owners may ask Microsoft to revoke the software’s ability to use WMDRM to play or copy protected content. Revocation does not affect unprotected content. When you download licenses for protected content, you agree that Microsoft may include a revocation list with the licenses. Content owners may require you to upgrade WMDRM to access their content. If you decline an upgrade, you will not be able to access content that requires the upgrade. 30 JUTBG NP-S2000 追加情報 日本語 Información adicional Español 機能変更により、再生可能なフォーマットに Apple Lossless フォーマット が追加されました。 ソフトウェアの著作権などについては裏面に示した原文をお読みください。 La función adicional de este producto admite formato de archivo de audio Apple Lossless Para obtener información detallada sobre la propiedad intelectual y la licencia, consulte la otra cara de esta página. Additional information Informazioni addizionali English Italiano The additional feature on this product supports Apple Lossless audio format. For detailed information about the Copyright and License, please see the opposite side of this page. La funzione aggiuntiva del prodotto supporta il formato audio Apple Lossless. Le informazioni dettagliate su copyright e licenza si trovano sul retro di questa pagina. Complément d’informations Aanvullende informatie Français Nederlands La fonction ajoutée à ce produit est compatible avec le format de fichier audio Apple Lossless. Pour plus de détails sur les droits d’auteur et la licence, voyez le verso de ce document. De aanvullende functie van dit product ondersteunt de Apple Losslessgeluidsbestandsindeling. Raadpleeg de andere kant van deze pagina voor gedetailleerde informatie over de copyright en licentie. Zusätzliche Informationen Дополнительная информация Deutsch Pусский Das Gerät unterstützt jetzt außerdem den Audio-Codec Apple Lossless. Detaillierte Urheberrechts- und Lizenzinformationen finden Sie auf der nächsten Seite. Дополнительная функция данного устройства поддерживает аудиоформат Apple Lossless. Для получения подробной информации об Авторских правах и Лицензиях см. следующую страницу. Ytterligare information 补充信息 Svenska Extrafunktionen på denna produkt stödjer ljudfilsformatet Apple Lossless. För detaljerad information om upphovsrätten och licensen, vänligen se andra sidan av detta blad. © 2012 Yamaha Corporation 中⽂ 本产品上的附加功能可支持 Apple Lossless 音频文件格式。 如需关于版权和许可证的详细信息,请参看本页背面上的内容。 Printed in Malaysia ZD38610 Copyright English Copyright © 2011 Apple Inc. All rights reserved. Licensed under the Apache License, Version 2.0 (the “License”); you may not use this file except in compliance with the License. You may obtain a copy of the License at http://www.apache.org/licenses/LICENSE-2.0 Unless required by applicable law or agreed to in writing, software distributed under the License is distributed on an "AS IS" BASIS, WITHOUT WARRANTIES OR CONDITIONS OF ANY KIND, either express or implied. See the License for the specific language governing permissions and limitations under the License. Droits d’auteur Français Le texte authentique est en anglais. Cette traduction sert à titre de référence seulement. Droits d’auteur © 2011 Apple Inc. Tous droits réservés. Sous licence Apache, Version 2.0 (la «Licence»); Le fichier peut être utilisé uniquement selon les termes de la Licence. Vous pouvez vous procurer une copie de la Licence sous http://www.apache.org/licenses/LICENSE-2.0 Sauf dans le cas d’obligations légales ou d’accords écrits, le logiciel distribué sous cette Licence est distribué «EN L’ÉTAT», SANS GARANTIE NI CONDITION DE QUELQUE NATURE, explicite ou tacite. Voyez la Licence pour les permissions et restrictions liées à la Licence dans votre langue. NP-S2000_OM_G_cv1_4.fm Page 1 Wednesday, June 22, 2011 5:03 PM G Network Player Lecteur Réseau © 2010 Yamaha Corporation Printed in Malaysia WV33240-2 OWNER’S MANUAL MODE D’EMPLOI BEDIENUNGSANLEITUNG BRUKSANVISNING MANUALE DI ISTRUZIONI MANUAL DE INSTRUCCIONES GEBRNUIKSAANWIJZIG ИНСТРУКЦИЯ ПО ЭКСПЛУАТАЦИИ-
 1
1
-
 2
2
-
 3
3
-
 4
4
-
 5
5
-
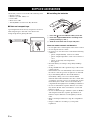 6
6
-
 7
7
-
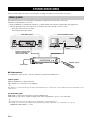 8
8
-
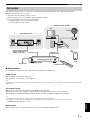 9
9
-
 10
10
-
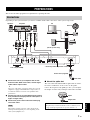 11
11
-
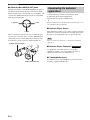 12
12
-
 13
13
-
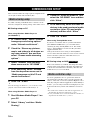 14
14
-
 15
15
-
 16
16
-
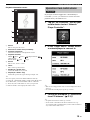 17
17
-
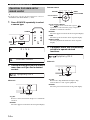 18
18
-
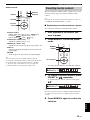 19
19
-
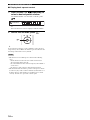 20
20
-
 21
21
-
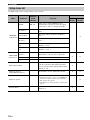 22
22
-
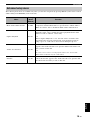 23
23
-
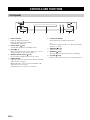 24
24
-
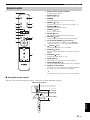 25
25
-
 26
26
-
 27
27
-
 28
28
-
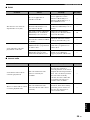 29
29
-
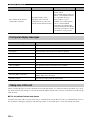 30
30
-
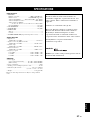 31
31
-
 32
32
-
 33
33
-
 34
34
-
 35
35
-
 36
36
-
 37
37


Yamaha CD-S2000 de handleiding
- Type
- de handleiding
- Deze handleiding is ook geschikt voor
in andere talen
- English: Yamaha CD-S2000 Owner's manual
- italiano: Yamaha CD-S2000 Manuale del proprietario
- русский: Yamaha CD-S2000 Инструкция по применению
- français: Yamaha CD-S2000 Le manuel du propriétaire
- Deutsch: Yamaha CD-S2000 Bedienungsanleitung
- dansk: Yamaha CD-S2000 Brugervejledning
- suomi: Yamaha CD-S2000 Omistajan opas
- svenska: Yamaha CD-S2000 Bruksanvisning
- Türkçe: Yamaha CD-S2000 El kitabı
- română: Yamaha CD-S2000 Manualul proprietarului
Gerelateerde artikelen
-
Yamaha CD-S2000 de handleiding
-
Yamaha CD-S3000 de handleiding
-
Yamaha CD-S2100 de handleiding
-
Yamaha CX-A5200 Handleiding
-
Yamaha RX-A3080 de handleiding
-
Yamaha CX-A5100 de handleiding
-
Yamaha RX-A2070BL Handleiding
-
Yamaha RX-A6A Gebruikershandleiding
-
-
Yamaha CX-A5000 Handleiding