
Quick Start Guide
UL 1000G2-R
UHF Wireless Belt-Pack Receiver for Behringer UL 1000G2
V 0.0

2 3Quick Start GuideUL 1000G2-R
(EN) Safety Instruction
1. Please read and follow all
instructions.
2. Keep the apparatus away from
water, except for outdoor products..
3. Clean only with a dry cloth.
4. Do not block any ventilation
openings. Install in accordance with the
manufacturer’s instructions.
5. Do not install near any heat sources
such as radiators, heat registers, stoves
or other apparatus (including ampliers)
that produce heat.
6. Use only attachments/accessories
specied by the manufacturer.
7. Use only
specied carts,
stands, tripods,
brackets, or tables.
Use caution to
prevent tip-over
when moving the cart/apparatus
combination.
8. Avoid installing in conned spaces
like bookcases.
9. Do not place naked ame sources,
such as lighted candles
10. Operating temperature range 5°
to 35°C (41° to 95°F).
11. Warning
To prevent possible
hearing damage, do not
listen at high volume levels for long
periods. As a guide to setting the
volume level, check that you can still
hear your own voice, when speaking
normally while listening with the
headphones.
12. Warning
• As with all small
batteries, the batteries
used with this product should be kept
away from small children who still
put things in their mouths. Ifthey are
swallowed, promptly call your local
poison controlcenter.
• Always purchase the correct size
and grade of battery most suitable for
intended use.
• Replace all batteries of a set at the
same time.
• Clean the battery contacts, and
also those of the device prior to
batteryinstallation.
• Ensure the batteries are installed
correctly with the regard to polarity
(+ and -).
• Always remove battery if consumed
or if product is to be left unused for a
long time.
• Replacement of a battery with an
incorrect type can defeat a safeguard.
Replace only with the same or
equivalent type.
• Risk of re or explosion if the battery
is replaced by an incorrect type.
• Batteries (battery pack or batteries
installed) shall not be exposed to
excessive heat such as sunshine, reor
the like.
• Disposal of a battery into re or a
hot oven, or mechanically crushing
or cutting of a battery can result in
anexplosion.
(ES)
Instrucción de seguridad
1. Por favor, lea y siga todas las
instrucciones.
2. Mantenga el aparato alejado
del agua, excepto para productos
destinados al uso en exteriores.
3. Limpie solo con un paño seco.
4. No bloquee ninguna abertura de
ventilación. Instale de acuerdo con las
instrucciones del fabricante.
5. No instale cerca de fuentes de
calor como radiadores, registros
de calor, estufas u otros aparatos
(incluyendo amplicadores) que
generen calor.
6. Utilice solo accesorios
especicados por el fabricante.
7. Use solo
carros, soportes,
trípodes, soportes
o mesas
especicados.
Tenga precaución
para evitar el vuelco al mover la
combinación carro/aparato.
8. Evite la instalación en espacios
connados como estanterías.
9. No coloque fuentes de llama
desnuda, como velas encendidas.
10. Rango de temperatura de
funcionamiento de 5° a 35° C
(41° a 95° F).
11. Advertencia
Para evitar posibles
daños auditivos, no
escuche a un volumen alto durante
períodos prolongados. Como guía para
congurar el nivel de volumen,
verique que aún puede escuchar su
propia voz cuando habla normalmente
mientras escucha con los auriculares.
12. Advertencia
• Al igual que con todas
las baterías pequeñas,
las baterías que se utilizan con este
producto deben mantenerse alejadas
de los niños pequeños que aún se
llevan cosas a la boca. Si se ingieren,
llame de inmediato a su centro local de
control de intoxicaciones.
•
Adquiera siempre el tamaño y grado
de batería correctos más adecuados
para el uso previsto.
• Reemplace todas las baterías de un
juego al mismo tiempo.
• Limpie los contactos de la batería y
también los del dispositivo antes de la
instalación de la batería.
• Asegúrese de que las baterías estén
instaladas correctamente con respecto
a la polaridad (+ y -).
• Retire siempre la batería si se
consume o si el producto no se va a
utilizar durante mucho tiempo.
• El reemplazo de una batería por
un tipo incorrecto puede anular una
protección. Reemplace sólo con el
mismo tipo o equivalente.
• Riesgo de incendio o explosión
si la batería se reemplaza por un
tipoincorrecto.
• Las baterías (paquete de baterías
o baterías instaladas) no deben
exponerse a un calor excesivo, como la
luz solar, el fuego o similares.
• Tirar una batería al fuego o en un
horno caliente, o aplastar o cortar
mecánicamente una batería puede
provocar una explosión.
• Dejar una batería en un entorno
circundante de temperatura
extremadamente alta puede provocar
una explosión o la fuga de líquido o
gas namable.
• Una batería sometida a una presión
de aire extremadamente baja puede
provocar una explosión o una fuga de
líquido o gas inamable.
• Se debe prestar atención a los
aspectos ambientales de la eliminación
de baterías.
(FR) Consignes de sécurité
1. Veuillez lire et suivre toutes les
instructions.
2. Gardez l'appareil éloigné de l'eau,
sauf pour les produits destinés à une
utilisation en extérieur.
3. Nettoyez uniquement avec un
chion sec.
4. Ne bloquez aucune ouverture de
ventilation. Installez conformément
aux instructions du fabricant.
5. N'installez pas près de sources de
chaleur telles que radiateurs, grilles de
chaleur, cuisinières ou autres appareils
(y compris les amplicateurs) qui
produisent de la chaleur.
6. Utilisez uniquement les
accessoires spéciés par le fabricant.
7. Utilisez
uniquement des
chariots, des
supports, des
trépieds, des
supports ou des
tables spéciés. Faites attention pour
éviter le renversement lors du
déplacement de la combinaison
chariot/appareil.
8. Évitez l'installation dans
des espaces connés comme les
bibliothèques.
9. Ne placez pas de sources de
amme nue, telles que des bougies
allumées.
10. Plage de température de
fonctionnement de 5° à 35° C (41° à 95)
11. Avertisse-
ment
Pour éviter d’éventuels
dommages auditifs, n’écoutez pas à
des niveaux de volume élevés pendant
de longues périodes. Pour vous guider
dans le réglage du niveau de volume,
vériez que vous pouvez toujours
entendre votre propre voix lorsque
vous parlez normalement tout en
écoutant avec le casque.
12. Avertissement
• Comme pour toutes
les petites piles, les
piles utilisées avec ce produit doivent
être tenues à l’écart des jeunes
enfants qui mettent encore des objets
dans leur bouche. S’ils sont avalés,
appelez rapidement votre centre
antipoisonlocal.
• Achetez toujours la bonne taille et
qualité de batterie la plus adaptée à
l’utilisation prévue.
• Remplacez toutes les piles d’un
ensemble en même temps.
• Nettoyez les contacts de la batterie,
ainsi que ceux de l’appareil avant
l’installation de la batterie.
• Assurez-vous que les piles sont
correctement installées en respectant
la polarité (+ et -).
• Retirez toujours la batterie si elle est
consommée ou si le produit doit rester
inutilisé pendant une longue période.
• Le remplacement d’une batterie
par un type incorrect peut annuler une
sauvegarde. Remplacez uniquement
par le même type ou un type
équivalent.
• Risque d’incendie ou d’explosion
si la batterie est remplacée par un
typeincorrect.
• Les batteries (bloc-batterie ou
batteries installées) ne doivent pas être
exposées à une chaleur excessive telle
que le soleil, le feu ou autre.
• La mise au rebut d’une batterie dans
le feu ou un four chaud, ou l’écrasement
ou la coupure mécanique d’une batterie
peut entraîner une explosion.
• Laisser une batterie dans un
environnement à température
extrêmement élevée peut entraîner
une explosion ou une fuite de liquide
ou de gaz inammable.
• Une batterie soumise à une
pression d’air extrêmement basse peut
provoquer une explosion ou une fuite
de liquide ou de gaz inammable.
• Il convient d’attirer l’attention sur
les aspects environnementaux de
l’élimination des batteries.
(DE) Wichtige
Sicherheitshinweise
1. Bitte lesen Sie alle Anweisungen
sorgfältig durch und befolgen Sie
diese.
2. Halten Sie das Gerät von Wasser
fern, außer für Produkte, die für den
Außeneinsatz vorgesehen sind.
3. Reinigen Sie es nur mit einem
trockenen Tuch.
4. Blockieren Sie keine
Belüftungsönungen. Installieren
Sie gemäß den Anweisungen des
Herstellers.
5. Installieren Sie nicht in der Nähe
von Wärmequellen wie Heizkörpern,
Heizregistern, Öfen oder anderen
Geräten (einschließlich Verstärkern),
die Wärme erzeugen.
6. Verwenden Sie nur Zubehörteile,
die vom Hersteller angegeben sind.
7. Verwenden
Sie nur
spezizierte
Wagen, Ständer,
Stative,
Halterungen oder
Tische. Achten Sie darauf, beim
Bewegen der Wagen-Geräte-
Kombination ein Umkippen zu
vermeiden.
8. Vermeiden Sie die Installation in
beengten Räumen wie Bücherregalen.
9. Platzieren Sie keine oenen
Flammenquellen, wie brennende
Kerzen.
10.
Betriebstemperaturbereich von 5°
bis 35°C (41° bis 95°F).
11. Warnung
Um mögliche
Hörschäden zu
vermeiden, hören Sie nicht über
längere Zeit mit hoher Lautstärke.
Überprüfen Sie als Richtlinie zum
Einstellen der Lautstärke, ob Sie Ihre
eigene Stimme noch hören können,
wenn Sie beim Hören mit den
Kopfhörern normal sprechen.
12. Warnung
• Wie bei allen
kleinen Batterien
sollten die mit diesem Produkt
verwendeten Batterien von kleinen
Kindern ferngehalten werden,

4 5Quick Start GuideUL 1000G2-R
dienoch Dinge in den Mund nehmen.
Wenn sie verschluckt werden,
rufen Sie umgehend Ihre örtliche
Giftnotrufzentrale an.
• Kaufen Sie immer die richtige
Batteriegröße und -klasse, die für den
beabsichtigten Gebrauch am besten
geeignet ist.
• Ersetzen Sie alle Batterien eines
Setsgleichzeitig.
• Reinigen Sie die Batteriekontakte
und auch die des Gerätes vor dem
Einsetzen der Batterie.
• Achten Sie auf die richtige Polarität
der Batterien (+ und -).
• Entfernen Sie immer die
Batterie, wenn sie verbraucht ist
oder das Produkt längere Zeit nicht
verwendetwird.
• Der Austausch einer Batterie
durch einen falschen Typ kann eine
Sicherheitsvorkehrung zunichte
machen. Nur durch den gleichen oder
einen gleichwertigen Typ ersetzen.
• Brand- oder Explosionsgefahr, wenn
die Batterie durch einen falschen Typ
ersetzt wird.
• Batterien (Batteriepack oder
eingebaute Batterien) dürfen
keiner übermäßigen Hitze wie
Sonneneinstrahlung, Feuer oder
ähnlichem ausgesetzt werden.
• Das Entsorgen einer Batterie ins
Feuer oder einen heißen Ofen oder
das mechanische Zerquetschen oder
Schneiden einer Batterie kann zu einer
Explosion führen.
• Das Belassen einer Batterie in
einer Umgebung mit extrem hohen
Temperaturen kann zu einer Explosion
oder dem Austreten von brennbaren
Flüssigkeiten oder Gasen führen.
• Eine Batterie, die extrem niedrigem
Luftdruck ausgesetzt ist, kann zu
einer Explosion oder zum Austreten
von brennbaren Flüssigkeiten oder
Gasenführen.
• Auf die Umweltaspekte
der Batterieentsorgung sollte
hingewiesenwerden.
(PT) Instruções de
Seguranç Importantes
1. Por favor, leia e siga todas as
instruções.
2. Mantenha o aparelho longe da
água, exceto para produtos destinados
ao uso externo.
3. Limpe apenas com um pano seco.
4. Não bloqueie nenhuma abertura
de ventilação. Instale de acordo com as
instruções do fabricante.
5. Não instale próximo a fontes
de calor, como radiadores, grelhas
de calor, fogões ou outros aparelhos
(incluindo amplicadores) que
gerem calor.
6. Use apenas acessórios
especicados pelo fabricante.
7. Use apenas
carrinhos,
suportes, tripés,
suportes ou mesas
especicados.
Tenha cuidado
para evitar tombamentos ao mover a
combinação carrinho/aparelho.
8. Evite instalar em espaços
connados, como estantes.
9. Não coloque fontes de chama nua,
como velas acesas.
10. Intervalo de temperatura de
operação de 5° a 35° C (41° a 95° F).
11. Aviso
Para evitar possíveis
danos à audição, não
ouça em níveis de volume altos por
longos períodos. Como um guia para
denir o nível de volume, verique se
você ainda consegue ouvir sua própria
voz, ao falar normalmente enquanto
ouve com os fones de ouvido.
12. Aviso
• Como acontece
com todas as baterias
pequenas, as baterias usadas com este
produto devem ser mantidas longe do
alcance de crianças que ainda colocam
coisas na boca. Se forem engolidos,
ligue imediatamente para o centro de
controle de intoxicações local.
• Sempre adquira o tamanho correto e
o tipo de bateria mais adequado para o
uso pretendido.
• Substitua todas as baterias de um
conjunto ao mesmo tempo.
• Limpe os contatos da bateria e
também os do dispositivo antes da
instalação da bateria.
• Certique-se de que as baterias
estão instaladas corretamente em
relação à polaridade (+ e -).
• Sempre remova a bateria se
consumida ou se o produto não for
usado por um longo tempo.
• A substituição de uma bateria por
um tipo incorreto pode anular uma
proteção. Substitua apenas pelo
mesmo tipo ou equivalente.
• Risco de incêndio ou explosão
se a bateria for substituída por um
tipoincorreto.
• As baterias (bateria ou baterias
instaladas) não devem ser expostas a
calor excessivo, como luz do sol, fogo
ou algo semelhante.
• O descarte de uma bateria no
fogo ou em um forno quente, ou o
esmagamento ou corte mecânico
de uma bateria pode resultar em
umaexplosão.
• Deixar a bateria em um ambiente
circundante de temperatura
extremamente alta pode resultar em
uma explosão ou vazamento de líquido
ou gás inamável.
• Uma bateria sujeita a uma pressão
de ar extremamente baixa pode resultar
em uma explosão ou vazamento de
líquido ou gás inamável.
• Deve-se atentar para os aspectos
ambientais do descarte da bateria.
(IT) Istruzioni di sicurezza
importanti
1. Per favore, leggere e seguire tutte
le istruzioni.
2. Mantenere l'apparecchio lontano
dall'acqua, tranne per i prodotti
destinati all'uso all'aperto.
3. Pulire solo con un panno asciutto.
4. Non ostruire alcuna apertura di
ventilazione. Installare in conformità
alle istruzioni del produttore.
5. Non installare vicino a fonti di
calore come termosifoni, bocchette
di calore, fornelli o altri apparecchi
(compresi gli amplicatori) che
producono calore.
6. Utilizzare solo accessori specicati
dal produttore.
7. Usare solo
carrelli, supporti,
treppiedi, stae o
tavoli specicati.
Prestare
attenzione per
evitare il ribaltamento durante lo
spostamento della combinazione
carrello/apparecchio.
8. Evitare l'installazione in spazi
connati come librerie.
9. Non posizionare fonti di amma
nuda, come candele accese.
10. Intervallo di temperatura di
funzionamento da 5° a 35° C
(41° a 95° F)
11. Avvertenza
Per prevenire possibili
danni all’udito, non
ascoltare ad alto volume per lunghi
periodi. Come guida per l’impostazione
del livello del volume, controlla che tu
possa ancora sentire la tua voce,
quando parli normalmente mentre
ascolti con le cue.
12. Avvertenza
• Come con tutte le
batterie piccole, le
batterie utilizzate con questo prodotto
devono essere tenute lontane dai
bambini piccoli che mettono ancora gli
oggetti in bocca. Se vengono ingeriti,
chiama immediatamente il centro
antivelenilocale.
• Acquistare sempre la dimensione e
il grado di batteria corretti più adatti
all’uso previsto.
• Sostituire tutte le batterie di un set
contemporaneamente.
• Pulire i contatti della batteria e
anche quelli del dispositivo prima
dell’installazione della batteria.
• Assicurarsi che le batterie siano
installate correttamente rispettando la
polarità (+ e -).
• Rimuovere sempre la batteria se
consumata o se il prodotto deve essere
lasciato inutilizzato per lungo tempo.
• La sostituzione di una batteria
con un tipo errato può vanicare una
protezione. Sostituire solo con lo stesso
tipo o equivalente.
• Rischio di incendio o esplosione se
la batteria viene sostituita con una di
tipo errato.
• Le batterie (pacco batterie o batterie
installate) non devono essere esposte
a calore eccessivo come luce solare,
fuoco o simili.
• Lo smaltimento di una batteria
nel fuoco o in un forno caldo, o lo
schiacciamento o il taglio meccanico
di una batteria può provocare
un’esplosione.
• Lasciare una batteria in un
ambiente circostante a temperatura
estremamente elevata può provocare
un’esplosione o la fuoriuscita di liquidi
o gas inammabili.
• Una batteria soggetta a una
pressione dell’aria estremamente
bassa può provocare un’esplosione o la
fuoriuscita di liquidi o gas inammabili.
• Occorre prestare attenzione agli
aspetti ambientali dello smaltimento
delle batterie.
(NL) Belangrijke
veiligheidsvoorschriften
1. Lees alsjeblieft alle instructies en
volg deze op.
2. Houd het apparaat uit de buurt
van water, behalve voor producten die
bedoeld zijn voor buitengebruik.
3. Reinig alleen met een droge doek.
4. Blokker geen ventilatieopeningen.
Installeer volgens de instructies van de
fabrikant.
5. Installeer niet in de buurt van
warmtebronnen zoals radiatoren,
warmte registers, fornuizen of andere
apparaten (inclusief versterkers) die
warmte produceren.
6. Gebruik alleen accessoires die
door de fabrikant zijn gespeciceerd.
7. Gebruik alleen
gespeciceerde
karren, standaards,
statieven, beugels
of tafels. Wees
voorzichtig om
kantelen te voorkomen bij het
verplaatsen van de kar/
apparaatcombinatie.
8. Vermijd installatie in afgesloten
ruimtes zoals boekenkasten.
9. Plaats geen open vlambronnen,
zoals brandende kaarsen.
10.
Bedrijfstemperatuurbereik van 5°
tot 35°C (41° tot 95°F).
11.
Waarschuwin
Om mogelijke
gehoorbeschadiging
te voorkomen, mag u
niet langdurig op een hoog volume
luisteren. Als richtlijn voor het
instellen van het volumeniveau moet
u controleren of u uw eigen stem nog
steeds kunt horen wanneer u normaal
spreekt terwijl u met de hoofdtelefoon
luistert.
12.
Waarschuwin
• Zoals bij alle kleine
batterijen, moeten
de batterijen die bij dit product
worden gebruikt, uit de buurt worden
gehouden van kleine kinderen die nog
dingen in hun mond stoppen. Als ze
worden ingeslikt, bel dan onmiddellijk
uw plaatselijke antigifcentrum.
• Koop altijd de juiste maat en
kwaliteit batterij die het meest
geschikt is voor het beoogde gebruik.
• Vervang alle batterijen van een
settegelijk.
• Reinig de batterijcontacten en ook
die van het apparaat voordat u de
batterij installeert.
•
Zorg ervoor dat de batterijen correct
zijn geplaatst met betrekking tot
polariteit (+ en -).
• Verwijder altijd de batterij als deze
verbruikt is of als het product lange tijd
niet wordt gebruikt.
• Vervanging van een batterij door
een onjuist type kan een beveiliging
teniet doen. Alleen vervangen door
hetzelfde of een gelijkwaardig type.

6 7Quick Start GuideUL 1000G2-R
• Risico op brand of explosie als de
batterij wordt vervangen door een
onjuist type.
• Batterijen (batterijpakket of
geplaatste batterijen) mogen niet
worden blootgesteld aan overmatige
hitte, zoals zonlicht, vuur en dergelijke.
• Het weggooien van een batterij
in vuur of een hete oven, of het
mechanisch pletten of snijden van een
batterij kan leiden tot een explosie.
• Als u een batterij in een omgeving
met extreem hoge temperaturen
achterlaat, kan dit leiden tot een
explosie of lekkage van ontvlambare
vloeistof of gas.
• Een batterij die wordt blootgesteld
aan extreem lage luchtdruk kan leiden
tot een explosie of het lekken van
brandbare vloeistof of gas.
• De aandacht moet worden
gevestigd op de milieuaspecten van
het weggooien van batterijen.
(SE) Viktiga
säkerhetsanvisningar
1. Vänligen läs och följ alla
instruktioner noggrant.
2. Håll apparaten borta från vatten,
förutom för utomhusprodukter.
3. Rengör endast med en torr trasa.
4. Blockera inte några
ventilationsöppningar. Installera enligt
tillverkarens anvisningar.
5. Installera inte nära några
värmekällor som element,
värmeregistrar, spisar eller andra
apparater (inklusive förstärkare) som
genererar värme.
6. Använd endast tillbehör som
anges av tillverkaren.
7. Använd endast
specicerade
vagnar, ställ, stativ,
fästen eller bord.
Var försiktig för att
undvika att
vagnen/apparatkombinationen tippar
när den yttas.
8. Undvik installation i trånga
utrymmen som bokhyllor.
9. Placera inte några nakna lågkällor,
som tända ljus.
10. Driftstemperaturområde 5° till
35° C (41° till 95° F).
11. Varning
För att förhindra
eventuella hörselskador,
lyssna inte på höga volymnivåer under
långa perioder. Kontrollera att du
fortfarande kan höra din egen röst när
du talar normalt medan du lyssnar
medhörlurarna.
12. Varning
• Som med alla små
batterier bör batterierna
som används med denna produkt
hållas borta från små barn som
fortfarande stoppar saker i munnen.
Om de sväljs, ring omedelbart ditt
lokala giftkontrollcenter.
• Köp alltid rätt storlek och typ av
batteri som är lämpligast för avsedd
användning.
• Byt ut alla batterier i en uppsättning
samtidigt.
• Rengör batterikontakterna, och
även enhetens kontakter, innan
batteriet installeras.
• Se till att batterierna är korrekt
installerade med avseende på polaritet
(+ och -).
• Ta alltid ut batteriet om det
förbrukas eller om produkten ska stå
oanvänd under en längre tid.
• Byte av ett batteri med en
felaktig typ kan besegra ett skydd.
Ersätt endast med samma eller
motsvarandetyp.
• Risk för brand eller explosion om
batteriet byts ut mot fel typ.
• Batterier (batteripaket eller
batterier installerade) får inte utsättas
för överdriven värme som solsken, eld
eller liknande.
• Kassering av ett batteri i eld eller en
het ugn eller mekanisk krossning eller
kapning av ett batteri kan resultera i
enexplosion.
• Om du lämnar ett batteri i en
omgivning med extremt hög
temperatur kan det resultera i en
explosion eller läckage av brandfarlig
vätska eller gas.
• Ett batteri som utsätts för extremt
lågt lufttryck kan resultera i en
explosion eller läckage av brandfarlig
vätska eller gas.
• Uppmärksamhet bör riktas mot
miljöaspekterna vid bortskaande
avbatterier.
(PL) Ważne informacje o
bezpieczeństwie
1. Proszę przeczytać i ścisłe
przestrzegać wszystkich instrukcji.
2. Trzymaj urządzenie z dala
od wody, z wyjątkiem produktów
przeznaczonych do użytku na
zewnątrz.
3. Czyść tylko suchą szmatką.
4. Nie blokuj żadnych otworów
wentylacyjnych. Instaluj zgodnie z
instrukcjami producenta.
5. Nie instaluj w pobliżu źródeł
ciepła, takich jak grzejniki, rejestratory
ciepła, kuchenki lub inne urządzenia
(w tym wzmacniacze), które generują
ciepło.
6. Używaj tylko akcesoriów
określonych przez producenta.
7.
Używaj tylko
określonych
wózków, stojaków,
statywów,
uchwytów lub
stołów. Uważaj,
aby zapobiec przewróceniu się wózka/
aparatu podczas przemieszczania.
8. Unikaj instalacji w ciasnych
miejscach, takich jak regały na książki.
9. Nie umieszczaj źródeł otwartego
ognia, takich jak płonące świeczki.
10. Zakres temperatury pracy od 5°
do 35°C (41° do 95°F).
11. Ostrzeżenie
Aby zapobiec możliwemu
uszkodzeniu słuchu,
nie słuchaj przy wysokim poziomie
głośności przez długi czas. Jako
wskazówkę dotyczącą ustawiania
poziomu głośności sprawdź, czy
nadal słyszysz własny głos, gdy
mówisz normalnie podczas słuchania
przezsłuchawki.
12. Ostrzeżenie
• Podobnie jak w
przypadku wszystkich
małych baterii, baterie używane z tym
produktem powinny być trzymane
z dala od małych dzieci, które wciąż
wkładają rzeczy do ust. Jeśli zostaną
połknięte, niezwłocznie skontaktuj się
z lokalnym centrum kontroli zatruć.
• Zawsze kupuj baterię o
odpowiednim rozmiarze i klasie,
najbardziej odpowiednią do
zamierzonego zastosowania.
• Wymień jednocześnie wszystkie
baterie zestawu.
• Wyczyść styki baterii, a także styki
urządzenia przed instalacją baterii.
• Upewnij się, że baterie są
prawidłowo zainstalowane z
uwzględnieniem biegunowości (+ i -).
• Zawsze wyjmuj baterię, jeśli
jest zużyta lub jeśli produkt ma być
nieużywany przez dłuższy czas.
• Wymiana baterii na niewłaściwy
typ może zniweczyć zabezpieczenie.
Zamień tylko na ten sam lub
równoważny typ.
• Wymiana baterii na baterię
niewłaściwego typu grozi pożarem lub
wybuchem.
• Baterie (akumulator lub
zainstalowane baterie) nie mogą być
wystawiane na działanie nadmiernego
ciepła, takiego jak światło słoneczne,
ogień lub tym podobne.
• Wrzucenie baterii do ognia lub
gorącego piekarnika lub mechaniczne
zgniecenie lub przecięcie baterii może
spowodować wybuch.
• Pozostawienie baterii w otoczeniu
o bardzo wysokiej temperaturze może
spowodować wybuch lub wyciek
łatwopalnej cieczy lub gazu.
• Bateria poddana bardzo niskiemu
ciśnieniu powietrza może spowodować
wybuch lub wyciek łatwopalnej cieczy
lub gazu.
• Należy zwrócić uwagę
na środowiskowe aspekty
utylizacjibaterii.
(JP)
安全指示
1. すべての指示を読んで、
従ってください。
2. 屋 外 の 製 品 を 除 き 、機 器
を 水 か ら 遠 ざ け てくだ さい 。
3. 乾 いた布 で のみ 清 掃して
ください。
4. 通気口を塞がないでくだ
さ い 。メ ー カ ー の 指 示 に 従 っ
てインストールしてください 。
5. 暖 房 器 、ヒ ー ト レ ジ ス タ
ー 、ス ト ー ブ な ど の 発 熱 機 器
(アンプを含む)の近くには
取り付けないでください。
6. メーカーが 指 定したアタ
ッチメント/アクセサリーのみ
使 用してください 。
7. 指定され
たカート、スタ
ン ド 、三 脚 、ブ
ラ ケ ッ ト 、ま た
は テ ーブル の
み 使 用してく
だ さ い 。カ ー ト / 機 器 の 組 み 合
わ せ を 移 動 す る 際 に は 、転 倒
を防ぐよう注 意してくださ
い。
8. 書棚などの密閉された
空間には設 置しないでくだ
さい。
9. 点 火したキャンドル な
ど 、裸 の 炎 源 を 置 か な い で く
ださい。
10. 動作温度範囲は摂氏 5
度から 35 度 (華氏 41 度から
95 度) です。
11. 警告
可能な聴覚損傷を
防ぐために、長時
間高音量で聞かないでくださ
い 。音 量 設 定 の ガ イ ド と し て 、
ヘッド フォンを 使 用しな が ら
通常に話す際に自分の声が
まだ聞こえるか確認してくだ
さい。
12. 警告
• この製品に使用
される電池はすべて
の小型電池と同様に、物を口に
入れる小さな子 供 から遠ざける
必要があります。もし誤って飲
み込まれた場合は、すぐに地元
の 毒 性 管 理 センター に 連 絡 して
ください。
•
常に意図した使用に最も適し
た正確なサイズとグレードの電
池 を 購 入してください 。
• 一 組 の 電 池 を 同 時 に交 換 して
ください。
• 電池の取り付け前に、電池の
接点とデバイスの接点を清掃し
てください 。
• 電 池 の 極 性( + お よ び - )に 関
して正しく取り付けられている
ことを 確 認 してください 。
• 常 に 電 池 を 取り外 してくだ さ
い 。も し く は 製 品 が 長 期 間 未 使
用 の 場 合 は 、電 池 が 消 耗 し た 場
合 も 取り外 してくだ さい 。
• 誤った種類の電池で交換す
る と 、セ ー フ ガ ー ド が 無 効 に な
る 可 能 性 が あ り ま す。同 じ ま た
は 同 等 の 種 類 で の み 交 換 してく
ださい。
• 誤ったタイプ で電池を交 換
すると火災や爆発の危険があ
りま す。
• 電池(電池パックまたは取り
付けられた電池)は日光や火な
どの過度な熱にさらされてはい
けません。
• 電池を火に投げ込むか、熱
いオーブンに投げ入れたり、電
池を機 械 的 に押しつぶ すか 切
断すると爆発する可能性があ
りま す。

8 9Quick Start GuideUL 1000G2-R
(CN)
安全须知
1. 请阅读, 保存, 遵守所有
的说明, 注意所有的警示。
2. 请勿在靠近水的地方使用
本产品。
3. 请用干布清洁本产品。
4. 请只使用厂家指定的附属
设备和配件。 不要堵塞任何
通风口。按照制造商的说明进
行安装。
5. 请只使用厂
家指定的或随
货销售的手推
车, 架子, 三角
架, 支架和桌
子等。 若使用
手推车来搬运设备, 请注意安
全放置设备, 以避免手推车和
设备倾倒而受伤。
6. 请勿安装在密闭空间, 如书
柜或类似装置。
7. 请勿将本产品安装在热源
附近, 如暖气片, 炉子或其它产
生热量的设备 (包括功放器)
。 产品上不要放置裸露的火焰
源, 如点燃的蜡烛。
8. 如果液体流入或异物落入
设备内, 设备遭雨淋或受潮,
设备不 能正常运作或被摔坏
等, 设备受损需进行维修时,
所有维修均须由 合格的维修
人员进行维修。
9. 警告
为防止可能的听力
损伤,请不要长时间
以高音量水平听音。关于音量
设置的指南,确保在佩戴耳机
时正常说话时仍能听到自己的
声音。
10. 警告
• 与所有小型电池
一样,与此产品一起
使用的电池应远离仍然喜欢把
东西放入口中的小孩。如果吞下
电池,请立即致电当地的毒物控
制中心。
• 始终购买适合预期使用的正
确大小和等级的电池。
• 同时更换一组电池。
• 在安装电池之前清洁电池接
点以及设备的接点。
• 确保电池正确安装, 考虑极性
(+ 和 -)。
• 如果电池已耗尽或产品长时
间不使用,始终取出电池。
• 用不正确的类型替换电池可
能会失去安全保护。只能用相同
或等效类型替换。
• 如果用不正确的类型替换
电池,可能发生火灾或爆炸的
危险。
• 电池(电池包或安装的电池)
不得暴露于过度的热量,如阳
光、火灾等。
• 将电池投入火中或热烤箱,
或机械压碎或切割电池会导致
爆炸。

10 11Quick Start GuideUL 1000G2-R
(EN) Step 1: Hook-Up
Mixing Console
Active Loudspeakers
Tx
Rx
Power
Adapter
UL 1000G2-T
UL 1000G2-R
UL 1000G2-R Hook-up

12 13Quick Start GuideUL 1000G2-R
(4) (5)
(3) (10)
(8)
(9)
(7)
(6)
(1) (2)
1. LEDS - indicate audio received, and receiver battery status
2. LCD - displays the receiver details and menu
3. ANTENNA - receive antenna
4. PHONES - connect supplied earphones to this 3.5 mm
stereo output
5. VOLUME - adjust the earphones volume, and turn the
receiver OFF
6. BELT CLIP - attach receiver to belt
7. MENU UP/DOWN - use to navigate the display menu
8. SET - use to select receiver menu items. Open the battery
compartment to access this button
9. BATTERY COMPARTMENT - ip open to access the
battery compartment (2x AA)
10. EARPHONES - connect to receiver’s PHONES output. Make
sure the volume is turned down before putting them on
Features
• Package of one UL 1000G2-R wireless belt-pack receiver and
monitoring earphones, for the Behringer UL 1000G2 in-ear
monitoring system
• Multiple UL 1000G2-R wireless belt-pack receivers can be used
with the UL 1000G2 at the same time
• UL 1000G2-R belt-pack receiver supports stereo / mono in-ear
monitoring exibility
• Integrated display for channel frequency, squelch, and
gaincontrol
• Working distance of up to 60 m (200 ft)
• AA x 2 batteries included
This receiver is designed to work with the UL 1000G2 in-ear
monitoring system only. For information regarding the
installation and operation of the UL 1000G2-R, please read the
quick start guide that comes with the UL-1000G2 transmitter/
receiver package.
UL 1000G2-R Controls
(EN) Step 2: Controls (EN) Step 3: Getting started
RECEIVER SETUP
Main Menu
1. The main menu displays the AF level, mono/stereo mode,
RFsignal strength, EQ, LIM, MIX, lock, frequency, squelch, and
battery level.
Selecting a Frequency Group
2. Open the battery cover to access the SET button.
3. Press the SET button until GROUP ashes in the receiver
display. Press up/down to select the same frequency group as
the transmitter.
Selecting a Channel
4. Press the SET button repeatedly until CHANNEL ashes in the
receiver display. Press up/down to select the same channel as
the transmitter.
Equalizer (EQ)
5. The treble at 10 kHz is enhanced by 6 dB while the EQ
isenabled.
6. Press the SET button repeatedly until “EQ” ashes in the
receiver display. Use the up/down buttons to enable (EQ ON)
ordisable (EQ OFF) the Equalizer.
Limiter (LIM)
7. To protect ears from injury, the Limiter function limits the
level of audio signal to earphones at 400mV. It is advised to
turn LIM ON if the receiver display indicates audio level is
atmaximum.
8. Press the SET button repeatedly until “LIM” ashes in the
receiver display. Use the up/down buttons to enable (LIM ON)
or disable (LIM OFF) the Limiter.
Mixer (MIX)
9. Enable the Mixer function to listen to the mix of two mono
signals, balance and regulate their volume.
For example: If the LEFT INPUT contains mono audio signal
from instruments and the RIGHT INPUT contains mono audio
signal vocals. The singer can monitor and adjust the volume
balance between the instruments and his own voice and the
overall volume level using the belt-pack receiver with MIX
ON setting.
10. Press the SET button repeatedly until “MIX” ashes in the
receiver display. Use the up/down buttons to enable (MIX ON)
or disable (MIX OFF) the Mixer.
Squelch (SQ)
11. The Squelch function enables you to set a minimum threshold
of signal received by the receiver. The setting consists of 3 bar
levels - Low, Medium, and High. The receiver rejects signals
below the set threshold and helps eradicate any unwanted
audio signal transmitted by the transmitter.
12. Press the SET button repeatedly until “SQ” ashes in the
receiver display. Use the up/down buttons to set Squelch at
Low, Medium, or High.
Balance
13. Adjust volume balance between left and right channels of a
Stereo signal using the up/down buttons.
The audio is centered at -0- level. There are 9 levels available
each for oset to the right channel and oset to the left
channel. Positive values (1-, 2-, 3-, 4-, 5-, 6-, 7-, 8-, 9-) oset
towards the Right, while negative values (-1-, -2-, -3-, -4-, -5-,
-6-, -7-, -8-, -9-) oset towards the Left channel.
14. NOTE: To ensure the transmission of a stereo audio signal, the
transmitter must be set in stereo mode and an audio signal
must be present at the LEFT INPUT and the RIGHT INPUT.
Locking the Receiver against changes
15. Press the SET button repeatedly until the LOCK icon ashes
in the receiver display. Press up/down to select LOCK ON or
LOCK OFF. LOCK ON function disables buttons, so no unwanted
changes can be made accidentally.
16. NOTE: LOCK ON is enabled automatically if no operation is
performed for 5 seconds. Under LOCK ON status, press and
hold SET button for 2 seconds to disable LOCK momentarily
and enables you to make changes.
Battery Power Status
17. Remaining battery power status is displayed via four bars.
Ifno bars are visible on the battery symbol, the BATT LED
will turn Red from Blue. The batteries should then be
replacedimmediately.
MONO
SQL
EQ
LIM
MIX
MONO
SQL
EQ
LIM
MIX
UL 1000G2-R Getting started

14 15Quick Start GuideUL 1000G2-R
(ES) Paso 1: Conexión
Mixing Console
Active Loudspeakers
Tx
Rx
Power
Adapter
UL 1000G2-T
UL 1000G2-R
UL 1000G2-R Conexión

16 17Quick Start GuideUL 1000G2-R
(4) (5)
(3) (10)
(8)
(9)
(7)
(6)
(1) (2)
1. LEDS - indican la recepción de señal audio y el estado de la
batería del receptor
2. LCD - muestra distintos detalles del receptor y el menú
3. ANTENNA - antena del receptor
4. PHONES - conecte en esta salida stereo de 3,5 mm los
auriculares intraurales incluidos
5. VOLUME - este control le permite ajustar el volumen de
los auriculares, así como desactivar el receptor
6. BELT CLIP - le permite sujetar el receptor de petaca a
sucinturón
7. MENU UP/DOWN - use estos botones para desplazarse
por el menú del transmisor
8. SET - use este botón para elegir los elementos de menú
del transmisor
9. BATTERY COMPARTMENT - tire de él para acceder al
compartimento de las pilas (2x AA)
10. EARPHONES - conéctelos a la salida PHONES del receptor.
Asegúrese de que el volumen esté al mínimo antes
decolocárselo
Características
• Pack formado por un receptor inalámbrico de petaca
UL 1000G2-R y auriculares intraurales de monitorización, para
el sistema de monitorización intraural Behringer UL 1000G2
• Puede usar a la vez varios receptores inalámbricos de petaca
UL 1000G2-R con el UL 1000G2
• El receptor de petaca UL 1000G2-R le ofrece una gran
exibilidad en cuanto a monitorización intraural stereo / mono
• Pantalla integrada que le muestra frecuencia de canal, squelch
o ajuste y control de ganancia
• Distancia operativa de hasta 60 m (200 pies)
• Incluye 2 x pilas AA
• Este receptor ha sido diseñado únicamente para funcionar con
el sistema de monitorización intraural UL 1000G2. Para más
información acerca de la instalación y el funcionamiento del
UL 1000G2-R, consulte el manual de puesta en marcha que se
incluye con el pack de transmisor/receptor UL-1000G2.
UL 1000G2-R Controles
(ES) Paso 2: Controles
UL 1000G2-R Puesta en marcha
(ES) Paso 3: Puesta en marcha
CONFIGURACIÓN DEL RECEPTOR
Menú principal
1. En el menú principal del receptor aparecerá el nivel AF, modo
mono/ stereo, fuerza de señal RF, EQ, LIM, MIX, lock,
frecuencia, squelch y ni4vel de las pilas.
Selección de un grupo de frecuencia
2. Abra la tapa del compartimento de las pilas para acceder al
botón SET.
3. Pulse el botón SET hasta que parpadee GROUP en la pantalla
del receptor. Pulse el botón arriba/abajo para elegir el mismo
grupo de frecuencia que en el transmisor.
Selección de un canal
4. Pulse SET de forma repetida hasta que en la pantalla del
receptor parpadee CHANNEL. Pulse el botón arriba/abajo
para elegir el mismo canal de frecuencia que haya elegido en
eltransmisor.
Ecualizador (EQ)
5. Cuando el EQ esté activado, los agudos serán enfatizados a
10kHz en 6 dB.
6. Pulse SET de forma repetida hasta que parpade “EQ” en la
pantalla del receptor. Use los botones arriba/abajo para activar
(EQ ON) o desactivar (EQ OFF) el ecualizador.
Limitador (LIM)
7. Para proteger sus oídos de posibles daños, la función de
limitador limita el nivel de la señal audio enviada a los
auriculares intraurales a 400 mV. Le recomendamos que deje
esta función en LIM ON si la pantalla del receptor indica que el
nivel audio está al máximo.
8. Pulse SET de forma repetida hasta que parpade “LIM” en la
pantalla del receptor. Use los botones arriba/abajo para activar
(LIM ON) o desactivar (LIM OFF) el limitador.
Mezclador (MIX)
9. Active la función de mezclador para escuchar la mezcla de dos
señales monos, ajustando el balance de su volumen.
Por ejemplo, si la entrada LEFT INPUT contiene una señal
de audio mono de instrumentos y la entrada RIGHT INPUT
contiene una señal de audio mono de voces. El cantante
podrá monitorizar y ajustar el balance de volumen entre
los instrumentos y su propia voz y el nivel global usando el
receptor de petaca con el ajuste MIX ON.
10. Pulse SET de forma repetida hasta que parpade “MIX” en la
pantalla del receptor. Use los botones arriba/abajo para activar
(MIX ON) o desactivar (MIX OFF) el mezclador.
Squelch (SQ)
11. La función Squelch le permite ajustar un umbral mínimo
de señal recibida por el receptor. El ajuste consiste en tres
barras de nivel - Low, Medium y High. El receptor rechaza las
señales que estén por debajo de ese umbral ajustado y ayuda a
erradicar así cualquier señal de audio no deseada transmitida
por el transmisor.
12. Pulse SET de forma repetida hasta que parpade “SQ” en la
pantalla del receptor. Use los botones arriba/abajo para
ajustar Squelch a Low, Medium o High.
Balance
13. Ajuste el balance de volumen entre los canales izquierdo y
derecho de una señal stereo usando los botones arriba/abajo.
El audio queda en el centro en el nivel -0-. Dispone de 9 niveles
de desfase hasta el canal derecho y otros 9 hasta el canal
izquierdo. Los valores positivos (1-, 2-, 3-, 4-, 5-, 6-, 7-, 8-, 9-)
suponen un desfase hacia el canal derecho, mientras que los
valores negativos (-1-, -2-, -3-, -4-, -5-, -6-, -7-, -8-, -9-) son lo
mismo hacia el canal izquierdo.
14. NOTA: Para asegurar la transmisión de una señal audio stereo,
debe ajustar el transmisor en el modo stereo y debe haber
presente una señal audio en las entradas LEFT INPUT y RIGHT
INPUT.
Bloqueo del receptor contra posibles cambios accidentales
15. Pulse el botón SET de forma repetida hasta que el icono LOCK
parpadee en la pantalla del receptor. Pulse arriba/abajo para
elegir LOCK ON o LOCK OFF. La función LOCK ON desactiva
los botones, por lo que no podrá realizar modicaciones de
formaaccidental.
16. NOTA: LOCK ON se activará de forma automática si no realiza
ninguna operación durante 5 segundos. Cuando la unidad
esté en el estado LOCK ON, mantenga pulsado el botón SET
durante 2 segundos para desactivar la función LOCK de forma
momentánea y que pueda realizar cambios.
Estado de carga de las pilas
17. El estado de carga restante de las pilas será mostrado con
cuatro barras. Si no aparece ninguna barra en el icono de
estado de la pila, el piloto BATT cambiará de azul a rojo. En ese
caso sustituya las pilas inmediatamente.
MONO
SQL
EQ
LIM
MIX
MONO
SQL
EQ
LIM
MIX

18 19Quick Start GuideUL 1000G2-R
(FR) Etape 1 : Connexions
Mixing Console
Active Loudspeakers
Tx
Rx
Power
Adapter
UL 1000G2-T
UL 1000G2-R
UL 1000G2-R Connexions

20 21Quick Start GuideUL 1000G2-R
(4) (5)
(3) (10)
(8)
(9)
(7)
(6)
(1) (2)
1. LEDS - elles indiquent si un signal audio est détecté ainsi
que l’état des piles
2. LCD - permet d’acher le menu et d’autres indications à
propos du récepteur
3. ANTENNA - antenne de réception
4. PHONES - cette sortie minijack stéréo permet de
connecter les écouteurs fournis
5. VOLUME - ermet de régler le volume des écouteurs et de
mettre le récepteur hors tension
6. BELT CLIP - permet d’accrocher le récepteur à
votreceinture
7. MENU UP/DOWN - ces boutons permettent de naviguer
dans le menu
8. SET - permet de sélectionner les éléments du menu. Ouvrez le
compartiment des piles pour accéder à cebouton
9. BATTERY COMPARTMENT - retirez le couvercle pour
accéder au compartiment des piles (2x AA)
10. EARPHONES - connectez-les à la sortie PHONES du
récepteur. Assurez-vous d’avoir baissé complètement le
niveau avant de les placer dans vos oreilles
Caractéristiques
• Contient 1 récepteur sans l UL 1000G2-R avec écouteurs pour
système d’écoute intra-auriculaire Behringer UL 1000G2
• Plusieurs récepteurs UL 1000G2-R peuvent être utilisés
simultanément avec l’UL 1000G2
• Le récepteur UL 1000G2-R peut être utilisé en stéréo ou
enmono
• L’acheur indique la fréquence du canal, la valeur du squelch
et le niveau de gain
• Portée jusqu’à 60 m
• 2 piles AA fournies
Ce récepteur est conçu pour fonctionner uniquement avec
le système d’écoute intra-auriculaire UL 1000G2. Pourplus
d’informations sur la mise en place et l’utilisation de
l’UL 1000G2-R, référez-vous au guide de mise en œuvre rapide
fourni avec l’ensemble émetteur/récepteur UL-1000G2.
UL 1000G2-R Réglages
(FR) Etape 2 : Réglages
UL 1000G2-R Mise en oeuvre
(FR) Etape 3: Mise en oeuvre
CONFIGURATION DU RÉCEPTEUR
Menu principal
1. Ce menu indique le niveau AF, le mode de fonctionnement
(MONO/STEREO), la puissance du signal RF, les fonctions EQ,
LIM, MIX, squelch et de verrouillage, la fréquence et le
niveau des piles.
Sélection d’un groupe de fréquence
2. Ouvrez le compartiment des piles an d’accéder au bouton
SET.
3. Appuyez sur le bouton SET jusqu’à ce que GROUP clignote sur
l’acheur. Sélectionnez le même groupe de fréquence que
celui de l’émetteur avec les boutons haut/bas.
Sélection d’un canal
4. Appuyez plusieurs fois sur le bouton SET jusqu’à ce que
CHANNEL clignote sur l’acheur. Sélectionnez le même canal
que celui de l’émetteur avec les boutons haut/bas.
Égaliseur (EQ)
5. Les fréquences autours de 10 kHz sont ampliées de 6 dB
lorsque l’EQ est activé.
6. Appuyez plusieurs fois sur le bouton SET jusqu’à ce que EQ
clignote sur l’acheur. Utilisez les boutons haut/bas pour
active (EQ ON) /désactiver (EQ OFF) l’égaliseur.
Limiteur (LIM)
7. An de protéger votre audition, le limiteur permet de limiter le
niveau du signal audio à 400mV. Il est recommandé d’activer
le limiteur si l’acheur du récepteur indique que le niveau
audio est au maximum.
8. Appuyez plusieurs fois sur le bouton SET jusqu’à ce que LIM
clignote sur l’acheur. Utilisez les boutons haut/bas pour
activer (LIM ON) /désactiver (LIM OFF) le limiteur.
Mixeur (MIX)
9. Activez la fonction Mix pour écouter, équilibrer et régler le
mixage de 2 signaux mono.
Par exemple : Si l’entrée LEFT porte le signal mono d’un
instrument et l’entrée RIGHT le signal mono de la voix,
lechanteur peut régler le volume des 2 signaux directement
sur le récepteur si MIX est activé.
10. Appuyez plusieurs fois sur le bouton SET jusqu’à ce que MIX
clignote sur l’acheur. Utilisez les boutons haut/bas pour
activer (MIX ON) /désactiver (MIX OFF) le mixeur.
Squelch (SQ)
11. La fonction Squelch permet de régler un niveau minimal pour
qu’un signal soit détecté par le récepteur. Trois niveaux sont
disponibles : bas, moyen et haut. Le récepteur rejette tous les
signaux dont le niveau est inférieur au seuil xé an d’éliminer
tous les signaux indésirables transmis par l’émetteur.
12. Appuyez plusieurs fois sur le bouton SET jusqu’à ce que SQ
clignote sur l’acheur. Utilisez les boutons haut/bas pour
sélectionner le niveau bas, moyen ou haut.
Mixage
13. Permet de mixer les canaux gauche et droit d’un signal stéréo
avec les boutons haut/bas.
Le mixage est centré au niveau -0-. 9 niveaux de panoramique
gauche et droit sont disponibles. Les valeurs positives (1-, 2-,
3-, 4-, 5-, 6-, 7-, 8-, 9-) décalent le signal vers la droite et les
valeurs négatives (-1-, -2-, -3-, -4-, -5-, -6-, -7-, -8-, -9-) vers
lagauche.
14. REMARQUE : Pour qu’un signal stéréo soit transmis, l’émetteur
doit être réglé en mode stéréo et un signal audio doit être
présent aux entrées LEFT et RIGHT.
Verrouiller le récepteur pour empêcher les modications
15. Appuyez plusieurs fois sur SET jusqu’à ce que l’icône du
cadenas clignote sur l’acheur. Utilisez les boutons haut/bas
pour activer/désactiver le verrouillage. Lorsque le verrouillage
est activé, les boutons sont désactivés, donc aucune
modication ne peut être appliquée par accident.
16. REMARQUE : Le verrouillage est automatiquement activé
au bout de 5 secondes sans modication. Maintenez le
bouton SET appuyé pendant 2 secondes pour désactiver
momentanément le verrouillage an d’eectuer des
modications.
État des piles
17. L’autonomie restante des piles est indiquée par 4 barres.
Sile symbole de la pile ne contient aucune barre, laLED
BATT s’allume en rouge. Les piles doivent alors être
immédiatementremplacées.
MONO
SQL
EQ
LIM
MIX
MONO
SQL
EQ
LIM
MIX

22 23Quick Start GuideUL 1000G2-R
(DE) Schritt 1: Verkabelung
Mixing Console
Active Loudspeakers
Tx
Rx
Power
Adapter
UL 1000G2-T
UL 1000G2-R
UL 1000G2-R Verkabelung

24 25Quick Start GuideUL 1000G2-R
(4) (5)
(3) (10)
(8)
(9)
(7)
(6)
(1) (2)
1. LEDS - zeigen den Empfang von Audiosignalen und den
Batteriestatus des Empfängers an.
2. LCD - zeigt die Empfängerdetails und das Menü an.
3. ANTENNA - Empfängerantenne.
4. PHONES - Schließen Sie die mitgelieferten Ohrhörer an
diesen 3,5 mm-Stereoausgang an.
5. VOLUME - stellt die Lautstärke der Ohrhörer ein und
schaltet den Empfänger aus.
6. BELT CLIP - befestigt den Empfänger am Gürtel.
7. MENU UP/DOWN - Zum Navigieren durch das
Sendermenü.
8. SET - Zur Auswahl von Menüpunkten des Senders.
9. BATTERY COMPARTMENT - aufklappen, um auf das
Batteriefach zuzugreifen (2 x AA):
10. EARPHONES - Zum Anschließen an den PHONES-
Ausgang des Empfängers. Vergewissern Sie sich, dass die
Lautstärke zurückgedreht ist, bevor Sie sie aufsetzen.
Features
• Paket mit einem drahtlosen Beltpack-Empfänger UL 1000G2-R
und Abhörkopfhörer für das Behringer In-Ear-Monitoring-
System UL 1000G2.
• Mehrere drahtlose Beltpack-Empfänger UL 1000G2-R können
gleichzeitig mit dem UL 1000G2 verwendet werden.
• Der Beltpack-Empfänger UL 1000G2-R unterstützt exibles
In-Ear-Monitoring in Stereo oder Mono.
• Integriertes Display für Kanalfrequenz, Squelch und
Gain-Steuerung.
• Arbeitsentfernung von bis zu 60 m (200 ft)
• AA x 2 Batterien im Lieferumfang enthalten
Dieser Empfänger ist nur für den Betrieb mit dem UL 1000G2
In-Ear-Monitoring-System vorgesehen. Für Informationen zur
Installation und zum Betrieb des UL 1000G2-R lesen Sie bitte die
Schnellstartanleitung, die dem UL-1000G2 Sender/Empfänger-
Paket beiliegt.
UL 1000G2-R Bedienelemente
(DE) Schritt 2: Bedienelemente
UL 1000G2-R Erste Schritte
(DE) Schritt 3: Erste Schritte
EMPFÄNGER EINRICHTEN
Hauptmenü
1. Das Hauptmenü zeigt den AF-Pegel, den Mono-/
Stereo-Modus, die RF-Signalstärke, EQ, LIM, MIX, Lock,
Frequenz, Squelch und den Batteriestand an.
Frequenzgruppe wählen
2. Önen Sie die Batterieabdeckung, um auf die SET-Taste
zuzugreifen.
3. Drücken Sie die SET-Taste, bis GROUP auf dem
Empfängerdisplay blinkt. Drücken Sie die Auf/Ab-Tasten, um
die gleiche Frequenzgruppe wie die des Senders auszuwählen.
Kanal wählen
4. Drücken Sie wiederholt die SET-Taste, bis CHANNEL auf dem
Empfängerdisplay blinkt. Drücken Sie die Auf/Ab-Tasten,
umden gleichen Kanal wie den des Senders zu wählen.
Equalizer (EQ)
5. Wenn der EQ aktiviert ist, werden die Höhen bei 10 kHz um
6dB angehoben.
6. Drücken Sie wiederholt die SET-Taste, bis "EQ" auf dem
Empfängerdisplay blinkt. Drücken Sie die Auf/Ab-Tasten, um den
Equalizer zu aktivieren (EQ ON) oder zu deaktivieren (EQ OFF).
Limiter (LIM)
7. Um die Ohren vor Verletzungen zu schützen, begrenzt die
Limiter-Funktion den Pegel des Audiosignals zu den Ohrhörern
auf 400 mV. Es wird empfohlen, den Limiter einzuschalten
(LIM ON), wenn das Display des Empfängers den maximalen
Signalpegel anzeigt.
8. Drücken Sie wiederholt die SET-Taste, bis "LIM" auf dem
Empfängerdisplay blinkt. Drücken Sie die Auf-/Ab-Tasten, um den
Limiter zu aktivieren (LIM ON) oder zu deaktivieren (LIM OFF).
Mixer (MIX)
9. Aktivieren Sie die Mixer-Funktion, um die Mischung zweier
Monosignale abzuhören, auszugleichen und deren Lautstärke
zu regeln.
Beispiel: Wenn LEFT INPUT ein Mono-Audiosignal von
Instrumenten und RIGHT INPUT ein Mono-Audiosignal vom
Gesang enthält. Der Sänger kann die Lautstärkebalance
zwischen den Instrumenten und seiner eigenen Stimme sowie
den Gesamtlautstärkepegel mit Hilfe der Einstellung MIX ON
am Gürtelempfänger überwachen und anpassen.
10. Drücken Sie wiederholt die SET-Taste, bis "MIX" auf dem
Empfängerdisplay blinkt. Drücken Sie die Auf/Ab-Tasten,
um den Mischer zu aktivieren (MIX ON) oder zu deaktivieren
(MIX OFF).
Squelch (SQ)
11. Mit der Squelch-Funktion können Sie einen
Mindestschwellenwert für das vom Empfänger empfangene
Signal festlegen. Die Einstellung besteht aus den 3
Stufenbalken Low, Medium und High. Der Empfänger ignoriert
Signale, die unter dem eingestellten Schwellenwert liegen,
und unterdrückt dadurch unerwünschte Audiosignale, die
vom Sender übertragen werden.
12. Drücken Sie wiederholt die SET-Taste, bis "SQ" auf dem
Empfängerdisplay blinkt. Verwenden Sie die Auf-/Ab-Tasten,
um Squelch auf Niedrig, Mittel oder Hoch einzustellen.
Balance
13. Hier stellen Sie mit den Auf-/Ab-Tasten die Lautstärkebalance
zwischen linkem und rechtem Kanal eines Stereosignals ein.
Das Audiomaterial wird bei einem Wert von -0- zentriert.
Esstehen jeweils 9 Werte für die Verschiebung zum rechten
Kanal und die Verschiebung zum linken Kanal zur Verfügung.
Positive Werte (1-, 2-, 3-, 4-, 5-, 6-, 7-, 8-, 9-) verschieben zum
rechten Kanal, während negative Werte (-1-, -2-, -3-, -4-, -5-,
-6-, -7-, -8-, -9-) zum linken Kanal verschieben.
14. HINWEIS: Um die Übertragung eines Stereo-Audiosignals
zu gewährleisten, muss der Sender in den Stereomodus
geschaltet werden und ein Audiosignal muss am LINKEN
EINGANG und am RECHTEN EINGANG anliegen.
Empfänger gegen Änderungen verriegeln
15. Drücken Sie wiederholt die SET-Taste, bis das LOCK-Symbol
auf dem Empfängerdisplay blinkt. Drücken Sie die Auf-/
Ab-Tasten, um LOCK ON oder LOCK OFF zu wählen. Mit der
Funktion LOCK ON werden die Tasten deaktiviert, so dass keine
unerwünschten Änderungen versehentlich vorgenommen
werden können.
16. HINWEIS: LOCK ON wird automatisch aktiviert, wenn 5
Sekunden keine Aktion durchgeführt wird. Halten Sie im
LOCK ON-Status die SET-Taste 2 Sekunden gedrückt, um LOCK
kurzzeitig zu deaktivieren und Änderungen vorzunehmen.
Batterieladezustand
17. Der Status der verbleibenden Batterieleistung wird durch vier
Balken angezeigt. Wenn keine Balken auf dem Batteriesymbol
zu sehen sind, wird die BATT LED von Blau auf Rot umgeschaltet.
Die Batterien sollten dann sofort ausgetauscht werden.
MONO
SQL
EQ
LIM
MIX
MONO
SQL
EQ
LIM
MIX

26 27Quick Start GuideUL 1000G2-R
(PT) Passo 1: Conexões
Mixing Console
Active Loudspeakers
Tx
Rx
Power
Adapter
UL 1000G2-T
UL 1000G2-R
UL 1000G2-R Conexões

28 29Quick Start GuideUL 1000G2-R
(4) (5)
(3) (10)
(8)
(9)
(7)
(6)
(1) (2)
1. LEDS - indicam áudio recebido e o status da bateria
doreceptor
2. LCD - exibe os detalhes do receptor e men
3. ANTENNA - antena receptora
4. PHONES - conecte os fones intra-auriculares a esta
entrada estéreo de 3.5 mm
5. VOLUME - ajusta o volume dos fones de ouvido e desliga
o receptor
6. BELT CLIP - prende o cinturão do receptor
7. MENU UP/DOWN - usado para percorrer pelo menu
Transmitter (transmissor)
8. SET - seleciona os itens do menu Transmitter (transmissor)
9. BATTERY COMPARTMENT - abra para ter acesso ao
compartimento de bateria (2x AA)
10. EARPHONES - conecte à saída PHONES do receptor.
Certique-se de que o volume esteja abaixado antes de
colocar os fones de ouvido
Recursos
• Pacote de um receptor de cinto sem o e fones de ouvido
de monitoramento UL 1000G2-R, para o sistema de
monitoramento auricular Behringer UL 1000G2
• Pode-se usar diversos receptores de cinto sem o UL 1000G2-R
com o UL 1000G2 ao mesmo tempo
• O receptor de cinto UL 1000G2-R exível, suporta
monitoramento auricular em estéreo ou mono
• O visor integrado proporciona frequência de canal,
silenciadore controle de ganho
• Possibilita operação remota de até 60 m (200 pés)
• 2 baterias AA incluídas
Este receptor foi projetado para funcionar apenas em sistemas de
monitoramento auricular UL 1000G2. Para obter mais informações
sobre a instalação e operação do UL 1000G2-R, por favor leia o
Guia de Primeiros Passos que acompanha o pacote de transmissor/
receptor UL-1000G2.
UL 1000G2-R Controles
(PT) Passo 2: Controles
UL 1000G2-R Primeiros Passos
(PT) Passo 3: Primeiros Passos
CONFIGURAÇÃO DO RECEPTOR
Menu Principal
1. O menu principal exibe o nível AF, modo mono/estéreo, força
do sinal RF, EQ, LIM, MIX, lock, frequência, squelch
(silenciador), e nível de bateria.
Seleção de um Grupo de Frequência
2. Abra o compartimento de bateria para ter acesso ao botão SET.
3. Aperte o botão SET até que GROUP comece a piscar na tela
do receptor. Aperte up/down (para cima/para baixo) para
selecionar o mesmo grupo de frequência do transmissor.
Seleção de canal
4. Aperte o botão SET repetidamente até que CHANNEL comece
a piscar na tela do receptor. Aperte up/down (para cima/para
baixo) para selecionar o mesmo canal do transmissor.
Equalizador (EQ)
5. A 10 kHz, o agudo é enfatizado em até 6 dB quando o EQ
estáhabilitado.
6. Aperte o botão SET repetidamente até que “EQ” comece a
piscar na tela do receptor. Use os botões up/down (para cima/
para baixo) para habilitar (EQ ON) ou desabilitar (EQ OFF)
oequalizador.
Limitador (LIM)
7. Para proteger os ouvidos de danos, a função Limiter limita
o nível de sinal do áudio aos fones de ouvido em 400 mV.
Éaconselhável ligar o LIM se a tela do receptor indicar que o
nível do áudio está no máximo.
8. Aperte o botão SET repetidamente até que “LIM” comece a piscar
na tela do receptor. Use os botões up/down (para cima/para
baixo) para habilitar (LIM ON) ou desabilitar (LIM OFF) o limitador.
Mixer (MIX)
9. Habilita a função Mixer para que se possa ouvir a mixagem de
dois sinais mono, seu balanço e regular seu volume.
Por exemplo: Se a entrada esquerda, LEFT INPUT, contiver
sinal áudio mono de instrumentos e a entrada direita, RIGHT
INPUT, contiver vocais de sinal de áudio mono, o cantor
pode monitorar e ajustar o balanço do volume entre os
instrumentos e sua própria voz e o nível de volume geral,
usando o receptor de cinto com a conguração MIX ON.
10. Aperte o botão SET repetidamente até que “MIX” comece a
piscar na tela do receptor. Use os botões up/down (para cima/
para baixo) para habilitar (MIX ON) ou desabilitar (MIX OFF)
o mixer.
Squelch (SQ)
11. A função Squelch possibilita ajustar um limiar mínimo para
o sinal recebido pelo receptor. A conguração consiste de 3
níveis de barra - Low (baixo), Medium (médio) e High (alto).
Oreceptor rejeita sinais abaixo do limiar congurado e ajuda a
erradicar quaisquer sinais de áudio indesejados transmitidos
pelo transmissor.
12. Aperte o botão SET repetidamente até que “SQ” comece a
piscar na tela do receptor. Use os botões up/down (para cima/
para baixo) para congurar Squelch em Low (baixo), Medium
(médio) e High (alto).
Balanço
13. Ajuste o balanço do volume entre os canais esquerdo e direito
de um sinal estéreo usando os botões up/down (para cima/
para baixo).
O áudio ca centrado no nível 0. Há 9 níveis disponíveis em cada
um para deslocamento a favor do canal direito e contra o canal
esquerdo. Valores Positivos (1-, 2-, 3-, 4-, 5-, 6-, 7-, 8-, 9-)
deslocam para o canal direito, Right, e valores negativos (-1-, -2-,
-3-, -4-, -5-, -6-, -7-, -8-, -9-) deslocam para o canal
esquerdo,Left.
14. Observação: Para garantir a transmissão de um sinal de áudio
em estéreo, o transmissor deve estar congurado no modo
estéreo e um sinal de áudio deve estar presente na entrada da
esquerda, LEFT INPUT, e entrada da direita, RIGHT INPUT.
Travar o Transmissor para evitar mudanças
15. Aperte o botão SET repetidamente até que o ícone “LOCK”
comece a piscar na tela do receptor. Aperte up/down (para
cima/para baixo) para selecionar LOCK ON ou LOCK OFF.
Afunção LOCK ON desabilita os botões para que nenhuma
mudança indesejada seja feita sem querer.
16. Observação: LOCK ON é automaticamente habilitado quando
nenhuma operação é realizada por 5 segundos. No status LOCK
ON, aperte e mantenha o botão SET apertado por 2 segundos para
desabilitar LOCK momentaneamente, isso habilita mudanças.
Status do Nível de Energia da Bateria
17. O status do nível de energia da bateria é demonstrado por
quatro barras. Se nenhuma barra estiver visível no símbolo de
bateria, o LED BATT passará de azul para vermelho. As baterias
devem então ser trocadas imediatamente.
MONO
SQL
EQ
LIM
MIX
MONO
SQL
EQ
LIM
MIX

30 31Quick Start GuideUL 1000G2-R
(IT) Passo 1: Allacciare
Mixing Console
Active Loudspeakers
Tx
Rx
Power
Adapter
UL 1000G2-T
UL 1000G2-R
UL 1000G2-R Allacciare

32 33Quick Start GuideUL 1000G2-R
(4) (5)
(3) (10)
(8)
(9)
(7)
(6)
(1) (2)
1. LEDS - indicano il livello audio ricevuto e lo stato della
batteria del ricevitore
2. LCD - mostra i dettagli e il menu del ricevitore
3. ANTENNA - antenna di ricezione
4. PHONES - collegare gli auricolari in dotazione a questo
ingresso stereo da 3,5 mm
5. VOLUME - serve per regolare il volume degli auricolari e
per spegnere il ricevitore
6. BELT CLIP - attacca il ricevitore alla cintura
7. MENU UP/DOWN - serve per navigare nel menu
deltrasmettitore
8. SET - serve per selezionare le voci del menu del
trasmettitore
9. BATTERY COMPARTMENT - aprire girando per accedere al
vano batteria (2x AA)
10. EARPHONES - collegare all'uscita PHONES del ricevitore.
Prima di indossarli assicuratevi che il volume sia abbassato
Contenuto
• Pacchetto di un ricevitore da cintura wireless UL 1000G2-R
e auricolari di monitoraggio, per il sistema di monitoraggio
in-ear Behringer UL 1000G2
• Con UL 1000G2 possono essere usati contemporaneamente più
ricevitori da cintura wireless UL 1000G2-R
• Il ricevitore da cintura UL 1000G2-R supporta la essibilità del
monitoraggio in-ear stereo/mono
• Display integrato per la frequenza del canale, lo squelch e il
controllo del guadagno
• Distanza operativa no a 60m (200 piedi)
• 2 batterie AA incluse
Questo ricevitore è progettato per funzionare solo con il sistema
di monitoraggio in-ear UL 1000G2. Per informazioni relative
all'installazione e al funzionamento dell'UL 1000G2-R, leggete
la guida rapida fornita con il pacchetto trasmettitore/ricevitore
UL-1000G2.
UL 1000G2-R Controlli
(IT) Passo 2: Controlli
UL 1000G2-R Iniziare
(IT) Passo 3: Iniziare
IMPOSTAZIONE DEL RICEVITORE
Menu principale
1. Il menu principale mostra il livello AF, il modo mono/stereo,
la potenza del segnale RF, EQ, LIM, MIX, blocco, frequenza,
squelch e livello della batteria.
Selezione di un gruppo di frequenze
2. Aprite il coperchio del vano batteria per accedere al
pulsanteSET.
3. Premete il pulsante SET nché sul display del ricevitore non
lampeggia GROUP. Premete su/giù per selezionare lo stesso
gruppo di frequenza del trasmettitore.
Selezione di un canale
4. Premete ripetutamente il pulsante SET nché sul display
del ricevitore non lampeggia CHANNEL. Premete su/giù per
selezionare lo stesso canale del trasmettitore.
Equalizzatore (EQ)
5. Quando l'EQ è attivato gli alti a 10 kHz sono esaltati di 6 dB.
6. Premete più volte il pulsante SET nché sul display del
ricevitore non lampeggia “EQ”. Usate i pulsanti su/giù per
abilitare (EQ ON) o disabilitare (EQ OFF) l'equalizzatore.
Limiter (LIM)
7. Per proteggere l’udito da danni, la funzione Limiter limita il
livello del segnale audio degli auricolari a 400 mV. Consigliamo
di attivare LIM su ON quando il display del ricevitore indica che
il livello audio è al massimo.
8. Premete più volte il pulsante SET nché sul display del
ricevitore non lampeggia “LIM”. Usate i pulsanti su/giù per
attivare (LIM ON) o disattivare (LIM OFF) il Limiter.
Mixer (MIX)
9. Attiva la funzione Mixer per ascoltare il mix di due segnali
mono, bilanciarli e regolarne il volume.
Esempio: l'ingresso LEFT contiene il segnale audio mono degli
strumenti e l'ingresso RIGHT contiene il segnale mono delle
voci. Con l’impostazione MIX ON il cantante può monitorare
e bilanciare il volume tra gli strumenti e la propria voce e il
livello del volume generale tramite il ricevitore.
10. Premete più volte il pulsante SET nché sul display del
ricevitore non lampeggia “MIX”. Usate i pulsanti su/giù per
attivare (MIX ON) o disattivare (MIX OFF) il Mix.
Squelch (SQ)
11. La funzione Squelch consente di impostare una soglia minima
di segnale ricevuto dal ricevitore. L'impostazione è realizzata
su 3 livelli: L (basso), M (medio) e H (alto). Ilricevitore
riuta i segnali inferiori alla soglia impostata e aiuta ad
eliminare qualsiasi segnale audio indesiderato trasmesso
daltrasmettitore.
12. Premete ripetutamente il pulsante SET nché sul display del
ricevitore non lampeggia “SQ”. Usate i pulsanti su/giù per
impostare lo Squelch su L (basso), M (medio) e H (alto).
Bilanciamento
13. Usando i pulsanti su/giù regolate il bilanciamento del volume
tra i canali di sinistra e di destra di un segnale stereo.
L'audio è centrale al livello -0-. Sono disponibili 9 livelli
ciascuno per l'oset del canale di destra e quello di sinistra.
Ivalori positivi (1-, 2-, 3-, 4-, 5-, 6-, 7-, 8-, 9-) spostano verso
destra, mentre i valori negativi (-1-, -2-, -3- , -4-, -5-, -6-, -7-,
-8-, -9-) spostano verso il canale di sinistra.
14. NOTA: Per garantire la trasmissione di un segnale audio stereo,
il trasmettitore deve essere impostato in modo STEREO e il
segnale audio deve essere presente agli ingressi di sinistra e
di destra.
Blocco del ricevitore contro le modiche
15. Premete ripetutamente il pulsante SET nché sul display
del ricevitore non lampeggia l'icona LOCK. Premete su/
giù per selezionare LOCK ON o LOCK OFF. La funzione LOCK
ON disattiva i pulsanti; ciò rende impossibile apportare
modicheindesiderate.
16. NOTA: LOCK ON si attiva automaticamente se non è
eseguita nessuna operazione per 5 secondi. Nello stato
LOCK ON, tenete premuto il pulsante SET per 2 secondi per
disabilitare momentaneamente il LOCK e consentire di
eettuaremodiche.
Stato di carica della batteria
17. Lo stato di carica residua della batteria è mostrato tramite
quattro barre. Se sul simbolo della batteria non sono visibili
barre, il LED BATT da blu diventerà rosso. Pertanto le batterie
devono essere sostituite immediatamente.
MONO
SQL
EQ
LIM
MIX
MONO
SQL
EQ
LIM
MIX

34 35Quick Start GuideUL 1000G2-R
(NL) Stap 1: Aansluiten
Mixing Console
Active Loudspeakers
Tx
Rx
Power
Adapter
UL 1000G2-T
UL 1000G2-R
UL 1000G2-R Aansluiten

36 37Quick Start GuideUL 1000G2-R
(4) (5)
(3) (10)
(8)
(9)
(7)
(6)
(1) (2)
1. LEDS - geven audio-ontvangst aan en de batterijstatus
van de ontvanger
2. LCD - geeft de gegevens en het menu van de
ontvangerweer
3. ANTENNA - ontvangstantenne
4. PHONES - sluit de meegeleverde oortelefoons aan op
deze 3,5 mm stereo-ingan
5. VOLUME - stelt het volume van de hoofdtelefoon in,
enschakelt de ontvanger UIT
6. BELT CLIP - bevestigt de ontvanger aan een riem
7. MENU UP/DOWN - hiermee navigeert u door het
zendermenu
8. SET - hiermee selecteert u de menuopties van de zende
9. BATTERY COMPARTMENT - klap open om toegang te
krijgen tot het batterijcompartiment (2x AA)
10. EARPHONES - aansluiten op PHONES-uitgang ontvanger.
Controleer of het volume laag is, alvorens de oortelefoons
te gebruike
Eigenschappen
11. Verpakking van één UL 1000G2-R draadloze
beltpackontvanger en monitoringoortelefoons, voor het
Behringer UL 1000G2 in-ear monitoringsysteem
12. Meerdere UL 1000G2-R draadloze beltpackontvangers
kunnen tegelijkertijd worden gebruikt met de UL 1000G2
13. UL 1000G2-R beltpackontvanger ondersteunt stereo of
mono in-ear monitoring
14. Geïntegreerd display voor kanaalfrequentie, squelch en
gainregelaar
15. Werkbereik tot 60 m (200 ft)
16. Inclusief 2 x AA-batterijen
Deze ontvanger is ontworpen om uitsluitend te werken met
het UL 1000G2 in-ear monitoringsysteem. Lees voor meer
informatie over de installatie en bediening van de UL 1000G2-R
de snelstartgids die bij het UL-1000G2 zender/ontvangerpakket
wordt geleverd.
UL 1000G2-R Bediening
(NL) Stap 2: Bediening
UL 1000G2-R Aan de slag
(NL) Stap 3: Aan de slag
CONFIGURATIE ONTVANGER
Hoofdmenu
1. Het hoofdmenu geeft het AF-niveau, mono/stereomodus,
RF-signaalsterkte, EQ, LIM, MIX, lock, frequentie, squelch en
batterijniveau weer.
Een frequentiegroep selecteren
2. Open het batterijdeksel om toegang te krijgen tot de SET-knop.
3. Druk op de SET-knop totdat de melding GROUP op het scherm
van de ontvanger knippert. Druk op omhoog/omlaag om
dezelfde frequentiegroep als de zender te selecteren.
Een kanaal selecteren
4. Druk meerdere malen op de SET-knop totdat CHANNEL op het
scherm van de ontvanger knippert. Druk op omhoog/omlaag
om hetzelfde kanaal als de zender te selecteren.
Equalizer (EQ)
5. De hoge tonen op 10 kHz worden met 6 dB verhoogd als de EQ
is ingeschakeld.
6. Druk meerdere malen op de SET-knop totdat “EQ” op het
scherm van de ontvanger knippert. Gebruik de knoppen
omhoog/omlaag om de equalizer in te schakelen (EQ ON) of uit
te schakelen (EQ OFF).
Limiter (LIM)
7. Om gehoorschade te voorkomen, beperkt de functie Limiter
het niveau van het audiosignaal naar de oortelefoon tot
400mV. Wij raden u aan om LIM ON te kiezen als het scherm
van de ontvanger aangeeft dat het audioniveau maximaal is.
8. Druk meerdere malen op de SET-knop totdat "LIM” op het
scherm van de ontvanger knippert. Gebruik de knoppen
omhoog/omlaag om de Limiter in te schakelen (LIM ON) of uit
te schakelen (LIM OFF).
Mixer (MIX)
9. Schakel de functie Mixer in om naar de mix van twee
monosignalen te luisteren en regel hun balans en volume.
Bijvoorbeeld: Als de LINKER INGANG een mono audiosignaal
van instrumenten bevat en de RECHTER INGANG een mono
audiosignaal van vocalen. De zanger kan de volumebalans
tussen de instrumenten en zijn eigen stem en het
totaalvolumeniveau monitoren en aanpassen met de
beltpackontvanger en MIX ON.
10. Druk meerdere malen op de SET-knop totdat “MIX” op het
scherm van de ontvanger knippert. Gebruik de knoppen
omhoog/omlaag om de mixer in te schakelen (MIX ON) of uit te
schakelen (MIX OFF).
Squelch (SQ)
11. Met de functie Squelch kunt u een minimale drempel instellen
van het signaal dat door de ontvanger wordt ontvangen.
Deinstelling heeft 3 standen - Laag, Gemiddeld en Hoog.
Deontvanger weigert signalen onder de ingestelde drempel
en helpt bij het elimineren van ongewenste audiosignalen die
door de zender worden verzonden.
12. Druk meerdere malen op de SET-knop totdat "SQ” op het scherm
van de ontvanger knippert. Gebruik de knoppen omhoog/
omlaag om Squelch in te stellen op Low, Medium of High.
Balance
13. Pas de volumebalans tussen de linker- en rechterkanalen van
een stereosignaal aan met de knoppen omhoog/omlaag.
De audio is gecentreerd op -0-niveau. Er zijn 9 niveaus
beschikbaar voor oset naar het rechterkanaal en oset naar
het linkerkanaal. Positieve waarden (1-, 2-, 3-, 4-, 5-, 6-, 7-, 8-,
9-) verplaatsen het signaal naar rechts, terwijl negatieve
waarden (-1-, -2-, -3-, -5-, -5-, -6-, -7-, -8-, -9-) het signaal
naar links verplaatsen.
14. NB: Om te waarborgen dat er een stereo-audiosignaal wordt
verzonden, moet de zender op stereomodus worden ingesteld.
Er moet een audiosignaal aanwezig zijn, zowel bij de LEFT als
de RIGHT ingang.
De ontvanger vergrendelen tegen wijzigingen
15. Druk meerdere malen op de SET-knop totdat het LOCK-
symbool op het scherm van de ontvanger knippert. Druk
op omhoog/omlaag om LOCK ON of LOCK OFF te selecteren.
Defunctie LOCK ON schakelt knoppen uit, dus er kunnen niet
per ongeluk ongewenste wijzigingen worden aangebracht.
16. NB: LOCK ON wordt automatisch ingeschakeld als er
5seconden geen bedieningshandelingen worden uitgevoerd.
Houd in LOCK ON-status de SET-knop 2 seconden ingedrukt
om LOCK tijdelijk uit te schakelen en wijzigingen te kunnen
aanbrengen.
Status batterijvermogen
17. De status van het resterende batterijvermogen wordt
weergegeven met vier balken. Als er geen balken in het
batterijsymbool worden weergegeven, gaat de BATT-LED
rood branden in plaats van blauw. De batterijen moeten dan
onmiddellijk worden vervangen.
MONO
SQL
EQ
LIM
MIX
MONO
SQL
EQ
LIM
MIX

38 39Quick Start GuideUL 1000G2-R
(SE) Steg 1: Anslutning
Mixing Console
Active Loudspeakers
Tx
Rx
Power
Adapter
UL 1000G2-T
UL 1000G2-R
UL 1000G2-R Anslutning

40 41Quick Start GuideUL 1000G2-R
(4) (5)
(3) (10)
(8)
(9)
(7)
(6)
(1) (2)
1. LEDS - indikerar mottaget ljud och mottagarens
batteristatus
2. LCD - visar information om mottagaren och menyn
3. ANTENNA - mottagningsantenn
4. PHONES - anslut medföljande hörlurar till denna 3,5 mm
stereoingång.
5. VOLUME - justerar hörlurarnas volym och stänger av
mottagaren
6. BELT CLIP - fäst mottagaren i ett bälte
7. MENU UP/DOWN - används för att navigera
påsändarmenyn
8. SET - används för att välja sändarens menyalternativ
9. BATTERY COMPARTMENT - fäll upp för att komma åt
batterifacket (2x AA)
10. EARPHONES - anslut till mottagarens PHONES-utgång.
Setill att volymen är avstängd innan du tar på dem
Funktioner
• Paket med en UL 1000G2-R trådlös bältespaketmottagare
och monitorhörlurar, för Behringer UL 1000G2 in-ear-
monitorsystem
• Flera trådlösa UL 1000G2-R-bältespaketmottagare kan
användas samtidigt med UL 1000G2
• UL 1000G2-R-bältespaketmottagare stöder stereo/
mono-exibilitet för in-ear-monitorlyssning
• Integrerad display för styrning av kanalfrekvens, squelch
ochgain
• Arbetsavstånd upp till 60 m
• 2 st. AA-batterier ingår
Den här mottagaren är utformad för att endast fungera med
UL 1000G2 in-ear-monitorsystemet. För information om
installation och drift av UL 1000G2-R, läs den snabbstartguide
som följer med UL-1000G2-sändar-/mottagarpaketet.
UL 1000G2-R Kontroller
(SE) Steg 2: Kontroller
UL 1000G2-R Komma igång
(SE) Steg 3: Komma igång
MOTTAGARINSTÄLLNING
Huvudmeny
1. Huvudmenyn visar AF-nivå, mono-/stereoläge,
RF-signalstyrka, EQ, LIM, MIX, lås, frekvens, squelch och
batterinivå.
Välja en frekvensgrupp
2. Öppna batteriluckan för att komma åt SET-knappen.
3. Tryck på SET-knappen tills GROUP blinkar på mottagarens
display. Tryck uppåt/nedåt för att välja samma frekvensgrupp
som sändaren.
Välja en kanal
4. Tryck på knappen SET upprepade gånger tills CHANNEL blinkar
på mottagarens display. Tryck uppåt/nedåt för att välja
samma kanal som sändaren.
Equalizer (EQ)
5. Diskanten vid 10 kHz förstärks med 6 dB när EQ:n är aktiverad.
6. Tryck på SET-knappen upprepade gånger tills "EQ" blinkar på
mottagarens display. Använd upp-/ned-knapparna för att
aktivera (EQ ON) eller inaktivera (EQ OFF) equalizern.
Limiter (LIM)
7. För att skydda öronen mot skador begränsar limiter-
funktionen nivån på ljudsignalen till hörlurarna till 400 mV.
Det rekommenderas att välja LIM ON om mottagarens display
visar att ljudnivån är maximal.
8. Tryck på SET-knappen upprepade gånger tills "LIM" blinkar
på mottagarens display. Använd upp-/ned-knapparna för att
aktivera (LIM ON) eller inaktivera (LIM OFF) limitern.
Mixer (MIX)
9. Aktivera Mixer-funktionen för att lyssna på mixen av två
monosignaler, balansera och reglera deras volym.
Till exempel: Om LEFT INPUT innehåller monoljud från
instrument och RIGHT INPUT innehåller monoljud från sång.
Sångaren kan monitorlyssna och justera volymbalansen
mellan instrumenten och sin egen röst samt den totala
volymnivån med hjälp av bältesmottagaren med inställningen
MIX ON.
10. Tryck på SET-knappen upprepade gånger tills "MIX" blinkar
på mottagarens display. Använd upp-/ned-knapparna för att
aktivera (MIX ON) eller inaktivera (MIX OFF) mixern.
Squelch (SQ)
11. Squelch-funktionen gör det möjligt att ställa in ett lägsta
tröskelvärde för den signal som tas emot av mottagaren.
Inställningen består av tre nivåstaplar – Low, Medium och
High. Mottagaren avvisar signaler som ligger under det
inställda tröskelvärdet och hjälper till att eliminera alla
oönskade ljudsignaler som sändaren sänder ut.
12. Tryck på SET-knappen upprepade gånger tills "SQ" blinkar på
mottagarens display. Använd upp-/ned-knapparna för att
ställa in Squelch på Low, Medium eller High.
Balans
13. Justera volymbalansen mellan vänster och höger kanal i en
stereosignal med hjälp av upp-/ned-knapparna.
Ljudet är centrerat på -0-nivån. Det nns nio nivåer för
förskjutning till höger kanal och förskjutning till vänster
kanal. Positiva värden (1-, 2-, 3-, 4-, 5-, 6-, 7-, 8-, 9-) förskjuter
mot höger, medan negativa värden (-1-, -2-, -3-, -4-, -5-, -6-,
-7-, -8-, -9-) förskjuter mot vänster kanal.
14. Obs! För att säkerställa överföringen av en stereoljudsignal
måste sändaren vara inställd i stereoläge och en ljudsignal
måste nnas vid LEFT INPUT och RIGHT INPUT.
Låsning av mottagaren mot ändringar
15. Tryck på SET-knappen upprepade gånger tills LOCK-ikonen
blinkar på mottagarens display. Tryck uppåt/nedåt för att
välja LOCK ON eller LOCK OFF. LOCK ON-funktionen inaktiverar
knapparna så att inga oönskade ändringar kan göras
avmisstag.
16. Obs! LOCK ON aktiveras automatiskt om ingen åtgärd utförs
på fem sekunder. När LOCK ON-statusen är aktiverad trycker
du på SET-knappen och håller den intryckt i två sekunder för
att inaktivera LOCK tillfälligt, vilket gör det möjligt för dig att
göra ändringar.
Status för batteriets laddning
17. Den återstående batteriladdningen visas med fyra staplar.
Ominga staplar syns på batterisymbolen växlar lysdioden
BATT till rött från blått. Batterierna ska då omedelbart
bytasut.
MONO
SQL
EQ
LIM
MIX
MONO
SQL
EQ
LIM
MIX

42 43Quick Start GuideUL 1000G2-R
(PL) Krok 1: Podłączeni
Mixing Console
Active Loudspeakers
Tx
Rx
Power
Adapter
UL 1000G2-T
UL 1000G2-R
UL 1000G2-R Podłączeni

44 45Quick Start GuideUL 1000G2-R
(4) (5)
(3) (10)
(8)
(9)
(7)
(6)
(1) (2)
1. LEDS - wskazuje na przychodzący sygnał audio oraz status
baterii odbiornika
2. LCD - pokazuje szczegóły odbiornika oraz menu
3. ANTENNA - antena odbiornika
4. PHONES - podłącz dostarczone słuchawki do tego wejścia
3.5 mm stere
5. VOLUME - dostosowuje głośność słuchawek oraz wyłącza
odbiornik (OFF)
6. BELT CLIP - mocuje odbiornik do paska
7. MENU UP/DOWN - użyj, aby poruszać się po
menunadajnika
8. SET - użyj, aby wybrać elementy z menu nadajnika
9. BATTERY COMPARTMENT - otwórz, aby wymienić baterie
(2x AA)
10. EARPHONES - podłącz do wyjścia PHONES odbiornika.
Upewnij się, że głośność jest zredukowana przed
ichzałożeniem
Cechy
• Pakiet jednego bezprzewodowego odbiornika biodrowego
UL 1000G2-R oraz monitorujące słuchawki douszne dla
systemu monitorowania Behringer UL 1000G2
• Wiele bezprzewodowych odbiorników biodrowych
UL 1000G2-R może być używanych jednocześnie wraz z
UL 1000G2
• Odbiornik biodrowy UL 1000G2-R wspiera elastyczność
monitorowania dousznego stereo / mono
• Zintegrowany wyświetlacz dla częstotliwości kanału,
wyciszenia oraz kontroli poziomu
• Działanie na odległość aż do 60 m
• Dwie baterie AA w zestawie
Ten odbiornik jest zaprojektowany jedynie do działania wraz z
systemem monitorowania dousznego UL 1000 G2. Aby uzyskać
więcej informacji na temat instalacji i działania UL 1000G2-R,
prosimy przeczytać poradnik szybkiego startu dostarczony wraz z
pakietem nadajnika/odbiornika UL-1000G2.
UL 1000G2-R Sterowanica
(PL) Krok 2: Sterowanica
UL 1000G2-R Pierwsze kroki
(PL) Krok 3: Pierwsze kroki
KONFIGURACJA ODBIORNIKA
Menu główne
1. Menu główne wyświetla poziom AF, tryb mono/stereo, siłę
sygnału RF, EQ, LIM, MIX, blokadę, częstotliwość, bramkę
oraz poziom baterii.
Wybór grupy częstotliwości
2. Otwórz gniazdo baterii, aby odsłonić przycisk SET.
3. Wciśnij SET, aż GROUP zacznie migać na wyświetlaczu
odbiornika. Wybierz przyciskami góra/dół tę samą grupę
częstotliwości, co nadajnik.
Wybór kanału
4. Wielokrotnie wciśnij SET, aż CHANNEL zacznie migać na
wyświetlaczu odbiornika. Wybierz przyciskami góra/dół ten
sam kanał, co nadajnik.
Korektor (EQ)
5. Wysokie częstotliwości przy 10 kHz są wzmocnione o 6 dB, gdy
EQ jest włączone.
6. Wielokrotnie wciśnij SET, aż EQ zacznie migać na wyświetlaczu
odbiornika. Za pomocą przycisków góra/dół włącz (EQ ON) lub
wyłącz (EQ OFF) korektor.
Limiter (LIM)
7. Aby chronić uszy przed uszkodzeniem, limiter ogranicza
poziom sygnału audio w słuchawkach do 400 mV. Zalecane
jest włączenie LIM ON, jeśli wyświetlacz odbiornika wskazuje
maksymalny poziom audio.
8. Wielokrotnie wciśnij SET, aż LIM zacznie migać na
wyświetlaczu odbiornika. Za pomocą przycisków góra/dół
włącz (LIM ON) lub wyłącz (LIM OFF) limiter.
Mikser (MIX)
9. Włącz funkcję miksera, aby słyszeć miks dwóch sygnałów
mono, wyważyć oraz regulować ich głośność.
Na przykład: Jeśli lewe wejście INPUT odbiera monofoniczny
sygnał audio z instrumentów, a prawe wejście INPUT
odbiera monofoniczny sygnał audio wokalu, wokalista
może monitorować i dostosować balans głośności między
instrumentami a własnym głosem oraz ogólny poziom
głośności za pomocą odbiornika z ustawieniem MIX ON.
10. Wielokrotnie wciśnij SET, aż MIX zacznie migać na
wyświetlaczu odbiornika. Za pomocą przycisków góra/dół
włącz (MIX ON) lub wyłącz (MIX OFF) mikser.
Bramka (SQ)
11. Funkcja bramki (Squelch) pozwala na ustawienie minimalnego
progu sygnału otrzymywanego przez odbiornik. Dostępne są 3
ustawienia – niskie, średnie oraz wysokie. Odbiornik odrzuca
sygnały poniżej ustawionego progu i pomaga w usunięciu
niepożądanych dźwięków przychodzących z nadajnika.
12. Wielokrotnie wciśnij SET, aż SQ zacznie migać na wyświetlaczu
odbiornika. Za pomocą przycisków góra/dół włącz funkcję
Squelch na poziom Low, Medium lub High.
Balans głośności
13. Dostosowuje balans głośności między lewym i prawym
kanałem sygnału stereo za pomocą przycisków góra/dół.
Audio jest w pozycji środkowej na poziomie -0-. Dostępne jest
po 9 poziomów wzmocnienia w stronę prawego lub lewego
kanału. Wartości dodatnie (1-, 2-, 3-, 4-, 5-, 6-, 7-, 8-, 9-)
wzmacniają prawy kanał, a wartości ujemne (-1-, -2-, -3-, -4-,
-5-, -6-, -7-, -8-, -9-) wzmacniają lewy kanał.
14. UWAGA: Aby zagwarantować transmisję sygnału stereo,
nadajnik musi znajdować się w trybie stereo i obecny musi być
sygnał audio zarówno na LEFT INPUT jak i RIGHT INPUT.
Blokada odbiornika przed zmianami
15. Wielokrotnie wciśnij SET, aż ikona LOCK zacznie migać na
wyświetlaczu odbiornika. Za pomocą przycisków góra/dół
wybierz LOCK ON lub LOCK OFF. LOCK ON wyłącza przyciski,
uniemożliwiając przypadkowe zmiany.
16. UWAGA: LOCK ON jest włączony automatycznie, jeśli nie
wykonano żadnej operacji przez 5 sekund. W trybie LOCK ON
wciśnij i przytrzymaj przycisk SET na 2 sekundy, aby chwilowo
wyłączyć blokadę, pozwalając na dokonanie zmian.
Status mocy baterii
17. Pozostała moc baterii jest wyświetlana za pomocą czterech
pasków. Jeśli na symbolu baterii nie ma już pasków, dioda
BATT zmieni kolor z czerwonego na niebieski. Baterie należy
wtedy natychmiast zmienić.
MONO
SQL
EQ
LIM
MIX
MONO
SQL
EQ
LIM
MIX

46 47Quick Start GuideUL 1000G2-R
Especicaciones Técnicas
Receptor
Rango de frecuencias RF 584 - 608 MHz / 823 - 832 MHz / 863 - 865 MHz
Número máximo de canales For EU Frequency: 96 (dependiendo de la banda de frecuencias)
For US Frequency: 120 (dependiendo de la banda de frecuencias)
Conmutación de ancho de banda 24 MHz (dependiendo de la banda de frecuencias)
Sensibilidad <-92 dBm para relación S/R 30 dB
PPM máximo +/- 15 kHz
Rango de frecuencias de audio 70 Hz - 13.5 kHz (+/- 3 dB)
Relación señal/ruido >80 dB(A)
THD <1% a 1 kHz
Specications
Receiver
RF Frequency range 584-608 MHz / 823-832 MHz / 863 - 865 MHz
Maximum channel number For EU Frequency: 96 (depending upon the frequency band)
For US Frequency: 120 (depending upon the frequency band)
Switching bandwidth 24 MHz (depending upon the frequency band)
Sensitivity <-92 dBm for 30 dB S/N ratio
Max PPM +/- 15 kHz
Audio Frequency range 70 Hz - 13.5 kHz (+/- 3 dB)
Signal to noise ratio >80 dB(A)
THD <1% to 1 kHz
Connectivity
Power switch Volume on/o
Earphones output 3.5 mm stereo
Power Requirements
Internal batteries 2 x 1.5 VDC (AA)
Operating time >6 hours/1300 mAH
Physical
Dimensions (W x H x D) 64 x 98 x 22 mm (2.5 x 3.85 x 0.86")
Weight 100 g (without batteries)
Technische Daten
Empfänger
RF-Frequenzbereich 584 – 608 MHz / 823 - 832 MHz / 863 - 865 MHz
Maximale Kanalanzahl For EU Frequency: 96 (abhängig vom Frequenzband)
For US Frequency: 120 (abhängig vom Frequenzband)
Bandbreitenumschaltung 24 MHz (abhängig vom Frequenzband)
Empndlichkeit <-92 dBm für 30 dB Störspannungsabstand
Max. PPM +/-15 kHz
Audiofrequenzbereich 70 Hz – 13,5 kHz (+/-3 dB)
Störspannungsabstand >80 dB(A)
Klirrfaktor <1% bis 1 kHz
Caractéristiques Techniques
Récepteur
Plage de radio fréquence 584 - 608 MHz / 823 - 832 MHz / 863 - 865 MHz
Nombre max de canaux For EU Frequency: 96 (dépend de la bande de fréquences)
For US Frequency: 120 (dépend de la bande de fréquences)
Largeur de bande commutable 24 MHz (dépend de la bande de fréquences)
Sensibilité <-92 dBm pour un rapport signal/bruit de 30 dB
PPM max +/- 15 kHz
Plage de fréquences audio 70 Hz - 13.5 kHz (+/- 3 dB)
Rapport signal/bruit >80 dB(A)
DHT De <1% à 1 kHz
Dados Técnicos
Receptor
Gama de frequência RF 584-608 MHz / 823-832 MHz / 863 - 865 MHz
Número máximo de canais For EU Frequency: 96 (dependendo da banda de frequência)
For US Frequency: 120 (dependendo da banda de frequência)
Comutação da largura de banda 24 MHz (dependendo da banda de frequência)
Sensibilidade <-92 dBm para uma relação de 30 dB S/N
Max PPM +/- 15 kHz
Gama de frequência de áudio 70 Hz - 13,5 kHz (+/- 3 dB)
Relação sinal-ruído > 80 dB(A)
THD <1% a 1 kHz

48 49Quick Start GuideUL 1000G2-R
Specikationer
Caratteristiche
Mottagare
RF-frekvensområde 584–608 MHz / 823–832 MHz / 863–865 MHz
Maximalt antal kanaler 96 (beroende på frekvensband)
Bandbredd för växling 24 MHz (beroende på frekvensbandet)
Känslighet <-92 dBm för 30 dB S/N-förhållande
Max PPM +/- 15 kHz
Ljudfrekvensområde 70 Hz–13,5 kHz (+/- 3 dB)
Signal-brusförhållande >80 dB(A)
THD <1 % till 1 kHz
Ricevitore
Gamma di frequenza RF 584-608 MHz / 823-832 MHz / 863-865 MHz
Numero massimo di canali For EU Frequency: 96 (secondo la banda della frequenza)
For US Frequency: 120 (secondo la banda della frequenza)
Cambio di larghezza di banda 24 MHz (secondo la banda della frequenza)
Sensibilità <-92 dBm per rapporto s/r 30 dB
Max PPM +/-15 kHz
Gamma di frequenza audio 70 Hz – 13,5 kHz (+/-3 dB)
Rapporto segnale/rumore >80 dB(A)
THD <1% a 1 kHz
Specicaties
Ontvanger
RF Frequentiebereik 584-608 MHz / 823-832 MHz / 863 - 865 MHz
Maximum aantal kanalen For EU Frequency: 96 (afhankelijk van de frequentieban)
For US Frequency: 120 (afhankelijk van de frequentieban)
Omschakelen bandbreedte 24 MHz (afhankelijk van de frequentieband)
Gevoeligheid <-92 dBm voor 30 dB S/R-verhouding
Max. PPM +/- 15 kHz
Audiofrequentiebereik 70 Hz - 13,5 kHz (+/- 3 dB)
Signaal/ruisverhouding >80 dB(A)
THD <1% tot 1 kHz
Specykacje
Odbiornik
Pasmo przenoszenia RF 584 - 608MHz / 823 - 832 MHz / 863 - 865 MHz
Maksymalna liczba kanałów For EU Frequency: 96 (w zależności od pasma częstotliwości)
For US Frequency: 120 (w zależności od pasma częstotliwości)
Przepustowość przełączenia 24 MHz (w zależności od pasma częstotliwości)
Czułość <-92 dBm dla stosunku 30 dB S/N
Maksymalne PPM +/- 15 kHz
Pasmo przenoszenia audio 70 Hz - 13.5 kHz (+/- 3 dB)
Stosunek sygnału do szumu >80 dB(A)
THD <1% do 1 kHz

50 51Quick Start GuideUL 1000G2-R
Other important information
1. Register online.
Pleaseregister your new Music Tribe
equipment right after you purchase it by
visiting musictribe.com. Registeringyour
purchase using our simple online
form helps us to process your repair
claims more quickly and eciently.
Also, read the terms and conditions of
our warranty, ifapplicable.
2. Malfunction. Should your
Music Tribe Authorized Reseller not be
located in your vicinity, you may contact
the Music Tribe Authorized Fulller for
your country listed under “Support” at
musictribe.com. Shouldyour country
not be listed, pleasecheck if your
problem can be dealt with by our
“OnlineSupport” which may also be
found under “Support” at musictribe.
com. Alternatively, please submit an
online warranty claim at musictribe.com
BEFORE returning theproduct.
1. Registro online.
Lerecomendamos que registre su nuevo
aparato Music Tribe justo después de
su compra accediendo a la página web
musictribe.com. Elregistro de su compra
a través de nuestro sencillo sistema online
nos ayudará a resolver cualquier incidencia
que se presente a la mayor brevedad
posible. Además,aproveche para leer los
términos y condiciones de nuestra garantía,
siesaplicable en sucaso.
2. Averías. En el caso de que no
exista un distribuidor Music Tribe en
las inmediaciones, puede ponerse en
contacto con el distribuidor Music Tribe
de su país, queencontrará dentro del
apartado “Support” de nuestra página web
musictribe.com. En caso de que su país no
aparezca en ese listado, acceda a la sección
“Online Support” (quetambiénencontrará
dentro del apartado “Support” de nuestra
páginaweb) y compruebe si su problema
aparece descrito y solucionado allí.
Deforma alternativa, envíenos a través
de la página web una solicitud online de
soporte en periodo de garantía ANTES de
devolvernoselaparato.
1. Enregistrez-vous
enligne. Prenezle temps
d’enregistrer votre produit Music Tribe
aussi vite que possible sur le site Internet
musictribe.com. Lefait d’enregistrer le
produit en ligne nous permet de gérer
les réparations plus rapidement et plus
ecacement. Prenezégalement le
temps de lire les termes et conditions de
notregarantie.
2. Dysfonctionnement. Si
vous n’avez pas de revendeur Music
Tribe près de chez vous, contactez le
distributeur Music Tribe de votre pays:
consultez la liste des distributeurs de
votre pays dans la page “Support” de
notre site Internet musictribe.com.
Si votre pays n’est pas dans la liste,
essayez de résoudre votre problème
avec notre “aideen ligne” que vous
trouverez également dans la section
“Support” du site musictribe.com.
Vouspouvez également nous faire
parvenir directement votre demande de
réparation sous garantie par Internet sur
le site musictribe.com AVANT de nous
renvoyer leproduit.
Important information Aspectos importantes Informations importantes
1. Online registrieren.
Bitteregistrieren Sie Ihr neues Music
Tribe-Gerät direkt nach dem Kauf auf
der Website musictribe.com. WennSie
Ihren Kauf mit unserem einfachen online
Formular registrieren, könnenwir Ihre
Reparaturansprüche schneller und
ezienter bearbeiten. Lesen Sie bitte
auch unsere Garantiebedingungen,
fallszutreend.
2. Funktionsfehler. Sollte sich
kein Music Tribe Händler in Ihrer Nähe
benden, können Sie den Music Tribe
Vertrieb Ihres Landes kontaktieren, der
auf musictribe.com unter „Support“
aufgeführt ist. Sollte Ihr Land nicht
aufgelistet sein, prüfen Sie bitte, ob
Ihr Problem von unserem „Online
Support“ gelöst werden kann, den Sie
ebenfalls auf musictribe.com unter
„Support“ nden. Alternativ reichen
Sie bitte Ihren Garantieanspruch online
auf musictribe.com ein, BEVOR Sie das
Produktzurücksenden..
1. Registre-se online.
Porfavor, registreseu novo
equipamento Music Tribe logo após
a compra visitando o site musictribe.
com Registrar sua compra usando nosso
simples formulário online nos ajuda
a processar seus pedidos de reparos
com maior rapidez e eciência. Além
disso, leia nossos termos e condições de
garantia, caso sejanecessário.
2. Funcionamento
Defeituoso. Casoseufornecedor
Music Tribe não esteja localizado nas
proximidades, vocêpode contatar
um distribuidor Music Tribe para o
seu país listado abaixo de “Suporte”
emmusictribe.com. Se seu país não
estiver na lista, favor checar se seu
problema pode ser resolvido com o
nosso “SuporteOnline” que também
pode ser achado abaixo de “Suporte”em
musictribe.com. Alternativamente,
favorenviar uma solicitação de garantia
online em musictribe.com ANTES da
devolução doproduto.
1. Registratevi online.
Vi invitiamo a registrare il nuovo
apparecchio Music Tribe subito dopo
averlo acquistato visitando musictribe.
com. La registrazione dell'acquisto
tramite il nostro semplice modulo online
ci consente di elaborare le richieste
di riparazione in modo più rapido ed
eciente. Leggete anche i termini e le
condizioni della nostra garanzia, qualora
applicabile.
2. Malfunzionamento.
Nel caso in cui il rivenditore autorizzato
Music Tribe non si trovi nelle vostre
vicinanze, potete contattare il Music
Tribe Authorized Fulller per il vostro
paese, elencato in “Support” @
musictribe.com. Se la vostra nazione non
è elencata, controllate se il problema
può essere risolto tramite il nostro
“Online Support”che può anche essere
trovato sotto “Support” @ musictribe.
com. In alternativa, inviate una richiesta
di garanzia online su musictribe.com
PRIMA di restituire il prodotto.
Weitere wichtige
Informationen
Outras Informações
Importantes Informazioni importanti

52 53Quick Start GuideUL 1000G2-R
Other important information
1. Registreer online.
Registreer uw nieuwe Music Tribe-
apparatuur direct nadat u deze hebt
gekocht door naar musictribe.com te
gaan. Door uw aankoop te registreren
via ons eenvoudige online formulier,
kunnen wij uw reparatieclaims sneller
en eciënter verwerken. Lees ook de
voorwaarden van onze garantie, indien
van toepassing.
2. Storing. Mocht uw
door Music Tribe geautoriseerde
wederverkoper niet bij u in de buurt zijn
gevestigd, dan kunt u contact opnemen
met de door Music Tribe Authorized
Fulller voor uw land vermeld onder
“Support” op musictribe.com. Als uw
land niet in de lijst staat, controleer dan
of uw probleem kan worden opgelost
door onze "Online Support", die u
ook kunt vinden onder "Support" op
musictribe.com. U kunt ook een online
garantieclaim indienen op musictribe.
com VOORDAT u het product retourneert.
1. Registrera online.
Registrera din nya Music Tribe-
utrustning direkt efter att du köpt den
genom att besöka musictribe.com.
Att registrera ditt köp med vårt enkla
onlineformulär hjälper oss att behandla
dina reparationsanspråk snabbare och
mer eektivt. Läs också villkoren i vår
garanti, om tillämpligt.
2. Fel. Om din Music Tribe-
auktoriserade återförsäljare inte nns i
din närhet kan du kontakta Music Tribe
Authorized Fulller för ditt land listat
under “Support” på musictribe.com.
Om ditt land inte är listat, kontrollera
om ditt problem kan hanteras av
vår “Onlinesupport” som också nns
under “Support” på musictribe.com.
Alternativt kan du skicka in ett online-
garantianspråk på musictribe.com
INNAN du returnerar produkten.
1. Zarejestrować online.
Zarejestruj swój nowy sprzęt Music Tribe
zaraz po zakupie na stronie musictribe.
com. Zarejestrowanie zakupu za pomocą
naszego prostego formularza online
pomaga nam szybciej i efektywniej
rozpatrywać roszczenia dotyczące
naprawy. Przeczytaj również warunki
naszej gwarancji, jeśli dotyczy.
2. Awaria. Jeśli Twój
autoryzowany sprzedawca Music Tribe
nie znajduje się w pobliżu, możesz
skontaktować się z autoryzowanym
dostawcą Music Tribe dla swojego kraju,
wymienionym w sekcji „Wsparcie” na
stronie musictribe.com. Jeśli Twojego
kraju nie ma na liście, sprawdź, czy Twój
problem może zostać rozwiązany przez
nasze „Wsparcie online”, które można
również znaleźć w sekcji „Wsparcie” na
stronie musictribe.com. Alternatywnie,
prześlij zgłoszenie gwarancyjne online
na musictribe.com PRZED zwrotem
produktu.
Belangrijke informatie Viktig information Ważna informacja
1. ヒューズの格納部 / 電圧
の選択: ユニットをパワーソケ
ットに接続する前に、各モデ
ルに対応した正しい主電源を
使用していることを確認して
ください。ユ ニットによって
は、230 V と 120 V の 2 つの違
うポジションを切り替えて使
う、ヒューズの格納部を備え
ているものがあります。正し
くない値のヒューズは、絶対
に適切な値のヒューズに交換
されている必要がありま す。
2. 故障: Music Tribe ディーラ
ーがお客様のお近くにないと
きは、musictribe.com の “Support”
内に列記されている、お客
様の国の Music Tribe ディスト
リビューターにコンタクトす
ることができます。お 客様
の国がリストにない場合は、
同じ musictribe.com の “Support”
内にある “OnlineSupport” でお客
様の問題が処理できないか、
チェックしてみてください。
あるいは、商品を返送する前
に、musictribe.com で、オンラ
インの保証請求を要請してく
ださい。
1. 在线注册。 请购买 Music Tribe
产品后立即在 musictribe.com 网站
注册。 网页上有简单的在线注册
表格。 这有助于我们更快更有效
率地处理您维修等事宜。 请阅读
保修的相关条款及条件。
2. 无法正常工作。 若您的
Music Tribe 产品无法正常工作,
我们会为您尽快修复。 请联
系您购买产品的销售商。 若你
所在地区没有 Music Tribe 销售
商, 请联系 musictribe.com 网站的
“WHERETOBUY” 一栏下的所列出
的子公司或经销商。
その他の重要な情報 其他的重要信息

54 55Quick Start GuideUL 1000G2-R
FEDERAL COMMUNICATIONS
COMMISSION COMPLIANCE
INFORMATION
Behringer
UL 1000G2-R
Responsible Party Name: Music Tribe Commercial NV Inc.
Address: 122 E. 42nd St.1,
8th Floor NY, NY 10168,
United States
Email Address: [email protected]
UL 1000G2-R
This equipment has been tested and found to comply with
the limits for a Class B digital device, pursuant to part
15 of the FCC Rules. These limits are designed to provide
reasonable protection against harmful interference in
a residential installation. This equipment generates,
uses and can radiate radio frequency energy and, if not installed
and used in accordance with the instructions, may cause harmful
interference to radio communications. However, there is no
guarantee that interference will not occur in a particular installation.
If this equipment does cause harmful interference to radio or
television reception, which can be determined by turning the
equipment o and on, the user is encouraged to try to correct the
interference by one or more of the following measures:
• • Reorient or relocate the receiving antenna.
• • Increase the separation between the equipment and receiver.
• • Connect the equipment into an outlet on a circuit dierent
from that to which the receiver is connected.
• • Consult the dealer or an experienced radio/TV
technician for help.
• • Consult the dealer or an experienced
radio/TV technician for help.
This equipment complies with Part 15 of the FCC rules. Operation
is subject to the following two conditions:
(1) this device may not cause harmful interference, and
(2) this device must accept any interference received, including
interference that may cause undesired operation.
Important information:
Changes or modications to the equipment not expressly
approved by Music Tribe can void the user’s authority to
use the equipment.
Hereby, Music Tribe declares that this product is in compliance
with Directive 2014/53/EU, Directive 2014/30/EU, Directive
2014/35/EU, Directive 2011/65/EU and Amendment 2015/863/
EU, Directive 2012/19/EU, Regulation 519/2012 REACH SVHC and
Directive 1907/2006/EC.
Full text of EU DoC is available at https://community.musictribe.com/
EU Representative: Music Tribe Brands DK A/S
Address: Gammel Strand 44, DK-1202 København K, Denmark
UK Representative: Music Tribe Brands UK Ltd.
Address: 8th Floor, 20 Farringdon Street London EC4A 4AB,
United Kingdom
Correct disposal of this product: This symbol
indicates that this product must not be disposed
of with household waste, according to the WEEE
Directive (2012/19/EU) and your national law.
Thisproduct should be taken to a collection center
licensed for the recycling of waste electrical and
electronic equipment (EEE). Themishandling of
this type of waste could have a possible negative impact on the
environment and human health due to potentially hazardous
substances that are generally associated with EEE. At the same
time, your cooperation in the correct disposal of this product will
contribute to the ecient use of natural resources. For more
information about where you can take your waste equipment for
recycling, please contact your local city oce, or your household
waste collection service.

We Hear You
-
 1
1
-
 2
2
-
 3
3
-
 4
4
-
 5
5
-
 6
6
-
 7
7
-
 8
8
-
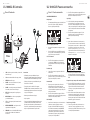 9
9
-
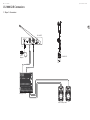 10
10
-
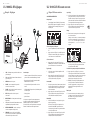 11
11
-
 12
12
-
 13
13
-
 14
14
-
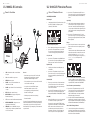 15
15
-
 16
16
-
 17
17
-
 18
18
-
 19
19
-
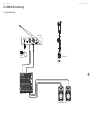 20
20
-
 21
21
-
 22
22
-
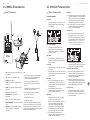 23
23
-
 24
24
-
 25
25
-
 26
26
-
 27
27
-
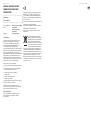 28
28
-
 29
29


in andere talen
- English: Behringer UL 1000G2-R Quick start guide
- italiano: Behringer UL 1000G2-R Guida Rapida
- français: Behringer UL 1000G2-R Guide de démarrage rapide
- español: Behringer UL 1000G2-R Guía de inicio rápido
- Deutsch: Behringer UL 1000G2-R Schnellstartanleitung
- português: Behringer UL 1000G2-R Guia rápido
- polski: Behringer UL 1000G2-R Skrócona instrukcja obsługi
