Beamz Pro MHL1940 de handleiding
- Categorie
- Schijnwerpers
- Type
- de handleiding

MHL1940
150.106 V1.0

SAFETY INSTRUCTIONS ........................................................................................................................................................................................................................................................................................ 3
UNPACKING INSTRUCTION .................................................................................................................................................................................................................................................................................. 4
POWERSUPPLY ......................................................................................................................................................................................................................................................................................................... 4
RIGGING ......................................................................................................................................................................................................................................................................................................................... 4
DMX512 CONTROL .................................................................................................................................................................................................................................................................................................... 5
RDM CONTROL ........................................................................................................................................................................................................................................................................................................... 5
CLEANING ..................................................................................................................................................................................................................................................................................................................... 5
REPLACING THE FUSE ........................................................................................................................................................................................................................................................................................... 6
MAINTENANCE........................................................................................................................................................................................................................................................................................................... 6
TROUBLE SHOOTING .............................................................................................................................................................................................................................................................................................. 7
VEILIGHEIDSINSTRUCTIES .................................................................................................................................................................................................................................................................................. 8
UITPAKKEN .................................................................................................................................................................................................................................................................................................................. 9
AANSLUITSPANNING .............................................................................................................................................................................................................................................................................................. 9
RIGGING ......................................................................................................................................................................................................................................................................................................................... 9
DMX BEDIENING ...................................................................................................................................................................................................................................................................................................... 10
RDM BEDIENING ...................................................................................................................................................................................................................................................................................................... 10
REINIGEN .................................................................................................................................................................................................................................................................................................................... 10
VERVANGEN ZEKERING ........................................................................................................................................................................................................................................................................................ 11
ONDERHOUD ............................................................................................................................................................................................................................................................................................................... 11
PROBLEMEN OPLOSSEN ..................................................................................................................................................................................................................................................................................... 12
SICHERHEITSHINWEISE....................................................................................................................................................................................................................................................................................... 13
AUSPACKEN ............................................................................................................................................................................................................................................................................................................... 14
NETZANSCHLUSS ................................................................................................................................................................................................................................................................................................... 14
RIGGING ........................................................................................................................................................................................................................................................................................................................ 14
DMX BEDIENUNG ..................................................................................................................................................................................................................................................................................................... 15
RDM BEDIENUNG ..................................................................................................................................................................................................................................................................................................... 15
REINIGUNG .................................................................................................................................................................................................................................................................................................................. 15
SICHERUNGWECHSEL ......................................................................................................................................................................................................................................................................................... 16
PFLEGE ........................................................................................................................................................................................................................................................................................................................ 16
FEHLERSUCHE ......................................................................................................................................................................................................................................................................................................... 17

INSTRUCCIONES DE SEGURIDAD ....................................................................................................................................................................................................................................................................18
INSTRUCCIONES DE DESEMBALAJE ........................................................................................................................................................................................................................................................... 19
FUENTE DE ALIMENTACIÓN ............................................................................................................................................................................................................................................................................. 19
INSTALACIÓN ............................................................................................................................................................................................................................................................................................................ 19
CONTROL DMX512 ................................................................................................................................................................................................................................................................................................. 20
CONTROL RDM ........................................................................................................................................................................................................................................................................................................ 20
LIMPIEZA.................................................................................................................................................................................................................................................................................................................... 20
CAMBIANDO EL FUSIBLE .................................................................................................................................................................................................................................................................................... 21
MANTENIMIENTO ..................................................................................................................................................................................................................................................................................................... 21
SOLUCIÓN DE PROBLEMAS ............................................................................................................................................................................................................................................................................. 22
INSTRUCTIONS DE SECURITE ......................................................................................................................................................................................................................................................................... 23
INSTRUCTIONS DE DEBALLAGE .................................................................................................................................................................................................................................................................... 24
ALIMENTATION ....................................................................................................................................................................................................................................................................................................... 24
FIXATION .................................................................................................................................................................................................................................................................................................................... 24
GESTION DMX512 ................................................................................................................................................................................................................................................................................................... 25
CONTROLE RDM ..................................................................................................................................................................................................................................................................................................... 25
NETTOYAGE ............................................................................................................................................................................................................................................................................................................. 25
REMPLACEMENT DU FUSIBLE ....................................................................................................................................................................................................................................................................... 26
ENTRETIEN ............................................................................................................................................................................................................................................................................................................... 26
RESOLUTION DE PROBLEMES ........................................................................................................................................................................................................................................................................ 27
INSTRUKCJA BEZPIECZENSTWA ................................................................................................................................................................................................................................................................. 28
ROZPAKOWYWANIE INSTRUKCJI ................................................................................................................................................................................................................................................................ 29
ZASILACZ ................................................................................................................................................................................................................................................................................................................... 29
MOCOWANIE ............................................................................................................................................................................................................................................................................................................ 29
KONTROLA DMX512 .............................................................................................................................................................................................................................................................................................. 30
KONTROLA RDM ..................................................................................................................................................................................................................................................................................................... 30
CZYSZCZENIE ............................................................................................................................................................................................................................................................................................................ 31
WYMIANA BEZPIECZNIKA ................................................................................................................................................................................................................................................................................ 32
KONSERWACJA ..................................................................................................................................................................................................................................................................................................... 32
ROZWIAZYWANIE PROBLEMÓW ................................................................................................................................................................................................................................................................... 33
CONTROL MENU ..................................................................................................................................................................................................................................................................................................... 34
DMX CHANNELS .................................................................................................................................................................................................................................................................................................... 35
TECHNICAL SPECIFICATIONS ......................................................................................................................................................................................................................................................................... 43

Before carrying out any operations with the unit, carefully read this instruction manual and keep it with care for future reference. It
contains important information about the installation, usage and maintenance of the unit.
• Unpack and check carefully that there is no transportation damage before using the unit
• Please read these instructions carefully and follow the instructions.
• Observe all safety warnings. Never remove safety warnings or other information from the equipment.
• Be sure that no ventilation slots are blocked; otherwise the unit will overheated.
Before connecting the equipment to the power outlet, first verify that the mains voltage and frequency match the values specified on
the equipment. If the equipment has a voltage selection switch, connect the equipment to the power outlet only if the equipment values and the
mains power values match. If the included power cord or power adapter does not fit in your wall outlet, contact your electrician.
• After connecting the unit, check all cables in order to prevent damage or accidents, e.g., due to tripping hazards.
• Make sure that the power cord is never crimped or damaged. Check the unit and the power cord from time to time.
• Always disconnect power from the mains, when unit is not used or before cleaning! Only handle the power cord by the plug. Never pull out the
plug by tugging the power cord.
• Unplug the power cord and power adapter from the power outlet if there is a risk of a lightning strike or before extended periods of disuse.
• Do not switch the unit on and off in short intervals.
• Do not connect the unit to a dimmerpack.
• Install the unit in a well ventilated place.
• Never place any material over the lens.
• Never let the sunlight lights directly to the front lens , even when the unit is not working.
• Always allow free air space of at least 50 cm around the unit for ventilation.
• Make sure that the area below the installation place is blocked when rigging, derigging or servicing the unit.
• For mounting height >100 cm, always fix the unit with an appropriate safety-rope. Fix the safety-rope at the correct fixation points only. The
safety-rope must never be fixed at the transport handles!
• Never look directly at the light beam. Please note that fast changes in lighting, e. g. flashing light, may trigger epileptic seizures in photosensitive
persons or persons with epilepsy.
• This unit is not designed for permanent operation. Consistent operation breaks will ensure that the unit will serve you for a long time without
defects.
If the power cord of the unit is equipped with an earthing contact, then it must be connected to an outlet with a protective ground.
Never deactivate the protective ground of a power cord.
• Make sure that the unit is not exposed to extreme heat, moisture or dust.
• Clean the unit using a dry cloth.
• Do not touch the unit bare-handed during its operation (housing becomes very hot). Allow the unit to cool for at least 5 minutes before
handling.
• This unit is designed exclusively for indoor use, do not use this equipment in the immediate vicinity of fluid (does not apply to special outdoor
equipment - in this case, observe the special instructions noted below). Do not expose this unit to flammable materials, fluids or gases.
• If the unit has been exposed to drastic temperature fluctuation (e.g. after transportation), do not switch it on immediately. The arising
condensation water might damage your unit. Leave the unit switched off until it has reached room temperature.
• Never attempt to bypass the thermostatic switch or fuses.
• Do not dismantle or modify the unit.
• For replacement use fuses/bulb of same type and rating only.
• Repairs, servicing and electric connection must be carried out by a qualified technician.
• The ambient temperature must always be between -5° C and +45° C.
• If this unit is operated in any other way, than the one described in this manual, the product may suffer damages and the warranty becomes
void.
• Plastic bags must be kept out of reach of children.
• Unit must be installed out of the reach of children. Never leave the unit running unattended.
This symbol on the product or on its packaging indicates that this product shall not be treated as household waste. Instead it shall be handed
over to the applicable collection point for the recycling of electrical and electronic equipment.
By ensuring this product is disposed of correctly, you will help prevent potential negative consequences for the environment and human health, which
could otherwise be caused by inappropriate waste handling of this product. The recycling of materials will help to conserve natural resources. For
more detailed information about recycling of this product, please contact your local Civic Office, your household waste disposal service or the shop
where you purchased the product.

Immediately upon receiving the product, carefully unpack the carton, check the contents to ensure that all parts are present, and
have been received in good condition. Notify the shipper immediately and retain packing material for inspection if any parts appear damage from
shipping or the package itself shows signs of mishandling. Save the package and all packing materials. In the event that the product must be returned to
the factory, it is important that the product be returned in the original factory box and packing.
If the unit has been exposed to drastic temperature fluctuation (e.g. after transportation), do not switch it on immediately. The arising condensation water
might damage your unit. Leave the unit switched off until it has reached room temperature.
The label on the backside of the unit indicates the mains voltage to which it must be connected. Check that the mains voltage corresponds to this. Any
other voltage than the one indicated may cause irreparable damage to the unit. The unit must also be connected directly to the mains voltage and no
dimmer or adjustable power supply may be used.
The unit has a powerconnector output on board. Depending on the local conditions several units can be linked by powerconnector in- and output. Connect
a maximum of four (when using 230V/16A) units in a row. Use an approved three-core cable with a cross-section of at least 1.5 mm². The installation
instructions of the manufacturer and the colour coding of the cable must be observed. Do not turn off the unit by turning the powerconnector but use the
power on/off switch or schuko!
Always connect the unit to a protected circuit (circuit breaker or fuse). Make sure the unit has an appropriate electrical ground to
avoid the risk of electrocution or fire.
The unit may be set up on a stable and even surface. By means of the fixing facilities of the baseplate, the unit can also be mounted upside down to a truss,
see below picture. For fixing, certified clamps with correct save working load are required. According to the figure, the quick lock bolts of the omega
brackets are placed into the openings provided in the base plate and turned clockwise until they lock (to the stop). The mounting place must be of
sufficient stability and be able to support a weight of 10 times of the unit’s weight. Secure the unit with a safety cable so that it cannot fall down.
When carrying out any installation, always comply European and national guidelines concerning rigging, truss and all other safety issues. Always let the
installation checked out by an authorized dealer !

If you are using a standard DMX controller, you can connect the DMX output of the controller directly to the DMX input of the first unit in a DMX chain.
Always connect the output of one unit with the input of the next unit until all units are connected.
At the last unit, you must close the DMX line with a terminating resistor. Take an XLR connector and solder a 120 Ohm resistor
between signal (-) and signal (+) and connect it to the DMX output of the last unit in the line.
This unit can communicate using RDM (Remote Device Management) via DMX512. RDM is a bi-directional communication protocol for use in DMX512
control systems, it is the open standard for DMX512 configuration and status monitoring.
The RDM protocol allows data packets to be inserted into a DMX512 line without affecting the existing non-RDM equipment. The system allows a controller
or special RDM controller to send and receive commands from specific fixtures.
The RDM function allows you, for example to remotely set the DMX start address of your fixtures. This is especially useful when the fixture is installed in an
inaccessible location. Each unit has an RDM UID (unique identification number).
The buildup of dust, dirt and other airborne particles will reduce the unit’s light output. It will also prevent the unit from cooling correctly, and this will
reduce the unit’s lifetime. The rate of dirt buildup will vary depending on environmental factors such as airborne dust, use of smoke machines, airflow
from ventilation systems, etc. The unit’s cooling fans will accelerate buildup, and any smoke particles that are present in the atmosphere will increase the
tendency for dirt to clog.
To get the best performance and lifetime from the unit, inspect it regularly and clean it as soon as you see signs of dirt buildup.
Assess the operating environment each time you begin to use the unit. In dusty or smoky conditions, inspect the unit after a few hours and check it
frequently the unit may attract dirt faster than you expect. Draw up a cleaning schedule that will make sure that dirt is removed before it can build up.
Use the following guidelines:
• Disconnect the unit from power and allow it to cool completely before cleaning.
• Do not use solvents, abrasives or any other aggressive product to clean the unit.
• Vacuum or use low-pressure compressed air to remove dust and loose particles from surfaces and air vents. Prevent the blades of cooling fans
from turning before you aim a vacuum or air jet at the fan, or you may spin the fan too fast and damage it.
• Clean glass components by wiping gently with a soft, clean, lint-free cloth moistened with a weak detergent solution. Put the solution on the cloth
and not on the surface to be cleaned. Avoid rubbing glass surfaces.
• Dry the unit with a soft, clean, lint-free cloth or low-pressure compressed air before reapplying power.

If the fuse is defective, replace the fuse with a fuse of the same type and value. Before replacing the fuse, unplug mains lead.
Procedure:
Step 1: Open the fuse holder on the rear panel with a fitting screwdriver.
Step 2: Remove the old fuse from the fuse holder.
Step 3: Install the new fuse in the fuse holder.
Step 4: Replace the fuse holder in the housing.
This unit is virtually maintenance-free, but you should check the unit regularly for mechanical and electrical aspects.
Assess the operating environment and establish an inspection and cleaning schedule that follows the guidelines below:
• Disconnect the unit from the power supply and allow it to cool completely before inspecting and cleaning.
• Check that the screws and bolts used to install the unit are securely tightened and free from corrosion.
• Check the housing, fixing points and installation points, they must not show any signs of deformation, wear or fatigue.
• Check the mechanically moving parts, these must not show any signs of wear or fatigue.
• Check the electrical power and signal cables, they must not show any damage or fatigue.
• Do not use solvents, abrasives or other aggressive products to clean the unit.
• Wipe the unit and clean the glass plate with a soft, clean, lint-free cloth moistened with a weak cleaning solution. Place the solution on the cloth
and not on the surface to be cleaned. Avoid rubbing glass surfaces.
• Dry the unit, connectors and contacts with a soft, clean, lint-free cloth or low-pressure compressed air before re-powering the unit.

The checklist below may help you troubleshoot in the unlikely event that a problem occurs while using the product:
No response from unit.
No power to unit.
Check that power is turned on.
Check cables and connections.
Fuse blown or internal fault.
Replace mean fuse or contact Beamz support
or Beamz authorized service partner. Do not
remove base or yoke covers. Do not attempt to
replace a fuse or carry out any repairs or service
that are not described in this User Manual
unless you have both authorization from Beamz
support or Beamz authorized service partner.
Unit resets correctly but does not respond (or
does not respond correctly) to the controller.
The controller is not connected.
Connect controller.
Bad DMX-line.
Inspect connections and cables. Correct poor
connections. Repair or replace damaged cables.
DMX-line has no end resistance.
Insert DMX terminator plug in DMX output
socket of last unit on DMX-line.
Incorrect unit addressing.
Check unit address and DMX mode settings.
A unit is defective and is disturbing data
transmission on the DMX-line.
Unplug DMX IN and OUT connectors and
connect them directly together to bypass one
unit at a time until normal operation is regained.
Have defective unit serviced by an authorized
technician.
Pin 2 and 3 are reversed in XLR connection.
Inspect connections and cables. Install a phase-
reversing cable between the units or swap pin 2
and 3 in the unit, that behaves erratically.
Error after unit reset.
Effect requires mechanical adjustment.
Check unit’s software version and error
messages for more information. Contact Beamz
support or Beamz authorized service partner.
Light output cuts out intermittently.
Unit too hot.
Allow unit to cool. Reduce ambient
temperature. Ensure free airflow around unit.
Clean unit if necessary.
LEDs damaged.
Disconnect unit and contact Beamz support or
Beamz authorized service partner.
The power supply settings do not
match local AC voltage and
frequency.
Disconnect unit. Check settings and
correct if necessary.

Lees deze gebruiksaanwijzing zorgvuldig door voordat u met het apparaat gaat werken en bewaar deze handleiding voor
toekomstig gebruik. Het bevat belangrijke informatie over de installatie, het gebruik en het onderhoud van het apparaat.
• Uitpakken en zorgvuldig controleren of er geen transportschade is voordat u het apparaat gebruikt.
• Lees deze instructies aandachtig door en volg de instructies op.
• Neem alle veiligheidswaarschuwingen in acht. Verwijder nooit veiligheidswaarschuwingen of andere informatie van het apparaat.
• Zorg ervoor dat er geen ventilatiesleuven geblokkeerd zijn, anders zal het apparaat oververhit raken.
Voordat u het apparaat verbind met een contactdoos, moet u eerst controleren of de netspanning en -frequentie
overeenkomen met de op de apparatuur aangegeven waarden. Als het apparaat een spanningsselectieschakelaar heeft, sluit het apparaat alleen aan
op het stopcontact als de waarden van het apparaat en de waarden van de netspanning overeenkomen. Als het bijgeleverde netsnoer of de
voedingsadapter niet in uw stopcontact past, neem dan contact op met uw elektricien.
• Controleer na het aansluiten van het apparaat alle kabels om schade of ongevallen, bijv. door struikelgevaar, te voorkomen.
• Zorg ervoor dat het netsnoer nooit gekrompen of beschadigd raakt. Controleer het apparaat en het netsnoer van tijd tot tijd.
• Trek altijd de stekker uit het stopcontact wanneer het apparaat niet wordt gebruikt of voordat u het apparaat schoonmaakt! Pak het netsnoer
alleen bij de stekker vast en trek nooit aan het netsnoer.
• Haal de stekker van het netsnoer en de voedingsadapter uit het stopcontact als er gevaar bestaat voor blikseminslag of voor langere perioden
van buitengebruikstelling.
• Schakel het apparaat niet snel achter elkaar in en uit.
• Sluit het apparaat niet aan op een dimmerpack.
• Installeer het apparaat op een goed geventileerde plaats.
• Plaats nooit materiaal over de lens.
• Laat het zonlicht nooit direct op de lens schijnen, ook niet als het apparaat niet in werking is.
• Zorg altijd voor een vrije luchtruimte van minstens 50 cm rondom het apparaat voor ventilatie.
• Zorg ervoor dat de ruimte rondom en onder de montageplek wordt afgezet tijdens het (de)monteren of onderhoud van het apparaat.
• Voor gebruik bij montagehoogte >100 cm, bevestig het apparaat altijd met een geschikte veiligheidskabel. Bevestig de veiligheidskabel alleen op
de juiste bevestigingspunten. De veiligheidskabel mag nooit aan de transporthandgrepen worden bevestigd!
• Kijk nooit direct naar de lichtbundel. Houd er rekening mee dat snelle veranderingen in de verlichting, bijv. knipperlicht, epileptische aanvallen
kunnen veroorzaken bij lichtgevoelige personen of personen met epilepsie.
• Dit apparaat is niet ontworpen voor permanent gebruik. Consistente bedieningspauzes zullen ervoor zorgen dat het apparaat lang zonder
defecten van dienst zal zijn.
Als het netsnoer van het apparaat is voorzien van een aardingscontact, moet het worden aangesloten op een stopcontact met
een beschermende aarding. Deactiveer nooit de beschermende aarding van een netsnoer.
• Zorg ervoor dat het apparaat niet wordt blootgesteld aan extreme hitte, vocht of stof.
• Reinig het apparaat met een droge doek.
• Raak het apparaat tijdens de werking ervan niet met blote handen aan (de behuizing kan zeer heet worden). Laat het apparaat ten minste 5
minuten afkoelen alvorens deze te hanteren.
• Dit apparaat is uitsluitend ontworpen voor gebruik binnenshuis, gebruik deze apparatuur niet in de onmiddellijke nabijheid van vloeistof (niet
van toepassing op speciale buitenapparatuur - in dit geval, neem de speciale instructies hieronder in acht). Stel dit apparaat niet bloot aan
brandbare materialen, vloeistoffen of gassen.
• Als het apparaat is blootgesteld aan drastische temperatuurschommelingen (bijv. na transport), schakel het dan niet onmiddellijk in. Het
ontstane condenswater kan uw apparaat beschadigen. Laat het apparaat uitgeschakeld tot het op kamertemperatuur is.
• Probeer nooit de thermostaatschakelaar of zekeringen te omzeilen.
• Demonteer of wijzig het apparaat niet.
• Gebruik voor vervanging alleen zekeringen/lampen van hetzelfde type en vermogen.
• Reparaties, onderhoud en elektrische aansluiting moeten worden uitgevoerd door een gekwalificeerde technicus.
• De omgevingstemperatuur moet altijd tussen -5° C en +45° C liggen.
• Als dit apparaat op een andere manier wordt gebruikt dan beschreven in deze handleiding, kan het product beschadigd raken en vervalt de
garantie.
• Plastic zakken moeten buiten het bereik van kinderen worden gehouden.
• Het apparaat moet buiten het bereik van kinderen worden geïnstalleerd. Laat het apparaat nooit zonder toezicht draaien.
Dit symbool op het product of op de verpakking geeft aan dat dit product niet als huishoudelijk afval mag worden behandeld. In plaats daarvan
moet het worden overhandigd aan het toepasselijke inzamelpunt voor de recycling van elektrische en elektronische apparatuur.
Door ervoor te zorgen dat dit product op de juiste wijze wordt afgevoerd, helpt u mogelijke negatieve gevolgen voor het milieu en de menselijke
gezondheid te voorkomen, die anders zouden kunnen worden veroorzaakt door ongepaste afvalverwerking van dit product. Het recyclen van
materialen draagt bij tot het behoud van natuurlijke hulpbronnen. Voor meer gedetailleerde informatie over het recyclen van dit product kunt u
contact opnemen met uw plaatselijke gemeente, uw huisvuildienst of de winkel waar u het product hebt gekocht.

Onmiddellijk na ontvangst, zorgvuldig uitpakken van de doos, controleer de inhoud om ervoor te zorgen dat alle onderdelen aanwezig
zijn en zijn in goede staat zijn ontvangen. Bij transportschade of ontbreken van onderdelen onmiddellijk de verkopende partij inlichten. Bewaar
de verpakking en het verpakkingsmateriaal. Indien het product moet worden teruggestuurd, is het belangrijk dat het product in originele verpakking wordt
geretourneerd.
Als het apparaat is blootgesteld aan drastische temperatuurverschillen (bv. na het transport), schakel het apparaat niet onmiddellijk in. De ontstane
condensatie kan het apparaat beschadigen. Zorg ervoor dat het apparaat op kamertemperatuur komt en steek vervolgens de voeding stekker in het
stopcontact.
Op achterzijde van het apparaat staat aangegeven op welke netspanning deze moet worden aangesloten. Controleer of de netspanning hiermee
overeenkomt, bij alle andere netspanningen dan aangegeven kan het apparaat onherstelbaar worden beschadigd. Tevens moet het apparaat direct op de
netspanning worden aangesloten en mag géén dimmer of regelbare voeding worden gebruikt.
Het apparaat heeft een powerconnector uitgang aan boord. Afhankelijk van de plaatselijke omstandigheden kunnen meerdere apparaten via de in- en
uitgang met elkaar worden verbonden. Sluit maximaal vier (bij gebruik van 230V/16A) apparaten op een rij aan. Gebruik een goedgekeurde 3-aderige
kabel met een doorsnede van minimaal 1,5 mm². De installatievoorschriften van de fabrikant en de kleurcodering van de kabel moeten in acht worden
genomen. Schakel het apparaat niet uit door de powerconnector te draaien, maar gebruik de aan/uit-schakelaar of trek de stekker uit het stopcontact!
Sluit het apparaat altijd aan op een beschermd circuit (aardlekschakelaar of zekering). Zorg ervoor dat het apparaat
voldoende elektrisch is geaard om het risico op elektrocutie of brand te vermijden.
Het apparaat kan op een stabiele en gelijkmatige ondergrond worden opgesteld. Door middel van de bevestigingsmogelijkheden van de grondplaat kan het
apparaat ook ondersteboven aan een truss gemonteerd worden, zie onderstaande afbeelding. Voor de bevestiging zijn gecertificeerde klemmen met de
juiste werklast vereist. Volgens de afbeelding, worden de quick-lock bouten van de omega beugels in de openingen in de bodemplaat geplaatst en
rechtsom gedraaid tot ze vergrendelen (tot aan de aanslag). De montageplaats moet voldoende stabiel zijn en een gewicht van 10 keer het gewicht van
het apparaat kunnen dragen. Borg het apparaat met een veiligheidskabel, zodat deze niet naar beneden kan vallen.
Volg bij het uitvoeren van een installatie altijd de Europese en nationale richtlijnen met betrekking tot rigging, truss en alle andere veiligheidskwesties.
Laat de installatie altijd controleren door een geautoriseerde dealer!

Als u gebruik maakt van een standaard DMX-lichtstuurtafel, kunt u de DMX uitgang van de lichtstuurtafel rechtstreeks aansluiten op de DMX ingang van
het eerste apparaat. Sluit altijd de DMX uitgang aan op de eerst volgende DMX ingang van het volgende apparaat totdat alle apparaten zijn aangesloten.
! Bij het laatste apparaat, dient u de DMX-lijn af te sluiten met een eindweerstand. Neem een XLR connector en soldeer een 120 Ohm
weerstand tussen signaal (-) en signaal (+)en steek deze in de DMX uitgang van het laatste apparaat in de lijn.
Dit apparaat kan communiceren met behulp van RDM (Remote Device Management) via DMX512. RDM is een bi-directioneel communicatieprotocol voor
gebruik in DMX512-besturingssystemen, het is de open standaard voor DMX512 configuratie en statusbewaking.
Het RDM-protocol maakt het mogelijk datapakketten in een DMX512-lijn in te voegen zonder dat de bestaande niet-RDM-apparatuur te beïnvloeden. Het
systeem is in staat, met behulp van een lichtstuurtafel of speciale RDM-controller, om commando's te verzenden en te ontvangen van specifieke
armaturen.
Met de RDM-functie kunt u onder andere het DMX-startadres van uw armaturen op afstand instellen. Dit is vooral handig wanneer het apparaat in een
onbereikbaar plek is geïnstalleerd. Elke apparaat heeft een RDM UID (uniek identificatienummer).
De opeenhoping van stof, vuil en andere zwevende deeltjes verminderen de lichtopbrengst van het apparaat. Het zal ook voorkomen dat het apparaat
correct koelt, en dit zal de levensduur van het apparaat verkorten. De snelheid van de vuilafzetting zal variëren afhankelijk van omgevingsfactoren zoals
stof in de lucht, gebruik van rookmachines, luchtstroom van ventilatiesystemen, enz. De koelventilatoren van het apparaat zullen de opbouw versnellen,
en alle rookdeeltjes die in de atmosfeer aanwezig zijn, zullen de neiging tot verstopping van vuil vergroten.
Om de beste preStatics en levensduur van het apparaat te krijgen, inspecteer het apparaat regelmatig en maak deze schoon zodra u tekenen van
vuilophoping ziet.
Beoordeel de gebruiksomgeving elke keer dat u het apparaat begint te gebruiken. In stoffige of rokerige omstandigheden, inspecteer het apparaat na
enkele uren en controleer het regelmatig of het apparaat mogelijk sneller vuil aantrekt dan u verwacht. Stel een reinigingsschema op dat ervoor zorgt dat
het vuil wordt verwijderd voordat het zich kan ophopen.
Gebruik de volgende richtlijnen:
• Ontkoppel het apparaat van het stroomnet en laat hem volledig afkoelen voordat u hem schoonmaakt.
• Gebruik geen oplosmiddelen, schuurmiddelen of andere agressieve producten om het apparaat te reinigen.
• Stofzuig of gebruik lage druk perslucht om stof en losse deeltjes van oppervlakken en luchtopeningen te verwijderen. Voorkom dat de bladen van
de koelventilatoren draaien voordat u een vacuüm of luchtstraal op de ventilator richt, anders kunt u de ventilator te snel laten draaien en deze
beschadigen.
• Reinig glazen onderdelen door ze voorzichtig af te vegen met een zachte, schone, pluisvrije doek, bevochtigd met een zwakke reinigingsoplossing.
Leg de oplossing op de doek en niet op het te reinigen oppervlak. Vermijd het wrijven van glazen oppervlakken.
• Droog het apparaat met een zachte, schone, pluisvrije doek of perslucht onder lage druk voordat u het apparaat opnieuw van stroom voorziet.

Indien de zekering defect is, dient u de zekering te vervangen door een zekering van hetzelfde type en waarde. Voor het vervangen van de zekering,
schakel eerst de stroom uit en volg de onderstaande stappen.
Procedure:
Stap 1: Open de zekeringhouder op het achterpaneel met een passende platte schroevendraaier.
Stap 2: Verwijder de oude zekering uit de zekeringhouder.
Stap 3: Installeer de nieuwe zekering in de zekeringhouder.
Stap 4: Plaats de zekeringhouder in de behuizing.
Dit apparaat is vrijwel onderhoudsvrij, echter u dient het apparaat regelmatig te controleren op mechanische en elektrische aspecten.
Beoordeel de gebruiksomgeving en stel een inspectie- en reinigingsschema waarbij de onderstaande richtlijnen in acht worden genomen:
• Ontkoppel het apparaat van het stroomnet en laat hem volledig afkoelen voordat u gaat beginnen met inspecteren en reinigen.
• Controleerde de schroeven en bouten die gebruikt worden voor het installeren van het apparaat, deze moeten stevig vast gedraaid zijn en
mogen geen corrosie vertonen.
• Controleer de behuizing, bevestigingspunten en installatiepunten, deze mogen geen sporen van vervorming, slijtage of materiaalmoeheid
vertonen.
• Controleer de mechanisch bewegende delen, deze andere mogen geen sporen van slijtage of materiaalmoeheid vertonen.
• Controleer de elektrische voedings- en signaalkabels, deze mogen geen beschadigingen of materiaalmoeheid vertonen.
• Gebruik geen oplosmiddelen, schuurmiddelen of andere agressieve producten om het apparaat te reinigen.
• Veeg het apparaat af en reinig het glasplaat met een zachte, schone, pluisvrije doek, bevochtigd met een zwakke reinigingsoplossing. Leg de
oplossing op de doek en niet op het te reinigen oppervlak. Vermijd het wrijven van glazen oppervlakken.
• Droog het apparaat, connectoren en contacten met een zachte, schone, pluisvrije doek of perslucht onder lage druk voordat u het apparaat
opnieuw van stroom voorziet.

De onderstaande checklist kan u hulp bieden in het onwaarschijnlijke geval dat zich een probleem voordoet tijdens het gebruik van het product:
Geen reactie van het apparaat.
Geen stroomvoorziening.
Controleer of de voeding is ingeschakeld.
Controleer de kabels en aansluitingen.
Zekering doorgebrand of interne fout.
Vervang de hoofdzekering of neem contact op
met de Beamz Support of de door Beamz
geautoriseerde servicepartner. Demonteer geen
onderdelen van de behuizing. Probeer geen
zekering te vervangen of reparaties of
onderhoud uit te voeren die niet in deze
gebruikershandleiding worden beschreven,
tenzij u hiervoor toestemming hebt van de
Beamz Support of een door Beamz
geautoriseerde servicepartner.
Het apparaat wordt correct gereset, maar
reageert niet (of niet correct) op de
lichtstuurtafel.
De lichtstuurtafel is niet aangesloten.
Verbind de lichtstuurtafel.
Slechte DMX-lijn.
Controleer de aansluitingen en kabels. Corrigeer
slechte verbindingen.
Repareer of vervang beschadigde kabels.
DMX-lijn heeft geen eindweerstand.
Steek de DMX terminatorstekker in de DMX-
uitgang van de laatste apparaat op de DMX-lijn.
Onjuiste adressering van het apparaat.
Controleer het apparaat adres en de instellingen
van de DMX-modus.
Een apparaat is defect en verstoort de
gegevensoverdracht op de DMX-lijn.
Haal de DMX IN en OUT connectoren uit het
apparaat en verbind ze direct met elkaar om
één apparaat per keer te omzeilen totdat de
normale werking is hersteld. Laat een defecte
apparaat onderhouden door een geautoriseerde
technicus.
Pin 2 en 3 zijn omgekeerd in XLR-aansluiting.
Controleer de aansluitingen en kabels. Installeer
een fase verschuivende kabel tussen de
armaturen of wissel pin 2 en 3 in het apparaat,
die zich afwijkend gedraagt.
Fout na reset van het apparaat.
Effect vereist mechanische aanpassing.
Controleer de softwareversie en foutmeldingen
van het apparaat voor meer informatie. Neem
contact op met Beamz Support of Beamz
geautoriseerde servicepartner.
Geen lichtopbrengst of licht valt met
tussenpozen uit.
Apparaat te warm.
Laat het apparaat afkoelen. Verlaag de
omgevingstemperatuur. Zorg voor een vrije
luchtstroom rond het apparaat. Reinig het
apparaat indien nodig.
LED's defect
Ontkoppel het apparaat en neem contact op
met de Beamz Support of met een door Beamz
geautoriseerde servicepartner.
Instellingen van de voedingsspanning komen
niet overeenkomen met de lokale
wisselspanning en frequentie.
Ontkoppel het apparaat. Controleer de
instellingen en corrigeer mogelijke fouten

Lesen Sie diese Anleitung sorgfältig durch, bevor Sie das Gerät in Betrieb nehmen, und bewahren Sie sie zum späteren Gebrauch auf.
Sie enthält wichtige Informationen über die Installation, den Gebrauch und die Wartung des Gerätes.
• Vor der Inbetriebnahme des Gerätes auspacken und sorgfältig auf Transportschäden prüfen.
• Lesen Sie diese Anleitung sorgfältig durch und befolgen Sie sie.
• Beachten Sie alle Sicherheitshinweise. Entfernen Sie niemals Sicherheitshinweise oder andere Informationen vom Gerät.
• Achten Sie darauf, dass keine Lüftungsschlitze blockiert sind, da das Gerät sonst überhitzt.
Bevor Sie das Gerät an eine Steckdose anschließen, überprüfen Sie, ob die Netzspannung und -frequenz mit den auf dem Gerät
angegebenen Werten übereinstimmen. Wenn das Gerät über einen Spannungswahlschalter verfügt, schließen Sie das Gerät nur dann an das Netz
an, wenn die Gerätewerte und die Netzspannungswerte übereinstimmen. Wenn das mitgelieferte Netzkabel oder -adapter nicht in Ihre Steckdose
passt, wenden Sie sich an Ihren Elektriker.
• Überprüfen Sie nach dem Anschluss des Gerätes alle Kabel, um Schäden oder Unfälle, z.B. durch Stolperfallen, zu vermeiden.
• Das Netzkabel darf niemals geschrumpft oder beschädigt werden. Überprüfen Sie das Gerät und das Netzkabel von Zeit zu Zeit.
• Ziehen Sie immer den Netzstecker, wenn Sie das Gerät nicht benutzen oder vor der Reinigung! Fassen Sie das Netzkabel nur am Stecker und
ziehen Sie niemals am Netzkabel.
• Ziehen Sie das Netzkabel und das Netzteil aus der Steckdose, wenn die Gefahr von Blitzschlag oder längerer Inaktivität besteht.
• Schalten Sie die Maschine nicht in schneller Folge ein und aus.
• Schließen Sie das Gerät nicht an ein Dimmerpack an.
• Installieren Sie das Gerät an einem gut belüfteten Ort.
• Legen Sie niemals Material über die Linse.
• Lassen Sie niemals Sonnenlicht direkt auf die Linse scheinen, auch wenn das Gerät nicht in Betrieb ist.
• Achten Sie immer auf einen Freiraum von mindestens 50 cm um das Gerät, um eine Belüftung zu gewährleisten.
• Achten Sie darauf, dass der Raum um und unter dem Montageort während der (Aus-)Montage oder Wartung des Geräts verschlossen ist.
• Bei Verwendung mit einer Montagehöhe >100 cm ist die Leuchte immer mit einem geeigneten Sicherungsdraht zu befestigen. Befestigen Sie
den Sicherungsdraht nur an den richtigen Befestigungspunkten. Der Sicherungsdraht darf niemals an den Transportgriffen befestigt werden!
• Niemals direkt in den Lichtstrahl schauen. Bitte beachten Sie, dass schnelle Veränderungen in der Beleuchtung, z.B. Blinklichter, bei
lichtempfindlichen oder epileptischen Patienten epileptische Anfälle verursachen können.
• Dieses Gerät ist nicht für den Dauerbetrieb ausgelegt. Durch konsequente Betriebspausen wird sichergestellt, dass das Gerät lange Zeit
störungsfrei arbeitet.
Wenn das Netzkabel des Geräts mit einer Erdungsklemme ausgestattet ist, schließen Sie es an eine Steckdose mit einer
Schutzerdungsklemme an. Deaktivieren Sie niemals die Schutzerdung eines Netzkabels.
• Achten Sie darauf, dass das Gerät keiner extremen Hitze, Feuchtigkeit oder Staub ausgesetzt ist.
• Reinigen Sie das Gerät mit einem trockenen Tuch.
• Berühren Sie das Gerät während des Betriebs nicht mit bloßen Händen (das Gehäuse kann sehr heiß werden). Lassen Sie das Gerät vor der
Handhabung mindestens 5 Minuten abkühlen.
• Dieses Gerät ist nur für den Innenbereich bestimmt, verwenden Sie es nicht in unmittelbarer Nähe von Flüssigkeiten (gilt nicht für spezielle
Außengeräte - in diesem Fall befolgen Sie die folgenden besonderen Anweisungen). Setzen Sie dieses Gerät keinen brennbaren Stoffen,
Flüssigkeiten oder Gasen aus.
• Wenn das Gerät starken Temperaturschwankungen ausgesetzt war (z.B. nach dem Transport), schalten Sie es nicht sofort ein. Die dabei
entstehende Kondensation kann Ihr Gerät beschädigen. Lassen Sie das Gerät ausgeschaltet, bis es Raumtemperatur erreicht hat.
• Versuchen Sie niemals, den Thermostatschalter oder die Sicherungen zu umgehen.
• Demontieren oder modifizieren Sie das Gerät nicht.
• Verwenden Sie für den Austausch nur Sicherungen/Leuchten gleichen Typs und gleicher Leistung.
• Reparaturen, Wartungen und der elektrische Anschluss dürfen nur von einem qualifizierten Techniker durchgeführt werden.
• Die Umgebungstemperatur muss immer zwischen -5°C und +45°C liegen.
• Wenn dieses Gerät auf eine andere Weise als in dieser Anleitung beschrieben verwendet wird, kann das Produkt beschädigt werden und die
Garantie erlischt.
• Plastiktüten sollten außerhalb der Reichweite von Kindern aufbewahrt werden.
• Das Gerät muss außerhalb der Reichweite von Kindern installiert werden. Betreiben Sie das Gerät niemals unbeaufsichtigt.
Dieses Symbol auf dem Produkt oder der Verpackung weist darauf hin, dass dieses Produkt nicht als normaler Haushaltsabfall behandelt
werden darf. Es muss stattdessen an die entsprechende Sammelstelle für das Recycling von elektrischen und elektronischen Geräten
abgegeben werden.
Indem Sie sicherstellen, dass dieses Gerät ordnungsgemäß entsorgt wird, tragen Sie dazu bei, mögliche negative Auswirkungen auf die Umwelt und
die menschliche Gesundheit zu vermeiden, die sonst durch eine unsachgemäße Entsorgung dieses Produkts verursacht werden könnten. Recycling-
Materialien tragen zur Schonung der natürlichen Ressourcen bei. Für weitere Informationen zur Wiederverwertung dieses Produkts wenden Sie sich
bitte an Ihre Gemeinde, Ihren Hausmüllentsorger oder an den Laden, in dem Sie das Produkt gekauft haben.

Packen Sie den Karton sofort nach Erhalt sorgfältig aus, überprüfen Sie seinen Inhalt, um sicherzustellen, dass alle Teile vorhanden
sind und in gutem Zustand erhalten wurden. Bei Transportschäden oder fehlenden Teilen ist der Verkäufer unverzüglich zu informieren. Lagern
Sie die Verpackung und das Verpackungsmaterial. Wenn das Produkt zurückgegeben werden muss, ist es wichtig, dass das Produkt in der
Originalverpackung zurückgegeben wird.
Wenn das Gerät drastischen Temperaturunterschieden ausgesetzt war (z.B. nach dem Transport), schalten Sie es nicht sofort ein. Die dabei entstehende
Kondensation kann das Gerät beschädigen. Vergewissern Sie sich, dass das Gerät Raumtemperatur hat, und stecken Sie dann den Netzstecker in die
Steckdose.
Auf der Rückseite von das Gerät wird angezeigt, an welche Netzspannung es angeschlossen werden muss. Prüfen Sie, ob die Netzspannung mit dieser
übereinstimmt. Wenn die Netzspannung von der angegebenen abweicht, kann das Gerät irreparabel beschädigt werden. Das Gerät muss auch direkt an
die Netzspannung angeschlossen werden. Es darf kein Dimmer oder eine einstellbare Stromversorgung verwendet werden.
Das Gerät verfügt über einen powerconnector Netzausgang. Entsprechend der örtlichen Gegebenheiten können mehrere Geräte durch powerconnector
Ein- und Ausgang verlinkt werden. Verbinden Sie maximal vier (bei Benutzung von 230V/16A) P12 in einer Reihe. Nutzen Sie dafür ein zugelassenes
dreiadriges Kabel mit min. 1,5 mm² Querschnitt. Dabei sind die Installationshinweise vom Hersteller und die Farbkodierung des Kabels zu beachten.
Schalten Sie das Gerät nicht durch Drehen des powerconnector aus, sondern verwenden Sie den Ein-/Ausschalter oder ziehen Sie den Netzstecker!
Schließen Sie das Gerät immer an einen geschützten Stromkreis an (Fehlerstromschutzschalter oder Sicherung). Vergewissern Sie
sich, dass das Gerät ausreichend elektrisch geerdet ist, um die Gefahr eines Stromschlags oder Brandes zu vermeiden.
Das Gerät kann auf einer stabilen und ebenen Fläche aufgestellt werden. Durch die Befestigungsmöglichkeiten der Grundplatte kann das Gerät auch
kopfüber an einer Traverse montiert werden, siehe untenstehende Abbildung. Für die Befestigung sind zertifizierte Klemmen mit korrekter Tragfähigkeit
erforderlich. Gemäß der Abbildung werden die Schnellverschlussriegel der Omega-Halterungen in die vorgesehenen Öffnungen der Grundplatte
eingesetzt und im Uhrzeigersinn gedreht, bis sie einrasten (bis zum Anschlag). Der Montageort muss ausreichend stabil sein und ein Gewicht von dem 10-
fachen des Gerätegewichts tragen können. Befestigen Sie das Gerät mit einem Sicherheitskabel so, dass es nicht herunterfallen kann.
Befolgen Sie bei der Durchführung einer Installation immer die europäischen und nationalen Richtlinien bezüglich Rigging, Traversen und allen anderen
Sicherheitsaspekten. Lassen Sie die Installation immer von einem autorisierten Fachhändler prüfen!

Wenn Sie einen Standard-DMX-Controller verwenden, können Sie den DMX-Ausgang des Controller direkt mit dem DMX-Eingang des ersten Geräts
verbinden. Verbinden Sie den DMX-Ausgang immer mit dem nächsten DMX-Eingang des nächsten Geräts, bis alle Geräte angeschlossen sind.
Bei der letzten Gerät müssen Sie die DMX-Leitung mit einem Abschlusswiderstand schließen. Nehmen Sie einen XLR-Stecker und löten
Sie einen 120-Ohm-Widerstand zwischen Signal (-) und Signal (+) und stecken Sie diesen in den DMX-Ausgang der letzten Gerät in der Leitung.
Dieses Gerät kann über RDM (Remote Device Management) via DMX512 kommunizieren. RDM ist ein bidirektionales Kommunikationsprotokoll für den
Einsatz in DMX512-controller, es ist der offene Standard für die DMX512-Konfiguration und Statusüberwachung.
Das RDM-Protokoll ermöglicht es, Datenpakete in eine DMX512-Leitung einzufügen, ohne die vorhandene Nicht-RDM-Ausrüstung zu beeinträchtigen. Das
System ermöglicht es einer Steuerung oder einem speziellen RDM-Controller, Befehle von bestimmten Vorrichtungen zu senden und zu empfangen.
Mit der RDM-Funktion können Sie unter anderem die DMX-Startadresse Ihrer Geräte ferngesteuert einstellen. Dies ist besonders nützlich, wenn das Gerät
an einem unzugänglichen Ort installiert wird. Jedes Gerät verfügt über eine RDM-UID (eindeutige Identifikationsnummer).
Die Ansammlung von Staub, Schmutz und anderen Schwebstoffen reduziert die Lichtleistung der Leuchte. Es verhindert auch, dass das Gerät richtig
abkühlt, was die Lebensdauer des Geräts verkürzt. Die Rate der Schmutzansammlung variiert je nach Umgebungsfaktoren wie luftgetragener Staub,
Einsatz von Nebelmaschinen, Luftstrom aus Lüftungsanlagen usw. Die Rate der Schmutzansammlung variiert je nach Umgebung. Die Kühlgebläse des
Gerät beschleunigen den Aufbau, und alle in der Atmosphäre vorhandenen Rauchpartikel erhöhen die Tendenz zur Verschmutzung.
Um die beste Leistung und Lebensdauer des Geräts zu erhalten, überprüfen und reinigen Sie das Gerät regelmäßig, sobald Sie Anzeichen von
Schmutzansammlung feststellen.
Überprüfen Sie die Betriebsumgebung jedes Mal, wenn Sie das Gerät in Betrieb nehmen. Unter staubigen oder rauchigen Bedingungen sollte das Gerät
nach einigen Stunden überprüft werden und regelmäßig überprüft werden, ob das Gerät schneller als erwartet Schmutz anziehen kann. Stellen Sie einen
Reinigungsplan auf, der sicherstellt, dass Schmutz entfernt wird, bevor er sich ansammeln kann.
Verwenden Sie die folgenden Richtlinien:
• Trennen Sie das Gerät vom Stromnetz und lassen Sie es vor der Reinigung vollständig abkühlen.
• Verwenden Sie zur Reinigung des Geräts keine Lösungsmittel, Scheuermittel oder andere aggressive Produkte.
• Staubsaugen oder Niederdruck-Druckluft verwenden, um Staub und lose Partikel von Oberflächen und Lüftungsöffnungen zu entfernen.
Vermeiden Sie es, die Lüfterblätter zu drehen, bevor Sie einen Vakuum- oder Luftstrom auf den Lüfter richten, da der Lüfter sonst zu schnell laufen
und ihn beschädigen könnte.
• Reinigen Sie Glasteile, indem Sie sie vorsichtig mit einem weichen, sauberen, fusselfreien Tuch abwischen, das mit einer schwachen
Reinigungslösung befeuchtet ist. Die Lösung auf das Tuch und nicht auf die zu reinigende Oberfläche geben. Vermeiden Sie es, Glasflächen zu
reiben.
• Trocknen Sie das Gerät mit einem weichen, sauberen, fusselfreien Tuch oder Niederdruck-Druckluft, bevor Sie das Gerät wieder mit Strom
versorgen.

Wenn die Sicherung defekt ist, ersetzen Sie sie durch eine Sicherung gleichen Typs und gleicher Leistung. Um die Sicherung auszutauschen, schalten Sie
zuerst die Stromversorgung aus und führen Sie die folgenden Schritte aus.
Vorgehensweise:
Schritt 1: Öffnen Sie den Sicherungshalter auf der Rückseite mit einem geeigneten flachen Schraubendreher.
Schritt 2: Entfernen Sie die alte Sicherung aus dem Sicherungshalter.
Schritt 3: Setzen Sie die neue Sicherung in den Sicherungshalter ein.
Schritt 4: Setzen Sie den Sicherungshalter in das Gehäuse ein.
Dieses Gerät ist wartungsfrei, aber Sie sollten das Gerät regelmäßig auf mechanische und elektrische Aspekte überprüfen.
Bewerten Sie die Betriebsumgebung und erstellen Sie einen Inspektions- und Reinigungsplan, der den folgenden Richtlinien entspricht:
• Trennen Sie das Gerät vom Stromnetz und lassen Sie es vollständig abkühlen, bevor Sie mit der Inspektion und Reinigung beginnen.
• Überprüfen Sie die Schrauben und Bolzen, mit denen die Vorrichtung montiert wurde, sie müssen fest angezogen sein und dürfen keine
Korrosion aufweisen.
• Überprüfen Sie das Gehäuse, die Befestigungspunkte und die Montagepunkte, sie dürfen keine Anzeichen von Verformung, Verschleiß oder
Ermüdung aufweisen.
• Überprüfen Sie die mechanisch beweglichen Teile, diese dürfen keine Anzeichen von Verschleiß oder Ermüdung aufweisen.
• Überprüfen Sie die elektrischen Versorgungs- und Signalkabel, sie dürfen keine Schäden oder Ermüdung aufweisen.
• Verwenden Sie zur Reinigung des Geräts keine Lösungsmittel, Scheuermittel oder andere aggressive Produkte.
• Wischen Sie das Gerät ab und reinigen Sie die Glasplatte mit einem weichen, sauberen, fusselfreien Tuch, das mit einer schwachen
Reinigungslösung befeuchtet ist. Die Lösung auf das Tuch und nicht auf die zu reinigende Oberfläche geben. Vermeiden Sie es, Glasflächen zu
reiben.
• Trocknen Sie das Gerät, die Anschlüsse und Kontakte mit einem weichen, sauberen, fusselfreien Tuch oder Niederdruck-Druckluft, bevor Sie das
Gerät wieder mit Strom versorgen.

Die folgende Checkliste kann Ihnen im unwahrscheinlichen Fall helfen, dass während der Verwendung des Produkts ein Problem auftritt:
Das Gerät reagiert nicht.
Keine Stromversorgung.
Vergewissern Sie sich, dass das Gerät
eingeschaltet ist.
Überprüfen Sie die Kabel und Anschlüsse.
Sicherung durchgebrannt oder interner Fehler.
Tauschen Sie die Hauptsicherung aus oder
wenden Sie sich an den Beamz Support oder
den autorisierten Beamz Servicepartner.
Demontieren Sie keine Teile des Gehäuses.
Versuchen Sie nicht, eine Sicherung
auszutauschen oder Reparaturen oder
Wartungsarbeiten durchzuführen, die nicht in
dieser Bedienungsanleitung beschrieben sind,
es sei denn, Sie haben die Erlaubnis von Beamz
Support oder einem von Beamz autorisierten
Servicepartner.
Das Gerät wird korrekt zurückgesetzt, reagiert
jedoch nicht (oder nicht richtig) auf den
Controller.
Der Controller ist nicht angeschlossen.
Verbinden Sie den Controller.
Schlechte DMX-Leitung.
Überprüfen Sie die Anschlüsse und Kabel.
Korrigieren Sie schlechte Verbindungen.
Reparieren oder ersetzen Sie beschädigte
Kabel.
Die DMX-Leitung hat keinen
Abschlusswiderstand.
Stecken Sie den DMX-Terminator-Stecker in
den DMX-Ausgang des letzen Gerätes auf der
DMX-Leitung.
Falsche Adressierung des Gerätes
Überprüfen Sie die Einstellungen der
Geräteadresse und des DMX-Modus.
Ein Gerät ist defekt und stört die
Datenübertragung auf der DMX-Leitung.
Entfernen Sie die DMX IN- und OUT-Stecker aus
dem Gerät und verbinden Sie sie direkt
miteinander, um jeweils ein Gerät zu umgehen,
bis der normale Betrieb wiederhergestellt ist.
Lassen Sie ein defektes Gerät von einem
autorisierten Techniker warten.
Pin 2 und 3 sind in XLR-Verbindung vertauscht.
Überprüfen Sie die Anschlüsse und Kabel.
Installieren Sie ein Phasenschieberkabel
zwischen den Geräten oder tauschen Sie die
Pins 2 und 3 in dem Gerät aus, das sich anders
verhält.
Fehler nach dem Zurücksetzen des Geräts
Der Effekt erfordert eine mechanische
Anpassung.
Überprüfen Sie die Softwareversion und die
Fehlermeldungen des Gerätes für weitere
Informationen. Wenden Sie sich an den Beamz
Support oder an den autorisierten Beamz-
Servicepartner.
Kein Lichtaustritt oder Licht ist intermittierend.
Gerät zu heiß
Lassen Sie das Gerät abkühlen.
Reduzieren Sie die Umgebungstemperatur.
Achten Sie auf einen freien Luftstrom um das
Gerät herum. Reinigen Sie das Gerät bei Bedarf.
LEDs defekt
Trennen Sie das Gerät und kontaktieren Sie den
Beamz Support oder einen von Beamz
autorisierten Servicepartner.
Die Stromversorgungseinstellungen passen
nicht zur örtlichen Netzspannung unf Frequenz,
Trennen Sie das Gerät vom Stromnetz.
Überprüfen Sie die Einstellungen und beheben
Sie mögliche Fehler.

Antes de realizar cualquier operación con la unidad, lea atentamente este manual de instrucciones y guárdelo con cura para futuras
consultas. Contiene información importante sobre la instalación, uso y mantenimiento de la unidad.
• Desembale y compruebe cuidadosamente que no haya daños de transporte antes de usar la unidad
• Lea atentamente estas instrucciones y siga las instrucciones.
• Observe todas las advertencias de seguridad. Nunca elimine las advertencias de seguridad u otra información del equipo.
• Asegúrese de que no haya ranuras de ventilación bloqueadas; de lo contrario la unidad se sobrecalentará.
Antes de conectar el equipo a la toma de corriente, primero verifique que la tensión y la frecuencia de la red coincidan con los
valores especificados en el equipo. Si el equipo tiene un interruptor de selección de voltaje, conecte el equipo a la toma de corriente solo si los valores
del equipo y los valores de la red eléctrica coinciden. Si el cable de alimentación incluido o el adaptador de corriente no encaja en el tomacorriente de
pared, comuníquese con su electricista.
• Después de conectar la unidad, verifique todos los cables para evitar daños o accidentes debido a peligros de tropiezos.
• Asegúrese de que el cable de alimentación nunca esté rizado o dañado. Compruebe el dispositivo y el cable de alimentación de vez en cuando.
• ¡Desconecte siempre la alimentación de la red eléctrica, cuando no se utilice el dispositivo o antes de limpiarlo! Sólo manipule el cable de
alimentación por el enchufe. Nunca desenchufe el cable tirando del cable de alimentación.
• Desenchufe el cable de alimentación y el adaptador de alimentación de la toma de corriente si existe riesgo de que se caiga un rayo o antes de
períodos prolongados de desuso.
• No encienda y apague la unidad en intervalos cortos.
• No conecte la unidad a un dimmerpack.
• Instale la unidad en un lugar bien ventilado.
• Nunca coloque ningún material sobre los leds o las lentes.
• Nunca deje que la luz del sol ilumine directamente a la lente, incluso cuando la unidad no esté funcionando.
• Permita siempre un espacio libre de aire de al menos 50 cm alrededor de la unidad para la ventilación.
• Asegúrese de que el área que se encuentra debajo del lugar de instalación esté bloqueada al instalar, desmontar o reparar el accesorio.
• Para una altura de montaje superior a un metro, fije siempre el accesorio con una cuerda de seguridad adecuada. Fije la cuerda de seguridad
únicamente en los puntos de fijación correctos. ¡La cuerda de seguridad no debe fijarse nunca en las asas de transporte!
• Nunca mire directamente al haz de luz. Tenga en cuenta que los cambios rápidos en la iluminación, y la luz intermitente, pueden desencadenar
ataques epilépticos en personas fotosensibles o personas con epilepsia.
• Esta unidad no está diseñada para una operación permanente. Las interrupciones constantes de la operación garantizarán que el dispositivo le
servirá durante mucho tiempo sin defectos.
Si el cable de alimentación del dispositivo está equipado con un contacto de conexión a tierra, debe conectarse a una toma de
corriente con una conexión a tierra de protección. Nunca desactive la conexión a tierra protectora de un cable de alimentación.
• Asegúrese de que la unidad no esté expuesta a calor extremo, humedad o polvo.
• Limpie la unidad con un paño seco.
• No toque el aparato con las manos descubiertas durante su funcionamiento (la carcasa se calienta mucho). Deje que el aparato se enfríe
durante al menos 5 minutos antes de manipularlo.
• Esta unidad está diseñada exclusivamente para uso en interiores, no use este equipo en las inmediaciones del fluido (no se aplica a equipos
especiales para exteriores, en este caso, siga las instrucciones especiales que se indican a continuación). No exponga esta unidad a materiales,
líquidos o gases inflamables.
• Si la unidad ha estado expuesta a una fluctuación drástica de la temperatura (por ejemplo, después del transporte), no la encienda de
inmediato. El agua de condensación que surge puede dañar su unidad. Deje la unidad apagada hasta que alcance la temperatura ambiente.
• Nunca intente pasar por alto el interruptor termostático o los fusibles.
• No desmonte ni modifique la unidad.
• Para reemplazo, use fusibles / bombilla del mismo tipo y clasificación solamente.
• Las reparaciones, el servicio y la conexión eléctrica deben ser llevados a cabo por un técnico calificado.
• La temperatura ambiente siempre debe estar entre -5 ° C y + 45 ° C.
• Si esta unidad se opera de una manera diferente a la descrita en este manual, el producto podría sufrir daños y la garantía quedará anulada.
• Las bolsas de plástico deben mantenerse fuera del alcance de los niños.
• La unidad debe instalarse fuera del alcance de los niños. Nunca deje la unidad funcionando sin supervisión-
Este símbolo en el producto o en su empaque indica que este producto no debe ser tratado como basura doméstica. En su lugar, se entregará
al punto de recolección correspondiente para el reciclaje de equipos eléctricos y electrónicos.
Al garantizar que este producto se elimine correctamente, ayudará a evitar posibles consecuencias negativas para el medio ambiente y la salud humana,
que de otro modo podrían ser causadas por el manejo inadecuado de los desechos de este producto. El reciclaje de materiales ayudará a conservar los
recursos naturales. Para obtener información más detallada sobre el reciclaje de este producto, comuníquese con su Oficina Cívica local, el servicio de
eliminación de desechos domésticos o la tienda donde adquirió el producto.

Inmediatamente después de recibir el producto, desembale la caja con cuidado, verifique el contenido para asegurarse de que
todas las partes estén presentes y se hayan recibido en buenas condiciones. Notifique al remitente de inmediato y guarde el material de
empaque para inspeccionarlo si aparecen piezas dañadas por el envío o si el propio paquete muestra signos de mal manejo. Guarde el paquete y todos los
materiales de embalaje. En el caso de que el producto deba devolverse a la fábrica, es importante que el producto se devuelva en la caja y empaque
originales de fábrica.
Si el dispositivo ha estado expuesto a una drástica fluctuación de la temperatura (por ejemplo, después del transporte), no lo encienda de inmediato. El
agua de condensación que surge podría dañar su dispositivo. Deje el dispositivo apagado hasta que alcance la temperatura ambiente.
En la etiqueta que se encuentra en la parte posterior del producto, se indica que este tipo de fuente de alimentación debe estar conectada. Verifique que la
tensión de la red corresponda a esto, todos los demás voltajes que los especificados, el efecto de la luz puede dañarse irreparablemente. El producto
también debe estar conectado directamente a la red eléctrica y se puede utilizar.
La unidad incorpora una salida de alimentación powercon. Dependiendo de la alimentación local, varias unidades pueden linkearse por powercon in y out.
Conecte un máximo de cuatro unidades (si usa toma 230V/16A) en una sola fila. Use cable apropiado de 3 hilos con una sección de al menos 1.5 mm². Las
instrucciones del fabricante y del código de colores de conexión deben seguirse siempre. No desconecte la unidad desde el conector powercon, use el
interruptor on/off o desconecte del schuko!
Siempre conecte el dispositivo a un circuito protegido (disyuntor o fusible). Asegúrese de que el dispositivo tenga una toma de
tierra eléctrica adecuada para evitar el riesgo de electrocución o incendio.
El accesorio se puede instalar en una superficie estable y uniforme. Por medio de las instalaciones de fijación de la placa de base, la unidad también se
puede montar boca abajo a un truss, vea la imagen de abajo. Para la fijación, se requieren abrazaderas certificadas con la carga de trabajo correcta. Según
la figura, los pernos de bloqueo rápido de los soportes omega se colocan en las aberturas provistas en la placa base y se giran en el sentido de las agujas
del reloj hasta que se bloquean (hasta el tope). El lugar de montaje debe ser lo suficientemente estable y ser capaz de soportar un peso de 10 veces el peso
de la unidad. Asegure el accesorio con un cable de seguridad para que no pueda caerse.
Al realizar cualquier instalación, siempre cumpla con las directrices europeas y nacionales relativas a aparejos, armazones y todos los demás problemas de
seguridad. Deje siempre la instalación revisada por un distribuidor autorizado!

Si está utilizando un controlador DMX estándar, puede conectar la salida DMX del controlador directamente a la entrada DMX del primer dispositivo en una
cadena DMX. Siempre conecte la salida de una unidad con la entrada del siguiente dispositivo hasta que todos los dispositivos estén conectados.
En el último aparato, debe cerrar la línea DMX con una resistencia de terminación. Tome un conector XLR y suelde una resistencia
de 120 Ohm entre la señal (-) y la señal (+) y conéctela a la salida DMX del último dispositivo en la línea.
Esta unidad puede comunicarse usando RDM (Remote Device Management) vía DMX512. RDM es un protocolo de comunicación bidireccional que se utiliza
en unidades de control DMX512, siendo un estándar abierto para configuraciones en DMX512 y monitorización.
El protocolo RDM permite insertar paquetes de datos en una línea DMX512 sin afectar a los equipos no-RDM conectados. El Sistema permite a una unidad
RDM enviar y recibir comandos para unidades específicas.
Esta función RDM permite por ejemplo fijar remotamente la dirección de inicio de un equipo DMX. Esto es especialmente útil cuando la unidad se
encuentra en lugar inaccesible. Cada unidad tiene un exclusivo RDM UID (número de identificación único).
La acumulación de polvo, suciedad y otras partículas en el aire reducirá la salida de luz del accesorio. También evitará que el dispositivo se enfríe
correctamente, y esto reducirá la vida útil del dispositivo. La tasa de acumulación de suciedad variará según los factores ambientales, como el polvo en el
aire, el uso de máquinas de humo, el flujo de aire de los sistemas de ventilación, etc. Los ventiladores de enfriamiento del dispositivo acelerarán la
acumulación, y cualquier partícula de humo que esté presente en la atmósfera aumentará la tendencia para que la suciedad se atasque.
Para obtener el mejor rendimiento y vida útil del accesorio, inspeccione regularmente y límpielo tan pronto como vea signos de acumulación de suciedad.
Evalúe el entorno operativo cada vez que comience a utilizar el dispositivo. En condiciones de mucho polvo o humo, inspeccione el dispositivo después de
unas horas y verifique si el dispositivo atrae la suciedad más rápido de lo que usted espera. Elabore un programa de limpieza que asegure que se elimine la
suciedad antes de que se acumule.
Utilice las siguientes pautas:
• Desconecte el artefacto del aparato y deje que se enfríe completamente antes de limpiarlo.
• No utilice disolventes, abrasivos ni ningún otro producto agresivo para limpiar el accesorio.
• Aspire o utilice aire comprimido a baja presión para eliminar el polvo y las partículas sueltas de las superficies y las salidas de aire. Evite que las aspas
de los ventiladores de enfriamiento giren antes de apuntar una aspiradora o chorro de aire hacia el ventilador, o puede girar el ventilador demasiado
rápido y dañarlo.
• Limpie los componentes de vidrio con un paño suave, limpio y sin pelusa humedecido con una solución detergente suave. Ponga la solución en el
paño y no en la superficie a limpiar. Evite frotar las superficies de vidrio.
• Seque el accesorio con un paño suave, limpio y sin pelusas o con aire comprimido a baja presión antes de volver a aplicar la energía.

Si el fusible está defectuoso, sustitúyalo por un fusible del mismo tipo y valor. Antes de cambiar el fusible, desenchufe el cable de alimentación.
Procedimiento:
Paso 1: Abra el portafusibles en el panel trasero con un destornillador adecuado.
Paso 2: Retire el fusible viejo del portafusibles.
Paso 3: Instale el nuevo fusible en el portafusibles.
Paso 4: Reemplace el portafusibles en la carcasa.
Esta unidad está prácticamente libre de mantenimiento, pero es necesario comprobar regularmente algunos aspectos mecánicos y eléctricos.
Asegure el ambiente de trabajo y establezca e inspeccione una pauta de limpieza con los siguientes parámetros:
• Desconecte la unidad de la toma de corriente y espere a que esté totalmente fria.
• Compruebe que los tornillos utilizados para su instalación estén seguros y libres de oxido.
• Compruebe la carcasa y puntos de anclaje que no deben presentar deformación ni fatiga.
• Compruebe las partes mecánicas móviles que no deben mostrar signos de fatiga ni desgaste.
• Compruebe las conexiones eléctricas y de señal que no deben mostrar daños ni fatiga.
• No use productos disolventes, abrasivos o agresivos para la limpieza exterior.
• Limpie las partes de cristal con un paño limpio, suave y sin filamentos con una solución neutra de limpieza. Coloque el líquido en el paño, nunca
directamente en la superficie a limpiar. Evite mojar las partes gomosas.
• Seque la unidad, los conectores y contactos con un paño seco y limpio o con un compressor de aire de baja presión, antes de volver a conectar la
unidad.

La siguiente lista de verificación puede ayudarle a resolver problemas en el caso de que ocurra un fallo al utilizar el producto:
No hay respuesta del aparato.
No llega alimentación.
Compruebe que la alimentación esté encendida.
Comprobar cables y conexiones.
Fusible quemado o fallo interno.
Reemplace el fusible o póngase en contacto con el
servicio técnico de Beamz o con un servicio autorizado de
Beamz. No quite las cubiertas de la base. No intente
reemplazar un fusible ni realizar reparaciones o
reparaciones que no se describen en este Manual del
usuario, a menos que cuente con la autorización del
servicio técnico de Beamz o de un servicio autorizado de
Beamz.
El aparato se reinicia correctamente pero
no responde (o no responde
correctamente) al controlador.
El controlador no está conectado.
Conecte el controlador.
Mala línea DMX.
Inspeccionar conexiones y cables. Corregir conexiones
malas. Repare o reemplace los cables dañados.
La línea DMX no tiene resistencia final.
Inserte el conector del terminador DMX en el zócalo de
salida de datos del último dispositivo en la línea DMX.
Direccionamiento incorrecto del aparato.
Verifique la dirección del aparato y la configuración del
modo DMX.
Un aparato está defectuoso y está
alterando la transmisión de datos en la
línea DMX.
Desenchufe los conectores DMX IN y OUT y conéctelos
directamente para evitar un dispositivo a la vez hasta que
se recupere el funcionamiento normal. Haga reparar el
artefacto defectuoso por un técnico autorizado.
Pin 2 y 3 están invertidos en la conexión
XLR.
Inspeccionar conexiones y cables. Instale un cable de
inversión de fase entre los dispositivos o intercambie los
pines 2 y 3 en el dispositivo, que se comporta de forma
errática.
Error después del reinicio del aparato.
El efecto requiere ajuste mecánico.
Verifique la versión del software del aparato y los
mensajes de error para obtener más información.
Póngase en contacto con el servicio de asistencia de
Beamz o con un servicio autorizado de Beamz.
La salida de luz se corta
intermitentemente.
El aparato está muy caliente.
Permita que el accesorio se enfríe. Reducir la
temperatura ambiente. Asegure el flujo de aire libre
alrededor del accesorio. Limpie el accesorio si es
necesario.
LEDs dañados.
Desconecte el accesorio y póngase en contacto con el
servicio técnico de Beamz
La configuración de la fuente de
alimentación no coincide con la tensión
de CA local y frecuencia.
Desconecte el accesorio. Compruebe la configuración y
corregir si es necesario.

Avant d'effectuer toute manipulation sur l'appareil, lisez avec attention la présente notice et conservez-la pour pouvoir vous y
reporter ultérieurement. Elle contient des informations importantes sur l’installation, l’utilisation et l’entretien de l’appareil.
• Déballez l'appareil, vérifiez soigneusement qu'il n'y a pas de dommages dus au transport avant de l'utiliser.
• Veuillez lire attentivement ces instructions et les suivre.
• Respectez tous les avertissements de sécurité. Ne retirez jamais les avertissements de sécurité ou autres informations figurant sur l’appareil.
• Assurez-vous qu'aucune ouïe d'aération n'est obstruée, sinon il y a risque de surchauffe de l’appareil.
Avant de brancher l’appareil à une prise d’alimentation, assurez-vous tout d’abord que la tension et la fréquence du secteur
correspondent aux valeurs spécifiées sur l’appareil. S’il est équipé d'un sélecteur de tension, ne branchez l'appareil à la prise de courant que si les
valeurs de l'appareil et celles de l'alimentation secteur correspondent. Si le cordon d'alimentation ou l'adaptateur secteur fourni ne s'adapte pas à
votre prise murale, contactez votre électricien.
• Après avoir branché l'appareil, vérifiez tous les câbles afin d'éviter tout dommage ou accident, par exemple pour ne pas trébucher.
• Assurez-vous que le cordon d'alimentation n'est jamais serti ou endommagé. Vérifiez régulièrement l'appareil et le cordon d'alimentation.
• Débranchez toujours le cordon d'alimentation du secteur lorsque l'appareil n'est pas utilisé ou avant de le nettoyer ! Ne manipulez le cordon
d'alimentation que par la fiche. Ne débranchez jamais la fiche en tirant sur le cordon d'alimentation.
• Débranchez le cordon d'alimentation et l'adaptateur secteur de la prise de courant s'il y a un risque de foudre ou avant une longue période
d'inutilisation.
• N'allumez et n'éteignez pas l'appareil à intervalles rapprochés.
• Ne connectez pas l'appareil à un gradateur.
• Installez l'appareil dans un endroit bien ventilé.
• Ne placez jamais de matériau sur l'objectif.
• Ne laissez jamais la lumière du soleil s'allumer directement sur l'objectif, même lorsque l'appareil ne fonctionne pas.
• Laissez toujours un espace libre de 50 cm au moins autour de l'appareil pour assurer une ventilation correcte.
• Veillez à ce que la zone située sous le lieu de montage soit toujours inaccessible au public lors de l’installation ou de l'entretien de l'appareil.
• Pour une hauteur de montage >100 cm, fixez toujours l'appareil avec une élingue de sécurité idoine. Fixez l’élingue uniquement aux points de
fixation. L’élingue de sécurité ne doit jamais être fixée aux poignées de transport!
• Ne regardez jamais directement le faisceau lumineux. Gardez présent à l’esprit que des changements rapides de lumière, par exemple une
lumière clignotante, peuvent déclencher des crises d'épilepsie chez les personnes photosensibles ou épileptiques.
• Cet appareil n'est pas conçu pour fonctionner en permanence. Des pauses d'utilisation régulières assureront un fonctionnement sans problème
sur le long terme.
Si le cordon d'alimentation de l'appareil est équipé d'un contact de mise à la terre, il doit être connecté à une prise de courant
avec une terre de protection. Ne jamais désactiver la terre de protection d'un cordon d'alimentation.
• Assurez-vous que l'appareil n'est pas exposé à une chaleur extrême, à l'humidité ou à la poussière.
• Nettoyez l'appareil à l'aide d'un chiffon sec.
• Ne touchez pas le projecteur à mains nues pendant son fonctionnement (le boîtier devient très chaud). Laissez le projecteur refroidir pendant 5
minutes au moins avant de le manipuler.
• Cet appareil est conçu exclusivement pour une utilisation à l'intérieur, n'utilisez pas cet appareil à proximité immédiate d'un liquide (ne
s'applique pas aux équipements extérieurs spéciaux - dans ce cas, respectez les instructions spéciales indiquées ci-dessous). N'exposez pas cet
appareil à des matériaux, liquides ou gaz inflammables.
• Si l'appareil a été exposé à des variations de température importantes (par ex. après un transport), ne l’allumez pas immédiatement. La
condensation pourrait endommager votre appareil. Laissez l'appareil éteint jusqu'à ce qu'il atteigne la température ambiante.
• N'essayez jamais de bridger l'interrupteur thermostatique ou les fusibles.
• Ne démontez pas ou ne modifiez pas l'appareil.
• Pour le remplacement, utilisez uniquement des fusibles/ampoules de même type et de même puissance.
• Les réparations, l'entretien et le raccordement électrique ne doivent être effectués que par un technicien qualifié.
• La température ambiante doit toujours être comprise entre -5° C et +45° C.
• Si cet appareil est utilisé dans un but autre que celui décrit dans ce manuel, il peut subir des dommages, dans ce cas, la garantie est caduque.
• Les sacs en plastique doivent être gardés hors de portée des enfants.
• L'appareil doit être installé hors de portée des enfants. Ne laissez jamais l'appareil en marche sans surveillance.
Ce symbole sur le produit ou sur son emballage indique que ce produit ne doit pas être traité comme un déchet ménager. Il doit être déposé
au point de collecte approprié pour le recyclage des équipements électriques et électroniques.
En vous assurant que ce produit est éliminé correctement, vous contribuerez à prévenir les conséquences négatives potentielles pour l'environnement et
la santé humaine, qui pourraient autrement être causées par une manipulation inappropriée des déchets de ce produit. Le recyclage des matériaux
contribuera à préserver les ressources naturelles. Pour de plus amples informations sur le recyclage de ce produit, veuillez contacter votre bureau
municipal local, votre service d'élimination des déchets ménagers ou le magasin où vous avez acheté le produit.

Dès réception du produit, déballez soigneusement le carton, vérifiez son contenu pour vous assurer que toutes les pièces sont
présentes et qu'elles ont été reçues en bon état. Avisez immédiatement l'expéditeur et conservez le matériel d'emballage ; contrôlez si des pièces
semblent endommagées lors de l'expédition ou si le colis lui-même montre des signes de mauvaise manipulation. Conservez l'emballage et tout le
matériel d'emballage. Dans le cas où le produit doit être retourné à l'usine, il est important que le produit soit retourné dans son emballage d'origine.
Si l'appareil a été exposé à des variations de température importantes (par ex. après un transport), ne l’allumez pas immédiatement. La condensation
pourrait endommager votre appareil. Laissez l'appareil éteint jusqu'à ce qu'il atteigne la température ambiante.
Le type d'alimentation auquel le produit doit être connecté est indiqué sur l'étiquette à l'arrière du produit. Vérifiez que la tension secteur corresponde à
cette tension, toutes les autres tensions que celles spécifiées peuvent endommager l’appareil. Le produit doit également être branché directement sur le
secteur et peut être utilisé. Pas de gradateur ni d'alimentation réglable.
L'appareil est équipé d'un connecteur de sortie d'alimentation. En fonction des conditions locales, plusieurs appareils peuvent être reliés entre eux par
l'entrée et la sortie du bloc d'alimentation. Connectez un maximum de quatre unités (si vous utilisez une tension de 230V/16A) à la suite. Utilisez un câble
trois conducteurs homologué avec une section de 1,5 mm² au moins. Respectez les instructions de montage du fabricant et le code couleur du câble.
N'éteignez pas l'appareil en retirant le cordon d'alimentation, mais utilisez l'interrupteur marche/arrêt ou schuko !
Reliez toujours l'appareil à un circuit protégé (disjoncteur ou fusible). Assurez-vous que l'appareil dispose d'une mise à la
terre électrique appropriée pour éviter tout risque d'électrocution ou d'incendie.
L’appareil peut être installé sur une surface stable et plane. Grâce aux possibilités de fixation de la plaque de base, l'appareil peut également être monté à
l'envers sur une poutrelle, voir photo ci-dessous. Pour la fixation, il est nécessaire d'utiliser des colliers de serrage certifiés avec une capacité de charge
correspondante. Comme indiqué sur le schéma, les boulons de verrouillage rapide des supports oméga sont placés dans les ouvertures prévues à cet effet
dans la plaque de base et tournés dans le sens des aiguilles d'une montre jusqu'à leur blocage (jusqu'à la butée). L'emplacement de montage doit être
suffisamment stable et pouvoir supporter un poids égal à 10 fois le poids de l'appareil. Fixez l'appareil à l'aide d'une élingue de sécurité afin qu'il ne puisse
pas tomber.
Lors de toute installation, respectez toujours les directives européennes et nationales concernant l’accrochage des produits, les structures et toutes les
autres questions de sécurité. Faites toujours vérifier l'installation par un revendeur agréé !

Si vous utilisez un contrôleur DMX standard, vous pouvez connecter la sortie DMX du contrôleur directement à l'entrée DMX du premier appareil dans une
chaîne DMX. Connectez toujours la sortie d'un appareil à l'entrée de l'appareil suivant jusqu'à ce que tous les appareils soient connectés entre eux.
sur le dernier appareil, vous devez terminer la ligne DMX avec une résistance. Prenez un connecteur XLR et soudez une résistance
de 120 ohms entre le signal (-) et le signal (+) et connectez-la à la sortie DMX du dernier appareil sur la ligne.
Cet appareil peut communiquer en utilisant le RDM (Remote Device Management) via Artnet DMX512. RDM est un protocole de communication
bidirectionnel pour les systèmes de contrôle DMX512, c'est le standard ouvert pour la configuration DMX512 et le monitoring.
Le protocole RDM permet d'insérer des paquets de données dans une ligne DMX512 sans affecter les équipements non-RDM existants. Le système permet
à un contrôleur ou à un contrôleur RDM spécial d'envoyer et de recevoir des commandes d'appareils spécifiques.
La fonction RDM vous permet, par exemple, de régler à distance l'adresse de démarrage DMX de vos appareils. Ceci est particulièrement utile lorsque le
projecteur est installé dans un endroit inaccessible. Chaque unité possède un RDM UID (numéro d'identification unique)
L'accumulation de poussière, de saleté et d'autres particules en suspension dans l'air réduira le rendement lumineux de l'appareil. Cela empêchera
également le projecteur de refroidir correctement, ce qui réduira sa durée de vie. Le taux d'accumulation de saleté varie en fonction de facteurs
environnementaux tels que la poussière en suspension dans l'air, l'utilisation de machines à fumée, le débit d'air des systèmes de ventilation, etc. Les
ventilateurs de refroidissement de l'appareil accélèrent l'accumulation et les particules de fumée présentes dans l'atmosphère augmentent la tendance à
l'encrassement.
Pour obtenir le meilleur rendement et la meilleure durée de vie de l'appareil, inspectez-le régulièrement et nettoyez-le dès que vous voyez des signes
d'accumulation de saleté.
Évaluez l'environnement de fonctionnement à chaque utilisation du projecteur. Dans des conditions poussiéreuses ou enfumées, inspectez le projecteur
après quelques heures et vérifiez fréquemment s'il capte la saleté plus rapidement que vous ne le pensez. Établissez un calendrier de nettoyage qui
permettra d'éliminer la saleté avant qu'elle ne s'accumule.
Suivez les directives suivantes :
• Débranchez le projecteur du secteur et laissez-le refroidir complètement avant de le nettoyer.
• N'utilisez pas de solvants, d'abrasifs ou tout autre produit agressif pour nettoyer l'appareil.
• Passez l'aspirateur ou utilisez de l'air comprimé à basse pression pour enlever la poussière et les particules libres des surfaces et des ouïes
d'aération. Empêchez les pales des ventilateurs de tourner avant de diriger un aspirateur ou un jet d'air vers le ventilateur, sinon vous risquez de
faire tourner le ventilateur trop rapidement et de l'endommager.
• Nettoyez les composants en verre en les essuyant doucement avec un chiffon doux, propre, non pelucheux et humidifié avec une solution
détergente douce. Posez la solution sur le chiffon et non sur la surface à nettoyer. Évitez de frotter les surfaces vitrées.
• Séchez le projecteur avec un chiffon doux, propre et non pelucheux ou avec de l'air comprimé basse pression avant de le remettre sous tension-

Si le fusible est défectueux, remplacez-le par un fusible de même type et valeur. Avant de remplacer le fusible, débranchez le cordon secteur.
Procédure :
Etape 1 : Ouvrez le porte-fusible sur la face arrière avec un tournevis.
Etape 2 : Retirez l’ancien fusible du porte-fusible.
Etape 3 : Installez le nouveau fusible dans le porte-fusible.
Etape 4 : Replacez le porte-fusible dans le boîtier.
Évaluez l'environnement d'exploitation et établissez un calendrier d'inspection et de nettoyage suivants les points ci-dessous :
• Débranchez le projecteur de l'alimentation électrique et laissez-le refroidir complètement avant de l'inspecter et de le nettoyer.
• Vérifiez que les vis et les boulons utilisés pour installer le projecteur sont bien serrés et ne présentent pas de trace de corrosion.
• Contrôlez le boîtier, les points de fixation et les points de montage, ils ne doivent présenter aucun signe de déformation, d'usure ou de fatigue.
• Contrôlez les pièces mécaniques en mouvement, celles-ci ne doivent présenter aucun signe d'usure ou de fatigue.
• Vérifiez les câbles d'alimentation électrique et de signal, ils ne doivent présenter aucun dommage ou fatigue.
• N'utilisez pas de solvants, d'abrasifs ou d'autres produits agressifs pour nettoyer l'appareil.
• Essuyez le projecteur et nettoyez la plaque de verre avec un chiffon doux, propre et non pelucheux imbibé d'une faible solution de nettoyage.
Posez la solution sur le chiffon et non sur la surface à nettoyer. Évitez de frotter les surfaces vitrées.
• Séchez le projecteur, les connecteurs et les contacts avec un chiffon doux, propre, non pelucheux ou de l'air comprimé basse pression avant de
remettre le projecteur sous tension.

La liste ci-dessous peut vous aider en cas de problèmes lors de l’utilisation du produit.
Pas de réponse de l’appareil.
L’appareil n’est pas alimenté.
Vérifiez que l’appareil est sous tension.
Vérifiez les câbles et branchements.
Le fusible a fondu ou problème interne.
Remplacer le fusible moyen ou contacter le
support Beamz ou un partenaire de service
agréé Beamz. N'enlevez pas les couvercles de
la base. N'essayez pas de remplacer un fusible
ou d'effectuer des réparations ou un entretien
qui ne sont pas décrits dans ce manuel
d'utilisation à moins d'avoir l'autorisation du
support Beamz ou du service autorisé Beamz.
L'appareil se réinitialise correctement mais ne
répond pas (ou ne répond pas correctement) au
contrôleur.
Le contrôleur DMX n’est pas relié.
Reliez le contrôleur.
Mauvaise ligne DMX.
Vérifiez les branchements et les câbles.
Réparez ou remplacez les câbles défectueux.
La ligne DMX n’a pas de résistance terminale.
Insérez un bouchon DMX dans la prise de
sortie DMX sur le dernier appareil de la ligne
DMX.
Mauvais adressage de l’appareil.
Vérifiez l’adresse de l’appareil et les réglages
DMX.
Un appareil est défectueux et perturbe la
transmission des données dans la ligne DMX.
Débranchez les connecteurs DMX IN et OUT et
relies-les directement ensemble pour bridger
un appareil à la fois jusqu’à ce que le
fonctionnement soit rétabli. Faites appel à un
technicien qualifié pour réparer l’appareil.
Les pins 2 et 3 sont inversés dans la connexion
XLR.
Vérifiez les câbles et branchements. Installez
un câble inversion de phase entre les appareils
ou remplacez les broches 2 et 3 dans l’appareil
qui se comporte de manière erratique.
Erreur après réinitialisation.
L’effet nécessite un réglage mécanique.
Vérifiez la version du logiciel de l'appareil et les
messages d'erreur pour plus d'informations.
Contacter le service après-vente Beamz ou un
partenaire de service agréé Beamz.
Le flux lumineux coupe de manière
intermittente.
L’appareil est trop chaud.
Laisser refroidir l'appareil. Réduire la
température ambiante. Veillez à ce que l'air
circule librement autour de l'appareil. Nettoyer
l'appareil si nécessaire.
Les LEDs sont endommagées.
Débrancher l'appareil et contacter le service
après-vente Beamz ou un partenaire agréé
Beamz-
Les réglages de l’alimentation ne correspondent
pas à la tension AC et à la fréquence locales.
Débranchez l’appareil. Vérifiez les réglages et
corrigez si besoin.

Przed przystąpieniem do jakichkolwiek czynności związanych z urządzeniem, należy uważnie przeczytać niniejszą instrukcję i
zachować ją z lekarstwem na przyszłość. Zawiera ważne informacje dotyczące instalacji, użytkowania i konserwacji urządzenia.
• Rozpakuj i sprawdź dokładnie, czy nie ma żadnych uszkodzeń transportowych przed użyciem urządzenia
• Przeczytaj uważnie te instrukcje i postępuj zgodnie z instrukcjami.
• Przestrzegaj wszystkich ostrzeżeń dotyczących bezpieczeństwa.
• Upewnij się, że żadne otwory wentylacyjne nie są zablokowane; w przeciwnym razie urządzenie się przegrzeje.
Przed podłączeniem urządzenia do gniazdka sieciowego należy najpierw sprawdzić, czy napięcie i częstotliwość sieci są zgodne z
wartościami podanymi na urządzeniu. Jeśli urządzenie ma przełącznik wyboru napięcia, podłącz urządzenie do gniazdka sieciowego tylko wtedy,
gdy wartości urządzeń i wartości sieciowe są zgodne. Jeśli dołączony przewód zasilający lub zasilacz nie pasują do gniazdka ściennego, skontaktuj się
z elektrykiem.
• Po podłączeniu urządzenia sprawdź wszystkie kable, aby zapobiec uszkodzeniom lub wypadkom, na przykład z powodu potknięć.
• Upewnij się, że przewód zasilający nie jest zaciśnięty ani uszkodzony. Od czasu do czasu sprawdzaj urządzenie i przewód zasilający.
• Zawsze odłączaj zasilanie z sieci, gdy urządzenie nie jest używane lub przed czyszczeniem! Obsługuj przewód zasilający tylko za wtyczkę. Nigdy
nie wyciągaj wtyczki, ciągnąc za przewód zasilający.
• Odłącz przewód zasilający i zasilacz od gniazdka, jeśli istnieje ryzyko uderzenia pioruna lub przed dłuższymi przerwami w pracy.
• Nie włączaj i wyłączaj urządzenia w krótkich odstępach czasu.
• Nie podłączaj urządzenia do dimmerpada.
• Zainstaluj urządzenie w dobrze wentylowanym miejscu.
• Nigdy nie kłaść żadnych materiałów na obiektywie.
• Nigdy nie pozwól, aby światło słoneczne świeciło bezpośrednio na obiektywie, nawet jeśli urządzenie nie działa.
• Zawsze należy zapewnić swobodną przestrzeń powietrzną o wysokości co najmniej 50 cm wokół urządzenia w celu wentylacji.
• Upewnij się, że obszar pod miejscem instalacji jest zablokowany podczas montażu, opróżniania lub serwisowania urządzenia.
• W przypadku wysokości montażu> 100 cm zawsze należy zamocować urządzenie odpowiednią liną zabezpieczającą. Przymocuj linę
zabezpieczającą tylko w poprawnych punktach mocowania. Linka zabezpieczająca nie może być nigdy zamocowana na uchwytach
transportowych!
• Nigdy nie patrz bezpośrednio na wiązkę światła. Zwróć uwagę, że szybkie zmiany w oświetleniu, np. szybko migające światło, może wywoływać
napady padaczkowe u osób światłoczułych lub z padaczką.
• To urządzenie nie jest przeznaczone do ciągłej pracy. Spójne przerwy w działaniu zapewnią, że urządzenie będzie służyć przez długi czas bez
wad.
Jeśli przewód zasilający urządzenia jest wyposażony w styk uziemiający, należy go podłączyć do gniazda z uziemieniem
ochronnym. Nigdy nie należy dezaktywować uziemienia ochronnego przewodu zasilającego.
• Upewnij się, że urządzenie nie jest narażone na działanie wysokich temperatur, wilgoci lub kurzu.
• Wyczyść urządzenie za pomocą suchej szmatki.
• Nie należy dotykać urządzenia gołymi rękoma podczas pracy (obudowa staje się bardzo gorąca). Odczekaj przynajmniej 5 minut, aż urządzenie
ostygnie.
• To urządzenie jest przeznaczone wyłącznie do użytku w pomieszczeniach, nie należy używać tego sprzętu w bezpośrednim sąsiedztwie płynu
(nie dotyczy specjalnych urządzeń zewnętrznych - w takim przypadku należy przestrzegać specjalnych instrukcji podanych poniżej). Nie należy
wystawiać tego urządzenia na łatwopalne materiały, płyny lub gazy.
• Jeśli urządzenie zostało narażone na drastyczne wahania temperatury (np. Po transporcie), nie włączaj go natychmiast. Powstająca woda
kondensacyjna może uszkodzić urządzenie. Pozostaw urządzenie wyłączone, aż osiągnie temperaturę pokojową.
• Nigdy nie próbuj ominąć przełącznika termostatycznego ani bezpieczników.
• Nie demontuj ani nie modyfikuj urządzenia.
• Do wymiany używać bezpieczników / żarówek tego samego typu i tylko tego samego typu.
• Naprawy, serwisowanie i podłączenie elektryczne muszą być wykonywane przez wykwalifikowanego technika.
• Temperatura otoczenia musi zawsze wynosić od -5 ° C do + 45 ° C.
• Jeśli urządzenie jest eksploatowane w inny sposób niż opisany w niniejszej instrukcji, produkt może ulec uszkodzeniu, a gwarancja traci
ważność.
• Plastikowe torby muszą być przechowywane w miejscu niedostępnym dla dzieci.
• Urządzenie musi być zainstalowane w miejscu niedostępnym dla dzieci. Nigdy nie pozostawiaj urządzenia bez nadzoru.
Ten symbol umieszczony na produkcie lub jego opakowaniu oznacza, że produkt ten nie może być traktowany jako odpad komunalny.
Zamiast tego należy przekazać go do odpowiedniego punktu zbiórki w celu recyklingu sprzętu elektrycznego i elektronicznego.
Zapewniając prawidłową utylizację tego produktu, pomagasz zapobiegać potencjalnym negatywnym konsekwencjom dla środowiska i zdrowia ludzkiego,
które mogłyby zostać spowodowane przez niewłaściwe postępowanie z odpadami tego produktu. Recykling materiałów pomoże chronić zasoby
naturalne. Aby uzyskać bardziej szczegółowe informacje na temat recyklingu tego produktu, należy skontaktować się z lokalnym biurem obywatelskim,
służbami oczyszczania miasta lub sklepem, w którym produkt został zakupiony.

Natychmiast po otrzymaniu produktu ostrożnie rozpakuj karton, sprawdź zawartość, aby upewnić się, że wszystkie części są obecne i
zostały odebrane w dobrym stanie. Natychmiast powiadomić dostawcę i zachować materiał do pakowania w celu sprawdzenia, czy jakakolwiek
część wygląda na uszkodzoną przez przesyłkę lub samo opakowanie wykazuje oznaki niewłaściwego postępowania. Zapisz pakiet i wszystkie materiały do
pakowania. W przypadku, gdy produkt musi zostać zwrócony do fabryki, ważne jest, aby produkt został zwrócony w oryginalnym opakowaniu fabrycznym
i opakowaniu.
Jeśli urządzenie zostało wystawione na drastyczne wahania temperatury (np. Po transporcie), nie włączaj go natychmiast. Powstająca woda
kondensacyjna może uszkodzić twoje urządzenie. Pozostaw urządzenie wyłączone, aż osiągnie temperaturę pokojową.
Na etykiecie z tyłu produktu jest wskazany jakiego typu zasilacz musi być podłączony. Sprawdź, czy napięcie w sieci jest właściwe do użytego zasilacza.
Każde inne napięcie niż podane, może sprawić nieodwracalne uszkodzenie oświetlenia. Produkt musi być również bezpośrednio podłączony do sieci
zasilającej i wtedy dopiero może być używany. Brak ściemniacza lub regulowany zasilacz.
Urządzenie ma wbudowane wyjście zasilania. W zależności od warunków w lokalu kilka urządzeń może być połączonych poprzez wejście i wyjście złącza
zasilania. Podłącz w rzędzie maksymalnie cztery jednostki (jeśli używasz zasilania 230V/16A). Użyj zatwierdzonego, trzy-żyłowego kabla o przekroju co
najmniej 1.5 mm². Należy przestrzegać instrukcji montażu producenta i oznaczenia kolorami kabla. Nie wyłączaj urządzenia poprzez odkręcanie złącza
zasilania, ale użyj włącznika/wyłącznika zasilania lub schuko!
Zawsze podłączaj urządzenie do zabezpieczonego obwodu (wyłącznik lub bezpiecznik). Upewnij się, że urządzenie ma
odpowiednie uziemienie elektryczne, aby uniknąć ryzyka porażenia prądem lub pożaru.
Oprawa powinna być ustawiona na stabilnej i równej powierzchni. Za pomocą elementów mocujących płyty podstawowej, urządzenie można również
zamontować do góry nogami do kratownicy, patrz poniższy rysunek. Do zamocowania wymagane są certyfikowane zaciski o prawidłowym obciążeniu
roboczym. Zgodnie z rysunkiem, śruby szybkiego blokowania wsporników omega są umieszczane w otworach przewidzianych w płycie podstawy i
obracane zgodnie z ruchem wskazówek zegara aż do zablokowania (do zatrzymania). Miejsce montażu musi mieć wystarczającą stabilność i być w stanie
utrzymać ciężar 10-krotności wagi urządzenia. Zabezpiecz urządzenie za pomocą linki zabezpieczającej, aby nie spadło.
Podczas wykonywania jakiejkolwiek instalacji należy zawsze przestrzegać europejskich i krajowych wytycznych dotyczących olinowania, wiązarów i
wszystkich innych kwestii związanych z bezpieczeństwem. Zawsze pozwól, aby instalacja została sprawdzona przez autoryzowanego dealera!

Jeśli używasz standardowego kontrolera DMX, możesz podłączyć wyjście DMX kontrolera bezpośrednio do wejścia DMX pierwszego urządzenia w
łańcuchu DMX. Zawsze podłącz wyjście jednego urządzenia do wejścia następnego urządzenia, aż wszystkie urządzenia zostaną podłączone.
Na ostatnim urządzeniu musisz mieć linię DMX z rezystorem końcowym. Weź złącze XLR i przylutuj rezystor 120 Ohm między sygnałem
(-) a sygnałem (+) i podłącz go do wyjścia DMX ostatniego urządzenia w linii.
Urządzenie może komunikować się za pomocą RDM (Remote Device Management) poprzez DMX512 Artnet. RDM jest dwukierunkowym protokołem
komunikacyjnym do użytku w systemach sterowania DMX512, jest to otwarty standard konfiguracji i monitorowania stanu DMX512.
Protokół RDM umożliwia wkładanie pakietów danych do linii DMX512 bez wpływu na istniejące urządzenia nie należące do DMX512. System umożliwia
kontrolerowi lub specjalnemu kontrolerowi RDM wysyłanie i odbieranie poleceń z określonych urządzeń.
Funkcja RDM umożliwia na przykład zdalne ustawienie adresu startowego DMX urządzenia. Jest to szczególnie przydatne, gdy urządzenie jest
zainstalowane w niedostępnym miejscu. Każde urządzenie posiada RDM UID (unikalny numer identyfikacyjny).

Nagromadzenie kurzu, brudu i innych cząstek unoszących się w powietrzu zmniejszy moc świetlną urządzenia. Uniemożliwi to również prawidłowe
chłodzenie urządzenia, co skróci żywotność urządzenia. Szybkość gromadzenia się zanieczyszczeń będzie się różnić w zależności od czynników
środowiskowych, takich jak pył unoszący się w powietrzu, użycie maszyn do dymu, przepływ powietrza z systemów wentylacyjnych itp. Wentylatory
chłodzące urządzenia przyspieszą gromadzenie się, a wszelkie cząstki dymu obecne w atmosferze zwiększą tendencję aby brud się zatkał.
Aby uzyskać najlepszą wydajność i żywotność urządzenia, należy go regularnie sprawdzać i czyścić, gdy tylko pojawią się oznaki gromadzenia się brudu.
Oceniaj środowisko operacyjne za każdym razem, gdy zaczniesz korzystać z urządzenia. W warunkach dużego zapylenia lub zadymienia, sprawdzaj
urządzenie po kilku godzinach i sprawdzaj często, czy urządzenie może przyciągnąć brud szybciej, niż się spodziewasz. Sporządź harmonogram
czyszczenia, który zapewni, że brud zostanie usunięty, zanim zacznie się gromadzić.
Skorzystaj z następujących wskazówek:
• Odłącz urządzenie od zasilania i pozwól mu całkowicie ostygnąć przed czyszczeniem.
• Do czyszczenia urządzenia nie należy używać rozpuszczalników, materiałów ściernych ani żadnych innych agresywnych środków.
• Odkurz lub użyj sprężonego powietrza o niskim ciśnieniu, aby usunąć kurz i luźne cząsteczki z powierzchni i otworów wentylacyjnych. Zapobiegaj
obracaniu się łopatek wentylacyjnych przed skierowaniem odkurzacza lub strumienia powietrza do wentylatora, lub możesz obracać wentylator
zbyt szybko i go uszkodzić.
• Czyść elementy szklane wycierając delikatnie miękką, czystą, niestrzępiącą się szmatką zwilżoną słabym roztworem detergentu. Umieść roztwór na
szmatce, a nie na czyszczonej powierzchni. Unikaj tarcia szklanych powierzchni.
• Przed ponownym użyciem należy osuszyć urządzenie miękką, czystą, niestrzępiącą się szmatką lub sprężonym powietrzem pod niskim ciśnieniem.

Jeśli bezpiecznik jest uszkodzony, należy wymienić bezpiecznik tego samego rodzaju i wartości. Przed wymianą bezpiecznika odłącz przewód zasilający.
Procedura:
Krok 1: Otwórz uchwyt bezpiecznika na tylnym panelu za pomocą śrubokręta montażowego.
Krok 2: Usuń stary bezpiecznik z uchwytu bezpiecznika.
Krok 3: Zainstaluj nowy bezpiecznik w uchwycie bezpiecznika.
Krok 4: Wymień uchwyt bezpiecznika w obudowie.
Ta oprawa jest praktycznie bezobsługowa, ale powinieneś regularnie sprawdzać urządzenie pod kątem aspektów mechanicznych i elektrycznych.
Oceń środowisko pracy i ustal harmonogram inspekcji i czyszczenia zgodnie z poniższymi wytycznymi:
• Odłącz urządzenie od zasilania i pozwól mu całkowicie ostygnąć przed przystąpieniem do kontroli i czyszczenia.
• Sprawdź, czy wkręty i śruby użyte do montażu urządzenia są dobrze dokręcone i wolne od korozji.
• Sprawdzić obudowę, punkty mocowania i punkty instalacji, nie mogą wykazywać żadnych oznak deformacji, zużycia ani zmęczenia.
• Sprawdź mechanicznie poruszające się części, które nie mogą wykazywać oznak zużycia ani zmęczenia.
• Sprawdź kable zasilania elektrycznego i sygnałowego, nie mogą one wykazywać żadnych uszkodzeń ani zmęczenia.
• Do czyszczenia urządzenia nie należy używać rozpuszczalników, materiałów ściernych ani innych podobnych produktów.
• Przetrzyj urządzenie i wyczyść szklaną płytkę miękką, czystą, niepozostawiającą włókien ściereczką zwilżoną słabym roztworem czyszczącym.
Umieść roztwór na szmatce, a nie na czyszczonej powierzchni. Unikaj pocierania szklanych powierzchni.
• Przed ponownym włączeniem urządzenia osusz urządzenie, złącza i styki miękką, czystą, niestrzępiącą się szmatką lub sprężonym powietrzem
o niskim ciśnieniu.

Poniższa lista kontrolna może pomóc w rozwiązaniu problemu w mało prawdopodobnym przypadku wystąpienia problemu podczas korzystania z
produktu:
Ż
Ł
Brak odpowiedzi z urządzenia.
Brak zasilania urządzenia.
Sprawdź, czy zasilanie jest włączone.
Sprawdź kable i połączenia.
Przepalony bezpiecznik lub błąd
wewnętrzny.
Wymienić średni bezpiecznik lub skontaktować się z
pomocą techniczną Beamz lub autoryzowanym partnerem
serwisowym Beamz. Nie zdejmuj osłon podstawy lub
jarzma. Nie należy wymieniać bezpieczników ani
przeprowadzać napraw lub usług, które nie są opisane w
niniejszej instrukcji obsługi, chyba że posiadasz autoryzację
od Beamz lub autoryzowanego partnera serwisowego
Beamz.
Urządzenie resetuje się prawidłowo, ale
nie reaguje (lub nie reaguje poprawnie)
na kontroler.
Kontroler nie jest podłączony.
Podłącz kontroler.
Zła linia DMX.
Sprawdź połączenia i kable. Popraw nieprawidłowe
połączenia. Napraw lub wymień uszkodzone kable.
Linia DMX nie ma oporności końcowej.
Włóż wtyczkę terminatora DMX do gniazda wyjścia danych
ostatniego urządzenia na linii DMX.
Niepoprawne adresowanie urządzeń.
Sprawdź adres urządzenia i ustawienia trybu DMX.
Urządzenie jest wadliwe i zakłóca
transmisję danych na linii DMX.
Odłącz złącza DMX IN i OUT i podłącz je bezpośrednio, aby
ominąć jedno urządzenie naraz, aż do odzyskania normalnej
pracy. Zlecić wadliwe urządzenie serwisowe
upoważnionemu technikowi.
Pin 2 i 3 są odwrócone w połączeniu XLR.
Sprawdź połączenia i kable. Zamontuj kabel zmiany fazy
pomiędzy urządzeniami lub sworzniem zamieniającym 2 i 3
w urządzeniu, które zachowuje się chaotycznie.
Błąd po zresetowaniu urządzenia.
Efekt wymaga mechanicznej regulacji.
Sprawdź wersję oprogramowania i komunikaty o błędach
urządzenia, aby uzyskać więcej informacji. Skontaktuj się z
Beamz lub autoryzowanym partnerem serwisowym Beamz.
Strumień świetlny odcina się z
przerwami.
Urządzenie zbyt gorące.
Pozwól urządzeniu ostygnąć. Zmniejsz temperaturę
otoczenia. Zapewnij swobodny przepływ powietrza wokół
oprawy. W razie potrzeby wyczyść urządzenie.
Diody LED uszkodzone.
Odłącz urządzenie i skontaktuj się z pomocą techniczną
Beamz lub autoryzowanym partnerem serwisowym Beamz.
Ustawienia zasilania nie
pasuje do lokalnego napięcia
przemiennego i częstotliwości.
Odłącz urządzenie. Sprawdź ustawienia i
poprawić w razie potrzeby.

DMX Address
A001-Axxx
DMX address setting
Channel Mode
26CH
26 Channel
38CH
38 Channel
102CH
102 Channel
114CH
114 Channel
Auto Run
Program 1~8
Master/Alone
Auto Run
Music Run
Program 1~8
Master/Alone
Sound Control
Reset Default
Yes
Reset Default
Signal Set
Wire DMX
Wire DMX
Reverse Pan
(On/Off)
Reverse Pan
Reverse Tilt
(On/Off)
Reverse Tilt
Select Pan
630° /540° /360°
Select Pan
Select Tilt
270° /180° /90°
Select Tilt
Mic Sensitivity
0-99%
Mic Sensitivity
Off Signal Mode
(On/Off)
Off at Original Status ON at Reset Status when no DMX signal
Scan Quick Mode
(On/Off)
Scan quick mode
Theater Mode
(On/Off)
Fan silent mode
Reset
Total reset
Reset All
Scan reset
Reset Scan
Zoom reset
Reset Zoom
Channel
Pan=XXX……
Channel control
Calibration
UID Code
Pan=XXX……
XX XX XX XX XX
Calibration
UID Code Setting
*Function description of special buttons: Press the UP and DOWN buttons at the same time, hold for 3 seconds,
the display direction will be reversed.

114CH
102CH
38CH
26CH
1
1
1
1
Pan
000-255
Pan movement
2
2
2
2
Pan-Fine
000-255
Fine control of Pan movement
3
3
3
3
Tilt
000-255
Tilt movement
4
4
4
4
Tilt-Fine
000-255
Fine control of Tilt movement
5
5
5
5
Speed Pan/Tilt
000-225
Max to min speed
225-236
Blackout by movement
236-255
No function
6
6
6
6
Dimmer
000-255
Dimmer 0%-100%
7
7
7
7
Shutter
000-031
Shutter closed
032-063
shutter open
064-095
Strobe effect slow to fast
096-127
shutter open
128-159
Pulse-effect in sequences slow to fast
160-191
shutter open
192-223
Random strobe effect slow to fast
224-255
shutter open
8
8
8
8
Red
000-255
0-100% Red dimmer from dark to bright
9
9
9
9
Green
000-255
0-100% Green dimmer from dark to bright
10
10
10
10
Blue
000-255
0-100% Blue dimmer from dark to bright
11
11
11
11
White
000-255
0-100% White dimmer from dark to bright
12
12
12
12
Zoom
000-255
ln(near) to out(far)
13
13
13
13
Zoom Rotation
000-015
Zoom rotation stop
016-063
shake slow to fast(width by Zoom Angle)
064-156
Forwards rotation from fast to slow
157-162
Zoom rotation stop
163-255
Backwards rotation from slow to fast
14
14
14
14
Zoom Angle
000-255
Zoom Angle(0 °~60 )
15
15
15
15
Virtual Color
000-000
No Function
001-013
Red
014-027
Green
028-041
Blue
042- 055
White
056-069
Red+White
070-083
Green+White
084-097
Blue+White
098-111
Green+Blue
112-125
Red+Blue
126-139
Red+Green
140-153
Green+Blue+White
154-167
Red+Blue+White
168-181
Red+Green+White
182-195
Red+Blue+Green+White
196-202
2700K
203-209
3200K
210-216
3500K
217-223
5000K
224-230
5500K
231-237
6000K
238-244
6500K

245-251
7000K
252-255
8000K
16
16
16
16
Color Temp
000-015
No Function
016-045
Below 3200K
046-075
3200K - 3500K
076-105
3500K - 5000K
106-135
5000K - 5500K
136-165
5500K - 6000K
166-195
6000K - 6500K
196-225
6500K - 7000K
226-255
7000K - 8000K
17
17
17
17
Visual Tungsten Lamp
000-015
No function
016-255
Tungsten lamp effect is gradually enhanced
18
18
Background color for
patterns. Choose
Foreground color for
Dynamic/Static Scene,
no function for
Multicolor Scene
000-000
No Function
001-013
Red
014-027
Green
028-041
Blue
042-055
White
056-069
Red+White
070-083
Green+White
084-097
Blue+White
098-111
Green+Blue
112-125
Red+Blue
126-139
Red+Green
140-153
Green+Blue+White
154-167
Red+Blue+White
168-181
Red+Green+White
182-195
Red+Blue+Green+White
196-202
2700K
203-209
3200K
210-216
3500K
217-223
5000K
224-230
5500K
231-237
6000K
238-244
6500K
245-251
7000K
252-255
8000K
19
19
Foreground Dimmer
000-255
Foreground dimmer 0 - 100%.
20
20
Background color for
patterns. Choose
Foreground color for
Dynamic/Static Scene,
no function for
Multicolor Scene
000-000
No Function
001-013
Red
014-027
Green
028-041
Blue
042-055
White
056-069
Red+White
070-083
Green+White
084-097
Blue+White
098-111
Green+Blue
112-125
Red+Blue
126-139
Red+Green
140-153
Green+Blue+White
154-167
Red+Blue+White
168-181
Red+Green+White

182-195
Red+Blue+Green+White
196-202
2700K
203-209
3200K
210-216
3500K
217-223
5000K
224-230
5500K
231-237
6000K
238-244
6500K
245-251
7000K
252-255
8000K
21
21
Background dimmer
000-255
Background dimmer 0 - 100%.
22
22
Patterns
000-015
No function
016-031
Static patterns
032-036
Dynamic Scene1
037-041
Dynamic Scene2
042-046
Dynamic Scene3
047-051
Dynamic Scene4
052-056
Dynamic Scene5
057-061
Dynamic Scene6
062-066
Dynamic Scene7
067-071
Dynamic Scene8
072-076
Dynamic Scene9
077-081
Dynamic Scene10
082-086
Dynamic Scene11
087-091
Dynamic Scene12
092-096
Dynamic Scene13
097-101
Dynamic Scene14
102.106
Dynamic Scene15
107-111
Dynamic Scene16
112-116
Dynamic Scene17
117-121
Dynamic Scene18
122-126
Dynamic Scene19
127-131
Dynamic Scene20
132-136
Dynamic Scene21
137-141
Dynamic Scene22
142-146
Dynamic Scene23
147-151
Dynamic Scene24
152-156
Dynamic Scene25
157-161
Dynamic Scene26
162-166
Dynamic Scene27
167-171
Dynamic Scene28
172-176
Dynamic Scene29
177-181
Dynamic Scene30
182-186
Dynamic Scene31
187-191
Dynamic Scene32
192-196
Multicolor Dynamic Scene1
197-201
Multicolor Dynamic Scene2
202-206
Multicolor Dynamic Scene3
207-211
Multicolor Dynamic Scene4
212-216
Multicolor Dynamic Scene5
217-221
Multicolor Dynamic Scene6
222-226
Multicolor Dynamic Scene7

227-231
Multicolor Dynamic Scene8
232-236
Multicolor Dynamic Scene9
237-241
Multicolor Dynamic Scene10
242-246
Multicolor Dynamic Scene11
247-251
Multicolor Dynamic Scene12
252-255
Multicolor Dynamic Scene13
23
23
Static patterns or patterns speed.
Static patterns (If patterns channel is in the interval 016-031)
000-005
Static scene1
006-011
Static scene2
012-017
Static scene3
018-023
Static scene4
024-029
Static scene5
030-035
Static scene6
036-041
Static scene7
042-047
Static scene8
048-053
Static scene9
054-059
Static scene10
060-065
Static scene11
066-071
Static scene12
072-075
Static scene13
078-083
Static scene14
084-089
Static scene15
090-095
Static scene16
096-101
Static scene17
102-107
Static scene18
108-113
Static scene19
114-119
Static scene20
120-125
Static scene21
126-131
Static scene22
132-137
Static scene23
138-143
Static scene24
144-149
Static scene25
150-155
Static scene26
156-161
Static scene27
162-167
Static scene28
168-173
Static scene29
174-179
Static scene30
180-185
Static scene31
186-191
Static scene32
192-197
Multicolor Static scene1
198-203
Multicolor Static scene2
204-209
Multicolor Static scene3
210-215
Multicolor Static scene4
216-221
Multicolor Static scene5
222-227
Multicolor Static scene6
228-233
Multicolor Static scene7
234-239
Multicolor Static scene8
240-245
Multicolor Static scene9
246-251
Multicolor Static scene10
252-255
Multicolor Static scene11

Dynamics patterns
(lf Patterns channel is in the interval 032 - 255)
000-023
No function
024-137
Forward speed from zero speed to fast speed
138-141
Stop movement
142-255
Reverse speed from zero speed to fast speed
24
18
24
18
Pix _Dimmer
000-255
Pix_Dimmer 0%-100%
25
19
25
19
Pix _Strobe
000-255
Pix_Strobe Speed 0%-100%
26
20
26
20
Pix _Red
000-255
0-100% Pix_Red dimmer from dark to bright
27
21
27
21
Pix _Green
000-255
0-100% Pix_Green dimmer from dark to bright
28
22
28
22
Pix _Blue
000-255
0-100% Pix_Blue dimmer from dark to bright
29
23
29
23
Pix _Color
000-000
No Function
001-015
Red
016-031
Green
032-047
Blue
048-063
Red+Blue
064-079
Red+Green
080-095
Green+Blue
096-111
Red+Blue+Green
112-127
2700K
128-143
3200K
144-159
3500K
160-175
S000K
176-191
5500K
192-207
6000K
208-223
6500K
224-239
7000K
240-255
8000K
30
24
30
24
Pix _Macro
000-015
No Function
016-029
Pix Dynamic Scene1
030-043
Pix Dynamic Scene2
044-057
Pix Dynamic Scene3
058-071
Pix Dynamic Scene4
072-085
Pix Dynamic Scene5
086-099
Pix Dynamic Scene6
100-113
Pix Dynamic Scene7
114-127
Pix Dynamic Scene8
128-143
Pix Dynamic Scene9
142-155
Pix Dynamic Scene1O
156-169
Pix Dynamic Scene11
170-183
Pix Dynamic Scene12
184-197
Pix Dynamic Scene13
198-211
Pix Dynamic Scene14
212-225
Pix Dynamic Scene15
226-239
Pix Dynamic Scene16
240-255
Pix Dynamic Scene17
31
25
31
25
Pix Macro Speed
000-255
Slow to fast
32
32
Expand Patterns
000-015
No Function
016-029
Pix Dynamic Scene1
030-043
Pix Dynamic Scene2
044-057
Pix Dynamic Scene3
058-071
Pix Dynamic Scene4

072-085
Pix Dynamic Scene5
086-099
Pix Dynamic Scene6
100-113
Pix Dynamic Scene7
114-127
Pix Dynamic Scene8
128-143
Pix Dynamic Scene9
142-155
Pix Dynamic Scene10
156-169
Pix Dynamic Scene11
170-183
Pix Dynamic Scene12
184-197
Pix Dynamic Scene13
198-211
Pix Dynamic Scene14
212-225
Pix Dynamic Scene15
226-239
Pix Dynamic Scene16
240-255
Pix Dynamic Scene17
33
33
Pix_Foreground dimmer
000-255
Pix_Expand Patterns Foreground dimmer 0- 100%.
(Foreground Color Share with "Pix_Macro"Channel)
34
34
Pix_Background dimmer
000-255
Pix_Expand Patterns Background dimmer O - 100%
35
35
Pix_Background Red
000-255
Pix_Expand Patterns Background Red( 0 - 100%)
36
36
Pix_Background Green
000-255
Pix_Expand Patterns Background Green (0 - 100%)
37
37
Pix_Background Blue
000-255
Pix_Expand Patterns Background Blue( 0- 100%)
38
26
Red in Pixel 1
000-255
Red in pixel 1 saturation control (0-100%)
39
27
Green in Pixel 1
000-255
Green in pixel 1 saturation control (0-100%)
40
28
Blue in Pixel 1
000-255
Blue in pixel 1 saturation control(0-100%)
41
29
White in pixel 1
000-255
White in pixel 1 saturation control(0-100%)
42
30
Red in pixel 2
000-255
Red in pixel 2 saturation control(0-100%)
43
31
Green in pixel 2
000-255
Green in pixel 2 saturation control(0-100%)
44
32
Blue in pixel 2
000-255
Blue in pixel 2 saturation control(0-100%)
45
33
White in pixel 2
000-255
White in pixel 2 saturation control(0-100%)
46
34
Red in Pixel 3
000-255
Red in pixel 3 saturation control (0-100%)
47
35
Green in pixel 3
000-255
Green in pixel 3 saturation control(0-100%
48
36
Blue in pixel 3
000-255
Blue in pixel 3 saturation control(0-100%)
49
37
White in pixel 3
000-255
White in pixel 3 saturation control(0-100%)
50
38
Red in Pixel 4
000-255
Red in pixel 4 saturation control (0-100%)
51
39
Green in pixel 4
000-255
Green in pixel 4 saturation control(0-100%)
52
40
Blue in pixel 4
000-255
Blue in pixel 4 saturation control(0-100%)
53
41
White in pixel 4
000-255
White in pixel 4 saturation control(0-100%)
54
42
Red in Pixel 5
000-255
Red in pixel 5 saturation control (0-100%)
55
43
Green in pixel 5
000-255
Green in pixel 5 saturation control(0-100%)
56
44
Blue in pixel 5
000-255
Blue in pixel 5 saturation control(0-100%)
57
45
White in pixel 5
000-255
White in pixel 5 saturation control(0-100%)
58
46
Red in Pixel 6
000-255
Red in pixel 6 saturation control (0-100%)
59
47
Green in pixel 6
000-255
Green in pixel 6 saturation control(0-100%)
60
48
Blue in pixel 6
000-255
Blue in pixel 6 saturation control(0-100%)
61
49
White in pixel 6
000-255
White in pixel 6 saturation control(0-100%)
62
50
Red in Pixel 7
000-255
Red in pixel 7 saturation control (0-100%)
63
51
Green in pixel 7
000-255
Green in pixel 7 saturation control(0-100%)
64
52
Blue in pixel 7
000-255
Blue in pixel 7 saturation control(0-100%)
65
53
White in pixel 7
000-255
White in pixel 7 saturation control(0-100%)
66
54
Red in Pixel 8
000-255
Red in pixel 8 saturation control (0-100%)
67
55
Green in Pixel 8
000-255
Green in pixel 8 saturation control (0-100%)
68
56
Blue in Pixel 8
000-255
Blue in pixel 8 saturation control(0-100%)
69
57
White in pixel 8
000-255
White in pixel 8 saturation control(0-100%)
70
58
Red in pixel 9
000-255
Red in pixel 9 saturation control(0-100%)

71
59
Green in pixel 9
000-255
Green in pixel 9 saturation control(0-100%)
72
60
Blue in pixel 9
000-255
Blue in pixel 9 saturation control(0-100%)
73
61
White in pixel 9
000-255
White in pixel 9 saturation control(0-100%)
74
62
Red in Pixel 10
000-255
Red in pixel 10 saturation control (0-100%)
75
63
Green in pixel 10
000-255
Green in pixel 10 saturation control(0-100%
76
64
Blue in pixel 10
000-255
Blue in pixel 10 saturation control(0-100%)
77
65
White in pixel 10
000-255
White in pixel 10 saturation control(0-100%)
78
66
Red in Pixel 11
000-255
Red in pixel 11 saturation control (0-100%)
79
67
Green in Pixel 11
000-255
Green in pixel 11 saturation control (0-100%)
80
68
Blue in Pixel 11
000-255
Blue in pixel 11 saturation control(0-100%)
81
69
White in pixel 11
000-255
White in pixel 11 saturation control(0-100%)
82
70
Red in pixel 12
000-255
Red in pixel 12 saturation control(0-100%)
83
71
Green in pixel 12
000-255
Green in pixel 12 saturation control(0-100%)
84
72
Blue in pixel 12
000-255
Blue in pixel 12 saturation control(0-100%)
85
73
White in pixel 12
000-255
White in pixel 12 saturation control(0-100%)
86
74
Red in Pixel 13
000-255
Red in pixel 13 saturation control (0-100%)
87
75
Green in pixel 13
000-255
Green in pixel 13 saturation control(0-100%
88
76
Blue in pixel 13
000-255
Blue in pixel 13 saturation control(0-100%)
89
77
White in pixel 13
000-255
White in pixel 13 saturation control(0-100%)
90
78
Red in Pixel 14
000-255
Red in pixel 14 saturation control (0-100%)
91
79
Green in pixel 14
000-255
Green in pixel 14 saturation control(0-100%)
92
80
Blue in pixel 14
000-255
Blue in pixel 14 saturation control(0-100%)
93
81
White in pixel 14
000-255
White in pixel 14 saturation control(0-100%)
94
82
Red in Pixel 15
000-255
Red in pixel 15 saturation control (0-100%)
95
83
Green in pixel 15
000-255
Green in pixel 15 saturation control(0-100%)
96
84
Blue in pixel 15
000-255
Blue in pixel 15 saturation control(0-100%)
97
85
White in pixel 15
000-255
White in pixel 15 saturation control(0-100%)
98
86
Red in Pixel 16
000-255
Red in pixel 16 saturation control (0-100%)
99
87
Green in pixel 16
000-255
Green in pixel 16 saturation control(0-100%)
100
88
Blue in pixel 16
000-255
Blue in pixel 16 saturation control(0-100%)
101
89
White in pixel 16
000-255
White in pixel 16 saturation control(0-100%)
102
90
Red in Pixel 17
000-255
Red in pixel 17 saturation control (0-100%)
103
91
Green in pixel 17
000-255
Green in pixel 17 saturation control(0-100%)
104
92
Blue in pixel 17
000-255
Blue in pixel 17 saturation control(0-100%)
105
93
White in pixel 17
000-255
White in pixel 17 saturation control(0-100%)
106
94
Red in Pixel 18
000-255
Red in pixel 18 saturation control (0-100%)
107
95
Green in Pixel 18
000-255
Green in pixel 18 saturation control (0-100%)
108
96
Blue in Pixel 18
000-255
Blue in pixel 18 saturation control(0-100%)
109
97
White in pixel 18
000-255
White in pixel 18 saturation control(0-100%)
110
98
Red in pixel 19
000-255
Red in pixel 19 saturation control(0-100%)
111
99
Green in pixel 19
000-255
Green in pixel 19 saturation control(0-100%)
112
100
Blue in pixel 19
000-255
Blue in pixel 19 saturation control(0-100%)
113
101
White in pixel 19
000-255
White in pixel 19 saturation control(0-100%)
114
102
38
26
Special Function
000-019
No function
020-029
No function
030-039
No function
040-079
No function
080-089
AlI Motor reset
090-094
SCAN Motor Reset
095-099
Focus Motor Reset
100-119
lnternal program 1
120-139
lnternal program 2

140-159
lnternal program 3
160-179
lnternal program 4
180-199
lnternal program 5
200-219
lnternal program 6
220-239
lnternal program 7
240-255
lnternal Sound program 1

Colour temperature 2700K - 8000K
Light source 4-in-1 LED
LED colours Red, Green, Blue, White
LED power 40
Quantity of LEDs 19
Beam angle: Min 6°
Beam angle: Max 60°
Zoom Yes
Illuminance 94.960 lx @ 1m
Head movement: Pan 540°
Head movement: Tilt 270°
Flash rate per second 1 - 25Hz
Modes Automatic programs, DMX, Master/Slave
Sound to light mode Yes
DMX channels 26, 38, 102, 114
DMX connector 3-pin and 5-pin XLR
Display LCD
IP rating IP20
Cooling Temperature controlled fan
Power plug Power-connector
Power consumption 2.97A
Power supply 220-240VAC 50Hz
Dimensions (L x W x H) 405 x 405 x 412mm
Weight 16,15kg
Accessories DMX cable, Mounting bracket, Power cable, Safety cord
Design and product specifications are subject to change without prior notice.
The products referred to in this manual conform to the European Community Directives to which they are subject:
European Union
United Kingdom
Tronios B.V.,
Bedrijvenpark Twente Noord 18,
7602KR Almelo, The Netherlands
Tronios Ltd.,
130 Harley Street,
London W1G 7JU, United Kingdom
2014/35/EU
S.I. 2016:1101
2014/30/EU
S.I. 2016:1091
2011/65/EC
S.I. 2012:3032

. . . . . . . . . . . . . . . . . . . . . . . . . . . . . . . . . . . . . . . . . . . . . . . . . . . . . . . . . . . . . . . . . . . . . . . . . . . . . . . . . . . . . . . . . . . . . . . . . . . . . . . . . . . . . . . . . . . . . . . . . . . . . . . . . . . . . . . . . . . . . . . . . . . . . . .
. . . . . . . . . . . . . . . . . . . . . . . . . . . . . . . . . . . . . . . . . . . . . . . . . . . . . . . . . . . . . . . . . . . . . . . . . . . . . . . . . . . . . . . . . . . . . . . . . . . . . . . . . . . . . . . . . . . . . . . . . . . . . . . . . . . . . . . . . . . . . . . . . . . . . . .
. . . . . . . . . . . . . . . . . . . . . . . . . . . . . . . . . . . . . . . . . . . . . . . . . . . . . . . . . . . . . . . . . . . . . . . . . . . . . . . . . . . . . . . . . . . . . . . . . . . . . . . . . . . . . . . . . . . . . . . . . . . . . . . . . . . . . . . . . . . . . . . . . . . . . . .
. . . . . . . . . . . . . . . . . . . . . . . . . . . . . . . . . . . . . . . . . . . . . . . . . . . . . . . . . . . . . . . . . . . . . . . . . . . . . . . . . . . . . . . . . . . . . . . . . . . . . . . . . . . . . . . . . . . . . . . . . . . . . . . . . . . . . . . . . . . . . . . . . . . . . . .
. . . . . . . . . . . . . . . . . . . . . . . . . . . . . . . . . . . . . . . . . . . . . . . . . . . . . . . . . . . . . . . . . . . . . . . . . . . . . . . . . . . . . . . . . . . . . . . . . . . . . . . . . . . . . . . . . . . . . . . . . . . . . . . . . . . . . . . . . . . . . . . . . . . . . . .
. . . . . . . . . . . . . . . . . . . . . . . . . . . . . . . . . . . . . . . . . . . . . . . . . . . . . . . . . . . . . . . . . . . . . . . . . . . . . . . . . . . . . . . . . . . . . . . . . . . . . . . . . . . . . . . . . . . . . . . . . . . . . . . . . . . . . . . . . . . . . . . . . . . . . . .
. . . . . . . . . . . . . . . . . . . . . . . . . . . . . . . . . . . . . . . . . . . . . . . . . . . . . . . . . . . . . . . . . . . . . . . . . . . . . . . . . . . . . . . . . . . . . . . . . . . . . . . . . . . . . . . . . . . . . . . . . . . . . . . . . . . . . . . . . . . . . . . . . . . . . . .
. . . . . . . . . . . . . . . . . . . . . . . . . . . . . . . . . . . . . . . . . . . . . . . . . . . . . . . . . . . . . . . . . . . . . . . . . . . . . . . . . . . . . . . . . . . . . . . . . . . . . . . . . . . . . . . . . . . . . . . . . . . . . . . . . . . . . . . . . . . . . . . . . . . . . . .
. . . . . . . . . . . . . . . . . . . . . . . . . . . . . . . . . . . . . . . . . . . . . . . . . . . . . . . . . . . . . . . . . . . . . . . . . . . . . . . . . . . . . . . . . . . . . . . . . . . . . . . . . . . . . . . . . . . . . . . . . . . . . . . . . . . . . . . . . . . . . . . . . . . . . . .
. . . . . . . . . . . . . . . . . . . . . . . . . . . . . . . . . . . . . . . . . . . . . . . . . . . . . . . . . . . . . . . . . . . . . . . . . . . . . . . . . . . . . . . . . . . . . . . . . . . . . . . . . . . . . . . . . . . . . . . . . . . . . . . . . . . . . . . . . . . . . . . . . . . . . . .
. . . . . . . . . . . . . . . . . . . . . . . . . . . . . . . . . . . . . . . . . . . . . . . . . . . . . . . . . . . . . . . . . . . . . . . . . . . . . . . . . . . . . . . . . . . . . . . . . . . . . . . . . . . . . . . . . . . . . . . . . . . . . . . . . . . . . . . . . . . . . . . . . . . . . . .
. . . . . . . . . . . . . . . . . . . . . . . . . . . . . . . . . . . . . . . . . . . . . . . . . . . . . . . . . . . . . . . . . . . . . . . . . . . . . . . . . . . . . . . . . . . . . . . . . . . . . . . . . . . . . . . . . . . . . . . . . . . . . . . . . . . . . . . . . . . . . . . . . . . . . . .
. . . . . . . . . . . . . . . . . . . . . . . . . . . . . . . . . . . . . . . . . . . . . . . . . . . . . . . . . . . . . . . . . . . . . . . . . . . . . . . . . . . . . . . . . . . . . . . . . . . . . . . . . . . . . . . . . . . . . . . . . . . . . . . . . . . . . . . . . . . . . . . . . . . . . . .
. . . . . . . . . . . . . . . . . . . . . . . . . . . . . . . . . . . . . . . . . . . . . . . . . . . . . . . . . . . . . . . . . . . . . . . . . . . . . . . . . . . . . . . . . . . . . . . . . . . . . . . . . . . . . . . . . . . . . . . . . . . . . . . . . . . . . . . . . . . . . . . . . . . . . . .
. . . . . . . . . . . . . . . . . . . . . . . . . . . . . . . . . . . . . . . . . . . . . . . . . . . . . . . . . . . . . . . . . . . . . . . . . . . . . . . . . . . . . . . . . . . . . . . . . . . . . . . . . . . . . . . . . . . . . . . . . . . . . . . . . . . . . . . . . . . . . . . . . . . . . . .
. . . . . . . . . . . . . . . . . . . . . . . . . . . . . . . . . . . . . . . . . . . . . . . . . . . . . . . . . . . . . . . . . . . . . . . . . . . . . . . . . . . . . . . . . . . . . . . . . . . . . . . . . . . . . . . . . . . . . . . . . . . . . . . . . . . . . . . . . . . . . . . . . . . . . . .
. . . . . . . . . . . . . . . . . . . . . . . . . . . . . . . . . . . . . . . . . . . . . . . . . . . . . . . . . . . . . . . . . . . . . . . . . . . . . . . . . . . . . . . . . . . . . . . . . . . . . . . . . . . . . . . . . . . . . . . . . . . . . . . . . . . . . . . . . . . . . . . . . . . . . . .
. . . . . . . . . . . . . . . . . . . . . . . . . . . . . . . . . . . . . . . . . . . . . . . . . . . . . . . . . . . . . . . . . . . . . . . . . . . . . . . . . . . . . . . . . . . . . . . . . . . . . . . . . . . . . . . . . . . . . . . . . . . . . . . . . . . . . . . . . . . . . . . . . . . . . . .
. . . . . . . . . . . . . . . . . . . . . . . . . . . . . . . . . . . . . . . . . . . . . . . . . . . . . . . . . . . . . . . . . . . . . . . . . . . . . . . . . . . . . . . . . . . . . . . . . . . . . . . . . . . . . . . . . . . . . . . . . . . . . . . . . . . . . . . . . . . . . . . . . . . . . . .
. . . . . . . . . . . . . . . . . . . . . . . . . . . . . . . . . . . . . . . . . . . . . . . . . . . . . . . . . . . . . . . . . . . . . . . . . . . . . . . . . . . . . . . . . . . . . . . . . . . . . . . . . . . . . . . . . . . . . . . . . . . . . . . . . . . . . . . . . . . . . . . . . . . . . . .
. . . . . . . . . . . . . . . . . . . . . . . . . . . . . . . . . . . . . . . . . . . . . . . . . . . . . . . . . . . . . . . . . . . . . . . . . . . . . . . . . . . . . . . . . . . . . . . . . . . . . . . . . . . . . . . . . . . . . . . . . . . . . . . . . . . . . . . . . . . . . . . . . . . . . . .
. . . . . . . . . . . . . . . . . . . . . . . . . . . . . . . . . . . . . . . . . . . . . . . . . . . . . . . . . . . . . . . . . . . . . . . . . . . . . . . . . . . . . . . . . . . . . . . . . . . . . . . . . . . . . . . . . . . . . . . . . . . . . . . . . . . . . . . . . . . . . . . . . . . . . . .
. . . . . . . . . . . . . . . . . . . . . . . . . . . . . . . . . . . . . . . . . . . . . . . . . . . . . . . . . . . . . . . . . . . . . . . . . . . . . . . . . . . . . . . . . . . . . . . . . . . . . . . . . . . . . . . . . . . . . . . . . . . . . . . . . . . . . . . . . . . . . . . . . . . . . . .
. . . . . . . . . . . . . . . . . . . . . . . . . . . . . . . . . . . . . . . . . . . . . . . . . . . . . . . . . . . . . . . . . . . . . . . . . . . . . . . . . . . . . . . . . . . . . . . . . . . . . . . . . . . . . . . . . . . . . . . . . . . . . . . . . . . . . . . . . . . . . . . . . . . . . . .
. . . . . . . . . . . . . . . . . . . . . . . . . . . . . . . . . . . . . . . . . . . . . . . . . . . . . . . . . . . . . . . . . . . . . . . . . . . . . . . . . . . . . . . . . . . . . . . . . . . . . . . . . . . . . . . . . . . . . . . . . . . . . . . . . . . . . . . . . . . . . . . . . . . . . . .
. . . . . . . . . . . . . . . . . . . . . . . . . . . . . . . . . . . . . . . . . . . . . . . . . . . . . . . . . . . . . . . . . . . . . . . . . . . . . . . . . . . . . . . . . . . . . . . . . . . . . . . . . . . . . . . . . . . . . . . . . . . . . . . . . . . . . . . . . . . . . . . . . . . . . . .
. . . . . . . . . . . . . . . . . . . . . . . . . . . . . . . . . . . . . . . . . . . . . . . . . . . . . . . . . . . . . . . . . . . . . . . . . . . . . . . . . . . . . . . . . . . . . . . . . . . . . . . . . . . . . . . . . . . . . . . . . . . . . . . . . . . . . . . . . . . . . . . . . . . . . . .
. . . . . . . . . . . . . . . . . . . . . . . . . . . . . . . . . . . . . . . . . . . . . . . . . . . . . . . . . . . . . . . . . . . . . . . . . . . . . . . . . . . . . . . . . . . . . . . . . . . . . . . . . . . . . . . . . . . . . . . . . . . . . . . . . . . . . . . . . . . . . . . . . . . . . . .
. . . . . . . . . . . . . . . . . . . . . . . . . . . . . . . . . . . . . . . . . . . . . . . . . . . . . . . . . . . . . . . . . . . . . . . . . . . . . . . . . . . . . . . . . . . . . . . . . . . . . . . . . . . . . . . . . . . . . . . . . . . . . . . . . . . . . . . . . . . . . . . . . . . . . . .
. . . . . . . . . . . . . . . . . . . . . . . . . . . . . . . . . . . . . . . . . . . . . . . . . . . . . . . . . . . . . . . . . . . . . . . . . . . . . . . . . . . . . . . . . . . . . . . . . . . . . . . . . . . . . . . . . . . . . . . . . . . . . . . . . . . . . . . . . . . . . . . . . . . . . . .
. . . . . . . . . . . . . . . . . . . . . . . . . . . . . . . . . . . . . . . . . . . . . . . . . . . . . . . . . . . . . . . . . . . . . . . . . . . . . . . . . . . . . . . . . . . . . . . . . . . . . . . . . . . . . . . . . . . . . . . . . . . . . . . . . . . . . . . . . . . . . . . . . . . . . . .
. . . . . . . . . . . . . . . . . . . . . . . . . . . . . . . . . . . . . . . . . . . . . . . . . . . . . . . . . . . . . . . . . . . . . . . . . . . . . . . . . . . . . . . . . . . . . . . . . . . . . . . . . . . . . . . . . . . . . . . . . . . . . . . . . . . . . . . . . . . . . . . . . . . . . . .
. . . . . . . . . . . . . . . . . . . . . . . . . . . . . . . . . . . . . . . . . . . . . . . . . . . . . . . . . . . . . . . . . . . . . . . . . . . . . . . . . . . . . . . . . . . . . . . . . . . . . . . . . . . . . . . . . . . . . . . . . . . . . . . . . . . . . . . . . . . . . . . . . . . . . . .

. . . . . . . . . . . . . . . . . . . . . . . . . . . . . . . . . . . . . . . . . . . . . . . . . . . . . . . . . . . . . . . . . . . . . . . . . . . . . . . . . . . . . . . . . . . . . . . . . . . . . . . . . . . . . . . . . . . . . . . . . . . . . . . . . . . . . . . . . . . . . . . . . . . . . . .
. . . . . . . . . . . . . . . . . . . . . . . . . . . . . . . . . . . . . . . . . . . . . . . . . . . . . . . . . . . . . . . . . . . . . . . . . . . . . . . . . . . . . . . . . . . . . . . . . . . . . . . . . . . . . . . . . . . . . . . . . . . . . . . . . . . . . . . . . . . . . . . . . . . . . . .
. . . . . . . . . . . . . . . . . . . . . . . . . . . . . . . . . . . . . . . . . . . . . . . . . . . . . . . . . . . . . . . . . . . . . . . . . . . . . . . . . . . . . . . . . . . . . . . . . . . . . . . . . . . . . . . . . . . . . . . . . . . . . . . . . . . . . . . . . . . . . . . . . . . . . . .
. . . . . . . . . . . . . . . . . . . . . . . . . . . . . . . . . . . . . . . . . . . . . . . . . . . . . . . . . . . . . . . . . . . . . . . . . . . . . . . . . . . . . . . . . . . . . . . . . . . . . . . . . . . . . . . . . . . . . . . . . . . . . . . . . . . . . . . . . . . . . . . . . . . . . . .
. . . . . . . . . . . . . . . . . . . . . . . . . . . . . . . . . . . . . . . . . . . . . . . . . . . . . . . . . . . . . . . . . . . . . . . . . . . . . . . . . . . . . . . . . . . . . . . . . . . . . . . . . . . . . . . . . . . . . . . . . . . . . . . . . . . . . . . . . . . . . . . . . . . . . . .
. . . . . . . . . . . . . . . . . . . . . . . . . . . . . . . . . . . . . . . . . . . . . . . . . . . . . . . . . . . . . . . . . . . . . . . . . . . . . . . . . . . . . . . . . . . . . . . . . . . . . . . . . . . . . . . . . . . . . . . . . . . . . . . . . . . . . . . . . . . . . . . . . . . . . . .
. . . . . . . . . . . . . . . . . . . . . . . . . . . . . . . . . . . . . . . . . . . . . . . . . . . . . . . . . . . . . . . . . . . . . . . . . . . . . . . . . . . . . . . . . . . . . . . . . . . . . . . . . . . . . . . . . . . . . . . . . . . . . . . . . . . . . . . . . . . . . . . . . . . . . . .
. . . . . . . . . . . . . . . . . . . . . . . . . . . . . . . . . . . . . . . . . . . . . . . . . . . . . . . . . . . . . . . . . . . . . . . . . . . . . . . . . . . . . . . . . . . . . . . . . . . . . . . . . . . . . . . . . . . . . . . . . . . . . . . . . . . . . . . . . . . . . . . . . . . . . . .
. . . . . . . . . . . . . . . . . . . . . . . . . . . . . . . . . . . . . . . . . . . . . . . . . . . . . . . . . . . . . . . . . . . . . . . . . . . . . . . . . . . . . . . . . . . . . . . . . . . . . . . . . . . . . . . . . . . . . . . . . . . . . . . . . . . . . . . . . . . . . . . . . . . . . . .
. . . . . . . . . . . . . . . . . . . . . . . . . . . . . . . . . . . . . . . . . . . . . . . . . . . . . . . . . . . . . . . . . . . . . . . . . . . . . . . . . . . . . . . . . . . . . . . . . . . . . . . . . . . . . . . . . . . . . . . . . . . . . . . . . . . . . . . . . . . . . . . . . . . . . . .
. . . . . . . . . . . . . . . . . . . . . . . . . . . . . . . . . . . . . . . . . . . . . . . . . . . . . . . . . . . . . . . . . . . . . . . . . . . . . . . . . . . . . . . . . . . . . . . . . . . . . . . . . . . . . . . . . . . . . . . . . . . . . . . . . . . . . . . . . . . . . . . . . . . . . . .
. . . . . . . . . . . . . . . . . . . . . . . . . . . . . . . . . . . . . . . . . . . . . . . . . . . . . . . . . . . . . . . . . . . . . . . . . . . . . . . . . . . . . . . . . . . . . . . . . . . . . . . . . . . . . . . . . . . . . . . . . . . . . . . . . . . . . . . . . . . . . . . . . . . . . . .
. . . . . . . . . . . . . . . . . . . . . . . . . . . . . . . . . . . . . . . . . . . . . . . . . . . . . . . . . . . . . . . . . . . . . . . . . . . . . . . . . . . . . . . . . . . . . . . . . . . . . . . . . . . . . . . . . . . . . . . . . . . . . . . . . . . . . . . . . . . . . . . . . . . . . . .
. . . . . . . . . . . . . . . . . . . . . . . . . . . . . . . . . . . . . . . . . . . . . . . . . . . . . . . . . . . . . . . . . . . . . . . . . . . . . . . . . . . . . . . . . . . . . . . . . . . . . . . . . . . . . . . . . . . . . . . . . . . . . . . . . . . . . . . . . . . . . . . . . . . . . . .
. . . . . . . . . . . . . . . . . . . . . . . . . . . . . . . . . . . . . . . . . . . . . . . . . . . . . . . . . . . . . . . . . . . . . . . . . . . . . . . . . . . . . . . . . . . . . . . . . . . . . . . . . . . . . . . . . . . . . . . . . . . . . . . . . . . . . . . . . . . . . . . . . . . . . . .
. . . . . . . . . . . . . . . . . . . . . . . . . . . . . . . . . . . . . . . . . . . . . . . . . . . . . . . . . . . . . . . . . . . . . . . . . . . . . . . . . . . . . . . . . . . . . . . . . . . . . . . . . . . . . . . . . . . . . . . . . . . . . . . . . . . . . . . . . . . . . . . . . . . . . . .
. . . . . . . . . . . . . . . . . . . . . . . . . . . . . . . . . . . . . . . . . . . . . . . . . . . . . . . . . . . . . . . . . . . . . . . . . . . . . . . . . . . . . . . . . . . . . . . . . . . . . . . . . . . . . . . . . . . . . . . . . . . . . . . . . . . . . . . . . . . . . . . . . . . . . . .
. . . . . . . . . . . . . . . . . . . . . . . . . . . . . . . . . . . . . . . . . . . . . . . . . . . . . . . . . . . . . . . . . . . . . . . . . . . . . . . . . . . . . . . . . . . . . . . . . . . . . . . . . . . . . . . . . . . . . . . . . . . . . . . . . . . . . . . . . . . . . . . . . . . . . . .
. . . . . . . . . . . . . . . . . . . . . . . . . . . . . . . . . . . . . . . . . . . . . . . . . . . . . . . . . . . . . . . . . . . . . . . . . . . . . . . . . . . . . . . . . . . . . . . . . . . . . . . . . . . . . . . . . . . . . . . . . . . . . . . . . . . . . . . . . . . . . . . . . . . . . . .
. . . . . . . . . . . . . . . . . . . . . . . . . . . . . . . . . . . . . . . . . . . . . . . . . . . . . . . . . . . . . . . . . . . . . . . . . . . . . . . . . . . . . . . . . . . . . . . . . . . . . . . . . . . . . . . . . . . . . . . . . . . . . . . . . . . . . . . . . . . . . . . . . . . . . . .
. . . . . . . . . . . . . . . . . . . . . . . . . . . . . . . . . . . . . . . . . . . . . . . . . . . . . . . . . . . . . . . . . . . . . . . . . . . . . . . . . . . . . . . . . . . . . . . . . . . . . . . . . . . . . . . . . . . . . . . . . . . . . . . . . . . . . . . . . . . . . . . . . . . . . . .
. . . . . . . . . . . . . . . . . . . . . . . . . . . . . . . . . . . . . . . . . . . . . . . . . . . . . . . . . . . . . . . . . . . . . . . . . . . . . . . . . . . . . . . . . . . . . . . . . . . . . . . . . . . . . . . . . . . . . . . . . . . . . . . . . . . . . . . . . . . . . . . . . . . . . . .
. . . . . . . . . . . . . . . . . . . . . . . . . . . . . . . . . . . . . . . . . . . . . . . . . . . . . . . . . . . . . . . . . . . . . . . . . . . . . . . . . . . . . . . . . . . . . . . . . . . . . . . . . . . . . . . . . . . . . . . . . . . . . . . . . . . . . . . . . . . . . . . . . . . . . . .
. . . . . . . . . . . . . . . . . . . . . . . . . . . . . . . . . . . . . . . . . . . . . . . . . . . . . . . . . . . . . . . . . . . . . . . . . . . . . . . . . . . . . . . . . . . . . . . . . . . . . . . . . . . . . . . . . . . . . . . . . . . . . . . . . . . . . . . . . . . . . . . . . . . . . . .
. . . . . . . . . . . . . . . . . . . . . . . . . . . . . . . . . . . . . . . . . . . . . . . . . . . . . . . . . . . . . . . . . . . . . . . . . . . . . . . . . . . . . . . . . . . . . . . . . . . . . . . . . . . . . . . . . . . . . . . . . . . . . . . . . . . . . . . . . . . . . . . . . . . . . . .
. . . . . . . . . . . . . . . . . . . . . . . . . . . . . . . . . . . . . . . . . . . . . . . . . . . . . . . . . . . . . . . . . . . . . . . . . . . . . . . . . . . . . . . . . . . . . . . . . . . . . . . . . . . . . . . . . . . . . . . . . . . . . . . . . . . . . . . . . . . . . . . . . . . . . . .
. . . . . . . . . . . . . . . . . . . . . . . . . . . . . . . . . . . . . . . . . . . . . . . . . . . . . . . . . . . . . . . . . . . . . . . . . . . . . . . . . . . . . . . . . . . . . . . . . . . . . . . . . . . . . . . . . . . . . . . . . . . . . . . . . . . . . . . . . . . . . . . . . . . . . . .
. . . . . . . . . . . . . . . . . . . . . . . . . . . . . . . . . . . . . . . . . . . . . . . . . . . . . . . . . . . . . . . . . . . . . . . . . . . . . . . . . . . . . . . . . . . . . . . . . . . . . . . . . . . . . . . . . . . . . . . . . . . . . . . . . . . . . . . . . . . . . . . . . . . . . . .
. . . . . . . . . . . . . . . . . . . . . . . . . . . . . . . . . . . . . . . . . . . . . . . . . . . . . . . . . . . . . . . . . . . . . . . . . . . . . . . . . . . . . . . . . . . . . . . . . . . . . . . . . . . . . . . . . . . . . . . . . . . . . . . . . . . . . . . . . . . . . . . . . . . . . . .
. . . . . . . . . . . . . . . . . . . . . . . . . . . . . . . . . . . . . . . . . . . . . . . . . . . . . . . . . . . . . . . . . . . . . . . . . . . . . . . . . . . . . . . . . . . . . . . . . . . . . . . . . . . . . . . . . . . . . . . . . . . . . . . . . . . . . . . . . . . . . . . . . . . . . . .
. . . . . . . . . . . . . . . . . . . . . . . . . . . . . . . . . . . . . . . . . . . . . . . . . . . . . . . . . . . . . . . . . . . . . . . . . . . . . . . . . . . . . . . . . . . . . . . . . . . . . . . . . . . . . . . . . . . . . . . . . . . . . . . . . . . . . . . . . . . . . . . . . . . . . . .
. . . . . . . . . . . . . . . . . . . . . . . . . . . . . . . . . . . . . . . . . . . . . . . . . . . . . . . . . . . . . . . . . . . . . . . . . . . . . . . . . . . . . . . . . . . . . . . . . . . . . . . . . . . . . . . . . . . . . . . . . . . . . . . . . . . . . . . . . . . . . . . . . . . . . . .
. . . . . . . . . . . . . . . . . . . . . . . . . . . . . . . . . . . . . . . . . . . . . . . . . . . . . . . . . . . . . . . . . . . . . . . . . . . . . . . . . . . . . . . . . . . . . . . . . . . . . . . . . . . . . . . . . . . . . . . . . . . . . . . . . . . . . . . . . . . . . . . . . . . . . . .

. . . . . . . . . . . . . . . . . . . . . . . . . . . . . . . . . . . . . . . . . . . . . . . . . . . . . . . . . . . . . . . . . . . . . . . . . . . . . . . . . . . . . . . . . . . . . . . . . . . . . . . . . . . . . . . . . . . . . . . . . . . . . . . . . . . . . . . . . . . . . . . . . . . . . . .
. . . . . . . . . . . . . . . . . . . . . . . . . . . . . . . . . . . . . . . . . . . . . . . . . . . . . . . . . . . . . . . . . . . . . . . . . . . . . . . . . . . . . . . . . . . . . . . . . . . . . . . . . . . . . . . . . . . . . . . . . . . . . . . . . . . . . . . . . . . . . . . . . . . . . . .
. . . . . . . . . . . . . . . . . . . . . . . . . . . . . . . . . . . . . . . . . . . . . . . . . . . . . . . . . . . . . . . . . . . . . . . . . . . . . . . . . . . . . . . . . . . . . . . . . . . . . . . . . . . . . . . . . . . . . . . . . . . . . . . . . . . . . . . . . . . . . . . . . . . . . . .
. . . . . . . . . . . . . . . . . . . . . . . . . . . . . . . . . . . . . . . . . . . . . . . . . . . . . . . . . . . . . . . . . . . . . . . . . . . . . . . . . . . . . . . . . . . . . . . . . . . . . . . . . . . . . . . . . . . . . . . . . . . . . . . . . . . . . . . . . . . . . . . . . . . . . . .
. . . . . . . . . . . . . . . . . . . . . . . . . . . . . . . . . . . . . . . . . . . . . . . . . . . . . . . . . . . . . . . . . . . . . . . . . . . . . . . . . . . . . . . . . . . . . . . . . . . . . . . . . . . . . . . . . . . . . . . . . . . . . . . . . . . . . . . . . . . . . . . . . . . . . . .
. . . . . . . . . . . . . . . . . . . . . . . . . . . . . . . . . . . . . . . . . . . . . . . . . . . . . . . . . . . . . . . . . . . . . . . . . . . . . . . . . . . . . . . . . . . . . . . . . . . . . . . . . . . . . . . . . . . . . . . . . . . . . . . . . . . . . . . . . . . . . . . . . . . . . . .
. . . . . . . . . . . . . . . . . . . . . . . . . . . . . . . . . . . . . . . . . . . . . . . . . . . . . . . . . . . . . . . . . . . . . . . . . . . . . . . . . . . . . . . . . . . . . . . . . . . . . . . . . . . . . . . . . . . . . . . . . . . . . . . . . . . . . . . . . . . . . . . . . . . . . . .
. . . . . . . . . . . . . . . . . . . . . . . . . . . . . . . . . . . . . . . . . . . . . . . . . . . . . . . . . . . . . . . . . . . . . . . . . . . . . . . . . . . . . . . . . . . . . . . . . . . . . . . . . . . . . . . . . . . . . . . . . . . . . . . . . . . . . . . . . . . . . . . . . . . . . . .
. . . . . . . . . . . . . . . . . . . . . . . . . . . . . . . . . . . . . . . . . . . . . . . . . . . . . . . . . . . . . . . . . . . . . . . . . . . . . . . . . . . . . . . . . . . . . . . . . . . . . . . . . . . . . . . . . . . . . . . . . . . . . . . . . . . . . . . . . . . . . . . . . . . . . . .
. . . . . . . . . . . . . . . . . . . . . . . . . . . . . . . . . . . . . . . . . . . . . . . . . . . . . . . . . . . . . . . . . . . . . . . . . . . . . . . . . . . . . . . . . . . . . . . . . . . . . . . . . . . . . . . . . . . . . . . . . . . . . . . . . . . . . . . . . . . . . . . . . . . . . . .
. . . . . . . . . . . . . . . . . . . . . . . . . . . . . . . . . . . . . . . . . . . . . . . . . . . . . . . . . . . . . . . . . . . . . . . . . . . . . . . . . . . . . . . . . . . . . . . . . . . . . . . . . . . . . . . . . . . . . . . . . . . . . . . . . . . . . . . . . . . . . . . . . . . . . . .
. . . . . . . . . . . . . . . . . . . . . . . . . . . . . . . . . . . . . . . . . . . . . . . . . . . . . . . . . . . . . . . . . . . . . . . . . . . . . . . . . . . . . . . . . . . . . . . . . . . . . . . . . . . . . . . . . . . . . . . . . . . . . . . . . . . . . . . . . . . . . . . . . . . . . . .
. . . . . . . . . . . . . . . . . . . . . . . . . . . . . . . . . . . . . . . . . . . . . . . . . . . . . . . . . . . . . . . . . . . . . . . . . . . . . . . . . . . . . . . . . . . . . . . . . . . . . . . . . . . . . . . . . . . . . . . . . . . . . . . . . . . . . . . . . . . . . . . . . . . . . . .
. . . . . . . . . . . . . . . . . . . . . . . . . . . . . . . . . . . . . . . . . . . . . . . . . . . . . . . . . . . . . . . . . . . . . . . . . . . . . . . . . . . . . . . . . . . . . . . . . . . . . . . . . . . . . . . . . . . . . . . . . . . . . . . . . . . . . . . . . . . . . . . . . . . . . . .
. . . . . . . . . . . . . . . . . . . . . . . . . . . . . . . . . . . . . . . . . . . . . . . . . . . . . . . . . . . . . . . . . . . . . . . . . . . . . . . . . . . . . . . . . . . . . . . . . . . . . . . . . . . . . . . . . . . . . . . . . . . . . . . . . . . . . . . . . . . . . . . . . . . . . . .
. . . . . . . . . . . . . . . . . . . . . . . . . . . . . . . . . . . . . . . . . . . . . . . . . . . . . . . . . . . . . . . . . . . . . . . . . . . . . . . . . . . . . . . . . . . . . . . . . . . . . . . . . . . . . . . . . . . . . . . . . . . . . . . . . . . . . . . . . . . . . . . . . . . . . . .
. . . . . . . . . . . . . . . . . . . . . . . . . . . . . . . . . . . . . . . . . . . . . . . . . . . . . . . . . . . . . . . . . . . . . . . . . . . . . . . . . . . . . . . . . . . . . . . . . . . . . . . . . . . . . . . . . . . . . . . . . . . . . . . . . . . . . . . . . . . . . . . . . . . . . . .
. . . . . . . . . . . . . . . . . . . . . . . . . . . . . . . . . . . . . . . . . . . . . . . . . . . . . . . . . . . . . . . . . . . . . . . . . . . . . . . . . . . . . . . . . . . . . . . . . . . . . . . . . . . . . . . . . . . . . . . . . . . . . . . . . . . . . . . . . . . . . . . . . . . . . . .
. . . . . . . . . . . . . . . . . . . . . . . . . . . . . . . . . . . . . . . . . . . . . . . . . . . . . . . . . . . . . . . . . . . . . . . . . . . . . . . . . . . . . . . . . . . . . . . . . . . . . . . . . . . . . . . . . . . . . . . . . . . . . . . . . . . . . . . . . . . . . . . . . . . . . . .
. . . . . . . . . . . . . . . . . . . . . . . . . . . . . . . . . . . . . . . . . . . . . . . . . . . . . . . . . . . . . . . . . . . . . . . . . . . . . . . . . . . . . . . . . . . . . . . . . . . . . . . . . . . . . . . . . . . . . . . . . . . . . . . . . . . . . . . . . . . . . . . . . . . . . . .
. . . . . . . . . . . . . . . . . . . . . . . . . . . . . . . . . . . . . . . . . . . . . . . . . . . . . . . . . . . . . . . . . . . . . . . . . . . . . . . . . . . . . . . . . . . . . . . . . . . . . . . . . . . . . . . . . . . . . . . . . . . . . . . . . . . . . . . . . . . . . . . . . . . . . . .
. . . . . . . . . . . . . . . . . . . . . . . . . . . . . . . . . . . . . . . . . . . . . . . . . . . . . . . . . . . . . . . . . . . . . . . . . . . . . . . . . . . . . . . . . . . . . . . . . . . . . . . . . . . . . . . . . . . . . . . . . . . . . . . . . . . . . . . . . . . . . . . . . . . . . . .
. . . . . . . . . . . . . . . . . . . . . . . . . . . . . . . . . . . . . . . . . . . . . . . . . . . . . . . . . . . . . . . . . . . . . . . . . . . . . . . . . . . . . . . . . . . . . . . . . . . . . . . . . . . . . . . . . . . . . . . . . . . . . . . . . . . . . . . . . . . . . . . . . . . . . . .
. . . . . . . . . . . . . . . . . . . . . . . . . . . . . . . . . . . . . . . . . . . . . . . . . . . . . . . . . . . . . . . . . . . . . . . . . . . . . . . . . . . . . . . . . . . . . . . . . . . . . . . . . . . . . . . . . . . . . . . . . . . . . . . . . . . . . . . . . . . . . . . . . . . . . . .
. . . . . . . . . . . . . . . . . . . . . . . . . . . . . . . . . . . . . . . . . . . . . . . . . . . . . . . . . . . . . . . . . . . . . . . . . . . . . . . . . . . . . . . . . . . . . . . . . . . . . . . . . . . . . . . . . . . . . . . . . . . . . . . . . . . . . . . . . . . . . . . . . . . . . . .
. . . . . . . . . . . . . . . . . . . . . . . . . . . . . . . . . . . . . . . . . . . . . . . . . . . . . . . . . . . . . . . . . . . . . . . . . . . . . . . . . . . . . . . . . . . . . . . . . . . . . . . . . . . . . . . . . . . . . . . . . . . . . . . . . . . . . . . . . . . . . . . . . . . . . . .
. . . . . . . . . . . . . . . . . . . . . . . . . . . . . . . . . . . . . . . . . . . . . . . . . . . . . . . . . . . . . . . . . . . . . . . . . . . . . . . . . . . . . . . . . . . . . . . . . . . . . . . . . . . . . . . . . . . . . . . . . . . . . . . . . . . . . . . . . . . . . . . . . . . . . . .
. . . . . . . . . . . . . . . . . . . . . . . . . . . . . . . . . . . . . . . . . . . . . . . . . . . . . . . . . . . . . . . . . . . . . . . . . . . . . . . . . . . . . . . . . . . . . . . . . . . . . . . . . . . . . . . . . . . . . . . . . . . . . . . . . . . . . . . . . . . . . . . . . . . . . . .
. . . . . . . . . . . . . . . . . . . . . . . . . . . . . . . . . . . . . . . . . . . . . . . . . . . . . . . . . . . . . . . . . . . . . . . . . . . . . . . . . . . . . . . . . . . . . . . . . . . . . . . . . . . . . . . . . . . . . . . . . . . . . . . . . . . . . . . . . . . . . . . . . . . . . . .
. . . . . . . . . . . . . . . . . . . . . . . . . . . . . . . . . . . . . . . . . . . . . . . . . . . . . . . . . . . . . . . . . . . . . . . . . . . . . . . . . . . . . . . . . . . . . . . . . . . . . . . . . . . . . . . . . . . . . . . . . . . . . . . . . . . . . . . . . . . . . . . . . . . . . . .
. . . . . . . . . . . . . . . . . . . . . . . . . . . . . . . . . . . . . . . . . . . . . . . . . . . . . . . . . . . . . . . . . . . . . . . . . . . . . . . . . . . . . . . . . . . . . . . . . . . . . . . . . . . . . . . . . . . . . . . . . . . . . . . . . . . . . . . . . . . . . . . . . . . . . . .
. . . . . . . . . . . . . . . . . . . . . . . . . . . . . . . . . . . . . . . . . . . . . . . . . . . . . . . . . . . . . . . . . . . . . . . . . . . . . . . . . . . . . . . . . . . . . . . . . . . . . . . . . . . . . . . . . . . . . . . . . . . . . . . . . . . . . . . . . . . . . . . . . . . . . . .
. . . . . . . . . . . . . . . . . . . . . . . . . . . . . . . . . . . . . . . . . . . . . . . . . . . . . . . . . . . . . . . . . . . . . . . . . . . . . . . . . . . . . . . . . . . . . . . . . . . . . . . . . . . . . . . . . . . . . . . . . . . . . . . . . . . . . . . . . . . . . . . . . . . . . . .

offers a wide range of high performance lighting
equipment and related accessories for the rental, entertainment
and architectural lighting markets. BeamZ Pro stands for performance,
innovation and value pricing!
-
 1
1
-
 2
2
-
 3
3
-
 4
4
-
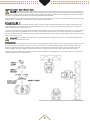 5
5
-
 6
6
-
 7
7
-
 8
8
-
 9
9
-
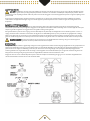 10
10
-
 11
11
-
 12
12
-
 13
13
-
 14
14
-
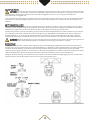 15
15
-
 16
16
-
 17
17
-
 18
18
-
 19
19
-
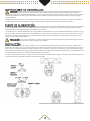 20
20
-
 21
21
-
 22
22
-
 23
23
-
 24
24
-
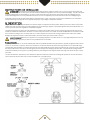 25
25
-
 26
26
-
 27
27
-
 28
28
-
 29
29
-
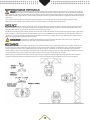 30
30
-
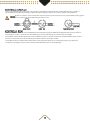 31
31
-
 32
32
-
 33
33
-
 34
34
-
 35
35
-
 36
36
-
 37
37
-
 38
38
-
 39
39
-
 40
40
-
 41
41
-
 42
42
-
 43
43
-
 44
44
-
 45
45
-
 46
46
-
 47
47
-
 48
48


Beamz Pro MHL1940 de handleiding
- Categorie
- Schijnwerpers
- Type
- de handleiding
in andere talen
Gerelateerde papieren
-
Beamz Pro MHL740 de handleiding
-
-
-
-
Beamz Pro Starcolor 540Z Handleiding
-
-
-
Beamz BTS300Z Handleiding
-
-
Andere documenten
-
Beamz Cobra 100R Spot 100W Moving Head de handleiding
-
Beamz FUZE 1910 Handleiding
-
-
-
-
-
-
-
-
Beamz COB30WW de handleiding