Avintage AV45XDZI de handleiding
- Categorie
- Wijnkoelers
- Type
- de handleiding

1
NOTICE D’UTILISATION
AVU8X(/IX) AVU23SX(/IX) AVU41SXDPA(/IX)
AVU52SX(/IX) AVU53CDZA AVU54SXDZA(/IX) PRO51C/1
FR – MANUEL D’UTILISATION p. 3 GB – USE INSTRUCTIONS p. 38
D – GEBRAUCHSANWEISUNG p. 72 NL – HANDLEIDING p. 107
SP – MANUAL DE UTILIZACION p. 143 IT – MANUAL D‘USO p. 178
CZ – NÁVOD K OBSLUZE p. 214 SK – NÁVOD NA OBSLUHU p. 249
Cave de service pose libre et encastrable sous plan

2

3
Avant toute utilisation, merci de lire et appliquer les règles de sécurité et d'utilisation du présent
manuel.
Tout d’abord, nous vous remercions d’avoir fait confiance à la marque AVINTAGE en acquérant cet
appareil et espérons qu’il satisfera pleinement vos attentes.
Cet appareil vous permet au choix de chambrer vos bouteilles (à température ambiante) ou de les mettre
à température de service (selon vos bouteilles) grâce à sa plage de réglage étendue.
1. CONSIGNES GÉNÉRALES DE SECURITÉ
Avant d’utiliser votre appareil pour la première fois, veuillez lire
attentivement ce manuel d’utilisation. Conservez-le
précieusement de façon à pouvoir vous y référer au besoin. Afin
de réduire le risque d’incendie, de choc électrique ou de blessure
lors de l’utilisation de votre cave, merci de suivre les précautions
données.
D'une manière générale, votre appareil doit être entretenu par un
professionnel qualifié.
Pour votre sécurité et pour une utilisation correcte de l’appareil,
avant d’installer et d’utiliser l’appareil pour la première fois, lisez
attentivement cette notice, y compris les mises en garde et les
conseils utiles qu’elle contient. Afin d’éviter d’endommager
l’appareil et/ou de vous blesser inutilement, il est important que
les personnes amenées à utiliser cet appareil aient pris
entièrement connaissance de son fonctionnement ainsi que de
ses instructions de sécurité. Conservez ces consignes pour plus
tard et pensez à les ranger à côté de l’appareil, afin qu’elles
soient transmises avec ce dernier en cas de vente ou de
déménagement. Cela permettra de garantir un fonctionnement
optimal de l’appareil.
Pour éviter tout risque de blessure, conservez cette notice. Le
fabricant ne saurait en effet être tenu responsable en cas de
mauvaise manipulation de l’appareil.

4
Cet appareil est destiné exclusivement à un usage domestique et
est prévu pour le stockage de boissons spéciales à une
température de stockage plus élevée que celle d'un compartiment
pour produits frais. En aucun cas cet appareil est destiné à
maintenir des produits alimentaires frais.
Assurez-vous que votre installation électrique (voltage)
corresponde à celle indiquée sur la plaque signalétique : l'appareil
doit être connecté à une prise terre règlementaire. Des
réparations ou des connexions incorrectes peuvent entraîner des
risques pour la sécurité. Faites vérifier votre installation électrique
par un professionnel si vous avez le moindre doute.
Pour votre protection, cet appareil doit être correctement
connecté à une prise terre. Ne pas couper ou retirer le fil de terre
du câble d’alimentation fourni.
Pour des raisons de sécurité, ne pas utiliser une rallonge
électrique.
Si votre appareil est endommagé (par un impact majeur, par
exemple) ou s’il subit un dommage (surtension due à la foudre,
inondation, incendie), il peut être dangereux à utiliser.
Débranchez la prise secteur et faites contrôler l'appareil par un
réparateur professionnel agréé.
Pour éviter tout danger, ne pas remplacer vous-même un câble
secteur endommagé. Contactez votre revendeur, un centre de
service agréé ou un réparateur professionnel.
Cet appareil doit être positionné de telle sorte que la prise secteur
soit accessible. Ne pas déplacer l'appareil une fois qu'il est plein :
vous pourriez déformer sa carrosserie en plus d’entrainer des
réparations. Les composants électriques ne doivent pas être

5
directement accessibles.
Maintenir les enfants éloignés de l’appareil
Ne pas utiliser l’appareil à l’extérieur
Dans le cas où du liquide serait accidentellement renversé
(bouteille cassée, etc.) sur des composants électriques (moteur,
etc.), veuillez débrancher immédiatement la prise secteur.
Pour éviter tout risque d'incendie, d'électrocution ou de blessure,
ne pas immerger le câble d'alimentation, la prise ou l'appareil lui-
même dans l'eau ou tout autre liquide. Ne pas manipuler
l'appareil avec les mains mouillées.
Maintenez l’appareil éloigné de toute source de chaleur et ne
l’exposez pas directement au soleil.
Ne laissez pas pendre le câble d’alimentation d'une table ou être
en contact avec des coins tranchants ou des surfaces chaudes.
Ne tirez pas sur le câble d'alimentation, saisissez la prise pour
débrancher l'appareil.
Assurez-vous que la zone où votre appareil est situé est capable
de supporter son poids lorsqu'il est chargé (une bouteille de 75 cl
pèse environ 1,3 kg). Votre cave doit être placée sur une surface
plane. Si vous devez la placer sur un tapis ou sur une moquette,
placez un support en-dessous.
Pour prévenir tout dommage du joint de la porte, assurez-vous
que la porte est entièrement ouverte lorsque vous souhaitez tirer
une clayette.

6
Sécurité des enfants et des autres personnes vulnérables
Cet appareil peut être utilisé par des enfants ayant 8 ans et
plus, et par des personnes ayant des capacités physiques,
sensorielles ou mentales réduites ou un manque d’expérience et
de connaissances, à condition qu’elles soient supervisées ou
qu’elles aient reçu des instructions concernant l’utilisation de
l’appareil en toute sécurité et qu’elles comprennent les dangers
encourus.
Le nettoyage et l’entretien par l’usager ne doivent pas être
effectués par des enfants, sauf s’ils ont plus de 8 ans et qu’ils
sont surveillés.
Conservez tous les emballages hors de portée des enfants
car il existe un risque de suffocation.
Risque que l’enfant se retrouve coincé : qu’un enfant se
retrouve bloqué dans l’appareil ou y suffoque ne sont pas des
faits du passé. Toutefois, des appareils jetés ou abandonnés
demeurent dangereux, même s'ils sont "juste laissés dans le
garage quelques jours".
Si vous décidez de mettre au rebut l’appareil, débranchez-le
de la prise murale, coupez le câble d’alimentation (aussi proche
de l’appareil que vous le pouvez) et retirez la porte afin
d’empêcher les enfants de jouer avec, de subir un choc électrique
ou de s’enfermer à l’intérieur.
Si l’appareil, doté d’un joint de porte magnétique, doit être
remplacé par un autre appareil doté d’un loquet sur la porte ou
sur le joint, vérifiez bien que le loquet est hors d’état de
fonctionner avant de vous débarrasser de l’ancien appareil. Cela
évitera de transformer cet appareil en piège pour les enfants.
Maintenir l’appareil et son cordon hors de portée des enfants
de moins de 8 ans.
Avant de jeter votre cave, veillez à bien retirer la porte.

7
Laissez également les clayettes qui étaient à l’intérieur de
l’appareil de manière à ce que les enfants ne puissent pas
grimper à l’intérieur.
Sécurité générale
ATTENTION — Cet appareil est conçu pour fonctionner dans un
foyer domestique ou pour une utilisation similaire comme :
Les zones de cuisine réservées au personnel des magasins,
des ateliers et autres milieux professionnels,
Les maisons secondaires et lieux utilisés par des clients de
l'hôtel, motels et autres environnements résidentiels,
Les environnements comme les chambres d'hôtel,
Les restaurants et établissements similaires, sauf détaillants.
ATTENTION — Afin d’éviter tout danger dû à l’instabilité de
l’appareil, il est important de le fixer et le monter selon les
instructions d’installation.
ATTENTION — Ne rangez jamais de substances inflammables
comme des aérosols à l’intérieur de cet appareil car elles
pourraient s’y déverser.
ATTENTION — Si le cordon d’alimentation est endommagé, vous
devez le remplacer immédiatement auprès de votre fabricant ou
d’un revendeur qualifié afin d’éviter tout risque d’électrocution.
ATTENTION — Maintenez la ventilation bien ouverte et vérifiez
bien que l’air peut circuler par les ouvertures, surtout si l’appareil
est encastré dans le mur.
ATTENTION — N’utilisez pas de dispositifs mécaniques ou autres
moyens pour accélérer le processus de dégivrage, autres que

8
ceux recommandés par le fabricant.
ATTENTION — N’endommagez pas le circuit de réfrigération.
ATTENTION — N’utilisez pas d’appareils électriques à l’intérieur
du compartiment, sauf si ces derniers sont tolérés par le
fabricant.
ATTENTION — Le gaz réfrigérant et le gaz isolant sont
inflammables. Lors de l'élimination de l'appareil, faites appel à un
centre de retraitement ou d’élimination des déchets agréé.
N’exposer pas l’appareil à une flamme.
ATTENTION — Le gaz réfrigérant de cet appareil est le R600a,
tout produit inflammable et explosif ne doit pas être mis dans la
cave ou près de celle-ci afin d’éviter le déclenchement d’un feu
ou d’une explosion.
Liquide réfrigérant
De l’isobutane réfrigérant (R600a) est utilisé dans le circuit
réfrigérant de l’appareil. Il s’agit d’un gaz naturel hautement
inflammable, et donc dangereux pour l’environnement. Pendant
les transports et l’installation de l’appareil, vérifiez qu’aucun des
composants du circuit de réfrigération ne soit endommagé. Le
réfrigérant (R600a) est un liquide inflammable.
Attention : risque d’incendie
Si le circuit de réfrigération est endommagé :
Évitez les flammes nues et toute source d’incendie.
Ventilez bien la pièce où se trouve l’appareil. Il est
dangereux de modifier la composition de cet appareil, de quelque
manière que ce soit.

9
Tout dommage fait au cordon peut provoquer un court-circuit,
et/ou une électrocution.
Sécurité électrique
Nous ne pouvons pas être tenus pour responsables de tout
incident causé par une mauvaise installation électrique.
Le cordon d’alimentation ne doit pas être rallongé. N’utilisez
ni prolongateur, ni adaptateur, ni prise multiple.
Vérifiez bien que la prise murale n’est pas endommagée.
Une prise murale en mauvais état pourrait entrainer une
surchauffe de l’appareil et son explosion.
Vérifiez bien que vous pouvez accéder à la prise murale de
l’appareil.
Ne tirez jamais sur le câble principal.
Ne supprimez jamais la mise à la terre.
Si la prise murale est lâche, ne branchez pas le cordon. Il
existe un risque d’électrocution ou d’incendie.
Vous ne devez jamais utiliser l’appareil si le cache de
l’éclairage intérieur n’est pas en place.
Débranchez votre appareil avant de procéder au
changement de l'ampoule.
Cet appareil fonctionne sur un courant à phase unique de
220~240V/50Hz.
Si le câble d’alimentation est endommagé, ne procédez pas
à son remplacement mais contactez votre service après-vente.
La prise de courant doit être facilement accessible mais hors
de portée des enfants. En cas d’incertitude, adressez-vous à
votre installateur.

10
Utilisation quotidienne
Cet appareil est uniquement destiné à mettre à température
des bouteilles de vin.
Ne stockez jamais de substances ou de liquides
inflammables à l’intérieur de l’appareil, cela provoquerait un
risque d’explosion.
Ne faites pas fonctionner d’autres appareils électriques à
l’intérieur de cet appareil (mixeurs, turbines à glace électrique,
etc.).
Lorsque vous débranchez l’appareil, tenez toujours la prise
dans vos mains et ne tirez pas sur le cordon.
Ne placez pas d’objets chauds près des composants en
plastique de cet appareil.
Les recommandations du fabricant quant au stockage de
l'appareil doivent être strictement respectées. Référez-vous aux
instructions correspondantes.
L’appareil doit être tenu éloigné des bougies, luminaires et
autres flammes nues afin d’éviter les risques d’incendie.
L'appareil est destiné à garder des boissons pour une
utilisation normale domestique comme expliqué dans ce manuel
d’utilisation.
L’appareil est lourd. Soyez prudent lorsque vous le déplacez.
Si votre appareil est équipé de roulettes, rappelez-vous qu’elles
servent uniquement à faciliter les petits mouvements. Ne le
déplacez pas sur de plus longs trajets.
N’utilisez jamais l’appareil ou ses éléments pour vous
appuyer.
Pour éviter les chutes d’objets et empêcher de détériorer
l’appareil, ne surchargez pas les compartiments de l’appareil.

11
Attention : nettoyage et entretien
Avant tout entretien, débranchez l’appareil et coupez le
courant.
Ne nettoyez pas l’appareil avec des objets métalliques, un
système à vapeur, des huiles volatiles, des solvants organiques
ou des composants abrasifs.
Ne nettoyez aucune partie de l’appareil avec des produits
inflammables. Les vapeurs peuvent provoquer un risque
d'incendie ou d'explosion.
N’utilisez pas d’objets tranchants ou pointus pour retirer la
glace. Utilisez un grattoir en plastique.
Informations importantes à propos de l’installation
Évitez d’installer votre appareil dans des zones humides.
Gardez l'appareil éloigné de la lumière directe du soleil et
des sources de chaleur (poêle, chauffage, radiateur, etc.). Une
exposition directe à la lumière solaire peut affecter le revêtement
acrylique et les sources de chaleur peuvent augmenter la
consommation électrique. Des températures ambiantes
extrêmement froides ou chaudes peuvent aussi entrainer une
mauvaise performance de l’appareil.
Branchez votre cave à vin à une prise terre murale
exclusivement et uniquement réglementaire. En aucun cas vous
ne devez réduire ou supprimer la troisième broche de mise à la
terre du cordon d'alimentation. Toutes les questions concernant la
puissance et /ou mise à la terre doivent être adressées à un
électricien certifié ou un centre de service autorisé.
Pour que les branchements électriques soient corrects,
suivez bien les consignes livrées dans ce manuel.
Déballez l’appareil et vérifiez qu’il n’est pas endommagé
visuellement. Ne branchez pas l’appareil si ce dernier est

12
endommagé. Signalez tout dommage au point de vente où vous
l’avez acheté. Dans ce cas, conservez l’emballage.
Il est recommandé d’attendre au moins 24 heures avant de
brancher l’appareil au courant, afin que le compresseur soit bien
alimenté en huile.
Une bonne circulation de l’air est nécessaire, afin d’éviter les
risques de surchauffe. Pour que la ventilation soit suffisante,
suivez bien les consignes d’installation fournies.
Dès que possible, évitez que l’appareil ne touche les parois
murales et/ou ne soit en contact avec des éléments chauds
(compresseur, condensateur) afin d’éviter les risques d’incendie.
Respectez toujours bien les consignes d’installation.
L’appareil ne doit pas être situé à côté de radiateurs ou de
feux de cuisson.
Vérifiez bien que les prises sont accessibles une fois
l’appareil installé.
Économies d’énergie
Pour limiter la consommation électrique de votre appareil :
Installez-le dans un endroit approprié (voir chapitre «
Instructions d’installation »).
Gardez les portes ouvertes le moins de temps possible.
Veillez au fonctionnement optimal de votre appareil en
nettoyant périodiquement le condenseur (voir chapitre «
Nettoyage et entretien »).
Contrôlez périodiquement les joints des portes et assurez-
vous qu’elles ferment toujours de manière efficace. Si ce n’est
pas le cas, adressez-vous à votre service après-vente.

13
Dépannage
Toute opération électrique doit être effectuée par un
technicien qualifié et compétent.
Cet appareil doit être dépanné par un Centre de Réparation
Agréé, et seules des pièces d’origine doivent être utilisées.
Cet appareil est réservé à un usage exclusivement domestique.
Le fabricant ne saurait être tenu responsable d’une autre
utilisation.
R600a
Instructions de sécurité
Attention — N’obstruer aucune grille de ventilation de l’appareil,
veillez à ce que les ouvertures d'aération soient toujours libres.
Attention — Ne pas stocker de substances explosives comme les
bombes d'aérosol avec un propulseur inflammables dans cet
appareil.
Attention — Ne pas endommager le circuit frigorifique de
l’appareil.
Attention — Les unités de réfrigération fonctionnant avec de
l'isobutane (R600a) ne peuvent être placées dans une zone avec
des sources d'ignition (par exemple, descellé contacts électriques
ou lorsque le fluide frigorigène pourrait rassembler en cas de
fuite). Le type de fluide frigorigène est indiqué sur la plaque
signalétique de l'armoire.
Attention — Ne pas utiliser d'appareils électriques dans les
compartiments de l'appareil, sauf s’ils sont du type recommandé
par le fabricant.

14
Cet appareil est conforme à toutes les directives européennes en vigueur et à leurs modifications
éventuelles et est conforme notamment aux normes suivantes :
2011/65/EU (ROHS)
2014/35/EU relative à la sécurité électrique
2014/30/EU relative à la compatibilité électromagnétique
643/2009/CE relative à l’étiquetage énergétique
2. PLAQUE SIGNALÉTIQUE
Ci-dessous l’exemple d’une plaque signalétique :
La plaque signalétique collée à l’intérieur ou à l’arrière de l’appareil (selon modèle) comporte toutes les
informations spécifiques à votre appareil.
Nous vous conseillons de noter son numéro de série sur ce livret avant son installation, pour vous y
référer si nécessaire ultérieurement (intervention technique, demande d’assistance, etc.).
En effet, une fois l’appareil installé et chargé, son accès y est plus compliqué.
ATTENTION : aucune assistance ne pourra vous être donnée sans ces informations.
3. INSTRUCTIONS D’INSTALLATION
Avant d’utiliser votre cave à vin
Enlevez l’emballage extérieur et intérieur.
Laissez votre appareil en position verticale au repos pendant environ 24h avant sa mise en service.
Cela permettra de réduire la possibilité d'un dysfonctionnement du système de refroidissement dû au

15
transport.
Nettoyez l’intérieur à l’aide d’un chiffon doux et d’eau tiède.
Lorsque vous installez votre appareil, merci de choisir un lieu autorisé.
Placez votre appareil sur un sol qui est assez résistant pour le soutenir lorsqu’il est entièrement
chargé. Veuillez ajuster les pieds de votre appareil afin de mettre à niveau votre cave.
Une ventilation adéquate est nécessaire, n’obstruez aucune sortie d’air.
N’est pas conçu pour être place dans un garage, sous-sol ou autre lieu du même type.
L’appareil est destiné à un usage seulement intérieur.
Cet appareil est destiné à être installé en pose libre ou de façon encastrée.
Branchez la cave à une prise unique, laissez un espace de 30 mm entre l’arrière de la cave et le mur.
Veillez à la caler parfaitement et à ajuster l’horizontalité de votre cave à vin (l’utilisation d’un niveau à
bulles est conseillée). Ceci évitera tout mouvement dû à l’instabilité, générateur de bruit et de vibration
et assurera la parfaite herméticité de la porte.
Cet appareil est uniquement réservé au stockage de vins.
Cet appareil utilise du gaz réfrigérant inflammable, veuillez donc à ne jamais endommager le tuyau de
refroidissement pendant le transport.
Attention
Stockez des bouteilles fermées.
Ne surchargez pas l’appareil.
N’ouvrez pas la porte plus que nécessaire.
Ne couvrez pas les clayettes avec des feuilles d’aluminium ou tout autre matériau qui pourrait
empêcher une bonne circulation de l’air.
Si la cave à vin doit être laissée vide pendant une longue période, il est suggéré de débrancher
l’appareil et, après un nettoyage très soigneux, de laisser la porte entrouverte pour laisser l’air circuler
et prévenir la formation de moisissures et d’odeurs.
ATTENTION : merci d’éloigner l’appareil de toute substance qui pourrait entrainer un risque
d’incendie.
Plages de températures ambiantes
Cet appareil est indiqué pour un fonctionnement dans des pièces dont la température ambiante est bien
spécifique, cette classe climatique est indiquée sur la plaque signalétique.
CLASSE
SYMBOLE
PLAGE DE TEMPÉRATURE AMBIANTE (°C)
Tempérée élargie
SN
De +10 à +32
Tempérée
N
De +16 à +32
Subtropicale
ST
De +16 à +38
Tropicale
T
De +16 à +43

16
Schémas d’encastrement
AVU8X(/IX)
AVU23SX(/IX)

17
AVU41SXDPA(/IX)
AVU52SX(/IX) AVU54SXDZA(/IX)

18
AVU53CDZA PRO51C/1
Réversibilité de la porte
Si vous désirez inverser le sens d’ouverture de la porte, qui initialement s’ouvre de gauche à droite,
procédez comme suit.
AVU8X(/IX)

19
1. Charnière inf. (droite) 2. Vis 3. Axe de la porte
4. Porte 5. Charnière sup. (droite) 6. Vis des charnières
7. Charnière sup. (gauche) 8. Charnière inf. (gauche)
1. Ouvrez la porte à 90 degrés. Dévissez deux vis (2) de l’axe inférieur de la porte, puis retirez la porte
(4) et l’axe de la porte (Fig. A). Positionnez correctement la porte (4) (Fig. A et B).
2. Retirez 3 vis (6) de la charnière supérieure (droite) (5) et ôtez celle-ci ainsi que la charnière inférieure
droite (Fig. C)
3. Installez la charnière supérieure de rechange (gauche) (7) sur le côté supérieur gauche à l’aide de
trois vis (Fig. D). Toujours selon la procédure ci-dessus, procédez à l’installation de la charnière
inférieure de rechange (gauche) (8) (Fig. E).
4. La porte s’ouvre à 180 degrés. La méthode d’installation de la porte est la même que celle de son
démontage ; alignez correctement la porte et fixez-la.
AVU23SX(/IX) AVU52SX(/IX)
1. Charnière inf. (droite) 2. Vis 3. Axe de la porte
4. Porte 5. Charnière sup. (droite) 6. Vis des charnières
7. Charnière sup. (gauche) 8. Clou décoratif 9. Charnière inf. (gauche)
10. Dispositif de retenue 11. Vis 12. Bouchon
1. Ouvrez la porte à 90 degrés. Dévissez deux vis (2) de l’axe inférieur de la porte (3), puis retirez la
porte (4) et l’axe de la porte (Fig. A).
2. Positionnez correctement la porte (4) et retirez le bouchon (12) de la partie supérieure du cadre de la
porte ; dévissez l’une des vis inférieures (11) et ôtez le dispositif de retenue (10). Installez ensuite ce
dispositif sur la partie supérieure du cadre de la porte. Il est préférable d’utiliser un bouchon de
rechange (12) pour obturer le trou sur la partie supérieure du cadre (Fig. A/B).
3. Retirez 3 vis (6) de la charnière supérieure droite (5) et ôtez celle-ci (Fig. C).
4. Retirez les clous décoratifs (8) du côté supérieur gauche de l’appareil et installez la charnière
supérieure de rechange gauche (7) sur le côté supérieur gauche à l’aide de trois vis (Fig. D).
5. Toujours selon la procédure ci-dessus, procédez à l’installation de la charnière inférieure de rechange

20
gauche (9) (Fig. E).
6. La porte s’ouvre à 180 degrés. La méthode d’installation de la porte est la même que celle de son
démontage ; alignez correctement la porte et fixez-la.
7. Obturez le trou situé en haut à droite de l’appareil avec un clou décoratif (8).
AVU53CDZA AVU54SXDZA(/IX) PRO51C/1
1. Charnière inf. (droite) 2. Vis 3. Axe de la porte
4. Porte 5. Charnière sup. (droite) 6. Vis des charnières
7. Charnière sup. (gauche) 8. Clou décoratif 9. Charnière inf. (gauche)
1. Ouvrez la porte à 90 degrés. Dévissez deux vis (2) de l’axe inférieur de la porte, puis retirez la porte
(4) et l’axe de la porte (Fig. A).
2. Positionnez correctement la porte (4).
3. Retirez 3 vis (6) de la charnière supérieure (droite) (5) et ôtez celle-ci (Fig. C).
4. Retirez les clous décoratifs (8) du côté supérieur gauche de l’appareil et installez la charnière
supérieure supplémentaire (gauche) (7) sur le côté supérieur gauche à l’aide de trois vis (Fig. D).
5. Toujours selon la procédure ci-dessus, procédez à l’installation de la charnière inférieure restante
(gauche) (9) (Fig. E).
6. La porte s’ouvre à 180 degrés. La méthode d’installation de la porte est la même que celle de son
démontage ; alignez correctement la porte et fixez.
7. Obturez le trou situé en haut à droite de l’appareil avec un clou décoratif (8).

21
4. INSTRUCTIONS D’UTILISATION
Il est recommandé d’installer votre appareil dans un endroit où la température ambiante est comprise
entre 16-32°C. Si la température ambiante est supérieure ou inférieure à la température recommandée,
le rendement de l'unité peut être influencé et il peut être impossible d'obtenir la température entre 5-20°C
ou 5-10°C/10-20°C (selon modèle).
AVU8X(/IX) / AVU23SX(/IX) AVU41SXDPA(/IX) AVU52SX(/IX) PRO51C/1
“RUN”
Indicateur de mise sous tension
Bouton
Pour allumer/éteindre l’appareil.
Appuyez et maintenez le bouton pendant environ 3 secondes.
Bouton
Bouton de contrôle de la lumière intérieure
Écran d’affichage
Afficheur électronique de la température
Bouton
Bouton de réglage de la température +
Bouton
Bouton de réglage de la température -
Vous pouvez choisir la température que vous souhaitez dans le compartiment en pressant les touches
“ / ” . La température que vous souhaitez programmer augmentera/diminuera de 1ºC à
chaque pression sur les boutons.
La température peut être choisie entre 5 et 20°C ou entre 5 et 10°C / 10 et 20°C (selon modèle). Une fois
sélectionnée, l’afficheur clignotera environ 5s avant d’indiquer la température interne instantanée de la
cave. À tout moment, la température de réglage est visible en appuyant 5s sur les touches de sélection
de température.
Dans le cas d’une coupure de courant, toutes les températures précédemment choisies seront effacées
et chaque compartiment reviendra par défaut à la valeur de température préprogrammée d’usine soit
12°C.

22
AVU53CDZA AVU54SXDZA(/IX)
“RUN”
Indicateur de mise sous tension
Bouton
Pour allumer/éteindre l’appareil.
Appuyez et maintenez le bouton pendant environ 3 secondes.
Bouton
Bouton de contrôle de la lumière intérieure
Écran d’affichage
Afficheur électronique de la température du compartiment supérieur
Écran d’affichage
Afficheur électronique de la température du compartiment inférieur
Bouton
Bouton de réglage de la température du compartiment supérieur
Bouton
Bouton de réglage de la température du compartiment inférieur
Appuyez sur “ ” pour régler la température du compartiment supérieur. L’afficheur relatif au
compartiment se met alors à clignoter et chaque pression vous permet de faire varier la température de
1°C. Une fois la température de réglage la plus basse atteinte 5°C, l’afficheur se repositionne
automatiquement sur la température de réglage la plus élevée 10°C. Une fois sélectionnée, l’afficheur
clignotera environ 5s avant d’indiquer la température interne instantanée de la cave. À tout moment, la
température de réglage est visible en appuyant 5s sur les touches de sélection de température.
Appuyez sur “ ” pour régler la température du compartiment inférieur. L’afficheur relatif au
compartiment se met alors à clignoter et chaque pression vous permet de faire varier la température de
1°C. Une fois la température de réglage la plus basse atteinte 10°C, l’afficheur se repositionne
automatiquement sur la température de réglage la plus élevée 20°C. Une fois sélectionnée, l’afficheur
clignotera environ 5s avant d’indiquer la température interne instantanée de la cave. À tout moment, la
température de réglage est visible en appuyant 5s sur les touches de sélection de température.
Dans le cas d’une coupure de courant, toutes les températures précédemment choisies seront effacées
et chaque compartiment reviendra par défaut à la valeur de température préprogrammée d’usine soit 6°C
pour le compartiment haut et 12°C pour le compartiment bas.
Fonction d’utilisation
Alarme de température :
Si la température intérieure est supérieure à 23°C après 10 heures de fonctionnement, l’écran
affichera ”HI” puis une alarme sonore retentira au bout d’une heure. Cette alarme vous informera que
la température intérieure est trop élevée, merci de vérifier quelle pourrait en être la raison. Si la
température intérieure est inférieure à 0°C, l’écran affichera “LO” et une alarme sonore retentira.
Fonction de mémorisation de la température :
Dans le cas d’une coupure de courant, la cave va mémoriser les derniers paramétrages et, lorsque

23
l’électricité reviendra, ces mêmes paramètres seront à nouveau opérationnels.
Lumière intérieure
Afin de réduire la consommation d’énergie, la lumière intérieure de cette cave à vin s’éteint
automatiquement au bout de 10 minutes.
Si vous souhaitez que la lumière intérieure de votre appareil soit constamment allumée, veuillez appuyer
sur le bouton pendant 5 secondes : sur l’écran apparaitra alors le message « LP ». Après 4
secondes, l’écran reviendra à la normale et la lumière restera allumée jusqu’à ce que vous l’éteigniez.
Si vous souhaitez revenir au paramétrage initial et économiser l’énergie (recommandé), veuillez appuyer
sur le bouton pendant 5 secondes : sur l’écran apparaitra alors le message « LF ». Après 4
secondes, l’écran reviendra à la normale et la lumière s’éteindra automatiquement après 10 minutes.
5. ÉQUIPEMENT
Le système de climatisation
Selon l’avis des spécialistes, la température idéale de conservation des vins se situe autour de 12°C,
dans une fourchette de 10° à 14°C. Ne pas confondre avec la température de service, qui elle varie selon
la spécificité de chaque type de vin de 5 à 20°C.
Il est surtout important d’éviter les variations brutales de température. Conçu par des spécialistes pour
des œnophiles, cet appareil, contrairement au simple réfrigérateur, prend en compte la sensibilité des
grands crûs aux variations brutales de températures en assurant un contrôle fin d’une température
moyenne constante.
Le système anti-vibration
Le compresseur frigorifique est équipé d’amortisseurs spéciaux (les silent-blocks) et la cuve intérieure est
isolée de la carrosserie par une épaisse couche de mousse de polyuréthane. Ces caractéristiques
permettent d’éviter la transmission de vibration à vos vins.
Le système d’humidification
Cet appareil est équipé d’un bac (selon modèle) qui maintient un niveau correct d’humidité. Si l’humidité
est trop basse, remplissez le niveau du réservoir aux ¾ de sa capacité. Vérifiez le niveau d’eau de temps
en temps et ajoutez de l’eau si nécessaire. Veillez à ce que le bac contienne toujours de l’eau.
Conçu par des spécialistes pour des œnophiles, la marque Avintage a donc pris en compte la sensibilité
des bouchons à une humidité ambiante trop basse. C’est pourquoi le bac est à placer sur la clayette sous
le ventilateur situé au fond afin d’apporter une humidité minimale. Attention à contrôler le niveau d’eau si
vous stockez vos vins sur une longue période et que vous ne dédiez pas l’appareil uniquement à leur
mise à température de service (avec des rotations rapides de vos bouteilles).
Assurez-vous que le bac rempli d’eau est bien stable pour éviter toute chute ou fuite d’eau.
Le système anti-UV
La lumière accélère le vieillissement de vos vins. Dans nos caves à porte pleine, vos vins sont
naturellement à l’abri, sous réserve bien entendu d’ouvertures pas trop fréquentes. Ce modèle à porte
vitrée a fait l’objet d’un traitement particulier, qui filtre les rayons ultra-violets néfastes ; vos vins sont donc
parfaitement à l’abri.

24
Dégivrage
Votre appareil est équipé d’un cycle automatique de dégivrage. Pendant l’arrêt du cycle de
refroidissement, les surfaces réfrigérées de l’appareil dégivrent automatiquement. L’eau de dégivrage
ainsi récupérée est évacuée vers un bac d’évaporation des condensas qui est situé à l’arrière de
l’appareil près du compresseur. La chaleur produite par le compresseur évapore ensuite les condensas
récupérés dans le bac.
Le système hiver (selon modèle)
Le kit hiver est un système hors gel qui permet à la cave de fonctionner dans un environnement ou la
température est comprise entre 0 et 32°C. Une sonde située à l’intérieur de l’appareil déclenche une
résistance électrique de faible puissance lorsque la température de la cave devient inférieure de 3°C à la
température programmée. Cette résistance est de faible puissance pour éviter une remontée brutale de
la température du vin et ainsi éviter les chocs thermiques préjudiciables pour la préservation du vin.
Le kit est destiné à réchauffer la température interne de la cave avant même qu’un échange thermique ne
se soit fait avec les bouteilles. Le système hiver permet de maintenir la température à l'intérieur de la
cave à l’identique de la température programmée. Lorsque le système s'active et que la température
intérieure atteint la température réglée, le système s'arrête.
Clayettes
Pour éviter d’endommager le joint de la porte, assurez-vous que la porte soit bien ouverte avant de
tirer les clayettes pour mettre ou enlever les bouteilles.
Pour un accès plus simple au contenu des clayettes, vous devez faire glisser la clayette vers
l’extérieur d’environ 1/3. Cependant, elles sont conçues avec une butée d’arrêt de chaque côté pour
éviter que les bouteilles ne tombent.
Pour retirer ou positionner les clayettes, inclinez la clayette comme indiqué sur le schéma et tirez ou
poussez selon les cas.
AVU41SXDPA(/IX)
Placez les clayettes aux emplacements adaptés.

25
a. Boîte en carton de pièces de rechange b. Petite clayette c. Grande clayette
1. Après avoir retiré l’emballage, sortez le carton contenant les pièces de rechange de l’appareil.
2. 4 petites clayettes (b) sont présentes dans le compartiment de gauche. Retirez les deux clayettes
inférieures.
3. Dans le compartiment de droite, on peut trouver 4 grandes clayettes (c). Retirez les deux clayettes
supérieures.
4. La position des petites et grandes clayettes doit alors être inversée (fig.2). Dans chaque
compartiment, placez deux petites clayettes en haut et deux grandes clayettes en bas.
5. Une fois les clayettes correctement positionnées, votre cave à vin peut être utilisée conformément
aux instructions figurant dans le manuel d’utilisation.
Stabilisateurs de pieds
Deux stabilisateurs de pieds sont fournis avec votre appareil, vous permettant ainsi de le déplacer
aisément lorsque vos pieds sont ajustés à hauteur maximale. Les stabilisateurs se mettent sous les
pieds, de façon parallèle en respectant bien l’emplacement pour l’avant et pour l’arrière.
La sécurité renforcée
Cette gamme d’appareils étant destinée au stockage d’objets de valeur, nous avons pris soin de
sélectionner des composants de qualité et de concevoir des techniques de fabrication propres à assurer
une sécurité optimale de fonctionnement.
Installation de la poignée
Votre appareil est équipé d’une poignée en acier inoxydable. Pour l’installer, vissez-la simplement sur la
porte avec les vis fournies, suivant le schéma ci-dessous en ayant préalablement retiré le joint
magnétique.
Arrière
Avant
Front
Back
Arrière
Avant
Stabilisateurs de pieds
Foot slider

26
6. CHARGEMENT
Les quantités maximales de chargement annoncées de bouteilles sont données à titre indicatif, ne sont
pas contractuelles, et permettent (comme les litrages des réfrigérateurs) d’avoir une estimation rapide de
la taille de l’appareil.
Elles correspondent à des tests effectués avec une bouteille étalon : la bouteille de type « bordelaise
tradition en 75 cl » (la normalisation reconnaît pour chaque forme de bouteille, une origine géographique :
bordelaise, bourguignonne, provençale, etc. et un type : tradition, lourde, allégée, flûte, etc., comportant
chacune des diamètres et des hauteurs qui leurs sont propres).
Dans la réalité, on pourrait ranger, à l’extrême, plus de bouteilles en empilage monotype et sans clayettes
mais une « cave variée » se constitue d’une grande variété de bouteilles et l’aspect « pratique » de la
gestion quotidienne d’une cave limite son chargement. Vous en chargerez donc probablement un peu
moins que le maximum annoncé.
Types de bouteilles :
Nous voyons ici 4 sortes de bouteilles 75 cl, Bourgogne et Bordelaise, de dimensions différentes. Il en
existe de nombreuses autres de toutes contenances et toutes formes. Vous noterez les différences de
rangement selon hauteur des bouteilles, diamètre et méthode de croisement.
A titre d’exemple, si l’on charge exclusivement une cave de bouteilles de Bourgogne, on remarquera être
environ 30% sous la quantité initiale calculée à partir de Bordeaux.
Types de croisement
Tête bêche col à col :
Notez bien la différence de profondeur !
Tête bêche col entre fûts :
Chargement accru

27
Exemples de températures de service
À respecter lors de vos dégustations pour éviter de passer à côté de la richesse des arômes de vos vins !
Les opinions varient, la température ambiante également mais beaucoup s’accordent sur :
Grands vins de Bordeaux – Rouges 16 – 17°C
Grands vins de Bourgogne – Rouges 15 – 16°C
Grands crûs de vins blancs secs 14 – 16°C
Rouges légers, fruités, jeunes 11 – 12°C
Rosés de Provence, vins de primeur 10 – 12°C
Blancs secs et vins de pays rouges 10 – 12°C
Vins de pays blancs 8 – 10°C
Champagnes 7 – 8°C
Vins liquoreux 6°C
7. NETTOYAGE ET ENTRETIEN
Avant de nettoyer votre appareil (opération à faire régulièrement), débranchez l’appareil en retirant la
prise de courant ou en débranchant le fusible dont elle dépend.
Nous vous conseillons, avant la première utilisation et de façon régulière, de nettoyer l’intérieur comme
l’extérieur (face avant, latérales et dessus) avec un mélange d’eau tiède et de produit de lavage doux.
Rincez avec de l’eau pure, laissez sécher totalement avant de rebrancher. N’utilisez ni solvants, ni agents
abrasifs. Lavez la plastification des clayettes acier avec une solution détergente douce puis séchez avec
un chiffon sec et doux. Les clayettes en bois ne demandent pas d’entretien particulier.
Lors de la première mise sous tension, des odeurs résiduelles peuvent subsister. Dans ce cas, faites
fonctionner l’appareil à vide pendant quelques heures, en paramétrant la température la plus froide. Le
froid annihilera ces odeurs possibles.
En cas de coupure de courant
La majorité des coupures de courant sont résolues pendant une courte période. Une coupure de 1 ou 2
heures n’affectera pas les températures de votre cave. Afin de protéger vos vins pendant les coupures de
courant, pensez à minimiser le nombre d’ouvertures de porte. Pour des coupures de courant de très
longue durée, prenez les mesures nécessaires pour protéger votre vin.
Si l’appareil est débranché, éteint ou s’il y a une coupure de courant vous devez attendre de 3 à 5
minutes avant de le redémarrer. Si vous essayez de le redémarrer avant ce délai, le compresseur se
mettra en fonction seulement au bout de 3/5 minutes (si la température le nécessite).
Au premier démarrage et suite à un arrêt prolongé de la cave, il est possible qu’au moment du
redémarrage les températures choisies et celles affichées ne correspondent pas. Ceci est normal. Il
sera alors nécessaire d’attendre quelques heures avant que les températures retrouvent leur stabilité.
Si vous partez en vacances
Courts séjours : laissez votre cave fonctionner pendant votre séjour si celui-ci dure moins de 3
semaines.
Longs séjours : si votre appareil venait à ne pas être utilisé pendant plusieurs mois, retirez toutes les
bouteilles et tous les accessoires, éteignez et débranchez l’appareil de la prise de courant. Nettoyez
et séchez soigneusement l’intérieur et l’extérieur de l’appareil. Laissez également la porte ouverte, en
la bloquant si nécessaire, pour éviter la formation de condensas, odeurs, moisissure.

28
Si vous devez déplacer votre cave à vin
Débranchez votre cave avant toute opération.
Enlevez toutes les bouteilles présentes dans la cuve et fixez les éléments mobiles.
Pour éviter d’endommager les vis de mise à niveau des pieds, vissez-les à fond dans leur base.
Fermez entièrement la porte.
Déplacez l’appareil en position verticale de préférence ou notez à partir des inscriptions portées sur
l’emballage, le sens sur lequel peut être couché l’appareil. Protégez également votre appareil avec
une couverture ou un tissu similaire.
Économies d’énergie
L’appareil doit être placé dans un local frais (mais au-dessus de +16°C), loin de toute source de
chaleur (autres appareils ménager) et d’une exposition directe au soleil.
Le local où est placé l’appareil doit être ventilé. Ne couvrez jamais les aérations.
N’ouvrez pas la porte plus que nécessaire.
8. EN CAS DE PANNE
Malgré tout le soin que nous apportons à nos fabrications, une panne n’est jamais totalement exclue.
Avant de contacter le service après-vente de votre revendeur, vérifiez néanmoins que :
La prise de courant est toujours en place
Il n’y a pas de coupure de courant
Que la panne n’a pas pour origine l’une de celles décrites dans le tableau en fin de ce manuel
IMPORTANT : si le cordon d’alimentation fourni est endommagé, il doit être remplacé par le
fabricant, un service agréé de la marque ou du revendeur. Dans tous les cas, il doit être remplacé
par un personnel qualifié pour éviter tout risque de blessure.
SI CES CONTROLES NE DONNENT RIEN, CONTACTEZ ALORS LE SERVICE APRES-VENTE DE VOTRE REVENDEUR.
ATTENTION !
Débranchez la prise murale avant toute opération d’entretien
ou réparation !

29
9. PROBLEME ET CAUSE POSSIBLE
Vous pouvez résoudre de nombreux problèmes simples de votre cave à vin, en évitant de faire appel à
votre service après-vente. Essayez avec les suggestions ci-dessous.
PROBLEME
CAUSE POSSIBLE
La cave ne démarre pas
La prise n’est pas branchée
Le bouton marche/arrêt est sur la position arrêt
Le fusible a sauté au niveau de votre
installation électrique
La cave ne refroidit pas assez
Contrôlez la température choisie
La température externe est au-delà de la
température d’application de la cave
La porte de la cave est ouverte trop souvent
La porte n’est pas bien fermée
Le joint de la porte n’est pas étanche
Le compresseur démarre et s’arrête
fréquemment
La température externe est trop élevée
Une grosse quantité de bouteilles a été mise
dans la cave
La porte de la cave est ouverte trop
fréquemment
La porte n’est pas bien fermée
Le réglage n’a pas été fait correctement
Le joint de la porte n’est pas étanche.
La lumière ne fonctionne pas
La prise n’est pas branchée
Le fusible a sauté au niveau de votre
installation électrique
Le LED est hors service/a grillé, contactez le
service après-vente
Le bouton de la lumière est sur arrêt
Vibrations
Contrôlez et assurez-vous que la cave soit bien
au niveau
La cave semble faire beaucoup de bruit
Un bruit qui ressemble à de l’eau qui circule est
produit par le gaz réfrigérant, ce qui est normal
En fin de cycle du compresseur, il est possible
d’entendre un bruit d’eau qui circule
Des contractions et des expansions des parois
internes peuvent provoquer des claquements
La cave n’est pas à niveau
La porte ne se ferme pas bien
La cave n’est pas à niveau
Le joint de la porte est sale ou abîmé
Les clayettes ne sont pas bien positionnées
Une partie du contenu empêche la porte de se
fermer

30
Remplacement de la lampe d’éclairage
Cet appareil est constitué de diodes électroluminescentes (LED). Ce type de diode ne peut être changé
par le consommateur. La durée de vie de ces LED est normalement suffisante pour qu’aucun
changement ne soit effectué. Si toutefois, et malgré tout le soin apporté lors de la fabrication de votre
cave à vin, les LED étaient défectueuses, veuillez contacter votre service après-vente pour toute
intervention.
10. ENVIRONNEMENT
Ce produit est conforme à la Directive UE 2012/19/CE relative aux déchets d'équipements
électriques et électroniques (DEEE). En vous assurant que ce produit est éliminé
correctement, vous aiderez à prévenir les conséquences négatives potentielles pour
l'environnement et la santé humaine qui pourraient être dues à la manipulation inappropriée
des déchets de ce produit.
Le symbole de poubelle barrée apposé sur l’appareil indique que ce produit devra, à la fin de son cycle
de vie, être traité séparément des autres déchets domestiques. Il devra donc être emmené dans un
centre de collecte sélective destiné aux appareils électriques et/ou électroniques ou bien, si vous achetez
un appareil équivalent, au revendeur de ce nouvel appareil.
L’utilisateur est responsable d’apporter l’appareil en fin de vie aux structures de collecte appropriées. Une
collecte sélective et adéquate visant à envoyer l’appareil inutilisé au recyclage, au traitement et à une
élimination compatible avec l’environnement, contribue à éviter les effets négatifs possibles sur
l’environnement, sur la santé et favorise le recyclage des matériaux dont le produit est composé.
Pour obtenir des renseignements plus détaillés sur les systèmes de collecte disponibles, s’adresser au
service local d’élimination des déchets ou bien au magasin où l’appareil a été acheté.
11. AVERTISSEMENT
Dans un souci d’amélioration constante de nos produits, nous nous réservons la possibilité de modifier
les caractéristiques techniques sans préavis.
Les garanties des produits de la marque AVINTAGE sont exclusivement énoncées par les distributeurs
que nous avons choisis. Aucun élément des présentes ne peut être interprété comme une garantie
supplémentaire.
La société FRIO ENTREPRISE ne peut être tenue responsable des erreurs ou des omissions techniques
et de rédaction dans les présentes.
Document non contractuel.

31
FICHE PRODUIT EUROPÉENNE
selon la réglementation (UE) N°1060/2010
-
CAVE DE SERVICE
MARQUE
AVINTAGE
RÉFÉRENCE COMMERCIALE
AVU8X(/IX)
DONNÉES ÉLECTRIQUES
220-240 V / 50 Hz
DIMENSIONS DU PRODUIT (L x P x H)
145 x 547,5 x 820 mm
POIDS NET
20 kg
CATÉGORIE DE L’APPAREIL
2
CLASSE ÉNERGÉTIQUE
A
CONSOMMATION ÉLECTRIQUE
Consommation d’énergie de 135 kWh par
an, calculée sur la base du résultat
obtenu pour 24 heures dans des
conditions d’essai normalisées. La
consommation d’énergie réelle dépend
des conditions d’utilisation et de
l’emplacement de l’appareil.
VOLUME NET
23 L
TEMPÉRATURE AJUSTABLE
5 – 20°C
DÉGIVRAGE
Dégivrage automatique
CLASSE CLIMATIQUE
Classe climatique : N
Cet appareil est conçu pour être utilisé à
une température ambiante comprise entre
16°C (température la plus basse) et 32°C
(température la plus haute).
NIVEAU SONORE dB(A) RE 1 pW
44 dB(A)
TYPE DE POSE
Encastrable sous plan
Cet appareil est destiné uniquement au stockage du vin.

32
FICHE PRODUIT EUROPÉENNE
selon la réglementation (UE) N°1060/2010
-
CAVE DE SERVICE
MARQUE
AVINTAGE
RÉFÉRENCE COMMERCIALE
AVU23SX(/IX)
DONNÉES ÉLECTRIQUES
220-240 V / 50 Hz
DIMENSIONS DU PRODUIT (L x P x H)
295 x 571 x 820 mm
POIDS NET
28 kg
CATÉGORIE DE L’APPAREIL
2
CLASSE ÉNERGÉTIQUE
A
CONSOMMATION ÉLECTRIQUE
Consommation d’énergie de 140 kWh par
an, calculée sur la base du résultat
obtenu pour 24 heures dans des
conditions d’essai normalisées. La
consommation d’énergie réelle dépend
des conditions d’utilisation et de
l’emplacement de l’appareil.
VOLUME NET
56 L
TEMPÉRATURE AJUSTABLE
5 – 20°C
DÉGIVRAGE
Dégivrage automatique
CLASSE CLIMATIQUE
Classe climatique : N
Cet appareil est conçu pour être utilisé à
une température ambiante comprise entre
16°C (température la plus basse) et 32°C
(température la plus haute).
NIVEAU SONORE dB(A) RE 1 pW
43 dB(A)
TYPE DE POSE
Pose libre et encastrable sous plan
Cet appareil est destiné uniquement au stockage du vin.

33
FICHE PRODUIT EUROPÉENNE
selon la réglementation (UE) N°1060/2010
-
CAVE DE SERVICE
MARQUE
AVINTAGE
RÉFÉRENCE COMMERCIALE
AVU41SXDPA(/IX)
DONNÉES ÉLECTRIQUES
220-240 V / 50 Hz
DIMENSIONS DU PRODUIT (L x P x H)
595 x 571 x 820 mm
POIDS NET
48 kg
CATÉGORIE DE L’APPAREIL
2
CLASSE ÉNERGÉTIQUE
A
CONSOMMATION ÉLECTRIQUE
Consommation d’énergie de 144 kWh par
an, calculée sur la base du résultat
obtenu pour 24 heures dans des
conditions d’essai normalisées. La
consommation d’énergie réelle dépend
des conditions d’utilisation et de
l’emplacement de l’appareil.
VOLUME NET
59,5 L x 2
TEMPÉRATURE AJUSTABLE
5 – 20°C
DÉGIVRAGE
Dégivrage automatique
CLASSE CLIMATIQUE
Classe climatique : N
Cet appareil est conçu pour être utilisé à
une température ambiante comprise entre
16°C (température la plus basse) et 32°C
(température la plus haute).
NIVEAU SONORE dB(A) RE 1 pW
43 dB(A)
TYPE DE POSE
Pose libre et encastrable sous plan
Cet appareil est destiné uniquement au stockage du vin.

34
FICHE PRODUIT EUROPÉENNE
selon la réglementation (UE) N°1060/2010
-
CAVE DE SERVICE
MARQUE
AVINTAGE
RÉFÉRENCE COMMERCIALE
AVU52SX(/IX)
DONNÉES ÉLECTRIQUES
220-240 V / 50 Hz
DIMENSIONS DU PRODUIT (L x P x H)
595 x 571 x 820 mm
POIDS NET
44 kg
CATÉGORIE DE L’APPAREIL
2
CLASSE ÉNERGÉTIQUE
A
CONSOMMATION ÉLECTRIQUE
Consommation d’énergie de 145 kWh par
an, calculée sur la base du résultat
obtenu pour 24 heures dans des
conditions d’essai normalisées. La
consommation d’énergie réelle dépend
des conditions d’utilisation et de
l’emplacement de l’appareil.
VOLUME NET
146 L
TEMPÉRATURE AJUSTABLE
5 – 20°C
DÉGIVRAGE
Dégivrage automatique
CLASSE CLIMATIQUE
Classe climatique : N
Cet appareil est conçu pour être utilisé à
une température ambiante comprise entre
16°C (température la plus basse) et 32°C
(température la plus haute).
NIVEAU SONORE dB(A) RE 1 pW
44 dB(A)
TYPE DE POSE
Pose libre et encastrable sous plan
Cet appareil est destiné uniquement au stockage du vin.

35
FICHE PRODUIT EUROPÉENNE
selon la réglementation (UE) N°1060/2010
-
CAVE DE SERVICE
MARQUE
AVINTAGE
RÉFÉRENCE COMMERCIALE
AVU53CDZA
DONNÉES ÉLECTRIQUES
220-240 V / 50 Hz
DIMENSIONS DU PRODUIT (L x P x H)
595 x 571 x 820 mm
POIDS NET
50 kg
CATÉGORIE DE L’APPAREIL
2
CLASSE ÉNERGÉTIQUE
A
CONSOMMATION ÉLECTRIQUE
Consommation d’énergie de 145 kWh par
an, calculée sur la base du résultat
obtenu pour 24 heures dans des
conditions d’essai normalisées. La
consommation d’énergie réelle dépend
des conditions d’utilisation et de
l’emplacement de l’appareil.
VOLUME NET
134 L
TEMPÉRATURE AJUSTABLE
5 – 10°C / 10 – 20°C
DÉGIVRAGE
Dégivrage automatique
CLASSE CLIMATIQUE
Classe climatique : N
Cet appareil est conçu pour être utilisé à
une température ambiante comprise entre
16°C (température la plus basse) et 32°C
(température la plus haute).
NIVEAU SONORE dB(A) RE 1 pW
45 dB(A)
TYPE DE POSE
Pose libre et encastrable sous plan
Cet appareil est destiné uniquement au stockage du vin.

36
FICHE PRODUIT EUROPÉENNE
selon la réglementation (UE) N°1060/2010
-
CAVE DE SERVICE
MARQUE
AVINTAGE
RÉFÉRENCE COMMERCIALE
AVU54SXDZA(/IX)
DONNÉES ÉLECTRIQUES
220-240 V / 50 Hz
DIMENSIONS DU PRODUIT (L x P x H)
595 x 571 x 820 mm
POIDS NET
50 kg
CATÉGORIE DE L’APPAREIL
2
CLASSE ÉNERGÉTIQUE
A
CONSOMMATION ÉLECTRIQUE
Consommation d’énergie de 145 kWh par
an, calculée sur la base du résultat
obtenu pour 24 heures dans des
conditions d’essai normalisées. La
consommation d’énergie réelle dépend
des conditions d’utilisation et de
l’emplacement de l’appareil.
VOLUME NET
134 L
TEMPÉRATURE AJUSTABLE
5 – 10°C / 10 – 20°C
DÉGIVRAGE
Dégivrage automatique
CLASSE CLIMATIQUE
Classe climatique : N
Cet appareil est conçu pour être utilisé à
une température ambiante comprise entre
16°C (température la plus basse) et 32°C
(température la plus haute).
NIVEAU SONORE dB(A) RE 1 pW
45 dB(A)
TYPE DE POSE
Pose libre et encastrable sous plan
Cet appareil est destiné uniquement au stockage du vin.

37
FICHE PRODUIT EUROPÉENNE
selon la réglementation (UE) N°1060/2010
-
CAVE DE SERVICE
MARQUE
AVINTAGE
RÉFÉRENCE COMMERCIALE
PRO51C/1
DONNÉES ÉLECTRIQUES
220-240 V / 50 Hz
DIMENSIONS DU PRODUIT (L x P x H)
595 x 571 x 820 mm
POIDS NET
48 kg
CATÉGORIE DE L’APPAREIL
2
CLASSE ÉNERGÉTIQUE
A
CONSOMMATION ÉLECTRIQUE
Consommation d’énergie de 145 kWh par
an, calculée sur la base du résultat
obtenu pour 24 heures dans des
conditions d’essai normalisées. La
consommation d’énergie réelle dépend
des conditions d’utilisation et de
l’emplacement de l’appareil.
VOLUME NET
146 L
TEMPÉRATURE AJUSTABLE
5 – 20°C
DÉGIVRAGE
Dégivrage automatique
CLASSE CLIMATIQUE
Classe climatique : N
Cet appareil est conçu pour être utilisé à
une température ambiante comprise entre
16°C (température la plus basse) et 32°C
(température la plus haute).
NIVEAU SONORE dB(A) RE 1 pW
45 dB(A)
TYPE DE POSE
Pose libre et encastrable sous plan
Cet appareil est destiné uniquement au stockage du vin.

38
Before use, please read and follow the safety rules and operating instructions in this manual.
Firstly, we would like to thank you for purchasing an AVINTAGE product and hope that this appliance fully
lives up to your expectations.
This appliance enables you to bring your bottles at room temperature or bring them to service
temperature (depending on the bottles) thanks to its wide adjustment range.
1. GENERAL SAFETY INSTRUCTIONS
Before you use your appliance for the first time, please read this
user manual carefully. Store it carefully so that you can refer to it
in the future, if necessary. To reduce the risk of fire, electrical
shock, or injury when using your appliance, follow these basic
precautions.
Generally speaking, your appliance must be maintained by a
qualified professional.
For your safety and correct usage, before installing and first
using
the appliance, read this user manual carefully, including
its hints
and warnings. To avoid unnecessary mistakes and
accidents or to
avoid damage to the appliance, it is important to make sure that all
people using the
appliance are thoroughly familiar with its
operation and safety
features. Save these instructions and be
sure that they remain
with the appliance if it is moved or sold, so
that anyone using it
throughout its life will be properly informed on
its usage and
safety notices. This will ensure optimum operation
of the appliance.
For the safety of life and property and to avoid any risk of injury,
keep the precautions of
these user's instructions as the
manufacturer is not responsible for damages caused by omission.
This appliance is intended exclusively for domestic use and is
intended for the storage of special drink products at a storage
temperature higher than that of a storage compartment for fresh

39
products. Under no circumstances is it intended to keep food
products fresh.
Make sure that your electrical installation's voltage corresponds
to that on the appliance’s nameplate; the appliance must be
connected to an approved, earthed system. Incorrect repairs or
connections can cause safety hazards. Have your electrical
installation checked by a professional, if you are in any doubt.
This unit must be correctly connected to an earthed socket for
your protection. Do not cut off or remove the earth wire on the
mains cable supplied.
For safety reasons, do not use an electrical extension cable.
If your appliance is damaged (e.g. a major impact) or suffers
harm (power surge due to lightning, flood, fire), it may be
dangerous to use. Disconnect the mains plug and have the
appliance checked by an approved professional repairer.
To prevent any danger, do not replace a damaged mains cable
yourself. Contact your retailer, an approved service center or
professional repairer.
This appliance must be positioned such that the mains socket is
accessible. Do not move the appliance once it is full: you might
distort its body beyond repair. The electrical parts must not be
directly accessible.
Keep children away from the appliance.
Do not use this appliance outdoors.
In the event that liquid is accidentally spilled (broken bottle,

40
etc.) on electrical components (motor, etc.), disconnect the
mains plug immediately.
To prevent any risk of fire, electrocution or injury, do not
immerse the mains cable, plug or the appliance itself in water or
any other liquid. Do not handle the appliance with wet hands.
Keep the appliance away from any source of heat and out of
direct sunlight.
Do not allow the mains cable to hang from a table or be in
contact with sharp edges or hot surfaces.
Do not pull on the mains cable - take hold of the plug to
disconnect the appliance.
Ensure that the area where your appliance is positioned can
support its weight when loaded (a 75 cl bottle weighs
approximately 1.3 kg). Your cellar must be placed on a flat
surface. If you have to position it on a rug or carpet, place a
support underneath.
To prevent damaging the door gasket, make sure the door is fully
open when pulling shelves out of the rail compartment.
Safety of children and other vulnerable persons
This appliance can be used by children aged from 8 years and
above, and by persons with reduced physical, sensory or
mental capabilities or lack of experience and knowledge if they
have been given supervision or instruction concerning use of
the appliance in a safe way and understand the hazards
involved.
User cleaning and servicing operations should not be carried

41
out by children, unless they are more than 8 years old and are
supervised.
Keep all packaging away from children as there is risk of
suffocation.
Risk of child entrapment. Child entrapment and suffocation are
not problems of the past. Junked or abandoned appliances are
still dangerous, even if they will “just sit in the garage a few
days”.
If you are discarding the appliance, pull the plug out of the
socket, cut the connection cable (as close to the appliance as
you can) and remove the door to prevent children playing from
suffering an electric shock or from closing themselves inside it.
If this appliance, featuring a magnetic door seals, is to replace
an older appliance having a spring lock (latch) on the door or
lid, be sure to make the spring lock unusable before you discard
the old appliance. This will prevent it from becoming a death
trap for a child.
Keep the appliance and its power cable out of reach of children
less than 8 years old.
Before you throw away your old wine cooler: take off the door.
Leave the shelves in place so that children may not easily climb
inside.
General safety
WARNING — This appliance is intended to be used in household
and similar applications such as:
Staff kitchen areas in shops, offices and other working
environments,
Farm houses and by clients in hotels, motels and other
residential type environments,
Bed and breakfast type environments,

42
Catering and similar non-retail applications.
WARNING — To avoid a hazard due to instability of the
appliance, it must be fixed in accordance with the instructions.
WARNING — Do not store explosive substances such as aerosol
cans with a flammable propellant in this appliance, as they could
leak or release fluids.
WARNING — If the supply cord is damaged, it must be replaced
by the manufacturer, its service agent or similarly qualified
persons in order to avoid a hazard.
WARNING — Keep ventilation openings, in the appliance
enclosure or in the built-in structure, clear of
obstruction and ensure that air can circulate, especially if the appli
ance is recessed into a wall.
WARNING — Do not use mechanical devices or other means to
accelerate the defrosting process, other than those recommended
by the manufacturer.
WARNING — Do not damage the refrigerant circuit.
WARNING — Do not use electrical appliances inside the food
storage compartments of the appliance, unless they are of the
type recommended by the manufacturer.
WARNING — The refrigerant and insulation blowing gas are
flammable. When disposing of the appliance, do so only at an
authorized waste disposal center. Do not expose to flame.
WARNING — The refrigerant of these appliances is R600a,
flammable and explosive articles should not be put in or near the

43
cabinet, to avoid the fire or explode caused.
Refrigerating fluid
The refrigerating circuit in the appliance uses refrigerating
isobutene (R600a), which is a highly inflammable natural gas and
is therefore dangerous for the environment. When transporting or
installing the appliance, ensure that no element of the
refrigerating circuit is damaged. The refrigerating fluid (R600a) is
inflammable.
Caution: risk of fire
If the refrigerant circuit should be damaged:
Avoid opening flames and sources of ignition.
Thoroughly ventilate the room in which the appliance is
situated. It is dangerous to alter the specifications or modify
this product in any way.
Any damage to the cord may cause a short circuit, fire, and/or
electric shock.
Electrical safety
We decline any liability in respect of incidents caused by poor
electrical installation.
The power cord must not be lengthened. Do not use an
extension cable, or adapter, or multi-way socket.
Make sure that the power plug is not crushed or damaged. A
crushed or damaged power plug may overheat and cause a
fire.
Make sure that you can access the main plug of the appliance.
Do not pull the main cable.
Ensure that the appliance is always electrically earthed.

44
If the power plug socket is loose, do not insert the power plug.
There is a risk of electric shock or fire.
You must not operate the appliance without the interior lighting
lamp cover.
Disconnect the appliance before replacing the lighting bulb.
The cellar is only applied with power supply of single phase
alternating current of 220~240V/50Hz.
Do not attempt to replace a damaged power cable, contact your
after-sales service.
The power socket must be easily accessible but out of reach of
children. In case of doubt, contact your installation technician.
Daily use
This appliance is intended to be used exclusively for the
storage of wine.
Do not store flammable gas or liquids in the appliance. There is
a risk of an explosion.
Do not operate any electrical appliances in the appliance
(electric ice cream makers, mixers etc.).
When unplugging always pull the plug from the mains socket
and do not pull on the cable.
Do not place hot items near the plastic components of this
appliance.
The appliance manufactures storage recommendations should
be strictly adhered to. Refer to relevant instructions for storage.
Keep burning candles lamps and other items with naked flames
away from the appliance so that do not set the appliance on
fire.
The appliance is intended for keeping beverages in normal

45
household as explained in this instruction booklet.
The appliance is heavy. Care should be taken when moving it. If
your appliance is equipped with castors, remember that these
are only designed to facilitate minor movements. Do not move
the appliance over long distances.
Never use the base, drawers, doors etc. to stand on or as
supports.
To avoid items falling and causing injury or damage to the
appliance, do not overload the door racks or put food in the
crisper drawers.
Caution: cleaning and servicing
Before carrying out servicing, switch off the power supply and
disconnect the appliance.
When cleaning the appliance, do not use metal objects, steam
systems, volatile fluids, organic solvents or abrasive
substances.
Never clean appliance parts with flammable fluids. The fumes
can create a fire hazard or explosion.
Do not use sharp or pointed objects to remove ice. Use a
plastic scraper.
Important information concerning installation
Avoid locating the unit in moist areas.
Keep the appliance away from direct sunlight and sources of
heat (stove, heater, radiator, etc.). Direct sunlight may affect the
acrylic coating and heat sources may increase electrical
consumption. Extreme cold or hot ambient temperatures may
also cause the appliances not to perform properly.
Plug the wine cooler into an exclusive, properly installed-

46
grounded wall outlet. Do not under any circumstances cut or
remove the third (ground) prong from the power cord. Any
questions concerning power and/or grounding should be
directed toward a certified electrician or an authorized products
service center.
To ensure proper electrical connection, follow the
recommendations given in the present manual.
Unpack the appliance and visually check that it is not damaged.
Do not connect a damaged appliance. Inform your retailer or
point of sale of any damage. In such a case, keep the
packaging.
It is recommended that the appliance be allowed to settle for at
least 24 hours before connecting the electrical power supply, so
that the compressor fluid feed is correct.
Proper air circulation is necessary to avoid overheating. To
ensure sufficient ventilation, observe the installation
recommendations provided.
In order to avoid fire risk, wherever possible, ensure that the
appliance is not in contact with walls or with any hot element
(compressor, condenser). Observe the installation
recommendations.
The appliance should not be placed close to radiators or
cooking hot plates or gas rings.
Check that electrical sockets remain accessible when the
appliance is installed.
Power saving
To limit the electricity consumption of your appliance:
Install it in an appropriate place (see “Installation
instructions”).
Leave the doors open as little time as possible.

47
To ensure that the appliance operates properly, clean the
condenser regularly (see “Maintenance”).
Regularly inspect the door seals and ensure that they are
still closing properly. If this is not the case, contact your after-
sales service.
Trouble shooting
Any electrical work should be carried out by a qualified and
skilled technician.
The appliance should be repaired by an accredited repair
centre, using only manufacturer’s original spare parts.
The appliance is designed for home use only. The manufacturer
declines any liability whatsoever in the case of other use.
R600a
Safety instructions
Caution — Do not obstruct the ventilation grills on the appliance.
Keep ventilation openings in the appliance enclosure or in the
structure for building-in clear of obstruction.
Caution — Do not store explosive substances, such as aerosol
cans containing an inflammable propellant, in the appliance.
Caution — Do not damage the refrigerating circuit in the
appliance.
Caution — The refrigerating units use isobutane (R600a), and
should not be placed close to ignition sources (for example,
electrical contacts that are exposed or open contacts that could
be closed by the refrigerating fluid in the event of a leak). The

48
refrigerating fluid type is specified on the power cabinet
identification plate.
Caution — Do not use electrical equipment in the compartments
of the appliance, unless they are of the type recommended by the
manufacturer.
This appliance meets the requirements of all applicable European directives and their amendments,
and notably complies with the following standards:
2011/65/EU (ROHS)
2014/35/EU on electrical safety
2014/30/EU on electromagnetic compatibility
643/2009/CE relating to energy labels
2. TECHNICAL DATA
Below is an example of the nameplate:
The nameplate attached to the inside or rear of the appliance (depending on the model) includes the
entire information specific to your appliance.
We recommend that you make a note of its serial number in this booklet prior to installation, so that you
can refer to it later (technical work, request for assistance, etc.).
Once the appliance is installed and loaded, access to it is not so easy.
CAUTION: no assistance can be provided without this information.

49
3. INSTALLATION INSTRUCTIONS
Before using this appliance
Remove the exterior and interior packing.
Before connecting the appliance to the power source, let it stand upright for approximately 24 hours.
This will reduce the possibility of a malfunction in the cooling system from handling during
transportation.
Clean the interior surface with lukewarm water using a soft cloth.
When disposing your appliance, please choose an authorized disposal site.
Place your wine cooler on a floor that is strong enough to support it when it is fully loaded. To level
your Wine cooler, adjust the front leveling leg at the bottom of the wine cooler.
Adequate ventilation is required, do not block the front air outlet.
Not designed for placement in adage or basement.
The appliance is for indoor use only.
This wine cellar is designed for free-standing or built-under installation.
Connect the cellar to a single socket, leaving a 30 mm gap between the back of the cellar and the
wall. Be careful to support it, so that your wine cellar is perfectly level (use of a spirit level is
recommended). This will prevent any movement due to instability, causing noise and vibration, and will
ensure that the door seals perfectly.
This appliance is intended to be used exclusively for the storage of wine.
This appliance is using flammability refrigerant. So never damage the cooling pipe work during the
transportation.
Attention
Store wine in sealed bottles.
Do not overload the cabinet.
Do not open the door unless necessary.
Do not cover shelves with aluminum foil or any other shelf material which may prevent air circulation.
Should the wine cooler be left empty for long periods it is suggested that the appliance is unplugged,
and after careful cleaning, leave the door ajar to allow air to circulate inside the cabinet in order to
avoid possible condensation, mold or odors forming.
CAUTION: please keep the appliance away from substance, which can cause ignition.
Ambient room temperature limits
This appliance is designed to operate in ambient temperatures specified by its temperature class marked
on the rating plate.
CLASS
SYMBOL
AMBIENT TEMPERATURES RANGE (°C)
Extended temperate
SN
From +10 to +32
Temperate
N
From +16 to +32
Subtropical
ST
From +16 to +38
Tropical
T
From +16 to +43

50
Built-in installation drawings
AVU8X(/IX)
AVU23SX(/IX)

51
AVU41SXDPA(/IX)
AVU52SX(/IX) AVU54SXDZA(/IX)

52
AVU53CDZA PRO51C/1
Reversing the door
The door can be changed from left and right side. No special requirement, all the door is opened from left
side. If required to open from right side please refer to the following direction.
AVU8X(/IX)

53
1. Lower hinge (right) 2. Screws 3. Door axis
4. Door 5. Top hinge (right) 6. Hinge screws
7. Top hinge (left) 8. Lower hinge (left)
1. Open the door to 90 degrees, take out two screws (2) from the lower door axis (3), remove the door
(4) and door axis (Fig. A). Position the door (4) safely (Fig. A and B).
2. Take out three hinge screws (6) from the top hinge (right) (5) and remove it as well as the lower hinge
(right) (Fig. C).
3. Install the spare top hinge (left) (7) on the top left of the cabinet with three screws (Fig. D). Install the
spare lower hinge (left) (8) according to the above procedure (Fig. E).
4. The door opens to 180 degrees. Install the door in the same way as it was removed and fix it so that
the door is aligned.
AVU23SX(/IX) AVU52SX(/IX)
1. Lower hinge (right) 2. Screws 3. Door axis
4. Door 5. Top hinge (Right) 6. Hinge screws
7. Top hinge (left) 8. Decorative nail 9. Lower hinge (left)
10. Door limit device 11. Screw 12. Plug
1. Open the door to 90 degrees, remove the two screws (2) from the lower door axis (3), remove the door
(4) and door axis (Fig. A).
2. Position the door (4) safely and remove the plug (12) from the top of the door frame. Unscrew one
screw (11) at the bottom and remove the door limit device (10). Install the door limit device (10) at the
top of the door frame. Please use the spare plug (12) to block the hole at the top of the door frame
(Fig. A/B).
3. Take out three hinge screws (6) from the upper hinge (right) (5) and remove it (Fig. C).
4. Remove the decorative nail (8) from the top left of the cabinet and install the spare top hinge (left) (7)
on the top left of the cabinet with three screws (Fig. D).
5. Install the spare lower hinge (left) (9) according to the above procedure (Fig. E).

54
6. The door opens to 180 degrees. Install the door in the same way as it was removed and fix it so that
the door is aligned.
7. Block the hole at the top right of the cabinet with the spare decorative nail (8).
AVU53CDZA AVU54SXDZA(/IX) PRO51C/1
1. Lower hinge (right) 2. Screws 3. Door axis
4. Door 5. Top hinge (right) 6. Hinge screws
7. Top hinge (left) 8. Decorative nail 9. Lower hinge (left)
1. Open the door to 90 degrees, take out two screws (2) from the lower door axis (3), remove the door
(4) and door axis (Fig. A).
2. Position the door (4) safely.
3. Take out three hinge screws (6) from the top hinge (right) (5) and remove it. (Fig. C)
4. Remove the decorative nail (8) from the top left of the cabinet and install the spare top hinge (Left) (7)
on the top left of the cabinet with three screws. (Fig. D)
5. Install the spare lower hinge (left) (9) according to the above procedure. (Fig. E)
6. The door opens to 180 degrees. Install the door in the same way as it was removed and fix it so that
the door is aligned.
7. Block the hole at the top right of the cabinet with the spare decorative nail (8).

55
4. OPERATING INSTRUCTIONS
It is recommended that you installed your appliance in a place where the ambient temperature is
between 16-32°C. If the ambient temperature is above or below recommended temperatures, the
performance of the unit may be affected and it may not be possible to obtain temperature between 5-
20°C or 5-10°C/10-20°C (depending on the model).
AVU8X(/IX) / AVU23SX(/IX) AVU41SXDPA(/IX) AVU52SX(/IX) PRO51C/1
“RUN”
Power indicator
button
To turn the appliance on or off.
Press and hold this button for around 3 seconds.
button
Inner lighting control button
Display
Electronic temperature display
button
+ temperature setting button
button
- temperature setting button
You can choose the desired chamber temperature by using the “ / ” buttons. The temperature
selected increases/decreases by 1°C with each button press.
Temperatures between 5 and 20°C or between 5 and 10°C / 10 and 20°C (depending on the model) can
be selected. Once the desired temperature has been selected, the display will flash for 5s before showing
the current internal cooler temperature. The set temperature can be viewed at any time by pressing and
holding the temperature select buttons for 5s.
In the event of a power cut, all previously selected temperature settings will be deleted and each chamber
will re-initialize to the factory-preset temperature of 12°C.

56
AVU53CDZA AVU54SXDZA(/IX)
“RUN”
Power indicator
button
To turn the appliance on or off.
Press and hold this button for around 3 seconds.
button
Inner lighting control button
Display
Upper chamber electronic display
Display
Lower chamber electronic display
Bouton
Upper chamber temperature setting button
Bouton
Lower chamber temperature setting button
Press “ ” to adjust the upper chamber temperature. The relevant chamber display will start to flash
and each press on the button will alter the temperature by 1°C. Once the lowest set temperature of 5°C is
reached, the display automatically changes to the highest set temperature of 10°C. Once selected, the
display will flash for approximately 5s before showing the current internal temperature of the cellar. The
set temperature can be viewed at any time by pressing and holding the temperature select buttons for 5s.
Press “ ” to set the upper chamber temperature.. The relevant chamber display will start to flash
and each press on the button will alter the temperature by 1°C. Once the lowest set temperature of 10°C
is reached, the display automatically changes to the highest set temperature of 20°C. Once selected, the
display will flash for approximately 5s before showing the current internal temperature of the cellar. The
set temperature can be viewed at any time by pressing and holding the temperature select buttons for 5s.
In the event of a power cut, all previously selected temperature settings will be deleted and each chamber
will re-initialize to the factory-preset temperature of 6°C for the upper chamber and 12°C for the lower
chamber.
Function instruction
Temperature alarm:
If inner temperature is higher than 23°C after running 10 hours with power, the “HI” is shown in display
panel, and the buzzer alarm after one hour continuously. It informs that the inner temperature is too
high, please check the reason. If inner temperature is lower than 0°C, the “LO” is shown in display
panel, and the buzzer alarm too will sound.
Temperature recollection function:
In the event of a power interruption, wine cabinet will remember the previous temperature settings and
when the power is recovered, the cabinet temperature will go back the same setting temperature as
power off.

57
Internal light
In order to reduce energy consumption, this wine cabinet will automatically switch off the LED lights after
10 minutes.
If you want the LED light to remain on continuously, this is possible. Please press and hold the
button for 5 seconds, the display will show "LP". After 4 seconds the display will revert back to normal,
and the light will remain on until manually switched off.
If you want to revert back and conserve energy (recommended), please press and hold the button for
5 seconds, the display will show "LF". After 4 seconds the display will revert back to normal, and the light
will automatically switch off after 10 minutes.
5. EQUIPMENT
The climate control system
According to advice from specialists, the ideal temperature for storing wine is around 12°C, within a
bracket of 10 to 14°C. Do not confuse this with service temperature, which varies between 5 and 20°C,
depending on the specific nature of the wine.
It is especially important to avoid sudden changes in temperature. Designed by specialists for oenophiles,
this appliance, unlike a simple refrigerator, takes into account the sensitivity of grand cru wines to sudden
variations in temperature by ensuring the close control of a constant average temperature.
The anti-vibration system
The refrigeration compressor is equipped with special dampers (silent-blocks) and the inner space is
insulated from the body by a thick layer of polyurethane foam. These characteristics prevent the
transmission of vibration to your wines.
The humidification system
This appliance is fitted with a tray (according to the model) that maintains the correct level of humidity. If
the humidity is too low, top up the level in the reservoir to three quarters of its capacity. Check the level
from time to time and add water if necessary. Ensure that the tray always contains water.
Designed by specialists for oenophiles, Avintage brand has taken into account the sensitivity of corks to
too low a level of ambient humidity. This is why the tray should be placed on the shelf below the fan
situated in the bottom, to provide minimum humidity. Be sure to check the water level, if you are storing
wines over a long period and you are not using the appliance solely for bringing wines to service
temperature (with a quick rotation of bottles).
Make sure that the tray full of water is completely stable to avoid any water falls or leaks.
The anti-UV system
Light accelerates the ageing of wine. In our solid door cellars, your wines are naturally protected, on
condition, of course, that the door is not opened too often. This glass-door model has been specially
treated and filters out harmful ultraviolet rays, thus ensuring your wines are perfectly shielded.
Defrosting
Your appliance is equipped with an automatic defrost cycle. When a cooling cycle finishes, the
appliance’s refrigerated surfaces are defrosted automatically. The defrost water is channeled into a
condensates evaporation tray which is located in the back of the appliance near the compressor. The
heat produced by the compressor then evaporates the condensates collected in the tray.

58
The winter system (depending on the model)
The winter kit is a frost protection system which enables the cellar to operate in an environment where the
temperature is between 0 and 32°C. A sensor located inside the appliance triggers a low power electrical
element when the inner temperature of the wine cellar becomes inferior by 3°C than the set temperature.
This is a low power element to avoid sudden rises in the temperature of the wine and so avoid thermal
shocks that are damaging to the preservation of the wine. The kit is intended to raise the cellar’s internal
temperature even before there is a thermal exchange with the bottles.
The kit is designed to heat the internal temperature of the cellar even before a heat exchange has
occurred with the bottles. The winter system keeps the temperature inside the wine cellar the same as the
programmed temperature. When the system is activated and the internal temperature reaches the set
temperature, the system stops.
Shelves
To prevent damage to the door seal, ensure that the door is fully open before pulling out the shelves
to add or remove bottles.
For easier access to the contents of the shelves, slide the shelf out approximately one third of the
way. The shelves are, however, fitted with a stop to prevent the bottles falling out.
To remove or reposition the shelves, incline the shelf as indicated in the diagram, then push or pull as
required.
For AVU41SXDPA(/IX)
Place the shelves in the spaces provided.
a. Spare part cardboard box b. Small shelf c. Large shelf
1. After removing the wrapping, take the spare parts cardboard box (a) out of the cabinet.

59
2. There are four small shelves (b) in the left compartment. Remove the two lower shelves.
3. There are four large shelves(c) in the right compartment. Remove the two upper shelves.
4. Swap the large and small shelves (fig 2). Place the two small shelves in the upper positions and the
two large shelves in the lower positions in both compartments.
5. When the shelves have been positioned correctly, you can use the wine cooler according to the
instruction manual.
Foot sliders
Two foot sliders are provided with your appliance, allowing you to move it easily when your feet are
adjusted to maximum height. The foot sliders have to be installed in parallel under the feet in accordance
with the location for the front and for the back.
Enhanced safety
Since this range of appliances is intended for storing items of value, we have been careful to select
quality components and to design suitable manufacturing techniques to ensure optimum safety in
operation.
Installing the handle
Your appliance has a stainless steel handle. To fit it, simply screw it onto the door with the screws
supplied as per the diagram below, having first removed the seal.
Front
Back
Back
Front
Back
Front
Foot sliders
Foot slider

60
6. LOADING
The maximum recommended loading quantities for bottles are given as guidelines and are indicative only;
they provide a quick estimate of the size of the appliance (similar to the capacity of a refrigerator
expressed in liters).
They correspond to tests conducted with a standard bottle: the standard “75 cl light Bordeaux” bottle -
standards apply the geographical origin of each bottle shape (Bordeaux, Burgundy, Provence, etc.) and a
type (traditional, heavy, light, flute, etc.), each with its own diameter and height.
In reality and in extreme cases, you could store more bottles by stacking the same type of bottle without
using shelves, but a varied cellar comprises a wide variety of bottles and the practical aspect of everyday
cellar management limits its capacity. You will therefore probably load the appliance a little less than the
recommended maximum.
Types of bottle:
We see here 4 kinds of 75 cl wine bottles: Burgundy and Bordeaux wine bottles of different dimensions.
There are many others of all shapes and sizes. You will note the storage differences depending on bottle
heights, diameters and alternating position method.
For example, if a wine cellar is loaded only with Burgundy wine bottles, there will be approximately 30%
fewer bottles than the initial quantity calculated for Bordeaux bottles.
Criss-crossing types
Top-to-bottom neck-to-neck:
Note the difference in depth!
Top-to-bottom neck between bottle bodies:
Increased loading.

61
Examples of serving temperatures
Opinions vary, and the ambient temperature too, but many people agree on the following:
Prestigious Bordeaux wines – Reds 16 – 17°C
Prestigious Burgundy wines – Reds 15 – 16°C
Prestigious dry white vintages 14 – 16°C
Light, young, fruity reds 11 – 12°C
Provence rosés, primeur wines 10 – 12°C
Dry whites and vin de pays reds 10 – 12°C
Vin de pays whites 8 – 10°C
Champagnes 7 – 8°C
Sweet wines 6°C
7. CARE AND MAINTENANCE
Before cleaning your appliance (something that should be done regularly), disconnect it by removing the
plug or by pulling the fuse on the circuit.
Before using your appliance for the first time and regularly after that, we recommend that you clean the
inside and outside (front, side and top) with warm mixed with a gentle cleaning product. Rinse with clean
water and allow drying before reconnecting. Do not use solvents or abrasives.
When the appliance is switched on for the first time, there may be a residual odor. In that case, runt the
appliance empty for a few hours at the coldest possible temperature. The cold will kill any odors.
In case of a power cut
Most power cuts are resolved within a short time. A power cut of 1 or 2 hours will not affect the
temperature in your cabinet. To protect your wines during a power cut, avoid opening the door as much
as possible. During very long power cuts, take the necessary measures to protect your wine.
If the appliance is disconnected or if there is a power cut, you must wait three to five minutes before
re- starting. If you try to re-start before this time, the compressor will only re-start after 3 to 5 minutes
(if the temperature requires).
When switching on for the first time or following a prolonged shutdown, it is possible that when re-
starting, the temperatures selected and those displayed are not the same. This is normal. It will take a
few hours before they stabilize.
Vacation time
Short vacations: leave the wine cooler operating during vacations of less than three weeks.
Long vacations: if the appliance will not be used for several months, remove all items and turn off the
appliance. Clean and dry the interior thoroughly. To prevent odor and mold growth, leave the door
open slightly: blocking it open if necessary.
Moving your wine cooler
Remove all items.
Securely tape down all loose items (shelves) inside your appliance.
Turn the adjustable leg up to the base to avoid damage.
Tape the door shut.
Be sure the appliance stays secure in the upright position during transportation. Also protect outside
of appliance with a blanket, or similar item.

62
Energy saving tips
The wine cooler should be located in the coolest area of the room (but at least at 16°C), away from
heat producing appliances, and out of the direct sunlight.
Ensure that the unit is adequately ventilated. Never cover air vents.
Only open the door for as long as necessary.
8. IN THE EVENT OF A BREAKDOWN
Despite the care we take during production, a breakdown can never be totally ruled out. Before contacting
your retailer’s after-sales department, please check that:
The appliance is properly plugged in
There is not a power cut in progress
The breakdown is not one of those described in the table at the end of this manual
IMPORTANT: if the power cable supplied is damaged, it must be replaced by the manufacturer, a
service centre approved by the brand or the retailer. In all events, it must be replaced by qualified
personnel in order to avoid any risk of injury.
IF THESE CHECKS REVEAL NOTHING, THEN CONTACT YOUR RETAILER’S AFTER-SALES DEPARTMENT.
CAUTION!
Unplug the appliance before carrying out any maintenance or
repair work.

63
9. TROUBLE SHOOTING
You can solve many common Wine cooler problems easily, saving you the cost of a possible service call.
Try the suggestions below to see if you can solve the problem before calling the servicer.
PROBLEM
POSSIBLE CAUSE
Wine cooler does not operate
Not plugged in
The appliance is turned off
The circuit breaker tripped or a blown fuse
Wine cooler is not cold enough
Check the temperature control setting
External environment may require a higher
setting
The door is opened too often
The door is not closed completely
The door gasket does not seal properly
Turns on and off frequently
The room temperature is hotter than normal
A large amount of contents has been added to
the wine cooler
The door is open too often
The door is not closed completely
The temperature control is not set correctly
The door gasket does not seal properly
The light does not work
Not plugged in
The circuit breaker tripped or a blown fuse
The bulb has burned out, contact your after-
sales service
The light switch is “OFF”
Vibrations
Check to assure that the wine cooler is level
The wine cooler seems to make too much noise
The rattling noise may come from the flow of
the refrigerant, which is normal
As each cycle ends, you may hear gurgling
sounds caused by the flow of refrigerant in your
wine cooler
Contraction and expansion of the inside walls
may cause popping and crackling noises
The wine cooler is not level
The door will not close properly
The wine cooler is not level
The door was reversed and not properly
installed
The gasket is dirty
The shelves are out of position
Replacing light
This appliance consists of light-emitting diodes (LEDs). This type of diode cannot be changed by the
consumer. The lifetime of these LEDs is normally sufficient for no change to be made. If however, and
despite all the care taken during the manufacture of your wine cellar, the LEDs were defective, please
contact your after-sales service for any intervention.

64
10. ENVIRONMENT
This appliance is marked according to the European directive 2012/19/CE on Waste
Electrical and Electronic Equipment (WEEE). By ensuring this product is disposed of
correctly, you will help prevent potential negative consequences for the environment and
human health, which could otherwise be caused by inappropriate waste handling of this
product.
The symbol on the product, or on the documents accompanying the product, the Crossed Out Wheelie
Bin, indicates that this appliance may not be treated as household waste. Instead it shall be handed over
to the applicable collection point for the recycling of electrical and electronic equipment, or, if you are
buying an equivalent product, to the retailer of the new product.
The user is responsible for taking the appliance to the appropriate collection center at the end of its useful
life. Selective and appropriate collection for the recycling of no longer used appliances and their disposal
and destruction in an environmentally friendly manner, helps to prevent potential negative effects on the
environment and health, and encourages the recycling of materials used to make the product.
For more detailed information about treatment, recovery and recycling of this product, please contact your
local authority, your household waste disposal service or the retailer where you purchased the product.
11. WARNING
As we continuously improve our products for the benefit of our customers, we reserve the right to modify
technical characteristics without notice.
Warranties for AVINTAGE brand products are offered exclusively by selected retailers. No part of these
instructions may be considered as a supplementary guarantee.
FRIO ENTREPRISE cannot be held liable for errors or technical or editorial omissions in this document.
Non-binding document.

65
EUROPEAN DATA SHEET
according to the regulations (UE) N°1060/2010
-
SERVICE WINE CABINET
BRAND
AVINTAGE
COMMERCIAL REFERENCE
AVU8X(/IX)
POWER SUPPLY
220-240 V / 50 Hz
PRODUCT DIMENSIONS (W x D x H)
145 x 547.5 x 820 mm
NET WEIGHT
20 kg
APPLIANCE CATEGORY
2
ENERGY EFFICIENCY CLASS
A
ENERGY CONSUMPTION
Energy consumption 135 kWh per year
calculated on the basis of results obtained
over 24 hours in standardized test
conditions. Actual energy consumption
depends on conditions of use and the
location of the appliance.
NET VOLUME
23 L
ADJUSTABLE TEMPERATURES
5 – 20°C
NO FROST
Automatic defrost
CLIMATE CLASS
Climate class: N
This appliance is designed to be used at
an ambient temperature of between 16°C
(lowest) and 32°C (highest).
ACOUSTIC EMISSIONS IN AIR IN dB(A) RE 1 pW
44 dB(A)
INSTALLATION TYPE
Built-under installation
This appliance is intended exclusively for the storage of wine.

66
EUROPEAN DATA SHEET
according to the regulations (UE) N°1060/2010
-
SERVICE WINE CABINET
BRAND
AVINTAGE
COMMERCIAL REFERENCE
AVU23SX(/IX)
POWER SUPPLY
220-240 V / 50 Hz
PRODUCT DIMENSIONS (W x D x H)
295 x 571 x 820 mm
NET WEIGHT
28 kg
APPLIANCE CATEGORY
2
ENERGY EFFICIENCY CLASS
A
ENERGY CONSUMPTION
Energy consumption 140 kWh per year
calculated on the basis of results obtained
over 24 hours in standardized test
conditions. Actual energy consumption
depends on conditions of use and the
location of the appliance.
NET VOLUME
56 L
ADJUSTABLE TEMPERATURES
5 – 20°C
NO FROST
Automatic defrost
CLIMATE CLASS
Climate class: N
This appliance is designed to be used at
an ambient temperature of between 16°C
(lowest) and 32°C (highest).
ACOUSTIC EMISSIONS IN AIR IN dB(A) RE 1 pW
43 dB(A)
INSTALLATION TYPE
Free-standing and built-under installation
This appliance is intended exclusively for the storage of wine.

67
EUROPEAN DATA SHEET
according to the regulations (UE) N°1060/2010
-
SERVICE WINE CABINET
BRAND
AVINTAGE
COMMERCIAL REFERENCE
AVU41SXDPA(/IX)
POWER SUPPLY
220-240 V / 50 Hz
PRODUCT DIMENSIONS (W x D x H)
595 x 571 x 820 mm
NET WEIGHT
48 kg
APPLIANCE CATEGORY
2
ENERGY EFFICIENCY CLASS
A
ENERGY CONSUMPTION
Energy consumption 144 kWh per year
calculated on the basis of results obtained
over 24 hours in standardized test
conditions. Actual energy consumption
depends on conditions of use and the
location of the appliance.
NET VOLUME
59.5 L x 2
ADJUSTABLE TEMPERATURES
5 – 20°C
NO FROST
Automatic defrost
CLIMATE CLASS
Climate class: N
This appliance is designed to be used at
an ambient temperature of between 16°C
(lowest) and 32°C (highest).
ACOUSTIC EMISSIONS IN AIR IN dB(A) RE 1 pW
43 dB(A)
INSTALLATION TYPE
Free-standing and built-under installation
This appliance is intended exclusively for the storage of wine.

68
EUROPEAN DATA SHEET
according to the regulations (UE) N°1060/2010
-
SERVICE WINE CABINET
BRAND
AVINTAGE
COMMERCIAL REFERENCE
AVU52SX(/IX)
POWER SUPPLY
220-240 V / 50 Hz
PRODUCT DIMENSIONS (W x D x H)
595 x 571 x 820 mm
NET WEIGHT
44 kg
APPLIANCE CATEGORY
2
ENERGY EFFICIENCY CLASS
A
ENERGY CONSUMPTION
Energy consumption 145 kWh per year
calculated on the basis of results obtained
over 24 hours in standardized test
conditions. Actual energy consumption
depends on conditions of use and the
location of the appliance.
NET VOLUME
146 L
ADJUSTABLE TEMPERATURES
5 – 20°C
NO FROST
Automatic defrost
CLIMATE CLASS
Climate class: N
This appliance is designed to be used at
an ambient temperature of between 16°C
(lowest) and 32°C (highest).
ACOUSTIC EMISSIONS IN AIR IN dB(A) RE 1 pW
44 dB(A)
INSTALLATION TYPE
Free-standing and built-under installation
This appliance is intended exclusively for the storage of wine.

69
EUROPEAN DATA SHEET
according to the regulations (UE) N°1060/2010
-
SERVICE WINE CABINET
BRAND
AVINTAGE
COMMERCIAL REFERENCE
AVU53CDZA
POWER SUPPLY
220-240 V / 50 Hz
PRODUCT DIMENSIONS (W x D x H)
595 x 571 x 820 mm
NET WEIGHT
50 kg
APPLIANCE CATEGORY
2
ENERGY EFFICIENCY CLASS
A
ENERGY CONSUMPTION
Energy consumption 145 kWh per year
calculated on the basis of results obtained
over 24 hours in standardized test
conditions. Actual energy consumption
depends on conditions of use and the
location of the appliance.
NET VOLUME
134 L
ADJUSTABLE TEMPERATURES
5 – 10°C / 10 – 20°C
NO FROST
Automatic defrost
CLIMATE CLASS
Climate class: N
This appliance is designed to be used at
an ambient temperature of between 16°C
(lowest) and 32°C (highest).
ACOUSTIC EMISSIONS IN AIR IN dB(A) RE 1 pW
45 dB(A)
INSTALLATION TYPE
Free-standing and built-under installation
This appliance is intended exclusively for the storage of wine.

70
EUROPEAN DATA SHEET
according to the regulations (UE) N°1060/2010
-
SERVICE WINE CABINET
BRAND
AVINTAGE
COMMERCIAL REFERENCE
AVU54SXDZA(/IX)
POWER SUPPLY
220-240 V / 50 Hz
PRODUCT DIMENSIONS (W x D x H)
595 x 571 x 820 mm
NET WEIGHT
50 kg
APPLIANCE CATEGORY
2
ENERGY EFFICIENCY CLASS
A
ENERGY CONSUMPTION
Energy consumption 145 kWh per year
calculated on the basis of results obtained
over 24 hours in standardized test
conditions. Actual energy consumption
depends on conditions of use and the
location of the appliance.
NET VOLUME
134 L
ADJUSTABLE TEMPERATURES
5 – 10°C / 10 – 20°C
NO FROST
Automatic defrost
CLIMATE CLASS
Climate class: N
This appliance is designed to be used at
an ambient temperature of between 16°C
(lowest) and 32°C (highest).
ACOUSTIC EMISSIONS IN AIR IN dB(A) RE 1 pW
45 dB(A)
INSTALLATION TYPE
Free-standing and built-under installation
This appliance is intended exclusively for the storage of wine.

71
EUROPEAN DATA SHEET
according to the regulations (UE) N°1060/2010
-
SERVICE WINE CABINET
BRAND
AVINTAGE
COMMERCIAL REFERENCE
PRO51C/1
POWER SUPPLY
220-240 V / 50 Hz
PRODUCT DIMENSIONS (W x D x H)
595 x 571 x 820 mm
NET WEIGHT
48 kg
APPLIANCE CATEGORY
2
ENERGY EFFICIENCY CLASS
A
ENERGY CONSUMPTION
Energy consumption 145 kWh per year
calculated on the basis of results obtained
over 24 hours in standardized test
conditions. Actual energy consumption
depends on conditions of use and the
location of the appliance.
NET VOLUME
146 L
ADJUSTABLE TEMPERATURES
5 – 20°C
NO FROST
Automatic defrost
CLIMATE CLASS
Climate class: N
This appliance is designed to be used at
an ambient temperature of between 16°C
(lowest) and 32°C (highest).
ACOUSTIC EMISSIONS IN AIR IN dB(A) RE 1 pW
45 dB(A)
INSTALLATION TYPE
Free-standing and built-under installation
This appliance is intended exclusively for the storage of wine.

72
Lesen Sie vor dem Gebrauch bitte die Bedienungsanleitung durch und befolgen Sie die darin
angegebenen Sicherheits- und Gebrauchsanweisungen.
Zunächst danken wir Ihnen für das Vertrauen, das Sie der AVINTAGE Gruppe mit dem Erwerb dieses
Gerätes entgegen gebracht haben und hoffen, dass es Ihren Erwartungen voll gerecht wird.
Durch den breit angelegten Temperatur-Einstellbereich haben Sie mit diesem Gerät die Wahl, Ihre
Flaschen (je nachdem, über welche Flaschen Sie verfügen) zu lagern oder sie auf Serviertemperatur zu
bringen.
1. ALLGEMEINE SICHERHEITSHINWEISE
Vor der Erstinbetriebnahme des Gerätes bitte die
Bedienungsanleitung sorgfältig lesen. Sie sorgsam aufbewahren,
um später bei Bedarf darin nachschlagen zu können. Um die
Gefahr eines Brandes oder Stromschlags und von Verletzungen
zu verringern, sollten Sie bei der Benutzung Ihres Geräts die
folgenden grundlegenden Sicherheitshinweise beachten.
Das Gerät muss grundsätzlich durch eine qualifizierte Fachkraft
gewartet werden.
Lesen Sie die Bedienungsanleitung, einschließlich der darin
enthaltenen Warnhinweise und nützlichen Tipps, zu Ihrer
Sicherheit und zum korrekten Gebrauch des Geräts vor der
Installation und Inbetriebnahme des Geräts aufmerksam durch.
Um das Gerät nicht zu beschädigen und/oder unnötige
Verletzungen zu vermeiden, ist es wichtig, dass die Personen, die
das Gerät benutzen, seine Funktionsweise sowie seine
Sicherheitsfunktionen gut kennen. Bewahren Sie die
Bedienungsanleitung zum späteren Nachschlagen auf und
verstauen Sie sie neben dem Gerät, damit sie beim Verkauf bzw.
Umzug zusammen mit dem Gerät übergeben wird. So kann
gewährleistet werden, dass das Gerät optimal funktioniert.
Bewahren Sie die Bedienungsanleitung auf, um der
Verletzungsgefahr vorzubeugen. Der Hersteller kann nicht für
Schäden durch unsachgemäßen Umgang mit dem Gerät haftbar

73
gemacht werden.
Das Gerät ist ausschließlich für den Hausgebrauch und die
Lagerung von bestimmten Getränken bei einer Lagertemperatur
bestimmt, die höher ist als diejenige eines Lagerfachs für
Frischprodukte. Es ist unter keinen Umständen zum Frischhalten
von Lebensmitteln bestimmt.
Sich vergewissern, dass die Spannung der elektrischen
Installation derjenigen auf dem Typenschild des Geräts entspricht.
Das Gerät muss an eine vorschriftsmäßig geerdete Steckdose
angeschlossen werden. Fehlerhafte Reparaturen oder
Anschlüsse können zu Sicherheitsrisiken führen. Im Zweifel ist
die elektrische Installation durch eine Elektrofachkraft prüfen zu
lassen.
Zu Ihrem Schutz muss das Gerät ordnungsgemäß an eine
Schukosteckdose angeschlossen werden. Auf keinen Fall den
Schutzleiter am mitgelieferten Netzkabel abschneiden oder
entfernen.
Aus Sicherheitsgründen kein Verlängerungskabel verwenden.
Ist das Gerät beschädigt (z.B. durch einen starken Stoß) oder hat
es Schaden erlitten (Stromstoß infolge Blitzschlag,
Wasserschaden, Brand), kann sich sein Gebrauch als gefährlich
erweisen. Den Netzstecker aus der Steckdose ziehen und das
Gerät durch eine zugelassene Reparaturwerkstatt prüfen lassen.
Zur Vorbeugung von Gefahren ein beschädigtes Netzkabel nicht
selbst austauschen. Den Händler, eine zugelassene
Reparaturwerkstatt oder eine Elektrofachkraft kontaktieren.
Das Gerät muss so aufgestellt werden, dass die Netzsteckdose

74
erreichbar ist. Das Gerät nicht verstellen, wenn es gefüllt ist – das
Gehäuse könnte sich verziehen und völlig unbrauchbar werden.
Die Elektroteile dürfen nicht direkt erreichbar sein.
Kinder von dem Gerät fernhalten.
Das Gerät nicht im Freien verwenden.
Sollte versehentlich Flüssigkeit (zerbrochene Flasche, usw.) auf
elektrische Bauteile (Motor, usw.) auslaufen, sofort den
Netzstecker aus der Steckdose ziehen.
Zur Vorbeugung der Brand-, Stromschlag- oder
Verletzungsgefahr das Netzkabel, den Netzstecker bzw. das
Gerät nicht in Wasser oder sonstige Flüssigkeiten tauchen. Das
Gerät nicht mit feuchten Händen anfassen.
Das Gerät von Wärmequellen fernhalten und vor direkter
Sonnenbestrahlung schützen.
Das Netzkabel nicht von einem Tisch hängen und mit scharfen
Kanten oder heissen Flächen in Berührung kommen lassen.
Nicht am Netzkabel, sondern am Netzstecker ziehen, um das
Gerät vom Stromnetz zu trennen.
Sicherstellen, dass die Fläche, auf der das Gerät aufgestellt wird,
sein Gewicht tragen kann, wenn es gefüllt ist (eine 75 cl Flasche
wiegt ungefähr 1.3 kg). Der Weinschrank muss auf einer ebenen
Fläche platziert werden. Beim Aufstellen des Gerätes auf einem
Teppich bzw. Teppichboden eine Unterlage darunter legen.
Um Schäden an der Türdichtung zu vermeiden, müssen Sie vor
dem Herausnehmen der Roste aus den Fächern sicherstellen,

75
dass die Tür ganz offen ist.
Sicherheit von Kindern und hilfsbedürftigen Personen
Das Gerät kann von Kindern im Alter von 8 Jahren und mehr
sowie Personen mit eingeschränkten körperlichen,
sensorischen oder geistigen Fähigkeiten oder die den
Gebrauch des Gerätes nicht erlernt haben, benutzt werden,
wenn sie von einer sachkundigen Person, die sich der damit
verbundenen Risiken bewusst ist, betreut werden. Kinder
dürfen nicht mit dem Gerät spielen.
Die Reinigung und Benutzerwartung dürfen nicht von Kindern
durchgeführt werden, außer sie sind mindestens 8 Jahre alt und
werden dabei überwacht.
Alle Verpackungen außerhalb der Reichweite von Kindern
aufbewahren, da Erstickungsgefahr besteht.
Es besteht die Gefahr, dass Kinder im Gerät eingeschlossen
werden. Leider kommt es immer wieder vor, dass Kinder in
solchen Geräten eingeschlossen werden und ersticken.
Weggeworfene oder zurückgelassene Geräte sind immer noch
gefährlich, auch wenn man sie „nur für ein paar Tage“ in der
Garage abstellt.
Bei der Entsorgung des Gerätes den Netzstecker aus der
Steckdose ziehen und das Netzkabel abschneiden (möglichst
dicht am Gerät) und die Tür entfernen, damit Kinder nicht damit
spielen und einen Stromschlag erleiden oder sich im
Geräteinneren einschließen können.
Muss das mit einer magnetischen Türdichtung ausgestattete
Gerät durch ein anderes Gerät mit einem Schnappschloss an
der Tür bzw. Dichtung ersetzt werden, vor der Entsorgung des
Altgerätes prüfen, dass das Schnappschloss funktionsunfähig
ist. So lässt sich vermeiden, dass das Gerät zu einer Falle für
Kinder wird.

76
Das Gerät und das Netzkabel außerhalb der Reichweite von
Kindern unter 8 Jahren aufbewahren.
Vor der Entsorgung Ihres ausgedienten Weinklimaschranks
sollten Sie die Gerätetür entfernen. Lassen Sie die
Zwischenböden im Kühlschrank, damit Kinder nicht einfach
hineinklettern können.
Allgemeine Sicherheit
ACHTUNG — Das Gerät ist für den Hausgebrauch und ähnliche
Anwendungen bestimmt, wie z.B
Personalküchen in Geschäften, Büros und sonstigen
Arbeitsumgebungen,
Gästehäuser, Hotels, Motels und sonstige
Wohnumgebungen,
Umgebungen vom Typ Bed and Breakfast,
Verpflegung und ähnliche Großhandelsanwendungen.
ACHTUNG — Um eine Gefährdung infolge einer Instabilität des
Geräts zu vermeiden, muss es gemäß den Anweisungen befestigt
werden.
ACHTUNG — Bewahren Sie keine entzündlichen Stoffe, wie z.B.
Spraydosen, im Inneren des Gerätes auf, da sie dort auslaufen
können.
ACHTUNG — Ist das Netzkabel beschädigt, muss es zur
Vermeidung der Stromschlaggefahr umgehend durch den
Hersteller oder einen Fachhändler ausgetauscht werden.
ACHTUNG — Die Lüftungsöffnungen dürfen nicht versperrt
werden. Prüfen Sie, dass die Luft frei durch die Öffnungen
zirkulieren kann, vor allem bei Einbaugeräten.

77
ACHTUNG — Keine mechanischen Vorrichtungen oder sonstige
Hilfsmittel zum Beschleunigen des Abtauvorgangs verwenden,
die nicht vom Hersteller empfohlen wurden.
ACHTUNG — Den Kältekreislauf auf keinen Fall beschädigen.
ACHTUNG — Im Inneren des Kühlfachs keine Elektrogeräte
verwenden, außer diese sind vom Hersteller zugelassen.
ACHTUNG — Kältemittel und das Treibmittel der Isolierung sind
brennbar. Das Gerät nur in einer amtlich zugelassenen
Entsorgungsanlage entsorgen. Keinem offenen Feuer aussetzen.
ACHTUNG — Diese Geräte enthalten das Kühlmittel R600a
(Isobutan), stellen Sie keine brenn- oder entzündbaren und
explosionsgefährlichen Artikel in den Kühlschrank oder in seine
Nähe, um jede Brand- und Explosionsgefahr auszuschließen.
Kältemittel
Im Kältekreislauf des Geräts wird Isobutan (R600a) eingesetzt.
Es handelt sich dabei um ein hochentzündliches Gas, das
umweltschädigend ist. Beim Transport und der Installation des
Geräts prüfen, dass keine Komponenten des Kältekreislaufs
beschädigt sind. Das Kältemittel (R600a) ist eine entzündbare
Flüssigkeit.
Achtung! Brandgefahr
Bei Beschädigungen des Kältekreislaufs:
Offene Flammen und sonstige Zündquellen vermeiden.
Den Raum, in dem sich das Gerät befindet, gut lüften. Es ist
gefährlich, irgendwelche Änderungen an der
Zusammensetzung des Geräts vorzunehmen.

78
Schäden am Netzkabel können einen Kurzschluss und/oder
elektrischen Schlag verursachen.
Elektrische Sicherheit
Wir können nicht für Schäden haftbar gemacht werden, die
durch eine fehlerhafte Elektroinstallation verursacht werden.
Das Netzkabel darf nicht verlängert werden. Kein
Verlängerungskabel, keinen Adapter und keine
Mehrfachsteckdose verwenden.
Prüfen, dass der Netzstecker nicht zerdrückt oder beschädigt
ist. Ein zerdrückter oder beschädigter Netzstecker kann
überhitzen und einen Brand verursachen.
Sicherstellen, dass der Netzstecker des Gerätes leicht
erreichbar ist.
Nicht am Netzkabel ziehen.
Den Schutzkontakt auf keinen Fall entfernen.
Wenn die Wandsteckdose locker ist, den Netzstecker nicht
anschließen. Es besteht Stromschlag- bzw. Brandgefahr.
Das Gerät darf nicht ohne die Leuchtenabdeckung der
Innenbeleuchtung betrieben werden.
Der Weinschrank darf nur an eine Stromversorgung mit
220~240V/50Hz Einphasenwechselstrom angeschlossen
werden.
Ist das Netzkabel beschädigt, es nicht selbst austauschen,
sondern den Kundendienst kontaktieren.
Der Netzstecker muss leicht erreichbar sein, aber außerhalb
der Reichweite von Kindern liegen. Bei Zweifeln wenden Sie
sich bitte an Ihren Elektroinstallateur.

79
Täglicher Gebrauch
Dieses Gerät ist ausschließlich für die Lagerung von Wein
bestimmt.
Keine entzündlichen Stoffe oder Flüssigkeiten im Geräteinneren
aufbewahren, da Explosionsgefahr besteht.
Keine anderen Elektrogeräte (Mixer, Eismaschinen, usw.) im
Geräteinneren betreiben.
Beim Abtrennen des Gerätes von der Stromversorgung am
Netzstecker und nicht am Kabel ziehen.
Keine heißen Gegenstände in der Nähe der
Kunststoffkomponenten des Gerätes platzieren.
Die Empfehlungen des Geräteherstellers zur Lagerung sind
genau zu befolgen. Für die Lagerung die entsprechenden
Anweisungen befolgen.
Das Gerät muss von Kerzen, Beleuchtungskörpern und offenen
Flammen ferngehalten werden, um der Brandgefahr
vorzubeugen.
Das Gerät ist für die Aufbewahrung von Lebensmitteln und/oder
Getränken in normalen Haushalten bestimmt, wie in der
Bedienungsanleitung erläutert.
Das Gerät ist schwer. Seien Sie vorsichtig, wenn Sie das Gerät
verstellen. Bei Geräten, die mit Rollen ausgestattet sind, ist zu
beachten, dass diese nur dazu dienen, kurze Bewegungen zu
erleichtern. Das Gerät nicht über längere Strecken verschieben.
Nicht auf das Gehäuseunterteil, die Schubkästen, Türen, usw.
steigen oder sich darauf abstützen.
Um das Herabstürzen von Gegenständen und Beschädigungen
des Gerätes zu vermeiden, die Fächer des Gerätes nicht
überladen.

80
Achtung: Reinigung und Pflege
Vor der Reinigung den Netzstecker aus der Steckdose ziehen
und den Strom abstellen.
Das Gerät nicht mit metallischen Gegenständen,
Dampfreinigern, flüchtigen Ölen, organischen Lösemitteln oder
Scheuermitteln reinigen.
Die einzelnen Geräteteile niemals mit brennbaren Flüssigkeiten
reinigen. Durch die Dämpfe könnten Brand- und
Explosionsgefahren entstehen.
Zum Entfernen von Eis keine scharfen oder spitzen
Gegenstände verwenden. Stattdessen einen Kunststoffschaber
verwenden.
Wichtiger Hinweis zur Installation!
Vermeiden Sie es, das Gerät an einem feuchten Standort
aufzustellen.
Das Gerät von direkter Sonnenbestrahlung und Wärmequellen
(Ofen, Heizgerät, Heizkörper, usw.) fernhalten. Direkte
Sonnenbestrahlung kann die Acrylbeschichtung beschädigen
und Wärmequellen können den Stromverbrauch erhöhen.
Extrem kalte oder warme Raumtemperaturen können ebenfalls
dazu führen, dass das Gerät nicht richtig funktioniert.
Schließen Sie den Weinklimaschrank nur an einer
vorschriftsmäßig installierten und geerdeten Wandsteckdose an
(keine Mehrfachsteckdose verwenden). Entfernen oder
unterbrechen Sie niemals den dritten Zinken (Erdungszinken)
des mitgelieferten Netzkabels. Bei Fragen zu Stromversorgung
und/oder Erdung wenden Sie sich direkt an einen
Elektroinstallateur oder ein autorisiertes Kundendienstzentrum.
Zur ordnungsgemäßen Ausführung der elektrischen Anschlüsse
die Vorschriften in der Bedienungsanleitung beachten.

81
Das Gerät auspacken und visuell prüfen, dass es nicht
beschädigt ist. Das Gerät nicht anschließen, wenn es
beschädigt ist. Etwaige Schäden der Verkaufsstelle melden, wo
Sie das Gerät gekauft haben. In diesem Fall die Verpackung
aufbewahren.
Es wird empfohlen, vor dem Anschluss des Gerätes an die
Stromversorgung mindestens vierundzwanzig Stunden zu
warten, damit der Kompressor ordnungsgemäß mit Öl gefüllt ist.
Eine gute Luftzirkulation ist notwendig, um die Gefahr der
Überhitzung zu vermeiden. Zur Gewährleistung einer
ausreichenden Belüftung die angegebenen
Installationshinweise beachten.
Möglichst vermeiden, dass das Gerät die Wand berührt
und/oder mit heissen Bauteilen (Kompressor, Kondensator) in
Berührung kommt, um der Brandgefahr vorzubeugen. Prinzipiell
die Installationsvorschriften beachten.
Das Gerät darf nicht neben Heizkörpern oder Kochplatten
aufgestellt werden.
Prüfen, dass die Steckdosen erreichbar sind, nachdem das
Gerät installiert wurde.
Energieeinsparungen
Zur Begrenzung des Stromverbrauchs des Gerätes:
Das Gerät an einem geeigneten Ort aufstellen (siehe
Abschnitt " Installationsanweisungen").
Die Türen nur so lange wie unbedingt nötig öffnen.
Durch die periodische Reinigung des Kondensators den
optimalen Betrieb des Gerätes sicherstellen (siehe Abschnitt
"Pflege").
Die Türdichtungen periodisch kontrollieren und prüfen, dass
die Türen gut schließen. Ist dies nicht der Fall, wenden Sie

82
sich bitte an den Kundendienst.
Störungsbehebung
Alle elektrischen Arbeiten müssen von einer sachkundigen
Elektrofachkraft durchgeführt werden.
Das Gerät muss von einer zugelassenen Reparaturstelle
repariert werden. Für die Reparatur dürfen nur
Originalersatzteile verwendet werden.
Das Gerät ist ausschließlich für den Hausgebrauch bestimmt. Der
Hersteller kann nicht für die unsachgemäße Verwendung haftbar
gemacht werden.
R600a
Hinweise Sicherheit
Achtung! Die Lüftungsgitter des Gerätes nicht versperren.
Achtung! In dem Gerät keine explosionsfähigen Stoffe, wie z.B.
Spraydosen mit entzündlichem Treibgas, lagern.
Achtung! Den Kältemittelkreislauf des Gerätes nicht
beschädigen.
Achtung! Die Kühleinheiten funktionieren mit Isobutan (R600a)
und dürfen daher nicht in einem Bereich mit Zündquellen
aufgestellt werden (z.B. offene elektrische Kontakte oder
auslaufendes Kältemittel). Der Kältemitteltyp ist auf dem
Typenschild des Gerätes angegeben.
Achtung! In den Fächern des Gerätes keine Elektrogeräte
verwenden, außer sie wurden vom Hersteller ausdrücklich
empfohlen.

83
Das Gerät entspricht allen geltenden europäischen Richtlinien und ihren etwaigen Änderungen
und ist insbesondere konform mit den folgenden Normen:
2011/65/EU (ROHS)
2014/35/EU Niederspannungsrichtlinie
2014/30/EU Richtlinie über die elektromagnetische Verträglichkeit
643/2009/CE über die Kennzeichnung von Haushaltskühlgeräten in Bezug auf den
Energieverbrauch
2. TECHNISCHE DATEN
Nachstehend als Beispiel ein Typenschild:
Das Typenschild befindet sich im Geräteinneren bzw. an der Geräterückseite (modellabhängig). Es
enthält alle gerätespezifischen Angaben.
Wir raten Ihnen, die Seriennummer vor der Installation in der Bedienungsanleitung zu notieren, um sie
später bei Bedarf griffbereit zu haben (Reparatur, Kundendienstanfrage).
Ist das Gerät erst einmal installiert und gefüllt, ist der Zugriff auf die Seriennummer erschwert.
ACHTUNG: ohne diese Angaben kann Ihnen der Kundendienst nicht weiterhelfen.
3. INSTALLATIONSANWEISUNGEN
Vor dem Gebrauch des Gerätes
Die Außen- und Innenverpackung entfernen.
Das Gerät vor dem Anschließen an das Stromnetz ungefähr 24 Stunden lang aufrecht stehen lassen.

84
Dies verringert die Gefahr von Funktionsstörungen des Kühlsystems durch die Handhabung beim
Transport.
Das Gerät innen mit einem weichen, mit lauwarmem Wasser getränkten Tuch reinigen.
Wählen Sie beim Aufstellen des Geräts einen geeigneten Standort.
Stellen Sie Ihren Weinschrank auf einen Untergrund, der über eine ausreichende Tragfähigkeit für den
vollgefüllten Schrank verfügt. Zum Ausrichten des Weinschranks den vorderen Einstellfuß unten am
Weinschrank einstellen.
Es ist eine ausreichende Belüftung erforderlich, den Luftaustritt an der Vorderseite nicht versperren.
Nicht für die Aufstellung im Keller bestimmt.
Das Gerät ist nur für den Gebrauch in Innenräumen bestimmt.
Dieser Schrank kann sowohl „frei stehend“, als auch als „Einbaugerät“ installiert werden.
Den Weinschrank an eine Einzelsteckdose anschließen, dabei einen Abstand von 30 mm zwischen
der Geräterückseite und der Mauer lassen. Justieren Sie Ihren Weinschrank aus und bringen Sie ihn
in die waagrechte Stellung (am besten mit einer Wasserwaage). Dies verhindert Bewegungen
aufgrund mangelnder Stabilität, die Geräusche und Vibrationen erzeugen können, und garantiert, dass
die Türe absolut dicht verschlossen wird.
Dieses Gerät ist ausschließlich zum Lagern von Wein bestimmt.
Dieses Gerät arbeitet mit einem brennbaren Kältemittel. Achten Sie deshalb darauf, das
Kühlrohrleitungssystem beim Transport nicht zu beschädigen.
Achtung
Lagern Sie die Flaschen im geschlossenen Zustand.
Überladen Sie das Gerät nicht.
Öffnen Sie die Tür nicht öfter als unbedingt notwendig.
Decken Sie die Roste nicht mit Alufolie oder anderem Material ab, das verhindert die gute Zirkulation
der Luft.
Wenn der Weinschrank während längerer Zeit leer stehen soll, empfehlen wir, das Gerät nach einem
sorgsamen Reinigen vom Netzstrom abzustecken und die Tür leicht geöffnet zu lassen, damit Luft
zirkulieren und das Entstehen von Schimmelpilzen und Gerüchen verhindert werden kann.
ACHTUNG: das Gerät von entzündlichen Stoffen fernhalten.
Raumtemperaturgrenzen
Dieses Gerät ist für den Betrieb unter Raumtemperaturbedingungen bestimmt, die durch die
Temperaturklasse bestimmt werden, die am Typenschild angeführt ist.
KLASSE
SYMBOL
UMGEBUNGSTEMPERATURBEREICH (°C)
Erweitert temperiert
SN
Von +10 bis +32
Temperiert
N
Von +16 bis +32
Subtropisch
ST
Von +16 bis +38
Tropisch
T
Von +16 bis +43

85
Einbauschema
AVU8X(/IX)
AVU23SX(/IX)

86
AVU41SXDPA(/IX)
AVU52SX(/IX) AVU54SXDZA(/IX)

87
AVU53CDZA PRO51C/1
Türumkehrung
Türanschlag wechseln: Die Tür kann links oder rechts befestigt werden. Werksseitig ist das Scharnier
rechts, so dass die Tür von links geöffnet wird. Sollte die Tür von rechts geöffnet werden, gehen Sie wie
folgt vor:
AVU8X(/IX)

88
1. Unteres Scharnier (rechts) 2. Schraube 3. Türachse
4. Tür 5. Oberes Scharnier (rechts) 6. Scharnierschrauben
7. Oberes Scharnier (links) 8. Unteres Scharnier (links)
1. Öffnen Sie die Tür im rechten Winkel. Lösen Sie die beiden Schrauben (2) der unteren Achse der Tür
und nehmen Sie die Tür (4) und die Türachse ab (Abb. A). Positionieren Sie die Tür (4) (Fig. A und B).
2. Schrauben Sie drei Schrauben (6) aus dem oberen Scharnier (rechts) (5) und nehmen Sie es ab
und unteres Scharnier (rechts). (Abb. C).
3. Ziehen Sie die Ziernägel (8) links oben aus dem Gerät und bringen Sie das obere Zusatzscharnier
(links) (7) links oben mithilfe der drei Schrauben an (Abb. D). Bauen Sie das verbliebene untere
Scharnier (links) (8) ebenso wie oben beschrieben ein (Abb. E).
4. Die Tür öffnet sich 180°C weit. Die Tür ist so einzubauen, wie sie ausgebaut wurde; setzen Sie die
Tür richtig an und befestigen Sie sie.
AVU23SX(/IX) AVU52SX(/IX)
1. Unteres Scharnier (rechts) 2. Schraube 3. Türachse
4. Tür 5. Oberes Scharnier (rechts) 6. Scharnierschrauben
7. Oberes Scharnier (links) 8. Ziernagel 9. Unteres Scharnier (links)
10. Rückhaltevorrichtung 11. Schraube 12. Stopfen
1. Öffnen Sie die Tür im rechten Winkel. Lösen Sie die beiden Schrauben (2) der unteren Achse der Tür
und nehmen Sie die Tür (4) und die Türachse ab (Abb. A).
2. Positionieren Sie die Tür (4) und ziehen Sie den Stopfen (12) aus dem oberen Abschnitt des
Türrahmens; lösen Sie eine der unteren Schrauben (11) und entfernen Sie die Rückhaltevorrichtung
(10). Bringen Sie diese Vorrichtung anschließend im oberen Abschnitt des Türrahmens an. Es sollte
vorzugsweise ein Austauschstopfen (12) verwendet werden, um das Loch im oberen Abschnitt des
Rahmens zu verschließen (Abb. A/B).
3. Schrauben Sie drei Schrauben (6) aus dem oberen Scharnier (rechts) (5) und nehmen Sie es ab
(Abb. C).
4. Entfernen Sie die Ziernägel (8) oben links am Gerät und bringen Sie das obere Austauschscharnier

89
(links) (7) oben links mithilfe von drei Schrauben an (Abb. D).
5. Bauen Sie das untere Austauschscharnier (links) (9) ebenso wie oben beschrieben ein (Abb. E).
6. Die Tür öffnet sich 180°C weit. Die Tür ist so wieder einzubauen, wie sie ausgebaut wurde; setzen
Sie die Tür richtig an und befestigen Sie sie.
7. Verschließen Sie das Loch oben rechts am Gerät mit einem Ziernagel (8).
AVU53CDZA AVU54SXDZA(/IX) PRO51C/1
1. Unteres Scharnier (rechts) 2. Schraube 3. Türachse
4. Tür 5. Oberes Scharnier (rechts) 6. Scharnierschrauben
7. Oberes Scharnier (links) 8. Ziernagel 9. Unteres Scharnier (links)
1. Öffnen Sie die Tür im rechten Winkel. Lösen Sie die beiden Schrauben (2) der unteren Achse der Tür
und nehmen Sie die Tür (4) und die Türachse ab (Abb. A).
2. Positionieren Sie die Tür (4).
3. Schrauben Sie drei Schrauben (6) aus dem oberen Scharnier (rechts) (5) und nehmen Sie es ab.
(Abb. C).
4. Ziehen Sie die Ziernägel (8) links oben aus dem Gerät und bringen Sie das obere Zusatzscharnier
(links) (7) links oben mithilfe der drei Schrauben an (Abb. D).
5. Bauen Sie das verbliebene untere Scharnier (links) (9) ebenso wie oben beschrieben ein (Abb. E).
6. Die Tür öffnet sich 180°C weit. Die Tür ist so einzubauen, wie sie ausgebaut wurde; setzen Sie die
Tür richtig an und befestigen Sie sie.
7. Verschließen Sie das Loch oben rechts am Gerät mit einem Ziernagel (8).

90
4. BETRIEB DES GERÄTES
Es wird empfohlen, das Gerät an einem Ort aufzustellen, an dem die Raumtemperatur zwischen 16-
32°C beträgt. Liegt die Raumtemperatur über oder unter den empfohlenen Temperaturen, kann die
Leistung des Gerätes beeinträchtigt und die Temperatur zwischen 5-20°C oder 5-10°C/10-20°C ggf. (je
nach Modell) nicht erreicht werden.
AVU8X(/IX) / AVU23SX(/IX) AVU41SXDPA(/IX) AVU52SX(/IX) PRO51C/1
“RUN”
Betriebsanzeige
Taste
Zum Einschalten/Ausschalten des Geräts.
Die Taste für ca. 3 Sekunden gedrückt halten.
Taste
Beleuchtungstaste
Temperaturanzeige
Elektronische Temperaturanzeige
Taste
Temperatureinstellknopf +
Taste
Temperatureinstellknopf -
Durch Drücken der Tasten / können Sie die gewünschte Temperatur im Fach auswählen.
Bei jedem Tastendruck erhöht/verringert sich die programmierte Temperatur um 1°C.
Sie können eine Temperatur zwischen 5 und 20°C oder 5 und 10°C / 10 und 20 °C auswählen (je nach
Modell). Sobald die Auswahl stattgefunden hat, blinkt die Anzeige etwa 5s lang, und zeigt dann die Ist-
Temperatur im Inneren des Weinschrankes an. Die Einstelltemperatur kann jederzeit angezeigt werden,
indem man 5s lang auf die Temperaturauswahltasten drückt.
Bei einem Stromausfall werden alle vorher ausgewählten Temperaturen gelöscht und jedes Fach wird
standardmäßig auf die werkseitig vorprogrammierte Temperatur von 12°C zurückgesetzt.
AVU53CDZA AVU54SXDZA(/IX)
“RUN”
Betriebsanzeige
Taste
Zum Einschalten/Ausschalten des Geräts.

91
Die Taste für ca. 3 Sekunden gedrückt halten.
Taste
Beleuchtungstaste
Temperaturanzeige
Elektronische Anzeige für das obere Fach
Temperaturanzeige
Elektronische Anzeige für das untere Fach
Taste
Temperaturauswahltaste für das obere Fach
Taste
Temperaturauswahltaste für das untere Fach
Drücken Sie auf “ ”, um die Temperatur des oberen Faches einzustellen. Die Anzeige des
entsprechenden Faches beginnt dann zu blinken und jeder Tastendruck verändert die Temperatur um
jeweils 1°C. Sobald die tiefste Einstelltemperatur von 5°C erreicht ist, springt die Anzeige automatisch
wieder auf die höchste Einstelltemperatur von 10°C zurück. Sobald die Auswahl stattgefunden hat, blinkt
die Anzeige etwa 5s lang, und zeigt dann die Ist-Temperatur im Inneren des Weinschrankes an. Die
Einstelltemperatur kann jederzeit angezeigt werden, indem man 5s lang auf die
Temperaturauswahltasten drückt.
Drücken Sie auf “ ”, um die Temperatur des unteren Faches einzustellen. Die Anzeige des
entsprechenden Faches beginnt dann zu blinken und jeder Tastendruck verändert die Temperatur um
jeweils 1°C. Sobald die tiefste Einstelltemperatur von 10°C erreicht ist, springt die Anzeige automatisch
wieder auf die höchste Einstelltemperatur von 20°C zurück. Sobald die Auswahl stattgefunden hat, blinkt
die Anzeige etwa 5s lang, und zeigt dann die Ist-Temperatur im Inneren des Weinschrankes an. Die
Einstelltemperatur kann jederzeit angezeigt werden, indem man 5s lang auf die
Temperaturauswahltasten drückt.
Bei einem Stromausfall werden alle vorher ausgewählten Temperaturen gelöscht und jedes Fach wird
standardmäßig auf die werkseitig vorprogrammierte Temperatur von 6°C im oberen, und 12°C im unteren
Fach zurückgesetzt.
Hinweise für den Betrieb
Temperaturalarm:
Wenn die Innentemperatur über 23 °C steigt, wird auf dem Bedienfeld „HI“ angezeigt und nach einer
Stunde ertönt ein durchgehendes akustisches Alarmsignal. Es zeigt an, dass die Innentemperatur zu
hoch ist. Überprüfen Sie den Grund dafür! Wenn die Innentemperatur unter 0 °C fällt, wird auf dem
Bedienfeld „LO“ angezeigt, gleichzeitig ertönt das akustische Alarmsignal und die Kontrollleuchte zur
Störungsanzeige leuchtet auf.
Wiederherstellung der Temperatur:
Für den Fall eines Stromausfalls speichert der Weinklimaschrank die Temperatureinstellungen. Sobald
die Stromversorgung wiederhergestellt ist, stellt der Weinklimaschrank die vor dem Stromausfall
eingestellte Temperatur wieder her.

92
Innenbeleuchtung
Um Energie einzusparen schaltet dieser Weinkühlschrank die LED-Beleuchtung nach 10 Minuten
automatisch ab.
Es ist möglich, die LED-Beleuchtung durchgehend eingeschaltet zu lassen. Dafür halten Sie die Taste
dsds5 Sekunden gedrückt, auf der Digitalanzeige erscheint nun „LP“. Nach 4 Sekunden kehrt das Display
auf die Normalanzeige zurück; die Beleuchtung bleibt an, bis sie von Hand ausgeschaltet wird.
Um wieder in den Energiesparmodus zu wechseln (empfohlene Betriebsart), halten Sie die Taste
5 Sekunden gedrückt. Auf der Digitalanzeige erscheint „LF“. Nach 4 Sekunden kehrt das Display auf
die Normalanzeige zurück und die Beleuchtung schaltet nach 10 Minuten automatisch ab.
5. AUSSTATTUNG
Die Klimatisierung
Entsprechend der Meinung von Fachleuten liegt die optimale Lagertemperatur für Weine um 12°C, in
einer Bandbreite zwischen 10° und 14°C. Diese ist jedoch nicht mit der Serviertemperatur zu
verwechseln, die ihrerseits je nach Eigenheit und Beschaffenheit des Weines zwischen 5 und 20°C liegt.
Abrupte Temperaturschwankungen sind in jedem Fall zu vermeiden. Dieses Gerät wurde von Fachleuten
für Weinliebhaber entwickelt, und berücksichtigt im Gegensatz zum einfachen Kühlschrank die
Empfindlichkeit der Grand Crus hinsichtlich abrupter Temperaturschwankungen mit der genauen
Kontrolle einer konstanten Durchschnittstemperatur.
Schwingungsdämpfung
Der Kühlkompressor ist mit speziellen Schwingungsdämpfern (Silent-Blocks) ausgestattet und das
Innengehäuse ist durch eine dicke Schicht an Polyurethan-Schaum vom Außengehäuse isoliert. Durch
diese Merkmale wird verhindert, dass sich die Schwingungen auf Ihre Weine übertragen.
Befeuchtung
Da dieses Gerät über keinen Kohlefilter verfügt, ist es mit einem Behälter ausgestattet, (je nach Modell),
der die Feuchtigkeit auf einem korrekten Niveau hält. Wenn nicht genügend Feuchtigkeit vorhanden ist,
füllen Sie den Tank bitte ¾ voll auf. Überprüfen Sie von Zeit zu Zeit den Wasserstand und füllen Sie bei
Bedarf Wasser nach. Achten Sie darauf, dass immer Wasser im Behälter ist.
Avintage wurde von Fachleuten für Weinliebhaber entwickelt, und berücksichtigt deshalb auch die
Empfindlichkeit der Korken hinsichtlich einer zu niedrigen Luftfeuchtigkeit. Deshalb ist der Behälter auf
den Rost unterhalb der Lüftung an der Rückseite zu stellen, um ein Mindestmaß an Feuchtigkeit zu
gewährleisten. Vergessen Sie nicht, den Wasserstand zu prüfen, wenn Sie Ihre Weine über einen langen
Zeitraum hinweg lagern, und das Gerät nicht nur zu Temperierungszwecken vor dem Servieren (mit einer
häufigen Flaschenrotation) nutzen.
Vergewissern Sie sich, dass das Tablett voll Wasser vollständig stabil ist, um Wasserfälle oder
Lecks zu vermeiden.
UV-Filterung
Licht beschleunigt den Alterungsprozess Ihrer Weine. In unseren Schränken mit Volltüren sind Ihre
Weine natürlich geschützt, wenn Sie davon Abstand nehmen, die Türen zu oft zu öffnen. Dieses Modell
mit Glastür ist mit einer besonderen Beschichtung versehen, die schädliche UV-Strahlen abweist; Ihre
Weine sind somit absolut geschützt.

93
Abtauen
Ihr Gerät ist mit einem automatischen Abtauzyklus ausgestattet. Bei Stillstand des Kühlzyklus tauen die
gekühlten Oberflächen des Gerätes automatisch ab. Das so aufgefangene Abtauwasser wird in die
Verdunstungsschale für Kondenswasser abgeleitet, die sich an der Geräterückseite in der Nähe des
Kompressors befindet. Die vom Kompressor erzeugte Abwärme verdampft danach das im Behälter
gesammelte Kondenswasser.
Wintersystem (je nach Modell)
Das Winterkit ist ein Frostschutzsystem mithilfe dessen der Weinschrank in einer Umgebung mit einer
Temperatur zwischen 0° und 32°C betrieben werden kann. Wenn die Temperatur des Weinschranks mehr
als 3°C unter die eingestellte Temperatur sinkt, wird ein elektrisches Heizelement mit geringer Leistung
eingeschaltet, um die Innentemperatur auf die gewählte Temperatur anzuheben. Dieses Heizelement mit
niedriger Leistung verhindert plötzliche Anstiege der Weintemperatur und Temperaturstöße, die sich
schädlich auf die Alterung des Weins auswirken.
Das automatische System dient zur Erhöhung der Weinschranktemperatur bevor es zu einem
Wärmeaustausch mit den Flaschen kommt. Wenn die Innentemperatur nach dem Einschalten des
Systems die eingestellte Temperatur erreicht, wird es ausgeschaltet.
Roste
Um Beschädigungen an der Türdichtung zu vermeiden, muss sichergestellt sein, dass die Türe weit
geöffnet ist, bevor man den Rost zum Einlegen oder Herausnehmen von Flaschen herauszieht.
Um leichter auf den Inhalt der Roste zugreifen zu können sollten Sie die Roste um etwa 1/3 ihrer
Länge herausziehen, wobei selbige beiderseits mit einem Anschlag ausgestattet sind, um ein
Herausfallen der Flaschen zu vermeiden.
Zum Herausnehmen oder Einlegen der Roste sind diese, wie auf der Abbildung dargestellt, zu neigen
und je nach Bedarf herauszuziehen oder einzuschieben.
AVU41SXDPA(/IX)
Setzen Sie die Roste an den passenden Stellen ein.

94
a. Karton mit den Ersatzteilen b. kleiner Rost c. großer Rost
1. Nehmen Sie nach dem Auspacken den Karton mit den Ersatzteilen für das Gerät heraus.
2. 4 kleine Roste (b) sind im linken Fach enthalten. Nehmen Sie die beiden unteren Roste heraus.
3. Im rechten Fach befinden sich 4 große Roste (c). Nehmen Sie die beiden oberen Roste heraus.
4. Die Position der kleinen und großen Roste muss also umgekehrt sein (Abb.2). Setzen Sie in jedes
Fach oben zwei kleine Roste und unten zwei große Roste ein.
5. Sobald die Roste richtig eingesetzt sind, können Sie Ihren Weinschrank entsprechend den
Vorschriften aus der Gebrauchsanweisung verwenden.
Fuß-Schieberegler
Zwei Fuß Schieber mit Ihrem Gerät zur Verfügung gestellt, so dass Sie sie leicht zu bewegen, wenn Sie
Ihre Füße sind, um eine maximale Höhe eingestellt. Die Fuß-Schieberegler müssen parallel unter den
Füßen in Übereinstimmung mit der Position für die vorderen und für den Rücken montiert werden.
Verstärkte Sicherheit
Da diese Gerätereihe zum Lagern von wertvollen Gegenständen bestimmt ist, haben wir darauf geachtet,
nur Bauteile von hoher Qualität zu verarbeiten, und Herstellungstechniken anzuwenden, die eine
optimale Betriebssicherheit gewährleisten.
Türgriffmontage
Ihr Gerät ist mit einem Edelstahl-Türgriff ausgestattet. Nehmen Sie die Türdichtung ab und befestigen Sie
den Türgriff gemäß nachfolgendem Schema mit den mitgelieferten Schrauben an der Tür.
Front
Back
Hinter
Vor
Hinter
Vor
Fuß-Schieberegler

95
6. BEFÜLLUNG
Die Angaben zur maximalen Flaschenanzahl sind unverbindlich und ermöglichen (wie der Volumeninhalt
von Kühlschränken) eine grobe Einschätzung der Gerätegröße.
Sie entsprechen Tests, die mit einer Standardflasche durchgeführt wurden (in diesem Fall eine leichte 75
cl Bordeaux-Flasche). In der Normierung hat jede Flaschenform einen eigenen geografischen Ursprung
(z.B. Bordeaux, Burgund, Provence, usw.) und Typ (z.B. Tradition, schwer, leicht, Flöte, usw.) mit jeweils
individuellem Durchmesser und individueller Höhe.
In Wirklichkeit könnte man im Extremfall mehr Flaschen einförmig und ohne Roste übereinander stapeln,
aber ein reichhaltiger Weinschrank umfasst eine große Vielzahl verschiedener Flaschen und durch den
praktischen Aspekt der alltäglichen Nutzung des Weinschranks bleibt die Flaschenanzahl begrenzt. Sie
werden das Gerät daher wahrscheinlich mit etwas weniger Flaschen befüllen als die angegebene
Höchstzahl.
Flaschentypen:
Hier sehen Sie vier Sorten von 75 cl Flaschen, Burgunder und Bordeaux, mit unterschiedlicher Größe. Es
gibt zahlreiche weitere Flaschen mit allen möglichen Fassungsvermögen und Formen.
Wird ein Weinschrank beispielsweise nur mit Burgunderflaschen gefüllt, liegt man rund 30% unter der
ursprünglich für Bordeaux berechneten Menge.
Gegeneinander Lagerung
„Kopf bei Fuß“ Hals an Hals:
Beachten Sie die unterschiedliche Tiefe!
Kopf bei Fuß Hals zwischen den Bäuchen:
Erhöhte Befüllung.

96
Beispiele von Serviertemperaturen
Bei Verkostungen zu beachten, um die volle Geschmacksvielfalt der Weine genießen zu können! Die
Meinungen gehen auseinander, die Umgebungstemperatur auch, aber viele sind sich über folgendes
einig:
Große Bordeaux-Weine / Rotwein 16 - 17°C
Große Burgunder-Weine / Rotwein 15 - 16°C
Grands Crus trockener Weißweine 14 - 16°C
Leichte, fruchtige, junge Rotweine 11 - 12°C
Rosé de Provence, Jungweine 10 - 12°C
Trockene Weißweine und rote Tafelweine 10 - 12°C
Weißer Tafelwein 8 - 10°C
Champagner 7 - 8°C
Zuckerreiche Weine 6°C
7. PFLEGE
Ziehen Sie vor der Reinigung des Gerätes (regelmäßig durchzuführen) den Netzstecker aus der
Steckdose oder nehmen Sie die entsprechende Sicherung heraus.
Wir raten Ihnen, das Gerät vor der Erstinbetriebnahme und dann regelmäßig innen und außen
(Frontseite, Seitenwände und Oberseite) mit lauwarmem Wasser und einem milden Reinigungsmittel zu
reinigen. Mit klarem Wasser abspülen und vor dem Wiedereinschalten gut trocknen lassen. Auf keinen
Fall Löse- bzw. Scheuermittel verwenden.
Bei der Erstinbetriebnahme können noch Restgerüche vorhanden sein. Lassen Sie das Gerät in diesem
Fall mehrere Stunden ohne Befüllung mit der niedrigsten Temperatur laufen. Durch die Kälte werden
etwaige Gerüche beseitigt.
Was tun bei Stromausfällen?
Die meisten Stromausfälle sind nur von kurzer Dauer. Ein ein- bis zweistündiger Stromausfall hat keinen
Einfluss auf die Temperatur im Weinschrank. Achten Sie bei Stromausfällen darauf, die Tür nicht unnötig
zu öffnen, um den Wein zu schützen. Bei sehr langen Stromausfällen ergreifen Sie bitte die notwendigen
Maßnahmen zum Schutz des Weines.
Falls der Stecker gezogen, das Gerät ausgeschaltet ist oder ein Stromausfall aufgetreten ist, müssen
Sie 3 bis 5 Minuten zuwarten, bevor Sie es wieder einschalten. Wenn Sie versuchen, es vor Ablauf
dieser Zeitspanne einzuschalten, wird der Kompressor erst nach etwa 3/5 Minuten anlaufen (falls laut
Temperatureinstellung nötig).
Bei der Erstinbetriebnahme und nach einer längeren Abschaltung des Schrankes kann es beim
Wiedereinschalten vorkommen, dass die ausgewählten und die angezeigten Temperaturen nicht
übereinstimmen. Das ist normal! Warten Sie einfach einige Stunden zu, bis sich die Temperaturen
wieder einpendeln.
Bei längerer Abwesenheit
Kurzer Urlaub: Lassen Sie den Weinklimaschrank während einer Abwesenheit von weniger als drei
Wochen in Betrieb.
Längere Abwesenheit: Sollte das Gerät mehrere Monate nicht benutzt werden, entfernen Sie den
gesamten Inhalt und schalten Sie das Gerät aus. Reinigen und trocknen Sie den Innenraum sorgfältig.
Um Geruchsentwicklung und Schimmelbefall vorzubeugen, lassen Sie die Tür leicht geöffnet: falls
nötig blockieren, um zu verhindern, dass die Tür zufällt.

97
Ortswechsel des weinschranks
Nehmen Sie alle Flaschen aus dem Gerät, befestigen Sie bewegliche Elemente.
Um Schäden an den Nivellierschrauben der Füße zu vermeiden, sollten Sie diese ganz in die Basis
des Geräts schrauben.
Kleben Sie die geschlossene Tür mit Klebeband zu.
Bewegen Sie das Gerät nur in senkrechter Stellung. Schützes Sie es mit Decken oder Ähnlichem vor
Schäden.
Energiesparen
Stellen Sie das Gerät in einem kühlen Raum (aber über 16 °C), von Hitzequellen (andere
Elektrogeräte) und direkter Sonnenbestrahlung entfernt auf.
Der Raum, in dem das Gerät installiert wird, muss über eine Belüftung verfügen. Decken Sie die
Belüftungsöffnungen des Geräts auf keinen Fall ab.
Öffnen Sie die Tür nicht öfter als unbedingt notwendig.
8. IM PANNENFALL
Trotz aller Sorgfalt, die wir für unsere Produkte aufwenden, kann eine Störung niemals völlig
ausgeschlossen werden. Bevor Sie sich mit dem Kundendienst Ihres Händlers in Verbindung setzen,
prüfen Sie bitte folgende Punkte:
Der Netzstecker ist in der Steckdose
Es liegt kein Stromausfall vor
Die Störung ist nicht auf eine der Ursachen zurückzuführen, die in der Tabelle am Ende der
Bedienungsanleitung beschrieben sind
WICHTIGER HINWEIS: Ist das Gerätenetzkabel beschädigt, muss es vom Hersteller, einem von der
Marke anerkannten Fachbetrieb oder dem Händler ausgetauscht werden. Zur Vermeidung der
Verletzungsgefahr muss es auf jeden Fall von einer qualifizierten Fachkraft ausgetauscht werden.
SOLLTEN DIESE KONTROLLEN ZU NICHTS FÜHREN, KONTAKTIEREN SIE BITTE DEN KUNDENDIENST IHRES
HÄNDLERS.
ACHTUNG!
Ziehen Sie vor Reinigungs- bzw. Reparaturarbeiten prinzipiell
den Netzstecker aus der Steckdose!

98
9. STÖRUNGSBEHEBUNG
Sie können viele einfache Probleme mit dem Temperierschrank selbst lösen, ohne den Kundendienst
einzuschalten. Versuchen Sie es mit den nachfolgenden Vorschlägen.
PROBLEM
MÖGLICHE URSACHE
Der Weinschrank schaltet sich nicht ein
Das Netzkabel wurde nicht angesteckt
Der Ein-/Ausschalter steht auf Aus
Die entsprechende Sicherung Ihrer
Elektroanlage ist durchgebrannt
Der Weinschrank kühlt nicht genug
Kontrollieren Sie die ausgewählte Temperatur
Die Außentemperatur im Raum überschreitet
die
Der Weinschrank wird zu oft geöffnet
Die Tür wird nicht gut geschlossen
Die Türdichtung ist nicht dicht
Der Kompressor startet und stoppt häufig
Die Raumtemperatur um den Weinschrank ist
hoch
Sie haben soeben viele neue Flaschen
eingelegt
Der Weinschrank wird zu oft geöffnet
Die Tür wird nicht gut geschlossen
Die Einstellung der Temperatur ist nicht richtig
Die Türdichtung ist nicht dicht
Die Beleuchtung funktioniert nicht
Das Netzkabel wurde nicht angesteckt
Die entsprechende Sicherung Ihrer
Elektroanlage ist durchgebrannt
Die LED ist außer Betrieb, wenden Sie sich
an den Kundendienst
Der Beleuchtungsknopf steht auf Aus
Schwingungen
Stellen Sie absolut sicher, dass der
Weinschrank ganz eben steht.
Der Weinschrank scheint sehr laut zu
funktionieren
Ein Geräusch wie zirkulierendes Wasser
entsteht durch das Kühlgas und ist normal
Am Ende des Kompressorzyklus hört man
gelegentlich ein Geräusch fließenden
Wassers
Das Zusammenziehen und Dehnen der
Innenwände kann krachende Geräusche
ergeben
Der Weinschrank steht nicht eben
Die Tür schließt nicht ganz
Der Weinschrank steht nicht eben
Die Türdichtung ist schmutzig oder defekt
Die Roste sind schlecht positioniert
Austausch der Beleuchtung
Dieses Gerät verfügt über Leuchtdioden (LED). Dieser Diodentyp kann vom Verbraucher nicht selbst
gewechselt werden. Die Lebensdauer dieser LEDs ist normalerweise lang genug, so dass sie nicht
gewechselt werden müssen. Sollte es jedoch trotz aller Sorgfalt bei der Fertigung Ihres Weinschranks zu
einem Defekt der LEDs kommen, wenden Sie sich bitte auf jeden Fall an den Kundendienst.

99
10. UMWELT
Das Gerät ist entsprechend der europäischen Richtlinie 2012/19/CE über Elektro- und
Elektronik-Altgeräte (WEEE) gekennzeichnet. Durch die Gewährleistung der
ordnungsgemäßen Entsorgung des Produkts helfen Sie, die potenziellen negativen
Auswirkungen auf die Umwelt und menschliche Gesundheit zu verhindern, die anderenfalls
durch die unsachgemäße Abfallbehandlung des Produkts entstehen können.
Das auf dem Gerät angebrachte Symbol der durchgestrichenen Abfalltonne auf Rädern zeigt an, dass
das Produkt am Ende seiner Lebensdauer vom restlichen Hausmüll getrennt entsorgt werden muss. Es
muss daher zu einer Sammelstelle für Elektro- und Elektronikgeräte bzw. beim Kauf eines gleichwertigen
Gerätes zum Händler des neuen Gerätes gebracht werden.
Der Benutzer ist dafür verantwortlich, dass das Gerät am Ende seiner Lebensdauer einer geeigneten
Sammelstelle zugeführt wird. Eine zweckmäßige, getrennte Sammlung zur Weiterleitung des
unbenutzten Gerätes zum Recycling, zur Aufbereitung und umweltgerechten Entsorgung trägt dazu bei,
mögliche negative Auswirkungen auf Umwelt und Gesundheit zu vermeiden und fördert das Recycling
der Wertstoffe, aus denen das Produkt besteht.
Um genauere Auskünfte zu den bestehenden Sammelsystemen zu erhalten, wenden Sie sich bitte an
das örtliche Amt für Abfallentsorgung oder das Geschäft, in dem Sie das Gerät gekauft haben.
11. WARNHINWEIS
In dem Bestreben der kontinuierlichen Qualitätsverbesserung unserer Produkte behalten wir uns die
Möglichkeit vor, die technischen Merkmale ohne Vorankündigung zu ändern.
Die Garantien für die Produkte der Marke AVINTAGE werden ausschließlich durch unsere
Vertragshändler gewährt. In dieser Bedienungsanleitung gemachte Angaben können nicht als eine
Zusatzgarantie ausgelegt werden.
Die Firma FRIO ENTREPRISE kann nicht für Fehler bzw. technische und redaktionelle Versäumnisse in
dieser Bedienungsanleitung haftbar gemacht werden.
Unverbindliche Unterlage.

100
PRODUKTDATENBLATT
gemäß der delegierten Verordnung (EU) Nr. 1060/2010
-
WEINSCHRANK
HERSTELLER
AVINTAGE
HANDELSBEZEICHNUNG
AVU8X(/IX)
STROMVERSORGUNG
220-240 V / 50 Hz
ABMESSUNGEN (B x T x H)
145 x 547,5 x 820 mm
NETTOGEWICHT
20 kg
GERÄTEKATEGORIE
2
ENERGIEEFFIZIENZKLASSE
A
ENERGIEVERBRAUCH
Energieverbrauch 135 kWh/Jahr, auf der
Grundlage von Ergebnissen der
Normprüfung über 24 Stunden. Der
tatsächliche Verbrauch hängt von der
Nutzung und vom Standort des Geräts ab.
NETTOVOLUMEN
23 L
TEMPERATUR-EINSTELLBEREICH
5 – 20°C
FROSTFREI
Automatischer Abtauvorgang
KLIMAKLASSE
Klimaklasse: N
Dieses Gerät ist für den Betrieb bei einer
Umgebungstemperatur zwischen 16 °C
(niedrigste Temperatur) und 32 °C
(höchste Temperatur) bestimmt.
LUFTSCHALLEMISSIONEN IN dB(A) RE 1 pW
44 dB(A)
GERÄTETYP
Einbaugerät
Dieses Gerät ist ausschließlich zur Lagerung von Wein bestimmt.

101
PRODUKTDATENBLATT
gemäß der delegierten Verordnung (EU) Nr. 1060/2010
-
WEINSCHRANK
HERSTELLER
AVINTAGE
HANDELSBEZEICHNUNG
AVU23SX(/IX)
STROMVERSORGUNG
220-240 V / 50 Hz
ABMESSUNGEN (B x T x H)
295 x 571 x 820 mm
NETTOGEWICHT
28 kg
GERÄTEKATEGORIE
2
ENERGIEEFFIZIENZKLASSE
A
ENERGIEVERBRAUCH
Energieverbrauch 140 kWh/Jahr, auf der
Grundlage von Ergebnissen der
Normprüfung über 24 Stunden. Der
tatsächliche Verbrauch hängt von der
Nutzung und vom Standort des Geräts ab.
NETTOVOLUMEN
56 L
TEMPERATUR-EINSTELLBEREICH
5 – 20°C
FROSTFREI
Automatischer Abtauvorgang
KLIMAKLASSE
Klimaklasse: N
Dieses Gerät ist für den Betrieb bei einer
Umgebungstemperatur zwischen 16 °C
(niedrigste Temperatur) und 32 °C
(höchste Temperatur) bestimmt.
LUFTSCHALLEMISSIONEN IN dB(A) RE 1 pW
43 dB(A)
GERÄTETYP
Freistehendes und als Einbaugerät
Dieses Gerät ist ausschließlich zur Lagerung von Wein bestimmt.

102
PRODUKTDATENBLATT
gemäß der delegierten Verordnung (EU) Nr. 1060/2010
-
WEINSCHRANK
HERSTELLER
AVINTAGE
HANDELSBEZEICHNUNG
AVU41SXDPA(/IX)
STROMVERSORGUNG
220-240 V / 50 Hz
ABMESSUNGEN (B x T x H)
595 x 571 x 820 mm
NETTOGEWICHT
48 kg
GERÄTEKATEGORIE
2
ENERGIEEFFIZIENZKLASSE
A
ENERGIEVERBRAUCH
Energieverbrauch 144 kWh/Jahr, auf der
Grundlage von Ergebnissen der
Normprüfung über 24 Stunden. Der
tatsächliche Verbrauch hängt von der
Nutzung und vom Standort des Geräts ab.
NETTOVOLUMEN
59.5 L x 2
TEMPERATUR-EINSTELLBEREICH
5 – 20°C
FROSTFREI
Automatischer Abtauvorgang
KLIMAKLASSE
Klimaklasse: N
Dieses Gerät ist für den Betrieb bei einer
Umgebungstemperatur zwischen 16 °C
(niedrigste Temperatur) und 32 °C
(höchste Temperatur) bestimmt.
LUFTSCHALLEMISSIONEN IN dB(A) RE 1 pW
43 dB(A)
GERÄTETYP
Freistehendes und als Einbaugerät
Dieses Gerät ist ausschließlich zur Lagerung von Wein bestimmt.

103
PRODUKTDATENBLATT
gemäß der delegierten Verordnung (EU) Nr. 1060/2010
-
WEINSCHRANK
HERSTELLER
AVINTAGE
HANDELSBEZEICHNUNG
AVU52SX(/IX)
STROMVERSORGUNG
220-240 V / 50 Hz
ABMESSUNGEN (B x T x H)
595 x 571 x 820 mm
NETTOGEWICHT
44 kg
GERÄTEKATEGORIE
2
ENERGIEEFFIZIENZKLASSE
A
ENERGIEVERBRAUCH
Energieverbrauch 145 kWh/Jahr, auf der
Grundlage von Ergebnissen der
Normprüfung über 24 Stunden. Der
tatsächliche Verbrauch hängt von der
Nutzung und vom Standort des Geräts ab.
NETTOVOLUMEN
146 L
TEMPERATUR-EINSTELLBEREICH
5 – 20°C
FROSTFREI
Automatischer Abtauvorgang
KLIMAKLASSE
Klimaklasse: N
Dieses Gerät ist für den Betrieb bei einer
Umgebungstemperatur zwischen 16 °C
(niedrigste Temperatur) und 32 °C
(höchste Temperatur) bestimmt.
LUFTSCHALLEMISSIONEN IN dB(A) RE 1 pW
44 dB(A)
GERÄTETYP
Freistehendes und als Einbaugerät
Dieses Gerät ist ausschließlich zur Lagerung von Wein bestimmt.

104
PRODUKTDATENBLATT
gemäß der delegierten Verordnung (EU) Nr. 1060/2010
-
WEINSCHRANK
HERSTELLER
AVINTAGE
HANDELSBEZEICHNUNG
AVU53CDZA
STROMVERSORGUNG
220-240 V / 50 Hz
ABMESSUNGEN (B x T x H)
595 x 571 x 820 mm
NETTOGEWICHT
50 kg
GERÄTEKATEGORIE
2
ENERGIEEFFIZIENZKLASSE
A
ENERGIEVERBRAUCH
Energieverbrauch 145 kWh/Jahr, auf der
Grundlage von Ergebnissen der
Normprüfung über 24 Stunden. Der
tatsächliche Verbrauch hängt von der
Nutzung und vom Standort des Geräts ab.
NETTOVOLUMEN
134 L
TEMPERATUR-EINSTELLBEREICH
5 – 10°C / 10 – 20°C
FROSTFREI
Automatischer Abtauvorgang
KLIMAKLASSE
Klimaklasse: N
Dieses Gerät ist für den Betrieb bei einer
Umgebungstemperatur zwischen 16 °C
(niedrigste Temperatur) und 32 °C
(höchste Temperatur) bestimmt.
LUFTSCHALLEMISSIONEN IN dB(A) RE 1 pW
45 dB(A)
GERÄTETYP
Freistehendes und als Einbaugerät
Dieses Gerät ist ausschließlich zur Lagerung von Wein bestimmt.

105
PRODUKTDATENBLATT
gemäß der delegierten Verordnung (EU) Nr. 1060/2010
-
WEINSCHRANK
HERSTELLER
AVINTAGE
HANDELSBEZEICHNUNG
AVU54SXDZA(/IX)
STROMVERSORGUNG
220-240 V / 50 Hz
ABMESSUNGEN (B x T x H)
595 x 571 x 820 mm
NETTOGEWICHT
50 kg
GERÄTEKATEGORIE
2
ENERGIEEFFIZIENZKLASSE
A
ENERGIEVERBRAUCH
Energieverbrauch 145 kWh/Jahr, auf der
Grundlage von Ergebnissen der
Normprüfung über 24 Stunden. Der
tatsächliche Verbrauch hängt von der
Nutzung und vom Standort des Geräts ab.
NETTOVOLUMEN
134 L
TEMPERATUR-EINSTELLBEREICH
5 – 10°C / 10 – 20°C
FROSTFREI
Automatischer Abtauvorgang
KLIMAKLASSE
Klimaklasse: N
Dieses Gerät ist für den Betrieb bei einer
Umgebungstemperatur zwischen 16 °C
(niedrigste Temperatur) und 32 °C
(höchste Temperatur) bestimmt.
LUFTSCHALLEMISSIONEN IN dB(A) RE 1 pW
45 dB(A)
GERÄTETYP
Freistehendes und als Einbaugerät
Dieses Gerät ist ausschließlich zur Lagerung von Wein bestimmt.

106
PRODUKTDATENBLATT
gemäß der delegierten Verordnung (EU) Nr. 1060/2010
-
WEINSCHRANK
HERSTELLER
AVINTAGE
HANDELSBEZEICHNUNG
PRO51C/1
STROMVERSORGUNG
220-240 V / 50 Hz
ABMESSUNGEN (B x T x H)
595 x 571 x 820 mm
NETTOGEWICHT
48 kg
GERÄTEKATEGORIE
2
ENERGIEEFFIZIENZKLASSE
A
ENERGIEVERBRAUCH
Energieverbrauch 145 kWh/Jahr, auf der
Grundlage von Ergebnissen der
Normprüfung über 24 Stunden. Der
tatsächliche Verbrauch hängt von der
Nutzung und vom Standort des Geräts ab.
NETTOVOLUMEN
146 L
TEMPERATUR-EINSTELLBEREICH
5 – 20°C
FROSTFREI
Automatischer Abtauvorgang
KLIMAKLASSE
Klimaklasse: N
Dieses Gerät ist für den Betrieb bei einer
Umgebungstemperatur zwischen 16 °C
(niedrigste Temperatur) und 32 °C
(höchste Temperatur) bestimmt.
LUFTSCHALLEMISSIONEN IN dB(A) RE 1 pW
45 dB(A)
GERÄTETYP
Freistehendes und als Einbaugerät
Dieses Gerät ist ausschließlich zur Lagerung von Wein bestimmt.

107
Gelieve voor het gebruik de veiligheids- en gebruiksregels van deze handleiding te lezen en toe te
passen.
Allereerst willen wij u bedanken voor uw vertrouwen in de groep AVINTAGE met de aankoop van dit
apparaat en wij hopen dat dit aan al uw verwachtingen zal voldoen.
Met dit apparaat kunt u uw flessen naar keuze bewaren of op de juiste schenktemperatuur (afhankelijk
van uw flessen) brengen dankzij de uitgebreide instelmogelijkheden.
1. ALGEMENE VEILIGHEIDSVOORSCHRIFTEN
Lees de in deze handleiding beschreven voorschriften aandachtig
door, voordat u het apparaat gaat gebruiken. Bewaar de
handleiding zorgvuldig voor toekomstig gebruik, indien nodig.
Neem de volgende basisvoorzorgsmaatregelen in acht om het
gevaar voor brand, elektrische schokken of verwondingen tijdens
het gebruik van uw apparaat te beperken.
In het algemeen dient het onderhoud aan uw apparaat door een
bevoegde vakman te worden uitgevoerd.
Lees, voor uw veiligheid en voor een correct gebruik van het
apparaat, deze handleiding en de hierin vermelde
waarschuwingen en adviezen aandachtig door alvorens het
apparaat te installeren en voor de eerste keer te gebruiken. Om
beschadigingen aan het apparaat te voorkomen en/of u onnodig
te verwonden, is het van belang dat de personen die dit apparaat
zullen gebruiken de werking en de beveiligingen ervan volledig
begrijpen. Bewaar deze aanwijzingen voor later gebruik en berg
ze op in de nabijheid van het apparaat, om deze bij het apparaat
te voegen bij verkoop of een verhuizing. Dit maakt een optimale
werking van het apparaat mogelijk.
Bewaar deze handleiding om risico op verwondingen te
voorkomen. De fabrikant kan niet aansprakelijk gesteld worden bij
een onjuist gebruik van het apparaat

108
Dit apparaat is uitsluitend bedoeld voor huishoudelijk gebruik en
bedoeld voor het opslaan van bijzondere drinkwaren op een
bewaartemperatuur die hoger is dan die van een opslagruimte voor
koel te bewaren producten. Het is geen geval bestemd voor het
bewaren van koel te bewaren producten.
Zorg ervoor dat het voltage van uw elektrische installatie
overeenstemt met de indicaties op het typeplaatje; het apparaat
moet worden aangesloten op een goedgekeurd, geaard systeem.
Verkeerde reparaties of aansluitingen brengen gevaren met zich
mee. Laat uw elektrische installatie bij twijfel door een
professionele vakman controleren
Dit apparaat dient voor uw veiligheid correct te worden
aangesloten op een geaarde contactdoos. Onderbreek of
verwijder in geen geval de aardingsdraad van het meegeleverde
voedingssnoer.
Om veiligheidsredenen mag u geen elektrisch verlengsnoer
gebruiken.
Als uw apparaat is beschadigd (grote schok) of schade heeft
opgelopen (te grote spanning naar aanleiding van bliksem,
overstroming, brand), kan het gebruik ervan gevaarlijk zijn.
Koppel de voedingsstekker los en laat het apparaat door een
erkende professionele hersteller controleren.
Vervang het voedingssnoer niet zelf als het is beschadigd, om elk
gevaar te vermijden. Wend u tot uw verkoper, een erkend
herstelcentrum of een professionele hersteller.
Dit apparaat dient zodanig te worden opgesteld dat de
netcontactdoos bereikbaar is. Verplaats het apparaat niet zodra
het is gevuld. U loopt het risico om de behuizing van het apparaat

109
onherstelbaar te beschadigen. De elektrische onderdelen mogen
niet rechtstreeks bereikbaar zijn.
Houd kinderen uit de buurt van het apparaat.
Gebruik dit apparaat niet buiten.
Wanneer er per ongeluk vloeistof (gebroken fles, enz.) op de
elektrische onderdelen (motor, enz.) wordt gemorst, moet u de
voedingsstekker onmiddellijk loskoppelen.
Om elk risico op brand, elektrocutie of verwonding te voorkomen,
het voedingssnoer, de stekker of het apparaat zelf niet in water
of een andere vloeistof onderdompelen. Raak het apparaat nooit
aan met natte handen
Houd het apparaat uit de buurt van warmtebronnen en stel het
niet rechtstreeks bloot aan zonnestralen.
Laat het voedingssnoer niet over een tafel hangen en zorg ervoor
dat het niet in aanraking komt met scherpe randen of warme
oppervlakken.
Trek niet aan het voedingssnoer om de stekker uit de contactdoos
te trekken, maar neem de stekker vast en trek eraan Vergewis u
ervan dat de plaats waar uw apparaat staat, het gewicht van het
apparaat kan ondersteunen zodra het is gevuld (1 fles van 75 cl
weegt ongeveer 1,3 kg). Uw wijnkast moet op een vlakke
ondergrond worden geplaatst. Plaats een steun onder het
apparaat indien u het op een mat of vast tapijt plaatst.
Zorg ervoor dat de deur helemaal geopend is als u de leggers uit
hun compartiment trekt, om beschadiging van de bekleding van
de deur te voorkomen.

110
Veiligheid van kinderen en overige kwetsbare personen
Dit apparaat mag gebruikt worden door kinderen van 8 jaar en
ouder en door personen met lichamelijke, zintuiglijke of
verstandelijke beperkingen, of door personen met gebrek aan
kennis en ervaring, op voorwaarde dat ze onder toezicht staan
van een persoon die de werking van het apparaat en de
hieraan verbonden gevaren kent. Laat kinderen niet met het
apparaat spelen.
De reiniging en het onderhoud mogen niet door kinderen
uitgevoerd worden, behalve als ze meer dan 8 jaar oud zijn en
onder toezicht staan.
Bewaar alle verpakkingen buiten het bereik van kinderen, om
risico op verstikking te voorkomen.
Gevaar voor opsluiting van kinderen. Opsluiting van en
verstikking bij kinderen zijn geen problemen uit het verleden.
Afgedankte of verlaten apparaten zijn nog altijd gevaarlijk ...
zelfs als ze "maar voor enkele dagen in de garage worden
geplaatst".
Snij, bij het afdanken van het apparaat, het snoer (zo dicht
mogelijk bij het apparaat) door en verwijder de deur zodat
spelende kinderen er zich niet in op kunnen sluiten of aan een
elektrische schok bloot gesteld worden.
Controleer, als het met een magnetisch deurrubber uitgeruste
apparaat vervangen moet worden door een apparaat voorzien
van een haak- of veersluiting op de deur of het deurrubber, of
deze buiten werking is alvorens het oude apparaat af te voeren.
Dit voorkomt dat kinderen zich in het apparaat kunnen
opsluiten.
Houd het apparaat en het snoer buiten bereik van kinderen van
onder de 8 jaar.
Verwijder de deur voordat u uw oude wijnkoeler weggooit. Laat

111
de oplegplanken zitten zodat kinderen niet gemakkelijk in het
apparaat kunnen klimmen.
Algemene veiligheid
WAARSCHUWING — Dit apparaat is bestemd voor gebruik voor
huishoudelijke en vergelijkbare toepassingen, zoals
Keukenruimten voor personeel in winkels, kantoren en
andere werkomgevingen,
Boerderijen en door klanten in hotels, motels en andere
residentiële omgevingen,
Bed-and-breakfastomgevingen,
Catering en vergelijkbare niet-retailtoepassingen.
WAARSCHUWING — Om gevaar door de instabiliteit van het
apparaat te vermijden, moet het in overeenstemming met de
voorschriften worden vastgemaakt.
WAARSCHUWING — Plaats nooit ontvlambare producten zoals
spuitbussen in dit apparaat, daar deze hierin kunnen lekken.
WAARSCHUWING — Als het snoer beschadigd is, moet u dit
direct door de fabrikant of een erkende verkoper laten vervangen
om risico op elektrocutie te voorkomen.
WAARSCHUWING — Houd de ventilatieopeningen volledig open
en controleer of de lucht door de openingen kan stromen, met
name als het apparaat in de wand is ingebouwd.
WAARSCHUWING — Gebruik alleen de door de fabrikant
aanbevolen mechanische apparaten of andere middelen om het
ontdooiproces te versnellen.
WAARSCHUWING — Zorg ervoor het koelcircuit niet te

112
beschadigen.
WAARSCHUWING — Gebruik geen elektrische apparaten in het
compartiment, behalve als deze toegestaan zijn door de fabrikant.
WAARSCHUWING — Het koelmiddel en het isolatieblaasgas zijn
brandbaar. Dankt u het apparaat af, breng het dan alleen naar
een erkende afvalverwerkingscentrale. Stel het apparaat niet
bloot aan vuur.
WAARSCHUWING — Het koelmiddel van deze apparaten is
R600a; brandbare en ontplofbare artikelen mogen niet in of in de
buurt van de kast worden geplaatst, om brand of ontploffingen te
vermijden.
Koelvloeistof
Het koelcircuit van het apparaat bevat het koelmiddel isobutaan
(R600a); dit is een licht ontvlambaar gas en dus schadelijk voor
het milieu. Controleer, tijdens het vervoer en de installatie van het
apparaat, of geen enkel onderdeel van het koelcircuit beschadigd
is. Het koelmiddel (R600a) is een ontvlambare vloeistof.
Let op: brandgevaar
Bij een beschadigd koelcircuit:
Voorkom open vlammen en alle ontstekingsbronnen.
Zorg voor voldoende ventilatie in het vertrek waar het
apparaat geïnstalleerd is. Het is gevaarlijk om welke
wijziging dan ook op dit apparaat uit te voeren.
Schade aan het snoer kan leiden tot kortsluiting en/of gevaar op
elektrocutie.

113
Elektrische veiligheid
We kunnen niet aansprakelijk gesteld worden voor ongevallen
veroorzaakt door een onjuist uitgevoerde of defecte elektrische
installatie.
Het snoer mag niet verlengd worden. Gebruik geen
verlengsnoeren, adapters of stekkerdozen.
Vergewis u ervan dat de netstekker niet is verpletterd of
beschadigd. Een verpletterde of beschadigde netstekker kan
oververhit raken en brand veroorzaken.
Vergewis u ervan dat de netstekker van het apparaat
bereikbaar is.
Trek niet aan het voedingssnoer.
Koppel nooit de aarding af.
Zit de contactdoos voor de netstekker los, stop de netstekker er
dan niet in. U kunt een elektrische schok krijgen of er kan brand
ontstaan.
U mag het apparaat nooit gebruiken zonder bescherming voor
de lamp van de binnenverlichting.
Haal de stekker van uw apparaat uit het stopcontact alvorens
het lampje te vervangen.
De wijnkast werkt alleen met een voeding van eenfasige
wisselstroom van 220~240 V / 50 Hz.
Probeer een beschadigd snoer niet te vervangen, maar neem
contact op met de Servicedienst.
Het stopcontact moet eenvoudig toegankelijk, maar buiten het
bereik van kinderen zijn. Neem bij twijfel contact op met uw
installateur.

114
Dagelijks gebruik
Dit apparaat is uitsluitend bedoeld om wijn te bewaren.
Berg nooit ontvlambare stoffen of vloeistoffen in het apparaat
op; dit kan leiden tot gevaar op ontploffing.
Laat nooit overige elektrische apparaten in dit apparaat werken
(mixers, elektrische ijsmachines, enz.).
Pak, om het apparaat van de stroom af te koppelen, altijd de
stekker vast en trek niet aan het snoer.
Plaats hete voorwerpen niet naast de plastic onderdelen van dit
apparaat.
De opslagaanbevelingen van de fabrikant van het apparaat
moeten strikt in acht worden genomen. Raadpleeg de
toepasselijke opslagvoorschriften.
Houd het apparaat op afstand van kaarsen, lampen en overige
open vlammen om risico op brand te voorkomen.
Het apparaat is bedoeld om eet- en/of drinkwaren te bewaren in
normale huishoudelijke omstandigheden, zoals wordt uitgelegd
in deze handleiding.
Het apparaat is zwaar. Ga voorzichtig te werk als u het moet
verplaatsen. Als uw apparaat uitgerust is met wieltjes, dienen
deze uitsluitend om het eenvoudig over korte afstanden te
verplaatsen. Verrijd het apparaat niet over langere afstanden.
Ga nooit op het voetstuk, de laden, de deuren enz. staan, of
gebruik die niet als steun.
Overbelast, om het vallen van voorwerpen en beschadigingen
aan het apparaat te voorkomen, de compartimenten van het
apparaat niet.
Let op! Reiniging en onderhoud
Haal, vóór het onderhoud, de stekker van het apparaat uit het

115
stopcontact en schakel de stroom uit.
Reinig het apparaat niet met metalen voorwerpen, een
stoomsysteem, vluchtige oliën, organische oplosmiddelen of
schuurmiddelen.
Reinig onderdelen van het apparaat nooit met brandbare
vloeistoffen. De dampen kunnen brandgevaar of ontploffingen
veroorzaken.
Gebruik geen scherpe of puntige voorwerpen om het ijs te
verwijderen. Gebruik een plastic krabber.
Belangrijke informatie voor de installatie
Plaats het apparaat niet in vochtige ruimten.
Houd het apparaat uit de buurt van rechtstreeks zonlicht en
rechtstreekse warmtebronnen (fornuis, verwarmingstoestel,
radiator, enz.). Rechtstreeks zonlicht kan de acryllaag
aantasten en warmtebronnen kunnen het stroomverbruik doen
toenemen. Buitengewoon koude of warme
omgevingstemperaturen kunnen er ook toe leiden dat de
apparaten niet goed functioneren.
Stop de stekker van de wijnkoeler in een afzonderlijke, juist
geïnstalleerde en geaarde wandcontactdoos. Het is absoluut
verboden om de derde (aardings) pen van het stroomsnoer te
snijden of te verwijderen. Voor vragen over de stroom en/of de
aarding dient er rechtstreeks contact te worden opgenomen
met een erkende elektricien of een erkend
productherstelcentrum.
Volg, voor een correcte elektrische aansluiting, de in deze
handleiding verstrekte aanwijzingen zorgvuldig op.
Verwijder de verpakking van het apparaat en controleer het op
zichtbare schade. Sluit het apparaat niet aan, als het
beschadigd is. Informeer het verkooppunt over de eventuele

116
schade. Bewaar in dit geval de verpakking.
We raden het aan om minstens vierentwintig uur te wachten
alvorens het apparaat op de stroom aan te sluiten opdat de
compressor voldoende olie bevat.
Om risico op oververhitting te voorkomen is een goede
luchtcirculatie vereist. Volg, voor voldoende ventilatie, de
verstrekte installatie-instructies na.
Vermijd, voor zover mogelijk, dat de achterkant van het
apparaat direct tegen de muur staat en/of in contact staat met
warme elementen (compressor, condensator) om risico op
brand te voorkomen. Volg de installatie-instructies altijd
zorgvuldig op.
Het apparaat mag niet naast radiators of kookplaten geplaatst
worden.
Controleer of de stopcontacten, na het installeren, toegankelijk
zijn.
Energiebesparingen
Om het energieverbruik van uw apparaat te beperken:
Installeer het in een geschikte ruimte (zie het hoofdstuk
"Installatievoorschriften").
Houd de deuren zo kort mogelijk open.
Zorg voor een optimale werking van het apparaat door
regelmatig de condensator te reinigen (zie het hoofdstuk "
Wartung").
Controleer regelmatig de deurrubbers om er zeker van te zijn
dat deze goed sluiten. Neem, indien dit niet het geval is, contact
op met de Servicedienst.

117
Reparaties
Alle elektrische werkzaamheden mogen uitsluitend uitgevoerd
worden door een erkende en vakbekwame elektricien.
Dit apparaat mag uitsluitend gerepareerd worden door een
erkend Servicecentrum met gebruik van originele
reserveonderdelen.
Dit apparaat is uitsluitend bestemd voor huishoudelijk gebruik. De
fabrikant kan niet aansprakelijk gesteld worden voor elk ander
gebruik.
R600a
Veiligheidsvoorschriften
Waarschuwing: dek de ventilatieroosters van het apparaat niet
af.
Waarschuwing: berg geen explosieve stoffen zoals spuitbussen
met ontvlambaar drijfgas in dit apparaat op.
Waarschuwing: vermijd schade aan de koelkringloop van het
apparaat.
Waarschuwing: koelunits die werken met isobutaan (R600a)
mogen niet worden geplaatst in een omgeving waar een
ontstekingsbron aanwezig is (bijvoorbeeld elektrische contacten
zonder afdichting of een plaats waar de koelvloeistof zich kan
ophopen in geval van een lek). Het type koelmiddel staat
vermeld op het typeplaatje op de kast.
Waarschuwing: Gebruik geen elektrische apparaten in de
compartimenten, tenzij dit wordt aanbevolen door de fabrikant.

118
Dit apparaat voldoet aan alle van kracht zijnde Europese richtlijnen en aan de eventuele
wijzigingen. Het voldoet met name aan de volgende normen:
2011/65/EU (ROHS)
2014/35/EU met betrekking tot elektrische veiligheid
2014/30/EU met betrekking tot elektromagnetische compatibiliteit
643/2009/CE met betrekking tot het energielabel
2. TECHNISCHE GEGEVENS
Hieronder ziet u een voorbeeld van een typeplaatje:
De op de binnen- of achterzijde van het apparaat (afhankelijk van het model) geplakte typeplaat bevat
alle informatie betreffende uw apparaat.
We raden u aan om het serienummer voor de installatie in dit boekje te noteren zodat u er later indien
nodig over beschikt (technische interventie, vraag om assistentie…)
Wanneer het apparaat namelijk eenmaal geïnstalleerd en geladen is, is toegang een stuk
gecompliceerder.
LET OP: Er kan geen bijstand verleend worden zonder dit serienummer.

119
3. INSTALLATIEVOORSCHRIFTEN
Voordat u dit apparaat gebruikt
Verwijder de verpakking rondom en binnenin.
Voordat u het apparaat aansluit op de stroombron, moet u het ongeveer 24 uur rechtop laten staan.
Dat zal de kans verkleinen dat het koelsysteem slecht functioneert wegens de behandeling tijdens het
transport.
Maak de binnenkart proper met behulp van een doek en lauw water.
Dankt u uw apparaat af, breng het dan naar een erkende stortlocatie.
Plaats uw wijnkoeler op een vloer die stevig genoeg is om het gewicht ervan te dragen in volledig
gevulde toestand. Om de wijnkoeler horizontaal te stellen, de voorste instelvoet onderaan de
wijnkoeler bijstellen.
Voldoende ventilatie is absoluut noodzakelijk; blokkeer de luchtuitlaat aan de voorzijde niet.
Niet ontworpen voor plaatsing in een garage of kelder.
Het apparaat is alleen bedoeld voor gebruik binnenshuis.
De wijnkast is ontworpen om vrijstaand of ingebouwd geïnstalleerd te worden.
Sluit de wijnkast aan op een enkelvoudige contactdoos en laat een ruimte van 30 mm tussen de
achterkant van de wijnkast en de muur. Zorg dat uw de wijnkast perfect ondersteund wordt en dat ze
waterpas staat (het gebruik van een waterpas wordt aanbevolen). Dit voorkomt dat de kast gaat
bewegen door instabiliteit, wat lawaai en trillingen produceert, en zorgt ervoor dat de deur perfect
luchtdicht is.
Dit apparaat is uitsluitend bedoeld om wijn te bewaren.
Het apparaat gebruikt een ontvlambaar koelmiddel. Beschadig dus nooit de buizen van de
koelinrichting tijdens transport.
Let op
Sla de flessen gesloten op.
Overlaad het apparaat niet.
Open de deur niet vaker dan nodig.
Bedek de leggers niet met aluminiumfolie of een ander materiaal dat een goede luchtcirculatie kan
verhinderen.
Als de wijnkast gedurende een langere periode leeg wordt gelaten, raden wij aan om de stekker uit
het stopcontact te nemen, het apparaat goed schoon te maken en de deur op een kier te laten om de
lucht te laten circuleren en de vorming van schimmels en vervelende geurtjes te voorkomen.
WAARSCHUWING: houd het apparaat uit de buurt van stoffen die ontbranding kunnen
veroorzaken.

120
Beperkingen op de temperatuur van de omgevingsruimte
Dit apparaat is ontworpen om te werken in de omgevingstemperaturen die worden opgegeven door de
temperatuurklasse zoals aangegeven op het typeplaatje.
KLASSE
SYMBOOL
BEREIK VAN
OMGEVINGSTEMPERATUUR (°C)
Uitgebreid gematigd
SN
Van +10 tot +32
Gematigd
N
Van +16 tot +32
Subtropisch
ST
Van +16 tot +38
Tropisch
T
Van +16 tot +43
Inbouwschema
AVU8X(/IX)

121
AVU23SX(/IX)
AVU41SXDPA(/IX)

122
AVU52SX(/IX) AVU54SXDZA(/IX)
AVU53CDZA PRO51C/1

123
Omkeren van de deur
De deur kan naar keuze vanaf de linker- of de rechterzijde worden geopend. Zonder bijzondere
behoeften wordt de deur altijd vanaf de linkerzijde geopend. Is het noodzakelijk om de deur vanaf de
rechterzijde te openen, volg dan de volgende instructies:
AVU8X(/IX)
1. Onderscharnier (rechts) 2. Schroef 3. Deuras
4. Deur 5. Bovenscharnier (rechts) 6. Schroeven van de scharnieren
7. Bovenscharnier (links) 8. Onderscharnier (links)
1. Open de deur 90 graden. Draai de twee schroeven (2) van de onderste deuras (3) los en verwijder
vervolgens de deur (4) en de deuras (Fig. A). Zet de deur in de juiste positie (4) (Fig. A en B).
2. Verwijder 3 schroeven (6) van de bovenste scharnier (rechts) (5) en verwijder deze laatste en
Onderscharnier (rechts) (Fig. C).
3. Verwijder de sierspijkers (8) linksboven op het apparaat en installeer de extra bovenscharnier (links)
(7) linksboven met behulp van drie schroeven (Fig. D). Ga volgens dezelfde procedure verder met het
installeren van de resterende onderscharnier (links) (8) (Fig. E).
4. De deur opent 180 graden. De installatiemethode voor de deur is dezelfde als voor de demontage;
zet de deur goed recht en bevestig hem.

124
AVU23SX(/IX) AVU52SX(/IX)
1. Onderscharnier (rechts) 2. Schroef 3. Deuras
4. Deur 5. Bovenscharnier (rechts) 6. Schroeven van de scharnieren
7. Bovenscharnier (links) 8. Sierspijker 9. Onderscharnier (links)
10. Borgvoorziening 11. Schroef 12. Dop
1. Open de deur 90 graden. Draai de twee schroeven (2) van de onderste deuras los en verwijder
vervolgens de deur (4) en de deuras (Fig. A).
2. Zet de deur (4) in de juiste stand en verwijder de dop (12) uit het bovenste gedeelte van de deurlijst;
draai één van de onderste schroeven (11) los en neem de borgvoorziening (10) uit. Installeer
vervolgens deze voorziening op het bovenste gedeelte van de deurlijst. Het verdient de voorkeur een
reservedop (12) te gebruiken om het gat op het bovenste gedeelte van de lijst te dichten (Fig. A/B).
3. Verwijder 3 schroeven (6) van de bovenscharnier (rechts) (5) en verwijder deze laatste (Fig. C).
4. Verwijder de sierspijkers (8) linksboven op het apparaat en installeer de bovenste reservescharnier
(links) (7) linksboven met behulp van drie schroeven (Fig. D).
5. Ga volgens dezelfde procedure verder met het installeren van de onderste reservescharnier (links)
(9) (Fig. E).
6. De deur opent 180 graden. De installatiemethode voor de deur is dezelfde als voor de demontage;
zet de deur goed recht en bevestig hem.
7. Dicht het gat rechtsboven op het apparaat met een sierspijker (8).

125
AVU53CDZA AVU54SXDZA(/IX) PRO51C/1
1. Onderscharnier (rechts) 2. Schroef 3. Deuras
4. Deur 5. Bovenscharnier (rechts) 6. Schroeven van de scharnieren
7. Bovenscharnier (links) 8. Sierspijker 9. Onderscharnier (links)
1. Open de deur 90 graden. Draai de twee schroeven (2) van de onderste deuras (3) los en verwijder
vervolgens de deur (4) en de deuras (Fig. A).
2. Zet de deur in de juiste positie (4).
3. Verwijder 3 schroeven (6) van de bovenste scharnier (rechts) (5) en verwijder deze laatste (Fig. C).
4. Verwijder de sierspijkers (8) linksboven op het apparaat en installeer de extra bovenscharnier (links)
(7) linksboven met behulp van drie schroeven (Fig. D).
5. Ga volgens dezelfde procedure verder met het installeren van de resterende onderscharnier (links)
(9) (Fig. E).
6. De deur opent 180 graden. De installatiemethode voor de deur is dezelfde als voor de demontage;
zet de deur goed recht en bevestig hem.
7. Dicht het gat rechtsboven op het apparaat met een sierspijker (8).
4. UW APPARAAT BEDIENEN
Het is raadzaam om uw apparaat op een plaats te installeren waar de omgevingstemperatuur tussen
16 en 32°C. Als de omgevingstemperatuur boven of onder de aanbevolen temperaturen ligt, kunnen de
prestaties van het apparaat worden beïnvloed en bestaat de kans dat het onmogelijk is om de
temperatuur tussen 5-20°C of 5-10°C/10-20°C (afhankelijk van het model) te krijgen.

126
AVU8X(/IX) / AVU23SX(/IX) AVU41SXDPA(/IX) AVU52SX(/IX) PRO51C/1
“RUN”
Voedingsaanwijzer
knop
Om het apparaat in/uit te schakelen.
Houd de knop ongeveer 3 seconden ingedrukt.
knop
Knop voor lichtbediening
Display
Elektronische display voor de temperatuur
knop
Afstelknop temperatuur +.
knop
Afstelknop temperatuur -
U kunt de temperatuur die u in het compartiment wenst, kiezen door te drukken op de toetsen
“ / ”. De temperatuur die u wenst te programmeren, wordt bij iedere druk op de knoppen
met 1ºC verhoogt/verlaagd.
De temperatuur kan gekozen worden tussen 5 en 20°C of tussen 5 en 10°C / 10 en 20°C (afhankelijk van
het model). Wanneer deze eenmaal geselecteerd is, knippert de display 5s alvorens de
binnentemperatuur op dat moment in de wijnkast aan te geven. De afgestelde temperatuur kan op ieder
moment bekeken worden door de selectieknoppen van de temperatuur 5s ingedrukt te houden.
In geval van een stroomonderbreking worden alle voordien gekozen temperaturen gewist en keert ieder
compartiment automatisch terug naar de in de fabriek voorgeprogrammeerde temperatuur van 12°C.
AVU53CDZA AVU54SXDZA(/IX)
“RUN”
Voedingsaanwijzer
knop
Om het apparaat in/uit te schakelen.
Houd de knop ongeveer 3 seconden ingedrukt.
knop
Knop voor lichtbediening

127
Display
Elektronische display voor het bovenste compartiment
Display
Elektronische display voor het onderste compartiment.
knop
Afstelknop voor de temperatuur van het bovenste compartiment.
knop
Afstelknop voor de temperatuur van het onderste compartiment
Druk op “ ” om de temperatuur van het bovenste compartiment af te stellen. De display voor het
compartiment begint dan te knipperen en bij iedere druk kunt u de temperatuur met 1°C veranderen.
Wanneer de de laagste afsteltemperatuur 5°C bereikt heeft, gaat de display automatisch terug naar de
hoogste afsteltemperatuur, 10°C. Na het selecteren knippert de display ca. 5s alvorens de
binnentemperatuur op dat moment in de wijnkast aan te geven. De afgestelde temperatuur kan op ieder
moment bekeken worden door de selectieknoppen van de temperatuur 5s ingedrukt te houden.
Druk op “ ” om de temperatuur van het onderste compartiment af te stellen. De display voor het
compartiment begint dan te knipperen en bij iedere druk kunt u de temperatuur met 1°C veranderen.
Wanneer de de laagste afsteltemperatuur 10°C bereikt heeft, gaat de display automatisch terug naar de
hoogste afsteltemperatuur, 20°C. Na het selecteren knippert de display ca. 5s alvorens de
binnentemperatuur op dat moment in de wijnkast aan te geven. De afgestelde temperatuur kan op ieder
moment bekeken worden door de selectieknoppen van de temperatuur 5s ingedrukt te houden.
In geval van een stroomonderbreking worden alle voordien gekozen temperaturen gewist en keert ieder
compartiment automatisch terug naar de in de fabriek voorgeprogrammeerde temperatuur van 6°C voor
het bovenste compartiment en 12°C voor het onderste compartiment.
Voorschriften met betrekking tot de werking
Temperatuuralarm:
Als de binnentemperatuur hoger is dan 23 °C, wordt "HI" weergegeven op het display en weerklinkt de
zoemer na één uur onafgebroken. Dat betekent dat de binnentemperatuur te hoog is; ga na waarom.
Als de binnentemperatuur lager is dan 0 °C, wordt "LO" weergegeven op het display en weerklinkt de
zoemer terwijl het storingscontrolelampje brandt.
Temperatuurherinneringsfunctie:
Bij een stroomonderbreking kan de wijnkoeler zich de vorige temperatuurinstellingen herinneren en
wanneer er opnieuw stroom is, zal de temperatuur van de koeler opnieuw op de insteltemperatuur van
net vóór de stroomuitval worden gebracht.
Binnenverlichting
Om het energieverbruik te verminderen schakelt de ledverlichting van deze wijnkoelkast automatisch uit
na 10 minuten.
Als u wilt dat de ledverlichting constant blijft branden, dan kan dat. Hiervoor drukt u de knop in en
houdt hem ingedrukt gedurende 5 seconden. Nu verschijnt 'LP' op het display. Na 4 seconden keert het
display naar de normale weergave terug en blijft het licht branden tot het handmatig wordt uitgeschakeld.
Als u terug wilt keren naar de standaardinstelling om energie te sparen (aanbevolen), druk dan op de
knop en houdt hem ingedrukt gedurende 5 seconden. Nu verschijnt 'LF' op het display. Na 4
seconden keert het display naar de normale weergave terug en gaat het licht automatisch uit na 10
minuten.

128
5. UITRUSTINGEN
Het temperatuurregelsysteem
Volgens specialisten is de ideale temperatuur om wijn te bewaren ongeveer 12 °C, binnen een
temperatuurbereik van 10° tot 14 °C. Niet te verwarren met de serveertemperatuur, die verschilt op basis
van het specifieke type wijn en tussen de 5 tot 20 °C ligt.
Het is uiterst belangrijk om sterke temperatuurschommelingen te vermijden. Dit apparaat werd door
specialisten voor wijnliefhebbers ontwikkeld en houdt, in tegenstelling tot een gewone koelkast, rekening
met de gevoeligheid van ‘grand cru’s' voor sterke temperatuursschommelingen en verzekert via een
nauwkeurige bediening een constante gemiddelde temperatuur.
Het anti-trillingssysteem
De koelcompressor is voorzien van speciale schokdempers (de silent-blocks) en de binnenruimte is van
de buitenzijde geïsoleerd door een dikke laag polyurethaanschuim. Deze kenmerken voorkomen het
doorgeven van trillingen aan uw wijnen.
Het bevochtigingssysteem
Aangezien dit apparaat niet met een koolstoffilter uitgerust is, beschikt het over een bak die een correct
vochtigheidsniveau behoudt (afhankelijk van het model). Als de vochtigheid te laag is, dient u het
reservoir aan te vullen tot ¾ van zijn capaciteit. Controleer het waterniveau op regelmatige tijdstippen en
vul het water bij indien nodig. Zorg dat de bak altijd water bevat.
Avintage is door specialisten voor wijnliefhebbers ontworpen en heeft dus rekening gehouden met de
gevoeligheid van kurken voor een te lage omgevingsvochtigheid. Daarom dient de bak op de oplegplank
onder de ventilator op de bodem geplaatst te worden om een minimale vochtigheid te voorzien. Let op:
controleer het waterniveau indien u uw wijnen gedurende een lange periode bewaart en het apparaat niet
uitsluitend gebruikt om de serveertemperatuur te verkrijgen (met snelle roulatie van uw flessen).
Zorg ervoor dat de bak vol water volledig stabiel is om te voorkomen dat er water valt of lekt.
Het anti-UVsysteem
Licht versnelt de veroudering van uw wijnen. In onze wijnkasten met volle deuren worden uw wijnen op
natuurlijke wijze beschut, op voorwaarde dat u de deur niet te vaak opent. Dit model met glazen deur
heeft een speciale behandeling ondergaan zodat het schadelijke ultravioletstralen filtert, zodat uw wijnen
perfect beschermd worden.
Ontdooien
Uw apparaat is uitgerust met een automatische ontdooicyclus. Tijdens de stilstand van de koelcyclus
worden de gekoelde oppervlakken van het apparaat automatisch ontdooid. Het op die manier
opgevangen dooiwater wordt afgevoerd naar een verdampingsbak voor condensaatwater, die zich vlak bij
de compressor op de achterkant van het apparaat bevindt. De warmte die door de compressor
geproduceerd wordt, verdampt vervolgens de condensaten die in de bak opgevangen werden.
Het wintersysteem (afhankelijk van het model)
Het wintersysteem helpt om de inwendige temperatuur gelijk te houden met de ingestelde temperatuur.
Op die manier kan de wijnkast werken in een omgeving met temperaturen van 0 tot 32°C. Wanneer de
inwendige temperatuur 3°C lager wordt dan de ingestelde waarde, treedt een elektrisch
verwarmingselement met laag vermogen in werking om de inwendige temperatuur terug op de initieel
ingestelde waarde te brengen. Het verwarmingselement heeft een laag vermogen. Plotse
temperatuursveranderingen en thermische schokken worden op die manier vermeden, want die zijn

129
schadelijk voor de bewaring van de wijn.
Het automatisch systeem is zo ontworpen dat de inwendige temperatuur van de wijnkast al gaat stijgen
nog voordat warmte wordt uitgewisseld met de flessen. Zodra door de werking van het systeem de
inwendige temperatuur tot op de ingestelde waarde is gestegen, schakelt het systeem uit.
Oplegplanken
Om schade aan de deurpakking te verwijderen, moet u zorgen dat de deur goed geopend is voordat
u aan de oplegplanken trekt om flessen te plaatsen of verwijderen.
Voor een eenvoudige toegang tot de inhoud van de oplegplanken, moet u de oplegplank ongeveer
1/3 naar buiten schuiven. De oplegplanken zijn aan elke kant voorzien van een aanslag zodat de
flessen niet vallen.
Om de oplegplanken te verwijderen of terug te plaatsen, moeten zij schuin geplaatst worden zoals op
het schema staat aangegeven en moet u hier, afhankelijk van het geval, aan trekken of hier tegen
duwen.
AVU41SXDPA(/IX)
Leg de oplegplanken op de hiervoor bedoelde plaatsen.a. kartonnen doos met reserveonderdelen.
a. kartonnen doos met reserveonderdelen b. kleine oplegplank c. grote oplegplank
1. Neem, na de verpakking verwijderd te hebben, de kartonnen doos met de reserveonderdelen van het
apparaat uit.
2. 4 kleine oplegplanken (b) zijn te vinden in het linker compartiment. Verwijder de onderste twee
oplegplanken.
3. In het rechter compartiment kan men 4 grote oplegplanken (c) vinden. Verwijder de bovenste twee
oplegplanken.

130
4. De positie van de kleine en grote oplegplanken moet dan omgekeerd worden (fig.2). Leg in ieder
compartiment twee kleine oplegplanken bovenin en twee grote oplegplanken onderin.
5. Wanneer de oplegplanken eenmaal goed geplaatst zijn, kan uw wijnkast overeenkomstig de
instructies uit de handleiding gebruikt worden.
Voet sliders
Twee voet sliders zijn voorzien van het apparaat, zodat u het gemakkelijk te verplaatsen als je voeten zijn
aangepast aan de maximale hoogte. De voet sliders hebben parallel worden geïnstalleerd onder de
voeten volgens de locatie voor de voor- en de achterkant.
Een verhoogde veiligheid
Omdat dit productassortiment bestemd is voor het opslaan van waardevolle voorwerpen, hebben we alles
in het werk gesteld om kwalitatieve onderdelen te kiezen en aangepaste vervaardigingstechnieken te
ontwikkelen om een optimale werkingsveiligheid te garanderen.
Installatie van de handgreep
Uw apparaat is uitgerust met een handgreep van roestvrij staal. Voor het installeren hiervan schroeft u
deze met de meegeleverde schroeven vast op de deur, volgens onderstaand schema en na de pakking
verwijderd te hebben.
6. LADEN
Het maximale aantal flessen dat in de kast gelegd mag worden, wordt louter ter informatie vermeld, is niet
contractueel en maakt het mogelijk (zoals de literinhoud bij koelkasten) om snel te schatten hoe groot het
apparaat is.
Front
Back
Achterzijde
Voorzijde
Achterzijde
Voorzijde
Voet sliders

131
Dit aantal stemt overeen met tests die uitgevoerd werden met een standaardfles: een fles van het type
"lichtere bordelaise van 75 cl" (de standaardisering identificeert voor elke flesvorm een geografische
oorsprong: bordelaise, bourguignonne, provençale, enz., en een type: traditioneel, zwaar, lichter, fluit, enz.,
die elk een eigen diameter en hoogte hebben.
In werkelijkheid is het mogelijk om, in het uiterste geval, meer flessen op te bergen door flessen van
hetzelfde type opeen te stapelen zonder oplegplanken, maar een ‘gevarieerde kast’ bestaat uit een grote
verscheidenheid van flessen en het ‘praktische’ aspect van het dagelijkse beheer van een wijnkast beperkt
de vulcapaciteit. Waarschijnlijk zult u dus wat minder flessen in uw kast leggen dan het vermelde
maximum.
Types flessen:
We zien hier 4 soorten flessen van 75 cl, bourgogneflessen en bordelaises, in verschillende groottes. Er
bestaan talrijke andere inhouden en vormen. U merkt de rangschikking verschillen naargelang van de
hoogte van de flessen, de diameters en de methode om ze kruiselings neer te leggen.
Als u bijvoorbeeld een wijnkast uitsluitend met bourgogneflessen vult, zult u merken dat u ongeveer 30 %
onder de op basis van bordeauxflessen berekende aanvankelijke hoeveelheid zit.
Methodes om flessen kruiselings neer te leggen:
Kop aan staart, hals tegen hals:
Let goed op het verschil in diepte!
Kop aan staart, hals tussen buiken:

132
Voorbeelden van serveeremperaturen
In acht te nemen bij uw degustaties om te voorkomen dat u aan de rijke aroma's van uw wijnen
voorbijgaat! Meningen verschillen, de omgevingstemperatuur ook, maar velen zijn het eens over het
volgende:
Bordeauxwijnen van de beste cru's – rood 16 – 17 °C
Bourgognewijnen van de beste cru's – rood 15 – 16 °C
Grand cru's van droge witte wijnen 14 – 16 °C
Lichte, fruitige, jonge wijnen 11 – 12 °C
Roséwijnen uit de Provence, primeurwijnen 10 – 12 °C
Droge witte wijnen en rode landwijnen 10 – 12 °C
Witte landwijnen 8 – 10 °C
Champagnewijnen 7 – 8 °C
Likeurwijnen 6 °C
7. WARTUNG
Voordat u uw apparaat schoonmaakt (regelmatig uit te voeren interventie), het apparaat loskoppelen door
de stekker uit te trekken of haar zekering los te koppelen.
We raden u aan om voor het eerste gebruik en daarna op regelmatige basis de binnen- en buitenkant
(voorkant, zijkant en onderkant) schoon te maken met een mengsel van lauw water en een zacht
reinigingsproduct. Spoel met zuiver water en laat het volledig apparaat drogen voordat u het opnieuw
aansluit. Gebruik geen oplos- noch schuurmiddelen.
Wanneer u het apparaat voor de eerste keer voedt, kan een restgeur blijven hangen. In dit geval het
apparaat enkele uren ongevuld gebruiken en de temperatuur kouder instellen. De kou zal deze mogelijke
geuren doen verdwijnen.
Wat moet u doen bij een stroomonderbreking?
De meeste stroomonderbrekingen worden snel opgelost. Een onderbreking van 1 of 2 uur zal de
temperaturen in uw wijnkast niet beïnvloeden. Wilt u uw wijnen tijdens stroomonderbrekingen
beschermen, denk er dan aan om de deur zo weinig mogelijk open te doen. Voor stroomonderbrekingen
die zeer lang duren, moet u de maatregelen nemen die noodzakelijk zijn om uw wijn te beschermen.
Indien uw apparaat losgekoppeld of uitgeschakeld is of bij een stroomonderbreking moet u 3 tot 5
minuten wachten om het opnieuw op te starten. Indien u de wijnkast eerder opnieuw probeert te
starten, zal de compressor pas na 3/5 minuten beginnen werken (indien nodig op basis van de
temperatuur).
Bij de eerste opstart en na een langdurige stilstand van de wijnkast is het bij het opnieuw opstarten
mogelijk dat de gekozen en weergegeven temperaturen niet overeenstemmen. Dit is normaal! U moet
dan enkele uren wachten zodat de temperaturen zich opnieuw kunnen stabiliseren.
Periodes van niet-gebruik
Korte periodes van niet-gebruik: laat de wijnkoeler werken tijdens periodes van niet-gebruik van
minder dan drie weken.
Lange periodes van niet-gebruik: zal het apparaat gedurende meerdere maanden niet worden
gebruikt, verwijder dan alle onderdelen en schakel het apparaat uit. Reinig en droog de binnenzijde
grondig. Om geuren en schimmelvorming te voorkomen, laat u de deur een kleine beetje openstaan:
blokkeer de deur daarvoor indien nodig.

133
Als u uw wijnkast moet verplaatsen
Verwijder alle flessen uit uw kast en maak losse onderdelen vast.
Om beschadiging van de schroeven van de voeten te voorkomen, moet u deze zo ver mogelijk
indraaien.
Plak de deur dicht met tape.
Verplaats het apparaat in verticale positie.
Bescherm het met dekens of andere bescherming.
Energiebesparingen
Het apparaat moet in een frisse ruimte worden geplaatst (wel boven +16°C), ver verwijderd van elke
warmtebron (andere huishoudelijke apparatuur) en niet in het directe zonlicht.
De ruimte waarin het apparaat geplaatst wordt, moet geventileerd zijn. Bedek nooit de ventilatiegaten.
Open de deur niet vaker dan nodig.
8. IN GEVAL VAN EEN DEFECT
Ondanks alle zorg die wij aan onze producten besteden, kan een defect nooit volledig uitgesloten
worden. Voordat u contact opneemt met de dienst na verkoop van uw handelaar, moet u echter het
volgende controleren:
Of het stopcontact nog altijd op zijn plaats zit
Of er geen stroomonderbreking is
Of de storing niet veroorzaakt wordt door één van de oorzaken beschreven in de tabel aan het einde
van deze handleiding
BELANGRIJK: Als het meegeleverde voedingssnoer beschadigd is, moet het vervangen worden
door de fabrikant of door een dienst die erkend wordt door het merk of de handelaar. In elk geval
moet het snoer vervangen worden door bevoegd personeel, om elk gevaar voor verwondingen te
voorkomen.
LEVEREN DEZE CONTROLES NIETS OP, NEEM DAN CONTACT OP MET DE KLANTENSERVICE VAN UW HANDELAAR.
OPGELET!
Koppel de wandaansluiting los voor elke onderhouds- of
herstellingsinterventie!

134
9. PROBLEMEN EN OPLOSSINGEN
U kunt veel eenvoudige problemen aan uw chambreerkamer oplossen, zonder de naverkoopdienst te
hoeven raadplegen. Probeer de onderstaande suggesties.
PROBLEEM
MOGELIJKE OORZAAK
De wijnkast start niet
De stekker steekt niet in het contact
De Aan/Uit knop staat op de UIT positie.
Gesprongen zekering. Controleer uw
elektrische installatie
De wijnkast wordt onvoldoende koud
Controleer de geselecteerde temperatuur
De buitentemperatuur ligt boven de
toepassingstemperatuur van de wijnkast
De wijnkast wordt te vaak geopend
De deur sluit niet goed
De afdichting van de deur is niet hermetisch
De compressor start vaak opnieuw
De buitentemperatuur ligt hoog
Er bevinden zich een grote hoeveelheid
flessen in de wijnkast
De wijnkast wordt vaak geopend
De deur is niet goed gesloten
De instelling werd niet correct uitgevoerd
De afdichting van de deur is niet hermetisch
Het lichtje brandt niet
De stekker steekt niet in het contact
Gesprongen zekering. Controleer uw
elektrische installatie
De LED weergave werkt niet meer, neem
contact op met uw klantenservice
De toets voor de binnenverlichting staat op
UIT
Trillingen
Controleer of de kast wel goed waterpas staat
De wijnkast lijkt nogal veel lawaai te maken
Een geluid dat lijkt op stromend water wordt
voortgebracht door het koelgas, dat is normaal
Op het einde van de cyclus van de
compressor, kan men het geluid van
circulerend water horen
Het krimpen en uitzetten van de
binnenwanden kan een krakend geluid
veroorzaken
De wijnkast is niet waterpas
De deur sluit niet goed
De dichting van de deur is vuil of beschadigd
De leggers zijn niet correct geïnstalleerd
De wijnkast is niet waterpas.
Vervanging van de verlichtingslamp
Dit apparaat bestaat uit elektroluminescente dioden (leds). Dit type diode mag niet worden vervangen
door de consument. Deze leds gaan normaal gezien lang genoeg mee om nooit te moeten worden
vervangen. Als de leds toch defect zouden zijn, ondanks alle zorg die wordt besteed aan de productie
van uw wijnkast, moet u voor verdere stappen contact opnemen met uw klantenservice.

135
10. MILIEU
Dit apparaat is gemarkeerd overeenkomstig Europese richtlijn 2012/19/CE betreffende
afgedankte elektrische en elektronische apparatuur (AEEA). Door ervoor te zorgen dat dit
product op de juiste manier wordt afgedankt, voorkomt u mee de potentiële negatieve
gevolgen voor het milieu en de volksgezondheid die anders zouden kunnen worden
veroorzaakt door een ongepaste afvalverwerking van dit product.
Het symbool met de doorstreepte vuilnisbak duidt erop dat dit product aan het einde van zijn levensduur
apart van ander huishoudelijk afval verwerkt moet worden. Het apparaat zal dus naar een centrum voor
selectieve afvalophaling voor elektrische en/of elektronische apparaten gebracht moeten worden, of naar
de doorverkoper van dit nieuwe apparaat, als u een vergelijkbaar apparaat koopt.
De gebruiker moet het apparaat aan het einde van de levensduur naar een geschikte inzamelcentrum
brengen. Een selectieve en adequate ophaling die erop gericht is het ongebruikte apparaat te laten
recycleren, te laten verwerken en met respect voor het milieu te laten vernietigen, helpt mee de mogelijke
negatieve gevolgen voor het milieu en de gezondheid te voorkomen, en bevordert de recyclage van de
materialen waarvan het product samengesteld is.
Om uitvoerigere informatie over de beschikbare systemen voor afvalophaling te verkrijgen, kunt u contact
opnemen met de plaatselijke dienst voor afvalverwijdering of met de winkel waar u het apparaat gekocht
hebt.
11. VERWITTIGING
Met het oog op de voortdurende verbetering van onze producten behouden wij ons het recht voor om de
technische kenmerken zonder voorafgaande kennisgeving te wijzigen.
De garanties van de AVINTAGE-producten worden uitsluitend door de door ons gekozen dealers
gegeven. Geen enkel onderdeel van deze handleiding kan geïnterpreteerd worden als een aanvullende
garantie.
De maatschappij FRIO ENTREPRISE kan niet aansprakelijk gesteld worden voor technische en
opstellingsvergissingen of -weglatingen in het onderhavige document.
Niet-contractueel document.

136
EUROPESE GEGEVENSKAART
volgens Verordening 1060/2010 (EU)
-
WIJNKAST
MERK
AVINTAGE
HANDELSREFERENTIE
AVU8X(/IX)
STROOMVOEDING
220-240 V / 50 Hz
AFMETINGEN VAN HET PRODUCT (B x D x H)
145 x 547,5 x 820 mm
NETTOGEWICHT
20 kg
CATEGORIE VAN HET APPARAAT
2
ENERGIE-EFFICIËNTIEKLASSE
A
ENERGIEVERBRUIK
Energieverbruik 135 kWh per jaar,
berekend op basis van resultaten
verkregen over 24 uur in genormeerde
testomstandigheden. Het werkelijke
energieverbruik hangt af van de
omstandigheden waarin het apparaat
wordt gebruikt en de plaats waar het
opgesteld is.
NETTO-INHOUD
23 L
INSTELBARE TEMPERATUREN
5 – 20°C
NO FROST
Automatisch ontdooien
KLIMAATKLASSE
Klimaatklasse: N
Dit apparaat is ontworpen om te worden
gebruikt bij een omgevingstemperatuur
tussen 16 °C (minimum) en 32 °C
(maximum).
GELUIDSEMISSIE IN LUCHT UITGEDRUKT IN
dB(A) RE 1 pW
44 dB(A)
INSTALLATIETYPE
Inbouw
Dit apparaat is uitsluitend bedoeld om wijn te bewaren.

137
EUROPESE GEGEVENSKAART
volgens Verordening 1060/2010 (EU)
-
WIJNKAST
MERK
AVINTAGE
HANDELSREFERENTIE
AVU23SX(/IX)
STROOMVOEDING
220-240 V / 50 Hz
AFMETINGEN VAN HET PRODUCT (B x D x H)
295 x 571 x 820 mm
NETTOGEWICHT
28 kg
CATEGORIE VAN HET APPARAAT
2
ENERGIE-EFFICIËNTIEKLASSE
A
ENERGIEVERBRUIK
Energieverbruik 140 kWh per jaar,
berekend op basis van resultaten
verkregen over 24 uur in genormeerde
testomstandigheden. Het werkelijke
energieverbruik hangt af van de
omstandigheden waarin het apparaat
wordt gebruikt en de plaats waar het
opgesteld is.
NETTO-INHOUD
56 L
INSTELBARE TEMPERATUREN
5 – 20°C
NO FROST
Automatisch ontdooien
KLIMAATKLASSE
Klimaatklasse: N
Dit apparaat is ontworpen om te worden
gebruikt bij een omgevingstemperatuur
tussen 16 °C (minimum) en 32 °C
(maximum).
GELUIDSEMISSIE IN LUCHT UITGEDRUKT IN
dB(A) RE 1 pW
43 dB(A)
INSTALLATIETYPE
Vrije plaatsing en Inbouw
Dit apparaat is uitsluitend bedoeld om wijn te bewaren.

138
EUROPESE GEGEVENSKAART
volgens Verordening 1060/2010 (EU)
-
WIJNKAST
MERK
AVINTAGE
HANDELSREFERENTIE
AVU41SXDPA(/IX)
STROOMVOEDING
220-240 V / 50 Hz
AFMETINGEN VAN HET PRODUCT (B x D x H)
595 x 571 x 820 mm
NETTOGEWICHT
48 kg
CATEGORIE VAN HET APPARAAT
2
ENERGIE-EFFICIËNTIEKLASSE
A
ENERGIEVERBRUIK
Energieverbruik 144 kWh per jaar,
berekend op basis van resultaten
verkregen over 24 uur in genormeerde
testomstandigheden. Het werkelijke
energieverbruik hangt af van de
omstandigheden waarin het apparaat
wordt gebruikt en de plaats waar het
opgesteld is.
NETTO-INHOUD
59.5 L x 2
INSTELBARE TEMPERATUREN
5 – 20°C
NO FROST
Automatisch ontdooien
KLIMAATKLASSE
Klimaatklasse: N
Dit apparaat is ontworpen om te worden
gebruikt bij een omgevingstemperatuur
tussen 16 °C (minimum) en 32 °C
(maximum).
GELUIDSEMISSIE IN LUCHT UITGEDRUKT IN
dB(A) RE 1 pW
43 dB(A)
INSTALLATIETYPE
Vrije plaatsing en Inbouw
Dit apparaat is uitsluitend bedoeld om wijn te bewaren.

139
EUROPESE GEGEVENSKAART
volgens Verordening 1060/2010 (EU)
-
WIJNKAST
MERK
AVINTAGE
HANDELSREFERENTIE
AVU52SX(/IX)
STROOMVOEDING
220-240 V / 50 Hz
AFMETINGEN VAN HET PRODUCT (B x D x H)
595 x 571 x 820 mm
NETTOGEWICHT
44 kg
CATEGORIE VAN HET APPARAAT
2
ENERGIE-EFFICIËNTIEKLASSE
A
ENERGIEVERBRUIK
Energieverbruik 145 kWh per jaar,
berekend op basis van resultaten
verkregen over 24 uur in genormeerde
testomstandigheden. Het werkelijke
energieverbruik hangt af van de
omstandigheden waarin het apparaat
wordt gebruikt en de plaats waar het
opgesteld is.
NETTO-INHOUD
146 L
INSTELBARE TEMPERATUREN
5 – 20°C
NO FROST
Automatisch ontdooien
KLIMAATKLASSE
Klimaatklasse: N
Dit apparaat is ontworpen om te worden
gebruikt bij een omgevingstemperatuur
tussen 16 °C (minimum) en 32 °C
(maximum).
GELUIDSEMISSIE IN LUCHT UITGEDRUKT IN
dB(A) RE 1 pW
44 dB(A)
INSTALLATIETYPE
Vrije plaatsing en Inbouw
Dit apparaat is uitsluitend bedoeld om wijn te bewaren.

140
EUROPESE GEGEVENSKAART
volgens Verordening 1060/2010 (EU)
-
WIJNKAST
MERK
AVINTAGE
HANDELSREFERENTIE
AVU53CDZA
STROOMVOEDING
220-240 V / 50 Hz
AFMETINGEN VAN HET PRODUCT (B x D x H)
595 x 571 x 820 mm
NETTOGEWICHT
50 kg
CATEGORIE VAN HET APPARAAT
2
ENERGIE-EFFICIËNTIEKLASSE
A
ENERGIEVERBRUIK
Energieverbruik 145 kWh per jaar,
berekend op basis van resultaten
verkregen over 24 uur in genormeerde
testomstandigheden. Het werkelijke
energieverbruik hangt af van de
omstandigheden waarin het apparaat
wordt gebruikt en de plaats waar het
opgesteld is.
NETTO-INHOUD
134 L
INSTELBARE TEMPERATUREN
5 – 10°C / 10 – 20°C
NO FROST
Automatisch ontdooien
KLIMAATKLASSE
Klimaatklasse: N
Dit apparaat is ontworpen om te worden
gebruikt bij een omgevingstemperatuur
tussen 16 °C (minimum) en 32 °C
(maximum).
GELUIDSEMISSIE IN LUCHT UITGEDRUKT IN
dB(A) RE 1 pW
45 dB(A)
INSTALLATIETYPE
Vrije plaatsing en Inbouw
Dit apparaat is uitsluitend bedoeld om wijn te bewaren.

141
EUROPESE GEGEVENSKAART
volgens Verordening 1060/2010 (EU)
-
WIJNKAST
MERK
AVINTAGE
HANDELSREFERENTIE
AVU54SXDZA(/IX)
STROOMVOEDING
220-240 V / 50 Hz
AFMETINGEN VAN HET PRODUCT (B x D x H)
595 x 571 x 820 mm
NETTOGEWICHT
50 kg
CATEGORIE VAN HET APPARAAT
2
ENERGIE-EFFICIËNTIEKLASSE
A
ENERGIEVERBRUIK
Energieverbruik 145 kWh per jaar,
berekend op basis van resultaten
verkregen over 24 uur in genormeerde
testomstandigheden. Het werkelijke
energieverbruik hangt af van de
omstandigheden waarin het apparaat
wordt gebruikt en de plaats waar het
opgesteld is.
NETTO-INHOUD
134 L
INSTELBARE TEMPERATUREN
5 – 10°C / 10 – 20°C
NO FROST
Automatisch ontdooien
KLIMAATKLASSE
Klimaatklasse: N
Dit apparaat is ontworpen om te worden
gebruikt bij een omgevingstemperatuur
tussen 16 °C (minimum) en 32 °C
(maximum).
GELUIDSEMISSIE IN LUCHT UITGEDRUKT IN
dB(A) RE 1 pW
45 dB(A)
INSTALLATIETYPE
Vrije plaatsing en Inbouw
Dit apparaat is uitsluitend bedoeld om wijn te bewaren.

142
EUROPESE GEGEVENSKAART
volgens Verordening 1060/2010 (EU)
-
WIJNKAST
MERK
AVINTAGE
HANDELSREFERENTIE
PRO51C/1
STROOMVOEDING
220-240 V / 50 Hz
AFMETINGEN VAN HET PRODUCT (B x D x H)
595 x 571 x 820 mm
NETTOGEWICHT
48 kg
CATEGORIE VAN HET APPARAAT
2
ENERGIE-EFFICIËNTIEKLASSE
A
ENERGIEVERBRUIK
Energieverbruik 145 kWh per jaar,
berekend op basis van resultaten
verkregen over 24 uur in genormeerde
testomstandigheden. Het werkelijke
energieverbruik hangt af van de
omstandigheden waarin het apparaat
wordt gebruikt en de plaats waar het
opgesteld is.
NETTO-INHOUD
146 L
INSTELBARE TEMPERATUREN
5 – 20°C
NO FROST
Automatisch ontdooien
KLIMAATKLASSE
Klimaatklasse: N
Dit apparaat is ontworpen om te worden
gebruikt bij een omgevingstemperatuur
tussen 16 °C (minimum) en 32 °C
(maximum).
GELUIDSEMISSIE IN LUCHT UITGEDRUKT IN
dB(A) RE 1 pW
45 dB(A)
INSTALLATIETYPE
Vrije plaatsing en Inbouw
Dit apparaat is uitsluitend bedoeld om wijn te bewaren.

143
Antes de utilizar la vinoteca, lea y aplique todas las reglas de seguridad y uso del presente
manual.
En primer lugar, le agradecemos la confianza que ha depositado en AVINTAGE al adquirir este aparato
que, estamos convencidos, cumplirá plenamente sus expectativas.
Este aparato le permitirá chambrear (poner a temperatura ambiente) sus botellas o ponerlas a
temperatura de servicio en función de su naturaleza.
1. INSTRUCCIONES GENERALES DE SEGURIDAD
Antes de utilizar el electrodoméstico por primera vez, leer este
manual de usuario atentamente. Guardarlo con cuidado para
futuras consultas en caso necesario. Para reducir el riesgo de
incendio, descarga eléctrica o daños cuando se esté usando su
aparato, siga estas precauciones básicas:
De manera general, un profesional cualificado debe realizar el
mantenimiento del electrodoméstico.
Por su seguridad y para utilizar correctamente el aparato, antes
de instalarlo y utilizarlo por primera vez, lea atentamente este
manual, así como las advertencias y los consejos útiles que
contiene. Con la finalidad de evitar que usted resulte herido
innecesariamente o que el aparato se estropee, es importante
que las personas que vayan a utilizarlo conozcan completamente
su funcionamiento, así como sus funciones de seguridad.
Conserve estas instrucciones para futuras consultas y guárdelas
junto al aparato, de modo que acompañen a este último en caso
de que se venda o traslade a otro lugar. Así se garantizará el
correcto funcionamiento del mismo.
Conserve este manual para evitar cualquier riesgo de lesiones. El
fabricante declina toda responsabilidad en caso de manipulación
incorrecta del aparato.
Este electrodoméstico debe utilizarse exclusivamente en el hogar

144
para guardar bebidas especiales a una temperatura de
almacenamiento superior a la del compartimento de
almacenamiento para productos frescos. No está previsto bajo
ningún concepto para guardar productos alimenticios frescos.
Asegurarse de que la tensión de la instalación eléctrica
corresponda con la placa de identificación del electrodoméstico;
este último debe estar conectado a un sistema a tierra
autorizado. Las reparaciones o conexiones incorrectas pueden
causar riesgos para la seguridad. En caso de duda, solicitar a un
profesional que compruebe la instalación eléctrica.
Esta unidad debe estar correctamente conectada a la toma de
corriente a tierra para su protección. No cortar ni retirar el hilo de
puesta a tierra del cable de la red eléctrica suministrado.
Por razones de seguridad, no utilizar un cable alargador eléctrico.
Si el electrodoméstico está estropeado (p. ej., si ha recibido un
golpe fuerte) o ha sufrido algún daño (subida de tensión debida a
relámpagos, inundaciones o incendios), puede resultar peligroso
utilizarlo. Desconectar el enchufe de la red eléctrica y solicitar a
un reparador profesional autorizado que compruebe el
electrodoméstico.
Para impedir los peligros, no reemplace usted mismo el cable
estropeado de la red eléctrica. Ponerse en contacto con el
distribuidor, un centro de reparación autorizado o un reparador
profesional.
Este electrodoméstico debe colocarse de tal manera que el
enchufe de la red eléctrica esté accesible. No mover el
electrodoméstico cuando esté lleno: podría deformarse su
estructura y no ser posible su reparación. Las partes eléctricas no

145
deben estar directamente accesibles.
Mantener a los niños alejados del electrodoméstico.
No utilizar este electrodoméstico al aire libre.
En caso de que se derrame líquido por accidente (rotura de una
botella, etc.) en los componentes eléctricos (motor, etc.),
desconectar el enchufe de la red eléctrica inmediatamente.
Para impedir todo riesgo de incendio, electrocución o lesiones,
no sumergir el cable de la red eléctrica, el enchufe o el propio
electrodoméstico en el agua o en cualquier otro líquido. No tocar
el electrodoméstico con las manos mojadas.
Mantener el electrodoméstico alejado de cualquier fuente de calor
o fuera de la luz directa del sol.
No permitir que el cable de la red eléctrica quede colgando de
una mesa o entre en contacto con bordes afilados o superficies
calientes.
No tirar del cable de red eléctrica, agarrar el enchufe para
desconectar el electrodoméstico.
Asegurarse de que la zona donde se vaya a colocar el
electrodoméstico pueda soportar su peso cargado (una botella de
75 cl pesa aproximadamente 1,3 kg). La vinoteca debe estar
colocada en una superficie plana. Si hay que colocarla en una
alfombra o tapete, colocar un soporte debajo.
Para evitar dañar la junta de puerta, cerciórese de que la puerta
está completamente abierta cuando usted saca las parrillas de
su compartimento.

146
Seguridad de los niños y demás personas vulnerables
Este aparato pueden utilizarlo niños de 8 años o más, personas
con capacidad física, sensorial o mental reducida o personas
que no hayan aprendido a utilizar el aparato, siempre que estén
bajo la supervisión de una persona informada y consciente de
los riesgos que ello implica. Los niños no deben jugar con el
aparato.
La limpieza y el mantenimiento del aparato no deben llevarlos a
cabo niños, excepto si son mayores de 8 años y están
vigilados.
Mantenga todos los componentes del embalaje fuera del
alcance de los niños, ya que existe riesgo de asfixia.
Riesgo de atrapamiento de niños. El riesgo de atrapamiento y
asfixia de los niños no son problemas del pasado. Los aparatos
desechados o abandonados siguen siendo peligrosos… incluso
si van a "dejarse en el garaje unos días".
Si decide desechar el aparato, desenchúfelo de la toma mural,
corte el cable de conexión (tan cerca del aparato como le sea
posible) y retire la puerta para impedir que los niños jueguen
con ella y se electrocuten o se encierren en el interior del
aparato.
Si el aparato, provisto de una junta de puerta magnética, debe
reemplazarse por otro aparato provisto de un pestillo en la
puerta o en la junta, compruebe que dicho pestillo no funciona
antes de deshacerse del aparato. De este modo, se evitará que
el aparato se convierta en una trampa para los niños.
Mantenga el aparato y el cable fuera del alcance de niños
menores de 8 años.
Antes de dar de baja la bodega en un sitio de reciclaje
específicos, quite la puerta, pero dejar los estantes en lugar de
una manera tal como para hacer difícil que los niños se suban

147
en el interior.
Seguridad general
ATENCIÓN — Este electrodoméstico está previsto para utilizarse
en una vivienda o para tener aplicaciones parecidas en
Áreas de cocina de oficina, en tiendas, oficinas u otros
lugares de trabajo,
Fincas y entre clientes en hoteles, moteles y cualquier otro
lugar de tipo residencial,
Lugares de tipo alojamiento y desayuno,
Servicio de comidas y aplicaciones parecidas no minoristas.
ATENCIÓN — Para evitar un peligro debido a la inestabilidad del
aparato, debe fijarse de acuerdo con las instrucciones.
ATENCIÓN — No guarde bajo ninguna circunstancia sustancias
inflamables como aerosoles dentro del aparato, ya que podrían
derramarse.
ATENCIÓN — Si el cable de alimentación está estropeado,
deberá reemplazarlo inmediatamente solicitándolo al fabricante o
a un distribuidor cualificado para evitar cualquier riesgo de
electrocución.
ATENCIÓN — Mantenga los orificios de ventilación abiertos y
compruebe que el aire circule correctamente por las aberturas,
sobre todo si el aparato está empotrado en la pared.
ATENCIÓN —No utilizar dispositivos mecánicos ni ningún otro
medio para acelerar el proceso de descongelación distintos de
los recomendados por el fabricante.

148
ATENCIÓN — No estropee el circuito de refrigeración.
ATENCIÓN — No utilice aparatos eléctricos dentro del
compartimento, • excepto si estos últimos son aceptados por el
fabricante.
ATENCIÓN — El refrigerante y el gas de soplado de aislamiento
son inflamables. Cuando se deseche el electrodoméstico, hacerlo
en un centro de eliminación de residuos autorizado. No exponer a
las llamas.
ATENCIÓN — El refrigerante de estos aparatos es el R600a, los
artículos inflamables y explosivos no deberían ponerse cerca del
armario para evitar que se produzca fuego o una explosión.
Líquido refrigerante
En el circuito refrigerante del aparato se utiliza isobutano
refrigerante (R600a). Se trata de un gas natural sumamente
inflamable y, por tanto, peligroso para el medio ambiente.
Compruebe que no se dañe ninguno de los componentes del
circuito de refrigeración durante el transporte y la instalación del
aparato. El refrigerante (R600a) es un líquido inflamable.
Atención: riesgo de incendio
Si el circuito de refrigeración resultara dañado:
Evite las llamas abiertas y cualquier otra fuente de
inflamación.
Ventile bien la habitación en la que se encuentre el aparato.
Es peligroso realizar cualquier tipo de modificación que
afecte a la composición del aparato.
Cualquier daño provocado al cable puede causar un cortocircuito
o una electrocución.

149
Seguridad eléctrica
Declinamos toda responsabilidad en caso de incidente causado
por una mala instalación eléctrica.
El cable de alimentación no debe alargarse. No utilice ningún
alargador, ningún adaptador ni ninguna toma múltiple.
Asegurarse de que el cable de alimentación no esté aplastado
ni estropeado. Si el cable está aplastado o estropeado, podría
sobrecalentarse y provocar un incendio.
Asegurarse de tener acceso al enchufe de la red eléctrica del
electrodoméstico.
No tirar del cable principal
No elimine en ningún caso la toma de tierra.
Si el enchufe de alimentación está suelto, no insertar el cable
de alimentación. Existe riesgo de descarga eléctrica o incendio.
No se debe poner en funcionamiento el electrodoméstico sin la
tapa de la lámpara de iluminación interior.
Desconecte el aparato antes de cambiar la bombilla.
La vinoteca se aplica solamente con suministro de alimentación
de corriente alterna monofásica de 220~240 V/50 Hz.
Si el cable de alimentación está estropeado, no lo reemplace.
Póngase en contacto con el servicio posventa.
La toma de corriente debe estar accesible fácilmente pero fuera
del alcance de los niños. En caso de duda, consulte al
instalador
Utilización diaria
Este aparato está diseñado para ser utilizado exclusivamente
para el almacenamiento de vino.
No almacene en ningún caso sustancias ni líquidos inflamables

150
dentro del aparato, pues implicaría un riesgo de explosión.
No ponga en funcionamiento otros aparatos eléctricos dentro
del aparato (batidoras, heladeras eléctricas, etc.).
Cuando desenchufe el aparato, agarre la toma con las manos y
no tire del cable.
No colocar objetos calientes cerca de los componentes de
plástico de este electrodoméstico.
Deben cumplirse estrictamente las recomendaciones de
almacenamiento de los electrodomésticos prescritas por el
fabricante. Consultar las instrucciones correspondientes de
almacenamiento.
No exponga el aparato directamente al sol.
El aparato debe mantenerse alejado de velas, luminarias y
demás llamas abiertas para evitar riesgos de incendio.
Este electrodoméstico está destinado a guardar bebidas
comunes de una vivienda, tal y como se explica en este manual
de instrucciones.
El aparato es pesado. Sea prudente cuando tenga que
desplazarlo. Si el aparato está provisto de ruedas, recuerde
que estas sirven únicamente para facilitar pequeños
movimientos. No lo desplace en trayectos largos.
No utilizar nunca la base, los cajones, las puertas, etc. como
sostén o soporte.
Para evitar que caigan objetos e impedir el deterioro del
aparato, no sobrecargue los compartimentos del aparato.
Atención: limpieza y mantenimiento
Antes de realizar el mantenimiento, desconecte el aparato y
corte la corriente.
No limpie el aparato con objetos metálicos, sistemas a vapor,

151
aceites volátiles, disolventes orgánicos o componentes
abrasivos.
Nunca limpie ninguna parte del aparato con fluidos inflamables.
Los humos pueden crear un peligro de incendio o explosión.
No utilice objetos cortantes ni puntiagudos para retirar el hielo.
Utilice un rascador de plástico.
Información importante acerca de la instalación
Evite colocar la unidad en zonas húmedas.
Mantener el electrodoméstico alejado de la luz directa del sol y
de las fuentes de calor (estufa, calentador, radiador, etc.). La
luz directa del sol puede afectar a la capa acrílica y las fuentes
de calor pueden aumentar el consumo eléctrico. El frío extremo
o las temperaturas ambiente de calor también pueden provocar
funcionamientos inadecuados de los electrodomésticos.
Enchufe la vinoteca en una toma de corriente exclusiva
apropiadamente instalada con toma de tierra. Bajo ninguna
circunstancia corte o quite la tercera clavija (tierra) del cable de
alimentación. Cualquier pregunta que tenga sobre la potencia
y/o puesta a tierra debe dirigirse a un electricista cualificado o
un centro de servicio de productos autorizado.
Para que las conexiones eléctricas sean correctas, siga las
instrucciones que se proporcionan en este manual.
Desembale el aparato y compruebe visualmente que no esté
dañado. No conecte el aparato si está dañado. Indique los
daños constatados en el punto de venta donde lo haya
adquirido. En ese caso, conserve el embalaje.
Se recomienda esperar al menos veinticuatro horas para
conectar el aparato a la corriente para que el compresor cuente
con el aceite suficiente.
Se requiere una buena circulación del aire para evitar riesgos

152
de sobrecalentamiento. Para que la ventilación sea suficiente,
siga correctamente las instrucciones de instalación
proporcionadas.
Cuando sea posible, evite que el aparato toque las paredes
murales o entre en contacto con elementos calientes
(compresor, condensador) para evitar riesgos de incendio.
Respete en todo momento las instrucciones de instalación.
El aparato no debe estar situado cerca de radiadores o de
fogones de cocción.
Una vez que se haya instalado el aparato, compruebe que se
puede acceder bien a las tomas.
Ahorro de energía
Siga las siguientes recomendaciones para limitar el consumo
eléctrico del aparato:
Instálelo en un lugar adecuado (véase el capítulo
“Instrucciones de instalación”).
Mantenga las puertas abiertas el menor tiempo posible.
Para que el aparato funcione correctamente, limpie
periódicamente el condensador (véase el capítulo
“Mantenimiento”).
Revise periódicamente las juntas de las puertas y asegúrese
de que cierren siempre correctamente. Si no es así,
póngase en contacto con el servicio posventa.
Reparación de averías
Las operaciones eléctricas debe efectuarlas un técnico
cualificado y competente.
Este aparato debe repararlo un centro de reparación autorizado
y solo deben utilizarse piezas originales.

153
Este aparato está reservado para uso doméstico exclusivamente.
El fabricante declina toda responsabilidad si el aparato se destina
a otros usos.
R600a
Instrucciones de seguridad
Atención: No obstruya ninguna rejilla de ventilación del aparato.
Atención: No almacene sustancias explosivas como esprays de
aerosol inflamables con propulsor en este aparato.
Atención: No estropee el circuito frigorífico del aparato.
Atención: Las unidades de refrigeración que funcionan con
isobutano (R600a) no pueden ubicarse en zonas con fuentes
de ignición (por ejemplo, contactos eléctricos no sellados o
lugares en los que se acumule fluido frigorígeno en caso de
fuga). El tipo de fluido frigorígeno se indica en la placa
descriptiva del armario.
Atención: No utilice aparatos eléctricos en los compartimentos
del aparato, excepto si son del tipo recomendado por el
fabricante.
Este aparato cumple todas las directivas europeas vigentes y sus posibles modificaciones y,
concretamente, las normas siguientes:
2011/65/EU (ROHS)
2014/35/EU relativa a la seguridad eléctrica
2014/30/EU relativa a la compatibilidad electromagnética
643/2009/CE relativa al etiquetado energético

154
2. DATOS TÉCNICOS
Ejemplo de placa de características:
La placa de características pegada en el interior o en la parte posterior del aparato (según el modelo)
contiene toda la información específica de la vinoteca.
Le aconsejamos que anote el número de serie en este manual antes de la instalación, para consultarlo
cuando lo necesite (intervención técnica, solicitud de asistencia…).
Una vez instalada y cargada la vinoteca, resulta más complicado acceder al número de serie.
ATENCIÓN: sin esta información no podremos proporcionarle ninguna asistencia.
3. INSTRUCCIONES DE INSTALACIÓN
Antes de utilizar este electrodoméstico
Retire el embalaje exterior e interior.
Antes de conectar el electrodoméstico a la fuente de alimentación, mantenerlo recto durante
aproximadamente 24 horas. De este modo, se reducirá la posibilidad de que se produzcan
funcionamientos inadecuados en el sistema de refrigeración a causa de las manipulaciones durante el
transporte.
Limpie el interior con un paño suave y agua tibia.
Cuando se deshaga de su aparato, escoja un punto limpio autorizado.
Sitúe su vinoteca en un piso lo suficientemente fuerte para soportarla cuando esté completamente
cargada. Para nivelar su vinoteca, ajuste las patas frontales de nivelación bajo la vinoteca.
Se necesita una ventilación adecuada, no bloquear la salida frontal de aire.
No diseñado para colocarse en un sótano.
El electrodoméstico solamente puede utilizarse en interiores.
Esta vinoteca ha sido diseñada para una instalación independiente o empotrada.

155
Conecte la vinoteca a una toma única, dejando un espacio de 30 mm entre la parte posterior de la
vinoteca y la pared. Calce el aparato correctamente y ajuste su horizontalidad (se aconseja el uso de
un nivel de burbujas). Esto evitará cualquier movimiento debido a la inestabilidad, que generaría
ruidos y vibraciones, y garantizará la perfecta hermeticidad de la puerta.
El uso previsto de este aparato es exclusivamente el almacenamiento de vino.
Este aparato uso refrigerante inflamable. Por lo tanto, no dañe las tuberías de refrigerante durante el
transporte.
Atención
Almacene las botellas cerradas.
No sobrecargue el aparato.
No abra la puerta más de lo que fuera necesario.
No cubra las parrillas con hojas de aluminio o cualquier otro material que pudiese impedir una buena
circulación del aire.
Si la bodega de vino debe dejarse vacía durante un largo período, se sugiere desconectar el aparato
y después limpiarla meticulosamente, dejar la puerta entreabierta para que el aire circule y prevenga
la formación de mohos y olores.
ATENCIÓN: mantener este electrodoméstico alejado de cualquier sustancia que pueda causar
ignición.
Límites de temperatura del ambiente de la sala
Este aparato está diseñado para que funcione a temperaturas ambiente especificadas en su clase de
temperatura indicada en la placa de características.
CLASE
SÍMBOLO
RANGO DE TEMPERATURAS
AMBIENTE (ºC)
Extensión de temperaturas
SN
Desde +10 a+32
Temperatura
N
Desde +16 a+32
Subtropical
ST
Desde +16 a+38
Tropical
T
Desde +16 a+43

156
Esquema de empotramiento
AVU8X(/IX)
AVU23SX(/IX)

157
AVU41SXDPA(/IX)
AVU52SX(/IX) AVU54SXDZA(/IX)

158
AVU53CDZA PRO51C/1
Inversión de la puerta
Se puede cambiar la puerta para que abra por el lado izquierdo o derecho. Si no hay ninguna petición
especial, la puerta se abre por el lado izquierdo. Si se necesita que abra por el lado derecho siga las
siguientes indicaciones:
AVU8X(/IX)

159
1. Bisagra inf. (derecha) 2. Tornillos 3. Eje de la puerta
4. Puerta 5. Bisagra sup. (derecha) 6. Tornillos de bisagras
7. Bisagra sup. (izquierda) 8. Bisagra inf. (izquierda)
1. Abra la puerta 90 grados. Retire los dos tornillos (2) del eje inferior de la puerta y después la puerta
(4) y el eje de la misma (Fig. A). Posicione correctamente la puerta (4) (Fig. A y B).
2. Quite los 3 tornillos (6) de la bisagra superior (derecha) (5) y retire esta bisagra y la bisagra inferior
(derecha) (Fig. C).
3. Coloque la bisagra superior adicional (izquierda) (7) en el lado superior izquierdo con ayuda de 3
tornillos (Fig. D). Proceda a la colocación de la bisagra inferior que queda (izquierda) (8), siguiendo
siempre el procedimiento anterior (Fig. E).
4. La puerta se abre 180 grados. El método de instalación de la puerta es el mismo que el de
desmontaje. Alinee correctamente la puerta y fíjela.
AVU23SX(/IX) AVU52SX(/IX)
1. Bisagra inf. (derecha) 2. Tornillos 3. Eje de la puerta
4. Puerta 5. Bisagra sup. (derecha) 6. Tornillos de las bisagras
7. Bisagra sup. (izquierda) 8. Clavo embellecedor 9. Bisagra inf. (izquierda)
10. Dispositivo de retención 11. Tornillos 12. Tapón embellecedor
1. Abra la puerta 90 grados. Retire los dos tornillos (2) del eje inferior de la puerta y después la puerta
(4) y el eje de la misma (fig. A).
2. Posicione correctamente la puerta (4) y retire el tapón embellecedor (12) de la parte superior del
marco de la puerta. Retire uno de los tornillos (11) inferiores y quite el dispositivo de retención (10). A
continuación, instale el dispositivo en la parte superior del marco de la puerta. Es preferible utilizar un
tapón embellecedor de recambio (12) para tapar el agujero de la parte superior del marco (fig. A/B).
3. Quite los 3 tornillos (6) de la bisagra superior (derecha) (5) y retire la bisagra (fig. C).
4. Retire los clavos embellecedores (8) del lado superior izquierdo del aparato y coloque la bisagra
superior de recambio (izquierda) (7) en el lado superior izquierdo con ayuda de 3 tornillos (fig. D).
5. Proceda a la colocación de la bisagra inferior de recambio (izquierda) (9), siguiendo siempre el

160
procedimiento anterior (fig. E).
6. La puerta se abre 180 grados. El método de instalación de la puerta es el mismo que el de
desmontaje. Alinee correctamente la puerta y fíjela.
7. Tape el agujero situado en la parte superior derecha del aparato con un clavo embellecedor (8).
AVU53CDZA AVU54SXDZA(/IX) PRO51C/1
1. Bisagra inf. (derecha) 2. Tornillos 3. Eje de la puerta
4. Puerta 5. Bisagra sup. (derecha) 6. Tornillos de bisagras
7. Bisagra sup. (izquierda) 8. Clavos embellecedores 9. Bisagra inf. (izquierda)
1. Abra la puerta 90 grados. Retire los dos tornillos (2) del eje inferior de la puerta y después la puerta
(4) y el eje de la misma (fig. A).
2. Posicione correctamente la puerta (4).
3. Quite los 3 tornillos (6) de la bisagra superior (derecha) (5) y retire la bisagra (fig. C).
4. Retire los clavos embellecedores (8) del lado superior izquierdo del aparato y coloque la bisagra
superior adicional (izquierda) (7) en el lado superior izquierdo con ayuda de 3 tornillos (fig. D).
5. Proceda a la colocación de la bisagra inferior que queda (izquierda) (9), siguiendo siempre el
procedimiento anterior (fig. E).
6. La puerta se abre 180 grados. El método de instalación de la puerta es el mismo que el de
desmontaje. Alinee correctamente la puerta y fíjela.
7. Tape el agujero situado en la parte superior derecha del aparato con un clavo embellecedor (8).
4. FUNCIONAMIENTO DEL ELECTRODOMÉSTICO
Se recomienda instalar el electrodoméstico en un lugar donde la temperatura ambiente se encuentre
entre 16 y 32 °C. Si la temperatura ambiente es superior o inferior a las temperaturas recomendadas, el
rendimiento de la unidad podría verse afectado y podría no ser posible obtener una temperatura entre 5-
20°C o 5-10°C/10-20°C (según el modelo).

161
AVU8X(/IX) / AVU23SX(/IX) AVU41SXDPA(/IX) AVU52SX(/IX) PRO51C/1
“RUN”
Indicador de encendido
Botón
Para encender/apagar el aparato
Pulse y mantenga pulsado el botón durante unos 3 segundos
Botón
Botón de control de la luz interior
Pantalla
Pantalla electrónica de temperatura
Botón
Botón de ajuste de la temperatura a más
Botón
Botón de ajuste de la temperatura a menos
Puede elegir la temperatura que desee para el compartimento pulsando las teclas “ / ”. La
temperatura que desee programar aumentará/disminuirá 1 ºC cada vez que pulse los botones.
La temperatura se puede seleccionar en una escala de entre 5 y 20 °C o entre 5 y 10°C / 10 y 20°C
(según el modelo). Una vez seleccionada, la pantalla parpadeará aproximadamente 5 segundos antes de
indicar la temperatura interna instantánea de la vinoteca. La temperatura de ajuste puede verse en
cualquier momento pulsando durante 5 segundos las teclas de selección de temperatura.
Si se produce un corte de electricidad, todas las temperaturas anteriormente seleccionadas se borrarán y
cada compartimento recuperará, por defecto, la temperatura predeterminada de fábrica, es decir 12 ºC.
AVU53CDZA AVU54SXDZA(/IX)
“RUN”
Indicador de encendido
Botón
Para encender/apagar el aparato
Pulse y mantenga pulsado el botón durante unos 3 segundos
Botón
Botón de control de la luz interior
Pantalla
Pantalla electrónica del compartimento superior

162
Pantalla
Pantalla electrónica del compartimento inferior
Botón
Botón de ajuste de la temperatura para el compartimento superior
Botón
Botón de ajuste de la temperatura para el compartimento inferior
Pulse el botón “ ” para ajustar la temperatura del compartimento superior. La pantalla del
compartimento comenzará a parpadear y cada vez que pulse uno de los botones la temperatura variará
en un 1 ºC. Una vez que la temperatura de ajuste más baja alcance los 5 ºC, la pantalla volverá
automáticamente a mostrar la temperatura de ajuste más elevada, 10 ºC. Cuando se haya seleccionado
la temperatura, la pantalla parpadeará unos 5 segundos antes de indicar la temperatura interna
instantánea de la vinoteca. La temperatura de ajuste puede verse en cualquier momento pulsando
durante 5 segundos las teclas de selección de temperatura.
Pulse el botón “ ” para ajustar la temperatura del compartimento inferior. La pantalla del
compartimento comenzará a parpadear y cada vez que pulse uno de los botones la temperatura variará
en un 1 ºC. Una vez que la temperatura de ajuste más baja alcance los 10 ºC, la pantalla volverá
automáticamente a mostrar la temperatura de ajuste más elevada, 20 ºC. Cuando se haya seleccionado
la temperatura, la pantalla parpadeará unos 5 segundos antes de indicar la temperatura interna
instantánea de la vinoteca. La temperatura de ajuste puede verse en cualquier momento pulsando
durante 5 segundos las teclas de selección de temperatura.
Si se produce un corte de electricidad, todas las temperaturas anteriormente seleccionadas se borrarán y
cada compartimento recuperará, por defecto, la temperatura predeterminada de fábrica, es decir, 6 °C en
el caso del compartimento superior y 12 ºC en el caso del compartimento inferior.
Funcionamiento
Alarma de temperatura:
Si la temperatura interior es superior a 23°C, se muestra “HI” en la pantalla y suena la alarma
después de una hora produciéndose de manera continua. Informa de que la temperatura interior es
demasiado alta, compruebe el motivo. Si la temperatura interior es inferior a 0°C, se muestra “LO” en
la pantalla y suena la alarma y se enciende el indicador de avería al mismo tiempo.
Función de memoria de temperatura:
En el caso de interrupción del suministro eléctrico, la vinoteca puede memorizar la consigna previa de
temperatura y cuando vuelva el suministro eléctrico, la temperatura de la enfriadora volverá a la
misma consigna de temperatura que tenía cuando se apagó.
Luz interior
Para reducir el consumo de energía, la vinoteca apagará automáticamente las luces LED después de 10
minutos.
Es posible, si lo desea, que la luz LED permanezca encendida permanentemente. Mantenga pulsado el
botón XXX durante 5 segundos, la pantalla mostrará "LP". Después de 4 segundos la pantalla volverá al
estado normal y la luz permanecerá encendida hasta que se apague manualmente.
Si desea revertir la acción y ahorrar energía (recomendado), mantenga pulsado el botón XXX durante 5
segundos, la pantalla mostrará "LF". Después de 4 segundos la pantalla volverá al estado normal y la luz
se apagará automáticamente después de 10 minutos.

163
5. EQUIPOS
Sistema de climatización
Según los especialistas, la temperatura ideal de conservación de los vinos es de aproximadamente 12
ºC, en una horquilla de 10 a 14 ºC. No se debe confundir con la temperatura de servicio, que varía según
las peculiaridades de cada tipo de vino de 5 a 20 ºC.
Es especialmente importante evitar las variaciones bruscas de temperatura. Diseñado por especialistas y
para enófilos, este aparato, a diferencia de un simple frigorífico, tiene en cuenta la sensibilidad de los
grandes caldos a las variaciones bruscas de temperatura, garantizando un control para obtener una
temperatura media constante.
Sistema antivibraciones
El compresor frigorífico está equipado con amortiguadores especiales (silent-blocks) y la cuba interior
está aislada del armazón por una gruesa capa de espuma de poliuretano. Estas características permiten
evitar la transmisión de vibraciones a los vinos.
Sistema de humidificación
Dado que este aparato no dispone de filtro de carbón, está equipado con un depósito que mantiene el
nivel correcto de humedad (según el modelo). Si la humedad es demasiado baja, llene el depósito hasta
las tres cuartas partes de su capacidad. Compruebe el nivel de agua de vez en cuando y añada agua si
es necesario. Procure que el depósito siempre tenga agua.
Diseñada por especialistas y para enófilos, la marca Avintage ha tenido en cuenta la sensibilidad de los
corchos a una humedad ambiente demasiado baja. Por esa razón, el depósito debe colocarse sobre la
bandeja que se encuentra bajo el ventilador, situado en el fondo, para aportar una mínima humedad.
Procure controlar el nivel de agua si va a mantener los vinos en el aparato durante un período
prolongado y no utiliza el aparato sólo para poner los vinos en temperatura de servicio (con rotaciones
rápidas de las botellas).
Asegúrese de que la bandeja llena de agua es estable para evitar cualquier caída o infiltración de
agua.
Sistema antiultravioleta
La luz acelera el envejecimiento del vino. En nuestras vinotecas de puerta compacta, los vinos están
protegidos de forma natural, siempre que no se abra la puerta con demasiada frecuencia. Este modelo
con puerta acristalada ha sido objeto de un tratamiento especial, que filtra los nefastos rayos ultravioleta,
por lo que los vinos están perfectamente protegidos.
Desescarche
La vinoteca está equipada con un ciclo automático de desescarche. Durante la parada del ciclo de
refrigeración, las superficies refrigeradas del aparato se desescarchan de forma automática. El agua de
desescarche así recuperada es evacuada hacia un depósito que se encuentra en la parte posterior del
aparato, cerca del compresor. El calor que produce el compresor permite la evaporación del agua
condensada que queda en el depósito.
Sistema de invierno (según el modelo)
El sistema de invierno ayuda a mantener la misma temperatura interna que la temperatura establecida y
permite que la vinoteca funcione en un entorno en el que la temperatura está entre 0 y 32°C. Cuando la
temperatura interna de la vinoteca baje de 3°C en comparación con la temperatura seleccionada, un
elemento de corriente eléctrica de baja potencia funcionará para llevar la temperatura interna a la

164
temperatura inicialmente seleccionada. Este es un elemento de baja potencia para evitar subidas
repentinas en la temperatura del vino y evitar así shocks térmicos que perjudiquen la conservación del
vino.
Está previsto que el sistema automático suba la temperatura interna de la vinoteca incluso antes de que
haya un intercambio térmico con las botellas. Cuando el sistema esté trabajando y la temperatura interna
alcanza la temperatura establecida, se parará.
Bandejas
Para evitar el deterioro de la junta de la puerta, asegúrese de que la puerta esté bien abierta antes
de retirar las bandejas para colocar o retirar las botellas.
Para acceder de forma más sencilla al contenido de las bandejas debe deslizar la bandeja hacia el
exterior aproximadamente 1/3. Las bandejas están diseñadas con un tope a cada lado para evitar
que las botellas se caigan.
Para retirar o colocar una bandeja, inclínela como se muestra en el dibujo y tire o empuje, según el
caso.
AVU41SXDPA(/IX)
Coloque las bandejas en sus alojamientos.
a. caja de cartón con piezas de recambio b. bandeja pequeña c. bandeja grande
1. Tras retirar el embalaje, saque la caja de cartón con las piezas de recambio del aparato.
2. Encontrará 4 bandejas pequeñas (b) en el compartimento izquierdo. Retire las dos bandejas
inferiores.
3. En el compartimento derecho encontrará 4 bandejas grandes (c). Retire las dos bandejas superiores.

165
4. Ahora tiene que invertir la posición de las bandejas grandes y pequeñas (fig.2). Coloque dos bandejas
pequeñas arriba y dos bandejas grandes abajo en cada compartimento.
5. Una vez que haya colocado las bandejas correctamente, podrá utilizar la vinoteca de acuerdo a las
instrucciones que figuran en el manual de uso.
Deslizadores del pie
Dos deslizadores pies se proporcionan con el aparato, lo que le permite moverse con facilidad cuando
sus pies se ajustan a la altura máxima. Los deslizadores pies tienen que ser instalados en paralelo
debajo de los pies de acuerdo con la ubicación para la parte delantera y para la espalda.
Mayor seguridad
Puesto que esta gama de aparatos está diseñada para el almacenamiento de objetos de valor, nos
hemos preocupado por seleccionar componentes de calidad y diseñar unas técnicas de fabricación
adecuadas para garantizar una seguridad óptima de funcionamiento.
Instalación del tirador
El aparato está equipado con un tirador de acero inoxidable. Para colocarlo, sólo tiene que retirar la junta
y fijar el tirador a la puerta con los tornillos que se proporcionan, siguiendo este esquema:
6. CARGA
Las cantidades máximas de carga de botellas se indican a título orientativo, no son contractuales y
permiten (al igual que la capacidad de los frigoríficos) tener una estimación rápida del tamaño del aparato.
Front
Back
Detrás
Frente
Detrás
Frente
Deslizadores del pie

166
Estas cantidades corresponden a unas pruebas realizadas con una botella estándar: la botella tipo
«bordelesa ligera de 75 cl» (la normalización reconoce para cada forma de botella un origen geográfico:
bordelesa, borgoñona, provenzal, etc., y un tipo: tradición, pesada, ligera, flauta, etc., cada uno con
diámetros y alturas diferentes).
En realidad, se podrían colocar, en un caso extremo, más botellas en apilado monotipo y sin bandejas,
pero una «vinoteca variada» se compone de una gran variedad de botellas y el aspecto «práctico» de la
gestión diaria de una vinoteca limita su carga. Por tanto, probablemente coloque usted una carga algo
menor que la cantidad máxima indicada.
Tipos de botellas:
Aquí tenemos 4 tipos de botellas de 75 cl, borgoñonas y bordelesas, de dimensiones diferentes. Existen
otros muchos otros tipos, de tamaño y forma diferentes. Puede observar las diferencias de colocación
según la altura de las botellas, el diámetro y la manera de cruzarlas.
Por ejemplo, si cargamos una vinoteca exclusivamente con botellas de tipo Borgoña, observaremos que
nos quedamos aproximadamente un 30% por debajo de la cantidad inicial calculada a partir de las
botellas de tipo Burdeos.
Tipos de cruzamiento
Cuello con cuello:
¡Fíjese en la diferencia de profundidad!
Cuello entre cuerpos:
Ejemplos de temperaturas de servicio
A tener en cuenta en las degustaciones para no perderse la riqueza de los aromas de los vinos.
Grandes vinos de Burdeos – Tintos 16 – 17°C
Grandes vinos de Borgoña – Tintos 15 – 16°C
“Grands crûs” de vinos blancos secos 14 – 16°C
Tintos ligeros, afrutados, jóvenes 11 – 12°C
Rosados de Provenza, vinos jóvenes 10 – 12°C
Blancos secos y vinos tintos de la tierra 10 – 12°C

167
Vinos blancos de la tierra 8 – 10°C
Champanes 7 – 8°C
Vinos licorosos 6°C
7. MANTENIMIENTO
Antes de limpiar el aparato (operación que se debe realizar regularmente), desconéctelo retirando el
cable de alimentación de la toma de corriente o desconectando el fusible del que dependa.
Antes de la primera utilización y de forma regular, aconsejamos que limpie el interior y el exterior (cara
delantera, laterales y parte superior) con una mezcla de agua tibia y un detergente suave. Aclare con
agua limpia y deje que se seque completamente antes de volver a conectarlo. No utilice disolventes ni
agentes abrasivos.
Al encender el aparato por primera vez, pueden producirse olores residuales. En ese caso, ponga a
funcionar el aparato en vacío durante unas horas con la temperatura más fría. El frío eliminará estos
posibles olores
¿Qué hacer si se produce un corte de electricidad?
La mayoría de los cortes de electricidad se resuelven en poco tiempo. Un corte de 1 o 2 horas no
afectará a la temperatura de su vinoteca. Para proteger los vinos durante los cortes de electricidad, abra
la puerta lo menos posible. En caso de cortes más prolongados, adopte las medidas necesarias para
proteger los vinos.
Si el aparato está desconectado, apagado o se ha producido un corte de electricidad, debe esperar
de 3 a 5 minutos antes de volver a encenderlo. Si intenta encenderlo antes de ese tiempo, el
compresor únicamente se pondrá a funcionar al cabo de 3 o 5 minutos (si la temperatura lo requiere).
Al encender el aparato por primera vez tras una parada prolongada, en el momento del encendido es
posible que las temperaturas seleccionadas no se correspondan con las que se muestran. Esto es
normal. Se debe esperar unas horas para que estas recuperen la estabilidad.
Período de vacaciones
Vacaciones cortas: deje la vinoteca funcionando durante las vacaciones de menos de tres semanas.
Vacaciones largas: si el aparato no se va a usar durante varios meses, retire todos los elementos y
apague el aparato. Limpie y seque el interior a fondo. Para prevenir los olores y la formación de
moho, deje la puerta ligeramente abierta: dejándola bloqueada abierta si es necesario.
Si debiese desplazar la bodega de vino
Saque todas las botellas que estén en la cuba y fije los elementos móviles.
Para evitar dañar los tornillos de puesta a nivel de los pies, atorníllelos a fondo en su base.
Almacénelo con la puerta cerrada.
Desplace el aparato en posición vertical.
Protéjalo con mantas o cualquier otra protección similar.
Ahorros de energía
El aparato debe colocarse en un local fresco (pero con temperatura por encima de +16°C), lejos de
cualquier fuente de calor (otros aparatos doméstico) y de una exposición directa al sol.
El local donde se instalará el aparato debe estar ventilado. No cubra nunca las aireaciones.
No abra la puerta más de lo que fuera necesario.

168
8. EN CASO DE AVERÍA
A pesar de todo el cuidado que ponemos en la fabricación de nuestros productos, las averías no se pueden
descartar completamente. Antes de ponerse en contacto con el servicio posventa de su distribuidor,
compruebe que:
La toma de corriente está conectada
No se ha producido un corte de electricidad
La avería no tenga su origen en alguna de las situaciones descritas en el cuadro que figura al final de
este manual
IMPORTANTE: si el cable de alimentación que se incluye está deteriorado, debe ser sustituido por el
fabricante o por un servicio autorizado por la marca o por el distribuidor. En cualquier caso y para
evitar cualquier riesgo de lesión, el cable lo debe sustituir personal cualificado.
SI ESTAS REVISIONES NO DAN RESULTADO, PÓNGASE EN CONTACTO CON EL SERVICIO POSVENTA DE SU DISTRIBUIDOR.
¡ATENCIÓN!
¡Desconecte la toma mural antes de realizar cualquier operación
de limpieza o reparación!

169
9. SOLUCIÓN DE PROBLEMAS
Usted mismo puede resolver muchos problemas sencillos de la vinoteca sin recurrir al servicio postventa.
Consulte las siguientes sugerencias:
PROBLEMA
CAUSA POSIBLE
La bodega no se enciende
La toma no está conectada
El botón marcha/parada se encuentra en
posición parada
El fusible de su instalación eléctrica ha
saltado.
La bodega no enfría lo suficiente
Controle la temperatura elegida
La temperatura externa supera a la
temperatura de uso de la bodega
La bodega se abre con mucha frecuencia
La puerta no está bien cerrada
La junta de la puerta no es estanca
El compresor arranca y se para con
frecuencia
La temperatura externa es elevada
Se ha puesto una gran cantidad de botellas
en la bodega
La bodega se abre con mucha frecuencia
La puerta no está bien cerrada
El regulado no se ha realizado correctamente
La junta de la puerta no es estanca
La luz no funciona
La toma no está conectada
El fusible de su instalación eléctrica ha
saltado
El LED está fuera de servicio, póngase en
contacto con su servicio postventa
El botón de la luz esta en parada
Vibraciones
Controle y asegúrese de que la bodega se
encuentra bien nivelada
La bodega parece hacer un poco de ruido
El panel de control está averiado
Un ruido semejante al del agua que circula se
produce por el gas refrigerante, lo que es
norma
Al final del ciclo del compresor puede que se
oiga un ruido de agua que circula
Las contracciones y expansiones de las
paredes internas pueden provocar
chasquidos
La bodega no se encuentra nivelada
La puerta no cierra bien
La bodega no se encuentra nivelada
La junta de la puerta está sucia o deteriorada
Las bandejas no están bien colocadas
Una parte del contenido impide que la puerta
se cierre
Sustitución de la LÁMPARA de iluminación
Este aparato está compuesto por diodos electroluminiscentes (LED). Este tipo de diodo no puede ser
cambiado por el usuario. La duración de estos LED es la suficiente para que no deba realizarse ningún

170
cambio. Si, a pesar de todo el esfuerzo puesto en la fabricación de su vinoteca los LED resultaran
defectuosos, póngase en contacto con su servicio postventa para una eventual intervención.
10. ENTORNO
Este electrodoméstico está marcado conforme a la Directiva europea 2012/19/CE relativa a
los residuos de aparatos eléctricos y electrónicos (RAEE). Al garantizar que este producto se
deseche de manera correcta, se está ayudando a impedir que existan posibles
consecuencias negativas para el entorno y la salud humana, lo que podría estar causado de
otro modo por un manejo inadecuado de los residuos de este producto.
El símbolo del contenedor de basura tachado que figura en el aparato indica que, al final de su vida útil,
este producto deberá tratarse de forma separada de los demás residuos domésticos. Por tanto se deberá
trasladar a un centro de recogida selectiva para aparatos eléctricos y/o electrónicos, o si adquiere un
aparato equivalente, al distribuidor del aparato nuevo.
El usuario es responsable de trasladar el aparato, al final de su vida útil, al centro de recogida apropiado.
Una recogida selectiva y adecuada, con el fin de que el aparato sea reciclado, tratado y eliminado de
forma respetuosa con el medio ambiente, contribuye a evitar los posibles efectos negativos sobre el
medio ambiente y la salud, y favorece el reciclaje de los materiales que componen el producto.
Para obtener información más detallada sobre los sistemas de recogida disponibles, diríjase al servicio
local de eliminación de residuos o a la tienda donde adquirió el aparato.
11. ADVERTENCIA
Con el fin de mejorar constantemente nuestros productos, nos reservamos la posibilidad de modificar las
características técnicas sin aviso previo.
Las garantías de los productos de la marca AVINTAGE son proporcionadas de forma exclusiva por una
serie de distribuidores que nosotros seleccionamos. Ningún elemento del presente manual podrá
interpretarse como una garantía adicional.
FRIO ENTREPRISE no asume ninguna responsabilidad por los errores u omisiones técnicas y de
redacción en el presente manual.
Documento no contractual.

171
HOJA DE DATOS EUROPEA
de acuerdo con la reglamentación (UE) N°1060/2010
-
ARMARIO DE SERVICIO DE VINO
MARCA
AVINTAGE
REFERENCIA
AVU8X(/IX)
SUMINISTRO ELÉCTRICO
220-240 V / 50 Hz
DIMENSIONES DEL PRODUCTO (A x P x A)
145 x 547,5 x 820 mm
PESO NETO
20 kg
CATEGORÍA DEL APARATO
2
CLASE DE EFICIENCIA ENERGÉTICA
A
CONSUMO DE ENERGÍA
Consumo de energía 135 kWh por año
calculado en base a resultados obtenidos
en 24 horas en condiciones de prueba
normales. El consumo energético real
depende de las condiciones de uso y de
la ubicación del aparato.
VOLUMEN NETO
23 L
AJUSTE DE TEMPERATURA
5 – 20°C
SIN ESCARCHE
Desescarche automático
CLASE CLIMÁTICA
Clase climática: N
Este aparato está diseñado para usarse a
una temperatura ambiente entre 16ºC
(inferior) y 32ºC (superior).
EMISIONES ACÚSTICA EN EL AIRE EN dB(A) RE
1 pW
44 dB(A)
TIPO DE INSTALACIÓN
Incorporada
Este aparato está destinado exclusivamente al almacenamiento de vino.

172
HOJA DE DATOS EUROPEA
de acuerdo con la reglamentación (UE) N°1060/2010
-
ARMARIO DE SERVICIO DE VINO
MARCA
AVINTAGE
REFERENCIA
AVU23SX(/IX)
SUMINISTRO ELÉCTRICO
220-240 V / 50 Hz
DIMENSIONES DEL PRODUCTO (A x P x A)
295 x 571 x 820 mm
PESO NETO
28 kg
CATEGORÍA DEL APARATO
2
CLASE DE EFICIENCIA ENERGÉTICA
A
CONSUMO DE ENERGÍA
Consumo de energía 140 kWh por año
calculado en base a resultados obtenidos
en 24 horas en condiciones de prueba
normales. El consumo energético real
depende de las condiciones de uso y de
la ubicación del aparato.
VOLUMEN NETO
56 L
AJUSTE DE TEMPERATURA
5 – 20°C
SIN ESCARCHE
Desescarche automático
CLASE CLIMÁTICA
Clase climática: N
Este aparato está diseñado para usarse a
una temperatura ambiente entre 16ºC
(inferior) y 32ºC (superior).
EMISIONES ACÚSTICA EN EL AIRE EN dB(A) RE
1 pW
43 dB(A)
TIPO DE INSTALACIÓN
Instalación sin soporte e incorporada
Este aparato está destinado exclusivamente al almacenamiento de vino.

173
HOJA DE DATOS EUROPEA
de acuerdo con la reglamentación (UE) N°1060/2010
-
ARMARIO DE SERVICIO DE VINO
MARCA
AVINTAGE
REFERENCIA
AVU41SXDPA(/IX)
SUMINISTRO ELÉCTRICO
220-240 V / 50 Hz
DIMENSIONES DEL PRODUCTO (A x P x A)
595 x 571 x 820 mm
PESO NETO
48 kg
CATEGORÍA DEL APARATO
2
CLASE DE EFICIENCIA ENERGÉTICA
A
CONSUMO DE ENERGÍA
Consumo de energía 144 kWh por año
calculado en base a resultados obtenidos
en 24 horas en condiciones de prueba
normales. El consumo energético real
depende de las condiciones de uso y de
la ubicación del aparato.
VOLUMEN NETO
59.5 L x 2
AJUSTE DE TEMPERATURA
5 – 20°C
SIN ESCARCHE
Desescarche automático
CLASE CLIMÁTICA
Clase climática: N
Este aparato está diseñado para usarse a
una temperatura ambiente entre 16ºC
(inferior) y 32ºC (superior).
EMISIONES ACÚSTICA EN EL AIRE EN dB(A) RE
1 pW
43 dB(A)
TIPO DE INSTALACIÓN
Instalación sin soporte e incorporada
Este aparato está destinado exclusivamente al almacenamiento de vino.

174
HOJA DE DATOS EUROPEA
de acuerdo con la reglamentación (UE) N°1060/2010
-
ARMARIO DE SERVICIO DE VINO
MARCA
AVINTAGE
REFERENCIA
AVU52SX(/IX)
SUMINISTRO ELÉCTRICO
220-240 V / 50 Hz
DIMENSIONES DEL PRODUCTO (A x P x A)
595 x 571 x 820 mm
PESO NETO
44 kg
CATEGORÍA DEL APARATO
2
CLASE DE EFICIENCIA ENERGÉTICA
A
CONSUMO DE ENERGÍA
Consumo de energía 145 kWh por año
calculado en base a resultados obtenidos
en 24 horas en condiciones de prueba
normales. El consumo energético real
depende de las condiciones de uso y de
la ubicación del aparato.
VOLUMEN NETO
146 L
AJUSTE DE TEMPERATURA
5 – 20°C
SIN ESCARCHE
Desescarche automático
CLASE CLIMÁTICA
Clase climática: N
Este aparato está diseñado para usarse a
una temperatura ambiente entre 16ºC
(inferior) y 32ºC (superior).
EMISIONES ACÚSTICA EN EL AIRE EN dB(A) RE
1 pW
44 dB(A)
TIPO DE INSTALACIÓN
Instalación sin soporte e incorporada
Este aparato está destinado exclusivamente al almacenamiento de vino.

175
HOJA DE DATOS EUROPEA
de acuerdo con la reglamentación (UE) N°1060/2010
-
ARMARIO DE SERVICIO DE VINO
MARCA
AVINTAGE
REFERENCIA
AVU53CDZA
SUMINISTRO ELÉCTRICO
220-240 V / 50 Hz
DIMENSIONES DEL PRODUCTO (A x P x A)
595 x 571 x 820 mm
PESO NETO
50 kg
CATEGORÍA DEL APARATO
2
CLASE DE EFICIENCIA ENERGÉTICA
A
CONSUMO DE ENERGÍA
Consumo de energía 145 kWh por año
calculado en base a resultados obtenidos
en 24 horas en condiciones de prueba
normales. El consumo energético real
depende de las condiciones de uso y de
la ubicación del aparato.
VOLUMEN NETO
134 L
AJUSTE DE TEMPERATURA
5 – 10°C / 10 – 20°C
SIN ESCARCHE
Desescarche automático
CLASE CLIMÁTICA
Clase climática: N
Este aparato está diseñado para usarse a
una temperatura ambiente entre 16ºC
(inferior) y 32ºC (superior).
EMISIONES ACÚSTICA EN EL AIRE EN dB(A) RE
1 pW
45 dB(A)
TIPO DE INSTALACIÓN
Instalación sin soporte e incorporada
Este aparato está destinado exclusivamente al almacenamiento de vino.

176
HOJA DE DATOS EUROPEA
de acuerdo con la reglamentación (UE) N°1060/2010
-
ARMARIO DE SERVICIO DE VINO
MARCA
AVINTAGE
REFERENCIA
AVU54SXDZA(/IX)
SUMINISTRO ELÉCTRICO
220-240 V / 50 Hz
DIMENSIONES DEL PRODUCTO (A x P x A)
595 x 571 x 820 mm
PESO NETO
50 kg
CATEGORÍA DEL APARATO
2
CLASE DE EFICIENCIA ENERGÉTICA
A
CONSUMO DE ENERGÍA
Consumo de energía 145 kWh por año
calculado en base a resultados obtenidos
en 24 horas en condiciones de prueba
normales. El consumo energético real
depende de las condiciones de uso y de
la ubicación del aparato.
VOLUMEN NETO
134 L
AJUSTE DE TEMPERATURA
5 – 10°C / 10 – 20°C
SIN ESCARCHE
Desescarche automático
CLASE CLIMÁTICA
Clase climática: N
Este aparato está diseñado para usarse a
una temperatura ambiente entre 16ºC
(inferior) y 32ºC (superior).
EMISIONES ACÚSTICA EN EL AIRE EN dB(A) RE
1 pW
45 dB(A)
TIPO DE INSTALACIÓN
Instalación sin soporte e incorporada
Este aparato está destinado exclusivamente al almacenamiento de vino.

177
HOJA DE DATOS EUROPEA
de acuerdo con la reglamentación (UE) N°1060/2010
-
ARMARIO DE SERVICIO DE VINO
MARCA
AVINTAGE
REFERENCIA
PRO51C/1
SUMINISTRO ELÉCTRICO
220-240 V / 50 Hz
DIMENSIONES DEL PRODUCTO (A x P x A)
595 x 571 x 820 mm
PESO NETO
48 kg
CATEGORÍA DEL APARATO
2
CLASE DE EFICIENCIA ENERGÉTICA
A
CONSUMO DE ENERGÍA
Consumo de energía 145 kWh por año
calculado en base a resultados obtenidos
en 24 horas en condiciones de prueba
normales. El consumo energético real
depende de las condiciones de uso y de
la ubicación del aparato.
VOLUMEN NETO
146 L
AJUSTE DE TEMPERATURA
5 – 20°C
SIN ESCARCHE
Desescarche automático
CLASE CLIMÁTICA
Clase climática: N
Este aparato está diseñado para usarse a
una temperatura ambiente entre 16ºC
(inferior) y 32ºC (superior).
EMISIONES ACÚSTICA EN EL AIRE EN dB(A) RE
1 pW
45 dB(A)
TIPO DE INSTALACIÓN
Instalación sin soporte e incorporada
Este aparato está destinado exclusivamente al almacenamiento de vino.

178
Prima dell'uso, leggere e mettere in pratica le istruzioni di sicurezza e d'uso del presente manuale.
Grazie per la fiducia dimostrata nel marchio AVINTAGE con l'acquisto di questo apparecchio, speriamo
che riuscirà a soddisfare le tue aspettative.
Con questo apparecchio è possibile conservare le bottiglie oppure portarle alla temperatura di servizio (a
seconda delle bottiglie) grazie al suo ampio intervallo di regolazione.
1. ISTRUZIONI DI SICUREZZA
Prima di utilizzare l'apparecchio per la prima volta, si prega di
leggere attentamente il presente manuale d'uso. Il manuale va
conservato cura in modo da poterlo consultare se necessario. Per
ridurre il rischio di incendio, di scossa elettrica o di lesioni durante
l'uso del frigo cantina, si prega di rispettare le precauzioni
indicate.
In via generale, la manutenzione dell'apparecchio deve essere
effettuata da un professionista qualificato.
Per motivi di sicurezza e per un uso corretto dell'apparecchio,
prima di installarlo e di metterlo in funzione per la prima volta si
prega di leggere attentamente il presente manuale d'uso, incluse
le avvertenze e i consigli utili che contiene. Per evitare di
danneggiare l'apparecchio e/o di ferirsi inutilmente, è importante
che le persone che utilizzeranno l'apparecchio abbiano preso
piena conoscenza del suo funzionamento e delle sue istruzioni di
sicurezza. Conservare le presenti istruzioni per successiva
consultazione e conservarle vicino all'apparecchio, in modo che in
caso di vendita o di trasloco, siano consegnate assieme
all'apparecchio per consentirne un funzionamento ottimale.
Per evitare qualsiasi rischio di lesioni, conservare il presente
manuale d'uso. Il produttore non potrà essere ritenuto
responsabile se l'apparecchio viene maneggiato in modo
scorretto.

179
Questo apparecchio è destinato esclusivamente ad uso
domestico ed è previsto per la conservazione di bevande speciali
ad una temperatura di conservazione più alta di quella di uno
scomparto per prodotti freschi. In nessun caso questo
apparecchio è destinato a conservare prodotti alimentari freschi.
Verificare che la tensione dell'impianto elettrico della casa
corrisponda a quella indicata sulla targa informativa: l'apparecchio
deve essere collegato ad una presa di terra regolamentare.
Riparazioni o collegamenti scorretti possono rappresentare un
rischio per la sicurezza. Se si ha il minimo dubbio, far controllare il
proprio impianto elettrico da un professionista.
Per la tua protezione, questo apparecchio deve essere collegato
correttamente ad una presa di terra. Non tagliare né togliere il filo
di terra dal cavo di alimentazione fornito.
Per motivi di sicurezza, non usare prolunghe.
Se l'apparecchio si fosse rovinato (ad esempio per un forte urto) o
danneggiato (sovratensione dovuta a fulmine, allagamento,
incendio), può essere pericoloso utilizzarlo. Scollegare
l'apparecchio dalla presa elettrica e farlo controllare da un
riparatore professionista autorizzato.
Per evitare pericoli, non sostituire da soli il cavo di alimentazione
se rovinato. Contattare il proprio rivenditore, un centro assistenza
autorizzato o un riparatore professionista.
Questo apparecchio deve essere posizionato in modo che la
presa a muro sia raggiungibile. Non spostare l'apparecchio una
volta che è stato caricato con i vini perché la scocca potrebbe
deformarsi, oltre a dover fare delle riparazioni. I componenti
elettrici non devono essere a vista.

180
Tenere i bambini lontano dall'apparecchio.
Non usare l'apparecchio all'esterno.
Se si fosse sparso accidentalmente del liquido (rottura di una
bottiglia, ecc.) sui componenti elettrici (motore, ecc.), scollegare
immediatamente l'apparecchio dalla presa elettrica.
Per evitare il rischio di incendio, di scossa elettrica o di lesioni,
non immergere il cavo di alimentazione, la spina o l'apparecchio
stesso in acqua o in qualsiasi altro liquido. Non toccare
l'apparecchio con le mani bagnate.
Collocare l'apparecchio lontano da fonti di calore e non esporlo
direttamente alla luce del sole.
Non far pendere il cavo di alimentazione da un tavolo e non
metterlo a contatto con angoli taglienti o superfici calde.
Per scollegare l'apparecchio dalla corrente, non tirare il cavo di
alimentazione ma afferrarlo dalla spina.
Verificare che la zona dove verrà installato l'apparecchio sia in
grado di sostenerne il peso una volta caricato (una bottiglia da 75
cl pesa circa 1,3 kg). Il frigo cantina deve essere collocato su una
superficie piana. Se deve essere appoggiato su un tappeto o
sulla moquette, infilare sotto un supporto.
Per evitare di danneggiare la cerniera della porta, aprirla
completamente quando si estraggono i ripiani.
Sicurezza dei bambini e delle persone vulnerabili
Questo apparecchio può essere utilizzato da bambini di età pari
e superiore agli 8 anni e da persone con ridotte capacità fisiche,
sensoriali o mentali o senza esperienza e conoscenza a patto
che vengano sorvegliati o istruiti sull'utilizzo dell'apparecchio in

181
sicurezza e che capiscano i pericoli connessi all'utilizzo
dell'apparecchio.
La pulizia e la manutenzione non devono essere eseguite da
bambini, salvo se di età superiore agli 8 anni e sotto
sorveglianza.
Conservare il materiale d'imballaggio fuori dalla portata dei
bambini. Pericolo di soffocamento.
Il rischio che i bambini possano rimanere intrappolati all'interno
dell'apparecchio e soffocare non deve essere sottovalutato. Gli
apparecchi da gettare o abbandonati rappresentano comunque
un pericolo anche se vengono "lasciati in garage solo per
qualche giorno".
Quando l'apparecchio deve essere gettato via, staccare la
spina dalla presa di corrente, tagliare il cavo di alimentazione (il
più vicino possibile all'apparecchio) e smontare la porta per
evitare che i bambini giocando prendano la scossa o si
chiudano dentro l'apparecchio.
Se l'apparecchio, dotato di una guarnizione magnetica sulla
porta, deve sostituire un altro apparecchio dotato di chiusura a
molla sulla porta o sulla cerniera, accertarsi di rendere
inutilizzabile la chiusura a molla prima di gettare il vecchio
apparecchio. In questo modo si evita che i bambini giocando
restino intrappolati dentro l'apparecchio.
Tenere l'apparecchio e il suo cavo fuori della portata dei
bambini con meno di 8 anni.
Prima di gettare via il frigo cantina, ricordarsi di smontare la
porta. Rimuovere anche i ripiani all'interno dell'apparecchio, in
modo che i bambini non possano giocarci o salirci sopra.

182
Istruzioni di sicurezza generali
ATTENZIONE — Questo apparecchio è destinato a funzionare in
un ambiente domestico o per usi simili quali:
Le zone di cucina riservate al personale di negozi, fabbriche
e altri ambienti professionali,
Seconde case e luoghi usati da clienti di hotel, motel e altri
ambienti residenziali,
Ambienti come le camere d'hotel,
Ristoranti e strutture simili, eccetto rivenditori.
ATTENZIONE — Per evitare qualsiasi rischio dovuto all'instabilità
dell'apparecchio, è importante fissarlo e montarlo seguendo le
istruzioni di installazione.
ATTENZIONE — Non riporre mai sostanze infiammabili come gli
spray all'interno dell'apparecchio perché potrebbero fuoriuscire.
ATTENZIONE — Se il cavo di alimentazione è danneggiato,
bisogna farlo sostituire immediatamente dal produttore o da un
rivenditore qualificato per evitare il rischio di scossa elettrica.
ATTENZIONE — Tenere la ventilazione ben aperta e controllare
che l'aria possa circolare liberamente dalle aperture, soprattutto
se l'apparecchio è incassato in una parete.
ATTENZIONE — Non usare apparecchiature elettriche all'interno
dello scomparto, a meno che non siano del tipo consigliato dal
produttore.
ATTENZIONE — Non danneggiare il circuito di refrigerazione.

183
ATTENZIONE — Non usare apparecchi elettrici all'interno
dell'apparecchio eccetto se permessi dal produttore.
ATTENZIONE — Il gas refrigerante e il gas isolante sono
infiammabili. Per lo smaltimento dell'apparecchio, conferirlo ad un
centro per la raccolta differenziata o ad un'isola ecologica. Non
esporre l'apparecchio alle fiamme.
ATTENZIONE — Il gas refrigerante di quest'apparecchio è il
R600a; non si deve riporre nel frigo cantina o vicino ad esso
nessun prodotto infiammabile o esplosivo per evitare di provocare
un incendio o un'esplosione.
Liquido refrigerante
Nel circuito refrigerante dell'apparecchio è impiegato come
refrigerante l'isobutano (R600a). Si tratta di un gas naturale
altamente infiammabile e quindi pericoloso per l'ambiente.
Controllare che nessuno dei componenti del circuito di
refrigerazione sia stato danneggiato durante il trasporto e
l'installazione dell'apparecchio. Il refrigerante (R600a) è un liquido
infiammabile.
Attenzione: rischio di incendio
Se il circuito di refrigerazione fosse danneggiato:
Evitare le fiamme libere e qualsiasi fonte di accensione.
Ventilare bene il locale in cui si trova l'apparecchio. È
pericoloso modificare in qualsiasi modo la composizione di
questo apparecchio.
Se il cavo elettrico viene danneggiato si può provocare un
cortocircuito e/o una scossa elettrica.

184
Sicurezza elettrica
Non possiamo essere ritenuti responsabili di eventuali incidenti
causati da un'installazione elettrica mal effettuata.
Il cavo di alimentazione non deve essere allungato. Non vanno
usate prolunghe né adattatori né prese multiple.
Controllare attentamente che la presa a muro non sia
danneggiata. Una presa a muro in cattivo stato potrebbe
causare il surriscaldamento dell'apparecchio e la sua
esplosione.
Accertarsi di poter raggiungere comodamente la presa a muro
a cui è collegato l'apparecchio.
Non tirare mai il cavo di alimentazione.
Non eliminare mai la messa a terra.
Se la presa a muro è allentata, non collegare il cavo. Rischio di
scossa elettrica o di incendio.
Non si deve mai utilizzare l'apparecchio se il coperchio
dell'illuminazione interna non è al suo posto.
Scollegare l'apparecchio dalla corrente prima di sostituire la
lampadina interna.
Questo apparecchio funziona con corrente monofase
220~240V/50Hz.
Se il cavo di alimentazione è danneggiato, non sostituirlo da
soli ma rivolgersi al servizio assistenza.
La spina elettrica deve poter essere facilmente raggiungibile ma
comunque restare fuori dalla portata dei bambini. In caso di
dubbi, rivolgersi per consiglio al proprio installatore.

185
Uso quotidiano
Questo apparecchio è destinato solamente alla messa a
temperatura di bottiglie di vino.
Non conservare mai sostanze o liquidi infiammabili all'interno
dell'apparecchio perché potrebbero provocare un'esplosione.
Non far funzionare altre apparecchiature elettriche all'interno di
questo apparecchio (mixer, gelatiere elettriche, ecc.).
Per scollegare l'apparecchio dalla presa di corrente, estrarre la
spina afferrandola con le mani e non tirare dal cavo.
Non mettere oggetti caldi vicino ai componenti di plastica di
questo apparecchio.
Si devono rigorosamente rispettare le raccomandazioni del
produttore relativa all'immagazzinamento dell'apparecchio. Fare
riferimento alle relative istruzioni.
L'apparecchio deve essere tenuto lontano da candele, lampade
e altre fiamme libere per evitare il rischio di incendio.
L'apparecchio è destinato a conservare delle bevande per un
normale uso domestico come spiegato nel presente manuale
d'uso.
L'apparecchio è pesante. Fare attenzione quando lo si deve
spostare. Se l'apparecchio è dotato di ruote, ricordarsi che
servono soltanto per rendere più agevoli le piccole manovre.
Non spostarlo per lunghi tragitti.
Non usare mai l'apparecchio o i suoi elementi come punto
d'appoggio.
Non sovraccaricare gli scomparti dell'apparecchio per evitare la
caduta di oggetti che possono danneggiarlo.

186
Attenzione: pulizia e manutenzione
Prima di effettuare la manutenzione, scollegare l'apparecchio
per togliere la corrente.
Non pulire l'apparecchio usando oggetti metallici, generatori di
vapore, oli volatili, solventi organici o componenti abrasivi.
Non pulire nessuna parte dell'apparecchio con prodotti
infiammabili. I vapori possono creare un rischio di incendio o di
esplosione.
Non usare oggetti taglienti o appuntiti per togliere il ghiaccio,
ma servirsi di un raschietto di plastica.
Informazioni importanti per l'installazione
Evitare di collocare l'apparecchio in zone umide.
Tenere l'apparecchio lontano dalla luce diretta del sole e da
fonti di calore (padelle, stufe, termosifoni, ecc.). L'esposizione
diretta alla luce del sole può rovinare il rivestimento in acrilico,
mentre le fonti di calore possono aumentare il consumo
elettrico. Anche delle temperature ambiente eccessivamente
fredde o calde possono causare il cattivo funzionamento
dell'apparecchio.
Collegare il frigo cantina solo ed esclusivamente ad una presa
di corrente dotata di terra. In nessun caso si deve ridurre o
eliminare il terzo spinotto della messa a terra del cavo di
alimentazione. Tutte le eventuali domande riguardanti la
potenza e/o la messa a terra devono essere rivolte ad un
elettricista certificato o ad un centro assistenza autorizzato.
Per effettuare i collegamenti elettrici in modo corretto, seguire
attentamente le indicazioni contenute nel presente manuale
d'uso.
Togliere l'apparecchio dall'imballo e ispezionarlo per controllare
che non sia danneggiato. Non collegare l'apparecchio alla

187
corrente se è danneggiato. Se si riscontrano dei danni, bisogna
avvisare il punto vendita in cui è stato acquistato. In tal caso,
conservare l'imballo.
Si raccomanda di aspettare almeno 24 ore prima di collegare
l'apparecchio alla corrente, in modo che il compressore sia ben
alimentato con l'olio.
Per evitare il rischio di surriscaldamento, è necessario che ci sia
una buona circolazione dell'aria attorno all'apparecchio. Seguire
attentamente le istruzioni di installazione fornite per garantire
una ventilazione adeguata.
Per quanto possibile, evitare che l'apparecchio tocchi le pareti
e/o sia a contatto con elementi caldi (compressore,
condensatore) per evitare il rischio di incendio. Rispettare
sempre tutte le istruzioni di installazione.
L'apparecchio non deve essere collocato vicino a termosifoni o
fornelli.
Dopo aver installato l'apparecchio, controllare di avere libero
accesso alle prese.
Risparmio energetico
Per limitare il consumo di energia elettrica dell'apparecchio:
Installarlo in un luogo adatto (vedi capitolo "Istruzioni
d'installazione").
Tenere le porte aperte il meno possibile.
Per un funzionamento ottimale dell'apparecchio, ricordarsi di
pulire periodicamente il condensatore (vedi capitolo "Pulizia
e manutenzione").
Controllare periodicamente le guarnizioni delle porte e
verificare che chiudano sempre bene. In caso contrario,
rivolgersi al servizio assistenza.

188
Risoluzione dei problemi
Tutti gli interventi elettrici devono essere effettuati da un tecnico
qualificato e competente.
Per qualsiasi riparazione, rivolgersi ad un Centro Riparazioni
Autorizzato e richiedere l'uso solo di pezzi di ricambio originali.
Questo apparecchio è destinato solo ad un uso domestico. Il
produttore non può essere ritenuto responsabile in caso di altro
utilizzo.
R600a
Istruzioni di sicurezza
Attenzione — Non ostruire nessuna griglia di ventilazione
dell'apparecchio, controllare che le aperture di aerazione siano
sempre libere.
Attenzione — Non conservare all'interno dell'apparecchio
sostanze esplosive come le bombolette spray con gas
infiammabile.
Attenzione — Non danneggiare il circuito frigorifero
dell'apparecchio.
Attenzione — Le unità di refrigerazione funzionano con isobutano
(R600a); non possono essere collocate in una zona con fonti di
accensione (per esempio contatti elettrici staccati o se il fluido
frigorifero possa raccogliersi in caso di perdite). Il tipo di fluido
frigorifero è indicato sulla targhetta informativa applicata
sull'apparecchio.

189
Attenzione — Non usare apparecchiature elettriche all'interno
degli scomparti dell'apparecchio, a meno che non siano del tipo
consigliato dal produttore.
Questo apparecchio è conforme a tutte le direttive europee vigenti e alle loro eventuali modifiche ed
è conforme in particolare alle seguenti norme:
2011/65/UE (ROHS)
2014/35/UE relativa alla sicurezza elettrica
2014/30/UE relativa alla compatibilità elettromagnetica
643/2009/CE relative all'etichettatura energetica
2. TARGHETTA INFORMATIVA
Qui sotto è illustrato l'esempio di una targhetta informativa:
La targhetta informativa incollata all'interno o sul retro dell'apparecchio (a seconda del modello) contiene
tutte le caratteristiche tecniche del frigo cantina.
Consigliamo di annotare il numero di serie su questo libretto prima dell'installazione, per ulteriore
riferimento (intervento tecnico, richiesta di assistenza, ecc.).
Una volta che l'apparecchio sarà installato o riempito infatti, riuscire ad arrivare alla targhetta informativa
sarà piuttosto complicato.
ATTENZIONE: senza le informazioni indicate sulla targhetta, non potrà essere fornita nessuna
assistenza.

190
3. ISTRUZIONI DI INSTALLAZIONE
Prima di utilizzare il frigo cantina
Rimuovere l'imballo esterno ed interno.
Lasciare l'apparecchio a riposo in posizione verticale per circa 24 ore prima di metterlo in funzione.
Così facendo, si limiterà la possibilità di un eventuale malfunzionamento del sistema di raffreddamento
dovuto al trasporto.
Pulire l'interno del frigo cantina con un panno morbido pulito e acqua tiepida.
Quando si installa l'apparecchio, scegliere un locale adatto.
Si raccomanda di essere di almeno 2 persone per spostare e installare il cantina. Fare attenzione a
non appendere il dispositivo con il rischio di provocare lesioni (schiena, ecc).
Posizionare l'apparecchio su un pavimento abbastanza resistente da sostenerlo quando è
completamente carico. Regolare i piedini del frigo cantina per livellarlo.
È necessario lasciare una ventilazione appropriata, non ostruire pertanto le uscite dell'aria.
Questo apparecchio non è destinato ad essere collocato in luoghi come un garage, un seminterrato o
simili.
Questo apparecchio è destinato solo all'uso in interno.
Questo apparecchio può essere collocato a libera installazione o a incasso.
Collegare il frigo cantina ad un'unica presa e lasciare uno spazio di 30 mm tra la parte posteriore della
cantina e la parete. Accertarsi di avere livellato correttamente e regolato l'orizzontalità del frigo cantina
(si consiglia di usare una livella a bolla). Questo eviterà movimenti dovuti all'instabilità che possono
provocare rumore e vibrazioni, garantendo così la perfetta tenuta della porta.
Questo apparecchio è destinato solamente alla conservazione di vini.
Questo apparecchio usa un gas refrigerante infiammabile; fare quindi attenzione a non danneggiare il
tubo di raffreddamento durante il trasporto.
Attenzione
Le bottiglie vanno conservate chiuse.
Non caricare eccessivamente l'apparecchio.
Non aprire la porta più del necessario.
Non coprire i ripiani con dei fogli di alluminio o con qualsiasi altro materiale che possa impedire una
buona circolazione dell'aria.
Se il frigo cantina deve essere lasciato vuoto per un lungo periodo di tempo, suggeriamo di scollegare
l'apparecchio della corrente e, dopo averlo pulito accuratamente, di lasciare la porta semiaperta per
far circolare l'aria ed evitare la formazione di muffa e odori.
ATTENZIONE: tenere lontano l'apparecchio da qualsiasi sostanza che possa comportare un
rischio di incendio.

191
Intervalli di temperatura ambiente
Questo apparecchio è indicato per l'uso in locali con una temperatura ambiente ben specifica; la classe
climatica è indicata sulla targhetta informativa.
CLASSE
SIMBOLO
INTERVALLO DI TEMPERATURA AMBIENTE
(°C)
Temperata estesa
SN
Da +10 °C a +32 °C
Temperata
N
Da +16 °C a +32 °C
Subtropicale
ST
Da +16 °C a +38 °C
Tropicale
T
Da +16 °C a +43 °C
Schemi di incasso
AVU8X(/IX)

192
AVU23SX(/IX)
AVU41SXDPA(/IX)

193
AVU52SX(/IX) AVU54SXDZA(/IX)
AVU53CDZA PRO51C/1

194
Reversibilità della porta
Se si vuole invertire il senso di apertura della porta, che in origine è da sinistra a destra, seguire la
procedura descritta di seguito.
AVU8X(/IX)
1. Cerniera inf. (destra) 2. Viti 3. Asse della porta
4. Porta 5. Cerniera sup. (destra) 6. Viti delle cerniere
7. Cerniera sup. (sinistra) 8. Cerniera inf. (sinistra)
1. Aprire la porta a 90°. Svitare le due viti (2) dell'asse inferiore della porta, quindi togliere la porta (4) e
l'asse della porta (Fig. A). Posizionare correttamente la porta (4) (Fig. A e B).
2. Togliere le 3 viti (6) della cerniera superiore (destra) (5) e rimuoverla assieme alla cerniera inferiore
destra (Fig. C)
3. Montare la cerniera superiore di ricambio (sinistra) (7) sul lato superiore sinistro con tre viti (Fig. D).
Seguendo la stessa procedura di prima, procedere al montaggio della cerniera inferiore di ricambio
(sinistra) (8) (Fig. E).
4. La porta si apre a 180°. Il metodo di montaggio della porta è lo stesso del suo smontaggio; allineare
correttamente la porta e fissarla.

195
AVU23SX(/IX) AVU52SX(/IX)
1. Cerniera inf. (destra) 2. Viti 3. Asse della porta
4. Porta 5. Cerniera sup. (destra) 6. Viti delle cerniere
7. Cerniera sup. (sinistra) 8. Chiodo decorativo 9.Cerniera inf. (sinistra)
10. Dispositivo di ritenuta 11. Viti 12. Tappo
1. Aprire la porta a 90°. Svitare le due viti (2) dell'asse inferiore della porta, quindi togliere la porta (4) e
l'asse della porta (Fig. A).
2. Posizionare correttamente la porta (4) e togliere il tappo (12) dalla parte superiore del telaio della
porta; svitare una delle viti (11) inferiori e togliere il dispositivo di ritenuta (10). Quindi montare il
dispositivo sulla parte superiore del telaio della porta. È preferibile usare un tappo di ricambio (12) per
chiudere il foro sulla parte superiore del telaio (Fig. A/B).
3. Togliere le 3 viti (6) della cerniera superiore (destra) (5) e rimuoverla (Fig. C).
4. Togliere i chiodi decorativi (8) sul lato superiore sinistro dell'apparecchio e montare la cerniera
superiore di ricambio (sinistra) (7) sul lato superiore sinistro con tre viti (Fig. D).
5. Seguendo la stessa procedura di prima, procedere al montaggio della cerniera inferiore di ricambio
(sinistra) (9) (Fig. E).
6. La porta si apre a 180°. Il metodo di montaggio della porta è lo stesso del suo smontaggio; allineare
correttamente la porta e fissarla.
7. Chiudere il foro situato in alto a destra sull'apparecchio con un chiodo decorativo (8).

196
AVU53CDZA AVU54SXDZA(/IX) PRO51C/1
1. Cerniera inf. (destra) 2. Viti 3. Asse della porta
4. Porta 5. Cerniera sup. (destra) 6. Viti delle cerniere
7. Cerniera sup. (sinistra) 8. Chiodo decorativo 9. Cerniera inf. (sinistra)
1. Aprire la porta a 90°. Svitare le due viti (2) dell'asse inferiore della porta, quindi togliere la porta (4) e
l'asse della porta (Fig. A).
2. Posizionare correttamente la porta (4).
3. Togliere le 3 viti (6) della cerniera superiore (destra) (5) e rimuoverla (Fig. C).
4. Togliere i chiodi decorativi (8) sul lato superiore sinistro dell'apparecchio e montare la cerniera
superiore supplementare (sinistra) (7) sul lato superiore sinistro con tre viti (Fig. D).
5. Seguendo la stessa procedura di prima, procedere al montaggio della cerniera inferiore rimanente
(sinistra) (9) (Fig. E).
6. La porta si apre a 180°. Il metodo di montaggio della porta è lo stesso del suo smontaggio; allineare
correttamente la porta e fissarla.
7. Chiudere il foro situato in alto a destra sull'apparecchio con un chiodo decorativo (8).
4. ISTRUZIONI D'USO
Si raccomanda di installare l'apparecchio in un locale la cui temperatura ambiente sia compresa tra 16
e 32 °C. Se la temperatura ambiente è superiore o inferiore a quella raccomandata, il rendimento
dell'apparecchio può esserne influenzato e potrebbe non essere possibile ottenere la temperatura tra 5-
20 °C o 5-10 °C/10-20 °C (a seconda del modello).
AVU8X(/IX) AVU23SX(/IX) AVU41SXDPA(/IX) AVU52SX(/IX) PRO51C/1

197
“RUN”
Indicatore di accensione
Pulsante
Per accendere/spegnere l'apparecchio.
Tenere premuto il pulsante per circa 3 secondi.
Pulsante
Pulsante di accensione della luce interna
Display di visualizzazione
Display elettronico della temperatura
Pulsante
Pulsante di regolazione della temperatura +
Pulsante
Pulsante di regolazione della temperatura -
È possibile scegliere la temperatura desiderata all'interno del compartimento premendo i tasti “ /
” . La temperatura che si vuole programmare aumenterà/diminuirà di 1 °C ad ogni pressione dei
pulsanti.
La temperatura può essere selezionata tra 5 e 20 °C o tra 5 e 10 °C/10 e 20 °C (a seconda del modello).
Una volta selezionata, il display lampeggerà per circa 5 secondi prima di indicare la temperatura interna
istantanea del frigo cantina. La temperatura impostata può essere controllata in qualsiasi momento
premendo i tasti di selezione della temperatura per 5 secondi.
In caso di interruzione della corrente, tutte le temperature precedentemente scelte saranno cancellate e
ogni compartimento ritornerà di default al valore della temperatura preimpostato in fabbrica, ovvero 12
°C.
AVU53CDZA AVU54SXDZA(/IX)
“RUN”
Indicatore di accensione
Pulsante
Per accendere/spegnere l'apparecchio.
Tenere premuto il pulsante per circa 3 secondi.
Pulsante
Pulsante di accensione della luce interna
Display di visualizzazione
Display elettronico della temperatura del compartimento superiore
Display di visualizzazione
Display elettronico della temperatura del compartimento inferiore
Pulsante
Pulsante di regolazione della temperatura del compartimento superiore

198
Pulsante
Pulsante di regolazione della temperatura del compartimento inferiore
Premere “ ” per regolare la temperatura del compartimento superiore. Il display relativo a quel
compartimento si mette a lampeggiare e ad ogni pressione del pulsante la temperatura viene modificata
di 1 °C. Una volta raggiunta la temperatura di 5 °C più bassa impostata, il display ritorna
automaticamente alla temperatura impostata più elevata di 10 °C. Una volta selezionata, il display
lampeggerà per circa 5 sec. prima di indicare la temperatura interna istantanea del frigo cantina. La
temperatura impostata può essere controllata in qualsiasi momento premendo i tasti di selezione della
temperatura per 5 secondi.
Premere “ ” per regolare la temperatura del compartimento inferiore. Il display relativo a quel
compartimento si mette a lampeggiare e ad ogni pressione del pulsante la temperatura viene modificata
di 1 °C. Una volta raggiunta la temperatura di 10°C più bassa impostata, il display ritorna
automaticamente alla temperatura impostata più elevata di 20°C. Una volta selezionata, il display
lampeggerà per circa 5 sec. prima di indicare la temperatura interna istantanea del frigo cantina. La
temperatura impostata può essere controllata in qualsiasi momento premendo i tasti di selezione della
temperatura per 5 secondi.
In caso di interruzione della corrente, tutte le temperature precedentemente scelte saranno cancellate e
ogni compartimento ritornerà di default al valore della temperatura preimpostato in fabbrica, ovvero 6 °C
per il compartimento superiore e 12 °C per il compartimento inferiore.
Funzionalità
Allarme di temperatura
Se la temperatura interna è superiore a 23 °C, sul display comparirà "HI" e ogni ora si attiverà un
allarme sonoro. L'allarme serve per avvisare che la temperatura interna è troppo alta; verificarne la
causa. Se la temperatura interna è inferiore a 0 °C, sul display comparirà "LO", si attiveranno
contemporaneamente un allarme sonoro e una spia luminosa di malfunzionamento.
Funzione di memorizzazione della temperatura
In caso di interruzione di corrente, il frigo cantina può memorizzare le ultime impostazioni in modo che
quando ritorna la corrente, possano essere di nuovo operative.
Luce interna
Per ridurre il consumo di corrente, la luce interna di questo frigo cantina si spegne automaticamente dopo
10 minuti.
Se si vuole che la luce interna resti sempre accesa, premere il pulsante “ ” per 5 secondi: sul display
compare il messaggio "LP". Dopo 4 secondi, il display torna alla normalità e la luce resterà accesa fino a
quando non verrà spenta manualmente.
Se si vuole ritornare all'impostazione iniziale e risparmiare corrente (consigliato), premere il pulsante “ ”
per 5 secondi: sul display compare il messaggio "LF". Dopo 4 secondi, il display torna alla normalità e la
luce si spegnerà automaticamente dopo 10 minuti.
5. DISPOSITIVI
Sistema di climatizzazione
Secondo il parere degli specialisti, la temperatura ideale di conservazione dei vini si aggira a circa 12 °C,
restando in una forchetta che va da 10 °C a 14 °C. Non va confusa con la temperatura di servizio, la
quale varia a seconda del tipo di vino da 5 a 20 °C.

199
È soprattutto fondamentale evitare brusche variazioni della temperatura. Progettato da specialisti per i
conoscitori di vini, questo apparecchio, diversamente da un semplice frigo, tiene conto di quanto i grandi
cru siano sensibili alle brusche variazioni di temperatura e garantisce un controllo preciso di una
temperatura media costante.
Sistema antivibrazioni
Il compressore frigorifero è dotato di ammortizzatori speciali (silent-block) e il vano interno è isolato dalla
scocca da uno spesso strato di schiuma di poliuretano. Queste caratteristiche consentono di evitare la
trasmissione delle vibrazioni ai vini.
Sistema di umidificazione
Questo apparecchio è dotato di una vaschetta che consente di mantenere il giusto livello di umidità. Se
l'umidità è troppo bassa, riempire il serbatoio per ¾ della capacità. Controllare di tanto in tanto il livello e
aggiungere acqua se necessario. Accertarsi che la vaschetta contenga sempre dell'acqua.
Pensato dagli specialisti per i conoscitori di vini, la marca Avintage ha preso in considerazione la
sensibilità dei tappi ad un'umidità ambiente troppo bassa. È per questo che la vaschetta deve essere
collocata sul ripiano sotto il ventilatore, situato sul fondo, per fornire un'umidità minima. Ricordarsi di
controllare il livello dell'acqua se si conservano dei vini per un lungo periodo e non si dedica l'apparecchio
solamente per portarli alla temperatura di servizio (con rapide rotazioni delle bottiglie).
Accertarsi che la vaschetta sia ben fissata per evitare fuoriuscite di liquido.
Sistema anti-UV
La luce accelera l'invecchiamento dei vini. Nei nostri frigo cantina a porta piena, i vini sono naturalmente
riparati, ovviamente se si evita di aprire l'apparecchio troppo spesso. Questo modello con porta a vetro è
stato sottoposto ad un trattamento particolare che filtra i raggi ultravioletti nocivi; i vini quindi sono
completamente riparati dalla luce.
Sbrinamento
L'apparecchio è dotato di un ciclo automatico di sbrinamento. Durante l'arresto del ciclo di
raffreddamento, le superfici refrigerate dell'apparecchio verranno sbrinate automaticamente. L'acqua di
sbrinamento formatasi viene scaricata in una vaschetta di evaporazione della condensa, situata sul retro
dell'apparecchio vicino al compressore. Sarà il calore prodotto dal compressore a far evaporare la
condensa raccolta nella vaschetta.
Il sistema inverno
Il kit inverno è un sistema per senza gelo che consente al frigo cantina di funzionare in un ambiente in cui
la temperatura sia compresa tra 0 e 32 °C. Un sensore situato all'interno dell'apparecchio attiva una
resistenza elettrica a bassa potenza quando la temperatura dell'apparecchio è di 3 °C più bassa di quella
impostata. Questa resistenza è a bassa potenza per evitare un brusco aumento della temperatura del
vino e quindi degli shock termici dannosi per la sua corretta conservazione.
Questo kit è destinato a riscaldare la temperatura interna del frigo cantina prima che ci sia uno scambio
termico con le bottiglie. Il sistema inverno consente di mantenere la temperatura all'interno del frigo
cantina sempre uguale a quella programmata. Il sistema si attiva e porta la temperatura interna a quella
impostata, quindi si arresta.

200
Ripiani
Per evitare di danneggiare la guarnizione della porta, accertarsi che sia completamente aperta prima
di estrarre i ripiani per mettere o prendere le bottiglie.
Per accedere più facilmente al contenuto dei ripiani, fare scorrere il ripiano verso l'esterno di circa 1/3.
I ripiani sono comunque studiati con un fermo d'arresto su ogni lato per evitare che le bottiglie cadano.
Per togliere o mettere i ripiani, inclinarli come indicato nella figura e tirare o spingere a seconda del
caso.
AVU41SXDPA(/IX)
Collocare i ripiani nelle posizioni adatte.
a. Scatola di cartone dei pezzi di ricambio b. Ripiano piccolo c. Ripiano grande
1. Dopo aver tolto l'imballo, tirare fuori la scatola che contiene i pezzi di ricambio dell'apparecchio.
2. Nel compartimento di sinistra ci sono 4 ripiani piccoli (b). Togliere i due ripiani inferiori.
3. Nel comparto di destra, ci sono 4 ripiani grandi (c). Togliere i due ripiani superiori.
4. La posizione dei ripiani piccoli e grandi deve quindi essere invertita (Fig.2). In ogni compartimento,
mettere due ripiani piccoli in alto e due ripiani grandi in basso.
5. Dopo aver posizionato correttamente i ripiani, il frigo cantina è pronto ad essere usato in base alle
istruzioni contenute nel manuale d'uso.
Stabilizzatori dei piedini
Con l'apparecchio sono forniti due stabilizzatori per i piedini che consentono di spostarlo facilmente
quando i piedini sono regolati alla massima altezza. Gli stabilizzatori vanno messi sotto i piedini, paralleli
rispettando il senso corretto avanti e retro.

201
Sicurezza rafforzata
Questa gamma di apparecchi è destinata alla conservazione di beni di valore, pertanto ci siamo assicurati
di scegliere componenti di qualità e di studiare tecniche di fabbricazione atte a garantire la massima
sicurezza di funzionamento.
Montaggio della maniglia
L'apparecchio è dotato di una maniglia in acciaio inossidabile. Per montarla, basta avvitarla alla porta con
le viti fornite seguendo il disegno qui sotto; prima bisogna togliere la guarnizione magnetica.
6. CARICO
Le quantità massime dichiarate di carico di bottiglie sono fornite a titolo indicativo come configurazione di
fabbrica; non hanno valore contrattuale ma servono soltanto (come la capacità in litri dei frigoriferi) per
avere un'idea delle dimensioni dell'apparecchio.
Corrispondono a dei test effettuati con una bottiglia campione: la bottiglia tipo "bordolese tradizionale 75
cl" (la normalizzazione riconosce per ogni forma di bottiglie un'origine geografica: bordolese, borgognona,
ad anfora tipica della Provenza, ecc. e un tipo: normale, pesante, alleggerita, affusolata, ecc., ognuna con
il suo proprio diametro e altezza).
In realtà, è possibile inserire, al limite, più bottiglie dello stesso tipo impilate senza usare i ripiani, ma un
"cantina diversificata" è formata da una gran varietà di bottiglie e l'aspetto della "praticità" nella gestione
quotidiana di un frigo cantina ne limita il carico. Pertanto il carico reale sarà probabilmente un po' meno
del massimo dichiarato.
Retro
Avanti
Retro
Avanti
Stabilizzatori dei piedini
Front
Back
Fronte
Retro
Viti
Porta
Maniglia

202
Tipi di bottiglie:
Qui possiamo vedere 4 tipi di bottiglie da 75 cl, borgognona e bordolese, di varie dimensioni. Esistono
molti altri tipi, di varie capacità e forme.
A titolo d'esempio, se si carica un frigo cantina solo con bottiglie borgognone, si potrà notare di essere di
circa il 30% al di sotto della quantità iniziale calcolata per delle bordolesi.
Tipi di disposizione
Rovesciata collo contro collo:
Notare la differenza di profondità!
Rovesciata collo tra i corpi:
Carico maggiorato
Esempi di temperatura di servizio
Da rispettare per le degustazioni in modo da poter assaporare tutta la ricchezza aromatica dei vini!
Le opinioni possono variare, così come la temperatura ambiente, ma solitamente si considera:
Vini pregiati Bordeaux – Rossi 16 – 17 °C
Vini pregiati di Borgogna – Rossi 15 – 16 °C
Grandi cru bianchi secchi 14 – 16 °C
Rossi leggeri, fruttati, giovani 11 – 12 °C
Rosati di Provenza, vini novelli 10 – 12 °C
Bianchi secchi e vini tipici rossi 10 – 12 °C
Vini tipici bianchi 8 – 10 °C
Champagne 7 – 8 °C
Vini liquorosi 6 °C
7. PULIZIA E MANUTENZIONE
Prima di pulire l'apparecchio (operazione da fare regolarmente), scollegare l'apparecchio togliendo la
spina dalla presa di corrente o staccando il fusibile da cui dipende.
Consigliamo prima del primo utilizzo e in seguito regolarmente, di pulire l'interno e l'esterno (lato frontale,
fianchi e piano superiore) con acqua tiepida e detersivo delicato. Risciacquare con acqua pulita e lasciare
asciugare totalmente prima di ricollegare l'apparecchio alla corrente. Per la pulizia non vanno usati

203
solventi né prodotti abrasivi.
La prima volta che si accende l'apparecchio, è possibile che emani degli odori residui. In tal caso, far
funzionare l'apparecchio a vuoto per alcune ore impostando la temperatura più fredda. Il freddo eliminerà
gli eventuali odori.
In caso di interruzione della corrente
Nella maggior parte dei casi, la corrente viene ripristinata in fretta. Un'interruzione di 1 o 2 ore non
modificherà la temperatura del frigo cantina. Per proteggere i vini durante le interruzioni di corrente,
evitare il più possibile di aprire la porta. In caso di interruzione di corrente molto prolungata, prendere le
misure necessarie per proteggere i vini.
Se l'apparecchio è stato scollegato dalla presa, è stato spento o c'è stata un'interruzione di corrente,
bisognerà aspettare 3-5 minuti prima di riaccenderlo. Se si prova ad accenderlo prima, il compressore
si metterà in funzione solo dopo 3/5 minuti (se la temperatura lo necessita).
Al primo avvio e dopo un arresto prolungato del frigo cantina, è possibile che al momento del riavvio le
temperature impostate e quelle visualizzate non corrispondano. È normale. Bisognerà aspettare
alcune ore prima che le temperature si ristabilizzino.
Se si va in vacanza
Vacanze brevi: lasciare il frigo cantina in funzione se ci si assenta per meno di 3 settimane.
Vacanze lunghe: se l'apparecchio non sarà utilizzato per diversi mesi, togliere tutte le bottiglie e tutti
gli accessori, spegnere l'apparecchio e scollegarlo dalla presa della corrente. Pulire e asciugare
accuratamente l'interno e l'esterno dell'apparecchio. Lasciare anche la porta aperta, bloccandola se
necessario, per evitare la formazione di condensa, odori, muffa.
Spostamento del frigo cantina
Scollegare il frigo cantina prima di qualsiasi operazione.
Togliere tutte le bottiglie presenti nel frigo cantina e fissare gli elementi mobili.
Per evitare di danneggiare le viti di livellamento dei piedini, avvitarle a fondo nella loro base.
Chiudere completamente la porta.
Spostare l'apparecchio preferibilmente in posizione verticale o controllare le scritte sull'imballo per il
senso nel quale può essere coricato l'apparecchio. Proteggere inoltre l'apparecchio con una coperta o
un tessuto simile.
Risparmio energetico
L'apparecchio deve essere collocato in un locale fresco (ma superiore a 16 ° C), lontano da qualsiasi
fonte di calore (altri elettrodomestici) e dall'esposizione diretta al sole.
Il locale in cui viene collocato l'apparecchio deve essere ventilato. Non coprire mai le fessure di
areazione.
Non aprire la porta più del necessario.

204
8. IN CASO DI GUASTI
Nonostante tutta la cura e l'attenzione che mettiamo nel fabbricare i nostri prodotti, l'eventualità di un
guasto non può essere completamente esclusa. Prima di contattare il servizio assistenza del proprio
rivenditore, si prega comunque di fare prima questi controlli:
La spina elettrica è inserita correttamente
Non è saltata la corrente
La causa del guasto non è tra quelle descritte nella tabella alla fine di questo manuale.
IMPORTANTE: se il cavo di alimentazione fornito fosse danneggiato, deve essere sostituito dal
produttore, da un servizio assistenza autorizzato del marchio o dal rivenditore. In ogni caso, deve
essere sostituito da personale qualificato per evitare rischi di lesioni.
SE QUESTI CONTROLLI NON RISOLVONO LA SITUAZIONE, CONTATTARE IL SERVIZIO ASSISTENZA DEL PROPRIO
RIVENDITORE.
ATTENZIONE!
Scollegare la spina dalla presa di corrente a muro prima di
effettuare la pulizia o delle riparazioni!

205
9. PROBLEMI E POSSIBILI CAUSE
In molti casi è possibile risolvere dei semplici problemi del frigo cantina senza doversi rivolgere al servizio
assistenza. Provare a seguire i consigli forniti qui sotto.
PROBLEMA
POSSIBILE CAUSA
Il frigo cantina non si accende
La spina non è inserita.
Il pulsante Start/Stop è sulla posizione stop.
È saltato un fusibile nell'impianto elettrico.
Il frigo cantina non raffredda abbastanza
Controllare la temperatura impostata.
La temperatura esterna è superiore alla
temperatura di utilizzo del frigo cantina.
Il frigo cantina è stato aperto troppo spesso.
Il frigo cantina non è ben chiuso.
La guarnizione della porta non tiene più.
Non c'è abbastanza spazio libero attorno
all'apparecchio.
Il compressore continua ad accendersi e
spegnersi
La temperatura esterna è troppo alta.
Sono state messe troppe bottiglie nel frigo
cantina.
La porta del frigo cantina è stata aperta
troppo spesso.
La porta non è ben chiusa.
L'impostazione non è stata fatta
correttamente.
La guarnizione della porta non tiene più.
La luce non funziona
La spina non è inserita.
È saltato un fusibile nell'impianto elettrico.
Il LED è guasto/saltato; contattare il servizio
assistenza.
Il pulsante della luce è su stop.
Vibrazioni
Accertarsi che il frigo cantina sia ben livellato.
Il frigo cantina è molto rumoroso
Un rumore simile ad acqua che circola è
dovuto al gas refrigerante ed è assolutamente
normale.
Alla fine del ciclo del compressore, si sente
un rumore di acqua che circola.
Contrazioni ed espansioni delle pareti interne
possono provocare dei colpi.
Il frigo cantina non è livellato.
La porta non chiude bene
Il frigo cantina non è livellato.
La guarnizione della porta è sporca o
rovinata.
I ripiani non sono posizionati bene.
Una parte del contenuto impedisce alla porta
di chiudersi.
Sostituzione della lampada di illuminazione
È costituita da diodi elettroluminescenti (LED). Questo tipo di diodo non può essere sostituito
dall'utilizzatore. La durata di vita dei LED è solitamente tale da non necessitare la loro sostituzione. Se
tuttavia, malgrado la cura con cui è stato costruito il frigo cantina, i LED dovessero essere difettosi,
rivolgersi al proprio servizio assistenza per l'intervento.

206
10. PROTEZIONE DELL'AMBIENTE
Questo prodotto è conforme alla Direttiva UE 2012/19/CE relativa ai rifiuti di apparecchi
elettrici ed elettronici (RAEE). Assicurandosi che questo prodotto sia smaltito in modo
corretto, si aiuta a prevenire le potenziali conseguenze negative per l'ambiente e la salute
dell'uomo che potrebbero derivare da trattamenti non appropriati dei rifiuti di questo prodotto.
Il simbolo del cassonetto barrato apposto sull'apparecchio significa che una volta giunto a fine vita, non
deve essere gettato assieme agli altri rifiuti domestici. Dovrà essere conferito ad un centro per la raccolta
differenziata di apparecchi elettrici e/o elettronici oppure, se si acquista un apparecchio equivalente, al
rivenditore del nuovo apparecchio.
L'utilizzatore è responsabile del conferimento dell'apparecchio a fine vita alle strutture di raccolta dei rifiuti
idonee. Una raccolta differenziata ed appropriata, allo scopo di inviare l'apparecchio non utilizzato al
riciclaggio, al trattamento e ad uno smaltimento ecosostenibile, contribuisce ad evitare i possibili effetti
nocivi sull'ambiente e sulla salute dell'uomo ed a favorire il riciclaggio dei materiali di cui è fatto il
prodotto.
Per ottenere informazioni più dettagliate sui sistemi di raccolta differenziata disponibili, rivolgersi al
proprio servizio comunale di smaltimento dei rifiuti oppure al negozio in cui si è acquistato l'apparecchio.
11. AVVERTENZA
Al fine del continuo miglioramento dei nostri prodotti, ci riserviamo la possibilità di modificare le
caratteristiche tecniche senza preavviso.
Le garanzie dei prodotti del marchio AVINTAGE sono stabilite esclusivamente dai distributori che
abbiamo scelto. Nessun elemento contenuto nel presente manuale può essere interpretato come una
garanzia supplementare.
FRIO ENTREPRISE non può essere ritenuta responsabile per errori o omissioni tecniche e di redazione
eventualmente presenti in questo manuale.
Documento senza valore contrattuale.

207
SCHEDA PRODOTTO EUROPEA
secondo il regolamento (UE) N°1060/2010
-
FRIGO CANTINA DI SERVIZIO
MARCA
AVINTAGE
RIFERIMENTO COMMERCIALE
AVU8X(/IX)
DATI ELETTRICI
220-240 V / 50 Hz
DIMENSIONI DEL PRODOTTO (L x P x A)
145 x 547,5 x 820 mm
PESO NETO
20 kg
CATEGORIA DELL'APPARECCHIO
2
CLASSE ENERGETICA
A
CONSUMO ELETTRICO
Consumo di energia di 135 kWh all'anno,
calcolato sulla base del risultato ottenuto
in 24 ore in condizioni di prova
normalizzate. Il consumo di corrente reale
dipende dalle condizioni d'uso e dalla
collocazione dell'apparecchio.
CAPACITÀ
23 L
TEMPERATURA REGOLABILE
5 – 20°C
SBRINAMENTO
Sbrinamento automatico
CLASSE CLIMATICA
Classe climatica: N
Questo apparecchio è destinato ad
essere utilizzato ad una temperatura
ambiente compresa tra i 16 °C
(temperatura più bassa) e 32 °C
(temperatura più alta).
LIVELLO DI RUMORE dB(A) RE 1 pW
44 dB(A)
TIPO DI INSTALLAZIONE
Da incasso sottopiano
Questo apparecchio è destinato solamente alla conservazione di vini.

208
SCHEDA PRODOTTO EUROPEA
secondo il regolamento (UE) N°1060/2010
-
FRIGO CANTINA DI SERVIZIO
MARCA
AVINTAGE
RIFERIMENTO COMMERCIALE
AVU23SX(/IX)
DATI ELETTRICI
220-240 V / 50 Hz
DIMENSIONI DEL PRODOTTO (L x P x A)
295 x 571 x 820 mm
PESO NETO
28 kg
CATEGORIA DELL'APPARECCHIO
2
CLASSE ENERGETICA
A
CONSUMO ELETTRICO
Consumo di energia di 140 kWh all'anno,
calcolato sulla base del risultato ottenuto
in 24 ore in condizioni di prova
normalizzate. Il consumo di corrente reale
dipende dalle condizioni d'uso e dalla
collocazione dell'apparecchio.
CAPACITÀ
56 L
TEMPERATURA REGOLABILE
5 – 20°C
SBRINAMENTO
Sbrinamento automatico
CLASSE CLIMATICA
Classe climatica: N
Questo apparecchio è destinato ad
essere utilizzato ad una temperatura
ambiente compresa tra i 16 °C
(temperatura più bassa) e 32 °C
(temperatura più alta).
LIVELLO DI RUMORE dB(A) RE 1 pW
43 dB(A)
TIPO DI INSTALLAZIONE
A libera installazione e da incasso
sottopiano
Questo apparecchio è destinato solamente alla conservazione di vini.

209
SCHEDA PRODOTTO EUROPEA
secondo il regolamento (UE) N°1060/2010
-
FRIGO CANTINA DI SERVIZIO
MARCA
AVINTAGE
RIFERIMENTO COMMERCIALE
AVU41SXDPA(/IX)
DATI ELETTRICI
220-240 V / 50 Hz
DIMENSIONI DEL PRODOTTO (L x P x A)
595 x 571 x 820 mm
PESO NETO
48 kg
CATEGORIA DELL'APPARECCHIO
2
CLASSE ENERGETICA
A
CONSUMO ELETTRICO
Consumo di energia di 144 kWh all'anno,
calcolato sulla base del risultato ottenuto
in 24 ore in condizioni di prova
normalizzate. Il consumo di corrente reale
dipende dalle condizioni d'uso e dalla
collocazione dell'apparecchio.
CAPACITÀ
59.5 x 2 L
TEMPERATURA REGOLABILE
5 – 20°C
SBRINAMENTO
Sbrinamento automatico
CLASSE CLIMATICA
Classe climatica: N
Questo apparecchio è destinato ad
essere utilizzato ad una temperatura
ambiente compresa tra i 16 °C
(temperatura più bassa) e 32 °C
(temperatura più alta).
LIVELLO DI RUMORE dB(A) RE 1 pW
43 dB(A)
TIPO DI INSTALLAZIONE
A libera installazione e da incasso
sottopiano
Questo apparecchio è destinato solamente alla conservazione di vini.

210
SCHEDA PRODOTTO EUROPEA
secondo il regolamento (UE) N°1060/2010
-
FRIGO CANTINA DI SERVIZIO
MARCA
AVINTAGE
RIFERIMENTO COMMERCIALE
AVU52SX(/IX)
DATI ELETTRICI
220-240 V / 50 Hz
DIMENSIONI DEL PRODOTTO (L x P x A)
595 x 571 x 820 mm
PESO NETO
44 kg
CATEGORIA DELL'APPARECCHIO
2
CLASSE ENERGETICA
A
CONSUMO ELETTRICO
Consumo di energia di 145 kWh all'anno,
calcolato sulla base del risultato ottenuto
in 24 ore in condizioni di prova
normalizzate. Il consumo di corrente reale
dipende dalle condizioni d'uso e dalla
collocazione dell'apparecchio.
CAPACITÀ
146 L
TEMPERATURA REGOLABILE
5 – 20°C
SBRINAMENTO
Sbrinamento automatico
CLASSE CLIMATICA
Classe climatica: N
Questo apparecchio è destinato ad
essere utilizzato ad una temperatura
ambiente compresa tra i 16 °C
(temperatura più bassa) e 32 °C
(temperatura più alta).
LIVELLO DI RUMORE dB(A) RE 1 pW
44 dB(A)
TIPO DI INSTALLAZIONE
A libera installazione e da incasso
sottopiano
Questo apparecchio è destinato solamente alla conservazione di vini.

211
SCHEDA PRODOTTO EUROPEA
secondo il regolamento (UE) N°1060/2010
-
FRIGO CANTINA DI SERVIZIO
MARCA
AVINTAGE
RIFERIMENTO COMMERCIALE
AVU53CDZA
DATI ELETTRICI
220-240 V / 50 Hz
DIMENSIONI DEL PRODOTTO (L x P x A)
595 x 571 x 820 mm
PESO NETO
50 kg
CATEGORIA DELL'APPARECCHIO
2
CLASSE ENERGETICA
A
CONSUMO ELETTRICO
Consumo di energia di 145 kWh all'anno,
calcolato sulla base del risultato ottenuto
in 24 ore in condizioni di prova
normalizzate. Il consumo di corrente reale
dipende dalle condizioni d'uso e dalla
collocazione dell'apparecchio.
CAPACITÀ
134 L
TEMPERATURA REGOLABILE
5 – 10°C / 10 – 20°C
SBRINAMENTO
Sbrinamento automatico
CLASSE CLIMATICA
Classe climatica: N
Questo apparecchio è destinato ad
essere utilizzato ad una temperatura
ambiente compresa tra i 16 °C
(temperatura più bassa) e 32 °C
(temperatura più alta).
LIVELLO DI RUMORE dB(A) RE 1 pW
45 dB(A)
TIPO DI INSTALLAZIONE
A libera installazione e da incasso
sottopiano
Questo apparecchio è destinato solamente alla conservazione di vini.

212
SCHEDA PRODOTTO EUROPEA
secondo il regolamento (UE) N°1060/2010
-
FRIGO CANTINA DI SERVIZIO
MARCA
AVINTAGE
RIFERIMENTO COMMERCIALE
AVU54SXDZA(/IX)
DATI ELETTRICI
220-240 V / 50 Hz
DIMENSIONI DEL PRODOTTO (L x P x A)
595 x 571 x 820 mm
PESO NETO
50 kg
CATEGORIA DELL'APPARECCHIO
2
CLASSE ENERGETICA
A
CONSUMO ELETTRICO
Consumo di energia di 145 kWh all'anno,
calcolato sulla base del risultato ottenuto
in 24 ore in condizioni di prova
normalizzate. Il consumo di corrente reale
dipende dalle condizioni d'uso e dalla
collocazione dell'apparecchio.
CAPACITÀ
134 L
TEMPERATURA REGOLABILE
5 – 10°C / 10 – 20°C
SBRINAMENTO
Sbrinamento automatico
CLASSE CLIMATICA
Classe climatica: N
Questo apparecchio è destinato ad
essere utilizzato ad una temperatura
ambiente compresa tra i 16 °C
(temperatura più bassa) e 32 °C
(temperatura più alta).
LIVELLO DI RUMORE dB(A) RE 1 pW
45 dB(A)
TIPO DI INSTALLAZIONE
A libera installazione e da incasso
sottopiano
Questo apparecchio è destinato solamente alla conservazione di vini.

213
SCHEDA PRODOTTO EUROPEA
secondo il regolamento (UE) N°1060/2010
-
FRIGO CANTINA DI SERVIZIO
MARCA
AVINTAGE
RIFERIMENTO COMMERCIALE
PRO51C/1
DATI ELETTRICI
220-240 V / 50 Hz
DIMENSIONI DEL PRODOTTO (L x P x A)
595 x 571 x 820 mm
PESO NETO
48 kg
CATEGORIA DELL'APPARECCHIO
2
CLASSE ENERGETICA
A
CONSUMO ELETTRICO
Consumo di energia di 145 kWh all'anno,
calcolato sulla base del risultato ottenuto
in 24 ore in condizioni di prova
normalizzate. Il consumo di corrente reale
dipende dalle condizioni d'uso e dalla
collocazione dell'apparecchio.
CAPACITÀ
146 L
TEMPERATURA REGOLABILE
5 – 20°C
SBRINAMENTO
Sbrinamento automatico
CLASSE CLIMATICA
Classe climatica: N
Questo apparecchio è destinato ad
essere utilizzato ad una temperatura
ambiente compresa tra i 16 °C
(temperatura più bassa) e 32 °C
(temperatura più alta).
LIVELLO DI RUMORE dB(A) RE 1 pW
45 dB(A)
TIPO DI INSTALLAZIONE
A libera installazione e da incasso
sottopiano
Questo apparecchio è destinato solamente alla conservazione di vini.

214
Před použitím přístroje čtěte a řiďte se prosím bezpečnostními pokyny a provozními instrukcemi
uvedenými v tomto návodu.
Nejdříve bychom Vám chtěli poděkovat za důvěru projevenou skupině AVINTAGE zakoupením tohoto
produktu, který, jak doufáme, dokonale naplní všechna Vaše očekávání.
Toto zařízení Vám umožní ohřát Vaše lahve vína až a pokojovou teplotu anebo je temperovat na
servírovací teplotu (podle typu vína) díky širokému rozsahu možného nastavení vinotéky.
1. OBECNÉ BEZPEČNOSTNÍ POKYNY
Před prvním použitím vaší vinotéky si prosím důkladně přečtěte
tento návod. Uschovejte jej pečlivě pro případné pozdější použití.
Abyste zabránili riziku požáru, úrazu elektrickým proudem, nebo
zranění, řiďte se bezpečnostními doporučeními uvedenými
v tomto návodu.
Zařízení může obsluhovat pouze osoba důkladně obeznámená
s funkcí a obsluhou.
Pro vaši bezpečnost a správnou obsluhu si před instalací přístroje
důkladně prostudujte tento návod včetně rad a upozornění.
Obsluha musí být důkladně seznámena s funkcemi
a bezpečnostními vlastnostmi přístroje, aby se zabránilo
nečekaným závadám, chybám a nehodám během provozu
zařízení. Tento návod pečlivě uchovejte a zajistěte jeho předání spolu
s přístrojem v případě jeho postoupení nebo prodeje. Takto zajistíte
optimální funkci zařízení po celou dobu jeho životnosti.
Dodržujte ustanovení tohoto návodu týkající se provozu
a bezpečnosti jeho obsluhy. Výrobce spotřebiče a jeho dodavatel
nejsou zodpovědní za škody, způsobené instalací nebo obsluhou
spotřebiče v rozporu s instrukcemi obsaženými v tomto návodu k
obsluze a instalaci.
Zařízení je určeno domácí použití a pro uchovávání zvláštních
nápojů při teplotách vyšších, než jsou obvyklé teploty pro

215
uchovávání čerstvých potravin. Za žádných okolností není určeno
pro uchovávání čerstvých potravin.
Zkontrolujte vaši elektrickou instalaci, zda napětí v síti odpovídá
tomu, které je uvedeno na štítku přístroje. Zařízení musí být
připojeno k schválenému a uzemněnému rozvodu. Nesprávné
opravy anebo připojení jsou bezpečnostním rizikem. v případě
pochybností nechte svůj elektrický rozvod prověřit profesionální
instalační firmou.
Zařízení musí být správně připojeno k uzemněné zásuvce.
Nepřerušujte ani neodstraňujte zemnící vodič na dodaném
připojovacím kabelu.
Napájecí kabel spotřebiče nesmí být prodlužován/nastavován. K
připojení spotřebiče k elektrické síti nepoužívejte prodlužovací
šňůry, adaptéry ani sdružené zásuvky.
V případě poškození zařízení (většího rozsahu) výpadkem
proudu a živly, může být používání přístroje nebezpečné. Odpojte
hlavní přívod ze sítě a nechte zařízení zkontrolovat oprávněnou
osobou.
Nikdy nevyměňujte přívodní kabel svépomocí. Přenechte tuto
práci profesně způsobilé osobě.
Zásuvka, která slouží k napájení spotřebiče, musí zůstat po jeho
instalaci snadno přístupná. Plnou vinotéku nikdy nepřesouvejte
ani nestěhujte. Mohlo by to způsobit její nevratné poškození.
Elektrické součásti nesmí být přímo přístupné.
Zabraňte dětem v přístupu k zařízení.
Nepoužívejte vinotéku ve venkovních prostorách.

216
V případě nenadálého potřísnění vinotéky (rozbitá láhev apod.,)
nebo jejích elektrických součástí, okamžitě odpojte hlavní přívod
elektřiny.
Nikdy nenamáčejte přívodní kabel, zástrčku, nebo celou vinotéku
do vody nebo jiné tekutiny. Nedotýkejte se zapnutého zařízení
vlhkými rukami.
Spotřebič postavte tak, aby nebyl exponován přímým slunečním
paprskům.
Nenechávejte hlavní přívodní kabel viset ze stolu nebo v kontaktu
s ostrou hranou, či horkým předmětem.
Při odpojování spotřebiče ze sítě nikdy netahejte za samotný
kabel, ale vždy jej pevně uchopte za zástrčku a odpojte jejím
vytažením ze síťové zásuvky.
Spotřebič má značnou váhu. Zohledněte tuto skutečnost při jeho
manipulaci. Zajistěte postavení vinotéky na dostatečně únosnou
podlahu (jedna 75 cl láhev váží přibližně 1,3 kg). Vinotéka musí
stát na vodorovné podlaze. Stavíte-li zařízení na měkký povrch
nebo koberec, podložte ji pevnou podložkou.
Při vytahování polic dbejte, aby byly dveře plně otevřené.
Zamezíte tím poškození dveřního těsnění.
Bezpečnost dětí a znevýhodněných osob
Osoby mladší osmi let a osoby se sníženými fyzickými,
psychickými nebo smyslovými schopnostmi nebo osoby
nedostatečně obeznámené s principy obsluhy a fungování tohoto
spotřebiče jej smějí používat pouze pod dohledem nebo
předchozí jasné a srozumitelné instrukci osobou s dostatečnou
znalostí, zodpovědnou za jejich bezpečnost.

217
Údržbu a čištění spotřebiče nelze svěřit dětem bez dozoru.
Obalové materiály spotřebiče po jeho vybalení odstraňte
z dosahu dětí. v opačném případě hrozí riziko udušení.
Spotřebič při ukončení jeho životnosti odpojte od zdroje
napětí, odstřihněte/odřízněte zástrčku napájecího kabelu (co
nejblíž korpusu spotřebiče) a odstraňte dvířka tak, aby si děti
nemohly se spotřebičem hrát a případně uvíznout zavřené uvnitř.
Nahrazujete-li vysloužilý spotřebič s magnetickým
uzavíráním/těsněním novým spotřebičem vybaveným
bezpečnostním zámkem/závorou na dveřích nebo těsnění,
přesvědčte se nejprve o deaktivaci bezpečnostního systému
nového spotřebiče tak, aby v něm v průběhu likvidace
vysloužilého spotřebiče nemohly uvíznout děti.
Dohlédněte, aby si v blízkosti spotřebiče při jeho provozu
nehrály bez dozoru děti mladší osmi let, obzvláště dbejte na to,
aby nepoužívaly jako hračku samotný spotřebič.
Obecná bezpečnostní upozornění
POZOR – toto zařízení je určeno pro domácí použití, nebo
v zařízeních, jako:
V služebních prostorách obchodů, úřadů a jiných pracovních
prostorách,
Na farmách a v hotelech, motelech a jiných ubytovacích
zařízeních,
V ubytovnách,
V restauratérství a velkoobchodních aplikacích.
POZOR! Zařízení musí být vhodně upevněno v souladu s tímto
návodem, aby se zabránilo následným škodám při jeho
používání.

218
POZOR! Uvnitř spotřebiče nikdy neskladujte hořlavé substance,
například spreje s hořlavými hnacími plyny.
POZOR! Poškozený napájecí kabel spotřebiče musí být,
z bezpečnostních důvodů, neprodleně opraven nebo nahrazen
výhradně pověřeným zaměstnancem výrobce nebo
kvalifikovaným zaměstnancem autorizovaného poprodejního
servisu dodavatele.
POZOR! Všechny ventilační otvory spotřebiče musí zůstat po
jeho instalaci volné. Zajistěte, aby byl kolem spotřebiče dostatek
volného prostoru pro řádnou cirkulaci vzduchu, obzvláště v okolí
prostor vzduchových vstupů a výstupů.
POZOR! Za všech okolností předcházejte poškození rozvodů
chladícího okruhu.
POZOR! Ve vnitřních prostorách spotřebiče nepoužívejte
elektrické přístroje a zařízení s výjimkou případů explicitně
povolených výrobcem zařízení.
POZOR! Chladící a izolační systém spotřebiče obsahují hořlavé
plyny. Při ukončení jeho životnosti je proto třeba dodržet přísná
pravidla bezpečnosti a k likvidaci spotřebiče využít služeb
specializovaných center pro likvidaci vysloužilých elektrických
a elektronických zařízení. Spotřebič, a to ani po ukončení jeho
životnosti, nevystavujte ohni.
Chladivo
Spotřebič využívá jako své chladicí médium isobutan (R600a) – k
životnímu prostředí šetrný, přesto snadno vznětlivý, a proto velmi
nebezpečný plyn. Při transportech spotřebiče a jeho instalaci
důsledně dbejte na to, aby nedošlo k poškození žádné z částí

219
rozvodu chladicího systému.
Pozor! Nebezpečí požáru
Při poškození rozvodů chladicího okruhu spotřebiče:
odstraňte z jeho bezprostřední blízkosti zápalné zdroje
a otevřený plamen.
řádně větrejte místnost, ve které je spotřebič instalován.
Nepokoušejte se o změny nebo zásahy do technických parametrů
spotřebiče – neodborné zásahy do zařízení představují výrazné
riziko ohrožení zdraví uživatelů!
Každé poškození napájecího kabelu zařízení může mít za
následek zkrat a požár.
Elektrická bezpečnost
Výrobce i dodavatel se zříkají zodpovědnosti za nehody
a problémy způsobené nesprávnou nebo neodbornou instalací
spotřebiče nebo jeho instalací v rozporu s pokyny obsaženými
v tomto návodu k obsluze a instalaci.
Napájecí kabel spotřebiče nesmí být
prodlužován/nastavován. K připojení spotřebiče k elektrické síti
nepoužívejte prodlužovací šňůry, adaptéry ani sdružené zásuvky.
Před připojením spotřebiče k síti prověřte bezvadný stav
síťové zásuvky. Připojení k poškozené nebo uvolněné zásuvce
může být příčinou přehřátí spotřebiče a jeho vznícení nebo
exploze.
Zásuvka, která slouží k napájení spotřebiče, musí zůstat po
jeho instalaci snadno přístupná.
Při odpojování spotřebiče ze sítě nikdy netahejte za samotný
kabel, ale vždy jej pevně uchopte za zástrčku a odpojte jejím
vytažením ze síťové zásuvky.

220
Nikdy neodstraňujte bezpečnostní – zemnící vodič!
Spotřebič nikdy nezapojujte/neprovozujte bez řádně
instalovaného krytu vnitřního osvětlení.
Před výměnou žárovky vnitřního osvětlení spotřebič vždy
nejprve odpojte od zdroje elektrického napětí.
Tento spotřebič je koncipován pro napájení jednofázovým
proudem 220~240 V/50 Hz přes předpisově instalovanou
uzemněnou zásuvku.
Poškozený napájecí kabel spotřebiče sami neopravujte!
Neprodleně kontaktujte autorizovaný poprodejní servis.
Napájecí zásuvka by měla být umístěna mimo dosah dětí
v dostatečné blízkosti od spotřebiče tak, aby bylo možné
v kterémkoli okamžiku jeho snadné odpojení od zdroje napětí.
v případě pochybností kontaktujte kvalifikovaného
elektrotechnika.
Doporučení pro každodenní provoz
Zařízení je určeno výhradně pro skladování vína.
Uvnitř spotřebiče nikdy neskladujte hořlavé nebo vznětlivé
látky, zvláště tekutiny. Hrozí riziko jejich vznícení nebo exploze.
Uvnitř spotřebiče neprovozujte jiná elektrické zařízení
(výrobníky ledu, mixéry apod.).
Při odpojování spotřebiče ze sítě nikdy netahejte za samotný
kabel, ale vždy jej pevně uchopte za zástrčku a odpojte jejím
vytažením ze síťové zásuvky.
Spotřebič ustavte tak, aby nebyl exponován přímým
slunečním paprskům.
Z bezprostřední blízkosti spotřebiče pro prevenci rizika jeho
vznícení a požáru odstraňte všechny zápalné zdroje (svíčky,
svítidla, aj zdroje s otevřeným plamenem).

221
Respektujte doporučení výrobce pro skladování vína ve
vinotéce.
V blízkosti zařízení nemanipulujte s otevřeným ohněm
a nevhazujte jej do ohně.
Zařízení je určeno ke skladování nápojů v normální
domácnosti, tak, jak je vysvětleno v tomto návodu.
Zařízení má značnou hmotnost, dbejte opatrnosti při jeho
stěhování.
Je-li spotřebič vybaven zadními transportními kolečky, mějte
na paměti, že tyto jsou určeny výhradně k usnadnění menších
změn polohy. Nepoužívejte tato transportní kolečka k přesouvání
spotřebiče na větší vzdálenosti.
Na spotřebič, ani žádnou z jeho částí/příslušenství si
nesedejte ani je nepoužívejte jako podstavce.
Pro ochranu uložených lahví a bezpečnost spotřebiče
nepřetěžujte police nad uvedenou hodnotu maximálního
povoleného zatížení.
Údržba a čištění
Před každým úkonem údržby a čištění spotřebič odpojte od
zdroje elektrické energie.
Pro čištění spotřebiče nikdy nepoužívejte: kovové nástroje,
parní a vysokotlaké čističe, těkavé kapaliny, organická
rozpouštědla a substance s abrazivními složkami.
Dvířka spotřebiče otevírejte pouze v nejnutnějších
případech.
Neurychlujte rozmrazování seškrabáváním námrazy ze stěn
spotřebiče ostrými nebo špičatými nástroji. Použijte speciální
plastovou škrabku.

222
Důležité informace pro instalaci zařízení
Neumísťujte zařízení ve vlhkých prostorách.
Zařízení nesmí být umístěno v blízkosti radiátorů, sporáků,
nebo dalších zdrojů tepla. Přímé sluneční světlo může poškodit
akrylátový nátěr a zdroje tepla mohou zvyšovat spotřebu
elektřiny. Mimořádně vysoké nebo nízké teploty okolí mohou také
způsobit nesprávnou funkci přístroje.
Vinotéku zapojte do vyhrazené, řádně instalované
a uzemněné zásuvky. Nikdy neodpojujte uzemnění z přívodního
kabelu. Jakékoli dotazy ohledně uzemnění směřujte na
kvalifikovanou elektroinstalační firmu, nebo autorizované servisní
středisko.
Pro zajištění správného elektrického připojení se řiďte tímto
návodem.
Rozbalte zařízení a zkontrolujte, zda zařízení není
poškozeno. Poškozený přístroj nepřipojujte do sítě. Informujte
svého prodejce o případném poškození. Pro tento případ si
ponechte přepravní obal.
Doporučujeme ponechat zařízení na místě provozu bez
připojení do sítě po dobu 4 hodin, čímž dojde k správnému
rozložení chladiva v chladícím okruhu.
Abyste zabránili přehřívání, je nutno zajistit řádnou cirkulaci
vzduchu kolem přístroje. Řiďte se doporučením poskytnutým
v tomto návodu.
Pro eliminaci rizika požáru dbejte, aby zařízení, nebo jeho
horké části (kompresor, kondenzátor) nebyly v přímém kontaktu
se zdí. Respektujte doporučení tohoto návodu.
Zařízení nesmí být umístěno v blízkosti radiátorů, sporáků,
nebo dalších zdrojů tepla.
Zajistěte přístupnost elektrické zásuvky, v níž je přístroj

223
připojen, také po instalaci zařízení.
Doporučení pro šetrný provoz
Pro úsporu elektrické energie:
Ustavujte spotřebič na vhodném místě (viz kapitola
„Instalace spotřebiče“).
Dvířka spotřebiče otevírejte pouze v nejnutnějších
případech.
Dbejte na optimální podmínky provozu spotřebiče včasnou
a pravidelnou údržbou např. kondenzátoru (více viz kapitola
„Údržba a čištění“).
Pravidelně kontrolujte funkčnost těsnění a přesvědčte se, že
dvířka řádně a dostatečně dovírají. v opačném případě
neprodleně kontaktujte autorizovaný poprodejní servis.
Opravy
Každý zásah do elektrických komponent zařízení musí být
realizován výhradně pověřeným kvalifikovaným specialistou.
Při servisních zásazích vyžadujte použití originálních
náhradních dílů s certifikátem zaručujícím jejich původ.
Tento spotřebič je určen výhradně pro domácí použití, kde slouží
ke skladování a přechovávání vína. Jeho výrobce a dodavatel se
zříkají veškeré zodpovědnosti za škody způsobené jiným než
shora uvedeným způsobem užití spotřebiče nebo jeho užívání
v rozporu s účelem, k němuž byl zkonstruován.
R600a

224
Bezpečnostní upozornění
POZOR! Ventilační otvory zařízení vždy ponechte volně průchozí
a nikdy je nezakrývejte ani neucpávejte.
POZOR! Uvnitř zařízení neskladujte hořlavé látky, jako nádoby se
spreji s hořlavým hnacím plynem apod.
POZOR! Vyvarujte se poškození chladivového okruhu!
POZOR! Chladící jednotka obsahuje Izobutan (R600a) a nesmí
být umístěna v prostředí s otevřeným ohněm (např. nekryté
elektrické kontakty) anebo na místech, kde hrozí nahromadění
chladiva po jeho úniku. Typ chladiva je vyznačen na výrobním
štítku zařízení.
POZOR! Nepoužívejte elektrické přístroje uvnitř prostoru pro
nápoje, pokud nejde o ty, které jsou přímo doporučeny výrobcem
zařízení.
Spotřebič splňuje požadavky vyplývající ze všech relevantních evropských směrnic ve znění
příslušných platných úprav, zvláště pak požadavky vyplývající z těchto směrnic:
2011/65/EU (ROHS)
2014/35/EU o elektrické bezpečnosti
2014/30/EU o elektromagnetické kompatibilitě
643/2009/CE týkající se energetických štítků

225
2. TECHNICKÉ ÚDAJE
Níže je zobrazen příklad typového štítku:
Typový štítek je upevněn dovnitř nebo na zadní stranu zařízení (v závislosti na modelu) a obsahuje
všechny informace o daném výrobku.
Doporučujeme, abyste si zde poznamenali sériové číslo vinotéky před její instalací pro případnou
pozdější potřebu (technické reference, požadavek asistence apod.).
Přístup k typovému štítku po instalaci přístroje může být nesnadný.
POZOR: bez těchto informací není možné poskytnout jakoukoli informaci nebo součinnost.
3. INSTALACE ZAŘÍZENÍ
Před použitím zařízení
Spotřebič vybalte (odstraňte ochranné a obalové materiály také z interiéru spotřebiče) a vizuálně
zkontrolujte jeho bezchybný stav. Jeví-li spotřebič známky poškození, instalaci přerušte a kontaktujte
prodejce, u kterého jste jej zakoupili. Pro tento případ si uschovejte obalový materiál, v němž byl
spotřebič dodán.
Před připojením vinotéky k síti ji nechte ustálit po dobu alespoň 24 hodin ve vertikální klidové poloze.
Tímto krokem předejdete možnému poškození nebo poruchám funkčnosti chladicího okruhu
spotřebiče v důsledku jeho předchozího transportu.
Vyčistěte vnitřní povrchy spotřebiče suchým jemným hadříkem.
Při likvidaci vysloužilého zařízení zaneste přístroj na příslušnou skládku oprávněnou k nakládání
s elektroodpady.
Spotřebič postavte na pevnou podlahu s dostatečnou nosností, schopnou unést tíhu plně zatížené
vinotéky. Pro vyvážení do vodorovné polohy použijte k nastavení přední nožku ve spodní části
zařízení.
Nezakrývejte ventilační otvory.
Zařízení není určeno pro umístění do garáží nebo sklepa.
Pouze pro vnitřní použití.
Zařízení je určeno pro vestavbu do kuchyňského nábytku.

226
Připojte vinotéku do jednoduché zásuvky tak, že ponecháte mezi zadní částí vinotéky a zdí prostor 30
mm. Dbejte na dokonalé vodorovné vyvážení. (Použijte vodováhu.) Tímto zabráníte pohybům vlivem
nestability, zvýšené hlučnosti a zajistíte, aby dveře vinotéky dokonale těsnily.
Zařízení je určeno výhradně pro skladování vína.
Zařízení používá chladivo s vysoce hořlavými vlastnostmi. Vyvarujte se poškození chladivového
okruhu!
Upozornění
Víno skladujte pouze v uzavřených lahvích.
Nepřetěžujte vinotéku. Dveře otvírejte pouze na nevyhnutnou dobu.
Nepřikrývejte police hliníkovou fólií ani jiným materiálem, který by mohl bránit ventilaci.
Pokud bude vinotéka delší dobu mimo provoz, odpojte ji ze sítě a pečlivě vyčistěte. Následně
ponechte dvířka otevřená. Tímto způsobem zabráníte kondenzaci a vzniku nepříjemných pachů uvnitř
skříňky.
POZOR: v blízkosti zařízení neskladujte hořlavé a výbušné látky, které by mohly způsobit požár.
Klimatické třídy
Zařízení je určeno pro provoz při teplotách okolí určených klimatickou třídou uvedenou na typovém štítku
spotřebiče.
KLIMATICKÁ TŘÍDA
SYMBOL
PROVOZNÍ TEPLOTA OKOLÍ (°C)
Subnormální
SN
Od +10 do +32
Normální
N
Od +16 do +32
Subtropická
ST
Od +16 do +38
Tropická
T
Od +16 do +43

227
Vestavné schéma
AVU8X(/IX)
AVU23SX(/IX)

228
AVU41SXDPA(/IX)
AVU52SX(/IX) AVU54SXDZA(/IX)

229
AVU53CDZA PRO51C/1
Otočení dveří
Dveře je možno otočit závěsy na obě strany. Obvykle je ve výrobě závěs umístěn na pravé straně. Pokud
potřebujete otočit dveře pro otevírání z opačné strany, řiďte se prosím následujícím doporučením.
AVU8X(/IX)

230
1
Spodní závěs (vpravo)
2
Šroubky
3
Otočná osa dveří
4
Dveře
5
Vrchní závěs (vpravo)
6
Šrouby závěsu
7
Vrchní závěs (vlevo)
8
Spodní závěs (vlevo)
1. Otevřete dveře v úhlu 90°, vyšroubujte dva šroubky (2) ze spodního závěsu (3), sejměte dveře (4)
a otočnou osu dveří (Obr. A). Dveře (4) umístěte bezpečně (Obr. a a B).
2. Odšroubujte šrouby (6) horního závěsu (5) a závěs sejměte stejně, jako spodní (vpravo) (Obr. C).
3. Namontujte druhý závěs nalevo (7) na levou horní stranu skříňky třemi šrouby (Obr. D). Stejně tak
namontujte i druhý závěs na levou spodní stranu (Obr. E).
4. Přiložte dveře k závěsům v úhlu 180° a upevněte je přišroubováním otočné osy.
AVU23SX(/IX) AVU52SX(/IX)
1
Spodní závěs (vpravo)
2
Šroubky
3
Otočná osa dveří
4
Dveře
5
Vrchní závěs (vpravo)
6
Šrouby závěsu
7
Vrchní závěs (vlevo)
8
Ozdobný hřebík
9
Spodní závěs (vlevo)
10
Omezovač dveří
11
Šroub
12
Krytka
1. Otevřete dveře v úhlu 90°, vyšroubujte dva šroubky (2) ze spodního závěsu (3), sejměte dveře (4)
a otočnou osu dveří (Obr. A).
2. Umístěte dveře (4) do bezpečné polohy a sejměte krytku (12) z horní strany rámu. Odšroubujte jeden
šroubek (11) na spodní straně a sejměte omezovač dveří (10). Upevněte omezovač dveří (10) na
opačnou stranu rámu. Krytku vložte do otvoru na horní straně rámu (Obr. A/B).
3. Odstraňte šroubky závěsu (6) z horní strany (vpravo) (5) a sejměte jej (Obr. C)
4. Odstraňte ozdobný hřebík (8) z horní levé strany skříňky a namontujte horní závěs (vlevo) (7) na horní
levou stranu skříňky pomocí tří šroubků (Obr. D).
5. Druhý závěs (9) namontujte obdobně na spodní levou stranu skříňky (Obr. E).
6. Přiložte dveře k závěsům v úhlu 180° a upevněte je přišroubováním otočné osy závěsu.

231
7. Otvor v horní pravé straně skříňky zakryjte ozdobným hřebíkem (8).
AVU53CDZA AVU54SXDZA(/IX) PRO51C/1
1
Spodní závěs (vpravo)
2
Šroubky
3
Otočná osa dveří
4
Dveře
5
Vrchní závěs (vpravo)
6
Šrouby závěsu
7
Vrchní závěs (vlevo)
8
Ozdobný hřebík
9
Spodní závěs (vlevo)
1. Otevřete dveře v úhlu 90°, vyšroubujte dva šroubky (2) ze spodního závěsu (3), sejměte dveře (4)
a otočnou osu dveří (Obr. A).
2. Umístěte dveře (4) do bezpečné polohy.
3. Vyšroubujte tři šrouby (6) z pravého horního závěsu (5) a sejměte jej (Obr. C).
4. Odstraňte ozdobný hřebík (8) z horní levé strany skříňky a namontujte horní závěs (vlevo) (7) na horní
levou stranu skříňky pomocí tří šroubků (Obr. D).
5. Druhý závěs (9) namontujte obdobně na spodní levou stranu skříňky (Obr. E).
6. Přiložte dveře k závěsům v úhlu 180° a upevněte je přišroubováním otočné osy závěsu.
7. Otvor v horní pravé straně skříňky zakryjte ozdobným hřebíkem (8).
4. PROVOZNÍ INSTRUKCE
Doporučujeme instalovat vinotéku na místě s teplotou prostředí mezi 16-32 °C. Pokud je teplota okolí
pod nebo nad doporučenou hodnotou, může být ovlivněn provoz vinotéky. Dosažení regulované teploty
uvnitř vinotéky v rozmezí 5-20 °C nebo 5-10 °C /10-20 °C (podle modelu) pak může být obtížnější.

232
Řídící panel AVU8X(/IX) / AVU23SX(/IX), AVU41SXDPA(/IX), AVU52SX(/IX), PRO51C/1
„RUN“ – indikátor zapnutí
Tlačítko „ “
Slouží k zapínání a vypínání spotřebiče.
Zmáčkněte a podržte tlačítko po dobu cca 3 sekund.
Tlačítko „ “
Slouží k zapínání a vypínání vnitřního osvětlení.
„Displej“ – zobrazení teploty
Tlačítko „ “
Nastavení teploty směrem nahoru.
Tlačítko „ “
Nastavení teploty směrem dolů.
Teplotu můžete nastavit pomocí tlačítek a . Každé zmáčknutí tlačítka zvýší/sníží
teplotu o jeden stupeň.
Teploty je možno nastavit v rozsahu 5 a 20 °C nebo 5-10 °C / 10-20 °C (podle modelu). Po navolení
teploty displej bliká po dobu asi 5 sekund a následně zobrazí skutečnou vnitřní teplotu oddílu.
Nastavenou teplotu můžeme kdykoli zobrazit zmáčknutím a podržením tlačítka volby teploty po dobu 5 s.
V případě výpadku proudu jsou veškerá teplotní nastavení vymazána a vinotéka nastaví továrně
uloženou hodnotu 12 °C.
Řídící panel pro AVU53CDZA, AVU54SXDZA(/IX)
RUN“ – indikátor zapnutí
Tlačítko „ “
Slouží k zapínání a vypínání spotřebiče.
Zmáčkněte a podržte tlačítko po dobu cca 3 sekund.
Tlačítko „ “
Slouží k zapínání a vypínání vnitřního osvětlení.
„Displej“ – elektronický displej pro horní oddíl.
„Displej“ – elektronický displej pro spodní oddíl.
Tlačítko „ “
Nastavení teploty horního oddílu.

233
Tlačítko „ “
Nastavení teploty spodního oddílu.
Zmáčkněte tlačítko „ “ pro nastavení teploty v horním oddílu. Příslušná teplota započne blikat
a každé zmáčknutí tlačítka změní teplotu o 1 °C. Jakmile dosáhneme nejnižší nastavitelnou teplotu 5 °C,
displej automaticky zobrazí nejvyšší nastavitelnou teplotu 10 °C. Po navolení teploty displej bliká po dobu
asi 5 sekund a následně zobrazí skutečnou vnitřní teplotu oddílu. Nastavenou teplotu můžeme kdykoli
zobrazit zmáčknutím a podržením tlačítka volby teploty po dobu 5 s.
Zmáčkněte tlačítko „ “ pro nastavení teploty v spodním oddílu. Příslušná teplota započne blikat
a každé zmáčknutí tlačítka změní teplotu o 1 °C. Jakmile dosáhneme nejnižší nastavitelnou teplotu 10 °C,
displej automaticky zobrazí nejvyšší nastavitelnou teplotu 20 °C. Po navolení teploty displej bliká po dobu
asi 5 sekund a následně zobrazí skutečnou vnitřní teplotu oddílu. Nastavenou teplotu můžeme kdykoli
zobrazit zmáčknutím a podržením tlačítka volby teploty po dobu 5 s.
V případě výpadku proudu jsou veškerá teplotní nastavení vymazána a vinotéka nastaví továrně
uloženou hodnotu 12 °C.
Zobrazení a funkce zařízení
Teplotní alarm:
Pokud je teplota uvnitř vinotéky vyšší, než 23°C, na displeji se zobrazí nápis „HI“ a po hodině se
rozezní signál alarmu. Ten nás informuje o vysoké teplotě uvnitř vinotéky. Zjistěte důvod. Pokud je
teplota uvnitř nižší než 0°C, displej zobrazuje nápis „LO“ a opět zazní zvuková a světelná signalizace.
Obnovení nastavené teploty:
V případě výpadku proudu si vinotéka pamatuje poslední nastavenou teplotu a po obnovení dodávky
elektřiny se obnoví původní stav teplot.
Vnitřní osvětlení
Vinotéka vypíná vnitřní osvětlení sama po deseti minutách za účelem šetření energií.
Pokud chcete ponechat osvětlení trvale zapnuté, zmáčkněte a podržte tlačítko po dobu 5 s. Displej
zobrazí nápis „LP“ a po 4 sekundách se displej vrátí do normálu. Světlo zůstane zapnuté, dokud ho opět
nevypnete.
Jestliže chcete světlo opět vypnout (doporučeno), pak zmáčkněte a podržte tlačítko po dobu 5
s a displej zobrazí „LF“. Po 4 sekundách se displej vrátí do normálu a světlo se automaticky vypne po 10
minutách.
5. VÝBAVA A FUNKCE VINOTÉKY
Udržování teploty
Podle rad odborníků je optimální teplota pro uchovávání vína 12 °C s tolerancí 10–14 °C. Tuto teplotu
není radno zaměňovat se servírovací teplotou, která kolísá v rozmezí 5–20 °C podle specifických
vlastností vína.
Je obzvlášť důležité zabránit náhlým změnám teploty Tato vinotéka, navržena specialisty na skladování
vína, na rozdíl od jednoduché chladničky, bere v úvahu citlivost vín na náhlé změny teploty a zajišťuje
dokonalou kontrolu zachování konstantní průměrné teploty.

234
Antivibrační systém
Kompresor je opatřen speciálními silentbloky a vnitřní prostor je izolován silnou vrstvou polyuretanové
pěny. Tímto způsobem je zamezeno přenosu vibrací do vína.
Udržování konstantní vlhkosti
Zařízení je vybaveno miskou (podle modelu), která umožňuje korigovat vlhkost ve vinotéce. Pokud je
vlhkost příliš nízká, naplňte misku do ¾ její objemu vodou. z času na čas kontrolujte výšku hladiny vody
a případně dolejte vodu. Ubezpečte se, že v misce je neustále správná hladina vody.
Výrobce se v tomto ohledu řídí radami znalců vína, kteří doporučují udržování určité vlhkosti ve vinotéce.
Zamezí to nadměrnému vysychání korkových zátek v lahvích a tím vzniku netěsností lahví způsobené
příliš suchým prostředím. To je důvod pro umístění nádobky s vodou na polici pod ventilátorem ve spodní
části vinotéky. Tím se zajistí vhodná minimální vlhkost uvnitř zařízení. Pokud používáte vinotéku
převážně pro zrání vína po delší časové období, dbejte na to, aby v nádobce byla neustále přítomna
hladina vody. Použití vinotéky pro servírovací účely (s rychlou obměnou lahví) zvlhčování nutně
nevyžaduje (ačkoli je také doporučeno).
Ochrana proti UV záření
Světlo urychluje zrání vína. v našich vinotékách s plnými dveřmi je víno přirozeně chráněno, pokud dveře
nejsou otevírány příliš často. Tento typ se skleněnými dveřmi disponuje speciálně upraveným sklem,
které nepropouští škodlivé ultrafialové záření a tím zajišťuje dokonalou ochranu vína.
Automatické odmrazování
Vinotéka je vybavena automatickým odmrazováním. Když končí chladící cyklus, namrzlé plochy zařízení
se automaticky odmrazí. Kondenzát se odvádí do odpařovací nádoby, která je umístěna na zadní straně
vinotéky poblíž kompresoru. Teplo, vyzařované kompresorem odpařuje kondenzát nasbíraný v nádobce.
Zimní režim (podle modelu)
Zimní režim je ochrana proti mrazu, která umožňuje vinotéce pracovat v prostředí s teplotou v rozmezí 0
až 32°C. Speciální čidlo ve vinotéce uvádí do provozu nízko výkonové topné těleso, jakmile vnitřní teplota
vinotéky klesne 3 °C pod nastavenou hodnotu. Jedná se o topné těleso s tak nízkým výkonem, že
nedochází k teplotním šokům vína a tím narušení jeho uchovávání. Tato funkce zajistí udržení vnitřní
teploty již předtím, než dojde k výměně teploty mezi lahvemi a vnitřním prostředím vinotéky.
Tato funkce je určena k udržování teploty uvnitř vinotéky na hodnotě, která zamezí přestupu tepla mezi
vnitřním prostředím a vínem v lahvích. Zimní režim udržuje naprogramovanou teplotu uvnitř vinotéky i
navzdory poklesu zevních teplot. Přídavný ohřev se vypíná vždy, když vnitřní teplota vinotéky dosáhne
požadované naprogramované teploty.
Police
Aby nedošlo k poškození těsnění dvířek, ujistěte se, že jsou dveře před každým vytažením police pro
ukládání/vyjímání láhví zcela otevřené. Pro snadnější přístup k uloženým láhvím vysuňte police na
přibližně jednu třetinu jejich hloubky. Police jsou vybaveny zvláštním stop systémem, který zabraňuje
vypadnutí láhví z polic. Pro vyjmutí nebo zasunutí nakloňte polici podle obrázku a pak tahejte nebo tlačte
dle potřeby.

235
Pro AVU41SXDPA(/IX)
Umístění polic uvnitř vinotéky.
a) Kartonová krabice s náhradními díly
b) Malá police
c) Velká police
1. Po odstranění obalu vyjměte z vinotéky krabici s náhradními díly (a).
2. V levém oddílu najdete 4 ks malých polic (b). Vyjměte dvě nejspodnější z nich.
3. V pravém oddílu jsou umístěny 4 ks velkých polic (c). Vyjměte dvě police umístěné nahoře.
4. Vyměňte velké a malé police (Obr. 2). Umístěte dvě malé police na horní pozici a dvě velké police na
spodní pozice v obou oddílech.
5. Po vložení polic můžete vinotéku používat způsobem, popsaným v návodu.
Přesuvné ližiny
S vinotékou se dodávají dvě přesuvné ližiny, které umožňují snadnější přesun vinotéky za podmínky
úplně vyšroubovaných nožek do maximální výšky. Ližiny se musí umístit souběžně pod nožky vinotéky
rovnoběžně ve směru posunu, v souladu s umístěním, pro přední a pro zadní stranu vinotéky (viz
obrázek).

236
Zvýšená bezpečnost
Jelikož je toto zařízení určeno pro uchovávání značných hodnot, vybírali jsme pečlivě kvalitní
komponenty a vhodné výrobní postupy, abychom zajistili optimální bezpečnost provozu vinotéky.
Instalace madla
Vinotéka má nerezové madlo. Pro upevnění na dveře použijte dodané šrouby. Před montáží napřed
uvolněte těsnění dveří a postupujte podle obrázku.
6. NALOŽENÍ VINOTÉKY
Indikace maximální kapacity naložení plní u našich vinoték především bezpečnostní a orientační účely
(např. při výběru vhodného typu spotřebiče o kapacitě přiměřené Vašim potřebám a cílům).
Tato indikace je uváděna na základě standardních 75 cl lahví typu Bordeaux včetně standardně
dodávaných polic.
Ačkoli by tedy bylo – hypoteticky – možné naplnit vinotéku, např. bez užití polic, při naplnění lahvemi
výhradně stejného tvaru a průměru apod., výrazně větším počtem lahví, ve skutečnosti bude praktické
hledisko každodenní organizace a provozu vinotéky velmi pravděpodobně vyžadovat použití několika
polic. z čistě praktických důvodů racionálního provozu proto nejspíš vinotéku naložíte menším počtem
lahví, než je její maximální indikovaná kapacita.
Typy lahví:
Schéma vpravo znázorňuje 4 nejobvyklejší typy 75 cl vinných lahví (láhve typu Bordeaux a Burgund
různých rozměrů). Níže uvedená demonstrace křížných způsobů uložení lahví se opírá o nejběžnější
lahve typu Bordeaux.

237
Například, jestliže je vinotéka naložena pouze lahvemi typu Burgund, celková kapacita vinotéky bude asi
o 30 % nižší, než která je vypočtena pro láhve Bordeaux.
Střídavé ukládání lahví
Hrdlo ke dnu, hrdly k sobě:
Všimněte si rozdílu v hloubce uložení.
Uložení hrdly mezi láhve:
Úspora hloubky, menší kapacita.
Příklady servírovacích teplot
Přestože se v této oblasti občas vyskytnou výrazné názorové rozdíly (a s vědomím nezbytně specifických
podmínek každé dílčí degustace), lze v následující tabulce ideálních servírovacích teplot shrnout
většinově akceptovanou shodu. Naprostá shoda všech, kteří to s vínem myslí vážně, nadto panuje
v názoru, že pouze servírováním při vhodné teplotě lze z konzumace vína učinit plnohodnotný zážitek pro
všechny smysly.
DRUH VÍNA
SERVÍROVACÍ
TEPLOTA (˚C)
Prestižní červená vína typu
„Bordeaux“
16-17
Prestižní červená burgundská vína
15-16
Prestižní suchá bílá vína
14-16
Světlá mladá vína ovocného
původu
11-12
Provensálská růžová vína
10-12
Suchá bílá vína a krajová červená
vína
10-12
Krajová bílá vína
8-10
Šampaňská vína
7-8
Dezertní vína
6
7. PÉČE O VINOTÉKU A ÚDRŽBA
Před každým úkonem údržby a čištění spotřebič vždy odpojte od zdroje elektrické energie (vytažením
zástrčky napájecího kabelu ze síťové zásuvky, popř. vypnutím příslušného jističe v elektrickém okruhu).
Před jeho uvedením do provozu (a poté v pravidelných intervalech, alespoň jednou za 3 měsíce)
doporučujeme vyčistit všechny vnitřní i vnější povrchy spotřebiče (čelo, rám a madlo dveří, vnější plášť
bočních stěn i horní části spotřebiče) teplou vodou s šetrným čisticím prostředkem. Očištěné povrchy
poté omyjte čistou vodou a před připojením do sítě nechte řádně vyschnout. K čištění spotřebiče
nepoužívejte rozpouštědla nebo abrazivní prostředky. K vyčištění plastových částí drátěných polic lze užít

238
slabého roztoku vody a jemného čisticího prostředku (např. saponátu na mytí nádobí). Dřevěné police
nevyžadují zvláštní údržbu.
Při prvním uvedení do provozu mohou některé části spotřebiče vydávat nepříjemný zápach. v takovém
případě nastavte termostaty spotřebiče na minimální hodnotu vnitřní teploty, a nechte spotřebič po dobu
několika hodin pracovat bez naložení lahví. Studený vzduch nežádoucí pachy odstraní.
Výpadek proudu
Běžný výpadek proudu v délce 1 nebo 2 hodin nemůže zásadně ovlivnit vnitřní teplotu vinotéky. Pro
ochranu uložených vín při výpadku proudu však zbytečně neotvírejte dveře spotřebiče, resp. otevírejte je
jen v nejnutnějších případech. Při dlouhodobém výpadku proudu je zapotřebí podstoupit nezbytné kroky k
ochraně uložených vín.
S opětovným zapnutím spotřebiče po jeho odpojení nebo po přerušení dodávky elektrické energie
doporučujeme vyčkat po dobu alespoň 3 až 5 minut. Zprovozníte-li spotřebič po jeho předchozím
odpojení ještě před uplynutím této doby, nedojde k nové aktivaci kompresoru (vyžaduje-li to vnitřní
teplota) dříve, než po uplynutí zmíněné doby (3 – 5 minut).
Při prvním zprovoznění spotřebiče (nebo po jeho delším odstavení) se mohou hodnoty
nastavené/požadované a reálné vnitřní teploty uvnitř spotřebiče lišit. Jde o obvyklý jev! K dosažení
požadované hodnoty vnitřní teploty a její stabilizaci dojde po několika hodinách provozu.
Provoz vinotéky během dovolené
Krátká dovolená: ponechte vinotéku v provozu během dovolené trvající méně než tři týdny.
Dlouhá dovolená: Pokud zařízení nebude používání po dobu několika měsíců, vyprázdněte jej
a odpojte ze sítě. Vnitřek a vnějšek vinotéky důkladně omyjte. Dveře vinotéky pak ponechte otevřené,
tak, aby se samovolně nezavřely. Tím zabráníte vzniku zápachů a plísní.
Stěhování vinotéky
Spotřebič před přemísťováním odpojte z elektrické sítě.
Vyjměte všechny uložené lahve a zabezpečte pohyblivé části uvnitř vinotéky tak, aby nedošlo k jejich
poškození během přepravy.
Nastavitelné nožky chraňte před poškozením během přepravy jejich úplným zašroubováním k tělu
spotřebiče.
Dveře zalepte páskou proti samovolnému otevření.
Vinotéku přemisťujte a manipulujte ve vertikální poloze. Vnější stranu zařízení chraňte při přepravě
vhodným materiálem (deka, bublinová fólie apod.).
Úspory energie
Vinotéka by měla být umístěna v nejchladnější místnosti bytu (ovšem nikoli chladnější, než +16 °C),
přičemž v její blízkosti by neměla být umístěna zařízení produkující teplo. Současně je vhodné
zabránit přímý přístup slunečního světla.
Přístroj má být důkladně větrán. Nikdy nezakrývejte ventilační průduchy!
Dveře vinotéky otvírejte pouze na nezbytně nutnou dobu.
8. V PŘÍPADĚ ZÁVADY
Přes veškerou péči věnovanou vývoji a výrobě, i přísnému systému kontroly jakosti, nemůžeme zcela
vyloučit možnost vzniku poruchy nebo závady. Než se však obrátíte na prodejce, dodavatele nebo jejich

239
autorizovaný servis, ověřte prosím, zda problém/závadu nedokážete odstranit sami. Nejprve prověřte,
zda:
Je vinotéka řádně připojena k elektrické síti?
Nedošlo k výpadku proudu?
Poté zkuste některá z řešení, která navrhujeme v tabulce níže
DŮLEŽITÉ UPOZORNĚNÍ: Vadný nebo poškozený napájecí kabel musí být vyměněn výrobcem,
dodavatelem nebo jeho autorizovaným servisním centrem, příp. dostatečně kvalifikovaným
technikem. v opačném případě se vystavujete vážnému nebezpečí ohrožení zdraví.
POKUD TYTO KROKY NEODHALÍ ZÁVADU, KONTAKTUJTE AUTORIZOVANÝ SERVIS.
POZOR!
Při provádění jakékoli údržby a oprav musí být zařízení
odpojeno z elektrické sítě!

240
9. ZÁVADY
Mnoho problémů je možno řešit snadno, aniž byste potřebovali volat servis. Dříve, než pozvete
servisního technika, zkuste následující doporučení.
ZÁVADA
MOŽNÁ PŘÍČINA
Vinotéka nefunguje
Není zapojena do sítě
Vinotéka je vypnuta
Vypínač okruhu přerušen anebo spálená
pojistka
Vinotéka dostatečně nechladí
Zkontrolujte a upravte nastavení termostatu.
Teplota okolního prostředí je příliš vysoká.
Dveře spotřebiče byly příliš často otevřeny.
Dveře spotřebiče nejsou řádně dovřeny.
Dveře spotřebiče dostatečně netěsní.
Časté zapínání a vypínání
Teplota v pokoji je vyšší než normální
Bylo přidáno větší množství lahví do vinotéky
najednou
Dveře se otevírají příliš často
Dveře nejsou správně zavřeny
Termostat není správně nastaven
Těsnění dveří neplní řádně svou funkci
Světlo ve vinotéce nesvítí
Vinotéka není zapojena do sítě
Vypínač okruhu přerušen anebo spálená
pojistka
Žárovka je vypálená, kontaktujte váš servis
Vypínač světla je vypnut
Nadměrné vibrace
Zkontrolujte vodorovné postavení vinotéky
Nadměrný provozní hluk
Určitá hladina provozního hluku je
běžným/obvyklým jevem doprovázejícím
spuštění/chod kompresoru.
Charakteristický zvuk slabé intenzity
(připomínající „tekoucí vodu“) je běžným
průvodním jevem oběhu chladicího média
v systému.
Charakteristický zvuk slabé intenzity
(připomínající „klepání“) je běžným průvodním
jevem provozu spotřebiče (resp. změn teplot
v jejichž důsledku dochází k
roztahování/smršťování vnitřních stěn
spotřebiče).
Při vyšší hladině hluku zkontrolujte řádné
usazení kompresoru na gumových tlumičích
(„silent-blocích“), resp. ověřte, zda není
kompresor v bezprostředním kontaktu
s přilehlým nábytkem, stěnou nebo jinou částí
spotřebiče.
Ověřte řádné vyrovnání spotřebiče.
Dveře řádně nedovírají
Spotřebič není řádně vyrovnán
Dveře byly otočeny a nejsou správně usazeny
Těsnění je znečištěno
Police jsou uloženy nesprávně

241
Výměna žárovky
Zařízení je opatřeno světlo emitujícími diodami (LED). Tyto diody nemohou být vyměněny zákazníkem.
Jejich životnost je dostačující a srovnatelná se životností celého zařízení. Pokud se přece jenom dioda
během provozu poškodí, požádejte o její výměnu váš servis.
10. ŽIVOTNÍ PROSTŘEDÍ
Toto zařízení bylo vyrobeno v souladu s nařízením EU č. 19/2012/CE které se týká nakládání
s odpady vznikajících z elektrických a elektronických zařízení (WEEE). Správnou likvidací
zařízení zabráníte potenciálně negativním dopadům na životní prostředí a lidské zdraví, které
by hrozily z nesprávné likvidace.
Tento symbol na výrobku nebo jeho balení udává, že tento výrobek nepatří do domácího odpadu. Je
nutné odvézt ho do sběrného místa pro recyklaci elektrického a elektronického zařízení. Zajištěním
správné likvidace tohoto výrobku pomůžete zabránit negativním důsledkům pro životní prostředí a lidské
zdraví, které by jinak byly způsobeny nevhodnou likvidaci tohoto výrobku.
Za správnou likvidaci vysloužilého zařízení je zodpovědný jeho uživatel. Třídění a zběr pro recyklaci
použitých zařízení a správné nakládání a likvidace způsobem, který je příznivý k životnímu prostředí,
pomáhá zabránit potenciálně negativním dopadům na prostředí a lidské zdraví a napomáhá k
opětovnému využití materiálů, z nichž je produkt vyroben.
Pro více informací o nakládání a recyklaci tohoto výrobku kontaktujte váš místní úřad, organizaci,
pověřenou nakládáním s odpady, nebo vašeho prodejce, u kterého jste produkt zakoupili.
11. ZÁVĚREČNÉ POZNÁMKY
V zájmu průběžného zlepšování našich spotřebičů si vyhrazujeme právo na změnu technických
parametrů bez předchozího upozornění.
Nositeli záruk výrobků značky AVINTAGE jsou vybraní prodejci. Žádná část tohoto návodu nemůže být
považována za záruční list.
FRIO ENTREPRISE není odpovědna za chyby nebo technická, či tisková opomenutí v tomto dokumentu.
Tento dokument není právně závazný.

242
INFORMAČNÍ LIST VÝROBKU DLE NAŘÍZENÍ EU Č. 1060/2010
-
Servírovací vinotéka
ZNAČKA
AVINTAGE
OBCHODNÍ OZNAČENÍ
AVU8X(/IX)
NAPÁJENÍ
220-240 v / 50 Hz
ROZMĚRY (Š X H X V)
145 x 547,5 x 820 mm
HMOTNOST NETTO
20 kg
KATEGORIE DOMÁCÍCH CHLADÍCÍCH ZAŘÍZENÍ
2
ENERGETICKÁ TŘÍDA
A
ROČNÍ SPOTŘEBA ENERGIE (AEC)
Spotřeba energie 135 kWh za rok
vypočítaná na základě výsledků
získaných během 24 hodin za
normalizovaných testovacích podmínek.
Skutečná spotřeba energie závisí na
podmínkách použití a umístění
spotřebiče.
UŽITNÝ OBJEM (L)
23 L
ROZSAHY NASTAVITELNÝCH TEPLOT
5 – 20 °C
ROZMRAZOVÁNÍ
Automatické
KLIMATICKÁ TŘÍDA
N
Tento spotřebič je koncipován pro provoz
při okolních teplotách v rozmezí 16 °C
(spodní) a 32 °C (horní hranice).
HLUČNOST DB (A) RE 1PW
44 dB(A)
TYP INSTALACE
Vestavná instalace pod pracovní desku
Toto zařízení je určeno výhradně pro skladování vína.

243
INFORMAČNÍ LIST VÝROBKU DLE NAŘÍZENÍ EU Č. 1060/2010
-
Servírovací vinotéka
ZNAČKA
AVINTAGE
OBCHODNÍ OZNAČENÍ
AVU23SX(/IX)
NAPÁJENÍ
220-240 v / 50 Hz
ROZMĚRY (Š X H X V)
295 x 571 x 820 mm
HMOTNOST NETTO
28 kg
KATEGORIE DOMÁCÍCH CHLADÍCÍCH ZAŘÍZENÍ
2
ENERGETICKÁ TŘÍDA
A
ROČNÍ SPOTŘEBA ENERGIE (AEC)
Spotřeba energie 140 kWh za rok
vypočítaná na základě výsledků
získaných během 24 hodin za
normalizovaných testovacích podmínek.
Skutečná spotřeba energie závisí na
podmínkách použití a umístění
spotřebiče.
UŽITNÝ OBJEM (L)
56 L
ROZSAHY NASTAVITELNÝCH TEPLOT
5 – 20 °C
ROZMRAZOVÁNÍ
Automatické
KLIMATICKÁ TŘÍDA
N
Tento spotřebič je koncipován pro provoz
při okolních teplotách v rozmezí 16 °C
(spodní) a 32 °C (horní hranice).
HLUČNOST DB (A) RE 1PW
43 dB(A)
TYP INSTALACE
Volně stojící a vestavná instalace pod
pracovní desku
Toto zařízení je určeno výhradně pro skladování vína.

244
INFORMAČNÍ LIST VÝROBKU DLE NAŘÍZENÍ EU Č. 1060/2010
-
Servírovací vinotéka
ZNAČKA
AVINTAGE
OBCHODNÍ OZNAČENÍ
AVU41SXDPA(/IX)
NAPÁJENÍ
220-240 v / 50 Hz
ROZMĚRY (Š X H X V)
595 x 571 x 820 mm
HMOTNOST NETTO
48 kg
KATEGORIE DOMÁCÍCH CHLADÍCÍCH ZAŘÍZENÍ
2
ENERGETICKÁ TŘÍDA
A
ROČNÍ SPOTŘEBA ENERGIE (AEC)
Spotřeba energie 144 kWh za rok
vypočítaná na základě výsledků
získaných během 24 hodin za
normalizovaných testovacích podmínek.
Skutečná spotřeba energie závisí na
podmínkách použití a umístění
spotřebiče.
UŽITNÝ OBJEM (L)
59,5 L x 2
ROZSAHY NASTAVITELNÝCH TEPLOT
5 – 20 °C
ROZMRAZOVÁNÍ
Automatické
KLIMATICKÁ TŘÍDA
N
Tento spotřebič je koncipován pro provoz
při okolních teplotách v rozmezí 16 °C
(spodní) a 32 °C (horní hranice).
HLUČNOST DB (A) RE 1PW
43 dB(A)
TYP INSTALACE
Volně stojící a vestavná instalace pod
pracovní desku
Toto zařízení je určeno výhradně pro skladování vína.

245
INFORMAČNÍ LIST VÝROBKU DLE NAŘÍZENÍ EU Č. 1060/2010
-
Servírovací vinotéka
ZNAČKA
AVINTAGE
OBCHODNÍ OZNAČENÍ
AVU52SX(/IX)
NAPÁJENÍ
220-240 v / 50 Hz
ROZMĚRY (Š X H X V)
595 x 571 x 820 mm
HMOTNOST NETTO
44 kg
KATEGORIE DOMÁCÍCH CHLADÍCÍCH ZAŘÍZENÍ
2
ENERGETICKÁ TŘÍDA
A
ROČNÍ SPOTŘEBA ENERGIE (AEC)
Spotřeba energie 145 kWh za rok
vypočítaná na základě výsledků
získaných během 24 hodin za
normalizovaných testovacích podmínek.
Skutečná spotřeba energie závisí na
podmínkách použití a umístění
spotřebiče.
UŽITNÝ OBJEM (L)
146 L
ROZSAHY NASTAVITELNÝCH TEPLOT
5 – 20 °C
ROZMRAZOVÁNÍ
Automatické
KLIMATICKÁ TŘÍDA
N
Tento spotřebič je koncipován pro provoz
při okolních teplotách v rozmezí 16 °C
(spodní) a 32 °C (horní hranice).
HLUČNOST DB (A) RE 1PW
44 dB(A)
TYP INSTALACE
Volně stojící a vestavná instalace pod
pracovní desku
Toto zařízení je určeno výhradně pro skladování vína.

246
INFORMAČNÍ LIST VÝROBKU DLE NAŘÍZENÍ EU Č. 1060/2010
-
Servírovací vinotéka
ZNAČKA
AVINTAGE
OBCHODNÍ OZNAČENÍ
AVU53CDZA
NAPÁJENÍ
220-240 v / 50 Hz
ROZMĚRY (Š X H X V)
595 x 571 x 820 mm
HMOTNOST NETTO
50 kg
KATEGORIE DOMÁCÍCH CHLADÍCÍCH ZAŘÍZENÍ
2
ENERGETICKÁ TŘÍDA
A
ROČNÍ SPOTŘEBA ENERGIE (AEC)
Spotřeba energie 145 kWh za rok
vypočítaná na základě výsledků
získaných během 24 hodin za
normalizovaných testovacích podmínek.
Skutečná spotřeba energie závisí na
podmínkách použití a umístění
spotřebiče.
UŽITNÝ OBJEM (L)
134 L
ROZSAHY NASTAVITELNÝCH TEPLOT
5 – 10 °C / 10 – 20 °C
ROZMRAZOVÁNÍ
Automatické
KLIMATICKÁ TŘÍDA
N
Tento spotřebič je koncipován pro provoz
při okolních teplotách v rozmezí 16 °C
(spodní) a 32 °C (horní hranice).
HLUČNOST DB (A) RE 1PW
45 dB(A)
TYP INSTALACE
Volně stojící a vestavná instalace pod
pracovní desku
Toto zařízení je určeno výhradně pro skladování vína.

247
INFORMAČNÍ LIST VÝROBKU DLE NAŘÍZENÍ EU Č. 1060/2010
-
Servírovací vinotéka
ZNAČKA
AVINTAGE
OBCHODNÍ OZNAČENÍ
AVU54SXDZA(/IX)
NAPÁJENÍ
220-240 v / 50 Hz
ROZMĚRY (Š X H X V)
595 x 571 x 820 mm
HMOTNOST NETTO
50 kg
KATEGORIE DOMÁCÍCH CHLADÍCÍCH ZAŘÍZENÍ
2
ENERGETICKÁ TŘÍDA
A
ROČNÍ SPOTŘEBA ENERGIE (AEC)
Spotřeba energie 145 kWh za rok
vypočítaná na základě výsledků
získaných během 24 hodin za
normalizovaných testovacích podmínek.
Skutečná spotřeba energie závisí na
podmínkách použití a umístění
spotřebiče.
UŽITNÝ OBJEM (L)
134 L
ROZSAHY NASTAVITELNÝCH TEPLOT
5 – 10 °C / 10 – 20 °C
ROZMRAZOVÁNÍ
Automatické
KLIMATICKÁ TŘÍDA
N
Tento spotřebič je koncipován pro provoz
při okolních teplotách v rozmezí 16 °C
(spodní) a 32 °C (horní hranice).
HLUČNOST DB (A) RE 1PW
45 dB(A)
TYP INSTALACE
Volně stojící a vestavná instalace pod
pracovní desku
Toto zařízení je určeno výhradně pro skladování vína.

248
INFORMAČNÍ LIST VÝROBKU DLE NAŘÍZENÍ EU Č. 1060/2010
-
Servírovací vinotéka
ZNAČKA
AVINTAGE
OBCHODNÍ OZNAČENÍ
PRO51C/1
NAPÁJENÍ
220-240 v / 50 Hz
ROZMĚRY (Š X H X V)
595 x 571 x 820 mm
HMOTNOST NETTO
48 kg
KATEGORIE DOMÁCÍCH CHLADÍCÍCH ZAŘÍZENÍ
2
ENERGETICKÁ TŘÍDA
A
ROČNÍ SPOTŘEBA ENERGIE (AEC)
Spotřeba energie 145 kWh za rok
vypočítaná na základě výsledků
získaných během 24 hodin za
normalizovaných testovacích podmínek.
Skutečná spotřeba energie závisí na
podmínkách použití a umístění
spotřebiče.
UŽITNÝ OBJEM (L)
146 L
ROZSAHY NASTAVITELNÝCH TEPLOT
5 – 20 °C
ROZMRAZOVÁNÍ
Automatické
KLIMATICKÁ TŘÍDA
N
Tento spotřebič je koncipován pro provoz
při okolních teplotách v rozmezí 16 °C
(spodní) a 32 °C (horní hranice).
HLUČNOST DB (A) RE 1PW
45 dB(A)
TYP INSTALACE
Volně stojící a vestavná instalace pod
pracovní desku
Toto zařízení je určeno výhradně pro skladování vína.

249
Pred použitím prístroja čítajte a riaďte sa prosím bezpečnostnými pokynmi a prevádzkovými
inštrukciami, ktoré sú uvedené v tomto návode.
Najskôr by sme vám chceli poďakovať za dôveru prejavenú skupine AVINTAGE zakúpením tohoto
produktu, ktorý, ako dúfame, dokonale naplní všetky Vaše očakávania.
Toto zariadenie Vám umožní ohriať Vaše fľaše vína až a izbovú teplotu alebo ich temperovať na
servírovaciu teplotu (podľa typu vína) vďaka širokému rozsahu možného nastavenia vinotéky.
1. VŠEOBECNÉ BEZPEČNOSTNÉ POKYNY
Pred prvým použitím vašej vinotéky si prosím dôkladne prečítajte
tento návod. Uschovajte ho dôkladne pre prípadné neskoršie
použitie. Aby ste zabránili riziku požiaru, úrazu elektrickým
prúdom, alebo zranenia, riaďte sa bezpečnostnými
odporúčaniami, ktoré sú uvedené v tomto návode.
Zariadenie môže obsluhovať len osoba dôkladne oboznámená
s funkciou a obsluhou.
Pre vašu bezpečnosť a správnu obsluhu si pred inštaláciou
prístroja dôkladne preštudujte tento návod vrátane rád
a upozornení. Obsluha musí byť dôkladne oboznámená
s funkciami a bezpečnostnými vlastnosťami prístroja, aby sa
zabránilo nečakaným poruchám, chybám a nehodám počas
prevádzky zariadenia. Tento návod dôkladne uschovajte a zaistite
jeho odovzdanie spolu s prístrojom v prípade jeho postúpenia alebo
predaja. Takto zaistíte optimálnu funkciu zariadenia po celú dobu jeho
životnosti.
Dodržujte ustanovenia tohoto návodu týkajúce sa prevádzky
a bezpečnosti jeho obsluhy. Výrobca spotrebiča a jeho dodávateľ
nie sú zodpovední za škody, spôsobené inštaláciou alebo
obsluhou spotrebiča v rozpore s inštrukciami obsiahnutými
v tomto návode na obsluhu a inštaláciu.
Zariadenie je určené pre domáce použitie a pre uchovávanie

250
zvláštnych nápojov pri teplotách vyšších, než sú obvyklé teploty
pre uchovávanie čerstvých potravín. Za žiadnych okolností nie je
určené pre uchovávanie čerstvých potravín.
Skontrolujte vašu elektrickú inštaláciu, či napätie v sieti
zodpovedá tomu, ktoré je uvedené na štítku prístroja. Zariadenie
musí byť pripojené k schválenému a uzemnenému rozvodu.
Nesprávne opravy alebo pripojenie sú bezpečnostným rizikom.
v prípade pochybností nechajte svoj elektrický rozvod
skontrolovať profesionálnou inštalatérskou firmou.
Zariadenie musí byť správne pripojené k uzemnené zásuvke.
Neprerušujte ani neodstraňujte uzemňujúci vodič na dodanom
pripojovacom kábli.
Napájací kábel spotrebiča sa nesmie predlžovať/ nadstavovať.
k pripojeniu spotrebiča k elektrickej sieti nepoužívajte predlžovací
kábel, adaptéry ani rozvodky.
V prípade poškodenia zariadenia (väčšieho rozsahu) výpadkom
prúdu a živlami môže byť používanie prístroja nebezpečné.
Odpojte hlavný prívod zo siete a nechajte zariadenie skontrolovať
oprávnenou osobou.
Nikdy nevymieňajte prívodný kábel svojpomocne. Prenechajte
túto prácu profesionálne spôsobilej osobe.
Zásuvka, ktorá slúži pre napájanie spotrebiča musí ostať po jeho
inštalácii ľahko prístupná. Plnú vinotéku nikdy nepresúvajte ani
nesťahujte. Mohlo by to spôsobiť jej nevratné poškodenie.
Elektrické súčiastky nesmú byť priamo prístupné.
Zabráňte deťom v prístupu k zariadeniu

251
Nepoužívajte vinotéku vo vonkajších priestoroch
V prípade náhodného poliatia vinotéky (rozbitá fľaša, apod.,)
alebo jej elektrických súčiastok, okamžite odpojte hlavný prívod
elektriny.
Nikdy nenamáčajte prívodný kábel, zástrčku, alebo celú vinotéku
do vody alebo inej tekutiny. Nedotýkajte sa zapnutého zariadenia
vlhkými rukami.
Spotrebič postavte tak, aby nebol exponovaný priamym slnečným
svetlom.
Nenechávajte hlavní prívodný kábel visieť zo stola alebo
v kontakte s ostrou hranou, či horúcim predmetom.
Pri odpájaní spotrebiča zo siete nikdy neťahajte za samotný
kábel, ale vždy ho pevne uchopte za zástrčku a odpojte jej
vytiahnutím zo sieťovej zásuvky.
Spotrebič má značnú hmotnosť. Berte ohľad na túto skutočnosť
pri jeho manipulácii. Zaistite postavenie vinotéky na dostatočne
pevnú podlahu (jedna 75 cl fľaša váži približne 1,3 kg). Vinotéka
musí stáť na vodorovnej podlahe. Ak staviate zariadenie na
mäkký povrch alebo koberec, podložte ho pevnou podložkou.
Pri vyťahovaní políc dbajte na to, aby boli dvere úplne otvorené.
Zabránite tým poškodeniu tesnenia dverí.
Bezpečnosť detí a znevýhodnených osôb
Osoby mladšie ako 8 rokov, osoby s obmedzenými fyzickými,
psychickými alebo zmyslovými schopnosťami alebo osoby
nedostatočne oboznámené s princípmi obsluhy a fungovania

252
tohoto spotrebiča ho smú používať len pod dohľadom alebo
predchádzajúcej jasnej a zrozumiteľnej inštruktáži osobou
s dostatočnou znalosťou, zodpovednou za ich bezpečnosť.
Údržbu a čistenie spotrebiča nie je možné zveriť deťom bez
dozoru.
Obalové materiály spotrebiča po jeho vybalení odstráňte
z dosahu detí. v opačnom prípade hrozí riziko zadusenia.
Spotrebič pri ukončení jeho životnosti odpojte od zdroja
napätia, odstrihnite/odrežte zástrčku napájacieho kábla (čo
najbližšie korpusu spotrebiča) a odstráňte dvierka tak, aby sa
deti nemohli so spotrebičom hrať a prípadne ostať zatvorené vo
vnútri.
Ak vymieňate starý spotrebič s magnetickým
zatváraním/tesnením za nový, vybavený bezpečnostným
zámkom alebo závorou na dverách alebo na tesnení,
presvedčte sa najprv o deaktivácii bezpečnostného systému
nového spotrebiča tak, aby v ňom počas likvidácie starého
spotrebiča nemohli uviaznuť deti.
Dajte pozor, aby sa v blízkosti spotrebiča pri jeho prevádzke
nehrali bez dozoru deti mladšie než 8 rokov. Zvlášť dbajte na
to, aby nepoužívali spotrebič ako hračku.
Všeobecné bezpečnostné upozornenia
POZOR – toto zariadenie je určené pre domáce použitie, alebo
v zariadeniach, ako:
V služobných priestoroch, obchodoch, úradoch a iných
pracovných priestoroch,
Na farmách a v hoteloch, moteloch a iných ubytovacích
zariadeniach,
V ubytovniach,
V reštauratérstve a veľkoobchodných aplikáciách.

253
POZOR — Zariadenie musí byť vhodne upevnené v súlade
s týmto návodom, aby sa zabránilo následným škodám pri jeho
používaní.
POZOR! Vo vnútri spotrebiča nikdy neskladujte horľavé látky,
napríklad spreje s horľavými hnacími plynmi.
POZOR! Poškodený napájací kábel spotrebiča musí byť,
z bezpečnostných dôvodov okamžite opravený, alebo nahradený
výhradne povereným zamestnancom výrobcu alebo
kvalifikovaným zamestnancom autorizovaného popredajného
servisu dodávateľa.
POZOR! Všetky ventilačné otvory spotrebiča musia ostať po jeho
inštalácii voľné. Zaistite, aby bol okolo spotrebiča dostatok
voľného priestoru pre riadnu cirkuláciu vzduchu, obzvlášť v okolí
vzduchových vstupov a výstupov.
POZOR! Za všetkých okolností predchádzajte poškodeniu
rozvodov chladiaceho okruhu.
POZOR! Vo vnútornom priestore spotrebiča nepoužívajte
elektrické prístroje a zariadenie s výnimkou prípadov vyslovene
povolených výrobcom zariadenia.
POZOR! Chladiaci a izolačný systém spotrebiča obsahuje
horľavé plyny. Pri ukončení jeho životnosti je preto treba dodržať
prísne pravidlá bezpečnosti a k likvidácii spotrebiča využiť služby
špecializovaných centier pre likvidáciu vyslúžilých elektrických
a elektronických zariadení. Spotrebič, a to ani po ukončení jeho
životnosti, nevystavujte ohňu.

254
Chladivo
Spotrebič využíva ako svoje chladiace médium izobután (R600a)
– k životnému prostrediu šetrný, napriek tomu ľahko zápalný,
a preto veľmi nebezpečný plyn. Pri transportoch spotrebiča a jeho
inštalácii dôsledne dbajte na to, aby nedošlo k poškodeniu
žiadnej časti rozvodu chladiaceho systému.
Pozor! Nebezpečie požiaru
Pri poškodení rozvodov chladiaceho okruhu spotrebiča:
odstráňte z jeho bezprostrednej blízkosti zápalné zdroje
a otvorený plameň.
riadne vetrajte miestnosť v ktorej je spotrebič inštalovaný.
Nepokúšajte sa o zmeny alebo zásahy do technických
parametrov spotrebiča – neodborné zásahy do zariadenia
predstavujú výrazné riziko ohrozenia zdravia používateľov!
Každé poškodenie napájacieho kábla zariadenia môže mať za
následok skrat a požiar.
Elektrická bezpečnosť
Výrobca i dodávateľ sa zriekajú zodpovednosti za nehody
a problémy spôsobené nesprávnou alebo neodbornou
inštaláciou spotrebiča alebo jeho inštaláciou v rozpore
s pokynmi, ktoré sú obsiahnuté v tomto návode na obsluhu
a inštaláciu.
Napájací kábel spotrebiča sa nesmie predlžovať/nadstavovať.
k pripojeniu spotrebiča do elektrickej siete nepoužívajte
predlžovačky, adaptéry, ani rozvodky.
Pred pripojením spotrebiča k sieti skontrolujte, či je sieťová
zásuvka bezchybná. Pripojenie k poškodenej alebo uvoľnenej
zásuvke môže byť príčinou prehriatia spotrebiča a jeho
vznietenia alebo explózie.

255
Zásuvka, ktorá slúži k napájaniu spotrebiča, musí ostať po jeho
inštalácii ľahko prístupná.
Pri odpájaní spotrebiča zo siete nikdy neťahajte za samotný
kábel, ale vždy ho pevne uchopte za zástrčku a odpojte jej
vytiahnutím zo sieťovej zásuvky.
Nikdy neodstraňujte bezpečnostný – uzemňujúci vodič!
Spotrebič nikdy nezapájajte/neprevádzkujte bez riadne
nainštalovaného krytu vnútorného osvetlenia.
Pred výmenou žiarovky vnútorného osvetlenia spotrebič vždy
najprv odpojte od zdroja elektrického napätia.
Tento spotrebič je koncipovaný pre napájanie jednofázovým
prúdom 220~240 V/50 Hz predpisovo inštalovanou
a uzemnenou zásuvkou.
Poškodený napájací kábel spotrebiča sami neopravujte!
Okamžite kontaktujte autorizovaný popredajný servis.
Napájacia zásuvka by mala byť umiestnená mimo dosah detí
v dostatočnej blízkosti od spotrebiča tak, aby bolo možné
v akejkoľvek chvíli jeho ľahké odpojenie od zdroja napätia.
v prípade pochybností kontaktujte kvalifikovaného
elektrotechnika.
Odporučenie pre každodennú prevádzku
Zariadenie je určené výlučne pre skladovanie vína.
Vo vnútri spotrebiča nikdy neskladujte horľavé alebo vznetlivé
látky, zvláštne tekutiny. Hrozí riziko ich vznietenia alebo
výbuchu.
Vo vnútri spotrebiča neprevádzkujte iné elektrické zariadenie
(výrobníky ľadu, mixéry apod.).
Pri odpojovaní spotrebiča zo siete nikdy neťahajte za samotný
kábel, ale vždy ho pevne uchopte za zástrčku a odpojte jej

256
vytiahnutím zo sieťovej zásuvky.
Spotrebič postavte tak, aby nebol vystavený priamym slnečným
lúčom.
Z bezprostrednej blízkosti spotrebiča pre prevenciu rizika jeho
vznietenia a požiaru odstráňte všetky zápalné zdroje (sviečky,
svietidlá, aj zdroje s otvoreným plameňom).
Rešpektujte odporúčania výrobcu pre skladovanie vína vo
vinotéke.
V blízkosti zariadenia nemanipulujte s otvoreným ohňom
a nevhadzujte ho do ohňa.
Zariadenie je určené na skladovanie nápojov v normálnej
domácnosti, tak, ako je vysvetlené v tomto návode.
Zariadenie má značnú hmotnosť, dbajte na opatrnosť pri jeho
sťahovaní.
Ak je spotrebič vybavený zadnými transportnými kolieskami,
pamätajte na to, že sú určené len k uľahčeniu malých presunov.
Nepoužívajte ich k presúvaniu spotrebiča na väčšie
vzdialenosti.
Na spotrebič, ani žiadnu z jeho častí/príslušenstva si nesadajte
ani ich nepoužívajte ako podstavec.
Pre ochranu uložených fliaš a pre bezpečnosť spotrebiča
nepreťažujte police nad uvedenú hodnotu maximálneho
povoleného zaťaženia.
Údržba a čistenie
Pred každým úkonom údržby a čistenia spotrebič odpojte od
zdroja elektrickej energie.
Na čistenie spotrebiča nikdy nepoužívajte: kovové nástroje,
parné a vysokotlakové čističe, prchavé kvapaliny, organické
rozpúšťadlá a látky s abrazívnymi zložkami.

257
Dvierka spotrebiča otvárajte len v najnutnejších prípadoch.
Neurýchľujte rozmrazovanie zoškrabovaním námrazy zo stien
spotrebiča ostrými alebo špicatými nástrojmi. Používajte
špeciálnu plastovú škrabku.
Dôležité informácie pre inštaláciu zariadenia
Neumiestňujte zariadenie vo vlhkých priestoroch.
Zariadenie nesmie byť umiestnené v blízkosti radiátorov,
sporákov, alebo ďalších zdrojov tepla. Priame slnečné svetlo
môže poškodiť akrylový náter a zdroje tepla môžu zvyšovať
spotrebu elektriny. Mimoriadne vysoké alebo nízke teploty
okolia môžu tiež spôsobiť nesprávnu funkciu prístroja.
Vinotéku zapojte do vyhradenej, riadne inštalovanej
a uzemnenej zásuvky. Nikdy neodpájajte uzemnenie
z prívodného kábla. Otázky, týkajúce sa uzemnenia smerujte
na kvalifikovanú elektroinštalatérsku firmu, alebo autorizované
servisné stredisko.
Pre zaistenie správneho elektrického pripojenia sa riaďte týmto
návodom.
Rozbaľte zariadenie a skontrolujte, či nie je poškodené.
Poškodený prístroj nepripájajte do siete. Informujte svojho
predajcu o prípadnom poškodení. Pre tento prípad si
ponechajte prepravný obal.
Odporúčame nechať zariadenie na mieste prevádzky bez
pripojenia do siete po dobu 4 hodín, čím dôjde k správnemu
rozloženiu chladiva v chladiacom okruhu.
Aby ste zabránili prehrievaniu, je nevyhnutné zaistiť riadnu
cirkuláciu vzduchu okolo prístroja. Riaďte sa odporúčaním
poskytnutým v tomto návode.
Pre elimináciu rizika požiaru dbajte, aby zariadenie, alebo jeho
horúce časti (kompresor, kondenzátor) neboli v priamom

258
kontakte so stenou. Rešpektujte odporúčania tohto návodu.
Zariadenie nesmie byť umiestnená v blízkosti radiátorov,
sporákov, alebo ďalších zdrojov tepla.
Zaistite prístupnosť elektrickej zásuvky, do ktorej je prístroj
pripojený, aj po inštalácii zariadenia.
Odporúčania pre šetrnú prevádzku
Pre úsporu elektrické energie:
Spotrebič postavte na vhodné miesto (pozri kapitola „
3. INŠTALÁCIA ZARIADENIA“).
Dvierka spotrebiča otvárajte len v najnutnejších prípadoch.
Dbajte na optimálne podmienky prevádzky spotrebiča včasnú
a pravidelnú údržbu napr. kondenzátora (viac pozri kapitola „
7. STAROSTLIVOSŤ O VINOTÉKU“).
Pravidelne kontrolujte funkčnosť tesnení a presvedčte sa, že
dvierka riadne a dostatočne doliehajú. v opačnom prípade
okamžite kontaktujte autorizovaný popredajný servis.
Opravy
Každý zásah do elektrických komponentov zariadenia sa musí
uskutočniť výlučne povereným kvalifikovaným špecialistom.
Pri servisných zásahoch vyžadujte použitie originálnych
náhradných dielov s certifikátom zaručujúcim ich pôvod.
Tento spotrebič je určený výlučne pre domáce použitie, kde slúži
k skladovaniu a uchovávaniu vína. Jeho výrobca a dodávateľ sa
zriekajú všetkej zodpovednosti za škody spôsobené iným než
zhora uvedeným spôsobom použitia spotrebiča alebo jeho
používania v rozpore s účelom, ku ktorému bol skonštruovaný.

259
R600a
Bezpečnostné upozornenie
POZOR! Ventilačné otvory zariadenia vždy nechajte voľne priechodné
a nikdy ich nezakrývajte ani neupchávajte.
POZOR! Vo vnútri zariadenia neskladujte horľavé látky, ako nádoby
so sprejmi s horľavým hnacím plynom apod.
POZOR! Vyvarujte sa poškodenia chladiaceho okruhu!
POZOR! Chladiaca jednotka obsahuje Izobután (R600a) a nesmie byť
umiestnená v prostredí s otvoreným ohňom (napr. nekryté elektrické
kontakty) alebo na miestach, kde hrozí nahromadenie chladiva po
jeho úniku. Typ chladiva je vyznačený na výrobnom štítku zariadenia.
POZOR! Nepoužívajte elektrické prístroje vo vnútri priestoru pre
nápoje, pokiaľ nejde o priamo odporúčané výrobcom zariadenie.
Spotrebič spĺňa požiadavky vyplývajúce zo všetkých relevantných európskych smerníc v znení
príslušných platných úprav, obzvlášť požiadavky vyplývajúce z týchto smerníc:
2011/65/EU (ROHS)
2014/35/EU o elektrickej bezpečnosti
2014/30/EU o elektromagnetickej kompatibilite
643/2009/CE týkajúce sa energetických štítkov

260
2. TECHNICKÉ ÚDAJE
Nižšie je vyobrazený príklad typového štítku:
Typový štítok je upevnený vo vnútri, alebo na zadnej strane zariadenia (podľa modelu) a obsahuje všetky
informácie o danom výrobku.
Odporúčame, aby ste si tu poznamenali sériové číslo vinotéky pred jej inštaláciou pre prípadnú neskoršiu
potrebu (technické referencie, požiadavka asistencie, apod.)
Prístup k typovému štítku po inštalácii prístroja môže byť obtiažny.
POZOR: bez týchto informácií nie je možné poskytnúť akúkoľvek súčinnosť.
3. INŠTALÁCIA ZARIADENIA
Pred použitím zariadenia
Spotrebič vybaľte (odstráňte ochranné a obalové materiály aj z interiéru spotrebiča) a vizuálne
skontrolujte jeho bezchybný stav. Ak spotrebič javí známky poškodenia, prerušte inštaláciu
a kontaktujte predajcu, u ktorého ste ho zakúpili. Pre tento prípad si uschovajte obalový materiál,
v ktorom bol spotrebič dodaný.
Pred pripojením vinotéky k sieti ju nechajte ustáliť po dobu aspoň 24 hodín vo vertikálnej polohe.
Týmto krokom predídete možnému poškodeniu alebo poruchám funkčnosti chladiaceho okruhu
spotrebiča v dôsledku jeho predošlého transportu.
Vyčistite vnútorné povrchy spotrebiča suchou jemnou handrou.
Pri likvidácii vyslúžilého spotrebiča tento zaneste na príslušnú skládku oprávnenú zaobchádzať s
elektro odpadmi.
Spotrebič postavte na pevnú podlahu s dostatočnou nosnosťou schopnou uniesť hmotnosť plne
zaťaženej vinotéky. Pre vyváženie do vodorovnej polohy použite k nastaveniu prednú nôžku v spodnej
časti zariadenia.
Nezakrývajte ventilačné otvory.
Zariadenie nie je určené pre umiestnenie do garáže alebo pivnice.

261
Len pre vnútorné použitie.
Zariadenie je určené pre zabudovanie do kuchynského nábytku.
Pripojte vinotéku do jednoduchej zásuvky tak, že ponecháte medzi zadnou časťou vinotéky a stenou
priestor 30 mm. Dbajte na dokonalé vodorovné vyváženie. (Použite vodováhu.) Týmto zabránite
pohybom vplyvom nestability, zvýšenej hlučnosti a zaistíte, aby dvere vinotéky dokonale tesnili.
Zariadenie je určené výlučne pre skladovanie vína.
Zariadenie používa chladivo s vysoko horľavými vlastnosťami. Chráňte chladiaci okruh pred
poškodením!
Upozornenie
Víno skladujte len v uzavretých fľašiach.
Nepreťažujte vinotéku.
Dvere otvárajte len na nevyhnutnú dobu.
Neprikrývajte police hliníkovou fóliou ani iným materiálom, ktorý by mohol brániť ventilácii.
Pokiaľ bude vinotéka dlhšiu dobu mimo prevádzku, odpojte ju od siete a dôkladne vyčistite. Následne
nechajte otvorené dvierka. Týmto spôsobom zabránite kondenzácii a vzniku nepríjemných pachov vo
vnútri skrinky.
POZOR: v blízkosti zariadenia neskladujte horľavé a výbušné látky, ktoré by mohli spôsobiť
požiar.
Klimatické triedy
Zariadenie je určené pre prevádzku pri teplotách okolia určených klimatickou triedou uvedenou na
typovom štítku spotrebiča.
KLIMATICKÁ TRIEDA
SYMBOL
PREVÁDZKOVÁ TEPLOTA OKOLIA (°C)
Subnormálna
SN
Od +10 do +32
Normálna
N
Od +16 do +32
Subtropická
ST
Od +16 do +38
Tropická
T
Od +16 do +43

262
Schéma pre zabudovanie
AVU8X(/IX)
AVU23SX(/IX)

263
AVU41SXDPA(/IX)
AVU52SX(/IX) AVU54SXDZA(/IX)

264
AVU53CDZA PRO51C/1
Otočenie dverí
Dvere sa dajú otočiť závesmi smerom na obe strany. Obvykle je vo výrobe záves umiestnený na pravej
strane. Ak potrebujete otočiť dvere pre otváranie z opačnej strany, postupujte prosím podľa
nasledujúceho odporúčania.
AVU8X(/IX)

265
1
Spodný záves (vpravo)
2
Skrutky
3
Otočná os dverí
4
Dvere
5
Horný záves (vpravo)
6
Skrutky závesu
7
Horný záves (vľavo)
8
Spodný záves (vľavo)
1. Otvorte dvere v uhle 90°, vyskrutkujte dve skrutky (2) zo spodného závesu (3), odstráňte dvere (4)
a otočnú os dverí (obr. A). Dvere (4) umiestnite bezpečne (obr. A a b).
2. Odskrutkujte skrutky (6) horného závesu (5) a záves odstráňte rovnako, ako spodný (vpravo) (obr.
C).
3. Namontujte druhý záves naľavo (7) na ľavú hornú stranu skrinky tromi skrutkami (obr. D). Rovnako
namontujte aj druhý záves na ľavú spodnú stranu (obr. E).
4. Priložte dvere k závesom v uhle 180° a upevnite ich priskrutkovaním otočnej osi.
AVU23SX(/IX) AVU52SX(/IX)
1
Spodný záves (vpravo)
2
Skrutky
3
Otočná os dverí
4
Dvere
5
Horný záves (vpravo)
6
Skrutky závesu
7
Horný záves (vľavo)
8
Ozdobný klinec
9
Spodný záves (vľavo)
10
Obmedzovač dverí
11
Skrutka
12
Krytka

266
1. Otvorte dvere v uhle 90°, vyskrutkujte dve skrutky (2) zo spodného závesu (3), odstráňte dvere (4)
a otočnú os dverí (obr. A).
2. Umiestnite dvere (4) do bezpečnej polohy a odstráňte krytku (12) z hornej strany rámu. Odskrutkujte
jednu skrutku (11) na spodnej strane a odoberte obmedzovač dverí (10). Upevnite obmedzovač dverí
(10) na opačnú stranu rámu. Krytku vložte do otvoru na hornej strane rámu (obr. A/b).
3. Odstráňte skrutky závesu (6) z hornej strany (vpravo) (5) a záves odoberte (obr. C)
4. Odstráňte ozdobný klinec (8) z hornej ľavej strany skrinky a namontujte horný záves (vľavo) (7) na
vrchnú ľavú stranu skrinky pomocou troch skrutiek (obr. D).
5. Druhý záves (9) namontujte podobne na spodnú ľavú stranu skrinky (obr. E).
6. Priložte dvere k závesom v uhle 180° a upevnite ich priskrutkovaním otočnej osi závesu.
7. Otvor v hornej pravej strane skrinky zakryte ozdobným klincom (8).
AVU53CDZA AVU54SXDZA(/IX) PRO51C/1
1
Spodný záves (vpravo)
2
Skrutky
3
Otočná os dverí
4
Dvere
5
Horný záves (vpravo)
6
Skrutky závesu
7
Horný záves (vľavo)
8
Ozdobný klinec
9
Spodný záves (vľavo)

267
1. tvorte dvere v uhle 90°, vyskrutkujte dve skrutky (2) zo spodného závesu (3), odoberte dvere (4)
a otočnú os dverí (obr. A).
2. Umiestnite dvere (4) do bezpečnej polohy.
3. Vyskrutkujte tri skrutky (6) z pravého horného závesu (5) a odstráňte ho (obr. C).
4. Odstráňte ozdobný klinec (8) z hornej ľavej strany skrinky a namontujte horný záves (vľavo) (7) na
hornú ľavú stranu skrinky pomocou troch skrutiek (obr. D).
5. Druhý záves (9) namontujte podobne na spodnú ľavú stranu skrinky (obr. E).
6. Priložte dvere k závesom v uhle 180° a upevnite ich priskrutkovaním otočnej osi závesu.
7. Otvor v hornej pravej strane skrinky zakryte ozdobným klincom (8).
4. PREVÁDZKOVÉ POKYNY
Odporúčame inštalovať vinotéku na mieste s teplotou prostredia medzi 16-32 °C. Pokiaľ je teplota okolia
pod alebo nad odporúčanou hodnotou, môže byť ovplyvnená prevádzka vinotéky. Dosiahnutie
regulovanej teploty vo vnútri vinotéky v rozmedzí 5-20 °C alebo 5-10 °C /10-20 °C (podľa modelu) môže
byť v tomto prípade obťažnejšie.
Riadiaci panel AVU8X(/IX) / AVU23SX(/IX), AVU41SXDPA(/IX), AVU52SX(/IX), PRO51C/1
„RUN“ – indikátor zapnutia
Tlačidlo „ “
Slúži pre zapínanie a vypínanie spotrebiča.
Stlačte a podržte tlačidlo počas cca 3 sekúnd.
Tlačidlo „ “
Slúži pre zapínanie a vypínanie vnútorného osvetlenia.
„Displej“ – zobrazenie teploty
Tlačidlo „ “
Nastavenie teploty smerom nahor.
Tlačidlo „ “
Nastavenie teploty smerom dole.
Teplotu môžete nastaviť pomocou tlačidiel a . Každé stlačenie tlačidla zvýši/zníži teplotu o
jeden stupeň.
Teploty sa dajú nastaviť v rozsahu 5 a 20 °C alebo 5-10 °C / 10-20 °C (podľa modelu). Po nastavení
teploty displej bliká počas asi 5 sekúnd a potom zobrazí skutočnú vnútornú teplotu oddielu. Nastavenú
teplotu môžeme kedykoľvek zobraziť stlačením a podržaním tlačidla voľby teploty po dobu 5 s.
V prípade výpadku prúdu sa všetky teplotné nastavenia vymažú a vinotéka nastaví továrensky uloženú
hodnotu 12 °C.

268
Ovládací panel pre AVU53CDZA, AVU54SXDZA(/IX)
RUN“ – indikátor zapnutia
Tlačidlo „ “
Slúži pre zapínanie a vypínanie spotrebiča.
Stlačte a podržte tlačidlo počas cca 3 sekúnd.
Tlačidlo „ “
Slúži pre zapínanie a vypínanie vnútorného osvetlenia.
„Displej“ – elektronický displej pre horný oddiel.
„Displej“ – elektronický displej pre spodný oddiel.
Tlačidlo „ “
Nastavenie teploty horného oddielu.
Tlačidlo „ “
Nastavenie teploty spodného oddielu.
Stlačte tlačidlo „ “ pre nastavenie teploty v hornom oddiele. Príslušná teplota započne blikať a každé
stlačenie tlačidla zmení teplotu o 1 °C. Ak dosiahneme najnižšiu nastaviteľnú teplotu 5 °C, displej
automaticky zobrazí najvyššiu nastaviteľnú teplotu 10 °C. Po výbere teploty displej bliká počas asi 5
sekúnd a potom zobrazí skutočnú vnútornú teplotu oddielu. Nastavenú teplotu môžeme kedykoľvek
zobraziť stlačením a podržaním tlačidla nastavenia teploty po dobu 5 s.
Stlačte tlačidlo „ “ pre nastavenie teploty v spodnom oddiele. Príslušná teplota započne blikať
a každé stlačenie tlačidla zmení teplotu o 1 °C. Ak dosiahneme najnižšiu nastaviteľnú teplotu 10 °C,
displej automaticky zobrazí najvyššiu nastaviteľnú teplotu 20 °C. Po výbere teploty displej bliká počas asi
5 sekúnd a potom zobrazí skutočnú vnútornú teplotu oddielu. Nastavenú teplotu môžeme kedykoľvek
zobraziť stlačením a podržaním tlačidla voľby teploty po dobu 5 s.
V prípade výpadku prúdu sa všetky nastavenia teplôt automaticky vymažú a vinotéka nastaví továrensky
uloženú hodnotu 12 °C.
Zobrazenie a funkcie zariadenia
Teplotný alarm:
Pokiaľ je teplota vnútri vinotéky vyššia, ako 23°C, na displeji sa zobrazí nápis „HI“ a po hodine zaznie
signál alarmu. Ten nás informuje o vysokej teplote vo vnútri vinotéky. Zistite dôvod. Pokiaľ je teplota
vo vnútri nižšia ako 0°C, displej zobrazuje nápis „LO“ a opäť zaznie zvuková a svetelná signalizácia.
Obnovenie nastavenej teploty;
V prípade výpadku prúdu si vinotéka pamätá poslednú nastavenú teplotu a po obnovení dodávky
elektriny sa obnoví pôvodný stav teplôt.
Vnútorné osvetlenie
Vinotéka vypína vnútorné osvetlenie sama od seba po desiatich minútach za účelom šetrenia energie.

269
Ak chcete ponechať osvetlenie trvale zapnuté, stlačte a podržte tlačidlo po dobu 5 s. Displej zobrazí
nápis „LP“ a po 4 sekundách sa displej vráti do normálu. Svetlo ostane zapnuté, dokiaľ ho opäť
nevypnete.
Ak chcete svetlo opäť vypnúť (odporúčame), potom stlačte a pridržte tlačidlo počas 5 s a displej
zobrazí „LF“. Po 4 sekundách sa displej vráti do normálu a svetlo sa automaticky vypne po 10 minútach.
5. VÝBAVA A FUNKCIE VINOTÉKY
Udržiavanie teploty
Podľa rád odborníkov je optimálna teplota pre uchovávanie vína 12°C s toleranciou 10 – 14 °C. Túto
teplotu nie je radno zamieňať so servírovacou teplotou, ktorá kolíše v rozmedzí 5 – 20 °C podľa
špecifických vlastností vína.
Je mimoriadne dôležité zabrániť náhlym zmenám teploty Táto vinotéka, navrhnutá špecialistami na
skladovanie vína, na rozdiel od jednoduchej chladničky, berie do úvahy citlivosť vín na náhle zmeny
teploty a zaisťuje dokonalú kontrolu zachovania konštantnej priemernej teploty.
Antivibračný systém
Kompresor je vybavený špeciálnymi silentblokmi a vnútorný priestor je izolovaný hrubou vrstvou
polyuretánovej peny. Týmto spôsobom sa znemožní prenos vibrácií do vína.
Udržiavanie konštantnej vlhkosti
Zariadenie je vybavené miskou (podľa modelu), ktorá umožňuje korigovať vlhkosť vo vinotéke. Ak je
vlhkosť príliš nízka, naplňte misku do ¾ jej objemu vodou. Z času na čas kontrolujte výšku hladiny vody
a prípadne dolejte vodu. Ubezpečte sa, že v miske je neustále správna hladina vody.
Výrobca sa v tomto ohľade riadi radami znalcov vína, ktorí odporúčajú udržiavať určitú vlhkosť vo
vinotéke. Zamedzí to nadmernému vysychaniu korkových zátok vo fľašiach a tým vzniku netesností fliaš
spôsobených príliš suchým prostredím. To je dôvod pre umiestnenie nádobky s vodou na policu pod
ventilátorom v spodnej časti vinotéky. Takto sa zaistí vhodná minimálna vlhkosť vo vnútri zariadenia. Ak
používate vinotéku prevažne pre zretie vína počas dlhšieho časového obdobia, dbajte na to, aby
v nádobke bola neustále prítomná hladina vody. Použitie vinotéky pre servírovacie účely (s rýchlou
obmenou fliaš) zvlhčovanie nutne nevyžaduje (aj keď sa tiež odporúča).
Ochrana proti UV žiareniu
Svetlo urýchľuje dozrievanie vína. V našich vinotékach s plnými dvermi je víno prirodzene chránené,
pokiaľ sa dvere neotvárajú príliš často. Tento typ so sklenenými dverami disponuje špeciálne upraveným
sklom, ktoré neprepúšťa škodlivé ultrafialové žiarenie a tým zaistí dokonalú ochranu vína.
Automatické odmrazovanie
Vinotéka je vybavená automatickým odmrazovaním. Keď končí chladiaci cyklus, namrznuté plochy
zariadenia sa automaticky odmrazia. Kondenzát sa odvádza do odparovacej nádoby, ktorá je umiestnená
na zadnej strane vinotéky neďaleko kompresora. Teplo, vyžarované kompresorom odparuje kondenzát
nazbieraný v nádobke.
Zimný režim (podľa modelu)
Zimný režim je ochrana proti mrazu, ktorá umožňuje vinotéke pracovať v prostredí s teplotou v rozmedzí
0 až 32°C. Čidlo umiestnené vo vinotéke uvádza do prevádzky nízko výkonové vykurovacie teleso,
akonáhle vnútorná teplota vinotéky klesne nižšie ako 3°C pod nastavenú hodnotu. Jedná sa o

270
vykurovacie teleso s tak nízkym výkonom, že nedochádza k teplotným šokom vína a tým narušeniu jeho
uchovávania.
Táto funkcia zaistí udržanie vnútornej teploty už predtým, než dôjde k výmene teploty medzi fľašami a
vnútorným prostredím vinotéky. Zimný režim udržiava teplotu vo vinotéke rovnakú, aká je
naprogramovaná teplota. Po dosiahnutí naprogramovanej teploty vo vinotéke sa zimný režim automaticky
vypne.
Police
Aby nedošlo k poškodeniu tesnenia dvierok, presvedčte sa, že sú dvere pred každým vytiahnutím
police pre ukladanie/vyberanie fliaš úplne otvorené.
Pre ľahší prístup k uloženým fľašiam vysuňte police na približne jednu tretinu ich hĺbky. Police sú
vybavené špeciálnym stop systémom, ktorý bráni vypadnutiu fliaš z políc.
Pre vybratie alebo zasunutie nakloňte policu podľa obrázku a potom ťahajte alebo tlačte, podľa
potreby.
Pre AVU41SXDPA(/IX)
Umiestnenie políc vo vinotéke:
a) Kartónová krabica s náhradnými dielmi
b) Malá polica
c) Veľká polica
1. Po odstránení obalu vyberte z vinotéky krabicu s náhradnými dielmi (a).
2. V ľavom oddiele nájdete 4 ks malých políc (b). Vyberte dve najspodnejšie z nich.
3. V pravom oddiele sú umiestnené 4 ks veľkých políc (c). Vyberte dve police umiestnené navrchu.
4. Vymeňte veľké a malé police (Obr. 2). Umiestnite dve malé police na horné pozície a dve veľké police

271
na spodné pozície v oboch oddieloch.
5. Po vložení políc môžete vinotéku používať spôsobom, popísaným v návode.
Sťahovacie lišty
S vinotékou sa dodávajú dve sťahovacie lišty, ktoré umožňujú ľahší presun vinotéky za podmienky úplne
vyskrutkovaných nôžok do maximálnej výšky. Lišty sa musia umiestniť rovnobežne pod nôžky vinotéky v
smere posunu, v súlade s umiestnením pre prednú a pre zadnú stranu vinotéky (pozri obrázok).
Zvýšená bezpečnosť
Keďže je toto zariadenie určené pre uchovávanie veľkej hodnoty, vyberali sme dôkladne kvalitné
komponenty a vhodné výrobné postupy, aby sme zaistili optimálnu bezpečnosť prevádzky vinotéky.
Inštalácia rukoväti
Vinotéka má nerezovú rukoväť. Pre upevnenie na dvere použite dodané skrutky. Pred montážou napred
uvoľnite tesnenie dverí a postupujte podľa obrázku.
6. NALOŽENIE VINOTÉKY
Indikácia maximálnej kapacity naloženia plní u našich vinoték predovšetkým bezpečnostné a orientačné
účely (napr. pri výbere vhodného typu spotrebiča o kapacite primeranej Vašim potrebám).
Tento údaj sa uvádza na základe štandardných 75 cl fliaš typu Bordeaux vrátane štandardne dodávaných
políc.

272
Aj keď by teda bolo – hypoteticky – možné naplniť vinotéku, napr. bez použitia políc, pri naplnení fľašami
výhradne rovnakého tvaru a priemeru, apod., omnoho väčším počtom fliaš, v skutočnosti bude praktické
hľadisko každodennej organizácie a prevádzky vinotéky veľmi pravdepodobne vyžadovať použitie
niekoľkých políc. Z výhradne praktických dôvodov racionálnej prevádzky preto najpravdepodobnejšie
vinotéku naložíte menším počtom fliaš, než je jej maximálna indikovaná kapacita.
Typy fliaš:
Schéma vpravo znázorňuje 4 najobvyklejšie typy 75 cl vínnych fliaš (fľaše typu Bordeaux a Burgund
rôznych rozmerov). Nižšie uvedená demonštrácia protiľahlého spôsobu uloženia fliaš počíta
s najbežnejšími fľašami typu Bordeaux.
Napríklad, ak je vinotéka naložená len fľašami typu Burgund, celková kapacita vinotéky bude asi o 30%
nižšia, než aká je vypočítaná pre fľaše Bordeaux.
Striedavé ukladanie fliaš
Hrdlo k dnu, hrdlami k sebe:
Všimnite si rozdiel v hĺbke uloženia.
Uloženie hrdlami medzi fľaše:
Úspora hĺbky, menšia kapacita.
Príklady servírovacích teplôt
Napriek tomu, že sa občas vyskytnú výrazné názorové rozdiely (a s vedomím nevyhnutne špecifických
podmienok každej jednotlivej degustácie), je možné v nasledujúcej tabuľke ideálnych servírovacích teplôt
zhrnúť väčšinovo akceptovanú zhodu. Úplná zhoda všetkých, kto to s vínom myslia vážne, panuje
v názore, že len servírovaním pri vhodnej teplote sa dá z konzumácie vína urobiť plnohodnotný zážitok
pre všetky zmysly.
DRUH VÍNA
SERVÍROVACIA
TEPLOTA (˚C)
Prestížne červené vína typu
„Bordeaux“
16-17
Prestížne červené burgundské
15-16

273
vína
Prestížne suché biele vína
14-16
Svetlé mladé vína ovocného
pôvodu
11-12
Provensálske ružové vína
10-12
Suché biele vína a krajové
červené vína
10-12
Krajové biele vína
8-10
Šampanské vína
7-8
Dezertné vína
6
7. STAROSTLIVOSŤ O VINOTÉKU
Pred každým úkonom údržby a čistenia spotrebič vždy odpojte od zdroje elektrickej energie (vytiahnutím
zástrčky napájacieho kábla zo sieťovej zásuvky, prípadne vypnutím príslušného ističa v elektrickom
okruhu).
Pred jeho uvedením do prevádzky (a potom v pravidelných intervaloch, aspoň raz za 3 mesiace)
odporúčame vyčistiť všetky vnútorné a vonkajšie povrchy spotrebiča (čelo, rám a rukoväť dverí, vonkajší
plášť bočných stien a horné časti spotrebiča) teplou vodou s šetrným čistiacim prostriedkom. Očistené
povrchy potom umyte čistou vodou a pred pripojením do siete nechajte riadne vyschnúť. Na čistenie
spotrebiča nepoužívajte rozpúšťadlá alebo abrazívne prostriedky.
K vyčisteniu plastových častí drôtených políc môžete použiť slabý roztok vody a jemného čistiaceho
prostriedku (napr. saponátu na umývanie riadu). Drevené police nevyžadujú zvláštnu údržbu. Pri prvom
uvedení do prevádzky môžu niektoré časti spotrebiča vydávať nepríjemný zápach. v takom prípade
nastavte termostaty spotrebiča na minimálnu hodnotu vnútornej teploty, a nechajte spotrebič po dobu
niekoľkých hodín pracovať bez naloženia fľašami. Studený vzduch nežiadúce pachy odstráni.
Výpadok prúdu
Bežný výpadok prúdu v dĺžke 1 alebo 2 hodín nemôže zásadne ovplyvniť vnútornú teplotu vinotéky. Pre
ochranu uložených vín pri výpadku prúdu však zbytočne neotvárajte dvere spotrebiča, resp. otvárajte je
jen v najnutnejších prípadoch. Pri dlhodobom výpadku prúdu je treba urobiť nevyhnutné kroky na ochranu
uložených vín.
S opätovným zapnutím spotrebiča po jeho odpojení alebo po prerušení dodávky elektrické energie
odporúčame počkať aspoň 3 až 5 minút. Ak spotrebič uvediete opätovne do prevádzky po predošlom
odpojení, ešte pred uplynutím tejto doby, nedôjde k novej aktivácii kompresora (ak to vyžaduje
vnútorná teplota vo vinotéke) skôr, ako po uplynutí zmienenej doby (3 – 5 minút).
Pri prvom uvedení spotrebiča do prevádzky (alebo po jeho dlhšej odstávke) sa môžu hodnoty
nastavené/požadované a reálne teploty vo vnútri spotrebiča líšiť. Ide o obvyklý jav! K dosiahnutiu
požadovanej hodnoty vnútornej teploty a jej stabilizácii dôjde po niekoľkých hodinách prevádzky.
Prevádzka vinotéky počas dovolenky
Krátka dovolenka: nechajte vinotéku v prevádzke počas dovolenky trvajúcej menej ako tri týždne.
Dlhá dovolenka: Pokiaľ sa zariadenie nebude používať počas niekoľkých mesiacov, vyprázdnite ho
a odpojte zo siete. Vnútro a vonkajšok vinotéky dôkladne umyte. Dvere vinotéky potom nechajte
otvorené, tak, aby sa samovoľne nezavreli. Tým zabránite vzniku zápachov a plesní.

274
Sťahovanie vinotéky
Spotrebič pred sťahovaním odpojte z elektrické siete.
Vyberte všetky uložené fľaše a zabezpečte pohyblivé časti vo vnútri vinotéky tak, aby nedošlo k ich
poškodeniu počas prepravy.
Nastaviteľné nôžky chráňte pred poškodením počas prepravy ich úplným zaskrutkovaním do tela
spotrebiča.
Dvere zalepte páskou proti samovoľnému otvoreniu.
Vinotéku premiestňujte a manipulujte vo zvislej polohe. Vonkajšiu stranu zariadenia chráňte pri
prepravy vhodným materiálom. (deka, bublinová fólia apod.).
Úspory energie
Vinotéka by mala byť umiestnená v najchladnejšej miestnosti bytu, ale nie chladnejšej, ako +16 °C),
pričom v jej blízkosti by nemalo byť umiestnené zariadenie produkujúce teplo. Súčasne je vhodné
zabrániť priamemu prístupu slnečného svetla.
Prístroj má byť dôkladne vetraný. Nikdy nezakrývajte ventilačné otvory!
Dvere vinotéky otvárajte len na nevyhnutnú dobu.
8. ČO ROBIŤ V PRÍPADE PORUCHY
Napriek všetkej starostlivosti, venovanej vývoju a výrobe a prísnemu systému kontroly kvality, nemôžeme
celkom vylúčiť možnosť vzniku poruchy. Než sa však obrátite na predajcu, dodávateľa alebo ich
autorizovaný servis, overte prosím, či problém/poruchu nedokážete odstrániť sami. Najprv sa presvedčte,
či:
Je vinotéka riadne pripojená k elektrickej sieti?
Nedošlo k výpadku prúdu?
Potom skúste niektoré z riešení, ktoré navrhujeme v tabuľke nižšie:
DÔLEŽITÉ UPOZORNENIE: Závadný alebo poškodený napájací kábel musí byť vymenený
výrobcom, dodávateľom alebo jeho autorizovaným servisným strediskom, prípadne dostatočne
kvalifikovaným technikom. v opačnom prípade sa vystavujete vážnemu nebezpečenstvu
ohrozenia zdravia.
POKIAĽ TIETO KROKY NEODHALIA PORUCHU, KONTAKTUJTE AUTORIZOVANÝ SERVIS.
POZOR!
Pri vykonávaní akejkoľvek údržby a opráv musí byť
zariadenie odpojené od elektrickej siete!

275
9. PORUCHY
Mnoho problémov môžete riešiť ľahko, bez toho, aby ste potrebovali volať servis. Skôr, než pozvete
servisného technika, skúste nasledujúce odporúčania:
PORUCHA
MOŽNÁ PRÍČINA
Vinotéka nefunguje
Nie je zapojená do siete
Vinotéka je vypnutá
Vypínač okruhu prerušený alebo spálená poistka
Vinotéka dostatočne nechladí
Skontrolujte a upravte nastavenie termostatu.
Teplota okolitého prostredia je príliš vysoká.
Dvere spotrebiča boli príliš často otvorené.
Dvere spotrebiča nie sú poriadne zatvorené.
Dvere spotrebiča dostatočne netesnia.
Časté zapínanie a vypínanie
Teplota v izbe je vyššia než normálna
Do vinotéky bolo pridané väčšie množstvo obsahu naraz
Dvere sa otvárajú príliš často
Dvere nie sú správne zatvorené
Termostat nie je správne nastavený
Tesnenie dverí neplní riadne svoju funkciu
Svetlo vo vinotéke nesvieti
Vinotéka nie je zapnutá do siete
Vypínač okruhu je prerušený alebo je spálená poistka
Žiarovka je vypálená, kontaktujte váš servis
Vypínač svetla je vypnutý
Nadmerné vibrácie
Skontrolujte vodorovné postavenie vinotéky
Nadmerný prevádzkový hluk
Určitá hladina prevádzkového hluku je bežným/obvyklým
sprievodným javom pri spustení/chode kompresoru.
Charakteristický zvuk slabej intenzity (pripomínajúci „tečúcu
vodu“) je bežným sprievodným javom obehu chladiaceho
média v systému.
Charakteristický zvuk slabé intenzity (pripomínajúci
„klepanie“) je bežným sprievodným javom prevádzky
spotrebiča (resp. zmien teplôt v ktorých dôsledku dochádza
k rozťahovaniu/zmršťovaniu vnútorných stien spotrebiča).
Pri vyššej hladine hluku skontrolujte riadne usadenie
kompresora na gumových tlmičoch („silent-blokoch“), resp.
overte, či nie je kompresor v bezprostrednom kontakte
s priľahlým nábytkom, stenou alebo inou časťou spotrebiča.
Overte riadne vyrovnanie spotrebiča.
Dvere sa riadne nezatvárajú
Spotrebič nie je riadne vyrovnaný
Dvere boli otočené a nie sú správne nasadené
Tesnenie je znečistené
Police sú uložené nesprávne
Dvere sa neotvárajú/ Systém push-
pull nefunguje
Skontrolujte správnu inštaláciu vinotéky (pozri kapitola „
3. Inštalácia zariadenia“
Nesprávna inštalácia zariadenia bráni správnej funkcii
vinotéky
Nastavte otváranie o 1 mm jeho otáčaním a skontrolujte
funkciu (dbajte aby ste nastavenie neprehnali. (Bližšie
inštrukcie nájdete v príslušnej kapitole tohoto návodu.)

276
Výmena žiarovky
Zariadenie je vybavené svetlo emitujúcimi diódami (LED). Tieto diódy nemôže vymeniť zákazník. Ich
životnosť je dostatočná a porovnateľná s životnosťou celého zariadenia. Ak sa predsa len dióda počas
prevádzky poškodí, požiadajte o jej výmenu váš servis.
10. ŽIVOTNÉ PROSTREDIE
Toto zariadenie bolo vyrobené v súlade s nariadením EU č. 19/2012/CE ktoré sa týka
zaobchádzania s odpadmi vznikajúcimi z elektrických a elektronických zariadení (WEEE).
Správnou likvidáciou zariadenia zabránite potenciálne negatívnym dopadom na životné
prostredie a ľudské zdravie, ktoré by hrozili z nesprávnej likvidácie.
Tento symbol na výrobku alebo jeho balení udáva, že tento výrobok nepatrí do domáceho odpadu. Je
nutné odviezť ho na zberné miesto pre recykláciu elektrického a elektronického zariadenia. Zaistením
správnej likvidácie tohto výrobku pomôžete zabrániť negatívnym dôsledkom pre životné prostredie a
ľudské zdravie, ktoré by inak boli spôsobené nevhodnou likvidáciou tohto výrobku.
Používateľ je zodpovedný za odvezenie vyslúžilého zariadenia do príslušného zberného strediska.
Triedenie a zber pre recykláciu po skončení životnosti zariadení, zaobchádzanie s nimi a ich likvidácia
spôsobom ktorý neškodí životnému prostrediu napomáha zabrániť potenciálne negatívnym dopadom na
prostredie a zdravie a umožňuje opätovné využitie materiálov, z ktorých sa spotrebič skladá.
Pre podrobnejšie informácie o zbere a likvidácii tohto výrobku kontaktujte váš miestne príslušný úrad,
spoločnosť poverenú zaobchádzaním s odpadmi alebo obchodníka, ktorý vám zariadenie predal.
11. ZÁVEREČNÉ POZNÁMKY
V záujme priebežného zlepšovania našich spotrebičov si vyhradzujeme právo na zmenu technických
parametrov bez predošlého upozornenia.
Nositeľmi záruk značky AVINTAGE sú vybraní predajsovia. Žiadna časť tohto návodu nemôže byť
považovaná za záručný list.
FRIO ENTREPRISE nezodpovedá za chyby, technické alebo textové opomenutia v tomto dokumente.
Tento dokument nie je právnicky záväzný.

277
INFORMAČNÝ LIST VÝROBKU PODĽA NARIADENIA EÚ Č.
1060/2010
-
Servírovacia vinotéka
ZNAČKA
AVINTAGE
OBCHODNÉ OZNAČENIE
AVU8X(/IX)
NAPÁJANIE
220-240 v / 50 Hz
ROZMERY (Š X H X V)
145 x 547,5 x 820 mm
HMOTNOSŤ NETTO
20 kg
KATEGORIE DOMÁCICH CHLADIACICH
ZARIADENÍ
2
ENERGETICKÁ TRIEDA
A
ROČNÁ SPOTREBA ENERGIE (AEC)
Spotreba energie 135 kWh za rok
vypočítaná na základe výsledkov
získaných počas 24 hodín pri
normalizovaných testovacích
podmienkach. Skutočná spotreba energie
závisí na podmienkach použitia
a umiestnenia spotrebiča.
UŽITOČNÝ OBJEM (L)
23 L
ROZSAHY NASTAVITEĽNÝCH TEPLÔT
5 – 20 °C
ROZMRAZOVANIE
Automatické
KLIMATICKÁ TRIEDA
N
Tento spotrebič je koncipovaný pre
prevádzku pri okolitých teplotách
v rozmedzí 16 °C (spodná) a 32 °C (horná
hranica).
HLUČNOSŤ DB (A) RE 1PW
44 dB(A)
TYP INŠTALÁCIE
Vstavaná inštalácia pod pracovnú dosku
Toto zariadenie je určené výlučne pre skladovanie vína.

278
INFORMAČNÝ LIST VÝROBKU PODĽA NARIADENIA EÚ Č.
1060/2010
-
Servírovacia vinotéka
ZNAČKA
AVINTAGE
OBCHODNÉ OZNAČENIE
AVU23SX(/IX)
NAPÁJANIE
220-240 v / 50 Hz
ROZMERY (Š X H X V)
295 x 571 x 820 mm
HMOTNOSŤ NETTO
28 kg
KATEGORIE DOMÁCICH CHLADIACICH
ZARIADENÍ
2
ENERGETICKÁ TRIEDA
A
ROČNÁ SPOTREBA ENERGIE (AEC)
Spotreba energie 140 kWh za rok
vypočítaná na základe výsledkov
získaných počas 24 hodín pri
normalizovaných testovacích
podmienkach. Skutočná spotreba energie
závisí na podmienkach použitia
a umiestnenia spotrebiča.
UŽITOČNÝ OBJEM (L)
56 L
ROZSAHY NASTAVITEĽNÝCH TEPLÔT
5 – 20 °C
ROZMRAZOVANIE
Automatické
KLIMATICKÁ TRIEDA
N
Tento spotrebič je koncipovaný pre
prevádzku pri okolitých teplotách
v rozmedzí 16 °C (spodná) a 32 °C (horná
hranica).
HLUČNOSŤ DB (A) RE 1PW
43 dB(A)
TYP INŠTALÁCIE
Voľne stojaca a vstavaná inštalácia pod
pracovnú dosku
Toto zariadenie je určené výlučne pre skladovanie vína.

279
INFORMAČNÝ LIST VÝROBKU PODĽA NARIADENIA EÚ Č.
1060/2010
-
Servírovacia vinotéka
ZNAČKA
AVINTAGE
OBCHODNÉ OZNAČENIE
AVU41SXDPA(/IX)
NAPÁJANIE
220-240 v / 50 Hz
ROZMERY (Š X H X V)
595 x 571 x 820 mm
HMOTNOSŤ NETTO
48 kg
KATEGORIE DOMÁCICH CHLADIACICH
ZARIADENÍ
2
ENERGETICKÁ TRIEDA
A
ROČNÁ SPOTREBA ENERGIE (AEC)
Spotreba energie 144 kWh za rok
vypočítaná na základe výsledkov
získaných počas 24 hodín pri
normalizovaných testovacích
podmienkach. Skutočná spotreba energie
závisí na podmienkach použitia
a umiestnenia spotrebiča.
UŽITOČNÝ OBJEM (L)
59,5 L x 2
ROZSAHY NASTAVITEĽNÝCH TEPLÔT
5 – 20 °C
ROZMRAZOVANIE
Automatické
KLIMATICKÁ TRIEDA
N
Tento spotrebič je koncipovaný pre
prevádzku pri okolitých teplotách
v rozmedzí 16 °C (spodná) a 32 °C (horná
hranica).
HLUČNOSŤ DB (A) RE 1PW
43 dB(A)
TYP INŠTALÁCIE
Voľne stojaca a vstavaná inštalácia pod
pracovnú dosku
Toto zariadenie je určené výlučne pre skladovanie vína.

280
INFORMAČNÝ LIST VÝROBKU PODĽA NARIADENIA EÚ Č.
1060/2010
-
Servírovacia vinotéka
ZNAČKA
AVINTAGE
OBCHODNÉ OZNAČENIE
AVU52SX(/IX)
NAPÁJANIE
220-240 v / 50 Hz
ROZMERY (Š X H X V)
595 x 571 x 820 mm
HMOTNOSŤ NETTO
44 kg
KATEGORIE DOMÁCICH CHLADIACICH
ZARIADENÍ
2
ENERGETICKÁ TRIEDA
A
ROČNÁ SPOTREBA ENERGIE (AEC)
Spotreba energie 145 kWh za rok
vypočítaná na základe výsledkov
získaných počas 24 hodín pri
normalizovaných testovacích
podmienkach. Skutočná spotreba energie
závisí na podmienkach použitia
a umiestnenia spotrebiča.
UŽITOČNÝ OBJEM (L)
146 L
ROZSAHY NASTAVITEĽNÝCH TEPLÔT
5 – 20 °C
ROZMRAZOVANIE
Automatické
KLIMATICKÁ TRIEDA
N
Tento spotrebič je koncipovaný pre
prevádzku pri okolitých teplotách
v rozmedzí 16 °C (spodná) a 32 °C (horná
hranica).
HLUČNOSŤ DB (A) RE 1PW
44 dB(A)
TYP INŠTALÁCIE
Voľne stojaca a vstavaná inštalácia pod
pracovnú dosku
Toto zariadenie je určené výlučne pre skladovanie vína.

281
INFORMAČNÝ LIST VÝROBKU PODĽA NARIADENIA EÚ Č.
1060/2010
-
Servírovacia vinotéka
ZNAČKA
AVINTAGE
OBCHODNÉ OZNAČENIE
AVU53CDZA
NAPÁJANIE
220-240 v / 50 Hz
ROZMERY (Š X H X V)
595 x 571 x 820 mm
HMOTNOSŤ NETTO
50 kg
KATEGORIE DOMÁCICH CHLADIACICH
ZARIADENÍ
2
ENERGETICKÁ TRIEDA
A
ROČNÁ SPOTREBA ENERGIE (AEC)
Spotreba energie 145 kWh za rok
vypočítaná na základe výsledkov
získaných počas 24 hodín pri
normalizovaných testovacích
podmienkach. Skutočná spotreba energie
závisí na podmienkach použitia
a umiestnenia spotrebiča.
UŽITOČNÝ OBJEM (L)
134 L
ROZSAHY NASTAVITEĽNÝCH TEPLÔT
5 – 10 °C / 10 – 20 °C
ROZMRAZOVANIE
Automatické
KLIMATICKÁ TRIEDA
N
Tento spotrebič je koncipovaný pre
prevádzku pri okolitých teplotách
v rozmedzí 16 °C (spodná) a 32 °C (horná
hranica).
HLUČNOSŤ DB (A) RE 1PW
45 dB(A)
TYP INŠTALÁCIE
Voľne stojaca a vstavaná inštalácia pod
pracovnú dosku
Toto zariadenie je určené výlučne pre skladovanie vína.

282
INFORMAČNÝ LIST VÝROBKU PODĽA NARIADENIA EÚ Č.
1060/2010
-
Servírovacia vinotéka
ZNAČKA
AVINTAGE
OBCHODNÉ OZNAČENIE
AVU54SXDZA(/IX)
NAPÁJANIE
220-240 v / 50 Hz
ROZMERY (Š X H X V)
595 x 571 x 820 mm
HMOTNOSŤ NETTO
50 kg
KATEGORIE DOMÁCICH CHLADIACICH
ZARIADENÍ
2
ENERGETICKÁ TRIEDA
A
ROČNÁ SPOTREBA ENERGIE (AEC)
Spotreba energie 145 kWh za rok
vypočítaná na základe výsledkov
získaných počas 24 hodín pri
normalizovaných testovacích
podmienkach. Skutočná spotreba energie
závisí na podmienkach použitia
a umiestnenia spotrebiča.
UŽITOČNÝ OBJEM (L)
134 L
ROZSAHY NASTAVITEĽNÝCH TEPLÔT
5 – 10 °C / 10 – 20 °C
ROZMRAZOVANIE
Automatické
KLIMATICKÁ TRIEDA
N
Tento spotrebič je koncipovaný pre
prevádzku pri okolitých teplotách
v rozmedzí 16 °C (spodná) a 32 °C (horná
hranica).
HLUČNOSŤ DB (A) RE 1PW
45 dB(A)
TYP INŠTALÁCIE
Voľne stojaca a vstavaná inštalácia pod
pracovnú dosku
Toto zariadenie je určené výlučne pre skladovanie vína.

283
INFORMAČNÝ LIST VÝROBKU PODĽA NARIADENIA EÚ Č.
1060/2010
-
Servírovacia vinotéka
ZNAČKA
AVINTAGE
OBCHODNÉ OZNAČENIE
PRO51C/1
NAPÁJANIE
220-240 v / 50 Hz
ROZMERY (Š X H X V)
595 x 571 x 820 mm
HMOTNOSŤ NETTO
48 kg
KATEGORIE DOMÁCICH CHLADIACICH
ZARIADENÍ
2
ENERGETICKÁ TRIEDA
A
ROČNÁ SPOTREBA ENERGIE (AEC)
Spotreba energie 145 kWh za rok
vypočítaná na základe výsledkov
získaných počas 24 hodín pri
normalizovaných testovacích
podmienkach. Skutočná spotreba energie
závisí na podmienkach použitia
a umiestnenia spotrebiča.
UŽITOČNÝ OBJEM (L)
146 L
ROZSAHY NASTAVITEĽNÝCH TEPLÔT
5 – 20 °C
ROZMRAZOVANIE
Automatické
KLIMATICKÁ TRIEDA
N
Tento spotrebič je koncipovaný pre
prevádzku pri okolitých teplotách
v rozmedzí 16 °C (spodná) a 32 °C (horná
hranica).
HLUČNOSŤ DB (A) RE 1PW
45 dB(A)
TYP INŠTALÁCIE
Voľne stojaca a vstavaná inštalácia pod
pracovnú dosku
Toto zariadenie je určené výlučne pre skladovanie vína.

Documenttranscriptie
Cave de service pose libre et encastrable sous plan NOTICE D’UTILISATION AVU8X(/IX) AVU23SX(/IX) AVU41SXDPA(/IX) AVU52SX(/IX) AVU53CDZA AVU54SXDZA(/IX) PRO51C/1 FR – MANUEL D’UTILISATION p. 3 GB – USE INSTRUCTIONS p. 38 D – GEBRAUCHSANWEISUNG p. 72 NL – HANDLEIDING p. 107 SP – MANUAL DE UTILIZACION p. 143 IT – MANUAL D‘USO p. 178 CZ – NÁVOD K OBSLUZE p. 214 SK – NÁVOD NA OBSLUHU p. 249 1 2 Avant toute utilisation, merci de lire et appliquer les règles de sécurité et d'utilisation du présent manuel. Tout d’abord, nous vous remercions d’avoir fait confiance à la marque AVINTAGE en acquérant cet appareil et espérons qu’il satisfera pleinement vos attentes. Cet appareil vous permet au choix de chambrer vos bouteilles (à température ambiante) ou de les mettre à température de service (selon vos bouteilles) grâce à sa plage de réglage étendue. 1. CONSIGNES GÉNÉRALES DE SECURITÉ Avant d’utiliser votre appareil pour la première fois, veuillez lire attentivement ce manuel d’utilisation. Conservez-le précieusement de façon à pouvoir vous y référer au besoin. Afin de réduire le risque d’incendie, de choc électrique ou de blessure lors de l’utilisation de votre cave, merci de suivre les précautions données. D'une manière générale, votre appareil doit être entretenu par un professionnel qualifié. Pour votre sécurité et pour une utilisation correcte de l’appareil, avant d’installer et d’utiliser l’appareil pour la première fois, lisez attentivement cette notice, y compris les mises en garde et les conseils utiles qu’elle contient. Afin d’éviter d’endommager l’appareil et/ou de vous blesser inutilement, il est important que les personnes amenées à utiliser cet appareil aient pris entièrement connaissance de son fonctionnement ainsi que de ses instructions de sécurité. Conservez ces consignes pour plus tard et pensez à les ranger à côté de l’appareil, afin qu’elles soient transmises avec ce dernier en cas de vente ou de déménagement. Cela permettra de garantir un fonctionnement optimal de l’appareil. Pour éviter tout risque de blessure, conservez cette notice. Le fabricant ne saurait en effet être tenu responsable en cas de mauvaise manipulation de l’appareil. 3 Cet appareil est destiné exclusivement à un usage domestique et est prévu pour le stockage de boissons spéciales à une température de stockage plus élevée que celle d'un compartiment pour produits frais. En aucun cas cet appareil est destiné à maintenir des produits alimentaires frais. Assurez-vous que votre installation électrique (voltage) corresponde à celle indiquée sur la plaque signalétique : l'appareil doit être connecté à une prise terre règlementaire. Des réparations ou des connexions incorrectes peuvent entraîner des risques pour la sécurité. Faites vérifier votre installation électrique par un professionnel si vous avez le moindre doute. Pour votre protection, cet appareil doit être correctement connecté à une prise terre. Ne pas couper ou retirer le fil de terre du câble d’alimentation fourni. Pour des raisons de sécurité, ne pas utiliser une rallonge électrique. Si votre appareil est endommagé (par un impact majeur, par exemple) ou s’il subit un dommage (surtension due à la foudre, inondation, incendie), il peut être dangereux à utiliser. Débranchez la prise secteur et faites contrôler l'appareil par un réparateur professionnel agréé. Pour éviter tout danger, ne pas remplacer vous-même un câble secteur endommagé. Contactez votre revendeur, un centre de service agréé ou un réparateur professionnel. Cet appareil doit être positionné de telle sorte que la prise secteur soit accessible. Ne pas déplacer l'appareil une fois qu'il est plein : vous pourriez déformer sa carrosserie en plus d’entrainer des réparations. Les composants électriques ne doivent pas être 4 directement accessibles. Maintenir les enfants éloignés de l’appareil Ne pas utiliser l’appareil à l’extérieur Dans le cas où du liquide serait accidentellement renversé (bouteille cassée, etc.) sur des composants électriques (moteur, etc.), veuillez débrancher immédiatement la prise secteur. Pour éviter tout risque d'incendie, d'électrocution ou de blessure, ne pas immerger le câble d'alimentation, la prise ou l'appareil luimême dans l'eau ou tout autre liquide. Ne pas manipuler l'appareil avec les mains mouillées. Maintenez l’appareil éloigné de toute source de chaleur et ne l’exposez pas directement au soleil. Ne laissez pas pendre le câble d’alimentation d'une table ou être en contact avec des coins tranchants ou des surfaces chaudes. Ne tirez pas sur le câble d'alimentation, saisissez la prise pour débrancher l'appareil. Assurez-vous que la zone où votre appareil est situé est capable de supporter son poids lorsqu'il est chargé (une bouteille de 75 cl pèse environ 1,3 kg). Votre cave doit être placée sur une surface plane. Si vous devez la placer sur un tapis ou sur une moquette, placez un support en-dessous. Pour prévenir tout dommage du joint de la porte, assurez-vous que la porte est entièrement ouverte lorsque vous souhaitez tirer une clayette. 5 Sécurité des enfants et des autres personnes vulnérables Cet appareil peut être utilisé par des enfants ayant 8 ans et plus, et par des personnes ayant des capacités physiques, sensorielles ou mentales réduites ou un manque d’expérience et de connaissances, à condition qu’elles soient supervisées ou qu’elles aient reçu des instructions concernant l’utilisation de l’appareil en toute sécurité et qu’elles comprennent les dangers encourus. Le nettoyage et l’entretien par l’usager ne doivent pas être effectués par des enfants, sauf s’ils ont plus de 8 ans et qu’ils sont surveillés. Conservez tous les emballages hors de portée des enfants car il existe un risque de suffocation. Risque que l’enfant se retrouve coincé : qu’un enfant se retrouve bloqué dans l’appareil ou y suffoque ne sont pas des faits du passé. Toutefois, des appareils jetés ou abandonnés demeurent dangereux, même s'ils sont "juste laissés dans le garage quelques jours". Si vous décidez de mettre au rebut l’appareil, débranchez-le de la prise murale, coupez le câble d’alimentation (aussi proche de l’appareil que vous le pouvez) et retirez la porte afin d’empêcher les enfants de jouer avec, de subir un choc électrique ou de s’enfermer à l’intérieur. Si l’appareil, doté d’un joint de porte magnétique, doit être remplacé par un autre appareil doté d’un loquet sur la porte ou sur le joint, vérifiez bien que le loquet est hors d’état de fonctionner avant de vous débarrasser de l’ancien appareil. Cela évitera de transformer cet appareil en piège pour les enfants. Maintenir l’appareil et son cordon hors de portée des enfants de moins de 8 ans. Avant de jeter votre cave, veillez à bien retirer la porte. 6 Laissez également les clayettes qui étaient à l’intérieur de l’appareil de manière à ce que les enfants ne puissent pas grimper à l’intérieur. Sécurité générale ATTENTION — Cet appareil est conçu pour fonctionner dans un foyer domestique ou pour une utilisation similaire comme : Les zones de cuisine réservées au personnel des magasins, des ateliers et autres milieux professionnels, Les maisons secondaires et lieux utilisés par des clients de l'hôtel, motels et autres environnements résidentiels, Les environnements comme les chambres d'hôtel, Les restaurants et établissements similaires, sauf détaillants. ATTENTION — Afin d’éviter tout danger dû à l’instabilité de l’appareil, il est important de le fixer et le monter selon les instructions d’installation. ATTENTION — Ne rangez jamais de substances inflammables comme des aérosols à l’intérieur de cet appareil car elles pourraient s’y déverser. ATTENTION — Si le cordon d’alimentation est endommagé, vous devez le remplacer immédiatement auprès de votre fabricant ou d’un revendeur qualifié afin d’éviter tout risque d’électrocution. ATTENTION — Maintenez la ventilation bien ouverte et vérifiez bien que l’air peut circuler par les ouvertures, surtout si l’appareil est encastré dans le mur. ATTENTION — N’utilisez pas de dispositifs mécaniques ou autres moyens pour accélérer le processus de dégivrage, autres que 7 ceux recommandés par le fabricant. ATTENTION — N’endommagez pas le circuit de réfrigération. ATTENTION — N’utilisez pas d’appareils électriques à l’intérieur du compartiment, sauf si ces derniers sont tolérés par le fabricant. ATTENTION — Le gaz réfrigérant et le gaz isolant sont inflammables. Lors de l'élimination de l'appareil, faites appel à un centre de retraitement ou d’élimination des déchets agréé. N’exposer pas l’appareil à une flamme. ATTENTION — Le gaz réfrigérant de cet appareil est le R600a, tout produit inflammable et explosif ne doit pas être mis dans la cave ou près de celle-ci afin d’éviter le déclenchement d’un feu ou d’une explosion. Liquide réfrigérant De l’isobutane réfrigérant (R600a) est utilisé dans le circuit réfrigérant de l’appareil. Il s’agit d’un gaz naturel hautement inflammable, et donc dangereux pour l’environnement. Pendant les transports et l’installation de l’appareil, vérifiez qu’aucun des composants du circuit de réfrigération ne soit endommagé. Le réfrigérant (R600a) est un liquide inflammable. Attention : risque d’incendie Si le circuit de réfrigération est endommagé : Évitez les flammes nues et toute source d’incendie. Ventilez bien la pièce où se trouve l’appareil. Il est dangereux de modifier la composition de cet appareil, de quelque manière que ce soit. 8 Tout dommage fait au cordon peut provoquer un court-circuit, et/ou une électrocution. Sécurité électrique Nous ne pouvons pas être tenus pour responsables de tout incident causé par une mauvaise installation électrique. Le cordon d’alimentation ne doit pas être rallongé. N’utilisez ni prolongateur, ni adaptateur, ni prise multiple. Vérifiez bien que la prise murale n’est pas endommagée. Une prise murale en mauvais état pourrait entrainer une surchauffe de l’appareil et son explosion. Vérifiez bien que vous pouvez accéder à la prise murale de l’appareil. Ne tirez jamais sur le câble principal. Ne supprimez jamais la mise à la terre. Si la prise murale est lâche, ne branchez pas le cordon. Il existe un risque d’électrocution ou d’incendie. Vous ne devez jamais utiliser l’appareil si le cache de l’éclairage intérieur n’est pas en place. Débranchez votre appareil changement de l'ampoule. avant de procéder au Cet appareil fonctionne sur un courant à phase unique de 220~240V/50Hz. Si le câble d’alimentation est endommagé, ne procédez pas à son remplacement mais contactez votre service après-vente. La prise de courant doit être facilement accessible mais hors de portée des enfants. En cas d’incertitude, adressez-vous à votre installateur. 9 Utilisation quotidienne Cet appareil est uniquement destiné à mettre à température des bouteilles de vin. Ne stockez jamais de substances ou de liquides inflammables à l’intérieur de l’appareil, cela provoquerait un risque d’explosion. Ne faites pas fonctionner d’autres appareils électriques à l’intérieur de cet appareil (mixeurs, turbines à glace électrique, etc.). Lorsque vous débranchez l’appareil, tenez toujours la prise dans vos mains et ne tirez pas sur le cordon. Ne placez pas d’objets chauds près des composants en plastique de cet appareil. Les recommandations du fabricant quant au stockage de l'appareil doivent être strictement respectées. Référez-vous aux instructions correspondantes. L’appareil doit être tenu éloigné des bougies, luminaires et autres flammes nues afin d’éviter les risques d’incendie. L'appareil est destiné à garder des boissons pour une utilisation normale domestique comme expliqué dans ce manuel d’utilisation. L’appareil est lourd. Soyez prudent lorsque vous le déplacez. Si votre appareil est équipé de roulettes, rappelez-vous qu’elles servent uniquement à faciliter les petits mouvements. Ne le déplacez pas sur de plus longs trajets. N’utilisez jamais l’appareil ou ses éléments pour vous appuyer. Pour éviter les chutes d’objets et empêcher de détériorer l’appareil, ne surchargez pas les compartiments de l’appareil. 10 Attention : nettoyage et entretien Avant tout entretien, débranchez l’appareil et coupez le courant. Ne nettoyez pas l’appareil avec des objets métalliques, un système à vapeur, des huiles volatiles, des solvants organiques ou des composants abrasifs. Ne nettoyez aucune partie de l’appareil avec des produits inflammables. Les vapeurs peuvent provoquer un risque d'incendie ou d'explosion. N’utilisez pas d’objets tranchants ou pointus pour retirer la glace. Utilisez un grattoir en plastique. Informations importantes à propos de l’installation Évitez d’installer votre appareil dans des zones humides. Gardez l'appareil éloigné de la lumière directe du soleil et des sources de chaleur (poêle, chauffage, radiateur, etc.). Une exposition directe à la lumière solaire peut affecter le revêtement acrylique et les sources de chaleur peuvent augmenter la consommation électrique. Des températures ambiantes extrêmement froides ou chaudes peuvent aussi entrainer une mauvaise performance de l’appareil. Branchez votre cave à vin à une prise terre murale exclusivement et uniquement réglementaire. En aucun cas vous ne devez réduire ou supprimer la troisième broche de mise à la terre du cordon d'alimentation. Toutes les questions concernant la puissance et /ou mise à la terre doivent être adressées à un électricien certifié ou un centre de service autorisé. Pour que les branchements électriques soient corrects, suivez bien les consignes livrées dans ce manuel. Déballez l’appareil et vérifiez qu’il n’est pas endommagé visuellement. Ne branchez pas l’appareil si ce dernier est 11 endommagé. Signalez tout dommage au point de vente où vous l’avez acheté. Dans ce cas, conservez l’emballage. Il est recommandé d’attendre au moins 24 heures avant de brancher l’appareil au courant, afin que le compresseur soit bien alimenté en huile. Une bonne circulation de l’air est nécessaire, afin d’éviter les risques de surchauffe. Pour que la ventilation soit suffisante, suivez bien les consignes d’installation fournies. Dès que possible, évitez que l’appareil ne touche les parois murales et/ou ne soit en contact avec des éléments chauds (compresseur, condensateur) afin d’éviter les risques d’incendie. Respectez toujours bien les consignes d’installation. L’appareil ne doit pas être situé à côté de radiateurs ou de feux de cuisson. Vérifiez bien que les prises sont accessibles une fois l’appareil installé. Économies d’énergie Pour limiter la consommation électrique de votre appareil : Installez-le dans un endroit approprié (voir chapitre « Instructions d’installation »). Gardez les portes ouvertes le moins de temps possible. Veillez au fonctionnement optimal de votre appareil en nettoyant périodiquement le condenseur (voir chapitre « Nettoyage et entretien »). Contrôlez périodiquement les joints des portes et assurezvous qu’elles ferment toujours de manière efficace. Si ce n’est pas le cas, adressez-vous à votre service après-vente. 12 Dépannage Toute opération électrique doit être effectuée par un technicien qualifié et compétent. Cet appareil doit être dépanné par un Centre de Réparation Agréé, et seules des pièces d’origine doivent être utilisées. Cet appareil est réservé à un usage exclusivement domestique. Le fabricant ne saurait être tenu responsable d’une autre utilisation. R600a Instructions de sécurité Attention — N’obstruer aucune grille de ventilation de l’appareil, veillez à ce que les ouvertures d'aération soient toujours libres. Attention — Ne pas stocker de substances explosives comme les bombes d'aérosol avec un propulseur inflammables dans cet appareil. Attention — Ne pas endommager le circuit frigorifique de l’appareil. Attention — Les unités de réfrigération fonctionnant avec de l'isobutane (R600a) ne peuvent être placées dans une zone avec des sources d'ignition (par exemple, descellé contacts électriques ou lorsque le fluide frigorigène pourrait rassembler en cas de fuite). Le type de fluide frigorigène est indiqué sur la plaque signalétique de l'armoire. Attention — Ne pas utiliser d'appareils électriques dans les compartiments de l'appareil, sauf s’ils sont du type recommandé par le fabricant. 13 Cet appareil est conforme à toutes les directives européennes en vigueur et à leurs modifications éventuelles et est conforme notamment aux normes suivantes : 2011/65/EU (ROHS) 2014/35/EU relative à la sécurité électrique 2014/30/EU relative à la compatibilité électromagnétique 643/2009/CE relative à l’étiquetage énergétique 2. PLAQUE SIGNALÉTIQUE Ci-dessous l’exemple d’une plaque signalétique : La plaque signalétique collée à l’intérieur ou à l’arrière de l’appareil (selon modèle) comporte toutes les informations spécifiques à votre appareil. Nous vous conseillons de noter son numéro de série sur ce livret avant son installation, pour vous y référer si nécessaire ultérieurement (intervention technique, demande d’assistance, etc.). En effet, une fois l’appareil installé et chargé, son accès y est plus compliqué. ATTENTION : aucune assistance ne pourra vous être donnée sans ces informations. 3. INSTRUCTIONS D’INSTALLATION Avant d’utiliser votre cave à vin Enlevez l’emballage extérieur et intérieur. Laissez votre appareil en position verticale au repos pendant environ 24h avant sa mise en service. Cela permettra de réduire la possibilité d'un dysfonctionnement du système de refroidissement dû au 14 transport. Nettoyez l’intérieur à l’aide d’un chiffon doux et d’eau tiède. Lorsque vous installez votre appareil, merci de choisir un lieu autorisé. Placez votre appareil sur un sol qui est assez résistant pour le soutenir lorsqu’il est entièrement chargé. Veuillez ajuster les pieds de votre appareil afin de mettre à niveau votre cave. Une ventilation adéquate est nécessaire, n’obstruez aucune sortie d’air. N’est pas conçu pour être place dans un garage, sous-sol ou autre lieu du même type. L’appareil est destiné à un usage seulement intérieur. Cet appareil est destiné à être installé en pose libre ou de façon encastrée. Branchez la cave à une prise unique, laissez un espace de 30 mm entre l’arrière de la cave et le mur. Veillez à la caler parfaitement et à ajuster l’horizontalité de votre cave à vin (l’utilisation d’un niveau à bulles est conseillée). Ceci évitera tout mouvement dû à l’instabilité, générateur de bruit et de vibration et assurera la parfaite herméticité de la porte. Cet appareil est uniquement réservé au stockage de vins. Cet appareil utilise du gaz réfrigérant inflammable, veuillez donc à ne jamais endommager le tuyau de refroidissement pendant le transport. Attention Stockez des bouteilles fermées. Ne surchargez pas l’appareil. N’ouvrez pas la porte plus que nécessaire. Ne couvrez pas les clayettes avec des feuilles d’aluminium ou tout autre matériau qui pourrait empêcher une bonne circulation de l’air. Si la cave à vin doit être laissée vide pendant une longue période, il est suggéré de débrancher l’appareil et, après un nettoyage très soigneux, de laisser la porte entrouverte pour laisser l’air circuler et prévenir la formation de moisissures et d’odeurs. ATTENTION : merci d’éloigner l’appareil de toute substance qui pourrait entrainer un risque d’incendie. Plages de températures ambiantes Cet appareil est indiqué pour un fonctionnement dans des pièces dont la température ambiante est bien spécifique, cette classe climatique est indiquée sur la plaque signalétique. CLASSE SYMBOLE PLAGE DE TEMPÉRATURE AMBIANTE (°C) Tempérée élargie SN De +10 à +32 Tempérée N De +16 à +32 Subtropicale ST De +16 à +38 Tropicale T De +16 à +43 15 Schémas d’encastrement AVU8X(/IX) AVU23SX(/IX) 16 AVU41SXDPA(/IX) AVU52SX(/IX) AVU54SXDZA(/IX) 17 AVU53CDZA PRO51C/1 Réversibilité de la porte Si vous désirez inverser le sens d’ouverture de la porte, qui initialement s’ouvre de gauche à droite, procédez comme suit. AVU8X(/IX) 18 1. Charnière inf. (droite) 4. Porte 7. Charnière sup. (gauche) 2. Vis 5. Charnière sup. (droite) 8. Charnière inf. (gauche) 3. Axe de la porte 6. Vis des charnières 1. Ouvrez la porte à 90 degrés. Dévissez deux vis (2) de l’axe inférieur de la porte, puis retirez la porte (4) et l’axe de la porte (Fig. A). Positionnez correctement la porte (4) (Fig. A et B). 2. Retirez 3 vis (6) de la charnière supérieure (droite) (5) et ôtez celle-ci ainsi que la charnière inférieure droite (Fig. C) 3. Installez la charnière supérieure de rechange (gauche) (7) sur le côté supérieur gauche à l’aide de trois vis (Fig. D). Toujours selon la procédure ci-dessus, procédez à l’installation de la charnière inférieure de rechange (gauche) (8) (Fig. E). 4. La porte s’ouvre à 180 degrés. La méthode d’installation de la porte est la même que celle de son démontage ; alignez correctement la porte et fixez-la. AVU23SX(/IX) AVU52SX(/IX) 1. Charnière inf. (droite) 4. Porte 7. Charnière sup. (gauche) 10. Dispositif de retenue 2. Vis 3. Axe de la porte 5. Charnière sup. (droite) 6. Vis des charnières 8. Clou décoratif 9. Charnière inf. (gauche) 11. Vis 12. Bouchon 1. Ouvrez la porte à 90 degrés. Dévissez deux vis (2) de l’axe inférieur de la porte (3), puis retirez la porte (4) et l’axe de la porte (Fig. A). 2. Positionnez correctement la porte (4) et retirez le bouchon (12) de la partie supérieure du cadre de la porte ; dévissez l’une des vis inférieures (11) et ôtez le dispositif de retenue (10). Installez ensuite ce dispositif sur la partie supérieure du cadre de la porte. Il est préférable d’utiliser un bouchon de rechange (12) pour obturer le trou sur la partie supérieure du cadre (Fig. A/B). 3. Retirez 3 vis (6) de la charnière supérieure droite (5) et ôtez celle-ci (Fig. C). 4. Retirez les clous décoratifs (8) du côté supérieur gauche de l’appareil et installez la charnière supérieure de rechange gauche (7) sur le côté supérieur gauche à l’aide de trois vis (Fig. D). 5. Toujours selon la procédure ci-dessus, procédez à l’installation de la charnière inférieure de rechange 19 gauche (9) (Fig. E). 6. La porte s’ouvre à 180 degrés. La méthode d’installation de la porte est la même que celle de son démontage ; alignez correctement la porte et fixez-la. 7. Obturez le trou situé en haut à droite de l’appareil avec un clou décoratif (8). AVU53CDZA AVU54SXDZA(/IX) PRO51C/1 1. Charnière inf. (droite) 4. Porte 7. Charnière sup. (gauche) 2. Vis 5. Charnière sup. (droite) 8. Clou décoratif 3. Axe de la porte 6. Vis des charnières 9. Charnière inf. (gauche) 1. Ouvrez la porte à 90 degrés. Dévissez deux vis (2) de l’axe inférieur de la porte, puis retirez la porte (4) et l’axe de la porte (Fig. A). 2. Positionnez correctement la porte (4). 3. Retirez 3 vis (6) de la charnière supérieure (droite) (5) et ôtez celle-ci (Fig. C). 4. Retirez les clous décoratifs (8) du côté supérieur gauche de l’appareil et installez la charnière supérieure supplémentaire (gauche) (7) sur le côté supérieur gauche à l’aide de trois vis (Fig. D). 5. Toujours selon la procédure ci-dessus, procédez à l’installation de la charnière inférieure restante (gauche) (9) (Fig. E). 6. La porte s’ouvre à 180 degrés. La méthode d’installation de la porte est la même que celle de son démontage ; alignez correctement la porte et fixez. 7. Obturez le trou situé en haut à droite de l’appareil avec un clou décoratif (8). 20 4. INSTRUCTIONS D’UTILISATION Il est recommandé d’installer votre appareil dans un endroit où la température ambiante est comprise entre 16-32°C. Si la température ambiante est supérieure ou inférieure à la température recommandée, le rendement de l'unité peut être influencé et il peut être impossible d'obtenir la température entre 5-20°C ou 5-10°C/10-20°C (selon modèle). AVU8X(/IX) / AVU23SX(/IX) AVU41SXDPA(/IX) AVU52SX(/IX) PRO51C/1 “RUN” Indicateur de mise sous tension Bouton Pour allumer/éteindre l’appareil. Appuyez et maintenez le bouton pendant environ 3 secondes. Bouton Bouton de contrôle de la lumière intérieure Écran d’affichage Afficheur électronique de la température Bouton Bouton de réglage de la température + Bouton Bouton de réglage de la température Vous pouvez choisir la température que vous souhaitez dans le compartiment en pressant les touches “ / ” . La température que vous souhaitez programmer augmentera/diminuera de 1ºC à chaque pression sur les boutons. La température peut être choisie entre 5 et 20°C ou entre 5 et 10°C / 10 et 20°C (selon modèle). Une fois sélectionnée, l’afficheur clignotera environ 5s avant d’indiquer la température interne instantanée de la cave. À tout moment, la température de réglage est visible en appuyant 5s sur les touches de sélection de température. Dans le cas d’une coupure de courant, toutes les températures précédemment choisies seront effacées et chaque compartiment reviendra par défaut à la valeur de température préprogrammée d’usine soit 12°C. 21 AVU53CDZA AVU54SXDZA(/IX) “RUN” Indicateur de mise sous tension Bouton Pour allumer/éteindre l’appareil. Appuyez et maintenez le bouton pendant environ 3 secondes. Bouton Bouton de contrôle de la lumière intérieure Écran d’affichage Afficheur électronique de la température du compartiment supérieur Écran d’affichage Afficheur électronique de la température du compartiment inférieur Bouton Bouton de réglage de la température du compartiment supérieur Bouton Bouton de réglage de la température du compartiment inférieur Appuyez sur “ ” pour régler la température du compartiment supérieur. L’afficheur relatif au compartiment se met alors à clignoter et chaque pression vous permet de faire varier la température de 1°C. Une fois la température de réglage la plus basse atteinte 5°C, l’afficheur se repositionne automatiquement sur la température de réglage la plus élevée 10°C. Une fois sélectionnée, l’afficheur clignotera environ 5s avant d’indiquer la température interne instantanée de la cave. À tout moment, la température de réglage est visible en appuyant 5s sur les touches de sélection de température. Appuyez sur “ ” pour régler la température du compartiment inférieur. L’afficheur relatif au compartiment se met alors à clignoter et chaque pression vous permet de faire varier la température de 1°C. Une fois la température de réglage la plus basse atteinte 10°C, l’afficheur se repositionne automatiquement sur la température de réglage la plus élevée 20°C. Une fois sélectionnée, l’afficheur clignotera environ 5s avant d’indiquer la température interne instantanée de la cave. À tout moment, la température de réglage est visible en appuyant 5s sur les touches de sélection de température. Dans le cas d’une coupure de courant, toutes les températures précédemment choisies seront effacées et chaque compartiment reviendra par défaut à la valeur de température préprogrammée d’usine soit 6°C pour le compartiment haut et 12°C pour le compartiment bas. Fonction d’utilisation Alarme de température : Si la température intérieure est supérieure à 23°C après 10 heures de fonctionnement, l’écran affichera ”HI” puis une alarme sonore retentira au bout d’une heure. Cette alarme vous informera que la température intérieure est trop élevée, merci de vérifier quelle pourrait en être la raison. Si la température intérieure est inférieure à 0°C, l’écran affichera “LO” et une alarme sonore retentira. Fonction de mémorisation de la température : Dans le cas d’une coupure de courant, la cave va mémoriser les derniers paramétrages et, lorsque 22 l’électricité reviendra, ces mêmes paramètres seront à nouveau opérationnels. Lumière intérieure Afin de réduire la consommation d’énergie, la lumière intérieure de cette cave à vin s’éteint automatiquement au bout de 10 minutes. Si vous souhaitez que la lumière intérieure de votre appareil soit constamment allumée, veuillez appuyer sur le bouton pendant 5 secondes : sur l’écran apparaitra alors le message « LP ». Après 4 secondes, l’écran reviendra à la normale et la lumière restera allumée jusqu’à ce que vous l’éteigniez. Si vous souhaitez revenir au paramétrage initial et économiser l’énergie (recommandé), veuillez appuyer sur le bouton pendant 5 secondes : sur l’écran apparaitra alors le message « LF ». Après 4 secondes, l’écran reviendra à la normale et la lumière s’éteindra automatiquement après 10 minutes. 5. ÉQUIPEMENT Le système de climatisation Selon l’avis des spécialistes, la température idéale de conservation des vins se situe autour de 12°C, dans une fourchette de 10° à 14°C. Ne pas confondre avec la température de service, qui elle varie selon la spécificité de chaque type de vin de 5 à 20°C. Il est surtout important d’éviter les variations brutales de température. Conçu par des spécialistes pour des œnophiles, cet appareil, contrairement au simple réfrigérateur, prend en compte la sensibilité des grands crûs aux variations brutales de températures en assurant un contrôle fin d’une température moyenne constante. Le système anti-vibration Le compresseur frigorifique est équipé d’amortisseurs spéciaux (les silent-blocks) et la cuve intérieure est isolée de la carrosserie par une épaisse couche de mousse de polyuréthane. Ces caractéristiques permettent d’éviter la transmission de vibration à vos vins. Le système d’humidification Cet appareil est équipé d’un bac (selon modèle) qui maintient un niveau correct d’humidité. Si l’humidité est trop basse, remplissez le niveau du réservoir aux ¾ de sa capacité. Vérifiez le niveau d’eau de temps en temps et ajoutez de l’eau si nécessaire. Veillez à ce que le bac contienne toujours de l’eau. Conçu par des spécialistes pour des œnophiles, la marque Avintage a donc pris en compte la sensibilité des bouchons à une humidité ambiante trop basse. C’est pourquoi le bac est à placer sur la clayette sous le ventilateur situé au fond afin d’apporter une humidité minimale. Attention à contrôler le niveau d’eau si vous stockez vos vins sur une longue période et que vous ne dédiez pas l’appareil uniquement à leur mise à température de service (avec des rotations rapides de vos bouteilles). Assurez-vous que le bac rempli d’eau est bien stable pour éviter toute chute ou fuite d’eau. Le système anti-UV La lumière accélère le vieillissement de vos vins. Dans nos caves à porte pleine, vos vins sont naturellement à l’abri, sous réserve bien entendu d’ouvertures pas trop fréquentes. Ce modèle à porte vitrée a fait l’objet d’un traitement particulier, qui filtre les rayons ultra-violets néfastes ; vos vins sont donc parfaitement à l’abri. 23 Dégivrage Votre appareil est équipé d’un cycle automatique de dégivrage. Pendant l’arrêt du cycle de refroidissement, les surfaces réfrigérées de l’appareil dégivrent automatiquement. L’eau de dégivrage ainsi récupérée est évacuée vers un bac d’évaporation des condensas qui est situé à l’arrière de l’appareil près du compresseur. La chaleur produite par le compresseur évapore ensuite les condensas récupérés dans le bac. Le système hiver (selon modèle) Le kit hiver est un système hors gel qui permet à la cave de fonctionner dans un environnement ou la température est comprise entre 0 et 32°C. Une sonde située à l’intérieur de l’appareil déclenche une résistance électrique de faible puissance lorsque la température de la cave devient inférieure de 3°C à la température programmée. Cette résistance est de faible puissance pour éviter une remontée brutale de la température du vin et ainsi éviter les chocs thermiques préjudiciables pour la préservation du vin. Le kit est destiné à réchauffer la température interne de la cave avant même qu’un échange thermique ne se soit fait avec les bouteilles. Le système hiver permet de maintenir la température à l'intérieur de la cave à l’identique de la température programmée. Lorsque le système s'active et que la température intérieure atteint la température réglée, le système s'arrête. Clayettes Pour éviter d’endommager le joint de la porte, assurez-vous que la porte soit bien ouverte avant de tirer les clayettes pour mettre ou enlever les bouteilles. Pour un accès plus simple au contenu des clayettes, vous devez faire glisser la clayette vers l’extérieur d’environ 1/3. Cependant, elles sont conçues avec une butée d’arrêt de chaque côté pour éviter que les bouteilles ne tombent. Pour retirer ou positionner les clayettes, inclinez la clayette comme indiqué sur le schéma et tirez ou poussez selon les cas. AVU41SXDPA(/IX) Placez les clayettes aux emplacements adaptés. 24 a. Boîte en carton de pièces de rechange b. Petite clayette c. Grande clayette 1. Après avoir retiré l’emballage, sortez le carton contenant les pièces de rechange de l’appareil. 2. 4 petites clayettes (b) sont présentes dans le compartiment de gauche. Retirez les deux clayettes inférieures. 3. Dans le compartiment de droite, on peut trouver 4 grandes clayettes (c). Retirez les deux clayettes supérieures. 4. La position des petites et grandes clayettes doit alors être inversée (fig.2). Dans chaque compartiment, placez deux petites clayettes en haut et deux grandes clayettes en bas. 5. Une fois les clayettes correctement positionnées, votre cave à vin peut être utilisée conformément aux instructions figurant dans le manuel d’utilisation. Stabilisateurs de pieds Deux stabilisateurs de pieds sont fournis avec votre appareil, vous permettant ainsi de le déplacer aisément lorsque vos pieds sont ajustés à hauteur maximale. Les stabilisateurs se mettent sous les pieds, de façon parallèle en respectant bien l’emplacement pour l’avant et pour l’arrière. Arrière Avant Avant Arrière Stabilisateurs de pieds Foot slider La sécurité renforcée Cette gamme d’appareils étant destinée au stockage d’objets de valeur, nous avons pris soin de sélectionner des composants de qualité et de concevoir des techniques de fabrication propres à assurer une sécurité optimale de fonctionnement. Installation de la poignée Votre appareil est équipé d’une poignée en acier inoxydable. Pour l’installer, vissez-la simplement sur la porte avec les vis fournies, suivant le schéma ci-dessous en ayant préalablement retiré le joint magnétique. Front Back 25 6. CHARGEMENT Les quantités maximales de chargement annoncées de bouteilles sont données à titre indicatif, ne sont pas contractuelles, et permettent (comme les litrages des réfrigérateurs) d’avoir une estimation rapide de la taille de l’appareil. Elles correspondent à des tests effectués avec une bouteille étalon : la bouteille de type « bordelaise tradition en 75 cl » (la normalisation reconnaît pour chaque forme de bouteille, une origine géographique : bordelaise, bourguignonne, provençale, etc. et un type : tradition, lourde, allégée, flûte, etc., comportant chacune des diamètres et des hauteurs qui leurs sont propres). Dans la réalité, on pourrait ranger, à l’extrême, plus de bouteilles en empilage monotype et sans clayettes mais une « cave variée » se constitue d’une grande variété de bouteilles et l’aspect « pratique » de la gestion quotidienne d’une cave limite son chargement. Vous en chargerez donc probablement un peu moins que le maximum annoncé. Types de bouteilles : Nous voyons ici 4 sortes de bouteilles 75 cl, Bourgogne et Bordelaise, de dimensions différentes. Il en existe de nombreuses autres de toutes contenances et toutes formes. Vous noterez les différences de rangement selon hauteur des bouteilles, diamètre et méthode de croisement. A titre d’exemple, si l’on charge exclusivement une cave de bouteilles de Bourgogne, on remarquera être environ 30% sous la quantité initiale calculée à partir de Bordeaux. Types de croisement Tête bêche col à col : Notez bien la différence de profondeur ! Tête bêche col entre fûts : Chargement accru 26 Exemples de températures de service À respecter lors de vos dégustations pour éviter de passer à côté de la richesse des arômes de vos vins ! Les opinions varient, la température ambiante également mais beaucoup s’accordent sur : Grands vins de Bordeaux – Rouges 16 – 17°C Grands vins de Bourgogne – Rouges 15 – 16°C Grands crûs de vins blancs secs 14 – 16°C Rouges légers, fruités, jeunes 11 – 12°C Rosés de Provence, vins de primeur 10 – 12°C Blancs secs et vins de pays rouges 10 – 12°C Vins de pays blancs 8 – 10°C Champagnes 7 – 8°C Vins liquoreux 6°C 7. NETTOYAGE ET ENTRETIEN Avant de nettoyer votre appareil (opération à faire régulièrement), débranchez l’appareil en retirant la prise de courant ou en débranchant le fusible dont elle dépend. Nous vous conseillons, avant la première utilisation et de façon régulière, de nettoyer l’intérieur comme l’extérieur (face avant, latérales et dessus) avec un mélange d’eau tiède et de produit de lavage doux. Rincez avec de l’eau pure, laissez sécher totalement avant de rebrancher. N’utilisez ni solvants, ni agents abrasifs. Lavez la plastification des clayettes acier avec une solution détergente douce puis séchez avec un chiffon sec et doux. Les clayettes en bois ne demandent pas d’entretien particulier. Lors de la première mise sous tension, des odeurs résiduelles peuvent subsister. Dans ce cas, faites fonctionner l’appareil à vide pendant quelques heures, en paramétrant la température la plus froide. Le froid annihilera ces odeurs possibles. En cas de coupure de courant La majorité des coupures de courant sont résolues pendant une courte période. Une coupure de 1 ou 2 heures n’affectera pas les températures de votre cave. Afin de protéger vos vins pendant les coupures de courant, pensez à minimiser le nombre d’ouvertures de porte. Pour des coupures de courant de très longue durée, prenez les mesures nécessaires pour protéger votre vin. Si l’appareil est débranché, éteint ou s’il y a une coupure de courant vous devez attendre de 3 à 5 minutes avant de le redémarrer. Si vous essayez de le redémarrer avant ce délai, le compresseur se mettra en fonction seulement au bout de 3/5 minutes (si la température le nécessite). Au premier démarrage et suite à un arrêt prolongé de la cave, il est possible qu’au moment du redémarrage les températures choisies et celles affichées ne correspondent pas. Ceci est normal. Il sera alors nécessaire d’attendre quelques heures avant que les températures retrouvent leur stabilité. Si vous partez en vacances Courts séjours : laissez votre cave fonctionner pendant votre séjour si celui-ci dure moins de 3 semaines. Longs séjours : si votre appareil venait à ne pas être utilisé pendant plusieurs mois, retirez toutes les bouteilles et tous les accessoires, éteignez et débranchez l’appareil de la prise de courant. Nettoyez et séchez soigneusement l’intérieur et l’extérieur de l’appareil. Laissez également la porte ouverte, en la bloquant si nécessaire, pour éviter la formation de condensas, odeurs, moisissure. 27 Si vous devez déplacer votre cave à vin Débranchez votre cave avant toute opération. Enlevez toutes les bouteilles présentes dans la cuve et fixez les éléments mobiles. Pour éviter d’endommager les vis de mise à niveau des pieds, vissez-les à fond dans leur base. Fermez entièrement la porte. Déplacez l’appareil en position verticale de préférence ou notez à partir des inscriptions portées sur l’emballage, le sens sur lequel peut être couché l’appareil. Protégez également votre appareil avec une couverture ou un tissu similaire. Économies d’énergie L’appareil doit être placé dans un local frais (mais au-dessus de +16°C), loin de toute source de chaleur (autres appareils ménager) et d’une exposition directe au soleil. Le local où est placé l’appareil doit être ventilé. Ne couvrez jamais les aérations. N’ouvrez pas la porte plus que nécessaire. 8. EN CAS DE PANNE Malgré tout le soin que nous apportons à nos fabrications, une panne n’est jamais totalement exclue. Avant de contacter le service après-vente de votre revendeur, vérifiez néanmoins que : La prise de courant est toujours en place Il n’y a pas de coupure de courant Que la panne n’a pas pour origine l’une de celles décrites dans le tableau en fin de ce manuel IMPORTANT : si le cordon d’alimentation fourni est endommagé, il doit être remplacé par le fabricant, un service agréé de la marque ou du revendeur. Dans tous les cas, il doit être remplacé par un personnel qualifié pour éviter tout risque de blessure. SI CES CONTROLES NE DONNENT RIEN, CONTACTEZ ALORS LE SERVICE APRES -VENTE DE VOTRE REVENDEUR. ATTENTION ! Débranchez la prise murale avant toute opération d’entretien ou réparation ! 28 9. PROBLEME ET CAUSE POSSIBLE Vous pouvez résoudre de nombreux problèmes simples de votre cave à vin, en évitant de faire appel à votre service après-vente. Essayez avec les suggestions ci-dessous. PROBLEME La cave ne démarre pas La cave ne refroidit pas assez Le compresseur démarre et s’arrête fréquemment La lumière ne fonctionne pas Vibrations La cave semble faire beaucoup de bruit La porte ne se ferme pas bien CAUSE POSSIBLE La prise n’est pas branchée Le bouton marche/arrêt est sur la position arrêt Le fusible a sauté au niveau de votre installation électrique Contrôlez la température choisie La température externe est au-delà de la température d’application de la cave La porte de la cave est ouverte trop souvent La porte n’est pas bien fermée Le joint de la porte n’est pas étanche La température externe est trop élevée Une grosse quantité de bouteilles a été mise dans la cave La porte de la cave est ouverte trop fréquemment La porte n’est pas bien fermée Le réglage n’a pas été fait correctement Le joint de la porte n’est pas étanche. La prise n’est pas branchée Le fusible a sauté au niveau de votre installation électrique Le LED est hors service/a grillé, contactez le service après-vente Le bouton de la lumière est sur arrêt Contrôlez et assurez-vous que la cave soit bien au niveau Un bruit qui ressemble à de l’eau qui circule est produit par le gaz réfrigérant, ce qui est normal En fin de cycle du compresseur, il est possible d’entendre un bruit d’eau qui circule Des contractions et des expansions des parois internes peuvent provoquer des claquements La cave n’est pas à niveau La cave n’est pas à niveau Le joint de la porte est sale ou abîmé Les clayettes ne sont pas bien positionnées Une partie du contenu empêche la porte de se fermer 29 Remplacement de la lampe d’éclairage Cet appareil est constitué de diodes électroluminescentes (LED). Ce type de diode ne peut être changé par le consommateur. La durée de vie de ces LED est normalement suffisante pour qu’aucun changement ne soit effectué. Si toutefois, et malgré tout le soin apporté lors de la fabrication de votre cave à vin, les LED étaient défectueuses, veuillez contacter votre service après-vente pour toute intervention. 10. ENVIRONNEMENT Ce produit est conforme à la Directive UE 2012/19/CE relative aux déchets d'équipements électriques et électroniques (DEEE). En vous assurant que ce produit est éliminé correctement, vous aiderez à prévenir les conséquences négatives potentielles pour l'environnement et la santé humaine qui pourraient être dues à la manipulation inappropriée des déchets de ce produit. Le symbole de poubelle barrée apposé sur l’appareil indique que ce produit devra, à la fin de son cycle de vie, être traité séparément des autres déchets domestiques. Il devra donc être emmené dans un centre de collecte sélective destiné aux appareils électriques et/ou électroniques ou bien, si vous achetez un appareil équivalent, au revendeur de ce nouvel appareil. L’utilisateur est responsable d’apporter l’appareil en fin de vie aux structures de collecte appropriées. Une collecte sélective et adéquate visant à envoyer l’appareil inutilisé au recyclage, au traitement et à une élimination compatible avec l’environnement, contribue à éviter les effets négatifs possibles sur l’environnement, sur la santé et favorise le recyclage des matériaux dont le produit est composé. Pour obtenir des renseignements plus détaillés sur les systèmes de collecte disponibles, s’adresser au service local d’élimination des déchets ou bien au magasin où l’appareil a été acheté. 11. AVERTISSEMENT Dans un souci d’amélioration constante de nos produits, nous nous réservons la possibilité de modifier les caractéristiques techniques sans préavis. Les garanties des produits de la marque AVINTAGE sont exclusivement énoncées par les distributeurs que nous avons choisis. Aucun élément des présentes ne peut être interprété comme une garantie supplémentaire. La société FRIO ENTREPRISE ne peut être tenue responsable des erreurs ou des omissions techniques et de rédaction dans les présentes. Document non contractuel. 30 FICHE PRODUIT EUROPÉENNE selon la réglementation (UE) N°1060/2010 CAVE DE SERVICE MARQUE AVINTAGE RÉFÉRENCE COMMERCIALE AVU8X(/IX) DONNÉES ÉLECTRIQUES 220-240 V / 50 Hz DIMENSIONS DU PRODUIT (L x P x H) 145 x 547,5 x 820 mm POIDS NET 20 kg CATÉGORIE DE L’APPAREIL 2 CLASSE ÉNERGÉTIQUE A CONSOMMATION ÉLECTRIQUE Consommation d’énergie de 135 kWh par an, calculée sur la base du résultat obtenu pour 24 heures dans des conditions d’essai normalisées. La consommation d’énergie réelle dépend des conditions d’utilisation et de l’emplacement de l’appareil. VOLUME NET 23 L TEMPÉRATURE AJUSTABLE 5 – 20°C DÉGIVRAGE Dégivrage automatique CLASSE CLIMATIQUE Classe climatique : N Cet appareil est conçu pour être utilisé à une température ambiante comprise entre 16°C (température la plus basse) et 32°C (température la plus haute). NIVEAU SONORE dB(A) RE 1 pW 44 dB(A) TYPE DE POSE Encastrable sous plan Cet appareil est destiné uniquement au stockage du vin. 31 FICHE PRODUIT EUROPÉENNE selon la réglementation (UE) N°1060/2010 CAVE DE SERVICE MARQUE AVINTAGE RÉFÉRENCE COMMERCIALE AVU23SX(/IX) DONNÉES ÉLECTRIQUES 220-240 V / 50 Hz DIMENSIONS DU PRODUIT (L x P x H) 295 x 571 x 820 mm POIDS NET 28 kg CATÉGORIE DE L’APPAREIL 2 CLASSE ÉNERGÉTIQUE A CONSOMMATION ÉLECTRIQUE Consommation d’énergie de 140 kWh par an, calculée sur la base du résultat obtenu pour 24 heures dans des conditions d’essai normalisées. La consommation d’énergie réelle dépend des conditions d’utilisation et de l’emplacement de l’appareil. VOLUME NET 56 L TEMPÉRATURE AJUSTABLE 5 – 20°C DÉGIVRAGE Dégivrage automatique CLASSE CLIMATIQUE Classe climatique : N Cet appareil est conçu pour être utilisé à une température ambiante comprise entre 16°C (température la plus basse) et 32°C (température la plus haute). NIVEAU SONORE dB(A) RE 1 pW 43 dB(A) TYPE DE POSE Pose libre et encastrable sous plan Cet appareil est destiné uniquement au stockage du vin. 32 FICHE PRODUIT EUROPÉENNE selon la réglementation (UE) N°1060/2010 CAVE DE SERVICE MARQUE AVINTAGE RÉFÉRENCE COMMERCIALE AVU41SXDPA(/IX) DONNÉES ÉLECTRIQUES 220-240 V / 50 Hz DIMENSIONS DU PRODUIT (L x P x H) 595 x 571 x 820 mm POIDS NET 48 kg CATÉGORIE DE L’APPAREIL 2 CLASSE ÉNERGÉTIQUE A CONSOMMATION ÉLECTRIQUE Consommation d’énergie de 144 kWh par an, calculée sur la base du résultat obtenu pour 24 heures dans des conditions d’essai normalisées. La consommation d’énergie réelle dépend des conditions d’utilisation et de l’emplacement de l’appareil. VOLUME NET 59,5 L x 2 TEMPÉRATURE AJUSTABLE 5 – 20°C DÉGIVRAGE Dégivrage automatique CLASSE CLIMATIQUE Classe climatique : N Cet appareil est conçu pour être utilisé à une température ambiante comprise entre 16°C (température la plus basse) et 32°C (température la plus haute). NIVEAU SONORE dB(A) RE 1 pW 43 dB(A) TYPE DE POSE Pose libre et encastrable sous plan Cet appareil est destiné uniquement au stockage du vin. 33 FICHE PRODUIT EUROPÉENNE selon la réglementation (UE) N°1060/2010 CAVE DE SERVICE MARQUE AVINTAGE RÉFÉRENCE COMMERCIALE AVU52SX(/IX) DONNÉES ÉLECTRIQUES 220-240 V / 50 Hz DIMENSIONS DU PRODUIT (L x P x H) 595 x 571 x 820 mm POIDS NET 44 kg CATÉGORIE DE L’APPAREIL 2 CLASSE ÉNERGÉTIQUE A CONSOMMATION ÉLECTRIQUE Consommation d’énergie de 145 kWh par an, calculée sur la base du résultat obtenu pour 24 heures dans des conditions d’essai normalisées. La consommation d’énergie réelle dépend des conditions d’utilisation et de l’emplacement de l’appareil. VOLUME NET 146 L TEMPÉRATURE AJUSTABLE 5 – 20°C DÉGIVRAGE Dégivrage automatique CLASSE CLIMATIQUE Classe climatique : N Cet appareil est conçu pour être utilisé à une température ambiante comprise entre 16°C (température la plus basse) et 32°C (température la plus haute). NIVEAU SONORE dB(A) RE 1 pW 44 dB(A) TYPE DE POSE Pose libre et encastrable sous plan Cet appareil est destiné uniquement au stockage du vin. 34 FICHE PRODUIT EUROPÉENNE selon la réglementation (UE) N°1060/2010 CAVE DE SERVICE MARQUE AVINTAGE RÉFÉRENCE COMMERCIALE AVU53CDZA DONNÉES ÉLECTRIQUES 220-240 V / 50 Hz DIMENSIONS DU PRODUIT (L x P x H) 595 x 571 x 820 mm POIDS NET 50 kg CATÉGORIE DE L’APPAREIL 2 CLASSE ÉNERGÉTIQUE A CONSOMMATION ÉLECTRIQUE Consommation d’énergie de 145 kWh par an, calculée sur la base du résultat obtenu pour 24 heures dans des conditions d’essai normalisées. La consommation d’énergie réelle dépend des conditions d’utilisation et de l’emplacement de l’appareil. VOLUME NET 134 L TEMPÉRATURE AJUSTABLE 5 – 10°C / 10 – 20°C DÉGIVRAGE Dégivrage automatique CLASSE CLIMATIQUE Classe climatique : N Cet appareil est conçu pour être utilisé à une température ambiante comprise entre 16°C (température la plus basse) et 32°C (température la plus haute). NIVEAU SONORE dB(A) RE 1 pW 45 dB(A) TYPE DE POSE Pose libre et encastrable sous plan Cet appareil est destiné uniquement au stockage du vin. 35 FICHE PRODUIT EUROPÉENNE selon la réglementation (UE) N°1060/2010 CAVE DE SERVICE MARQUE AVINTAGE RÉFÉRENCE COMMERCIALE AVU54SXDZA(/IX) DONNÉES ÉLECTRIQUES 220-240 V / 50 Hz DIMENSIONS DU PRODUIT (L x P x H) 595 x 571 x 820 mm POIDS NET 50 kg CATÉGORIE DE L’APPAREIL 2 CLASSE ÉNERGÉTIQUE A CONSOMMATION ÉLECTRIQUE Consommation d’énergie de 145 kWh par an, calculée sur la base du résultat obtenu pour 24 heures dans des conditions d’essai normalisées. La consommation d’énergie réelle dépend des conditions d’utilisation et de l’emplacement de l’appareil. VOLUME NET 134 L TEMPÉRATURE AJUSTABLE 5 – 10°C / 10 – 20°C DÉGIVRAGE Dégivrage automatique CLASSE CLIMATIQUE Classe climatique : N Cet appareil est conçu pour être utilisé à une température ambiante comprise entre 16°C (température la plus basse) et 32°C (température la plus haute). NIVEAU SONORE dB(A) RE 1 pW 45 dB(A) TYPE DE POSE Pose libre et encastrable sous plan Cet appareil est destiné uniquement au stockage du vin. 36 FICHE PRODUIT EUROPÉENNE selon la réglementation (UE) N°1060/2010 CAVE DE SERVICE MARQUE AVINTAGE RÉFÉRENCE COMMERCIALE PRO51C/1 DONNÉES ÉLECTRIQUES 220-240 V / 50 Hz DIMENSIONS DU PRODUIT (L x P x H) 595 x 571 x 820 mm POIDS NET 48 kg CATÉGORIE DE L’APPAREIL 2 CLASSE ÉNERGÉTIQUE A CONSOMMATION ÉLECTRIQUE Consommation d’énergie de 145 kWh par an, calculée sur la base du résultat obtenu pour 24 heures dans des conditions d’essai normalisées. La consommation d’énergie réelle dépend des conditions d’utilisation et de l’emplacement de l’appareil. VOLUME NET 146 L TEMPÉRATURE AJUSTABLE 5 – 20°C DÉGIVRAGE Dégivrage automatique CLASSE CLIMATIQUE Classe climatique : N Cet appareil est conçu pour être utilisé à une température ambiante comprise entre 16°C (température la plus basse) et 32°C (température la plus haute). NIVEAU SONORE dB(A) RE 1 pW 45 dB(A) TYPE DE POSE Pose libre et encastrable sous plan Cet appareil est destiné uniquement au stockage du vin. 37 Before use, please read and follow the safety rules and operating instructions in this manual. Firstly, we would like to thank you for purchasing an AVINTAGE product and hope that this appliance fully lives up to your expectations. This appliance enables you to bring your bottles at room temperature or bring them to service temperature (depending on the bottles) thanks to its wide adjustment range. 1. GENERAL SAFETY INSTRUCTIONS Before you use your appliance for the first time, please read this user manual carefully. Store it carefully so that you can refer to it in the future, if necessary. To reduce the risk of fire, electrical shock, or injury when using your appliance, follow these basic precautions. Generally speaking, your appliance must be maintained by a qualified professional. For your safety and correct usage, before installing and first using the appliance, read this user manual carefully, including its hints and warnings. To avoid unnecessary mistakes and accidents or to avoid damage to the appliance, it is important to make sure that all people using the appliance are thoroughly familiar with its operation and safety features. Save these instructions and be sure that they remain with the appliance if it is moved or sold, so that anyone using it throughout its life will be properly informed on its usage and safety notices. This will ensure optimum operation of the appliance. For the safety of life and property and to avoid any risk of injury, keep the precautions of these user's instructions as the manufacturer is not responsible for damages caused by omission. This appliance is intended exclusively for domestic use and is intended for the storage of special drink products at a storage temperature higher than that of a storage compartment for fresh 38 products. Under no circumstances is it intended to keep food products fresh. Make sure that your electrical installation's voltage corresponds to that on the appliance’s nameplate; the appliance must be connected to an approved, earthed system. Incorrect repairs or connections can cause safety hazards. Have your electrical installation checked by a professional, if you are in any doubt. This unit must be correctly connected to an earthed socket for your protection. Do not cut off or remove the earth wire on the mains cable supplied. For safety reasons, do not use an electrical extension cable. If your appliance is damaged (e.g. a major impact) or suffers harm (power surge due to lightning, flood, fire), it may be dangerous to use. Disconnect the mains plug and have the appliance checked by an approved professional repairer. To prevent any danger, do not replace a damaged mains cable yourself. Contact your retailer, an approved service center or professional repairer. This appliance must be positioned such that the mains socket is accessible. Do not move the appliance once it is full: you might distort its body beyond repair. The electrical parts must not be directly accessible. Keep children away from the appliance. Do not use this appliance outdoors. In the event that liquid is accidentally spilled (broken bottle, 39 etc.) on electrical components (motor, etc.), disconnect the mains plug immediately. To prevent any risk of fire, electrocution or injury, do not immerse the mains cable, plug or the appliance itself in water or any other liquid. Do not handle the appliance with wet hands. Keep the appliance away from any source of heat and out of direct sunlight. Do not allow the mains cable to hang from a table or be in contact with sharp edges or hot surfaces. Do not pull on the mains cable - take hold of the plug to disconnect the appliance. Ensure that the area where your appliance is positioned can support its weight when loaded (a 75 cl bottle weighs approximately 1.3 kg). Your cellar must be placed on a flat surface. If you have to position it on a rug or carpet, place a support underneath. To prevent damaging the door gasket, make sure the door is fully open when pulling shelves out of the rail compartment. Safety of children and other vulnerable persons This appliance can be used by children aged from 8 years and above, and by persons with reduced physical, sensory or mental capabilities or lack of experience and knowledge if they have been given supervision or instruction concerning use of the appliance in a safe way and understand the hazards involved. User cleaning and servicing operations should not be carried 40 out by children, unless they are more than 8 years old and are supervised. Keep all packaging away from children as there is risk of suffocation. Risk of child entrapment. Child entrapment and suffocation are not problems of the past. Junked or abandoned appliances are still dangerous, even if they will “just sit in the garage a few days”. If you are discarding the appliance, pull the plug out of the socket, cut the connection cable (as close to the appliance as you can) and remove the door to prevent children playing from suffering an electric shock or from closing themselves inside it. If this appliance, featuring a magnetic door seals, is to replace an older appliance having a spring lock (latch) on the door or lid, be sure to make the spring lock unusable before you discard the old appliance. This will prevent it from becoming a death trap for a child. Keep the appliance and its power cable out of reach of children less than 8 years old. Before you throw away your old wine cooler: take off the door. Leave the shelves in place so that children may not easily climb inside. General safety WARNING — This appliance is intended to be used in household and similar applications such as: Staff kitchen areas in shops, offices and other working environments, Farm houses and by clients in hotels, motels and other residential type environments, Bed and breakfast type environments, 41 Catering and similar non-retail applications. WARNING — To avoid a hazard due to instability of the appliance, it must be fixed in accordance with the instructions. WARNING — Do not store explosive substances such as aerosol cans with a flammable propellant in this appliance, as they could leak or release fluids. WARNING — If the supply cord is damaged, it must be replaced by the manufacturer, its service agent or similarly qualified persons in order to avoid a hazard. WARNING — Keep ventilation openings, in the appliance enclosure or in the built-in structure, clear of obstruction and ensure that air can circulate, especially if the appli ance is recessed into a wall. WARNING — Do not use mechanical devices or other means to accelerate the defrosting process, other than those recommended by the manufacturer. WARNING — Do not damage the refrigerant circuit. WARNING — Do not use electrical appliances inside the food storage compartments of the appliance, unless they are of the type recommended by the manufacturer. WARNING — The refrigerant and insulation blowing gas are flammable. When disposing of the appliance, do so only at an authorized waste disposal center. Do not expose to flame. WARNING — The refrigerant of these appliances is R600a, flammable and explosive articles should not be put in or near the 42 cabinet, to avoid the fire or explode caused. Refrigerating fluid The refrigerating circuit in the appliance uses refrigerating isobutene (R600a), which is a highly inflammable natural gas and is therefore dangerous for the environment. When transporting or installing the appliance, ensure that no element of the refrigerating circuit is damaged. The refrigerating fluid (R600a) is inflammable. Caution: risk of fire If the refrigerant circuit should be damaged: Avoid opening flames and sources of ignition. Thoroughly ventilate the room in which the appliance is situated. It is dangerous to alter the specifications or modify this product in any way. Any damage to the cord may cause a short circuit, fire, and/or electric shock. Electrical safety We decline any liability in respect of incidents caused by poor electrical installation. The power cord must not be lengthened. Do not use an extension cable, or adapter, or multi-way socket. Make sure that the power plug is not crushed or damaged. A crushed or damaged power plug may overheat and cause a fire. Make sure that you can access the main plug of the appliance. Do not pull the main cable. Ensure that the appliance is always electrically earthed. 43 If the power plug socket is loose, do not insert the power plug. There is a risk of electric shock or fire. You must not operate the appliance without the interior lighting lamp cover. Disconnect the appliance before replacing the lighting bulb. The cellar is only applied with power supply of single phase alternating current of 220~240V/50Hz. Do not attempt to replace a damaged power cable, contact your after-sales service. The power socket must be easily accessible but out of reach of children. In case of doubt, contact your installation technician. Daily use This appliance is intended to be used exclusively for the storage of wine. Do not store flammable gas or liquids in the appliance. There is a risk of an explosion. Do not operate any electrical appliances in the appliance (electric ice cream makers, mixers etc.). When unplugging always pull the plug from the mains socket and do not pull on the cable. Do not place hot items near the plastic components of this appliance. The appliance manufactures storage recommendations should be strictly adhered to. Refer to relevant instructions for storage. Keep burning candles lamps and other items with naked flames away from the appliance so that do not set the appliance on fire. The appliance is intended for keeping beverages in normal 44 household as explained in this instruction booklet. The appliance is heavy. Care should be taken when moving it. If your appliance is equipped with castors, remember that these are only designed to facilitate minor movements. Do not move the appliance over long distances. Never use the base, drawers, doors etc. to stand on or as supports. To avoid items falling and causing injury or damage to the appliance, do not overload the door racks or put food in the crisper drawers. Caution: cleaning and servicing Before carrying out servicing, switch off the power supply and disconnect the appliance. When cleaning the appliance, do not use metal objects, steam systems, volatile fluids, organic solvents or abrasive substances. Never clean appliance parts with flammable fluids. The fumes can create a fire hazard or explosion. Do not use sharp or pointed objects to remove ice. Use a plastic scraper. Important information concerning installation Avoid locating the unit in moist areas. Keep the appliance away from direct sunlight and sources of heat (stove, heater, radiator, etc.). Direct sunlight may affect the acrylic coating and heat sources may increase electrical consumption. Extreme cold or hot ambient temperatures may also cause the appliances not to perform properly. Plug the wine cooler into an exclusive, properly installed45 grounded wall outlet. Do not under any circumstances cut or remove the third (ground) prong from the power cord. Any questions concerning power and/or grounding should be directed toward a certified electrician or an authorized products service center. To ensure proper electrical connection, recommendations given in the present manual. follow the Unpack the appliance and visually check that it is not damaged. Do not connect a damaged appliance. Inform your retailer or point of sale of any damage. In such a case, keep the packaging. It is recommended that the appliance be allowed to settle for at least 24 hours before connecting the electrical power supply, so that the compressor fluid feed is correct. Proper air circulation is necessary to avoid overheating. To ensure sufficient ventilation, observe the installation recommendations provided. In order to avoid fire risk, wherever possible, ensure that the appliance is not in contact with walls or with any hot element (compressor, condenser). Observe the installation recommendations. The appliance should not be placed close to radiators or cooking hot plates or gas rings. Check that electrical sockets remain accessible when the appliance is installed. Power saving To limit the electricity consumption of your appliance: Install it in instructions”). an appropriate place (see “Installation Leave the doors open as little time as possible. 46 To ensure that the appliance operates properly, clean the condenser regularly (see “Maintenance”). Regularly inspect the door seals and ensure that they are still closing properly. If this is not the case, contact your aftersales service. Trouble shooting Any electrical work should be carried out by a qualified and skilled technician. The appliance should be repaired by an accredited repair centre, using only manufacturer’s original spare parts. The appliance is designed for home use only. The manufacturer declines any liability whatsoever in the case of other use. R600a Safety instructions Caution — Do not obstruct the ventilation grills on the appliance. Keep ventilation openings in the appliance enclosure or in the structure for building-in clear of obstruction. Caution — Do not store explosive substances, such as aerosol cans containing an inflammable propellant, in the appliance. Caution — Do not damage the refrigerating circuit in the appliance. Caution — The refrigerating units use isobutane (R600a), and should not be placed close to ignition sources (for example, electrical contacts that are exposed or open contacts that could be closed by the refrigerating fluid in the event of a leak). The 47 refrigerating fluid type is specified on the power cabinet identification plate. Caution — Do not use electrical equipment in the compartments of the appliance, unless they are of the type recommended by the manufacturer. This appliance meets the requirements of all applicable European directives and their amendments, and notably complies with the following standards: 2011/65/EU (ROHS) 2014/35/EU on electrical safety 2014/30/EU on electromagnetic compatibility 643/2009/CE relating to energy labels 2. TECHNICAL DATA Below is an example of the nameplate: The nameplate attached to the inside or rear of the appliance (depending on the model) includes the entire information specific to your appliance. We recommend that you make a note of its serial number in this booklet prior to installation, so that you can refer to it later (technical work, request for assistance, etc.). Once the appliance is installed and loaded, access to it is not so easy. CAUTION: no assistance can be provided without this information. 48 3. INSTALLATION INSTRUCTIONS Before using this appliance Remove the exterior and interior packing. Before connecting the appliance to the power source, let it stand upright for approximately 24 hours. This will reduce the possibility of a malfunction in the cooling system from handling during transportation. Clean the interior surface with lukewarm water using a soft cloth. When disposing your appliance, please choose an authorized disposal site. Place your wine cooler on a floor that is strong enough to support it when it is fully loaded. To level your Wine cooler, adjust the front leveling leg at the bottom of the wine cooler. Adequate ventilation is required, do not block the front air outlet. Not designed for placement in adage or basement. The appliance is for indoor use only. This wine cellar is designed for free-standing or built-under installation. Connect the cellar to a single socket, leaving a 30 mm gap between the back of the cellar and the wall. Be careful to support it, so that your wine cellar is perfectly level (use of a spirit level is recommended). This will prevent any movement due to instability, causing noise and vibration, and will ensure that the door seals perfectly. This appliance is intended to be used exclusively for the storage of wine. This appliance is using flammability refrigerant. So never damage the cooling pipe work during the transportation. Attention Store wine in sealed bottles. Do not overload the cabinet. Do not open the door unless necessary. Do not cover shelves with aluminum foil or any other shelf material which may prevent air circulation. Should the wine cooler be left empty for long periods it is suggested that the appliance is unplugged, and after careful cleaning, leave the door ajar to allow air to circulate inside the cabinet in order to avoid possible condensation, mold or odors forming. CAUTION: please keep the appliance away from substance, which can cause ignition. Ambient room temperature limits This appliance is designed to operate in ambient temperatures specified by its temperature class marked on the rating plate. CLASS SYMBOL AMBIENT TEMPERATURES RANGE (°C) Extended temperate SN From +10 to +32 Temperate N From +16 to +32 Subtropical ST From +16 to +38 Tropical T From +16 to +43 49 Built-in installation drawings AVU8X(/IX) AVU23SX(/IX) 50 AVU41SXDPA(/IX) AVU52SX(/IX) AVU54SXDZA(/IX) 51 AVU53CDZA PRO51C/1 Reversing the door The door can be changed from left and right side. No special requirement, all the door is opened from left side. If required to open from right side please refer to the following direction. AVU8X(/IX) 52 1. Lower hinge (right) 4. Door 7. Top hinge (left) 2. Screws 5. Top hinge (right) 8. Lower hinge (left) 3. Door axis 6. Hinge screws 1. Open the door to 90 degrees, take out two screws (2) from the lower door axis (3), remove the door (4) and door axis (Fig. A). Position the door (4) safely (Fig. A and B). 2. Take out three hinge screws (6) from the top hinge (right) (5) and remove it as well as the lower hinge (right) (Fig. C). 3. Install the spare top hinge (left) (7) on the top left of the cabinet with three screws (Fig. D). Install the spare lower hinge (left) (8) according to the above procedure (Fig. E). 4. The door opens to 180 degrees. Install the door in the same way as it was removed and fix it so that the door is aligned. AVU23SX(/IX) AVU52SX(/IX) 1. Lower hinge (right) 4. Door 7. Top hinge (left) 10. Door limit device 2. Screws 5. Top hinge (Right) 8. Decorative nail 11. Screw 3. Door axis 6. Hinge screws 9. Lower hinge (left) 12. Plug 1. Open the door to 90 degrees, remove the two screws (2) from the lower door axis (3), remove the door (4) and door axis (Fig. A). 2. Position the door (4) safely and remove the plug (12) from the top of the door frame. Unscrew one screw (11) at the bottom and remove the door limit device (10). Install the door limit device (10) at the top of the door frame. Please use the spare plug (12) to block the hole at the top of the door frame (Fig. A/B). 3. Take out three hinge screws (6) from the upper hinge (right) (5) and remove it (Fig. C). 4. Remove the decorative nail (8) from the top left of the cabinet and install the spare top hinge (left) (7) on the top left of the cabinet with three screws (Fig. D). 5. Install the spare lower hinge (left) (9) according to the above procedure (Fig. E). 53 6. The door opens to 180 degrees. Install the door in the same way as it was removed and fix it so that the door is aligned. 7. Block the hole at the top right of the cabinet with the spare decorative nail (8). AVU53CDZA AVU54SXDZA(/IX) PRO51C/1 1. Lower hinge (right) 4. Door 7. Top hinge (left) 2. Screws 5. Top hinge (right) 8. Decorative nail 3. Door axis 6. Hinge screws 9. Lower hinge (left) 1. Open the door to 90 degrees, take out two screws (2) from the lower door axis (3), remove the door (4) and door axis (Fig. A). 2. Position the door (4) safely. 3. Take out three hinge screws (6) from the top hinge (right) (5) and remove it. (Fig. C) 4. Remove the decorative nail (8) from the top left of the cabinet and install the spare top hinge (Left) (7) on the top left of the cabinet with three screws. (Fig. D) 5. Install the spare lower hinge (left) (9) according to the above procedure. (Fig. E) 6. The door opens to 180 degrees. Install the door in the same way as it was removed and fix it so that the door is aligned. 7. Block the hole at the top right of the cabinet with the spare decorative nail (8). 54 4. OPERATING INSTRUCTIONS It is recommended that you installed your appliance in a place where the ambient temperature is between 16-32°C. If the ambient temperature is above or below recommended temperatures, the performance of the unit may be affected and it may not be possible to obtain temperature between 520°C or 5-10°C/10-20°C (depending on the model). AVU8X(/IX) / AVU23SX(/IX) AVU41SXDPA(/IX) AVU52SX(/IX) PRO51C/1 “RUN” Power indicator button To turn the appliance on or off. Press and hold this button for around 3 seconds. button Inner lighting control button Display Electronic temperature display button + temperature setting button button - temperature setting button You can choose the desired chamber temperature by using the “ selected increases/decreases by 1°C with each button press. / ” buttons. The temperature Temperatures between 5 and 20°C or between 5 and 10°C / 10 and 20°C (depending on the model) can be selected. Once the desired temperature has been selected, the display will flash for 5s before showing the current internal cooler temperature. The set temperature can be viewed at any time by pressing and holding the temperature select buttons for 5s. In the event of a power cut, all previously selected temperature settings will be deleted and each chamber will re-initialize to the factory-preset temperature of 12°C. 55 AVU53CDZA AVU54SXDZA(/IX) “RUN” Power indicator button To turn the appliance on or off. Press and hold this button for around 3 seconds. button Inner lighting control button Display Upper chamber electronic display Display Lower chamber electronic display Bouton Upper chamber temperature setting button Bouton Lower chamber temperature setting button Press “ ” to adjust the upper chamber temperature. The relevant chamber display will start to flash and each press on the button will alter the temperature by 1°C. Once the lowest set temperature of 5°C is reached, the display automatically changes to the highest set temperature of 10°C. Once selected, the display will flash for approximately 5s before showing the current internal temperature of the cellar. The set temperature can be viewed at any time by pressing and holding the temperature select buttons for 5s. Press “ ” to set the upper chamber temperature.. The relevant chamber display will start to flash and each press on the button will alter the temperature by 1°C. Once the lowest set temperature of 10°C is reached, the display automatically changes to the highest set temperature of 20°C. Once selected, the display will flash for approximately 5s before showing the current internal temperature of the cellar. The set temperature can be viewed at any time by pressing and holding the temperature select buttons for 5s. In the event of a power cut, all previously selected temperature settings will be deleted and each chamber will re-initialize to the factory-preset temperature of 6°C for the upper chamber and 12°C for the lower chamber. Function instruction Temperature alarm: If inner temperature is higher than 23°C after running 10 hours with power, the “HI” is shown in display panel, and the buzzer alarm after one hour continuously. It informs that the inner temperature is too high, please check the reason. If inner temperature is lower than 0°C, the “LO” is shown in display panel, and the buzzer alarm too will sound. Temperature recollection function: In the event of a power interruption, wine cabinet will remember the previous temperature settings and when the power is recovered, the cabinet temperature will go back the same setting temperature as power off. 56 Internal light In order to reduce energy consumption, this wine cabinet will automatically switch off the LED lights after 10 minutes. If you want the LED light to remain on continuously, this is possible. Please press and hold the button for 5 seconds, the display will show "LP". After 4 seconds the display will revert back to normal, and the light will remain on until manually switched off. If you want to revert back and conserve energy (recommended), please press and hold the button for 5 seconds, the display will show "LF". After 4 seconds the display will revert back to normal, and the light will automatically switch off after 10 minutes. 5. EQUIPMENT The climate control system According to advice from specialists, the ideal temperature for storing wine is around 12°C, within a bracket of 10 to 14°C. Do not confuse this with service temperature, which varies between 5 and 20°C, depending on the specific nature of the wine. It is especially important to avoid sudden changes in temperature. Designed by specialists for oenophiles, this appliance, unlike a simple refrigerator, takes into account the sensitivity of grand cru wines to sudden variations in temperature by ensuring the close control of a constant average temperature. The anti-vibration system The refrigeration compressor is equipped with special dampers (silent-blocks) and the inner space is insulated from the body by a thick layer of polyurethane foam. These characteristics prevent the transmission of vibration to your wines. The humidification system This appliance is fitted with a tray (according to the model) that maintains the correct level of humidity. If the humidity is too low, top up the level in the reservoir to three quarters of its capacity. Check the level from time to time and add water if necessary. Ensure that the tray always contains water. Designed by specialists for oenophiles, Avintage brand has taken into account the sensitivity of corks to too low a level of ambient humidity. This is why the tray should be placed on the shelf below the fan situated in the bottom, to provide minimum humidity. Be sure to check the water level, if you are storing wines over a long period and you are not using the appliance solely for bringing wines to service temperature (with a quick rotation of bottles). Make sure that the tray full of water is completely stable to avoid any water falls or leaks. The anti-UV system Light accelerates the ageing of wine. In our solid door cellars, your wines are naturally protected, on condition, of course, that the door is not opened too often. This glass-door model has been specially treated and filters out harmful ultraviolet rays, thus ensuring your wines are perfectly shielded. Defrosting Your appliance is equipped with an automatic defrost cycle. When a cooling cycle finishes, the appliance’s refrigerated surfaces are defrosted automatically. The defrost water is channeled into a condensates evaporation tray which is located in the back of the appliance near the compressor. The heat produced by the compressor then evaporates the condensates collected in the tray. 57 The winter system (depending on the model) The winter kit is a frost protection system which enables the cellar to operate in an environment where the temperature is between 0 and 32°C. A sensor located inside the appliance triggers a low power electrical element when the inner temperature of the wine cellar becomes inferior by 3°C than the set temperature. This is a low power element to avoid sudden rises in the temperature of the wine and so avoid thermal shocks that are damaging to the preservation of the wine. The kit is intended to raise the cellar’s internal temperature even before there is a thermal exchange with the bottles. The kit is designed to heat the internal temperature of the cellar even before a heat exchange has occurred with the bottles. The winter system keeps the temperature inside the wine cellar the same as the programmed temperature. When the system is activated and the internal temperature reaches the set temperature, the system stops. Shelves To prevent damage to the door seal, ensure that the door is fully open before pulling out the shelves to add or remove bottles. For easier access to the contents of the shelves, slide the shelf out approximately one third of the way. The shelves are, however, fitted with a stop to prevent the bottles falling out. To remove or reposition the shelves, incline the shelf as indicated in the diagram, then push or pull as required. For AVU41SXDPA(/IX) Place the shelves in the spaces provided. a. Spare part cardboard box b. Small shelf c. Large shelf 1. After removing the wrapping, take the spare parts cardboard box (a) out of the cabinet. 58 2. There are four small shelves (b) in the left compartment. Remove the two lower shelves. 3. There are four large shelves(c) in the right compartment. Remove the two upper shelves. 4. Swap the large and small shelves (fig 2). Place the two small shelves in the upper positions and the two large shelves in the lower positions in both compartments. 5. When the shelves have been positioned correctly, you can use the wine cooler according to the instruction manual. Foot sliders Two foot sliders are provided with your appliance, allowing you to move it easily when your feet are adjusted to maximum height. The foot sliders have to be installed in parallel under the feet in accordance with the location for the front and for the back. Back Front Front Back Foot sliders Foot slider Enhanced safety Since this range of appliances is intended for storing items of value, we have been careful to select quality components and to design suitable manufacturing techniques to ensure optimum safety in operation. Installing the handle Your appliance has a stainless steel handle. To fit it, simply screw it onto the door with the screws supplied as per the diagram below, having first removed the seal. Front Back 59 6. LOADING The maximum recommended loading quantities for bottles are given as guidelines and are indicative only; they provide a quick estimate of the size of the appliance (similar to the capacity of a refrigerator expressed in liters). They correspond to tests conducted with a standard bottle: the standard “75 cl light Bordeaux” bottle standards apply the geographical origin of each bottle shape (Bordeaux, Burgundy, Provence, etc.) and a type (traditional, heavy, light, flute, etc.), each with its own diameter and height. In reality and in extreme cases, you could store more bottles by stacking the same type of bottle without using shelves, but a varied cellar comprises a wide variety of bottles and the practical aspect of everyday cellar management limits its capacity. You will therefore probably load the appliance a little less than the recommended maximum. Types of bottle: We see here 4 kinds of 75 cl wine bottles: Burgundy and Bordeaux wine bottles of different dimensions. There are many others of all shapes and sizes. You will note the storage differences depending on bottle heights, diameters and alternating position method. For example, if a wine cellar is loaded only with Burgundy wine bottles, there will be approximately 30% fewer bottles than the initial quantity calculated for Bordeaux bottles. Criss-crossing types Top-to-bottom neck-to-neck: Note the difference in depth! Top-to-bottom neck between bottle bodies: Increased loading. 60 Examples of serving temperatures Opinions vary, and the ambient temperature too, but many people agree on the following: Prestigious Bordeaux wines – Reds 16 – 17°C Prestigious Burgundy wines – Reds 15 – 16°C Prestigious dry white vintages 14 – 16°C Light, young, fruity reds 11 – 12°C Provence rosés, primeur wines 10 – 12°C Dry whites and vin de pays reds 10 – 12°C Vin de pays whites 8 – 10°C Champagnes 7 – 8°C Sweet wines 6°C 7. CARE AND MAINTENANCE Before cleaning your appliance (something that should be done regularly), disconnect it by removing the plug or by pulling the fuse on the circuit. Before using your appliance for the first time and regularly after that, we recommend that you clean the inside and outside (front, side and top) with warm mixed with a gentle cleaning product. Rinse with clean water and allow drying before reconnecting. Do not use solvents or abrasives. When the appliance is switched on for the first time, there may be a residual odor. In that case, runt the appliance empty for a few hours at the coldest possible temperature. The cold will kill any odors. In case of a power cut Most power cuts are resolved within a short time. A power cut of 1 or 2 hours will not affect the temperature in your cabinet. To protect your wines during a power cut, avoid opening the door as much as possible. During very long power cuts, take the necessary measures to protect your wine. If the appliance is disconnected or if there is a power cut, you must wait three to five minutes before re- starting. If you try to re-start before this time, the compressor will only re-start after 3 to 5 minutes (if the temperature requires). When switching on for the first time or following a prolonged shutdown, it is possible that when restarting, the temperatures selected and those displayed are not the same. This is normal. It will take a few hours before they stabilize. Vacation time Short vacations: leave the wine cooler operating during vacations of less than three weeks. Long vacations: if the appliance will not be used for several months, remove all items and turn off the appliance. Clean and dry the interior thoroughly. To prevent odor and mold growth, leave the door open slightly: blocking it open if necessary. Moving your wine cooler Remove all items. Securely tape down all loose items (shelves) inside your appliance. Turn the adjustable leg up to the base to avoid damage. Tape the door shut. Be sure the appliance stays secure in the upright position during transportation. Also protect outside of appliance with a blanket, or similar item. 61 Energy saving tips The wine cooler should be located in the coolest area of the room (but at least at 16°C), away from heat producing appliances, and out of the direct sunlight. Ensure that the unit is adequately ventilated. Never cover air vents. Only open the door for as long as necessary. 8. IN THE EVENT OF A BREAKDOWN Despite the care we take during production, a breakdown can never be totally ruled out. Before contacting your retailer’s after-sales department, please check that: The appliance is properly plugged in There is not a power cut in progress The breakdown is not one of those described in the table at the end of this manual IMPORTANT: if the power cable supplied is damaged, it must be replaced by the manufacturer, a service centre approved by the brand or the retailer. In all events, it must be replaced by qualified personnel in order to avoid any risk of injury. IF THESE CHECKS REVEAL NOTHING, THEN CONTACT YOUR RETAILER’S AFTER-SALES DEPARTMENT. CAUTION! Unplug the appliance before carrying out any maintenance or repair work. 62 9. TROUBLE SHOOTING You can solve many common Wine cooler problems easily, saving you the cost of a possible service call. Try the suggestions below to see if you can solve the problem before calling the servicer. PROBLEM Wine cooler does not operate Wine cooler is not cold enough Turns on and off frequently The light does not work Vibrations The wine cooler seems to make too much noise The door will not close properly POSSIBLE CAUSE Not plugged in The appliance is turned off The circuit breaker tripped or a blown fuse Check the temperature control setting External environment may require a higher setting The door is opened too often The door is not closed completely The door gasket does not seal properly The room temperature is hotter than normal A large amount of contents has been added to the wine cooler The door is open too often The door is not closed completely The temperature control is not set correctly The door gasket does not seal properly Not plugged in The circuit breaker tripped or a blown fuse The bulb has burned out, contact your aftersales service The light switch is “OFF” Check to assure that the wine cooler is level The rattling noise may come from the flow of the refrigerant, which is normal As each cycle ends, you may hear gurgling sounds caused by the flow of refrigerant in your wine cooler Contraction and expansion of the inside walls may cause popping and crackling noises The wine cooler is not level The wine cooler is not level The door was reversed and not properly installed The gasket is dirty The shelves are out of position Replacing light This appliance consists of light-emitting diodes (LEDs). This type of diode cannot be changed by the consumer. The lifetime of these LEDs is normally sufficient for no change to be made. If however, and despite all the care taken during the manufacture of your wine cellar, the LEDs were defective, please contact your after-sales service for any intervention. 63 10. ENVIRONMENT This appliance is marked according to the European directive 2012/19/CE on Waste Electrical and Electronic Equipment (WEEE). By ensuring this product is disposed of correctly, you will help prevent potential negative consequences for the environment and human health, which could otherwise be caused by inappropriate waste handling of this product. The symbol on the product, or on the documents accompanying the product, the Crossed Out Wheelie Bin, indicates that this appliance may not be treated as household waste. Instead it shall be handed over to the applicable collection point for the recycling of electrical and electronic equipment, or, if you are buying an equivalent product, to the retailer of the new product. The user is responsible for taking the appliance to the appropriate collection center at the end of its useful life. Selective and appropriate collection for the recycling of no longer used appliances and their disposal and destruction in an environmentally friendly manner, helps to prevent potential negative effects on the environment and health, and encourages the recycling of materials used to make the product. For more detailed information about treatment, recovery and recycling of this product, please contact your local authority, your household waste disposal service or the retailer where you purchased the product. 11. WARNING As we continuously improve our products for the benefit of our customers, we reserve the right to modify technical characteristics without notice. Warranties for AVINTAGE brand products are offered exclusively by selected retailers. No part of these instructions may be considered as a supplementary guarantee. FRIO ENTREPRISE cannot be held liable for errors or technical or editorial omissions in this document. Non-binding document. 64 EUROPEAN DATA SHEET according to the regulations (UE) N°1060/2010 SERVICE WINE CABINET BRAND AVINTAGE COMMERCIAL REFERENCE AVU8X(/IX) POWER SUPPLY 220-240 V / 50 Hz PRODUCT DIMENSIONS (W x D x H) 145 x 547.5 x 820 mm NET WEIGHT 20 kg APPLIANCE CATEGORY 2 ENERGY EFFICIENCY CLASS A ENERGY CONSUMPTION Energy consumption 135 kWh per year calculated on the basis of results obtained over 24 hours in standardized test conditions. Actual energy consumption depends on conditions of use and the location of the appliance. NET VOLUME 23 L ADJUSTABLE TEMPERATURES 5 – 20°C NO FROST Automatic defrost CLIMATE CLASS Climate class: N This appliance is designed to be used at an ambient temperature of between 16°C (lowest) and 32°C (highest). ACOUSTIC EMISSIONS IN AIR IN dB(A) RE 1 pW 44 dB(A) INSTALLATION TYPE Built-under installation This appliance is intended exclusively for the storage of wine. 65 EUROPEAN DATA SHEET according to the regulations (UE) N°1060/2010 SERVICE WINE CABINET BRAND AVINTAGE COMMERCIAL REFERENCE AVU23SX(/IX) POWER SUPPLY 220-240 V / 50 Hz PRODUCT DIMENSIONS (W x D x H) 295 x 571 x 820 mm NET WEIGHT 28 kg APPLIANCE CATEGORY 2 ENERGY EFFICIENCY CLASS A ENERGY CONSUMPTION Energy consumption 140 kWh per year calculated on the basis of results obtained over 24 hours in standardized test conditions. Actual energy consumption depends on conditions of use and the location of the appliance. NET VOLUME 56 L ADJUSTABLE TEMPERATURES 5 – 20°C NO FROST Automatic defrost CLIMATE CLASS Climate class: N This appliance is designed to be used at an ambient temperature of between 16°C (lowest) and 32°C (highest). ACOUSTIC EMISSIONS IN AIR IN dB(A) RE 1 pW 43 dB(A) INSTALLATION TYPE Free-standing and built-under installation This appliance is intended exclusively for the storage of wine. 66 EUROPEAN DATA SHEET according to the regulations (UE) N°1060/2010 SERVICE WINE CABINET BRAND AVINTAGE COMMERCIAL REFERENCE AVU41SXDPA(/IX) POWER SUPPLY 220-240 V / 50 Hz PRODUCT DIMENSIONS (W x D x H) 595 x 571 x 820 mm NET WEIGHT 48 kg APPLIANCE CATEGORY 2 ENERGY EFFICIENCY CLASS A ENERGY CONSUMPTION Energy consumption 144 kWh per year calculated on the basis of results obtained over 24 hours in standardized test conditions. Actual energy consumption depends on conditions of use and the location of the appliance. NET VOLUME 59.5 L x 2 ADJUSTABLE TEMPERATURES 5 – 20°C NO FROST Automatic defrost CLIMATE CLASS Climate class: N This appliance is designed to be used at an ambient temperature of between 16°C (lowest) and 32°C (highest). ACOUSTIC EMISSIONS IN AIR IN dB(A) RE 1 pW 43 dB(A) INSTALLATION TYPE Free-standing and built-under installation This appliance is intended exclusively for the storage of wine. 67 EUROPEAN DATA SHEET according to the regulations (UE) N°1060/2010 SERVICE WINE CABINET BRAND AVINTAGE COMMERCIAL REFERENCE AVU52SX(/IX) POWER SUPPLY 220-240 V / 50 Hz PRODUCT DIMENSIONS (W x D x H) 595 x 571 x 820 mm NET WEIGHT 44 kg APPLIANCE CATEGORY 2 ENERGY EFFICIENCY CLASS A ENERGY CONSUMPTION Energy consumption 145 kWh per year calculated on the basis of results obtained over 24 hours in standardized test conditions. Actual energy consumption depends on conditions of use and the location of the appliance. NET VOLUME 146 L ADJUSTABLE TEMPERATURES 5 – 20°C NO FROST Automatic defrost CLIMATE CLASS Climate class: N This appliance is designed to be used at an ambient temperature of between 16°C (lowest) and 32°C (highest). ACOUSTIC EMISSIONS IN AIR IN dB(A) RE 1 pW 44 dB(A) INSTALLATION TYPE Free-standing and built-under installation This appliance is intended exclusively for the storage of wine. 68 EUROPEAN DATA SHEET according to the regulations (UE) N°1060/2010 SERVICE WINE CABINET BRAND AVINTAGE COMMERCIAL REFERENCE AVU53CDZA POWER SUPPLY 220-240 V / 50 Hz PRODUCT DIMENSIONS (W x D x H) 595 x 571 x 820 mm NET WEIGHT 50 kg APPLIANCE CATEGORY 2 ENERGY EFFICIENCY CLASS A ENERGY CONSUMPTION Energy consumption 145 kWh per year calculated on the basis of results obtained over 24 hours in standardized test conditions. Actual energy consumption depends on conditions of use and the location of the appliance. NET VOLUME 134 L ADJUSTABLE TEMPERATURES 5 – 10°C / 10 – 20°C NO FROST Automatic defrost CLIMATE CLASS Climate class: N This appliance is designed to be used at an ambient temperature of between 16°C (lowest) and 32°C (highest). ACOUSTIC EMISSIONS IN AIR IN dB(A) RE 1 pW 45 dB(A) INSTALLATION TYPE Free-standing and built-under installation This appliance is intended exclusively for the storage of wine. 69 EUROPEAN DATA SHEET according to the regulations (UE) N°1060/2010 SERVICE WINE CABINET BRAND AVINTAGE COMMERCIAL REFERENCE AVU54SXDZA(/IX) POWER SUPPLY 220-240 V / 50 Hz PRODUCT DIMENSIONS (W x D x H) 595 x 571 x 820 mm NET WEIGHT 50 kg APPLIANCE CATEGORY 2 ENERGY EFFICIENCY CLASS A ENERGY CONSUMPTION Energy consumption 145 kWh per year calculated on the basis of results obtained over 24 hours in standardized test conditions. Actual energy consumption depends on conditions of use and the location of the appliance. NET VOLUME 134 L ADJUSTABLE TEMPERATURES 5 – 10°C / 10 – 20°C NO FROST Automatic defrost CLIMATE CLASS Climate class: N This appliance is designed to be used at an ambient temperature of between 16°C (lowest) and 32°C (highest). ACOUSTIC EMISSIONS IN AIR IN dB(A) RE 1 pW 45 dB(A) INSTALLATION TYPE Free-standing and built-under installation This appliance is intended exclusively for the storage of wine. 70 EUROPEAN DATA SHEET according to the regulations (UE) N°1060/2010 SERVICE WINE CABINET BRAND AVINTAGE COMMERCIAL REFERENCE PRO51C/1 POWER SUPPLY 220-240 V / 50 Hz PRODUCT DIMENSIONS (W x D x H) 595 x 571 x 820 mm NET WEIGHT 48 kg APPLIANCE CATEGORY 2 ENERGY EFFICIENCY CLASS A ENERGY CONSUMPTION Energy consumption 145 kWh per year calculated on the basis of results obtained over 24 hours in standardized test conditions. Actual energy consumption depends on conditions of use and the location of the appliance. NET VOLUME 146 L ADJUSTABLE TEMPERATURES 5 – 20°C NO FROST Automatic defrost CLIMATE CLASS Climate class: N This appliance is designed to be used at an ambient temperature of between 16°C (lowest) and 32°C (highest). ACOUSTIC EMISSIONS IN AIR IN dB(A) RE 1 pW 45 dB(A) INSTALLATION TYPE Free-standing and built-under installation This appliance is intended exclusively for the storage of wine. 71 Lesen Sie vor dem Gebrauch bitte die Bedienungsanleitung durch und befolgen Sie die darin angegebenen Sicherheits- und Gebrauchsanweisungen. Zunächst danken wir Ihnen für das Vertrauen, das Sie der AVINTAGE Gruppe mit dem Erwerb dieses Gerätes entgegen gebracht haben und hoffen, dass es Ihren Erwartungen voll gerecht wird. Durch den breit angelegten Temperatur-Einstellbereich haben Sie mit diesem Gerät die Wahl, Ihre Flaschen (je nachdem, über welche Flaschen Sie verfügen) zu lagern oder sie auf Serviertemperatur zu bringen. 1. ALLGEMEINE SICHERHEITSHINWEISE Vor der Erstinbetriebnahme des Gerätes bitte die Bedienungsanleitung sorgfältig lesen. Sie sorgsam aufbewahren, um später bei Bedarf darin nachschlagen zu können. Um die Gefahr eines Brandes oder Stromschlags und von Verletzungen zu verringern, sollten Sie bei der Benutzung Ihres Geräts die folgenden grundlegenden Sicherheitshinweise beachten. Das Gerät muss grundsätzlich durch eine qualifizierte Fachkraft gewartet werden. Lesen Sie die Bedienungsanleitung, einschließlich der darin enthaltenen Warnhinweise und nützlichen Tipps, zu Ihrer Sicherheit und zum korrekten Gebrauch des Geräts vor der Installation und Inbetriebnahme des Geräts aufmerksam durch. Um das Gerät nicht zu beschädigen und/oder unnötige Verletzungen zu vermeiden, ist es wichtig, dass die Personen, die das Gerät benutzen, seine Funktionsweise sowie seine Sicherheitsfunktionen gut kennen. Bewahren Sie die Bedienungsanleitung zum späteren Nachschlagen auf und verstauen Sie sie neben dem Gerät, damit sie beim Verkauf bzw. Umzug zusammen mit dem Gerät übergeben wird. So kann gewährleistet werden, dass das Gerät optimal funktioniert. Bewahren Sie die Bedienungsanleitung auf, um der Verletzungsgefahr vorzubeugen. Der Hersteller kann nicht für Schäden durch unsachgemäßen Umgang mit dem Gerät haftbar 72 gemacht werden. Das Gerät ist ausschließlich für den Hausgebrauch und die Lagerung von bestimmten Getränken bei einer Lagertemperatur bestimmt, die höher ist als diejenige eines Lagerfachs für Frischprodukte. Es ist unter keinen Umständen zum Frischhalten von Lebensmitteln bestimmt. Sich vergewissern, dass die Spannung der elektrischen Installation derjenigen auf dem Typenschild des Geräts entspricht. Das Gerät muss an eine vorschriftsmäßig geerdete Steckdose angeschlossen werden. Fehlerhafte Reparaturen oder Anschlüsse können zu Sicherheitsrisiken führen. Im Zweifel ist die elektrische Installation durch eine Elektrofachkraft prüfen zu lassen. Zu Ihrem Schutz muss das Gerät ordnungsgemäß an eine Schukosteckdose angeschlossen werden. Auf keinen Fall den Schutzleiter am mitgelieferten Netzkabel abschneiden oder entfernen. Aus Sicherheitsgründen kein Verlängerungskabel verwenden. Ist das Gerät beschädigt (z.B. durch einen starken Stoß) oder hat es Schaden erlitten (Stromstoß infolge Blitzschlag, Wasserschaden, Brand), kann sich sein Gebrauch als gefährlich erweisen. Den Netzstecker aus der Steckdose ziehen und das Gerät durch eine zugelassene Reparaturwerkstatt prüfen lassen. Zur Vorbeugung von Gefahren ein beschädigtes Netzkabel nicht selbst austauschen. Den Händler, eine zugelassene Reparaturwerkstatt oder eine Elektrofachkraft kontaktieren. Das Gerät muss so aufgestellt werden, dass die Netzsteckdose 73 erreichbar ist. Das Gerät nicht verstellen, wenn es gefüllt ist – das Gehäuse könnte sich verziehen und völlig unbrauchbar werden. Die Elektroteile dürfen nicht direkt erreichbar sein. Kinder von dem Gerät fernhalten. Das Gerät nicht im Freien verwenden. Sollte versehentlich Flüssigkeit (zerbrochene Flasche, usw.) auf elektrische Bauteile (Motor, usw.) auslaufen, sofort den Netzstecker aus der Steckdose ziehen. Zur Vorbeugung der Brand-, Stromschlagoder Verletzungsgefahr das Netzkabel, den Netzstecker bzw. das Gerät nicht in Wasser oder sonstige Flüssigkeiten tauchen. Das Gerät nicht mit feuchten Händen anfassen. Das Gerät von Wärmequellen fernhalten und vor direkter Sonnenbestrahlung schützen. Das Netzkabel nicht von einem Tisch hängen und mit scharfen Kanten oder heissen Flächen in Berührung kommen lassen. Nicht am Netzkabel, sondern am Netzstecker ziehen, um das Gerät vom Stromnetz zu trennen. Sicherstellen, dass die Fläche, auf der das Gerät aufgestellt wird, sein Gewicht tragen kann, wenn es gefüllt ist (eine 75 cl Flasche wiegt ungefähr 1.3 kg). Der Weinschrank muss auf einer ebenen Fläche platziert werden. Beim Aufstellen des Gerätes auf einem Teppich bzw. Teppichboden eine Unterlage darunter legen. Um Schäden an der Türdichtung zu vermeiden, müssen Sie vor dem Herausnehmen der Roste aus den Fächern sicherstellen, 74 dass die Tür ganz offen ist. Sicherheit von Kindern und hilfsbedürftigen Personen Das Gerät kann von Kindern im Alter von 8 Jahren und mehr sowie Personen mit eingeschränkten körperlichen, sensorischen oder geistigen Fähigkeiten oder die den Gebrauch des Gerätes nicht erlernt haben, benutzt werden, wenn sie von einer sachkundigen Person, die sich der damit verbundenen Risiken bewusst ist, betreut werden. Kinder dürfen nicht mit dem Gerät spielen. Die Reinigung und Benutzerwartung dürfen nicht von Kindern durchgeführt werden, außer sie sind mindestens 8 Jahre alt und werden dabei überwacht. Alle Verpackungen außerhalb der Reichweite von Kindern aufbewahren, da Erstickungsgefahr besteht. Es besteht die Gefahr, dass Kinder im Gerät eingeschlossen werden. Leider kommt es immer wieder vor, dass Kinder in solchen Geräten eingeschlossen werden und ersticken. Weggeworfene oder zurückgelassene Geräte sind immer noch gefährlich, auch wenn man sie „nur für ein paar Tage“ in der Garage abstellt. Bei der Entsorgung des Gerätes den Netzstecker aus der Steckdose ziehen und das Netzkabel abschneiden (möglichst dicht am Gerät) und die Tür entfernen, damit Kinder nicht damit spielen und einen Stromschlag erleiden oder sich im Geräteinneren einschließen können. Muss das mit einer magnetischen Türdichtung ausgestattete Gerät durch ein anderes Gerät mit einem Schnappschloss an der Tür bzw. Dichtung ersetzt werden, vor der Entsorgung des Altgerätes prüfen, dass das Schnappschloss funktionsunfähig ist. So lässt sich vermeiden, dass das Gerät zu einer Falle für Kinder wird. 75 Das Gerät und das Netzkabel außerhalb der Reichweite von Kindern unter 8 Jahren aufbewahren. Vor der Entsorgung Ihres ausgedienten Weinklimaschranks sollten Sie die Gerätetür entfernen. Lassen Sie die Zwischenböden im Kühlschrank, damit Kinder nicht einfach hineinklettern können. Allgemeine Sicherheit ACHTUNG — Das Gerät ist für den Hausgebrauch und ähnliche Anwendungen bestimmt, wie z.B Personalküchen in Geschäften, Arbeitsumgebungen, Gästehäuser, Hotels, Wohnumgebungen, Büros Motels und sonstigen und sonstige Umgebungen vom Typ Bed and Breakfast, Verpflegung und ähnliche Großhandelsanwendungen. ACHTUNG — Um eine Gefährdung infolge einer Instabilität des Geräts zu vermeiden, muss es gemäß den Anweisungen befestigt werden. ACHTUNG — Bewahren Sie keine entzündlichen Stoffe, wie z.B. Spraydosen, im Inneren des Gerätes auf, da sie dort auslaufen können. ACHTUNG — Ist das Netzkabel beschädigt, muss es zur Vermeidung der Stromschlaggefahr umgehend durch den Hersteller oder einen Fachhändler ausgetauscht werden. ACHTUNG — Die Lüftungsöffnungen dürfen nicht versperrt werden. Prüfen Sie, dass die Luft frei durch die Öffnungen zirkulieren kann, vor allem bei Einbaugeräten. 76 ACHTUNG — Keine mechanischen Vorrichtungen oder sonstige Hilfsmittel zum Beschleunigen des Abtauvorgangs verwenden, die nicht vom Hersteller empfohlen wurden. ACHTUNG — Den Kältekreislauf auf keinen Fall beschädigen. ACHTUNG — Im Inneren des Kühlfachs keine Elektrogeräte verwenden, außer diese sind vom Hersteller zugelassen. ACHTUNG — Kältemittel und das Treibmittel der Isolierung sind brennbar. Das Gerät nur in einer amtlich zugelassenen Entsorgungsanlage entsorgen. Keinem offenen Feuer aussetzen. ACHTUNG — Diese Geräte enthalten das Kühlmittel R600a (Isobutan), stellen Sie keine brenn- oder entzündbaren und explosionsgefährlichen Artikel in den Kühlschrank oder in seine Nähe, um jede Brand- und Explosionsgefahr auszuschließen. Kältemittel Im Kältekreislauf des Geräts wird Isobutan (R600a) eingesetzt. Es handelt sich dabei um ein hochentzündliches Gas, das umweltschädigend ist. Beim Transport und der Installation des Geräts prüfen, dass keine Komponenten des Kältekreislaufs beschädigt sind. Das Kältemittel (R600a) ist eine entzündbare Flüssigkeit. Achtung! Brandgefahr Bei Beschädigungen des Kältekreislaufs: Offene Flammen und sonstige Zündquellen vermeiden. Den Raum, in dem sich das Gerät befindet, gut lüften. Es ist gefährlich, irgendwelche Änderungen an der Zusammensetzung des Geräts vorzunehmen. 77 Schäden am Netzkabel können einen Kurzschluss und/oder elektrischen Schlag verursachen. Elektrische Sicherheit Wir können nicht für Schäden haftbar gemacht werden, die durch eine fehlerhafte Elektroinstallation verursacht werden. Das Netzkabel darf nicht Verlängerungskabel, keinen Mehrfachsteckdose verwenden. verlängert Adapter werden. Kein und keine Prüfen, dass der Netzstecker nicht zerdrückt oder beschädigt ist. Ein zerdrückter oder beschädigter Netzstecker kann überhitzen und einen Brand verursachen. Sicherstellen, dass der Netzstecker des Gerätes erreichbar ist. leicht Nicht am Netzkabel ziehen. Den Schutzkontakt auf keinen Fall entfernen. Wenn die Wandsteckdose locker ist, den Netzstecker nicht anschließen. Es besteht Stromschlag- bzw. Brandgefahr. Das Gerät darf nicht ohne die Leuchtenabdeckung der Innenbeleuchtung betrieben werden. Der Weinschrank darf nur an eine Stromversorgung mit 220~240V/50Hz Einphasenwechselstrom angeschlossen werden. Ist das Netzkabel beschädigt, es nicht selbst austauschen, sondern den Kundendienst kontaktieren. Der Netzstecker muss leicht erreichbar sein, aber außerhalb der Reichweite von Kindern liegen. Bei Zweifeln wenden Sie sich bitte an Ihren Elektroinstallateur. 78 Täglicher Gebrauch Dieses Gerät ist ausschließlich für die Lagerung von Wein bestimmt. Keine entzündlichen Stoffe oder Flüssigkeiten im Geräteinneren aufbewahren, da Explosionsgefahr besteht. Keine anderen Elektrogeräte (Mixer, Eismaschinen, usw.) im Geräteinneren betreiben. Beim Abtrennen des Gerätes von der Stromversorgung am Netzstecker und nicht am Kabel ziehen. Keine heißen Gegenstände in der Kunststoffkomponenten des Gerätes platzieren. Nähe der Die Empfehlungen des Geräteherstellers zur Lagerung sind genau zu befolgen. Für die Lagerung die entsprechenden Anweisungen befolgen. Das Gerät muss von Kerzen, Beleuchtungskörpern und offenen Flammen ferngehalten werden, um der Brandgefahr vorzubeugen. Das Gerät ist für die Aufbewahrung von Lebensmitteln und/oder Getränken in normalen Haushalten bestimmt, wie in der Bedienungsanleitung erläutert. Das Gerät ist schwer. Seien Sie vorsichtig, wenn Sie das Gerät verstellen. Bei Geräten, die mit Rollen ausgestattet sind, ist zu beachten, dass diese nur dazu dienen, kurze Bewegungen zu erleichtern. Das Gerät nicht über längere Strecken verschieben. Nicht auf das Gehäuseunterteil, die Schubkästen, Türen, usw. steigen oder sich darauf abstützen. Um das Herabstürzen von Gegenständen und Beschädigungen des Gerätes zu vermeiden, die Fächer des Gerätes nicht überladen. 79 Achtung: Reinigung und Pflege Vor der Reinigung den Netzstecker aus der Steckdose ziehen und den Strom abstellen. Das Gerät nicht mit metallischen Gegenständen, Dampfreinigern, flüchtigen Ölen, organischen Lösemitteln oder Scheuermitteln reinigen. Die einzelnen Geräteteile niemals mit brennbaren Flüssigkeiten reinigen. Durch die Dämpfe könnten Brand- und Explosionsgefahren entstehen. Zum Entfernen von Eis keine scharfen oder spitzen Gegenstände verwenden. Stattdessen einen Kunststoffschaber verwenden. Wichtiger Hinweis zur Installation! Vermeiden Sie es, das Gerät an einem feuchten Standort aufzustellen. Das Gerät von direkter Sonnenbestrahlung und Wärmequellen (Ofen, Heizgerät, Heizkörper, usw.) fernhalten. Direkte Sonnenbestrahlung kann die Acrylbeschichtung beschädigen und Wärmequellen können den Stromverbrauch erhöhen. Extrem kalte oder warme Raumtemperaturen können ebenfalls dazu führen, dass das Gerät nicht richtig funktioniert. Schließen Sie den Weinklimaschrank nur an einer vorschriftsmäßig installierten und geerdeten Wandsteckdose an (keine Mehrfachsteckdose verwenden). Entfernen oder unterbrechen Sie niemals den dritten Zinken (Erdungszinken) des mitgelieferten Netzkabels. Bei Fragen zu Stromversorgung und/oder Erdung wenden Sie sich direkt an einen Elektroinstallateur oder ein autorisiertes Kundendienstzentrum. Zur ordnungsgemäßen Ausführung der elektrischen Anschlüsse die Vorschriften in der Bedienungsanleitung beachten. 80 Das Gerät auspacken und visuell prüfen, dass es nicht beschädigt ist. Das Gerät nicht anschließen, wenn es beschädigt ist. Etwaige Schäden der Verkaufsstelle melden, wo Sie das Gerät gekauft haben. In diesem Fall die Verpackung aufbewahren. Es wird empfohlen, vor dem Anschluss des Gerätes an die Stromversorgung mindestens vierundzwanzig Stunden zu warten, damit der Kompressor ordnungsgemäß mit Öl gefüllt ist. Eine gute Luftzirkulation ist notwendig, um die Gefahr der Überhitzung zu vermeiden. Zur Gewährleistung einer ausreichenden Belüftung die angegebenen Installationshinweise beachten. Möglichst vermeiden, dass das Gerät die Wand berührt und/oder mit heissen Bauteilen (Kompressor, Kondensator) in Berührung kommt, um der Brandgefahr vorzubeugen. Prinzipiell die Installationsvorschriften beachten. Das Gerät darf nicht neben Heizkörpern oder Kochplatten aufgestellt werden. Prüfen, dass die Steckdosen erreichbar sind, nachdem das Gerät installiert wurde. Energieeinsparungen Zur Begrenzung des Stromverbrauchs des Gerätes: Das Gerät an einem geeigneten Ort aufstellen (siehe Abschnitt " Installationsanweisungen"). Die Türen nur so lange wie unbedingt nötig öffnen. Durch die periodische Reinigung des Kondensators den optimalen Betrieb des Gerätes sicherstellen (siehe Abschnitt "Pflege"). Die Türdichtungen periodisch kontrollieren und prüfen, dass die Türen gut schließen. Ist dies nicht der Fall, wenden Sie 81 sich bitte an den Kundendienst. Störungsbehebung Alle elektrischen Arbeiten müssen von einer sachkundigen Elektrofachkraft durchgeführt werden. Das Gerät muss von einer zugelassenen Reparaturstelle repariert werden. Für die Reparatur dürfen nur Originalersatzteile verwendet werden. Das Gerät ist ausschließlich für den Hausgebrauch bestimmt. Der Hersteller kann nicht für die unsachgemäße Verwendung haftbar gemacht werden. R600a Hinweise Sicherheit Achtung! Die Lüftungsgitter des Gerätes nicht versperren. Achtung! In dem Gerät keine explosionsfähigen Stoffe, wie z.B. Spraydosen mit entzündlichem Treibgas, lagern. Achtung! Den beschädigen. Kältemittelkreislauf des Gerätes nicht Achtung! Die Kühleinheiten funktionieren mit Isobutan (R600a) und dürfen daher nicht in einem Bereich mit Zündquellen aufgestellt werden (z.B. offene elektrische Kontakte oder auslaufendes Kältemittel). Der Kältemitteltyp ist auf dem Typenschild des Gerätes angegeben. Achtung! In den Fächern des Gerätes keine Elektrogeräte verwenden, außer sie wurden vom Hersteller ausdrücklich empfohlen. 82 Das Gerät entspricht allen geltenden europäischen Richtlinien und ihren etwaigen Änderungen und ist insbesondere konform mit den folgenden Normen: 2011/65/EU (ROHS) 2014/35/EU Niederspannungsrichtlinie 2014/30/EU Richtlinie über die elektromagnetische Verträglichkeit 643/2009/CE über die Kennzeichnung Energieverbrauch von Haushaltskühlgeräten in Bezug auf den 2. TECHNISCHE DATEN Nachstehend als Beispiel ein Typenschild: Das Typenschild befindet sich im Geräteinneren bzw. an der Geräterückseite (modellabhängig). Es enthält alle gerätespezifischen Angaben. Wir raten Ihnen, die Seriennummer vor der Installation in der Bedienungsanleitung zu notieren, um sie später bei Bedarf griffbereit zu haben (Reparatur, Kundendienstanfrage). Ist das Gerät erst einmal installiert und gefüllt, ist der Zugriff auf die Seriennummer erschwert. ACHTUNG: ohne diese Angaben kann Ihnen der Kundendienst nicht weiterhelfen. 3. INSTALLATIONSANWEISUNGEN Vor dem Gebrauch des Gerätes Die Außen- und Innenverpackung entfernen. Das Gerät vor dem Anschließen an das Stromnetz ungefähr 24 Stunden lang aufrecht stehen lassen. 83 Dies verringert die Gefahr von Funktionsstörungen des Kühlsystems durch die Handhabung beim Transport. Das Gerät innen mit einem weichen, mit lauwarmem Wasser getränkten Tuch reinigen. Wählen Sie beim Aufstellen des Geräts einen geeigneten Standort. Stellen Sie Ihren Weinschrank auf einen Untergrund, der über eine ausreichende Tragfähigkeit für den vollgefüllten Schrank verfügt. Zum Ausrichten des Weinschranks den vorderen Einstellfuß unten am Weinschrank einstellen. Es ist eine ausreichende Belüftung erforderlich, den Luftaustritt an der Vorderseite nicht versperren. Nicht für die Aufstellung im Keller bestimmt. Das Gerät ist nur für den Gebrauch in Innenräumen bestimmt. Dieser Schrank kann sowohl „frei stehend“, als auch als „Einbaugerät“ installiert werden. Den Weinschrank an eine Einzelsteckdose anschließen, dabei einen Abstand von 30 mm zwischen der Geräterückseite und der Mauer lassen. Justieren Sie Ihren Weinschrank aus und bringen Sie ihn in die waagrechte Stellung (am besten mit einer Wasserwaage). Dies verhindert Bewegungen aufgrund mangelnder Stabilität, die Geräusche und Vibrationen erzeugen können, und garantiert, dass die Türe absolut dicht verschlossen wird. Dieses Gerät ist ausschließlich zum Lagern von Wein bestimmt. Dieses Gerät arbeitet mit einem brennbaren Kältemittel. Achten Sie deshalb darauf, das Kühlrohrleitungssystem beim Transport nicht zu beschädigen. Achtung Lagern Sie die Flaschen im geschlossenen Zustand. Überladen Sie das Gerät nicht. Öffnen Sie die Tür nicht öfter als unbedingt notwendig. Decken Sie die Roste nicht mit Alufolie oder anderem Material ab, das verhindert die gute Zirkulation der Luft. Wenn der Weinschrank während längerer Zeit leer stehen soll, empfehlen wir, das Gerät nach einem sorgsamen Reinigen vom Netzstrom abzustecken und die Tür leicht geöffnet zu lassen, damit Luft zirkulieren und das Entstehen von Schimmelpilzen und Gerüchen verhindert werden kann. ACHTUNG: das Gerät von entzündlichen Stoffen fernhalten. Raumtemperaturgrenzen Dieses Gerät ist für den Betrieb unter Raumtemperaturbedingungen bestimmt, die durch die Temperaturklasse bestimmt werden, die am Typenschild angeführt ist. KLASSE SYMBOL UMGEBUNGSTEMPERATURBEREICH (°C) Erweitert temperiert SN Von +10 bis +32 Temperiert N Von +16 bis +32 Subtropisch ST Von +16 bis +38 Tropisch T Von +16 bis +43 84 Einbauschema AVU8X(/IX) AVU23SX(/IX) 85 AVU41SXDPA(/IX) AVU52SX(/IX) AVU54SXDZA(/IX) 86 AVU53CDZA PRO51C/1 Türumkehrung Türanschlag wechseln: Die Tür kann links oder rechts befestigt werden. Werksseitig ist das Scharnier rechts, so dass die Tür von links geöffnet wird. Sollte die Tür von rechts geöffnet werden, gehen Sie wie folgt vor: AVU8X(/IX) 87 1. Unteres Scharnier (rechts) 4. Tür 7. Oberes Scharnier (links) 2. Schraube 5. Oberes Scharnier (rechts) 8. Unteres Scharnier (links) 3. Türachse 6. Scharnierschrauben 1. Öffnen Sie die Tür im rechten Winkel. Lösen Sie die beiden Schrauben (2) der unteren Achse der Tür und nehmen Sie die Tür (4) und die Türachse ab (Abb. A). Positionieren Sie die Tür (4) (Fig. A und B). 2. Schrauben Sie drei Schrauben (6) aus dem oberen Scharnier (rechts) (5) und nehmen Sie es und unteres Scharnier (rechts). (Abb. C). ab 3. Ziehen Sie die Ziernägel (8) links oben aus dem Gerät und bringen Sie das obere Zusatzscharnier (links) (7) links oben mithilfe der drei Schrauben an (Abb. D). Bauen Sie das verbliebene untere Scharnier (links) (8) ebenso wie oben beschrieben ein (Abb. E). 4. Die Tür öffnet sich 180°C weit. Die Tür ist so einzubauen, wie sie ausgebaut wurde; setzen Tür richtig an und befestigen Sie sie. Sie die AVU23SX(/IX) AVU52SX(/IX) 1. Unteres Scharnier (rechts) 4. Tür 7. Oberes Scharnier (links) 10. Rückhaltevorrichtung 2. Schraube 5. Oberes Scharnier (rechts) 8. Ziernagel 11. Schraube 3. Türachse 6. Scharnierschrauben 9. Unteres Scharnier (links) 12. Stopfen 1. Öffnen Sie die Tür im rechten Winkel. Lösen Sie die beiden Schrauben (2) der unteren Achse der Tür und nehmen Sie die Tür (4) und die Türachse ab (Abb. A). 2. Positionieren Sie die Tür (4) und ziehen Sie den Stopfen (12) aus dem oberen Abschnitt des Türrahmens; lösen Sie eine der unteren Schrauben (11) und entfernen Sie die Rückhaltevorrichtung (10). Bringen Sie diese Vorrichtung anschließend im oberen Abschnitt des Türrahmens an. Es sollte vorzugsweise ein Austauschstopfen (12) verwendet werden, um das Loch im oberen Abschnitt des Rahmens zu verschließen (Abb. A/B). 3. Schrauben Sie drei Schrauben (6) aus dem oberen Scharnier (rechts) (5) und nehmen Sie es ab (Abb. C). 4. Entfernen Sie die Ziernägel (8) oben links am Gerät und bringen Sie das obere Austauschscharnier 88 (links) (7) oben links mithilfe von drei Schrauben an (Abb. D). 5. Bauen Sie das untere Austauschscharnier (links) (9) ebenso wie oben beschrieben ein (Abb. E). 6. Die Tür öffnet sich 180°C weit. Die Tür ist so wieder einzubauen, wie sie ausgebaut wurde; setzen Sie die Tür richtig an und befestigen Sie sie. 7. Verschließen Sie das Loch oben rechts am Gerät mit einem Ziernagel (8). AVU53CDZA AVU54SXDZA(/IX) PRO51C/1 1. Unteres Scharnier (rechts) 4. Tür 7. Oberes Scharnier (links) 2. Schraube 5. Oberes Scharnier (rechts) 8. Ziernagel 3. Türachse 6. Scharnierschrauben 9. Unteres Scharnier (links) 1. Öffnen Sie die Tür im rechten Winkel. Lösen Sie die beiden Schrauben (2) der unteren Achse der Tür und nehmen Sie die Tür (4) und die Türachse ab (Abb. A). 2. Positionieren Sie die Tür (4). 3. Schrauben Sie drei Schrauben (6) aus dem oberen Scharnier (rechts) (5) und nehmen Sie (Abb. C). es ab. 4. Ziehen Sie die Ziernägel (8) links oben aus dem Gerät und bringen Sie das obere Zusatzscharnier (links) (7) links oben mithilfe der drei Schrauben an (Abb. D). 5. Bauen Sie das verbliebene untere Scharnier (links) (9) ebenso wie oben beschrieben ein (Abb. E). 6. Die Tür öffnet sich 180°C weit. Die Tür ist so einzubauen, wie sie ausgebaut wurde; setzen Tür richtig an und befestigen Sie sie. Sie die 7. Verschließen Sie das Loch oben rechts am Gerät mit einem Ziernagel (8). 89 4. BETRIEB DES GERÄTES Es wird empfohlen, das Gerät an einem Ort aufzustellen, an dem die Raumtemperatur zwischen 1632°C beträgt. Liegt die Raumtemperatur über oder unter den empfohlenen Temperaturen, kann die Leistung des Gerätes beeinträchtigt und die Temperatur zwischen 5-20°C oder 5-10°C/10-20°C ggf. (je nach Modell) nicht erreicht werden. AVU8X(/IX) / AVU23SX(/IX) AVU41SXDPA(/IX) AVU52SX(/IX) PRO51C/1 “RUN” Betriebsanzeige Taste Zum Einschalten/Ausschalten des Geräts. Die Taste für ca. 3 Sekunden gedrückt halten. Taste Beleuchtungstaste Temperaturanzeige Elektronische Temperaturanzeige Taste Temperatureinstellknopf + Taste Temperatureinstellknopf Durch Drücken der Tasten / können Sie die gewünschte Temperatur im Fach auswählen. Bei jedem Tastendruck erhöht/verringert sich die programmierte Temperatur um 1°C. Sie können eine Temperatur zwischen 5 und 20°C oder 5 und 10°C / 10 und 20 °C auswählen (je nach Modell). Sobald die Auswahl stattgefunden hat, blinkt die Anzeige etwa 5s lang, und zeigt dann die IstTemperatur im Inneren des Weinschrankes an. Die Einstelltemperatur kann jederzeit angezeigt werden, indem man 5s lang auf die Temperaturauswahltasten drückt. Bei einem Stromausfall werden alle vorher ausgewählten Temperaturen gelöscht und jedes Fach wird standardmäßig auf die werkseitig vorprogrammierte Temperatur von 12°C zurückgesetzt. AVU53CDZA AVU54SXDZA(/IX) “RUN” Betriebsanzeige Taste Zum Einschalten/Ausschalten des Geräts. 90 Die Taste für ca. 3 Sekunden gedrückt halten. Taste Beleuchtungstaste Temperaturanzeige Elektronische Anzeige für das obere Fach Temperaturanzeige Elektronische Anzeige für das untere Fach Taste Temperaturauswahltaste für das obere Fach Taste Temperaturauswahltaste für das untere Fach Drücken Sie auf “ ”, um die Temperatur des oberen Faches einzustellen. Die Anzeige des entsprechenden Faches beginnt dann zu blinken und jeder Tastendruck verändert die Temperatur um jeweils 1°C. Sobald die tiefste Einstelltemperatur von 5°C erreicht ist, springt die Anzeige automatisch wieder auf die höchste Einstelltemperatur von 10°C zurück. Sobald die Auswahl stattgefunden hat, blinkt die Anzeige etwa 5s lang, und zeigt dann die Ist-Temperatur im Inneren des Weinschrankes an. Die Einstelltemperatur kann jederzeit angezeigt werden, indem man 5s lang auf die Temperaturauswahltasten drückt. Drücken Sie auf “ ”, um die Temperatur des unteren Faches einzustellen. Die Anzeige des entsprechenden Faches beginnt dann zu blinken und jeder Tastendruck verändert die Temperatur um jeweils 1°C. Sobald die tiefste Einstelltemperatur von 10°C erreicht ist, springt die Anzeige automatisch wieder auf die höchste Einstelltemperatur von 20°C zurück. Sobald die Auswahl stattgefunden hat, blinkt die Anzeige etwa 5s lang, und zeigt dann die Ist-Temperatur im Inneren des Weinschrankes an. Die Einstelltemperatur kann jederzeit angezeigt werden, indem man 5s lang auf die Temperaturauswahltasten drückt. Bei einem Stromausfall werden alle vorher ausgewählten Temperaturen gelöscht und jedes Fach wird standardmäßig auf die werkseitig vorprogrammierte Temperatur von 6°C im oberen, und 12°C im unteren Fach zurückgesetzt. Hinweise für den Betrieb Temperaturalarm: Wenn die Innentemperatur über 23 °C steigt, wird auf dem Bedienfeld „HI“ angezeigt und nach einer Stunde ertönt ein durchgehendes akustisches Alarmsignal. Es zeigt an, dass die Innentemperatur zu hoch ist. Überprüfen Sie den Grund dafür! Wenn die Innentemperatur unter 0 °C fällt, wird auf dem Bedienfeld „LO“ angezeigt, gleichzeitig ertönt das akustische Alarmsignal und die Kontrollleuchte zur Störungsanzeige leuchtet auf. Wiederherstellung der Temperatur: Für den Fall eines Stromausfalls speichert der Weinklimaschrank die Temperatureinstellungen. Sobald die Stromversorgung wiederhergestellt ist, stellt der Weinklimaschrank die vor dem Stromausfall eingestellte Temperatur wieder her. 91 Innenbeleuchtung Um Energie einzusparen schaltet dieser Weinkühlschrank die LED-Beleuchtung nach 10 Minuten automatisch ab. Es ist möglich, die LED-Beleuchtung durchgehend eingeschaltet zu lassen. Dafür halten Sie die Taste dsds5 Sekunden gedrückt, auf der Digitalanzeige erscheint nun „LP“. Nach 4 Sekunden kehrt das Display auf die Normalanzeige zurück; die Beleuchtung bleibt an, bis sie von Hand ausgeschaltet wird. Um wieder in den Energiesparmodus zu wechseln (empfohlene Betriebsart), halten Sie die Taste 5 Sekunden gedrückt. Auf der Digitalanzeige erscheint „LF“. Nach 4 Sekunden kehrt das Display auf die Normalanzeige zurück und die Beleuchtung schaltet nach 10 Minuten automatisch ab. 5. AUSSTATTUNG Die Klimatisierung Entsprechend der Meinung von Fachleuten liegt die optimale Lagertemperatur für Weine um 12°C, in einer Bandbreite zwischen 10° und 14°C. Diese ist jedoch nicht mit der Serviertemperatur zu verwechseln, die ihrerseits je nach Eigenheit und Beschaffenheit des Weines zwischen 5 und 20°C liegt. Abrupte Temperaturschwankungen sind in jedem Fall zu vermeiden. Dieses Gerät wurde von Fachleuten für Weinliebhaber entwickelt, und berücksichtigt im Gegensatz zum einfachen Kühlschrank die Empfindlichkeit der Grand Crus hinsichtlich abrupter Temperaturschwankungen mit der genauen Kontrolle einer konstanten Durchschnittstemperatur. Schwingungsdämpfung Der Kühlkompressor ist mit speziellen Schwingungsdämpfern (Silent-Blocks) ausgestattet und das Innengehäuse ist durch eine dicke Schicht an Polyurethan-Schaum vom Außengehäuse isoliert. Durch diese Merkmale wird verhindert, dass sich die Schwingungen auf Ihre Weine übertragen. Befeuchtung Da dieses Gerät über keinen Kohlefilter verfügt, ist es mit einem Behälter ausgestattet, (je nach Modell), der die Feuchtigkeit auf einem korrekten Niveau hält. Wenn nicht genügend Feuchtigkeit vorhanden ist, füllen Sie den Tank bitte ¾ voll auf. Überprüfen Sie von Zeit zu Zeit den Wasserstand und füllen Sie bei Bedarf Wasser nach. Achten Sie darauf, dass immer Wasser im Behälter ist. Avintage wurde von Fachleuten für Weinliebhaber entwickelt, und berücksichtigt deshalb auch die Empfindlichkeit der Korken hinsichtlich einer zu niedrigen Luftfeuchtigkeit. Deshalb ist der Behälter auf den Rost unterhalb der Lüftung an der Rückseite zu stellen, um ein Mindestmaß an Feuchtigkeit zu gewährleisten. Vergessen Sie nicht, den Wasserstand zu prüfen, wenn Sie Ihre Weine über einen langen Zeitraum hinweg lagern, und das Gerät nicht nur zu Temperierungszwecken vor dem Servieren (mit einer häufigen Flaschenrotation) nutzen. Vergewissern Sie sich, dass das Tablett voll Wasser vollständig stabil ist, um Wasserfälle oder Lecks zu vermeiden. UV-Filterung Licht beschleunigt den Alterungsprozess Ihrer Weine. In unseren Schränken mit Volltüren sind Ihre Weine natürlich geschützt, wenn Sie davon Abstand nehmen, die Türen zu oft zu öffnen. Dieses Modell mit Glastür ist mit einer besonderen Beschichtung versehen, die schädliche UV-Strahlen abweist; Ihre Weine sind somit absolut geschützt. 92 Abtauen Ihr Gerät ist mit einem automatischen Abtauzyklus ausgestattet. Bei Stillstand des Kühlzyklus tauen die gekühlten Oberflächen des Gerätes automatisch ab. Das so aufgefangene Abtauwasser wird in die Verdunstungsschale für Kondenswasser abgeleitet, die sich an der Geräterückseite in der Nähe des Kompressors befindet. Die vom Kompressor erzeugte Abwärme verdampft danach das im Behälter gesammelte Kondenswasser. Wintersystem (je nach Modell) Das Winterkit ist ein Frostschutzsystem mithilfe dessen der Weinschrank in einer Umgebung mit einer Temperatur zwischen 0° und 32°C betrieben werden kann. Wenn die Temperatur des Weinschranks mehr als 3°C unter die eingestellte Temperatur sinkt, wird ein elektrisches Heizelement mit geringer Leistung eingeschaltet, um die Innentemperatur auf die gewählte Temperatur anzuheben. Dieses Heizelement mit niedriger Leistung verhindert plötzliche Anstiege der Weintemperatur und Temperaturstöße, die sich schädlich auf die Alterung des Weins auswirken. Das automatische System dient zur Erhöhung der Weinschranktemperatur bevor es zu einem Wärmeaustausch mit den Flaschen kommt. Wenn die Innentemperatur nach dem Einschalten des Systems die eingestellte Temperatur erreicht, wird es ausgeschaltet. Roste Um Beschädigungen an der Türdichtung zu vermeiden, muss sichergestellt sein, dass die Türe weit geöffnet ist, bevor man den Rost zum Einlegen oder Herausnehmen von Flaschen herauszieht. Um leichter auf den Inhalt der Roste zugreifen zu können sollten Sie die Roste um etwa 1/3 ihrer Länge herausziehen, wobei selbige beiderseits mit einem Anschlag ausgestattet sind, um ein Herausfallen der Flaschen zu vermeiden. Zum Herausnehmen oder Einlegen der Roste sind diese, wie auf der Abbildung dargestellt, zu neigen und je nach Bedarf herauszuziehen oder einzuschieben. AVU41SXDPA(/IX) Setzen Sie die Roste an den passenden Stellen ein. 93 a. Karton mit den Ersatzteilen b. kleiner Rost c. großer Rost 1. Nehmen Sie nach dem Auspacken den Karton mit den Ersatzteilen für das Gerät heraus. 2. 4 kleine Roste (b) sind im linken Fach enthalten. Nehmen Sie die beiden unteren Roste heraus. 3. Im rechten Fach befinden sich 4 große Roste (c). Nehmen Sie die beiden oberen Roste heraus. 4. Die Position der kleinen und großen Roste muss also umgekehrt sein (Abb.2). Setzen Sie in jedes Fach oben zwei kleine Roste und unten zwei große Roste ein. 5. Sobald die Roste richtig eingesetzt sind, können Sie Ihren Weinschrank entsprechend den Vorschriften aus der Gebrauchsanweisung verwenden. Fuß-Schieberegler Zwei Fuß Schieber mit Ihrem Gerät zur Verfügung gestellt, so dass Sie sie leicht zu bewegen, wenn Sie Ihre Füße sind, um eine maximale Höhe eingestellt. Die Fuß-Schieberegler müssen parallel unter den Füßen in Übereinstimmung mit der Position für die vorderen und für den Rücken montiert werden. Hinter Vor Vor Hinter Fuß-Schieberegler Verstärkte Sicherheit Da diese Gerätereihe zum Lagern von wertvollen Gegenständen bestimmt ist, haben wir darauf geachtet, nur Bauteile von hoher Qualität zu verarbeiten, und Herstellungstechniken anzuwenden, die eine optimale Betriebssicherheit gewährleisten. Türgriffmontage Ihr Gerät ist mit einem Edelstahl-Türgriff ausgestattet. Nehmen Sie die Türdichtung ab und befestigen Sie den Türgriff gemäß nachfolgendem Schema mit den mitgelieferten Schrauben an der Tür. Front Back 94 6. BEFÜLLUNG Die Angaben zur maximalen Flaschenanzahl sind unverbindlich und ermöglichen (wie der Volumeninhalt von Kühlschränken) eine grobe Einschätzung der Gerätegröße. Sie entsprechen Tests, die mit einer Standardflasche durchgeführt wurden (in diesem Fall eine leichte 75 cl Bordeaux-Flasche). In der Normierung hat jede Flaschenform einen eigenen geografischen Ursprung (z.B. Bordeaux, Burgund, Provence, usw.) und Typ (z.B. Tradition, schwer, leicht, Flöte, usw.) mit jeweils individuellem Durchmesser und individueller Höhe. In Wirklichkeit könnte man im Extremfall mehr Flaschen einförmig und ohne Roste übereinander stapeln, aber ein reichhaltiger Weinschrank umfasst eine große Vielzahl verschiedener Flaschen und durch den praktischen Aspekt der alltäglichen Nutzung des Weinschranks bleibt die Flaschenanzahl begrenzt. Sie werden das Gerät daher wahrscheinlich mit etwas weniger Flaschen befüllen als die angegebene Höchstzahl. Flaschentypen: Hier sehen Sie vier Sorten von 75 cl Flaschen, Burgunder und Bordeaux, mit unterschiedlicher Größe. Es gibt zahlreiche weitere Flaschen mit allen möglichen Fassungsvermögen und Formen. Wird ein Weinschrank beispielsweise nur mit Burgunderflaschen gefüllt, liegt man rund 30% unter der ursprünglich für Bordeaux berechneten Menge. Gegeneinander Lagerung „Kopf bei Fuß“ Hals an Hals: Beachten Sie die unterschiedliche Tiefe! Kopf bei Fuß Hals zwischen den Bäuchen: Erhöhte Befüllung. 95 Beispiele von Serviertemperaturen Bei Verkostungen zu beachten, um die volle Geschmacksvielfalt der Weine genießen zu können! Die Meinungen gehen auseinander, die Umgebungstemperatur auch, aber viele sind sich über folgendes einig: Große Bordeaux-Weine / Rotwein 16 - 17°C Große Burgunder-Weine / Rotwein 15 - 16°C Grands Crus trockener Weißweine 14 - 16°C Leichte, fruchtige, junge Rotweine 11 - 12°C Rosé de Provence, Jungweine 10 - 12°C Trockene Weißweine und rote Tafelweine 10 - 12°C Weißer Tafelwein 8 - 10°C Champagner 7 - 8°C Zuckerreiche Weine 6°C 7. PFLEGE Ziehen Sie vor der Reinigung des Gerätes (regelmäßig durchzuführen) den Netzstecker aus der Steckdose oder nehmen Sie die entsprechende Sicherung heraus. Wir raten Ihnen, das Gerät vor der Erstinbetriebnahme und dann regelmäßig innen und außen (Frontseite, Seitenwände und Oberseite) mit lauwarmem Wasser und einem milden Reinigungsmittel zu reinigen. Mit klarem Wasser abspülen und vor dem Wiedereinschalten gut trocknen lassen. Auf keinen Fall Löse- bzw. Scheuermittel verwenden. Bei der Erstinbetriebnahme können noch Restgerüche vorhanden sein. Lassen Sie das Gerät in diesem Fall mehrere Stunden ohne Befüllung mit der niedrigsten Temperatur laufen. Durch die Kälte werden etwaige Gerüche beseitigt. Was tun bei Stromausfällen? Die meisten Stromausfälle sind nur von kurzer Dauer. Ein ein- bis zweistündiger Stromausfall hat keinen Einfluss auf die Temperatur im Weinschrank. Achten Sie bei Stromausfällen darauf, die Tür nicht unnötig zu öffnen, um den Wein zu schützen. Bei sehr langen Stromausfällen ergreifen Sie bitte die notwendigen Maßnahmen zum Schutz des Weines. Falls der Stecker gezogen, das Gerät ausgeschaltet ist oder ein Stromausfall aufgetreten ist, müssen Sie 3 bis 5 Minuten zuwarten, bevor Sie es wieder einschalten. Wenn Sie versuchen, es vor Ablauf dieser Zeitspanne einzuschalten, wird der Kompressor erst nach etwa 3/5 Minuten anlaufen (falls laut Temperatureinstellung nötig). Bei der Erstinbetriebnahme und nach einer längeren Abschaltung des Schrankes kann es beim Wiedereinschalten vorkommen, dass die ausgewählten und die angezeigten Temperaturen nicht übereinstimmen. Das ist normal! Warten Sie einfach einige Stunden zu, bis sich die Temperaturen wieder einpendeln. Bei längerer Abwesenheit Kurzer Urlaub: Lassen Sie den Weinklimaschrank während einer Abwesenheit von weniger als drei Wochen in Betrieb. Längere Abwesenheit: Sollte das Gerät mehrere Monate nicht benutzt werden, entfernen Sie den gesamten Inhalt und schalten Sie das Gerät aus. Reinigen und trocknen Sie den Innenraum sorgfältig. Um Geruchsentwicklung und Schimmelbefall vorzubeugen, lassen Sie die Tür leicht geöffnet: falls nötig blockieren, um zu verhindern, dass die Tür zufällt. 96 Ortswechsel des weinschranks Nehmen Sie alle Flaschen aus dem Gerät, befestigen Sie bewegliche Elemente. Um Schäden an den Nivellierschrauben der Füße zu vermeiden, sollten Sie diese ganz in die Basis des Geräts schrauben. Kleben Sie die geschlossene Tür mit Klebeband zu. Bewegen Sie das Gerät nur in senkrechter Stellung. Schützes Sie es mit Decken oder Ähnlichem vor Schäden. Energiesparen Stellen Sie das Gerät in einem kühlen Raum (aber über 16 °C), von Hitzequellen (andere Elektrogeräte) und direkter Sonnenbestrahlung entfernt auf. Der Raum, in dem das Gerät installiert wird, muss über eine Belüftung verfügen. Decken Sie die Belüftungsöffnungen des Geräts auf keinen Fall ab. Öffnen Sie die Tür nicht öfter als unbedingt notwendig. 8. IM PANNENFALL Trotz aller Sorgfalt, die wir für unsere Produkte aufwenden, kann eine Störung niemals völlig ausgeschlossen werden. Bevor Sie sich mit dem Kundendienst Ihres Händlers in Verbindung setzen, prüfen Sie bitte folgende Punkte: Der Netzstecker ist in der Steckdose Es liegt kein Stromausfall vor Die Störung ist nicht auf eine der Ursachen zurückzuführen, die in der Tabelle am Ende der Bedienungsanleitung beschrieben sind WICHTIGER HINWEIS: Ist das Gerätenetzkabel beschädigt, muss es vom Hersteller, einem von der Marke anerkannten Fachbetrieb oder dem Händler ausgetauscht werden. Zur Vermeidung der Verletzungsgefahr muss es auf jeden Fall von einer qualifizierten Fachkraft ausgetauscht werden. SOLLTEN DIESE KONTROLLEN ZU NICHTS FÜHREN, KONTAKTIEREN SIE BITTE DEN KUNDENDIENST IHRES HÄNDLERS. ACHTUNG! Ziehen Sie vor Reinigungs- bzw. Reparaturarbeiten prinzipiell den Netzstecker aus der Steckdose! 97 9. STÖRUNGSBEHEBUNG Sie können viele einfache Probleme mit dem Temperierschrank selbst lösen, ohne den Kundendienst einzuschalten. Versuchen Sie es mit den nachfolgenden Vorschlägen. PROBLEM Der Weinschrank schaltet sich nicht ein Der Weinschrank kühlt nicht genug Der Kompressor startet und stoppt häufig Die Beleuchtung funktioniert nicht Schwingungen Der Weinschrank scheint sehr laut zu funktionieren Die Tür schließt nicht ganz MÖGLICHE URSACHE Das Netzkabel wurde nicht angesteckt Der Ein-/Ausschalter steht auf Aus Die entsprechende Sicherung Ihrer Elektroanlage ist durchgebrannt Kontrollieren Sie die ausgewählte Temperatur Die Außentemperatur im Raum überschreitet die Der Weinschrank wird zu oft geöffnet Die Tür wird nicht gut geschlossen Die Türdichtung ist nicht dicht Die Raumtemperatur um den Weinschrank ist hoch Sie haben soeben viele neue Flaschen eingelegt Der Weinschrank wird zu oft geöffnet Die Tür wird nicht gut geschlossen Die Einstellung der Temperatur ist nicht richtig Die Türdichtung ist nicht dicht Das Netzkabel wurde nicht angesteckt Die entsprechende Sicherung Ihrer Elektroanlage ist durchgebrannt Die LED ist außer Betrieb, wenden Sie sich an den Kundendienst Der Beleuchtungsknopf steht auf Aus Stellen Sie absolut sicher, dass der Weinschrank ganz eben steht. Ein Geräusch wie zirkulierendes Wasser entsteht durch das Kühlgas und ist normal Am Ende des Kompressorzyklus hört man gelegentlich ein Geräusch fließenden Wassers Das Zusammenziehen und Dehnen der Innenwände kann krachende Geräusche ergeben Der Weinschrank steht nicht eben Der Weinschrank steht nicht eben Die Türdichtung ist schmutzig oder defekt Die Roste sind schlecht positioniert Austausch der Beleuchtung Dieses Gerät verfügt über Leuchtdioden (LED). Dieser Diodentyp kann vom Verbraucher nicht selbst gewechselt werden. Die Lebensdauer dieser LEDs ist normalerweise lang genug, so dass sie nicht gewechselt werden müssen. Sollte es jedoch trotz aller Sorgfalt bei der Fertigung Ihres Weinschranks zu einem Defekt der LEDs kommen, wenden Sie sich bitte auf jeden Fall an den Kundendienst. 98 10. UMWELT Das Gerät ist entsprechend der europäischen Richtlinie 2012/19/CE über Elektro- und Elektronik-Altgeräte (WEEE) gekennzeichnet. Durch die Gewährleistung der ordnungsgemäßen Entsorgung des Produkts helfen Sie, die potenziellen negativen Auswirkungen auf die Umwelt und menschliche Gesundheit zu verhindern, die anderenfalls durch die unsachgemäße Abfallbehandlung des Produkts entstehen können. Das auf dem Gerät angebrachte Symbol der durchgestrichenen Abfalltonne auf Rädern zeigt an, dass das Produkt am Ende seiner Lebensdauer vom restlichen Hausmüll getrennt entsorgt werden muss. Es muss daher zu einer Sammelstelle für Elektro- und Elektronikgeräte bzw. beim Kauf eines gleichwertigen Gerätes zum Händler des neuen Gerätes gebracht werden. Der Benutzer ist dafür verantwortlich, dass das Gerät am Ende seiner Lebensdauer einer geeigneten Sammelstelle zugeführt wird. Eine zweckmäßige, getrennte Sammlung zur Weiterleitung des unbenutzten Gerätes zum Recycling, zur Aufbereitung und umweltgerechten Entsorgung trägt dazu bei, mögliche negative Auswirkungen auf Umwelt und Gesundheit zu vermeiden und fördert das Recycling der Wertstoffe, aus denen das Produkt besteht. Um genauere Auskünfte zu den bestehenden Sammelsystemen zu erhalten, wenden Sie sich bitte an das örtliche Amt für Abfallentsorgung oder das Geschäft, in dem Sie das Gerät gekauft haben. 11. WARNHINWEIS In dem Bestreben der kontinuierlichen Qualitätsverbesserung unserer Produkte behalten wir uns die Möglichkeit vor, die technischen Merkmale ohne Vorankündigung zu ändern. Die Garantien für die Produkte der Marke AVINTAGE werden ausschließlich durch unsere Vertragshändler gewährt. In dieser Bedienungsanleitung gemachte Angaben können nicht als eine Zusatzgarantie ausgelegt werden. Die Firma FRIO ENTREPRISE kann nicht für Fehler bzw. technische und redaktionelle Versäumnisse in dieser Bedienungsanleitung haftbar gemacht werden. Unverbindliche Unterlage. 99 PRODUKTDATENBLATT gemäß der delegierten Verordnung (EU) Nr. 1060/2010 WEINSCHRANK HERSTELLER AVINTAGE HANDELSBEZEICHNUNG AVU8X(/IX) STROMVERSORGUNG 220-240 V / 50 Hz ABMESSUNGEN (B x T x H) 145 x 547,5 x 820 mm NETTOGEWICHT 20 kg GERÄTEKATEGORIE 2 ENERGIEEFFIZIENZKLASSE A ENERGIEVERBRAUCH Energieverbrauch 135 kWh/Jahr, auf der Grundlage von Ergebnissen der Normprüfung über 24 Stunden. Der tatsächliche Verbrauch hängt von der Nutzung und vom Standort des Geräts ab. NETTOVOLUMEN 23 L TEMPERATUR-EINSTELLBEREICH 5 – 20°C FROSTFREI Automatischer Abtauvorgang KLIMAKLASSE Klimaklasse: N Dieses Gerät ist für den Betrieb bei einer Umgebungstemperatur zwischen 16 °C (niedrigste Temperatur) und 32 °C (höchste Temperatur) bestimmt. LUFTSCHALLEMISSIONEN IN dB(A) RE 1 pW 44 dB(A) GERÄTETYP Einbaugerät Dieses Gerät ist ausschließlich zur Lagerung von Wein bestimmt. 100 PRODUKTDATENBLATT gemäß der delegierten Verordnung (EU) Nr. 1060/2010 WEINSCHRANK HERSTELLER AVINTAGE HANDELSBEZEICHNUNG AVU23SX(/IX) STROMVERSORGUNG 220-240 V / 50 Hz ABMESSUNGEN (B x T x H) 295 x 571 x 820 mm NETTOGEWICHT 28 kg GERÄTEKATEGORIE 2 ENERGIEEFFIZIENZKLASSE A ENERGIEVERBRAUCH Energieverbrauch 140 kWh/Jahr, auf der Grundlage von Ergebnissen der Normprüfung über 24 Stunden. Der tatsächliche Verbrauch hängt von der Nutzung und vom Standort des Geräts ab. NETTOVOLUMEN 56 L TEMPERATUR-EINSTELLBEREICH 5 – 20°C FROSTFREI Automatischer Abtauvorgang KLIMAKLASSE Klimaklasse: N Dieses Gerät ist für den Betrieb bei einer Umgebungstemperatur zwischen 16 °C (niedrigste Temperatur) und 32 °C (höchste Temperatur) bestimmt. LUFTSCHALLEMISSIONEN IN dB(A) RE 1 pW 43 dB(A) GERÄTETYP Freistehendes und als Einbaugerät Dieses Gerät ist ausschließlich zur Lagerung von Wein bestimmt. 101 PRODUKTDATENBLATT gemäß der delegierten Verordnung (EU) Nr. 1060/2010 WEINSCHRANK HERSTELLER AVINTAGE HANDELSBEZEICHNUNG AVU41SXDPA(/IX) STROMVERSORGUNG 220-240 V / 50 Hz ABMESSUNGEN (B x T x H) 595 x 571 x 820 mm NETTOGEWICHT 48 kg GERÄTEKATEGORIE 2 ENERGIEEFFIZIENZKLASSE A ENERGIEVERBRAUCH Energieverbrauch 144 kWh/Jahr, auf der Grundlage von Ergebnissen der Normprüfung über 24 Stunden. Der tatsächliche Verbrauch hängt von der Nutzung und vom Standort des Geräts ab. NETTOVOLUMEN 59.5 L x 2 TEMPERATUR-EINSTELLBEREICH 5 – 20°C FROSTFREI Automatischer Abtauvorgang KLIMAKLASSE Klimaklasse: N Dieses Gerät ist für den Betrieb bei einer Umgebungstemperatur zwischen 16 °C (niedrigste Temperatur) und 32 °C (höchste Temperatur) bestimmt. LUFTSCHALLEMISSIONEN IN dB(A) RE 1 pW 43 dB(A) GERÄTETYP Freistehendes und als Einbaugerät Dieses Gerät ist ausschließlich zur Lagerung von Wein bestimmt. 102 PRODUKTDATENBLATT gemäß der delegierten Verordnung (EU) Nr. 1060/2010 WEINSCHRANK HERSTELLER AVINTAGE HANDELSBEZEICHNUNG AVU52SX(/IX) STROMVERSORGUNG 220-240 V / 50 Hz ABMESSUNGEN (B x T x H) 595 x 571 x 820 mm NETTOGEWICHT 44 kg GERÄTEKATEGORIE 2 ENERGIEEFFIZIENZKLASSE A ENERGIEVERBRAUCH Energieverbrauch 145 kWh/Jahr, auf der Grundlage von Ergebnissen der Normprüfung über 24 Stunden. Der tatsächliche Verbrauch hängt von der Nutzung und vom Standort des Geräts ab. NETTOVOLUMEN 146 L TEMPERATUR-EINSTELLBEREICH 5 – 20°C FROSTFREI Automatischer Abtauvorgang KLIMAKLASSE Klimaklasse: N Dieses Gerät ist für den Betrieb bei einer Umgebungstemperatur zwischen 16 °C (niedrigste Temperatur) und 32 °C (höchste Temperatur) bestimmt. LUFTSCHALLEMISSIONEN IN dB(A) RE 1 pW 44 dB(A) GERÄTETYP Freistehendes und als Einbaugerät Dieses Gerät ist ausschließlich zur Lagerung von Wein bestimmt. 103 PRODUKTDATENBLATT gemäß der delegierten Verordnung (EU) Nr. 1060/2010 WEINSCHRANK HERSTELLER AVINTAGE HANDELSBEZEICHNUNG AVU53CDZA STROMVERSORGUNG 220-240 V / 50 Hz ABMESSUNGEN (B x T x H) 595 x 571 x 820 mm NETTOGEWICHT 50 kg GERÄTEKATEGORIE 2 ENERGIEEFFIZIENZKLASSE A ENERGIEVERBRAUCH Energieverbrauch 145 kWh/Jahr, auf der Grundlage von Ergebnissen der Normprüfung über 24 Stunden. Der tatsächliche Verbrauch hängt von der Nutzung und vom Standort des Geräts ab. NETTOVOLUMEN 134 L TEMPERATUR-EINSTELLBEREICH 5 – 10°C / 10 – 20°C FROSTFREI Automatischer Abtauvorgang KLIMAKLASSE Klimaklasse: N Dieses Gerät ist für den Betrieb bei einer Umgebungstemperatur zwischen 16 °C (niedrigste Temperatur) und 32 °C (höchste Temperatur) bestimmt. LUFTSCHALLEMISSIONEN IN dB(A) RE 1 pW 45 dB(A) GERÄTETYP Freistehendes und als Einbaugerät Dieses Gerät ist ausschließlich zur Lagerung von Wein bestimmt. 104 PRODUKTDATENBLATT gemäß der delegierten Verordnung (EU) Nr. 1060/2010 WEINSCHRANK HERSTELLER AVINTAGE HANDELSBEZEICHNUNG AVU54SXDZA(/IX) STROMVERSORGUNG 220-240 V / 50 Hz ABMESSUNGEN (B x T x H) 595 x 571 x 820 mm NETTOGEWICHT 50 kg GERÄTEKATEGORIE 2 ENERGIEEFFIZIENZKLASSE A ENERGIEVERBRAUCH Energieverbrauch 145 kWh/Jahr, auf der Grundlage von Ergebnissen der Normprüfung über 24 Stunden. Der tatsächliche Verbrauch hängt von der Nutzung und vom Standort des Geräts ab. NETTOVOLUMEN 134 L TEMPERATUR-EINSTELLBEREICH 5 – 10°C / 10 – 20°C FROSTFREI Automatischer Abtauvorgang KLIMAKLASSE Klimaklasse: N Dieses Gerät ist für den Betrieb bei einer Umgebungstemperatur zwischen 16 °C (niedrigste Temperatur) und 32 °C (höchste Temperatur) bestimmt. LUFTSCHALLEMISSIONEN IN dB(A) RE 1 pW 45 dB(A) GERÄTETYP Freistehendes und als Einbaugerät Dieses Gerät ist ausschließlich zur Lagerung von Wein bestimmt. 105 PRODUKTDATENBLATT gemäß der delegierten Verordnung (EU) Nr. 1060/2010 WEINSCHRANK HERSTELLER AVINTAGE HANDELSBEZEICHNUNG PRO51C/1 STROMVERSORGUNG 220-240 V / 50 Hz ABMESSUNGEN (B x T x H) 595 x 571 x 820 mm NETTOGEWICHT 48 kg GERÄTEKATEGORIE 2 ENERGIEEFFIZIENZKLASSE A ENERGIEVERBRAUCH Energieverbrauch 145 kWh/Jahr, auf der Grundlage von Ergebnissen der Normprüfung über 24 Stunden. Der tatsächliche Verbrauch hängt von der Nutzung und vom Standort des Geräts ab. NETTOVOLUMEN 146 L TEMPERATUR-EINSTELLBEREICH 5 – 20°C FROSTFREI Automatischer Abtauvorgang KLIMAKLASSE Klimaklasse: N Dieses Gerät ist für den Betrieb bei einer Umgebungstemperatur zwischen 16 °C (niedrigste Temperatur) und 32 °C (höchste Temperatur) bestimmt. LUFTSCHALLEMISSIONEN IN dB(A) RE 1 pW 45 dB(A) GERÄTETYP Freistehendes und als Einbaugerät Dieses Gerät ist ausschließlich zur Lagerung von Wein bestimmt. 106 Gelieve voor het gebruik de veiligheids- en gebruiksregels van deze handleiding te lezen en toe te passen. Allereerst willen wij u bedanken voor uw vertrouwen in de groep AVINTAGE met de aankoop van dit apparaat en wij hopen dat dit aan al uw verwachtingen zal voldoen. Met dit apparaat kunt u uw flessen naar keuze bewaren of op de juiste schenktemperatuur (afhankelijk van uw flessen) brengen dankzij de uitgebreide instelmogelijkheden. 1. ALGEMENE VEILIGHEIDSVOORSCHRIFTEN Lees de in deze handleiding beschreven voorschriften aandachtig door, voordat u het apparaat gaat gebruiken. Bewaar de handleiding zorgvuldig voor toekomstig gebruik, indien nodig. Neem de volgende basisvoorzorgsmaatregelen in acht om het gevaar voor brand, elektrische schokken of verwondingen tijdens het gebruik van uw apparaat te beperken. In het algemeen dient het onderhoud aan uw apparaat door een bevoegde vakman te worden uitgevoerd. Lees, voor uw veiligheid en voor een correct gebruik van het apparaat, deze handleiding en de hierin vermelde waarschuwingen en adviezen aandachtig door alvorens het apparaat te installeren en voor de eerste keer te gebruiken. Om beschadigingen aan het apparaat te voorkomen en/of u onnodig te verwonden, is het van belang dat de personen die dit apparaat zullen gebruiken de werking en de beveiligingen ervan volledig begrijpen. Bewaar deze aanwijzingen voor later gebruik en berg ze op in de nabijheid van het apparaat, om deze bij het apparaat te voegen bij verkoop of een verhuizing. Dit maakt een optimale werking van het apparaat mogelijk. Bewaar deze handleiding om risico op verwondingen te voorkomen. De fabrikant kan niet aansprakelijk gesteld worden bij een onjuist gebruik van het apparaat 107 Dit apparaat is uitsluitend bedoeld voor huishoudelijk gebruik en bedoeld voor het opslaan van bijzondere drinkwaren op een bewaartemperatuur die hoger is dan die van een opslagruimte voor koel te bewaren producten. Het is geen geval bestemd voor het bewaren van koel te bewaren producten. Zorg ervoor dat het voltage van uw elektrische installatie overeenstemt met de indicaties op het typeplaatje; het apparaat moet worden aangesloten op een goedgekeurd, geaard systeem. Verkeerde reparaties of aansluitingen brengen gevaren met zich mee. Laat uw elektrische installatie bij twijfel door een professionele vakman controleren Dit apparaat dient voor uw veiligheid correct te worden aangesloten op een geaarde contactdoos. Onderbreek of verwijder in geen geval de aardingsdraad van het meegeleverde voedingssnoer. Om veiligheidsredenen mag u geen elektrisch verlengsnoer gebruiken. Als uw apparaat is beschadigd (grote schok) of schade heeft opgelopen (te grote spanning naar aanleiding van bliksem, overstroming, brand), kan het gebruik ervan gevaarlijk zijn. Koppel de voedingsstekker los en laat het apparaat door een erkende professionele hersteller controleren. Vervang het voedingssnoer niet zelf als het is beschadigd, om elk gevaar te vermijden. Wend u tot uw verkoper, een erkend herstelcentrum of een professionele hersteller. Dit apparaat dient zodanig te worden opgesteld dat de netcontactdoos bereikbaar is. Verplaats het apparaat niet zodra het is gevuld. U loopt het risico om de behuizing van het apparaat 108 onherstelbaar te beschadigen. De elektrische onderdelen mogen niet rechtstreeks bereikbaar zijn. Houd kinderen uit de buurt van het apparaat. Gebruik dit apparaat niet buiten. Wanneer er per ongeluk vloeistof (gebroken fles, enz.) op de elektrische onderdelen (motor, enz.) wordt gemorst, moet u de voedingsstekker onmiddellijk loskoppelen. Om elk risico op brand, elektrocutie of verwonding te voorkomen, het voedingssnoer, de stekker of het apparaat zelf niet in water of een andere vloeistof onderdompelen. Raak het apparaat nooit aan met natte handen Houd het apparaat uit de buurt van warmtebronnen en stel het niet rechtstreeks bloot aan zonnestralen. Laat het voedingssnoer niet over een tafel hangen en zorg ervoor dat het niet in aanraking komt met scherpe randen of warme oppervlakken. Trek niet aan het voedingssnoer om de stekker uit de contactdoos te trekken, maar neem de stekker vast en trek eraan Vergewis u ervan dat de plaats waar uw apparaat staat, het gewicht van het apparaat kan ondersteunen zodra het is gevuld (1 fles van 75 cl weegt ongeveer 1,3 kg). Uw wijnkast moet op een vlakke ondergrond worden geplaatst. Plaats een steun onder het apparaat indien u het op een mat of vast tapijt plaatst. Zorg ervoor dat de deur helemaal geopend is als u de leggers uit hun compartiment trekt, om beschadiging van de bekleding van de deur te voorkomen. 109 Veiligheid van kinderen en overige kwetsbare personen Dit apparaat mag gebruikt worden door kinderen van 8 jaar en ouder en door personen met lichamelijke, zintuiglijke of verstandelijke beperkingen, of door personen met gebrek aan kennis en ervaring, op voorwaarde dat ze onder toezicht staan van een persoon die de werking van het apparaat en de hieraan verbonden gevaren kent. Laat kinderen niet met het apparaat spelen. De reiniging en het onderhoud mogen niet door kinderen uitgevoerd worden, behalve als ze meer dan 8 jaar oud zijn en onder toezicht staan. Bewaar alle verpakkingen buiten het bereik van kinderen, om risico op verstikking te voorkomen. Gevaar voor opsluiting van kinderen. Opsluiting van en verstikking bij kinderen zijn geen problemen uit het verleden. Afgedankte of verlaten apparaten zijn nog altijd gevaarlijk ... zelfs als ze "maar voor enkele dagen in de garage worden geplaatst". Snij, bij het afdanken van het apparaat, het snoer (zo dicht mogelijk bij het apparaat) door en verwijder de deur zodat spelende kinderen er zich niet in op kunnen sluiten of aan een elektrische schok bloot gesteld worden. Controleer, als het met een magnetisch deurrubber uitgeruste apparaat vervangen moet worden door een apparaat voorzien van een haak- of veersluiting op de deur of het deurrubber, of deze buiten werking is alvorens het oude apparaat af te voeren. Dit voorkomt dat kinderen zich in het apparaat kunnen opsluiten. Houd het apparaat en het snoer buiten bereik van kinderen van onder de 8 jaar. Verwijder de deur voordat u uw oude wijnkoeler weggooit. Laat 110 de oplegplanken zitten zodat kinderen niet gemakkelijk in het apparaat kunnen klimmen. Algemene veiligheid WAARSCHUWING — Dit apparaat is bestemd voor gebruik voor huishoudelijke en vergelijkbare toepassingen, zoals Keukenruimten voor personeel in winkels, kantoren en andere werkomgevingen, Boerderijen en door klanten in hotels, motels en andere residentiële omgevingen, Bed-and-breakfastomgevingen, Catering en vergelijkbare niet-retailtoepassingen. WAARSCHUWING — Om gevaar door de instabiliteit van het apparaat te vermijden, moet het in overeenstemming met de voorschriften worden vastgemaakt. WAARSCHUWING — Plaats nooit ontvlambare producten zoals spuitbussen in dit apparaat, daar deze hierin kunnen lekken. WAARSCHUWING — Als het snoer beschadigd is, moet u dit direct door de fabrikant of een erkende verkoper laten vervangen om risico op elektrocutie te voorkomen. WAARSCHUWING — Houd de ventilatieopeningen volledig open en controleer of de lucht door de openingen kan stromen, met name als het apparaat in de wand is ingebouwd. WAARSCHUWING — Gebruik alleen de door de fabrikant aanbevolen mechanische apparaten of andere middelen om het ontdooiproces te versnellen. WAARSCHUWING — Zorg ervoor het koelcircuit niet te 111 beschadigen. WAARSCHUWING — Gebruik geen elektrische apparaten in het compartiment, behalve als deze toegestaan zijn door de fabrikant. WAARSCHUWING — Het koelmiddel en het isolatieblaasgas zijn brandbaar. Dankt u het apparaat af, breng het dan alleen naar een erkende afvalverwerkingscentrale. Stel het apparaat niet bloot aan vuur. WAARSCHUWING — Het koelmiddel van deze apparaten is R600a; brandbare en ontplofbare artikelen mogen niet in of in de buurt van de kast worden geplaatst, om brand of ontploffingen te vermijden. Koelvloeistof Het koelcircuit van het apparaat bevat het koelmiddel isobutaan (R600a); dit is een licht ontvlambaar gas en dus schadelijk voor het milieu. Controleer, tijdens het vervoer en de installatie van het apparaat, of geen enkel onderdeel van het koelcircuit beschadigd is. Het koelmiddel (R600a) is een ontvlambare vloeistof. Let op: brandgevaar Bij een beschadigd koelcircuit: Voorkom open vlammen en alle ontstekingsbronnen. Zorg voor voldoende ventilatie in het vertrek waar het apparaat geïnstalleerd is. Het is gevaarlijk om welke wijziging dan ook op dit apparaat uit te voeren. Schade aan het snoer kan leiden tot kortsluiting en/of gevaar op elektrocutie. 112 Elektrische veiligheid We kunnen niet aansprakelijk gesteld worden voor ongevallen veroorzaakt door een onjuist uitgevoerde of defecte elektrische installatie. Het snoer mag niet verlengd worden. verlengsnoeren, adapters of stekkerdozen. Gebruik geen Vergewis u ervan dat de netstekker niet is verpletterd of beschadigd. Een verpletterde of beschadigde netstekker kan oververhit raken en brand veroorzaken. Vergewis u ervan dat de netstekker van het apparaat bereikbaar is. Trek niet aan het voedingssnoer. Koppel nooit de aarding af. Zit de contactdoos voor de netstekker los, stop de netstekker er dan niet in. U kunt een elektrische schok krijgen of er kan brand ontstaan. U mag het apparaat nooit gebruiken zonder bescherming voor de lamp van de binnenverlichting. Haal de stekker van uw apparaat uit het stopcontact alvorens het lampje te vervangen. De wijnkast werkt alleen met een voeding van eenfasige wisselstroom van 220~240 V / 50 Hz. Probeer een beschadigd snoer niet te vervangen, maar neem contact op met de Servicedienst. Het stopcontact moet eenvoudig toegankelijk, maar buiten het bereik van kinderen zijn. Neem bij twijfel contact op met uw installateur. 113 Dagelijks gebruik Dit apparaat is uitsluitend bedoeld om wijn te bewaren. Berg nooit ontvlambare stoffen of vloeistoffen in het apparaat op; dit kan leiden tot gevaar op ontploffing. Laat nooit overige elektrische apparaten in dit apparaat werken (mixers, elektrische ijsmachines, enz.). Pak, om het apparaat van de stroom af te koppelen, altijd de stekker vast en trek niet aan het snoer. Plaats hete voorwerpen niet naast de plastic onderdelen van dit apparaat. De opslagaanbevelingen van de fabrikant van het apparaat moeten strikt in acht worden genomen. Raadpleeg de toepasselijke opslagvoorschriften. Houd het apparaat op afstand van kaarsen, lampen en overige open vlammen om risico op brand te voorkomen. Het apparaat is bedoeld om eet- en/of drinkwaren te bewaren in normale huishoudelijke omstandigheden, zoals wordt uitgelegd in deze handleiding. Het apparaat is zwaar. Ga voorzichtig te werk als u het moet verplaatsen. Als uw apparaat uitgerust is met wieltjes, dienen deze uitsluitend om het eenvoudig over korte afstanden te verplaatsen. Verrijd het apparaat niet over langere afstanden. Ga nooit op het voetstuk, de laden, de deuren enz. staan, of gebruik die niet als steun. Overbelast, om het vallen van voorwerpen en beschadigingen aan het apparaat te voorkomen, de compartimenten van het apparaat niet. Let op! Reiniging en onderhoud Haal, vóór het onderhoud, de stekker van het apparaat uit het 114 stopcontact en schakel de stroom uit. Reinig het apparaat niet met metalen voorwerpen, een stoomsysteem, vluchtige oliën, organische oplosmiddelen of schuurmiddelen. Reinig onderdelen van het apparaat nooit met brandbare vloeistoffen. De dampen kunnen brandgevaar of ontploffingen veroorzaken. Gebruik geen scherpe of puntige voorwerpen om het ijs te verwijderen. Gebruik een plastic krabber. Belangrijke informatie voor de installatie Plaats het apparaat niet in vochtige ruimten. Houd het apparaat uit de buurt van rechtstreeks zonlicht en rechtstreekse warmtebronnen (fornuis, verwarmingstoestel, radiator, enz.). Rechtstreeks zonlicht kan de acryllaag aantasten en warmtebronnen kunnen het stroomverbruik doen toenemen. Buitengewoon koude of warme omgevingstemperaturen kunnen er ook toe leiden dat de apparaten niet goed functioneren. Stop de stekker van de wijnkoeler in een afzonderlijke, juist geïnstalleerde en geaarde wandcontactdoos. Het is absoluut verboden om de derde (aardings) pen van het stroomsnoer te snijden of te verwijderen. Voor vragen over de stroom en/of de aarding dient er rechtstreeks contact te worden opgenomen met een erkende elektricien of een erkend productherstelcentrum. Volg, voor een correcte elektrische aansluiting, de in deze handleiding verstrekte aanwijzingen zorgvuldig op. Verwijder de verpakking van het apparaat en controleer het op zichtbare schade. Sluit het apparaat niet aan, als het beschadigd is. Informeer het verkooppunt over de eventuele 115 schade. Bewaar in dit geval de verpakking. We raden het aan om minstens vierentwintig uur te wachten alvorens het apparaat op de stroom aan te sluiten opdat de compressor voldoende olie bevat. Om risico op oververhitting te voorkomen is een goede luchtcirculatie vereist. Volg, voor voldoende ventilatie, de verstrekte installatie-instructies na. Vermijd, voor zover mogelijk, dat de achterkant van het apparaat direct tegen de muur staat en/of in contact staat met warme elementen (compressor, condensator) om risico op brand te voorkomen. Volg de installatie-instructies altijd zorgvuldig op. Het apparaat mag niet naast radiators of kookplaten geplaatst worden. Controleer of de stopcontacten, na het installeren, toegankelijk zijn. Energiebesparingen Om het energieverbruik van uw apparaat te beperken: Installeer het in een geschikte ruimte (zie het hoofdstuk "Installatievoorschriften"). Houd de deuren zo kort mogelijk open. Zorg voor een optimale werking van het apparaat door regelmatig de condensator te reinigen (zie het hoofdstuk " Wartung"). Controleer regelmatig de deurrubbers om er zeker van te zijn dat deze goed sluiten. Neem, indien dit niet het geval is, contact op met de Servicedienst. 116 Reparaties Alle elektrische werkzaamheden mogen uitsluitend uitgevoerd worden door een erkende en vakbekwame elektricien. Dit apparaat mag uitsluitend gerepareerd worden door een erkend Servicecentrum met gebruik van originele reserveonderdelen. Dit apparaat is uitsluitend bestemd voor huishoudelijk gebruik. De fabrikant kan niet aansprakelijk gesteld worden voor elk ander gebruik. R600a Veiligheidsvoorschriften Waarschuwing: dek de ventilatieroosters van het apparaat niet af. Waarschuwing: berg geen explosieve stoffen zoals spuitbussen met ontvlambaar drijfgas in dit apparaat op. Waarschuwing: vermijd schade aan de koelkringloop van het apparaat. Waarschuwing: koelunits die werken met isobutaan (R600a) mogen niet worden geplaatst in een omgeving waar een ontstekingsbron aanwezig is (bijvoorbeeld elektrische contacten zonder afdichting of een plaats waar de koelvloeistof zich kan ophopen in geval van een lek). Het type koelmiddel staat vermeld op het typeplaatje op de kast. Waarschuwing: Gebruik geen elektrische apparaten in de compartimenten, tenzij dit wordt aanbevolen door de fabrikant. 117 Dit apparaat voldoet aan alle van kracht zijnde Europese richtlijnen en aan de eventuele wijzigingen. Het voldoet met name aan de volgende normen: 2011/65/EU (ROHS) 2014/35/EU met betrekking tot elektrische veiligheid 2014/30/EU met betrekking tot elektromagnetische compatibiliteit 643/2009/CE met betrekking tot het energielabel 2. TECHNISCHE GEGEVENS Hieronder ziet u een voorbeeld van een typeplaatje: De op de binnen- of achterzijde van het apparaat (afhankelijk van het model) geplakte typeplaat bevat alle informatie betreffende uw apparaat. We raden u aan om het serienummer voor de installatie in dit boekje te noteren zodat u er later indien nodig over beschikt (technische interventie, vraag om assistentie…) Wanneer het apparaat namelijk eenmaal geïnstalleerd en geladen is, is toegang een stuk gecompliceerder. LET OP: Er kan geen bijstand verleend worden zonder dit serienummer. 118 3. INSTALLATIEVOORSCHRIFTEN Voordat u dit apparaat gebruikt Verwijder de verpakking rondom en binnenin. Voordat u het apparaat aansluit op de stroombron, moet u het ongeveer 24 uur rechtop laten staan. Dat zal de kans verkleinen dat het koelsysteem slecht functioneert wegens de behandeling tijdens het transport. Maak de binnenkart proper met behulp van een doek en lauw water. Dankt u uw apparaat af, breng het dan naar een erkende stortlocatie. Plaats uw wijnkoeler op een vloer die stevig genoeg is om het gewicht ervan te dragen in volledig gevulde toestand. Om de wijnkoeler horizontaal te stellen, de voorste instelvoet onderaan de wijnkoeler bijstellen. Voldoende ventilatie is absoluut noodzakelijk; blokkeer de luchtuitlaat aan de voorzijde niet. Niet ontworpen voor plaatsing in een garage of kelder. Het apparaat is alleen bedoeld voor gebruik binnenshuis. De wijnkast is ontworpen om vrijstaand of ingebouwd geïnstalleerd te worden. Sluit de wijnkast aan op een enkelvoudige contactdoos en laat een ruimte van 30 mm tussen de achterkant van de wijnkast en de muur. Zorg dat uw de wijnkast perfect ondersteund wordt en dat ze waterpas staat (het gebruik van een waterpas wordt aanbevolen). Dit voorkomt dat de kast gaat bewegen door instabiliteit, wat lawaai en trillingen produceert, en zorgt ervoor dat de deur perfect luchtdicht is. Dit apparaat is uitsluitend bedoeld om wijn te bewaren. Het apparaat gebruikt een ontvlambaar koelmiddel. Beschadig dus nooit de buizen van de koelinrichting tijdens transport. Let op Sla de flessen gesloten op. Overlaad het apparaat niet. Open de deur niet vaker dan nodig. Bedek de leggers niet met aluminiumfolie of een ander materiaal dat een goede luchtcirculatie kan verhinderen. Als de wijnkast gedurende een langere periode leeg wordt gelaten, raden wij aan om de stekker uit het stopcontact te nemen, het apparaat goed schoon te maken en de deur op een kier te laten om de lucht te laten circuleren en de vorming van schimmels en vervelende geurtjes te voorkomen. WAARSCHUWING: houd het apparaat uit de buurt van stoffen die ontbranding kunnen veroorzaken. 119 Beperkingen op de temperatuur van de omgevingsruimte Dit apparaat is ontworpen om te werken in de omgevingstemperaturen die worden opgegeven door de temperatuurklasse zoals aangegeven op het typeplaatje. KLASSE SYMBOOL BEREIK VAN OMGEVINGSTEMPERATUUR (°C) Uitgebreid gematigd SN Van +10 tot +32 Gematigd N Van +16 tot +32 Subtropisch ST Van +16 tot +38 Tropisch T Van +16 tot +43 Inbouwschema AVU8X(/IX) 120 AVU23SX(/IX) AVU41SXDPA(/IX) 121 AVU52SX(/IX) AVU54SXDZA(/IX) AVU53CDZA PRO51C/1 122 Omkeren van de deur De deur kan naar keuze vanaf de linker- of de rechterzijde worden geopend. Zonder bijzondere behoeften wordt de deur altijd vanaf de linkerzijde geopend. Is het noodzakelijk om de deur vanaf de rechterzijde te openen, volg dan de volgende instructies: AVU8X(/IX) 1. Onderscharnier (rechts) 2. Schroef 3. Deuras 4. Deur 5. Bovenscharnier (rechts) 6. Schroeven van de scharnieren 7. Bovenscharnier (links) 8. Onderscharnier (links) 1. Open de deur 90 graden. Draai de twee schroeven (2) van de onderste deuras (3) los en verwijder vervolgens de deur (4) en de deuras (Fig. A). Zet de deur in de juiste positie (4) (Fig. A en B). 2. Verwijder 3 schroeven (6) van de bovenste scharnier (rechts) (5) en verwijder deze laatste Onderscharnier (rechts) (Fig. C). en 3. Verwijder de sierspijkers (8) linksboven op het apparaat en installeer de extra bovenscharnier (links) (7) linksboven met behulp van drie schroeven (Fig. D). Ga volgens dezelfde procedure verder met het installeren van de resterende onderscharnier (links) (8) (Fig. E). 4. De deur opent 180 graden. De installatiemethode voor de deur is dezelfde als voor de demontage; zet de deur goed recht en bevestig hem. 123 AVU23SX(/IX) AVU52SX(/IX) 1. Onderscharnier (rechts) 4. Deur 7. Bovenscharnier (links) 10. Borgvoorziening 2. Schroef 3. Deuras 5. Bovenscharnier (rechts) 6. Schroeven van de scharnieren 8. Sierspijker 9. Onderscharnier (links) 11. Schroef 12. Dop 1. Open de deur 90 graden. Draai de twee schroeven (2) van de onderste deuras los en verwijder vervolgens de deur (4) en de deuras (Fig. A). 2. Zet de deur (4) in de juiste stand en verwijder de dop (12) uit het bovenste gedeelte van de deurlijst; draai één van de onderste schroeven (11) los en neem de borgvoorziening (10) uit. Installeer vervolgens deze voorziening op het bovenste gedeelte van de deurlijst. Het verdient de voorkeur een reservedop (12) te gebruiken om het gat op het bovenste gedeelte van de lijst te dichten (Fig. A/B). 3. Verwijder 3 schroeven (6) van de bovenscharnier (rechts) (5) en verwijder deze laatste (Fig. C). 4. Verwijder de sierspijkers (8) linksboven op het apparaat en installeer de bovenste reservescharnier (links) (7) linksboven met behulp van drie schroeven (Fig. D). 5. Ga volgens dezelfde procedure verder met het installeren van de onderste reservescharnier (links) (9) (Fig. E). 6. De deur opent 180 graden. De installatiemethode voor de deur is dezelfde als voor de demontage; zet de deur goed recht en bevestig hem. 7. Dicht het gat rechtsboven op het apparaat met een sierspijker (8). 124 AVU53CDZA AVU54SXDZA(/IX) PRO51C/1 1. Onderscharnier (rechts) 2. Schroef 3. Deuras 4. Deur 5. Bovenscharnier (rechts) 6. Schroeven van de scharnieren 7. Bovenscharnier (links) 8. Sierspijker 9. Onderscharnier (links) 1. Open de deur 90 graden. Draai de twee schroeven (2) van de onderste deuras (3) los en verwijder vervolgens de deur (4) en de deuras (Fig. A). 2. Zet de deur in de juiste positie (4). 3. Verwijder 3 schroeven (6) van de bovenste scharnier (rechts) (5) en verwijder deze laatste (Fig. C). 4. Verwijder de sierspijkers (8) linksboven op het apparaat en installeer de extra bovenscharnier (links) (7) linksboven met behulp van drie schroeven (Fig. D). 5. Ga volgens dezelfde procedure verder met het installeren van de resterende onderscharnier (links) (9) (Fig. E). 6. De deur opent 180 graden. De installatiemethode voor de deur is dezelfde als voor de demontage; zet de deur goed recht en bevestig hem. 7. Dicht het gat rechtsboven op het apparaat met een sierspijker (8). 4. UW APPARAAT BEDIENEN Het is raadzaam om uw apparaat op een plaats te installeren waar de omgevingstemperatuur tussen 16 en 32°C. Als de omgevingstemperatuur boven of onder de aanbevolen temperaturen ligt, kunnen de prestaties van het apparaat worden beïnvloed en bestaat de kans dat het onmogelijk is om de temperatuur tussen 5-20°C of 5-10°C/10-20°C (afhankelijk van het model) te krijgen. 125 AVU8X(/IX) / AVU23SX(/IX) AVU41SXDPA(/IX) AVU52SX(/IX) PRO51C/1 “RUN” Voedingsaanwijzer knop Om het apparaat in/uit te schakelen. Houd de knop ongeveer 3 seconden ingedrukt. knop Knop voor lichtbediening Display Elektronische display voor de temperatuur knop Afstelknop temperatuur +. knop Afstelknop temperatuur U kunt de temperatuur die u in het compartiment wenst, kiezen door te drukken op de toetsen “ / ”. De temperatuur die u wenst te programmeren, wordt bij iedere druk op de knoppen met 1ºC verhoogt/verlaagd. De temperatuur kan gekozen worden tussen 5 en 20°C of tussen 5 en 10°C / 10 en 20°C (afhankelijk van het model). Wanneer deze eenmaal geselecteerd is, knippert de display 5s alvorens de binnentemperatuur op dat moment in de wijnkast aan te geven. De afgestelde temperatuur kan op ieder moment bekeken worden door de selectieknoppen van de temperatuur 5s ingedrukt te houden. In geval van een stroomonderbreking worden alle voordien gekozen temperaturen gewist en keert ieder compartiment automatisch terug naar de in de fabriek voorgeprogrammeerde temperatuur van 12°C. AVU53CDZA AVU54SXDZA(/IX) “RUN” Voedingsaanwijzer knop Om het apparaat in/uit te schakelen. Houd de knop ongeveer 3 seconden ingedrukt. knop Knop voor lichtbediening 126 Display Elektronische display voor het bovenste compartiment Display Elektronische display voor het onderste compartiment. knop Afstelknop voor de temperatuur van het bovenste compartiment. knop Afstelknop voor de temperatuur van het onderste compartiment Druk op “ ” om de temperatuur van het bovenste compartiment af te stellen. De display voor het compartiment begint dan te knipperen en bij iedere druk kunt u de temperatuur met 1°C veranderen. Wanneer de de laagste afsteltemperatuur 5°C bereikt heeft, gaat de display automatisch terug naar de hoogste afsteltemperatuur, 10°C. Na het selecteren knippert de display ca. 5s alvorens de binnentemperatuur op dat moment in de wijnkast aan te geven. De afgestelde temperatuur kan op ieder moment bekeken worden door de selectieknoppen van de temperatuur 5s ingedrukt te houden. Druk op “ ” om de temperatuur van het onderste compartiment af te stellen. De display voor het compartiment begint dan te knipperen en bij iedere druk kunt u de temperatuur met 1°C veranderen. Wanneer de de laagste afsteltemperatuur 10°C bereikt heeft, gaat de display automatisch terug naar de hoogste afsteltemperatuur, 20°C. Na het selecteren knippert de display ca. 5s alvorens de binnentemperatuur op dat moment in de wijnkast aan te geven. De afgestelde temperatuur kan op ieder moment bekeken worden door de selectieknoppen van de temperatuur 5s ingedrukt te houden. In geval van een stroomonderbreking worden alle voordien gekozen temperaturen gewist en keert ieder compartiment automatisch terug naar de in de fabriek voorgeprogrammeerde temperatuur van 6°C voor het bovenste compartiment en 12°C voor het onderste compartiment. Voorschriften met betrekking tot de werking Temperatuuralarm: Als de binnentemperatuur hoger is dan 23 °C, wordt "HI" weergegeven op het display en weerklinkt de zoemer na één uur onafgebroken. Dat betekent dat de binnentemperatuur te hoog is; ga na waarom. Als de binnentemperatuur lager is dan 0 °C, wordt "LO" weergegeven op het display en weerklinkt de zoemer terwijl het storingscontrolelampje brandt. Temperatuurherinneringsfunctie: Bij een stroomonderbreking kan de wijnkoeler zich de vorige temperatuurinstellingen herinneren en wanneer er opnieuw stroom is, zal de temperatuur van de koeler opnieuw op de insteltemperatuur van net vóór de stroomuitval worden gebracht. Binnenverlichting Om het energieverbruik te verminderen schakelt de ledverlichting van deze wijnkoelkast automatisch uit na 10 minuten. Als u wilt dat de ledverlichting constant blijft branden, dan kan dat. Hiervoor drukt u de knop in en houdt hem ingedrukt gedurende 5 seconden. Nu verschijnt 'LP' op het display. Na 4 seconden keert het display naar de normale weergave terug en blijft het licht branden tot het handmatig wordt uitgeschakeld. Als u terug wilt keren naar de standaardinstelling om energie te sparen (aanbevolen), druk dan op de knop en houdt hem ingedrukt gedurende 5 seconden. Nu verschijnt 'LF' op het display. Na 4 seconden keert het display naar de normale weergave terug en gaat het licht automatisch uit na 10 minuten. 127 5. UITRUSTINGEN Het temperatuurregelsysteem Volgens specialisten is de ideale temperatuur om wijn te bewaren ongeveer 12 °C, binnen een temperatuurbereik van 10° tot 14 °C. Niet te verwarren met de serveertemperatuur, die verschilt op basis van het specifieke type wijn en tussen de 5 tot 20 °C ligt. Het is uiterst belangrijk om sterke temperatuurschommelingen te vermijden. Dit apparaat werd door specialisten voor wijnliefhebbers ontwikkeld en houdt, in tegenstelling tot een gewone koelkast, rekening met de gevoeligheid van ‘grand cru’s' voor sterke temperatuursschommelingen en verzekert via een nauwkeurige bediening een constante gemiddelde temperatuur. Het anti-trillingssysteem De koelcompressor is voorzien van speciale schokdempers (de silent-blocks) en de binnenruimte is van de buitenzijde geïsoleerd door een dikke laag polyurethaanschuim. Deze kenmerken voorkomen het doorgeven van trillingen aan uw wijnen. Het bevochtigingssysteem Aangezien dit apparaat niet met een koolstoffilter uitgerust is, beschikt het over een bak die een correct vochtigheidsniveau behoudt (afhankelijk van het model). Als de vochtigheid te laag is, dient u het reservoir aan te vullen tot ¾ van zijn capaciteit. Controleer het waterniveau op regelmatige tijdstippen en vul het water bij indien nodig. Zorg dat de bak altijd water bevat. Avintage is door specialisten voor wijnliefhebbers ontworpen en heeft dus rekening gehouden met de gevoeligheid van kurken voor een te lage omgevingsvochtigheid. Daarom dient de bak op de oplegplank onder de ventilator op de bodem geplaatst te worden om een minimale vochtigheid te voorzien. Let op: controleer het waterniveau indien u uw wijnen gedurende een lange periode bewaart en het apparaat niet uitsluitend gebruikt om de serveertemperatuur te verkrijgen (met snelle roulatie van uw flessen). Zorg ervoor dat de bak vol water volledig stabiel is om te voorkomen dat er water valt of lekt. Het anti-UVsysteem Licht versnelt de veroudering van uw wijnen. In onze wijnkasten met volle deuren worden uw wijnen op natuurlijke wijze beschut, op voorwaarde dat u de deur niet te vaak opent. Dit model met glazen deur heeft een speciale behandeling ondergaan zodat het schadelijke ultravioletstralen filtert, zodat uw wijnen perfect beschermd worden. Ontdooien Uw apparaat is uitgerust met een automatische ontdooicyclus. Tijdens de stilstand van de koelcyclus worden de gekoelde oppervlakken van het apparaat automatisch ontdooid. Het op die manier opgevangen dooiwater wordt afgevoerd naar een verdampingsbak voor condensaatwater, die zich vlak bij de compressor op de achterkant van het apparaat bevindt. De warmte die door de compressor geproduceerd wordt, verdampt vervolgens de condensaten die in de bak opgevangen werden. Het wintersysteem (afhankelijk van het model) Het wintersysteem helpt om de inwendige temperatuur gelijk te houden met de ingestelde temperatuur. Op die manier kan de wijnkast werken in een omgeving met temperaturen van 0 tot 32°C. Wanneer de inwendige temperatuur 3°C lager wordt dan de ingestelde waarde, treedt een elektrisch verwarmingselement met laag vermogen in werking om de inwendige temperatuur terug op de initieel ingestelde waarde te brengen. Het verwarmingselement heeft een laag vermogen. Plotse temperatuursveranderingen en thermische schokken worden op die manier vermeden, want die zijn 128 schadelijk voor de bewaring van de wijn. Het automatisch systeem is zo ontworpen dat de inwendige temperatuur van de wijnkast al gaat stijgen nog voordat warmte wordt uitgewisseld met de flessen. Zodra door de werking van het systeem de inwendige temperatuur tot op de ingestelde waarde is gestegen, schakelt het systeem uit. Oplegplanken Om schade aan de deurpakking te verwijderen, moet u zorgen dat de deur goed geopend is voordat u aan de oplegplanken trekt om flessen te plaatsen of verwijderen. Voor een eenvoudige toegang tot de inhoud van de oplegplanken, moet u de oplegplank ongeveer 1/3 naar buiten schuiven. De oplegplanken zijn aan elke kant voorzien van een aanslag zodat de flessen niet vallen. Om de oplegplanken te verwijderen of terug te plaatsen, moeten zij schuin geplaatst worden zoals op het schema staat aangegeven en moet u hier, afhankelijk van het geval, aan trekken of hier tegen duwen. AVU41SXDPA(/IX) Leg de oplegplanken op de hiervoor bedoelde plaatsen.a. kartonnen doos met reserveonderdelen. a. kartonnen doos met reserveonderdelen b. kleine oplegplank c. grote oplegplank 1. Neem, na de verpakking verwijderd te hebben, de kartonnen doos met de reserveonderdelen van het apparaat uit. 2. 4 kleine oplegplanken (b) zijn te vinden in het linker compartiment. Verwijder de onderste twee oplegplanken. 3. In het rechter compartiment kan men 4 grote oplegplanken (c) vinden. Verwijder de bovenste twee oplegplanken. 129 4. De positie van de kleine en grote oplegplanken moet dan omgekeerd worden (fig.2). Leg in ieder compartiment twee kleine oplegplanken bovenin en twee grote oplegplanken onderin. 5. Wanneer de oplegplanken eenmaal goed geplaatst zijn, kan uw wijnkast overeenkomstig de instructies uit de handleiding gebruikt worden. Voet sliders Twee voet sliders zijn voorzien van het apparaat, zodat u het gemakkelijk te verplaatsen als je voeten zijn aangepast aan de maximale hoogte. De voet sliders hebben parallel worden geïnstalleerd onder de voeten volgens de locatie voor de voor- en de achterkant. Achterzijde Voorzijde Voorzijde Achterzijde Voet sliders Een verhoogde veiligheid Omdat dit productassortiment bestemd is voor het opslaan van waardevolle voorwerpen, hebben we alles in het werk gesteld om kwalitatieve onderdelen te kiezen en aangepaste vervaardigingstechnieken te ontwikkelen om een optimale werkingsveiligheid te garanderen. Installatie van de handgreep Uw apparaat is uitgerust met een handgreep van roestvrij staal. Voor het installeren hiervan schroeft u deze met de meegeleverde schroeven vast op de deur, volgens onderstaand schema en na de pakking verwijderd te hebben. Front Back 6. LADEN Het maximale aantal flessen dat in de kast gelegd mag worden, wordt louter ter informatie vermeld, is niet contractueel en maakt het mogelijk (zoals de literinhoud bij koelkasten) om snel te schatten hoe groot het apparaat is. 130 Dit aantal stemt overeen met tests die uitgevoerd werden met een standaardfles: een fles van het type "lichtere bordelaise van 75 cl" (de standaardisering identificeert voor elke flesvorm een geografische oorsprong: bordelaise, bourguignonne, provençale, enz., en een type: traditioneel, zwaar, lichter, fluit, enz., die elk een eigen diameter en hoogte hebben. In werkelijkheid is het mogelijk om, in het uiterste geval, meer flessen op te bergen door flessen van hetzelfde type opeen te stapelen zonder oplegplanken, maar een ‘gevarieerde kast’ bestaat uit een grote verscheidenheid van flessen en het ‘praktische’ aspect van het dagelijkse beheer van een wijnkast beperkt de vulcapaciteit. Waarschijnlijk zult u dus wat minder flessen in uw kast leggen dan het vermelde maximum. Types flessen: We zien hier 4 soorten flessen van 75 cl, bourgogneflessen en bordelaises, in verschillende groottes. Er bestaan talrijke andere inhouden en vormen. U merkt de rangschikking verschillen naargelang van de hoogte van de flessen, de diameters en de methode om ze kruiselings neer te leggen. Als u bijvoorbeeld een wijnkast uitsluitend met bourgogneflessen vult, zult u merken dat u ongeveer 30 % onder de op basis van bordeauxflessen berekende aanvankelijke hoeveelheid zit. Methodes om flessen kruiselings neer te leggen: Kop aan staart, hals tegen hals: Let goed op het verschil in diepte! Kop aan staart, hals tussen buiken: 131 Voorbeelden van serveeremperaturen In acht te nemen bij uw degustaties om te voorkomen dat u aan de rijke aroma's van uw wijnen voorbijgaat! Meningen verschillen, de omgevingstemperatuur ook, maar velen zijn het eens over het volgende: Bordeauxwijnen van de beste cru's – rood 16 – 17 °C Bourgognewijnen van de beste cru's – rood 15 – 16 °C Grand cru's van droge witte wijnen 14 – 16 °C Lichte, fruitige, jonge wijnen 11 – 12 °C Roséwijnen uit de Provence, primeurwijnen 10 – 12 °C Droge witte wijnen en rode landwijnen 10 – 12 °C Witte landwijnen 8 – 10 °C Champagnewijnen 7 – 8 °C Likeurwijnen 6 °C 7. WARTUNG Voordat u uw apparaat schoonmaakt (regelmatig uit te voeren interventie), het apparaat loskoppelen door de stekker uit te trekken of haar zekering los te koppelen. We raden u aan om voor het eerste gebruik en daarna op regelmatige basis de binnen- en buitenkant (voorkant, zijkant en onderkant) schoon te maken met een mengsel van lauw water en een zacht reinigingsproduct. Spoel met zuiver water en laat het volledig apparaat drogen voordat u het opnieuw aansluit. Gebruik geen oplos- noch schuurmiddelen. Wanneer u het apparaat voor de eerste keer voedt, kan een restgeur blijven hangen. In dit geval het apparaat enkele uren ongevuld gebruiken en de temperatuur kouder instellen. De kou zal deze mogelijke geuren doen verdwijnen. Wat moet u doen bij een stroomonderbreking? De meeste stroomonderbrekingen worden snel opgelost. Een onderbreking van 1 of 2 uur zal de temperaturen in uw wijnkast niet beïnvloeden. Wilt u uw wijnen tijdens stroomonderbrekingen beschermen, denk er dan aan om de deur zo weinig mogelijk open te doen. Voor stroomonderbrekingen die zeer lang duren, moet u de maatregelen nemen die noodzakelijk zijn om uw wijn te beschermen. Indien uw apparaat losgekoppeld of uitgeschakeld is of bij een stroomonderbreking moet u 3 tot 5 minuten wachten om het opnieuw op te starten. Indien u de wijnkast eerder opnieuw probeert te starten, zal de compressor pas na 3/5 minuten beginnen werken (indien nodig op basis van de temperatuur). Bij de eerste opstart en na een langdurige stilstand van de wijnkast is het bij het opnieuw opstarten mogelijk dat de gekozen en weergegeven temperaturen niet overeenstemmen. Dit is normaal! U moet dan enkele uren wachten zodat de temperaturen zich opnieuw kunnen stabiliseren. Periodes van niet-gebruik Korte periodes van niet-gebruik: laat de wijnkoeler werken tijdens periodes van niet-gebruik van minder dan drie weken. Lange periodes van niet-gebruik: zal het apparaat gedurende meerdere maanden niet worden gebruikt, verwijder dan alle onderdelen en schakel het apparaat uit. Reinig en droog de binnenzijde grondig. Om geuren en schimmelvorming te voorkomen, laat u de deur een kleine beetje openstaan: blokkeer de deur daarvoor indien nodig. 132 Als u uw wijnkast moet verplaatsen Verwijder alle flessen uit uw kast en maak losse onderdelen vast. Om beschadiging van de schroeven van de voeten te voorkomen, moet u deze zo ver mogelijk indraaien. Plak de deur dicht met tape. Verplaats het apparaat in verticale positie. Bescherm het met dekens of andere bescherming. Energiebesparingen Het apparaat moet in een frisse ruimte worden geplaatst (wel boven +16°C), ver verwijderd van elke warmtebron (andere huishoudelijke apparatuur) en niet in het directe zonlicht. De ruimte waarin het apparaat geplaatst wordt, moet geventileerd zijn. Bedek nooit de ventilatiegaten. Open de deur niet vaker dan nodig. 8. IN GEVAL VAN EEN DEFECT Ondanks alle zorg die wij aan onze producten besteden, kan een defect nooit volledig uitgesloten worden. Voordat u contact opneemt met de dienst na verkoop van uw handelaar, moet u echter het volgende controleren: Of het stopcontact nog altijd op zijn plaats zit Of er geen stroomonderbreking is Of de storing niet veroorzaakt wordt door één van de oorzaken beschreven in de tabel aan het einde van deze handleiding BELANGRIJK: Als het meegeleverde voedingssnoer beschadigd is, moet het vervangen worden door de fabrikant of door een dienst die erkend wordt door het merk of de handelaar. In elk geval moet het snoer vervangen worden door bevoegd personeel, om elk gevaar voor verwondingen te voorkomen. LEVEREN DEZE CONTROLES NIETS OP, NEEM DAN CONTACT OP MET DE KLANTENSERVICE VAN UW HANDELAAR. OPGELET! Koppel de wandaansluiting los voor elke onderhouds- of herstellingsinterventie! 133 9. PROBLEMEN EN OPLOSSINGEN U kunt veel eenvoudige problemen aan uw chambreerkamer oplossen, zonder de naverkoopdienst te hoeven raadplegen. Probeer de onderstaande suggesties. PROBLEEM De wijnkast start niet De wijnkast wordt onvoldoende koud De compressor start vaak opnieuw Het lichtje brandt niet Trillingen De wijnkast lijkt nogal veel lawaai te maken De deur sluit niet goed MOGELIJKE OORZAAK De stekker steekt niet in het contact De Aan/Uit knop staat op de UIT positie. Gesprongen zekering. Controleer uw elektrische installatie Controleer de geselecteerde temperatuur De buitentemperatuur ligt boven de toepassingstemperatuur van de wijnkast De wijnkast wordt te vaak geopend De deur sluit niet goed De afdichting van de deur is niet hermetisch De buitentemperatuur ligt hoog Er bevinden zich een grote hoeveelheid flessen in de wijnkast De wijnkast wordt vaak geopend De deur is niet goed gesloten De instelling werd niet correct uitgevoerd De afdichting van de deur is niet hermetisch De stekker steekt niet in het contact Gesprongen zekering. Controleer uw elektrische installatie De LED weergave werkt niet meer, neem contact op met uw klantenservice De toets voor de binnenverlichting staat op UIT Controleer of de kast wel goed waterpas staat Een geluid dat lijkt op stromend water wordt voortgebracht door het koelgas, dat is normaal Op het einde van de cyclus van de compressor, kan men het geluid van circulerend water horen Het krimpen en uitzetten van de binnenwanden kan een krakend geluid veroorzaken De wijnkast is niet waterpas De dichting van de deur is vuil of beschadigd De leggers zijn niet correct geïnstalleerd De wijnkast is niet waterpas. Vervanging van de verlichtingslamp Dit apparaat bestaat uit elektroluminescente dioden (leds). Dit type diode mag niet worden vervangen door de consument. Deze leds gaan normaal gezien lang genoeg mee om nooit te moeten worden vervangen. Als de leds toch defect zouden zijn, ondanks alle zorg die wordt besteed aan de productie van uw wijnkast, moet u voor verdere stappen contact opnemen met uw klantenservice. 134 10. MILIEU Dit apparaat is gemarkeerd overeenkomstig Europese richtlijn 2012/19/CE betreffende afgedankte elektrische en elektronische apparatuur (AEEA). Door ervoor te zorgen dat dit product op de juiste manier wordt afgedankt, voorkomt u mee de potentiële negatieve gevolgen voor het milieu en de volksgezondheid die anders zouden kunnen worden veroorzaakt door een ongepaste afvalverwerking van dit product. Het symbool met de doorstreepte vuilnisbak duidt erop dat dit product aan het einde van zijn levensduur apart van ander huishoudelijk afval verwerkt moet worden. Het apparaat zal dus naar een centrum voor selectieve afvalophaling voor elektrische en/of elektronische apparaten gebracht moeten worden, of naar de doorverkoper van dit nieuwe apparaat, als u een vergelijkbaar apparaat koopt. De gebruiker moet het apparaat aan het einde van de levensduur naar een geschikte inzamelcentrum brengen. Een selectieve en adequate ophaling die erop gericht is het ongebruikte apparaat te laten recycleren, te laten verwerken en met respect voor het milieu te laten vernietigen, helpt mee de mogelijke negatieve gevolgen voor het milieu en de gezondheid te voorkomen, en bevordert de recyclage van de materialen waarvan het product samengesteld is. Om uitvoerigere informatie over de beschikbare systemen voor afvalophaling te verkrijgen, kunt u contact opnemen met de plaatselijke dienst voor afvalverwijdering of met de winkel waar u het apparaat gekocht hebt. 11. VERWITTIGING Met het oog op de voortdurende verbetering van onze producten behouden wij ons het recht voor om de technische kenmerken zonder voorafgaande kennisgeving te wijzigen. De garanties van de AVINTAGE-producten worden uitsluitend door de door ons gekozen dealers gegeven. Geen enkel onderdeel van deze handleiding kan geïnterpreteerd worden als een aanvullende garantie. De maatschappij FRIO ENTREPRISE kan niet aansprakelijk gesteld worden voor technische en opstellingsvergissingen of -weglatingen in het onderhavige document. Niet-contractueel document. 135 EUROPESE GEGEVENSKAART volgens Verordening 1060/2010 (EU) WIJNKAST MERK AVINTAGE HANDELSREFERENTIE AVU8X(/IX) STROOMVOEDING 220-240 V / 50 Hz AFMETINGEN VAN HET PRODUCT (B x D x H) 145 x 547,5 x 820 mm NETTOGEWICHT 20 kg CATEGORIE VAN HET APPARAAT 2 ENERGIE-EFFICIËNTIEKLASSE A ENERGIEVERBRUIK Energieverbruik 135 kWh per jaar, berekend op basis van resultaten verkregen over 24 uur in genormeerde testomstandigheden. Het werkelijke energieverbruik hangt af van de omstandigheden waarin het apparaat wordt gebruikt en de plaats waar het opgesteld is. NETTO-INHOUD 23 L INSTELBARE TEMPERATUREN 5 – 20°C NO FROST Automatisch ontdooien KLIMAATKLASSE Klimaatklasse: N Dit apparaat is ontworpen om te worden gebruikt bij een omgevingstemperatuur tussen 16 °C (minimum) en 32 °C (maximum). GELUIDSEMISSIE IN LUCHT UITGEDRUKT IN dB(A) RE 1 pW 44 dB(A) INSTALLATIETYPE Inbouw Dit apparaat is uitsluitend bedoeld om wijn te bewaren. 136 EUROPESE GEGEVENSKAART volgens Verordening 1060/2010 (EU) WIJNKAST MERK AVINTAGE HANDELSREFERENTIE AVU23SX(/IX) STROOMVOEDING 220-240 V / 50 Hz AFMETINGEN VAN HET PRODUCT (B x D x H) 295 x 571 x 820 mm NETTOGEWICHT 28 kg CATEGORIE VAN HET APPARAAT 2 ENERGIE-EFFICIËNTIEKLASSE A ENERGIEVERBRUIK Energieverbruik 140 kWh per jaar, berekend op basis van resultaten verkregen over 24 uur in genormeerde testomstandigheden. Het werkelijke energieverbruik hangt af van de omstandigheden waarin het apparaat wordt gebruikt en de plaats waar het opgesteld is. NETTO-INHOUD 56 L INSTELBARE TEMPERATUREN 5 – 20°C NO FROST Automatisch ontdooien KLIMAATKLASSE Klimaatklasse: N Dit apparaat is ontworpen om te worden gebruikt bij een omgevingstemperatuur tussen 16 °C (minimum) en 32 °C (maximum). GELUIDSEMISSIE IN LUCHT UITGEDRUKT IN dB(A) RE 1 pW 43 dB(A) INSTALLATIETYPE Vrije plaatsing en Inbouw Dit apparaat is uitsluitend bedoeld om wijn te bewaren. 137 EUROPESE GEGEVENSKAART volgens Verordening 1060/2010 (EU) WIJNKAST MERK AVINTAGE HANDELSREFERENTIE AVU41SXDPA(/IX) STROOMVOEDING 220-240 V / 50 Hz AFMETINGEN VAN HET PRODUCT (B x D x H) 595 x 571 x 820 mm NETTOGEWICHT 48 kg CATEGORIE VAN HET APPARAAT 2 ENERGIE-EFFICIËNTIEKLASSE A ENERGIEVERBRUIK Energieverbruik 144 kWh per jaar, berekend op basis van resultaten verkregen over 24 uur in genormeerde testomstandigheden. Het werkelijke energieverbruik hangt af van de omstandigheden waarin het apparaat wordt gebruikt en de plaats waar het opgesteld is. NETTO-INHOUD 59.5 L x 2 INSTELBARE TEMPERATUREN 5 – 20°C NO FROST Automatisch ontdooien KLIMAATKLASSE Klimaatklasse: N Dit apparaat is ontworpen om te worden gebruikt bij een omgevingstemperatuur tussen 16 °C (minimum) en 32 °C (maximum). GELUIDSEMISSIE IN LUCHT UITGEDRUKT IN dB(A) RE 1 pW 43 dB(A) INSTALLATIETYPE Vrije plaatsing en Inbouw Dit apparaat is uitsluitend bedoeld om wijn te bewaren. 138 EUROPESE GEGEVENSKAART volgens Verordening 1060/2010 (EU) WIJNKAST MERK AVINTAGE HANDELSREFERENTIE AVU52SX(/IX) STROOMVOEDING 220-240 V / 50 Hz AFMETINGEN VAN HET PRODUCT (B x D x H) 595 x 571 x 820 mm NETTOGEWICHT 44 kg CATEGORIE VAN HET APPARAAT 2 ENERGIE-EFFICIËNTIEKLASSE A ENERGIEVERBRUIK Energieverbruik 145 kWh per jaar, berekend op basis van resultaten verkregen over 24 uur in genormeerde testomstandigheden. Het werkelijke energieverbruik hangt af van de omstandigheden waarin het apparaat wordt gebruikt en de plaats waar het opgesteld is. NETTO-INHOUD 146 L INSTELBARE TEMPERATUREN 5 – 20°C NO FROST Automatisch ontdooien KLIMAATKLASSE Klimaatklasse: N Dit apparaat is ontworpen om te worden gebruikt bij een omgevingstemperatuur tussen 16 °C (minimum) en 32 °C (maximum). GELUIDSEMISSIE IN LUCHT UITGEDRUKT IN dB(A) RE 1 pW 44 dB(A) INSTALLATIETYPE Vrije plaatsing en Inbouw Dit apparaat is uitsluitend bedoeld om wijn te bewaren. 139 EUROPESE GEGEVENSKAART volgens Verordening 1060/2010 (EU) WIJNKAST MERK AVINTAGE HANDELSREFERENTIE AVU53CDZA STROOMVOEDING 220-240 V / 50 Hz AFMETINGEN VAN HET PRODUCT (B x D x H) 595 x 571 x 820 mm NETTOGEWICHT 50 kg CATEGORIE VAN HET APPARAAT 2 ENERGIE-EFFICIËNTIEKLASSE A ENERGIEVERBRUIK Energieverbruik 145 kWh per jaar, berekend op basis van resultaten verkregen over 24 uur in genormeerde testomstandigheden. Het werkelijke energieverbruik hangt af van de omstandigheden waarin het apparaat wordt gebruikt en de plaats waar het opgesteld is. NETTO-INHOUD 134 L INSTELBARE TEMPERATUREN 5 – 10°C / 10 – 20°C NO FROST Automatisch ontdooien KLIMAATKLASSE Klimaatklasse: N Dit apparaat is ontworpen om te worden gebruikt bij een omgevingstemperatuur tussen 16 °C (minimum) en 32 °C (maximum). GELUIDSEMISSIE IN LUCHT UITGEDRUKT IN dB(A) RE 1 pW 45 dB(A) INSTALLATIETYPE Vrije plaatsing en Inbouw Dit apparaat is uitsluitend bedoeld om wijn te bewaren. 140 EUROPESE GEGEVENSKAART volgens Verordening 1060/2010 (EU) WIJNKAST MERK AVINTAGE HANDELSREFERENTIE AVU54SXDZA(/IX) STROOMVOEDING 220-240 V / 50 Hz AFMETINGEN VAN HET PRODUCT (B x D x H) 595 x 571 x 820 mm NETTOGEWICHT 50 kg CATEGORIE VAN HET APPARAAT 2 ENERGIE-EFFICIËNTIEKLASSE A ENERGIEVERBRUIK Energieverbruik 145 kWh per jaar, berekend op basis van resultaten verkregen over 24 uur in genormeerde testomstandigheden. Het werkelijke energieverbruik hangt af van de omstandigheden waarin het apparaat wordt gebruikt en de plaats waar het opgesteld is. NETTO-INHOUD 134 L INSTELBARE TEMPERATUREN 5 – 10°C / 10 – 20°C NO FROST Automatisch ontdooien KLIMAATKLASSE Klimaatklasse: N Dit apparaat is ontworpen om te worden gebruikt bij een omgevingstemperatuur tussen 16 °C (minimum) en 32 °C (maximum). GELUIDSEMISSIE IN LUCHT UITGEDRUKT IN dB(A) RE 1 pW 45 dB(A) INSTALLATIETYPE Vrije plaatsing en Inbouw Dit apparaat is uitsluitend bedoeld om wijn te bewaren. 141 EUROPESE GEGEVENSKAART volgens Verordening 1060/2010 (EU) WIJNKAST MERK AVINTAGE HANDELSREFERENTIE PRO51C/1 STROOMVOEDING 220-240 V / 50 Hz AFMETINGEN VAN HET PRODUCT (B x D x H) 595 x 571 x 820 mm NETTOGEWICHT 48 kg CATEGORIE VAN HET APPARAAT 2 ENERGIE-EFFICIËNTIEKLASSE A ENERGIEVERBRUIK Energieverbruik 145 kWh per jaar, berekend op basis van resultaten verkregen over 24 uur in genormeerde testomstandigheden. Het werkelijke energieverbruik hangt af van de omstandigheden waarin het apparaat wordt gebruikt en de plaats waar het opgesteld is. NETTO-INHOUD 146 L INSTELBARE TEMPERATUREN 5 – 20°C NO FROST Automatisch ontdooien KLIMAATKLASSE Klimaatklasse: N Dit apparaat is ontworpen om te worden gebruikt bij een omgevingstemperatuur tussen 16 °C (minimum) en 32 °C (maximum). GELUIDSEMISSIE IN LUCHT UITGEDRUKT IN dB(A) RE 1 pW 45 dB(A) INSTALLATIETYPE Vrije plaatsing en Inbouw Dit apparaat is uitsluitend bedoeld om wijn te bewaren. 142 Antes de utilizar la vinoteca, lea y aplique todas las reglas de seguridad y uso del presente manual. En primer lugar, le agradecemos la confianza que ha depositado en AVINTAGE al adquirir este aparato que, estamos convencidos, cumplirá plenamente sus expectativas. Este aparato le permitirá chambrear (poner a temperatura ambiente) sus botellas o ponerlas a temperatura de servicio en función de su naturaleza. 1. INSTRUCCIONES GENERALES DE SEGURIDAD Antes de utilizar el electrodoméstico por primera vez, leer este manual de usuario atentamente. Guardarlo con cuidado para futuras consultas en caso necesario. Para reducir el riesgo de incendio, descarga eléctrica o daños cuando se esté usando su aparato, siga estas precauciones básicas: De manera general, un profesional cualificado debe realizar el mantenimiento del electrodoméstico. Por su seguridad y para utilizar correctamente el aparato, antes de instalarlo y utilizarlo por primera vez, lea atentamente este manual, así como las advertencias y los consejos útiles que contiene. Con la finalidad de evitar que usted resulte herido innecesariamente o que el aparato se estropee, es importante que las personas que vayan a utilizarlo conozcan completamente su funcionamiento, así como sus funciones de seguridad. Conserve estas instrucciones para futuras consultas y guárdelas junto al aparato, de modo que acompañen a este último en caso de que se venda o traslade a otro lugar. Así se garantizará el correcto funcionamiento del mismo. Conserve este manual para evitar cualquier riesgo de lesiones. El fabricante declina toda responsabilidad en caso de manipulación incorrecta del aparato. Este electrodoméstico debe utilizarse exclusivamente en el hogar 143 para guardar bebidas especiales a una temperatura de almacenamiento superior a la del compartimento de almacenamiento para productos frescos. No está previsto bajo ningún concepto para guardar productos alimenticios frescos. Asegurarse de que la tensión de la instalación eléctrica corresponda con la placa de identificación del electrodoméstico; este último debe estar conectado a un sistema a tierra autorizado. Las reparaciones o conexiones incorrectas pueden causar riesgos para la seguridad. En caso de duda, solicitar a un profesional que compruebe la instalación eléctrica. Esta unidad debe estar correctamente conectada a la toma de corriente a tierra para su protección. No cortar ni retirar el hilo de puesta a tierra del cable de la red eléctrica suministrado. Por razones de seguridad, no utilizar un cable alargador eléctrico. Si el electrodoméstico está estropeado (p. ej., si ha recibido un golpe fuerte) o ha sufrido algún daño (subida de tensión debida a relámpagos, inundaciones o incendios), puede resultar peligroso utilizarlo. Desconectar el enchufe de la red eléctrica y solicitar a un reparador profesional autorizado que compruebe el electrodoméstico. Para impedir los peligros, no reemplace usted mismo el cable estropeado de la red eléctrica. Ponerse en contacto con el distribuidor, un centro de reparación autorizado o un reparador profesional. Este electrodoméstico debe colocarse de tal manera que el enchufe de la red eléctrica esté accesible. No mover el electrodoméstico cuando esté lleno: podría deformarse su estructura y no ser posible su reparación. Las partes eléctricas no 144 deben estar directamente accesibles. Mantener a los niños alejados del electrodoméstico. No utilizar este electrodoméstico al aire libre. En caso de que se derrame líquido por accidente (rotura de una botella, etc.) en los componentes eléctricos (motor, etc.), desconectar el enchufe de la red eléctrica inmediatamente. Para impedir todo riesgo de incendio, electrocución o lesiones, no sumergir el cable de la red eléctrica, el enchufe o el propio electrodoméstico en el agua o en cualquier otro líquido. No tocar el electrodoméstico con las manos mojadas. Mantener el electrodoméstico alejado de cualquier fuente de calor o fuera de la luz directa del sol. No permitir que el cable de la red eléctrica quede colgando de una mesa o entre en contacto con bordes afilados o superficies calientes. No tirar del cable de red eléctrica, agarrar el enchufe para desconectar el electrodoméstico. Asegurarse de que la zona donde se vaya a colocar el electrodoméstico pueda soportar su peso cargado (una botella de 75 cl pesa aproximadamente 1,3 kg). La vinoteca debe estar colocada en una superficie plana. Si hay que colocarla en una alfombra o tapete, colocar un soporte debajo. Para evitar dañar la junta de puerta, cerciórese de que la puerta está completamente abierta cuando usted saca las parrillas de su compartimento. 145 Seguridad de los niños y demás personas vulnerables Este aparato pueden utilizarlo niños de 8 años o más, personas con capacidad física, sensorial o mental reducida o personas que no hayan aprendido a utilizar el aparato, siempre que estén bajo la supervisión de una persona informada y consciente de los riesgos que ello implica. Los niños no deben jugar con el aparato. La limpieza y el mantenimiento del aparato no deben llevarlos a cabo niños, excepto si son mayores de 8 años y están vigilados. Mantenga todos los componentes del embalaje fuera del alcance de los niños, ya que existe riesgo de asfixia. Riesgo de atrapamiento de niños. El riesgo de atrapamiento y asfixia de los niños no son problemas del pasado. Los aparatos desechados o abandonados siguen siendo peligrosos… incluso si van a "dejarse en el garaje unos días". Si decide desechar el aparato, desenchúfelo de la toma mural, corte el cable de conexión (tan cerca del aparato como le sea posible) y retire la puerta para impedir que los niños jueguen con ella y se electrocuten o se encierren en el interior del aparato. Si el aparato, provisto de una junta de puerta magnética, debe reemplazarse por otro aparato provisto de un pestillo en la puerta o en la junta, compruebe que dicho pestillo no funciona antes de deshacerse del aparato. De este modo, se evitará que el aparato se convierta en una trampa para los niños. Mantenga el aparato y el cable fuera del alcance de niños menores de 8 años. Antes de dar de baja la bodega en un sitio de reciclaje específicos, quite la puerta, pero dejar los estantes en lugar de una manera tal como para hacer difícil que los niños se suban 146 en el interior. Seguridad general ATENCIÓN — Este electrodoméstico está previsto para utilizarse en una vivienda o para tener aplicaciones parecidas en Áreas de cocina de oficina, en tiendas, oficinas u otros lugares de trabajo, Fincas y entre clientes en hoteles, moteles y cualquier otro lugar de tipo residencial, Lugares de tipo alojamiento y desayuno, Servicio de comidas y aplicaciones parecidas no minoristas. ATENCIÓN — Para evitar un peligro debido a la inestabilidad del aparato, debe fijarse de acuerdo con las instrucciones. ATENCIÓN — No guarde bajo ninguna circunstancia sustancias inflamables como aerosoles dentro del aparato, ya que podrían derramarse. ATENCIÓN — Si el cable de alimentación está estropeado, deberá reemplazarlo inmediatamente solicitándolo al fabricante o a un distribuidor cualificado para evitar cualquier riesgo de electrocución. ATENCIÓN — Mantenga los orificios de ventilación abiertos y compruebe que el aire circule correctamente por las aberturas, sobre todo si el aparato está empotrado en la pared. ATENCIÓN —No utilizar dispositivos mecánicos ni ningún otro medio para acelerar el proceso de descongelación distintos de los recomendados por el fabricante. 147 ATENCIÓN — No estropee el circuito de refrigeración. ATENCIÓN — No utilice aparatos eléctricos dentro del compartimento, • excepto si estos últimos son aceptados por el fabricante. ATENCIÓN — El refrigerante y el gas de soplado de aislamiento son inflamables. Cuando se deseche el electrodoméstico, hacerlo en un centro de eliminación de residuos autorizado. No exponer a las llamas. ATENCIÓN — El refrigerante de estos aparatos es el R600a, los artículos inflamables y explosivos no deberían ponerse cerca del armario para evitar que se produzca fuego o una explosión. Líquido refrigerante En el circuito refrigerante del aparato se utiliza isobutano refrigerante (R600a). Se trata de un gas natural sumamente inflamable y, por tanto, peligroso para el medio ambiente. Compruebe que no se dañe ninguno de los componentes del circuito de refrigeración durante el transporte y la instalación del aparato. El refrigerante (R600a) es un líquido inflamable. Atención: riesgo de incendio Si el circuito de refrigeración resultara dañado: Evite las llamas abiertas y cualquier otra fuente de inflamación. Ventile bien la habitación en la que se encuentre el aparato. Es peligroso realizar cualquier tipo de modificación que afecte a la composición del aparato. Cualquier daño provocado al cable puede causar un cortocircuito o una electrocución. 148 Seguridad eléctrica Declinamos toda responsabilidad en caso de incidente causado por una mala instalación eléctrica. El cable de alimentación no debe alargarse. No utilice ningún alargador, ningún adaptador ni ninguna toma múltiple. Asegurarse de que el cable de alimentación no esté aplastado ni estropeado. Si el cable está aplastado o estropeado, podría sobrecalentarse y provocar un incendio. Asegurarse de tener acceso al enchufe de la red eléctrica del electrodoméstico. No tirar del cable principal No elimine en ningún caso la toma de tierra. Si el enchufe de alimentación está suelto, no insertar el cable de alimentación. Existe riesgo de descarga eléctrica o incendio. No se debe poner en funcionamiento el electrodoméstico sin la tapa de la lámpara de iluminación interior. Desconecte el aparato antes de cambiar la bombilla. La vinoteca se aplica solamente con suministro de alimentación de corriente alterna monofásica de 220~240 V/50 Hz. Si el cable de alimentación está estropeado, no lo reemplace. Póngase en contacto con el servicio posventa. La toma de corriente debe estar accesible fácilmente pero fuera del alcance de los niños. En caso de duda, consulte al instalador Utilización diaria Este aparato está diseñado para ser utilizado exclusivamente para el almacenamiento de vino. No almacene en ningún caso sustancias ni líquidos inflamables 149 dentro del aparato, pues implicaría un riesgo de explosión. No ponga en funcionamiento otros aparatos eléctricos dentro del aparato (batidoras, heladeras eléctricas, etc.). Cuando desenchufe el aparato, agarre la toma con las manos y no tire del cable. No colocar objetos calientes cerca de los componentes de plástico de este electrodoméstico. Deben cumplirse estrictamente las recomendaciones de almacenamiento de los electrodomésticos prescritas por el fabricante. Consultar las instrucciones correspondientes de almacenamiento. No exponga el aparato directamente al sol. El aparato debe mantenerse alejado de velas, luminarias y demás llamas abiertas para evitar riesgos de incendio. Este electrodoméstico está destinado a guardar bebidas comunes de una vivienda, tal y como se explica en este manual de instrucciones. El aparato es pesado. Sea prudente cuando tenga que desplazarlo. Si el aparato está provisto de ruedas, recuerde que estas sirven únicamente para facilitar pequeños movimientos. No lo desplace en trayectos largos. No utilizar nunca la base, los cajones, las puertas, etc. como sostén o soporte. Para evitar que caigan objetos e impedir el deterioro del aparato, no sobrecargue los compartimentos del aparato. Atención: limpieza y mantenimiento Antes de realizar el mantenimiento, desconecte el aparato y corte la corriente. No limpie el aparato con objetos metálicos, sistemas a vapor, 150 aceites volátiles, abrasivos. disolventes orgánicos o componentes Nunca limpie ninguna parte del aparato con fluidos inflamables. Los humos pueden crear un peligro de incendio o explosión. No utilice objetos cortantes ni puntiagudos para retirar el hielo. Utilice un rascador de plástico. Información importante acerca de la instalación Evite colocar la unidad en zonas húmedas. Mantener el electrodoméstico alejado de la luz directa del sol y de las fuentes de calor (estufa, calentador, radiador, etc.). La luz directa del sol puede afectar a la capa acrílica y las fuentes de calor pueden aumentar el consumo eléctrico. El frío extremo o las temperaturas ambiente de calor también pueden provocar funcionamientos inadecuados de los electrodomésticos. Enchufe la vinoteca en una toma de corriente exclusiva apropiadamente instalada con toma de tierra. Bajo ninguna circunstancia corte o quite la tercera clavija (tierra) del cable de alimentación. Cualquier pregunta que tenga sobre la potencia y/o puesta a tierra debe dirigirse a un electricista cualificado o un centro de servicio de productos autorizado. Para que las conexiones eléctricas sean correctas, siga las instrucciones que se proporcionan en este manual. Desembale el aparato y compruebe visualmente que no esté dañado. No conecte el aparato si está dañado. Indique los daños constatados en el punto de venta donde lo haya adquirido. En ese caso, conserve el embalaje. Se recomienda esperar al menos veinticuatro horas para conectar el aparato a la corriente para que el compresor cuente con el aceite suficiente. Se requiere una buena circulación del aire para evitar riesgos 151 de sobrecalentamiento. Para que la ventilación sea suficiente, siga correctamente las instrucciones de instalación proporcionadas. Cuando sea posible, evite que el aparato toque las paredes murales o entre en contacto con elementos calientes (compresor, condensador) para evitar riesgos de incendio. Respete en todo momento las instrucciones de instalación. El aparato no debe estar situado cerca de radiadores o de fogones de cocción. Una vez que se haya instalado el aparato, compruebe que se puede acceder bien a las tomas. Ahorro de energía Siga las siguientes recomendaciones para limitar el consumo eléctrico del aparato: Instálelo en un lugar adecuado “Instrucciones de instalación”). (véase el capítulo Mantenga las puertas abiertas el menor tiempo posible. Para que el aparato funcione correctamente, limpie periódicamente el condensador (véase el capítulo “Mantenimiento”). Revise periódicamente las juntas de las puertas y asegúrese de que cierren siempre correctamente. Si no es así, póngase en contacto con el servicio posventa. Reparación de averías Las operaciones eléctricas debe efectuarlas un técnico cualificado y competente. Este aparato debe repararlo un centro de reparación autorizado y solo deben utilizarse piezas originales. 152 Este aparato está reservado para uso doméstico exclusivamente. El fabricante declina toda responsabilidad si el aparato se destina a otros usos. R600a Instrucciones de seguridad Atención: No obstruya ninguna rejilla de ventilación del aparato. Atención: No almacene sustancias explosivas como esprays de aerosol inflamables con propulsor en este aparato. Atención: No estropee el circuito frigorífico del aparato. Atención: Las unidades de refrigeración que funcionan con isobutano (R600a) no pueden ubicarse en zonas con fuentes de ignición (por ejemplo, contactos eléctricos no sellados o lugares en los que se acumule fluido frigorígeno en caso de fuga). El tipo de fluido frigorígeno se indica en la placa descriptiva del armario. Atención: No utilice aparatos eléctricos en los compartimentos del aparato, excepto si son del tipo recomendado por el fabricante. Este aparato cumple todas las directivas europeas vigentes y sus posibles modificaciones y, concretamente, las normas siguientes: 2011/65/EU (ROHS) 2014/35/EU relativa a la seguridad eléctrica 2014/30/EU relativa a la compatibilidad electromagnética 643/2009/CE relativa al etiquetado energético 153 2. DATOS TÉCNICOS Ejemplo de placa de características: La placa de características pegada en el interior o en la parte posterior del aparato (según el modelo) contiene toda la información específica de la vinoteca. Le aconsejamos que anote el número de serie en este manual antes de la instalación, para consultarlo cuando lo necesite (intervención técnica, solicitud de asistencia…). Una vez instalada y cargada la vinoteca, resulta más complicado acceder al número de serie. ATENCIÓN: sin esta información no podremos proporcionarle ninguna asistencia. 3. INSTRUCCIONES DE INSTALACIÓN Antes de utilizar este electrodoméstico Retire el embalaje exterior e interior. Antes de conectar el electrodoméstico a la fuente de alimentación, mantenerlo recto durante aproximadamente 24 horas. De este modo, se reducirá la posibilidad de que se produzcan funcionamientos inadecuados en el sistema de refrigeración a causa de las manipulaciones durante el transporte. Limpie el interior con un paño suave y agua tibia. Cuando se deshaga de su aparato, escoja un punto limpio autorizado. Sitúe su vinoteca en un piso lo suficientemente fuerte para soportarla cuando esté completamente cargada. Para nivelar su vinoteca, ajuste las patas frontales de nivelación bajo la vinoteca. Se necesita una ventilación adecuada, no bloquear la salida frontal de aire. No diseñado para colocarse en un sótano. El electrodoméstico solamente puede utilizarse en interiores. Esta vinoteca ha sido diseñada para una instalación independiente o empotrada. 154 Conecte la vinoteca a una toma única, dejando un espacio de 30 mm entre la parte posterior de la vinoteca y la pared. Calce el aparato correctamente y ajuste su horizontalidad (se aconseja el uso de un nivel de burbujas). Esto evitará cualquier movimiento debido a la inestabilidad, que generaría ruidos y vibraciones, y garantizará la perfecta hermeticidad de la puerta. El uso previsto de este aparato es exclusivamente el almacenamiento de vino. Este aparato uso refrigerante inflamable. Por lo tanto, no dañe las tuberías de refrigerante durante el transporte. Atención Almacene las botellas cerradas. No sobrecargue el aparato. No abra la puerta más de lo que fuera necesario. No cubra las parrillas con hojas de aluminio o cualquier otro material que pudiese impedir una buena circulación del aire. Si la bodega de vino debe dejarse vacía durante un largo período, se sugiere desconectar el aparato y después limpiarla meticulosamente, dejar la puerta entreabierta para que el aire circule y prevenga la formación de mohos y olores. ATENCIÓN: mantener este electrodoméstico alejado de cualquier sustancia que pueda causar ignición. Límites de temperatura del ambiente de la sala Este aparato está diseñado para que funcione a temperaturas ambiente especificadas en su clase de temperatura indicada en la placa de características. CLASE SÍMBOLO RANGO DE TEMPERATURAS AMBIENTE (ºC) Extensión de temperaturas SN Desde +10 a+32 Temperatura N Desde +16 a+32 Subtropical ST Desde +16 a+38 Tropical T Desde +16 a+43 155 Esquema de empotramiento AVU8X(/IX) AVU23SX(/IX) 156 AVU41SXDPA(/IX) AVU52SX(/IX) AVU54SXDZA(/IX) 157 AVU53CDZA PRO51C/1 Inversión de la puerta Se puede cambiar la puerta para que abra por el lado izquierdo o derecho. Si no hay ninguna petición especial, la puerta se abre por el lado izquierdo. Si se necesita que abra por el lado derecho siga las siguientes indicaciones: AVU8X(/IX) 158 1. Bisagra inf. (derecha) 4. Puerta 7. Bisagra sup. (izquierda) 2. Tornillos 5. Bisagra sup. (derecha) 8. Bisagra inf. (izquierda) 3. Eje de la puerta 6. Tornillos de bisagras 1. Abra la puerta 90 grados. Retire los dos tornillos (2) del eje inferior de la puerta y después la puerta (4) y el eje de la misma (Fig. A). Posicione correctamente la puerta (4) (Fig. A y B). 2. Quite los 3 tornillos (6) de la bisagra superior (derecha) (5) y retire esta bisagra y la bisagra inferior (derecha) (Fig. C). 3. Coloque la bisagra superior adicional (izquierda) (7) en el lado superior izquierdo con ayuda de 3 tornillos (Fig. D). Proceda a la colocación de la bisagra inferior que queda (izquierda) (8), siguiendo siempre el procedimiento anterior (Fig. E). 4. La puerta se abre 180 grados. El método de instalación de la puerta es el mismo que el de desmontaje. Alinee correctamente la puerta y fíjela. AVU23SX(/IX) AVU52SX(/IX) 1. Bisagra inf. (derecha) 4. Puerta 7. Bisagra sup. (izquierda) 10. Dispositivo de retención 2. Tornillos 5. Bisagra sup. (derecha) 8. Clavo embellecedor 11. Tornillos 3. Eje de la puerta 6. Tornillos de las bisagras 9. Bisagra inf. (izquierda) 12. Tapón embellecedor 1. Abra la puerta 90 grados. Retire los dos tornillos (2) del eje inferior de la puerta y después la puerta (4) y el eje de la misma (fig. A). 2. Posicione correctamente la puerta (4) y retire el tapón embellecedor (12) de la parte superior del marco de la puerta. Retire uno de los tornillos (11) inferiores y quite el dispositivo de retención (10). A continuación, instale el dispositivo en la parte superior del marco de la puerta. Es preferible utilizar un tapón embellecedor de recambio (12) para tapar el agujero de la parte superior del marco (fig. A/B). 3. Quite los 3 tornillos (6) de la bisagra superior (derecha) (5) y retire la bisagra (fig. C). 4. Retire los clavos embellecedores (8) del lado superior izquierdo del aparato y coloque la bisagra superior de recambio (izquierda) (7) en el lado superior izquierdo con ayuda de 3 tornillos (fig. D). 5. Proceda a la colocación de la bisagra inferior de recambio (izquierda) (9), siguiendo siempre el 159 procedimiento anterior (fig. E). 6. La puerta se abre 180 grados. El método de instalación de la puerta es el mismo que el de desmontaje. Alinee correctamente la puerta y fíjela. 7. Tape el agujero situado en la parte superior derecha del aparato con un clavo embellecedor (8). AVU53CDZA AVU54SXDZA(/IX) PRO51C/1 1. Bisagra inf. (derecha) 4. Puerta 7. Bisagra sup. (izquierda) 2. Tornillos 5. Bisagra sup. (derecha) 8. Clavos embellecedores 3. Eje de la puerta 6. Tornillos de bisagras 9. Bisagra inf. (izquierda) 1. Abra la puerta 90 grados. Retire los dos tornillos (2) del eje inferior de la puerta y después la puerta (4) y el eje de la misma (fig. A). 2. Posicione correctamente la puerta (4). 3. Quite los 3 tornillos (6) de la bisagra superior (derecha) (5) y retire la bisagra (fig. C). 4. Retire los clavos embellecedores (8) del lado superior izquierdo del aparato y coloque la bisagra superior adicional (izquierda) (7) en el lado superior izquierdo con ayuda de 3 tornillos (fig. D). 5. Proceda a la colocación de la bisagra inferior que queda (izquierda) (9), siguiendo siempre el procedimiento anterior (fig. E). 6. La puerta se abre 180 grados. El método de instalación de la puerta es el mismo que el de desmontaje. Alinee correctamente la puerta y fíjela. 7. Tape el agujero situado en la parte superior derecha del aparato con un clavo embellecedor (8). 4. FUNCIONAMIENTO DEL ELECTRODOMÉSTICO Se recomienda instalar el electrodoméstico en un lugar donde la temperatura ambiente se encuentre entre 16 y 32 °C. Si la temperatura ambiente es superior o inferior a las temperaturas recomendadas, el rendimiento de la unidad podría verse afectado y podría no ser posible obtener una temperatura entre 520°C o 5-10°C/10-20°C (según el modelo). 160 AVU8X(/IX) / AVU23SX(/IX) AVU41SXDPA(/IX) AVU52SX(/IX) PRO51C/1 “RUN” Indicador de encendido Botón Para encender/apagar el aparato Pulse y mantenga pulsado el botón durante unos 3 segundos Botón Botón de control de la luz interior Pantalla Pantalla electrónica de temperatura Botón Botón de ajuste de la temperatura a más Botón Botón de ajuste de la temperatura a menos Puede elegir la temperatura que desee para el compartimento pulsando las teclas “ / temperatura que desee programar aumentará/disminuirá 1 ºC cada vez que pulse los botones. ”. La La temperatura se puede seleccionar en una escala de entre 5 y 20 °C o entre 5 y 10°C / 10 y 20°C (según el modelo). Una vez seleccionada, la pantalla parpadeará aproximadamente 5 segundos antes de indicar la temperatura interna instantánea de la vinoteca. La temperatura de ajuste puede verse en cualquier momento pulsando durante 5 segundos las teclas de selección de temperatura. Si se produce un corte de electricidad, todas las temperaturas anteriormente seleccionadas se borrarán y cada compartimento recuperará, por defecto, la temperatura predeterminada de fábrica, es decir 12 ºC. AVU53CDZA AVU54SXDZA(/IX) “RUN” Indicador de encendido Botón Para encender/apagar el aparato Pulse y mantenga pulsado el botón durante unos 3 segundos Botón Botón de control de la luz interior Pantalla Pantalla electrónica del compartimento superior 161 Pantalla Pantalla electrónica del compartimento inferior Botón Botón de ajuste de la temperatura para el compartimento superior Botón Botón de ajuste de la temperatura para el compartimento inferior Pulse el botón “ ” para ajustar la temperatura del compartimento superior. La pantalla del compartimento comenzará a parpadear y cada vez que pulse uno de los botones la temperatura variará en un 1 ºC. Una vez que la temperatura de ajuste más baja alcance los 5 ºC, la pantalla volverá automáticamente a mostrar la temperatura de ajuste más elevada, 10 ºC. Cuando se haya seleccionado la temperatura, la pantalla parpadeará unos 5 segundos antes de indicar la temperatura interna instantánea de la vinoteca. La temperatura de ajuste puede verse en cualquier momento pulsando durante 5 segundos las teclas de selección de temperatura. Pulse el botón “ ” para ajustar la temperatura del compartimento inferior. La pantalla del compartimento comenzará a parpadear y cada vez que pulse uno de los botones la temperatura variará en un 1 ºC. Una vez que la temperatura de ajuste más baja alcance los 10 ºC, la pantalla volverá automáticamente a mostrar la temperatura de ajuste más elevada, 20 ºC. Cuando se haya seleccionado la temperatura, la pantalla parpadeará unos 5 segundos antes de indicar la temperatura interna instantánea de la vinoteca. La temperatura de ajuste puede verse en cualquier momento pulsando durante 5 segundos las teclas de selección de temperatura. Si se produce un corte de electricidad, todas las temperaturas anteriormente seleccionadas se borrarán y cada compartimento recuperará, por defecto, la temperatura predeterminada de fábrica, es decir, 6 °C en el caso del compartimento superior y 12 ºC en el caso del compartimento inferior. Funcionamiento Alarma de temperatura: Si la temperatura interior es superior a 23°C, se muestra “HI” en la pantalla y suena la alarma después de una hora produciéndose de manera continua. Informa de que la temperatura interior es demasiado alta, compruebe el motivo. Si la temperatura interior es inferior a 0°C, se muestra “LO” en la pantalla y suena la alarma y se enciende el indicador de avería al mismo tiempo. Función de memoria de temperatura: En el caso de interrupción del suministro eléctrico, la vinoteca puede memorizar la consigna previa de temperatura y cuando vuelva el suministro eléctrico, la temperatura de la enfriadora volverá a la misma consigna de temperatura que tenía cuando se apagó. Luz interior Para reducir el consumo de energía, la vinoteca apagará automáticamente las luces LED después de 10 minutos. Es posible, si lo desea, que la luz LED permanezca encendida permanentemente. Mantenga pulsado el botón XXX durante 5 segundos, la pantalla mostrará "LP". Después de 4 segundos la pantalla volverá al estado normal y la luz permanecerá encendida hasta que se apague manualmente. Si desea revertir la acción y ahorrar energía (recomendado), mantenga pulsado el botón XXX durante 5 segundos, la pantalla mostrará "LF". Después de 4 segundos la pantalla volverá al estado normal y la luz se apagará automáticamente después de 10 minutos. 162 5. EQUIPOS Sistema de climatización Según los especialistas, la temperatura ideal de conservación de los vinos es de aproximadamente 12 ºC, en una horquilla de 10 a 14 ºC. No se debe confundir con la temperatura de servicio, que varía según las peculiaridades de cada tipo de vino de 5 a 20 ºC. Es especialmente importante evitar las variaciones bruscas de temperatura. Diseñado por especialistas y para enófilos, este aparato, a diferencia de un simple frigorífico, tiene en cuenta la sensibilidad de los grandes caldos a las variaciones bruscas de temperatura, garantizando un control para obtener una temperatura media constante. Sistema antivibraciones El compresor frigorífico está equipado con amortiguadores especiales (silent-blocks) y la cuba interior está aislada del armazón por una gruesa capa de espuma de poliuretano. Estas características permiten evitar la transmisión de vibraciones a los vinos. Sistema de humidificación Dado que este aparato no dispone de filtro de carbón, está equipado con un depósito que mantiene el nivel correcto de humedad (según el modelo). Si la humedad es demasiado baja, llene el depósito hasta las tres cuartas partes de su capacidad. Compruebe el nivel de agua de vez en cuando y añada agua si es necesario. Procure que el depósito siempre tenga agua. Diseñada por especialistas y para enófilos, la marca Avintage ha tenido en cuenta la sensibilidad de los corchos a una humedad ambiente demasiado baja. Por esa razón, el depósito debe colocarse sobre la bandeja que se encuentra bajo el ventilador, situado en el fondo, para aportar una mínima humedad. Procure controlar el nivel de agua si va a mantener los vinos en el aparato durante un período prolongado y no utiliza el aparato sólo para poner los vinos en temperatura de servicio (con rotaciones rápidas de las botellas). Asegúrese de que la bandeja llena de agua es estable para evitar cualquier caída o infiltración de agua. Sistema antiultravioleta La luz acelera el envejecimiento del vino. En nuestras vinotecas de puerta compacta, los vinos están protegidos de forma natural, siempre que no se abra la puerta con demasiada frecuencia. Este modelo con puerta acristalada ha sido objeto de un tratamiento especial, que filtra los nefastos rayos ultravioleta, por lo que los vinos están perfectamente protegidos. Desescarche La vinoteca está equipada con un ciclo automático de desescarche. Durante la parada del ciclo de refrigeración, las superficies refrigeradas del aparato se desescarchan de forma automática. El agua de desescarche así recuperada es evacuada hacia un depósito que se encuentra en la parte posterior del aparato, cerca del compresor. El calor que produce el compresor permite la evaporación del agua condensada que queda en el depósito. Sistema de invierno (según el modelo) El sistema de invierno ayuda a mantener la misma temperatura interna que la temperatura establecida y permite que la vinoteca funcione en un entorno en el que la temperatura está entre 0 y 32°C. Cuando la temperatura interna de la vinoteca baje de 3°C en comparación con la temperatura seleccionada, un elemento de corriente eléctrica de baja potencia funcionará para llevar la temperatura interna a la 163 temperatura inicialmente seleccionada. Este es un elemento de baja potencia para evitar subidas repentinas en la temperatura del vino y evitar así shocks térmicos que perjudiquen la conservación del vino. Está previsto que el sistema automático suba la temperatura interna de la vinoteca incluso antes de que haya un intercambio térmico con las botellas. Cuando el sistema esté trabajando y la temperatura interna alcanza la temperatura establecida, se parará. Bandejas Para evitar el deterioro de la junta de la puerta, asegúrese de que la puerta esté bien abierta antes de retirar las bandejas para colocar o retirar las botellas. Para acceder de forma más sencilla al contenido de las bandejas debe deslizar la bandeja hacia el exterior aproximadamente 1/3. Las bandejas están diseñadas con un tope a cada lado para evitar que las botellas se caigan. Para retirar o colocar una bandeja, inclínela como se muestra en el dibujo y tire o empuje, según el caso. AVU41SXDPA(/IX) Coloque las bandejas en sus alojamientos. a. caja de cartón con piezas de recambio b. bandeja pequeña c. bandeja grande 1. Tras retirar el embalaje, saque la caja de cartón con las piezas de recambio del aparato. 2. Encontrará 4 bandejas pequeñas (b) en el compartimento izquierdo. Retire las dos bandejas inferiores. 3. En el compartimento derecho encontrará 4 bandejas grandes (c). Retire las dos bandejas superiores. 164 4. Ahora tiene que invertir la posición de las bandejas grandes y pequeñas (fig.2). Coloque dos bandejas pequeñas arriba y dos bandejas grandes abajo en cada compartimento. 5. Una vez que haya colocado las bandejas correctamente, podrá utilizar la vinoteca de acuerdo a las instrucciones que figuran en el manual de uso. Deslizadores del pie Dos deslizadores pies se proporcionan con el aparato, lo que le permite moverse con facilidad cuando sus pies se ajustan a la altura máxima. Los deslizadores pies tienen que ser instalados en paralelo debajo de los pies de acuerdo con la ubicación para la parte delantera y para la espalda. Detrás Frente Frente Detrás Deslizadores del pie Mayor seguridad Puesto que esta gama de aparatos está diseñada para el almacenamiento de objetos de valor, nos hemos preocupado por seleccionar componentes de calidad y diseñar unas técnicas de fabricación adecuadas para garantizar una seguridad óptima de funcionamiento. Instalación del tirador El aparato está equipado con un tirador de acero inoxidable. Para colocarlo, sólo tiene que retirar la junta y fijar el tirador a la puerta con los tornillos que se proporcionan, siguiendo este esquema: Front Back 6. CARGA Las cantidades máximas de carga de botellas se indican a título orientativo, no son contractuales y permiten (al igual que la capacidad de los frigoríficos) tener una estimación rápida del tamaño del aparato. 165 Estas cantidades corresponden a unas pruebas realizadas con una botella estándar: la botella tipo «bordelesa ligera de 75 cl» (la normalización reconoce para cada forma de botella un origen geográfico: bordelesa, borgoñona, provenzal, etc., y un tipo: tradición, pesada, ligera, flauta, etc., cada uno con diámetros y alturas diferentes). En realidad, se podrían colocar, en un caso extremo, más botellas en apilado monotipo y sin bandejas, pero una «vinoteca variada» se compone de una gran variedad de botellas y el aspecto «práctico» de la gestión diaria de una vinoteca limita su carga. Por tanto, probablemente coloque usted una carga algo menor que la cantidad máxima indicada. Tipos de botellas: Aquí tenemos 4 tipos de botellas de 75 cl, borgoñonas y bordelesas, de dimensiones diferentes. Existen otros muchos otros tipos, de tamaño y forma diferentes. Puede observar las diferencias de colocación según la altura de las botellas, el diámetro y la manera de cruzarlas. Por ejemplo, si cargamos una vinoteca exclusivamente con botellas de tipo Borgoña, observaremos que nos quedamos aproximadamente un 30% por debajo de la cantidad inicial calculada a partir de las botellas de tipo Burdeos. Tipos de cruzamiento Cuello con cuello: ¡Fíjese en la diferencia de profundidad! Cuello entre cuerpos: Ejemplos de temperaturas de servicio A tener en cuenta en las degustaciones para no perderse la riqueza de los aromas de los vinos. Grandes vinos de Burdeos – Tintos 16 – 17°C Grandes vinos de Borgoña – Tintos 15 – 16°C “Grands crûs” de vinos blancos secos 14 – 16°C Tintos ligeros, afrutados, jóvenes 11 – 12°C Rosados de Provenza, vinos jóvenes 10 – 12°C Blancos secos y vinos tintos de la tierra 10 – 12°C 166 Vinos blancos de la tierra Champanes Vinos licorosos 8 – 10°C 7 – 8°C 6°C 7. MANTENIMIENTO Antes de limpiar el aparato (operación que se debe realizar regularmente), desconéctelo retirando el cable de alimentación de la toma de corriente o desconectando el fusible del que dependa. Antes de la primera utilización y de forma regular, aconsejamos que limpie el interior y el exterior (cara delantera, laterales y parte superior) con una mezcla de agua tibia y un detergente suave. Aclare con agua limpia y deje que se seque completamente antes de volver a conectarlo. No utilice disolventes ni agentes abrasivos. Al encender el aparato por primera vez, pueden producirse olores residuales. En ese caso, ponga a funcionar el aparato en vacío durante unas horas con la temperatura más fría. El frío eliminará estos posibles olores ¿Qué hacer si se produce un corte de electricidad? La mayoría de los cortes de electricidad se resuelven en poco tiempo. Un corte de 1 o 2 horas no afectará a la temperatura de su vinoteca. Para proteger los vinos durante los cortes de electricidad, abra la puerta lo menos posible. En caso de cortes más prolongados, adopte las medidas necesarias para proteger los vinos. Si el aparato está desconectado, apagado o se ha producido un corte de electricidad, debe esperar de 3 a 5 minutos antes de volver a encenderlo. Si intenta encenderlo antes de ese tiempo, el compresor únicamente se pondrá a funcionar al cabo de 3 o 5 minutos (si la temperatura lo requiere). Al encender el aparato por primera vez tras una parada prolongada, en el momento del encendido es posible que las temperaturas seleccionadas no se correspondan con las que se muestran. Esto es normal. Se debe esperar unas horas para que estas recuperen la estabilidad. Período de vacaciones Vacaciones cortas: deje la vinoteca funcionando durante las vacaciones de menos de tres semanas. Vacaciones largas: si el aparato no se va a usar durante varios meses, retire todos los elementos y apague el aparato. Limpie y seque el interior a fondo. Para prevenir los olores y la formación de moho, deje la puerta ligeramente abierta: dejándola bloqueada abierta si es necesario. Si debiese desplazar la bodega de vino Saque todas las botellas que estén en la cuba y fije los elementos móviles. Para evitar dañar los tornillos de puesta a nivel de los pies, atorníllelos a fondo en su base. Almacénelo con la puerta cerrada. Desplace el aparato en posición vertical. Protéjalo con mantas o cualquier otra protección similar. Ahorros de energía El aparato debe colocarse en un local fresco (pero con temperatura por encima de +16°C), lejos de cualquier fuente de calor (otros aparatos doméstico) y de una exposición directa al sol. El local donde se instalará el aparato debe estar ventilado. No cubra nunca las aireaciones. No abra la puerta más de lo que fuera necesario. 167 8. EN CASO DE AVERÍA A pesar de todo el cuidado que ponemos en la fabricación de nuestros productos, las averías no se pueden descartar completamente. Antes de ponerse en contacto con el servicio posventa de su distribuidor, compruebe que: La toma de corriente está conectada No se ha producido un corte de electricidad La avería no tenga su origen en alguna de las situaciones descritas en el cuadro que figura al final de este manual IMPORTANTE: si el cable de alimentación que se incluye está deteriorado, debe ser sustituido por el fabricante o por un servicio autorizado por la marca o por el distribuidor. En cualquier caso y para evitar cualquier riesgo de lesión, el cable lo debe sustituir personal cualificado. SI ESTAS REVISIONES NO DAN RESULTADO, PÓNGASE EN CONTACTO CON EL SERVICIO POSVENTA DE SU DISTRIBUIDOR. ¡ATENCIÓN! ¡Desconecte la toma mural antes de realizar cualquier operación de limpieza o reparación! 168 9. SOLUCIÓN DE PROBLEMAS Usted mismo puede resolver muchos problemas sencillos de la vinoteca sin recurrir al servicio postventa. Consulte las siguientes sugerencias: PROBLEMA La bodega no se enciende La bodega no enfría lo suficiente El compresor arranca y se para con frecuencia La luz no funciona Vibraciones La bodega parece hacer un poco de ruido La puerta no cierra bien CAUSA POSIBLE La toma no está conectada El botón marcha/parada se encuentra en posición parada El fusible de su instalación eléctrica ha saltado. Controle la temperatura elegida La temperatura externa supera a la temperatura de uso de la bodega La bodega se abre con mucha frecuencia La puerta no está bien cerrada La junta de la puerta no es estanca La temperatura externa es elevada Se ha puesto una gran cantidad de botellas en la bodega La bodega se abre con mucha frecuencia La puerta no está bien cerrada El regulado no se ha realizado correctamente La junta de la puerta no es estanca La toma no está conectada El fusible de su instalación eléctrica ha saltado El LED está fuera de servicio, póngase en contacto con su servicio postventa El botón de la luz esta en parada Controle y asegúrese de que la bodega se encuentra bien nivelada El panel de control está averiado Un ruido semejante al del agua que circula se produce por el gas refrigerante, lo que es norma Al final del ciclo del compresor puede que se oiga un ruido de agua que circula Las contracciones y expansiones de las paredes internas pueden provocar chasquidos La bodega no se encuentra nivelada La bodega no se encuentra nivelada La junta de la puerta está sucia o deteriorada Las bandejas no están bien colocadas Una parte del contenido impide que la puerta se cierre Sustitución de la LÁMPARA de iluminación Este aparato está compuesto por diodos electroluminiscentes (LED). Este tipo de diodo no puede ser cambiado por el usuario. La duración de estos LED es la suficiente para que no deba realizarse ningún 169 cambio. Si, a pesar de todo el esfuerzo puesto en la fabricación de su vinoteca los LED resultaran defectuosos, póngase en contacto con su servicio postventa para una eventual intervención. 10. ENTORNO Este electrodoméstico está marcado conforme a la Directiva europea 2012/19/CE relativa a los residuos de aparatos eléctricos y electrónicos (RAEE). Al garantizar que este producto se deseche de manera correcta, se está ayudando a impedir que existan posibles consecuencias negativas para el entorno y la salud humana, lo que podría estar causado de otro modo por un manejo inadecuado de los residuos de este producto. El símbolo del contenedor de basura tachado que figura en el aparato indica que, al final de su vida útil, este producto deberá tratarse de forma separada de los demás residuos domésticos. Por tanto se deberá trasladar a un centro de recogida selectiva para aparatos eléctricos y/o electrónicos, o si adquiere un aparato equivalente, al distribuidor del aparato nuevo. El usuario es responsable de trasladar el aparato, al final de su vida útil, al centro de recogida apropiado. Una recogida selectiva y adecuada, con el fin de que el aparato sea reciclado, tratado y eliminado de forma respetuosa con el medio ambiente, contribuye a evitar los posibles efectos negativos sobre el medio ambiente y la salud, y favorece el reciclaje de los materiales que componen el producto. Para obtener información más detallada sobre los sistemas de recogida disponibles, diríjase al servicio local de eliminación de residuos o a la tienda donde adquirió el aparato. 11. ADVERTENCIA Con el fin de mejorar constantemente nuestros productos, nos reservamos la posibilidad de modificar las características técnicas sin aviso previo. Las garantías de los productos de la marca AVINTAGE son proporcionadas de forma exclusiva por una serie de distribuidores que nosotros seleccionamos. Ningún elemento del presente manual podrá interpretarse como una garantía adicional. FRIO ENTREPRISE no asume ninguna responsabilidad por los errores u omisiones técnicas y de redacción en el presente manual. Documento no contractual. 170 HOJA DE DATOS EUROPEA de acuerdo con la reglamentación (UE) N°1060/2010 ARMARIO DE SERVICIO DE VINO MARCA AVINTAGE REFERENCIA AVU8X(/IX) SUMINISTRO ELÉCTRICO 220-240 V / 50 Hz DIMENSIONES DEL PRODUCTO (A x P x A) 145 x 547,5 x 820 mm PESO NETO 20 kg CATEGORÍA DEL APARATO 2 CLASE DE EFICIENCIA ENERGÉTICA A CONSUMO DE ENERGÍA Consumo de energía 135 kWh por año calculado en base a resultados obtenidos en 24 horas en condiciones de prueba normales. El consumo energético real depende de las condiciones de uso y de la ubicación del aparato. VOLUMEN NETO 23 L AJUSTE DE TEMPERATURA 5 – 20°C SIN ESCARCHE Desescarche automático CLASE CLIMÁTICA Clase climática: N Este aparato está diseñado para usarse a una temperatura ambiente entre 16ºC (inferior) y 32ºC (superior). EMISIONES ACÚSTICA EN EL AIRE EN dB(A) RE 1 pW 44 dB(A) TIPO DE INSTALACIÓN Incorporada Este aparato está destinado exclusivamente al almacenamiento de vino. 171 HOJA DE DATOS EUROPEA de acuerdo con la reglamentación (UE) N°1060/2010 ARMARIO DE SERVICIO DE VINO MARCA AVINTAGE REFERENCIA AVU23SX(/IX) SUMINISTRO ELÉCTRICO 220-240 V / 50 Hz DIMENSIONES DEL PRODUCTO (A x P x A) 295 x 571 x 820 mm PESO NETO 28 kg CATEGORÍA DEL APARATO 2 CLASE DE EFICIENCIA ENERGÉTICA A CONSUMO DE ENERGÍA Consumo de energía 140 kWh por año calculado en base a resultados obtenidos en 24 horas en condiciones de prueba normales. El consumo energético real depende de las condiciones de uso y de la ubicación del aparato. VOLUMEN NETO 56 L AJUSTE DE TEMPERATURA 5 – 20°C SIN ESCARCHE Desescarche automático CLASE CLIMÁTICA Clase climática: N Este aparato está diseñado para usarse a una temperatura ambiente entre 16ºC (inferior) y 32ºC (superior). EMISIONES ACÚSTICA EN EL AIRE EN dB(A) RE 1 pW 43 dB(A) TIPO DE INSTALACIÓN Instalación sin soporte e incorporada Este aparato está destinado exclusivamente al almacenamiento de vino. 172 HOJA DE DATOS EUROPEA de acuerdo con la reglamentación (UE) N°1060/2010 ARMARIO DE SERVICIO DE VINO MARCA AVINTAGE REFERENCIA AVU41SXDPA(/IX) SUMINISTRO ELÉCTRICO 220-240 V / 50 Hz DIMENSIONES DEL PRODUCTO (A x P x A) 595 x 571 x 820 mm PESO NETO 48 kg CATEGORÍA DEL APARATO 2 CLASE DE EFICIENCIA ENERGÉTICA A CONSUMO DE ENERGÍA Consumo de energía 144 kWh por año calculado en base a resultados obtenidos en 24 horas en condiciones de prueba normales. El consumo energético real depende de las condiciones de uso y de la ubicación del aparato. VOLUMEN NETO 59.5 L x 2 AJUSTE DE TEMPERATURA 5 – 20°C SIN ESCARCHE Desescarche automático CLASE CLIMÁTICA Clase climática: N Este aparato está diseñado para usarse a una temperatura ambiente entre 16ºC (inferior) y 32ºC (superior). EMISIONES ACÚSTICA EN EL AIRE EN dB(A) RE 1 pW 43 dB(A) TIPO DE INSTALACIÓN Instalación sin soporte e incorporada Este aparato está destinado exclusivamente al almacenamiento de vino. 173 HOJA DE DATOS EUROPEA de acuerdo con la reglamentación (UE) N°1060/2010 ARMARIO DE SERVICIO DE VINO MARCA AVINTAGE REFERENCIA AVU52SX(/IX) SUMINISTRO ELÉCTRICO 220-240 V / 50 Hz DIMENSIONES DEL PRODUCTO (A x P x A) 595 x 571 x 820 mm PESO NETO 44 kg CATEGORÍA DEL APARATO 2 CLASE DE EFICIENCIA ENERGÉTICA A CONSUMO DE ENERGÍA Consumo de energía 145 kWh por año calculado en base a resultados obtenidos en 24 horas en condiciones de prueba normales. El consumo energético real depende de las condiciones de uso y de la ubicación del aparato. VOLUMEN NETO 146 L AJUSTE DE TEMPERATURA 5 – 20°C SIN ESCARCHE Desescarche automático CLASE CLIMÁTICA Clase climática: N Este aparato está diseñado para usarse a una temperatura ambiente entre 16ºC (inferior) y 32ºC (superior). EMISIONES ACÚSTICA EN EL AIRE EN dB(A) RE 1 pW 44 dB(A) TIPO DE INSTALACIÓN Instalación sin soporte e incorporada Este aparato está destinado exclusivamente al almacenamiento de vino. 174 HOJA DE DATOS EUROPEA de acuerdo con la reglamentación (UE) N°1060/2010 ARMARIO DE SERVICIO DE VINO MARCA AVINTAGE REFERENCIA AVU53CDZA SUMINISTRO ELÉCTRICO 220-240 V / 50 Hz DIMENSIONES DEL PRODUCTO (A x P x A) 595 x 571 x 820 mm PESO NETO 50 kg CATEGORÍA DEL APARATO 2 CLASE DE EFICIENCIA ENERGÉTICA A CONSUMO DE ENERGÍA Consumo de energía 145 kWh por año calculado en base a resultados obtenidos en 24 horas en condiciones de prueba normales. El consumo energético real depende de las condiciones de uso y de la ubicación del aparato. VOLUMEN NETO 134 L AJUSTE DE TEMPERATURA 5 – 10°C / 10 – 20°C SIN ESCARCHE Desescarche automático CLASE CLIMÁTICA Clase climática: N Este aparato está diseñado para usarse a una temperatura ambiente entre 16ºC (inferior) y 32ºC (superior). EMISIONES ACÚSTICA EN EL AIRE EN dB(A) RE 1 pW 45 dB(A) TIPO DE INSTALACIÓN Instalación sin soporte e incorporada Este aparato está destinado exclusivamente al almacenamiento de vino. 175 HOJA DE DATOS EUROPEA de acuerdo con la reglamentación (UE) N°1060/2010 ARMARIO DE SERVICIO DE VINO MARCA AVINTAGE REFERENCIA AVU54SXDZA(/IX) SUMINISTRO ELÉCTRICO 220-240 V / 50 Hz DIMENSIONES DEL PRODUCTO (A x P x A) 595 x 571 x 820 mm PESO NETO 50 kg CATEGORÍA DEL APARATO 2 CLASE DE EFICIENCIA ENERGÉTICA A CONSUMO DE ENERGÍA Consumo de energía 145 kWh por año calculado en base a resultados obtenidos en 24 horas en condiciones de prueba normales. El consumo energético real depende de las condiciones de uso y de la ubicación del aparato. VOLUMEN NETO 134 L AJUSTE DE TEMPERATURA 5 – 10°C / 10 – 20°C SIN ESCARCHE Desescarche automático CLASE CLIMÁTICA Clase climática: N Este aparato está diseñado para usarse a una temperatura ambiente entre 16ºC (inferior) y 32ºC (superior). EMISIONES ACÚSTICA EN EL AIRE EN dB(A) RE 1 pW 45 dB(A) TIPO DE INSTALACIÓN Instalación sin soporte e incorporada Este aparato está destinado exclusivamente al almacenamiento de vino. 176 HOJA DE DATOS EUROPEA de acuerdo con la reglamentación (UE) N°1060/2010 ARMARIO DE SERVICIO DE VINO MARCA AVINTAGE REFERENCIA PRO51C/1 SUMINISTRO ELÉCTRICO 220-240 V / 50 Hz DIMENSIONES DEL PRODUCTO (A x P x A) 595 x 571 x 820 mm PESO NETO 48 kg CATEGORÍA DEL APARATO 2 CLASE DE EFICIENCIA ENERGÉTICA A CONSUMO DE ENERGÍA Consumo de energía 145 kWh por año calculado en base a resultados obtenidos en 24 horas en condiciones de prueba normales. El consumo energético real depende de las condiciones de uso y de la ubicación del aparato. VOLUMEN NETO 146 L AJUSTE DE TEMPERATURA 5 – 20°C SIN ESCARCHE Desescarche automático CLASE CLIMÁTICA Clase climática: N Este aparato está diseñado para usarse a una temperatura ambiente entre 16ºC (inferior) y 32ºC (superior). EMISIONES ACÚSTICA EN EL AIRE EN dB(A) RE 1 pW 45 dB(A) TIPO DE INSTALACIÓN Instalación sin soporte e incorporada Este aparato está destinado exclusivamente al almacenamiento de vino. 177 Prima dell'uso, leggere e mettere in pratica le istruzioni di sicurezza e d'uso del presente manuale. Grazie per la fiducia dimostrata nel marchio AVINTAGE con l'acquisto di questo apparecchio, speriamo che riuscirà a soddisfare le tue aspettative. Con questo apparecchio è possibile conservare le bottiglie oppure portarle alla temperatura di servizio (a seconda delle bottiglie) grazie al suo ampio intervallo di regolazione. 1. ISTRUZIONI DI SICUREZZA Prima di utilizzare l'apparecchio per la prima volta, si prega di leggere attentamente il presente manuale d'uso. Il manuale va conservato cura in modo da poterlo consultare se necessario. Per ridurre il rischio di incendio, di scossa elettrica o di lesioni durante l'uso del frigo cantina, si prega di rispettare le precauzioni indicate. In via generale, la manutenzione dell'apparecchio deve essere effettuata da un professionista qualificato. Per motivi di sicurezza e per un uso corretto dell'apparecchio, prima di installarlo e di metterlo in funzione per la prima volta si prega di leggere attentamente il presente manuale d'uso, incluse le avvertenze e i consigli utili che contiene. Per evitare di danneggiare l'apparecchio e/o di ferirsi inutilmente, è importante che le persone che utilizzeranno l'apparecchio abbiano preso piena conoscenza del suo funzionamento e delle sue istruzioni di sicurezza. Conservare le presenti istruzioni per successiva consultazione e conservarle vicino all'apparecchio, in modo che in caso di vendita o di trasloco, siano consegnate assieme all'apparecchio per consentirne un funzionamento ottimale. Per evitare qualsiasi rischio di lesioni, conservare il presente manuale d'uso. Il produttore non potrà essere ritenuto responsabile se l'apparecchio viene maneggiato in modo scorretto. 178 Questo apparecchio è destinato esclusivamente ad uso domestico ed è previsto per la conservazione di bevande speciali ad una temperatura di conservazione più alta di quella di uno scomparto per prodotti freschi. In nessun caso questo apparecchio è destinato a conservare prodotti alimentari freschi. Verificare che la tensione dell'impianto elettrico della casa corrisponda a quella indicata sulla targa informativa: l'apparecchio deve essere collegato ad una presa di terra regolamentare. Riparazioni o collegamenti scorretti possono rappresentare un rischio per la sicurezza. Se si ha il minimo dubbio, far controllare il proprio impianto elettrico da un professionista. Per la tua protezione, questo apparecchio deve essere collegato correttamente ad una presa di terra. Non tagliare né togliere il filo di terra dal cavo di alimentazione fornito. Per motivi di sicurezza, non usare prolunghe. Se l'apparecchio si fosse rovinato (ad esempio per un forte urto) o danneggiato (sovratensione dovuta a fulmine, allagamento, incendio), può essere pericoloso utilizzarlo. Scollegare l'apparecchio dalla presa elettrica e farlo controllare da un riparatore professionista autorizzato. Per evitare pericoli, non sostituire da soli il cavo di alimentazione se rovinato. Contattare il proprio rivenditore, un centro assistenza autorizzato o un riparatore professionista. Questo apparecchio deve essere posizionato in modo che la presa a muro sia raggiungibile. Non spostare l'apparecchio una volta che è stato caricato con i vini perché la scocca potrebbe deformarsi, oltre a dover fare delle riparazioni. I componenti elettrici non devono essere a vista. 179 Tenere i bambini lontano dall'apparecchio. Non usare l'apparecchio all'esterno. Se si fosse sparso accidentalmente del liquido (rottura di una bottiglia, ecc.) sui componenti elettrici (motore, ecc.), scollegare immediatamente l'apparecchio dalla presa elettrica. Per evitare il rischio di incendio, di scossa elettrica o di lesioni, non immergere il cavo di alimentazione, la spina o l'apparecchio stesso in acqua o in qualsiasi altro liquido. Non toccare l'apparecchio con le mani bagnate. Collocare l'apparecchio lontano da fonti di calore e non esporlo direttamente alla luce del sole. Non far pendere il cavo di alimentazione da un tavolo e non metterlo a contatto con angoli taglienti o superfici calde. Per scollegare l'apparecchio dalla corrente, non tirare il cavo di alimentazione ma afferrarlo dalla spina. Verificare che la zona dove verrà installato l'apparecchio sia in grado di sostenerne il peso una volta caricato (una bottiglia da 75 cl pesa circa 1,3 kg). Il frigo cantina deve essere collocato su una superficie piana. Se deve essere appoggiato su un tappeto o sulla moquette, infilare sotto un supporto. Per evitare di danneggiare la cerniera della porta, aprirla completamente quando si estraggono i ripiani. Sicurezza dei bambini e delle persone vulnerabili Questo apparecchio può essere utilizzato da bambini di età pari e superiore agli 8 anni e da persone con ridotte capacità fisiche, sensoriali o mentali o senza esperienza e conoscenza a patto che vengano sorvegliati o istruiti sull'utilizzo dell'apparecchio in 180 sicurezza e che capiscano i pericoli connessi all'utilizzo dell'apparecchio. La pulizia e la manutenzione non devono essere eseguite da bambini, salvo se di età superiore agli 8 anni e sotto sorveglianza. Conservare il materiale d'imballaggio fuori dalla portata dei bambini. Pericolo di soffocamento. Il rischio che i bambini possano rimanere intrappolati all'interno dell'apparecchio e soffocare non deve essere sottovalutato. Gli apparecchi da gettare o abbandonati rappresentano comunque un pericolo anche se vengono "lasciati in garage solo per qualche giorno". Quando l'apparecchio deve essere gettato via, staccare la spina dalla presa di corrente, tagliare il cavo di alimentazione (il più vicino possibile all'apparecchio) e smontare la porta per evitare che i bambini giocando prendano la scossa o si chiudano dentro l'apparecchio. Se l'apparecchio, dotato di una guarnizione magnetica sulla porta, deve sostituire un altro apparecchio dotato di chiusura a molla sulla porta o sulla cerniera, accertarsi di rendere inutilizzabile la chiusura a molla prima di gettare il vecchio apparecchio. In questo modo si evita che i bambini giocando restino intrappolati dentro l'apparecchio. Tenere l'apparecchio e il suo cavo fuori della portata dei bambini con meno di 8 anni. Prima di gettare via il frigo cantina, ricordarsi di smontare la porta. Rimuovere anche i ripiani all'interno dell'apparecchio, in modo che i bambini non possano giocarci o salirci sopra. 181 Istruzioni di sicurezza generali ATTENZIONE — Questo apparecchio è destinato a funzionare in un ambiente domestico o per usi simili quali: Le zone di cucina riservate al personale di negozi, fabbriche e altri ambienti professionali, Seconde case e luoghi usati da clienti di hotel, motel e altri ambienti residenziali, Ambienti come le camere d'hotel, Ristoranti e strutture simili, eccetto rivenditori. ATTENZIONE — Per evitare qualsiasi rischio dovuto all'instabilità dell'apparecchio, è importante fissarlo e montarlo seguendo le istruzioni di installazione. ATTENZIONE — Non riporre mai sostanze infiammabili come gli spray all'interno dell'apparecchio perché potrebbero fuoriuscire. ATTENZIONE — Se il cavo di alimentazione è danneggiato, bisogna farlo sostituire immediatamente dal produttore o da un rivenditore qualificato per evitare il rischio di scossa elettrica. ATTENZIONE — Tenere la ventilazione ben aperta e controllare che l'aria possa circolare liberamente dalle aperture, soprattutto se l'apparecchio è incassato in una parete. ATTENZIONE — Non usare apparecchiature elettriche all'interno dello scomparto, a meno che non siano del tipo consigliato dal produttore. ATTENZIONE — Non danneggiare il circuito di refrigerazione. 182 ATTENZIONE — Non usare apparecchi elettrici all'interno dell'apparecchio eccetto se permessi dal produttore. ATTENZIONE — Il gas refrigerante e il gas isolante sono infiammabili. Per lo smaltimento dell'apparecchio, conferirlo ad un centro per la raccolta differenziata o ad un'isola ecologica. Non esporre l'apparecchio alle fiamme. ATTENZIONE — Il gas refrigerante di quest'apparecchio è il R600a; non si deve riporre nel frigo cantina o vicino ad esso nessun prodotto infiammabile o esplosivo per evitare di provocare un incendio o un'esplosione. Liquido refrigerante Nel circuito refrigerante dell'apparecchio è impiegato come refrigerante l'isobutano (R600a). Si tratta di un gas naturale altamente infiammabile e quindi pericoloso per l'ambiente. Controllare che nessuno dei componenti del circuito di refrigerazione sia stato danneggiato durante il trasporto e l'installazione dell'apparecchio. Il refrigerante (R600a) è un liquido infiammabile. Attenzione: rischio di incendio Se il circuito di refrigerazione fosse danneggiato: Evitare le fiamme libere e qualsiasi fonte di accensione. Ventilare bene il locale in cui si trova l'apparecchio. È pericoloso modificare in qualsiasi modo la composizione di questo apparecchio. Se il cavo elettrico viene danneggiato si può provocare un cortocircuito e/o una scossa elettrica. 183 Sicurezza elettrica Non possiamo essere ritenuti responsabili di eventuali incidenti causati da un'installazione elettrica mal effettuata. Il cavo di alimentazione non deve essere allungato. Non vanno usate prolunghe né adattatori né prese multiple. Controllare attentamente che la presa a muro non sia danneggiata. Una presa a muro in cattivo stato potrebbe causare il surriscaldamento dell'apparecchio e la sua esplosione. Accertarsi di poter raggiungere comodamente la presa a muro a cui è collegato l'apparecchio. Non tirare mai il cavo di alimentazione. Non eliminare mai la messa a terra. Se la presa a muro è allentata, non collegare il cavo. Rischio di scossa elettrica o di incendio. Non si deve mai utilizzare l'apparecchio se il coperchio dell'illuminazione interna non è al suo posto. Scollegare l'apparecchio dalla corrente prima di sostituire la lampadina interna. Questo apparecchio 220~240V/50Hz. funziona con corrente monofase Se il cavo di alimentazione è danneggiato, non sostituirlo da soli ma rivolgersi al servizio assistenza. La spina elettrica deve poter essere facilmente raggiungibile ma comunque restare fuori dalla portata dei bambini. In caso di dubbi, rivolgersi per consiglio al proprio installatore. 184 Uso quotidiano Questo apparecchio è destinato solamente alla messa a temperatura di bottiglie di vino. Non conservare mai sostanze o liquidi infiammabili all'interno dell'apparecchio perché potrebbero provocare un'esplosione. Non far funzionare altre apparecchiature elettriche all'interno di questo apparecchio (mixer, gelatiere elettriche, ecc.). Per scollegare l'apparecchio dalla presa di corrente, estrarre la spina afferrandola con le mani e non tirare dal cavo. Non mettere oggetti caldi vicino ai componenti di plastica di questo apparecchio. Si devono rigorosamente rispettare le raccomandazioni del produttore relativa all'immagazzinamento dell'apparecchio. Fare riferimento alle relative istruzioni. L'apparecchio deve essere tenuto lontano da candele, lampade e altre fiamme libere per evitare il rischio di incendio. L'apparecchio è destinato a conservare delle bevande per un normale uso domestico come spiegato nel presente manuale d'uso. L'apparecchio è pesante. Fare attenzione quando lo si deve spostare. Se l'apparecchio è dotato di ruote, ricordarsi che servono soltanto per rendere più agevoli le piccole manovre. Non spostarlo per lunghi tragitti. Non usare mai l'apparecchio o i suoi elementi come punto d'appoggio. Non sovraccaricare gli scomparti dell'apparecchio per evitare la caduta di oggetti che possono danneggiarlo. 185 Attenzione: pulizia e manutenzione Prima di effettuare la manutenzione, scollegare l'apparecchio per togliere la corrente. Non pulire l'apparecchio usando oggetti metallici, generatori di vapore, oli volatili, solventi organici o componenti abrasivi. Non pulire nessuna parte dell'apparecchio con prodotti infiammabili. I vapori possono creare un rischio di incendio o di esplosione. Non usare oggetti taglienti o appuntiti per togliere il ghiaccio, ma servirsi di un raschietto di plastica. Informazioni importanti per l'installazione Evitare di collocare l'apparecchio in zone umide. Tenere l'apparecchio lontano dalla luce diretta del sole e da fonti di calore (padelle, stufe, termosifoni, ecc.). L'esposizione diretta alla luce del sole può rovinare il rivestimento in acrilico, mentre le fonti di calore possono aumentare il consumo elettrico. Anche delle temperature ambiente eccessivamente fredde o calde possono causare il cattivo funzionamento dell'apparecchio. Collegare il frigo cantina solo ed esclusivamente ad una presa di corrente dotata di terra. In nessun caso si deve ridurre o eliminare il terzo spinotto della messa a terra del cavo di alimentazione. Tutte le eventuali domande riguardanti la potenza e/o la messa a terra devono essere rivolte ad un elettricista certificato o ad un centro assistenza autorizzato. Per effettuare i collegamenti elettrici in modo corretto, seguire attentamente le indicazioni contenute nel presente manuale d'uso. Togliere l'apparecchio dall'imballo e ispezionarlo per controllare che non sia danneggiato. Non collegare l'apparecchio alla 186 corrente se è danneggiato. Se si riscontrano dei danni, bisogna avvisare il punto vendita in cui è stato acquistato. In tal caso, conservare l'imballo. Si raccomanda di aspettare almeno 24 ore prima di collegare l'apparecchio alla corrente, in modo che il compressore sia ben alimentato con l'olio. Per evitare il rischio di surriscaldamento, è necessario che ci sia una buona circolazione dell'aria attorno all'apparecchio. Seguire attentamente le istruzioni di installazione fornite per garantire una ventilazione adeguata. Per quanto possibile, evitare che l'apparecchio tocchi le pareti e/o sia a contatto con elementi caldi (compressore, condensatore) per evitare il rischio di incendio. Rispettare sempre tutte le istruzioni di installazione. L'apparecchio non deve essere collocato vicino a termosifoni o fornelli. Dopo aver installato l'apparecchio, controllare di avere libero accesso alle prese. Risparmio energetico Per limitare il consumo di energia elettrica dell'apparecchio: Installarlo in un luogo adatto (vedi capitolo "Istruzioni d'installazione"). Tenere le porte aperte il meno possibile. Per un funzionamento ottimale dell'apparecchio, ricordarsi di pulire periodicamente il condensatore (vedi capitolo "Pulizia e manutenzione"). Controllare periodicamente le guarnizioni delle porte e verificare che chiudano sempre bene. In caso contrario, rivolgersi al servizio assistenza. 187 Risoluzione dei problemi Tutti gli interventi elettrici devono essere effettuati da un tecnico qualificato e competente. Per qualsiasi riparazione, rivolgersi ad un Centro Riparazioni Autorizzato e richiedere l'uso solo di pezzi di ricambio originali. Questo apparecchio è destinato solo ad un uso domestico. Il produttore non può essere ritenuto responsabile in caso di altro utilizzo. R600a Istruzioni di sicurezza Attenzione — Non ostruire nessuna griglia di ventilazione dell'apparecchio, controllare che le aperture di aerazione siano sempre libere. Attenzione — Non conservare all'interno dell'apparecchio sostanze esplosive come le bombolette spray con gas infiammabile. Attenzione — dell'apparecchio. Non danneggiare il circuito frigorifero Attenzione — Le unità di refrigerazione funzionano con isobutano (R600a); non possono essere collocate in una zona con fonti di accensione (per esempio contatti elettrici staccati o se il fluido frigorifero possa raccogliersi in caso di perdite). Il tipo di fluido frigorifero è indicato sulla targhetta informativa applicata sull'apparecchio. 188 Attenzione — Non usare apparecchiature elettriche all'interno degli scomparti dell'apparecchio, a meno che non siano del tipo consigliato dal produttore. Questo apparecchio è conforme a tutte le direttive europee vigenti e alle loro eventuali modifiche ed è conforme in particolare alle seguenti norme: 2011/65/UE (ROHS) 2014/35/UE relativa alla sicurezza elettrica 2014/30/UE relativa alla compatibilità elettromagnetica 643/2009/CE relative all'etichettatura energetica 2. TARGHETTA INFORMATIVA Qui sotto è illustrato l'esempio di una targhetta informativa: La targhetta informativa incollata all'interno o sul retro dell'apparecchio (a seconda del modello) contiene tutte le caratteristiche tecniche del frigo cantina. Consigliamo di annotare il numero di serie su questo libretto prima dell'installazione, per ulteriore riferimento (intervento tecnico, richiesta di assistenza, ecc.). Una volta che l'apparecchio sarà installato o riempito infatti, riuscire ad arrivare alla targhetta informativa sarà piuttosto complicato. ATTENZIONE: senza le informazioni indicate sulla targhetta, non potrà essere fornita nessuna assistenza. 189 3. ISTRUZIONI DI INSTALLAZIONE Prima di utilizzare il frigo cantina Rimuovere l'imballo esterno ed interno. Lasciare l'apparecchio a riposo in posizione verticale per circa 24 ore prima di metterlo in funzione. Così facendo, si limiterà la possibilità di un eventuale malfunzionamento del sistema di raffreddamento dovuto al trasporto. Pulire l'interno del frigo cantina con un panno morbido pulito e acqua tiepida. Quando si installa l'apparecchio, scegliere un locale adatto. Si raccomanda di essere di almeno 2 persone per spostare e installare il cantina. Fare attenzione a non appendere il dispositivo con il rischio di provocare lesioni (schiena, ecc). Posizionare l'apparecchio su un pavimento abbastanza resistente da sostenerlo quando è completamente carico. Regolare i piedini del frigo cantina per livellarlo. È necessario lasciare una ventilazione appropriata, non ostruire pertanto le uscite dell'aria. Questo apparecchio non è destinato ad essere collocato in luoghi come un garage, un seminterrato o simili. Questo apparecchio è destinato solo all'uso in interno. Questo apparecchio può essere collocato a libera installazione o a incasso. Collegare il frigo cantina ad un'unica presa e lasciare uno spazio di 30 mm tra la parte posteriore della cantina e la parete. Accertarsi di avere livellato correttamente e regolato l'orizzontalità del frigo cantina (si consiglia di usare una livella a bolla). Questo eviterà movimenti dovuti all'instabilità che possono provocare rumore e vibrazioni, garantendo così la perfetta tenuta della porta. Questo apparecchio è destinato solamente alla conservazione di vini. Questo apparecchio usa un gas refrigerante infiammabile; fare quindi attenzione a non danneggiare il tubo di raffreddamento durante il trasporto. Attenzione Le bottiglie vanno conservate chiuse. Non caricare eccessivamente l'apparecchio. Non aprire la porta più del necessario. Non coprire i ripiani con dei fogli di alluminio o con qualsiasi altro materiale che possa impedire una buona circolazione dell'aria. Se il frigo cantina deve essere lasciato vuoto per un lungo periodo di tempo, suggeriamo di scollegare l'apparecchio della corrente e, dopo averlo pulito accuratamente, di lasciare la porta semiaperta per far circolare l'aria ed evitare la formazione di muffa e odori. ATTENZIONE: tenere lontano l'apparecchio da qualsiasi sostanza che possa comportare un rischio di incendio. 190 Intervalli di temperatura ambiente Questo apparecchio è indicato per l'uso in locali con una temperatura ambiente ben specifica; la classe climatica è indicata sulla targhetta informativa. CLASSE SIMBOLO INTERVALLO DI TEMPERATURA AMBIENTE (°C) Temperata estesa SN Da +10 °C a +32 °C Temperata N Da +16 °C a +32 °C Subtropicale ST Da +16 °C a +38 °C Tropicale T Da +16 °C a +43 °C Schemi di incasso AVU8X(/IX) 191 AVU23SX(/IX) AVU41SXDPA(/IX) 192 AVU52SX(/IX) AVU54SXDZA(/IX) AVU53CDZA PRO51C/1 193 Reversibilità della porta Se si vuole invertire il senso di apertura della porta, che in origine è da sinistra a destra, seguire la procedura descritta di seguito. AVU8X(/IX) 1. Cerniera inf. (destra) 4. Porta 7. Cerniera sup. (sinistra) 2. Viti 5. Cerniera sup. (destra) 8. Cerniera inf. (sinistra) 3. Asse della porta 6. Viti delle cerniere 1. Aprire la porta a 90°. Svitare le due viti (2) dell'asse inferiore della porta, quindi togliere la porta (4) e l'asse della porta (Fig. A). Posizionare correttamente la porta (4) (Fig. A e B). 2. Togliere le 3 viti (6) della cerniera superiore (destra) (5) e rimuoverla assieme alla cerniera inferiore destra (Fig. C) 3. Montare la cerniera superiore di ricambio (sinistra) (7) sul lato superiore sinistro con tre viti (Fig. D). Seguendo la stessa procedura di prima, procedere al montaggio della cerniera inferiore di ricambio (sinistra) (8) (Fig. E). 4. La porta si apre a 180°. Il metodo di montaggio della porta è lo stesso del suo smontaggio; allineare correttamente la porta e fissarla. 194 AVU23SX(/IX) AVU52SX(/IX) 1. Cerniera inf. (destra) 4. Porta 7. Cerniera sup. (sinistra) 10. Dispositivo di ritenuta 2. Viti 5. Cerniera sup. (destra) 8. Chiodo decorativo 11. Viti 3. Asse della porta 6. Viti delle cerniere 9.Cerniera inf. (sinistra) 12. Tappo 1. Aprire la porta a 90°. Svitare le due viti (2) dell'asse inferiore della porta, quindi togliere la porta (4) e l'asse della porta (Fig. A). 2. Posizionare correttamente la porta (4) e togliere il tappo (12) dalla parte superiore del telaio della porta; svitare una delle viti (11) inferiori e togliere il dispositivo di ritenuta (10). Quindi montare il dispositivo sulla parte superiore del telaio della porta. È preferibile usare un tappo di ricambio (12) per chiudere il foro sulla parte superiore del telaio (Fig. A/B). 3. Togliere le 3 viti (6) della cerniera superiore (destra) (5) e rimuoverla (Fig. C). 4. Togliere i chiodi decorativi (8) sul lato superiore sinistro dell'apparecchio e montare la cerniera superiore di ricambio (sinistra) (7) sul lato superiore sinistro con tre viti (Fig. D). 5. Seguendo la stessa procedura di prima, procedere al montaggio della cerniera inferiore di ricambio (sinistra) (9) (Fig. E). 6. La porta si apre a 180°. Il metodo di montaggio della porta è lo stesso del suo smontaggio; allineare correttamente la porta e fissarla. 7. Chiudere il foro situato in alto a destra sull'apparecchio con un chiodo decorativo (8). 195 AVU53CDZA AVU54SXDZA(/IX) PRO51C/1 1. Cerniera inf. (destra) 4. Porta 7. Cerniera sup. (sinistra) 2. Viti 5. Cerniera sup. (destra) 8. Chiodo decorativo 3. Asse della porta 6. Viti delle cerniere 9. Cerniera inf. (sinistra) 1. Aprire la porta a 90°. Svitare le due viti (2) dell'asse inferiore della porta, quindi togliere la porta (4) e l'asse della porta (Fig. A). 2. Posizionare correttamente la porta (4). 3. Togliere le 3 viti (6) della cerniera superiore (destra) (5) e rimuoverla (Fig. C). 4. Togliere i chiodi decorativi (8) sul lato superiore sinistro dell'apparecchio e montare la cerniera superiore supplementare (sinistra) (7) sul lato superiore sinistro con tre viti (Fig. D). 5. Seguendo la stessa procedura di prima, procedere al montaggio della cerniera inferiore rimanente (sinistra) (9) (Fig. E). 6. La porta si apre a 180°. Il metodo di montaggio della porta è lo stesso del suo smontaggio; allineare correttamente la porta e fissarla. 7. Chiudere il foro situato in alto a destra sull'apparecchio con un chiodo decorativo (8). 4. ISTRUZIONI D'USO Si raccomanda di installare l'apparecchio in un locale la cui temperatura ambiente sia compresa tra 16 e 32 °C. Se la temperatura ambiente è superiore o inferiore a quella raccomandata, il rendimento dell'apparecchio può esserne influenzato e potrebbe non essere possibile ottenere la temperatura tra 520 °C o 5-10 °C/10-20 °C (a seconda del modello). AVU8X(/IX) AVU23SX(/IX) AVU41SXDPA(/IX) AVU52SX(/IX) PRO51C/1 196 “RUN” Indicatore di accensione Pulsante Per accendere/spegnere l'apparecchio. Tenere premuto il pulsante per circa 3 secondi. Pulsante Pulsante di accensione della luce interna Display di visualizzazione Display elettronico della temperatura Pulsante Pulsante di regolazione della temperatura + Pulsante Pulsante di regolazione della temperatura È possibile scegliere la temperatura desiderata all'interno del compartimento premendo i tasti “ ” . La temperatura che si vuole programmare aumenterà/diminuirà di 1 °C ad ogni pressione dei pulsanti. / La temperatura può essere selezionata tra 5 e 20 °C o tra 5 e 10 °C/10 e 20 °C (a seconda del modello). Una volta selezionata, il display lampeggerà per circa 5 secondi prima di indicare la temperatura interna istantanea del frigo cantina. La temperatura impostata può essere controllata in qualsiasi momento premendo i tasti di selezione della temperatura per 5 secondi. In caso di interruzione della corrente, tutte le temperature precedentemente scelte saranno cancellate e ogni compartimento ritornerà di default al valore della temperatura preimpostato in fabbrica, ovvero 12 °C. AVU53CDZA AVU54SXDZA(/IX) “RUN” Indicatore di accensione Pulsante Per accendere/spegnere l'apparecchio. Tenere premuto il pulsante per circa 3 secondi. Pulsante Pulsante di accensione della luce interna Display di visualizzazione Display elettronico della temperatura del compartimento superiore Display di visualizzazione Display elettronico della temperatura del compartimento inferiore Pulsante Pulsante di regolazione della temperatura del compartimento superiore 197 Pulsante Pulsante di regolazione della temperatura del compartimento inferiore Premere “ ” per regolare la temperatura del compartimento superiore. Il display relativo a quel compartimento si mette a lampeggiare e ad ogni pressione del pulsante la temperatura viene modificata di 1 °C. Una volta raggiunta la temperatura di 5 °C più bassa impostata, il display ritorna automaticamente alla temperatura impostata più elevata di 10 °C. Una volta selezionata, il display lampeggerà per circa 5 sec. prima di indicare la temperatura interna istantanea del frigo cantina. La temperatura impostata può essere controllata in qualsiasi momento premendo i tasti di selezione della temperatura per 5 secondi. Premere “ ” per regolare la temperatura del compartimento inferiore. Il display relativo a quel compartimento si mette a lampeggiare e ad ogni pressione del pulsante la temperatura viene modificata di 1 °C. Una volta raggiunta la temperatura di 10°C più bassa impostata, il display ritorna automaticamente alla temperatura impostata più elevata di 20°C. Una volta selezionata, il display lampeggerà per circa 5 sec. prima di indicare la temperatura interna istantanea del frigo cantina. La temperatura impostata può essere controllata in qualsiasi momento premendo i tasti di selezione della temperatura per 5 secondi. In caso di interruzione della corrente, tutte le temperature precedentemente scelte saranno cancellate e ogni compartimento ritornerà di default al valore della temperatura preimpostato in fabbrica, ovvero 6 °C per il compartimento superiore e 12 °C per il compartimento inferiore. Funzionalità Allarme di temperatura Se la temperatura interna è superiore a 23 °C, sul display comparirà "HI" e ogni ora si attiverà un allarme sonoro. L'allarme serve per avvisare che la temperatura interna è troppo alta; verificarne la causa. Se la temperatura interna è inferiore a 0 °C, sul display comparirà "LO", si attiveranno contemporaneamente un allarme sonoro e una spia luminosa di malfunzionamento. Funzione di memorizzazione della temperatura In caso di interruzione di corrente, il frigo cantina può memorizzare le ultime impostazioni in modo che quando ritorna la corrente, possano essere di nuovo operative. Luce interna Per ridurre il consumo di corrente, la luce interna di questo frigo cantina si spegne automaticamente dopo 10 minuti. Se si vuole che la luce interna resti sempre accesa, premere il pulsante “ ” per 5 secondi: sul display compare il messaggio "LP". Dopo 4 secondi, il display torna alla normalità e la luce resterà accesa fino a quando non verrà spenta manualmente. Se si vuole ritornare all'impostazione iniziale e risparmiare corrente (consigliato), premere il pulsante “ ” per 5 secondi: sul display compare il messaggio "LF". Dopo 4 secondi, il display torna alla normalità e la luce si spegnerà automaticamente dopo 10 minuti. 5. DISPOSITIVI Sistema di climatizzazione Secondo il parere degli specialisti, la temperatura ideale di conservazione dei vini si aggira a circa 12 °C, restando in una forchetta che va da 10 °C a 14 °C. Non va confusa con la temperatura di servizio, la quale varia a seconda del tipo di vino da 5 a 20 °C. 198 È soprattutto fondamentale evitare brusche variazioni della temperatura. Progettato da specialisti per i conoscitori di vini, questo apparecchio, diversamente da un semplice frigo, tiene conto di quanto i grandi cru siano sensibili alle brusche variazioni di temperatura e garantisce un controllo preciso di una temperatura media costante. Sistema antivibrazioni Il compressore frigorifero è dotato di ammortizzatori speciali (silent-block) e il vano interno è isolato dalla scocca da uno spesso strato di schiuma di poliuretano. Queste caratteristiche consentono di evitare la trasmissione delle vibrazioni ai vini. Sistema di umidificazione Questo apparecchio è dotato di una vaschetta che consente di mantenere il giusto livello di umidità. Se l'umidità è troppo bassa, riempire il serbatoio per ¾ della capacità. Controllare di tanto in tanto il livello e aggiungere acqua se necessario. Accertarsi che la vaschetta contenga sempre dell'acqua. Pensato dagli specialisti per i conoscitori di vini, la marca Avintage ha preso in considerazione la sensibilità dei tappi ad un'umidità ambiente troppo bassa. È per questo che la vaschetta deve essere collocata sul ripiano sotto il ventilatore, situato sul fondo, per fornire un'umidità minima. Ricordarsi di controllare il livello dell'acqua se si conservano dei vini per un lungo periodo e non si dedica l'apparecchio solamente per portarli alla temperatura di servizio (con rapide rotazioni delle bottiglie). Accertarsi che la vaschetta sia ben fissata per evitare fuoriuscite di liquido. Sistema anti-UV La luce accelera l'invecchiamento dei vini. Nei nostri frigo cantina a porta piena, i vini sono naturalmente riparati, ovviamente se si evita di aprire l'apparecchio troppo spesso. Questo modello con porta a vetro è stato sottoposto ad un trattamento particolare che filtra i raggi ultravioletti nocivi; i vini quindi sono completamente riparati dalla luce. Sbrinamento L'apparecchio è dotato di un ciclo automatico di sbrinamento. Durante l'arresto del ciclo di raffreddamento, le superfici refrigerate dell'apparecchio verranno sbrinate automaticamente. L'acqua di sbrinamento formatasi viene scaricata in una vaschetta di evaporazione della condensa, situata sul retro dell'apparecchio vicino al compressore. Sarà il calore prodotto dal compressore a far evaporare la condensa raccolta nella vaschetta. Il sistema inverno Il kit inverno è un sistema per senza gelo che consente al frigo cantina di funzionare in un ambiente in cui la temperatura sia compresa tra 0 e 32 °C. Un sensore situato all'interno dell'apparecchio attiva una resistenza elettrica a bassa potenza quando la temperatura dell'apparecchio è di 3 °C più bassa di quella impostata. Questa resistenza è a bassa potenza per evitare un brusco aumento della temperatura del vino e quindi degli shock termici dannosi per la sua corretta conservazione. Questo kit è destinato a riscaldare la temperatura interna del frigo cantina prima che ci sia uno scambio termico con le bottiglie. Il sistema inverno consente di mantenere la temperatura all'interno del frigo cantina sempre uguale a quella programmata. Il sistema si attiva e porta la temperatura interna a quella impostata, quindi si arresta. 199 Ripiani Per evitare di danneggiare la guarnizione della porta, accertarsi che sia completamente aperta prima di estrarre i ripiani per mettere o prendere le bottiglie. Per accedere più facilmente al contenuto dei ripiani, fare scorrere il ripiano verso l'esterno di circa 1/3. I ripiani sono comunque studiati con un fermo d'arresto su ogni lato per evitare che le bottiglie cadano. Per togliere o mettere i ripiani, inclinarli come indicato nella figura e tirare o spingere a seconda del caso. AVU41SXDPA(/IX) Collocare i ripiani nelle posizioni adatte. a. Scatola di cartone dei pezzi di ricambio b. Ripiano piccolo c. Ripiano grande 1. Dopo aver tolto l'imballo, tirare fuori la scatola che contiene i pezzi di ricambio dell'apparecchio. 2. Nel compartimento di sinistra ci sono 4 ripiani piccoli (b). Togliere i due ripiani inferiori. 3. Nel comparto di destra, ci sono 4 ripiani grandi (c). Togliere i due ripiani superiori. 4. La posizione dei ripiani piccoli e grandi deve quindi essere invertita (Fig.2). In ogni compartimento, mettere due ripiani piccoli in alto e due ripiani grandi in basso. 5. Dopo aver posizionato correttamente i ripiani, il frigo cantina è pronto ad essere usato in base alle istruzioni contenute nel manuale d'uso. Stabilizzatori dei piedini Con l'apparecchio sono forniti due stabilizzatori per i piedini che consentono di spostarlo facilmente quando i piedini sono regolati alla massima altezza. Gli stabilizzatori vanno messi sotto i piedini, paralleli rispettando il senso corretto avanti e retro. 200 Retro Avanti Avanti Retro Stabilizzatori dei piedini Sicurezza rafforzata Questa gamma di apparecchi è destinata alla conservazione di beni di valore, pertanto ci siamo assicurati di scegliere componenti di qualità e di studiare tecniche di fabbricazione atte a garantire la massima sicurezza di funzionamento. Montaggio della maniglia L'apparecchio è dotato di una maniglia in acciaio inossidabile. Per montarla, basta avvitarla alla porta con le viti fornite seguendo il disegno qui sotto; prima bisogna togliere la guarnizione magnetica. Fronte Front Back Retro Porta Viti Maniglia 6. CARICO Le quantità massime dichiarate di carico di bottiglie sono fornite a titolo indicativo come configurazione di fabbrica; non hanno valore contrattuale ma servono soltanto (come la capacità in litri dei frigoriferi) per avere un'idea delle dimensioni dell'apparecchio. Corrispondono a dei test effettuati con una bottiglia campione: la bottiglia tipo "bordolese tradizionale 75 cl" (la normalizzazione riconosce per ogni forma di bottiglie un'origine geografica: bordolese, borgognona, ad anfora tipica della Provenza, ecc. e un tipo: normale, pesante, alleggerita, affusolata, ecc., ognuna con il suo proprio diametro e altezza). In realtà, è possibile inserire, al limite, più bottiglie dello stesso tipo impilate senza usare i ripiani, ma un "cantina diversificata" è formata da una gran varietà di bottiglie e l'aspetto della "praticità" nella gestione quotidiana di un frigo cantina ne limita il carico. Pertanto il carico reale sarà probabilmente un po' meno del massimo dichiarato. 201 Tipi di bottiglie: Qui possiamo vedere 4 tipi di bottiglie da 75 cl, borgognona e bordolese, di varie dimensioni. Esistono molti altri tipi, di varie capacità e forme. A titolo d'esempio, se si carica un frigo cantina solo con bottiglie borgognone, si potrà notare di essere di circa il 30% al di sotto della quantità iniziale calcolata per delle bordolesi. Tipi di disposizione Rovesciata collo contro collo: Notare la differenza di profondità! Rovesciata collo tra i corpi: Carico maggiorato Esempi di temperatura di servizio Da rispettare per le degustazioni in modo da poter assaporare tutta la ricchezza aromatica dei vini! Le opinioni possono variare, così come la temperatura ambiente, ma solitamente si considera: Vini pregiati Bordeaux – Rossi 16 – 17 °C Vini pregiati di Borgogna – Rossi 15 – 16 °C Grandi cru bianchi secchi 14 – 16 °C Rossi leggeri, fruttati, giovani 11 – 12 °C Rosati di Provenza, vini novelli 10 – 12 °C Bianchi secchi e vini tipici rossi 10 – 12 °C Vini tipici bianchi 8 – 10 °C Champagne 7 – 8 °C Vini liquorosi 6 °C 7. PULIZIA E MANUTENZIONE Prima di pulire l'apparecchio (operazione da fare regolarmente), scollegare l'apparecchio togliendo la spina dalla presa di corrente o staccando il fusibile da cui dipende. Consigliamo prima del primo utilizzo e in seguito regolarmente, di pulire l'interno e l'esterno (lato frontale, fianchi e piano superiore) con acqua tiepida e detersivo delicato. Risciacquare con acqua pulita e lasciare asciugare totalmente prima di ricollegare l'apparecchio alla corrente. Per la pulizia non vanno usati 202 solventi né prodotti abrasivi. La prima volta che si accende l'apparecchio, è possibile che emani degli odori residui. In tal caso, far funzionare l'apparecchio a vuoto per alcune ore impostando la temperatura più fredda. Il freddo eliminerà gli eventuali odori. In caso di interruzione della corrente Nella maggior parte dei casi, la corrente viene ripristinata in fretta. Un'interruzione di 1 o 2 ore non modificherà la temperatura del frigo cantina. Per proteggere i vini durante le interruzioni di corrente, evitare il più possibile di aprire la porta. In caso di interruzione di corrente molto prolungata, prendere le misure necessarie per proteggere i vini. Se l'apparecchio è stato scollegato dalla presa, è stato spento o c'è stata un'interruzione di corrente, bisognerà aspettare 3-5 minuti prima di riaccenderlo. Se si prova ad accenderlo prima, il compressore si metterà in funzione solo dopo 3/5 minuti (se la temperatura lo necessita). Al primo avvio e dopo un arresto prolungato del frigo cantina, è possibile che al momento del riavvio le temperature impostate e quelle visualizzate non corrispondano. È normale. Bisognerà aspettare alcune ore prima che le temperature si ristabilizzino. Se si va in vacanza Vacanze brevi: lasciare il frigo cantina in funzione se ci si assenta per meno di 3 settimane. Vacanze lunghe: se l'apparecchio non sarà utilizzato per diversi mesi, togliere tutte le bottiglie e tutti gli accessori, spegnere l'apparecchio e scollegarlo dalla presa della corrente. Pulire e asciugare accuratamente l'interno e l'esterno dell'apparecchio. Lasciare anche la porta aperta, bloccandola se necessario, per evitare la formazione di condensa, odori, muffa. Spostamento del frigo cantina Scollegare il frigo cantina prima di qualsiasi operazione. Togliere tutte le bottiglie presenti nel frigo cantina e fissare gli elementi mobili. Per evitare di danneggiare le viti di livellamento dei piedini, avvitarle a fondo nella loro base. Chiudere completamente la porta. Spostare l'apparecchio preferibilmente in posizione verticale o controllare le scritte sull'imballo per il senso nel quale può essere coricato l'apparecchio. Proteggere inoltre l'apparecchio con una coperta o un tessuto simile. Risparmio energetico L'apparecchio deve essere collocato in un locale fresco (ma superiore a 16 ° C), lontano da qualsiasi fonte di calore (altri elettrodomestici) e dall'esposizione diretta al sole. Il locale in cui viene collocato l'apparecchio deve essere ventilato. Non coprire mai le fessure di areazione. Non aprire la porta più del necessario. 203 8. IN CASO DI GUASTI Nonostante tutta la cura e l'attenzione che mettiamo nel fabbricare i nostri prodotti, l'eventualità di un guasto non può essere completamente esclusa. Prima di contattare il servizio assistenza del proprio rivenditore, si prega comunque di fare prima questi controlli: La spina elettrica è inserita correttamente Non è saltata la corrente La causa del guasto non è tra quelle descritte nella tabella alla fine di questo manuale. IMPORTANTE: se il cavo di alimentazione fornito fosse danneggiato, deve essere sostituito dal produttore, da un servizio assistenza autorizzato del marchio o dal rivenditore. In ogni caso, deve essere sostituito da personale qualificato per evitare rischi di lesioni. SE QUESTI CONTROLLI NON RISOLVONO LA SITUAZIONE, CONTATTARE IL SERVIZIO ASSISTENZA DEL PROPRIO RIVENDITORE. ATTENZIONE! Scollegare la spina dalla presa di corrente a muro prima di effettuare la pulizia o delle riparazioni! 204 9. PROBLEMI E POSSIBILI CAUSE In molti casi è possibile risolvere dei semplici problemi del frigo cantina senza doversi rivolgere al servizio assistenza. Provare a seguire i consigli forniti qui sotto. PROBLEMA Il frigo cantina non si accende Il frigo cantina non raffredda abbastanza Il compressore continua ad accendersi e spegnersi La luce non funziona Vibrazioni Il frigo cantina è molto rumoroso La porta non chiude bene POSSIBILE CAUSA La spina non è inserita. Il pulsante Start/Stop è sulla posizione stop. È saltato un fusibile nell'impianto elettrico. Controllare la temperatura impostata. La temperatura esterna è superiore alla temperatura di utilizzo del frigo cantina. Il frigo cantina è stato aperto troppo spesso. Il frigo cantina non è ben chiuso. La guarnizione della porta non tiene più. Non c'è abbastanza spazio libero attorno all'apparecchio. La temperatura esterna è troppo alta. Sono state messe troppe bottiglie nel frigo cantina. La porta del frigo cantina è stata aperta troppo spesso. La porta non è ben chiusa. L'impostazione non è stata fatta correttamente. La guarnizione della porta non tiene più. La spina non è inserita. È saltato un fusibile nell'impianto elettrico. Il LED è guasto/saltato; contattare il servizio assistenza. Il pulsante della luce è su stop. Accertarsi che il frigo cantina sia ben livellato. Un rumore simile ad acqua che circola è dovuto al gas refrigerante ed è assolutamente normale. Alla fine del ciclo del compressore, si sente un rumore di acqua che circola. Contrazioni ed espansioni delle pareti interne possono provocare dei colpi. Il frigo cantina non è livellato. Il frigo cantina non è livellato. La guarnizione della porta è sporca o rovinata. I ripiani non sono posizionati bene. Una parte del contenuto impedisce alla porta di chiudersi. Sostituzione della lampada di illuminazione È costituita da diodi elettroluminescenti (LED). Questo tipo di diodo non può essere sostituito dall'utilizzatore. La durata di vita dei LED è solitamente tale da non necessitare la loro sostituzione. Se tuttavia, malgrado la cura con cui è stato costruito il frigo cantina, i LED dovessero essere difettosi, rivolgersi al proprio servizio assistenza per l'intervento. 205 10. PROTEZIONE DELL'AMBIENTE Questo prodotto è conforme alla Direttiva UE 2012/19/CE relativa ai rifiuti di apparecchi elettrici ed elettronici (RAEE). Assicurandosi che questo prodotto sia smaltito in modo corretto, si aiuta a prevenire le potenziali conseguenze negative per l'ambiente e la salute dell'uomo che potrebbero derivare da trattamenti non appropriati dei rifiuti di questo prodotto. Il simbolo del cassonetto barrato apposto sull'apparecchio significa che una volta giunto a fine vita, non deve essere gettato assieme agli altri rifiuti domestici. Dovrà essere conferito ad un centro per la raccolta differenziata di apparecchi elettrici e/o elettronici oppure, se si acquista un apparecchio equivalente, al rivenditore del nuovo apparecchio. L'utilizzatore è responsabile del conferimento dell'apparecchio a fine vita alle strutture di raccolta dei rifiuti idonee. Una raccolta differenziata ed appropriata, allo scopo di inviare l'apparecchio non utilizzato al riciclaggio, al trattamento e ad uno smaltimento ecosostenibile, contribuisce ad evitare i possibili effetti nocivi sull'ambiente e sulla salute dell'uomo ed a favorire il riciclaggio dei materiali di cui è fatto il prodotto. Per ottenere informazioni più dettagliate sui sistemi di raccolta differenziata disponibili, rivolgersi al proprio servizio comunale di smaltimento dei rifiuti oppure al negozio in cui si è acquistato l'apparecchio. 11. AVVERTENZA Al fine del continuo miglioramento dei nostri prodotti, ci riserviamo la possibilità di modificare le caratteristiche tecniche senza preavviso. Le garanzie dei prodotti del marchio AVINTAGE sono stabilite esclusivamente dai distributori che abbiamo scelto. Nessun elemento contenuto nel presente manuale può essere interpretato come una garanzia supplementare. FRIO ENTREPRISE non può essere ritenuta responsabile per errori o omissioni tecniche e di redazione eventualmente presenti in questo manuale. Documento senza valore contrattuale. 206 SCHEDA PRODOTTO EUROPEA secondo il regolamento (UE) N°1060/2010 FRIGO CANTINA DI SERVIZIO MARCA AVINTAGE RIFERIMENTO COMMERCIALE AVU8X(/IX) DATI ELETTRICI 220-240 V / 50 Hz DIMENSIONI DEL PRODOTTO (L x P x A) 145 x 547,5 x 820 mm PESO NETO 20 kg CATEGORIA DELL'APPARECCHIO 2 CLASSE ENERGETICA A CONSUMO ELETTRICO Consumo di energia di 135 kWh all'anno, calcolato sulla base del risultato ottenuto in 24 ore in condizioni di prova normalizzate. Il consumo di corrente reale dipende dalle condizioni d'uso e dalla collocazione dell'apparecchio. CAPACITÀ 23 L TEMPERATURA REGOLABILE 5 – 20°C SBRINAMENTO Sbrinamento automatico CLASSE CLIMATICA Classe climatica: N Questo apparecchio è destinato ad essere utilizzato ad una temperatura ambiente compresa tra i 16 °C (temperatura più bassa) e 32 °C (temperatura più alta). LIVELLO DI RUMORE dB(A) RE 1 pW 44 dB(A) TIPO DI INSTALLAZIONE Da incasso sottopiano Questo apparecchio è destinato solamente alla conservazione di vini. 207 SCHEDA PRODOTTO EUROPEA secondo il regolamento (UE) N°1060/2010 FRIGO CANTINA DI SERVIZIO MARCA AVINTAGE RIFERIMENTO COMMERCIALE AVU23SX(/IX) DATI ELETTRICI 220-240 V / 50 Hz DIMENSIONI DEL PRODOTTO (L x P x A) 295 x 571 x 820 mm PESO NETO 28 kg CATEGORIA DELL'APPARECCHIO 2 CLASSE ENERGETICA A CONSUMO ELETTRICO Consumo di energia di 140 kWh all'anno, calcolato sulla base del risultato ottenuto in 24 ore in condizioni di prova normalizzate. Il consumo di corrente reale dipende dalle condizioni d'uso e dalla collocazione dell'apparecchio. CAPACITÀ 56 L TEMPERATURA REGOLABILE 5 – 20°C SBRINAMENTO Sbrinamento automatico CLASSE CLIMATICA Classe climatica: N Questo apparecchio è destinato ad essere utilizzato ad una temperatura ambiente compresa tra i 16 °C (temperatura più bassa) e 32 °C (temperatura più alta). LIVELLO DI RUMORE dB(A) RE 1 pW 43 dB(A) TIPO DI INSTALLAZIONE A libera installazione sottopiano e da incasso Questo apparecchio è destinato solamente alla conservazione di vini. 208 SCHEDA PRODOTTO EUROPEA secondo il regolamento (UE) N°1060/2010 FRIGO CANTINA DI SERVIZIO MARCA AVINTAGE RIFERIMENTO COMMERCIALE AVU41SXDPA(/IX) DATI ELETTRICI 220-240 V / 50 Hz DIMENSIONI DEL PRODOTTO (L x P x A) 595 x 571 x 820 mm PESO NETO 48 kg CATEGORIA DELL'APPARECCHIO 2 CLASSE ENERGETICA A CONSUMO ELETTRICO Consumo di energia di 144 kWh all'anno, calcolato sulla base del risultato ottenuto in 24 ore in condizioni di prova normalizzate. Il consumo di corrente reale dipende dalle condizioni d'uso e dalla collocazione dell'apparecchio. CAPACITÀ 59.5 x 2 L TEMPERATURA REGOLABILE 5 – 20°C SBRINAMENTO Sbrinamento automatico CLASSE CLIMATICA Classe climatica: N Questo apparecchio è destinato ad essere utilizzato ad una temperatura ambiente compresa tra i 16 °C (temperatura più bassa) e 32 °C (temperatura più alta). LIVELLO DI RUMORE dB(A) RE 1 pW 43 dB(A) TIPO DI INSTALLAZIONE A libera installazione sottopiano e da incasso Questo apparecchio è destinato solamente alla conservazione di vini. 209 SCHEDA PRODOTTO EUROPEA secondo il regolamento (UE) N°1060/2010 FRIGO CANTINA DI SERVIZIO MARCA AVINTAGE RIFERIMENTO COMMERCIALE AVU52SX(/IX) DATI ELETTRICI 220-240 V / 50 Hz DIMENSIONI DEL PRODOTTO (L x P x A) 595 x 571 x 820 mm PESO NETO 44 kg CATEGORIA DELL'APPARECCHIO 2 CLASSE ENERGETICA A CONSUMO ELETTRICO Consumo di energia di 145 kWh all'anno, calcolato sulla base del risultato ottenuto in 24 ore in condizioni di prova normalizzate. Il consumo di corrente reale dipende dalle condizioni d'uso e dalla collocazione dell'apparecchio. CAPACITÀ 146 L TEMPERATURA REGOLABILE 5 – 20°C SBRINAMENTO Sbrinamento automatico CLASSE CLIMATICA Classe climatica: N Questo apparecchio è destinato ad essere utilizzato ad una temperatura ambiente compresa tra i 16 °C (temperatura più bassa) e 32 °C (temperatura più alta). LIVELLO DI RUMORE dB(A) RE 1 pW 44 dB(A) TIPO DI INSTALLAZIONE A libera installazione sottopiano e da incasso Questo apparecchio è destinato solamente alla conservazione di vini. 210 SCHEDA PRODOTTO EUROPEA secondo il regolamento (UE) N°1060/2010 FRIGO CANTINA DI SERVIZIO MARCA AVINTAGE RIFERIMENTO COMMERCIALE AVU53CDZA DATI ELETTRICI 220-240 V / 50 Hz DIMENSIONI DEL PRODOTTO (L x P x A) 595 x 571 x 820 mm PESO NETO 50 kg CATEGORIA DELL'APPARECCHIO 2 CLASSE ENERGETICA A CONSUMO ELETTRICO Consumo di energia di 145 kWh all'anno, calcolato sulla base del risultato ottenuto in 24 ore in condizioni di prova normalizzate. Il consumo di corrente reale dipende dalle condizioni d'uso e dalla collocazione dell'apparecchio. CAPACITÀ 134 L TEMPERATURA REGOLABILE 5 – 10°C / 10 – 20°C SBRINAMENTO Sbrinamento automatico CLASSE CLIMATICA Classe climatica: N Questo apparecchio è destinato ad essere utilizzato ad una temperatura ambiente compresa tra i 16 °C (temperatura più bassa) e 32 °C (temperatura più alta). LIVELLO DI RUMORE dB(A) RE 1 pW 45 dB(A) TIPO DI INSTALLAZIONE A libera installazione sottopiano e da incasso Questo apparecchio è destinato solamente alla conservazione di vini. 211 SCHEDA PRODOTTO EUROPEA secondo il regolamento (UE) N°1060/2010 FRIGO CANTINA DI SERVIZIO MARCA AVINTAGE RIFERIMENTO COMMERCIALE AVU54SXDZA(/IX) DATI ELETTRICI 220-240 V / 50 Hz DIMENSIONI DEL PRODOTTO (L x P x A) 595 x 571 x 820 mm PESO NETO 50 kg CATEGORIA DELL'APPARECCHIO 2 CLASSE ENERGETICA A CONSUMO ELETTRICO Consumo di energia di 145 kWh all'anno, calcolato sulla base del risultato ottenuto in 24 ore in condizioni di prova normalizzate. Il consumo di corrente reale dipende dalle condizioni d'uso e dalla collocazione dell'apparecchio. CAPACITÀ 134 L TEMPERATURA REGOLABILE 5 – 10°C / 10 – 20°C SBRINAMENTO Sbrinamento automatico CLASSE CLIMATICA Classe climatica: N Questo apparecchio è destinato ad essere utilizzato ad una temperatura ambiente compresa tra i 16 °C (temperatura più bassa) e 32 °C (temperatura più alta). LIVELLO DI RUMORE dB(A) RE 1 pW 45 dB(A) TIPO DI INSTALLAZIONE A libera installazione sottopiano e da incasso Questo apparecchio è destinato solamente alla conservazione di vini. 212 SCHEDA PRODOTTO EUROPEA secondo il regolamento (UE) N°1060/2010 FRIGO CANTINA DI SERVIZIO MARCA AVINTAGE RIFERIMENTO COMMERCIALE PRO51C/1 DATI ELETTRICI 220-240 V / 50 Hz DIMENSIONI DEL PRODOTTO (L x P x A) 595 x 571 x 820 mm PESO NETO 48 kg CATEGORIA DELL'APPARECCHIO 2 CLASSE ENERGETICA A CONSUMO ELETTRICO Consumo di energia di 145 kWh all'anno, calcolato sulla base del risultato ottenuto in 24 ore in condizioni di prova normalizzate. Il consumo di corrente reale dipende dalle condizioni d'uso e dalla collocazione dell'apparecchio. CAPACITÀ 146 L TEMPERATURA REGOLABILE 5 – 20°C SBRINAMENTO Sbrinamento automatico CLASSE CLIMATICA Classe climatica: N Questo apparecchio è destinato ad essere utilizzato ad una temperatura ambiente compresa tra i 16 °C (temperatura più bassa) e 32 °C (temperatura più alta). LIVELLO DI RUMORE dB(A) RE 1 pW 45 dB(A) TIPO DI INSTALLAZIONE A libera installazione sottopiano e da incasso Questo apparecchio è destinato solamente alla conservazione di vini. 213 Před použitím přístroje čtěte a řiďte se prosím bezpečnostními pokyny a provozními instrukcemi uvedenými v tomto návodu. Nejdříve bychom Vám chtěli poděkovat za důvěru projevenou skupině AVINTAGE zakoupením tohoto produktu, který, jak doufáme, dokonale naplní všechna Vaše očekávání. Toto zařízení Vám umožní ohřát Vaše lahve vína až a pokojovou teplotu anebo je temperovat na servírovací teplotu (podle typu vína) díky širokému rozsahu možného nastavení vinotéky. 1. OBECNÉ BEZPEČNOSTNÍ POKYNY Před prvním použitím vaší vinotéky si prosím důkladně přečtěte tento návod. Uschovejte jej pečlivě pro případné pozdější použití. Abyste zabránili riziku požáru, úrazu elektrickým proudem, nebo zranění, řiďte se bezpečnostními doporučeními uvedenými v tomto návodu. Zařízení může obsluhovat pouze osoba důkladně obeznámená s funkcí a obsluhou. Pro vaši bezpečnost a správnou obsluhu si před instalací přístroje důkladně prostudujte tento návod včetně rad a upozornění. Obsluha musí být důkladně seznámena s funkcemi a bezpečnostními vlastnostmi přístroje, aby se zabránilo nečekaným závadám, chybám a nehodám během provozu zařízení. Tento návod pečlivě uchovejte a zajistěte jeho předání spolu s přístrojem v případě jeho postoupení nebo prodeje. Takto zajistíte optimální funkci zařízení po celou dobu jeho životnosti. Dodržujte ustanovení tohoto návodu týkající se provozu a bezpečnosti jeho obsluhy. Výrobce spotřebiče a jeho dodavatel nejsou zodpovědní za škody, způsobené instalací nebo obsluhou spotřebiče v rozporu s instrukcemi obsaženými v tomto návodu k obsluze a instalaci. Zařízení je určeno domácí použití a pro uchovávání zvláštních nápojů při teplotách vyšších, než jsou obvyklé teploty pro 214 uchovávání čerstvých potravin. Za žádných okolností není určeno pro uchovávání čerstvých potravin. Zkontrolujte vaši elektrickou instalaci, zda napětí v síti odpovídá tomu, které je uvedeno na štítku přístroje. Zařízení musí být připojeno k schválenému a uzemněnému rozvodu. Nesprávné opravy anebo připojení jsou bezpečnostním rizikem. v případě pochybností nechte svůj elektrický rozvod prověřit profesionální instalační firmou. Zařízení musí být správně připojeno k uzemněné zásuvce. Nepřerušujte ani neodstraňujte zemnící vodič na dodaném připojovacím kabelu. Napájecí kabel spotřebiče nesmí být prodlužován/nastavován. K připojení spotřebiče k elektrické síti nepoužívejte prodlužovací šňůry, adaptéry ani sdružené zásuvky. V případě poškození zařízení (většího rozsahu) výpadkem proudu a živly, může být používání přístroje nebezpečné. Odpojte hlavní přívod ze sítě a nechte zařízení zkontrolovat oprávněnou osobou. Nikdy nevyměňujte přívodní kabel svépomocí. Přenechte tuto práci profesně způsobilé osobě. Zásuvka, která slouží k napájení spotřebiče, musí zůstat po jeho instalaci snadno přístupná. Plnou vinotéku nikdy nepřesouvejte ani nestěhujte. Mohlo by to způsobit její nevratné poškození. Elektrické součásti nesmí být přímo přístupné. Zabraňte dětem v přístupu k zařízení. Nepoužívejte vinotéku ve venkovních prostorách. 215 V případě nenadálého potřísnění vinotéky (rozbitá láhev apod.,) nebo jejích elektrických součástí, okamžitě odpojte hlavní přívod elektřiny. Nikdy nenamáčejte přívodní kabel, zástrčku, nebo celou vinotéku do vody nebo jiné tekutiny. Nedotýkejte se zapnutého zařízení vlhkými rukami. Spotřebič postavte tak, aby nebyl exponován přímým slunečním paprskům. Nenechávejte hlavní přívodní kabel viset ze stolu nebo v kontaktu s ostrou hranou, či horkým předmětem. Při odpojování spotřebiče ze sítě nikdy netahejte za samotný kabel, ale vždy jej pevně uchopte za zástrčku a odpojte jejím vytažením ze síťové zásuvky. Spotřebič má značnou váhu. Zohledněte tuto skutečnost při jeho manipulaci. Zajistěte postavení vinotéky na dostatečně únosnou podlahu (jedna 75 cl láhev váží přibližně 1,3 kg). Vinotéka musí stát na vodorovné podlaze. Stavíte-li zařízení na měkký povrch nebo koberec, podložte ji pevnou podložkou. Při vytahování polic dbejte, aby byly dveře plně otevřené. Zamezíte tím poškození dveřního těsnění. Bezpečnost dětí a znevýhodněných osob Osoby mladší osmi let a osoby se sníženými fyzickými, psychickými nebo smyslovými schopnostmi nebo osoby nedostatečně obeznámené s principy obsluhy a fungování tohoto spotřebiče jej smějí používat pouze pod dohledem nebo předchozí jasné a srozumitelné instrukci osobou s dostatečnou znalostí, zodpovědnou za jejich bezpečnost. 216 Údržbu a čištění spotřebiče nelze svěřit dětem bez dozoru. Obalové materiály spotřebiče po jeho vybalení odstraňte z dosahu dětí. v opačném případě hrozí riziko udušení. Spotřebič při ukončení jeho životnosti odpojte od zdroje napětí, odstřihněte/odřízněte zástrčku napájecího kabelu (co nejblíž korpusu spotřebiče) a odstraňte dvířka tak, aby si děti nemohly se spotřebičem hrát a případně uvíznout zavřené uvnitř. Nahrazujete-li vysloužilý spotřebič s magnetickým uzavíráním/těsněním novým spotřebičem vybaveným bezpečnostním zámkem/závorou na dveřích nebo těsnění, přesvědčte se nejprve o deaktivaci bezpečnostního systému nového spotřebiče tak, aby v něm v průběhu likvidace vysloužilého spotřebiče nemohly uvíznout děti. Dohlédněte, aby si v blízkosti spotřebiče při jeho provozu nehrály bez dozoru děti mladší osmi let, obzvláště dbejte na to, aby nepoužívaly jako hračku samotný spotřebič. Obecná bezpečnostní upozornění POZOR – toto zařízení je určeno pro domácí použití, nebo v zařízeních, jako: V služebních prostorách obchodů, úřadů a jiných pracovních prostorách, Na farmách a v hotelech, motelech a jiných ubytovacích zařízeních, V ubytovnách, V restauratérství a velkoobchodních aplikacích. POZOR! Zařízení musí být vhodně upevněno v souladu s tímto návodem, aby se zabránilo následným škodám při jeho používání. 217 POZOR! Uvnitř spotřebiče nikdy neskladujte hořlavé substance, například spreje s hořlavými hnacími plyny. POZOR! Poškozený napájecí kabel spotřebiče musí být, z bezpečnostních důvodů, neprodleně opraven nebo nahrazen výhradně pověřeným zaměstnancem výrobce nebo kvalifikovaným zaměstnancem autorizovaného poprodejního servisu dodavatele. POZOR! Všechny ventilační otvory spotřebiče musí zůstat po jeho instalaci volné. Zajistěte, aby byl kolem spotřebiče dostatek volného prostoru pro řádnou cirkulaci vzduchu, obzvláště v okolí prostor vzduchových vstupů a výstupů. POZOR! Za všech okolností předcházejte poškození rozvodů chladícího okruhu. POZOR! Ve vnitřních prostorách spotřebiče nepoužívejte elektrické přístroje a zařízení s výjimkou případů explicitně povolených výrobcem zařízení. POZOR! Chladící a izolační systém spotřebiče obsahují hořlavé plyny. Při ukončení jeho životnosti je proto třeba dodržet přísná pravidla bezpečnosti a k likvidaci spotřebiče využít služeb specializovaných center pro likvidaci vysloužilých elektrických a elektronických zařízení. Spotřebič, a to ani po ukončení jeho životnosti, nevystavujte ohni. Chladivo Spotřebič využívá jako své chladicí médium isobutan (R600a) – k životnímu prostředí šetrný, přesto snadno vznětlivý, a proto velmi nebezpečný plyn. Při transportech spotřebiče a jeho instalaci důsledně dbejte na to, aby nedošlo k poškození žádné z částí 218 rozvodu chladicího systému. Pozor! Nebezpečí požáru Při poškození rozvodů chladicího okruhu spotřebiče: odstraňte z jeho bezprostřední blízkosti zápalné zdroje a otevřený plamen. řádně větrejte místnost, ve které je spotřebič instalován. Nepokoušejte se o změny nebo zásahy do technických parametrů spotřebiče – neodborné zásahy do zařízení představují výrazné riziko ohrožení zdraví uživatelů! Každé poškození napájecího kabelu zařízení může mít za následek zkrat a požár. Elektrická bezpečnost Výrobce i dodavatel se zříkají zodpovědnosti za nehody a problémy způsobené nesprávnou nebo neodbornou instalací spotřebiče nebo jeho instalací v rozporu s pokyny obsaženými v tomto návodu k obsluze a instalaci. Napájecí kabel spotřebiče nesmí být prodlužován/nastavován. K připojení spotřebiče k elektrické síti nepoužívejte prodlužovací šňůry, adaptéry ani sdružené zásuvky. Před připojením spotřebiče k síti prověřte bezvadný stav síťové zásuvky. Připojení k poškozené nebo uvolněné zásuvce může být příčinou přehřátí spotřebiče a jeho vznícení nebo exploze. Zásuvka, která slouží k napájení spotřebiče, musí zůstat po jeho instalaci snadno přístupná. Při odpojování spotřebiče ze sítě nikdy netahejte za samotný kabel, ale vždy jej pevně uchopte za zástrčku a odpojte jejím vytažením ze síťové zásuvky. 219 Nikdy neodstraňujte bezpečnostní – zemnící vodič! Spotřebič nikdy nezapojujte/neprovozujte instalovaného krytu vnitřního osvětlení. bez řádně Před výměnou žárovky vnitřního osvětlení spotřebič vždy nejprve odpojte od zdroje elektrického napětí. Tento spotřebič je koncipován pro napájení jednofázovým proudem 220~240 V/50 Hz přes předpisově instalovanou uzemněnou zásuvku. Poškozený napájecí kabel spotřebiče sami neopravujte! Neprodleně kontaktujte autorizovaný poprodejní servis. Napájecí zásuvka by měla být umístěna mimo dosah dětí v dostatečné blízkosti od spotřebiče tak, aby bylo možné v kterémkoli okamžiku jeho snadné odpojení od zdroje napětí. v případě pochybností kontaktujte kvalifikovaného elektrotechnika. Doporučení pro každodenní provoz Zařízení je určeno výhradně pro skladování vína. Uvnitř spotřebiče nikdy neskladujte hořlavé nebo vznětlivé látky, zvláště tekutiny. Hrozí riziko jejich vznícení nebo exploze. Uvnitř spotřebiče neprovozujte jiná elektrické zařízení (výrobníky ledu, mixéry apod.). Při odpojování spotřebiče ze sítě nikdy netahejte za samotný kabel, ale vždy jej pevně uchopte za zástrčku a odpojte jejím vytažením ze síťové zásuvky. Spotřebič ustavte tak, aby nebyl exponován přímým slunečním paprskům. Z bezprostřední blízkosti spotřebiče pro prevenci rizika jeho vznícení a požáru odstraňte všechny zápalné zdroje (svíčky, svítidla, aj zdroje s otevřeným plamenem). 220 Respektujte doporučení výrobce pro skladování vína ve vinotéce. V blízkosti zařízení a nevhazujte jej do ohně. nemanipulujte s otevřeným ohněm Zařízení je určeno ke skladování nápojů v normální domácnosti, tak, jak je vysvětleno v tomto návodu. Zařízení má značnou hmotnost, dbejte opatrnosti při jeho stěhování. Je-li spotřebič vybaven zadními transportními kolečky, mějte na paměti, že tyto jsou určeny výhradně k usnadnění menších změn polohy. Nepoužívejte tato transportní kolečka k přesouvání spotřebiče na větší vzdálenosti. Na spotřebič, ani žádnou z jeho částí/příslušenství si nesedejte ani je nepoužívejte jako podstavce. Pro ochranu uložených lahví a bezpečnost spotřebiče nepřetěžujte police nad uvedenou hodnotu maximálního povoleného zatížení. Údržba a čištění Před každým úkonem údržby a čištění spotřebič odpojte od zdroje elektrické energie. Pro čištění spotřebiče nikdy nepoužívejte: kovové nástroje, parní a vysokotlaké čističe, těkavé kapaliny, organická rozpouštědla a substance s abrazivními složkami. Dvířka případech. spotřebiče otevírejte pouze v nejnutnějších Neurychlujte rozmrazování seškrabáváním námrazy ze stěn spotřebiče ostrými nebo špičatými nástroji. Použijte speciální plastovou škrabku. 221 Důležité informace pro instalaci zařízení Neumísťujte zařízení ve vlhkých prostorách. Zařízení nesmí být umístěno v blízkosti radiátorů, sporáků, nebo dalších zdrojů tepla. Přímé sluneční světlo může poškodit akrylátový nátěr a zdroje tepla mohou zvyšovat spotřebu elektřiny. Mimořádně vysoké nebo nízké teploty okolí mohou také způsobit nesprávnou funkci přístroje. Vinotéku zapojte do vyhrazené, řádně instalované a uzemněné zásuvky. Nikdy neodpojujte uzemnění z přívodního kabelu. Jakékoli dotazy ohledně uzemnění směřujte na kvalifikovanou elektroinstalační firmu, nebo autorizované servisní středisko. Pro zajištění správného elektrického připojení se řiďte tímto návodem. Rozbalte zařízení a zkontrolujte, zda zařízení není poškozeno. Poškozený přístroj nepřipojujte do sítě. Informujte svého prodejce o případném poškození. Pro tento případ si ponechte přepravní obal. Doporučujeme ponechat zařízení na místě provozu bez připojení do sítě po dobu 4 hodin, čímž dojde k správnému rozložení chladiva v chladícím okruhu. Abyste zabránili přehřívání, je nutno zajistit řádnou cirkulaci vzduchu kolem přístroje. Řiďte se doporučením poskytnutým v tomto návodu. Pro eliminaci rizika požáru dbejte, aby zařízení, nebo jeho horké části (kompresor, kondenzátor) nebyly v přímém kontaktu se zdí. Respektujte doporučení tohoto návodu. Zařízení nesmí být umístěno v blízkosti radiátorů, sporáků, nebo dalších zdrojů tepla. Zajistěte přístupnost elektrické zásuvky, v níž je přístroj 222 připojen, také po instalaci zařízení. Doporučení pro šetrný provoz Pro úsporu elektrické energie: Ustavujte spotřebič „Instalace spotřebiče“). na Dvířka případech. otevírejte spotřebiče vhodném místě pouze (viz kapitola v nejnutnějších Dbejte na optimální podmínky provozu spotřebiče včasnou a pravidelnou údržbou např. kondenzátoru (více viz kapitola „Údržba a čištění“). Pravidelně kontrolujte funkčnost těsnění a přesvědčte se, že dvířka řádně a dostatečně dovírají. v opačném případě neprodleně kontaktujte autorizovaný poprodejní servis. Opravy Každý zásah do elektrických komponent zařízení musí být realizován výhradně pověřeným kvalifikovaným specialistou. Při servisních zásazích vyžadujte použití originálních náhradních dílů s certifikátem zaručujícím jejich původ. Tento spotřebič je určen výhradně pro domácí použití, kde slouží ke skladování a přechovávání vína. Jeho výrobce a dodavatel se zříkají veškeré zodpovědnosti za škody způsobené jiným než shora uvedeným způsobem užití spotřebiče nebo jeho užívání v rozporu s účelem, k němuž byl zkonstruován. R600a 223 Bezpečnostní upozornění POZOR! Ventilační otvory zařízení vždy ponechte volně průchozí a nikdy je nezakrývejte ani neucpávejte. POZOR! Uvnitř zařízení neskladujte hořlavé látky, jako nádoby se spreji s hořlavým hnacím plynem apod. POZOR! Vyvarujte se poškození chladivového okruhu! POZOR! Chladící jednotka obsahuje Izobutan (R600a) a nesmí být umístěna v prostředí s otevřeným ohněm (např. nekryté elektrické kontakty) anebo na místech, kde hrozí nahromadění chladiva po jeho úniku. Typ chladiva je vyznačen na výrobním štítku zařízení. POZOR! Nepoužívejte elektrické přístroje uvnitř prostoru pro nápoje, pokud nejde o ty, které jsou přímo doporučeny výrobcem zařízení. Spotřebič splňuje požadavky vyplývající ze všech relevantních evropských směrnic ve znění příslušných platných úprav, zvláště pak požadavky vyplývající z těchto směrnic: 2011/65/EU (ROHS) 2014/35/EU o elektrické bezpečnosti 2014/30/EU o elektromagnetické kompatibilitě 643/2009/CE týkající se energetických štítků 224 2. TECHNICKÉ ÚDAJE Níže je zobrazen příklad typového štítku: Typový štítek je upevněn dovnitř nebo na zadní stranu zařízení (v závislosti na modelu) a obsahuje všechny informace o daném výrobku. Doporučujeme, abyste si zde poznamenali sériové číslo vinotéky před její instalací pro případnou pozdější potřebu (technické reference, požadavek asistence apod.). Přístup k typovému štítku po instalaci přístroje může být nesnadný. POZOR: bez těchto informací není možné poskytnout jakoukoli informaci nebo součinnost. 3. INSTALACE ZAŘÍZENÍ Před použitím zařízení Spotřebič vybalte (odstraňte ochranné a obalové materiály také z interiéru spotřebiče) a vizuálně zkontrolujte jeho bezchybný stav. Jeví-li spotřebič známky poškození, instalaci přerušte a kontaktujte prodejce, u kterého jste jej zakoupili. Pro tento případ si uschovejte obalový materiál, v němž byl spotřebič dodán. Před připojením vinotéky k síti ji nechte ustálit po dobu alespoň 24 hodin ve vertikální klidové poloze. Tímto krokem předejdete možnému poškození nebo poruchám funkčnosti chladicího okruhu spotřebiče v důsledku jeho předchozího transportu. Vyčistěte vnitřní povrchy spotřebiče suchým jemným hadříkem. Při likvidaci vysloužilého zařízení zaneste přístroj na příslušnou skládku oprávněnou k nakládání s elektroodpady. Spotřebič postavte na pevnou podlahu s dostatečnou nosností, schopnou unést tíhu plně zatížené vinotéky. Pro vyvážení do vodorovné polohy použijte k nastavení přední nožku ve spodní části zařízení. Nezakrývejte ventilační otvory. Zařízení není určeno pro umístění do garáží nebo sklepa. Pouze pro vnitřní použití. Zařízení je určeno pro vestavbu do kuchyňského nábytku. 225 Připojte vinotéku do jednoduché zásuvky tak, že ponecháte mezi zadní částí vinotéky a zdí prostor 30 mm. Dbejte na dokonalé vodorovné vyvážení. (Použijte vodováhu.) Tímto zabráníte pohybům vlivem nestability, zvýšené hlučnosti a zajistíte, aby dveře vinotéky dokonale těsnily. Zařízení je určeno výhradně pro skladování vína. Zařízení používá chladivo s vysoce hořlavými vlastnostmi. Vyvarujte se poškození chladivového okruhu! Upozornění Víno skladujte pouze v uzavřených lahvích. Nepřetěžujte vinotéku. Dveře otvírejte pouze na nevyhnutnou dobu. Nepřikrývejte police hliníkovou fólií ani jiným materiálem, který by mohl bránit ventilaci. Pokud bude vinotéka delší dobu mimo provoz, odpojte ji ze sítě a pečlivě vyčistěte. Následně ponechte dvířka otevřená. Tímto způsobem zabráníte kondenzaci a vzniku nepříjemných pachů uvnitř skříňky. POZOR: v blízkosti zařízení neskladujte hořlavé a výbušné látky, které by mohly způsobit požár. Klimatické třídy Zařízení je určeno pro provoz při teplotách okolí určených klimatickou třídou uvedenou na typovém štítku spotřebiče. KLIMATICKÁ TŘÍDA SYMBOL PROVOZNÍ TEPLOTA OKOLÍ (°C) Subnormální SN Od +10 do +32 Normální N Od +16 do +32 Subtropická ST Od +16 do +38 Tropická T Od +16 do +43 226 Vestavné schéma AVU8X(/IX) AVU23SX(/IX) 227 AVU41SXDPA(/IX) AVU52SX(/IX) AVU54SXDZA(/IX) 228 AVU53CDZA PRO51C/1 Otočení dveří Dveře je možno otočit závěsy na obě strany. Obvykle je ve výrobě závěs umístěn na pravé straně. Pokud potřebujete otočit dveře pro otevírání z opačné strany, řiďte se prosím následujícím doporučením. AVU8X(/IX) 229 1 3 5 7 Spodní závěs (vpravo) Otočná osa dveří Vrchní závěs (vpravo) Vrchní závěs (vlevo) 2 4 6 8 Šroubky Dveře Šrouby závěsu Spodní závěs (vlevo) 1. Otevřete dveře v úhlu 90°, vyšroubujte dva šroubky (2) ze spodního závěsu (3), sejměte dveře (4) a otočnou osu dveří (Obr. A). Dveře (4) umístěte bezpečně (Obr. a a B). 2. Odšroubujte šrouby (6) horního závěsu (5) a závěs sejměte stejně, jako spodní (vpravo) (Obr. C). 3. Namontujte druhý závěs nalevo (7) na levou horní stranu skříňky třemi šrouby (Obr. D). Stejně tak namontujte i druhý závěs na levou spodní stranu (Obr. E). 4. Přiložte dveře k závěsům v úhlu 180° a upevněte je přišroubováním otočné osy. AVU23SX(/IX) AVU52SX(/IX) 1 3 5 7 9 11 Spodní závěs (vpravo) Otočná osa dveří Vrchní závěs (vpravo) Vrchní závěs (vlevo) Spodní závěs (vlevo) Šroub 2 4 6 8 10 12 Šroubky Dveře Šrouby závěsu Ozdobný hřebík Omezovač dveří Krytka 1. Otevřete dveře v úhlu 90°, vyšroubujte dva šroubky (2) ze spodního závěsu (3), sejměte dveře (4) a otočnou osu dveří (Obr. A). 2. Umístěte dveře (4) do bezpečné polohy a sejměte krytku (12) z horní strany rámu. Odšroubujte jeden šroubek (11) na spodní straně a sejměte omezovač dveří (10). Upevněte omezovač dveří (10) na opačnou stranu rámu. Krytku vložte do otvoru na horní straně rámu (Obr. A/B). 3. Odstraňte šroubky závěsu (6) z horní strany (vpravo) (5) a sejměte jej (Obr. C) 4. Odstraňte ozdobný hřebík (8) z horní levé strany skříňky a namontujte horní závěs (vlevo) (7) na horní levou stranu skříňky pomocí tří šroubků (Obr. D). 5. Druhý závěs (9) namontujte obdobně na spodní levou stranu skříňky (Obr. E). 6. Přiložte dveře k závěsům v úhlu 180° a upevněte je přišroubováním otočné osy závěsu. 230 7. Otvor v horní pravé straně skříňky zakryjte ozdobným hřebíkem (8). AVU53CDZA AVU54SXDZA(/IX) PRO51C/1 1 3 5 7 9 Spodní závěs (vpravo) Otočná osa dveří Vrchní závěs (vpravo) Vrchní závěs (vlevo) Spodní závěs (vlevo) 2 4 6 8 Šroubky Dveře Šrouby závěsu Ozdobný hřebík 1. Otevřete dveře v úhlu 90°, vyšroubujte dva šroubky (2) ze spodního závěsu (3), sejměte dveře (4) a otočnou osu dveří (Obr. A). 2. Umístěte dveře (4) do bezpečné polohy. 3. Vyšroubujte tři šrouby (6) z pravého horního závěsu (5) a sejměte jej (Obr. C). 4. Odstraňte ozdobný hřebík (8) z horní levé strany skříňky a namontujte horní závěs (vlevo) (7) na horní levou stranu skříňky pomocí tří šroubků (Obr. D). 5. Druhý závěs (9) namontujte obdobně na spodní levou stranu skříňky (Obr. E). 6. Přiložte dveře k závěsům v úhlu 180° a upevněte je přišroubováním otočné osy závěsu. 7. Otvor v horní pravé straně skříňky zakryjte ozdobným hřebíkem (8). 4. PROVOZNÍ INSTRUKCE Doporučujeme instalovat vinotéku na místě s teplotou prostředí mezi 16-32 °C. Pokud je teplota okolí pod nebo nad doporučenou hodnotou, může být ovlivněn provoz vinotéky. Dosažení regulované teploty uvnitř vinotéky v rozmezí 5-20 °C nebo 5-10 °C /10-20 °C (podle modelu) pak může být obtížnější. 231 Řídící panel AVU8X(/IX) / AVU23SX(/IX), AVU41SXDPA(/IX), AVU52SX(/IX), PRO51C/1 „RUN“ – indikátor zapnutí Tlačítko „ “ Slouží k zapínání a vypínání spotřebiče. Zmáčkněte a podržte tlačítko po dobu cca 3 sekund. Tlačítko „ “ Slouží k zapínání a vypínání vnitřního osvětlení. „Displej“ – zobrazení teploty Tlačítko „ “ Nastavení teploty směrem nahoru. Tlačítko „ “ Nastavení teploty směrem dolů. Teplotu můžete nastavit pomocí tlačítek teplotu o jeden stupeň. a . Každé zmáčknutí tlačítka zvýší/sníží Teploty je možno nastavit v rozsahu 5 a 20 °C nebo 5-10 °C / 10-20 °C (podle modelu). Po navolení teploty displej bliká po dobu asi 5 sekund a následně zobrazí skutečnou vnitřní teplotu oddílu. Nastavenou teplotu můžeme kdykoli zobrazit zmáčknutím a podržením tlačítka volby teploty po dobu 5 s. V případě výpadku proudu jsou veškerá teplotní nastavení vymazána a vinotéka nastaví továrně uloženou hodnotu 12 °C. Řídící panel pro AVU53CDZA, AVU54SXDZA(/IX) RUN“ – indikátor zapnutí Tlačítko „ “ Slouží k zapínání a vypínání spotřebiče. Zmáčkněte a podržte tlačítko po dobu cca 3 sekund. Tlačítko „ “ Slouží k zapínání a vypínání vnitřního osvětlení. „Displej“ – elektronický displej pro horní oddíl. „Displej“ – elektronický displej pro spodní oddíl. Tlačítko „ “ Nastavení teploty horního oddílu. 232 Tlačítko „ “ Nastavení teploty spodního oddílu. Zmáčkněte tlačítko „ “ pro nastavení teploty v horním oddílu. Příslušná teplota započne blikat a každé zmáčknutí tlačítka změní teplotu o 1 °C. Jakmile dosáhneme nejnižší nastavitelnou teplotu 5 °C, displej automaticky zobrazí nejvyšší nastavitelnou teplotu 10 °C. Po navolení teploty displej bliká po dobu asi 5 sekund a následně zobrazí skutečnou vnitřní teplotu oddílu. Nastavenou teplotu můžeme kdykoli zobrazit zmáčknutím a podržením tlačítka volby teploty po dobu 5 s. Zmáčkněte tlačítko „ “ pro nastavení teploty v spodním oddílu. Příslušná teplota započne blikat a každé zmáčknutí tlačítka změní teplotu o 1 °C. Jakmile dosáhneme nejnižší nastavitelnou teplotu 10 °C, displej automaticky zobrazí nejvyšší nastavitelnou teplotu 20 °C. Po navolení teploty displej bliká po dobu asi 5 sekund a následně zobrazí skutečnou vnitřní teplotu oddílu. Nastavenou teplotu můžeme kdykoli zobrazit zmáčknutím a podržením tlačítka volby teploty po dobu 5 s. V případě výpadku proudu jsou veškerá teplotní nastavení vymazána a vinotéka nastaví továrně uloženou hodnotu 12 °C. Zobrazení a funkce zařízení Teplotní alarm: Pokud je teplota uvnitř vinotéky vyšší, než 23°C, na displeji se zobrazí nápis „HI“ a po hodině se rozezní signál alarmu. Ten nás informuje o vysoké teplotě uvnitř vinotéky. Zjistěte důvod. Pokud je teplota uvnitř nižší než 0°C, displej zobrazuje nápis „LO“ a opět zazní zvuková a světelná signalizace. Obnovení nastavené teploty: V případě výpadku proudu si vinotéka pamatuje poslední nastavenou teplotu a po obnovení dodávky elektřiny se obnoví původní stav teplot. Vnitřní osvětlení Vinotéka vypíná vnitřní osvětlení sama po deseti minutách za účelem šetření energií. Pokud chcete ponechat osvětlení trvale zapnuté, zmáčkněte a podržte tlačítko po dobu 5 s. Displej zobrazí nápis „LP“ a po 4 sekundách se displej vrátí do normálu. Světlo zůstane zapnuté, dokud ho opět nevypnete. Jestliže chcete světlo opět vypnout (doporučeno), pak zmáčkněte a podržte tlačítko po dobu 5 s a displej zobrazí „LF“. Po 4 sekundách se displej vrátí do normálu a světlo se automaticky vypne po 10 minutách. 5. VÝBAVA A FUNKCE VINOTÉKY Udržování teploty Podle rad odborníků je optimální teplota pro uchovávání vína 12 °C s tolerancí 10–14 °C. Tuto teplotu není radno zaměňovat se servírovací teplotou, která kolísá v rozmezí 5–20 °C podle specifických vlastností vína. Je obzvlášť důležité zabránit náhlým změnám teploty Tato vinotéka, navržena specialisty na skladování vína, na rozdíl od jednoduché chladničky, bere v úvahu citlivost vín na náhlé změny teploty a zajišťuje dokonalou kontrolu zachování konstantní průměrné teploty. 233 Antivibrační systém Kompresor je opatřen speciálními silentbloky a vnitřní prostor je izolován silnou vrstvou polyuretanové pěny. Tímto způsobem je zamezeno přenosu vibrací do vína. Udržování konstantní vlhkosti Zařízení je vybaveno miskou (podle modelu), která umožňuje korigovat vlhkost ve vinotéce. Pokud je vlhkost příliš nízká, naplňte misku do ¾ její objemu vodou. z času na čas kontrolujte výšku hladiny vody a případně dolejte vodu. Ubezpečte se, že v misce je neustále správná hladina vody. Výrobce se v tomto ohledu řídí radami znalců vína, kteří doporučují udržování určité vlhkosti ve vinotéce. Zamezí to nadměrnému vysychání korkových zátek v lahvích a tím vzniku netěsností lahví způsobené příliš suchým prostředím. To je důvod pro umístění nádobky s vodou na polici pod ventilátorem ve spodní části vinotéky. Tím se zajistí vhodná minimální vlhkost uvnitř zařízení. Pokud používáte vinotéku převážně pro zrání vína po delší časové období, dbejte na to, aby v nádobce byla neustále přítomna hladina vody. Použití vinotéky pro servírovací účely (s rychlou obměnou lahví) zvlhčování nutně nevyžaduje (ačkoli je také doporučeno). Ochrana proti UV záření Světlo urychluje zrání vína. v našich vinotékách s plnými dveřmi je víno přirozeně chráněno, pokud dveře nejsou otevírány příliš často. Tento typ se skleněnými dveřmi disponuje speciálně upraveným sklem, které nepropouští škodlivé ultrafialové záření a tím zajišťuje dokonalou ochranu vína. Automatické odmrazování Vinotéka je vybavena automatickým odmrazováním. Když končí chladící cyklus, namrzlé plochy zařízení se automaticky odmrazí. Kondenzát se odvádí do odpařovací nádoby, která je umístěna na zadní straně vinotéky poblíž kompresoru. Teplo, vyzařované kompresorem odpařuje kondenzát nasbíraný v nádobce. Zimní režim (podle modelu) Zimní režim je ochrana proti mrazu, která umožňuje vinotéce pracovat v prostředí s teplotou v rozmezí 0 až 32°C. Speciální čidlo ve vinotéce uvádí do provozu nízko výkonové topné těleso, jakmile vnitřní teplota vinotéky klesne 3 °C pod nastavenou hodnotu. Jedná se o topné těleso s tak nízkým výkonem, že nedochází k teplotním šokům vína a tím narušení jeho uchovávání. Tato funkce zajistí udržení vnitřní teploty již předtím, než dojde k výměně teploty mezi lahvemi a vnitřním prostředím vinotéky. Tato funkce je určena k udržování teploty uvnitř vinotéky na hodnotě, která zamezí přestupu tepla mezi vnitřním prostředím a vínem v lahvích. Zimní režim udržuje naprogramovanou teplotu uvnitř vinotéky i navzdory poklesu zevních teplot. Přídavný ohřev se vypíná vždy, když vnitřní teplota vinotéky dosáhne požadované naprogramované teploty. Police Aby nedošlo k poškození těsnění dvířek, ujistěte se, že jsou dveře před každým vytažením police pro ukládání/vyjímání láhví zcela otevřené. Pro snadnější přístup k uloženým láhvím vysuňte police na přibližně jednu třetinu jejich hloubky. Police jsou vybaveny zvláštním stop systémem, který zabraňuje vypadnutí láhví z polic. Pro vyjmutí nebo zasunutí nakloňte polici podle obrázku a pak tahejte nebo tlačte dle potřeby. 234 Pro AVU41SXDPA(/IX) Umístění polic uvnitř vinotéky. a) Kartonová krabice s náhradními díly b) Malá police c) Velká police 1. Po odstranění obalu vyjměte z vinotéky krabici s náhradními díly (a). 2. V levém oddílu najdete 4 ks malých polic (b). Vyjměte dvě nejspodnější z nich. 3. V pravém oddílu jsou umístěny 4 ks velkých polic (c). Vyjměte dvě police umístěné nahoře. 4. Vyměňte velké a malé police (Obr. 2). Umístěte dvě malé police na horní pozici a dvě velké police na spodní pozice v obou oddílech. 5. Po vložení polic můžete vinotéku používat způsobem, popsaným v návodu. Přesuvné ližiny S vinotékou se dodávají dvě přesuvné ližiny, které umožňují snadnější přesun vinotéky za podmínky úplně vyšroubovaných nožek do maximální výšky. Ližiny se musí umístit souběžně pod nožky vinotéky rovnoběžně ve směru posunu, v souladu s umístěním, pro přední a pro zadní stranu vinotéky (viz obrázek). 235 Zvýšená bezpečnost Jelikož je toto zařízení určeno pro uchovávání značných hodnot, vybírali jsme pečlivě kvalitní komponenty a vhodné výrobní postupy, abychom zajistili optimální bezpečnost provozu vinotéky. Instalace madla Vinotéka má nerezové madlo. Pro upevnění na dveře použijte dodané šrouby. Před montáží napřed uvolněte těsnění dveří a postupujte podle obrázku. 6. NALOŽENÍ VINOTÉKY Indikace maximální kapacity naložení plní u našich vinoték především bezpečnostní a orientační účely (např. při výběru vhodného typu spotřebiče o kapacitě přiměřené Vašim potřebám a cílům). Tato indikace je uváděna na základě standardních 75 cl lahví typu Bordeaux včetně standardně dodávaných polic. Ačkoli by tedy bylo – hypoteticky – možné naplnit vinotéku, např. bez užití polic, při naplnění lahvemi výhradně stejného tvaru a průměru apod., výrazně větším počtem lahví, ve skutečnosti bude praktické hledisko každodenní organizace a provozu vinotéky velmi pravděpodobně vyžadovat použití několika polic. z čistě praktických důvodů racionálního provozu proto nejspíš vinotéku naložíte menším počtem lahví, než je její maximální indikovaná kapacita. Typy lahví: Schéma vpravo znázorňuje 4 nejobvyklejší typy 75 cl vinných lahví (láhve typu Bordeaux a Burgund různých rozměrů). Níže uvedená demonstrace křížných způsobů uložení lahví se opírá o nejběžnější lahve typu Bordeaux. 236 Například, jestliže je vinotéka naložena pouze lahvemi typu Burgund, celková kapacita vinotéky bude asi o 30 % nižší, než která je vypočtena pro láhve Bordeaux. Střídavé ukládání lahví Hrdlo ke dnu, hrdly k sobě: Všimněte si rozdílu v hloubce uložení. Uložení hrdly mezi láhve: Úspora hloubky, menší kapacita. Příklady servírovacích teplot Přestože se v této oblasti občas vyskytnou výrazné názorové rozdíly (a s vědomím nezbytně specifických podmínek každé dílčí degustace), lze v následující tabulce ideálních servírovacích teplot shrnout většinově akceptovanou shodu. Naprostá shoda všech, kteří to s vínem myslí vážně, nadto panuje v názoru, že pouze servírováním při vhodné teplotě lze z konzumace vína učinit plnohodnotný zážitek pro všechny smysly. DRUH VÍNA Prestižní červená vína typu „Bordeaux“ Prestižní červená burgundská vína Prestižní suchá bílá vína Světlá mladá vína ovocného původu Provensálská růžová vína Suchá bílá vína a krajová červená vína Krajová bílá vína Šampaňská vína Dezertní vína SERVÍROVACÍ TEPLOTA (˚C) 16-17 15-16 14-16 11-12 10-12 10-12 8-10 7-8 6 7. PÉČE O VINOTÉKU A ÚDRŽBA Před každým úkonem údržby a čištění spotřebič vždy odpojte od zdroje elektrické energie (vytažením zástrčky napájecího kabelu ze síťové zásuvky, popř. vypnutím příslušného jističe v elektrickém okruhu). Před jeho uvedením do provozu (a poté v pravidelných intervalech, alespoň jednou za 3 měsíce) doporučujeme vyčistit všechny vnitřní i vnější povrchy spotřebiče (čelo, rám a madlo dveří, vnější plášť bočních stěn i horní části spotřebiče) teplou vodou s šetrným čisticím prostředkem. Očištěné povrchy poté omyjte čistou vodou a před připojením do sítě nechte řádně vyschnout. K čištění spotřebiče nepoužívejte rozpouštědla nebo abrazivní prostředky. K vyčištění plastových částí drátěných polic lze užít 237 slabého roztoku vody a jemného čisticího prostředku (např. saponátu na mytí nádobí). Dřevěné police nevyžadují zvláštní údržbu. Při prvním uvedení do provozu mohou některé části spotřebiče vydávat nepříjemný zápach. v takovém případě nastavte termostaty spotřebiče na minimální hodnotu vnitřní teploty, a nechte spotřebič po dobu několika hodin pracovat bez naložení lahví. Studený vzduch nežádoucí pachy odstraní. Výpadek proudu Běžný výpadek proudu v délce 1 nebo 2 hodin nemůže zásadně ovlivnit vnitřní teplotu vinotéky. Pro ochranu uložených vín při výpadku proudu však zbytečně neotvírejte dveře spotřebiče, resp. otevírejte je jen v nejnutnějších případech. Při dlouhodobém výpadku proudu je zapotřebí podstoupit nezbytné kroky k ochraně uložených vín. S opětovným zapnutím spotřebiče po jeho odpojení nebo po přerušení dodávky elektrické energie doporučujeme vyčkat po dobu alespoň 3 až 5 minut. Zprovozníte-li spotřebič po jeho předchozím odpojení ještě před uplynutím této doby, nedojde k nové aktivaci kompresoru (vyžaduje-li to vnitřní teplota) dříve, než po uplynutí zmíněné doby (3 – 5 minut). Při prvním zprovoznění spotřebiče (nebo po jeho delším odstavení) se mohou hodnoty nastavené/požadované a reálné vnitřní teploty uvnitř spotřebiče lišit. Jde o obvyklý jev! K dosažení požadované hodnoty vnitřní teploty a její stabilizaci dojde po několika hodinách provozu. Provoz vinotéky během dovolené Krátká dovolená: ponechte vinotéku v provozu během dovolené trvající méně než tři týdny. Dlouhá dovolená: Pokud zařízení nebude používání po dobu několika měsíců, vyprázdněte jej a odpojte ze sítě. Vnitřek a vnějšek vinotéky důkladně omyjte. Dveře vinotéky pak ponechte otevřené, tak, aby se samovolně nezavřely. Tím zabráníte vzniku zápachů a plísní. Stěhování vinotéky Spotřebič před přemísťováním odpojte z elektrické sítě. Vyjměte všechny uložené lahve a zabezpečte pohyblivé části uvnitř vinotéky tak, aby nedošlo k jejich poškození během přepravy. Nastavitelné nožky chraňte před poškozením během přepravy jejich úplným zašroubováním k tělu spotřebiče. Dveře zalepte páskou proti samovolnému otevření. Vinotéku přemisťujte a manipulujte ve vertikální poloze. Vnější stranu zařízení chraňte při přepravě vhodným materiálem (deka, bublinová fólie apod.). Úspory energie Vinotéka by měla být umístěna v nejchladnější místnosti bytu (ovšem nikoli chladnější, než +16 °C), přičemž v její blízkosti by neměla být umístěna zařízení produkující teplo. Současně je vhodné zabránit přímý přístup slunečního světla. Přístroj má být důkladně větrán. Nikdy nezakrývejte ventilační průduchy! Dveře vinotéky otvírejte pouze na nezbytně nutnou dobu. 8. V PŘÍPADĚ ZÁVADY Přes veškerou péči věnovanou vývoji a výrobě, i přísnému systému kontroly jakosti, nemůžeme zcela vyloučit možnost vzniku poruchy nebo závady. Než se však obrátíte na prodejce, dodavatele nebo jejich 238 autorizovaný servis, ověřte prosím, zda problém/závadu nedokážete odstranit sami. Nejprve prověřte, zda: Je vinotéka řádně připojena k elektrické síti? Nedošlo k výpadku proudu? Poté zkuste některá z řešení, která navrhujeme v tabulce níže DŮLEŽITÉ UPOZORNĚNÍ: Vadný nebo poškozený napájecí kabel musí být vyměněn výrobcem, dodavatelem nebo jeho autorizovaným servisním centrem, příp. dostatečně kvalifikovaným technikem. v opačném případě se vystavujete vážnému nebezpečí ohrožení zdraví. POKUD TYTO KROKY NEODHALÍ ZÁVADU, KONTAKTUJTE AUTORIZOVANÝ SERVIS. POZOR! Při provádění jakékoli údržby a oprav musí být zařízení odpojeno z elektrické sítě! 239 9. ZÁVADY Mnoho problémů je možno řešit snadno, aniž byste potřebovali volat servis. Dříve, než pozvete servisního technika, zkuste následující doporučení. MOŽNÁ PŘÍČINA ZÁVADA Vinotéka nefunguje Vinotéka dostatečně nechladí Časté zapínání a vypínání Světlo ve vinotéce nesvítí Nadměrné vibrace Nadměrný provozní hluk Dveře řádně nedovírají Není zapojena do sítě Vinotéka je vypnuta Vypínač okruhu přerušen anebo spálená pojistka Zkontrolujte a upravte nastavení termostatu. Teplota okolního prostředí je příliš vysoká. Dveře spotřebiče byly příliš často otevřeny. Dveře spotřebiče nejsou řádně dovřeny. Dveře spotřebiče dostatečně netěsní. Teplota v pokoji je vyšší než normální Bylo přidáno větší množství lahví do vinotéky najednou Dveře se otevírají příliš často Dveře nejsou správně zavřeny Termostat není správně nastaven Těsnění dveří neplní řádně svou funkci Vinotéka není zapojena do sítě Vypínač okruhu přerušen anebo spálená pojistka Žárovka je vypálená, kontaktujte váš servis Vypínač světla je vypnut Zkontrolujte vodorovné postavení vinotéky Určitá hladina provozního hluku je běžným/obvyklým jevem doprovázejícím spuštění/chod kompresoru. Charakteristický zvuk slabé intenzity (připomínající „tekoucí vodu“) je běžným průvodním jevem oběhu chladicího média v systému. Charakteristický zvuk slabé intenzity (připomínající „klepání“) je běžným průvodním jevem provozu spotřebiče (resp. změn teplot v jejichž důsledku dochází k roztahování/smršťování vnitřních stěn spotřebiče). Při vyšší hladině hluku zkontrolujte řádné usazení kompresoru na gumových tlumičích („silent-blocích“), resp. ověřte, zda není kompresor v bezprostředním kontaktu s přilehlým nábytkem, stěnou nebo jinou částí spotřebiče. Ověřte řádné vyrovnání spotřebiče. Spotřebič není řádně vyrovnán Dveře byly otočeny a nejsou správně usazeny Těsnění je znečištěno Police jsou uloženy nesprávně 240 Výměna žárovky Zařízení je opatřeno světlo emitujícími diodami (LED). Tyto diody nemohou být vyměněny zákazníkem. Jejich životnost je dostačující a srovnatelná se životností celého zařízení. Pokud se přece jenom dioda během provozu poškodí, požádejte o její výměnu váš servis. 10. ŽIVOTNÍ PROSTŘEDÍ Toto zařízení bylo vyrobeno v souladu s nařízením EU č. 19/2012/CE které se týká nakládání s odpady vznikajících z elektrických a elektronických zařízení (WEEE). Správnou likvidací zařízení zabráníte potenciálně negativním dopadům na životní prostředí a lidské zdraví, které by hrozily z nesprávné likvidace. Tento symbol na výrobku nebo jeho balení udává, že tento výrobek nepatří do domácího odpadu. Je nutné odvézt ho do sběrného místa pro recyklaci elektrického a elektronického zařízení. Zajištěním správné likvidace tohoto výrobku pomůžete zabránit negativním důsledkům pro životní prostředí a lidské zdraví, které by jinak byly způsobeny nevhodnou likvidaci tohoto výrobku. Za správnou likvidaci vysloužilého zařízení je zodpovědný jeho uživatel. Třídění a zběr pro recyklaci použitých zařízení a správné nakládání a likvidace způsobem, který je příznivý k životnímu prostředí, pomáhá zabránit potenciálně negativním dopadům na prostředí a lidské zdraví a napomáhá k opětovnému využití materiálů, z nichž je produkt vyroben. Pro více informací o nakládání a recyklaci tohoto výrobku kontaktujte váš místní úřad, organizaci, pověřenou nakládáním s odpady, nebo vašeho prodejce, u kterého jste produkt zakoupili. 11. ZÁVĚREČNÉ POZNÁMKY V zájmu průběžného zlepšování našich spotřebičů si vyhrazujeme právo na změnu technických parametrů bez předchozího upozornění. Nositeli záruk výrobků značky AVINTAGE jsou vybraní prodejci. Žádná část tohoto návodu nemůže být považována za záruční list. FRIO ENTREPRISE není odpovědna za chyby nebo technická, či tisková opomenutí v tomto dokumentu. Tento dokument není právně závazný. 241 INFORMAČNÍ LIST VÝROBKU DLE NAŘÍZENÍ EU Č. 1060/2010 Servírovací vinotéka ZNAČKA AVINTAGE OBCHODNÍ OZNAČENÍ AVU8X(/IX) NAPÁJENÍ 220-240 v / 50 Hz ROZMĚRY (Š X H X V) 145 x 547,5 x 820 mm HMOTNOST NETTO 20 kg KATEGORIE DOMÁCÍCH CHLADÍCÍCH ZAŘÍZENÍ 2 ENERGETICKÁ TŘÍDA A ROČNÍ SPOTŘEBA ENERGIE (AEC) Spotřeba energie 135 kWh za rok vypočítaná na základě výsledků získaných během 24 hodin za normalizovaných testovacích podmínek. Skutečná spotřeba energie závisí na podmínkách použití a umístění spotřebiče. UŽITNÝ OBJEM (L) 23 L ROZSAHY NASTAVITELNÝCH TEPLOT 5 – 20 °C ROZMRAZOVÁNÍ Automatické KLIMATICKÁ TŘÍDA N Tento spotřebič je koncipován pro provoz při okolních teplotách v rozmezí 16 °C (spodní) a 32 °C (horní hranice). HLUČNOST DB (A) RE 1PW 44 dB(A) TYP INSTALACE Vestavná instalace pod pracovní desku Toto zařízení je určeno výhradně pro skladování vína. 242 INFORMAČNÍ LIST VÝROBKU DLE NAŘÍZENÍ EU Č. 1060/2010 Servírovací vinotéka ZNAČKA AVINTAGE OBCHODNÍ OZNAČENÍ AVU23SX(/IX) NAPÁJENÍ 220-240 v / 50 Hz ROZMĚRY (Š X H X V) 295 x 571 x 820 mm HMOTNOST NETTO 28 kg KATEGORIE DOMÁCÍCH CHLADÍCÍCH ZAŘÍZENÍ 2 ENERGETICKÁ TŘÍDA A ROČNÍ SPOTŘEBA ENERGIE (AEC) Spotřeba energie 140 kWh za rok vypočítaná na základě výsledků získaných během 24 hodin za normalizovaných testovacích podmínek. Skutečná spotřeba energie závisí na podmínkách použití a umístění spotřebiče. UŽITNÝ OBJEM (L) 56 L ROZSAHY NASTAVITELNÝCH TEPLOT 5 – 20 °C ROZMRAZOVÁNÍ Automatické KLIMATICKÁ TŘÍDA N Tento spotřebič je koncipován pro provoz při okolních teplotách v rozmezí 16 °C (spodní) a 32 °C (horní hranice). HLUČNOST DB (A) RE 1PW 43 dB(A) TYP INSTALACE Volně stojící a vestavná instalace pod pracovní desku Toto zařízení je určeno výhradně pro skladování vína. 243 INFORMAČNÍ LIST VÝROBKU DLE NAŘÍZENÍ EU Č. 1060/2010 Servírovací vinotéka ZNAČKA AVINTAGE OBCHODNÍ OZNAČENÍ AVU41SXDPA(/IX) NAPÁJENÍ 220-240 v / 50 Hz ROZMĚRY (Š X H X V) 595 x 571 x 820 mm HMOTNOST NETTO 48 kg KATEGORIE DOMÁCÍCH CHLADÍCÍCH ZAŘÍZENÍ 2 ENERGETICKÁ TŘÍDA A ROČNÍ SPOTŘEBA ENERGIE (AEC) Spotřeba energie 144 kWh za rok vypočítaná na základě výsledků získaných během 24 hodin za normalizovaných testovacích podmínek. Skutečná spotřeba energie závisí na podmínkách použití a umístění spotřebiče. UŽITNÝ OBJEM (L) 59,5 L x 2 ROZSAHY NASTAVITELNÝCH TEPLOT 5 – 20 °C ROZMRAZOVÁNÍ Automatické KLIMATICKÁ TŘÍDA N Tento spotřebič je koncipován pro provoz při okolních teplotách v rozmezí 16 °C (spodní) a 32 °C (horní hranice). HLUČNOST DB (A) RE 1PW 43 dB(A) TYP INSTALACE Volně stojící a vestavná instalace pod pracovní desku Toto zařízení je určeno výhradně pro skladování vína. 244 INFORMAČNÍ LIST VÝROBKU DLE NAŘÍZENÍ EU Č. 1060/2010 Servírovací vinotéka ZNAČKA AVINTAGE OBCHODNÍ OZNAČENÍ AVU52SX(/IX) NAPÁJENÍ 220-240 v / 50 Hz ROZMĚRY (Š X H X V) 595 x 571 x 820 mm HMOTNOST NETTO 44 kg KATEGORIE DOMÁCÍCH CHLADÍCÍCH ZAŘÍZENÍ 2 ENERGETICKÁ TŘÍDA A ROČNÍ SPOTŘEBA ENERGIE (AEC) Spotřeba energie 145 kWh za rok vypočítaná na základě výsledků získaných během 24 hodin za normalizovaných testovacích podmínek. Skutečná spotřeba energie závisí na podmínkách použití a umístění spotřebiče. UŽITNÝ OBJEM (L) 146 L ROZSAHY NASTAVITELNÝCH TEPLOT 5 – 20 °C ROZMRAZOVÁNÍ Automatické KLIMATICKÁ TŘÍDA N Tento spotřebič je koncipován pro provoz při okolních teplotách v rozmezí 16 °C (spodní) a 32 °C (horní hranice). HLUČNOST DB (A) RE 1PW 44 dB(A) TYP INSTALACE Volně stojící a vestavná instalace pod pracovní desku Toto zařízení je určeno výhradně pro skladování vína. 245 INFORMAČNÍ LIST VÝROBKU DLE NAŘÍZENÍ EU Č. 1060/2010 Servírovací vinotéka ZNAČKA AVINTAGE OBCHODNÍ OZNAČENÍ AVU53CDZA NAPÁJENÍ 220-240 v / 50 Hz ROZMĚRY (Š X H X V) 595 x 571 x 820 mm HMOTNOST NETTO 50 kg KATEGORIE DOMÁCÍCH CHLADÍCÍCH ZAŘÍZENÍ 2 ENERGETICKÁ TŘÍDA A ROČNÍ SPOTŘEBA ENERGIE (AEC) Spotřeba energie 145 kWh za rok vypočítaná na základě výsledků získaných během 24 hodin za normalizovaných testovacích podmínek. Skutečná spotřeba energie závisí na podmínkách použití a umístění spotřebiče. UŽITNÝ OBJEM (L) 134 L ROZSAHY NASTAVITELNÝCH TEPLOT 5 – 10 °C / 10 – 20 °C ROZMRAZOVÁNÍ Automatické KLIMATICKÁ TŘÍDA N Tento spotřebič je koncipován pro provoz při okolních teplotách v rozmezí 16 °C (spodní) a 32 °C (horní hranice). HLUČNOST DB (A) RE 1PW 45 dB(A) TYP INSTALACE Volně stojící a vestavná instalace pod pracovní desku Toto zařízení je určeno výhradně pro skladování vína. 246 INFORMAČNÍ LIST VÝROBKU DLE NAŘÍZENÍ EU Č. 1060/2010 Servírovací vinotéka ZNAČKA AVINTAGE OBCHODNÍ OZNAČENÍ AVU54SXDZA(/IX) NAPÁJENÍ 220-240 v / 50 Hz ROZMĚRY (Š X H X V) 595 x 571 x 820 mm HMOTNOST NETTO 50 kg KATEGORIE DOMÁCÍCH CHLADÍCÍCH ZAŘÍZENÍ 2 ENERGETICKÁ TŘÍDA A ROČNÍ SPOTŘEBA ENERGIE (AEC) Spotřeba energie 145 kWh za rok vypočítaná na základě výsledků získaných během 24 hodin za normalizovaných testovacích podmínek. Skutečná spotřeba energie závisí na podmínkách použití a umístění spotřebiče. UŽITNÝ OBJEM (L) 134 L ROZSAHY NASTAVITELNÝCH TEPLOT 5 – 10 °C / 10 – 20 °C ROZMRAZOVÁNÍ Automatické KLIMATICKÁ TŘÍDA N Tento spotřebič je koncipován pro provoz při okolních teplotách v rozmezí 16 °C (spodní) a 32 °C (horní hranice). HLUČNOST DB (A) RE 1PW 45 dB(A) TYP INSTALACE Volně stojící a vestavná instalace pod pracovní desku Toto zařízení je určeno výhradně pro skladování vína. 247 INFORMAČNÍ LIST VÝROBKU DLE NAŘÍZENÍ EU Č. 1060/2010 Servírovací vinotéka ZNAČKA AVINTAGE OBCHODNÍ OZNAČENÍ PRO51C/1 NAPÁJENÍ 220-240 v / 50 Hz ROZMĚRY (Š X H X V) 595 x 571 x 820 mm HMOTNOST NETTO 48 kg KATEGORIE DOMÁCÍCH CHLADÍCÍCH ZAŘÍZENÍ 2 ENERGETICKÁ TŘÍDA A ROČNÍ SPOTŘEBA ENERGIE (AEC) Spotřeba energie 145 kWh za rok vypočítaná na základě výsledků získaných během 24 hodin za normalizovaných testovacích podmínek. Skutečná spotřeba energie závisí na podmínkách použití a umístění spotřebiče. UŽITNÝ OBJEM (L) 146 L ROZSAHY NASTAVITELNÝCH TEPLOT 5 – 20 °C ROZMRAZOVÁNÍ Automatické KLIMATICKÁ TŘÍDA N Tento spotřebič je koncipován pro provoz při okolních teplotách v rozmezí 16 °C (spodní) a 32 °C (horní hranice). HLUČNOST DB (A) RE 1PW 45 dB(A) TYP INSTALACE Volně stojící a vestavná instalace pod pracovní desku Toto zařízení je určeno výhradně pro skladování vína. 248 Pred použitím prístroja čítajte a riaďte sa prosím bezpečnostnými pokynmi a prevádzkovými inštrukciami, ktoré sú uvedené v tomto návode. Najskôr by sme vám chceli poďakovať za dôveru prejavenú skupine AVINTAGE zakúpením tohoto produktu, ktorý, ako dúfame, dokonale naplní všetky Vaše očakávania. Toto zariadenie Vám umožní ohriať Vaše fľaše vína až a izbovú teplotu alebo ich temperovať na servírovaciu teplotu (podľa typu vína) vďaka širokému rozsahu možného nastavenia vinotéky. 1. VŠEOBECNÉ BEZPEČNOSTNÉ POKYNY Pred prvým použitím vašej vinotéky si prosím dôkladne prečítajte tento návod. Uschovajte ho dôkladne pre prípadné neskoršie použitie. Aby ste zabránili riziku požiaru, úrazu elektrickým prúdom, alebo zranenia, riaďte sa bezpečnostnými odporúčaniami, ktoré sú uvedené v tomto návode. Zariadenie môže obsluhovať len osoba dôkladne oboznámená s funkciou a obsluhou. Pre vašu bezpečnosť a správnu obsluhu si pred inštaláciou prístroja dôkladne preštudujte tento návod vrátane rád a upozornení. Obsluha musí byť dôkladne oboznámená s funkciami a bezpečnostnými vlastnosťami prístroja, aby sa zabránilo nečakaným poruchám, chybám a nehodám počas prevádzky zariadenia. Tento návod dôkladne uschovajte a zaistite jeho odovzdanie spolu s prístrojom v prípade jeho postúpenia alebo predaja. Takto zaistíte optimálnu funkciu zariadenia po celú dobu jeho životnosti. Dodržujte ustanovenia tohoto návodu týkajúce sa prevádzky a bezpečnosti jeho obsluhy. Výrobca spotrebiča a jeho dodávateľ nie sú zodpovední za škody, spôsobené inštaláciou alebo obsluhou spotrebiča v rozpore s inštrukciami obsiahnutými v tomto návode na obsluhu a inštaláciu. Zariadenie je určené pre domáce použitie a pre uchovávanie 249 zvláštnych nápojov pri teplotách vyšších, než sú obvyklé teploty pre uchovávanie čerstvých potravín. Za žiadnych okolností nie je určené pre uchovávanie čerstvých potravín. Skontrolujte vašu elektrickú inštaláciu, či napätie v sieti zodpovedá tomu, ktoré je uvedené na štítku prístroja. Zariadenie musí byť pripojené k schválenému a uzemnenému rozvodu. Nesprávne opravy alebo pripojenie sú bezpečnostným rizikom. v prípade pochybností nechajte svoj elektrický rozvod skontrolovať profesionálnou inštalatérskou firmou. Zariadenie musí byť správne pripojené k uzemnené zásuvke. Neprerušujte ani neodstraňujte uzemňujúci vodič na dodanom pripojovacom kábli. Napájací kábel spotrebiča sa nesmie predlžovať/ nadstavovať. k pripojeniu spotrebiča k elektrickej sieti nepoužívajte predlžovací kábel, adaptéry ani rozvodky. V prípade poškodenia zariadenia (väčšieho rozsahu) výpadkom prúdu a živlami môže byť používanie prístroja nebezpečné. Odpojte hlavný prívod zo siete a nechajte zariadenie skontrolovať oprávnenou osobou. Nikdy nevymieňajte prívodný kábel svojpomocne. Prenechajte túto prácu profesionálne spôsobilej osobe. Zásuvka, ktorá slúži pre napájanie spotrebiča musí ostať po jeho inštalácii ľahko prístupná. Plnú vinotéku nikdy nepresúvajte ani nesťahujte. Mohlo by to spôsobiť jej nevratné poškodenie. Elektrické súčiastky nesmú byť priamo prístupné. Zabráňte deťom v prístupu k zariadeniu 250 Nepoužívajte vinotéku vo vonkajších priestoroch V prípade náhodného poliatia vinotéky (rozbitá fľaša, apod.,) alebo jej elektrických súčiastok, okamžite odpojte hlavný prívod elektriny. Nikdy nenamáčajte prívodný kábel, zástrčku, alebo celú vinotéku do vody alebo inej tekutiny. Nedotýkajte sa zapnutého zariadenia vlhkými rukami. Spotrebič postavte tak, aby nebol exponovaný priamym slnečným svetlom. Nenechávajte hlavní prívodný kábel visieť zo stola alebo v kontakte s ostrou hranou, či horúcim predmetom. Pri odpájaní spotrebiča zo siete nikdy neťahajte za samotný kábel, ale vždy ho pevne uchopte za zástrčku a odpojte jej vytiahnutím zo sieťovej zásuvky. Spotrebič má značnú hmotnosť. Berte ohľad na túto skutočnosť pri jeho manipulácii. Zaistite postavenie vinotéky na dostatočne pevnú podlahu (jedna 75 cl fľaša váži približne 1,3 kg). Vinotéka musí stáť na vodorovnej podlahe. Ak staviate zariadenie na mäkký povrch alebo koberec, podložte ho pevnou podložkou. Pri vyťahovaní políc dbajte na to, aby boli dvere úplne otvorené. Zabránite tým poškodeniu tesnenia dverí. Bezpečnosť detí a znevýhodnených osôb Osoby mladšie ako 8 rokov, osoby s obmedzenými fyzickými, psychickými alebo zmyslovými schopnosťami alebo osoby nedostatočne oboznámené s princípmi obsluhy a fungovania 251 tohoto spotrebiča ho smú používať len pod dohľadom alebo predchádzajúcej jasnej a zrozumiteľnej inštruktáži osobou s dostatočnou znalosťou, zodpovednou za ich bezpečnosť. Údržbu a čistenie spotrebiča nie je možné zveriť deťom bez dozoru. Obalové materiály spotrebiča po jeho vybalení odstráňte z dosahu detí. v opačnom prípade hrozí riziko zadusenia. Spotrebič pri ukončení jeho životnosti odpojte od zdroja napätia, odstrihnite/odrežte zástrčku napájacieho kábla (čo najbližšie korpusu spotrebiča) a odstráňte dvierka tak, aby sa deti nemohli so spotrebičom hrať a prípadne ostať zatvorené vo vnútri. Ak vymieňate starý spotrebič s magnetickým zatváraním/tesnením za nový, vybavený bezpečnostným zámkom alebo závorou na dverách alebo na tesnení, presvedčte sa najprv o deaktivácii bezpečnostného systému nového spotrebiča tak, aby v ňom počas likvidácie starého spotrebiča nemohli uviaznuť deti. Dajte pozor, aby sa v blízkosti spotrebiča pri jeho prevádzke nehrali bez dozoru deti mladšie než 8 rokov. Zvlášť dbajte na to, aby nepoužívali spotrebič ako hračku. Všeobecné bezpečnostné upozornenia POZOR – toto zariadenie je určené pre domáce použitie, alebo v zariadeniach, ako: V služobných priestoroch, obchodoch, úradoch a iných pracovných priestoroch, Na farmách a v hoteloch, moteloch a iných ubytovacích zariadeniach, V ubytovniach, V reštauratérstve a veľkoobchodných aplikáciách. 252 POZOR — Zariadenie musí byť vhodne upevnené v súlade s týmto návodom, aby sa zabránilo následným škodám pri jeho používaní. POZOR! Vo vnútri spotrebiča nikdy neskladujte horľavé látky, napríklad spreje s horľavými hnacími plynmi. POZOR! Poškodený napájací kábel spotrebiča musí byť, z bezpečnostných dôvodov okamžite opravený, alebo nahradený výhradne povereným zamestnancom výrobcu alebo kvalifikovaným zamestnancom autorizovaného popredajného servisu dodávateľa. POZOR! Všetky ventilačné otvory spotrebiča musia ostať po jeho inštalácii voľné. Zaistite, aby bol okolo spotrebiča dostatok voľného priestoru pre riadnu cirkuláciu vzduchu, obzvlášť v okolí vzduchových vstupov a výstupov. POZOR! Za všetkých okolností predchádzajte poškodeniu rozvodov chladiaceho okruhu. POZOR! Vo vnútornom priestore spotrebiča nepoužívajte elektrické prístroje a zariadenie s výnimkou prípadov vyslovene povolených výrobcom zariadenia. POZOR! Chladiaci a izolačný systém spotrebiča obsahuje horľavé plyny. Pri ukončení jeho životnosti je preto treba dodržať prísne pravidlá bezpečnosti a k likvidácii spotrebiča využiť služby špecializovaných centier pre likvidáciu vyslúžilých elektrických a elektronických zariadení. Spotrebič, a to ani po ukončení jeho životnosti, nevystavujte ohňu. 253 Chladivo Spotrebič využíva ako svoje chladiace médium izobután (R600a) – k životnému prostrediu šetrný, napriek tomu ľahko zápalný, a preto veľmi nebezpečný plyn. Pri transportoch spotrebiča a jeho inštalácii dôsledne dbajte na to, aby nedošlo k poškodeniu žiadnej časti rozvodu chladiaceho systému. Pozor! Nebezpečie požiaru Pri poškodení rozvodov chladiaceho okruhu spotrebiča: odstráňte z jeho bezprostrednej blízkosti zápalné zdroje a otvorený plameň. riadne vetrajte miestnosť v ktorej je spotrebič inštalovaný. Nepokúšajte sa o zmeny alebo zásahy do technických parametrov spotrebiča – neodborné zásahy do zariadenia predstavujú výrazné riziko ohrozenia zdravia používateľov! Každé poškodenie napájacieho kábla zariadenia môže mať za následok skrat a požiar. Elektrická bezpečnosť Výrobca i dodávateľ sa zriekajú zodpovednosti za nehody a problémy spôsobené nesprávnou alebo neodbornou inštaláciou spotrebiča alebo jeho inštaláciou v rozpore s pokynmi, ktoré sú obsiahnuté v tomto návode na obsluhu a inštaláciu. Napájací kábel spotrebiča sa nesmie predlžovať/nadstavovať. k pripojeniu spotrebiča do elektrickej siete nepoužívajte predlžovačky, adaptéry, ani rozvodky. Pred pripojením spotrebiča k sieti skontrolujte, či je sieťová zásuvka bezchybná. Pripojenie k poškodenej alebo uvoľnenej zásuvke môže byť príčinou prehriatia spotrebiča a jeho vznietenia alebo explózie. 254 Zásuvka, ktorá slúži k napájaniu spotrebiča, musí ostať po jeho inštalácii ľahko prístupná. Pri odpájaní spotrebiča zo siete nikdy neťahajte za samotný kábel, ale vždy ho pevne uchopte za zástrčku a odpojte jej vytiahnutím zo sieťovej zásuvky. Nikdy neodstraňujte bezpečnostný – uzemňujúci vodič! Spotrebič nikdy nezapájajte/neprevádzkujte nainštalovaného krytu vnútorného osvetlenia. bez riadne Pred výmenou žiarovky vnútorného osvetlenia spotrebič vždy najprv odpojte od zdroja elektrického napätia. Tento spotrebič je koncipovaný pre napájanie jednofázovým prúdom 220~240 V/50 Hz predpisovo inštalovanou a uzemnenou zásuvkou. Poškodený napájací kábel spotrebiča sami neopravujte! Okamžite kontaktujte autorizovaný popredajný servis. Napájacia zásuvka by mala byť umiestnená mimo dosah detí v dostatočnej blízkosti od spotrebiča tak, aby bolo možné v akejkoľvek chvíli jeho ľahké odpojenie od zdroja napätia. v prípade pochybností kontaktujte kvalifikovaného elektrotechnika. Odporučenie pre každodennú prevádzku Zariadenie je určené výlučne pre skladovanie vína. Vo vnútri spotrebiča nikdy neskladujte horľavé alebo vznetlivé látky, zvláštne tekutiny. Hrozí riziko ich vznietenia alebo výbuchu. Vo vnútri spotrebiča neprevádzkujte iné elektrické zariadenie (výrobníky ľadu, mixéry apod.). Pri odpojovaní spotrebiča zo siete nikdy neťahajte za samotný kábel, ale vždy ho pevne uchopte za zástrčku a odpojte jej 255 vytiahnutím zo sieťovej zásuvky. Spotrebič postavte tak, aby nebol vystavený priamym slnečným lúčom. Z bezprostrednej blízkosti spotrebiča pre prevenciu rizika jeho vznietenia a požiaru odstráňte všetky zápalné zdroje (sviečky, svietidlá, aj zdroje s otvoreným plameňom). Rešpektujte odporúčania výrobcu pre skladovanie vína vo vinotéke. V blízkosti zariadenia nemanipulujte a nevhadzujte ho do ohňa. s otvoreným ohňom Zariadenie je určené na skladovanie nápojov v normálnej domácnosti, tak, ako je vysvetlené v tomto návode. Zariadenie má značnú hmotnosť, dbajte na opatrnosť pri jeho sťahovaní. Ak je spotrebič vybavený zadnými transportnými kolieskami, pamätajte na to, že sú určené len k uľahčeniu malých presunov. Nepoužívajte ich k presúvaniu spotrebiča na väčšie vzdialenosti. Na spotrebič, ani žiadnu z jeho častí/príslušenstva si nesadajte ani ich nepoužívajte ako podstavec. Pre ochranu uložených fliaš a pre bezpečnosť spotrebiča nepreťažujte police nad uvedenú hodnotu maximálneho povoleného zaťaženia. Údržba a čistenie Pred každým úkonom údržby a čistenia spotrebič odpojte od zdroja elektrickej energie. Na čistenie spotrebiča nikdy nepoužívajte: kovové nástroje, parné a vysokotlakové čističe, prchavé kvapaliny, organické rozpúšťadlá a látky s abrazívnymi zložkami. 256 Dvierka spotrebiča otvárajte len v najnutnejších prípadoch. Neurýchľujte rozmrazovanie zoškrabovaním námrazy zo stien spotrebiča ostrými alebo špicatými nástrojmi. Používajte špeciálnu plastovú škrabku. Dôležité informácie pre inštaláciu zariadenia Neumiestňujte zariadenie vo vlhkých priestoroch. Zariadenie nesmie byť umiestnené v blízkosti radiátorov, sporákov, alebo ďalších zdrojov tepla. Priame slnečné svetlo môže poškodiť akrylový náter a zdroje tepla môžu zvyšovať spotrebu elektriny. Mimoriadne vysoké alebo nízke teploty okolia môžu tiež spôsobiť nesprávnu funkciu prístroja. Vinotéku zapojte do vyhradenej, riadne inštalovanej a uzemnenej zásuvky. Nikdy neodpájajte uzemnenie z prívodného kábla. Otázky, týkajúce sa uzemnenia smerujte na kvalifikovanú elektroinštalatérsku firmu, alebo autorizované servisné stredisko. Pre zaistenie správneho elektrického pripojenia sa riaďte týmto návodom. Rozbaľte zariadenie a skontrolujte, či nie je poškodené. Poškodený prístroj nepripájajte do siete. Informujte svojho predajcu o prípadnom poškodení. Pre tento prípad si ponechajte prepravný obal. Odporúčame nechať zariadenie na mieste prevádzky bez pripojenia do siete po dobu 4 hodín, čím dôjde k správnemu rozloženiu chladiva v chladiacom okruhu. Aby ste zabránili prehrievaniu, je nevyhnutné zaistiť riadnu cirkuláciu vzduchu okolo prístroja. Riaďte sa odporúčaním poskytnutým v tomto návode. Pre elimináciu rizika požiaru dbajte, aby zariadenie, alebo jeho horúce časti (kompresor, kondenzátor) neboli v priamom 257 kontakte so stenou. Rešpektujte odporúčania tohto návodu. Zariadenie nesmie byť umiestnená v blízkosti radiátorov, sporákov, alebo ďalších zdrojov tepla. Zaistite prístupnosť elektrickej zásuvky, do ktorej je prístroj pripojený, aj po inštalácii zariadenia. Odporúčania pre šetrnú prevádzku Pre úsporu elektrické energie: Spotrebič postavte na vhodné miesto (pozri kapitola „ 3. INŠTALÁCIA ZARIADENIA“). Dvierka spotrebiča otvárajte len v najnutnejších prípadoch. Dbajte na optimálne podmienky prevádzky spotrebiča včasnú a pravidelnú údržbu napr. kondenzátora (viac pozri kapitola „ 7. STAROSTLIVOSŤ O VINOTÉKU“). Pravidelne kontrolujte funkčnosť tesnení a presvedčte sa, že dvierka riadne a dostatočne doliehajú. v opačnom prípade okamžite kontaktujte autorizovaný popredajný servis. Opravy Každý zásah do elektrických komponentov zariadenia sa musí uskutočniť výlučne povereným kvalifikovaným špecialistom. Pri servisných zásahoch vyžadujte použitie originálnych náhradných dielov s certifikátom zaručujúcim ich pôvod. Tento spotrebič je určený výlučne pre domáce použitie, kde slúži k skladovaniu a uchovávaniu vína. Jeho výrobca a dodávateľ sa zriekajú všetkej zodpovednosti za škody spôsobené iným než zhora uvedeným spôsobom použitia spotrebiča alebo jeho používania v rozpore s účelom, ku ktorému bol skonštruovaný. 258 R600a Bezpečnostné upozornenie POZOR! Ventilačné otvory zariadenia vždy nechajte voľne priechodné a nikdy ich nezakrývajte ani neupchávajte. POZOR! Vo vnútri zariadenia neskladujte horľavé látky, ako nádoby so sprejmi s horľavým hnacím plynom apod. POZOR! Vyvarujte sa poškodenia chladiaceho okruhu! POZOR! Chladiaca jednotka obsahuje Izobután (R600a) a nesmie byť umiestnená v prostredí s otvoreným ohňom (napr. nekryté elektrické kontakty) alebo na miestach, kde hrozí nahromadenie chladiva po jeho úniku. Typ chladiva je vyznačený na výrobnom štítku zariadenia. POZOR! Nepoužívajte elektrické prístroje vo vnútri priestoru pre nápoje, pokiaľ nejde o priamo odporúčané výrobcom zariadenie. Spotrebič spĺňa požiadavky vyplývajúce zo všetkých relevantných európskych smerníc v znení príslušných platných úprav, obzvlášť požiadavky vyplývajúce z týchto smerníc: 2011/65/EU (ROHS) 2014/35/EU o elektrickej bezpečnosti 2014/30/EU o elektromagnetickej kompatibilite 643/2009/CE týkajúce sa energetických štítkov 259 2. TECHNICKÉ ÚDAJE Nižšie je vyobrazený príklad typového štítku: Typový štítok je upevnený vo vnútri, alebo na zadnej strane zariadenia (podľa modelu) a obsahuje všetky informácie o danom výrobku. Odporúčame, aby ste si tu poznamenali sériové číslo vinotéky pred jej inštaláciou pre prípadnú neskoršiu potrebu (technické referencie, požiadavka asistencie, apod.) Prístup k typovému štítku po inštalácii prístroja môže byť obtiažny. POZOR: bez týchto informácií nie je možné poskytnúť akúkoľvek súčinnosť. 3. INŠTALÁCIA ZARIADENIA Pred použitím zariadenia Spotrebič vybaľte (odstráňte ochranné a obalové materiály aj z interiéru spotrebiča) a vizuálne skontrolujte jeho bezchybný stav. Ak spotrebič javí známky poškodenia, prerušte inštaláciu a kontaktujte predajcu, u ktorého ste ho zakúpili. Pre tento prípad si uschovajte obalový materiál, v ktorom bol spotrebič dodaný. Pred pripojením vinotéky k sieti ju nechajte ustáliť po dobu aspoň 24 hodín vo vertikálnej polohe. Týmto krokom predídete možnému poškodeniu alebo poruchám funkčnosti chladiaceho okruhu spotrebiča v dôsledku jeho predošlého transportu. Vyčistite vnútorné povrchy spotrebiča suchou jemnou handrou. Pri likvidácii vyslúžilého spotrebiča tento zaneste na príslušnú skládku oprávnenú zaobchádzať s elektro odpadmi. Spotrebič postavte na pevnú podlahu s dostatočnou nosnosťou schopnou uniesť hmotnosť plne zaťaženej vinotéky. Pre vyváženie do vodorovnej polohy použite k nastaveniu prednú nôžku v spodnej časti zariadenia. Nezakrývajte ventilačné otvory. Zariadenie nie je určené pre umiestnenie do garáže alebo pivnice. 260 Len pre vnútorné použitie. Zariadenie je určené pre zabudovanie do kuchynského nábytku. Pripojte vinotéku do jednoduchej zásuvky tak, že ponecháte medzi zadnou časťou vinotéky a stenou priestor 30 mm. Dbajte na dokonalé vodorovné vyváženie. (Použite vodováhu.) Týmto zabránite pohybom vplyvom nestability, zvýšenej hlučnosti a zaistíte, aby dvere vinotéky dokonale tesnili. Zariadenie je určené výlučne pre skladovanie vína. Zariadenie používa chladivo s vysoko horľavými vlastnosťami. Chráňte chladiaci okruh pred poškodením! Upozornenie Víno skladujte len v uzavretých fľašiach. Nepreťažujte vinotéku. Dvere otvárajte len na nevyhnutnú dobu. Neprikrývajte police hliníkovou fóliou ani iným materiálom, ktorý by mohol brániť ventilácii. Pokiaľ bude vinotéka dlhšiu dobu mimo prevádzku, odpojte ju od siete a dôkladne vyčistite. Následne nechajte otvorené dvierka. Týmto spôsobom zabránite kondenzácii a vzniku nepríjemných pachov vo vnútri skrinky. POZOR: v blízkosti zariadenia neskladujte horľavé a výbušné látky, ktoré by mohli spôsobiť požiar. Klimatické triedy Zariadenie je určené pre prevádzku pri teplotách okolia určených klimatickou triedou uvedenou na typovom štítku spotrebiča. KLIMATICKÁ TRIEDA SYMBOL PREVÁDZKOVÁ TEPLOTA OKOLIA (°C) Subnormálna SN Od +10 do +32 Normálna N Od +16 do +32 Subtropická ST Od +16 do +38 Tropická T Od +16 do +43 261 Schéma pre zabudovanie AVU8X(/IX) AVU23SX(/IX) 262 AVU41SXDPA(/IX) AVU52SX(/IX) AVU54SXDZA(/IX) 263 AVU53CDZA PRO51C/1 Otočenie dverí Dvere sa dajú otočiť závesmi smerom na obe strany. Obvykle je vo výrobe záves umiestnený na pravej strane. Ak potrebujete otočiť dvere pre otváranie z opačnej strany, postupujte prosím podľa nasledujúceho odporúčania. AVU8X(/IX) 264 1 3 5 7 Spodný záves (vpravo) Otočná os dverí Horný záves (vpravo) Horný záves (vľavo) 2 4 6 8 Skrutky Dvere Skrutky závesu Spodný záves (vľavo) 1. Otvorte dvere v uhle 90°, vyskrutkujte dve skrutky (2) zo spodného závesu (3), odstráňte dvere (4) a otočnú os dverí (obr. A). Dvere (4) umiestnite bezpečne (obr. A a b). 2. Odskrutkujte skrutky (6) horného závesu (5) a záves odstráňte rovnako, ako spodný (vpravo) (obr. C). 3. Namontujte druhý záves naľavo (7) na ľavú hornú stranu skrinky tromi skrutkami (obr. D). Rovnako namontujte aj druhý záves na ľavú spodnú stranu (obr. E). 4. Priložte dvere k závesom v uhle 180° a upevnite ich priskrutkovaním otočnej osi. AVU23SX(/IX) AVU52SX(/IX) 1 3 5 7 9 11 Spodný záves (vpravo) Otočná os dverí Horný záves (vpravo) Horný záves (vľavo) Spodný záves (vľavo) Skrutka 2 4 6 8 10 12 Skrutky Dvere Skrutky závesu Ozdobný klinec Obmedzovač dverí Krytka 265 1. Otvorte dvere v uhle 90°, vyskrutkujte dve skrutky (2) zo spodného závesu (3), odstráňte dvere (4) a otočnú os dverí (obr. A). 2. Umiestnite dvere (4) do bezpečnej polohy a odstráňte krytku (12) z hornej strany rámu. Odskrutkujte jednu skrutku (11) na spodnej strane a odoberte obmedzovač dverí (10). Upevnite obmedzovač dverí (10) na opačnú stranu rámu. Krytku vložte do otvoru na hornej strane rámu (obr. A/b). 3. Odstráňte skrutky závesu (6) z hornej strany (vpravo) (5) a záves odoberte (obr. C) 4. Odstráňte ozdobný klinec (8) z hornej ľavej strany skrinky a namontujte horný záves (vľavo) (7) na vrchnú ľavú stranu skrinky pomocou troch skrutiek (obr. D). 5. Druhý záves (9) namontujte podobne na spodnú ľavú stranu skrinky (obr. E). 6. Priložte dvere k závesom v uhle 180° a upevnite ich priskrutkovaním otočnej osi závesu. 7. Otvor v hornej pravej strane skrinky zakryte ozdobným klincom (8). AVU53CDZA AVU54SXDZA(/IX) PRO51C/1 1 3 5 7 9 Spodný záves (vpravo) Otočná os dverí Horný záves (vpravo) Horný záves (vľavo) Spodný záves (vľavo) 2 4 6 8 Skrutky Dvere Skrutky závesu Ozdobný klinec 266 1. tvorte dvere v uhle 90°, vyskrutkujte dve skrutky (2) zo spodného závesu (3), odoberte dvere (4) a otočnú os dverí (obr. A). 2. Umiestnite dvere (4) do bezpečnej polohy. 3. Vyskrutkujte tri skrutky (6) z pravého horného závesu (5) a odstráňte ho (obr. C). 4. Odstráňte ozdobný klinec (8) z hornej ľavej strany skrinky a namontujte horný záves (vľavo) (7) na hornú ľavú stranu skrinky pomocou troch skrutiek (obr. D). 5. Druhý záves (9) namontujte podobne na spodnú ľavú stranu skrinky (obr. E). 6. Priložte dvere k závesom v uhle 180° a upevnite ich priskrutkovaním otočnej osi závesu. 7. Otvor v hornej pravej strane skrinky zakryte ozdobným klincom (8). 4. PREVÁDZKOVÉ POKYNY Odporúčame inštalovať vinotéku na mieste s teplotou prostredia medzi 16-32 °C. Pokiaľ je teplota okolia pod alebo nad odporúčanou hodnotou, môže byť ovplyvnená prevádzka vinotéky. Dosiahnutie regulovanej teploty vo vnútri vinotéky v rozmedzí 5-20 °C alebo 5-10 °C /10-20 °C (podľa modelu) môže byť v tomto prípade obťažnejšie. Riadiaci panel AVU8X(/IX) / AVU23SX(/IX), AVU41SXDPA(/IX), AVU52SX(/IX), PRO51C/1 „RUN“ – indikátor zapnutia Tlačidlo „ “ Slúži pre zapínanie a vypínanie spotrebiča. Stlačte a podržte tlačidlo počas cca 3 sekúnd. Tlačidlo „ “ Slúži pre zapínanie a vypínanie vnútorného osvetlenia. „Displej“ – zobrazenie teploty Tlačidlo „ “ Nastavenie teploty smerom nahor. Tlačidlo „ “ Nastavenie teploty smerom dole. Teplotu môžete nastaviť pomocou tlačidiel jeden stupeň. a . Každé stlačenie tlačidla zvýši/zníži teplotu o Teploty sa dajú nastaviť v rozsahu 5 a 20 °C alebo 5-10 °C / 10-20 °C (podľa modelu). Po nastavení teploty displej bliká počas asi 5 sekúnd a potom zobrazí skutočnú vnútornú teplotu oddielu. Nastavenú teplotu môžeme kedykoľvek zobraziť stlačením a podržaním tlačidla voľby teploty po dobu 5 s. V prípade výpadku prúdu sa všetky teplotné nastavenia vymažú a vinotéka nastaví továrensky uloženú hodnotu 12 °C. 267 Ovládací panel pre AVU53CDZA, AVU54SXDZA(/IX) RUN“ – indikátor zapnutia Tlačidlo „ “ Slúži pre zapínanie a vypínanie spotrebiča. Stlačte a podržte tlačidlo počas cca 3 sekúnd. Tlačidlo „ “ Slúži pre zapínanie a vypínanie vnútorného osvetlenia. „Displej“ – elektronický displej pre horný oddiel. „Displej“ – elektronický displej pre spodný oddiel. Tlačidlo „ “ Nastavenie teploty horného oddielu. Tlačidlo „ “ Nastavenie teploty spodného oddielu. Stlačte tlačidlo „ “ pre nastavenie teploty v hornom oddiele. Príslušná teplota započne blikať a každé stlačenie tlačidla zmení teplotu o 1 °C. Ak dosiahneme najnižšiu nastaviteľnú teplotu 5 °C, displej automaticky zobrazí najvyššiu nastaviteľnú teplotu 10 °C. Po výbere teploty displej bliká počas asi 5 sekúnd a potom zobrazí skutočnú vnútornú teplotu oddielu. Nastavenú teplotu môžeme kedykoľvek zobraziť stlačením a podržaním tlačidla nastavenia teploty po dobu 5 s. Stlačte tlačidlo „ “ pre nastavenie teploty v spodnom oddiele. Príslušná teplota započne blikať a každé stlačenie tlačidla zmení teplotu o 1 °C. Ak dosiahneme najnižšiu nastaviteľnú teplotu 10 °C, displej automaticky zobrazí najvyššiu nastaviteľnú teplotu 20 °C. Po výbere teploty displej bliká počas asi 5 sekúnd a potom zobrazí skutočnú vnútornú teplotu oddielu. Nastavenú teplotu môžeme kedykoľvek zobraziť stlačením a podržaním tlačidla voľby teploty po dobu 5 s. V prípade výpadku prúdu sa všetky nastavenia teplôt automaticky vymažú a vinotéka nastaví továrensky uloženú hodnotu 12 °C. Zobrazenie a funkcie zariadenia Teplotný alarm: Pokiaľ je teplota vnútri vinotéky vyššia, ako 23°C, na displeji sa zobrazí nápis „HI“ a po hodine zaznie signál alarmu. Ten nás informuje o vysokej teplote vo vnútri vinotéky. Zistite dôvod. Pokiaľ je teplota vo vnútri nižšia ako 0°C, displej zobrazuje nápis „LO“ a opäť zaznie zvuková a svetelná signalizácia. Obnovenie nastavenej teploty; V prípade výpadku prúdu si vinotéka pamätá poslednú nastavenú teplotu a po obnovení dodávky elektriny sa obnoví pôvodný stav teplôt. Vnútorné osvetlenie Vinotéka vypína vnútorné osvetlenie sama od seba po desiatich minútach za účelom šetrenia energie. 268 Ak chcete ponechať osvetlenie trvale zapnuté, stlačte a podržte tlačidlo po dobu 5 s. Displej zobrazí nápis „LP“ a po 4 sekundách sa displej vráti do normálu. Svetlo ostane zapnuté, dokiaľ ho opäť nevypnete. Ak chcete svetlo opäť vypnúť (odporúčame), potom stlačte a pridržte tlačidlo počas 5 s a displej zobrazí „LF“. Po 4 sekundách sa displej vráti do normálu a svetlo sa automaticky vypne po 10 minútach. 5. VÝBAVA A FUNKCIE VINOTÉKY Udržiavanie teploty Podľa rád odborníkov je optimálna teplota pre uchovávanie vína 12°C s toleranciou 10 – 14 °C. Túto teplotu nie je radno zamieňať so servírovacou teplotou, ktorá kolíše v rozmedzí 5 – 20 °C podľa špecifických vlastností vína. Je mimoriadne dôležité zabrániť náhlym zmenám teploty Táto vinotéka, navrhnutá špecialistami na skladovanie vína, na rozdiel od jednoduchej chladničky, berie do úvahy citlivosť vín na náhle zmeny teploty a zaisťuje dokonalú kontrolu zachovania konštantnej priemernej teploty. Antivibračný systém Kompresor je vybavený špeciálnymi silentblokmi a vnútorný priestor je izolovaný hrubou vrstvou polyuretánovej peny. Týmto spôsobom sa znemožní prenos vibrácií do vína. Udržiavanie konštantnej vlhkosti Zariadenie je vybavené miskou (podľa modelu), ktorá umožňuje korigovať vlhkosť vo vinotéke. Ak je vlhkosť príliš nízka, naplňte misku do ¾ jej objemu vodou. Z času na čas kontrolujte výšku hladiny vody a prípadne dolejte vodu. Ubezpečte sa, že v miske je neustále správna hladina vody. Výrobca sa v tomto ohľade riadi radami znalcov vína, ktorí odporúčajú udržiavať určitú vlhkosť vo vinotéke. Zamedzí to nadmernému vysychaniu korkových zátok vo fľašiach a tým vzniku netesností fliaš spôsobených príliš suchým prostredím. To je dôvod pre umiestnenie nádobky s vodou na policu pod ventilátorom v spodnej časti vinotéky. Takto sa zaistí vhodná minimálna vlhkosť vo vnútri zariadenia. Ak používate vinotéku prevažne pre zretie vína počas dlhšieho časového obdobia, dbajte na to, aby v nádobke bola neustále prítomná hladina vody. Použitie vinotéky pre servírovacie účely (s rýchlou obmenou fliaš) zvlhčovanie nutne nevyžaduje (aj keď sa tiež odporúča). Ochrana proti UV žiareniu Svetlo urýchľuje dozrievanie vína. V našich vinotékach s plnými dvermi je víno prirodzene chránené, pokiaľ sa dvere neotvárajú príliš často. Tento typ so sklenenými dverami disponuje špeciálne upraveným sklom, ktoré neprepúšťa škodlivé ultrafialové žiarenie a tým zaistí dokonalú ochranu vína. Automatické odmrazovanie Vinotéka je vybavená automatickým odmrazovaním. Keď končí chladiaci cyklus, namrznuté plochy zariadenia sa automaticky odmrazia. Kondenzát sa odvádza do odparovacej nádoby, ktorá je umiestnená na zadnej strane vinotéky neďaleko kompresora. Teplo, vyžarované kompresorom odparuje kondenzát nazbieraný v nádobke. Zimný režim (podľa modelu) Zimný režim je ochrana proti mrazu, ktorá umožňuje vinotéke pracovať v prostredí s teplotou v rozmedzí 0 až 32°C. Čidlo umiestnené vo vinotéke uvádza do prevádzky nízko výkonové vykurovacie teleso, akonáhle vnútorná teplota vinotéky klesne nižšie ako 3°C pod nastavenú hodnotu. Jedná sa o 269 vykurovacie teleso s tak nízkym výkonom, že nedochádza k teplotným šokom vína a tým narušeniu jeho uchovávania. Táto funkcia zaistí udržanie vnútornej teploty už predtým, než dôjde k výmene teploty medzi fľašami a vnútorným prostredím vinotéky. Zimný režim udržiava teplotu vo vinotéke rovnakú, aká je naprogramovaná teplota. Po dosiahnutí naprogramovanej teploty vo vinotéke sa zimný režim automaticky vypne. Police Aby nedošlo k poškodeniu tesnenia dvierok, presvedčte sa, že sú dvere pred každým vytiahnutím police pre ukladanie/vyberanie fliaš úplne otvorené. Pre ľahší prístup k uloženým fľašiam vysuňte police na približne jednu tretinu ich hĺbky. Police sú vybavené špeciálnym stop systémom, ktorý bráni vypadnutiu fliaš z políc. Pre vybratie alebo zasunutie nakloňte policu podľa obrázku a potom ťahajte alebo tlačte, podľa potreby. Pre AVU41SXDPA(/IX) Umiestnenie políc vo vinotéke: a) Kartónová krabica s náhradnými dielmi b) Malá polica c) Veľká polica 1. Po odstránení obalu vyberte z vinotéky krabicu s náhradnými dielmi (a). 2. V ľavom oddiele nájdete 4 ks malých políc (b). Vyberte dve najspodnejšie z nich. 3. V pravom oddiele sú umiestnené 4 ks veľkých políc (c). Vyberte dve police umiestnené navrchu. 4. Vymeňte veľké a malé police (Obr. 2). Umiestnite dve malé police na horné pozície a dve veľké police 270 na spodné pozície v oboch oddieloch. 5. Po vložení políc môžete vinotéku používať spôsobom, popísaným v návode. Sťahovacie lišty S vinotékou sa dodávajú dve sťahovacie lišty, ktoré umožňujú ľahší presun vinotéky za podmienky úplne vyskrutkovaných nôžok do maximálnej výšky. Lišty sa musia umiestniť rovnobežne pod nôžky vinotéky v smere posunu, v súlade s umiestnením pre prednú a pre zadnú stranu vinotéky (pozri obrázok). Zvýšená bezpečnosť Keďže je toto zariadenie určené pre uchovávanie veľkej hodnoty, vyberali sme dôkladne kvalitné komponenty a vhodné výrobné postupy, aby sme zaistili optimálnu bezpečnosť prevádzky vinotéky. Inštalácia rukoväti Vinotéka má nerezovú rukoväť. Pre upevnenie na dvere použite dodané skrutky. Pred montážou napred uvoľnite tesnenie dverí a postupujte podľa obrázku. 6. NALOŽENIE VINOTÉKY Indikácia maximálnej kapacity naloženia plní u našich vinoték predovšetkým bezpečnostné a orientačné účely (napr. pri výbere vhodného typu spotrebiča o kapacite primeranej Vašim potrebám). Tento údaj sa uvádza na základe štandardných 75 cl fliaš typu Bordeaux vrátane štandardne dodávaných políc. 271 Aj keď by teda bolo – hypoteticky – možné naplniť vinotéku, napr. bez použitia políc, pri naplnení fľašami výhradne rovnakého tvaru a priemeru, apod., omnoho väčším počtom fliaš, v skutočnosti bude praktické hľadisko každodennej organizácie a prevádzky vinotéky veľmi pravdepodobne vyžadovať použitie niekoľkých políc. Z výhradne praktických dôvodov racionálnej prevádzky preto najpravdepodobnejšie vinotéku naložíte menším počtom fliaš, než je jej maximálna indikovaná kapacita. Typy fliaš: Schéma vpravo znázorňuje 4 najobvyklejšie typy 75 cl vínnych fliaš (fľaše typu Bordeaux a Burgund rôznych rozmerov). Nižšie uvedená demonštrácia protiľahlého spôsobu uloženia fliaš počíta s najbežnejšími fľašami typu Bordeaux. Napríklad, ak je vinotéka naložená len fľašami typu Burgund, celková kapacita vinotéky bude asi o 30% nižšia, než aká je vypočítaná pre fľaše Bordeaux. Striedavé ukladanie fliaš Hrdlo k dnu, hrdlami k sebe: Všimnite si rozdiel v hĺbke uloženia. Uloženie hrdlami medzi fľaše: Úspora hĺbky, menšia kapacita. Príklady servírovacích teplôt Napriek tomu, že sa občas vyskytnú výrazné názorové rozdiely (a s vedomím nevyhnutne špecifických podmienok každej jednotlivej degustácie), je možné v nasledujúcej tabuľke ideálnych servírovacích teplôt zhrnúť väčšinovo akceptovanú zhodu. Úplná zhoda všetkých, kto to s vínom myslia vážne, panuje v názore, že len servírovaním pri vhodnej teplote sa dá z konzumácie vína urobiť plnohodnotný zážitok pre všetky zmysly. SERVÍROVACIA TEPLOTA (˚C) DRUH VÍNA Prestížne červené „Bordeaux“ Prestížne červené vína typu 16-17 burgundské 15-16 272 vína Prestížne suché biele vína 14-16 Svetlé mladé vína ovocného pôvodu Provensálske ružové vína 11-12 Suché biele vína červené vína Krajové biele vína a krajové Šampanské vína Dezertné vína 10-12 10-12 8-10 7-8 6 7. STAROSTLIVOSŤ O VINOTÉKU Pred každým úkonom údržby a čistenia spotrebič vždy odpojte od zdroje elektrickej energie (vytiahnutím zástrčky napájacieho kábla zo sieťovej zásuvky, prípadne vypnutím príslušného ističa v elektrickom okruhu). Pred jeho uvedením do prevádzky (a potom v pravidelných intervaloch, aspoň raz za 3 mesiace) odporúčame vyčistiť všetky vnútorné a vonkajšie povrchy spotrebiča (čelo, rám a rukoväť dverí, vonkajší plášť bočných stien a horné časti spotrebiča) teplou vodou s šetrným čistiacim prostriedkom. Očistené povrchy potom umyte čistou vodou a pred pripojením do siete nechajte riadne vyschnúť. Na čistenie spotrebiča nepoužívajte rozpúšťadlá alebo abrazívne prostriedky. K vyčisteniu plastových častí drôtených políc môžete použiť slabý roztok vody a jemného čistiaceho prostriedku (napr. saponátu na umývanie riadu). Drevené police nevyžadujú zvláštnu údržbu. Pri prvom uvedení do prevádzky môžu niektoré časti spotrebiča vydávať nepríjemný zápach. v takom prípade nastavte termostaty spotrebiča na minimálnu hodnotu vnútornej teploty, a nechajte spotrebič po dobu niekoľkých hodín pracovať bez naloženia fľašami. Studený vzduch nežiadúce pachy odstráni. Výpadok prúdu Bežný výpadok prúdu v dĺžke 1 alebo 2 hodín nemôže zásadne ovplyvniť vnútornú teplotu vinotéky. Pre ochranu uložených vín pri výpadku prúdu však zbytočne neotvárajte dvere spotrebiča, resp. otvárajte je jen v najnutnejších prípadoch. Pri dlhodobom výpadku prúdu je treba urobiť nevyhnutné kroky na ochranu uložených vín. S opätovným zapnutím spotrebiča po jeho odpojení alebo po prerušení dodávky elektrické energie odporúčame počkať aspoň 3 až 5 minút. Ak spotrebič uvediete opätovne do prevádzky po predošlom odpojení, ešte pred uplynutím tejto doby, nedôjde k novej aktivácii kompresora (ak to vyžaduje vnútorná teplota vo vinotéke) skôr, ako po uplynutí zmienenej doby (3 – 5 minút). Pri prvom uvedení spotrebiča do prevádzky (alebo po jeho dlhšej odstávke) sa môžu hodnoty nastavené/požadované a reálne teploty vo vnútri spotrebiča líšiť. Ide o obvyklý jav! K dosiahnutiu požadovanej hodnoty vnútornej teploty a jej stabilizácii dôjde po niekoľkých hodinách prevádzky. Prevádzka vinotéky počas dovolenky Krátka dovolenka: nechajte vinotéku v prevádzke počas dovolenky trvajúcej menej ako tri týždne. Dlhá dovolenka: Pokiaľ sa zariadenie nebude používať počas niekoľkých mesiacov, vyprázdnite ho a odpojte zo siete. Vnútro a vonkajšok vinotéky dôkladne umyte. Dvere vinotéky potom nechajte otvorené, tak, aby sa samovoľne nezavreli. Tým zabránite vzniku zápachov a plesní. 273 Sťahovanie vinotéky Spotrebič pred sťahovaním odpojte z elektrické siete. Vyberte všetky uložené fľaše a zabezpečte pohyblivé časti vo vnútri vinotéky tak, aby nedošlo k ich poškodeniu počas prepravy. Nastaviteľné nôžky chráňte pred poškodením počas prepravy ich úplným zaskrutkovaním do tela spotrebiča. Dvere zalepte páskou proti samovoľnému otvoreniu. Vinotéku premiestňujte a manipulujte vo zvislej polohe. Vonkajšiu stranu zariadenia chráňte pri prepravy vhodným materiálom. (deka, bublinová fólia apod.). Úspory energie Vinotéka by mala byť umiestnená v najchladnejšej miestnosti bytu, ale nie chladnejšej, ako +16 °C), pričom v jej blízkosti by nemalo byť umiestnené zariadenie produkujúce teplo. Súčasne je vhodné zabrániť priamemu prístupu slnečného svetla. Prístroj má byť dôkladne vetraný. Nikdy nezakrývajte ventilačné otvory! Dvere vinotéky otvárajte len na nevyhnutnú dobu. 8. ČO ROBIŤ V PRÍPADE PORUCHY Napriek všetkej starostlivosti, venovanej vývoju a výrobe a prísnemu systému kontroly kvality, nemôžeme celkom vylúčiť možnosť vzniku poruchy. Než sa však obrátite na predajcu, dodávateľa alebo ich autorizovaný servis, overte prosím, či problém/poruchu nedokážete odstrániť sami. Najprv sa presvedčte, či: Je vinotéka riadne pripojená k elektrickej sieti? Nedošlo k výpadku prúdu? Potom skúste niektoré z riešení, ktoré navrhujeme v tabuľke nižšie: DÔLEŽITÉ UPOZORNENIE: Závadný alebo poškodený napájací kábel musí byť vymenený výrobcom, dodávateľom alebo jeho autorizovaným servisným strediskom, prípadne dostatočne kvalifikovaným technikom. v opačnom prípade sa vystavujete vážnemu nebezpečenstvu ohrozenia zdravia. POKIAĽ TIETO KROKY NEODHALIA PORUCHU, KONTAKTUJTE AUTORIZOVANÝ SERVIS. POZOR! Pri vykonávaní akejkoľvek údržby a opráv musí byť zariadenie odpojené od elektrickej siete! 274 9. PORUCHY Mnoho problémov môžete riešiť ľahko, bez toho, aby ste potrebovali volať servis. Skôr, než pozvete servisného technika, skúste nasledujúce odporúčania: MOŽNÁ PRÍČINA PORUCHA Vinotéka nefunguje Vinotéka dostatočne nechladí Časté zapínanie a vypínanie Svetlo vo vinotéke nesvieti Nadmerné vibrácie Nadmerný prevádzkový hluk Dvere sa riadne nezatvárajú Dvere sa neotvárajú/ Systém pushpull nefunguje Nie je zapojená do siete Vinotéka je vypnutá Vypínač okruhu prerušený alebo spálená poistka Skontrolujte a upravte nastavenie termostatu. Teplota okolitého prostredia je príliš vysoká. Dvere spotrebiča boli príliš často otvorené. Dvere spotrebiča nie sú poriadne zatvorené. Dvere spotrebiča dostatočne netesnia. Teplota v izbe je vyššia než normálna Do vinotéky bolo pridané väčšie množstvo obsahu naraz Dvere sa otvárajú príliš často Dvere nie sú správne zatvorené Termostat nie je správne nastavený Tesnenie dverí neplní riadne svoju funkciu Vinotéka nie je zapnutá do siete Vypínač okruhu je prerušený alebo je spálená poistka Žiarovka je vypálená, kontaktujte váš servis Vypínač svetla je vypnutý Skontrolujte vodorovné postavenie vinotéky Určitá hladina prevádzkového hluku je bežným/obvyklým sprievodným javom pri spustení/chode kompresoru. Charakteristický zvuk slabej intenzity (pripomínajúci „tečúcu vodu“) je bežným sprievodným javom obehu chladiaceho média v systému. Charakteristický zvuk slabé intenzity (pripomínajúci „klepanie“) je bežným sprievodným javom prevádzky spotrebiča (resp. zmien teplôt v ktorých dôsledku dochádza k rozťahovaniu/zmršťovaniu vnútorných stien spotrebiča). Pri vyššej hladine hluku skontrolujte riadne usadenie kompresora na gumových tlmičoch („silent-blokoch“), resp. overte, či nie je kompresor v bezprostrednom kontakte s priľahlým nábytkom, stenou alebo inou časťou spotrebiča. Overte riadne vyrovnanie spotrebiča. Spotrebič nie je riadne vyrovnaný Dvere boli otočené a nie sú správne nasadené Tesnenie je znečistené Police sú uložené nesprávne Skontrolujte správnu inštaláciu vinotéky (pozri kapitola „ 3. Inštalácia zariadenia“ Nesprávna inštalácia zariadenia bráni správnej funkcii vinotéky Nastavte otváranie o 1 mm jeho otáčaním a skontrolujte funkciu (dbajte aby ste nastavenie neprehnali. (Bližšie inštrukcie nájdete v príslušnej kapitole tohoto návodu.) 275 Výmena žiarovky Zariadenie je vybavené svetlo emitujúcimi diódami (LED). Tieto diódy nemôže vymeniť zákazník. Ich životnosť je dostatočná a porovnateľná s životnosťou celého zariadenia. Ak sa predsa len dióda počas prevádzky poškodí, požiadajte o jej výmenu váš servis. 10. ŽIVOTNÉ PROSTREDIE Toto zariadenie bolo vyrobené v súlade s nariadením EU č. 19/2012/CE ktoré sa týka zaobchádzania s odpadmi vznikajúcimi z elektrických a elektronických zariadení (WEEE). Správnou likvidáciou zariadenia zabránite potenciálne negatívnym dopadom na životné prostredie a ľudské zdravie, ktoré by hrozili z nesprávnej likvidácie. Tento symbol na výrobku alebo jeho balení udáva, že tento výrobok nepatrí do domáceho odpadu. Je nutné odviezť ho na zberné miesto pre recykláciu elektrického a elektronického zariadenia. Zaistením správnej likvidácie tohto výrobku pomôžete zabrániť negatívnym dôsledkom pre životné prostredie a ľudské zdravie, ktoré by inak boli spôsobené nevhodnou likvidáciou tohto výrobku. Používateľ je zodpovedný za odvezenie vyslúžilého zariadenia do príslušného zberného strediska. Triedenie a zber pre recykláciu po skončení životnosti zariadení, zaobchádzanie s nimi a ich likvidácia spôsobom ktorý neškodí životnému prostrediu napomáha zabrániť potenciálne negatívnym dopadom na prostredie a zdravie a umožňuje opätovné využitie materiálov, z ktorých sa spotrebič skladá. Pre podrobnejšie informácie o zbere a likvidácii tohto výrobku kontaktujte váš miestne príslušný úrad, spoločnosť poverenú zaobchádzaním s odpadmi alebo obchodníka, ktorý vám zariadenie predal. 11. ZÁVEREČNÉ POZNÁMKY V záujme priebežného zlepšovania našich spotrebičov si vyhradzujeme právo na zmenu technických parametrov bez predošlého upozornenia. Nositeľmi záruk značky AVINTAGE sú vybraní predajsovia. Žiadna časť tohto návodu nemôže byť považovaná za záručný list. FRIO ENTREPRISE nezodpovedá za chyby, technické alebo textové opomenutia v tomto dokumente. Tento dokument nie je právnicky záväzný. 276 INFORMAČNÝ LIST VÝROBKU PODĽA NARIADENIA EÚ Č. 1060/2010 Servírovacia vinotéka ZNAČKA AVINTAGE OBCHODNÉ OZNAČENIE AVU8X(/IX) NAPÁJANIE 220-240 v / 50 Hz ROZMERY (Š X H X V) 145 x 547,5 x 820 mm HMOTNOSŤ NETTO 20 kg KATEGORIE DOMÁCICH CHLADIACICH ZARIADENÍ 2 ENERGETICKÁ TRIEDA A ROČNÁ SPOTREBA ENERGIE (AEC) Spotreba energie 135 kWh za rok vypočítaná na základe výsledkov získaných počas 24 hodín pri normalizovaných testovacích podmienkach. Skutočná spotreba energie závisí na podmienkach použitia a umiestnenia spotrebiča. UŽITOČNÝ OBJEM (L) 23 L ROZSAHY NASTAVITEĽNÝCH TEPLÔT 5 – 20 °C ROZMRAZOVANIE Automatické KLIMATICKÁ TRIEDA N Tento spotrebič je koncipovaný pre prevádzku pri okolitých teplotách v rozmedzí 16 °C (spodná) a 32 °C (horná hranica). HLUČNOSŤ DB (A) RE 1PW 44 dB(A) TYP INŠTALÁCIE Vstavaná inštalácia pod pracovnú dosku Toto zariadenie je určené výlučne pre skladovanie vína. 277 INFORMAČNÝ LIST VÝROBKU PODĽA NARIADENIA EÚ Č. 1060/2010 Servírovacia vinotéka ZNAČKA AVINTAGE OBCHODNÉ OZNAČENIE AVU23SX(/IX) NAPÁJANIE 220-240 v / 50 Hz ROZMERY (Š X H X V) 295 x 571 x 820 mm HMOTNOSŤ NETTO 28 kg KATEGORIE DOMÁCICH CHLADIACICH ZARIADENÍ 2 ENERGETICKÁ TRIEDA A ROČNÁ SPOTREBA ENERGIE (AEC) Spotreba energie 140 kWh za rok vypočítaná na základe výsledkov získaných počas 24 hodín pri normalizovaných testovacích podmienkach. Skutočná spotreba energie závisí na podmienkach použitia a umiestnenia spotrebiča. UŽITOČNÝ OBJEM (L) 56 L ROZSAHY NASTAVITEĽNÝCH TEPLÔT 5 – 20 °C ROZMRAZOVANIE Automatické KLIMATICKÁ TRIEDA N Tento spotrebič je koncipovaný pre prevádzku pri okolitých teplotách v rozmedzí 16 °C (spodná) a 32 °C (horná hranica). HLUČNOSŤ DB (A) RE 1PW 43 dB(A) TYP INŠTALÁCIE Voľne stojaca a vstavaná inštalácia pod pracovnú dosku Toto zariadenie je určené výlučne pre skladovanie vína. 278 INFORMAČNÝ LIST VÝROBKU PODĽA NARIADENIA EÚ Č. 1060/2010 Servírovacia vinotéka ZNAČKA AVINTAGE OBCHODNÉ OZNAČENIE AVU41SXDPA(/IX) NAPÁJANIE 220-240 v / 50 Hz ROZMERY (Š X H X V) 595 x 571 x 820 mm HMOTNOSŤ NETTO 48 kg KATEGORIE DOMÁCICH CHLADIACICH ZARIADENÍ 2 ENERGETICKÁ TRIEDA A ROČNÁ SPOTREBA ENERGIE (AEC) Spotreba energie 144 kWh za rok vypočítaná na základe výsledkov získaných počas 24 hodín pri normalizovaných testovacích podmienkach. Skutočná spotreba energie závisí na podmienkach použitia a umiestnenia spotrebiča. UŽITOČNÝ OBJEM (L) 59,5 L x 2 ROZSAHY NASTAVITEĽNÝCH TEPLÔT 5 – 20 °C ROZMRAZOVANIE Automatické KLIMATICKÁ TRIEDA N Tento spotrebič je koncipovaný pre prevádzku pri okolitých teplotách v rozmedzí 16 °C (spodná) a 32 °C (horná hranica). HLUČNOSŤ DB (A) RE 1PW 43 dB(A) TYP INŠTALÁCIE Voľne stojaca a vstavaná inštalácia pod pracovnú dosku Toto zariadenie je určené výlučne pre skladovanie vína. 279 INFORMAČNÝ LIST VÝROBKU PODĽA NARIADENIA EÚ Č. 1060/2010 Servírovacia vinotéka ZNAČKA AVINTAGE OBCHODNÉ OZNAČENIE AVU52SX(/IX) NAPÁJANIE 220-240 v / 50 Hz ROZMERY (Š X H X V) 595 x 571 x 820 mm HMOTNOSŤ NETTO 44 kg KATEGORIE DOMÁCICH CHLADIACICH ZARIADENÍ 2 ENERGETICKÁ TRIEDA A ROČNÁ SPOTREBA ENERGIE (AEC) Spotreba energie 145 kWh za rok vypočítaná na základe výsledkov získaných počas 24 hodín pri normalizovaných testovacích podmienkach. Skutočná spotreba energie závisí na podmienkach použitia a umiestnenia spotrebiča. UŽITOČNÝ OBJEM (L) 146 L ROZSAHY NASTAVITEĽNÝCH TEPLÔT 5 – 20 °C ROZMRAZOVANIE Automatické KLIMATICKÁ TRIEDA N Tento spotrebič je koncipovaný pre prevádzku pri okolitých teplotách v rozmedzí 16 °C (spodná) a 32 °C (horná hranica). HLUČNOSŤ DB (A) RE 1PW 44 dB(A) TYP INŠTALÁCIE Voľne stojaca a vstavaná inštalácia pod pracovnú dosku Toto zariadenie je určené výlučne pre skladovanie vína. 280 INFORMAČNÝ LIST VÝROBKU PODĽA NARIADENIA EÚ Č. 1060/2010 Servírovacia vinotéka ZNAČKA AVINTAGE OBCHODNÉ OZNAČENIE AVU53CDZA NAPÁJANIE 220-240 v / 50 Hz ROZMERY (Š X H X V) 595 x 571 x 820 mm HMOTNOSŤ NETTO 50 kg KATEGORIE DOMÁCICH CHLADIACICH ZARIADENÍ 2 ENERGETICKÁ TRIEDA A ROČNÁ SPOTREBA ENERGIE (AEC) Spotreba energie 145 kWh za rok vypočítaná na základe výsledkov získaných počas 24 hodín pri normalizovaných testovacích podmienkach. Skutočná spotreba energie závisí na podmienkach použitia a umiestnenia spotrebiča. UŽITOČNÝ OBJEM (L) 134 L ROZSAHY NASTAVITEĽNÝCH TEPLÔT 5 – 10 °C / 10 – 20 °C ROZMRAZOVANIE Automatické KLIMATICKÁ TRIEDA N Tento spotrebič je koncipovaný pre prevádzku pri okolitých teplotách v rozmedzí 16 °C (spodná) a 32 °C (horná hranica). HLUČNOSŤ DB (A) RE 1PW 45 dB(A) TYP INŠTALÁCIE Voľne stojaca a vstavaná inštalácia pod pracovnú dosku Toto zariadenie je určené výlučne pre skladovanie vína. 281 INFORMAČNÝ LIST VÝROBKU PODĽA NARIADENIA EÚ Č. 1060/2010 Servírovacia vinotéka ZNAČKA AVINTAGE OBCHODNÉ OZNAČENIE AVU54SXDZA(/IX) NAPÁJANIE 220-240 v / 50 Hz ROZMERY (Š X H X V) 595 x 571 x 820 mm HMOTNOSŤ NETTO 50 kg KATEGORIE DOMÁCICH CHLADIACICH ZARIADENÍ 2 ENERGETICKÁ TRIEDA A ROČNÁ SPOTREBA ENERGIE (AEC) Spotreba energie 145 kWh za rok vypočítaná na základe výsledkov získaných počas 24 hodín pri normalizovaných testovacích podmienkach. Skutočná spotreba energie závisí na podmienkach použitia a umiestnenia spotrebiča. UŽITOČNÝ OBJEM (L) 134 L ROZSAHY NASTAVITEĽNÝCH TEPLÔT 5 – 10 °C / 10 – 20 °C ROZMRAZOVANIE Automatické KLIMATICKÁ TRIEDA N Tento spotrebič je koncipovaný pre prevádzku pri okolitých teplotách v rozmedzí 16 °C (spodná) a 32 °C (horná hranica). HLUČNOSŤ DB (A) RE 1PW 45 dB(A) TYP INŠTALÁCIE Voľne stojaca a vstavaná inštalácia pod pracovnú dosku Toto zariadenie je určené výlučne pre skladovanie vína. 282 INFORMAČNÝ LIST VÝROBKU PODĽA NARIADENIA EÚ Č. 1060/2010 Servírovacia vinotéka ZNAČKA AVINTAGE OBCHODNÉ OZNAČENIE PRO51C/1 NAPÁJANIE 220-240 v / 50 Hz ROZMERY (Š X H X V) 595 x 571 x 820 mm HMOTNOSŤ NETTO 48 kg KATEGORIE DOMÁCICH CHLADIACICH ZARIADENÍ 2 ENERGETICKÁ TRIEDA A ROČNÁ SPOTREBA ENERGIE (AEC) Spotreba energie 145 kWh za rok vypočítaná na základe výsledkov získaných počas 24 hodín pri normalizovaných testovacích podmienkach. Skutočná spotreba energie závisí na podmienkach použitia a umiestnenia spotrebiča. UŽITOČNÝ OBJEM (L) 146 L ROZSAHY NASTAVITEĽNÝCH TEPLÔT 5 – 20 °C ROZMRAZOVANIE Automatické KLIMATICKÁ TRIEDA N Tento spotrebič je koncipovaný pre prevádzku pri okolitých teplotách v rozmedzí 16 °C (spodná) a 32 °C (horná hranica). HLUČNOSŤ DB (A) RE 1PW 45 dB(A) TYP INŠTALÁCIE Voľne stojaca a vstavaná inštalácia pod pracovnú dosku Toto zariadenie je určené výlučne pre skladovanie vína. 283 AVINTAGE/FRIO ENTREPRISE - 143 boulevard Pierre Lefaucheux 72230 Arnage - FRANCE www.avintage.com – [email protected] 284-
 1
1
-
 2
2
-
 3
3
-
 4
4
-
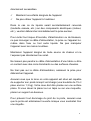 5
5
-
 6
6
-
 7
7
-
 8
8
-
 9
9
-
 10
10
-
 11
11
-
 12
12
-
 13
13
-
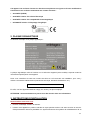 14
14
-
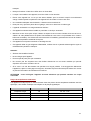 15
15
-
 16
16
-
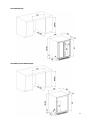 17
17
-
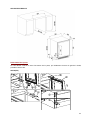 18
18
-
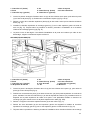 19
19
-
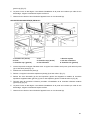 20
20
-
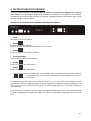 21
21
-
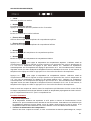 22
22
-
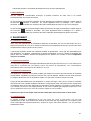 23
23
-
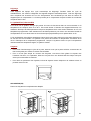 24
24
-
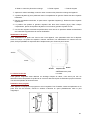 25
25
-
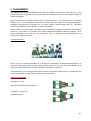 26
26
-
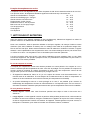 27
27
-
 28
28
-
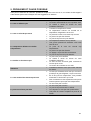 29
29
-
 30
30
-
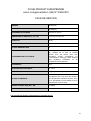 31
31
-
 32
32
-
 33
33
-
 34
34
-
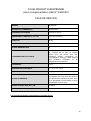 35
35
-
 36
36
-
 37
37
-
 38
38
-
 39
39
-
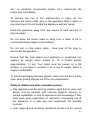 40
40
-
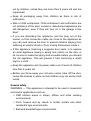 41
41
-
 42
42
-
 43
43
-
 44
44
-
 45
45
-
 46
46
-
 47
47
-
 48
48
-
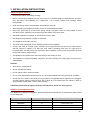 49
49
-
 50
50
-
 51
51
-
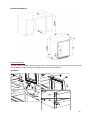 52
52
-
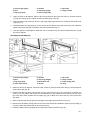 53
53
-
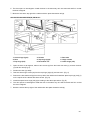 54
54
-
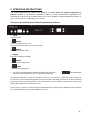 55
55
-
 56
56
-
 57
57
-
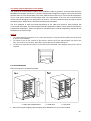 58
58
-
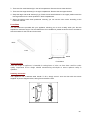 59
59
-
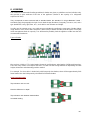 60
60
-
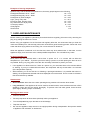 61
61
-
 62
62
-
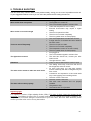 63
63
-
 64
64
-
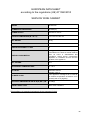 65
65
-
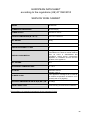 66
66
-
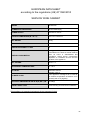 67
67
-
 68
68
-
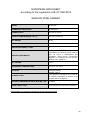 69
69
-
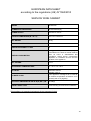 70
70
-
 71
71
-
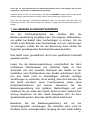 72
72
-
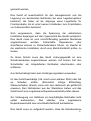 73
73
-
 74
74
-
 75
75
-
 76
76
-
 77
77
-
 78
78
-
 79
79
-
 80
80
-
 81
81
-
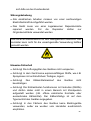 82
82
-
 83
83
-
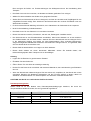 84
84
-
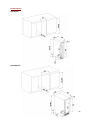 85
85
-
 86
86
-
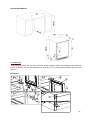 87
87
-
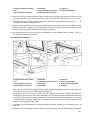 88
88
-
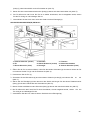 89
89
-
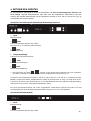 90
90
-
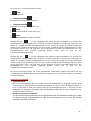 91
91
-
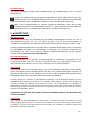 92
92
-
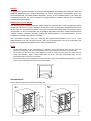 93
93
-
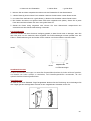 94
94
-
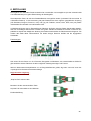 95
95
-
 96
96
-
 97
97
-
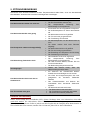 98
98
-
 99
99
-
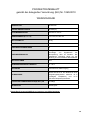 100
100
-
 101
101
-
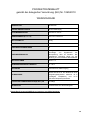 102
102
-
 103
103
-
 104
104
-
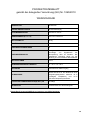 105
105
-
 106
106
-
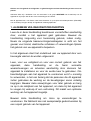 107
107
-
 108
108
-
 109
109
-
 110
110
-
 111
111
-
 112
112
-
 113
113
-
 114
114
-
 115
115
-
 116
116
-
 117
117
-
 118
118
-
 119
119
-
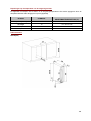 120
120
-
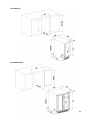 121
121
-
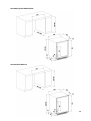 122
122
-
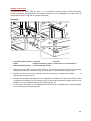 123
123
-
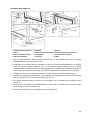 124
124
-
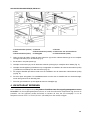 125
125
-
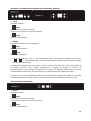 126
126
-
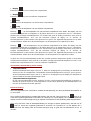 127
127
-
 128
128
-
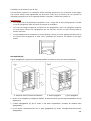 129
129
-
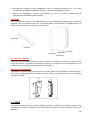 130
130
-
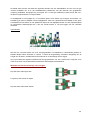 131
131
-
 132
132
-
 133
133
-
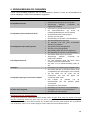 134
134
-
 135
135
-
 136
136
-
 137
137
-
 138
138
-
 139
139
-
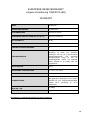 140
140
-
 141
141
-
 142
142
-
 143
143
-
 144
144
-
 145
145
-
 146
146
-
 147
147
-
 148
148
-
 149
149
-
 150
150
-
 151
151
-
 152
152
-
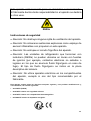 153
153
-
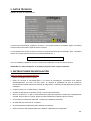 154
154
-
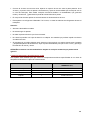 155
155
-
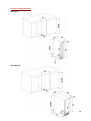 156
156
-
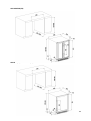 157
157
-
 158
158
-
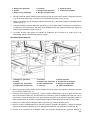 159
159
-
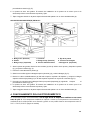 160
160
-
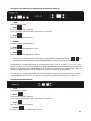 161
161
-
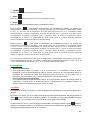 162
162
-
 163
163
-
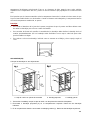 164
164
-
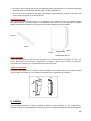 165
165
-
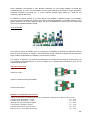 166
166
-
 167
167
-
 168
168
-
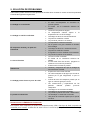 169
169
-
 170
170
-
 171
171
-
 172
172
-
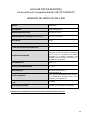 173
173
-
 174
174
-
 175
175
-
 176
176
-
 177
177
-
 178
178
-
 179
179
-
 180
180
-
 181
181
-
 182
182
-
 183
183
-
 184
184
-
 185
185
-
 186
186
-
 187
187
-
 188
188
-
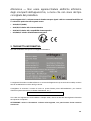 189
189
-
 190
190
-
 191
191
-
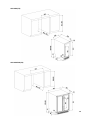 192
192
-
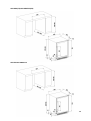 193
193
-
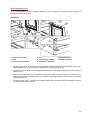 194
194
-
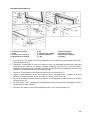 195
195
-
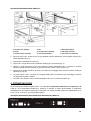 196
196
-
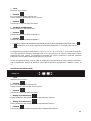 197
197
-
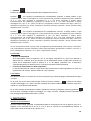 198
198
-
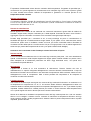 199
199
-
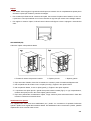 200
200
-
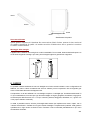 201
201
-
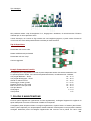 202
202
-
 203
203
-
 204
204
-
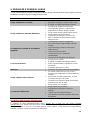 205
205
-
 206
206
-
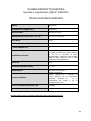 207
207
-
 208
208
-
 209
209
-
 210
210
-
 211
211
-
 212
212
-
 213
213
-
 214
214
-
 215
215
-
 216
216
-
 217
217
-
 218
218
-
 219
219
-
 220
220
-
 221
221
-
 222
222
-
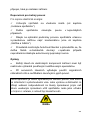 223
223
-
 224
224
-
 225
225
-
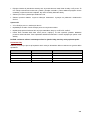 226
226
-
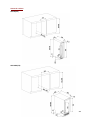 227
227
-
 228
228
-
 229
229
-
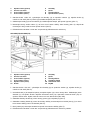 230
230
-
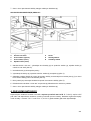 231
231
-
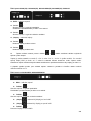 232
232
-
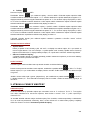 233
233
-
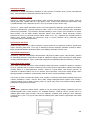 234
234
-
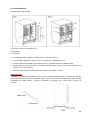 235
235
-
 236
236
-
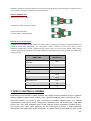 237
237
-
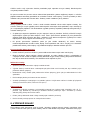 238
238
-
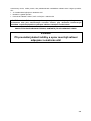 239
239
-
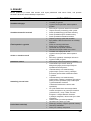 240
240
-
 241
241
-
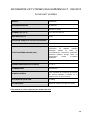 242
242
-
 243
243
-
 244
244
-
 245
245
-
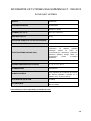 246
246
-
 247
247
-
 248
248
-
 249
249
-
 250
250
-
 251
251
-
 252
252
-
 253
253
-
 254
254
-
 255
255
-
 256
256
-
 257
257
-
 258
258
-
 259
259
-
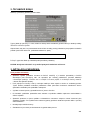 260
260
-
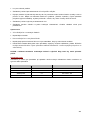 261
261
-
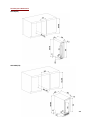 262
262
-
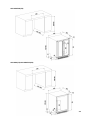 263
263
-
 264
264
-
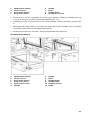 265
265
-
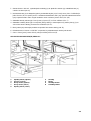 266
266
-
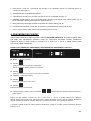 267
267
-
 268
268
-
 269
269
-
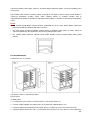 270
270
-
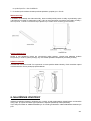 271
271
-
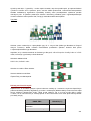 272
272
-
 273
273
-
 274
274
-
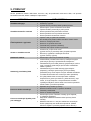 275
275
-
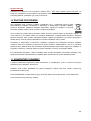 276
276
-
 277
277
-
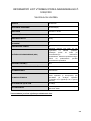 278
278
-
 279
279
-
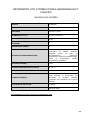 280
280
-
 281
281
-
 282
282
-
 283
283
-
 284
284


Avintage AV45XDZI de handleiding
- Categorie
- Wijnkoelers
- Type
- de handleiding
in andere talen
- English: Avintage AV45XDZI Owner's manual
- italiano: Avintage AV45XDZI Manuale del proprietario
- français: Avintage AV45XDZI Le manuel du propriétaire
- español: Avintage AV45XDZI El manual del propietario
- Deutsch: Avintage AV45XDZI Bedienungsanleitung
- slovenčina: Avintage AV45XDZI Návod na obsluhu
- čeština: Avintage AV45XDZI Návod k obsluze
Gerelateerde papieren
Andere documenten
-
Baumatic HWCB 15/1 Handleiding
-
Haier WINE BANK 50 SERIES 7 - HWS77GDAU1 de handleiding
-
-
-
Hoover RWCB 60/N Handleiding
-
Baumatic CCVB 30 UK/1 Handleiding
-
LA SOMMELIERE ECELLAR185 Handleiding
-
Hoover HWCB 60D/1 Handleiding
-
Zanussi ZA36S3P Handleiding
-
 Zanussi - Electrolux ZA3PS3 Handleiding
