
Front Surround System
Owner’s Manual
EN
• Read the supplied booklet “Safety Brochure” before using the unit.

CONTENTS
INTRODUCTION 4
BEFORE USING THE UNIT 6
Features.............................................................6
Accessories.........................................................9
Using the remote control......................................9
Part names and functions....................................11
PREPARATION 17
1 Installation.. ................................................ 17
Installing the unit.. .............................................................................................. 17
2 Connecting a TV.. .......................................... 18
Connecting a TV that supports Audio Return Channel (ARC)............................ 18
Connecting a TV that does not support Audio Return Channel (ARC).............. 19
3 Connecting AV devices.. ................................. 19
HDMI connection with an AV device................................................................... 19
4 Connecting to power......................................20
Connecting to power........................................................................................... 20
5 Connecting to a network................................20
Network functions................................................................................................20
Wired network connections.................................................................................21
Wireless network connections.. ..........................................................................21
Connecting to a network with the Sound Bar Controller app.. .........................22
PLAYBACK 23
Basic operations.. .............................................. 23
Basic procedure for playback..............................................................................23
Operating the unit using voice commands (Amazon Alexa)..............................25
Enjoying your favorite sound...............................28
Playback with 3D surround sound/surround sound.. ........................................28
Selecting a surround mode.. ...............................................................................28
Playback with 2-channel stereo sound...............................................................28
Playback of human voices clearly (Clear Voice).. ...............................................29
Enjoying enhanced bass sound (Bass Extension)...............................................29
Using a Bluetooth® device.. ................................. 30
Listening to audio from a Bluetooth® device......................................................30
Useful features for playback................................32
Using a TV’s remote control to operate the unit (HDMI control).. .....................32
Showing audio information and function settings.. ..........................................33
En
2

Playing audio content using the Sound Bar
Controller app...................................................34
Streaming services.............................................................................................. 34
Playing audio content on your mobile device.. ................................................. 34
CONFIGURATIONS 35
Configuring various functions..............................35
Changing the brightness of the indicators (Dimmer)........................................ 35
Configuring the HDMI control function.............................................................. 36
Configuring HDMI audio output.. ....................................................................... 37
Setting the auto power standby function.......................................................... 38
Enabling/disabling touch panel control (Child Lock function)......................... 39
Enabling/disabling the network standby function............................................ 40
Enabling/disabling the wireless (Wi-Fi) function............................................... 41
Enabling/disabling the Bluetooth function.. ..................................................... 41
Updating the unit’s firmware.. ........................................................................... 42
Pairing the center unit and subwoofer manually.............................................. 42
Selecting the HDMI signal format....................................................................... 43
Initializing the unit.. ............................................................................................ 44
Setting the dynamic range compression.. ......................................................... 44
APPENDIX 46
When any problem occurs (General)......................46
When any problem occurs (Power and system
function)...........................................................46
When any problem occurs (Audio).........................49
When any problem occurs (Bluetooth®).................51
When any problem occurs (Network trouble)......... 52
Specifications....................................................54
Center unit specifications....................................................................................54
Subwoofer specifications.. ..................................................................................56
Supported HDMI audio and video formats.. .......................................................57
Supported digital audio formats.........................................................................58
Information for qualified contractors or dealers.....59
Mounting the center unit on a wall.. ...................................................................59
En
3

INTRODUCTION
Information
Indicates notes on instructions, restrictions on functions, and additional
information that may be helpful.
About functions included in the unit
The services that can be used with this unit that are provided by third
parties may be changed, suspended, or ended without notice. Please be
aware that Yamaha Corporation does not bear any responsibility for
these services.
Trademarks
Manufactured under license from Dolby Laboratories. Dolby, Dolby Audio, Pro
Logic, and the double-D symbol are trademarks of Dolby Laboratories.
For DTS patents, see http://patents.dts.com.
Manufactured under license from DTS, Inc. DTS, the Symbol, DTS and the Symbol
together, DTS Digital Surround, and DTS Virtual:X are registered trademarks or
trademarks of DTS, Inc. in the United States and/or other countries.
© DTS, Inc. All Rights Reserved.
Amazon, Alexa, Amazon Music, Kindle and all related logos are trademarks of
Amazon.com, Inc. or its affiliates.
App Store
SM
App Store is a service mark of Apple Inc.
The terms HDMI, the HDMI Logo, and High-Definition Multimedia Interface are
trademarks or registered trademarks of HDMI Licensing LLC in the United States
and other countries.
x.v.Color™
“x.v.Color” is a trademark of Sony Corporation.
Android™ Google Play™
Android and Google Play are trademarks of Google LLC.
The Wi-Fi CERTIFIED™ Logo is a certification mark of Wi-Fi Alliance®.
Wi-Fi and Wi-Fi CERTIFIED are registered trademarks of Wi-Fi Alliance®.
En
4

The Bluetooth® word mark and logos are registered trademarks owned by
Bluetooth SIG, Inc. and any use of such marks by Yamaha Corporation is under
license.
Spotify and Spotify logo are registered trademarks of the Spotify Group.
The Spotify Software is subject to third party licenses found here:
www.spotify.com/connect/third-party-licenses
Blu-ray™
“Blu-ray Disc™”, “Blu-ray™”, and the logos are trademarks of the Blu-ray Disc
Association.
About content in this manual
• This manual is for the following readers:
– the users of the unit
– the constructor, builder and dealer that mount the unit on the wall
• This manual uses the following signal words for the important
information:
–
WARNING
This content indicates “risk of serious injury or death.”
–
CAUTION
This content indicates “risk of injury.”
– n NOTICE
Indicates points that you must observe in order to prevent product
failure, damage or malfunction and data loss, as well as to protect
the environment.
– n NOTE
Indicates notes on instructions, restrictions on functions, and
additional information that may be helpful.
• The illustrations and screens in this manual are for instructional
purposes only.
• The company names and product names in this manual are the
trademarks or registered trademarks of their respective companies.
• Software may be revised and updated without prior notice.
• In this manual, iOS and Android mobile devices are collectively
referred to as “mobile devices”. The specific type of mobile device is
noted in explanations as needed.
En
5

BEFORE USING THE UNIT
Features
Introduction
This unit is a front surround system that allows for the enjoyment of superior sound quality from video played on a TV connected to the unit.
n
Play surround sound
Audio from a TV, media
streaming service, or BD/
DVD player can be played
with 3D surround sound/
surround sound.
n
Ask Alexa to control the unit
Alexa, turn up the volume.
Alexa, switch the input source to HDMI.
With Alexa built-in, you can
operate this unit, access
your music playlists.
Alexa may not be available in your region.
View the Yamaha product website for
details.
En
6

n
Easy operation using the smartphone app
Sound Bar Controller
Install the Sound Bar
Controller app on
either a smartphone
or tablet. Various
features and settings
can be easily accessed
and controlled via the
app.
n
Listen to audio from Bluetooth devices and streaming
services
Bluetooth devices
Streaming services
*
A subscription may be required to listen
to streaming services via this unit.
Enjoy listening to audio
from Bluetooth devices
and streaming services*
such as Amazon Music and
Spotify.
En
7

3D surround playback
This unit supports virtual 3D surround sound technology called “DTS
Virtual:X”. Surround sound can be heard not only from horizontal
directions, but also from varying heights when this unit’s 3D surround
mode is enabled, creating a virtual acoustic environment. This ultimately
provides an immersive audio and sound experience by creating a sense
of sounds not only coming from behind, but also above the listener. For
details, see the following:
• “Playback with 3D surround sound/surround sound”(p.28)
Wireless subwoofer
The supplied wireless subwoofer enables more dynamic audio playback.
Transmission of 4K high dynamic range
(HDR) video
Enjoy 4K High Dynamic Range (HDR) content from HDR-compatible
sources such as a TV, media streaming device, gaming console, or set-top
box. For details, see the following:
• “Supported HDMI audio and video formats”(p.57)
HDMI control function
Link functions of a TV and the unit are available using the TV’s remote
control. When a TV that supports Audio Return Channel (ARC) is used,
this ARC-compatible unit can be connected to the TV via a single HDMI
cable. For details, see the following:
• “Using a TV’s remote control to operate the unit (HDMI
control)”(p.32)
• “Connecting a TV that supports Audio Return Channel (ARC)”(p.18)
Bass Extension
The bass extension feature boosts bass levels for more impactful sound.
For details, see the following:
• “Enjoying enhanced bass sound (Bass Extension)”(p.29)
Clear Voice
The clear voice function makes speech, such as dialog and narration,
clearer. For details, see the following:
• “Playback of human voices clearly (Clear Voice)”(p.29)
En
8

Accessories
Checking the accessories
Make sure you have received all of the following accessories.
Power cord x 2
The unit (YAS-CU209)
Remote control
Optical digital audio cable
Mounting template
In this manual, the wireless subwoofer
is referred to as the “subwoofer”.
Quick Start Guide Safety Brochure
A CR2025 Lithium battery
has already been inserted
into the remote control.
Wireless subwoofer
(NS-WSW44)
Use when mounting the center unit on a wall.
In this manual, the unit may also be
referred to as the “center unit”.
Using the remote control
Preparing the remote control
Remove the battery insulating strip before attempting to use the remote
control.
Battery insulating strip
Operating range of the remote control
Operate the remote control within the range shown in the following
figure.
Remote control
sensor
Within 6 m (20 ft)
En
9

Replacing the battery in the remote
control
WARNING
• DO NOT SWALLOW THE BATTERY.
• Keep new and used batteries away from children.
• If the battery compartment does not close securely, stop using the product and
keep it away from children.
The remote control supplied with this product contains a coin/button cell battery.
If the coin/button cell battery is swallowed, it can cause severe internal burns in
just two hours and can eventually lead to death. If you think a battery might have
been swallowed or placed inside any part of the body, seek immediate medical
attention.
CAUTION
• Do not put in a pocket or bag, carry, or store batteries together with pieces of
metal.
The battery could short, burst, or leak, causing a fire or injury.
• When storing or discarding batteries, insulate the terminal area by applying tape, or
some other protection.
Mixing them with other batteries or metal objects can cause a fire, burns, or
inflammation due to fluid.
Press and hold ▽ on the rear cover of the remote control, slide the cover
out in the direction indicated [1], and replace the old battery with a new
one [2]. Slide the rear cover back into place in the direction indicated
[3].
CR2025
+
[1]
[2]
[3]
[1]
[2]
[3]
Rear cover
CR2025 Lithium battery
En
10

Part names and functions
Part names and functions of the front/top panel
The part names and functions of the front and top panels are as follows.
i
b c d e fa
h
h
g
a Indicators
The indicators on the top panel flash or glow to
show the operation and setting status. In this
manual, indicator status, such as off, glowing,
and flashing, are shown as the illustrations
below.
Off
Glows
Flashes
b ) (Alexa)
Manually wake Alexa to enable a voice
command (p.25).
c ) (Microphones disabled)
Touch to disable the microphones. Alexa will
not respond to utterances while the
microphones are disabled. Disable the
microphones to maintain privacy. Touch again
to enable the microphones (p.25).
d y (input)
Select an input source (p.23).
e } / { (volume +/-)
Adjust the volume (p.23).
f z (power)
Turn on or off the unit.
g Microphones
Used to interact with Alexa.
n NOTICE
• Do not use a vacuum cleaner or aerosol air duster
on the microphones when cleaning the unit. Doing
so may damage the microphones.
h Speakers
En
11

i Remote control sensor
Receives infrared (IR) signals from the remote
control of the unit (p.9).
n NOTE
• b, c, d, e and f are touch sensors. Touch icons
with your finger to control functions.
• Do not place any objects on the touch panel as doing
so may result in unintended operations.
• When touch panel control is disabled, no operations
can be performed using the unit’s touch panel. This
prevents accidental operation of the unit. For details,
see the following:
– “Enabling/disabling touch panel control (Child Lock
function)”(p.39)
• The brightness of the indicators can be changed using
MUSIC on the remote control. For details, see the
following:
– “Changing the brightness of the indicators
(Dimmer)”(p.35)
En
12

Part names and functions of the rear panel
The part names and functions of the rear panel are as follows.
a e
b
c
d f
a Power connector
Connect the power cord (p.20).
b HDMI IN jack
For connecting to an HDMI-compatible AV
device, such as a BD/DVD player, a satellite and
cable TV tuner, and a game console, and
inputting video/audio signals (p.19).
c HDMI OUT (ARC) jack
For connecting to an HDMI-compatible TV and
outputting video/audio signals (p.18). When a
TV that supports Audio Return Channel (ARC) is
used, TV audio signals can also be input through
this jack.
d NETWORK jack
For connecting to an ethernet cable (sold
separately) (p.21).
e TV input jack
For connecting to a TV that does not support
ARC. This jack cannot be used when the unit is
connected to an ARC-compatible TV (p.19).
f UPDATE ONLY jack
Use to update this unit’s firmware, if necessary.
The jack is located inside the cover.
Refer to the instructions supplied with the
firmware for details.
En
13

Part names and functions of the subwoofer
The part names and functions of the subwoofer are as follows.
a
e
b
c d
Front panel
Rear panel
a Bass reflex port
b PAIRING button
Use to pair the center unit with the subwoofer
manually (p.42).
c STANDBY indicator
Shows subwoofer’s status (p.15).
d * indicator
Glows when the center unit and subwoofer are
connected wirelessly.
e Power connector
Connect the power cord (p.20).
En
14

Part names and functions of the remote control
The part names and functions of the supplied remote control are as follows.
z
|
HDMI
MOVIE TV MUSIC
SPORTS
SUBWOOFER VOLUME
INFO
BASS
EXT
GAME STEREO
CLEAR VOICE
3D SURROUND
TV
BLUETOOTH
NET
a
b
c
d
e
f
g
h
i
j
k
l
a @ (Alexa) button
Manually wake Alexa to enable a voice
command (p.25).
b Input buttons
Select an input source to be played back.
• HDMI : Sound from a device connected to the
HDMI IN jack (p.19)
• TV : TV audio (p.18)
• BLUETOOTH : Sound from a Bluetooth device
(p.30)
• NET : Audio from streaming services (p.34)
c CLEAR VOICE button
Enable/disable the clear voice function (p.29).
d Surround mode buttons
Select a surround mode for 3D surround or
surround playback according to your individual
preference (p.28).
• MOVIE
• TV
• MUSIC
• SPORTS
• GAME
e BASS EXT button
Enable/disable the bass extension function
(p.29).
f SUBWOOFER (+/-) button
Adjust the volume of the subwoofer (p.23).
g | (mute) button
Mute the audio output (p.23). Press the button
again to unmute or press VOLUME (+/-).
h z (power) button
Turn on/off the unit.
Center unit
Turned on
Off
Turned off/network standby(p.40)
Glows (red)
Turned off/Voice Control Ready (p.25)
Glows (white)
Subwoofer
Turned on
Off
Glows (green)
Turned off/network standby (p.40)
Glows (red)
En
15

i 3D SURROUND button
Switch between 3D surround playback and
surround playback each time the button is
pressed (p.28).
j STEREO button
Switch to stereo (2-channel) playback (p.28).
k VOLUME (+/-) button
Adjust the volume of the unit (p.23).
l INFO button
Confirm the type of audio signal being played,
as well as settings for functions (p.33).
En
16

PREPARATION
1 Installation
Installing the unit
Install the unit as shown in the following illustration.
Install the subwoofer externally of the center unit. To prevent sound
from reflecting off of walls, angle the subwoofer slightly toward the
center of the room.
Touch panel
n NOTICE
• Do not stack the center unit and any other device directly on each other. Doing so
may cause a malfunction due to vibrations.
• Do not apply excessive force to the unit when moving it. Doing so may damage the
speakers or the portion covered with fabric.
• Avoid the following when installing the subwoofer to prevent any loss in sound
volume.
– Installing the subwoofer so that the speaker (portion covered with fabric) is too
close to a wall.
– Covering the subwoofer’s bass reflex port.
• The subwoofer can only be used in its upright position. Do not position the
subwoofer on its side.
• The unit contains non-magnetic shielding speakers. Do not place magnetically
sensitive items (hard disk drive, etc.) near the unit.
• Do not place objects such as metallic furniture between the center unit and the
subwoofer as such objects may interfere with wireless communication.
n NOTE
The center unit can also be mounted on a wall. For details, see the following:
• “Mounting the center unit on a wall”(p.59)
En
17

2 Connecting a TV
Connecting a TV that supports Audio
Return Channel (ARC)
Connect the TV, which supports Audio Return Channel (ARC), to the unit
with an HDMI cable (sold separately).
HDMI
(ARC)
HDMIHDMI
HDMIHDMI
HDMI OUT (ARC) jack
Center unit (rear)
HDMI input jack
TV
n What is Audio Return Channel (ARC)?
In order for the unit to play audio from a TV, the TV must usually be connected to the
unit via an audio cable as well as an HDMI cable. If, however, the TV supports Audio
Return Channel (ARC), TV audio signals can be input to the unit via the HDMI cable that
outputs video signals from the unit to the TV.
n NOTE
• Connect an HDMI cable to the audio return channel supported jack (the jack with
“ARC” indicated) on TV.
• Enable the HDMI control function of the unit to activate the Audio Return Channel
(ARC). For details, see the following:
– “Configuring the HDMI control function”(p.36)
• Use a 19-pin HDMI cable with the HDMI logo printed on it.
• Keep the cable as short as possible to prevent any degradation in signal quality.
• Use a premium high-speed HDMI cable for playback of 3D and 4K video content.
• The TV input jack cannot be used when a TV that supports the Audio Return Channel is
connected to the unit.
En
18

Connecting a TV that does not support
Audio Return Channel (ARC)
Connect the TV to the unit with an HDMI cable (sold separately) and an
optical digital audio cable (supplied).
OPTICAL
HDMI
OO OO
HDMI
HDMI
HDMIHDMI
HDMI OUT (ARC) jack
Center unit
(rear)
TV jack
Audio output jack
(digital optical)
HDMI input jack
TV
Remove the cap.1. 2. Check the plug’s
orientation.
n NOTE
• Use a 19-pin HDMI cable with the HDMI logo printed on it.
• Keep the cable as short as possible to prevent any degradation in signal quality.
• Use a premium high-speed HDMI cable for playback of 3D and 4K video content.
3 Connecting AV devices
HDMI connection with an AV device
Connect an AV device such as a media streaming device to the unit with
an HDMI cable (sold separately).
HDMI
HDMIHDMI
HDMIHDMI
HDMI IN jack
Center unit (rear)
HDMI output jack
AV device
n NOTE
• Once the HDMI control function has been activated, video and audio signals from AV
devices can be output from the TV even when the unit is turned off (HDMI signal pass-
through). For details, see the following:
– “Configuring the HDMI control function”(p.36)
• Use a 19-pin HDMI cable with the HDMI logo printed on it.
• Keep the cable as short as possible to prevent any degradation in signal quality.
• Use a premium high-speed HDMI cable for playback of 3D and 4K video content.
En
19

4 Connecting to power
Connecting to power
Once all connections have been made, connect the unit to power as
shown in the following illustration.
Rear
To an AC wall outlet
Power cord (supplied)
Once all connections have been made, connect the subwoofer to power
as shown in the following illustration.
Rear
To an AC wall outlet
Power cord (supplied)
5 Connecting to a network
Network functions
A network connection allows you to play various streaming services via
the unit, and to talk with Amazon Alexa to operate this unit, or to play
music.
The Sound Bar Controller app for mobile devices is required to configure
and operate network functions.
n NOTICE
• Do not connect this product to public Wi-Fi or Internet directly. Only connect this
product to the Internet through a router with strong password-protections. Consult
your router manufacturer for information on security best practices.
n NOTE
• To use network function, the unit and mobile device must be connected to the same
router.
• When using a multiple SSID router, access to the unit might be restricted depending on
the SSID to connect. Connect the unit and mobile device to the same SSID.
• Some security software installed on your computer, or network device settings (such
as a firewall), may block the unit’s access to streaming services. Should this occur,
change security software and/or network device settings.
• A network connection cannot be established if the MAC address filter on your router is
enabled. Check your router’s settings.
• To configure your router’s subnet mask manually, apply the same subnet used by this
unit to all devices.
• Use of a broadband connection is recommended when using Internet services.
• The unit cannot be connected to a network that requires manual setup. Connect the
unit to a DHCP enabled router.
En
20

Wired network connections
To use a wired network connection, connect the unit to a router via an
STP ethernet cable (CAT-5 or higher straight cable).
LAN
WAN
Internet
Mobile device
Modem
STP ethernet cable
(sold separately)
Router
NETWORK jack
Wireless network connections
Connect the unit to a wireless router (access point) to use a network.
See the following for instructions on connecting to a wireless router
(access point).
• “Connecting to a network with the Sound Bar Controller app”(p.22)
Internet
Mobile device
Wireless router
(access point)
Modem
n NOTE
• If the unit and the wireless router (access point) are too far apart, the unit may not
connect to a wireless router (access point). In such case, place them close to each
other.
• This unit operates only in the 2.4-GHz band. Connect your mobile device to the
network using the 2.4-GHz band and then configure the unit’s settings for a wireless
connection.
En
21

Connecting to a network with the Sound
Bar Controller app
Install the Sound Bar Controller app on your mobile device to connect
the unit to a network.
n NOTE
• Confirm that your mobile device is connected to your home router before beginning.
• Screen displays are provided for reference purposes only. Actual screen displays may
differ depending upon the mobile device used.
• Sound Bar Controller app screens and menu labels are subject to change without prior
notice.
1
Install the Sound Bar Controller app on your mobile
device, and then open the app.
Search for “Sound Bar Controller” on the App Store or
Google Play.
2
Follow the app’s on-screen instructions to complete
the settings.
The * indicator on the unit glows when the unit is connected to a
wireless network.
Glows (White)
n NOTE
When the unit is connected to a network for the first time after purchase, the unit’s
firmware is updated to the latest firmware version.
En
22

PLAYBACK
Basic operations
Basic procedure for playback
Basic procedure for playing back music is as follows.
z
|
HDMI
MOVIE TV MUSIC
SPORTS
SUBWOOFER VOLUME
INFO
BASS
EXT
GAME STEREO
CLEAR VOICE
3D SURROUND
TV
BLUETOOTH
NET
z
HDMI
CLEAR VOICE
3D SURROUND
TV
BLUETOOTH
NET
CLEAR VOICE
3D SURROUND
|
SPORTS
SUBWOOFER VOLUME
INFO
BASS
EXT
GAME STEREO
SPORTS
INFO
BASS
EXT
GAME
STEREO
Input buttons
|
z
(power)
(mute)
SUBWOOFER (+/-)
VOLUME (+/-)
1
Press z to turn on the unit.
The center unit and subwoofer are automatically connected
via wireless connection. Once the connection has been
successfully established, the * indicator on the subwoofer’s
rear panel glows, and the unit is ready for playback.
2
Turn on the external devices (such as a TV, BD/DVD
player, and gaming console) connected to the unit.
En
23

3
Use the input buttons to directly select an input
source to be played.
HDMI: Sound from a device connected to the HDMI IN jack
TV: TV audio
BLUETOOTH: Sound from a Bluetooth device
NET: Audio from streaming services
The indicator for the selected input source glows.
Glows
When TV is selected
Example
TV
4
Start playback on the external device selected in step
3.
5
Press VOLUME (+/-) to adjust the volume.
The number of glowing indicators (other than the Alexa
indicator) increases or decreases as volume is raised or
lowered.
Volume down (-)
Volume up (+)
When audio is output from both TV speaker and the unit,
mute the TV sound.
6
Adjust sound settings to suit individual preferences.
n NOTE
• If the * indicator on the subwoofer does not glow properly the first time the unit is
turned on, pair the center unit and subwoofer manually. For details, see the following:
– “Pairing the center unit and subwoofer manually”(p.42)
• For details on adjusting sound settings, see the following:
– “Playback with 3D surround sound/surround sound”(p.28)
– “Playback with 2-channel stereo sound”(p.28)
– “Playback of human voices clearly (Clear Voice)”(p.29)
– “Enjoying enhanced bass sound (Bass Extension)”(p.29)
En
24

• For details on playing music files stored on a Bluetooth device, see the following:
– “Listening to audio from a Bluetooth® device”(p.30)
• For details on playing audio from streaming services, see the following:
– “Streaming services”(p.34)
• To mute the sound, press |. Press | again or VOLUME (+/-) to unmute.
Flash (on mute)
• When sound input to the HDMI IN jack is output from the TV, the volume level does not
change even if you press VOLUME (+/-) or |.
• To adjust the subwoofer volume, press SUBWOOFER (+/-). The subwoofer volume can
be adjusted separately from the whole volume.
The indicator (other than the Alexa indicator) that glows changes as volume is raised or
lowered.
Volume down (-) Volume up (+)
• When playing audio/video from a device connected to the TV, select TV as the unit’s
input source, and select the playback device with the input selector on the TV.
Operating the unit using voice
commands (Amazon Alexa)
You can talk to Amazon Alexa on your unit. With Alexa, you can ask to
play music, hear the news, check weather, control smart home devices,
and more.
An Amazon account is required to use Amazon Alexa and the unit must
be connected to a network. Use the Sound Bar Controller app to enter
your Amazon account information and log into the service.
Alexa can perform the following operations with the proper voice
commands.
• Switching input sources
• Adjusting (muting) the volume
• Selecting and listening to streaming services
See the following website for details on the supported streaming
services:
https://manual.yamaha.com/av/sb/ss/sbc/
n NOTE
• As of August 2019, Amazon Alexa supports the following languages: English, German
and French.
• Service is limited to certain areas.
• Services supported by the unit may not be available in some regions in which the unit
is sold.
• See the product information page on the Yamaha website for the latest information.
• A subscription may be required to listen to Amazon Music or Amazon Kindle on this
unit. For more information, visit the Amazon website.
• For information on other streaming services, visit the websites of those service
providers.
• A smart hub (sold separately) may be required to connect smart home devices that will
be controlled via the unit.
En
25

For example, just ask:
l Adjust the volume
“Alexa, turn up the volume.”
“Alexa, turn down the volume.”
l Switch input sources
“Alexa, switch the input source to HDMI.”
l Listen to streaming content from Amazon Music
“Alexa, play some jazz music.”
l Operate playback
“Alexa, play next song.”
“Alexa, stop the music.”
“Alexa, what is this song?”
l Check the weather
“Alexa, what's the weather?”
l Set a timer
“Alexa, set a timer for 10 minutes.”
n NOTE
• Amazon Alexa is a service provided by Amazon. This service may change, be
discontinued, or be terminated without notice. Please note that Yamaha Corporation
is in no way responsible for the continuation of this service, and will not be held liable
for any issues that arise from the use of this service.
• This service is limited to certain areas.
• This service may not be available in some countries or regions.
• Some functions require a third party service agreement.
• To prevent accidental or mistaken response from Alexa, or to maintain privacy,
touch ) on this unit to disable the microphones.
• Alexa can be activated or summoned by calling out, “Alexa,” or by pressing @ on the
remote control or touching ) on the unit.
• When the Voice Control Ready function is enabled, Alexa can accept voice commands
even when the unit is turned off. Use the Sound Bar Controller app to enable or disable
the Voice Control Ready function.
• The dedicated Amazon Alexa app for mobile devices provided by Amazon allows you to
configure detailed settings and add functions. For details, see the Amazon Alexa app
help guide.
En
26

n
Alexa indicator
The Alexa indicator on this unit glows depending on the status of Alexa,
as follows.
Examples of
Alexa indicator activity
Status of Alexa
Goes off
Idle
Glows pale blue
Listening to a request
Flashing blue
Processing a request
Flashing blue and pale blue slowly
Responding
Flashing blue and pale blue quickly
Notifications such as timers, alarms, and
reminders
Flashing yellow
A notification is received.
Examples of
Alexa indicator activity
Status of Alexa
Glows red
The microphones are disabled.
Glows orange
A system setting is changed.
Flashing red three times
An error occurred.
En
27

Enjoying your favorite sound
Playback with 3D surround sound/
surround sound
The unit switches between 3D surround playback and surround playback
each time 3D SURROUND is pressed. Select 3D surround playback or
surround playback according to the input source or your individual
preference.
When 3D surround playback is selected, DTS Virtual:X makes it possible
to hear sound not only from horizontal directions, but also from varying
heights.
3D surround playback
Glows (blue): 3D surround playback
3D SURROUND
Surround playback
3D SURROUND
Glows (white): surround playback
Selecting a surround mode
Select the surround mode best suited to the content by pressing MOVIE,
TV, MUSIC, SPORTS, or GAME with 3D surround playback or surround
playback enabled.
MOVIE TV MUSIC
SPORTS GAME
Playback with 2-channel stereo sound
Press STEREO to switch to 2-channel stereo playback according to the
input source or your individual preference.
When stereo playback is enabled, the SURROUND indicator goes off.
Off
STEREO
En
28

Playback of human voices clearly (Clear
Voice)
Press CLEAR VOICE to turn on the clear voice function. Human voices
such as dialogue in movies, TV shows, news, and sport commentary can
be heard clearly.
Press the button again to disable the function. The indicators will go off.
Glows
CLEAR VOICE
Enjoying enhanced bass sound (Bass
Extension)
Press BASS EXT to turn on the bass extension function. You can enjoy
enhanced bass sound and more powerful sound.
Press the button again to disable the function.
Flash three times (enabled)
Flash once (disabled)
BASS
EXT
n NOTE
Press INFO to confirm whether the bass extension function is enabled or disabled. For
details, see the following:
• “Showing audio information and function settings”(p.33)
En
29

Using a Bluetooth® device
Listening to audio from a Bluetooth®
device
Audio content from a Bluetooth device (such as a smartphone, tablet,
laptop, or digital music player) can be played through this unit over a
wireless connection.
Bluetooth devices
n NOTE
• Our exclusive Compressed Music Enhancer technology improves sound quality and
characteristics, and can be used to enjoy realistic and impressive sound.
• The network standby function is enabled by default. When a Bluetooth device is
connected to this unit while the unit is off, the unit will be turned on and will be
immediately ready to play sound from the Bluetooth device. For details, see the
following:
– “Enabling/disabling the network standby function”(p.40)
1
Press BLUETOOTH to select “Bluetooth” as the input
source.
The unit is ready for the Bluetooth connection, and the
BLUETOOTH indicator on the unit flashes.
BLUETOOTH
Flashes
n NOTE
If Bluetooth devices have been connected before, the unit will connect to the
last connected device when BLUETOOTH is pressed.
2
On the Bluetooth device, enable the Bluetooth
function.
The Bluetooth device list appears on the Bluetooth device.
En
30

3
Select this unit in the list.
The unit’s name is displayed as shown in the following
illustration.
Yamaha YAS-209
When the connection between the Bluetooth device and the
unit is established, a completion message is displayed on
the Bluetooth device, and the BLUETOOTH indicator on the
unit glows.
Glows
4
Play content with audio on the Bluetooth device.
The unit will begin playing audio from the Bluetooth device.
n NOTE
• To terminate the Bluetooth connection, perform one of the following operations.
– Turn off the Bluetooth function on the Bluetooth device.
– Hold down BLUETOOTH for at least five seconds.
– Select an input source other than Bluetooth on the unit.
– Turn off the unit.
• Adjust the volume level of the Bluetooth device as required.
• Perform Bluetooth connection with the Bluetooth device and unit within 10 m (33 ft) of
each other.
• See documentation supplied with your Bluetooth device for more information.
En
31

Useful features for playback
Using a TV’s remote control to operate
the unit (HDMI control)
The HDMI control function coordinates TV and unit operation so that the
unit can be operated using the TV’s remote control.
When the unit is connected to a TV via HDMI cable, the TV’s remote
control can be used to perform the following operations.
a
b
c
d
TV's remote control (example)
a Turn on/off
Both the TV and the unit turn on/off at the same time.
b Switch input sources
The unit's input source switches accordingly when the TV’s input source is
switched.
For example, when a TV program is selected on the TV, the unit’s audio input
source is switched to the HDMI OUT (ARC) jack using the ARC function or TV
input jack.
When a BD/DVD player is connected to the HDMI IN jack on the unit, the
unit’s input source switches to HDMI when the BD/DVD player is selected
with the TV’s remote control.
c Switch the audio output device
The audio output device can be switched to the TV or this unit. Operations
may differ depending upon TVs.
d Adjust volume
The unit’s volume can be adjusted when the TV’s audio output is set to the
unit.
n NOTE
• If you are unable to operate the unit with your TV’s remote control, configure the HDMI
control function of your TV and the unit. For details, see the following:
– “Configuring the HDMI control function”(p.36)
• The input source can be switched while the unit is off (HDMI signal pass-through).
• The volume displays on the TV and unit may not be the same.
En
32

Showing audio information and function
settings
The type of audio signal being played, as well as settings for functions
can be confirmed by the status of indicators.
1
Press INFO.
The indicators on the unit will show the following audio
information for three seconds immediately after INFO is
pressed.
INFO
a b c d e f g
a Show the type of audio signal.
STATUS glows (white): Dolby Digital
STATUS glows (red): DTS
STATUS and HDMI off: PCM/no input
b Show whether Dolby Pro Logic II is enabled or disabled.
Glows: Enabled
Off: Disabled
n NOTE
Dolby Pro Logic II is enabled automatically when 2-channel stereo signals are
played in surround sound.
c Show the bass extension function setting.
Glows: Enabled
Off: Disabled
d Show the Bluetooth function setting.
Glows: Enabled
Off: Disabled
n NOTE
The Bluetooth function setting is not shown while audio content is playing from a
Bluetooth device or over a network.
e Show the dynamic range compression setting
Glows (blue): Compression (maximum)
Glows (white): Compression (standard)
Off: No compression
f Show the wireless (Wi-Fi) function setting.
Glows: Enabled
Off: Disabled
g Show touch panel control setting
Glows: Enabled
Off: Disabled
En
33

Playing audio content using the Sound Bar Controller app
Streaming services
Audio content distributed by various streaming services over the Internet
can be played via the unit. Use the dedicated app for mobile devices
provided by a particular streaming service or talk to Amazon Alexa to
select content to play from a streaming service. See the product
information page on the Yamaha website for information on services
supported by the unit.
For additional information on the streaming services, see the following
website.
https://manual.yamaha.com/av/sb/ss/sbc/
n NOTE
• A subscription may be required to listen to streaming services via this unit. For
information on a particular streaming service, visit that service’s website.
• Service is limited to certain areas.
• Services supported by the unit may not be available in some regions in which the unit
is sold.
• Services may change or be discontinued without notice. Please note that Yamaha
Corporation is in no way responsible for, and will not be held liable for, streaming
services or issues arising from their use.
Playing audio content on your mobile
device
Play audio content on your mobile device over a network.
Use the Sound Bar Controller app installed on your mobile device to play
audio content. See the Sound Bar Controller app for details.
Mobile device
Router
wired or wireless
En
34

CONFIGURATIONS
Configuring various functions
Changing the brightness of the
indicators (Dimmer)
Change the brightness of the indicators on the center unit.
The brightness is dim by default.
1
Turn off the unit.
2
Press and hold MUSIC for at least five seconds.
The brightness setting of the indicators is changed.
MUSIC
Once the indicators have shown the brightness setting
applied to the unit as follows, the unit will turn on.
• Dim (default setting)
Glow
• Off
Glow
• Bright
Glow Glow Glow
n NOTE
Indicators glow brightly just after operation and change to the specified brightness after a
few seconds.
En
35

Configuring the HDMI control function
Enable or disable the unit’s HDMI control function (link function). This
function coordinates TV and unit operation so that the unit can be
operated using the TV’s remote control.
This function is enabled by default.
1
Turn off the unit.
2
Press and hold HDMI for at least five seconds.
The HDMI control function is enabled or disabled.
HDMI
Once the indicator has shown the HDMI control function
setting applied to the unit as follows, the unit will turn on.
Glows (enabled)
Off (disabled)
n NOTE
• Enable the HDMI control function when connecting a TV that supports Audio Return
Channel (ARC), or when using HDMI signal pass-through. For details, see the following:
– “Connecting a TV that supports Audio Return Channel (ARC)”(p.18)
– “HDMI connection with an AV device”(p.19)
• If the unit cannot be operated with the TV’s remote control, confirm that the HDMI
control function of this unit is enabled and the HDMI control function is enabled on the
TV. For details, see the following:
– “The unit cannot be operated using the TV’s remote control”(p.48)
• The unit’s power consumption will be reduced if the HDMI control function is disabled.
En
36

Configuring HDMI audio output
Select the device from which audio input via the unit’s HDMI IN jack will
be played when the HDMI control function is disabled. HDMI audio is
output from this unit by default.
The unit (default) Play HDMI audio input signal from the unit.
TV Play HDMI audio input signal from the TV.
1
Turn off the unit.
2
Press and hold 3D SURROUND for at least five
seconds.
The HDMI audio output setting is changed.
3D SURROUND
Once the indicator has shown the HDMI audio output setting
applied to the unit as follows, the unit will turn on.
Glows (audio is played from the unit)
Off (audio is played from the TV)
n NOTE
• When playing back HDMI audio input signal from the TV, the unit cannot be used to
adjust volume. Use TV controls to adjust volume.
• For details on the HDMI control function, see the following:
– “Configuring the HDMI control function”(p.36)
• To configure HDMI audio output with the HDMI control function enabled, select the
audio output device on the TV connected to the unit.
• HDMI video signals input to the HDMI IN jack of this unit are always output from the
HDMI OUT (ARC) jack of the unit.
En
37

Setting the auto power standby function
Enabling the auto power standby function prevents the unit from
remaining on when not in use. When the auto power standby function is
enabled, the unit automatically turns off in any of the following
situations.
• No operations for 8 hours
• No audio input and no operations for 10 minutes
This function is enabled by default.
1
Turn off the unit.
2
Touch and hold y and then touch and hold z on the
unit for at least five seconds.
The auto power standby function is enabled or disabled.
Once the indicator has shown the auto power standby
function setting applied to the unit as follows, the unit will
turn on.
Glows (disabled)
Off (enabled)
En
38

Enabling/disabling touch panel control
(Child Lock function)
Disable touch panel control to prevent children from accidentally
operating the unit.
Touch panel control is enabled by default.
1
Turn off the unit.
2
Press and hold INFO for at least five seconds.
The touch panel control is enabled or disabled.
INFO
Once the indicator has shown the touch panel control
setting applied to the unit as follows, the unit will turn on.
Glows (enabled)
Off (disabled)
n NOTE
Press INFO to confirm whether the child lock function is enabled or disabled. For details,
see the following:
• “Showing audio information and function settings”(p.33)
En
39

Enabling/disabling the network standby
function
Enabling the network standby function allows the unit to be turned on or
off using a mobile or Bluetooth device as follows.
This function is enabled by default.
• The unit can also be turned on and off using the Sound Bar Controller
app installed on your mobile device.
• When a Bluetooth device is connected to this unit while it is off, this
unit turns on and the input source switched to BLUETOOTH.
1
Turn off the unit.
2
Press SPORTS for at least five seconds.
The network standby function is enabled or disabled.
SPORTS
Once the indicator has shown the network standby function
setting applied to the unit as follows, the unit will turn on.
Glows (enabled)
Off (disabled)
n NOTE
The unit consumes more power when it is off with the network standby function enabled
than it does when it is off with this function disabled.
En
40

Enabling/disabling the wireless (Wi-Fi)
function
Enable or disable the wireless (Wi-Fi) function.
This function is enabled by default.
1
Turn off the unit.
2
Press and hold NET for at least five seconds.
The wireless (Wi-Fi) function is enabled or disabled.
NET
Once the indicator has shown the wireless (Wi-Fi) function
setting applied to the unit as follows, the unit will turn on.
Glows (enabled)
Off (disabled)
n NOTE
Press INFO to confirm whether the wireless (Wi-Fi) function is enabled or disabled. For
details, see the following:
• “Showing audio information and function settings”(p.33)
Enabling/disabling the Bluetooth
function
Enable or disable the Bluetooth function.
This function is enabled by default.
1
Turn off the unit.
2
Press and hold BLUETOOTH for at least five seconds.
The Bluetooth function is enabled or disabled.
BLUETOOTH
Once the indicator has shown the Bluetooth function setting
applied to the unit as follows, the unit will turn on.
Glows (enabled)
Off (disabled)
n NOTE
Press INFO to confirm whether the Bluetooth function is enabled or disabled. For details,
see the following:
• “Showing audio information and function settings”(p.33)
En
41

Updating the unit’s firmware
New firmware that provides additional features or product
improvements will be released as needed. Firmware can be updated
using the Sound Bar Controller app installed on a mobile device.
n NOTICE
• Do not operate the unit or disconnect the power cord or network cable during
firmware update.
• If the Internet connection speed is slow, or the unit is connected to the wireless
network, network update may not be possible depending on the condition of the
network connection. Should this occur, try again at a later time.
• For details on update, visit the Yamaha website.
When a new firmware is released, a “NEW” icon is displayed on the
screen of the Sound Bar Controller app. Tap the icon, then follow the on-
screen instructions to update the firmware.
Pairing the center unit and subwoofer
manually
The center unit and subwoofer are automatically connected via wireless
connection the first time the unit is turned on. If the center unit and
subwoofer are not properly connected due to a temporary
communications failure, pair the center unit and subwoofer manually.
n NOTE
Pairing is the process of having the center unit and subwoofer recognize one another as
connection destinations.
1
Turn off the unit.
2
Press and hold SUBWOOFER (-) for at least five
seconds.
The center unit is turned on and the HDMI indicator flashes.
SUBWOOFER
Flashes
En
42

3
Within 30 seconds, press and hold the PAIRING button
on the rear panel of the subwoofer for at least five
seconds.
When the center unit and subwoofer have been paired
successfully, the * indicator will glow.
PAIRING button
indicator
*
If the * indicator on the subwoofer does not glow after following the
procedure described here, see “No sound is coming from the
subwoofer”(p.50).
Selecting the HDMI signal format
Problems such as a lack of sound or the appearance of abnormal colors
in a video may occur when some AV devices are connected to the unit.
Should this occur, changing the setting may resolve these issues.
Mode 1 (default) Select this mode in most cases.
Mode 2
Select this mode if problems such as the appearance of
abnormal colors in video have occurred.
1
Turn on the unit.
2
Press STEREO for at least five seconds.
STEREO
Once the indicator has shown the setting applied to the unit
as follows, the unit will turn on.
Glows (mode 1)
Off (mode 2)
En
43

Initializing the unit
Reset the settings of the unit to the factory presets.
1
Turn off the unit.
2
Touch and hold } and z on the unit until all
indicators except the Alexa indicator flash.
Flash (initialized)
Setting the dynamic range compression
Select the dynamic range compression level.
This function is set to “No compression” by default.
1
Turn off the unit.
2
Use the remote control to select the desired
compression level.
Compresssion
level
Function
Operations (buttons must
be pressed consecutively
within three seconds.)
Compression
(maximum)
Apply the maximum amount
of dynamic range
compression.
STEREO, VOLUME (+), and
then z
Compression
(standard)
Apply the standard amount
of dynamic range
compression for normal
home use.
STEREO, VOLUME (-), and
then z
No compression
Dynamic range compression
is not applied.
STEREO, |, and then z
En
44

The indicators show the compression level applied for several seconds.
Compression level Indicators
Compression
(maximum)
Compression
(standard)
Glows (white)
No compression
Glow (white)
n NOTE
Press INFO to confirm the dynamic range compression level applied to the unit. For
details, see the following:
• “Showing audio information and function settings”(p.33)
En
45

APPENDIX
When any problem occurs (General)
Check the following first:
Refer to the following when the unit does not function properly.
• The power cords of the unit (center unit and subwoofer), TV and AV
devices are connected to AC wall outlets securely.
• The unit (center unit and subwoofer), TV and AV devices are turned on.
• The connectors of each cable are securely inserted into jacks on each
device.
If there is no problem with the power and cables, see the following:
• “When any problem occurs (Power and system function)”(p.46)
• “When any problem occurs (Audio)”(p.49)
• “When any problem occurs (Bluetooth®)”(p.51)
If the problem you are experiencing is not listed or if the instructions do
not help, turn off the unit, disconnect the power cord, and contact the
nearest authorized Yamaha dealer or service center.
When any problem occurs (Power and
system function)
The power turns off suddenly
l The auto power standby function activated.
When the auto power standby function is enabled, the unit
automatically turns off in any of the following situations:
– No operations have been performed for 8 hours
– No audio has been input to the unit or no operations have been
performed with the unit for more than 10 minutes.
Turn on the unit again. If the auto power standby function is not
used, disable the function. For details, see the following:
– “Setting the auto power standby function”(p.38)
l The protection circuitry has been activated. (The STATUS
indicator flashes white or red.)
After confirming that all connections are made properly, turn on the
unit again. If the power still turns off frequently, unplug the power
cord from the AC wall outlet and contact the nearest authorized
Yamaha dealer or service center.
En
46

The power cannot be turned on
l The protection circuitry has been activated three times
consecutively.
To protect the product, the power cannot be turned on. Unplug the
power cord from the AC wall outlet and contact the nearest
authorized Yamaha dealer or service center.
l The firmware has not been updated properly. (The * indicator is
flashing.)
Use a USB flash drive to update the firmware. For details, see the
product information page on the Yamaha website.
– Product information page > Support (Download) > Firmware/
Software
No operations can be performed from
the unit’s touch panel
l The touch panel control is disabled.
Enable the touch panel control. For details, see the following:
– “Enabling/disabling touch panel control (Child Lock
function)”(p.39)
All indicators go out although the unit is
turned on (it may seem that the unit is
turned off)
l Indicator brightness is configured so that they do not light.
Change the brightness. For details, see the following:
– “Changing the brightness of the indicators (Dimmer)”(p.35)
The unit does not function correctly
l The internal microcomputer is frozen due to an external electric
shock (such as lightning or excessive static electricity) or to a
drop in the power supply voltage.
Unplug the power cord from the AC wall outlet and plug it again.
The unit turns on by itself
l Another Bluetooth device is being operated nearby.
Terminate Bluetooth connection with the unit. For details, see the
following:
– “Listening to audio from a Bluetooth® device”(p.30)
The TV’s 3D glasses do not work
l The unit is blocking the TV's 3D glasses transmitter.
Confirm the position of the TV's 3D glasses transmitter and position
the unit so that it does not obstruct the transmitter.
HDMI video is not displayed correctly on
TV screen
l The HDMI cable is not securely connected.
Connect the HDMI cable properly. For details, see the following:
– “Connecting a TV that supports Audio Return Channel
(ARC)”(p.18)
– “Connecting a TV that does not support Audio Return Channel
(ARC)”(p.19)
En
47

l A communication error between the unit and connected device
has occurred.
A communication error may occur depending upon the generation of
the device connected to the unit. See the following if such an error
occurs:
– “Selecting the HDMI signal format”(p.43)
l The TV does not support HDCP version 2.2/2.3.
Connect the unit to the HDMI input jack on an HDCP v2.2/2.3-
compliant TV when playing video content that requires an HDCP
v2.2/2.3-compliant device.
l The unit is connected to an HDMI input jack on the TV that does
not support HDCP v2.2/2.3.
Connect the unit to an HDMI input jack on the TV that supports HDCP
v2.2/2.3 when playing video content that requires an HDCP v2.2/2.3-
compliant device.
When the unit is turned off, video and/or
audio from an AV device are not output
to the TV
l The HDMI control function is disabled.
Enable the HDMI control function. For details, see the following:
– “Configuring the HDMI control function”(p.36)
The unit cannot be operated using the
remote control
l The unit is out of the operating range.
Use the remote control within the operating range. For details, see
the following:
– “Operating range of the remote control”(p.9)
l The batteries are weak.
Replace with new batteries. For details, see the following:
– “Replacing the battery in the remote control”(p.10)
l The remote control sensor of the unit is exposed to direct
sunlight or strong lighting.
Adjust the lighting angle or reposition the unit.
The TV cannot be operated using the TV’s
remote control
l The unit is blocking the TV’s remote control sensor.
Position the unit so that it does not obstruct the TV’s remote control
sensor.
The unit cannot be operated using the
TV’s remote control
l The HDMI control function is incorrect.
Confirm the settings are properly configured as follows.
– The HDMI control function of the unit is enabled.
– The HDMI control function is enabled on the TV.
– Set audio output to any option other than TV.
If the unit cannot be operated with the TV's remote control, even
after the settings have been applied correctly:
– Turn off the unit and the TV, and then turn them back on again.
– Disconnect the power cord of the unit and external devices
connected to the unit via HDMI cable. Plug them in again after
about 30 seconds.
En
48

l The TV does not support the unit’s functions.
Even if your TV supports the HDMI control function, some functions
may not be available. For details, see documentation supplied with
your TV.
Alexa will not operate the unit
l Alexa is not properly configured.
Use the Sound Bar Controller app to configure Alexa. For details, see
the following:
– “Operating the unit using voice commands (Amazon Alexa)”(p.25)
l The unit is not connected to a network.
Connect the unit to a network. For details, see the following:
– “Connecting to a network with the Sound Bar Controller
app”(p.22)
Alexa does not respond when
summoned.
l The microphones are disabled.
Touch ) to enable the microphones.
When any problem occurs (Audio)
No sound
l Another input source is selected.
Select an appropriate input source. For details, see the following:
– “Basic procedure for playback”(p.23)
l The mute function is activated.
Cancel the mute function. For details, see the following:
– “Basic procedure for playback”(p.23)
l The volume is too low.
Turn up the volume. For details, see the following:
– “Basic procedure for playback”(p.23)
l The power cord of the unit is not connected properly.
Make sure that the power cord of the unit is securely connected to an
AC wall outlet. For details, see the following:
– “Connecting to power”(p.20)
l Input jacks on an AV device are connected.
Connect the input jack on the unit and the output jack on the AV
device.
l Signals that the unit cannot play back are being input.
Change the digital audio output setting on the AV device to PCM,
Dolby Digital, or DTS.
l The unit is configured so that HDMI audio input signals are
output from the TV.
Configure the unit so that HDMI audio input signals are output from
the unit. For details, see the following:
– “Configuring HDMI audio output”(p.37)
l The HDMI control function is disabled.
When connecting a TV that supports ARC (Audio Return Channel) to
the unit using an HDMI cable only, enable the HDMI control function.
To output audio signals from the unit with the HDMI control function
disabled, connect the TV’s audio output jack to the unit’s TV input
jack (optical digital) via the optical digital audio cable.
For details, see the following:
– “Configuring the HDMI control function”(p.36)
– “Connecting a TV that does not support Audio Return Channel
(ARC)”(p.19)
En
49

l Sound from an HDMI control-enabled TV is set for output from
the TV’s built-in speakers.
Use the TV’s HDMI settings to set audio output to any option other
than the TV’s built-in speakers.
No sound is coming from the subwoofer
l The subwoofer is not connected to an AC wall outlet.
Plug in the power cord of the subwoofer to an AC wall outlet. For
details, see the following:
– “Connecting to power”(p.20)
l [When the * and STANDBY indicators on the subwoofer flash.]
The protection circuitry in the subwoofer has been activated.
To protect the product, the power of the subwoofer cannot be
turned on. Unplug the power cord from the AC wall outlet and
contact the nearest authorized Yamaha dealer or service center.
l The playback source does not contain low-frequency signals.
Play back a sound source containing low-frequency signals, and
confirm that the sound is output from the subwoofer.
l The volume is too low.
Turn up the volume of the subwoofer. For details, see the following:
– “Basic procedure for playback”(p.23)
l The front side of the subwoofer is blocked.
Clear the area around the front side and the bass reflex port of the
subwoofer.
l [When the * indicator on the subwoofer flashes.] or [When the
STANDBY indicator on the subwoofer glows.]
The center unit and subwoofer are not connected due to a bad
wireless communication status.
– Move the subwoofer closer to the center unit.
– If the communication between the center unit and subwoofer is
obstructed by a metallic object or another object, change the
position of the center unit and subwoofer or change the
installation location of the subwoofer.
– If there is a device (microwave oven, wireless LAN, etc.) that emits
radio frequency signals, move the center unit and subwoofer away
from the device.
l [When the * indicator on the subwoofer does not stop flashing.]
The center unit and subwoofer are not connected due to a bad
wireless communication status.
– Move the subwoofer closer to the center unit.
– If the communication between the center unit and subwoofer is
obstructed by a metallic object or another object, change the
position of the center unit and subwoofer or change the
installation location of the subwoofer.
– If there is a device (microwave oven, wireless LAN, etc.) that emits
radio frequency signals, move the center unit and subwoofer away
from the device.
– If the issue is not resolved after following the procedure described
above, pair the center unit and subwoofer manually. For details,
see the following:
“Pairing the center unit and subwoofer manually”(p.42)
En
50

The volume decreases when the unit is
turned on
l The automatic volume adjustment function is activated.
To prevent excessive loudness, the unit automatically controls its
volume within a certain level when the unit is turned on. Turn up the
volume as required. For details, see the following:
– “Basic procedure for playback”(p.23)
No surround effect
l Stereo playback is selected.
Select surround playback or 3D surround playback. For details, see
the following:
– “Playback with 3D surround sound/surround sound”(p.28)
l The volume is too low.
Turn up the volume. For details, see the following:
– “Basic procedure for playback”(p.23)
l The TV or AV device is set to output 2-channel audio (such as
PCM) only.
Change the digital audio output setting on the TV or AV device to
multi-channel linear PCM or bitstream.
l Sound is also heard from the TV built-in speakers.
Set the TV volume to minimum.
l The listening position is too close to the unit.
The listening position should be at some distance from the unit.
Noise is heard
l The unit is too close to another digital or high-frequency device.
Move those devices away from the unit.
When any problem occurs
(Bluetooth®)
The unit cannot be connected to a
Bluetooth® device
l Bluetooth is not selected as the input source.
Select Bluetooth as the input source. For details, see the following:
– “Listening to audio from a Bluetooth® device”(p.30)
l The unit is too far away from the Bluetooth device.
Move the Bluetooth device closer to the unit.
l A device emitting electromagnetic waves (such as a microwave
oven, a wireless device, etc.) may be located nearby.
Do not use the unit near devices that emit electromagnetic waves.
l The Bluetooth device you are using may not support the A2DP
profile.
Use a Bluetooth device that supports the A2DP profile.
l The connection profile registered in the Bluetooth device may
not be functioning correctly.
Delete the connection profile in the Bluetooth device, and then
connect the Bluetooth device to the unit.
l The passkey for devices such as a Bluetooth adapter is not
“0000”.
Use a Bluetooth device with a passkey of “0000”.
En
51

l The unit is already connected to another Bluetooth device.
Terminate the current Bluetooth connection, and then connect to
the new device.
No sound can be heard or the sound cuts
off intermittently from a Bluetooth®
device
l The volume on the Bluetooth device may be too low.
Raise the volume on the Bluetooth device.
l Bluetooth is not selected as the input source.
Select Bluetooth as the input source. For details, see the following:
– “Listening to audio from a Bluetooth® device”(p.30)
l Playback on the Bluetooth device has not been performed.
Perform playback on the Bluetooth device.
l The sound output on the Bluetooth device may not be set to the
unit.
Select the unit as the output destination on the Bluetooth device.
l The connection to the Bluetooth device was terminated.
Connect with the Bluetooth device one more time.
l The unit may be too far away from the Bluetooth device.
Move the Bluetooth device near the unit.
l A device emitting electromagnetic waves (such as a microwave
oven, a wireless device, etc.) may be located nearby.
Do not use the unit near devices that emit electromagnetic waves.
When any problem occurs (Network
trouble)
The network feature does not function
l The network parameters (IP address) have not been obtained
properly.
Enable the DHCP server function on the wireless router.
l The unit does not support IPv6 network.
Connect IPv4 network.
The unit cannot connect to the Internet
via a wireless router (access point)
l The wireless router (access point) is turned off.
Turn on the wireless router.
l The unit and the wireless router (access point) are too far apart.
Place the unit and the wireless router (access point) closer to each
other.
l There is an obstacle between the unit and the wireless router
(access point).
Move the unit and the wireless router (access point) in a location
where there are no obstacles between them.
l The wireless router (access point) is configured to use a specific
wireless channel.
Change wireless router settings so that a channel is selected
automatically. If a specific channel will be specified, specify channel
1 or 11.
En
52

Wireless network is not found
l Microwave ovens or other wireless devices might disturb the
wireless communication.
Turn off these devices or move them farther away from the unit and
wireless router.
l Access to the network is restricted by the firewall settings of the
wireless router (access point).
Check the firewall setting of the wireless router (access point).
The streaming service cannot be played
l The selected streaming service is currently not available.
Play the streaming service later.
l Access to the network is restricted by the firewall settings of
your network devices (such as the router).
Check the firewall settings of your network devices. The streaming
service can be played only when it passes through the port
designated by each streaming service. The port number varies
depending on the streaming service.
The Sound Bar Controller app does not
detect the unit
l The unit and mobile device are not in the same network.
Check the network connections and router's settings, and then
connect the unit and mobile device to the same network.
l The mobile device is not connected to the network using the 2.4-
GHz band.
Connect the mobile device to the network using the 2.4-GHz band.
l The mobile device is not connected to the wireless router over a
wireless connection.
Connect the mobile device to the wireless router over a wireless
connection.
l The unit is connected to a multiple SSID router.
The router’s network splitter may be blocking access to the unit.
Connect the unit and mobile device to a network with the same
SSID. Try connecting to the primary SSID first.
l The wireless (Wi-Fi) function is disabled.
Enable the wireless (Wi-Fi) function. For details, see the following:
– “Enabling/disabling the wireless (Wi-Fi) function”(p.41)
Firmware update via the network is
failed
l It may not be possible depending on the condition of the
network.
Update the firmware via the network again or use a USB memory
device.
En
53

Specifications
Center unit specifications
Center unit (YAS-CU209) specifications are as follows.
Amplifier section
Maximum rated output power
• Front L/R 50 W × 2ch
Speaker section
Front L/R
• Type
Acoustic suspension type
(non-magnetic shielding)
• Driver 4.6 cm (1-3/4") cone × 4
• Frequency response 190 Hz to 22 kHz
• Impedance 4 Ω (8 Ω × 2)
Tweeter
• Driver 2.5 cm (1") dome × 2
• Frequency response 9 kHz to 22 kHz
• Impedance 4 Ω
Decoder
Supported audio signal
(HDMI/optical input)
PCM (up to 5.1ch)
Dolby Digital (up to 5.1ch)
DTS Digital Surround (up to 5.1ch)
Input jacks
HDMI 1 (HDMI IN)
Digital (optical) 1 (TV)
Output jacks
HDMI 1 (HDMI OUT (ARC))
Other jacks
USB 1 (UPDATE ONLY)
LAN 1 (NETWORK)
Bluetooth
Function Sink function (source device to this unit)
Bluetooth version Ver 4.2
Supported profiles A2DP
Supported codecs Sink function: SBC, AAC
Bluetooth class Bluetooth Class 2
Range (line-of-sight) Approx. 10 m (33 ft)
Supported content protection method SCMS-T (sink function)
En
54

[U.K. and Europe models]
• Radio frequency 2402 MHz to 2480 MHz
• Maximum output power (EIRP) 8.8 dBm (7.6 mW)
Network
Ethernet standard 100BASE-TX/10BASE-T
Supported codecs
WAV (PCM format only) /FLAC: up to 192 kHz
ALAC: up to 96 kHz
MP3/WMA/MPEG-4 AAC: up to 48 kHz
Wi-Fi function
• Wireless LAN standards: IEEE802.11b/g/n
• Radio frequency band 2.4 GHz
• Available security method: WEP, WPA2-PSK (AES), Mixed Mode
[U.K. and Europe models]
• Radio frequency
2.4 GHz band 2402 MHz to 2482 MHz (20 MHz)
• Maximum output power (EIRP)
2.4 GHz band 18.1 dBm (64.6 mW)
General
Power supply
• [U.S.A. and Canada models] AC 100 to 120 V, 50/60 Hz
• [Australia model] AC 100 to 240 V, 50/60 Hz
• [U.K., Europe and Russia models ] AC 100 to 240 V, 50/60 Hz
• [General model] AC 100 to 240 V, 50/60 Hz
• [Taiwan and Mexico models] AC 100 to 120 V, 50/60 Hz
• [China model] AC 100 to 240 V, 50/60 Hz
• [Korea model] AC 100 to 240 V, 50/60 Hz
Power consumption
25 W
4.3 W (Voice Control Ready)
Standby power consumption
• [U.S.A., Canada, Taiwan and Mexico models]
– HDMI control off, network standby off 0.2 W
– HDMI control off, network standby on (Wired/Wi-Fi/
Bluetooth)
1.6/1.8/1.7 W
– HDMI control on, network standby off 0.6 W
– HDMI control on, network standby on 2.2 W
• [U.K. and Europe models and other models]
– HDMI control off, network standby off 0.2 W
– HDMI control off, network standby on (Wired/Wi-Fi/
Bluetooth)
1.6/1.8/1.7 W
– HDMI control on, network standby off 0.6 W
– HDMI control on, network standby on 2.2 W
Dimensions (W x H x D)
930 × 62 × 109 mm
(38-5/8" × 2-1/2" × 4-1/4")
En
55

Weight 2.7 kg (6 lbs)
n NOTE
The contents of this manual apply to the latest specifications as of the publishing date. To
obtain the latest manual, access the Yamaha website then download the manual file.
Subwoofer specifications
Subwoofer (NS-WSW44) specifications are as follows.
Amplifier section
Maximum rated output power 100 W
Speaker section
• Type Bass reflex type
(non-magnetic shielding type)
• Driver 16 cm (6-1/2") cone × 1
• Frequency response 34 Hz to 190 Hz
• Impedance 2 Ω
• Radio frequency band 2.4 GHz
• Transmission range 10 m ([33 ft] without interference)
[U.K. and Europe models]
• Radio frequency 2405.35 MHz to 2477.35 MHz
• Maximum output power (EIRP) 9.0 dBm (7.9 mW)
General
Power supply
• [U.S.A. and Canada models] AC 100 to 120 V, 50/60 Hz
• [Australia model] AC 100 to 240 V, 50/60 Hz
• [U.K., Europe and Russia models ] AC 100 to 240 V, 50/60 Hz
• [General model] AC 100 to 240 V, 50/60 Hz
• [Taiwan and Mexico models] AC 100 to 120 V, 50/60 Hz
• [China model] AC 100 to 240 V, 50/60 Hz
• [Korea model] AC 100 to 240 V, 50/60 Hz
Power consumption 20 W
Standby power consumption
• [U.S.A., Canada , Taiwan and Mexico models] 0.8 W
• [U.K. and Europe models and other models] 0.8 W
Dimensions (W × H × D)
191 × 420 × 406 mm
(7-1/2" × 16-1/2" × 16)
Weight 7.9 kg (17.4 lbs)
n NOTE
The contents of this manual apply to the latest specifications as of the publishing date. To
obtain the latest manual, access the Yamaha website then download the manual file.
En
56

Supported HDMI audio and video formats
The following HDMI audio and video formats can be used by the unit.
Audio signals
Audio signal types Audio signal formats
2ch Linear PCM 2ch, 32 kHz to 192 kHz, 16/20/24 bit
Multi-ch Linear PCM 6ch, 32 kHz to 192kHz, 16/20/24 bit
Bitstream Dolby Digital, DTS
Video signals
The unit is compatible with the following video signals.
• Deep Color
• x.v.Color
• 3D video signal
• High Dynamic Range (HDR) video
– HDR10
– HLG
The unit is compatible with the following resolutions.
• VGA
• 480i/60 Hz
• 480p/60 Hz
• 576i/50 Hz
• 576p/50 Hz
• 720p/60 Hz, 50 Hz
• 1080i/60 Hz, 50 Hz
• 1080p/60 Hz, 50 Hz, 30 Hz, 25 Hz, 24 Hz
• 4K/60 Hz, 50 Hz, 30 Hz, 25 Hz, 24 Hz
Copyright protection standard
This unit supports HDCP version 2.3.
n NOTE
• Refer to documentation supplied with the AV device, and set the device appropriately.
• When CPPM copy-protected DVD-Audio is played back, video and audio signals may
not be output depending on the type of the DVD player.
• The unit is not compatible with HDCP-incompatible HDMI or DVI devices. Refer to
documentation supplied with the HDMI or DVI device for HDCP compatibility.
• To decode audio bitstream signals on the unit, set the input source device
appropriately so that the device outputs the bitstream audio signals directly (does not
decode the bitstream signals on the device). Refer to documentation supplied with the
device for details.
• The resolution of transmitted video signal varies according to specifications of the TV
connected to the unit.
• The contents of this manual apply to the latest specifications as of the publishing date.
To obtain the latest manual, access the Yamaha website to download the manual file.
En
57

Supported digital audio formats
The following digital audio formats can be used by the unit.
Optical
Audio signal types Audio signal formats
2ch Linear PCM 2ch, 32 kHz to 96 kHz, 16/20/24 bit
Bitstream Dolby Digital, DTS
HDMI (ARC)
Audio signal types Audio signal formats
2ch Linear PCM 2ch, 32 kHz to 96 kHz, 16/20/24 bit
Bitstream Dolby Digital, DTS
n NOTE
The contents of this manual apply to the latest specifications as of the publishing date. To
obtain the latest manual, access the Yamaha website to download the manual file.
En
58

Information for qualified contractors or dealers
Mounting the center unit on a wall
Mount the center unit on a wall using the screw holes on the rear panel.
CAUTION
• Please have a qualified contractor or dealer when mounting the center unit on a
wall. Some skills and experience are required for safe installation.
• To prevent the center unit from falling, attach it to a wall constructed of drywall
(plasterboard).
• Make sure you use screws (sold separately) that can support the weight of the
installation. Using clamps other than specified screws, such as short screws, nails,
and two-sided tape, may cause the center unit to fall.
• Fix the cables in place where they will not become loose. If your foot or hand
accidentally gets caught on a loose cable, the center unit may fall.
• Do not lean on the unit or apply excessive force to the top of the center unit. Doing
so may cause the center unit to fall.
• Check that the center unit is securely fixed after the installation. Yamaha will bear
no responsibility for any accidents caused by improper installations.
1
Attach the mounting template (supplied) on a wall
and mark for the screw holes.
Tape or thumbtacks
Mounting template (supplied)
Screw holes
2
Remove the mounting template from the wall, and
then install screws (sold separately) at the points
marked on the wall.
7 to 9 mm
(1/4" to 3/8")
4.5 to 6 mm
(1/8" to 1/4")
4 to 5 mm
(#8 to #10)
20 mm (3/4") or
more
457 mm
(18")
En
59

3
Hang the center unit on the screws.
Mounting holes on
the rear of the
center unit
En
60

Yamaha Global Site
https://www.yamaha.com/
Yamaha Downloads
https://download.yamaha.com/
Manual Development Group
© 2019 Yamaha Corporation
Published 09/2019 NV-B0
AV18-0050
10-1 Nakazawa-cho, Naka-ku, Hamamatsu, 430-8650 Japan
-
 1
1
-
 2
2
-
 3
3
-
 4
4
-
 5
5
-
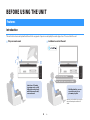 6
6
-
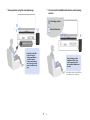 7
7
-
 8
8
-
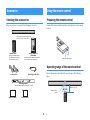 9
9
-
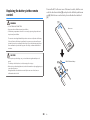 10
10
-
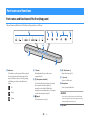 11
11
-
 12
12
-
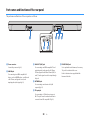 13
13
-
 14
14
-
 15
15
-
 16
16
-
 17
17
-
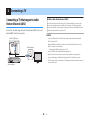 18
18
-
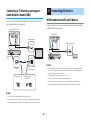 19
19
-
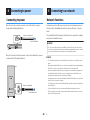 20
20
-
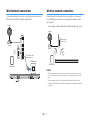 21
21
-
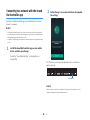 22
22
-
 23
23
-
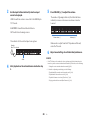 24
24
-
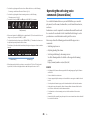 25
25
-
 26
26
-
 27
27
-
 28
28
-
 29
29
-
 30
30
-
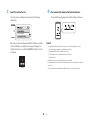 31
31
-
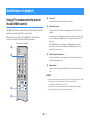 32
32
-
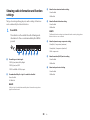 33
33
-
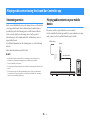 34
34
-
 35
35
-
 36
36
-
 37
37
-
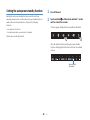 38
38
-
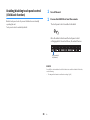 39
39
-
 40
40
-
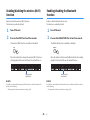 41
41
-
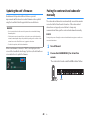 42
42
-
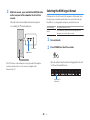 43
43
-
 44
44
-
 45
45
-
 46
46
-
 47
47
-
 48
48
-
 49
49
-
 50
50
-
 51
51
-
 52
52
-
 53
53
-
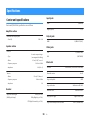 54
54
-
 55
55
-
 56
56
-
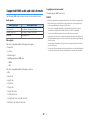 57
57
-
 58
58
-
 59
59
-
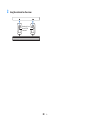 60
60
-
 61
61


Yamaha YAS-209BL Handleiding
- Type
- Handleiding
- Deze handleiding is ook geschikt voor
in andere talen
- English: Yamaha YAS-209BL User manual
- italiano: Yamaha YAS-209BL Manuale utente
- русский: Yamaha YAS-209BL Руководство пользователя
- français: Yamaha YAS-209BL Manuel utilisateur
- Deutsch: Yamaha YAS-209BL Benutzerhandbuch
- português: Yamaha YAS-209BL Manual do usuário
- dansk: Yamaha YAS-209BL Brugermanual
- suomi: Yamaha YAS-209BL Ohjekirja
- svenska: Yamaha YAS-209BL Användarmanual
- Türkçe: Yamaha YAS-209BL Kullanım kılavuzu
Gerelateerde artikelen
-
Yamaha ATS-2090 de handleiding
-
-
Yamaha SR-C20A Gebruikershandleiding
-
-
Yamaha ATS-B200 Gebruikershandleiding
-
Yamaha SR-B20ABL de handleiding
-
-
-
-